JCMSWeb User Guide
User Manual:
Open the PDF directly: View PDF ![]() .
.
Page Count: 89
- Computational Sciences
- The Jackson Laboratory
- Table of Contents
- Table of Figures
- Description
- Overview
- Getting Started
- Home
- Administration
- Manage Colony
- Queries
- Reports
- Cage Cards
- Pedigree Tracker
- Strain Viability Report
- Colony Status Histograms
- Kaplan Meier Charts
- Samples
- Experiment Data
- My Preferences
- Known Issues

JCMS Web User’s Guide
Computational Sciences
The Jackson Laboratory
Revision Date Author Comments
1 06/20/12-
06/22/12
Kavitha Rama First Draft
2 01/11/13 Craig Hanna JCMS Web Version 4.6.0 Release
3 01/14/13 Craig Hanna JCMS Web Version 4.6.0 Update
4
5
04/08/13
05/08/13
Mike Amato
Mike Amato
JCMS Web Version 4.7.0 Update
JCMS Web Mouse Scheduling
6
7
05/14/13
06/6/13
Craig Hanna
Mike Amato
JCMS Web Administration
JCMS Web Mouse Scheduling Calendar
8
9
10
11
12
13
06/17/13
07/16/13
09/16/13
09/16/13
09/16/13
09/16/13
Craig Hanna
Mike Amato
Mike Amato
Mike Amato
Mike Amato
Mike Amato
JCMS Web Administration Update Manage Cages
JCMS Web Mouse Scheduling Calendar – Add use
JCMS Web Samples Module
JCMS Web Roles
JCMS Web Bulk Updates
Add User Screen

JCMS Web User Guide Page 2
14
10/04/13
Mike Amato
Storage Manager
15
16
17
18
10/23/13
12/9/2013
1/20/2014
1/20/2014
Beth Sundberg
Mike Amato
Mike Amato
Mike Amato
Vivaria Layout
Vivaria Layout Add Mating and Cage Card Ownership
Vivaria Layout Add Litter with Pups
Calendar View – Projected Wean Dates
19
20
21
22
2/3/2014
2/26/2014
4/24/2014
5/16/2014
Beth Sundberg
Michael Amato
Michael Amato
Michael Amato
Wean Report
JCMS Dashboard
Use Schedules
3.7.0 Updates
23 6/9/2014 Beth Sundberg Phenotypes
24 6/13/2014 Michael Amato Dashboard updates
25 7/25/14 Beth Sundberg User Preferences
26 8/12/14 Beth Sundberg Added Mating User Preferences
27 8/22/14 Beth Sundberg Added Litter User Preferences
28
3/6/15
Beth Sundberg
Added Experimental Data
JCMS Web User Guide Page 3
Table of Contents
DESCRIPTION ...................................................................................................................................................... 7
OVERVIEW .......................................................................................................................................................... 7
GETTING STARTED............................................................................................................................................... 8
HOME ................................................................................................................................................................. 8
NAVIGATION .............................................................................................................................................................. 8
ADMINISTRATION ............................................................................................................................................... 9
CENTERS .................................................................................................................................................................... 9
Accounts ............................................................................................................................................................. 9
Add User ........................................................................................................................................................... 10
CONTROLLED VOCABULARY ......................................................................................................................................... 11
Genotyping ....................................................................................................................................................... 13
Matings ............................................................................................................................................................ 15
Miscellaneous ................................................................................................................................................... 15
Mice.................................................................................................................................................................. 16
Phenotypes ....................................................................................................................................................... 17
Use Schedules ................................................................................................................................................... 18
Cages, Rooms, and Cage Cards ........................................................................................................................ 18
Vivaria Layout Manager ................................................................................................................................... 21
Samples ............................................................................................................................................................ 22
MANAGE COLONY ............................................................................................................................................. 25
ADD MOUSE ............................................................................................................................................................ 25
Auto incrementing IDs ...................................................................................................................................... 27
Business Rules or Validation ............................................................................................................................. 28
EDIT MOUSE - SEARCH ............................................................................................................................................... 28
Search results ................................................................................................................................................... 29
EDIT MOUSE FORM ................................................................................................................................................... 30
Litter Search and Select Litter# ........................................................................................................................ 30
Save button ...................................................................................................................................................... 32
Return to Search ............................................................................................................................................... 32
Preview Cage Card ........................................................................................................................................... 33
NEW CAGE ............................................................................................................................................................... 33
Business Rules or Validation ............................................................................................................................. 34
ADD MATING ........................................................................................................................................................... 35
Business Rules or Validation ............................................................................................................................. 36
Dam/Sire ID Search and Selection .................................................................................................................... 37
EDIT MATING ........................................................................................................................................................... 38
ADD LITTER WITH PUPS .............................................................................................................................................. 41
Business Rules or Validation ............................................................................................................................. 43
EDIT LITTER .............................................................................................................................................................. 45
Litter Search Results ......................................................................................................................................... 46
ADD GENOTYPE ........................................................................................................................................................ 48
JCMS Web User Guide Page 4
Edit Genotype ................................................................................................................................................... 49
MOUSE SCHEDULING ................................................................................................................................................. 50
Add Mouse Use ................................................................................................................................................ 50
Edit Mouse Use ................................................................................................................................................ 51
Delete Use ........................................................................................................................................................ 51
MOUSE SCHEDULING CALENDAR .................................................................................................................................. 51
Add Use ............................................................................................................................................................ 52
Projected Wean Dates ...................................................................................................................................... 53
PLUG DATES ............................................................................................................................................................. 54
Add Plug Date .................................................................................................................................................. 54
Edit Plug Date ................................................................................................................................................... 55
BULK UPDATES ......................................................................................................................................................... 56
VIVARIA LAYOUT ....................................................................................................................................................... 57
Moving Cages ................................................................................................................................................... 57
Vivaria Layout Color Coding and Icons ............................................................................................................. 58
Adding Cages.................................................................................................................................................... 59
Change Mouse and Cage Status....................................................................................................................... 59
Move Mice........................................................................................................................................................ 59
Create Mating .................................................................................................................................................. 60
Add Litter with Pups ......................................................................................................................................... 63
USE SCHEDULES ........................................................................................................................................................ 63
Use Schedule Manager..................................................................................................................................... 64
Kaplan Meier Plots ........................................................................................................................................... 64
QUERIES ............................................................................................................................................................ 65
REPORTS ........................................................................................................................................................... 66
COLONY SUMMARY REPORT ........................................................................................................................................ 66
CAGE SUMMARY REPORT ............................................................................................................................................ 66
WEAN REPORT ......................................................................................................................................................... 67
MOUSE SCHEDULING CALENDAR .................................................................................................................................. 68
CAGE CARDS ..................................................................................................................................................... 68
MAKE A CUSTOM CAGE CARD ..................................................................................................................................... 69
LOAD CARD .............................................................................................................................................................. 71
BUSINESS RULES ....................................................................................................................................................... 72
PEDIGREE TRACKER ........................................................................................................................................... 72
STRAIN VIABILITY REPORT................................................................................................................................. 74
COLONY STATUS HISTOGRAMS ......................................................................................................................... 77
KAPLAN MEIER CHARTS .................................................................................................................................... 77
SAMPLES ........................................................................................................................................................... 78
ADD SAMPLE ............................................................................................................................................................ 78
EDIT SAMPLE ............................................................................................................................................................ 80
EXPERIMENT DATA ........................................................................................................................................... 80
JCMS Web User Guide Page 5
ADD TEST TYPE ......................................................................................................................................................... 81
ADD EXPERIMENT DATA ............................................................................................................................................. 83
EDIT EXPERIMENT DATA ............................................................................................................................................. 84
QUERY EXPERIMENT DATA .......................................................................................................................................... 84
MY PREFERENCES .............................................................................................................................................. 85
GLOBAL CHANGES ..................................................................................................................................................... 86
Strain Name First.............................................................................................................................................. 86
ADD AND EDIT MOUSE SCREEN .................................................................................................................................... 86
ADD AND EDIT MATING SCREEN................................................................................................................................... 88
ADD AND EDIT LITTER SCREEN ..................................................................................................................................... 88
KNOWN ISSUES ................................................................................................................................................. 89
HTTP STATUS 403 – ACCESS TO THE REQUESTED RESOURCE HAS BEEN DENIED ..................................................................... 89
BROWSER IS UNABLE TO DISPLAY THE WEB PAGE .............................................................................................................. 89
Table of Figures
Figure 1: Navigation Example ___________________________________________________________________ 9
Figure 2: Add New User _______________________________________________________________________ 10
Figure 3: Add User ___________________________________________________________________________ 11
Figure 4: Example of Standard Functionality and Add Allele __________________________________________ 12
Figure 5: Pager Control _______________________________________________________________________ 12
Figure 6: How to Edit Seconds in a Date __________________________________________________________ 13
Figure 7: Second Method for Editing a Date _______________________________________________________ 13
Figure 8: Phenotype Selection __________________________________________________________________ 17
Figure 9: A Use Schedule Example _______________________________________________________________ 18
Figure 10: Manage Cages - Cage List ____________________________________________________________ 19
Figure 11: Manage Cages - Edit Cage Status and Location ___________________________________________ 20
Figure 12: Add Vivaria Layout __________________________________________________________________ 21
Figure 13: Edit Vivaria Layout __________________________________________________________________ 22
Figure 14: Storage Manager ___________________________________________________________________ 24
Figure 15: Storage Manager - Sample List ________________________________________________________ 24
Figure 16: Manage Mice - Add Mouse ___________________________________________________________ 26
Figure 17: Manage Mice - Edit Mouse Search _____________________________________________________ 29
Figure 18: Edit Mouse - Search Results ___________________________________________________________ 30
Figure 19: Edit Mouse ________________________________________________________________________ 31
Figure 20: Edit Mouse – Select Litter ____________________________________________________________ 32
Figure 21: Edit Mouse - New Cage ______________________________________________________________ 33
Figure 22: Add Mating ________________________________________________________________________ 35
Figure 23: Add Mating – Select Dam/Sire _________________________________________________________ 37
Figure 24: Select Mating for Editing _____________________________________________________________ 38
Figure 25: Edit Icon ___________________________________________________________________________ 39
Figure 26: Edit Mating ________________________________________________________________________ 40
Figure 27: Select Cage ________________________________________________________________________ 40
Figure 28: Add Litter with Pups _________________________________________________________________ 41
JCMS Web User Guide Page 6
Figure 29: Add Litter with Pups (lower portion) ____________________________________________________ 42
Figure 30: Add Litter - Mouse Search ____________________________________________________________ 44
Figure 31: Edit Litter - Litter Search _____________________________________________________________ 45
Figure 32: Litter List/Edit Litter - Search Results____________________________________________________ 46
Figure 33: Edit Litter _________________________________________________________________________ 47
Figure 34: Add Genotype - Search _______________________________________________________________ 48
Figure 35: Genotype Search Results _____________________________________________________________ 49
Figure 36: Add Genotype – Show Link ___________________________________________________________ 49
Figure 37: Edit Genotype ______________________________________________________________________ 50
Figure 38: Mouse Scheduling ___________________________________________________________________ 51
Figure 39: Mouse Use Calendar _________________________________________________________________ 52
Figure 40: Edit Mouse Use on Calendar ___________________________________________________________ 53
Figure 41: Projected Wean Date Pop Up __________________________________________________________ 54
Figure 42: Add Plug Date ______________________________________________________________________ 55
Figure 43: Edit Plug Date ______________________________________________________________________ 55
Figure 44: Bulk Update ________________________________________________________________________ 56
Figure 45: Vivaria Layout View _________________________________________________________________ 57
Figure 46: Layout Color Coding and Icons _________________________________________________________ 58
Figure 48: Change Life Status and Cage Status _____________________________________________________ 59
Figure 47: Cage Details Panel __________________________________________________________________ 59
Figure 49: Move Mice to a New Cage ____________________________________________________________ 60
Figure 50: Add mating with Vivaria Layout ________________________________________________________ 61
Figure 51: Mating Details ______________________________________________________________________ 62
Figure 52: Mating Cage _______________________________________________________________________ 62
Figure 53: Litter Details Panel __________________________________________________________________ 63
Figure 55: Kaplan Meier Plots __________________________________________________________________ 64
Figure 54: Use Schedule Manager link ___________________________________________________________ 64
Figure 56: Mouse Query Search Results __________________________________________________________ 65
Figure 57: Load Queries _______________________________________________________________________ 66
Figure 58: Download Cage Summary Report ______________________________________________________ 67
Figure 59: Wean Report Options ________________________________________________________________ 67
Figure 60: Print Blank Cards ___________________________________________________________________ 68
Figure 61: Cage Cards ________________________________________________________________________ 69
Figure 62: Custom Cage Card Builder ____________________________________________________________ 71
Figure 63: Load Cage Cards ____________________________________________________________________ 72
Figure 64: Mouse Pedigree ____________________________________________________________________ 73
Figure 65: Genotype based Pedigree Tree Visualization ______________________________________________ 74
Figure 66: Strain Viability Filter Panel ____________________________________________________________ 75
Figure 67: Kaplan Meier Chart Tool ______________________________________________________________ 78
Figure 68: Add Sample – Choosing a Source _______________________________________________________ 78
Figure 69: Add Sample ________________________________________________________________________ 79
Figure 70: Edit Sample ________________________________________________________________________ 80
Figure 71: Experiments ________________________________________________________________________ 81
Figure 72: The test type detail list shows all the data result fields, format, and any min/max values __________ 81
Figure 73: Add a test type _____________________________________________________________________ 82
Figure 74: Adding data for an experiment ________________________________________________________ 83
JCMS Web User Guide Page 7
Figure 75: Edit experiment data ________________________________________________________________ 84
Figure 76: Experiment query ___________________________________________________________________ 85
Figure 77: My Preferences on the Menu Bar _______________________________________________________ 85
Figure 78: Hide Icon __________________________________________________________________________ 86
Figure 79: My Preferences Choices ______________________________________________________________ 86
Figure 80: Preference Choices for the Add and Edit Mouse Screen _____________________________________ 87
Figure 81: Preference Choices for the Add and Edit Mating Screen _____________________________________ 88
Figure 82: Preference Choices for the Add and Edit Litter Screen _______________________________________ 88
Description
JAX Colony Management System Web (JCMS Web) is a web interface for the JCMS application,
providing mouse colony management.
Overview
JCMS Web is organized into these functional areas.
• Home
• Administration
• Manage Colony
• Samples
• Experiment Data
• Queries
• Reports
• Cage Cards
• Pedigree Tracker
• About JCMS Web
Home provides a general page to navigate to all areas of JCMS.
Administration provides center, workgroup, user management, and system access.
Manage Colony provides mouse, litter, and mating management; genotyping; mouse scheduling;
phenotypes; and vivaria layout.
Samples provide tracking of physical materials.
Experiment Data provides a method of describing the data to collect and data management by mouse.
Queries provide custom mouse, mating, and experiment data reporting.
Reports provide standard colony and cage summary reporting and a mouse scheduling calendar.
Cage Cards provide custom cage card management.

JCMS Web User Guide Page 8
Pedigree Tracker provides mouse pedigree reporting.
My Preferences provides a place for specifying user-specific customizations.
About JCMS Web summarizes the most recent system information for JCMS Web and JCMS.
Getting Started
JCMS Web default URL is http://{servername}:8080/jcms. Consult with your local Information
Technology department for specific instructions. For problems with starting JCMS Web, see the Known
Issues section.
The first step is to create JCMS Web users and grant system access. Refer to the next section on
Administration for guidance.
Home
This is the central navigation area to all JCMS Web modules: manage mice, create custom queries, run
standard colony and cage reports, manage and customize card design, and research mouse pedigree
hierarchies.
Navigation
JCMS Web employs a menu across the top and a sidebar down the left side. To get to an interface,
select the topic, such as ‘Manage Colony’. Second select the subtopic from the left side, such as
‘Manage Mice’. It will open up to show more choices. Third select the desired interface, such as ‘Add
Mouse’ and the interface will open.
JCMS Web User Guide Page 9
Administration
Centers
Accounts
An administrator accesses JCMS Web administration by logging in as a user that has administration
privileges granted to them (such as mtsadmin). Once in JCMS Web, navigate to Administration to
create centers, workgroups, and user accounts as well as edit user accounts and who has access to
different workgroups.
A center is an organizational grouping of users. Further subdivisions are workgroups where a user can
belong to one or more workgroups. To add a center click the add center button and to add one or
more workgroups to a center select the desired center and then click add workgroup. Note that only
mtsadmin can create new centers.
Figure 1: Navigation Example
JCMS Web User Guide Page 10
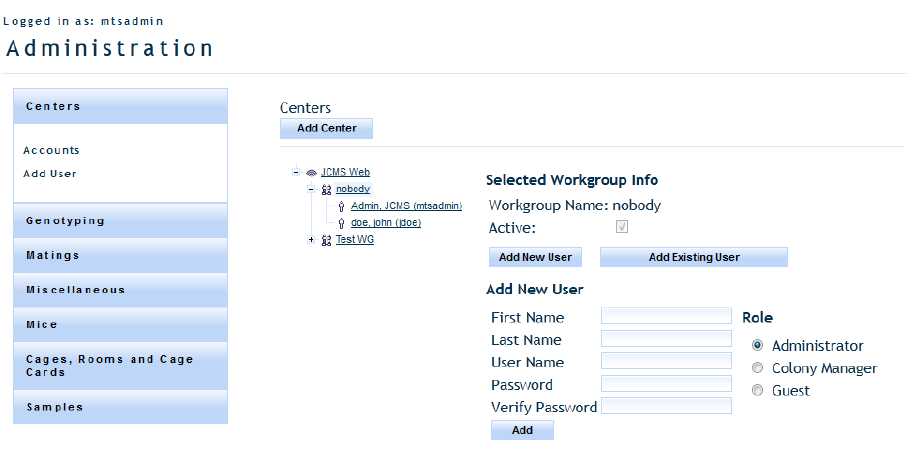
Figure 2: Add New User
There are two different means of adding users through this screen. In the case where you are adding a
new user to a workgroup you must select the ‘Add New User’ button. To add a user to a workgroup
that already exists, click the ‘Add Existing User’ button. The add new user view is pictured above
(Figure 2). Keep in mind that should you wish to add a new user to multiple workgroups it is likely
faster to use the ‘Add User’ screen explained in the following subsection.
By clicking on a user in the accounts tree you can edit that user’s information such as their username
and password, but you can also edit the role of that user in that specific workgroup (administrator,
colony manager, or guest).
The roles in JCMS Web are defined as follows: An administrator can do all JCMS Functions (including
Controlled Vocabulary management and Add/Edit/Remove user functionality), a colony manager can
access all screen except the administration screen, and a Guest can only access data read features such
as Queries, Reports (not including the mouse scheduling calendar), Cage Cards, and the Pedigree
Tracker.
Add User
The Add User panel gives users a faster means of adding a user to multiple workgroups. To get there
one simply needs to click on the ‘Add User’ link in the Administration sidebar under the label
‘Accounts’.
The screen will appear as shown below. You will need to provide a username and password and select
a role and workgroups to add this user to in that role. An administrator can do all JCMS Functions
(including Controlled Vocabulary management and Add/Edit/Remove user functionality), a colony
manager can access all screen except the administration screen, and a Guest can only access data read
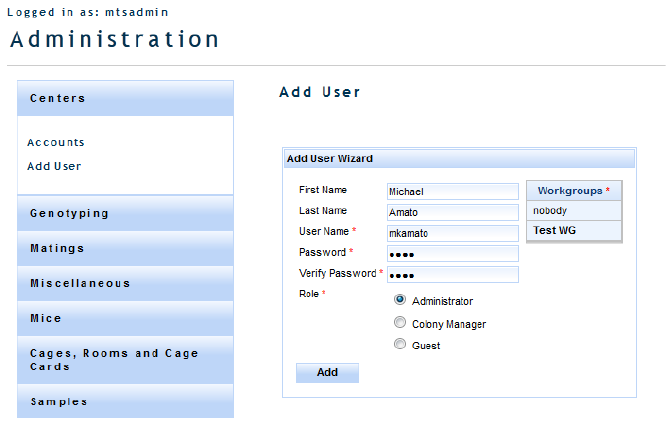
JCMS Web User Guide Page 11
features such as Queries, Reports (not including the mouse scheduling calendar), Cage Cards, and the
Pedigree Tracker.
Figure 3: Add User
Controlled Vocabulary
Controlled vocabularies standardize JCMS colony management terms and concepts. The first step in
setting up JCMS Web is to visit each one of these vocabularies and enter at least one value. Each set of
vocabulary are grouped together into logical categories.
• Genotyping
• Matings
• Miscellaneous
• Mice
• Cages, Rooms, and Cage Cards
Standard Functionality
Most, if not all, vocabulary is displayed in a tabular list. Just below each column label may be an empty
field. After you have some results a filter can be applied to filter out some extraneous rows. Each
filter performs a “contains” search except in some situations where there is a checkbox where it
retrieves all active or inactive data. For example, it can select all alleles containing a plus sign, “+”.
Simply enter + in the blank field and tab out. Tabbing out of the filter field initiates the action to filter
the search results.
JCMS Web User Guide Page 12
Figure 4: Example of Standard Functionality and Add Allele
On selecting the add button an entry row is inserted as the first row of the list view. Enter the
required data and select save to store your new values. Pay close attention to any error messages
above the section header. In the case of alleles, messages display just above the add button and Allele
title. Delete removes a vocabulary from storage. Strain delete is an exception to the rule because
strains are either active or inactive.
On save, validation messages will display if you haven’t entered all required data and in the proper
data type, such as text or number. Read the error message, fix content, and select save once more.
Figure 5: Pager Control
All list views will display a pager control at the bottom of the tabular display when a specific number of
rows are reached. When it displays there are more rows to access by selecting the next available page
or using the speedy buttons to go to next, previous, first, or last set of results.
JCMS Web User Guide Page 13
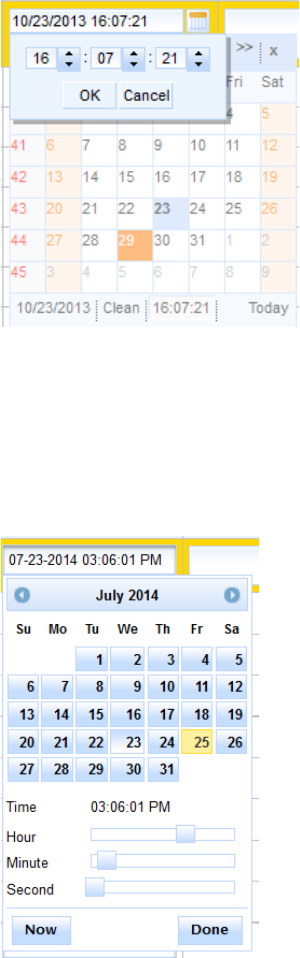
Date and Time Editing
Figure 6: How to Edit Seconds in a Date
To edit a date field, click the small calendar icon and select the date. To change the time, click on the
time where it is shown below the calendar and a new box pops up as shown in Figure 6. Click ‘Clean’ to
remove the date leaving the field blank. Note that you may not be able to change a date by typing in
the field.
Figure 7: Second Method for Editing a Date
If there is no calendar icon, click in the date. Use the sliding bars to enter the time and click ‘Done’.
Genotyping
To add an allele you need to add some genes and gene classes first.
Gene Class Terms
This interface displays a list of gene classes. All standard functionality is provided.
General guidelines:
JCMS Web User Guide Page 14
• Gene class names are not case sensitive
• Duplicate gene class names are not allowed
• Required fields are marked with a red asterisk
Gene
This interface displays a list of genes. Genes are not a simple vocabulary as each gene is made up of six
potential data elements, only one of which is required, lab symbol.
If trying to navigate more than 20 genes make special use of the tabular pager and filters to find your
data faster.
General guidelines:
• Gene names are not case sensitive
• Duplicate gene names are not allowed
• Required fields are marked with a red asterisk
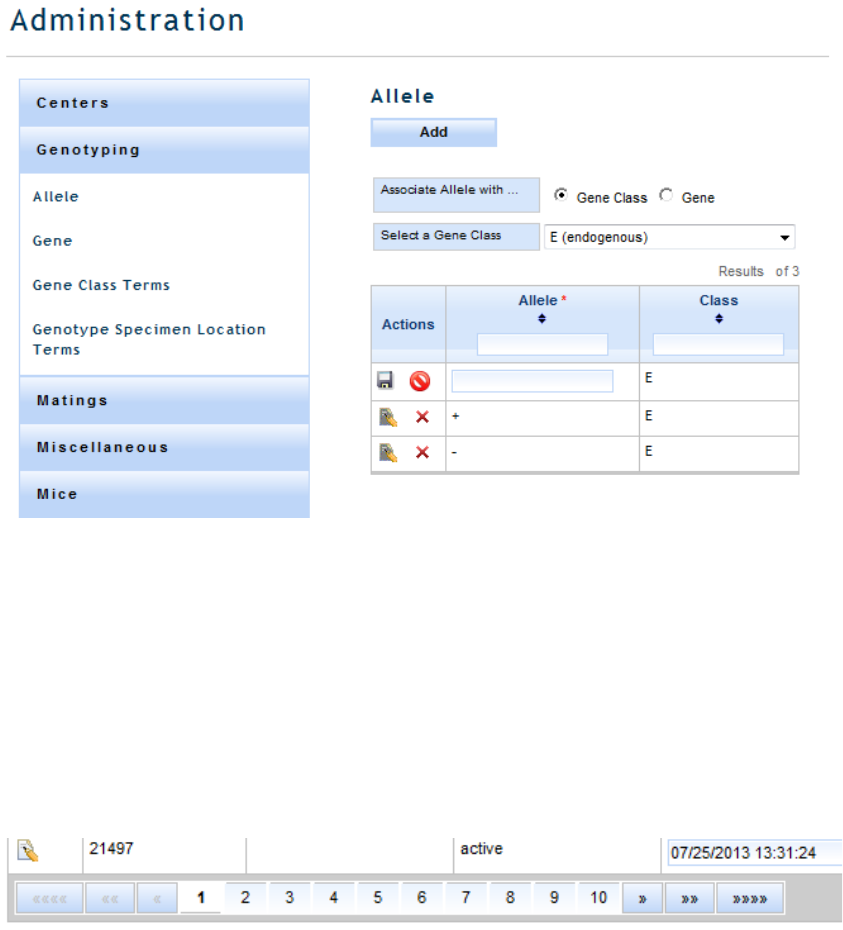
Allele
To add an allele you need to add some genes and gene classes first.
This interface displays a list of alleles by gene class or gene (Figure 4). Start by selecting a ‘Gene Class’
or ‘Gene’. This action automatically jumps you to the next step which is selecting a specific gene class
or gene. After selecting, search results are displayed in a tabular view below the selections.
List view contains three columns of data. The first column provides the ability to edit an allele, delete
an allele, save an allele, and cancel changes. Alleles are not editable but can be deleted and added
back in at a later time.
General guidelines:
• Allele names are not case sensitive
• Duplicate allele names are not allowed
• Required fields are marked with a red asterisk
Genotype Specimen Location Terms
This interface displays a list of gene specimen locations. All standard functionality is provided.
General guidelines:
• Gene specimen locations are not case sensitive
• Duplicate gene specimen locations are not allowed
• Required fields are marked with a red asterisk
JCMS Web User Guide Page 15
Matings
Approved Mating Strains
This interface displays a list of approved mating strains. An approved mating strain is comprised of a
dam strain, sire strain, and litter strain. Additionally, mating strains can be marked inactive. Select the
active filter checkbox to display active or inactive mating strains. All standard functionality is provided.
General guidelines:
• Dam, sire, and litter strain names are not case sensitive
• Unique combinations of dam, sire, and litter strains are enforced
• Required fields are marked with a red asterisk
Miscellaneous
This category lists a variety of administrable system variables and functionality.
JCMS Setup Variables
This interface is a tabular display of JCMS Web setup variables. These variables are grouped by
container, litter, and mouse. Container variables display by default after selecting Miscellaneous ->
JCMS Setup Variables links.
Container is divided into sub groups ‘Container Defaults’ and ‘Cage Cards’. Litter and mouse tabs
require no additional groupings.
Here is a helpful chart listing each variable name, system property, and corresponding description.
Tool tips are available for each variable field where you can hover over the field and view a short
description of each. Users who are completely new to setting up JCMS may want to show all
descriptions at once by enabling ‘Show Descriptions’ in the upper right hand corner of the display.
Group
Setup Variable
Description
Cage
Cage Defaults
Automatically Increment Cage ID
If enabled, the cage ID is automatically
incremented when adding new cages.
Cage Status Specify the default value for cage status; must
match a value in the cage status table.
Maximum Mice Per Cage Maximum number of live mice in any cage.
Mouse Room
Specify the default mouse room; must match a
value in the Room table.
Use Cage Names If enabled, cage names will be displayed on most
forms.
Warn about Duplicate Cage
Names
If enabled, warn if a duplicate cage name is used.
Cage Cards Detail Card Note A note that will be printed on all Detail cage
cards.
Lab Name Name of lab PI who owns colonies tracked by
JCMS, printed on some cage cards.
Phone Number Phone numbers, printed on mating card.
JCMS Web User Guide Page 16
Group
Setup Variable
Description
Print Exited Mice If enabled, mice with an exit status such as dead,
euthanized, missing, shipped, etc. will print on
cage cards.
Relax Restrictions on Cage IDs [NOT IMPLEMENTED]
If enabled, then it is required that a cage card is
printed for all cages.
Litter
Automatically Generate Litter
Numbers
If enabled, litter numbers are automatically
generated for matings.
Loop Litter Numbers
If enabled, the litter numbers recycle after 10
litters, appending a character to the number.
Maximum Auto Litter Number This variable sets the number of litter numbers
that are assigned to a mating. It should be set to
a value bigger than the max number of litters
you ever expect. Suggested values are 10 or 100.
Mouse
Extended Wean Time The number of days from the birth date to when
a litter should be weaned - used for late
weanings/"long" wean time.
Mouse ID Prefix A short string of characters that are prefixed on
mouse IDs generated by JCMS (not all mouse IDs
are generated by JCMS).
Standard Wean Time The number of days from the birth date to when
a litter should normally be weaned.
Strain Name First If enabled the strain name will appear first (to
the left of the Stock number) in all drop down
lists.
Security
Enforce Password Change Tells application whether to remind user
whether to change password after password
change period has elapsed
Password Change Period
The number of days between a user changing
and being reminded to change their password.
Preferences
Date Format Preference Value describing date format in JCMS Web
Mice
This group contains many vocabularies for managing mouse interfaces. Instead of listing each
separately, here is a list of all the simple vocabularies accessible using the same standard user
interface. Other vocabularies containing functionality out of the norm are listed with a description of
the additional features.
Standard mouse vocabularies are:
• Cause of Death
• Coat Color
• Diet
• Generation
JCMS Web User Guide Page 17
• Life Status
• Mouse Origin
o Not editable
• Mouse Protocol
• Mouse Use
• Phenotypes
• Strain Status
o Strain status A, C, D, and F cannot be modified. The JCMS system requires these
values to apply special business logic.
• Strain Type
o Not editable
Strains
This interface displays a list of strains and a search panel to retrieve strains. Strain can be searched by
strain name containing specific text and stock numbers greater than, less than, or in a range of
numeric values.
Unique to this strain list view is the column header grouping yellow line viability columns and red line
viability columns. Aside from that all standard functionality is provided.
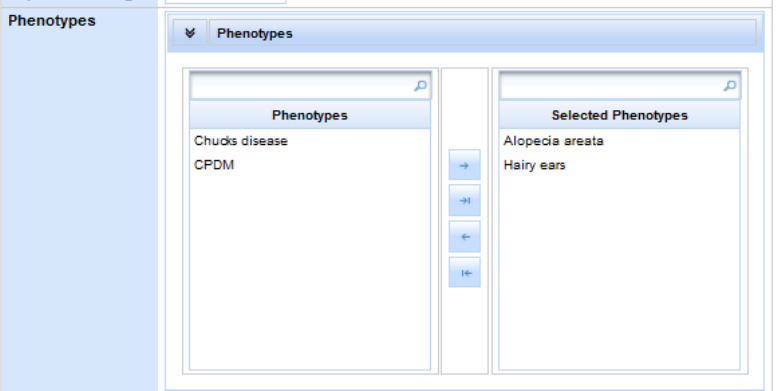
Phenotypes
A mouse may have several different phenotypes associated with it. They are assigned on the add
mouse, edit mouse, or bulk update screens. The mouse query may be filtered by one or more
phenotypes and phenotypes can be returned as an output column.
Figure 8: Phenotype Selection
JCMS Web User Guide Page 18
Use Schedules
Use schedules are a collection of mouse uses scheduled according to a date of interest (for example a
plug date or a mouse birth date). To add a use schedule click ‘Setup Use Schedule’ in the Mice portion
of the administration accordion and click the ‘Create Use Schedule’ button.
The ‘Use Schedule Name’ is what users will see in the view when they are viewing use schedule
information. The Workgroup is the owner of the use schedule, and only users who are members of
that workgroup will be able to add mice/view information on that use schedule. The color will be
integrated more in the future, but for now is only used in the ‘Manage Use Schedules’ view. The start
event is the event that will be the start date of the use schedule. For example if the start event is birth
date, and you have a use scheduled to happen 5 days after event, then the use will be scheduled for
the day that is five days after the birth date of the mouse.
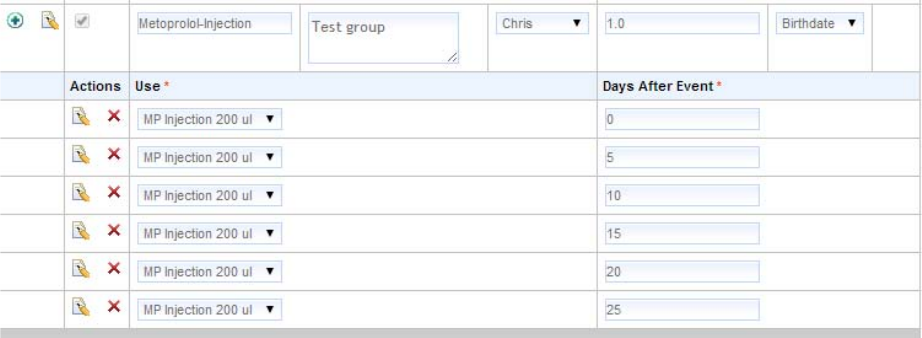
Once the Use schedule has been created you can schedule uses for that use schedule. In the example
below you can see that it is a birth date triggered use schedule and there are 6 uses associated with it,
all MP Injections happening at 5 day intervals after birth.
Figure 9: A Use Schedule Example
Cages, Rooms, and Cage Cards
This group contains many vocabularies for managing cages, rooms, and cage card interfaces. Instead
of listing each separately, here is a list of all the simple vocabularies accessible using the same
standard user interface. Other vocabularies containing functionality out of the norm are listed with a
description of the additional features.
Standard cage, room, and cage card vocabularies are:
• Health Level Terms
• Mating Card Note Terms
o Not editable
• Cage Status Terms
JCMS Web User Guide Page 19
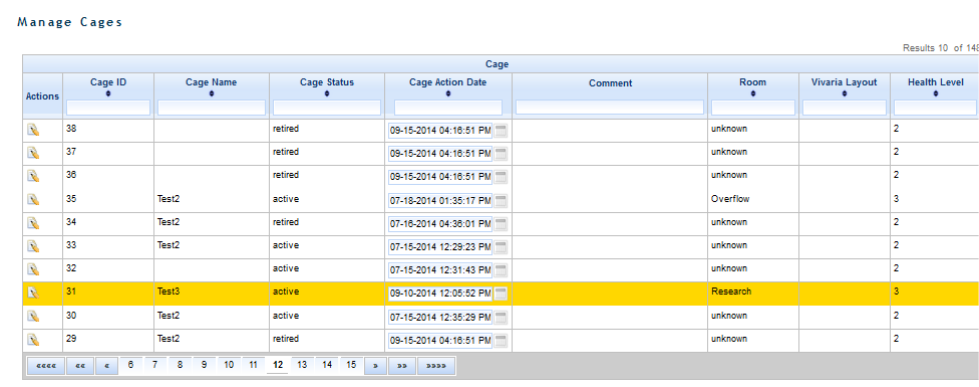
Manage Cages
This interface provides you a simple view of all cages in JCMS. Using header sort and filter options you
can pare down the number of cages to a select few. Each cage is editable by clicking on the edit
action. Edit is an inline update where you make changes in the list view one cage at a time. Note that
any change must have a unique cage action date, which can be done by changing the time by a few
seconds. Duplicate cage names are allowed. A setup variable is provided for turning off the warning
about a duplicate cage name. Once updates are complete select the save button to save or the cancel
button to cancel all changes one cage at a time.
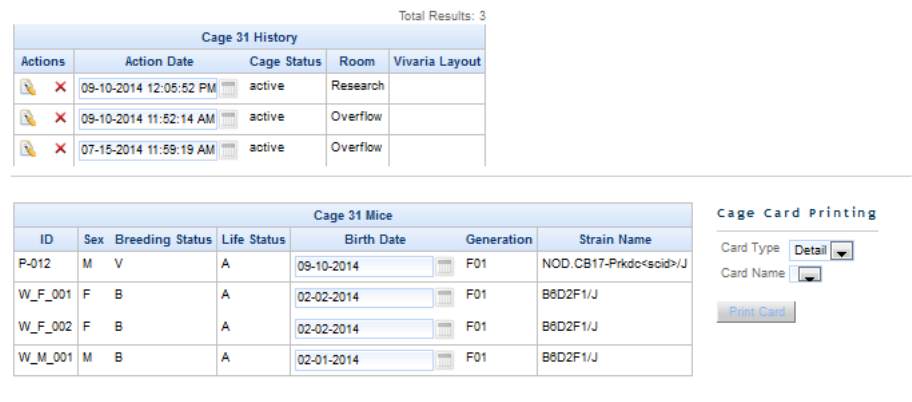
Cage history is displayed just underneath our cage listing for each cage you select. Operationally, this
interface works the same as the manage rooms interface.
• Editing a cage requires a unique action date
• Each cage update to room or status creates a new cage history record
• All cage history records can be deleted except for one, the last one, which is read only
• Cage history detail is editable
Figure 10: Manage Cages - Cage List
Mice residing in the selected cage are displayed below cage history. Mouse detail is not editable
although you can print detail, mating, and wean cards using the features to the right of this mouse
listing.
When using cage card printing, select a card type first, detail, mating, or wean card, then select from a
filtered list of card names by card type. Last step is to print the card(s). Printing one or more cards
displays a print preview, review the cards, and print out the cards of your choosing. When there are
no mating or wean card templates the corresponding option will not display as a card type option.
JCMS Web User Guide Page 20
Figure 11: Manage Cages - Edit Cage Status and Location
Manage Room
This interface displays a list of mouse rooms and recorded health history per room. Main display is
arranged and functions as other interfaces. Can add, save, cancel, and deactivate any room.
Additionally, selecting a room displays a list of health level history on the top right hand side of the
screen. Each time a new room is created or a change to either the health level or health level start
date is made a history record is created. The only activity that does not produce a history log is
renaming a room name.
Health level history tracking introduces a few user interface rules:
• Renaming a room does not generate a history log
• Only one health level entry is allowed for a specific date and time.
o Additional entries are possible by changing the date and time.
• Room name size is limited to 8 characters
• When changing a health level
o If start date is before the most recent health level than just add to history table
o If start date is after most recent health level than add to history table and update
room to point to this new entry
o If the current health record is deleted, the room health level must be set to point to
the new current health level record.
• Can delete any health level history except the last one.
o The last history log is read only
Retire Cages
This interface is significantly different than the other standard vocabulary screens. Bulk retiring of
cages is an Administrator function. The retire cages action searches the database for cages that are
JCMS Web User Guide Page 21
empty (have no mice in them or have only mice in them that have an exit life status). These cages have
their cage status set to retired on today’s date.
NOTE: The retire cage function can take a long time to complete. It may take up to 3 minutes to
finish. If you have more than 10,000 cages, you should consider running the retire cages function
when you have several hours available in which the database will not be used. You should also back up
your MySQL database before running this function just in case they take too long to complete.
Whether or not this precaution is necessary will not be known until we have more experience with the
retiring cages performance with very large data sets.
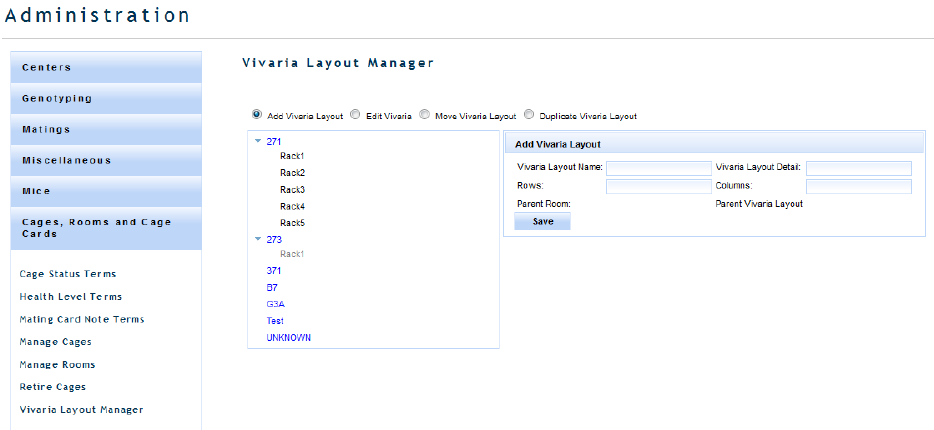
Vivaria Layout Manager
The vivaria layout allows you to describe the room(s) where your cages reside in greater detail. The
layout uses a hierarchy so a room can be subdivided into sections, racks can be in sections, etc.
Start at ‘Administration’ on the menu, click on ‘Cages, Rooms, and Cage Cards’, and then on ‘Vivaria
Layout Manager’.
Figure 12: Add Vivaria Layout
Add Vivaria Layout
Select the ‘Add Vivaria Layout’ radio button to create a new level. Click on the room or sub-level where
the new layout level should go. Give it a ‘Vivaria Layout Name’. The ‘Vivaria Layout Detail’ is for adding
any comments about this layout. The bottom level will need to have rows and columns defining its
shape. Intermediate levels may be setup with zero rows and zero columns if no cages will be placed
there. For example, Room 371 has two sections, each section contains racks. Cages will only be placed
in the racks. The sections are considered an intermediate level with 0 rows and 0 columns, while each
rack has a two-dimensional layout. If a rack has a three dimensional layout, then it should be defined
with shelves as the final level.
JCMS Web User Guide Page 22
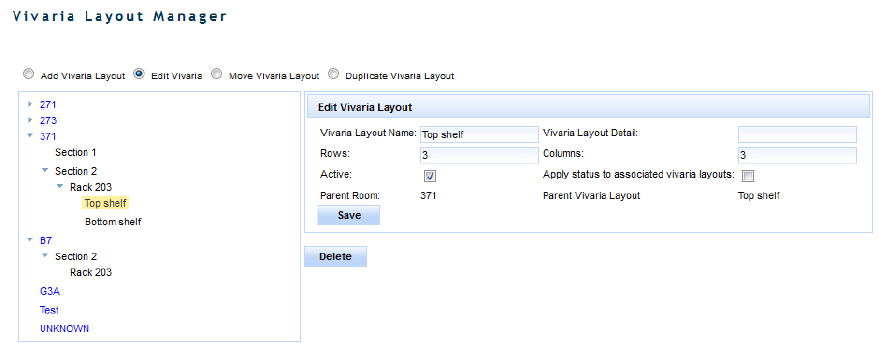
Edit Vivaria Layout
Select the ‘Edit Vivaria Layout’ radio button. Click on the level to be changed, it will be highlighted in
yellow. Make the desired changes and click ‘Save’ or click ‘Delete’ to remove.
Figure 13: Edit Vivaria Layout
Move Vivaria Layout
Select the ‘Move Vivaria Layout’ radio button. Click on the layout and drag it to a new location. Hover
over the room or layout name where it will be moved until it is highlighted in light blue. Drop the
layout and it will be moved to become sub-layout of the selected room or layout.
Duplicate Vivaria Layout
Select the ‘Duplicate Vivaria Layout’ radio button. Once a room layout has been created, you may like
to duplicate it in other rooms or sections of rooms. Click on the layout and drag it to a new location.
Hover over the room or layout name where it will be duplicated until it is highlighted in light blue. Any
sub-layouts will also be duplicated. The duplicated layout will not contain any cages.
Samples
Sample Class
This interface displays all the sample classes. Sample Classes have Sample Types and Preservation
Types associated with them. To add a sample class click ‘Add’ give the name of the sample class and
click the save icon.
Sample Types
Sample types must be associated with sample classes. To add a new sample type click ‘Add’ and type in
the name of the sample type, choose a sample class from the drop down, and click the save icon to the
left.
Preservation
This interface is used for adding Preservation Types, Methods, and Details. Types are associated with
sample classes, methods with preservation types, and details with preservation methods.
JCMS Web User Guide Page 23
To add a preservation type, select a sample class from the drop down, type in the preservation type
name, and click save. The ‘Add’ button will be disabled unless a sample class is selected from the drop
down. To add a preservation method, select a preservation type from the preservation type list,
provide a preservation method name in the input text box below the preservation method list box, and
click ‘Add’. To add a preservation detail, select a preservation method, type in the name of the detail in
the text box below the preservation detail list box, and click ‘Add’.
Sample Date Type
To add a sample date type, click ‘Add’, type in the sample date type, and click the save icon.
Harvest Method
To add a harvest method, click ‘Add’, type in the harvest method, and click the save icon.
Weight Unit
To add a weight unit, click ‘Add’, type in the weight unit, and click the save icon.
Time Unit
Time unit has a time unit name (minutes, seconds, hours etc.), an abbreviation (what will be displayed
in the time unit drop down), and minutes per unit.
To add, click the add button, provide a value for each field, and click the save icon. To delete, click the
delete icon, and to edit, click the edit button, and then you can change either the abbreviation or
minutes per unit.
Epoch
To add an epoch, click ‘Add’, type in the epoch, and click the save icon.
Sample Status
Sample status has two fields, is in storage and sample status. You can edit whether or not the status is
in storage. To add a sample status, click add, provide values for the two fields, and click the ‘Save’ icon.
Storage Manager
The storage manager is a tree-like structure where a storage facility is the ‘root’ and the locations are
where you store the samples. For example, a building might be a storage facility and in that building is
your lab, which is a location. In your lab you can have a freezer location with shelves in the freezer and
so on. So a location can either be associated with a storage facility OR another location.
JCMS Web User Guide Page 24
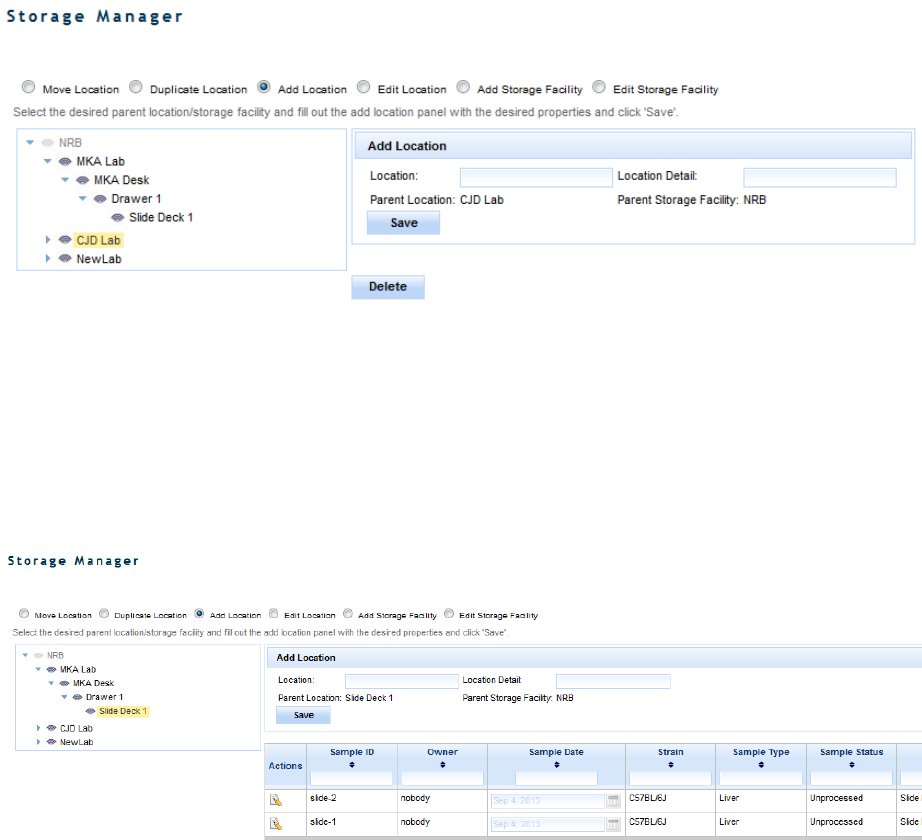
Figure 14: Storage Manager
If a Storage Facility or Location contains no samples it can be deleted. To delete a location/storage
facility click on the node you would like to delete and click the ‘Delete’ button. If a storage
facility/location contains samples, those samples will be displayed in a table to the right of the tree
upon clicking on the node. You can edit these samples by clicking on the edit icon in the ‘Actions’
column of the table.
Figure 15: Storage Manager - Sample List
To add a storage facility, select the ‘Add Storage Facility’ radio button, type in the name of the storage
facility, and click ‘Save’. To edit a storage facility, select the radio button, click on the storage facility
you would like to edit, provide the new name, and click ‘Save’. To add a new location, click on either a
storage facility or location node in the tree (this will be the parent node), provide the location type and
detail, and click ‘Save’. You can also edit the location type name and detail by clicking the ‘Edit
Location Type’ radio button, typing in the new location type and detail, and clicking save.
In order to edit or move a location or storage facility you must be in all the workgroups of the samples
contained within that location/storage facility.
One can move locations by selecting the ‘Move Location’ radio button. To do this, click on the location
you would like to move, drag it to its new location/storage facility, and drop it. This will move all the
locations that reference the moved location and all samples to the new location you drop it on.
JCMS Web User Guide Page 25
Remember that to move a location you must be in the workgroups of the samples contained in the
location you are moving.
One can also duplicate a location by selecting the ‘Duplicate Location’ radio button and dragging the
location you would like to duplicate onto the node you would like to contain it. This will recreate the
location structure in the dropped node, but will NOT duplicate any of the samples.
Manage Colony
This module provides the ability to manage mice, matings, and litters; genotyping; mouse scheduling;
and vivaria layout.
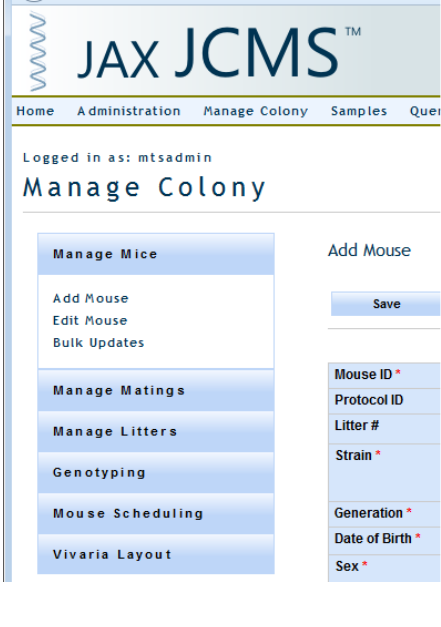
Add Mouse
Adding mice in JCMS Web works similarly to how it works in the JCMS Access interface. After adding
the first mouse and enabling auto increment ID, the mouse ID increments to the next system
maintained ID (see Auto incrementing IDs below). The next mouse is ready to add. All fields are
already initialized to the details entered on the first mouse. Review the content, make the appropriate
updates, and save. This process can be as simple as ten mouse clicks to quickly add 10 mice to JCMS.
Notice each mouse is added to a specific owner designated by the Owner/Workgroup required field.
This establishes workgroup ownership of all mice. Other users can update and report on these mice
only if they have access to do so.

JCMS Web User Guide Page 26
Figure 16: Manage Mice - Add Mouse
My Preferences may be used to hide and/or set a default value for some of the fields on this screen. A
hidden field with a default will always have that default value added for the mouse.
Cage ID has a bundle of functionality tied to it. The recommended operation is to enable ‘Use Next ID’
to auto generate the next cage ID for the first mouse. After the first mouse is saved the second mouse
pre-initialized content disables ‘Use Next ID’ so all you have to do is save again to save the second
mouse in the same cage as the first. When you fill up the first cage enable ‘Use Next ID’ to get the next
system cage ID and continue the process of adding mice to the second cage. With all values remaining
consistent, many mice and cages can be created in a manner of minutes.

JCMS Web User Guide Page 27
A user can enter a custom cage ID by disabling ‘Use Next ID’ and entering the value in the Cage ID field.
Also available are ‘Select Cage’ and’ New Cage’ options. ‘Select Cage’ provides a way to search for and
choose an existing cage. While ‘New Cage’ allows you to create a new cage capturing more detail than
the automated way.
After creating a custom cage card you can select it from the ‘Cage Card’ drop down list. Select
‘Preview Cage Card’ to display this mouse detail in your custom cage card format and print it out if you
like.
Auto incrementing IDs
Enable ‘Auto Increment ID’ to auto generate the next available Mouse ID. The mouse ID must be
appended with a numeric value in order to use this feature. For example, mouse ID “ABC-100” is a
valid identifier.
Action System
User clicks the ‘Add Mouse’ link from
the ‘Manage Mice’ sidebar
User clicks the ‘Edit Mouse’ link from
the ‘Manage Mice’ sidebar
Mouse information is added/updated
when ‘Save’ button is clicked
System displays Add Mouse Form
Data entry fields are displayed
New mouse is added to database
System displays Edit Mouse Form
Data entry fields are displayed
Mouse data is updated in the database
Exceptions Validation Message
Mouse ID is blank Message “Mouse ID is missing. Please enter a Mouse
ID” is displayed
Strain is blank
Message “Strain is missing. Please enter a Strain” is
displayed
Generation is blank Message “Generation is missing. Please enter a
Generation” is displayed
Date of Birth is blank Message “Date of Birth is missing. Please enter Date of
Birth” is displayed
Sex is blank Message “Sex is missing. Please enter Sex” is displayed
Life Status is blank
Message “Life Status is missing. Please enter a Life
Status” is displayed

JCMS Web User Guide Page 28
Breeding Status is blank Message “Breeding Status is missing. Please enter a
Breeding Status” is displayed
Owner is blank Message “Owner is missing. Please enter Owner” is
displayed
Origin is blank
Message “Origin is missing. Please enter the Origin” is
displayed
Cage ID is blank Message “Cage ID is missing. Please enter a Cage ID” is
displayed
Business Rules or Validation
1. Mouse ID must be unique otherwise the user will see an error message “Mouse ID already
exists. Please choose a unique Mouse ID.”
2. Replacement Tag ID must be unique otherwise the user will see an error message
“Replacement Tag already exists. Please choose a unique Replacement Tag.”
3. Date of birth is defaulted to today and cannot be in the future.
4. When litter is selected, strain and generation is auto populated.
5. Exit date cannot be before the Birth date. If Exit is in the future, then a warning is displayed.
6. Age is calculated for the Edit Mouse Form based on the following rules
o Mouse age is calculated from exit date minus birth date. If the exit date is null, then
from the difference between birth date and today’s date.
o Days, weeks, and months are the options
o The value is rounded to the nearest integer for days, rounded to one decimal value for
weeks, and rounded to two decimal values for months.
o Whenever birth date or exit date is revised, age is recalculated and redisplayed.
7. Auto increment Mouse ID is implemented in only the Add Mouse Form. If checked, Mouse ID
needs to be able to be incremented sequentially for the next mouse to be added.
8. If Life Status is “Alive” and Exit status is false, then Exit Date, COD, and COD Notes columns
disappear. If Life Status is not “Alive” and Exit status is true, then Exit Date, COD, COD Notes
columns appear, and Exit Date, COD columns are required.
Edit Mouse - Search
Edit Mouse opens with a convenient search screen for finding mice in your workgroup.
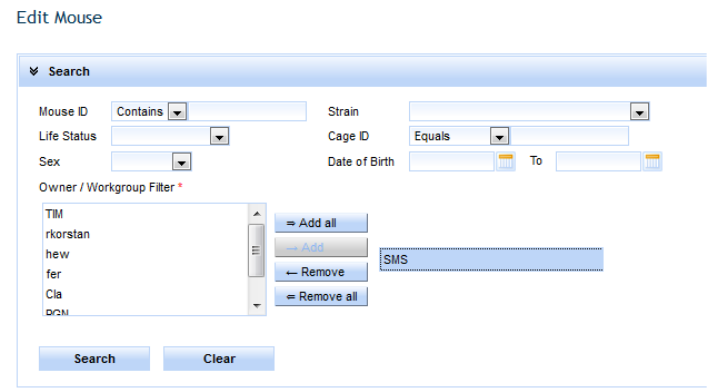
JCMS Web User Guide Page 29
Specify an Owner/Workgroup filter to identify where you want to search for mice.
Figure 17: Manage Mice - Edit Mouse Search
Search results are displayed below the filter section in a tabular list.
Select some search criteria to avoid too many results showing up. Otherwise the user will see an error
message such as “Select some search criteria”.
The following Search fields are provided: Mouse ID, Strain, Life Status, Sex, Cage ID, Date of Birth, and
Owner. Clicking on the ‘Search’ button brings up the search results. Clicking on the ‘Clear’ button
clears the Search criteria and search results.
To avoid performance problems, only up to 500 rows are fetched from the database at a time.
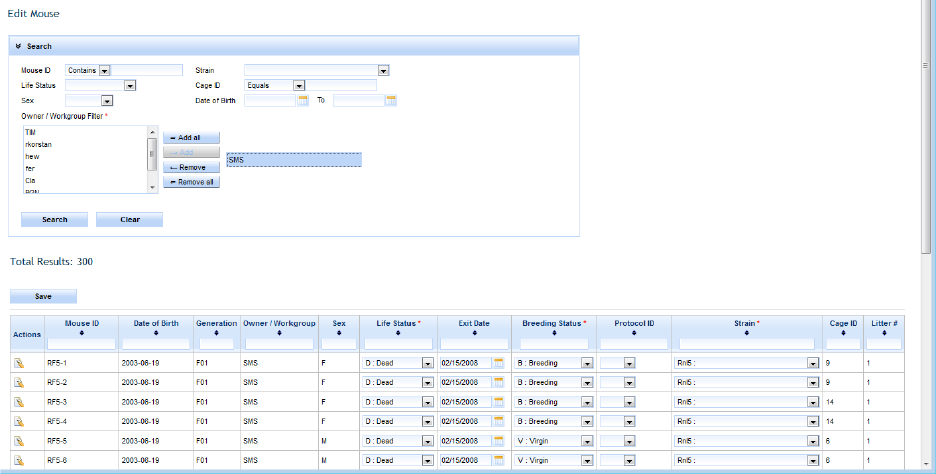
Search results
Search results offer more functionality than just an edit and delete action.
• All the columns can be sorted in Ascending or Descending order by clicking on the column header.
• Search results can be filtered by columns by typing in the filter criteria in the columns header text
box.
• Pagination of the results is provided. 15 rows are shown per page; click the page control to get to
the next set of results.
• Mouse ID, Date of Birth, Generation, Owner/Workgroup, Sex, Cage ID, and Litter # are provided as
read only columns in the results.
• Life Status, Exit Date, Breeding Status, Protocol ID, and Strain are provided as editable columns as
selectable drop down lists in the search results.
• After making bulk edits to the editable columns in the search results, when ‘Save’ button on the
right hand side is clicked, changes are submitted to the database.
JCMS Web User Guide Page 30
• An edit icon is provided under Actions on the first column for each row. Clicking it takes you to the
details of the specific mouse in the Edit Mouse form, which lets you edit all the mouse details and
save the changes to the database.
Figure 18: Edit Mouse - Search Results
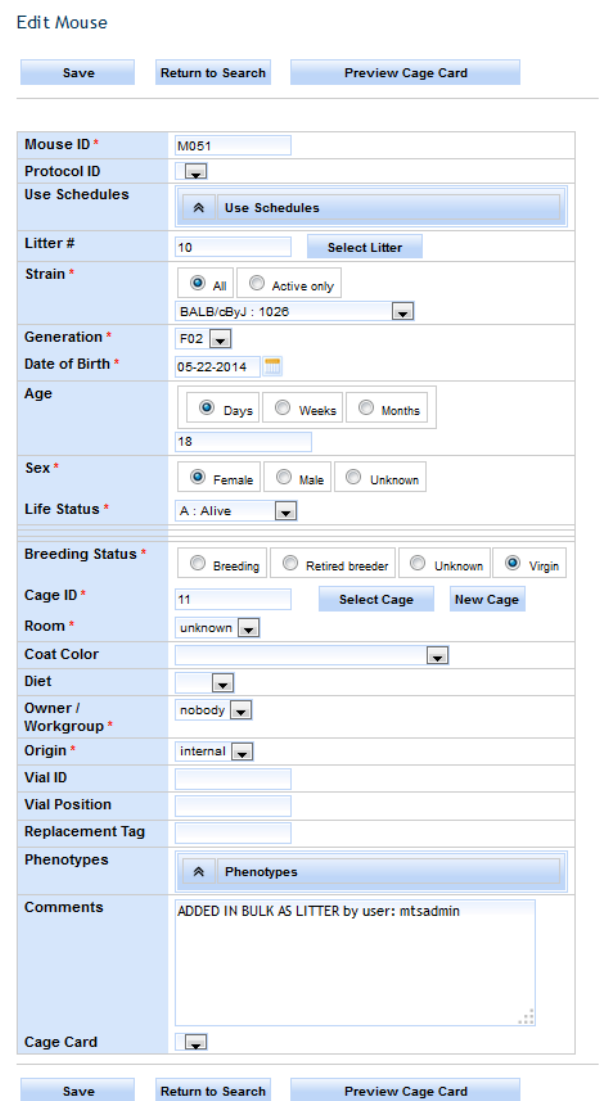
Edit Mouse Form
Use this screen to make changes to any mouse record you have ownership of. Aside from the
standard add functionality you’ll notice the cage ID option to use next ID is not visible. Auto
generating the next cage ID is only available when you first add a mouse and for the first mouse in a
series of adding mice. Cage ID is editable in case you ever need to change it or you can search for an
existing cage assignment using select cage or create a new one by selecting new cage. Cage room can
be updated from either add or edit mouse. Just keep in mind it does update the room for this cage
system wide as you would expect. For example, there are 6 mice in cage “Blue” and you move it from
building “One Room 3” to building “Two Room 5”. You can update the room by editing any one of the
mice in this cage. The change affects all mice contained in the cage.
My Preferences may be used to hide some of the fields on this screen. No defaults are used when
editing. When a mouse’s life status is changed to an exit status, the COD (cause of death) field will be
displayed even if it is supposed to be hidden. The COD notes field is not shown, to see it, change your
preference.
Litter Search and Select Litter#
Litter search and select Litter# is the feature used by most of the manage mice forms. It works as
follows.
JCMS Web User Guide Page 31
Figure 19: Edit Mouse
Litter # column has a text box where the user can directly enter or click the button ‘Select litter’. When
the User clicks the ‘Select Litter’ button, the pop-up window below appears.
JCMS Web User Guide Page 32
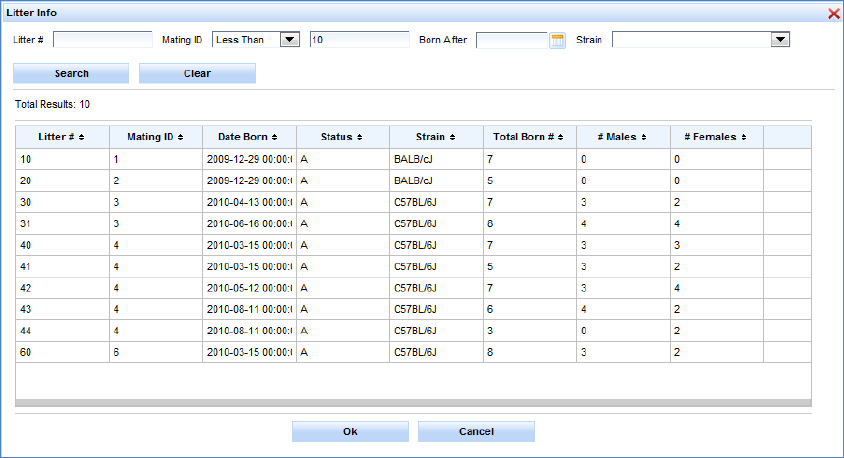
Select the search criteria and get the search results. Select the desired litter row, click the ‘Ok’ button,
and litter ID will be populated in the form’s litter column.
Some search criteria need to be selected to avoid too many results showing up. Otherwise the user will
see an error message such as “Select some search criteria”.
Litter Search has the following search columns: Litter #, Mating ID, Born After specific date, and Strain.
Figure 20: Edit Mouse – Select Litter
Litter Search Results has the following columns
• Litter #, Mating ID, Date Born, Status, Strain, Total Born, #Males, and #Females
• All the above columns can be sorted in Ascending or Descending order by clicking on the column
header.
• To avoid performance problems, only up to 500 rows are fetched from the database at a time.
Save button
By clicking ‘Save’ the form checks for the validations and business rules described in the Add Mouse
section, if successful submits the form to the database, and you see a message that “Mouse has been
saved”, otherwise you will see validation error messages as discussed in the Add Mouse section.
Return to Search
This button takes you to the search results where the user came from by refreshing search data so that
you can see the new changes.

JCMS Web User Guide Page 33
Preview Cage Card
Prior to previewing a cage card, select the Cage Cards menu option to create a custom card template
for the set of mice you would like to print cage cards for. Refer to the Cage Cards section for more
information.
Once you have created a cage card template you should select it prior to selecting preview cage card.
New Cage
By clicking the ‘New Cage’ button on the Add Mouse or Edit Mouse forms, you will be able to add new
cage to the database as follows.
Figure 21: Edit Mouse - New Cage
Action System
User clicks the ‘New Cage’ button in the
parent form
Cage information is added when ‘Save’
button is clicked
Cage information is added when ‘Save and
Close’ button is clicked
System displays New Cage form
Data entry fields are displayed
New cage is added to database, lets user add
multiple cages
New cage is added to database and pop-up
window closes
Exceptions Validation Message
Cage ID is blank Message “Cage ID is missing. Please enter a Cage

JCMS Web User Guide Page 34
Action System
ID” is displayed
Cage Status is blank Message “Cage Status is missing. Please enter a
Status” is displayed
Date is blank Message “Date is missing. Please enter a Date” is
displayed
Room is blank
Message “Room is missing. Please enter a Room”
is displayed
Business Rules or Validation
• Date defaulted to today and cannot be in future.
• Cage ID must be unique otherwise the user will see an error message “Cage ID already exists.
Please choose a unique Cage ID.”
• When next available Cage ID is checked, Cage ID text box is disabled and it auto populates the next
Cage ID.
JCMS Web User Guide Page 35
Add Mating
Figure 22: Add Mating
Action
System
User clicks the ‘Add Mating’ link from
the ‘Manage Matings’ sidebar
‘Save’ button is clicked
System displays Add Mating Form
Data entry fields are displayed
New Mating is added to database
Exceptions Validation Message

JCMS Web User Guide Page 36
Dam1 ID is blank Message “Dam1 ID is missing. Please enter a Dam1 ID” is
displayed
Sire ID is blank Message “Sire ID is missing. Please enter a Sire ID” is
displayed
Litter Strain is blank
Message “Strain is missing. Please enter a Strain” is
displayed
Litter Generation is blank Message “Generation is missing. Please enter a
Generation” is displayed
Mating Date is blank
Message “Mating Date is missing. Please enter Mating
Date” is displayed
Owner is blank Message “Owner is missing. Please enter Owner” is
displayed
Cage ID is blank Message “Cage is missing. Please enter a Cage ID” is
displayed
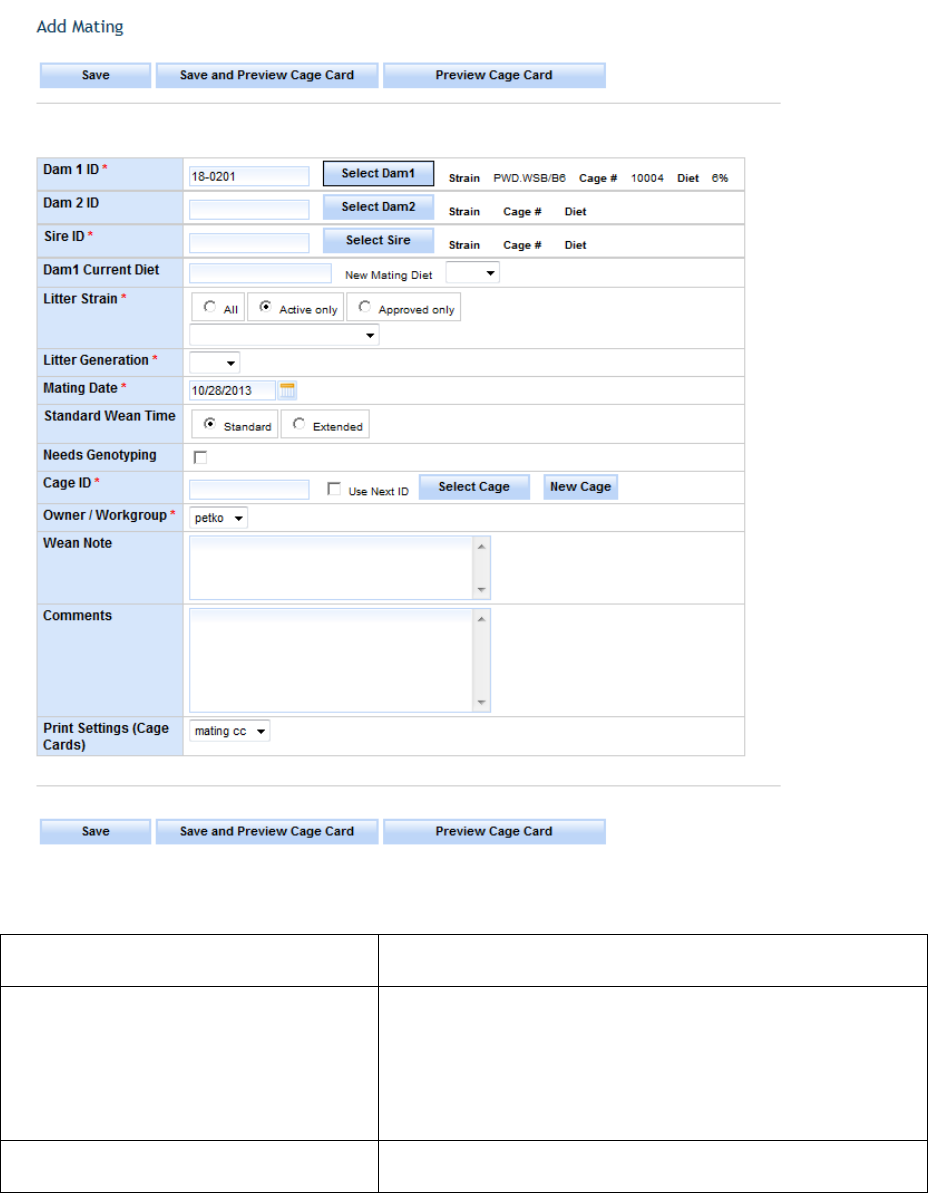
Business Rules or Validation
1. Dam1 is required and you need to select the female mouse from the ‘Select Dam1’ pop-up
search window.
2. Dam2 is defaulted to the Dam1 strain in the search criteria in the pop-up search window.
3. Sire ID is required and you need to select the male mouse from the ‘Select Sire’ pop-up
search window.
4. Mating Date is defaulted to today and cannot be in the future.
5. Dam 1 Current Diet is displayed when Dam 1 is selected. In case you want to update
Dam(s) and Sire with a new diet, New Mating Diet is displayed as a drop down and can be
selected.
6. Mating ID is auto-generated once the Save button is clicked and validation is successful.
7. Mating Status is set to Active by default for new matings.
8. Litter Strain rules as follows
Dam1 and Sire ID need to be selected prior to selecting the litter strain.
If the setup variable called JCMS_ENFORCE_APPROVED_MATINGS is true, then the ‘approved
only’ radio button is selected by default. The approved strains registry will be checked for the

JCMS Web User Guide Page 37
selected Dam(s) and Sire strains in order to populate the Litter strain choices. The user may
change this option to show either ‘All’ or ‘Active’ strains as Litter strain choices.
If Dam(s) and Sire are of the same strain, the litter strain will be the same strain too.
Dam/Sire ID Search and Selection
Figure 23: Add Mating – Select Dam/Sire
Dam / Sire ID column is a text box that the user can directly type in or click the button ‘Select
Dam1/Dam2/Sire’. When you click ‘Select’ on the Add Mating Form, the pop-up window in the figure
above appears.
Search criteria can be selected and you get the search results by clicking the ‘Search’ button. Life
Status is defaulted to “Alive”. The desired row can be selected and when you click the ‘Ok’ button, the
Mouse ID will be populated in the Dam/Sire ID column.

JCMS Web User Guide Page 38
Some search criteria need to be selected to avoid too many results showing up.
Search Results has the columns: Mouse ID, Date of birth, Generation, Owner/Workgroup, Life Status,
Breeding Status, and Diet.
• All the above columns can be sorted in Ascending or Descending order by clicking on the column
header.
• To avoid performance problems, only up to 500 rows are fetched from the database at a time.
Edit Mating
Use this screen to make changes to any mating record you have ownership of. You are first presented
with a search screen where you can enter criteria for Owner(s), Mating ID, and Mating Status. Only 500
rows are returned at one time.
Figure 24: Select Mating for Editing
You must then click the edit icon next to one of those matings and you will be brought to the edit
mating page.

JCMS Web User Guide Page 39
Figure 25: Edit Icon
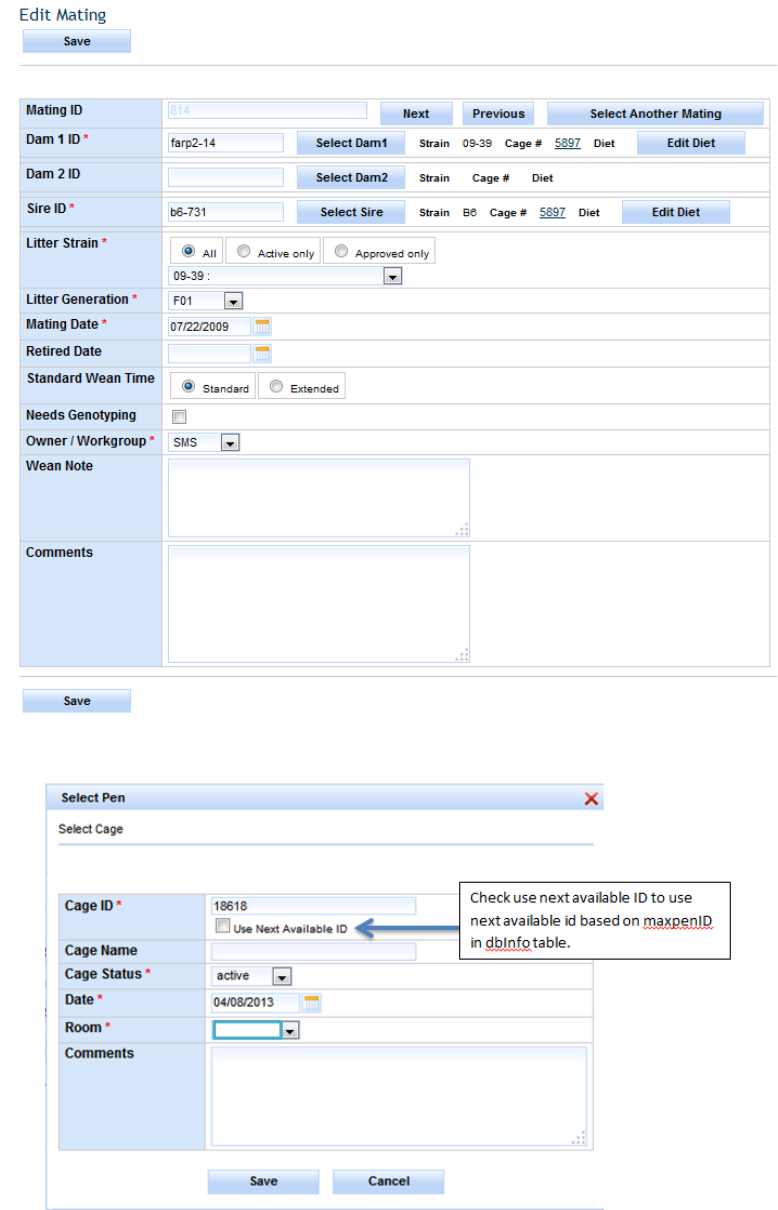
You’ll notice that the form appears somewhat like the Add Mating form with a few exceptions. At the
very top of the form there is a ‘Mating ID’ input field that contains a list of all the matings that you
own. To change the mating you are currently editing simply change this field’s value by clicking on
‘Select Another Mating’, typing in or selecting a value, and tabbing out of the field. The remainder of
the page will update itself with the information for that particular mating and its mice. If you wish to
update the mating with the next mating ID (current mating ID + 1) just click the ‘Next’ button, and if
you wish to edit the previous mating click ‘Previous’. In order to not lose any changes, before
navigating away from this mating by leaving the page or moving on to another mating be sure to click
the ‘Save’ button at the top of the page.
In the Dam 1, Dam 2, and Sire panels you’ll see a Cage ID link and an ‘Edit Diet’ button. Clicking the link
will show a pop up that allows you to change the cage where that mouse currently is and specify
information for that cage such as its name, status, comments, etc. If you click the ‘Edit Diet’ button a
drop down list will be shown containing all the diet options that are available in your database. You
can change the mouse’s diet by selecting the desired diet from the drop down and clicking the ‘Save
Diet’ button. Another feature of the Dam 1, Dam 2, and Sire panels is that should a user change any of
the mice in that mating, a new row will appear containing the information for the mouse that was
originally associated with that mating, in case it was mistakenly changed.
There is a Retired Date field that corresponds to the date the mating was retired. At the moment there
is no printing cage card functionality on this page.
JCMS Web User Guide Page 40
Figure 26: Edit Mating
Figure 27: Select Cage
JCMS Web User Guide Page 41
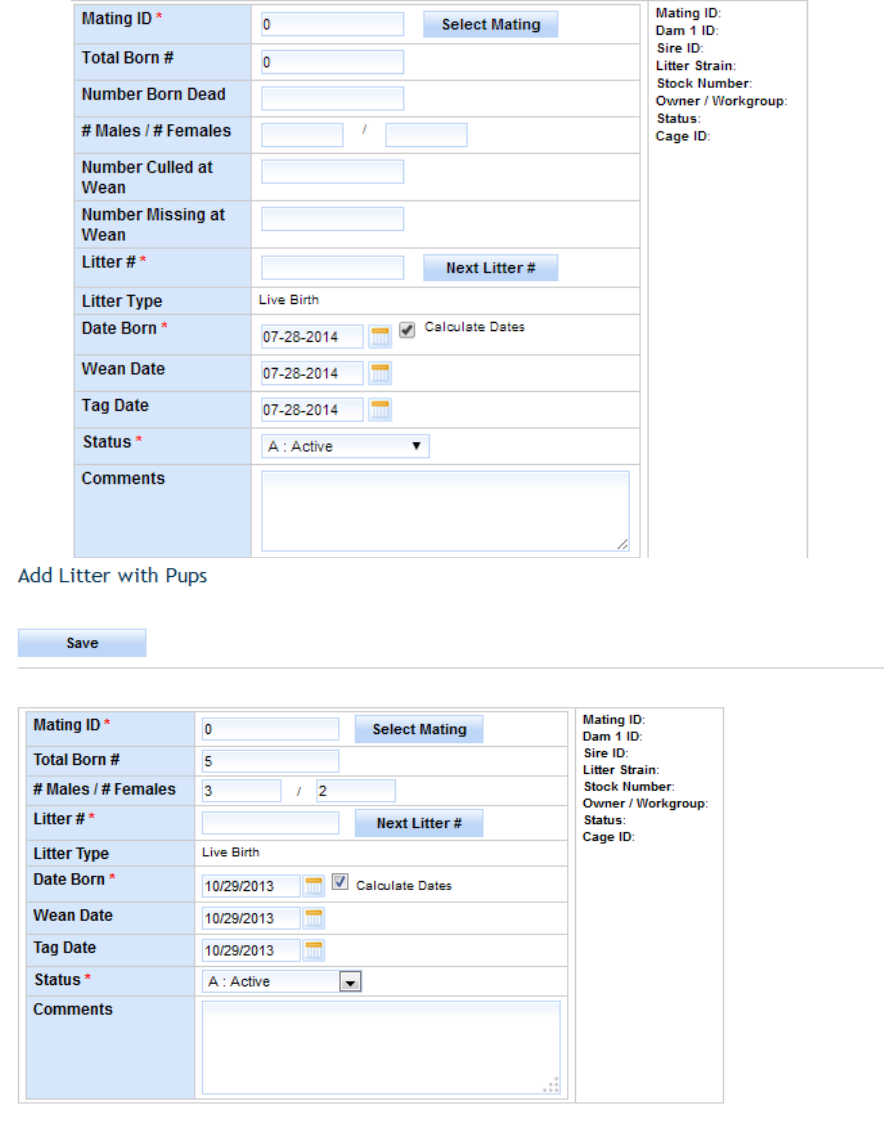
Add Litter with Pups
Click ‘Manage Litters’ and ‘Add Litter with Pups’ choices.
Figure 28: Add Litter with Pups
JCMS Web User Guide Page 42
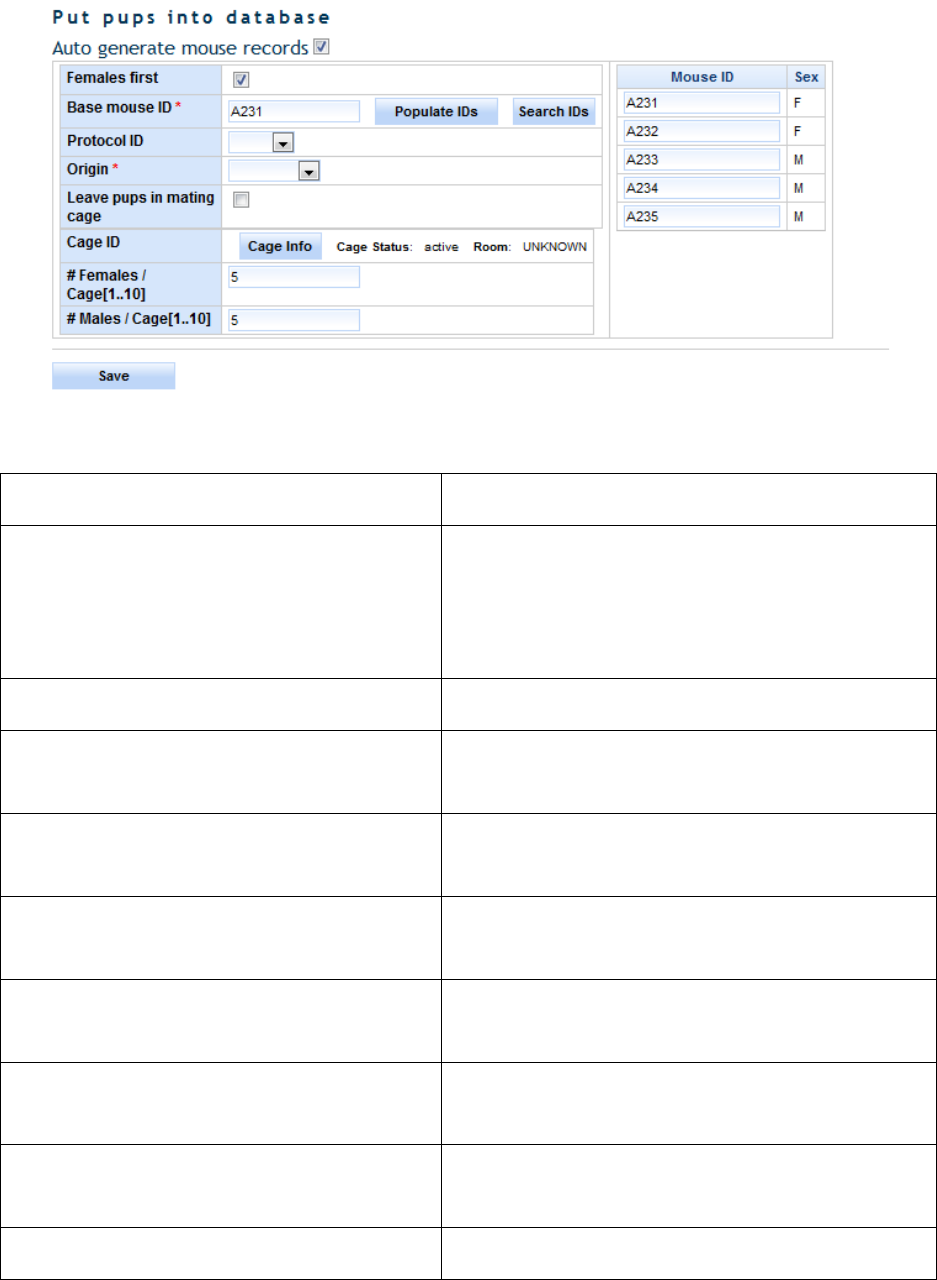
Figure 29: Add Litter with Pups (lower portion)
Action System
User clicks the ‘Add Litter with Pups’
Litter information is saved when ‘Save’ button
is clicked
System displays Add Litter with Pups Form
Data entry fields are displayed
New Litter is added to database
Exceptions Validation Message
Mating ID is blank Message “Mating ID is missing. Please enter a valid
Mating ID” is displayed
Total Born # is blank
Message “"Total Born # is missing, Please enter Total
Born #” is displayed
# Males / # Females is blank Message “# Males is missing. # Females is missing.”
is displayed
Litter # is blank Message “Litter # is missing, Please enter Litter #” is
displayed
Date Born is blank
Message “Date Born is missing. Please enter Date
Born” is displayed
Status is blank Message “Status is missing. Please select a Status” is
displayed
Origin is blank
Message “Origin is missing.” is displayed

JCMS Web User Guide Page 43
Base mouse ID is blank Message “Base mouse ID is missing. Please select a
Base mouse ID” is displayed
Business Rules or Validation
1. Total Born # needs to be a valid number > 0.
2. # Males and # Females cannot be greater than Total Born #.
3. Total Born #, # Males, and # Females are required or need to be a valid number > 0 only if
pups are entered, otherwise optional.
4. Limit # Males to <= 10 and # Females to <= 10 otherwise show error message “Number of
males and females cannot be greater than 20”.
5. Date born is defaulted to today and cannot be in future.
6. Wean Date is defaulted today’s date. Once mating is selected, if Mating’s wean time is true,
then standard wean time (18) days are added to today’s date or when false extended wean
time (28) days are added to today’s date.
7. Tag Date is defaulted to today’s date. Once mating is selected, if Mating’s wean time is true,
then standard wean time (18) days are added to today’s date or when false extended wean
time (28) days are added to today’s date.
8. Auto generate mouse records is defaulted to true. When true generate pups and cages in
the database for the litter. When false, do not generate any pups. Pups section will be
hidden.
9. Female’s first checkbox defaulted to true. When true process females first and then males
or vice versa when false.
10. Leave pups in mating defaulted to false. When false, Create new cage for
• The set of males and
• The set of females and
• When the max limit per cage is reached.
When true, use the same mating cage but if the mating cage is retired, gives an error message
“The mating cage is retired. Unable to keep pups in a retired cage”. When true, Cage ID, #
Females per Cage, and # Males per Cage fields are hidden.
11. # Females or # Males / Cage cannot be greater than the value of the setup variable
“MTS_MAX_MICE_PER_PEN”.
12. Cage ID is used if ‘Leave pups in mating pen’ is false. Clicking the button ‘Cage Info’
populates a pop-up form which provides cage information and generates next available
Cage ID whenever necessary, otherwise use default cage information.
13. Base Mouse ID provides a valid first Mouse ID for the pups. ‘Search IDs’ is a pop-up search
form that provides search criteria for Mouse ID, Life Status, Strain, and Owner. When a
Mouse ID is selected from the results, it generates a base mouse ID by incrementing it and
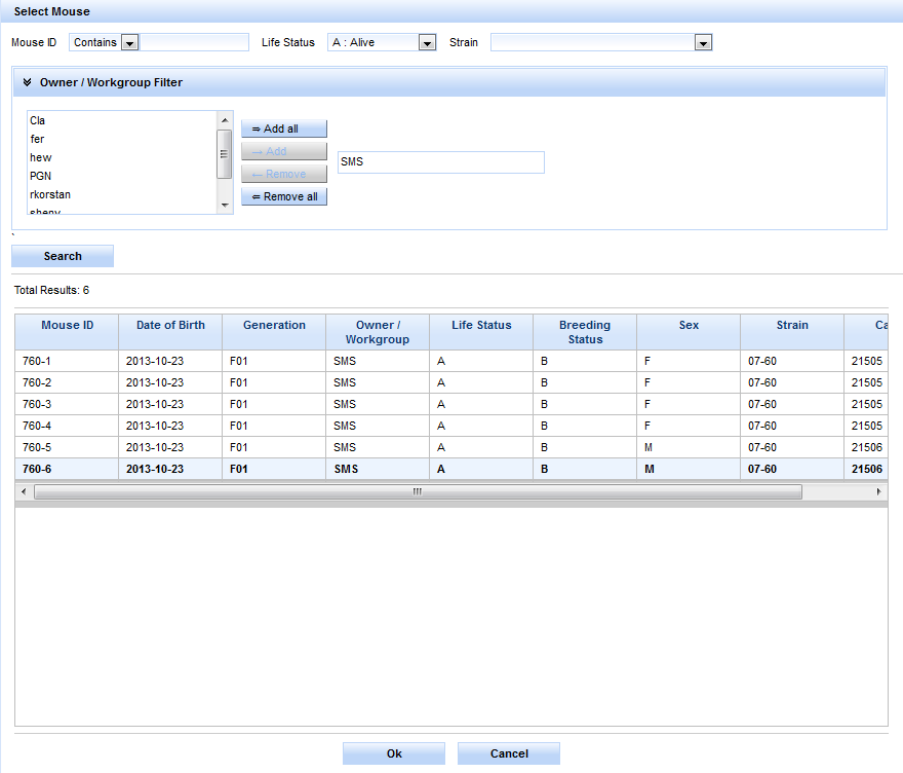
JCMS Web User Guide Page 44
if it is valid unique mouse ID, then populate it as the base mouse ID otherwise leave it
blank.
Figure 30: Add Litter - Mouse Search
14. ‘Populate IDs’ will use the base Mouse ID if it exists and show the mouse ID’s that will be
used for the pups as follows.
o Clicking ‘Populate IDs’ takes the Base Mouse ID and shows the list of Mouse IDs that will
be created.
o If the Base Mouse ID is blank, get the maxAutoMouseID value from the dbInfo table,
append it to the value of the setup variable “MTS_MOUSE_ID_PREFIX”, and shows the list
of Mouse IDs that will be created.
o The list of Mouse ID’s to use may be manually edited before saving the pups.
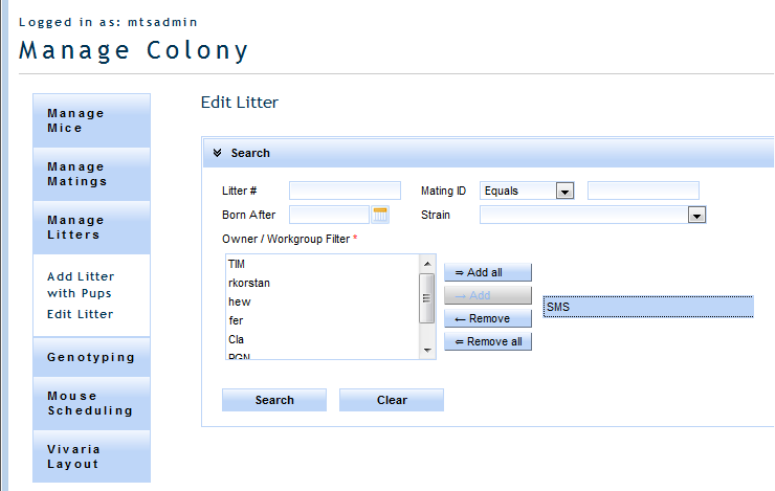
JCMS Web User Guide Page 45
Edit Litter
Edit Litter starts by providing search criteria to search for the litter.
Search criteria need to be selected to avoid too many results showing up. Otherwise the user will see
an error message such as “Select some search criteria”.
The following Search columns are provided:
Litter #, Mating ID, Born After specific date, Owner, and Strain
Clicking on the ‘Search’ button brings up the search results. Clicking on the ‘Clear’ button clears the
Search criteria and search results.
To avoid performance problems, only up to 500 rows are fetched from the database at a time.
Figure 31: Edit Litter - Litter Search
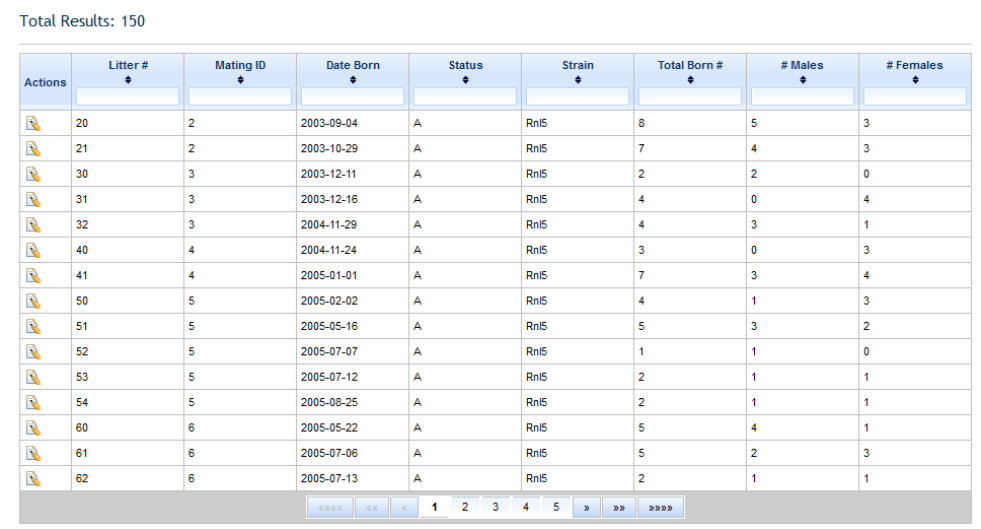
JCMS Web User Guide Page 46
Litter Search Results
Figure 32: Litter List/Edit Litter - Search Results
Litter Search Results
• All the above columns can be sorted in Ascending or Descending order by clicking on the
column header.
• Search results can be filtered by typing in the filter criteria in the columns header text box.
• Pagination of the results is provided. 15 rows are shown per page; click the pager control to
get to the next set of results.
• Litter #, Mating ID, Date Born, Litter Status, Strain, Total Born #, # Males, # Females are
provided as read only columns in the results.
• Clicking on the Edit icon for a row takes you to the Edit Litter form.

JCMS Web User Guide Page 47
Figure 33: Edit Litter
Edit litter:
• Form lets user edit Litter information and add pups to an existing litter.
• Click the ‘Save button’, the form checks the validations and business rules. If successful, the
changes are made to the database and the user sees a message that “Litter has been
updated”, otherwise the user will see validation error messages as discussed in the above
section.
• Click the ‘Return to Search’ button to go back to the search results where the user came from.
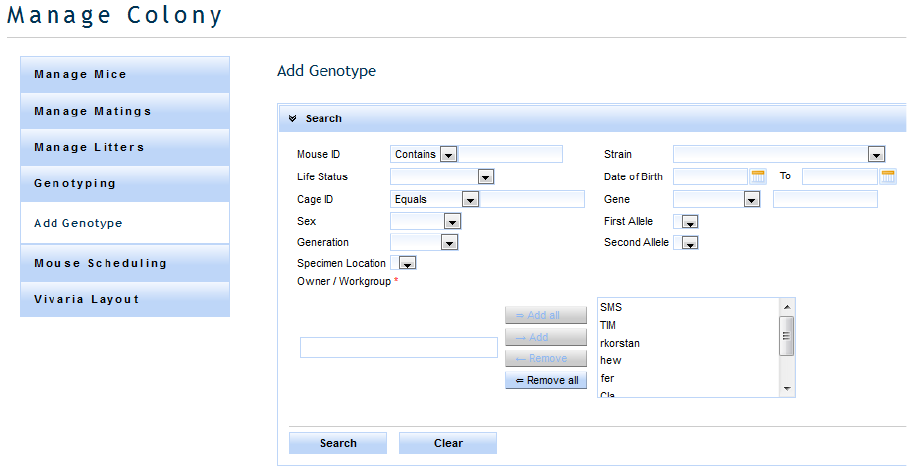
JCMS Web User Guide Page 48
Add Genotype
This module provides the functionality to add genotypes to mice. A search panel is provided for
finding a mouse or list of mice.
Figure 34: Add Genotype - Search
The format of the gene filter is different from some other filters. The equals filter is a drop down list of
genes and you activate the filter by selecting a gene from the list. The “contains” filter is a text field
just to the right of the “equals” filter where you can enter the partial text of a gene name. If filters are
entered for both the search query will get all genotypes with the selected gene and all the other
genotypes containing the entered filter. When specifying a genotype filter using gene, first allele, or
second allele only mice with genotypes matching this criteria are returned. If you are looking for mice
only, opt out from specifying a genotype filter.
Select search to execute the query. Search results will display below. Click on the search header to
collapse the search filter providing more room to view search results.

JCMS Web User Guide Page 49
Figure 35: Genotype Search Results
In the actions column, you may have an option to add a genotype, search genotypes, or show/hide
genotypes. By clicking the show link, a sub table of genotypes matching the filter criteria for this
Mouse ID is displayed. From here a genotype can be edited or deleted for the parent mouse. Add
genotype automatically expands the sub table and inserts a new genotype row for you to fill out and
save. Search genotype provides a more robust search engine than the general search mechanism
located at the top of the Add Genotype screen. In this release, the numbers of genotype results are
constrained to 10 genotype records per mouse. In the future, a feature is planned allowing a user to
advance through all sets of genotypes returned by the query. When adding a new genotype, gene and
first allele are required, and a new genotype must be saved prior to adding another.
In this example below, the text “Show (6 of 6, 6)” needs some explanation. The first number is the
total number of genotypes returned matching the genotype filter not to exceed the maximum of 10.
The second number, of 6, is the total number of genotypes matching the genotype filters for this
mouse. The last number represents the total number of genotypes associated to this mouse.
Figure 36: Add Genotype – Show Link
Edit Genotype
Clicking the edit icon provides a simple pop up of a single genotype where you can change values and
save. Changes are reflected on the main list after the edits are saved.

JCMS Web User Guide Page 50
Figure 37: Edit Genotype
Mouse Scheduling
Mouse Scheduling can be reached through the Manage Mice sidebar by clicking on the ‘Mouse
Scheduling’ link.
Add Mouse Use
This form allows users to schedule, edit, and delete uses for their mice such as necropsy or clinical
exams.
A user must first select a mouse which can be done by either typing in a mouse ID in the Mouse ID
input field or by searching for and selecting a mouse using the ‘Select Mouse’ button. The only other
field that is required to add a mouse use is to select a use from the use drop down directly below the
mouse ID input.
The field below use is ‘Use Age Determination’ which can be either Manually Entered or calculated
from plug date and DPC (days post conception). If you are manually entering the use age you can
simply type in a value in the ‘Use age in’ input and upon tabbing out you will notice that the projected
date is automatically calculated by adding the Use Age In to the selected mouse’s birth date. If you
instead choose to calculate based on plug date and DPC you will see a new row appear that has a drop
down for DPC and a drop down containing the animal’s plug dates that have been inserted into the
database. After selecting a plug date and a DPC value the projected date and use age in will be
automatically calculated based on the DPC added to the plug date (for the projected date) and
projected date minus the mouse’s birth date to calculate the use age.
The observed data columns are for the data associated with the scheduled use and the labels for the
observed data will be changed according to what the selected use was.
The final two fields that need to be explained are the ‘On Submit Don’t Clear Data’ checkbox, which
can be selected. Then, upon saving, the information in the form is not cleared.
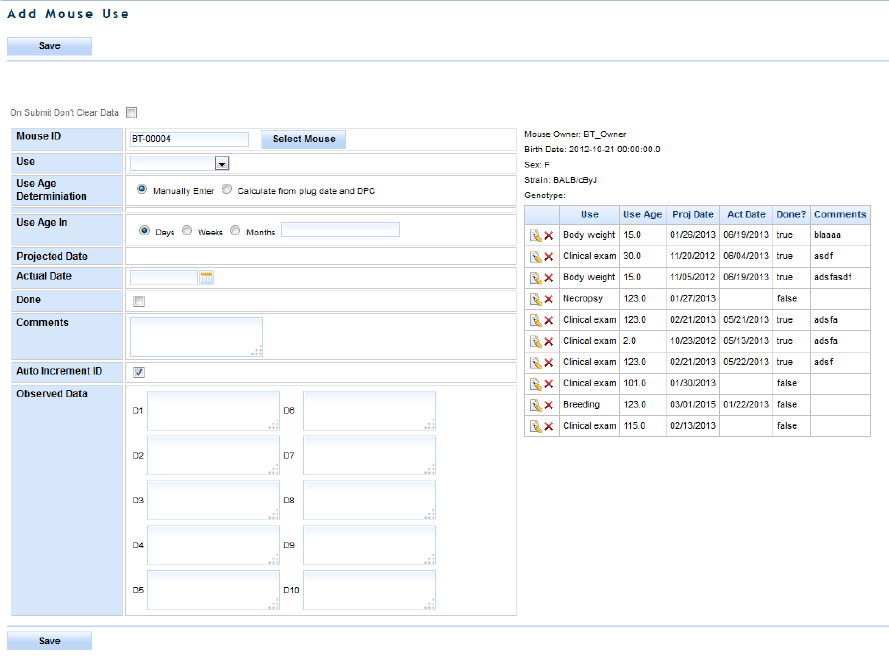
JCMS Web User Guide Page 51
To add the use to the mouse, simply click the save button located at the top and bottom of the form.
When the ‘Auto Increment ID’ checkbox is selected, a user can add the same use to a series of mice by
repeatedly clicking ‘Save’.
Figure 38: Mouse Scheduling
Edit Mouse Use
To edit a use click the edit icon next to the use in the table of Mouse Uses to the right of the form,
make the desired changes and click the Save button at either the top or bottom of the form. If you do
not wish to make any edits simply click the cancel icon next to the use in the use table.
Delete Use
To delete a use click the delete icon (red ‘X’) in the Mouse Uses table to the right of the form and you
will be prompted to confirm the delete. Confirm you wish to delete (or cancel if you do not wish to
delete) and the use will be deleted.
Mouse Scheduling Calendar
This module is a Calendar view of the different mouse uses that are scheduled. It is found in the
Reports interface. First criteria must be selected to populate the calendar from Mouse Uses, Owners,
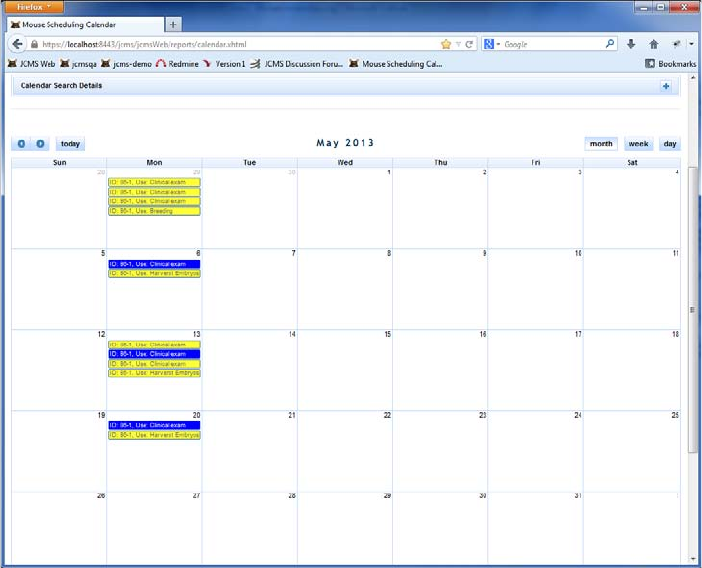
JCMS Web User Guide Page 52
Strains, and Use statuses. After the Display Calendar button has been pressed the Calendar will
populate and be displayed below the search box.
In the Calendar view a yellow use implies the date is based on projected date, a blue use implies the
use is based on the actual date. If a user drags a use to a different day the actual or projected date is
changed depending on whether the use is based on actual or projected date. A user can also edit the
details of a use by clicking on the use and changing the data in the editable fields in the pop up.
Add Use
From the calendar view a user can add a use to a day by clicking on that day and selecting a mouse and
use. Either a projected date or actual date or both must be given to add a use from this particular view.
Figure 39: Mouse Use Calendar
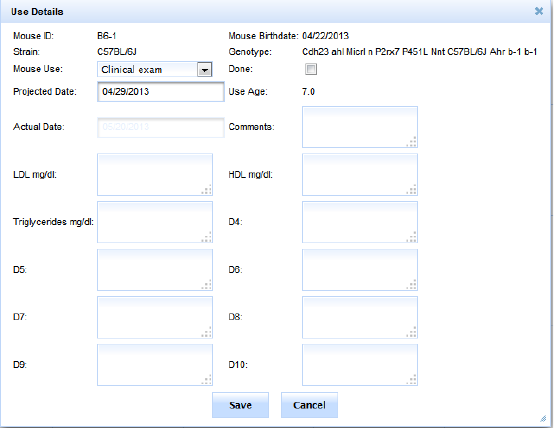
JCMS Web User Guide Page 53
Figure 40: Edit Mouse Use on Calendar
Projected Wean Dates
To view projected wean dates check the ‘Display Projected Wean Date’ check box and then select a
time period starting from the first selected date to the second selected date.
After clicking ‘Display Calendar’ a calendar will appear with the number of wean dates and uses
printed above the calendar. On the calendar all the pink boxes represent projected wean dates. A
projected wean date can be caused by one of three things:
1. There exists an active mating that has not produced a litter in the wean time (either standard
or extended depending on what’s recorded in the database for the mating) plus the gestation
period.
2. There exists an active litter that does not have a wean date recorded for it. The wean date will
be projected to be the birthdate plus the wean time (extended or standard depending on the
mating that created it).
3. There exists an active litter that does have a wean date but does not have any pups associated
with it in the database.
When you click on one of the pink wean dates on the schedule you will see a panel pop up like the one
below:
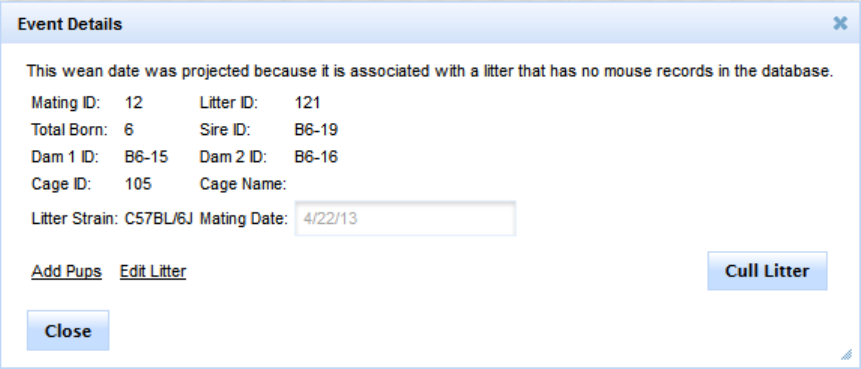
JCMS Web User Guide Page 54
Figure 41: Projected Wean Date Pop Up
The links and buttons will change according to what caused the projected wean date. If the wean date
was related to a mating that hasn’t produced a litter the Cull Litter button will read ‘Retire Mating’.
Clicking cull litter will automatically change the litter status to ‘Harvested’ and remove it from the
calendar view. Clicking ‘Retire Mating’ will set the litter status to retired, set the retired date to today’s
date, and remove the projected wean date from the calendar.
Plug Dates
The plug date module can be accessed by navigating to ’Manage Colony’, then ‘Manage Matings’, and
clicking on the ‘Add/Edit Plug Date’ link in the sidebar.
Add Plug Date
To add a plug date, type a mating ID in the mating ID field and tab out. This will load the mating
information and you will see a screen that appears as shown below.

JCMS Web User Guide Page 55
Figure 42: Add Plug Date
Select the plug date, which Dams to apply it to and whether it is obsolete, hit save, and you will have
added the plug date(s). You can add mouse uses directly from this page that will be associated with the
plug date you add, by selecting the mouse use you would like to add, a number of days post
conception (DPC) and clicking the add button. Upon saving the plug date it will save all the uses you’ve
added as well.
Edit Plug Date
To edit a plug date type in the mating ID that the plug date is associated with and tab out. Then click
the edit icon next to the plug date you wish to edit, your screen will appear as below.
Figure 43: Edit Plug Date
You can then change the date, comments, and whether it is obsolete by changing those values and
clicking the ‘Save’ icon.
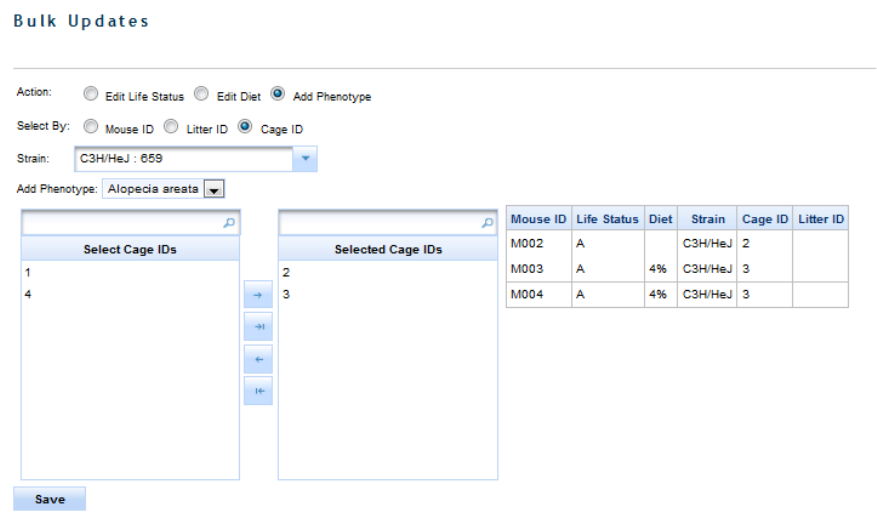
JCMS Web User Guide Page 56
Bulk Updates
The ‘Bulk Updates’ screen is used for changing the status of groups of mice all at once without having
to use the ‘Edit Mouse’ screen. This form may also be used to add a phenotype to a group of mice. This
interface is located in the Manage Colony section under Manage Mice.
First the user must select what they are editing (Life Status, Diet, Protocol, or Owner) or adding
(Phenotype) and what unit they would like to edit by (either Mouse ID, Cage ID, or Litter ID). Then a
user must select what Strain the Mice/Litters/Cages are, if editing by cage any cage that contains any
mice of that strain is included (so if one C57BL/6J mouse and two DBA/J mice are in a cage and the
selected strain is C57BL/6J the former cage will be included in the list of cages you can select from).
The mice in the units you select will be shown in a table to the right of the pick list. After saving the
mice in that table will be updated with the value indicted in the new life status/diet/phenotype drop
down (or whatever value you are bulk updating).
Figure 44: Bulk Update

JCMS Web User Guide Page 57
Vivaria Layout
The ‘Vivaria Layout View’ provides a visual method of displaying and moving the cages within a room.
Mice may be moved between cages on the same rack. It also allows for retiring cages and exiting the
mice. Please note that the Vivaria Layout view does not work properly in the Internet Explorer browser
and we recommend using Firefox or Chrome.
First use the’ Vivaria Layout Manager’ to subdivide your rooms into sections, racks, etc. This is
described in the Administration section under Vivaria Layout Manager.
To open this interface, select ‘Manage Colony’ from the menu, ‘Vivaria Layout’ from the sidebar, and
then ‘Vivaria Layout View’.
Moving Cages
Select the ‘Move Cage to Rack’ radio button. Select the rack to fill. Select a strain from the strain drop
down. A list of cage IDs containing one or more mice of that strain will be populated in the strain list
box below the strain drop down. Drag any Cage ID from the strain list into an empty space on the rack.
The cage is now moved. Move a cage within the rack by dragging it into an empty space. Switch two
cages within a rack by dragging one cage and dropping it over the cage it should be switched with. To
move a cage to a different rack, you must move it using the strain list.
Figure 45: Vivaria Layout View
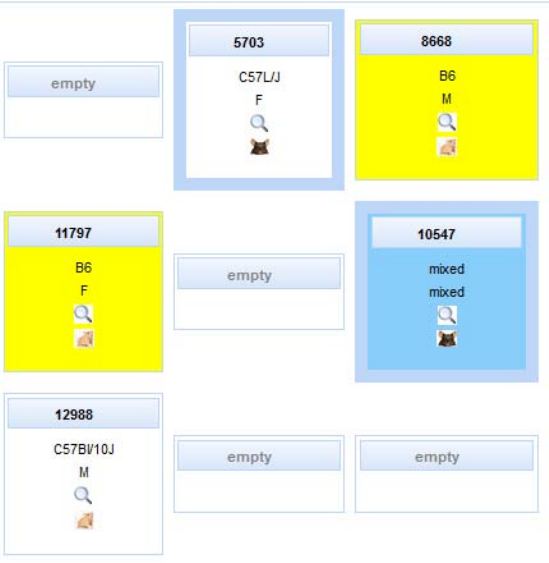
JCMS Web User Guide Page 58
Vivaria Layout Color Coding and Icons
Figure 46: Layout Color Coding and Icons
Each cage is represented by a box.
• The top row contains the cage ID number or “empty” if there is no cage in that space.
• The second row contains the strain. It says “mixed” if the mice have different strains.
• The third row gives the sex as “M”, “F”, or “mixed”.
• The fourth row contains a magnifying glass ‘Search’ icon. Click the magnifying glass and a list of
the live (non-exited) mice in the cage will be displayed below the rack display and the
background of the box changes to a solid blue.
• The fifth row contains a mouse icon. Click the mouse icon to print a cage card for this cage.
The cage card format is selected in the ‘Mating Card’ and ‘Detail Card’ drop downs.
• A cage with a yellow background contains at least one mouse with the strain that was
selected.
• A cage with a thick blue border contains a mating. A cage is defined as a mating cage if one of
the females is a dam 1 in a mating (even if the dam 1 is no longer alive). Note that sires may be
moved into a different cage from the dam(s) in the mating.
• A cage with a red background has been selected to have the mouse life status and cage status
changed.
• When dragging, the background of a list or the box representing a cage will change to a light
blue when the item may be dropped there.
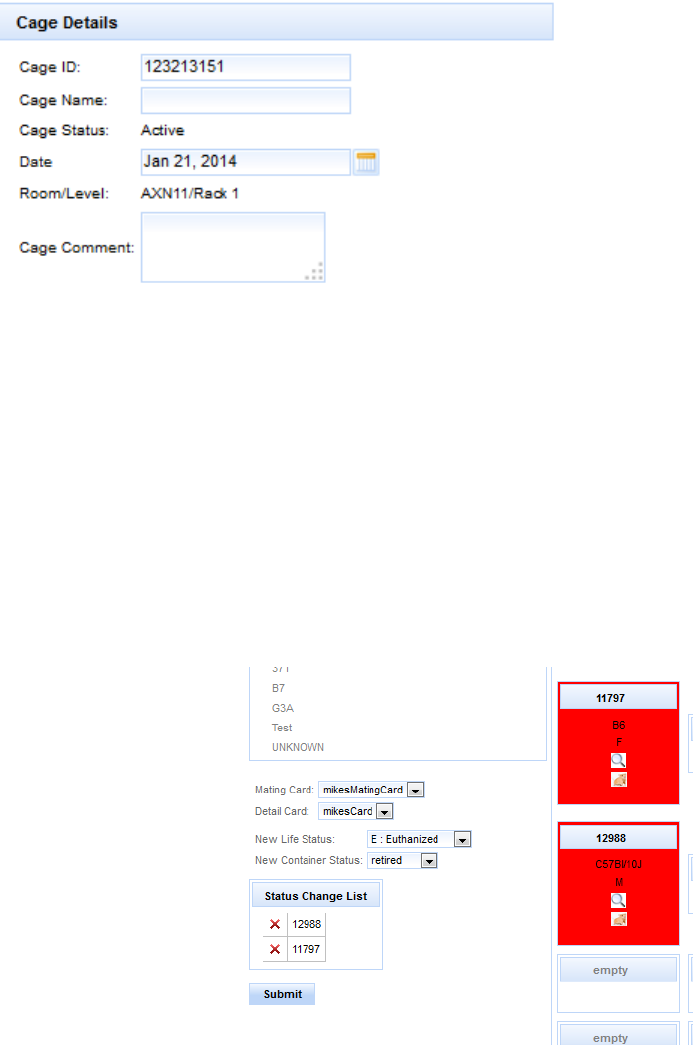
JCMS Web User Guide Page 59
Adding Cages
To add a cage click one of the green ‘+’
icons in an empty cage slot when one
of the Add Mating options is not
selected and a cage details panel will
render on the left hand side of the
screen and the slot you selected to add
a cage was will be colored orange. Fill
in the cage details panel with the
desired details and click the save icon
or to cancel click the cancel icon.
Change Mouse and Cage Status
Select the ‘Change Mouse and Cage Status’ radio button. This feature is designed to be used to retire
cages and exit mice. All mice in the cage will have their life status changed. Select a ‘New Life Status’
and ‘New Container Status’. Both fields are required. Drag the cages from the rack into the ‘Status
Change List’. Note the color of the cage on the rack now changes to red. Use the red ‘X’ delete button
to remove any cages accidentally added to the status change list. Click ‘Submit’ to finalize the changes.
Be careful with this as the cages will no longer be shown on the rack or in the strain list once they are
retired, so a mistake will be difficult to fix.
Figure 48: Change Life Status and Cage Status
Move Mice
Click on the ‘Mouse Icon’ next to the mouse ‘ID’ and drag it into a different cage.
Figure 47: Cage Details Panel
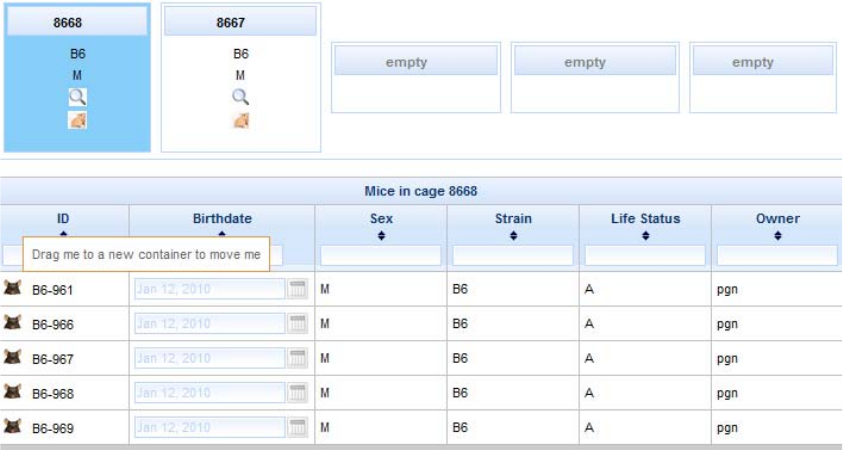
JCMS Web User Guide Page 60
Figure 49: Move Mice to a New Cage
Create Mating
To create a mating select either the ‘Add Mating’ or ‘Add Trio Mating’ option from function choice list
at the top of the page. The only difference between the two is that if you drag a cage onto the box in
which you are trying to create a mating if Trio is select and the cage is a female cage two dams will be
added where as if Add Mating is selected only one dam will be added.
After selecting ‘Add Mating’ or ‘Add Trio Mating’ the empty slots in the view will all have a green plus
icon in the middle of them. To create a mating you have to click the green plus in one of those cages
(only one can be selected at a time). This cage will become highlighted in pink and save and cancel
icons will be rendered on the cage as well as labels for the dam1, 2, and sire.
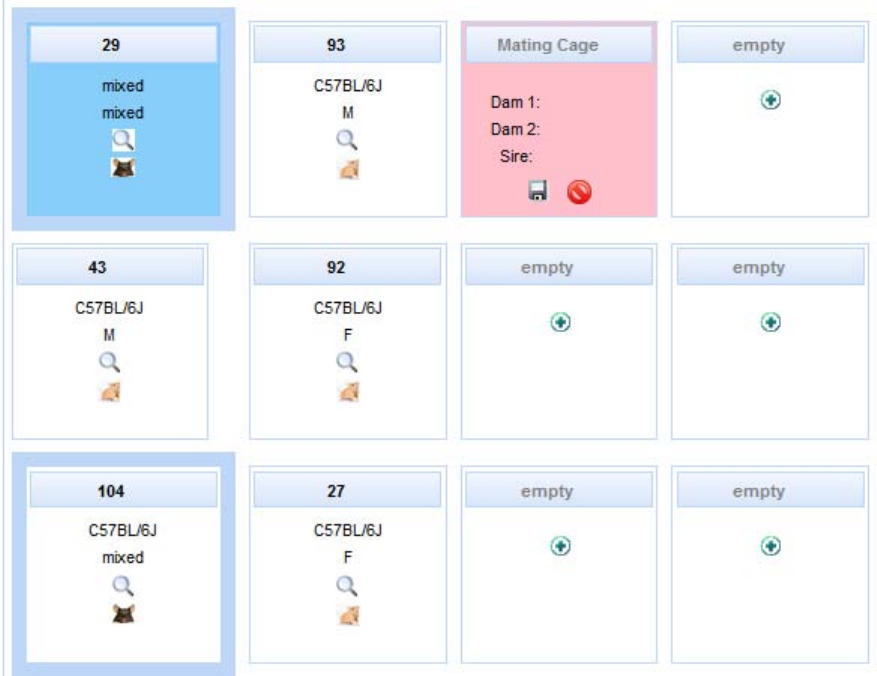
JCMS Web User Guide Page 61
Figure 50: Add mating with Vivaria Layout
After selecting one of the add mating functions a mating details window will render to the left of the
vivaria layout. The details of the mating will fill out according to sire and dams added to the matings.
The mating owner will default to the owner of dam1, the litter strain will automatically be filled in
depending on whether there is an approved mating strain relationship for the dam(s) and sire, if the
sire and dam are of the same strain, or if the previous mating had the same dam and sire strains as the
one currently being created in which case the litter strain will default to the same strain as the
previous mating. The mating diet will default to Dam 1’s diet unless it is changed by the user, in which
case it will remain the value provided by the user. The remainder of the mating info will have to be
filled in manually.
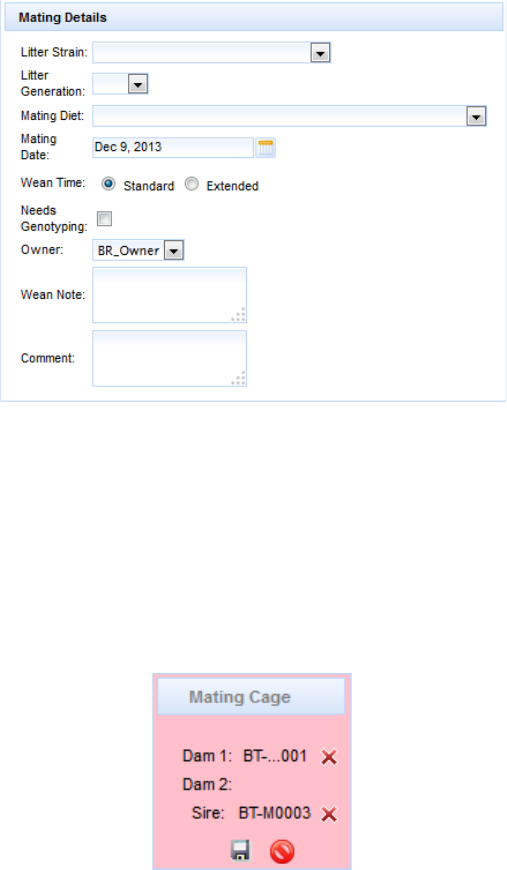
JCMS Web User Guide Page 62
Figure 51: Mating Details
There are two ways to add a dam or sire to the mating. One can either drag a cage into the mating
cage which will add the first dam that is not in an active mating to the mating or in the case that it is a
male cage, the first male in the cage (regardless of whether it is in an active mating). The other means
is to click on the magnifying glass in the cage that contains the desired member of the mating and a list
of the mice in that cage will be shown on the page below the vivaria layout. The mouse icon next to
each one of the mice can be dragged into the cage which will add that particular mouse to the mating.
Figure 52: Mating Cage
From here the mating can either be saved or canceled. If saved the mice you added to the mating will
be moved to the new cage and a mating will be added to the database. If cancelled the mating cage
will turn back into a normal cage, but if you which to add a mating to another cage the dams and sires
will remain the same until removed with the red x icon.
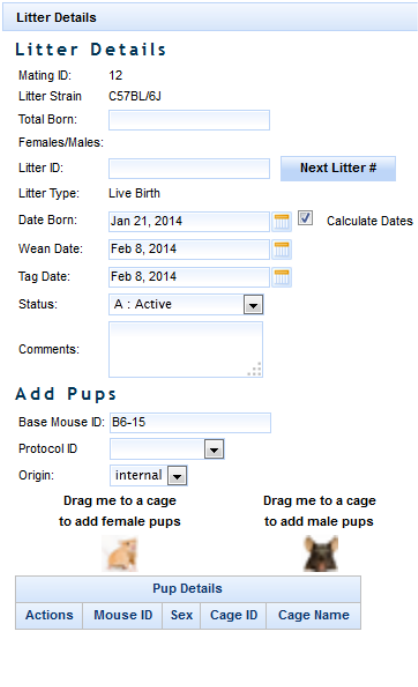
JCMS Web User Guide Page 63
Add Litter with Pups
To create a litter with pups select ‘Add Litter’ from
the selection menu at the top of the page. After this
selection a panel will render on the left hand side of
the screen with all the litter and pup information.
Also every breeding cage will have a new green ‘+’
icon rendered on it. Clicking on that icon will select
the mating in that cage as the mating for that litter. It
will also change the color of that cage to purple and
render a save icon as well as a cancel icon on that
cage. In the litter details panel the Mating ID and litter
strain will be filled out based on that particular
mating and the Base Mouse ID will be set to Dam 1’s
ID.
To add a pup to the litter simple drag the female
mouse icon (agouti) or the male mouse icon (black) to
the desired location (can be either an empty slot, or a
cage already on the rack). Any cage you add a pup to
will have its background color changed to pink, and
after dropping the mouse in the cage/empty slot you
will see it added to the pup details table on the LHS of
the screen at the bottom of the Litter Details panel.
The mouse ID will be determined based on the Base Mouse ID field in the Add Pups portion of the
panel. In the example in figure 48 above upon dropping a mouse the application will look in the
database for the highest ID containing the ‘B6-‘ id pattern and increment that so instead of B6-16
being next the next will be B6-106 (as my last B6- mouse was B6-105).
If you hover your mouse over (or on a tablet hold your finger on) either the cage or any mouse in the
pup details table all the mice in that cage will be highlighted green as well as the cage those mice will
be in. If you would like to add a Cage Name to a new cage you are adding pups to you can change it in
the cage name field in the Pup Details table.
To save the litter click the save icon in the breeding cage that is associated with the litter.
Use Schedules
Use schedules provide users a means of grouping Mouse Uses and scheduling mice for multiple uses
with a single click, with those uses scheduled according to a date of importance such as a plug date, or
a mouse birthdate.
A mouse can be added to a use schedule either through the Add Mouse screen, the Add Litter with
Pups screen, or the Add Plug Date screen. Once a mouse has been added to a use schedule the uses
Figure 53: Litter Details Panel
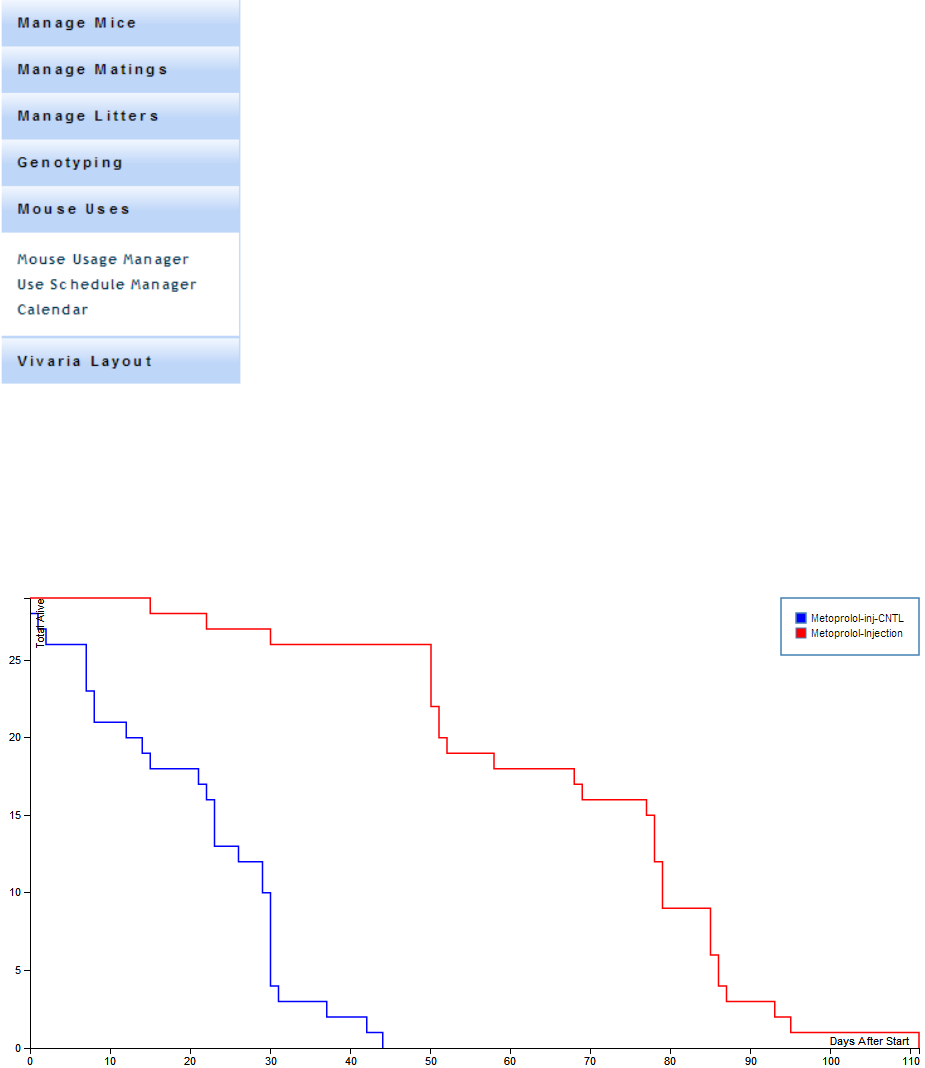
JCMS Web User Guide Page 64
associated with that schedule will automatically be added according to the days after event of the use
schedule, and the start event (plug date or birthdate) date.
Use Schedule Manager
The use schedule manager can be reached through Use Schedule
Manager link in the Manage Colony accordion.
There is a filter panel that can be used to return only the use schedules of
interest with both mouse based and use schedule based filters. After
selecting some search criteria and clicking ‘Search’ a list of Use Schedules
will be displayed below. This interface provides a convenient means of
entering mouse use data for the uses associated with a mouse’s use
schedule. From here the use schedule itself can also be marked as ‘done’
indicating that the use schedule is no longer active for that mouse.
Kaplan Meier Plots
With the use schedule model comes the ability to create Kaplan Meier plots. Kaplan Meier plots can be
used to illustrate the survivability of mice in a use schedule by showing the volume of mice that were
alive after a number of days.
Figure 55: Kaplan Meier Plots
Figure 54: Use Schedule
Manager link
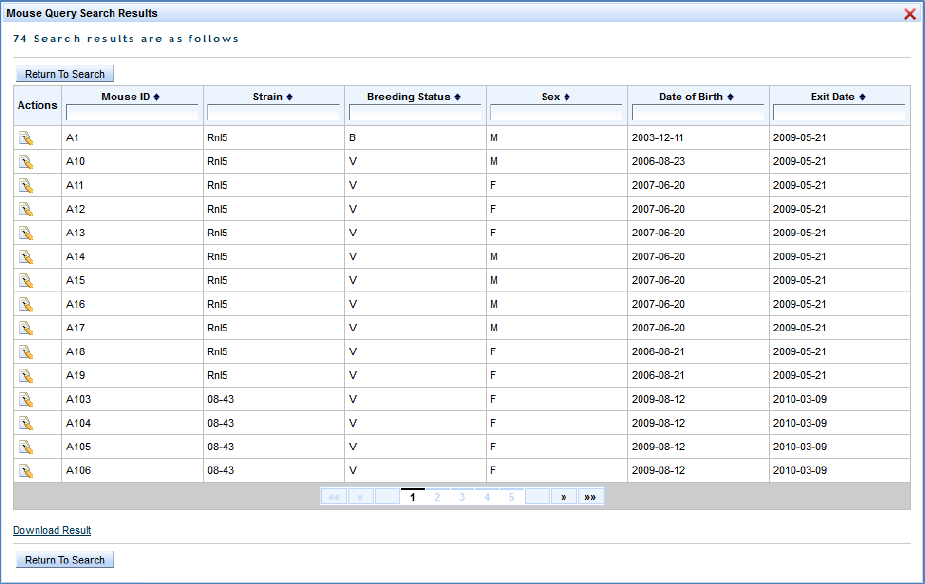
JCMS Web User Guide Page 65
Queries
This module provides ad hoc query functionality. A user can define and save a mouse or mating query.
The mouse and mating forms let a user select the fields to display, specify the filter criteria, preview
the result set, and save the query form to load and run at a future date. Run the query to test out the
filter. Once satisfied with the definition, select the save button to be able to run it another time. Select
clear to reset output field selections and filters.
Select run to execute the query and view search results. Search results view provides a link to
download the list of results as a comma separated text file (csv or txt).
Figure 56: Mouse Query Search Results
The load query interface lists all saved queries by name. Queries are listed by mouse or mating. Select
the query name to load. The query is loaded and displays in a new browser tab providing easy
navigation back to select another query. The action column provides a delete icon used to remove
queries that are no longer useful.
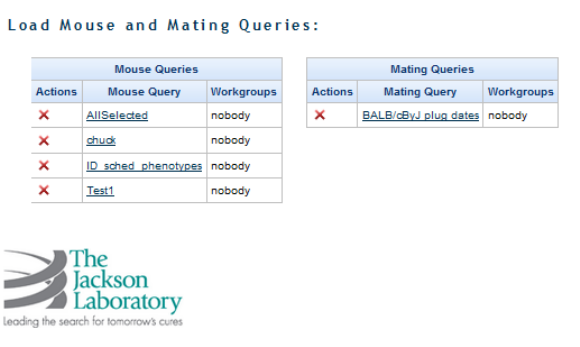
JCMS Web User Guide Page 66
Figure 57: Load Queries
Reports
Colony Summary Report
The colony summary report gathers all statistics for the owners/workgroups by:
• The number of live mice and active strains listing owner/workgroup, strain, and number of live
mice
• The number of active cages listing owner/workgroup, room, number of cages, and cage status
• The number of active matings listing total number of active matings per owner/workgroup
• The number of active plans and tests listing owner/workgroup, plan, test ID, test, projected
number of mice, and test status
• The number of mice scheduled for testing listing owner/workgroup, plan, test ID, test, and
number of mice scheduled
Cage Summary Report
The cage summary report can generate a billing report by room, status, date, and owner/workgroup.
Statistics can be grouped by no grouping, room, or status. Cage billing can be defined as any day, full
day, partial first day, or partial last day. This report lists the date, number of cages, and room name.
Select the ‘Download Result’ link to store results as a CSV text file.
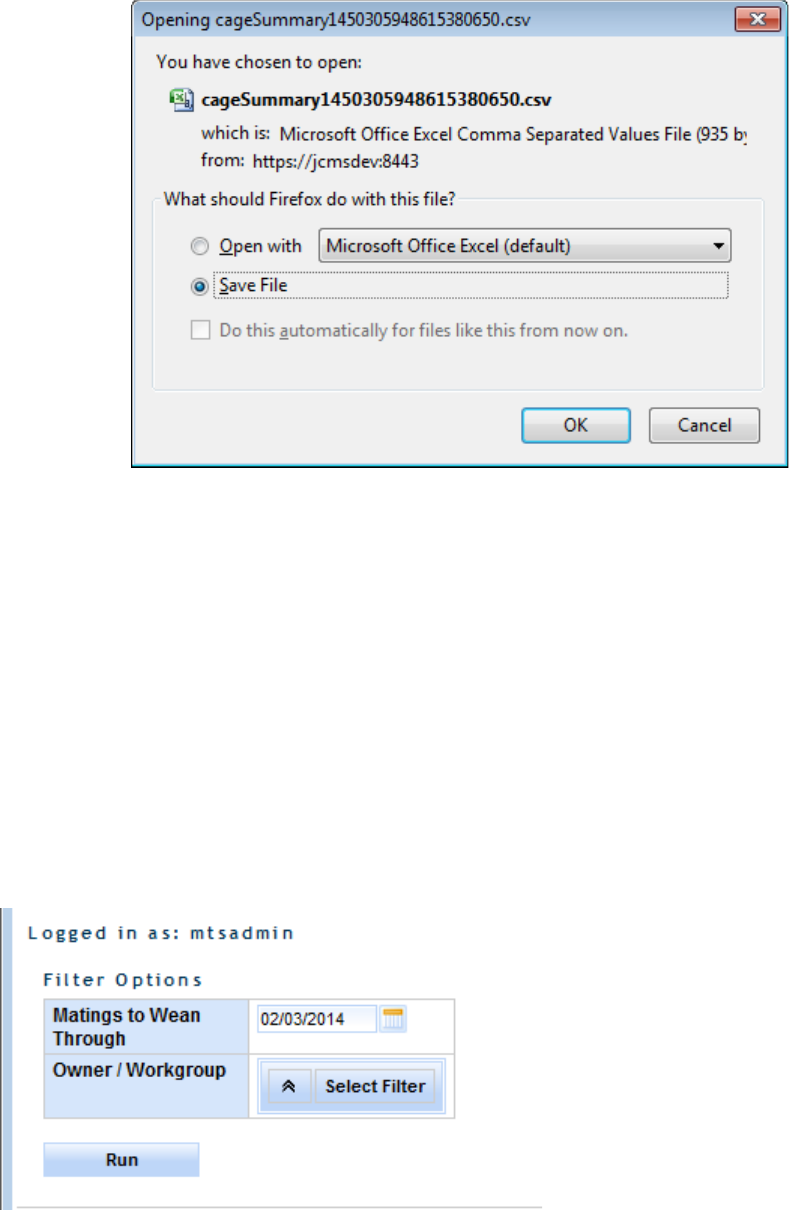
JCMS Web User Guide Page 67
Figure 58: Download Cage Summary Report
Wean Report
The wean report lists matings that should be checked for a litter to wean. This report may be exported
to Excel in the same fashion as the cage summary report (see above). A mating is listed if on the
selected date:
• It is an active mating that has not had a litter recorded and its mating date is older than the
expected wean time (standard or extended) plus gestation period.
• It is an active mating that has a litter with a birth date but no wean date, and it is past the
expected wean time. If the mating has two litters with no wean date, both will be listed.
The following setup variables are used in determining the projected wean date:
JCMS_GESTATION_PERIOD, JCMS_STANDARD_WEAN_TIME, and JCMS_EXT_WEAN_TIME.
Figure 59: Wean Report Options

JCMS Web User Guide Page 68
Enter an end date for the report. Matings that have a projected wean date within a window of 60 days
prior to that date will be listed. This will help to catch older matings that have not produced. To
produce a report of work for a particular week, enter Friday of that week as the date.
The report may be filtered by owner/workgroup if run by an administrator. Owners will only be
returned a list of their own mice.
Mouse Scheduling Calendar
This report is described in the Mouse Colony section: Mouse Scheduling Calendar.
Cage Cards
When a user first navigates to the Cage Card page by clicking ‘Cage Cards’ on the main bar a user has
the option to print cards for one or multiple cages, two drop down menus (one for the card type, the
other for the particular card), and an input text box (for the Cage ID). The three buttons ‘Submit’,
‘Preview’, and ‘Print Blank Cards’ are for printing cards for the user provided cages (the fields Card
Name and Cage ID are required), preview shows the user the cage card that is selected in the Card
Name field in a new window, and print Blank Cards opens a modal panel for the user to select cards to
print for cages from dbInfo.maxPenID to dbInfo.maxPenID+Number of cards.
The idea is that a person would print off cage cards for cages maxPenID through maxPenID + Number
of Cards, proceed to go into a mouse room, on those cards record the information for the printed
cages (how many mice would go in there, what strain they are, what gender they are, etc.), return to a
computer with that information, and add it to the database using the Add Mouse form.
The first time a user navigates to this page there will be no cage cards in the drop down for any of the
card types, to create a card you need to follow the link below the buttons to ‘Make Custom Card’.
Figure 60: Print Blank Cards

JCMS Web User Guide Page 69
Figure 61: Cage Cards
Make a Custom Cage Card
The Card Name field is the name of the card as it is saved in the database as well as the name that is
seen in the drop down menu from the interfaces where you can print a cage card (cage card, add/edit
mouse, and add/edit mating interfaces).
The Card Type button corresponds to the type of card you are making, it is saved in the database (and
determines the path that is taken in the code) and affects the fields you are allowed to select in the
field menu in the grid below. If you change the card type while you have fields already present in the
card, if that field is not available in the new card it will be highlighted in red. To see this effect select
Card Type: Detail, add a Detail Card Note, and then switch to another card type.
The Orientation field lets you select whether you are printing a landscape (5x3) or portrait (3x5) style
card. What you have selected as the Orientation will change your choices for the Row Portion (a field
that will be defined later).
Finally the print settings should be selected according to what your printer is. If you have a printer that
has a 3x5 option you can use 3x5, if your printer has a left, center, or right envelope feed, you can use
the corresponding 3x5 on 8.5x11 setting.
The Workgroups list to the right of the card settings choices is a multi-select list containing the owners
to which this cage card will belong. All the owners selected will be able to use and edit this cage card.
The four buttons below the print settings drop down are to add a field to the cage card having the
properties corresponding to the rows in the custom card field grid, preview the card as it is currently
JCMS Web User Guide Page 70
built according to the fields you have added, clear the card’s contents (all the fields in the data table
below the field grid), and save card which saves the card with the settings as they are set out on the
page.
The Load Card link brings you to the Load Card page, more on that later.
In the custom card field grid you have the ‘field’ drop down that indicates what the item from the
database is going to be that belongs in the cell to create and add to the card.
The ‘row portion’ is the percentage of the row that will be taken up by cell that you create. Note that if
you do not leave enough room for that field to fit in its entirety in the cell then information will be
truncated. For example if you only allocate 25% of the row to the strain name of a mouse, then it is
very possible that the strain name will not be displayed fully. However, since some of the fields like
generation are generally shorter (N2, F1, etc) it can be safe to have certain fields being only 1/6th of a
row.
The ‘number of rows’ field indicates how many rows the field will span. For example, if you are adding
genotypes to a card, a mouse could have several genotypes (anywhere from one to thousands) and
you may want anywhere between 1 through 5 genotypes displayed on your card for a mouse, so you
could dedicate two entire rows to it. However, if you wish to have a field span several rows it must
take up all of as many rows as you want to expand. So if you have a row portion of anything other than
100%, then you cannot have the field spanning multiple rows.
The ‘bar coded’, ‘labels’, and ‘borders’ check boxes are true/false boxes meant to indicate whether the
cell you are creating is to have a border, whether it’s to be labeled, and whether it is to contain a bar
code. A note on the bar code, you should have at least 50 percent of the cell dedicated to any field
that you desire to be a bar code, otherwise the bar code scales too small and cannot be read by most
bar code scanners.
Finally the ‘label’ input field allows the user to customize the label that appears on the created cage
card assuming the ‘Labels’ check box is checked. The idea is that if a user wishes a specific label for
something like generation because generation takes up too much room they could change it to
something like ‘gen’ and convey the same information.
Next, when the user hits ‘add field’ a new row will appear in the data table containing the outline of
the cage card. You will see three action icons appear in an ‘Options’ column on the left hand side of
the table. The first is a red ‘X’ to delete the field, the second icon is an edit icon, when you click on it a
panel will pop up and give you the options to edit the row, and the green ‘+’ icon gives you the option
to insert a new row above the field containing the green ‘+’ you clicked on.
Finally, when you’re building your card there is a limit on the number of rows you can insert, for
portrait style cards the limit is 30 rows, and for landscape cards the limit is 17 rows. This field will
change each time you add a field (using the add field button), insert a field (using the green ‘+’ icon),
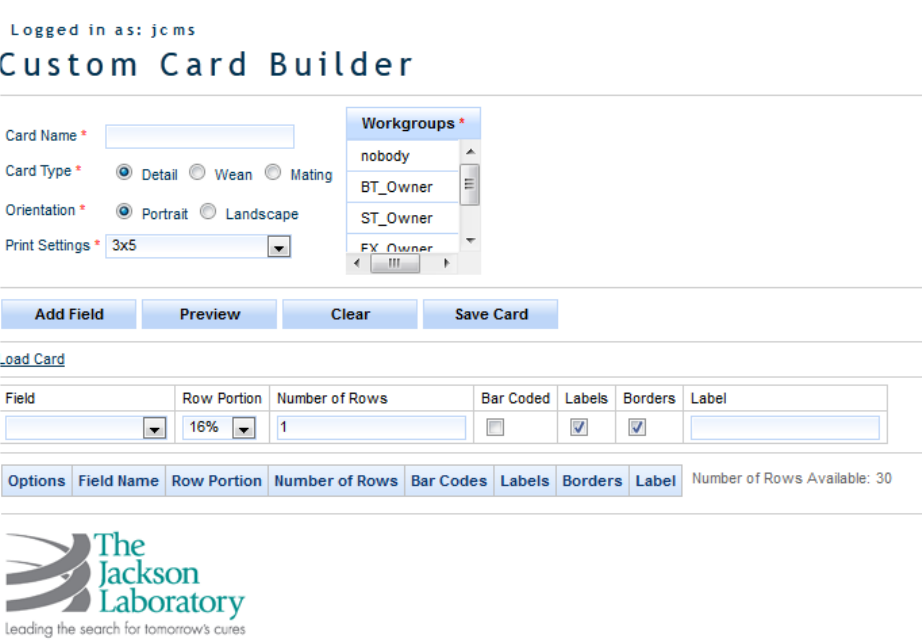
JCMS Web User Guide Page 71
and edit a field (using the ‘edit’ icon). This field should never fall below 0 and should not allow you to
add a field after the counter reaches 0.
Figure 62: Custom Cage Card Builder
Load Card
The load card screen is relatively simple; there are two things you can do.
1. Delete a card
a. Deleting a card will remove it from the database permanently. To delete a card simply
click on the red ‘X’ and confirm that your wish is to remove that card.
2. Load a card
a. To load a card simply click on the link associated with the card and a new tab will open
the make custom card page with the exact fields in the field data table and all the card
info filled out such as card name, card type, orientation, etc.
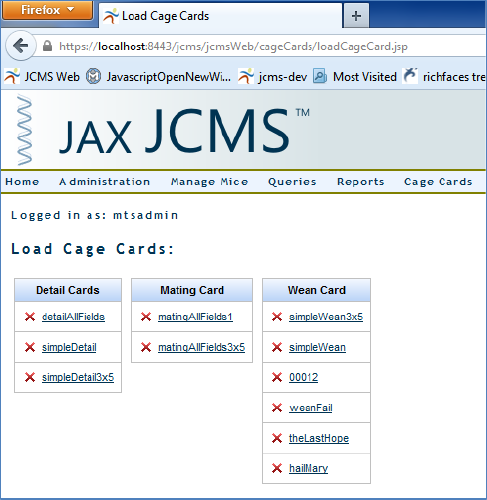
JCMS Web User Guide Page 72
Figure 63: Load Cage Cards
Business Rules
The wean and mating cards can only be printed if the mice in the cage meet a certain set of criteria.
For a mating card the cage must contain either 1 or 2 female mice (dam1 and 2) and 0 or 1 male mice
(0 because after a mating has taken place the sire may be moved to another cage).
A wean card must contain mice of the same strain. There is no other qualifier such as litter or gender
as it is our desire to allow the user to be as flexible as possible with the application.
There are no qualifiers on detail cards.
Each cage card is associated with a workgroup and to access that cage card you must be a member of
the workgroup to which the cage card belongs.
Pedigree Tracker
A pedigree tracker tracks the ancestry or progeny history of a mouse using a mouse ID. You can either
type in the mouse ID in the Mouse ID field or you can click the Find Mouse button and select a mouse
from a set found using the search criteria the user defines. The user also must choose a tree depth
which represents the number of generation the progeny search goes through with a minimum of one
and a maximum of three. The display options grid determines what text is displayed for the mouse
results in the pedigree tree.
When the tree criteria meet your specifications click the show tree button, if your tree depth is
particularly deep (five or six) a Progeny search could take a while. When the tree is displayed you can
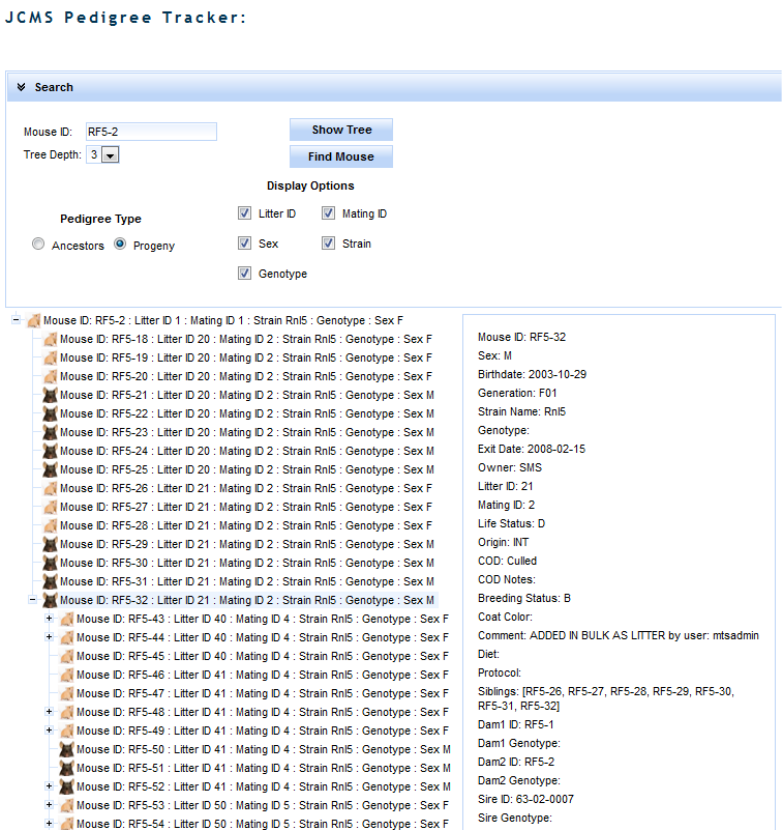
JCMS Web User Guide Page 73
click on a mouse to see more of that mouse’s information such as owner, diet, cause of death etc. in
both a tool tip, and a panel to the right of the top of the tree.
Figure 64: Mouse Pedigree
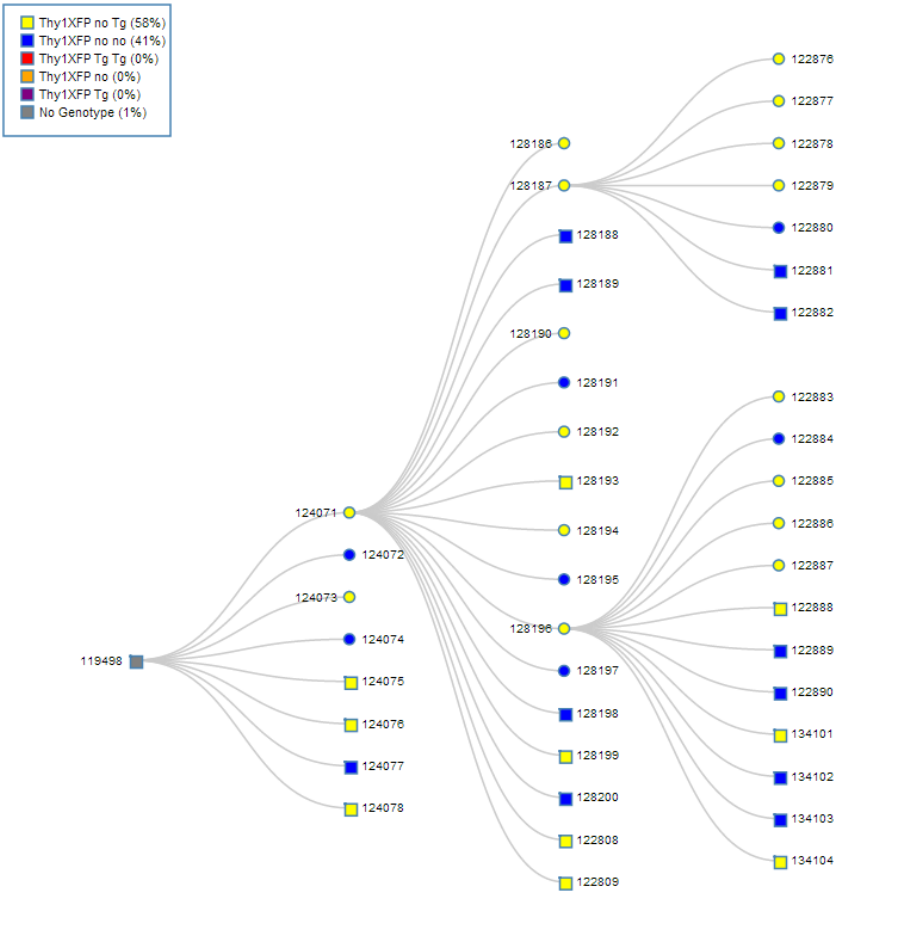
JCMS Web User Guide Page 74
As part of the JCMS VizBoard a new Pedigree Tracker was created that helps illustrate genotype
distribution in your pedigree trees was released.
Figure 65: Genotype based Pedigree Tree Visualization
Strain Viability Report
The strain viability report is available via the JCMS Dashboard on the JCMS Web homepage. After
clicking the icon you will be brought to a page with two filters, strain and owner, which can be used to
specify what data you would like returned from your database.

JCMS Web User Guide Page 75
Figure 66: Strain Viability Filter Panel
After selecting some filter criteria hit the ‘Submit’ button to return your results. The results will return
a bubble chart where each bubble represents a strain with the size corresponding to the number of
mice in your database of that strain and the color representing the viability of the strain. The viability
of the strain is calculated based on eight user provided values in the strain table: yellow min # males,
yellow min # females, yellow max age males, yellow max age females, red min # males, red min #
females, red max age males, and red max age females.
The yellow max age is the age for each gender at which the mouse is considered an ideal breeder – if
the mouse were any older it would no longer be ideal for breeding purposes. The red max age is the
max age at which a mouse is still considered a plausible breeder, so if the mouse were any older it is
no longer a viable breeder (red status mouse). So given the case where a strain has a male red max age
of 365 days, and a male yellow max age of 240 days the mouse status would be calculated as follows:
green status 240 days old yellow status 365 days old red status
Once the mouse statuses have been calculated for all the living mice of that strain the strain status is
calculated using the following algorithm:
If the number of green status mice of that strain you have is greater than or equal to the Yellow Min #
found in the strain table for both sexes for that strain the strain is Green Status.
If the strain is NOT green status and the number of yellow and green combined mice is greater than or
equal to the Red Min # for both males and females the strain is considered Yellow Status.
If the total number of green and yellow male or female mice of that strain is less than that sex’s
respective Red Min # then that strain is considered red status.
For example let’s say there is an imaginary strain called Strain A with the following values for its line
viability numbers:
JCMS Web User Guide Page 76
Red Min # Males: 3
Red Min # Females: 6
Red Max Age Males: 365
Red Max Age Females: 365
Yellow Min # Males: 6
Yellow Min # Females: 12
Yellow Max Age Males: 240
Yellow Max Age Females 240
In this example any mouse less than or equal to 240 days old is a green status mouse, between 241
and 365 days old inclusive is yellow status and any mouse older than 365 days old is a red status
mouse (regardless of gender because the red and yellow max age numbers are the same for both
sexes).
If a user has 8 green status males and any number of red and yellow status males and 13 green status
females (and any number of red and yellow status females) that strain status is green because:
13 (green status females) >= Yellow Min # females for this strain (12 as outlined in the made up data
above)
AND
8 (green status males) >= Yellow Min # Males (6 as laid out above).
If a user has 5 green status males and any number of yellow and red status males and 20 green status
females the strain status is YELLOW because the number of green status males is NOT greater than the
yellow min # males so it’s not green but the number of Yellow and Green status males IS greater than
or equal to the Red Min # males for that strain.
If the user instead had 1 green status male and 10 yellow status males and the same number of
females the strain would still be YELLOW because to be yellow the total Green and Yellow status mice
must be greater than or equal to the Red Min # for that gender.
If a user has 5 Green status females and no yellow status females and any number of red, green , and
yellow status males that strain status is red because the Red Min # of females is greater than the total
Green and yellow mice in this instance.
JCMS Web User Guide Page 77
The application is shipped to use default values of the following values for a strain that does not have
its own line viability values:
Red Min # Males: 3
Red Min # Females: 6
Red Max Age Males: 365
Red Max Age Females: 365
Yellow Min # Males: 6
Yellow Min # Females: 12
Yellow Max Age Males: 240
Yellow Max Age Females 240
Colony Status Histograms
The JCMS Dashboard Colony Status Histograms are meant to show the status of your colony over the
last 30 days by showing total number of living mice and active cages grouped by both owner and
strain.
To increase speed of calculation a special table was created that contains calculated data to populate
these histograms which needs to be refreshed nightly to be kept current. As part of the upgrade
process a MySQL event is created that will automatically refresh the data nightly at 3:00 AM. This
event can only occur if the computer is on and active and the MySQL service is running, so in the case
where the computer is asleep or shutoff nightly there is a data refresh button that only the mtsadmin
user can click.
Kaplan Meier Charts
The Kaplan Meier chart tool in JCMS Web is meant to offer users a means of plotting survivability of
mice either in a protocol or of a certain strain.
JCMS Web queries the database retrieving all the mice that do not have the ‘alive’ life status and plots
the percentage of mice that are alive after however many days. The plot comes with seven different
colors allowing a user to plot as many as seven unique lines on the chart at a time with each line
representing either a strain or a use schedule. To select a strain or a use schedule to plot simply select
it from the list pick lists at the top and click the ‘Submit’ button.
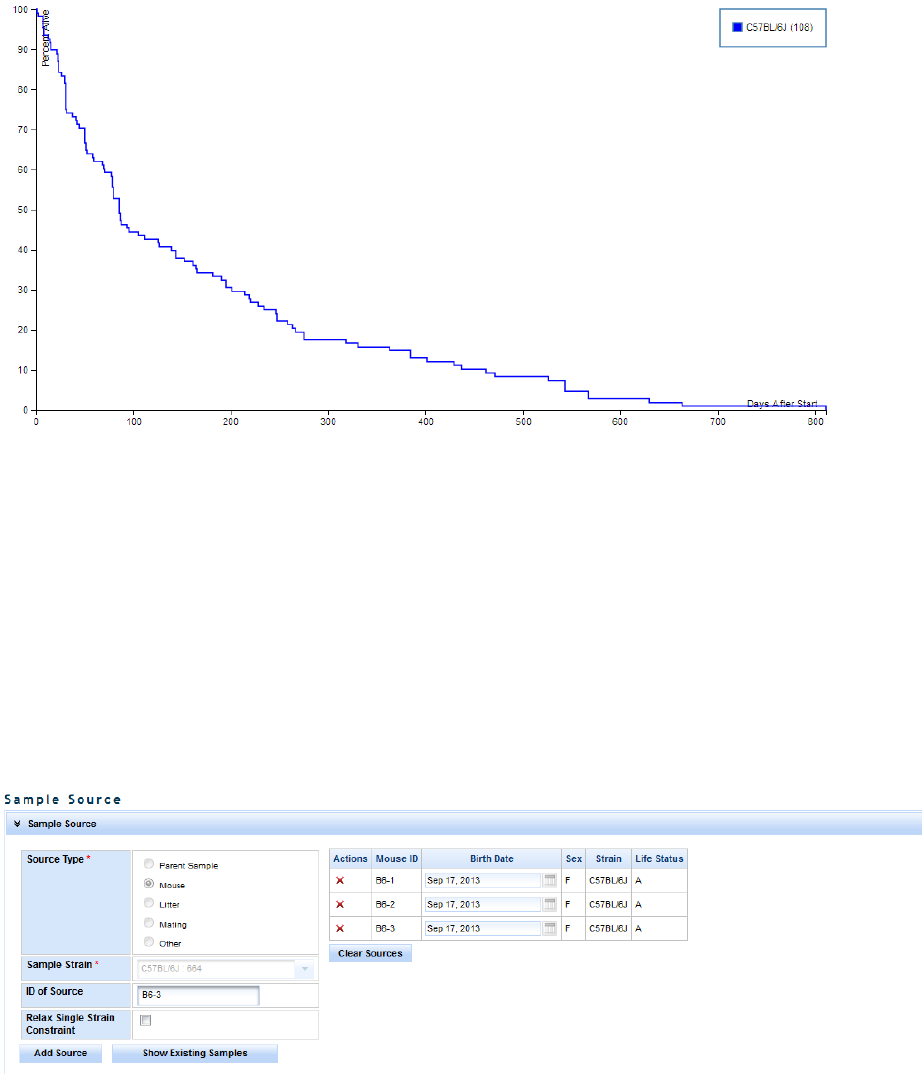
JCMS Web User Guide Page 78
Figure 67: Kaplan Meier Chart Tool
Samples
Add Sample
To add a sample in JCMS it must be associated with a source. That source can be another sample, a
mouse, a litter, a mating, or other. If other you only have to select a strain for that sample. A sample
can have multiple sources, but they have to be of the same source type so one cannot have a sample
which has a mouse source and a mating source and so on. A sample can only have multiple strains in
its sources if ‘Relax Single Strain Constraint’ is selected.
Figure 68: Add Sample – Choosing a Source
Once the sources have been selected the source box can be collapsed to provide more room for the
samples information. Each sample has a unique identifier (the ID), and owner, and different
information defining the type of sample etc. When a user first navigates to the samples page drop
down, sample type and the preservation fields will be disabled. They will remain that way until you
select a field that has sample type, preservation type/method/detail associated with it. For example
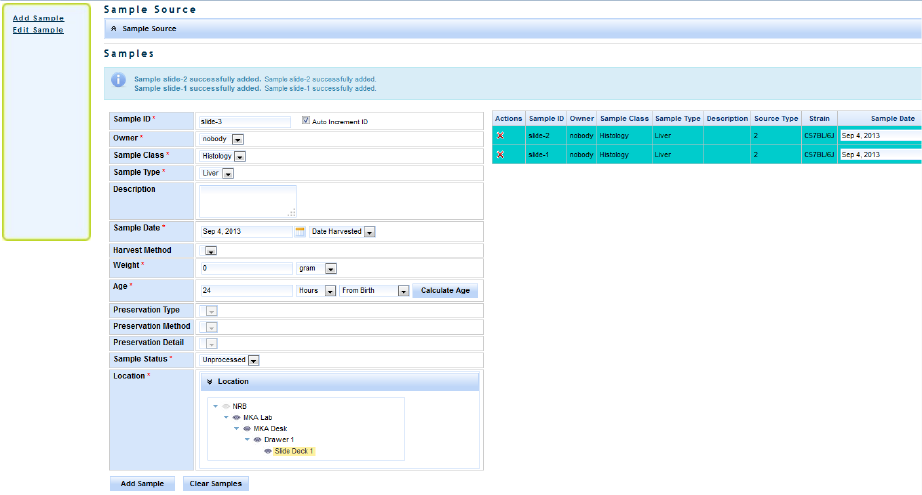
JCMS Web User Guide Page 79
sample types and preservation types are associated with a sample class. So once a sample class is
selected if that sample class has sample types or preservation types associated with it those drop
downs will enable and be populated with the values associated with that sample class. Preservation
methods are associated with preservation types, and preservation details are associated with
preservation methods.
The Age of the sample can be calculated assuming that all the sample have the same birth
date/sample date. If they do not a sample date has to be entered manually.
Each sample must be associated with a location. To select a location simply expand the location tree
until the desired location is visible and click on it. If all samples are in the same location you can
collapse the location panel to save room on the screen.
Once all the information is filled out as desired click the ‘Add’ button. You will see the sample appear
in a table to the right of the sample information table. It is important to note that these samples are
not saved until the Save button is clicked, after the samples have been saved their color changes from
white to blue background.
Figure 69: Add Sample
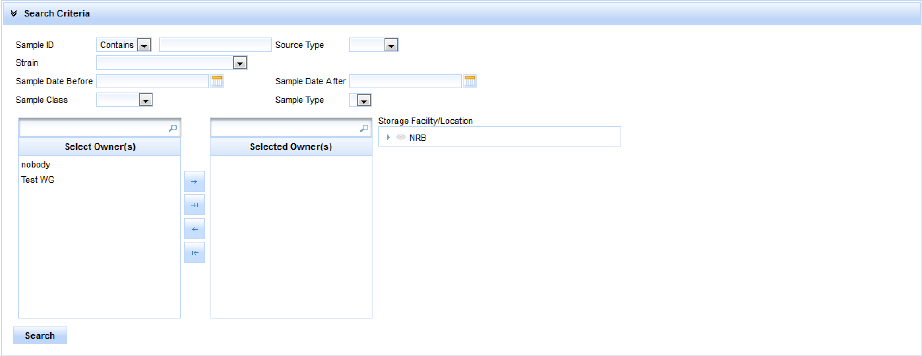
JCMS Web User Guide Page 80
Edit Sample
To edit a sample click the ‘Edit Sample’ link in the samples sidebar on the left hand side of the screen.
You will see a panel with some search criteria as shown below:
Figure 70: Edit Sample
After selecting a search criteria and clicking ‘Search’ a list of matching samples will be displayed in a
table below the collapsible table. A sample can be edited by clicking the edit icon in the left most
column in the row.
After clicking the icon you will be taken to a screen similar to the ‘Add Sample’ screen with the fields all
filled out with the values that are associated with that sample. Any of these values can be changed by
simply selecting a new value and clicking the ‘Save’ button. To change the ID of the sample click the
‘Change ID’ button, a panel will pop up where you will type in the new ID, and click ‘Save’. You can also
edit a different sample by clicking ‘Edit Different Sample’, typing in a new sample ID, and tabbing out.
You can return to the search view by clicking the ‘Return to Search’ button.
Experiment Data
Multiple data records may be associated with a mouse. Normally this data is from an experiment, but
the content of the records is designed by the user, so it could be anything you desire. The definition of
the data is called a “test type”.
This section is accessed from the “Experiments” choice on the menu bar.
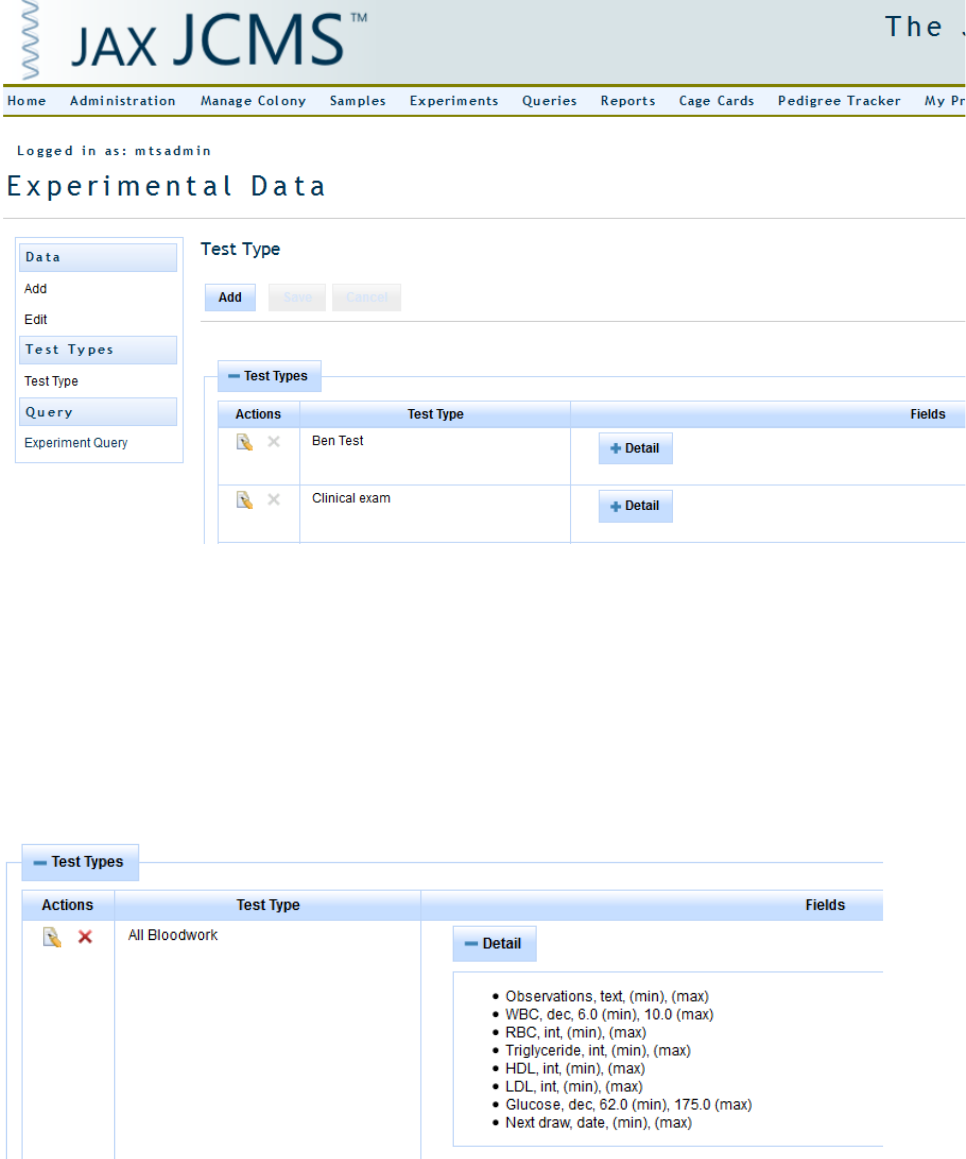
JCMS Web User Guide Page 81
Figure 71: Experiments
Add Test Type
The test type defines the data results fields to be collected. It must be created before data can be
added. Only an administrator or colony manager may create a test type. Select “Experiments” from the
menu bar and then “Test Type” from the side bar. An alphabetical list of existing test types is
displayed.
Click on “+ Detail” to see the fields used by the test type.
Figure 72: The test type detail list shows all the data result fields, format, and any min/max values
Click on the “Add” button to create a new test type, or click on the edit icon next to an existing test
type to use it as a template for creating a new, similar, test type. Once a test type has data associated
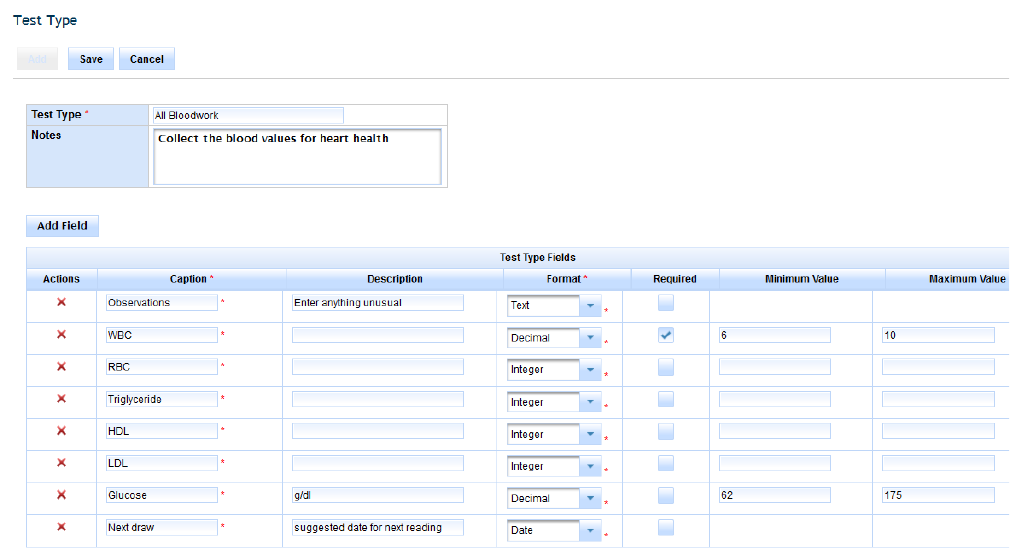
JCMS Web User Guide Page 82
with it, it may not be edited or deleted. Instead create a new one containing the necessary changes to
be used going forward.
Figure 73: Add a test type
Use a brief but meaningful name for the test type, up to 32 characters long. This name must be unique
(not used by any other test type). Use the notes field to enter a description of the test, protocols, etc.
Up to 30 fields may be added, each field describes a single data result to be recorded.
• Caption: The “name” of the data to enter. Use a short but meaningful caption, up to 32 characters
long.
• Field description: An optional short description of the result field. The description might indicate
the units such as cm, gm, etc. or the expected text entries such as yes/no or mutant/control. It
may be up to 32 characters long.
• Format: Select text, date, integer, or decimal value. The format will be used during data entry to
check for errors. For example, when the data results are entered, if a numeric format (integer or
decimal) is chosen no text or special characters will be allowed except for the normal ones
associated with numbers (- +. ,).
• Required: Indicates if the field is required or not during data entry. By default, fields are not
required.
• Min value: Optional field. When data is entered, numeric data may not be less than this minimum
value.
• Max value: Optional field. When data is entered, numeric data may not be greater than this
maximum value.
Click “Save” to create the test type.
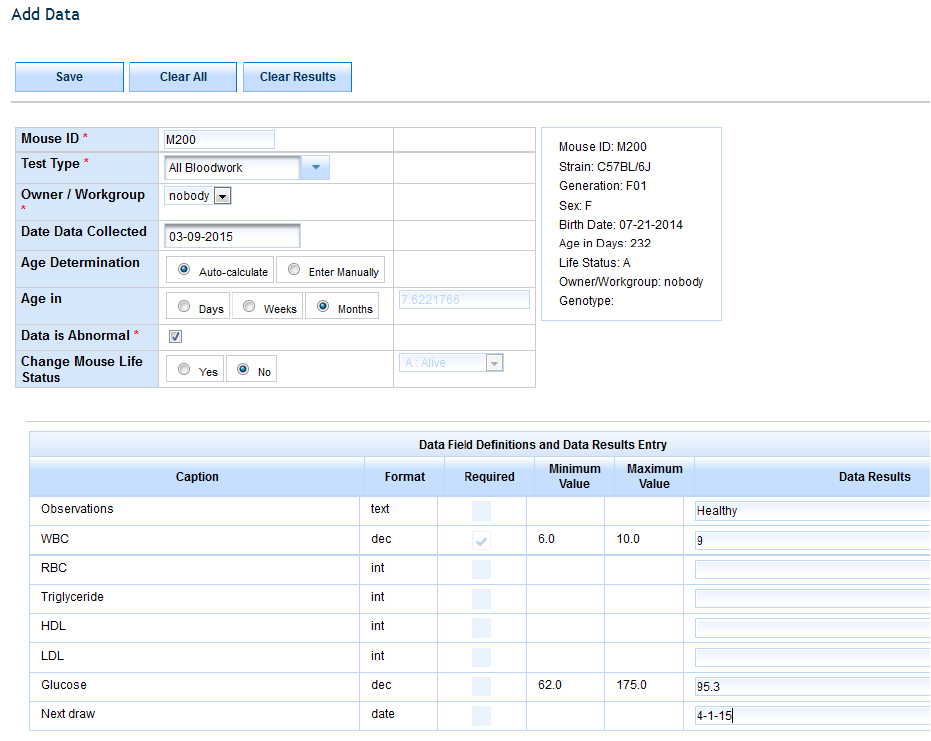
JCMS Web User Guide Page 83
Add Experiment Data
Select “Experiments” from the menu bar and then “Add” under “Data” on the side bar.
Figure 74: Adding data for an experiment
Begin by typing the mouse ID. The mouse’s information will then display in the box on the right side of
the screen. Choose a test type. The captions for the data fields will then appear on the form. Any
minimum or maximum values will be displayed and the required box will be checked if the field must
have data entered. The owner of the data may be set to any workgroup. A warning will be displayed if
the owner is different from the mouse’s owner. The data collection date is optional.
Age determination: The optional age field indicates the age of the mouse at the time of data collection.
JCMS will calculate this from the data collection date and birth date of the mouse if the auto-calculate
button is selected. JCMS will store the age field value as number of days old. Age may be entered in
weeks or months by selecting the appropriate radio button.
If one or more data result values for this mouse are abnormal, then check the data is abnormal box.
Later, this value may be used to easily locate all experimental data records with unusual results.
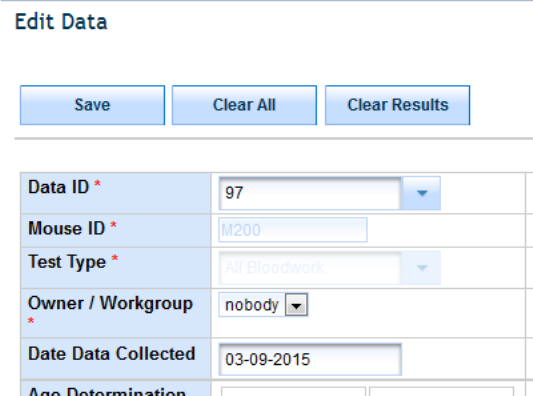
JCMS Web User Guide Page 84
If the “change mouse life status” box is checked, then the mouse record will be updated at the same
time as the experimental data record is saved. The mouse will not be updated unless the save is
successful for the experimental data record. The mouse’s life status will be changed to the value
selected. If that value is an exit life status, the mouse’s exit date will be changed to the data collection
date. If there is no data collection date, the mouse may not have its life status changed to an exit life
status.
The Data ID for this experimental data record is assigned by JCMS and will be displayed on the form.
Record this number, it will prove useful to find the record for editing.
Edit Experiment Data
Select “Experiments” from the menu bar and then “Edit” under “Data” on the side bar.
This form looks and works the same as the add version, except it adds the data ID field used to select
the data record to edit.
Figure 75: Edit experiment data
Query Experiment Data
Select “Queries” from the menu bar or “Experiments” from the menu bar and then “Experiment
Query” on the side bar.
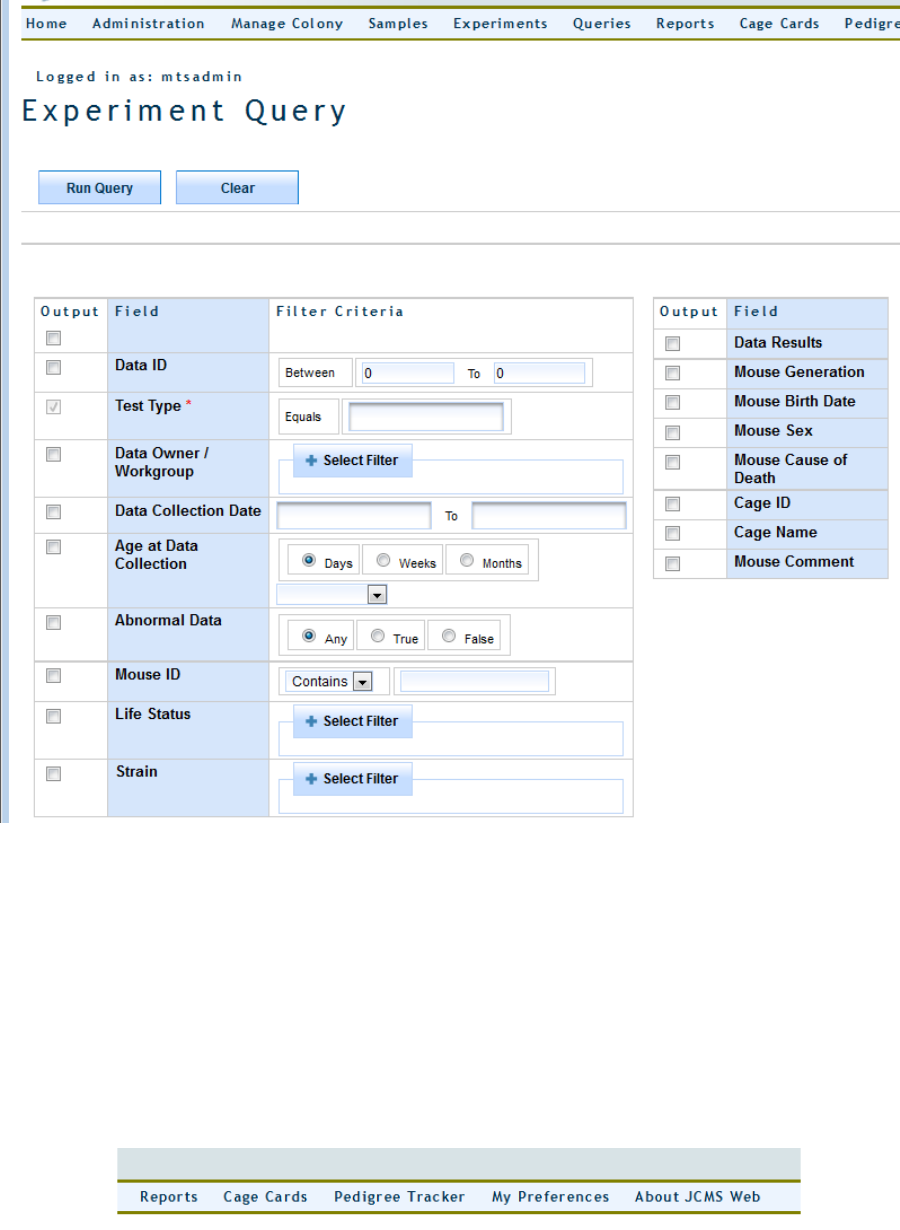
JCMS Web User Guide Page 85
Figure 76: Experiment query
The test type is required and this query will only return data records for one selected test type. If you
are also using the JCMS Access interface, all data records for the test type can be returned but the
results will not include the experimental plan or test information.
My Preferences
The preferences feature allows each user to specify their own settings. Over time, more preference
settings will be added. This section is accessed from the menu bar.
Figure 77: My Preferences on the Menu Bar
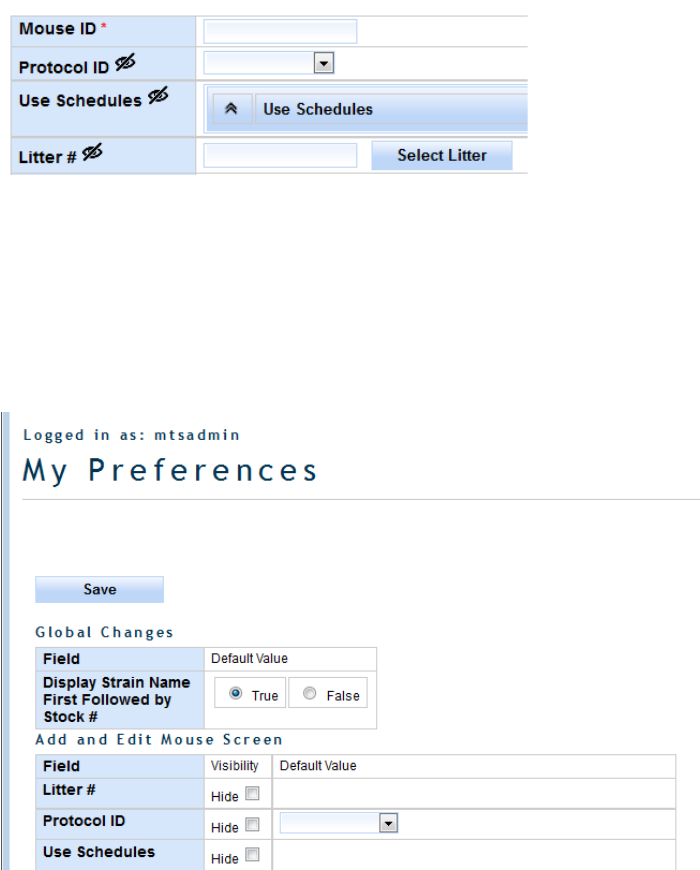
JCMS Web User Guide Page 86
Any changed preferences will take effect the next time an affected screen is re-opened. At any time, if
a user wants to see a hidden field, simply change the My Preferences visibility setting. The default
values can be changed back and forth too, so for example, if work is being done in one room, and later
in another, simply change the default value for room name.
A hide icon (eye with a slash through it) is displayed next to a field that may optionally be hidden.
Clicking the icon will open the My Preferences page.
Figure 78: Hide Icon
Global Changes
Strain Name First
Some users prefer to use the Stock # instead of the strain name. By setting “Display strain name first
followed by Stock #” to false, most selection lists will switch the display of strains to be by Stock #.
Figure 79: My Preferences Choices
Add and Edit Mouse Screen
Changing the settings for the fields listed in this section will only affect the screen used when adding a
new mouse or editing a mouse. Enable the visibility setting for ‘Hide’ to remove the field from view. A
default value specified here will be shown on the Add Mouse screen when it is opened. The default
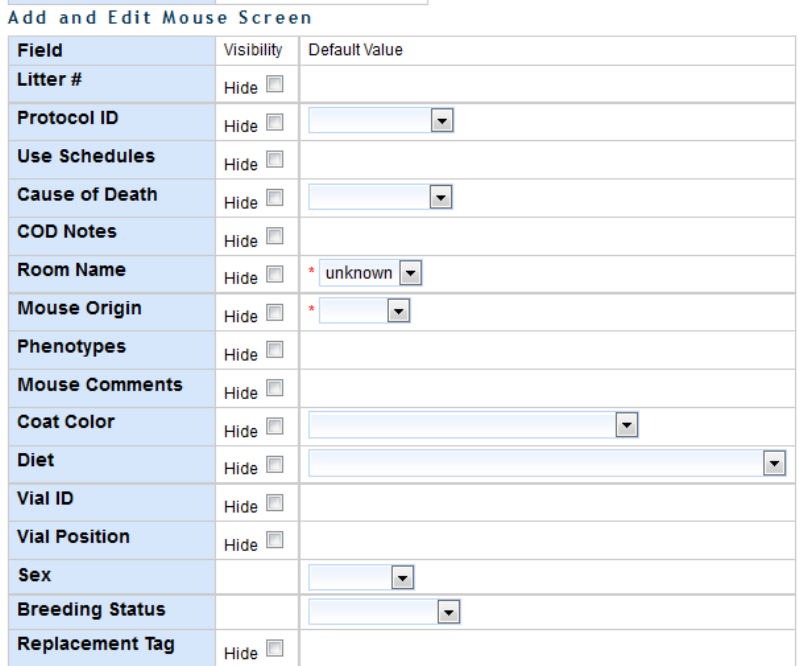
JCMS Web User Guide Page 87
value will be saved even when the field is hidden. Note some fields are required and must have a
default value specified if they are hidden.
Figure 80: Preference Choices for the Add and Edit Mouse Screen
The Edit Mouse screen will hide the same fields as the Add Mouse screen. Anything previously entered
in these fields will not be changed, except when a life status is changed, which has to work a little
differently. If an exited mouse’s life status is changed to a non-exit status the exit date, cause of death,
and COD notes are all removed. If a mouse that is alive has its life status changed to an exit status, the
cause of death field will become visible so a value can be entered, even if it is supposed to be hidden.
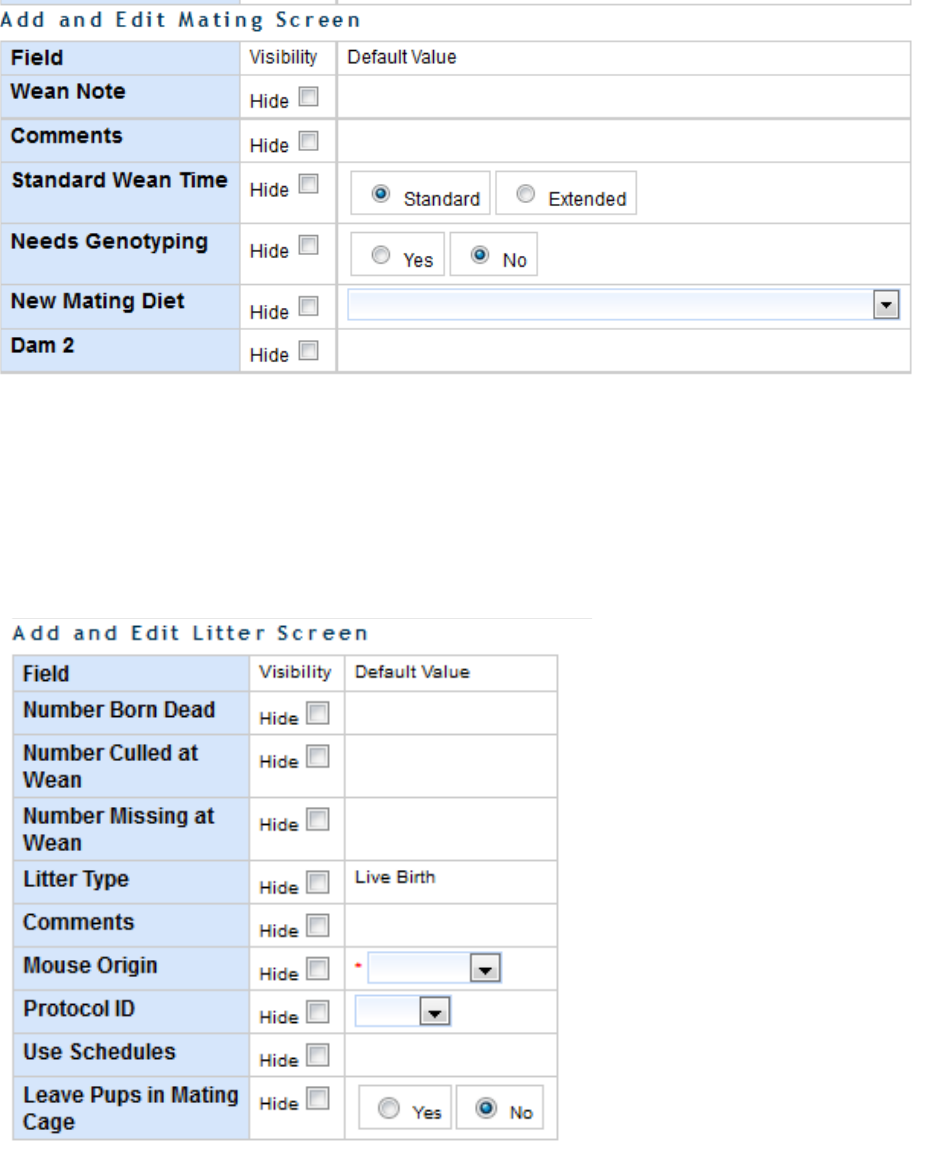
JCMS Web User Guide Page 88
Add and Edit Mating Screen
Figure 81: Preference Choices for the Add and Edit Mating Screen
Note that Dam 2 may be hidden even if there are matings with a Dam 2.
Note that hiding the new mating diet will also hide the display of the Dam 1/2 and Sire diets and the
edit diet buttons.
Add and Edit Litter Screen
Figure 82: Preference Choices for the Add and Edit Litter Screen
JCMS Web User Guide Page 89
Known Issues
HTTP Status 403 – Access to the requested resource has been denied
This occurs when a general user without privileges to access a certain module attempts to
access that module.
Browser is unable to display the web page
The web server may not be running. If your server is on your local machine, then jcmsweb.cmd
must be started, give it two minutes to complete, and then leave it running (minimized). Now
open the web page.
