Harlequin RIP JDF Enabler Enable User Guide
User Manual: JDF Enable User Guide
Open the PDF directly: View PDF ![]() .
.
Page Count: 136 [warning: Documents this large are best viewed by clicking the View PDF Link!]
- Chapter 1- JDF-Enabled RIP
- Chapter 2- System description
- Chapter 3- Installing and starting the JDF- Enabled RIP
- Chapter 4- -Configuration of the JDF-Enabled RIP
- 4.1 Creating input channels (Administrator)
- 4.2 JMF Submission
- 4.3 Hot folders, Output folders and Auxiliary files
- 4.4 Configuration of the archive (Administrator)
- 4.5 Edit Advanced (Administrator)
- 4.6 Logging configuration (Administrator)
- 4.7 Reset to Defaults
- 4.8 RIP progress configuration
- 4.9 Editing configuration files
- 4.10 Automatic channel creation
- 4.11 Harlequin RIP configuration
- Chapter 5- Using the JDF-Enabled RIP
- Appendix A- Configuring SOAR memory
- Appendix B- JMF Error codes
- Appendix C- Customizing the JDF Enabler
- C.1 Introduction
- C.2 Configure and customize web UI files
- C.3 Web architecture
- C.4 Files that can be overridden in the web UI
- C.5 Brief introduction to Maverick
- C.6 Brief introduction to Velocity templates
- C.7 The Displayer
- C.8 Configuration of the login screen
- C.9 Changing the logo
- C.10 Changing colors in the user interface
- Appendix D- JDF Control application
- Appendix E- SOAR Control tool
- E.1 Using the SOAR Control tool
- E.1.1 Reverting to factory settings
- E.1.2 Stopping the Core Services
- E.1.3 Checking the status of a component
- E.1.4 Configuring the networking mode
- E.1.5 Job logging
- E.1.6 Setting the Core Services
- E.1.7 Setting or changing the Harlequin RIP used in the Core Services
- E.1.8 Automatically starting the JDF Enabler web browser
- E.1.9 Configuration of transactions used within SOAR services
- E.1 Using the SOAR Control tool
- Appendix F- TIFF output integration
- Appendix G- Plugin support for the ImageSetting process
- Appendix H- JDF parameters
- Appendix I- Updated JDF
- Appendix J- References
- Appendix K- Licenses

JDF Enabler
User’s and System Guide
Version 3.2
September 2008

INDEX CONTENTS ii
Copyright and Trademarks
JDF Enabler for the Harlequin RIP
Version 3.2: September 2008
Part number: HQ-JDF Enabler-v.3.2-OEM
Document issue: 153
Copyright © 2008 Global Graphics Software Ltd. All rights reserved.
Certificate of Computer Registration of Computer Software. Registration No. 2006SR05517
No part of this publication may be reproduced, stored in a retrieval system, or transmitted, in any form or by any
means, electronic, mechanical, photocopying, recording, or otherwise, without the prior written permission of
Global Graphics Software Ltd.
The information in this publication is provided for information only and is subject to change without notice. Glo-
bal Graphics Software Ltd. and its affiliates assume no responsibility or liability for any loss or damage that may
arise from the use of any information in this publication. The software described in this book is furnished under
license and may only be used or copied in accordance with the terms of that license.
Harlequin is a registered trademark of Global Graphics Software Ltd.
The Global Graphics Software logo, the Harlequin at Heart Logo, Cortex, Harlequin RIP, Harlequin ColorPro,
EasyTrap, FireWorks, FlatOut, Harlequin Color Management System (HCMS), Harlequin Color Production Solu-
tions (HCPS), Harlequin Color Proofing (HCP), Harlequin Error Diffusion Screening Plugin 1-bit (HEDS1), Har-
lequin Error Diffusion Screening Plugin 2-bit (HEDS2), Harlequin Full Color System (HFCS), Harlequin ICC
Profile Processor (HIPP), Harlequin Standard Color System (HSCS), Harlequin Chain Screening (HCS), Harle-
quin Display List Technology (HDLT), Harlequin Dispersed Screening (HDS), Harlequin Micro Screening (HMS),
Harlequin Precision Screening (HPS), HQcrypt, Harlequin Screening Library (HSL), ProofReady, Scalable Open
Architecture (SOAR), SetGold, SetGoldPro, TrapMaster, TrapWorks, TrapPro, TrapProLite, Harlequin RIP Eclipse
Release and Harlequin RIP Genesis Release are all trademarks of Global Graphics Software Ltd.
Protected by U.S. Patents 5,579,457; 5,808,622; 5,784,049; 5,862,253; 6,343,145; 6,330,072; 6,483,524; 6,380,951;
6,755,498; 6,624,908; 6,809,839.
Other U.S. Patents Pending
Protected by European Patents 0 803 160; 0 772 934; 0 896 771; 672 29 760.8-08.
Portions licensed under U.S. Patent No. 5,212,546; 4,941,038.
TrueType is a registered trademark of Apple Computer, Inc.
The ECI and FOGRA ICC color profiles supplied with this Harlequin RIP are distributed with the kind permis-
sion of the ECI (European Color Initiative) and FOGRA respectively, and of Heidelberger Druckmaschinen AG
(HEIDELBERG).
The IFRA ICC profiles supplied with this Global Graphics Software are distributed with the kind permission of
IFRA and of GretagMacbeth.
International Cooperation for Integration of Processes in Prepress, Press and Postpress, CIP4, Job Definition For-
mat, JDF and the CIP4 logo are trademarks of CIP4.
Adobe, Adobe Photoshop, Adobe Type Manager, Acrobat, Display PostScript, Adobe Illustrator, PostScript, Dis-
tiller and PostScript 3 are either registered trademarks or trademarks of Adobe Systems Incorporated in the
United States and/or other countries which may be registered in certain jurisdictions.
Global Graphics Software Ltd is a licensee of Pantone, Inc. PANTONE®Colors generated by ScriptWorks are
four-color process simulations and may not match PANTONE-identified solid color standards. Consult current
PANTONE Color Publications for accurate color. PANTONE®, Hexachrome®, and PANTONE CALIBRATED™
are trademarks of Pantone, Inc. © Pantone, Inc., 1991.
Other brand or product names are the registered trademarks or trademarks of their respective holders.

JDF ENABLER FOR THE HARLEQUIN RIP
INDEX CONTENTS iii
INDEX CONTENTS iii
US Government Use
JDF Enabler software is a computer software program developed at private expense and is subject to the following Restricted Rights Legend: ·Use,
duplication, or disclosure by the United States Government is subject to restrictions as set forth in (i) FAR 52.227-14 Alt III or (ii) FAR 52.227-19, as
applicable. Use by agencies of the Department of Defense (DOD) is subject to Global Graphics Software’s customary commercial license as con-
tained in the accompanying license agreement, in accordance with DFAR 227.7202-1(a). For purposes of the FAR, the Software shall be deemed to
be `unpublished· and licensed with disclosure prohibitions, rights reserved under the copyright laws of the United States. Global Graphics Soft-
ware Incorporated, 5875 Trinity Parkway, Suite 110, Centreville, VA 20120.
Europe:
Global Graphics Software Limited.
2nd Floor, Building 2030
Cambourne Business Park
Cambourne
Cambridge, CB23 6DW
UK
telephone +44 1954 283 100
fax +44 1954 283 101
United States:
Global Graphics Software, Inc.
5875 Trinity Parkway
Suite 110
Centreville, VA 20120.
USA
telephone +1 703 266 9588
fax +1 703 266 9582
Web:
www.globalgraphics.com
E-mail:
soar-support@globalgraphics.com

INDEX CONTENTS iv
Contents
Chapter 1– JDF-Enabled RIP. . . . . . . . . . . . . . . . . . . . . . . . . . . . . . . . . . . . . . . . . . . . . . . . . . . . . . . . . . 1
1.1 About this document . . . . . . . . . . . . . . . . . . . . . . . . . . . . . . . . . . . . . . . . . . . . . . . . . . . . . . . . . 1
1.2 JDF and the Harlequin RIP . . . . . . . . . . . . . . . . . . . . . . . . . . . . . . . . . . . . . . . . . . . . . . . . . . . . 2
1.3 JDFinput ...................................................................4
1.4 Harlequin RIP input . . . . . . . . . . . . . . . . . . . . . . . . . . . . . . . . . . . . . . . . . . . . . . . . . . . . . . . . . . 5
Chapter 2– System description . . . . . . . . . . . . . . . . . . . . . . . . . . . . . . . . . . . . . . . . . . . . . . . . . . . . . . . . 6
2.1 What is the JDF Enabler? . . . . . . . . . . . . . . . . . . . . . . . . . . . . . . . . . . . . . . . . . . . . . . . . . . . . . . 6
2.2 Operation of the JDF Enabler . . . . . . . . . . . . . . . . . . . . . . . . . . . . . . . . . . . . . . . . . . . . . . . . . . 9
2.3 Content files. . . . . . . . . . . . . . . . . . . . . . . . . . . . . . . . . . . . . . . . . . . . . . . . . . . . . . . . . . . . . . . . 10
Chapter 3– Installing and starting the JDF-Enabled RIP . . . . . . . . . . . . . . . . . . . . . . . . . . . . . . . . 12
3.1 Platform and system requirements . . . . . . . . . . . . . . . . . . . . . . . . . . . . . . . . . . . . . . . . . . . . 12
3.2 Installing the JDF Enabler . . . . . . . . . . . . . . . . . . . . . . . . . . . . . . . . . . . . . . . . . . . . . . . . . . . . 13
3.3 Starting the JDF Enabler. . . . . . . . . . . . . . . . . . . . . . . . . . . . . . . . . . . . . . . . . . . . . . . . . . . . . . 16
3.4 Uninstalling the JDF Enabler. . . . . . . . . . . . . . . . . . . . . . . . . . . . . . . . . . . . . . . . . . . . . . . . . . 20
Chapter 4– -Configuration of the JDF-Enabled RIP . . . . . . . . . . . . . . . . . . . . . . . . . . . . . . . . . . . . . 22
4.1 Creating input channels (Administrator)........................................ 22
4.2 JMF Submission. . . . . . . . . . . . . . . . . . . . . . . . . . . . . . . . . . . . . . . . . . . . . . . . . . . . . . . . . . . . . 26
4.3 Hot folders, Output folders and Auxiliary files . . . . . . . . . . . . . . . . . . . . . . . . . . . . . . . . . . 26
4.4 Configuration of the archive (Administrator) ....................................28
4.5 Edit Advanced (Administrator)................................................28
4.6 Logging configuration (Administrator)..........................................31
4.7 Reset to Defaults . . . . . . . . . . . . . . . . . . . . . . . . . . . . . . . . . . . . . . . . . . . . . . . . . . . . . . . . . . . . 31
4.8 RIP progress configuration . . . . . . . . . . . . . . . . . . . . . . . . . . . . . . . . . . . . . . . . . . . . . . . . . . . 32
4.9 Editing configuration files . . . . . . . . . . . . . . . . . . . . . . . . . . . . . . . . . . . . . . . . . . . . . . . . . . . . 33
4.10 Automatic channel creation. . . . . . . . . . . . . . . . . . . . . . . . . . . . . . . . . . . . . . . . . . . . . . . . . . . 35
4.11 Harlequin RIP configuration. . . . . . . . . . . . . . . . . . . . . . . . . . . . . . . . . . . . . . . . . . . . . . . . . . 39
Chapter 5– Using the JDF-Enabled RIP . . . . . . . . . . . . . . . . . . . . . . . . . . . . . . . . . . . . . . . . . . . . . . . 41
5.1 The Monitor screen. . . . . . . . . . . . . . . . . . . . . . . . . . . . . . . . . . . . . . . . . . . . . . . . . . . . . . . . . . 41
5.2 TheLogsscreen.............................................................46
5.3 Usage for JMF workflow integrators . . . . . . . . . . . . . . . . . . . . . . . . . . . . . . . . . . . . . . . . . . . 47
5.4 Support....................................................................51
Appendix A– Configuring SOAR memory . . . . . . . . . . . . . . . . . . . . . . . . . . . . . . . . . . . . . . . . . . . . 52
A.1 Multiparthandling..........................................................53
AppendixB–JMFErrorcodes........................................................54
Appendix C– Customizing the JDF Enabler . . . . . . . . . . . . . . . . . . . . . . . . . . . . . . . . . . . . . . . . . . . 55
C.1 Introduction................................................................55
C.2 Configure and customize web UI files. . . . . . . . . . . . . . . . . . . . . . . . . . . . . . . . . . . . . . . . . . 55

JDF ENABLER FOR THE HARLEQUIN RIP
INDEX CONTENTS v
INDEX CONTENTS v
C.3 Web architecture . . . . . . . . . . . . . . . . . . . . . . . . . . . . . . . . . . . . . . . . . . . . . . . . . . . . . . . . . . . . 57
C.4 Files that can be overridden in the web UI . . . . . . . . . . . . . . . . . . . . . . . . . . . . . . . . . . . . . . 58
C.5 Brief introduction to Maverick . . . . . . . . . . . . . . . . . . . . . . . . . . . . . . . . . . . . . . . . . . . . . . . . 59
C.6 Brief introduction to Velocity templates . . . . . . . . . . . . . . . . . . . . . . . . . . . . . . . . . . . . . . . . 61
C.7 The Displayer . . . . . . . . . . . . . . . . . . . . . . . . . . . . . . . . . . . . . . . . . . . . . . . . . . . . . . . . . . . . . . 62
C.8 Configuration of the login screen . . . . . . . . . . . . . . . . . . . . . . . . . . . . . . . . . . . . . . . . . . . . . . 66
C.9 Changing the logo. . . . . . . . . . . . . . . . . . . . . . . . . . . . . . . . . . . . . . . . . . . . . . . . . . . . . . . . . . . 69
C.10 Changing colors in the user interface . . . . . . . . . . . . . . . . . . . . . . . . . . . . . . . . . . . . . . . . . . 70
Appendix D– JDF Control application . . . . . . . . . . . . . . . . . . . . . . . . . . . . . . . . . . . . . . . . . . . . . . . . 71
D.1 Introduction . . . . . . . . . . . . . . . . . . . . . . . . . . . . . . . . . . . . . . . . . . . . . . . . . . . . . . . . . . . . . . . . 71
D.2 SendJMF...................................................................72
D.3 createMultipart . . . . . . . . . . . . . . . . . . . . . . . . . . . . . . . . . . . . . . . . . . . . . . . . . . . . . . . . . . . . . 73
D.4 noteoutput . . . . . . . . . . . . . . . . . . . . . . . . . . . . . . . . . . . . . . . . . . . . . . . . . . . . . . . . . . . . . . . . . 75
D.5 Known limitations . . . . . . . . . . . . . . . . . . . . . . . . . . . . . . . . . . . . . . . . . . . . . . . . . . . . . . . . . . 75
Appendix E– SOAR Control tool . . . . . . . . . . . . . . . . . . . . . . . . . . . . . . . . . . . . . . . . . . . . . . . . . . . . . 76
E.1 Using the SOAR Control tool . . . . . . . . . . . . . . . . . . . . . . . . . . . . . . . . . . . . . . . . . . . . . . . . . 76
Appendix F– TIFF output integration . . . . . . . . . . . . . . . . . . . . . . . . . . . . . . . . . . . . . . . . . . . . . . . . . 86
F.1 The ImageSetting and ExposedMedia JDF resource . . . . . . . . . . . . . . . . . . . . . . . . . . . . . . 86
F.2 Overview of the TIFF workflow . . . . . . . . . . . . . . . . . . . . . . . . . . . . . . . . . . . . . . . . . . . . . . . 86
F.3 Creating a TIFF workflow in the JDF Enabler . . . . . . . . . . . . . . . . . . . . . . . . . . . . . . . . . . . 87
F.4 Integrating a TIFF shooter (without SOAR) . . . . . . . . . . . . . . . . . . . . . . . . . . . . . . . . . . . . . 87
F.5 Plugins other than TIFF . . . . . . . . . . . . . . . . . . . . . . . . . . . . . . . . . . . . . . . . . . . . . . . . . . . . . . 89
Appendix G– Plugin support for the ImageSetting process . . . . . . . . . . . . . . . . . . . . . . . . . . . . . . 90
G.1 Preface.....................................................................90
G.2 JDF to PostScript language conversion . . . . . . . . . . . . . . . . . . . . . . . . . . . . . . . . . . . . . . . . . 90
G.3 The imagesetting process. . . . . . . . . . . . . . . . . . . . . . . . . . . . . . . . . . . . . . . . . . . . . . . . . . . . . 91
Appendix H– JDF parameters . . . . . . . . . . . . . . . . . . . . . . . . . . . . . . . . . . . . . . . . . . . . . . . . . . . . . . . . 93
H.1 How the JDF Enabler selects process nodes . . . . . . . . . . . . . . . . . . . . . . . . . . . . . . . . . . . . . 93
H.2 ProcessGroup Auto-Combine . . . . . . . . . . . . . . . . . . . . . . . . . . . . . . . . . . . . . . . . . . . . . . . . . 94
H.3 The capabilities of the Harlequin RIP . . . . . . . . . . . . . . . . . . . . . . . . . . . . . . . . . . . . . . . . . . 94
H.4 How JDF Processes interact with the Channel Page Setup . . . . . . . . . . . . . . . . . . . . . . . . 95
H.5 How the Harlequin RIP treats JDF resources . . . . . . . . . . . . . . . . . . . . . . . . . . . . . . . . . . . . 96
H.6 JDF parameter tables . . . . . . . . . . . . . . . . . . . . . . . . . . . . . . . . . . . . . . . . . . . . . . . . . . . . . . . . 97
Appendix I– Updated JDF . . . . . . . . . . . . . . . . . . . . . . . . . . . . . . . . . . . . . . . . . . . . . . . . . . . . . . . . . . 119
I.1 How to add names of RIP output files to an updated JDF . . . . . . . . . . . . . . . . . . . . . . . . 119
AppendixJ–References............................................................124
AppendixK–Licenses .............................................................125
K.1 The Apache Software License, Version 1.1 . . . . . . . . . . . . . . . . . . . . . . . . . . . . . . . . . . . . . 125
K.2 MaverickLicense ..........................................................125
K.3 Jettylicense ...............................................................126
Index............................................................................129

INDEX CONTENTS 1
Chapter 1–JDF-Enabled RIP
The Job Definition Format or JDF is an XML-based file format that is becoming the industry standard
for the definition of job tickets in pre-press workflows. Its main purpose is to facilitate the exchange of
information between printing applications and systems.
For more information on XML (Extensible Markup Language), go to:
http://www.xml.com/pub/a/98/10/guide0.html
JDF allows a designer to attach a ticket to a job which outlines the processes required for that job and
how it should be handled. This ticket remains with the job and is carried through the whole workflow
until the job is completed.
The advantages of JDF are:
• A job ticket format for the whole workflow.
• A “true” standard which can be implemented by anyone.
• Built using XML with its widely available toolsets, easy connectivity and integration properties.
• Central monitoring.
• Easy identification of the causes of waste, workflow bottlenecks, spare capacity, job status and
material requirements.
• Links to the supply chain, accounting, and strategic planning.
1.1 About this document
Please note that the current documentation is provided for Windows, Mac OS X and Linux. In gen-
eral, most of the features work in the same way on all platforms. However, installation, start-up pro-
cedures and system paths will be different according to the host platform.
All images shown in this document are displayed as if the user is logged-in as the Administrator. For
more information on setting the default user accounts, see “Introduction”, page 71.
This document provides much useful information about JDF and the JDF Enabler. You are encouraged
to use the list of contents and index to locate the information you require.You can if you wish, go
straight to the information you need. For example, if you would like to install your system straight-
away go directly to Chapter 3, “Installing and starting the JDF-Enabled RIP”.
The following information in provided in this document
• Chapter 1 (this chapter) provides information about the capabilities of the JDF Enabler and the
Harlequin RIP and the various components.
•Chapter 2, “System description” provides a full system description.
•Chapter 3, “Installing and starting the JDF-Enabled RIP” provides you with full details about
how to install and start-up your system.
•Chapter 4, “-Configuration of the JDF-Enabled RIP” provides details on how to configure the
JDF Enabler.
•Chapter 5, “Using the JDF-Enabled RIP” provides details about the web UI and how to use it.

JDF ENABLER FOR THE HARLEQUIN RIP
JDF-ENABLED RIP INDEX CONTENTS 2
INDEX CONTENTS 2
•Appendix A, “Configuring SOAR memory” gives you information on how to configure the
available memory.
•Appendix B, “JMF Error codes” describes the JMF error codes returned to a client application.
•Appendix C, “Customizing the JDF Enabler” describes how to perform some simple customiza-
tion tasks.
•Appendix D, “JDF Control application” provides details about the JDF Control application.
•Appendix E, “SOAR Control tool” provides details about the SOAR control application.
•Appendix F, “TIFF output integration” provides details on how to integrate the JDF Enabler
with an OEM’s TIFF Shooter.
•Appendix G, “Plugin support for the ImageSetting process” provides some information and an
example on this topic.
•Appendix H, “JDF parameters” provides the list of parameters supported by JDF-Enabled RIP.
•Appendix I, “Updated JDF” provides information on how to add names of RIP output files to an
updated JDF.
•Appendix J, “References” provides some useful references for more information.
•Appendix K, “Licenses” provides licensing information.
1.2 JDF and the Harlequin RIP
The purpose of adding JDF support to the Harlequin RIP is to allow the RIP to be used as a compo-
nent of a larger workflow based on open systems principles and using products from multiple ven-
dors.
The JDF Enabler is aimed at providing JDF support for commercial print environments using conven-
tional printing presses and digital proofing devices.
This version provides:
• JDF support as an extra add-on for the Harlequin RIP alongside the Harlequin Print Production
Manager, which may be installed at the same time. Both JDF Enabler and Print Production
Manager are separately protected by a permit file which can be obtained from the Global
Graphics web site.
• Basic JDF support for the Harlequin RIP to enable the quick deployment of workflow solutions
using JDF.
• The foundation for later, extensible JDF support, enabling JDF processes to be added to those
already supported and also to provide JDF technology to core technology customers.
1.2.1 JDF version
The JDF-Enabled RIP supports a subset of JDF version 1.3.

JDF ENABLER FOR THE HARLEQUIN RIP
JDF-ENABLED RIP INDEX CONTENTS 3
INDEX CONTENTS 3
1.2.2 JDF components
This section provides a view of the JDF components and how they are associated with the Harlequin
RIP.
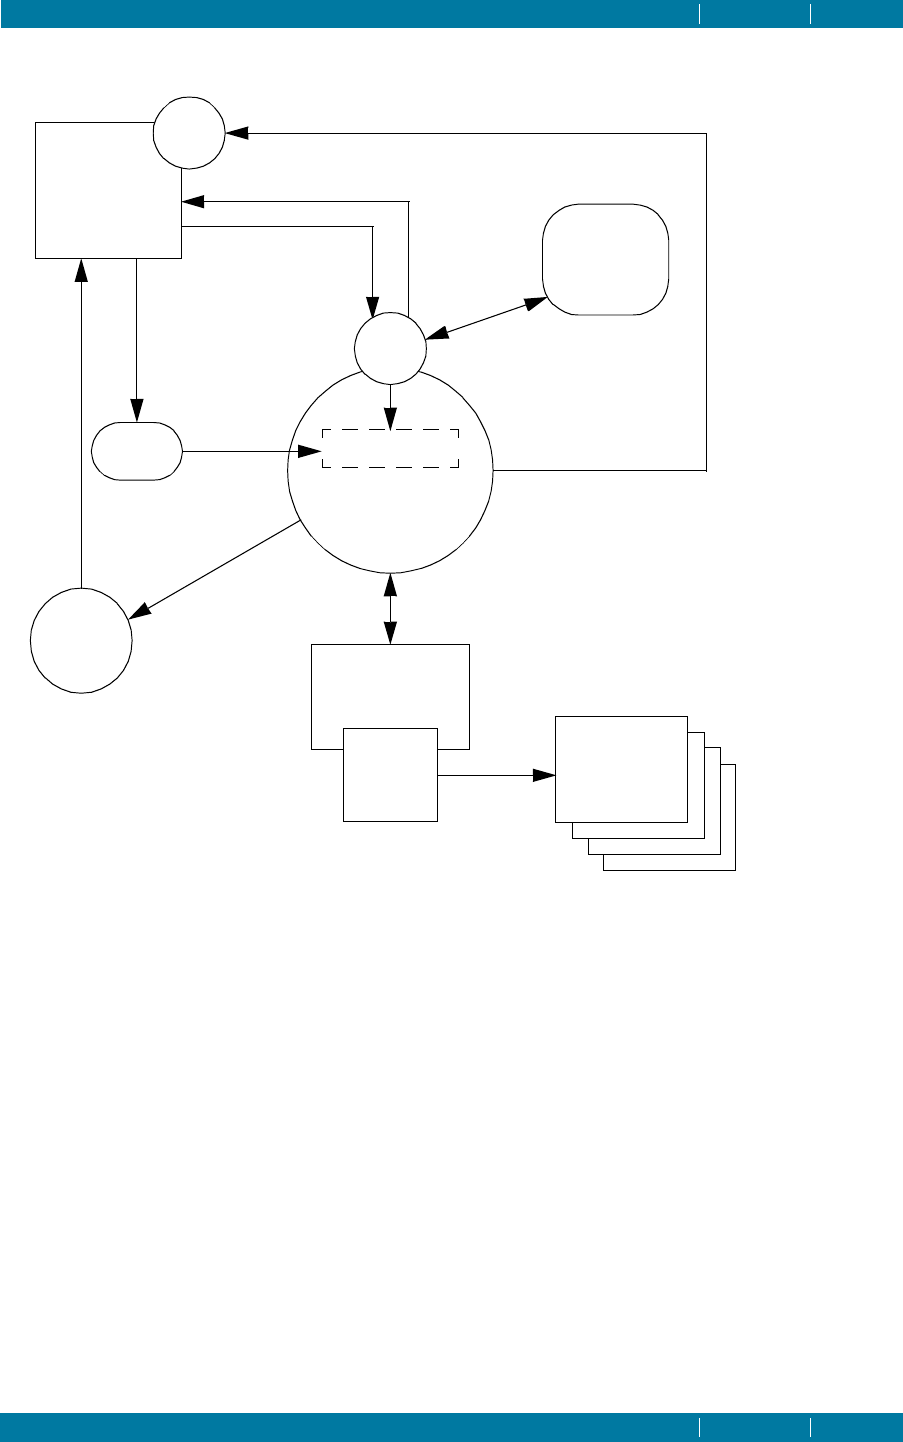
Figure 1.1 JDF Components
JDF Enabler This is the component that parses JDF files, locates the required graphi-
cal content file(s), transforms data from the JDF into RIP configuration
data, transmits that data to the RIP, updates the JDF file with appropri-
ate audit pool and resource data, and handles JMF messaging
The JDF Enabler component is required to send JMF (Job Messaging
Format) messages to third-party products to notify them of progress
and status. This also entails dealing with HTTP job submission requests.
HQN RIP Some parts of the JDF system are provided by the Harlequin RIP.
JDF UI The JDF user interface is provided by a web-based UI.
SOAR The JDF component includes SOAR (Scalable Open Architecture RIP)
components which are outside of the Harlequin RIP.
Web Server The web sever is used to serve-up the pages of the web UI. In addition,
the web server hosts the servlet that processes incoming JMF messages.
The Web server is built into the JDF Enabler and requires no extra instal-
lation or configuration procedures.
1.2.3 Supported processes
The combination of the JDF Enabler and the Harlequin RIP, supports a number of combined pro-
cesses, which are constructed from the following single processes:
•Interpreting
•Imposition
•Trapping
JDF
JDF UI
HQN RIP
Enabler
Web Browser
Web
Server
Output
Plug-ins
SOAR
JDF job submission
via hot folder
JMF job submission,
Web
Server
3rd Party
JDF
JMF status reporting (signals)
queries etc.
Controller

JDF ENABLER FOR THE HARLEQUIN RIP
JDF-ENABLED RIP INDEX CONTENTS 4
INDEX CONTENTS 4
•ColorSpaceConversion
•Rendering
•Separation
•ContoneCalibration
•Screening
•ImageSetting
In the JDF Enabler, all combined processes supported include both Interpreting and Rendering, and
will only support ImageSetting in combination with those two.
The JDF Enabler may receive JDF files in various levels of completeness. The JDF Enabler uses locally-
stored default values for those attributes that are not included as part of the job ticket. Thus any val-
ues which are not present in the JDF file can be supplied as part of the Harlequin RIP Page Setup.
Two examples are:
• A workflow system built around the Harlequin RIP, and communicating with the RIP using JDF.
In a system of this type the supplied JDF is often likely to be almost complete.
• JDF files received from imposition programs. These files are not likely to be complete and may
only contain a very small number of processes (for example, Imposition and Separation) and
even then they will not define which process nodes the RIP is required to perform.
1.2.4 Combined processes
When JDF files contain only a small number of processes (such as when received from imposition
applications), they will be supplied as separate processes. In this case, the RIP will not only perform
the requested processes, but will effectively override portions of a pre-existing JDF template with val-
ues from the JDF file supplied.
Thus, if the RIP has been locally configured to perform Interpreting,Imposition,
ColorSpaceConversion,Rendering,ContoneCalibration,Screening and Imagesetting, the “new”
input resources in the form of run lists, layouts and parameters will override any pre-existing param-
eters.
Currently, processes specified in the Page Setup but not specified in the JDF are not removed. For
example, if the RIP Page Setup specifies Trapping, then Trapping will be performed for all jobs,
whether it is present in the JDF or not.
For more information see “How JDF Processes interact with the Channel Page Setup”, page 95.
1.3 JDF input
The JDF Enabler supports the receipt of JDF files through both hot folder and JMF (Job Messaging
Format) submission.
The JDF submission routes into the JDF Enabler are:
• JDF to hot folder.
• JMF via HTTP where the JMF contains a URL to a JDF resource.
• MIME package of JDF and content to hot folder (optional).
• MIME package of JMF, JDF and content via HTTP (optional).
• JMF via HTTP where the JMF contains a URL to a resource that is a MIME package containing
JDF and optional content. The MIME packages must not contain JMF.

JDF ENABLER FOR THE HARLEQUIN RIP
JDF-ENABLED RIP INDEX CONTENTS 5
INDEX CONTENTS 5
For more information, see “JDF Input channels”, page 6.
1.4 Harlequin RIP input
Once the JDF Enabler has parsed an incoming JDF file and located the graphical content file(s) associ-
ated with the job ticket, it supplies configuration data to the RIP and requests that the RIP processes
the content files. For more information, see “Operation of the JDF Enabler”, page 9.

INDEX CONTENTS 6
Chapter 2–System description
2.1 What is the JDF Enabler?
The JDF Enabler is an application that understands the JDF data format and its associated transmis-
sion protocols. It can analyze incoming JDF jobs, and determine which parts of those jobs can be exe-
cuted. The JDF Enabler then converts relevant portions of the JDF data into formats that can be
directly understood by other Global Graphics products, such as the Harlequin RIP. The JDF Enabler
makes extensive use of SOAR (Scalable Open Architecture RIP) technology to drive those products,
instructing them to execute the work required by each JDF job ticket, and monitoring their progress.
The JDF Enabler is built from a combination of SOAR components, but it runs as a single additional
process called JDFServices. This release of the JDF Enabler installs as an add-on for the Harlequin
RIP, and works in partnership with it to form a fully JDF-compliant RIP device.
2.1.1 JDF Input channels
The JDF Enabler is fully compliant with the JDF standard, and can therefore converse directly with
JDF Controllers supplied by other vendors. As required by the specification, the JDF Enabler can
receive JDF jobs in two ways; via a hot folder, into which JDF files are delivered, or via a JMF
SubmitQueueEntry command. Because the route through which a JDF job arrives makes very little dif-
ference to how it is processed, these two methods of input are combined to form a JDF Input Channel.
The JDF Enabler supports multiple channels, allowing jobs coming from different sources to be pro-
cessed in different ways.
The hot folder for each Input Channel is nominated by the user when the channel is created. This hot
folder name is then provided to the third-party Controller. Additionally, the JDF Enabler will auto-
matically generate an http URL, which is also provided to the Controller if jobs are to be delivered via
JMF command.
2.1.2 Hot folders
The JDF Enabler scans a hot folder and each arriving document is then passed to the JDF Input Chan-
nel, which then builds a job description. Each input channel must have a its own separate hot folder.
When JDF documents are submitted to the RIP, they normally reference one or more page description
files, which form the graphical content of the job. These files are referenced by URLs within the JDF. It
is permitted for content files to be delivered into the hot folder itself, or into a sub-directory of the hot
folder, where they can then be referenced by URLs that are expressed relative to the JDF document.
This can be particularly convenient when setting up automated workflows with imposition tools.
These tools can commonly be configured to write the content files and the JDF files out to a single des-
tination folder (often with sub-folders used for the content files). It is strongly recommended that the
JDF file be the last document written to the hot folder, although most imposition tools will do this
automatically.
It is important to note that the hot folder server will accept read-only files, but will not accept hidden
files.

JDF ENABLER FOR THE HARLEQUIN RIP
SYSTEM DESCRIPTION INDEX CONTENTS 7
INDEX CONTENTS 7
2.1.3 JMF messages
JMF messages generally arrive via HTTP as an XML-stream. In the case of MIME Multipart submis-
sions, only the first two parts inside the MIME format are XML; the JMF message, and then the JDF
file. Any other parts are resources referred to by the JDF part. For more information, see “MIME
messages”on page 7.
What happens to an incoming JMF depends on the JMF message type. In the case of a
SubmitQueueEntry, the URL referencing the new JDF job would be handed to the JDF Input Channel,
which will treat it in the same way as it treats JDF files arriving in the hot folder.
Figure 2.1 Input channels
For information on the codes returned to the third-party controller as part of the JMF response from
the JDF Enabler, see Appendix B, “JMF Error codes”.
2.1.4 MIME messages
MIME (Multipurpose Internet Mail Extensions), is a flexible format, allowing any type of file or docu-
ment to be included within a message passed across the internet. MIME messages can contain text
and images as well as other application-specific data. MIME is an internet standard that specifies how
messages are formatted so that they can be exchanged between different systems.
There are many types of MIME messages. Simple ones include “text/plain”, “text/html”, “applica-
tion/pdf” and “text/xml”.
There are a number of MIME types whose names start “multipart”. This is a way of packaging several
pieces of data, of different types, into a single MIME object. These pieces of data are called (body)
parts.
In JDF, a subtype of multipart is used, called multipart/related. In this, each of the body parts represents
different data, but all the body parts are associated with the overall transmission—in this case, a JDF
job.
Generally, a multipart with a JMF part can only be submitted to the JDF Enabler via HTTP. A multi-
part with no JMF part can only be submitted via a hot folder.
The JDF Enabler accepts one particular type of MIME multipart/related file, submitted to a hot folder.
The file must conform to the usual requirements for multipart/related and must have a MIME-Version
and a Content-type internet header at the start. There must be a blank line between the block of inter-
net headers and the first boundary string. The first part in the multipart must be a JDF job. There may
be zero or more additional resources, such as PDL files, in subsequent parts. If there are, these may be
referenced by CID: URLs.
A MIME multipart can be submitted to a JMF channel with a full Content-Type with parameters or
with a simple Content-type without multipart/related parameters, if the start of the submitted data is
Hot folder Input
JMF submit queue entry command
JDF
Document
Input
Channel JDF Enabler
(SubmitQueueEntry)

JDF ENABLER FOR THE HARLEQUIN RIP
SYSTEM DESCRIPTION INDEX CONTENTS 8
INDEX CONTENTS 8
a list of internet headers including a full Content-type with parameters (for example, a boundary
string).
Multipart handling has a threshold between a memory-expensive, yet fast implementation for small
multiparts and a memory-efficient but slower implementation for large multiparts. For more informa-
tion see “Multipart handling”on page 53.
Note: The JDF Enabler expects all body parts to have a content-id header. However, it will accept
multiparts where some body parts do not have a content-id header. If only the JMF and/or JDF body
parts have missing content-id headers, the job should process successfully and no extra log messages
should be seen (unless the log level for “JDF Input” is set to maximum verbosity). If any subsequent
body parts, such as PDL resources, have missing content-id headers, the job will not be able to refer-
ence them and may well fail. WARNING log messages will then be generated.
Note: The JDF Enabler expects all body parts to have a content-transfer-encoding header. However, it
will assume “binary” encoding for any that have no such header; a WARNING log message will be gen-
erated.
Note: The JDF Enabler will ignore enclosing double-quotes, single quotes and angle brackets, plus
any leading or trailing whitespace when interpreting content-ids. This applies to both content-id
headers in multipart, and to cid:URLs in the JDF itself. Therefore, content providers should not
attempt to use such characters as part of the unique content-id of a body part.
2.1.5 Out-going content type compatibility
To provide compatibility with third-party software the Content-type generated by an out-going
JDF/JMF is set to be the same as the one read from the input.
For example, if a JMF HTTP request has a Content-type “text/xml”, that is used for the response. Oth-
erwise, the full CIP4 JMF Content-type is used. That is, “application/vnd.cip4-jmf+xml”. The full
CIP4 JMF Content-type is used for responses to multiparts.
When a JDF is rewritten to an HTTP URL, and a Content-type was available for the original JDF, the
rewritten JDF now has the same Content-type. If the Content-type is not available the CIP4 JDF Con-
tent-type is used.
2.1.6 Web server and UI
The main job of the web server is to serve pages to the browser-based web UI. It is important to
understand that the web UI is a window on the system and provides some configuration and job con-
trols. However, all the actual work performed on the files is done on the server and within the RIP.
Because the web UI is browser-based, it is available for use anywhere from which an HTTP connec-
tion can be obtained. However, we do not recommend making connections to the web UI from out-
side of the local network. This is because the security required to make that connection safe has not
been implemented. The port number might need to be changed to make the HTTP possible. For more
information on how to change the port number, see “jdfenabler.txt”on page 34.
VPN (Virtual Private Network) is a another way of allowing a user at a remote location to gain access
to the local network. This is a recommended way of allowing remote users to use the web UI.
The web UI displays job status information, RIP status information and system messaging. However,
once your system is up and running it will perform perfectly well without the web UI being dis-
played.
The web server also hosts the servlet that processes incoming JMF messages.
JDF files can contain URLs that refer to other resources required for output by the RIP. The JDF
Enabler can locate these resources from either third-party web servers or from locally supplied files.

JDF ENABLER FOR THE HARLEQUIN RIP
SYSTEM DESCRIPTION INDEX CONTENTS 9
INDEX CONTENTS 9
http:// URLs are supported. In addition, for multipart submission only, a cid:// URL refers to a part
within a multipart, via its Content-ID.
When resources required by the JDF are specified by a file:// URL they are handled by the underly-
ing operating system’s file system in cooperation with the JDF Enabler.
Note: When files are referenced using http://, performance is optimum if those files are on the local
network. There may be firewall issues if attempts are made to retrieve those files from outside the net-
work. This is not usually a problem when using HTTP because this retrieval method works in the
same way as web browsing and most firewalls allow web requests on to the internet.
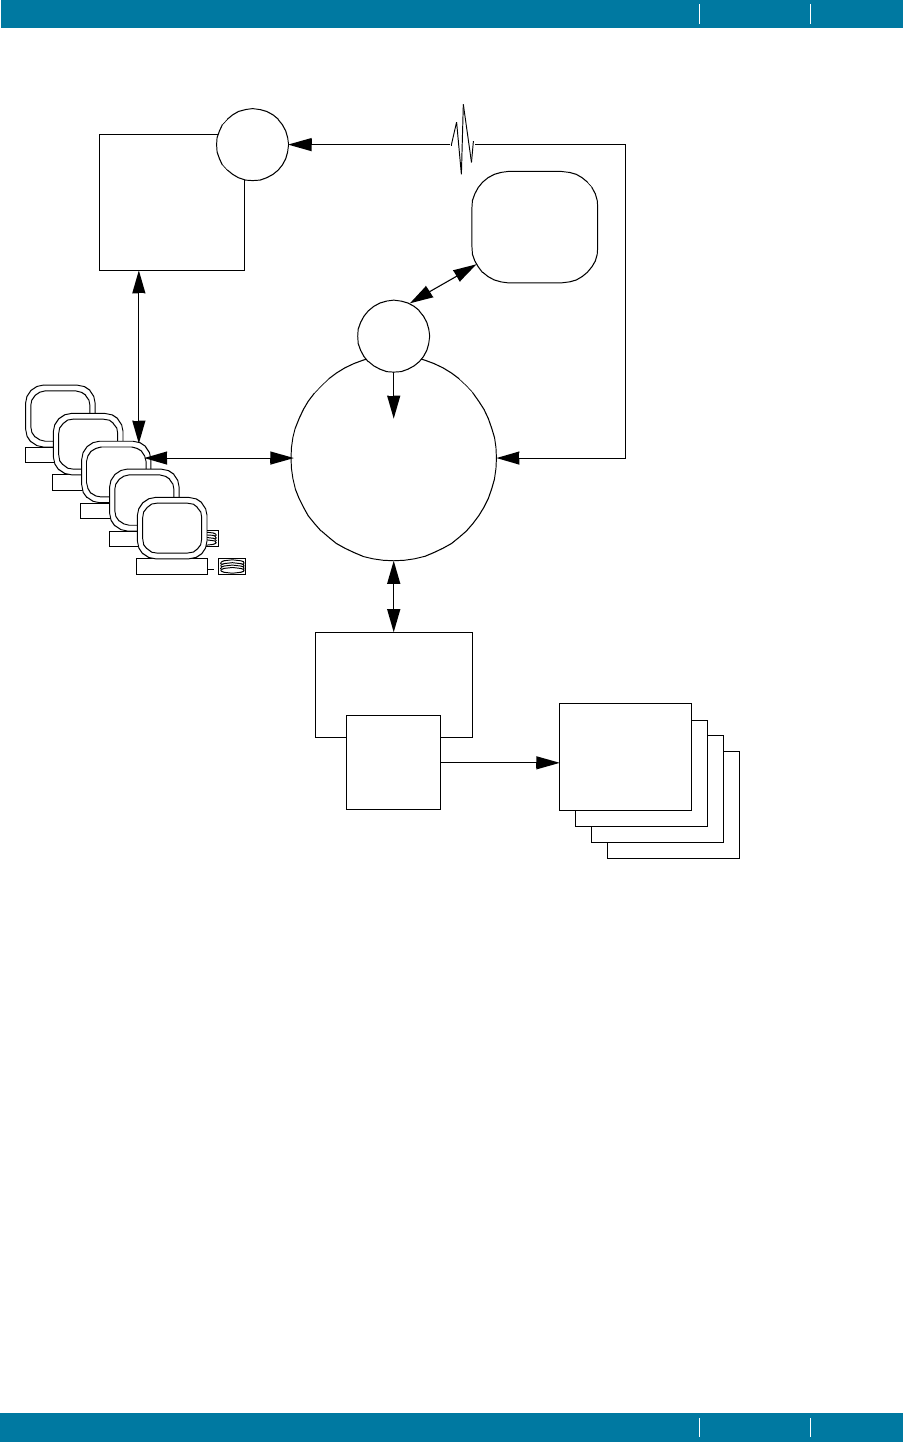
2.2 Operation of the JDF Enabler
Once a JDF file is received, a high-level examination of the file must happen before processors, such as
the Harlequin RIP, can be set into action. This examination results in the generation of a sequence of
required RIP work, known as the Job Description.
Working with the job description, the JDF Enabler searches for process nodes that are eligible for sub-
mission to the RIP. These process nodes are those whose input resources are all marked as “Avail-
able”, and whose processing requirements match a subset of the JDF process list in “Supported
processes”on page 3. Each process node identified during this phase is converted into a processing
instruction for the RIP.
The next stage is for each instruction to be submitted to the RIP. At this point, the instruction is simply
a pointer to a process within the Job Description.
JDF fragments can be directly represented in the PostScript language using a conversion process. The
result of this conversion is an equivalent fragment of PostScript Language code that retains all of the
information that was contained in the original JDF.
At this point a control job is processed by the RIP using a workflow process.
The workflow process contains a job queue onto which references to PDL (Page Description Lan-
guage) files, such as PostScript Language and PDF, can be placed. It then locates the RIP, and forms a
partnership with it.
Each PDL sub-job that reaches the head of the queue is submitted to the RIP. The RIP receives the job
and processes it. A job logger monitors the actions of the RIP, and records the progress of the job.
Because the workflow process monitors this progress, it can determine when the RIP is ready to
receive the next job.
JDF ENABLER FOR THE HARLEQUIN RIP
SYSTEM DESCRIPTION INDEX CONTENTS 10
INDEX CONTENTS 10
Figure 2.2 The JDF Enabler showing JDF and JMF data flow
2.3 Content files
JDF is not a page description language, it is a job description language, and may be provided with any
number of PDL files that need to be sent to the Harlequin RIP as part of processing the job. The PDL
files would take the form of PostScript language or PDF document files and can be located either
locally or remotely via HTTP.
It is permitted for content files to be delivered into the hot folder itself, or into a sub-directory of the
hot folder, where they can then be referenced by URLs that are expressed relative to the JDF docu-
ment. This is useful when setting up automated workflows with imposition tools. These tools can
commonly be configured to write the content files and the JDF files out to a single destination folder
(often with sub-folders used for the content files). It is strongly recommended that the JDF file be the
last document written to the hot folder, although most imposition tools will do this automatically.
Harlequin RIP
Printers
Proofers
Digital press
etc.
Third-party
JDF Controller
Hot
Folder
JDF Enabler
Web browser
Plugins
JMF input
JDF
Updated
JDF
(Commands)
JMF output
(Responses)
Web
Server
interface
-based user
Input Channel
Web
Server
Input
JMF signals
JDF ENABLER FOR THE HARLEQUIN RIP
SYSTEM DESCRIPTION INDEX CONTENTS 11
INDEX CONTENTS 11
Figure 2.3 JDF Enabler showing PDL availability
Harlequin RIP
Printers
Proofers
Digital press
etc.
Third-party
JDF Controller
JDF Enabler
Web browser
Plugins
PDL available
Web
Server
interface
-based user
Web
Server
on local network
PDL available
via HTTP

INDEX CONTENTS 12
Chapter 3–Installing and starting the JDF-
Enabled RIP
This section describes how to get your JDF-Enabled RIP installed and working. Before using the JDF
installer, a Harlequin RIP must be installed. This is because the JDF installer prompts you to select the
Harlequin RIP executable.
Before proceeding, check that your host platforms conform to the supported platforms list. Also, refer
to your Harlequin RIP installation manual for full RIP installation details.
3.1 Platform and system requirements
This section provides the platform and system requirements for the JDF-Enabled RIP.
3.1.1 Supported platforms
The following platforms support the JDF-Enabled RIP:
• Microsoft Windows 2000 (with SP2 and later), Microsoft Server 2003, XP (Pro), and Windows
Vista.
•Mac OS 10.4.6 or later. You should have Java 5 installed. You can download Java from Apple’s
website.
• Red Hat Enterprise Linux ES v4.0.
Note: The RIP, Harlequin Print Production Manager and the JDF Enabler will often run on the same
computer, and the platform requirements therefore apply to both.
Note: Windows 95, 98, ME, NT and Mac OS 10.3.x and earlier are not supported.
3.1.2 Harlequin RIP support
During the installation of the JDF Enabler you are requested to select a Harlequin RIP executable. The
Harlequin RIP must be:
• Harlequin RIP v8.0 Release or later.
3.1.3 Getting a permit
For the Harlequin RIP JDF Enabler to work you must have a valid permit. The permit allows you to
use both JDF Enabler and PPM (Print Production Manager). Separate passwords apply to each
product. If you only require JDF Enabler you need only have the JDF password. For information
about how to get a permit file contact your supplier.

JDF ENABLER FOR THE HARLEQUIN RIP
INSTALLING AND STARTING THE JDF-ENABLED RIP INDEX CONTENTS 13
INDEX CONTENTS 13
The data in the permits for PPM and JDF is now used to control which of the two products (PPM and
JDF) is enabled. It can enable one or both. If there is no permit at all, or an expired permit, attempts to
start PPM or JDF will result in a message informing you that a licensing failure has occurred. How-
ever, if there is a permit but its application data does not enable the product that you are trying to run,
an error message similar to the following is displayed:
Mon Jul 02 11:33:55 BST 2007 - Application Manager: INFO: The following error could
be due to a licence/permit problem
Mon Jul 02 11:33:55 BST 2007 - Application Manager: ERROR: Couldn't instantiate class
com.harlequin.DPP.SOAR.JDF.HarlequinRIP.EnablerPart: java.lang.ClassFormatError:
Incompatible magic value 3397665293 in class file
com/harlequin/DPP/SOAR/JDF/HarlequinRIP/EnablerPart at
java.lang.ClassLoader.defineClass1(Native Method)
Use the Harlequin License Manager to view or add licenses and permits. This is a simple application
providing license management.
On a Windows platform the License Manager is located at:
\Program Files\Common Files\Global Graphics Software\License Manager
On Mac OS X the License Manager is located at:
Library/Application Support/Global Graphics Software/License Manager
On Linux the License Manager is located at:
/<Harlequin RIP folder>/LicenseManager
For more information about licenses, permits and the License Manager, see the Harlequin License
Server documentation from GGS.
Note: Permit files specify the maximum and minimum versions of the associated RIP. If the RIP is not
the correct version the system will not work. The specified versions of the RIP can be different for the
JDF Enabler and PPM.
3.2 Installing the JDF Enabler
This section describes how to install your JDF Enabler services.
Before installing the JDF Enabler you should quit any other open applications.
1. When the Harlequin RIP is fully installed, start the RIP in the normal way.
2. Create a new Page Setup using any device other than the Preview device. Preferably use the
output device that you intend to use.
3. Stop the RIP and make sure it is shutdown.
Note: That the JDF Enabler/Print Production Manager is supplied on a different and separate CD to
that which contains the Harlequin RIP.
4. Insert the CD into your CD-ROM drive. The InstallAnywhere file is found in the top level direc-
tory of the installation CD. On Linux platforms, use the following command to view the CD con-
tents:
mount /media/cdrom
5. Follow the installation instructions for your chosen platform.
JDF ENABLER FOR THE HARLEQUIN RIP
INSTALLING AND STARTING THE JDF-ENABLED RIP INDEX CONTENTS 14
INDEX CONTENTS 14
Windows Instructions:
• Double-click install.exe.
You do not need to install any other software. A Java virtual machine is included with this
installation package.
Mac OS X Instructions:
• Double-click the install.zip file to extract the file.
• Double click the install file to start the installation process.
Make sure you have Java 5 or later installed. See “Supported platforms” on page 12 for
more information.
Linux Instructions:
• Open a shell and navigate to the top level of the CD (using cd /media/cdrom) or to the
directory where you downloaded the installer.
• At the prompt type:
./install.bin
A Java virtual machine is included with this download. It will be run automatically when
you run the shell script.
• Alternatively you can copy the install.bin file to the desktop. Remove the .bin extension
and suitably rename the file (for example, install_jdf). Double clicking on this renamed
file will start the installation process.
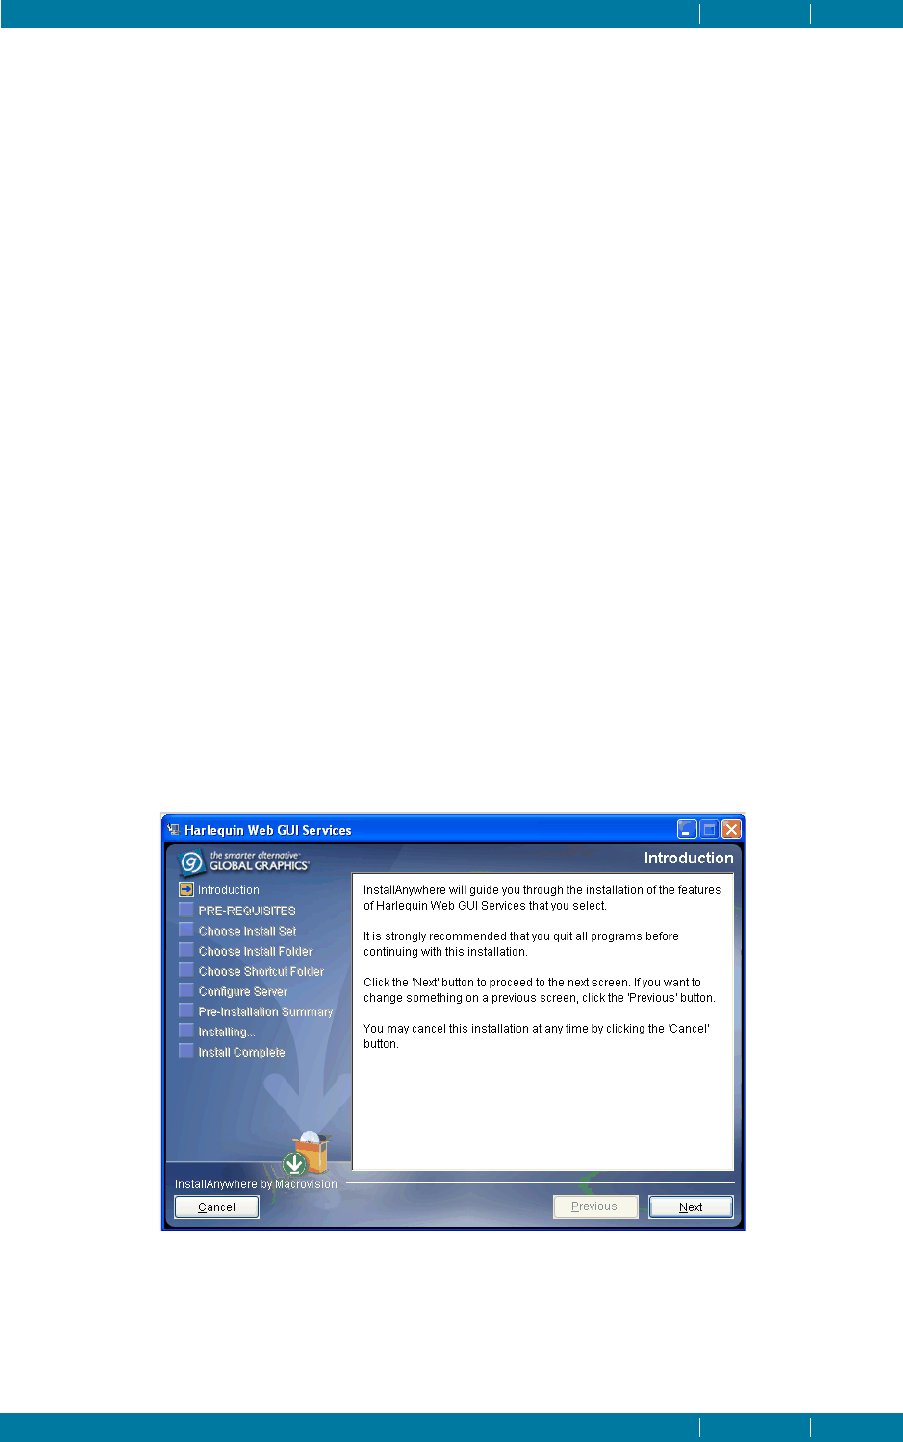
6. Depending on your operating system a “Preparing to Install” dialog box may be displayed while
the installer is preparing.
7. The InstallAnywhere window is displayed.
Follow the on-screen instructions for the install.
8. The PRE-REQUISITES window lists the items that must be installed before running either JDF
Enabler or the Print Production Manager. Failure to install them may result in a non-functioning
installation. Check the Please confirm reading the above message check box before continuing,

JDF ENABLER FOR THE HARLEQUIN RIP
INSTALLING AND STARTING THE JDF-ENABLED RIP INDEX CONTENTS 15
INDEX CONTENTS 15
9. In the “Choose Install Set” window the following four options are provided. You may choose to
install one or both packages. On a Linux installation only the JDF Enabler is available.
JDF Enabler and Harlequin PPM
JDF Enabler and Harlequin Print Production Manager (PPM) are
installed and configured to run simultaneously. A Harlequin License
Server permit for JDF and PPM is required. On a Linux installation this
option is not available.
JDF Enabler JDF Enabler is installed and configured to run. (PPM will not run). A
Harlequin License Server permit for JDF Enabler is required.
Harlequin PPM Harlequin Print Production Manager (PPM) is installed and configured
to run. (JDF Enabler will not run). On a Linux installation this option is
not available. A valid Harlequin License Server permit for PPM is
required.
Note: The Harlequin License Server, which is required by the Harlequin RIP, is installed automat-
ically with the Harlequin RIP and is started automatically when running the Harlequin RIP.
However, you must ensure that a valid permit file for the RIP is available before running either
JDF or PPM Services. Note that permits issued for JDF v2 will not enable JDF v3. For more infor-
mation on starting the License Server, see the Harlequin License Server (HLS) Guide.
Unload all Files This option copies all files, for all platforms, from the installer to the
destination directory. The installation can not be run as an application.
No uninstaller is created. This option is used to help OEMs repackage
this product in their own products. Included in this unload are the
InstallAnywhere project files.
10. The “Choose Install Folder” window provides the option to install the chosen service(s) in the
default location by clicking Next, or to Choose another location for the installation.
11. Use the Windows “Choose Shortcut Folder”, Mac OS X “Choose Alias Folder” or Linux “Choose
Link Folder” screen to create any icons or menu options. Note that the Windows Start Menu
option puts icons directly into the Start Menu at the top level. Click Next to continue.
12. The “Configure Server” Window prompts you for the location of the Harlequin RIP you wish to
use with WebGUI Services.
On Mac OS X, if the Harlequin RIP executable file is located on a alternative hard disk to your
installation, you should navigate to the top of the main disk and find the Volumes folder, then
navigate to the disk of your choice.
13. The “Configure PPM Web User Interface” window allows you to set the Base directory for PPM.
Similarly, the “Configure JDF Enabler Web User Interface” window allows you to set the Base
directory for JDF. The Base directory is only used for customization of the Web User Interface. If
you do not need to customize the Web User Interface, you can leave the base directory empty.
If you do choose a Base Directory, it must be an empty directory, or contain a valid set of custom-
ization files.
Note: If you wish to change the type of RIP launched at a later date, you can use the SOAR Con-
trol tool, as described in “Using the SOAR Control tool” on page 115.
Note: The Harlequin License Server, which is required by the Harlequin RIP, is installed with the
Harlequin RIP and started automatically when running the Harlequin RIP. However, you must
ensure that a valid permit file for the RIP is available before running the Core Services. Note that
permits issued for JDF v2 will not enable JDF v3.

JDF ENABLER FOR THE HARLEQUIN RIP
INSTALLING AND STARTING THE JDF-ENABLED RIP INDEX CONTENTS 16
INDEX CONTENTS 16
14. The “Pre-Installation Summary” describes the location of the configuration file(s) created during
installation.
Click OK to complete the installation process.
The JDF Enabler is installed.
Note: If the installation appears to have stalled, you should check that it is not waiting for a response,
such as selecting the Harlequin RIP executable. This may happen if you use your machine for other
purposes while the installer is running.
Note: If you are re-installing the JDF Enabler in the same location as a previous installation, you will
see the following message:
Modifications complete. Note that existing state may be invalid. Consider resetting
to factory defaults
This occurs because the networking_choice.txt file is being overwritten when the installer runs the
SOAR Control application.
When the message appears, either click the OK button or wait a few seconds and the message will
disappear.
3.3 Starting the JDF Enabler
This section describes how to start and stop the JDF Enabler and the web UI.
It is important to note that when you start and stop the JDF services, the Harlequin RIP, which you
associated with the JDF Enabler, is also started and stopped. Therefore, please ensure the Harlequin
RIP is not running when starting the JDF Enabler.
If the Harlequin License Server service is stopped, it will be automatically started when the JDF
Enabler is started. For more information, see the Harlequin RIP Installation Guide for your platform
or the Harlequin License Server documentation.
Depending on your choice during installation, you may or may not be able to interact with the Harle-
quin RIP user interface.
If the Harlequin RIP Classic UI is not displayed, and you wish to alter RIP configurations, you must
stop the JDF services and then start and use the Harlequin RIP in the normal way.
1. Start the JDF Enabler:
2. Close the Harlequin RIP if it is running.
For Windows:
Select Start > All Programs > Global Graphics > WebGUI Services > Start JDF + PPM Services.
If you have chosen to install only the JDF Enabler:
Select Start > All Programs > Global Graphics > WebGUI Services > Start JDF Services.
For Mac OS X:
Navigate to <installation_dir>/SOAR/WebGUIServices/<version>/<revision>/macos_x-
ub/rel.
If you have created an Alias, navigate to <Alias folder>.
and double-click on Harlequin Web GUI Services .
For Linux:
Navigate to:<install dir>/SOAR/WebGUIServices/<version>/<revision>/linux_2-
pentium/rel
JDF ENABLER FOR THE HARLEQUIN RIP
INSTALLING AND STARTING THE JDF-ENABLED RIP INDEX CONTENTS 17
INDEX CONTENTS 17
If you have created a link then navigate to <Links folder>.
and double click Start JDF Services.
Alternatively, when using Linux you may drag and drop the Start JDF Services icon into the
terminal window and press Return.
If you have decided not to display the Harlequin RIP Classic UI you may proceed to the next step
when a RIP icon appears (without a red cross).
If you have decided to display the Harlequin RIP Classic UI, it will appear in the normal way.
You can click OK to remove the About window. Alternatively, it will disappear after a few sec-
onds.
A***JDF Enabler Activated*** message will appear in the RIP monitor.
3. If you decided to automatically start the browser when starting up the JDF Enabler, the browser
configured as the default in the operating system will start-up. Linux uses the htmlview com-
mand, which attempts to find a suitable browser. Some environment variables may be set, to con-
figure htmlview.
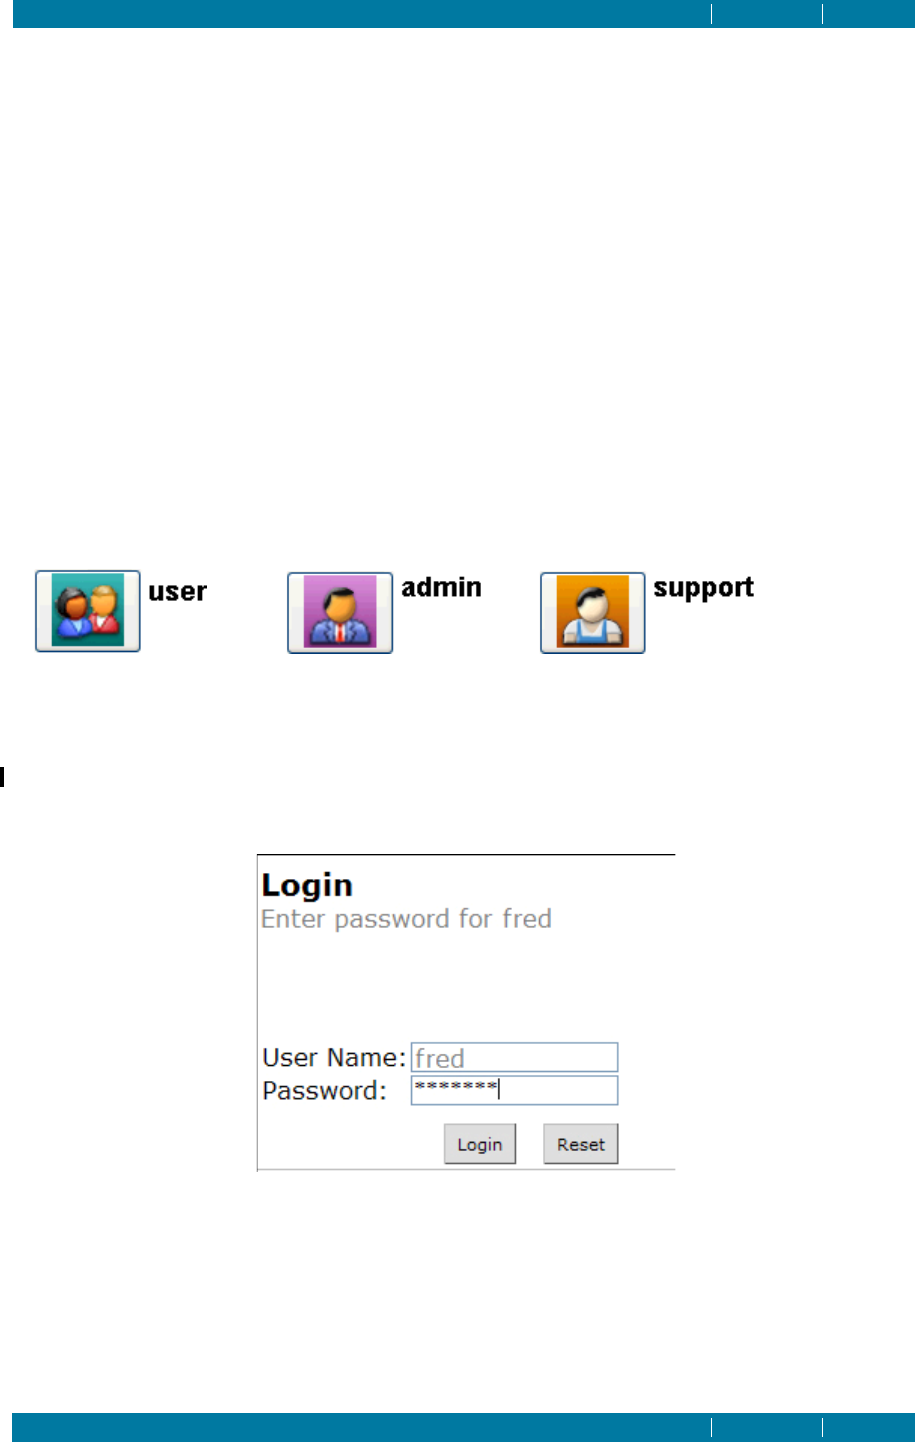
4. If no logins or passwords have been configured, the default login screen appears. You can select
your required login by clicking the appropriate button. When you login as admin you are able to
create and delete channels:
Figure 3.1 Default login icons
Note: These instructions are for using the default logins and passwords. You should change the log-
ins and passwords to suit your working environment. This is done by creating a realm.properties
file as described in “Introduction” on page 55.
5. If user logins and passwords have been created, you should select your user login icon. A display
similar to the following will appear:
Figure 3.2 User login
6. Enter your login and password followed by clicking the green arrow icon. If you key-in a wrong
password a “try again” message will appear. Clicking the log out icon will return you to the ini-
tial login screen.
7. At this point the JDF Enabler graphical user interface will appear.

JDF ENABLER FOR THE HARLEQUIN RIP
INSTALLING AND STARTING THE JDF-ENABLED RIP INDEX CONTENTS 18
INDEX CONTENTS 18
Note: If you are experiencing shutdown immediately after start-up, you should look in the
logger.log file for an explanation. The log messages will provide information to help diagnose the
problem. See “Log files” on page 19 for more information. Errors in any Configuration file will cause
the system to shutdown.
Note: When the JDF Enabler is installed you are provided with an option to select whether the RIP
GUI is on or off. That is, whether or not the Harlequin RIP displays windows and dialogs. If you
would like to change this setting after install time, you can either use the SOAR control ripExec
option (see “Setting or changing the Harlequin RIP used in the Core Services” on page 83), or edit the
harlequinrip.txt file (see “harlequinrip.txt” on page 34).
Note: If at any point you are unsure whether the browser is showing the correct information, use the
browser’s Refresh option or press F5. See “Refresh” on page 43 for more information. If a refresh does
not rectify the problem, open a new browser window.
If you decided during the install procedure not to display your browser window, or if it is closed
while the JDF Enabler is still running, you can re-display the JDF Enabler web UI by opening a new
browser window and using the following URLs:
On Windows:
http://localhost:8080/soar/index.html
or:
http://<YOURHOSTNAME>:8080/soar/index.html
On Mac OS X:
http://<your machine name>:8080/soar/index.html
On Linux:
http://<IP address>:8080/soar/index.html
where 8080 is a typical port number used for your browser. This number could be something else, for
example: 80,8008 or 8080.
Note: For the URLs to work any pop-up blocker options should be disabled. See below for more
details.
The port number and context are configured in the WebGUIpart config file (called by default
jdfenabler.txt). This file can be changed by directly editing the config file or by using the SOAR
control jdfweb command.
The HTTP context for the web server defaults to /soar. but you can use just /if you wish.
For more information see “jdfenabler.txt” on page 34 and “Automatically starting the JDF Enabler
web browser” on page 84.
3.3.1 Pop-up blocking programs
If any of the popular pop-up advert blocking programs are activated, including the default option on
WinXP SP2, or most firewalls in their default configuration, they will view the JDF Enabler as
unwanted material, and kill it off.
Pop-up blocking utilities are designed to prevent web applications from popping up new browser
windows.The JDF web UI contains a small number of pop-ups, including the directory browser and
job details pages. These pages may be adversely affected by pop-up killer utilities. Most pop-up killer
software can be configured to allow pop-ups from certain sites/applications.
It is recommended that pop-up blocking software be disabled on the browser or it should be config-
ured to allow pop-ups from the JDF Enabler.

JDF ENABLER FOR THE HARLEQUIN RIP
INSTALLING AND STARTING THE JDF-ENABLED RIP INDEX CONTENTS 19
INDEX CONTENTS 19
For more information on pop-up blocking on WinXP SP2, please consult Harlequin technote
HQN 063.
Some browsers, such as Internet Explorer, have a toolbar Enable Pop-Up Blocker option which should
not be selected.
3.3.2 Log files
The most useful log file is logger.log. This file displays the messages useful for fault finding. You
will find this file in your standard install:
For Windows:
<installation dir>\SOAR\WebGUIServices\<version>\<revision>\win_32-pentium\rel
For Mac OS X, go to the following location and double click:
<installation dir>/SOAR/WebGUIServices/<version>/<revision>/macos_x-ub/rel
For Linux:
<installation dir>/SOAR/WebGUIServices/<version>/<revision>/linux_2-pentium/rel
When the logger.log file reaches 64 KB the data is copied into backup.log which also has a maxi-
mum file size of 64 KB. When the maximum file is reached the oldest data is overwritten with the
newest.
3.3.3 Helpful hints
If your system fails to start, the first thing to do is to check your logger.log file.
Some common observations are noted below:
A Harlequin RIP logo briefly appears but the system failed to start.
If you look in the logger.log file you may see the following messages preceded by the date and
time:
Licence: INFO: permit for this software not available
Licence: ERROR: Failed on first attempt to get license for product
Application Manager: ERROR: com.harlequin.DPP.SOAR.JDF.HarlequinRIP.EnablerPart
(could not decrypt class - is a licence available?)
If you do see these messages you do not have a valid Permit file. You should check that you have
a valid permit for the JDF Enabler and it is in the correct location. See “Getting a permit” on page
12 for more information.
The system failed to start and the following message is displayed:
License Server Failure (0xC800100D) permit for this product has expired
After dismissing this message by selecting OK the following message appears:
Fatal Security Device Failure
You should check that you have a valid dongle attached to your computer. You should also check
that you have a valid permit and that it is in the correct location.
The Harlequin logo appears but it has a red cross or disappears altogether.
The License Server is not running. Please check your documentation to start your License Server.

JDF ENABLER FOR THE HARLEQUIN RIP
INSTALLING AND STARTING THE JDF-ENABLED RIP INDEX CONTENTS 20
INDEX CONTENTS 20
3.3.4 The web UI and the JDF Enabler
The web UI is a way of monitoring and controlling the JDF Enabler. There is no requirement for the
web UI windows to be open for job processing to occur. Therefore, when your JDF Enabler services
are running, you may close the web UI. Job processing will continue as normal. When you decide to
re-display the web UI, you are able to view any messages that may have been generated in the
Alarm/Event logs. See “The Logs screen” on page 46 for more information.
3.3.5 Stopping the JDF Enabler
To stop the JDF Enabler services:
For Windows:
Select Start > Programs > Global Graphics > WebGUI Services> Stop Services.
Alternatively, you can right-click on the Harlequin logo in the System Tray and select Quit.
For Mac OS X:
In the System Dock hold down the Control key while clicking Harlequin Web GUI Services and
then choose Quit from the pop-up menu.
For Linux:
Select <install dir>/SOAR\Control/<version>/<revision>/linux_2-pentium/rel.
When using Linux you may drag and drop the SOAR icon into the terminal window and press
Return. Then type shutdown in the SOAR Control command line.
After a few moments the following message appears:
Shutdown request successful on localhost
You can click OK to remove the message. Alternatively, leave it for a few seconds and the message will
disappear.
When you stop the JDF Enabler, the web UI status window will continue to refresh. Once the RIP is
shutdown the web UI will display the message:
The page cannot be displayed
If you decide to restart the JDF Enabler, once the Harlequin RIP icon appears in the system tray (with-
out a red cross), you can simply refresh the web UI and the login prompt will re-appear.
3.4 Uninstalling the JDF Enabler
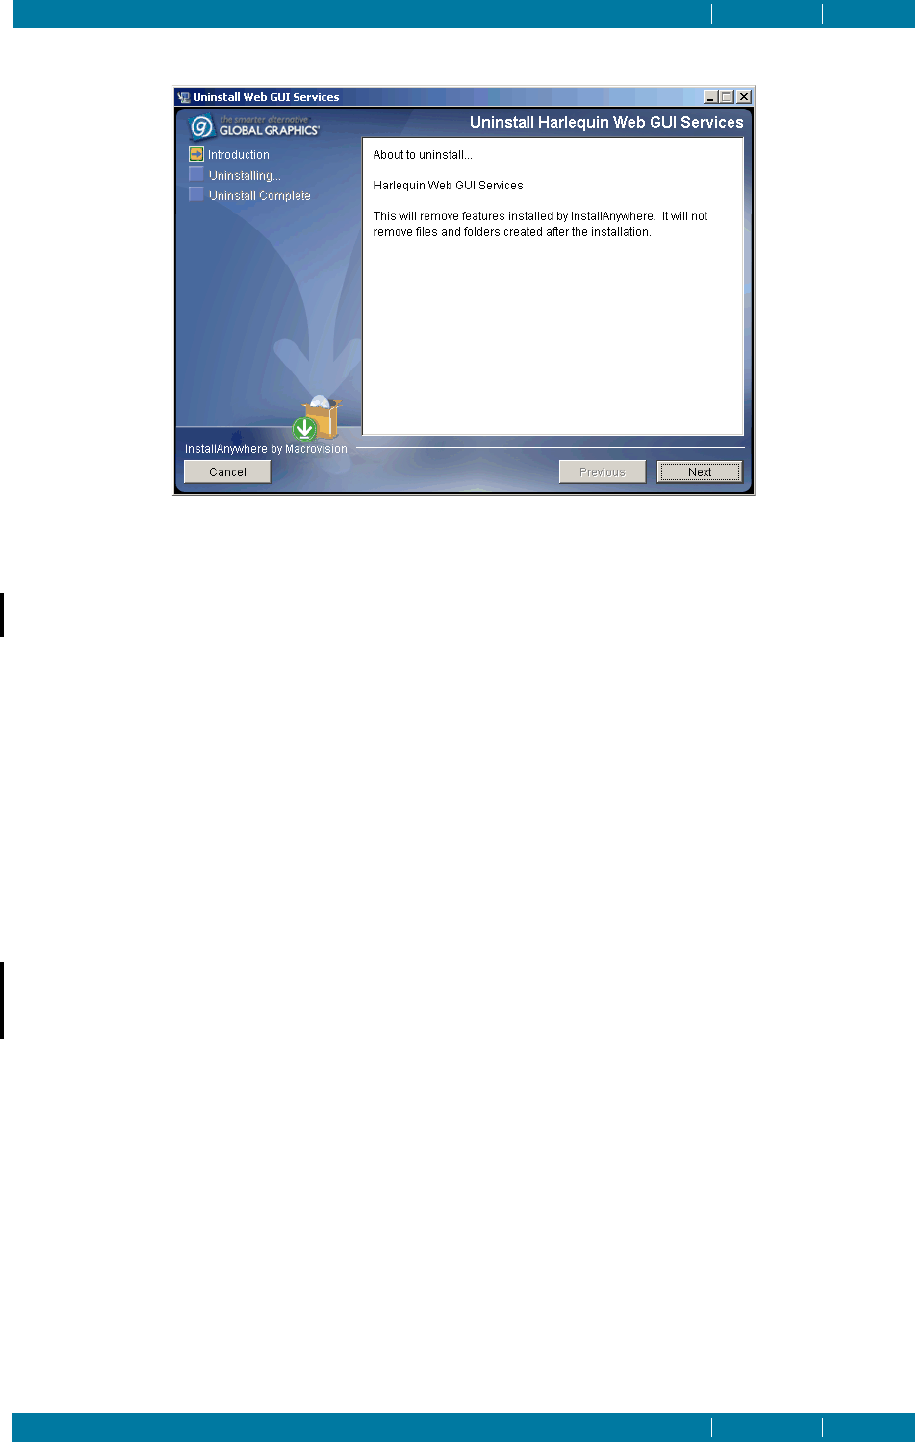
Use the Uninstaller, shown in Figure 3.3, to uninstall the JDF Enabler application from the server.
Uninstalling removes the native spooled printer jobs, channel settings and job processing data associ-
ated with the application, but it does not delete job files (PS, EPS, TIFF, and so on.) from your hot fold-
ers, nor your application base folder, if you have created one. If you have also installed the Harlequin
Print Production Manager, the uninstaller will remove this as well.
JDF ENABLER FOR THE HARLEQUIN RIP
INSTALLING AND STARTING THE JDF-ENABLED RIP INDEX CONTENTS 21
INDEX CONTENTS 21
Figure 3.3 The Uninstaller application
To uninstall Harlequin Web GUI Services:
1. If JDF Enabler is running on the server shut it down, as described in “Stopping the JDF Enabler”
on page 20.
2. Assuming you have installed JDF Enabler in the default location, run the Uninstaller application
as follows:
• On Windows, click:
Start > All Programs > Global Graphics> WebGUI Services > Uninstall WebGUI Services.
• On Mac OS X go to the following location:
<install dir>/Uninstall_Web_GUI_services
and double click Uninstall Web GUI Services.
• On Linux ES 4 go to the following location:
<install dir>/Uninstall_Web_GUI_services
and execute Uninstall_Web_GUI_Services.
Alternatively if you have created a link folder during the JDF installation go to the
installation directory and execute Uninstallion_Web_GUI_Services.
3. If you have installed PPM in an alternative location, the Uninstall application will be found at the
top level of the installation, wherever that is. Run the Uninstall application as follows:
• On Windows select
<installation directory>/WebGUI Services /Uninstall WebGUI Services.
• On Mac OS X, navigate to:
<installation directory>/WebGUI Services/
and double click Uninstall WebGUI Services.
4. Lastly, click Uninstall in the Uninstall window to run the JDF Enabler uninstaller.
INDEX CONTENTS 22
Chapter 4–-Configuration of the JDF-Enabled
RIP
When started, the JDF-Enabled RIP UI appears in the web browser displaying the Monitor screen.
Two other screens are available: Configure and Logs. Access these screens by selecting the Monitor,
Configure and Logs tabs in the web UI.
When you select Configure tab you can choose to configure either Channels,Logging or (RIP) Progress.
You may select the About option to display copyright and license information.
Note: Selecting the Harlequin RIP JDF Enabled logo, in the top left-hand corner of the Monitor win-
dow, also displays the About text.
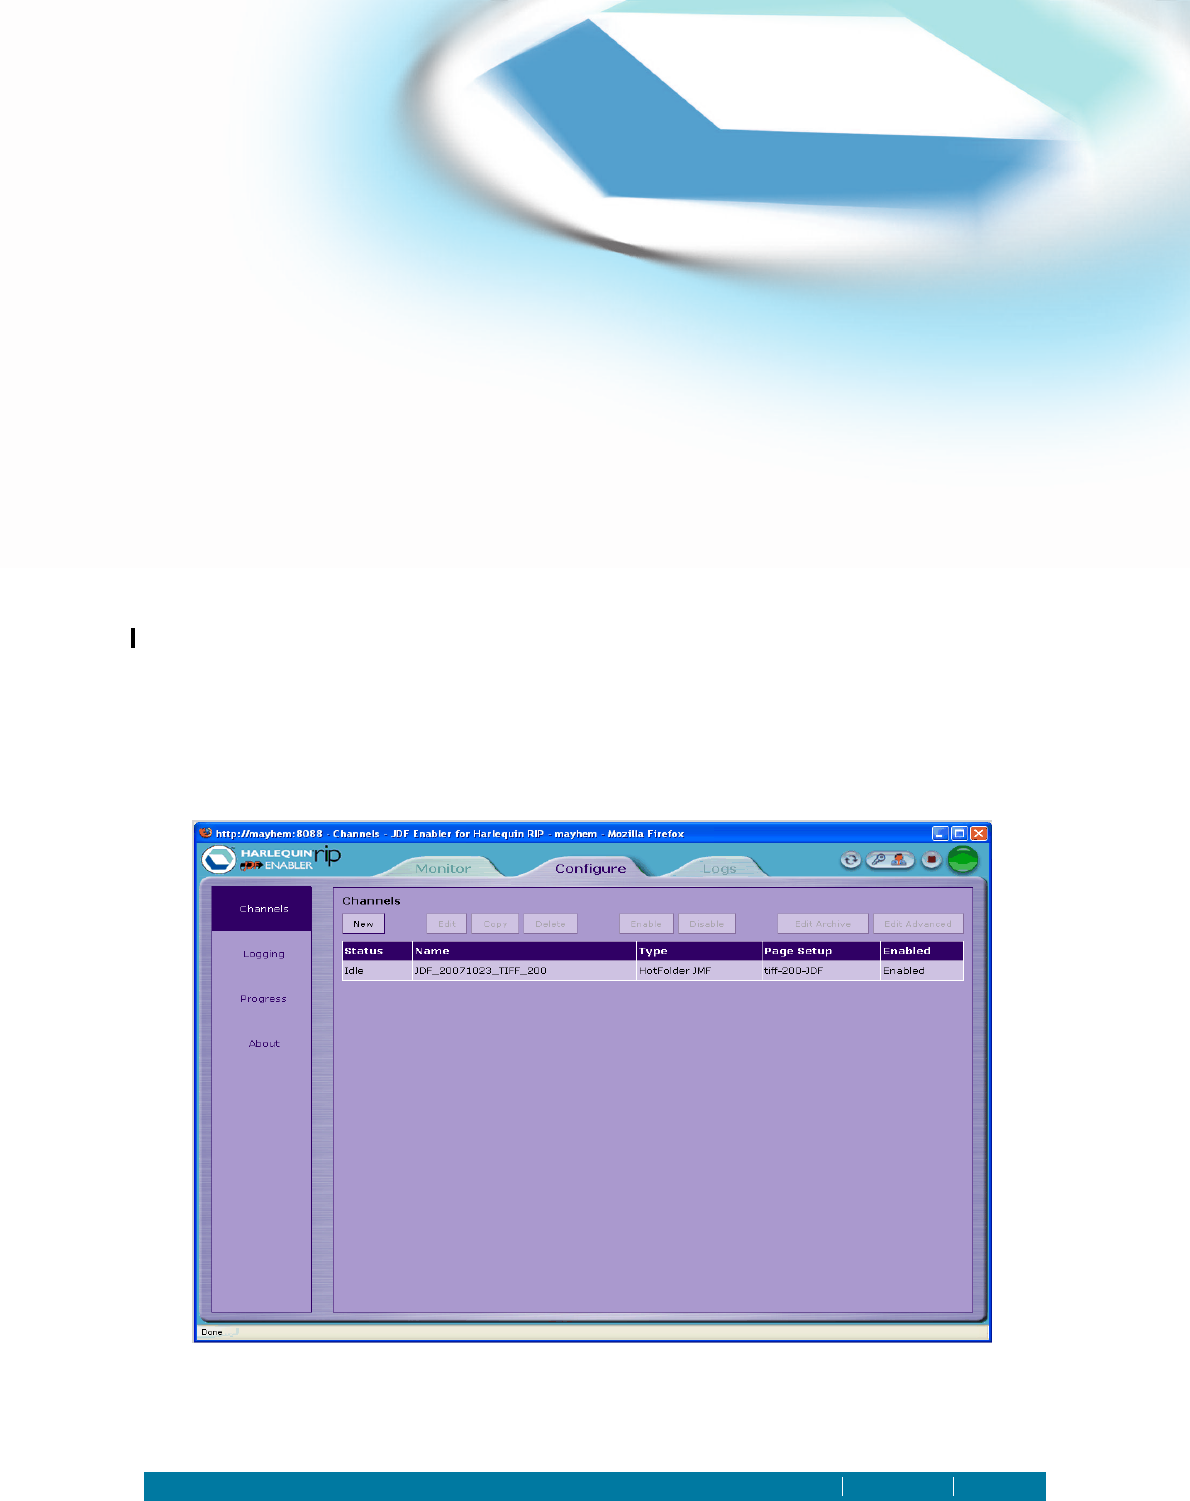
4.1 Creating input channels (Administrator)
This is where you will define the various routes for JDF jobs to enter and leave the system, and specify
the RIP Page Setups that are pre-loaded when processing them.
Before you are able to use the JDF Enabler you must configure one or more input channels.
To create and configure input channels you must be logged-in as Administrator. Users are able to view
the configuration of the Input channels.
When the JDF-Enabled RIP is used for the first time, an input channel must be configured. This is
done in the Configure screen with the Channels option selected:
Figure 4.1 JDF Enabler Configure Channels screen

JDF ENABLER FOR THE HARLEQUIN RIP
-CONFIGURATION OF THE JDF-ENABLED RIP INDEX CONTENTS 23
INDEX CONTENTS 23
Note: This image shows an existing channel. When you enter this screen for the first time no channels
will be present.
The options in this screen allow you to manage input channels. You can use the various Configure
options to view the current configuration. The following options are available:
Create New Channel Click this option to create a new channel. On selection the New Channel
screen appears. See “Create a new channel”on page 24 for more
information.
All options described below are available to Administrator level only (unless otherwise identified), and
affect the currently selected channel, which is identified by the radio button in the Select column of the
Channel screen.
Edit This allows some channel options to be edited or viewed. For more
information about editing a currently existing channel see “Editing
channels”on page 26.
Copy Click this option to copy the configuration of the currently selected
channel into a new channel.
Delete Click this option to remove the currently selected channel.
Enable Click this option to enable the currently selected channel. An enabled
channel will process jobs that appear in its hot folder.
Disable Click this option to disable the currently selected channel and stop pro-
cessing jobs.
Edit Archive This option allows you to manage your archive of job information. See
“Configuration of the archive (Administrator)”on page 28 for more
information.
Edit Advanced This option provides further configuration options for the currently
selected channel, including the configuration of replacement URLs and
throughput mode. For more information see “Edit Advanced
(Administrator)”on page 28.
JDF ENABLER FOR THE HARLEQUIN RIP
-CONFIGURATION OF THE JDF-ENABLED RIP INDEX CONTENTS 24
INDEX CONTENTS 24
4.1.1 Create a new channel
You must create at least one input channel so that JDF files can be input to the JDF Enabler. Select
Create New Channel from the Configure screen to display the New Channel screen:
Figure 4.2 JDF Enabler New Channel screen
The following options are available:
Enable Channel Select this check box to enable the new input channel. When a channel is
enabled it will process jobs.
Display Name Enter a name for your new input channel.
Unique ID The ID of the channel can only be set for a new channel, not an existing
one. When editing channels the Unique ID is displayed as read-only. A
unique ID is automatically generated and used as the initial value in the
Unique ID field for any new channel. At this stage the ID may be edited.
You must however ensure the ID you select is unique.
The following characters are not allowed: space, any brackets, plus sign,
forward and back slash (PC/UNIX file separator), colon (Mac File sepa-
rator), question mark, star (wild cards). Note that dash (minus sign), dot
and underscore are allowed. It is recommended that you use
alpha/numerics and underscore.
JMF messages always identify the channel by its unique ID.

JDF ENABLER FOR THE HARLEQUIN RIP
-CONFIGURATION OF THE JDF-ENABLED RIP INDEX CONTENTS 25
INDEX CONTENTS 25
Page Setup Select from the menu the Harlequin RIP Page Setup you want to associ-
ate with this new channel.
You cannot use a Page Setup with the Preview device, and any Page
Setup using this device is excluded from the JDF GUI. In addition to
this, the JDF Enabler will attempt to create a suitable Page Setup if none
exists on RIP start-up. To enable this automatic creation, you must have
the None and/or TIFF plugin installed in your RIP.
Input The Input section specifies the JDF input parameters. A channel has two
possible types of submission, one or both of which may be active. They
are hot folder and JMF submission by HTTP.
The Hot Folder check box enables submission by hot folder. The text box
displays the path of the folder into which files to be processed are
dropped. To generate this path, select the check box followed by Choose
Folder. In the dialog that appears either, directly enter the folder path, or
navigate to the folder using the various icons. (Note that clicking the
folder icon at the top of the chooser moves you up a directory level.) See
“Hot folders, Output folders and Auxiliary files”on page 26 for more
information. An example hot folder path could be:
C:\JDF_input\HotFolder
A hot folder can only be associated with a single input channel. If you
choose a hot folder which is already in use, a message will appear
(when you select OK), indicating this. You must select the Go Back but-
ton and choose a new hot folder.
Period (in seconds) specifies the rate at which the hot folder is polled for
files. A value of 3 seconds indicates that the hot folder is checked for
files every 3 seconds.
Stabilization specifies the length of time the size of a file must remain con-
stant before it can be processed. This is important when large files are
delivered across a network. You would configure a higher stabilization
value to prevent the file from being processed before it is complete.
The JMF check box, enables JMF submission. The text box displays the
URL for submission, which is automatically created by the JDF Enabler.
The URL in this field should be copied into the appropriate place in the
third-party application which is sending JMF. This text box gets its con-
tent when the JMF check box is selected.
Output When the JDF Enabler processes a JDF file, it can optionally rewrite an
updated version of that file to another directory.
Select the Output Folder check box to enable the JDF file rewrite. The text
box displays the path of the folder into which output files will be writ-
ten. To generate this path, select the check box followed by Choose
Folder. In the dialog that appears either, directly enter the folder path, or
navigate to the folder using the various icons. (Note that clicking the
folder icon at the top of the chooser moves you up a directory level.) See
“Hot folders, Output folders and Auxiliary files”on page 26 for more
information. An example folder path could be:
C:\JDF_output
When saving a JDF file to the previously selected Output folder, the JDF
Rewrite option allows you to select various JDF file rewrite levels includ-
ing: Status updates,Audit terse and Audit verbose.
When you have completed the configuration, select OK to save the details. Selecting Cancel aborts any
configuration settings.

JDF ENABLER FOR THE HARLEQUIN RIP
-CONFIGURATION OF THE JDF-ENABLED RIP INDEX CONTENTS 26
INDEX CONTENTS 26
If you have missed any important configuration fields, or selected a hot folder which is already in use,
a message will appear, and you will be able to select a Go Back button and change your settings.
4.1.2 Editing channels
Once a channel is created some of the options relating to that channel can be subsequently edited,
whereas other options may not.
In the Configure screen with the Channels option selected, you should click the radio button in the
Select column for the channel you want to edit. Now click the Configure button. The Edit Channel
screen will appear displaying the currently selected options for that channel.
Please note that the properties of a channel are captured when sub-jobs are queued to the RIP. This
means that if you have several pending jobs queued to the RIP, and then you modify the properties or
a channel, the pending jobs will behave according to the old channel properties, not the new ones.
Only jobs that are submitted after the channel edits will behave according to the modified channel
properties.
The following properties can be edited:
Channel name The Channel name can be edited. However, if the Channel name has
been used in any workflows, care should be taken before it is changed.
Channel Enable and Disable
You can choose to enable or disable a channel from the Edit Channel
screen. Alternatively, in the Channels screen you can select the channel
and use the Enable or Disable buttons.
Hot Folder period This option can be changed if a hot folder is being used.
Hot Folder stabilization This option can be changed if a hot folder is being used.
JDF rewrite level If an Output folder is being used you can change the JDF rewrite level.
The options which cannot be changed after a channel has been created are; the Unique ID, the selec-
tion of the hot folder, whether the channel is JMF enabled, or the selection of the output folder. That is,
you cannot add a hot folder, make the channel JMF enabled or add an output folder to an existing
channel that does not already have it. You can view the selected channel’s settings by clicking the
Configure option in the Channels screen.
4.2 JMF Submission
Any third-party application submitting JMF files to the JDF Enabler needs to know about one of the
JMF input channels in the JDF Enabler. The URL which is displayed in the JMF field of the New Chan-
nel or Edit Channel screen should be copied into the appropriate place in the third-party application
configuration. You can view the JMF URL by displaying the Configure screen; selecting the appropri-
ate channel, and clicking the Configure button.
If a JMF job is submitted to a disabled channel, the job is rejected and a message is logged. All other
channels will continue to work as normal.
4.3 Hot folders, Output folders and Auxiliary files
The same method is used to select hot folders, output folders and the Auxiliary file. After the first
install of the JDF Enabler, and when you first log in to the JDF Enabler web UI, the default folder
shown by each of the folder chooser dialogs is the folder containing the JDF services executable. This
is typically deeply-buried and not very helpful.

JDF ENABLER FOR THE HARLEQUIN RIP
-CONFIGURATION OF THE JDF-ENABLED RIP INDEX CONTENTS 27
INDEX CONTENTS 27
You can change the default folder by editing the hostServer.txt file. For more information, see
“hostServer.txt”on page 33.
For the duration of a session, the web UI does remember the last place selected as a hot folder or out-
put folder. Therefore, if you configure a channel with a hot folder at: C:\1hotfolder,the next time you
configure another channel, it will start from that location.
It is important to note that the folder being chosen is on the server machine, not the web client
machine. It is possible that the client and server machines may be on different operating systems, with
different ideas of what a file system looks like.
Before attempting to assign a hot folder to an input channel or selecting an output folder, you must
first create the folder on the server. When you subsequently select the Choose Folder button you are
presented with a chooser screen allowing you to navigate to the required folder:
Figure 4.3 JDF Enabler folder selection
If you wish, you may enter the path of a directory into the file chooser and go straight to that directory
by selecting the Go To button. If the path you enter is invalid, a red error message appears, and the
chooser remains at its current location.
Click any icon with a gray surround to navigate to that folder. Click the top-most icon to navigate up
the tree. When you have found the required folder or file (in the case of the Auxiliary file), click the
button next to the folder icon. In the Hot folder browser this is the Use as Hot Folder button, and when
choosing an Output folder this is the Use for Output button. The Auxiliary file chooser displays a Use
as Auxiliary button. On selection the chooser will close and your chosen folder or file name appears in
the appropriate text window.
4.3.1 Hot folder sub folders
When a hot folder is selected for an input channel and the configuration is completed by selecting OK,
three sub-folders are automatically created. These folders are:
Complete This is where the original JDF files that successfully complete are stored.
Error This is where original JDF files that caused an error are stored.

JDF ENABLER FOR THE HARLEQUIN RIP
-CONFIGURATION OF THE JDF-ENABLED RIP INDEX CONTENTS 28
INDEX CONTENTS 28
Submitted This is a temporary store for input JDF files when they have been sub-
mitted to the JDF Enabler.
Users or external programs place files into the hot folder directory. When the file is stable, it is moved
from the hot folder to the Submitted sub-folder. If there is already a file with the same name, a unique
name is created. The job file stays in the Submitted folder while it is being processed by the JDF
Enabler. When processing completes, the file is moved to the Completed or Error sub-folder. In this
move, any same-name file already there is overwritten.
It is important to note that the files in the Complete and Error folders are never purged. Therefore,
care should be taken to avoid excessive file build-up.
4.4 Configuration of the archive (Administrator)
The configure archive parameters control how long the JDF job information (name, status, joblog and
so on) is stored within the JDF Enabler, once processing of the job has completed.
To change the configuration of the archive you must be logged-in as Administrator.Users are only able
to view the configuration of the archive.
The archive parameters can be configured for each individual input channel. Select the Channel (in
the Select column of the Channel screen), followed by clicking the Edit Archive button.
This job information is not the same as the job file itself.
The following options are available for Completed jobs and Failed jobs, that is, jobs which have been
processed successfully and those which have not.
Auto-Destroy Policy The options available allow you to delete the jobs Immediately or Never.
In addition, selecting the Max Jobs option will delete the oldest file once
the Max Recent Jobs value is reached. Selecting the Max Age option means
that the job information is removed from the JDF Enabler, once its age
reaches the value set as the Time-Out Minutes.
The default Auto-Destroy policy is set to remove Completed jobs after
one day (1440 minutes), and Failed jobs after three days (4320 minutes).
Time-Out Minutes This sets the maximum length of time a job information file can remain
in the JDF Enabler before it is removed when Max Age is selected as the
auto-destroy policy.
Max Recent Jobs This sets the maximum number of job information files that can remain
in the JDF Enabler when Max Jobs is selected as the auto-destroy policy.
When the configuration is completed, click OK to save the changes. Selecting Cancel aborts the
changes and closes the Configure Archive screen.
4.5 Edit Advanced (Administrator)
When a channel has been created you may apply further configuration options to the channel.
To change the Advanced configuration you must be logged-in as Administrator.Users are only able to
view the Advanced configuration options.
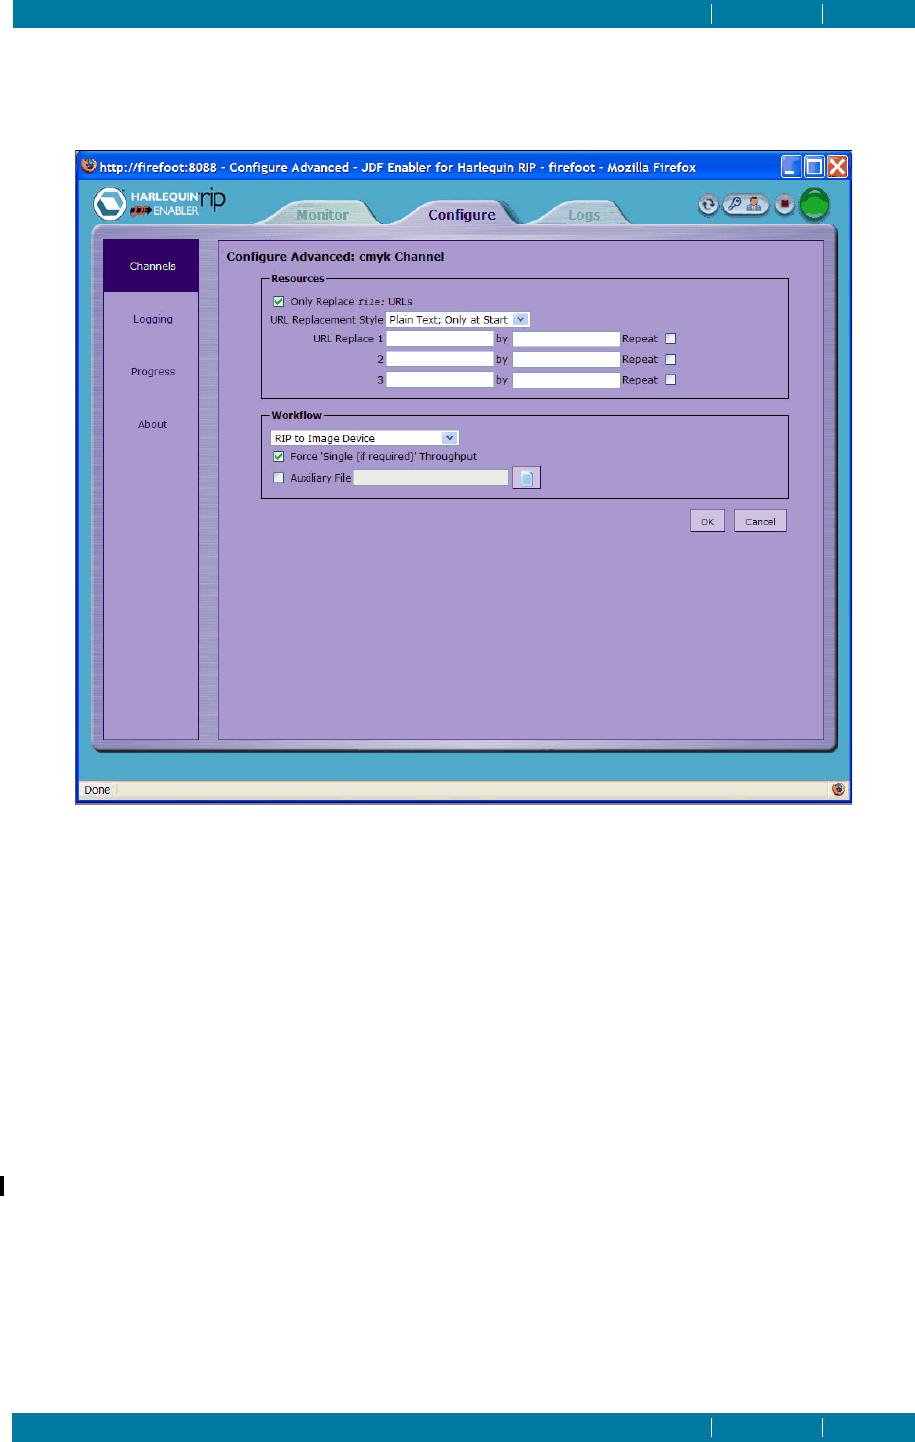
JDF ENABLER FOR THE HARLEQUIN RIP
-CONFIGURATION OF THE JDF-ENABLED RIP INDEX CONTENTS 29
INDEX CONTENTS 29
The Advanced configuration options can be configured for each individual input channel. Select the
Channel (in the Select column of the Channel screen), followed by clicking the Edit Advanced button.
On selection the following screen appears:
Figure 4.4 JDF Enabler Configure Advanced Screen
Resources The URL Replacement Style option defaults to Plain text only at start
(initial simple string), for new channels. Any existing channel will dis-
play Regular Expression, for backwards compatibility.
The first text box on each line can contain a regular expression or a sim-
ple string for text to find within a URL. The second box is for literal text
with which to replace the found text. The Repeat check box controls
whether just the first occurrence, or all occurrences of the text found,
will be replaced.
The server has the ability to apply the text replacement either to just
file: URLs or to all URLs depending on the setting of the Only replace
file URLS option. The web UI only allows three find-replace pairs to be
configured.
For more information see -urlReplacement on page 38.
Examples of replacements URLS are:
Replace:
localhost
by:
<mymachine>.<mynetwork>.co.uk
This replaces “localhost” with a different host.

JDF ENABLER FOR THE HARLEQUIN RIP
-CONFIGURATION OF THE JDF-ENABLED RIP INDEX CONTENTS 30
INDEX CONTENTS 30
Replace:
file:///share/<directory>/<filename>
by:
file://<PCname>/share/<directory>/<filename>
Note the two //after file.
Replace:
/olddir.*/
by:
/newdir/
This replaces any directory starting olddir (including subdirectories)
with newdir (no subdirectory).
For more information on regular expressions see:
http://java.sun.com/j2se/1.4.2/docs/api/java/util/regex/Pattern.ht
ml
Workflow In the selector you can choose either; RIP to Image Device, which
should be used when outputting directly to an output device such as an
imagesetter; or RIP to File and Queue for Output which should be
used when the RIP is producing disk-based files (such as TIFF), that are
consumed by a separate OEM developed process such as a shooter. For
more information see Appendix F, “TIFF output integration”
Not all channels have a workflow style defined; therefore, if there is no
value set prior to submission, the channel is given the workflow style
RIP to Image Device.
By default, JDF jobs delivered to the Harlequin RIP are always dealt
with as if the RIP were running in Single-If mode, even if its global set-
ting is Multiple/Parallel. This is normally desirable for the most reliable
communication between the JDF Enabler and third-party JDF compo-
nents. Unchecking the Force “Single (if required)” Throughput option over-
rides this, and allows the RIP to use Multiple/Parallel mode for JDF
jobs. It is important to remember that if you allow the RIP to work in
Multiple/Parallel mode, the JDF Enabler will consider jobs to have been
completed as soon as all of their Page Buffers have been painted to disk.
This can cause it to indicate that ExposedMedia resources are available
prematurely, which could potentially confuse other components of a
JDF workflow. The use of Single-If mode eliminates this concern, hence
the reason why it is configured as the default condition.
Auxiliary file The Auxiliary file option is available so you can use PostScript language
files, such as page device keys or plugin parameters, to configure your
JDF input channel. This allows PostScript language overrides to be inte-
grated with the job submission. Jobs submitted through this channel
maintain a reference to the selected Postscript language file as they pass
through to the RIP.
You can consider an Auxiliary file as the same as a page feature (as used
with the RIP), except that it is specifically for JDF.
Note: If you do select an incorrect Auxiliary file, you can remove the
selection by unchecking the Auxiliary file check box and then closing the
Configure Advanced screen. You may then re-select the Configure
Advanced screen and try again.

JDF ENABLER FOR THE HARLEQUIN RIP
-CONFIGURATION OF THE JDF-ENABLED RIP INDEX CONTENTS 31
INDEX CONTENTS 31
It is important to note that the PostScript language file is executed with-
out any special error handling or protection. This means that if the file
generates an error, the job will be halted, and marked as a failure. For
more information on how to select the Auxiliary file see “Hot folders,
Output folders and Auxiliary files”on page 26.
4.6 Logging configuration (Administrator)
By selecting Logging in the left-hand window of the Configure screen you are presented with options
to configure the logging information.
To change the Logging configuration you must be logged-in as Administrator.Users are only able to
view the logging configuration.
Two types of log are available; the Alarm/Event Log and the RIP Monitor Log.
The RIP Monitor Log is a copy of what you would normally see in the monitor window of the Harle-
quin RIP. Most messages are stored with a reference to the current job. A few messages (such as start-
up messages), are not job-specific.
The Alarm/Event Log is specific to SOAR and is where SOAR components can write messages that
could be useful for auditing or for solving problems. Most Alarm/Event Logs are not job-specific, but
they all have a textual category and a severity level.
The configuration options are the same for both RIP Monitor Logs and Alarm/Event Logs.
Current Size (kilobytes) This (non-editable) field displays the current size of the log.
Log-Full Action The options in this field decide what to do when the log becomes full
(according to the Max. Size value). If Halt is selected, no more logging
will occur when the log is full. You should select this option if you want
to ensure old log messages are never lost. If Wrap is selected, any new
messages will replace the oldest existing messages. The Wrap option is
the most usual selection.
Max. Size (kilobytes) This option specifies the maximum size of the log.
Max. Record Life (minutes)
This option specifies the maximum life of a record. When a record
reaches the end of its life it is removed from the log.
Note: To maintain optimum memory usage it is advisable to set Max. Size or Max. Record life (min-
utes) to reasonably small values. All the message logs can be sorted and viewed using various options
and filters. For more information see “Logging configuration (Administrator)”on page 31.
4.7 Reset to Defaults
A facility for returning the JDF-Enabled RIP to its factory settings is provided. This option should be
used with caution as any changes you have made to the configuration, including the creation of any
input channels, will be lost.
To return the JDF-Enabled RIP to its factory settings:
1. Stop the JDF-Enabled RIP.
2. Select Start > All Programs > Global Graphics > Web GUI Services > Reset to Defaults.

JDF ENABLER FOR THE HARLEQUIN RIP
-CONFIGURATION OF THE JDF-ENABLED RIP INDEX CONTENTS 32
INDEX CONTENTS 32
The following message appears:
3. Select Yes to continue to reset the JDF-Enabled RIP back to its factory settings. Select No to cancel
this option.
4. Restart the system. All previous configuration options are now removed.
4.8 RIP progress configuration
You can monitor the activity of the Harlequin RIP directly from the JDF Enabler. See “RIP monitor”on
page 42 for details on how to view the RIP Monitor. The information displayed in the Activity and
Progress sections of the RIP Monitor depend on the RIP progress configuration (see below) or the con-
figuration of the SOAR control command joblogger. This command accepts two optional options, -
progress and -detail. For more information see “Job logging”on page 81.
To display the RIP Progress Configuration screen make sure the Configure tab is selected and then click
Progress. You may select any of the following options:
Publishing The setting up of input channels, for example AppleTalk.
Bound Bound inputs to the RIP, such as a static job file on disk. Bound progress
is used when the total size of the data is known ahead of time, making it
possible to express the amount consumed as a fraction of the total.
Unbound Unbound inputs to the RIP, for example, a channel. Unbound progress
is when the size of the data is not known in advance. The RIP keeps
reading the data until the input is exhausted. In this case, it is impossible
to express the progress as a fraction or percentage. The RIP therefore
provides a counter of how much data has been read so far.
CRD Generation The generation of CRD caches. That is, the process of interpolating data
points in a color profile.
Recombination This is where the RIP is trying to match up graphic objects in pre-sepa-
rated jobs, in order to recombine the input.
Note: Recombine is explicitly disabled for JDF jobs.
Screening Generation
The generation of Halftone caches.
Trapping Transfer The transfer of the display list to trapping.
Trapping Generation
The progress of the trapping.
Painting To Disk The generation of PGBs on disk.
Output (Ripped and Printed)
The transfer of raster data to the output device.
Compositing Progress of compositing.

JDF ENABLER FOR THE HARLEQUIN RIP
-CONFIGURATION OF THE JDF-ENABLED RIP INDEX CONTENTS 33
INDEX CONTENTS 33
Preparing To Render
Progress of Preparing to Render.
Note: Displaying more types of progress information may affect performance.
When you have made your selection click OK. A message indicating that your changes have been
applied will appear. Clicking Cancel will abort any changes you have made.
4.9 Editing configuration files
Anumber of user editable files are provided which allow you to configure your system to more suit
your working environment.
To ensure that any changes you make to these files are implemented, it is important that you stop the
JDF-Enabled RIP, edit the files and then re-start.
For a standard Windows installation you will find the configuration files at:
C:\Program Files\Global Graphics\WebGUIServices\SOAR\WebGUIServices\<version>\
<revision>\all-all\all\config
For a standard Mac OS X installation you will find the configuration files at:
Applications/Global Graphics/WebGUIServices/SOAR/WebGUIServices/<version>/
<revision>/all-all/all/config
For a standard Linux installation you will find the configuration files at:
/<install folder>/Global Graphics/WebGUIServices/SOAR/WebGUIServices/<version>/
<revision>/all-all/all/config
4.9.1 hostServer.txt
This file sets the “SOAR host server base directories”. The web UI uses the first host server base direc-
tory, if any, as the initial default folder in a chooser.
If for example, you want the folder chooser to start at C:\, add the following lines to hostServer.txt:
-mount
rw
C:\
4.9.2 networking_choice.txt
SOAR provides a method of maintaining connections between objects which can be re-established in
later sessions. This method is managed using networking_choice.txt. The file contains a single
string, selected from the following:
ip Machines are referenced by their numeric IP address. This is the most
sensible default, but requires that the underlying network configuration
will maintain static IP addresses for all machines involved in the SOAR
configuration.
fqdn Machines are referenced by their fully-qualified domain names. This
option is the alternative to use in a distributed system where IP
addresses are not guaranteed to remain static, and domain names are

JDF ENABLER FOR THE HARLEQUIN RIP
-CONFIGURATION OF THE JDF-ENABLED RIP INDEX CONTENTS 34
INDEX CONTENTS 34
expected to exhibit greater stability. The SOAR server networking policy
fqdn will not work on a Windows 2000 machine unless that machine
specifies a primary DNS suffix.
localhost A special case for when the entire “SOAR world” is confined to a single
machine, with no network communication between components. This
option can be used when installing SOAR-based products on laptops for
demonstration purposes. Currently, the JDF Enabler always automati-
cally sets networking_choice.txt to localhost to simplify single-
machine installation.
It is important to note that the JDF Enabler can be configured as a
“SOAR world” which is distributed across a number of machines. For
more information, see “Configuring the networking mode”on page 79
and the SOAR documentation.
If you do decide to change the networking_choice.txt file, you should also select the Reset to Defaults
option before restarting. For information on this option see “Reset to Defaults”on page 31.
There is a networking_choice.txt file for each Java SOAR product. In the JDF Enabler for the Harle-
quin RIP, these products are: DPPprod_jdf_services and DPPprod_soar_control. It is important that
both the files contain the same value.
Alternatively, the SOAR Control application can be used to edit the networking_choice.txt file. This
method has the advantage that it will locate both the networking_choice.txt files in an installation
and change them to the new value.
The SOAR Control application is invoked from the Operating System command line. For more infor-
mation see Appendix E, “SOAR Control tool”.
4.9.3 harlequinrip.txt
This file locates the Harlequin RIP executable associated with the JDF Enabler, and should not be
edited unless you wish to reference another RIP. In this case, your Page Setups and other configura-
tion options may not be valid.
The JDF Enabler is installed as a default with the Harlequin RIP UI displayed. If however you would
like to remove access to the RIP UI while running the JDF Enabler, you may edit the
harlequinrip.txt file.
The default option is to display the Harlequin RIP UI and uses:
-gui
To run a Harlequin RIP with no UI use:
-headless
This option suppresses the Harlequin RIP Classic UI and configures the RIP as a headless RIP by set-
ting non-throughput mode, starting inputs and so on.
4.9.4 jdfenabler.txt
Various parameters are set in the configuration file associated with the JDFWebGUIPart; the name of
that configuration file is jdfenabler.txt in a default installation, but its name may be changed by
altering the coreconfig configuration file.
The settings in the jdfenabler.txt file control the web server. The main effect of changing -port or -
context is that the URL to the web UI will change.

JDF ENABLER FOR THE HARLEQUIN RIP
-CONFIGURATION OF THE JDF-ENABLED RIP INDEX CONTENTS 35
INDEX CONTENTS 35
Note: After you have configured and been using the JDF Enabler it is possible to change the web
server -context and/or -port settings and not to break the JMF input. The URLs will, of course
change, but providing that the new URLs are used, then JMF input to existing channels will work.
The full set of options available are:
-port The HTTP port number for the web server. It defaults to 8080, but you
may use 80 which is the standard port for the World Wide Web. If the
port is set to 80, most browsers will not require the port number to be
specified in the URL.
-startBrowser -noBrowser
With -startBrowser (the default option) an attempt is made to start a
web browser on the local machine, displaying the “Welcome” page of
the web UI. When the
-noBrowser option is used no web browser is started.
-context The HTTP context for web server. It defaults to /soar. but you can use
just /if you wish.
-base Local directory as base of file resources for web server. A use of this
would be to serve up PDL files.
4.10 Automatic channel creation
You can instruct the JDF Enabler to automatically create one or more input channels when it starts up,
without having to use the web UI. Automatic channel creation, or auto-instantiation, is a useful feature
for two main reasons:
• It is quick because it requires no form filling in the web UI.
• It provides stable and repeatable identities for channels, which means that their JMF input URLs
remain constant, even when the channel is deleted and re-created. This remains true even when
the Reset to Defaults option is used. Because of this, you may publish the URLs to external parties
(such as JDF Controllers), certain in the knowledge that those URLs will continue to work.
To configure automatic channel creation, you must supply the JDF Enabler with a series of command
arguments that provide the details for the channels that you want to create. These arguments are
listed in a simple text file within the application config directory. This text file can be given any name,
but the recommended name is enabler.txt. This text file can be used to set up any number of chan-
nels. When you have created this file, it must be linked to the JDF Enabler by editing the coreconfig,
file which is in the same directory.
Alter the line that reads:
com.harlequin.DPP.SOAR.JDF.HarlequinRIP.EnablerPart
so that it reads:
com.harlequin.DPP.SOAR.JDF.HarlequinRIP.EnablerPart enabler.txt
The JDF Enabler will now consult the enabler.txt file whenever the JDF Services are started. How-
ever, channels are only created where they do not already exist. If you delete channels (or use the
Reset to Defaults operation), the missing channels will be created again as soon as the Services are re-
started, but channels that already exist will not be re-created.

JDF ENABLER FOR THE HARLEQUIN RIP
-CONFIGURATION OF THE JDF-ENABLED RIP INDEX CONTENTS 36
INDEX CONTENTS 36
4.10.1 Enabler.txt
The format of enabler.txt file is shown below. The argument file tells the JDF Enabler to auto-instan-
tiate a single input channel called “My Automatic Channel”, with hot folder as well as JMF input:
# Automatic Channels for the JDF Enabler
# (Comments starting with # are ignored in argument files.)
-minimumFreeSpaceInK
4096
-downloadBufferInK
64
-channel
-id
channel1
-name
My Automatic Channel
-in
C:\HotFolder1
-out
C:\OutputFolder1
-jmf
-enabled
-rewrite
RL1_AuditVerbose
-psu
Default Page Setup
-urlReplacement
localhost
charcoal.cam.harlequin.co.uk
true
As with all argument files in the application config directory, arguments are listed one-per-line, with
blank lines being ignored, and lines beginning with the #character treated as comments.
The following sections describe the general form of the argument sequence used to create a channel.
4.10.1.1 -channel {option}
The options are:
-id identity. The unique identity of the channel. It is recommended that
you always supply this option, although it will default to autochannel if
no id is supplied (which obviously is only useful once). The identity
should be a unique name, containing only about 4-15 alphanumeric
characters (strictly no spaces or punctuation). Not only does this iden-
tify the channel, but it also forms the leaf part of the JMF upload URL, if
the channel is JMF-enabled.
-name name. The readable name of the channel, as printed in the Channels
Table in the Configure tab of the web UI. This need not be unique, and
there are no restrictions on how it is made up. The default value is Auto
Channel, but you would normally provide a value so that channels are
easily identified in the web UI.
-in hot folder name. Gives the absolute path to a directory (which must
already exist) to use as the input hot folder for the channel. Only directo-
ries on the JDF Enabler's local machine can be specified. If you do not
provide this argument, the channel is created without hot folder input.

JDF ENABLER FOR THE HARLEQUIN RIP
-CONFIGURATION OF THE JDF-ENABLED RIP INDEX CONTENTS 37
INDEX CONTENTS 37
-out output directory name. Gives the absolute path to a directory (which
must already exist) to use as the output folder. The JDF Enabler will re-
write JDF documents into this folder after they have been processed.
Only directories on the JDF Enabler's local machine can be specified. If
you do not provide this argument, the channel will not re-write jobs
after processing.
-jmf Makes the channel a JMF-enabled channel. If you do not supply this
switch, no upload URL will be created for JMF.
-enabled Makes the channel enabled, and so available for immediate use. You
would normally want to supply this option.
-rewrite [ RL1_StatusUpdates | RL1_AuditTerse | RL1_AuditVerbose ]
Indicates the level of detail used when JDF documents are re-written to
the channel's output directory. Defaults to RL1_AuditTerse.
-psu page setup name. When using JDF with the Harlequin RIP, this argu-
ment indicates the name of the Page Setup that should be used to pro-
cess jobs in the channel. Defaults to None 300 CMYK Comp. If you use a
different name, you must ensure that a Page Setup of that name has
actually been created in the Harlequin RIP. Unfortunately, the JDF
Enabler cannot reliably validate the Page Setup name when the channel
is created, therefore if you input an incorrect name jobs using that
channel will fail.
You cannot use a Page Setup with the Preview device, and any Page
Setup using this device is excluded from the JDF GUI. In addition to
this, the JDF Enabler will attempt to create a suitable Page Setup if none
exists on RIP start-up. To enable this automatic creation, you must have
the None and/or TIFF plugin installed in your RIP.
-jmfInput <filename>
This can be used to pre-configure the JMF processing. In particular, it
can be used to configure fixed communication channels with other com-
ponents. For example, a repeating message reporting the status of a
channel to a known URL can be configured in this way.
If -jmfInput is supplied, it should refer to a file containing a JMF mes-
sage which will be read on startup and submitted to the channel as if it
had been received over HTTP. The reply to this automatically read
message is written by default to the same file name with
-response on the end of the name (but before any extension).
The -jmfInput option works in the same way as all of the other options:
it is only consulted when the channel is created, and not every time the
JDF Services are started. As with everything else in the auto-instantiate
file, you must delete the channel (or do a factory reset) if you want the
JMF message to be submitted again.
-jmfOutput <filename>
If you want to override the output file name for the response to the auto-
matically read JMF message
-jmfOutput can be used.
-tp throughput. By default, JDF jobs delivered to the Harlequin RIP are
always dealt with as if the RIP were running in Single-If mode, even if
its global setting is Multiple/Parallel. This is normally desirable for the

JDF ENABLER FOR THE HARLEQUIN RIP
-CONFIGURATION OF THE JDF-ENABLED RIP INDEX CONTENTS 38
INDEX CONTENTS 38
most reliable communication between the JDF Enabler and third-party
JDF components. Supplying the -tp switch overrides this, and allows
the RIP to use Multiple/Parallel mode for JDF jobs, should you require
this. It is important to remember that if you allow the RIP to work in
Multiple/Parallel mode, the JDF Enabler will consider jobs to have com-
pleted as soon as all of their Page Buffers have been painted to disk. This
can cause it to indicate that ExposedMedia resources are available prema-
turely, which could potentially confuse other components of a JDF
workflow. The use of Single-If mode eliminates this concern, hence the
reason why it is configured as the default condition.
-auxiliaryFile <filename>
auxiliary file. This specifies an auxiliary PostScript language file
used to configure your JDF input channel. The PostScript language file
is executed without any special error handling or protection. Therefore,
if the PostScript language file generates an error, the job will be halted,
and marked as a failure.
-workflowStyle
[ RIPToFileAndQueueForOutput | RIPToImageDevice]
workflow style. This specifies the workflow style of the channel. When
using the JDF Enabler directly connected to an output device, such as an
image or plate setter, the RIPToImageDevice option would be used.
When outputting to a disk-based image format such as TIFF, and inte-
grating with a third-party TIFF shooter, the
RIPToFileAndQueueForOutput option should be used. If no option is
specified RIPToImageDevice is assumed. For more information on inte-
gration with a third-party TIFF shooter see Appendix F, “TIFF output
integration”.
-urlReplacement
Channel instantiation using the enabler.txt file accepts configuration
of an arbitrary number of -urlReplacement switches. This allows URLs
within a file to be automatically replaced with a new URL. The follow-
ing is an example:
-urlReplacement
localhost
charcoal.cam.harlequin.co.uk
true
This first value can contain a regular expression, depending on the con-
figuration of -urlRegex (see below), for text to find within a URL. The
text string, in this case is localhost.
The second value is the text used to replace the regular expression.
The Boolean (optional) controls whether just the first occurrence, or all
occurrences of the found text, will be replaced. If no value is given, it
defaults to false.
-urlRegex If present, regular expressions are used, otherwise initial simple strings
are used.
4.10.1.2 -minimumFreeSpaceInK
This option sets the free disk space size at which the JDF Enabler suspends the workflow. It takes a
single additional argument: the space in kilobytes.

JDF ENABLER FOR THE HARLEQUIN RIP
-CONFIGURATION OF THE JDF-ENABLED RIP INDEX CONTENTS 39
INDEX CONTENTS 39
The downloader node processor, checks the free disk space before commencing the download and
checks it again if the download fails. If there is not enough space, the current job will fail and the
workflow is suspended. In addition, an error message will appear in the alarm log.
The minimum free space can be changed by a setting in the Enabler.txt configuration file. For
example:
-minimumFreeSpaceInK
4096
Note: The value is in KB.
4.10.1.3 -downloadBufferInK
This option takes a single additional argument: the buffer size in kilobytes. This sets the size of the
buffer used for HTTP downloads in JDF jobs. Reasonable buffer sizes vary from a few kilobytes to a
few hundred kilobytes. A large buffer may improve download performance, at the expense of higher
memory use.
4.10.1.4 Additional information
To create more than one channel, you can add further -channel directives, and repeat the option
sequence as many times as you wish, giving the details for each channel that you want to build.
Remember, that channels cannot use the same input Hot Folder, although it is permitted for them to
share the same Output folder. You can configure as many JMF-enabled channels as you wish.
Auto-instantiation takes place every time the JDF Services are started, but channels are only created
where they do not already exist. If you delete channels in the web UI, or use the Reset to Defaults oper-
ation, the missing channels will be created again as soon as the Services are re-started, and they will
be re-created with exactly the same properties, including the JMF upload URL. However, channels
that already exist will not be re-created. This is for efficiency reasons, but it does mean that you cannot
adjust individual properties of channels using the enabler.txt file and expect those changes to take
effect. For this to happen, you must first delete the affected channel(s). You cannot, for example,
change the input or output directory of a channel by changing the -in or -out options in the text file
and restart the Services. You must delete the channel first, so that it is re-created in its entirety with the
new properties.
If any error occurs during the auto-instantiation procedure, such as a missing input/output directory
or a badly-formed command option, the affected channel will be skipped, and the JDF Enabler will try
to instantiate the next channel in the sequence. An error message will be logged if a channel has to be
skipped. Therefore, it is worth checking for these on the web UI Logs tab if the JDF Enabler does not
appear to be creating the required channel(s).
Channels created by auto-instantiation behave identically in all respects to channels that are created
manually using the JDF Enabler web UI.
4.11 Harlequin RIP configuration
Jobs queued to the RIP from a JDF channel force the RIP into Single-If mode, even if the RIP’s global
setting is Multiple [Parallel]. If you would like to make use of the RIP's throughput controller, you
will have to configure a switch in your input channel(s).
You can configure the throughput mode from the JDF Enabler Edit Advanced screen, see the Workflow
option in “Edit Advanced (Administrator)”on page 28.
Output progress in multiple modes from the RIP cannot be reported to the JDF Enabler; therefore a
JDF node that includes ImageSetting will be completed as soon as rendering has been done, even if
the page buffer is still in the Active queue with output disabled. This could cause problems if an

JDF ENABLER FOR THE HARLEQUIN RIP
-CONFIGURATION OF THE JDF-ENABLED RIP INDEX CONTENTS 40
INDEX CONTENTS 40
updated JDF file is output that instructs further processes to start working on a job which is, in fact,
not complete.
If you create your channels using an auto-instantiation configuration file, you can add the -tp switch
to each channel, which permits the use of Multiple [Parallel] mode for jobs coming from that chan-
nel. For more information see “Enabler.txt”on page 36.
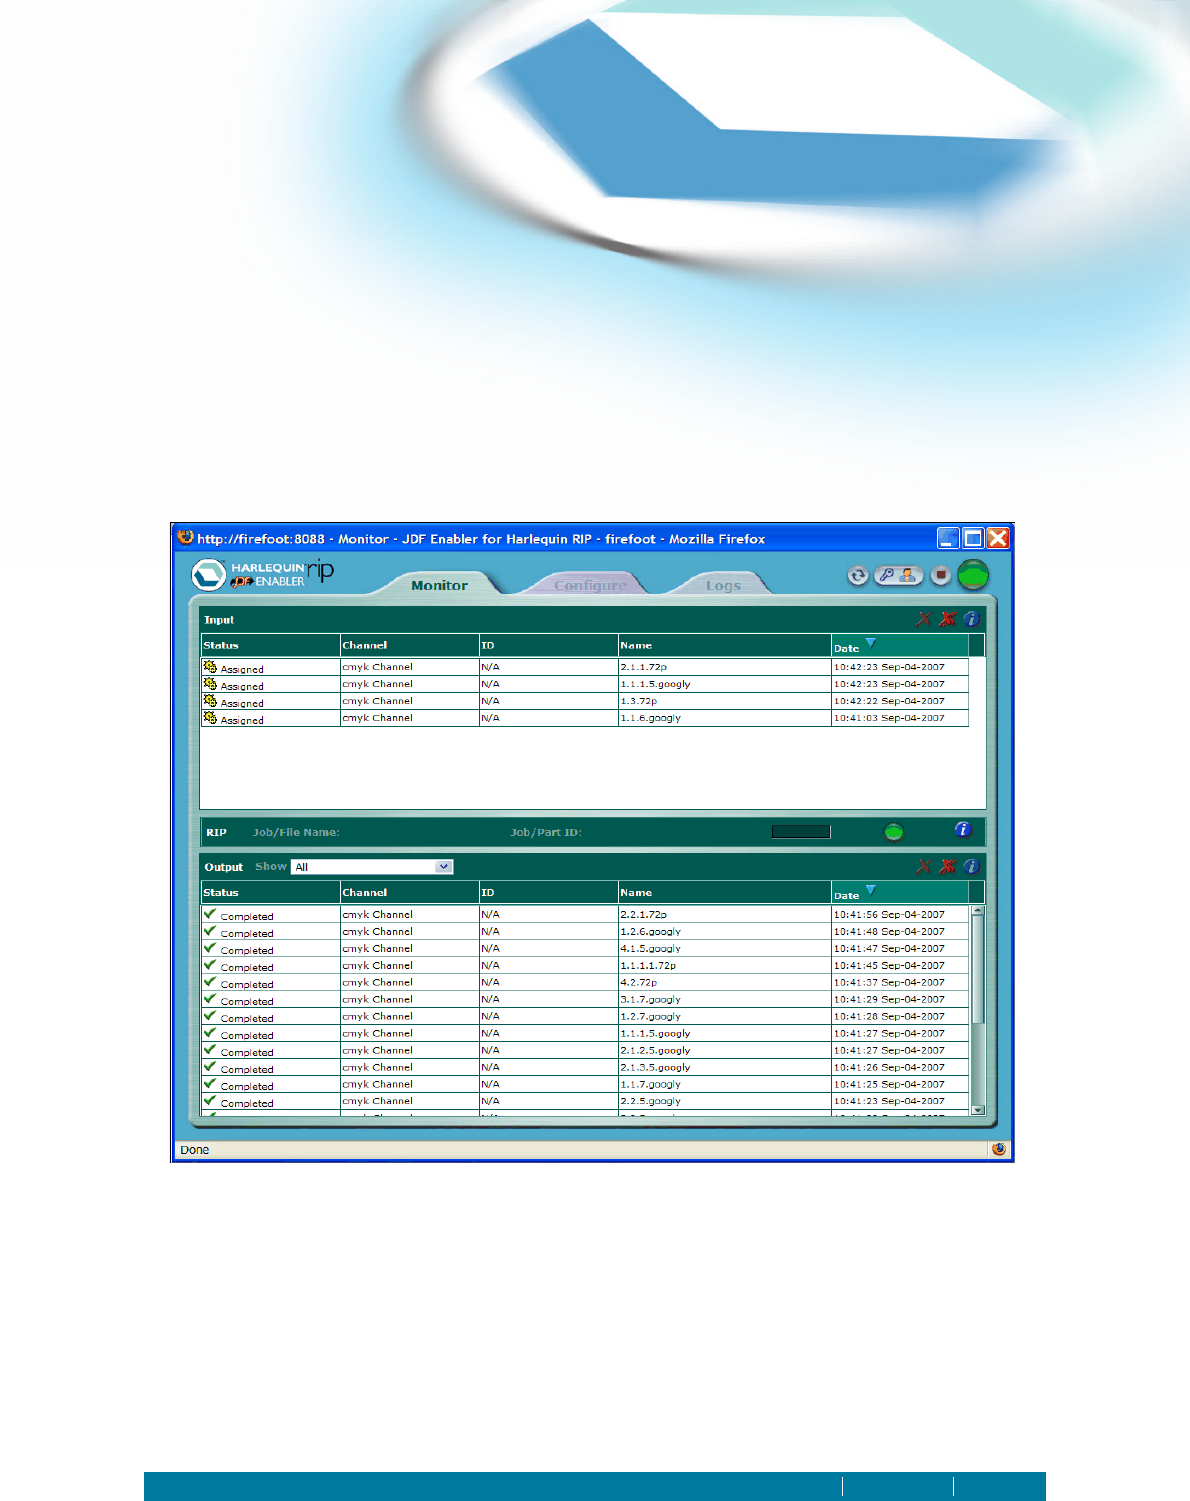
INDEX CONTENTS 41
Chapter 5–Using the JDF-Enabled RIP
When the JDF-Enabled RIP is installed and configured, and you are ready to start using it to process
JDF files, you should first familiarize yourself with the most useful views and controls.
5.1 The Monitor screen
The Monitor screen is the most useful view of the system and provides important job and process
information. If the Monitor screen is not displayed select the Monitor tab:
Figure 5.1 Monitor Screen
This section describes all the various components of the Monitor screen:
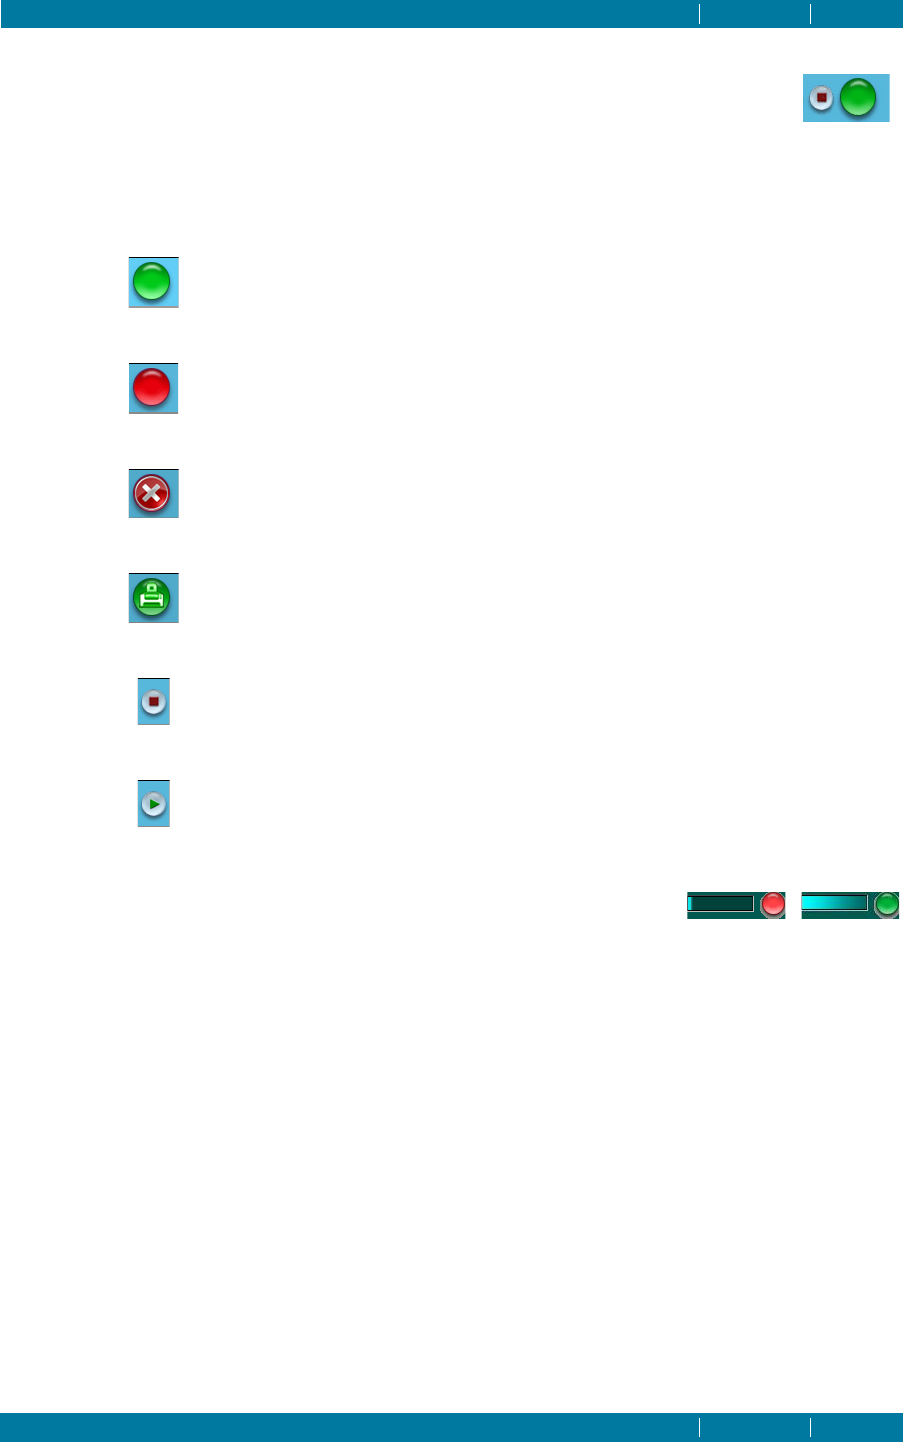
JDF ENABLER FOR THE HARLEQUIN RIP
INDEX CONTENTS 42
INDEX CONTENTS 42
5.1.1 Status (JDF Enabler)
The Status section at the top right-hand side of the Monitor screen displays the current
status of the JDF Enabler. Pacing the mouse over any of the icons displays more infor-
mation about the status.
5.1.2 RIP monitor
The Red/Green light on the monitor page indicates whether the RIP pro-
cess is responding to the JDF Enabler workflow. When the light is red, the JDF Enabler workflow sta-
tus is always NO-RIP.
The blue animation indicates whether the RIP is currently processing a file.
This is displayed when the RIP is available.
This is displayed when the RIP has stopped.
This is displayed when the RIP is not available.
This is displayed when the RIP is processing a file.
If the RIP is running and this is clicked, the RIP will be stopped.
If the RIP is stopped and this is clicked, the RIP will be restarted.
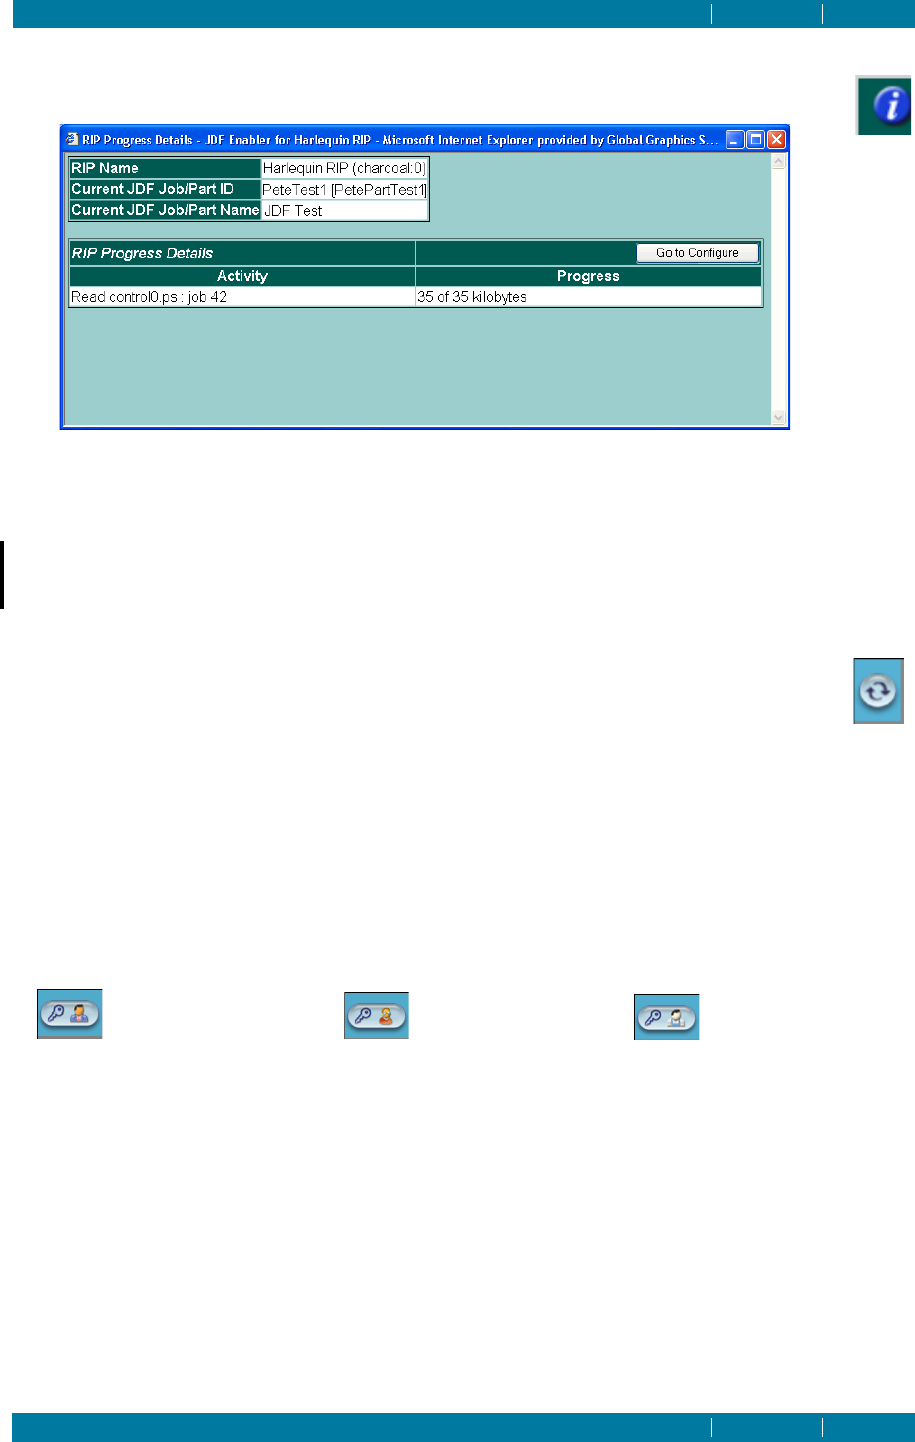
JDF ENABLER FOR THE HARLEQUIN RIP
INDEX CONTENTS 43
INDEX CONTENTS 43
For more information on RIP progress you can select the information icon situated to the
right of the RIP monitor. This will display the RIP Progress Details dialog:
Figure 5.2 RIP Progress Details dialog
You can control what appears in the Activity and Progress sections of this screen in two ways; by
changing the RIP progress configuration, which appears when you click the Go to Configure button,
(see “RIP progress configuration” on page 32 for more information); or by using the SOAR control
joblogger -progress commands. (See “RIP progress configuration” on page 32 and “Job logging” on
page 81 for more information.)
5.1.3 Refresh
The Refresh button will refresh the web UI display and update all fields with the latest infor-
mation from the server.
If your web UI appears incorrect or is not displaying the information you would expect to see, use the
Refresh option. If this does not rectify the problem, try opening a new browser window.
5.1.4 Log out
The Log out option allows you to log out of the web UI. Different logout icons are displayed depend-
ing on whether you logged in as an Administrator, a User or as Support.
Logging out presents you with the initial login screen allowing you to log back into the web UI as a
different user or at a different user level.
Logout Administrator Logout User Logout Support
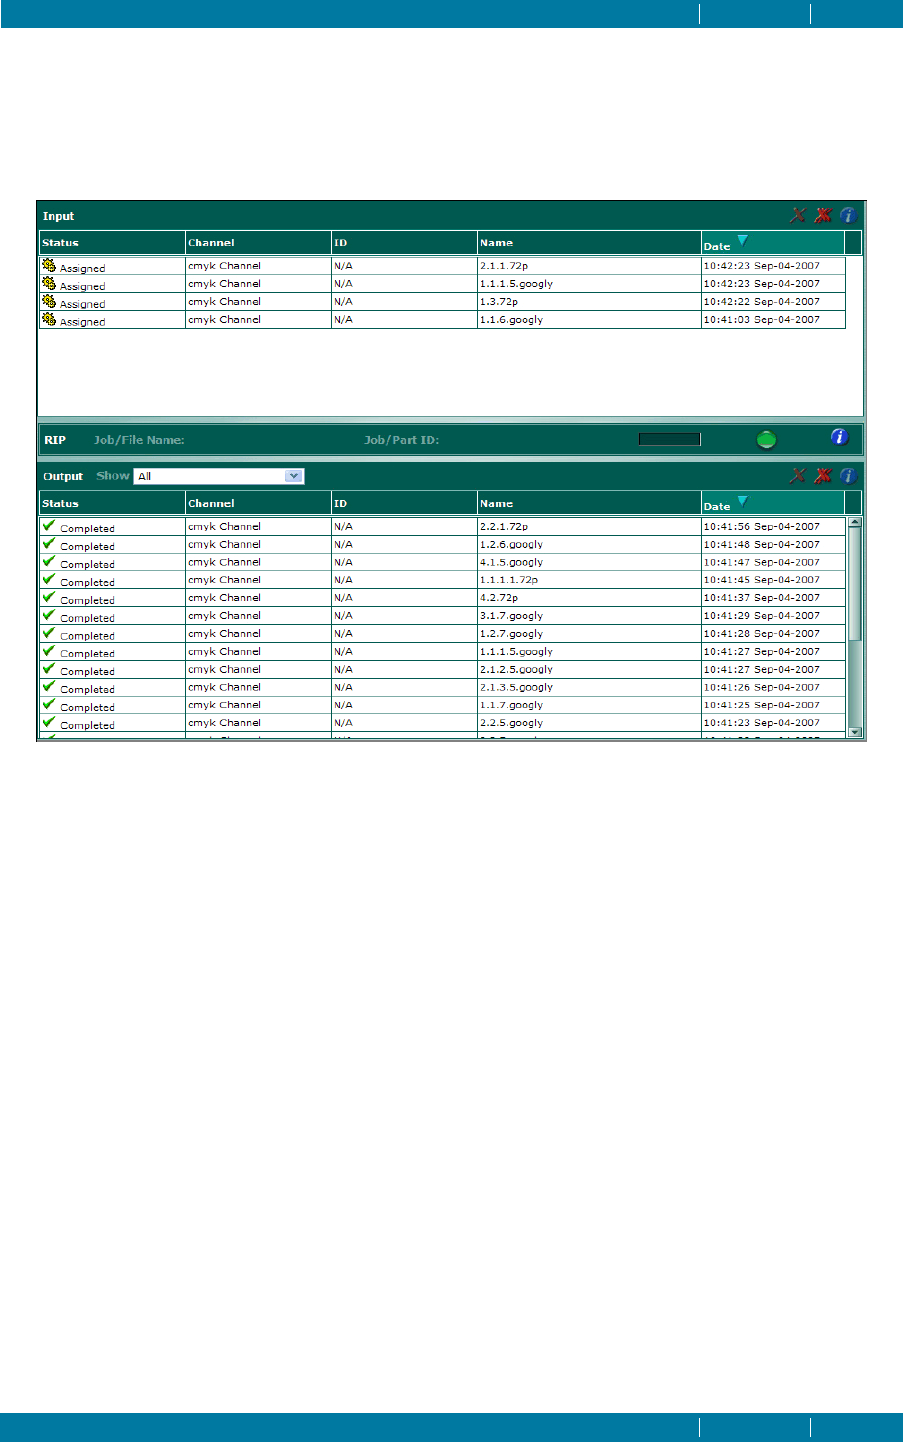
JDF ENABLER FOR THE HARLEQUIN RIP
INDEX CONTENTS 44
INDEX CONTENTS 44
5.1.5 The Input and output queues
The Input queue is where JDF files waiting for processing by the RIP are placed. Each file will be
XML-parsed and assigned and prepared ready for further processing The Output queue is where
completed files are placed.
Figure 5.3 JDF Enabler Input and output queues
In the example shown in Figure 5.3, there are several “Completed” jobs in the Output queue. The
Input queue has two jobs that are marked as “Assigned” while the other four jobs require further
resources or files, to be downloaded over HTTP. Each of these four jobs have two outstanding files,
with the last job in the queue showing that 12K of 35K has been downloaded.
Note: See below for a description of “Completed” and “Assigned”.
Jobs that require files to be downloaded are addressed each in turn using a “round-robin” method. In
general, this means that the JDF Enabler will distribute the downloading work as fairly as possible
when dealing with several jobs that require it, and will prevent the more demanding jobs from hold-
ing up the smaller ones.
An example of this type of distribution follows. The first job in the queue has a single file to be down-
loaded. The second job then has a single file to be downloaded followed by the third and fourth jobs.
After this, the second file of the first job will be downloaded followed by the second file of the second
job, and so on. This method is used because it allows throughput to be maintained even when you
have a long queue of jobs waiting for a single file, and one of those jobs requires twenty files to be
downloaded. In this case, each job will download a single file before starting at the top of the queue
again. In this way, all the jobs in the queue are not held up by the one job waiting for many resources.
For each JDF file, the input and output tables present similar information. Some status values can only
appear in the upper table (Unparsed,Parsed, and Assigned), while the remainder can only appear in
the lower table. When a job moves to the lower table, it means that the JDF Enabler and RIP will do no
further work on it.

JDF ENABLER FOR THE HARLEQUIN RIP
INDEX CONTENTS 45
INDEX CONTENTS 45
Status The full set of status levels of a JDF job are:
Unparsed—The job has just arrived, and its XML has not yet been read.
Parsed—The job has been successfully parsed, and is in the process of
being dispatched to devices.
Assigned—The job has been assigned to one or more available devices,
and is waiting for them to complete their work.
Badly Formed—The job was not successfully parsed. Its XML data is not
valid JDF.
Already Complete—The job was successfully parsed but no attempt is
made to perform any work on the job, because all work appears to be
complete. A job will only have this status if all the JDF Nodes in the job
have an assignment failure and all the JDF Nodes are completed. The
job will go to the failed jobs archive.
Unassignable—The job was successfully parsed but no attempt is made
to perform any work on the job, even though some work appears to be
needed. This is probably because the JDF Enabler was not the right type
of device to do the outstanding work. The job will go to the failed jobs
archive.
Failed—An attempt has been made to process one or more nodes in the
job, but not all of them succeeded.
Completed—One or more nodes have been processed, and all of them
were successfully completed.
Channel This is the name of the input channel that was used to get the JDF file
into the system.
Job[Part] ID This field displays the JobID and JobPartID names used in the JDF. The
same name appears in the Job[Part] ID field when the job is processing.
Job/File Name This field displays the DescriptiveName used in the JDF. The same name
appears in the RIP Job/File Name window when the file is ripping.
Time Stamp This displays the date and time the file was processed.
*This column allows you to select an individual file. Either for more
information or deletion.
5.1.6 Viewing, sorting and managing the queues
A number of options are provided to view, sort and manage the input and output queues. You can
choose to display the queues using various filters
Input Sort By and Output Sort By
By selecting one of the various options you are able to sort the Input or
Output queues by either: Date,Channel,Name,Status or ID.
If you would like to view the currently downloading job, even when
there are lots of other jobs in the input job list, you should sort the input
job list by Status. The downloading job will then always appear at the
top or the bottom of the list (depending on the currently selected sort
direction—see below).
JDF ENABLER FOR THE HARLEQUIN RIP
INDEX CONTENTS 46
INDEX CONTENTS 46
Sort queue ascending/descending
Select the triangle to reverse the sort direction. For example, if
you are sorting the queue by Date, selecting the triangle would
place the most recent file first or last in the queue.
Delete selected job
To delete an individual job, select it by clicking the * field, fol-
lowed by the clicking Delete selected job icon.The JDF Enabler
will, however, refuse to delete any job which is currently RIP-
ping. If this is the case, it will display an error.
Delete all jobs
Select this option to delete all the jobs in the queue, including
those jobs not displayed due to filtering. The JDF Enabler will,
however, refuse to delete any job which is currently RIPping.If
Delete All is selected JDF Enabler will silently skip the current job, leav-
ing that job in the table.
Information
Select this option to display more information about the
selected job. The information appears in the Job Details screen
and includes all the information displayed in the Monitor
screen, plus all the RIP monitor log information associated with the
selected job. To update the RIP monitor log, click the Job’s RIP Monitor
Log button. The First,Prev,Next and Last options are available. See “The
Logs screen” on page 46 or more information.
Show (Output queue only)
You can select one of the various menu
options to filter the Output queue.
5.2 The Logs screen
A number of system messages are generated by the JDF Enabler and the Harlequin RIP. All these can
be viewed from the web UI. Select the Logs tab to display the Logs screen so that all the messages can
be viewed. Logs are divided into Alarm/Event messages and RIP Monitor messages.
For more information on how to configure the logging options, including management of the size of
message logs, see “Logging configuration (Administrator)” on page 31.
The same display options are provided for both Event/Alarm logging messages and RIP Monitor
messages:
Prev Select this option to view the previous screen of log messages.
First Select this option to view the first screen of log messages.
Next Select this option to view the next screen of log messages.
Last Select this option to view the last screen of log messages.
Filter (Alarm/Event only)
Filters are provided only for the Alarm/Event Log.
Choose the option in the menu that displays the mes-
sage types you would like to view.

JDF ENABLER FOR THE HARLEQUIN RIP
INDEX CONTENTS 47
INDEX CONTENTS 47
There are files logger.log and backup.log files, which are duplicates of
the most recently added Alarm/Event log entries. For more information
see, “Log files” on page 19.
5.3 Usage for JMF workflow integrators
The information in this section is of use to JMF workflow integrators and covers the following topics:
• Submitting jobs using SubmitQueueEntry
• Getting status information with a JMF Query
• Setting up a status query with a subscription
To assist integration into multi-vendor workflow environments, the JDF Enabler supports a limited
subset of the JMF messaging protocol. JMF is transported over HTTP, and is actually handled by the
same Web Server component that generates the HTML pages for the web UI. JMF messages arrive at
the Enabler via HTTP POST commands that are directed to a URL that the server automatically estab-
lishes for each Input Channel. (Note that JMF messaging support for individual channels is optional,
and a URL for JMF will only be established for those channels where it is requested. See “Create a new
channel” on page 24 for more information on the creation of Input Channels).
Two classes of JMF message are supported: Query messages and Command messages. Messages of any
other type will be ignored. For Command messages, the only supported message types are
SubmitQueueEntry, which can be used to submit jobs without requiring a hot folder, and
StopPersistentChannel. For Query messages, the only supported message type is Status, which can
be used to obtain live updates on the status of the RIP. Query messages can include a Subscription
element, allowing a persistent channel to be established between the JDF Enabler and another JDF
controller in the workflow. The StopPersistentChannel command is used to close persistent chan-
nels. (Take care not to confuse the terms persistent channel and input channel: the former is a term intro-
duced in the JDF specification, and refers to a monitoring pipeline established between two JDF
components; the latter is our own terminology, as explained in “JDF Input channels” on page 6.)
5.3.1 JMF Queries
A JMF Query must have its Type attribute set to Status. Queries of any other type will be rejected by
the JDF Enabler. As long as the query is of the correct type, the JDF Enabler will respond with a stan-
dard JMF Response structure that describes the current operational status of the RIP. This will indicate
whether the RIP is alive, and whether it is actively processing jobs. It is also possible to obtain lists of
active and completed jobs within the Response.
In order for the JDF Enabler to accept a Query, the Query must have exactly one sub-element of type
StatusQuParams. (Strictly, the JDF specification allows for status queries with no StatusQuParams ele-
ment at all, but the current version of the JDF Enabler will not accept this.) Attributes of
StatusQuParams are supported by the JDF Enabler as follows:
DeviceDetails The values None,Brief and Details are supported. If any other value is
seen, the JDF Enabler will reject the query. When the value is None no
device details are provided. When the value is Brief, the returned
response will contain only a DeviceInfo element describing the device
status, and there will be no further information about the device. When
the value is Details, an additional Device element will be added
beneath the DeviceInfo element, providing some further information
about the device. In the current version, the Device element is just the
Device identifier. Note that the Input Channel name is always used as
the Device identifier in JMF Responses. To configure the Device ID to be
a specific string, you will need to edit the Input Channel properties.

JDF ENABLER FOR THE HARLEQUIN RIP
INDEX CONTENTS 48
INDEX CONTENTS 48
JobDetails The value None and Brief are supported. If any other value is seen, the
JDF Enabler will reject the query. When the value is None only the JobID,
JobPartID and Amount, and/or PercentCompleted are specified.When
the value is Brief the response will contain JobPhase elements for all
active, completed and aborted jobs in the Input Channel, but no further
details about the job will be provided. The JobPhase elements seen will
correspond exactly to the unfiltered job lists in both the upper and lower
tables of the web UI Monitor page, except that only jobs from this spe-
cific channel will be provided.
JobID To obtain the JobPhase element for just a single specific job, you can pro-
vide its JobID attribute here. If the job is found in the channel, its single
JobPhase element will be returned in the Response. Otherwise, no
JobPhase elements are returned.
Here is an example JMF Query from a controller:
<JMF DeviceID="Device1" TimeStamp="2004-05-10T04:57:18Z" SenderID="Device1"
Version="1.1" xmlns="http://www.CIP4.org/JDFSchema_1_1">
<Query ID="Q0000001" Type="Status">
<StatusQuParams DeviceDetails="Brief" JobDetails="None"/>
</Query>
</JMF>
and here is the kind of response that might be generated:
<JMF Version="1.1" DeviceID="Device1" SenderID="Harlequin RIP Instance 0"
TimeStamp="2004-05-27T08:51:36Z" xmlns="http://www.CIP4.org/JDFSchema_1_1">
<Response ID="R000000001" refID="Q0000001" Type="Status"
ReturnCode="0" TimeStamp="2004-05-27T08:51:36Z" Acknowledged="false"
Subscribed="false">
<DeviceInfo DeviceStatus="Idle">
<Device DeviceID="Harlequin RIP Instance 0"/>
<JobPhase StartTime="2004-05-24T03:28:32Z" JobID=""
Activation="Active" Status="Completed" JobPartID=""/>
<JobPhase StartTime="2004-05-24T03:13:13Z" JobID=""
Activation="Active" Status="Aborted" JobPartID=""/>
<JobPhase StartTime="2004-05-24T03:30:08Z" JobID=""
Activation="Active" Status="Aborted" JobPartID=""/>
<JobPhase StartTime="2004-05-24T03:31:01Z" JobID=""
Activation="Active" Status="Aborted" JobPartID=""/>
</DeviceInfo>
</Response>
</JMF>
5.3.2 JMF Queries with Subscriptions
A JMF status query can be used to establish a persistent channel. For this you must include a
Subscription sub-element of the Query. The presence of a subscription does not alter the initial
Response structure that is sent back: this will be provided exactly as described above, except that its
Subscribed attribute will be set to true if the subscription is successful. The effect of the subscription
is that the JDF Enabler will store the JMF Query in its own persistent database, and then send regular
JMF Notifications to the URL that the subscription has specified.
In the case of a subscription, the treatment of the StatusQuParams is exactly the same as for a one-off
query.
The only supported attributes of the Subscription sub-element are URL (which may be expressed
using the file or http schemes, where http would be by far the most common in production environ-

JDF ENABLER FOR THE HARLEQUIN RIP
INDEX CONTENTS 49
INDEX CONTENTS 49
ments), and RepeatTime. The JDF Enabler is only able to send JMF Notifications on a regular, timed
basis. Trigger elements within subscriptions are not supported.
The persistent channels established by subscriptions can be closed down by a JMF
StopPersistentChannel command (see Section 5.3.4.2). Until such a command is received, the JDF
Enabler will send notifications for as long as it is running. If the JDF Enabler is restarted, provided
that a factory reset operation is not performed, it will once again begin to send regular notifications to
the target URLs for all persistent channels.
Here is an example of a query with a subscription:
<JMF DeviceID="Device1" TimeStamp="2004-05-10T04:57:18Z" SenderID="Device1"
Version="1.1" xmlns="http://www.CIP4.org/JDFSchema_1_1">
<Query ID="Q0000002" Type="Status">
<StatusQuParams DeviceDetails="Brief" JobDetails="None"/>
<Subscription
URL="http://device1:8080/jmf/notifications?Query=Q0000002"
RepeatTime="60"/>
</Query>
</JMF>
5.3.3 JMF Errors
When JMF response is reporting an error, you should see the following elements:
<Comment> This is always included and contains the description of the JMF error
return code, directly from the JDF specification.
<Comment> This may be included and contains a human-readable description of the
problem. This is intended for customer interpretation.
<Error> This may be included and contains further information about the prob-
lem. This is for use by Global Graphics' support and development staff
only.
This element contains a Java exception string, a source code file name
and a source code line. It should be noted that the presence of an
<Error> element does not necessarily mean that there is a fault with
GGS software. Many Java exceptions, if correctly handled, do not indi-
cate a programming bug.
5.3.4 JMF Commands
A JMF Command must have its Type attribute set to either SubmitQueueEntry or
StopPersistentChannel. Commands of any other type will be rejected by the JDF Enabler. The JDF
Enabler does not currently support the acknowledgement of commands. Therefore, the
AcknowledgeType and AcknowledgeURL attributes of the command, where they are present, will be
ignored. The JDF Enabler will always generate a JMF Response for any command (even an unsup-
ported command), but its Acknowledged attribute will always be set as false.
5.3.4.1 The SubmitQueueEntry Command
This command is used to queue a new JDF job to an Input Channel. Semantically, this is equivalent to
dropping a JDF document into the Hot Folder associated with the same Input Channel. It is also pos-
sible to post MIME multipart requests, which contain the JMF command and the JDF job ticket, and
possibly also the graphical content files needed when processing the job. MIME is described in more
detail in “MIME messages” on page 7.

JDF ENABLER FOR THE HARLEQUIN RIP
INDEX CONTENTS 50
INDEX CONTENTS 50
ASubmitQueueEntry command must have exactly one sub-element of type QueueSubmissionParams.
The JDF Enabler supports the attributes of this element as follows:
URL This URL is used to fetch the JDF job that is being submitted. URLs
expressed with the file and http schemes are supported. Additionally,
if the SubmitQueueEntry command is a part within a multipart MIME
package (See 2.1.4), CIDs are also supported.
ReturnURL This URL will receive the updated JDF document after all job processing
has been performed.
The JDF 1.2 spec introduces ReturnJMF in addition to ReturnURL in the
QueueSubmissionParams. Version 2.0 of the JDF Enabler will not support
this attribute.
Note: The WatchURL feature is not supported. If this attribute is supplied, it will be ignored.
An example JMF SubmitQueueEntry command is shown below:
<JMF Version="1.1" TimeStamp="2004-05-27T09:29:26Z" SenderID="Device1">
<Command ID="JMF1085646566217" Type="SubmitQueueEntry">
<QueueSubmissionParams URL="http://device1:8080/job28.jdf"
ReturnURL="http://device1:8080/return/job28"/>
</Command>
</JMF>
If it is supplied, the ReturnURL will receive the updated JDF document after the job has been fully pro-
cessed. The JDF document itself (not wrapped in any JMF message) will be sent to the URL. If the
URL is an http URL, the document will be sent via HTTP POST. The level of updates in the document
are controlled by the Input Channel's rewrite policy, just as for jobs written to the channel's Output
folder. However, when the JDF Enabler writes JDF documents to a JMF ReturnURL, it does not also
write them to the Output folder. The ReturnURL overrides this default rewriting behavior. If no
ReturnURL is specified, the JDF document will be rewritten according to the channel's default behav-
ior.
5.3.4.2 The StopPersistentChannel Command
This command is useful only when a JDF controller has previously established a persistent channel
with the JDF Enabler, using a JMF Query with a Subscription sub-element (see above). The command
must contain a single StopPersChParams element, whose attributes are supported as follows:
ChannelID This attribute is optional. If it is supplied, it must match the ID of the
Query that was originally sent to establish the persistent channel. (This
ID will also have been echoed back as the refID attribute of the initial
Response that was prompted by the query.) If you do not supply the
ChannelID attribute, all persistent channels for the target URL will be
stopped. This behavior is in accordance with the specification for
StopPersistentChannel.
URL This attribute is required, and it must match the URL that was given in
the original Subscription element for the channel that is being stopped.

JDF ENABLER FOR THE HARLEQUIN RIP
INDEX CONTENTS 51
INDEX CONTENTS 51
Here is an example StopPersistentChannel command:
<JMF Version="1.1" TimeStamp="2004-05-27T09:29:26Z" SenderID="Device1">
<Command ID="JMF1085646566219" Type="StopPersistentChannel">
<StopPersChParams
URL="http://device1:8080/jmf/notifications?Query=Q0000002"
ChannelID="Q0000002"/>
</Command>
</JMF>
For further information about JMF commands and queries, refer to Chapter 5 of The JDF Specification.
5.3.5 Capture incoming JMF messages
If you have problems with JMF and wish to view all the messages you can capture them and save
them to disk. The logging of all JMF input and output files is turned off by default. You can however
turn on the capture of incoming JMF messages by putting the line JMF 4 in a logsubjects.txt file in
the same directory as the JDF services executable file. The location of the resulting JMF log files can be
found by viewing all logs (including INFO logs) in the JDF Enabler Monitor GUI.
5.4 Support
We do not support or recommend the use of the product outside a local network.

INDEX CONTENTS 52
Appendix A–Configuring SOAR memory
The SOAR Core Services including the JDF Services are, by default, configured with a preset maxi-
mum amount of available memory (Java “heap size”). It is important to ensure that the maximum
heap size is sufficient for the scale of the SOAR application. A complex SOAR application may find
that the preset maximum heap size is insufficient. Raising the heap size may help in such situations.
Conversely, an application where memory is at a premium may find that the preset maximum heap
size is excessive. It may be possible to reduce the heap size, making more memory available for other
processes.
The JDF Enabler inherits the SOAR issues and functionality around the Java heap size. Heap size is
allocated at start-up and cannot be increased during that session. A default heap size is set up during
the installation which should cope with most applications, but may not be ideal for all. A complex or
demanding application may need to allocate more heap, while a simple but memory-constrained
application may want to allocate less.
As well as preventing OutOfMemoryError problems, allocating more memory to SOAR allows it to
cache more information (web pages, persistent objects and so on), and thus improves performance.
However, this should not be done if it means allocating insufficient memory to the Harlequin RIP.
Generally, memory allocation to the RIP should be given precedence.
The default amount of heap is 32 MB. Increasing the size to 64 MB may be beneficial. However,
increasing the heap to more than 64 MB would not generally be useful.
The maximum heap size may be set by supplying a command-line argument to the Core Services exe-
cutable (or the Windows Service, on PC platforms).
If the Core Services are executed by a script (or batch file), the argument may be added there. If the
SOAR Core Services are executed via a Windows shortcut, the argument may be added via the prop-
erties of that shortcut.
If the Core Services are executed as a Windows Service, the argument may be added via the Windows
Services Control Panel or used in conjunction with the -install command line option.
The argument is of the form:
-Xmx{SIZE}m
where {SIZE}should be replaced by the maximum heap size, in megabytes.
Set a minimum heap size, via an argument of the form:
-Xms{SIZE}m
In addition, the -XX:MinHeapFreeRatio and -XX:MaxHeapFreeRatio options allow control over how
Java grows and shrinks the heap, between the minimum (-Xms) and maximum (-Xmx).
This might be necessary if another application is tending to use too much memory early on, making it
impossible for SOAR Core Services to increase its heap size, even when it is less than the specified
maximum.
On Mac OS X platforms, you can adjust the Java heap size via the -Xms and -Xmx command line
options. The -XX:MinHeadFreeRatio and -XX:MaxHeapFreeRatio options allow control over the way
Java grows and shrinks the heap size between the minimum (-Xms) and the maximum (-Xmx).

JDF ENABLER FOR THE HARLEQUIN RIP
CONFIGURING SOAR MEMORY INDEX CONTENTS 53
INDEX CONTENTS 53
A.1 Multipart handling
Multipart handling has a threshold between a memory inefficient with fast implementation for small
multiparts, and a memory-efficient but slow implementation for large multiparts. The threshold can
be raised by giving more heap space to the services Java VM, using the -Xmx and -Xms options
(described above).

INDEX CONTENTS 54
Appendix B–JMF Error codes
When a client application sends JMF to the JDF Enabler over HTTP the JDF Enabler sends JMF mes-
sages back over HTTP describing what has happened.
The error codes described below are part of the returned JMF response. That is, the return code num-
ber is one of the attributes of the body of XML sent back to the client. In addition to the return code a
textual comment is also returned. Currently, the comment is an error string produced automatically
from an internal exception that allows technical support to diagnose reported problems.
Return code 0 is returned by default as the success value unless a failure or more specific situation is
detected.
If there is a legal JDF sub-element of the JMF but it is not a Message request node, code 3 is returned
which is an XML parser error.
If a job has been submitted, the return codes are as follows:
2 If the job is still unparsed or only just parsed at the time of the return,
this code is returned.
3 If the job is badly formed, this code is returned for an XML error.
101 If the job is valid, but either there is nothing left to do or there is nothing
we could have done, this code is returned for device incapable.
If there has been an exception while processing any JMF (either job submission or query), the follow-
ing codes are returned:
2 If there is a general I/O exception code 2, which represents an internal
error, is sometimes returned and sometimes code 6, for invalid parame-
ter, depending on whether the exception is local (2) or CORBA (6).
If there is a error spooling the resources to disk, code 2 is also returned
for internal error. Additionally, any other unexpected exception will
return code 2 for internal error.
3 If the XML parser signals an exception this code is returned, which is an
XML error.
Also, If the XML parser has managed to parse the raw XML, but it is not
valid JMF, this code is also returned for an XML parsing error.
5 If a feature is not implemented, this code is returned.
6 If a file cannot be found, this code is returned for an invalid parameter.
This invalid parameter code is also returned if a file cannot be accessed.

INDEX CONTENTS 55
Appendix C–Customizing the JDF Enabler
This JDF Enabler allows customization of various aspects of the web UI. The options include:
• Configuring the default accounts and passwords. For more information see “Configuration of
the login screen” on page 66.
• Changing or adding the default login buttons. For more information see “Adding graphic
images for logins” on page 67.
• Changing the company logo. For more information see “Changing the logo” on page 69.
• Changing the color of web UI elements. For more information see “Changing colors in the user
interface” on page 70.
This chapter also gives you an overview of the technologies and concepts used in the development of
the JDF Enabler web UI, including:
•“Web architecture” on page 57.
•“Files that can be overridden in the web UI” on page 58.
•“Brief introduction to Maverick” on page 59.
•“Brief introduction to Velocity templates” on page 61.
•“The Displayer” on page 62.
C.1 Introduction
The JDF Enabler has a UI based on widely used World Wide Web technologies, such as HTML and
JavaScript, DHTML (Dynamic HTML), and the DOM (Document Object Model).
Many aspects of the web UI may be customized and configured. This is achieved without the need to
recompile any application programs. All that is required is for some text files to be copied, moved
and/or edited.
C.2 Configure and customize web UI files
A distribution of the JDF Enabler or SOAR SDK includes a directory containing example web UI con-
figuration and content files. Relative to the top level directory of the product, this directory is:
all-all/all/examples/web
It is important to note that these files are examples only, and are not the “live” files used to control the
configuration and content of the web UI, although they do have identical content. As distributed, the
files used to control the configuration and content are built into the JDF Enabler and cannot be
directly modified. However, the built-in files can be overridden, by placing same-named files into the
base directory of the JDF Enabler's web server.
The base directory is configured by the -base parameter of the JDFWebGUIPart. That parameter is set
in the configuration file associated with the JDFWebGUIPart; the name of that configuration file is
jdfenabler.txt in a default installation, but its name may be changed by altering the coreconfig

JDF ENABLER FOR THE HARLEQUIN RIP
CUSTOMIZING THE JDF ENABLER INDEX CONTENTS 56
INDEX CONTENTS 56
configuration file. These configuration files are found in the following locations relative to the product
top-level directory:
all-all/all/config
It is important to note that if an example file is located in a subdirectory of the all-
all/all/examples/web/content or all-all/all/examples/web/config directory, the equivalent
overriding file should be placed into the same subdirectory of the web UI’s base directory.
For example, if table C.1 shows the coreconfig, table C.2 shows how to set the web server base direc-
tory.
The override file corresponding to the example file:
all-all/all/examples/web/config/JDFWebGUI/maverick.xml
would be:
c:\custom\JDFWebGUI\maverick.xml
Whereas the override file for the example file:
all-all/all/examples/web/content/JDFWebGUI/en/about.vm
would be:
c:\custom\JDFWebGUI\en\about.vm
all-all/all/config/coreconfig
com.harlequin.DPP.SOAR.jdfservices.JDFLicensingPart
com.harlequin.DPP.SOAR.NameService.NameServicePart
com.harlequin.DPP.SOAR.logserver.LogServerPart
com.harlequin.DPP.SOAR.HostServer.HostServerPart hostserver.txt
com.harlequin.DPP.SOAR.HotFolderServer.HotFolderServerPart
com.harlequin.DPP.SOAR.JobLogger.JobLogServerPart joblogger.txt
com.harlequin.DPP.SOAR.JDF.HarlequinRIP.EnablerPart enabler.txt
com.harlequin.DPP.SOAR.ExecPart.RIPExecPart rip.txt
com.harlequin.DPP.SOAR.ExecPart.RoamServerExecPart roam.txt
com.harlequin.DPP.SOAR.LayoutServer.LayoutServerPart
com.harlequin.DPP.SOAR.jdfservices.JDFWebGUIPart jdfenabler.txt
Table C.1 coreconfig
all-all/all/config/jdfenabler.txt
-noBrowser
-port
8080
-context
/soar
-base
c:\custom
Table C.2 Setting the web server base directory

JDF ENABLER FOR THE HARLEQUIN RIP
CUSTOMIZING THE JDF ENABLER INDEX CONTENTS 57
INDEX CONTENTS 57
As well as overriding built-in files, it is possible to add new files to the web UI. These are also placed
in the web server base directory, in the same way as override files. Some examples of when it could be
appropriate to add new files include:
•New graphic images are required, as a result of overriding some elements of the web UI.
For instance, a new icon graphic for the login screen could be required for a user who appears in
an overriding security configuration file for the web UI.
• New HTML is required, as a result of adding new pages to the UI (it is possible to add entirely
new pages, within some constraints).
C.3 Web architecture
The JDF Enabler web UI conforms approximately to the common “Model-View-Controller” (MVC)
architecture. This separates the rendering of the UI (the “View”) from the data being displayed (the
“Model”) and the logic such as navigation (the “Controller”).
Data flow in our architecture is shown below
Figure C.1 Data flow
1. A user gesture (or perhaps some JavaScript code) causes a Request to be made from the web
browser to the Controller.
2. The Controller interacts with the Model to obtain the dynamic data to be displayed. The Model
typically has to interact with various SOAR components to get this data.
For some types of Request, information in the Model may be modified during this stage.
3. The Controller passes the data to the View.
4. The View renders the data. It adds fixed elements and formatting.
5. View passes rendered data back to the Controller.
6. The Controller wraps the rendered data in some standard “envelope” then returns a Response to
the web browser.
In the JDF Enabler web UI, the Controller and Model are implemented by some custom Java code in
combination with the open-source Maverick library. The architecture used does not permit modifica-
tion or extension of the Java code, but some aspects of the Controller and Model behavior can be cus-
tomized by overriding the Maverick configuration file.
Implementation of the View is via another open-source library called Velocity, again in combination
with custom Java code. However, most of the layout and static content of the web pages is defined by
“Velocity template” files, any of which may be overridden; see “Brief introduction to Velocity
templates” on page 61 for more information. Additionally, there are various configuration files associ-
ated with Views, any or all of which may be overridden; see “The Displayer” on page 62 for more
information.
Web
Controller
View
Model
browser
Application
being
controlled
12
35
4
6
e.g SOAR

JDF ENABLER FOR THE HARLEQUIN RIP
CUSTOMIZING THE JDF ENABLER INDEX CONTENTS 58
INDEX CONTENTS 58
C.4 Files that can be overridden in the web UI
Table C.3 lists most of the files that can be overridden in the web UI.
Note: The asterisk character is a wildcard.
File Purpose
maverick.xml Configuration file for the Maverick library, which
defines the “Commands” implemented by the Control-
ler and associates them with appropriate Views.
displayer*.xml Configuration files for the Displayer, which determines
how many elements of the Views are rendered.
This file configures defaults for all locales. Files with
locales as suffixes to their names (for example,
displayer_en.xml) provide configuration for a particu-
lar locale.
realm.properties Configuration file for controlling access to the JDF
Enabler. It defines user names, roles and, optionally,
passwords.
stylesheet.vm Cascading Style Sheets (CSS) configuration for the GUI.
The style sheet is a Velocity template, to allow the use of
Velocity features, like defining constants and comment
stripping. However, unlike Velocity templates used
directly for Views, the style sheet template has little, if
any, data in its context/model.
tabs.xml Configuration file for the tabs and side-menus that
appear in the web UI. Associates tabs with Maverick
“Commands”.
velocity.properties Configuration file for the Velocity library. One of its
main purposes is to enumerate the Velocimacro libraries
(see below) that are to be made available.
*.vm A Velocity template. Mostly, these define HTML with
dynamic parts, to be used as elements of Views.
If the template does not appear in a subdirectory named
after a locale, all content in the template should be
locale-independent. That is, it can be formatting HTML,
JavaScript code or dynamic elements that automatically
render themselves in a way appropriate to the locale.
Any template containing elements that are locale-
dependent, particularly static, user-visible text, should
be in a subdirectory named after the locale (for example,
en).
*.tvm A Velocity template that must interact with transac-
tional SOAR server(s).
Unlike ordinary Velocity templates, the Model which
associates with one of these templates contains a consis-
tent view of transactional SOAR objects.
*.vml A Velocimacro library. See Velocity's own documenta-
tion for more details.
Table C.3 File that can be overridden

JDF ENABLER FOR THE HARLEQUIN RIP
CUSTOMIZING THE JDF ENABLER INDEX CONTENTS 59
INDEX CONTENTS 59
If you wish to override any of these files for JDF Enabler you should use the following procedure:
1. Create the base directory and configure it.
2. Create another folder called JDFWebGUI inside the base directory.
3. Copy the required files into the JDFWebGUI folder.
C.5 Brief introduction to Maverick
A third-party library called Maverick has been chosen, for our implementation of Controllers. For full
and detailed information you should consult the Maverick documentation (see Appendix J,
“References” for a link).
Maverick handles requests for URLs of format *.m, called a Maverick “Command”. It maps each
request to an appropriate implementation of the Maverick Controller interface. This mapping is
defined by the maverick.xml configuration file. The Controller chooses a View for the response, in co-
operation with information in the configuration file.
Parameters may be supplied to Maverick Controllers, from the configuration file. Uses of parameters
include:
• One controller class for more than one command
• Controller needs a command or view name. For example. the “action” of an HTML form (a com-
mand).
Transforms can be specified, to apply transformations to the results of Views. Common transforms
include Velocity and XSLT (not used by JDF Enabler). Transforms are useful for wrapping one View
inside another.
*.js A JavaScript library for client-side scripting.
*.html Static HTML content.
*.gif Static graphical content.
*.ico An icon for web browser menus.
Some web browsers allow a web application to define
an icon to be used on “Favorites” menus.
File Purpose
Table C.3 File that can be overridden

JDF ENABLER FOR THE HARLEQUIN RIP
CUSTOMIZING THE JDF ENABLER INDEX CONTENTS 60
INDEX CONTENTS 60
Table C.4 shows a trivial example of some Maverick configuration:
Shunts can be used to select different versions of Views depending on the mode. They are most com-
monly applied to internationalization, and used to select different versions of views for each lan-
guage. In this case, the mode is obtained from the HTTP header Accept-Language. Most browsers
have a configuration dialog in which the language/locale can be set and this causes an appropriate
Accept-Language header to be sent with each request. Note that Maverick Shunts cause a different
version of a whole View to be used in different locales, whereas the Displayer (see “The Displayer” on
page 62) can be configured to render individual pieces of data differently in different locales.
<?xml version="1.0"?>
<maverick version="2.0">
<views>
<view id="error" name="error" path="error.vm">
<transform path="mainTable.vm"/>
</view>
<!-- Obviously, there would be lots more Views -->
</views>
<commands>
<command name="index">
<controller class="com.harlequin.BasicController"
<param name="subTitle" value="Welcome"/>
</controller>
<view name="success" path="name.vm">
<transform path="mainTable.vm"/>
</view>
<view ref="error"/>
</command>
<!-- Obviously, there would be lots more Commands -->
</commands>
</maverick>
Table C.4 Maverick.xml

JDF ENABLER FOR THE HARLEQUIN RIP
CUSTOMIZING THE JDF ENABLER INDEX CONTENTS 61
INDEX CONTENTS 61
Table C.5 shows an example of Maverick Shunt configuration:
Note: If referring to a file in a language-specific subdirectory like fr/about.vm, the corresponding file
should be placed in the same subdirectory of the Web server base directory. So, if the base directory
was c:\web, then the French version of about.vm would go in c:\web\fr\about.vm.
It is also possible to add a <param> to the <Controller> in the Maverick configuration file. For exam-
ple, to debug-dump a HTTP request from the controller, use requestDumpLevel and the value 1to
dump just the names of the items in the request, or 2to dump the names and values. By default the
dump is stored as a file of name CommandName.req in the current directory of the application. An
optional controller parameter requestFileDump can change that.
C.6 Brief introduction to Velocity templates
A third-party library, the Velocity template engine, has been chosen for our implementation of Views.
For full and detailed information you should consult the Velocity documentation (see Appendix J,
“References” for a link).
Velocity operates on a template. This is a file containing mostly static text into which Velocity will
insert dynamic data at defined places. In a web UI, the static text is usually HTML. Dynamic data
comes from the Velocity context, which is a store from which dynamic data objects may be retrieved
by name. Special tokens in the template indicate where the dynamic data from the context should be
inserted.
For example:
${model.jobName}
Also, there are special #directives for looping, conditionals and so on. For example:
#foreach ( $job in ${model.jobs} )
Particularly important items in the Velocity context of the web UI include:
${model} The dynamic data, in the model for a Maverick Command.
<maverick version="2.0" default-view-type="document">
<modules>
<shunt-factory
provider="org.infohazard.maverick.shunt.LanguageShuntFactory"/>
</modules>
<commands>
<command name="about">
<controller class="com.harlequin.AboutController"/>
<view name="success" path="en/about.vm"/>
<view name="success" mode="fr" path="fr/about.vm"/>
<view name="success" mode="de" path="de/about.vm"/>
<view name="error" path="en/aboutError.vm"/>
<view name="error" mode="fr" path="fr/aboutError.vm"/>
<view name="error" mode="de" path="de/aboutError.vm"/>
</command>
</commands>
</maverick>
Table C.5 Maverick Shunt configuration

JDF ENABLER FOR THE HARLEQUIN RIP
CUSTOMIZING THE JDF ENABLER INDEX CONTENTS 62
INDEX CONTENTS 62
${wrapped} The wrapped view, in a Maverick Transform.
${displayer} The Displayer (see “The Displayer” on page 62).
Here is an example of a simple Velocity template, which could interact with the Model of a Maverick
Command, to render a simple list of jobs. Velocity directives are shown in blue, while elements that
will be replaced by dynamic data on rendering are shown in red.
C.7 The Displayer
One of the special objects in the Velocity context of the JDF web UI is the Displayer. In a Velocity tem-
plate, the Displayer is ${displayer}. It is used to control how dynamic data objects are rendered in
the View. Note that the Displayer is not part of the open-source Velocity library, but is a Global Graph-
ics concept.
Applications of the Displayer include:
• Format a date or time object in a human-readable form
• Perform text look-up to replace one piece of text with another
• Convert from a machine-friendly piece of text (for example, an IDL enumeration member name)
to human-friendly text.
• Replace characters that have a special meaning in HTML with their equivalent HTML escape
codes
The Displayer is often used directly in Velocity templates. For instance:
${displayer.lookup("Hello world")}
will look up the string "Hello world" and replace it by whatever text is specified in the Displayer
configuration (see below).
${displayer.escape("<CODE>")}
will replace the angle brackets, which are special characters in HTML, with their HTML escape
codes, giving "<CODE>"
<!DOCTYPE HTML PUBLIC "-//W3C//DTD HTML 4.01 Transitional//EN">
<html>
<head>
<title>Loop Example</title>
</head>
<body>
<table>
<caption>Job Details</caption>
#foreach ( $job in ${model.jobs} )
<TR><TD>${job.id}<TD>${job.name}<TD>
#if ( ${job.isComplete} )
<IMG SRC="images/tick.png" alt="tick">
#else
<IMG SRC="images/cross.png" alt="cross">
#end
#end
</table>
</body>
</html>
Table C.6 example.vm

JDF ENABLER FOR THE HARLEQUIN RIP
CUSTOMIZING THE JDF ENABLER INDEX CONTENTS 63
INDEX CONTENTS 63
However, the Displayer is most often invoked implicitly. Many of the objects in the Velocity context
automatically invoke operations on the Displayer when they render themselves. For instance, objects
representing IDL enumerations automatically look themselves up in the Displayer configuration, to
see if replacement human-friendly text has been defined for each enumeration member. Such objects
generally make the underlying semantic value (the lookup key) available, via value(); for example,
${model.job.status.value()}. The value() is often useful in loops (#foreach) and conditionals
(#if) within the template.
C.7.1 Configuration and locales
The Displayer understands the concept of locales which is key to the localization of the web UI. In the
Displayer configuration, different look-ups and date formats can be defined for different locales. The
Displayer uses the Accept-Language header of the HTTP request to determine the locale; most brows-
ers have a configuration dialog in which the language/locale can be set, and this causes an appropri-
ate Accept-Language header to be sent with each request. Note that Maverick Shunts (see CORSS REF
earlier section) cause a different version of a whole View to be used in different locales, whereas the
Displayer can render individual pieces of data differently in different locales.
To configure the Displayer, one or more XML configuration files are used. These files all have the
same format, and all have names in the form displayer*.xml, but relate to different locales. Where
the same configuration item appears in more than one file, the item from the file whose locale most
closely matches the locale of the request is used.
For example, if you consider that the following Displayer configuration files are provided:
displayer.xml containing configuration items A,B,C.
displayer_en.xml containing configuration item A,B.
displayer_en_US.xml containing configuration item B.
displayer_fr.xml containing configuration items A,B.
It follows that:
a request from locale en_US for item Bwould obtain it from displayer_en_US.xml
a request from locale en_US for item Awould obtain it from displayer_en.xml.
a request from locale en_GB for item Bwould obtain it from displayer_en.xml.
a request from locale jp_JP for any item would obtain it from displayer.xml.
a request from locale fr_FR for item Awould obtain it from displayer_fr.xml.
a request from any locale for item Cwould obtain it from displayer.xml.
installed.
C.7.1.1 Creating a localization
When creating a new localization of one of Global Graphics' SOAR Web UIs (e.g. PPM), one of the first
tasks is to obtain a list of all the strings and regular expressions for which localized versions will be
required. This could be done entirely manually, by inspecting the Web page sources, but this would be
a time-consuming process, and the results would quickly become out-of-date. Therefore, a new facil-
ity has been introduced, which will help you to generate this list.
The config file for any SOAR WebGUIPart accepts an argument -logLookup, which will turn on log-
ging of all Displayer lookup. In PPM, the appropriate config file for SWWebGUIPart is normally called
swwebgui.txt. In JDF, the config file for JDFWebGUIPart is typically called jdfenabler.txt. See
“Configure and customize web UI files” on page 55 for more information.

JDF ENABLER FOR THE HARLEQUIN RIP
CUSTOMIZING THE JDF ENABLER INDEX CONTENTS 64
INDEX CONTENTS 64
The config file will also accept -noLogLookup, to turn off logging, although this is the default value.
When Displayer logging is turned on, each run of the application server (for example, PPM) generates
a log file called lookup.csv. This is in the same directory as the executable for the application. This file
is in comma-separated value (CSV) format, suitable for easy importing into spreadsheets such as
Microsoft Excel or OpenOffice Calc, where further processing, such as sorting or filtering, is possible.
Each line of the file refers to one string that has had to be looked up, together with the context (Dis-
player style, default style and Maverick command) in which it was looked up. There are no duplicate
lines in the file, although there may be some groups of lines that could all be handled by a single entry
in a Displayer configuration. See “Configuration file format” on page 65 for more information.
C.7.2 Styles and Commands
The behavior of the Displayer can be made to be dependent upon which Maverick command is exe-
cuting, or even upon which specific part of a Velocity template is being rendered. These features are
achieved via Displayer Styles.
The Style is a hierarchical file system-like concept. A Style can be represented by a path, such as
/channels/statusArea. A section of configuration defined for a certain Style applies to requests in
that Style and also forms a default for any more-specific Styles that do not provide that piece of con-
figuration.
For example, consider that a Displayer configuration has the following Styles:
/containing configuration items A,B,C
/Foo containing configuration item A,B
/Foo/Bar containing configuration item B
/Baz containing configuration items A,B
It then follows that:
a request from Style /Foo/Bar for item Bwould obtain the version declared for /Foo/Bar.
a request from Style /Foo/Bar for item Awould obtain the version declared for /Foo.
a request from Style /Foo for item Bwould obtain the version declared for /Foo.
a request from Style /for item Bwould obtain the version declared for /.
a request from Style /Foo/Bar/Wibble for item Bwould obtain the version declared for /Foo/Bar.
a request from Style /Baz/Cuttlefish for item Bwould obtain the version declared for /Baz.
a request from any Style for item Cwould obtain the version declared for /.
A Style is automatically associated with each Maverick Command. For example, when servicing the
Command "index", the Displayer Style is "/index".
A Style can be specified in an individual section of dynamic data in a Velocity template. When invok-
ing the Displayer directly, it may be given as an additional parameter to the lookup() and date()
methods. When invoking the Displayer implicitly on an object, a Style may often be given. For
instance, to render the status of job in Style "/graphicstatus", the Velocity code would be
${job.status.toString("/graphicstatus")}

JDF ENABLER FOR THE HARLEQUIN RIP
CUSTOMIZING THE JDF ENABLER INDEX CONTENTS 65
INDEX CONTENTS 65
C.7.3 Configuration file format
Displayer configuration is done via XML. The root element of each XML file must be a <Displayer/>
element. The following table explains the remainder of the format:
Except where specified, all the listed XML attributes are required, whereas all the listed child elements
are optional (zero or more are allowed). All attributes are case-sensitive.
Element Attributes
Allowable
child
elements
<Displayer/>
the root element
name
for internal housekeeping purposes only
<Command/>
<Style/>
<Lookup/>
<Date/>
<Command/>
style associated
with a Maverick
Command
name
must correspond to a Command defined in the
Maverick configuration
<Style/>
<Lookup/>
<Date/>
<Style/>
general style
name
any text, though white-space, punctuation and
special characters are best avoided
<Style/>
<Lookup/>
<Date/>
<Lookup/>
text replacement
by look-up
type (optional, default = "simple")
either “simple” or “regex”. Note that “regex” is
much more computationally expensive, so should
be used only when required.
key
the text to look up. For “simple” type, this must be
the exact text to match. For “regex” type, it may be
a Java-compatible regular expression.
value
the replacement text. For “regex”, this may
include references to capturing groups within the
regular expression. Such references are {N},
where Nis the number of the capturing group,
starting at 1.
None
<Date/>
Date formatting
format
Java-compatible date format string.
None
Table C.7 Displayer configuration file format

JDF ENABLER FOR THE HARLEQUIN RIP
CUSTOMIZING THE JDF ENABLER INDEX CONTENTS 66
INDEX CONTENTS 66
Table C.8 is an example Displayer configuration:
C.8 Configuration of the login screen
The JDF Enabler login screen presents graphic login buttons for each of the standard users: user,
admin and support. It is possible to add or change users, via the realm.properties configuration file.
However, if only that file is changed, the new or modified users will not be shown with graphic but-
tons; plain buttons will be displayed instead. The following sections describe how to create and edit
users and assign graphic buttons to those users.
C.8.1 Creating and editing users
The first part of the configuration is to change and add the users. In this example, we remove the user
named user and add two new users called john and jane. The first step is to override the built-in
realm.properties file:
1. Check the WebGUIPart configuration to see whether a base directory is configured for the web
server. If it is not, then add one.
2. Locate the realm.properties file in the examples:
\all-all\all\examples\web\config\JDFWebGUI
3. Copy the example realm.properties file to the product-specific subdirectory of the web server
base directory. Ensure that the copy is writable. For example, if your web server base directory is:
c:\custom
place the realm.properties file in the subdirectory:
c:\custom\JDFWebGUI
4. Edit the realm.properties file in the web server base directory. Remove the user named user,
which we no longer need. Also remove junit, which is only needed for Global Graphics' internal
testing. Add the new users john and jane, with role user and appropriate passwords.
<?xml version="1.0"?>
<Displayer name="Locale-independent default">
<Lookup key="hound" value="dog"/>
<Date format=""dd/MM/yyyy hh:mm:ss/>
<Command name="index">
<Lookup key="hound" value="mutt"/>
<Style name="graphic">
<Lookup key="hound" value="<IMG src='images/dog.gif'>">
</Style>
</Command>
</Displayer>
Table C.8 displayer.xml

JDF ENABLER FOR THE HARLEQUIN RIP
CUSTOMIZING THE JDF ENABLER INDEX CONTENTS 67
INDEX CONTENTS 67
Note: The default user in the built-in file has no password.
5. At this point, you should check that the change to realm.properties has been successful.
6. If the JDF Enabler is running, stop it and then start the JDF Enabler and bring up the web UI.
7. The login page should now contain no user called user login, but should have new plain buttons
for john and jane.
C.8.2 Adding graphic images for logins
The next step is to add the new graphic images, for the new users, to the web server base directory. To
be consistent with the built-in graphics, the new graphics should be added to a subdirectory called
images of the base directory.
1. If it does not already exist, create an images subdirectory within the product-specific subdirec-
tory in the web server base directory. For example, if your web server base directory is:
c:\custom
create:
c:\custom\JDFWebGUI\images
2. Copy the new images, which we assume to be called john.gif and jane.gif into the images sub-
directory.
3. The Displayer configuration should now be modified to apply the new graphics and add descrip-
tions for these users. This is in the displayer_en.xml because English text is included.
4. Find the example displayer_en.xml file in the following location:
\all-all\all\examples\web\config\JDFWebGUI
5. Copy the example displayer_en.xml file to the product-specific subdirectory within the web
server base directory and ensure that the copy is writable.
Built-in Modified
user: ,user
admin: ,user,administrator
support: support,user,administra-
tor,debug
junit: junit,user,administra-
tor,debug
john: foo,user
jane: bar,user
admin: ,user,administrator
support: support,user,administra-
tor,debug
Table C.9 realm.properties file (# comments omitted)

JDF ENABLER FOR THE HARLEQUIN RIP
CUSTOMIZING THE JDF ENABLER INDEX CONTENTS 68
INDEX CONTENTS 68
6. Edit the displayer_en.xml file in the product-specific subdirectory within web server base direc-
tory. Only the part related to the Command login should be edited. The code shown in Table C.10 is
the built-in code as supplied as an example.
<Command name="login">
<Style name="loginButton">
<Lookup key="user" value="<IMG src='images/standarduser.gif'
alt='Standard User'>"/>
<Lookup key="admin" value="<IMG src='images/adminuser.gif'
alt='Administrator'>"/>
<Lookup key="support" value="<IMG src='images/debuguser.gif'
alt='Support'>"/>
</Style>
<Style name="loginDescription">
<Lookup key="user" value="Monitor jobs and view configuration
only"/>
<Lookup key="admin" value="Monitor jobs and logs, and configure
Enabler settings"/>
<Lookup key="support" value="Enable additional views for techni-
cal support personnel"/>
</Style>
...
</Command>
Table C.10 Built-in displayer.xml (extract)

JDF ENABLER FOR THE HARLEQUIN RIP
CUSTOMIZING THE JDF ENABLER INDEX CONTENTS 69
INDEX CONTENTS 69
The code shown in Table C.11 is the modified code located in the web server base directory.
7. Lastly, check that these changes have been successful, by restarting the JDF Enabler, and logging
in to the web UI.
You may wish to look at the Velocity template loginForm.vm, to see how these changes to the Dis-
player configuration caused the observed changes to the rendered login form.
C.9 Changing the logo
You are able to change any of the logos or graphics displayed in the JDF Enabler web UI. Shown
below is a strategy for replacing the Harlequin logo displayed on the JDF Enabler web UI. However,
you can examine the Velocity templates to see the names of the other graphic elements which can also
be replaced.
To change the Harlequin logo you should create a GIF file called Logo.gif. Ideally, create a GIF file
with a size of 294 x 50 pixels or smaller. If you use a graphic image larger than this, the elements of the
web UI could become displaced.
1. If it does not already exist, create an images subdirectory within the product-specific subdirec-
tory in the web server base directory. For example, if your web server base directory is:
c:\custom
create:
c:\custom\JDFWebGUI\images
<Command name="login">
<Style name="loginButton">
<Lookup key="john" value="<IMG src='images/john.gif' alt='John
Smith'>"/>
<Lookup key="jane" value="<IMG src='images/jane.gif' alt='Jane
Jones'>"/>
<Lookup key="admin" value="<IMG src='images/adminuser.gif'
alt='Administrator'>"/>
<Lookup key="support" value="<IMG src='images/debuguser.gif'
alt='Support'>"/>
</Style>
<Style name="loginDescription">
<Lookup key="john" value="Monitor jobs and view configuration
only"/>
<Lookup key="jane" value="Monitor jobs and view configuration
only"/>
<Lookup key="admin" value="Monitor jobs and logs, and configure
Enabler settings"/>
<Lookup key="support" value="Enable additional views for techni-
cal support personnel"/>
</Style>
...
</Command>
Table C.11 Modified displayer.xml (extract)

JDF ENABLER FOR THE HARLEQUIN RIP
CUSTOMIZING THE JDF ENABLER INDEX CONTENTS 70
INDEX CONTENTS 70
2. Copy the new images, which we assume to be called john.gif and jane.gif into the images sub-
directory.
3. Place Logo.gif into the images subdirectory.
4. Restart the JDF Enabler. The new logo will not appear on the web UI until the system is re-
started.
For more information on jdfenabler.txt, see “jdfenabler.txt” on page 34.
C.10 Changing colors in the user interface
If you wish you may change the colors of the web UI elements. This is done by replacing the colors in
the stylesheet.vm file with hexadecimal RGB or simple colors such as black,white,red and blue.
1. Locate the example stylesheet.vm file:
For Windows:
<installation dir>\SOAR\WebGUIServices\<version>\<revision>\
all-all\all\examples\web\config\JDFWebGUI
For Mac OS X:
/<install folder>/SOAR/WebGUIServices/<version>/<revision>/
all-all/all/examples/web/config/JDFWebGUI
For Linux:
/<install folder>/SOAR/WebGUIServices/<version>/<revision>/
all-all/all/examples/web/config/JDFWebGUI
2. Copy the example stylesheet.vm file to the product-specific subdirectory of the web server base
directory. Ensure that the copy is writable. For example, if your web server base directory is:
c:\custom
place the stylesheet.vm file in the subdirectory:
c:\custom\JDFWebGUI
3. Edit the file by replacing the colors with hexadecimal RGB or simple colors.
4. Restart the JDF Enabler to view the changes.

INDEX CONTENTS 71
Appendix D–JDF Control application
D.1 Introduction
The JDF Control application is a simple command line utility for interacting with the JDF Enabler for
the Harlequin RIP. JDF Control can be used as a conventional command line program or within a JDF
Client.
On Windows the JDF Client is launched from the Start menu:
Start/Programs/Global Graphics/JDF Enabler/Tools/JDF Control
On Linux you will find the JDF Control shortcut at:
<installation dir>/Harlequin/JDF_Control
On Mac OS X you will find the JDF Control shortcut at:
<installation dir>/JDF Control
The general form of invocation is as follows:
jdf <command> <options>
JDF Control is a complementary utility to SOARControl which provides a set of commands for
administering a general SOAR application.
Whereas SOARControl uses CORBA over IIOP to communicate with a general SOAR application, JDF
Control mainly uses JMF over HTTP to communicate with the JDF Enabler.
JDF Control can be used for:
• Learning about JDF/JMF
• Testing the JDF Enabler for the Harlequin RIP
• Administering the JDF Enabler for the Harlequin RIP (as further commands are added)
• For quickly creating prototype JDF workflows
JDF Control can be used as a conventional command line program or, like SOARControl, can be run
as a simple GUI form. The advantages of the GUI form are:
• Ease-of-use
Simplifies invocation on Mac OS X where actual executable is buried in directory hierarchy
The history of command line input can be selected interactively
Help can be invoked interactively
Output is captured in a message area
• Efficiency
The overhead of starting a Java virtual machine is only encountered once on startup
At present JDF Control supports only one command sendjmf for sending JMF messages to the JDF
Enabler.

JDF ENABLER FOR THE HARLEQUIN RIP
JDF CONTROL APPLICATION INDEX CONTENTS 72
INDEX CONTENTS 72
D.2 SendJMF
jdf sendjmf -service <url> -request <file> [ -response <file> ] [ -subscriptions
<directory> ] [ -sleep <timeout> ] [ -type <mimetype> ]
D.2.1 Description
The sendjmf command sends a JMF message from a local file to a channel of the JDF Enabler. The
response is captured and is written into a local file. If the JMF message is a query that sets up a sub-
scription, sendjmf can wait for a given period, during which time the signals it receives from the JDF
Enabler will be written out as separate files to a designated directory.
D.2.2 Options
-request <file name>
This is a required argument. It represents the path name of the file con-
taining a JMF message, for example:
-request c:\MySubmitQueueEntry.jmf
Currently, the path must be absolute. No file extension is necessary.
-response <file name>
This is an optional argument. It represents the path name of a response
file that will be created and filled from the JMF response sent back from
the JDF Enabler, for example:
-response MySubmitQueryEntryResponse.jmf
If the argument is not supplied, the response file name is automatically
determined by adding the string -response to end the request file name
(but before any file extension if there is one). If supplied, it should be an
absolute file name.
-service <url>
This a required argument. It represents the URL of the JDF Enabler
channel to send the JMF message to, for example:
-service http://localhost:8080/soar/jmf/MyJDFChannel
-sleep <timeout>
This is an optional argument. It represents the number of seconds to
wait for JMF signal messages arriving from the JDF Enabler if a sub-
scription query was sent as the request, for example:
-sleep 10
If the argument is supplied, JDF Control sets up a built-in HTTP server
to listen for replies.
If the sleep argument is not supplied, no HTTP server is setup and JDF
Control does not wait for any signals.
-subscriptions <directory>
This is an optional argument. It represents a directory into which the
JMF signal messages received from the JDF Enabler are written if a sub-
scription query was sent as the request, for example:
-subscriptions c:\MySignals\
If the argument is not supplied, the subscriptions directory is automati-
cally determined from the directory of the request file. If the argument is
supplied it should be an absolute file name.

JDF ENABLER FOR THE HARLEQUIN RIP
JDF CONTROL APPLICATION INDEX CONTENTS 73
INDEX CONTENTS 73
-type <mimetype>
This is an optional argument. The value is used as the content-type
header for the HTTP stream. If not supplied it defaults to text/xml. If
you want to send a MIME file containing both JMF, JDF, and other con-
tent then the type should be set to multipart/related.
-port <integer>
This option controls the port on which JDF Control will listen for Signals
from JMF Subscriptions. It defaults to a value of 8088. The automatic
documentation of the port option includes printing out what the return
URL of the <Subscription/> in the JMF must be, to interact with JDF
Control. The returnURL in JMF must match this. For the default port, the
returnURL must be: http://127.0.0.1:8088/SendJMF/
Note the trailing /which is required.
Also, when processing a sendjmf command that includes listening for
subscriptions (see -sleep above), it prints out the URL on which it is
actually listening, with the actual port specified via -port. For example:
Starting HTTP server listening for JMF signals at
http://127.0.0.1:8089/SendJMF/
D.2.3 Examples
jdf sendjmf -service http://localhost:8080/soar/jmf.MyJDFChannel/-request
c:\temp\MyQueryStatus.jmf -sleep 10
jdf sendjmf -service http://localhost:8080/soar/jmf.MyJDFChannel/-request
c:\temp\MyStopPersistentChannel.jmf
jdf sendjmf -service http://localhost:8080/soar/MyJDFChannel -request c:\MyMIMEFile
-type multipart/related
D.3 createMultipart
The tool can create the two types of multipart file that the Harlequin JDF Enabler can currently under-
stand:
1. JMF, JDF and optional resources (for example. PDL files). The JDF Enabler will currently only
accept this type of multipart when sent via HTTP. You may submit it using the sendjmf command
in JDF Control.
2. JDF and optional resources. The JDF Enabler currently only accepts this type of multipart when
submitted to a hot folder.
There are a variety of options for how to create a multipart:
• Starting with a JMF in a file, the tool can read the JMF, locate the JDFs that it references, find
them and include them in the multipart. The URLs in the JMF will be adjusted to use the CID
URL scheme, to reference the JDFs in the multipart. This makes a multipart for case (1) above.
For example:
jdf createMultipart -out mymultipart.out -jmf example.jmf
• Starting with a JDF in a file, the tool can read then create a simple JMF that will submit it. Again,
this makes a multipart for case (1) above.
jdf createMultipart -out mymultipart.out -jdf example.jdf
-jmfCreate

JDF ENABLER FOR THE HARLEQUIN RIP
JDF CONTROL APPLICATION INDEX CONTENTS 74
INDEX CONTENTS 74
• Starting with a JDF in a file, the tool can make a multipart file that starts with that JDF. This
makes a multipart file for case (2) above.
jdf createMultipart -out mymultipart.out -jdf example.jdf
In all these cases, each JDF is read and the referenced resources are located. These resources are
then included (in BASE64 encoding) in the multipart file. The URLs in the JDFs will be adjusted
to use the CID URL scheme, to reference the resources in the multipart file.
If you do not want all resources to be included in the multipart file, you can use the -resources REGEX
command-line switch to select just some of them. For example:
jdf createMultipart -out mymultipart.out -jdf example.jdf
-resources 'file:.*'
Note: This is a proper regular expression, not just a simple wildcard. For example, to ask for all
resources with a file: protocol, the regular expression is file:.*, and not file:* (note the extra dot
in the correct version).
D.3.1 Options
All options must be introduced with a dash (-) createMultipart can accept the following options
which specify how the command is run:
-console Use the console to report progress or errors. Always assume the default
response to any question. This is the default.
-gui Use dialogs to display questions and to report progress or errors.
-jmfCreate <file name>
If no JMF file specified, create a simple one for the multipart file.
-jmf <file name>
The specification of the path to JMF file (optional)
-jdf <file name>
Specifies a JDF in a file, which the tool can read (optional).
-logOutput During some operations, JDF Control writes messages indicating the
progress of the operation. Normally, these do not go to the logger.log
file. However, if you use this command, messages are included.
-noJMFCreate
If no JMF file specified, do not include any JMF in the multipart file.
-noLogOutput
The log output messages are not written to the logger.log file.
-out <file name>
Specify the path for the generated multipart file (required).
-resources <url>
Specify the resources to include in the multipart file (optional regular
expression).

JDF ENABLER FOR THE HARLEQUIN RIP
JDF CONTROL APPLICATION INDEX CONTENTS 75
INDEX CONTENTS 75
D.4 noteoutput
This noteoutput command tells the JDF Enabler about TIFF file completion, and its command syntax
is:
jdf noteoutput -channel <channel-id> -file <filename>
For more information on how to use the noteoutput command see “The JDF Control noteoutput
command” on page 88.
D.5 Known limitations
The createMultipart command can make some multiparts that the JDF Enabler will not currently
accept. For instance, a multipart with JMF and resources, but no JDF.
The createMultipart command does most of its processing in memory. This means that it is not able
to create really large multiparts. It should work properly up to a few megabytes. The JDF Control tool
will, accept the usual command line arguments to increase Java heap size, which may help in some
cases.

INDEX CONTENTS 76
Appendix E–SOAR Control tool
E.1 Using the SOAR Control tool
A command line tool known as SOAR Control is supplied with the SOAR SDK. This tool can be used
to:
• Restore SOAR to its default settings—see Section E.1.1.
• Shutdown SOAR—see Section E.1.2.
• Check whether a particular component is responding—see Section E.1.3.
• Configure the networking mode—see Section E.1.4.
• Set the Core Services—see Section E.1.6.
• Set or change the Harlequin RIP used in the Core Services—see Section E.1.7.
• Automatically start the JDF Enabler web browser as part of the Core Services—see Section E.1.8.
• Configuration of various levels of Job logging—see Section E.1.5.
Note that this tool is used during the standard installation of the SOAR SDK to set the Core Services.
Some of the Start menu items and shortcuts/aliases also rely on this tool.
When the SOAR Control tool is installed, logging information is stored in a controllogger.log file in
the .manifest directory. You should refer to this file for further information if you have any problems
installing the SOAR SDK. Further logging information is stored in a logger.log file alongside the exe-
cutable.
You can start SOAR Control from the following locations:
On Windows the SOAR Control is launched from the Start menu:
Start > All Programs > Global Graphics > WebGUI Services > SOAR Control
On Linux you will find the SOAR Control shortcut at:
<installation dir>/Harlequin/SOAR_Control
On Mac OS X you will find the SOAR Control shortcut at:
<installation dir>/SOAR Control
The soar executable is in the following location:
PC:
<installation directory>\SOAR\Control\<version>\<revision>\win_32-pentium\rel\soar
Linux:
<installation directory>/SOAR/Control/<version>/<revision>/linux_2-pentium/rel/soar

JDF ENABLER FOR THE HARLEQUIN RIP
SOAR CONTROL TOOL INDEX CONTENTS 77
INDEX CONTENTS 77
Mac OS X:
<installation directory>\SOAR\Control\<version>\<revision>\macos_x-
ppc\rel\SOARControl.app\Contents\MacOS\soar
Note that on Mac OS X platforms you must specify the path to the executable within the SOARControl
application package.
You can also use the Start menu shortcut (PC platforms) or the shortcut/alias at the top level of the
installation folder (Linux/Mac OS X platforms) to run the SOAR Control tool. This runs the SOAR
Control tool without any options, which displays a window describing the available options, as
shown in Figure E.1.
Figure E.1 SOAR Control window
You can enter your commands in the Command field of this window and then click Go or press Return.
The format of the command line is:
soar command options
where command is one of the following:
reset Restore SOAR to its factory default settings on the local host. See
Section E.1.1 for more details.
shutdown Shut down SOAR on local and/or remote hosts. See Section E.1.2 for
more details.
ping Check whether a particular component is responding, on local or remote
hosts. See Section E.1.3 for more details.
localHostPolicy
Specify the networking mode to use. See Section E.1.4 for more details.
components Set the components included in the Core Services. See Section E.1.6 for
more details.

JDF ENABLER FOR THE HARLEQUIN RIP
SOAR CONTROL TOOL INDEX CONTENTS 78
INDEX CONTENTS 78
ripexec Set or change the Harlequin RIP used in the Core Services. See
Section E.1.7 for more details.
jdfweb Automatically start the JDF Enabler web browser as part of the Core
Services. See Section E.1.8 for more details.
joblogger Configure the various levels of job logging. See Section E.1.5 for more
details.
All options must be introduced with a dash (-). All commands, except components, can accept either of
the following options which specify whether the command is run in an interactive or non-interactive
mode:
-gui Use dialogs to display questions and to report progress or errors.
-console Use the console to report progress or errors. Always assume the default
response to any question.
The components command must be run with the -gui option to allow you to choose the components
from a dialog.
All commands can also accept either of the following options:
-logOutput Add progress messages and so on for the component to the log file
(logger.log).
-noLogOutput
Do not add progress messages, and so on, for the component to the log
file (logger.log).
E.1.1 Reverting to factory settings
The reset command described in Section E.1 can be used to revert to default settings on the local host.
The options -gui and -console can be used to control whether or not a GUI is displayed for user
interaction.
Note: The Core Services must be stopped before using this command. When you next start the Core
Services, the startup process is longer than normal because they have to be configured to use the
default settings, whereas normally the settings from the last session are retained.
E.1.2 Stopping the Core Services
The shutdown command described in Section E.1 can be used to stop the Core Services.
You can use the -host option to shut down the Core Services on the specified remote host(s). For
example, soar shutdown -host computer1 computer2 would shut down the Core Services on the
specified remote computers. If this argument is not given, the local host is assumed.
E.1.3 Checking the status of a component
The ping command described in Section E.1 can be used to check whether a particular component is
responding.
The ping command accepts the following options:
-local Look for the specified component on the local host only.
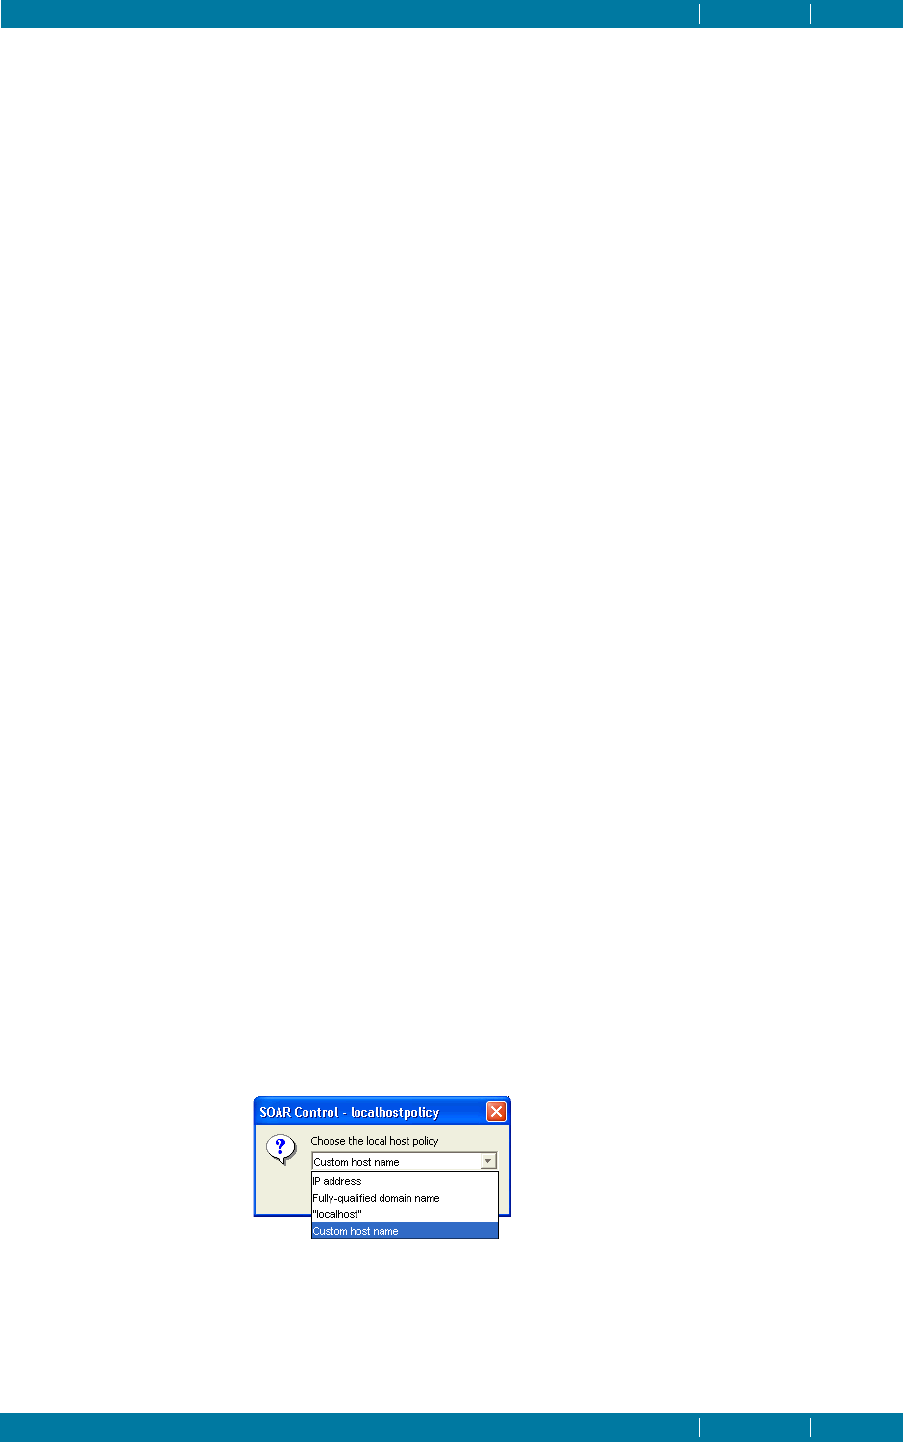
JDF ENABLER FOR THE HARLEQUIN RIP
SOAR CONTROL TOOL INDEX CONTENTS 79
INDEX CONTENTS 79
-remote Look for the specified component on the local host or on the parent host
whose name service is connected to the local one. This is the default.
Note: You cannot look for a component on a child host.
-rip <instance>
Ping the specified persistent RIP instance.
-soar <moduleName> <interfaceName>
Ping the specified SOAR component. For instance, the component could
be JobLogger and the interface could be JobLogServer.
-name <stringifiedNamePath>
Ping the specified component, which can be part of SOAR, but could
also be a third-party component implementing ServerModule (described
in the IDL documentation). The name path uses the corbaname scheme
for stringification. For example,
Harlequin.company/SOAR.product/JobLogger.module/JobLogServer.i
nterface. Only one component can be “pinged” in a single command.
E.1.4 Configuring the networking mode
The localHostPolicy command described in Section E.1 can be used to set or change the networking
mode that is specified in the networking_choice.txt configuration file.
The localHostPolicy command accepts the following options:
-ip Machines are referenced using numeric IP addresses.
-localhost A special case for when the entire SOAR world is confined to a single
machine, with no network communication between components.
-fqdn Machines are referenced by their fully-qualified domain names.
-custom <host>
This allows the host name or IP address used by the ORB to be explicitly
set. It is equivalent to:
com.harlequin.CORBA.ORB.IIOPLocalHost="host"
This may be useful for selecting the right IP address on a machine with
multiple network adapters, for instance.
If you use the -gui option with this command, as described in Section E.1, a dialog will appear allow-
ing you to select one of the above networking options.
Figure E.2 SOAR Control localhostpolicy dialog
When the JDF Enabler is installed, SOAR Control is run from the distribution to perform several of the
initial setting-up tasks. These runs of SOAR Control operate with localhost networking policy. This
allows success whether or not a network is connected.

JDF ENABLER FOR THE HARLEQUIN RIP
SOAR CONTROL TOOL INDEX CONTENTS 80
INDEX CONTENTS 80
Although the primary way of controlling the networking policy is via the networking_choice.txt
file, as set up by the SOAR Control command localHostPolicy, it is now possible to override this via
the command line.
All SOAR Java applications (such as JDF Control) will override networking_choice.txt with a net-
working policy specified on the command line via Java system properties. To specify a Java system
property on the command line, add an argument:
-D<property>=<value>
For example:
soar -Dcom.harlequin.CORBA.ORB.IIOPLocalHost=myhost shutdown
Two properties are relevant:
Note: If you are using this command to change the networking mode, you should then use the Reset
to defaultsoption. This is necessary to delete object references (IORs) between SOAR components that
com.harlequin.CORBA.ORB.IIOPLocalHost Explicitly specifies the host name or
IP address that will be used by the
ORB.
The localhost networking policy is
the equivalent of com.harle-
quin.CORBA.ORB.IIOPLocal-
Host="localhost"
Explicitly specifying a host name or
IP address, in this way, usually
means that the ORB does not require
a network to be connected, though
this depends on the precise configu-
ration of the particular machine.
com.harlequin.CORBA.ORB.IIOPLocalHost-
Policy
If com.harle-
quin.CORBA.ORB.IIOPLocal-
Host is not specified, this property
specifies a policy by which a host
name or IP address, for use by the
ORB, is determined.
The important values are ip, meaning
that the local host's IP address will be
used, and fqdn, meaning that the
local host's fully-qualified domain
name will be used.
The policies ip and fqdn often require
a network to be connected, though
this depends on the precise configu-
ration of the particular machine.
Table E.1 Java System Properties

JDF ENABLER FOR THE HARLEQUIN RIP
SOAR CONTROL TOOL INDEX CONTENTS 81
INDEX CONTENTS 81
are based on the old networking mode (See Reverting to factory settings for further details). The fol-
lowing message appears to remind you of this recommendation:
Modifications complete. Note that existing state may be invalid.
Consider resetting to factory defaults
E.1.5 Job logging
The SOAR Control command jobLogger allows configuration of the progress level. It accepts two
optional options, -progress and -detail.
For example:
soar jobLogger -progress bound unbound output
soar jobLogger -progress OutputProgress_1
Note: The JDF Enabler sets the job logging detail level, so the -detail command is not useful when
working with JDF Enabler.
-progress Specifies the types of progress. This can either be the full IDL enumera-
tion name, such as BoundProgress_1, or the name without the
Progress_1 part, such as Bound. Please note that the options are case-
insensitive.
The options are:
Publishing The setting up of input channels, for example AppleTalk.
Bound Bound inputs to the RIP, such as a static job file on disk. Bound progress
is used when the total size of the data is known ahead of time, making it
possible to express the amount consumed as a fraction of the total.
Unbound Unbound inputs to the RIP, for example, a channel. Unbound progress
is when the size of the data is not known in advance. The RIP keeps
reading the data until the input is exhausted. In this case, it is impossible
to express the progress as a fraction or percentage. The RIP therefore
provides a counter of how much data has been read so far.
CRD Generation
The generation of CRD caches. That is, the process of interpolating data
points in a color profile.
Recombination
This is where the RIP is trying to match up graphic objects in pre-sepa-
rated jobs, in order to recombine the input.
Note: Recombine is explicitly disabled for JDF jobs.
ScreeningGeneration
The generation of Halftone caches.
TrappingTransfer
The transfer of the display list to trapping.
TrappingGeneration
The progress of the trapping.
PaintingToDisk
The generation of PGBs on disk.
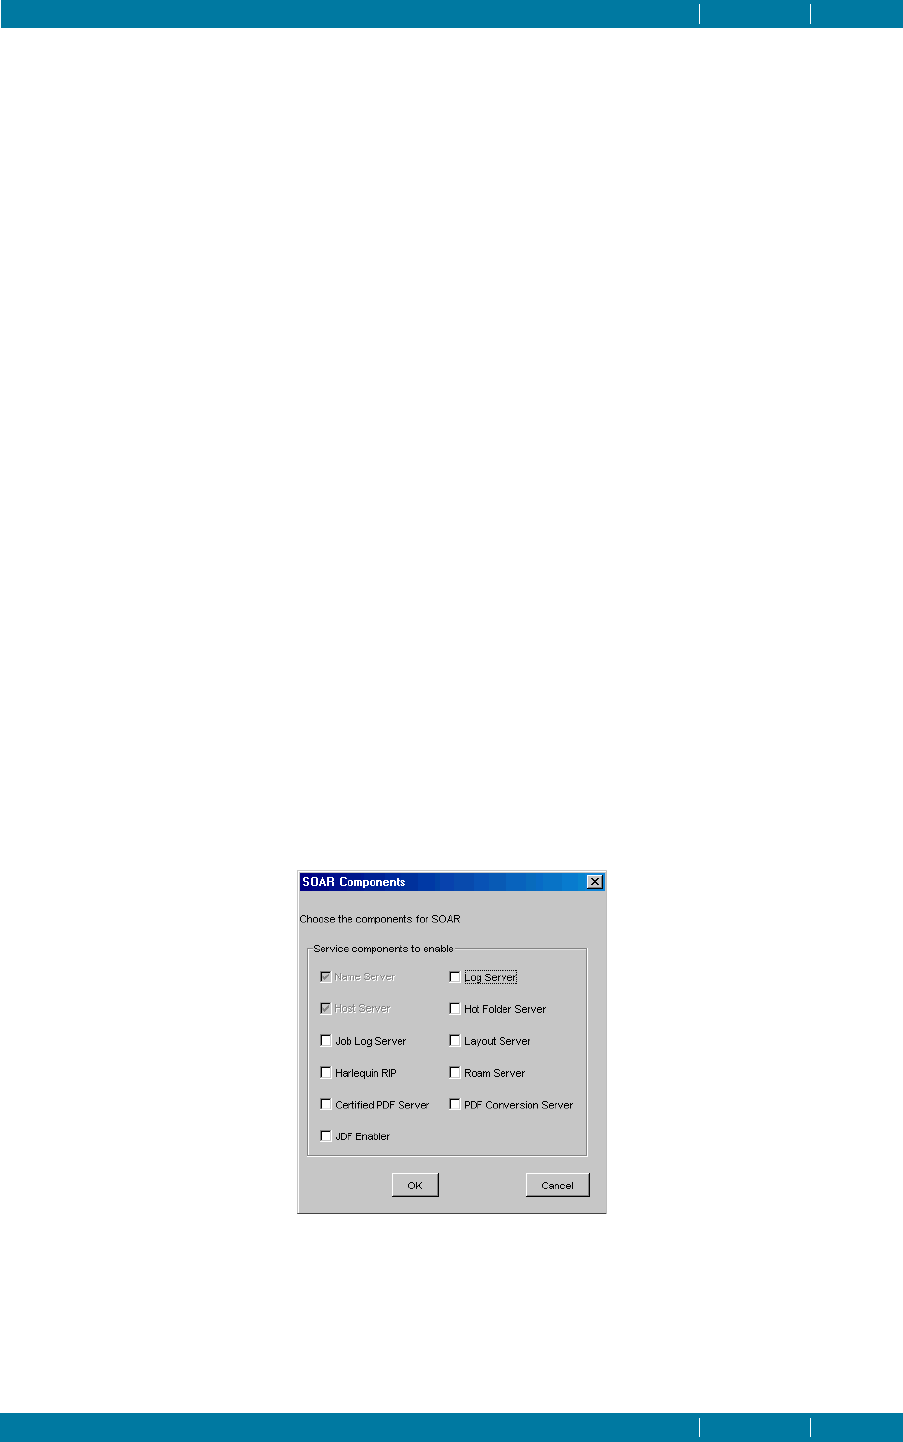
JDF ENABLER FOR THE HARLEQUIN RIP
SOAR CONTROL TOOL INDEX CONTENTS 82
INDEX CONTENTS 82
Output The transfer of raster data to the output device.
Compositing Progress of compositing.
PreparingToRender
Progress of Preparing to Render.
-detail Has options of rip,job,page, and pagebuffer. These control whether
page buffers, pages, jobs or just RIPs are logged.
Please note that the JDF Enabler sets the job logging detail level, therefore the -detail command is
not useful when working with JDF Enabler.
E.1.6 Setting the Core Services
The components command, described in Section E.1, can be used to create or modify the coreconfig
file that is used by the JavaCoreSOAR application to determine which components to run as Core Ser-
vices.
If you select the RIP and/or Roam component(s) when running the components command, it runs the
ripexec and/or roamexec sub-command(s) to create the secondary configuration file(s) required by
JavaCoreSOAR (harlequinrip.txt and roam.txt by default).
Likewise, if you choose JDF Enabler, the appropriate sub-commands are run to create the required
configuration files, as described in Section E.1.8.
The components command must be used in conjunction with the -gui and
-dir options, which allow you to use a dialog to select components, and to specify the location of the
coreconfig file that you wish to create/modify. During standard SOAR installations, the coreconfig
file is saved in the config folder within the JavaCoreSOAR installation directory.
For example, if you run the following command (PC and Linux platforms):
soar components -gui -dir config-directory
the following dialog box appears, allowing you to choose which components to run as Core Services:
Figure E.3 Core Services dialog
If you have selected the RIP check box, a dialog box will appear prompting you for the location of the
RIP you wish to use. See Section E.1.7 for full details on the Show Classic UI option in this dialog box
that allows you to configure the type of RIP (GUI RIP vs. headless RIP).
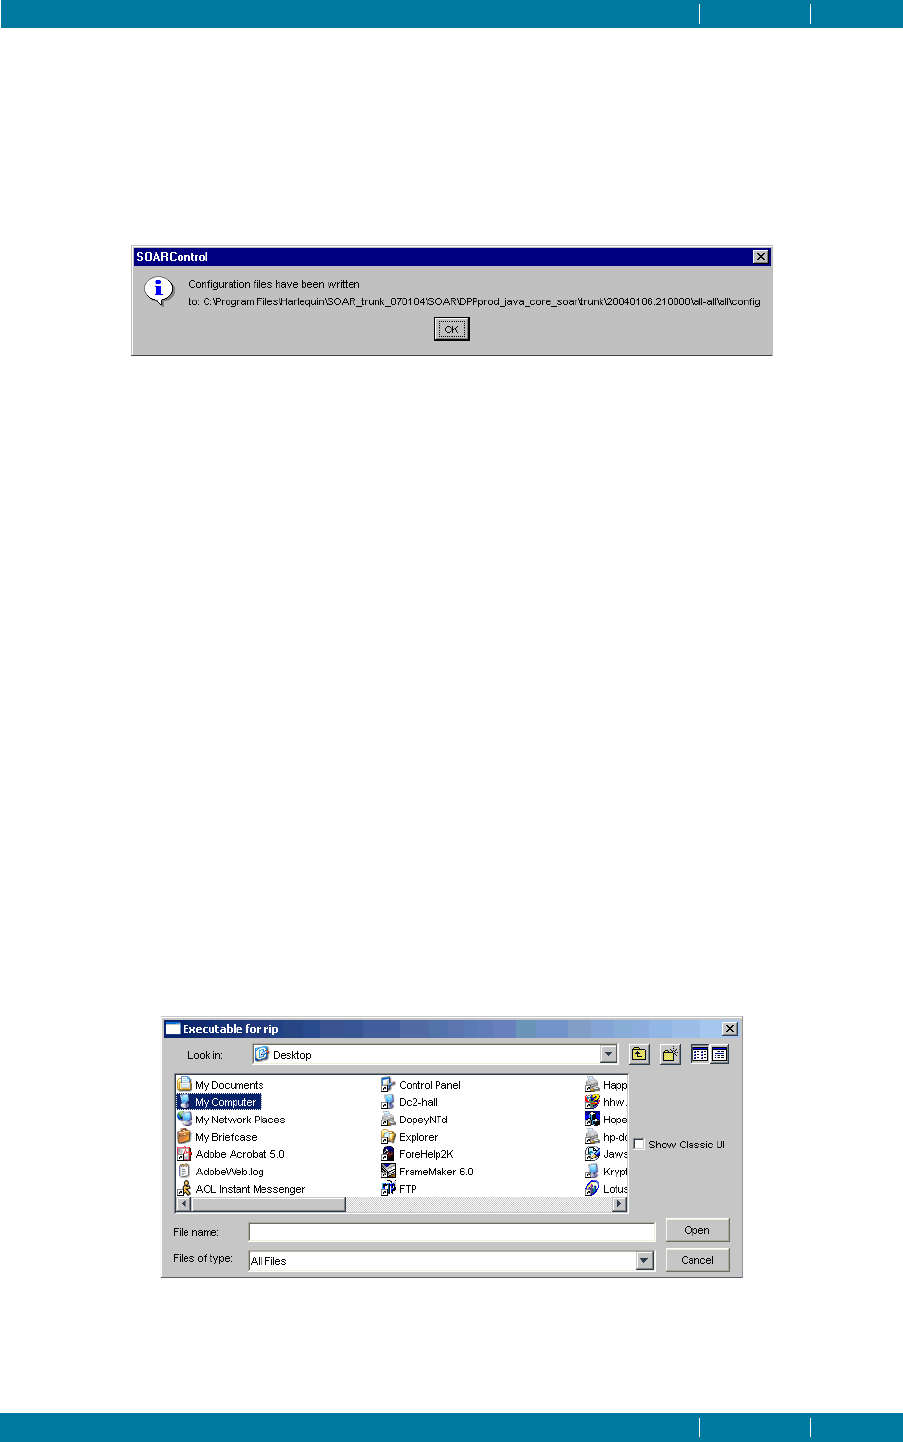
JDF ENABLER FOR THE HARLEQUIN RIP
SOAR CONTROL TOOL INDEX CONTENTS 83
INDEX CONTENTS 83
Note: If at a later date you wish to add or change the type of RIP Server launched, you can use the
ripexec command, as described in Section E.1.7.
Likewise, a dialog box will appear for the JDF Enabler check box that you select, as described in
Section E.1.8.
Once you have chosen the components you wish to run, a dialog box appears confirming the location
of the configuration file(s) created:
Figure E.4 SOAR Control confirmation dialog
Note: If you are using the components command to change the components running in your SOAR
system, we recommend that you run the reset command afterwards, as described in Section E.1.1, to
ensure that there are no conflicts between old and new components.
E.1.7 Setting or changing the Harlequin RIP used in the Core Services
The ripexec command described in Section E.1 is an optional sub-command of the components com-
mand and configures the Harlequin RIP used in the Core Services. It can also be used to change the
Harlequin RIP that is run as part of the Core Services. Note that in this case, you must have already set
a Harlequin RIP to run as part of the Core Services; either during installation, or post-installation
using the components command of the SOAR Control tool.
This command creates or modifies the configuration file (named harlequinrip.txt by default) that is
used by the JavaCoreSOAR application to determine which Harlequin RIP to run as part of the Core
Services.
It should be used in conjunction with the -gui and -dir options, which allow you to use a file browser
to choose a Harlequin RIP, and to specify the location of the harlequinrip.txt file that you wish to
create/modify. During standard SOAR installations, the harlequinrip.txt file is saved in the config
folder within the JavaCoreSOAR installation directory.
For example, if you run the following command (PC and Linux platforms):
soar ripexec -gui -dir config-directory
the following dialog appears, allowing you to choose a Harlequin RIP:
Figure E.5 Harlequin RIP chooser
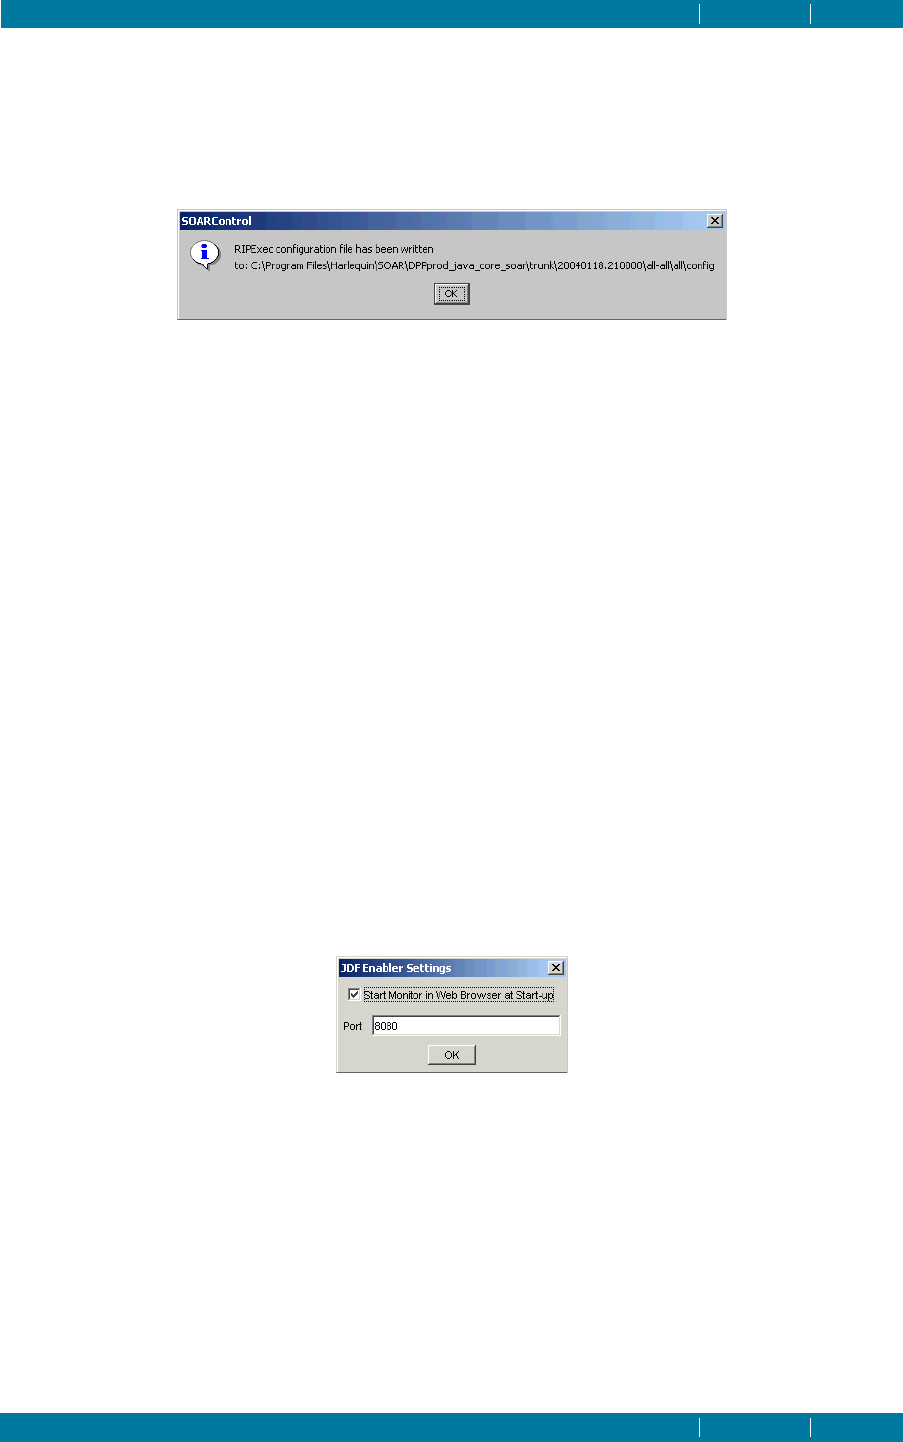
JDF ENABLER FOR THE HARLEQUIN RIP
SOAR CONTROL TOOL INDEX CONTENTS 84
INDEX CONTENTS 84
Select the Show Classic UI check box in this dialog box if you wish to run the RIP in GUI mode rather
than headless mode. By default, the selected RIP will be set to run in headless and persistent mode
(instance 0) and to automatically start whenever the Core Services are started.
Once you have chosen the Harlequin RIP you wish to run, a dialog appears confirming the location of
the configuration file created:
Figure E.6 Confirmation dialog
Note: If you do not wish to use the -gui option to interactively configure the RIP, you can use addi-
tional options such as -ripExe <full path to RIP executable>. For example, you can use the -
ripInstance <instance number> option to specify the instance number of the server. By default, the
instance number is set to 0. The -ripHeadless and -ripGUI options can also be used to determine
whether the RIP is run in headless or GUI mode.
E.1.8 Automatically starting the JDF Enabler web browser
The jdfweb command described in Section E.1 can be used to automatically start the JDF Enabler web
browser as part of the Core Services.
This command creates or modifies the configuration file (named jdfenabler.txt by default) that is
used by the JavaCoreSOAR application to configure the JDF Enabler web browser. See Section 2.9.4,
“jdfenabler.txt” for further details on the use of the jdfenabler.txt configuration file.
The jdfweb command must be used in conjunction with the -gui and -dir options, which allows you
to use a dialog to choose your browser options, and to specify the location of the jdfenabler.txt file
that you wish to create/modify. During standard SOAR installations, the jdfenabler.txt file is saved
in the config folder within the JavaCoreSOAR installation directory.
For example, if you run the following command (PC and Linux platforms):
soar jdfweb -gui -dir config-directory
the following dialog appears, allowing you to configure the JDF Enabler web browser:
Figure E.7 JDF Enabler settings dialog
Note: If you do not wish to use the -gui option to interactively specify the browser settings, you can
use the supported options listed in the SOAR Control window to configure the browser.
E.1.9 Configuration of transactions used within SOAR services
A means is provided for users of SOAR Services, including JDF Enabler, to configure the settings used
by the transactions running within GGSL developed Java CORBA code (for example. core SOAR ser-
vices, JDF services).

JDF ENABLER FOR THE HARLEQUIN RIP
SOAR CONTROL TOOL INDEX CONTENTS 85
INDEX CONTENTS 85
The Java system properties are:
To set these (or any other) Java system properties, arguments may be passed to the javalauncher exe-
cutable (for example, javacoresoar.exe for SOAR services on Windows). For example:
javacoresoar -Dcom.harlequin.transactions.retries=3
One way to pass these arguments is to modify the shortcut, alias or script being used to run SOAR ser-
vices.
Generally, these setting do not need modification as the default values will, in most cases, work well.
You may be requested to change these settings in response to a suggestion from Global Graphics' sup-
port or development.
Note: If you own code is initiating transactions, these transactions will not use the internal
TransactionUtils class, and are therefore unaffected.
com.harlequin.transactions.time-
out
Default transaction time-out, in seconds. If
transaction does not finish (commit or roll-
back), within this time, it is killed and its associ-
ated resources are freed.
The default is one hour (3600 seconds).
com.harlequin.transactions.retries Default maximum transaction retries. If the
transaction is forced (e.g. by a clash with other
transactions on the same object) to retry more
than this number of times, the transaction rolls
back and finishes.
The default is 10.
Table E.2

INDEX CONTENTS 86
Appendix F–TIFF output integration
F.1 The ImageSetting and ExposedMedia JDF resource
When a combined JDF process node includes the ImageSetting process, the final output resource is
always of type ExposedMedia, representing the physical results of operating an output device be that
film, plate or even just proofing paper. This resource is always marked as Unavailable when the pro-
cess arrives at the RIP; the JDF Enabler then marks it as Available when the job successfully com-
pletes. However, the JDF Enabler only tracks the process node while it is active in the RIP. As soon as
the RIP terminates the job, either successfully or with an error, the JDF Enabler regards all of the com-
bined sub-processes as having been executed. This includes the ImageSetting process. Hence the
default behavior of the JDF Enabler is to override any use of the RIP's throughput controller, and to
prevent any page buffering. The problem arises when a job completes in the RIP, but its pages have
been buffered on disk (as PGB files), and are awaiting output on the physical device. In this case, the
JDF Enabler records the job as having been completed, and marks the ExposedMedia resource as
Available, even though the outputting procedure is still underway. This has two important and usu-
ally undesirable effects:
• In the JDF Enabler’s web UI, the job moves from the upper input table down to the lower output
table, and appears to have been completed. See “The Monitor screen” on page 41 for more infor-
mation.
• The JDF document, with its updated ExposedMedia resource status, is re-written to the job's
output channel. This output channel may just be a default JDF output folder, or it could be the
ReturnURL of an earlier SubmitQueueEntry JMF command. In either case, the new JDF document
is communicated to other components in the workflow, all of which would see the ExposedMedia
as being available prematurely.
To avoid these potential sources of conflict within the workflow The JDF Enabler normally operates
the RIP in Single-If mode. It is however still possible to operate the RIP in Multiple/Parallel mode if
required. For more information see description of the -tp channel switch in “-channel {option}” on
page 36.
There is a further case to be considered. Even when the RIP is operating in Single-If mode, it is possi-
ble for the JDF Enabler to record a job as being prematurely complete. This can happen if the output
plugin is not driving a physical device, but is instead generating binary raster files on disk. The most
common example of this is the TIFF plugin. In this case, when a job terminates in the RIP, the end
result is a selection of TIFF files, and not physical media. Once again, it is faulty for the JDF Enabler to
assume that the ImageSetting process has been executed, and it is possible for the workflow to
become confused. To overcome this, the JDF Enabler has a mechanism for tracking the progress of the
ImageSetting process, even when it is being performed separately from the RIP. This mechanism is
described below.
F.2 Overview of the TIFF workflow
Many existing Harlequin RIP workflows use the TIFF plugin, and then integrate a separate output
engine (often called a TIFF shooter or catcher), to drive the physical device, such as a plate setter or dig-
ital press. The aim of the JDF Enabler is to take account of this additional, post-RIP output stage, and
to defer marking jobs as “complete” (and rewriting their JDF to the output channel) until the TIFF
files have been imaged on the physical device. To achieve this, the JDF Enabler must be aware that

JDF ENABLER FOR THE HARLEQUIN RIP
TIFF OUTPUT INTEGRATION INDEX CONTENTS 87
INDEX CONTENTS 87
TIFF files are being generated by the RIP, and that a TIFF shooter is subsequently outputting those
files to a device.
The JDF Enabler offers two ways for third-party TIFF shooters to be integrated: a tight integration
approach, and a loose integration approach. Tight integration would suit OEMs who are developing
their own TIFF shooter application, and are able to use the SOAR API to communicate directly with
the JDF Enabler. For more information on this method please consult the SOAR SDK documentation.
Where the SOAR SDK is not being used, the JDF Enabler offers the loose integration route, which
allows the TIFF shooter to pick up TIFF files using its own Hot Folder system. The JDF Enabler still
needs to be notified when the TIFF output is complete, but this can be achieved by invoking a small
command-line messaging tool, packaged as part of the jdfcontrol utility. For more information, see
Appendix D, “JDF Control application”. The command-line tool itself uses SOAR technology to com-
municate with the JDF Enabler, but no SOAR programming is required to make it work.
The next section describes how to create JDF Input Channels that operate the TIFF workflow.
F.3 Creating a TIFF workflow in the JDF Enabler
Whether you are adopting a loose integration or a tight integration method, the first step is to notify
the JDF Enabler that a TIFF-based workflow is going to be used.
1. Create a Harlequin RIP Page Setup configured for the TIFF device.
2. Associate the Page Setup with the JDF Input Channel. See “Create a new channel” on page 24 for
more information.
3. The JDF Input channel must be configured as a TIFF-based workflow channel, (as this is what
will prevent the JDF Enabler from assuming that jobs are complete once they are finished in the
RIP). In the Configure Advanced screen select the RIP to File and Queue For Output Workflow
option. For more information see “Edit Advanced (Administrator)” on page 28. This option can
also be configured using the Automatic channel creation facility. See “-channel {option}” on page
36 for more information.
Note: It is not necessary for all input channels to operate in the same way. The JDF Enabler will per-
mit you to work with a mixture of input channels, where some use the TIFF workflow and others do
not. The JDF Enabler will just behave slightly differently for each JDF job, depending on the type of
the input channel through which it arrives.
When JDF jobs are submitted to an input channel that is configured as RIP To File And Queue For
Output, the JDF Enabler will not mark them as “complete” when they have finished in the RIP. In the
JDF Monitor web UI the jobs will remain in the upper (“input”) table, marked as Assigned, indicating
that additional work is underway. For the jobs to progress to completion, the JDF Enabler must to be
notified that the TIFF files produced by the RIP have been imaged on the output device. How this
happens depends on whether the TIFF shooter is loosely or tightly integrated with the JDF Enabler.
For more information on the tight integration please consult the SOAR SDK documentation.
The next section describes how to integrate the TIFF shooter without using SOAR technology.
F.4 Integrating a TIFF shooter (without SOAR)
With the loose integration method, the JDF Enabler and the TIFF shooter do not communicate directly
with one another. The JDF Enabler determines for itself which TIFF files have been produced by the
various jobs. It then stores this information in an internal database, and then awaits notification that
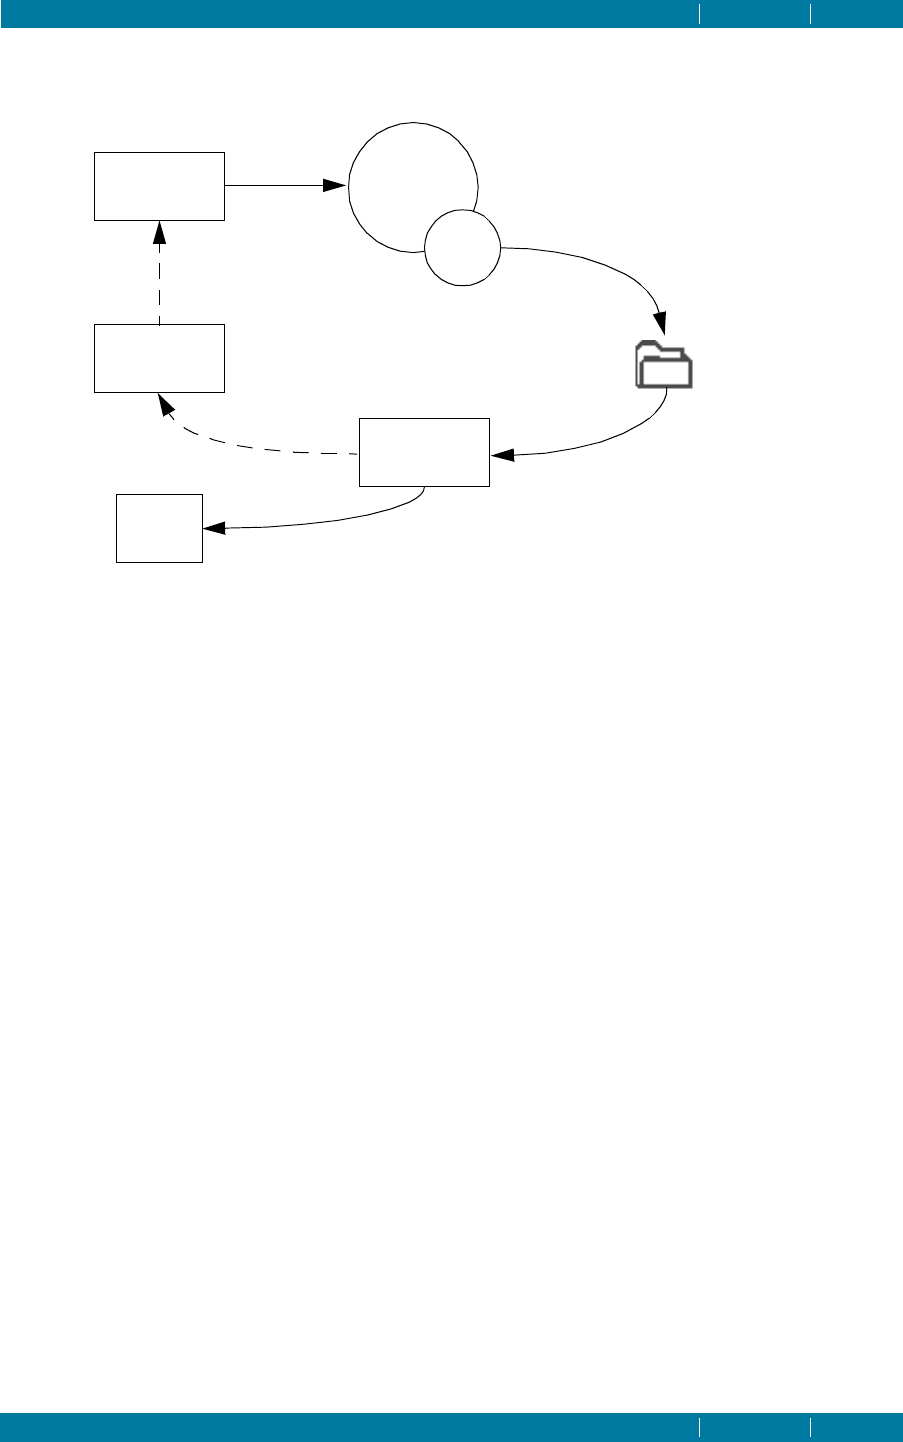
JDF ENABLER FOR THE HARLEQUIN RIP
TIFF OUTPUT INTEGRATION INDEX CONTENTS 88
INDEX CONTENTS 88
they have been completed. Until all of these notifications are received, the JDF Enabler assumes that
the job is still in progress.
Figure F.1 TIFF shooter loose integration
Because the TIFF shooter does not communicate with the JDF Enabler directly, it must be able to inde-
pendently detect the generation of TIFF files by the RIP. This can be done using a hot folder mecha-
nism. The TIFF shooter must be configured to observe the TIFF output directory which is specified in
the RIP’s Page Setup, or more specifically in the TIFF plugin configuration. (By default, this is a direc-
tory somewhere inside the RIP’s SW folder).
Because this loose integration allows the JDF Enabler and the TIFF shooter to function independently,
all that remains to be done is to notify the JDF Enabler of the completion individual TIFF files. This is
achieved using the JDF Control utility. For more information on JDF Control see Appendix D, “JDF
Control application”.
F.4.1 The JDF Control noteoutput command
This noteoutput command tells the JDF Enabler about TIFF file completion, and its command syntax
is:
jdf noteoutput -channel <channel-id>-file <filename>
where <channel-id>is the identity of the JDF Input channel through which the job was originally
submitted, and <filename> is the absolute name of the TIFF file that has been processed. For example,
the command might be invoked like this:
jdf noteoutput -channel channel1 -file C:\HarlequinRIP\SW\TIFFOutput\TIFF00.TIF
It is also possible to register the completion of several files at the same time, by making repeated use
of the -file option, for example:
jdf noteoutput -channel channel1
-file C:\HarlequinRIP\SW\TIFFOutput\TIFF00.TIF
-file C:\HarlequinRIP\SW\TIFFOutput\TIFF01.TIF
-file C:\HarlequinRIP\SW\TIFFOutput\TIFF02.TIF
JDF Enabler RIP
TIFF
Plugin
JDF Control
noteoutput
OEM
TIFF shooter
Shared Hot Folder
Storing TIFFs
Notification of
completion
Output
device
JDF
Jobs

JDF ENABLER FOR THE HARLEQUIN RIP
TIFF OUTPUT INTEGRATION INDEX CONTENTS 89
INDEX CONTENTS 89
You do not need to supply any information about the JDF job ID, or the ID of the individual process
nodes. This is because the JDF Enabler maintains this information internally. It only needs to know the
channel name and the file name for each completed file.
The channel identity is already specified in the JDF Enabler's channel config file when the channel is
first created. This is the Unique ID option in the Configure New Channel window (see “Create a new
channel” on page 24) or the -id attribute of the channel option in the automatic configuration file. It is
important to remember that the Unique ID is distinct from the channel's name (the -name attribute)
You must always use the Unique ID, and not the name, when nominating channels with noteoutput,
otherwise an error message will be generated.
The file name specified by the TIFF shooter must be exactly the same as the file name generated by the
TIFF plugin.
The TIFF shooter may delete the TIFF file(s) before the noteoutput command can be invoked. This
should not be a problem. The noteoutput command will not check that the file still exists.
It is important that the noteoutput command is invoked for all TIFF file completions. If the JDF
Enabler does not receive all of these notifications, it will result in JDF jobs getting stuck in the input
queue indefinitely, and apparently never reaching completion.
F.5 Plugins other than TIFF
There are of course other image file formats that might be adopted in a workflow of this type. An
OEM may develop their own plugin to generate a specific file format. The same overall solution is
needed to integrate the post RIP ImageSetting phase with the JDF Enabler.

INDEX CONTENTS 90
Appendix G–Plugin support for the
ImageSetting process
G.1 Preface
In a combined Raster image processing node, ImageSetting is always the final process, and is the
transfer of rendered raster data to the physical output medium. In the Harlequin RIP, this stage is per-
formed by the output plugin, rather than by the RIP itself. Like any JDF process, ImageSetting can be
parameterized with data from the JDF document, notably the ImageSetterParams and Media input
resources. The RIP provides a mechanism for the plugin to inspect these input resources using OEM’s
PostScript language code, and to set up configurations that are relevant for the plugin, based upon the
JDF itself.
G.2 JDF to PostScript language conversion
This mechanism includes an automatic conversion of the JDF input resources into PostScript language
dictionary form.
JDF resources are converted to the PostScript language by creating a PostScript language dictionary
for each XML element that makes up the resource.
The attributes of the element become keys (of the same name) within the dictionary. The values are
converted to the best-applicable PostScript data type for each XML schema type. Many of the complex
data types are also catered for, minimizing the need to write PostScript language code to parse raw
string forms. For example, the JDF XYPair type will be converted into an array of two numbers, and
the CTM type will be converted into an array of six numbers.
Simple Boolean, numeric and string attributes are converted in the most obvious way. Enumerations
are converted into PostScript language literal names.
In addition to the keys based on XML attributes, each PostScript language dictionary also has a key
/$Type, whose value is a literal name corresponding to the local XML element name. If there are
nested XML elements, there will also be a key /$Elements, whose value is an array, where each mem-
ber of the array is the dictionary corresponding to each child element. In this way, the PostScript lan-
guage data exactly preserves the nested structure in the XML.

JDF ENANBLER FOR THE HARLEQUIN RIP
PLUGIN SUPPORT FOR THE IMAGESETTING PROCESS INDEX CONTENTS 91
INDEX CONTENTS 91
For example, the PostScript language dictionary corresponding to a typical ImageSetterParams
resource might look like this:
<<
/$Type /ImageSetterParams
/AdvanceDistance 0.0
/BurnOutArea [ 0 0 ]
/CenterAcross /FeedDirection
/CutMedia true
/ManualFeed false
/MirrorAround /None
/Polarity /Positive
/Punch false
/Resolution [ 2400 2400 ]
/Sides /OneSidedFront
/$Element
[
<<
/$Type /FitPolicy
/ClipOffset [ 0.0 0.0 ]
... etc ...
>>
]
>>
AMedia resource might look like this:
<<
/$Type /Media
/BackCoatings /None
/ColorName (Cyan)
/Dimension [ 720 720 ]
/Grade 4
/HoleType [ /None ]
/MediaTypeDetails /DryFilm
... etc ...
>>
The plugin can provide an optional PostScript language procedure that works on these dictionaries. If
it is present, the RIP will call it automatically for each JDF process node that includes ImageSetting in
its process list. There are no restrictions on what the plugin PostScript language code can do, but nor-
mally it would be expected to use the JDF input data to amend the set of plugin-specific output device
parameters whose defaults would have been loaded from the Page Setup at the start of the job. For
convenience, a dictionary of these parameters is also passed to the plugin's procedure, where they can
be modified.
Note: When JDF elements are converted to the PostScript language, only those attributes that were
present in the original JDF will be present in the PostScript language version. Optional attributes will
not be filled in with default values, so you need to take special care to cope with their absence.
Another way of integrating your own PostScript language code with JDF job execution is to use the
auxiliary file mechanism. See “Hot folders, Output folders and Auxiliary files” on page 26.
G.3 The imagesetting process
For a plugin to support the ImageSetting process, it needs to provide a jdfdef.ps file in its Misc
directory, which will be run from the relevant file in its Setups folder, so it also needs the following
line added in the relevant file in the Setups directory:
(%fs%PluginMisc/jdfdef.ps) run

JDF ENANBLER FOR THE HARLEQUIN RIP
PLUGIN SUPPORT FOR THE IMAGESETTING PROCESS INDEX CONTENTS 92
INDEX CONTENTS 92
In the jdfdef.ps file /JDFToOutputParams, must be defined as a dictionary that can contain a number
of methods. Currently, you just need to define /ImageSetting. The /ImageSetting method expects on
the stack the Media dictionary, the ImageSetterParams dictionary (as defined in JDF) and the
OutputDeviceParameters dictionary already there for the plugin. The method needs to extract the rel-
evant parameters for the plugin and act accordingly.
For the Epson plugin for instance, only the CutMedia appears to be relevant from the
ImageSetterParams. The method needs to leave on the stack a dictionary containing the
OutputDeviceParameters that need changing, or an empty dictionary or null.
ImageSetterParams is always passed to /JDFToOutputParams, although it may be null as it is an
optional resource.
% JDF to OutputDeviceParameters for the Epson plugin
%|- Media ImageSetterParams OutputDeviceParameters -> OutputDeviceParameters
/JDFToOutputDeviceParams
<<
/ImageSetting
{
pop % OutputDeviceParameters
dup /CutMedia known
{
<<
/EpsonAutoCut
3 -1 roll /CutMedia get
>>
}
{
pop % ImageSetterParams
null % leave null on the stack
} ifelse
pop % Media - Epson might need to set some media params
} bind
>> def
If the plugin does not support ImageSetting, the following warning is issued:
The plugin will use its default settings

INDEX CONTENTS 93
Appendix H–JDF parameters
H.1 How the JDF Enabler selects process nodes
When a new JDF document arrives at its Input Channel, the first action taken by the JDF Enabler is to
locate the executable process nodes within the job. The Enabler does this by visiting every JDF node
within the job, starting at the root. Product nodes are never directly selected for execution, but the
Enabler will visit all of their child nodes, attempting to discover as many candidate ProcessGroup,
Process or Combined nodes as possible. The JDF Enabler will always do this, regardless of the job's
complexity.
Not all process nodes are considered eligible for execution. The JDF Enabler will perform the follow-
ing additional tests on candidate process nodes:
• The Status attribute of the node is examined. The Status attribute must be set to either Ready or
Waiting. The JDF Enabler will never execute process nodes with any other Status value.
• The node and its ancestors are examined to determine the correct overall value for the
Activation attribute. The JDF Enabler will not execute process nodes with Activation levels of
Inactive,Informative or Held. The overall Activation level must be set at Active1.
• The node's ResourceLinkPool is examined. For each resource linked as input to the process, the
JDF Enabler checks that the resource's Status attribute is set to Available. If any input resource
is seen to have any other Status value, the process will not be executed2.
• The process itself is matched against the capabilities of the JDF-Enabled product. If the product
can perform the process (or, in the case of a Combined node, all of the processes in the Types
attribute), the node will be selected for execution.
Each process node that meets all of the above criteria will be placed into a queue to be executed by the
JDF-Enabled product. As each node is processed, the JDF Enabler takes the following additional
action:
• If the process execution succeeded, all output resources of the process node will have their
Status attribute updated to Available, and the Status attribute of the node itself will be set to
Completed.
• If the process execution failed, the output resources are not updated, and the process node will
have its Status attribute updated to Aborted.
• If any new resources have been made available by the successful execution of the process, the
JDF Enabler will see whether any further process nodes can now be executed as a result. If any
such nodes are found, they too will be executed in the same way, and so on.
• Entries may be added to the AuditPool for the process node. This depends on how the Input
Channel has been configured.
This is a generalized description in two respects. Firstly, many of the jobs seen by the JDF Enabler con-
tain just a single process node, making the node selection procedure trivially straightforward. Sec-
1. There is no special treatment of the TestRun or TestRunAndGo activations in the current version of the product. Both of
these activation levels are treated as being equivalent to Active.
2. For the case of partitioned resources, the current version will only examine the Status attribute of the root partition, and this
will be assumed as the Status value for the entire Resource. The Status attributes of nested partitions are not examined.

JDF ENABLER FOR THE HARLEQUIN RIP
JDF PARAMETERS INDEX CONTENTS 94
INDEX CONTENTS 94
ondly, this description would apply to any JDF-Enabled product, not just the Harlequin RIP. The JDF
capabilities of the Harlequin RIP are considered next.
H.2 ProcessGroup Auto-Combine
The JDF Enabler will normally select Process and Combined nodes for individual submission to the
RIP. However, when a series of such nodes is nested within a ProcessGroup node, the JDF Enabler can
sometimes optimize this by executing the entire ProcessGroup as a single RIP job. In such cases, the
ProcessGroup is effectively treated as if it were a single Combined process node. To achieve this, the
JDF Enabler examines the resources that are transferred between the individual processes within the
group. (It is common for grouped processes to feed resources forward, where the output of one pro-
cess forms the input of the next.)
The JDF Enabler is able to detect the case where all of these resources can be transferred internally by
the RIP, within the context of a single job submission. It is often more efficient for the RIP to do this,
rather than let the JDF Enabler coordinate the transfer.
For example, a common case is where the Imposition process is declared separately from the com-
bined processing of the imposed document, as demonstrated by the JDF skeleton template below:
<JDF Type="ProcessGroup" ID="ImposeAndRIP" ...>
<JDF Type="Imposition" ID="Process1" ... >
<JDF Type="Combined" Types="Interpreting Rendering" ID="Process2"... >
</JDF>
Here, the output of the Imposition process—an imposed RunList—feeds forward to the combined
Interpreting and Rendering process. In this case, the JDF Enabler would automatically combine the
two process nodes, submitting just one job to the RIP rather than two. The imposed RunList resource
would be transferred in memory.
Note that the JDF Enabler can only perform this optimization for ProcessGroup nodes, and never for
Product nodes.
The JDF Enabler can optimize ProcessGroup nodes under the following conditions:
• The ProcessGroup node must itself be eligible for execution, according to the rules listed in
“How the JDF Enabler selects process nodes” on page 93
• All of the individual processes within the group must match the RIP’s capabilities as outlined in
“Supported processes” on page 3.
• The resources transferred between the individual process nodes must form an unbroken chain.
This means that at least one process must have all of its inputs available to begin with. The exe-
cution of these must then enable the execution of at least one more process in the group, and so
on for the rest of the group.
• The resources transferred between the individual processes must all be of a type that can be han-
dled internally by the RIP within the context of a job. Currently, this extends only to the RunList
and InterpretedPDLData resource types.
H.3 The capabilities of the Harlequin RIP
The JDF-Enabled Harlequin RIP can execute individual process nodes whose Type attribute is either
Imposition or Interpreting. Additionally, it can execute combined process nodes whose initial pro-
cess type is either Imposition or Interpreting, provided that all of the remaining processes in the
sequence are taken from the list of supported processes in “Supported processes” on page 3. These
remaining processes can appear in any order.

JDF ENABLER FOR THE HARLEQUIN RIP
JDF PARAMETERS INDEX CONTENTS 95
INDEX CONTENTS 95
The process type RIPping should never be used, either as an individual process, or as any entry in a
combined node. The RIPping process token is introduced by the JDF specification only as shorthand
for a Combined process node, whose processes are typical RIP processes such as those in “Supported
processes” on page 3. Nodes that explicitly specify the RIPping process will not be executed.
H.4 How JDF Processes interact with the Channel Page Setup
Each JDF Input Channel has a named Page Setup associated with it. For every process node that the
RIP executes, this Page Setup is loaded in advance of running the job. This has a notable effect on how
the JDF processes are treated. Consider, for example, a Page Setup that is configured to drive an imag-
esetter, and which has been configured to produce screened, separated output, with trapping and
color management. This Page Setup is, in effect, automatically executing the Screening,Separation,
Trapping,ColorSpaceConversion and ImageSetting processes, based on its own internal parameters.
These additional processes are therefore performed implicitly for every JDF process node that is exe-
cuted, even if that process node does not specify them. It is important to understand that the RIP does
not switch off features from the Page Setup when the equivalent JDF processes are absent from a job.
In this case, a process node of type Imposition would actually be treated as if it were a combined
node with:
Types="Imposition Interpreting ColorSpaceConversion Rendering Trapping Separation
Screening ImageSetting"
(The Interpreting and Rendering processes are invariably performed—these cannot really be
avoided in the context of a RIP).
When the channel Page Setup is configured to perform a process implicitly, it will always do so. How-
ever, when a JDF node calls for the same process type explicitly, and provides one or more parameter
resources to control it, those parameter resources will be used to override the relevant portions of the
Page Setup. With Separation, for example, the JDF ColorantControl resource might specify a differ-
ent sequence of colorants from those in the RIP's Separations Manager. In cases like this, the JDF data
will always take precedence over the Page Setup's original configuration.
If a JDF node specifies a process that is not being implicitly performed by the Page Setup, the RIP will
temporarily modify the Page Setup to switch on the additional feature. This modification will only
last for the duration of the job. Again, parameter resources from the JDF are used to fine-tune the con-
figuration for each extra process.
Some features within the RIP are extras that need to be enabled by a password. If a JDF node calls for
a particular process that requires such a feature, the RIP will check that the feature is enabled. If the
feature is disabled, the RIP will take a best effort action. If the SettingsPolicy attribute for the node is
BestEffort, the RIP will issue a warning message and skip the process, although it will attempt to
execute the remaining processes required by the node. If the SettingsPolicy attribute is MustHonor,
the RIP will halt and fail the job.
There are some restrictions imposed on how extensively the channel Page Setup can be modified for
each JDF job:
• It is not possible to change the plugin or output device type. Regardless of which JDF processes
are performed, the RIP will always drive the same output device.
• If the output device does not support the required raster output style for the job, the job will fail.
For example, if a combined process node lists Screening in its Types list, but the output device
accepts only contone data, the job will be halted.
The only work-around for these restrictions is to create separate Input Channels, each with a Page
Setup appropriately configured for the kinds of job that will arrive through that channel. For instance,
you may wish to have one channel for proofing jobs, and a second for plate-making jobs, each config-
ured for a different device.

JDF ENABLER FOR THE HARLEQUIN RIP
JDF PARAMETERS INDEX CONTENTS 96
INDEX CONTENTS 96
H.5 How the Harlequin RIP treats JDF resources
This section discusses the treatment of JDF parameter resources.
H.5.1 RunList Resources
A single input RunList resource can be linked to each process node that is executed by the RIP. The
only exception to this is where the process type (or initial entry in the combined process list) is
Imposition, when it is possible to link two separate RunLists (one “Document” RunList, and one
“Marks” RunList)for input. Input RunListsare allowed to be partitioned. (When the Imposition pro-
cess is being performed, the input RunLists are invariably partitioned to create a logical sequence of
page placements.)
No additional input RunList resources should be linked to the process. The transfer of the RunList
resource between the individual processes in a combined node is always implicit. For example, the
ContoneCalibration process is specified as accepting an uncalibrated input RunList, and producing a
calibrated output RunList. These RunLists, though, are just a conceptual model of how raster data
flows between processes. Within the RIP, these RunLists are never explicitly consumed or generated.
Only the Imposition and Interpreting processes consume RunList resources explicitly.
The RIP has some limited support for processing output RunLists. While they currently cannot be
used to control where RIP output data is written, they can be used to obtain information about where
data was written by plugins such as TIFF, which write raster files to disk. For more information see
“How to add names of RIP output files to an updated JDF” on page 119.
H.5.2 Other parameter resources
For parameter resources other than RunLists, all of the JDF process types listed in “Supported
processes” on page 3 may have their full complement of resources linked to them. As described
above, the RIP will use this resource data to override the channel Page Setup as far as possible.
In the standard case of a combined process node, there are some restrictions on the linkage of input
resources:
• Only a single ColorantControl resource can be linked to the process as a whole. Within the com-
bined process, this same resource can be linked to the Interpreting,ColorSpaceConversion and
Separation processes as required. If more than one ColorantControl resource is linked, the pro-
cess node will be stopped in the RIP.
• Only a single ScreeningParams resource can be linked to the combined process as a whole,
although it can be individually linked to the Screening and ContoneCalibration processes as
required.
Figure H.1 below presents an overall view of how resources connect with the individual processed of
a combined JDF node.
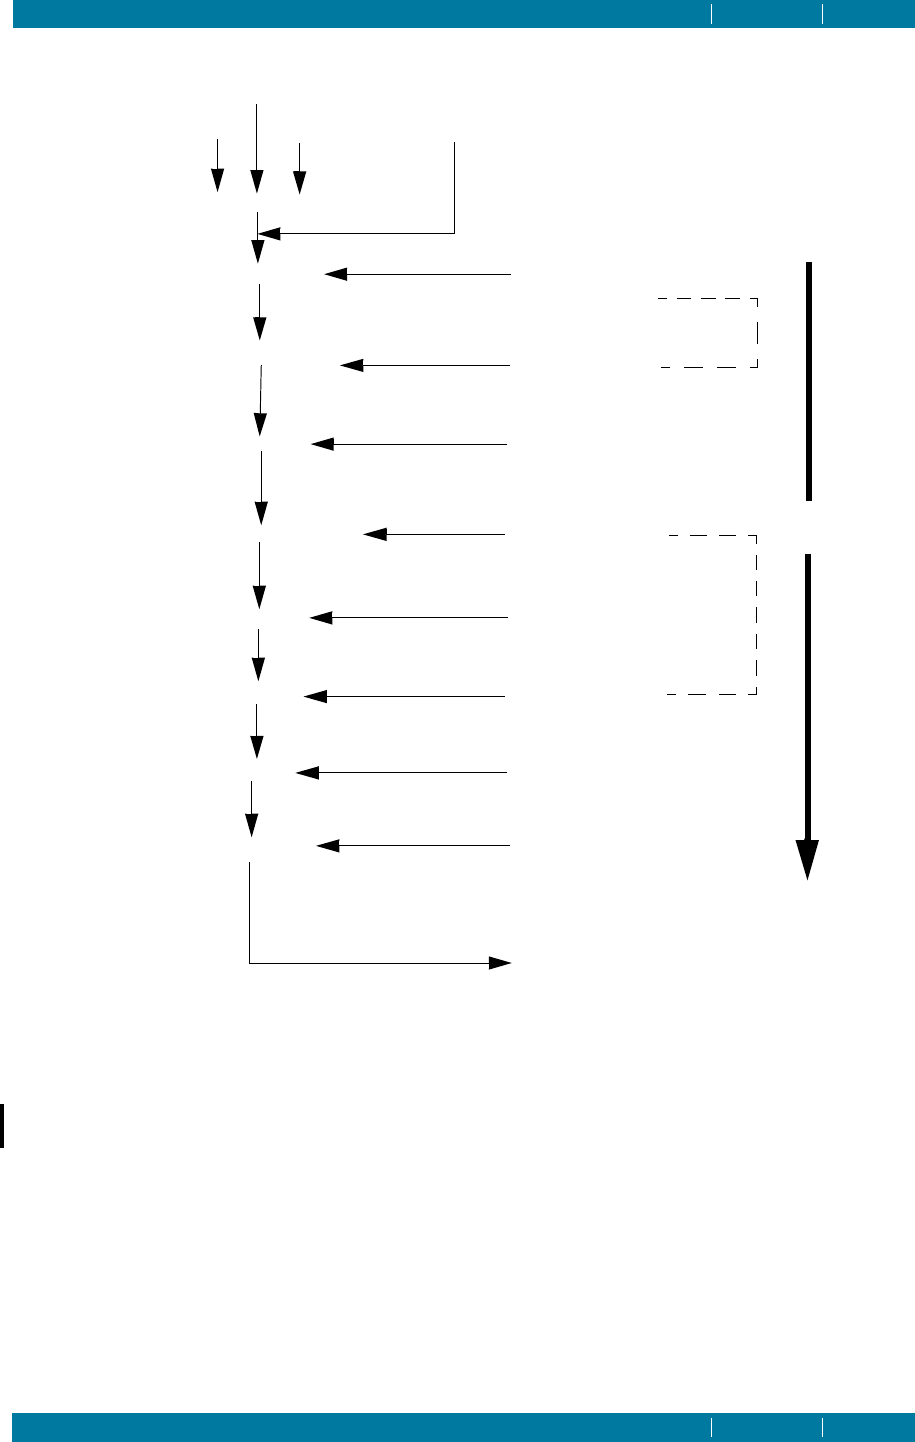
JDF ENABLER FOR THE HARLEQUIN RIP
JDF PARAMETERS INDEX CONTENTS 97
INDEX CONTENTS 97
Figure H.1 Selecting and Processing JDF Nodes
Not every attribute of every parameter resource element can be processed by the RIP. Of those that
can be processed, some are subject to constraints and limitations. For a complete list of every resource
attribute, and some additional notes on how each is treated, please refer to “JDF parameter tables” on
page 97.
H.6 JDF parameter tables
This sections contains the JDF parameter tables.
Note: Up to JDF 1.2 the Layout Resource (used to position pages for Imposition) had specifically
named sub-elements for Signature,Sheet and Surface. As from JDF 1.3 these have been deprecated
in favour of using the general JDF partitioning model. If the layout is partitioned, the keys
SignatureName, SheetName and Side should all be present and specified in this order. Only a Layout
with exactly PartIDkeys = “SignatureName SheetName Side” can be translated into a JDF 1.2 layout
Imposition
Interpreting
ColorSpaceConversion
Rendering
ContoneCalibration
Separation
Screening
Trapping
ImageSetting
ExposedMedia
RunList
RunList RunList
(Marks)
InterpretingParams
ColorantControl
FontPolicy
ColorantControl
ColorantControl
RenderingParams
ScreeningParams
TransferFunctionControl
SeparationControlParams
ScreeningParams
TrappingDetails
DevelopingParams
ImageSetterParams
Media
TransferCurvePool
RunList
(Implicit)
(Document)
ColorSpaceConversionParams

JDF ENABLER FOR THE HARLEQUIN RIP
JDF PARAMETERS INDEX CONTENTS 98
INDEX CONTENTS 98
or a PJTF. It is therefore highly recommended that exactly this partitioning be used in the Layout when-
ever possible. Any other partitioning will make consumption by existing products very unlikely.
H.6.1 Key to Status column
Ignored The parameter is allowed to be present in the JDF, but its value is not
used by the JDF Enabler or by the RIP. This may be because the attribute
just holds information that does not affect processing; or, it may be
because the attribute cannot be processed at all.
Supported The parameter is generally supported, according to its description in the
JDF specification. The Comment column may outline some minor
restrictions on its use.
BestEffort The parameter is supported only to a limited extent. The Comment col-
umn will have more information. If the RIP encounters unsupported
values for the parameter, it will either issue a warning, or fail the job,
depending on the SettingsPolicy attribute of the process node.
Plugin The parameter is handed to the output plugin, which has the option to
provide some additional PostScript Language code to implement it. The
plugin may take “best effort” actions.
H.6.2 The tables
The following tables give a complete list of every resource attribute, with additional notes on how
each is treated.

JDF ENABLER FOR THE HARLEQUIN RIP
JDF PARAMETERS INDEX CONTENTS 99
INDEX CONTENTS 99
H.6.2.1 RunList
H.6.2.2 LayoutElement
Table H.1 RunList
Attribute Status Comment
Directory Supported
DocCopies Ignored
DocNames Ignored
Docs Ignored
EndOfDocument Ignored
EndOfSet Ignored
FirstPage Supported
IsPage Ignored
LogicalPage Ignored
NDoc Ignored
NPage Ignored
NSet Ignored
PageCopies Ignored
PageNames Ignored
Pages Supported
RunTag Ignored
SetCopies Ignored
SetNames Ignored
Sets Ignored
SkipPage Supported This is only supported for PDF input
files.
Sorted Ignored
Table H.2 LayoutElement
Attribute Status Comment
ClipPath Ignored
ElementType Supported The Reservation value can be used to
indicate a blank page. This is particu-
larly useful for imposition.


JDF ENABLER FOR THE HARLEQUIN RIP
JDF PARAMETERS INDEX CONTENTS 101
INDEX CONTENTS 101
H.6.2.3 FileSpec
H.6.2.4 Layout
Table H.3 FileSpec
Attribute Status Comment
Application Ignored
AppOS Ignored
AppVersion Ignored
CheckSum Ignored
Compression Ignored
Disposition Ignored
DocumentNaturalLang Ignored
FileFormat Ignored
FileSize Ignored Note that JDF 1.2 permits a larger
range of values than JDF 1.1a. These
large values will cause errors in the
JDF Enabler, which only supports the
1.1a specification.
FileTemplate Ignored
FileVersion Ignored
MimeType Ignored
OSVersion Ignored
PageOrder Ignored
ResourceUsage Ignored
UID Ignored
URL Supported URLS of type file, http and cid (for
multi-part MIME jobs) are supported.
UserFileName Ignored
Table H.4 Layout
Attribute Status Comment
Automated Ignored All Layout resources are assumed to
be explicitly described.
MaxDocOrd Ignored
MaxOrd Ignored


JDF ENABLER FOR THE HARLEQUIN RIP
JDF PARAMETERS INDEX CONTENTS 103
INDEX CONTENTS 103
H.6.2.5 Signature (Deprecated in JDF 1.3)
H.6.2.6 Sheet (Deprecated in JDF 1.3)
H.6.2.7 Surface (Deprecated in JDF 1.3)
H.6.2.8 PlacedObject
Table H.5 Signature
Attribute Status Comment
Name Ignored This is just information.
Table H.6 Sheet
Attribute Status Comment
LockOrigins Ignored
Name Ignored This is just information.
SurfaceContentsBox Supported
Table H.7 Surface
Attribute Status Comment
Side Supported
SurfaceContentsBox Supported
Table H.8 PlacedObject
Attribute Status Comment
ClipBox Supported
CTM Supported
HalfTonePhaseOrigin Ignored
LayerID Ignored
OrdID Ignored
SourceClipPath Supported
TrimCTM Ignored

JDF ENABLER FOR THE HARLEQUIN RIP
JDF PARAMETERS INDEX CONTENTS 104
INDEX CONTENTS 104
H.6.2.9 ContentObject
H.6.2.10 MarkObject
H.6.2.11 InterpretingParams
Table H.9 ContentObject
Attribute Status Comment
DocOrd Ignored
Ord Supported Logical page ordinal index is cur-
rently the only way to reference a
page.
OrdExpression Ignored
SetOrd Ignored
Table H.10 MarkObject
Attribute Status Comment
LayoutElementPageNum Ignored
Ord Supported
Table H.11 InterpretingParams
Attribute Status Comment
Center Supported
FitToPage Supported
MirrorAround Supported
Best Effort
None and MediaWidth values are sup-
ported.
FeedDirection is supported in non
XFed devices, otherwise the "best
effort" action is to ignore it.
Both is ignored in "best effort" action.
Polarity Supported
Poster Ignored
PosterOverlap Ignored
PrintQuality Ignored
Scaling Supported
ScalingOrigin Ignored A warning is issued if any non-
default value is encountered.

JDF ENABLER FOR THE HARLEQUIN RIP
JDF PARAMETERS INDEX CONTENTS 105
INDEX CONTENTS 105
H.6.2.12 PDFInterpretingParams
H.6.2.13 ObjectResolution
H.6.2.14 FitPolicy
Table H.12 PDFInterpretingParams
Attribute Status Comment
EmitPDFBG Ignored Not applicable for PDF input.
EmitPDFHalftones Ignored Not applicable for PDF input.
EmitPDFTransfers Ignored Not applicable for PDF input.
EmitPDFUCR Ignored Not applicable for PDF input.
HonorPDFOverprint Ignored Not applicable for PDF input.
ICCColorAsDeviceColor Supported This is treated as an override of PDF
color management.
PrintPDFAnnotations Supported
TransparencyRenderingQual
ity
Ignored The RIP only supports one transpar-
ency quality.
Table H.13 ObjectResolution
Attribute Status Comment
Resolution Supported The RIP will attempt any resolution
specified in the JDF ticket. Note that
the plugin may adjust the resolution
internally if it is not supported, or it
may fail to output the job.
SourceObjects BestEffort The only supported value is All. The
RIP cannot render at different resolu-
tions for different source object
groups.
Table H.14 FitPolicy
Attribute Status Comment
ClipOffset Supported
GutterPolicy Ignored
MinGutter Ignored
ResourceUsage Ignored

JDF ENABLER FOR THE HARLEQUIN RIP
JDF PARAMETERS INDEX CONTENTS 106
INDEX CONTENTS 106
RotatePolicy BestEffort Attempts to automatically rotate can
be upset when an Imposition process
is being performed as part of the job.
RotatePolicy may be discarded in
this case.
SizePolicy BestEffort The “Tile” policy is not supported.
Table H.14 FitPolicy

JDF ENABLER FOR THE HARLEQUIN RIP
JDF PARAMETERS INDEX CONTENTS 107
INDEX CONTENTS 107
H.6.2.15 RenderingParams
H.6.2.16 AutomatedOverprintParams
Table H.15 RenderingParams
Attribute Status Comment
BandHeight Ignored This must be set in the plugin.
BandOrdering Ignored This must be set in the plugin.
BandWidth Ignored This must be set in the plugin.
ColorantDepth Ignored 1is assumed for halftone output, 8is
assumed for contone output. This
depends on whether the job includes
a Screening process, or on the original
Page Setup output configuration.
Interleaved Ignored This must be set in the plugin.
Table H.16 AutomatedOverprintParams
Attribute Status Comment
OverPrintBlackText BestEffort The RIP cannot overprint black text
selectively. It only has a single switch
for automated black overprinting. If
OverPrintBlackText and
OverPrintBlackLineArt have differ-
ent values in a single job, a warning
will be issued. The “best effort” action
is to switch on black overprints if
either attribute is supplied as true.
OverPrintBlackLineArt BestEffort See comment for
OverPrintBlackText.
TextSizeThreshold BestEffort This parameter cannot be applied,
because the RIP only has a single
Boolean switch.
TextBlackLevel BestEffort This parameter cannot be applied,
because the RIP only has a single
Boolean switch.
LineArtBlackLevel BestEffort This parameter cannot be applied,
because the RIP only has a single
Boolean switch.

JDF ENABLER FOR THE HARLEQUIN RIP
JDF PARAMETERS INDEX CONTENTS 108
INDEX CONTENTS 108
H.6.2.17 ScreeningParams
H.6.2.18 ScreenSelector
H.6.2.19 SeparationControlParams
Table H.17 ScreeningParams
Attribute Status Comment
IgnoreSourceFile Ignored
AbortJobWhenScreeningMatc
hFails
Ignored
Table H.18 ScreenSelector
Attribute Status Comment
Angle Supported
AngleMap Supported
DotSize Ignored A warning will be issued if this
parameter is encountered, because the
RIP's FM screening will not take
account of it.
Frequency BestEffort Only a single screening frequency can
be applied for a job.
ScreeningFamily Ignored This is effectively derived from the
spot function name.
ScreeningType Supported
Separation Supported Individual separations, as well as the
All value, are supported.
SourceFrequency Ignored
SourceObjects BestEffort The only supported value is All.
SpotFunction Supported This requires the named spot function
to be present in the RIP, which may in
turn require a password for screening
systems such as HDS.
Table H.19 SeparationControlParams
Attribute Status Comment

JDF ENABLER FOR THE HARLEQUIN RIP
JDF PARAMETERS INDEX CONTENTS 109
INDEX CONTENTS 109
No attributes The AutomatedOverprintParams sub-
element is supported. The
TransferFunctionControl sub-ele-
ment will be ignored, unless it is also
linked separately to a
ContoneCalibration process.
Table H.19 SeparationControlParams

JDF ENABLER FOR THE HARLEQUIN RIP
JDF PARAMETERS INDEX CONTENTS 110
INDEX CONTENTS 110
H.6.2.20 TransferFunctionControl
H.6.2.21 TranferCurveSet
Table H.20 TransferFunctionControl
Attribute Status Comment
TransferFunctionSource Supported If the value is Custom,the RIP will use
calibration curves supplied within the
JDF. For any other value, the RIP will
just calibrate according to the Page
Setup configuration.
Table H.21 TransferCurveSet
Attribute Status Comment
CTM Ignored
Name Supported The RIP can calibrate with two
curves: a device calibration curve and
a press calibration curve. The RIP will
use one of Proof,Film or Plate as the
device calibration curve. If the process
node includes the Separation pro-
cess, the RIP will assume that the job
is not a proofing job, and therefore it
will use the Film curve if it is pro-
vided (and is not simply “0 0 1 1"), or
otherwise the Plate curve. For press
calibration, the RIP will select the
Plate curve (if it was not already
used for device calibration), or the
Press curve (if it is present, and not
just “0 0 1 1"), or the Paper curve.
Once a Press curve has been selected,
all other curves are ignored, whether
they are linear or not.
If the job is not separating, and
Proofing transfer curves are sup-
plied, the RIP will assume that the job
must be calibrated for a proofing
device, and it will use the Proof
curve.
When custom transfer curves are
applied from JDF, all original calibra-
tions in the Page Setup are discarded.

JDF ENABLER FOR THE HARLEQUIN RIP
JDF PARAMETERS INDEX CONTENTS 111
INDEX CONTENTS 111
H.6.2.22 TransferCurve
H.6.2.23 FontPolicy
H.6.2.24 TrappingDetails
H.6.2.25 TrapRegion
Table H.22 TransferCurve
Attribute Status Comment
Curve Supported This is used directly to map the
Harlequin RIP Nominal Values
(SNVs) to Nominal Device Codes
(NDCs).
Separation Supported Individual separations are sup-
ported, as well as the All separation.
Table H.23 FontPolicy
Attribute Status Comment
PreferredFont Supported
UseDefaultFont BestEffort
UseFontEmulation BestEffort
Table H.24 TrappingDetails
Attribute Status Comment
DefaultTrapping Supported
IgnoreFileParams Ignored
Trapping
TrappingType
Table H.25 TrapRegion
Attribute Status Comment
TrapZone Ignored
Pages Ignored

JDF ENABLER FOR THE HARLEQUIN RIP
JDF PARAMETERS INDEX CONTENTS 112
INDEX CONTENTS 112
H.6.2.26 TrappingParams
H.6.2.27 ColorantZoneDetails
Table H.26 TrappingParams
Attribute Status Comment
BlackColorLimit Supported
BlackDensityLimit Supported
BlackWidth Supported
Enabled Supported
HalftoneName Supported
ImageInternalTrapping Supported
ImageResolution Supported
ImageMaskTrapping BestEffort A system default is always applied.
ImageToImageTrapping BestEffort A system default is always applied.
ImageToObjectTrapping Supported
ImageTrapPlacement Supported
MinimumBlackWidth BestEffort A system default is always applied.
SlidingTrapLimit Supported
StepLimit Supported
TrapColorScaling Supported
TrapEndStyle BestEffort A system default is always applied.
TrapJoinStyle BestEffort A system default is always applied.
TrapWidth Supported
Table H.27 ColorZoneDetails
Attribute Status Comment
Colorant Supported
StepLimit Supported
TrapColorScaling Supported

JDF ENABLER FOR THE HARLEQUIN RIP
JDF PARAMETERS INDEX CONTENTS 113
INDEX CONTENTS 113
H.6.2.28 Color
H.6.2.29 ColorSpaceConversionParams
H.6.2.30 ColorSpaceConversionOp
Table H.28 Color
Attribute Status Comment
CMYK Ignored
ColorBook Ignored
ColorBookEntry Ignored
ColorBookPrefix Ignored
ColorBookSuffix Ignored
ColorName Ignored
ColorType Supported This attribute is consulted only when
performing the Trapping process.
Lab Ignored
MediaType Ignored
Name Supported
NeutralDensity Supported This attribute is consulted only when
performing the Trapping process.
sRGB Ignored
UsePDLAlternateCS Ignored
Table H.29 ColorSpaceConversionParams
Attribute Status Comment
ICCProfileUsage tbd New in v1.2
ColorManagementSystem Ignored
ConvertDevIndepColors Ignored
Table H.30 ColorSpaceConversionOp
Attribute Status Comment
IgnoreEmbeddedICC Ignored The existing Page Setup configuration
for “override color management in
job” is applied.

JDF ENABLER FOR THE HARLEQUIN RIP
JDF PARAMETERS INDEX CONTENTS 114
INDEX CONTENTS 114
Operation BestEffort The only supported operation is
Convert.
PreserveBlack BestEffort If any ColorSpaceConversionOp speci-
fies this as true, then it will be glo-
bally applied. The flag is not treated
separately for each interpreted color
space.
RenderingIntent BestEffort The treatment of RenderingIntent
depends on SourceCS and
SourceObjects. The RIP's color man-
agement settings allow different ren-
dering intents for the following:
RGB Images
Other Images (in any color space)
Vignettes
Named colors
Logos
All other input
RGBGray2Black BestEffort Treated in the same way as
PreserveBlack.
RGBGray2BlackThreshold BestEffort New in v1.2
SourceCS BestEffort See comment for RenderingIntent.
SourceObjects BestEffort See comment for RenderingIntet.
Note that the RIP does not treat pho-
tographic images differently from
“screen shot” images.
SourceRenderingIntent Ignored New in v1.2
Table H.30 ColorSpaceConversionOp

JDF ENABLER FOR THE HARLEQUIN RIP
JDF PARAMETERS INDEX CONTENTS 115
INDEX CONTENTS 115
H.6.2.31 ColorantControl
H.6.2.32 ColorantAlias
H.6.2.33 ColorPool
H.6.2.34 DeviceNSpace
H.6.2.35 SeparationSpec
Table H.31 ColorantControl
Attribute Status Comment
ForceSeparations Ignored
ProcessColorModel Supported
Table H.32 ColorandAlias
Attribute Status Comment
ReplacementColorantName Supported Aliases are handled in the RIP using
the setcolorantmapping operator.
Table H.33 ColorPool
Attribute Status Comment
ColorantSetName Ignored This is just treated as information.
Table H.34 DevieNSpace
Attribute Status Comment
Name Ignored
NIgnored
Table H.35 SeparationSpac
Attribute Status Comment
Name Supported

JDF ENABLER FOR THE HARLEQUIN RIP
JDF PARAMETERS INDEX CONTENTS 116
INDEX CONTENTS 116
H.6.2.36 Media
H.6.2.37 DevelopingParams
Table H.36 Media
Attribute Status Comment
BlackCoatings Plugin
Brightness Plugin
ColorName Plugin
Dimension Plugin
FrontCoatings Plugin
Grade Plugin
GrainDirection Plugin
HoleType Plugin
ImagableSide Plugin
MediaColorName Plugin
MediaSetCount Plugin
MediaType Plugin
MediaTypeDetails Plugin
MediaUnit Plugin
Opacity Plugin
Polarity Plugin
PrePrinted Plugin
Recycled Plugin
RollDiameter Plugin
ShrinkIndex Plugin
StockType Plugin
Texture Plugin
Thickness Plugin
Weight Plugin
Table H.37 DevelopingParams
Attribute Status Comment
PreHeatTemp Plugin

JDF ENABLER FOR THE HARLEQUIN RIP
JDF PARAMETERS INDEX CONTENTS 117
INDEX CONTENTS 117
H.6.2.38 ImageSetterParams
H.6.2.39 ExposedMedia
PreHeatTime Plugin
PostBakeTemp Plugin
PostBakeTime Plugin
PostExposeTime Plugin
Table H.38 ImageSetterParams
Attribute Status Comment
AdvanceDistance Plugin
BurnOutArea Plugin
CenterAcross Plugin
CutMedia Plugin
ManualFeed Plugin
MirrorAround Plugin
Polarity Plugin
Punch Plugin
PunchType Plugin
Resolution Plugin
RollCut Plugin
Sides Plugin
SourceWorkStyle Ignored
TransferCurve Plugin
Table H.39 ExposedMedia
Attribute Status Comment
ColorType Ignored This is not an input resource for the
RIP.
Polarity Ignored This is not an input resource for the
RIP.
ProofQuality Ignored This is not an input resource for the
RIP.
Table H.37 DevelopingParams


INDEX CONTENTS 119
Appendix I–Updated JDF
I.1 How to add names of RIP output files to an updated JDF
It is possible for the JDF- Enabled RIP to include the names and locations of output files when the JDF
document is updated for delivery to the next controller in the workflow. This feature is useful in
workflows where the RIP is used to generate raster data files for consumption by a second process,
such as a press controller. For example, when using the RIP to generate press-ready TIFF images on
disk, the names of these files can be added to the JDF document, allowing the press controller to locate
and open the files.
This feature works using a shared RunList resource, which is linked as an output resource for the RIP,
and an input resource for whatever process is consuming the raster files. The shared RunList is ini-
tially empty (and has its Status attribute set to Unavailable). As the RIP processes the job, it updates
the RunList with an entry for each output file that is generated. When the job is finished, the RunList
has its Status attribute automatically set to Available. The updated job is then sent to the next con-
troller, which can read the RunList and process the files as required from their URLs.
The following JDF job is an example which has been stripped down to show only those details that are
relevant to this feature:
<JDF ID="RootNode" Type="Product" Version="1.2 Status="Waiting">
<ResourcePool>
<RunList ID="SharedRunList" Status="Unavailable" Class="Parameter"/>
</ResourcePool>
<JDF ID="RIPNode" Type="Combined" Types="Imposition Interpreting Rendering
FormatConversion" Status="Waiting">
<ResourceLinkPool>
<RunListLink rRef="SharedRunList" ResourceUsage="Output"
CombinedProcessIndex="3"/>
</ResourceLinkPool>
</JDF>
<JDF ID="PressNode" Type="ImageSetting" Status="Waiting">
<ResourceLinkPool>
<RunListLink rRef="SharedRunList" ResourceUsage="Input"/>
</ResourceLinkPool>
</JDF>
</JDF>
The intent here is for the RIP to execute the first process node, and for the press controller to execute
the second. The shared RunList resource and its resource links are highlighted. At the moment, the
RunList is empty. As the RIP executes the first node, it populates the RunList with details of each out-
put file. As soon as the RIPping is complete, the second process node becomes eligible for processing,
and the updated JDF can be delivered to the press controller. The press controller can then perform
the ImageSetting process, using the shared RunList resource as its input.

JDF ENABLER FOR THE HARLEQUIN RIP
UPDATED JDF INDEX CONTENTS 120
INDEX CONTENTS 120
What follows is an example of how the updated JDF might look when delivered to the press control-
ler. (Again, the updates performed by the JDF Enabler are highlighted.):
<JDF ID="RootNode" Type="Product" Version="1.2 Status="Waiting">
<ResourcePool>
<RunList ID="SharedRunList" Status="Available" Class="Parameter" PartIDKeys="Run
Separation">
<RunList Run="0">
<RunList Separation="Cyan" IsPage="false">
<LayoutElement>
<FileSpec URL="file://riphost/Output/Page-1-C.tif"/>
</LayoutElement>
</RunList>
<RunList Separation="Magenta" IsPage="false">
<LayoutElement>
<FileSpec URL="file://riphost/Output/Page-1-M.tif"/>
</LayoutElement>
</RunList>
<RunList Separation="Yellow" IsPage="false">
<LayoutElement>
<FileSpec URL="file://riphost/Output/Page-1-Y.tif"/>
</LayoutElement>
</RunList>
<RunList Separation="Black" IsPage="false">
<LayoutElement>
<FileSpec URL="file://riphost/Output/Page-1-K.tif"/>
</LayoutElement>
</RunList>
</RunList>
<RunList Run="1">
<RunList Separation="Cyan" IsPage="false">
<LayoutElement>
<FileSpec URL="file://riphost/Output/Page-2-C.tif"/>
</LayoutElement>
</RunList>
<RunList Separation="Magenta" IsPage="false">
<LayoutElement>
<FileSpec URL="file://riphost/Output/Page-2-M.tif"/>
</LayoutElement>
</RunList>
<RunList Separation="Yellow" IsPage="false">
<LayoutElement>
<FileSpec URL="file://riphost/Output/Page-2-Y.tif"/>
</LayoutElement>
</RunList>
<RunList Separation="Black" IsPage="false">
<LayoutElement>
<FileSpec URL="file://riphost/Output/Page-2-K.tif"/>
</LayoutElement>
</RunList>
</RunList>
</RunList>
</ResourcePool>
<JDF ID="RIPNode" Type="Combined" Types="Imposition Interpreting Rendering
FormatConversion" Status="Completed">
<ResourceLinkPool>
<RunListLink rRef="SharedRunList" ResourceUsage="Output"
CombinedProcessIndex="3"/>
</ResourceLinkPool>
</JDF>
<JDF ID="PressNode" Type="ImageSetting" Status="Waiting">
<ResourceLinkPool>

JDF ENABLER FOR THE HARLEQUIN RIP
UPDATED JDF INDEX CONTENTS 121
INDEX CONTENTS 121
<RunListLink rRef="SharedRunList" ResourceUsage="Input"/>
</ResourceLinkPool>
</JDF>
</JDF>
This updated document can then be read and processed by the press controller.
To activate these updates, the JDF input channel must satisfy the following criteria:
• Its associated Page Setup must be using an output plugin that produces files on disk, such as the
TIFF plugin.
• It must be configured to force “Single (If Required)” throughput (which is the default). Failure to
do this may result in an incomplete list of files when the document is updated. For more infor-
mation see “Edit Advanced (Administrator)” on page 28, under the heading “Workflow”.
Additionally, the JDF input job (submitted to the Input Channel), must satisfy the following criteria:
• It must define an empty RunList resource whose Status attribute is set to Unavailable. This
resource will be updated with the specifications of the output files, as shown above.
• The RIP process node must be a combined node (or a ProcessGroup) that includes the
FormatConversion process. (This will not actually cause the job to be processed any differently
by the RIP, but it will trigger the required filename updates).
• The empty RunList must be linked as an output resource of the FormatConversion process
(using the ResourceLink@CombinedProcessIndex attribute if necessary).
I.1.1 RunList partitioning and the imposition process
By default, the JDF Enabler will update the output RunList using Run index partitions. In addition, it
will use nested Separation partitions when the output is separated. However, this structure does not
always apply if the JDF Imposition process is being performed. If Imposition is specified, and the
Layout resource is partitioned using JDF 1.3 conventions (with SignatureName,SheetName and Side
partitions, rather than Signature,Sheet and Surface sub-elements), the partitions of the Layout
resource will automatically be applied to the RunList. This makes it easier to correlate each output file
with its layout signature. The Separation partition is still used for separated output. For example, if
the following Layout resource is used:
<Layout PartIDKeys="SignatureName SheetName Side" ID="LayoutResource"
Status="Available" Class="Parameter">
<Layout SignatureName="Sig001">
<Layout SheetName="Page001">
<Layout Side="Front">
--- imposed objects --
</Layout>
<Layout Side="Back">
--- imposed objects --
</Layout>
</Layout>
<Layout SheetName="Page002">
<Layout Side="Front">
--- imposed objects --
</Layout>
<Layout Side="Back">
--- imposed objects --
</Layout>
</Layout>
</Layout>
</Layout>

JDF ENABLER FOR THE HARLEQUIN RIP
UPDATED JDF INDEX CONTENTS 122
INDEX CONTENTS 122
the output RunList would be structured accordingly, as follows:
<Runlist PartIDKeys="SignatureName SheetName Side Separation" ID="RunlistResource"
Status="Available" Class="Parameter">
<Runlist SignatureName="Sig001">
<Runlist SheetName="Page001">
<Runlist Side="Front">
<RunList Separation="Cyan" IsPage="false">
--- output file --
</RunList>
<RunList Separation="Magenta" IsPage="false">
--- output file --
</RunList>
<RunList Separation="Yellow" IsPage="false">
--- output file --
</RunList>
<RunList Separation="Black" IsPage="false">
--- output file --
</RunList>
</Runlist>
<Runlist Side="Back">
<RunList Separation="Cyan" IsPage="false">
--- output file --
</RunList>
<RunList Separation="Magenta" IsPage="false">
--- output file --
</RunList>
<RunList Separation="Yellow" IsPage="false">
--- output file --
</RunList>
<RunList Separation="Black" IsPage="false">
--- output file --
</RunList>
</Runlist>
</Runlist>
<Runlist SheetName="Page002">
<Runlist Side="Front">
<RunList Separation="Cyan" IsPage="false">
--- output file --
</RunList>
<RunList Separation="Magenta" IsPage="false">
--- output file --
</RunList>
<RunList Separation="Yellow" IsPage="false">
--- output file --
</RunList>
<RunList Separation="Black" IsPage="false">
--- output file --
</RunList>
</Runlist>
<Runlist Side="Back">
<RunList Separation="Cyan" IsPage="false">
--- output file --
</RunList>
<RunList Separation="Magenta" IsPage="false">
--- output file --
</RunList>
<RunList Separation="Yellow" IsPage="false">
--- output file --
</RunList>
<RunList Separation="Black" IsPage="false">
--- output file --
</RunList>

JDF ENABLER FOR THE HARLEQUIN RIP
UPDATED JDF INDEX CONTENTS 123
INDEX CONTENTS 123
</Runlist>
</Runlist>
</Runlist>
</Runlist>
I.1.2 File URLs and networking
URLs for raster output files are always written using the file:// scheme. The JDF enabler automatically
examines the directory sharing in order to produce a URL that can be resolved by any machine on the
local network.
For example, if the RIP is creating its output files in the directory C:\Program Files\Harlequin RIP
8.0 Generic\SW\TIFF Output, and the SW directory is shared on the local network, the resulting
URLs will be of the form file://<hostname>/SW/TIFF%20Output/<filename>. The machine-private
segment of the path is omitted, allowing other machines to resolve the URL and access the file, pro-
vided that they have permission to do so. The JDF Enabler will also automatically adjust the URL to
use the correct share name. So, if SW is actually shared as (say) RIPConfigurationFolder, the URLs
will be of the form file://<hostname>/RIPConfigurationFolder/TIFF%20%Output/<filename>.
I.1.3 OEM-developed output plugins
If you have developed your own output plugin to generate raster files in a proprietary format, and
you wish to make use of this JDF update feature, it is important that your output plugin implements
the D_GET_OUTPUT_FILENAME selector. Without this selector, the JDF Enabler will not receive the infor-
mation it needs to do the filename update. For more information about how to implement this selec-
tor, see Section 7.18 of the Plugins Manual.

INDEX CONTENTS 124
Appendix J–References
This appendix provides various references where you can find more information:
For more information on XML (Extensible Markup Language):
http://www.xml.com/pub/a/98/10/guide0.html
For more information on JDF:
http://www.cip4.org/index.html
For more information on MIME:
http://www.faqs.org/rfcs/rfc2045.html
For more information on multipart/related:
http://www.faqs.org/rfcs/rfc2387.html
For more information on content type:
http://www.faqs.org/rfcs/rfc1873.html
For more information on Maverick:
http://mav.sourceforge.net/
For more information on Velocity.:
http://velocity.apache.org/
For more information on Java regular expressions:
http://java.sun.com/j2se/1.5.0/docs/api/java/util/regex/Pattern.html
For more information on Java date format:
http://java.sun.com/j2se/1.5.0/docs/api/java/text/SimpleDateFo
rmat.html
For more information on HTML:
http://www.htmlhelp.com/reference/html40/
For more information on Global Graphics Limited:
http://www.globalgraphics.com/

INDEX CONTENTS 125
Appendix K–Licenses
This appendix provides various information on various software licenses.
K.1 The Apache Software License, Version 1.1
Copyright © 2001-2003 The Apache Software Foundation. All rights reserved.
Redistribution and use in source and binary forms, with or without modification, are permitted pro-
vided that the following conditions are met:
1. Redistributions of source code must retain the above copyright notice, this list of conditions and
the following disclaimer.
2. Redistributions in binary form must reproduce the above copyright notice, this list of conditions
and the following disclaimer in the documentation and/or other materials provided with the dis-
tribution.
3. The end-user documentation included with the redistribution, if any, must include the following
acknowledgement:
“This product includes software developed by the Apache Software Foundation
http://www.apache.org/.”
Alternately, this acknowledgement may appear in the software itself, if and wherever such third-
party acknowledgements normally appear.
4. The names “Apache”, “The Jakarta Project”, “Commons”, and “Apache Software Foundation”
must not be used to endorse or promote products derived from this software without prior writ-
ten permission. For written permission, please contact apache@apache.org.
5. Products derived from this software may not be called “Apache” nor may “Apache” appear in
their name without prior written permission of the Apache Software Foundation.
THIS SOFTWARE IS PROVIDED “AS IS” AND ANY EXPRESSED OR IMPLIED WARRANTIES,
INCLUDING, BUT NOT LIMITED TO, THE IMPLIED WARRANTIES OF MERCHANTABILITY
AND FITNESS FOR A PARTICULAR PURPOSE ARE DISCLAIMED. IN NO EVENT SHALL
THE APACHE SOFTWARE FOUNDATION OR ITS CONTRIBUTORS BE LIABLE FOR ANY
DIRECT, INDIRECT, INCIDENTAL, SPECIAL, EXEMPLARY, OR CONSEQUENTIAL DAM-
AGES (INCLUDING, BUT NOT LIMITED TO, PROCUREMENT OF SUBSTITUTE GOODS OR
SERVICES; LOSS OF USE, DATA, OR PROFITS; OR BUSINESS INTERRUPTION) HOWEVER
CAUSED AND ON ANY THEORY OF LIABILITY, WHETHER IN CONTRACT, STRICT LIABIL-
ITY, OR TORT (INCLUDING NEGLIGENCE OR OTHERWISE) ARISING IN ANY WAY OUT OF
THE USE OF THIS SOFTWARE, EVEN IF ADVISED OF THE POSSIBILITY OF SUCH DAM-
AGE.
This software consists of voluntary contributions made by many individuals on behalf of the Apache
Software Foundation. For more information on the Apache Software Foundation, please see
http://www.apache.org/.
K.2 Maverick License
Copyright © 2001 Infohazard.org

JDF ENABLER FOR THE HARLEQUIN RIP
LICENSES INDEX CONTENTS 126
INDEX CONTENTS 126
Permission is hereby granted, free of charge, to any person obtaining a copy of this software and asso-
ciated documentation files (the “Software”), to deal in the Software without restriction, including
without limitation the rights to use, copy, modify, merge, publish, distribute, sublicense, and/or sell
copies of the Software, and to permit persons to whom the Software is furnished to do so, subject to
the following conditions:
• The above copyright notice and this permission notice shall be included in all copies or substan-
tial portions of the Software.
• THE SOFTWARE IS PROVIDED “AS IS”, WITHOUT WARRANTY OF ANY KIND, EXPRESS
OR IMPLIED, INCLUDING BUT NOT LIMITED TO THE WARRANTIES OF MERCHANT-
ABILITY, FITNESS FOR A PARTICULAR PURPOSE AND NONINFRINGEMENT. IN NO
EVENT SHALL THE AUTHORS OR COPYRIGHT HOLDERS BE LIABLE FOR ANY CLAIM,
DAMAGES OR OTHER LIABILITY, WHETHER IN AN ACTION OF CONTRACT, TORT OR
OTHERWISE, ARISING FROM, OUT OF OR IN CONNECTION WITH THE SOFTWARE OR
THE USE OR OTHER DEALINGS IN THE SOFTWARE.
K.3 Jetty license
Jetty License $Revision: 3.7 $
K.3.1 Preamble
The intent of this document is to state the conditions under which the Jetty Package may be copied,
such that the Copyright Holder maintains some semblance of control over the development of the
package, while giving the users of the package the right to use, distribute and make reasonable modi-
fications to the Package in accordance with the goals and ideals of the Open Source concept as
described at http://www.opensource.org.
It is the intent of this license to allow commercial usage of the Jetty package, so long as the source code
is distributed or suitable visible credit given or other arrangements made with the copyright holders.
K.3.2 Definitions
“Jetty” refers to the collection of Java classes that are distributed as a HTTP server with servlet capa-
bilities and associated utilities.
“Package” refers to the collection of files distributed by the Copyright Holder, and derivatives of that
collection of files created through textual modification.
“Standard Version” refers to such a Package if it has not been modified, or has been modified in accor-
dance with the wishes of the Copyright Holder.
“Copyright Holder” is whoever is named in the copyright or copyrights for the package. Mort Bay
Consulting Pty. Ltd. (Australia) is the “Copyright Holder” for the Jetty package.
“You” is you, if you're thinking about copying or distributing this Package.
“Reasonable copying fee” is whatever you can justify on the basis of media cost, duplication charges,
time of people involved, and so on. (You will not be required to justify it to the Copyright Holder, but
only to the computing community at large as a market that must bear the fee.)
“Freely Available” means that no fee is charged for the item itself, though there may be fees involved
in handling the item. It also means that recipients of the item may redistribute it under the same con-
ditions they received it.
1. The Jetty Package is Copyright © Mort Bay Consulting Pty. Ltd. (Australia) and others. Individ-
ual files in this package may contain additional copyright notices. The javax.servlet packages are
copyright Sun Microsystems Inc.

JDF ENABLER FOR THE HARLEQUIN RIP
LICENSES INDEX CONTENTS 127
INDEX CONTENTS 127
2. The Standard Version of the Jetty package is available from http://jetty.mortbay.org.
3. You may make and distribute verbatim copies of the source form of the Standard Version of this
Package without restriction, provided that you include this license and all of the original copy-
right notices and associated disclaimers.
4. You may make and distribute verbatim copies of the compiled form of the Standard Version of
this Package without restriction, provided that you include this license.
5. You may apply bug fixes, portability fixes and other modifications derived from the Public
Domain or from the Copyright Holder. A Package modified in such a way shall still be consid-
ered the Standard Version.
6. You may otherwise modify your copy of this Package in any way, provided that you insert a
prominent notice in each changed file stating how and when you changed that file, and provided
that you do at least ONE of the following:
a) Place your modifications in the Public Domain or otherwise make them Freely Available, such
as by posting said modifications to Usenet or an equivalent medium, or placing the modifications
on a major archive site such as ftp.uu.net, or by allowing the Copyright Holder to include your
modifications in the Standard Version of the Package.
b) Use the modified Package only within your corporation or organization.
c) Rename any non-standard classes so the names do not conflict with standard classes, which
must also be provided, and provide a separate manual page for each non-standard class that
clearly documents how it differs from the Standard Version.
d) Make other arrangements with the Copyright Holder.
7. You may distribute modifications or subsets of this Package in source code or compiled form,
provided that you do at least ONE of the following:
8. a) Distribute this license and all original copyright messages, together with instructions (in the
about dialog, manual page or equivalent) on where to get the complete Standard Version.
b) Accompany the distribution with the machine-readable source of the Package with your mod-
ifications. The modified package must include this license and all of the original copyright
notices and associated disclaimers, together with instructions on where to get the complete Stan-
dard Version.
c) Make other arrangements with the Copyright Holder.
9. You may charge a reasonable copying fee for any distribution of this Package. You may charge
any fee you choose for support of this Package. You may not charge a fee for this Package itself.
However, you may distribute this Package in aggregate with other (possibly commercial) pro-
grams as part of a larger (possibly commercial) software distribution provided that you meet the
other distribution requirements of this license.
10. Input to or the output produced from the programs of this Package do not automatically fall
under the copyright of this Package, but belong to whomever generated them, and may be sold
commercially, and may be aggregated with this Package.
11. Any program subroutines supplied by you and linked into this Package shall not be considered
part of this Package.
12. The name of the Copyright Holder may not be used to endorse or promote products derived
from this software without specific prior written permission.
13. This license may change with each release of a Standard Version of the Package. You may choose
to use the license associated with version you are using or the license of the latest Standard Ver-
sion.

JDF ENABLER FOR THE HARLEQUIN RIP
LICENSES INDEX CONTENTS 128
INDEX CONTENTS 128
14. THIS PACKAGE IS PROVIDED “AS IS” AND WITHOUT ANY EXPRESS OR IMPLIED WAR-
RANTIES, INCLUDING, WITHOUT LIMITATION, THE IMPLIED WARRANTIES OF MER-
CHANTABILITY AND FITNESS FOR A PARTICULAR PURPOSE.
15. If any superior law implies a warranty, the sole remedy under such shall be, at the Copyright
Holders option either a) return of any price paid or b) use or reasonable endeavours to repair or
replace the software.
16. This license shall be read under the laws of Australia.
End
This license was derived from the Artistic license published on http://www.opensource.com.

INDEX CONTENTS 129
A
Adding names of RIP output files to an updated JDF 2,
119
B
backup.log 19
C
Capture incoming JMF messages 51
Channels option 22
Configuration files 33
harlequinrip.txt 34
hostServer.txt 33
jdfenabler.txt 34
networking_choice.txt 33
Configuration of the archive 28
Configure Advanced 28,29
Force Single (if required) Throughput 30
Repeat 29
Resources 29
Workflow 30
Configure Archive 28
Auto-Destroy Policy 28
Max Recent Jobs 28
Time-Out Minutes 28
Configure Channels
Configure Advanced 23
Copy 23
Create New Channel 23
Delete 23
Enable 23
Configure screen 22
Configuring default accounts 55
Configuring SOAR memory 52
Content-id header 8
Content-transfer-encoding header 8
Create New Channel 24
Enable Channel 24
Input 25
Choose Folder 25
Hot Folder 25
JMF 25
Period 25
Stabilization 25
Output 25
JDF Rewrite 25
Output Folder 25
Page Setup 25
Creating input channels 22
Customize colors 70
Customize logo 69
D
Delete all jobs 46
Delete selected job 46
H
Harlequin RIP support 12
Header files
content-id 8
content-transfer-encoding 8
Hot folder sub folders 27
Complete 27
Error 27
Submitted 28
Hot folders 26
How to add names of RIP output files to an updated
JDF 2,119
I
ID 45
ImageSetting process 91
Information 46
Input and output queues 44
Channel 45
Job/File Name 45
Status 45
Time Stamp 45
Input Sort By 45
InstallAnywhere for SOAR 14
InstallAnywhere installation 13
Installation
using InstallAnywhere 13
Installing the JDF Enabler 13
J
JDF Control
createMultipart 73
noteoutput 75,88
SendJMF 72
JDF Control application 71
JDF Enabler customization 55,90
JDF Nodes
Index

JDF ENABLER FOR THE HARLEQUIN RIP
INDEX INDEX CONTENTS 130
INDEX CONTENTS 130
selecting and processing 97
JDF Parameters 93,119
AutomatedOverprintParams 107
Color 113
ColorantAlias 115
ColorantControl 115
ColorantZoneDetails 112
ColorPool 115
ColorSpaceConversionOp 113
ColorSpaceConversionParams 113
ContentObject 104
DevelopingParams 116
DeviceNSpace 115
ExposedMedia 117
FileSpec 101
FitPolicy 105
FontPolicy 111
ImageSetterParams 117
InterpretingParams 104
Layout 101
LayoutElement 99
MarkObject 104
Media 116
ObjectResolution 105
PDFInterpretingParams 105
PlacedObject 103
RenderingParams 107
RunList 99
ScreeningParams 108
ScreenSelector 108
SeparationControlParams 108
SeparationSpec 115
Sheet 103
Signature 103
Surface 103
TranferCurveSet 110
TransferCurve 111
TransferFunctionControl 110
TrappingDetails 111
TrappingParams 112
TrapRegion 111
JDF Parametetrs
ColorSpaceConversion 96
JMF Error codes 54,71
JMF messages (capture) 51
JMF Submission 26
Job’s RIP Monitor Log 46
Joint permits 12
L
Log out icon 43
logger.log 19
Logging 31
Current Size (bytes) 31
Log-Full Action 31
Max. Record Life (minutes) 31
Max. Size (bytes) 31
Logs screen 46
Filter 46
First 46
Last 46
Next 46
Prev 46
M
Managing queues 45
Maverick
configuration file 58
introduction to 59
Maverick library 57
Memory configuration 52
Monitor screen 41
Multipart handling 53
O
OutOfMemoryError 52
Output folders 26
Output Sort By 45
P
Input and output queues
Job 45
Passwords 12
Permits 12
Platform requirements 12
Plugin support 90
ImageSetting process 91
jdfdef.ps file 91
Pop-up blocking programs 18
R
Refresh icon 43
Reset to Defaults 31
RIP monitor 42
RIP progress configuration 32
S
sendjmf command 71
Show 46
SOAR
InstallAnywhere 14
SOAR memory 52
Software licenses 125
Sort queue last/first 46
Sorting queues 45
Starting the JDF Enabler 16
Status (JDF Enabler workflow) 42
Stopping the JDF Enabler 20
Supported platforms 12
System requirements 12

JDF ENABLER FOR THE HARLEQUIN RIP
INDEX CONTENTS 131
INDEX INDEX CONTENTS 131
T
TIFF output integration 86
TIFF shooter 86
TIFF Workflow 86
U
Uninstalling the JDF Enabler 20
Updated JDF
File URLs and networking 123
OEM-developed output plugins 123
RunList partitioning and the imposition process 121
V
Viewing queues 45
W
Web UI 20
