Java Tea User Guide
User Manual:
Open the PDF directly: View PDF ![]() .
.
Page Count: 52
- 1. Introduction
- 2. Installation
- 3. Getting Started
- 4. Examples
- 5. Tea Script Language Specifications
- 6. Preprocessor
- 7. TeaBase defined variables and methods
- 8. Custom Shift Methods
- 9. Properties File – Multiple Languages
- 10. Template Transformation
- 11. Debugging Tips
- 12. Event Listener
- 13. Command Usage
- 14. Troubleshooting
- 15. Pairwise Testing
End-to-end Testing Framework
JavaTea
User Guide
Revision History
Version
Date
Author
Description
0.0.1
5/1/2019
Masayuki Otoshi
Document Created
Table of Contents
1. Introduction ............................................................................................................................... 2
2. Installation ................................................................................................................................. 4
3. Getting Started ........................................................................................................................... 5
4. Examples .................................................................................................................................... 7
5. Tea Script Language Specifications ........................................................................................... 16
6. Preprocessor ............................................................................................................................ 24
7. TeaBase defined variables and methods .................................................................................. 24
8. Custom Shift Methods .............................................................................................................. 26
9. Properties File – Multiple Languages ....................................................................................... 28
10. Template Transformation ..................................................................................................... 30
11. Debugging Tips ..................................................................................................................... 40
12. Event Listener ....................................................................................................................... 43
13. Command Usage .................................................................................................................. 45
14. Troubleshooting ................................................................................................................... 46
15. Pairwise Testing .................................................................................................................... 49
2
1. Introduction
Selenium is a tool widely used to code tests in test automation. It is very efficient to make sure
all functions work as we expected. However, in order to make our tests reusable and
maintainable, for example, applying Page Object Model (POM), some amount of programming
is required. With this approach, you need to create page classes and define properties that
represent elements to be displayed on target web page. This concept works fine while your
web application works stable. But, in real word, we need to continuously change the code to
enhance features and fix issues. The changes break existing tests and you need to spend time
to fix. Because of this, developers spends a lot of time to manage tests as well as application
code.
To reduce the cost of test automation, testing tool must be highly flexible and describable.
JavaTea is designed to capture web elements based on text strings shown on the web page to
provide an intuitive and easy way to point the target element.
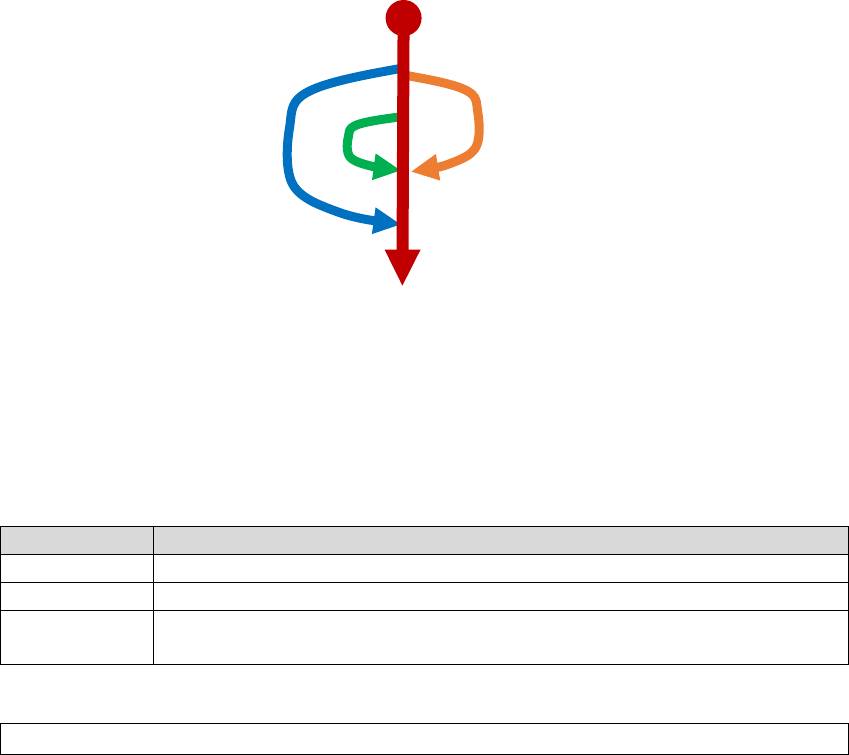
Suppose we have the above web page and want to populate values in each input element.
Now you can get an element of the 'Email' label with the expression below:
'Email'
Tea script finds a text element from the page by using the text 'Email'. Also it allows you to
access other input elements around the text element by using the index number from the text.
Since we are on the Email label, the index number is now numbered as shown below:
First Name
John
Last Name
Smith
Email
your@email
Date of Birth
12
31
1911
/
/
1
2
3
4
-1
-2
Email
your@email
12
31
1911
Smith
John
0
0
'Email'>
'Email'>>
'Email'<
'Email'<<
1
2
3
4
-1
-2

3
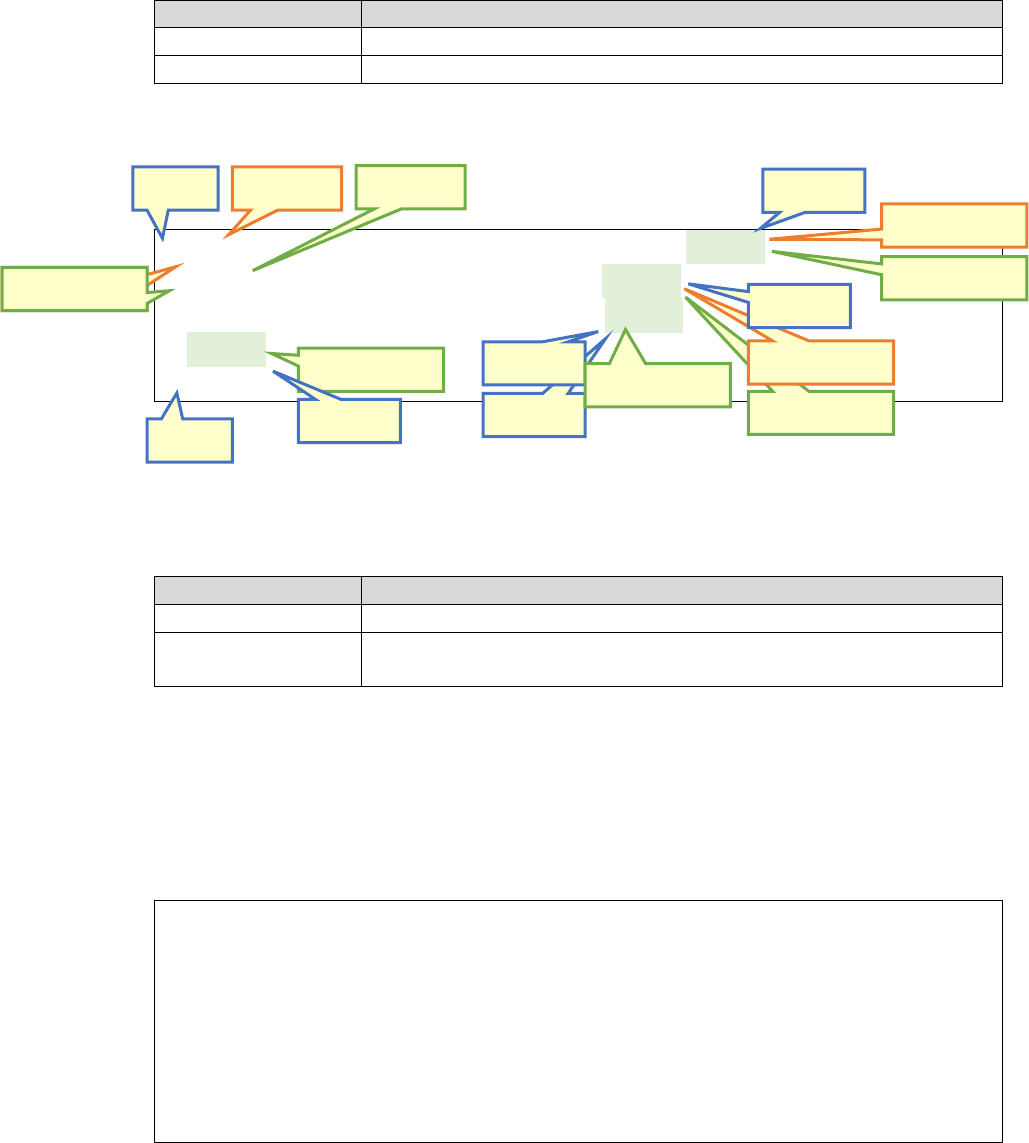
To move the index, '>' and '<'operators can be used. The > moves the index to the right and <
operator moves to the left. Likewise, '>>' and '<<' operators move by two input elements to
the right and left, respectively.
If you want to enter an email address in the Email input box, you can describe the script using
the > operator:
#'Email'> = 'your@email';
If you want to enter your date of birth (for example, December 31st, 1911), describe this:
#'Email'>> = 12 31 1911;
This expression tries to access the second input element on the right direction from the Email
label, which is the input box next to 'Date of Birth' label on the right. After the first value '12' is
entered, the index is automatically counted up and the index becomes 3, which is now points
to the second input box for the Date of Birth. So, the number '31' is populated into the second
input box, and the index is also counted up again. The last number '1911' is populated into the
third input box.
Next example is using < operator. If you want to enter first and last names (first name: John,
last name: Smith), use this expression:
#'Email'< = 'Smith' 'John';
The '<' operator sets index to -1 from the current position, thus, the first value 'Smith' is set to
Last name input box. This time, the index is decreased and the value becomes '-2', which
points to the First name input box. Thus, the next value 'John' is populated into the First name
input box.
In order to show example to use < operator, I accessed starting from the Email label, however,
in real world, we usually gets the first label on the page and simply enter the values from the
top to bottom.
#
'First name'> = 'John' 'Smith'
'your@email' // Email
12 31 1911 // Date of birth
;
Or you can also specify label text for each element in order to make your script robustness for
future changes:
#
'First name'> = 'John' 'Smith'
'Email'> = 'your@email'
'Date of Birth'> = 12 31 1911
;

4
The tea script is described in Java code, and it is compiled as a Java class. Thus, you can easily
integrate existing other Java libraries. Also you can debug the Java code compiled from Tea
script using your favorite IDE.
JavaTea also supports pairwise testing with using 2 and 3-wise algorithm to reduce the
number of combinations. A test script created for a single test scenario can be easily extended
to the script for pairwise testing by adding possible values to each element.
For more details, please see chapter Pairwise Testing.
2. Installation
Dependencies
JavaTea requires the following software:
Java SE Version 8 or above
https://www.oracle.com/technetwork/java/javase/
Maven Version 3.1.6 or above
https://maven.apache.org/
Chrome browser
https://www.google.com/chrome/
ChromeDriver (WebDriver for Chrome)
http://chromedriver.chromium.org/
In this document, we assume that Maven and ChromeDriver are installed in the following
folder structure:
/ (Root)
├── apache-maven-3.6.1
│ └── ...
│
├── webdrivers
│ └── chromedriver.exe
└── ...
The apache-maven and webdrivers directories should be placed on your system PATH.
SET PATH=%PATH%;/apache-maven-3.6.1;/webdrivers

5
3. Getting Started
Download, Compile and Run
JavaTea samples are available to get from the site:
https://github.com/teafarm/javatea/tree/master/examples/
We here show one of easiest samples, how to run GoogleSearch test.
Step 1. Download the following files:
pom.xml
https://github.com/teafarm/javatea/tree/master/examples/GoogleSearch/pom.xml
GoogleSearchTest.javat
https://github.com/teafarm/javatea/tree/master/examples/GoogleSearch/src/test/G
oogleSearchTest.javat
Store the files in the following folder structure:
. (Current)
├── pom.xml
├── src
│ └── test
│ └── javat
│ └── GoogleSearchTest.javat
└── ...
Step 2. Compile and Run tests
C:> SET PATH=/apache-maven-3.6.1/bin;/webdrivers;C:/Windows/System32
C:> mvn exec:java
C:> mvn test
A chrome browser will be opened and show a Google site. And a keyword search will be
executed automatically.

6
Basic Syntax
To understand basic syntax on JavaTea and Tea script, go back to previous chapter and see the
sample code.
import org.junit.jupiter.api.Test;
public class GoogleSearchTest extends tea.TeaBase {
@Test
public void test() {
createDriver('chrome');
driver.get('http://www.google.com');
#
'name:q' = 'Test Tool'
true
;
}
}
There are the following JavaTea specific rules:
Rule 1: A test class must inherit from tea.TeaBase class:
public class GoogleSearchTest extends tea.TeaBase {
Rule 2: createDriver() must be called with a browser name before starting to access target
web pages. Once you call this, a WebDriver object is created internally and available to use
through a property ‘driver’.
createDriver('chrome');
Rule 3: driver.get() must be called to display the target web page.
driver.get('http://www.google.com');
Rule 4: Tea script must be described between # and ; or # and #.
#'name:q' = 'Test Tool';
As for # and # syntax, the second # can be omitted if the script ends with ‘,’ or ‘)’.
assertEquals(#'NAME'@>, 'John', 'Name entered');
The above code can be described as show below with the second #:
assertEquals(#'NAME'@>#, 'John', 'Name entered');
7
4. Examples
This chapter shows some useful examples to understand how to compile and run JavaTea tests
and how to describe Tea scripts in it.
Locations Example
The first example is Locators. This example accesses the web page shown below and shows
various ways to find element objects:
Text locator (text:)
Text locator is the most-used locator in JavaTea. It finds a web element by a text displayed on
the page. The text must exact match with the body text of a tag. For example, if you want to
find ‘Name’, it has to be defined as <span>Name</span>. If it may contains extra spaces such
as <span> Name </span>, use partial text locator instead.
To use a text locator, add ‘text:’ prefix on the target text string. For example, if you want to
find a text element of label ‘Name’, describe as shown below:
'text:Name'
Or you can also simply specify the label text only (‘text:’ is optional)
'Name'
If you access the text element in a function parameter, use # # syntax.
assertEquals(#'Name', 'Name', 'text locator');

8
Partial Text locator (partial:)
Partial text locator finds an element by using a part of text string.
With specifying the partial: prefix, you can find Name text element by using a partial string, for
example, ‘ame’.
'partial:ame'
The ‘partial:ame’ matches all displayed text elements which contains a text ‘ame’, e.g. ‘Name’,
‘frame’, ‘america’
XPath locator (xpath:)
XPath locator finds an element by using a XPath expression. The expression below returns an
input element whose id attribute is ‘name’:
'xpath://input[@id="name"]'
ID locator (id:)
ID locator finds an element by using an id attribute value. The expression below returns a tag
whose id attribute is ‘name’:
'id:name'
Name locator (name:)
Name locator finds an element by using a name attribute value. The expression below returns
a tag whose name attribute is ‘option-value’:
'name:option-value'
Link Text locator (linkText:)
Link Text locator finds an element by using a text string of a hyper link. The expression below
returns an anchor link tag whose body text exacts match with the given text ‘Visit JavaTea
site’:
'linkText:Visit JavaTea site'
Partial Link Text locator (partialLinkText:)
Partial Link Text locator finds an element by using a text string of a hyper link with using partial
match condition. The expression below returns an anchor link tag whose body text contains
the given text ‘JavaTea site’:
'partialLinkText:JavaTea site'
Class Name locator (className:)
Class Name locator finds an element by using a class attribute value. The expression below
returns a tag whose class is ‘label’, class=”label”:
'className:label'

9
Tag Name locator (tagName:)
Tag Name locator finds an element by using a tag name. The expression below returns a tag
whose tag name is h2:
'tagName:h2'
CSS Selector locator (cssSelector:)
CSS Selector locator finds an element by using a CSS Selector expression. The expression below
returns a tag whose id attribute is ‘name’:
'cssSelector:#name'
This Locators example contains a sample code to obtain a TeaElement object by using # #
syntax.
TeaElement name = #'id:name'#;
The TeaElement implements WebElement interface, so you can get the element information
through the APIs.
name.getTagName();
name.getAttribute('id');
name.getText();
name.getCssValue('font-family');
name.getLocation();
name.getSize();
10
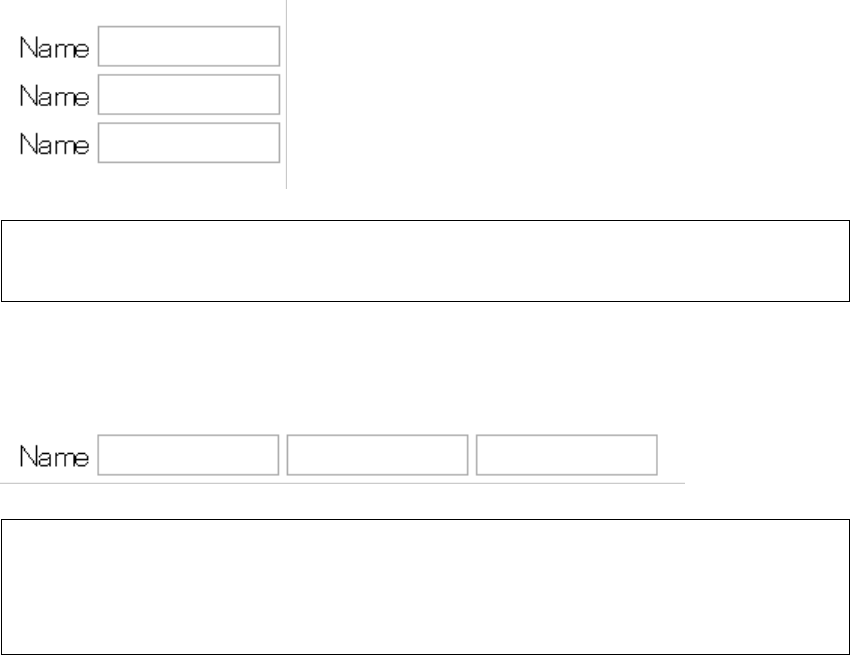
ArraySuffix (and Shift) Example
Locator returns the first element if it found more than one element with the given condition. If
you want to access another element, for example the second element, use array suffix to
specify the index. The index number starts with zero.
'Name'[0] // returns the first Name text element
'Name'[1] // returns the second Name text element
'Name'[2] // returns the third Name text element
Once you obtained an element object, you can move to another form element (input, button,
select, etc) by using shift operator ‘>’.
'Name'> // returns the first input element displayed right next to the Name element
'Name'>> // returns the second input element
'Name'2> // returns the second input element
'Name'>>> // returns the third input element
'Name'3> // returns the third input element
11
Elements Example
This sample shows ways to set a value into various type of elements.
Input element
Enter a value ‘John Smith’ into an input element displayed right next to ‘Name’ text element.
1) Clear and enter the given value.
'Name'> = 'John Smith'
2) Enter the given value
Keep the original value and append the given value (Use += assignment)
'Name'> += ' suffix'
Select element - single selection
There are some ways to select an option.
1) Select an option by the displayed text ‘Tokyo’. (Use an equal assignment)
'Place'> = 'New York'
2) Select an option by the option value ‘ny’. (Use @= assignment)
'Place'> @= 'ny'
3) Select an option by the display text with using a regular expression. (Use /…/ leteral)
(Select an option text starting with ‘New’)
'Place'> = /New.*/
Select element - multiple selection
Select options by the displayed texts. (Use an array).
'Color'> = ['Red', 'Blue']
Name
Place
New York
Color
Red
Yellow
Blue
12
Radio button
Click on a radio button (Use true literal).
1) Click on Auto radio button.
'Type'> = true
2) Click on Truck (Skip Auto radio button).
'Type'> = false true
or
'Truck'< = true
Check box
Click on a check box (Use true literal).
'Agreement'> = true
Button element
Click on a button (Use true literal).
'Next' = true
Note that ‘>’ is not needed to specify. In this case, we want to click the ‘Next’ button itself.
Type
Auto
Truck
Agreement
Next
13
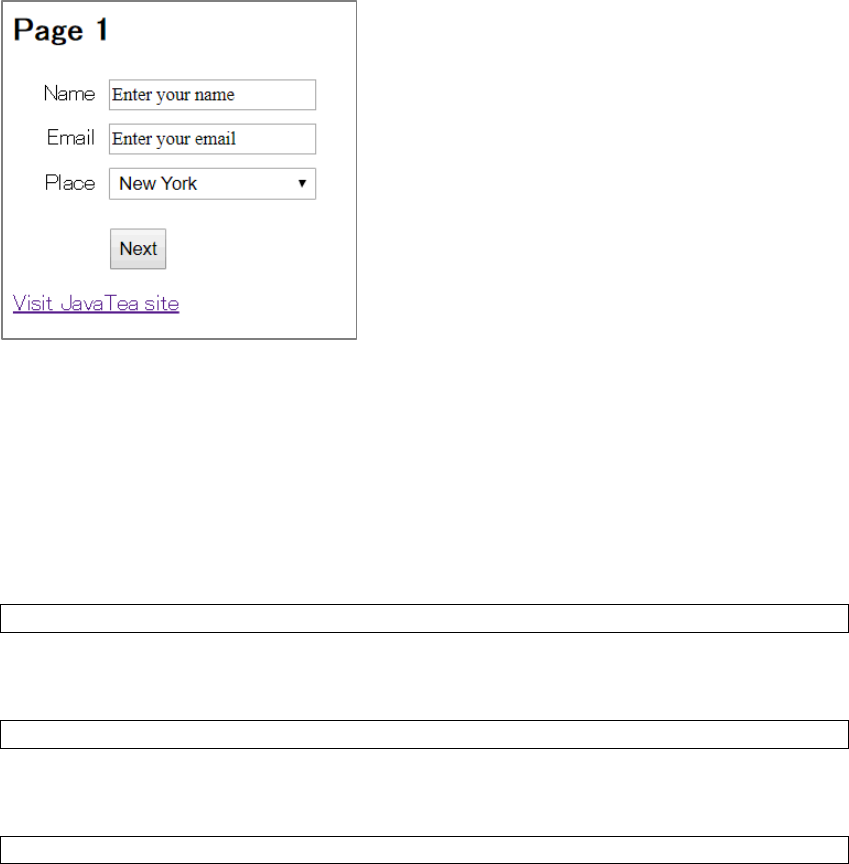
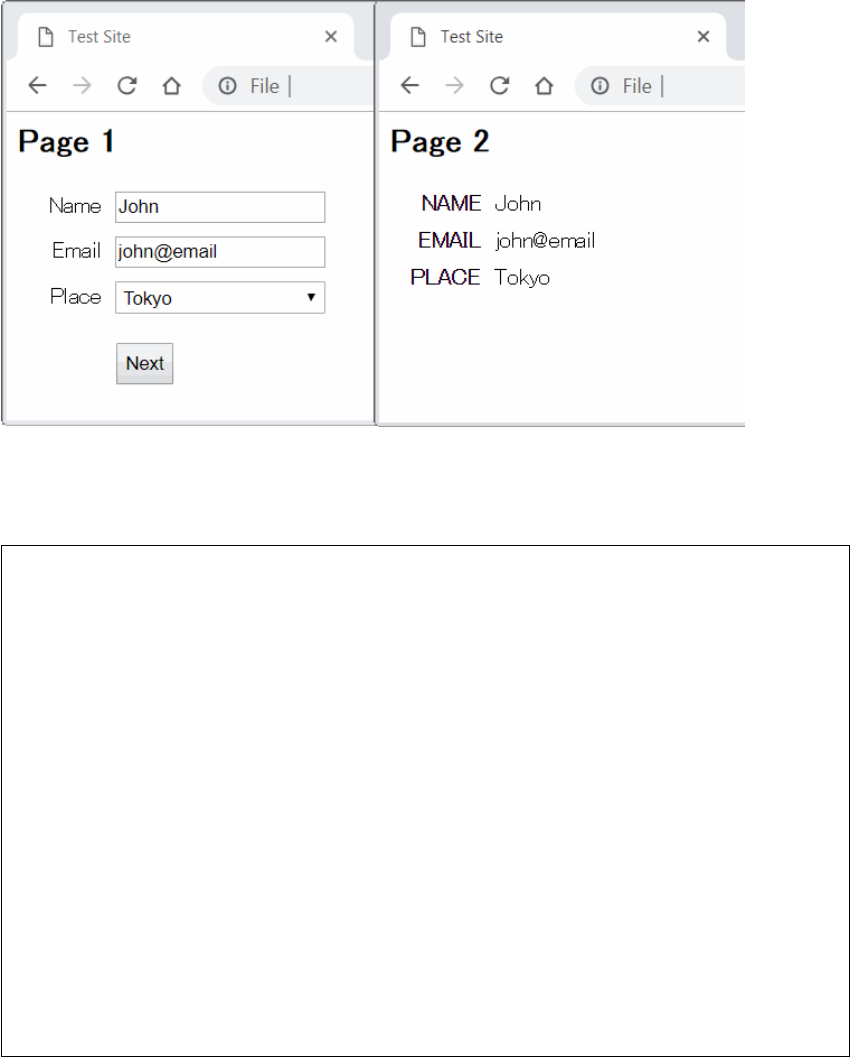
Wizard Example
This is a realistic example compared to previous ones. We here test HTML pages with wizard
style. There are two pages titled Page 1 and Page 2. This sample enters a name, an email
address and select a place on the first page. Then the second page shows the values entered.
Here is the JavaTea file to test the pages above.
WizardTest.javat
import static tea.TeaAssert.assertEquals;
import org.junit.jupiter.api.Test;
public class WizardTest extends tea.TeaBase {
@Test
public void test() {
createDriver('chrome');
driver.get(new java.io.File('Page1.html').toURI().toString());
#
'Name'> = 'John'
'john@email'
'Tokyo'
true
;
assertEquals(#'NAME'@>, 'John', 'Name entered');
assertEquals(#'EMAIL'@>, 'john@email', 'Email entered');
assertEquals(#'PLACE'@>, 'Tokyo', 'Place selected');

14
driver.quit();
}
}
The main Tea script code in this sample is this:
'Name'> = 'John'
'john@email'
'Tokyo'
true
The assignment statement in the first line represents sending a value to Name input field. The
‘Name’ is a text locator which returns a text element object of the Name label. But > operator
is attached on the right, so it actually returns a Name input element object displayed right next
to the Name label. Thus, the test string ‘John’ is set in the Name field after execution of this
line.
The assignment statement also counts up element index pointing to current element. Thus
current element index is now pointed to Email input field.
After the first line, there is a value defined in each line. This is because the first line element
index has already set. Since JavaTea moves among elements automatically when a value is set,
you don’t have to specify where you set the value.
The second text string ‘john@email’ is set into the Email field, and element index is increased
and points to the next input element. Likewise, the third line selects ‘Tokyo’ from the selection
box. And the fourth line clicks on the Next button.
After submitted the form on the Page 1, the sample code validates the values entered with the
code below:
assertEquals(#'NAME'@>, 'John', 'Name entered');
assertEquals(#'EMAIL'@>, 'john@email', 'Email entered');
assertEquals(#'PLACE'@>, 'Tokyo', 'Place selected');
The assertEquals() takes three parameters:
void assertEquals( TesElement actual, String expected, String message );
To set an actual value displayed on the Page 2, we want to use a Tea script. So the first
parameter starts with a # sign, and specify the label text of the target value. Next we need to
make a shift and get a target text string of Name. Although we used > operator to shift and
find an input element, this time we need to use @> operator instead. It is because the target
operator is read-only text element, not editable one. ‘Name’@> finds a text string displayed
right next to the ‘Name’ label. In this sample, it is expected to be ‘John’. If the application
works fine as expected, the first parameter in the assertion returns ‘John’ and it matches with
the second parameter which is an expected value.

15
In the sample folder, run the following commands to compile and run the test.
C:> SET PATH=/apache-maven-3.6.1/bin;/webdrivers;C:/Windows/System32
C:> mvn exec:java
C:> mvn test

16
5. Tea Script Language Specifications
This chapter describes language specifications of Tea script. Tea script can be described
between # and ; or # and # in Java code.
Expression
Description
# <script> ;
Sets a value into a specified element or current element object.
Multiple statements can be described in a script section. For example,
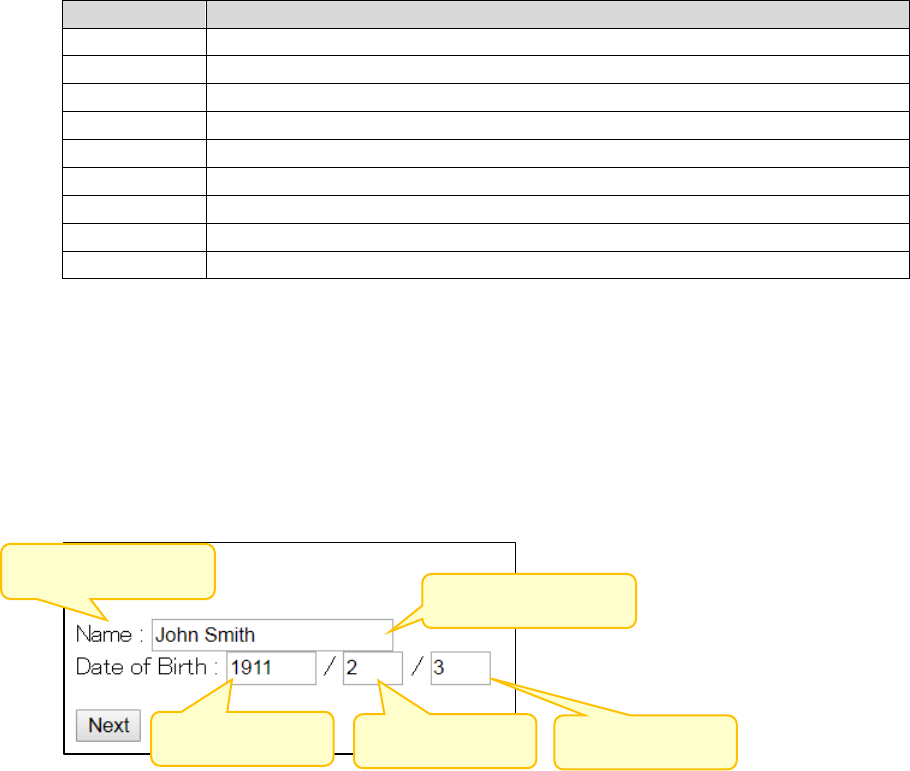
#‘Name’> = ‘John Smith’;
#‘Date of Birth’> = 1911 2 3;
The above two statements can be rewritten as shown below:
#
‘Name’> = ‘John Smith’
‘Date of Birth’> = 1911 2 3
;
# <script> #
Returns a value without setting into an element object.
You can omit the closing number-sign character if it ends with a comma
‘,’ or closing parenthesis. For example,
assertEquals( #’Name’@>#, #’UserName’@># );
the above line can be rewritten as shown below:
assertEquals( #’Name’@>, #’UserName’@> );
Between those notations, the following tokens are available to describe.
Comments
/* comment */
Multiple-line comment can be described between /* and */.
// comment
Single-line comment can be described after //.
Keywords
The following word is reserved for use as Tea script keywords and cannot be used as
identifiers.
optional
The ‘optional’ keyword makes element optional. By default, JavaTea waits until it finds the
element or timed out (default: 20 seconds). If you specify the optional keyword, JavaTea
checks the existence of the element once. If the element does not exist, JavaTea skips the
statement and execute the next line.

17
Keyword
Description
optional
Do not wait for appearance of the target element.
(JavaTea waits until the target element appears on the page by
default)
Boolean Literals
A boolean type has two values below:
true
false
A true value represents a mouse click, and false does nothing to do. For example, the following
code makes a mouse click on Truck (second option) but Auto.
‘Track’> = false true
String Literals
A string literal consist of zero or more characters enclosed in single or double quotes.
One character must be enclosed in double quotes.
"text"
'text'
Regular Expression Literals
A regular expression literal consist of a regular expression enclosed with slashes. Flags can be
added.
/regular expression/
/regular expression/flags
Below are the flags available to specify:
Flag
Description
Value in Java
Click on the current element if true.
Do not click if false.

18
e
Enables canonical equivalence.
Pattern.CANON_EQ
i
Enables case-insensitive matching.
Pattern.CASE_INSENSITIVE
x
Permits whitespace and comments in
pattern.
Pattern.COMMENTS
s
Enables dotall mode.
Pattern.DOTALL
l
Enables literal parsing of the pattern.
Pattern.LITERAL
m
Enables multiline mode.
Pattern.MULTILINE
u
Enables Unicode-aware case folding.
Pattern.UNICODE_CASE
c
Enables the Unicode version of
Predefined character classes and POSIX
character classes.
Pattern.UNICODE_CHARACTER_CLASS
d
Enables Unix lines mode.
Pattern.UNIX_LINES
Character Literals
A character literal consist of one character enclosed in single quotes. For example,
'a'
Number Literals
A number literal consist of one or more digits. It may starts with a minus sign.
For example,
123
-123
Java Code Section
By default, javat file is in Java mode. Hence, you can start writing Java code without any special
notations. Use the following expressions, when you need to change back to Java mode from
Script mode.
{ Java code }
String s = #’Name’>{.toString()};
Note that the number of start and close curly braces must be matched in the code. If it
does not match, use {%, %}.
{% Java code %}
#
{% for (int index=0; index<10; index++) { %}
‘Name’index> = ‘’
{% } %}
;
Java and script modes can be nested.

19
#
‘Name’> = () -> {
return ‘Test’ + getUserID(#’User’@>);
}
;
Lambda Java Functions
A lambda function executes the Java code and set the return value to the current element
object if it is not null.
Thin arrow
( parameters ) -> {
Java code
}
Fat arrow
( parameters ) => {
Java code
}
Curly braces are optional if there is only a single function call in the body section.
() -> func()
The above expression is equivalent to the following code:
() -> { func(); }
Java Methods
A Java method executes the method, but the return value is ignored. It isn’t set to the current
element object.
method( parameters )
The above expression is equivalent to the following code:
{ method( parameters ); }
Element
An element represents a web element on the target web page.
Locators
The element can be found by Selenium locators (xpath, cssName, tagName, etc) as well as text
string displayed on the page.
By default, JavaTea uses text locator. The text locator searches web elements that the body
text matches with the given text. Suppose you described ‘Name’ in your script, the text locator
could return an element object, for example, <SPAN>Name</SPAN>.

20
Other locator names are the same as the ones defined in Selenium Java API.
Locator name
Description
text
Finds element based on the text displayed on the page. (default)
partial
Finds element based on the partial text displayed on the page.
partialText
Same as ‘partial’
className
Finds element based on the value of the "class" attribute.
cssSelector
Finds element via the driver's underlying W3 Selector engine.
id
Finds element based on the value of the "id" attribute.
linkText
Finds element based on the body text of the "a" tag.
name
Finds element based on the value of the "name" attribute.
partialLinkText
Finds element based on the partial body text of the "a" tag.
tagName
Finds element based on the tag name.
xpath
Finds element based on the given xpath.
The locator names can be described at the beginning of element text string. The locator name
and element text must be separated by ‘:’. If you do not specify a locator name, text locator is
used by default.
#
’Name’ // text locator
’text:Name’
’partial:Name’
‘xpath://button’ // xpath locator
‘id:ID-name’
‘name:Name’
‘className:Element Class’
‘tagName:TABLE’
‘linkText:Click here’
‘partialLinkText:Partial Link Text’
‘cssSelector:tag.class[attribute=value]’
OPTIONAL
In addition to locators, element accepts the keyword below:
optional JavaTea does not wait for the element appearance.
#optional ‘Name’;
The above statement searches a text element which body test is ‘Name’. And it tries to search
once (optional). If the element does not exist, JavaTea moves to the next statement to
execute.
ARRAY SUFFIX
21
An array suffix represents an index number of elements found. When multiple elements found
with the given text, you need to specify the index number to pick one element from the
elements. The index number starts with zero.
‘label’[0] The first element in the found elements.
SHIFT INDEX
TeaElement internally has an index number pointing to the current index. With using a shift
expression, you can increase or decrease the index number.
Notation
Description
<>
Stays at the current position.
>
Moves 1 unit forward from the current position. (Same as ‘1 >’)
>>
Moves 2 units forward from the current position. (Same as ‘2 >’)
>>>
Moves 3 units forward from the current position. (Same as ‘3 >’)
<
Moves 1 unit backward from the current position. (Same as ‘1 <’)
<<
Moves 2 units backward from the current position. (Same as ‘2 <’)
<<<
Moves 3 units backward from the current position. (Same as ‘3 <’)
number >
Moves number units forward from the current position.
number <
Moves number units backward from the current position.
Example
‘Name’ points to the text element whose tag body is ‘Name’, and the element index is set to
zero. Now, we want to get a web element next to the Name text. By using a shift operator > ,
we can move the position to the right.
‘Name’> represents the element for the Name input box. Likewise, ‘Name’>> or ‘Name’2>
returns the element of year input box. And ‘Name’>>> or ‘Name’3> returns the element of
month input box.
Assignment
An assignment statement sets a value to the given element object.
elementIndex = 0
elementIndex = 1
elementIndex = 2
elementIndex = 3
elementIndex = 4

22
If you use ‘+=’ against an input or textarea element, the given value is appended at the end of
existing value.
If you use ‘@=’ against a select element, the option in the select box is chosen by the given
value. (It is not selected by the visible value)
<element> = <value>
<input or textarea> += <value>
<select> @= <value>
For examples,
‘label’[1]> = ‘Test value’
‘label’[1]> += ‘Test value’ // append mode
‘typeSelect’> @= ‘value1’ // select by value
‘label’ = () -> func()
Most of elements treats the value as a String value. For example, even if you specify a number,
the number is converted into a String object and sent to the target element.
#'Name'> = '123';
#'Name'> = 123;
If the 'Name'> represents an input box, the above two statements behaves exact same. A
String "123" is set to the input.
However, if the target element is a select element, the behavior is different depending on the
type of value.
#'Make'> = '0';
If you specify a String value, it searches an option which visible text is ‘0’. Instead of the String,
if you specify a number, it selects by an index. In this example below, the first option is
selected. (The index is zero-origin)
#'Make'> = 0;
Array
An array values pass multiple values to an element object.
<element> = [ value1, value2, …, valuen ]
This expression is only available when the element is select tag with ‘multiple’ attribute.
The values in the array are selected.
23
<element1> | <element2> | … | <elementn> = [ value1, value2, …, valuen ]
<element1> | <element2> | … | <elementn> = value
Multiple elements can be described on the left hand side to switch processes based on
order of element appearance on the page. JavaTea watches all the elements and executes
only the value for the first element appeared.
If there is only one value (not an array) on the right hand side, no matter what element is
chosen, the value is set to the element found.

24
6. Preprocessor
JavaTea reads the source code before parsing Tea script for the following preprocessing.
Command
Description
include <path>
Includes the file contents. The file must be in your CLASSPATH.
Example: Include contents of Common.javatt.
include ‘Common,javatt’
7. TeaBase defined variables and methods
TeaBase declares some variables and methods for your development.
Variables:
Name
Description
driver
A WebDriver object.
You must call createDriver(browser) method in your Test to populate a driver
object into this variable.
Methods:
Name
Description
createDriver(String)
Initializes a WebDriver object based on the given browser
type. The generated driver object is set into the driver
variable.
options.setVerbose(boolean)
Displays detail messages on console if true is given. No
messages are displayed if it is false. (default: true)
setPropertiesFile(String)
Set a properties file that defines message keys and values.
{key} expression in your text is replaced with the value for
the key defined in the properties file. (default: no
properties)
$(String)
Expand properties expressions in the given text.
pushContext()
popContext()
If you want to execute your method in different context (use
another element index), call pushContext() when entered
into your method. And call popContext() before leaving from
your method.
element(String)
Finds an element object by using the given text, and returns
the element object when you call build() method.
elements()
Returns a list of elements in current context stack.
currentElement()
Returns a current element object.
elementIndex()
Returns an index number of the current element.
buildOr(elementBuilder…)
Chooses one element from the given element builders.
25
shift(int)
Returns a xpath string to find an element shifted by the
given number.
shiftAt(int)
Same as shift(int) except finding an text element.
print(String)
Prints the given text on console. When verbose is false, it
does not display any messages.
takeScreenshot(String)
Takes a screenshot and generates a PNG file.
setAttribute(element, key,
value)
Sets an attribute value to the even element.
removeAttribute(element,
key)
Removes an attribute from even element.
Also TeaBase provides the following methods to wait under various conditions.
Methods:
Name
Description
waitForText(String)
Waits until the given text is displayed on the page.
waitForNotText(String)
Waits until the given text disappears from the page.
waitForPartialText(String)
Waits until a text containing the given partial text is
displayed.
waitForNotPartialText(String)
Waits until texts containing the given text disappear from
the page.
waitUntil(BooleanSupplier)
Wait until the supplier function returns true.
waitUntilSuccess(Runnable)
Wait until the runner function is executed with no errors.
26
8. Custom Shift Methods
Override
Shift methods are the methods to define how to move an element by using <, > operators. By
default, Tea script provide you two shift methods, shift and shiftAt. Each method is called
when you use the following operators:
Method
Operators
shift( int n )
>, >>, >>>, n>, <, <<, <<<, n<
shiftAt ( int n )
@>, @>>, @>>>, @n>, @<, @<<, @<<<, @n<
For example, > operator is converted into shift(1), << operator is shift(-2). Likewise, @> is
converted to shiftAt(1), @<< is shiftAt(-2).
Let’s see the source code of the shift():
protected String shift(int n) {
return "./" + (n < 0 ? "preceding" : "following") +
"::*[self::input or self::select or self::textarea or self::a or self::button]";
}
The methods returns a XPath string that defines HTML tags to find. By default, it only captures
input, select, textarea, a and button tags.
How about shiftAt()?
protected String shiftAt(int n) {
return "./" + (n < 0 ? "preceding" : "following") +
"::*[text() and (self::div or self::span or self::p)]";
}
As you can see the source code above, shiftAt() finds text node only and also it limits to get
div, span and p tags only.
Since it is a protected, you can override with another implementation in your test class. For
example, if you want to move on input tag only, override the shift() with the implementation
below:
Let’s see the source code of the shift():
protected String shift(int n) {
return "./" + (n < 0 ? "preceding" : "following") + "::input";
}
Custom Shift
If you want to use additional implementation with keeping the default implementations, you
can define a custom shift method.

27
Define a shift method in your test class with the name starting “shift”. For example, if you
need a shift method moving on input tag only, you can define the following method with the
name “shiftinput”.
protected String shiftinput(int n) {
return "./" + (n < 0 ? "preceding" : "following") + "::input";
}
To call the method from your script, specify the name ‘input’ between the text string and @>
operator.
# 'Name'input@> = 'Your Name';
To move the element by 5 to the right, describe the number between @ and > operator.
# 'Name'input@5> = 'Your Name';
28
9. Properties File – Multiple Languages
This chapter shows how to handle to test web site that supports multiple languages. To do so,
you need to create properties file and define messages in it for each language. Here is an
example of web site that supports English and Japanese.
English
Japanese
First, you need to create properties files for English and Japanese, and define the keys and
values of each language.
message.properties
Name = Name
DOB = Date of Birth
TestName = John Smith
message_ja_JP.properties
Name = 名前
DOB = 生年月日
TestName = ジョン スミス
In your script, you need to set properties file by calling setPropertiesFile() method, and then
use {key} expression instead of the actual message.
setPropertiesFile('message.properties');
#
'{Name}' = '{TestName}'
'{DOB}' = 12 31 1911
Name
John Smith
Date of Birth
12
31
1911
/
/
名前
John Smith
生年月日 h
12
31
1911
/
/

29
;
The {Name} is replaced with the Name value, ‘Name’, in message.properties file. Likewise, the
{TestName} and {DOB} are replaced with ‘John Smith’ and ‘Date of Birth’, respectively.
When you test Japanese messages, set message_ja_JP.properties.
setPropertiesFile('message_ja_JP.properties');
#
'{Name}' = '{TestName}'
'{DOB}' = 12 31 1911
;
String values for element and value are automatically expanded into actual values defined in
properties file. However, you may need to access actual value to specify in other places, such
as JavaScript parameters. In that case, you can use $() method to expand {key} expression.
assertEquals(#'Name'@>, $('{TestName}') );
The 'Name' is handled as element text, hence, you don’t have to convert using $(). But the second
parameter is neither element text nor element value, so you have to expand the {TextName} by yourself
using the $() method.
30
10. Template Transformation
In practice, you may often have created many different versions of test script based on a main
scenario. It is because there are many alternative flows in web site. Suppose you are entering
your address on an address form.
You normally need to enter Street address, city, state and zip code (Main flow).
If you know 9 digits of a full zip code, the web site may be able to populate the rest of
all information (Alternative flow #1).
Even if you know only 5 digits zip code, the site could detect your city and state
(Alternative flow #2).
Instead of entering zip code, if user enters city and state, the site could populate the
zip code automatically.
To test all the scenarios (main and alternative flows), you need to create four test scripts. But
they are representing operations executed on the same page, thus, the scripts tend to have
duplicate codes. To avoid the duplicates, JavaTea provides a template transformation feature
that transforms specific parts of a template file by using advice and joinpoint. The following
advice types are available.
Advice
Description
before
Inserts code before a joint point.
after
Inserts code after a joint point.
around
Replace a joint point or codes between joint points with the given code.
Around advice can use a ‘proceed’ keyword to keep the original code.
The advice can be described in the following format:
advice joinpoint { code }
Main flow
Alternative flow #1
Search by a full Zip code
Alternative flow #2
Search by 5 digits Zip code
Alternative flow #3
Search by city and state

31
Addition to that, around advice can be also described in the format below:
around start-joinpoint end-joinpoint { code }
Joinpoint is a point where the code is inserted or replaced with. The following joinpoint types
are available to specify:
Joinpoint
Description
String literal
A quoted string, e.g. ‘My Class’, “assertEquals”.
Label
JavaTea label ending with an exclamation mark, e.g. Label!
Regular expression
literal
A regular expression enclosed between slashes and flags,
e.g. /public.*\(\)/g , /testcase/i
The string literal and label joinpoints can add Array Suffix, Shift Suffix and AddSub Suffix.
Array Suffix
Array Suffix
Description
[ n ]
The nth joinpoint in joinpoints found.
[ s .. e ]
Joinpoints between sth and eth. The s and e are optional.
1..3 represents 1st, 2nd and 3rd joinpoints
..2 represents 0th, 1st and 2nd joinpoints
1.. represents 1st, 2nd, …, and the last endpoint.
.. represents all joinpoints
Array Suffix also accepts multiple values split by a comma. Below are the examples:
[ 1, 3, 5 ] // 1st, 3rd and 5th joinpoints
[ ..2, 5, 7..9, 11, 15.. ] // 0, 1, 2, 5, 7, 8, 9, 11, 15 and the rest of joinpoints
Shift Suffix
Array Suffix
Description
n>, >>, >>>
Move jointpoint to the nth newline code to the right from the given
joinpoint.
n<, <<, <<<
Move jointpoint to the nth newline code to the left from the given
joinpoint.
AddSub Suffix (Only available for before/after advice)
Array Suffix
Description
+ n
Move jointpoint by n characters to the right from the given joinpoint.
- n
Move jointpoint by n characters to the left from the given joinpoint.
32
Also following two labels are predefined. You can use the labels without defining in your
template file.
Predefined Label
Description
BOF!
Beginning of file. It points to the top of the file.
EOF!
End of file. It points to the end of the file.
Below shows some examples of joinpoints:
public class HelloWorld extends tea.TeaBase {[Newline]
public static void main(String[] args) {[Newline]
#System.out.println('Hello, World!');[Newline]
}[Newline]
}
Before starting to operate file contents, you need to load the file into memory. The commands
below operate files to load and save.
Command
Description
load ‘path’
Load the file contents into memory.
save ‘path’
Save the updated contents in memory into a file.
This command is used for debugging purpose.
Alternative Flow
Let’s create an alternative flow based on WizardTest using template feature. Here is the javat
code, WizardTest, explained in Getting Started chapter.
WizardTest.javat
import static tea.TeaAssert.*;
import static tea.Assert.*;
public class WizardTest extends tea.TeaBase {
public static void main(String[] args) {
new WizardTest().start();
}
private void next() {
BOF!
EOF!
‘public’[0]
‘public’[1]
BOF!>
‘public’[0]>
‘public’[1]>
‘public’[1]3>
‘public’[1]>
‘public’[0]>>
BOF!>>
EOF!<
EOF!<<
BOF!<<<
‘public’[1]>>
‘public’[0..1]

33
print('next');
#'xpath://button'[0] = true;
}
private void start() {
createDriver('chrome');
driver.get(new java.io.File('Page1.html').toURI().toString());
#
// Page 1
'Name'> = 'John Smith'
'Date of Birth'> = 1911 2 3
next()
// Page 2
'Make'> = 'Toyota'
'Type'> = false true
'Agreement'> = true
next()
;
// Page 3
assertEquals(#'Name'@>, 'John Smith', 'Name on Page 3');
assertEquals(#'Make'@>, 'Toyota', 'Make on Page 3');
driver.close();
}
}
To implement another Test class for an alternative flow, create a javatt file below:
Alternative1.javatt
// Load template code into this working memory.
load 'WizardTest.javat'
// Replace class names.
around 'WizardTest' {Alternative1}
// Insert a new statement
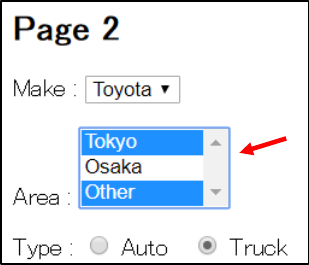
before "'Type'" {
'Area'> = ['Tokyo', 'Other']
}
// Insert a new assertion
34
after 'assertEquals'[1]> {
assertEquals(#'Area'@>, 'Tokyo,Other', 'Area on Page 3');
}
First, you need to load the base javat file.
load 'WizardTest.javat'
Next, replace the class name with the new name, Alternative1, by using around advice.
around 'WizardTest' {Alternative1}
The around advice searches the keyword, ‘WizardTest’, in the loaded code. It will find two
places, at line 4 and 6. By default, it replaces both with the code in { and }, ‘Alternative1’.
The next advice is ‘before’ that inserts a new statement for setting Area selection values.
before "'Type'" {
'Area'> = ['Tokyo', 'Other']
}
The before advice searches the keyword “‘Type’” and insert the code described in { and }
before the keyword. Thus, the new statement will be added between Make and Type
statements.
The last advice is ‘after’ that inserts a new statement for Area assertion.
after 'assertEquals'[1]> {
assertEquals(#'Area'@>, 'Tokyo,Other', 'Area on Page 3');
}
The after advice searches the given keyword ‘assertEquals’, however, array and shift suffixes
are attached.
'assertEquals'[1]>
The array suffix [1] represents to pick the specific keyword from the keywords founds by the
index number. The index starts with zero, so it returns the second keyword.
Also it has a shift suffix ‘>’ that means the position where found the keyword will be moved to
the place where a newline code appears to the right.
As you can see, there are two ‘assertEquals’, and the ‘assertEquals’[1] points to the second
one. And then it searches a newline code to the right from the second ‘assertEquals’.
// Page 3[newline]
assertEquals(#'Name'@>, 'John Smith', 'Name on Page 3');[newline]
assertEquals(#'Make'@>, 'Toyota', 'Make on Page 3');[newline]
[newline]
[1]
>

35
Thus, the after advice inserts the code after the newline code at the end of the second
assertEquals method.
Run the command below to generate javat file from the javatt.
C:> java tea.JavaTea Alternative1.javatt
It will generate Alternative1.javat below:
Alternative1.javat
import static tea.TeaAssert.*;
import static tea.Assert.*;
public class Alternative1 extends tea.TeaBase {
public static void main(String[] args) {
new Alternative1().start();
}
private void next() {
print('next');
#'xpath://button'[0] = true;
}
private void start() {
createDriver('chrome');
driver.get(new java.io.File('../Wizard/Page1.html').toURI().toString());
#
// Page 1
'Name'> = 'John Smith'
'Date of Birth'> = 1911 2 3
next()
// Page 2
'Make'> = 'Toyota'
'Area'> = ['Tokyo', 'Other']
'Type'> = false true
'Agreement'> = true
next()
;
// Page 3
assertEquals(#'Name'@>, 'John Smith', 'Name on Page 3');
assertEquals(#'Make'@>, 'Toyota', 'Make on Page 3');

36
assertEquals(#'Area'@>, 'Tokyo,Other', 'Area on Page 3');
driver.close();
}
}
To compile and execute the generated javat, run the following commands.
C:> java tea.JavaTea Alternative1.javat
C:> javac Alternative1.java
C:> java Alternative1

37
TestNG Template
This section shows another example using a template. When you created a test for TestNG,
you may notice that some codes are reusable in most of your tests. We here define the
common code as a template, and define test specific code in javatt.
First, we create a common template for TestNG:
TestTemplate.javat
import static tea.TeaAssert.*;
import static org.testng.Assert.*;
import org.testng.annotations.Parameters;
import org.testng.annotations.Optional;
import org.testng.annotations.Test;
import!
public class className! extends tea.TeaBase {
@Parameters({ "browser", "verbose" })
@Test
public void test(String browser, @Optional String verbose) {
try {
createDriver(browser);
options.setVerbose(verbose);
scenario();
} catch (Throwable t) {
takeScreenshot("error{***ID***}.png");
} finally {
driver.close();
}
}
private void scenario() {
driver.get(url!);
testcode!
}
javacode!
}
The above code was created based on WizardTest.javat for TestNG, but we deleted test
scenario code and Java methods called from the scenario. Also we added some Tea labels to
make us easily point the place to insert or replace with new code from javatt.
Now we can create a test based the template.

38
WizardTest.javatt
load 'TestTemplate.javat'
around className! {WizardTest}
around url! {new java.io.File('../Wizard/Page1.html').toURI().toString()}
before import! {
import tea.TeaElement;
}
before javacode! {
private void next() {
print('next');
#'xpath://button'[0] = true;
}
private String error() {
TeaElement el = #"xpath://*[contains(@class, 'error')]"[0]#;
return el != null ? el.toString().trim() : null;
}
private Object checkElement(TeaElement element) {
assertEquals(element.getAttribute("id"), "area");
return null;
}
}
before testcode! {
// Page 1 (error)
#'Name'> = '';
next();
if (error() == null) fail('Should show a validation error message for an empty name.');
#
// Page 1 (success)
'Name'> = {*'John Smith','George Washington'*}
'Date of Birth'> = {*1911 2 3, '2001' '02' '03'*}
assertEquals(#'Name'>,
{***0***},
'Failed to fill in name element.')
next()
// Page 2

39
'Make'> = 'Toyota'
'Area'> = checkElement(#.#) [{*'Tokyo', 'Osaka'*}, 'Other'] // (multiple selection)
'Type'> = false true
'Agreement'> = () -> {
return 'Toyota'.equals(#'Make'>#.toString());
}
next()
;
// Page 3
assertEquals(#'Name'@>, {***0***}, 'Name on Page 3');
assertEquals(#'Area'@>, {***2***}+',Other', 'Area on Page 3');
assertEquals(#'Make'@>, 'Toyota', 'Make on Page 3');
assertEquals(#'Type'@>, 'Truck', 'Type on Page 3');
assertTrue(#'Agreement'@>, 'Agreement on Page 3');
}
At first, load the template into the memory and replace className! with the actual class name
‘WizardTest’ by using around advice. Likewise, replace url! Label with an accrual URL.
Next, insert an import statement before the import! label.
Likewise, insert Java methods before javacode! And insert test scenario code before testcode!.
To generate javat from the javatt, execute the following command.
C:> java tea.JavaTea WizardTest.javatt
It generates WizardTest.javat, so run these to generate java files and compile.
C:> java tea.JavaTea -X -t 2 WizardTest.javat
C:> javac *.java
The –X option generates a testing.xml, so you can run it using TestNG with the following
command.
C:> java org.testng.TestNG testng.xml
40
11. Debugging Tips
This chapter introduces some tips to debug javat and javatt files.
Screenshot
If you want to see element states on screen while running your script, you can take a
screenshot and check the image. JavaTea provides you the following method to take a
screenshot:
void takeScreenshot ( String path );
The method take a screenshot of the current screen and save it in your local disk with the
given path.
If you have already narrowed down where could go wrong, you can manually add the method
call in your script. But if you have no idea where is wrong and you need to check all screens to
see what is wrong, you can create a custom EventListener class and implement events where
you want to take screenshots. For example, most of updates on screen happens by mouse-
click. So, it is a good idea to capture beforeClickOn and afterClickOn events and implement
code to take a screenshot in each event.
For the details, see chapter Event Listener.
Element location
JavaTea provides setAttibute() method below:
void setAttribute ( TeaElement gwElement, String attrName, String attrValue );
The method populates a given value to the specified attribute in the element object. With
using this, you can draw a box surrounding the target element to ensure that your script code
properly finds the element you intended.
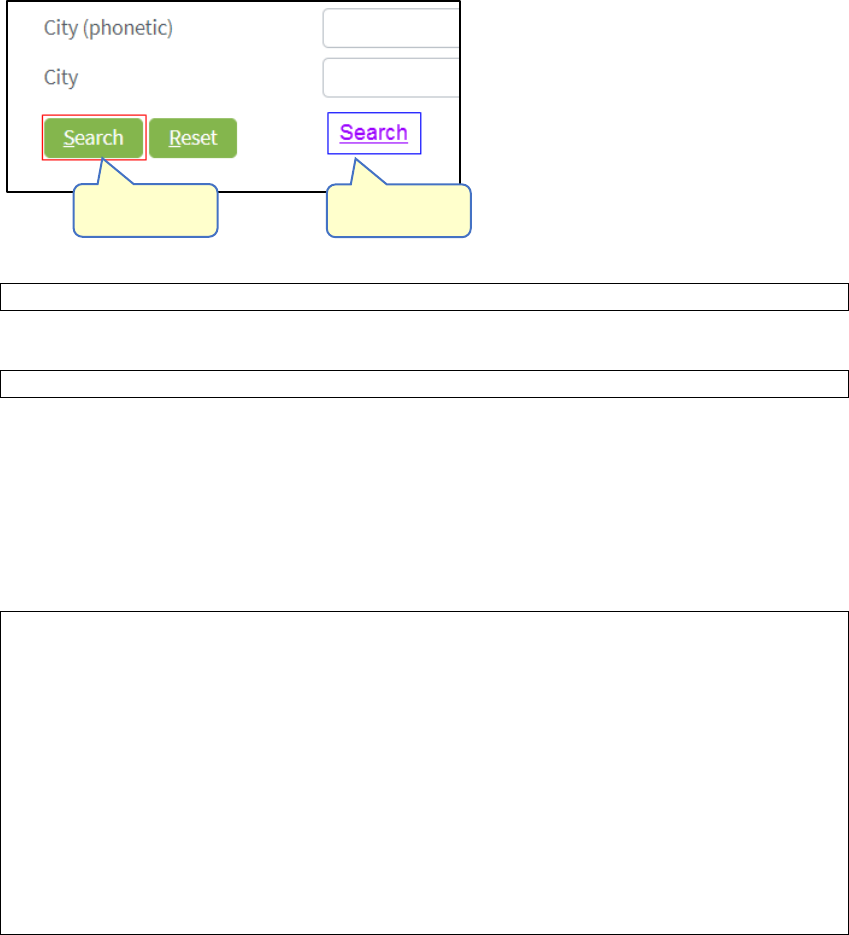
Suppose there are multiple Search buttons on a page, and you wanted to click one of the
Search buttons but search was not performed. You somehow need to identify what element
was actually selected with the expression of the locator.
For that purpose, you can call setAttribute method with the locator expression:
setAttribute(#'Search'[0], 'style', 'border: 1px solid red');
setAttribute(#'Search'[1], 'style', 'border: 1px solid blue');
The setAttribute sets a value into an attribute of the element found. The above example
searches elements which the body text is ‘Search’, and populates a style attribute with a value
that draws a border box surround its element in RED and BLUE, respectively.
41
If you want to click the Search button, describe the statement below:
#’Search’[0] = true;
If you want to click on the Search link, describe below:
#’Search’[1] = true;
Debug javatt
In javatt file, if you describes many advices and updated contents a lot, it may be hard to
understand what keywords are there to define joinpoints in later steps. To see the updated
contents and what parts are updated in each step, JavaTea provides save command.
load 'WizardTest.javat'
save 'debug1'
around 'WizardTest' {Alternative1}
save 'debug2'
before "'Type'" {
'Area'> = ['Tokyo', 'Other']
}
save 'debug3'
after 'assertEquals'[1]> {
assertEquals(#'Area'@>, 'Tokyo,Other', 'Area on Page 3');
}
save 'debug4'
As you can see in the above, if you add save command between steps, you can check to see
what are updated in each step. After you run the javatt, debug1 to 4 files will be generated as
well as javat file. And then you can compare the files using diff command or tool.
For example, if you compare 'WizardTest.javat' with 'debug1', you will see a difference at the
bottom of the file. If you use Mac
‘Search’[0]
‘Search’[1]
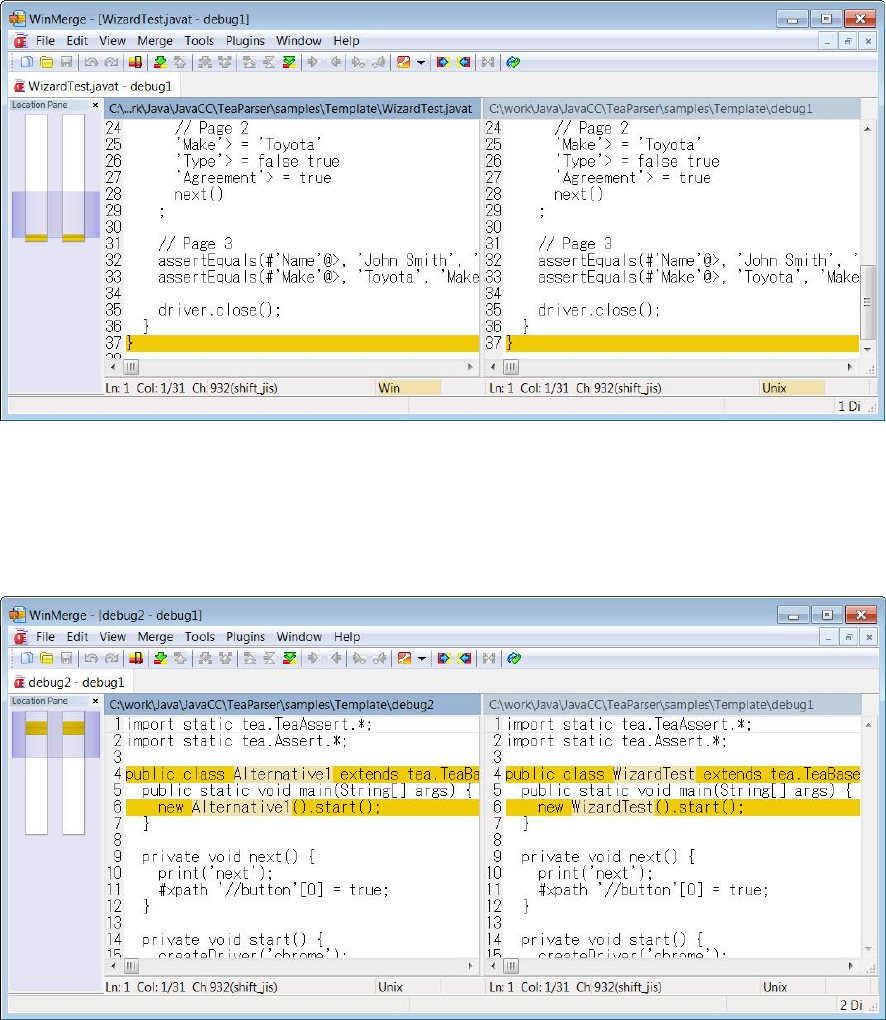
42
This is because load command removes spaces at the beginning and end of the file so that you
can easily count lines from BOF! And EOF!.
Likewise, compare 'debug1' with 'debug2'. You will see changes updated by the statement,
“around 'WizardTest' {Alternative1}”.
The above shows that replacement of WizardTest with Alternative1 was applied in two places
at line 4 and 6.

43
12. Event Listener
Selenium has a capability to listen events and fire actions defined in custom EventListener
class. It enables us to create effective logging, taking screenshot and reporting in Selenium.
You can use the capability from JavaTea also. This chapter shows how to capture screenshot
before and after mouse click is fired as an example.
First, you need to create your custom EventListener class:
CustomEventListener.java
import java.io.*;
import org.openqa.selenium.*;
import org.openqa.selenium.io.FileHandler;
import org.openqa.selenium.support.events.AbstractWebDriverEventListener;
public class CustomEventListener extends AbstractWebDriverEventListener {
private int index = 0;
@Override
public void beforeClickOn(WebElement element, WebDriver driver) {
takeScreenshot(driver, "screenshot"+(++index)+".png");
}
@Override
public void afterClickOn(WebElement element, WebDriver driver) {
takeScreenshot(driver, "screenshot"+(++index)+".png");
}
protected void takeScreenshot(WebDriver driver, String path) {
try {
File out = ((TakesScreenshot) driver).getScreenshotAs(OutputType.FILE);
FileHandler.copy(out, new File(path));
} catch (IOException ioe) {
throw new RuntimeException("Failed to take a screenshot. path: "+path);
}
}
}
Your EventListener class must be extended from AbstractWebDriverEventListener, and
override interface that you want to change default behavior. We here want to capture mouse
events and insert our custom logic to take screenshot before and after mouse click, so we
override the following two interface:
void beforeClickOn(WebElement element, WebDriver driver)

44
void afterClickOn(WebElement element, WebDriver driver)
The beforeClickOn method is fired before mouse click, hence we can capture a screen image
before the mouse click and save into a PNG image file. Likewise, the afterClickOn method is
fired after mouse click, and save a screen image after the mouse click.
Next, you need to register the CustomEventListener class into WebDriver. Since WebDriver is
generated in createDriver() method, you need to override the method and create a
EventFiringWebDriver in your test class.
import org.openqa.selenium.chrome.ChromeDriver;
import org.openqa.selenium.support.events.EventFiringWebDriver;
public class WizardTest extends tea.TeaBase {
@Override
protected void createDriver(String browser) {
ChromeDriver webDriver = new ChromeDriver();
driver = new EventFiringWebDriver(webDriver);
((EventFiringWebDriver) driver).register(new CustomEventListener());
}
…
The above is a sample code of createDriver() method that replaces with your own
implementation that creates an EventFiringWebDriver object and registers your custom
EventListener into it. Now the WebDriver calls beforeClickOn and afterClickOn methods
implemented in your CustomEventListener class whenever mouse click is executed.
45
13. Command Usage
JavaTea
JavaTea command converts Tea scripts into Java code, and generates a Java file.
java tes.JavaTea [ -t <n> ] [ -i <input-dir> ] [ -o <output-dir> ] [ -X ] [ -x <path> ] javat-file…
JavaTea accepts the following options:
Option
Description
-t
t-wise number (a degree of thoroughness)
0 : All combinations
1 : Single
2 : Pairwise (default)
3 : 3-wise
-i <input-dir>
A directory path where javat / javatt source files are stored.
(default: current directory)
-o <output-dir>
A directory path where java / javat output files are generated.
(default: current directory)
-X
Generates a testing.xml file to execute the tests with using TestNG tool.
-x <path>
Generates a testing XML file with the given path name.
After that, it accepts javat or javatt file names. If you specify javat file, JavaTea generates a
java file. If you specify javatt file, javat file is generated.
Examples:
Generate a java files that covers with the test cases created based on pairwise (2-wise)
algorithm. Also it generates a Test NG XML file with the name, ‘wizard.xml’.
java tea.JavaTea –t 2 –x wizard.xml WizardTest.javat
46
14. Troubleshooting
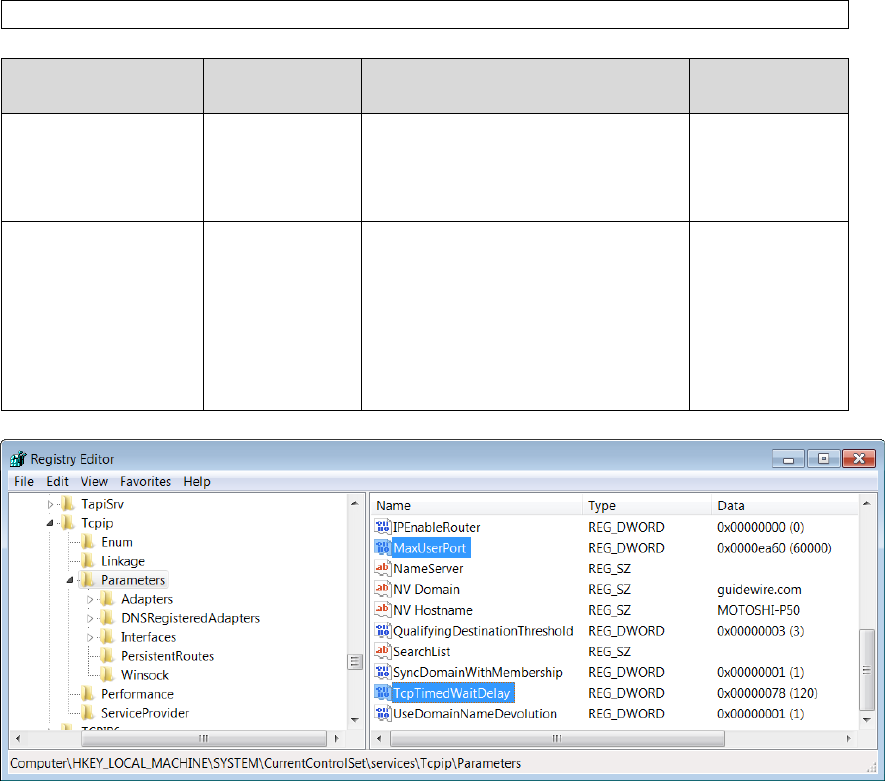
Bind error (socket) on Windows
If you run tests with parallel executions on Windows machine, you need to edit the following
two Windows Registry values.
Modern browsers make HTTP connections with keep-alive. Even though the communication
was done, the connection is still alive. It makes the number of using connections increase and
uses up all available ports and you will see socket bind errors in your console. To avoid the
error, you need to increase the number of available ports and change to shorter timeout to
release used connections timely.
Location:
HKEY_LOCAL_MACHINE¥SYSTEM¥CurrentControlSet¥Services¥Tcpip¥Parameters
Parameter Name
Data Type
Description
Recommended
Value
MaxUserPort
REG_DWORD
Determines the highest port
number TCP can assign when an
application requests an available
user port from the system.
65534
TcpTimedWaitDelay
REG_DWORD
Determines the time that must
elapse before TCP can release a
closed connection and reuse its
resources. This interval between
closure and release is known as
the TIME_WAIT state or 2MSL
state.
60 to 120
47
Kill driver process
Even though you closed the browser by using close function, the driver process (e.g.
chromedriver.exe for Chrome, geckodriver.exe for FireFox, IEDriverServer.exe for IE) still
exists.
To kill the process, you need to run command below from command line:
C:> taskkill /im chromedriver.exe /im geckodriver.exe /im IEDriverServer.exe /f

48
Out of disk space
Selenium drivers create temporary folders and some of folders are not removed after
WebDriver finishes the process. Thus, disk space on your machine will be consumed and you
will encounter out of disk space error.
Where and what folders are created depends on selenium driver version and your machine.
Here is an example of chromedriver.exe on Windows 7.
Location:
C:\Users\<username>\AppData\Local\Temp
or
%AppData%\..\Local\Temp
Folders and files created by Selenium:
scoped_dir1234_56789
seleniumSslSupport12345678901234567890.selenium.doesnotexist
screenshot12345678901234567890.png
We strongly recommend you watching in your temporary directory and clean up regularly if
you found such folders.

49
15. Pairwise Testing
For those who never heard about Pairwise Testing, this chapter explains the basic idea of the
testing. Pairwise Testing is a method of software testing to create test cases that covers all
combinations for all possible parameter values. There are many terms to express Pairwise
Testing, for example, All Pairs, 2-wise, t-wise, etc. The letter ‘t’ represents the number of
parameters that cover all combinations, so it expresses the degree of thoroughness and bigger
number generates more test cases. The 2-wise is one of instances of t-wise, in this case, 2-wise
represents t-wise testing with 2 degree of toughness.
It will come up a question which degree is enough to detect errors. Below shows cumulative
percent of faults triggered by t-wise testing:
t
RAX
conver-
gence
RAX
correct-
ness
RAX
interf
RAX
engine
POSIX
modules
Medical
Devices
Browser
Server
NASA
GSFC
1
61
72
48
39
82
66
29
42
68
2
97
82
54
47
*
97
76
70
93
3
*
*
*
*
*
99
95
89
98
4
*
*
*
*
*
100
97
96
100
5
*
*
*
*
*
99
96
6
*
*
*
*
*
100
100
*= not reported
Source: IEEE TRANSACTIONS ON SOFTWARE ENGINEERING, VOL. 30, NO. 6, JUNE 2004
Software Fault Interactions and Implications for Software Testing
https://pdfs.semanticscholar.org/1ad8/adab7815cf9299b752e00ea860bc28c4c090.pdf
According to the case study, if your target application is a mission critical system that requires
extremely high quality, you may need to test with t=3 to 6. But it requires more test cases to
test, and it is unrealistic to apply such a big number to all tests. Hence, in general, we apply t=2
(pairwise) on general test scenarios and apply t=3 (3-wise) on some critical scenarios.
To understand how pairwise covers test patterns, let’s see test cases created for all
combinations and test cases created by using pairwise. Consider pairs of three input boxes on
a page, and each element could have two values.
For example,
‘John’ and <empty> for First Name,
‘Smith’ and <empty> for Last Name,
‘your@email’ and ‘invalid’ for Email.
50
To simplify this explanation, we here call the elements, Parameter A, B and C instead of First
Name, Last Name and Email. And each parameter could have two values: 0 or 1, instead of
actual values.
A = 0 or 1
B = 0 or 1
C = 0 or 1
If we test all the combinations of the three parameters, the total number of combinations will
be eight ( 2 x 2 x 2 = 8 ), and the test patterns are below:
Test Case ID
A
B
C
1
0
0
0
2
0
0
1
3
0
1
0
4
0
1
1
5
1
0
0
6
1
0
1
7
1
1
0
8
1
1
1
Now, let’s focus on all combinations of each two parameters: AB, BA and AC.
A
B
B
C
A
C
0
0
0
0
0
0
0
1
0
1
0
1
1
0
1
0
1
0
1
1
1
1
1
1
Next, create a test case with zero values for all parameters.
Test Case ID
A
B
C
1
0
0
0
First Name
John
Last Name
Smith
Email
your@email
Parameter A
Parameter B
Parameter C
51
This test case covers three parameter combinations (AB=00, BC=00, AC=00) to test.
A
B
B
C
A
C
0
0
0
0
0
0
0
1
0
1
0
1
1
0
1
0
1
0
1
1
1
1
1
1
Create another test case with zero values for all parameters.
Test Case ID
A
B
C
1
0
0
0
2
0
1
1
The test case covers another three parameter combinations (AB=01, BC-11, AC=01).
A
B
B
C
A
C
0
0
0
0
0
0
0
1
0
1
0
1
1
0
1
0
1
0
1
1
1
1
1
1
Likewise, create two more test cases below:
Test Case ID
A
B
C
1
0
0
0
2
0
1
1
3
1
0
1
4
1
1
0
And the additional test cases covers the rest of combinations as shown below:
A
B
B
C
A
C
0
0
0
0
0
0
0
1
0
1
0
1
1
0
1
0
1
0
1
1
1
1
1
1
By focusing on combinations of two parameters, we can reduce the number of test cases to 4
from 8. This is a basic idea of pairwise algorithm that only covers all patterns for between two
parameters.

52
We could reduce the number of test cases with pairwise, but you may feel that it is not a big
difference. However, in real world, we could have more elements and possible values that
make the number of test cases dramatically increase. If we have, for example, 6 elements and
3 possible values each, the total number combinations are 729 ( 3 x 3 x 3 x 3 x 3 = 729 ). If we
apply pairwise (2-wise) on it, it can be decreased to about 15 to 30 test cases (the number is
vary depending on implementation of pairwise algorithm). That is a reasonable number of
tests that we can execute.
For more information about Pairwise Testing, see the site below:
https://inductive.no/pairwiser/knowledge-base/introduction-to-pairwise-testing/
