DESIGN WIZARD KF740_Preliminary_Owners_Manual KF740 Preliminary Owners Manual
User Manual: KF740_Preliminary_Owners_Manual
Open the PDF directly: View PDF ![]() .
.
Page Count: 22
- READ THIS FIRST
- 2. INTRODUCTION
- 3. UNPACKING
- 4. KF740 ARRAY DESIGN
- 5. ARRAY OPERATION
- 6. RIGGING
- 7. SERVICE AND MAINTENANCE
- 8. CONTACTING EAW
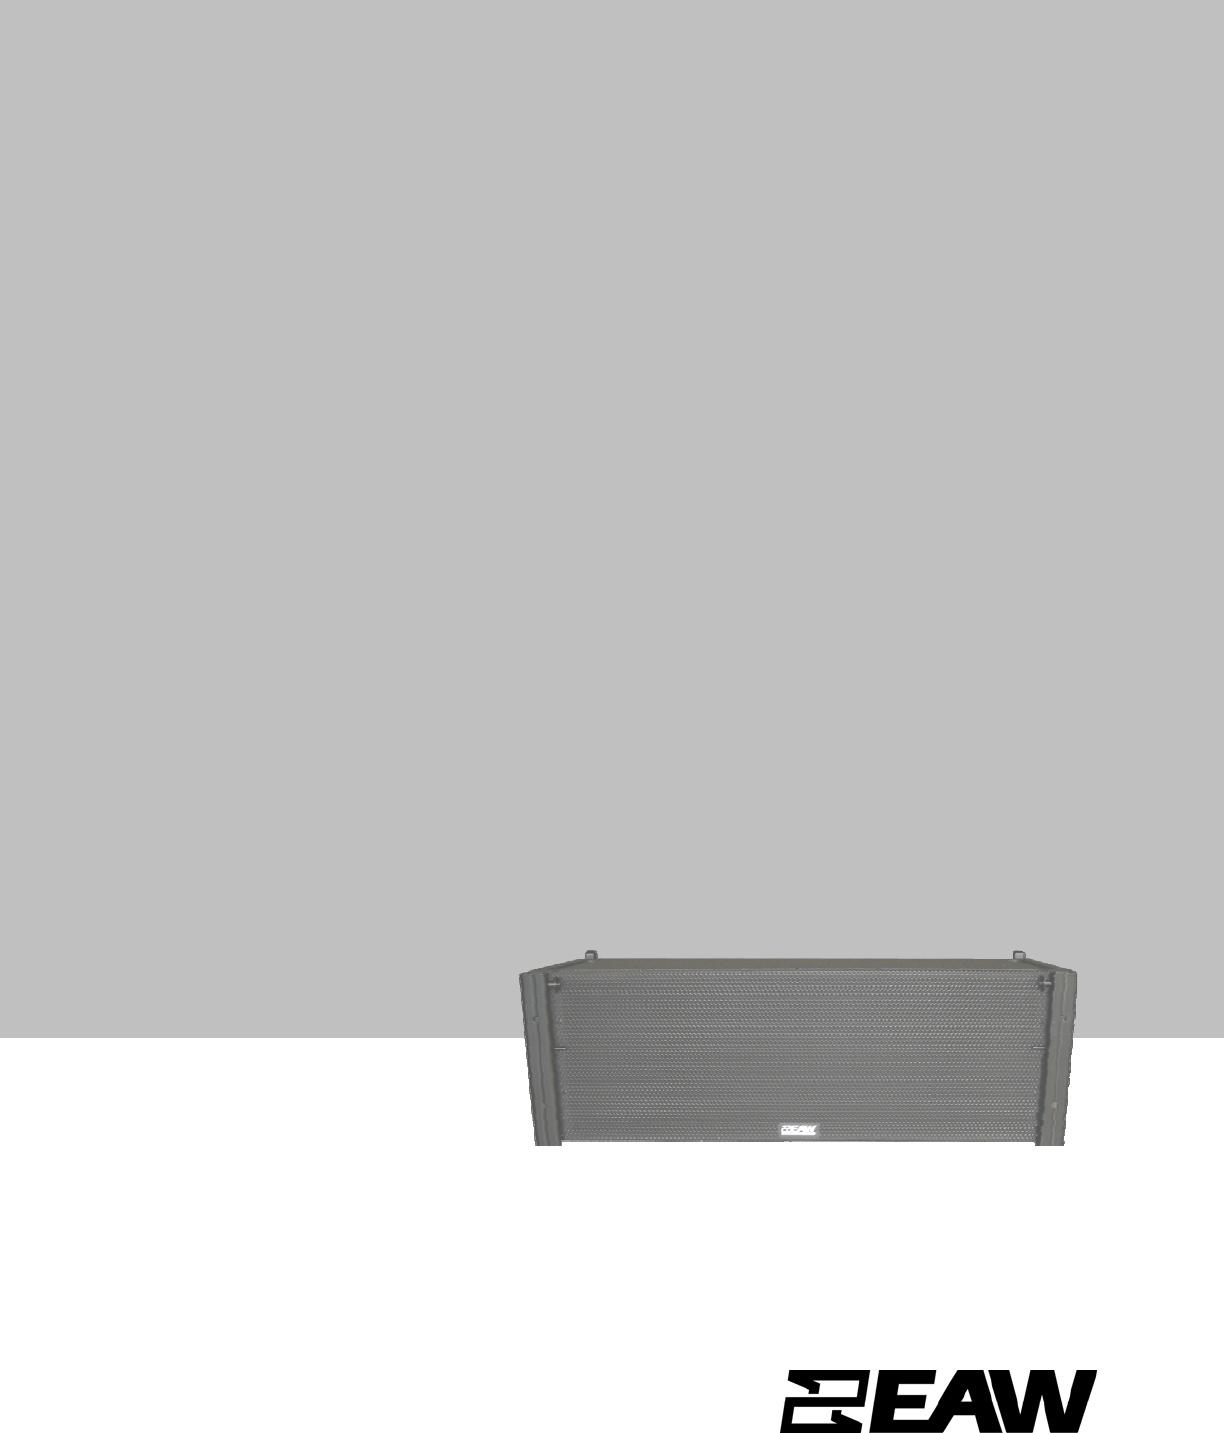
KF740 LOUDSPEAKER
OWNER’S MANUAL
Including KF740P
Page 2 of 22 KF740 OWNER’S MANUAL
TABLE OF CONTENTS
1. READ THIS FIRST................................................................................................................4
1.1 EC Statement Of Conformity.............................................................................................4
1.2 Saftey Precautions ............................................................................................................4
1.3 General Precautions..........................................................................................................4
2. INTRODUCTION...................................................................................................................5
2.1 KF740 ................................................................................................................................5
2.2 KF740P..............................................................................................................................5
3. UNPACKING.........................................................................................................................5
3.1 Contents ............................................................................................................................5
3.2 Shipping Damage..............................................................................................................5
3.3 Returning Products to EAW...............................................................................................5
4. KF740 ARRAY DESIGN .......................................................................................................6
4.1 EAW Resolution.................................................................................................................6
4.2 Fill Coverage......................................................................................................................6
4.3 Ground Stacking................................................................................................................6
4.4 Subwoofers........................................................................................................................7
5. ARRAY OPERATION............................................................................................................8
5.1 Overview............................................................................................................................8
5.2 Engineering Design ...........................................................................................................8
5.3 Signal Diagram ..................................................................................................................8
5.4 Signmal Processing...........................................................................................................8
5.5 Amplifier Gain Settings......................................................................................................9
5.6 User Adjustments ..............................................................................................................9
5.7 Amplifier Power Requirements..........................................................................................9
5.8 Input Connections............................................................................................................11
6. RIGGING.............................................................................................................................12
6.1 Rigging Warnings ............................................................................................................12
6.2 Suspension Load Rating – Working Load Limits (WLL)..................................................12
6.3 Fly-bar Rigging Recomedations ......................................................................................12
6.4 Attaching Enclosures to the Fly-Bar ................................................................................13
6.5 Suspension Procedures ..................................................................................................16
6.6 Adaptor Bars....................................................................................................................17
6.7 Ground Stacking Procedures ..........................................................................................18
7. SERVICE AND MAINTENANCE.........................................................................................20
7.1 General Service...............................................................................................................20
7.2 Rigging Service................................................................................................................20
7.3 Basic Field Troubleshooting ............................................................................................20
7.4 Inspection ........................................................................................................................20
7.5 Maintenance........................................................................................................................21
8. CONTACTING EAW ...........................................................................................................22
8.1 Operating Questions and Service Information ................................................................22
8.2 General............................................................................................................................22
Page 3 of 22 KF740 OWNER’S MANUAL
1. READ THIS FIRST
1.1 EC STATEMENT OF CONFORMITY
This document confirms that the range of products of Eastern Acoustic Works bearing the CE
label meet all the requirements in the EMC directive 89/336/EEC laid down by the Member States
Council for adjustment of legal requirements, furthermore the products comply to the rules and
regulations referring to the electromagnetic compatibility of devices from 30 August 1995.
The authorized declaration and compatibility certification resides with the manufacturer and can
be viewed upon request. The responsible manufacturer is the company:
Eastern Acoustic Works
One Main St.
Whitinsville, MA 01588 USA
Tel: 508-234-6158
Fax: 508-234-8251
E-mail: info@eaw.com
Whitinsville, MA USA
1.2 SAFETY PRECAUTIONS
The terms “Caution,” “Warning,” and “Danger” are used throughout this manual to alert the reader
to important safety considerations. If you have any questions about any aspects of these
precautions, contact your local dealer, distributor, or EAW. The following are the descriptions of
the safety precautions.
CAUTION: describes an operating condition or user action that may expose the equipment or
user to potential damage or danger.
WARNING: describes an operating condition or user action that will cause damage to the
equipment or injure the user.
DANGER: describes an operating condition or user action that will immediately damage the
equipment or be extremely dangerous or possibly life-threatening to the user.
1.3 GENERAL PRECAUTIONS
WARNING: Some aspects of rigging and other related fields for which EAW manufactures, sells,
or distributes equipment are potentially hazardous. Any people using this equipment are
personally responsible for their own safety. EAW transactions are made with the assumption that
the purchaser is a qualified individual or will have only qualified individuals perform work with the
equipment. EAW will not be liable for any damages arising from the use of equipment sold to
purchaser.
WARNING: Only persons with the knowledge of proper hardware and safe rigging techniques
should attempt to suspend EAW loudspeaker systems overhead. Failure to follow this precaution
may result in damage to the equipment, injury, or death.
Page 4 of 22 KF740 OWNER’S MANUAL
2. INTRODUCTION
The KF740 Series is a mid-sized line array system designed to bridge the gap between the
popular KF760 and KF730 Series. With output capabilities resembling the KF760 and a footprint
similar to a KF730, the KF740 delivers 3-way, KF Series performance in a flexible, easy-to use
system. A full KF740 array can provide uniform sound coverage from directly beneath itself out to
hundreds of feet without complex signal processing.
This manual provides information about the design, configuration, and operation of KF740 Line
Arrays. It is intended to be used in conjunction with EAW Resolution Windows®-based array
design software. Please thoroughly familiarize yourself with this manual. The more you learn and
understand the KF740 Line Array the easier you will find it to use. This is not so much because of
any inherent complexities, but because it is actually easier to use than most, if not all, array
systems.
2.1 KF740
The KF740 is physically configured for temporary installation. Rigging information for this purpose
is provided in this manual
2.2 KF740P
The KF740P is physically configured for permanent installation. Full rigging information and
instructions for the KF740P is provided with the KF740P rigging hardware kits. All non-rigging
information provided herein applies to the KF740P.
3. UNPACKING
3.1 CONTENTS
KF740
(1) KF740 loudspeaker
(6) Tethered quick release pins
3.2 SHIPPING DAMAGE
After unpacking, if the loudspeaker is found to have shipping damage, save the packing materials
for the carrier’s inspection, notify the carrier immediately, and file a shipping damage claim.
Although EAW will help in any way possible, it is always the responsibility of the receiving party to
file any shipping damage claim. The carrier will help prepare and file this claim.
3.3 RETURNING PRODUCTS TO EAW
If the loudspeaker must be returned to EAW, contact the EAW Service Department for a Return
Authorization (See Chapter 7). Use the original shipping carton and packing materials. If the
shipping carton is damaged, contact EAW for a new carton, for which there will be a small
charge. EAW will not be responsible for damage caused by inadequate packing.
KF740 OWNER’S MANUAL Page 5 of 22
4. KF740 ARRAY DESIGN
4.1 EAW RESOLUTION
Use EAW Resolution design software when designing a KF740 array. It can be found in the
Downloads/Software section of the EAW website (www.eaw.com). Resolution’s primary function
is to determine the configuration providing the best vertical performance for a given application.
Various venue dimensions are entered that allow Resolution to calculate the resultant array
performance. Resolution can automatically generate a suggested array or an end user can tailor
a Resolution generated array or build a unique array to view array performance.
For complete instructions about operating the EAW Resolution, click on the About/Help menu
when running software.
4.1.1 Computer Requirements
Resolution requires an IBM compatible PC with Windows ® XP, or Vista 32 bit operating systems.
It is not designed to work with Macintosh® operating systems.
4.1.2 Resolution Results
Graphical representations of the array and the venue
Aiming splay angle between each pair of enclosures
How to set the enclosure-to-enclosure rigging
On-axis aiming angle for each enclosure as a difference from 0° horizontal
Various angles and throw distances calculated from the venue’s dimensions
Difference between the array beamwidth angle and the needed coverage angles
Height of the array and trim height to the bottom of the array from the floor
Pick Point on the Fly-Bar to achieve the calculated array angle when suspended
Weight of the array
4.2 FILL COVERAGE
4.2.1 Up-Fill
Some applications, such as theaters and small arenas, can require up-fill coverage from the
array. In this case, the array is designed to tilt back for up-firing coverage from the topmost
enclosures.
4.2.2 Down-Fill
Many applications require extreme down-fill coverage. In this case, the array is designed to have
enough curvature for the bottom KF740 to provide coverage almost directly beneath the array.
4.2.3 Horizontal Coverage and Side-Fill Arrays
Regardless of the length of the array, a KF740 array has a horizontal beamwidth (-6 dB points) of
approximately 90°, with pattern control maintained to a very low frequency.
4.2.4 KF740 Series as Side-fill Arrays
KF740 side fill arrays can be hung adjacent to the mains, extending the coverage 180° for side
audience coverage.
4.3 GROUND STACKING
Normally, a ground-stacked KF740 main array is used where suspension is not possible, too
difficult, or too time consuming. Additional uses are as stage side fills and audience front fill.
Two (2) units are recommended for a minimum ground stack not to exceed six (6) units.
Page 6 of 22 KF740 OWNER’S MANUAL

WARNING: Ground-stacked arrays, especially the maximum recommended arrays, requires
assembly by personnel qualified to ensure adequate stability from tip over for the particular
application. See Section 6 for correct array assembly. Mechanical assistance will be required to
lift and position enclosures for arrays taller than approximately 5 feet.
4.4 SUBWOOFERS
4.4.1 General Considerations
Although the impressive low frequency performance of KF740 Series arrays allows them to be
used without subwoofers for some events, subwoofers will normally be used for live musical
performances. The recommended subwoofer is EAW’s SB1001/1002.
A general recommendation is to use KF740 loudspeakers and SB1001/1002 subwoofers in a
ratio of two KF740 loudspeakers to one SB1001/1002 subwoofer.
NOTE: Bass performance is often highly program or venue-dependent, as well as subjective as
to quantity and quality. For this reason the type, quantity, and disposition of subwoofers may vary
considerably with the application. The quantity recommendations below are for general purposes,
providing a balanced system for most music applications. Quantities may need to be adjusted up
or down for specific situations.
4.4.2 Other Subwoofers
Other subwoofers, such as the EAW’s SB1001, SB1002, or BH760 can also be used with
KF740s. Recommended quantities of KF740 for each subwoofer are:
Model Subwoofer KF740
SB1001/1002 1 2
BH760 1 3
4.4.3 Signal Delay on Subwoofers
Because subs are not flown in the same array as the KF740 it will usually be necessary to
determine the signal delay settings by measurement.
KF740 OWNER’S MANUAL Page 7 of 22
5. ARRAY OPERATION
5.1 OVERVIEW
The operation of a KF740 Series system involves:
1. Understanding the principles on which it operates.
2. How to electronically configure it for a specific task.
5.2 ENGINEERING DESIGN
How a KF740 Array works: Divergence Shading
In almost any venue, there are significant differences in distance from the loudspeaker array to
the nearest and farthest audience members. The idea is to turn up the output level of the array
aimed towards the farthest audience members, and then progressively turn it down for audience
members closer to the array. These differences in distance are accompanied by changes in the
array’s vertical aiming angle.
Rather than use amplifier input levels, the volume controls for a KF740 array is a combination of
the shape of its curvature and the quantity of KF740 units that make up the array. A shallow curve
means more loudspeakers are facing a given direction, putting more energy within a given
vertical angle. A more radical curvature for the same number of loudspeakers spreads the energy
over a wider vertical angle, reducing the energy at any particular point. Simply put, less curvature
turns the volume up and more curvature turns the volume down.
If you understand this point, you understand how a KF740 array works. Specifically:
1. More splay at the rear of the enclosures turns the volume up (adds less curvature to the
array)
2. Less splay at the rear of the enclosures turns the volume down (adds more curvature to
the array).
3. More enclosures provide a greater vertical coverage angle.
4. Fewer enclosures provide less vertical coverage angle.
EAW Rersolutionuses the above variables to determine the quantity of enclosures and the
variation in curvature along the length of the array that will optimize coverage for the audience
distances and angles the array must address.
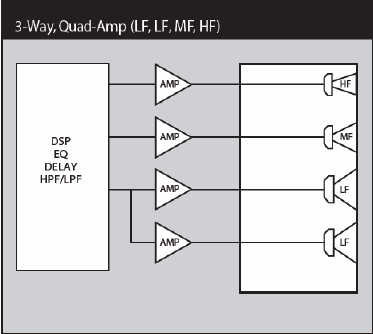
5.3 SIGNAL DIAGRAM
The signal diagram shows the signal flow for a single KF740. An
EAW UX8800 processor is required to provide proper signal
processing to drive each section of the loudspeaker.
5.4 SIGNAL PROCESSING
Use the EAW UX8800 digital signal processor with the KF740.
Each system of KF740 used will require three outputs of a single
UX8800. For more information on the UX8800 including
EAWPilot software used to control and program the UX8800
from a PC and Greybox pre-programmed settings visit
www.eaw.com/products/ux8800.html.
WARNING: The KF740 has been optimized for use with the EAW UX8800 processor only. KF740
array performance, in terms of frequency response, beamwidth consistency, output level
capability, and wavefront coherency is dependent on the EAW engineered Greybox settings used
by the UX8800.
Page 8 of 22 KF740 OWNER’S MANUAL

5.5 AMPLIFIER GAIN SETTINGS
In order for Divergence Shading to work properly, all amplifiers for all passbands must be set to
the same voltage gain, regardless of their power output ratings. Among other things, equal
amplifier gains are required to maintain array coherence throughout the venue.
NOTE: This does NOT mean the same input sensitivity, but the same input to output voltage
gain. Consult your amplifier manufacturer if this cannot be readily determined. Do not selectively
boost or attenuate loudspeaker levels at the amplifiers in order to achieve consistent SPL at
various distances. This is achieved by adjusting the array curvature as described above.
5.6 USER ADJUSTMENTS
5.6.1 Equalization
EAW recommends that 1/3 octave or careful use of parametric equalization be used to modify
performance to accommodate a particular program, venue characteristics, or personal taste.
5.6.2 Array Measurements
It is recommended to use a multi-channel measurement software platform to investigate the
interaction between an array and the acoustical characteristics of a venue. This is a fast, yet
sophisticated, process that will indicate problem areas due to particular venue characteristics.
Usually it is a matter of applying small amounts of 1/3 octave or parametric equalization to adjust
significant anomalies.
5.7 AMPLIFIER POWER REQUIREMENTS
As is true of all professional loudspeaker systems, the performance of the KF740 depends on
amplifiers delivering an adequate supply of clean power. Determining the appropriate power
amplifier wattage for a given loudspeaker and application is a subject of some debate. In fact,
there are three distinct issues regarding amplifier power as discussed in the next sections:
“Power Ratings,” “Selecting an Appropriate Amplifier Size,” and “Operating Limits.”
For more information on selecting amplifiers, please consult the Frequently Asked Questions
(FAQ) portion of the EAW web site, EAW’s Technical Paper on Amplifier Power also available on
the EAW web site; or contact EAW Applications Support Group.
5.7.1 Power Ratings
The KF740 is a Tri or Quad amplified loudspeaker depending on the end users preference,
requiring power for two LF, one MF, and one HF amplifier channel. LF sections can be
connected in parallel to a single amplifier channel or each can be connected to a separate
amplifier channel. The following tables list the rms voltage limits for the KF740.
NOTE: The rms Voltage Limit listed for each sub-system (LF, MF, or HF) is the same for any
enclosure quantity. The wattages are calculated using the Voltage Limits and the overall nominal
impedance for the each listed quantity of KF740 loudspeakers.
Section Nominal Z Wattage rms Volts
LF Side 8 700 W 74.83
LF Front 8 700 W 74.83
MF 8 625 W 70.71
HF 8 200 W 40
CAUTION: The rms voltage limits listed above are related to the thermal limits determined from
EAW’s standard power test. In this test, transducers are “exercised” to a point of damage or
KF740 OWNER’S MANUAL Page 9 of 22
failure. The test signal has a 6 dB crest factor (peak to average ratio). A maximum continuous
voltage limit for the loudspeaker is then determined based on the test results and on the
transducer’s application in the loudspeaker. The powers listed in the table are calculated as the
square of the rms voltage limit divided by the sub-system’s nominal impedance (Z) in ohms.
5.7.2 Selecting an Appropriate Amplifier Size
The wattages listed in the above charts are intended primarily as points of comparison with the
power ratings of other loudspeakers. For this purpose, each wattage listed should be considered
as a +/-1 dB range = 0.8 to 1.25 times the wattage listed. For example, 700 W should be
considered as a range from approximately 550 W to 900 W.
In many applications, the wattages listed will NOT correspond to the best amplifier sizes for
optimizing loudspeaker reliability and performance. Proper amplifier selection requires a
considered analysis for the particular application. Amplifiers should be sized according to both the
sound levels required and the type of audio signals that will be reproduced. If you are unsure of
how to determine these parameters, consult a qualified professional or contact EAW’s Application
Support Group.
5.7.3 Selecting an Appropriate Amplifier Size Rule Of Thumb
If a KF740 Line Array is used for professionally operated concert applications, a rule of thumb can
be applied. Where the full output capabilities of the loudspeakers may be needed to achieve
appropriate acoustic output levels, EAW recommends amplifiers with power ratings up to twice
the wattages listed in the above charts. This provides a peak voltage capability of 6 dB above the
specified rms voltage limit. This assumes the audio signals will have a peak to average ratio in
excess of 6 dB, which is usually, but not always, true. Under this condition, the thermal limits are
unlikely to be exceeded. While this rule of thumb is consistent with the EAW’s testing parameters,
it does NOT guarantee trouble-free operation. That is discussed under “Operating Limits.”
WARNING: The power amplifier sizes recommended by the above rule of thumb are capable of
continuous output levels that can cause damage to or failure of the transducers. Exercise caution
in operation to avoid exceeding the specified maximum rms voltage limits.
In some cases, applying this rule of thumb to the power ratings listed in Section 5.7.1, would
indicate impractical amplifier sizes. In such cases, multiple amplifier channels each powering
fewer KF740s would be more practical.
5.7.4 Operating Limits
It is the responsibility of the audio system operator to operate the loudspeakers within their
capabilities. This is the only way to ensure that loudspeakers are not stressed beyond their limits
to the point of damage or failure.
Operation beyond their capabilities usually includes, but is not limited to, one or more of the
following conditions:
Amplifier clipping
Voltage input in excess of the specified rms voltage limit
Peak voltage input in excess of twice the specified voltage limit
Noticeable distortion
Mechanical noise (such as cones bottoming out)
A suitable means for determining these conditions is highly recommended. At a minimum, the
operator should have a meter display calibrated to indicate when the maximum rms voltage limits
will be exceeded. This assumes amplifiers are not being driven into clipping at those limits.
Page 10 of 22 KF740 OWNER’S MANUAL
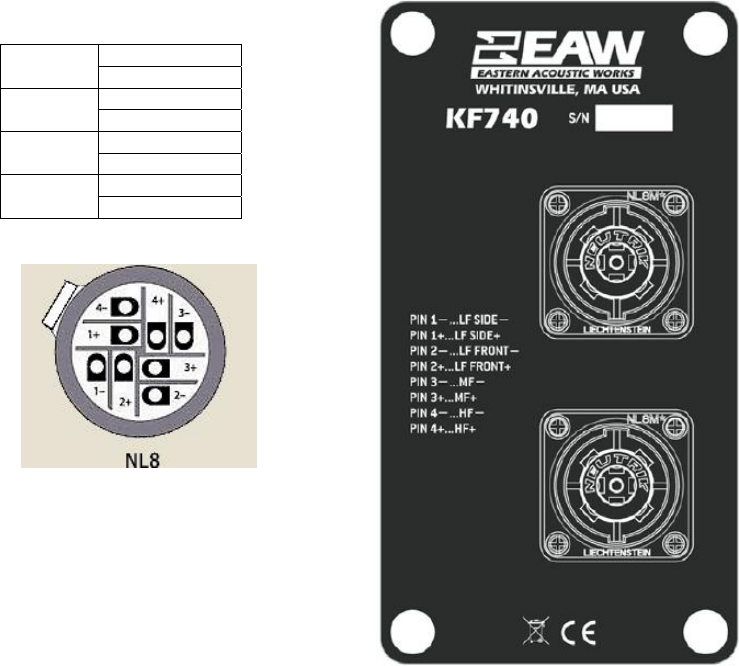
5.8 INPUT CONNECTIONS
5.8.1 KF740 Input Connections
There are two Neutrik NL8 connectors on the rear of each KF740. These connections are wired in
parallel inside of the unit. Use one input to power a system of KF740 loudspeakers and the other
to loop through to other units in the system, it does not matter which input is used for either
purpose.
KF740 INPUT NL8 (each of two)
- LF Side PIN 1 +/- + LF Side
- LF Front PIN 2 +/- + LF Front
- MF PIN 3 +/1 + MF
- HF PIN 4 +/- +HF
5.8.2 KF740P Input Connections
There are two 8-terminal barrier strip connectors on the rear of each KF740P. The connectors are
wired in parallel so that the second connector can be used to loop signals to additional KF740s.
The connectors accept stripped wire ends or wire lugs.
KF740 OWNER’S MANUAL Page 11 of 22
6. RIGGING
KF740 Series arrays can be suspended or ground-stacked. When suspended, the KF740 can be
used in conjunction with the KF730, KF737, KF760, and KF761 with the use of adapter bars.
This chapter details how to physically configure KF740 Series arrays. The following are the
recommended methods for most situations. Specific situations may require other methods. It is
the user’s responsibility to determine the viability and safety for alternate methods and implement
them accordingly.
KF740P: The procedures to suspend and ground-stack permanently installed KF740Ps and are
detailed in instructions provided with the KF740P instillation hardware kits. Use those instructions
for rigging any KF740P products and their accessories.
NOTE: The ‘P’ version of the KF740 will not mate to ‘P’ versions of any other product.
6.1 RIGGING WARNINGS
WARNING: Suspending anything, especially overhead of people, should be done with extreme
caution. Always engage the services of a certified professional who is qualified to determine the
requirements for and to implement overhead rigging. Only persons with the knowledge of proper
hardware and safe rigging techniques should attempt to suspend KF740 Series arrays overhead.
Failure to follow these precautions may result in damage to the equipment, injury, or death.
DANGER: When suspending or stacking KF740 loudspeakers, avoid placing any parts of the
body between enclosures, enclosures and Fly-bar, and enclosures and Adaptor-bars. Always use
the integral handles to lift or position enclosures. Failure to follow this precaution may result in
damage to the equipment, injury, or death.
CAUTION: A KF740 weighs approximately 107 lb / 49 kg. Always use two people or mechanical
assistance to lift a KF740.
IMPORTANT RIGGING NOTE: Each Quick Release Pin, used to attach enclosures together, can
be inserted into one of several holes in both the Hinges and Hinge Tubes integral to the
enclosures. The particular holes used set the splay angle between the enclosures and thus their
aiming. Use the correct holes as determined by Resolution software or as desired by the user.
IMPORTANT TRANSPORTATION NOTE: To avoid damage to the Quick Release Pin handles
when transporting, always insert the pins from the inside of the Hinge Tubes. This keeps the
Quick Release Pin handles from extending beyond the footprint of the enclosures or Fly-Bar.
6.2 SUSPENSION LOAD RATING - WORKING LOAD LIMIT (WLL)
The Fly-Bar has a WLL for suspending a maximum under-hang of sixteen (16) KF740
loudspeakers. The design factor for this rating is 10:1.
CAUTION: Different combinations of loudspeakers allowing for a variety of splay angles between
units combined with multiple possible Fly-bar hang positions creates unique loading of stresses
on structural members in any given array. Some array configurations may not allow for a 10:1
design factor for sixteen (16) units. Consult Resolution for specific WLL information for any given
array configuration. Always consult Resolution for WLL information when combining the KF740
with KF730 or KF737 and KF760 or KF761 loudspeakers.
6.3 FLY-BAR RIGGING RECOMMENDATIONS
WARNING: It is the responsibility of the user to ensure the attachment to the Fly-Bar, the rigging
method, and attachment to structure are determined by a certified professional who is qualified to
Page 12 of 22 KF740 OWNER’S MANUAL
determine the requirements for and to implement overhead rigging.
6.3.1 Attachment to the Fly-Bar
The KF740 Fly-Bar design permits several methods of attachment.
1. Center Holes:
Use one of these holes for single point attachment, the particular hole being dictated by
Resolution to result in the correct array tilt angle.
Use one hole in the rear and one in the front for bridling to a single point.
Use one hole in the rear and one in the front to attach two chain motors.
2. Side Hoisting Points:
Use each side-to-side pair to bridle to a single point or for attaching two chain motors.
6.3.2 Rigging Methods
The two recommended rigging methods are:
1. Employ one chain motor by attaching to a particular Center Hole dictated by Resolution, or two
chain motors on the side components of the fly-bar in the holes dictated.
This will automatically result in the correct array tilt angle when all enclosures are flown.
One motor may be easier to deploy than two.
2. Employ two chain motors, one attached to the front of the Fly-Bar and the second to the rear.
The attachment can be to the Center Holes
The array will be easier to assemble because it allows tilting the enclosures already
suspended to better match the angle of the next enclosure to be attached.
Once assembled, the overall tilt angle for the array can be easily adjusted.
6.4 ATTACHING ENCLOSURES TO THE FLY-BAR
6.4.1 Splay Angles
The splay angles required between each enclosure to achieve the desired array curvature are set
by the integral rigging hardware. The hardware consists of square Hinge Tubes each with a
sliding Hinge on each corner of the enclosure.
6.4.2 Quick Release Pins
Each KF740 is supplied with six tethered Quick Release Pins. Four are used for attaching
enclosures together or to the Fly-Bar. Two are used as locking pins for the rear Hinges. See
“Locking Pins” Section 6.4.5.
KF740 OWNER’S MANUAL Page 13 of 22
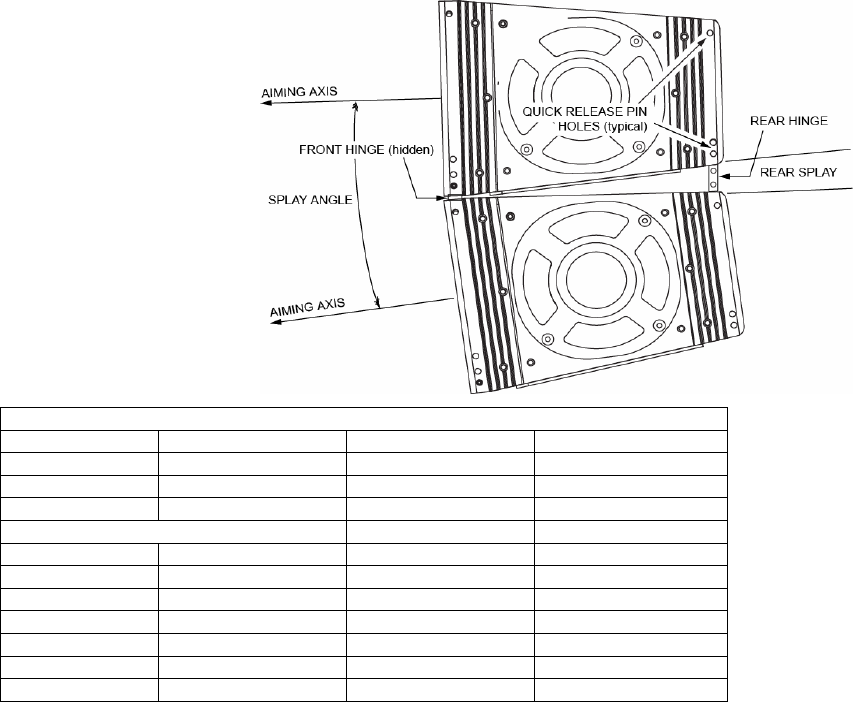
6.4.3 Hinge and Hinge Tube Holes
DANGER: Ensure each Quick Release Pin used in assembling an array is fully inserted and
engaged into the Hinge Tubes and Hinge holes. Only use the Quick Release Pins supplied or
equal. Pins of different lengths, diameter, or materials will compromise the structural integrity of
the rigging system and may result in damage to the equipment, injury, or death.
The Hinges and Hinge Tubes,
located on four corners of each
enclosure, have several holes for
inserting the Quick Release Pins
to attach enclosures together or to
the Fly-Bar. The particular holes
used will determine the splay
angles between the loudspeaker
aiming axes. The rear splays
required for these splay angles
and the Hinge and Hinge Tube
Holes to use to achieve them are
designated by Resolution.
KF740 to Fly-Bar
Rear Hinge Hole Rear Hinge Tube Hole Front Hinge Hole Front Hinge Tube Hole
0° 2B 1A Upper
3.0° 2A 1A Upper
6.0° 3A 1A Upper
KF740 to KF740 1
Front Splay Angle Rear Hinge Hole Rear Hinge Tube Hole Front Hinge Hole
1.5° 1 A 2
3.0° 2 B 2
6.0° 2 A 2
9.0° 3 A 2
12.0° 4 B 2
18.0° 2 4 B 1
NOTES: 1.The front splay angle is the between the aiming axes, not the top/bottom enclosure surfaces.
2. A front splay angle of 18.0° requires two additional Quick Release Pins not supplied with the
KF740. Please contact an EAW dealer to obtain additional Pins.
Page 14 of 22 KF740 OWNER’S MANUAL
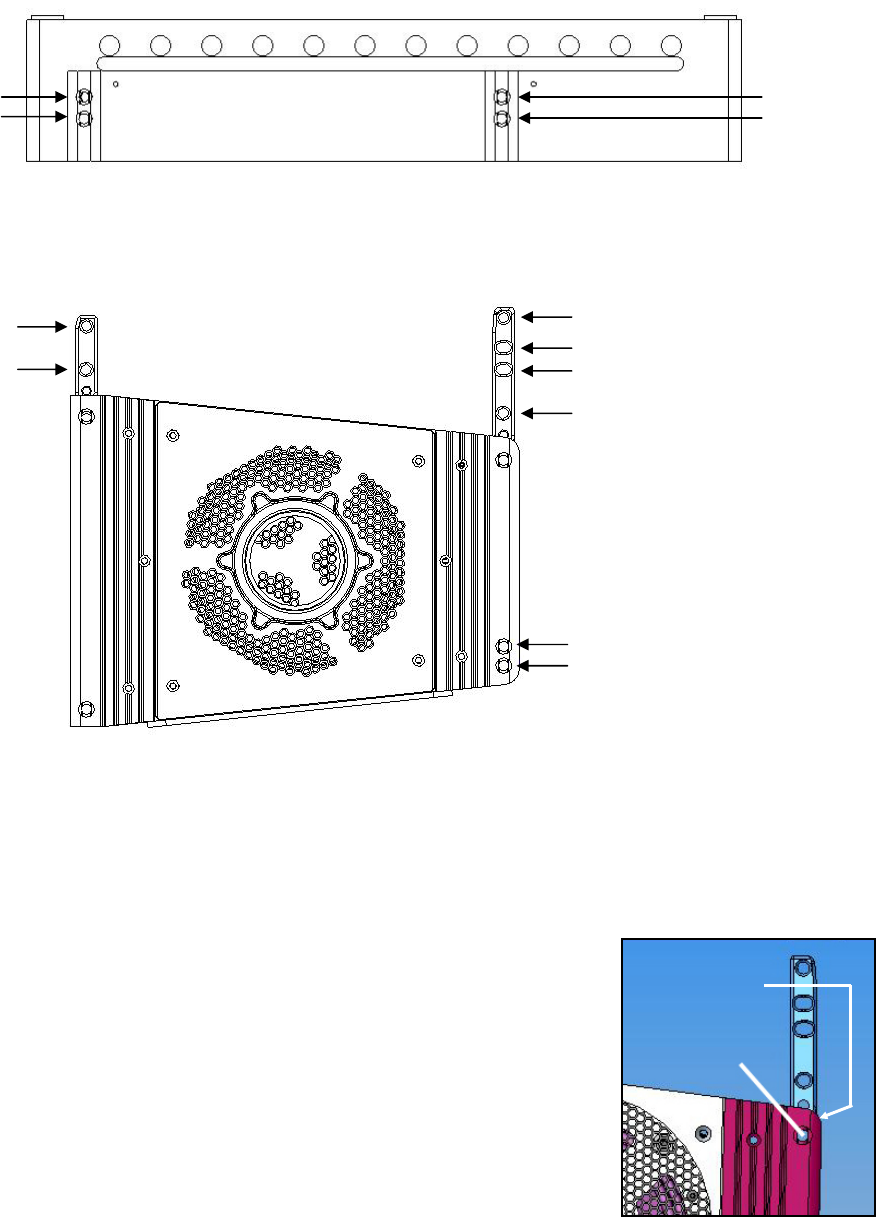
KF740 FLY-BAR HINGE TUBE HOLES
KF740 HINGE AND HINGE TUBE HOLES
Locking Pins
WARNING: Due to the center of gravity with a suspended curved array, any open splays
between enclosures may close up unexpectedly either during array assembly or disassembly. To
prevent this occurrence and possible injury that may result, always use locking pins in the rear
Hinges and Hinge Tubes on each enclosure. When ground stacking, creating splays between
enclosures REQUIRES the use of locking pins to create rear splays.
Each KF740 is supplied with six 1.5 in Quick Release Pins. Two of
these Pins are intended for use as locking pins. Certain array
configurations and array tilts can cause the collapse of any open splays
between KF740 enclosures. This is more likely to occur the more the
array is curved relative to its length. Locking pins can prevent the
occurrence of splay collapse.
Locking pins are inserted in the Hinge Tubes through the hole in the
part of the Hinge that is captive to that Hinge Tube and below the Hinge
knuckle. This prevents the Hinge from receding into its own Hinge
Tube, which is what happens when the splay between two enclosures
collapses.
Hole 4
LOCKING PIN
HOLE
HINGE KNUCKLE
(hidden)
Hole
A
Hole
A
Hole B Hole B
Hole 1
Hole 2 Hole 3
Hole 4
Hole 2
Rea
r
Hin
g
e
Hole 1
Front Hin
g
e
Rea
r
Hin
g
e Tube
Hole A
Hole B
KF740 OWNER’S MANUAL Page 15 of 22
6.5 SUSPENSION PROCEDURES
It is recommended when rigging an array of KF740 loudspeakers to attach one enclosure
at a time.
Information on rigging KF740 arrays to other EAW line array products can be found in
section 6.6 of this manual and with the instructions for individual adapter-bars.
Reverse each procedure to disassemble an array.
DANGER: Ensure each Quick Release Pin used in assembling an array is fully inserted and
engaged. Use only the 1.5 inch Quick Release Pins supplied or equal. Quick Release Pins of
different lengths or diameter will compromise the structural integrity of the enclosure and Fly-Bar
rigging system and may result in damage to the equipment, injury, or death.
CAUTION: When attaching Hinges to Hinge Tubes, use the correct holes as determined by the
EAW Resolution or by the user-desired angles to achieve the desired splay angle. Failure to
follow this instruction can result in poor acoustical performance.
CAUTION: To help prevent personal injury, clear all pallets as soon as they are empty from the
immediate work area.
6.5.1 KF740 loudspeakers On KF740 Pallet
1. Move a KF740 Pallet to the rigging location.
2. Slide a KF740 forward on the pallet until the front rigging of the loudspeaker is resting on
the lip of the pallet.
6.5.2 Attaching a KF740 to the Fly-Bar
1. Rig the FB174 fly-bar to a chain motor(s) using the designated holes on the fly-bar as
determined by Resolution.
2. Remove the Quick Release Pins from the top of the enclosure’s Hinge Tubes and lock
the rear hinges as described in 6.4.5.
3. Lower the fly-bar onto the rear hinges of a KF740 and pin them.
4. Fully lower the fly-bar onto the KF740 until the front of the fly-bar is resting on the KF740.
5. Extend the front hinges into the Fly-bar and pin them.
6. Lift the array to the working height needed for the next applicable procedure in the
following sections.
6.5.3 Attaching KF740 loudspeaker to a KF740 Already Suspended
CAUTION: When attaching Hinges to Hinge Tubes in steps 5 and 10, use the correct holes as
determined by Resolution or by the user-desired angles to achieve the desired splay angle.
Failure to follow this instruction can result in poor acoustical performance.
1. Move a KF740 Pallet so the top rear Hinges of a KF740 are below the rear Hinge Tubes
of the bottom KF740 in the array.
2. Remove the Quick Release Pins from the rear of the KF740 on the pallet.
3. Extend the rear hinges of the KF740 on the pallet into the rear hinge tubes in the flown
KF740 and lock them with the Quick Release Pins.
4. Lower the array until the rear Hinge Tubes of the bottom suspended KF740 are even with
the top of the rear Hinge Tubes of the KF740 on the pallet.
5. Place the Hinges of the KF740 on the pallet into the suspended KF740’s Hinge Tubes.
NOTE: Bump the array slightly as needed to line up the enclosures so the Hinges slide easily
into the Hinge Tubes
6. Lower the array of KF740 loudspeakers slightly until the reaer pin holes are aligned as
dictated by Resolution.
Page 16 of 22 KF740 OWNER’S MANUAL
7. Attach each Hinge to the Hinge Tube by inserting a Quick Release Pin (removed in Step
2) through both.
8. Lift the Array, with the KF740 attached only by its rear Hinges, to a comfortable working
height for the next step.
NOTE: The following two steps require two people
9. The first of two people required to complete the attaching process lifts the front of the
KF740, rotating it on the attached rear Hinges.
10. The second person slides the KF740’s front Hinges into the suspended KF740’s Hinge
Tubes.
CAUTION: When attaching the front Hinges, the normal configuration is tight packing the
enclosure fronts unless otherwise indicated by Resolution.
NOTE: It will usually be necessary to nudge the KF740 enclosure being attached backwards
to line up its Hinges with the Hinge Tubes on the suspended enclosure above.
11. Attach each Hinge to the Hinge Tube by inserting a Quick Release Pin (removed in step
7) through both.
12. Repeat Steps 1 to 10 for additional KF740 loudspeakers.
6.5.4 Setting the Tilt Angle for the Entire Array
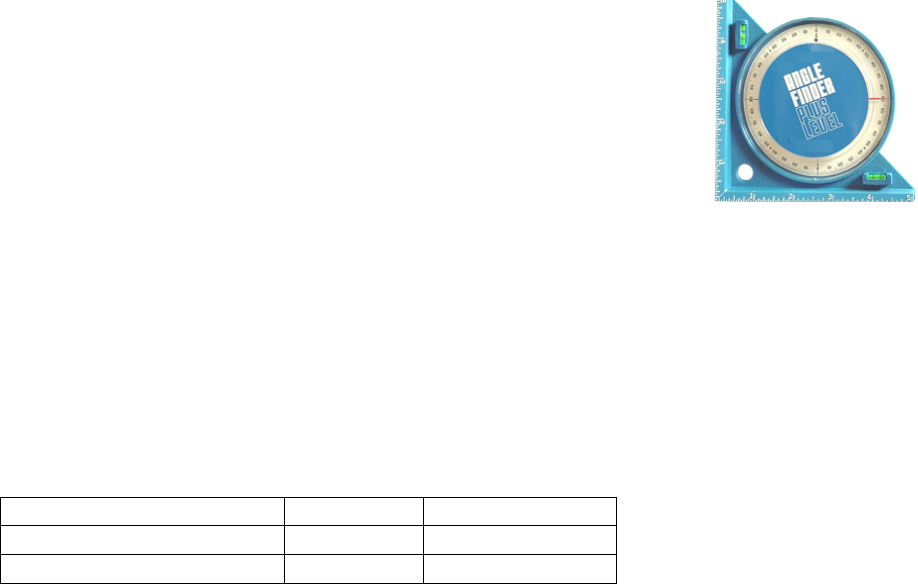
Normally, the easiest method is to use a clinometer, such as a simple, bubble-
type angle finder (pictured). More sophisticated, albeit more expensive,
electronic clinometers can also be used.
Place the angle finder against one of the rigging tubes on the face of the
uppermost enclosure in the array that can be physically reached. Adjust the
angle of the entire array so that the face of this enclosure is set at its
prescribed aiming angle listed in Resolution.
6.6 ADAPTER BARS
KF740 arrays can be mounted under an array of KF760 or KF761 and above an array of KF730
or KF737 loudspeakers with specially designed adapter-bars available from EAW.
Consult Resolution when designing a mixed KF array to obtain proper splay angles and hardware
configurations. Information on building arrays of KF760 and KF761 loudspeakers can be found
in the KF760 rigging guide. Information on building arrays of KF730 and KF737 loudspeakers
can be found in the KF730/SB730 manual. These documents along with detailed instructions for
each adapter bar can be found on the downloads portion of the EAW web site at
http://eaw.com/downloads/
Description Name Part Number
KF760/761 to KF740 or KF730/737 AB7674-73 2034117
KF740 to KF730/737 AB7473 0032870
6.6.1 Attaching a KF740 to an AB7674-73
It is recommended to begin the process by attaching the adapter-bar to a KF740 prior to the
KF760 or KF761. Follow steps one (1) through five (5) of section 6.5.2 Attaching a KF740 to the
Fly-Bar.
KF740 OWNER’S MANUAL Page 17 of 22
NOTE: Note that in this application the top portion of the rear hinge will be pinned twice. Pin hole
1 in the AB and hole 4 through the top of the hinge tube.
Then mount the AB7674-73 to an array of KF760 or KF761 as though it were a KF760 or KF761
by pinning the adapter-bar into the bottom KF760/761 unit in the array using the four (4) pins
supplied with the adapter bar.
CAUTION: Consult the KF760 rigging guide for all proper safety procedures when rigging an
array of KF760 or KF761 loudspeakers. Rigging a KF760 array and attaching an AB7674-73
adapter-bar with KF740 attached requires at least two people. Improper handling of products or
rigging procedures can cause damage to the product, personal injury, or death.
6.6.2 Attaching a KF730 or KF737 to an array of KF740 loudspeakers
It is recommended to begin the process by attaching the AB7473 adapter-bar to a KF730 or
KF737 prior to an array of KF740 loudspeakers. Follow steps one (1) through five (5) of section
6.7.3 in the KF730/SB730 manual to attach a KF730 or KF737 to the AB7473. Follow steps one
(1) through five (5) from this manual in section 6.5.2 Attaching a KF740 to the Fly-Bar to attach
the AB7473 with KF730 or KF7373 attached to an array of KF740 loudspeakers.
NOTE: Note that in this application the top portion of the rear hinge will be pinned twice. Pin hole
1 in the AB and hole 4 through the top of the hinge tube.
CAUTION: Consult the KF730 manual for all proper safety procedures when rigging an array of
KF730 or KF737 loudspeakers. Improper handling of products or rigging procedures can cause
damage to the product, personal injury, or death.
6.7 GROUND STACKING PROCEDURES
Up to six KF740 loudspeakers may be ground-stacked. Always stack KF740s using the KF740
Fly-Bar as a base for the stack.
DANGER: A ground stack of more than six KF740 enclosures may shift the center of gravity
making the stack unstable. Failure to follow this warning may result in damage to the equipment
damage, injury, or death.
6.7.1 Stacking With the Fly-Bar as the Base
IMPORTANT NOTE: If using the Fly-Bar as the base, all KF740 enclosures and the fly-bar are
stacked upside down.
Use the KF760 Ground Stack kit with the KF740 flybar.
1. Attach KF760 Ground Stack Kit to KF740 fly-bar with hardware included in kit. Kit will
include four (4) height adjustable legs with feet to be mounted to the front and back of the
fly-bar oriented in the opposite direction of loudspeakers when attached to the fly-bar.
CAUTION: Be sure to consult the directions included with the Ground Stack Kit. Improper
handling of products or rigging procedures can cause damage to the product, personal injury,
or death.
2. At the desired stacking location, position the KF740 Fly-Bar with Ground Stack Kit on the
floor so it is resting on its leveling feet. This will be upside down from its normal
orientation for suspension, oriented with the corner hinge Tubes towards the audience.
3. Adjust the leveling feet on the Fly-Bar so the Fly-Bar sits level or at the desired angle.
Firmly tighten the nut on each leveling foot against the Fly-Bar pad. Firmly tighten the
Page 18 of 22 KF740 OWNER’S MANUAL
6.7.2 Stacking the First Enclosure (Fly-Bar as the base)
CAUTION: When attaching Hinges to Hinge Tubes in step 4, use the correct holes as determined
by the Resolution or by the user-desired angles to achieve the desired aiming angle. Failure to
follow this instruction can result in poor acoustical performance.
1. Lift a KF740 from its pallet and turn it upside down, so the Hinges on the enclosure are
on the bottom. Position it onto the Fly-Bar so its Hinges line up the Fly-Bar Hinge Tubes.
2. Remove the four or six Quick Release Pins from the Hinges.
3. If they do not drop from gravity, slide the four Hinges of the enclosure down into the
Hinge Tubes on the Fly-Bar.
4. Attach each Hinge to the Hinge Tube by inserting a Quick Release Pin (removed in Step
2). Use holes 1-A in the front and 2-B in the rear.
5. Use the handles on the loudspeaker to lift the rear of the enclosure as far as possible and
insert a Quick Release Pin (removed in step 2) into each of the enclosure’s rear Hinge
Tubes as a locking pin.
6.7.3 Stacking Additional Enclosures (Fly-Bar as the base)
CAUTION: When attaching Hinges to Hinge Tubes in step 5, use the correct holes as determined
by Resolution or by the user-desired angles to achieve the desired splay angle. Failure to follow
this instruction can result in poor acoustical performance.
1. Lift a KF740 from its pallet and turn it upside down, so the Hinges on the enclosure are
on the bottom.
2. Lift the enclosure onto the stack mating the alignment pads and recesses between them.
3. Remove the four Quick Release Pins from the Hinges of the upper enclosure and the
spare two pins in the lower enclosure.
4. If they do not drop from gravity, slide the four Hinges on the upper enclosure down into
the Hinge Tubes on the enclosure below it.
5. Attach each Hinge to the Hinge Tube by inserting a Quick Release Pin (removed in Step
9) through both.
6. Use the loudspeakers handles to lift the rear of the enclosure as far as possible and
insert a Quick Release Pin (removed in step 2) into each of the enclosure’s rear Hinge
Tubes as a locking pin.
7. Repeat steps 1 to 6 for additional enclosures.
KF740 OWNER’S MANUAL Page 19 of 22
7. SERVICE AND MAINTENANCE
7.1 GENERAL SERVICE
For any faults that cannot be field-repaired as noted below, contact the EAW Service Department
listed in Chapter 7 to determine the appropriate action. This applies to both warranty and non-
warranty faults.
7.2 RIGGING SERVICE
Because of the potential for serious consequences and liabilities due to faulty rigging, contact
EAW to determine the appropriate service solution for any rigging hardware problems.
7.3 BASIC FIELD TROUBLESHOOTING
Each KF740 has an input panel, internal components and wiring, transducers, and an enclosure.
Troubleshooting for various performance problems usually involves isolating the problem to one
of these areas:
1. Transducers
2. Input panel, internal components, and wiring
3. Enclosure and integral hardware
If no problems can be traced to any of these items, look for problems with external electronics or
cabling. Troubleshooting these items is beyond the scope of this manual.
7.3.1 Transducers
A faulty transducer will usually cause readily audible distortions or other unwanted noises. In
other cases, they may stop functioning. Use your ears and test signals or other sound source to
determine which one is at fault. Normally a faulty transducer requires service or replacement by
EAW.
7.3.2 Input panel, Internal Components and Wiring
Faults with these items will usually cause transducers to stop working or possibly be intermittent.
Check that audio signals pass from the input jacks to the transducer terminals. Many faults with
this area can be field-repaired.
7.3.3 Enclosures
Enclosure problems, such as loose hardware, faulty joints, or other structural problems, will
usually be heard as distinct buzzes, rattles, or other unwanted noises. To test for enclosure
problems, use a sine wave signal manually swept on the LF sub-system. The input level should
be no more than 6 dB below rated power (equals no more than 1/2 rated voltage). It may be
possible to field-repair some enclosure problems.
7.4 INSPECTION
7.4.1 In-Use Inspection
Visually inspect all rigging parts and enclosures each time they are used for wear, deformation,
cracks, corrosion, damage, and any other condition that may affect load handling capability.
DANGER: If there is any question about the integrity or capability of any rigging part to perform
its intended function, immediately remove it from service for repair or replacement.
Page 20 of 22 KF740 OWNER’S MANUAL
KF740 OWNER’S MANUAL Page 21 of 22
7.4.2 Periodic Inspection
Perform complete and thorough inspections on a routine, periodic basis. The interval between
inspections and scope of the inspections will depend on the frequency of system usage and the
conditions of use. This interval must not exceed 1 year.
DANGER: Should any of the below listed types of damage exist, immediately remove the
affected part from service for repair or replacement.
7.4.3 Complete Inspection
A complete inspection should include, but not be limited to, looking for the types of damage or
failures listed in each group:
7.4.4 Rigging Components
1. Bends
2. Breaks
3. Broken parts
4. Corrosion
5. Cracks
6. Cracks in welded joints
7. Deformation
8. Denting
9. Wear
10. Loose parts or fasteners
11. Missing parts or fasteners
12. Binding Hinges, Hinge joints or Hinge Tubes
7.4.5 Loudspeaker Enclosures
1. Cracks or breaks in the wood
2. Cracks or bends in the covers
7.4.6 Fly-Bar
1. Bends
2. Cracks
3. Cracked welds
4. Worn spots
7.4.7 Connecting Pins
1. Out-of-roundness
2. Plunger binding or other improper
operation
3. Loss of plunger spring action
4. Missing ball bearings
7.4.8 Caster Pallets
1. Cracks or breaks in the wood
2. Bent wheels
3. Wheels that bind when swiveled or rolled
4. Damaged tires
7.5 MAINTENANCE
7.5.1 Performance Testing
Listening tests and/or formal measurements should be done periodically. The interval between
such tests will depend on the frequency of system usage and the conditions of use. All
transducers should be tested for functionality and proper performance. A sine wave sweep at
approximately 10% of rated power will usually reveal transducer and/or enclosure problems in the
form of distortion, buzzes, or rattles.
7.5.2 Cleaning
Clean the exterior surfaces of the enclosures as required, using a damp cloth to remove any dust
or dirt. After cleaning, use a clean dry cloth to remove any excess moisture.
CAUTION: To avoid damaging the exterior finishes do not use cleaning solvents or abrasives.
7.5.3 Cosmetic Field Repairs
While the enclosure paint finish and wood is of high quality and durability, mars, marks, and other
blemishes will likely appear from normal use. For touch up paint and procedures, contact the
Application and Support Group for a Sherwin Williams part number for paint needed and
instructions for its application. Otherwise, use the closest match to this paint from a local
Sherwin-Williams dealer. For cosmetically damaged wood, use common woodworking methods
and materials as appropriate for the damage. §§§

8. CONTACTING EAW
We have tried to answer any questions you may have about the KF740 in this manual. Should
you need further assistance, please do not hesitate to contact us. You can contact us in several
different ways.
8.1 OPERATING QUESTIONS AND SERVCICE INFORMATION
For questions about configuring or operating the loudspeakers, contact:
EAW Applications Support Group
Tel 508-234-6158
Tel 800-992-5013 (USA only)
Fax 508-234-8251
e-mail asg@eaw.com
8.2 GENERAL
For all other information:
Mail Eastern Acoustic Works
One Main Street
Whitinsville, MA 01588 USA
Tel 508-234-6158
Tel 800-992-5013 (USA only)
Fax 508-234-8251
Web Site http://www.eaw.com
e-mail info@eaw.com
Page 22 of 22 KF740 OWNER’S MANUAL
