Assessment Kaams Creation User Guide
User Manual:
Open the PDF directly: View PDF ![]() .
.
Page Count: 28
Assessment
Assessment Creation Steps
By Amsphere Kaams Test Team

Assessment
2
Introduction
Welcome to Assessment Creation user guide. This user guide designed to provide
Kaams assessment creation steps. As per company training procedures employees
have to attend assessments. Kaams platform facilitates assessment module for each
entity. Employees can read the documentation in the entity content and artifact
section and attend to the assessment.
Users who have ‘Edit’ permission to the topic can create questions and prepare
assessment by adding created questions. Finally assign the users who need to be
attended.
Distribution menu of entity shows all assessment assignees statuses. Based on user
actions (Respond to acknowledgement, Assessment pass/Fail, Resubmission)
distribution menu ‘Receive, Understood, demonstrated’ column statuses are changed.
User guide section 3.1 describes the status change.
Assessment
3
Contents
1.1 Create Questions ....................................................................................................................... 4
1.2 Modify Questions ............................................................................................................................................................... 8
1.3 Delete Questions and Answers ................................................................................................................................... 11
2.1 Create an Assessment ............................................................................................................. 13
2.2 View Details of Assessment .......................................................................................................................................... 19
2.3 Assessment Detail Modification ........................................................................................................................... 20
2.3 2.4 Delete Questions/Users ........................................................................................................................ 23
3.1 Distribution Menu Statuses Change ....................................................................................... 25
3.2 Distribution Statuses Change ...................................................................................................................................... 25
Assessment
4
To create assessment and questions in the entity you should have ‘Edit’ permission on
the topic. Once create questions on the entity you can create assessment by adding
questions.
1.1 Create Questions
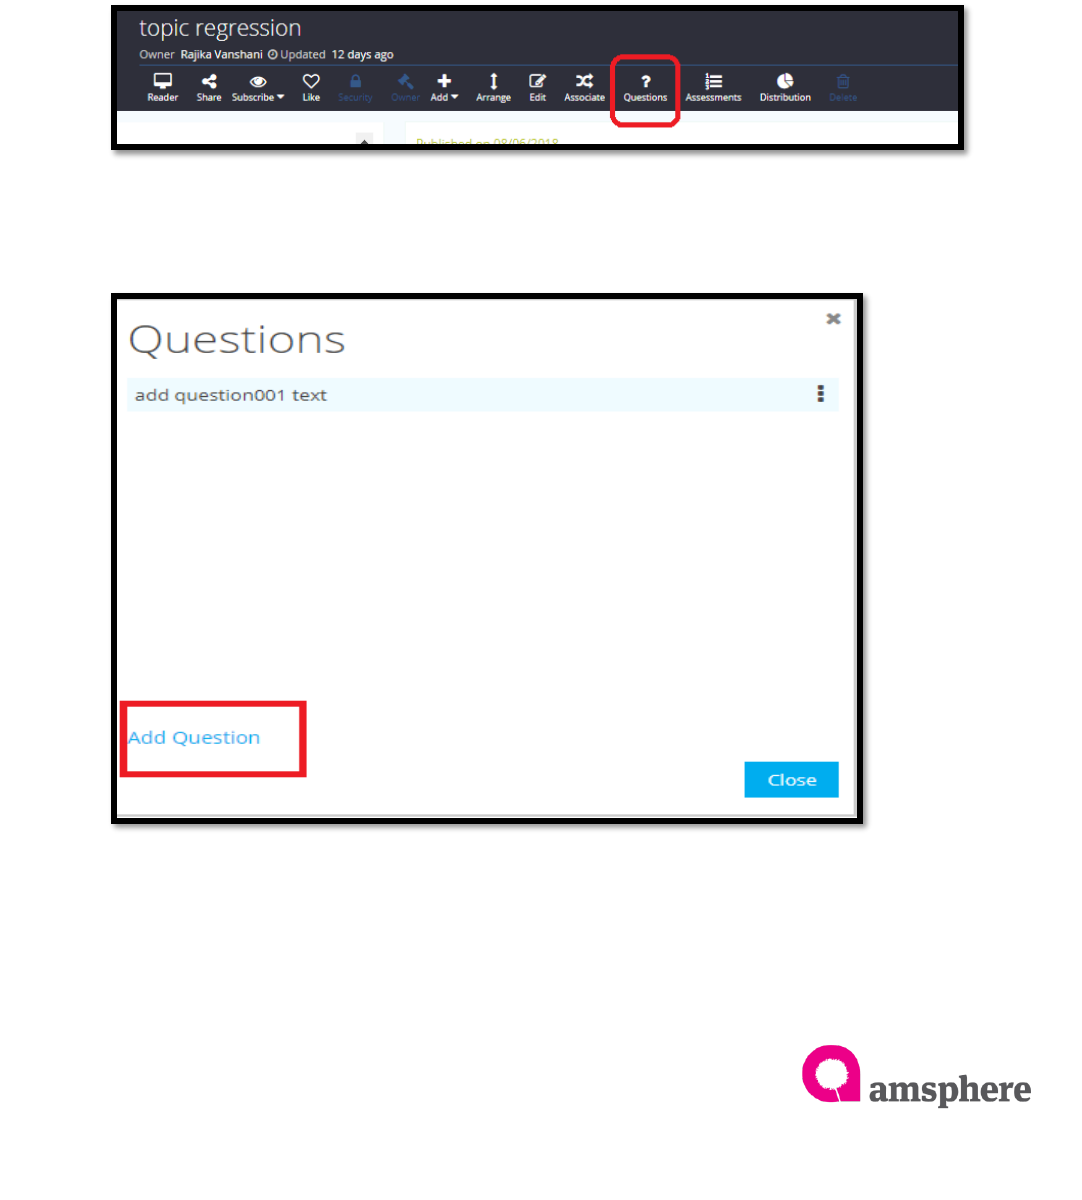
To open question creation form, navigate to entity detail page you need to create
assessment and click on ‘Questions’ menu in the entity menu bar.
Once Click on the ‘Questions’ button to add questions, click on ‘Add Questions’ label
in the questions form. It will show the ‘Add Questions’ form.
Assessment
5
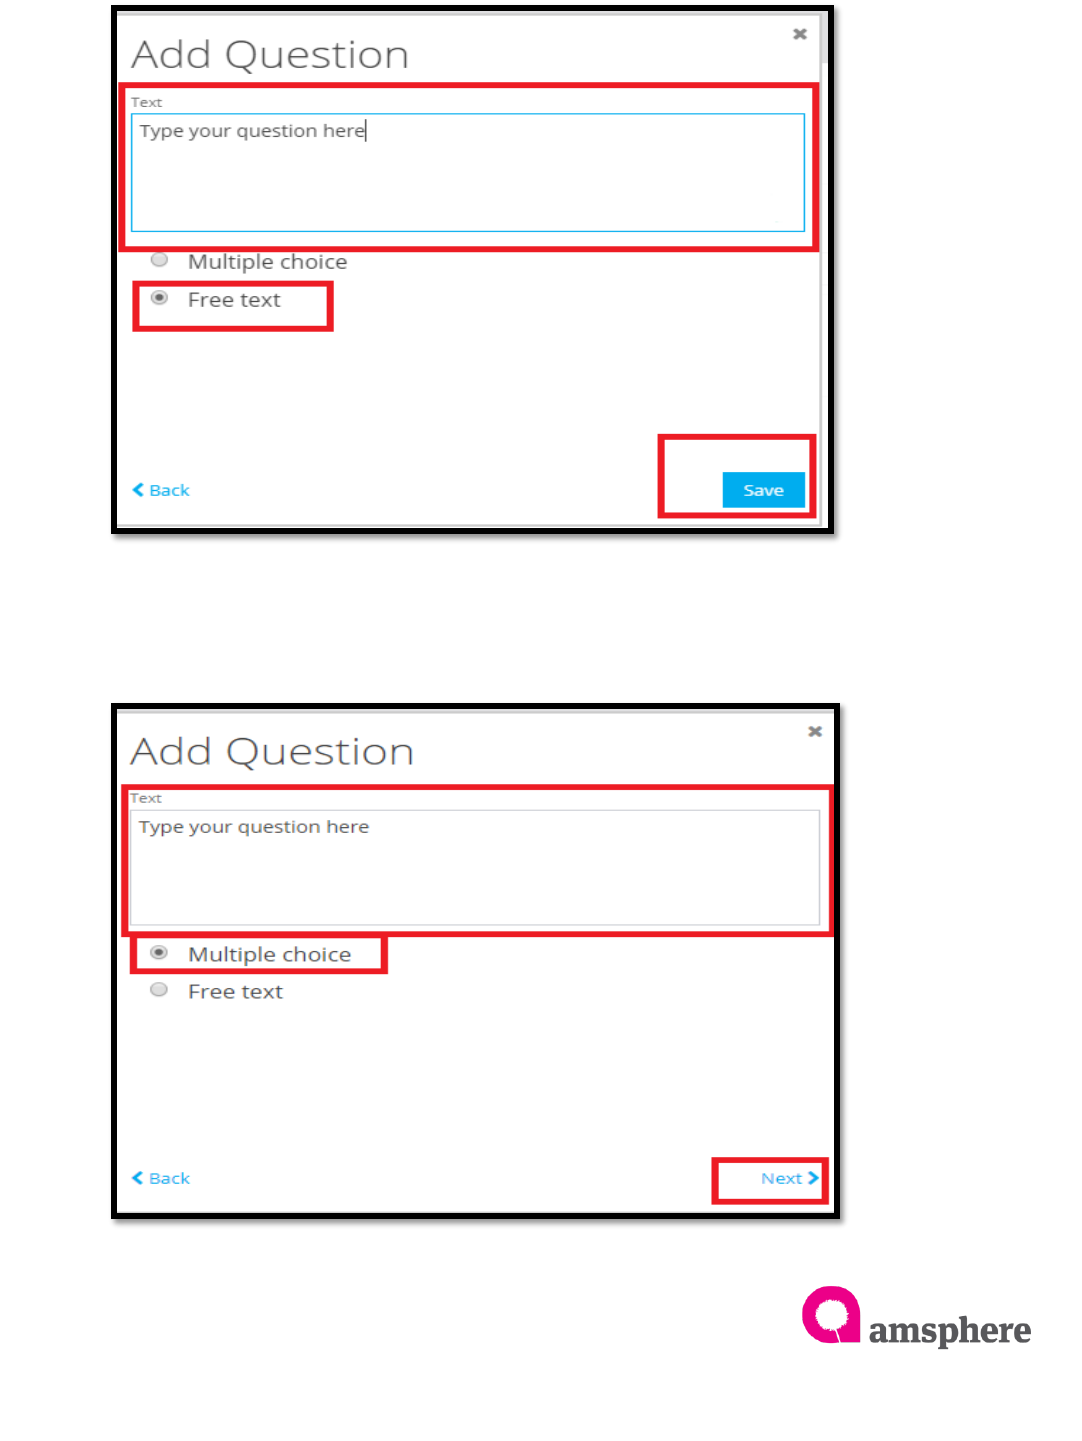
To add ‘Free Text’ questions, select free text radio button and type the question you
want to appear, then save the question by clicking ‘Save’ button.
To add multiple choice question, select multiple choice question radio button and
type question you want to appear in the text area and click on ‘Next’ button. It will
appear ‘Add Questions’ form to add answers to the multiple-choice question.

Assessment
6
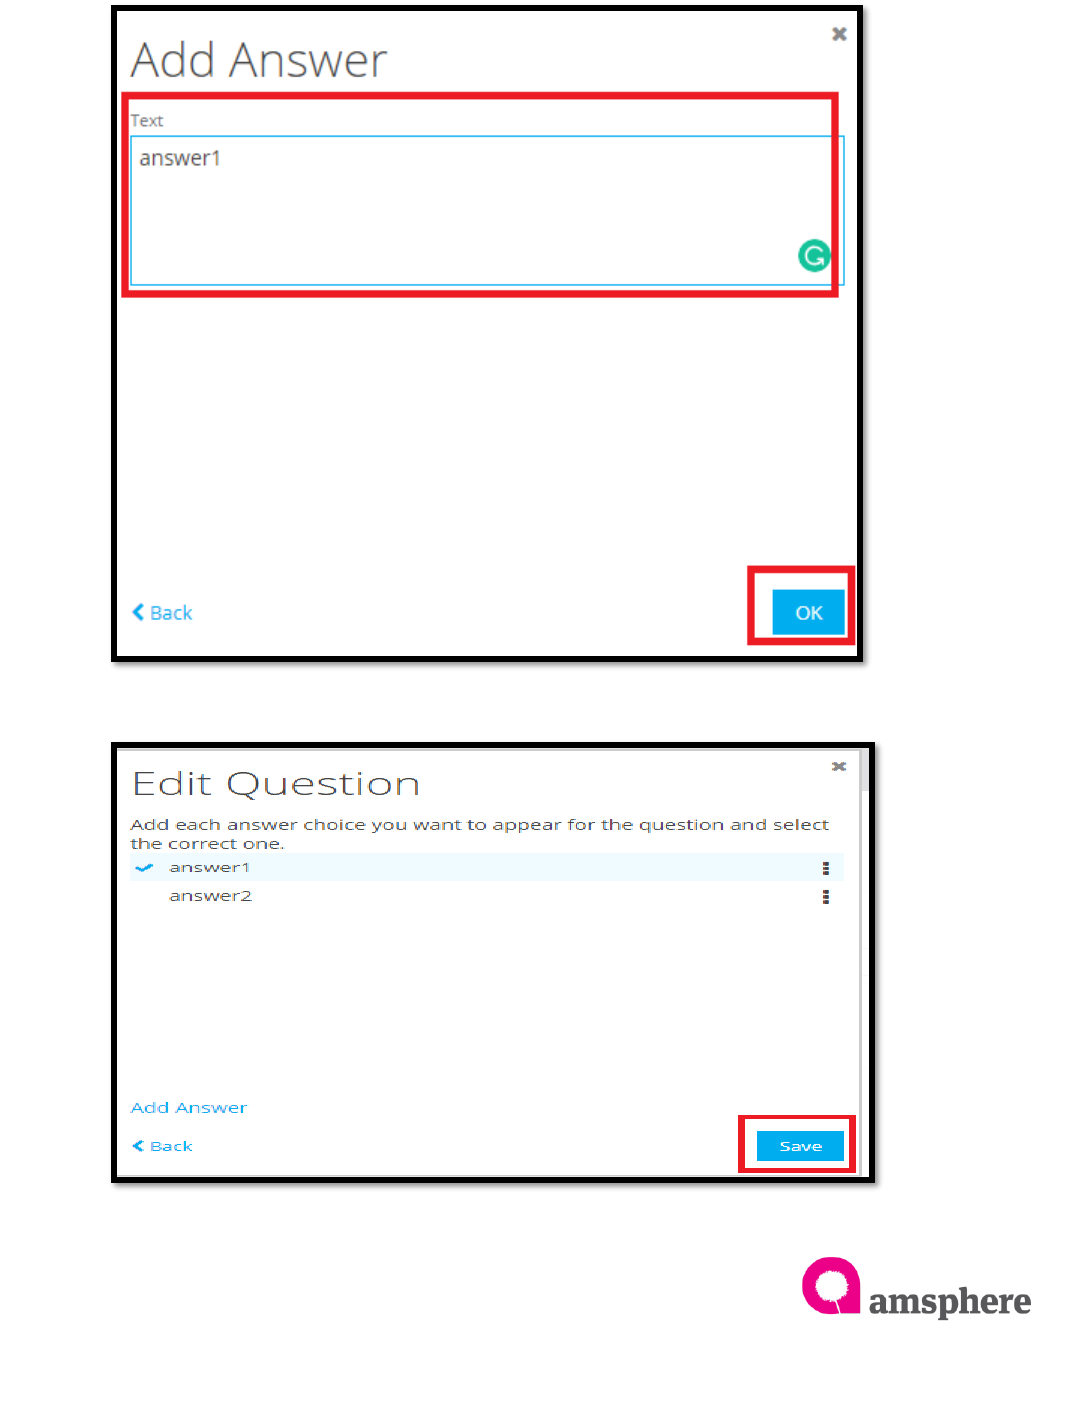
To add answers, click on ‘add answer’ label in the ‘Add Question’ form. It will display
‘Add Answer’ form. Type answer you want to add to the question and click ‘Ok’ button.
Add multiple answers to the question by clicking ‘add answer’ label.
Assessment
7
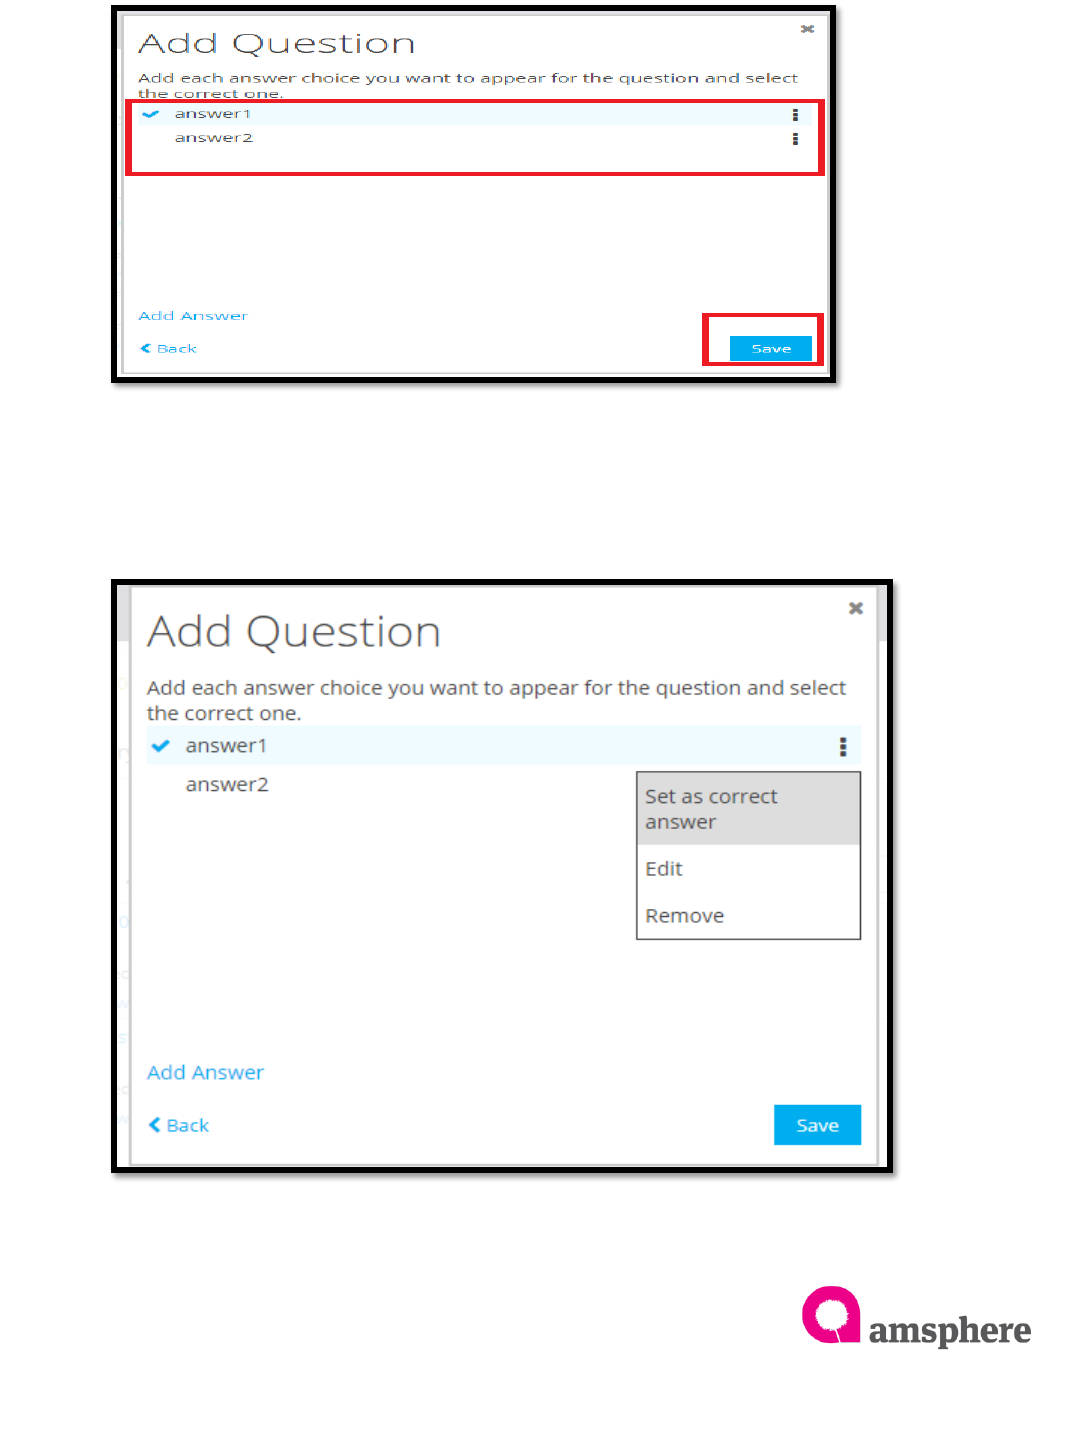
Once you added all the answers, system displays all added answers as below image.
Finally click on ‘Save’ button to save the answers.
To select correct answer, click on three dotted line of correct answer and select ‘Set as
correct answer’. (If you do not select correct the answer, default answer will be the first
answer)
Assessment
8
1.2 Modify Questions
To modify a question, open question menu by clicking entity detail page ‘Questions’
menu. It will show all the questions available. Click on three dotted line menu of
required question and select ‘Edit’. Edit shows edit question form.
For free text question edit, modify question in the edit question text area and save it.
Then system shows the edited question in the questions form.
Assessment
9
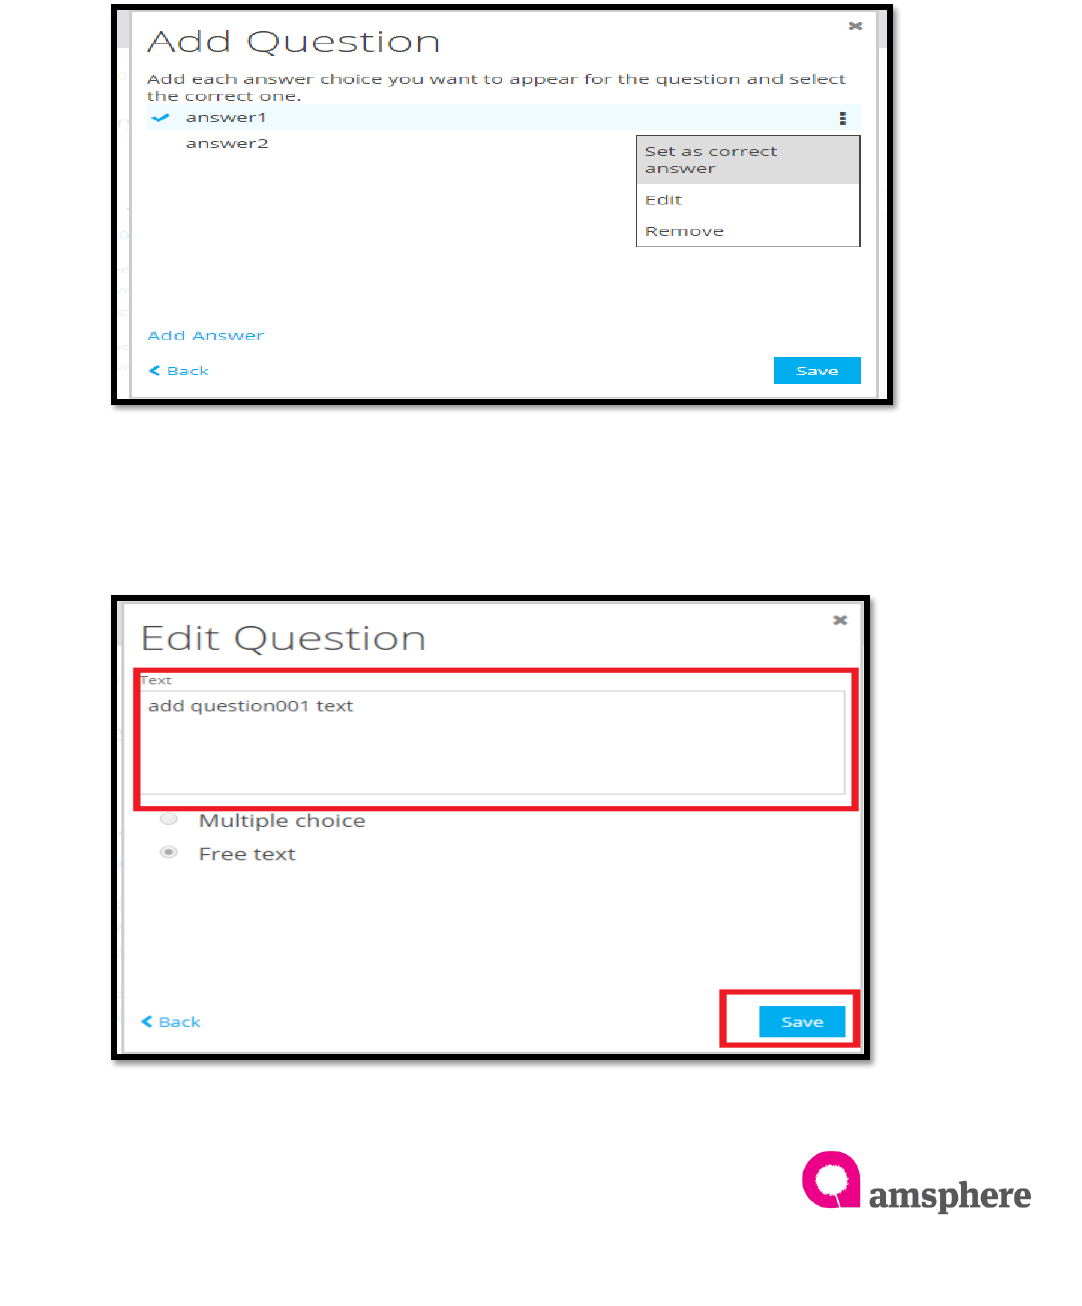
To edit multiple choice question, click on three dotted menu of question and select
edit. It will show edit question form. Edit the question and click on next.
To edit multiple choice question answers, click on three dotted line menu of required
answer and select ‘Edit’. It will show ‘Add Answer’ page to edit the answer.
Assessment
10
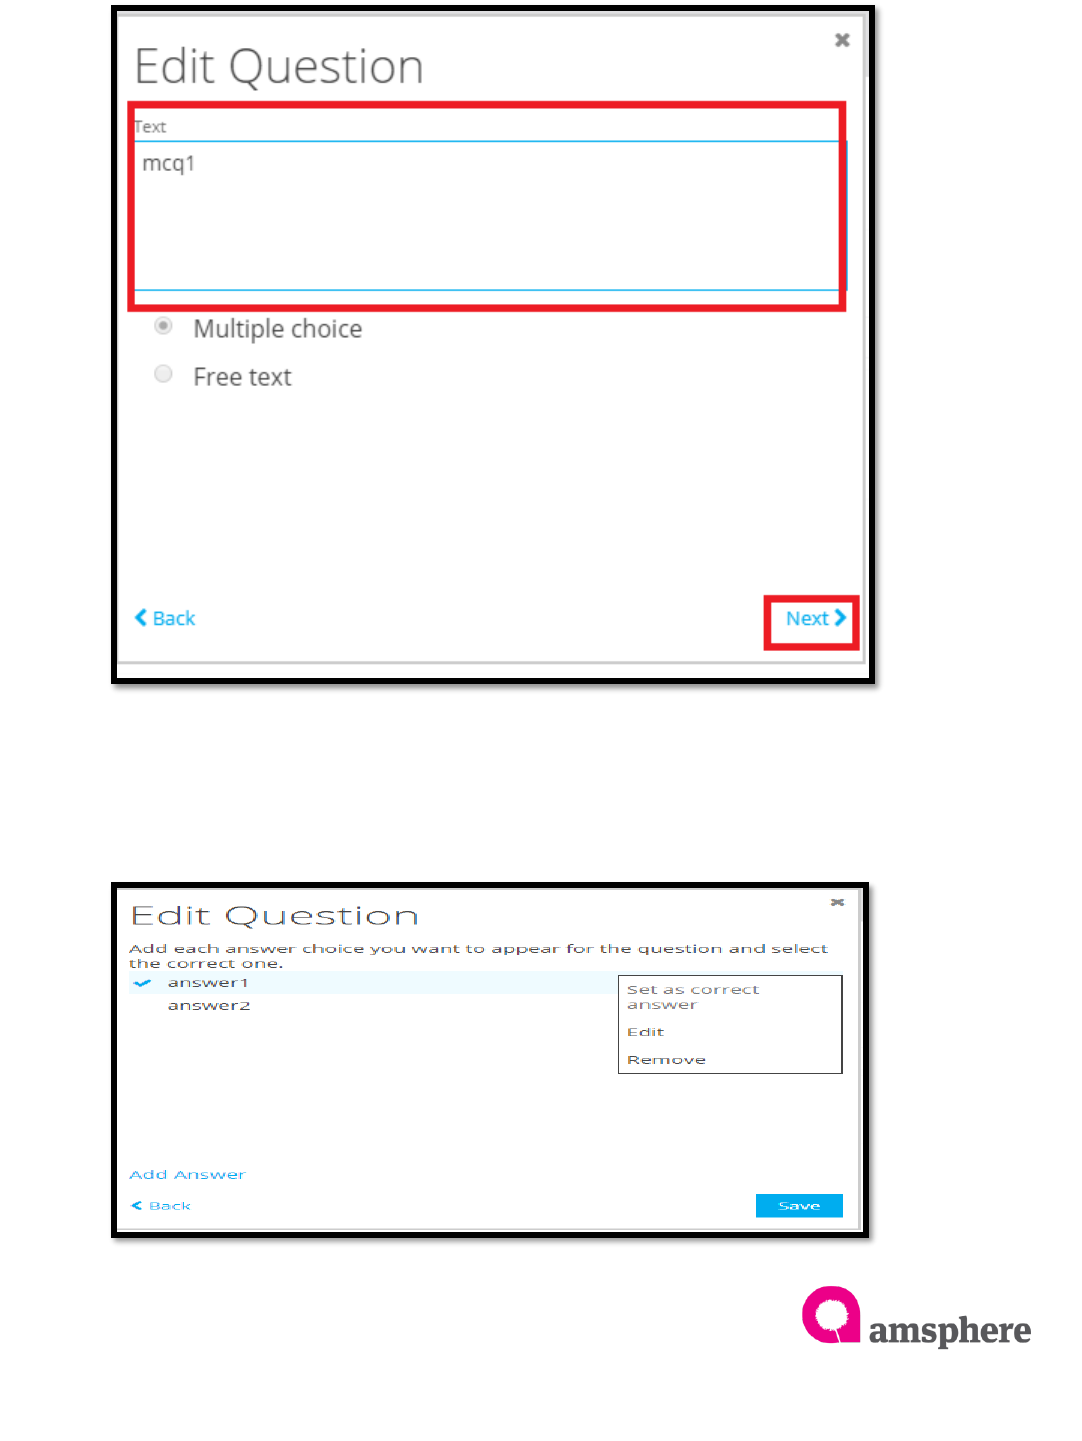
To Edit multiple choice answer, modify the answer in the ‘Add Answer’ page and click
on ‘ok’ button. In this way update all the required answers. Finally click on ‘Save’
button to save the modified answers.
Assessment
11
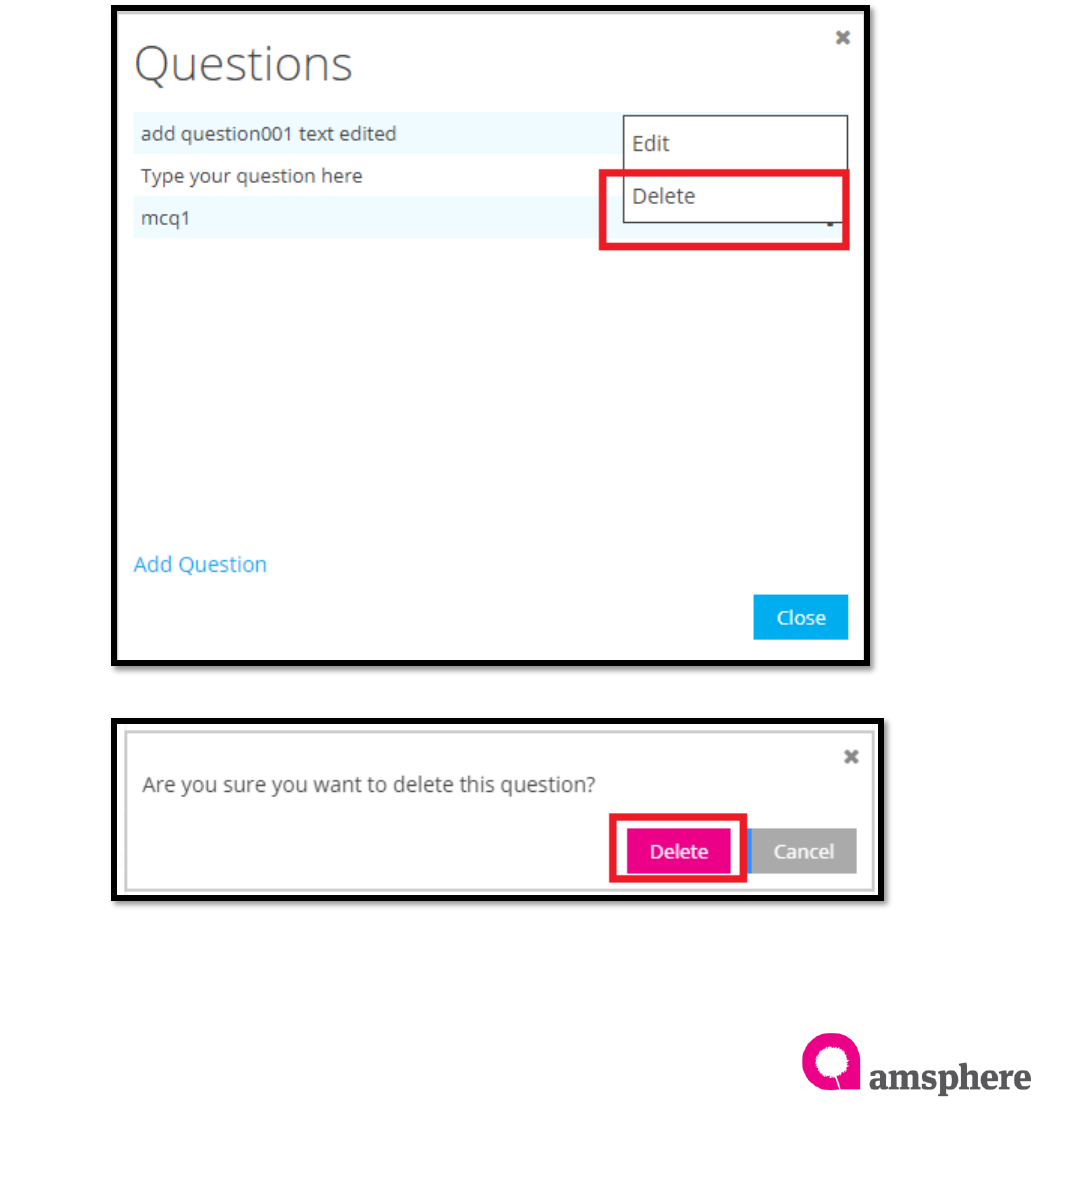
1.3 Delete Questions and Answers
To delete a question, open question menu by clicking entity detail page ‘Questions’
menu. It will show all the questions available. Click on three dotted line menu of
required question and select ‘Delete’. Then select ‘Delete’ option of error message.
It will delete the question, for multiple choice questions it deletes questions and all the
answers.
Warning!! You can not delete question which already added to the assessment.
Assessment
12
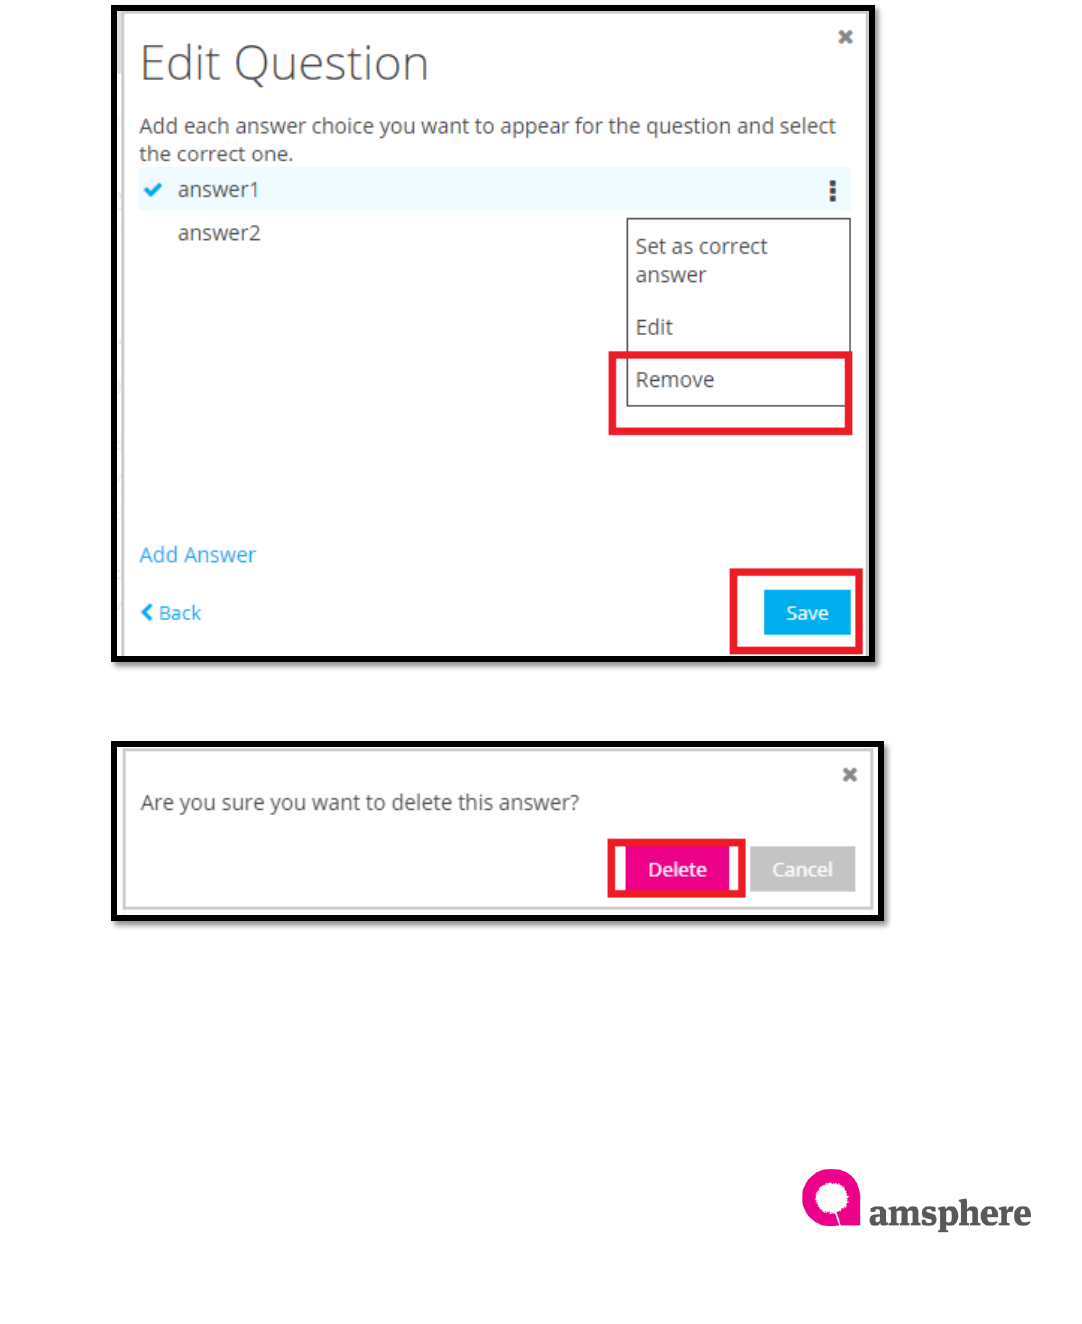
To delete multiple choice question answer, click on question menu of entity detail
page and click on three dotted line menu of required question. Then select ‘Edit’
option >>click on ‘Next’ button in the ‘edit question’ page. Next step selects ‘Remove’
option of answer which you want to remove by clicking three dotted line menu. Finally
click on ‘Delete’ option for error message.
Once you remove all required answers, click on ‘Save’ button to save the
modifications.
Assessment
13
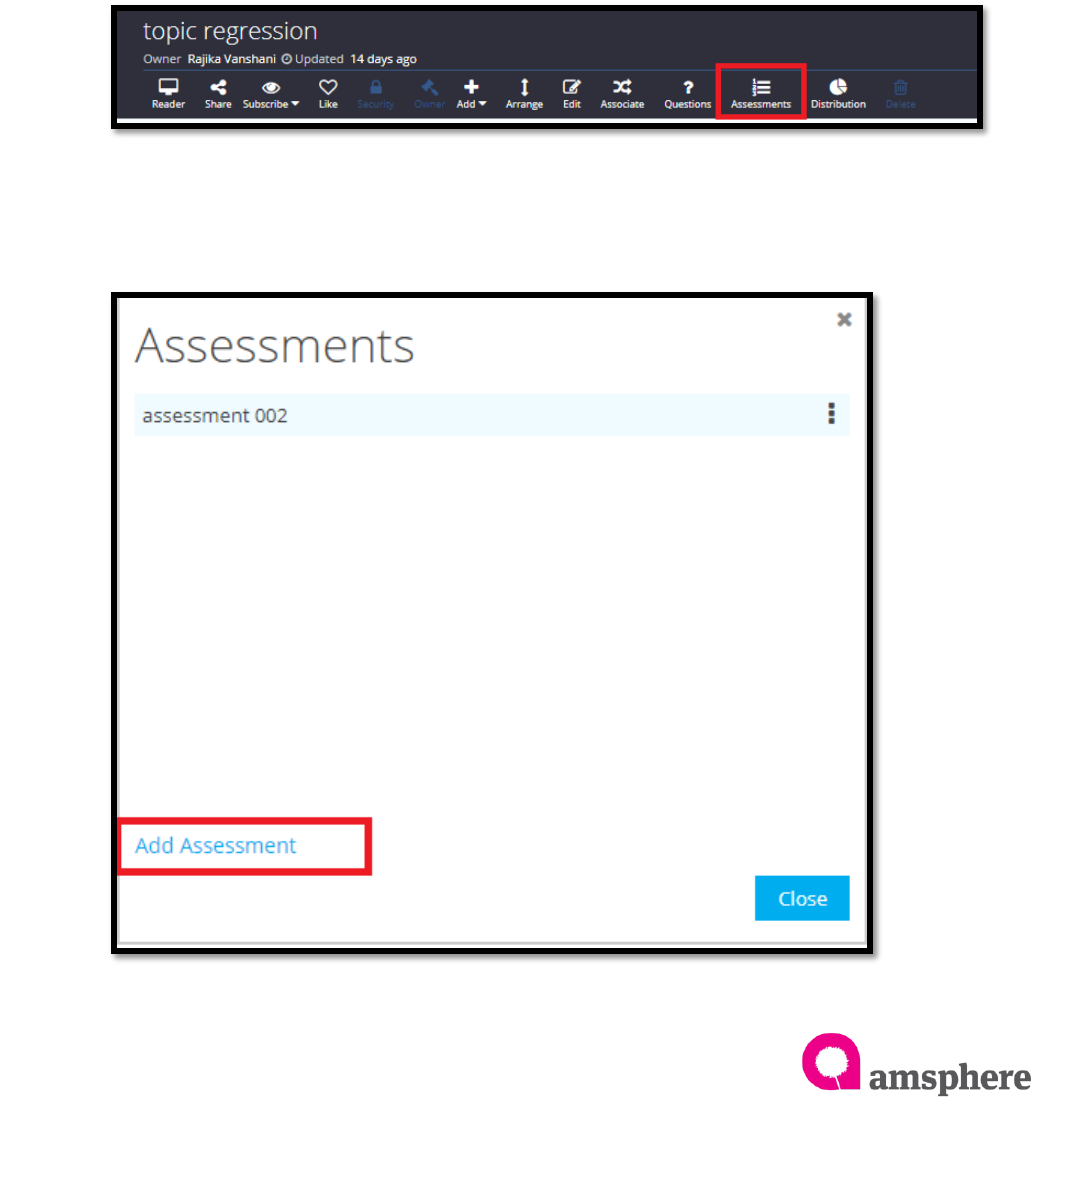
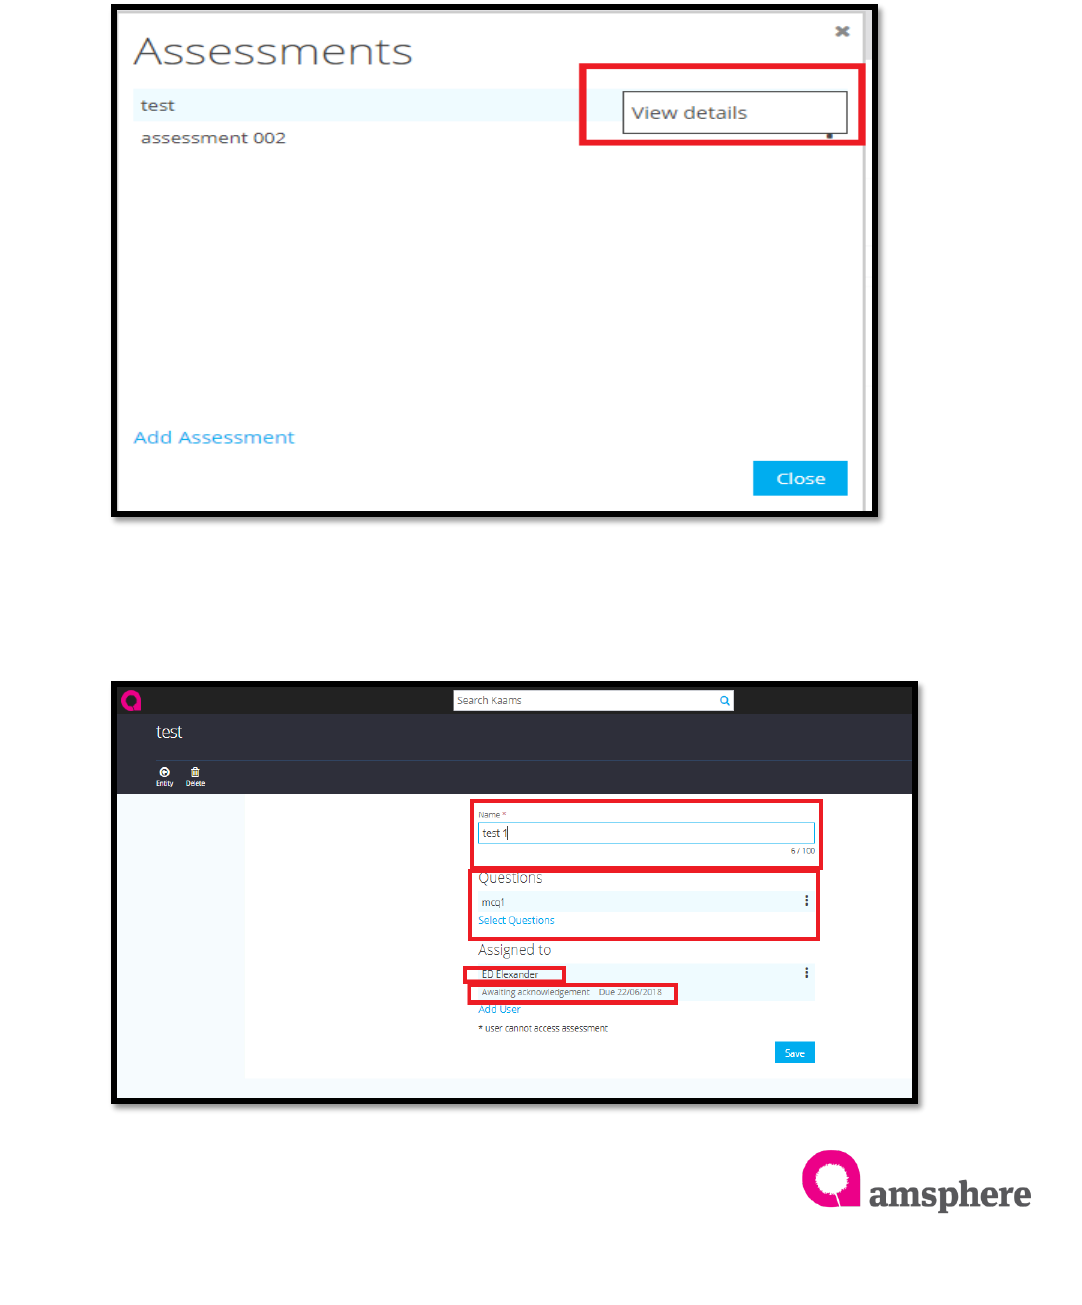
2.1 Create an Assessment
To Create an assessment, you need to have questions in the questions menu. Once
you added questions to the questions to the questions (to add questions refer ‘Create
Questions’ 1.1 section of this document)
To open ‘Assessment’ menu of entity, navigate to the entity detail page and click on
‘Assessment’ menu of top menu bar. Once you click on assessment menu it will show
‘Assessments’ form.
To add new assessment, click on ‘Add Assessment’ label in the assessment form. It will
show ‘New Assessment’ form.
Assessment
14
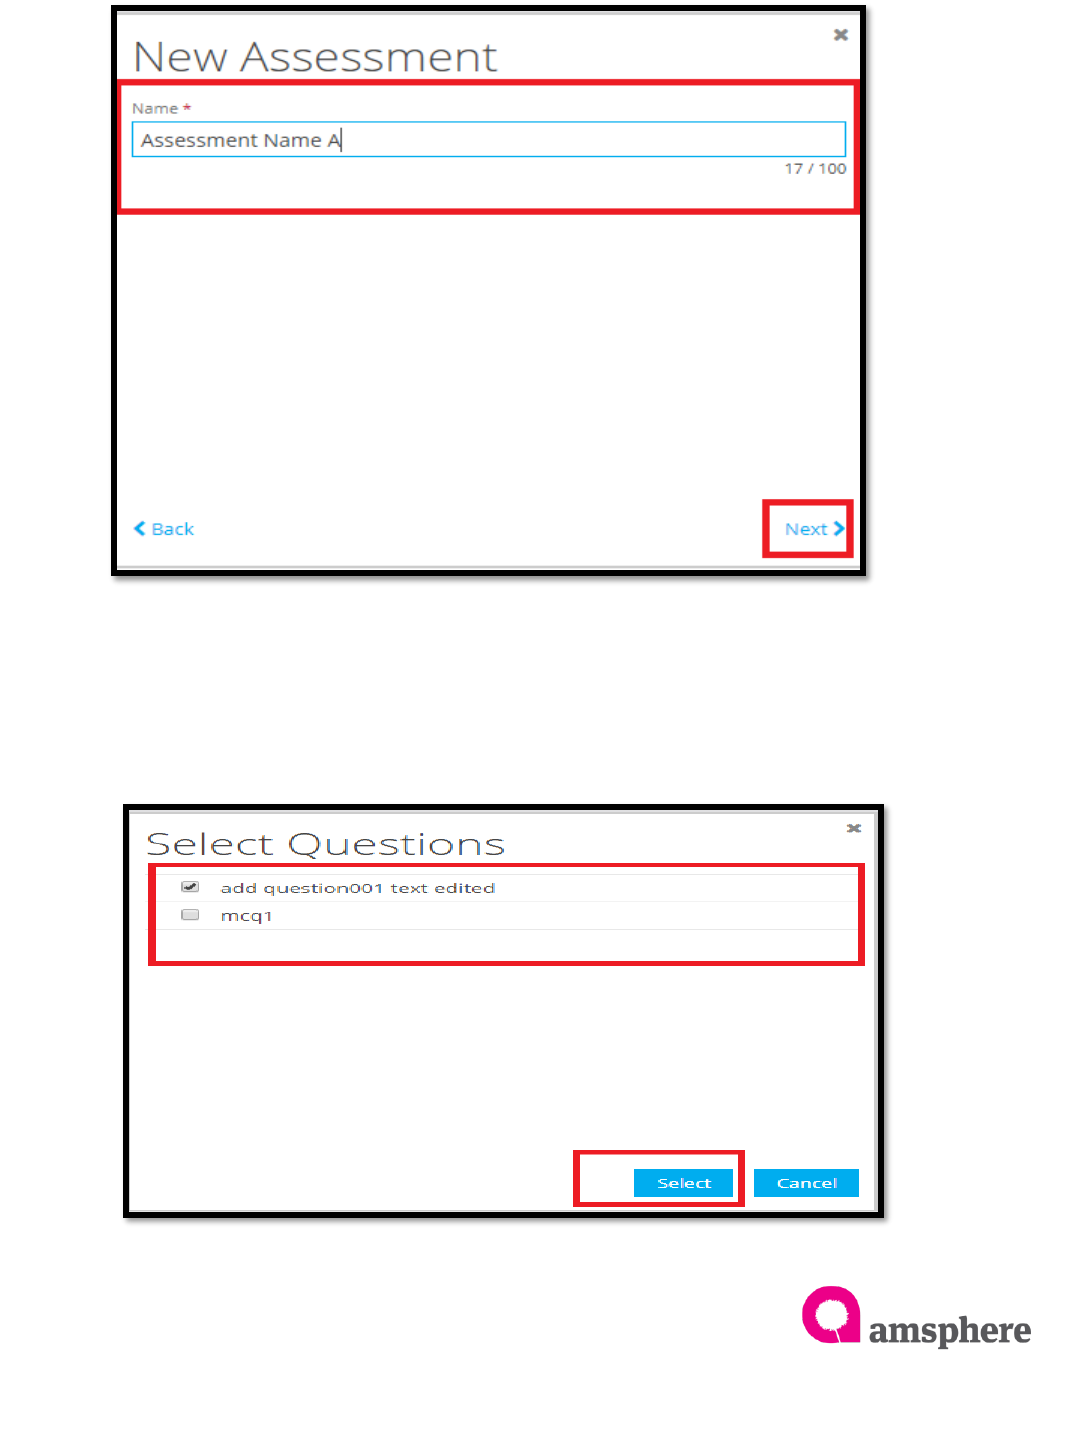
Then type name for the assessment in the ‘Name’ text field and click on ‘Next’ button
of ‘New Assessment’ form.
To add questions to the assessment, click on ‘Add Questions’ label. It will open ‘Select
Questions’ page. Select questions which you want to display under assessment and
click on ‘Select’ button. (Can select multiple questions at one time)
Assessment
15
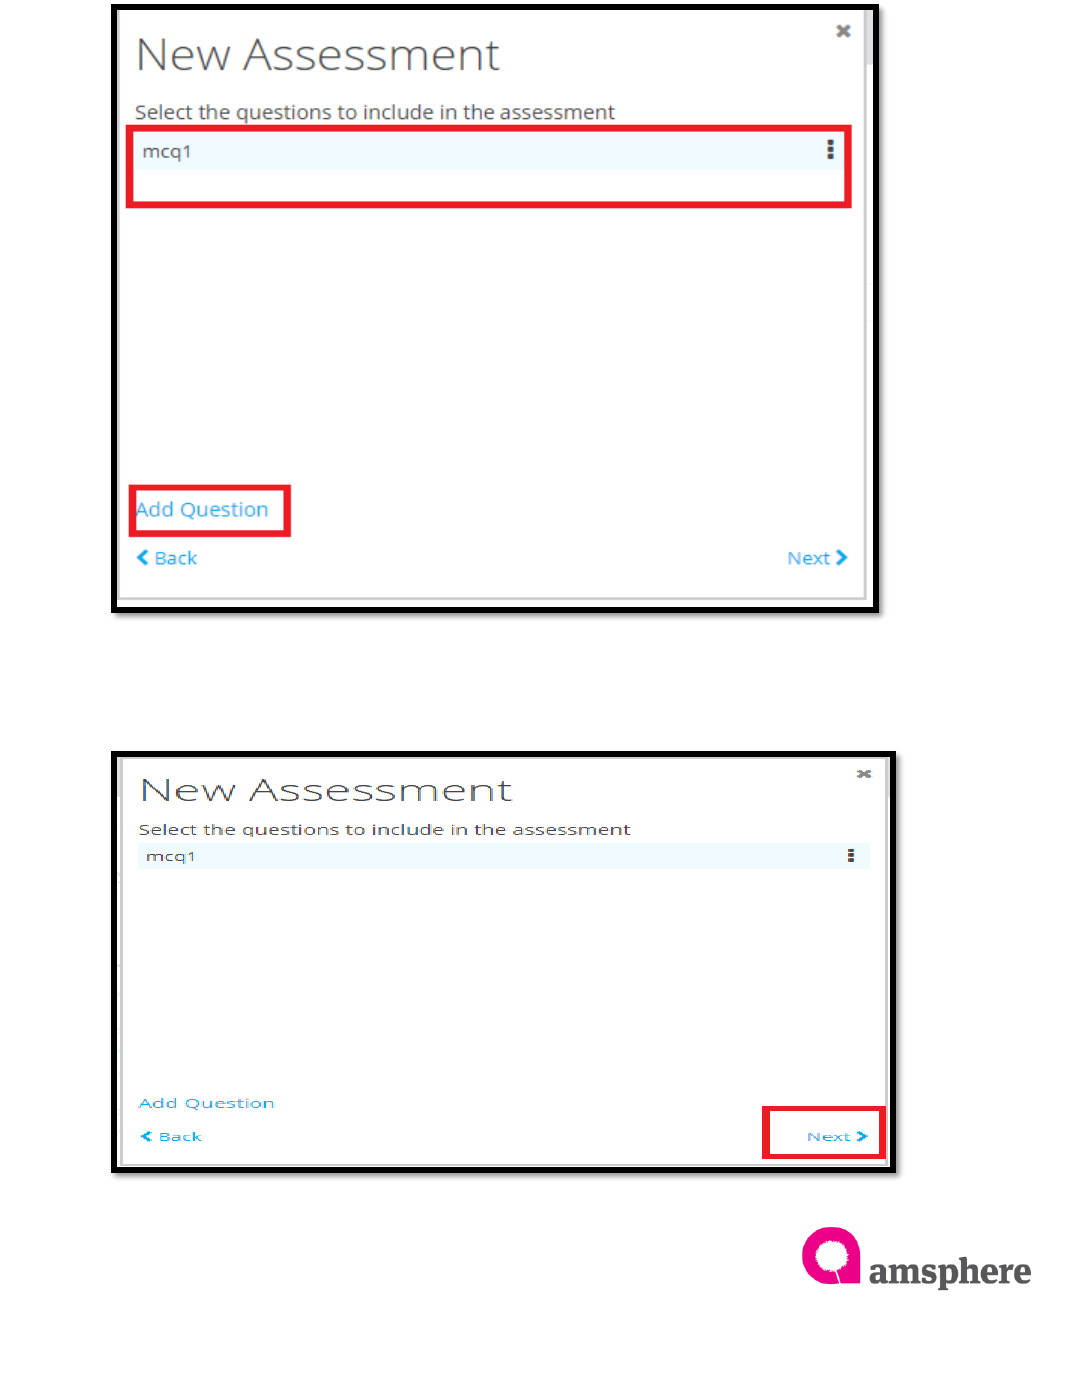
Once you click on ‘Select’ button system shows ‘New Assessment’ form as below. New
assessment form shows all added questions. To add new more questions, click on ‘Add
Questions’ label and again select questions from ‘Select Question’ form and click on
‘Select’ button.
After adding all required questions, select ‘Next ‘button to assign assessment to the
users.
Assessment
16
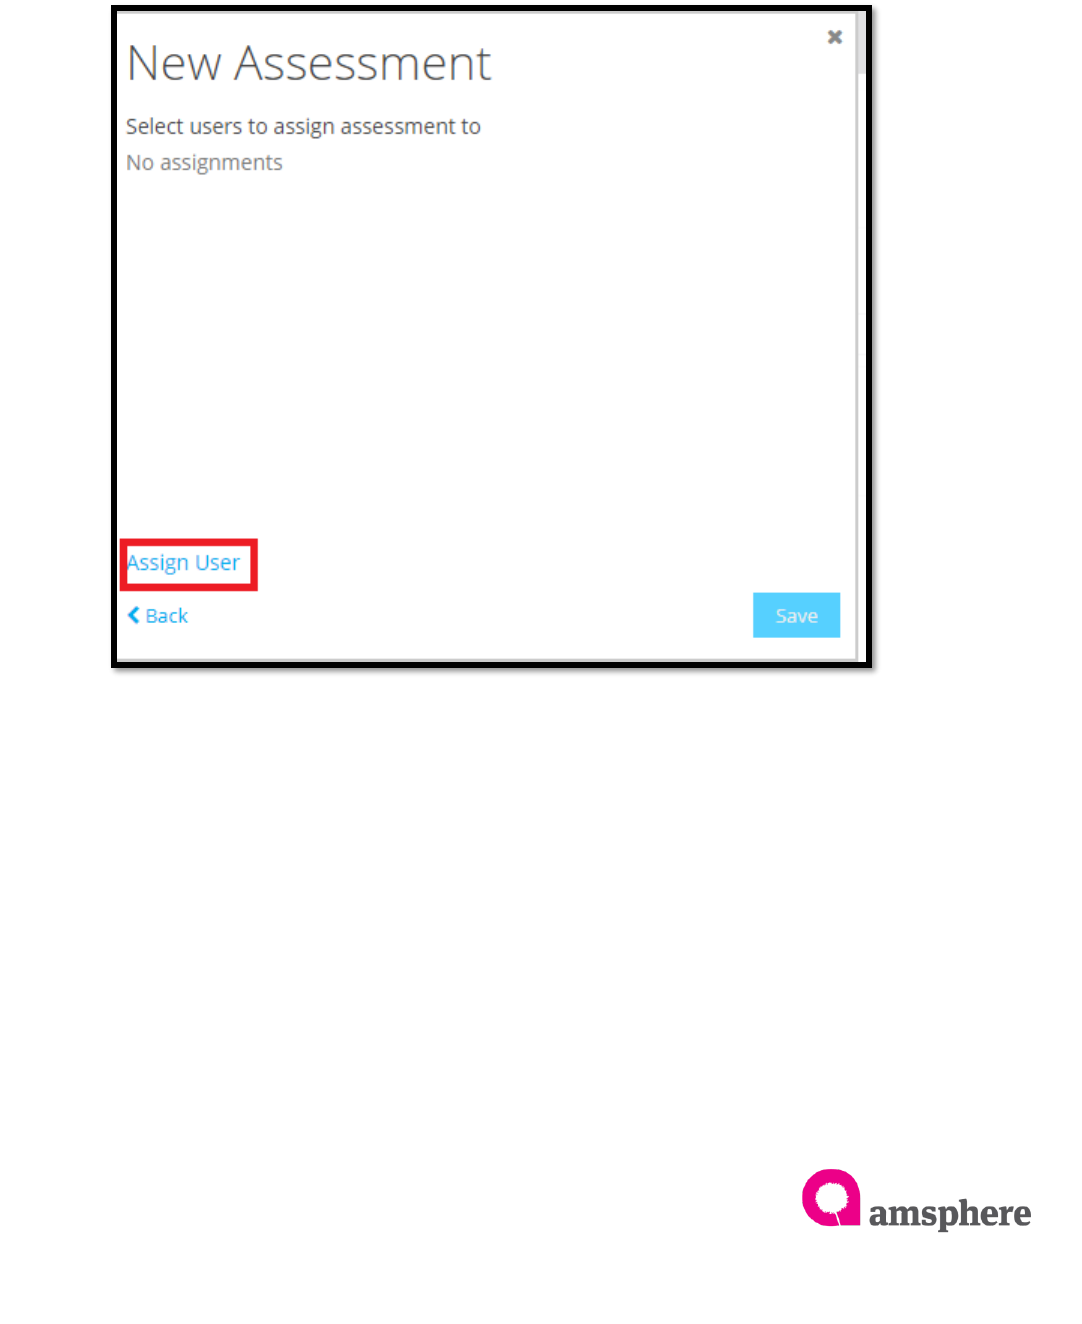
Assign users to assessment, assignee user should have ‘Read’ access to the entity
which you create the assessment. If assignee does not have ‘Read’ access assign
access to the user.
To assign users, once you click on ‘Next’ label of ‘New Assessment’ form system shows
below form. Select ‘Assign User’ label. It shows ‘Select Users’ form.
Assessment
17
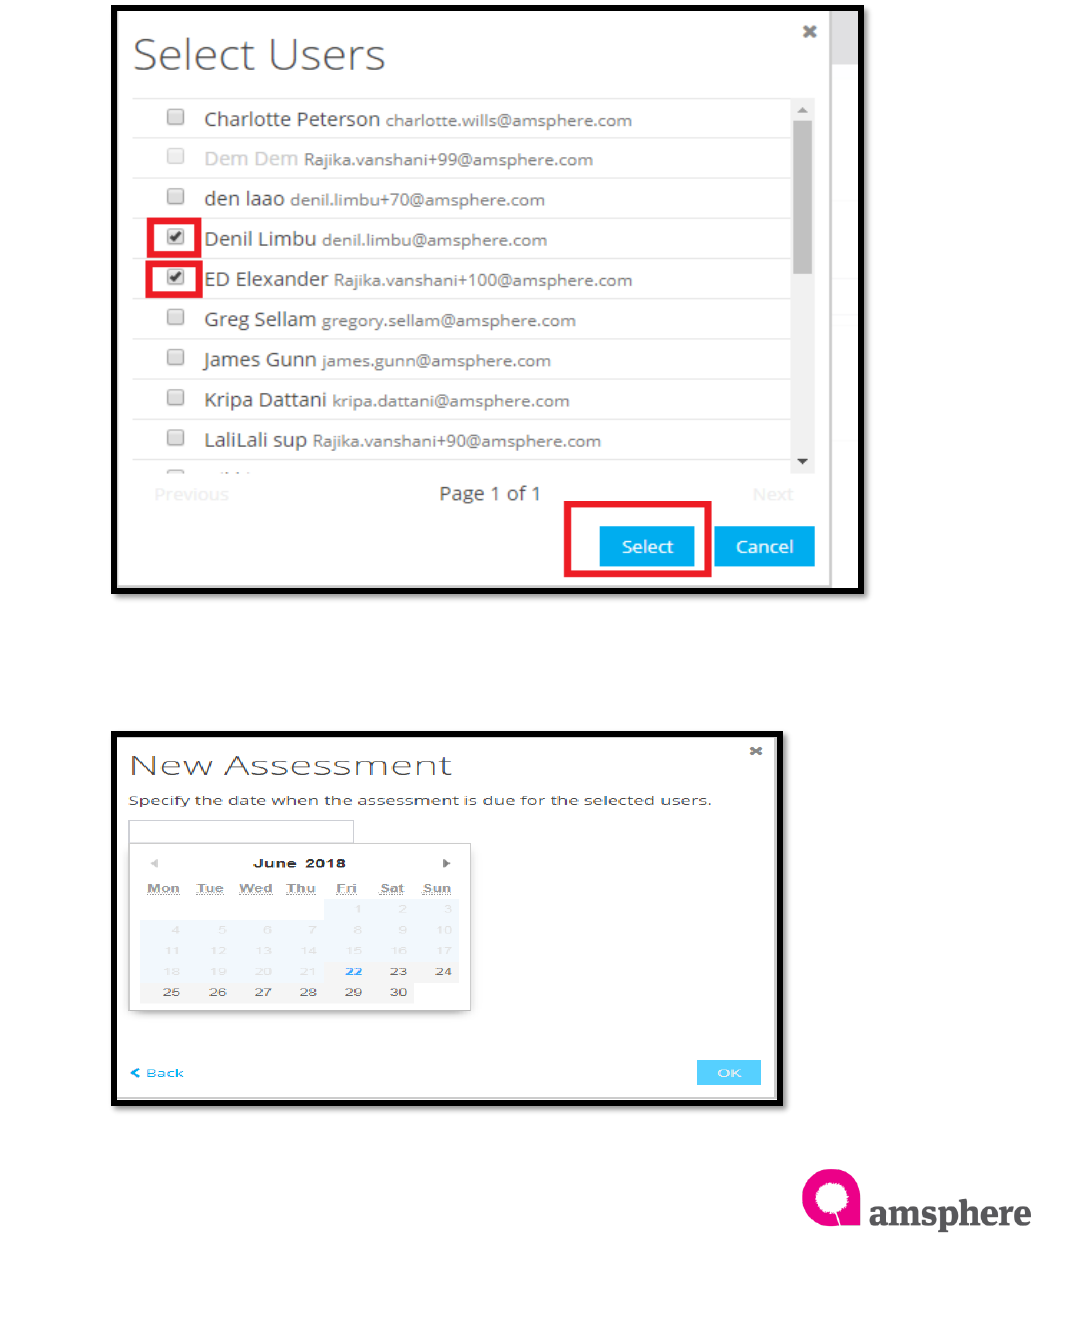
To select users, System shows all entity ‘Read’ accessible users names in the ‘Select
Users’ form when you click ‘Assign User’ label. Select user names you want to assign
the assessment. Finally click on ‘Select’ button.
FYI: If ‘Select User’ form does not show user name you need to select, provide ‘Read’
access to the user though security menu. Refer Kaams User guide ‘Adding new users
to a topic’ section for assigning ‘read’ access.
Once you click on select button system shows below form to select due date for
selected users. Click on text box and select the date using date time picker. Then click
‘ok’.
Assessment
18
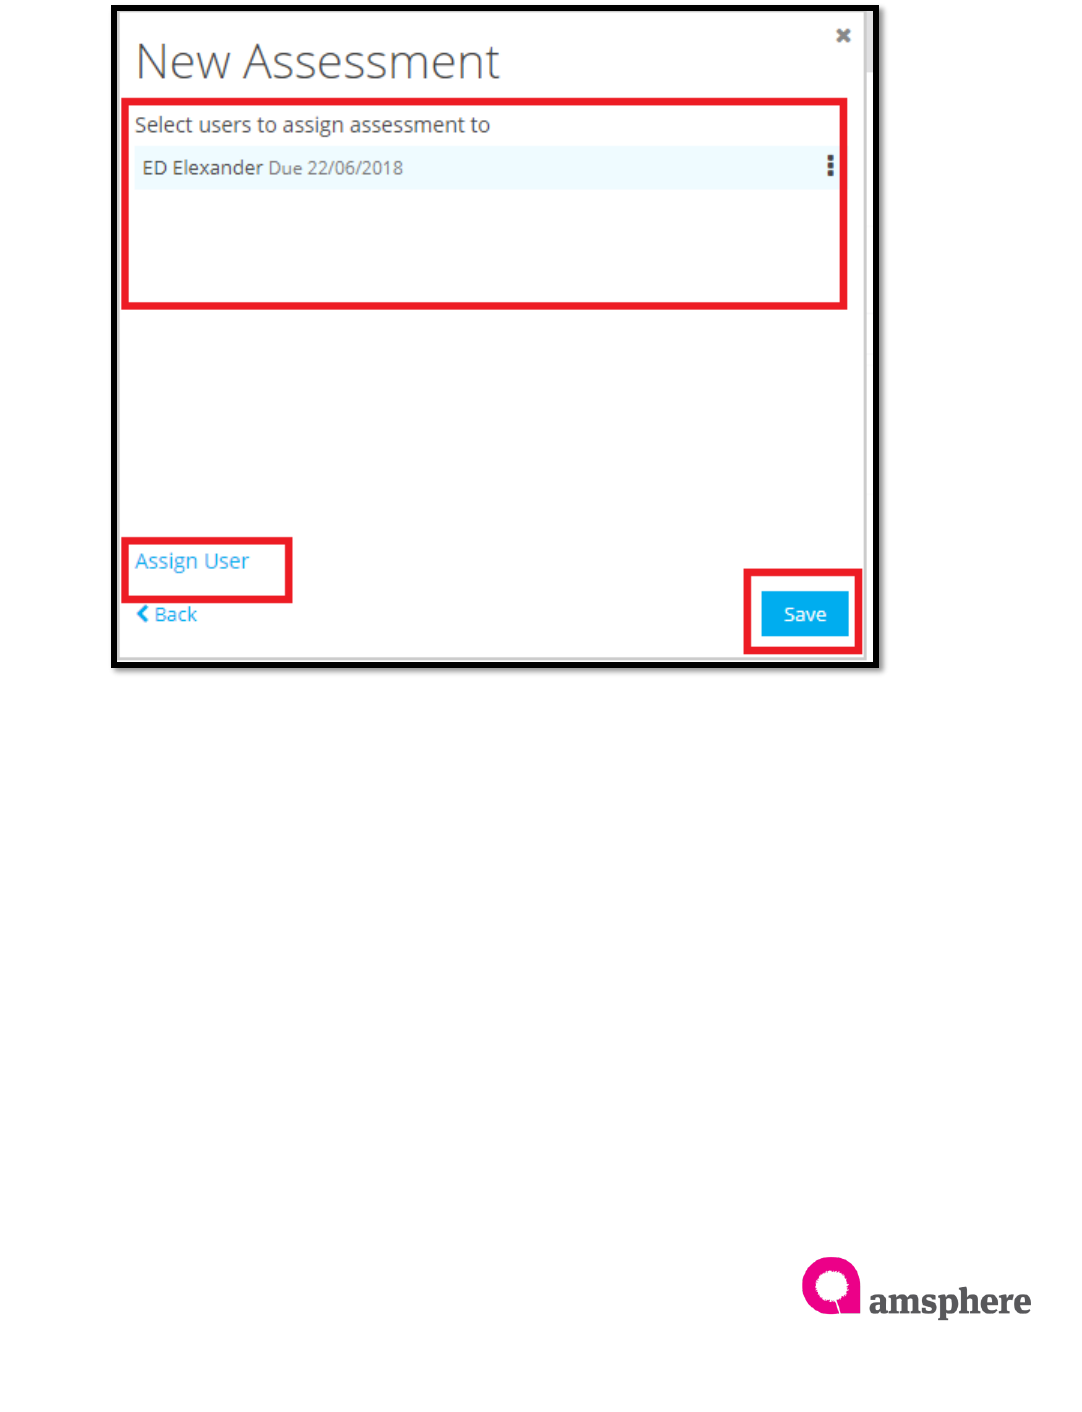
Once you select due date and ‘ok’ system shows all assigned users and due dates. If
you want to assign more users click on ‘Assign User’ again and select users. After
assigning all required users click ‘Save’ to save the assessment and assigned users.
Assessment
19
2.2 View Details of Assessment
To view the details of assessment, click on ‘Assessment’ menu and click on the three
dotted menu of assessment which you want to view the details.
View details page shows, Assessment name, questions, assigned users and users
statuses.
Assessment
20
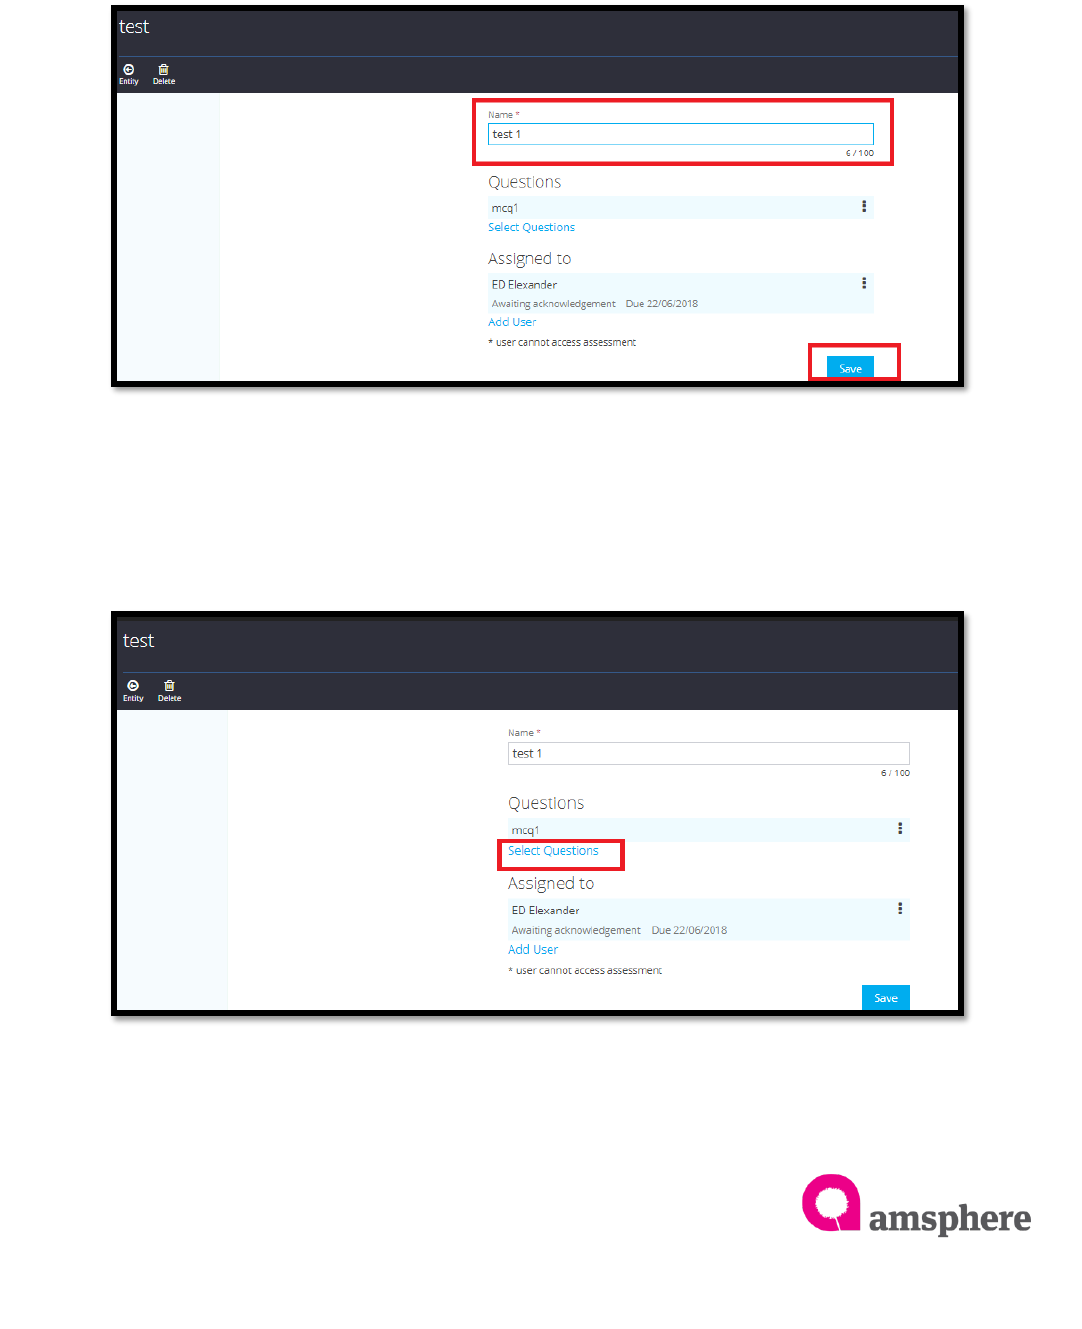
2.3 Assessment Detail Modification
To edit the assessment name, click on assessment menu>>then select assessment you
want to edit name and click on three dotted line menu ‘View Details’. Change the
‘Name’ field of view detail page. And ‘save’ it.
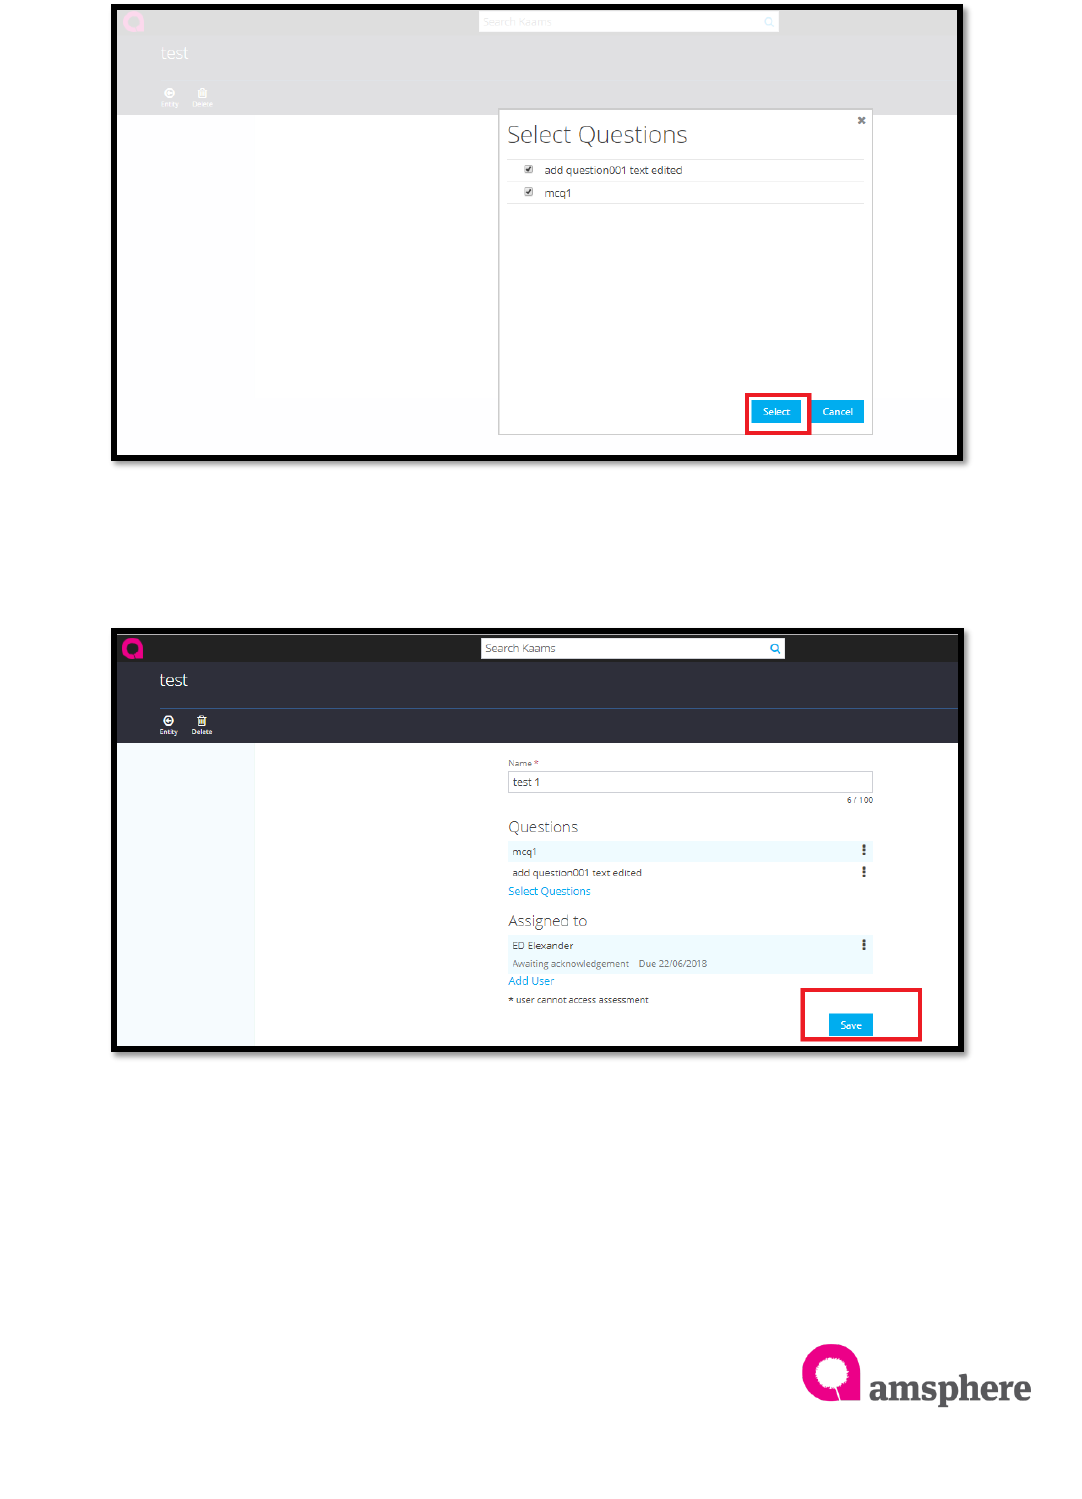
To update assessment questions, click on ‘View Detail’ option of required assessment
and click on ‘Select Questions’ label. It will open ‘Select Questions’ form to select more
questions. Select question you want to add and click on ‘Select’ button of ‘Select
Questions’ form.
Assessment
21
Once you click on the ‘Select’, system shows updated questions in the assessment
view all page. Click ‘Save’ to save the updated questions.
Assessment
22
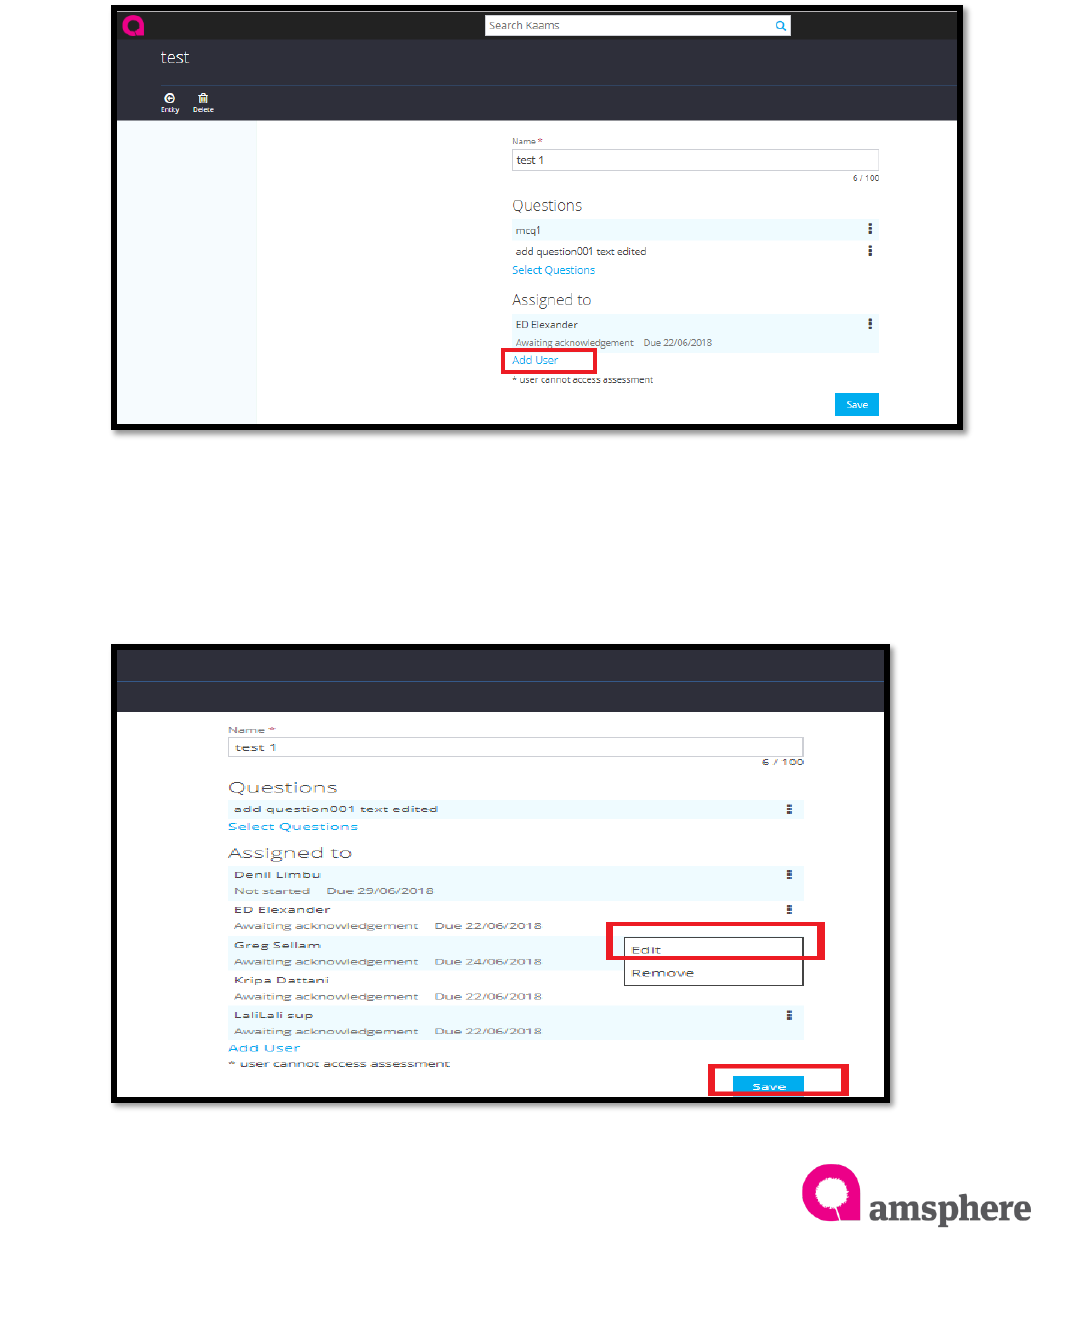
Add new users to the assessment, click on ‘View Detail’ option of required
assessment and click on ‘Add User’ label to add users. It will show ‘Assign Assessment’
form to select ‘due date’. Click on text box of ‘Assign Assessment’ and click ‘Next’
label. It shows ‘Select Users’ form to select users. Click on the check boxes to select
users and finally click on the ‘Select’ and ‘Save’ the changes in the assessment detail
page.
To edit user assessment due date, click on the user’s three dotted line menu
and select ‘Edit’. Then system shows ‘Assign Assessment’ form. Change the
date from date time picker and click on ‘Ok’. Finally click on ‘Save’ to save the
modification.

Assessment
23
2.4 Delete Questions/Users
To delete questions, click on three dotted line menu of question and click on
‘Remove’ option and ‘Save’ the change.
Assessment
24
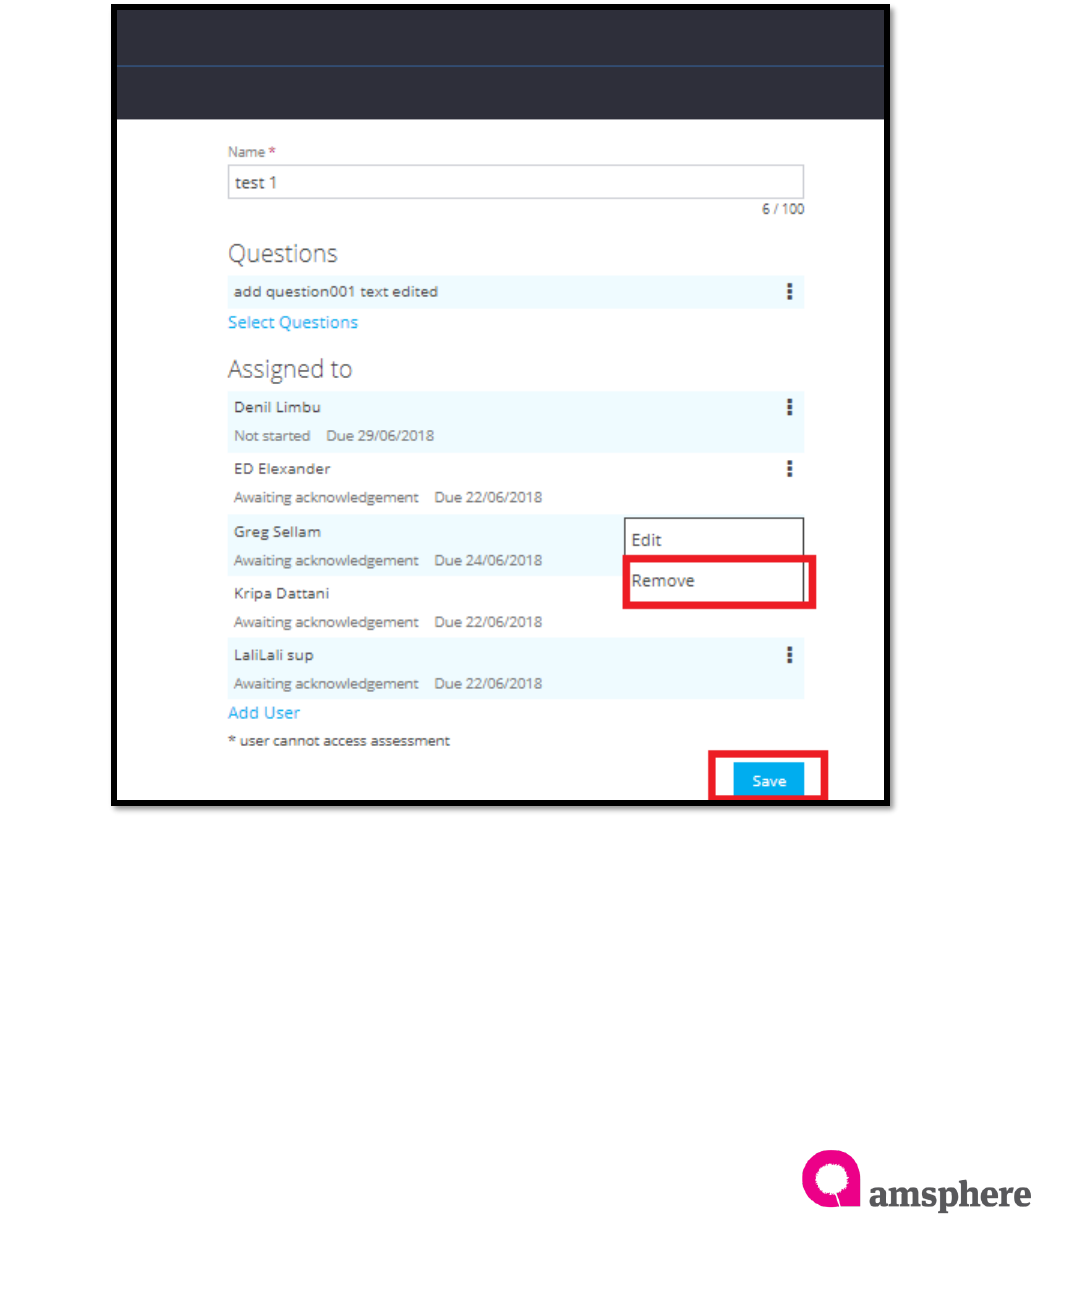
To delete users, you can delete only users who has ‘Waiting for
acknowledgement’ and ‘Not Started’ status. All the other status user deletion
gives an error. To delete user, select the user need be deleted from assessment
view all page. Click on three dotted menu of user and select ‘Remove’ option.
Click on remove option remove the user from the page. Finally, save the
changes by clicking ‘Save’ button.
Assessment
25
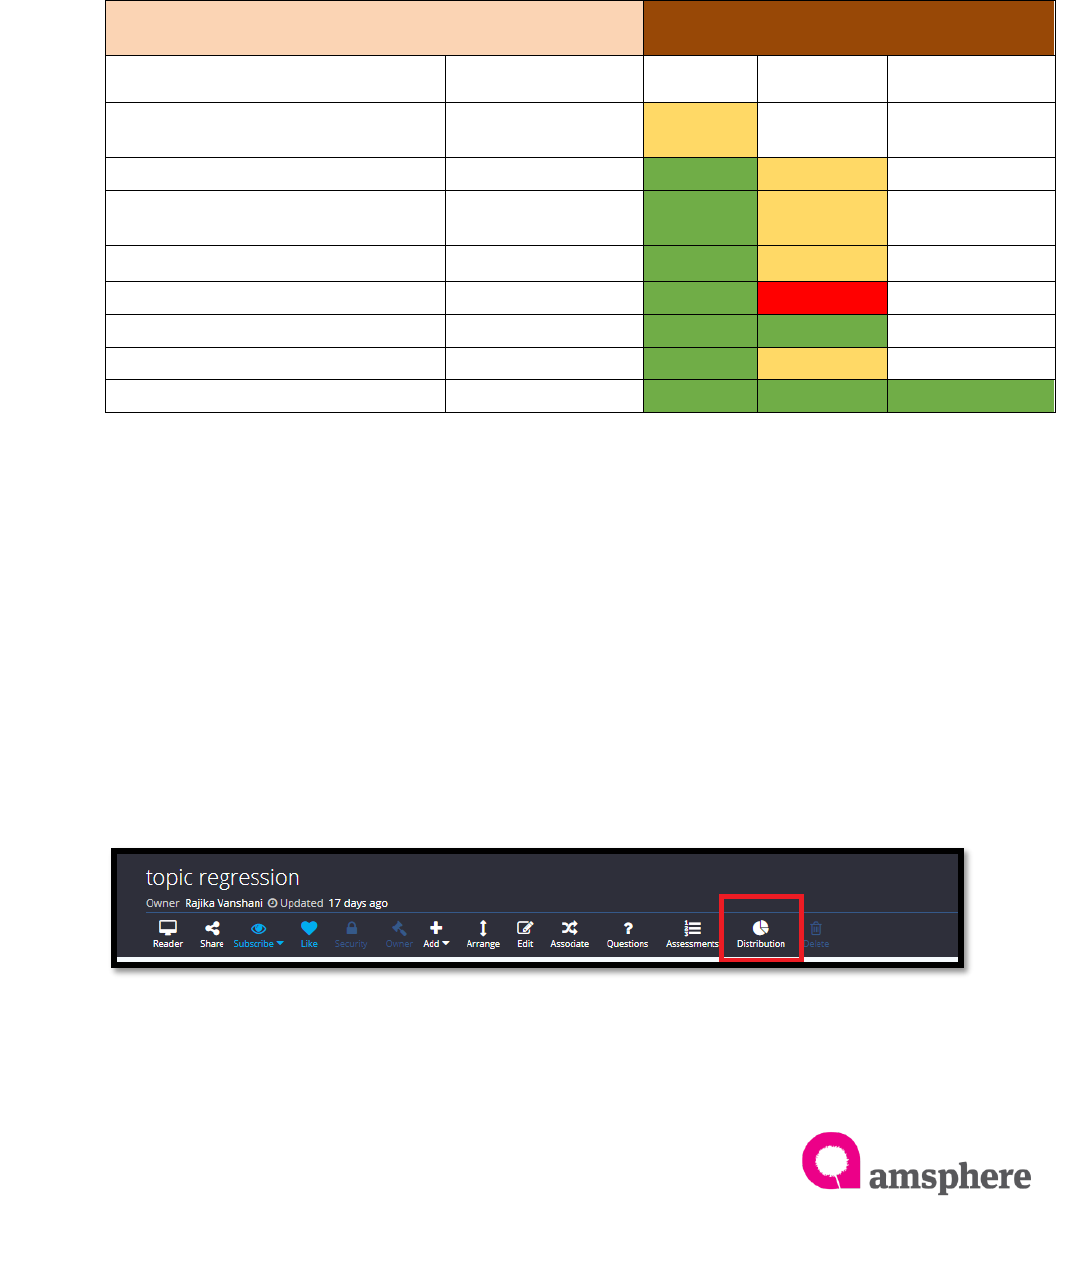
3.1 Distribution Menu Statuses Change
Once you assign user to an assessment, user statuses get change according to the
user activities as below table. As per the user status distribution menu ‘Receive,
Understood, demonstrated’ status flags will be changed. (demonstrated status should
change after demonstration. Refer 2.6 topic)
Note: When user assign to multiple assessments in same entity above statuses will be
same.
3.2 Distribution Statuses Change
To change the demonstrated status, assessment assigned user should passed the test
and demonstration. Then click on the distribution menu and select the correct name of
user. Finally click on three dotted line menu and select ‘Demonstrated’.
Distribution Form Status
User Activity
User Status
Received
Understood
Demonstrated
User has assigned new assessment
Waiting for
Acknowledgement
Null
Null
User acknowledge to the request
Not Started
Null
User saves the answers of
assessment
In Progress
Null
User submits the assessment
Pending
Null
User fails the assessment
Fail
Null
User passes the assessment
Pass
Null
User resubmits the assessment
Pending
Null
User demonstrates the details
Pass

Assessment
26

Assessment
27

Assessment
28
