Linnaeus 2.5 Win User Guide L2
User Manual:
Open the PDF directly: View PDF ![]() .
.
Page Count: 64
Linnaeus II
Windows 98 / ME / XP version 2.5
Hawksbill Turtle – Eretmochelys imbricata (Linnaeus, 1766)
USER GUIDE WINDOWS VERSION 2.5
Jorrit van Hertum
Peter Schalk
Ruud Altenburg
Gideon Gijswijt
Wijnand Heitmans
Mil de Reus
Huub Veldhuijzen van Zanten
Paul Klinkenberg

3
2
3
Preface
The Linnaeus II software tools were developed to provide taxonomists, ecolo-
gists and biodiversity specialists with a content management system that
allows them to store, manage, exchange, combine and electronically publish
scientic information in a standardized format. The Linnaeus II software
has been developed by the ETI Biodiversity Center, an NGO in operational
relation with UNESCO. Its mission is to develop innovative computer-based
systems to concentrate, preserve and distribute taxonomic and biodiversity
knowledge and to act as a specialized informatics center to technically sup-
port the life sciences.
The Linnaeus II software comes in three different modules:
® Linnaeus II Builder (the content management system that allows you to
create information systems)
® Linnaeus II Runtime (to disseminate completed information systems as
electronic publication on CD-ROM or DVD-ROM)
® Linnaeus II Web Publisher (a Web-based version to disseminate informa-
tion systems via the Internet)
Information on the Linnaeus II tools as well as other software applica-
tions and services for the scientic community by ETI is available on our
website: www.eti.uva.nl. An overview of CD-ROM publications made with
the Linnaeus II software is available at: www.etiis.org.
This manual explains the use of Linnaeus II Builder version 2.5. It allows
you to create your own taxonomic or biodiversity information system. With
this software you can store and manage multimedia information on taxa in
your eld of expertise, including text descriptions, photographs, drawings,
audio, and video. It also allows you to create various types of computer-aided
identication keys and to set up an interactive geographic information system
with distribution data. The thus formed Linnaeus II information systems
can be published as electronic monographs on compact disk or made ac-
cessible via the web. They are Species Banks in the true sense as intended by
the Global Biodiversity Information Facility. Data stored in the Linnaeus II
format can be easily exchanged and merged with information from fellow
scientists.
This software is fully licensed and may not be reproduced for commercial
or any other purposes without the express written consent of ETI. Academic
and commercial licenses for the Linnaeus II software are available at ETI.

3
2
3
ETI provides the academic license free of charge to scientists who wish to
participate in the ETI Partner Program and intend to contribute taxonomic
and biodiversity data to the ETI/UNESCO ‘World Biodiversity Database’.
Completed data sets are, after peer-review by specialists, electronically pub-
lished and thus made available to all scientists and other interested parties.
We invite taxonomists and biodiversity specialists to enter data on their eld
of expertise and to contribute to the completion of the World Biodiversity
Database.
If you have any comments on the program or this manual, please contact
ETI at:
ETI Biodiversity Center
Mauritskade 61
NL-1092 AD Amsterdam
The Netherlands
Phone: +31-20-5257239
Fax: +31-20-5257238
E-mail: support@eti.uva.nl
Web site: http://www.eti.uva.nl

5
4
5
Table of contents
ETI’s Partner Program................................................................................... 5
Software and hardware requirements ........................................................... 6
How to install and run the software.............................................................. 7
Introduction................................................................................................... 8
How to get help .............................................................................................. 9
Before you start ............................................................................................ 10
What’s new in version 2.5............................................................................ 11
Using Linnaeus II......................................................................................... 12
Customizing your project............................................................................ 16
Working with text ........................................................................................ 18
Working with multimedia ........................................................................... 19
Importing text.............................................................................................. 21
The Navigator module................................................................................. 23
The Introduction module............................................................................ 23
The Species module ..................................................................................... 24
The Higher Taxa module............................................................................. 27
The Glossary module................................................................................... 28
The Literature module................................................................................. 30
The Index module........................................................................................ 32
The Text Key................................................................................................. 33
The Picture Key............................................................................................ 35
IdentifyIt....................................................................................................... 38
MapIt ............................................................................................................ 46
Index............................................................................................................. 53
Software license............................................................................................ 64

5
4
5
ETI’s Partner Program
The ETI Partner Program was set up by ETI and UNESCO. Its purpose is
to make a contribution to the documentation of the world’s biodiversity by
working with the scientic community to build a ‘World Biodiversity Data-
base’ that describes, depicts and identies the presently known 1.7 million
species. ETI Partners are scientists with expertise on a particular group of
organisms. Partners state their intention to contribute data on their taxon
or region. A Partner receives a free copy and user license of the Linnaeus II
Builder software package allowing for the use of this software on their own
computer equipment.
A Partner maintains his/her Linnaeus II information and identication
system as a multimedia record of that taxonomic group. Scientists who do not
have access to multimedia input devices (such as scanners, sound recorders,
and video boards), may work at ETI’s multimedia lab (bench fees apply) or
hire ETI staff (against nominal fees) to digitize photographs, sound record-
ings and video tapes in a computer format that can be used in the Linnaeus
software. ETI staff can also build a whole information system as assignment.
Partner Networks, associations between Partners who work together on the
same taxon or region, may be formed.
Completed information systems and other submitted data to the World
Biodiversity Database are subjected to a peer-review procedure before being
published on CD-ROM/DVD-ROM or the Internet, so that a high quality
of information can be maintained. ETI sponsors the publication of com-
pleted Linnaeus II monographs on CD-ROM. Available funding limits the
number of such ‘e-publications’ to 10 CD-ROM titles per year. The idea of
releasing your data on CD-ROM may be new to you. We urge you to keep in
mind that publication on CD-ROM can be thought of in exactly the same
way as publication in printed form. All ETI CD-ROMs have ISB numbers
and are sent to major organisations referencing scientic publications (e.g.
Zoological Records, Current Contents). ETI does not claim copyrights as it
promotes the sharing of information. The authors and contributors remain
owner of their information and merely transfer the non-exclusive right of
electronic dissemination to ETI. Partners receive a copy of their CD-ROM
free of charge in return for their contribution.

7
6
7
Software and hardware requirements
The Windows version of Linnaeus II version 2.5 requires a PC running Win-
dows 98, ME or XP, with at least 32 Mb free RAM memory. We also urge you
to use a monitor that can display 32-bit images (“True color” / “Highest”
setting), so that high-resolution images are correctly displayed.
You should also consider how much storage space you will need. You may
need signicant amounts of hard disk space – multimedia materials (images,
audio and video) take up particularly large amounts of storage space.

7
6
7
How to install and run the software
To install Linnaeus II 2.5 on your computer’s hard disk, double-click the
“Setup.exe” icon. This will launch the installation program.
Important: Under Windows XP, Linnaeus II can be installed in the
Programs folder only if you have full administrative privileges. Users with
a Limited User or Guest account will be able to install the program in the
Programs folder if they have access to an administrator password.
How to start the program
1. Click on the Start button in the task bar (usually located near the bot-
tom of the screen).
2. Select Programs from the list now shown.
3. Select ETI from the subsequent list now shown.
4. Select ‘Linnaeus II 2.5’ and click once on this item.
How to delete the program
1. Click on the Start button in the task bar (usually located near the bot-
tom of the screen).
2. Select Programs from the list now shown.
3. Select ETI from the subsequent list now shown.
4. Select ‘Uninstall Linnaeus II 2.5’ and click once on this item.
9
8
9
Introduction
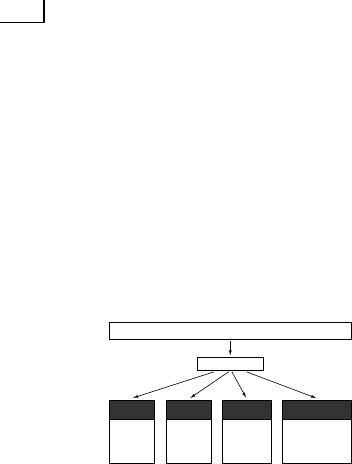
The Linnaeus II software package consists of a number of parts, known as
“modules.” These modules can be divided into four categories:
® the taxonomic databases
® the supporting databases
® the identication tools
® the biogeographical information system
The software package consists of
the Linnaeus II application,
the Navigator and ten additional modules.
Linnaeus II application
Navigator
Supporting
databases
Identification
tools
Biogeographical
information system
Higher Taxa
Species
Introduction
Glossary
Literature
Index
Text Key
Picture Key
IdentifyIt
MapIt
Taxonomic
databases
The taxonomic databases consist of two modules: Species and Higher Taxa.
The Species module is usually the most important part of your database. It
holds text and multimedia information on species (as well as subspecies and
other taxa below species level) within your taxonomic group: descriptions,
synonyms, common (vernacular) names, taxonomic information, literature
references, photographs, drawings, audio, video, etc. The Higher Taxa module
can be used to store information on all taxa above species level.
The supporting databases can be used to store additional information.The
Navigator acts as the central point or “main menu” of your project; it can
be used to navigate around Linnaeus II and store information on scientists,
students, publishers, and other contributors to your project. Use the Intro-
duction to enter general and introductory material on your taxonomic group;
you can also store other information here on topics such as methodology.
The Glossary holds denitions for technical terms used in the program.
The Literature module contains literature references for your group. And
the Index lists all described species and other taxa in alphabetical order, as
well as (sub)species epithets, scientic synonyms and common (vernacular)
names given for the described taxa.
There are three identication modules which let users of the program
identify a specimen based on its characters. The identication tool which
will probably be most familiar to you is the Text Key™, because it simply
is an electronic version of written dichotomous keys. The Picture Key™ is
similar to the Text Key but is picture- rather than text-based, and therefore
better suited to visual identication.

9
8
9
The third, most powerful identication tool is called IdentifyIt™. It is a
multiple-entry key based on a matrix of taxa, characters, and character states.
Unlike the Species and Higher Taxa databases, which hold text descriptions
of the taxa, in IdentifyIt taxa are described in a more structured format:
as a series of character states. This allows you to easily obtain answers to
specic questions like, “Which species are red and/or white with wings and
large feet?” We therefore encourage you to enter as much information as
possible in the IdentifyIt format because this will allow you to get the most
out of your data.
IdentifyIt has been designed to allow multiple data les for each group.
Thus, you could create one IdentifyIt le for basic taxonomic descriptions,
one for ecological characteristics, and one for morphologic or structural
information. Or it could be useful to create one IdentifyIt le for characters
as seen in preserved specimens, and another for fresh specimens. You can
also create a “master” or metale leading to specic les for each larger taxon
within your taxonomic group.
Linnaeus also contains a biogeographical information system called
MapIt™. This grid-based system allows you to enter geographical data on
species and other taxa, such as distributions and type localities. The data
can then be used to, among other things, search for species occurring in a
particular geographic region, compare the distribution of a species to that
of another, or display species richness.
How to get help
This manual is included with Linnaeus II version 2.5 as a PDF (Portable
Document Format) le. You can access it using Acrobat® Reader, which
is included on the Linnaeus II version 2.5 CD-ROM version. You can also
download the program free of charge at http://www. adobe.com/acrobat/
The Linnaeus II manual is also available within the program by going to
the Help menu and choosing the section that you want to read. This will
open the Help window to the appropriate page. You can also click the Help
button in the Navigator to open the Help window. The online documentation
is fully searchable: click on the Find button in the Help window, then enter
the text string that you want to nd, and click on Find or press return.
10
Before you start
We urge you to rst take some time to learn your way around Linnaeus II.
That way, you will feel more condent when you begin using the software
to enter actual data, and you will reduce the chance of making mistakes and
having to re-enter your data. If you have been working with an older version
of Linnaeus II (versions 2.0 up to 2.2), please take some time to familiarize
yourself with the changes in interface and functionality by checking out the
section “What’s new in version 2.5.”
There are also some important things you should consider and understand
before you start entering your data.
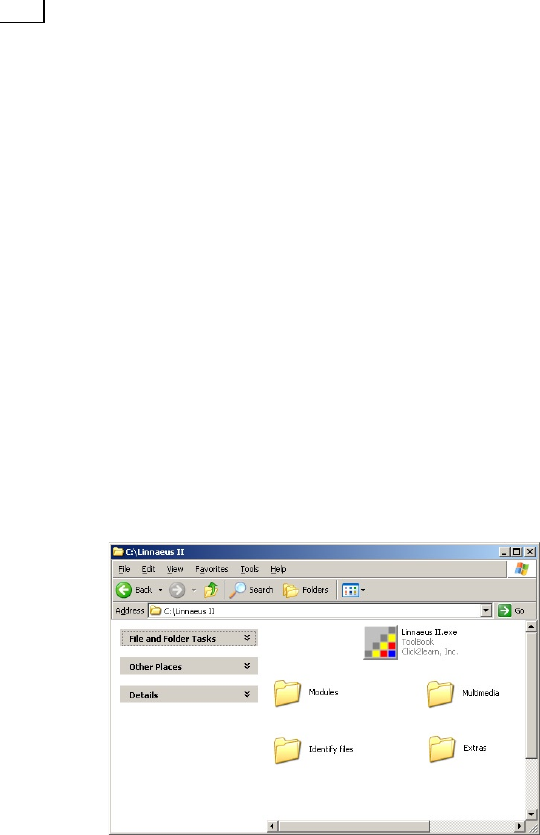
The Linnaeus II folder. All the les associated with your project should
be placed within a single Linnaeus II folder, in the appropriate subfolders
within this main folder. You should make a backup copy of your modules at
least once a day, and a backup of your entire Linnaeus II at least once a week.
However, it’s important that you do not keep two copies of the Linnaeus II
application on the same volume, or work with more than one copy, because
this may cause Linnaeus II to get confused and crash your computer.
The main Linnaeus II folder
contains the application
and four folders.
Multimedia les should be placed in the Pictures, Sounds, Movies, and
Text subfolders of the Multimedia folder. You can better organize your
multimedia les by creating new subfolders within the Multimedia fold-
ers, e.g., an Overview Pictures folder within the Picture folder. However,
you must tell Linnaeus about the existence of any new folders. To do this,
choose Edit Paths... from the File menu, click on Add..., and choose a le
within the newly-created subfolder. For more information, read the section
on “Customizing your project.”
Be consistent when entering your data. For instance, if you use subhead-
ers in the description of a species, then you should use the same subheaders

11
in all species descriptions. Do not mix fonts, sizes, and styles. Use 8-point
Verdana for all text.
When you copy text from a Microsoft Word document and paste it into a
text eld in Linnaeus II, the text sometimes includes unwanted information
about the font(s) used.
When in doubt, consult the manual or contact ETI’s support staff.
What’s new in version 2.5
This section outlines the most important changes in version 2.5 of ETI’s
Linnaeus II software package. If you have not used an older version of Lin-
naeus, you can skip this section.
Linnaeus II version 2.5 no longer has a Lower Taxa module; taxa below
species level are now stored in the Species module. Taxa below species level
now have a four-word name also indicating the subspecic rank, e.g., the
subspecies “Terrapene carolina mexicana” becomes “Terrapene carolina subsp.
mexicana”.
The Taxonomy eld in the Species and Higher Taxa modules is now called
the Classication eld. The available taxonomic levels have also changed -
the highest available level is now domain (in previous versions, the highest
level was kingdom), while the number of available taxonomic levels below
species level has been reduced to ve: subspecies, variety, subvariety, form
and subform. You can now enter your own kingdom and phylum names,
while in previous versions you were restricted to a preset list of names taken
from Margulis & Schwartz’ Five Kingdoms.
The Index now allows you to list the epithets of species and lower taxa
names as well, e.g. “exigua (Janthina)” for the species Janthina exigua. If you
choose to include synonyms in the Index, epithets of the synonyms will also
be listed in the Index. In addition, the Index module is now better at handling
duplicates – two or more taxa with the same synonym or common name.
In IdentifyIt, the Identify menu has been overhauled. File commands (e.g.
“Open Identify File”, “Save Identify File”) have been moved to the File menu,
while the commands Search Unknowns, Add Unknowns and Remove Un-
knowns have been replaced by a single command, Include Unknowns, which
can be toggled on and off to indicate whether you want to take unknown
(undened) characters into account when calculating the match percentages.
Another important interface change is the Add... button under the Identify
tab, which has been renamed Dene... and opens a window called Dene
Search Pattern.
The Find/Replace function now allows you to limit your search to one or

13
12
13
more elds in a module, e.g. you can search the name eld only, ignoring
the other elds. To access this feature, click the Fields... button in the Find
window (or the Replace window).
The Run Demo feature (accessible from the File menu) now allows you
to skip the elds during the demo and only show the pictures linked in the
Multimedia eld of the Species and Higher Taxa modules.
Find Hotwords now supports literature reference links in the format
“author (year)” as well. Verify Multimedia Files is a new command in the
File menu that allows you to check whether all linked multimedia les can
be found, verifying that none of the les have been accidentally renamed,
deleted or moved to a location where Linnaeus II can’t nd them. Port
Multimedia Files lets you generate a folder with cross-platform multimedia
and identify les (i.e., les with names that are valid in both Windows and
Macintosh OS).
In the Picture Key, new text-only choices now get a standard size, so you
can easily use the Picture Key as a text key (with the occasional picture-based
choice) as well. Both the Picture Key and the Navigator now display a line
grid when you hold down the Control key to help you place and align key
choices and module buttons.
Using Linnaeus II
This section explains the basic functionality of Linnaeus II. It will tell you
how to navigate around the software package, search for text, and export or
print text. Data entry is discussed in later chapters.
Windows. Each “module” (a Linnaeus II le) is shown in a separate
window. These windows can be opened by clicking on the icons in the
Navigator or choosing its name from the Window menu; a check mark in
this menu indicates the module window that you are currently using. The
menu also provides some commands that are useful for people with small
screens. The Close Window command provides you with a handy keyboard
shortcut (Ctrl+W) to close the topmost window. The Close Others command
(Ctrl+Shift+W) closes all windows except the topmost one.
In addition to the module windows, the Window menu also lists any
windows that are currently open, including multimedia and notepad (text
editing) windows.
Navigation. Each module consists of a number of “pages” that you can
leaf through just like in a real book. To turn to the next or previous page in
a module, click on the Next and Previous buttons along the bottom of the
window. You can also select Next Page or Previous Page from the Go menu,
13
12
13
or use the left and right arrow keys on your keyboard (whenever the cursor
is not inserted into text).
To see a list of all pages in the module that you are currently using, select
Contents... from the Go menu. You can also click on the Contents button
in the current module window, or press the up arrow key. Scroll down the
list to nd the page you want, then click on Go or press return to jump to
that page.
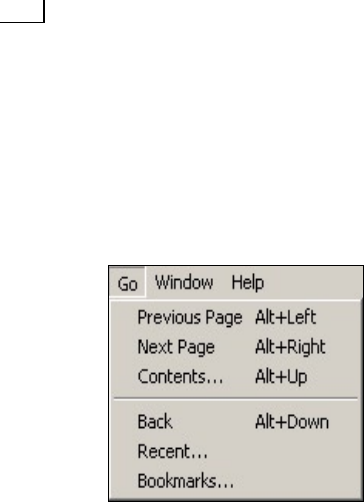
Use the Go menu to turn to
another page or retrace your steps.
To retrace your steps through Linnaeus II, choose Back (Ctrl+K) from the
Go menu or click on the Back button in the current module window. This
takes you back to the last page visited (rather than the last window, as it did
in older versions of Linnaeus II). You can also choose Recent... from the Go
menu to see a history, or list of all the pages that you have visited since you
launched Linnaeus II, and then return to any of these pages. You can see the
list of pages alphabetically or in the order that you visited them.
Finally, Linnaeus II offers a bookmarks feature similar to the ones found
in Web browsers. This feature allows you to create free-form subsets of your
data, and is therefore useful not only to CD-ROM users, but also to scien-
tists entering data. To place or open bookmarks, you must rst create a new
bookmarks le or open an existing one. To do so, select Bookmarks... from
the Go menu, click on New... or Open... to create or choose a le, and then
click on OK in the Bookmarks dialog box. A Bookmarks menu will now
appear in the menu bar. From this menu, you can select Add Bookmark to
bookmark the current page, or jump to any bookmarked page.
Fields. Each database module consists of a number of text elds. To switch
between elds, click on the “tabs” along the top of the window. When the eld
name shown on the tab is “grayed out,” the eld is empty on that page.To edit
the text in the elds, you have to “unlock” them by clicking on the lock icon.
Click again on this icon to lock the elds. The elds are also automatically
locked when the window is closed.
15
14
15
There are some exceptions. Classication and Multimedia elds cannot
be edited directly. When the elds are unlocked, click in the Classication
eld to open the Edit Classication dialog box, and click in the Multimedia
eld to open the Edit Multimedia dialog box. You can also choose Edit Clas-
sication... (Ctrl+J) or Edit Multimedia... (Ctrl+E) from the Entry menu.
In the Literature module, the Key Words eld cannot be edited directly;
select Edit Key Words (Ctrl+E) from the Entry menu to edit this eld. In
the Navigator, the “About ETI” eld cannot be edited except by ETI staff. In
the Index module, the elds cannot be edited; to update the information in
the elds, choose Update Index from the Entry menu.
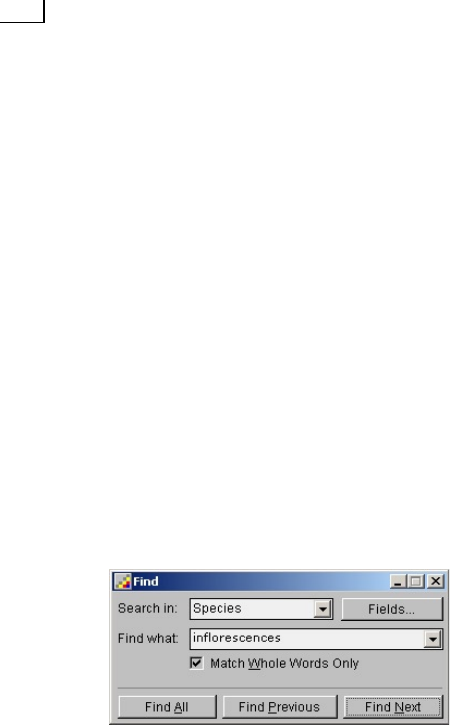
Finding text. To nd a text string or word(s), open the Find window by
selecting Find... (Ctrl+F) from the Edit menu. Choose the window where you
want to search from the dropdown menu marked “Search in:”. You can also
select “Search everywhere” from the dropdown menu to search system-wide.
Enter the text that you want to nd and click on the Find Next button or
press the Enter key. Linnaeus II will then perform the search and highlight
(invert) the found text. Click on Find Next to nd the next occurrence of
the text string. You can also click on Find Previous to jump back to the last
hit that was found.
The Find window lets you
nd text in a module or anywhere
within your project.
For your convenience, you can click on the black triangle to the right of
the text box in the Find window and use the dropdown menu to select a
text string that you have searched for once before since you launched Lin-
naeus II.
To nd all occurrences of a text string, click on the Find All button. After
searching, Linnaeus II will present the results in the Items Found window,
which lists the window, page, eld, and sentence where each hit was found.
Now click on an item in the list to jump directly to that hit. You can also
save or print the list of items found by clicking on one of the two icons in
the top left corner of the Items Found window.
To perform a global search, choose “Search everywhere” from the drop-
down menu in the Find window and then click on Find All.
To limit your search to one or more elds of a module (for example, to
search the page names only), click on the Fields... button and select the elds
15
14
15
that you want to search from the list.
You can perform nd-and-replace operations by selecting Replace...
(Ctrl+G) from the Edit menu. Click on Find to nd the occurrence of the
text that you want to replace, then click on Replace to replace it with the
text string that you have entered in the Replace window. Replace & Find
replaces the currently selected hit and immediately searches for the next hit.
To replace all occurrences in a window, nd the rst occurrence of the text
string that you want to replace and then click on Replace All. Note that you
cannot select “Search everywhere” from the window dropdown menu in the
Replace window at this time.
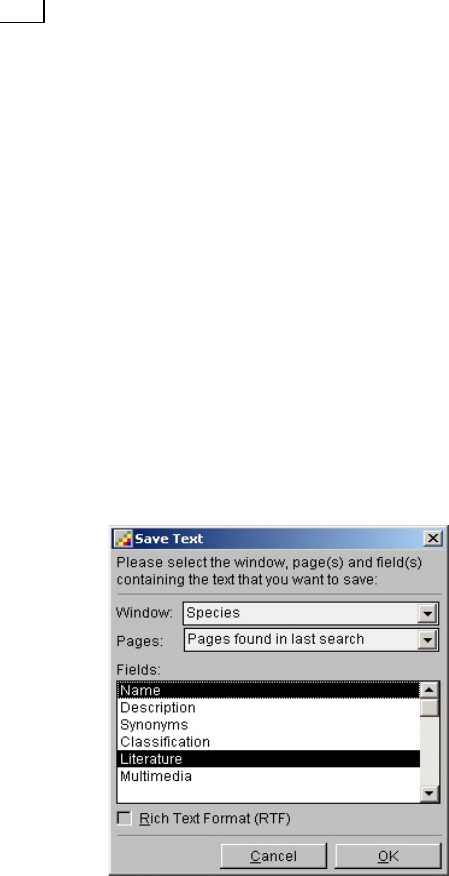
Saving and printing text. You can export text in Linnaeus II to a le by
using the Save Text... and Export Text... commands in the File menu. You
can also print text by selecting Print Text... from the File menu. The Save
Text... command lets you save text in standard format, while the Export Text
command is available only to entry users (and not on the nal published CD-
ROM version) and lets you create custom exports that can be re-imported
into Linnaeus II or another program, like a database or spreadsheet.
Choose Save Text... from the
File menu to save text to a le
Use the top dropdown menu to choose the window from which you want
to export text, and the second dropdown menu to select the range of pages
from which you want to export text. Then click in the list to select the elds
that you want to export. Check off the “Rich Text Format” box to export the
text in RTF format, which retains the bold, italic, and underline text styles.
If you selected Export Text... (rather than Save Text... or Print Text...), you
must also specify the eld delimiter, i.e., the character(s) placed between the
text of each eld. The best eld delimiter to use is dependent on the program
17
16
17
where you want to re-import the data.
When you save or print a key, you can select the format in which you
want to do so (“linear” or “hierarchical”) from the dropdown menu marked
“Format.”
When you choose MapIt from the top dropdown menu, you can only
select one eld in the list. Check off “Include map data” to include infor-
mation about each relevant grid square in the export.
Customizing your project
You can customize your project in a number of ways. Some things you should
always do, while others are advanced features that should be used only in
consultation with ETI.
Project title. To enter or change the title of your project, choose Edit Proj-
ect Title... from the File menu. After you enter the title, it will appear at the
top of the Navigator window. If you want, you can also change the name of
the Linnaeus II application in Windows Explorer to the name of your project.
Before doing this, however, you must rst exit Linnaeus II.
Navigator. Use the Welcome and Contributors elds in the Navigator to
enter, respectively, a welcome message and credits specic to your project.
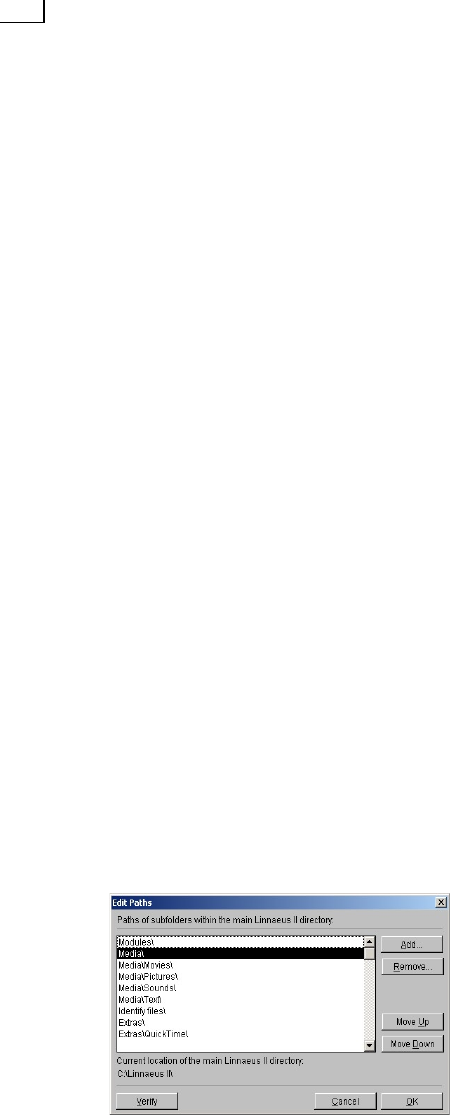
Paths. You have to tell Linnaeus in which subfolders within the main Lin-
naeus II folder it should look for les. For instance, if you add an Overview
Pictures folder within the Pictures folder, Linnaeus won’t be able to nd the
les within this new folder until you tell it about the new folder. You can’t
add paths outside the main Linnaeus II folder (the folder where the Linnaeus
II application resides).
Choose Edit Paths... from the File menu to bring up the Paths dialog box.
Here, click on Add... to add another path to the list and on Remove to remove
the paths that you have selected from the list. Click on Verify to verify that
all the paths are still valid, i.e., that those subfolders still exist. When you
are done, click on OK.
Choose Edit Paths... from the
File menu to change the list of
subfolders within the main
Linnaeus II folder.

17
16
17
Linnaeus II will offer to add a path automatically whenever you select a
le in a folder that it doesn’t know about (when you click on Add... in an
Edit Multimedia dialog box, for instance). The list of paths are stored in the
“Linnaeus Prefs” le in the Extras folder.
Modules (advanced feature). Choose Edit Modules... from the File menu
to bring up a dialog box where you can attach or remove modules from your
project. For example, if you won’t be using the Picture Key module, you
can remove it from your project so that it will no longer be shown in the
Navigator or in the Window menu. When you remove a module from your
project, the module le is not deleted from the Modules folder, so you can
re-attach it to your project at any time.
In the Edit Modules dialog box, click on Add... to add a module or on
Remove... to remove the selected modules in the list. You can change the
order in which the modules are shown in the Window menu by clicking on
the Move Up and Move Down buttons. Click on Divider to add a divider
(separator) to the Window menu, shown in the list as a “-”.
Custom modules (advanced feature). The Edit Modules... command also
lets you create a custom database module. In the Edit Modules dialog box,
click on the New Module... button to open the New Module dialog box.
You must now provide the name of the new module and the title of the
page name eld (e.g., “Method” for a methodology database), and choose
between one of four database templates. The standard template is similar
to the Higher Taxa module; the Species template adds an overview picture;
the Introduction template provides a single-eld database with an overview
picture; and the Glossary template provides a small window with an A-Z bar
like the Glossary and Literature have.
You must also provide the names of the text elds and the order in which
they will be listed as tabs along the top of the window. Use the Add, Remove,
Move Up, Move Down, and Rename buttons to specify the elds.
Click on OK to close the New Module dialog box, then click OK to close
the Edit Modules dialog box. Linnaeus will now create your custom module
(using the Module Templates le in the Extras folder), adding its name to
the Window menu, and adding a button to the Navigator. You can move this
button by holding down the Control key and dragging it to another location
in the Navigator window.
Custom elds (advanced feature). Select the Edit Fields... commands to
edit the text elds of the current module window. This command brings
up the Edit Fields dialog box, where you can add one or more elds to the
module; remove elds; rename elds; or change the order of the elds. You
can customize the database modules, but not the identication modules (Text
Key, Picture Key, IdentifyIt, MapIt). The maximum number of elds allowed

19
18
19
varies from module to module; the Navigator allows ve elds, while the
Introduction only allows one (not counting the page name eld).
Be very careful: if you remove a eld, you will also lose the text that it
contained – on every page in the module.
Working with text
Each database module has a number of text “elds.” Click on the lock icon
to “unlock” the elds so that you can type in them.
The Edit menu contains all the commands that you need for text editing.
Here you can cut, copy, and paste text; change the font, size, and style; nd
and replace text; and insert a hypertextual “hotword” that users can click on
to open a multimedia le, or jump directly to a page in the same or another
module.
Undo. The Undo (Ctrl+Z) command in the Edit menu undoes all changes
that you’ve made to a text eld since you’ve inserted the cursor into it. This
function works only in the text elds of the database modules (Navigator,
Introduction, Species, Glossary, Literature, and custom modules).
Changing the font, size, and style. For maximum legibility, text should
be in 8-point Verdana. To change text to this font and size, select it and then
choose “Verdana 8” from the Edit menu. Please consult ETI before using any
font other than standard Windows system fonts.
The Style submenu lets you change text to boldface (Bold, or Ctrl+B), ital-
ics (Italic, or Ctrl+I), or underlined text (Underline, or Ctrl+U). You can also
remove text styles by choosing Plain (Ctrl+T) from the Style submenu.
Inserting a page name or hotword. To insert a page name (such as a spe-
cies name or literature reference) or a hotword that opens a multimedia le
or takes the user directly to another page in the same or another module,
use the commands in the Insert submenu of the Edit menu. To insert a link
to a le into the text, choose Multimedia File... and then select the le you
want from the le dialog box. Valid le types are: text les; TIFF and JPEG
images; and QuickTime audio/video les. After you click OK, the le name
is inserted into the text as a blue-colored “hotword.” This means that, when
the elds are locked and you click on the le name, the le will open auto-
matically in a multimedia or notepad (text) window.
In the dialog box that opens when you choose Page Name..., you can select
a window and then choose the page within that window that you want to
insert into the text. You can also choose between “Normal Text” and “Ho-
tword.” If you click on “Hotword,” the inserted page name will be colored

19
18
19
blue and become “hot” so that, when the elds are locked and you click on
the page name, you jump directly to that page.
You do not need to insert any hotwords yourself. After your project is
completed, ETI staff will generate the hotwords for you by running software
that searches the texts for page names and turns them all into hotwords
(clickable links to other pages in the same module or other modules).
Notepads. When you click on the name of a text le in a Multimedia
eld, the text le is opened in a “notepad” window. Here, you can save the
text under another name, print it, or copy part of the text. You can also open
any text le in a notepad window by selecting Open Notepad... from the File
menu. If you want to jot down some notes, or simply need a separate text-
editing window, choose New Notepad... from the File menu or click on the
Notepad button in the Navigator.
Working with multimedia
Linnaeus II supports four types of multimedia les:
® text
® pictures
® audio
® video
When you open a text, picture, audio, or video le in Linnaeus II, its
contents are shown in a multimedia window. Along the top of the window
are icons that you can click to print the le, save a copy of the le, or (for
pictures) zoom up and down.
Text les can be written with a Linnaeus notepad, which you can create by
selecting New Notepad... from the File menu. You can also use a text editor,
or a word processor such as Microsoft Word. Note that text les are plain text
– fonts, sizes, and styles (bold, italic, and underlined text) are not shown.
Image les must be saved in TIFF or JPEG format. If you want to use
an image le as an overview picture (in the Species or Introduction, for
instance), the picture must have a height of 281 pixels and a width of 241
pixels. In addition, all images must be saved at 72 dots per inch (dpi) reso-
lution and at a bit depth of 32 bits. To digitize images, you need scanning
software as well as a at-bed scanner, hand-held scanner, slide scanner, or
frame grabber. You can also use a digital camera.
To reduce the size (disk space) of a le without losing image quality, save
images in TIFF format using LZW compression. JPEG compression (in JPEG

21
20
21
les) also reduces the size (disk space) of a le, but be warned, this can lead
to noticeable loss of image quality! For more information on image com-
pression, please contact ETI.
Linnaeus also supports audio and video les in Apple’s QuickTime™
format. To create an audio le, start with a quality recording of the sound
or record it directly on the computer, using a sound digitizer or (if available)
built-in sound recording equipment. To create a movie, begin with a quality
video recording. Next, you will need a video board that creates QuickTime
movies. Create the digital QuickTime movie and then save it as designated
by your video hardware.
ETI organizes courses on the use of multimedia software and hardware.
The course materials provide more detailed information on the use of pro-
grams like PhotoShop and hardware devices such as scanners and sound
recorders. Please contact ETI to obtain these materials, to sign up for a course,
or for assistance with choosing multimedia hardware and software. ETI also
provides access to its multimedia lab in Amsterdam.
Never use the same name twice for two different les, even when they
are in two different folders or have different formats (e.g. when one is a text
le and the other an audio le). You should also avoid nondescriptive le
names, abbreviations, and numbering schemes.
Multimedia les should be placed in one of four subfolders of the Multi-
media folder (Pictures, Sounds, Movies, and Text) within the main Linnaeus
II folder. When a folder contains more than 200 les, you should create
new subfolder(s) within that folder and divide the les between them. For
instance, you can create an Overview Pictures subfolder within the main
Pictures folder. However, you must tell Linnaeus about the existence of any
new folders. To do this, choose Edit Paths... from the File menu and then
click on Add... (see the section on “Customizing your project”).
The easiest way to provide access to multimedia les is to place them in
the Multimedia eld of a module. For instance, a picture of a species should
be placed in the Multimedia eld of the page for that species in the Species
module. To change the contents of a Multimedia eld, choose Edit Multi-
media... (Ctrl+E) from the Entry menu. You can also click in the Multimedia
eld when the elds are unlocked (click on the lock icon to unlock the elds
of a module).
This command opens the Edit Multimedia dialog box, where you can add
or remove les from the list. You can also click on the Caption... button to
attach a “caption” to a le that provides users with additional information
about that le. The caption is shown in [brackets] behind the le name in
the list. To remove a caption, click on Caption..., press Backspace to delete
the text, and then click on OK.

21
20
21
The second way to attach multimedia to your project is to insert links to
multimedia les into the text. In the description of a species, for instance,
you could insert a link to a distribution map picture following a description
of that species’ geographical distribution.
To insert a multimedia le link into the text, rst unlock the elds of the
module (by clicking on the lock icon) and place the cursor into the text where
you want to insert the link. Next, go to the Insert submenu of the Edit menu,
and choose Multimedia File... from the submenu. Finally, choose the le that
you want to insert from the le dialog box. The blue-colored link will now
be inserted into the text. When you lock the eld and click on the link, the
linked multimedia le will open automatically in a new window.
You can also link multimedia les to character states in an IdentifyIt le.
For more information, see the section on IdentifyIt.
Importing text
Linnaeus II offers a powerful text import feature. You can import text from
a plain text le, a Rich Text Format (RTF) le, a Linnaeus 1.x le, or a Lin-
naeus 2.x le.
To import text, choose Import Text... from the File menu. You are now
presented with a le dialog box where you can choose the le that you want
to import. This can be either by a text le, a Linnaeus 1.x module, or a Lin-
naeus 2.x module.
Importing from an older version of Linnaeus. To import from a le made
with Linnaeus II versions 1.0 to 1.2, select Import Text... from the File menu,
then select the le from which you want to import.
If you try to import a page that already exists, you can choose to replace
it or add the new page under a different name. You can also click on Replace
All to automatically replace all existing pages.
Importing from a module. To import from a Linnaeus II 2.x module (cre-
ated in Linnaeus versions 2.0 up to 2.5), select Import Text... from the File
menu and then choose it from the le dialog box. Select the pages that you
want to import and click OK, or click Import All to import all pages.
You can also import a key; this will replace all existing information cur-
rently contained in that key. In other words, you cannot use the import
function to modify an existing key. To import into MapIt, you must use the
Export Objects... command to rst export the data to a le, and then import
the data back into MapIt using the Import Objects... command.
Importing from a text le. Importing from a text le (saved as “text-only”
in your word processor) or RTF le is more complex because you must tell
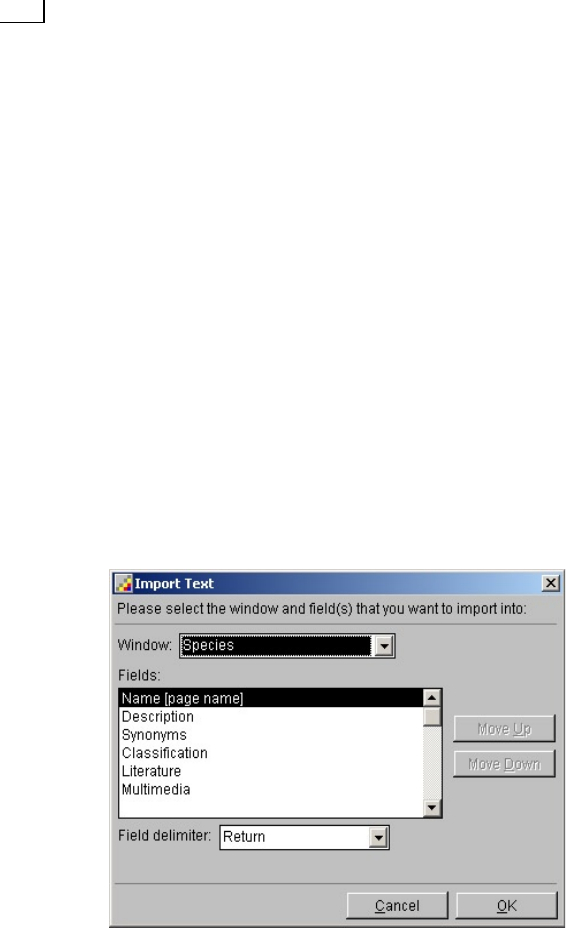
23
22
23
Linnaeus II what the format of the data is, and where you want to import
the text. Select the window from the dropdown menu, then click in the list
to select the elds to import into. You can specify in which order the text
should be imported into the elds by clicking on the “Move Up” and “Move
Down” arrow buttons. Finally, you must specify the eld delimiter, i.e., the
character(s) that will be placed between the text of each eld in order to
separate them. The delimiter that you use to separate elds must be identical
to the delimiter used to separate pages, i.e., the characters used to separate
the last eld of a page and the rst eld of the next page. You can use one
of the standard delimiters (carriage return, tab, double carriage return, or
double tab), or use one or more unusual characters that you are certain do
not occur in the text itself (such as ”∞” or “Δ”).
If you have a list of species names that is return-delimited (one name per
line), you can automatically create pages for them in the Species module.
To do so, choose Import Text... from the File menu and select the text le
from the dialog box, then select Species from the window dropdown menu,
click on “Name [page name]” in the list of elds (and de-select any other
elds), choose “Return” from the eld delimiter dropdown menu, and click
on OK.
Linnaeus II lets you
import from a text or
RTF le.
When you import from a Rich Text Format (RTF) le, Linnaeus II will
keep the text’s bold, italic, and underline formatting, but ignore all other
formatting, including fonts and sizes.

23
22
23
The Navigator module
The Navigator module opens automatically when you launch Linnaeus II. It
acts as the central point or “main menu” of your project. Use it to navigate
around Linnaeus II and to store information on scientists, students, pub-
lishers, and other contributors.
The buttons that lead to the various modules are visible only when 1) the
Contents eld is visible and 2) the elds are locked. They disappear as soon
as you click on the “Welcome,” “Contributors,” or “About ETI” tab, or when
you click on the lock icon to unlock the elds.
You can move any of the module buttons around in the window by holding
down the Control key and dragging it. The buttons are added and removed
automatically when you use the advanced feature Edit Modules... in the File
menu (see the section on “Customizing your project”).
Choose Get Info from the Entry menu to nd out what the location and
le size of the Navigator module is.
The text in the “About ETI” eld cannot be changed by anyone except
ETI staff.
The Introduction module
Use the Introduction to enter general and introductory material on your
group; you can also store other information here on topics such as method-
ology. To open the Introduction, click on its icon in the Navigator, or choose
it from the Window menu.
In the Introduction window, click on the Next and Previous buttons to
leaf through the pages of the Introduction, or click on Contents to see the
list of pages in the Introduction and jump to any of them.
The Introduction does not have any “tabs” along the top of the window be-
cause it contains one text eld only. To edit the text, click on the lock icon.
To add a page to the Introduction, choose New Topic... (Ctrl+N) from
the Entry menu and then enter the name of new page. You can change the
name of the current page by choosing Rename Topic...(Ctrl+R) from the
Entry menu, or remove one or more pages from the Introduction using the
Delete Topics... command. To change the order of the pages in the Intro-
duction, select Sort Topics... from the Entry menu. This opens the Sort Topics
dialog box, where you can click on the Move Up and Move Down buttons
to rearrange the pages, or click on the Sort Alphabetically button to arrange
the pages in alphabetical order. You can also add and remove topics in this
dialog box by clicking on Add... or Remove.

25
24
25
On any page in the Introduction, you can display an overview picture
next to the text by choosing Show Picture... from the Entry menu and then
selecting a TIFF or JPEG le from the le dialog box. The picture must be 241
pixels horizontally and 281 pixels vertically. Remove the overview picture by
choosing Hide Picture from the Entry menu. You can also click on the Hide
Picture button in the bottom left corner of the window to hide the picture
and give more space to the text; click again on the button (now called Show
Picture) to display the overview picture again.
Choose Get Info from the Entry menu to nd out how many pages the
Introduction contains, as well as the location and le size of the module.
The Species module
Use the Species module to store descriptions of species within your taxo-
nomic group, as well as subspecies and other taxa below species level. This
information can be text (descriptions, synonyms, common names, taxo-
nomic information, references, etc.) or multimedia (photographs, drawings,
audio, video). Taxa above species level should be stored in the Higher Taxa
module. To open the Species module, click on its icon in the Navigator, or
choose it from the Window menu.
The module contains one page for each species. Click on the Next and
Previous buttons in the Species window to leaf through the pages, or click
on Contents to see the list of pages and jump to any of them.
The name of the current species is shown in blue along the top of the
window. Click on the “tabs” to switch between text elds. When the eld
name shown on the tab is “grayed out,” the eld is empty on that page. To
unlock the elds and edit the text in them, click on the lock icon.
Add another page to the Species by choosing New Taxon... (Ctrl+N) from
the Entry menu. This command opens a dialog box where you can select the
taxonomic level of the new taxon (species or a subspecic taxonomic level)
and enter its name. If you’re entering a species, you can click on the Genus...
button to insert the name of a genus into the rst word of the name eld;
or if you’re entering a subspecies, click on the Species... button to insert the
name of a species into the rst two words of the name eld. Then choose
which elds you want to copy from the current page to the new page. For
example, if you add a new species belonging to same genus as the current
species, select Classication to copy the higher taxonomic classication in
the Classication eld of the current taxon to the Classication eld of the
new taxon. Otherwise, the Classication eld of the new species will be au-
tomatically copied from a species within the same genus, if available.
25
24
25
You can change the name of the current species by choosing Rename
Taxon...(Ctrl+R) from the Entry menu, or remove one or more pages from
the Species using the Delete Taxa... command. To change the order of species,
select Sort Taxa... from the Entry menu and then choose whether you want
to sort them alphabetically, by taxon (all species together, all subspecies to-
gether etc.), in taxonomic order (alphabetically, based on the contents of the
Classication eld on each page), or in custom order. If you choose “Custom
order ...”, the Sort Taxa dialog box will open. Here, click on the Move Up and
Move Down buttons to rearrange the pages, then click on OK.
Use the Description eld to enter a standard taxonomic description of
the taxon. What is standard differs from one taxonomic group to the next
and should therefore be decided by the author (or group of authors) on the
basis of current usage in the area of expertise. Use a concise, but not tele-
graphic, style of writing. The Description eld can also contain the name
of the author and the year of publication, as well as information on ecology,
morphology, etc.
The Classication eld lists the current taxonomic hierarchy for the spe-
cies. List only those categories which are really functional for your group of
organisms. Botanists are invited to read “division” where it says “phylum.” To
enter the higher taxonomic classication of a taxon or change the contents of
the Classication eld, choose Edit Classication... (Ctrl+J) from the Entry
menu, or unlock the elds (by clicking on the lock icon) and click in the Clas-
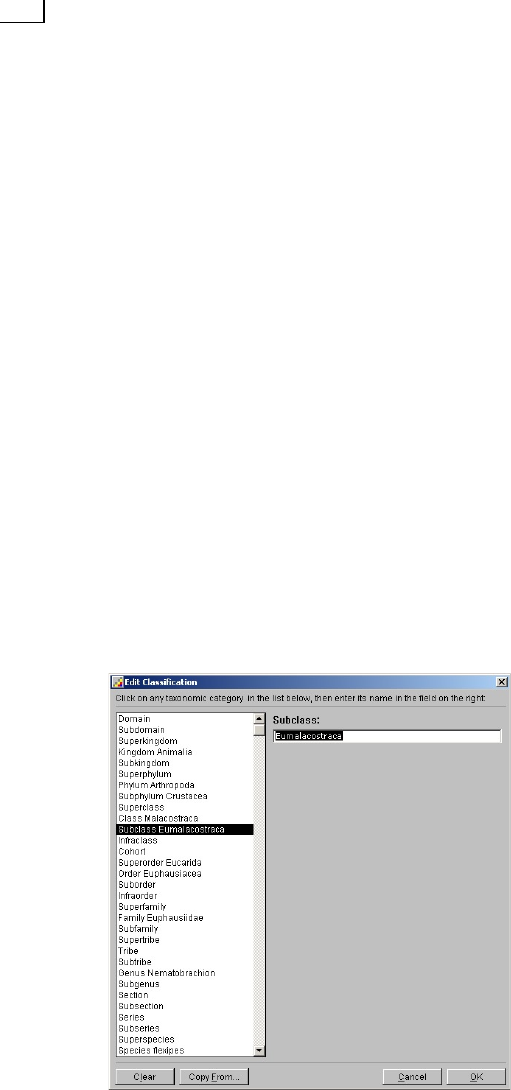
sication eld. This command opens the Edit Classication dialog box.
Use the Edit Classication
dialog box to enter the
higher taxonomic
classication of a species
or another taxon.

27
26
27
Click in the eld on the left to select a taxon, and then enter its name into
the eld on the right. If you selected kingdom or phylum, you are presented
with a list from which you can choose a taxon name, or you can enter another
name. Click on Clear to remove all taxon names. Click on Copy From.. to
copy the taxonomic classication of a species or other taxon to the taxonomic
classication of the current taxon. For instance, when entering a species, you
can copy the taxonomic classication of the genus or a species in the same
genus, saving you the trouble of re-entering the taxonomic classication for
each taxon you add to the Species module.
To assign multimedia les to a species, choose Edit Multimedia... (Ctrl+E)
from the Entry menu, or unlock the elds and click in the Multimedia eld.
This opens the Edit Multimedia dialog box, where you can add or remove
les, or copy them from another taxon (see the section on “Working with
multimedia”).
We recommend that each page in the Species have an overview picture
representing the overall morphology of the taxon. The overview picture is
displayed to the right of the text. After you click on OK in the Edit Multi-
media dialog box, Linnaeus II automatically searches for the rst TIFF or
JPEG le in the list with a width of 241 pixels and a height of 281 pixels and
assigns it as the overview picture of that taxon. You can click on the Hide
Picture button in the bottom left corner of the Species window to hide the
overview picture and give more space to the text; click again on the button
(now called Show Picture) to display the overview picture again.
The Synonyms eld holds any scientic synonyms for the taxon name
as well as common (vernacular) names. When entering scientic synonyms
for a taxon into the Synonyms eld, make sure each name is followed by a
vertical line (|). This will enable the synonym to be included in the Index
when you choose Update Index from the Entry menu in that module. The
vertical line should follow the actual name but precede the additional info,
e.g., Dugestia festae | n. sp. Borelli, 1898. The vertical lines will be removed
by ETI staff during nalization of your project.
Common names should be followed by the language in [brackets]. For
more about common names, see the section on the Index module.
To simplify entry of literature references and ensure that the reference is
identical in the taxonomic databases (Species and Higher Taxa), you must
enter literature references directly into the Literature module (see that sec-
tion). You can add the name of the current taxon to the Key words eld of
one or more references in the Literature by selecting Link to References...
from the Entry menu.
Choose Get Info from the Entry menu to nd out how many pages the
Species contains, as well as the location and le size of the module.

27
26
27
The Higher Taxa module
The Higher Taxa module holds information on taxa above species level
– from domain down to superspecies. This information can be text (de-
scriptions, synonyms, common names, taxonomic information, references,
etc.) or multimedia (photographs, drawings, audio, video). Species and
taxa below species level should be placed in the Species module. To open
the Higher Taxa, click on its icon in the Navigator, or choose it from the
Window menu.
The module contains one page for each higher taxon. Click on the Next
and Previous buttons in the Higher Taxa window to leaf through the pages,
or click on Contents to see the list of pages and jump to any of them.
The name of the current taxon is shown in blue along the top of the win-
dow. Click on the “tabs” to switch between text elds. To unlock the elds
and edit the text in them, click on the lock icon.
Add another page to the Higher Taxa by choosing New Taxon... (Ctrl+N)
from the Entry menu. This command opens a dialog box where you can
select the taxon from the dropdown menu and enter its name into the text
box. Then choose which elds you want to copy from the current page to
the new page and click OK. You can change the name of the current taxon
by choosing Rename Taxon... (Ctrl+R) from the Entry menu, or remove one
or more pages from the Higher Taxa using the Delete Taxa... command. To
change the order of the taxa, select Sort Taxa... from the Entry menu and
then choose whether you want to sort them alphabetically, by taxon (all or-
ders together, all families together etc.), in taxonomic order (alphabetically,
based on the contents of the Classication eld on each page), or in custom
order. If you choose “Custom order ...”, the Sort Taxa dialog box will open.
Here, click on the Move Up and Move Down buttons to rearrange the pages,
then click on OK.
To enter the higher taxonomic classication of a taxon or change the con-
tents of the Classication eld, choose Edit Classication... (Ctrl+J) from the
Entry menu, or unlock the elds (by clicking on the lock icon) and click in
the Classication eld. This command opens the Edit Classication dialog
box. Click in the eld on the left to select a higher taxon, and then enter its
name into the eld on the right. If you selected kingdom or phylum, you
are presented with a list from which you can choose a taxon name, or you
can enter another name. Click on Clear to remove all taxon names. Click on
Copy From... to copy the taxonomic classication of a taxon to the taxonomic
classication of the current taxon. For instance, if you are entering the taxo-
nomic classication of a genus, you can copy the taxonomic classication
of a species within that genus.

29
28
29
To assign multimedia les to a taxon, choose Edit Multimedia... (Ctrl+E)
from the Entry menu, or unlock the elds and click in the Multimedia eld.
This opens the Edit Multimedia dialog box, where you can add or remove
les, or copy them from another taxon (see “Working with multimedia”).
The Higher Taxa module does not display overview pictures.
The Synonyms eld holds any scientic synonyms for the taxon name
as well as common (vernacular) names. When entering scientic synonyms
for a taxon into the Synonyms eld, make sure each name is followed by a
vertical line (|). This will enable the synonym to be included in the Index
when you choose Update Index from the Entry menu in that module. The
vertical line should follow the actual name but precede the additional info,
e.g., Genus Dugestia | Borelli, 1898. The vertical lines will be removed by ETI
staff during nalization of your project.
Common names should be followed by the language in [brackets]. For
more information on entering common names, see the section on the Index
module.
To simplify entry of literature references and ensure that the reference is
identical in the taxonomic databases (Species and Higher Taxa), you must
enter literature references directly into the Literature module (see that sec-
tion). You can add the name of the current taxon to the Key words eld of
one or more references in the Literature by selecting Link to References...
from the Entry menu.
Choose Get Info from the Entry menu to nd out how many pages the
Higher Taxa contains, as well as the location and le size of the module.
The Glossary module
The Glossary holds denitions for technical and/or scientic terms used
in your project. To open the Glossary, click on its icon in the Navigator, or
choose it from the Window menu.
The Glossary contains one page for each term. Click on the Next and
Previous buttons in the Glossary window to leaf through the pages, or click
on Contents to see the list of pages and jump to any of them.
Clicking on a word doesn’t automatically look it up in the Glossary (as
it did in Linnaeus 1.x), unless it is a blue-colored “hotword” that you’ve
added using the Insert Page Name command. Terms found in the Glossary
are marked as hotwords by ETI staff only after all data has been entered and
your project is ready to be published.
Along the top of the Glossary window is an A-Z bar. Click on a letter to
jump to the rst term starting with that letter. If there are no terms for a
29
28
29
particular letter, it is “grayed out” (disabled). Click on the “tabs” to switch
between the Denition, Synonyms, and Multimedia elds. To unlock the
elds and edit the text in them, click on the lock icon.
Add another page to the Glossary by choosing New Term... (Ctrl+N) from
the Entry menu. This command opens a dialog box where you enter the new
term. Then, choose which elds you want to copy from the current page to
the new page, and click OK. You can change the name of the current term by
selecting Rename Term... (Ctrl+R) from the Entry menu, or remove one or
more pages from the Glossary using the Delete Terms... command. To sort
the terms in alphabetical order and update the A-Z bar along the top of the
window, choose Sort Terms from the Entry menu.
To assign multimedia les to a term, choose Edit Multimedia... (Ctrl+E)
from the Entry menu, or unlock the elds and click in the Multimedia eld.
This opens the Edit Multimedia dialog box, where you can add or remove
les, or copy them from another term (see “Working with multimedia”).
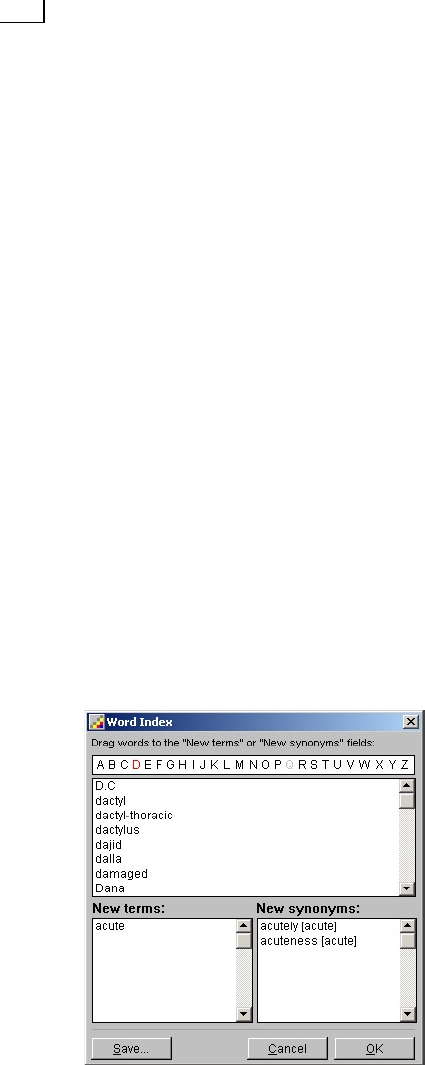
You can add a number of terms and synonyms simultaneously by choosing
Word Index... from the Entry menu and then choosing in which module(s)
you want to index the text. Note that this operation can take up to several
hours to complete, depending on the size of the module(s) that you want to
index. When it is done, Linnaeus will present the indexed words in the Word
Index window. Click on a letter in the A-Z bar to see the words starting with
that letter. Now you can drag words from the list and drop them in the “new
terms” or “new synonyms” eld. When you drag a word to the synonyms,
you also have to assign it to a term.
The Word Index lets you add terms
and synonyms to the Glossary in
one step.

31
30
31
Click on Save... to export the word index to a le, so you can go through
the list at another time to nd the terms and synonyms that need to be
dened in the Glossary.
Choose Get Info from the Entry menu to nd out how many pages the
Glossary contains, as well as the location and le size of the module.
The Literature module
The Literature module contains literature references for your taxonomic
group. To open the Literature, click on its icon in the Navigator, or choose
it from the Window menu.
The Literature contains one page for each reference. Click on the Next
and Previous buttons in the Literature window to leaf through the pages, or
click on Contents to see the list of pages and jump to any of them.
Unlike the “References” stack in Linnaeus II version 1.x, the Literature
module requires that each page be named. The name of the current reference
is shown in blue.
Along the top of the Literature window is an A-Z bar. Click on a letter to
jump to the rst reference starting with that letter. If there are no references
for a particular letter, it is “grayed out” (disabled). Click on the “tabs” to
switch between the Reference and Key words elds. To unlock the elds and
edit the text in them, click on the lock icon.
To simplify entry of literature references and ensure that each reference
is identical in the Literature and the Species and Higher Taxa modules, you
must enter literature references directly into the Literature module and assign
species and other taxa as key words. When you have entered all the references
into the Literature and added the proper key words for each, choose Update
Literature from the Entry menu to copy each reference to the Literature eld
of the taxa in the Higher Taxa and Species that have been assigned as key
words to that reference.
To edit the key words of the current reference, choose Edit Key words
(Ctrl+E) from the Entry to open the Edit Key words dialog box. Click on
Add... to add taxa names or other key words to the list. You can also copy the
key words from the Key words eld of another reference by clicking on the
Copy From... button. To remove key words, select one or more key words
in the list and click on Remove. You can change the order of the key words
by selecting one or more items in the list and clicking on the Move Up and
Move Down buttons. Click on Sort to sort the items in the list in alphabetical
order, or close the Edit Key words dialog box and choose Sort Key words...
from the Entry menu.

31
30
31
Add another page to the Literature by choosing New Reference... (Ctrl+N)
from the Entry menu. This command opens a dialog box where you enter
the name of the new reference. Choose whether the reference has one, two,
or multiple authors, enter the name(s) of the author(s) and year of publi-
cation, specify whether you want to copy the key words from the current
reference to the new reference, and click on OK.
You can change the name of the current reference by choosing Rename
Reference... (Ctrl+R) from the Entry menu, or remove one or more pages
from the Literature using the Delete References... command. To sort the
references in alphabetical order and update the A-Z bar along the top of the
window, select Sort References from the Entry menu.
When you import literature references from a text, RTF, or Linnaeus
1.x le (see the section on “Importing text”), new pages will be named
“Untitled x,” where x is a number. After the import is done, you must give
every “Untitled” page its proper name by turning to that page and choos-
ing Rename Reference... (Ctrl+R) from the Entry menu. The program will
suggest a page name to you, so in most instances all you have to do is click
OK (or press Enter).
Choose Get Info to nd out how many pages the Literature contains, as
well as the location and le size of the module.
References should be entered in the following formats:
® single-author paper:
Sluys, R., 1990. On Bdellasimilis barwicki (Platyhelminthes: Tricladida)
and its phyletic position. Invertebr. Taxon. 4: 149-158.
® double-author paper:
Franzèn, A. and B. J. Afzelius, 1987. The ciliated epidermis of Xenoturbella
bocki (Platyhelminthes, Xenoturbellida) with some phylogenetic consid-
erations. Zool. Scr. 16: 9-17.
® multiple-author paper:
Jennings, J. B., L. R. G. Cannon and A. J. Hick, 1992. The nature and origin
of the epidermal scales of Notodactylus handschini - an unusual Temnoce-
phalid turbellarian ectosymbiotic on craysh from Northern Queensland.
Biol. Bull. 182: 117-128.
® chapter in a book:
Karling, T. G., 1974. On the anatomy and afnities of the turbellarian
orders. In: N. W. Riser & M. P. Morse (eds), Biology of the Turbellaria,
McGraw-Hill, New York: 1-16.

33
32
33
® book:
Margulis, L. and K. V. Schwartz, 1988. Five Kingdoms. W. H. Freeman &
Company, New York. 376 pp.
® edited book:
Ainsworth, G. C. & A. S. Sussman (eds), 1965-1973. The fungi. 4 vols.,
Academic Press, New York.
The Index module
The Index lists all the species and other taxa described in the taxonomic
database modules (Species and Higher Taxa), including scientic synonyms,
common (vernacular) names and epithets. To open the Index, click on its
icon in the Navigator, or choose it from the Window menu.
Click on the “tabs” to switch between the Species and Lower Taxa, Higher
Taxa, and Common Names elds. You cannot edit the text in the elds; to
update the lists, choose Update Index from the Entry menu. Note that this
operation may take a long time to complete, depending on how many taxa
you have entered.
The “Species and Lower Taxa” eld is an alphabetical list of all taxa (spe-
cies as well as subspecies and other taxa below species level) with a page in
the Species module, while the “Higher Taxa” eld is an alphabetical list of
all taxa above species level that have a page in the Higher Taxa modules.
The names of taxa that have a page in one of the two taxonomic database
modules are marked in blue. To jump directly to the page for that taxon,
click on its name.
The Species and Lower Taxa and Higher Taxa elds can also include sci-
entic synonyms for taxa. Refer to the sections on the Species and Higher
Taxa modules for further information on how to include synonyms in the
Index.
Click the “Common Names” tab to display the common names of species
and other taxa. If common names are available in more than one language,
you can switch to another language by choosing it from the dropdown menu
marked “Choose language:”. To specify the common names of a taxon, enter
them into the Synonyms eld on the page for that taxon (one per line) fol-
lowed by the language, which is placed between [brackets]. So, for instance,
the Synonyms eld for the species Platalea leucorodia would contain (in
addition to any scientic synonyms):
33
32
33
Eurasian Spoonbill [English]
Spatule blanche [French]
Löfer [German]
Espátula [Spanish]
Lepelaar [Dutch]
Alternatively, you can use each language’s native name, but be consistent
throughout your project — do not use “Français” in some places and
“French” in others.
The Text Key
Of the three identication tools included with Linnaeus II, which let you
identify a specimen based on its characters, the Text Key will be most fa-
miliar to taxonomists because it is simply an electronic version of written
dichotomous keys. To open the Text Key, click on its icon in the Navigator,
or choose it from the Window menu.
The Text Key has a hierarchical structure of pages that you traverse by
clicking on choices. Each page has at least two and no more than four choices.
You construct a key by adding choices. Pages are added automatically when-
ever you add a choice that leads to a new page in the key. The page numbers
are also renumbered automatically when pages are added or removed.
Keys are structured hierarchically.
Page 1
Family
Page 2
Genus a
Page 5
Genus b
Page 3
Species a1
Page 4
Species a2
Page 6
Species b1
Page 7
Species b2
Page 8
Species b3
Choices are indicated by the page number and the letter a, b, c, or d. So,
for instance, “4c” would be the third choice on the fourth page. In the bot-
tom right corner of each choice is its destination, i.e., where you go when
you click on that choice. The destination can be:
® a new page in the key
® an existing page in the key
® a species
® a higher or subspecic taxon

35
34
35
Click on the Previous button to undo the most recent choice that you’ve
made and return to the page where you clicked on that choice. To undo all
choices made and return to the rst page in the key, click on the First button.
You can jump directly to another part of the key by clicking on the Contents
button and choosing the page you want from the list. You can also use the
Decision Path window to jump to another part of the key.
The Decision Path window, which shows you the list of choices that you’ve
made so far, opens when you click on the Decision Path button in the Text
Key window. Click on a choice in the list to return to the page where you
clicked on that choice, undoing all choices made since. Also shown are the
list of possible species and other taxa based on the choices made so far, and
the list of species and other taxa that your choices have eliminated from
consideration; you can click on any name in one of the two lists to jump
directly to the page for the appropriate taxon.
Click on Save Text... or Print Text... in the Decision Path window to export
the list of choices made to a text le, or to print the list of choices made. You
can also save or print the list of possible species and the list of eliminated
species. Click on Find... to nd a text string in the Decision Path window
(click on Find in the Picture Key window to search the key itself).
An empty Text Key consists of one page and two empty choices. To start
building the key, choose Edit Choice... (Ctrl+E) from the Edit menu. You
can also right-click on the choice that you want to edit. This opens the Edit
Choice dialog box, where you can enter the text of the choice and select its
destination.
Write or paste the text into the eld on the left. You can use the Insert
dropdown menu to insert a multimedia le link or a page name hotword
into the text. The Edit menu is also available to you. Key choices should
preferably be written in 8-point Verdana.
Specify the destination of the choice on the right side of the window. Use
the dropdown menu to choose whether the choice will lead to a new page
(following the hierarchical structure of the key); an existing page (to jump
to another part of the key); a species; a higher taxon; or a subspecic taxon.
If the choice will lead to a new page, you can also specify the name of the
new page and the number of choices on the new page. Else, click in the list
to select the destination, then click on OK.
A page can contain up to four choices. To add another choice to the current
page, select New Choice (Ctrl+N) from the Entry menu. To remove one of
the choices on the current page, choose Delete Choice from the Entry menu
and then click on the choice that you want to remove. When you delete a
choice that leads to another page, you also delete the destination page and
all pages branching from it. Linnaeus will then automatically renumber the

35
34
35
pages of the key. This also happens when you change the destination of a
choice to a taxon or an existing page in the key.
You should name as many pages in the key to give users as many reference
points as possible. For instance, if you have a page named “Genus Platalea,”
and the user knows his/her specimen belongs within that genus, he/she can
save time by jumping directly to that page and starting the identication
process there. You can enter the name of the new page when you choose “a
new page in the key” as the destination of a choice, or select Name this Page...
from the Entry menu to enter or change the name of the current page. You
can also simply click on the left side of the white bar along the top of the
Text Key window, where the page number and name is displayed.
On any page with just two choices, you can display an overview picture
to illustrate the choices on that page by choosing Show Picture... from the
Entry menu and then selecting a TIFF or JPEG le from the le dialog box.
The picture must be 241 pixels horizontally and 281 pixels vertically. Remove
the overview picture by choosing Hide Picture from the Entry menu.
To insert a page between the current page and one the pages leading to
and from it, select Insert Page... from the Entry menu and choose where the
page should be inserted. If you are on the rst page of the key, you also have
the option of inserting a “New page 1” before the current rst page.
The Update Key command updates the information in the Decision Path
window. When you click on the Decision Path button and the key needs to be
updated, Linnaeus II will ask you whether you want to update the key at that
time. Note that this operation may take some time to complete, depending
on the size of the key.
Choose Get Info to nd out how many pages the Picture Key contains, as
well as the location and le size of the module. Click on More... to analyze
the key and present the results in a notepad window. For instance, this will
tell you whether the key contains any choices without a destination, and list
the species that have not yet been included in the key.
The Picture Key
The Picture Key is similar to the Text Key, but here choices can consist of
a picture only, text only, or a picture with a text caption. This module is
therefore better suited to building keys for visual identication. To open
the Picture Key, click on its icon in the Navigator, or choose it from the
Window menu.
Like the Text Key, the Picture Key has a hierarchical structure of pages that
you traverse by clicking on choices. You construct a key by adding choices.

37
36
37
Pages are added automatically whenever you add a choice that leads to a new
page in the key. The page numbers are also renumbered automatically when
pages are added or removed.
A choice can lead to:
® a new page in the key
® an existing page in the key
® a species
® a higher or subspecic taxon
Click on the Previous button to undo the most recent choice that you’ve
made and return to the page where you clicked on that choice. To undo all
choices made and return to the rst page in the key, click on the First button.
You can jump directly to another part of the key by clicking on the Contents
button and choosing the page you want from the list. You can also use the
Decision Path window to jump to another part of the key.
The Decision Path window, which shows you the list of choices that you’ve
made so far, opens when you click on the Decision Path button in the Pic-
tureKey window. Click on a choice in the list to return to the page where
you clicked on that choice, undoing all choices made since. Also shown are
the list of possible species and other taxa based on the choices made so far,
and the list of species and other taxa that your choices have eliminated from
consideration; you can click on any name in one of the two lists to jump
directly to the page for the appropriate taxon.
Click on Save Text... or Print Text... in the Decision Path window to export
the list of choices made to a text le, or to print the list of choices made. You
can also save or print the list of possible species and the list of eliminated
species. Click on Find... to nd a text string in the Decision Path window
(click on Find in the Picture Key window to search the key itself).
Constructing a Picture Key is similar, but not identical, to building a
Text Key. An empty Picture Key consists of one page without any choices.
To start, choose New Choice (Ctrl+N) from the Edit menu. This opens the
New Choice dialog box, where you specify the picture and text (either or
both) and destination of the new choice.
To assign a picture to the choice, click on Choose... and select a TIFF or
JPEG le within the Pictures folder from the le dialog box. You will now see
the name of the picture and the scale at which it will be shown on the page.
To change the scale, click on Scale... and enter the new scale or drag the slider.
To remove the picture from this choice, click on the Remove... button.
Write or paste the text into the eld in the bottom left. You can use the
Insert dropdown menu to insert a multimedia le link or a page name hot-
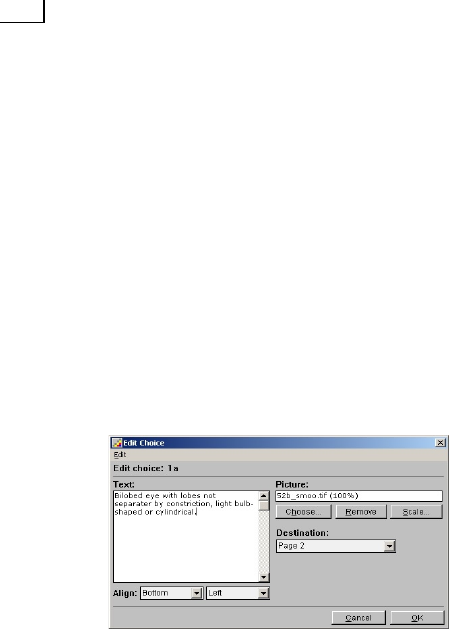
37
36
37
word into the text. The Edit menu is also available to you. Key choices should
preferably be written in 8-point Verdana. If you have selected a picture, you
can also specify where the text will be shown in relation to the picture, using
the three dropdown menus below the text eld. Before you start building
the key, experiment with this feature to nd the caption style that best suits
to your data.
Specify the destination of the choice on the right side of the window. Use
the dropdown menu to choose whether the choice will lead to a new page
(following the hierarchical structure of the key); an existing page (to jump
to another part of the key); a species; a higher taxon; or a subspecic taxon.
If the choice will lead to a new page, you can also specify the name of the
new page and the number of choices on the new page. Else, click in the list
to select the destination, then click on OK.
The Edit Choice dialog box lets you
specify the appearance and destination
of a choice.
The new choice will now be placed in the centre of the current page of
the key. You can move the choice to another location by holding down the
Control key and dragging it. If the choice consists of text only, you can also
resize the choice rectangle by holding down the Control key and dragging
from one of its corners.
To change the picture, text, or destination of an existing choice, choose
Edit Choice... (Ctrl+E) from the Entry menu and click on the choice that
you want to edit. You can also right-click on the choice.
Unlike the Text Key, which can have no more than four choices on a page,
the Picture Key can offer up to 26 choices(designated by the letters a through
z) on a single page. To remove one of the choices on the current page, choose
Delete Choice from the Entry menu and then click on the choice that you
want to remove. When you delete a choice that leads to another page, you
also automatically delete the destination page and all pages branching from
it. This also happens when you change the destination of a choice to a spe-
cies, taxon, or existing page in the key.
You should name as many pages in the key to give users as many reference

39
38
39
points as possible. For instance, if you have a page named “Genus Platalea,”
and the user knows his/her specimen belongs within that genus, he/she can
save time by jumping directly to that page and starting the identication
process there. You can enter the name of the new page when you choose “a
new page in the key” as the destination of a choice, or select Name this Page...
from the Entry menu to enter or change the name of the current page. You
can also simply click on the left side of the white bar along the top of the
Picture Key window, where the page number and name is displayed.
To insert a page between the current page and one the pages leading to and
from it, select Insert Page... from the Entry menu and choose where the page
should be inserted. If you are on the rst page of the key, you also have the
option of inserting a “New page 1” before the current rst page. The inserted
new page will contain one choice, with the text “This page was inserted.”
The Update Key command updates the information in the Decision Path
window. When you click on the Decision Path button and the key needs to be
updated, Linnaeus II will ask you whether you want to update the key at that
time. Note that this operation may take some time to complete, depending
on the size of the key.
Choose Get Info to nd out how many pages the Picture Key contains, as
well as the location and le size of the module. Click on More... to analyze
the key and present the results in a notepad window. For instance, this will
give you a list of pictures used, tell you whether the key contains any choices
without a destination, and list the species that have not yet been included
in the key.
IdentifyIt
IdentifyIt™ is a multiple-entry key based on a matrix of “objects” (species
and other taxa) and character states. The matrix denes each object as a series
of character states. For example, the denition for an object with green eyes
and four legs would contain the state “green” for the character “eyes,” and
the state 4 for the character “number of legs.” To open IdentifyIt, click on its
icon in the Navigator, or choose it from the Window menu.
In this module, you can identify a specimen by entering a “search pattern”
that describes it as a series of character states. IdentifyIt then compares the
search pattern to the objects in the current le and tells you the percentage
match for each, so that you can nd out which object is the closest match
to your specimen.
The current version of IdentifyIt includes support for separation coef-
cients (calculating the “next best” character to add to the search pattern),

39
38
39
numerical characters, and import/export of Nexus format les. You can still
use les made with previous versions of IdentifyIt.
Files. IdentifyIt lets you create and use “identify les,” each of which con-
tains a matrix of objects and character states. You can store these identify les
in the “Identify les” folder within the main Linnaeus II folder.
IdentifyIt has been designed to allow multiple identify les for each taxo-
nomic group. Thus, you could create one IdentifyIt le for basic taxonomic
descriptions, one for ecological characteristics, and one for morphologic or
structural information. Or it could be useful to create one IdentifyIt le for
characters as seen in preserved specimens, and another for fresh specimens.
You can also create a tree-shaped hierarchy of identify les – a “master” le
with a general key for your group, leading to several other les with more
detailed keys of subgroups.
When IdentifyIt rst opens, a new “Untitled” le is automatically created.
To open another le, click on the Open... button in the top right corner of
the window or choose Open Identify File... (Ctrl+O) from the File menu.
You can also create a new le by choosing New Identify File or Close Identify
File. To save the latest changes to the current identify le, select Save Identify
File (Ctrl+S), and to save it under another name, choose Save Identify File
as... from the File menu. Select Identify File Info... from the File menu to
nd out where the current le is located; how large the le is; and how many
objects, characters, and states it contains.
When you open an identify le made with a previous version of Linnaeus
II, you should save it under another name (using the Save Identify File as...
command) before continuing. The le then becomes a Linnaeus II version
2.5 identify le. Note that links between states and multimedia les are now
saved in a separate le (carrying the le extension .L2L) Older link les (with
the extension .LNK) will be automatically converted to the new format.
The name of the current identify le is displayed at the top of the Iden-
tifyIt window. After you open another le, you can jump back to any of the
les that you have previously opened by clicking on the le name (or on the
arrow to the right of the eld) and then choosing it from the list.
Modes. IdentifyIt operates in four different modes:
® identify – create a search pattern to nd out which object(s) most closely
match your specimen
® examine – examine the character states of an object in the current iden-
tify le
® compare – compare the character states of an object in the current identify
le to another object in the le
® entry – create an identify le or make changes to an existing le
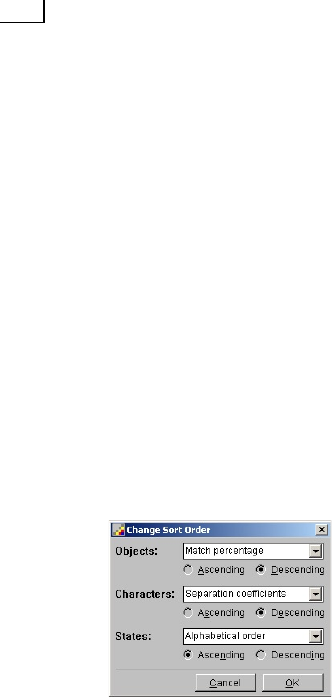
41
40
41
To switch from one mode to another, click on one of the tabs in the lower
left corner of the IdentifyIt window.
Sort order. You can change the sort order of the objects, characters, and
states by clicking on the Sort... button or by choosing Change Sort Order...
from the Identify menu. This opens the Sort Order dialog box, where you
can choose the sort order for each from the dropdown menus, and set the
sort direction to ascending (low to high) or descending (high to low) for
each. If you are editing an identify le (in entry mode), you should set the
sort order to “entry order” for all three. But if you are identifying, the sort
order for objects should be set to descending “match percentage,” so that the
object with the closest match (highest percentage) is listed rst. To identify
your specimen in the smallest possible number of steps, you should also set
the sort order for characters to descending “separation coefcients.” This
will arrange the characters in order of which is the next best character to
add to the search pattern. The separation coefcient values, shown to the left
of the character names, are recalculated every time you change the search
pattern.
Click on Sort... to change the sort order
of the objects, characters and states.
Identifying. To switch to identication mode, click on the Identify tab
along the bottom of the window. The eld on the left contains the search
pattern – the character states which you have so far dened. The eld on the
right lists all objects in the current le, along with the “hit” percentage for
each, i.e., the match percentage based on the search pattern.
To add one or more character states to the search pattern, click on the
Dene... button below the search pattern eld. The Dene Search Pattern
window will now open. Click on a character in the top list, and then click on
one or several character states in the list below. If the rst state selected in
the list is linked to a multimedia le, that le will be automatically shown.
When you choose a numerical character (a range or a distribution), you
must enter the search value into the eld on the right. When you choose a
distribution, you also have to select the standard width from the dropdown
menu below the eld on the right.
When you click on OK, the selected character state(s) are added to the

41
40
41
search pattern and the objects’ match percentages are automatically recal-
culated. You can jump to the page in the taxonomic databases (Species and
Higher Taxa) for one of the objects by clicking on its name in the list of
objects and then clicking on Go. If the object name is followed by a “>>”
character, clicking on Go will open another identify le.
You can click in the search pattern to select one or more character states
and then click on Remove to remove them from the search pattern. Click on
Clear to clear all character states from the search pattern, or choose Clear
Search Pattern from the Identify menu.
When Include Unknowns in the Identify menu has been enabled (indi-
cated with a check mark), unknown (undened) chararacters will be taken
into consideration when calculating the match percentages. This enables
IdentifyIt to deal with insufcient data in an identication matrix – in-
complete data may cause some objects to be omitted from the results of the
identication process, as it is impossible to calculate match percentages for
such objects. When the “Include unknowns” option is enabled, an object will
not be excluded from the identication process if no states are assigned to a
particular character. For a good and reliable identication, this function is
enabled by default. After a search pattern has been dened that results in a
limited list of objects with a 100% score, it is advised to turn off the “Include
unknowns” option and check if the list of matching objects is signicantly
reduced. If this is the case, omissions in the data matrix have played an impor-
tant role during the identication. In such a scenario, the most reliable way
to correctly identify your object would be to turn the “Include unknowns”
option on again and to use the Examine mode for the remaining objects to
check the best match of characters and states.
Examining an object. To switch to examination mode, click on the Ex-
amine tab along the bottom of the window. Now you can examine the de-
nition of each object in the current identify le. Choose the object that you
want to examine from the dropdown menu marked “Examine this object”.
The character states for the selected object will now be listed in the eld. Click
on “Table” to list the characters in one column and the states in another, or
on “Text” to present the program’s best attempt at an object description in
plain English.
Comparing two objects. To switch to comparison mode, click on the
Compare tab along the bottom of the window. Now you can compare the
description of one object to that of another. Choose the objects that you want
to compare from the dropdown menus marked “Compare this object:” and
“to:”. The eld will now display the character states for the both objects. Click
on Object to sort the list by object, or on Character to sort it by character.
The taxonomic distance between the two objects is calculated and shown
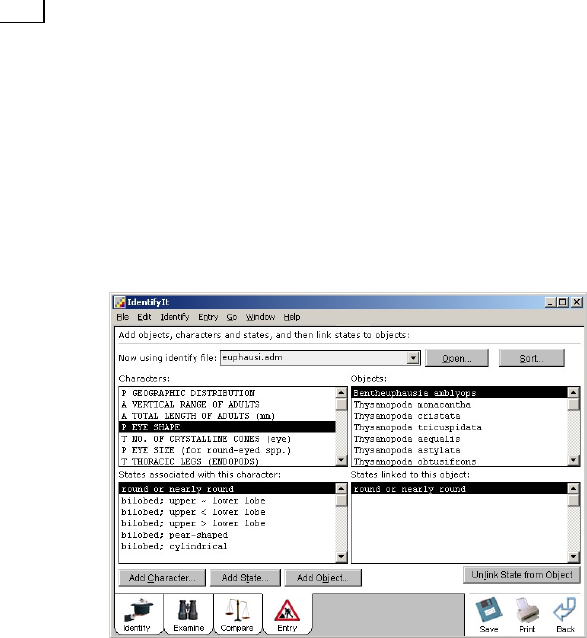
43
42
43
below the eld. Click on the Formula... button to choose the formula that
you want to use to calculate this value. Here you will also nd some other
useful statistics: the number of character states unique to each object; the
number of states present in both objects; and the number of states absent
from both.
Entry. To switch to entry mode, click on the Entry tab along the bottom
of the window. Now you can make changes to the objects, characters, and
states in the current identify le.
In entry mode, you
can make changes
to an identify le.
Adding characters. The top left eld lists the characters contained in the
current le. Go to the Character submenu of the Entry menu to nd the
commands for entering and changing characters. To add another character,
click on the Add Character... button or choose Add Character... (Ctrl+R)
from the Character submenu, then enter the name of the new character and
choose its type. There are seven types of characters, which can be divided
into three categories:
® plain character: “text”
® multimedia characters: “long text,” “picture,” “movie,” and “sound”
® numerical characters: “range” and “distribution”
Use one of the multimedia types if you want to link a multimedia le
to some or all of that character’s states. For instance, you can assign the
“picture” type to an external character, so that each state can be illustrated
with a picture, while the “long text” type should be used when you need to
present lengthy descriptions of each state in separate text les.

43
42
43
A character’s type is shown as a small icon to the left of its name. You can
change the type of a character by choosing Change Character Type... from the
Character submenu. You can also change the type when you select Rename
Character... However, you cannot change the character type of a numeri-
cal character, and you cannot change a “text” or multimedia character to a
numerical character. And if you change the type of a multimedia character,
its states will no longer be linked to any multimedia les.
The Add Character... command adds a character to the bottom of the
list of characters (sorted in entry order). Use Insert Character... to add a
character before the one that is selected in the list. You can also change the
entry order of the characters by selecting Change Entry Order... This opens
a dialog box where you can click on the Move Up and Move Down buttons
to rearrange the characters. Choose Rename Character... to change the name
and/or type of the selected character, and choose Remove Character... to
delete the selected character.
Adding states. The states of the selected character are shown in the bottom
left eld. Go to the State submenu of the Entry menu to nd the commands
for entering and changing states. To add a state, click on the Add State...
button or choose Add State... (Ctrl+E) from the State submenu, then enter
the name of the new state and click OK. The new state will now be added
to the bottom of the list. Choose Rename State... to change the name of the
selected state and Remove State... to delete it.
To add a state for a numerical character, you also choose Add State...
(Ctrl+E) from the State submenu. If the character type is “range,” this will
open the Add Range dialog box, where you can enter the minimum and
maximum values of the numerical range. If the type is “distribution,” you
must specify the mean value and standard deviation. To change the values
of a numerical state, choose Change State... from the State submenu.
To attach a multimedia le to the state of a “long text,” “picture,” “movie,”
or “sound” character, select Link File to State... (Ctrl+J) from the State sub-
menu and then choose the le from the le dialog box. Picture les must be
in TIFF or JPEG format and have a width of 241 pixels and a height of 281
pixels. IdentifyIt will then create a separate le to store the multimedia le
links. The link le is in the same folder as the current identify le and its name
is identical to that of the identify le, but followed by the extension “.L2L”.
To remove the multimedia le link for the selected state, choose Unlink File
from State from the State submenu.
Adding objects. Now you are ready to start adding objects (taxa) to the
le and dening them as a series of character states. The top right eld lists
the objects contained in the current le. Go to the Object submenu of the
Entry menu to nd the commands for entering and changing objects. To

45
44
45
add another object, click on the Add Object... button or choose Add Object...
(Ctrl+N) from the Object submenu. The Add Object dialog box will now
open. Here, enter the name of the new object, or click on Choose... and se-
lect a name from the list of objects that have not yet been added. Check off
“Duplicate current object” to make a copy of the object currently selected in
the list, or leave it unchecked to create an undened (empty) object. Finally,
click on OK to add the new object to the current identify le.
Use Insert Object... to add an object before the one that is selected in the
list. You can also change the entry order of the objects by selecting Change
Entry Order... from the Object submenu. This opens a dialog box where you
can click on the Move Up and Move Down buttons to rearrange the objects.
Choose Rename Object... to change the name of the selected object, and
choose Remove Object... to delete the selected object.
You dene an object by linking character states to it. First click in the list
of character states (in the top left corner of the window) to select a character,
and then click in the list of states (in the bottom left corner) to choose the
state that you want to link to the selected object. Then, choose Link State
to Object from the Entry menu or click on the Link State to Object button
to add that character state to the object’s denition. To remove a character
state from the object’s denition, click on it in the bottom right eld, which
lists the linked states for the selected character and object, and then choose
Unlink State from Object from the Entry menu or click on the Unlink State
from Object button. To see the list of all character states linked to the selected
object, switch to examination mode by clicking on the Examine tab along
the bottom of the window.
You can link the currently selected state to several objects simultaneously
by choosing Link State to Objects... from the Entry menu, and then clicking
in the list to select the objects to which you want to link the selected state.
If you want to unlink all states for the selected character from the currently
selected object, choose Unlink All States from Object from the Entry menu.
You can also unlink the selected state from all objects in the current identify
le by choosing Unlink State from All Objects from the Entry menu.
You can also link objects to another identify le. For instance, you can
create a “master” identify le for your entire taxonomic group in which each
object is a family, so that you can identify down to family level. You then
create a separate identify le for each family, and link each object in the
master le to the identify le for that family, which lets users identify down
to species level. When an object is linked to another identify le, its name is
followed by a “>>” character. When you are in identication mode, you can
click in the list of objects to select such an object, then click on Go to open
the identify le to which that object is linked. You can then click on Back to

45
44
45
return to the parent le.
To link an object to an identify le, choose Link Identify File to Object...
from the Object submenu and then select the target le from the le dialog
box. To remove the le link, use the Unlink Identify File from Object com-
mand.
You can export the description of one or more objects to a le by choosing
Save Object Descriptions... from the Object submenu of the Entry menu,
then enter the le name in the le dialog and click in the list to select the
objects that you want to save to le. The description is identical to the one
shown in Examine mode when you list the characters in text rather than
table format. You can also copy object descriptions directly to the taxonomic
database modules (Species and Higher Taxa) by selecting Copy Object De-
scriptions... This handy feature lets you create a Linnaeus II database from an
identify le in a single step. It copies the description of each selected object to
the Description eld on the page for that species or taxon in the taxonomic
database modules, automatically adding pages where needed. However, the
selected object names may not be abbreviated, and must be identical to their
names in the taxonomic database modules.
After selecting Copy Object Descriptions..., choose the object(s) that
you want to copy to the taxonomic databases from the list or click on Copy
All.
Importing and exporting. Choose Export to Nexus File... from the File
menu to save a le in Nexus format, which can by used directly in PAUP,
MacClade, and other matrix-based taxonomic programs that support this
format. You can also open Nexus les and save them in IdentifyIt format by
selecting Import from Nexus File... from the File menu.
Importing Nexus les into IdentifyIt is subject to the following require-
ments:
® The Nexus le must specify either “Charlabels” or “Taxlabels,” depending
on whether the matrix includes character or taxon names. In both cases,
IdentifyIt will produce a taxon versus character matrix.
® The Nexus le must include a “Statelabels” block containing a description
of all states for each character. This is because identication in IdentifyIt
is done by way of the character states.
® The string of character state codes in the matrix must be uninterrupted
(without separators such as spaces, carriage returns, or paragraph mark-
ers).
When working with Nexus les, you should realize that this format has
some limitations which have implications on data transfer. For example,

47
46
47
feature and state descriptions and taxon names are limited to 31 characters
in length. For most output, PAUP further truncates the text to 10 characters.
See the MacClade and PAUP manuals for further specications.
Nexus les exported from DELTA can be imported into IdentifyIt without
difculty, provided that the string of character state codes in the matrix is
uninterrupted (without separators such as spaces, returns, or paragraph
markers). This requires an additional step. You can either:
® open and subsequently save the DELTA le in MacClade, then import
this MacClade le into IdentifyIt by choosing Import from Nexus File...
from the File menu; or
® open the DELTA le in a text editor (such as Notepad) and make the
character state strings uninterrupted by hand, then save the changes and
import this text le into IdentifyIt by choosing Import from Nexus File...
from the File menu.
Furthermore, Nexus les in DELTA format sometimes contain separators
inside a state description (in the “Statelabels” block). These separators should
be removed, or else the state will be transposed into two separate states.
Choose Export Objects... from the File menu to export a list of all objects
in the current identify le, along with the character states dened for each
object, and select Export Characters... from the menu to export a list of all
characters in the le, along with the states dened for each.
MapIt
MapIt is a grid-based biogeographical information system that lets you enter
geographical data for species and other taxa, such as distributions and type
localities. The data can then be used to, among other things, search for taxa
occurring in a particular geographic region, compare the distribution of a
taxon to that of another, or display species/taxon richness. To open MapIt,
click on its icon in the Navigator, or choose it from the Window menu.
Modes. MapIt operates in ve different modes:
® examine — examine the distribution of an object
® compare — compare the distribution of an object to the distribution
of another object
® search — perform a geographical search for objects
® diversity — display species/taxon richness, i.e., the number of objects
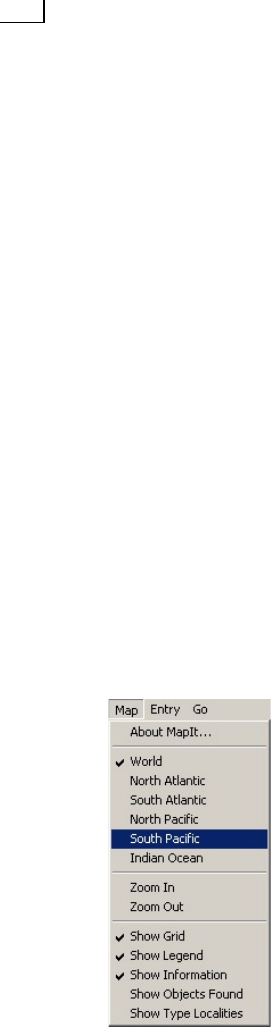
47
46
47
occurring in each square
® entry — enter objects and edit object distributions
To switch from one mode to another, click on one of the tabs in the lower
left corner of the MapIt window.
Objects and maps. Like IdentifyIt, MapIt also works with “objects” such
as species and other taxa. The distribution of an object can be entered and
displayed on a number of maps. The standard maps consist of a global
overview map and ve maps with greater detail (North Atlantic, South At-
lantic, North Pacic, South Pacic, and Indian Ocean). To switch to one of
the other maps, choose it from the Map menu. In Examine mode, you can
also click in the map to switch to another map that covers the coordinates
where you clicked.
Contact ETI for assistance with adding maps down to any level of detail.
For instance, if your taxonomic group occurs primarily in Southeast Asia,
ETI can provide you with a MapIt module containing overview and detailed
maps for this specic region.
MapIt displays the distribution of an object as a number of squares on
the grid of the current map. To show and hide the grid covering the map,
use the Show Grid command in the Map menu. The Information window,
which oats above the MapIt window in a separate “palette” window, tells
you what the coordinates (latitude and longitude) and diversity (richness)
are at the current location of the cursor. To show and hide the Information
window, use the Show Information command in the Map menu.
You can switch to another map by
selecting its name from the Map menu.
Color layers. Each of the squares that make up the distribution of an
object can be in one of 11 colors. For instance, one color can indicate sum-

49
48
49
mer distribution, a second color winter distribution, and a third year-round
distribution.
These colors are shown in the Legend, which oats above the MapIt win-
dow in a separate “palette” window. To show and hide the Legend, use the
Show Legend command in the Map menu. To enter or change the name of
a color layer, click on it in the Legend and then choose Name Color Layer...
from the Entry menu, or double-click on the name of the color layer in the
Legend. You can also assign a different color to a layer by switching it with
another (unused) color layer. To do this, click on a color layer in the Legend,
choose Switch Layers... from the Entry menu, and then enter the number of
the layer (between 1 and 11) that you want to switch with the selected layer.
Note that this affects all maps of all objects.
To the left of each color in the Legend is a check box which indicates
whether the layer is active or not. To deactivate a layer, uncheck the box next
to it. Inactive layers are hidden in examine mode, and are also ignored in
search, compare, and diversity mode.
Entry. To switch to entry mode, click on the Entry tab along the bot-
tom of the window. Now you can enter or change the distribution of one
or more objects. Select the object that you want to edit by clicking on the
object name (or on the Choose... button to the right of the eld) and then
choosing it from the list.
To add another object, choose Add Object... (Ctrl+N) from the Entry
menu. The Add Object dialog box will now open. Here, enter the name of
the new object, or click on Choose... and select a name from the list of ob-
jects that have not yet been added. Check off “Copy distribution of current
object” to make a copy of the current object, or leave it unchecked to create
an undened (empty) object. Finally, click on OK.
Choose Rename Object... (Ctrl+R) to change the name of the selected
object, Remove Objects... to delete one more objects, and Sort Objects... to
rearrange the objects or sort them in alphabetical order. To change the dis-
tribution of the current object, choose a color layer by clicking on it in the
Legend, then simply click in the map to add or remove squares. You can also
drag the mouse on the map to add or remove a rectangular area of squares.
Clear all squares on the current map for the current object by selecting Clear
Map... from the Entry menu.
If you are using an overview map and several detail maps, you should
enter your data on the detail maps and then let MapIt transfer the distri-
bution data to the main map. Transferring data is also useful if your maps
partially overlap.
To transfer map data, choose Transfer Map... (Ctrl+J) from the Entry
menu. This opens the Transfer Map dialog box, where you must specify:

49
48
49
® objects: the object(s) for which you want to transfer map data
® source maps: the map(s) that you want to transfer data from
® destination maps: the map(s) that you want to transfer data to
Map transfers add to existing data on the target map(s) rather than re-
placing it. To clear old data before transfer, use the Clear Map... command.
When you transfer data to a map with less detail (e.g. from the North
Atlantic map to the World map), differently colored squares on the source
map may be transferred to the same square on the destination map. In such
cases, the target square will be assigned to the color layer that is highest up
in the list in the Legend. You can specify a custom priority order by clicking
on the Layers... button in the Transfer Map dialog box to open the Layers
dialog box. Here you can change the priority order by selecting one or more
layers in the list and clicking on Move Up or Move Down; click on Default
Order to restore the order to the one given in the Legend. If you specify a
custom priority order, it will be applied to all map transfers until you exit
Linnaeus II.
After adding or deleting objects, or editing the distribution of one or
more objects, choose Update Diversity Index from the Entry menu to update
the values for the diversity index, i.e., the information about the number of
objects occurring in each square.
You can export objects to a MapIt le using the Export Objects... com-
mand, and import objects from a MapIt le by choosing Import Objects...
from the Entry menu.
Type localities. You can attach up to eight type localities to an object. Each
type locality must have a specic set of coordinates, and is shown on all maps
for the current object which cover those coordinates. The type localities for
the current object are listed in the Type Localities “palette” window, which
you can show and hide using the Show Type Localities command in the
Map menu.
To add a type locality, choose Add Type Locality... from the Entry menu,
enter its longitude, latitude, and (optionally) text description, and then click
on OK. Click in the Type Localities window to select a type locality and then
choose Change Type Locality... to change its coordinates or text, or select
Delete Type Locality to delete the selected type locality. You can also use this
feature to attach other coordinates-based data to an object.
Examining an object. To switch to examination mode, click on the Ex-
amine tab along the bottom of the window. Now you can examine the distri-
bution of an object. Choose the object that you want to examine by clicking
on the object name eld (or click on the Choose... button to the right of the
eld) and then selecting the object you want from the list. You can also use
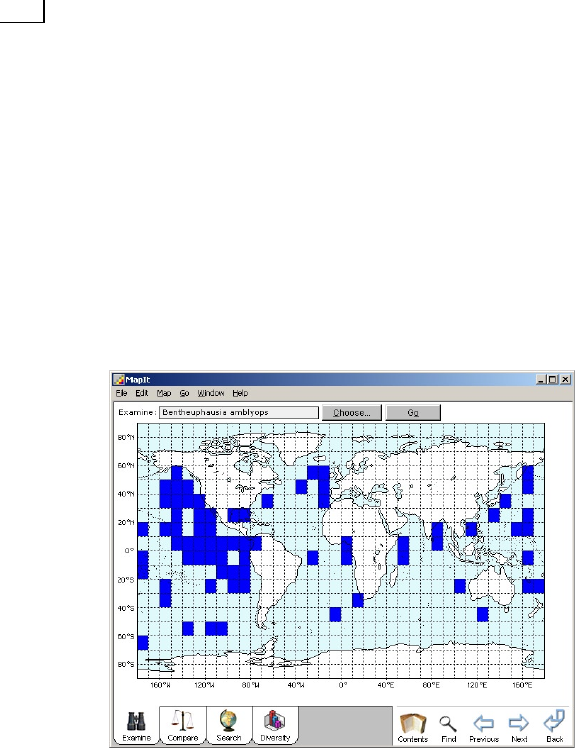
51
50
51
the Next and Previous buttons, or click on Contents or Find to nd an object
by name. Click on Back to return to the most recently displayed object.
The map will now display the distribution of the selected object, but
only active color layers are shown (you can activate and deactivate layers by
clicking on the check boxes in the Legend). Click on Go to jump to the page
in the proper taxonomic database module (Species or Higher Taxa) for the
current object. Click on the More Info... button in the Information window
to obtain more information about the current object. To export the distribu-
tion of one or more objects to a le, choose Save Text... from the File menu.
In the Save dialog box, select Objects from the list and check off “Include
map data,” then click on OK to save the data to a le.
MapIt displays the
distribution of a taxon
as a series of grid
squares.
Click on the map to open the Switch dialog box, which lists the maps
covering the coordinates where you clicked. To switch to another map, click
in the top list; to examine another object, click in the bottom list. Then click
on OK to examine the selected object on the selected map. Click on Objects...
to list all the objects that occur in the grid square where you clicked. Select an
object from the list and click OK to display the distribution of that object.
Comparing two objects. To switch to comparison mode, click on the
Compare tab along the bottom of the window. Now you can compare the
distribution of one object to that of another. Click the Choose... buttons to
select the objects that you want to compare.
Grid squares where both objects occur are colored purple, while squares
where only one of the objects occurs are colored blue or red, depending on
which object occurs in that square. Click on the More Info... button in the

51
50
51
Information window to obtain more information about the most recent
comparison. To export the results of the most recent comparison to a le,
choose Save Text... from the File menu. In the Save dialog box, select Com-
parison from the list and click on OK.
Geographical searches. To switch to search mode, click on the Search tab
along the bottom of the window. Now you can perform a geographic search
for objects occurring in one or more grid squares on the map.
First, click on the squares where you want to search. You can also drag
the mouse on the map to select a rectangular area of squares, or click on the
Clear Map button to clear all selected search squares. The selected search
squares are colored light green. Then, execute the search by clicking on the
Search button.
The Objects Found window, a “palette” oating above the MapIt window,
will now open to list the objects that occur in one or more of the selected
search squares. Click on a name in the list to examine the distribution of that
object. To show or hide the Objects Found window, use the Show Objects
Found command in the Map menu. Click on the More Info... button in the
Information window to obtain more information about the most recent
search. To export the results of the most recent search to a le, choose Save
Text... from the File menu. In the Save dialog box, select Search from the list
and click on OK.
If you’ve deactivated one or more color layers using the check boxes in
the Legend, those layer(s) will be ignored in the search. This allows you to
search in specic color layers. For instance, if you have dened three layers
as “Summer distribution,” “Winter distribution,” and “Year-round distri-
bution,” you can turn off the “Winter distribution” layers to search only for
objects occurring in the selected layers in summertime or in both summer-
and wintertime.
To perform a more complex search, click on the Options... button. This
will open the Search Options dialog box. Here, you can specify the Boolean
search mode, i.e., whether to search for objects occurring in some or all of
the selected search squares; in all of the selected squares; or in none of the
squares. Check off the “fuzzy search” box and choose the fuzzy search range
to perform a “fuzzy” or approximate search, i.e., to extend the search in a
range of one, two, or three squares beyond the selected search squares. Click
on “Limit search to objects found in the last search” to search only among the
objects that were found in the most recent search that you’ve performed.
Click on Clear Map, then click on Paste... to paste the distribution of an
object onto the search map. Squares in deactivated color layers will not be
pasted onto the search map. If you’ve set the search mode (in the Search
Options) to “some or all,” you can now click on Search >> to nd out which

53
52
53
objects partially overlap the distribution of that object.
To search on another map, select it from the Map menu. If you’ve selected
one or more squares on the search map, MapIt will automatically translate
the search squares to the new map.
You can also nd an object by name, either by clicking on the Contents
button and typing the rst few letters of its name, or by clicking on the Find
button, typing the text string that you want to nd in the object names into
the Find window, and clicking on Find.
Diversity (taxon richness). To switch to diversity mode, click on the
Diversity tab along the bottom of the window. Now you can examine the
species/taxon richness — the number of objects that occur in each square
on the current map. The legend along the top of the MapIt window tells you
what each shade of green signies; darker shades indicate higher counts,
lighter shades indicate low counts. Click on “Range” to change the range
(the minimum and maximum objects pr. square shown), or on “Interval” to
change the interval (the number of objects pr. square that each shade of green
signies). For greater color detail, change the interval to a lower number.
If you’ve deactivated one or more color layers using the check boxes in
the Legend, those layer(s) will be ignored in the diversity index. You can
therefore turn color layers on or off in the Legend to see the diversity index
for one ore more specic layers.
The Information window tells you how many objects occur in the grid
square underneath the cursor. Click on More Info... to nd out more about
the diversity index. To export the diversity index to a le, choose Save Text...
from the File menu. In the Save dialog box, select Search from the list and
click on OK.

53
52
53
Index
A
A-Z bar 17, 28, 30
About ETI eld 14, 23
Acrobat Reader 9
Add… button 11
Add Bookmark 13
Add Character... 42, 43
Add Character... button 42
Add Object... 44, 48
Add Object... button 44
Add Object dialog box 44, 48
Add Range dialog box 43
Add State... 43
Add State... button 43
Add Type Locality... 49
Add Unknowns 11
arrow keys 13
audio les 20
B
Back 13
Back button 13, 44, 50
Bold 18
bookmarks 13
Bookmarks... 13
Bookmarks menu 13
C
Caption... button 20
CD-ROM 2, 5, 9
Change Character Type... 43
Change Entry Order... 43, 44
Change Sort Order... 40
Change State... 43
Change Type Locality... 49
character states 38
Character submenu 42, 43
Choose... button 36, 44, 48, 49, 50
Classication eld 11, 14, 24, 25, 27

55
54
55
Clear button 26, 27, 41
Clear Map... 48
Clear Map button 51
Clear Search Pattern 41
Close Identify File 39
Close Others 12
Close Window 12
color layers 47, 50, 51
common names 26, 28, 32
Compare Info... button 50
compression See image compression
Contents... 13
Contents button 13, 27, 50, 52
contributors 23
Contributors eld 16
Copy distribution of current object 48
Copy From... button 26, 27
Copy Object Descriptions... 45
credits 16
custom elds 17
custom modules 17
D
Decision Path button 34, 35, 36, 38
Decision Path window 34, 35, 36, 38
Dene... button 11, 40
Dene Search Pattern window 11, 40
Denition eld 29
Delete Choice 37
Delete References... 31
Delete Taxa... 25, 27
Delete Terms... 29
Delete Topics... 23
Delete Type Locality 49
DELTA 46
Description eld 25, 45
digital camera 19
distribution 40, 42, 43
division 25
domain 11, 27
Duplicate current object 44

55
54
55
DVD-ROM 2, 5
E
Edit Choice... 34
Edit Choice dialog box 34
Edit Classication... 25, 27
Edit Classication dialog box 14, 25, 27
Edit Fields... 17
Edit Fields dialog box 17
Edit menu 14, 15, 18
Edit Modules... 17, 23
Edit Modules dialog box 17
Edit Multimedia... 14, 20, 26, 28, 29
Edit Multimedia dialog box 14, 17, 20, 26, 28, 29
Edit Paths... 16, 20
Edit Project Title... 16
ETI Biodiversity Center 2, 3, 5
Export Characters... 46
Export Objects... 21, 46, 49
Export Text... 15
Export to Nexus File... 45
Extras folder 17
F
elds 13, 18
Fields... button 14
eld delimiter 15, 22
File menu 20
le names 20
Find... 14
Find... button 34, 36
nding text 14
Find All button 14
Find button 14, 34, 36, 50, 52
Find Next button 14
Find Previous button 14
Find window 14
First button 34, 36
fonts 11, 18
form 11
Formula... button 42

57
56
57
fuzzy map search 51
G
genus 24, 26, 27, 35, 38
Genus... button 24
Get Info 24, 26, 28, 30, 35, 38
Global Biodiversity Information Facility 2
Glossary module 28
Go button 41, 50
Go menu 12, 13
grid 12, 47
H
Help menu 9
Help window 9
Hide Picture 24, 35
Hide Picture button 24, 26
Higher Taxa eld 32
Higher Taxa module 27
hotwords 18, 28
I
identication tools 8
IdentifyIt 38
identify les 39
Identify File Info... 39
Identify menu 39, 40, 41, 46
image bit depth 19
image compression 19
image resolution 19
importing
MapIt les 49
Nexus les 45
references 31
text 21
Import from Nexus File... 45
Import Objects... 21, 49
Import Text... 21, 22
Include Unknowns 11, 41
Index module 32
Information window 47, 50, 51, 52

57
56
57
Insert Character... 43
Insert dropdown menu 34
Insert Multimedia File... 18
Insert Object... 44
Insert Page... 35, 38
Insert Page Name... 18
Insert submenu 18, 21
Internet 2, 5
interval 52
Introduction module 23
Italic 18
Items Found window 14
J
JPEG compression See image compression
JPEG le 18, 19, 20, 24, 26, 35, 36, 43
K
keys 8
Key words eld 30
kingdom 11, 26, 27
L
languages of common names 32
latitude 47, 49
layers 47, 48, 50, 52
Legend window 48, 50, 51, 52
Limit search to objects found in the last search 51
link les 43
Link File to State... 43
Link Identify File to Object... 45
Link State to Object 44
Link State to Objects... 44
Link State to Object button 44
Linnaeus 1.x les 21
Linnaeus II 2, 5, 8, 10, 11, 12
customizing 16
installing 7
launching 7
runtime version 2
Web Publisher 2

59
58
59
Linnaeus II folder 10, 20
Linnaeus Prefs le 17
Literature module 30
lock icon 13, 18
longitude 47, 49
LZW compression See image compression
M
MacClade 45, 46
Macintosh OS 12
MapIt les 49
MapIt module 46
maps 47
Map menu 51, 52
match percentage 40
mean value 43
Microsoft Word 11, 19
modules 8, 12
Module Templates le 17
More Info... button 50, 51, 52
Multimedia eld 14, 19, 20, 28, 29
multimedia les 19
Multimedia folder 10, 20
multimedia lab 5
N
Name Color Layer... 48
Name this Page... 35, 38
Navigator module 16, 17, 23
New Choice 34, 36
New Choice dialog box 36
New Identify File 39
New Module... button 17
New Module dialog box 17
New Notepad... 19
New Reference... 31
New Taxon... 24, 27
New Term... 29
New Topic... 23
Next button 50
Next Page 12

59
58
59
Nexus les 39, 45
Notepad button 19
notepad windows 19, 35, 38
numerical characters 39, 40, 42, 43
O
Objects Found window 51
Object submenu 43, 44, 45
Open... button 39
Open Identify File... 39
Open Notepad... 19
Options... button 51
overview pictures 19, 24, 26, 28, 35
P
pages 12
Partner Program 5
Paste... button 51
Paths dialog box 16
PAUP 45, 46
PDF See Portable Document Format
phylum 11, 25, 26, 27
Pictures folder 16, 20, 36
Picture Key module 35
Portable Document Format 9
preferences le 17
Previous button 34, 36, 50
Previous Page 12
Print... button 34, 36
printing 15
Print Text... 15
project title 16
Q
QuickTime 18, 20
R
range 40, 42, 43, 52
Recent... 13
references 30
Reference eld 30

61
60
61
Remove... button 36
Remove Character... 43
Remove Object... 44
Remove Objects... 48
Remove State... 43
Remove Unknowns 11
Rename Character... 43
Rename Object... 44, 48
Rename Reference... 31
Rename State... 43
Rename Taxon... 25, 27
Rename Term... 29
Rename Topic... 23
Replace... 15
Replace & Find 15
Replace All button 15
Replace button 15
Replace window 15
Rich Text Format 15, 21, 22
RTF See Rich Text Format
Runtime version 2
S
Save... button 34, 36
Save Identify File 39
Save Identify File as... 39
Save Object Descriptions... 45
Save Text... 15
saving text 15
Scale... button 36
scanner 19
scanning 19
searching
for text 14
geographically 51
Search >> button 51
Search button 51
Search everywhere 14, 15
search mode 51
Search Options dialog box 51
search pattern 38

61
60
61
Search Unknowns 11
separation coefcients 38, 40
Show Grid 47
Show Information 47
Show Legend 48
Show Objects Found 51
Show Picture... 24, 35
Show Picture button 24, 26
Show Type Localities 49
Sort... button 40
Sort Alphabetically button 23
Sort Objects... 48
Sort References 31
Sort Taxa... 25
Sort Terms 29
Sort Topics... 23
Sort Topics dialog box 23
sound digitizer 20
sound les 20
species 24
Species... button 24
Species and Lower Taxa eld 32
Species module 24
standard deviation 43
State submenu 43
Style submenu 18
subform 11
subspecies 8, 11, 24, 32
subvariety 11
superspecies 27
supporting databases 8
Switch dialog box 50
Switch Layers... 48
synonyms, scientic 26, 28, 32
Synonyms eld 26, 28, 29, 32
T
tabs 13
taxonomic databases 8
taxonomic distance 41
Taxonomy eld 11

63
62
63
terms 28
text editing 18
Text Key module 33
text windows See notepad windows
TIFF le 18, 19, 24, 26, 35, 36, 43
title 16
Transfer Map... 48
Transfer Map dialog box 48
type localities 49
Type Localities window 49
U
Underline 18
Undo 18
Unknown character states 45
Unlink All States from Object 44
Unlink File from State 43
Unlink Identify File from Object 45
Unlink State from All Objects 44
Unlink State from Object 44
Unlink State from Object button 44
Update Diversity Index 49
Update Index 14
Update Key 35, 38
V
variety 11
Verdana See fonts
Verdana 8 (menu command) 18
vernacular names See common names
video les 20
W
Web Publisher 2
Welcome eld 16
Windows 6, 12
windows 12
Window menu 12, 17
Word Index... 29
World Biodiversity Database 3, 5

63
62
63
© Copyright 2004 Expert Center for Taxonomic Identication. All Rights Reserved.
Trademark acknowledgements:
ETI and the ETI logo, Linnaeus, Linnaeus II, IdentifyIt, MapIt,Text Key and Picture Key are trade-
marks of the Expert Center for Taxonomic Identication.
Macintosh, QuickTime and the QuickTime logo are trademarks of Apple Computer Inc., used
under license.
Windows and Microsoft Word are registrated trademarks of Microsoft Corporation.
PhotoShop and Acrobat are registrated trademarks of Adobe Systems Incorporated.
All other company names and trademarks are the property of their respective owners.

64
64
Software license
PLEASE READ THIS LICENSE CAREFULLY BEFORE USING THE SOFTWARE. BY USING THE SOFTWARE, YOU ARE
AGREEING TO BE BOUND BY THE TERMS OF THIS LICENSE. IF YOU DO NOT AGREE TO THE TERMS OF THIS
LICENSE, PROMPTLY RETURN THE UNUSED SOFTWARE TO THE ADDRESS WHERE YOU OBTAINED IT AND
YOUR MONEY WILL BE REFUNDED.
1. License. The application, demonstration, system and other software accompanying this License, whether on disk, in
read-only memory, or on any other medium (the “software”), and related documentation are licensed to you by ETI. You
own the disk on which the software is recorded but ETI retains title to the software and related documentation. This
License allows you to use the software on a single computer and/or on a network provided the network is accessible only
within Licensee’s organization. You may make one copy of the software in machine-readable form for backup purposes. You
must reproduce on such copy the ETI copyright notice and any other proprietary legends that were on the original copy
of the software. You may also transfer all your license rights in the software, the backup copy of the software, the related
documentation and a copy of this License to another party provided the other party reads and agrees to accept the terms
and conditions of this License.
2. Restrictions. The software contains copyrighted material, trade secrets and other proprietary information. In order to
protect them you may not decompile, reverse engineer, dissemble or otherwise reduce the software to a human-perceivable
form. You may not modify, rent, lease, loan, distribute or create derivative works based upon the software in whole or part.
The software is for private use. You may not place the software at the disposal of public use without written permission of
ETI.
3. Limited Warranty on Media. ETI warrants the disks on which the software is recorded to be free from defects in material
and workmanship under normal use for a period of ninety (90) days from the date of purchase as evidenced by a copy of
the receipt. ETI’s entire liability and your exclusive remedy will be replacement of the disk not meeting ETI’s limited war-
ranty and which is returned to ETI or an ETI authorized representative with a copy of the receipt. ETI will have no respon-
sibility to replace a disk damaged by accident, abuse or misapplication. ANY IMPLIED WARRANTIES ON THE DISKS,
INCLUDING THE IMPLIED WARRANTIES OF MERCHANTABILITY AND FITNESS FOR A PARTICULAR PURPOSE,
ARE LIMITED IN DURATION TO NINETY (90) DAYS FROM THE DATE OF DELIVERY. THIS WARRANTY GIVES
YOU SPECIFIC LEGAL RIGHTS; YOU MAY HAVE RIGHTS THAT VARY FROM COUNTRY TO COUNTRY.
4. Disclaimer of Warranty on Software. You expressly acknowledge and agree that use of the software is at your sole risk.
The software and related documentation are provided “as is” and without warranty EXPRESS OR IMPLIED, INCLUDING,
BUT NOT LIMITED TO, THE IMPLIED WARRANTIES OF MERCHANTABILITY AND FITNESS FOR A PARTICULAR
PURPOSE. ETI DOES NOT WARRANT THAT THE FUNCTIONS CONTAINED IN THE SOFTWARE WILL MEET
YOUR REQUIREMENTS, OR THAT THE OPERATION OF THE SOFTWARE WILL BE UNINTERRUPTED OR ERROR-
FREE, OR THAT DEFECTS IN THE SOFTWARE WILL BE CORRECTED. FURTHERMORE, ETI DOES NOT WARRANT
OR MAKE ANY REPRESENTATIONS REGARDING THE USE OR THE RESULTS OF THE USE OF THE SOFTWARE
OR RELATED DOCUMENTATION IN TERMS OF THEIR CORRECTNESS, ACCURACY, RELIABILITY, OR OTHER-
WISE. NO ORAL OR WRITTEN INFORMATION OR ADVICE GIVEN BY ETI OR ANY ETI AUTHORIZED REPRESEN-
TATIVE SHALL CREATE A WARRANTY OR IN ANY WAY INCREASE THE SCOPE OF THIS WARRANTY. SHOULD
THE SOFTWARE PROVE DEFECTIVE, YOU (AND NOT ETI OR AN ETI AUTHORIZED REPRESENTATIVE) ASSUME
THE ENTIRE COST OF ALL NECESSARY SERVICING, REPAIR OR CORRECTION. SOME COUNTRIES DO NOT AL-
LOW THE EXCLUSION OF IMPLIED WARRANTIES, SO THE ABOVE EXCLUSION MAY NOT APPLY TO YOU.
5. Limitation of Liability. UNDER NO CIRCUMSTANCES INCLUDING NEGLIGENCE, SHALL ETI BE LIABLE FOR
ANY INCIDENTAL, SPECIAL OR CONSEQUENTIAL DAMAGES THAT RESULT FROM THE USE OR INABILITY TO
USE THE SOFTWARE OR RELATED DOCUMENTATION, EVEN IF ETI OR AN ETI AUTHORIZED REPRESENTA-
TIVE HAS BEEN ADVISED OF THE POSSIBILITY OF SUCH DAMAGES. SOME COUNTRIES DO NOT ALLOW THE
LIMITATION OR EXCLUSION OF LIABILITY FOR INCIDENTAL OR CONSEQUENTIAL DAMAGES SO THE ABOVE
LIMITATION MAY NOT APPLY TO YOU.
In no event shall ETI’s total liability to you for damages, losses, and causes of action (whether in contract or not, including
negligence, or otherwise) exceed the amount paid by you for the software.
6. Controlling Law and Severability. This License shall be governed by and construed in accordance with the laws of the
Netherlands, as applied to agreements entered into and to be performed entirely within the Netherlands and between Neth-
erlands residents. If for any reason a court of competent jurisdiction nds any provision of the License, or portion thereof,
to be unenforceable, that provision of the License shall be enforced to the maximum extent permissible so as to effect the
intent of the parties, and the remainder of this License shall continue in full force and effect.
7. Complete Agreement. This License constitutes the entire agreement between the parties with respect to the use of the
software and related documentation, and supersedes all prior or contemporaneous understandings or agreements, written
or oral, regarding such subject matter. No amendment to or modication of this License will be binding unless in writing
and signed by a duly authorized representation of ETI.
