L7 Instructions
User Manual:
Open the PDF directly: View PDF ![]() .
.
Page Count: 5

CSCI 3308 Software Development Methods and Tools [Fall 2018]
Instructor: Alan Paradise
TA: Chelsea Chandler, Ajay Kedia, Nikhil Sulegaon, Rohit Mehra, Michael
Schneider
Lab7 – Material by Liz Boese.
REST Web Services
Objectives
• Start a local web server
• Create a web page and display on a web server
• Create a web page and display on a web server
• Use jQuery’s Ajax to get data from a REST API web server
• Parse JSON data and display on a web page
Note: if there is anything wrong with your computer, pair program today with someone else!
Pre-lab work
1. Be sure you have a web server installed. You might be all ready to go, check to see
what happens if you type in a terminal window:
• This should work with python, and the default port should be8000. But you
can specify a different port, like 8080 if you’d like.
Python 2
python -m SimpleHTTPServer 8000
Python 3
python –m http.server 8000
• There may be an elegant way to terminate the web server(Ctrl + c),but closing
the terminal works.
2. Install the jq command line tool for formatting JSON data.
• Linux
i. sudo apt-get install jq
• OS X
i. Install Homebrew ← Super cool, you shouldprobably just
have this if you use OSX.
ii. brew install jq
3. Sign up for a free API key for the Dark Sky Forecast API.
4. Learn the basics of HTML and JavaScript if you don’t know it already. It will help to
understand what you are doing. We will walk you through what you need for this lab—it
just helps to know more. You may also want to read up on Ajax.

Exercise
The goal of this project is to set up a client-side web program using JavaScript, the jQuery library,
and Ajax to access data on a web server via REST API. More specifically, you will create a web
application that displays dynamic information on the current weather conditions of different
cities.
Part 1 - Web server
Setup a local web server to serve a simple HTML file.
1. Open a terminal window.
2. Go to a directory (or create a new directory) to work from.
3. Using vim, create a new web page titled hello.html.
4. Add the following HTML code to the file
<html>
<head>
<title>Hello</title>
</head>
<body>
<p>Hello,world.</p>
</body>
</html>
5. Save the file.
6. Open a second terminal window and go to the same directory.
7. Run the command below(same from thepre-lab) to start the simple web server using
the current directory as the base.
For python 2
python -m SimpleHTTPServer 8000
For python 3
python -m http.server 8000
8. Open a web browser and open the filehello.html via the local web server
http://127.0.0.1:8000/hello.html.
a.
Also, you can goto127.0.0.1:8000/ and clickhello.html which should bean
option, as well as anything else in the directory where you started your server.
Part2-QueryRESTAPI
We will start by getting the weather of Boulder from forecast.io.
curl 'https://api.forecast.io/forecast/<Insert API key>/40.014984,-
105.270546'>results.json
cat results.json
You should see a JSON document printed. We can use jq to format the JSON code so we
can more easily read it.
cat results.json | jq .
Feel free to read the manual page for jq. The ‘.’ is a filter, but a very simple filter. jq is a filtering
program for JSON files.

Part 3 - Web console
Every web browser contains a collection of debugging tools known as the Web Inspector. The
web console is similar to a terminal window: you can execute JavaScript code and view its
output.
The menu item to open the console can be found here in each of these major browsers:
●
Chrome: View > Developer > Developer Tools
●
Firefox: Tools > Web Developer > Web Console
●
Safari: Preferences > Advanced > Show Develop menu
We’ll need this console open for the rest of the lab to view output from calls to console.log.
Part 4 - jQuery
The jQuery library is a fast, small, and feature-rich JavaScript library. It makes things likeHTML
document traversal and manipulation, event handling, animation, and Ajax much simpler with an
easy-to-use API that works across a multitude of browsers.
The code below is the ajax code that will query forecast.io, just like the curl command we used earlier.
It specifies the URL and the default HTTP method is GET.
var url = 'https://api.forecast.io/forecast/APIKEY/40.014984,-
105.270546'
$.ajax({url:url, dataType:"jsonp"}).then(function(data)
{ console.log(data)
})
If the ajax call is successful, it calls the then function with the response body returned from
the server in the variable named data.
We need to put this code inside jQuery’s document.ready function.
<html>
<head>
<title>Hello</title>
<script>
$(document).ready(function() {
var url =
'https://api.forecast.io/forecast/APIKEY/40.014984,-105.270546'
$.ajax({url:url, dataType:"jsonp"}).then(function(data) {
console.log(data)
})
})
</script>
</head>
<body>
<p>Hello, world.</p>
</body>
</html>

Include jQuery
If you try to run it, you won’t see the results yet. We need to include the jQuery library in our
code. Type the following inside the <head> tags:
<script src="http://code.jquery.com/jquery-2.2.0.js"></script>
Note: You need to add this script just after title inside the head.
The browser will download and initialize the jQuery library before our code uses it later in the page.
Feel free to look at the code you’re using, go to: http://code.jquery.com/jquery-2.2.0.js to check
it out. It’s a whole lot of code, so realistically you might click that link and immediately close it,
scared.
That’s
okay.
But
check
out
jquery,
http://www.w3schools.com/jquery/jquery_get_started.asp
and
ajax - http://www.w3schools.com/xml/ajax_intro.asp
Note: While you can have your web page access the library on the Internet, most sites download
and serve it themselves from a directory named js/, ‘javascripts/`, etc. This prevents the site from
breaking should the file hosted on the jQuery servers move or disappear.
Note: Do take screenshot of the Console with the output (jquery request)
Part 5 - JSON
When we receive JSON data from $.ajax, jQuery has already parsed the JSON text into a
JavaScript
Object. To understand what jQuery did for us, let’s parse our own JSON formatted text
document. Paste the following into your browser’s web console:
var characters='{"characters": [ \
{"name": "Rachel", "funrating": 10}, \
{"name": "Joe", "funrating": 10}, \
{"name": "Monica", "funrating": 10} \
]}';
var friends= JSON.parse(characters);
console.log(friends.characters[0]
.name,friends.characters[0].funra
ting);
console.log(friends.characters[1]
.name,friends.characters[1].funra
ting);
console.log(friends.characters[2]
.name,friends.characters[2].funra
ting);
Notice the dot notation used to navigate the object properties. We can use this same syntax
while navigating the weather JSON data.
Note: Do take screenshot of the Console log with the output
Part 6 - Display results
The last step is to take this information that we can now access from the JSON response and
add it to the web page.
We will again make use of jQuery to help us. Add the following line (intelligently):
$('#results').text(data.currently.temperature)
<p id="results">original</p>
This is jQuery’s way of updating the content within an HTML tag. The #results selector references
any element that has the id attribute equal to results. The .text()call replaces the text inside the
tags with the new String.
Add the currently.apparentTemperature and currently.precipType field values from the JSON
object to the page. Be sure to label each thing that is displayed.
Hint, you can use .append instead of .text to keep adding to the same HTML tag, or add
multiple p tags with different IDs and reference those to add additional fields or you can use html
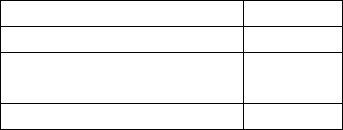
table to display the result. Your output should look something like this if you use table.
Stat
Value
Temperature
30.61
Apparent
Temperature
22.6
Precipitation Type
snow
Credit: To get credit for this lab exercise, make sure to turn in the hello.html file along with
2 screenshot (Part4 and Part5) on Moodle.
