LANCOM 821+.LANCOM 1711+ VPN.LANCOM 1721+ VPN 821 LC 821plus 1711plus 1721plus MANUAL EN
User Manual: 821
Open the PDF directly: View PDF ![]() .
.
Page Count: 79
- 1 Introduction
- 2 Installation
- 3 Basic configuration
- 4 Setting up Internet access
- 5 Connecting two networks
- 6 Providing dial-in access
- 7 Fax transmission with LANCAPI
- 8 Security settings
- 9 Advice & assistance
- 10 Appendix
110739/0409
LANCOM Systems GmbH
Adenauerstr. 20/B2
52146 Würselen
Germany
E-Mail: info@lancom.eu
Internet www.lancom.eu
LANCOM 821+
LANCOM 1711+ VPN
LANCOM 1721+ VPN
LANCOM 821+ LANCOM 1711+ VPN LANCOM 1721 VPN
쮿 Handbuch
쮿 Manual
...connecting your business
110739_LC-821plus-1711plus-1721p1 1110739_LC-821plus-1711plus-1721p1 1 20.04.2009 10:32:3020.04.2009 10:32:30

LANCOM 821+
LANCOM 1711+ VPN
LANCOM 1721+ VPN

© 2009 LANCOM Systems GmbH, Wuerselen (). All rights reserved.
While the information in this manual has been compiled with great care, it may not be deemed an assurance of product
characteristics. LANCOM Systems shall be liable only to the degree specified in the terms of sale and delivery.
The reproduction and distribution of the documentation and software supplied with this product and the use of its contents
is subject to written authorization from LANCOM Systems. We reserve the right to make any alterations that arise as the
result of technical development.
Windows®, Windows Vista™, Windows NT® and Microsoft® are registered trademarks of Microsoft, Corp.
The LANCOM Systems logo, LCOS and the name LANCOM are registered trademarks of LANCOM Systems GmbH. All other
names or descriptions used may be trademarks or registered trademarks of their owners.
Subject to change without notice. No liability for technical errors or omissions.
Products from LANCOM Systems include software developed by the OpenSSL Project for use in the OpenSSL Toolkit (http:/
/www.openssl.org/).
Products from LANCOM Systems include cryptographic software written by Eric Young (eay@cryptsoft.com).
Products from LANCOM Systems include software developed by the NetBSD Foundation, Inc. and its contributors.
Products from LANCOM Systems contain the LZMA SDK developed by Igor Pavlov.
LANCOM Systems GmbH
Adenauerstr. 20/B2
52146 Wuerselen
Germany
www.lancom.eu
Wuerselen, April 2009
11
0
7
39
/
0
4
09

LANCOM 821+ – LANCOM 1711+ VPN – LANCOM 1721+ VPN
Preface
3
EN
Preface
Thank you for placing your trust in this LANCOM Systems product.
With the LANCOM Router you have chosen a powerful router that possesses
integrated DSL respectively ADSL and ISDN interfaces by default as well as an
integrated 4-port switch. With this router you can simply and comfortably
connect individual PCs or whole local networks to the high-speed Internet.
Model variants
This user manual applies to the following models of the LANCOM Router
series:
LANCOM 821+
LANCOM 1721+ VPN
LANCOM 1711+ VPN
Model
restriction
The sections of the documentation that refer only to a range of models are
marked either in the corresponding text itself or with appropriate comments
placed beside the text.
In the other parts of the documentation, all described models have been clas-
sified under the general term LANCOM Router.
Security settings
To maximize the security available from your product, we recommend that you
undertake all of the security settings (e.g. firewall, encryption, access protec-
tion) that were not already activated when you purchased the product. The
LANconfig Wizard 'Security Settings' will help you with this task. Further infor-
mation is also available in the chapter 'Security settings'.
We would additionally like to ask you to refer to our Internet site
www.lancom.eu for the latest information about your product and technical
developments, and also to download our latest software versions.

LANCOM 821+ – LANCOM 1711+ VPN – LANCOM 1721+ VPN
Preface
4
EN
Components of the documentation
The documentation of your device consists of the following parts:
Installation Guide
User manual
PBX Functions manual
Reference manual
Menu Reference Guide
You are now reading the user manual.
It contains all information you need to put your device into operation. It also
contains all of the important technical specifications.
The Reference Manual is to be found as an Acrobat document (PDF file) at
www.lancom.eu/download or on the CD supplied. It is designed as a supple-
ment to the user manual and goes into detail on topics that apply to a variety
of models. These include, for example:
The system design of the operating system LCOS
Configuration
Management
Diagnosis
Security
Routing and WAN functions
Firewall
Quality of Service (QoS)
Virtual Private Networks (VPN)
Virtual Local Networks (VLAN)
Wireless networks (WLAN)
Backup solutions
LANCAPI
Further server services (DHCP, DNS, charge management)
The Menu Reference Guide (also available at www.lancom.eu/download or on
the CD supplied) describes all of the parameters in LCOS, the operating system
used by LANCOM products. This guide is an aid to users during the configu-
ration of devices by means of WEBconfig or the telnet console.

LANCOM 821+ – LANCOM 1711+ VPN – LANCOM 1721+ VPN
Preface
5
EN
This documentation was created by …
... several members of our staff from a variety of departments in order to
ensure you the best possible support when using your LANCOM product.
Should you find any errors, or if you would like to suggest improvements,
please do not hesitate to send an e-mail directly to:
info@lancom.eu
Our online services www.lancom.eu are available to you around the
clock if you have any questions on the content in this manual, or if you
require any further support. The area 'Support' will help you with
many answers to frequently asked questions (FAQs). Furthermore, the
knowledgebase offers you a large reserve of information. The latest
drivers, firmware, utilities and documentation are constantly available
for download.
In addition, LANCOM Support is available. For telephone numbers
and contact addresses for LANCOM Support, please refer to the
enclosed leaflet or the LANCOM Systems Web site.
Information symbols
Very important instructions. Failure to observe these may result in damage.
Important instruction that should be observed.
Additional information that may be helpful but is not essential.

LANCOM 821+ – LANCOM 1711+ VPN – LANCOM 1721+ VPN
Contents
6
EN
Contents
1 Introduction 9
1.1 How do ADSL and ADSL 2+ work? 9
1.2 What does VPN offer? 10
2 Installation 14
2.1 Package contents 14
2.2 System requirements 14
2.3 Status displays and interfaces 15
2.3.1 Device connectors 19
2.4 Hardware installation 22
2.5 Software installation 23
2.5.1 Starting the software setup 24
2.5.2 Which software should I install? 24
3 Basic configuration 25
3.1 What details are necessary? 25
3.1.1 TCP/IP settings 25
3.1.2 Configuration protection 27
3.1.3 Settings for the wireless LAN 28
3.1.4 Settings for the DSL connection 29
3.1.5 Settings for the ISDN Connection 29
3.1.6 Charge protection 29
3.2 Instructions for LANconfig 30
3.3 Instructions for WEBconfig 31
3.4 TCP/IP settings for PC workstations 35
4 Setting up Internet access 37
4.1 The Internet Connection Wizard 39
4.1.1 Instructions for LANconfig 39
4.1.2 Instructions for WEBconfig 40

LANCOM 821+ – LANCOM 1711+ VPN – LANCOM 1721+ VPN
Contents
7
EN
5 Connecting two networks 41
5.1 Which details are necessary? 42
5.1.1 General information 42
5.1.2 Settings for the TCP/IP router 44
5.1.3 Settings for the IPX router 45
5.1.4 Settings for NetBIOS routing 46
5.2 Instructions for LANconfig 47
5.3 1-Click-VPN for networks (site-to-site) 48
5.4 Instructions for WEBconfig 49
6 Providing dial-in access 51
6.1 Which details are necessary? 51
6.1.1 General information 52
6.1.2 Settings for TCP/IP 53
6.1.3 Settings for IPX 54
6.1.4 Settings for NetBIOS routing 54
6.2 Settings on the dial-in computer 55
6.2.1 Dialing-in via VPN 55
6.2.2 Dialing-in via ISDN 55
6.3 Instructions for LANconfig 56
6.4 1-Click-VPN for LANCOM Advanced VPN Client 56
6.5 Instructions for WEBconfig 57
7 Fax transmission with LANCAPI 58
7.1 Installing the LANCOM CAPI Faxmodem 59
7.2 Installing the MS Windows Fax Service 60
7.3 Sending a fax 61
7.3.1 Sending faxes from an office application 61
7.3.2 Sending faxes with the Windows Fax Service 61
8 Security settings 63
8.1 Security settings Wizard 63
8.1.1 LANconfig Wizard 63
8.1.2 WEBconfig Wizard 64
8.2 The security checklist 64

LANCOM 821+ – LANCOM 1711+ VPN – LANCOM 1721+ VPN
Contents
8
EN
9 Advice & assistance 68
9.1 No WAN connection can be established 68
9.2 DSL data transfer is slow 68
9.3 Unwanted connections under Windows XP 69
9.4 Cable testing 69
10 Appendix 71
10.1 Performance data and specifications 71
10.2 Connector wiring 72
10.2.1 WAN interface 72
10.2.2 ADSL interface 72
10.2.3 ISDN-S0 interface 73
10.2.4 Ethernet interface 10/100Base-T 73
10.2.5 Configuration interface (outband) 74
10.3 Declaration of conformity 74
11 Index 75

LANCOM 821+ – LANCOM 1711+ VPN – LANCOM 1721+ VPN
Chapter 1: Introduction
9
EN
1Introduction
The models LANCOM 821+, LANCOM 1721+ VPN and LANCOM 1711+ VPN
are fully-featured routers that therefore also can be used in combination with
the integrated firewall for providing secure Internet access to a complete local
network (LAN).
The VPN option, which is either integrated already or can be activated subs-
quently, enables the LANCOM 1721+ VPN and LANCOM 1711+ VPN to act as
powerful Dynamic VPN gateways for external offices or mobile users.
The LANCOM Router models offer each a DSL or ADSL connector and also an
ISDN connector. The ISDN line can be used as back- up for the DSL connection,
for remote management of the router, as basis for the office communication
via LANCAPI or for establishing VPN connections to remote sites with dynamic
IP addresses.
By using the Voice over IP function, these devices can transfer voice data over
broadband Internet connections as well.
1.1 How do ADSL and ADSL 2+ work?
ADSL (Asymmetric Digital Subscriber Line) is currently the most common tech-
nology for broadband Internet connections. Standard and almost ubiquitous
telephone lines (analog or DSL) are the basis for DSL data transfer to the near-
est telephone exchange. From here, the data is passed directly on to the Inter-
net over high-speed connections.
The asymmetric DSL variant ADSL was developed for applications where users
receive large amounts of data but transmit only small amounts, such as when
surfing in the WWW. ADSL subscribers can receive data at up to 8 Mbps
("downstream") and transmit at up to 800 kbps ("upstream"). ADSL providers
are able to reduce these maximum rates as they please.
To satisfy the strongly increasing demand for higher bandwidths, the stand-
ards ADSL 2 and ADSL 2+ provider higher data rates as a basis for applica-
tions such as video streaming or high-definition TV (HDTV) over the Internet.
Depending on the Internet provider, ADSL 2 devices support downstream data
rates of up to 12 Mbps, and ADSL 2+ devices support up to 24 Mbps. Hand-
shake routines during connection establishment ensure that the standards
ADSL, ADSL 2 and ADSL 2+ are intercompatible.
Parallel to data transfer, ADSL also provides full and unlimited support for the
classic applications in telephony (telephone, fax, answering machine, PBX).
LANCOM 821+ – LANCOM 1711+ VPN – LANCOM 1721+ VPN
Chapter 1: Introduction
10
EN
This is facilitated by splitters which separate the voice frequencies from the
data frequencies.
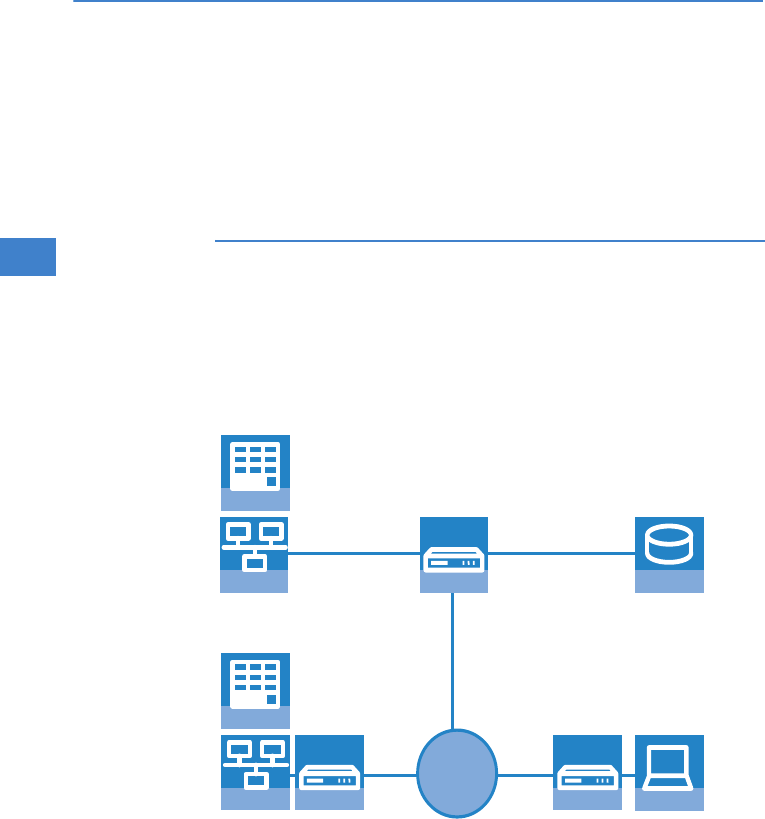
1.2 What does VPN offer?
For LANCOM
1711+ VPN and
LANCOM 1721+
VPN only
A VPN (Virtual Private Network) can be used to set up secure data communi-
cations over the Internet.
The models LANCOM 1721+ VPN and LANCOM 1711+ VPN are fac-
tory equipped to support VPN with 5 active tunnels. With the addi-
tional LANCOM VPN Option, VPN support can be extended to 25
active tunnels (incl. activated hardware accelerator).
The following structure results when using the Internet instead of direct con-
nections:
All participants have fixed or dial-up connections to the Internet. Expensive
dedicated lines are no longer needed.
All that is required is the Internet connection of the LAN in the headquar-
ters. Special switching devices or routers for dedicated lines to individual
participants are superfluous.
The subsidiary also has its own connection to the Internet.
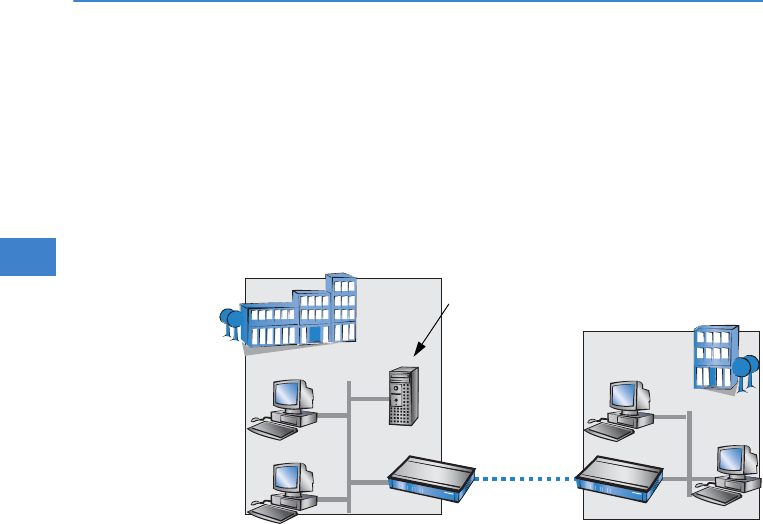
HEADQUARTER
VPN GATEWAY
LAN
SERVER
LAPTOP
INTERNET
VPN ROUTER ROUTER
BRANCH
LAN

LANCOM 821+ – LANCOM 1711+ VPN – LANCOM 1721+ VPN
Chapter 1: Introduction
11
EN
The RAS PCs connect to the headquarters LAN via the Internet.
The Internet is available virtually everywhere and typically has low access
costs. Significant savings can thus be achieved in relation to switched or ded-
icated connections, especially over long distances.
The physical connection no longer exists directly between two participants;
instead, the participants rely on their connection to the Internet. The access
technology used is not relevant in this case: Broadband technology such as
DSL (Digital Subscriber Line) is ideal. A conventional ISDN line can be used,
too.
The technologies of the individual participants do not have to be compatible
to one another, as would be the case for conventional direct connections. A
single Internet access can be used to establish multiple simultaneous logical
connections to a variety of remote sites.
The resulting savings and high flexibility makes the Internet (or any other IP
network) an outstanding backbone for a corporate network.
What can your LANCOM Router do?The following table contains a direct
comparison of the properties and functions of your devices with other models:
LANCOM
821+
LANCOM
1711+ VPN
LANCOM
1721+ VPN
Applications
Internet access ✔✔✔
LAN to LAN coupling via VPN ✔✔
LAN to LAN coupling via ISDN ✔✔✔
RAS server (via VPN) ✔✔
RAS server (via ISDN) ✔✔✔
IP router ✔✔✔
IPX router (via ISDN), e.g. for coupling of Novell networks or dialling into
Novell networks
✔
NetBIOS proxy for coupling of Microsoft peer-to-peer networks via ISDN ✔✔✔
DHCP and DNS server (for LAN and WAN) ✔✔✔
N:N mapping for coupling networks using the same IP address ranges ✔✔✔
Bridge function for coupling networks via ISDN connection ✔✔✔

LANCOM 821+ – LANCOM 1711+ VPN – LANCOM 1721+ VPN
Chapter 1: Introduction
12
EN
Port-Mapping to set up LAN ports as additional WAN ports ✔✔
Policy-based routing for policy-based selection of target routes ✔✔✔
Load-balancing for bundling of multiple DSL channels 2 channels 4 channels 4 channels
Backup solutions and load balancing with VRRP ✔✔✔
NAT Traversal (NAT-T) ✔✔✔
DMZ with configurable IDS checks ✔✔✔
PPPoE-Server ✔✔✔
WAN- RIP ✔✔✔
Spanning Tree Protocol ✔✔✔
Layer-2-QoS-Tagging ✔✔✔
ISDN leased lines ✔✔✔
LANCAPI server for the operating with office applications as fax or
answering machine via ISDN interface
✔✔✔
WAN connection
Connection for DSL or cable modem ✔✔✔
Integrated ADSL modem (ADSL2+ ready) ✔✔
ISDN S0 bus in multi device-mode or in point-to-point mode with auto-
matic D-channel protocol identification. Supports static and dynamic
channel bundling per MLPPP and BACP as well as Stac data compression
(Hi/fn)
✔✔✔
Port for external modem, analogue or GSM (requires LANCOM modem
adapter kit; from LCOS 5.0)
✔✔✔
LAN connection
4 individual Fast Ethernet LAN ports, switchable separately, e.g. as LAN
switch or separate DMZ ports, auto crossover.
✔✔✔
USB connector
USB 2.0 host port (full speed: 12 Mbps) for connecting a USB printer and
for future extensions
✔✔
Security functions
IPSec encryption in external software (VPN client) ✔✔
5 integrated VPN tunnels for protection of network connections ✔✔
IPSec encryption in hardware (optional; activated with the VPN-25
option)
✔✔
IP masquerading (NAT, PAT) to conceal individual LAN workstations
behind a single public IP address.
✔✔✔
LANCOM
821+
LANCOM
1711+ VPN
LANCOM
1721+ VPN

LANCOM 821+ – LANCOM 1711+ VPN – LANCOM 1721+ VPN
Chapter 1: Introduction
13
EN
Stateful Inspection Firewall ✔✔✔
Firewall filter for blocking individual IP addresses, protocols and ports ✔✔✔
MAC address filter regulates, for example, LAN-workstation access to the
IP routing function
✔✔✔
Protection of the configuration from brute-force attacks. ✔✔✔
Configuration
Configuration with LANconfig or with web browser, additionally terminal
mode for Telnet or other terminal programs, SNMP interface and TFTP
server function.
✔✔✔
Remote configuration via ISDN (with ISDN-PPP connections e.g. via Win-
dows network and dial-up connections)
✔✔✔
Serial configuration interface ✔✔✔
Callback function with PPP authentication mechanisms for restriction to
fixed ISDN telephone numbers
✔✔✔
FirmSafe with firmware versions for absolutely secure software upgrades ✔✔✔
Optional software extensions
LANCOM VPN Option with 25 active tunnels for protection of network
couplings
✔✔
Optional hardware extensions
LANCOM Modem Adapter Kit for connection of analog or GSM modems
to the serial interface
✔✔✔
LANCOM
821+
LANCOM
1711+ VPN
LANCOM
1721+ VPN

LANCOM 821+ – LANCOM 1711+ VPN – LANCOM 1721+ VPN
Chapter 2: Installation
14
EN
2 Installation
This chapter will assist you to quickly install hardware and software. First,
check the package contents and system requirements. The device can be
installed and configured quickly and easily if all prerequisites are fulfilled.
2.1 Package contents
Please check the package contents for completeness before starting the
installation. In addition to the device itself, the package should contain the
following accessories:
If anything is missing, please contact your retailer or the address stated on the
delivery slip of the unit.
2.2 System requirements
Computers that connect to a LANCOM must meet the following minimum
requirements:
LANCOM 821+
LANCOM 1721+ VPN
LANCOM 1711+ VPN
Power adapter ✔✔✔
LAN connector cable (green plugs) ✔✔✔
WAN connector cable (dark blue plugs) ✔
ADSL connector cable (transparent plugs) ✔✔
ISDN connector cable (light blue plugs) ✔✔✔
Connector cable for the configuration interface ✔✔✔
LANCOM CD ✔✔✔
Printed documentation ✔✔✔

LANCOM 821+ – LANCOM 1711+ VPN – LANCOM 1721+ VPN
Chapter 2: Installation
15
EN
Operating system that supports TCP/IP, e.g. Windows Vista™,
Windows XP, Windows Millennium Edition (Me), Windows 2000, Win-
dows 98, Linux, BSD Unix, Apple Mac OS, OS/2.
Access to the LAN via the TCP/IP protocol.
The LANtools also require a Windows operating system. A web
browser under any operating system provides access to WEBconfig.
2.3 Status displays and interfaces
Meanings of the LEDs
In the following sections we will use different terms to describe the behaviour
of the LEDs:
Blinking means, that the LED is switched on or off at regular intervals in
the respective indicated colour.
Flashing means, that the LED lights up very briefly in the respective col-
our and stay then clearly longer (approximately 10x longer) switched off.
Inverse flashing means the opposite. The LED lights permanently in the
respective colour and is only briefly interrupted.
Flickering means, that the LED is switched on and off in irregular inter-
vals.
Front side
The various LANCOM Router models have different numbers of indicators on
the front panel depending on their functionality.
LANCOM 821+ and
LANCOM 1721+ VPN
LANCOM 1711+ VPN
LANCOM
LANCOM
1721
1721
VPN
VPN
Power
Power
ADSL Status
ADSL Status
Online
Online
ADSL Data
ADSL Data
ETH 3
ETH 3
ETH 4
ETH 4
ISDN Status
ISDN Status
ISDN Data
ISDN Data
ETH 1
ETH 1
ETH 2
ETH 2
VPN
VPN
not available on LANCOM 821+
1711+ VPN
Power
WAN Status
Online
WAN Data
ETH 3
ETH 4
ISDN Status
ISDN Data
ETH 1
ETH 2
VPN
LANCOM 821+ – LANCOM 1711+ VPN – LANCOM 1721+ VPN
Chapter 2: Installation
16
EN
Top
The two top-mounted LEDs enable the main function status to be assessed
even if the device is positioned vertically.
Power This LED indicates that the device is operational. After the device has been
switched on, it will flash green for the duration of the self-test. After the self-
test, either an error is output by a flashing red light code or the device starts
and the LED remains lit green.
The power LED flashes red/green in alternation until a configuration
password has been specified. Without a configuration password, the
configuration data of the LANCOM is insecure. Under normal circum-
stances, you would assign a configuration password during the basic
configuration (see instructions in the following chapter). For informa-
tion about a later assignment of the configuration password see the
section “Security settings”.
Power
Online
off Device off
green blinking Self-test when powering up
green constantly on Device ready for use
red/
green
blinking alternately Device insecure: configuration password not assigned
red blinking Time or connect-charge reached

LANCOM 821+ – LANCOM 1711+ VPN – LANCOM 1721+ VPN
Chapter 2: Installation
17
EN
Online The online LED displays the general status of all WAN interfaces:
ADSL status
( LANCOM
821+ and
LANCOM
1721+ VPN
only)
Information on connection status at the ADSL connector:
Flashing Power LED but no connection?
There's no need to worry if the Power LED blinks red and you can no
longer connect to the WAN. This simply indicates that a preset time or
connect-charge limit has been reached. There are three methods
available for unlocking:
Reset connect charge protection.
Increase the limit that has been reached.
Completely deactivate the lock that has been triggered (set limit
to '0').
If a time or connect charge limit has been reached, you will be notified in LANmonitor. To
reset the connect charge protection, select Reset Charge and Time Limits in the context
menu (right mouse click). You can configure the connect charge settings in LANconfig under
Management Costs (you will only be able to access this configuration if 'Complete con-
figuration display' is selected under View Options…).
You will find the connect charge protection reset in WEBconfig and all parameters under
Expert Configuration Setup Charges-module.
Signal for reached time
or connect-charge
limit
Power
Power
Off No active connection
Green Flashing Opening the first connection
Green Inverse flashing Opening an additional connection
Green On (perma-
nently)
At least one connection is established
Red On (perma-
nently)
Error establishing the last connection
Off Interface deactivated
Green Blinking/flashing Handshake/training
Green Permanently Synchronization successful
Red Flickering Error (CRC error, framing error, etc.)
Red On (permanently) No synchronization, searching for remote station
Red/
orange
Blinking Hardware error

LANCOM 821+ – LANCOM 1711+ VPN – LANCOM 1721+ VPN
Chapter 2: Installation
18
EN
ADSL data
( LANCOM
821+ and
LANCOM
1721+ VPN
only)
Information on data traffic at the ADSL connector:
WAN Status
(only LANCOM
1711+ VPN)
Connection status of the WAN connection:
WAN Data
(only LANCOM
1711+ VPN)
Data traffic via the WAN connection:
ISDN status Information on connection status at the ISDN S0 connector:
If the ISDN status LED goes off automatically, this does not indicate
an error at the S0 bus. It is in fact because several ISDN connections
and PBXs switch the S0 bus into power-saving mode after a certain
Off No logical connection
Green Blinking Opening the first connection
Green Inverse flashing Opening an additional connection
Green Permanently At least one logical connection is established
Green Inverse flickering Data traffic (send or receive)
off not connected
green blinking Establishing first connection
green invers flashing Establishing further connection
green constantly on At least one connection established
red constantly on Error while establishing connection
off No network device connected
green constantly on Connection to network device operational, no data traffic
green flickering Data traffic (send or receive)
Off Not connected or no S0 voltage (no error message)
Green Blinking D-channel initialization (establishing contact to provider)
Green On (perma-
nently)
D-channel operational
Red Flickering D-channel error
Red On (perma-
nently)
D-channel activation failed

LANCOM 821+ – LANCOM 1711+ VPN – LANCOM 1721+ VPN
Chapter 2: Installation
19
EN
period of inactivity. When needed, the S0 bus automatically reacti-
vates and the ISDN status LED illuminates in green.
ISDN Data Status display for both ISDN B channels:
ETH LAN connector status in the integrated switch:
VPN Status of a VPN connection.
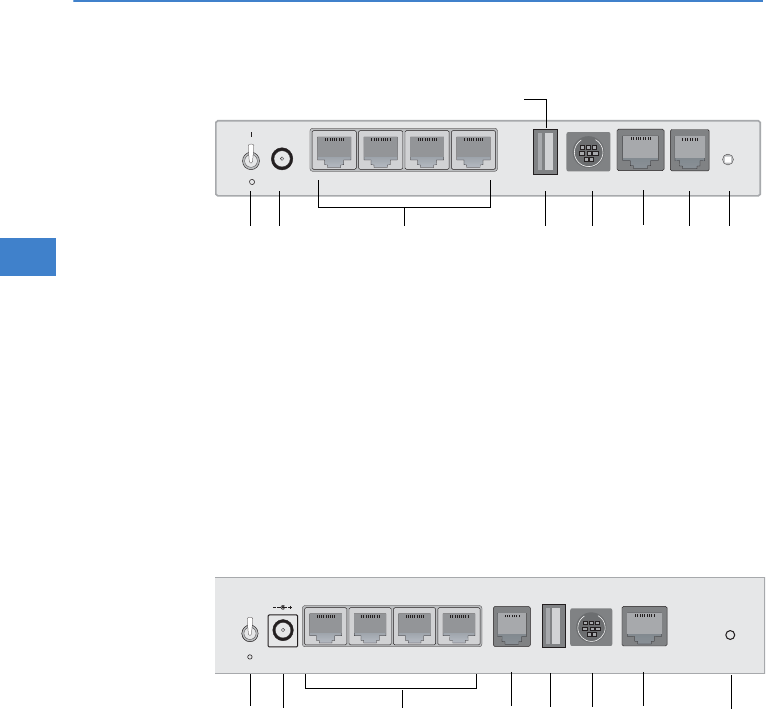
2.3.1 Device connectors
The connections and switches of the router are located on the back panel:
off No connection established
green Blinking Dialling
green Flashing Establishing first connection
green Inverse flashing Establishing further connection
green Constantly on Connection established via B channel
green Flickering Data traffic (send or receive)
Off No networking device attached
Green On (perma-
nently)
Connection to network device operational, not data traffic
Green Flickering Data traffic
Red Flickering Data packet collision
Off No VPN tunnel established
Green Blinking Connection establishment
Green Flashing First connection
Green Inverse flashing Other connections
Green On (perma-
nently)
VPN tunnels are established
LANCOM 821+ – LANCOM 1711+ VPN – LANCOM 1721+ VPN
Chapter 2: Installation
20
EN
LANCOM 821+ and
LANCOM 1721+
VPN
Voltage switch
Connection for the included power adapter
Switch with four 10/100Base-Tx connections
USB connection
Serial configuration port
ISDN/S0 port
ADSL port
Reset switch
LANCOM 1711+
VPN
Voltage switch
Connection for the included power adapter
Switch with four 10/100Base-Tx connections
WAN port
USB connection
ISDN/S0 port
Serial configuration port
Reset
DC12V
ETH3ETH4 ETH2 ETH 1
ISDN S
0
ADSL
ConfigUSB (COM)
not available on LANCOM 821+
WAN USB ISDN-S0
Reset
DC 12 V
Config (COM)
ETH 1
ETH 2
ETH 3
ETH 4
I

LANCOM 821+ – LANCOM 1711+ VPN – LANCOM 1721+ VPN
Chapter 2: Installation
21
EN
Reset switch
The reset switch has two different functions depending on the length of time
that it is pressed:
Restarting the device (soft reset) – push the button for less than five
seconds. The device will restart.
Resetting the configuration (hard reset) – push the button for more
than five seconds. All the device's LEDs will light up green and stay
on. As soon as the reset switch is released, the device will restart with
factory default settings.
Reset button functions
The reset button offers two basic functions—boot (restart) and reset (to the
factory settings)—which are called by pressing the button for different
lengths of time.
It is not always possible to install a device under lock and key. There is conse-
quently a risk that the configuration will be deleted by mistake if a co-worker
presses the reset button too long. With the suitable setting, the behavior of
the reset button can be controlled.
Reset button
This option controls the behavior of the reset button when it is pressed:
Ignore: The button is ignored.
Boot only: With a suitable setting, the behavior of the reset button can
be controlled; the button is then ignored or a press of the button
prompts a re-start only, however long it is held down.
Configuration tool Call
WEBconfig, Telnet Expert configuration > Setup > Config
Please observe the following notice: The settings 'Ignore' or 'Boot only' makes it
impossible to reset the configuration to the factory settings. If the password is lost for
a device with this setting, there is no way to access the configuration! In this case the
serial communications interface can be used to upload a new firmware version to the
device—this resets the device to its factory settings, which results in the deletion of the
former configuration. Instructions on firmware uploads via the serial configuration
interface are available in the LCOS reference manual.

LANCOM 821+ – LANCOM 1711+ VPN – LANCOM 1721+ VPN
Chapter 2: Installation
22
EN
Reset-or-boot (standard setting): Press the button briefly to re-start
the device. Pressing the button for 5 seconds or longer restarts the
device and resets the configuration to its factory settings.
All LEDs on the device light up continuously.
Once the switch is released the device will restart with the restored
factory settings.
After resetting, the device starts completely unconfigured and all set-
tings are lost. If possible be sure to backup the current device config-
uration before resetting.
2.4 Hardware installation
The installation of the LANCOM Router base station takes place in the follow-
ing steps:
LAN – connect the LANCOM Router to your LAN or to an individual PC.
For that purpose, plug the included network cable (green plugs) into the
LAN connector of the device and the other end into a free network
connecting socket of your local network, into a free socket of a hub/switch
or into the network socket of an individual PC.
The LAN connector identifies automatically the transfer rate (10/100
Mbps) of the connected network device (autosensing). A parallel connec-
tion of devices with different speeds and types is possible.
You should never have more than one unconfigured LANCOM Router
in a network segment at any given time. All unconfigured LANCOM
Router devices use the same IP address (with the final digits '254'),
which would result in an address conflict. To avoid problems, always
configure multiple LANCOM Router devices one at a time, immedi-
ately assigning each device a unique IP address (one that does not
end with '254').
821+/1721 only ADSL – connect the ADSL interface to the splitter using the supplied
ADSL connector cable (transparent plugs).
1711+ only DSL – connect the WAN interface to the DSL modem socket using the
supplied DSL connector cable (dark blue plugs).
ISDN – to connect the LANCOM Router to the ISDN, plug one end of the
supplied ISDN connector cable (light blue plugs) in the ISDN/S0 port

LANCOM 821+ – LANCOM 1711+ VPN – LANCOM 1721+ VPN
Chapter 2: Installation
23
EN
(LANCOM 821+ and LANCOM 1721+ VPN) or (LANCOM 1711+ VPN)
of the router and the other end into an ISDN/S0 multi-device mode or
point-to-point mode connection.
Configuration port – you may optionally connect the router directly to
the serial port (RS-232, V.24) of a PC. Use the cable supplied for this pur-
pose. Connect the configuration port of the LANCOM (LANCOM 821+
and LANCOM 1721+ VPN) or (LANCOM 1711+ VPN) with a free serial
port of the PC.
Alternatively you may connect an external modem (analogue or GSM) to
the serial port using the LANCOM modem adapter kit, if you would like to
make use of an additional WAN line for remote maintenance, backup con-
nections or dynamic VPN.
Connect to power – Connect socket of the unit to a power supply
using the included power adapter.
Use the supplied power supply unit only! Using an unsuitable power
supply unit may cause damage or injury.
Operational? – After a short device self-test the Power LED will be per-
manently lit. Green LAN LEDs indicate the LAN sockets that have function-
ing connections.
Devices with integrated ADSL modem could become quite warm dur-
ing their operation. Concerning these models, please pay attention to
the ambient air temperature range of max. 35°C. Make sure that the
ventilation is sufficient. Do not stack the devices and do not expose
them to direct insolation!
2.5 Software installation
The following section describes the installation of the Windows-compatible
system software LANtools, as supplied.
You may skip this section if you use your LANCOM VPN Router exclu-
sively with computers running operating systems other than Win-
dows.
LANCOM 821+ – LANCOM 1711+ VPN – LANCOM 1721+ VPN
Chapter 2: Installation
24
EN
2.5.1 Starting the software setup
Place the product CD into your drive. The setup program will start automati-
cally.
If the setup does not start automatically, run AUTORUN.EXE in the
root directory of the LANCOM CD.
In Setup, select Install software. The following selection menus will appear
on screen:
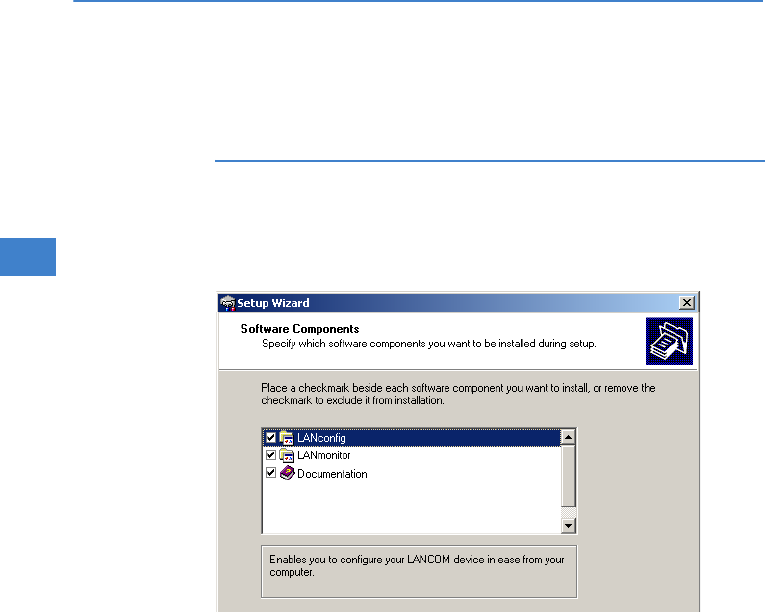
2.5.2 Which software should I install?
LANconfig is the Windows configuration program for all LANCOM
routers and LANCOM access points. WEBconfig can be used alterna-
tively or in addition via a web browser.
With LANmonitor you can use a Windows computer to monitor all of
your LANCOM routers and LANCOM access points.
With Documentation you copy the documentation files onto your PC.
Select the appropriate software options and confirm your choice with Next.
The software is installed automatically.

LANCOM 821+ – LANCOM 1711+ VPN – LANCOM 1721+ VPN
Chapter 3: Basic configuration
25
EN
3 Basic configuration
The basic configuration is conducted with a convenient Setup Wizard that
provides step-by-step guidance through the configuration and that requests
any necessary information.
First of all this chapter presents the information that has to be entered for the
basic configuration. This first section will help you to gather up all of the nec-
essary data before you start the Wizard.
You subsequently enter this information into the Setup Wizard. Starting the
program and the following procedure are described step by step. LANconfig
and WEBconfig each have their own description. With all of the necessary
information collected in advance, this basic configuration can now take place
quickly and in ease.
At the end of this chapter we show you the necessary settings for the work-
place computers in the LAN so that they can access the device without prob-
lem.
3.1 What details are necessary?
The Basic Settings Wizard is used to set the LANCOM VPN Routers basic TCP/
IP parameters and to protect the device with a configuration password. The
following description of the information required by the wizard is divided into
the following configuration sections:
TCP/IP settings
Protecting the configuration
Wireless LAN details
DSL connection details
DSL connection details
Configuring toll protection
Security settings
3.1.1 TCP/IP settings
TCP/IP configuration can be performed in two different ways: Either fully auto-
matically or manually. No user input is required if TCP/IP configuration is per-
formed automatically. All parameters are set by the Setup Wizard on its own.
When manual TCP/IP configuration is performed the wizard prompts for the
usual TCP/IP parameters: IP address, network mask etc. (more on this later)

LANCOM 821+ – LANCOM 1711+ VPN – LANCOM 1721+ VPN
Chapter 3: Basic configuration
26
EN
The fully automatic TCP/IP configuration is only possible in certain network
environments. For this reason the Setup Wwizard analyses the connected LAN
to see whether fully automatic configuration is possible or not.
New LAN – fully automatic configuration possible
The setup wizard offers to configure TCP/IP fully automatically if no network
devices connected have yet been configured. This usually happens in the fol-
lowing situations:
Only a single PC is going to be attached to the LANCOM VPN Router
Setting up a new network
Fully automatic TCP/IP configuration will not be offered if you are integrating
the LANCOM VPN Router into an existing TCP/IP LAN. In this case please con-
tinue with the section 'Required information for manual TCP/IP configuration'.
The result of fully automatic TCP/IP configuration is as follows: The LANCOM
VPN Router is assigned the IP address '172.23.56.254' (network mask
'255.255.255.0'). The integrated DHCP server is also activated so that the
LANCOM VPN Router can assign the devices in the LAN IP addresses automat-
ically.
Should you still configure manually?
Fully automatic TCP/IP configuration is optional. Instead of this you can select
manual configuration. Make this selection after considering the following:
Select automatic configuration if you are not familiar with networks and
IP addresses.
Select manual TCP/IP configuration if you are familiar with networks and
IP addresses and one of the following statements is true:
You have not yet used any IP addresses in your network but would like
to now; You would like to specify the IP address for the router yourself
and would like to assign it a user-defined address from one of the
address ranges reserved for private use, for example '10.0.0.1' with
a network mask of '255.255.255.0'. If you do this you simultaneously
specify the address range that the DHCP server will subsequently use
for the other devices in the network (provided the DHCP server is acti-
vated).
You have so far also used IP addresses on the computers in the LAN.

LANCOM 821+ – LANCOM 1711+ VPN – LANCOM 1721+ VPN
Chapter 3: Basic configuration
27
EN
Required information for manual TCP/IP configuration
When performing manual TCP/IP configuration the Setup Wwizard prompts
you for the following information:
DHCP mode of operation
Off: The IP addresses required must be entered manually.
Server: The LANCOM VPN Router operates as DHCP server in the net-
work; as a minimum its own IP address and the network mask must
be assigned.
Client: The LANCOM VPN Router obtains its address information from
another DHCP server; no address information is required.
IP address and network mask for the LANCOM VPN Router
Assign the LANCOM VPN Router a free IP address from your LAN's address
range and enter the network mask.
Gateway address
Enter the gateway's IP address if you have selected 'Off' as the DHCP
mode of operation or if another network device is assuming the role of
gateway in the 'Server' mode of operation.
DNS server
Enter the IP address of a DNS server to resolve domain names if you have
selected 'Off' as the DHCP mode of operation or if another network device
is assuming the role of DNS server in the 'Server' mode of operation.
3.1.2 Configuration protection
Using a password secures access to the LANCOM VPN Router's configuration
and thus prevents unauthorized modification. The device's configuration con-
tains a great deal of sensitive data such as data for Internet access and should
be protected by a password in all cases.
Multiple administrators can be set up in the configuration of the
LANCOM, each with differing access rights. Up to 16 different admin-
istrators can be set up for a LANCOM VPN Router. Further information
can be found in the LCOS reference manual under “Managing rights
for different administrators”.
In the managed mode the LANCOM Wireless Routers and LANCOM
Access Points automatically receive the same root password as the
WLAN-Controller, assuming that no root password has been set in the
device itself.

LANCOM 821+ – LANCOM 1711+ VPN – LANCOM 1721+ VPN
Chapter 3: Basic configuration
28
EN
3.1.3 Settings for the wireless LAN
Network name (SSID)
The Basic Settings Wizard prompts for the access point's network name (fre-
quently referred to as SSID – Service Set Identifier). The name is of your own
choice. Several access points with the same name form a common wireless
LAN.
Open or closed wireless LAN?
Mobile wireless devices select the desired wireless LAN by specifying the net-
work name. Two methods serve to facilitate the specification of network
name:
Mobile wireless devices can search ("scan") the vicinity for wireless LANs
and offer the wireless LANs they find in a list for selection.
By using the network name 'ANY' the mobile wireless device registers with
the nearest available wireless LAN.
The wireless LAN can be "closed" in order to prevent this procedure. In this
case it will not accept any devices attempting to register with the network
name 'ANY'.
Selecting a radio channel
The access point operates in a specific radio channel. The radio channel is
selected from a list of up to 13 channels in the 2.4 frequency band or up to 19
channels in the 5 GHz frequency band (individual radio channels are blocked
in some countries. Please refer to the appendix for more details).
The channel and frequency range used determine the operation if the com-
mon wireless standard, with the 5 GHz frequency range corresponding to the
IEEE 802.11a/h standard and the 2.4 GHz frequency range determining oper-
ation in the IEEE 802.11g and IEEE 802.11b standards.
If no other access points are operating within the access point's range, any
radio channel can be set. Otherwise the channels in the 2.4 GHz band must
be selected in such a way that they do not overlap and are as far apart as pos-
sible. In the 5 GHz band the automatic setting, where the LANCOM Access
Point uses TPC and DFS to select the best channel is normally sufficient.
Please refer to the LCOS reference manual for more information on
TPC and DFS.

LANCOM 821+ – LANCOM 1711+ VPN – LANCOM 1721+ VPN
Chapter 3: Basic configuration
29
EN
3.1.4 Settings for the DSL connection
It may be necessary to enter the transmission protocol used for the DSL con-
nection. The wizard will enter the correct setting for the most important DSL
providers on its own. Only when the wizard does not list your provider must
the transmission protocol used by your DSL provider be entered.
The wizard will offer you a universal 'multimode' protocol that works with all
common types of DSL connection.
3.1.5 Settings for the ISDN Connection
If you wish to use the ISDN connection you can make the following settings:
One or more ISDN MSNs on which the router should answer calls. MSNs
are ISDN call numbers that your telephone company allocates to you. They
are usually specified without a prefix. The numbers specified are only
important for router functions (LAN-LAN coupling, RAS), but not for the
remote configuration and LANCOM VPN Option.
A prefix to access the public telephone network. It is normally only
required when connecting via an ISDN PBX. Usually this is a '0'. This prefix
is used for all outgoing calls.
Finally you should know whether the telephone company transmits an
ISDN metering pulse. This can be evaluated by the LANCOM Router for
cost budgets and the accounting function.
3.1.6 Charge protection
Charge protection prevents DSL connections being established above and
beyond a predefined amount and therefore protects you from unexpectedly
high connection charges.
If you operate the LANCOM Router on a DSL link that is charged on a time
basis you can set the maximum connection time in minutes.
The budget can be completely deactivated by entering a value of '0'.
In the basic settings, charge protection is set to a maximum value of
600 minutes in any seven day period. Please adjust this parameter to
match your own requirements, or deactivate charge protection if you
have agreed a tariff for unlimited traffic with your provider.
LANCOM 821+ – LANCOM 1711+ VPN – LANCOM 1721+ VPN
Chapter 3: Basic configuration
30
EN
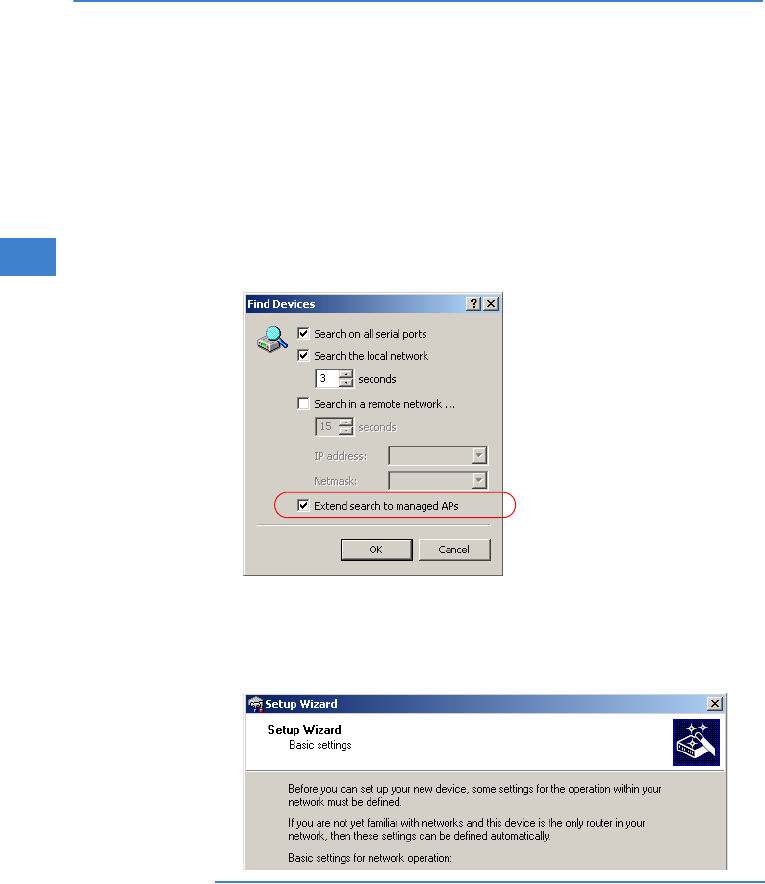
3.2 Instructions for LANconfig
Start LANconfig with Start Programs LANCOM LANconfig.
LANconfig automatically detects new LANCOM devices in the TCP/IP net-
work.
As standard, LANCOM Wireless Routers and LANCOM Access Points in
managed mode are not displayed by LANconfig carrying out its device
search. To display these devices, activate the option 'Search for managed
APs'.
If the search detects an unconfigured device, the Setup Wizard launches
to help you with its basic settings, or indeed to handle the entire process
on your behalf (assuming that the appropriate networking environment
exists).
If the Setup Wizard does not start automatically, you can manually
search for new devices at all interfaces (if the LANCOM VPN Router is
connected via the serial configuration interface) or in the network
(File Find devices).

LANCOM 821+ – LANCOM 1711+ VPN – LANCOM 1721+ VPN
Chapter 3: Basic configuration
31
EN
If you cannot access an unconfigured LANCOM VPN Router, the prob-
lem may be the LAN netmask: In case there are less than 254 potential
hosts available (netmask >'255.255.255.0'), you must ensure that the
IP address 'x.x.x.254' is available in your subnet.
If you choose automatic TCP/IP configuration, you can continue with step
.
Give the LANCOM an address from the applicable IP address range. Con-
firm with Next.
In the window that follows, you first set the password to the configura-
tion. Entries are case sensitive and should be at least 6 characters long.
You also define whether the device can be configured from the local net-
work only, or if remote configuration via WAN (i.e.. from a remote net-
work) is to be permitted.
Be aware that releasing this option also allows remote configuration
over the Internet. Whichever option you select, make sure that con-
figuration access is password protected.
Charge protection is a function which can place a limit on the costs from
WAN connections. Accept your entries with Next.
Close the configuration with Finish.
See the section 'TCP/IP settings for PC workstations' for information
on the settings that are required for computers in the LAN.
3.3 Instructions for WEBconfig
Device settings can be configured from any Web browser. WEBconfig config-
uration software is an integral component of the LANCOM. A Web browser is
all that is required to access WEBconfig. WEBconfig offers similar Setup Wiz-
ards to LANconfig and hence provides the perfect conditions for easy config-
uration of the LANCOM – although, unlike LANconfig, it runs under any
operating system with a Web browser.
Secure with HTTPS
WEBconfig offers secure (remote) configuration by encrypting the configura-
tion data with HTTPS.

LANCOM 821+ – LANCOM 1711+ VPN – LANCOM 1721+ VPN
Chapter 3: Basic configuration
32
EN
https://<IP address or device name>
Always use the latest version of your browser to ensure maximum
security. For Windows, LANCOM Systems GmbH recommends the lat-
est version of the Internet Explorer.
Accessing the device with WEBconfig
To carry out a configuration with WEBconfig, you need to know how to con-
tact the device. Device behavior and accessibility for configuration via a Web
browser depend on whether the DHCP server and DNS server are active in the
LAN already, and whether these two server processes share the assignment in
the LAN of IP addresses to symbolic names. WEBconfig accesses the LANCOM
either via its IP address, the device name (if configured), or by means of any
name if the device has not yet been configured.
Following power-on, unconfigured LANCOM devices first check whether a
DHCP server is already active in the LAN. Depending on the situation, the
device can either enable its own DHCP server or enable DHCP client mode. In
the second operating mode, the device can retrieve an IP address for itself
from a DHCP server in the LAN.
If a LANCOM Wireless Router or LANCOM Access Point is centrally
managed from a LANCOM WLAN Controller, the DHCP mode is
switched from auto-mode to client mode upon provision of the WLAN
configuration.
Network without a DHCP server
Not for centrally
managed LANCOM
Wireless Routers or
LANCOM Access
Points
In a network without a DHCP server, unconfigured LANCOM devices enable
their own DHCP server service when switched on and assign IP addresses,
information on gateways, etc. to other computers in the LAN (provided they
are set to automatic retrieval of IP addresses – auto DHCP). In this constella-
tion, the device can be accessed by every computer with the auto DHCP func-
tion enabled with a Web browser under IP address 172.23.56.254.
With the factory settings and an activated DHCP server, the device for-
wards all incoming DNS requests to the internal Web server. This
means that a connection can easily be made to set set up an uncon-
figured LANCOM by entering any name into a Web browser.
LANCOM 821+ – LANCOM 1711+ VPN – LANCOM 1721+ VPN
Chapter 3: Basic configuration
33
EN
If the configuration computer does not retrieve its IP address from the
LANCOM DHCP server, it determines the current IP address of the computer
(with Start Run cmd and command ipconfig at the prompt under Win-
dows 2000 or Windows XP or Windows Vista, with Start Run cmd and
command winipcfg at the prompt under Windows Me or Windows 9x, or
with command ifconfig in the console under Linux). In this case, the LANCOM
can be accessed with address x.x.x.254 (the “x”s stand for the first three
blocks in the IP address of the configuration computer).
Network with DHCP server
If a DHCP server for the assignment of IP addresses is active in the LAN, an
unconfigured LANCOM device disables its own DHCP server, switches to DHCP
client mode and retrieves an IP address from the DHCP server in the LAN.
However, this IP address is initially unknown and accessing the device
depends on the name resolution:
If the LAN also has a DNS server for name resolution and this communi-
cates the IP address/name assignment to the DHCP server, the device can
be reached under name "-<MAC address>", e.g. “-00a057xxxxxx”.
http://-00a05700094A

LANCOM 821+ – LANCOM 1711+ VPN – LANCOM 1721+ VPN
Chapter 3: Basic configuration
34
EN
The MAC address on a sticker on the base of the device.
If there is no DNS server in the LAN, or if it is not coupled to the DHCP
server, the device cannot be reached via the name. In this case the follow-
ing options remain:
Under LANconfig use the function "Find devices", or under WEBconfig
use the "search for other devices" option from any other networked
LANCOM.
Use suitable tools to find out the IP address assigned to the LANCOM
by DHCP and access the device directly using this IP address.
Use the serial configuration interface to connect a computer running
a terminal program to the device.
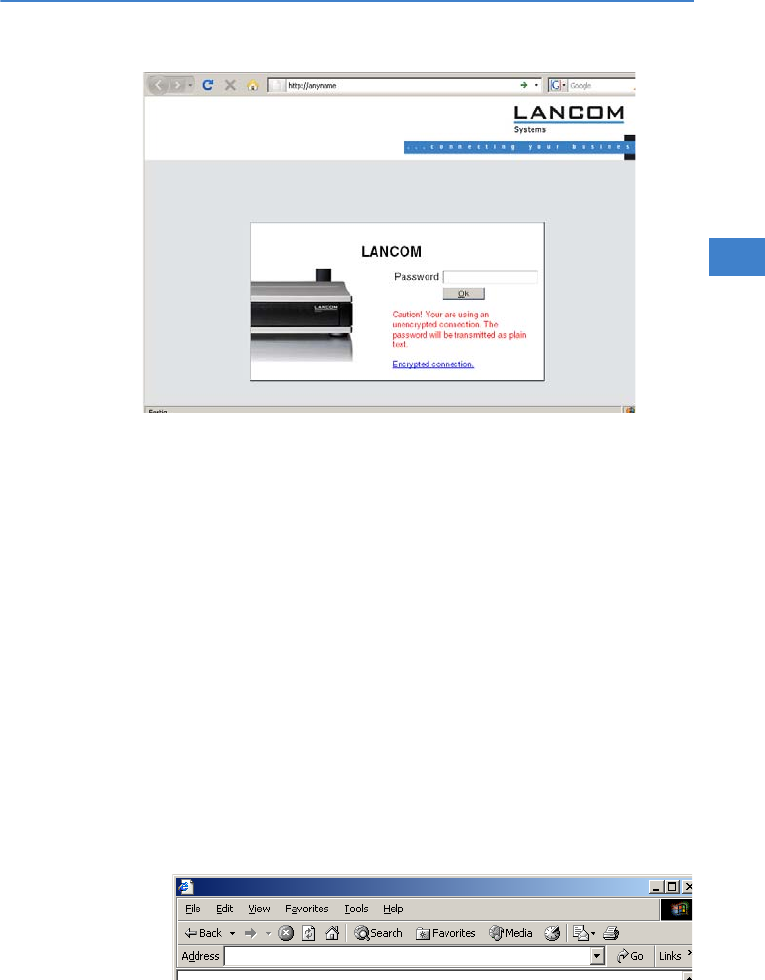
Login
When prompted for user name and password when accessing the device,
enter your personal data in the appropriate fields. Observe the use of upper
and lower case.
If you used the general configuration access, only enter the corresponding
password. The user name field remains blank in this case.
As an alternative, the login dialog provides a link for an encrypted
connection over HTTPS. Always use the HTTPS connection for
increased security whenever possible.
LANCOM 821+ – LANCOM 1711+ VPN – LANCOM 1721+ VPN
Chapter 3: Basic configuration
35
EN
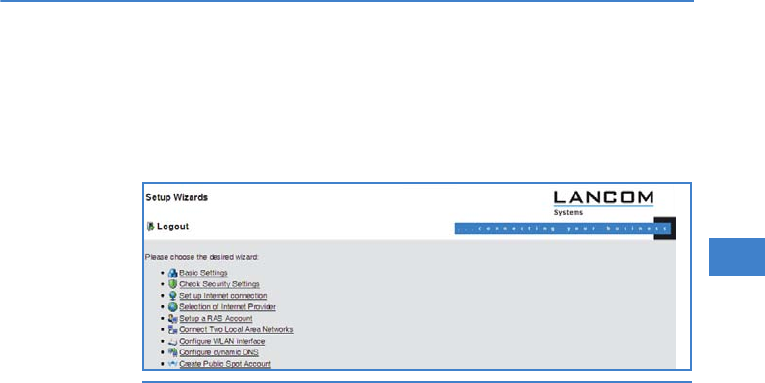
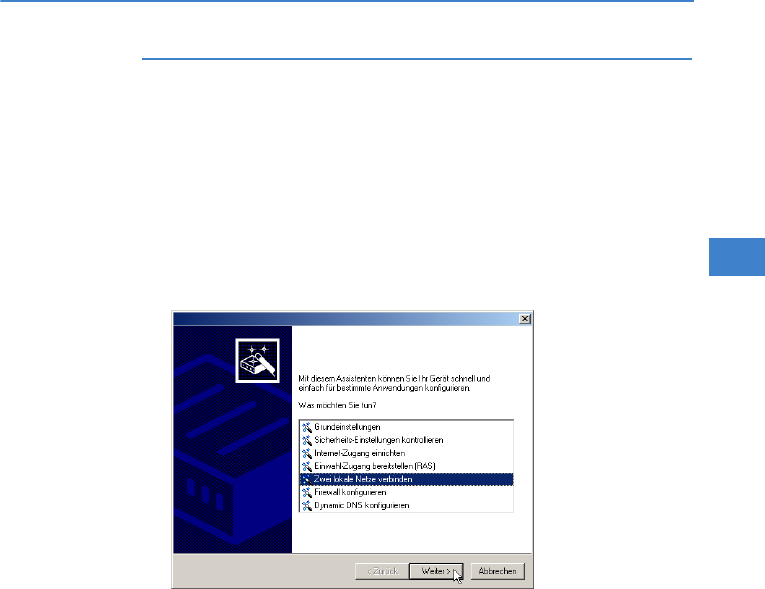
Setup Wizards
The setup Wizards allow quick and easy configuration of the most common
device settings. Select the Wizard and enter the appropriate data on the fol-
lowing screens.
The settings are not stored in the device until inputs are confirmed on
the last screen of the Wizard.
3.4 TCP/IP settings for PC workstations
It is extremely important to assign the correct addresses to all of the devices
in the LAN. Also, all of these computers must know the IP addresses of two
central stations in the LAN:
Standard gateway – receives all packets which are not addressed to com-
puters in the local network
DNS server – translates network and computer names into their actual IP
addresses.
The LANCOM VPN Router can fulfill the functions of a standard gateway and
also of a DNS server. It can also operate as a DHCP server, which automatically
assigns IP addresses to all of the computers in the LAN.
The correct TCP/IP configuration of a PC in the LAN depends essentially on the
method used for assigning IP addresses in the LAN:
IP address allocation by a LANCOM
In this operating mode, a LANCOM uses DHCP to allocate not only an IP
address to each PC in the LAN and WLAN (for devices with a radio mod-
ule), but it also communicates its own IP address as the standard gateway
and DNS server. For this reason, the PCs have to be set up to automatically
retrieve their own IP address and those of the standard gateway and DNS
server via DHCP.

LANCOM 821+ – LANCOM 1711+ VPN – LANCOM 1721+ VPN
Chapter 3: Basic configuration
36
EN
IP address allocation by a separate DHCP server
For this reason, the workstation PCs have to be set up to automatically
retrieve their own IP address and those of the standard gateway and DNS
server via DHCP. The DHCP server is to be programmed such that the IP
address of the LANCOM is communicated to the PCs in the LAN as the
standard gateway. The DHCP server should also communicate that the
LANCOM is the DNS server.
Manual IP address assignment
If IP addresses in a network are statically assigned, then the IP address of
the LANCOM is to be set as the standard gateway and DNS server in the
TCP/IP configuration of each PC in the LAN.
Further information and help on the TCP/IP settings for your LANCOM
VPN Router is available in the Reference Manual. For information on
the network configuration of workstation PCs, refer to the documen-
tation for the installed operating system.
LANCOM 821+ – LANCOM 1711+ VPN – LANCOM 1721+ VPN
Chapter 4: Setting up Internet access
37
EN
4 Setting up Internet access
The LANCOM provides a central point of Internet access for all of the comput-
ers in the LAN.
The connection to the Internet provider can be established via the WAN con-
nection which is connected to an ADSL or cable modem.
For models not equipped with a WAN connector, a LAN interface is configured
as a DSLoL connector and is connected to a compatible ADSL modem.
The connection to the Internet provider can be established via any WAN con-
nector, i.e. via ADSL, UMTS or ISDN (where available). Internet access via
UMTS or ISDN can be used to backup an ADSL connection. When setting up
Internet access via UMTS, please also take note of the information under the
section →'Setting up the UMTS profile'.
The connection to the Internet provider can be established via any WAN con-
nector, i.e. via DSL or ISDN (where available). Internet access via ISDN can be
used to backup a DSL connection.
Which WAN interface?
Setting up the Internet access is carried out with the help of a convenient Wiz-
ard. In the first step you select the WAN interface that is to be used for estab-
lishing the Internet connection.
To establish an Internet connection via the DSL interface, an external ADSL
modem first has to be connected to one of the device's ETH ports. When set-
ting up the Internet access, you define which ETH port the ADLS modem has
been connected to.
Does the Setup Wizard know your Internet provider?
The Wizard is preset with access data for the principal Internet providers in
your country and offers you a selection list. If you find your Internet provider
in this list, then you generally do not have to enter any additional parameters
INTERNET
HEADQUARTER
SERVER LAN GATEWAYROUTER

LANCOM 821+ – LANCOM 1711+ VPN – LANCOM 1721+ VPN
Chapter 4: Setting up Internet access
38
EN
to set up your Internet access. All that is required is the authentication data
as supplied to you by your Internet provider.
Internet provider unknown
If the list in the Setup Wizard does not contain your provider, you will be asked
step- by- step for all of the necessary data. This access data will have been sup-
plied to you by your Internet provider.
Other connection options
In addition you can use the Wizard to activate or deactivate additional options
(if supported by your Internet provider):
Billing by time or flatrate – select the method by which you are billed by
your Internet provider.
In case of billing by time, you can set the LANCOM to cut connections
automatically if no data flows for a certain time (the hold time).
You can also set up line polling that detects inactive remote sites very
quickly and, in such cases, can close the connection before the hold
time expires.
In case of flatrate billing you can also set up line polling to monitor
the function of the remote site.
Apart from that you can opt to keep flatrate connections permanently
active ("keep-alive"). In case a connection should fail, it is re-estab-
lished automatically.
Creating a backup connection to the Internet
The most common utilization of the backup solution is to provide an auxiliary
Internet connection. When setting up an Internet connection, an the addi-
tional option is to create a second connection to the Internet via an alternative
WAN interface. If the primary Internet access is set up to operate via the ADSL
interface, you can set up your backup connection to operate via UMTS or
ISDN.
When configuring the backup connection you can set up an alterna-
tive provider, if available. This allows you not only to overcome prob-
lems with the physical line, but also problems in your provider's own
network as well.
LANCOM 821+ – LANCOM 1711+ VPN – LANCOM 1721+ VPN
Chapter 4: Setting up Internet access
39
EN
4.1 The Internet Connection Wizard
4.1.1 Instructions for LANconfig
Mark your device in the selection window. From the command line, select
Extras Setup Wizard.
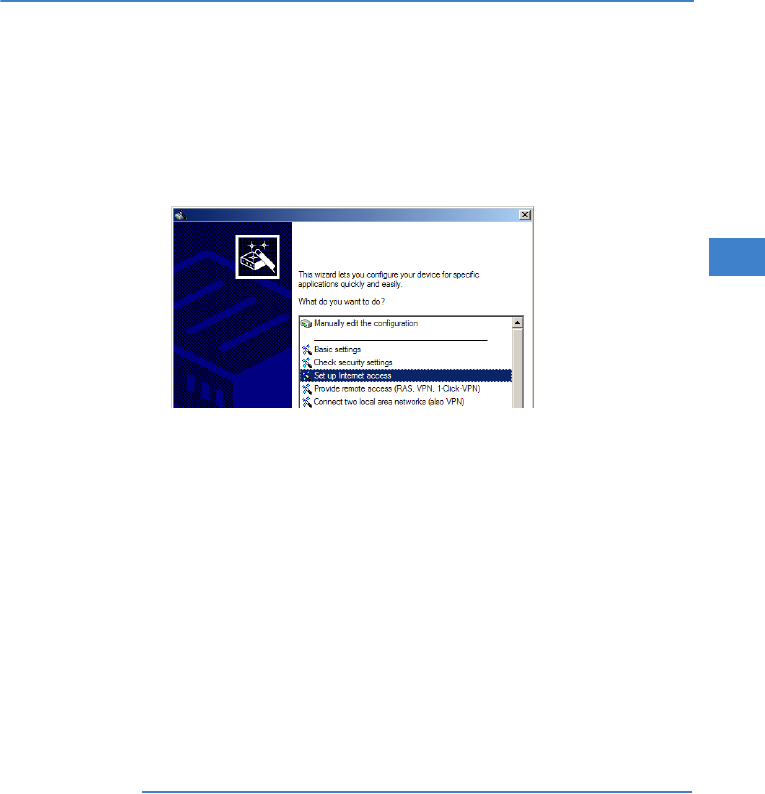
In the selection menu, select the Setup Wizard, Set up Internet connec-
tion and confirm the selection with Next.
In the following windows you select your country, your Internet provider
if possible, and you enter your access data.
Depending on availability the Wizard provides further options for your
Internet connection.
After entering all of the necessary data the Wizard then offers you the
option of setting up a backup connection. Select the corresponding WAN
interface to be used for the backup connection and enter the relevant
access data for the Internet connection.
The Wizard then sets up the alternative Internet access and at the same
time creates the necessary entries into the backup table and also in the
PPP table for checking the Internet connection.
Please be aware that in the case of backup via UMTS, some of the
services provided over the main Internet connection may not be avail-
able. Some UMTS service providers either prevent the use of VPN tun-
nels or VoIP applications or only allow them after payment of
additional fees. Other providers assign IP addresses from an internal
address range, so preventing applications that rely on public IP
addresses from working. Please ask your UMTS provider for informa-
tion on limitations that may apply.
LANCOM 821+ – LANCOM 1711+ VPN – LANCOM 1721+ VPN
Chapter 4: Setting up Internet access
40
EN
The Wizard will inform you as soon as the entries are complete. Close the
configuration with Finish.
4.1.2 Instructions for WEBconfig
Select the entry Set up Internet connection from the main menu.
In the following windows you select your country, your Internet provider
if possible, and you enter your access data.
Depending on availability the Wizard provides further options for your
Internet connection.
The wizard will inform you as soon as the entries are complete. Close the
configuration with Finish.
LANconfig: Fast starting of the Setup Wiz-
ards
The fastest way of starting the Setup Wizards
under LANconfig is to use the command button
in the button bar.

LANCOM 821+ – LANCOM 1711+ VPN – LANCOM 1721+ VPN
Chapter 5: Connecting two networks
41
EN
5 Connecting two networks
Network connectivity, also known as LAN-LAN connectivity, with the
LANCOM Router is used for interconnecting two local area networks. LAN-
LAN connectivity can be implemented in two basic ways:
VPN: Connecting LANs over VPN ensures that the Internet-based connec-
tion between the two LANs has high-security protection. Each LAN must
be equipped with a VPN-capable router.
ISDN: Connectivity based on ISDN uses a direct connection between the
two LANs via an ISDN connection. Each LAN must be equipped with a
router with an ISDN interface.
Setting up LAN-LAN connectivity is carried out with the familiar convenience
of a Setup Wizard.
Always configure both ends
Both of the routers for LAN-LAN connectivity must be configured. Note that
the configuration information at both ends must match.
The following instructions assume that LANCOM Routers are being
operated at both ends. It is possible to set up network connectivity
between routers from other manufacturers. However, this mixed con-
figuration frequently requires far-reaching modifications to both
devices. In cases like this refer to the Reference Manual.
Security aspects
Of course your LAN has to be protected from unauthorized access. For this
reason, a LANCOM provides a range of security mechanisms that offer an out-
standing level of protection.
VPN: VPN-based connectivity relies on IPsec for transferring data. The
encryption methods employed are 3-DES, AES or Blowfish
ISDN: Security for ISDN-based connectivity relies on password protection,
a check of the ISDN number, and the call-back function.
The ISDN call-back function cannot be set up by Wizard, but in the
Expert Configuration only. Refer to the reference manual for informa-
tion on this.

LANCOM 821+ – LANCOM 1711+ VPN – LANCOM 1721+ VPN
Chapter 5: Connecting two networks
42
EN
5.1 Which details are necessary?
The Wizard requests you for all of the necessary details step by step. If possi-
ble, you should have all of this information to hand before you start the Wiz-
ard.
The significance of the information required by the Wizard can be explained
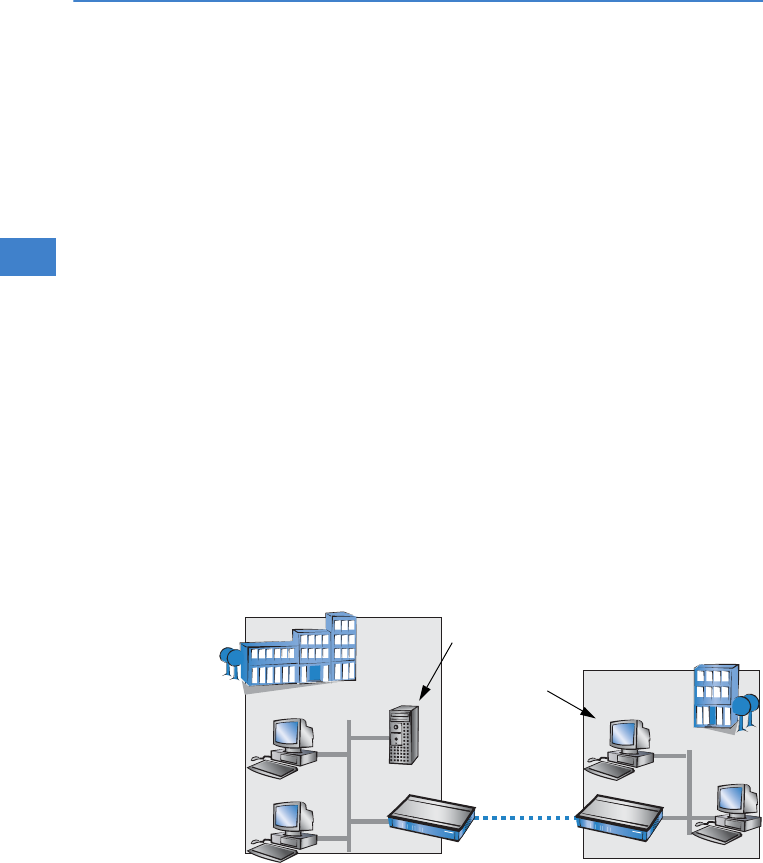
by an example: Connectivity between a branch office and your main office.
The two routers are named 'MAIN OFFICE' and 'BRANCH OFFICE'.
The following tables indicate which entries are to be made for each of the two
routers. Paths show how the entries relate to one another.
5.1.1 General information
The following information is required for setting up LAN-LAN connectivity. The
first column shows whether the information for network connectivity is
required via VPN (simple method with pre-shared keys) and/or via ISDN.
For further information on VPN-based network connectivity by other
methods, refer to the LANCOM Reference Manual.
Connec-
tivity
Entry Gateway 1 Gateway 2
VPN Does the remote site have an ISDN connec-
tion?
Yes/No Yes/No
VPN Type of local IP address Static/dynamic Static/dynamic
VPN Type of remote IP address Static/dynamic Static/dynamic
VPN + ISDN Name of the local device 'MAIN OFFICE' 'BRANCH OFFICE'
VPN + ISDN Name of the remote site 'BRANCH OFFICE' 'MAIN OFFICE'
VPN + ISDN ISDN-calling number of the remote device (0123) 123456 (0789) 654321
VPN + ISDN ISDN calling line ID of the remote device (0789) 654321 (0123) 123456
VPN Password for the secure transmission of the
IP address
'Secret' 'Secret'
VPN Shared Secret for encryption 'Secret' 'Secret'
VPN IP address of remote device '10.0.2.100' '10.0.1.100'
VPN + ISDN IP-network address of the remote network '10.0.2.0' '10.0.1.0'
VPN + ISDN Netmask of the remote network '255.255.255.0' '255.255.255.0'

LANCOM 821+ – LANCOM 1711+ VPN – LANCOM 1721+ VPN
Chapter 5: Connecting two networks
43
EN
Notes on the different settings:
If you own device features an ISDN connection, the Wizard will ask you
whether the remote site also has one.
For VPN connections over the Internet, the type of IP address at each end
must be specified. There are two types of IP address. Static and
dynamic. The differences between these two IP address types are
explained in the Reference Manual.
The Dynamic VPN function makes it possible to establish VPN connections
between gateways with dynamic IP addresses, and not only between
gateways with static (fixed) IP addresses. An ISDN connection is required
to actively establish VPN connections to remote sites that use dynamic IP
addresses.
If you have not yet given a name to your LANCOM, the Wizard will ask you
to enter a new name for your device. Entering a name will cause your
LANCOM to be renamed. Ensure that you give different names to the two
remote devices.
The name of the remote site is required for identifying the devices.
In the field ISDN number the telephone number of the remote ISDN site
is specified. Enter the full telephone number for the remote site, including
all necessary prefixes (e.g. area codes).
VPN + ISDN Domain descriptor in the remote network 'branch.company' 'headquarter.com-
pany'
VPN Hide own stations when accessing remote
network (extranet VPN)?
Yes/No Yes/No
ISDN TCP/IP routing for accessing the remote net-
work?
Yes/No Yes/No
ISDN IPX routing for accessing the remote net-
work?
Yes/No Yes/No
VPN + ISDN NetBIOS routing for accessing the remote
network?
Yes/No Yes/No
VPN + ISDN Name of a local workgroup (for NetBIOS
only)
'workgroup1' 'workgroup2'
ISDN Data compression On/off On/off
ISDN Channel bundling On/off On/off
Connec-
tivity
Entry Gateway 1 Gateway 2
LANCOM 821+ – LANCOM 1711+ VPN – LANCOM 1721+ VPN
Chapter 5: Connecting two networks
44
EN
The ISDN calling line ID specified is used to identify and authenticate the
caller. If a LANCOM Router is called, it compares the ISDN calling line ID
entered for the remote site to the ID that is actually received over the D
channel from the caller. An ISDN ID generally consists of the country code
and an MSN.
The password for the ISDN connection is an alternative to the ISDN
calling line ID. This is used to authenticate the caller if no ISDN calling line
ID is received. The password must be entered identically at both ends. It
is used for calls in both directions.
The shared secret is the central password for the VPN connection's secu-
rity. It must be entered identically at both ends.
Data compression improves transmission speeds without incurring extra
costs. This is the completely different to the bundling of two ISDN chan-
nels by MLPPP (MultiLink-PPP): This doubles the bandwidth, although
this generally doubles the connection costs as well.
5.1.2 Settings for the TCP/IP router
In the TCP/IP network, correct addressing is of extreme importance. For net-
work connectivity, it should be observed that both networks are logically sep-
arated. For this reason they require their own network number (e.g. '10.0.1.x'
and '10.0.2.x'). The two network numbers must be different.
Unlike with Internet access, network connectivity makes all of IP addresses
visible in all participating networks, including those in the remote LAN, and
LAN at the main office. IP:
10.0.1.0,
Netmask: 255.255.255.0
10.0.1.100
(0123) 123456
Branch office LAN. IP: 10.0.2.0,
Netmask: 255.255.255.0
Domain: 'branch_office.com-
'
10.0.1.2
10.0.2.10
10.0.2.100
(0789) 654321
'server.main_office.com-
'pc1.branch_office.
VPN or ISDN con-
nection

LANCOM 821+ – LANCOM 1711+ VPN – LANCOM 1721+ VPN
Chapter 5: Connecting two networks
45
EN
not just that of the router. The computer with the IP address 10.0.2.10 in the
branch-office LAN sees the server 10.0.1.2 at the main office and, with the
appropriate rights, has access to it. The same applies in the other direction.
DNS access to the remote LAN
Remote computers in a TCP/IP network can be accessed not only with their IP
addresses, but also by freely definable names with the aid of DNS.
For example, the computer named 'pc1.branch_office.company (IP 10.0.2.10)
can access the server at the main office by using its IP address or the name
'server.main_office.company'. There is just one requirement: The domain of
the remote network must be entered into the Wizard.
The domain can only be specified in the LANconfig Wizard. With
WEBconfig, the necessary changes are made later in the Expert Con-
figuration. Refer to the LANCOM Router reference manual for more
detailed information.
VPN extranet
In the case of LAN-LAN connectivity via VPN, you can mask the individual
computers behind another IP address. The operating mode referred to as
'extranet VPN' enables computers to be made visible from the remote LAN not
with their own IP address, but with a freely definable address such as that of
the VPN gateway.
This avoids giving stations in a remote LAN direct access to the computers in
your own LAN. For example, if extranet VPN mode is set up to provide access
from the branch-office LAN to the main office from the IP address
'10.10.2.100', and computer '10.10.2.10' then accesses the server
'10.10.1.2', the server receives a request from the IP '10.10.2.100'. The actual
address of the computer is masked.
If LAN connectivity uses the extranet mode, the remote site does not receive
the actual (masked) LAN addresses, but the IP address published by the LAN
('10.10.2.100' in the above example). The netmask in this case is
'255.255.255.255'.
5.1.3 Settings for the IPX router
VPN-based IPX-network connectivity cannot be set up in the Wizard.
The Expert Configuration has to be used instead. Refer to the refer-
ence manual for information on this.
LANCOM 821+ – LANCOM 1711+ VPN – LANCOM 1721+ VPN
Chapter 5: Connecting two networks
46
EN
Only LANCOM
821+
For connectivity between two typical IPX networks via a WAN, three IPX net-
work numbers are necessary:
For the LAN at the main office
For the LAN at the branch office
For the superordinate WAN
The IPX network numbers for the main and branch office are each entered at
their respective opposite sites.
According to IPX convention, the three necessary network numbers are
referred to as "external network numbers". Similar to IP network addresses,
they apply for an entire LAN segment. Conversely, the IPX internal network
numbers are for addressing a particular Novell server in the LAN. All three of
these network numbers must differ not only from one another but also from
all IPX internal network numbers being used.
Furthermore, it may be necessary to specify the frame type (binding) used in
the remote LAN.
If a Novell server is operated in the remote network, it is not necessary to
specify the remote IPX network number or the binding. In this case, the only
requirement is the manual entry of the network number for the WAN.
5.1.4 Settings for NetBIOS routing
NetBIOS routing is quick to set up: In addition to the specifying the TCP/IP pro-
tocol being used, the only other information required is the name of a Win-
dows workgroup in the LAN used by the router.
LAN at the main office
IPX network no.: 00000001
Binding: Ethernet_II
(0123) 123456
LAN at the branch office
IPX network no.: 00000002
Binding: Ethernet_II
WAN
IPX network no.:
00000009
(0789) 654321
IPX internal net:
00020002
VPN or ISDN con-
nection
LANCOM 821+ – LANCOM 1711+ VPN – LANCOM 1721+ VPN
Chapter 5: Connecting two networks
47
EN
Remote Windows workgroups do not appear in the Windows network
environment, but they can be contacted directly (e.g.by searching for
a computer of known name).
5.2 Instructions for LANconfig
Carry out the configuration on both routers, one after the other.
Launch the Wizard 'Connect two local area networks'. Follow the Wizard’s
instructions and enter the necessary data.
The Wizard will inform you when the required information is complete.
You can then close the Wizard with Finish.
Once you have completed the set-up of both routers, you can start testing
the network connection. Try to communicate with a computer in the
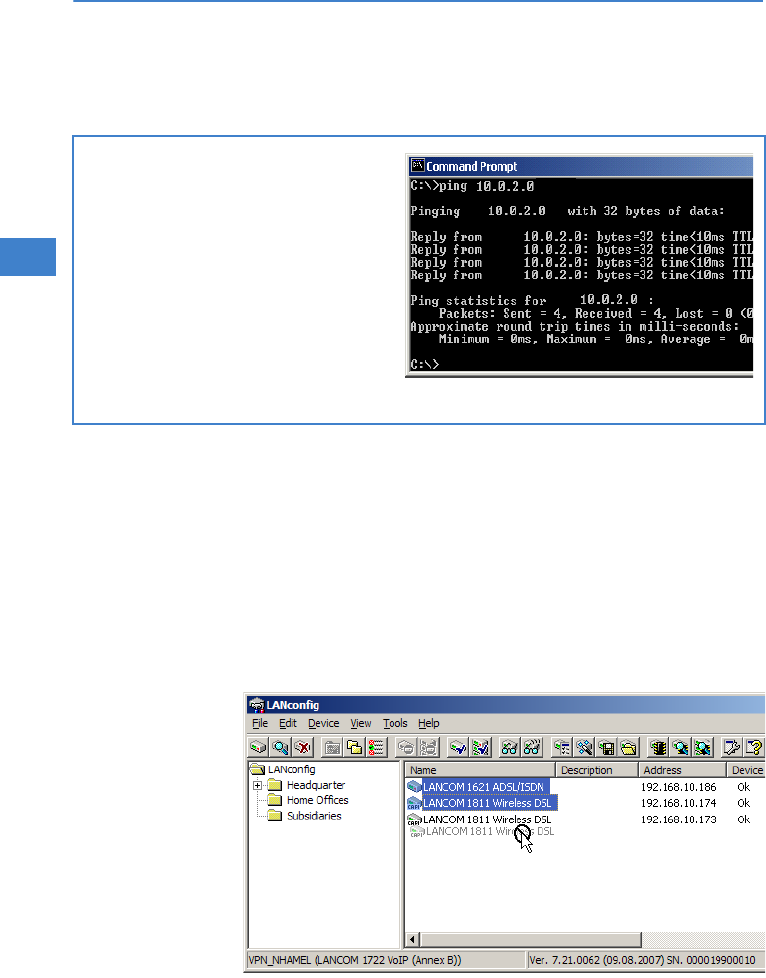
LANCOM 821+ – LANCOM 1711+ VPN – LANCOM 1721+ VPN
Chapter 5: Connecting two networks
48
EN
remote LAN (e.g. with
ping
). The LANCOM Router should automatically
connect to the remote site and make contact to the requested computer.
5.3 1-Click-VPN for networks (site-to-site)
The site-to-site-to-site connectivity of networks is now very simple with the
help of the 1-Click-VPN wizard. It is even possible to simultaneously couple
multiple routers to a central network.
In LANconfig, mark the routers at branch offices which are to be coupled
to a central router via VPN.
Use drag&drop by mouse to place the devices onto the entry for the cen-
tral router.
Ping – the quick test of a TCP/IP con-
nection
To test a TCP/IP connection, simply send a
ping
from your computer to a computer in
the remote network. Details on the ping
command are available from the documen-
tation for your operating system.
IPX connections can be tested by searching
for a remote Novell server. NetBIOS connec-
tions can be tested by searching a computer
in the remote Windows workgroup.
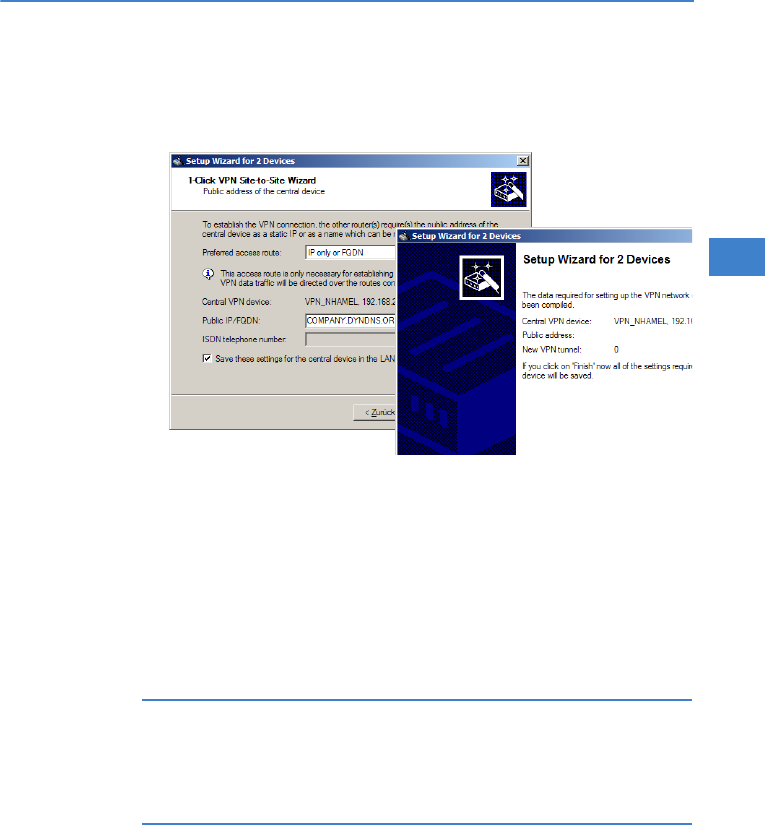
LANCOM 821+ – LANCOM 1711+ VPN – LANCOM 1721+ VPN
Chapter 5: Connecting two networks
49
EN
The 1-Click-VPN Site-to-Site Wizard will be started. Enter a name for this
access and select the address under which the router is accessible from
the Internet.
Select whether connection establishment is to take place via the name or
IP address of the central router, or via an ISDN connection. Enter the
address or name of the central router, or its ISDN number.
The final step is to define how the networks are to intercommunicate:
The INTRANET at headquarters only is to be provided to the branch
offices.
All private networks at the branch offices can also be connected to
one another via headquarters.
All entries for the central device are made just once and are then
stored to the device properties.
5.4 Instructions for WEBconfig
In WEBconfig, VPN-based network connectivity cannot be set up in
the Wizard. The Expert Configuration has to be used instead. Refer to
the reference manual for information on this.
Carry out the configuration on both routers, one after the other.
In the main menu, launch the Wizard 'Connect two local area networks'.
Follow the Wizard’s instructions and enter the necessary data.

LANCOM 821+ – LANCOM 1711+ VPN – LANCOM 1721+ VPN
Chapter 5: Connecting two networks
50
EN
The Wizard will inform you when the required information is complete.
You can then close the Wizard with Next.
Once you have completed the set-up of both routers, you can start testing
the network connection. Try to communicate with a computer in the
remote LAN (e.g. with
ping
). The LANCOM Router should automatically
connect to the remote site and make contact to the requested computer.

LANCOM 821+ – LANCOM 1711+ VPN – LANCOM 1721+ VPN
Chapter 6: Providing dial- in access
51
EN
6 Providing dial-in access
Your LANCOM can be set up with dial-in access accounts enabling individual
computers to dial-in to your LAN and fully participate in the network for the
duration of the connection. This service is called RAS (Remote Access Service).
RAS access can be implemented in two basic ways:
VPN: RAS access via VPN provides a highly secure Internet-based connec-
tion between the LAN and the dial-in computer. The router in the LAN
must support VPN; the dial-in computer needs any form of Internet access
and a VPN client.
ISDN: RAS access via ISDN provides a direct connection between the LAN
and the dial-in computer over an ISDN phone line. The router in the LAN
needs an ISDN interface. The dial-in computer needs an ISDN adapter or
an ISDN modem. The protocol of data transfer is PPP. This ensures that all
normal devices and operating systems are supported.
Setting up dial-in access is carried out with the familiar convenience of a
Setup Wizard.
Security aspects
Of course your LAN has to be protected from unauthorized access.
For this reason, a LANCOM provides a range of security mechanisms that offer
an outstanding level of protection.
VPN: VPN-based connectivity relies on IPsec for transferring data. The
encryption methods employed are 3-DES, AES or Blowfish
ISDN: Security for ISDN-based connectivity relies on password protection,
a check of the ISDN number, and the call-back function.
The ISDN call-back function cannot be set up by Wizard, but in the
Expert Configuration only. Refer to the reference manual for informa-
tion on this.
6.1 Which details are necessary?
The Wizard sets up an access account for just one user. For additional users,
launch the Wizard again.

LANCOM 821+ – LANCOM 1711+ VPN – LANCOM 1721+ VPN
Chapter 6: Providing dial- in access
52
EN
6.1.1 General information
The following information is required for setting up RAS access. The first col-
umn shows whether the information for RAS access is required via VPN (sim-
ple method with pre-shared keys) and/or via ISDN.
For further information on RAS access by other methods, refer to the
LANCOM Reference Manual.
Notes on the different settings:
User name and password: This access data serves to identify the user
when dialing in.
Incoming number: The optional ISDN calling line ID is used by the
LANCOM Router for additional user authentication. This security function
should not be employed if the user will be dialing-in from various ISDN
connections.
Connec-
tivity
Entry
VPN + ISDN User name
VPN + ISDN Password
VPN Shared Secret for encryption
VPN Hide own stations when accessing remote network (extranet VPN)?
ISDN Incoming caller ID number of the dial-in computer
ISDN TCP/IP routing for accessing the remote network?
ISDN IPX routing for accessing the remote network?
VPN + ISDN IP address(es) for one or more dial-in computer(s): Fixed or dynamic from the
IP address pool
VPN + ISDN NetBIOS routing for accessing the remote network?
VPN + ISDN Name of a local workgroup (for NetBIOS only)
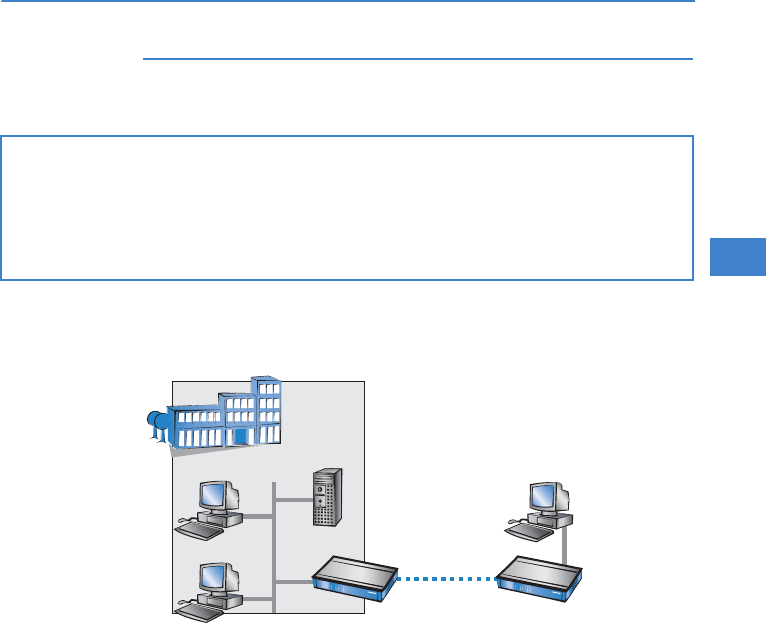
LANCOM 821+ – LANCOM 1711+ VPN – LANCOM 1721+ VPN
Chapter 6: Providing dial- in access
53
EN
You will find information on the other parameters required for RAS
access in the chapter 'Connecting two networks'.
6.1.2 Settings for TCP/IP
TCP/IP requires that every active RAS is assigned an IP address.
This IP address can be manually set to a fixed value when the user is created.
A simpler option is to allow the LANCOM Router to assign the user with a free
IP address when dialing in. In this case, all you have to do is to set the range
of IP addresses which are to be available for assignment to the RAS users by
the LANCOM Router.
For both manual and automatic IP address assignment, ensure that the
addresses are freely available in your local network. In our example, the PC is
assigned with the IP address '10.0.1.101' when it dials in.
This IP address allows the PC to fully participate in the LAN: With the appro-
priate rights, it can access any other device in the LAN. This relationship also
applies in the other direction: The remote PC can be access from the LAN.
The ISDN calling line ID (CLI)
The ISDN Calling Line Identity (CLI)is the phone number of the calling party as transmitted to
the called party. This is a number generally made up of the national dial code and an MSN.
The CLI is ideal for authentication for two reasons: It is difficult to manipulate. It is transmitted
free of charge via the ISDN D-channel.
10.0.1.100
(0123) 123456
User: 'SMITH'
(0123) 777888
ISDN adapter
Remote computer
IP: 10.0.1.101
LAN at the main
office. IP: 10.0.1.0
VPN or ISDN con-
nection
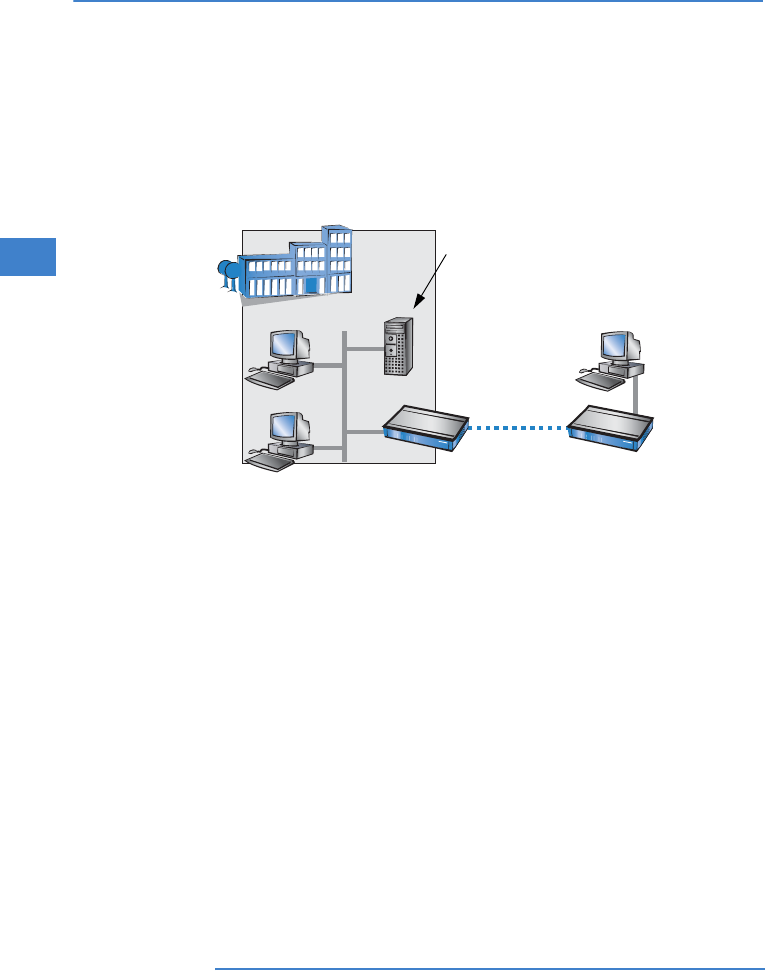
LANCOM 821+ – LANCOM 1711+ VPN – LANCOM 1721+ VPN
Chapter 6: Providing dial- in access
54
EN
6.1.3 Settings for IPX
Only LANCOM
821+
For RAS dial-in to an IPX network, two IP network numbers have to be spec-
ified:
the IPX network number of the main office
An additional IPX network number for the superordinate WAN
According to IPX convention, the necessary network numbers are referred to
as "external network numbers". Similar to IP network addresses, they apply
for an entire LAN segment. Conversely, the IPX internal network numbers are
for addressing Novell servers in the LAN. All three of these network numbers
must differ not only from one another but also from all IPX internal network
numbers being used.
Furthermore, it may be necessary to specify the frame type (binding) used in
the remote LAN.
If a Novell server is operated in the remote network, it is not necessary to
specify the remote IPX network number or the binding. In this case, too, a net-
work number for the WAN must be specified manually.
6.1.4 Settings for NetBIOS routing
When working with NetBIOS, the only information required is the name of a
Windows workgroup in the LAN used by the router.
The connection is not established automatically. The RAS user first has
to manually establish a connection to the LANCOM Router with the
LAN at the main office
IPX network no.: 00000001, Binding: Ethernet_II
(0123) 123456
WAN
IPX network no.:
00000009
IPX internal net:
00020002
Remote computer
ISDN adapter
User: 'SMITH'
(0123) 777888
VPN or ISDN con-
nection

LANCOM 821+ – LANCOM 1711+ VPN – LANCOM 1721+ VPN
Chapter 6: Providing dial- in access
55
EN
help of Dial-Up Networking. Once the connection has been estab-
lished, the computer can access and search the other network (click
on Search Computer, do not use the Network Neighborhood).
6.2 Settings on the dial-in computer
6.2.1 Dialing-in via VPN
For dialing-in to a network via VPN, a computer needs:
Internet access
A VPN client
LANCOM Systems offers you a 30-day test version of the LANCOM Advanced
VPN Client on the CD supplied. A precise description of the VPN client and
notes on its setup are also to be found on the CD.
The Wizard then requests the parameters that were specified when setting up
the RAS access in the LANCOM Router.
6.2.2 Dialing-in via ISDN
A number of settings are required by the dial-in computer. This example is
based on a Windows computer.
Dial-Up Networking (or any other PPP client) installed correctly.
Network protocol (TCP/IP, IPX) installed and associated with the dial-up
adapter
New connection in Dial-Up Networking with the phone number of the
router
Terminal adapter or ISDN card set up for PPPHDLC
PPP selected and the dial-up server type, 'Activate compression in soft-
ware' and 'Request encrypted password' switched off.
Select the required network protocols (TCP/IP, IPX)
Additional TCP/IP settings
Assignment of IP address and name server address activated
'IP header compression' deactivated
With these settings, a PC can dial-in to the remote LAN and access the net-
work resource in the usual manner.
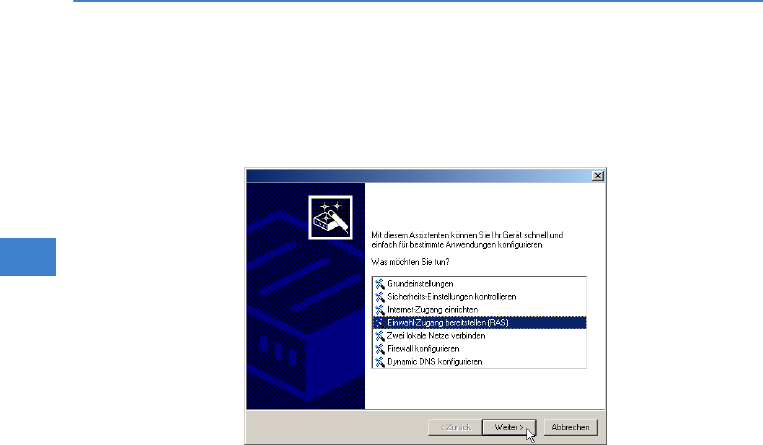
LANCOM 821+ – LANCOM 1711+ VPN – LANCOM 1721+ VPN
Chapter 6: Providing dial- in access
56
EN
6.3 Instructions for LANconfig
Launch the 'Provide Remote Access (RAS, VPN, IPsec over WLAN)' Wizard.
Follow the Wizard’s instructions and enter the necessary data.
The Wizard will inform you when the required information is complete.
You can then close the Wizard with Finish.
Configure the access account on the dial-in PC as described. Subsequently
test the connection (see box 'Ping – the quick test of a TCP/IP connec-
tion').
6.4 1-Click-VPN for LANCOM Advanced VPN Client
VPN accesses for employees who dial into the network with the LANCOM
Advanced VPN Client are very easy to set up with the Setup Wizard and
exported to a file. This file can then be imported as a profile by the LANCOM
Advanced VPN Client. All of the information about the LANCOM VPN Router's
configuration is also included, and then supplemented with randomly gener-
ated values (e.g. for the preshared key).
Use LANconfig to start the 'Set up a RAS Account' wizard and select the
'VPN connection'.
Activate the options 'LANCOM Advanced VPN Client' and 'Speed up con-
figuration with 1-Click-VPN'.
Enter a name for this access and select the address under which the router
is accessible from the Internet.
In the final step you can select how the access data is to be entered:

LANCOM 821+ – LANCOM 1711+ VPN – LANCOM 1721+ VPN
Chapter 6: Providing dial- in access
57
EN
Save profile as an import file for the LANCOM Advanced VPN Client
Send profile via e-mail
Print out profile
Sending a profile via e-mail could be a security risk should the e-mail
be intercepted en route!
To send the profile via e-mail, the device configuration must be set up
with an SMTP account with the necessary access data. Further, the
configuration computer requires an e-mail program that is set up as
the standard e-mail application and that can be used by other appli-
cations to send e-mails.
When setting up the VPN access, certain settings are made to optimize oper-
ations with the LANCOM Advanced VPN Client, including:
Gateway: If defined in the LANCOM VPN Router, a DynDNS name is used
here, or alternatively the IP address
FQDN: Combination of the name of the connection, a sequential number
and the internal domain in the LANCOM VPN Router.
Domain: If defined in the LANCOM VPN Router, the internal domain is
used here, or alternatively a a DynDNS name or IP address
VPN IP networks: All IP networks defined in the device as type 'Intranet'.
Preshared key: Randomly generated key 16 ASCII characters long.
Connection medium: The LAN is used to establish connections.
VoIP prioritization: VoIP prioritization is activated as standard.
Exchange mode: The exchange mode to be used is 'Aggressive Mode'.
IKE config mode: The IKE config mode is activated, the IP address infor-
mation for the LANCOM Advanced VPN Client is automatically assigned
by the LANCOM VPN Router.
6.5 Instructions for WEBconfig
In the main menu, launch the Wizard 'Provide remote access (RAS)'. Fol-
low the Wizard’s instructions and enter the necessary data.
Configure the access account on the dial-in PC as described. Subsequently
test the connection (see box 'Ping – the quick test of a TCP/IP connec-
tion').
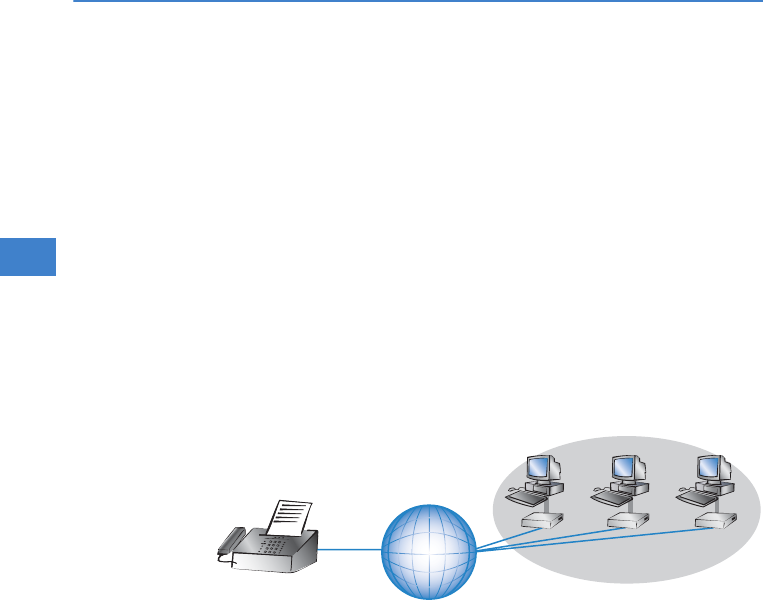
LANCOM 821+ – LANCOM 1711+ VPN – LANCOM 1721+ VPN
Chapter 7: Fax transmission with LANCAPI
58
EN
7 Fax transmission with LANCAPI
LANCAPI from LANCOM Systems is a specialized version of the widespread
ISDN CAPI interface. CAPI stands for Common ISDN Application Programming
Interface and it links ISDN adapters and communications software. This soft-
ware in turn provides the computer with office-communications functions
such as a fax or answering machine.
The chief benefit from using LANCAPI is economical. LANCAPI provides all of
the Windows workstations in a LAN with unlimited access to ISDN office-
communication functions such as fax, answering machine, online banking,
and Eurofile transfer. Without any additional hardware, every workstation can
make use of the full range of ISDN functions provided via the network. This
completely dispenses with the need to equip workstations with expensive
equipment such as ISDN adapters or modems. The sole requirement is to
install the office-communication software on each workstation.
LANCAPI from LANCOM equips workstation PCs with a convenient fax trans-
mission facility without having a fax machine connected to it. A number of
components must be installed on the computer to support this:
The LANCAPI client. This sets up the connection between your worksta-
tion PC and the LANCAPI server.
The LANCOM CAPI Faxmodem. This tool simulates a fax machine on
your computer.
Fax
ISDN ISDN adapter
PCs with fax software
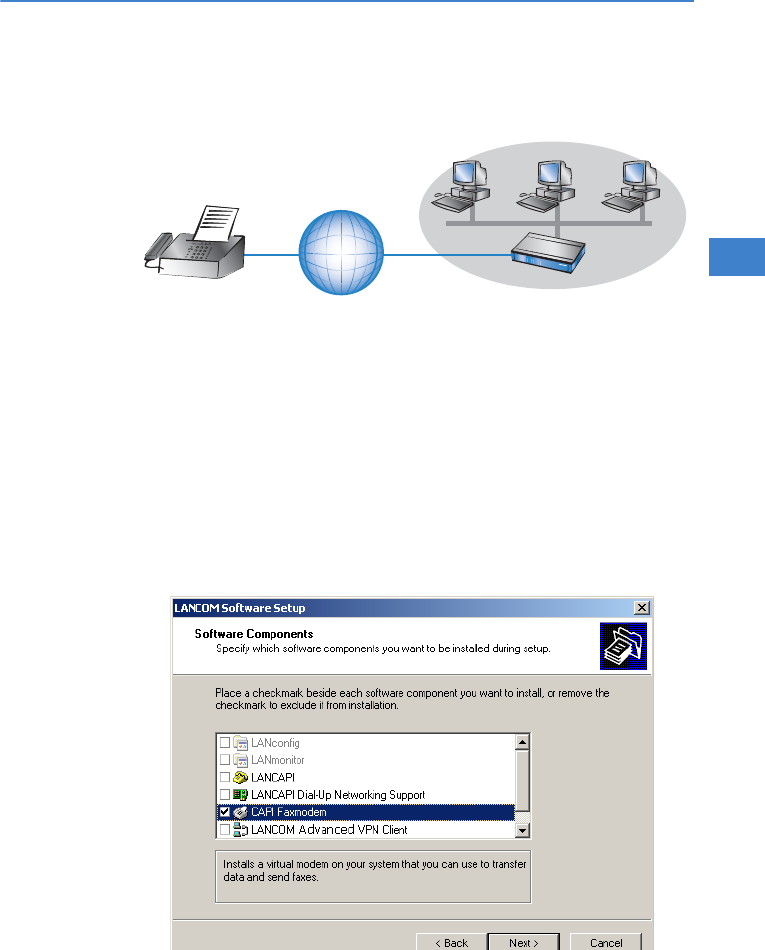
LANCOM 821+ – LANCOM 1711+ VPN – LANCOM 1721+ VPN
Chapter 7: Fax transmission with LANCAPI
59
EN
The MS Windows Fax Service. This is the interface between the fax
applications and the virtual fax.
Installing the LANCAPI client is described in the Reference Manual. This chap-
ter deals with installing and configuring the LANCOM CAPI Faxmodem and
MS Windows Fax Service.
7.1 Installing the LANCOM CAPI Faxmodem
From the setup program on your LANCOM CD, select the entry LANCOM
software installation.
Select the option CAPI Faxmodem, click on Next and follow the instruc-
tions of the installation routine.
Fax
ISDN
LANCOM with
LANCAPI server
PCs with fax software, LANCAPI client, CAPI
Faxmodem and MS Windows Fax Service
LAN
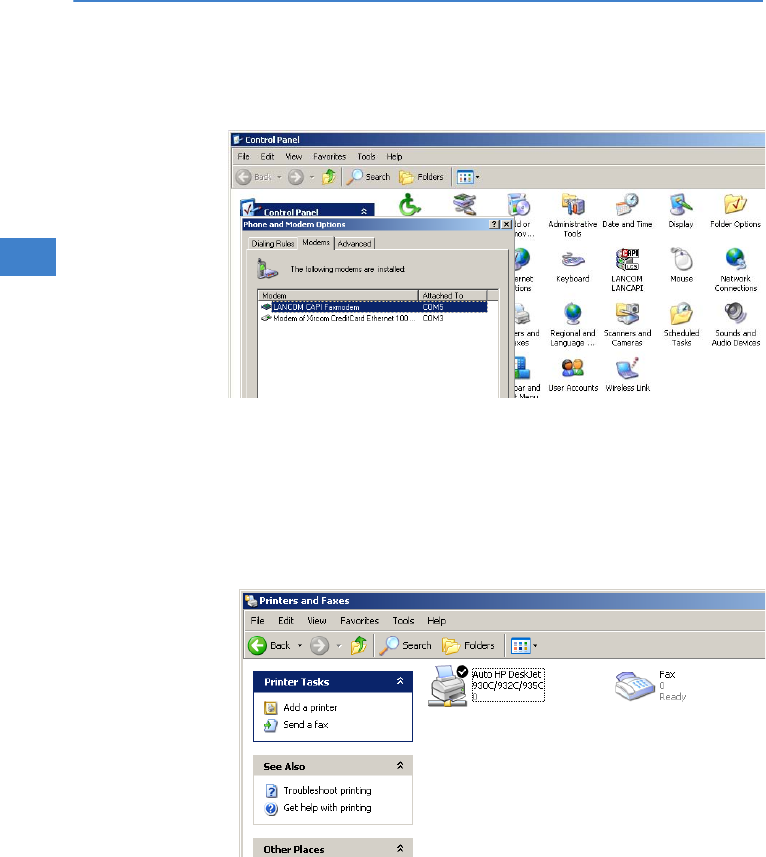
LANCOM 821+ – LANCOM 1711+ VPN – LANCOM 1721+ VPN
Chapter 7: Fax transmission with LANCAPI
60
EN
After successful installation, the LANCOM CAPI Fax Modem is entered into the
Control Panel under Phone and modem options.
7.2 Installing the MS Windows Fax Service
Go to the Control Panel and select the option Printers and faxes.
In the Printers and faxes window select the option Install a local fax
printer. Then follow the instructions provided by the installation tool. In
the current window, an icon for the new fax printer appears.
To check the installation, click with the right-hand mouse key on the fax icon
and select Properties. The LANCOM CAPI Faxmodem should be entered on
the 'Devices' tab.
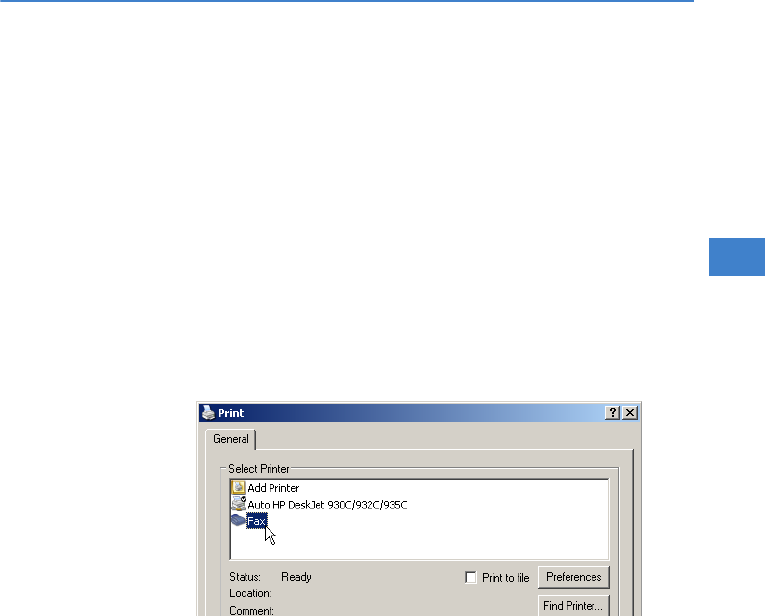
LANCOM 821+ – LANCOM 1711+ VPN – LANCOM 1721+ VPN
Chapter 7: Fax transmission with LANCAPI
61
EN
7.3 Sending a fax
After installing the necessary components, there are a number of ways to send
a fax from your computer. If you have a file ready to send, you can send this
straight from its application. On the other hand, if you just want to send a
short note, you can use the MS Windows Fax Service itself. Alternatively you
can use any fax program.
7.3.1 Sending faxes from an office application
Open your document in the usual manner with your office application and
select the menu item File/Print.
Define the fax device as the printer.
Click on “OK”. A Wizard is displayed that guides you through the rest of
the procedure.
7.3.2 Sending faxes with the Windows Fax Service
Go to the Control Panel and open the Printers and faxes dialog.
Double-click with the left-hand mouse key on the fax-device icon.
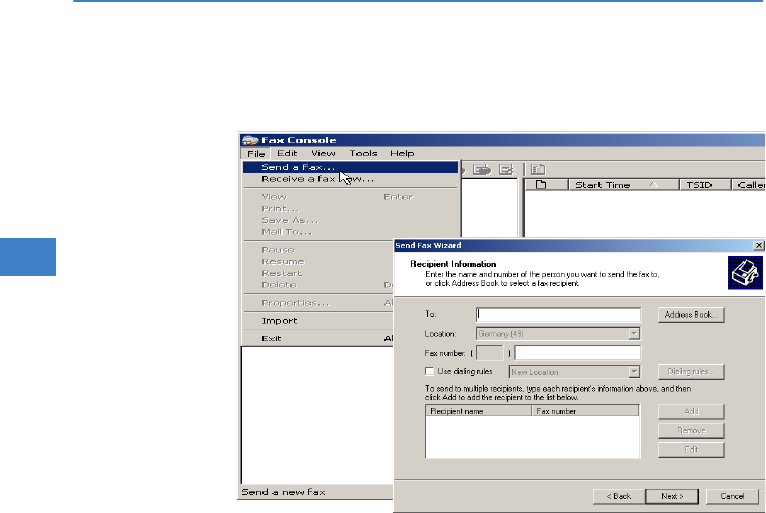
LANCOM 821+ – LANCOM 1711+ VPN – LANCOM 1721+ VPN
Chapter 7: Fax transmission with LANCAPI
62
EN
The fax client console opens up. Select the menu item Send file/fax. A
Wizard guides you through the remaining procedure.
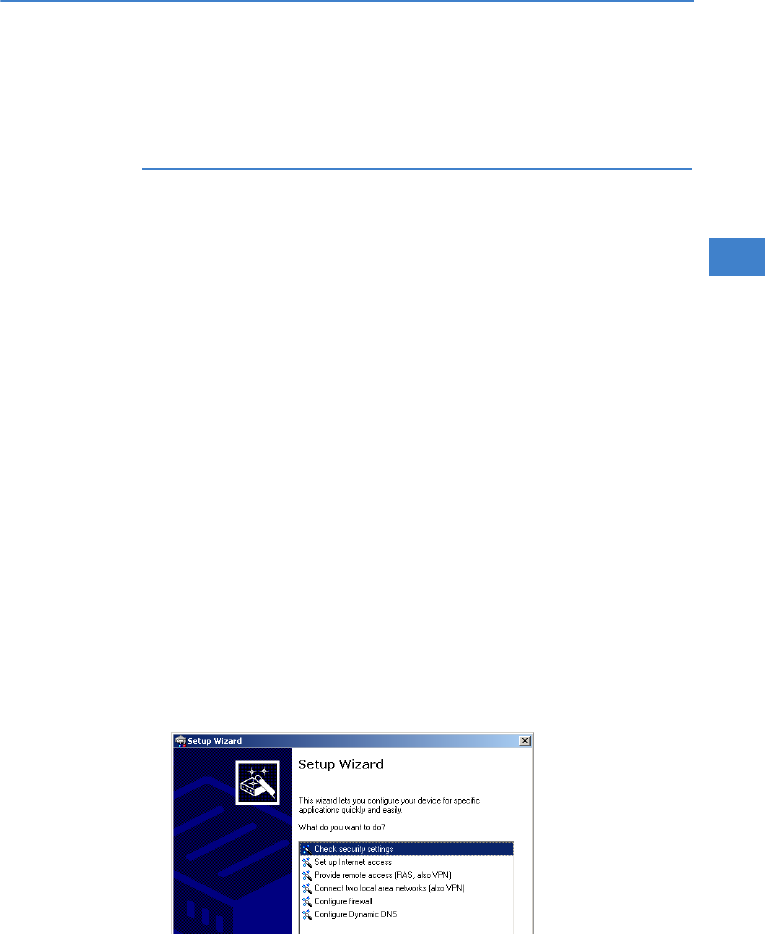
LANCOM 821+ – LANCOM 1711+ VPN – LANCOM 1721+ VPN
Chapter 8: Security settings
63
EN
8 Security settings
Your LANCOM features numerous security functions. This chapter provides you
with all of the information you need to optimally protect your device.
You can carry out the configuration of security settings very quickly
and conveniently with the Security Wizards in LANconfig and
WEBconfig.
8.1 Security settings Wizard
Access to the configuration of a device allows access to more than just critical
information (e.g. Internet password). Far more critical is that settings for
security functions (e.g.the firewall) can be altered. Unauthorized access is not
just a risk for the device itself, but for the entire network.
Your LANCOM offers password-protected access to its configuration. This is
activated during the initial basic configuration simply by entering a password.
If the wrong password is entered a certain number of times, the device auto-
matically blocks access to the configuration for a fixed period. You can modify
the critical number of attempts and also the duration of the lock. By default,
the device locks for five minutes after five incorrect entries of the password.
Along with these basic settings, you can use the Security settings Wizard to
check the settings of your wireless network (if so equipped).
8.1.1 LANconfig Wizard
Mark your LANCOM in the selection window. From the command line,
select Extras Setup Wizard.
In the selection menu, select the Setup Wizard, Check security settings
and confirm the selection with Next.

LANCOM 821+ – LANCOM 1711+ VPN – LANCOM 1721+ VPN
Chapter 8: Security settings
64
EN
In the dialogs that follow you can set the password and select the proto-
cols to be available for accessing the configuration from local and remote
networks.
In a subsequent step, you can set parameters for locking the configuration
such as the number of incorrect password entries and the duration of the
lock.
For the firewall, you can activate stateful inspection, ping blocking, and
the stealth mode.
The Wizard will inform you as soon as the entries are complete. Close the
configuration with Finish.
8.1.2 WEBconfig Wizard
With WEBconfig you have the option to launch the Check security settings
Wizard to check and change any settings. The following values are edited:
Device password
The protocols to be available for accessing the configuration from local
and remote networks
The parameters for locking the configuration (the number of incorrect
password entries and the duration of the lock)
8.2 The security checklist
The following checklists provide an overview of all security settings that are
important to professionals. Most of the points in this checklist are uncritical
for simple configurations. In these cases, the security settings in the basic
configuration or that were set with the Security Wizard are sufficient.
Detailed information about the security settings mentioned here are
to be found in the reference manual.
Have you protected the configuration with a password?
The simplest way of protecting the configuration is to agree upon a pass-
word. If no password has been agreed for the device, the configuration is
open to be changed by anybody. The field for entering the password is to
be found in LANconfig in the 'Management' configuration area on the
'Security' tab. It is absolutely imperative to assign a password to the con-
figuration if you want to enable remote configuration!

LANCOM 821+ – LANCOM 1711+ VPN – LANCOM 1721+ VPN
Chapter 8: Security settings
65
EN
Have you permitted remote configuration?
If you do not require remote configuration, please ensure to switch it off.
If you need to make use of remote configuration, ensure that you do not
fail to password-protect the configuration (see the section above). The
field for disenabling remote configuration is to be found in LANconfig in
the 'Management' configuration area on the 'Security' tab. Under ‘Access
rights – From remote networks’ select the option ‘denied’ for all methods
of configuration.
Have your password-protected the SNMP configuration?
Protect the SNMP configuration with a password too. The field for pass-
word-protecting the SNMP configuration is also to be found in LANconfig
in the 'Management' configuration area on the 'Security' tab.
Have you activated the firewall?
The stateful inspection firewall of LANCOM devices ensures that you local
network cannot be attacked from the outside. Activate the firewall in
LANconfig under 'Firewall/QoS' on the 'General' tab.
Note that firewall security mechanisms (incl. IP masquerading, port
filters, access lists) are active only for data connections that are trans-
mitted via the IP router. Direct data connections via the bridge are not
protected by the firewall!
Are you using a 'deny all' firewall strategy?
Maximum security and control is initially achieved by denying all data
traffic from passing the firewall. The only connections to be accepted by
the firewall are those that are to be explicitly permitted. This ensures that
Trojan horses and certain types of e-mail virus are denied communication
to the outside. Activate the firewall rules in LANconfig under 'Firewall/
QoS' on the 'Rules' tab. Instructions on this are to be found in the refer-
ence manual.
Have you activated IP masquerading?
IP masquerading refers to the concealment of local computers while they
access the Internet. All that is revealed to the Internet is the IP number of
the router module of the device. The IP address can be fixed or dynami-
cally assigned by the provider. The computers in the LAN then use the
router as a gateway and are not visible themselves. The router separates
the Internet from the intranet like a wall. The application of IP masquer-
ading is set in the routing table for every route individually. The routing

LANCOM 821+ – LANCOM 1711+ VPN – LANCOM 1721+ VPN
Chapter 8: Security settings
66
EN
table can be found in the LANconfig in the configuration area 'IP router'
on the 'Routing' tab.
Have you used filters to close critical ports?
The firewall filters in LANCOM devices offer filter functions for individual
computers or entire networks. It is possible to set up source and destina-
tion filters for individual ports or port ranges. Furthermore, filters can be
set for individual protocols or any combination of protocols (TCP/UDP/
ICMP). It is especially convenient to set up the filters with the aid of
LANconfig. Under 'Firewall/QoS', the 'Rules' tab contains the functions for
defining and editing filter rules.
Have you excluded certain stations from accessing the device?
A special filter list can be used to limit access to the device's internal func-
tions via TCP/IP. The phrase "internal functions" refers to configuration
sessions via LANconfig, WEBconfig, Telnet or TFTP. As standard this table
contains no entries, meaning that computers with any IP address can use
TCP/IP and Telnet or TFTP to commence accessing the device. The first time
an IP address is entered with its associated netmask, the filter is activated
and only the IP addresses contained in this entry are entitled to make use
of internal functions. Further entries can be used to extend the circle of
authorized parties. The filter entries can describe individual computers or
even entire networks. The access list can be found in the LANconfig in the
configuration area 'TCP/IP' on the 'General' tab.
Do you store your saved LANCOM configuration to a safe location?
Protect your saved configurations in a location that is safe from unauthor-
ized access. Otherwise, byway of example, an unauthorized person may
load your stored configuration file into another device and they can access
the Internet at your expense.
Have you activated the protection of your WAN access in case the
device is stolen?
After being stolen, the device can theoretically be operated at another
location by unauthorized persons. Password-protected device configura-
tions do not stop third parties from operating RAS access, LAN connectiv-
ity or VPN connections that are set up in the device: A thief could gain
access to a protected network.
The device’s operation can be protected by various means; for example, it
will cease to function if there is an interruption to the power supply, or if
the device is switched on in another location.

LANCOM 821+ – LANCOM 1711+ VPN – LANCOM 1721+ VPN
Chapter 8: Security settings
67
EN
With the ISDN location verification, the device can only be operated at
one particular ISDN connection. After being switched on, the device calls
itself at the corresponding telephone number to check that it is still con-
nected to the “correct” ISDN connection (for further information see the
reference manual).
The scripting function can store the entire configuration in RAM only so
that restarting the device will cause the configuration to be deleted. The
configuration is not written to the non-volatile flash memory. A loss of
power because the device has been relocated will cause the entire config-
uration to be deleted (for further information see the reference manual).
Have you ensured that the reset button is safe from accidental
configuration resets?
Some devices simply cannot be installed under lock and key. There is con-
sequently a risk that the configuration will be deleted by mistake if a co-
worker presses the reset button too long. The behavior of the reset button
can be set so that a press is either ignored or it causes a re-start, depend-
ing on the time for which it is held pressed.

LANCOM 821+ – LANCOM 1711+ VPN – LANCOM 1721+ VPN
Chapter 9: Advice & assistance
68
EN
9 Advice & assistance
See this chapter for first-aid assistance if some of the typical problems should
occur.
9.1 No WAN connection can be established
After starting, the router attempts automatically to connect to the Internet
provider. During this phase, the Internet-connection status LED blinks green.
If successful, this LED switches to constant green. If contact cannot be made,
the Online LED illuminates red. This is generally due to one of the following
causes:
Problems with the cabling?
For the DSL connection, use only the connector cable supplied. This cable
must be connected to the Ethernet connector of the DSL modem or the net-
work connector. The LED for the WAN connection must illuminate in green to
show that it is physically connected.
Is the correct transmission protocol selected?
The transmission protocol is defined with the basic settings. The Basic Settings
Wizard actually sets the correct protocol for a wide variety of DSL providers. If
your DSL provider is unknown to the Wizard you have to set the protocol your-
self. The protocol specified by your DSL provider should work without prob-
lem.
You can check and adjust your protocol settings under:
9.2 DSL data transfer is slow
The data transfer rate of an broadband (Internet) DSL connection is dependent
upon numerous factors, most of which are outside of one's own sphere of
influence. Important factors aside from the bandwidth of one's own Internet
connection are the Internet connection and current load of the desired target.
Numerous other factors involving the Internet itself can also influence the
transfer rate.
Configuration tool Call
LANconfig Communication General Communication layers
WEBconfig Expert configuration Setup WAN module Layer list

LANCOM 821+ – LANCOM 1711+ VPN – LANCOM 1721+ VPN
Chapter 9: Advice & assistance
69
EN
Increasing the TCP/IP window size under Windows
If the actual transfer rate of a DSL connection is significantly below the fastest
rate listed by the provider, there are only a few possible causes (apart from the
above-mentioned external factors) which may involve one's own equipment.
One common problem occurs when large amounts of data are sent and recei-
ved simultaneously with a Windows PC using an asynchronous connection.
This can cause a severe decrease in download speed. The cause of this pro-
blem is what is known as the TCP/IP receive window size of the Windows ope-
rating system that is set to a value too small for asynchronous connections.
Instructions on how to increase the Windows size can be found in the Know-
ledge Base of the support section of the LANCOM web site (www.lancom.eu).
9.3 Unwanted connections under Windows XP
Windows XP computers attempt to compare their clocks with a timeserver on
the Internet at start-up. This is why when a Windows XP in the WLAN is
started, a connection to the Internet is established by the LANCOM.
To resolve this issue, you can turn off the automatic time synchronization on
the Windows XP computers under Right mouse click on the time of day
Properties Internet time.
9.4 Cable testing
A cabling defect might have occurred, if no data is transmitted over LAN or
WAN connection, although the configuration of the devices does not show
any discernible errors.
You can test the cabling with the built-in cable tester of your LANCOM.
Change under WEBconfig to menu item Expert configuration Status
LAN statistics Cable test. Enter here the name of the interface to be
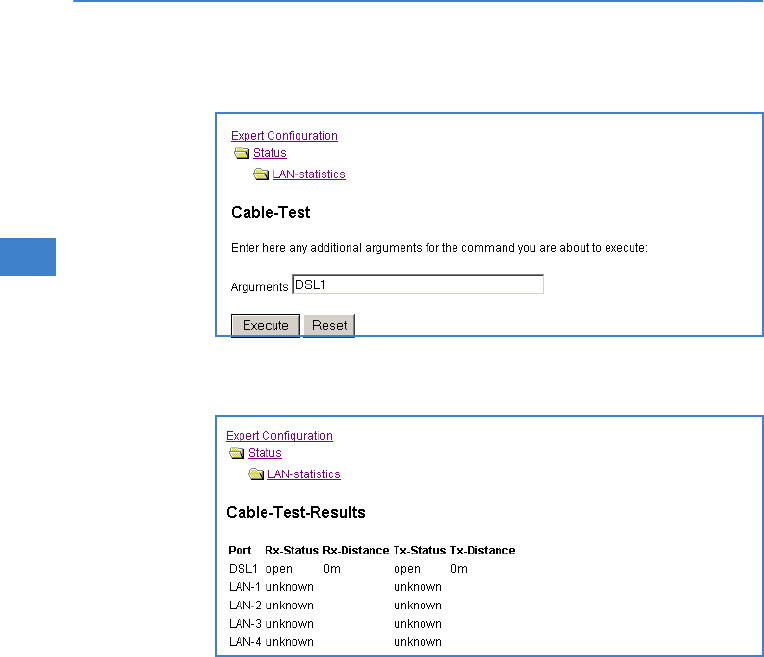
LANCOM 821+ – LANCOM 1711+ VPN – LANCOM 1721+ VPN
Chapter 9: Advice & assistance
70
EN
tested (e.g. “DSL1” or “LAN-1”). Pay attention to the correct spelling of the
interfaces. Start the test for the specified interface by clicking on Execute.
Change then to menu item Expert configuration Status LAN statis-
tics Cable test results. The results of the cable test for the individual
interfaces are show up in a list.
The following results can occur:
OK: Cable plugged in correctly, line ok.
open with distance “0m”: No cable plugged in or interruption within less
than 10 meters distance.
open with indication of distance: Cable is plugged in, but defect (short-
circuited) at the indicated distance.
Impedance error: The pair of cables is not terminated with the correct
impedance at the other end.

LANCOM 821+ – LANCOM 1711+ VPN – LANCOM 1721+ VPN
Chapter 10: Appendix
71
EN
10 Appendix
10.1 Performance data and specifications
LANCOM 821+ LANCOM 1721+
VPN
LANCOM 1711+
VPN
Connections Ethernet LAN 4x 10/100Base-TX, auto sensing, switch with node/hub auto sensing
WAN/ADSL ADSL over ISDN as per ITU G.992.1 Annex B
(compatible to U-R2 connections of the Deut-
sche Telekom) or ADSL over POTS as per ITU
G.992.1 Annex A
ADSL over ISDN as per ITU 992.3, ITU G.992.5
Annex B (ADSL2+) or ADSL over POTS as per
ITU G992.3 and ITU G.992.5 Annex A
10/100Base-TX, auto
sensing
ISDN ISDN S0 bus
Outband serial V.24/V.28 port (8 pol. mini DIN), in combination with LANCOM
modem adapter kit suited for connection of external analogue or GSM
modems
Power supply 12V DC via external power supply. Permitted power supplies:
NEST 12V/1A DC/S Hohlstkr 2.1/5.5mm (RoHS)
LANCOM item no. 110524
Type identification on the power supply „Type: 15.2230S“
Housing 210 x 143 x 45 mm (W x H x D), rugged plastic case, connectors on the
rear side, stackable, provision for wall mounting
Standards EU (CE certification: EN 55022, EN 55024, EN 60950)
Environment /
temperature
range
Temperature range 0°C to + 40°C at 80% max.
humidity (non condensing)
Temperature range
0°C to +55°C at 80%
max. humidity (non
condensing)
Options LANCOM VPN Option 25 channels (hardware
accelerated, max.25 simultaneous connec-
tions, 50 connections configurable) for VPN in
WAN
(Art. no.60083)
Accessories LANCOM Modem Adapter Kit for connecting modems (analogue or
GSM) to the serial configuration interface (Art. no. 110288)
LANCOM Rack Mount Option (Art. no. 61501)
LANCOM Advanced VPN Client (Art. no. 61600)
LANCOM Advanced VPN Client (10 bulk)
(Art. no. 61601)
LANCOM Advanced VPN Client (25 bulk)
(Art. no. 61602)
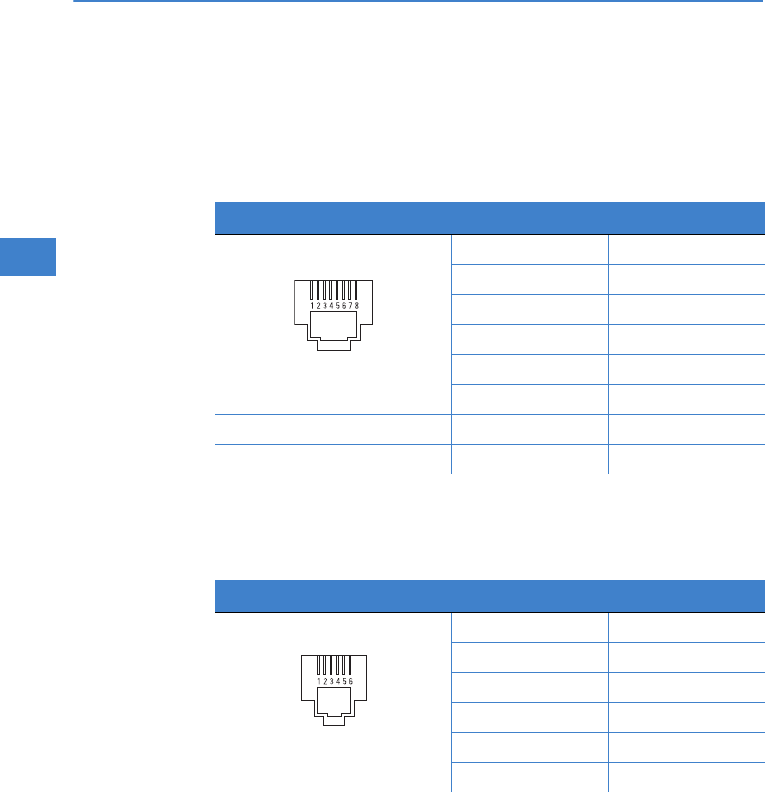
LANCOM 821+ – LANCOM 1711+ VPN – LANCOM 1721+ VPN
Chapter 10: Appendix
72
EN
10.2 Connector wiring
10.2.1 WAN interface
LANCOM 1711+
VPN only
8-pin RJ45 socket
10.2.2 ADSL interface
LANCOM 821+ and
LANCOM 1721+
VPN only
6-pin RJ11 socket
Connector Pin IAE
1T+
2T-
3R+
4–
5–
6R-
7–
8–
Connector Pin IAE
1–
2–
3a
4b
5–
6–
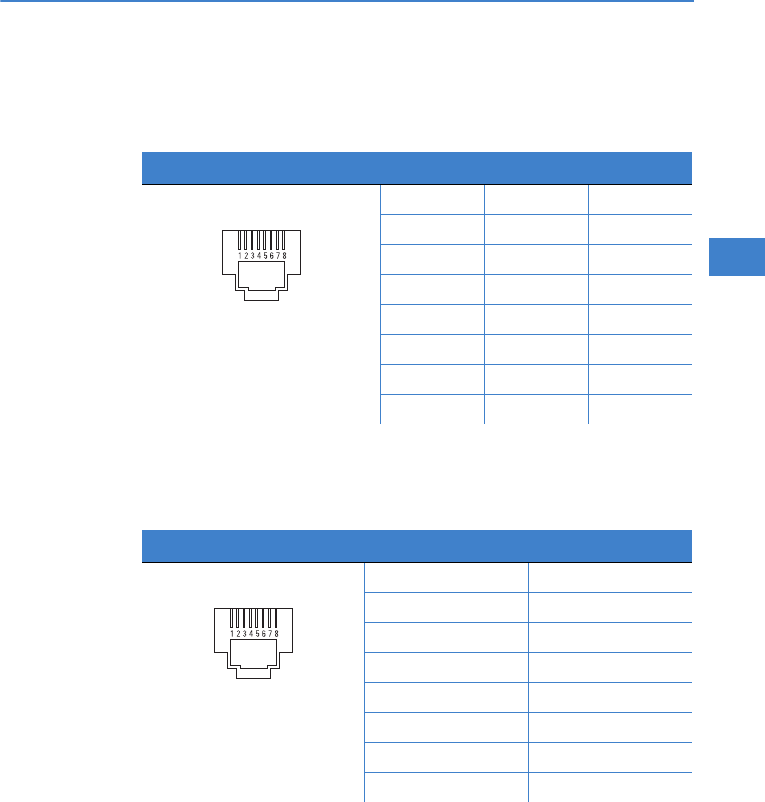
LANCOM 821+ – LANCOM 1711+ VPN – LANCOM 1721+ VPN
Chapter 10: Appendix
73
EN
10.2.3 ISDN-S0 interface
8-pin RJ45 socket (ISO 8877, EN 60603-7)
10.2.4 Ethernet interface 10/100Base-T
8-pin RJ45 sockets (ISO 8877, EN 60603-7)
Connector Pin Line IAE
1––
2––
3T+2a
4R+1a
5R-1b
6T-2b
7––
8––
Connector Pin Line
1T+
2T-
3R+
4–
5–
6R-
7–
8–
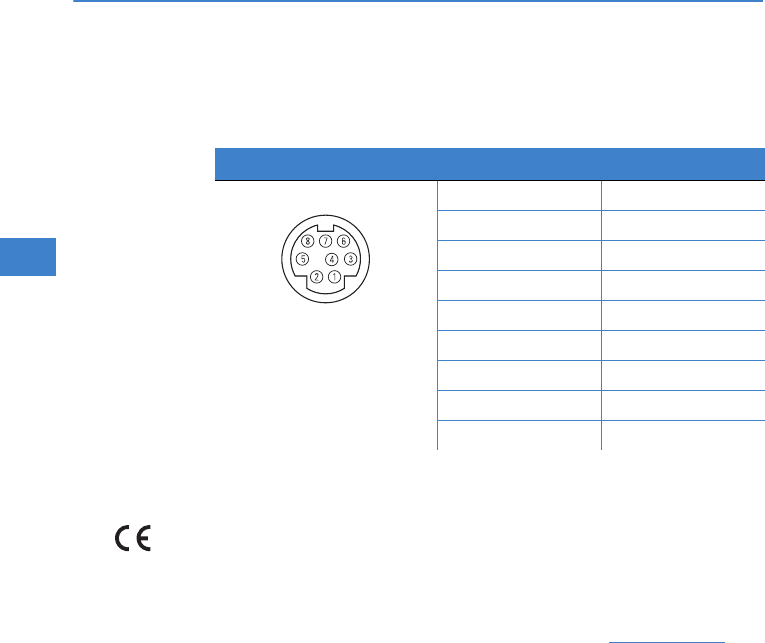
LANCOM 821+ – LANCOM 1711+ VPN – LANCOM 1721+ VPN
Chapter 10: Appendix
74
EN
10.2.5 Configuration interface (outband)
8-pin Mini DIN socket
10.3 Declaration of conformity
LANCOM Systems herewith declares that the devices of the type described in
this documentation are in agreement with the basic requirements and other
relevant regulations of the 1995/5/EC directive.
The CE declarations of conformity for your device are available in the appro-
priate product area on the LANCOM Systems web site (www.lancom.eu).
Connector Pin Line
1CTS
2RTS
3RxD
4RI
5TxD
6DSR
7DCD
8DTR
UGND

LANCOM 821+ – LANCOM 1711+ VPN – LANCOM 1721+ VPN
Index
75
EN
Index
Numerics
10/100Base-TX 20
3 DES 41, 51
A
Accounting 29
ADSL
Connect 20
Connector cable 14
Transfer rates 9
AES 41, 51
Answering machine 9
Autosensing 22
B
Basic configuration 25
Blowfish 41, 51
C
Call-back function 41, 51
Callback function 13
Calling Line Identity (CLI) 53
CAPI interface 58
charge lock 17
Charge protection 29, 31
Common ISDN Application
Programming Interface (CAPI) 58
Configuration access 31
Configuration file 66
Configuration interface 13
Connector cable 14
Configuration password 64
Configuration port 20
Configuration protection 13, 27, 30
Connector wiring 72
ADSL interface 72
Configuration port 74
DSL interface 72
Ethernet interface 73
ISDN S0 interface 73
LAN interface 73
Outband 74
WAN interface 73
Cost budget 29
D
Data frequencies 10
Default gateway 65
DHCP 35
DHCP server 11, 26, 36
Dial-in access 51
Dial-up adapter 55
DNS
DNS access to the remote LAN 45
DNS server 11, 35
Documentation 14
Domain 45
Download 5
Downstream 9
DSL
data transfer is too slow 68
E
Encryption 41, 51
F
Fax 9
Firewall 13, 66
Block stations 66
FirmSafe 13
Firmware 5
Flatrate 38
H
Hardware installation 21
HTTPS 31
I
ICMP 66

LANCOM 821+ – LANCOM 1711+ VPN – LANCOM 1721+ VPN
Index
76
EN
Information symbols 5
Installation 14
ADSL 22
configuration port 23
DSL 22
ISDN 22
LAN 22
LANtools 23
power adapter 23
Internet access 11, 37
Authentication data 38
Flatrate 38
Internet access setup 37
Internet provider 37
IP
Block ports 66
Filter 66
IP address 26, 27, 46, 66
IP address of the LANCOM 22
IP masquerading 12, 65
IP router 11
IPsec 41, 51
IPX 55
Binding 46, 54
External network number 46, 54
Frame type 46
Internal net number 54
IPX conventions 46
IPX router 11
Settings 45
ISDN
Connector cable 14
D channel 53
MSN 29
S0 port 20
ISDN calling line ID 44, 52, 53
ISDN connection
Basic settings 29
ISDN leased-line option 12
ISDN modem 51
ISDN number 43
ISDN PBX 29
ISDN S0 connection 12
L
LAN
Connector cable 14
LAN to LAN coupling 11
LANCAPI 12, 29
LANCOM VPN Option 13
LANconfig 24, 30
Starting the Wizards 40
LAN-LAN connectivity 41
Required information 42
LAN-LAN coupling 29
LANmonitor 24
LANtools
System requirements 15
M
MAC address filter 13
Metering pulse 29
MSN 53
N
NAT – see IP masquerading
NetBIOS 46
NetBIOS proxy 11
Netmask 26
Network connectivity 41
Security aspects 41, 51
Network mask 27, 66
Network segment 22, 46
P
Package contents 14
Password 27, 31, 41, 51
Password for the ISDN connection 44
PAT – see IP masquerading
PBX 9
Ping 48
Power adapter 14, 20

LANCOM 821+ – LANCOM 1711+ VPN – LANCOM 1721+ VPN
Index
77
EN
PPP 51
PPP client 55
Prefix for external line 29
R
RAS 11
Remote Access Service (RAS)
Activate compression in software 55
Configuring the dial-in computer 55
IPX 54
NetBIOS 54
Server 11
Setup 51
Specify MSN 29
TCP/IP 53
User name 52
Windows workgroup search 54
Remote configuration 31
Remote configuration via ISDN 13
Reset connect charge protection. 17
Reset switch 20, 21
Resetting the configuration 21
Restarting the device 21
Router function 9
Routing table 65
S
Security
Firewall wizard 64
Security settings wizard 63
Security checklist 64
Security settings 68
SNMP
Configuration protection 65
Software installation 23
SSID 28
Standard gateway 35
Status display
ETH 19
Power 16
Status displays
Power 16, 17
Support 5
Switch 20
System preconditions 14
System requirements 14
T
TCP 66
TCP/IP 15, 55
Connect test 48
Settings 25
Settings to PCs in the LAN 35
Windows size 69
TCP/IP configuration
Fully automatic 25, 26
Manual 25, 27
TCP/IP filter 13, 66
TCP/IP router
Settings 44
Telephone 9
Telnet 66
TFTP 66
Transmission protocol 68
U
UDP 66
Upstream 9
V
Virtual Private Network 10
Virtual Private Network (VPN) 11
Voice frequencies 10
Voltage switch 20
VPN 10
VPN client 55
W
WAN
Connector cable 14
WEBconfig 31
HTTPS 31
System requirements 15

