F LE32N1620 SERVICE MANUAL
User Manual: LE32N1620 SERVICE MANUAL
Open the PDF directly: View PDF ![]() .
.
Page Count: 92

MT5311 Training Documents
Installation
Connecting to a DC input .................................................. 29
Connecting to an Antenna input .................................... 29
Choose Your Connection .................................................... 30
Connecting to an AV Device.............................................. 30
Connecting to an Audio Device .................................... 31
Connecting to a PC ............................................................ 32
Connecting Headphones ................................................ 33
Introduction
Controls .............................................................................................. 25
Connection Options ...................................................................... 26
Universal Remote control ............................................................ 27
Accessories ....................................................................................... 28
Install the Stand .............................................................................. 28
Install the Wall Mount ................................................................... 28
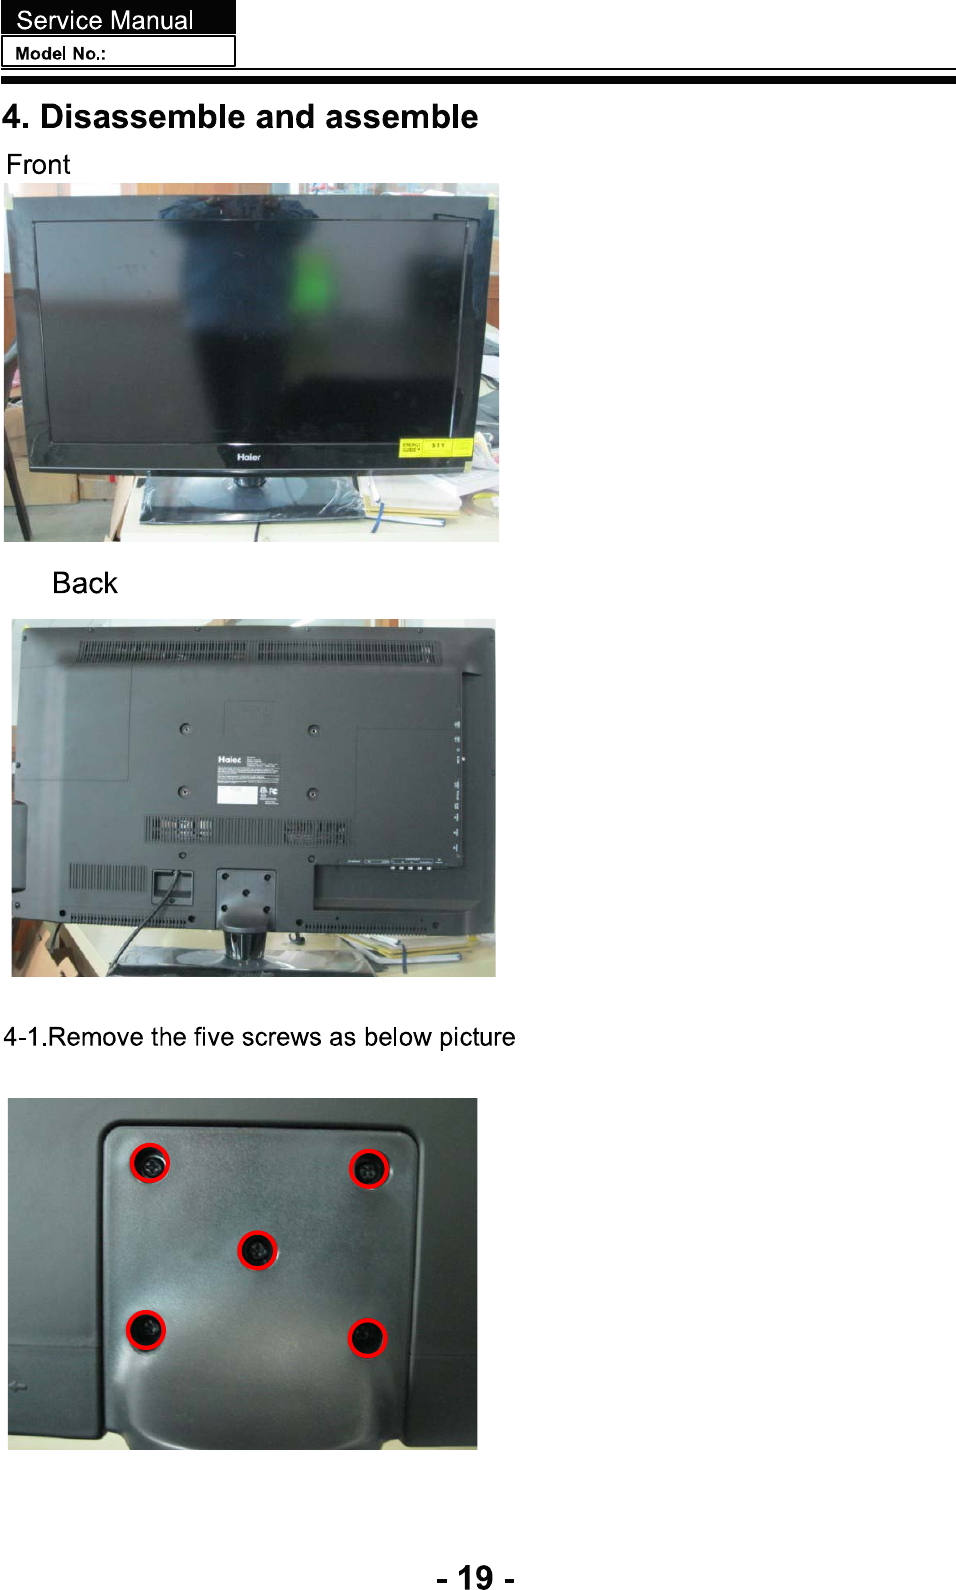
6.
7. Operation
Channel menu .................................................... 33
Video menu ........................................................ 36
Audio menu ........................................................ 37
Function menu ................................................... 38
Lock Menu .......................................................... 42
Other Functions ................................................. 45
Playing External Media .................................... 54
Universal Remote Control
Setting Up Your Remote Control ...................... 58
Remote Control Codes ...................................... 63
Maintenance 63
Specication 63
8.
9.
10.
11
12
13
64
65
77
78
79
88

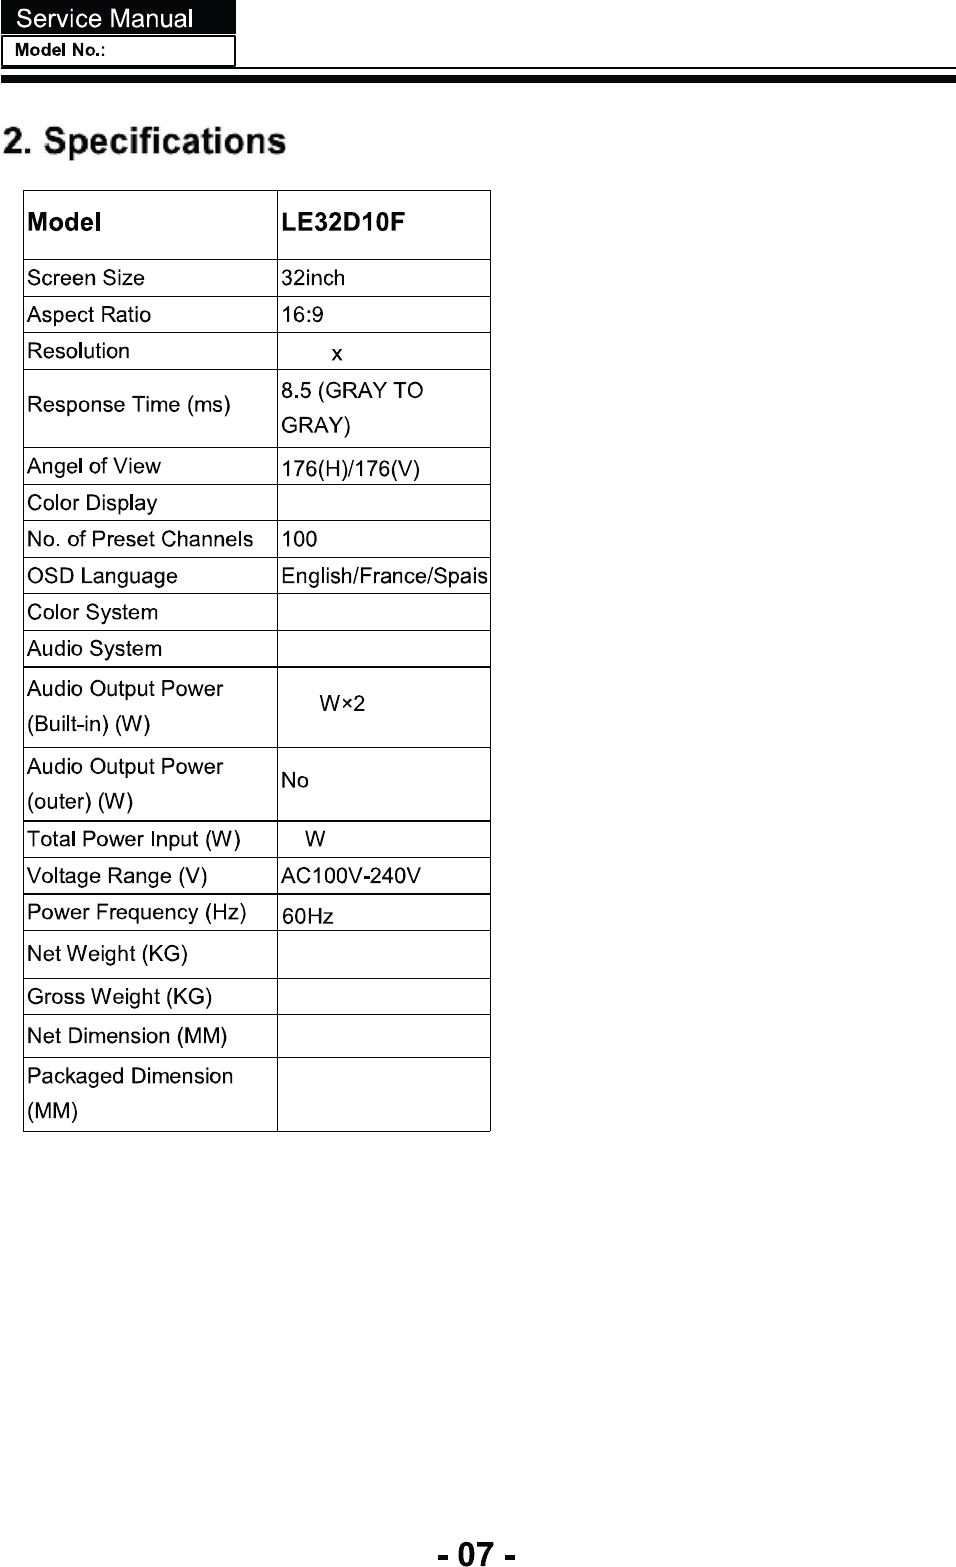
1366 768
16.7M
ATSC/NTSC
10
75
m/mts/AC-3

T.MT5311.81B
CNA2
CN5
CN22
CN18 CON1 CON2
T.MT5311.81B
T.MT5311.81B
34
MINI AV IN SPDIF
OUT LINE OUT 12
1
ETHERENT

CNA2
CN5
CN18
CON1
NC
Logic Level Control (Default For High Level)
No Connection
I2C SCL
I2C SDA
CN22

L-
L+
R-
R+
Audio Left Channel Output+
Audio Left Channel Output-
Audio Right Channel Output-
Audio Right Channel Output+
CON2
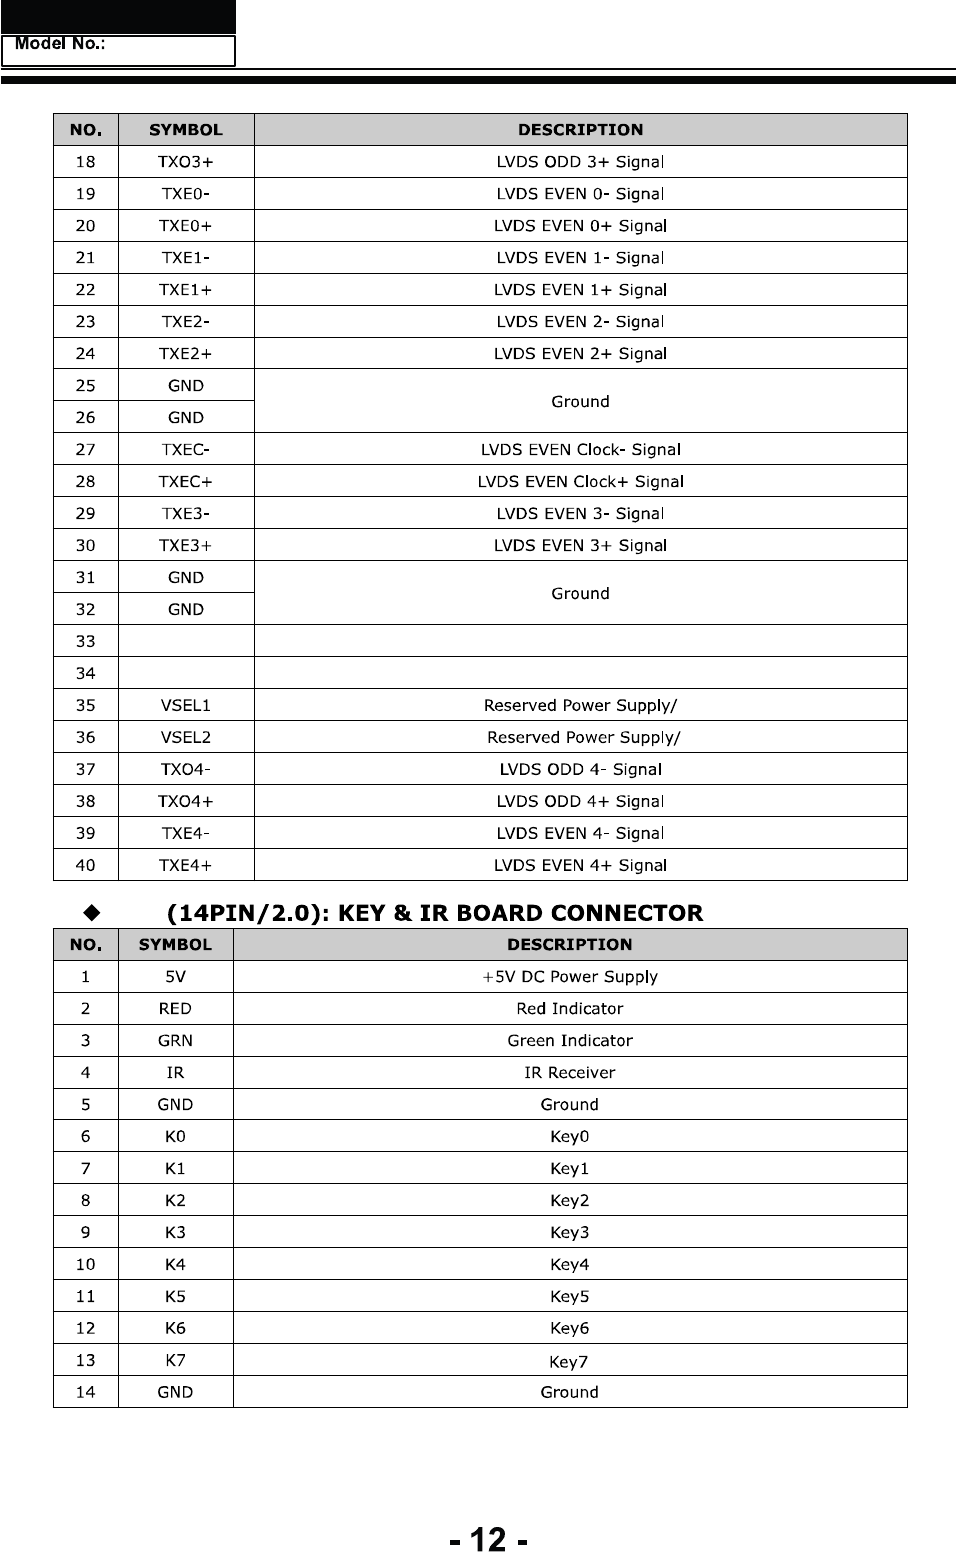
ƹCON1 (4PIN/2.54): AMPLIFIER POWER SUPPLY CONNECTOR
NO. SYMBOL DESCRIPTION
124V
+24V DC Power Supply
224V
3 GND Ground
4 GND Ground

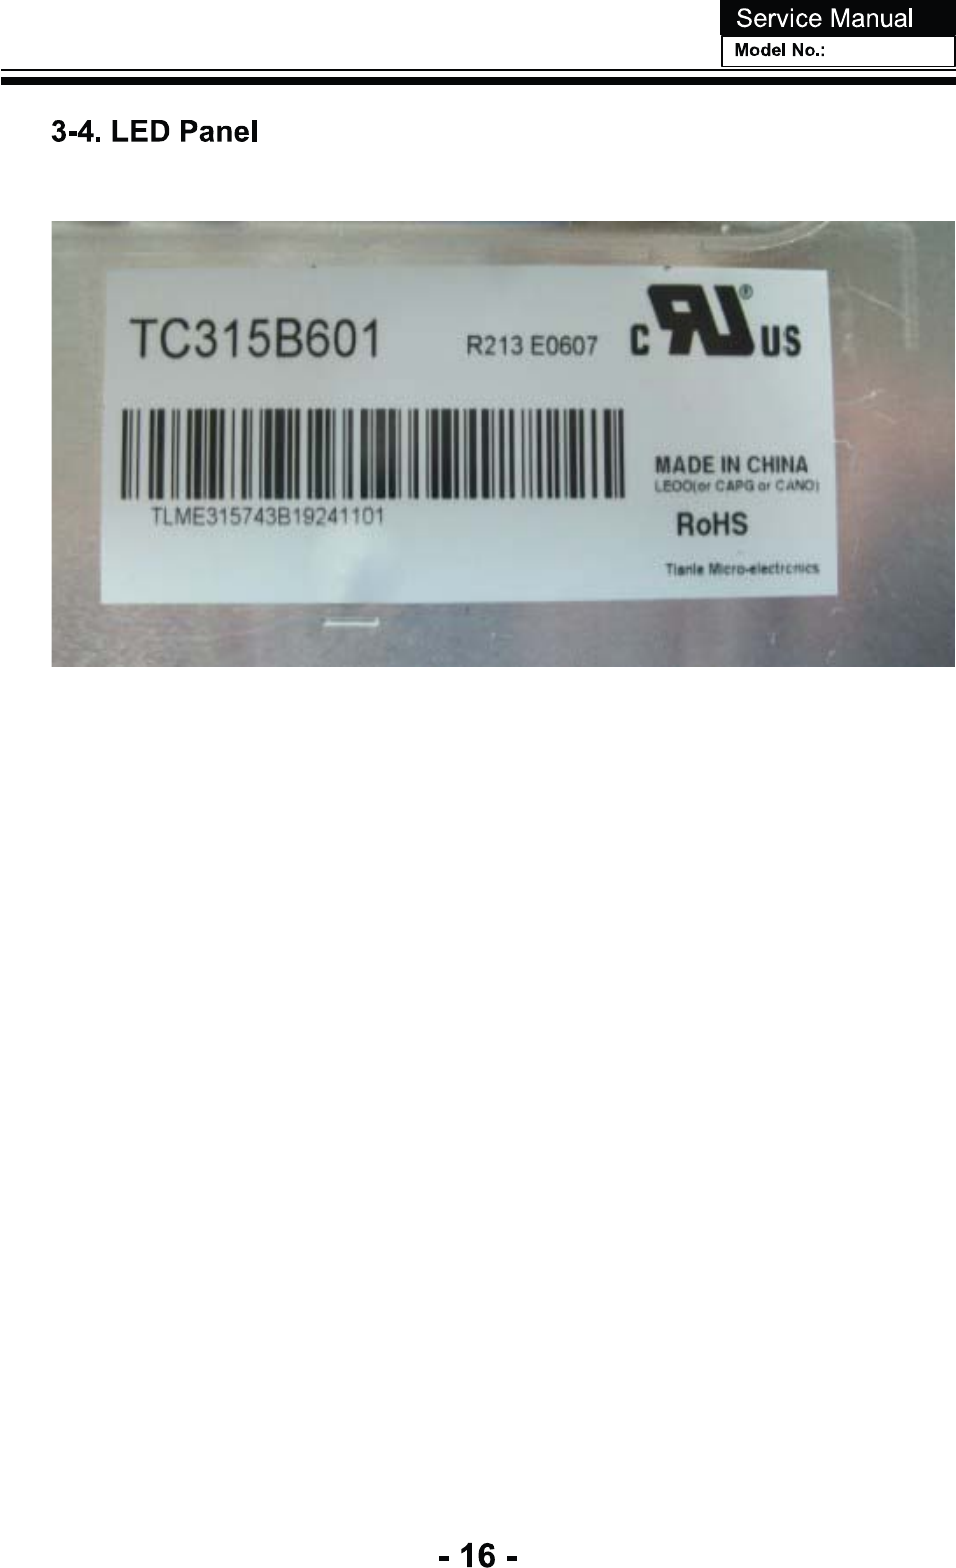
TC315B601

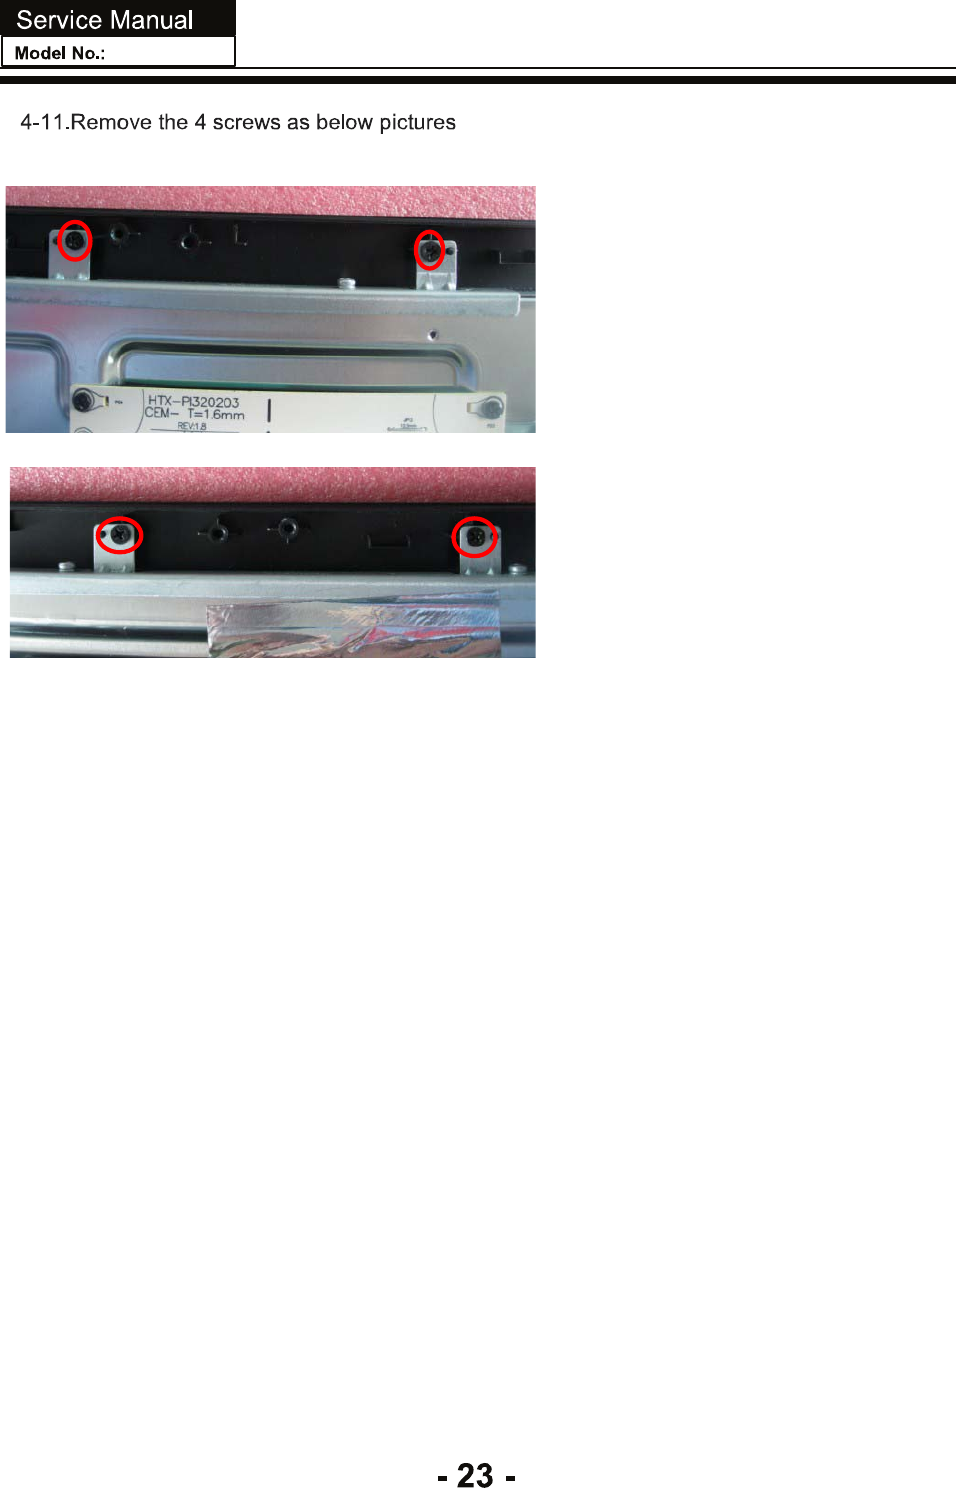
5.INTER FACE PIN CO N N E C TION
5.1 T F T L C D MODULE
CNF1 Co n n ecto r Pin Assignment
etoNnoitpircseDlobmyS.oNniP
1 V C C supply:+12V
2 V C C supply:+12V
3 V C C supply:+12V
4 V C C Powersupply:+12V
5 G N D Ground
6 G N D Ground
7 G N D Ground
8 G N D Ground
)6()2(tamrofatadSDVLtceleSSDVLLES9
)6()3(noitceleSelbaTpukooLevirdrevOLESDO01
11 G N D Ground
0lexipfoatad-0XR21
d+0XR31
a
ta of pixel0
14 G N D Ground
1lexipfoatad-1XR51
1lexipfoatad+1XR61
17 G N D Ground
18 R X 2- Negative transmission dat
a of pixel2
19 R X 2+ Positive data of pixel2
20 G N D Ground
21 R X C LK - of clock
22 R X C LK + of clock
23 G N D Ground
3lexipfoatad-3XR42
3lexipfoatad+3XR52
26 G N D Ground
)4(edoMgnigAEGA_TST72
28 N C Noconnection (5)
29 G N D Ground
30 G N D Ground
N ote (1) Connector type:S TA R C O N N 093G30 -B 0001A or P -TWO 187053-30091 or compat
i
ble
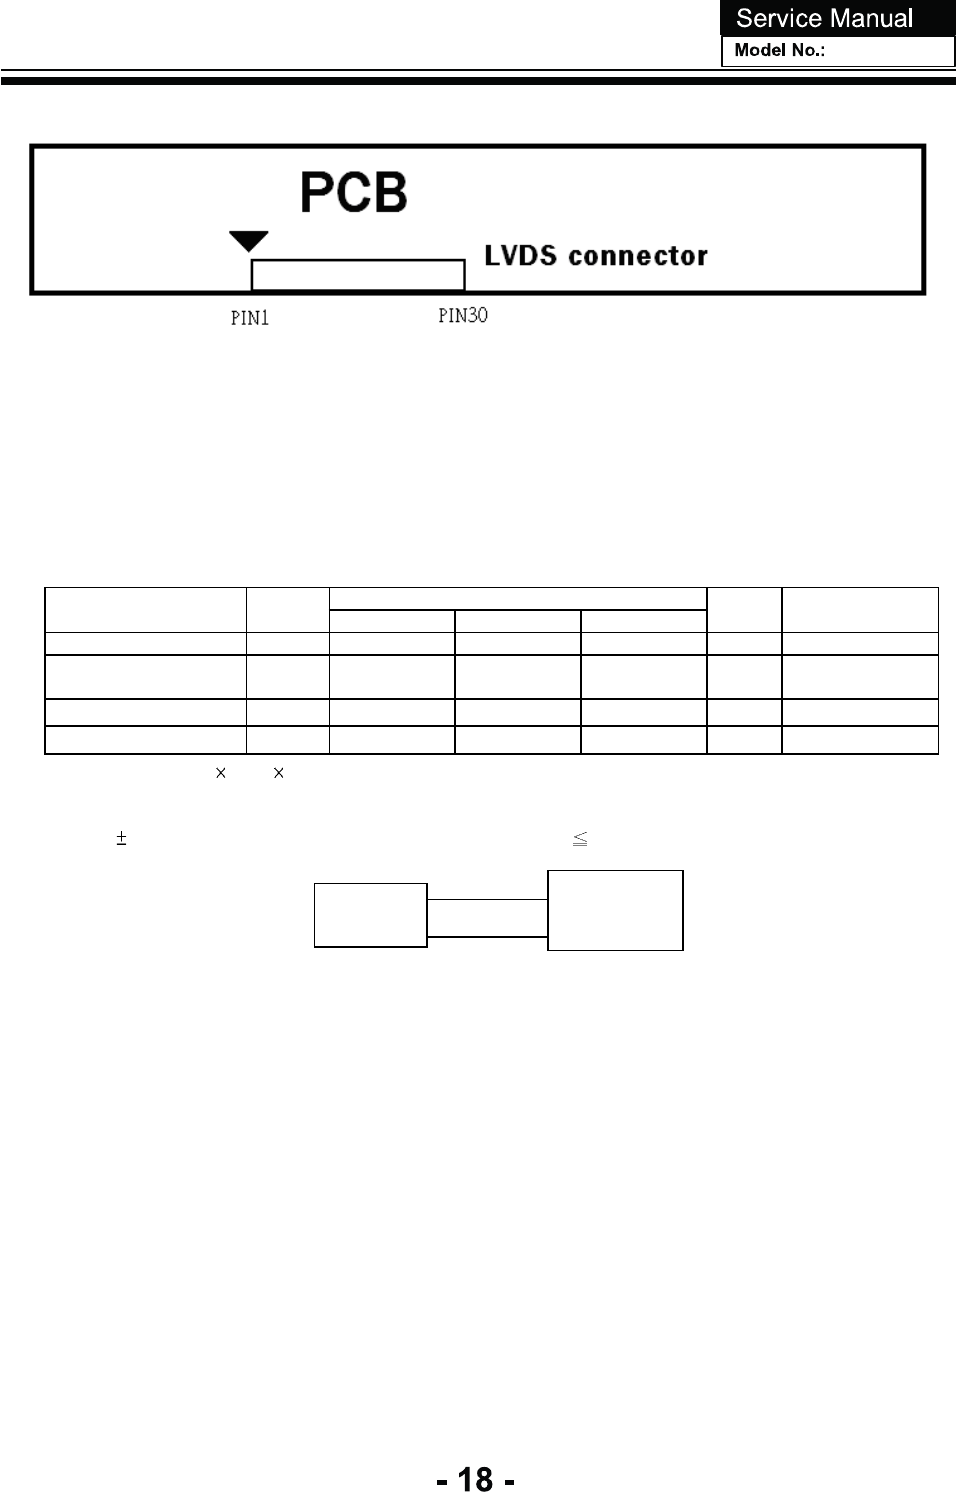
LV D S connector pi
n order defined as fol
lows
transmission
transmission
transmission
transmission
transmission
transmission
transmission
Negative
Negative
Negative
Negative
Positive
Positive
Positive
Positive
Power
Power
Power
-17-
Note (2) Low = Open or connect to GND: VE S A F ormat, High = C onnect to +3.3V: J E IDA F ormat.
Please refer to 5.5 LVDS INTE RFACE
Note (3) Overdrive lookup table selection. The Overdrive lookup table should be selected in accordance to the
frameratetooptimizeimagequality.
3.2 B ACKL IGHT UNIT
3.2.1 LE D LIGHT BARCHARACTE RISTICS (
Ta=25±2ºC)
(21)
Value
Parameter Symbol Min. Typ. Max. Unit Note
Li ght B ar I nput Vol tage VLED VDC (Duty 100%)
Li ght Bar Input Current ILED mA
DC (Duty 100%)
per string
Power Consumption PLED -- -- W (1)
LED Life Time LBL (30000) -- -- Hrs (2)
Note (1) PLED =(ILED 7) VLED
Note (2) The lifetime of LED is defined as the timewhen it continues to operate under the conditions at Ta =25
2andI=
120mA ( Per E A ) until the bri ghtness becomes 50% of its original value.
LED
Converter
LED
Backlight
Module
VLED ILED
(17) (19)
()
,LEDmatrix is 6S6P.
(120)
-- --
15.96
ºC
9
6
Introduction
Haier LED HDTV EN-4
Introduction
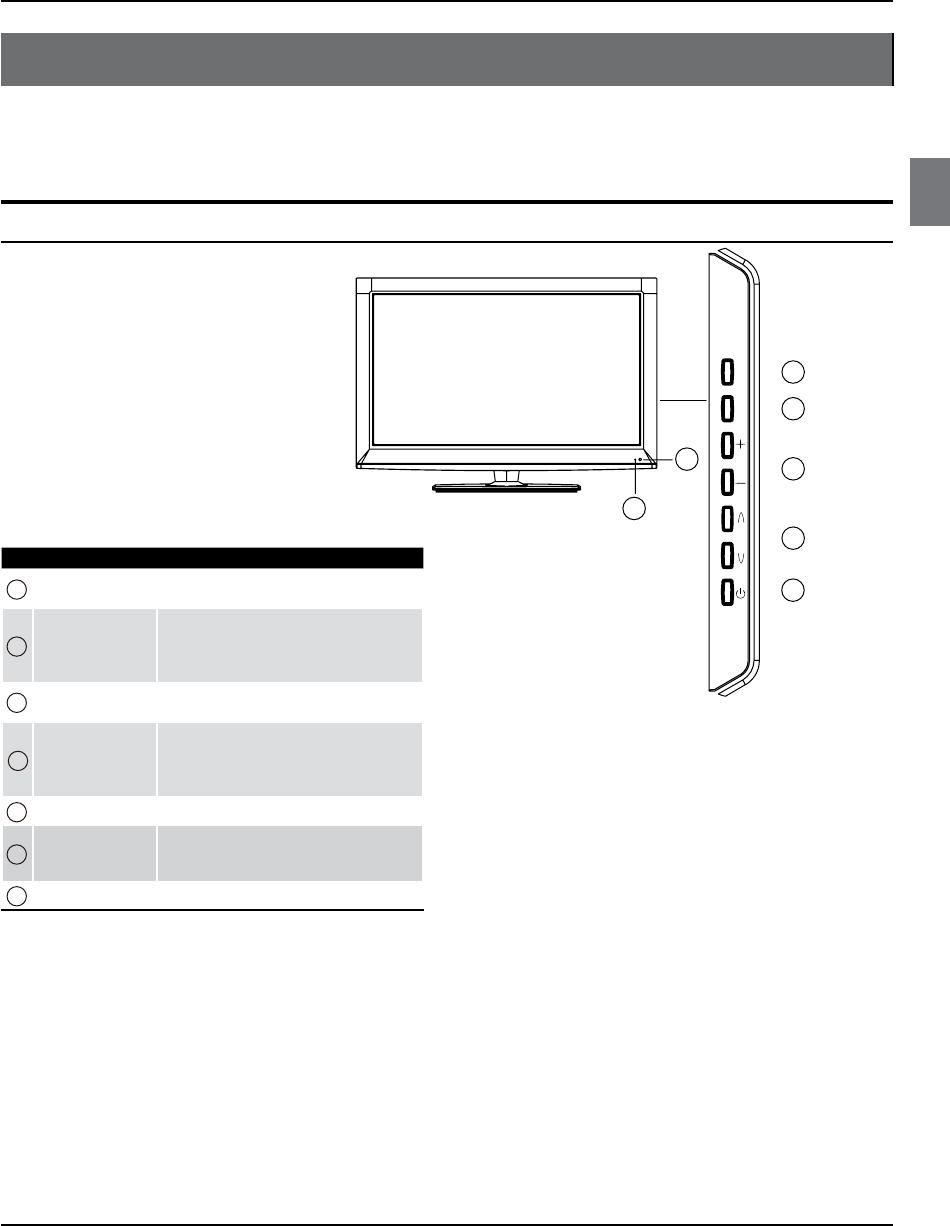
Controls
This is a simplied representation of the TV front panel, side panel control buttons and side inputs.
TV Side panel controls and connections
1MENU Menu display. Press to access the on-screen
menu display.
2INPUT
Press to access the input source mode. Press
repeatedly to change the source to the one
you want to watch. In the MENU screen, the
INPUT button serves as the ENTER button.
3VOL +/-
Press to adjust the volume. In the MENU screen,
these buttons serve as left/right buttons.
4CH +/-
Press to scan through channels.To scan quickly
through channels, press and hold down either
+/- . In the MENU screen, these buttons serve
as up/down buttons.
5POWER Press to turn on and off the TV.
6Remote Sensor
Receives IR signals from the remote control.
Do not put anything near the sensor, which
may block the remote control signal.
7Power indicator
CHVOL
INPUT MENU
7
6
1
2
4
5
-25-
-26-
Introduction
EN-5 Haier LED HDTV
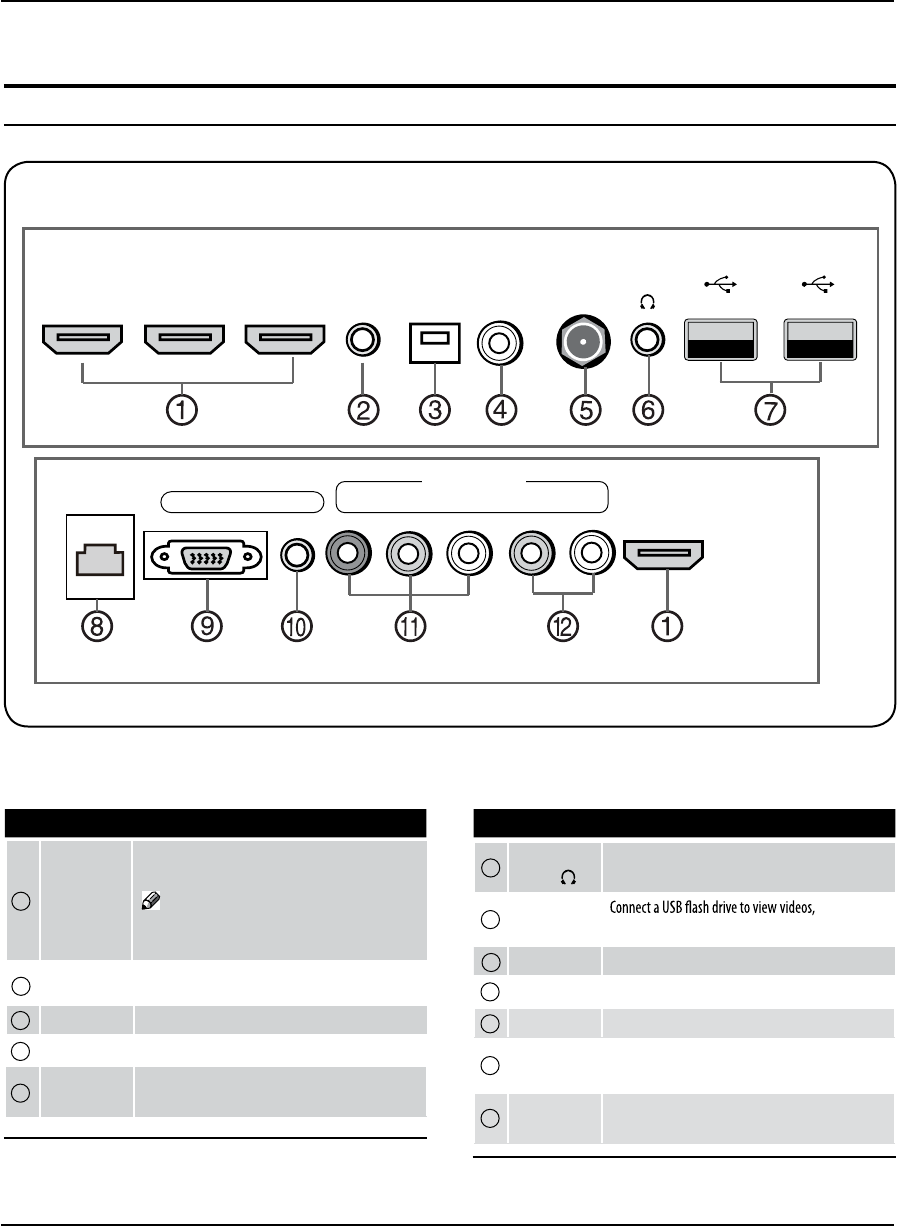
Connection Options
Back panel connections
8ETHERNET Connect a ETHERNET cable to the Network.
6Headphone
jack Headphone audio output terminal.
7USB Input x2
images or
music, and support wifi.
1HDMI In x4
Connect a HDMI device to receive digital audio
and uncompressed digital video.
Note
HDMI 1 supports (ARC)Audio Return 5
Channel.
2MINI AV In Connect the video and audio signal from a video
device with the converter cable.
5Antenna
Input
Connect cable or antenna signals to theTV, either
directly or through your cable box.
9PC Video In Connect a video cable from a computer.
3Optical
Connect to the digital audio equipment.
4AUDIO Out
Connect the audio L/R cables to your audio equipment.
10 PC Audio In Connect the audio cable from a computer.
12 Component
AUDIO In
Connect the audio L/R cables from the component
source or an AV audio.
11 Component
Video In
Connect a component video device or an AV
composite video.
ETHERNET PC AUDIO Y Pb Pr R-AUDIO-L HDMI1
IN
COMPONENT
HDMI2 HDMI3 HDMI4 AV IN OPTICAL AUDIO ANT IN USB1 USB2
IN IN IN MINI OUT
Introduction
Haier LED HDTV EN-6
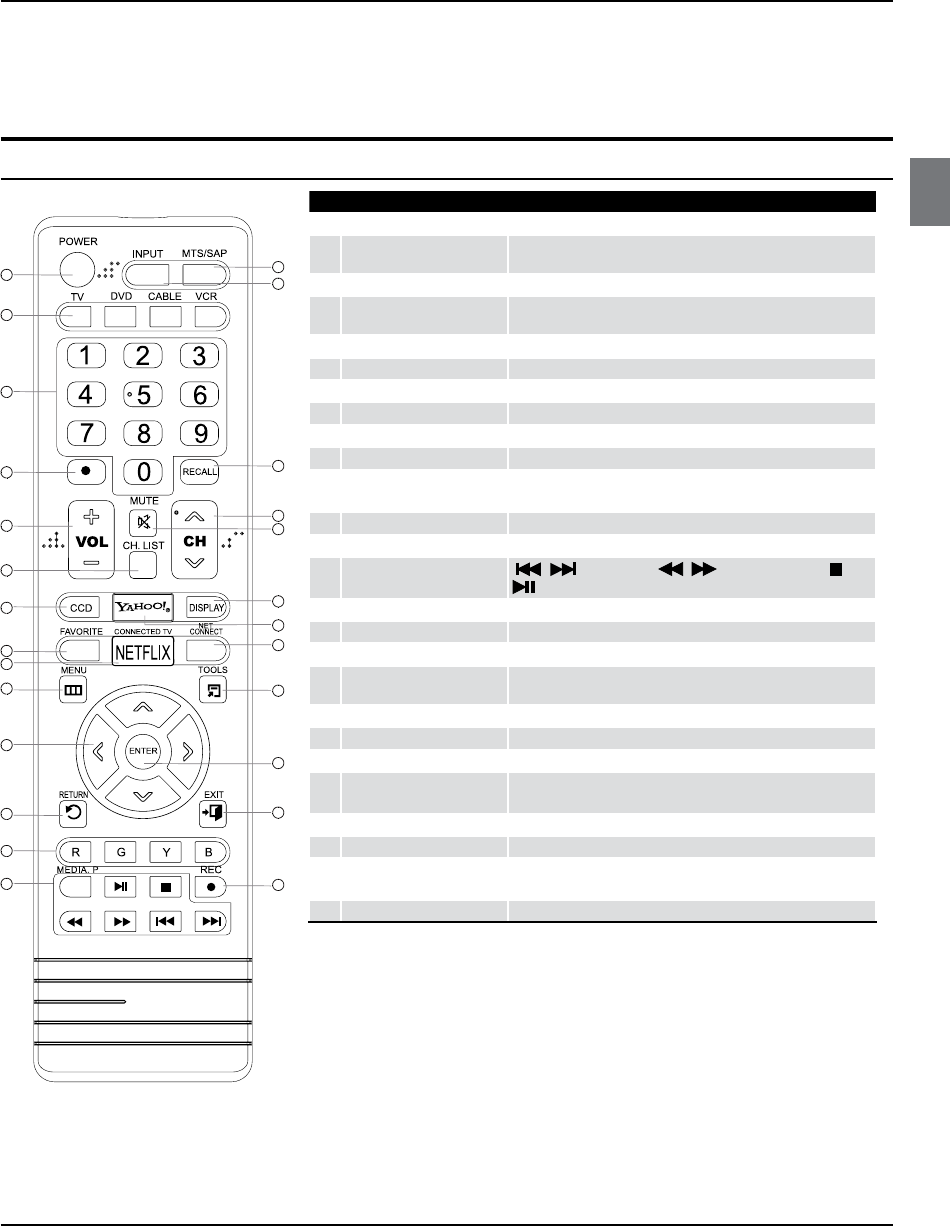
Universal Remote control
The remote control cannot be operated unless the batteries are properly loaded.
When using the remote control, aim it at the remote sensor on the TV.
15
16
17
18
19
20
21
22
23
24
25
26
1
2
3
4
5
6
7
8
9
10
11
12
13
14
Function introduction
1Power Press to turn on and o the TV
2TV DVD CABLE VCR To select one of the system modes in which the remote control
can be used.
3Number buttons Press to change a channel.
4tCVUUPO Press to select digital channels. For example, to enter “54-3” ,
QSFTTiwitwBOEiw
5VOLUME UP/DOWNPress to adjust the volume.
6CH.LISTDisplay the channel list in TV mode.
7CCD(closed caption)Select a closed caption.
8FAV.LISTPress to display the favorite channel list in TV mode.
9NETFLIX Press to launch Netix.
0MENU Press to display the on-screen menu
AArrow keys (Up/Down/
Left/Right)
Allows you to navigate the on-screen menus and adjust the
system settings.
BRETURN Return to the previous menu.
CR G Y B
Buttons used in the
Channel list, Media Play menu, etc.
DMedia Player Functions / Rewind / Fast / Backward /Forward Stop
Play/Pause
EMTS/SAP Select MONO, STEREO, SAP in NTSC system
FINPUTShow the input source list.
GRECALL Press to jump back and forth between two channels.
HCHANNEL UP/DOWNPress to scan through channels. To scan quickly between the last
two channels, press and hold down either ġ/Ģ.
IMUTESwitches the sound on or off.
JDISPLAY
Press to display the TV status information on the top of the TV screen.
KYAHOO!Launches Yahoo Connected TV!
LNet ContentDisplay the Net Connect main menu, which includes Yahoo,
Netix, Multimedia, and more.
MTOOLS Quickly select frequently used functions.
NENTER
Accesses the highlighted item in the on-screen menu
OEXIT Clears all on-screen displays and returns to TV viewing from any
menu
PREC Press to start the timeshift process.
-27-
Introduction
EN-7 Haier LED HDTV
Note
5
product.
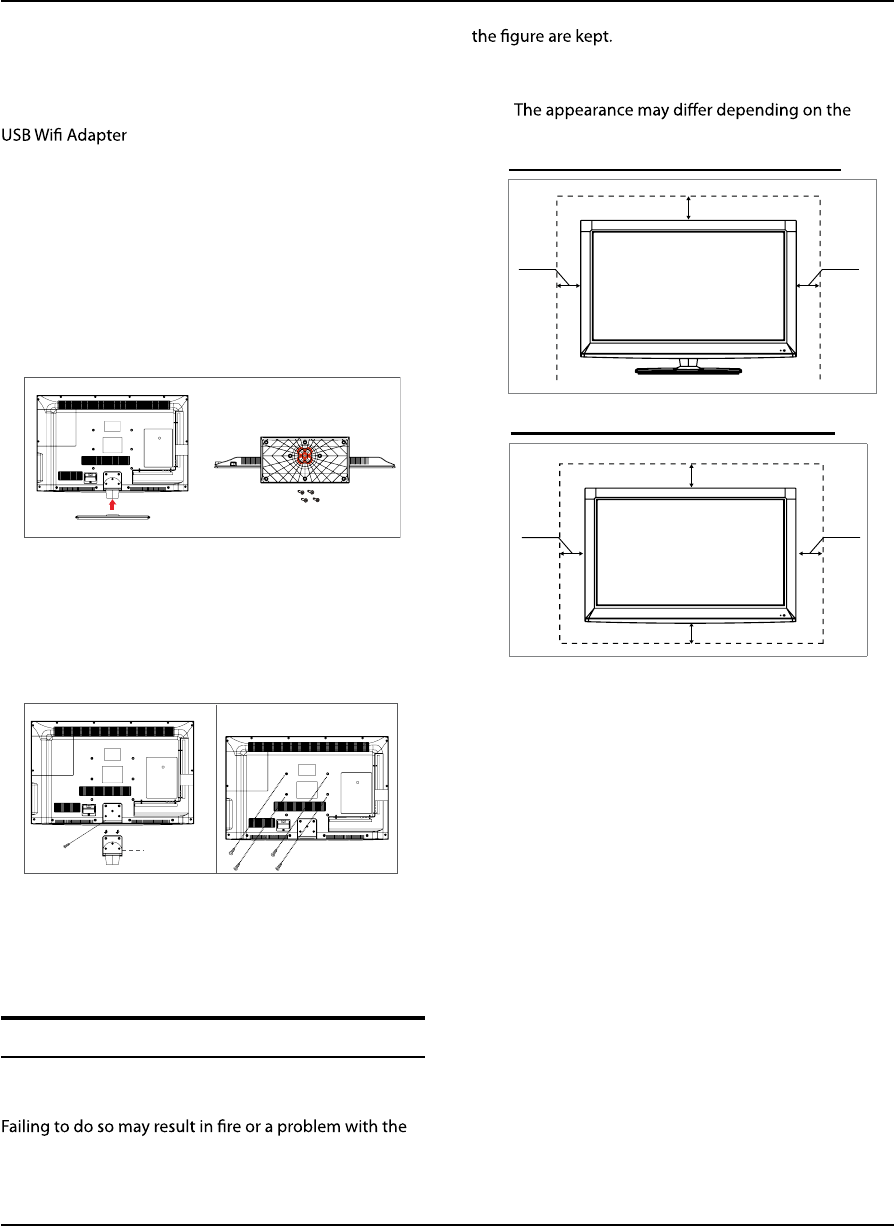
When installing the product within an enclosure
When installing the product with a wall-mount
4’’
4’’4’’
4’’
4’’
4’’
4’’
Accessories
Remo
Mini AV converter cable x1
USB extension cable x1
te x1
Owner’s manual x1
Alkaline battery(AAA) x2
x1
Install the Stand
Carefully place the TV screen side down on a table. We
suggest that you place the wrapping material from the
TV package on the table top to protect the screen from
damage. connect the TV to the Stand as shown.
Install the Wall Mount
1. Removing the TV base support
When mounting the TV onto a wall, remove the TV base
support as shown.
12
base support
2. InstallingWall-Mount
Use screws to secure the wall bracket to the back of your
TV.
For more information on how to install a wall mount,
refer to the wall mount's user manual.
Securing the Installation Space
Keep the required distances between the product and
other objects (e.g. walls) to ensure proper ventilation.
product due to an increase in the internal temperature
of the product.
Install the product so the required distances shown in
-28-
Installation
Haier LED HDTV EN-8
Installation
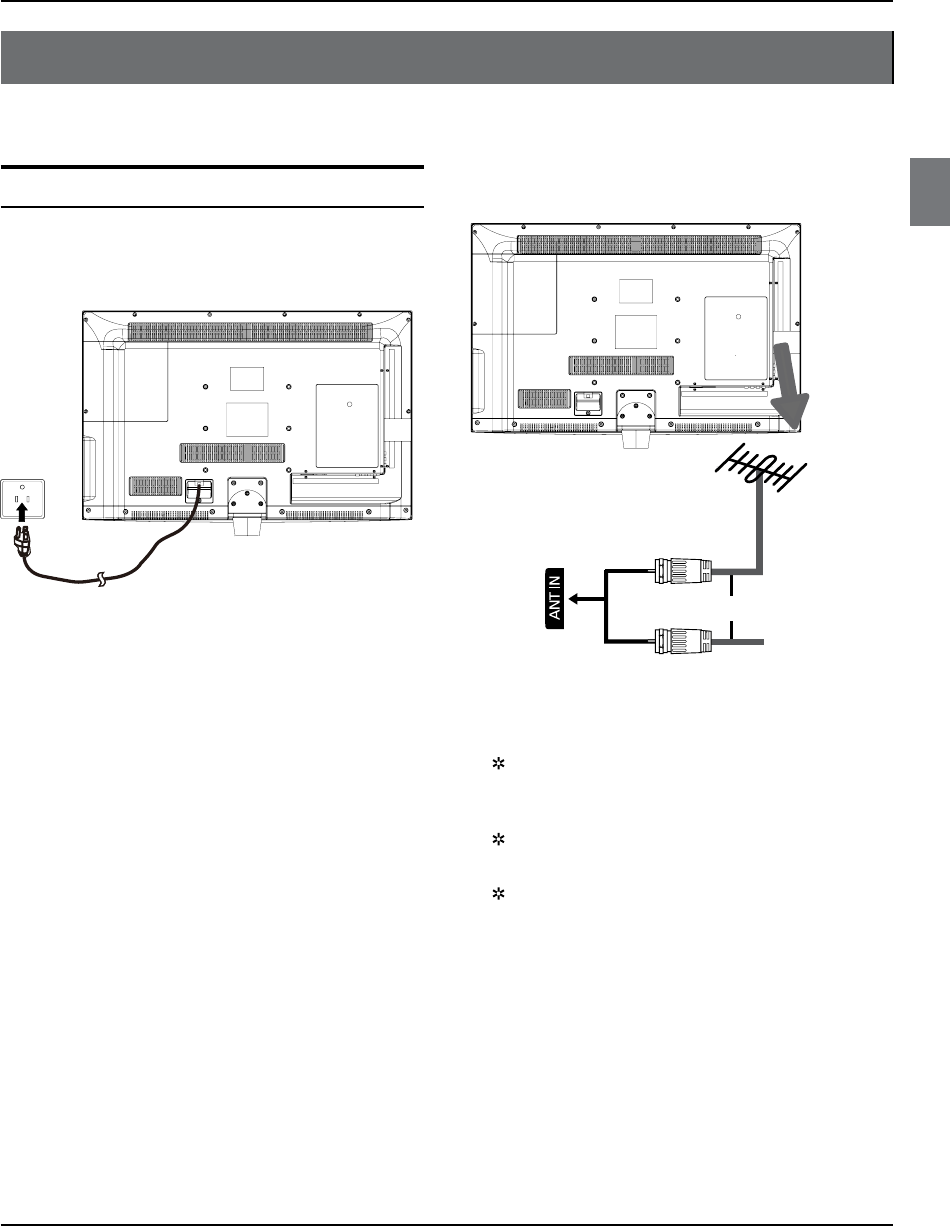
Connecting to a DC input
To use AC Power Suppley
Connect the power cable to the power outlet, as shown
in the gure.
Connecting to an Antenna
Over-the-air TV reception quality will depend on your
antenna type, antenna location and antenna positioning.
Cable Television
Network
or
Note
To improve the picture quality in a poor signal
area, please purchase a signal amplier and install
properly.
If the antenna needs to be split for two TV’s, install
a “2-Way Signal Splitter” .
To install the antenna properly please contact a
professional in your area.
-29-
Installation
EN-9 Haier LED HDTV
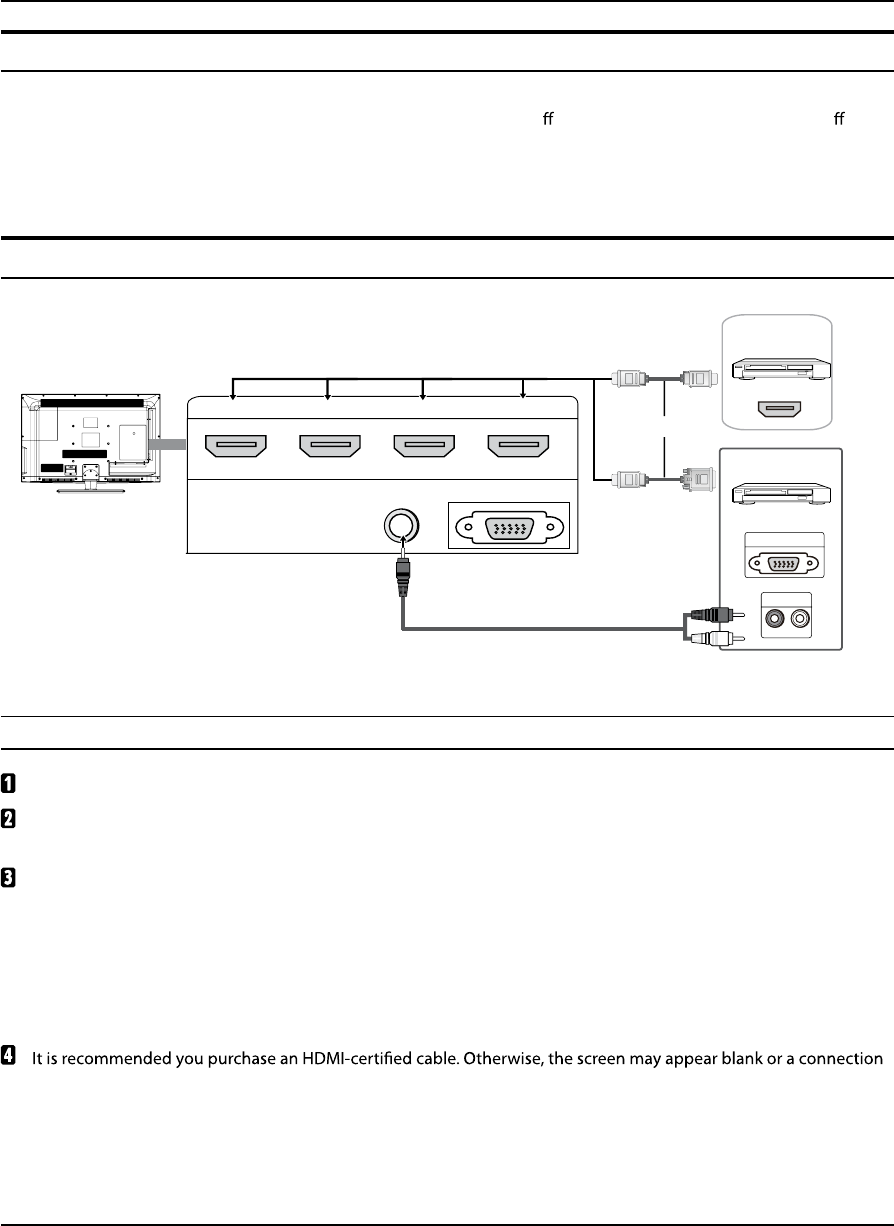
Choose Your Connection
There are several ways to connect your television, depending on the components you want to connect and the quality
of the signal you want to achieve. The following are examples of some di erent ways to connect your TV with di erent
input sources.
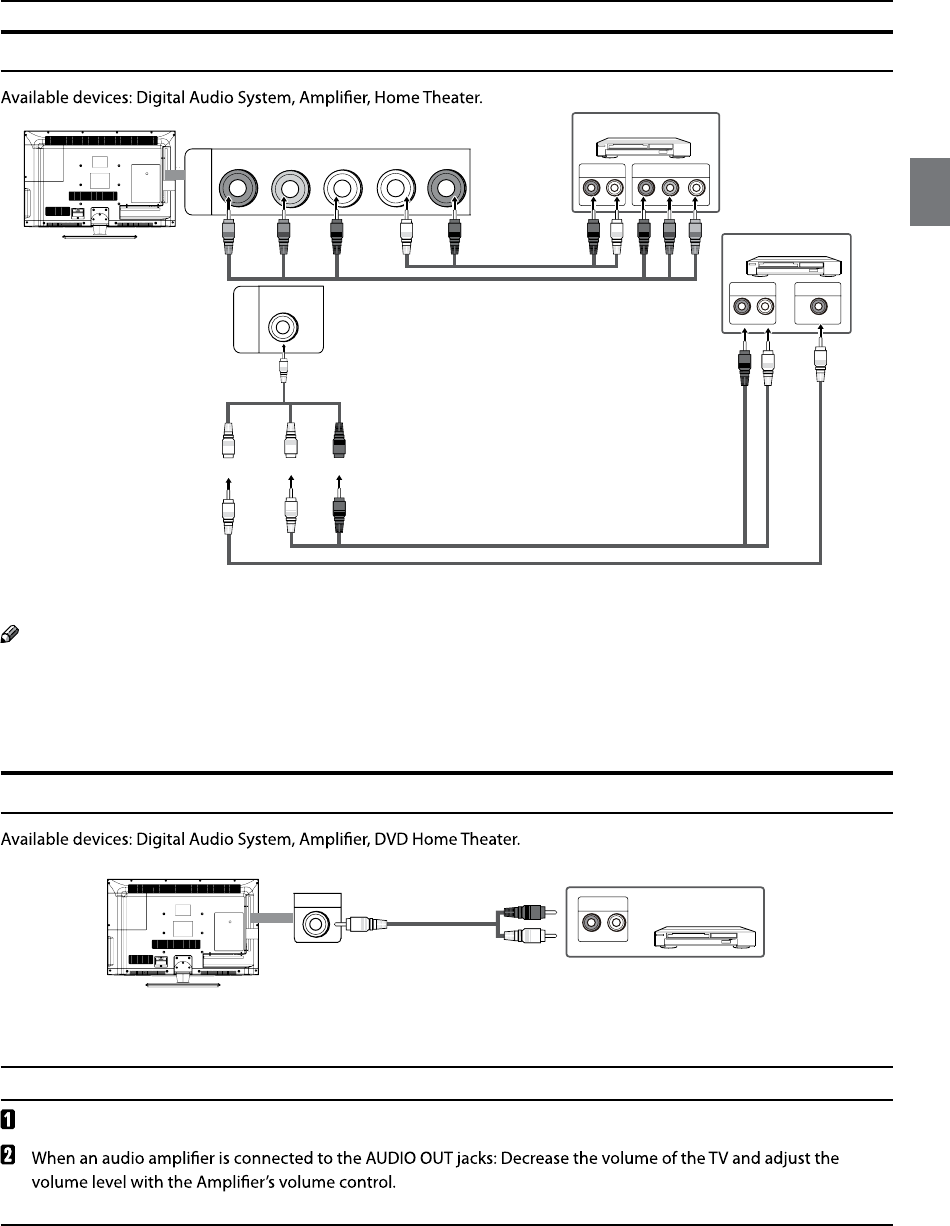
Connecting to an AV Device
Using an HDMI Cable: HD connection(up to 1080p)
Available devices: DVD, Blu-ray player, HD cable box, HD STB(Set-Top-Box) satellite receiver.
Audio left= white
Audio right= red
HDMI IN/DVI AUDIO IN
Device
Device
PC OUT
AUDIO OUT
R-AUDIO-L
WR
or
Audio Cable(Not Supplied)
HDMI Cable(Not Supplied)
HDMIto DVI Cable
(Not Supplied)
PC/DVI AUDIO IN PC IN
HDMI 1 IN HDMI 2 IN HDMI 3 IN HDMI 4 IN
When using an HDMI/DVI cable connection for video, the PC/DVI AUDIO IN jack is required for audio.
Haier TVs support HDMI 1.4 (Audio Return Channel). However, the ARC(Audio Return Channel) function is only
supported on HDMI 1 IN (ARC).
The ARC function enables digital output of sound using the HDMI 1 IN (ARC) port and can only be operated when
the TV is connected to an audio receiver that supports the ARC function.
The ARC Single mode is only enabled when the TV is connected to the device when using a Category2High Speed
HDMI cable.
When the Input source is the TV, the ARC function allows audio to be heard from a receiver. The audio is sent to a
receiver from the TV via an HDMI cable without the need for a separate optical cable.
error may occur.
-30-
Installation
Haier LED HDTV EN-10
Using a Component(up to 1080p) or Audio/Video (480i only)Cable
COMPONENT
or AV IN
Y/VIDEO Pb Pr L -AUDIO- R
COMPONENT OUT
Device
AUDIO OUT
Pr Pb YR-AUDIO-L
RG B R GBW R WR
Device
AUDIO OUT
R-AUDIO-L
VIDEO OUT
WV
R
Audio Cable(Not Supplied)
Component Cable(Not Supplied)
Video= yellow
Audio left= white
Audio right= red
Component video cable:
Y=Green
Pb=Blue
Pr=Red
AV IN
mini
L R
V
L R
V
Note
For better picture quality, the Component connection is recommended over the A/V connection.5
Connecting to an Audio Device
Using an Audio(Analog) Cable Connections
Amplifier/ DVD
Home Theater
AUDIO IN
R-AUDIO-L
WR
Audio Cable(Not Supplied)
Audio left= white
Audio right= red
AUDIO OUT
AUDIO OUT
When connecting, use the appropriate connector (sold separately).
-31-
Installation
EN-11 Haier LED HDTV
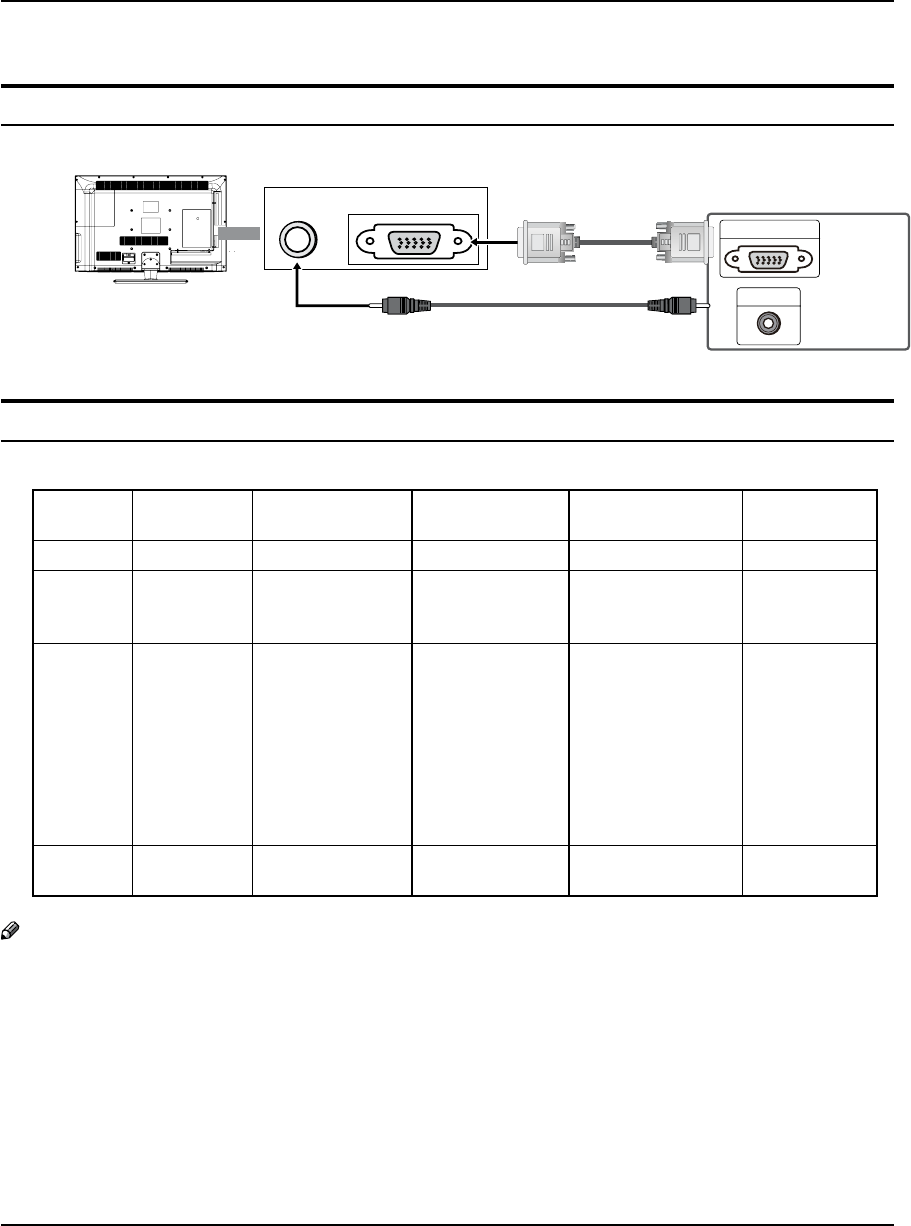
Connecting to a PC
Using an HDMI/DVI Cable or a D-Sub Cable
AUDIO OUT
PC OUT
Audio Cable (Not Supplied)
D-Sub Cable
(Not Supplied)
PC AUDIO IN PC IN
Display Modes(D-Sub and HDMI/DVI Input)
Optimal resolution is 1920x1080@60Hz.
Mode Resolution Horizontal
Frequency (KHz)
Vertical
Frequency (Hz)
Pixel Clock
Frequency (MHz)
Sync
Polarityl(H/V)
IBM 720400 31.469 701.087 28.322 -/+
MAC 640480
832624
1152870
35.000
49.726
68.681
66.667
74.551
75.062
30.240
57.284
100.000
-/-
-/-
-/-
VESA DMT 640480
640480
800600
800600
800600
1024768
1024768
1024768
1280720
37.861
37.500
37.879
48.007
46.875
48.363
56.476
60.023
45.000
72.809
75.000
60.317
72.118
75.000
60.004
70.069
75.029
60.000
31.500
31.500
40.000
50.000
49.500
65.000
75.000
78.750
74.250
-/-
-/-
+/+
+/+
+/+
-/-
-/-
+/+
+/+
VESA DMT-
DTV CEA
19201080p 67.500 60.000 148.500 +/+
Note
The set may operate abnormally if a non-standard video format is selected.5
Separate and Composite modes are supported. SOG(Sync On Green) is not supported.5
-32-
Operation
Haier LED HDTV EN-12
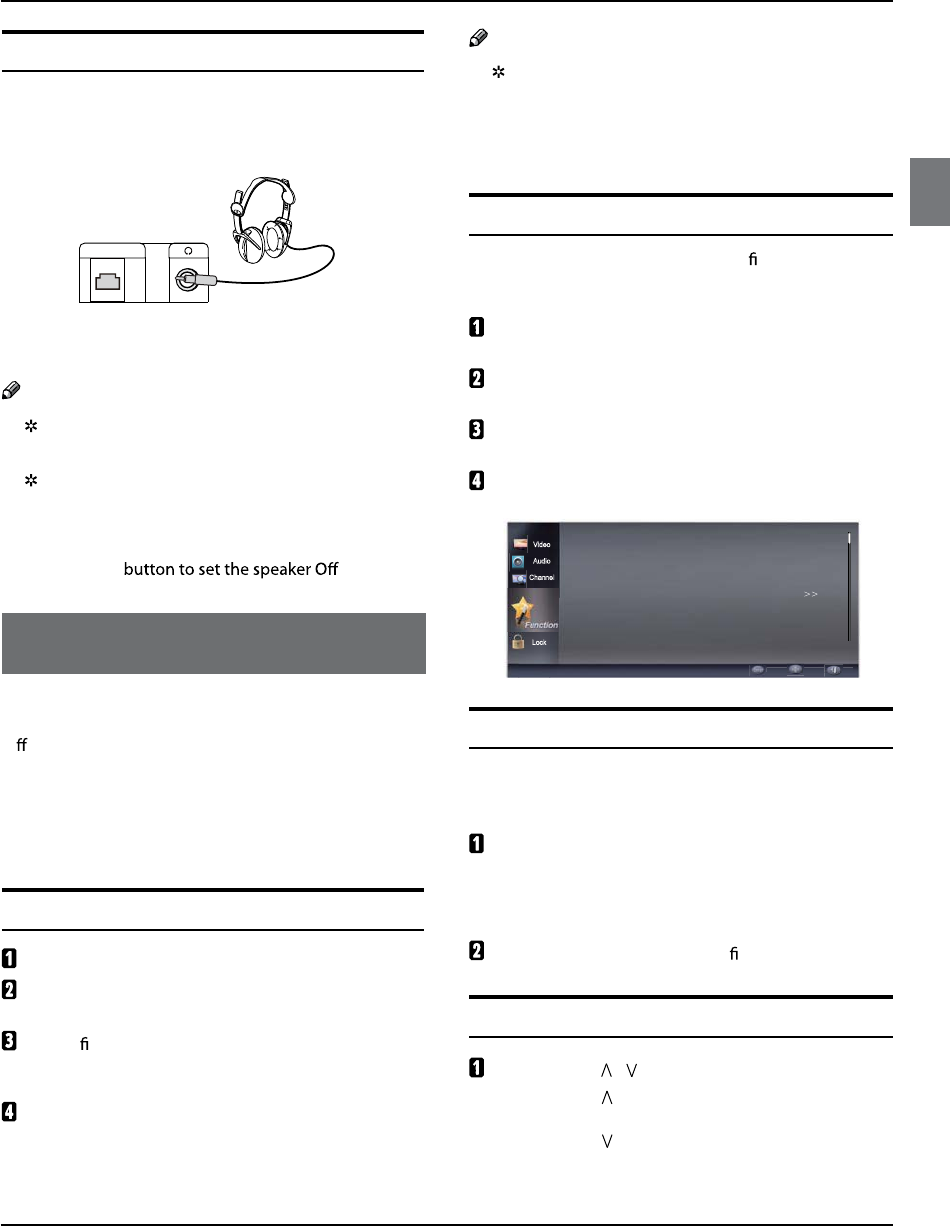
Connecting Headphones
Youcan connect a set of headphones to your set
if you wish to watch a TV programme without
disturbing the other people in the room.
ETHERNET
Back of TV
Plug a set of headphones into the 3.5 mm jack on the
back panel of the set.
Note
Prolonged use of headphones at a high volume
may damage your hearing.
When headphones are connected, the TV's
speakers will still be on. Select the Audio
menu press the
/
ENTER button and press
the
/
button to select Speaker, press
the
/
.
5
Operation
In the manual, the OSD (on screen display) may be
di erent from your TV’s, because it is just an example to
help you with the TV operation.
There are several options you might need to set up in
order for your TV to work properly. Read the instructions
that follow.
Initial Setup: Set accordingto the screen display.
Switching On/Off the TV set
First, connect the power cord correctly.
Select the source you want to view by using the
INPUT button on the remote control.
When nished using the TV, press the POWER button
on the remote control. The TV reverts to standby
mode.
If you will not use the TV for an extended period of
time, it is recommended to disconnect the power
plug from the wall power outlet.
Note
When the TV is powered on, an on screen display
will indicate the active input source for a few
moments then disappear. If there is no signal
present at that input, "No Signal" will be displayed
on the screen.
Choose the MenuLanguage
When you start using your set for the rst time, you must
select the language which will be used for displaying
menus and messages.
Choose the TV input and then press the MENU
button.
Press the
/
button to select the Function
menu.
Press
the
/
ENTER button and then use
the
/
button to select Language.
Press the
/
button to select language.
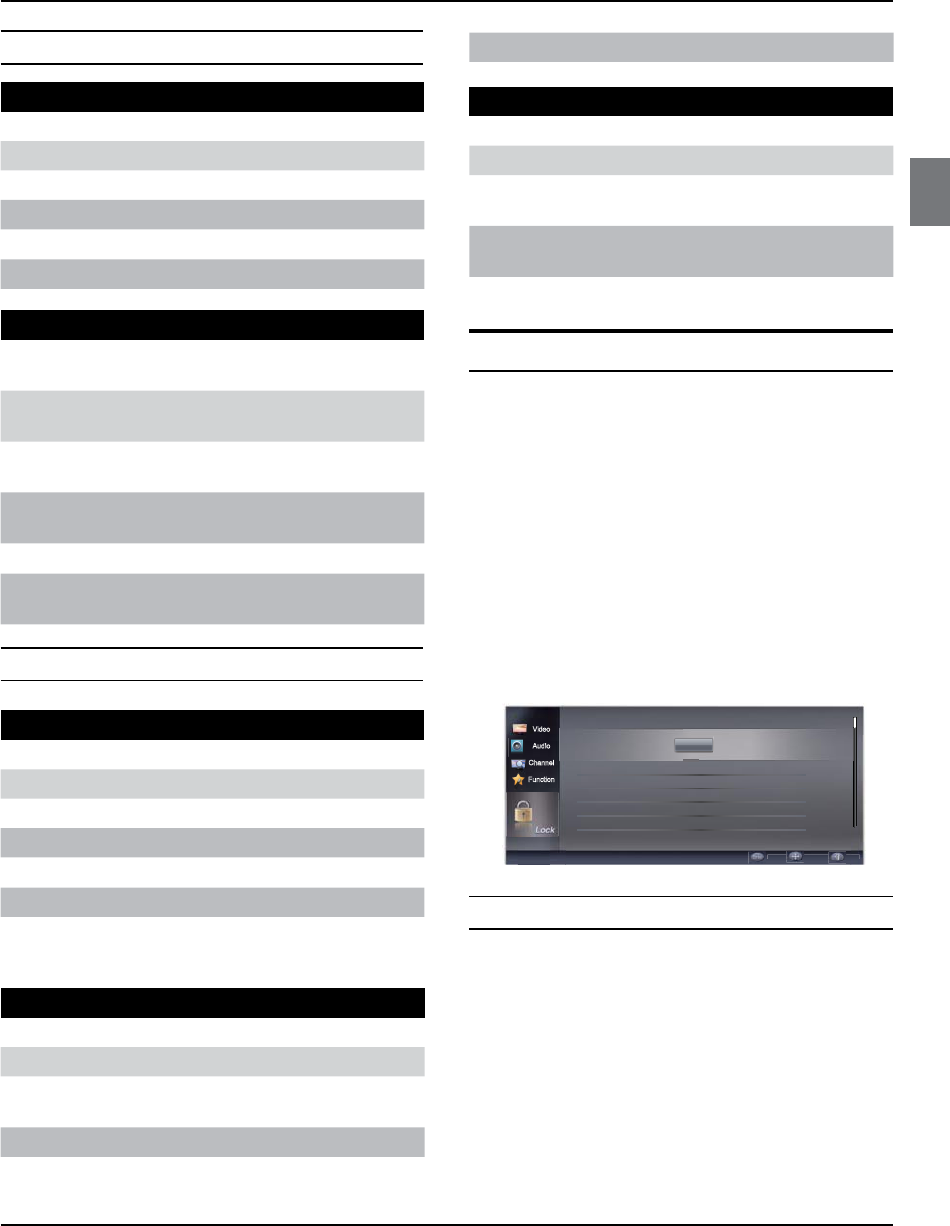
( English, Español or Français)
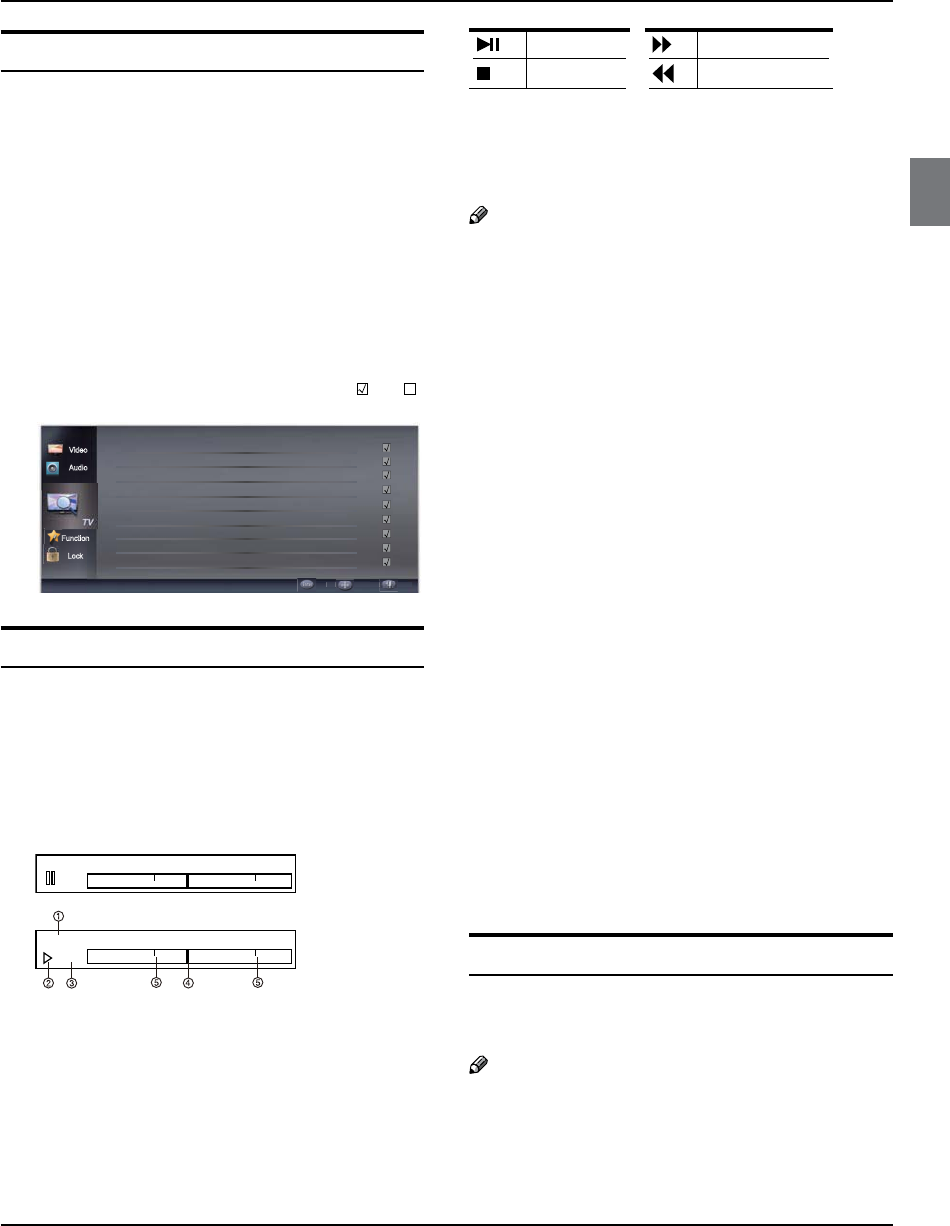
Lock
Language English
Aspect Ratio Normal
OSD Timeout Long
DPMS On
CEC Setup Menu
DCR Off
Enter Move Exit
Video
Audio
Channel
Choose the Input source
Change the picture source so you can watch your TV,
VCR, DVD player, cable box , or other devices that are
connected to your TV.
Press
the
INPUT button to enter the Select Source
menu and then use the
/
button to select the
desired items (TV, Video, Component , PC, HDMI 1,
HDMI 2, HDMI3, HDMI4).
Press the ENTER button to con rm .
Select the desired program
Usingthe CH / buttons.
Press the CH button to change the channel
higher.
Press the CH button to change the channel lower.
-33-
Operation
EN-13 Haier LED HDTV
viewing.
Channel menu
This TV set has two methods to set the channels:
Channel Scan and Channel Skip.
In this section, using the remote control to set the
channels is explained. You can also use the buttons
on the TV to set the channels.
Note
The Channel Menu is only accessible while the 5
input source is set to TV.
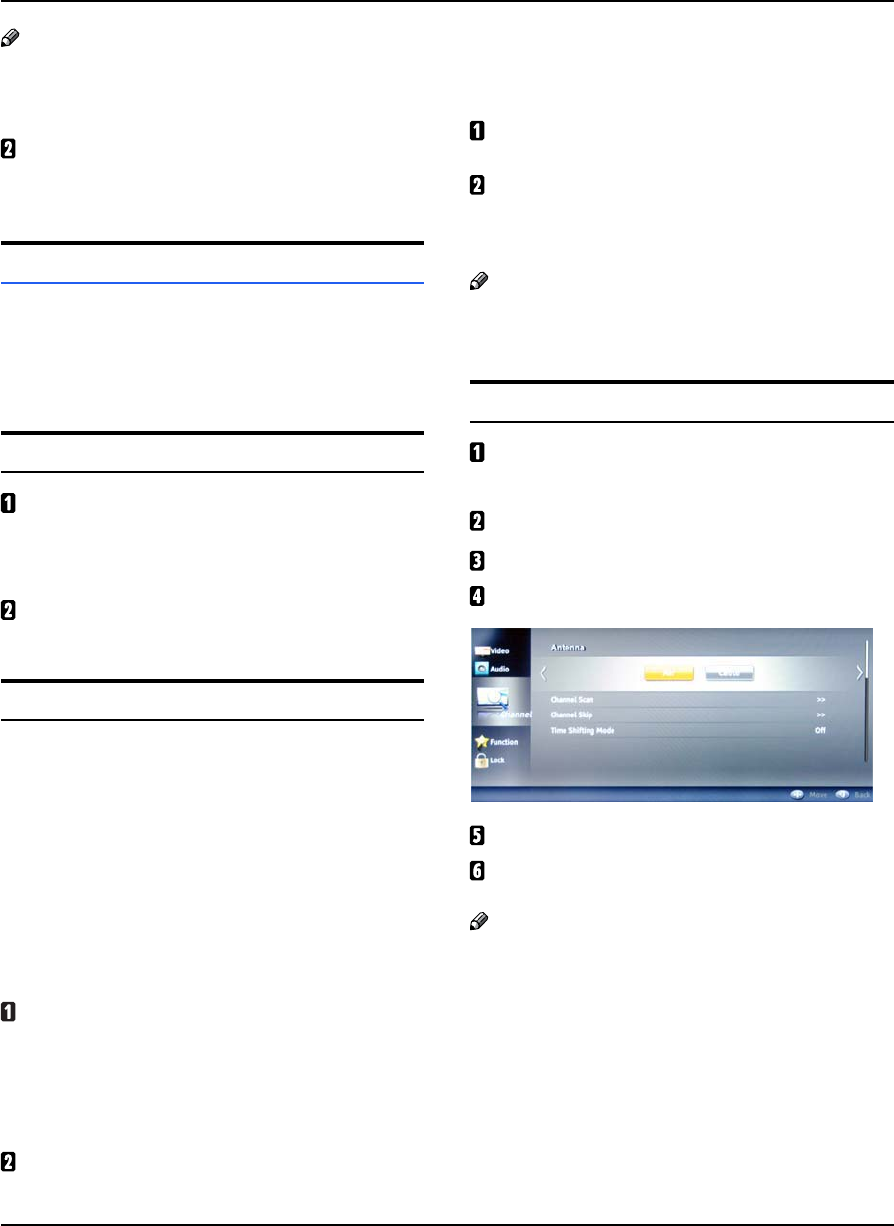
Channel Scan
Press the MENU button and then use the
/
button to select the TV menu.
Press the
/ ENTER button to select Antenna.
Press the
/
button to select Air or Cable mode.
Press the
/
button to select Channel Scan.
Press the
/ ENTER button to start searching.
To cancel searching, press the EXIT button.
Note
When5Air is selected, the TV will detect antenna
signals and will search for antenna TV (NTSC and
ATSC) channels available in your local area.
When5Cable is selected, the TV will detect cable
company supplied signals and will search for cable
TV (NTSC, QAM modulated) channels available in
your Area.
Note
If skip is set to ON for a channel, pressing the 5
CHvv/vv
buttons will not show the skipped
channel(s).
You can also enter a channel number directlyby
entering the channel number using the number pad
on the remote control and then pressingENTER.
Select the desired volume level
Press the VOL-/+ buttons on the remote or the side of
the TV set to adjust the volume level. The range is 0~100.
When the volume buttons are pressed the volume level
is displayed automatically on the TV screen.
Mute
Press the MUTE button on the remote control and
an icon indicating the MUTE function is active will
display on the screen. At this time, the sound of the
TV set is turned o.
If you want to enable the sound, press the MUTE
button again or directly press the VOL+ button.
SAP Broadcasts Setup
This TV can receive MTS stereo programs and SAP
(SecondaryAudio Program) that accompanies the stereo
program, if the station transmits an additional sound
signal as well as the original one.
When the MTS button on the remote control is pressed,
the TV will only receive the signal if the TV station
transmits the proper signals.
Mono sound is automaticallyreceived if the broadcast is
only in Mono, even
if
Stereo or SAP has been selected.
Select Mono if you want to listen to mono sound during
stereo/SAP broadcasting. Stereo or SAP can be received
in an analog channel.
Use the MTS button to select your desired MTS
mode in an analog signal.
Each time you pressx
the MTS
button, Mono, Stereo
or SAP appear. If other languages are available
in the digital signal, select them with the
MTS
button.
Press the EXIT button to save and return to TV
-34-
Operation
Haier LED HDTV EN-14
Channel Skip
A channel that has been set to skip will not be viewable
when using the
/
buttons to browse channels. A
skipped channel can be viewed by using the remote
control keypad to select the channel. Default un-
scanned analog channels are set to skip. Channels with a
check mark icon are skipped channels..
Press
Athe MENU button and then use the
/
button to select the Channel menu.
Press
Bthe
/ ENTER button and then use the
/
button to select Channel Skip.
Press
Cthe
/
button to select a channel, then
press the ENTER button to toggle between and .
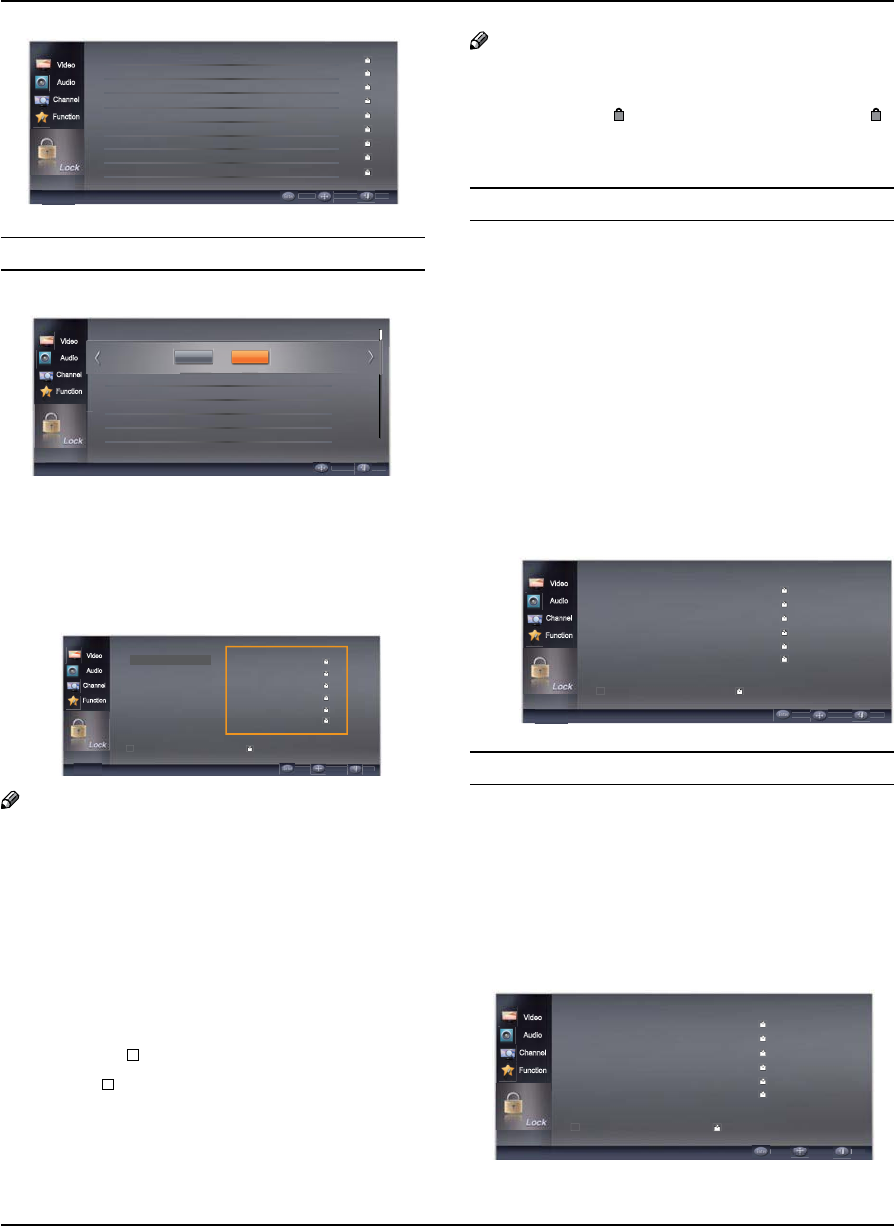
Function
Lock
2 Analog
3 Analog
4 Analog
5 Analog
6 Analog
7 Analog
8 Analog
9 Analog
10 Analog
Set Select Back
Video
Audio
Time Shifting Mode
To turn the Time Shifting Mode on or o.
Set the
ATime Shifting On, then insert a USB drive in
the USB input.
Press BPLAY/PAUSE to play or pause the program. If
you want to stop the time shift function, press the
EXIT button.
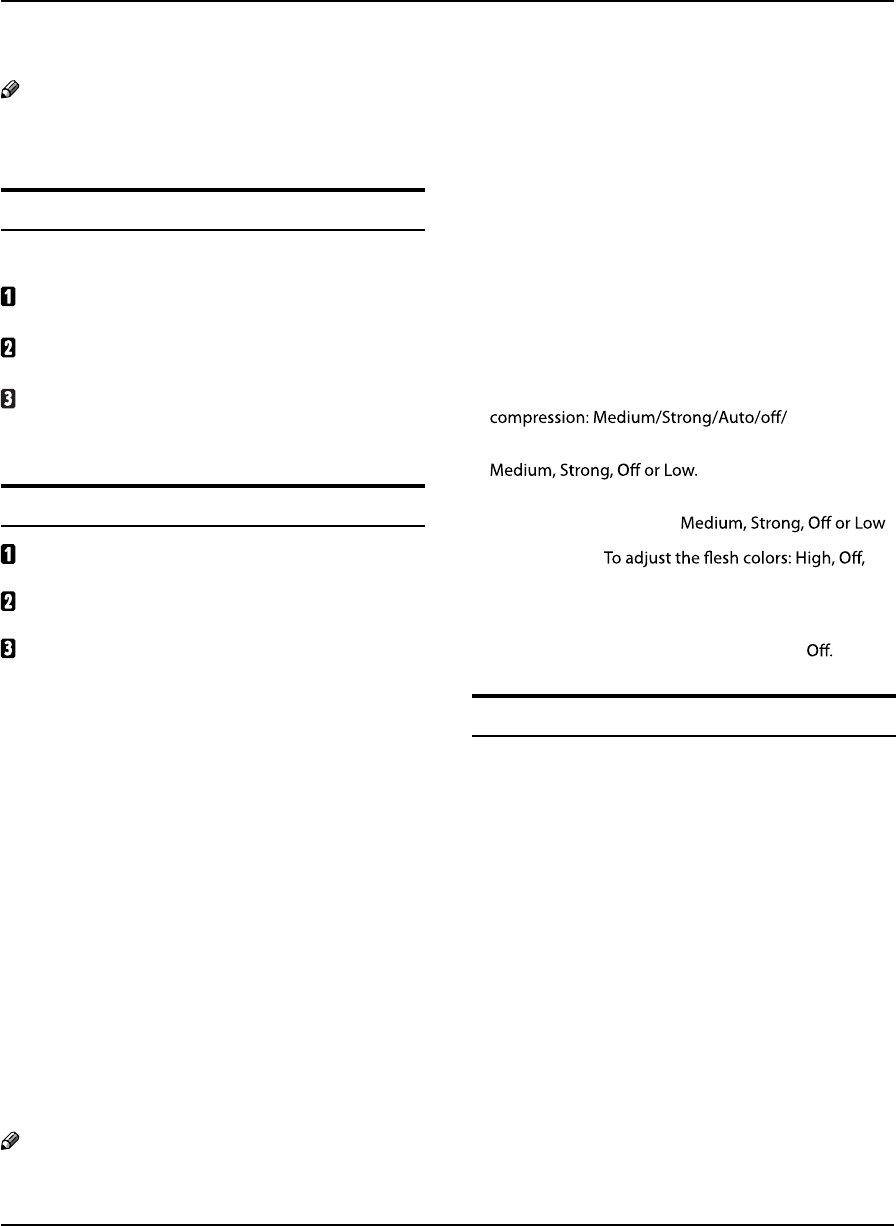
-00:00:01
1x
7:00 7:30
-00:00:01 7:00 7:30
1.Time shift time. The time delay to the current program
time.
2.Current time
3.Channel name
Playback status: It shows the playback status (Play,
Pause, Fast Forward, Rewind).
Play/Pause Fast forward
Stop Fast backward
3.Playback speed: playback speed can be changed -
1x,2x,4x,8x,16x,32x.
4.Playback position: The playback position is always at
the center of the time bar.
5.Time scale:shows the time in half hour increments.
Note
Time Shift function is only available in DTVR
mode.
The maximum recording duration is determined R
by the memory size of the USB drive and the signal
resolution. Please use a high-speed USB 2.0 drive
with a minimum of 1GB capacity.
Time shift Ris only supported on USB drives
formatted to the FAT32 le-system.
Time shift supports more than 4GB recordings by R
using multi-le storage.
When the maximum recording duration is reached, R
the oldest program will be deleted and the latest
program is recorded.
When changing channels or changing input R
source, the time shift will stop automatically.
Time shift will store the video, audio and data R
service. Maximum allowed:
Video streams: Max 1 stream
Audio streams: Max 8 streams
CC stream: Unlimited.
During recording, the data is not guaranteed to be R
stored on the disk. If the timeshift playback plays
a corrupted data block, it will show “Data lost”
message to indicate that the current data is not
stored correctly.
Please connect the TV antenna or Cable TV coaxial R
cable to the Antenna input on the TV. Then,
complete the channel scan. The Time Shift feature
only is available when using your ATSC tuner and
QAM cable tuner.
Audio Language
Press the
/
button to select audio language.
( English, Español or Français)
Note
This function is only available in digital channel mode.
-35-
Operation
EN-15 Haier LED HDTV
Video menu
Note
Depending on the input signal, one or more menu 5
items may not be selectable.
How to select picture mode
The picture mode provides the pre-dened video
settings: User,
Mild, Standard, Vivid and Movie.
Press the MENU button and then use the
/
button to select the Video menu.
Press the
/ENTER button and then use the
/
button to select PictureMode.
Press the
/
button to select the option User,
Mild, Standard, Vivid and Movie.
How to customize video settings
Press the MENU button and then use the
/
button to select Video menu.
Press the
/ENTER button and then use the
/
button to select the desired items.
Press the
/ENTER button and then use the
/
button to adjust the setting.
Picture Mode
Select the picture mode (User/
Mild/Standard/Vivid/
Movie
).
Brightness
This will adjust the light output of the complete
picture, which will mainly aect the darker areas of
the picture.
Contrast
This will adjust the intensity of bright parts in the
picture but keep the dark parts unchanged.
Color
This will adjust the saturation level of the colors to suit
your personal preference.
Tint
Allows you to select the color mix (Tint) of the picture.
Sharpness
This will adjust the sharpness of ne details in the
picture.
Note
Video adjustments are only available in the User5
mode.
If adjustments are attempted in any of the other 5
Picture modes the system will automatically switch
to the User mode.
Only when the picture mode is set to User can the 5
Brightness, Contrast, Color, Tint, Sharpness and
Color Temperature be adjusted. All other Picture
Modes are preset.
Color temperature
This will increase or decrease Warm (red) and Cool
(blue) colors to suit personal preferences.
Select Cool to give the white colors a blue tint, Normal
to give the white colors a neutral tint, Warm to give
the white colors a red tint.
Advanced Video
To adjust the picture in advanced: DNR, MPEG NR,
Adaptive Luma Control, Flesh Tone, DI Film Mode, Blue
Stretch , Game Mode, HDMI Mode and Overscan.
DNR:xDigital Noise Reduction, adjust to reduce
the appearance of digitizing errror caused by
Low.
MPEG NR:xTo adjust the MPEG Noise Reduction:
AdaptiveLuma Control:xTo adjust changes in the
luminance of the picture: .
Flesh Tone:x
Low or Medium.
DI flim mode: xTo set DI im mode: Auto or o.
Blue Stretch:xTo set Blue Stretch: On or
PC Set
When you select the PC input, this function is used.
Adjustment for screen Position, Clock, Phase, Setting
Display adjustment menu by pressing the INPUT button
then use the
/
button to select the source of PC
item.
Auto Adjust: Automatically adjust the display of the
picture (Onlyavailable in PC source).
H. Position: Press the
/
button and then press
the
/
button to adjust the horizontal position of
the picture.
V. Position: Press the
/
button and then press
the
/
button to adjust the vertical position of the
picture.
Phase: Adjust the phase of the pixel clock.
Clock: Adjust the clock of the input signal.
-36-
Operation
Haier LED HDTV EN-16
Press the MENU button and then use the
/
button to select the Video menu.
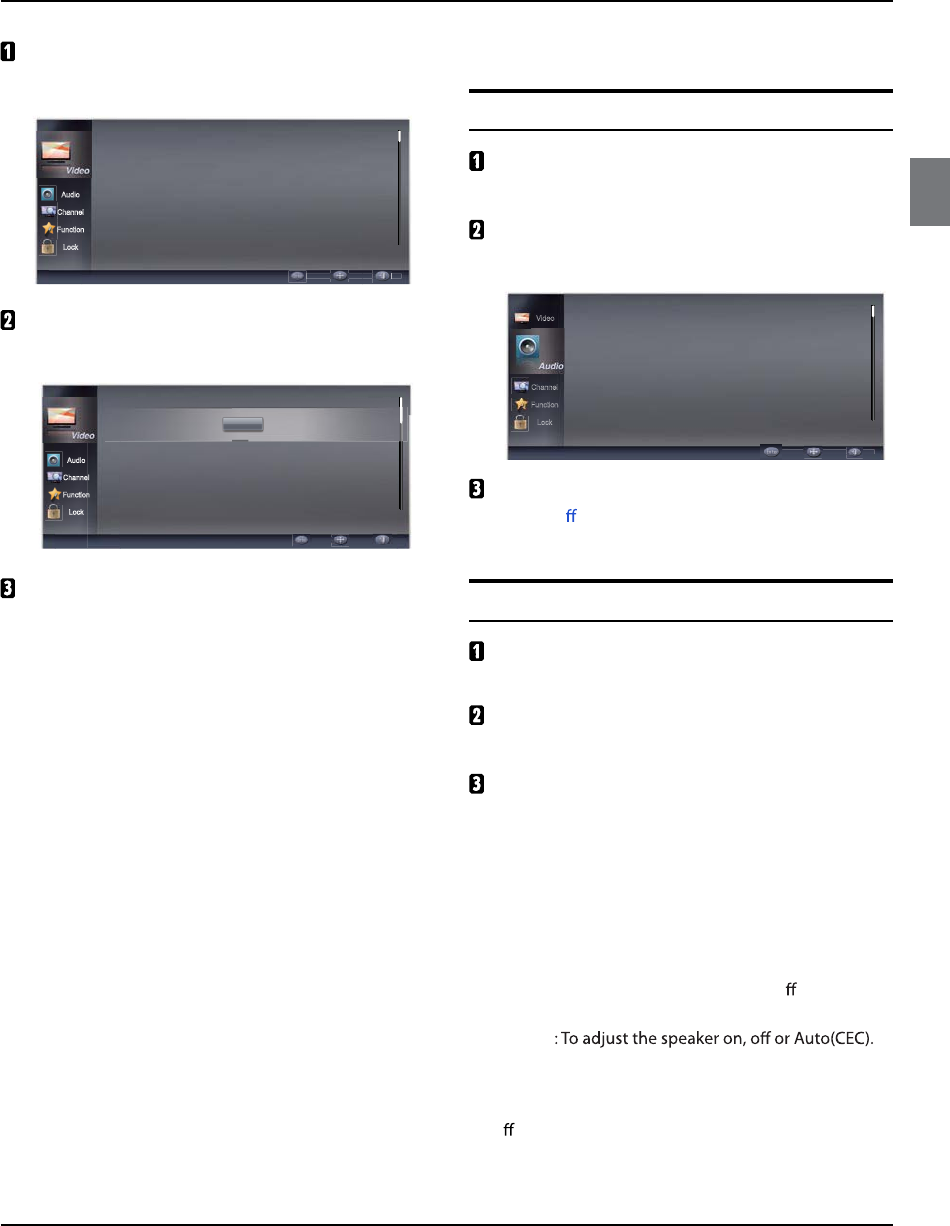
Audio
Channel
Function
Lock
Picture Mode User
Brightness 50
Contrast 50
Color 50
Tint 0
Sharpness 10
Enter Move Exit
Press the
/ENTER button and then use the
/
button to select PC.
Audio
Channel
Function
Lock
H.Position 64
V.Position 50
Phase 5
Clock 12 0
Enter Move Back
Auto Adjust
Enter
Press the
/ENTER button and then use the
/
button to adjust the setting.
Audio menu
How to select audio mode
Press the MENU button and then use the
/
button to select the Audio menu.
Press the
/ENTER button and then use the
/
button to select Sound Mode.
Channel
Function
Lock
Balance 1
Bass 50
Treble 50
Sound Mode On
Speaker On
Enter Move Exit
Video
Press the
/ENTER button to select the audio
mode (O , Rock, Pop, Live, Dance, Techno, Classic
and Soft).
How to customize audio settings
Press the MENU button and then use
the
/
button to select the Audio menu.
Press the
/ENTER button and then use the
/
button to select desired items.
Press the
/ENTER button and then use the
/
button to adjust the setting.
Balance: Adjust to emphasize left or right speaker
balance.
Bass: Adjust to increase or decrease lower-pitched
sounds.
Treble: Adjust to increase or decrease higher-pitched
sounds.
Sound Mode: To adjust the equalizer: O , Rock, Pop,
Live, Dance, Techno, Classic and Soft.
Speaker
AVL(AutoVolumeLeveler): This will reduce the
SPDIF Type: To adjust the SPDIF type o, Dolby digital
or PCM.
di erences in volume level duringcommercials or
when changing the channel.
-37-
Operation
EN-17 Haier LED HDTV
Function menu
Menu Language
When you start using your set for the first time, you must
select the language which will be used for displaying
menus and messages.
Press the
AMENUbutton and then use the
/
button to select the Function menu.
Press
Bthe
/ENTER button and then use the
/
button to select Language.
Press
Cthe
/
button to select a language.
(English, Español or Français )
Lock
Language English
Aspect Ratio Normal
OSD Timeout Long
DPMS On
CEC Setup Menu ˚˚
DCR Off
Enter Move Exit
Video
Audio
Channel
Aspect Ratio
Occasionally, you may want to change the size of the
image on your screen. Your TV comes with several screen
size options, each designed to work best with specic
types of video input. Your cable box/satellite receiver
may have its own set of screen sizes as well. In general,
though, you should view the TV in Normal mode as
much as possible.
Note
If a xed image is displayed on the screen for a R
long time, the image may become permanently
burned on the screen and remain visible.
Press the
AMENU button and then use the
/
button to select the Function menu.
Press
Bthe
/ENTER button and then use the
/
button to select Aspect Ratio.
Press
Cthe
/
button to select 16:9,Normal,
Cinema, Zoom.
OSD Timeout
Press the
AMENU button and then use the
/
button to select the Function menu.
Press
Bthe
/ENTER button and then use the
/
button to select OSD Timeout.
Press
Cthe
/
button to select Short,Middle
or Long. (Short is for 5 seconds; Middle is for 10
seconds; Long is for 15 seconds)
DPMS
Press the
/ENTER button to selet On or O.
I
An PC mode, the TV will go into standby mode
automatically if there is no PC input signal present
for 1 minute. The set will turn on and automatically
go into PC mode when the PC input is connected.
With all other sources, the set will go into standby
B
mode automatically if there is no signal present for
5 minutes.
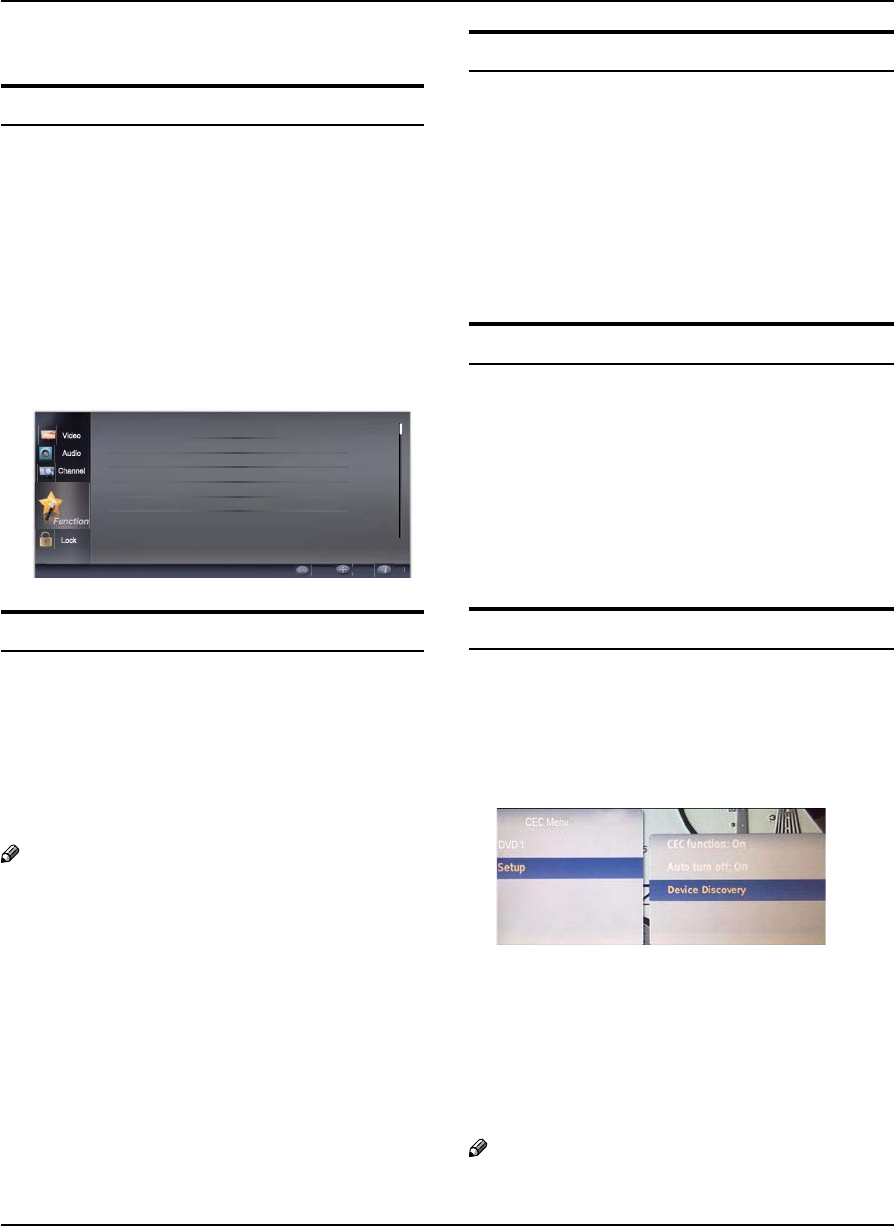
CEC Setup Menu
Consumer electronic control (CEC) allows you to control
other devices using your remote control when those
devices are connected via HDMI.
Press the
ATOOLS button and then use the
/
button to select CEC Setup Menu.
Press the
B
/
button to set.
CEC function: Turn CEC On of O. When set to O, your
TVwill not send or receive any CEC commands.
Device Discovery: Register devices with your TV. Before
CEC will work, perform a device discovery to see if there
are any CEC supported devices connected to your TV.
Note
Only devices that support CEC will be compatible R
-38-
Operation
Haier LED HDTV EN-18
with this function.
DCR
Dynamic Contrast Ratio. Press the
/
button to select
Note
Dynamic Contrast delivers deeper blacks in 5
predominantly dark scenes and brighter whites in
bright scenes.
Blue Screen
This will select the background color.
Press the MENU button and then use
the
/
button to select the Function menu.
Press the
/ENTER button and then use the
/
button to select Blue Screen.
Press the
/
button to select On or Off.
Note
When Blue Screen is set to On, the TV will display a 5
blue screen when there is no signal present. When
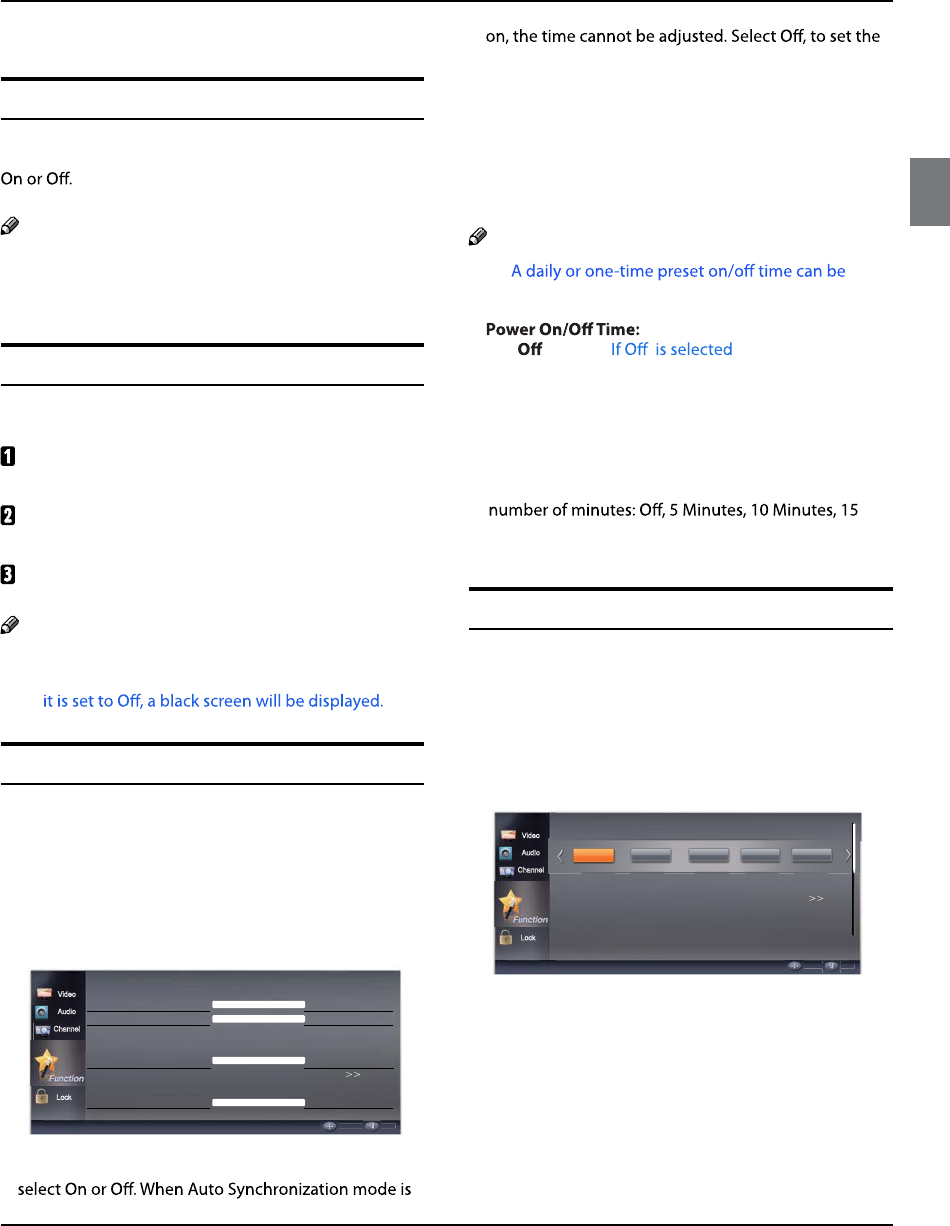
TimeSetup
This function allows you to select your local time zone.
Broadcasted time information will correct the clock
displayfor your local time.
TimeZone: Press the
/
button to select the
appropriate time zone.
Time: Press the
/ENTER button to enter the
submenu.
Lock
Move Back
Video
Audio
Channel
Auto Synchronization On
Date 2000/01/01
Time 09:01:00
Power On Time Off
Timer 01:01:00AM
Power On Channel
Power Off Timer On
Timer 09:01:00PM
Auto Synchronization: Press the
/
button to
time manually.
Date: Press the
/
button to select the position and
use the number buttons to set the date.
Time: Press the
/
button to select the position
and use the number buttons to set the time. Press the
ENTER button to switch AM and PM.
Note
5
programmed.
Press the
/
button to select
On, or once. , the time cannot be
adjusted.
Timer: Press the
/
button to select the position
and use the number buttons to set the time. Press the
ENTER button to switch AM and PM.
Sleep Timer: Press the
/
button to select the
Minutes, 30 Minutes, 60 Minutes, 90 Minutes, 120
Minutes, 180 Minutes or 240 Minutes.
Closed Caption
This allows you to modify how digital captions are
displayed on your TV. Select from the following options
to change the visual characteristics of your TV’s digital
captioning. Customize the DTV/CADTV captions that
appear on your screen.
Press the
/ENTER button to enter the submenu.
Lock
Move Back
Video
Audio
Channel
Analog Closed Caption
Digital Closed Caption Off
Digital Closed Style
Off CC1 CC2 CC3 CC4
Analog Caption: Press the
/
button to select the
Closed Caption options. It helps the hearing impaired
with the broadcast program, as well as helping
children learn how to read. A built in decoder displays
the audio portion of a program as text on the screen
when this option is selected.
CC1: When CC1is displayed on the TV, it means
CC mode is turned on.
-39-
Operation
EN-19 Haier LED HDTV
CC2 to CC4: For other modes of video related
broadcast information.
Text1: For program guide and other information
displayed by broadcasters. (This blocks a large
portion of the picture on your screen).
Text2 to Text4: For other modes of information
displayed by broadcasters. (This blocks a large
portion of the picture on your screen).
IMPORTANT: Closed captioning availability
entirely depends on broadcasters supplying the
signal. Therefore, closed captioning might not
always be available and language availability
Select CC1 for full translation of the primary
language such as English in your area. Select
CC2 for secondary language translation such
as French or any other language that may be
broadcast in your area.
Digital Closed Caption: Press the
/
button
Service5/Service6.
There are 6 standard services. Select one of the
digital service channels made available by the
caption provider. Service 1 is designated as the
PrimaryCaption Service. This service contains
the verbatim, or near-verbatim captions for
the primary language being spoken in the
accompanying program audio. Service 2 is
designated as the Secondary Language Service.
This service contains captions in a secondary
language which are translations of the captions
in the primaryCaption Service. The other service
subchannels are not pre-assigned. It is up to the
discretion of the individual caption provider to
utilize the remaining service channels.
ABC
Lock
Move Back
Video
Audio
TV
Analog Caption Off
Digital Closed Style
Off Service1 Service2 Service3 Service4
Digital Closed Caption
Digital Caption Style: Press the
/ENTER button
to enter the submenu.
Caption Style: Select Default or Custom mode.
Font Size: To adjust the font size: Large, Small or
Medium.
Font Style: To adjust the font style: Style1, Style2,
Style3, Style4, Style5, Style6 or Style7.
Font Color: To adjust the font color: White, Green,
Blue, Red, Cyan, Yellow, Magenta or Black.
Font Opacity: To adjust the font opacity: Solid,
Translucent or Transparent.
Background Color: To adjust the background color:
Black, White, Green, Blue, Red, Cyan, Yellow or
Magenta.
Background Opacity: To adjust the background
opacity: Solid, Translucent or Transparent.
Window Color:To adjust the window color: Black,
White, Green, Blue, Red, Cyan, Yellow or Magenta.
Window Opacity: To adjust the window opacity:
Translucent, Transparent or Solid.
Network Setup
Your TV's wireless Internet network connection can
be established automatically or manually. Follow the
instructions below to establish a network connection.
Connecting to a Network
You can set up your TV to access the Internet through
your local area network (LAN) using a wired or wireless
connection.
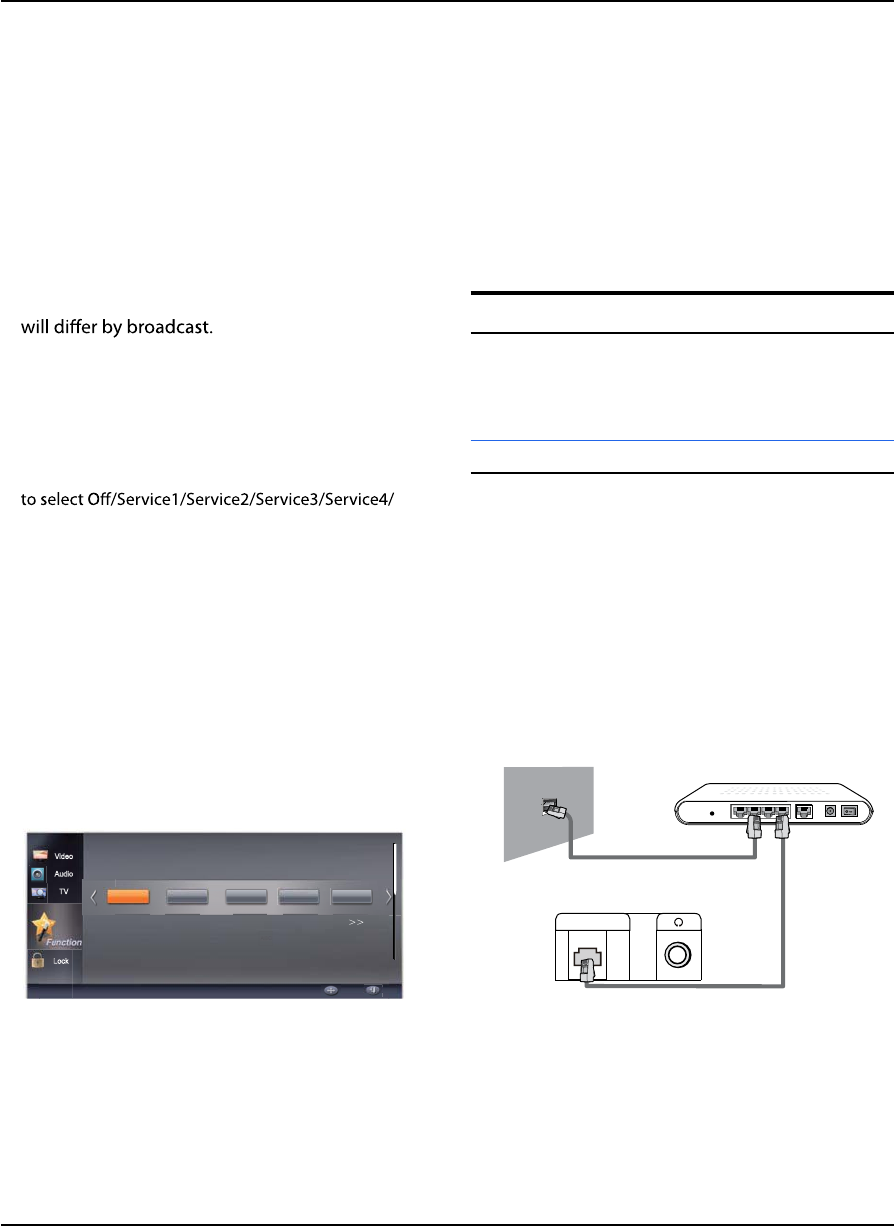
Connecting to a Wired Network
You can attach your TV to your LAN using a cable (cable
not included) in three ways:
You can attach your TV to your LAN byconnectingx
the LAN port on the back of your TV to an external
modem using a Cat 5 cable. See the diagram below:
ETHERNET
The Modem Port on the Wall External Modem
(ADSL / VDSL / Cable TV)
LAN Cable
(not supplied)
Modem Cable(not supplied)
Back of TV
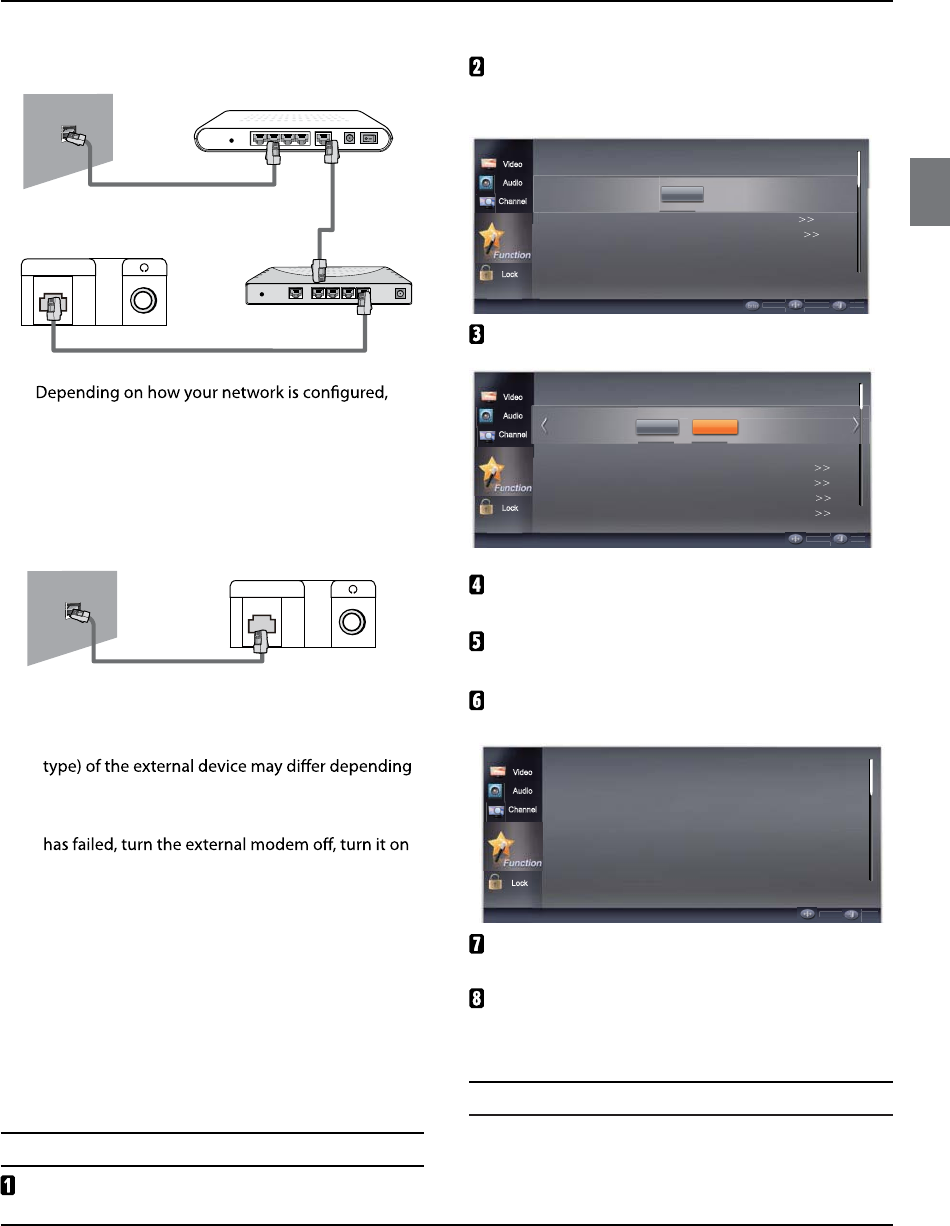
You can attach your TV to your LAN byconnectingx
the LAN port on the back of your TV to a router
-40-
Operation
Haier LED HDTV EN-20
which is connected to an external modem. Use a Cat
5 cable for the connection. See the diagram below:
LAN
The Modem Port on the Wall External Modem
(ADSL / VDSL / Cable)
LAN Cable
(not supplied)
LAN Cable(not supplied)
Modem Cable(not supplied)
Back of TV Router
x
you may be able to attach your TV to your LAN by
connecting the LAN port on the back of your TV
directlyto a network wall outlet using a Cat 5 cable.
See the diagram below. Note that the wall outlet is
attached to a modem or router elsewhere in your
house.
ETHERNET
The Modem Port on the Wall
LAN Cable(not supplied)
Back of TV
Note
T5he terminals (the position of the port and the
on the manufacturer.
If the IP address allocation by the DHCP server5
again after at least 10 seconds and then try again.
For the connections between the external modem 5
and the router, refer to the owner’s manual of the
corresponding product.
You can connect the TV to the LAN directly without 5
connecting it through a router.
You cannot use a manual-connection-type ADSL 5
modem because it does not support DHCP. You
have to use an automatic connection-type ADSL
modem.
How to set up automatically
Press the MENU button and then use the
/
button to select the Function menu.
Press the
/ENTER button and then use the
/
button to select Network. Press the
/
ENTER button, and the network screen appears.
Lock
Network Upgrade
Applications
Enter Move Back
Video
Audio
Channel
Configuration
Enter
Press the
/ENTER button, the menu appears.
Lock
Interface Wireless
Wireless Setting
Information
IP Setting
Connection Test
Move Back
Video
Audio
Channel
Internet Connection
Off On
Press the
/
button to set the interface to
Ethernet.
Press the
/
button to select IP Setting and
press the
/ENTER button to enter the menu.
Press the
/
button to select address type
AUTO.
Lock
Address Type AUTO
IP Address
Subnet Mask
Default Gateway
Primary DNS
Secondary DNS
Move Back
Video
Audio
Channel
AUTO acquires and enters the needed Internet
values automatically.
Wait two minutes, and then press the BACK button
on the remote. Select Connection Test to check the
Internet connectivity.
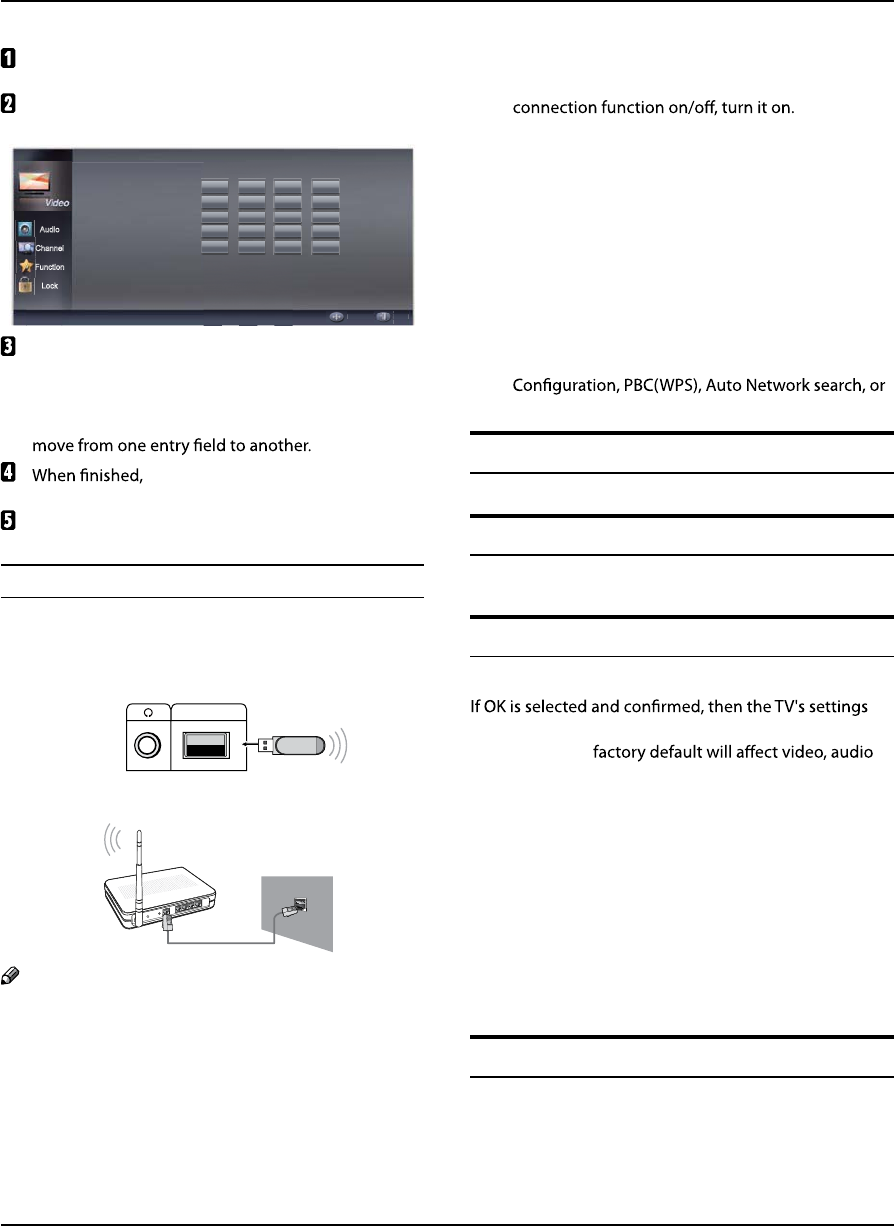
How to set up Manually
For use when connectingyour TV to a network that
requires a static IP address.
Follow the steps below to set up your TV's network
-41-
Operation
EN-21 Haier LED HDTV
connection manually.
Follow Steps 1 through 5 in the "How to set up
automatically" procedure.
Press the
/
button to select address type
Manual.
Audio
Channel
Function
Lock
Address Type Manual
IP Address
Subnet Mask
Default Gateway
Primary DNS
Secondary DNS
Move Back
Enter the IP Address,Subnet Mask, Default
Gateway, Primary DNS and Secondary DNSentry
values. Use the number buttons on your remote to
enter numbers and the
/
/
/
buttons to
press the BACK button on the
remote.
Select Connection Test to check the Internet
connectivity.
Connecting to a Wireless Network
To connect your TV to your wireless network, you need
a wireless router or modem and a wireless LAN Adaptor
(included), which you connect to the USB input.
The LAN Port on the Wall
Wireless
Router
Wireless LAN Adapter
(WiFi Dongle)
LAN Cable
Back of TV
USB
Note
You must use the included Wireless LAN Adaptor5
(included) to connect to a wireless network.
To use a wireless network, your TV must be 5
connected to a wireless router. If the wireless
router supports DHCP, your TV can use a DHCP
or static IP address to connect to the wireless
network.
The Included Wireless LAN adapter supports IEEE 5
802.11A, IEEE 802.11B, IEEE 802.11G, IEEE 802.11N.
When you play DLNA video over IEEE 802.11B/G
connection, the video may not play smoothly.
If the wireless5router allows you to turn the Ping
Select a channel for the wireless5router that is not
currently being used. If the channel set for the
wireless router is currently being used by another
device nearby, this will result in interference and
communications may fail.
When connecting the Wireless LAN Adapter to the 5
TV in 802.11N mode, WEP/TKIP/TKIP-AES is not
supported
C5onnection methods: you can set up the wireless
network connection four ways. Haier Auto
manually.
Reset Default
Yahoo! Connected TV version info
Press the
/ENTER button to enter the submenu.
Press ENTER button to display the Yahoo version.
Yahoo! Connected TV Reset Default
Press ENTER button, and select YES item to return the
Yahoo settings to the initial state.
will be changed to the factory default setting.
Resettingto the
and function settings only. All Channel programming
information remains as it was.
Lock Menu
Parental Control can be used to block specic channels
and content by using a rating system.
The parental control function is used to block program
viewing based on the ratings sent by the broadcasting
station. The default setting is to allow all programs to be
viewed. Viewing can be blocked by choosing the type of
the program and the categories.
Parental Control rating and categories
Rating guidelines are provided by broadcasting stations.
Most television programs and television movies can be
blocked byTV Rating or Individual Categories. Movies
that have been shown at the theaters or direct-to-video
movies use the Movie RatingSystem (MPAA) only.
-42-
Operation
Haier LED HDTV EN-22
Ratings for Television programs:
Parental Guide:
TV-Y (All children)
TV-Y7 (Children 7 years older)
TV-G (General audience)
TV-PG (Parental guidance suggested)
TV-14(Parents strongly cautioned)
TV-MA (Mature audience only)
TV Rating:
A (Age) (applies to TV-Y, TV-Y7, TV-G, TV-PG,
TV-14, TV-MA)
D (Dialogue -
sexual dialogue) (applies to TV-PG, TV-14)
L (Language -
adult language) (applies to TV-PG, TV-14, TV-MA)
S (Sex - sexual
situations) (applies to TV-PG, TV-14, TV-MA)
V (Violence) (applies to TV-PG, TV-14, TV-MA)
FV (Fantasy
Violence) (applies to TV-Y7)
Ratings for Movies previously shown in theaters:
MPAA Rating:
G (General audience)
PG (Parental guidance suggested)
PG-13(Parents strongly cautioned)
R (Restricted)
NC-17 (No one 17 and under admitted)
X(Adult only)
If you set PG-13 : G and PG movies will be available,
PG-13, R, NC-17 and X will be blocked.
CA Eng Rating:
C Children
C8+Children eight years and older
GGeneral Programming, suitable for all
audiences
PG Parental Guidance
14+Viewers 14 years and older
18+Adult Programming
CA Fren Rating:
G General
8 ans+Not recommended for young children
13 ans+Programming may not be suitable for
children under the age of 13
16 ans+Programming is not suitable for
children under the age of 16
18 ans+Programming restricted to adults
Lock setup
Set up blocking schemes to block specific channels,
ratings, and external viewing sources.
A password is required to gain access to this menu.
Press
Athe MENU button and then use the
/
button to select the Lock menu. Then, press
the
/ENTER button.
The TV is set up with the initial password “0-0-0-0” q
and security default password is 9-4-4-3.
Use
Bthe
/
button to select the desired items,
and press the
/ENTER button to enter the next
menu. Once the option is selected, change the
settings to your preference.
Input Block ˚˚
Channel Block ˚˚
Program Block ˚˚
Change Password ˚˚
Clean All ˚˚
Enter Move Back
Video
Audio
Channel
Function
Enter
Password
Channel Block
Press
Athe MENU button and then use the
/
button to select Lock menu.
Press
Bthe
/ENTER button and then use the
/
button to select Channel Block.
Press
Cthe
/
button to select the item, press the
ENTER button to set.
-43-
Operation
EN-23 Haier LED HDTV
Set Move Back
Video
Audio
Channel
Function
2 Analog
3 Analog
4 Analog
5 Analog
6 Analog
7 Analog
8 Analog
9 Analog
10 Analog
Program Block
Press the
/ENTER button to enter the submenu.
Parental Guide ˚˚
MPAA Rating ˚˚
CA Eng Rating ˚˚
CA Fren Rating ˚˚
Block Unrated Off
Move Back
Video
Audio
Channel
Function
Parental Lock
Off On
Parental Lock: Press the
/
button to select On or
O.
Parental Guide: Press the
/ENTER button to enter
the submenu. To clearly understand the TV program
rating codes, read the following information:
Set Move Back
Video
Audio
Channel
Function
AllowedRating BlockedRating
A TV-Y
D TV-Y7
L TV-G
S TV-PG
V TV-14
FV TV-MA
Note
The Parental control will automatically block certain R
categories that are “more restrictive” . For example, if
you block “TV-Y” category, then all the categories in
the “young adult” group will be blocked (TV-Y, TV-Y7,
TV-G, TV-PG, TV-14 and TV-MA).
The sub-ratings (A, D, L, S, V, FV) work together R
similarly.
How to set the A, D, L, S, V and FV sub-ratings
First, press q
/
button select one of these
Ratings: TV-Y, TV-Y7, TV-G, TV-PG, TV-14, or TV-MA.
A symbol “ q ” will be displayed for each sub-rating.
While “ q ” is selected, press ENTER button to go
to a sub rating. To select a different Rating, press
/
buttons and then repeat the process.
Note
The V-chip will automatically block certain R
categories that are “More restrictive” . For example,
if you block “ ” sub-rating in TV-PG, then the “ ”
sub-ratings in TV-14 and TV-MA will automatically
be blocked.
MPAA Rating
Blocks movies according to the movie ratings limits q
specified, so children cannot view certain movies.
You can set the ratings limit by blocking out all the
movies with the ratings above a specified level. Keep
in mind that the movie ratings limit only applies to
movies shown on TV, not TV programs, such as soap
operas.
Press
Athe
/
button to select the MPAA Rating
item.
Press
Bthe
/ENTER button and then use
the
/
button to select the rating.
Press
Cthe ENTER button to set block or unblock.
Set Move Back
Video
Audio
Channel
Function
AllowedRating BlockedRating
G
PG
PG-13
R
NG-17
X
CA Eng Rating
Canadian English Language Rating
Press
Athe
/
button to select the CA Eng
Rating item.
Press
Bthe
/ENTER button and then use
the
/
button to select the rating.
Press
Cthe ENTER button to confirm.
Set Move Back
Video
Audio
Channel
Function
AllowedRating BlockedRating
C
C8+
G
PG
14+
18+
-44-
Operation
Haier LED HDTV EN-24
CA Fren Rating
Canadian French Language Rating
Press
Athe
/
button to select the CA Fren
Rating item.
Press
Bthe
/ENTER button and then use the
/
button to select the rating.
Press
Cthe ENTER button to confirm.
Set Move Back
Video
Audio
Channel
Function
AllowedRating BlockedRating
G
8 ans+
13 ans+
16 ans+
18 ans+
Change Password
Press the
/ENTER button to enter the submenu,
by entering a 4 digit number using the 0-9 buttons on
the remote control for both the New Password and
Conrm Password prompts.
Clean All
Press the
/ENTER button to enter the submenu:
If OK is selected and conrmed, all parental lock options
will be set to the factory default setting, which is all
programming and all channels are allowed.
The reset may take several moments to complete...up to
30 seconds.
Note
If there is any lock mark on the top of the set such as R
channel lock, parental lock and so on, you can press OK
to resume it. (Press OK to display the password menu
and input your password.)
Other Functions
Net Connect Function – Yahoo!
Connected TV
You can monitor nancial stocks, share photos with
friends and family, and track news and weather all
through the Yahoo Widget Engine.
Note
Depending on your country's regulations, some R
applications may have limited service or not be
supported.
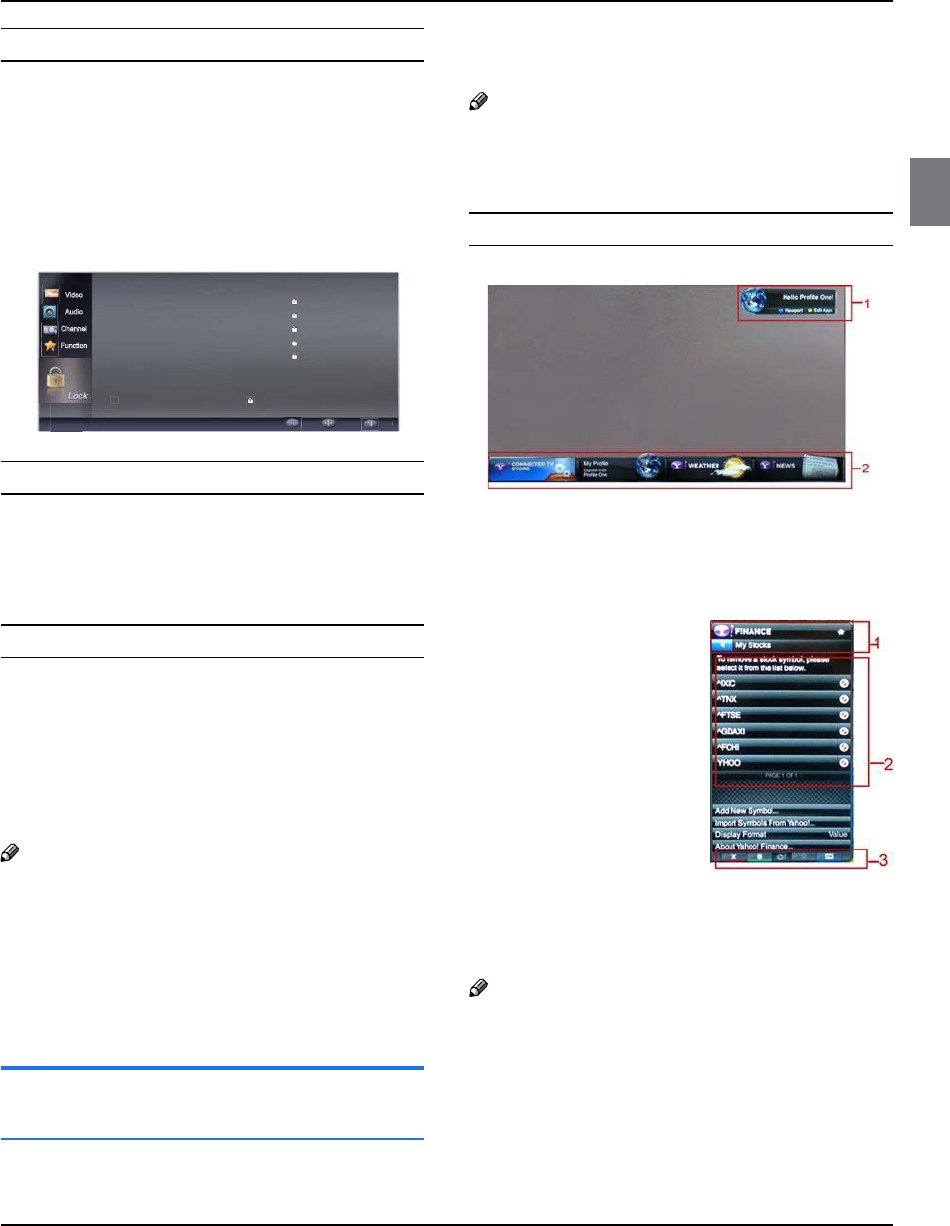
Screen Display
Dock Mode
1. Welcome Banner: Shows your prole.
2. Dock:Displays your snippets. Snippets are quick
launch icons for your widgets.
Sidebar Mode
1. Widget logo and Current
menu.
2. Contents List: The current
selection is highlighted in Blue.
Display the current page and
number of total pages.
3. Controls:
Red: To close the widget. q
Green: To change the q
widget's settings.
Yellow: To manage your q
snippets.
Blue: To size video to t or display in full screen.q
Note
Some buttons may not be available with certain R
widgets.
Editing Snippets in the Dock
1. Editing a snippet by selecting in the dock and
pressing the Yellow button.
2. The snippet moves to the Second position and its
tile slides up to show the following help text:
-45-

Operation
EN-25 Haier LED HDTV
Note
Using the color buttons with the dock mode. R
Red(Deqlete): To remove the widget.
Deleted widgets can be restored from RWidget
Gallery.
Blue(Move): To rearrange snippets.q
Yellow(Done)q: To exit the Editing Snippet menu.
PROFILE Widget
Set up user proles through Prole Widget. You can set
up mulitiple prole, each with its own list of widgets. Use
the Switch Prole option to switch to a dierent user
prole.
Note
There must be at least two registered proles. For R
instuctions on adding a prole, refer to
Administrative Controls.
Use the Prole Settings
option to customize and
protect your prole.
User proles can be
customized with a unique
name and avatar(a picture
used to represent your
prole).
Your prole's name and
avatar are displayed in the
prole snippet in the dock.
Protect your prole using the
Creste Prole PIN option.
When setting up a new PIN, you can set a Security
Question.
The Prole Settings option limits access to the
proles widgets.
If you forget your prole PIN, answer your prole's
Security Question.
New widgets cannot be added to proles with Limit
Prole indicator enabled.
Note
Owner PIN must be set to use this featureR.
For instuctions on setting Owner PIN, refer to
Administrative Controls.
System Settings allowsyou to:
Change your Location and Zip Code(US only) to tailor
contents specic to your region.
Replay the tutorial that was shown during guided setup.
Restore Factory Settings resets all widget settings and
information.
Note
When you canot run RRestore Factory Settings
normally or you can not install/run the specic
widgets normally, press the remote conrol buttons
in the following sequence, which resets the Yahoo
Service:
From the Adminstrative Controls menu you can:
Congure Screen Saver timeout toavoid screen burn-
in.
Create Owner PIN and set a Security Question to
control other proles.
Create and congure a new prole with a unique set
of widgets.
Delete an existing prole.
Sign into Yahoo! from PROFILE Widget using your
Yahoo! ID
If you have a Yahoo! ID, you can access personalized
content using Yahoo! TV widgets.
You will be automatically signed-in to all installed
Yahoo! TV widgets with your prole's Yahoo! ID.
If you do not have a Yahoo! account, visit "www.
yahoo.com" to create one.
You may not be able to log in with an ID created
through a Yahoo website in a country that does not
support Internet@TV.
About Prole Widget: Press the Green button to view
a brief description of Prole Widget, Copyright Policy,
Terms of Service, and Privacy Policy.
PROFILE Widget
Use Yahoo! Widget Gallery to add more widgets to your
TV. View available TV widgets in the following categories:
Featured: Displays recommended widgets.
Latest: Displays the most recent widgets.
All widgets: Displays all widgets.
Categories: Displays all widgets by category.
Note
To install a Rwidget, navigate to the detail screenand
select Aaa Widget to My Prole and press the
ENTER button. The widget will be installed and
-46-
Operation
Haier LED HDTV EN-26
become available in the dock.
Widgets Gallery Settings: Press the Green button.
About yahoo! Widget
Gallery...: You can view
brief information for the
Widget Gallery, Copyright
Policy, Terms of Service, and
Privacy Policy.
TV Widget Software:
Displays the current version
of the system software, and
installed widgets.
Create your own widgets
through the Developer
Settings menu. For more
information, visit our
developer site at http://connectedtv.yahoo.com/.
Yahoo!® Connected TV
You can enjoy the best of the Internet in perfect
harmony with the simplicity and reliability of your TV.
Understanding Yahoo!® Connected TV
Yahoo! Connected TV provides an integrated Internet
and TV experience
Use your remote control to access your favorite q
Internet content while watching TV.
Add TV Apps from Yahoo! and your favorite Internet q
and media companies.
Keep up with world, business, entertainment, and q
sports news.
Track your stocks and stay current with nancial q
news.
Share photos with friends and family.q
View photos on your big screen TV.q
Watch your favorite web videos.q
Access user-generated content.q
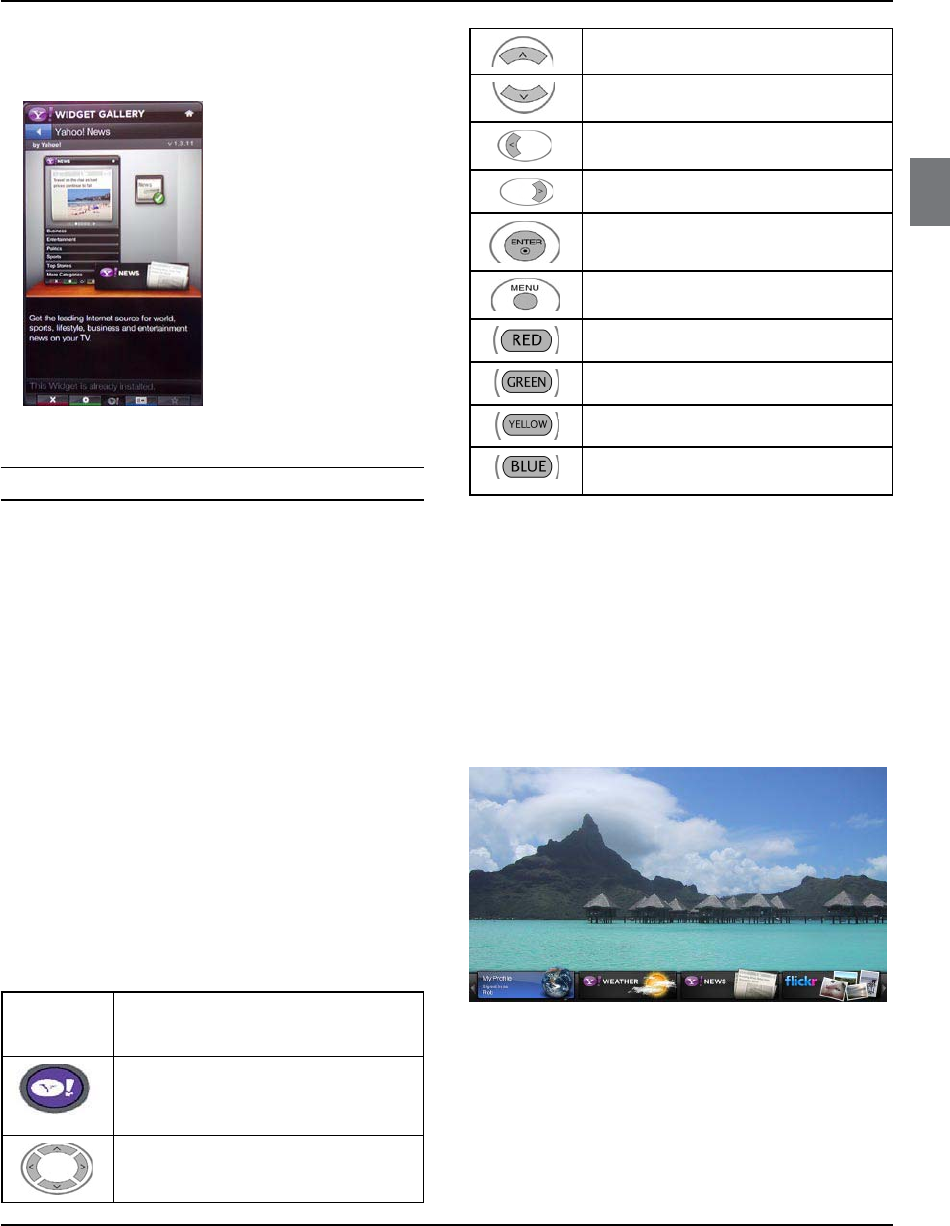
Using the Remote Control
Remote
Control
Key
Operation
Display/hide the Yahoo! Connected TV
user interface.
Highlight and focus on buttons in the
Yahoo! Connected TV user interface.
Move the focus selection up.
Move the focus selection down.
Move the focus selection to the left.
Move the focus selection to the right.
Select the focused item.
Go to the TV Menu.
Close the app.
Change the app’s settings.
Add, delete, or move your apps.
Resize the video to t onscreen, or to
make it fullscreen.
Getting Started Out of the Box
Once your television is powered up and your network is
operational, the Yahoo! Connected TV software guides
you through its step-by-step setup wizard.
These setup steps are designed to provide you with the
information and settings you will need to start using
Yahoo! Connected TV.
Activating Yahoo! Connected TV
Press the Yahoo! TV Key to activate the Yahoo!
Connected TV user interface.
What is a TV App?
TV App is an Internet application designed to run on q
your TV.
What is the Dock?
The dock is the horizontal list of TV App bookmarks q
appearing at the bottom of your TV screen when
you press the Yahoo! TV Key on the remote control.
What is a TV App bookmark?
-47-
Operation
EN-27 Haier LED HDTV
A TV App bookmark is a shortcut which launches a q
TV App sidebar.
TV App bookmarks are dynamic icons to TV App q
content.
Guided Setup
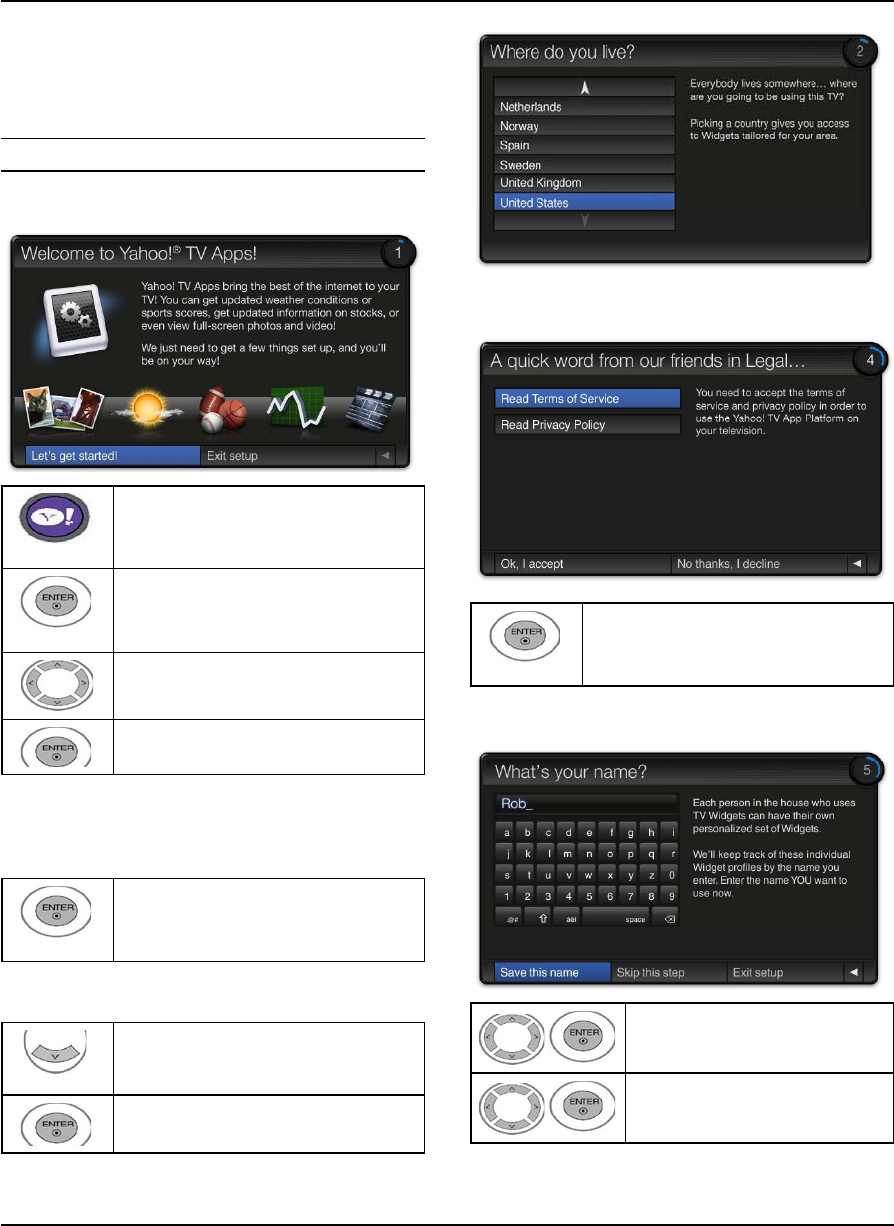
Guided Setup Welcome to Yahoo! Connected TV!
Press the Yahoo!
Press the Yahoo! TV Key to activate
Yahoo! Connected TV. The rst time you
use TV Apps this step-by-step wizard
begins with the Welcome Screen.
Select Let’s get started! If you select
Exit Setup now, this step will resume
the next time you press the Yahoo! TV
Key.
Follow the onscreen instructions.
Highlight and focus on buttons in the
Yahoo! Connected TV user interface.
Select the focused item.
Activate Yahoo! Connected TV. The rst time you use TV
Apps this step-by-step wizard begins with the Welcome
Screen.
Welcome to Yahoo!® TV Apps!
Select Let’s get started! If you select
Exit Setup now, this step will resume
the next time you press the Yahoo! TV
Key.
Where do you live?
Choosing your location allows TV Apps
to use localized content.
Highlight your country.
Select your country.
A quick word from our friends in Legal…
Accepting the Yahoo! Terms of Service
and Privacy Policy is required to use
Yahoo! Connected TV.
Select Ok, I accept.
What’s your name?
Enter your name to setup your
prole. Highlight letters on the
keyboard and spell your name.
Select Save this name to create
your prole.
-48-
Operation
Haier LED HDTV EN-28
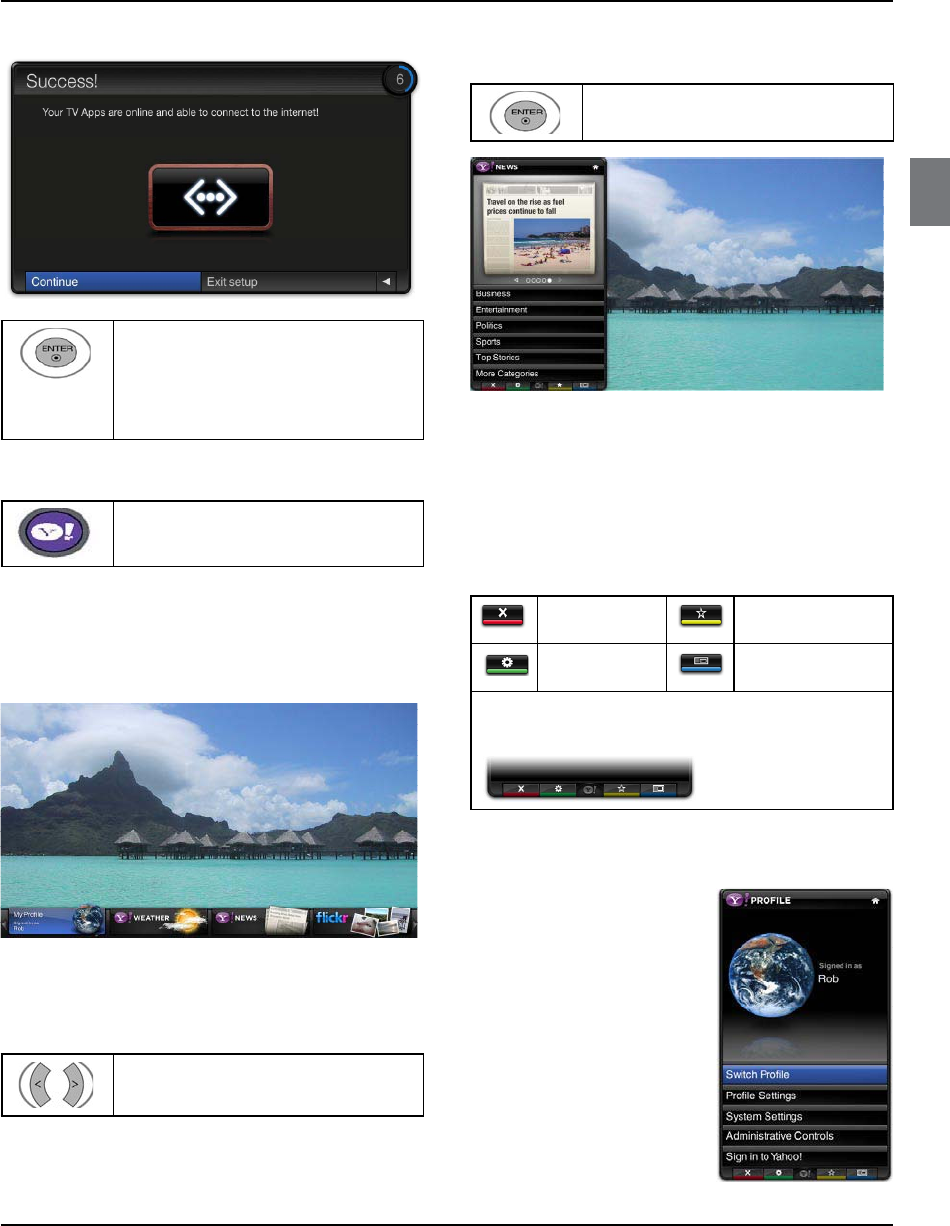
Success!
Test your network connection. Setup is
now complete. A tutorial on how to use
Yahoo! Connected TV is next.
Select Continue and review the
tutorial. Select Exit setup to start using
Yahoo! Connected TV now.
Activating Yahoo! Connected TV
Press the Yahoo! TV Key to activate
Yahoo! Connected TV.
The horizontal list at the bottom of your TV screen is q
called “the dock.”
The items in this list are called TV Apps or q
“bookmarks.”
A bookmark is a shortcut which launches a TV App q
sidebar.
Moving between TV App Bookmarks
Activate Yahoo! Connected TV. The rst time you use TV
Apps th
Move between TV App bookmarks by
pressing the Left or Right Arrow.
Focus is located in the leftmost region (the q
highlighted bookmark).
The dock scrolls bookmarks under this focal point.q
Moving between TV App Bookmarks
Open the TV App sidebar by pressing
ENTER when its bookmark is in focus.
The TV App logo and Home button are at the top of q
the sidebar.
Use the qUp & Down Arrows to navigate to a menu
item.
The currently focused button is highlighted.q
Press qENTER to select the focused button.
Using the Sidebar Toolbar
Close the APP. Manage your
bookmarks
Change the
App"s. settings
Size video to t, or
mark it fullscreen
The sidebar’s bottom toolbar includes four color-
coded buttons that correspond to the colored keys on
the remote control.
Using the Prole TV App
The qProle TV App
congures your user
prole.
You can set up multiple q
proles for multiple users.
Each prole maintains its q
own list of TV Apps.
The qSwitch Prole menu
allows you to switch to a
dierent user prole.
The qProle Settings menu
allows you to customize
and protect your prole.
The qSystem Settings
-49-
Operation
EN-29 Haier LED HDTV
menu allows you to change your Location, Repeat
the Tutorial, and Restore Factory Settings.
The qAdministrative Controls menu allows you to
set the Screen Saver timeout, create the Owner
PIN, and to Create a Prole.
The qSign in to Yahoo! menu allows you to
personalize your experience using your Yahoo! ID.
Visit http://www.yahoo.com to create a Yahoo! ID.q
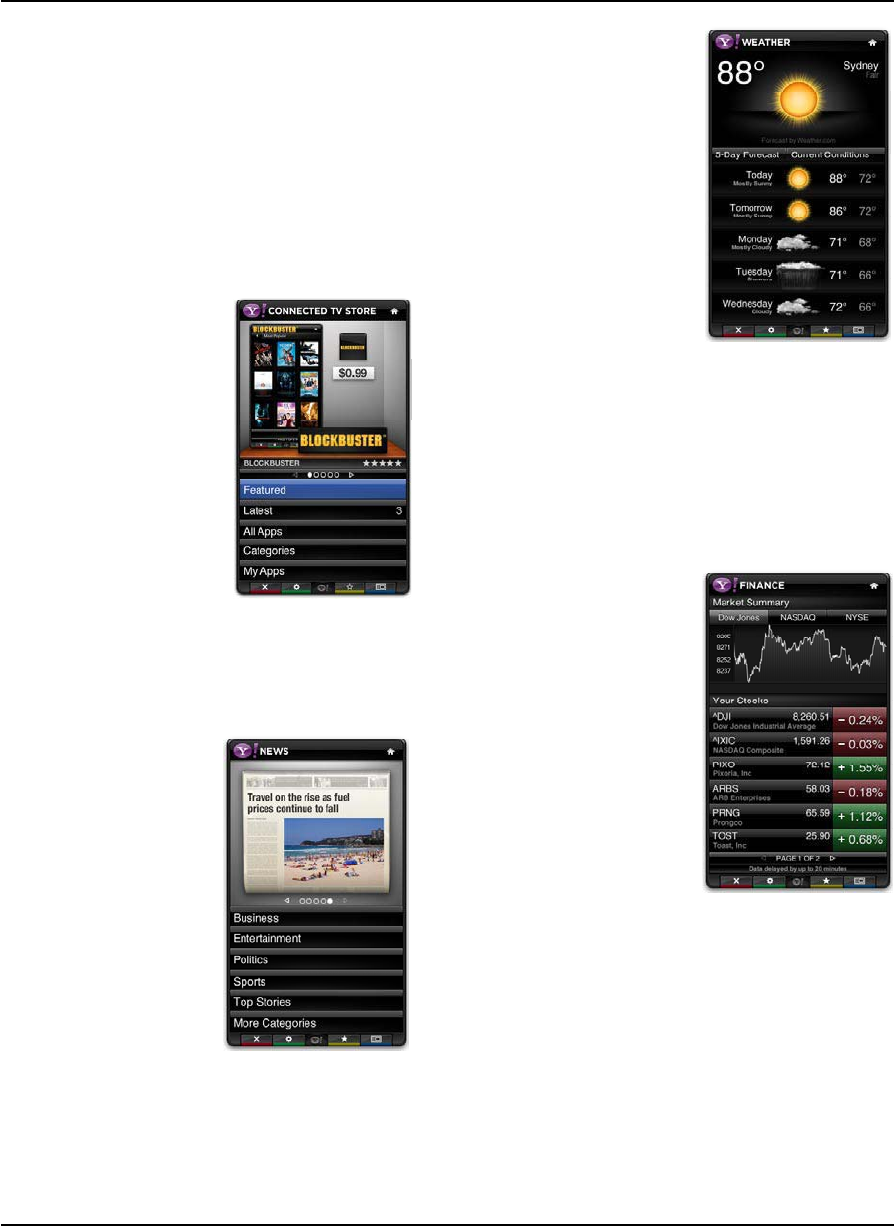
Using the Connected TV Store
The qConnected TV Store allows you to browse and
discover new TV Apps.
The featured TV Apps are q
highlighted in the display
case at the top of the
sidebar.
You can also browse q
available TV Apps by
category.
To install an app, select q
Add App to My Prole
and press the ENTER key.
The qOwner PIN is
needed to install apps for
proles that have been
protected through the
Limit Prole indicator
under the Prole TV App--Prole Settings menu.
Refer to the qProle TV App--Administrative
Controls menu to set the Owner PIN.
Using the Connected TV Store
The qYahoo! News
TV App provides
the latest headline
news for business,
entertainment, politics,
sports, top stories, and
many other categories.
Select a category, press q
ENTER.
Select a headline within
q
the category, press
ENTER.
View the dynamically q
updated news summary
for the selected
headline.
Using the Yahoo! Weather TV App
The qYahoo! Weather TV App provides updates on
your local and favorite weather locations.
Press the qGREEN key to display the Settings menu.
t"EEB/FX$JUZCZFOUFSJOHUIFOBNFPGUIFDJUZ
tDelete a City by selecting the
city you want to delete from the
city list.
tSelect the Display Units
As button to change the
temperature indication mode to
Imperial or Metric.
To create a bookmark for q
a favorite city:
tSelect the city from the
home page.
tPress the YELLOW key.
tSelect the Add Bookmark
button and press ENTER.
To delete a bookmark for q
a city:
tNavigate to the bookmark and press ENTER to start the
app.
tPress the YELLOW key.
tSelect the Delete Bookmark button and press ENTER.
Using the Yahoo! Finance TV App
View the latest stock news with the Yahoo! Finance q
TV app.
Press the qGREEN key to
set up your stocks.
tUse the Add New Symbol
menu to enter the name of a new
stock.
tThe Import Symbols From
Yahoo! menu retrieves the
stocks from your Yahoo! Finance
portfolio.
tThe Merge Symbols button
merges with your portfolio.
tThe Replace Symbols
button replaces your symbols
with the symbols from your
portfolio.
tThe Display Format button
changes the stock-price uctuation transition to Value or
Percentage.
To create a bookmark for a favorite stock:q
tSelect the stock symbol from the home page.
tPress the YELLOW key.
tSelect the Add Bookmark button and press ENTER.
To delete a bookmark:q
tNavigate to the bookmark and press ENTER to start app.
tPress the YELLOW key.
tSelect the Delete Bookmark button and press ENTER.
-50-
Operation
Haier LED HDTV EN-30
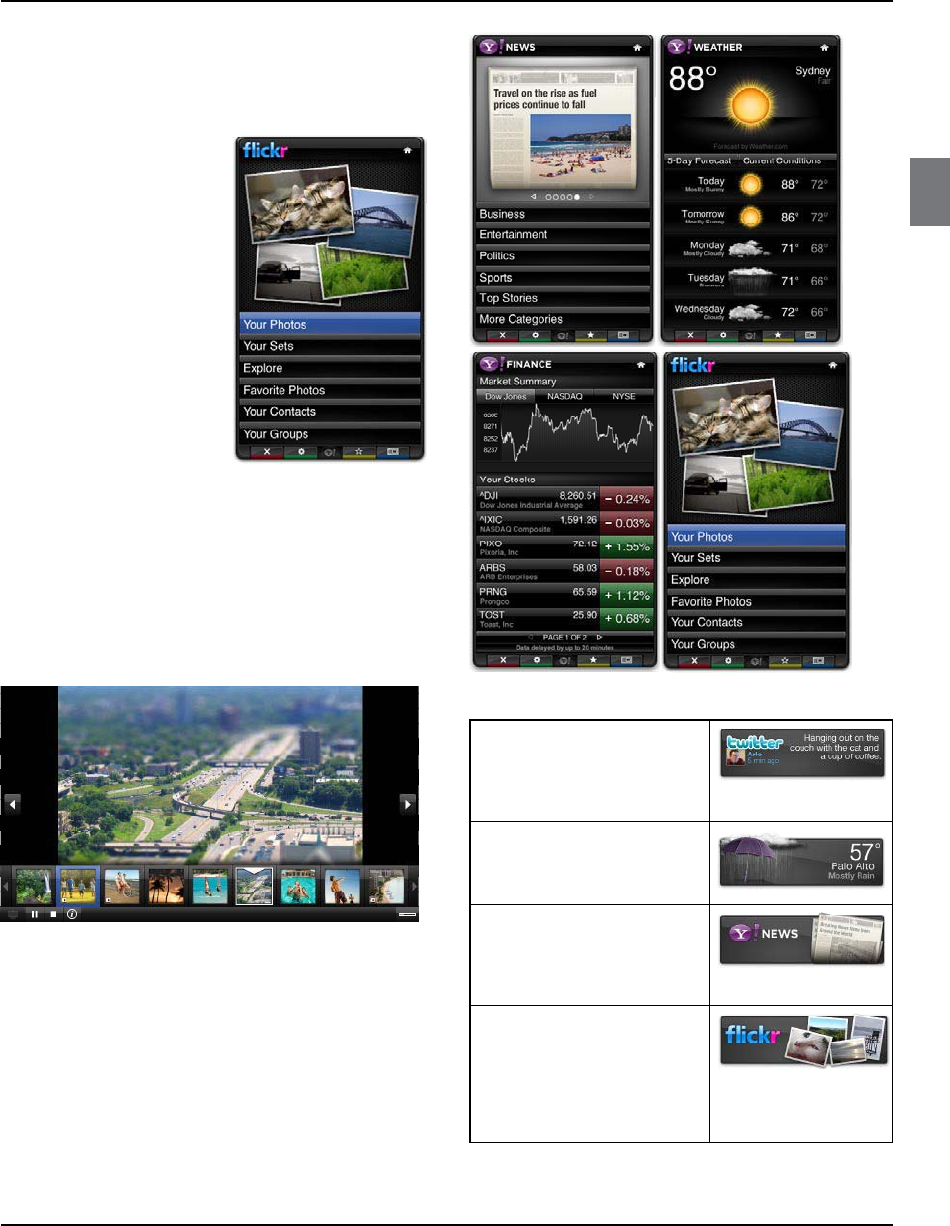
Using the ickr TV App
The ickr TV App enables slideshows of family and q
friends’ photos on your TV.
Personalize the ickr TV App by logging in with your q
Yahoo! ID.
To view photos in a q
slideshow:
tSelect a thumbnail of a
photo and press ENTER to view
the photo’s details.
tSelect Start Slideshow and
press ENTER.
To control the slideshow q
display:
tPress ENTER during a
slideshow.
tThe thumbnails of photos
are displayed on the bottom of
the screen.
tWhen the slideshow control
is displayed, you can Pause, Play, and Stop the slideshow.
tIf you select the button and press ENTER, you can view
details for the photo.
To congure the Settings press the qGREEN key.
tThe Time Per Slide button controls the speed of the
slideshow.
tThe Repeat button will restart the slideshow at the
beginning after the last photo is shown.
Using Yahoo! TV Apps
The Yahoo! News TV App provides the latest q
headline news for business, entertainment, politics,
sports, top stories, and many other categories.
The Yahoo! Weather TV App provides updates on q
your local and favorite weather locations.
View the latest stock news with the Yahoo! Finance q
TV App.
The ickr TV App enables slideshows of family and q
friends’ photos on your TV.
Using Yahoo! TV Apps
Yahoo! Connected TV is an
open software platform for
extending Internet services
to televisions and other living
room devices.
Our Compelling User
Interface is designed to
address the needs of the TV
watcher.
An Open Yahoo! Connected
TV Store ensures you have
access to all of the services
you want, without walls or
restrictions.
The Yahoo! Connected TV
Developer SDK provides
developers with powerful
tools for building applications
using the languages and
systems with which they are
familiar.
-51-
Operation
EN-31 Haier LED HDTV
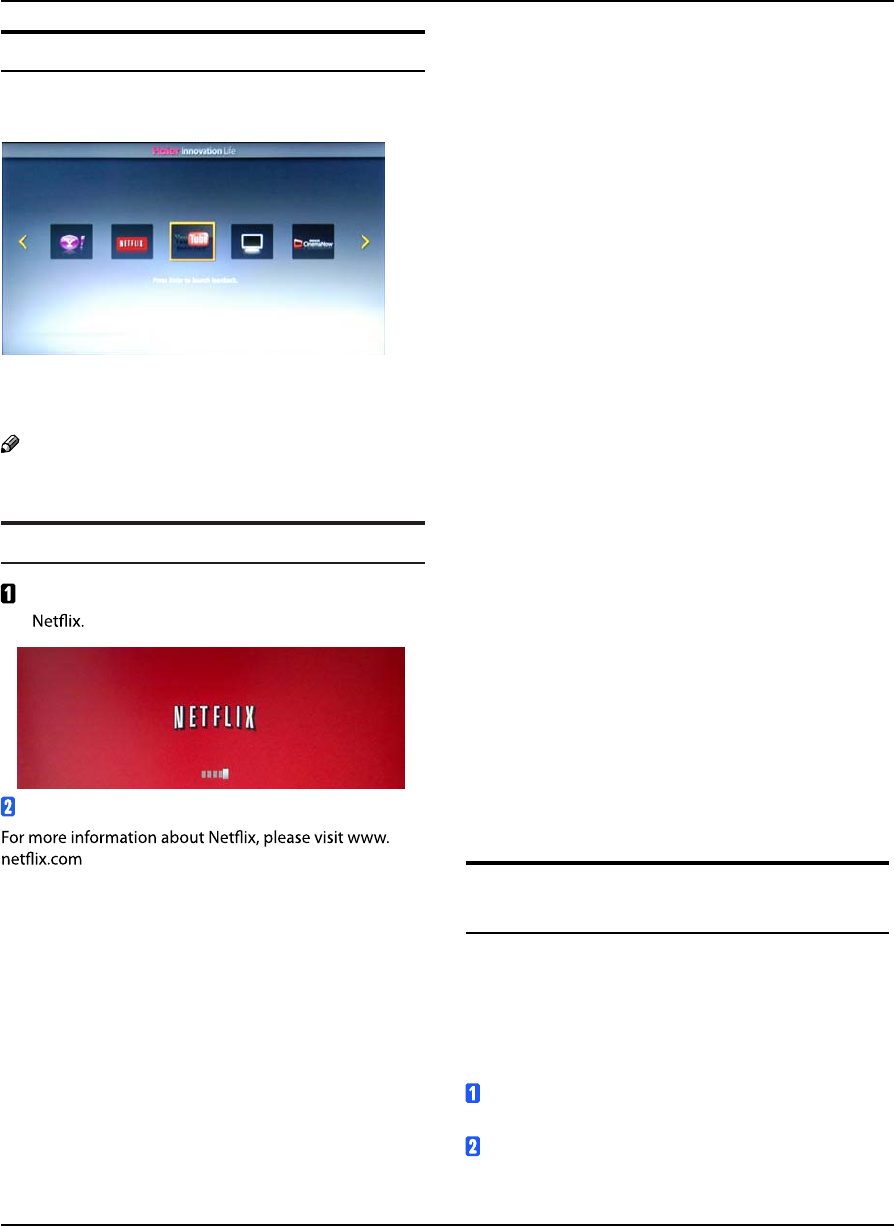
NET CONNECT
Press the NET CONNECT button, the NET CONNECT
menu will be displayed:
Press the
/
button to
select YAHOO, NETFLIX,
Youtube, Blockbuster, TV, USB menu.
Note
Services may be added or removed.5
NETFLIX
Press the NETFLIX button to enter the menu launch
Follow the instructions displayed on the screen.
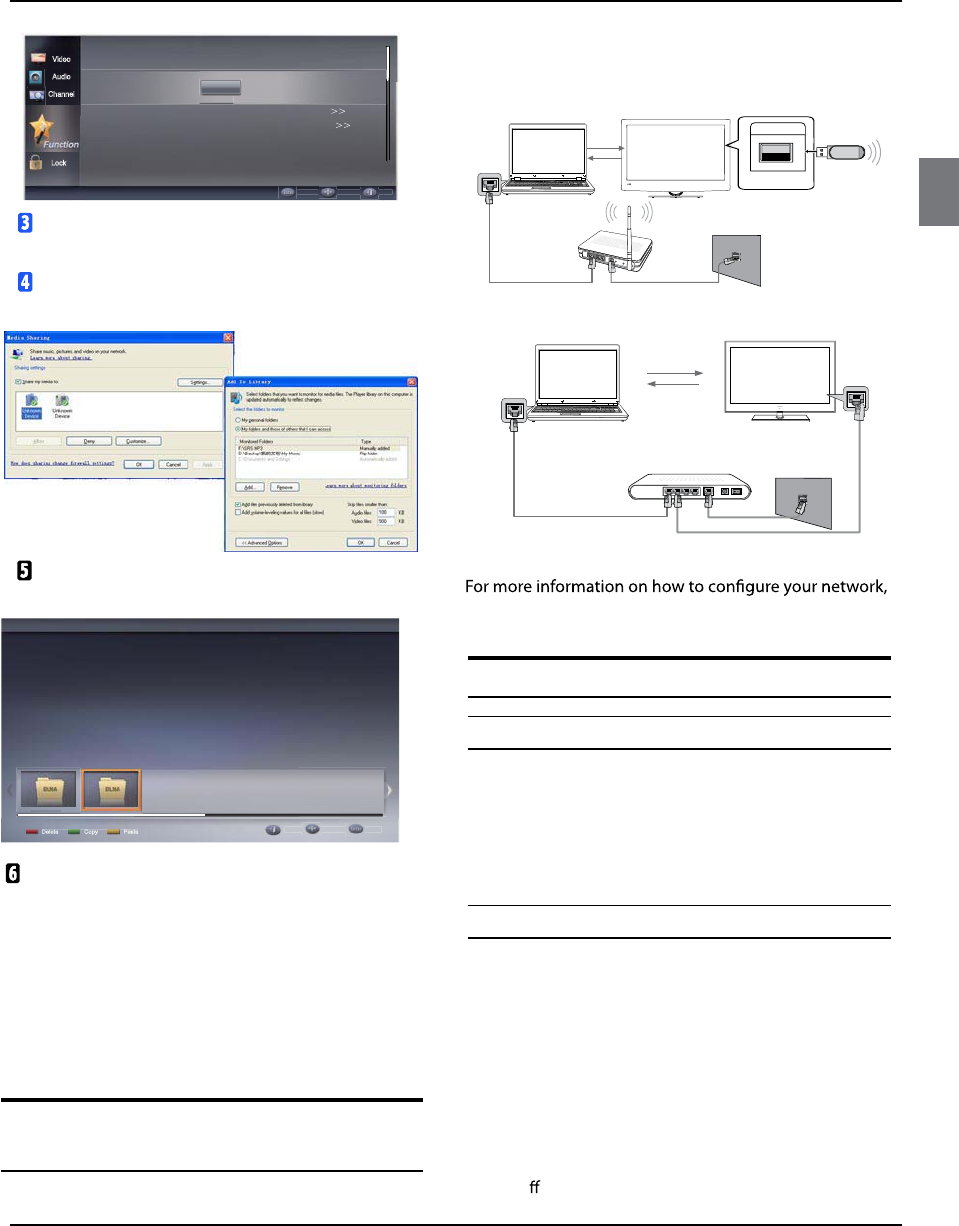
DLNA (Digital Living Network
Alliance)
Digital Living Network Alliance (DLNA) is a standard that
allows various consumer electronic devices to share
content with each other across a standard home network.
This would allow a device such as a DLNA compatible
television to play music or view videos or photos stored
on a desktop computer or other compatible device.
Press the MENUbutton and then use the
/
button to select the Function menu.
Press the
/ENTER button and then use the
/
button to select Network.
-52-
Operation
Haier LED HDTV EN-32
Lock
Network Upgrade
Applications
Enter Move Back
Video
Audio
Channel
Configuration
Enter
Music
Delete Copy Paste Back Move Play
All Picture Rating
Press the
/ENTER button and then use the
/
button to select Applications.
Press the
/ENTER button and then use the
/
button to
select On.
Launch the Multimedia Player by pressing the
MEDIA.P button.
Press
/
/
/
button to select
the desired
item.
To access content from your computer or other device,
it must be properly set up. Refer to the documentation
that came with your computer, operating system, or
device.
Example: If your computer is runningWindows 7, you
can stream media usingWindows Media Player 12.
Connecting to your PC through a
network
You can play pictures, music and movies saved on your
PC on your TV through a network connectin in the Media
Play mode.
TV
Back of TV
PC
ETHERNET
Wireless IP sharer LAN
USB
Wireless LAN Adapter
TV
PC
ETHERNET
ETHERNET
External Modem
(ADSL/VDSL/Cable TV)
refer to "Network Connection"
CCD (Closed Caption Display)
Closed Captions
Closed captioningis a process which converts thex
audio portion of a television program into written
words which then appear as subtitles on the television
screen. Closed captions allow viewers to read the
dialogue and narration of television programs.
Using Closed Captions
Captions are the subtitles of the dialogue and x
narration of television programs. For prerecorded
programs, program dialogue can be arranged
into captions in advance. Its possible to caption a
live program by using a process called real-time
captioning, which creates captions instantly.
Real-time captioning is normally done by professionalx
reporters using a machine shorthand system and
computer for translation into English. Captioning is
an e ective system for the hearing-impaired, and it
-53-
Operation
EN-33 Haier LED HDTV
can also aid in teaching language skills.
In ATV mode the CCD function allows you toij
con gure the wayyou choose to view the digital
captioning(O ,CC 1, CC 2, CC 3, CC 4, Text 1,Text 2,
Text 3 or Text 4).
CAPTION
The term for the words that scroll across the bottom
of the TV screen, usually the audio portion of the
program provided for the hearing impaired.
TEXT
The term for the words that appear in a large black
frame and almost cover the entire screen; usually
messages provided by the broadcaster.
In DTV mode allows you to con gure the wayyouij
choose to view the digital captioning (O , service 1,
service 2, service 3, service 4, service 5 or service 6).
Select one of the digital service channels made ij
availableby the caption provider.
There are 6 standard services. Service 1 is designatedij
as the PrimaryCaption Service. This servicecontains
the verbatim, or near-verbatim captions for the
primary language being spoken in the accompanying
program audio. Service 2 is designated as the
Secondary Language Service. This servicecontains
captions in a secondary language which are
translations of the captions in the primaryCaption
Service. The other service subchannels are not pre-
assigned. It is up to the discretion of the individual
caption provider to utilize the remaining service
channels.
Note
The captions do not always use correct spelling 5
and grammar. Not all TV programs and product
commercials are made for broadcast with Closed
Caption information included. Refer to your area’s
TV program listings for the TV channels and times
of Closed Caption shows. The captioned programs
are usually noted in the TV listings with service
marks such as “CC” .
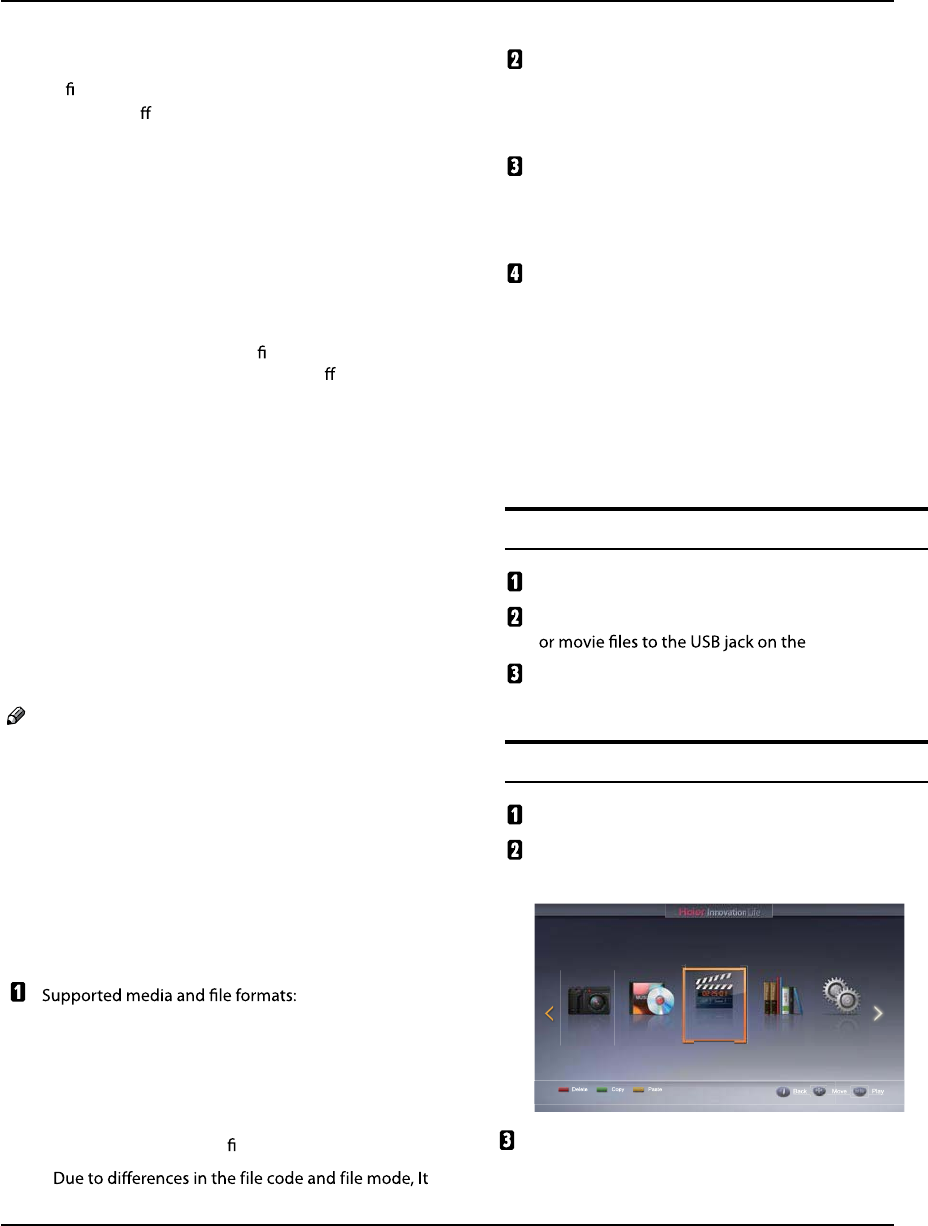
Playing External Media
Digital pictures: (.JPG/ .JPEG/ .BMP(Baseline &
Progressive)/ .PNG)
Digital music: (.MP3(8~320kbps))
Video: (.avi/.mpg/.mpeg/.vro/.vob/.ts coded with
MPEG-1 or MPEG-2 standard) les.
ij
Back Move Play
Picture Music Movie Text Setup
Delete Copy Paste
is possible that some les cannot be read.
Before starting operation, verifythat the USB
storage device is formatted to the FAT32 le system.
At present, this television does not support NTFS
and the le systems of other formats.
Supports Plug & Play (no need to reset the TV). USB
hard drive support - only supports the class of USB
hard drive that follows USB power consumption
spec.
The television operation may be halted (screen
freezes, no function operation) due to excessive rate
of information code errors. In such a case, restart the
system (by unplugging the TV from the AC power
source, waiting 15 seconds and then reconnecting
the power source). Please note that there are many
non-standard USB mobile devices in the market. If a
non-standard device is used then an identication
problem may occur.
Connecting a USB Device
Turn the TV on.
Connect a USB devicecontaining photo, music and/
back of the TV.
When the USB is connected to the TV, then you can
select the Media Playmode.
USB Media Menu operation
Plug-in an external storage device into the USB port.
Press the MEDIA.P button on the remote to display
the multimedia selection menu.
Press the ENTER button on the remote to display
the sub menu.
-54-
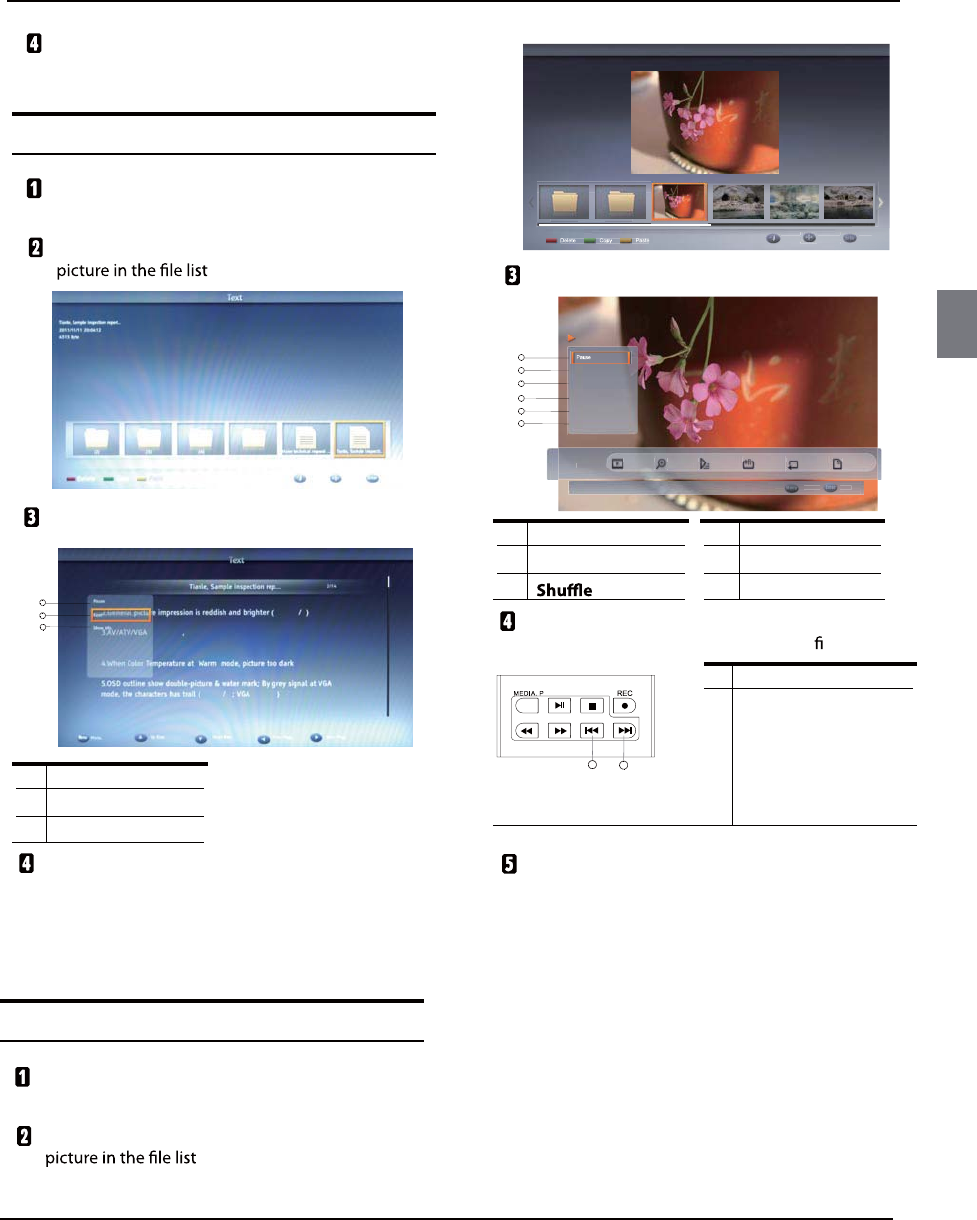
Press the EXIT button on the remote to return to the
previous menu.
To play text
Press
the
/
button
to selectPicture, then press
the
ENTER button in the Media
Play menu.
Use
the
/
/
/
buttons to select
the desired
.
Press the MENU button to display the option list.
1 Play/Pause
2Font
Show Info
3
Press the EXIT button to return to the previous
menu.
Press the MEDIA.P button to exit the
Media
Play
mode.
1
2
3
Operation
To play pictures
Press
the
/
button
to selectPicture, then press
the
ENTER button in the Media
Play menu.
Use
the
/
/
/
buttons to select
the desired
.
Picture
Delete Copy Paste
DSCF0793.JPG
2011:03:18 09:31:45
3488x2616
4575712 Byte
Back Move Play
001.jpg None 1x Short Shuffle Off None 6/8
Menu Enter
Pause
Repeat
Shuffle
Duration
Effect
Show Info
1
2
3
4
5
6
12
Press the MENU button to display the option list.
1 Play/Pause 4 Duration
2Repeat 5
36Show Info
Press the button on the remote controlto selectan
option. Press the ENTER button to con rm.
1. Play previous
2Play next
Press the EXIT button to return to the previous
menu.
Press the MEDIA.P button to exit the
Media
Play
mode.
Haier LED HDTV EN-34
-55-
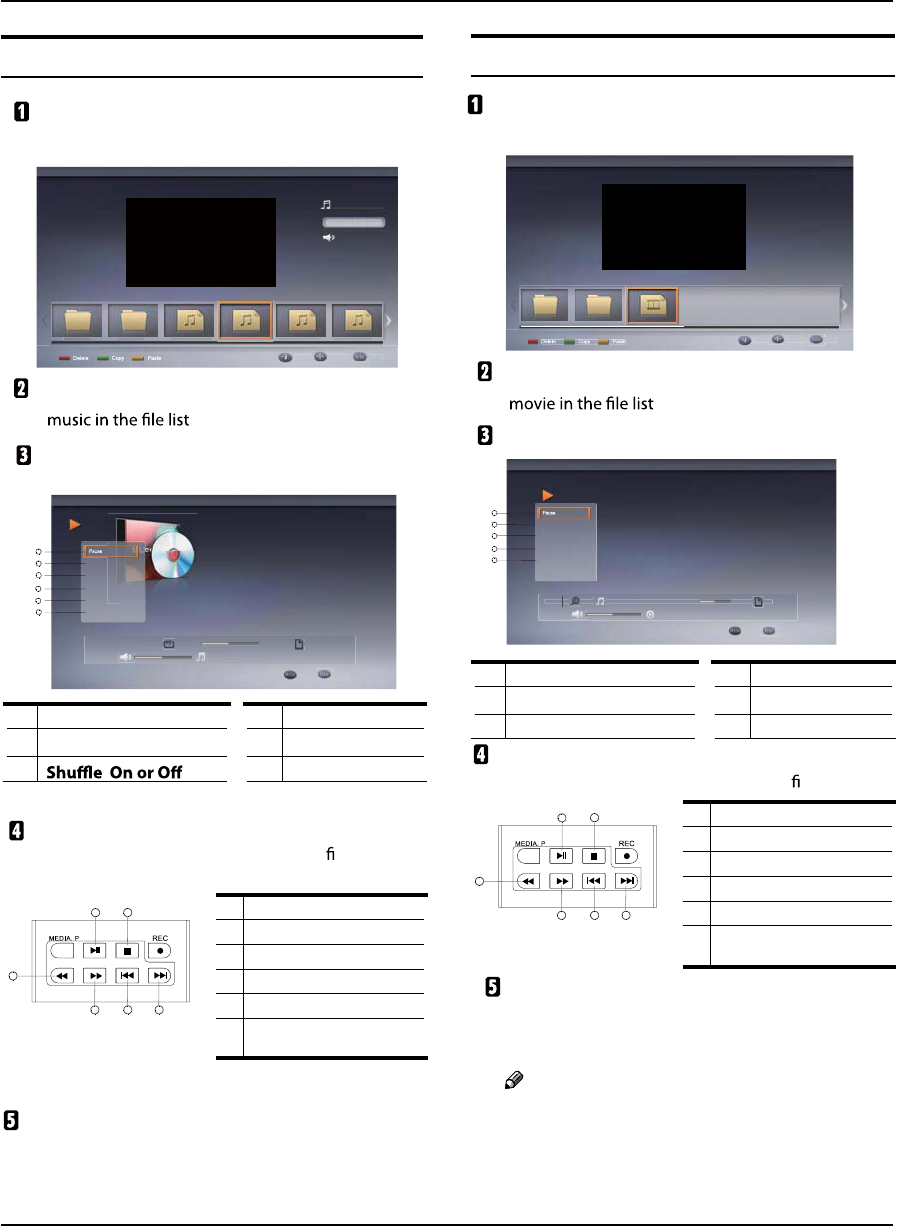
Operation
Haier LED HDTV EN-35
Music
Delete Copy Paste
OST
-
Other
-
1.03M
12
Back Move Play
Music 00:02:17 00:04:56 6/16
Menu Enter
mp3
Pause
Repeat
Shuffle On
Show Info
Hide Spectrum
Lyric options
1
2
3
4
5
6
12
3
45 6
1. Play/Pause 4. Show Info
2. Repeat 5. Hide Spectrum
3.6.Audio Only
Press the button on the remote controlto selectan
option. Press the ENTER button to con rm.
To play music
Preess the
/
button
to selectMusic, then press
the
ENTER button in the Media
Play menu.
Use
the
/
/
/
buttons to select
the desired
.
Press the MENU button to display the option list.
Press the EXIT button to return to the previous
menu. Press the MEDIA.P button to exit the
Media
Play mode.
1. Play or pause
2Stop
3.Fast reverse
4. Fast forward
5. Play previous
6. Play next
Movie
Delete Copy Paste
-
-
00:05:25
20.03M
12
Back Move Play
Video 1x 1/3 00:02:17 00:04:56 3/3
Menu Play
.avi
Pause
Repeat
Show Info
Picture Mode
Screen Mode
1
2
3
4
5
12
3
45 6
To play movies
Press the
/
button
to selectMovie, then press
the
ENTER button in the Media
Play menu
Use
the
/
/
/
buttons to select
the desired
.
Press the MENU button to display the option list.
1. Play/Pause 4. Picture Mode
2. Repeat 5. Screen Mode
3. Show Info
Press the button on the remote controlto selectan
option. Press the ENTER button to con rm.
1. Play or pause
2Stop
3.Fast reverse
4. Fast forward
5. Play previous
6. Play next
Press the EXIT button to return to the previous
menu. Press the MEDIA.P button to exit the
Media
Play mode.
Note
Do not remove USB device from the TV until5
you have exited the USB mode otherwise you
may damage the USB device.
-56-

UniversalRemote Control
EN-36
Haier LED HDTV
Note
The remote control might not be compatible5
with all DVD Players, VCRs and Cable boxes.
Control Operation
Program the remote controlto work with your
device.
Change the device mode by pressing the TV, DVD,
CABLE or VCR key.When the device is set, the related
device LED will turn on for 1 second and then turn
o.
Aim the remote at the device.
Use the other remote control buttons to operate the
device. The device LED will blink if you press any key
(if the key has a function in the current mode). If the
key has no function, then the LED will not blink.
Manually Programming the <Remote Control
Check the code no. from the code list.
Choose the deviceyou want to program.
While pressing and holding the ENTER key, press
the INPUT key, and the device LED will be ON. After
about 3 seconds, and the LED will blink, indicating
that the remote control is readyfor programming,
then release both keys.
The LED will blink once when you enter a digit key,
indicating the digit key is programmed. If 3 digits are
programmed successfully, the device LED will turn
ON for about 3 seconds and then blink twice per
second.
You can now:
Tryto operate the deviceby using A) the power key.
If the device powers on, press the B) ENTER key to
save the current 3-digit code to memoryand exit
the manual programming mode.
Return to step 3C) to reprogram the control.
Universal Remote Control
Setting UpYourRemote Control
After it has been set up properly,your remote control
can operate in four di erent modes: TV, DVD, VCR or
CABLE.
If your input is incorrect, the LED will blink 6 times
in 3 seconds. And then keep blinking.You can now
return to step 3 and reprogram the device. You must
enter the 3-digit brand code correspondingto your
device within 30 seconds. If time runs out or any key
other than Power or digits are pressed, the LED will
turn o and the manual programming process will
exit.
Manual scan mode<
With manual scan and program, the remote control
tests all the codes available in the codeset database and
assigns the correct one for the selected device. Although
this method is more time consuming, it saves you the
trouble of looking up the brand codes necessaryfor
manual programming.
To manually-scan and program the remote control:
Turn OFF the devicethat you wish to program.(TV,
VCR, DVD or cable box equipment).
Choose the deviceyou want to program.
While pressing and holding the ENTER key, press
the INPUTkey,and the device LED will be ON. It will
remain on for about 3 seconds and then the LED will
blink, indicating that the
remote c
ontrol is readyfor
programming, then release both keys.
Press and release the CHvv/vv key. it will emit the
next or the previous POWER key code. The LED will
blink rapidly (10 times per second), indicating that
the remote control is in manual scan mode.
Press the CHvv/vv key repeatedly until the device
switches ON (CHvv key conducts a upward search
while the CHvv key conducts a downward search in
the code set database). When the device turns ON,
press and release the ENTER key to program the
remote control with the new code, savingthe code
to memory.
After saving the new code, press the POWER key.
If the device responds, no further programming is
required. If the device does not respond, repeat
step 3 through 5. And searching will start from the
current code that is set.
To exit without programming, press any other key.The
code will not be saved to memory.
After searching the entire data base, this mode will
automatically exit and the LED will blink 3 times. The
code will not be saved to memory.
Automatic Scan Programming the <Remote
-57-
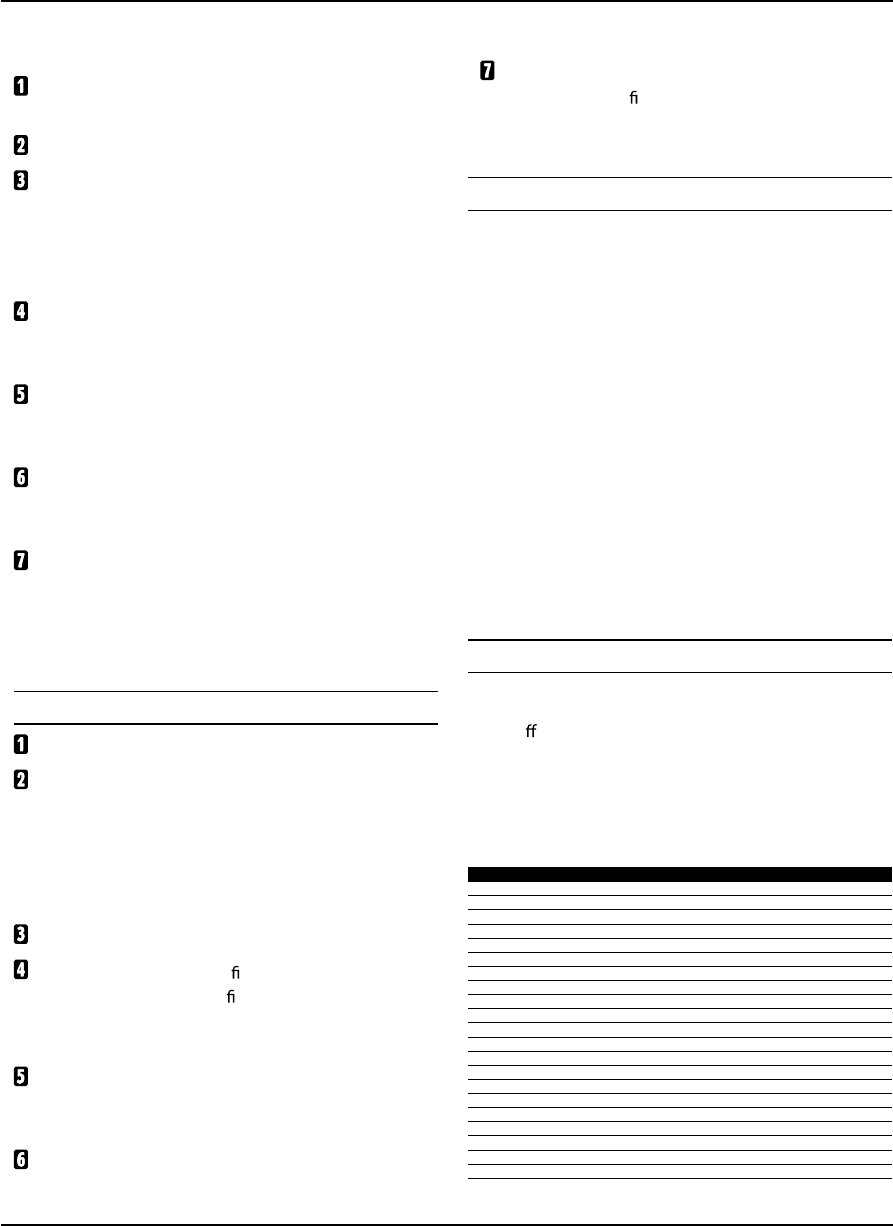
UniversalRemote Control
Haier LED HDTV EN-37
t
t
Control
To automaticly scan and program the remote control:
Turn OFF the deviceyou wish to program.(TV, VCR,
DVD or cable box equipment).
Choose the deviceyou wish to program.
While pressing and holding the ENTER key, press
the INPUT key and the device LED will turn ON. The
LED will remain on for about 3 seconds and it will
blink, indicating that the
remote control
is readyfor
programming, then release both keys.
Press and release the Mute key to enter automatic
scan mode. And the remote will automatically send
codes to the device every 2 seconds.
When the device turns ON, press ENTER key to
program the
remote control
with the new code,
saving it to
memory
.
Press the POWER key, if the device responds, no
further programming is required. If the device does
not respond repeat steps 1 through 5.
After searching the entire data-base, this mode will
automatically exit and the LED will blink 3 times. The
will not be saved to
memory
.
In automatic scan mode, press any key other than the
ENTER key to exit without programming.
Display mode
Choose the deviceyou wish to program.
To enter display mode, while pressing and holding
the ENTER key, press the INPUT key and the device
LED will turn ON. It will remain on for about 3
seconds and then the LED will blink, indicating tha
the remote control is readyfor programming, then
release both keys.
Press 9 then 8 then 0 to enter display mode.
Press the 1 key to get the rst digit of the current
code. For example, if the rst digit of code is 1, the led
will blink once and remain OFF. Digit “0” in the code
will not be displayed.
Press the 2 key to get the second digit of the curren
code. For example, if the second digit of the code is 3,
then the LED will blink three times.
Press the 3 key to get the third digit of the current
code.
Only digit 1, 2, 3 are valid in this mode. And the
sequence is not xed.
The remote control will not send out data in this mode if
you press any key other than the 1, 2 or 3 key.
Pass-Through Features
The remote control provides pass-through features that
allow users to control the TVvolume and DVD or VCR
operation while the remote control is in another device
mode.
Volume Pass-Through<
The TVVolume/Mute pass-through feature allows you
to control the volume and mute function of your TV
while the remote control is in another device mode. The
feature is applicable for all devices and brands that do
not use the volume control buttons for other purposes.
Playback Control Key Pass-Through<
The DVD or VCR playbackcontrol key pass through
feature lets you control the PLAY, STOP, PAUSE, REWIND,
FF and RECORD functions of your DVD or VCR while the
remote control operates in other modes. The feature is
applicablefor all devices and brands that do not use the
playbackcontrol keysfor other purposes.
Fast Programming Haier default TV code
Pressing and holding the ENTER key and then press the
POWER key for 3 seconds, the LED will blink 3 times and
turn o, default Haier codeset (001) will be programmed
to the control.
Remote Control Codes
TV
NO. Brand Code
1 Haier
001 002 003 004 005 006 007 008 009 010 240 241 297 307 355
2 Abex 077
3 Acer 267
4 Addison 333
5 Admiral 057 078 334 338
6 Advent 324
7 Adventura 079
8 Aiko 066 333
9 Aiwa 165
10 Akai 038 058 258 271 279 331 350
11 Albatron 321 325
12 Alleron 068
13 America Action 335
14 Ampro 323
15 Amtron 067
16 Anam 335
17 Anam National 059 067
18 AOC 060 061 062 222 331 349 350 353
19 Apex 092 135 151 195 339
20 Archos 308
21 Astar 259
-58-

UniversalRemote Control
EN-38 Haier LED HDTV
NO. Brand Code
22 Audiovox 067 189 191 207 256 333 335 337
23 Aventura 053
24 Axion 280
25 Bang & Olufsen 345 346
26 Baur 058
27 Belcor 060 349
28 Bell & Howell 057
29 Benq 245 246 284 329
30 Bradford 067 335
31 Brillian 342
32 Brockwood 060 349
33 Broksonic 197 335 338
34 byd:sign 310
35 Candle 060 062 063 079 331 350
36 Carnivale 331 350
37 Carver 055 320
38 CCE 239 351
39 Celebrity 058
40 Celera 339
41 Centurion 064
42 Changhong 339
43 Ching Tai 333
44 Chun Yun 333 335 361 374
45 Chung Hsin 335 364
46 Citizen 060 062 063 066 067 074 076 331 333 350 352 354 380
47 Clarion 335
48 Coby 210
49 Colortyme 060 062
50 Colt 377
51 Commercial Solutions332
52 Concerto 060 062
53 Contec 335
54 Contec/Cony 065 067
55 Craig 067 335
56 Crosley 055 293 320
57 Crown 067 071 335 352
58 CTX 235
59 Curtis Mathes
038 055 056 060 062 074 076 088 320 331 332 334 337 340 350 352 354
60 CXC 067 335
61 Cytron 238 278
62 Daewoo 060 061 062 066 076 093 117 125 152 333 337 349 352 380
63 Daytron 060 062 076 349
64 Dell 251 285 304
65 Denon 340
66 DiamondVision 311 317 319
67 Dimensia 056 088
68 Disney 132
69 Dumont 031 060 330 349
70 Durabrand 053 097 137 341 335 338
71 Dwin 322 334
72 Electroband 058
73 Electrograph 243
74 Electrohome 058 059 060 062
75 Element 228
76 Emerson
053 060 062 065 067 068 076 093 137 266 292 335 338 349 352 380
77 Emprex 314
78 Envision 060 062 222 331 350
79 Epson 225
80 Erres 347
81 ESA 053
82 Ether 362
83 Firstar 372
84 Fujitsu 068 216
85 Funai 053 067 068 335
86 Furi 368
87 Futuretech 067 335
88 Gateway 243 274 341 360
89 GE 027 056 059 060 062 069 070 085 088 107 116 332 337 378
90 GFM 051 305
91 Gibralter 031 060 330 331 349 350
92 Go Video 328
93 Goldstar 060 061 062 065 076 077 331 349 350 379
94 Gradiente 242
95 Grundig 351
96 Grunpy 067 068 335
97 Hallmark 060 062
98 Hankook 335 362 371
99 Harman/Kardon 055
100 Harvard 067 335
101 Havermy 334
102 Hello Kitty 337
103 Hewlett Packard 175 204 219
104 Hisense 250 370 375
NO. Brand Code
105 Hitachi 032 060 062 065 126 127 134 149 150 186 200 340
106 HP 204 219
107 Hyundai 327
108 Ilo 174 254 266 312
109 IMA 067
110 Infinity 055 071 320
111 InFocus 275
112 Initial 277
113 Innova 351
114 Insignia 097 237 298 299 300 306 313
115 Inteq 330
116 Janeil 079
117 JBL 055 071 320
118 JC Penney 056 060 061 062 063 069 070 074 076 077 088
119 JCB 058
120 Jean 333 363 370 372
121 Jensen 060 062 236
122 Jinxing 365 368 370
123 JVC 047 048 049 065 070 114 154 172 199 201
124 Kawasho 058 060 062
125 Kaypani 353
126 KEC 335
127 Kenwood 060 062 331 349 350
128 Kioto 055
129 KLH 339
130 Kloss Novabeam 067 079
131 Kolin 335 369
132 KTV 067 076 331 335 350 352
133 LG 030 060 061 182 224 257 302 321 350
134 Loewe 071
135 Logik 057
136 Luxman 060 062
137 LXI 055 056 062 071 088 151 320 332
138 M & S 055
139 Magnasonic 380
140 Magnavox
052 055 060 062 063 071 090 105 108 110 163 174 176 218 320 331 350
141 Magnin 378
142 Majestic 057
143 Marantz 055 060 062 071 231 272 320 331 350 351
144 Matsushita 336
145 Maxent 243 252 301
146 Mediator 374
147 Megapower 321
148 Megatron 062 340
149 Memorex 057 061 062 137 181 338 376 379
150 MGA 060 061 062 331 349 350 378
151 Midland 031 070 076 077 330 332 352
152 Mintek 174
153 Minutz 069
154 Mitsubishi 060 061 062 119 159 170 334 349
155 Monivision 321 325
156 Montgomery Ward 057
157 Motorola 059 078 334
158 MTC 060 061 062 074 331 349 350 354
159 Multitech 067 335
160 Multivision 072
161 NAD 062 151 351
162 NEC 059 060 061 062 234 268 331 349 350
163 Netsat 351
164 NET-TV 243 247
165 Newave 333 367 371
166 Nikko 062 066 331 333 350
167 Norcent 222
168 Noshi 348
169 NTC 066 333
170 Olevia 138 192 221 357 358
171 Onwa 067 335
172 Oppo 282
173 Optimus 336 376
174 Optoma 276
175 Optonica 073 078 334
176 Orion 097 338
177 Otto Versand 058
178 Panasonic
021 022 023 024 025 026 059 070 071 086 103 122 144 147 155 168 183 185 336 376
179 Penney 151 331 332 348 349 350 352 354 378 379
180 Philco 055 059 060 061 062 063 065 071 181 320 331 349 350
181 Philips
040 041 042 043 044 045 046 055 059 060 063 065 071 089 090 091 096 160 162 164 169
174 177 179 190 208 291 320 347 351
182 Philips Magnavox 042 045 089 090 096
183 Phonola 347
184 Pilot 060 076 331 349 350 352
-59-

UniversalRemote Control
Haier LED HDTV
EN-39
200 Quelle 058
201 R
adio Shack/Realistic
056 060 062 065 067 073 076 077
202 Radiola 347
203 Radio Shack 088 331 332 335 349 350 352
204 RCA
027 028 029 056 059 060 061 062 082 088 095 098 332 348 349 354 378
205 Realistic 088 331 335 349 350 352
206 Runco 031 330 331 350
207 Sampo 060 062 076 077 243 283 331 350 352 353
208 Samsung
037 038 039 060 061 062 065 074 076 077 129 130 140 143 158
166 178 193 194 209 213 229 232 286 294 295 331 349 350 351 354
209 Samsux 352
210 Sansui 097 338
211 Sanyo 060 249 270 378
212 SBR 347
213 Sceptre 264
214 Scimitsu 349
215 Scotch 062
216 Scott 060 062 065 067 068 255 335 349
217 Sears 053 055 056 060 062 068 080 088 151 244 320 332 379
218 SEI 058
219 Sharp
033 034 035 036 060 062 065 073 076 078 083 112 131 139 142
145 167 171 180 198 202 203 334 352
220 Shen Ying 333
221 Sheng Chia 334 367
222 Shogun 060 349
223 Signature 057
224 Simpson 063
225 Sinudyne 058
226 SKY 351
227 Skygiant 335
228 Sony
011 012 013 014 015 016 058 087 094 101 102 118 124 128 136
148 153 184 206 226 287 288
229 Soundesign 060 062 063 067 068 335
230 Sowa 366 370
231 Squareview 053 080
232 SSS 060 067 335 349
233 Starlite 067 335
234 Studio Experience325
235 Superscan 052 260 334 356
236 Supre-Macy 079
237 Supreme 058
238 SVA 230 355
239 Sylvania
046 050 051 052 053 054 055 060 062 063 071 137 141 161 289 320 331 350
240 Symphonic 053 067 080 141 335
241 Synco 333 337 361 366 367 371
242 Syntax 138 192 344 357 358
243 Syntax-Brillian 192 244
244 Tacico 333 371
245 Tandy 078 334
246 Tatung 059 253 273 341 360 363 366 370
247 Technics 070 336
248 Techview 326
249 Techwood 060 062 070
250 Teco 363 367 371
251 Teknika
055 057 060 061 062 063 065 066 067 068 074 076 320 333 335 349 352 354
252 Telecaption 075
253 Telefunken 038
254 Thomson 088
255 TMK 060 062
256 TNCi 330
257 Toshiba
017 018 019 020 074 075 099 100 104 106 109 111 113 115 120 123 146 151 173 227 354
258 Totevision 076 352
259 Trutech 248
260 Tuntex 333 362
261 TVS 338
262 Universal 069
NO. Brand Code
185 Pioneer 060 062 156 157 205 212
186 Plasmsync 269
187 Polaroid 211 217 220 228 315 339
188 Portland 060 061 062 066 076 333 349 352
189 Price Club 074
190 Prima 281 324
191 Princeton 321
192 Prism 070
193 Proscan 027 056 088 332
194 Proton 060 062 065 353
195 Protron 196 262
196 Proview 263 343
197 Pulsar 031 060 330 349
198 Pye 347
199 Quasar 022 059 070 336 376
NO. Brand Code
263 Vector Research 331 350
264 Victor 065
265 Vidikron 055 320
266 Vidtech 060 061 062 349
267 Viewsonic 133 214 218 223 233 243 316 356
268 Viking 079
269 Viore 254
270 Visco 309
271 Vizio 133 257 261 296 318 341 356 359 360
272 Wards
055 056 057 060 061 062 068 069 071 073 088 320 331 349 350
273 Waycon 151
274 Westinghouse 133 187 188 195 215 290 303 337
275
White Westinghouse
093 338
276 Yamaha 060 061 062 331 349 350
277 Yapshe 373
278 Zenith 030 031 032 057 060 081 084 093 121 330 333 338
DVD
NO. Brand Code
1 Accele Vision 250
2 Accurian 355
3 Advent 330
4 Aiwa 307
5 Akai 280 323 361
6 Alco 328
7 Allegro 349
8 Alpine 257
9
Amphion MediaWorks
258
10 AMW 258
11 Apex 025 026 027 028 078 117 172 192 342 343
12 Apple 319
13 Arrgo 351
14 Aspire 332
15 Astar 252
16 Audiovox 164 167 223 328
17 Axion 281
18 Bang & Olufsen 344
19 Blaupunkt 249 343
20 Blue Parade 340
21 BOSE 062 079
22 BOSS 251
23 Boston Acoustics 381
24 Broksonic 123 323
25
California Audio Labs
325
26
CambridgeSoundWorks
290
27 Changhong 326 375
28 CineVision 196 349 350
29 Clarion 262
30 Classic 236
31 Coby 082 129 143 237 331
32 Curtis 129
33 Curtis Mathes 352
34 CyberHome 029 048 351 368 373 374 377
35 Cytron 279
36 Daewoo 113 349 361
37 Denon 070 182 198 209 299 300 325
38 Desay 268
39 DiamondVision 320 321 322
40 Disney 100 132
41 Dual 312
42 Durabrand 353
43 DVD2000 337
44 Eclipse 227
45 Emerson 063 248 324 345 385
46 Enterprise 345
47 ESA 259 354
48 Fisher 305 346
49 Funai 354 385
50 Gateway 376 378 384
51 GE 101 195 338 343
52 GFM 204
53 Go Video 118 349 382 384
54 Goldstar 120
55 GPX 194
56 Gradiente 270 325
57 Greenhill 343
58 Grundig 339
59 Haier 334
60 Harman/Kardon 224 347
61 Hitachi 014 136 203 244
-60-

UniversalRemote Control
EN-40 Haier LED HDTV
NO. Brand Code
62 Hiteker 342
63 iLive 293
64 Ilo 213
65 iLuv 314
66 Initial 278 343
67 Insignia 274 289 298 303 354
68 Integra 326 340
69 Irradio 174
70 iSymphony 294
71 Jamo 308
72 JBL 162 347
73 Jensen 311 331
74 JVC
030 031 032 033 034 035 036 037 038 086 087 095 103 122 141 142 161 173 214 218 243 306 341
75 Jwin 309
76 Kawasaki 328
77 Kenwood 325
78 KLH 115 272 328 343
79 Konka 359 360
80 Koss 153 286 327 334
81 Landel 363
82 Lasonic 263 348
83 Lenoxx 333 353
84 Lexicon 357
85 LG 102 151 165 185 189 201 211 242 256 283 345 349
86 Liquid Video 334
87 Liteon 158 219 355 384
88 Loewe 356 365
89 Magnavox 068 071 124 156 179 213 298 324 336 339 354
90 Marantz 245 301 302 339
91 Memorex 100 133 323
92 Microsoft 338
93 Mintek 213 278 343
94 Mitsubishi 106 177 190 337
95 NAD 264
96 Nakamichi 310
97 Nesa 343
98 Next Base 363
99 Nexxtech 271
100 Norcent 129 246
101 Onkyo 145 188 197 206 207 326 336
102 Oppo 273 284
103 Oritron 327 334
104 Panasonic
017 018 019 020 021 022 023 024 051 059 067 070 072 073 077 080 083 091 099 135 138 160 181
183 184 199 205 233 234 235 325 336 387 388
105 Philco 328
106 Philips
007 041 042 071 098 137 144 152 157 168 174 176 178 208 213 336 339 357 385
107 Pioneer 043 044 045 046 047 058 110 150 200 229 247 340 390
108 Polaroid 028 241 277
109 Polk Audio 339
110 Portland 361
111 Presidian 385
112 Prima 282 383
113 Princeton 358
114 Proceed 342
115 Proscan 069 338
116 Pye 276
117 Qwestar 327
118 RCA 039 040 069 090 166 191 328 338 340 343
119 Regent 333
120 Rio 349
121 Rotel 341
122 Rowa 329
123 Sampo 119 265 370 372
124 Samsung
012 013 014 015 016 054 064 066 074 075 085 104 105 108 111 121 125 134 154 193 210 226 325
389
125 Sansui 228 275 323
126 Sanyo 287 323 346
127 Sensory Science 384
128 Sharp 093 119 187 202 220 291 295 296 297
129 Sharper Image 368
130 Sherwood 292 361
131 Shinco 260
132 Shinsonic 213 335
133 Sigma Designs 358
134 Sonic Blue 349
135 Sony
000 001 002 003 004 005 006 049 052 055 056 057 060 061 065 076 081 092 094 097 109 112 114
126 127 128 146 147 148 155 230 231 232 316 317 318 335
136 Sungale 267
137 Superscan 124 324
138 SVA 364
139 Sylvania 042 063 124 133 159 204 225 285 324 354 385 386
NO. Brand Code
140 Symphonic 133 159 385
141 Teac 266 328 371 379 380
142 Technics 325
143 Techwood 261
144 Terapin 366
145 Theta Digital 340
146 Toshiba
007 008 009 010 011 050 053 084 088 089 096 107 130 131 140 163 169 170 171 175 186 212 215
216 217 221 238 239 240 254 255 323 336
147 Tredex 362
148 Trutech 296
149 Tview 313
150 Urban Concepts 336
151 US Logic 213
152 Venturer 288 328
153 Vizio 367 369
154 Vocopro 315
155 Westinghouse 222
156 Xbox 338
157 Yamaha 180 253 325 339
158 Zenith 102 116 120 139 149 336 345 349
VCR
NO. Brand Code
1 ABS 111
2 Adventura 008 032
3 Aiwa 008 032 095 112
4 Akai 019
5 Alienware 111
6 American High 031
7 Apex 115
8 Asha 012 029
9 Audio Dynamics 016
10 Audiovox 030 082 112
11 Bang & Olufsen 113
12 Beaumark 012 029
13 Bell & Howell 028
14 Broksonic 074 099 114
15 Calix 030 112
16 Candle 029 030
17 Canon 031
18 CineVision 094
19 Citizen 029 030 112 121
20 Colortyme 016
21 Colt 118
22 Craig 012 029 030 112
23 Curtis Mathes 016 029 031
24 Cybernex 012 029
25 Cyperpower 111
26 Daewoo 018 032 051 093 121
27 Davidson 008
28 DBX 016
29 Dell 111
30 Denon 013
31 DiamondVision 107
32 DIRECTV 110 122 124 125 129 130 134 136
33 Dishpro 133
34 Durabrand 025
35 Dynatech 008 032
36 Echostar 133
37 Electrohome 010 030 112
38 Electrophonic 030 112
39 Emerson 008 010 020 030 031 032 105 112 116 121
40 ESA 101
41 Expressvu 133
42 Fisher 028 073
43 Fuji 031
44 Funai 008 020 032 105 116
45 Garrard 008 032
46 Gateway 111
47 GE 012 029 031 055 119
48 Go Video 012 072
49 GOI 133
50 Goldstar 016 030 106 112 120
51 Gradiente 008 032
52 Harley Davidson 032
53 Harman/Kardon 016
54 Headquarter 028
55 Hewlett Packard 111
56 Hitachi 008 013 048
57 HNS 110
-61-

UniversalRemote Control
Haier LED HDTV EN-41
NO. Brand Code
58 Howard Computers 111
59 HP 111
60 HTS 133
61
Hughes Network Systems
013 110 122 124 125 130
62 Humax 110 122
63 Hush 111
64 iBUYPOWER 111
65 Insignia 081
66 Instant Replay 031
67 JC Penney 016 028 029 030 031
68 JCL 031
69 JVC 014 015 016 028 040 059 060 083 084 085 086 122 133
70 KEC 112
71 Kenwood 016 028
72 Kodak 030 031 112
73 LG 030 081 091
74 Linksys 111
75 Lloyd's 008 032
76 LXI 030 112
77 Magnasonic 020 121
78 Magnavox 008 020 021 025 027 031 044
79 Magnin 012 030 119
80 Marantz 016 028 031
81 Marta 030 112
82 Matsushita 031
83 Media Center PC 111
84 MEI 031
85 Memorex 008 012 025 028 029 030 031 032 100 108 112 114 117 120
86 MGA 010 012 119
87 MGN Technology 012 029
88 Microsoft 111
89 Mind 111
90 Minolta 013
91 Mitsubishi 010 041
92 Motorola 031
93 MTC 008 012 029
94 Multitech 008 029 032
95 NEC 016 028
96 Nikko 030 112
97 Niveus Media 111
98 Noblex 012 029
99 Northgate 111
100 Olympus 031
101 Optimus 020 030 112 117
102 Optonica 023
103 Orion 045 108
104 Panasonic 000 001 002 003 031 035 037 056 063 079 089 098 109 117 128
105 Penney 012 013 112 119 120
106 Pentax 013
107 Philco 031
108 Philips 023 031 044 071 087 110 116 122 124 125 126
109 Philips Magnavox 044
110 Pilot 030 112
111 Polaroid 104 115
112 Presidian 116
113 Profitronic 012
114 Proscan 069 070 134
115 Pulsar 025
116 Pye 103
117 Quarter 028
118 Quartz 028
119 Quasar 031 076 117
120 Radio Shack 008 023 030
121 Radio Shack/Realistic023 028 029 030 031 032
122 Radix 030 112
123 Randex 030 112
124 RCA 011 012 013 029 031 034 058 067 097 110 119 122 124 134 136
125 Realistic 008 023 028 029 030 031 032 112
126 ReplayTV 109 127
127 Ricavision 111
128 Runco 025
129 Samsung 012 017 018 019 029 043 049 050 068 080 110 124
130 Sanky 025
131 Sansui 008 045 102 108 114
132 Sanyo 012 028 029 073 119
133 Scott 010 018
134 Sears 008 013 028 030 031 112 120
135 Sharp 022 023 052 090 096
136 Shogun 012 029
137 Singer 031
138 Sonic Blue 109 127
NO. Brand Code
139 Sony
004 005 006 007 008 033 036 038 039 046 064 065 066 075 111 123 131 135
140 Stack 111
141 STS 013 031
142 Superscan 021
143 Sylvania 008 010 020 021 031 032 048 062 088 116
144 Symphonic 008 020 021 032 105 116
145 Systemax 111
146 Tagar Systems 111
147 Tandy 028
148 Tashiko 030
149 Teac 008 032
150 Technics 031
151 Teknika 008 030 031 032 112
152 Thomas 008
153 Tivo 110 122 123 124 126 130 131 135
154 TMK 012 029
155 Toshiba 009 010 018 042 047 053 054 057 061 077 111 132
156 Totevision 012 029 030 112
157 Touch 111
158 UltimateTV 136
159 Unitech 012 029
160 Vector 018
161 Vector Research 016
162 Video Concepts 016 018
163 Videomagic 112
164 Videosonic 012 029
165 Viewsonic 111
166 Villain 008
167 Voodoo 111
168 Wards 008 012 013 023 029 030 031 032
169 White Westinghouse 105
170 XR-1000 008 031 032
171 Yamaha 016 028
172 Zenith 008 024 025 026 078 092
173 ZT Group 111
CABLE
NO. Brand Code
1 ABC 009 010 011 013 031 044
2 Adelphia 007
3 Americast 050
4 Antronix 015 016
5 Archer 016
6 AT&T 003
7 Bell South 050
8 Cable Vision 006
9 Cabletenna 015
10 Cableview 014
11 Clearmaster 049
12 ClearMax 049
13 Colour Voice 018
14 Comcast 000 005
15 Comtronics 019
16 Contec 020
17 Coolmax 049
18 COX 005
19 Daeryung 057
20 Director 043
21 Dumont 056
22 Eastern 021
23 Everquest 045
24 Focus 048
25 GC Electronics 016
26 GE 009 010
27 Gehua 055
28 Gemini 045
29
General Instrument
005 008 010 040 042 043
30 Goldstar 046
31 Hamlin 022
32 Hitachi 010
33 Jasco 045
34 Jerrold 008 010 031 032 040 042 043 045
35 LG 053
36 Magnavox 025
37 MegaCable 005
38 Memorex 024 044
39 Motorola 000 003 005 008 039 040 042 043
40 Movie Time 025
41 Multitech 049
-62-
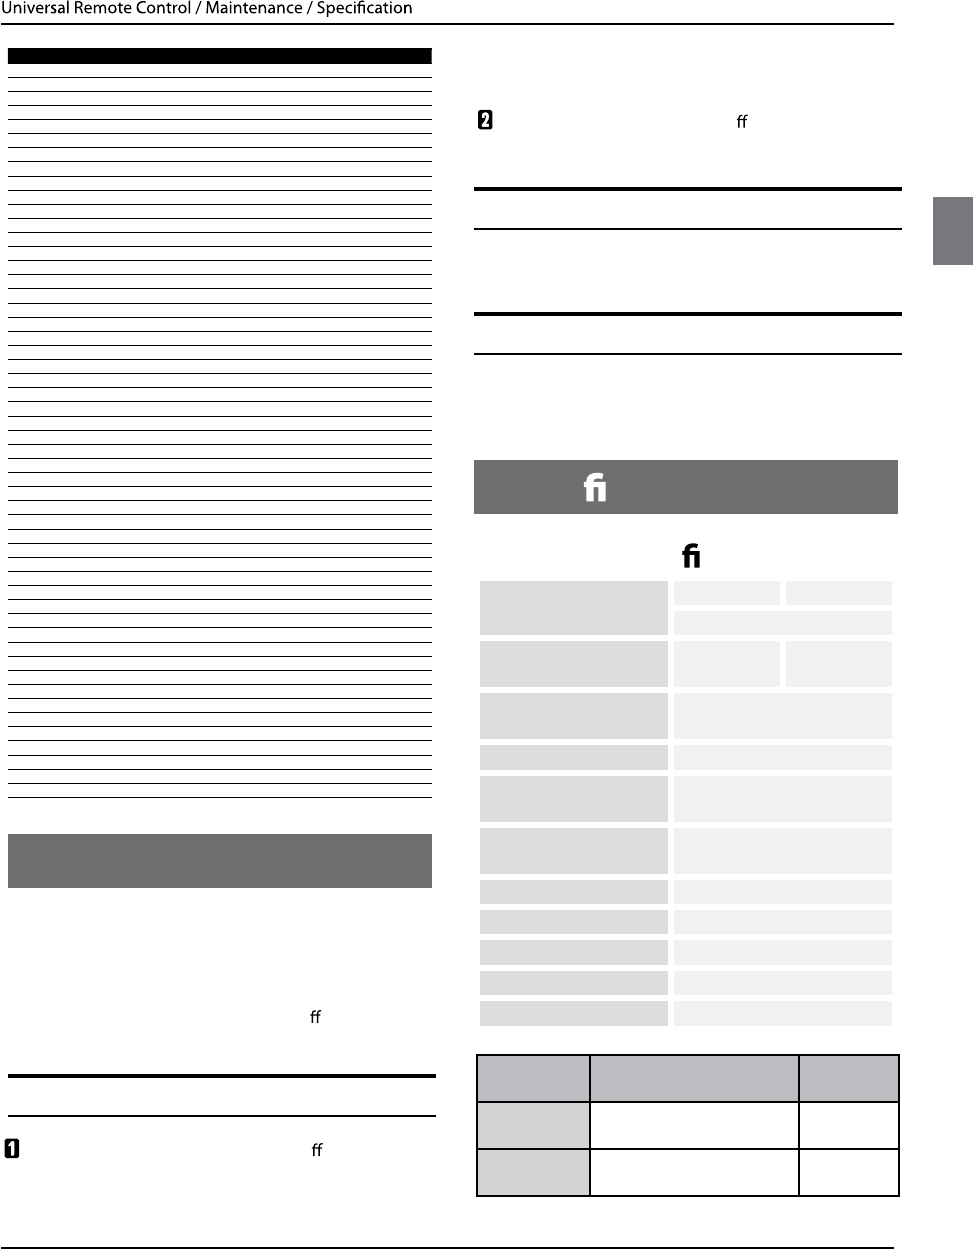
EN-42 Haier LED HDTV
NO. Brand Code
42 NEC 012
43 NET Brazil 036
44 NSC 025
45 Oak 020
46 Pace 001 047
47 Panasonic 028 030 044
48 Paragon 044
49 Philips 017 018 023
50 Pioneer 002 026 033 038 046
51 PopularMechanics 048
52 Proscan 009 010
53 Pulsar 044
54 Quasar 044
55 Radio Shack 045 049
56 RCA 014 030
57 Realistic 016
58 Rec
oton 048
59 Regal 020
60 Regency 021
61 Rembrandt 010
62 Runco 044
63 Samsung 001 026 035 046
64
ScientificAtlanta
001 002 003 007 013 037 038 041
65 Signal 045
66 Signature 010
67 Sony 006 051
68 S
prucer 030
69
tandardS Component
027
70 Starcom 031 045
71 Stargate 045
72 Starguest 045
73 Supercable 040
74 Supermax 049
75 TIME WARNER 004
76 Tocom 011
77 Torx 052
78 Toshiba 044
79 Trans PX054
80 Tristar 049
81 TS052
82 Tusa 045
83 Tv86 025
84 Unika015 016
85 UnitedCable 031
86 Universal 015 016
87 V2 049
88 ViewStar 020 023 025
89 Viewmaster 049
90 Vision 049
91 Vort
exView 049
92 Zenith 029 034 044 050
93 Zentek 048
Maintenance
Maintenance
Early malfunctions can be prevented. Careful and regular
cleaning can extend the amount of time you will have
your new TV. Be sure to turn the power o and unplug
the power cord before you begin any cleaning.
Cleaning the Screen
Here’s a great wayto keep the dust oyour screen
for a while. Wet a soft cloth in a mixture of lukewarm
water and a little fabric softener or dish washing
detergent. Wring the cloth until it’s almost dry, and
then use it to wipe the screen.
Make sure the excess water is o the screen, and
then let it air-dry before you turn on your TV.
Cleaning the Cabinet
To remove dirt or dust, wipe the cabinet with a soft, dry,
lint-free cloth. Please be sure not to use a wet cloth.
Extended Absence
If you expectto leave your TV dormant for a long time
(such as a vacation), it’s a good idea to unplug the power
cord to protect against possible damage from lightning
or power surges.
Speci cation
Product Speci cation
Resolution 32"
1366x768 ( Dot)
Estimated Yearly
Energy Cost
$11
Power requirement 120 V~ , 60 Hz
Color system NTSC, ATSC, Clear QAM
ExternalAntenna
Impedance
75 ohm
Color 1,070,000,000 (1024 steps
of each R, G and B)
OperatingTemperature 50~104 °F (10~40 °C)
Operating Humidity20~80%
StorageTemperature 5~113 °F (-15~45 °C)
Storage HumidityLess than 80%
Maximum Elevation 6561feet (2000 m)
MODEL
Dimensen (WXDXH) Unit:inches/
mm (Includingstand
)
Weight
(pounds/kg)
32"31.2X7.9 X22.3 inches
792x200x565 mm 21.1/9.6
-63-
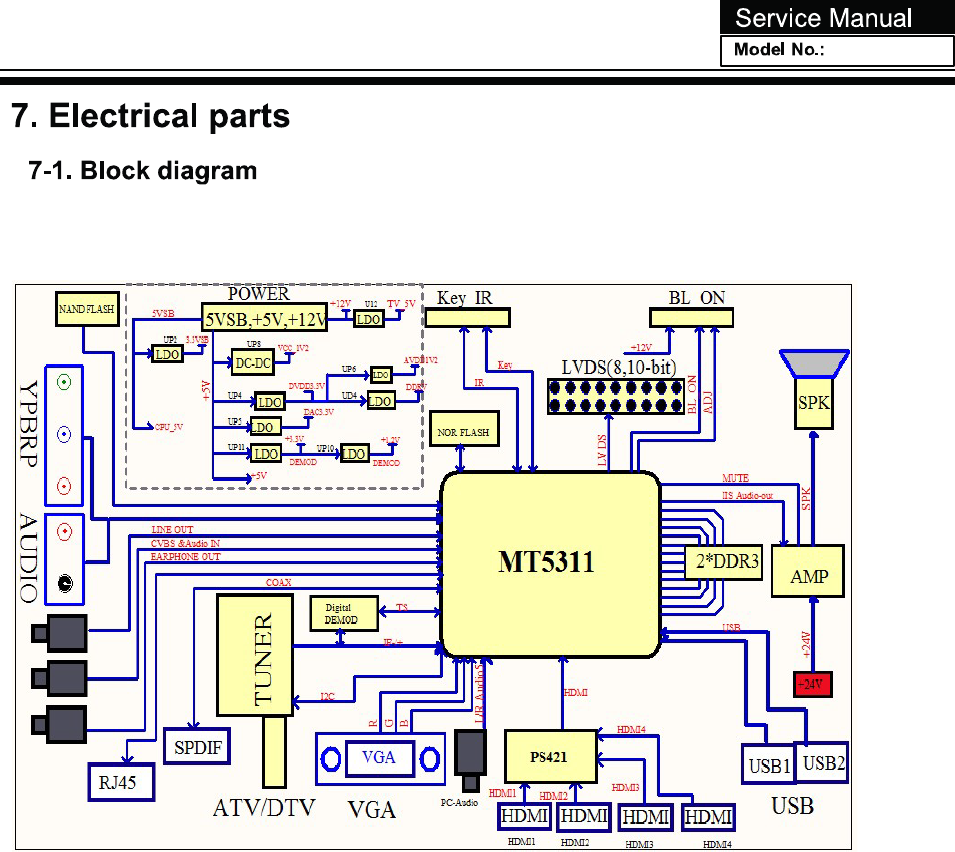
-64-
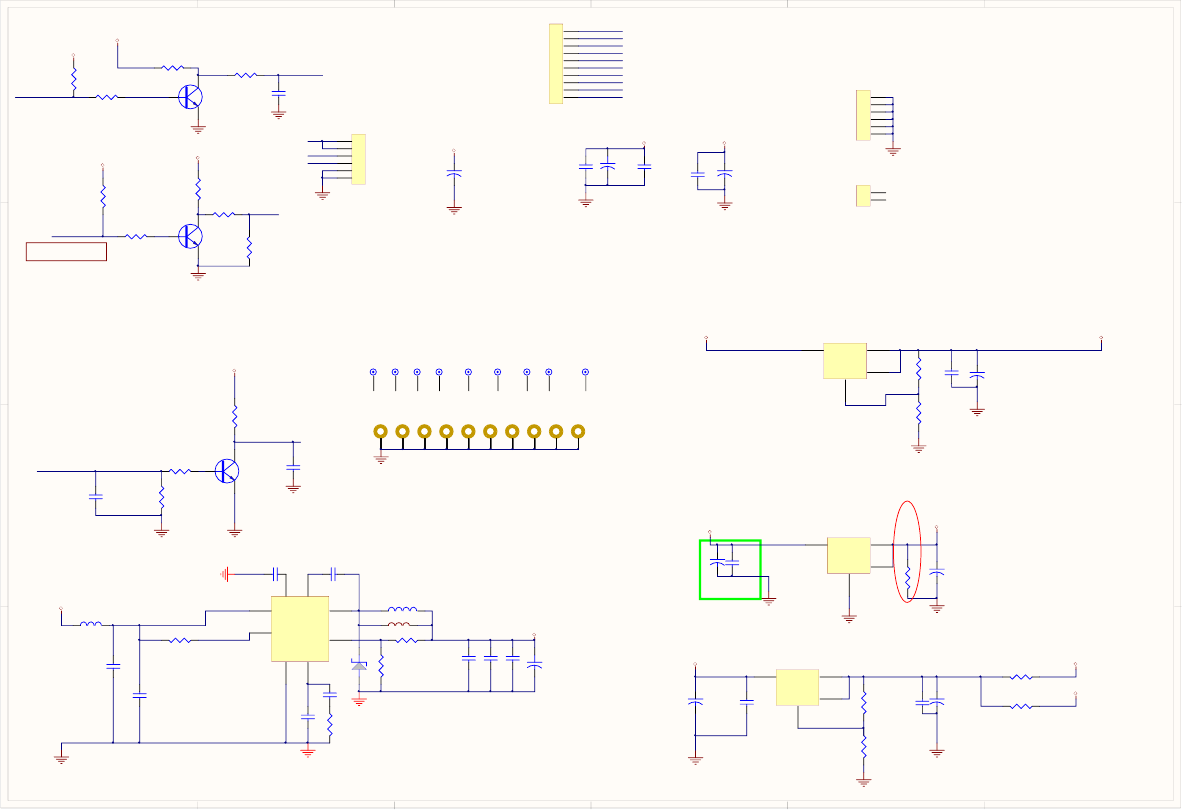
1
1
2
2
3
3
4
4
5
5
6
6
D D
C C
B B
A A
BL_Control
Dimming
BL_ON/OFF
SW_POWER
BL_DIMMING
OPW RS B
BL_PWM
SPR3
0ohm-0402-±5%-1/16W
RL8
10Kohm-0402-±5%- 1/16W
RL9 1Kohm-0402-±5%-1/ 16W
CP4
10uF-0805-Y5V- +80%-20% -10V
SPR6
0ohm-0402-±5%-1/16W
RL2
510ohm-0402-± 5%- 1/16W
R88
100Kohm-0402-±5%- 1/16W
RP2
1Kohm-0402-±5% -1/16W
RP6
4K7ohm-0402-±5%- 1/16W
SPR5
NC/ 110ohm-0402-±1%-1/16W
RL3
1Kohm-0402-±5% -1/16W
RP10
47Kohm-0402-±5%- 1/16W
XR21
10Kohm-0402-±5%- 1/16W
CM57
NC/ 10pF-0402-NPO-±5%-50V
CL1
1uF-0603-Y5V- +80%-20% -10V
C15
0.1uF-0402-Y5V -+80% -20%-16V
SPC11
0.1uF-0402-Y5V -+80% -20%-16V
SPR1
NC/ 110ohm-0402-±1%-1/16W
RL13
4K7ohm-0402-±5%- 1/16W
RL4
4K7ohm-0402-±5%- 1/16W
GND
GND
+5V
GND
GND
GND
GND
+5V
+5V
3V3SB
3V3SB
AVDD3V3
DVDD3V3
GND
GND
GND
GND GND
AVDD1V2
AVDD3V3
+5VSB 3V3SB
+5VSB
GND
GND
+5V
GND
GND
LO = > POWER_ON
HI =>POWER_OFF
0.925 x ( 1+Rup/Rdn) = 1.12V
CORE POWER
1.25 x (1+180/110) = 3.3V <1.8A
ANALOG POWER AVDD1V2
Vout = Fixed 1. 2V
HI =>POWER_OFF
LO = > POWER_ON
MAIN POWER
DIGITAL POWER DVDD3V3
3.3V fix ouput for low power consider.
+
CEP6 100uF-16V-±20%-5×11-105
+
SPC17
NC/100uF-16V-±20%-5×11-105
CB22
0.1uF-0402-Y5V -+80%-20%-16V
+
CEP14 100uF-16V-±20%-5×11-105
+
SPC14
100uF-16V-±20%-5×11-105
+
SPC15
100uF-16V-±20%-5×11-105
LP3
0ohm-0603-±5%-1/10W
VI
3VO 2
ADJ
1
VO 4
UP6 LC 1 1 17 C LTR AD
R46
NC/ 100ohm-0402-±5%-1/16W
CPR15
0ohm-0603-±5%-1/10W
CPR16
0ohm-0603-±5%-1/10W
L5
TC5026U-470K-06
BS 1
IN
2SW 3
GND
4
FB 5
CO M P
6
EN
7
NC 8
UP8
RT8250NGSP
C4
NC/100pF-0402-NPO-±5%-50VC6
3900pF-0402-X7R-±10%-50V
R12
4K7ohm-0402-±5%-1/16W
C23 0.01uF-0402-X7R-±10%-50V
R6
4K7ohm-0402-±1%-1/16W
R11
18Kohm-0402-±1%-1/16W
C22
0.1uF-0402-Y5V-+80%-20%-16V
D1
NC/ SK3 4A- SMA
GND
GND
GND
L1
NC/CH8010U-220K-045-G
CPC39
0.1uF-0402-Y5V -+80%-20%-16V
CPC43
0.01uF-0402-X7R -±10%-50V
CPC42
1uF-0603-Y5V- +80%-20% -10V
VCCK
2A
+
CPC1
470uF-10V-±20%-6.3×11-105 -
+5VSB
GND
+
CEP3
100uF-16V-±20%-5×11-105
C17
0.1uF-0402-Y5V -+80%-20%-16V
GND
+12 V
+
CEP2
100uF-16V-±20%-5×11-105
QL1 MMBT3904(f350MHz)
QL2
MMBT3904(f350MHz )
QP1
MMBT 3 9 04( f 350MHz )
+5Vp a ne l
1
2
3
4
5
6
7
8
9
10
CNA2
10PIN-2.54-D-H-G
SW_ POW E R
+5VSB
+5V
GND
+12 V
GND
+5V
+5Vp a ne l
GND
Di m m i ng
+12 V 1
2
3
4
5
6
CN5
6PIN-2.0-D-H- -G
BL_Cont rol
RL10
33ohm-0402-±5%-1/16W
R340
2K2ohm-0402-±5%-1/16W
CPC28
1uF-0603-Y5V- +80%-20% -10V
CB990
0.1uF-0402-Y5V -+80%-20%-16V
+5V
GND
+
CPC31
470uF-10V-±20%-6.3×11-105 -
CP6
NC/0. 1uF-0402-Y5V-+80%-20%-16V
1
2
3
4
5
6
CN1
NC/70. 5*51. 5*12. 8
GND
1
2
CN2
34*28.4*8 ( )
VI
3VO 2
ADJ
1
VO 4
UP4 AZ1084S2-3.3(TR)E1
VI
3VO 2
ADJ
1
VO 4
UP2 LC1117CLTR33
M1
MARK
M2
MARK
M3
MARK
M4
MARK
M5
MARK
M6
MARK
M7
MARK
M8
MARK
H1 H2 H3 H4 H5 H6 H7 H8 H9 H10
GND
T. MT5311.81B 11411
BOARD NAME
C3
0.1uF-0402-Y5V -+80%-20%-16V
C7
0.1uF-0402-Y5V -+80% -20%-16V
-65-

1
1
2
2
3
3
4
4
5
5
6
6
D D
C C
B B
A A
JTCK
JTDI
JTRST#
JTDO
JTMS
OSDA 0
AVDD 33_XTAL_STB
OSCL0
AVDD10_LDO
AVDD12_PLL
AVDD 33_XTAL_STB
OXTALO
OXTALI
3V3SB
ORESET#
U0RX
U0TX
PACLE
PAALE
POCE1#
PARB#
POOE#
POWE#
PDD0
PDD2
PDD3
PDD4
PDD6
PDD7
PDD1
PDD5
POCE0#
OPWR SB
FSR C _W R
AVDD12_PLL
PACLE
PAALE
PDD0
PDD2
PDD3
PDD4
PDD6
PDD7
PARB#
POCE1#
Fla sh _W P #
PDD1
POOE#
POWE#
PDD5
PDD6
POOE#Flash_WP #
POCE0#
PDD7
OSDA 0
OSCL0
ORESET#
OXTALI OX TALO
OPCTRL4
AOSDATA1
OPCTRL5
JTCK
JTDI
JTRST#
JTDO
JTMS
SYS_EEPROM_WP
U0TX
U0RX
OSDA 1
OSCL1
LED_GR E#
OPCTRL3
LED_RED#
IR
R/B
7
RE
8
CE
9
VCC 12
VSS
13
CLE
16
ALE
17
WE
18
WP
19
GND
6
I/O0 29
I/O1 30
I/O2 31
I/O3 32
VSS
36
VCC 37
I/O4 41
I/O5 42
I/O6 43
I/O7 44
UM3
HY27U F082G2B-TPCB
RM21
1Mohm-0402-±5%-1/16W
R66
510ohm-0402-±5%-1/16W
RW6
NC/10K ohm-0402-±5%-1/16W
R1779
510ohm-0402-±5%-1/16W
RM8
1K2ohm-0402-±1%-1/16W
RM20
3K9ohm-0402-±1%-1/16W
CM7
NC/10pF-0402-NPO -±5%-50V
CM18
0.1uF-0402-Y5V-+80% -20%-16V
RW2
10Kohm-0402-±5%-1/ 16W
CM16
0.1uF-0402-Y5V-+80% -20%-16V
CM53
NC/10pF-0402-NPO -±5%-50V
RM17
4K7ohm-0402-±5%-1/16W
RM19 7K5ohm-0402-±5%-1/ 16W
CM19
NC/10pF-0402-NPO -±5%-50V
E0 1
E1 2
E2 3
GND 4
SDA
5SCL
6WP
7VCC
8
UM5
GT24C32-2GLI-TR
RM2
10Kohm-0402-±5%-1/ 16W
RM14
4K7ohm-0402-±5%-1/16W
TP3
RW22
1Kohm-0402-±5%-1/ 16W
RW4
10Kohm-0402-±5%-1/ 16W
RM13
4K7ohm-0402-±5%-1/16W
CM12
0.1uF-0402-Y5V-+80% -20%-16V
CM14
0.1uF-0402-Y5V-+80% -20%-16V
CM9
0.1uF-0402-Y5V-+80% -20%-16V
CM11
0.1uF-0402-Y5V-+80% -20%-16V
RM7
0ohm-0402-±5%-1/16W
CM47
0.1uF-0402-Y5V-+80% -20%-16V
RW5 10K ohm-0402-±5%-1/16W
RM15
4K7ohm-0402-±5%-1/16W
TP1 1
CM15
0.1uF-0402-Y5V-+80% -20%-16V
RW1 NC /10Kohm-0402-±5%-1/ 16W
CM10
NC/0. 1uF-0402-Y5V-+80%- 20%-16V
R1777
10Kohm-0402-±5%-1/ 16W
RM27
0ohm-0402-±5%-1/16W
RM6
4K7ohm-0402-±5%-1/16W
R1776
4K7ohm-0402-±5%-1/ 16W
JTCK
R4
JTDI
T1
JTDO
R3
JTMS
T3
JTRST _
T2
OSDA1
U4
OSCL 1
U3
XTAL I
AE1 9
XTAL O
AD19
AVDD33_XT AL_STB
AC18
AVSS33_ XTAL _ST B
AE1 8
AVDD12_PL L
AB15
AVSS12_ PLL
AA17
OPWR SB AB9
ORE SET _ Y8
OIRI AC 8
DVSS
H6 DVSS
M9 DVSS
W19 DVSS
Y19 DVSS
W20 DVSS
Y20
DVSS
N9
DVSS
L12
DVSS
L13
DVSS
L14
DVSS
P9
DVSS
R10
DVSS
M11
DVSS
M12
DVSS
M13
DVSS
M14
DVSS
M15
DVSS
M16
DVSS
N11
DVSS
N12
DVSS
N13
DVSS
N14
DVSS
N15
DVSS
N16
DVSS
P11
DVSS
P12
DVSS
P13
DVSS
P14
DVSS
P15
DVSS
P16
DVSS
R11
DVSS
R12
DVSS
R13
DVSS
R14
DVSS
K12
DVSS
K13
DVSS
M10
DVSS
N10
DVSS
P10
U0T X AB8
U0RX AC 7
U1RX U2
U1T X U1
POWE _ J19
POOE_ K21
POCE 1_ K22
POCE 0_ J21
PDD7 K23
PDD6 L23
PDD5 L24
PDD4 L25
PDD3 K20
PDD2 K19
PDD1 L22
PDD0 M23
PARB_ J20
PACL E J24
PAALE J25
VCCK M1
VCCK M2
VCCK M3
VCCK M4
VCCK M5
VCCK M6
VCCK N1
VCCK N2
VCCK N3
VCCK N4
VCCK N5
VCCK N6
VCCK K1 0
VCCK K1 1
VCCK K9
VCCK L9
VCCK R9
VCCK K1 5
VCCK K1 6
VCCK L10
VCCK T9
VCCK T10
VCCK T11
VCCK T12
VCCK T13
VCCK T14
VCCK T15
VCCK T16
VCC3 IO T8
VCC3 IO M18
VCC3 IO H19
VCC3 IO V8
VCC3 IO U8
VCC3 IO N18
AVDD10_LDO
AA12
FSRC_WR E23
OSDA0
J22
OSCL 0
J23
DVSS
A25
DVSS
B25
DVSS
AA20
DVSS
W21
DVSS
Y21
DVSS
Y22
DVSS
AB22
DVSS
AA23
DVSS
AB23
DVSS
AC23
DVSS
AB24
AVDD33_VGA_STB
AA7
AVSS33_ VGA_ST B
W8
DVSS
AC24
DVSS
AB25
OSCL 2
T23 OSDA2
T22
VCCK L11
VCCK L15
VCCK R15
VCCK L16
VCCK R16
VCCK R17
DVSS
K14
DVSS
K17
DVSS
L17
DVSS
N17
DVSS
P17
VCCK T17
DVSS
W17
DVSS
V19
UM1A
MT5311
TP2
RM30
4K7ohm-0402-±5%-1/16W
CM17
0.1uF-0402-Y5V-+80% -20%-16V
CM8
0.1uF-0402-Y5V-+80% -20%-16V
RW3 NC /10Kohm-0402-±5%-1/ 16W
RM31
100ohm-0402-±5% -1/16W
RM16
10Kohm-0402-±5%-1/16W
CM3
27pF-0402-NPO-±5%- 50V
RM4
4K7ohm-0402-±5%-1/16W
CM33
0.1uF-0402-Y5V-+80% -20%-16V
R1778
4K7ohm-0402-±5%-1/ 16W
CS#
1
DOUT
2
WP#/VPP
3
VSS
4DIN 5
CLK 6
HOLD# 7
VCC 8
UM4
NC/ MX25L6406E M2I-12G
RM18
12Kohm-0402-±5%-1/16W
RM3
4K7ohm-0402-±5%-1/16W
CM4
27pF-0402-NPO-±5%- 50V
TP1 3
TP1 0
TP9
RM25
0ohm-0402-±5%-1/16W
CM20
0.1uF-0402-Y5V-+80% -20%-16V
RM37
100ohm-0402-±5% -1/16W
VCCK
VCCK
DVDD3V3
GND
GND
GND
GND
GND
GND
GNDGND
GND GND
GND
GND
GND GNDGND
GNDGND GND
AVDD1V23V3SB
DVDD3V3
3V3SB
GND GNDGND
GND
DVDD3V3 DVDD3V3DVDD3V3
GND
DVDD3V3
GND DVDD3V3
GND
3V3SB 3V3SB 3V3SB
3V3SB
DVDD3V3
GND
GND
GND
GND
3V3SB
3V3SB
GND
GND GNDGND GND
GND GND
GND
DVDD3V3
DVDD3V3
+5VSB +5VSB
GND
GNDGND
+5VSB
3V3SB
Anal o g Po wer
Core Power
3.3V IO Po wer
MT 5303G Serial Flash ( Co-Layout )NAND Flash
(10 mA )
(13 mA )
(42 mA )
Default 2G bit NAN D Flash used
RESET Circuit
27MH z CR YSTAL
Near 5303G
STRAPPING
JTAG Port
I2C ADDRESS "A0"
LO = > WRITE
HI=>WP
Near 5303G
KEY PANEL
UART Port 0
IR Receiver & LED
HI=>LEDRED
LO= > L ED GR EEN
LED ON whe n TV Standby
LEDOFFwhenTVWork
CM1
10uF-0805-X5R-±10%-6. 3V
CM6
NC/10uF-0805-X5R -±10%-10V
CEM2NC/10uF-0805-X5R-±10%-10V
CM13
10uF-0805-X5R-±10%-6. 3V
RM1
4K7ohm-0402-±5%-1/ 16W
DVDD3V3
RM5
4K7ohm-0402-±5%-1/ 16W
YM1
27. 0 00MHz -- 20PPM- +10PPM- 20PF- HC-4 9S
C1
NC/10pF-0402-NPO -±5%-50V
C2
NC/10pF-0402-NPO -±5%-50V
GND
D6
AVLC18S02003
D3
AVLC18S02003
GND
C
B
E
Q51
3CG3906M
Q68
MMBT3904(f350MHz )
D14
AVLC18S02003
D18
AVLC18S02003
QM1
MMBT 39 04( f 350MHz)
QM2
MMBT 39 04( f 350MHz)
AA7
+
CEM1
47uF-16V-±20%-4×7-105
R1
75ohm-0402-±5%-1/16W
R7
1Kohm-0402-±5%-1/16W
R8
6K8ohm-0402-±5%-1/16W
R4
3K3ohm-0402-±5%-1/16W
C631
0.01uF-0402-X7R-±10%-50V
GND
K0
K1
K2
K3
K4
K5
K6
K7
R9
1Kohm-0402-±5%-1/16W
R39
6K8ohm-0402-±5%-1/16W
R44
3K3ohm-0402-±5%-1/16W
D7
AVLC18S02003
14
13
12
11
10
9
8
7
6
5
4
3
2
1
CN22
14PIN-2.0-D-H-G
CPU_5V
LED_GRE #
LED_RED#
GND
IR
R40 22ohm-0402-±5%-1/16W
C630
0.01uF-0402-X7R-±10%-50V
D8
AVLC18S02003
+5VSB
R45
75ohm-0402-±5%-1/16W
R1774 3K3ohm-0402-±5%-1/16W
R1775 3K3ohm-0402-±5%-1/16W
3V3SB
R1773
1Kohm-0402-±5%-1/16W
R1771
1Kohm-0402-±5%-1/16W
C54 0.1uF-0402-Y5V-+80%-20%-16V
ADIN3
ADIN2
1
2
3
4
JM1
4PIN-2.0-D-H- -G
URX#'
UTX# '
CM37
0.1uF-0402-Y5V-+80% -20%-16V
GND
-66-
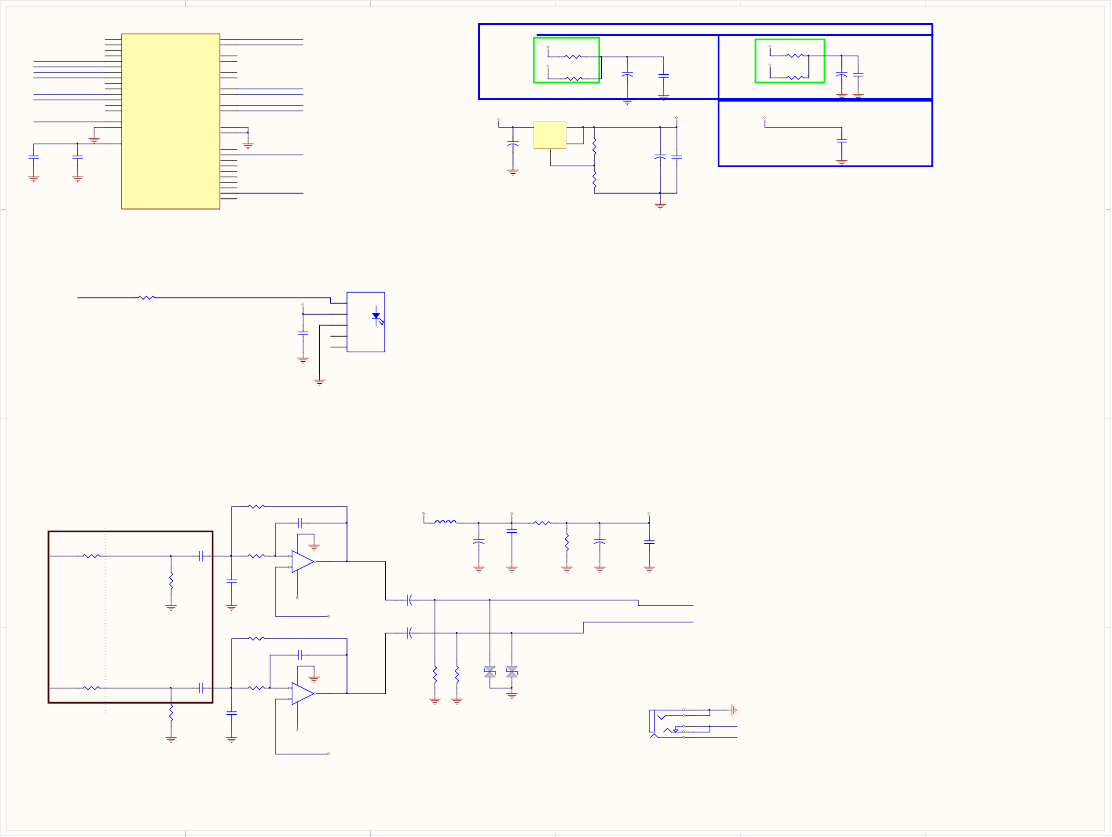
1
1
2
2
3
3
4
4
5
5
6
6
D D
C C
B B
A A
VGA _L_In
VGA_R_In
AV 1_R_In
AV 1_L_In
AVDD3V3
AV DD 33_DAC
AR3O
AL3O
AV DD 33_DAC 1
SPDIF_OUT
VMID_AADC
YP bPr _R_In1
YP bPr _L_In1
AOSD ATA1
AL0O
AR0O
LO2_L
AL3O
AR3O
LO2_R
SPDIF_OUT
AV DD 33_DAC 1
AVDD33_DAC
LINE_OUT_L
LINE_OUT_R
Coaxial
RA28
NC/ 47Kohm-0402-±5%-1/ 16W
RM34
47ohm-0402-±5%-1/16W
RA29
NC/ 47Kohm-0402-±5%-1/ 16W
+
-
3
2
1
8 4
U70A
AZ4558CMTR-E1
RA23
NC/ 100Kohm-0402-±5%-1/ 16W
CA17
1000pF-0402-X 7R- ±10%- 50V
RA31
5K6ohm-0402-±5%-1/ 16W
RA19
10Kohm-0402-±5%-1/ 16W
SPR7
NC/ 110ohm-0402-±1%-1/16W
CM24
0.1uF-0402-Y5V -+80%-20% -16V
RA 27 10Kohm-0402-±5%-1/ 16W
CA5
0.1uF-0402-Y5V -+80%-20% -16V
CA13
100pF-0402-NPO-±5% -50V
RM32
NC/ 47ohm-0402-±5%-1/16W
+
-
5
6
7
8 4
U70B
AZ4558CMTR-E1
CM22
0.1uF-0402-Y5V -+80%-20% -16V
CA3
33ohm-0402-±5%-1/16W
RM33
NC/ 47ohm-0402-±5%-1/16W
CA12
1000pF-0402-X 7R- ±10%- 50V
RM36
0ohm-0402-±5%-1/16W
RA21
5K6ohm-0402-±5%-1/ 16W
CA2
0.1uF-0402-Y5V -+80%-20% -16V
RA34
NC/ 100Kohm-0402-±5%-1/ 16W
AIN0 _R_AADC
AE2 5
AIN0 _L _AADC
AB21
AIN1 _R_AADC
AD25
AIN1 _L _AADC
AE2 2
AIN2 _R_AADC
AC25
AIN2 _L _AADC
AD22
AIN3 _R_AADC
AD23
AIN3 _L _AADC
AB20
AIN4 _R_AADC
AE2 4
AIN4 _L _AADC
AC21
AIN5 _R_AADC
AE2 3
AIN5 _L _AADC
AC20
AVDD33_ AADC
AA19
AVSS33_ AADC
AA21
VMID_AADC
AA18
AR0_ADAC Y23
AL0 _ADAC AA25
AR1_ADAC W23
AL1 _ADAC AA24
AR2_ADAC V24
AL2 _ADAC Y25
AR3_ADAC V25
AL3 _ADAC Y24
AVDD33_ DAC1 V2 3
AVSS33 _DAC1 W22
AVDD33_ DAC V22
AVSS33 _DAC AA22
ALI N V21
ASPDIF V2 0
AOBCK T21
AOLR CK U2 4
AOMCL K U25
AOSDAT A4 R21
AOSDAT A3 R20
AOSDAT A2 T19
AOSDAT A1 U2 3
AOSDAT A0 T20
AIN6 _R_AADC
AD24
AIN6 _L _AADC
AC22
UM1F
MT5311
CA4
0.1uF-0402-Y5V -+80%-20% -16V
RA4
10Kohm-0402-±5%-1/ 16W
RA32
15Kohm-0402-±5%-1/ 16W
CA1
0.1uF-0402-Y5V -+80%-20% -16V
RA22
15Kohm-0402-±5%-1/ 16W
RA3
10Kohm-0402-±5%-1/ 16W
CM21
0.1uF-0402-Y5V -+80%-20% -16V
SPR8
0ohm-0402-±5%-1/16W
CA10
100pF-0402-NPO-±5% -50V
CM23
0.1uF-0402-Y5V -+80%-20% -16V
GND
GND
GNDGND
GND GND GND GND GND
+12 V OPAV12 0 OPA2VREF
GND GND
GND
GND GND
GND
GNDGND
GND
GND
OPAV12 0
OPAV12 0
OPA2VREF
OPA2VREF
+5V
GND
GND
DAC_3V3
GND
GND
GNDGND
AVDD3V3 AVDD3V3
GND
AVDD3V3
GND
+5V DAC_ 3V3
DAC_3V3
MT 5303G
Au d io O u t p ut
OPTICAL
Close to MT5303G
SCT2 Audio Out
(1 mA ) (1 mA )
(13 mA )
Anal o g Po wer
Out to HP
Out to Bypass
CM25
1uF-0603-Y5V-+80%- 20%-10V
+
CEP8
100uF-16V-±20%-5×11-105
+
SPC16
100uF-16V-±20%-5×11-105
+
CEA1
100uF-16V-±20%-5×11-105
+
CEA2
100uF-16V-±20%-5×11-105
CA11
2.2uF-0603-Y5V -+80%-20% -10V
CA16
2.2uF-0603-Y5V -+80%-20% -10V
D11
AVLC 18 S02 00 3
D12
AVLC 18 S02 00 3
IR Transmit te r
Ni n
1
Vcc
2
GND
3
NC1
4
NC2
5
BP10
GQ-0 8
VI
3VO 2
ADJ
1
VO 4
UP5 LC1117CLTR33
+
CEM3
47uF-16V-±20%-4×7-105 +
CEM4
47uF-16V-±20%-4×7-105
LINE_OUT_ L
LINE_OUT_ R
LA1
120ohm-0603-±25%
L4
5
SW 2
1
R3
BP11
PJ-3 063
GND
+
CEA5
47uF-16V-±20%-4×7-105
+
CEA6
47uF-16V-±20%-4×7-105
-67-
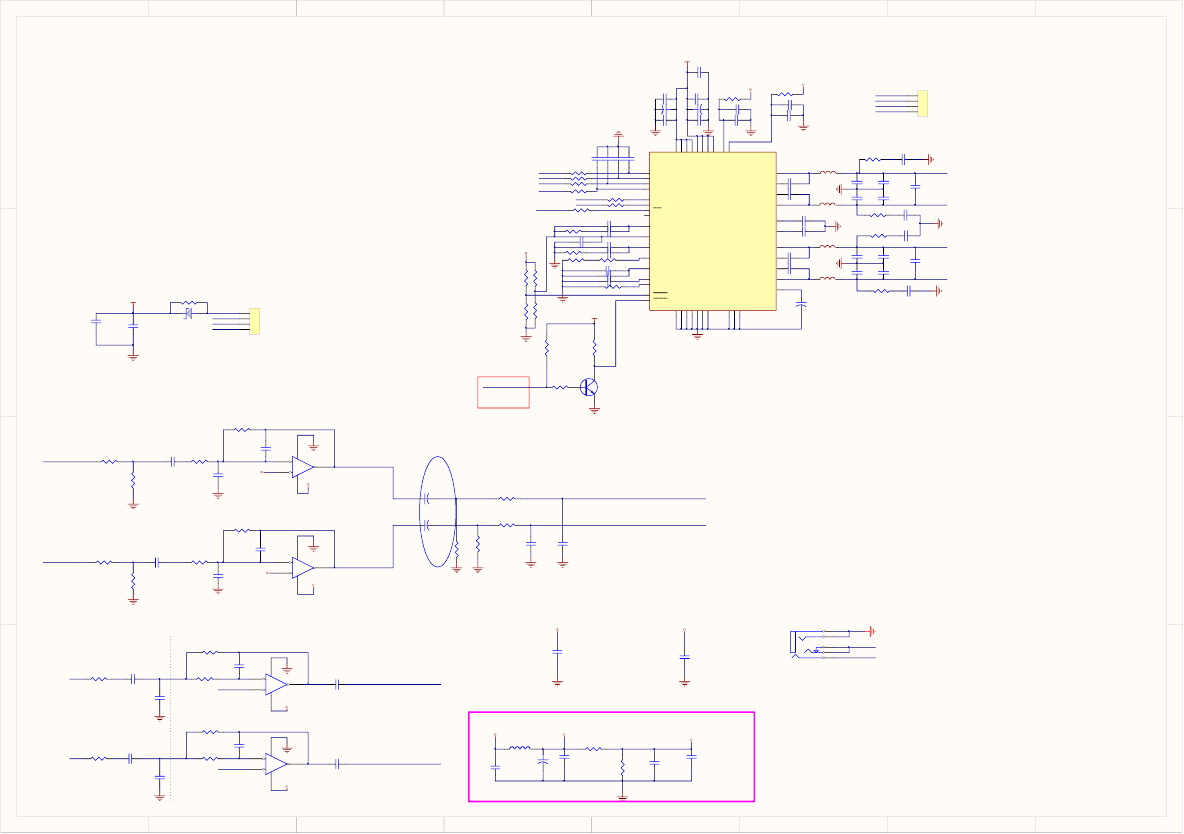
1
1
2
2
3
3
4
4
5
5
6
6
7
7
8
8
D D
C C
B B
A A
HPOL
HPOR
AV L1_OUT/AMP
AL0O
AV L1_OUT/AMP
OPA2VREF
OPA2VREF
AVR1_OUT/AMP
AV R1_OUT/A MP
AR0O
EAR_L
EAR_R
C645
100pF-0402-NPO-±5% -50V
C750
0.1uF-0402-Y5V -+80%-20% -16V
C669
10uF-0805-Y5V-+80% -20%-10V
C749
0.1uF-0402-Y5V -+80%-20% -16V
C648
100pF-0402-NPO-±5% -50V
ER7
3K9ohm-0402-±1%-1/ 16W
C646
1000pF-0402-X7R-±10%- 50V
EC4
NC/ 1000pF-0402-X7R-±10%-50V
EC 14 NC/470pF-0402-X7 R-±10%-50V
+
-
3
2
1
8 4
U68A
AZ4558CMTR-E1
ER17
1Kohm-0402-±5%-1/ 16W
R80
NC/ 1K8ohm-0402-±5%-1/ 16W
X
-
5
6
7
8 4
EUA2B
AZ4558CMTR-E1
CB997
0.1uF-0402-Y5V -+80%-20% -16V
ER18
1Kohm-0402-±5%-1/ 16W
R81
NC/ 1K8ohm-0402-±5%-1/ 16W
ER21
22Kohm-0402-±5%-1/ 16W
+
-
5
6
7
8 4
U68B
AZ4558CMTR-E1
C754
0.01uF-0402-X7R-±10% -50V
R1800
10Kohm-0402-±5%-1/ 16W
ER24
22ohm-0402-±5%-1/16W
R1764
15Kohm-0402-±5%-1/ 16W
R1781
4K7ohm-0402-±5%-1/ 16W
C751
0.1uF-0402-Y5V -+80%-20% -16V
EC8
NC/ 1000pF-0402-X7R-±10%-50V
X
-
3
2
1
8 4
EUA2A
AZ4558CMTR-E1
R1799
10Kohm-0402-±5%-1/ 16W
R1786
15Kohm-0402-±5%-1/ 16W
ER8
3K9ohm-0402-±1%-1/ 16W
R532
8K2ohm-0402-±5%-1/ 16W
R1757
4K7ohm-0402-±5%-1/ 16W
C647
1000pF-0402-X7R-±10%- 50V
R1758
15Kohm-0402-±5%-1/ 16W
R534
8K2ohm-0402-±5%-1/ 16W
EC13
NC/ 470pF-0402-X7R-±10%-50V
R1780
15Kohm-0402-±5%-1/ 16W
EC2
NC/ 100pF-0402-NPO-±5%- 50V
CB 999
0.1uF-0402-Y5V -+80%-20% -16V
EC6
NC/ 100pF-0402-NPO-±5%- 50V
C670
10uF-0805-Y5V-+80% -20%-10V
ER19
22ohm-0402-±5%-1/16W
C755
0.1uF-0603-Y5V -+80%-20% -50V
ER20
22Kohm-0402-±5%-1/ 16W
GND
VRE F_2 5
GND
GNDGND
GND
GND
HP_PW R
HP_PW R
GND GND
GND
VRE F_2 5
VRE F_2 5
+5V HP_ PWR
GND
GND
GND
OPAV12 0
OPAV12 0
GND
GND
OPAV12 0 OPA2VRE F
GND
GND GND
GND
AMP_PW R
NO HP_DETECT
HeadPhone OUTPUT
Near MT5303G
24v 35v
CE 652
10uF-0805-Y5V-+80% -20%-10V
CE 641
10uF-0805-Y5V-+80% -20%-10V
+
EC16
100uF-16V-±20%-5×11-105
+
EC15
100uF-16V-±20%-5×11-105
CE 645
10uF-0805-Y5V-+80% -20%-10V
+
CE 644
47uF-16V-±20%-4×7-105
EAR_R
EAR_L
L147
120ohm-0603-±25%
C300
2.2uF-0603-Y5V-+80%-20%-10V
C301
2.2uF-0603-Y5V-+80%-20%-10V
1
2
3
4
CON1
4PIN-2.54-D-H- -G
+24 V
+24 V
GND
DA1
SK34A-SMA
R43
NC/0ohm-1206-±5%-1/4W
GND
L4
5
SW 2
1
R3
BP28
PJ-3063
GND
AMP_SD
AMP- Lout-
AMP-Rout-
AMP-Lout+
AMP-Rout+
AMP-Lout+
AMP-Lout-
AMP-Rout-
AMP-Rout+
C175
0.047uF-0402-X7R-±10% -16V
C169
0.1uF-0603-Y5V -+80%-20% -50V
R266
10ohm-0402-±5%-1/16W
C261
0.1uF-0402-Y5V -+80%-20% -16V
C286
0.01uF-0402-X7R-±10% -50V
C259
0.1uF-0603-X7R-±10% -50V
OUT_ B 46
PGND_AB
47
PGND_AB
48
OUT_ A 1
PVCC_A 2
PVCC_A 3
AVSS
9
PLL_FLTM
10
PLL_FLTP
11
VR_ANA
12
AVDD 13
FAULT
14
MCL K
15
OSC_ RE S
16
DVSSO
17
VR_DI G
18
PDN
19
LRCLK
20 SCL K
21
SDIN
22
SDA
23 SCL
24
RESET
25
STEST
26
DVDD 27
DVSS
28
PVCC_D 40
PVCC_D 41
PGND_CD
37
PGND_CD
38
OUT_ D 36
OUT_ C 39
PVCC_C 45
BST_C 42
VCL AMP_C D 32
BST_D 33
VRE G 31
AGND
30
AVCC 34
BST_A 4
VCL AMP_AB 5
BST_B 43
PVCC_B 44
PVCC 35
GND
29
OC_ADJ
7
NC
8
SSTI MER
6
U38
TAS 5707
C227
0.1uF-0603-Y5V -+80%-20% -50V
R272
200ohm-0402-±5%-1/16W
R355
NC
C284
0.1uF-0603-X7R-±10% -50V
C408
NC/ 5pF-0402-NPO-±5%- 50V
C275
0.1uF-0603-X7R-±10% -50V
C268
0.1uF-0603-X7R-±10% -50V
R1846
33ohm-0402-±5%-1/16W
C278
0.1uF-0603-X7R-±10% -50V
C325
NC/ 5pF-0402-NPO-±5%- 50V
R399 NC/3R3
C283
0.1uF-0603-X7R-±10% -50V
R330
33ohm-0402-±5%-1/16W
R351
33ohm-0402-±5%-1/16W
C218
0.1uF-0603-Y5V -+80%-20% -50V
R345
470ohm-0402-±5%-1/16W
R352
33ohm-0402-±5%-1/16W
C186
0.1uF-0402-Y5V -+80%-20% -16V
R356
NC
C274
0.1uF-0603-X7R-±10% -50V
R359
18Kohm-0603-±5%-1/ 10W
R267
0ohm-0402-±5%-1/16W
R397 NC/3R3
C254
0.1uF-0603-X7R-±10% -50V
C407
NC/ 5pF-0402-NPO-±5%- 50V
R265
18Kohm-0603-±5%-1/ 10W
C276
0.1uF-0603-X7R-±10% -50V
R1845
33ohm-0402-±5%-1/16W
R360
15Kohm-0402-±5%-1/ 16W
R341
33ohm-0402-±5%-1/16W
C217
0.1uF-0603-Y5V -+80%-20% -50V
R373
22Kohm-0402-±1%-1/ 16W
C626
4700pF-0402-X7R-±10%- 50V
C363
NC/ 5pF-0402-NPO-±5%- 50V C168
0.1uF-0603-Y5V -+80%-20% -50V
C263
0.1uF-0603-X7R-±10% -50V
R1847
470ohm-0402-±5%-1/16W
C280
0.1uF-0603-X7R-±10% -50V
C306
NC/ 0.01uF-0402-X7R-±10% -50V
C294 NC/ 0.01uF-0402-X7R-±10% -50V
R401
NC/3R3
C167
0.1uF-0402-Y5V -+80%-20% -16V
R395
NC/3R3
C256
0.047uF-0402-X7R-±10% -16V
C262
NC/ 2200pF-0402-X7R-±10%-50V
C270
0.1uF-0603-X7R-±10% -50V
C291 NC/ 0.01uF-0402-X7R-±10% -50V
C257
4700pF-0402-X7R-±10%- 50V
C303
NC/ 0.01uF-0402-X7R-±10% -50V
GND
GND
GND
GND
GND
GND
GND
GND
GND
GND
GND
GND
GND
GND
GND
DVDD3V3
DVDD3V3
DVDD3V3
+
CA41
470uF-35V-±20%-10×13 105
+
CA39
470uF-35V-±20%-10×13 105
AMP_PW R
C260
10uF-0805-Y5V-+80% -20%-10V
C264
10uF-0805-Y5V-+80% -20%-10V
EA4
4.7uF-50V-±20%-4×7-105
L2
CH8010U-220K-045-G
L3
CH8010U-220K-045-G
L4
CH8010U-220K-045-G
L6
CH8010U-220K-045-G
C8
CL71-334J100V(T=3.5m m)
C765
CL71-334J100V(T=3.5m m)
1
2
3
4
CON2
4PIN-2.54-D-H-G
BOSLRCLK
BOSBCLK
BOSDATA
BOSMCLK
OSD A0
OSC L0
R1823 33ohm-0402-±5%-1/16W
MUTE _C TL
GND
DVDD3V3
Lo = > U N-MU TE
Hi= > MUTE
R1829
10Kohm-0402-±5%-1/ 16W
R1831
10Kohm-0402-±5%-1/ 16W
R1830
4K7ohm-0402-±5%-1/ 16W
XQ7 MMBT 39 04(f 350MHz)
C11 1uF-0603-X5R-±10%-25V
C12 1uF-0603-X5R-±10%-25V
C13
4.7uF-0603-X5R-±10%-10V
-68-
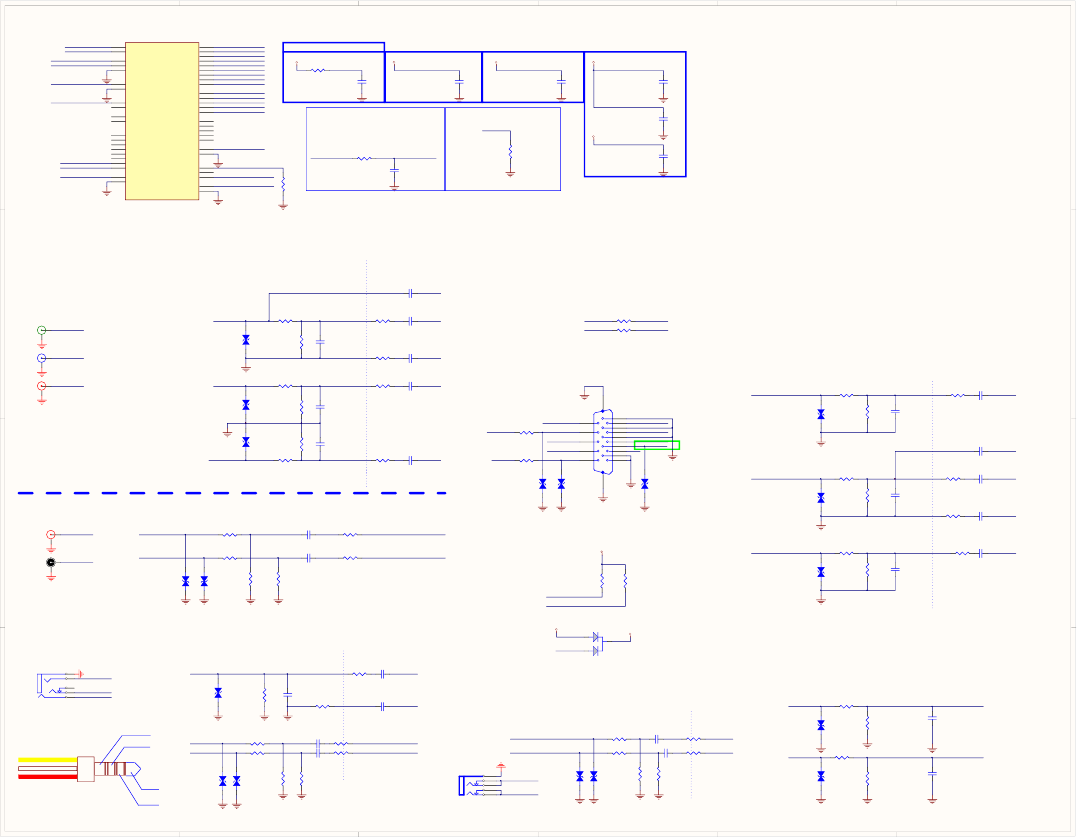
1
1
2
2
3
3
4
4
5
5
6
6
D D
C C
B B
A A
GP
SOG
VGACOM
BP
RP
VSYNC
HSYNC
VIP_ATV
VIN_ATV
AVDD3V3
AVDD3V3
AVDD12_RGB
VGASDA
VGASCL
MONI TOR _OU T
AV DD12_RGB
SOY1
Y1P
COM1
PR1P
PB1P
VDAC_FS
AVDD3V3
AVDD1V2
CVBS_COM
CVBS0P
AVDD3V3
IF_AGC_DEMODIF_AGC
CVBS0P
CVBS_COM
SOY1
Y1P
COM1
PB1
PR1PPR1PR_IN_1
Y_IN_1
PB1P
Y1
YP bPr_L_In1
YPbPr_R_In1
YBRL_IN1
PB_IN_1
AV 1L_IN
AV 1R_IN AV1_R_In
AV1_L_In
IF_AGC
YBRR_IN1
RV26
75ohm-0402-±5%-1/16W
RA9
10Kohm-0402-±5%-1/16W
CV4
0.01uF-0402-X7R-±10%- 50V
RV9
100ohm-0402-±5%-1/16W
RV4
56ohm-0402-±5%-1/16W
12
DV15
NC/I CVL0518030FR
CM26
0.1uF-0402-Y5V -+80%-20%-16V
RV2
18ohm-0402-±5%-1/16W
12
DV13
NC/I CVL0518030FR
CV1
1500pF-0402-X7R-±10%-50V
RV1256ohm-0402-±5%-1/16W
CM29
0.1uF-0402-Y5V -+80%-20%-16V
12
DV2
NC/I CVL0518030FR
RA2
47Kohm-0402-±5%-1/16W
1 2
DV4
NC/I CVL0518030FR
RV32 0ohm-0402-±5%-1/ 16W
RA5
10Kohm-0402-±5%-1/16W
CV2
0.01uF-0402-X7R-±10%- 50V
CV16
47pF-0402-NPO-±5%-50V
12
DV14
NC/I CVL0518030FR
RM35
0ohm-0402-±5%-1/16W
RV16
18ohm-0402-±5%-1/16W
CV3
47pF-0402-NPO-±5%-50V
CM30
0.1uF-0402-Y5V -+80%-20%-16V
CM27
0.1uF-0402-Y5V -+80%-20%-16V
RV14
56ohm-0402-±5%-1/16W
RA8
47Kohm-0402-±5%-1/16W
12
DV7
NC/I CVL0518030FR
RT52
10Kohm-0402-±5%-1/16W
RA10
47Kohm-0402-±5%-1/16W
RV17
100ohm-0402-±5%-1/16W
RA6
10Kohm-0402-±5%-1/16W
RV39
30Kohm-0402-±5%-1/16W
CM45
0.1uF-0402-Y5V -+80%-20%-16V
CV5
0.01uF-0402-X7R-±10%- 50V
RV24
100ohm-0402-±5%-1/16W
CM28
0.1uF-0402-Y5V -+80%-20%-16V
CV7
47pF-0402-NPO-±5%-50V
RV37
30Kohm-0402-±5%-1/16W
CV10
0.01uF-0402-X7R-±10%- 50V
FS_VDAC AA15
VDAC_OUT 1 W13
VDAC_OUT 2 Y12
AVDD33_ VDAC AA14
AVSS33_ VDAC W15
ADCINP_ DE MOD
AD17
ADCINN_ DE MOD
AE1 7
AVDD33_ DE MOD
AC19
AVDD33_ IFPGA
AB19
AVSS33_ DEMOD
Y18
AVDD12_ DE MOD
AB18
AVSS12_ DEMOD
Y16
IF_AGC
R19
RF_AGC
P23
SC0
AD15
SC1
AC15
SY0
AE1 5
SY1
AB16
CVBS2P
AC16
CVBS1P
AC17
CVBS0P
AB17
CVBS_COM
Y15
AVDD33_ CVBS
W14
AVSS33_ CVBS
W16
HSYNC W12
VSYNC W11
RP AC10
GP AC9
BP AD9
COM AB10
SOG AE9
COM1 AE1 1
PB1P AD1 2
PR1P AE 12
Y1P AD11
SOY1 AB11
COM0 AC1 3
PB0P AB 14
PR0P AC 14
Y0P AB1 3
SOY0 AC12
AVDD12_ RGB AD14
AVSS12_ RGB Y1 4
VGA_SDA AC1 1
VGA_SCL AB 12
LOUTN
AD20
LOUTP
AE2 0
UM1C
MT5311
RM41
560ohm-0402-±1%-1/16W
RA1
47Kohm-0402-±5%-1/16W
RV3
100ohm-0402-±5%-1/16W
CV15
0.047uF-0402-X7R-±10%- 16V
CV9
47pF-0402-NPO-±5%-50V
CV17 1uF-0603-Y5 V-+80%-20% -10V
RV38
30Kohm-0402-±5%-1/16W
RV40
30Kohm-0402-±5%-1/16W
RV8
18ohm-0402-±5%-1/16W
12
DV1
NC/I CVL0518030FR
CT19
0.047uF-0402-X7R-±10%- 16V
RA7
10Kohm-0402-±5%-1/16W
12
DV8
NC/I CVL0518030FR
RV6
100ohm-0402-±5%-1/16W
GND GND
GND
GND
GND
GND
GND
GND
AVDD1V2 AVDD3V3
GND
GND
AVDD3V3
GND
GND
GND
AVDD3V3
AVDD1V2
GNDGND GND
GND GND
GND
GND
GNDGND GND GND
GND GND
Anal o g Power
MT 5303G
Close to MT5303G
(86 mA )(65 mA )(42 mA ) ( 9.5 mA )
(20 mA )
(37 mA )
AV1 I nput(Horizontal)
Clo se to I CClo se to CO NN.
YPbPr1 Video Input(Horizotal)
YPbPr1 Audio Input
Clo se to CO NN.
Clo se to CO NN.
CVBS
L
GND
R
Y_IN_ 1
PB_I N_1
PR_I N_1
YBRR _I N1
YBRL _I N1
CV28
1uF-0603-Y5V-+80%-20%-10V
CV29
1uF-0603-Y5V-+80%-20%-10V
CV31
1uF-0603-Y5V-+80%-20%-10V
CV30
1uF-0603-Y5V-+80%-20%-10V
CVBS _0
2
1
4
3
6
5
BP1
AV3-8.4-06( )-U
GND
GND
GND
GND
GND
AV1L _I N
AV1R_ IN
L4
5
SW 2
1
R3
BP15
PJ-3063
CVBS_0
GND
VGASCL#
VSYNC
BLU1
RED
GRN1 GP
VGACOM
SOG
BP
RP
VSYNC#
HSYNC#
BLU
VGA_ 5V_IN
VGA_ L_In
VGA_R_In
GRN
RED1
HSYNC
VGASCL
VGASDA
VGA_ 5V_IN
URX#
UTX#
VGASDA#
HSYNC#
VSYNC#
RED
GRN
BLU
VGA_Audio_L_In
VGA_Audio_R_In
12
DV31
AV LC18S02003
DV28
AV LC18S02003
RA18
47Kohm-0402-±5%-1/16W
RM90
220ohm-0402-±5%-1/16W
CV42
47pF-0402-NPO-±5%-50V
RV65
75ohm-0402-±5%-1/16W
12
DV27
AV LC18S02003
CV47
NC/5pF-0402-NP O-±5%-50V
RV64
100ohm-0402-±5%-1/16W
RV68
100ohm-0402-±5%-1/16W
1617
1
2
3
4
5
6
7
8
9
10
11
12
13
14
15
BP8
D351-015F-001- -G
RV42
30Kohm-0402-±5%-1/16W
RA24
2K2ohm-0402-±5%-1/16W
RV61
100ohm-0402-±5%-1/16W
CV46
47pF-0402-NPO-±5%-50V
CV45
NC/5pF-0402-NP O-±5%-50V
CV41 0. 01uF-0402-X7R-±10%- 50V
RA15
10Kohm-0402-±5%-1/16W
RA20
2K2ohm-0402-±5%-1/16W
RV79
100ohm-0402-±5%-1/16W
RA17
10Kohm-0402-±5%-1/16W
12
DV34
AV LC18S02003
RV71
75ohm-0402-±5%-1/16W
CV39
47pF-0402-NPO-±5%-50V
RV67
100ohm-0402-±5%-1/16W
CV44
0.01uF-0402-X7R-±10%- 50V
RM91
220ohm-0402-±5%-1/16W
12
DV33
AV LC18S02003
RM87
0ohm-0402-±5%-1/16W
CV40
1500pF-0402-X7 R-±10% -50V
CV38
0.01uF-0402-X7R-±10%- 50V
DV29
AV LC18S02003
RV80
100ohm-0402-±5%-1/16W
12
DA12
AV LC18S02003
12
DV32
AV LC18S02003
RV41
30Kohm-0402-±5%-1/16W
RM88
0ohm-0402-±5%-1/16W
CV43 0. 01uF-0402-X7R-±10%- 50V
DV30
AV LC18S02003
RV62
75ohm-0402-±5%-1/16W
12
DA13
AV LC18S02003
RA16
47Kohm-0402-±5%-1/16W
RM89
0ohm-0402-±5%-1/16W
GND
GND
GND
GND
GND
GND
GND
GNDGND
GND
GND GND
GND GND
GND GND
GND GND
GND
GND
Close to VGACONN.
VGA SYNC SLICER
VGA Input
PC Audio Input Close to CONN.
CV35
1uF-0603-Y5V-+80%-20%-10V
CV34
1uF-0603-Y5V-+80%-20%-10V
MONI TOR _OU T
RV60
75ohm-0402-±5%-1/16W
GND
MONITOR OUT
VGA_5V_IN
VGASDA#
VGASCL#
RV77
10Kohm-0402-±5%-1/16W
RV76
10Kohm-0402-±5%-1/16W
+5VSB
VGA_5V
VGA_5V
3
1
2
VD1
BAT54C
VGAYPBPR
AV
2
1
4
3
BP2
AV2-8.4-06( )
VGA_Audio_L_In
VGA_Audio_R_In
C
R
R1
L
L1
BP9
EJ-3525-5P
UTX#
URX# R94
100ohm-0402-±5%-1/16W
R95
100ohm-0402-±5%-1/16W
VGA.PIN11
VGA.PIN4 URX# '
UTX# '
-69-
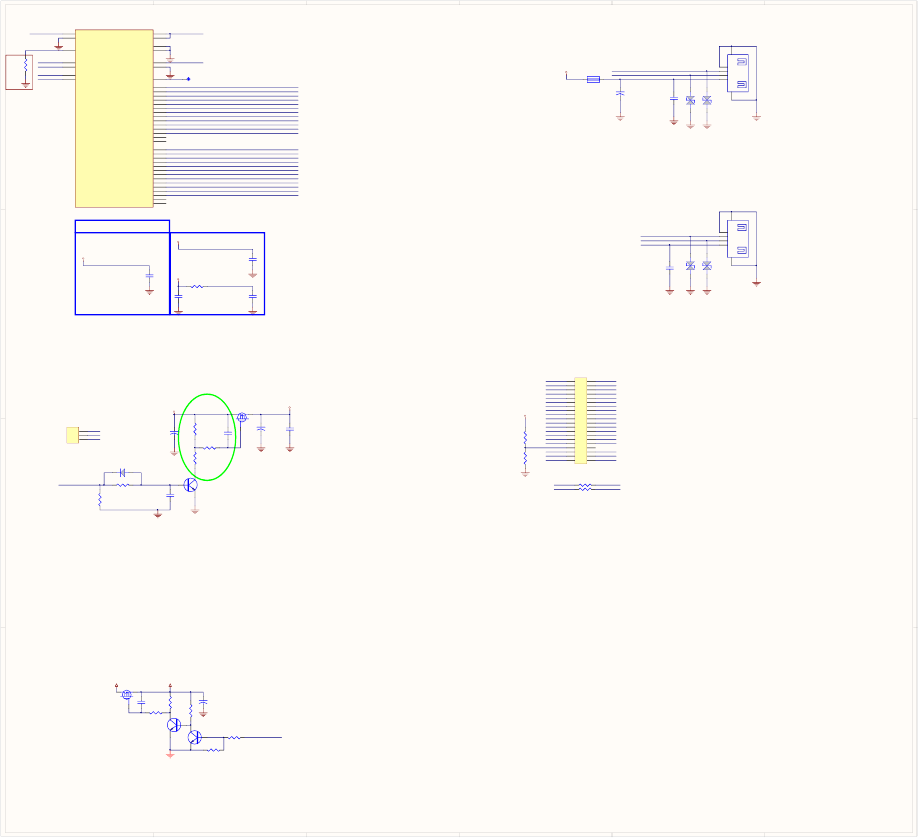
1
1
2
2
3
3
4
4
5
5
6
6
D D
C C
B B
A A
AVDD3V3 AVDD3V3
AVDD12_VPLL
USB_VRT
USB_DM0
USB_DP0
AVDD12_VPLL
USB_DM1
LVDS _PW R_EN
AE1P
AE1N
AE0P
AO4P
AO4N
AO3P
AO3N
AOCKN
AOCKP
AO2P
AO2N
AO1P
AO1N
AO0P
AO0N
AE4P
AE0N
AE4N
AE3P
AE3N
AECKP
AECKN
AE2P
AE2N
USB_DM1
USB_DP1
USB_DM0
P_SCL P_SDA
USB_DP1
USB_DP0
CM32
0.1uF-0402-Y5V-+80% -20%-16V
AE0 P D17
AE0 N C17
AE1 P C19
AE1 N D19
AE2 P D20
AE2 N C20
AEC KP C21
AEC KN D21
AE3 P D23
AE3 N C23
AE4 P C24
AE4 N D24
AE5 P D25
AE5 N C25
AO0P A17
AO0N B17
AO1P A18
AO1N B18
AO2P A19
AO2N B19
AOCKP A20
AOCKN B20
AO3P A21
AO3N B21
AO4P A22
AO4N B22
AO5P A23
AO5N B23
TP_VPLL A24
AVDD33_LVDSA E18
AVDD33_LVDSA E19
AVDD12_VPLL F19
USB_2 P_DP0
AB2
USB_2 P_DM0
AC1
USB_2 P_DP1
AC2
USB_2 P_DM1
AD1
AVDD33_USB_2P
AB1
AVSS33_USB _2P
V7
USB_2P_VRT
AC3 AVSS33_ LVDSA E16
AVSS33_L VDSA E17
AVSS12_VPL L G19
UM1D
MT5311
R123
10Kohm-0402-±5%-1/16W
R126 NC/ 10Kohm-0402-±5%-1/16W
CB152
0.1uF-0402-Y5V-+80% -20%-16V
C354
0.1uF-0402-Y5V-+80% -20%-16V
CB155
0.1uF-0402-Y5V-+80% -20%-16V
RM42
5K1ohm-0402-±1%-1/16W
TP24
CM34
0.1uF-0402-Y5V-+80% -20%-16V
C349
0.1uF-0402-Y5V-+80% -20%-16V
R124
100Kohm-0402-±5%-1/16W
CM54
NC/0. 1uF-0402-Y5V-+80%-20% -16V
CM31
0.1uF-0402-Y5V-+80% -20%-16V
R125
10Kohm-0402-±5%-1/16W
RM47
0ohm-0402-±5%-1/16W
GND
GND
GND
GND
AVDD3V3
AVDD3V3
GND
AVDD1V2
GND
GND
GND
GND GND
GND
LVDSVDD
GND
GND
GND
GND
+5V_USB
GND GND
GND
GND
MT5303G
Anal o g Po wer
(?? mA )
( 180 mA )
( 6.5 mA )
Closeto5303G
USB PORT 1 EQUAL LENGTH andDIFFERENTIALIMPEDANCE 90ohm
Panel Tcon POW ER Control
HI = > L VDS PO WER O N
LO = > LVDS POWER OFF
EQUAL LENGTH andDIFFERENTIALIMPEDANCE 90ohm
USB 5 V POWER
USB PORT 0( W iFi Dongle)
+
CE49
NC/100uF-16V-±20%-5×11-105 +
CE51
100uF-16V-±20%-5×11-105
Q70 WPM3407
D124
ASES12U020R2
D125
ASES12U020R2
POWE R
1DM
2DP
3GND
4
GND
5GND 6
BP17
RUSB-UK-04WH
+
CE653
100uF-16V-±20%-5×11-105
GNDGND
D122
ASES12U020R2
D123
ASES12U020R2
GND
POWE R
1DM
2DP
3GND
4
GND
5GND 6
BP13
RUSB-UK-04WH
XQ4 MMBT3904(f350MHz )
USB_5 V
USB_5 V
F1
FSMD200R
GND
LVDSVDD
GND GND
LVDSVDD
LVDSVDD
GND
GND
GND
GND
GND GND
1 2
3 4
5 6
7 8
910
11 12
13 14
15 16
17 18
19 20
21 22
23 24
25 26
27 28
29 30
31 32
33 34
35 36
37 38
39 40
CN18
2*20PIN-2. 0-D-H-M
BR33
1Kohm-0402-±5%-1/16W
BR36
NC/4K7ohm-0402-±5%-1/16W
DVDD3V3 AO3N
AO2N
AO0N
AOCKN
AO1N
AO4N
AO0P
AO1P
AO2P
AOCKP
AO3P
AO4P
AE4N
AE0N
AE3N
AE1N
AE2N
AECKN
AE0P
AE1P
AE2P
AECKP
AE3P
AE4P
LVDS _FORMAT
BR43
100ohm-0402-±5%-1/16W
BR42
100ohm-0402-±5%-1/16W
OSDA 0
OSCL0
P_SCL
P_SDA
LVDS
PVCC
+5Vpa n e l
+12V
5V 1
PVCC 2
12V 3
CN3
3PIN-2.54+
PVCC
D13
NC/PMLL4148L
Q2
MMBT3904(f350MHz )
R15
10Kohm-0402-±5%-1/16W
R41
10Kohm-0402-±5%-1/16W
Q1
WPM2341A-3/TR
R37
100Kohm-0402-±5%-1/16W
C5
0.1uF-0402-Y5V-+80%-20%-16V
R42
10Kohm-0402-±5%-1/16W
+5V
GND
+5V_USB
XQ5
MMBT3904(f350MHz )
R36
4K7ohm-0402-±5%-1/16W
+CPC35
100uF-16V-±20%-5×11-105
USB_POWER_CTL
R47
0ohm-0402-±5%-1/16W
CB153
0.1uF-0402-Y5V-+80%-20%-16V
-70-
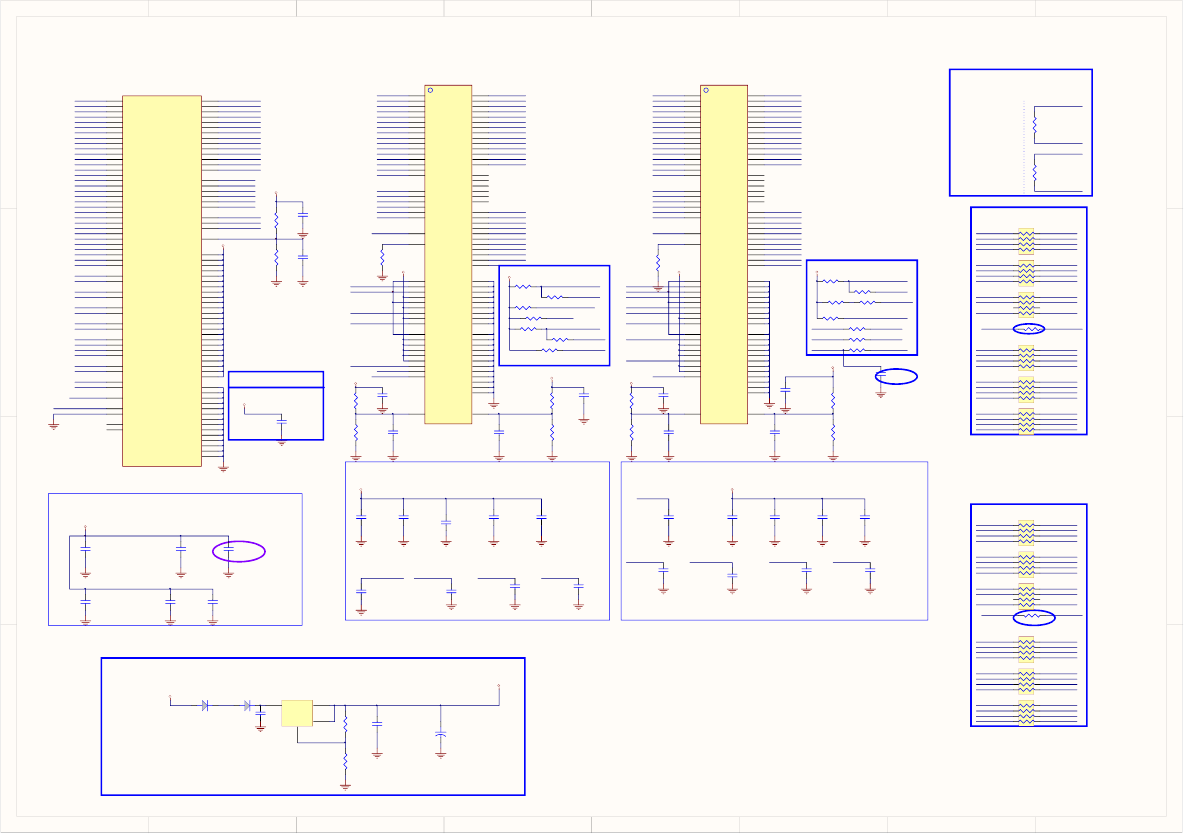
1
1
2
2
3
3
4
4
5
5
6
6
7
7
8
8
D D
C C
B B
A A
RVREF5
RDQM3
RDQM2
1_CK E
1_A0
1_A1
1_RAS #
1_CAS #
1_ODT
1_WE#
1_A2
1_A3
1_A4
1_A5
1_A6
1_A7
1_A8
1_A9
1_A10
1_A11
1_A12
1_A13
1_BA 2
1_BA 0
1_BA 1
ZQ2
AVDD1V2
RDQ1
RDQ2
RDQ3
RDQ7
RDQ6
RDQ5
RDQ0
RDQ4
RDQ15
RDQ14
RDQ9
RDQ13
RDQ8
RDQ12
RDQ11
RDQ10
RDQ16
RDQ17
RDQ31
RDQ19
RDQ30
RDQ18
RDQ21
RDQ20
RDQ28
RDQ23
RDQ22
RDQ29
RDQ27
RDQ24
RDQ25
RDQ26
RDQS3#
RDQS3
RDQS1#
RVREF2
RDQS0#
RDQS0
RDQS1
RVREF3
RDQS1#
RDQS0#
RDQS0
RDQS1
1_RST#
ZQ1
RVREF1
RDQS2#
RDQS2
A_RST#
RDQM1
RDQM0
RDQM3
RDQM2
RDQS3#
RDQS2#
RDQS2
RDQS3
RDQ16
RDQ17
RDQ31
RDQ19
RDQ30
RDQ18
RDQ21
RDQ20
RDQ28
RDQ23
RDQ22
RDQ29
RDQ27
RDQ24
RDQ25
RDQ26
RDQ1
RDQ2
RDQ3
RDQ7
RDQ6
RDQ5
RDQ0
RDQ4
RDQ15
RDQ14
RDQ9
RDQ13
RDQ8
RDQ12
RDQ11
RDQ10
CLK1#
CLK1
CLK0#
CLK0
A_A0
A_A1
A_A2
A_A3
A_A4
A_A5
A_A6
A_A7
A_A8
A_A9
A_A10
A_A11
CLK1#
CLK1
A_A12
A_A13
A_BA0
A_BA1
A_BA2
A_CS#
A_WE#
A_ODT
A_CAS#
A_RAS#
A_CKE
B_A1
B_A3
B_A2
B_A5
B_A7
B_A6
B_A4
B_A9
B_A11
B_A10
B_A8
B_A13
B_A12
B_A0
CLK0
CLK0#
CLK1#
CLK1
B_CAS#
B_ODT
B_RAS#
CLK0
CLK0#
B_WE#
B_CKE
B_BA0
B_BA1
B_BA2
B_CS#
B_RST#
RVREF4
RDQM1
RDQM0
1_DDR V_F1
1_DDR V_C1
1_DDR V_H9
1_DDR V_N9
1_DDR V_F1
1_DDR V_A8
1_DDR V_H9
1_DDR V_N9
2_DDR V_F1
2_DDR V_C1
2_DDR V_H9
2_DDR V_A8
2_DDR V_H9
2_DDR V_F1
1_DDR V_C1 2_D DRV _C1
2_DDR V_N1
2_DDR V_N1
1_DDR V_C1 1_D DRV _A8 1_D DRV _H9
2_DDR V_C1 2_D DRV _H92_DDRV _A8
2_DDR V_H9 2_D DRV _C92_DDR V_C9
2_DDR V_C9
2_DDR V_C9
2_DDR V_C9
2_DDR V_A8
2_DDR V_C9
2_DDR V_R1
2_DDR V_R1
2_DDR V_N1
2_DDR V_N1
1_DDR V_R1
1_DDR V_R1
1_DDR V_R9
1_DDR V_R9
1_DDR V_A8
A_BA0 1_BA 0
A_A7 1_A7
A_RST# 1_RST #
1_A4 B_A4
1_A8 B_A8
1_A6 B_A6
1_CK EA_CKE
A_A10 1_A10
A_A12 1_A12
A_A11 1_A11
A_BA1 1_BA 1
1_A12 B_A12
1_BA 1 B_BA1
1_A10 B_A10
1_CK E B_CKE
1_BA 0 B_BA0
1_A5 B_A5
A_A9 1_A9
A_A13 1_A13
A_A2 1_A2
1_A3 B_A3
1_A2 B_A2
B_A131_A 13
B_A91_A9
A_A0 1_A0
A_BA2 1_BA 2
1_A0 B_A0
1_A7 B_A7
A_ODT 1_ODT
A_CAS# 1_CAS#
A_RAS# 1_RAS#
1_A11 B_A11
A_A6 1_A6
A_A8 1_A8
1_RAS # B_RAS#
1_BA 2 B_BA2
1_CAS # B_CAS#
1_RST# B_RST#
1_A5A_A 5
1_ODT B_ODT
A_A3 1_A3
A_A4 1_A4
A_A1 1_A1
1_A1 B_A1
1_DDR V_N9
B_CS#
1_CS#A_CS#
1_CS#
1_CS#
A_WE# 1_WE#
1_WE# B_WE#
CM39
0.1uF-0402-Y5V -+80%-20% -16V
RD28
0ohm-0805-±5%-1/8W
RD20
0ohm-0603-±5%-1/10W
CM41
0.1uF-0402-Y5V -+80%-20% -16V
RD12
1Kohm-0402-±1%-1/ 16W
CD22
0.1uF-0402-Y5V -+80%-20% -16V
RD13
1Kohm-0402-±1%-1/ 16W
RD29
0ohm-0603-±5%-1/10W
RD21
0ohm-0603-±5%-1/10W
CM48
0.1uF-0402-Y5V -+80%-20% -16V
CD19
0.1uF-0402-Y5V -+80%-20% -16V
CM51
0.1uF-0402-Y5V -+80%-20% -16V
RD9
1Kohm-0402-±1%-1/ 16W
VDD_0
B2
NC_0 J1
VSS_0 A9
VSSQ_0 B1
UDQS#
B7
VDDQ_0
A1
DQ14
B8
VSSQ_1 B9
UDM
D3
UDQS
C7
VSSQ_2 D1
DQ15
A3
VDDQ_1
A8
DQ9
C3
VDDQ_2
C1
VDDQ_3
C9
DQ8
D7
VDDQ_4
D2
DQ12
A7
VSSQ_3 D8
DQ11
C2 DQ10
C8
VSSQ_4 E2
DQ13
A2
VDD_1
D9
NC_1 J9
VSS_1 B3
VSSQ_5 E8
LDQS#
G3
VDDQ_5
E9
DQ6
G2
VSSQ_6 F9
LDM
E7
LDQS
F3
VSSQ_7 G1
DQ7
H7
VDDQ_6
F1
DQ1
F7
VDDQ_7
H2
DQ0
E3
VDDQ_8
H9
DQ4
H3
VSSQ_8 G9
DQ3
F8 DQ2
F2
BA2 M3
DQ5
H8
VDD_5
N1
VRE FDQ
H1
VSS_2 E1
VSS_5 J8
CK J7
VDD_2
G7
CKE K9
WE# L3
RAS# J3
CK# K7
ODT K1
RESET#
T2
BA0 M2
BA1 N8
CAS# K3
CS# L2
A10 / AP L7
A1 P7
A2 P3
A0 N3
VDD_3
K2 VSS_3 G8
A3 N2
A5 P2
A6 R8
A4 P8
A7 R2
A9 R3
A11 R7
A8 T8
VSS_4 J2
VDD_4
K8
A12 / BC# N7
NC_3 L9
ZQ
L8
NC_2 L1
VRE FCA M8
NC_4 M7
A13 T3
NC_6 T7
VSS_6 M1
VSS_7 M9
VSS_8 P1
VSS_9 P9
VSS_1 0 T1
VSS_1 1 T9
VDD_6
N9
VDD_7
R1 VDD_8
R9
UD1
H5TQ2G63BFR-H9C
CD7
0.1uF-0402-Y5V -+80%-20% -16V
RD5
100ohm-0402-±1%-1/16W
RD18
0ohm-0603-±5%-1/10W
CM59
0.1uF-0402-Y5V -+80%-20% -16V
CD23
0.1uF-0402-Y5V -+80%-20% -16V
CD15
0.1uF-0402-Y5V -+80%-20% -16V
RD34
0ohm-0805-±5%-1/8W
CD14
0.1uF-0402-Y5V -+80%-20% -16V
CD10
0.1uF-0402-Y5V -+80%-20% -16V
CM40
0.1uF-0402-Y5V -+80%-20% -16V
RD26
0ohm-0805-±5%-1/8W
CM38 0.1uF-0402-Y5V -+80%-20% -16V
RD14
1Kohm-0402-±1%-1/ 16W
CD24
0.1uF-0402-Y5V -+80%-20% -16V
CD18
0.1uF-0402-Y5V -+80%-20% -16V
CD12
0.1uF-0402-Y5V -+80%-20% -16V
RD16
1Kohm-0402-±1%-1/ 16W
CM50
0.1uF-0402-Y5V -+80%-20% -16V
CD25
0.1uF-0402-Y5V -+80%-20% -16V
RD19
499ohm-0402-±1%-1/16W
RD10
1Kohm-0402-±1%-1/ 16W
RD2
100ohm-0402-±1%-1/16W
CD4
0.1uF-0402-Y5V -+80%-20% -16V
CD5
0.1uF-0402-Y5V -+80%-20% -16V
CD1
0.1uF-0402-Y5V -+80%-20% -16V
RD32
0ohm-0805-±5%-1/8W
RD8
240ohm-0402-±1%-1/16W
RD22
0ohm-0603-±5%-1/10W
RD15
1Kohm-0402-±1%-1/ 16W
CM35
0.1uF-0402-Y5V -+80%-20% -16V
RD23
100ohm-0402-±1%-1/16W
RD30 0ohm-0603-±5%-1/ 10W
CM52
0.1uF-0402-Y5V -+80%-20% -16V
RD31
0ohm-0603-±5%-1/10W
RD35
0ohm-0805-±5%-1/8W
CM46
0.1uF-0402-Y5V -+80%-20% -16V
CD9
0.1uF-0402-Y5V -+80%-20% -16V
RD36
0ohm-0603-±5%-1/10W
RM49
1Kohm-0402-±1%-1/ 16W
CD2
0.1uF-0402-Y5V -+80%-20% -16V
CD6
0.1uF-0402-Y5V -+80%-20% -16V
RM48
1Kohm-0402-±1%-1/ 16W
RD17
0ohm-0805-±5%-1/8W
RD33 0ohm-0603-±5%-1/ 10W
RM51
0ohm-0402-±5%-1/16W
RM50
0ohm-0402-±5%-1/16W
VDD_0
B2
NC_0 J1
VSS_0 A9
VSSQ_0 B1
UDQS#
B7
VDDQ_0
A1
DQ14
B8
VSSQ_1 B9
UDM
D3
UDQS
C7
VSSQ_2 D1
DQ15
A3
VDDQ_1
A8
DQ9
C3
VDDQ_2
C1
VDDQ_3
C9
DQ8
D7
VDDQ_4
D2
DQ12
A7
VSSQ_3 D8
DQ11
C2 DQ10
C8
VSSQ_4 E2
DQ13
A2
VDD_1
D9
NC_1 J9
VSS_1 B3
VSSQ_5 E8
LDQS#
G3
VDDQ_5
E9
DQ6
G2
VSSQ_6 F9
LDM
E7
LDQS
F3
VSSQ_7 G1
DQ7
H7
VDDQ_6
F1
DQ1
F7
VDDQ_7
H2
DQ0
E3
VDDQ_8
H9
DQ4
H3
VSSQ_8 G9
DQ3
F8 DQ2
F2
BA2 M3
DQ5
H8
VDD_5
N1
VRE FDQ
H1
VSS_2 E1
VSS_5 J8
CK J7
VDD_2
G7
CKE K9
WE# L3
RAS# J3
CK# K7
ODT K1
RESET#
T2
BA0 M2
BA1 N8
CAS# K3
CS# L2
A10 / AP L7
A1 P7
A2 P3
A0 N3
VDD_3
K2 VSS_3 G8
A3 N2
A5 P2
A6 R8
A4 P8
A7 R2
A9 R3
A11 R7
A8 T8
VSS_4 J2
VDD_4
K8
A12 / BC# N7
NC_3 L9
ZQ
L8
NC_2 L1
VRE FCA M8
NC_4 M7
A13 T3
NC_6 T7
VSS_6 M1
VSS_7 M9
VSS_8 P1
VSS_9 P9
VSS_1 0 T1
VSS_1 1 T9
VDD_6
N9
VDD_7
R1 VDD_8
R9
UD2
H5TQ2G63BFR-H9C
CM49
0.1uF-0402-Y5V -+80%-20% -16V
CM60
10uF-0805-X5R-±10% -6.3V
CD11
0.1uF-0402-Y5V -+80%-20% -16V
CD3
0.1uF-0402-Y5V -+80%-20% -16V
CD16
0.1uF-0402-Y5V -+80%-20% -16V
RDQ6// RDQ0
D13
RDQ0// RDQ1
D12
RDQ1// RDQ2
E13
RDQ7// RDQ3
D11
RDQ4// RDQ4
D14
RDQ5// RDQ5
E12
RDQ3// RDQ6
E14
RDQ2// RDQ7
E11
RDQ13// RDQ8
B10
RDQ11// RDQ9
B15
RDQ10// RDQ10
A10
RDQ12// RDQ11
A15
RDQ15// RDQ12
C11
RDQ9// RDQ13
C15
RDQ8// RDQ14
C10
RDQ14// RDQ15
C14
RDQ22// RDQ16
G5
RDQ23// RDQ17
J5
RDQ17// RDQ18
H5
RDQ16// RDQ19
J4
RDQ20// RDQ20
H4
RDQ21// RDQ21
K4
RDQ19// RDQ22
G4
RDQ18// RDQ23
K3
RDQ26// RDQ24
J1
RDQ27// RDQ25
D2
RDQ29// RDQ26
J2
RDQ28// RDQ27
C1
RDQ31// RDQ28
H3
RDQ25// RDQ29
D1
RDQ24// RDQ30
J3
RDQ30// RDQ31
E2
RDQS0//RDQS0
B13
RDQS0_//RDQS0_
A13
RDQS1//RDQS1
A12
RDQS1_//RDQS1_
B12
RDQS2//RDQS2
F2
RDQS2_//RDQS2_
F1
RDQS3//RDQS3
G1
RDQS3_//RDQS3_
G2
RDQM0//RDQM0
C12
RDQM1//RDQM1
C13
RDQM2//RDQM2
G3
RDQM3//RDQM3
E1
RCLK0// RCLK0
A9
RCLK0_// RCLK0_
B9
RCLK1// RCLK1
K1
RCLK1_// RCLK1_
K2
RBA2//RRE SET_
C6
AVDD12_ ME MPLL
H9
AVSS1 2_ ME MPL L
H10
MEMTP
D8
MEMTN
C8
RCAS_ / / RA0 C4
RA6//RA1 F9
RBA0//RA2 C5
RA5//RA3 A7
RA4//RA4 F8
RBA1//RA5 D5
RA13//RA6 D7
RA10//RA7 A6
NC/ / RA8 E6
RA3//RA9 B7
RA12//RA10 E8
RA11//RA11 F7
RA0//RA12 D6
RA1//RA13 B6
RCKE// RWE_ B4
RODT//RODT A3
RRAS_// RCAS_ B3
RWE_/ /RCS_ A4
RCS_//RRAS_ A2
RA9//RCKE D9
RA8//RBA0 E7
RA2//RBA1 E9
RA7//RBA2 C7
RVREF E3
VCC2 IO C16
VCC2 IO B16
VCC2 IO A1 6
VCC2 IO F1 5
VCC2 IO E15
VCC2 IO D1 5
VCC2 IO H1 4
VCC2 IO H1 3
VCC2 IO K8
VCC2 IO J8
VCC2 IO H8
VCC2 IO B1
VCC2 IO F6
DVSS L5
VCC2 IO E5
DVSS L4
VCC2 IO D4
DVSS L3
VCC2 IO C3
VCC2 IO B2
VCC2 IO A1
DVSS L6
DVSS K6
DVSS C9
DVSS F11
DVSS F12
DVSS E10
DVSS J6
DVSS F10
DVSS H11
DVSS K7
DVSS H12
VCC2 IO C2
VCC2 IO D3
VCC2 IO E4
VCC2 IO F5
VCC2 IO G6
VCC2 IO F1 4
UM1B
MT5311
RD7
240ohm-0402-±1%-1/16W
CM62
10uF-0805-X5R-±10% -6.3V
RD11
1Kohm-0402-±1%-1/ 16W
GND
DDRV DDRV
GND
DDRV
GND
GND GND
GND
GND
+5V
GND
GND
GND
GNDGND
GND
GND
GND GNDGND GND
GND GND
GND GND
DDRVDDRV
AVDD1V2
DDRV
DDRV
DDRV
DDRV
GNDGND
DDRV
GND
GND
GND
GND
DDRV
GND
GND
GND GNDGND
DDRV
DDRV
GND
GND
GND
GND GND
GND
GNDGND
GND
GNDGND
DDRV
GND
GND GND
GND
GND
GND
GND
CAPs for DRAM IO Power ( Close to MT5311 )
Anal o g Po wer
DDR3_DDRV= 1.5V
MT 5303G
CAPs for DRAM IO Power ( Close to DDR#1 ) CAPs for DRAM IO Power ( Close to DDR#2 )
DDR3#2DDR3#1
Close toMT5311
Damping and Termination for CLK
Close to DRAM
Damping for DDR#2 ADDR/CMD
Damping for DDR#1 ADDR/CMD
1.25 x (1+22/110) = 1.5V
(4 mA )
For Layout
For Layout
Position:Near CM37
CM36
10uF-0805-X5R-±10% -6.3V
CM42
10uF-0805-X5R-±10% -6.3V
+
CED2
470uF-10V-±20%-6.3×11-105 -
CM58
10uF-0805-X5R-±10% -6.3V
CM61
10uF-0805-X5R-±10% -6.3V
1
3
5
7 8
6
4
2
RNF2
4*100ohm-0402-±5%-1/16W
1
3
5
7 8
6
4
2
RNF4
4*100ohm-0402-±5%-1/16W
1
3
5
7 8
6
4
2
RNF6
4*100ohm-0402-±5%-1/16W
1
3
5
7 8
6
4
2
RNF8
4*100ohm-0402-±5%-1/16W
1
3
5
7 8
6
4
2
RNF10
4*100ohm-0402-±5%-1/16W
1
3
5
7 8
6
4
2
RNF12
4*100ohm-0402-±5%-1/16W
1
3
5
7 8
6
4
2
RNF1
4*100ohm-0402-±5%-1/16W
1
3
5
7 8
6
4
2
RNF3
4*100ohm-0402-±5%-1/16W
1
3
5
7 8
6
4
2
RNF5
4*100ohm-0402-±5%-1/16W
1
3
5
7 8
6
4
2
RNF7
4*100ohm-0402-±5%-1/16W
1
3
5
7 8
6
4
2
RNF9
4*100ohm-0402-±5%-1/16W
1
3
5
7 8
6
4
2
RNF11
4*100ohm-0402-±5%-1/16W
H5T Q1G6 3DFR -H9 C- C
VI
3VO 2
ADJ
1
VO 4
UD4 BM1084-ADJ(TO263-2)
D2
M7( For m osa MS)
D4
M7( For m osa MS)
-71-
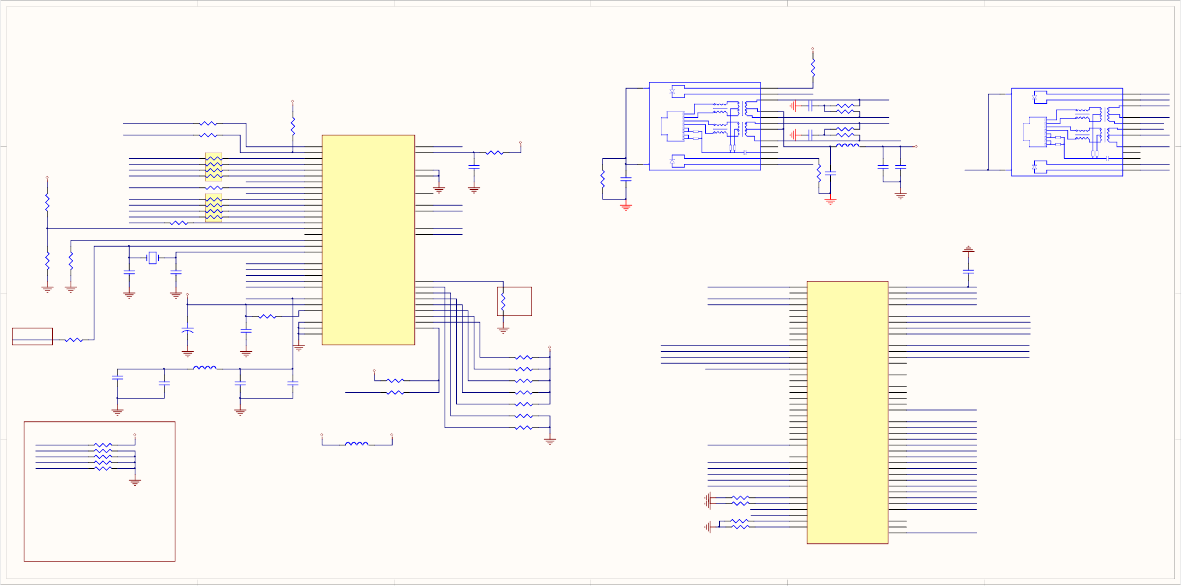
1
1
2
2
3
3
4
4
5
5
6
6
D D
C C
B B
A A
LED1/PHYAD1
GREEN_LED-
LED4/PHYAD4
LED2/PHYAD2
YE LLOW_LE D-
PHY_REFCLK
ETTXD0
ETTXD1
ETTXD2
ETTXD3
MII_RST#
ETTX CLK_REF_CLK
REGIN
ETMDC
PHYRST# DPLX
ETCOL
ETMDIO
MDI _TP
MDI _R N
RE GOUT
MII_XTAL_IN
SPD
REGIN
MII_S NIB
GREEN_LED-
MII_XTAL_OUT
ETRXD3
ETRXD2
ETRXD1
ETRXD0
LED1/PHYAD1
LED2/PHYAD2
ISOL
RE GOUT
YE LLOW_LE D-
AN_ENA
LED4/PHYAD4
AVDD3V3_MII
ETTXEN
ETRXDV
ETRXER
RPTR
ETRX CLK _C50M_O
APS
MDI _R P
MDI _TN
RW32
4K7ohm-0402-±5%-1/ 16W
RW36
4K7ohm-0402-±5%-1/ 16W
RW10
5K1ohm-0402-±5%-1/ 16W
RW30
0ohm-0402-±5%-1/16W
RW42
5K1ohm-0402-±5%-1/ 16W
RW43 0ohm-0402-±5%-1/ 16W
CW19
0.1uF-0402-Y5V -+80%-20% -16V
RW14
5K1ohm-0402-±5%-1/ 16W
RW16
5K1ohm-0402-±5%-1/ 16W
RW39 4K7ohm-0402-±5%-1/16W
CW6
NC/ 22pF-0402-NPO-±5%- 50V
RW31
4K7ohm-0402-±5%-1/ 16W
RW18
5K1ohm-0402-±5%-1/ 16W
RW44
0ohm-0402-±5%-1/16W
RW8
5K1ohm-0402-±5%-1/ 16W
CW5
NC/ 22pF-0402-NPO-±5%- 50V
RW11
0ohm-0402-±5%-1/16W
CW2
0.1uF-0402-Y5V -+80%-20% -16V
RW33
5K1ohm-0402-±5%-1/ 16W
CW16
0.1uF-0402-Y5V -+80%-20% -16V
RW34
4K7ohm-0402-±5%-1/ 16W
RW15
NC/ 5K1ohm-0402-±1%-1/ 16W
RW45
0ohm-0402-±5%-1/16W
RW37
4K7ohm-0402-±5%-1/ 16W
CW21
0.1uF-0402-Y5V -+80%-20% -16V
RW35
0ohm-0402-±5%-1/16W
RW38
4K7ohm-0402-±5%-1/ 16W
RW13
5K1ohm-0402-±5%-1/ 16W
CW20
0.01uF-0402-X7R-±10% -50V
RW46
0ohm-0402-±5%-1/16W
RW29
0ohm-0402-±5%-1/16W
RW7
5K1ohm-0402-±5%-1/ 16W
IP101A
COL/RMII
1
TX_EN
2TXD3
3TXD2
4TXD1
5TXD0
6
TX_CLK/REF_CLK
7
REGIN
8
L ED0 / PHYAD0
9
L ED1 / PHYAD1
10
DGND
11
L ED2 / PHYAD2
12
L ED3 / PHYAD3
13
DVDD33
14
L ED4 / PHYAD4
15
RX_CLK/C50M_O
16
DGND
17
RXD3
18 RXD2
19 RXD1
20 RXD0
21 RX_DV/CRS_DV
22
CR S/ LE DMOD
23
RX_ER/FIBMOD
24
MDC
25
MDIO
26
TEST_ON 27
RTSET 28
AGND 29
MDI_ RN 30
MDI_ RP 31
REGOUT 32
MDI_ T N 33
MDI_ T P 34
AGND 35
AVDD33 36
AN_E NA 37
DPLX 38
SPD 39
RPTR 40
APS 41
RESET_N 42
ISOL 43
MII_SNIB 44
DGND
45
X1
46
X2
47
INTR/FIB_DIS
48
UW2
IP101A-LF
DVDD3V3_ MII
DVDD3V3_ MII
DVDD3V3_ MII
DVDD3V3_ MII
DVDD3V3_ MII
DVDD3V3_ MII
DVDD3V3_ MII
DVDD3V3_ MII
GND
GNDGND
GNDGND
GND GND
GND
GND
GND
GND
GND
GND
GND
DVDD3V3
SET PHY ADDRE SS 00001
LINKED IN 10BT/ACT(BLINKING)
LINKED IN 100BT/ACT(BLINKING)
ETHERNET PHY
MII Mode
25MHz RE F_CLK f ro m MT 5365
COL = 0 , Set i n MI I
1
3
5
7 8
6
4
2
RNF13
4*0ohm-0402-±5%-1/16W
1
3
5
7 8
6
4
2
RNF14
4*0ohm-0402-±5%-1/16W
YW1
NC/ 2 5MHz -±3 0PPM- 20 PF-HC -4 9S
CEW1
10uF-0805-Y5V-+80% -20%-10V
FBW 4
120ohm-0603-±25%
FB1
120ohm-0603-±25%
RW24
6K19ohm-0402-±1%-1/ 16W
+CW17
47uF-16V-±20%-4×7-105
DEMOD_TSVAL
DEMOD_TSSYNC
DEMOD_TSDATA0
DEMOD_TSDATA1
DEMOD_TSDATA2
DEMOD_TSDATA3
DEMOD_TSDATA4
DEMOD_TSDATA5
DEMOD_TSDATA6
DEMOD_TSDATA7
BL_DIMMING
ETTXD2
ETTXD3
ETRX CLK _C50M_O
ETMDIO
ETCOL
ETTXEN
ETRXDV
ETRXD3
ETRXD0
ETRXD2
ETRXD1
ETMDC
ETTXD1
ETTX CLK_REF_CLK
ETTXD0
PHY_REFCLK
PHYRST#
OPCTRL4
OPCTRL5
ADIN3
BL_ON/OFF
SYS_EEPROM_WP
ADIN2
DEMOD_TSCLK
OPCTRL3
DEMOD_RST
USB_POWER_CTL
LVD S_P WR _EN
MUTE _ CTL
HDMI_A RC _EN
BOSBCLK
BOSLRCLK
BOSDATA
BOSMCLK
R115 10Kohm-0402-±5%-1/16W
R109 10Kohm-0402-±5%-1/16W
R110 10Kohm-0402-±5%-1/16W
CW7
NC/ 5pF-0402-NPO-±5%- 50V
GPIO2
F23
GPIO1 2
G20
GPIO1 3
H24
GPIO1 4
G25
GPIO1 5
G22
GPIO1 6
P6
GPIO1 7
R6
GPIO1 8
P5
GPIO1 9
P4
GPIO2 0
P3
GPIO2 1
P2
GPIO2 2
P1
GPIO2 3
R5
GPIO2 4
U5
GPIO2 5
U6
GPIO2 6
V6
OPCTRL0
AD8
OPCTRL1
AE8
OPCTRL2
AA8
OPCTRL3
AE6
OPCTRL4
AB7
OPCTRL5
Y7
ADIN0_SRV
AA9
ADIN1_SRV
AA11
ADIN2_SRV
Y10
ADIN3_SRV
W9
ADIN4_SRV
W10
ADIN5_SRV
Y11
OPWM0 R7
OPWM1 T5
OPWM2 T6
DEMOD_T SCL K R25
DEMOD_T SVAL R24
DEMOD_T SSYNC R22
DEMOD_T SDAT A0 N19
CI_TSCLK P25
CI_TSVAL N20
CI_TSSYNC P21
CI_TSDATA0 P24
PVR_T SC LK P2 2
PVR_T SVAL M21
PVR_T SSYNC M20
PVR_T SDAT A0 M19
SPI_CL K N21
SPI_DATA M2 2
SPI_CL E M25
CI_INT M24
DEMOD_RST R23
ETCOL AA3
ETTXEN W5
ETTXD3 Y5
ETTXD2 Y3
ETTXD1 Y2
ETTXD0 Y1
ETTXCLK W2
ETRXDV Y4
ETRXD3 W3
ETRXD2 W4
ETRXD1 V3
ETRXD0 V4
ETRXCLK W1
ETPHYCLK AA4
ETMDIO V5
ETMDC W6
GPIO1
G24 GPI O0
E25
GPIO3
H25
GPIO4
G23
GPIO5
E24
GPIO6
H20
GPIO7
G21
GPIO8
H21
GPIO9
E22
GPIO2 7
U7
GPIO1 1
F21 GPI O10
F22
PVR_T SDAT A1 N22
UM1E
MT5311
R113 10Kohm-0402-±5%-1/16W
GND
GND
GND
GND
MT 5303G
Out to AMP
R288
510ohm-0402-±5%-1/16W
RW25
510ohm-0402-±5%-1/16W
YELLOW _ L ED-
REGOUT
CW15
0.1uF-0402-Y5V-+80%-20%-16V
RW9
49R9ohm-0402-±1%-1/16W
RW12
49R9ohm-0402-±1%-1/16W
CW1
0.1uF-0402-Y5V-+80%-20%-16V
GND
RW20
49R9ohm-0402-±1%-1/16W
RW21
49R9ohm-0402-±1%-1/16W
CW10
0.1uF-0402-Y5V-+80%-20%-16V
GND
GND
TD- 2
RD+ 7
TDCT 3
RDCT 6
RD- 8
NC 4
GND 5
TD+ 1
LED2A 9
LED2K 10
LED1K 12
LED1A 11
13
13
14
14
BP14
NC/ BH-WO-102
FB2
120ohm-0603-±25%
CW3
0.1uF-0402-Y5V-+80%-20%-16V
GND
GRE E N_L E D-
DVDD3V3_ MII
RW26
NC/ 1Mohm-0402-±5%-1/ 16W
CW13
0.1uF-0402-Y5V -+80%-20% -16V
CW11
1uF-0603-Y5V- +80%-20%- 10V
GND
MDI _TP
MDI _R N
MDI _R P
MDI _TN
TD- 2
RD+ 7
TDCT 3
RDCT 6
RD- 8
NC 4
GND 5
TD+ 1
LED2A 9
LED2K 10
LED1K 12
LED1A 11
13
13
14
14
BP3
509047110
H_GND
H_GND
DVDD3V3_ MII '
DVDD3V3_ MII '
GRE E N_L E D-
MDI_ T P
MDI_ T N
MDI_ RP
MDI_ RNREGOUT '
RE GOUT '
RE GOUT '
YELLOW _ L ED-
L_GND
L_GND
-72-
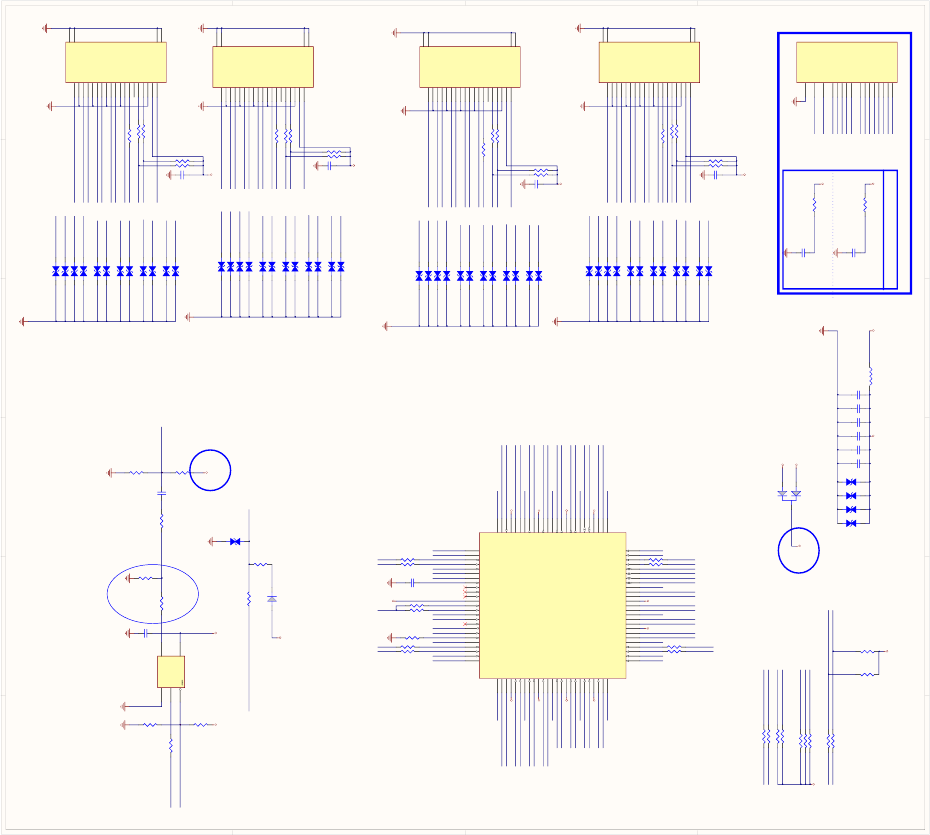
1
1
2
2
3
3
4
4
5
5
6
6
D D
C C
B B
A A
AVDD33_HDMI
AVDD12_HDMI
RX_1B
RX_C
RX_CB
RX_2
RX_2B
RX_1
RX_0
RX_0B
HDMI_CEC
HPD_SINK
SCL_S INK
SDA_SINK
AVDD12_HDMI
AVDD33_HDMI
POW_DET
RX0_0
RX0_0B
RX0_2B
RX0_2
RX0_1
RX0_CB
RX0_C
RX0_1B
RX0_5V
SDA _0_0
SCL_0_0
HPD0
RX3_0
RX3_0B
RX3_2B
RX3_2
RX3_1
RX3_C B
RX3_C
RX3_1B
RX3_5V
HPD3
RX2_0
RX2_0B
RX2_2B
RX2_2
RX2_1
RX2_CB
RX2_C
RX2_1B
RX2_5V
HPD2
POW_DET
RX0_2
RX0_2B
RX0_1
RX0_1B
RX0_0
RX0_0B
RX0_C
RX0_C B
OE#/P OWDN
I2C_CTL_EN
DDCBUF_EN
OSDA 0
RX2 _ 5 V
OSCL0
RX0 _ 5 V
HPD_SINK
CEC#
RX2_2
RX2_2B
RX2_1
RX2_1B
RX2_0
RX2_0B
RX2_C
RX2_CB
SCL_S INK
SDA_SINK
POW_SINK
RX_ 1 B
RX_ 1
RX_ 2 B
RX_ 2
RX_ 0 B
RX_ 0
RX3_2
RX3_2B
RX3_1
RX3_1B
RX3_0
RX3_0B
RX3_C
RX3_CB
RX_ CB
RX_ C
RX3_5V
CEC_ O UT
OE#/POWDN
SDA_3
HPD2
GND
GND
GND
GND
GND
GND
GND
GND
GND
GND
DDCBUF_ E N
SCL_SINK
GND
GND
SDA_SINK
GND
GND
S1/SDA_CTL
S2/SCL_CTL
HPD0
I2C _ CTL _ E N
GND
SCL_2 SCL_ 3
HPD_ SINK
SCL_0
POW_SINK
SDA_0
SDA_2
CEC#
CEC_ IN
RX3_5V
RX3_1B
RX3_C B
SDA_3
RX3_2B
RX3_2
SCL_3
RX3_0
RX3_0B
CEC#
RX3_1
RX3_C
HPD3
HPD3
RX2_1B
RX2_CB
SDA_2
RX2_2B
RX2_2
SCL_2
RX2_0
RX2_0B
CEC#
RX2_1
RX2_C
HPD2
RX0_1B
RX0_C B
SDA_0
RX0_2B
RX0_2
SCL_0
RX0_0
RX0_0B
CEC#
RX0_1
RX0_C
GND
HPD0
SDA_0_0
SCL_0_0
SPDIF_OUT
HDMI_CEC
HDMI_ARC
CEC#
HDMI_ARC_EN
HDMI_ARC
S1/SDA_CTL
S2/SCL_CTL
R34
499ohm-0402-±1%-1/16W
1 2
D94 NC/ ULCE 0505A015FR
RH14
5K1ohm-0402-±5%-1/ 16W
CB64
0.1uF-0402-Y5V -+80%-20%-16V
C746
0.1uF-0402-Y5V -+80%-20%-16V
SCL1
1
SDA1
2
HPD1
3
POW1
4
CEC
5
DDCBUF_EN
6
GND
7
CEX T
8
PC0 /I2 C_RS T
9
PC1/I2C_ADDR1
10
TEST
11
VCC
12
CEC_IN
13
CEC_O U T
14
S1/SDA_CTL
15
S2/SCL_CTL
16
S3/ I2C_A DD R0
17
OE#/POWDN
18
I2C_CTL_E N
19
REX T
20
GND
21
POW4
22
HPD4
23
SDA4
24
SCL4
25
GND 50
IN3D4p 49
IN3D4n 48
VCC 47
IN3D3p 46
IN3D3n 45
GND 44
IN3D2p 43
IN3D2n 42
VCC 41
IN3D1p 40
IN3D1n 39
GND 38
IN4D4p 37
IN4D4n 36
VCC 35
IN4D3p 34
IN4D3n 33
GND 32
IN4D2p 31
IN4D2n 30
VCC 29
IN4D1p 28
IN4D1n 27
GND 26
SCL2 75
SDA2 74
HPD2 73
POW2 72
POW_SINK 71
HPD_SINK 70
SDA_SINK 69
SCL_SINK 68
GND 67
OUT_D1n 66
OUT_D1p 65
VCC 64
OUT_D2n 63
OUT_D2p 62
GND 61
OUT_D3n 60
OUT_D3p 59
VCC 58
OUT_D4n 57
OUT_D4p 56
GND 55
POW3 54
HPD3 53
SDA3 52
SCL3 51
GND
76
IN2D1n
77
IN2D1p
78
VCC
79
IN2D2n
80
IN2D2p
81
GND
82
IN2D3n
83
IN2D3p
84
VCC
85
IN2D4n
86
IN2D4p
87
GND
88
IN1D1n
89
IN1D1p
90
VCC
91
IN1D2n
92
IN1D2p
93
GND
94
IN1D3n
95
IN1D3p
96
VCC
97
IN1D4n
98
IN1D4p
99
GND
100
U4
PS421TQFP100G-A2
D17
AV LC18S02003
12
D87 NC/ULCE0505A015FR
R31 4K7ohm-0402-±5%- 1/16W
CB61
0.1uF-0402-Y5V -+80%-20%-16V
PWR 5V AD6
HDMI_C EC AB 6
HDMI_HPD AC 6
HDMI_SC L AC5
HDMI_SDA AB 5
AVDD33_HDMI AE 1
AVDD12_HDMI AA6
AVSS33_ HDMI AC4
RX_0 AE3
RX_0B AD3
RX_1 AE4
RX_1B AD4
RX_2 AE5
RX_2B AD5
RX_C AE2
RX_CB AD2
UM1G
MT5311
CH1
0.1uF-0402-Y5V -+80%-20%-16V
12
D89 NC/ULCE0505A015FR
OE 1
A2
GND 3
Y
4
VCC
5
UA1
SN74LV C1G125DB VR
CM43
0.1uF-0402-Y5V -+80%-20%-16V
1 2
D92 NC/ ULCE 0505A015FR
RH1
NC/10Kohm-0402-±5%-1/16W
C748
0.1uF-0402-Y5V -+80%-20%-16V
12
D64 NC/ULC E0505A0 15FR
1 2
D91 NC/ ULCE 0505A015FR
RH2
10Kohm-0402-±5%-1/ 16W
SHELL1
20
SHELL2
21
D2+ 1
D2 Sh i e l d 2
D2- 3
D1+ 4
D1 Sh i e l d 5
D1- 6
D0+ 7
D0 Sh i e l d 8
D0- 9
CK+ 10
CKShield 11
CK- 12
CEC 13
NC 14
DDC CL K 15
DDC DATA 16
GND 17
+5V 18
HP DET 19
SHELL3
22
SHELL4
23
CN13
HHF-12B000-2S A
CB63
0.1uF-0402-Y5V -+80%-20%-16V
RH3
33ohm-0402-±5%-1/16W
R2003
27Kohm-0402-±1%-1/ 16W
CM44
0.1uF-0402-Y5V -+80%-20%-16V
SHELL1
20
SHELL2
21
D2+ 1
D2 Sh i e l d 2
D2- 3
D1+ 4
D1 Sh i e l d 5
D1- 6
D0+ 7
D0 Sh i e l d 8
D0- 9
CK+ 10
CKShield 11
CK- 12
CEC 13
NC 14
DDC CL K 15
DDC DATA 16
GND 17
+5V 18
HP DET 19
SHELL3
22
SHELL4
23
CN14
HHF-12B000-2S A
R33 4K7ohm-0402-±5%- 1/16W
RH13
1K2ohm-0402-±1%-1/ 16W
CB65
0.1uF-0402-Y5V -+80%-20%-16V
12
D67 NC/ULCE0505A015FR
D16
AVLC18S02003
12
D86 NC/ULCE0505A015FR
12
D88 NC/ULCE0505A015FR
12
D66 NC/ULCE0505A015FR
CB60
0.1uF-0402-Y5V -+80%-20%-16V
C747
0.1uF-0402-Y5V -+80%-20%-16V
CH4
1uF-0603-Y5V-+80%- 20%-10V
RH9
220ohm-0402-±5%-1/16W
SHELL1
20
SHELL2
21
D2+ 1
D2 Sh i e l d 2
D2- 3
D1+ 4
D1 Sh i e l d 5
D1- 6
D0+ 7
D0 Sh i e l d 8
D0- 9
CK+ 10
CKShield 11
CK- 12
CEC 13
NC 14
DDC CL K 15
DDC DATA 16
GND 17
+5V 18
HP DET 19
SHELL3
22
SHELL4
23
CN15
HHF-12B000-2S A
RM46
4K7ohm-0402-±5%-1/ 16W
RM43
4K7ohm-0402-±5%-1/ 16W
D15
AVLC18S02003
R1802
0ohm-0402-±5%-1/16W
RM52
0ohm-0402-±5%-1/16W
RH8
120ohm-0402-±5%-1/16W
12
D65 NC/ULCE0505A015FR
D10
AVLC18S02003
R2
0ohm-0402-±5%-1/16W
CB62
0.1uF-0402-Y5V -+80%-20%-16V
1 2
D90 NC/ ULCE 0505A015FR
RH12
56ohm-0402-±5%-1/16W
GND
GND
GND
AVDD1V2
AVDD3V3
GND
GND
GND
HDMI_3 V3
HDMI_3 V3HDMI_3V3
HDMI_3 V3
HDMI_3 V3
HDMI_3 V3
HDMI_3 V3
GND
HDMI_3 V3
HDMI_3 V3
GND
HDMI_3 V3
HDMI_3 V3
GND
GND
GND
HDMI_3 V3
HDMI_3 V3
GND
GND
GND
GND
GND
GND
GND
GND
HDMI_ARC_5V
AVDD3V3
3V3SB
GNDGND
GND
GND
AVDD3V3
HDMI_AR C_5 V
RX3_5V
+5V
RX3_5V
3V3SB
HDMI_3 V3
MT 5303G
Anal o g Power
(17 mA )
(61 mA )
ESD ARE LAYOUTED UNDER SW.IC(Square).
I2C CONTROL ADDRESS:0x9C/9D
EDID SHADOW ADDRESS:0x9E/9F
NEARLY SW IC
HDMI SWITCH
HDMI PORT 2
HDMI PORT 1
HDMI PORT 3
To HDMI pin14/ARC
To MT5311 GPIO3
To MT5311 SPDIF OUT
To MT5311 HDMI_CECTo Connector CEC
ARC OUT THROUGH PORT1
FB34
120ohm-0603-±25%
RX0_5V
RX2_5V
1 2
D121 NC/ ULCE 0505A015FR
12
D114 NC/ULCE0505A015FR
12
D116 NC/ULCE0505A015FR
1 2
D119 NC/ ULCE 0505A015FR
12
D109 NC/ULCE 0505A015FR
1 2
D118 NC/ ULCE 0505A015FR
12
D112 NC/ULCE0505A015FR
12
D113 NC/ULCE0505A015FR
12
D115 NC/ULCE0505A015FR
12
D111 NC/ULCE0505A015FR
12
D110 NC/ULCE0505A015FR
1 2
D117 NC/ ULCE 0505A015FR
1 2
D108 NC/ ULCE 0505A015FR
12
D100 NC/ULCE0505A015FR
1 2
D107
NC/U LCE0505A 015FR
12
D103 NC/ULCE0505A015FR
1 2
D106 NC/ ULCE 0505A015FR
12
D95 NC/ULC E0505A0 15FR
1 2
D105 NC/ ULCE 0505A015FR
12
D98 NC/ULCE0505A015FR
12
D99 NC/ULCE0505A015FR
12
D102 NC/ULCE0505A015FR
12
D97 NC/ULCE0505A015FR
12
D96 NC/ULCE0505A015FR
1 2
D104 NC/ ULCE 0505A015FR
D126
PMLL4148L
3
1
2
VD5
BAT54C
R1795 0ohm-0402-±5%-1/16W
R1841
100ohm-0402-±5%-1/16W
R1842
100ohm-0402-±5%-1/16W
R1797
47Kohm-0402-±5%-1/ 16W
R1801
47Kohm-0402-±5%-1/ 16W
R1784 0ohm-0402-±5%-1/16W
R1785
47Kohm-0402-±5%-1/ 16W
R1782
47Kohm-0402-±5%-1/ 16W
R1839
100ohm-0402-±5%-1/16W
R1840
100ohm-0402-±5%-1/16W
R1843
100ohm-0402-±5%-1/16W
R1844
100ohm-0402-±5%-1/16W
R1787
47Kohm-0402-±5%-1/ 16W
R1788
47Kohm-0402-±5%-1/ 16W
R1793 0ohm-0402-±5%-1/16W
R17
100ohm-0402-±5%-1/16W
R16
100ohm-0402-±5%-1/16W
R32
100ohm-0402-±5%-1/16W
R30
100ohm-0402-±5%-1/16W
R24 4K7ohm-0402-±5%- 1/16W
R23 4K7ohm-0402-±5%- 1/16W
R38 NC/ 4K7ohm-0402-±5%-1/ 16W
R29
33Kohm-0402-±5%-1/ 16W
R28
1Kohm-0402-±5%-1/ 16W
R22 33Kohm-0402-±5%- 1/16W
R21 1Kohm-0402-±5%-1/16W
R25
NC/100ohm-0402-±5%-1/ 16W
R35
NC/100ohm-0402-±5%-1/ 16W
R14
33Kohm-0402-±5%-1/ 16W
R19
1Kohm-0402-±5%-1/16W
CB24
2.2uF-0603-Y5V-+80%-20%-10V
RX1_1B
RX1_C B
SDA_1
RX1_2B
RX1_2
SCL_1
RX1_0
RX1_0B
CEC#
RX1_1
RX1_C
HPD1
C745
0.1uF-0402-Y5V -+80%-20%-16V
SHELL1
20
SHELL2
21
D2+ 1
D2 Sh i e l d 2
D2- 3
D1+ 4
D1 Sh i e l d 5
D1- 6
D0+ 7
D0 Sh i e l d 8
D0- 9
CK+ 10
CKShield 11
CK- 12
CEC 13
NC 14
DDC CL K 15
DDC DATA 16
GND 17
+5V 18
HP DET 19
SHELL3
22
SHELL4
23
CN6
HHF-12B000-2S A
GND
GND
GND
GND
RX1_5V
1 2
D49 NC/ ULCE 0505A015FR
12
D46 NC/ULCE0505A015FR
12
D42 NC/ULCE0505A015FR
1 2
D51 NC/ ULCE 0505A015FR
12
D48 NC/ULC E0505A0 15FR
1 2
D52 NC/ ULCE 0505A015FR
12
D43 NC/ULCE0505A015FR
12
D45 NC/ULCE0505A015FR
12
D41 NC/ULCE0505A015FR
12
D47 NC/ULCE0505A015FR
12
D44 NC/ULCE0505A015FR
1 2
D50 NC/ ULCE 0505A015FR
R1804 0ohm-0402-±5%-1/16W
R1807
47Kohm-0402-±5%-1/ 16W
R1805
47Kohm-0402-±5%-1/ 16W
R1836
100ohm-0402-±5%-1/16W
R1838
100ohm-0402-±5%-1/16W
RX1_1B
RX1_C B
RX1_2B
RX1_2
RX1_0
RX1_0B
RX1_1
RX1_C
RX1_5V
HPD1
RX1_1B
RX1_CB
RX1_2B
RX1_2
RX1_0
RX1_0B
RX1_1
RX1_C
RX1_5V
HPD1
R27
1Kohm-0402-±5%-1/ 16W
R26
33Kohm-0402-±5%-1/ 16W
SDA_1
SCL_1
GND
SDA_3_1
SDA _3_1
SCL_3_1
SCL_3_1
SDA_2_1
SDA_2_1
SCL_2_1
SCL_2_1
SDA_1_1
SDA _1_1
SCL_1_1
SCL_1_1
-73-

1
1
2
2
3
3
4
4
5
5
6
6
D D
C C
B B
A A
MT5112_TUNE R_D ATA
MT5112_TUNE R_C LK
tuner_scl_T
IF_T_AGC
tuner_sda_T
IF_AGC_DEMOD
tuner_sc l_ T
FAT_IN-
FAT_IN+ VIP_ATV
VIN_ATV
DFAT_IN+
DFAT_IN-
tuner_sda_T
IF_T_AGC
DFAT_IN-
DFAT_IN+
ZC20
NC/90pF
ZC7
27pF-0402-N PO -±5% -50V
ZC12
120ohm-0402-±5%-1/16W
ZL5
0ohm-0402-±5%-1/16W
ZR11
4K7ohm-0402-±5%- 1/16W
ZC8 0.01uF-0402-X7R-±10% -50V
ZC16
NC/ 27pF-0402-NPO-±5% -50V
ZL1
0ohm-0402-±5%-1/16W
ZR4
4K7ohm-0402-±5%- 1/16W
ZC14 NC /100pF-0402-NPO-±5%-50V
CB 197
0.1uF-0402-Y5V -+80%-20%-16V
ZC18
NC/ 180pF-0402-NPO-±5% -50V
ZC19
NC/ 180pF-0402-NPO-±5% -50V
ZL3
NC/ SD CL1608C R22JT(F)
ZC15
NC/ 100pF-0402-NPO-±5% -50V
R2007
100ohm-0402-±5%-1/16W
ZC11
NC/ 5pF-0402-NPO-±5% -50V
ZC13
120ohm-0402-±5%-1/16W
ZC4
NC/ 27pF-0402-NPO-±5% -50V
CB398
0.1uF-0402-Y5V -+80%-20%-16V
R2006
100ohm-0402-±5%-1/16W
ZL4
NC/ 330nH
ZR12
0ohm-0402-±5%-1/16W
IN
1
GND
2
OUT 3
UP1
UTC78D05L
ZC5
47pF-0402-NPO-±5% -50V
ZC10
NC/ 33pF-0402-NPO-±5% -50V
ZR3
4K7ohm-0402-±5%- 1/16W
ZC6
27pF-0402-N PO -±5% -50V
ZR2
0ohm-0402-±5%-1/16W
ZC17
47pF-0402-NPO-±5% -50V
+5V_ T UNE R
GND
GND
GND
GND
+12 V
GND GND GND GND
+5V_ T UNE R
GND
Nea r Tuner
Nea r Tuner
Near Tuner Near MT538X
Neartuner NearCHIP
ZL1 ZL5 0
Edit @0716
TUNER POWER +5V_TUNER
Edit @0716
ZC1
0.01uF-0402-X7R -±10%-50V
ZC2 0.01uF-0402-X7R -±10%-50V
+
CET7
100uF-16V-±20%-5×11-105
+
CET8
100uF-16V-±20%-5×11-105
GND
GND
GND
NC 1
NC 2
NC 3
VCC-5 V 4
RFAGC 5
GND 6
SDA 7
SCL 8
AS 9
IFA OUT 10
GND
15
GND
16
GND
17
GND
18
NC 11
IF_AGC 12
DIF2 13
DIF1 14
TU2
NC/ DVT - 10B C/ T 4 1F0
+5V_ T UNE R
NC 1
TV 2
RF-AGC 3
SCL 4
SDA 5
BTL30V 6
VCC5V 7
IF-AIF1 8
IF- AGC 9
IFD1-OUT 10
IFD2-OUT 11
GND
12
GND
13
GND
14
GND
15
TU1
DVT -8 C/ T 41 FOHS
DFAT_I N-
DFAT_I N+
IF_T_AGC
AGC
+5V_ T UNE R
C49
1uF-0603-Y5V-+80%-20%-10V
tuner_scl_T
tuner_sda_T
ZR1
0ohm-0402-±5%-1/16W
-74-
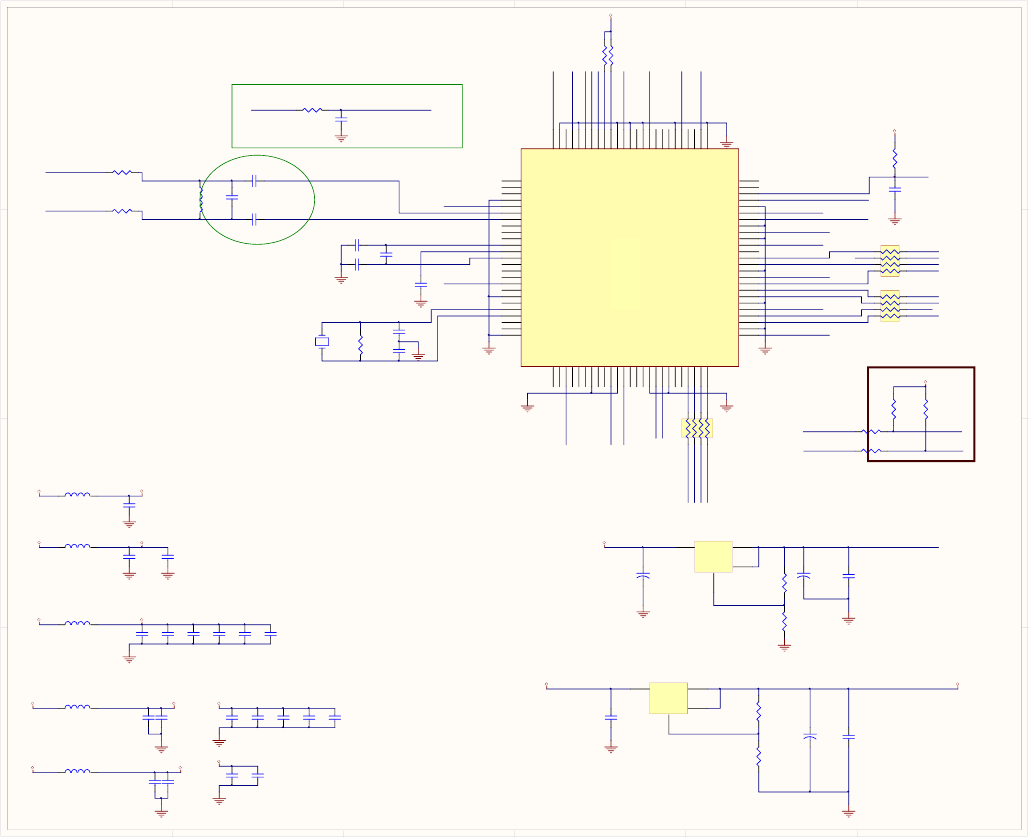
1
1
2
2
3
3
4
4
5
5
6
6
D D
C C
B B
A A
MT5112_TUNER_CLK
AVDD1
AVDD2
HOST_SDA
XTAL2
DVDD3 3
AVDD33
DVDD3 3
REFBOT
MT5112_IF_AGC
DVDD1 2
VCMEXT
MT5112_TUNER_DATA
DEMOD_TS DATA1
AVDD2
DVDD3 3
HOST_SCL
DVDD12
XTAL1
DEMOD_TS DATA0
DEMOD_TS DATA2
DVDD33
DVDD33
AVDD33
DVDD12
DVDD33
REFTOP
IF_A GC_DEMOD
DEMOD_TS DATA3
MT5112_IF_AGC
DVDD12
DEMO D_TSDATA6
DEMO D_TSDATA4
DEMO D_TSDATA5
DEMO D_TSDATA7
DVDD3 3
DVDD1 2
DVDD1 2
DVDD1 2
+1V 2
FAT_IN+
FAT_IN-
DEMOD_RST
HOST_SCL
HOST_SDA
OSC L1
OSD A1
CB7
0.1uF-0402-Y5V -+80%-20% -16V
CB16
0.1uF-0402-Y5V -+80%-20% -16V
CB4
0.1uF-0402-Y5V -+80%-20% -16V
QC3
NC/ 10uF-0805-X5R-±10% -10V
L9
NC/ SD CL1608CR 22JT(F)
CB18
0.1uF-0402-Y5V -+80%-20% -16V
C10
0.01uF-0402-X7R-± 10%-50V
RM24
47Kohm-0402-±5%- 1/16W
QR2
NC/ 4K7ohm-0402-±5% -1/16W
CB6
0.1uF-0402-Y5V -+80%-20% -16V
CB11
0.1uF-0402-Y5V -+80%-20% -16V
R2005
100ohm-0402-±5%-1/16W
C806
10uF-0805-Y5V-+80% -20% -10V
R2009 4K7 ohm-0402-±5%-1/16W
CB2
0.1uF-0402-Y5V -+80%-20% -16V
C9
0.047uF-0402-X7R-± 10%-16V
R18
0ohm-0603-±5%-1/10W
R10
NC/ 110ohm-0402-±1%-1/16W
RM23
47Kohm-0402-±5%- 1/16W
CB19
0.1uF-0402-Y5V -+80%-20% -16V
CB21
0.1uF-0402-Y5V -+80%-20% -16V
R2012
0ohm-0402-±5%-1/16W
C3110uF-0805-X5R-±10% -6.3V
CB14
0.1uF-0402-Y5V -+80%-20% -16V
R13
0ohm-0402-±5%-1/16W
R5
100ohm-0402-±5%-1/16W
C24
27pF-0402-NPO-±5% -50V
C805
0.1uF-0402-Y5V -+80%-20% -16V
R20
0ohm-0603-±5%-1/10W
CB10
0.1uF-0402-Y5V -+80%-20% -16V
CB5
0.1uF-0402-Y5V -+80%-20% -16V
C808
27pF-0402-NPO-±5% -50V
CB9
0.1uF-0402-Y5V -+80%-20% -16V
C3210uF-0805-X5R-±10% -6.3V
CB17
0.1uF-0402-Y5V -+80%-20% -16V
CB 20 0.1uF-0402-Y5V -+80%-20% -16V
CB13
0.1uF-0402-Y5V -+80%-20% -16V
R2010
1Mohm-0402-±5%-1/ 16W
CB12
0.1uF-0402-Y5V -+80%-20% -16V
C16
0.01uF-0402-X7R-± 10%-50V
CB8
0.1uF-0402-Y5V -+80%-20% -16V
C804
0.1uF-0402-Y5V -+80%-20% -16V
CB3
0.1uF-0402-Y5V -+80%-20% -16V
R3
10Kohm-0402-±5%- 1/16W
R2008
4K7ohm-0402-±5%- 1/16W
C807
0.1uF-0402-Y5V -+80%-20% -16V
C803
NC/ 47pF-0402-NPO-±5% -50V
CB1
0.1uF-0402-Y5V -+80%-20% -16V
MT511
2EE
LQFP-
100
NC
1
NC
2
AVDD2
3
NC
4
NC
5
NC
6
AVSS3
7
NC
8
NC
9
AVDD3
10
AVSS4
11
AVDD4
12
NC
13
NC
14
NC
15
DGND33
16
DVDD33
17
DVDD12
18
DGND12
19
NC
20
GPIO0(P1.0)
21
TS_DA TA7
22
TS_DA TA6
23
TS_DA TA5
24
TS_DA TA4
25
DVDD33 26
DGND33 27
TS_DATA3 28
TS_DATA2 29
DVDD12 30
DGND12 31
TS_DATA1 32
TS_DATA0 33
TS_SYNC 34
DVDD33 35
DGND33 36
TS_CLK 37
TS_VAL 38
TS_ERR 39
DVDD12 40
DGND12 41
DVDD33 42
DGND33 43
HOST_DAT A 44
DVDD12 45
DGND12 46
HOST_CLK 47
RESET_ 48
GPIO1(P1.1) 49
NC 50
DVDD12 75
DGND12 74
RF _A G C 73
IF_A G C 72
DGND33 71
DVDD33 70
TU N E R_CLK 69
TUNER_DATA 68
SA1 67
SA0 66
DGND12 65
DVDD12 64
DGND12 63
ANT_TX(POUT3.1) 62
DGND33 61
DVDD33 60
ANT_RX(PIN3.0) 59
ANT_DET(PIN3.1) 58
GPIO3(P1.3) 57
DGND12 56
DVDD12 55
GPIO2(P1.2) 54
NC 53
DVDD33 52
DGND33 51
AVSS2
100 NC
99 NC
98 XTAL1
97 XTAL2
96 NC
95 AVSS2
94 NC
93 AVDD2
92 NC
91 NC
90 NC
89 REFTOP
88 VCME XT
87 REFBOT
86 NC
85 NC
84 NC
83 IN+
82 IN-
81 AVDD1
80 AVSS1
79 NC
78 NC
77 NC
76
U71
MT5112EE / LQFP100
R2004
100ohm-0402-±5%-1/16W
CB15
0.1uF-0402-Y5V -+80%-20% -16V
GND
GND
GND GND
GND
GND
DVDD33
GND
DVDD12
GND
AVDD2AVDD33
GND
GND
AVDD33
GND
+3V3
GND
GND
AVDD33
DVDD33DVDD33
AVDD1
+3V3
GND
AVDD33
GND
GND
GND
+3V3+5V
GND
GND
+3V3
GND
GND
GND
+1V2
+3V3
GND
+3V3
Close to MT5112
Close toMT5112EE
Digital 1.2V Bypass Caps
Analog 3.3V Bypass Caps
Digital 3.3V Bypass Caps
MT5112EE Power
1.25 x (1+180/110) = 3.3V
MT5112 25MHz 18pF 2400Hz
27pF 370Hz
27pF <15PPM
+
CE2
100uF-16V-±20%-5×11-105
+
CE1
100uF-16V-±20%-5×11-105
+
CE3
100uF-16V-±20%-5×11-105
Y1
25MHz- ±20PPM-2 0PF- HC- 49 S
1
3
5
7 8
6
4
2
RN3
4*47ohm-0402-±5%-1/16W
1
3
5
78
6
4
2
RN2
4*47ohm-0402-±5%-1/16W
VI
3VO 2
ADJ
1
VO 4
UP10 LC1117CLTRAD
VI
3VO 2
ADJ
1
VO 4
UP11 LC1117CLTR33
L10
120ohm-0603-±25%
L11
120ohm-0603-±25%
L15
120ohm-0603-±25%
L18
120ohm-0603-±25%
L152
120ohm-0603-±25%
DEMOD_TS CLK
DEMOD_TS SYNC
DEMOD_TS VAL
1
3
5
78
6
4
2
RN1
4*47ohm-0402-±5%-1/16W
GNDGND
-75-
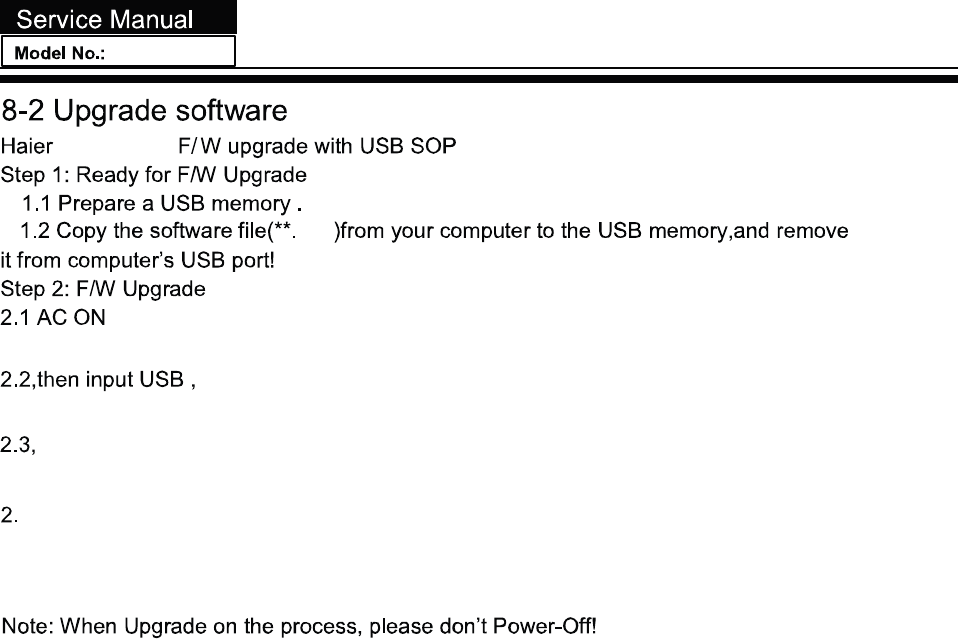
mtk5311
pkg
Remote boot;
U disk light will flash until the lights do not flash U disk upgrade is successful
4,Then enter the factory reset menu, turn it off
-76-
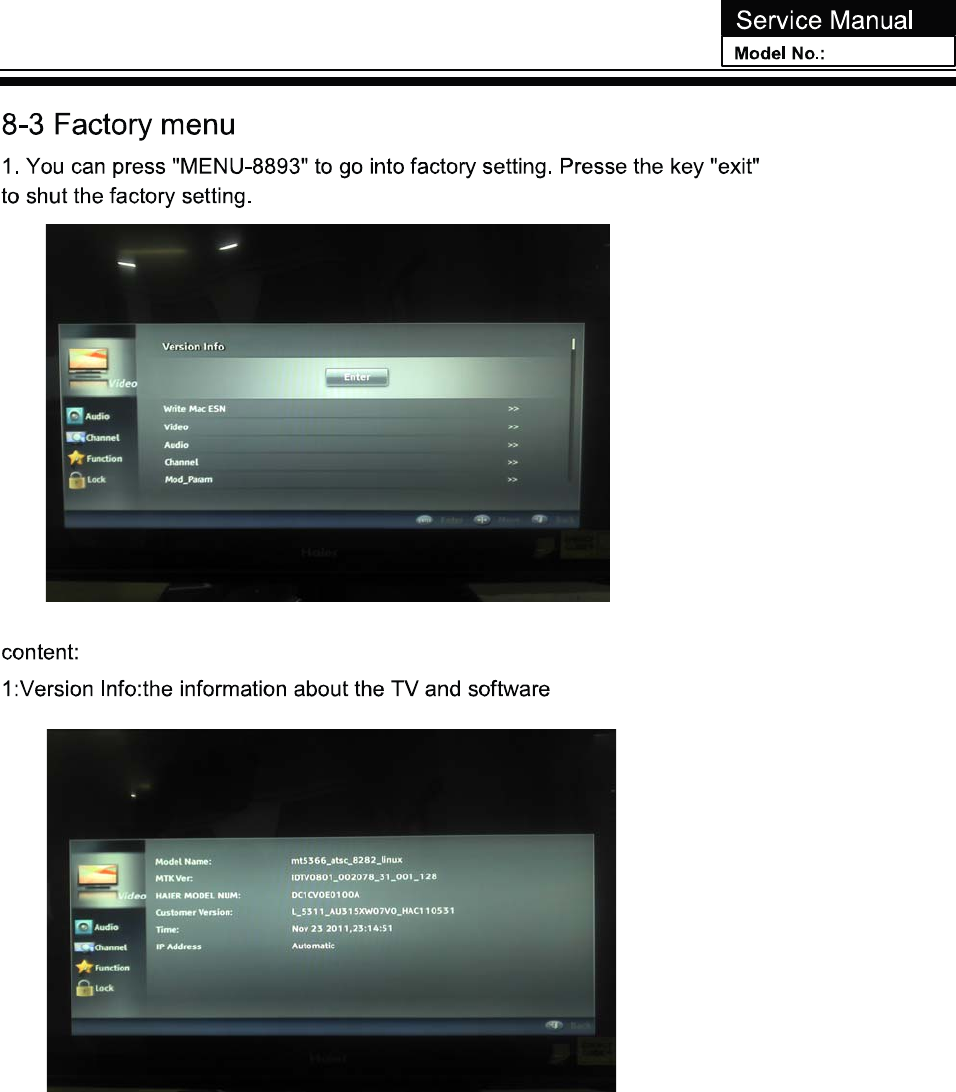
-77-

Check if the pin No.1 of CNA1 is 5VSB
Y
N
1. Power Supply Trouble
Change the power board
Y
N
Check if the pin No.2 of UP2
is 3.3VSB
Check if the pin No.7 and No.8 of CNA1
is 5V, and if No.10 is 12V
Y
N
Check the
circuit of
UP2
YN
Check if the 1.2V
control circuit of
UP8 is 1.2V
Check if the voltage
on No.2 of CNA1 is
high level
Y
N
UP2
Check the power
control circuit of
QP1
Check if the pin No.3 of
UP8 is PWM signal
Check the voltage
of UP4/3/3V,UD4/1.5V
YN
N
QP1
Check if L5/47 H is
welded of damaged.
YN
UP8(RT8250)
is damaged
Change
damaged
O
The power
modules is
NY
Change
UP8(RT8250) Change
UP8
Change or
weld L5.
YN
circuit LD
O
OK
OK
OK
trouble-shooting
-78-

3.3. Display Trouble (Exceptional screen)
Exceptional screen
Check if the cable is correct
and connected tightly.
Y N
Check if the voltage on pin
No. 1,2,3 of CN18 is OK
YN
If the software
Check the voltage for
CN3 is panel VCC
YN
Change the cable
for Panel connector
If the software
on board is OK
Check the
circuit of
Q70(3407)
Ch V lt f CN3
1<
Ch
ange
V
o
lt
age
f
or
CN3
Change
software
Change LCD
(Screen) Change Q70
N
-79-

White screen
4.4. Display Trouble (White screen)
Check the power
supply for panel
supply for panel
NY
Check if Q70(3407) is OK Check the output
LVDS signal of UM1
NY YN
Change CN3 Change the No.92 of UM1/5311
and B voltage of XQ4/0.6V
Change the LCD panel
Or the cable to panel
Change UM3
or flash
software
ChangeAE8or XQ4 Change UM1/5311
<1
-80-

5.5. Display Trouble (Black screen)
Black screen
Check if volta
g
e on
p
in3 of CN5
(
BLON Si
g
nal
)
is hi
g
h level
gp ( g)g
NY
Is inverter power is normal?
NY
Check the circuit of BLON
from QL2 to UM1 (pin
N E25)
Check the voltage on pin No.1,2 of CN5 Change inverter
N
o.
E25)
-81-

No Sound
6. Audio Trouble6. Audio Trouble˄˄no soundno sound˅˅
Check if there is audio signal input
NY
Check if the set of
volume Mute is normal
Y
N
volume
,
Mute is normal
Check signal output of C0N1
YN
Check if power supply of
pin No.2,3,34,35of U38 is 24V
Check if pin No 25 of U38 is 0V
NY
Check if pin No
.
25 of U38 is 0V
Check the signal input
on pin,No.22 of U38
Y
N
Y
N
Check the
power
Control
Y
N
Check the signal output on
pin No.1,4,39,36of U38.
Check the signal output on
pin No.H24of UM1
Y
NCheck the si
g
nal in
p
ut
YN
Check external
audio equipment
circuit of
amplifier
Check
Check pin No AA8
Check the network from
UM1(pin No.H24)
to U38 (pin No 22)
gp
of UM1 audio
toAD25/AD22PIN
Change
UM1
Check the
circuit from
YN
Reset it
External
speaker
Check pin No
.
AA8
of UM1/5311
and circuit of R1830
Change
U38
Check the circuit
from U38 and to
C0N2
to U38 (pin No
.
22)
UM1
circuit from
audio input
terminal to
UM1
-82-

TV cannot scan
/
7. Function Trouble7. Function Trouble˄˄TV videoTV video˅˅
any channel
/
Picture
whether the external
RF input signal is normal
N Y
N
Y
Check if pin No.7of T1(DVT-8C/T41F) is normal
YN
Check if pin No.6,7 of T1 has I2C data
N
Y
C f 10 11 f 1 1
C
heck i
f
pin No.
10
,
11
o
f
T
1
has IF signal to U7
1
NY
Check the
power circuit
of UP1(7805)
Check if pin No.9 of T1
has voltage(1.8 ~3.3V)
NY
Repair external
RF equipment
of UP1(7805)
Check the network between
UM1(pin No. M19,M20) and U71,
and if the demod power is OK.
Check the circuit
from U71(pin No.72)
toT1(pin No.9,
Change U71
Check I2C network
from T1(pin No.4,5)
to U71/5112
(pin No 68 69)
Change
T1
(pin No
.
68
,
69)
-83-
8.Function Trouble8.Function Trouble (PC)(PC)
Under PC channel
Picture is
not in center color fade Image
Stabilization No signal
Check the R G B input signal
Check if VS HS signal
Check the R
.
G
.
B input signal
for UM1(pin No.218,220,222)
YN
Check if VS
,
HS signal
is Ruled and stable
YN
Ch k th i it
Check the circuit of VS.HS
OSD settings don
’
tmatch
Ch k th i it
Do ‘Auto adjust’
process
Reset the
DDC settings
Ch
ec
kth
e c
i
rcu
it
from BP8 (VGA)
To UM1
Check the circuit of VS.HS
From BP8 (VGA)
to UM1(pin No.W12,W11)
OSD settings don t match
.
Reset the OSD or input
mode don’t support.
Ch
ec
kth
e c
i
rcu
it
Of VS, HS
-84-

9. Function Trouble9. Function Trouble (HDMI)(HDMI)
HDMI have no signal
If another Four
HDMI have no signal
Check the circuit from Check the power circuit of
NY
HDMI terminal to
U4/PS421
UM1 and I2C control
signal
N
Y
U4 or HDMI terminal
pad contact is badly
Check the circuit from
HDMI terminals to UM1
(pin No.55 to 66) is OK
N
Y
Check the circuit
from HDMI
terminal to U4
NY
Change U4 Change
U4/PS421
U4/PS421
-85-

10. Function Trouble10. Function Trouble ((YPBPR,CVBS,LINE OUT))
CVBS
have no signal
LINE OUT
have no sound
YPBPR
have no signal
Check if audio output on
pin No.1,7 of U70 is OK
Check the signal input
on pin No.AB17 of UM1
Y
N
Check the signal
between UM1 No.AB11 and No.AE11
Check the circuit from
CVBS terminal
and to UM1.
Check the power
of UM1, or the
UM1 chip defective
Y
N
Change
UM1
Check the
circuit from
UM1 to BP1
YN
Check the
circuit from
terminal to
Check the
circuit from
UM1 t U70
Y
N
Check the signal
Between CV1 and
Change the
defective
YN
Change the
f
Y
terminal to
U70
UM1 t
o
U70
Change
UM1
Change U70or
YN
Between CV1 and
external terminal material de
f
ective material
UM1
Change U70or
materials in
Peripheral circuit
Change
YPBPR The input signal
problem
YN
-86-
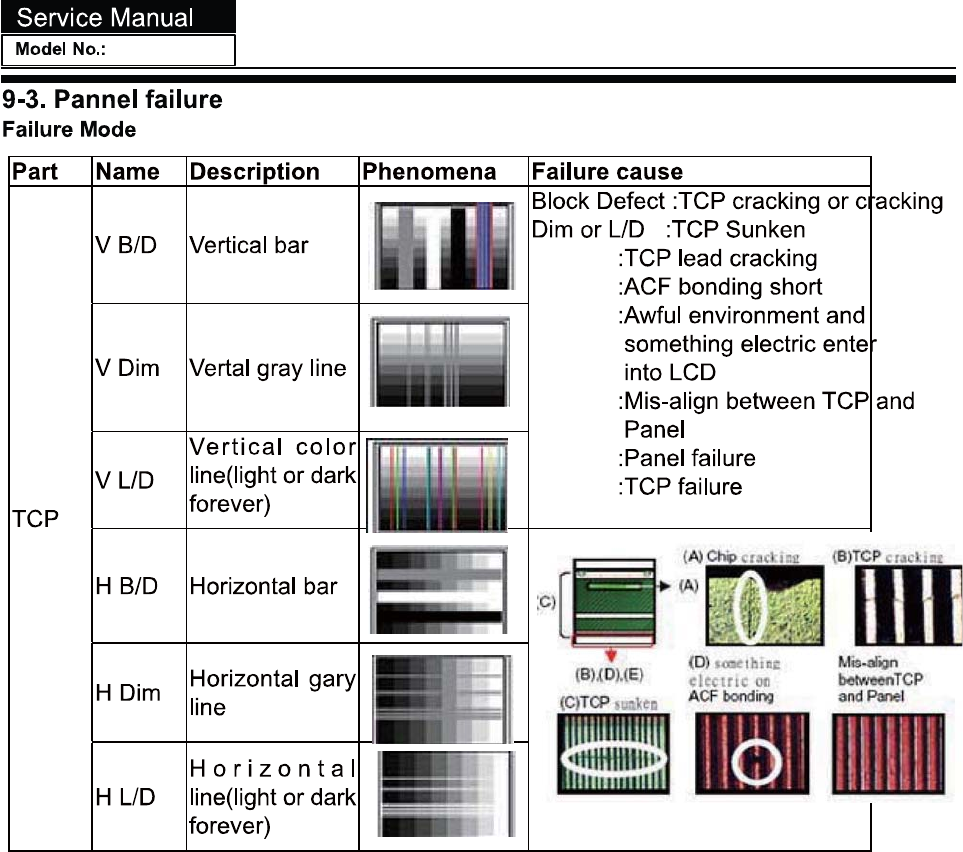
-87-
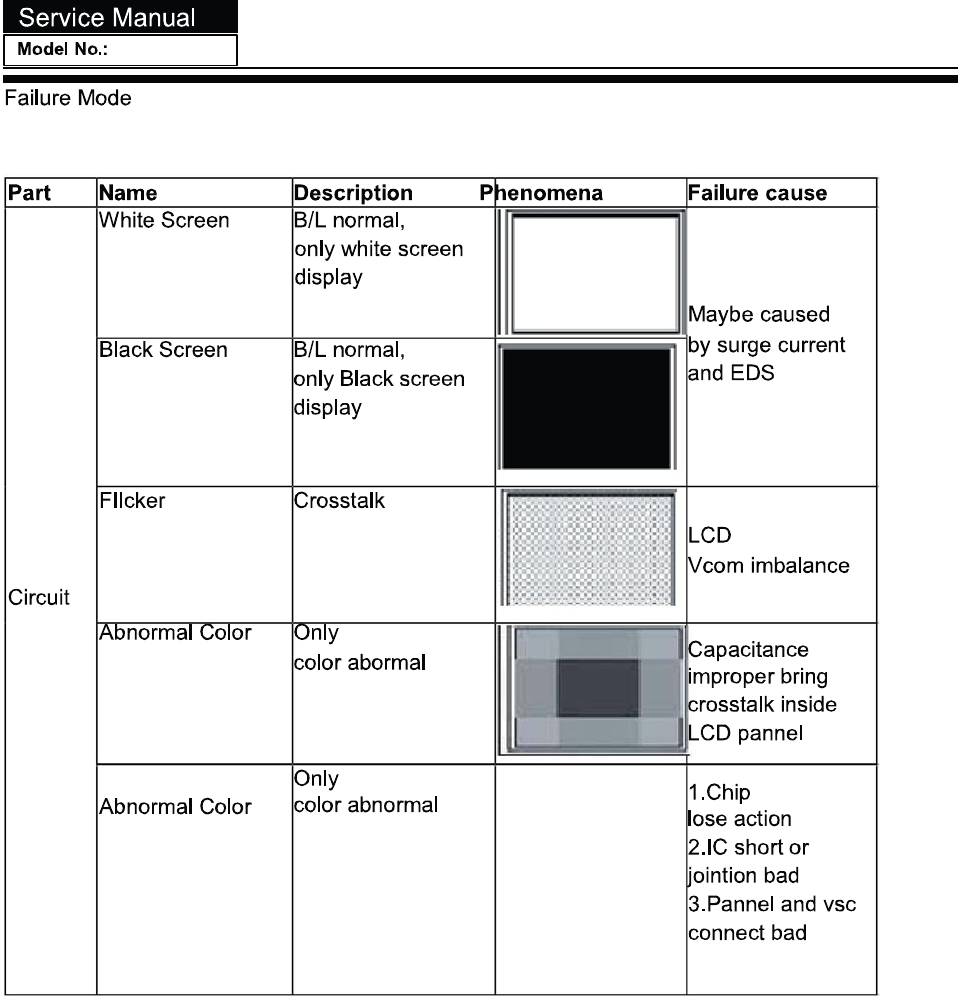
-88-
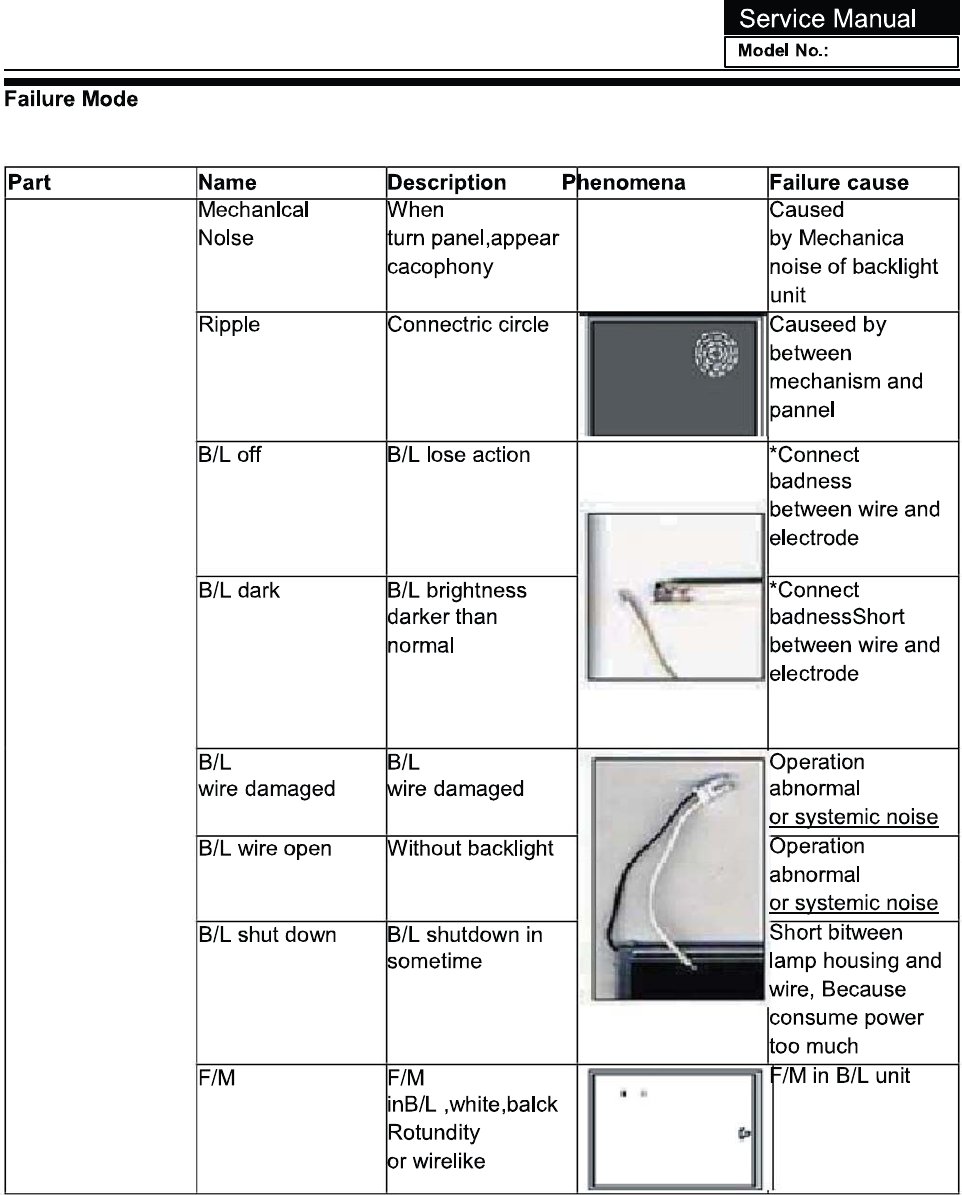
-89-
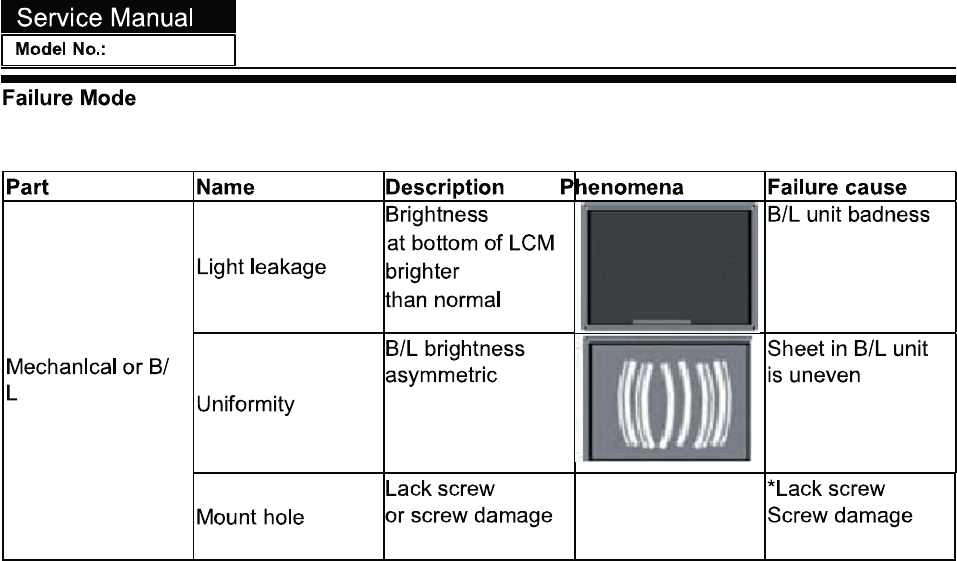
-90-
1, Copy the software ino the root directory of the
Upgrade Software:
U disk;
2, Put your disk inserted into the TV set,
then connect the tv to power supply.
3, The indicator lamp will flash for about 1 min.
5, Then factory reset.
Factory Reset: menu/8893/function/clean stroage
select YES.
-91-
4, Until the indicator lamp stop flashing.It means
upgrade is succesful
