LST 5100P_OM LG 5100P Digital Set Top User Manual
User Manual: LG LST-5100P Digital set top User Manual
Open the PDF directly: View PDF ![]() .
.
Page Count: 38

High Definition
Television Receiver
OWNER’S MANUAL
MODEL : LST-5100P
Before connecting, operating or adjusting this product,
please read this owner’s manual carefully and completely.
2
Safety Precautions
WARNING
TO PREVENT FIRE OR SHOCK HAZARDS, DO NOT EXPOSE THIS PRODUCT TO RAIN OR MOISTURE.
The apparatus shall not be exposed to dripping or splashing and that no objects filled with liquids, such as vases,
shall be placed on the apparatus.
WARNING: Do not install this equipment in a confined space such as a book case or similar unit.
CAUTION: TO PREVENT ELECTRIC SHOCK, MATCH WIDE BLADE OF PLUG TO WIDE SLOT AND FULLY
INSERT.
CAUTION
DO NOT ATTEMPT TO MODIFY THIS PRODUCT IN ANY WAY WITHOUT WRITTEN AUTHORIZATION FROM LG
ELECTRONICS CORPORATION. UNAUTHORIZED MODIFICATION COULD VOID THE USER’S AUTHORITY TO
OPERATE THIS PRODUCT.
THIS EQUIPMENT IS INTENDED TO RECEIVE AND DECODE SIGNALS TRANSMITTED ACCORDING TO DVB
AND IS INTENDED TO BE USED WITH AN APPROPRIATE ANTENNA AND DISPLAY DEVICE THAT YOU MUST
PROVIDE.
CAUTION:
•The appliance is not intended for use by young children or infirm persons without supervision.
•Young Children should be supervised to ensure that they do not play with appliance.
•If the appliance is supplied from a cord extension set or an electrical portable outlet device, the cord extension
set on electrical portable outlet device must be positioned so that it is not subject to splashing or ingress of
moisture.
CAUTION
RISK OF ELECTRIC SHOCK
DO NOT OPEN
THE LIGHTNING FLASH WITH ARROWHEAD SYMBOL, WITHIN AN EQUILATERAL TRIANGLE, IS INTENDED
TO ALERT THE USER TO THE PRESENCE OF UNINSULATED “DANGEROUS VOLTAGE” WITHIN THE PROD-
UCT’S ENCLOSURE THAT MAY BE OF SUFFICIENT MAGNITUDE TO CONSTITUTE A RISK OF ELECTRIC
SHOCK TO PERSONS.
THE EXCLAMATION POINT WITHIN AN EQUILATERAL TRIANGLE IS INTENDED TO ALERT THE USER TO THE
PRESENCE OF IMPORTANT OPERATING AND MAINTENANCE (SERVICING) INSTRUCTIONS IN THE LITERA-
TURE ACCOMPANYING THE APPLIANCE.
CAUTION:
TO REDUCE THE RISK OF ELECTRIC SHOCK DO NOT REMOVE
COVER (OR BACK). NO USER SERVICEABLE PARTS INSIDE.
REFER TO QUALIFIED SERVICE PERSONNEL.

INTRODUCTION
3
IMPORTANT SAFETY INSTRUCTIONS
1. Read these instructions. - All these safety and oper-
ating instructions should be read before the product is
operated.
2. Keep these instructions. - The safety, operating and
use instructions should be retained for future refer-
ence.
3. Heed all warnings. - All warnings on the product and
in the operating instructions should be adhered to.
4. Follow all instructions. - All operating and use
instructions should be followed.
5. Do not use this apparatus near water. – For exam-
ple: near a bath tub, wash bowl, kitchen sink, laundry
tub, in a wet basement; near a swimming pool; etc.
6. Clean only with dry cloth. – Unplug this product from
the wall outlet before cleaning. Do not use liquid
cleaners.
7.
Do not block any ventilation openings. Install in
accordance with the manufacturer’s instructions. -
Slots and openings in the cabinet are provided for
ventilation, to ensure reliable operation of the product,
and to protect it from over- heating. The openings
should never be blocked by placing the product on a
bed, sofa, rug or other similar surface. This product
should not be placed in a built-in installation such as a
bookcase or rack unless proper ventilation is provided
and the manufacturer’s instructions have been
adhered to.
8. Do not install near any heat sources such as radi-
ators, heat registers, stoves, or other apparatus
(including amplifiers) that produce heat.
9.
Do not defeat the safety purpose of the polarized or
grounding-type plug. A polarized plug has two
blades with one wider than the other. A grounding
type plug has two blades and a third grounding
prong. The wide blade or the third prong are pro-
vided for your safety. If the provided plug does not
fit into your outlet, consult an electrician for
replacement of the obsolete outlet.
10. Protect the power cord from being walked on or
pinched particularly at plugs, convenience
receptacles, and the point where they exit from
the apparatus.
11. Only use attachments/accessories specified by
the manufacturer.
12. Use only the cart, stand, tripod, bracket, or table
specified by the manufacturer, or sold with appa-
ratus. When a cart is used, use caution when
moving the cart/ apparatus combination to avoid
injury from tip-over.
13. Unplug this apparatus during lightning storms or
when unused for long periods of time.
14.
Refer all servicing to qualified service personnel.
Servicing is required when the apparatus has
been damaged in any way, such as power-
supply cord or plug is damaged, liquid has been
spilled or objects have fallen into the apparatus,
the apparatus has been exposed to rain or mois-
ture, does not operate normally, or has been
dropped.
CAUTION: PLEASE READ AND OBSERVE ALL WARNINGS AND INSTRUCTIONS IN THIS INSTALLATION
AND OPERATING GUIDE AND THOSE MARKED ON THE UNIT. RETAIN THIS GUIDE FOR
FUTURE REFERENCE.
This set has been designed and manufactured to assure personal safety. Improper use can result in electric shock
or fire hazard. The safeguards incorporated in this unit will protect you if you observe the following procedures for
installation, use, and servicing.
This unit does not contain any parts that can be repaired by the user.
DO NOT REMOVE THE CABINET COVER, OR YOU MAY BE EXPOSED TO DANGEROUS VOLTAGE. REFER
SERVICING TO QUALIFIED SERVICE PERSONNEL ONLY.
4
Table of Contents
INTRODUCTION
Safety Precautions . . . . . . . . . . . . . . . . . . . . . . . . . 2
IMPORTANT SAFETY INSTRUCTIONS . . . . . . . . . . 3
Table of Contents . . . . . . . . . . . . . . . . . . . . . . . . . . 4
Front Panel Controls and Display Window . . . . . . 5
Remote Control Key Functions . . . . . . . . . . . . . . . 6
Unpacking HDTV Receiver and
Accessories/Connection Overview. . . . . . . . . . . . . 7
Connection Panel Overview . . . . . . . . . . . . . . . . . . 8
INSTALLATION
Connections . . . . . . . . . . . . . . . . . . . . . . . . . . . . 9-15
Antenna Connections. . . . . . . . . . . . . . . . . . . . . . 9
Analog Monitor Connections . . . . . . . . . . . . . . . 10
HD Monitor Component (YPbPr) Connections . . 11
HD Monitor RGB Connections . . . . . . . . . . . . . . 12
HD Monitor DVI-HDTV Connections . . . . . . . . . . 13
VCR Connections . . . . . . . . . . . . . . . . . . . . . . . 14
Amplifier (Receiver) Connections . . . . . . . . . . . . 15
Setting the Display Format . . . . . . . . . . . . . . . . . . 16
MENU OPERATION
Initial Settings . . . . . . . . . . . . . . . . . . . . . . . . . . . . 17
General Operation . . . . . . . . . . . . . . . . . . . . . . . 17
Setup Menu Options. . . . . . . . . . . . . . . . . . . . . 18-19
Initial Settings . . . . . . . . . . . . . . . . . . . . . . . . . . 17
Auto Programme . . . . . . . . . . . . . . . . . . . . . . . . 18
Programme Edit. . . . . . . . . . . . . . . . . . . . . . . . . 18
Signal Strength . . . . . . . . . . . . . . . . . . . . . . . . . 19
Audio Menu Options . . . . . . . . . . . . . . . . . . . . 20-21
Audio Option . . . . . . . . . . . . . . . . . . . . . . . . . . . 20
Digital Audio Output . . . . . . . . . . . . . . . . . . . . . . 20
Audio Variable . . . . . . . . . . . . . . . . . . . . . . . . . . 21
Special Menu Options . . . . . . . . . . . . . . . . . . . 22-23
Aspect Ratio . . . . . . . . . . . . . . . . . . . . . . . . . . . 22
Clock Set . . . . . . . . . . . . . . . . . . . . . . . . . . . . . . 23
Caption . . . . . . . . . . . . . . . . . . . . . . . . . . . . . . . 23
Lock (Parental Control) Menu Options . . . . . . 24-26
Lock System . . . . . . . . . . . . . . . . . . . . . . . . . . . 24
Change PIN . . . . . . . . . . . . . . . . . . . . . . . . . . . . 24
Block Programme . . . . . . . . . . . . . . . . . . . . . . . 25
Parental Guidance . . . . . . . . . . . . . . . . . . . . . . . 26
NORMAL OPERATION
Information Displays . . . . . . . . . . . . . . . . . . . . 27-28
Programme Banner Display . . . . . . . . . . . . . . . . 27
Programme Information Display . . . . . . . . . . . . . 28
Programme Guide . . . . . . . . . . . . . . . . . . . . . . . . . 29
Normal Operation . . . . . . . . . . . . . . . . . . . . . . . . . 30
Programme Selection
Programme Selection . . . . . . . . . . . . . . . .
. . . . . . . . . . . . . . . . 30
30
V
Volume
olume Adjustment
Adjustment. . . . . . . . . . . . . . . . . .
. . . . . . . . . . . . . . . . . . 30
30
Signal
Signal . . . . . . . . . . . . . . . . . . . . . . . . . . .
. . . . . . . . . . . . . . . . . . . . . . . . . . . 30
30
Teletext Operation . . . . . . . . . . . . . . . . . . . . . . 31-32
REFERENCE
Programming the Remote Control to Operate
the TV. . . . . . . . . . . . . . . . . . . . . . . . . . . . . . . . . . . 33
Remote Control Codes for TVs . . . . . . . . . . . . 34-35
Troubleshooting . . . . . . . . . . . . . . . . . . . . . . . . . . 36
Specifications . . . . . . . . . . . . . . . . . . . . . . . . . . . . 37
About the symbols for instructions
Indicates hazards likely to cause harm to the unit
itself or other material damage.
Indicates special operating features of this unit.
Indicates tips and hints for making the task easier.
Manufactured under license from Dolby Laboratories. Dolby,
and the double-D symbol are trademarks of Dolby
Laboratories. Confidential unpublished works. Copyright
1992-1997 Dolby Laboratories. All rights reserved.

INTRODUCTION
5
Front Panel Controls and Display Window
Remote Control Sensor
Receives signals from the remote control.
Display Window
EXIT
Clears all on-screen displays and returns to
normal viewing from any menu.
SELECT
If the main menu is displayed, pressing the (SELECT) button will activate
the selected MENU option. If the (SELECT) button is pressed while you
are in normal viewing, the Programme Banner will be displayed.
Arrow Buttons (33/ 44/ 11/ 22)
Allow you to navigate on-screen menus and to adjust the system settings and preferences. Use
the arrow keys to move to a menu option and then use the
(SELECT)
button to access it.
If no menu is displayed,the LEFT/RIGHT arrows control the volume setting and the
UP/DOWN arrows select programmes.
MENU
Shows the main menu on the screen.You can return to
normal viewing by pressing the EXIT button.
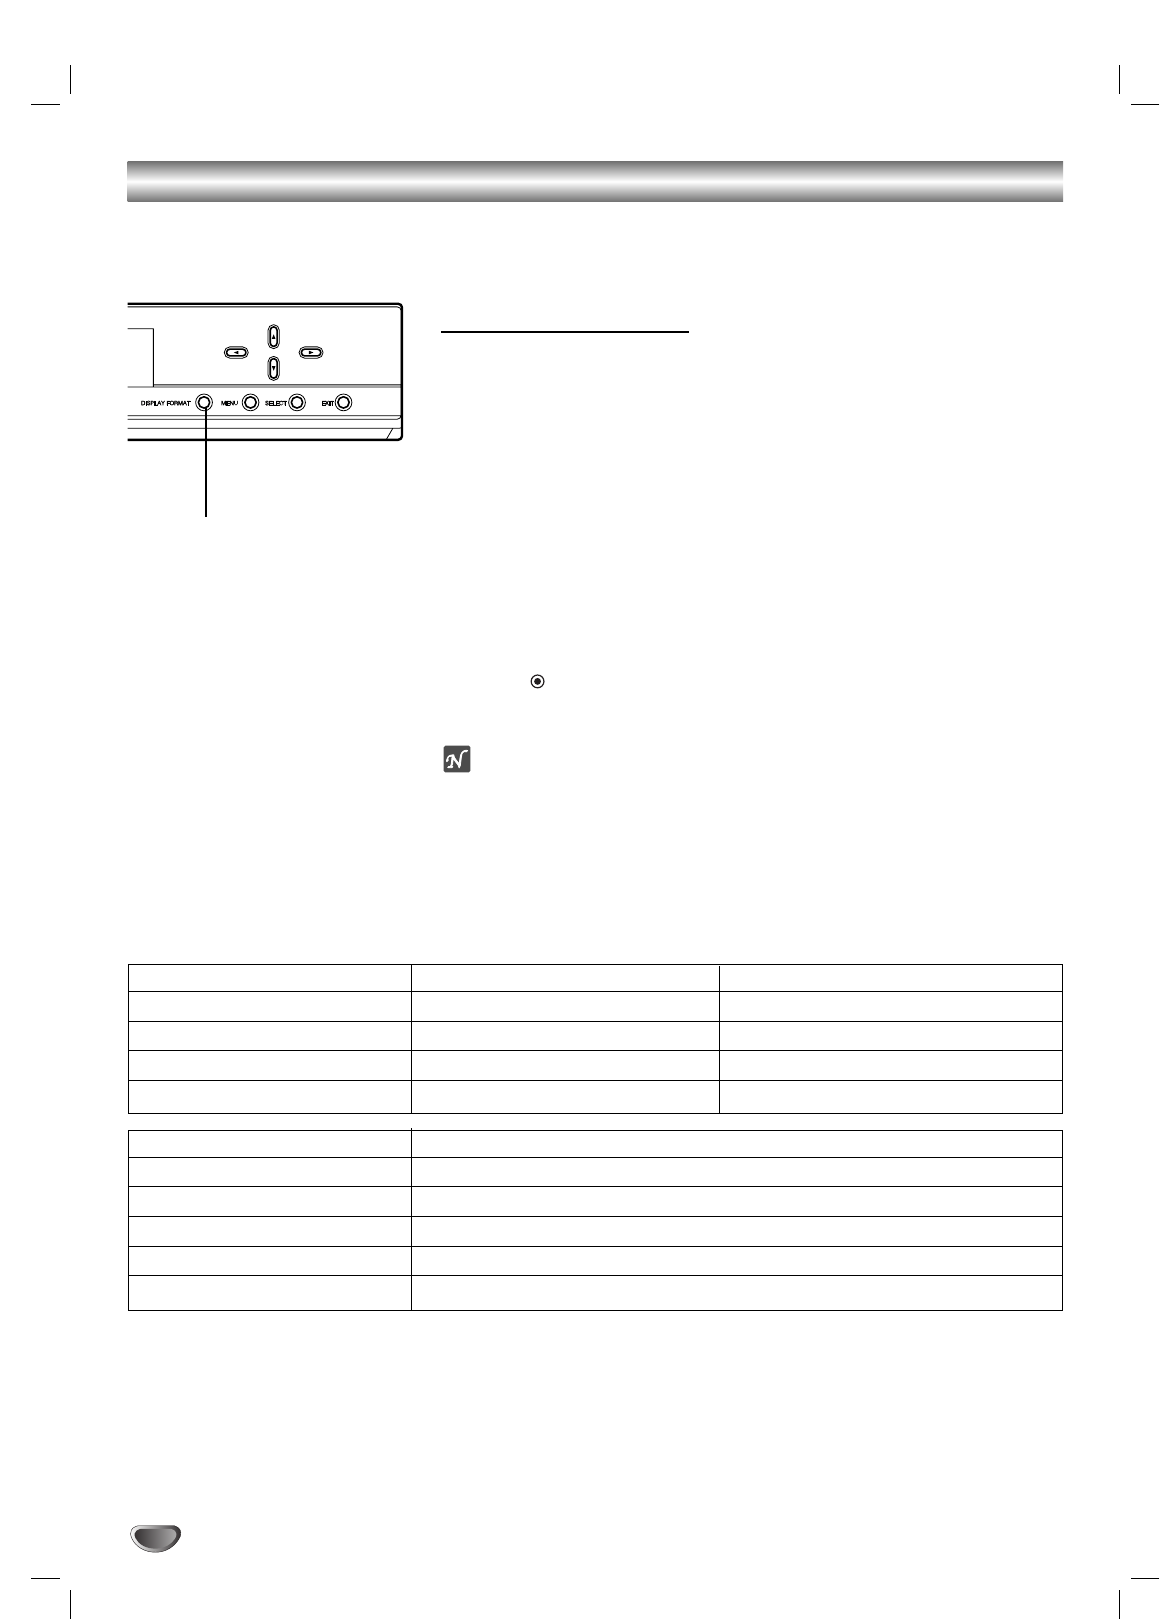
DISPLAY FORMAT
Sets the output resolution to formats and chooses the correct display
format for your TV.
POWER
Turns the HDTV Receiver on or off.
1080i 720p 576p 576i DVI RGB YPBPR
Standby Indicator
Lights when the HDTV
Receiver is turned off.
Resolution Indicator
Indicates output resolution.
Connection Indicator
Indicates output connection.
Character Indicators
Indicates programme number, volume level, etc.
6
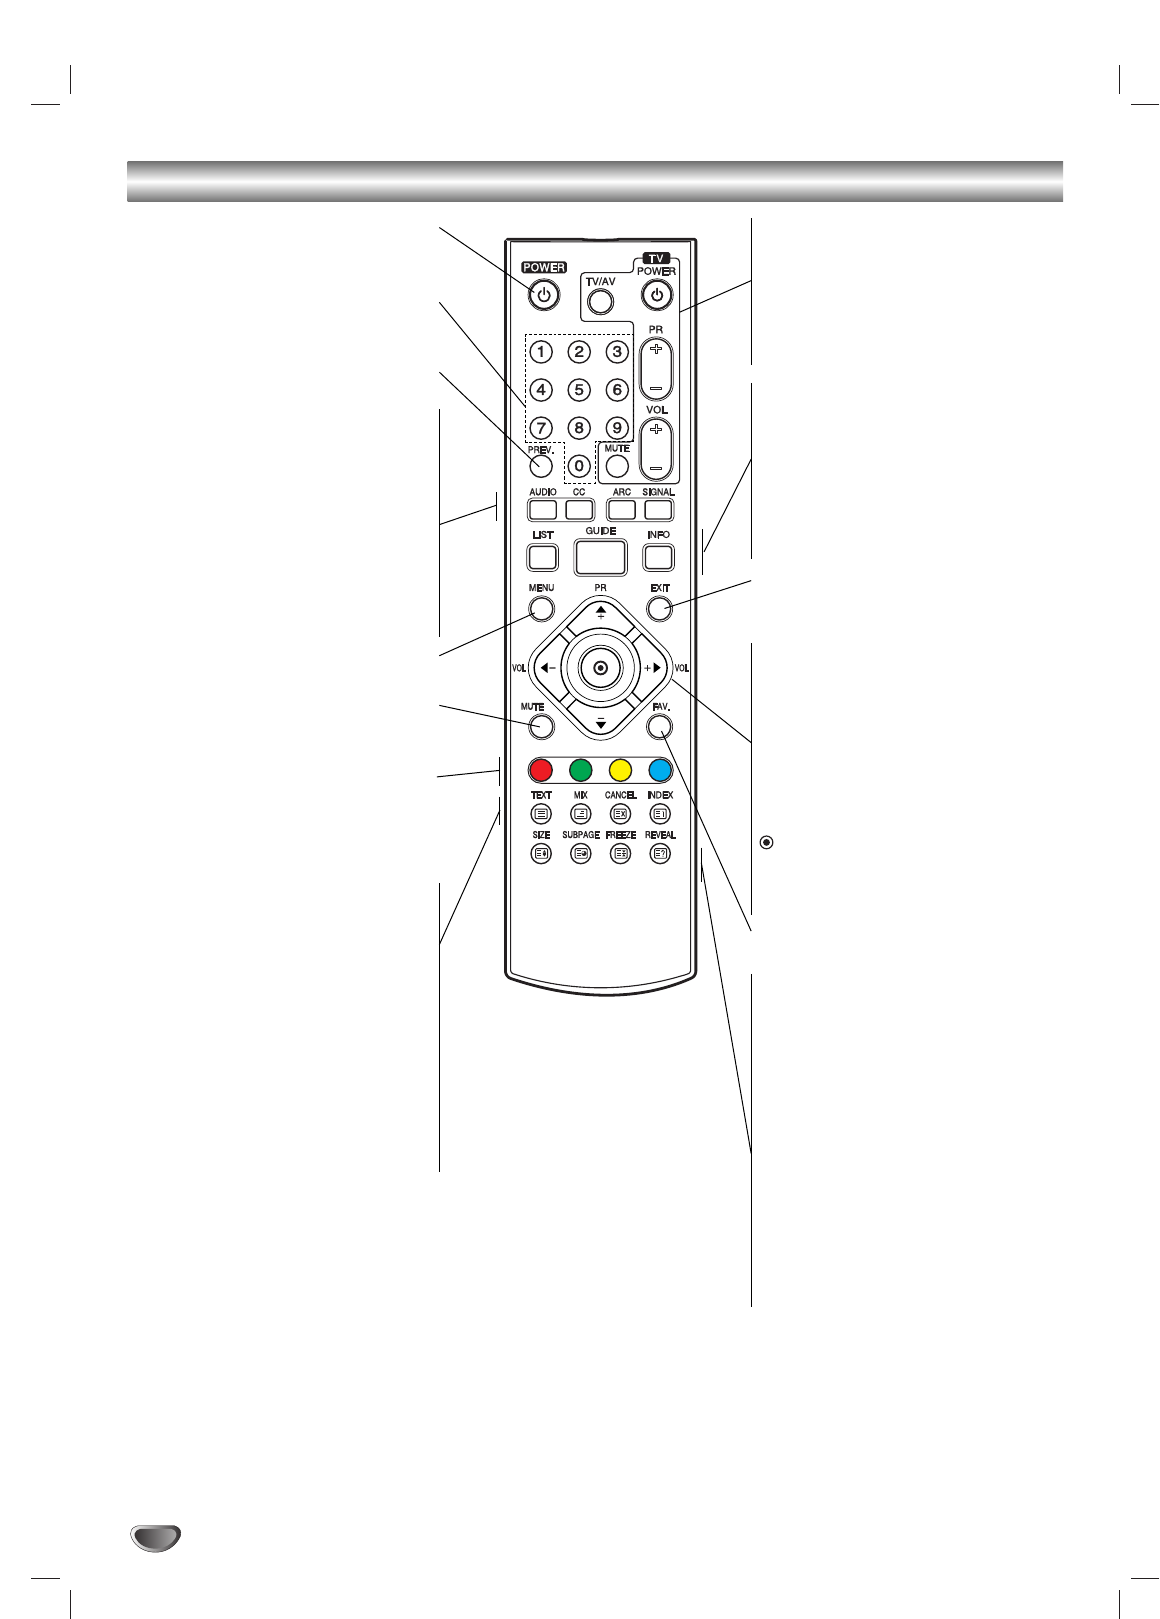
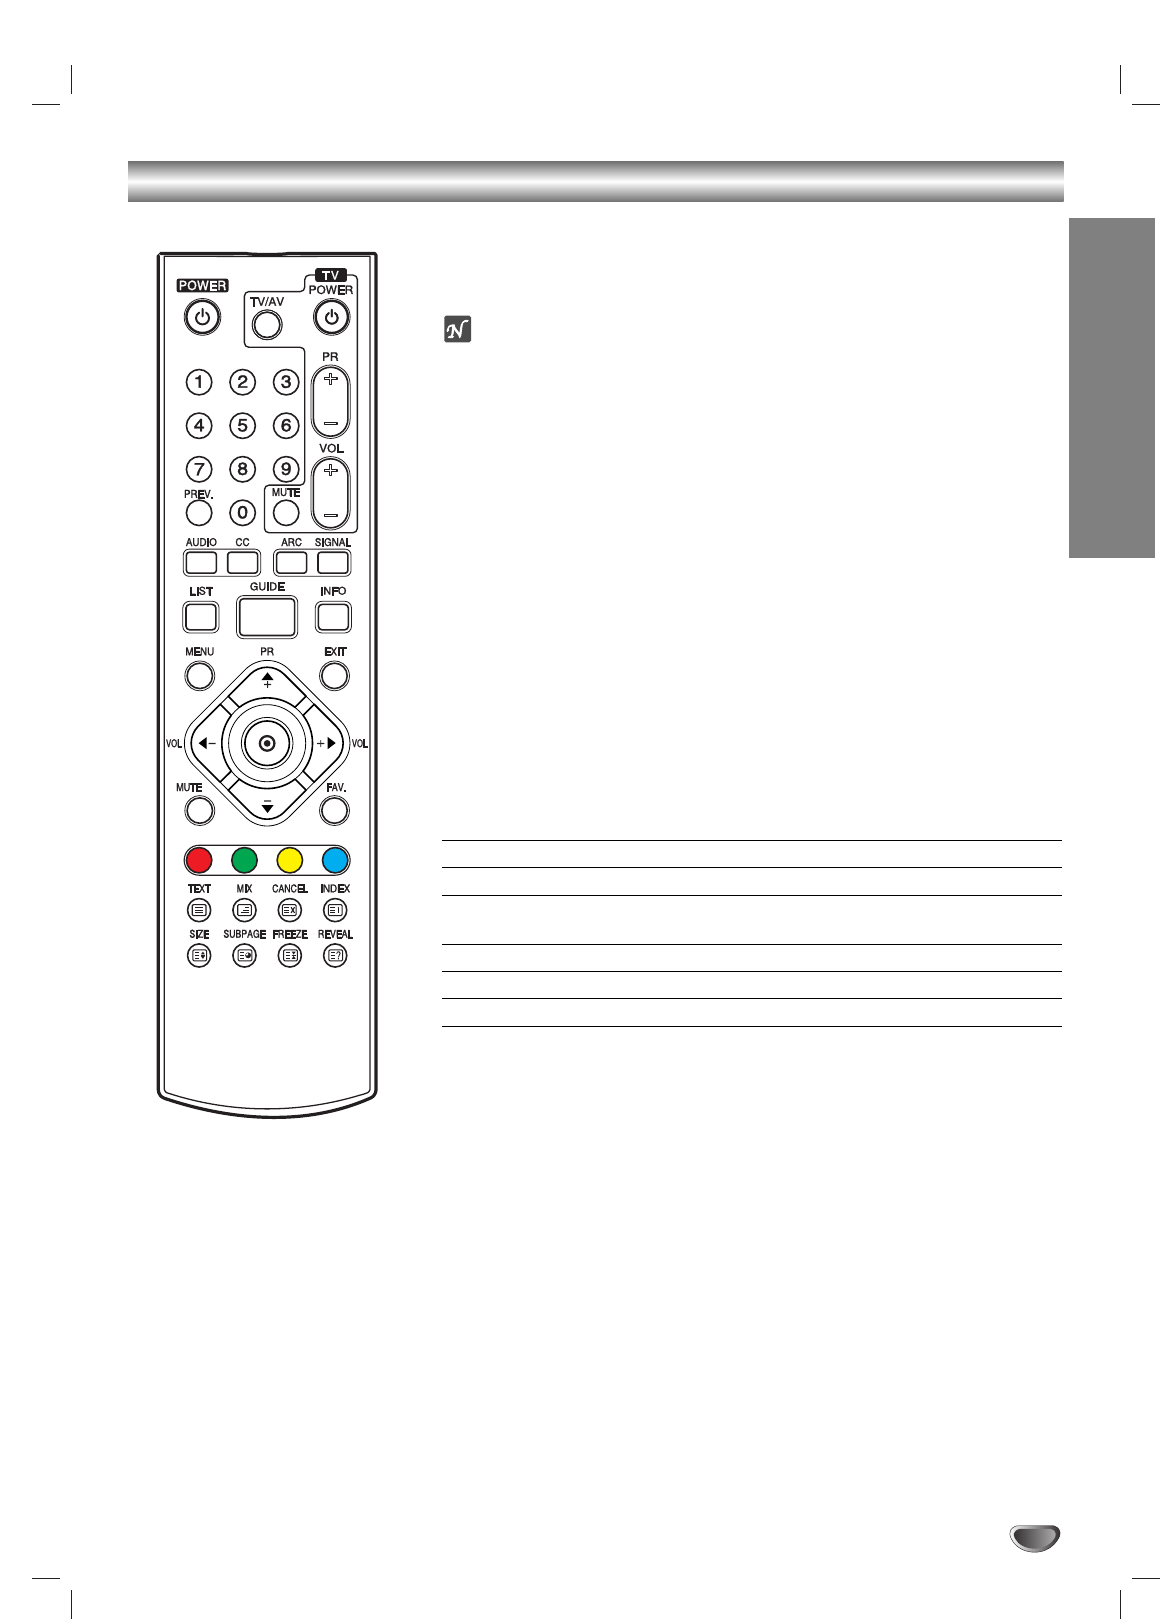
Remote Control Key Functions
POWER
Turns the HDTV Receiver ON and
OFF.
Numbers
Chooses programmes and enters
programming information.
PREV.
Turns to the previous programme.
AUDIO
Selects programme’s audio language
options if available.
CC
Selects caption mode if available.
ARC
Changes the picture aspect ratio.
SIGNAL
Shows the signal strength of the
current programme.
MENU
Accesses or closes main menu.
MUTE
Pauses the audio temporarily. That
is, volumes on/off temporarily.
COLOR Buttons
It’s for teletext application.
Pressing RED or GREEN buttons
pages through the Programme Guide
menu.
TEXT
Switches between teletext mode and
normal TV viewing.
MIX
Selects the background for teletext
screen (Opaque, User Transparency,
Transparency).
CANCEL
Hides the teletext screen except
page number.
INDEX
Moves to Index screen. If Index page
is not present, moves to page 100.
TV Control Buttons
-POWER: Turns the TV on or off.
-TV/AV: Selects the TV’s source.
-PR +/–: Selects TV’s programme.
-VOL +/–: Adjusts TV’s volume.
-MUTE: Temporarily turns TV sound
OFF, press again to restore.
LIST
Displays the programme list.
GUIDE
Displays the Programme Guide.
INFO
Shows the current station and
programme information on the
screen.
EXIT
Removes all on-screen displays and
returns to TV viewing from any menu.
ARROW Buttons (33/ 44/ 11/ 22)
Selects options in a menu.
VOL +/-
Changes volume.
PR +/-
Selects a memorized programmes.
Pressing these buttons pages
through the Teletext menu.
(SELECT)
Completes the programme number
input and promptly tunes to selected
programme.
FAV.
Changes to the favorite programme.
SIZE
Enlarges the text size to double in
the teletext mode.
SUBPAGE
Searches the sub-page using the
sub-code.
FREEZE
Freezes the current image during TV
viewing. Pressing the button again
returns the image to live video.
Holds the teletext display and stops
the automatic page change in the
teletext mode.
REVEAL
Displays concealed information.
7
INTRODUCTION
Unpacking HDTV Receiver and Accessories/Connection Overview
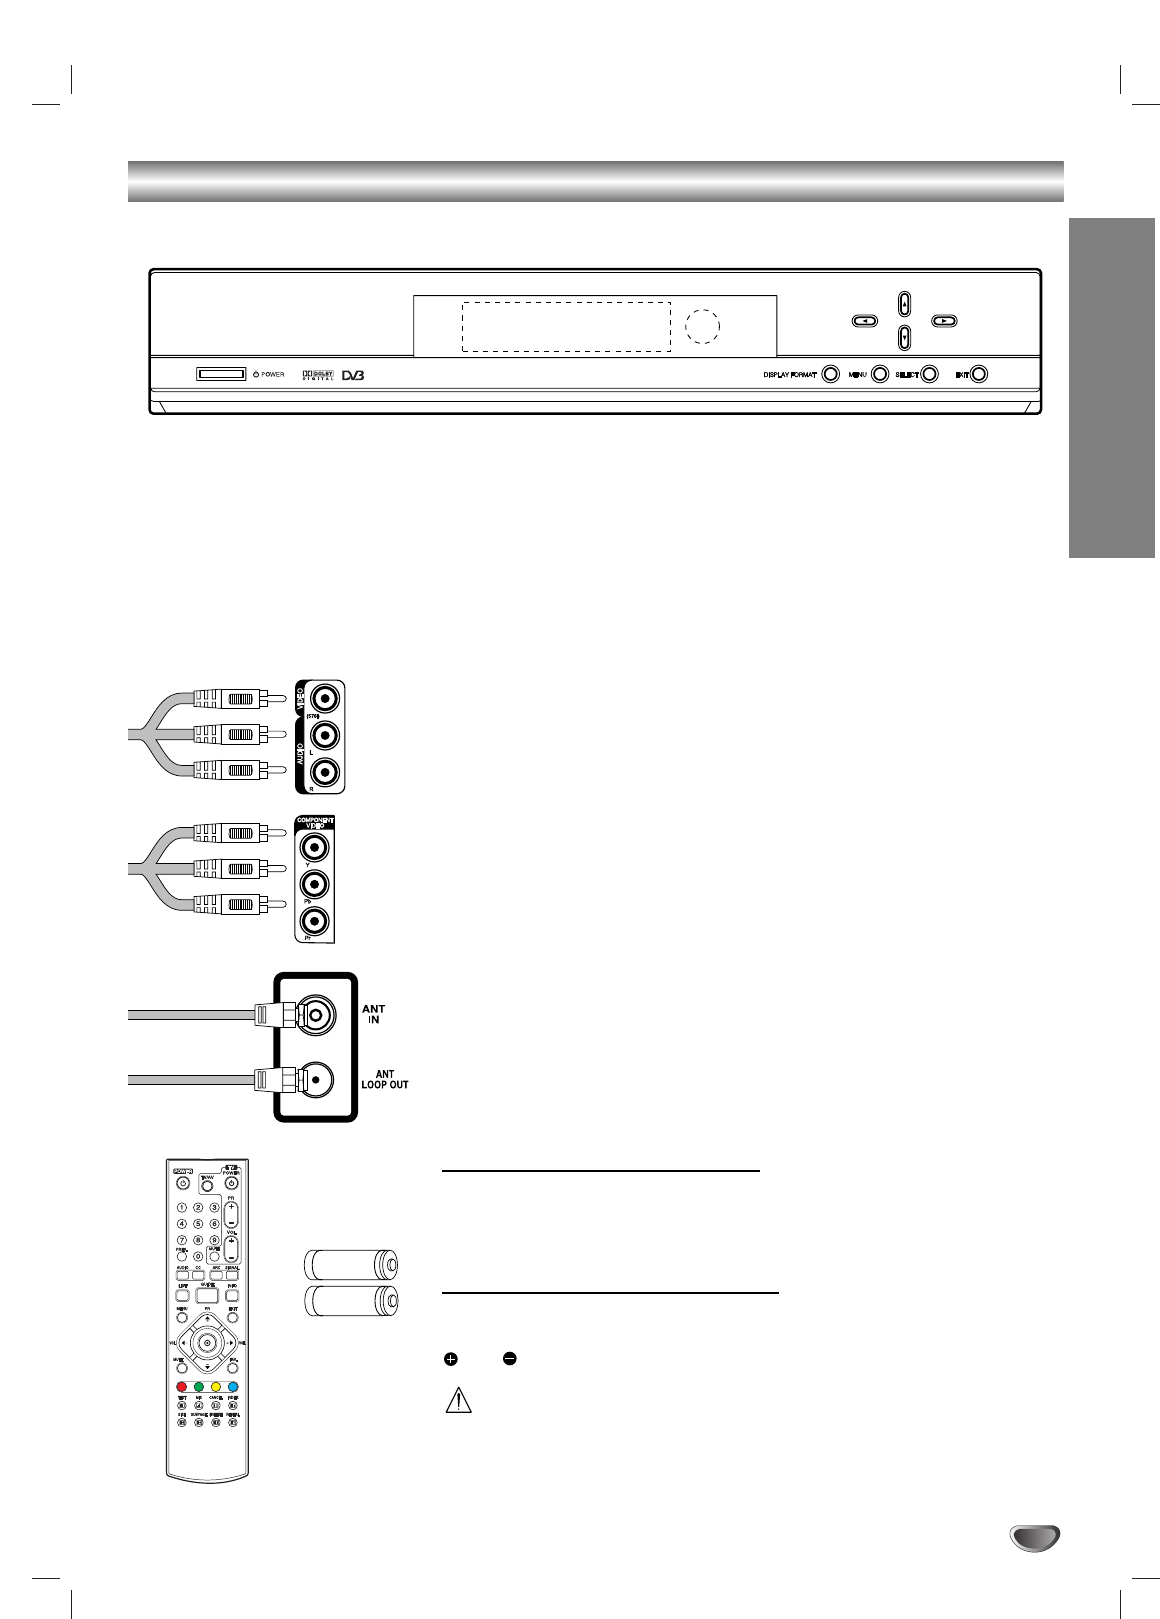
Audio/Video Jacks and Cables
The Audio/Video jacks provide excellent picture and sound quality. They are
used for making most Audio/Video connections between components. The
Audio/Video jacks may be color coded (yellow for video, red for right audio,
and white for left audio). If your component has only one input for audio
(mono), connect it to the left (white L/mono) audio jack on the HDTV
Receiver.
Component Out Jacks and Cables
Component Cables are used to connect the HDTV Receiver to an industry
standard YPbPr compatible HD Monitor (green for Y, blue for Pb, and red
for Pr). Remember to connect the left and right audio cables. The YPbPr
Component jacks carry only the picture signals, not the sound.
ANT LOOP OUT Jack, and RF Cable
ANT LOOP OUT provides an RF connection between the HDTV Receiver
and the TV and provides the signal of ANT IN jack to TV.
Remote Control
In addition to the HDTV Receiver, the remote control can be programmed to
control many other devices.
Remote Control Operation Range
Point the remote control at the remote sensor and press the buttons.
Distance: About 7 m from the front of the remote sensor.
Angle: About 30° in each direction of the front of the remote sensor.
Remote Control Battery Installation
Remove the battery cover on the rear of the remote control, and insert two
batteries (size AAA) with
and aligned correctly. Reinstall cover.
Caution
Do not mix old and new batteries. Never mix different types of batteries (stan-
dard, alkaline, etc.).
Make sure you have received all the accessories listed below with the High Definition Television Receiver.
AAA
AAA
High Definition Television Receiver
The HDTV Receiver is capable of receiving signals from over-the-air antenna sources and
sending the signals to your TV.
Included with the Receiver are the following accessories.
Audio Cable Video Cable
Component (YPbPr) Cable RF Cable
Remote Control 2 AAA Batteries
8
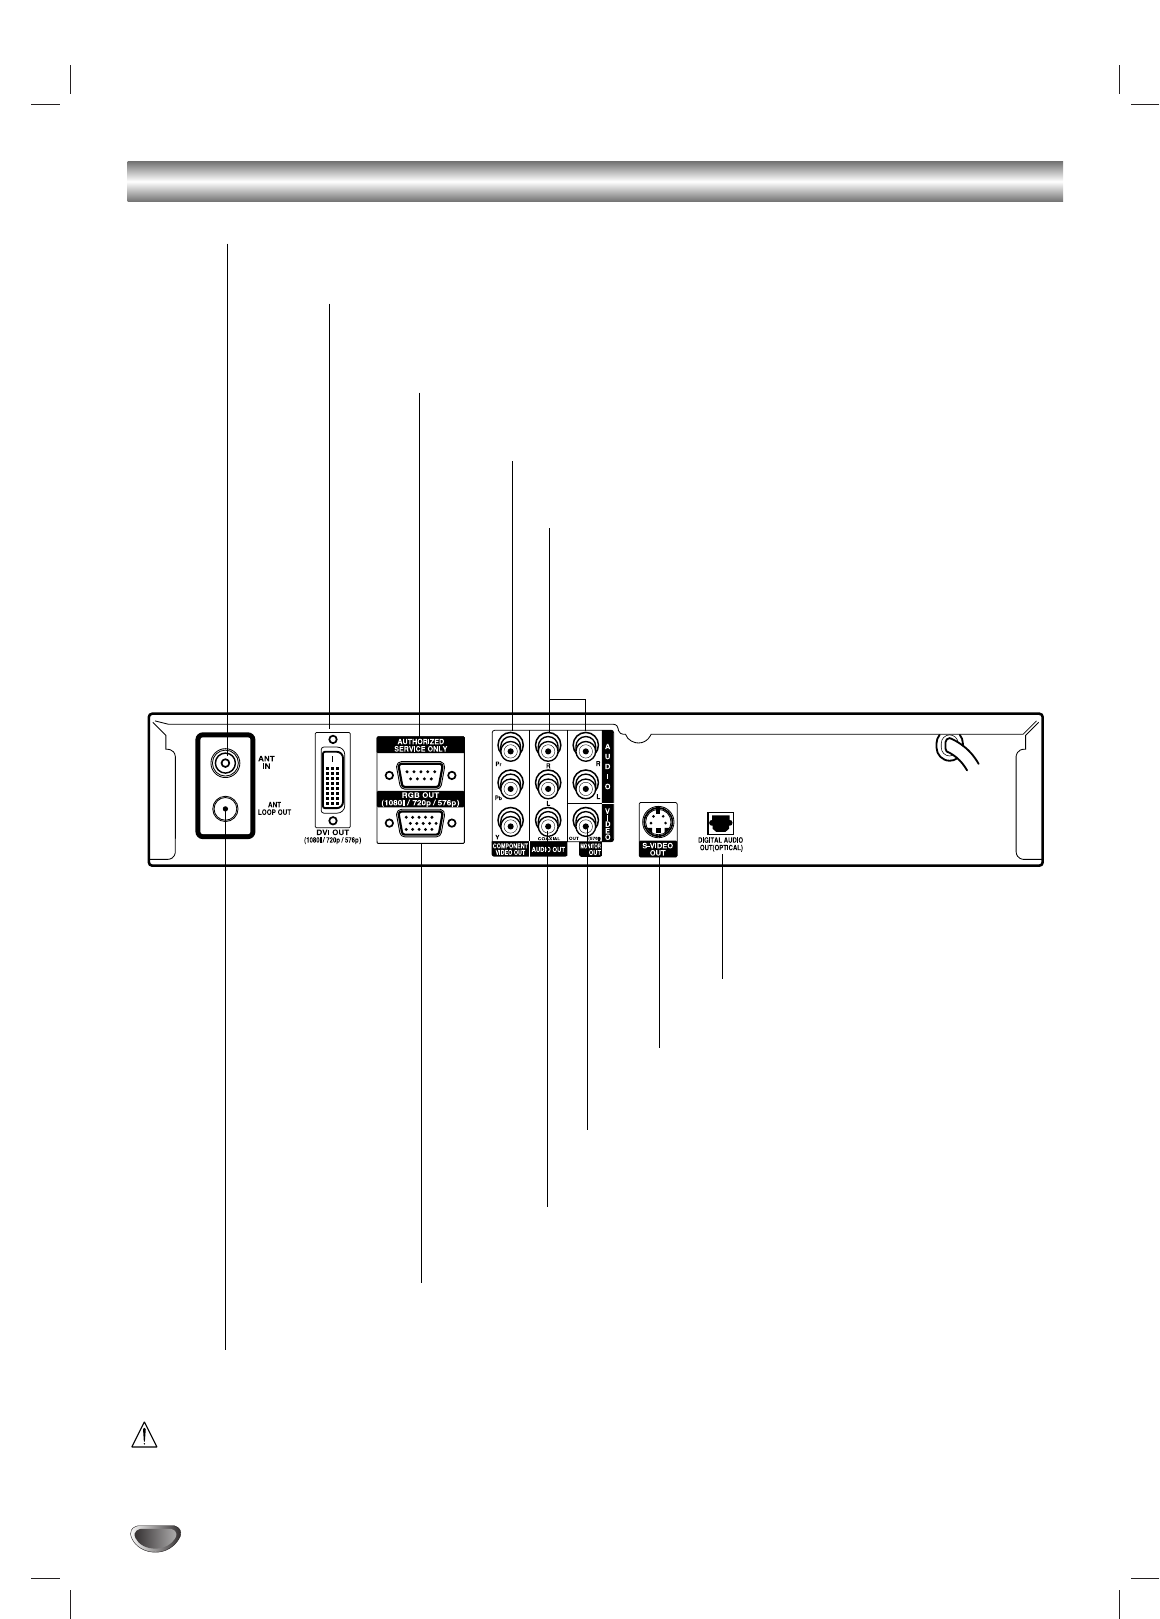
Connection Panel Overview
Do not touch the inner pins of the jacks on the rear panel.
Electrostatic discharge may cause permanent damage to the unit.
ANT LOOP OUT
RF output to TV ’s “Antenna In ” jack or other devices.
VIDEO OUT
Connect to a TV with video inputs.
AUTHORIZED SERVICE ONLY
Is used only for authorized service purposes.
DVI OUT
Connect to a TV with DVI-DTV
connector.
COAXIAL (Digital audio out jack)
Connect to digital (coaxial) audio equipment.
COMPONENT VIDEO OUT
Connect to a TV with YPbPr inputs.
ANT IN
Connect to HDTV signal source;external/internal antenna.
OPTICAL (Digital audio out jack)
Connect to digital (optical)audio
equipment.
RGB OUT
Connect to a TV with RGB-DTV inputs.
S-VIDEO OUT
Connect to a TV with S-Video inputs.
Variable AUDIO OUT (Left/Right)
Connect to a TV, Amplifier, Receiver or Stereo System.
INSTALLATION
9
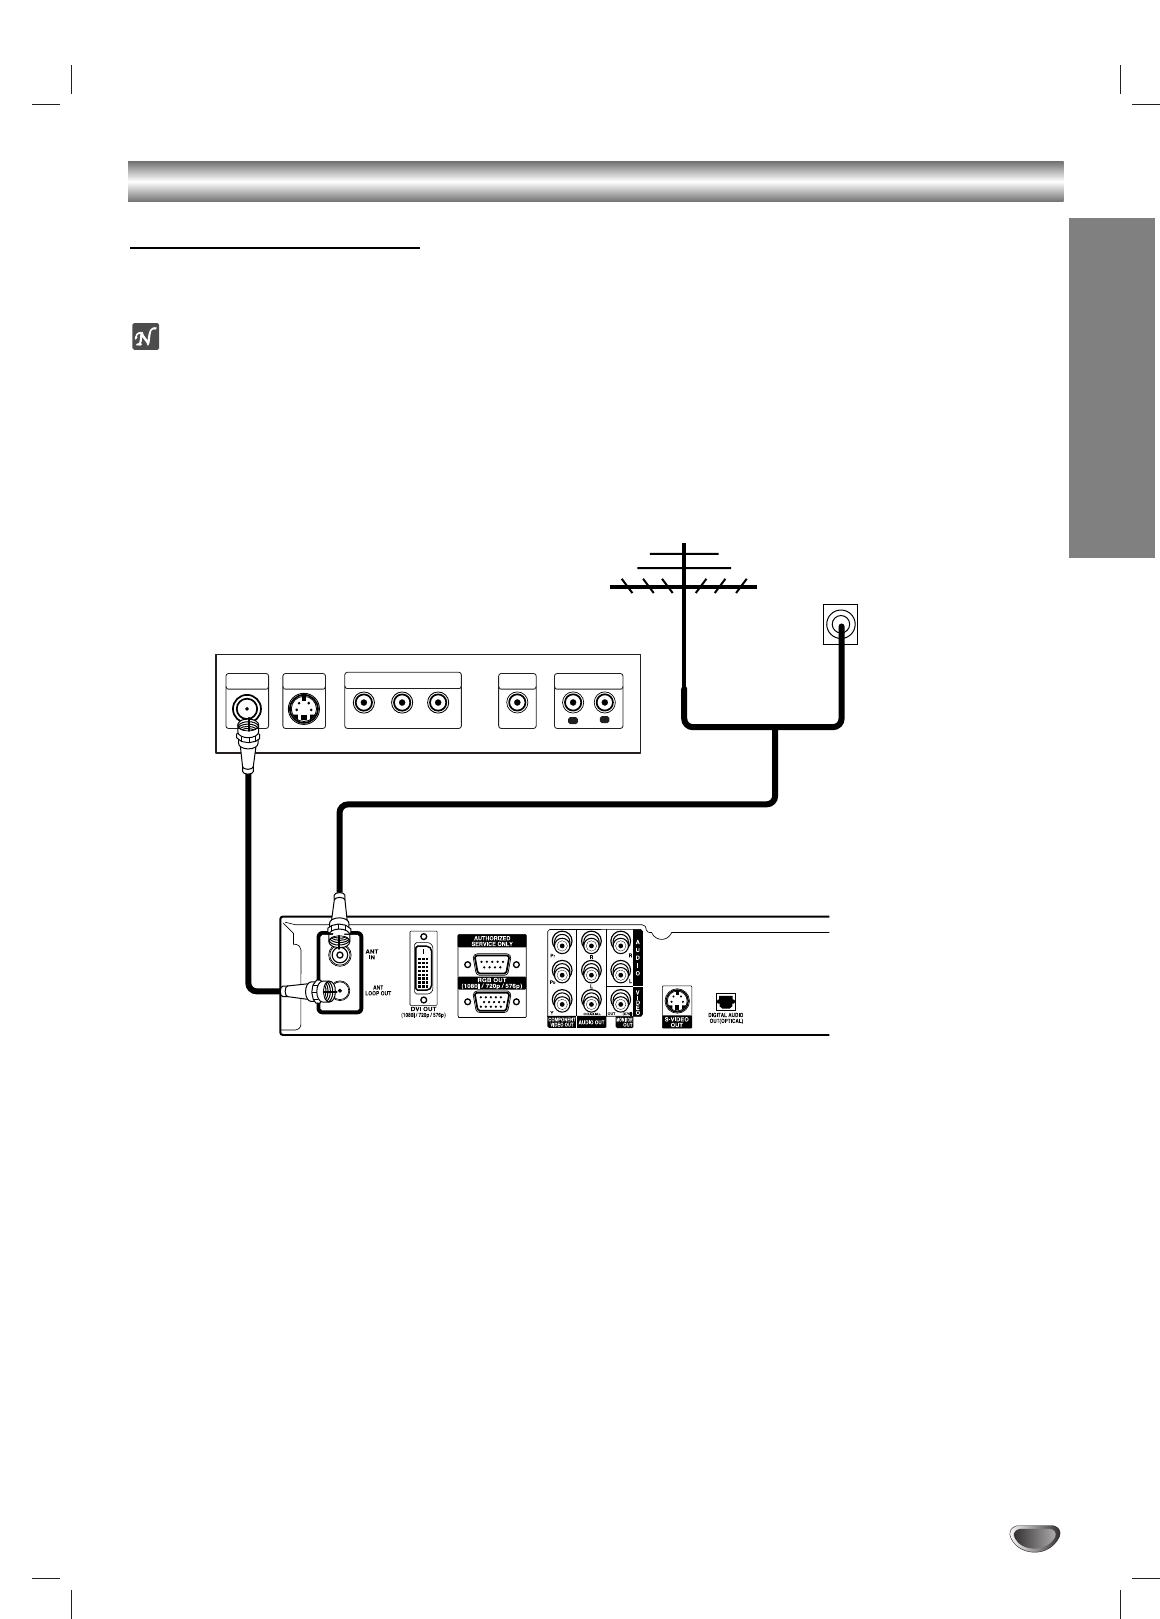
Connections
Antenna Connections
11
Connect the “Antenna” to the “ANT IN” jack on the HDTV Receiver using a coaxial RF cable.
ote
There might be some areas where the signal strength could be too high. If so, you may need to connect the
antenna to an attenuator. Screw the attenuator onto the “ANT IN” jack.
22
Connect the “ANT LOOP OUT” jack on the HDTV Receiver to the “Antenna In” jack on your TV using a coaxial
RF cable.
L
R
Y
Pb
Pr
COMPONENT VIDEO INPUT AUDIO INPUT
L
VIDEO
INPUT
S-VIDEO
INPUT
ANTENNA
INPUT
TV or Other Device Connection Panel
HDTV Receiver Connection Panel
Antenna
Wall Jack Panel
Antenna
Connections (Continued)
10
Display Formats Overview
•The HDTV Receiver offers various display formats and multiple video outputs.When the HDTV Tuner is connected
to A/V systems, the HDTV Tuner can provide video signal formats 1080i, 720p, 576p, and 576i.
•1080i, 720p, 576p, and 576i modes are available for component video (YPbPr)outputs.
•1080i, 720p, and 576p modes are available for RGB and DVI outputs.
•576i mode is available for VIDEO, S-VIDEO, and COMPONENT VIDEO outputs.
•The HDTV Tuner has two digital audio outputs;Dolby Digital 5.1 and PCM.The HDTV Tuner sends out a digital
audio signal to OPTICAL and COAXIAL audio outputs when digital broadcasts are being received by the HDTV
Tuner.
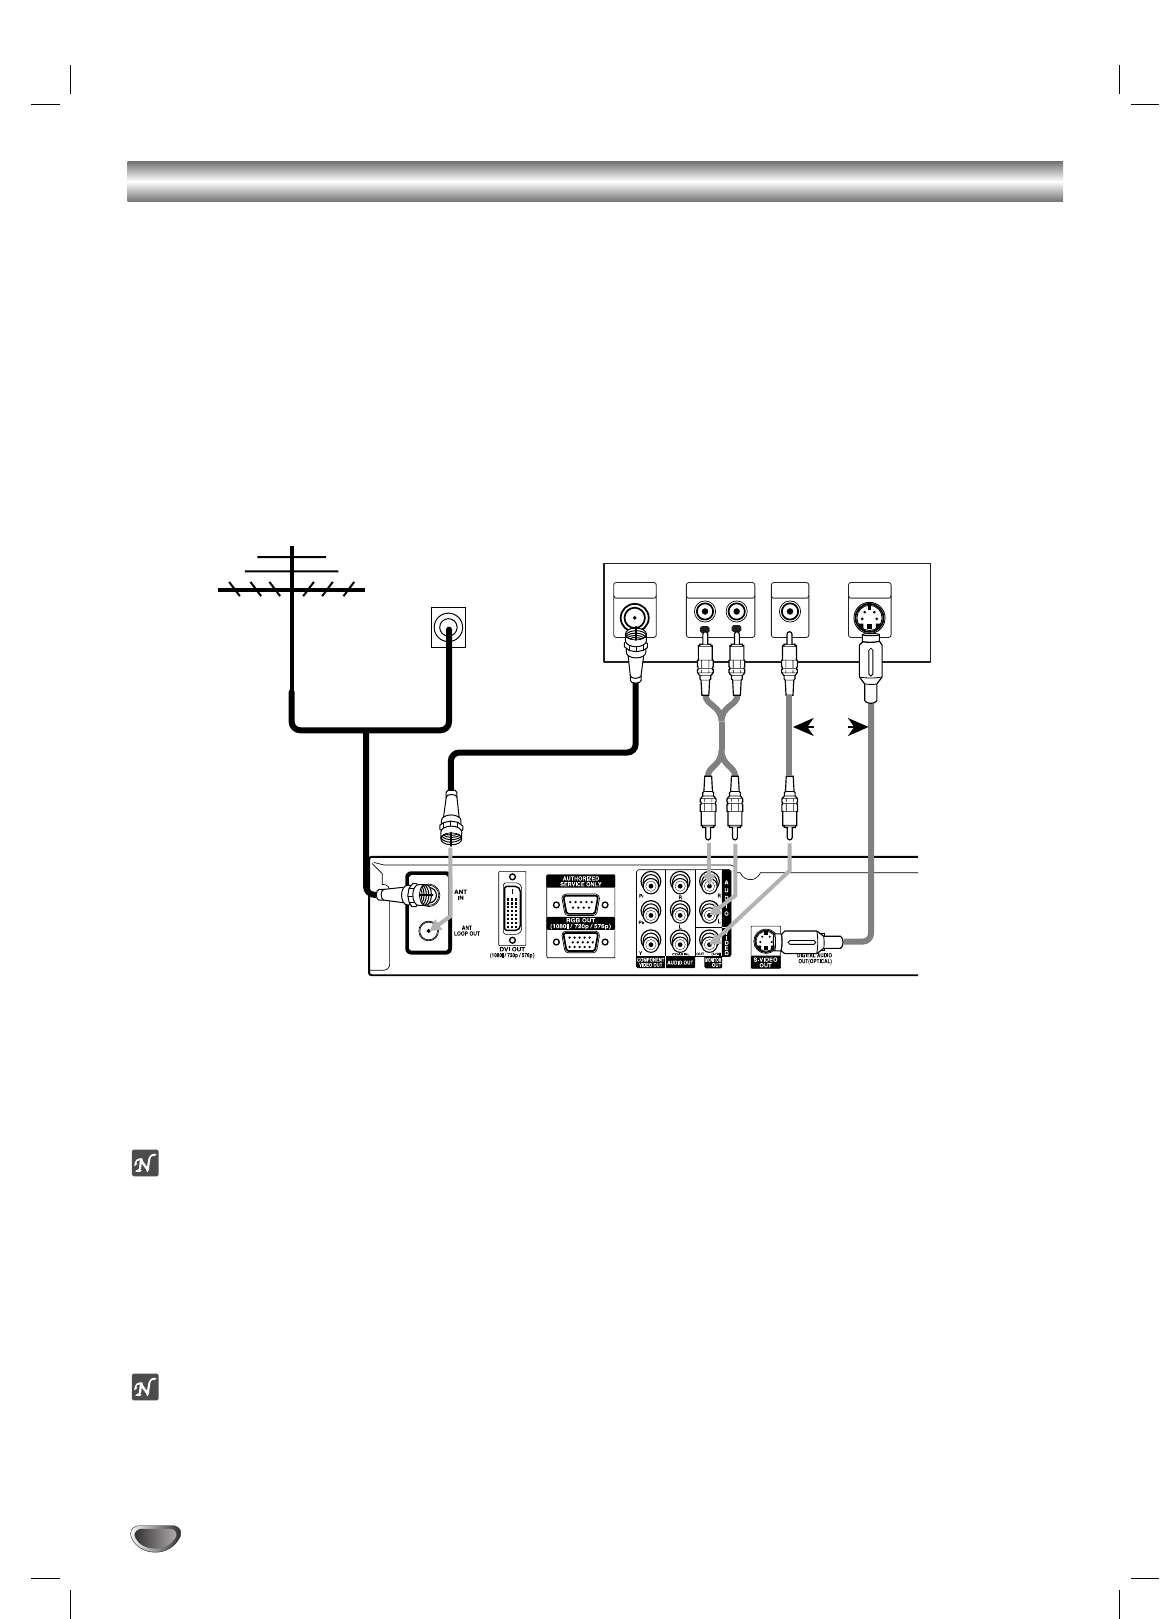
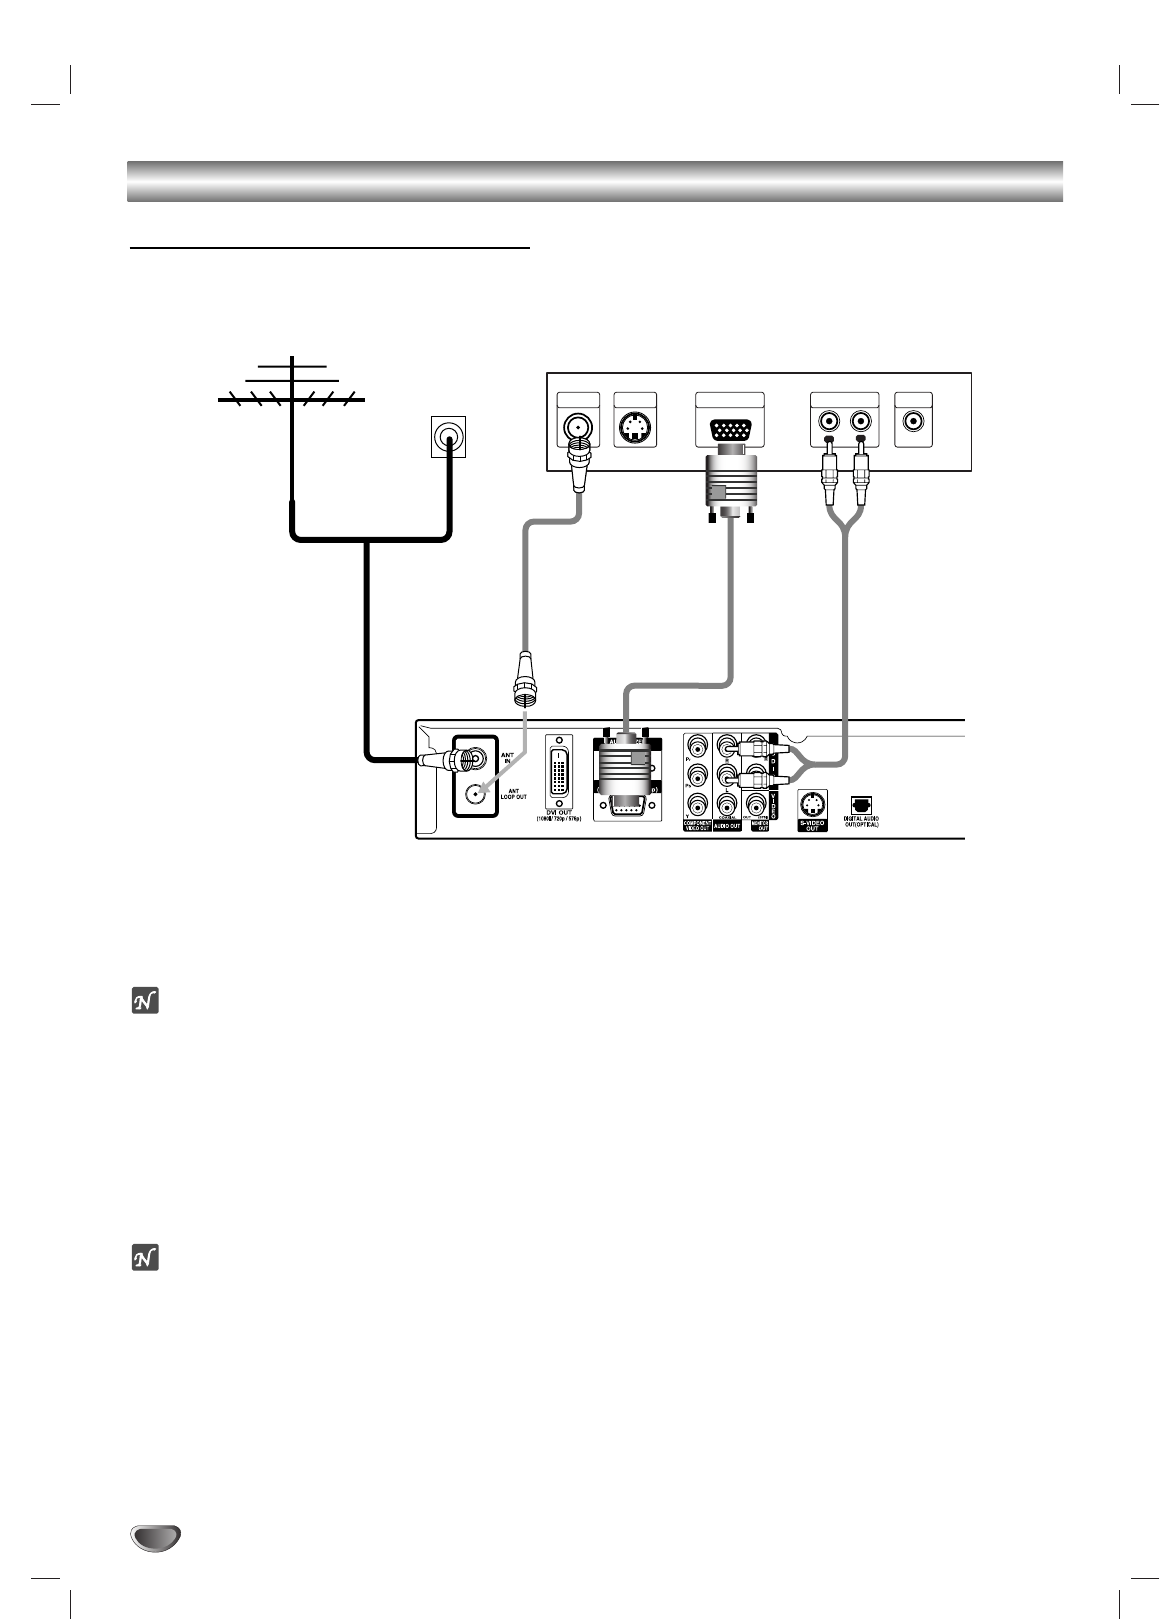
Analog Monitor Connections
11
Connect the “Antenna” to the “ANT IN” jack on the HDTV Receiver using a coaxial RF cable.
ote
There might be some areas where the signal strength could be too high. If so, you may need to connect the
antenna to an attenuator. Screw the attenuator onto the “ANT IN” jack. (Refer to page 9.)
22
Connect the “ANT LOOP OUT” jack on the HDTV Receiver to the “Antenna In” jack on your TV using a coaxial
RF cable.
33
Connect the “AUDIO OUT” and “VIDEO OUT” jacks on the HDTV Receiver to the “A/V IN” jacks on your TV
using RCA-type cables. If your TV is equipped with an S-Video jack, use the S-VIDEO OUT jack.
(The Output Selection must be set to YPbPr, refer to Display Format Setup on page 16.)
ote
When using Composite VIDEO OUT (yellow connector) or S-video outputs from HDTV Receiver, MENU will only
appear and operate if 576i format is selected.
Antenna
Wall Jack Panel
OR
L
R
AUDIO INPUT
L
VIDEO
INPUT
S-VIDEO
INPUT
ANTENNA
INPUT
TV Connection Panel
HDTV Receiver Connection Panel
Antenna
OR
INSTALLATION
11
Connections (Continued)
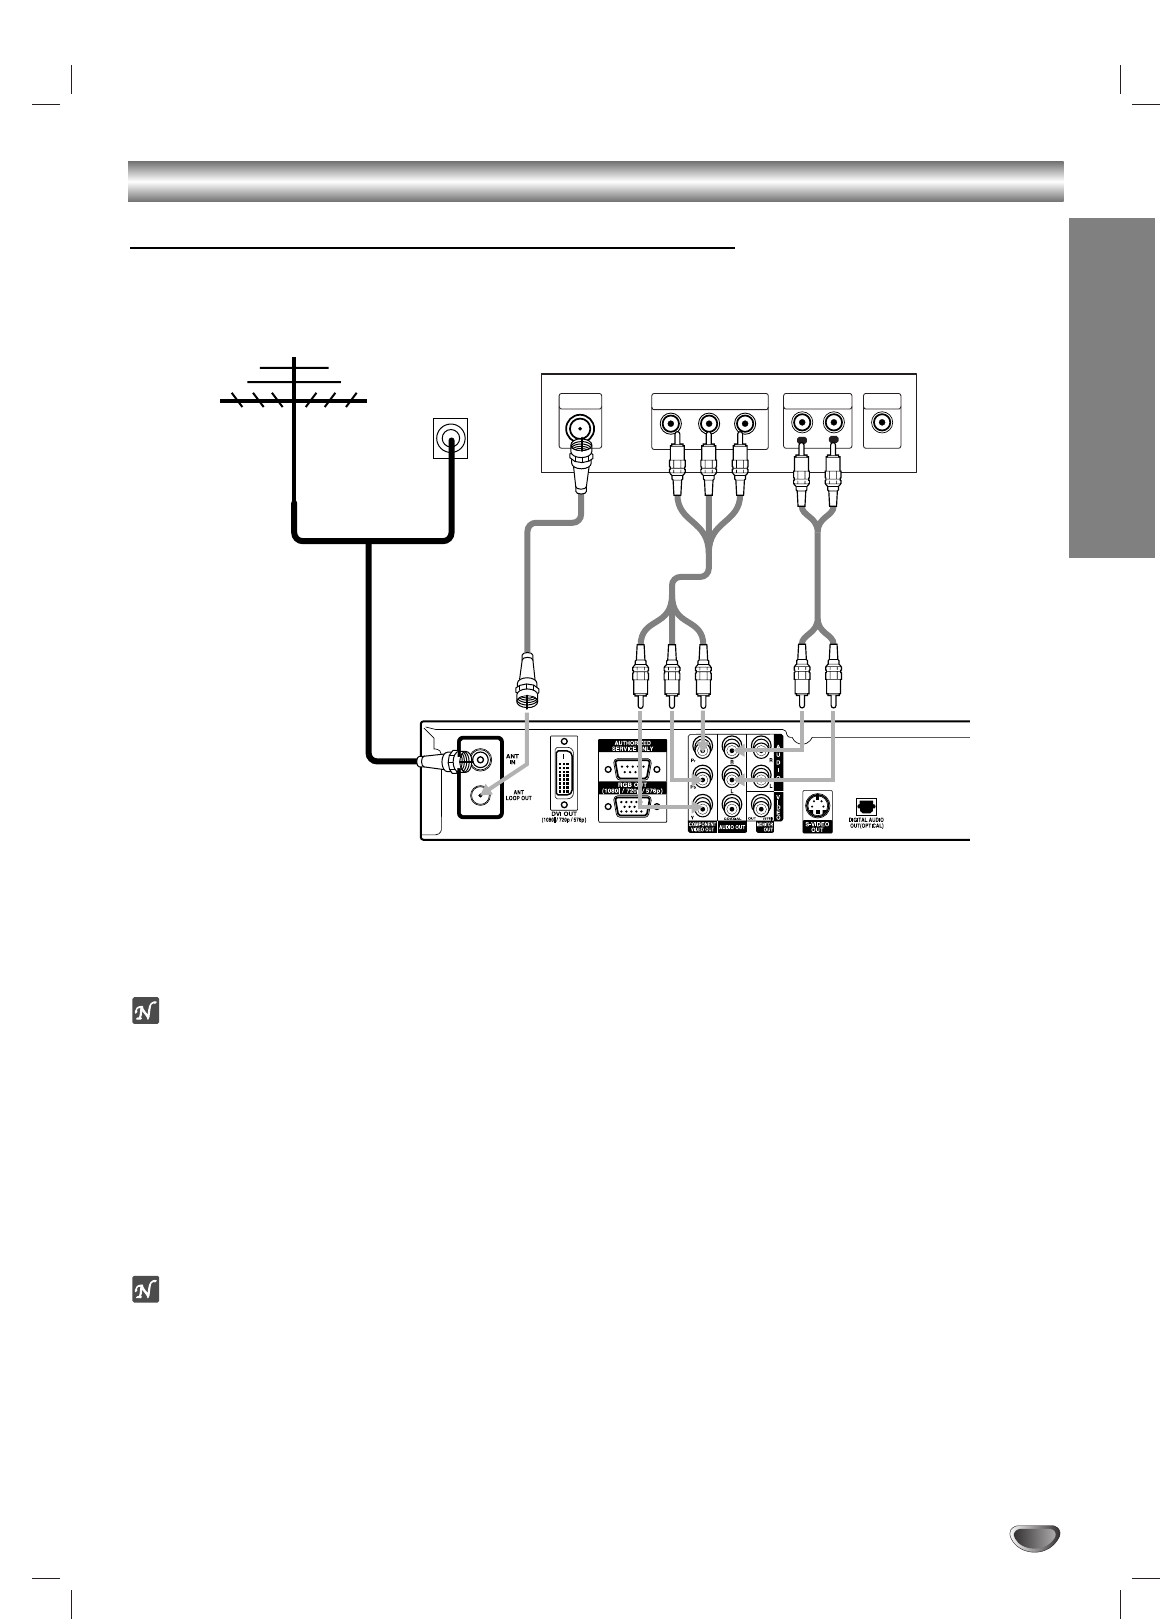
HD Monitor Component (YPbPr) Connections
11
Connect the “Antenna” to the “ANT IN” jack on the HDTV Receiver using a coaxial RF cable.
ote
There might be some areas where the signal strength could be too high. If so, you may need to connect the
antenna to an attenuator. Screw the attenuator onto the “ANT IN” jack. (Refer to page 9.)
22
Connect the “ANT LOOP OUT” jack on the HDTV Receiver to the “Antenna In” jack on your TV using a coaxial
RF cable.
33
Connect the “COMPONENT OUT” jacks on the HDTV Receiver to the “COMPONENT IN” jacks of your TV
using RCA-type cables. (The Output Selection must be set to YPbPr, refer to Display Format Setup on page
16.)
44
Connect the L/R “AUDIO OUT” jacks on the HDTV Receiver to the L/R “AUDIO IN” jacks on your TV using
RCA-type cables.
ote
1080i, 720p, 576p, and 576i modes are available for component video (YPbPr) outputs.
Y
Pb
Pr
COMPONENT VIDEO INPUT
L
R
AUDIO INPUT VIDEO
INPUT
ANTENNA
INPUT
Antenna
Wall Jack Panel
OR
HD Ready TV Connection Panel
HDTV Receiver Connection Panel
Antenna
12
Connections (Continued)
HD Monitor RGB Connections
11
11
Connect the “Antenna” to the “ANT IN” jack on the HDTV Receiver using a coaxial RF cable.
ote
There might be some areas where the signal strength could be too high. If so, you may need to connect the
antenna to an attenuator. Screw the attenuator onto the “ANT IN” jack. (Refer to page 9.)
22
Connect the “ANT LOOP OUT” jack on the HDTV Receiver to the “Antenna In” jack on your TV using a coaxial
RF cable.
33
Connect the “RGB OUT” jack on the HDTV Receiver to the “RGB IN for DTV” jack of your TV using VGA-type
connector. (The Output Selection must be set to RGB, refer to Display Format Setup on page 16.)
44
Connect the L/R “AUDIO OUT” jacks on the HDTV Receiver to the L/R “AUDIO IN” jacks on your TV using
RCA-type cables.
ote
1080i, 720p, and 576p modes are available for RGB outputs.
Antenna
Wall Jack Panel
OR
Antenna
L
R
AUDIO INPUTRGB INPUT VIDEO
INPUT
S-VIDEO
INPUT
ANTENNA
INPUT
HD Ready TV Connection Panel
HDTV Receiver Connection Panel
Connections (Continued)
INSTALLATION
13
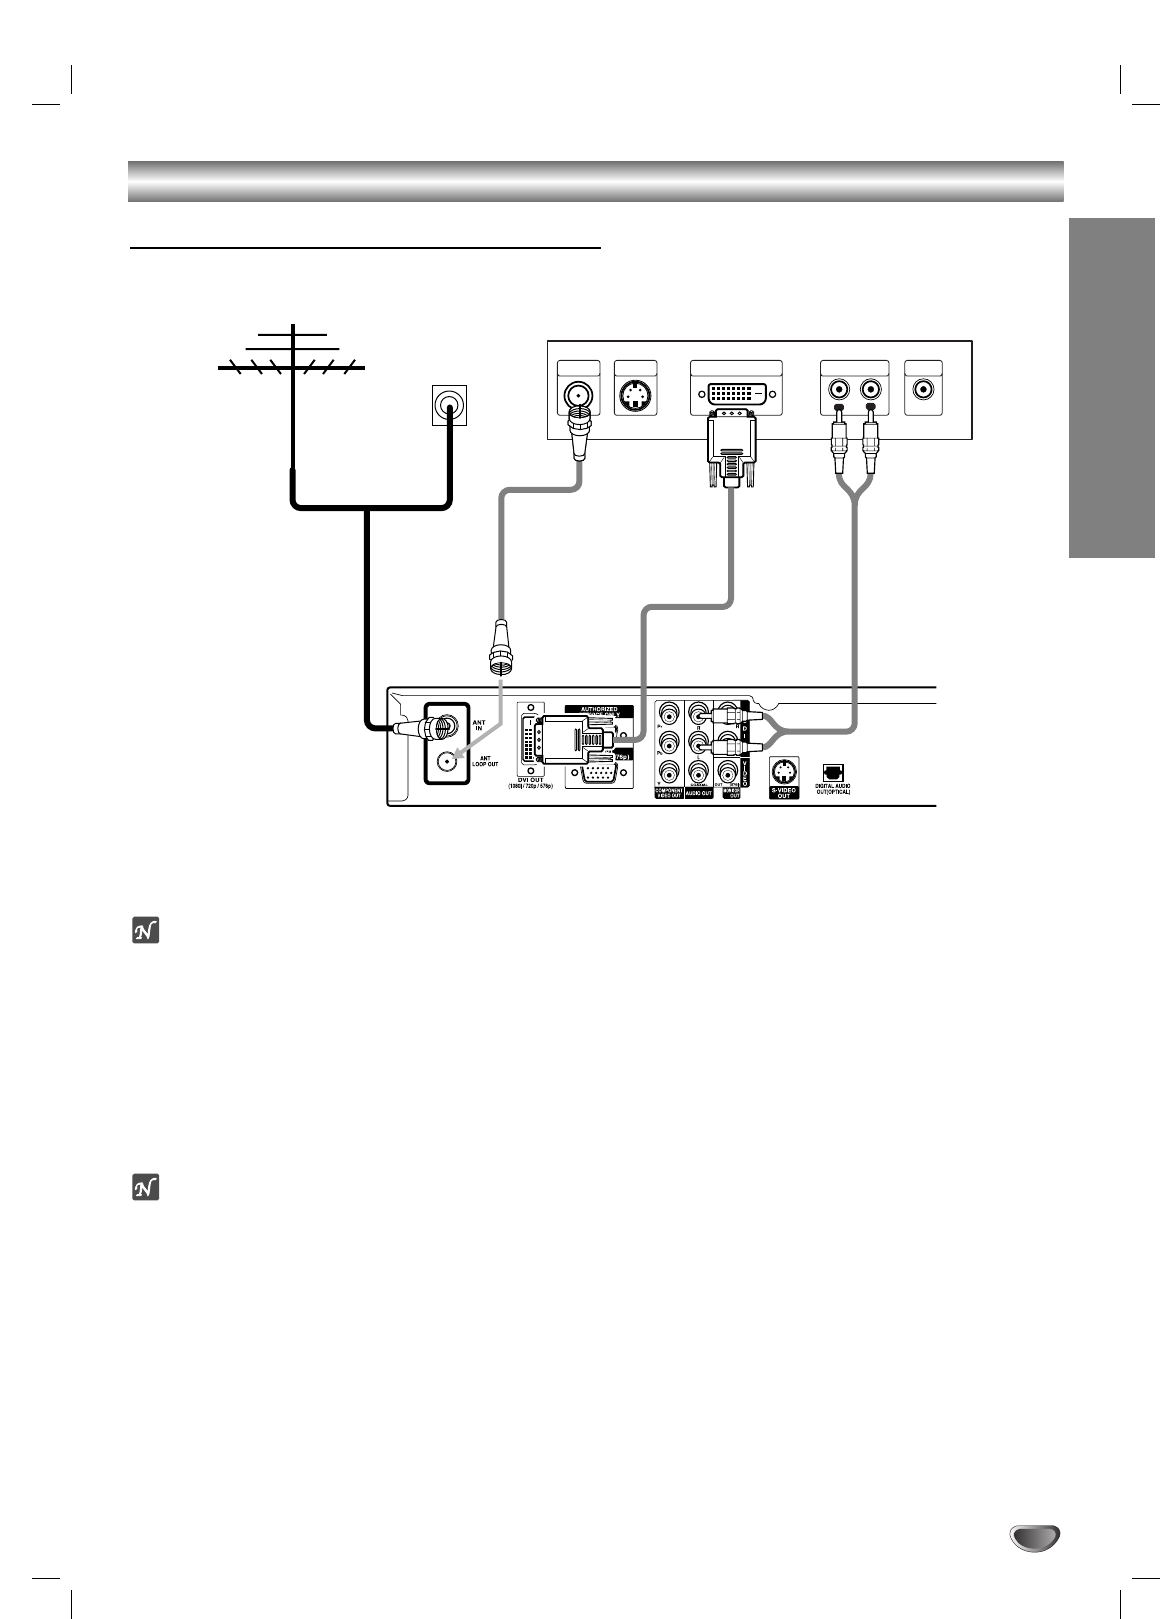
HD Monitor DVI-HDTV Connections
11
Connect the “Antenna” to the “ANT IN” jack on the HDTV Receiver using a coaxial RF cable.
ote
There might be some areas where the signal strength could be too high. If so, you may need to connect the
antenna to an attenuator. Screw the attenuator onto the “ANT IN” jack. (Refer to page 9.)
22
Connect the “ANT LOOP OUT” jack on the HDTV Receiver to the “Antenna In” jack on your TV using a coaxial
RF cable.
33
Connect the “DVI OUT” jack on the HDTV Receiver to the “DVI IN for DTV” jack of your TV using DVI-D type
connector. (The Output Selection must be set to DVI, refer to Display Format Setup on page 16.)
44
Connect the L/R “AUDIO OUT” jacks on the HDTV Receiver to the L/R “AUDIO IN” jacks on your TV using
RCA-type cables.
ote
•1080i, 720p, and 576p modes are available for DVI outputs.
•ADVI-HDTV input is one that is compliant with EIA-861 specifications. Check your TV or monitor's user manual to
find out if the TV or monitor's DVI input is compliant with these specifications.
•Some HD Monitors designed for PC applications using DVI-D may not work with this connection.
DVI-HDTV INPUT
L
R
AUDIO INPUT VIDEO
INPUT
S-VIDEO
INPUT
ANTENNA
INPUT
Antenna
Wall Jack Panel
OR
Antenna
HD Ready TV Connection Panel
HDTV Receiver Connection Panel
14
Connections (Continued)
VCR Connections
Connect the L/R “AUDIO OUT” jacks and “VIDEO OUT” jack on the HDTV Receiver to the “A/V in” jacks on your
VCR using RCA-type cables. (If your VCR is equipped with an S-Video jack, use the “S-Video” jack.)
Caution
If the Output Selection is set to YPbPr and 576i display format is selected, the VCR will record an onscreen
display onto the tape during recording if:
the programme is changed with PR (+/–)
the sound level is adjusted with VOL (+/–)
or by pressing the (SELECT) button, etc.
ote
The caption signal is recorded when the display format settings are set to 576i. (Refer to page 16.)
L
R
AUDIO INPUT
L
VIDEO
INPUT
VCR Connection Panel
HDTV Receiver Connection Panel
INSTALLATION
15
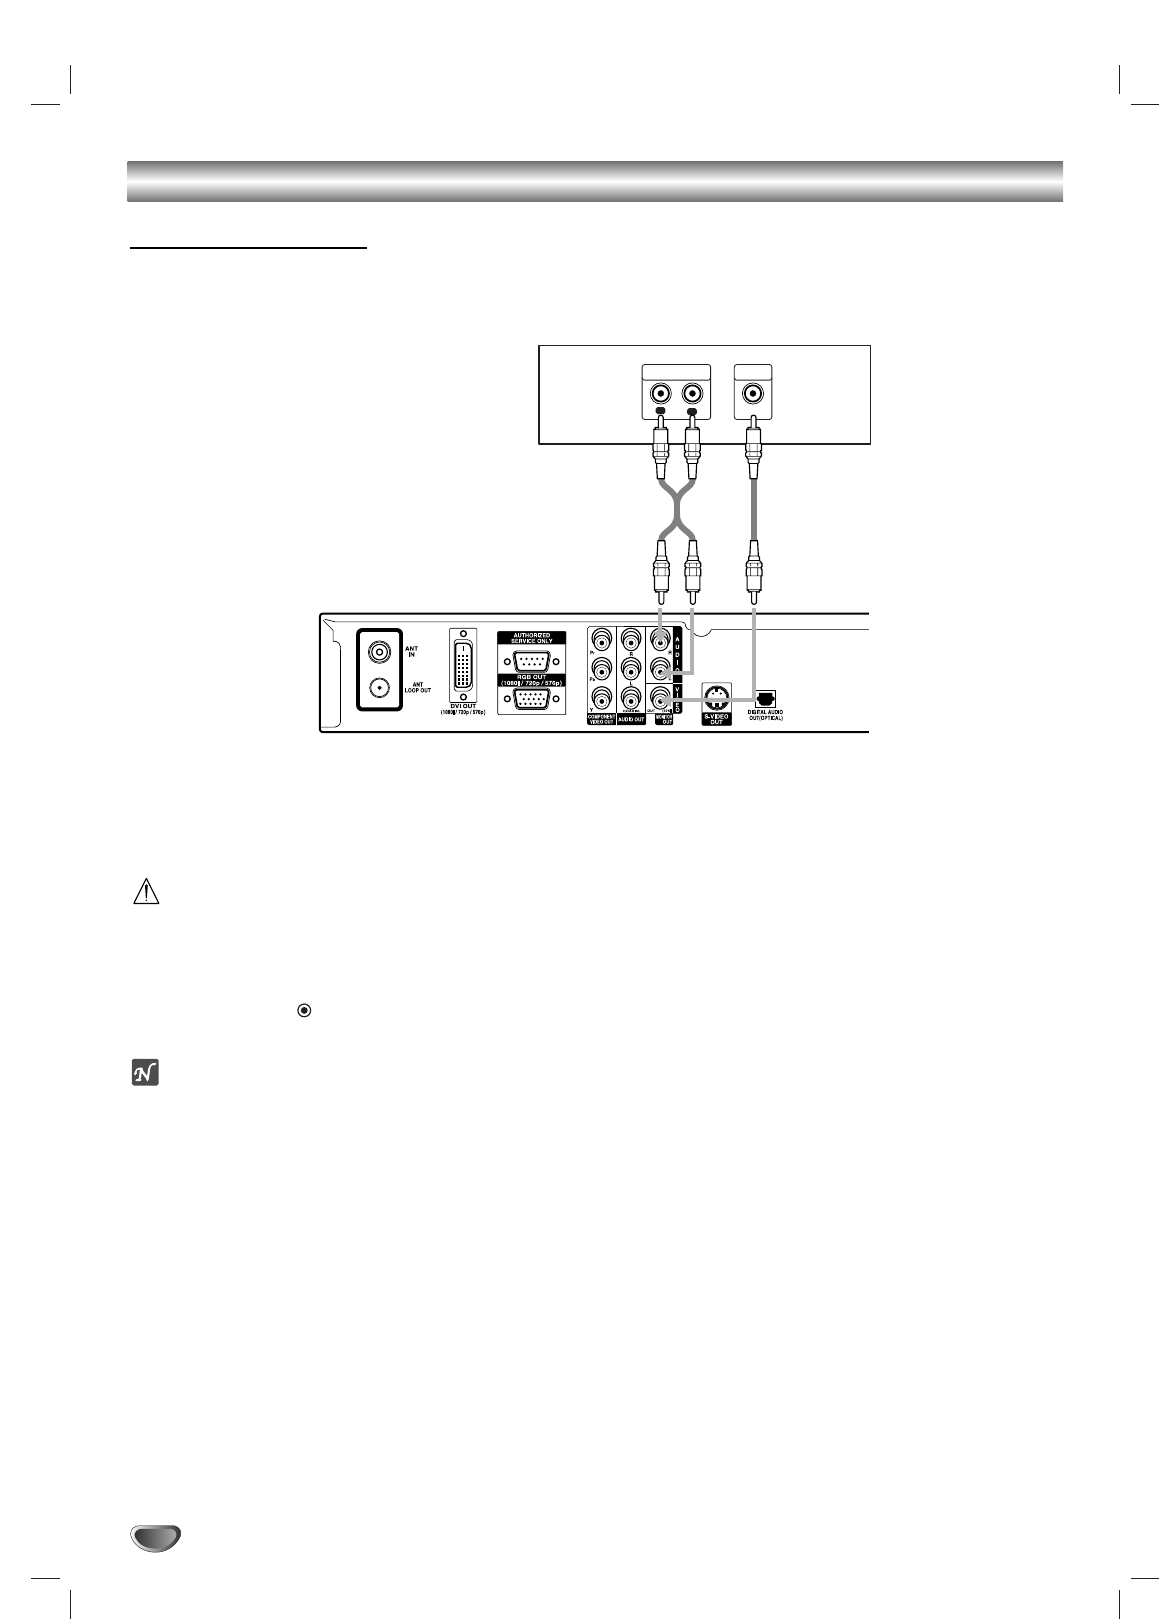
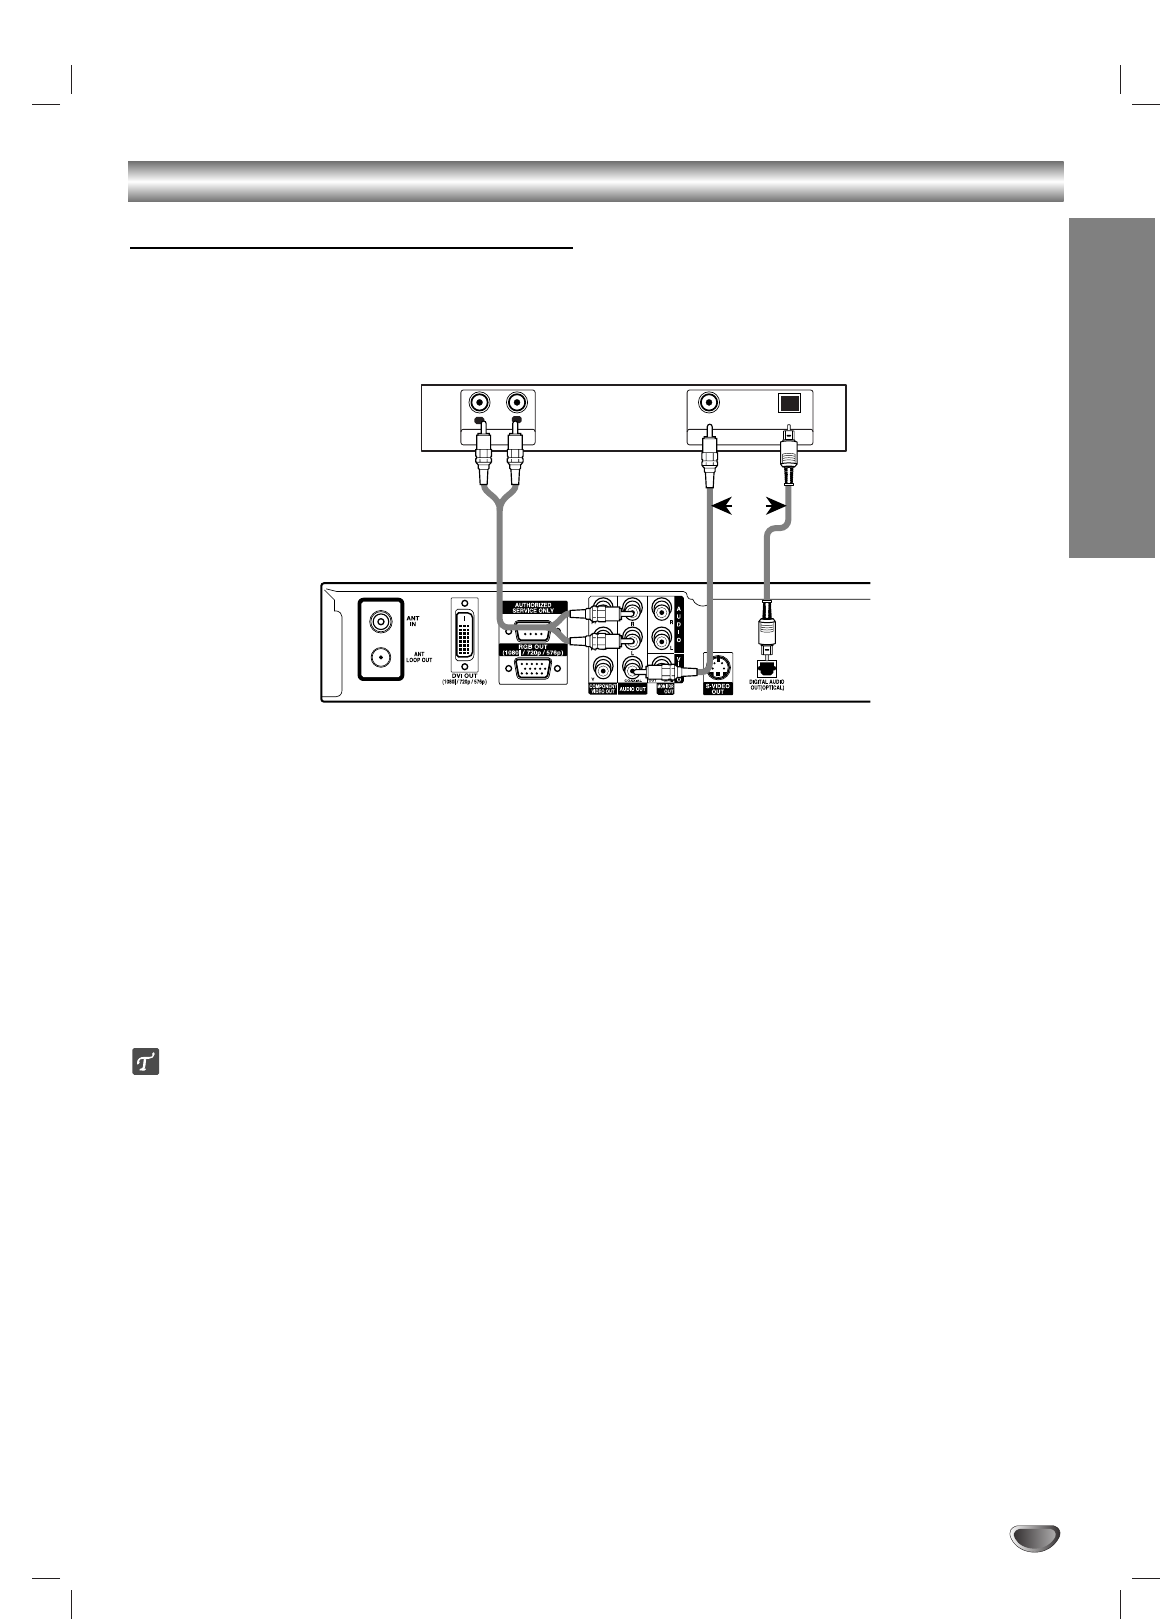
Connections (Continued)
Amplifier (Receiver) Connections
Connecting to an amplifier equipped with two channel analog stereo or Dolby Surround
Connect the Left and Right AUDIO OUT jacks on the HDTV Receiver to the audio left and right in jacks on your
amplifier, receiver, or stereo system, using the supplied audio cables.
Connecting to an amplifier equipped with two channel digital stereo (PCM) or to an Audio/ Video
receiver equipped with a multi-channel decoder (Dolby Digital™)
Connect one of the HDTV Receiver’s DIGITAL AUDIO OUT jacks (OPTICAL or COAXIAL) to the corresponding
input jack on your amplifier. Use an optional digital (optical or coaxial) audio cable.
Digital Multi-channel sound
Adigital multi-channel connection provides the best sound quality. For this you need a multi-channel Audio/Video
receiver that supports one or more of the audio formats supported by your HDTV Receiver (Dolby Digital). Check
the receiver manual and the logos on the front of the receiver.
R
L
AUDIO INPUT DIGITAL INPUT
OPTICALCOAXIAL
HDTV Receiver Connection Panel
Amplifier (Receiver) Connection Panel
OR
Setting the Display Format
16
The HDTV Receiver provides several display formats. The DISPLAY FOR-
MAT button on the front panel changes the output resolution. The output res-
olution may be converted from the original broadcast format.
Display Format Setup
11
Press DISPLAY FORMAT once on the front panel.
The current output signal will appear in the display window.
22
Depending on the type of Monitor that the HDTV Receiver is con-
nected to, press DISPLAY FORMAT or 11/ 22repeatedly on the front
panel to select desired output connector. (YPbPr, RGB, or DVI.)
Press MENU button if you wish to exit the display format setting.
33
Use SELECT on the front panel to confirm your output connector
selection.
The current output resolution will appear in the display window.
44
Depending on the type of Monitor that the HDTV Receiver is con-
nected to, press DISPLAY FORMAT or 11/ 22repeatedly on the front
panel to select desired output resolution. (1080i, 720p, 576p, 576i)
Press MENU button if you wish to return to the output connector setting
mode.
55
Press (SELECT) on the front panel to confirm your output resolu-
tion selection.
Display Format setup is finished.
otes
•
You can exit Display Format Setup mode by pressing EXIT on the front
panel.
•The S-VIDEO and VIDEO OUT jacks’ signals are converted from all for-
mats to 576i format.
•When using Composite video or S-video outputs from HDTV Receiver, on-
screen display will only appear and operate if 576i format is selected.
Display Format modes Input Signal format Output Signal format
1080i all formats 1080i
720p all formats 720p
576p all formats 576p
576i all formats 576i
OUTPUT CONNECTION AVAILABLE FORMATS
COMPONENT VIDEO OUT 1080i/720p/576p/576i
RGB OUT 1080i/720p/576p
DVI OUT 1080i/720p/576p
VIDEO OUT All formats converted to 576i
S-VIDEO OUT All formats converted to 576i
DISPLAY FORMAT
MENU OPERATION
17
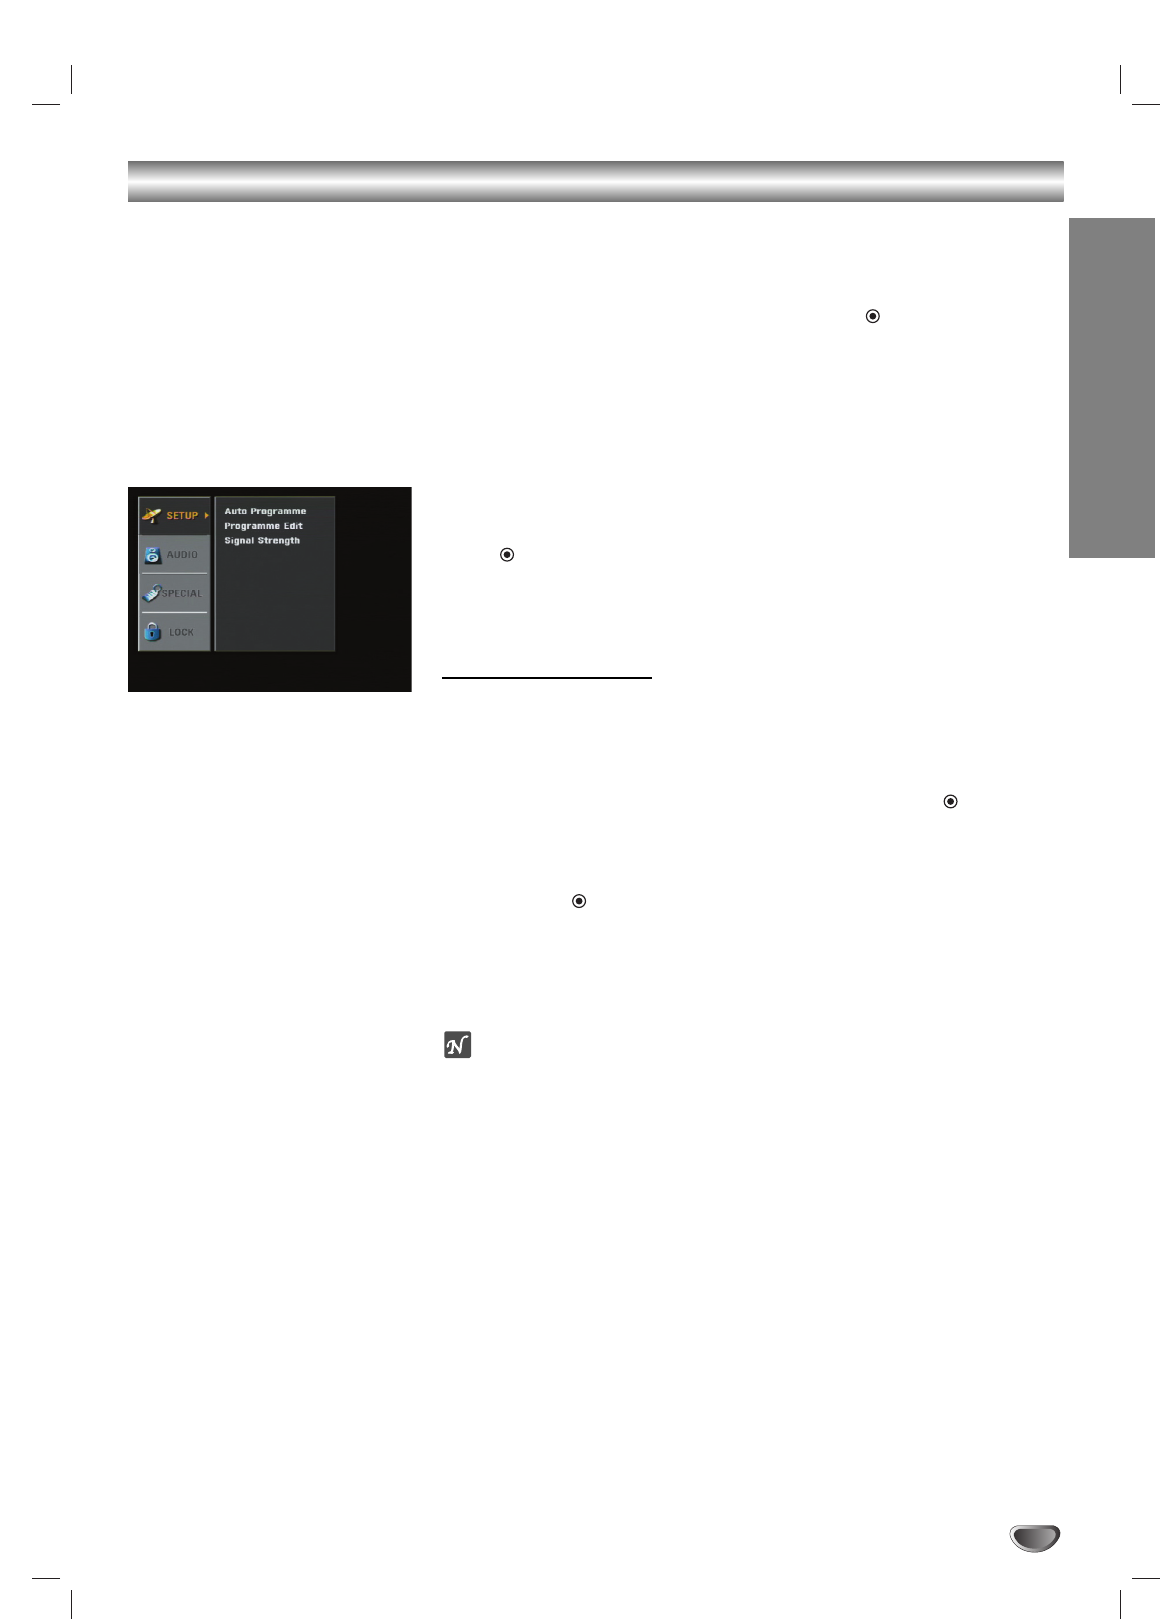
Initial Settings
In this menu system, there are several ways to customize the settings pro-
vided. Most menus consist of three levels to set up the options, but some
require greater depth for the variety of settings. If you press the MENU but-
ton, only the first and second level of the menu system will appear on the TV
screen. The third level can be displayed by pressing (SELECT). If a menu
has more than three levels, the pop-up dialogue box will be displayed as the
fourth or fifth level. For navigating the menu levels, you will see “ 22” on the
right side of the menu label to help you go to the next level.
To show and remove the Menu:
Press the MENU button on the remote control to display the menu. A second
press of the MENU button or a press of the EXIT button will take you back to
TV viewing.
To go to the next level:
Press “ (SELECT)” (or “ 22”) on the remote control.
To go back to the previous level:
Press MENU (or “ 11”) on the remote control.
General Operation
11
Press MENU.
The main menu will appear.
22
Use 33/ 44to select the desired menu option.
33
While the desired menu option is selected, press 22or (SELECT)
to move to the second level.
44
Use 33/ 44to select the second menu option.
55
Press 22or (SELECT) to move to the third level.
Some menu options require additional steps.
66
Press MENU to return to the previous menu or press EXIT on the
remote control to return to TV viewing.
ote
If your TV is in zoom mode, the menu screen may be cut off.
In this case, set the TV’s zoom mode to normal to display the menu properly.
18
Setup Menu Options
ote
PIN is needed to access the SETUP menu if [Lock System] option is set
to [On].
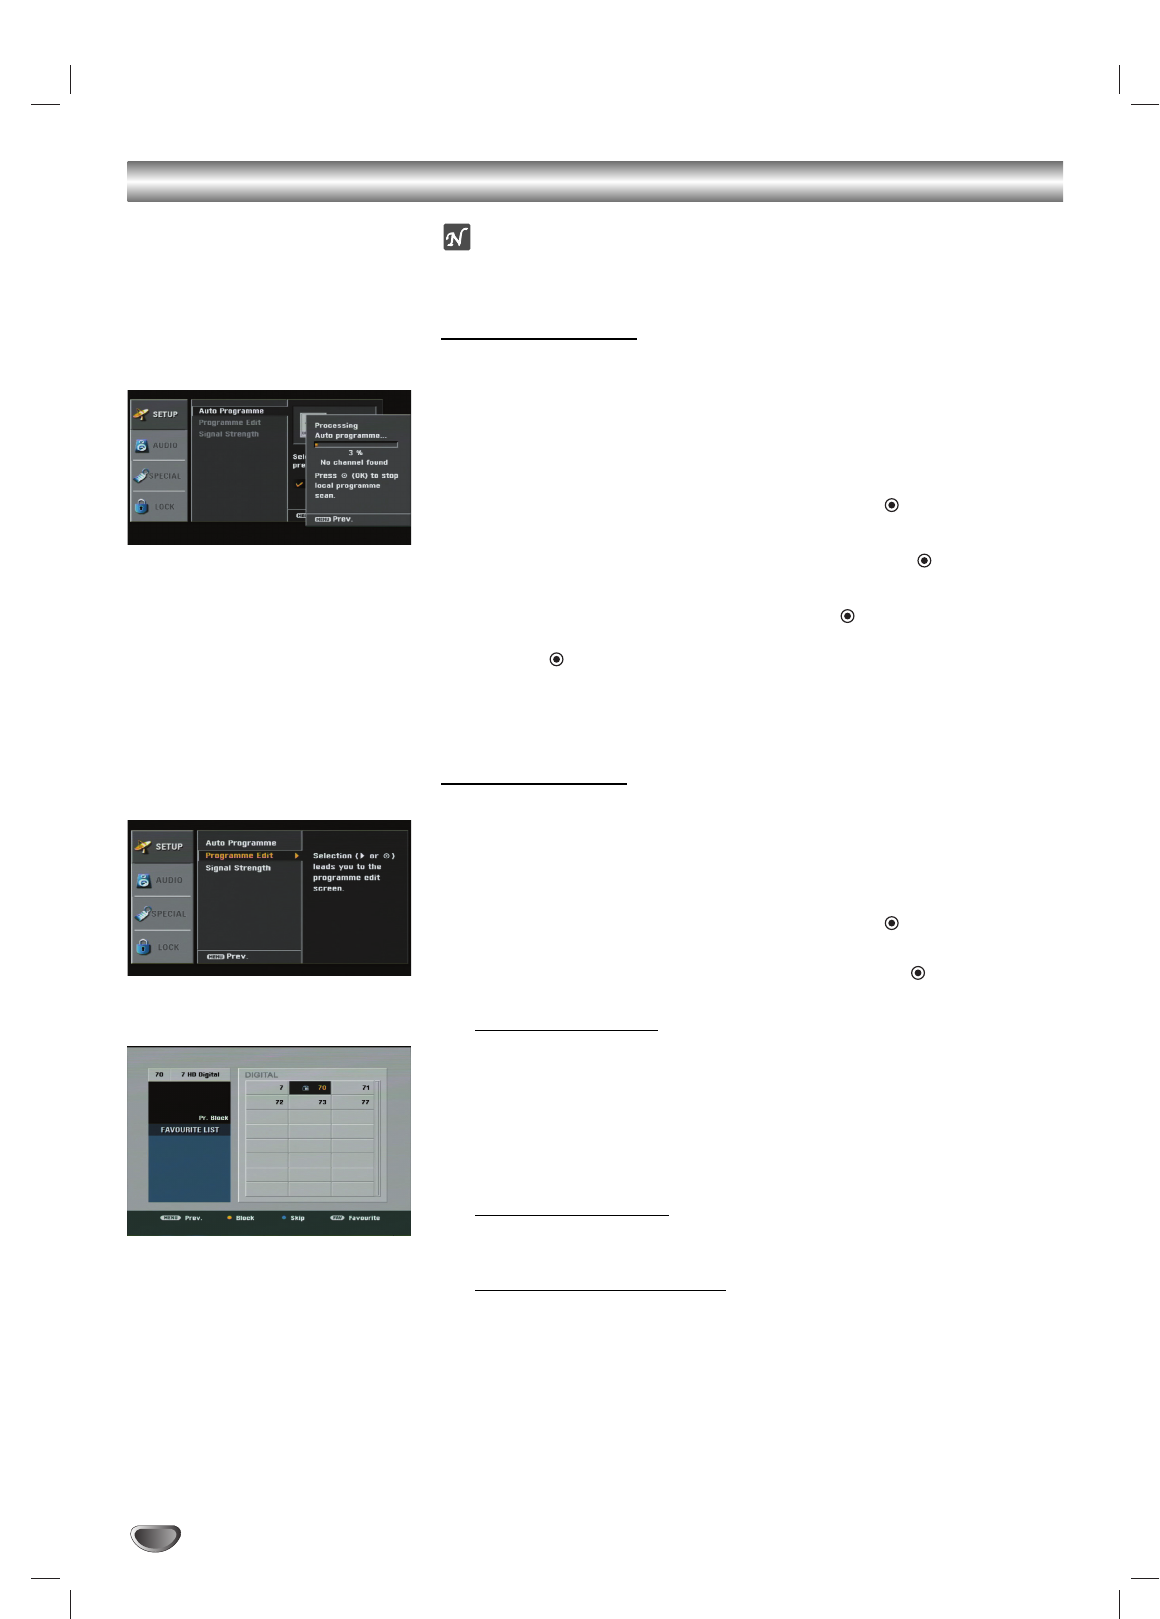
Auto Programme
Automatically finds all programmes (digital), and stores all the active pro-
grammes found on the programme list. Inactive or weak programmes may
not appear on the list.
11
Press MENU to display the on-screen menu.
22
Select the SETUP menu using 33/ 44then press (SELECT) or 22to
move to the second level.
33
Select the Auto Programme using 33/ 44then press (SELECT) or
22to move to the third level.
44
Select the “1.DTV” using 33/ 44then press (SELECT).
The programme search process begins. You can stop the process by
pressing (SELECT), MENU or EXIT.
55
When programme search is complete, the lowest programme num-
ber found appears on the TV screen.
Programme Edit
Programme Edit allows you to add or skip programmes from the programme list
in memory manually and create your own favorite list of favorite programmes.
11
Press MENU to display the on-screen menu.
22
Select the SETUP menu using 33/ 44then press (SELECT) or 22to
move to the second level.
33
Select the Programme Edit using 33/ 44then press (SELECT) or 22.
Programme Edit menu appears.
To skip a programme
Select a programme on the programme editing menu then press blue
button to skip the programme. The skipped programme number will dim.
When a programme number is skipped it means that you will be unable
to select it using the PR (+/-) button during normal TV viewing. If you
want to select the skipped programme, directly enter the programme
number with the number buttons or select it in the Programme List
menu.
To block a programme
Select a programme on the programme editing menu then press yellow
button to block the programme. (See page 25 for more details.)
To create a FAVOURITE LIST:
Select a programme on the programme editing menu then press FAV. to
add the programme to the FAVOURITE LIST.
Only the programmes on the programme editing menu can be added to
the surf list.
44
Press MENU to return to the previous screen or press EXIT on the
remote control to return to TV viewing.
Note: If you access this menu
when resolution is set to 576p,
720p, or 1080i, the VIDEO OUT
and S-VIDEO OUT jacks’ signals
are blocked. Press EXIT button to
restore the output signals.

Setup Menu Options
MENU OPERATION
19
ote
PIN is needed to access the SETUP menu if [Lock System] option is set
to [On].
Signal Strength
Shows the strength bar for incoming signal to help you adjust the antenna to
the correct position from your location.
11
Press MENU to display the on-screen menu.
22
Select the SETUP menu using 33/ 44then press (SELECT) or 22.
33
Select the Signal Strength using 33/ 44.
The signal strength bar will be displayed.
44
Press MENU to return to the previous screen or press EXIT on the
remote control to return to TV viewing.
ip
You can also view signal strength bar by pressing SIGNAL on the remote
control.
Audio Menu Options
20
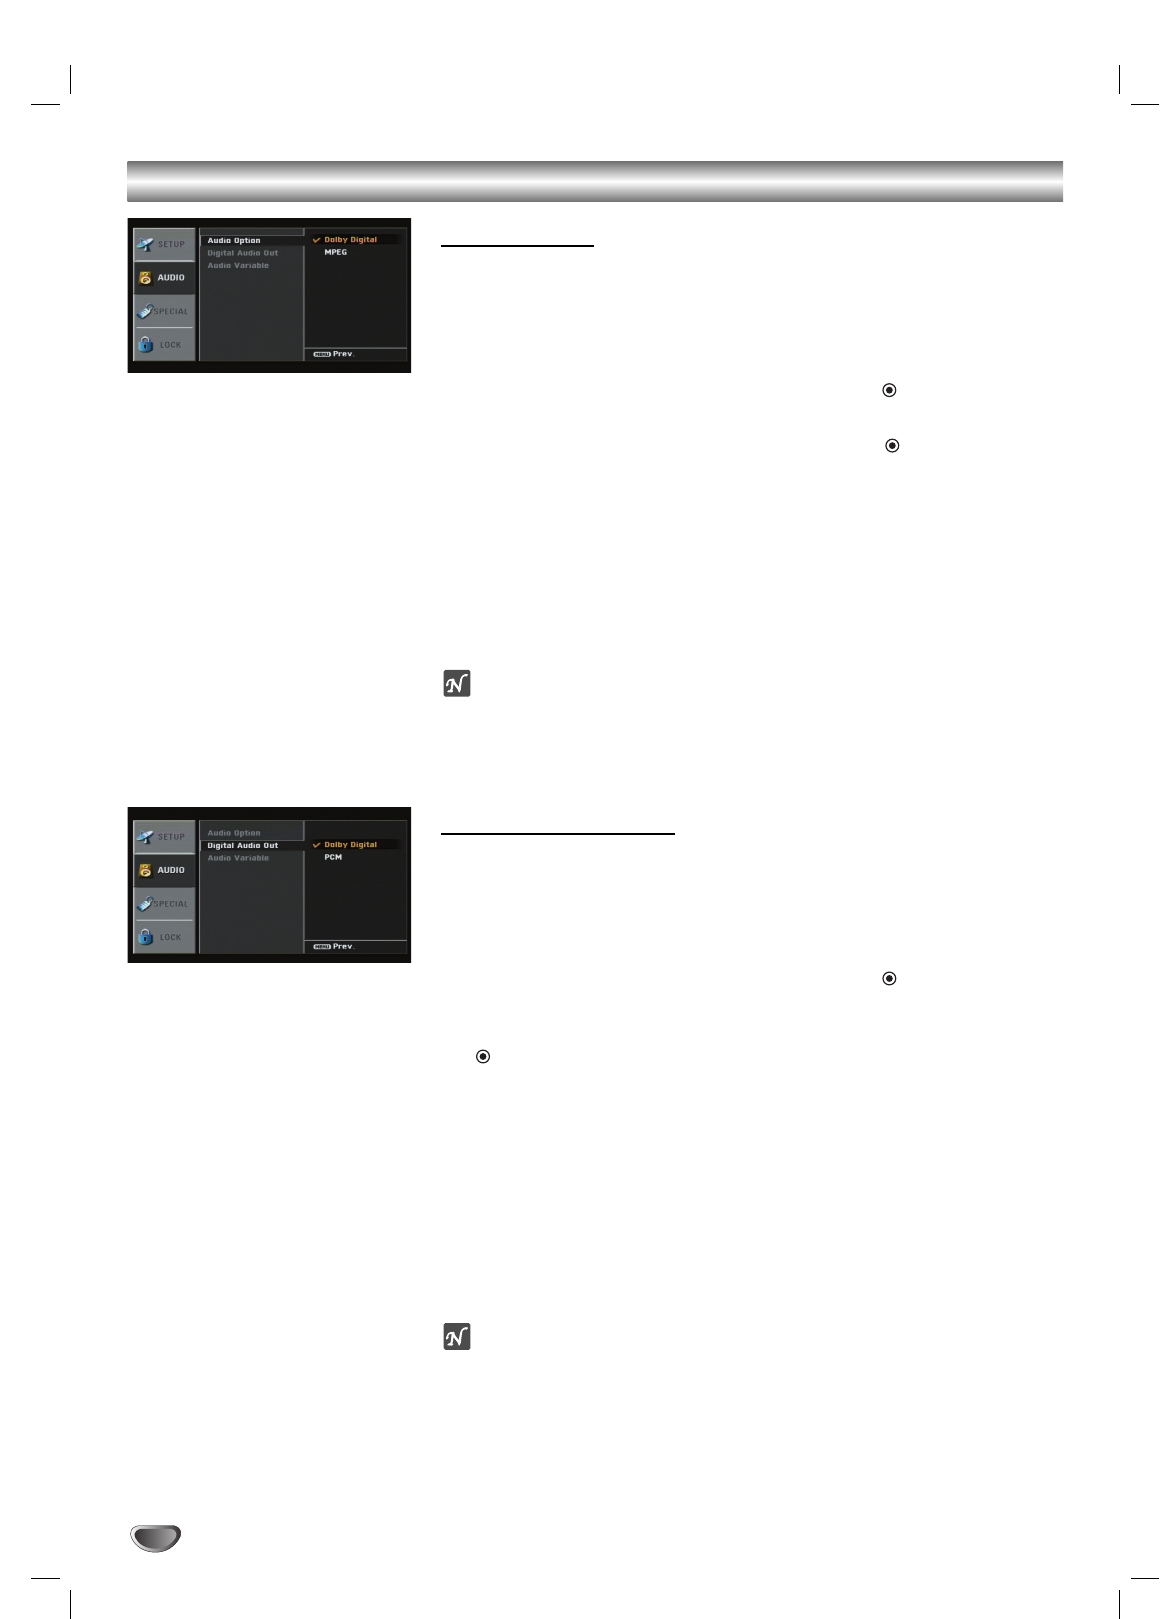
Audio Option
The Audio Option allows you to select an audio stream for the TV pro-
gramme being received.
11
Press MENU to display the on-screen menu.
22
Select the AUDIO menu using 33/ 44then press (SELECT) or 22.
33
Select the Audio Option using 33/ 44then press (SELECT) or 22.
44
Select the desired mode using 33/ 44.
Dolby Digital: Dolby Digital audio stream is received.
MPEG: MPEG audio stream is received.
55
Press MENU to return to the previous menu or press EXIT on the
remote control to return to TV viewing.
otes
•If the selected audio stream is not received, original audio stream will be automati-
cally selected.
•You cannot change the “Audio Option” setting when the current programme’s digital
picture grade is SD (Standard Definition).
Digital Audio Output
Sets the HDTV Receiver’s digital Audio Output according to the type of audio
system you use.
11
Press MENU to display the on-screen menu.
22
Select the AUDIO menu using 33/ 44then press (SELECT) or 22.
33
Select the Digital Audio Out option using 33/ 44then press
(SELECT) or 22.
44
Select the desired audio output using 33/ 44.
Dolby Digital: Select “Dolby Digital” if you connected the HDTV
Receiver’s DIGITAL OUT jack to a Dolby Digital decoder (or an amplifi-
er or other equipment with a Dolby Digital decoder).
PCM: Select when the HDTV Receiver’s DIGITAL OUT jack is con-
nected to a 2-channel digital stereo amplifier.
55
Press MENU to return to the previous menu or press EXIT on the
remote control to return to TV viewing.
otes
•If you select the “Dolby Digital” and current audio stream is not “Dolby Digital”, the
HDTV Receiver outputs the “PCM” signal from DIGITAL AUDIO OUT jacks (OPTI-
CAL and COAXIAL).
•The “Digital Audio Out” is fixed to “PCM” when the “Audio Option” is set to “MPEG”,
•You cannot change the “Digital Audio Out” setting when the current programme’s
digital picture grade is SD (Standard Definition).

Audio Menu Options
MENU OPERATION
21
Audio Variable
If the audio variable menu is set to On, audio volume can be increased/
decreased with by pressing VOL (+/–) on the remote control or 11/ 22 on the
front panel. If set to Off, audio volume can not be controlled by HDTV receiv-
er.
11
Press MENU to display the on-screen menu.
22
Select the AUDIO menu using 33/ 44then press (SELECT) or 22.
33
Select Audio Variable using 33/ 44then press (SELECT) or 22.
44
Select an Audio Variable option (On or Off) using 33/ 44.
55
Press MENU to return to the previous menu or press EXIT on the
remote control to return to TV viewing.
otes
•Before setting the Audio Variable to Off, make sure that you have turned down the
TV’s volume to the minimum. Otherwise, sudden high volume sound may cause
hearing or speaker damage.
•The volume of digital audio out on HDTV Receiver can not be adjusted on the
HDTV Receiver.

Special Menu Options
22
Aspect Ratio
Lets you choose the screen format according to the screen ratio.
11
Press MENU.
The main menu appears.
22
Use 33/ 44to select the SPECIAL menu then press 22or (SELECT)
to move to the second level.
33
Use 33/ 44to select the Aspect Ratio option.
44
Press 22or (SELECT) to move to the third level.
55
Use 33/ 44to select an option.
66
Press MENU to return to the previous menu or press EXIT on the
remote control to return to TV viewing
otes
•If the programme format is High Definition (16:9) and HDTV Receiver’s
resolution is 576p or 576i, the Aspect Ratio is set to Auto, Letter Box, or
Pan & Scan.
•If the programme format is High Definition (16:9) and and HDTV
Receiver’s resolution is 1080i or 720p, the Aspect Ratio is set to Auto, 4:3,
16:9, or Zoom.
•If you select “Auto”, the aspect ratio will be changed by programme auto-
matically.
ip
•While watching TV, you can change the picture aspect ratio using ARC on
the remote control. To view a high definition picture with 4:3 normal TV,
use the ARC button on the remote control to change the wide mode (Auto,
Letter Box, or Pan & Scan ).
•To view a high definition picture with wide (16:9) TV, use the ARC
button on the remote control to change the wide mode in the cycle
(Auto, 4:3, 16:9, or Zoom).
•To view a standard definition picture with wide (16:9) TV, use the ARC but-
ton on the remote control to change the wide mode in the cycle (Auto, 4:3,
16:9, or Zoom).
Special Menu Options
MENU OPERATION
23
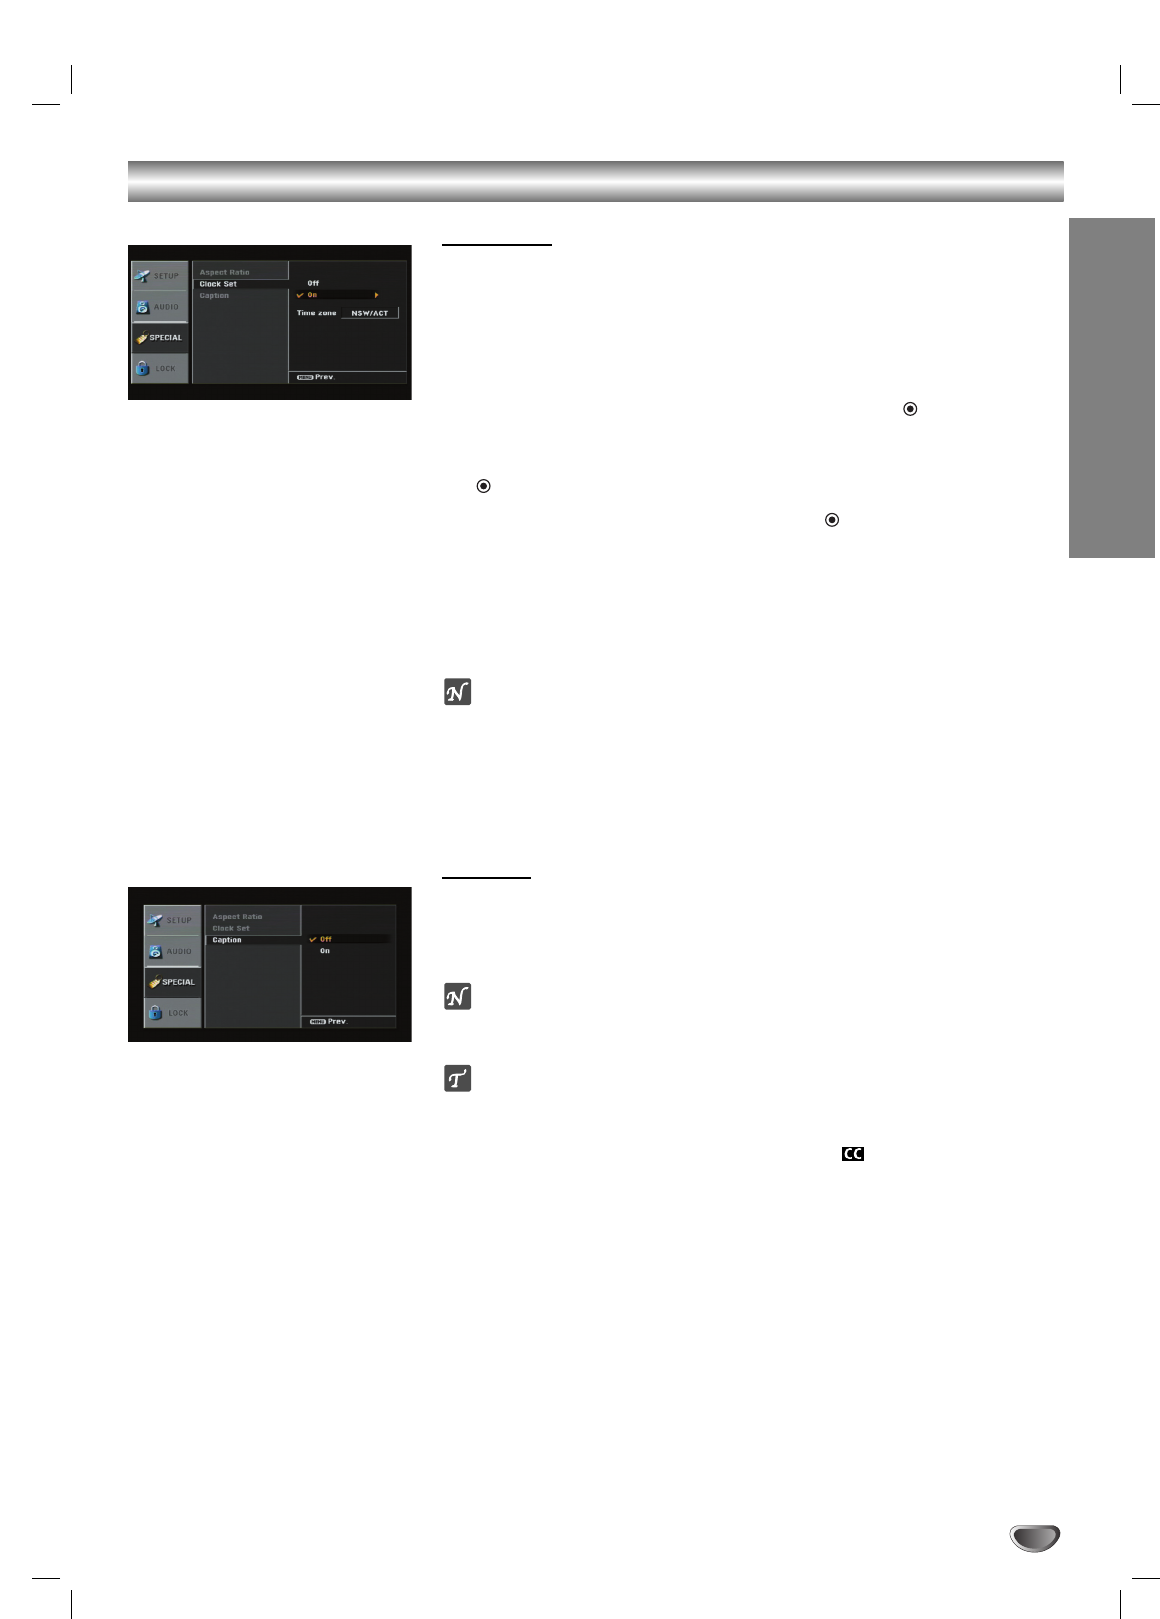
Clock Set
Enables the user to adjust the time zone. Normally, your clock is set using
signals transmitted by DTV stations. Choosing your time zone sets the cur-
rent time automatically.
11
Press MENU to display the on-screen menu.
22
Select the SPECIAL menu using 33/ 44then press (SELECT) or 22.
33
Use 33/ 44to select the Clock Set option then press 22or
(SELECT) to move to the third level.
44
Use 33/ 44to select On or Off then press (SELECT).
If you select Off, the clock is not set.
55
If you select On, use 33/ 44to set Time Zone.
66
Press MENU to return to the previous menu or press EXIT on the
remote control to return to TV viewing.
ote
•There are cases where the TV station does not send, or sends wrong date and/or
time information causing the HDTV Receiver to set an incorrect time.
•You have no way to manually set the clock.
Caption
If the Caption option is set to On, Closed Caption is displayed when
receiving TV programme with Closed Caption signal.
If the Caption option is set to Off, Closed Caption is not displayed.
ote
Caption will appear only if provided by the broadcaster.
ip
•If available, you can also select a closed caption while viewing TV, press
CC button repeatedly on the remote control.
•If captions are available, the DTV caption icon ( ) appears on the pro-
gramme information display, Programme Guide to indicate that you can
select one of those caption options with the CC button.
24
Lock (Parental Control) Menu Options
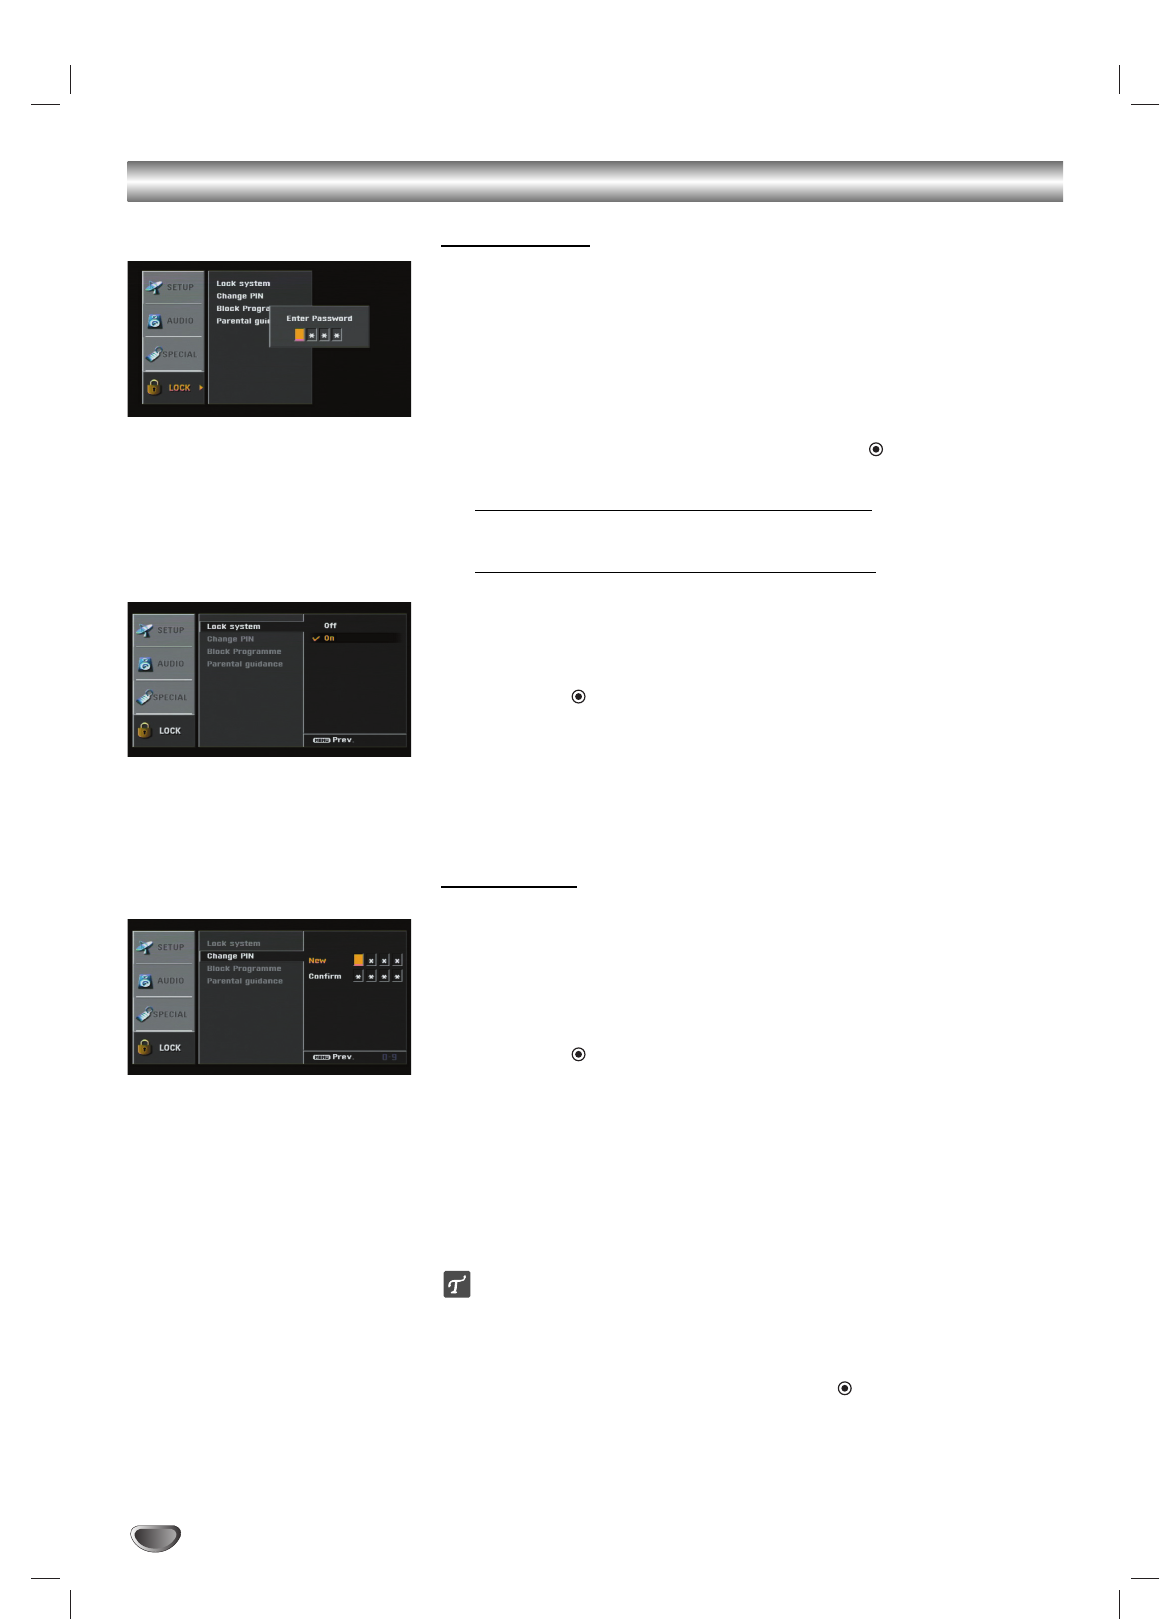
Lock System
Allows you to set up specific programmes and ratings through blocking
schemes. Also allows you to activate or disable all of the lock schemes previ-
ously set up. A PIN number is required to gain access to the LOCK menus.
When the Lock System is set to Off, the Programme and Programme Rating
are not effective.
11
Press MENU.
The main menu appears.
22
Use 33/ 44to select the LOCK then press 22or (SELECT) to move
to the second level.
When you have not entered a PIN number yet;
Enter “0000” PIN number using the numbered buttons.
When you have already entered a PIN number;
Enter the 4-digit PIN number using the numbered buttons to confirm the
personal 4-digit security PIN number.
33
Use 33/ 44to select the Lock System option.
44
Press 22or (SELECT) to move to the third level.
55
Use 33/ 44to select an option (On or Off).
66
Press MENU to return to the previous menu or press EXIT on the
remote control to return to TV viewing.
Change PIN
Changes the PIN number.
11
Follow steps 1-2 as shown above (Lock System).
22
Use 33/ 44to select the Change PIN option.
33
Press 22or (SELECT) to move to the third level.
44
Enter the new 4-digit code.
55
Enter the same code again to verify.
66
Press MENU to return to the previous menu or press EXIT on the
remote control to return to TV viewing.
If you forget your PIN number
If you forget your PIN number, to clear the current PIN number, follow the
procedure below.
1. Press MENU. The main menu appears.
2. Use 3/ 4to select the LOCK then press 2or (SELECT) to move to
the second level.
3. Use the Number buttons to enter the 4-digit number “7777”.
The 4-digit PIN number is cleared.
4. Enter a new PIN number using number buttons then enter it again to
verify.
MENU OPERATION
25
Lock (Parental Control) Menu Options (Continued)
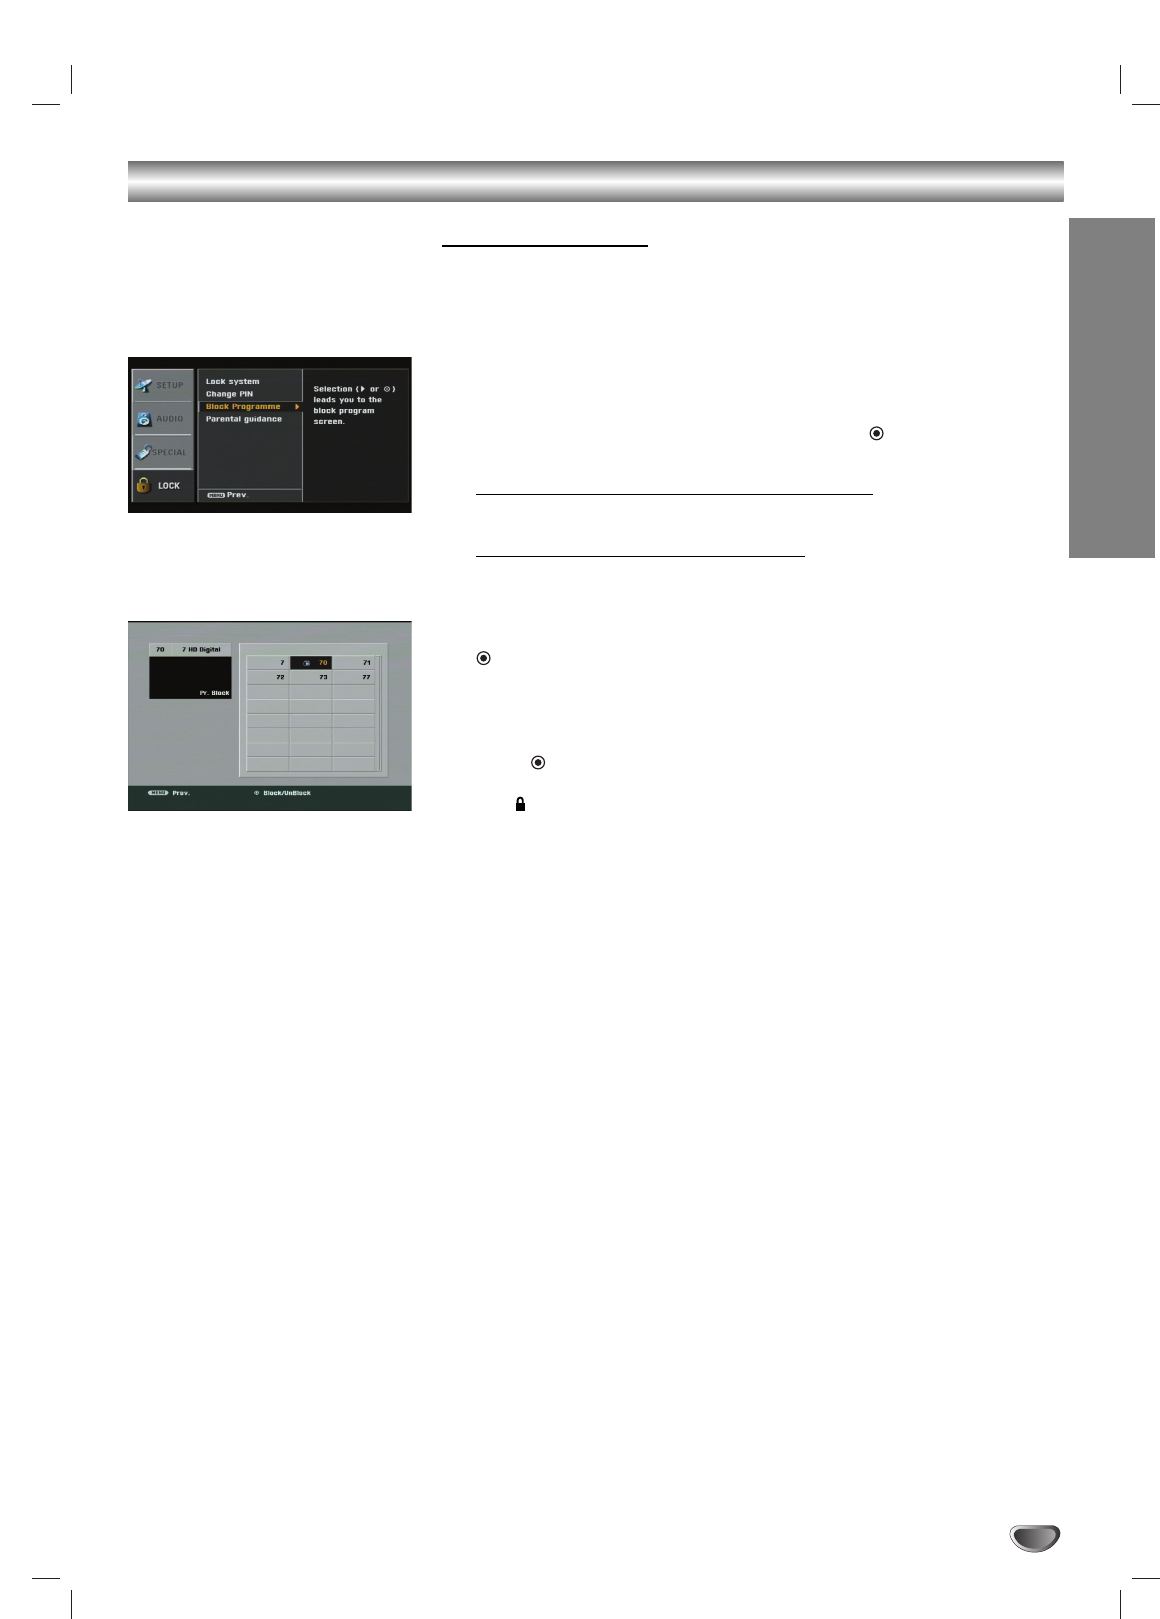
Block Programme
Blocks any programme that you do not want to view or that you do not want
your kids to watch. If you tune in a blocked programme, a black screen with
a pop-up box will appear. This menu can override Programme Edit menu set-
tings (page 18).
11
Press MENU.
The main menu appears.
22
Use 33/ 44to select the LOCK then press 22or (SELECT) to move
to the second level.
When you have not entered a PIN number yet;
Enter “0000” PIN number using the numbered buttons.
When you have already entered a PIN;
Enter the 4-digit PIN number using the numbered buttons to confirm the
personal 4-digit security PIN number.
33
Use 33/ 44to select the Block Programme then press 22or
(SELECT).
The programme list screen appears.
44
Use 33/ 44/ 11/ 22to a programme on the block programme menu.
55
Press (SELECT) to block or unblock the programme on the block
programme menu.
The mark will appear to the right of the station name to indicate the
blocked programme.
44
Repeat step 3 to block or unblock additional programmes in the
programme list menu.
55
Press MENU to return to the previous menu or press EXIT on the
remote control to return to TV viewing.
Note: If you access this menu
when resolution is set to 576p,
720p, or 1080i, the VIDEO OUT
and S-VIDEO OUT jacks’ signals
are blocked. Press EXIT button to
restore the output signals.
Lock (Parental Control) Menu Options (Continued)
26
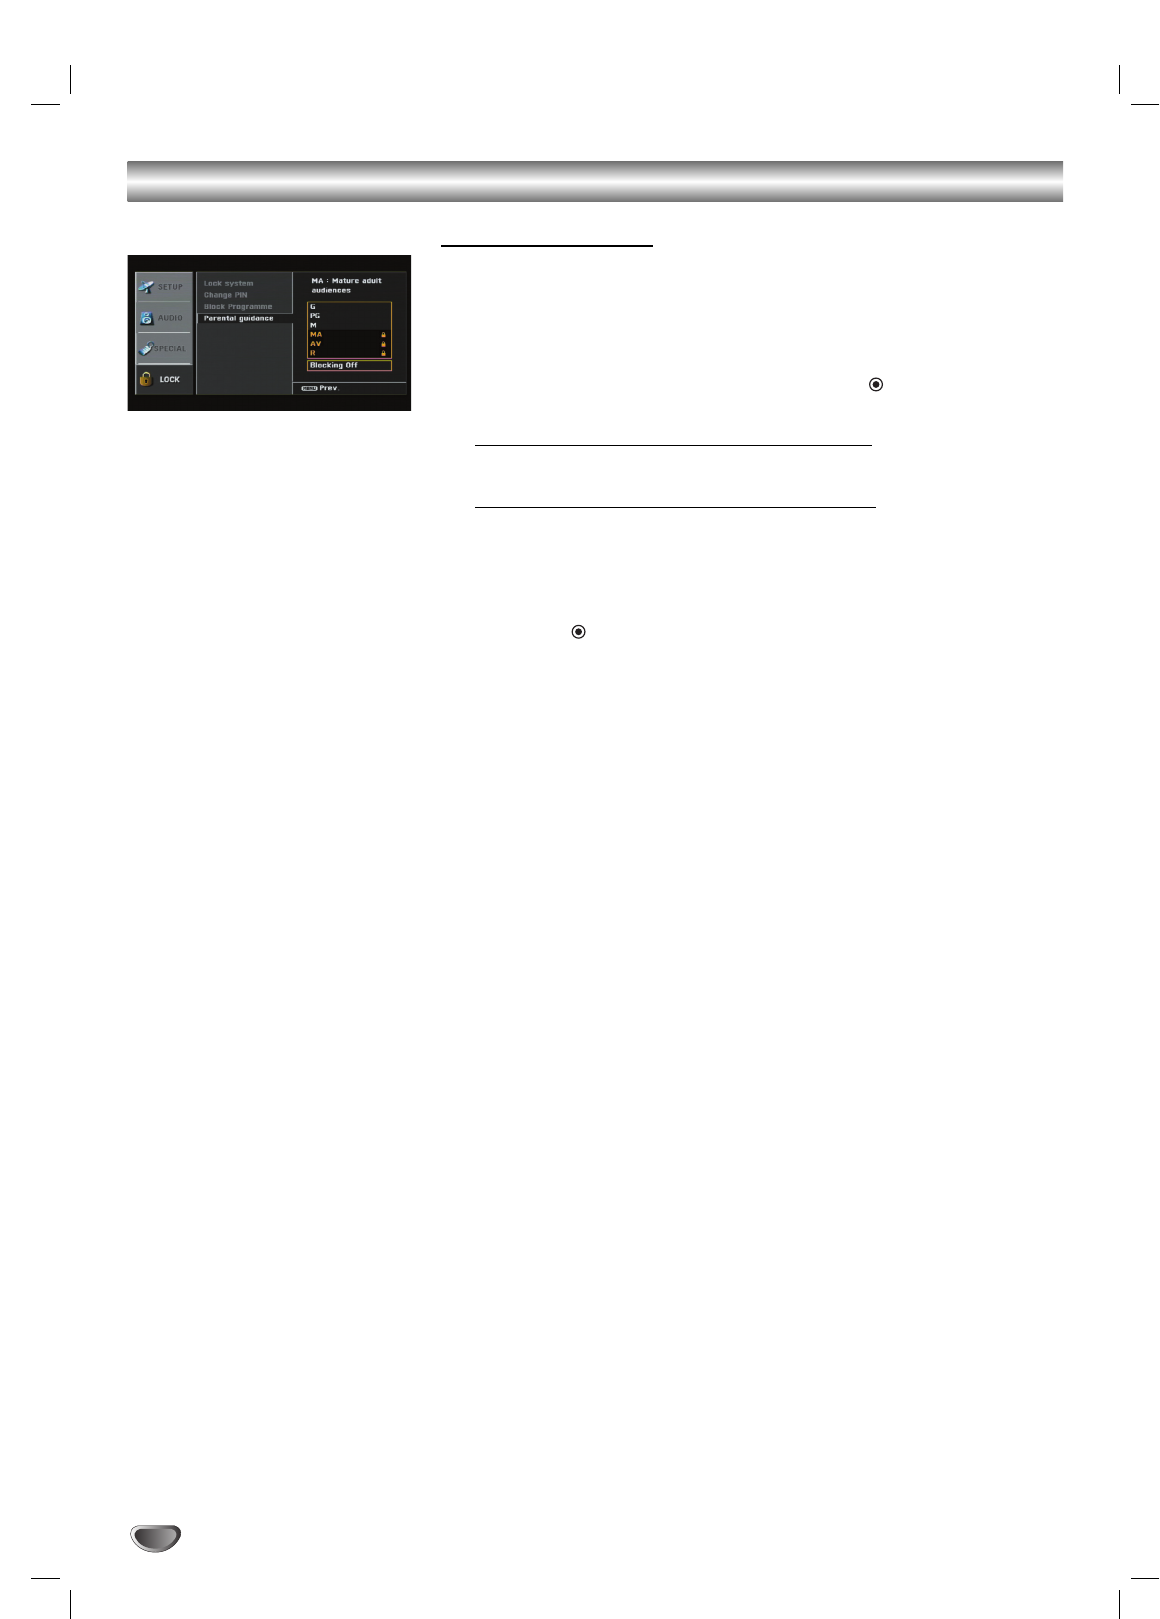
Parental Guidance
You can set the ratings to block out all the programmes with ratings above a
specified level.
11
Press MENU.
The main menu appears.
22
Use 33/ 44to select the LOCK then press 22or (SELECT) to move
to the second level.
When you have not entered a PIN number yet;
Enter “0000” PIN number using the numbered buttons.
When you have already entered a PIN number;
Enter the 4-digit PIN number using the numbered buttons to confirm the
personal 4-digit security PIN number.
33
Use 33/ 44to select the Parent guidance option.
44
Press 22or (SELECT) to move to the third level.
44
Use 33/ 44to select a rating.
G (General Audiences): Content is not offensive to most viewers.
PG (Parental Guidance Recommended): Content is such that parents
may not want their children to view the programme.
M (Mature Audience 15+): Mature Audience only. This programme is
specifically designed to be viewed by adults and therefore may be
unsuitable for children under 15.
MA (Mature Adult Audience 15+): Mature Adult only.Mature Audience
Only. This programme is specifically designed to be viewed by adults
and therefore may be unsuitable for children under 15.
AV (Adult Audience strong violence 15+)
R (Restricted 18+): Not for children under age 18. Strong elements of
sex and/or violence.
Blocking Off: Cancel the blocking
55
Press MENU to return to the previous menu or press EXIT on the
remote control to return to TV viewing.

NORMAL OPERATION
27
Information Displays
Programme Banner Display
The Programme Banner appears whenever you tune to a new programme or
press the (SELECT) button on the remote control while viewing a pro-
gramme.
11
Press (SELECT) while watching a programme
The Programme Banner appears on the TV screen (programme number,
digital picture grade, audio, station name, and current time).
•The Programme Banner can be displayed on the TV screen for a
moment.
a) Programme number and Station name
Displays the current programme number and station name.
b) Displays Analog or Digital broadcasting.
c) Digital Picture Grade
Displays the digital picture grade such as HD (High Definition) or SD
(Standard Definition).
d) Audio Format type (Dolby Digital, MPEG I, MPEG II)
Indicates audio track is Dolby Digital, MPEG I, or MPEG II.
e) Block information
Displays the block information such as no signal, rating blocked, pro-
gramme blocked, audio only or scrambled.
f) Date and Clock
Displays the current date and clock.
22
Press (SELECT) again while the Programme Banner is displayed.
The Programme Banner disappears from the TV screen.
otes
•Station name and clock are displayed only if they are set up by broadcast.
•The scrambled programme may not be able to see the programme.
abc
e
d
f

Information Displays (Continued)
28
Programme Information Display
The Programme Information appears whenever you press the INFO button
on the remote control while viewing a programme.
11
Press INFO while watching a programme
Programme Information appears on the TV screen.
a) Programme title
Indicates title of current programme.
b) Start Time and End Time
Displays the start time and end time for the current programme.
c) DTV Caption Icon ( )
Indicates that the current programme contains digital closed caption
data service.
d) Audio Format type (Dolby Digital, MPEG I, MPEG II)
Indicates audio track is Dolby Digital, MPEG I, or MPEG II.
e) Block information
Displays the block information such as no signal, rating blocked, pro-
gramme blocked, audio only or scrambled.
f) Content Advisory Icon ( )
Content Advisory data is used for the parental guide control to block
programmes that are beyond predefined rating criteria set by users.
This icon means that the current programme contains content adviso-
ry data, and displays rating value of programme.
g) Current or Next selection
Indicates the information is for current or next program. Use 1/ 2to
change between Current or Next.
22
Press INFO or EXIT while the Programme Information is displayed.
The Programme Information disappears from the TV screen.
ote
Station name and clock are displayed only if they are set up by broadcast.
ab cdefg
NORMAL OPERATION
29
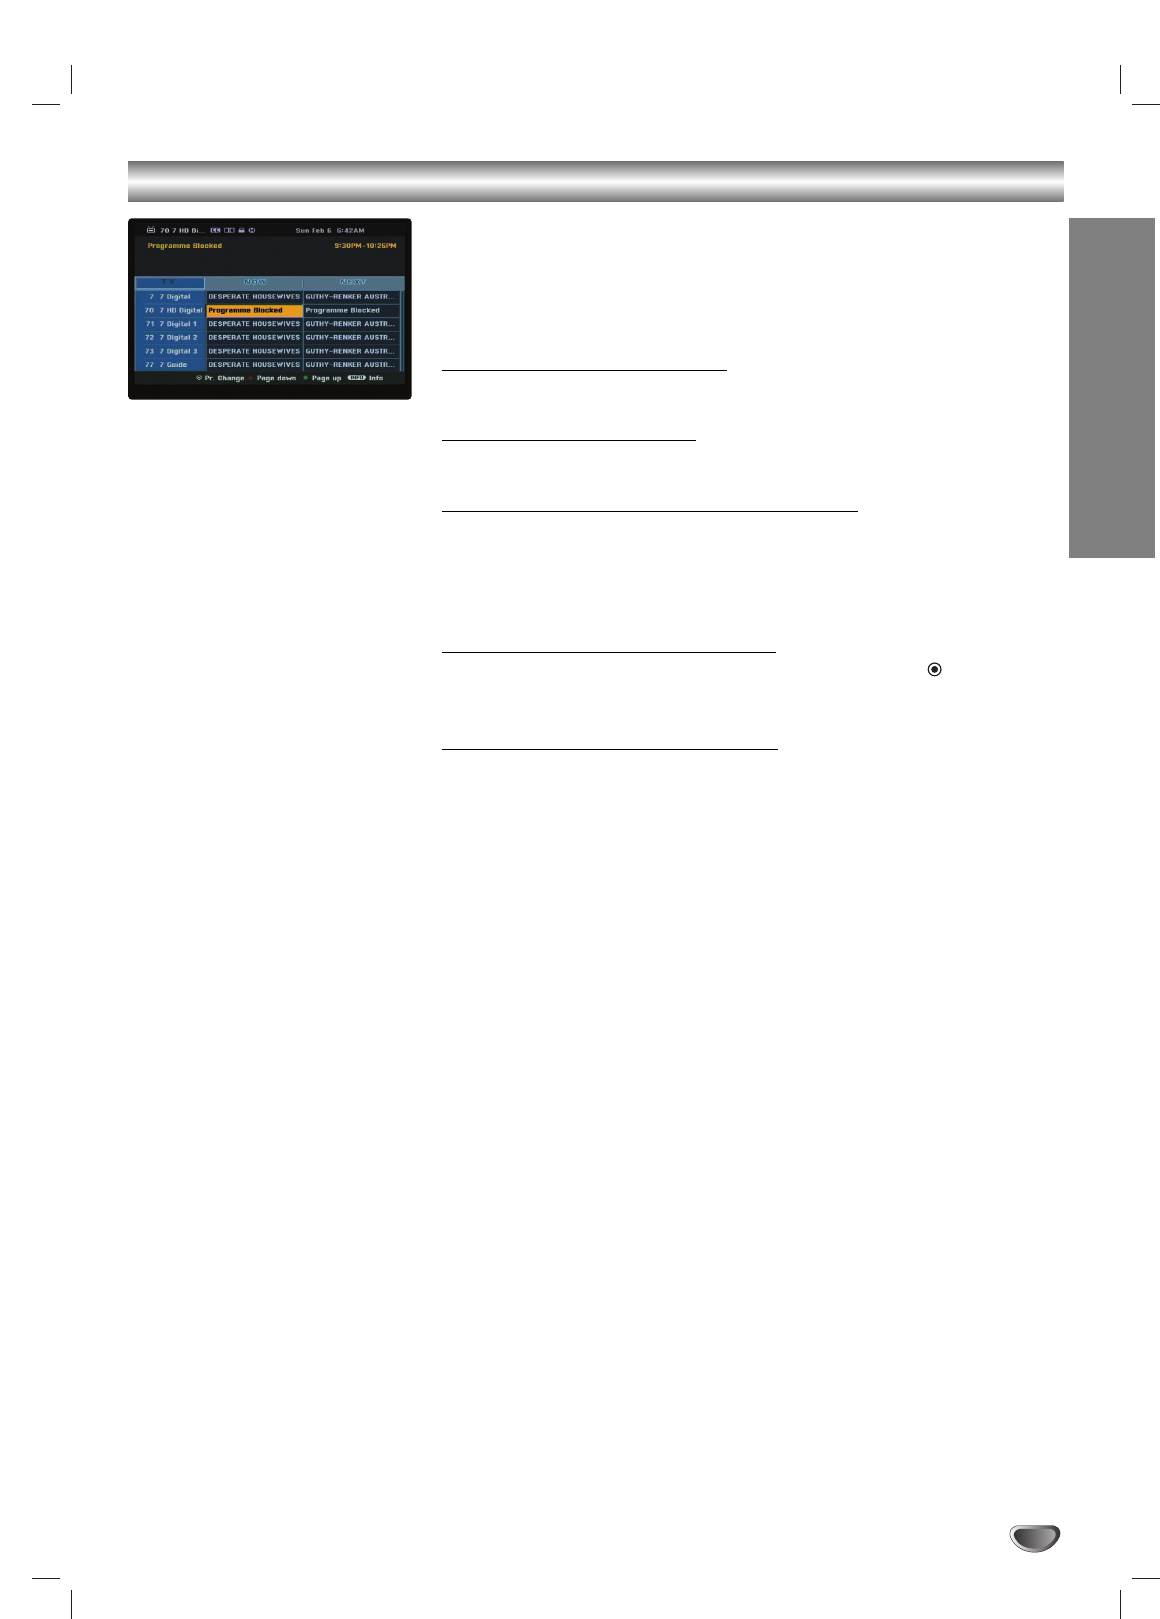
Programme Guide
The Programme Guide contains schedule and programme information for all
programmes. They also provide local over-the-air programmes information
including conventional digital programmes. Use the Programme Guide to find
programmes easily and conveniently and to view schedule and descriptive
programme information for the programmes.
To Display the Programme Guide
Press the GUIDE button on your remote control.
To Exit the Programme Guide
Press the EXIT button to return to the last programme you tuned to.
To Navigate through programmes on the Guides
Use 1/ 2/ 3/ 4on your remote control to navigate the guide screen.
You can move faster through programmes by scrolling page-by-page with the
RED or GREEN buttons on the remote control. Each button stroke scrolls
one page up or down.
To Tune to another current programme
Use 1/ 2/ 3/ 4to select a current programme then press (SELECT).
You can watch the programmed.
To Display the Full Information window
You can view detail informations for the highlighted program. Press INFO to
display detail information window. To exit the detail information window, press
INFO again.
30
Normal Operation
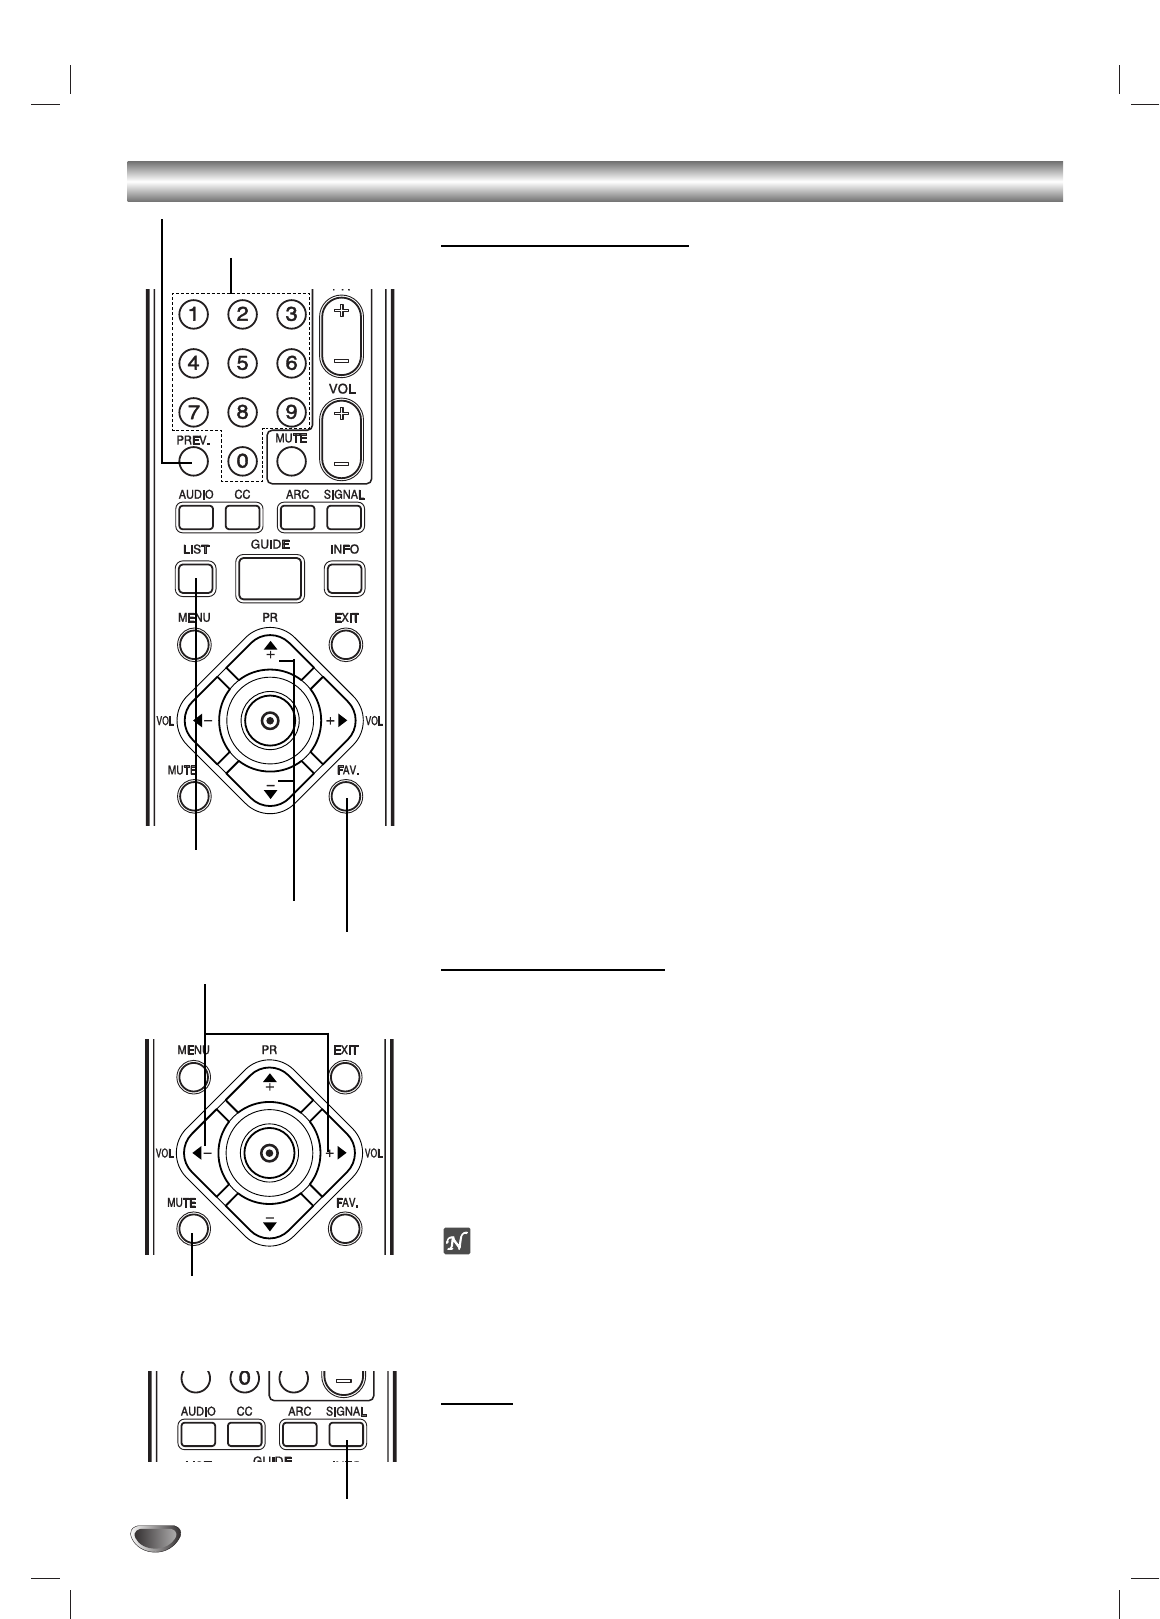
Programme Selection
You can select a programme as shown below.
Number buttons (on the remote control)
Use Number (0-9) buttons to select a programme directly.
PREV. button (on the remote control)
Press to return to the previous programme you viewed. For example, if
the DTV Receiver is tuned to programme 55 and then you change to pro-
gramme 56, pressing PREV. will return to programme 55.
FAV. button (on the remote control)
Press to scroll through your favorite programmes.
PR +/– buttons (on the remote control) or 3/ 4(on the front panel)
Use PR +/– on the remote control or 3/ 4on the front panel to cycle the
HDTV Receiver through the programmes in memory.
LIST buttons
Press LIST on the remote control and Programme List appears. Use 3/ 4
to select a programme that you want to tune.
Volume Adjustment
Adjusts the volume of analog audio out on HDTV Receiver. You must set
Audio Variable to On in the Audio menu to use the Volume Adjustment. See
page 21.
VOL +/– buttons (on the remote control) or 11/ 22(on the front panel)
Use VOL +/– on the remote control or 11/ 22on the front panel to adjust
the volume for analog audio out on the HDTV Receiver.
MUTE (on the remote control)
Press MUTE to turn off the volume for analog/digital audio out on the
HDTV Receiver.
otes
•Before setting Audio Variable to Off, make sure that you have turned down the TV’s
volume to the minimum. Otherwise, sudden high volume sound may cause hearing
or speaker damage.
•The volume of digital audio out on HDTV Receiver can not be adjusted on the
HDTV Receiver.
Signal
Shows the signal strength bar for incoming signal to help you adjust the
antenna to the correct position for your location. You can view the signal
strength bar by pressing SIGNAL on the remote control.
PR +/– buttons
LIST button
FAV. button
Number buttons
PREV. button
VOL +/– buttons
MUTE button
SIGNAL button
NORMAL OPERATION
31
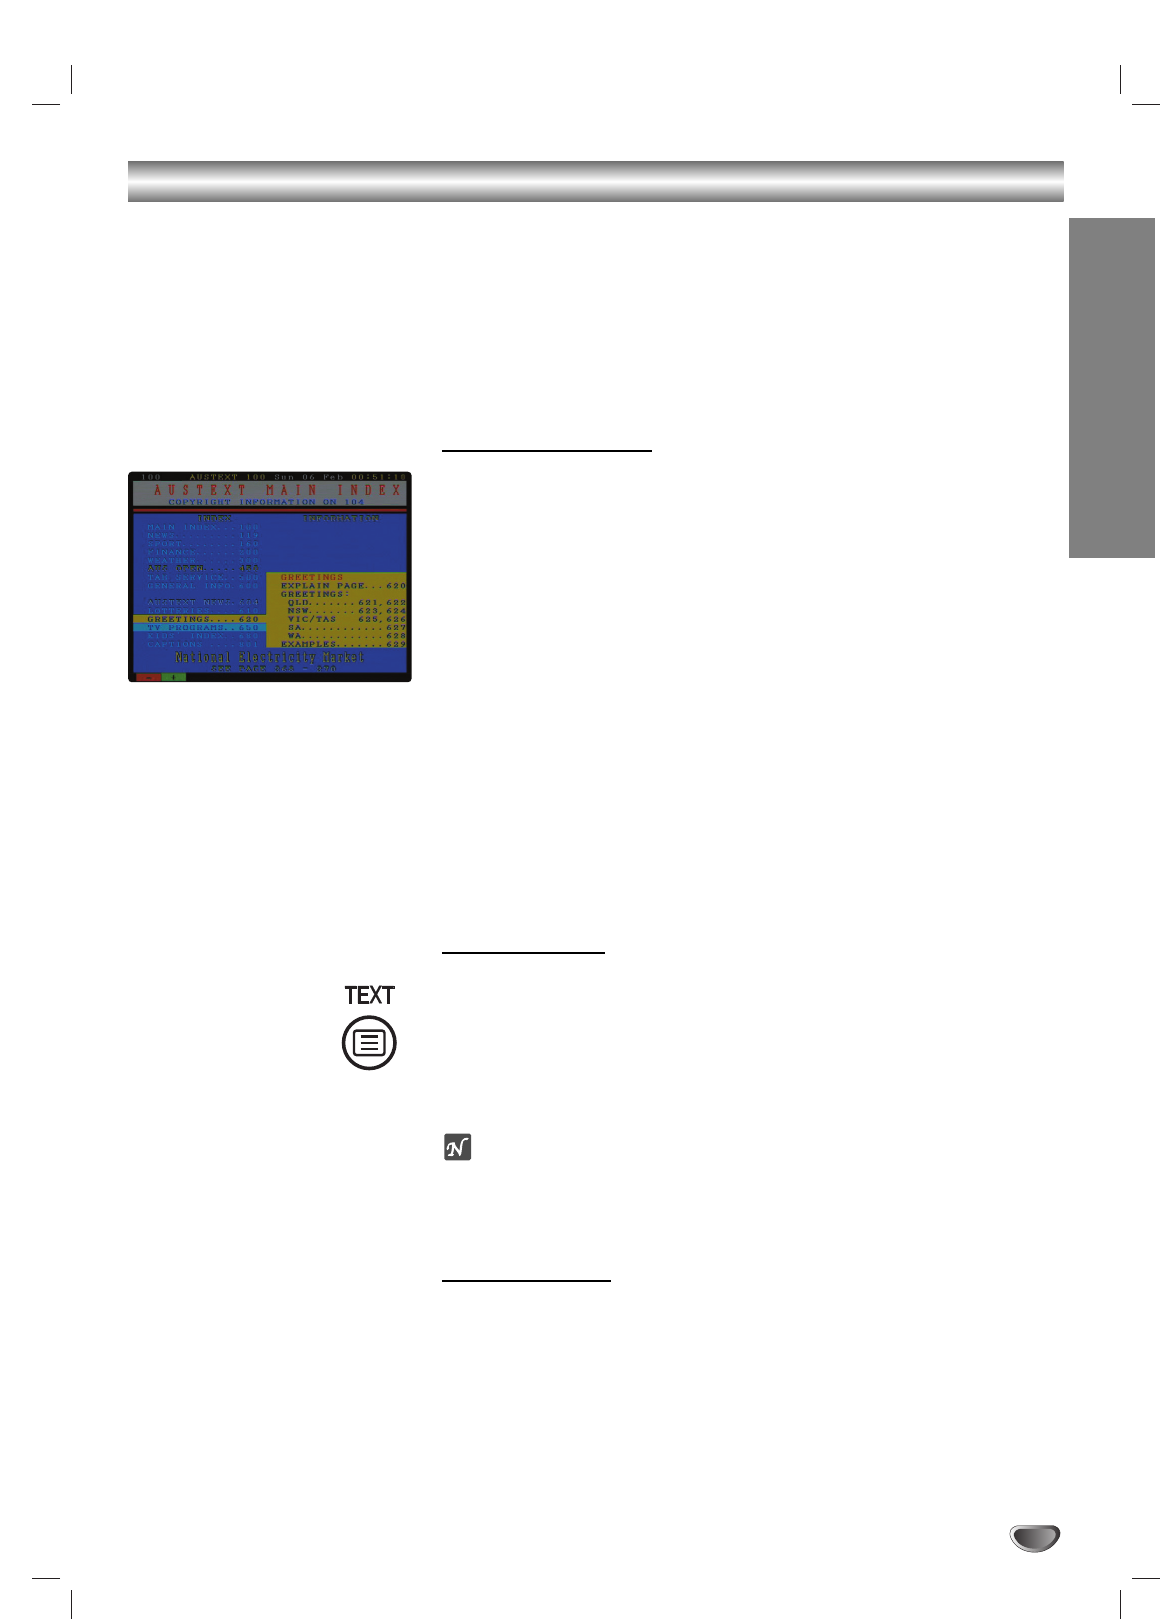
Teletext Operation
Teletext is an optional function, therefore only those with the teletext system
can receive the teletext broadcast.
Teletext is a free service broadcast by some TV stations which gives up-to-
the-minute information on news, weather, television programmes, share
prices and many other topics.
The teletext decoder can support the SIMPLE systems. SIMPLE (standard
teletext) consists of a number of pages which are selected by directly enter-
ing the corresponding page number.
Teletext in Service
The HDTV Receiver gives you access to teletext which is greatly improved in
various aspects such as text and graphics.
This teletext can be accessed by special teletext services and specific servic-
es which broadcast teletext.
11
Press number or PR+/- buttons to select a service which broadcast
teletext.
22
Press TEXT to access on the teletext.
33
Follow the indications on teletext and move onto the next step by
pressing RED and GREEN buttons and so on.
44
Press TEXT or EXIT to switch off teletext and return to TV viewing.
Teletext on/off
11
Press TEXT to switch to teletext.
The initial page or last page appears on the screen.
Two page numbers, TV station name, date and time are displayed on
the screen headline. The first page number indicates your selection,
while the second shows the current page displayed.
22
Press TEXT or EXIT to switch off teletext.
ote
If your TV is in zoom mode, the Teletext menu screen may be cut off.
In this case, set the TV’s zoom mode to normal to display the menu screen
properly.
Page selection
1. Enter the desired page number as a three digit number with the
numbered buttons.
If during selection you press a wrong number, you must complete the
three digit number and then reenter the correct page number.
2. Use PR (+/-) buttons to select the previous or next page.
3. Use RED/GREEN buttons to move up and down pages.
Note: If you access this menu
when resolution is set to 576p,
720p, or 1080i, the VIDEO OUT
and S-VIDEO OUT jacks’ signals
are blocked. Press EXIT button to
restore the output signals.
Teletext Operation (Continued)
32
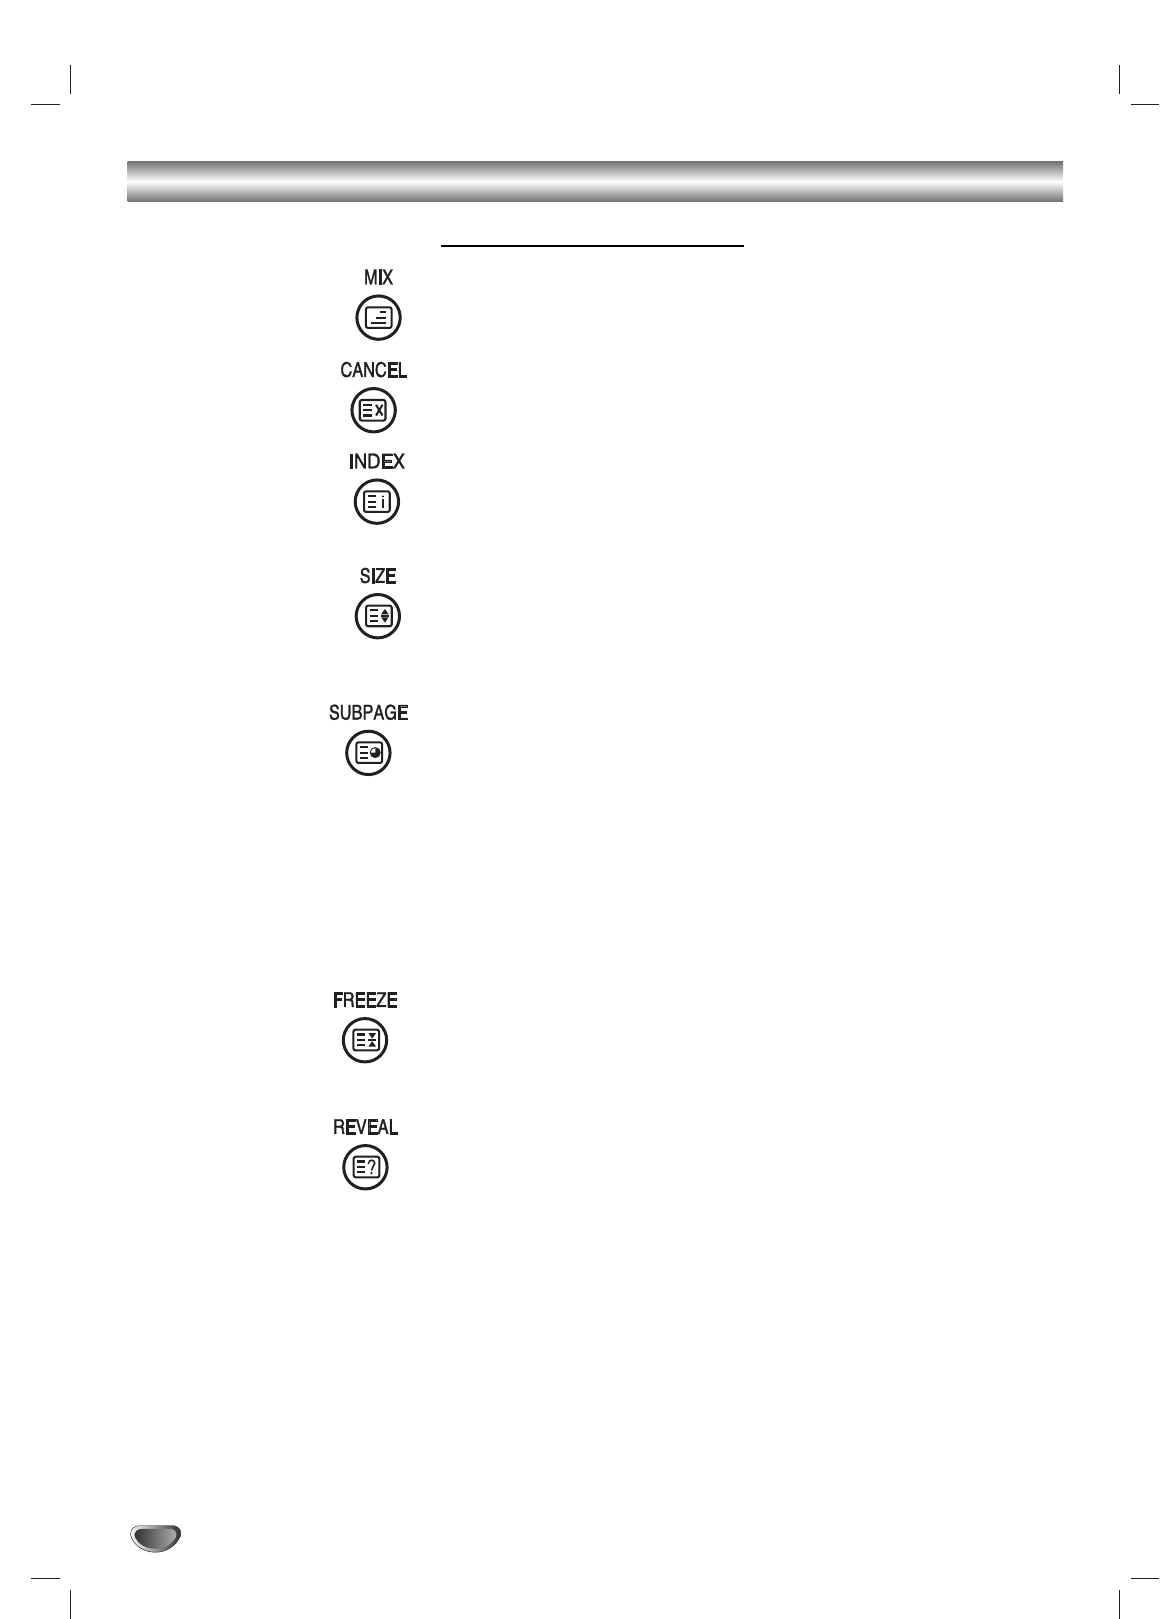
Special Teletext Functions
MIX button
Displays the teletext pages superimposed on the TV picture.
To switch the TV picture off press this button again.
CANCEL button
Hides the teletext screen except page number.
INDEX button
Selects the index page.
SIZE button
Selects double height text.
Press this button to enlarge the top half of the page. Press this button again
to enlarge the bottom half of the page. Press this button again to return to
the normal display.
SUBPAGE button
In teletext mode, press this button to select a sub page number. The sub
page number is displayed at the bottom of the screen. To hold or change the
sub page, press the number buttons. Press this button again to exit this func-
tion. (Refer to “Page selection” on page 30.)
•Use SUBPAGE button.
1) Press SUBPAGE. The sub page number is displayed at the bottom of
the screen.
2) Enter the desired page number as a 4-digit number using number but-
tons. (ex press 0 0 0 9 for page 09.)
If you press a wrong number during selection, press SUBPAGE then
enter the correct page number.
FREEZE button
Stops the automatic page change which will occur if a teletext page consists
of 2 or more sub pages. When this button is pressed the stop symbol is dis-
played at the top left-hand corner of the screen and the automatic page
change is inhibited. To continue press this button again.
REVEAL button
Press this button to display concealed information, such as solutions of rid-
dles or puzzles. Press this button again to remove the information from the
display.
REFERENCE
33
Programming the Remote Control to Operate the TV
The HDTV Receiver remote control is a multi-brand or universal remote con-
trol that can be programmed to operate most remote-controllable TVs from
other manufacturers.
ote
The remote control may not be able to control all models of other brands.
11
Test your remote control.
To find out whether your remote control can operate a TV without pro-
gramming, turn on the TV and press the TV on the remote control while
pointing at the TV. Use the TV POWER and TV PR +/– buttons to see if
the TV responds properly. If not, the remote control requires program-
ming.
22
Turn on the TV to be programmed.
33
Find the manufacturer code for your TV. (Refer to pages 34-35)
44
While holding down TV POWER button, press the number buttons
to select the manufacturer code for your TV.
55
Test the remote control functions to see if the device responds
properly. If not, repeat from step 3-4.
You can control your TV using the buttons below.
By pressing You can
POWER Turn the TV on or off.
TV/AV Switch the TV’s input source between the TV and other
input sources.
PR +/– Scans up or down through memorized programmes.
VOL +/– Adjust the volume of the TV.
MUTE Temporarily turns TV sound OFF, press again to restore.
34
Remote Control Codes for TVs
BRANDS CODES
ADMIRAL 137 204
ADYSON 159 219
AKAI 009 010 108 132
133 135 139 140
156 174 175
AKURA 064 086 108 110
155 171
ALBA 009 060 064
ALLSTAR 108
AMSTRAD 006 025 157
AMWAY 108
ANITECH 010 049 108 185
219
ANTECNO 064
ARC EN CIEL 173 179 239
ASA 087 102 108 235
236
ASBERG 185
ASORA 171
ATLANTIC 089 197
AUDIOSONIC 085
AUTOVOX 159 163 197
BANK 232
BEKO 045 085 086 108
250
BESTAR 086
BLAUPUNKT 031 091 092 096
097 098 099 210
253
BONDSTEC 163
BOSCH 210
BRANDT 173 179 225 239
ELECTRONIQUE
BRIONVEGA 204
BSR 144
BUSH 009 136 139 144
232
CENTURY 165 204
CGE 139 165 210
CIE 025 108 170
CLATRONIC 009 010 064 108
144 149 159 164
165 171 185
CLARIVOX 033
CONDOR 108 149 191
CONIC 219
CONTEC 171 222
CONTINENTAL 173 179 225 239
EDISON
COSMOS 108
CROSLEY 165 204
CROWN 084 085 086 108
144 171 185
CS-ELECTRONICS 064
DAEWOO 051 108 120 127
170
DANSAI 010 219
DE GRAAF 108 134
DECCA 070 108 159 161
162 184 189 190
206
DECCAVIDEO 108
DUAL 233
DUMONT 204
BRANDS CODES
ELBE 058 144 157 160
192 246
ELBIT 108 248
ELECTROVENDA 108
ELEKTRONIKA 108
ELIN 108
ELITE 064 149
ELMAN 144
ELTA 010 171
EMERSON 108 204
ESC 108
ETRON 133
EUROPHON 144 159
EXPERT 089
FENNER 171
FERGUSON 078 079 080 160
182 195 198 199
200 201 202
FINLANDIA 194 195
FINLUX 008 087 102 104
105 107 108 140
144 159 161 174
189 235 236
FIRST-LINE 144
FISHER 086 208 222 233
FORMENTI 108 149
FRABA 108
FRONTECH 136 171 220
FUBA 073 109
FUJITSU GENERAL
088 159 197
FUNAI 010
GALAXIS 108 185
GALERIA 171
GBC 137 144 171
GEC 011 108 129 147
159 189
GELOSO 064 137 144 164
171
GENERAL 171
GENERAL TECHNIC
171
GOLDHAND 159 171
GOLDSTAR 038 050 108 110
136 144 159 163
166 171 191 219
237
GOODMANS 009 064 108 109
110 120 159 170
171
GORENJE 086
GPM 010 064
GRANADA 027 105 108 111
121 134 140 159
162 167 187 194
195 238
GRUNDIG 091 092 093 094
095 097 098 100
101 172 232 238
HCM 010 108 159 171
HIFIVOX 173 179 239
HINARI 010 064 108 133
171
HIT 204
BRANDS CODES
HITACHI 011 013 015 017
021 022 023 024
028 029 030 035
039 040 041 048
053 054 055 056
057 120 127 128
129 134 135 140
143 145 147 151
156 159 173 193
219
HYPER 009 159 163 171
ICE 009 010 064 108
171
IMPERIAL 043 049 108 139
144 154 165 255
INGERSOLL 171
INNO HIT 159 189 237
INTERBUY 010
INTERCORD 233
INTERFUNK 108 109 113 130
133 134 135 137
141 146 147 148
165 179 210
INTERVISION 010 086 108 132
144 166
IRRADIO 163 235 237
ITC 144 159
ITS 009 010 064 171
ITT 141 151 186
JVC 009 169
KAIDO 136
KAPSCH 089 147 148 197
KARCHER 084 108
KATHREIN 109
KAWA 009
KENDO 060 108 137 157
KENNEDY 197
KNEISSEL 108
KONKA 009
KORTING 086 204 209
KUBA 233
KUBA ELECTRONIC
233
KURA 134
LENCO 108 170
LG 001(Default) 038
050 108 110 136
144 159 163 166
171 191 219 237
LIESENKOTTER 108 210
LIFETEC 010 064 108 170
LOEWE 109 113 204 205
LOGIK 070 227
LUMA 137 197
LUXOR 102 104 132 133
134 135 138 140
143 145 153 156
174 186 237
M ELECTRONIC 103 104
MAGNADYNE 163 164 204
MAGNAFON 199
MAGNASONIC 108
MARANTZ 108
MARSHAL 064
MATSUI 009 016 025 060
061 062 063 070
108 131 136 152
154 159 171 172

Remote Control Codes for TVs (Continued)
REFERENCE
35
BRANDS CODES
MERRIT 132
METZ 047 092 097 098
100 101 108 204
207 254
MITSUBISHI 075 076 077 097
113 204 222 224
240
MIVAR 044 042 159 235
MNARTT 007
MTC 086 109 134
MULTITECH 136 159 171 185
MURPHY 232
NAONIS 137
NECKERMANN 037 059 060 092
098 100 101 108
109 113 115 118
119 134 135 137
143 157 159
NEI 064 108
NIKKAI 219
NIKKO 108
NOBLIKO 232 235
NOGAMATIC 173 179 239
NOKIA 014 019 032 102
103 104 108 132
133 134 135 138
140 141 145 146
147 148 156 174
NORDMENDE 129 173 179 180
181 193 195 225
226 228 239
NORMN 108
NOVA 087
OCEANIC 032 103 104 135
140 156
OKANO 108
ONWA 009 010 064
ORAVA 108
ORBITER 086
ORION 025 059 060 061
062 064 070 108
110 118 219
OSAKE 106
OTTO-VERSAND 002 005 009 014
059 060 081 082
083 085 092 097
098 100 101 108
109 111 113
PAEL 235
PANASONIC 002 003 005 167
168 229
PATHE CINEMA 144
PATHE MARCONI 173 179 225 239
PHILCO 090 108 139 144
148 165 204
PHILIPS 065 066 067 068
069 092 108 109
111 112 114 115
116 119 122 123
124 125 193 212
251 252
PIONEER 193
PRANDONI-PRINCE
137 235
PRIMA 219
PRO VISION 108
BRANDS CODES
PROFEX 108 136 171
PROFITRONIC 108
QUELLE 002 010 014 019
025 059 060 072
084 086 087 088
092 097 098 100
101 102 175
RADIOLA 108
RADIOTONE 010 085 108 171
REDIFUSSION 187
REVOX 109
REX 088 089 137 157
158 164 197 246
247
RFT 064 085 135 204
RITAR 138
ROADSTAR 108
ROSITA 171
SABA 079 146 147 173
179 181 193 195
225 226 239
SAISHO 025 060 070 136
159
SAKIO 171
SALORA 019 032 103 104
132 133 134 135
137 138 140 142
143 145 150 156
174 237 241
SAMBERS 235
SAMSUNG 004 010 050 086
108 117 126 171
220 237
SANY 193
SANYO 014 018 019 020
032 034 071 086
087 189 218 221
222 223
SCHNEIDER 009 064 088 108
133 141 159 163
233
SEG 010 064 108 144
159 165 171 185
219
SEI-SINUDYNE 025 108 204 212
SELECO 088 089 137 157
197 222
SENTRA 064 133
SHARP 081 082 083 222
SHINTOM 108
SHINTOSHI 108
SHIVAKI 108
SIAREM 204
SIEMENS 092 096 097 098
100 101 108 210
218 219 221
SIESTA 085
SILVER 010 064
SINGER 108 164 204
SINUDYNE 118 131
SMARAGO 172
SOLAVOX 133
SONOLOR 140 156
SONTEC 108
SONY 072 074 211 212
213 214 215 216
217 222
BRANDS CODES
SPECTRA 170
STARLITE 108 171
STARLUX 171
STERN 088 089 137 157
197
SUNSTAR 108 171
SUPERTECH 108 139 152 171
TADISTAR 108
TASHIKO 108 159 218
TEC 108 139 144 159
170 171
TECHLINE 185
TECHNISAT 108 165
TECNISON 108 171
TEKON 171
TELEAVIA 173 178 179 225
239
TELEFUNKEN 079 177 179 181
193 195 200 210
TELEOPTA 171
TELERNT 109
TELETECH 165 171
TELETEXT 115
TELETON 088
TELETON 089 134 159 197
TENSAI 064 108 144 149
171 191
TENSON 171
TESLA 204
THOMSON 052 078 079 134
173 178 179 181
193 195 225 239
THORN 011 014 016 018
026 028 066 072
075 087 097 102
108 116 135 141
145 146 160
THORN-FERGUSON
160 188 200 227
TOSHIBA 012 016 026 036
037 222 232
TOWADA 144 185
TRISTAR 010 064
TRIUMPH 025 219 236
UHER 089 108 109 149 185
197 233
ULTRAVOX 108 164 185 204
UNIVERSUM 174
UNIVOX 204
VESTEL 108
VIDEOSAT 165
VIDEOTON 178 193
VIDEOWAY 230
VISION 108 149
VOXSON 137 204
WALTHAM 178
WATSON 064 108 149 171
WEGA 208 222
WHITE 108 110 149
WESTINGHOUSE
YOKO 010 064 108 136
144 159 164 170
171
ZANUSSI 137 197
ZENITH 231

36
Troubleshooting
Check the following guide for the possible cause of a problem before contacting service.
Symptom
HDTV Receiver does
not turn on.
Fragmented picture and
unclear sound.
No picture.
Normal picture but no
sound.
Picture is distorted.
The remote control
does not work properly.
Solution(s)
Plug the power cord into a wall power outlet securely.
Check your antenna input, location, and signal strength.
Make sure the correct video display format is selected.
Make sure that the right component type is selected.
If HDTV Receiver is connected to your monitor or TV via the COMPONENT VIDEO
jacks on the back panel, the Output Selection must be set to YPbPr (refer to Display
Format Setup on page 16.). Otherwise, you will probably see an abnormal picture.
If HDTV Receiver is connected to your monitor or TV via the RGB port on the back
panel,Output Selection must be set to RGB (refer to Display Format Setup on page
16.). Otherwise, you may not be able to see a picture.
Select the Auto Programme or Programme Edit functions if you have not already
done so.
Check to make sure all the cables are installed correctly and that the proper source
is selected on your TV. For example, Video 1 or 2.
The antenna signal strength may be low. Check the signal strength and adjust the
antenna location and direction.
Due to copyright restrictions, you may not be able to view some high definition pro-
grammes in the high definition format.
For more information about connections, please refer to connections on pages 9-14.
Check volume levels.
Make sure the TV is not muted.
Check that the HDTV receiver is connected properly.
Make sure the proper format is selected.
Make sure the proper aspect ratio is selected.
Make sure the video output is connected to the TV.
Point the remote control on the remote sensor on the HDTV Receiver.
Operate the remote control within 7 m.
Remove possible obstacles blocking the signal.
Replace exhausted batteries with new ones.
Reset the HDTV Receiver
The HDTV Receiver is not operating normally. You can reset the HDTV Receiver as follows:
Unplug the power cord, wait at least 30 seconds, and then plug it in again.
REFERENCE
37
Specifications
Television System DVB-T Australian Standard Compliant
Frequency Range VHF : 177.5 to 226.5 MHz
UHF : 529.5 to 816.5 MHz
RF Inputs ANT IN (1) 75 ohm unbalanced
ANT Loop Out Out To TV (1)
DVI Output DVI-HDTV Out (1), DVI-D Single Link connector
1080i, 720p, 576p digital RGB
Component Video Output Component Out (1 Set), Typical RCA type Jack connectors
1080i, 720p, 576p, 576i YPbPr
RGB Output RGB Out (1), 15-pin connector
1080i, 720p, 576p RGB
S-Video Output S-Video Out (1), 4-pin Mini-DIN
576i Y/C
Video Output Video Out (1), Typical RCA type Jack connector
576i Composite
Digital Audio Output Coaxial, Optical (Dolby Digital, PCM output)
Analog Audio Output Audio Out (2) (Variable Output Level)
Authorized Service Port 9-pin Serial Port (1)
Dimension (W x H X D) 360 x 60 x 262 mm
Weight 3.5 kg
Power Requirements AC 110-240V, 50/60Hz
Power Consumption 15W
Humidity 0 to 99 percent non condensing
Storage Temperature -20 to 60 degrees Celsius
Operating Temperature 0 to 40 degrees Celsius
RF cable . . . . . . . . . . . . . . . . . . . .1
Video and Audio (L/R) cable . . . . .1
Component (YPbPr) cable . . . . . .1
Remote Control . . . . . . . . . . . . . .1
Batteries (size AAA) . . . . . . . . . . .2
•Design and specifications are subject to change without prior notice.
Input/Output
Environment
Accessories

P/NO : 3834RB0002J
