ICO OPE 00116 LLT User Guide
User Manual:
Open the PDF directly: View PDF ![]() .
.
Page Count: 47

www.ingenico.com
28/32, boulevard de Grenelle, 75015 Paris - France / (T) +33 (0)1 58 01 80 00 / (F) +33 (0)1 58 01 91 35
Ingenico – S.A. au capital de 53 086 309 € / 317 218 758 RCS PARIS
LLT 5.4
User guide
ICO-OPE-00116-V07
R&D/Software Engineering/Terminal Security Solutions
2017-07-11

2/47 LLT 5.4 / 2017-07-11
Contents
1_ Global presentation ......................................................................... 4
1_1 What is new? ................................................................................................. 4
1_2 Telium file tree structure ................................................................................ 5
1_3 Declination of LLT modes .............................................................................. 6
2_ Installation ........................................................................................ 7
2_1 Under Windows .............................................................................................. 7
2_1_1 Configure the user language ........................................................................................ 13
2_2 Under Ubuntu ............................................................................................... 13
2_3 Under Mac OS ............................................................................................. 15
3_ Starting LLT standalone application ............................................ 16
3_1 Under Windows ............................................................................................ 16
3_2 Under Ubuntu ............................................................................................... 16
3_3 Under Mac OS ............................................................................................. 17
4_ Graphical interface presentation .................................................. 18
4_1 Definitions of terms ...................................................................................... 18
4_2 The local browser ......................................................................................... 19
4_3 The terminal browser ................................................................................... 22
4_3_1 Terminal activities ......................................................................................................... 25
4_4 Hotkeys summary ........................................................................................ 25
4_5 Error message ............................................................................................. 25
4_6 Favorite paths .............................................................................................. 26
4_7 Plugged terminals view ................................................................................ 27
4_8 Transfer tasks view ...................................................................................... 28
4_9 Terminal observatory ................................................................................... 29
4_10 Installed components list ........................................................................... 30
4_11 Actions history view ................................................................................... 32

3/47 LLT 5.4 / 2017-07-11
4_12 File viewer ................................................................................................. 32
5_ Catalogue files ............................................................................... 33
5_1 Catalogue files format .................................................................................. 33
5_2 Catalogue editor ........................................................................................... 34
5_2_1 Duplicated files filter ..................................................................................................... 37
5_2_2 Missing files filter .......................................................................................................... 39
5_2_3 Export for USB key or MLT NFS Tool .......................................................................... 39
6_ How to start a connection with the terminal ................................ 41
6_1 Perform the disconnection ........................................................................... 41
7_ Command line mode ...................................................................... 42
7_1 Command-line usage ................................................................................... 42
7_1_1 Result file option ........................................................................................................... 46
7_1_2 Ignore errors option ...................................................................................................... 47
7_1_3 Force uppercase option ................................................................................................ 47
4/47 LLT 5.4 / 2017-07-11
1_Global presentation
The Local Loading Tool (LLT) is a software application intended for data and files exchange between a
computer and Ingenico electronic payment terminals.
The LLT application provides the user with an access to the terminal content and details.
This tool allows the browsing of terminal contents, consulting its characteristics, and retrieving the
terminal life counters.
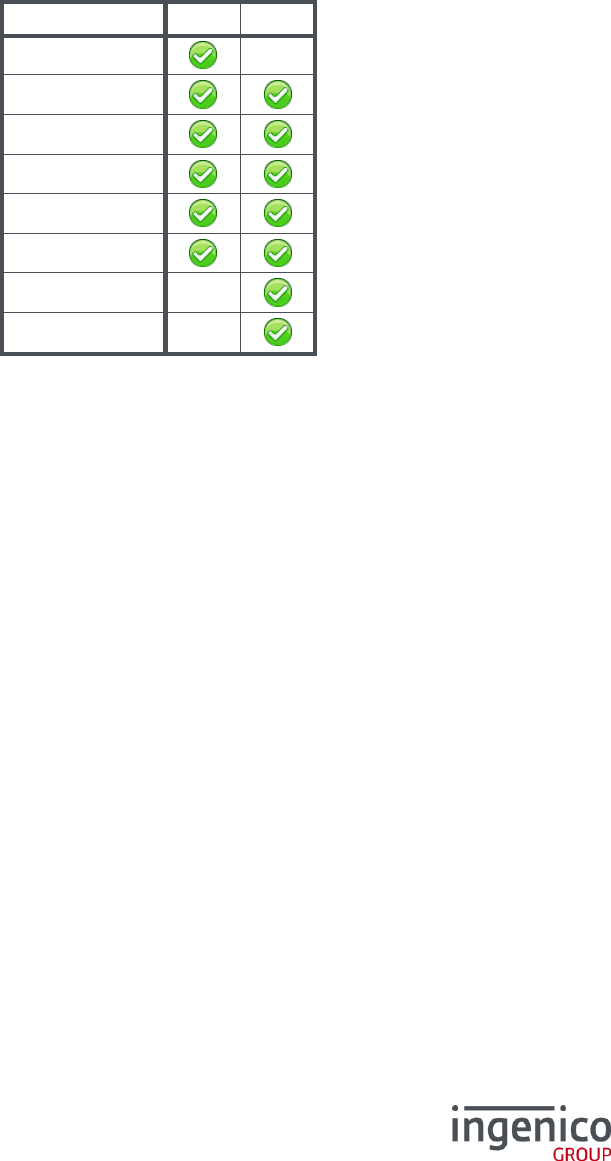
LLT 5.4 is supporting the following operating system versions:
32 bits
64 bits
Windows XP
Windows Vista
Windows Seven
Windows 8
Windows 8.1
Windows 10
Ubuntu 16
Mac OS X
LLT shall run with other operating system versions not listed in the above table, however no support will
be provided for them.
With the present version, only one terminal connection is possible at one time per LLT instance.
1_1 What is new?
From version 5.1, LLT supports all existing Telium terminal ranges, i.e. Telium 1, Telium 2 and
Telium Tetra.
Its design has been reviewed and LLT now features:
a full integration within IngeDev by means of a dedicated plugin
a more ergonomic interface standalone tool
an enhanced command-line mode, allowing easy integration with other software tools requiring
capabilities of download / upload
a new communication stack without any configuration required, that highly improves the user-
experience with a “ready to connect” solution
LLT is provided with the Ingenico USB driver and is installed as part of LLT installation. This USB driver
is required for communication operation.
5/47 LLT 5.4 / 2017-07-11
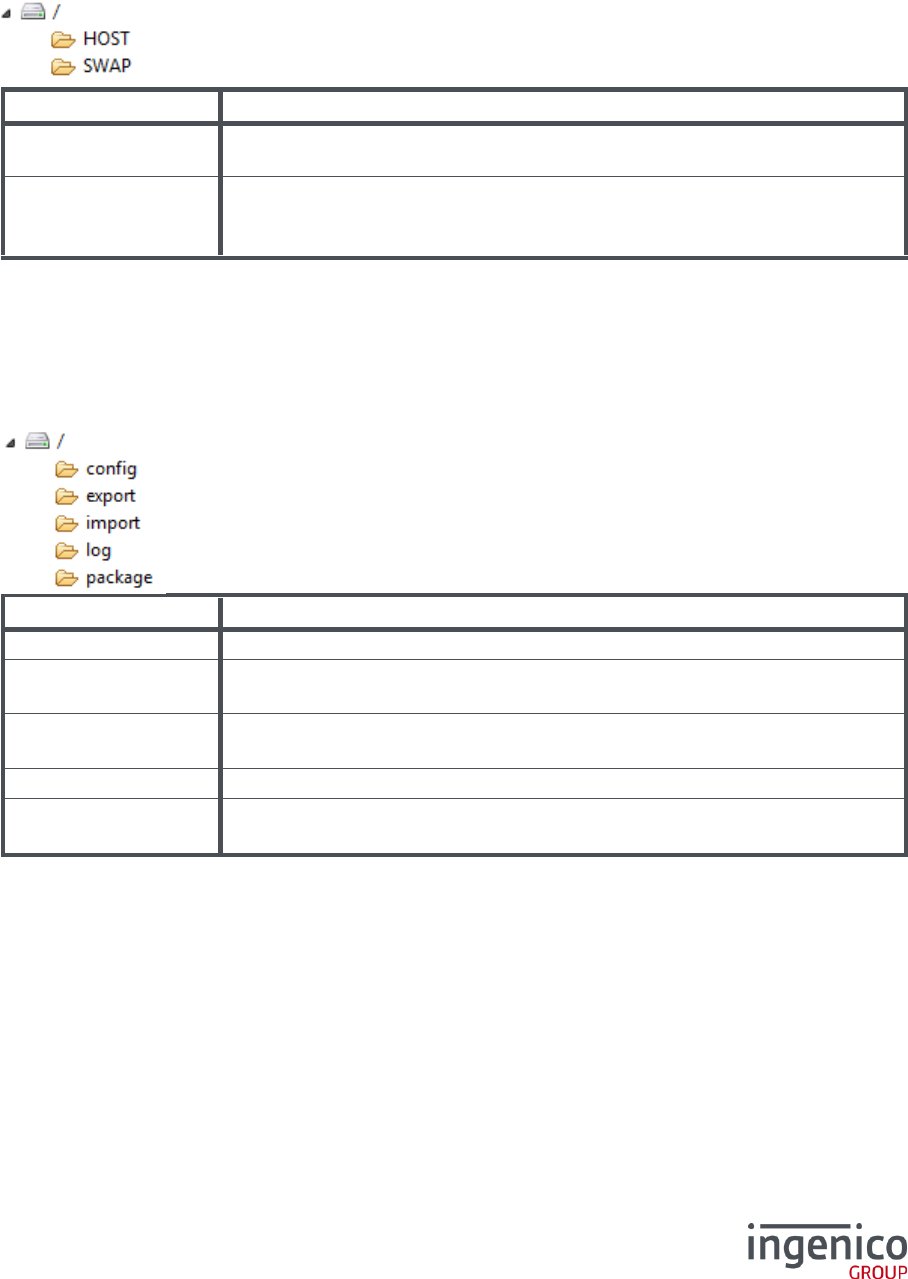
1_2 Telium file tree structure
The Telium Tetra file tree structure is different from those of Telium 1 and 2. When LLT browses the
terminal content, it works with a sand-box file system.
/ Telium 1 and Telium 2 file tree
Directory
Description
/HOST
The parameters files must be downloaded into this directory.
This directory is called “import” in Telium Tetra terminals.
/SWAP
The signed applications and components files must be downloaded into
this directory.
This directory is called “package” in Telium Tetra terminals.
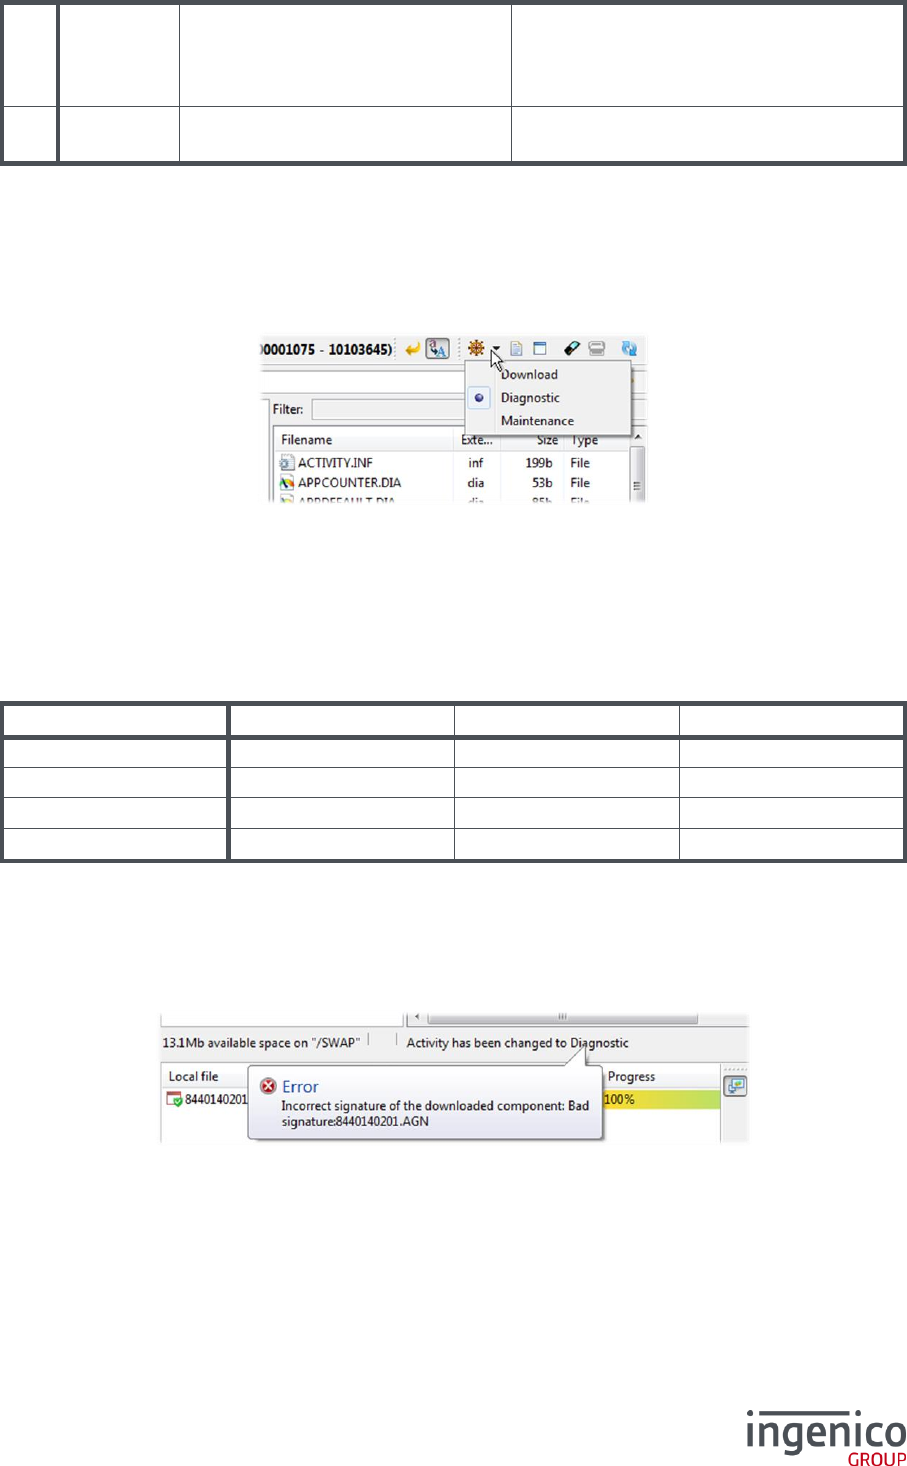
All the files downloaded in the “/SWAP” directory will be checked after changing the activity or after
disconnecting the LLT connection. A “Bad signature” error could appear if the component is not properly
signed.
/ Telium Tetra file tree
Directory
Description
/config
Contains the configuration files of the terminal.
/export
This directory receives the non-sensible files from applications in the terminal.
These files aim to be locally uploaded for further analysis.
/import
The parameters files must be downloaded into this directory.
This directory is called “HOST” in Telium 1 and Telium 2 terminals.
/log
Contains system and applications logs files.
/package
The application package files must be downloaded into this directory.
This directory is called “SWAP” in Telium 1 and Telium 2 terminals.
All files downloaded in the “/package” directory will be checked after disconnecting the LLT connection.
An “INVALID_SIGNATURE” error could appear if the package is not properly signed.
Thus, this incorrect package must be manually deleted from the “/package” directory.
If the package check passes when the terminal is disconnected, the package is installed into the
terminal.

6/47 LLT 5.4 / 2017-07-11
1_3 Declination of LLT modes
The LLT application comes with three running modes:
standalone application
command-line mode
perspective and plug-in integration into IngeDev
The standalone application and the “Local Loading Tool” perspective in IngeDev are similar.
7/47 LLT 5.4 / 2017-07-11
2_Installation
2_1 Under Windows
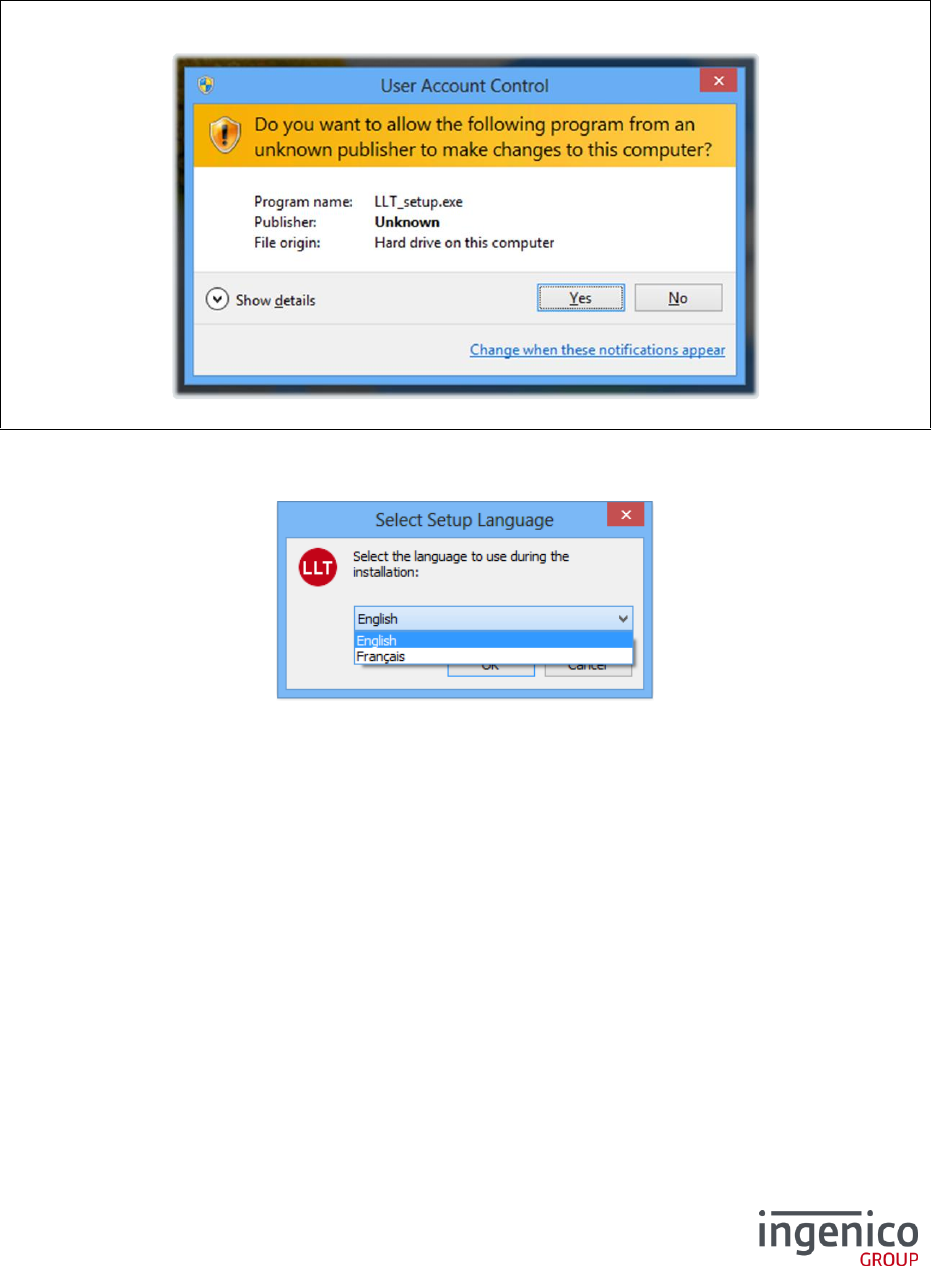
Launch the “LLT_setup.exe” program and follow the installation steps.
With Windows Vista, Seven or 8, the following message could appear:
Select “Yes”.
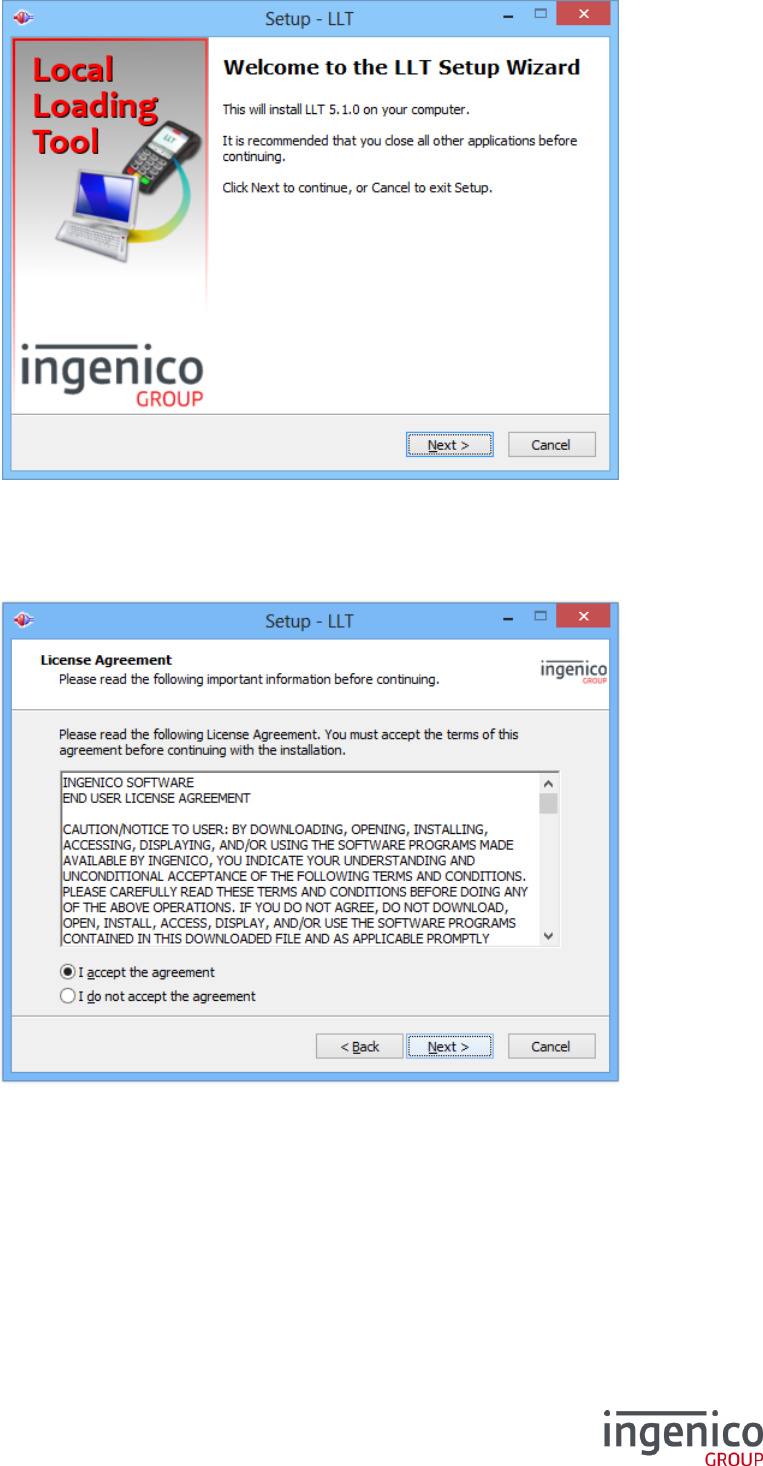
Choose your language in the combo-box and confirm with “OK”.
8/47 LLT 5.4 / 2017-07-11
Select “Next” to continue.
Accept the agreement, and select “Next”.
9/47 LLT 5.4 / 2017-07-11
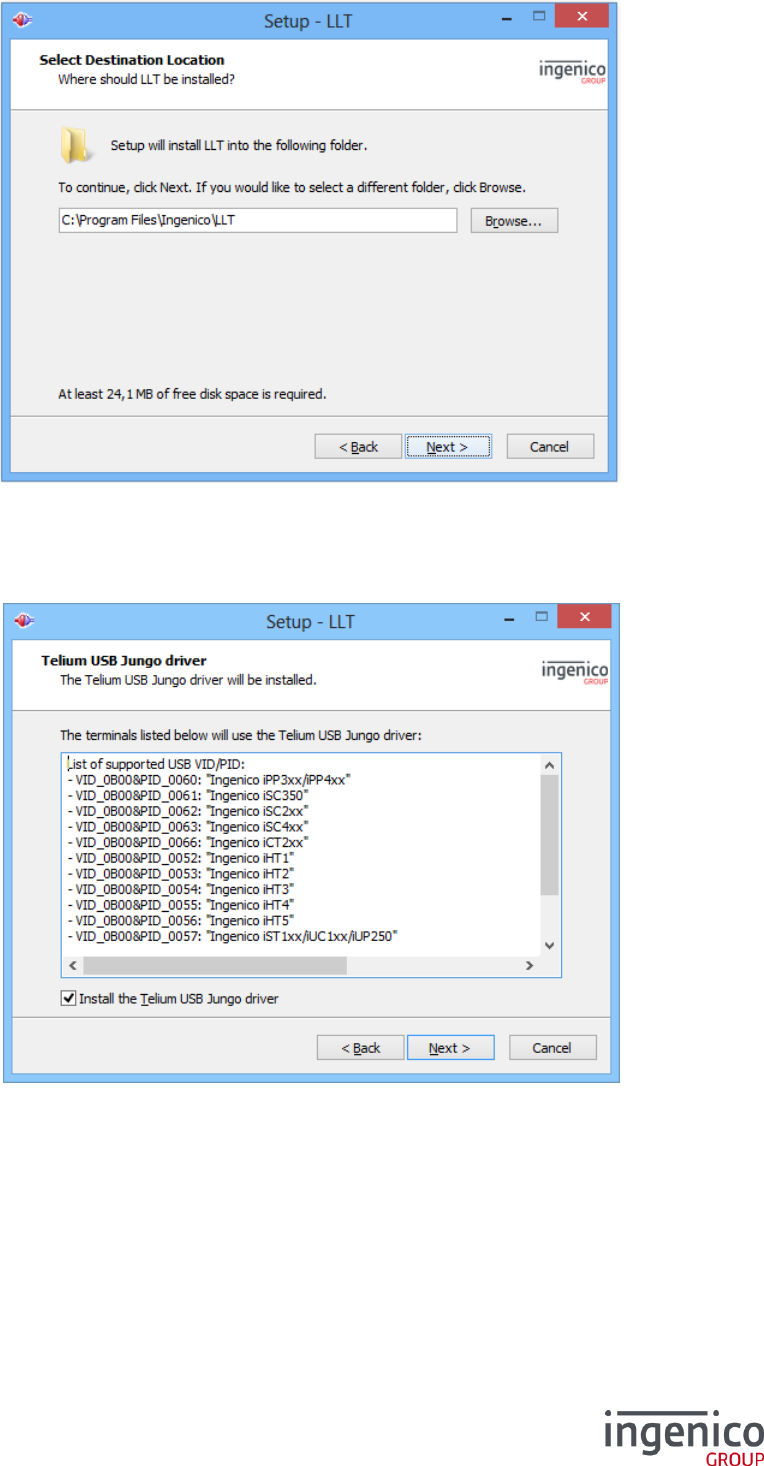
Choose the destination path for the LLT installation and confirm with “Next”.
The list of supported terminal by the Ingenico USB driver is displayed for information.
Select the check-box if you want to install this driver.
Click “Next” to continue.
10/47 LLT 5.4 / 2017-07-11
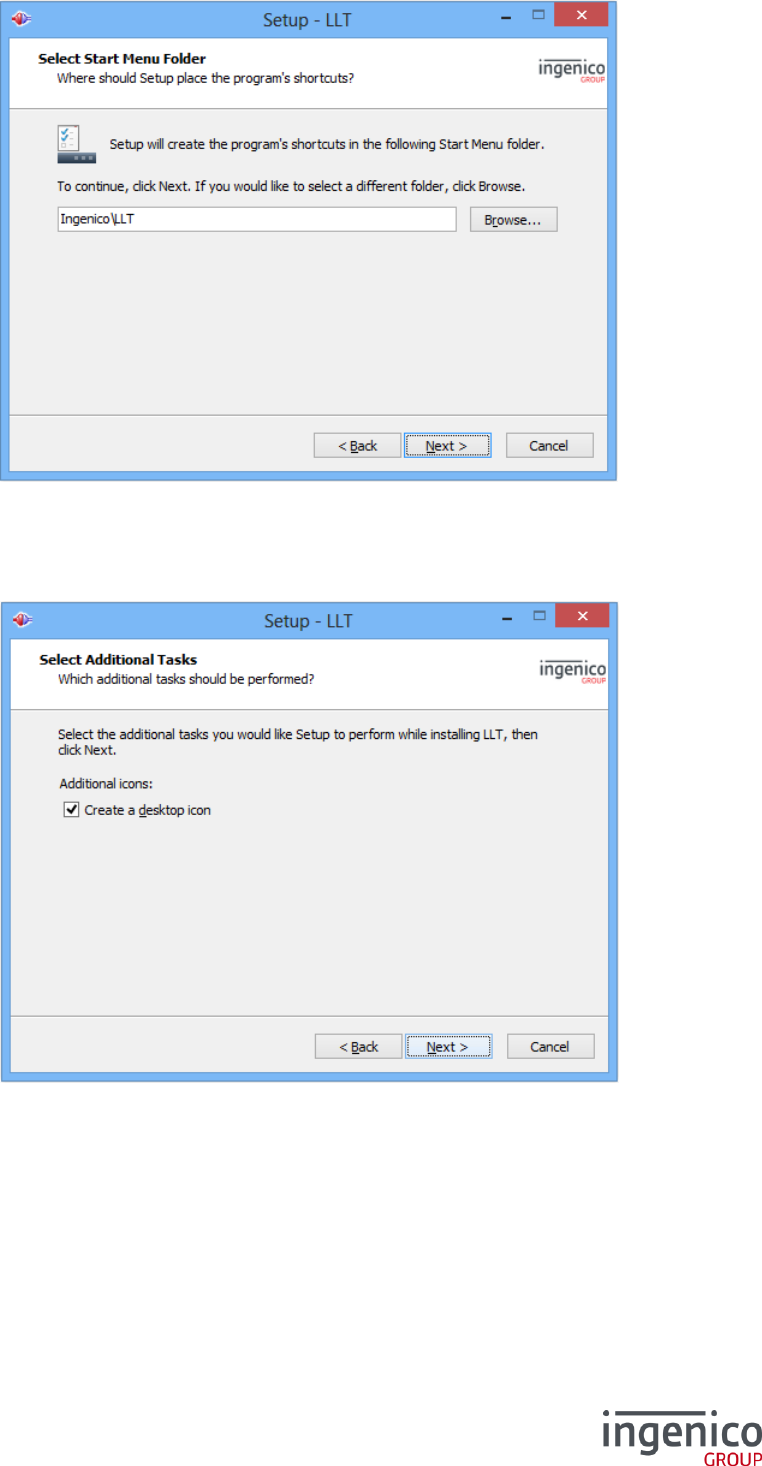
Select the shortcut location in the Start menu. Then select “Next”.
Select whether you want a LLT desktop icon or not and confirm with “Next”.
11/47 LLT 5.4 / 2017-07-11
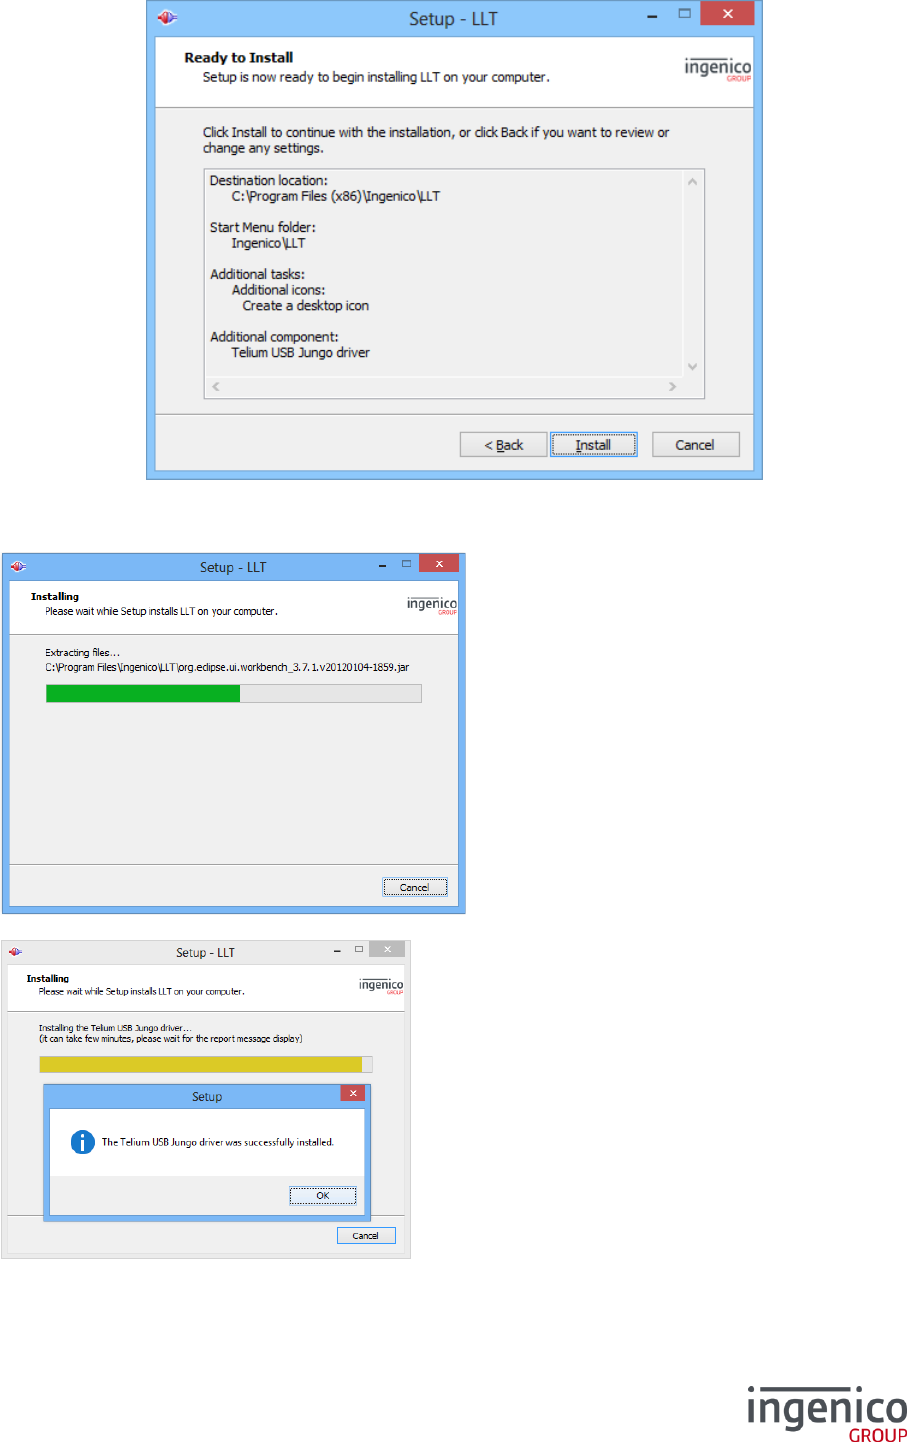
The following screen summarizes the options that will be applied during installation:
Select “Install” to start the copy of required LLT files.
The installer window shows the files copy
progression.
The installation of the Ingenico USB driver
might take a few minutes. During this period of
time, the progress bar may not be updated.
Finally a report message confirms if the driver
has been correctly installed.
12/47 LLT 5.4 / 2017-07-11
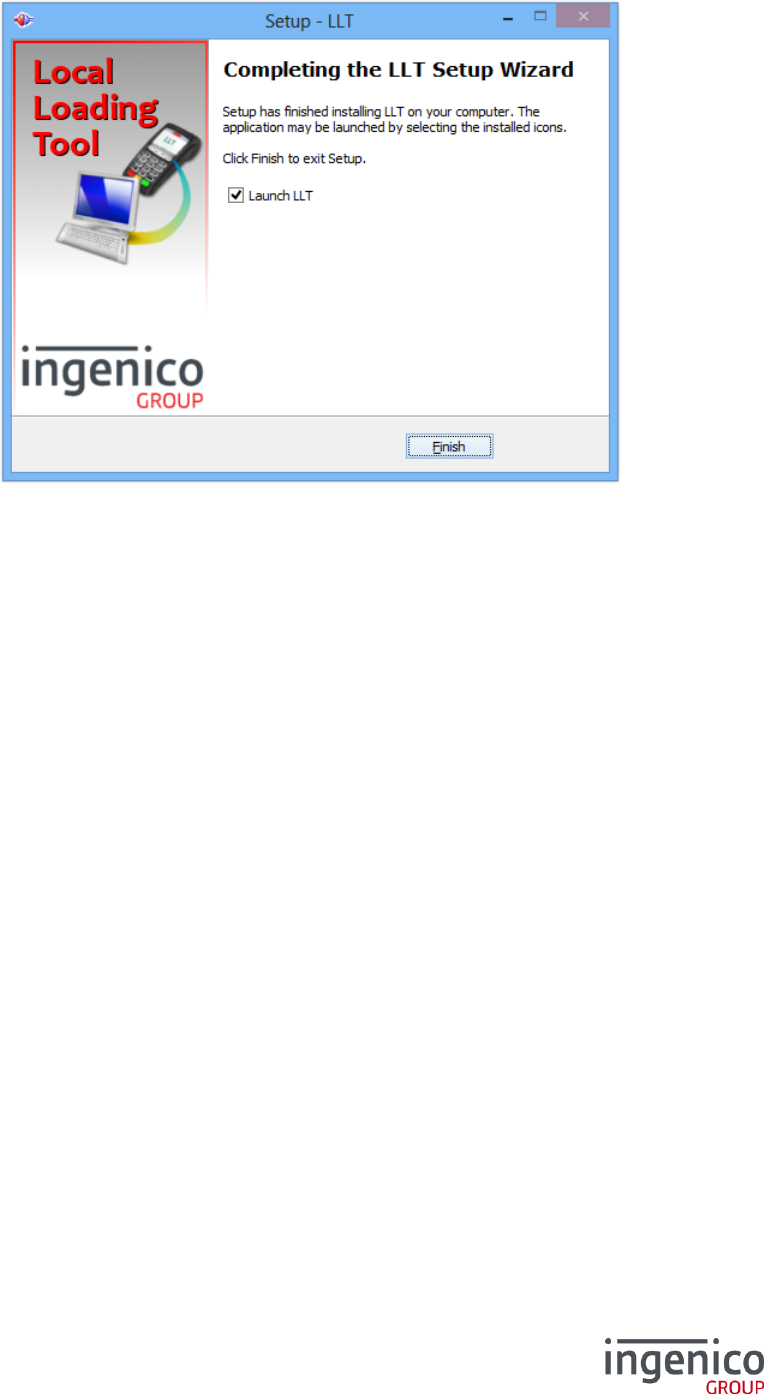
At the end of the installation process, the installer shall confirm that the installation is completed, and
proposes to launch LLT.
Select “Finish” to close the installation program.
13/47 LLT 5.4 / 2017-07-11
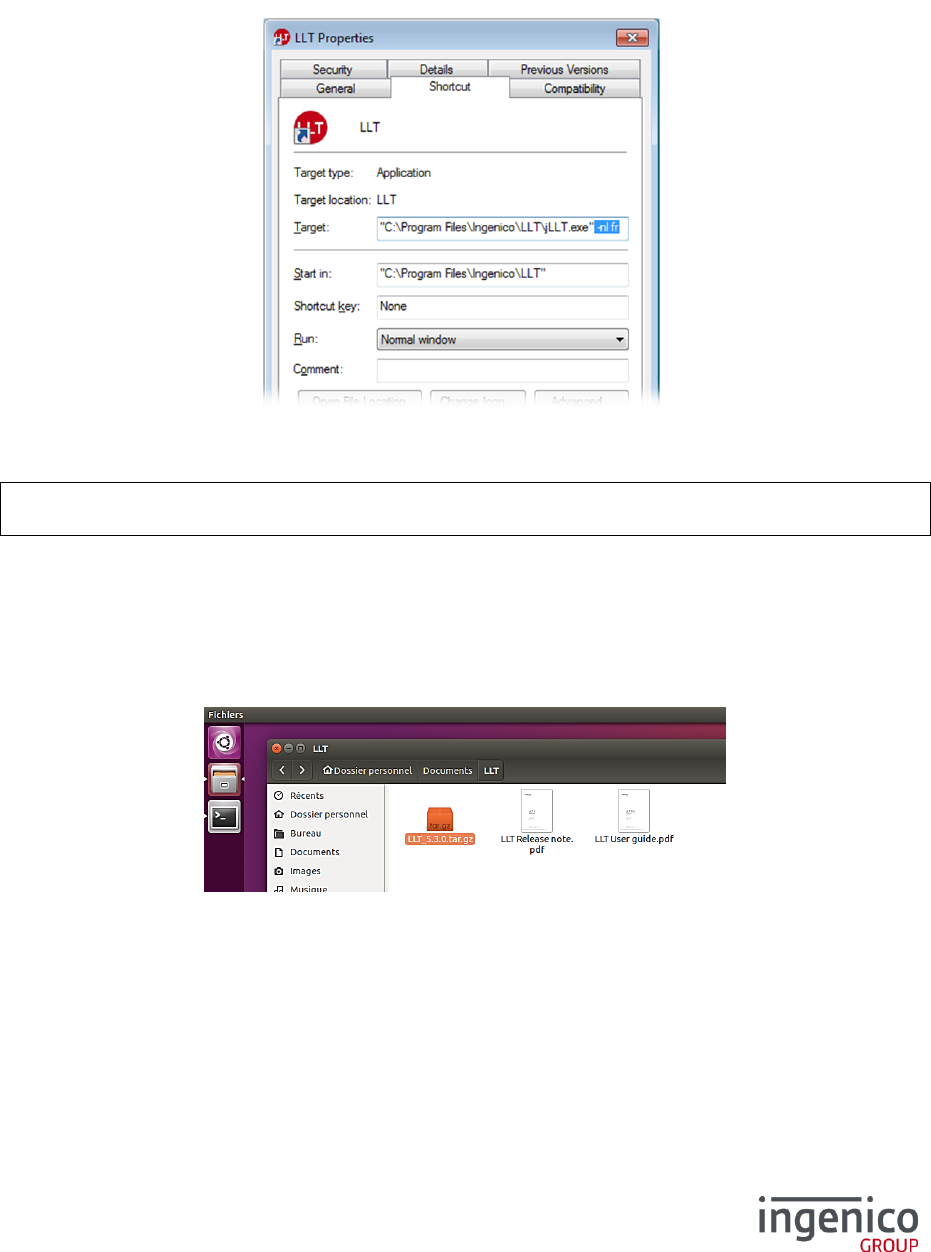
2_1_1 Configure the user language
By default, the user interface language is that of the operating system. There are two ways to change
the default language.
In the shortcut properties, append to the command-line -nl en (to force English) or -nl fr (for French)
as shown below:
In order to apply the same language for all, create a file named llt.ini in the installation directory of
the LLT, with the following content:
-vmargs
-Duser.language=fr
2_2 Under Ubuntu
Open the “LLT_5.X.x.tar.gz” archive.
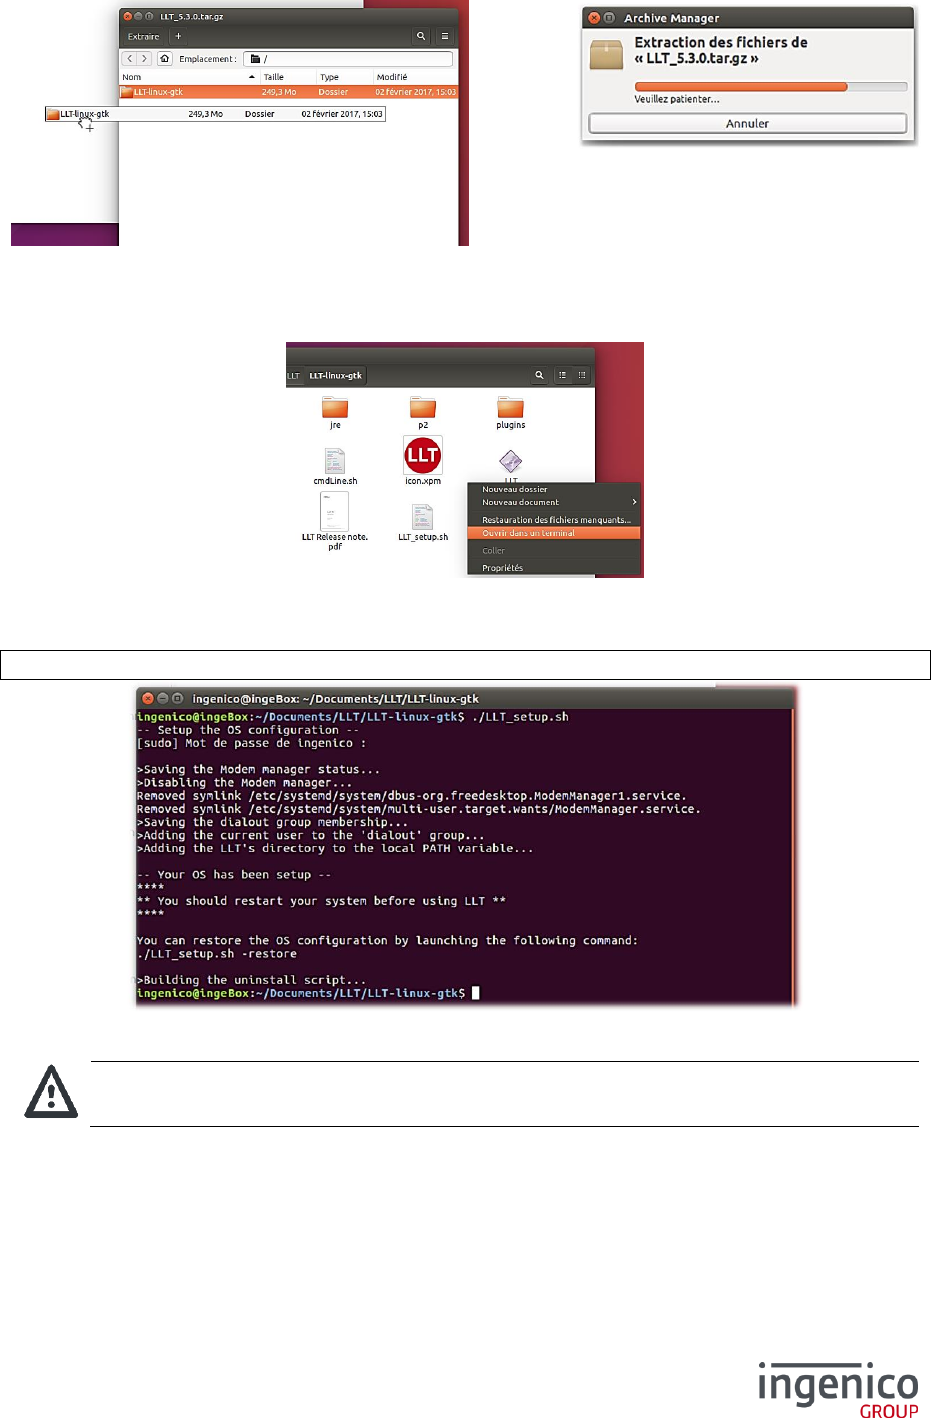
14/47 LLT 5.4 / 2017-07-11
Unpack the archive by drag-and-drop into your desired destination.
Then, open a terminal from the LLT destination directory, by right-click and “Open in a terminal”.
Start the installation process with the following command:
./LLT_setup.sh
NOTICE
You have to restart your system before using LLT
15/47 LLT 5.4 / 2017-07-11
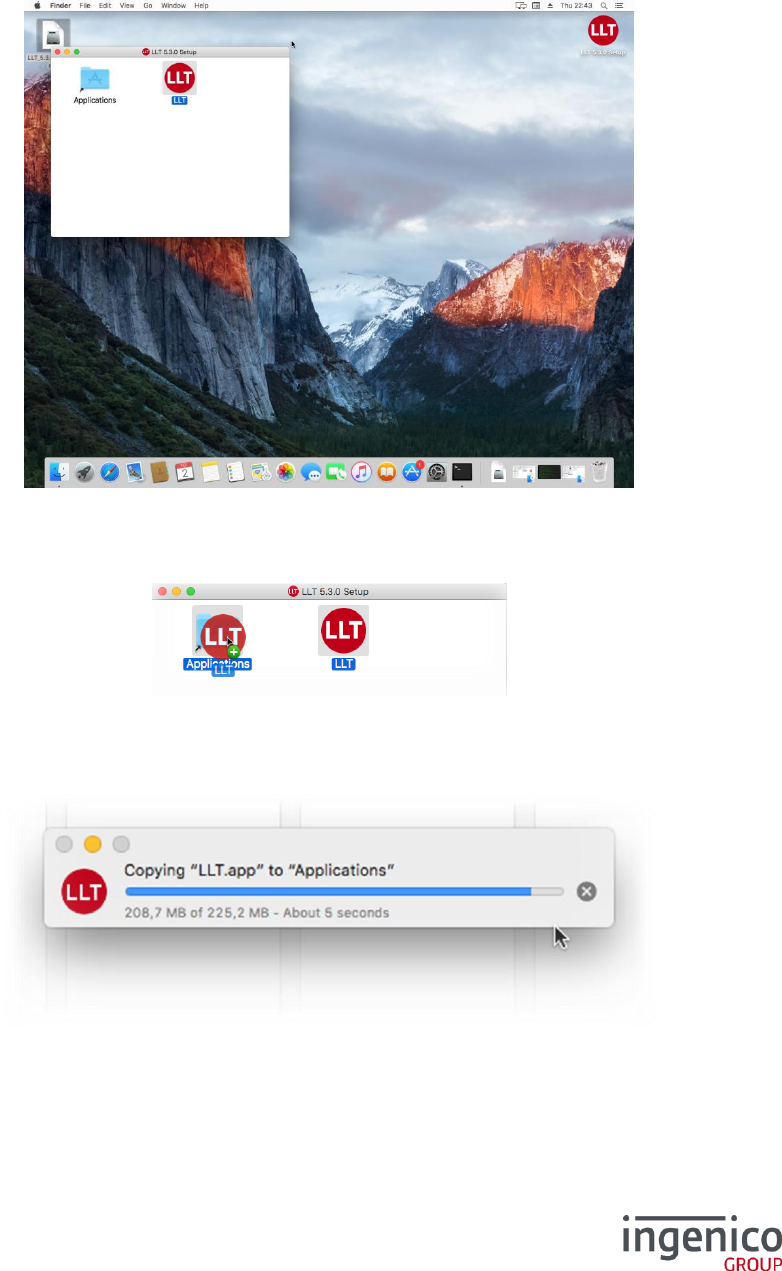
2_3 Under Mac OS
Launch the “LLT_5.X.x_setup.dmg” package.
A panel is displayed with the representation of the LLT application:
Make a drag-and-drop from the “LLT” icon to the “Application” folder.
The LLT application is being copied into your Mac.
16/47 LLT 5.4 / 2017-07-11
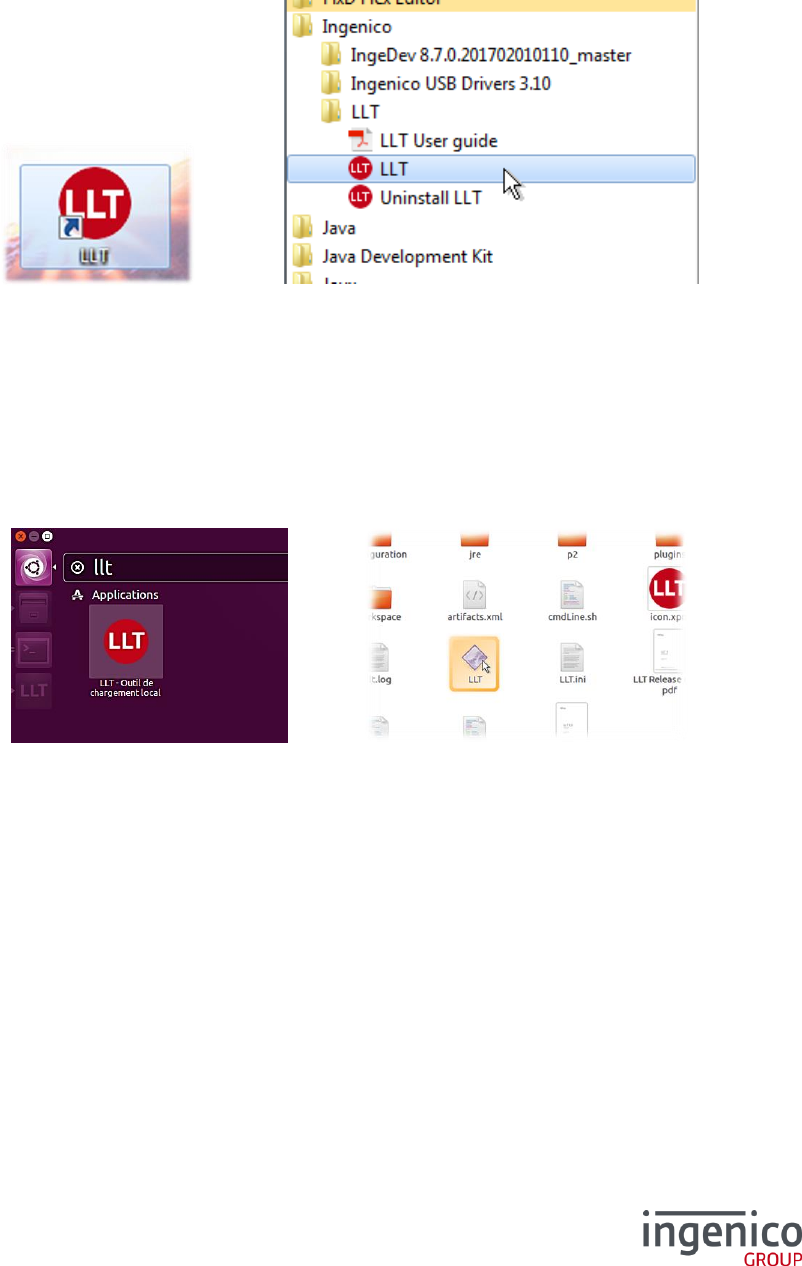
3_Starting LLT standalone application
3_1 Under Windows
In order to launch LLT in standalone mode, click on the LLT shortcut on your desktop or in the Start
menu:
If you use Windows Vista, Windows Seven or Windows 8, you shall be prompted to confirm the LLT
execution (by User Account Control). Select “Yes” to accept.
3_2 Under Ubuntu
You can find the LLT application in the Launcher. You can also launch it with the “LLT” application from
the installation directory.
17/47 LLT 5.4 / 2017-07-11
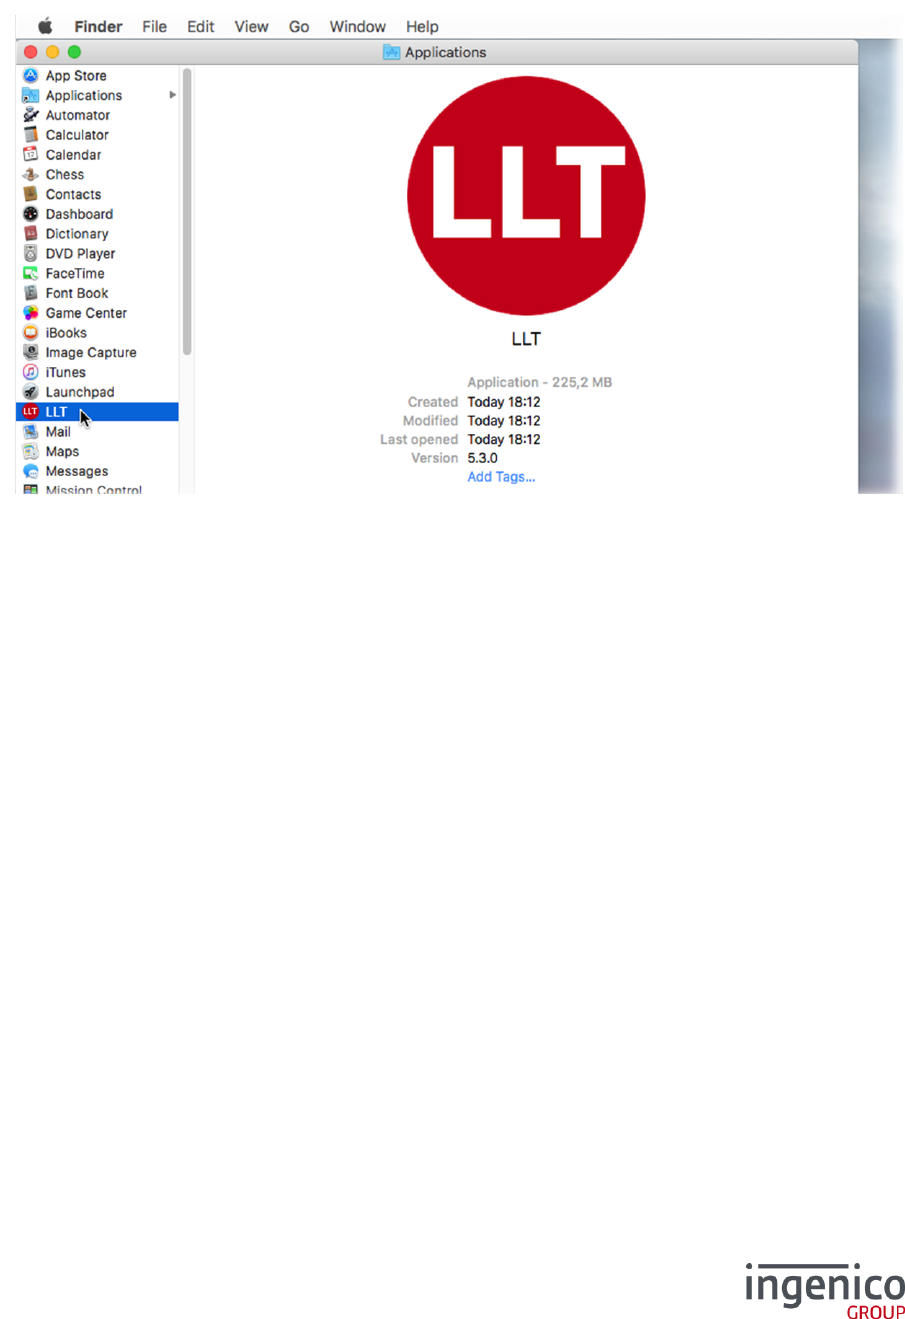
3_3 Under Mac OS
LLT is available in the “Applications” list of the Finder. Double-click on it to open the LLT application.
18/47 LLT 5.4 / 2017-07-11
4_Graphical interface presentation
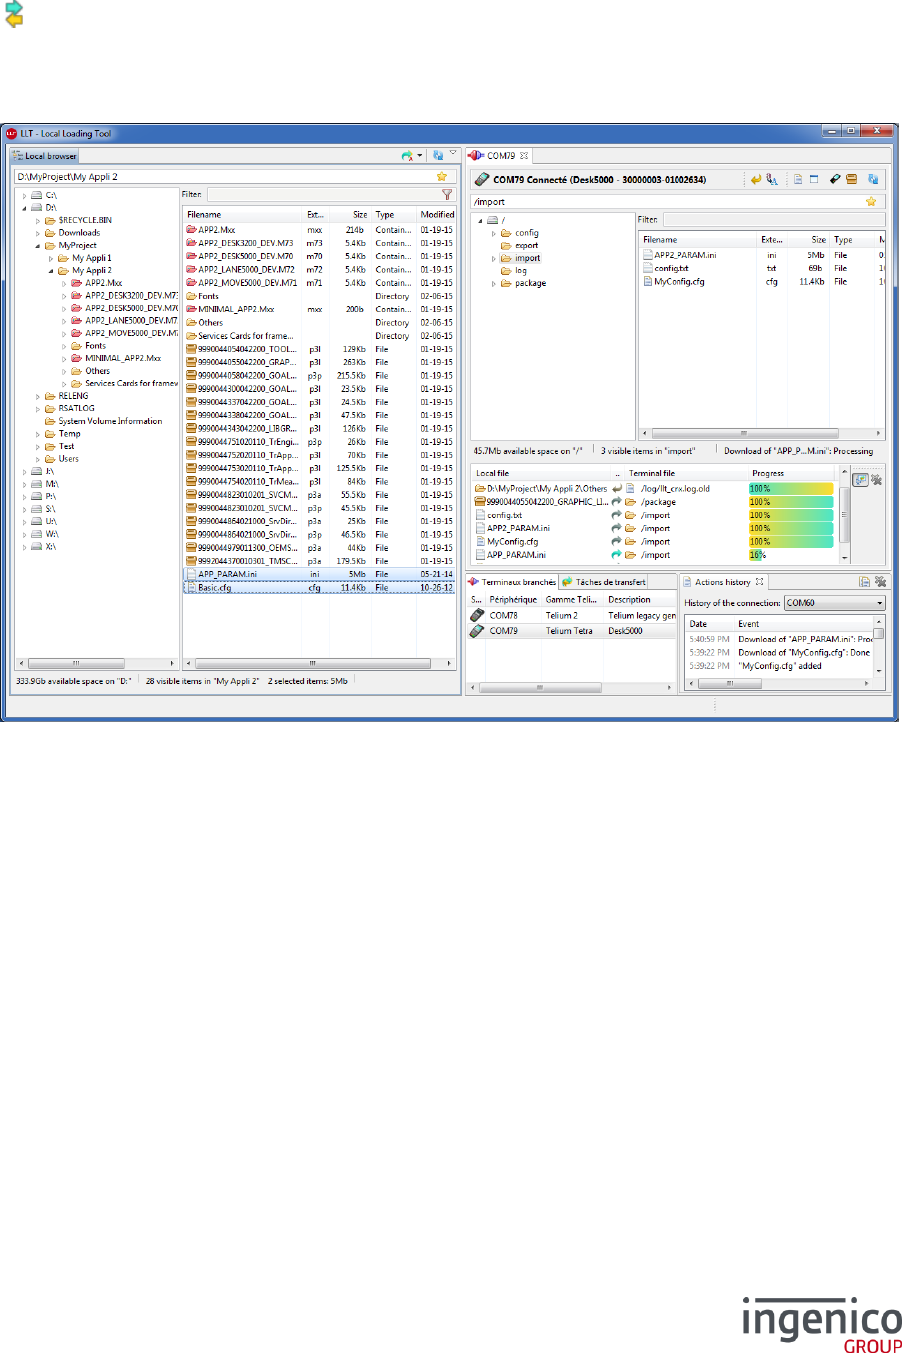
LLT can be used as a standalone application or integrated in IngeDev through the
“ Local Loading Tool” perspective.
/ LLT perspective overview
The main display of the LLT software includes 2 main views:
The left view represents the local computer filesystem
The right view is mainly related to terminals: it displays the list of available terminal devices, the
terminal browser and its corresponding files transfer
4_1 Definitions of terms
In this document is mentioned “local browser” and the “terminal browser”. If the single term
“browser” is used, it can refer to either the “local browser” or the “terminal browser”.
An “item” designates a file or a directory in the browser.
A “catalogue file” refers to a list of files to be loaded. This particular file is used to ease
downloads for Telium 1 and Telium 2 products (see “5_Catalogue files” for more details).
A “container file” is a file that contains files or refers to a list of files. For the moment, only
catalogue files are handled as container files.
19/47 LLT 5.4 / 2017-07-11
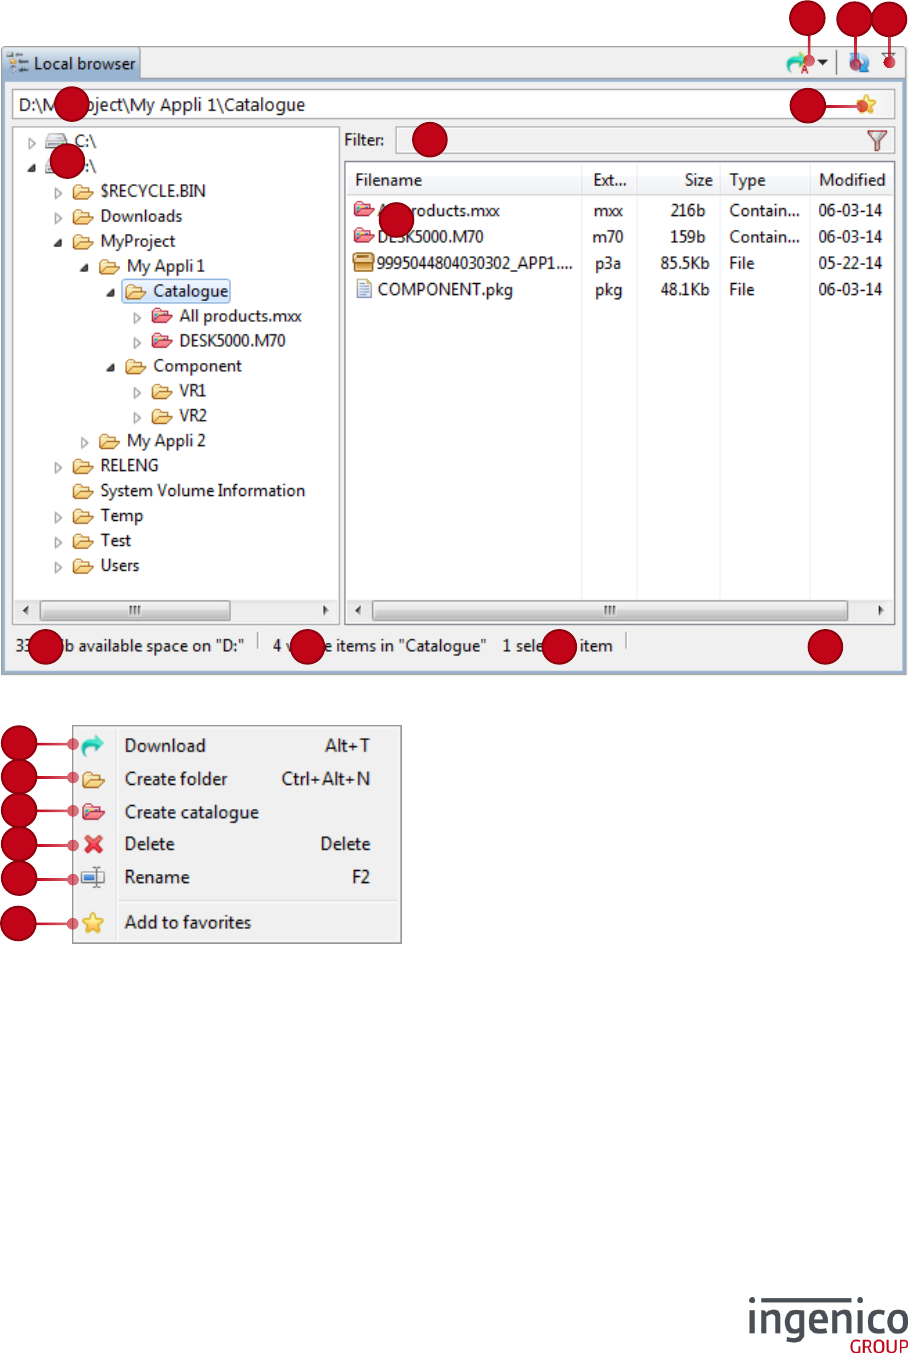
4_2 The local browser
The Local browser view is usually displayed on the left side. It displays the computer drives content and
eventually mapped network drives.
Full context menu:
1
2
3
5
6
7
8
4
10
9
25
12
12
13
14
15
25
16
20/47 LLT 5.4 / 2017-07-11
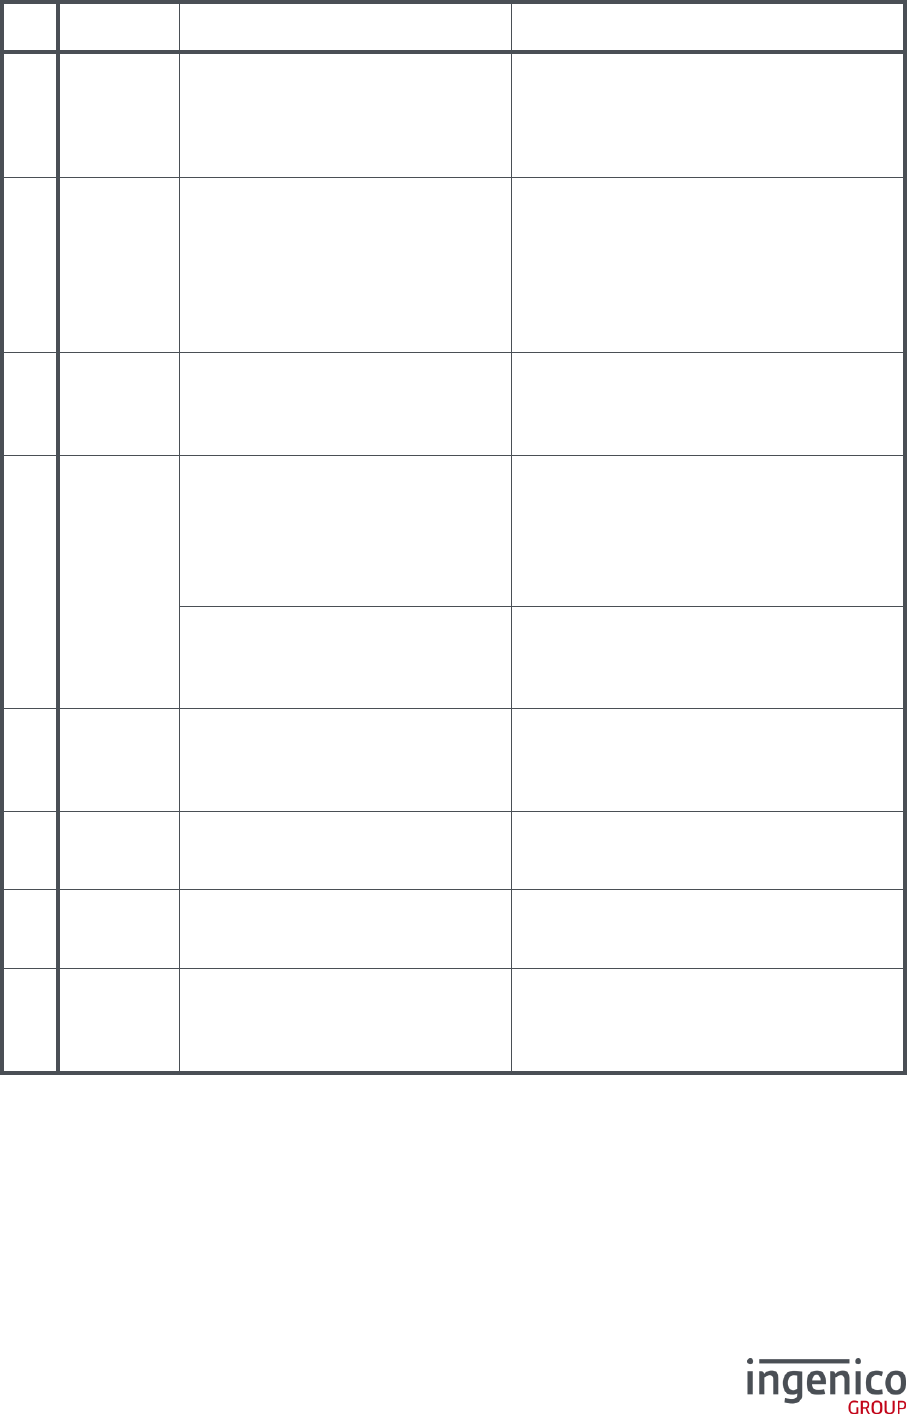
/ Legend
#
Element
Description
Action / details
1
Path bar
Display the path of the current
directory displayed in the browser.
Change the path bar value to directly
browse the input path. Validate your input
by pressing the Enter key, or leave focus
from the path bar.
The path bar is case-sensitive.
2
Tree panel
The tree panel of the browser
displays:
Only the directory and the
container files, if the detail
panel is shown;
All files and directories, if the
detail panel is hidden.
Select a directory or a container file in order
to view its content, or to execute an action
on it.
If files are present, actions on files are also
available.
3
Detail panel
The detail panel of the browser
provide more information about files
of the selected directory or container
file (in the tree panel).
Select one (or more) file or directory for
details, or to execute an action on it.
This panel can be hidden (see #9).
4
Filter
Filter the files and directories in the
detail panel.
The filter is applied on the text field value
change.
In order to view a file or a directory, its
filename must contain (anywhere) the value
of the filter field. The search is not case-
sensitive.
Funnel button: filter containers
according to the terminal’s product
code.
Click on this icon to enable/disable the
automatic filter. When enabled, catalogue
files are filtered according to the active
terminal connection (product code).
5
Available
disk space
Display the available drive space of
the selection.
When the mouse pointer passes over this
label, the disk space usage is shown and a
tooltip specifies the “available space / total
space”.
6
Number of
visible items
Display the number of visible items
in the current directory or container
file.
7
Selected
items
Display the number of selected
items in the detail panel, and the
total size.
8
Last action
status
Display the status of the last action.
Errors are in red colour, warnings in
orange and regular messages in
black.
A double-click on this label shows the
Actions history view.
21/47 LLT 5.4 / 2017-07-11
9
Additional
commands
Display additional commands.
Additional commands of the Local browser:
Actions history: show the Action
history view for the local browser
Switch the details: show or hide the
detail panel (see #2 and #3)
Help contents: display the help
contents
About LLT: display the current LLT
version
10
Refresh
Refresh the browser content,
particularly needed when an item
has been modified out of the LLT
software.
12
Download
Download the selected item to the
terminal.
This action is available from the toolbar,
from the contextual menu on a selection
(right-click), or by pressing the shortcut key
“Alt+T”.
Arrow menu of the icon: change the
download destination mode
Available destination modes:
Manual destination: the destination
is the current directory, or for
drag & drop the designated
directory
Automatic destination: the
destination is determined by the
extension of files to download.
Using the drag & drop will display
the predicted destination(s).
13
Create
folder
Create a folder in the current
directory.
This action is available from the contextual
menu (right-click), or by pressing the
shortcut key “Ctrl+Alt+N”.
14
Create
catalogue
Create a new catalogue file. The
catalogue editor is opened, and
catalogue file will not exist until
saved.
This action is available from the contextual
menu (right-click).
15
Delete
Delete the selected files or
directories.
This action is available from the contextual
menu (right-click), or by pressing the
shortcut key “Del”.
16
Rename
Rename the selected file or
directory.
This action is available from the contextual
menu (right-click), or by pressing the
shortcut key “F2”.
25
Add to
favorites
Add and open the list of favorite
paths.
At click, a popup window is displayed with
the list of saved paths (a left-click adds the
current path, other buttons only open it).
For more details, see 4_6 Favorite paths.
22/47 LLT 5.4 / 2017-07-11
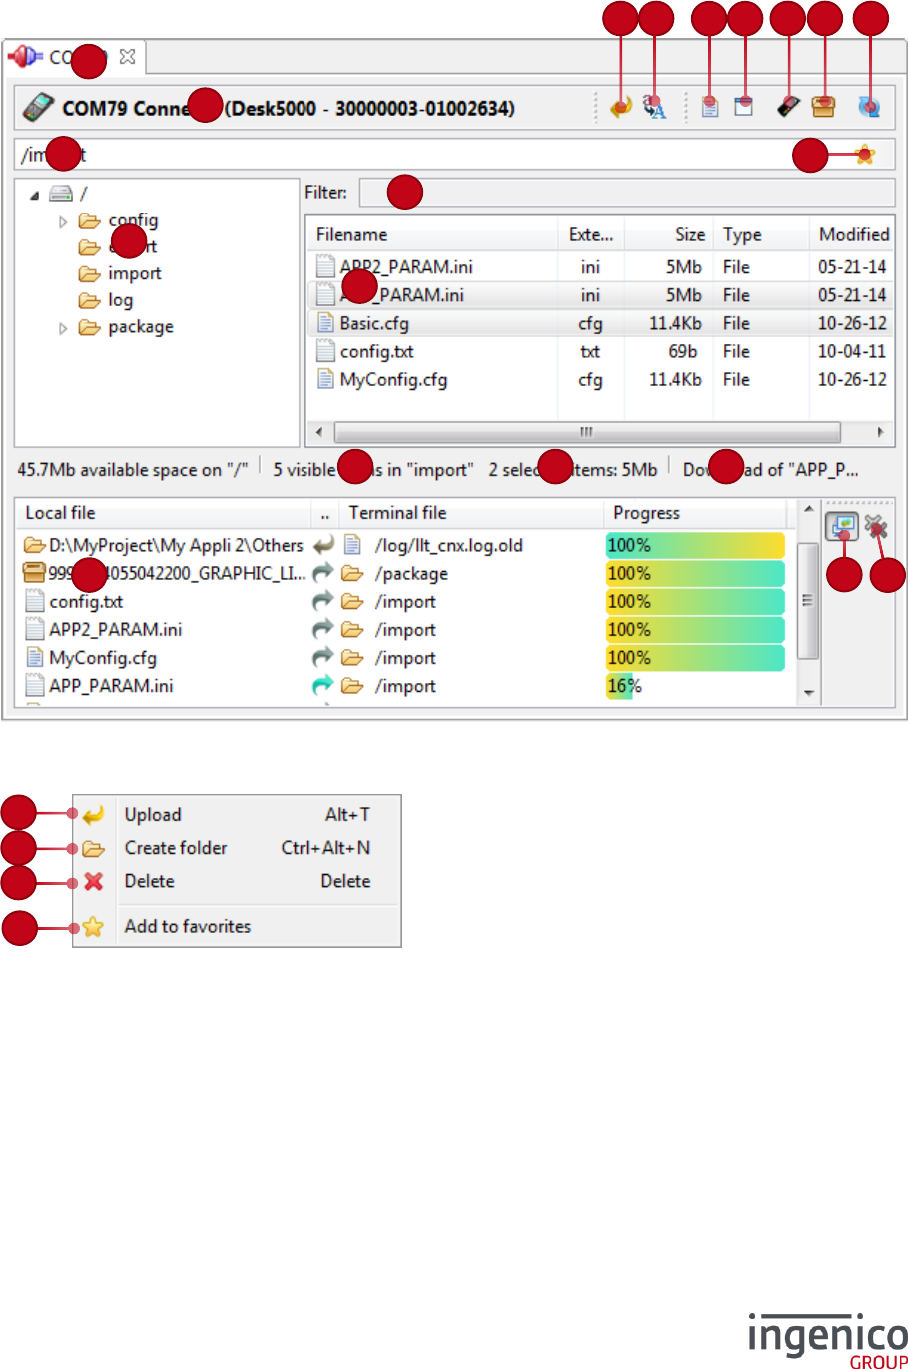
4_3 The terminal browser
The Terminal browser view is commonly displayed on the right hand side. It shows the terminal content.
Full context-menu:
18
1
10
4
22
11
20
12
19
3
2
6
7
8
12
13
15
16
24
23
21
25
25
26
23/47 LLT 5.4 / 2017-07-11
/ Legend
#
Element
Description
Action / details
1
Path bar
Display the path of the current
directory displayed in the browser.
Change the path bar value to directly
browse the input path. Validate your input
by pressing the Enter key, or leave focus
from the path bar.
The path bar is case-sensitive.
2
Tree panel
The tree panel of the browser
displays:
Only the directory and the
container files, if the detail
panel is shown;
All files and directories, if the
detail panel is hidden.
Select a directory or a container file in order
to view its content, or to execute an action
on it.
If files are present, actions on files are also
available.
3
Detail panel
The detail panel of the browser
provides details on files of the
selected directory or container file (in
the tree panel).
Select one (or more) file or directory for
details, or to execute an action on it.
This panel can be hidden (see #26).
4
Filter
Filter the files and directories in the
detail panel.
The filter is applied on the text field value
change.
In order to view a file or a directory, its
filename must contain (anywhere) the value
of the filter field. The search is not case-
sensitive.
6
Number of
visible items
Display the number of visible items
in the current directory or container
file.
7
Selected
items
Display the number of selected
items in the detail panel, and the
total size.
8
Last action
status
Display the status of the last action.
Errors are in red colour, warnings in
orange and regular messages in
black.
A double-click on this label shows the
Actions history view.
10
Refresh
Refresh the browser content,
particularly needed when an item
has been modified out of the LLT
software.
11
Force
uppercases
Force uppercases of filename for
download.
When this option is selected, the following
transformation is applied on downloaded
files:
On Telium 1 and Telium 2, the
filename and extension are forced
in uppercases.
On Telium Tetra, only the
extension is changed to uppercase.
12
Upload
Upload the selected item from the
terminal to the selected directory in
the local browser.
This action is available from the toolbar,
from the contextual menu on a selection
(right-click), or by pressing the shortcut key
“Alt+T”.
24/47 LLT 5.4 / 2017-07-11
13
Create
folder
Create a folder in the current
directory.
This action is available from the contextual
menu (right-click), or by pressing the
shortcut key “Ctrl+Alt+N”.
15
Delete
Delete the selected files or
directories.
This action is available from the contextual
menu (right-click), or by pressing the
shortcut key “Del”.
17
Transfer
task panel
This panel establishes a list of the
download and upload tasks. For
each transfer task, the local file or
directory, the direction, the terminal
file or directory, and the progression
are displayed.
In the case of download:
The local file denotes the original
file
The direction is a right direction
arrow (in turquoise blue if the task
is transferring, otherwise in grey)
The terminal file denotes the
destination directory
In the case of upload:
The local file denotes the
destination directory
The direction is a left direction
arrow (in yellow if the task is
transferring, otherwise in grey)
The terminal file denotes the
source file
For further details, see the 4_8 Transfer
tasks view section.
18
Bring on top
transfer
events
If this option is activated, the current
transfer task is kept visible.
Clicking this button to enable or disable the
option.
19
Clean
complete
transfers
Clean all terminated transfer tasks
and errors
20
Show the
actions
history
Show the Action history view for the
current terminal connection.
21
Show the
terminal
information
Report information regarding the
connected terminal.
For more details, see the section
4_9 Terminal observatory.
22
Show the
installed
components
Show the list of the installed
components in the terminal, and
allow uninstalling them.
For more details, see the section
4_10 Installed components list.
23
Terminal
tab
Each terminal connection appears in
a dedicated tab.
Its icon reflects the connection state
(connected or disconnected) and the
label is the serial port name used for
the connection.
Closing a terminal tab automatically commit
the transfer transaction and close the
connection with this terminal.
24
Terminal
status
The terminal status bar gives
information about the current
terminal state, and also some
identifiers of this terminal.
A double-clicks on the terminal status bar
will toggle its state: switching it to
connected, or disconnecting it.
25/47 LLT 5.4 / 2017-07-11
25
Add to
favorites
Add and open the list of favorite
paths.
At click, a popup window is displayed with
the list of saved paths (a left-click adds the
current path, other buttons only open it).
For more details, see 4_6 Favorite paths.
26
Toggle the
details
Show or hide the detail panel (see #2
and #3).
4_3_1 Terminal activities
When browsing either Telium 1 or Telium 2 terminals, it is possible to switch from one terminal activity
to another.
The activities bring different views of the terminal content, depending on the use-case.
The activity menu selection is not available for Telium Tetra terminals.
Behind the corresponding menu icon, you can check which activity is currently selected or select another
one.
4_4 Hotkeys summary
Command
Windows hotkey
Ubuntu hotkey
Mac OS hotkey
Download / Upload
Alt + T
Alt + T
Opt ⌥ + N
Create folder
Ctrl + Alt + N
Ctrl + Alt + N
Opt ⌥ + Cmd ⌘ + N
Delete
Delete
Delete
Delete ⌦
Rename
F2
F2
F2
4_5 Error message
If any error occurs, a message providing details on the error is shown in the status bar of the browser.
This error is also displayed in an error balloon message. Click on it in order to hide it.
All error messages are logged into the Actions history view (see section 4_11).
26/47 LLT 5.4 / 2017-07-11
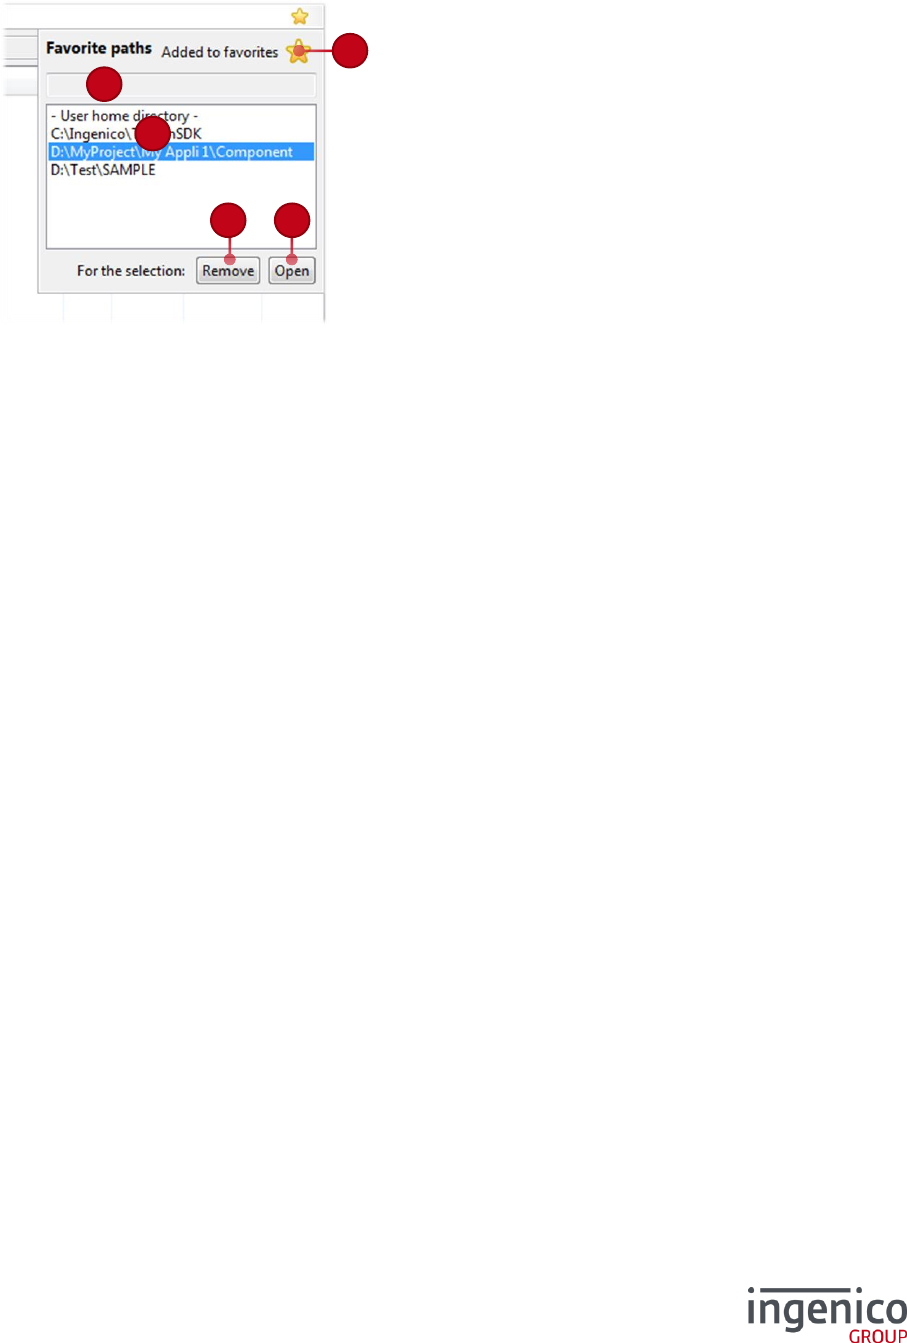
4_6 Favorite paths
Clicking the star at the right hand of the browser’s path-bar (a left-click adds the current path, other
buttons only open it), or using the contextual menu “Add to favorites” (#25) on a directory or a container,
displays the list of favorite paths:
Clicking the biggest star adds or removes the current path from the list (#31).
Double-clicking on a selection in the list opens a favorite path.
31
34
35
33
32
27/47 LLT 5.4 / 2017-07-11
/ Legend
#
Element
Description
31
Favorite switch
Add or remove the current path from the favorites.
32
Filter
Filter the paths in the list. To be listed, the path must contain the value
of the filter field. The search is not case-sensitive.
33
Saved paths list
The list of favorite paths. The item “- User home directory -” is related
to the current user, for the local browser.
34
Remove
Remove the selected path from the list of favorites.
35
Open
Open and browse the selected path.
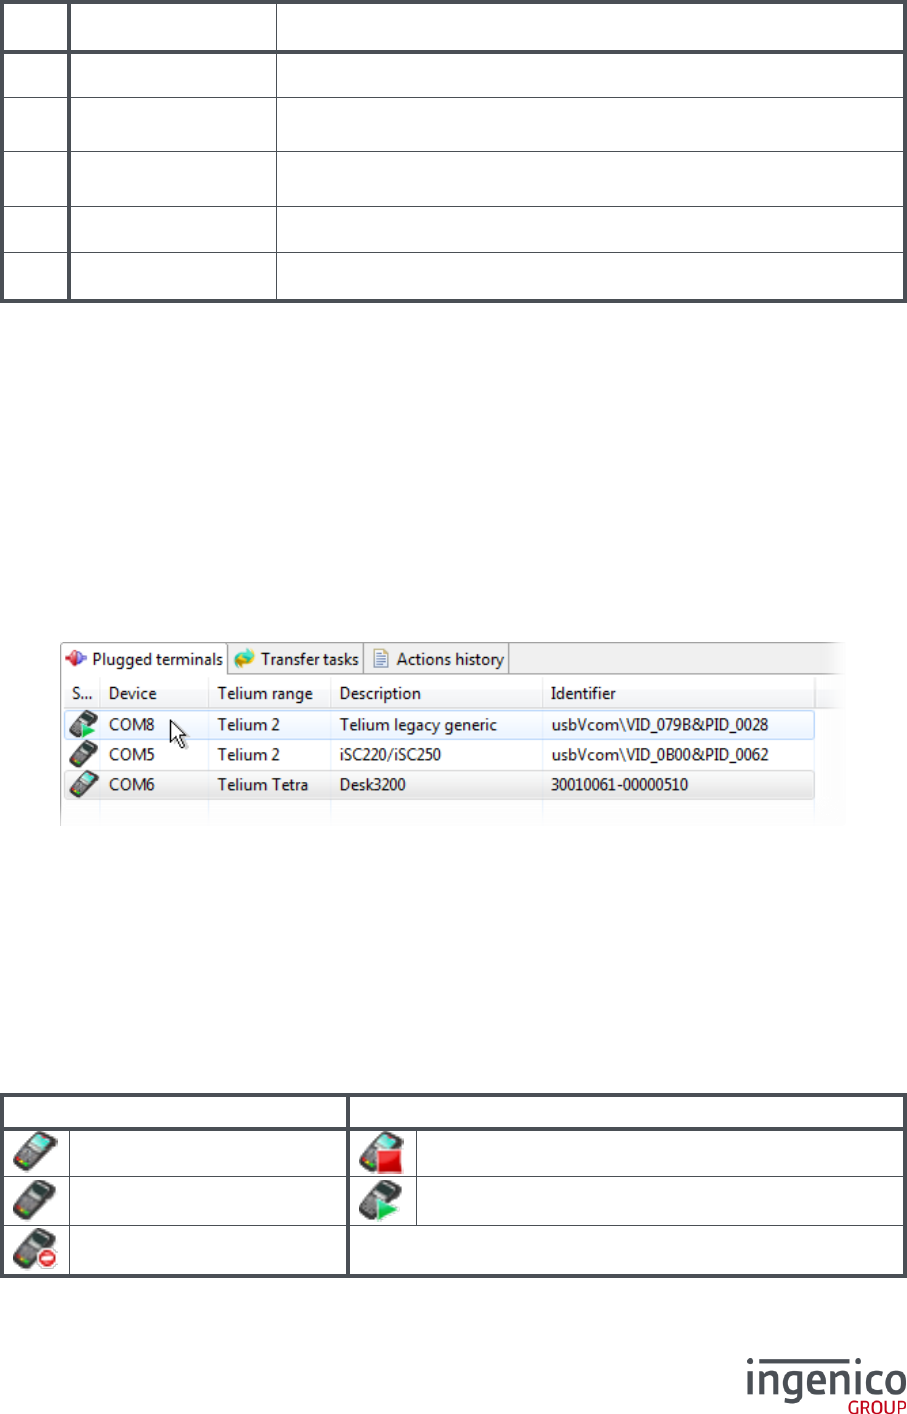
4_7 Plugged terminals view
The “Plugged terminals” view provides a list of the plugged terminals to the PC.
The device port identifies the plugged terminal. This device port is displayed on the terminal tab.
The connection state is reflected by a characteristic icon, and the next action appears when the mouse-
cursor is over a terminal.
The “Description” column reveals the name of the current connected terminal on this port, and the
“Identifier” gives the device or the terminal identifiers (composed by the product number and its serial
number).
A double-clicks on a terminal or pressing the Enter key (when selected) toggle its state: switching it to
connected, or disconnecting it.
At terminal connection, a new tab is opened with the terminal browser. The current directory is set on
the last accessed directory for the device port.
When a tab corresponding to this terminal is already opened, this tab is activated when the terminal is
selected in the plugged terminals list.
/ Terminal states
Current state
Next action (on mouse-over)
Connected
Disconnect
Disconnected
Connect
Unavailable
None
28/47 LLT 5.4 / 2017-07-11
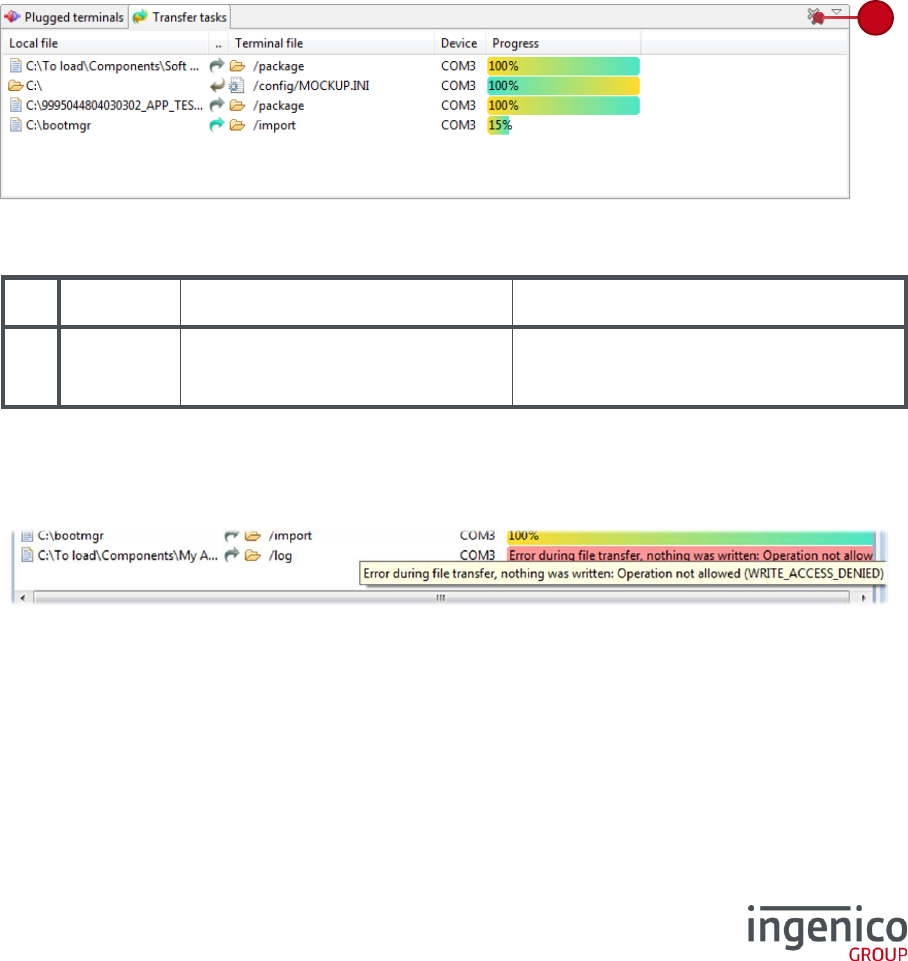
4_8 Transfer tasks view
The transfer tasks view gives an overview of all transfer tasks (downloads and uploads) of all terminal
connections.
For each transfer task the local file or directory, the direction, the terminal file or directory, the concerned
device, and the progression are displayed.
In the case of download:
The local file denotes the origin file
The direction is a right arrow (in turquoise blue if the task is transferring, otherwise in grey)
The terminal file denotes the destination directory
In the case of upload:
The local file denotes the destination directory
The direction is a left arrow (in yellow if the task is transferring, otherwise in grey)
The terminal file denotes the source file
/ Legend
#
Element
Description
Action / details
19
Clean
complete
transfers
Clean all terminated transfer tasks
and errors
When an error occurs during a transfer, the progress-bar background is in red color, and the reason is
displayed.
Passing the mouse over the progress-bar gives the full error message:
19
29/47 LLT 5.4 / 2017-07-11
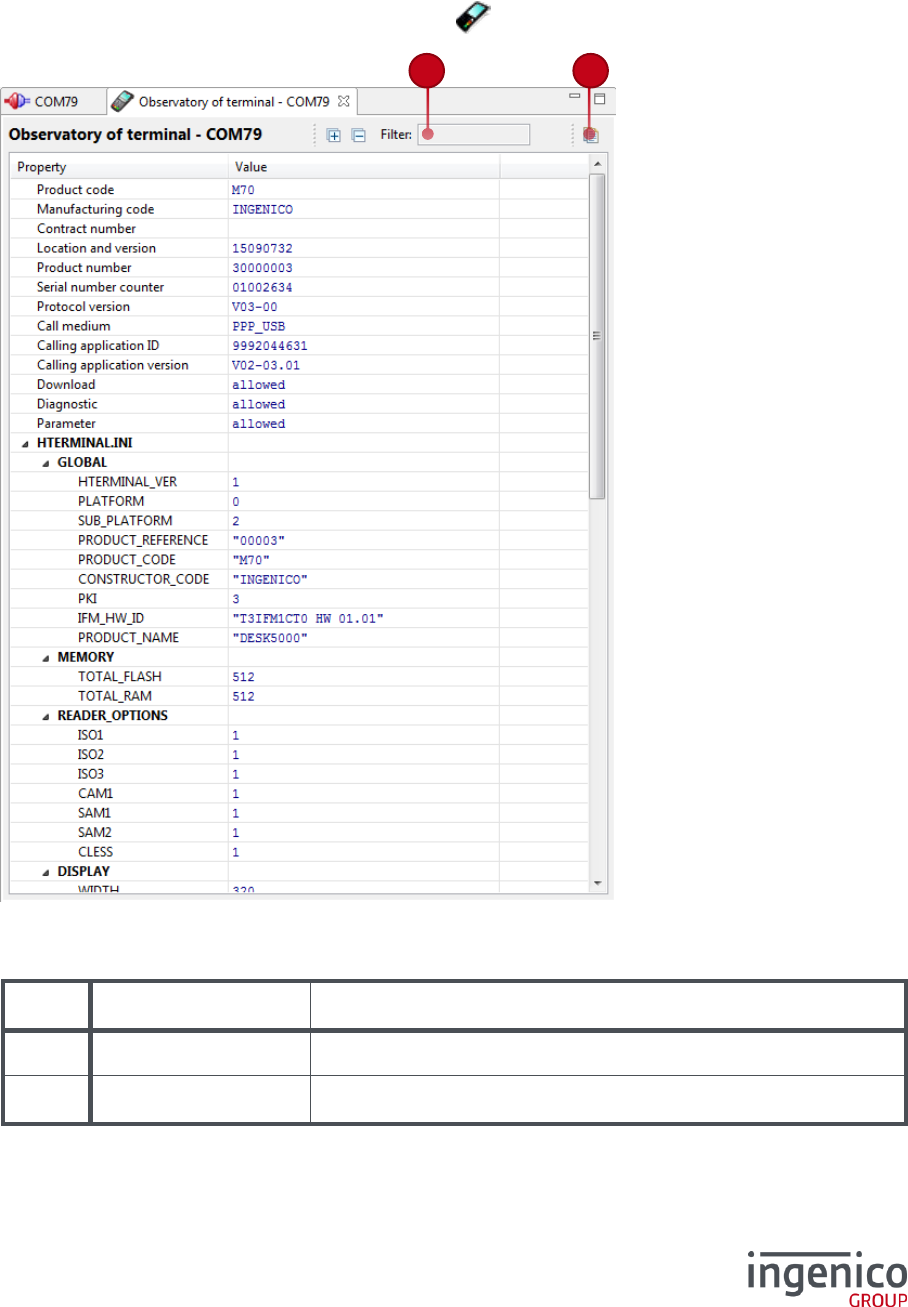
4_9 Terminal observatory
The terminal observatory provides a report page describing all available information about the connected
terminal.
Those data are mainly terminal identifiers details and hardware characteristics.
The Observatory of terminal view is called from the icon of the Terminal browser.
/ Legend
#
Element
Description
36
Filter
Filter the terminal properties
37
Copy
Copy to the Windows clipboard the terminal information.
36
37
30/47 LLT 5.4 / 2017-07-11
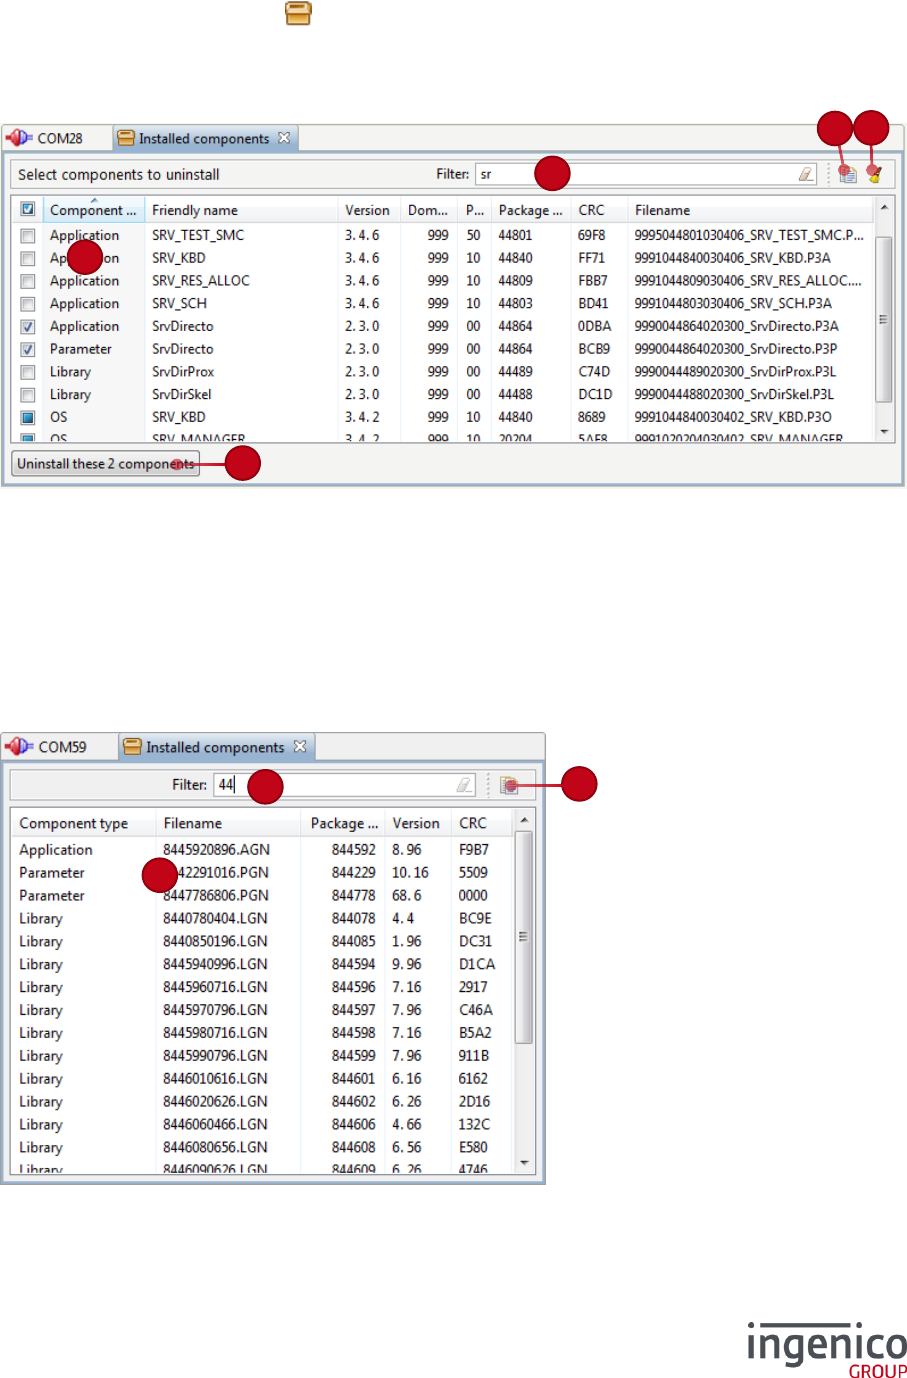
4_10 Installed components list
The “Installed components” view lists all installed packages and components in the terminal.
This list can be called from the icon of the Terminal browser. Its presentation slightly differs
depending on the terminal range:
/ Telium Tetra terminals
At the terminal disconnection, all selected components (including hidden ones by a filter) are marked to
be uninstalled.
You can check this operation in the Actions history view of the corresponding terminal connection (see
the section 4_11 Actions history view).
In the case of success, each selected component should trace:
"package_filename" marked for uninstallation
/ Telium 1 and Telium 2 terminals
The list of installed components is only available in the Download and Maintenance activities.
The uninstallation of components is impossible for Telium 1 and Telium 2 terminals.
43
44
45
46
44
42
45
42
31/47 LLT 5.4 / 2017-07-11
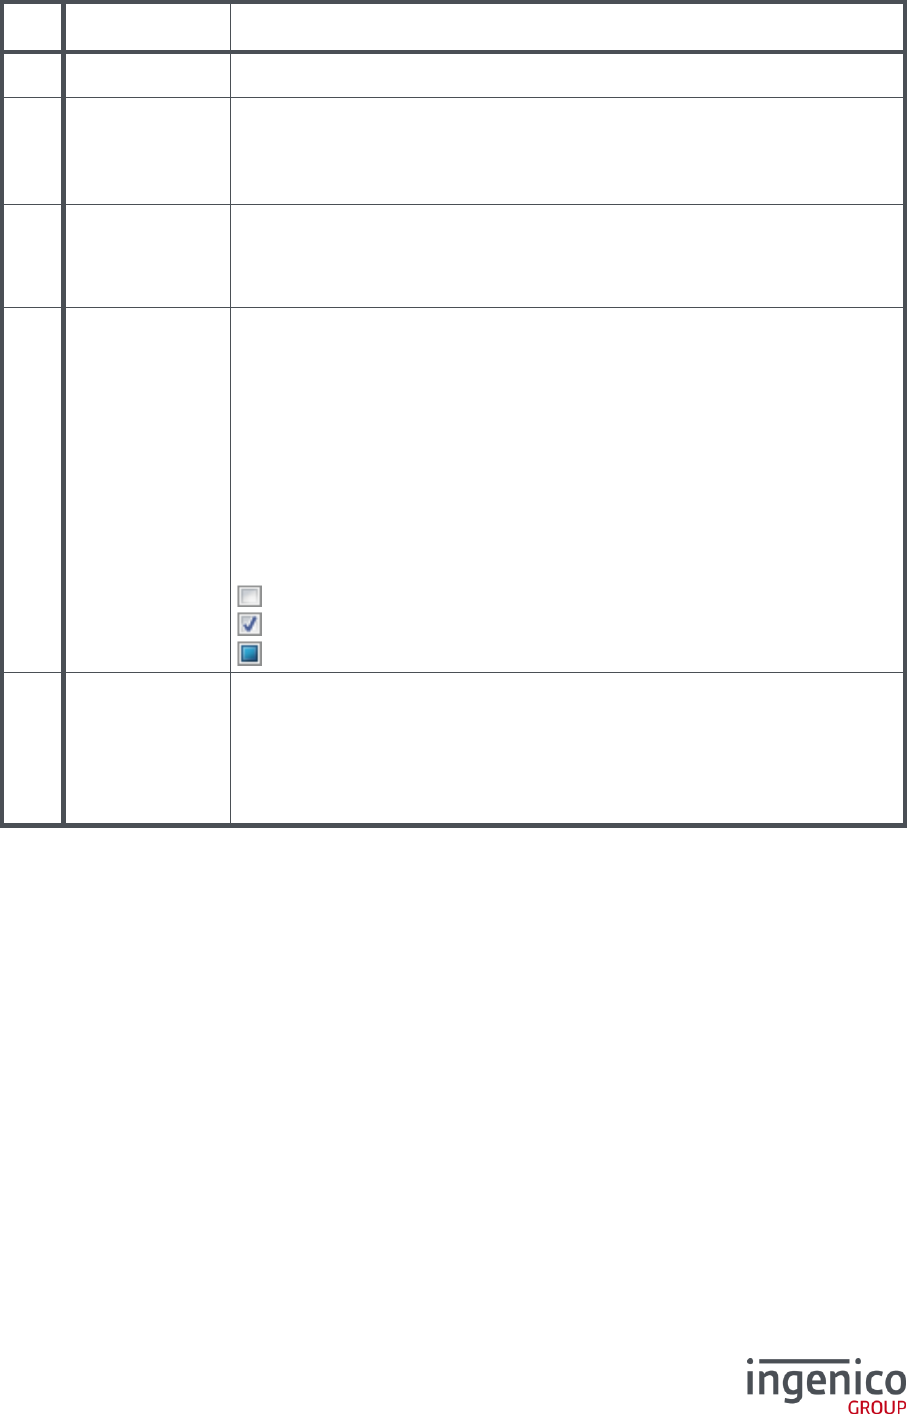
/ Legend
#
Element
Description
42
Copy
Copy to the Windows clipboard the entire components list.
43
Clean terminal
Clean all the terminal content:
Telium 1 and Telium 2: all files in /HOST/ and all signed
components in /SWAP/
Telium Tetra: all files in /export/, /import/ and /package/
44
Filter the installed
components list
The filter is applied on the text field value change.
In order to view an installed component, its Filename, its Friendly name* or
its Full identifier must contain (anywhere) the value of the filter field.
The search is not case-sensitive.
45
List of installed
components
Each row of this list describes the:
Component type: only Applications, Libraries and Parameters can
be selected in order to be uninstalled*
Friendly name
Version: composed by Major, Minor and Maintenance revision*
values
Domain* │
Package range* │ known as “Full identifier”
Package identifier │
CRC
Filename: the original filename of the component
: This component is not selected*
: This component is selected*
: This component is not selectable for uninstallation*
46
Uninstall button*
This button saves the selected components list, in order to uninstall them at
the next terminal disconnection.
Clicking this button closes the Installed component list. This list can be
displayed again and can be modified before the uninstallation.
The number of selected components is indicated on the button label.
In case no item is selected, this button simply closes the list.
*: theses information are only available for Telium Tetra terminals.
32/47 LLT 5.4 / 2017-07-11
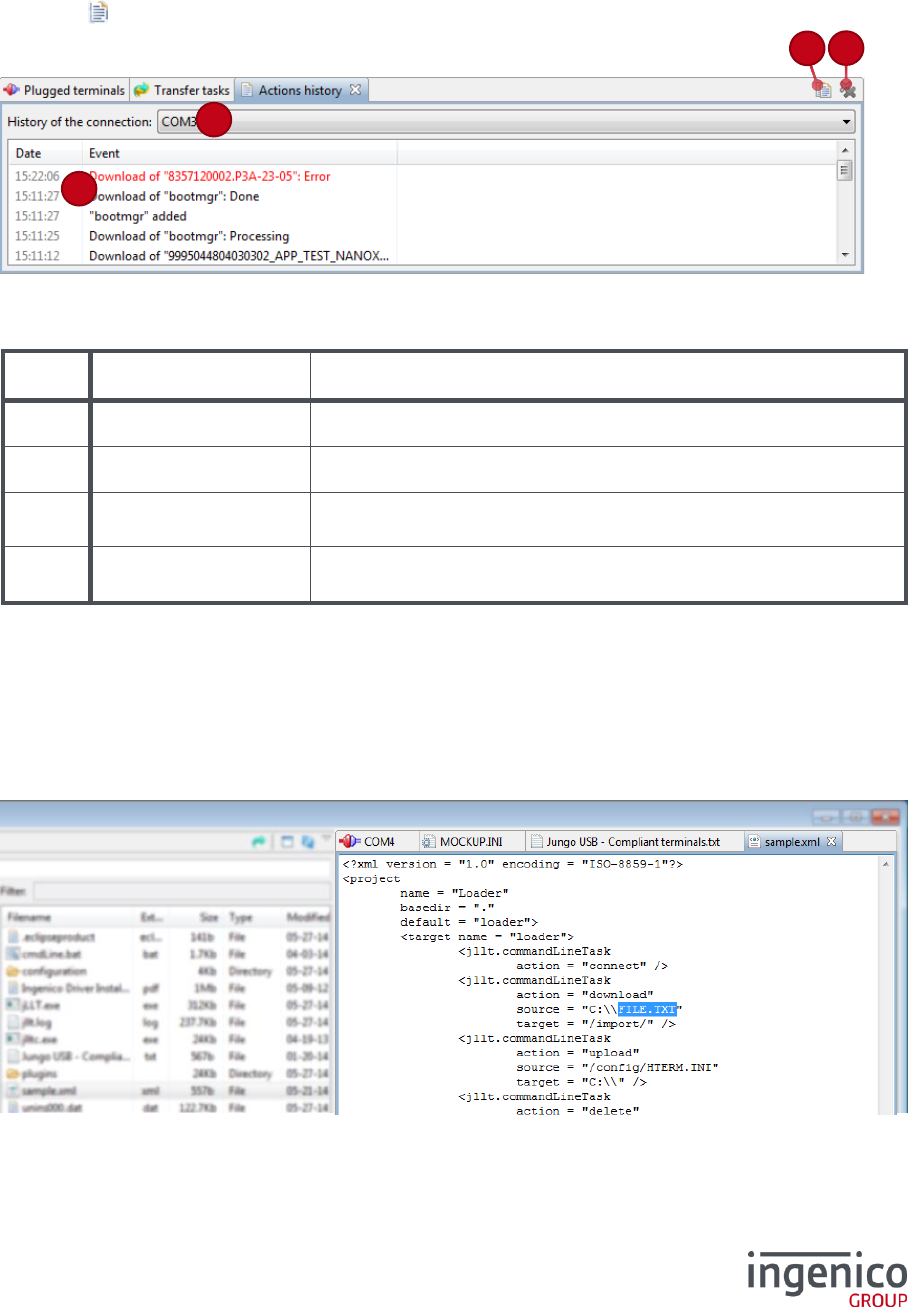
4_11 Actions history view
This view is reporting the history of past actions.
Errors are in the red color, warnings in orange and regular messages in black.
The Action history view can be called by double-clicking in the status-bar of the file browser (#8), or
using the icon from the toolbar (#20).
/ Legend
#
Element
Description
47
Copy
Copy the actions history in the Windows clipboard.
48
Clear logs
Clear the logs list.
49
Connection selector
Choose the history connection to display the actions.
The “Local actions” is related to the Local browser actions.
50
Events list
Displays the list of past actions, within two columns: the date and
the event.
4_12 File viewer
The file viewer allows consulting local and terminal files content.
Double-clicking on a file (or pressing the “Enter” key after selection) in the local browser opens a new
tab with the file content.
In some files (especially binary files), the null characters are represented by a dot sign (“ . “).
48
47
49
50
33/47 LLT 5.4 / 2017-07-11
5_Catalogue files
The catalogue is a file which references a list of files to be downloaded in the terminal.
5_1 Catalogue files format
A catalogue file extension form is “.Mnn” form, where nn represents the product code of the target
terminals (two digits). These catalogue files can be automatically filtered with the funnel button of the
Local browser (see 4_2 section, #4).
All terminals can be targeted using the “.MXX” catalogue file-extension.
The syntax is simple: each line points out a file in an absolute or a relative path (either in the Windows
or Unix format, depending on the local system). The comments are preceded by a “;”.
/ Sample catalogue file
; Comment of the catalogue file
Comment
C:\absolute PATH\to the\File.txt
Download File.txt into the current path in the
terminal
-eSWAP
Change the download destination to /SWAP/
..\8440140201.AGN
The file to be downloaded is in the parent
directory of the catalogue file
8440140201.PGN
Download this file from the same directory of the
catalogue file
-eHOST
Change the download destination to /HOST/
D:\APPCONFIG.CFG ; Custom config
File given in absolute path followed by a
comment
Generally speaking, the referenced files are downloaded in the default directory of the terminal, but it is
possible to denote a destination directory by preceding the absolute path in the terminal by “-e” (see
default and possible destinations at 1_2 Telium file tree structure).
34/47 LLT 5.4 / 2017-07-11
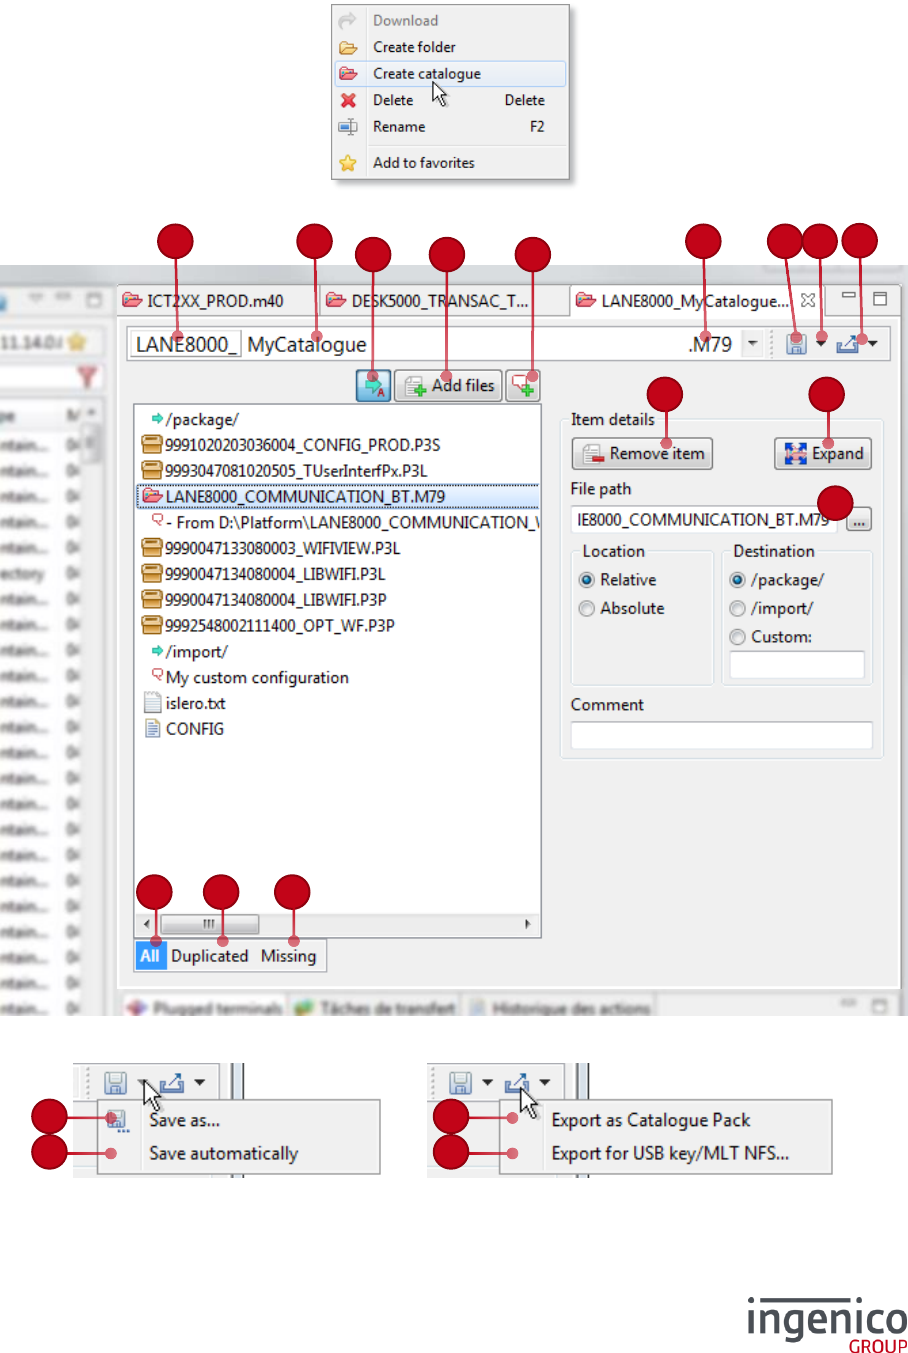
5_2 Catalogue editor
The catalogue editor is opened when double-clicking on a catalogue file in the files browser, or when
selecting “Create a Catalogue” in contextual-menu (called with a right-click):
69
76
77
78
80
63
62
60
61
67
68
73
75
70
71
72
74
64
65
66
6
81
82
83
35/47 LLT 5.4 / 2017-07-11
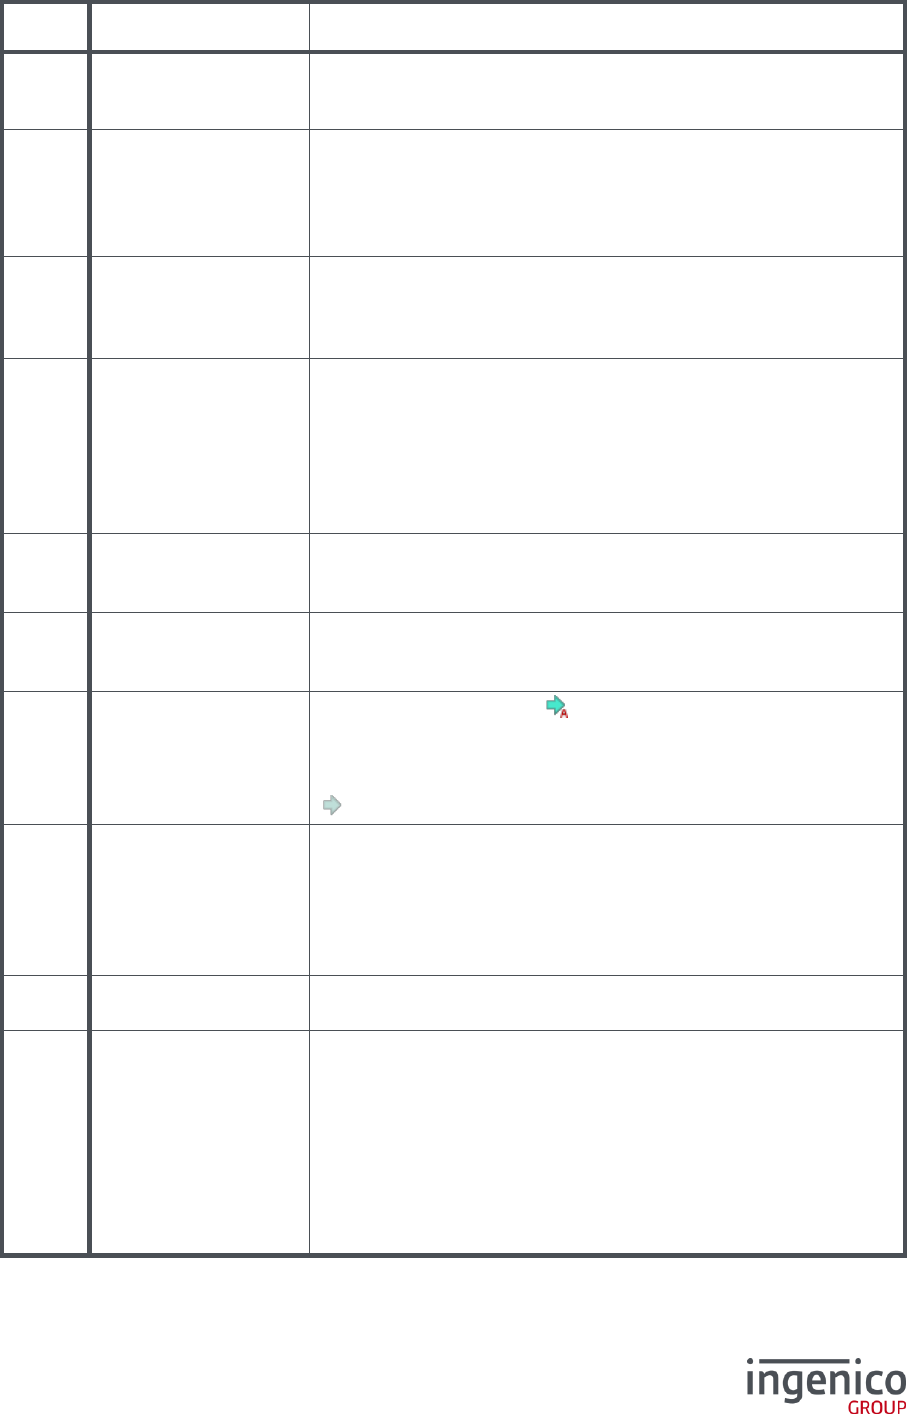
/ Legend
#
Element
Description
60
Automatic filename
prefix
Add a prefix on filename depending on the catalogue extension
(representing product codes covered by this catalogue).
This button can be toggled in order to activate or not.
61
Filename
This field contains the catalogue filename.
Changing its value will rename the catalogue file at the next save
operation.
Any pending change of the filename or extension is represented by
a highlight color around the catalogue name.
62
Catalogue extension
The catalogue extension represents product code covered by the
catalogue file.
Changing its value will rename the catalogue file at the next save
operation.
63
Save
Save the catalogue file.
If the catalogue filename has been modified (filename fields with a
blue border), then the current catalogue file will be renamed
according to this new filename.
The catalogue editor tab contains the current edited catalogue
filename, with a star “ * ”, whenever a modification has not been
yet saved.
64
Save menu
Access to additional save commands and options:
Save as… (see #80)
Save automatically (see #81)
65
Export menu
Access to export commands:
Export as Catalogue Pack (see #82)
Export for USB key/MLT NFS… (see #83)
66
Automatic destination
If this button is activated ( icon), then appropriate destination is
automatically set for each added file (by drag and drop from the
local browser, or via the “Add files” button).
Click on this button to switch off the automatic destination
( icon).
67
Add files
Select file(s) to add into the referenced files list of the edited
catalogue.
In the file selection dialog, you can choose a file filter. The default
filter displays suitable files and catalogues for the current edited
catalogue.
Shortcut key for this command: “Ins”
68
Add a comment
Add a comment into files list of the edited catalogue.
Shortcut keys for this command: “Alt” + “Ins”
69
Referenced files list
This list enumerates all files (and comments) referenced by the
edited catalogue. It can also specify directive that change the
terminal destination, for files downloading.
You can use drag and drop with your mouse in order to:
Add new references of files from the Local files browser
(including comments and files from existing catalogues)
Change the order of files references in the list for the edited
catalogue
A double-click on a sub-catalogue open this catalogue into editor.
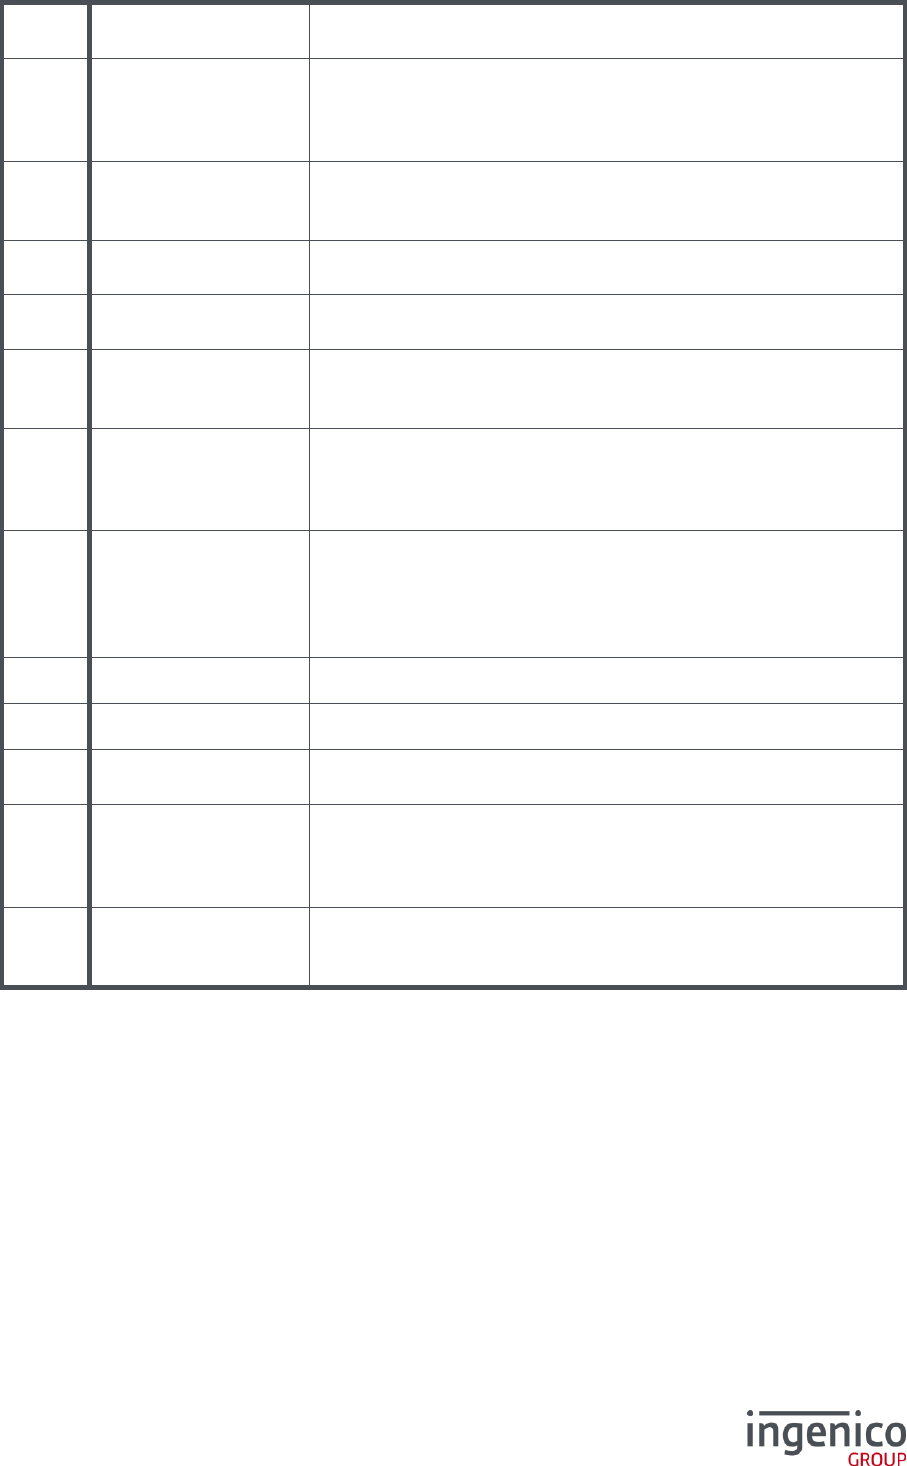
36/47 LLT 5.4 / 2017-07-11
70
Filter All
Displays all referenced files of the edited catalogue, without any
filter.
71
Filter Duplicated
Displays only directives and duplicated files (whatever their
versions).
This mode is detailed at section 5_2_1 Duplicated files filter.
Go back to filter “All” in order to fully edit the referenced files list.
72
Filter Missing
Displays only directives and missing files.
This mode is detailed at section 5_2_2 Missing files filter.
Go back to filter “All” in order to fully edit the referenced files list.
73
Remove item
Remove the selection from the referenced files list.
Related shortcut key is “Del”.
74
Expand
Includes into the current edited catalogue all referenced files by the
selected sub-catalogue files.
75
File path
Indicate the file path of the selected referenced file.
Click on the “…” button (or double-click on the text field) in order to
select another file.
76
File location
If possible, the file is referenced in the catalogue by its relative
path.
The file can also be referenced by its full path (absolute location).
Changing this value affects location modification for all selection.
77
File destination
By default, the file will be downloaded into the “/package/” or
“/SWAP/” terminal directory (see 1_2 Telium file tree structure).
But you can change the file destination into “/import/” or “/HOST/”.
Changing this value affects destination modification for all
selection.
78
Comment
A comment can be added into the list of files, or for a specific file.
80
Save as…
Save the current referenced files list into another catalogue file.
81
Save automatically
If enabled, this option will trigger saving the current edited
catalogue at each modification.
82
Export as Catalogue
Pack
Export the current catalogue content to a Catalogue Pack: all
referenced files (including from sub-catalogues) will be copied to
the chosen destination, and a new catalogue (that references those
files) will be created.
83
Export for USB key /
MLT NFS…
Adapt and export the current catalogue content to be copied on a
USB key, or to be used as input for the MLT NFS tool.
See section 5_2_3 Export for USB key or MLT NFS Tool.
37/47 LLT 5.4 / 2017-07-11
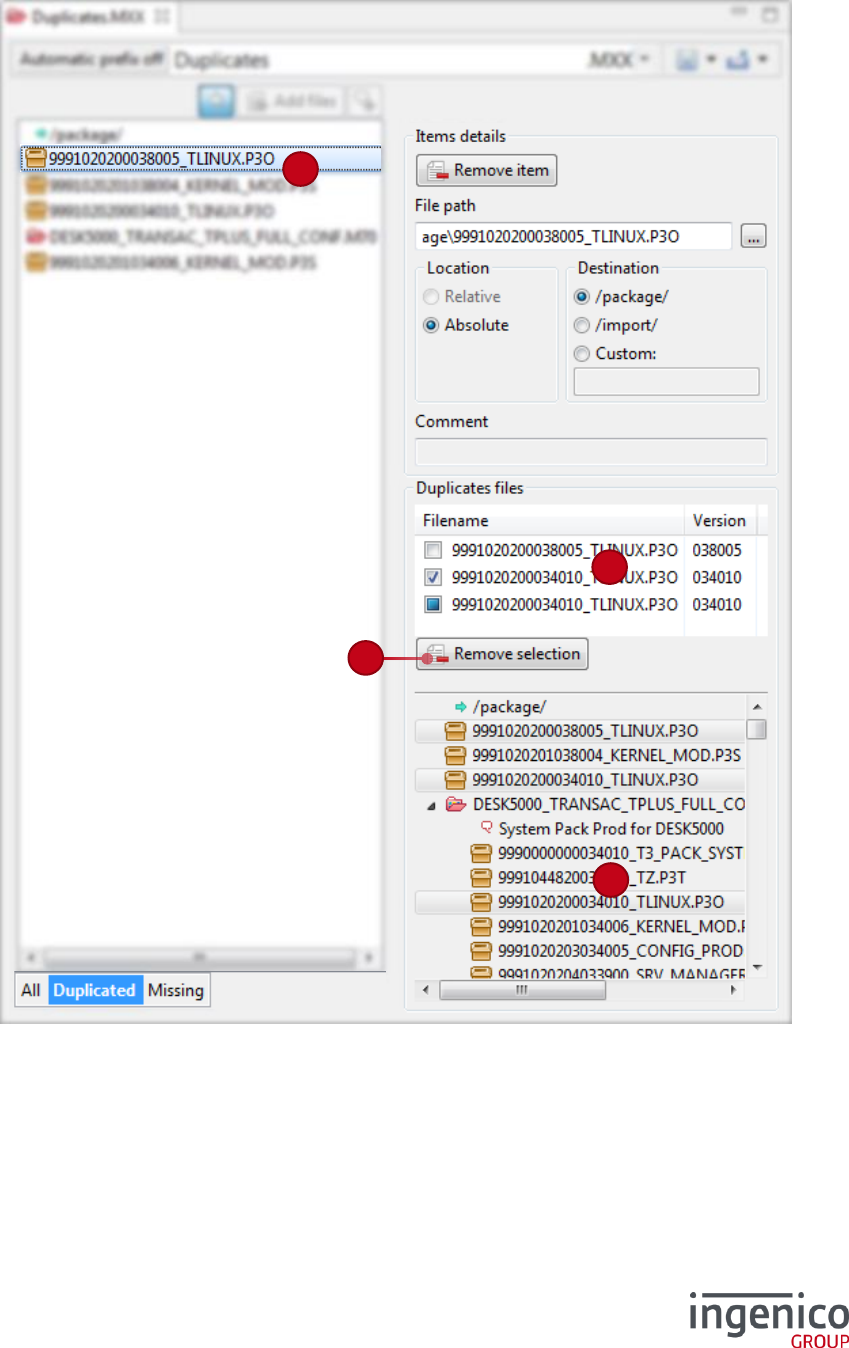
5_2_1 Duplicated files filter
Using the “Duplicated” filter, you can easily analyze the duplicated files directly referenced or through
sub-catalogues.
91
90
93
92
38/47 LLT 5.4 / 2017-07-11
/ Legend
#
Element
Description
90
Filtered list of
referenced files
List only the referenced files that are implied in a duplication
(directly or via a sub-catalogue). Comments are hidden, but
destination directives are shown.
Select a file in this list to see all duplicates for this file (see #91 and
#93).
91
Duplicated files list
For the current selection in referenced files (#90), list all duplicates
whatever the version (based on filename conventions).
For each duplicated file from this list, you can:
Double-click on it: reveal and select this file in the
duplicated tree (#93)
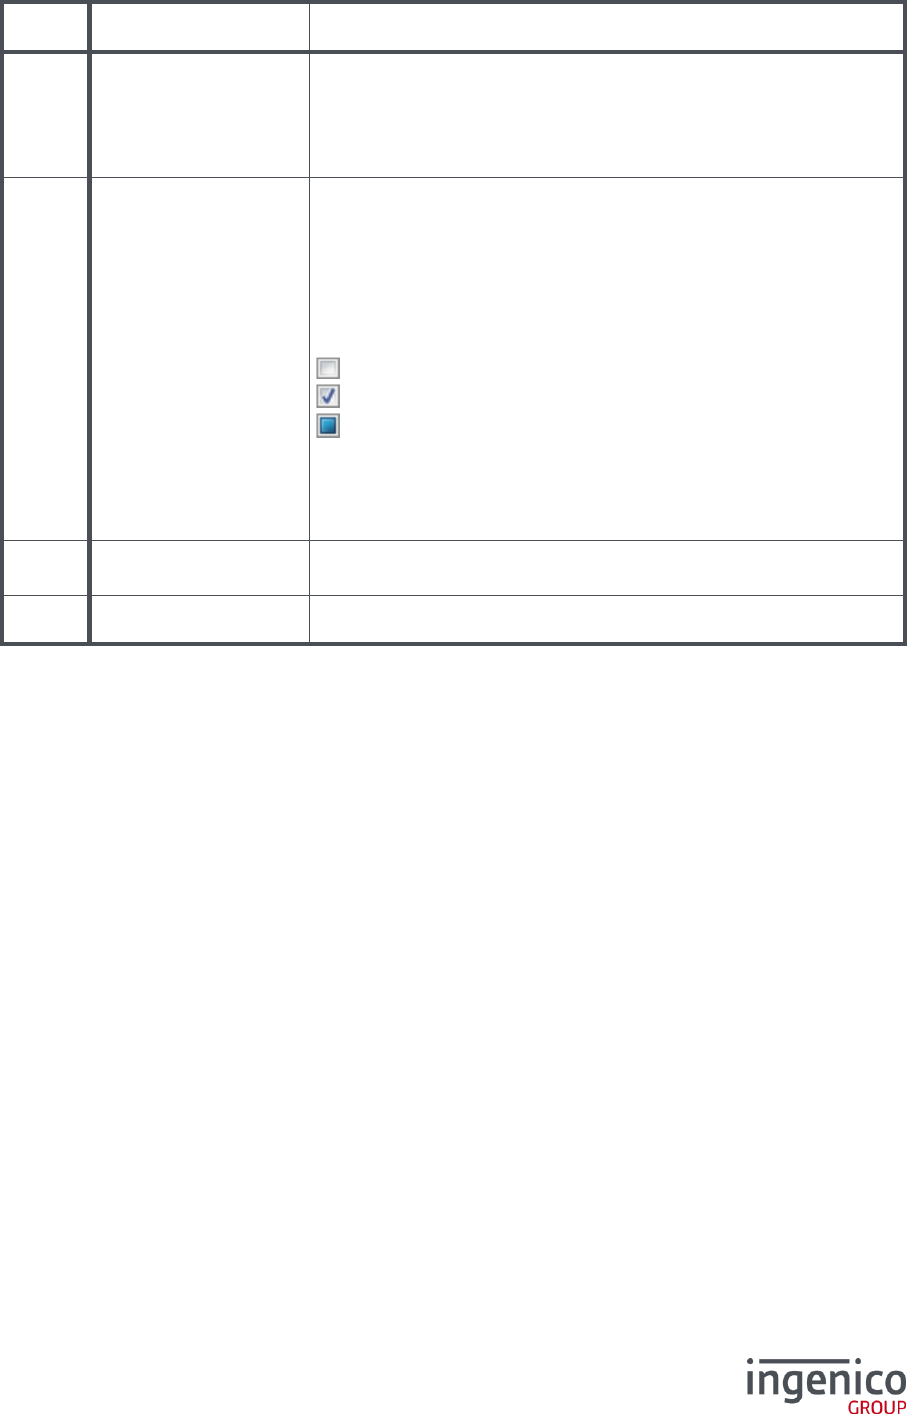
Check the box in order to change the selection of files to
remove (see #92). So, depending on its state:
: This file is not selected
: This file is selected
: This file is referenced through a sub-catalogue. Edit this sub-
catalogue in order to solve the duplication, or remove the reference
to this sub-catalogue.
By default, the earlier version of the file is unselected, and others
files references are selected to be removed.
92
Remove duplicates
selection
Remove selected files references of the list above (#91)
93
Duplicated files tree
Display duplicated files organization in a files-tree representation
39/47 LLT 5.4 / 2017-07-11
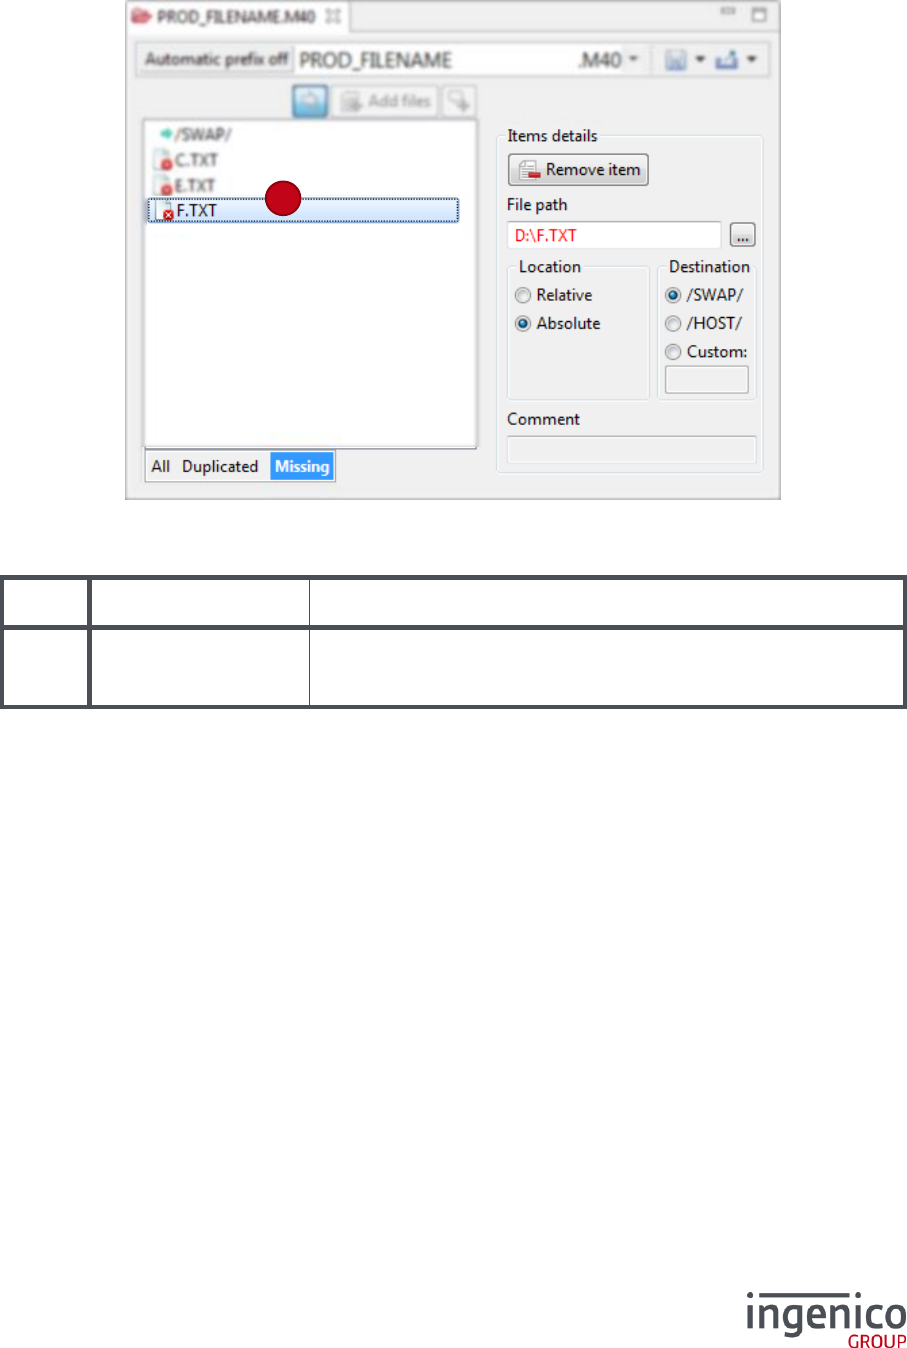
5_2_2 Missing files filter
Using the “Missing” filter, allows you analyzing the missing files directly referenced or at the first depth
level of sub-catalogues.
/ Legend
#
Element
Description
95
Filtered list of
referenced files
List only the referenced missing files or catalogues which contain
a missing file. Comments are hidden, but destination directives are
shown.
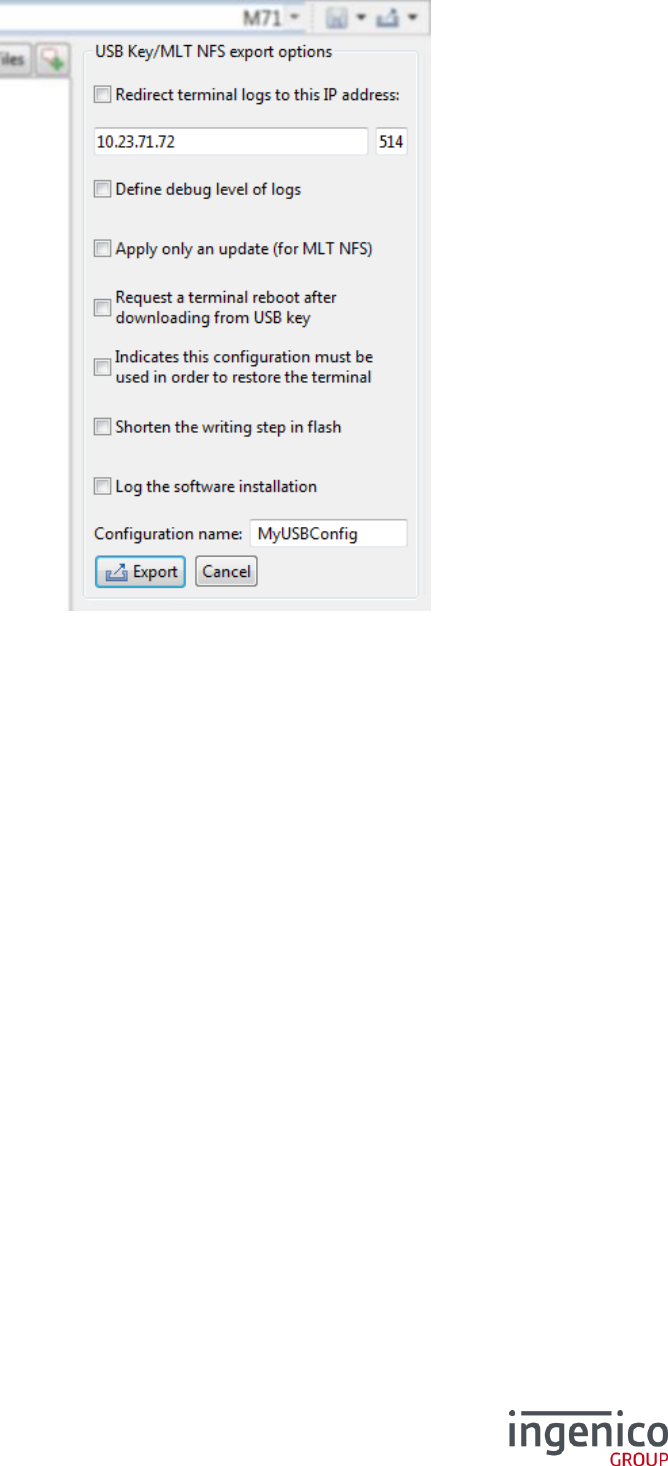
5_2_3 Export for USB key or MLT NFS Tool
Referenced files of the current catalogue can be copied into a chosen destination (an USB key, or any
directory).
Additionally, some options are available for Telium Tetra products only. They are disabled for other
products ranges.
95
40/47 LLT 5.4 / 2017-07-11
You can input a Configuration name for this export.
Click on Export button in order to generate options files, copy all referenced files (including from sub-
catalogues) and create a new catalogue that references exported files.
41/47 LLT 5.4 / 2017-07-11
6_How to start a connection with the terminal
Please make sure the terminal is properly plugged to the computer: the terminal is connected
by the USB cable and must be recognized by your operating system (for Windows: in the Device
manager, under COM port devices).
Launch the LLT software (see 3_Starting LLT standalone application).
Before connecting the terminal with LLT, the loading session must be started on the terminal.
In order to start the LLTCLIENT application on the terminal, depending on the terminal Telium
range:
o For Telium 1 and Telium 2:
restart the terminal and keep pressing (usually) the “F3” (or UP) key on the terminal until the
word “LLT” appears on the screen
or use the graphical menu (press “F” key, then Telium Manager > Evolution > Load > Local)
o For Telium Tetra:
restart the terminal and keep pressing the “.” (dot) key on the terminal until a folder icon
appears on the screen
or use the graphical menu (Control panel > Software management > Evolution >
Local upgrade)
In the LLT software Plugged terminal view (see 4_7 Plugged terminals view), the terminal must
appear. Double-click on the terminal icon start the connection attempt. The terminal state reports the
terminal connection status. If the terminal is correctly connected, download or upload can be
performed and terminal information can be gathered.
6_1 Perform the disconnection
In order to disconnect a terminal from LLT, double-click on the terminal status label (see #24 in 4_3 The
terminal browser) or the corresponding connection in the Plugged terminal view (see 4_7 Plugged
terminals view).
The disconnection of LLT is required to validate and install the downloaded files into the terminal. The
terminal then restarts in order to take the changes into account.
For Telium 1 and Telium 2 terminal, the validation of downloaded components is also performed at
terminal activity change (see 4_3_1 Terminal activities).
LLT
42/47 LLT 5.4 / 2017-07-11
7_Command line mode
The command-line mode allows downloading, uploading and deleting files.
To use the command-line, use the “cmdLine.bat” script provided at the LLT root installation directory.
UBUNTU AND MAC OS SCRIPT
All presented commands are using the “cmdLine.bat” script, designed for
Windows.
In Ubuntu and Mac OS platform, please use the command-line script
“cmdLine.sh” instead, which has the same functioning as “cmdLine.bat”.
7_1 Command-line usage
The command-line usage can be consulted when typing:
/ Calling the command-line help
C:\Program Files\Ingenico\LLT>cmdLine.bat
Usage:
cmdLine [/q] [/v] [/p port] load_scenario_location [target_name]
/q: (optional) quiet mode, no pause during the script execution
/v: (optional) verbose mode, shows additional logs on error
/p port: (optional) specify the serial port name to use for the terminal
connection, if it is not specified into the scenario
load_scenario_location: the load scenario file to process
("C:\LLT\MyScripts\load.xml" for example)
target_name: (optional) the name of the target section of the scenario file
to process. If not present the default target will be executed.
Appuyez sur une touche pour continuer...
Note that the load_scenario uses the ANT standard. Hence, the commands provided with LLT can
be extended by other ANT commands and libraries.
You’ll find further documentation at the following address: http://ant.apache.org/manual/index.html
/ Calling the “cmdLine.bat”
C:\Program Files\Ingenico\LLT>cmdLine.bat "sample.xml"

43/47 LLT 5.4 / 2017-07-11
/ Sample script of the loading scenario
<?xml version = "1.0" encoding = "ISO-8859-1"?>
<project
name = "Loader"
basedir = "."
default = "loaderT2">
<!-- For Telium TETRA terminals -->
<target name = "loaderTETRA">
<jllt.commandLineTask
action = "terminals"
target = "C:\\Terminals.txt" />
<jllt.commandLineTask
action = "connect" />
<jllt.commandLineTask
action = "query"
property = "Manufacturing Code"
target = "C:\\Manufacturing code.txt" />
<jllt.commandLineTask
action = "download"
source = "C:\\FILE_TETRA.TXT" />
<jllt.commandLineTask
action = "upload"
source = "/config/HTERMINAL.INI"
target = "C:\\" />
<jllt.commandLineTask
action = "delete"
target = "/import/FILE_TETRA.TXT" />
<jllt.commandLineTask
action = "disconnect" />
</target>
<!-- For Telium 2 terminals -->
<target name = "loaderT2">
<jllt.commandLineTask
action = "connect"
device = "COM12" />
<jllt.commandLineTask
action = "terminals"
target = "C:\\Terminals.txt" />
<jllt.commandLineTask
action = "download"
source = "C:\\FILE_T2.TXT"
target = "/HOST/" />
<jllt.commandLineTask
action = "download"
source = "..\\MyApp\\8440140201.M40" />
<jllt.commandLineTask
action = "activity"
mode = "maintenance" />
<jllt.commandLineTask
action = "upload"
source = "/SWAP/APPRESET.DIA"
target = "D:\\" />
<jllt.commandLineTask
action = "disconnect" />
</target>
</project>
44/47 LLT 5.4 / 2017-07-11
/ Parameters details
action =
Parameters
Description
"terminals"
target =
"target_file"
target_file is the optional full path of the file that
receives the terminals list; for example:
target="C:\\Terminals.txt"
This command produces for each plugged terminal
the following information, separated with tabulation:
Port\t Range\t Description\t State
This command can be called if a terminal is
connected or not.
"connect"
device =
"device_name"
device_name is the name of the device to connect;
for example: device="COM3"
If the device isn’t specified, the first plugged terminal
is used.
"download"
source =
"source_file"
source_file is the full path with filename of the
file to download (from the local browser). It can be,
or not, a catalogue file;
for example: source="C:\\MyDir\\FILE.TXT"
target =
"target_file"
target_file is the full path of the directory or the
target file that receives the downloaded file; for
example:
target="/import/"
or
target="/import/destFile.bin"
If the target isn’t specified, the destination is
automatically predicted depending on the source
extension.
"upload"
source =
"source_file"
source_file is the full path with filename of the
file to upload (from the terminal); for instance:
source="/config/HTERMINAL.INI"
target =
"target_file"
target_file is the full path of the directory or the
target file that receives the downloaded file;
for example:
target="C:\\"
or
target="C:\\destFile.bin"
If the target isn’t specified, the previous specified
local target is re-used.
"delete"
target =
"target_file"
target_file is the full path of the file to delete in
the terminal, or the filename of the package to
uninstall; for example:
target="/import/FILE.TXT"
or
target="9990019010084000_MyApp.P3A"
45/47 LLT 5.4 / 2017-07-11
"query"
property = "key"
key is the property key to request, it is case
sensitive. Available keys are listed through the
Terminal observatory (see the section 4_9); for
instance:
property = "DISPLAY/WIDTH"
In addition, you can use one on those shortcut for
the key value:
Islero Serial Number
Terminal Model
target =
"target_file"
target_file is the full path of the file that receives
the value of the requested property; for instance:
target = "C:\\Display.txt"
"parse"
source =
"source_file"
source_file is the full path with filename of the
file to analyze.
It can be a local file, or a terminal file if the option
terminal source is used; for instance:
source="/log/LIFECOUNTER.DIA"
or
source="C:\\MyDir\\MYPACKAGE.P3A"
target =
"target_file"
target_file is the full path with filename of the
file that will receive the parsed content of the
source_file; for instance:
target="C:\\Parsed descriptor.txt"
For each property, output is in the form (separated
with tabulation):
<property_label | property_id>\t
<raw_value>\t <parsed_value>
option = "terminal
source"
Optional parameter that indicates the
source_file is on the terminal side
property = "use id"
If specified, the property identifier is outputted
instead its readable form (language dependent)
"activity"
mode = "activity"
activity is the requested terminal activity;
available values are (case insensitive):
download
diagnostic
maintenance
"clean"
option = "uninstall
packages"
This command cleans the terminal content:
Telium 1 and Telium 2: all files in /HOST/
and all signed components in /SWAP/
Telium Tetra: all files in /export/,
/import/ and /package/
option = "uninstall packages" is an
optional parameter used in order to uninstall all
erasable signed content
"enable"
option =
"option_name"
option_name is the option to enable
"disable"
option =
"option_name"
option_name is the option to disable
"disconnect"
The download transaction is committed for the
current terminal connection. Then the terminal is
disconnected.
46/47 LLT 5.4 / 2017-07-11
CAUTION
For any value of the load scenario file, the “\” character must be double slashed.
So Windows paths should look like this:
"C:\\MyDirectory\\SubDirectory\\File.ext"
7_1_1 Result file option
Generate a file reporting a code and a message. Only the first error is recorded in the result file, or the
success if no error occurred during the current load scenario.
Enabling the result file option resets the last error code, even if the target parameter isn’t
specified. Thus the result file can be overwritten with the first next error, or the success of the load
scenario.
Enabling option:
<jllt.commandLineTask
action = "enable"
option = "result file"
target = "C:\\path_to_result_file.log"/>
Disabling option:
<jllt.commandLineTask
action = "disable"
option = "result file"/>
Possible error codes:
Code
Message
Command context
0
OK
All
-1
Missing parameter
All
-2
Catalogue file access problem
download
-3
Target file access problem
terminals, query
-4
Downloadable files access problem
download
-15
Activity badly finished
activity, disconnect
-19
Unknown terminal port
connect
-20
Catalogue file not adapted for this terminal
download
-21
File not intended for this Telium range
download
-22
An error occurs during download
download
-23
An error occurs during upload
upload, parse
-24
The destination on the terminal is unreachable
download
-25
Cannot access to this terminal file
upload, parse
-26
Cannot access to this source file
parse
-99
Unexpected error
All
47/47 LLT 5.4 / 2017-07-11
7_1_2 Ignore errors option
This option allow having non-blocking errors during a load scenario. Without this option, any error stops
the execution of the next commands.
Enabling this option can be useful for uploading or deleting of probably missing files.
Enabling option:
<jllt.commandLineTask
action = "enable"
option = "ignore errors"/>
Disabling option:
<jllt.commandLineTask
action = "disable"
option = "ignore errors"/>
7_1_3 Force uppercase option
By default, this option is enabled, and letters case of downloaded filenames are forced to uppercase.
Like the ad-hoc command in the graphical mode, the following modification is applied:
On Telium 1 and Telium 2, the filename and extension are forced in uppercases.
On Telium Tetra, only the extension is changed to uppercase.
Enabling option:
<jllt.commandLineTask
action = "enable"
option = "force uppercase"/>
Disabling option:
<jllt.commandLineTask
action = "disable"
option = "force uppercase"/>
