Lab 5: HTML Tables And Forms Lab05 Instructions
User Manual:
Open the PDF directly: View PDF ![]() .
.
Page Count: 25
LAB 5
(WEEK 4, CHAPTER 5 & 6)
HTML TABLES, FORMS AND
MEDIA
What You Will Learn
• How to create HTML tables
• How to style tables
• How to create HTML forms
• How to use the <video> and <audio> elements
Approximate Time
The exercises in this lab should take approximately 80 minutes to complete.
2
Lab 5: HTML Tables and Forms
CREATING TABLES
PREPARING DIRECTORIES
1 If you haven’t done so already, create a folder in your personal drive for all the labs for
this course.
2 Unzip lab05 files to your course folder created in step one.
The <table> element in HTML represents information that exists in a two-
dimensional grid. Tables can be used to display calendars, financial data,
pricing tables, and many other types of data. Just like a real-world table, an
HTML table can contain any type of data: not just numbers, but text, images,
forms, even other tables.
Exercise 5. 1
— CREATE A BASIC TABLE
1 Open, examine, and test lab05-exercise01.html in browser.
2 Add the following markup to the document.
<body>
<table>
<tr>
<td>The Death of Marat</td>
<td>Jacques-Louis David</td>
<td>1793</td>
<td>162cm</td>
<td>128cm</td>
</tr>
<tr>
<td>Burial at Ornans</td>
<td>Gustave Courbet</td>
<td>1849</td>
<td>314cm</td>
<td>663cm</td>
</tr>
Copyright © 2017 Randy Connolly and Ricardo Hoar
3
Fundamentals of Web Development
</table>
</body>
The indenting shown here is purely for clarity purposes (that is, it is there to help you
see the structure of the table more clearly). It is up to you whether you want to space
the table markup in the same fashion.
3 Test in browser.
4 Add the following markup.
<table>
<tr>
<th>Title</th>
<th>Artist</th>
<th>Year</th>
<th>Width</th>
<th>Height</th>
</tr>
<tr>
<td>The Death of Marat</td>
...
This adds a heading row to the table.
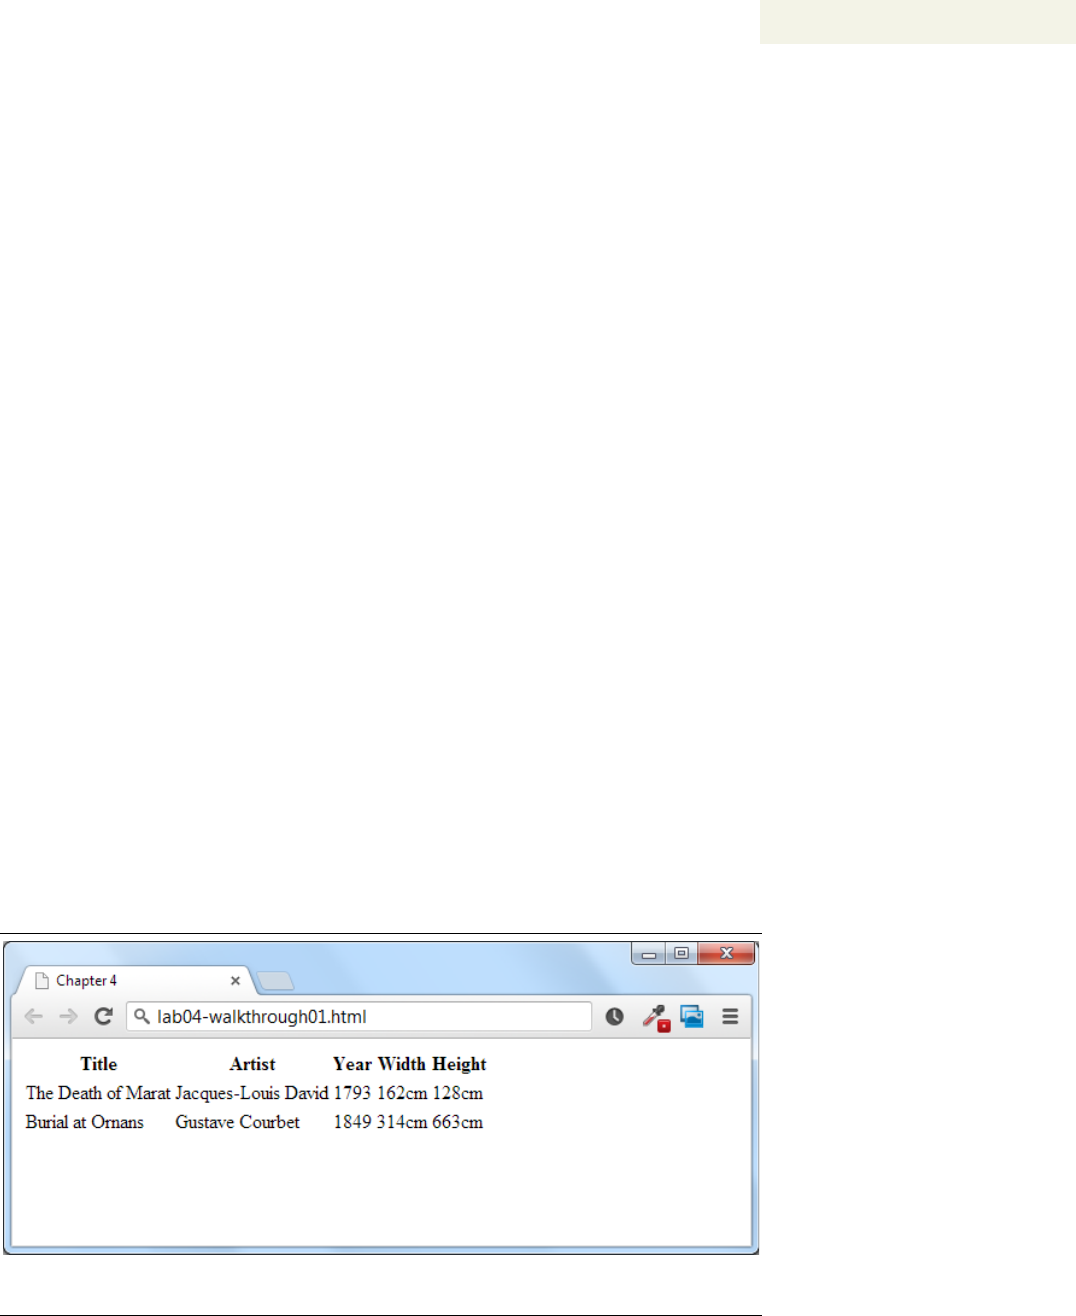
5 Test in browser. The result should look similar to that shown in Figure 5.1.
Figure 5.1 – Exercise 5.1 Complete

4
Lab 5: HTML Tables and Forms
Exercise 5. 2
— COMPLEX CONTENT IN TABLES
1 Open, examine, and test lab05-exercise02.html in browser.
2 Add the following content to the table.
<table>
<tr>
<th></th>
<th>Work</th>
<th>Year</th>
<th>Size</th>
</tr>
<tr>
<td><img src="images/art/05030.jpg" alt="The Death of Marat" /></td>
<td><em>The Death of Marat</em><br/>Jacques-Louis David</td>
<td>1793</td>
<td>Width: 162cm<br/>Height: 128cm</td>
</tr>
<tr>
<td><img src="images/art/10020.jpg" alt="Burial at Ornans" /></td>
<td><em>Burial at Ornans</em><br/>Gustave Courbet</td>
<td>1849</td>
<td>Width: 314cm<br/>Height: 663cm</td>
</tr>
<tr>
<td><img src="images/art/06020.jpg" alt="Betty de Rothschild" /></td>
<td><em>Betty de Rothschild</em><br/>Jean-Auguste Ingres</td>
<td>1848</td>
<td>Width: 142cm<br/>Height: 101cm</td>
</tr>
<tr>
<td><img src="images/art/13030.jpg" alt="Arrangement in Grey and
Black" /></td>
Copyright © 2017 Randy Connolly and Ricardo Hoar
5
Fundamentals of Web Development
<td><em>Arrangement in Grey and Black</em><br/>James Abbott
Whistler</td>
<td>1871</td>
<td>Width: 144cm<br/>Height: 162cm</td>
</tr>
</table>
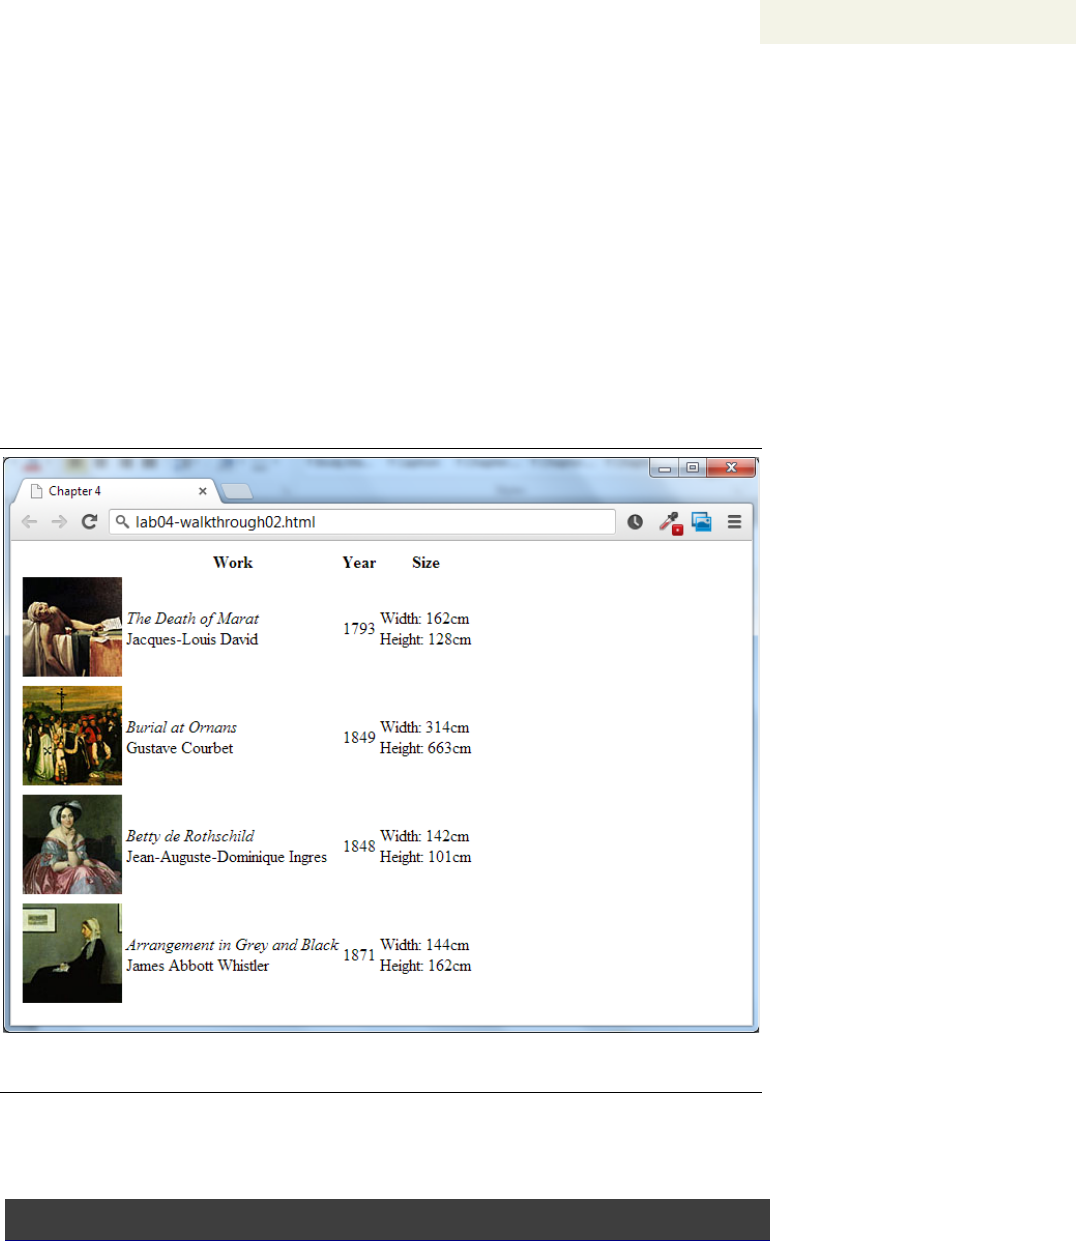
Here we are adding content to an existing table structure. Notice that some cells
contain multiple HTML elements.
3 Test in browser. The result should look similar to that shown in Figure 5.2.
Figure 5.2 – Exercise 5.2 complete
Exercise 5. 3
— SPANNING ROWS AND COLUMNS
1 Open, examine, and test lab05-exercise03.html in browser.

6
Lab 5: HTML Tables and Forms
2 Add the following style to the <head> of the document and test.
<style>
td, th { border: solid 1pt black; }
</style>
This will make the structure of the table more obvious.
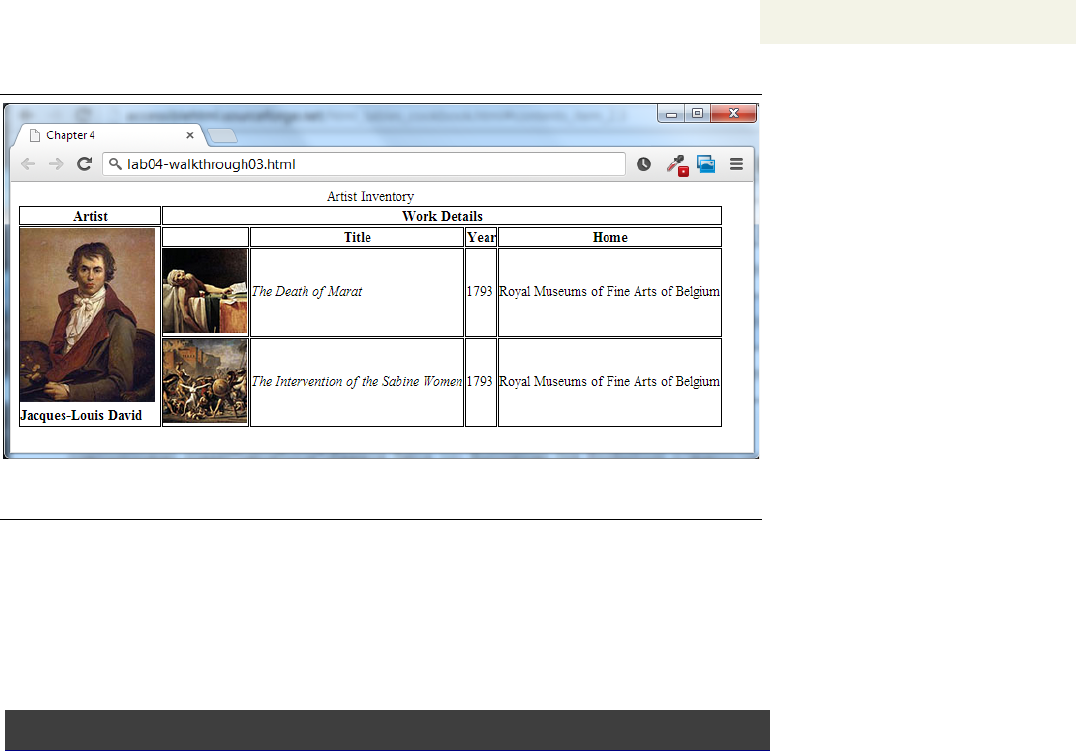
3 Add the following two tags to the beginning of the table and test in browser.
<tr>
<th>Artist</th>
<th colspan="4">Work Details</th>
</tr>
<tr>
<td rowspan="4">
<img src="images/art/5.jpg" alt="Jacques-Louis David" />
<br/><strong>Jacques-Louis David</strong>
</td>
</tr>
4 Add the following element at the beginning of the table.
<table>
<caption>Artist Inventory</caption>
<tr>
<th>Artist</th>
The caption is used to provide a title for the table, which improves accessibility.
5 Test in browser. The result should be similar to that shown in Figure 5.3.
Copyright © 2017 Randy Connolly and Ricardo Hoar
7
Fundamentals of Web Development
Figure 5.3 – Exercise 5.3 complete
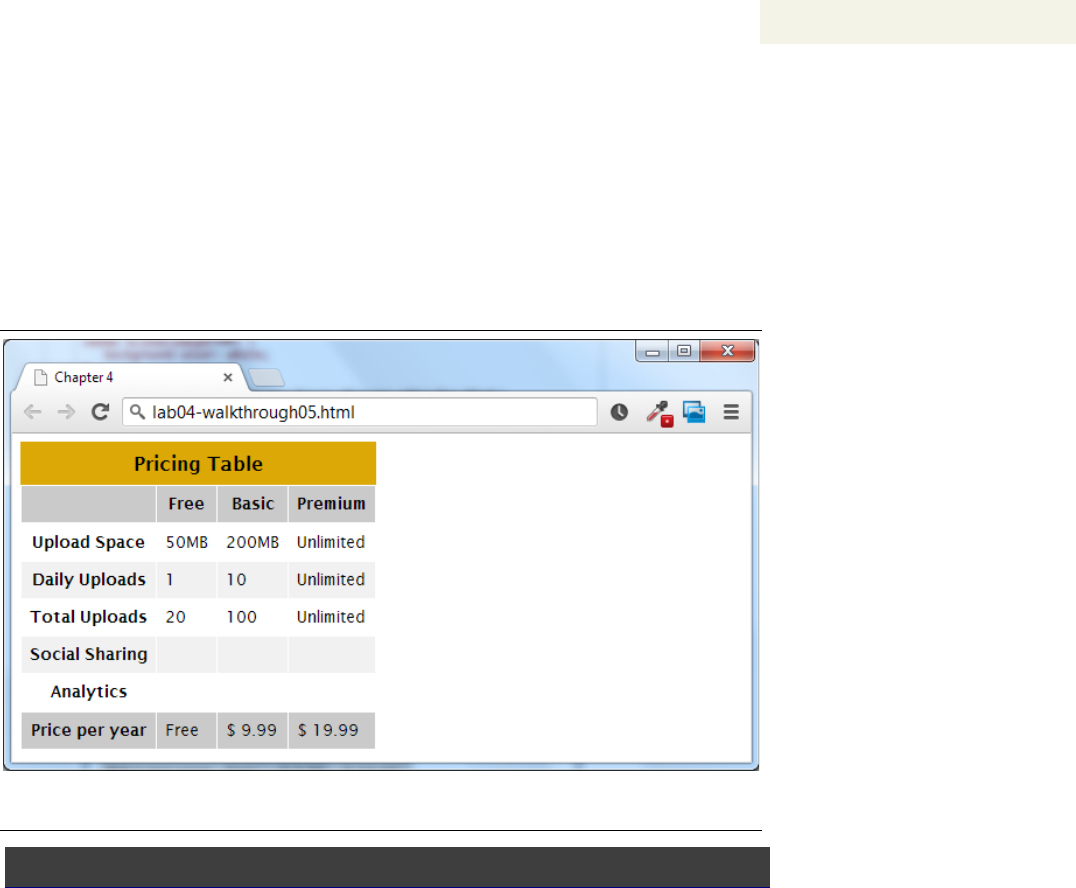
Exercise 5. 4
— ALTERNATE TABLE STRUCTURE ELEMENTS
1 Open, examine, and test lab05-exercise04.html in browser.
Notice that the <td> element can be used in rows and columns.
2 Add the following attributes to the table headings.
<table>
<caption>Pricing Table</caption>
<tr>
<th></th>
<th scope="col">Free</th>
<th scope="col">Basic</th>
<th scope="col">Premium</th>
</tr>
<tr>
<th scope="row">Upload Space</th>
<td>50MB</td>

8
Lab 5: HTML Tables and Forms
<td>200MB</td>
<td>Unlimited</td>
</tr>
<tr>
<th scope="row">Daily Uploads</th>
<td>1</td>
<td>10</td>
<td>Unlimited</td>
</tr>
<tr>
<th scope="row">Total Uploads</th>
<td>20</td>
<td>100</td>
<td>Unlimited</td>
</tr>
<tr>
<th scope="row">Social Sharing</th>
<td></td>
<td></td>
<td></td>
</tr>
<tr>
<th scope="row">Analytics</th>
<td></td>
<td></td>
<td></td>
</tr>
</table>
This improves the accessibility of the table.
3 Add the following around the first row.
<thead>

Copyright © 2017 Randy Connolly and Ricardo Hoar
9
Fundamentals of Web Development
<tr>
<th></th>
<th scope="col">Free</th>
<th scope="col">Basic</th>
<th scope="col">Premium</th>
</tr>
</thead>
4 Test in browser. There is no special formatting for this element; instead we can apply
special styling to it.
5 Add the following element around the other table rows.
<tbody>
<tr>
<th scope="row">Upload Space</th>
<td>50MB</td>
<td>200MB</td>
<td>Unlimited</td>
</tr>
<tr>
<th scope="row">Daily Uploads</th>
<td>1</td>
<td>10</td>
<td>Unlimited</td>
</tr>
<tr>
<th scope="row">Total Uploads</th>
<td>20</td>
<td>100</td>
<td>Unlimited</td>
</tr>
<tr>
<th scope="row">Social Sharing</th>

10
Lab 5: HTML Tables and Forms
<td></td>
<td></td>
<td></td>
</tr>
<tr>
<th scope="row">Analytics</th>
<td></td>
<td></td>
<td></td>
</tr>
</tbody>
Like with the <thead> element, there is no preset-browser formatting associated with
the <tbody> element.
6 Add the following element between the <thead> and <tbody> element.
<tfoot>
<tr>
<th scope="row">Price per year</th>
<td>Free</td>
<td>$ 9.99</td>
<td>$ 19.99</td>
</tr>
</tfoot>
7 Test in browser.
Notice the <tfoot> appears at the end of the table but should appear in the markup
before the <tbody> element.
STYLING TABLES
Exercise 5. 5
— SIMPLE TABLE STYLING
1 Open, examine, and test lab05-exercise05.html in browser.
2 Add the following style to the <style> element and test.

Copyright © 2017 Randy Connolly and Ricardo Hoar
11
Fundamentals of Web Development
table {
border: solid 1pt black;
}
3 Change the style as follows and test.
table, td {
border: solid 1pt black;
}
4 Add the following and test.
td, table {
border: solid 1pt black;
border-collapse: collapse;
}
5 Add the following and test.
td, table {
border: solid 1pt black;
border-collapse: collapse;
padding: 0.5em;
}
6 Replace the above styles with the following and test.
table {
font-family: "Lucida Sans", Verdana, Arial, sans-serif;
font-size: 1em;
}
tbody {
background-color: #F1F1F1;
}
td, th {
padding: 0.5em;
}
thead, tfoot {

12
Lab 5: HTML Tables and Forms
background-color: #CACACA;
}
7 Add the following and test.
caption {
font-size: 1.2em;
font-weight: bold;
background-color: #DCA806;
padding: 0.5em;
}
Copyright © 2017 Randy Connolly and Ricardo Hoar
13
Fundamentals of Web Development
8 Add the following styles and test. The final result should look similar to Figure 5.4.
tbody tr:nth-child(odd) {
background-color: white;
}
This changes the background color of every other row within the <tbody>
Figure 5.4 – Exercise 5.5 complete
Exercise 5. 6
— CSS3 TABLE STYLING
1 Open, examine, and test lab05-exercise06.html in browser.
2 Add the following style and test.
caption {
margin-left: -2000px;
}
While we want to keep the caption element for accessibility reasons, we don’t, in this
case, want it to be visible. Shifting it to the left off screen does that. In Chapter Five, you
will learn how to do this via CSS positioning.

14
Lab 5: HTML Tables and Forms
3 Add the following to the bottom two rows of the markup.
<tr>
<th scope="row">Social Sharing</th>
<td></td>
<td><span class="check"></span></td>
<td><span class="check"></span></td>
</tr>
<tr>
<th scope="row">Analytics</th>
<td></td>
<td></td>
<td><span class="yes"></span></td>
</tr>
4 Add the following style and test.
tbody span.yes:before {
content: url(images/yes16.png);
}
The before or after pseudo-elements allow you to insert content before or after the
content of an element. In this case we are adding an image into the select cells.
5 Add the following style and test.
tbody th {
text-align:right;
color: #1D1626;
background-color: #F2E0BD;
}
This will make the first column within the <tbody> element different from the other
columns.
6 Add the following style and test.
thead th:empty {
background-color: white;
}

Copyright © 2017 Randy Connolly and Ricardo Hoar
15
Fundamentals of Web Development
This uses the empty pseudo-element to select any empty <th> element within the
<thead>.
7 Add the following style and test.
tfoot th {
background-color: white;
}
8 Add the following style and test.
tfoot {
color: #C74223;
text-shadow:1px 1px 1px black;
font-weight: bold;
}
This changes every element within the <tfoot> element.
9 Change the following style and test.
tfoot th {
background-color: white;
text-shadow: none;
}
This removes the text shadow from the first cell of the footer.
10 Modify the following style and test. The result should look like that in Figure 5.5.
tfoot, thead th:nth-last-child(1) {
color: #C74223;
text-shadow:1px 1px 1px #000;
font-weight: bold;
}
This selects the last cell in the <thead> so that it has the same styling as the footer
elements.

16
Lab 5: HTML Tables and Forms
Figure 5.5 – Exercise 5.6 complete
CREATING FORMS
Forms provide the user with an alternative way to interact with a web server.
Up to now, clicking hyperlinks was the only mechanism available to the user
for communicating with the server. Forms provide a much richer mechanism.
Using a form, the user can enter text, choose items from lists, and click
buttons. Typically programs running on the server will take the input from
HTML forms and do something with it, such as save it in a database, interact
with an external web service, or customize subsequent HTML based on that
input.
A form is constructed in HTML in the same manner as tables or lists: that is,
using special HTML elements.
Exercise 5. 7
— CREATING A FORM
1 Open lab05-exercise07.html in text editor.

Copyright © 2017 Randy Connolly and Ricardo Hoar
17
Fundamentals of Web Development
2 Add the following to the <body> of the document.
<form method="get" action="">
<fieldset>
<legend>Details</legend>
<p>
<label>Title: </label>
<input type="text" name="title" />
</p>
<p>
<label>Country: </label>
<select name="where">
<option>Choose a country</option>
<option>Canada</option>
<option>Finland</option>
<option>United States</option>
</select>
</p>
<input type="submit" />
</fieldset>
</form>
3 Test in browser.
Exercise 5. 8
— TESTING A FORM
1 Open lab05-exercise08.html in text editor.
2 Modify the <form> element as follows then test.
<form method="get" action="http://www.randyconnolly.com/tests/process.php">
This sample PHP script on the book’s web site simply echoes back any form data in the
request.
3 Modify the <form> element as follows then test.

18
Lab 5: HTML Tables and Forms
<form method="post"
action="http://www.randyconnolly.com/tests/process.php">
FORM CONTROLS
Exercise 5. 9
— TEXT CONTROLS
1 Open and examine lab05-exercise09.html.
2 Modify the form as follows and test.
<p>
<label>Title: </label><br/>
<input type="text" name="title" />
</p>
<p>
<label>Password: </label><br/>
<input type="password" name="pass" size="8"/>
</p>
<p>
<label>Email: </label><br/>
<input type="email" name="email" size="45"/>
</p>
<p>
<label>Website: </label><br/>
<input type="url" name="website" size="45"/>
</p>
<p>
<label>Description: </label><br/>
<textarea placeholder="enter a description" rows="5"
cols="45"></textarea>
</p>

Copyright © 2017 Randy Connolly and Ricardo Hoar
19
Fundamentals of Web Development
Exercise 5.10
— CHOICE CONTROLS
1 Open and examine lab05-exercise10.html.
2 Modify the form as follows and test (be sure to submit form).
<p>
<label>Countries: </label><br/>
<select name="country">
<option>Australia</option>
<option>Canada</option>
<option>France</option>
<option>Sweden</option>
<option>Thailand</option>
<option>United States</option>
</select>
</p>
<p>
<label>Continent: </label><br/>
<select size="4" name="continent">
<option value="NA">North America</option>
<option value="EU">Europe</option>
<option value="AS">Asia</option>
<option value="SA">South America</option>
</select>
</p>
<p>
<label>City: </label><br/>
<select name="city">
<optgroup label="North America">
<option>Calgary</option>
<option>Los Angeles</option>
</optgroup>
<optgroup label="Europe">

20
Lab 5: HTML Tables and Forms
<option>London</option>
<option>Paris</option>
<option>Prague</option>
</optgroup>
</select>
</p>
<p>
<label>Gender of Traveler: </label><br/>
<input type="radio" name="gender" value="1">Female<br/>
<input type="radio" name="gender" value="2">Male<br/>
</p>
<p>
<label>How did you hear about the site: </label><br/>
<input type="checkbox" name="hear" value="email">Email<br/>
<input type="checkbox" name="hear" value="friend">Friend<br/>
<input type="checkbox" name="hear" value="website">Website
</p>
Exercise 5.11
— BUTTON CONTROLS
1 Open and examine lab05-exercise11.html.
2 Modify the form as follows and test.
<p>
<input type="button" value="Click Me" />
<input type="image" src="images/yes16.png" />
<input type="image" src="images/no16.png" />
</p>
<p>
<button>
<a href="#">
<img src="images/yes16.png" alt=""/>

Copyright © 2017 Randy Connolly and Ricardo Hoar
21
Fundamentals of Web Development
Yes
</a>
</button>
<button>
<img src="images/no16.png" alt=""/>
No
</button>
</p>
<p>
<input type="submit" />
<input type="reset" />
</p>
Exercise 5.12
— SPECIALIZED CONTROLS
1 Open and examine lab05-exercise12.html.
2 Modify the form as follows and test (be sure to submit form).
<p>
<label>Rate this photo: </label><br/>
<input type="number" min="1" max="5" name="rate" />
</p>
<p>
Happiness Rating: Grumpy
<input type="range" min="0" max="10" step="1" name="happiness" />
Ecstatic
</p>
<p>
<label>Companion Color: </label><br/>
<input type="color" name="back" />
</p>
Note: not every browser supports all of these controls.

22
Lab 5: HTML Tables and Forms
Exercise 5.13
— DATE AND TIME CONTROLS
1 Open and examine lab05-exercise13.html.
2 Modify the form as follows and test (be sure to submit form).
<p>
<label>Date of photo: </label><br/>
<input type="date" name="photodate" />
</p>
<p>
<label>Time of photo: </label><br/>
<input type="time" name="phototime" />
</p>
<p>
<label>Date and time of photo: </label><br/>
<input type="datetime" name="photodatetime" />
</p>
<p>
<label>Week of photo: </label><br/>
<input type="week" name="photoweek" />
</p>
Note: not every browser supports all of these controls.
WORKING WITH AUDIO AND VIDEO
Exercise 5.14
— VIDEO AND AUDIO ELEMENTS
1 Open and examine lab05-exercise14-audio.html.
2 Add the following code and test.
<h2>mp3</h2>
<audio src="Media/Sochi-Edit.mp3" controls >

Copyright © 2017 Randy Connolly and Ricardo Hoar
23
Fundamentals of Web Development
Browser doesn't support the audio control
</audio>
3 Add the following code and test (ideally in IE and Chrome or Firefox).
<h2>ogg</h2>
<audio controls >
<source src="Media/Sochi-Edit.ogg" >
<p>Browser doesn't support the audio control</p>
</audio>
At the time of writing, IE 10 does not support the Ogg audio format. Notice also that this
step illustrates an alternative way of specifying the source.
4 Add the following code and test (ideally in IE and Chrome or Firefox).
<h2>m4a</h2>
<audio controls >
<source src="Media/Sochi-Edit.m4a" >
<p>Browser doesn't support the audio control</p>
</audio>
<h2>wav</h2>
<audio controls >
<source src="Media/Sochi-Edit.wav" >
<p>Browser doesn't support the audio control</p>
</audio>
<h2>webm</h2>
<audio controls >
<source src="Media/Sochi-Edit.webm" >
<p>Browser doesn't support the audio control</p>
</audio>
5 Add the following code and test.
<h2>All in one</h2>
<audio controls >
<source src="Media/Sochi-Edit.mp3" type="audio/mpeg">
<source src="Media/Sochi-Edit.ogg" type="audio/ogg">

24
Lab 5: HTML Tables and Forms
<source src="Media/Sochi-Edit.m4a" type="audio/mp4">
<source src="Media/Sochi-Edit.wav" type="audio/wav">
<source src="Media/Sochi-Edit.webm" type="audio/webm">
<p>Browser doesn't support the audio control</p>
</audio>
The browser will use the first source format that it supports. Notice also that MIME
types are also defined.
6 Open and examine lab05-exercise14-video.html.
7 Add the following code and test (ideally in IE and Chrome and Firefox).
<h2>mp4</h2>
<video id="video1" poster="Media/video-preview.jpg" controls width="480"
height="360">
<source src="Media/rocky.mp4" type=”video/mp4">
not supported
</video>
<h2>ogg</h2>
<video id="video2" poster="Media/video-preview.jpg" controls width="480"
height="360">
<source src="Media/rocky.ogv" type=”video/ogg">
not supported
</video>
<h2>WebM</h2>
<video id="video3" poster="Media/video-preview.jpg" controls width="480"
height="360">
<source src="Media/rocky.webm" type=”video/webm">
not supported
</video>
8 Add the following code for HTML plug-in and test.
<h2>flash </h2>

Copyright © 2017 Randy Connolly and Ricardo Hoar
25
Fundamentals of Web Development
<object type="application/x-shockwave-flash" data="Media/rocky.swf"
width="480" height="360">
</object>
COMPLETE YOUR LAB REPORT
Open lab 05 report.doc and answer the questions based on what you learned in
this lab exercise. Save your lab report as lab05_yourname and submit your
report via dropbox on elearning under lab 05 Report Submission before
Sunday 11:59PM.
