How To Use The Lawson Time Entry Screens ZE40 Timesheet Quick Reference Guide
User Manual: ZE40
Open the PDF directly: View PDF ![]() .
.
Page Count: 15

Lawson Timesheet Quick Reference Guide |
1
Lawson Time Entry Quick Reference Guide
The following pages are designed to be an easy, step-by-step guide to some of the more
common timesheet functions in Lawson.
Please refer to the Payroll Manual for more in-depth discussion of these topics.
Tips:
• In the Hourly and Salaried screens, you must save before moving to the next
employee/position, or your data will be lost.
o You do not have to save after each entry on the same employee/position—
enter all data (hours, leave, addl hours) for that record, then save.
o Exception: if you need to enter more than one leave type on a given day, you
must save before entering the additional hours/leave type.
• Be sure to check the status bar on the bottom left of the Lawson window for
messages. You could easily miss errors or other vital information, which may result in
your data not being saved.
o Check after:
Saving
Inquiring
Adding new employees/new positions
Clicking the Back button
Submitting your data
o If any errors exist, your cursor will be placed in the first field in error, on the
first record in error, and the field will be highlighted.
• Reports to be turned in to Payroll must be run AFTER submitting your data.
o Reports run BEFORE submission will be a review report only.
o Reports run AFTER submission have a signature line and indicate data is
finalized.
o Any reports received without a signature line will be returned as we cannot be
sure data on the report is final.
• Use the Employee Lookup report on Lawson Reporting (HR/PR tab, under HR Reports)
to find employee numbers for new hires and subs.
o The Substitute screens also give you the ability to find employee numbers.
2 Lawson Time Entry Quick Reference Guide
The Division of Information Technology
Staff Guide: How to Use Lawson Time Entry Screens
ZE40, ZE41, ZE45, ZE49, ZE47
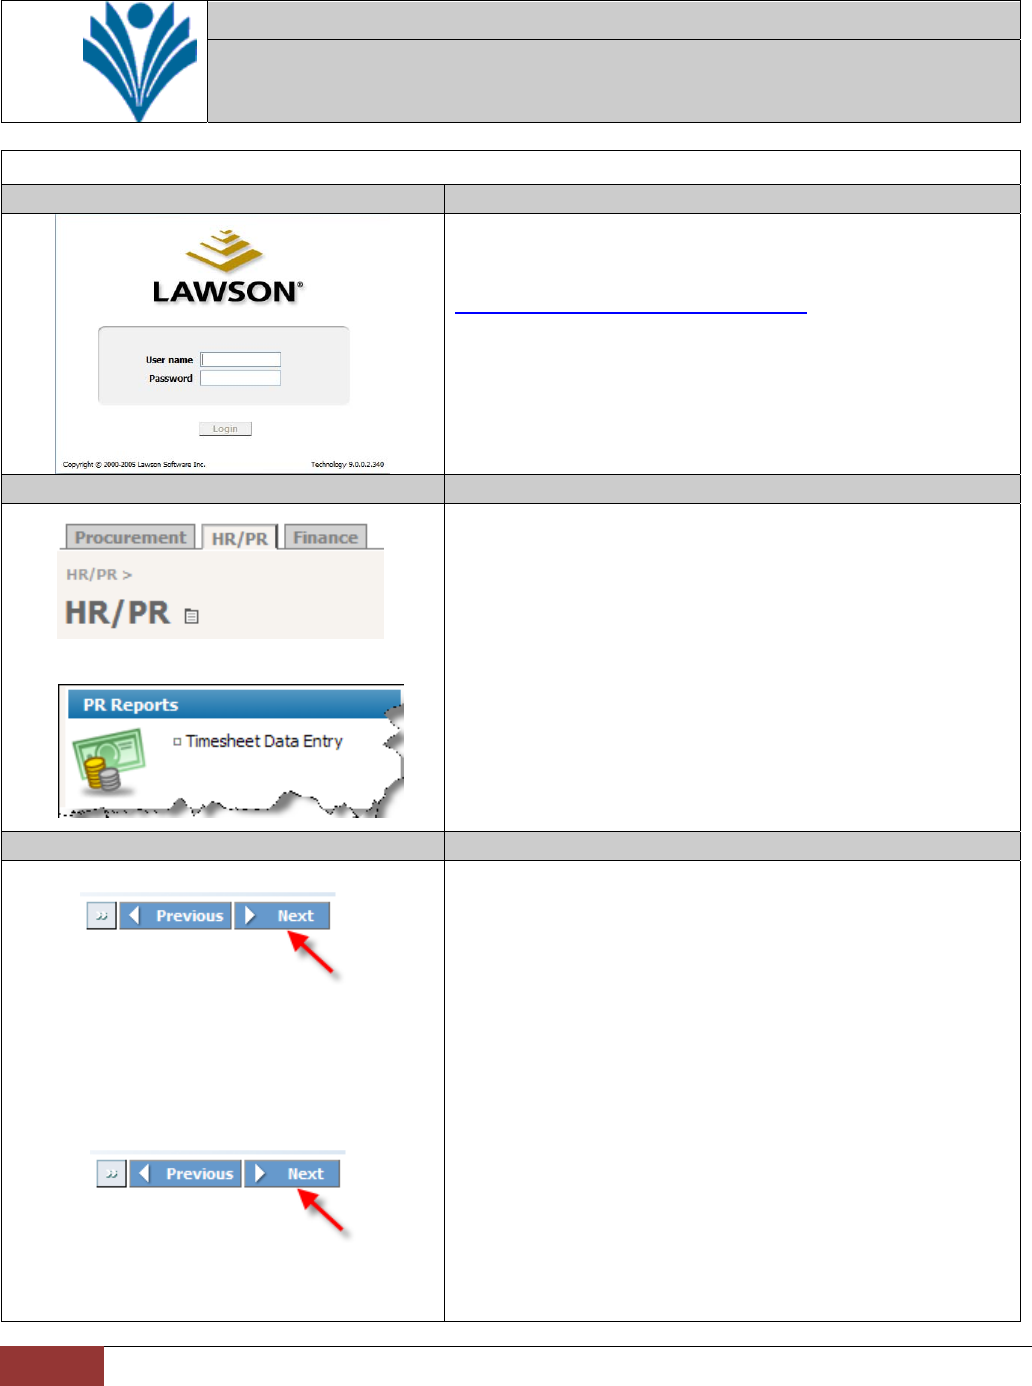
Accessing the Time Entry Splash Screen (ZE40.1)
Step 1 Log on to Lawson Reporting
Go to Lawson Reporting (“Lawson Dashboard”) at
http://lawsonreporting.bvsd.org
Enter your User name and Password.
Click Login.
Step 2 Click on the Time Entry Link
Click on the HR/PR tab.
Then click on the Timesheet Data Entry link under
the PR Reports section heading.
The Time Entry Splash screen (ZE40.1) will open.
Step 3 Find the appropriate week for data entry
Click the Next button at the top of your screen to
find the first open week for your school or
department.
A blank screen will appear when ZE40.1 opens. When you
click Next, the data for your login ID and location will
appear, along with the buttons necessary to continue with
time and absence entry.
Click the Next (or Previous) button as needed to
find the appropriate week.
Lawson Timesheet Quick Reference Guide |
3
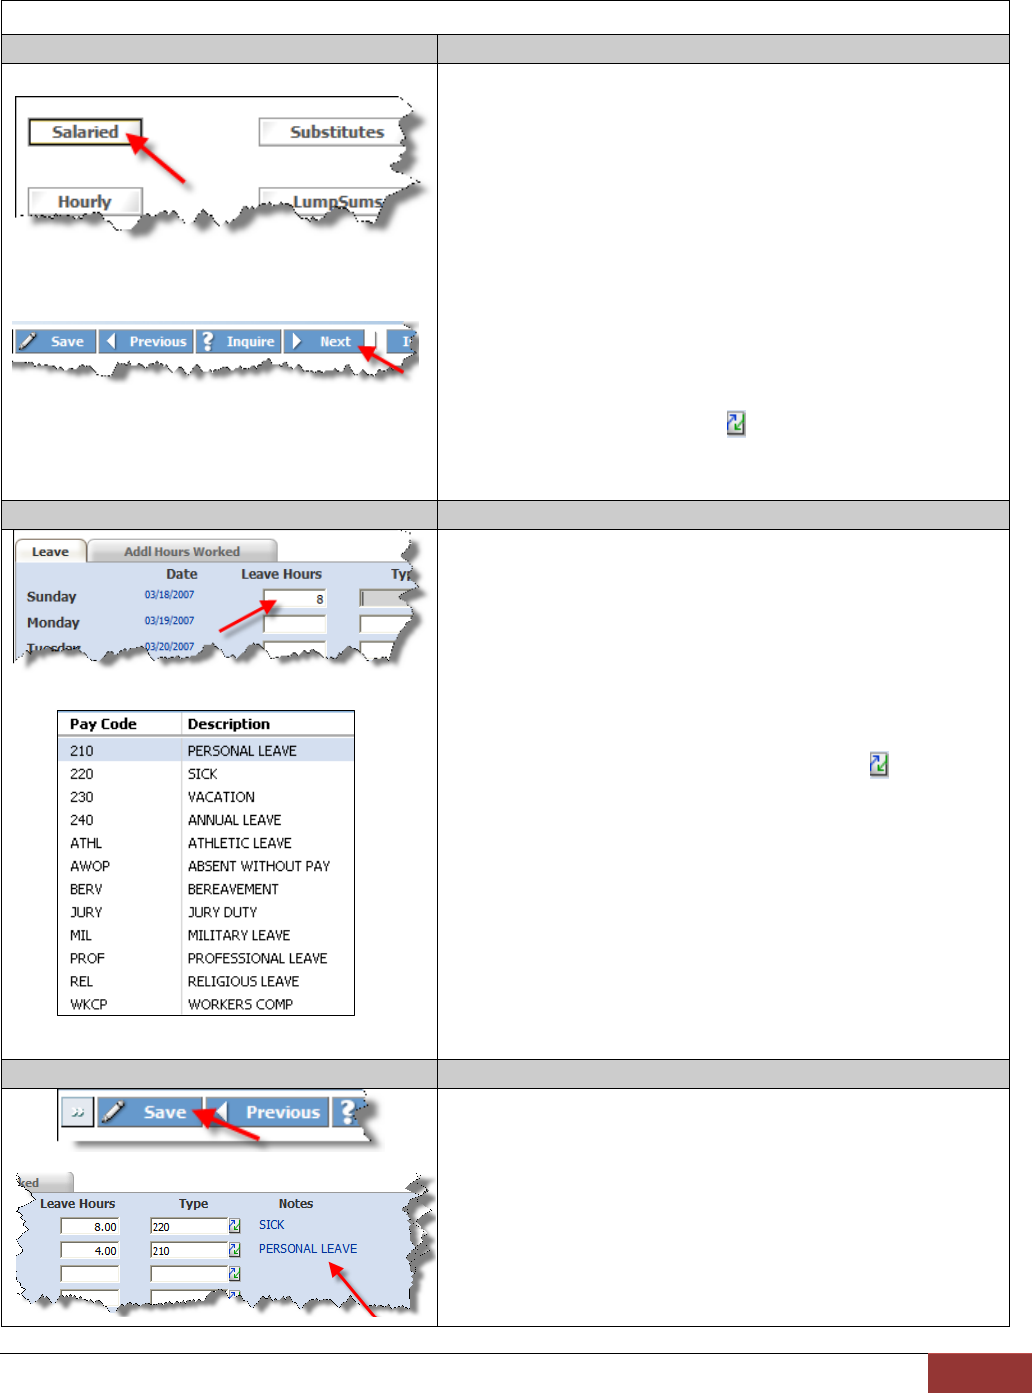
Entering Salaried Employees’ Leave and Additional hours worked (ZE41.1)
Step 1 Accessing Salaried Employees’ Information
Click on the Salaried button.
The Salaried Time Entry screen (ZE41.1) will open.
Click the Next button.
This will display, in order by name then position, the first
salaried employee at your location.
Clicking the Next button will navigate you
through your salaried employees in alphabetical
order. To quickly go to a specific employee, use
the Drill Around button ( ) to the right of the
Employee field. Then click Inquire.
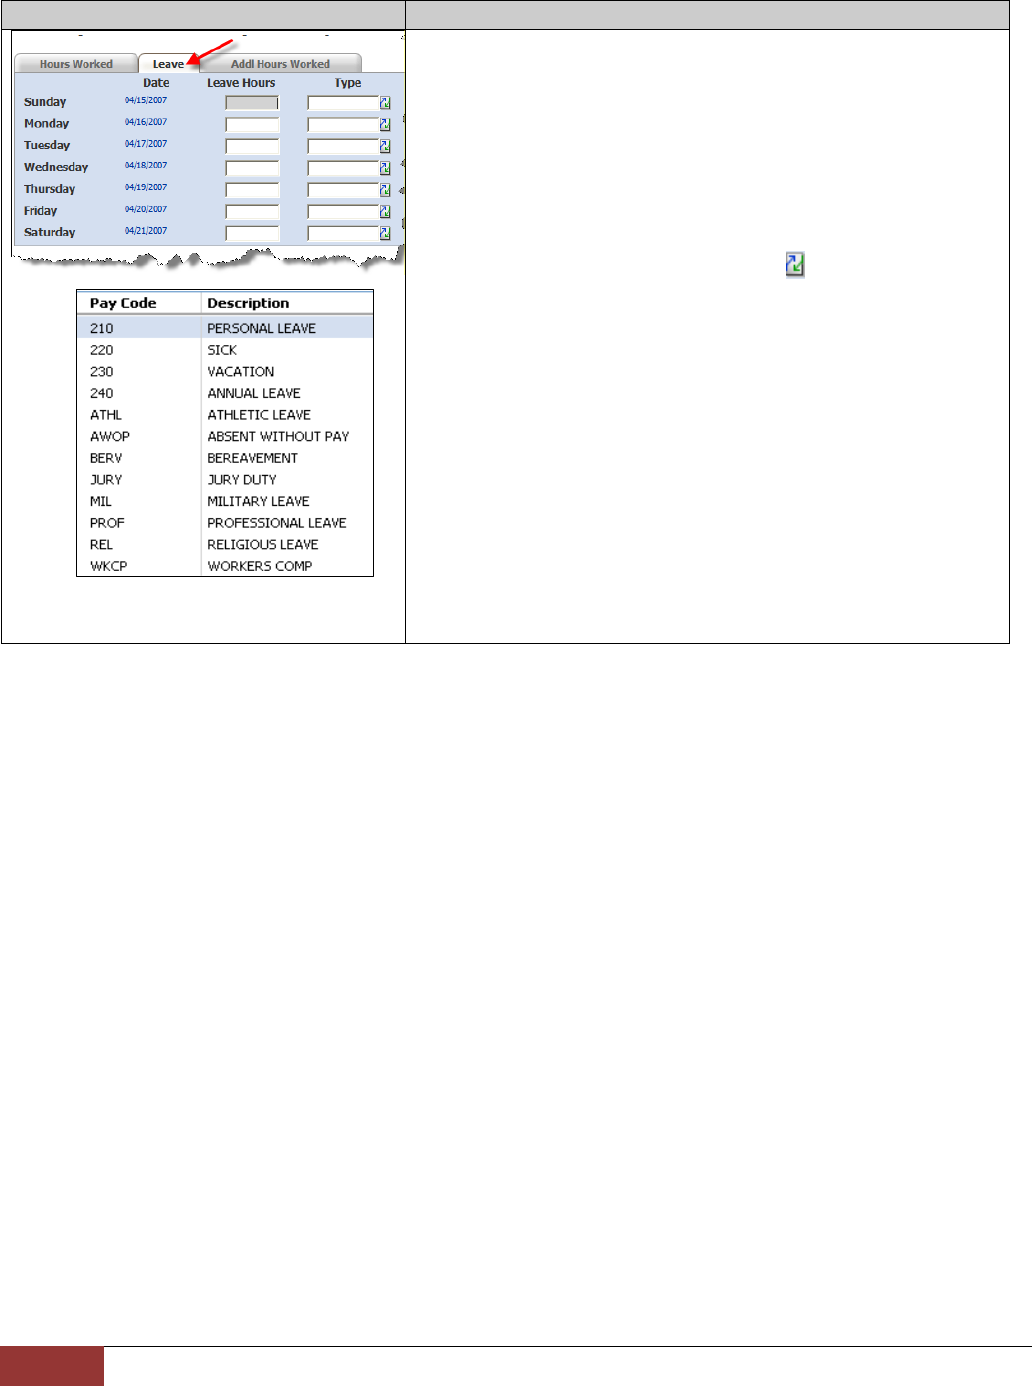
Step 2 Enter Salaried Leave Time/Leave Type
Enter the employee’s leave time for each day by
typing the appropriate leave hours in the Leave
Hours fields (for zero leave hours/no leave, leave
the field(s) blank).
To choose Leave Type (vacation, personal, sick,
etc), click on the Drill Around button ( ) next to
the field.
Click on the appropriate leave type. This will pop
you out of the drop down list and display the leave
type you chose.
If you prefer, you can simply enter the
appropriate Pay Code in the Type field without
using the drop down list.
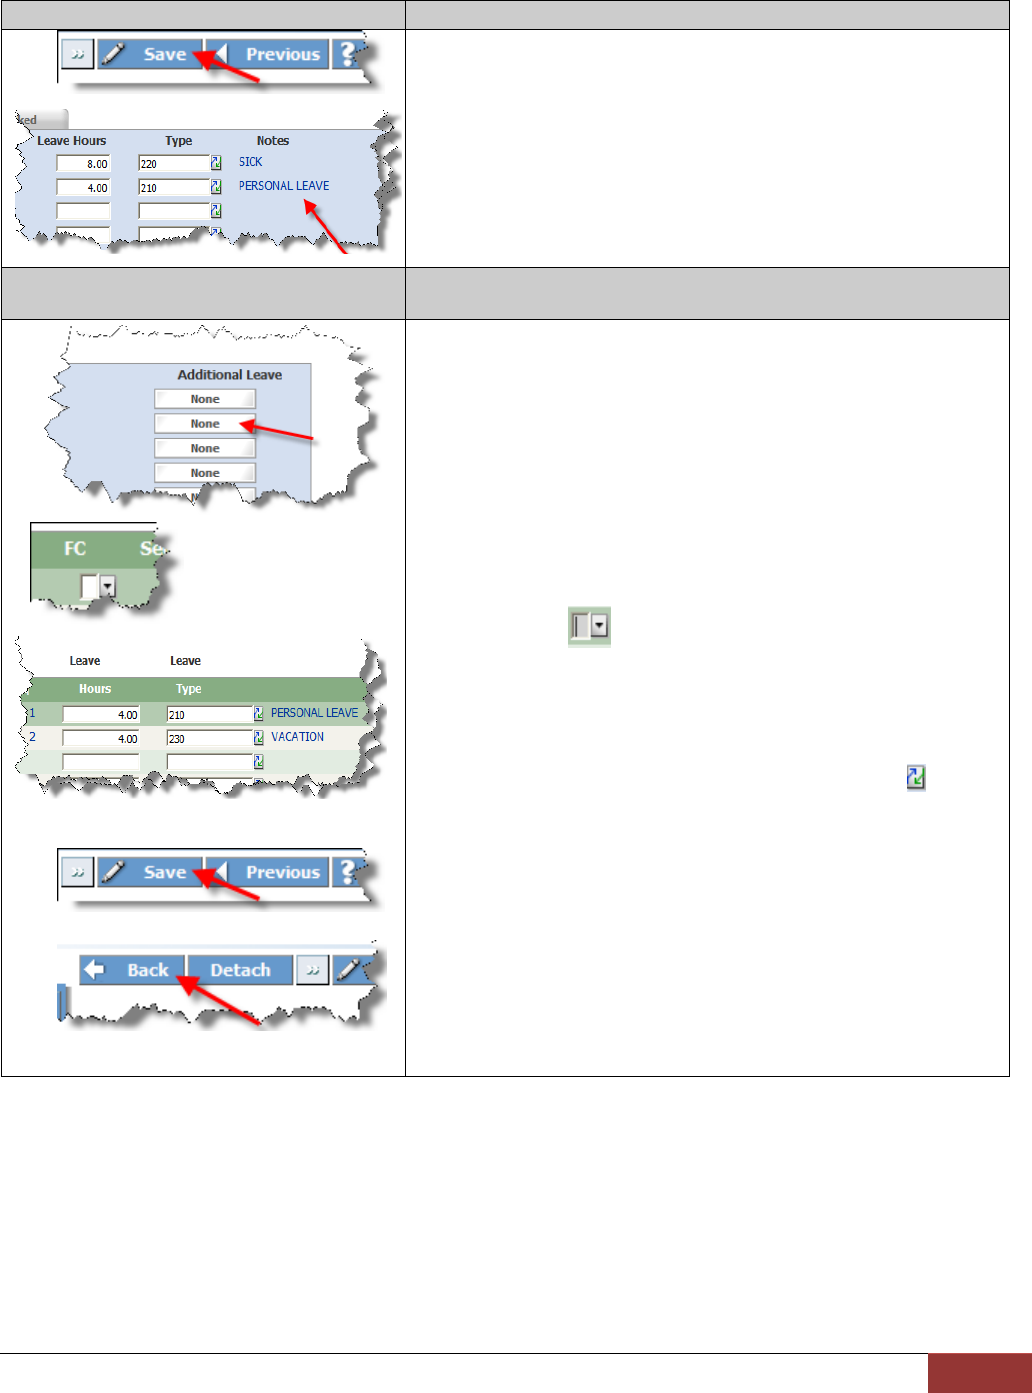
Step 3 Saving Entries
Click the Save button to save all entries before
entering more than one leave type (next step)
and/or continuing to the next employee.
After saving, the leave type(s) will be displayed under the
Notes heading.
4 Lawson Time Entry Quick Reference Guide
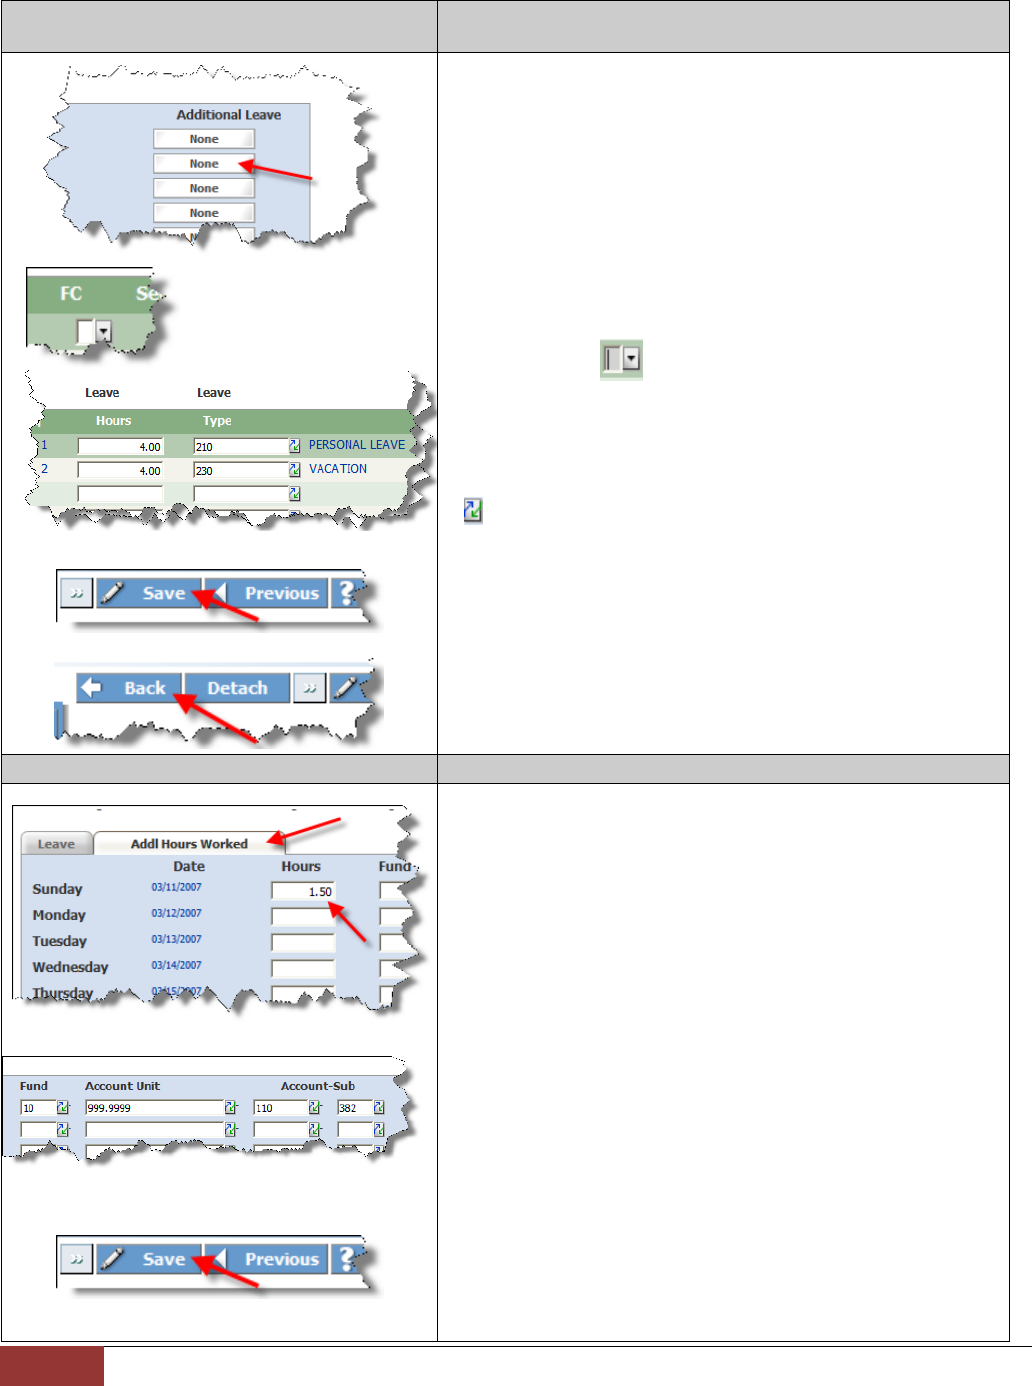
Step 4 Using More than One Leave Type/Entering Additional
Leave
When an employee uses more than one leave type
on any one day, enter and save the first leave
type. Then click on the corresponding day’s
button under the Additional Leave heading.
The Additional Leave Hours screen (ZE42.1) will open. The
employee’s current leave usage will be displayed.
To add additional leave types, click on the Drop
Down Menu ( ) under the FC heading on the
first blank line. Then click Add.
Enter the employee’s additional leave time for
each leave type (click on the Drill Around button
( ) to view all types).
Click the Save button.
Click the Back button to return to the Salaried
Time Entry screen (ZE41.1). Click Inquire to see
your changes.
Step 5 Entering Additional Hours
Worked
To enter additional hours worked for an
employee, click on the Addl Hours Worked tab.
Enter additional hours worked under the Hours
heading in the field for the corresponding day.
Leave the account code fields (Fund, Account
Unit, Account-Sub) blank if additional hours are
to be paid out of the employee’s regular
assignment code(s), indicated under the Account
Codes heading at the top.
To charge the additional hours to a different
account code, enter the appropriate account
code.
Click the Save Button.
Lawson Timesheet Quick Reference Guide |
5
Entering Hourly Employees’ Hours Worked, Leave, and Additional Hours
(ZE45.1)
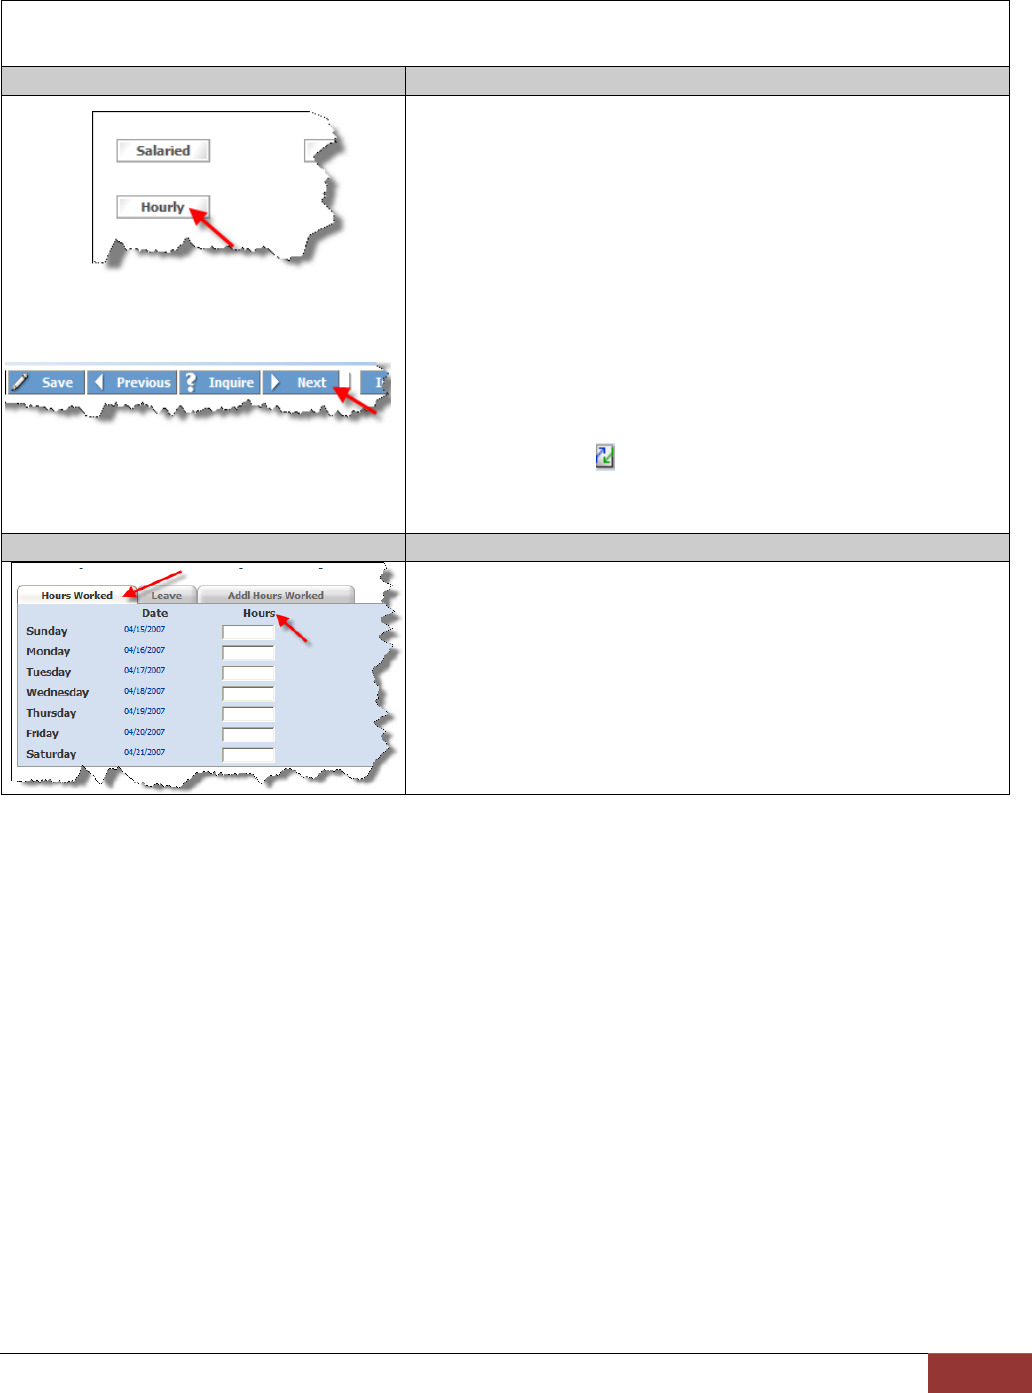
Step 1 Accessing Hourly
Employees’ Information
Click on the Hourly button.
The Hourly Time Entry screen (ZE45.1) will open.
Click the Next button.
This will display, in alphabetical order, the first employee at
your location.
Clicking the Next button will navigate you through
your hourly employees in alphabetical order. To
quickly go to a specific employee, use the Drill
Around button ( ) to the right of the Employee
field. Then click Inquire.
Step 2 Enter Hours Worked for Hourly Employees
Under the Hours Worked tab, enter the employee’s
hours worked for the week by typing the appropriate
hours in the Hours fields (for zero hours, leave the
field(s) blank).
6 Lawson Time Entry Quick Reference Guide
Step 3 Enter Hourly
Leave Time/Leave Type
Enter the employee’s leave time for each day by
typing the appropriate leave hours in the Leave
Hours fields (for zero leave hours/no leave, leave the
field(s) blank).
To choose Leave Type (vacation, personal, sick, etc),
click on the Drill Around button ( ) next to the
field.
Click on the appropriate leave type. This will pop
you out of the drop down list and display the leave
type you chose.
If you prefer, you can simply enter the appropriate
Pay Code in the Type field without using the drop
down list.
Lawson Timesheet Quick Reference Guide |
7
Step 4 Saving Entries
Click the Save button to save all entries before
entering more than one leave type (next step) and/or
continuing to the next employee.
After saving, the leave type(s) will be displayed under the Notes
heading.
Step 5 Using More than One Leave Type/Entering Additional
Leave
When an employee uses more than one leave type on
any one day, enter and save the first leave type.
Then click on the corresponding day’s button under
the Additional Leave heading.
The Additional Leave Hours screen (ZE42.1) will open. The
employee’s current leave usage will be displayed.
To add additional leave types, click on the Drop
Down Menu ( ) under the FC heading on the first
blank line. Then click Add.
Enter the employee’s additional leave time for each
leave type (click on the Drill Around button ( ) to
view all types).
Click the Save button.
Click the Back button to return to the Salaried Time
Entry screen (ZE41.1). Click Inquire to see your
changes.

8 Lawson Time Entry Quick Reference Guide
Step 6 Entering Additional Hours
Worked
To enter additional hours worked for an employee,
click on the Addl Hours Worked tab.
Enter additional hours worked under the Hours
heading in the field for the corresponding day.
Leave the account code fields (Fund, Account Unit,
Account-Sub) blank if additional hours are to be paid
out of the employee’s regular assignment code(s),
indicated under the Account Codes heading at the
top.
To charge the additional hours to a different account
code, enter the appropriate account code.
Click the Save Button.
Lawson Timesheet Quick Reference Guide |
9
Adding a new or additional Position Code to a Current Employee
Step 1 Adding a Position Code
“Current employee” means a person who already has
an employee number in our HR system, whether or
not currently employed at your location.
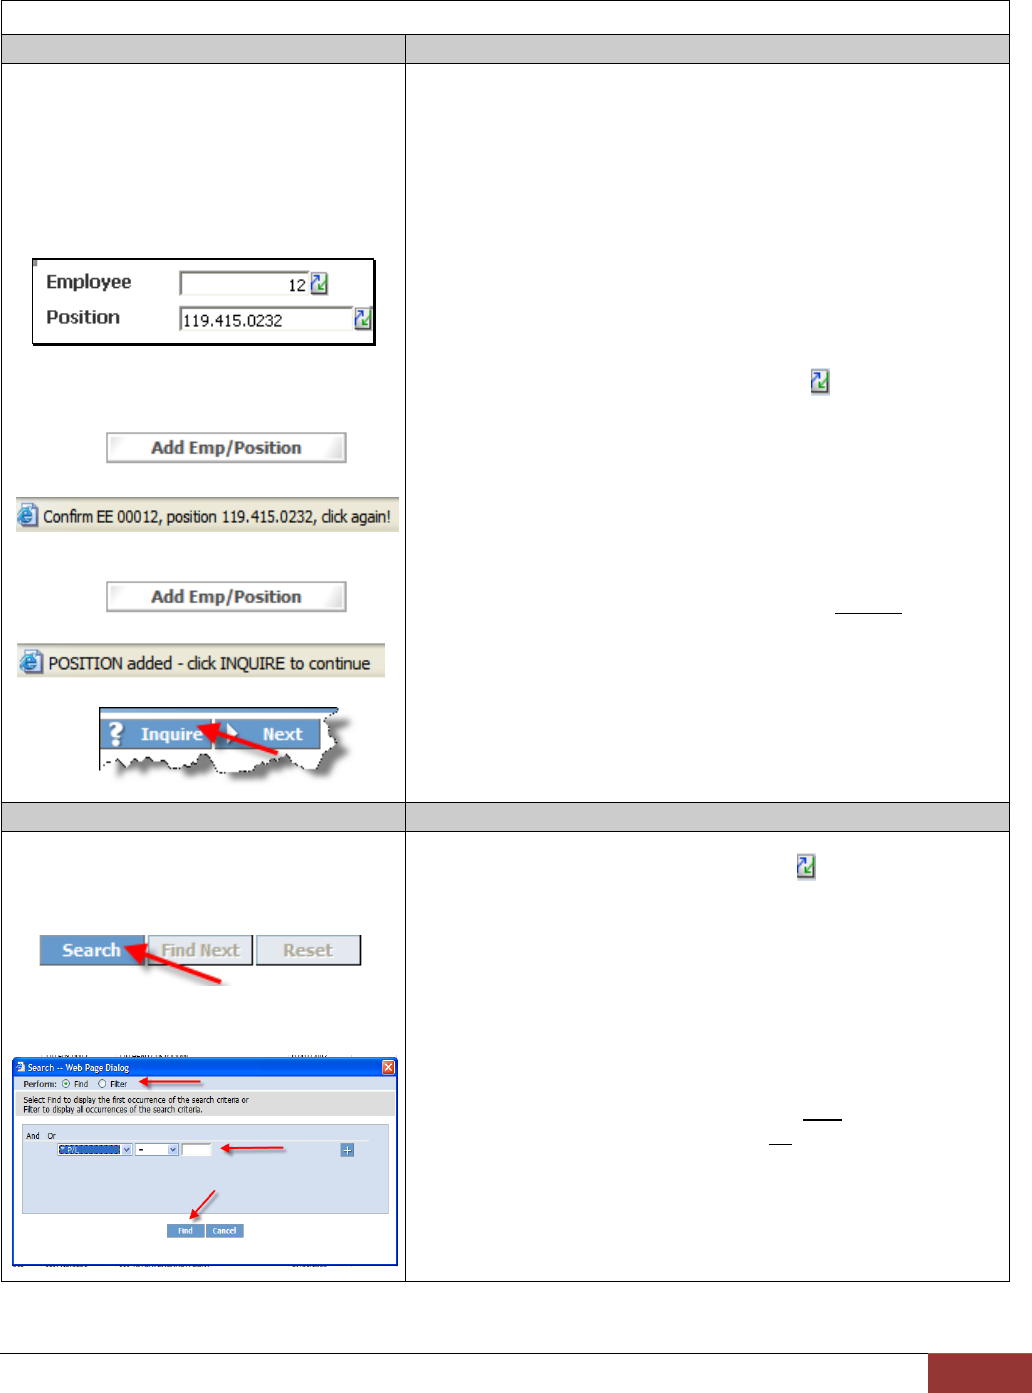
To add an additional assignment/position code to a
current employee, enter his/her employee number in
the Employee field.
Enter the new/additional employee position code in
the Position field or search for the position code by
clicking on the Drill Around button ( ) next to the
field (see step 2 below).
Click on the Add Emp/Position button.
The status bar at the bottom of the screen will indicate:
“Confirm EE (#), position (#), click again!”
Click on the Add Emp/Position button AGAIN to add.
The status bar at the bottom of the screen will indicate:
“POSITION added – click INQUIRE to continue.”
Click Inquire to refresh the screen, then enter time
and/or leave for that employee/position code.
Step 2 Position Code Search/Drill Around Function
After clicking on the Drill Around button ( ), a Drill Around –-
Web Page Dialog window will open.
To search for a position code, click on the Search
button.
A Search – Web Page Dialog window will open.
Select Find or Filter under Perform: at the top of
the window. Select Find to display the first occurrence of
the search criteria or Filter to display all occurrences of the
search criteria.

10 Lawson Time Entry Quick Reference Guide
Select and enter your search criteria from the drop
down and empty fields, then, depending on your
Perform: selection, click Find or Filter to begin your
search.
Click on the appropriate position code.
The code will be inserted into the Position field.
Lawson Timesheet Quick Reference Guide |
11
Adding an Unknown Employee (ZE49.1)
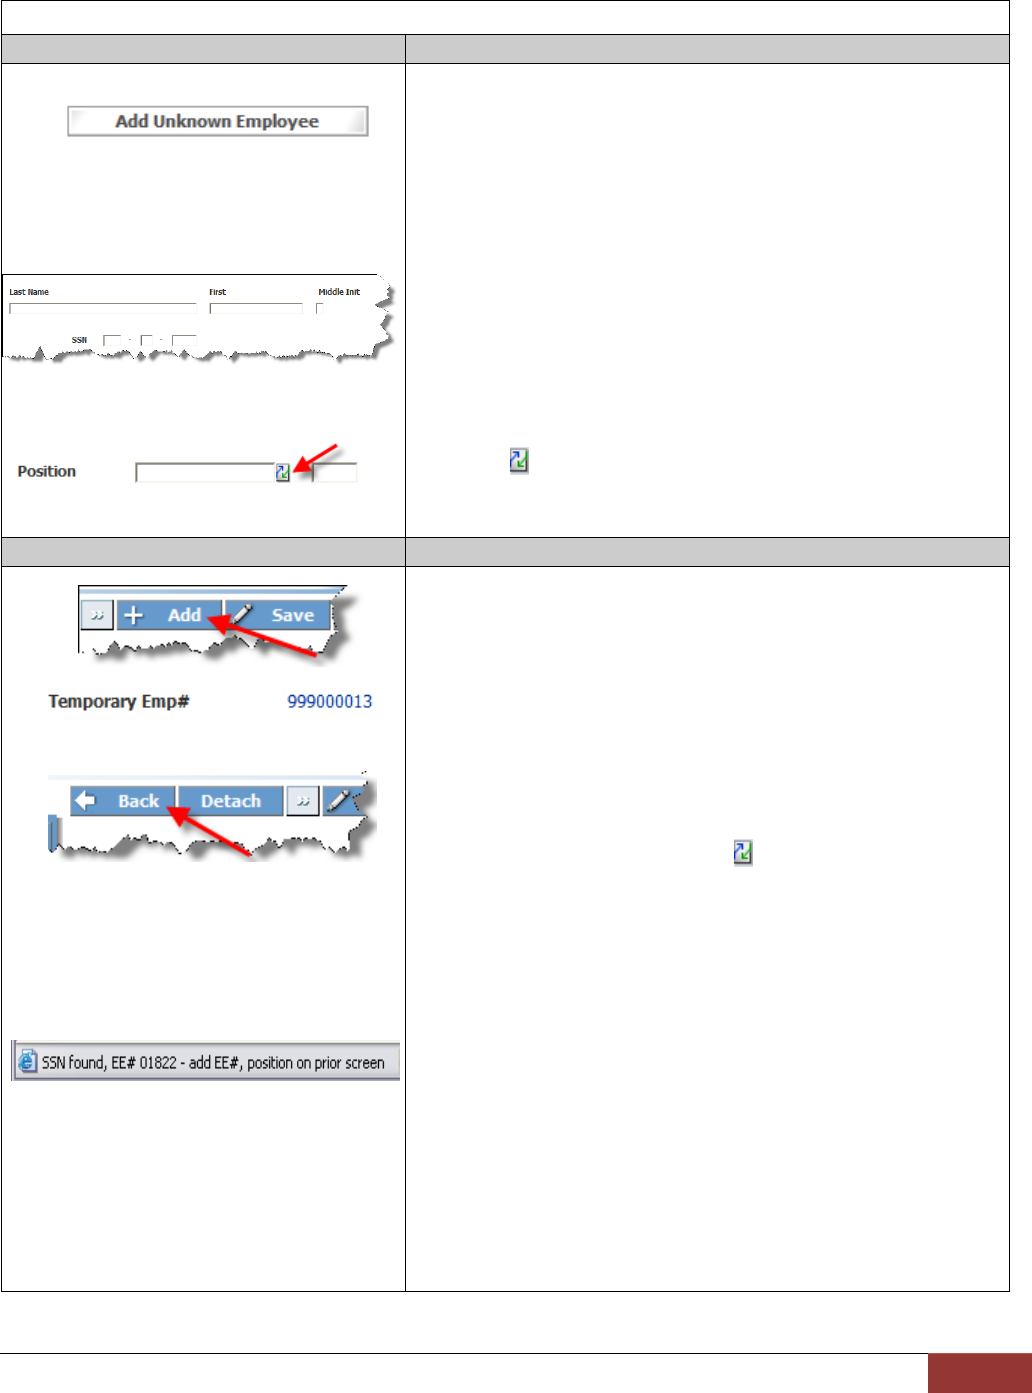
Step 1 Adding an New Employee
Employees not yet in the system (no employee
number) can be added by clicking on the Add
Unknown Employee button in the appropriate
Salaried or Hourly Time Entry screen.
The Unknown Employee (ZE49.1) screen will open.
Type the new employee’s last name, first name,
middle initial, and social security number in the
corresponding fields.
Type the position code in the Position field or search
for the position code by clicking on the Drill Around
button ( ) next to the field (see step 2 under the
previous section for instructions).
Step 2 Adding a New Employee –
Final Step
After entering the data for all fields on the Unknown
Employee screen, click the Add button.
A Temporary Emp # will be assigned.
Click the Back button to return to the Time Entry
screen.
Use the Drill Around button ( ) next to the
Employee field to quickly find your new
employee/position. Click Inquire. Enter data as
usual.
If the social security number already exists, a
message with the correct Employee # will appear in
the status bar.
Make note of the employee number, and see the
previous section, “Adding a new or additional
Position Code to a Current Employee”.

12 Lawson Time Entry Quick Reference Guide
Entering Substitute Time Worked (ZE47.1)
Step 1 Accessing the Substitute’s Time Entry Screen
Click on the Substitutes button.
The Substitute Time Entry screen (ZE47.1) will open.
Step 2 Entering
the Date and Substitute’s Employee Number
To enter a substitute’s time worked, click on the
Drop Down Menu ( ) under the FC heading. Then
click Add.
Click on the Calendar button ( ) under the Date
heading to open the calendar, then click on the date
the substitute worked.
The date will be inserted into the Date field box.
Enter the substitute’s employee number under the
EE# heading or search for the employee number by
clicking on the Drill Around button ( ). (See next
step for Drill Around instructions)
Step 3 Using the Drill
Around Function
Clicking on the Drill Around button ( ) will open a Drill Around
–- Web Page Dialog window.
To search for an employee, click the Search button.
A Search – Web Page Dialog window will open.
Select Find or Filter under Perform: at the top of
the window. Select Find to display the first occurrence of
the search criteria or Filter to display all occurrences of the
search criteria.
Select and enter your search criteria from the drop
down and empty field boxes, then, depending on
your Perform: selection, click Find or Filter to begin
your search.
Click on the appropriate Employee # or Employee
Name.
Lawson Timesheet Quick Reference Guide |
13
The employee number will be inserted into the EE# field and
the substitute’s name will appear next to the EE# field on the
Substitute Time Entry screen (ZE47.1).
Step 4 Entering the Account
Code to Charge a Substitute’s
Time
Enter the account code in the Fnd, Account Unit,
and Acct-Sub fields, or use the Drill Around button
( ) to verify or search for the appropriate code (see
prior step on how to use Drill Around).
Step 5 Selecting the Substitute Position/Entering Hours
Click on the Drop Down Menu ( ) under the
Position heading and select the appropriate position
for the substitute.
In the Hours field, enter the time the substitute
worked that particular day in the position selected
above.
Teacher subs and KCare subs only: enter .5 for a
half-day, or 1.0 for a full day.
All other subs: enter the number of hours worked.
Step 6 Entering Subbed
for Whom/Vacancy
In the field under the heading Subbed for Whom (or
“Vacancy”), type the name of the absent employee
(the one needing the sub). Type “Vacancy” if the
sub was working in a vacant position. Type a short
description if the sub was working as needed for a
specific project.
Step 7 Saving Entries
Click the Save button after each row or page, or
before exiting the Substitute Time Entry screen.
Review the status bar at the bottom of the screen to
ensure that all entries are complete and correct and
that entries saved successfully.
14 Lawson Time Entry Quick Reference Guide
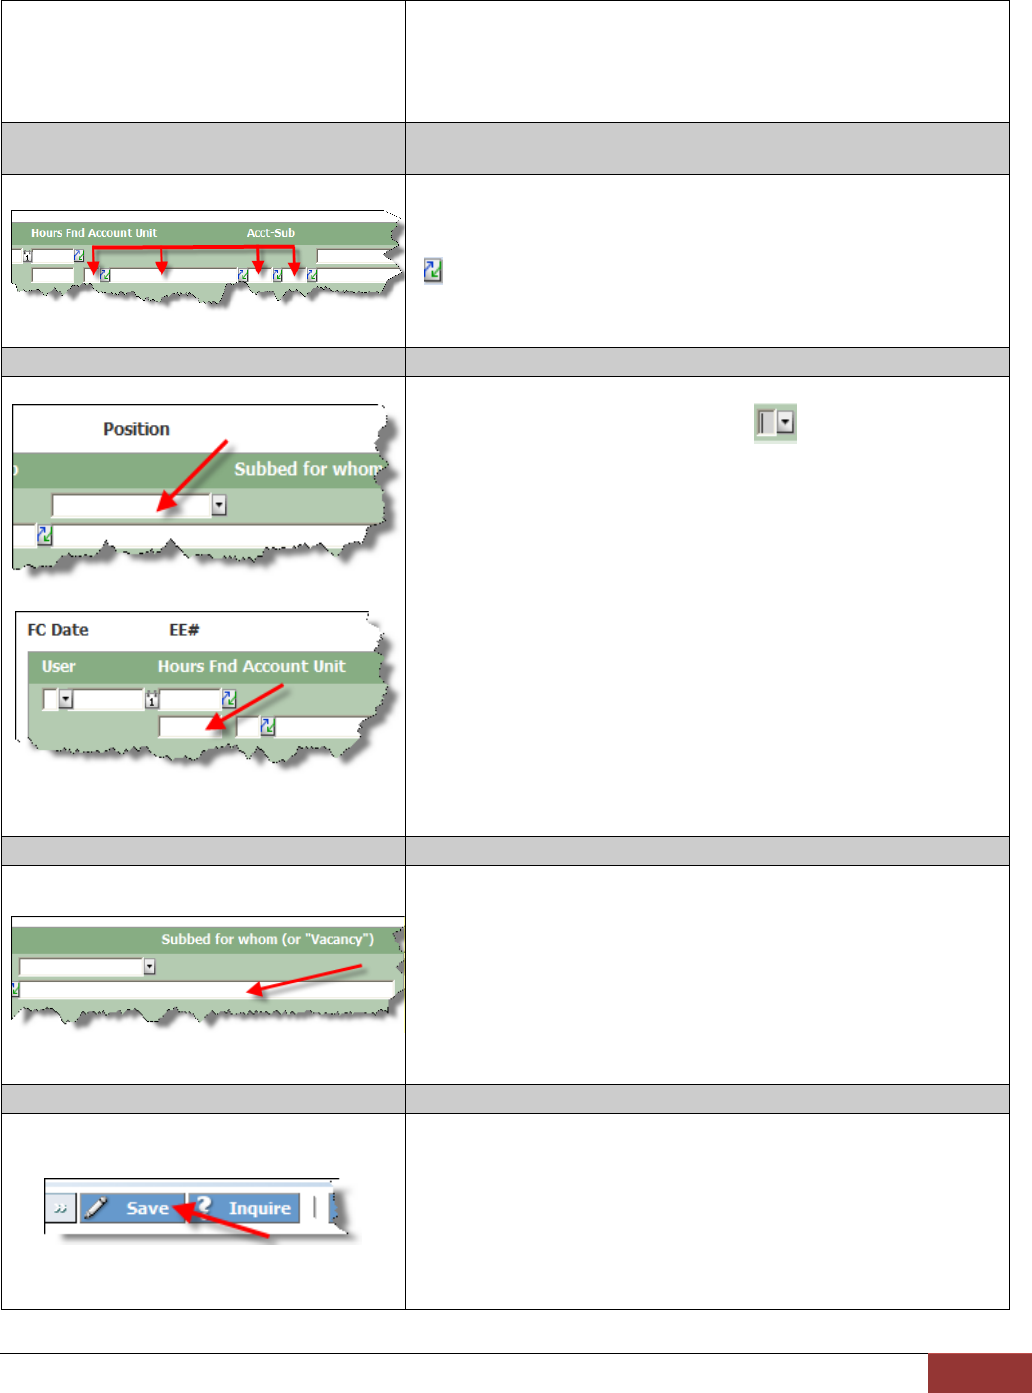
Step 8 Deleting and/or Changing Entries
To Delete an entry made in the Substitute Time Entry
screen, click on the Drop Down Menu ( ) under
the FC heading. Then click Delete.
Click the Save button.
----------------
To Change an entry made in the Substitute Time
Entry screen, click on the Drop Down Menu ( )
under the FC heading. Then click Change.
Make the appropriate changes to the relevant fields.
Click the Save button.
Submitting Hours and Leave – Final Submittal to Payroll
Step 1 Submitting Hours and Leave to Payroll
When you are finished entering all your information
and you have reviewed your data, you are ready to
submit your final data to Payroll.
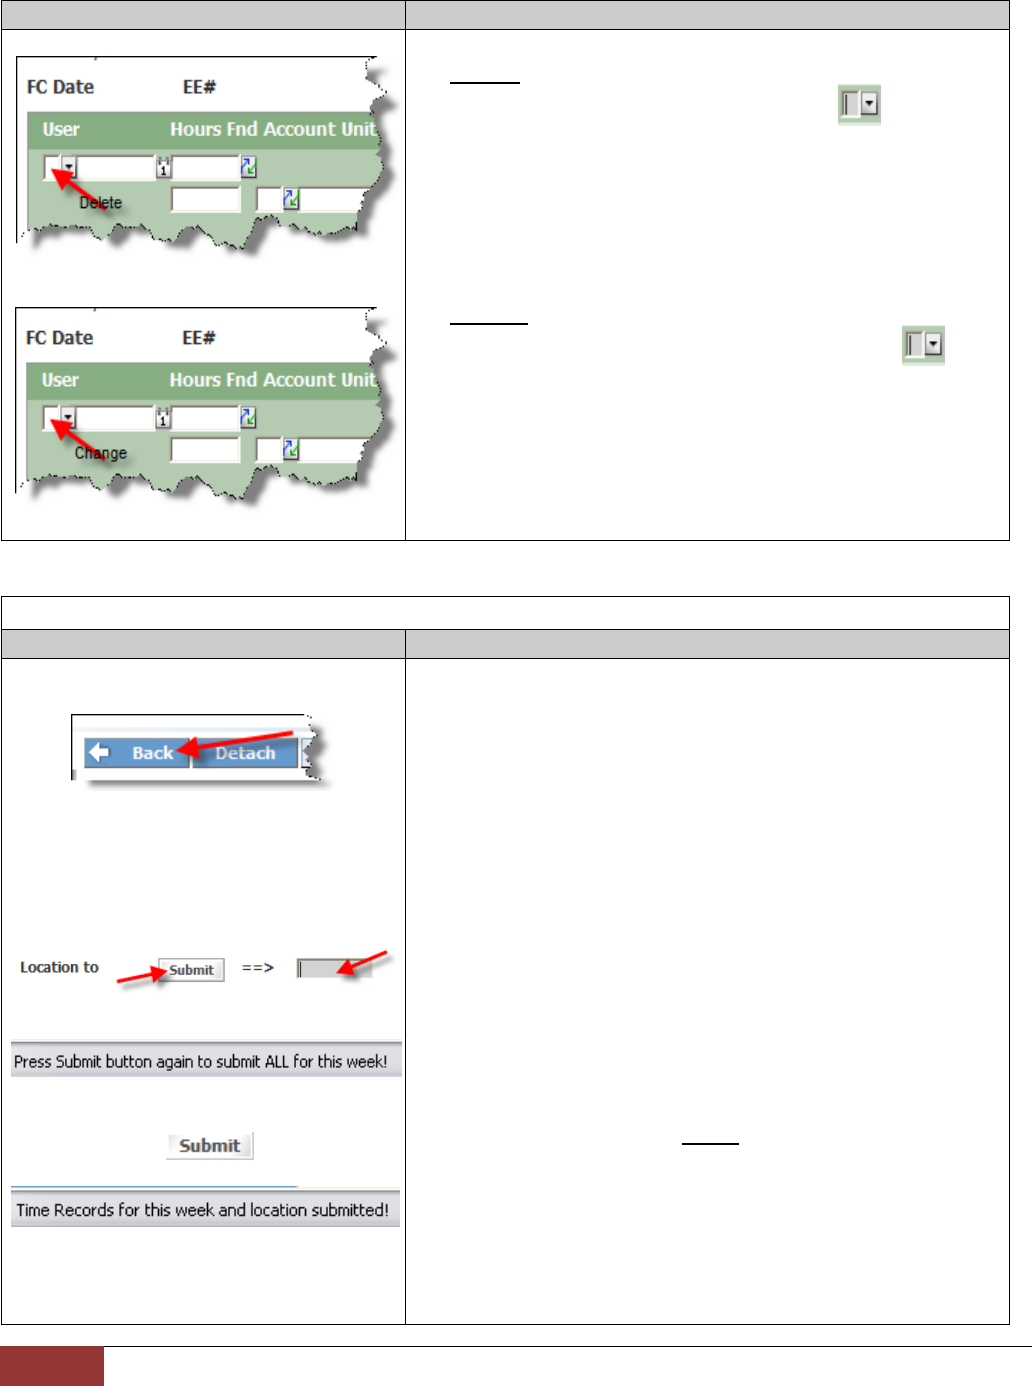
Return to the Time Entry Splash screen (ZE40.1) by
clicking on the Back button.
Enter your location code in the Location to field near
the bottom of the screen.
Click the Submit button.
The status bar at the bottom of the screen will display “Press
Submit button again to submit ALL for this week!” and the word
“YES” will appear to the right of the location code field box.
Click the Submit button again.
The status bar at the bottom of the screen will display “Time
Records for this week and location submitted!”
Run the “Timesheet Detail Review” report again.
Print, sign, and turn in to the Payroll Office.

Lawson Timesheet Quick Reference Guide |
15
