Installation Guide Linux 07 RHEL7Installation
User Manual:
Open the PDF directly: View PDF ![]() .
.
Page Count: 501 [warning: Documents this large are best viewed by clicking the View PDF Link!]
- Table of Contents
- CHAPTER 1. GETTING STARTED
- CHAPTER 2. DOWNLOADING RED HAT ENTERPRISE LINUX
- CHAPTER 3. MAKING MEDIA
- PART I. AMD64, INTEL 64, AND ARM 64 - INSTALLATION AND BOOTING
- CHAPTER 4. QUICK INSTALLATION GUIDE
- CHAPTER 5. PLANNING FOR INSTALLATION ON 64-BIT AMD, INTEL, AND ARM SYSTEMS
- 5.1. UPGRADE OR INSTALL?
- 5.2. IS YOUR HARDWARE COMPATIBLE?
- 5.3. SUPPORTED INSTALLATION TARGETS
- 5.4. SYSTEM SPECIFICATIONS LIST
- 5.5. DISK SPACE AND MEMORY REQUIREMENTS
- 5.6. RAID AND OTHER DISK DEVICES
- 5.7. CHOOSE AN INSTALLATION BOOT METHOD
- 5.8. AUTOMATING THE INSTALLATION WITH KICKSTART
- 5.9. USING A BETA RELEASE WITH UEFI SECURE BOOT
- CHAPTER 6. UPDATING DRIVERS DURING INSTALLATION ON AMD64 AND INTEL 64 SYSTEMS
- CHAPTER 7. BOOTING THE INSTALLATION ON 64-BIT AMD, INTEL, AND ARM SYSTEMS
- CHAPTER 8. INSTALLING USING ANACONDA
- 8.1. INTRODUCTION TO ANACONDA
- 8.2. CONSOLES AND LOGGING DURING THE INSTALLATION
- 8.3. INSTALLING IN TEXT MODE
- 8.4. INSTALLING IN THE GRAPHICAL USER INTERFACE
- 8.5. WELCOME SCREEN AND LANGUAGE SELECTION
- 8.6. THE INSTALLATION SUMMARY SCREEN
- 8.7. DATE & TIME
- 8.8. LANGUAGE SUPPORT
- 8.9. KEYBOARD CONFIGURATION
- 8.10. SECURITY POLICY
- 8.11. INSTALLATION SOURCE
- 8.12. NETWORK & HOSTNAME
- 8.13. SOFTWARE SELECTION
- 8.14. INSTALLATION DESTINATION
- 8.15. STORAGE DEVICES
- 8.16. KDUMP
- 8.17. BEGIN INSTALLATION
- 8.18. THE CONFIGURATION MENU AND PROGRESS SCREEN
- 8.19. INSTALLATION COMPLETE
- CHAPTER 9. TROUBLESHOOTING INSTALLATION ON 64-BIT AMD, INTEL, AND ARM SYSTEMS
- 9.1. TROUBLE BEGINNING THE INSTALLATION
- 9.2. TROUBLE DURING THE INSTALLATION
- 9.3. PROBLEMS AFTER INSTALLATION
- 9.3.1. Are You Unable to Boot With Your RAID Card?
- 9.3.2. Trouble With the Graphical Boot Sequence
- 9.3.3. Booting into a Graphical Environment
- 9.3.4. No Graphical User Interface Present
- 9.3.5. X Server Crashing After User Logs In
- 9.3.6. Is Your RAM Not Being Recognized?
- 9.3.7. Is Your System Displaying Signal 11 Errors?
- PART II. IBM POWER SYSTEMS - INSTALLATION AND BOOTING
- CHAPTER 10. PLANNING FOR INSTALLATION ON IBM POWER SYSTEMS
- 10.1. UPGRADE OR INSTALL?
- 10.2. IS YOUR HARDWARE COMPATIBLE?
- 10.3. IBM INSTALLATION TOOLS
- 10.4. PREPARATION FOR IBM POWER SYSTEMS SERVERS
- 10.5. SUPPORTED INSTALLATION TARGETS
- 10.6. SYSTEM SPECIFICATIONS LIST
- 10.7. DISK SPACE AND MEMORY REQUIREMENTS
- 10.8. RAID AND OTHER DISK DEVICES
- 10.9. CHOOSE AN INSTALLATION BOOT METHOD
- 10.10. AUTOMATING THE INSTALLATION WITH KICKSTART
- CHAPTER 11. UPDATING DRIVERS DURING INSTALLATION ON IBM POWER SYSTEMS
- CHAPTER 12. BOOTING THE INSTALLATION ON IBM POWER SYSTEMS
- CHAPTER 13. INSTALLING USING ANACONDA
- 13.1. INTRODUCTION TO ANACONDA
- 13.2. CONSOLES AND LOGGING DURING THE INSTALLATION
- 13.3. INSTALLING IN TEXT MODE
- 13.4. USING THE HMC VTERM
- 13.5. INSTALLING IN THE GRAPHICAL USER INTERFACE
- 13.6. WELCOME SCREEN AND LANGUAGE SELECTION
- 13.7. THE INSTALLATION SUMMARY SCREEN
- 13.8. DATE & TIME
- 13.9. LANGUAGE SUPPORT
- 13.10. KEYBOARD CONFIGURATION
- 13.11. SECURITY POLICY
- 13.12. INSTALLATION SOURCE
- 13.13. NETWORK & HOSTNAME
- 13.14. SOFTWARE SELECTION
- 13.15. INSTALLATION DESTINATION
- 13.16. STORAGE DEVICES
- 13.17. KDUMP
- 13.18. BEGIN INSTALLATION
- 13.19. THE CONFIGURATION MENU AND PROGRESS SCREEN
- 13.20. INSTALLATION COMPLETE
- CHAPTER 14. TROUBLESHOOTING INSTALLATION ON IBM POWER SYSTEMS
- 14.1. TROUBLE BEGINNING THE INSTALLATION
- 14.2. TROUBLE DURING THE INSTALLATION
- 14.3. PROBLEMS AFTER INSTALLATION
- 14.3.1. Trouble With the Graphical Boot Sequence
- 14.3.2. Booting into a Graphical Environment
- 14.3.3. No Graphical User Interface Present
- 14.3.4. X Server Crashing After User Logs In
- 14.3.5. Is Your System Displaying Signal 11 Errors?
- 14.3.6. Unable to IPL from Network Storage Space (*NWSSTG)
- 14.3.7. The GRUB2 next_entry variable can behave unexpectedly in a virtualized environment
- PART III. IBM Z ARCHITECTURE - INSTALLATION AND BOOTING
- CHAPTER 15. PLANNING FOR INSTALLATION ON IBM Z
- CHAPTER 16. BOOTING THE INSTALLATION ON IBM Z
- CHAPTER 17. INSTALLING USING ANACONDA
- 17.1. INTRODUCTION TO ANACONDA
- 17.2. CONSOLES AND LOGGING DURING THE INSTALLATION
- 17.3. INSTALLATION IN NON-INTERACTIVE LINE MODE
- 17.4. INSTALLING IN TEXT MODE
- 17.5. INSTALLING IN THE GRAPHICAL USER INTERFACE
- 17.6. WELCOME SCREEN AND LANGUAGE SELECTION
- 17.7. THE INSTALLATION SUMMARY SCREEN
- 17.8. DATE & TIME
- 17.9. LANGUAGE SUPPORT
- 17.10. KEYBOARD CONFIGURATION
- 17.11. SECURITY POLICY
- 17.12. INSTALLATION SOURCE
- 17.13. NETWORK & HOSTNAME
- 17.14. SOFTWARE SELECTION
- 17.15. INSTALLATION DESTINATION
- 17.16. STORAGE DEVICES
- 17.17. KDUMP
- 17.18. BEGIN INSTALLATION
- 17.19. THE CONFIGURATION MENU AND PROGRESS SCREEN
- 17.20. INSTALLATION COMPLETE
- CHAPTER 18. TROUBLESHOOTING INSTALLATION ON IBM Z
- CHAPTER 19. CONFIGURING AN INSTALLED LINUX ON IBM Z INSTANCE
- CHAPTER 20. PARAMETER AND CONFIGURATION FILES ON IBM Z
- CHAPTER 21. IBM Z REFERENCES
- PART IV. ADVANCED INSTALLATION OPTIONS
- CHAPTER 22. BOOT OPTIONS
- CHAPTER 23. PREPARING FOR A NETWORK INSTALLATION
- CHAPTER 24. USING VNC
- CHAPTER 25. HEADLESS SYSTEMS
- CHAPTER 26. KICKSTART INSTALLATIONS
- 26.1. WHAT ARE KICKSTART INSTALLATIONS?
- 26.2. HOW DO YOU PERFORM A KICKSTART INSTALLATION?
- 26.3. KICKSTART SYNTAX REFERENCE
- 26.4. SAMPLE KICKSTART CONFIGURATIONS
- CHAPTER 27. INSTALLING INTO A DISK IMAGE
- 27.1. MANUAL DISK IMAGE INSTALLATION
- 27.2. AUTOMATIC DISK IMAGE INSTALLATION
- 27.2.1. Overview of livemedia-creator
- 27.2.2. Installing livemedia-creator
- 27.2.3. Sample Kickstart Files
- 27.2.4. Creating Custom Images
- 27.2.4.1. Using lorax to create a boot.iso file
- 27.2.4.2. Creating a Live Image Using virt-install
- 27.2.4.3. Creating a Live Image Using Anaconda's Image Install
- 27.2.4.4. Creating a Disk or File System Image
- 27.2.4.5. Using a Previously Created Disk or File System Image
- 27.2.4.6. Creating an Appliance
- 27.2.4.7. Creating an Amazon Machine Image (AMI)
- 27.2.4.8. Additional Arguments
- 27.2.5. Troubleshooting livemedia-creator Problems
- CHAPTER 28. BUILDING CUSTOM SYSTEM IMAGES WITH COMPOSER
- 28.1. INTRODUCTION TO COMPOSER
- 28.2. COMPOSER SYSTEM REQUIREMENTS
- 28.3. PREPARING A REPOSITORY MIRROR FOR COMPOSER
- 28.4. INSTALLING COMPOSER
- 28.5. ACCESSING COMPOSER GUI IN COCKPIT
- 28.6. CREATING A COMPOSER BLUEPRINT
- 28.7. EDITING A COMPOSER BLUEPRINT
- 28.8. CREATING A SYSTEM IMAGE WITH COMPOSER
- 28.9. ADDITIONAL RESOURCES
- CHAPTER 29. UPGRADING YOUR CURRENT SYSTEM
- PART V. AFTER INSTALLATION
- CHAPTER 30. INITIAL SETUP
- CHAPTER 31. YOUR NEXT STEPS
- CHAPTER 32. BASIC SYSTEM RECOVERY
- CHAPTER 33. UNREGISTERING FROM RED HAT SUBSCRIPTION MANAGEMENT SERVICES
- CHAPTER 34. UNINSTALLING RED HAT ENTERPRISE LINUX
- PART VI. TECHNICAL APPENDIXES
- APPENDIX A. AN INTRODUCTION TO DISK PARTITIONS
- APPENDIX B. ISCSI DISKS
- APPENDIX C. UNDERSTANDING LVM
- APPENDIX D. OTHER TECHNICAL DOCUMENTATION
- APPENDIX E. REFERENCE TABLE FOR EXT4 AND XFS COMMANDS
- APPENDIX F. DATA SIZE TERMINOLOGY REFERENCE TABLE
- APPENDIX G. REVISION HISTORY
- INDEX

Red Hat Enterprise Linux 7
Installation Guide
Installing Red Hat Enterprise Linux 7 on all architectures
Last Updated: 2019-01-04


Red Hat Enterprise Linux 7 Installation Guide
Installing Red Hat Enterprise Linux 7 on all architectures
Vladimír Slávik
Red Hat Customer Content Services
vslavik@redhat.com
Sharon Moroney
Red Hat Customer Content Services
smoroney@redhat.com
Robert Grange
Red Hat Customer Content Services
Petr Bokoč
Red Hat Customer Content Services
Clayton Spicer
Red Hat Customer Content Services
Tomáš Čapek
Red Hat Customer Content Services
Barbora Ančincová
Red Hat Customer Content Services
Yoana Ruseva
Red Hat Customer Content Services
Brian Exelbierd
Red Hat Customer Content Services
Jack Reed
Red Hat Customer Content Services
Radek Bíba
Red Hat Customer Content Services
Zac Dover
Red Hat Customer Content Services

Legal Notice
Copyright © 2018 Red Hat, Inc. and others.
This document is licensed by Red Hat under the Creative Commons Attribution-ShareAlike 3.0
Unported License. If you distribute this document, or a modified version of it, you must provide
attribution to Red Hat, Inc. and provide a link to the original. If the document is modified, all Red Hat
trademarks must be removed.
Red Hat, as the licensor of this document, waives the right to enforce, and agrees not to assert,
Section 4d of CC-BY-SA to the fullest extent permitted by applicable law.
Red Hat, Red Hat Enterprise Linux, the Shadowman logo, JBoss, OpenShift, Fedora, the Infinity
logo, and RHCE are trademarks of Red Hat, Inc., registered in the United States and other
countries.
Linux ® is the registered trademark of Linus Torvalds in the United States and other countries.
Java ® is a registered trademark of Oracle and/or its affiliates.
XFS ® is a trademark of Silicon Graphics International Corp. or its subsidiaries in the United States
and/or other countries.
MySQL ® is a registered trademark of MySQL AB in the United States, the European Union and
other countries.
Node.js ® is an official trademark of Joyent. Red Hat Software Collections is not formally related to
or endorsed by the official Joyent Node.js open source or commercial project.
The OpenStack ® Word Mark and OpenStack logo are either registered trademarks/service marks
or trademarks/service marks of the OpenStack Foundation, in the United States and other countries
and are used with the OpenStack Foundation's permission. We are not affiliated with, endorsed or
sponsored by the OpenStack Foundation, or the OpenStack community.
All other trademarks are the property of their respective owners.
Abstract
This manual explains how to boot the Red Hat Enterprise Linux 7 installation program (Anaconda)
and how to install Red Hat Enterprise Linux 7 on AMD64 and Intel 64 systems, 64-bit ARM systems,
64-bit IBM Power Systems servers, and IBM Z servers. It also covers advanced installation methods
such as Kickstart installations, PXE installations, and installations over VNC. Finally, it describes
common post-installation tasks and explains how to troubleshoot installation problems. Information
on installing Red Hat Enterprise Linux Atomic Host can be found in the Red Hat Enterprise Linux
Atomic Host Installation and Configuration Guide.

. . . . . . . . . . . . . . . . . . . . . . . . . . . . . . . . . . . . . . . . . . . . . . . . . . . . . . . . . . . . . . . . . . . . . . . . . . . . . . . . . . . . . . . . . . . . . . . . . . . . . . . . . . . . . . . . . . . . . . . . . . . . . . . . . . . . . . . . . . . . . . . . . . . . . . . . . . . . . . . . . . . . . . . . . . . . . . . . . . . . . . . . . . . . . . . . . . . . . . . . . . . . . . . . . . . . . . . . . . . . . . . . . . . . . . . . . . . . . . . . . . . . . . . . . . . . . . . . . . . . . . . . . . . . . . . . . . . . . . . .
. . . . . . . . . . . . . . . . . . . . . . . . . . . . . . . . . . . . . . . . . . . . . . . . . . . . . . . . . . . . . . . . . . . . . . . . . . . . . . . . . . . . . . . . . . . . . . . . . . . . . . . . . . . . . . . . . . . . . . . . . . . . . . . . . . . . . . . . . . . . . . . . . . . . . . . . . . . . . . . . . . . . . . . . . . . . . . . . . . . . . . . . . . . . . . . . . . . . . . . . . . . . . . . . . . . . . . . . . . . . . . . . . . . . . . . . . . . . . . . . . . . . . . . . . . . . . . . . . . . . . . . . . . . . . . . . . . . . . . . .
. . . . . . . . . . . . . . . . . . . . . . . . . . . . . . . . . . . . . . . . . . . . . . . . . . . . . . . . . . . . . . . . . . . . . . . . . . . . . . . . . . . . . . . . . . . . . . . . . . . . . . . . . . . . . . . . . . . . . . . . . . . . . . . . . . . . . . . . . . . . . . . . . . . . . . . . . . . . . . . . . . . . . . . . . . . . . . . . . . . . . . . . . . . . . . . . . . . . . . . . . . . . . . . . . . . . . . . . . . . . . . . . . . . . . . . . . . . . . . . . . . . . . . . . . . . . . . . . . . . . . . . . . . . . . . . . . . . . . . . .
. . . . . . . . . . . . . . . . . . . . . . . . . . . . . . . . . . . . . . . . . . . . . . . . . . . . . . . . . . . . . . . . . . . . . . . . . . . . . . . . . . . . . . . . . . . . . . . . . . . . . . . . . . . . . . . . . . . . . . . . . . . . . . . . . . . . . . . . . . . . . . . . . . . . . . . . . . . . . . . . . . . . . . . . . . . . . . . . . . . . . . . . . . . . . . . . . . . . . . . . . . . . . . . . . . . . . . . . . . . . . . . . . . . . . . . . . . . . . . . . . . . . . . . . . . . . . . . . . . . . . . . . . . . . . . . . . . . . . . . .
. . . . . . . . . . . . . . . . . . . . . . . . . . . . . . . . . . . . . . . . . . . . . . . . . . . . . . . . . . . . . . . . . . . . . . . . . . . . . . . . . . . . . . . . . . . . . . . . . . . . . . . . . . . . . . . . . . . . . . . . . . . . . . . . . . . . . . . . . . . . . . . . . . . . . . . . . . . . . . . . . . . . . . . . . . . . . . . . . . . . . . . . . . . . . . . . . . . . . . . . . . . . . . . . . . . . . . . . . . . . . . . . . . . . . . . . . . . . . . . . . . . . . . . . . . . . . . . . . . . . . . . . . . . . . . . . . . . . . . . .
. . . . . . . . . . . . . . . . . . . . . . . . . . . . . . . . . . . . . . . . . . . . . . . . . . . . . . . . . . . . . . . . . . . . . . . . . . . . . . . . . . . . . . . . . . . . . . . . . . . . . . . . . . . . . . . . . . . . . . . . . . . . . . . . . . . . . . . . . . . . . . . . . . . . . . . . . . . . . . . . . . . . . . . . . . . . . . . . . . . . . . . . . . . . . . . . . . . . . . . . . . . . . . . . . . . . . . . . . . . . . . . . . . . . . . . . . . . . . . . . . . . . . . . . . . . . . . . . . . . . . . . . . . . . . . . . . . . . . . . .
. . . . . . . . . . . . . . . . . . . . . . . . . . . . . . . . . . . . . . . . . . . . . . . . . . . . . . . . . . . . . . . . . . . . . . . . . . . . . . . . . . . . . . . . . . . . . . . . . . . . . . . . . . . . . . . . . . . . . . . . . . . . . . . . . . . . . . . . . . . . . . . . . . . . . . . . . . . . . . . . . . . . . . . . . . . . . . . . . . . . . . . . . . . . . . . . . . . . . . . . . . . . . . . . . . . . . . . . . . . . . . . . . . . . . . . . . . . . . . . . . . . . . . . . . . . . . . . . . . . . . . . . . . . . . . . . . . . . . . . .
. . . . . . . . . . . . . . . . . . . . . . . . . . . . . . . . . . . . . . . . . . . . . . . . . . . . . . . . . . . . . . . . . . . . . . . . . . . . . . . . . . . . . . . . . . . . . . . . . . . . . . . . . . . . . . . . . . . . . . . . . . . . . . . . . . . . . . . . . . . . . . . . . . . . . . . . . . . . . . . . . . . . . . . . . . . . . . . . . . . . . . . . . . . . . . . . . . . . . . . . . . . . . . . . . . . . . . . . . . . . . . . . . . . . . . . . . . . . . . . . . . . . . . . . . . . . . . . . . . . . . . . . . . . . . . . . . . . . . . . .
. . . . . . . . . . . . . . . . . . . . . . . . . . . . . . . . . . . . . . . . . . . . . . . . . . . . . . . . . . . . . . . . . . . . . . . . . . . . . . . . . . . . . . . . . . . . . . . . . . . . . . . . . . . . . . . . . . . . . . . . . . . . . . . . . . . . . . . . . . . . . . . . . . . . . . . . . . . . . . . . . . . . . . . . . . . . . . . . . . . . . . . . . . . . . . . . . . . . . . . . . . . . . . . . . . . . . . . . . . . . . . . . . . . . . . . . . . . . . . . . . . . . . . . . . . . . . . . . . . . . . . . . . . . . . . . . . . . . . . . .
Table of Contents
CHAPTER 1. GETTING STARTED
1.1. GRAPHICAL INSTALLATION
1.2. REMOTE INSTALLATION
1.3. AUTOMATED INSTALLATION
CHAPTER 2. DOWNLOADING RED HAT ENTERPRISE LINUX
CHAPTER 3. MAKING MEDIA
3.1. MAKING AN INSTALLATION CD OR DVD
3.2. MAKING INSTALLATION USB MEDIA
3.3. PREPARING INSTALLATION SOURCES
PART I. AMD64, INTEL 64, AND ARM 64 - INSTALLATION AND BOOTING
CHAPTER 4. QUICK INSTALLATION GUIDE
4.1. INTERACTIVE INSTALLATION
4.2. AUTOMATIC INSTALLATION
CHAPTER 5. PLANNING FOR INSTALLATION ON 64-BIT AMD, INTEL, AND ARM SYSTEMS
5.1. UPGRADE OR INSTALL?
5.2. IS YOUR HARDWARE COMPATIBLE?
5.3. SUPPORTED INSTALLATION TARGETS
5.4. SYSTEM SPECIFICATIONS LIST
5.5. DISK SPACE AND MEMORY REQUIREMENTS
5.6. RAID AND OTHER DISK DEVICES
5.7. CHOOSE AN INSTALLATION BOOT METHOD
5.8. AUTOMATING THE INSTALLATION WITH KICKSTART
5.9. USING A BETA RELEASE WITH UEFI SECURE BOOT
CHAPTER 6. UPDATING DRIVERS DURING INSTALLATION ON AMD64 AND INTEL 64 SYSTEMS
6.1. LIMITATIONS OF DRIVER UPDATES DURING INSTALLATION
6.2. PREPARING FOR A DRIVER UPDATE DURING INSTALLATION
6.3. PERFORMING A DRIVER UPDATE DURING INSTALLATION
CHAPTER 7. BOOTING THE INSTALLATION ON 64-BIT AMD, INTEL, AND ARM SYSTEMS
7.1. STARTING THE INSTALLATION PROGRAM
7.2. THE BOOT MENU
CHAPTER 8. INSTALLING USING ANACONDA
8.1. INTRODUCTION TO ANACONDA
8.2. CONSOLES AND LOGGING DURING THE INSTALLATION
8.3. INSTALLING IN TEXT MODE
8.4. INSTALLING IN THE GRAPHICAL USER INTERFACE
8.5. WELCOME SCREEN AND LANGUAGE SELECTION
8.6. THE INSTALLATION SUMMARY SCREEN
8.7. DATE & TIME
8.8. LANGUAGE SUPPORT
8.9. KEYBOARD CONFIGURATION
8.10. SECURITY POLICY
8.11. INSTALLATION SOURCE
8.12. NETWORK & HOSTNAME
8.13. SOFTWARE SELECTION
8.14. INSTALLATION DESTINATION
8.15. STORAGE DEVICES
7
7
7
7
9
12
12
12
17
25
26
26
31
34
34
34
35
35
36
37
38
39
39
42
42
43
44
48
48
50
52
52
52
53
55
56
57
59
61
61
63
65
66
70
72
94
Table of Contents
1

. . . . . . . . . . . . . . . . . . . . . . . . . . . . . . . . . . . . . . . . . . . . . . . . . . . . . . . . . . . . . . . . . . . . . . . . . . . . . . . . . . . . . . . . . . . . . . . . . . . . . . . . . . . . . . . . . . . . . . . . . . . . . . . . . . . . . . . . . . . . . . . . . . . . . . . . . . . . . . . . . . . . . . . . . . . . . . . . . . . . . . . . . . . . . . . . . . . . . . . . . . . . . . . . . . . . . . . . . . . . . . . . . . . . . . . . . . . . . . . . . . . . . . . . . . . . . . . . . . . . . . . . . . . . . . . . . . . . . . . .
. . . . . . . . . . . . . . . . . . . . . . . . . . . . . . . . . . . . . . . . . . . . . . . . . . . . . . . . . . . . . . . . . . . . . . . . . . . . . . . . . . . . . . . . . . . . . . . . . . . . . . . . . . . . . . . . . . . . . . . . . . . . . . . . . . . . . . . . . . . . . . . . . . . . . . . . . . . . . . . . . . . . . . . . . . . . . . . . . . . . . . . . . . . . . . . . . . . . . . . . . . . . . . . . . . . . . . . . . . . . . . . . . . . . . . . . . . . . . . . . . . . . . . . . . . . . . . . . . . . . . . . . . . . . . . . . . . . . . . . .
. . . . . . . . . . . . . . . . . . . . . . . . . . . . . . . . . . . . . . . . . . . . . . . . . . . . . . . . . . . . . . . . . . . . . . . . . . . . . . . . . . . . . . . . . . . . . . . . . . . . . . . . . . . . . . . . . . . . . . . . . . . . . . . . . . . . . . . . . . . . . . . . . . . . . . . . . . . . . . . . . . . . . . . . . . . . . . . . . . . . . . . . . . . . . . . . . . . . . . . . . . . . . . . . . . . . . . . . . . . . . . . . . . . . . . . . . . . . . . . . . . . . . . . . . . . . . . . . . . . . . . . . . . . . . . . . . . . . . . . .
. . . . . . . . . . . . . . . . . . . . . . . . . . . . . . . . . . . . . . . . . . . . . . . . . . . . . . . . . . . . . . . . . . . . . . . . . . . . . . . . . . . . . . . . . . . . . . . . . . . . . . . . . . . . . . . . . . . . . . . . . . . . . . . . . . . . . . . . . . . . . . . . . . . . . . . . . . . . . . . . . . . . . . . . . . . . . . . . . . . . . . . . . . . . . . . . . . . . . . . . . . . . . . . . . . . . . . . . . . . . . . . . . . . . . . . . . . . . . . . . . . . . . . . . . . . . . . . . . . . . . . . . . . . . . . . . . . . . . . . .
. . . . . . . . . . . . . . . . . . . . . . . . . . . . . . . . . . . . . . . . . . . . . . . . . . . . . . . . . . . . . . . . . . . . . . . . . . . . . . . . . . . . . . . . . . . . . . . . . . . . . . . . . . . . . . . . . . . . . . . . . . . . . . . . . . . . . . . . . . . . . . . . . . . . . . . . . . . . . . . . . . . . . . . . . . . . . . . . . . . . . . . . . . . . . . . . . . . . . . . . . . . . . . . . . . . . . . . . . . . . . . . . . . . . . . . . . . . . . . . . . . . . . . . . . . . . . . . . . . . . . . . . . . . . . . . . . . . . . . . .
. . . . . . . . . . . . . . . . . . . . . . . . . . . . . . . . . . . . . . . . . . . . . . . . . . . . . . . . . . . . . . . . . . . . . . . . . . . . . . . . . . . . . . . . . . . . . . . . . . . . . . . . . . . . . . . . . . . . . . . . . . . . . . . . . . . . . . . . . . . . . . . . . . . . . . . . . . . . . . . . . . . . . . . . . . . . . . . . . . . . . . . . . . . . . . . . . . . . . . . . . . . . . . . . . . . . . . . . . . . . . . . . . . . . . . . . . . . . . . . . . . . . . . . . . . . . . . . . . . . . . . . . . . . . . . . . . . . . . . . .
8.16. KDUMP
8.17. BEGIN INSTALLATION
8.18. THE CONFIGURATION MENU AND PROGRESS SCREEN
8.19. INSTALLATION COMPLETE
CHAPTER 9. TROUBLESHOOTING INSTALLATION ON 64-BIT AMD, INTEL, AND ARM SYSTEMS
9.1. TROUBLE BEGINNING THE INSTALLATION
9.2. TROUBLE DURING THE INSTALLATION
9.3. PROBLEMS AFTER INSTALLATION
PART II. IBM POWER SYSTEMS - INSTALLATION AND BOOTING
CHAPTER 10. PLANNING FOR INSTALLATION ON IBM POWER SYSTEMS
10.1. UPGRADE OR INSTALL?
10.2. IS YOUR HARDWARE COMPATIBLE?
10.3. IBM INSTALLATION TOOLS
10.4. PREPARATION FOR IBM POWER SYSTEMS SERVERS
10.5. SUPPORTED INSTALLATION TARGETS
10.6. SYSTEM SPECIFICATIONS LIST
10.7. DISK SPACE AND MEMORY REQUIREMENTS
10.8. RAID AND OTHER DISK DEVICES
10.9. CHOOSE AN INSTALLATION BOOT METHOD
10.10. AUTOMATING THE INSTALLATION WITH KICKSTART
CHAPTER 11. UPDATING DRIVERS DURING INSTALLATION ON IBM POWER SYSTEMS
11.1. PREPARING FOR A DRIVER UPDATE DURING INSTALLATION
11.2. PERFORMING A DRIVER UPDATE DURING INSTALLATION
CHAPTER 12. BOOTING THE INSTALLATION ON IBM POWER SYSTEMS
12.1. THE BOOT MENU
12.2. INSTALLING FROM A DIFFERENT SOURCE
12.3. BOOTING FROM THE NETWORK USING AN INSTALLATION SERVER
CHAPTER 13. INSTALLING USING ANACONDA
13.1. INTRODUCTION TO ANACONDA
13.2. CONSOLES AND LOGGING DURING THE INSTALLATION
13.3. INSTALLING IN TEXT MODE
13.4. USING THE HMC VTERM
13.5. INSTALLING IN THE GRAPHICAL USER INTERFACE
13.6. WELCOME SCREEN AND LANGUAGE SELECTION
13.7. THE INSTALLATION SUMMARY SCREEN
13.8. DATE & TIME
13.9. LANGUAGE SUPPORT
13.10. KEYBOARD CONFIGURATION
13.11. SECURITY POLICY
13.12. INSTALLATION SOURCE
13.13. NETWORK & HOSTNAME
13.14. SOFTWARE SELECTION
13.15. INSTALLATION DESTINATION
13.16. STORAGE DEVICES
13.17. KDUMP
13.18. BEGIN INSTALLATION
13.19. THE CONFIGURATION MENU AND PROGRESS SCREEN
13.20. INSTALLATION COMPLETE
103
103
104
108
110
112
113
119
124
125
125
125
125
126
126
127
128
129
129
130
131
131
133
137
138
139
140
142
142
142
143
145
145
147
148
150
152
152
154
156
157
161
163
183
190
191
192
196
Installation Guide
2

. . . . . . . . . . . . . . . . . . . . . . . . . . . . . . . . . . . . . . . . . . . . . . . . . . . . . . . . . . . . . . . . . . . . . . . . . . . . . . . . . . . . . . . . . . . . . . . . . . . . . . . . . . . . . . . . . . . . . . . . . . . . . . . . . . . . . . . . . . . . . . . . . . . . . . . . . . . . . . . . . . . . . . . . . . . . . . . . . . . . . . . . . . . . . . . . . . . . . . . . . . . . . . . . . . . . . . . . . . . . . . . . . . . . . . . . . . . . . . . . . . . . . . . . . . . . . . . . . . . . . . . . . . . . . . . . . . . . . . . .
. . . . . . . . . . . . . . . . . . . . . . . . . . . . . . . . . . . . . . . . . . . . . . . . . . . . . . . . . . . . . . . . . . . . . . . . . . . . . . . . . . . . . . . . . . . . . . . . . . . . . . . . . . . . . . . . . . . . . . . . . . . . . . . . . . . . . . . . . . . . . . . . . . . . . . . . . . . . . . . . . . . . . . . . . . . . . . . . . . . . . . . . . . . . . . . . . . . . . . . . . . . . . . . . . . . . . . . . . . . . . . . . . . . . . . . . . . . . . . . . . . . . . . . . . . . . . . . . . . . . . . . . . . . . . . . . . . . . . . . .
. . . . . . . . . . . . . . . . . . . . . . . . . . . . . . . . . . . . . . . . . . . . . . . . . . . . . . . . . . . . . . . . . . . . . . . . . . . . . . . . . . . . . . . . . . . . . . . . . . . . . . . . . . . . . . . . . . . . . . . . . . . . . . . . . . . . . . . . . . . . . . . . . . . . . . . . . . . . . . . . . . . . . . . . . . . . . . . . . . . . . . . . . . . . . . . . . . . . . . . . . . . . . . . . . . . . . . . . . . . . . . . . . . . . . . . . . . . . . . . . . . . . . . . . . . . . . . . . . . . . . . . . . . . . . . . . . . . . . . . .
. . . . . . . . . . . . . . . . . . . . . . . . . . . . . . . . . . . . . . . . . . . . . . . . . . . . . . . . . . . . . . . . . . . . . . . . . . . . . . . . . . . . . . . . . . . . . . . . . . . . . . . . . . . . . . . . . . . . . . . . . . . . . . . . . . . . . . . . . . . . . . . . . . . . . . . . . . . . . . . . . . . . . . . . . . . . . . . . . . . . . . . . . . . . . . . . . . . . . . . . . . . . . . . . . . . . . . . . . . . . . . . . . . . . . . . . . . . . . . . . . . . . . . . . . . . . . . . . . . . . . . . . . . . . . . . . . . . . . . . .
. . . . . . . . . . . . . . . . . . . . . . . . . . . . . . . . . . . . . . . . . . . . . . . . . . . . . . . . . . . . . . . . . . . . . . . . . . . . . . . . . . . . . . . . . . . . . . . . . . . . . . . . . . . . . . . . . . . . . . . . . . . . . . . . . . . . . . . . . . . . . . . . . . . . . . . . . . . . . . . . . . . . . . . . . . . . . . . . . . . . . . . . . . . . . . . . . . . . . . . . . . . . . . . . . . . . . . . . . . . . . . . . . . . . . . . . . . . . . . . . . . . . . . . . . . . . . . . . . . . . . . . . . . . . . . . . . . . . . . . .
. . . . . . . . . . . . . . . . . . . . . . . . . . . . . . . . . . . . . . . . . . . . . . . . . . . . . . . . . . . . . . . . . . . . . . . . . . . . . . . . . . . . . . . . . . . . . . . . . . . . . . . . . . . . . . . . . . . . . . . . . . . . . . . . . . . . . . . . . . . . . . . . . . . . . . . . . . . . . . . . . . . . . . . . . . . . . . . . . . . . . . . . . . . . . . . . . . . . . . . . . . . . . . . . . . . . . . . . . . . . . . . . . . . . . . . . . . . . . . . . . . . . . . . . . . . . . . . . . . . . . . . . . . . . . . . . . . . . . . . .
. . . . . . . . . . . . . . . . . . . . . . . . . . . . . . . . . . . . . . . . . . . . . . . . . . . . . . . . . . . . . . . . . . . . . . . . . . . . . . . . . . . . . . . . . . . . . . . . . . . . . . . . . . . . . . . . . . . . . . . . . . . . . . . . . . . . . . . . . . . . . . . . . . . . . . . . . . . . . . . . . . . . . . . . . . . . . . . . . . . . . . . . . . . . . . . . . . . . . . . . . . . . . . . . . . . . . . . . . . . . . . . . . . . . . . . . . . . . . . . . . . . . . . . . . . . . . . . . . . . . . . . . . . . . . . . . . . . . . . . .
. . . . . . . . . . . . . . . . . . . . . . . . . . . . . . . . . . . . . . . . . . . . . . . . . . . . . . . . . . . . . . . . . . . . . . . . . . . . . . . . . . . . . . . . . . . . . . . . . . . . . . . . . . . . . . . . . . . . . . . . . . . . . . . . . . . . . . . . . . . . . . . . . . . . . . . . . . . . . . . . . . . . . . . . . . . . . . . . . . . . . . . . . . . . . . . . . . . . . . . . . . . . . . . . . . . . . . . . . . . . . . . . . . . . . . . . . . . . . . . . . . . . . . . . . . . . . . . . . . . . . . . . . . . . . . . . . . . . . . . .
CHAPTER 14. TROUBLESHOOTING INSTALLATION ON IBM POWER SYSTEMS
14.1. TROUBLE BEGINNING THE INSTALLATION
14.2. TROUBLE DURING THE INSTALLATION
14.3. PROBLEMS AFTER INSTALLATION
PART III. IBM Z ARCHITECTURE - INSTALLATION AND BOOTING
CHAPTER 15. PLANNING FOR INSTALLATION ON IBM Z
15.1. PRE-INSTALLATION
15.2. OVERVIEW OF THE IBM Z INSTALLATION PROCEDURE
CHAPTER 16. BOOTING THE INSTALLATION ON IBM Z
16.1. CUSTOMIZING BOOT PARAMETERS
16.2. CONSIDERATIONS FOR HARD DRIVE INSTALLATION ON IBM Z
16.3. INSTALLING UNDER Z/VM
16.4. INSTALLING IN AN LPAR
CHAPTER 17. INSTALLING USING ANACONDA
17.1. INTRODUCTION TO ANACONDA
17.2. CONSOLES AND LOGGING DURING THE INSTALLATION
17.3. INSTALLATION IN NON-INTERACTIVE LINE MODE
17.4. INSTALLING IN TEXT MODE
17.5. INSTALLING IN THE GRAPHICAL USER INTERFACE
17.6. WELCOME SCREEN AND LANGUAGE SELECTION
17.7. THE INSTALLATION SUMMARY SCREEN
17.8. DATE & TIME
17.9. LANGUAGE SUPPORT
17.10. KEYBOARD CONFIGURATION
17.11. SECURITY POLICY
17.12. INSTALLATION SOURCE
17.13. NETWORK & HOSTNAME
17.14. SOFTWARE SELECTION
17.15. INSTALLATION DESTINATION
17.16. STORAGE DEVICES
17.17. KDUMP
17.18. BEGIN INSTALLATION
17.19. THE CONFIGURATION MENU AND PROGRESS SCREEN
17.20. INSTALLATION COMPLETE
CHAPTER 18. TROUBLESHOOTING INSTALLATION ON IBM Z
18.1. TROUBLE DURING THE INSTALLATION
18.2. PROBLEMS AFTER INSTALLATION
CHAPTER 19. CONFIGURING AN INSTALLED LINUX ON IBM Z INSTANCE
19.1. ADDING DASDS
19.2. ADDING FCP-ATTACHED LOGICAL UNITS (LUNS)
19.3. ADDING A NETWORK DEVICE
CHAPTER 20. PARAMETER AND CONFIGURATION FILES ON IBM Z
20.1. REQUIRED PARAMETERS
20.2. THE Z/VM CONFIGURATION FILE
20.3. INSTALLATION NETWORK PARAMETERS
20.4. PARAMETERS FOR KICKSTART INSTALLATIONS
20.5. MISCELLANEOUS PARAMETERS
20.6. SAMPLE PARAMETER FILE AND CMS CONFIGURATION FILE
198
199
200
205
209
210
210
211
213
213
214
215
219
222
222
222
223
223
225
226
227
228
230
231
232
234
235
239
241
259
269
270
271
275
278
279
284
286
286
291
295
305
305
305
306
310
310
311
Table of Contents
3

. . . . . . . . . . . . . . . . . . . . . . . . . . . . . . . . . . . . . . . . . . . . . . . . . . . . . . . . . . . . . . . . . . . . . . . . . . . . . . . . . . . . . . . . . . . . . . . . . . . . . . . . . . . . . . . . . . . . . . . . . . . . . . . . . . . . . . . . . . . . . . . . . . . . . . . . . . . . . . . . . . . . . . . . . . . . . . . . . . . . . . . . . . . . . . . . . . . . . . . . . . . . . . . . . . . . . . . . . . . . . . . . . . . . . . . . . . . . . . . . . . . . . . . . . . . . . . . . . . . . . . . . . . . . . . . . . . . . . . . .
. . . . . . . . . . . . . . . . . . . . . . . . . . . . . . . . . . . . . . . . . . . . . . . . . . . . . . . . . . . . . . . . . . . . . . . . . . . . . . . . . . . . . . . . . . . . . . . . . . . . . . . . . . . . . . . . . . . . . . . . . . . . . . . . . . . . . . . . . . . . . . . . . . . . . . . . . . . . . . . . . . . . . . . . . . . . . . . . . . . . . . . . . . . . . . . . . . . . . . . . . . . . . . . . . . . . . . . . . . . . . . . . . . . . . . . . . . . . . . . . . . . . . . . . . . . . . . . . . . . . . . . . . . . . . . . . . . . . . . . .
. . . . . . . . . . . . . . . . . . . . . . . . . . . . . . . . . . . . . . . . . . . . . . . . . . . . . . . . . . . . . . . . . . . . . . . . . . . . . . . . . . . . . . . . . . . . . . . . . . . . . . . . . . . . . . . . . . . . . . . . . . . . . . . . . . . . . . . . . . . . . . . . . . . . . . . . . . . . . . . . . . . . . . . . . . . . . . . . . . . . . . . . . . . . . . . . . . . . . . . . . . . . . . . . . . . . . . . . . . . . . . . . . . . . . . . . . . . . . . . . . . . . . . . . . . . . . . . . . . . . . . . . . . . . . . . . . . . . . . . .
. . . . . . . . . . . . . . . . . . . . . . . . . . . . . . . . . . . . . . . . . . . . . . . . . . . . . . . . . . . . . . . . . . . . . . . . . . . . . . . . . . . . . . . . . . . . . . . . . . . . . . . . . . . . . . . . . . . . . . . . . . . . . . . . . . . . . . . . . . . . . . . . . . . . . . . . . . . . . . . . . . . . . . . . . . . . . . . . . . . . . . . . . . . . . . . . . . . . . . . . . . . . . . . . . . . . . . . . . . . . . . . . . . . . . . . . . . . . . . . . . . . . . . . . . . . . . . . . . . . . . . . . . . . . . . . . . . . . . . . .
. . . . . . . . . . . . . . . . . . . . . . . . . . . . . . . . . . . . . . . . . . . . . . . . . . . . . . . . . . . . . . . . . . . . . . . . . . . . . . . . . . . . . . . . . . . . . . . . . . . . . . . . . . . . . . . . . . . . . . . . . . . . . . . . . . . . . . . . . . . . . . . . . . . . . . . . . . . . . . . . . . . . . . . . . . . . . . . . . . . . . . . . . . . . . . . . . . . . . . . . . . . . . . . . . . . . . . . . . . . . . . . . . . . . . . . . . . . . . . . . . . . . . . . . . . . . . . . . . . . . . . . . . . . . . . . . . . . . . . . .
. . . . . . . . . . . . . . . . . . . . . . . . . . . . . . . . . . . . . . . . . . . . . . . . . . . . . . . . . . . . . . . . . . . . . . . . . . . . . . . . . . . . . . . . . . . . . . . . . . . . . . . . . . . . . . . . . . . . . . . . . . . . . . . . . . . . . . . . . . . . . . . . . . . . . . . . . . . . . . . . . . . . . . . . . . . . . . . . . . . . . . . . . . . . . . . . . . . . . . . . . . . . . . . . . . . . . . . . . . . . . . . . . . . . . . . . . . . . . . . . . . . . . . . . . . . . . . . . . . . . . . . . . . . . . . . . . . . . . . . .
. . . . . . . . . . . . . . . . . . . . . . . . . . . . . . . . . . . . . . . . . . . . . . . . . . . . . . . . . . . . . . . . . . . . . . . . . . . . . . . . . . . . . . . . . . . . . . . . . . . . . . . . . . . . . . . . . . . . . . . . . . . . . . . . . . . . . . . . . . . . . . . . . . . . . . . . . . . . . . . . . . . . . . . . . . . . . . . . . . . . . . . . . . . . . . . . . . . . . . . . . . . . . . . . . . . . . . . . . . . . . . . . . . . . . . . . . . . . . . . . . . . . . . . . . . . . . . . . . . . . . . . . . . . . . . . . . . . . . . . .
. . . . . . . . . . . . . . . . . . . . . . . . . . . . . . . . . . . . . . . . . . . . . . . . . . . . . . . . . . . . . . . . . . . . . . . . . . . . . . . . . . . . . . . . . . . . . . . . . . . . . . . . . . . . . . . . . . . . . . . . . . . . . . . . . . . . . . . . . . . . . . . . . . . . . . . . . . . . . . . . . . . . . . . . . . . . . . . . . . . . . . . . . . . . . . . . . . . . . . . . . . . . . . . . . . . . . . . . . . . . . . . . . . . . . . . . . . . . . . . . . . . . . . . . . . . . . . . . . . . . . . . . . . . . . . . . . . . . . . . .
. . . . . . . . . . . . . . . . . . . . . . . . . . . . . . . . . . . . . . . . . . . . . . . . . . . . . . . . . . . . . . . . . . . . . . . . . . . . . . . . . . . . . . . . . . . . . . . . . . . . . . . . . . . . . . . . . . . . . . . . . . . . . . . . . . . . . . . . . . . . . . . . . . . . . . . . . . . . . . . . . . . . . . . . . . . . . . . . . . . . . . . . . . . . . . . . . . . . . . . . . . . . . . . . . . . . . . . . . . . . . . . . . . . . . . . . . . . . . . . . . . . . . . . . . . . . . . . . . . . . . . . . . . . . . . . . . . . . . . . .
. . . . . . . . . . . . . . . . . . . . . . . . . . . . . . . . . . . . . . . . . . . . . . . . . . . . . . . . . . . . . . . . . . . . . . . . . . . . . . . . . . . . . . . . . . . . . . . . . . . . . . . . . . . . . . . . . . . . . . . . . . . . . . . . . . . . . . . . . . . . . . . . . . . . . . . . . . . . . . . . . . . . . . . . . . . . . . . . . . . . . . . . . . . . . . . . . . . . . . . . . . . . . . . . . . . . . . . . . . . . . . . . . . . . . . . . . . . . . . . . . . . . . . . . . . . . . . . . . . . . . . . . . . . . . . . . . . . . . . . .
. . . . . . . . . . . . . . . . . . . . . . . . . . . . . . . . . . . . . . . . . . . . . . . . . . . . . . . . . . . . . . . . . . . . . . . . . . . . . . . . . . . . . . . . . . . . . . . . . . . . . . . . . . . . . . . . . . . . . . . . . . . . . . . . . . . . . . . . . . . . . . . . . . . . . . . . . . . . . . . . . . . . . . . . . . . . . . . . . . . . . . . . . . . . . . . . . . . . . . . . . . . . . . . . . . . . . . . . . . . . . . . . . . . . . . . . . . . . . . . . . . . . . . . . . . . . . . . . . . . . . . . . . . . . . . . . . . . . . . . .
. . . . . . . . . . . . . . . . . . . . . . . . . . . . . . . . . . . . . . . . . . . . . . . . . . . . . . . . . . . . . . . . . . . . . . . . . . . . . . . . . . . . . . . . . . . . . . . . . . . . . . . . . . . . . . . . . . . . . . . . . . . . . . . . . . . . . . . . . . . . . . . . . . . . . . . . . . . . . . . . . . . . . . . . . . . . . . . . . . . . . . . . . . . . . . . . . . . . . . . . . . . . . . . . . . . . . . . . . . . . . . . . . . . . . . . . . . . . . . . . . . . . . . . . . . . . . . . . . . . . . . . . . . . . . . . . . . . . . . . .
. . . . . . . . . . . . . . . . . . . . . . . . . . . . . . . . . . . . . . . . . . . . . . . . . . . . . . . . . . . . . . . . . . . . . . . . . . . . . . . . . . . . . . . . . . . . . . . . . . . . . . . . . . . . . . . . . . . . . . . . . . . . . . . . . . . . . . . . . . . . . . . . . . . . . . . . . . . . . . . . . . . . . . . . . . . . . . . . . . . . . . . . . . . . . . . . . . . . . . . . . . . . . . . . . . . . . . . . . . . . . . . . . . . . . . . . . . . . . . . . . . . . . . . . . . . . . . . . . . . . . . . . . . . . . . . . . . . . . . . .
. . . . . . . . . . . . . . . . . . . . . . . . . . . . . . . . . . . . . . . . . . . . . . . . . . . . . . . . . . . . . . . . . . . . . . . . . . . . . . . . . . . . . . . . . . . . . . . . . . . . . . . . . . . . . . . . . . . . . . . . . . . . . . . . . . . . . . . . . . . . . . . . . . . . . . . . . . . . . . . . . . . . . . . . . . . . . . . . . . . . . . . . . . . . . . . . . . . . . . . . . . . . . . . . . . . . . . . . . . . . . . . . . . . . . . . . . . . . . . . . . . . . . . . . . . . . . . . . . . . . . . . . . . . . . . . . . . . . . . . .
CHAPTER 21. IBM Z REFERENCES
21.1. IBM Z PUBLICATIONS
21.2. IBM REDBOOKS PUBLICATIONS FOR IBM Z
21.3. ONLINE RESOURCES
PART IV. ADVANCED INSTALLATION OPTIONS
CHAPTER 22. BOOT OPTIONS
22.1. CONFIGURING THE INSTALLATION SYSTEM AT THE BOOT MENU
22.2. USING THE MAINTENANCE BOOT MODES
CHAPTER 23. PREPARING FOR A NETWORK INSTALLATION
23.1. CONFIGURING NETWORK BOOT SERVICES
CHAPTER 24. USING VNC
24.1. INSTALLING A VNC VIEWER
24.2. PERFORMING A VNC INSTALLATION
24.3. KICKSTART CONSIDERATIONS
CHAPTER 25. HEADLESS SYSTEMS
CHAPTER 26. KICKSTART INSTALLATIONS
26.1. WHAT ARE KICKSTART INSTALLATIONS?
26.2. HOW DO YOU PERFORM A KICKSTART INSTALLATION?
26.3. KICKSTART SYNTAX REFERENCE
26.4. SAMPLE KICKSTART CONFIGURATIONS
CHAPTER 27. INSTALLING INTO A DISK IMAGE
27.1. MANUAL DISK IMAGE INSTALLATION
27.2. AUTOMATIC DISK IMAGE INSTALLATION
CHAPTER 28. BUILDING CUSTOM SYSTEM IMAGES WITH COMPOSER
28.1. INTRODUCTION TO COMPOSER
28.2. COMPOSER SYSTEM REQUIREMENTS
28.3. PREPARING A REPOSITORY MIRROR FOR COMPOSER
28.4. INSTALLING COMPOSER
28.5. ACCESSING COMPOSER GUI IN COCKPIT
28.6. CREATING A COMPOSER BLUEPRINT
28.7. EDITING A COMPOSER BLUEPRINT
28.8. CREATING A SYSTEM IMAGE WITH COMPOSER
28.9. ADDITIONAL RESOURCES
CHAPTER 29. UPGRADING YOUR CURRENT SYSTEM
PART V. AFTER INSTALLATION
CHAPTER 30. INITIAL SETUP
Options in the Initial Setup
30.1. GRAPHICAL MODE
30.2. TEXT MODE
30.3. STARTING INITIAL SETUP MANUALLY
CHAPTER 31. YOUR NEXT STEPS
CHAPTER 32. BASIC SYSTEM RECOVERY
32.1. COMMON PROBLEMS
32.2. ANACONDA RESCUE MODE
313
313
313
313
315
316
316
331
334
335
343
343
343
348
349
350
350
350
355
414
416
416
418
427
427
427
428
429
431
431
432
434
435
436
437
438
438
439
442
442
444
447
447
447
Installation Guide
4

. . . . . . . . . . . . . . . . . . . . . . . . . . . . . . . . . . . . . . . . . . . . . . . . . . . . . . . . . . . . . . . . . . . . . . . . . . . . . . . . . . . . . . . . . . . . . . . . . . . . . . . . . . . . . . . . . . . . . . . . . . . . . . . . . . . . . . . . . . . . . . . . . . . . . . . . . . . . . . . . . . . . . . . . . . . . . . . . . . . . . . . . . . . . . . . . . . . . . . . . . . . . . . . . . . . . . . . . . . . . . . . . . . . . . . . . . . . . . . . . . . . . . . . . . . . . . . . . . . . . . . . . . . . . . . . . . . . . . . . .
. . . . . . . . . . . . . . . . . . . . . . . . . . . . . . . . . . . . . . . . . . . . . . . . . . . . . . . . . . . . . . . . . . . . . . . . . . . . . . . . . . . . . . . . . . . . . . . . . . . . . . . . . . . . . . . . . . . . . . . . . . . . . . . . . . . . . . . . . . . . . . . . . . . . . . . . . . . . . . . . . . . . . . . . . . . . . . . . . . . . . . . . . . . . . . . . . . . . . . . . . . . . . . . . . . . . . . . . . . . . . . . . . . . . . . . . . . . . . . . . . . . . . . . . . . . . . . . . . . . . . . . . . . . . . . . . . . . . . . . .
. . . . . . . . . . . . . . . . . . . . . . . . . . . . . . . . . . . . . . . . . . . . . . . . . . . . . . . . . . . . . . . . . . . . . . . . . . . . . . . . . . . . . . . . . . . . . . . . . . . . . . . . . . . . . . . . . . . . . . . . . . . . . . . . . . . . . . . . . . . . . . . . . . . . . . . . . . . . . . . . . . . . . . . . . . . . . . . . . . . . . . . . . . . . . . . . . . . . . . . . . . . . . . . . . . . . . . . . . . . . . . . . . . . . . . . . . . . . . . . . . . . . . . . . . . . . . . . . . . . . . . . . . . . . . . . . . . . . . . . .
. . . . . . . . . . . . . . . . . . . . . . . . . . . . . . . . . . . . . . . . . . . . . . . . . . . . . . . . . . . . . . . . . . . . . . . . . . . . . . . . . . . . . . . . . . . . . . . . . . . . . . . . . . . . . . . . . . . . . . . . . . . . . . . . . . . . . . . . . . . . . . . . . . . . . . . . . . . . . . . . . . . . . . . . . . . . . . . . . . . . . . . . . . . . . . . . . . . . . . . . . . . . . . . . . . . . . . . . . . . . . . . . . . . . . . . . . . . . . . . . . . . . . . . . . . . . . . . . . . . . . . . . . . . . . . . . . . . . . . . .
. . . . . . . . . . . . . . . . . . . . . . . . . . . . . . . . . . . . . . . . . . . . . . . . . . . . . . . . . . . . . . . . . . . . . . . . . . . . . . . . . . . . . . . . . . . . . . . . . . . . . . . . . . . . . . . . . . . . . . . . . . . . . . . . . . . . . . . . . . . . . . . . . . . . . . . . . . . . . . . . . . . . . . . . . . . . . . . . . . . . . . . . . . . . . . . . . . . . . . . . . . . . . . . . . . . . . . . . . . . . . . . . . . . . . . . . . . . . . . . . . . . . . . . . . . . . . . . . . . . . . . . . . . . . . . . . . . . . . . . .
. . . . . . . . . . . . . . . . . . . . . . . . . . . . . . . . . . . . . . . . . . . . . . . . . . . . . . . . . . . . . . . . . . . . . . . . . . . . . . . . . . . . . . . . . . . . . . . . . . . . . . . . . . . . . . . . . . . . . . . . . . . . . . . . . . . . . . . . . . . . . . . . . . . . . . . . . . . . . . . . . . . . . . . . . . . . . . . . . . . . . . . . . . . . . . . . . . . . . . . . . . . . . . . . . . . . . . . . . . . . . . . . . . . . . . . . . . . . . . . . . . . . . . . . . . . . . . . . . . . . . . . . . . . . . . . . . . . . . . . .
. . . . . . . . . . . . . . . . . . . . . . . . . . . . . . . . . . . . . . . . . . . . . . . . . . . . . . . . . . . . . . . . . . . . . . . . . . . . . . . . . . . . . . . . . . . . . . . . . . . . . . . . . . . . . . . . . . . . . . . . . . . . . . . . . . . . . . . . . . . . . . . . . . . . . . . . . . . . . . . . . . . . . . . . . . . . . . . . . . . . . . . . . . . . . . . . . . . . . . . . . . . . . . . . . . . . . . . . . . . . . . . . . . . . . . . . . . . . . . . . . . . . . . . . . . . . . . . . . . . . . . . . . . . . . . . . . . . . . . . .
. . . . . . . . . . . . . . . . . . . . . . . . . . . . . . . . . . . . . . . . . . . . . . . . . . . . . . . . . . . . . . . . . . . . . . . . . . . . . . . . . . . . . . . . . . . . . . . . . . . . . . . . . . . . . . . . . . . . . . . . . . . . . . . . . . . . . . . . . . . . . . . . . . . . . . . . . . . . . . . . . . . . . . . . . . . . . . . . . . . . . . . . . . . . . . . . . . . . . . . . . . . . . . . . . . . . . . . . . . . . . . . . . . . . . . . . . . . . . . . . . . . . . . . . . . . . . . . . . . . . . . . . . . . . . . . . . . . . . . . .
. . . . . . . . . . . . . . . . . . . . . . . . . . . . . . . . . . . . . . . . . . . . . . . . . . . . . . . . . . . . . . . . . . . . . . . . . . . . . . . . . . . . . . . . . . . . . . . . . . . . . . . . . . . . . . . . . . . . . . . . . . . . . . . . . . . . . . . . . . . . . . . . . . . . . . . . . . . . . . . . . . . . . . . . . . . . . . . . . . . . . . . . . . . . . . . . . . . . . . . . . . . . . . . . . . . . . . . . . . . . . . . . . . . . . . . . . . . . . . . . . . . . . . . . . . . . . . . . . . . . . . . . . . . . . . . . . . . . . . . .
. . . . . . . . . . . . . . . . . . . . . . . . . . . . . . . . . . . . . . . . . . . . . . . . . . . . . . . . . . . . . . . . . . . . . . . . . . . . . . . . . . . . . . . . . . . . . . . . . . . . . . . . . . . . . . . . . . . . . . . . . . . . . . . . . . . . . . . . . . . . . . . . . . . . . . . . . . . . . . . . . . . . . . . . . . . . . . . . . . . . . . . . . . . . . . . . . . . . . . . . . . . . . . . . . . . . . . . . . . . . . . . . . . . . . . . . . . . . . . . . . . . . . . . . . . . . . . . . . . . . . . . . . . . . . . . . . . . . . . . .
. . . . . . . . . . . . . . . . . . . . . . . . . . . . . . . . . . . . . . . . . . . . . . . . . . . . . . . . . . . . . . . . . . . . . . . . . . . . . . . . . . . . . . . . . . . . . . . . . . . . . . . . . . . . . . . . . . . . . . . . . . . . . . . . . . . . . . . . . . . . . . . . . . . . . . . . . . . . . . . . . . . . . . . . . . . . . . . . . . . . . . . . . . . . . . . . . . . . . . . . . . . . . . . . . . . . . . . . . . . . . . . . . . . . . . . . . . . . . . . . . . . . . . . . . . . . . . . . . . . . . . . . . . . . . . . . . . . . . . . .
CHAPTER 33. UNREGISTERING FROM RED HAT SUBSCRIPTION MANAGEMENT SERVICES
33.1. SYSTEMS REGISTERED WITH RED HAT SUBSCRIPTION MANAGEMENT
33.2. SYSTEMS REGISTERED WITH RED HAT SATELLITE
CHAPTER 34. UNINSTALLING RED HAT ENTERPRISE LINUX
34.1. REMOVING RED HAT ENTERPRISE LINUX FROM 64-BIT AMD, INTEL, AND ARM SYSTEMS
34.2. REMOVING RED HAT ENTERPRISE LINUX FROM IBM Z
PART VI. TECHNICAL APPENDIXES
APPENDIX A. AN INTRODUCTION TO DISK PARTITIONS
A.1. HARD DISK BASIC CONCEPTS
A.2. STRATEGIES FOR DISK REPARTITIONING
A.3. PARTITION NAMING SCHEMES AND MOUNT POINTS
APPENDIX B. ISCSI DISKS
B.1. ISCSI DISKS IN ANACONDA
B.2. ISCSI DISKS DURING START UP
APPENDIX C. UNDERSTANDING LVM
APPENDIX D. OTHER TECHNICAL DOCUMENTATION
APPENDIX E. REFERENCE TABLE FOR EXT4 AND XFS COMMANDS
APPENDIX F. DATA SIZE TERMINOLOGY REFERENCE TABLE
APPENDIX G. REVISION HISTORY
INDEX
454
454
454
455
455
460
462
463
463
468
472
474
474
475
476
477
478
479
481
482
Table of Contents
5

Installation Guide
6

CHAPTER 1. GETTING STARTED
You can install Red Hat Enterprise Linux with an installation utility called Anaconda. Most users can
simply follow the procedure outlined in Section 4.1, “Interactive Installation” to install Red Hat
Enterprise Linux using the graphical interface in Anaconda.
Users with advanced requirements can also use the graphical interface to configure many aspects of the
installation, and install Red Hat Enterprise Linux on a wide variety of systems. On systems without a local
interface, installation can be accessed entirely remotely. Installation can also be automated by using a
Kickstart file, and performed with no interaction at all.
1.1. GRAPHICAL INSTALLATION
The Red Hat Enterprise Linux installer, Anaconda, provides a simple graphical method to install
Red Hat Enterprise Linux. The graphical installation interface has a built-in help system which can guide
you through most installations, even if you have never installed Linux before. However, Anaconda can
also be used to configure advanced installation options if required.
Anaconda is different from most other operating system installation programs due to its parallel nature.
Most installers follow a linear path; you must choose your language first, then you configure networking,
and so on. There is usually only one way to proceed at any given time.
In the graphical interface in Anaconda you are at first only required to select your language and locale,
and then you are presented with a central screen, where you can configure most aspects of the
installation in any order you like. While certain parts require others to be completed before configuration
- for example, when installing from a network location, you must configure networking before you can
select which packages to install - most options in Anaconda can be configured in any order. If a
background task, such as network initialization or disk detection, is blocking configuration of a certain
option, you can configure unrelated options while waiting for it to complete.
Additional differences appear in certain screens; notably the custom partition process is very different
from other Linux distributions. These differences are described in each screen's subsection.
Some screens will be automatically configured depending on your hardware and the type of media you
used to start the installation. You can still change the detected settings in any screen. Screens which
have not been automatically configured, and therefore require your attention before you begin the
installation, are marked by an exclamation mark. You cannot start the actual installation process before
you finish configuring these settings.
Installation can also be performed in text mode, however certain options, notably including custom
partitioning, are unavailable. See Section 8.3, “Installing in Text Mode”, or if using an IBM Power system
or IBM Z, see Section 13.3, “Installing in Text Mode”, or Section 17.4, “Installing in Text Mode”,
respectively, for more information.
1.2. REMOTE INSTALLATION
You can use the graphical interface remotely to install Red Hat Enterprise Linux. For headless systems,
Connect Mode can be used to perform a graphical installation completely remotely. For systems with a
display and keyboard, but without the capacity to run the graphical interface, Direct Mode can instead
be used to facilitate setup. For more information, see the Chapter 24, Using VNC.
1.3. AUTOMATED INSTALLATION
CHAPTER 1. GETTING STARTED
7

Anaconda installations can be automated through the use of a Kickstart file. Kickstart files can be
used to configure any aspect of installation, allowing installation without user interaction, and can be
used to easily automate installation of multiple instances of Red Hat Enterprise Linux.
In most situations, you can simply follow the procedure outlined in Section 4.2, “Automatic Installation” to
create and configure a Kickstart file, which can be used to perform an arbitrary number of non-
interactive installations of Red Hat Enterprise Linux.
Kickstart files can be automatically created based on choices made using the graphical interface,
through the online Kickstart Generator tool, or written from scratch using any text editor. For more
information, see Section 26.2.1, “Creating a Kickstart File”.
Kickstart files can be easily maintained and updated using various utilities in Red Hat Enterprise Linux.
For more information, see Section 26.2.2, “Maintaining the Kickstart File”.
Installation Guide
8

CHAPTER 2. DOWNLOADING RED HAT ENTERPRISE LINUX
If you have a Red Hat subscription, you can download ISO image files of the Red Hat Enterprise Linux 7
installation DVD from the Red Hat Customer Portal. If you do not have a subscription, either purchase
one or obtain a free evaluation subscription from the Software & Download Center at
https://access.redhat.com/downloads/.
There are two basic types of installation media available for the AMD64 and Intel 64 (x86_64), ARM
(Aarch64), and IBM Power Systems (ppc64) architectures:
Binary DVD
A full installation image that boots the installation program and performs the entire installation without
additional package repositories.
NOTE
Binary DVDs are also available for IBM Z. They can be used to boot the installation
program using a SCSI DVD drive or as installation sources.
Boot.iso
A minimal boot image that boots the installation program but requires access to additional package
repositories. Red Hat does not provide the repository; you must create it using the full installation ISO
image.
NOTE
Supplementary DVD images containing additional packages, such as the IBM Java
Runtime Environment and additional virtualization drivers may be available, but they are
beyond the scope of this document.
If you have a subscription or evaluation subscription, follow these steps to obtain the Red Hat
Enterprise Linux 7 ISO image files:
Procedure 2.1. Downloading Red Hat Enterprise Linux ISO Images
1. Visit the Customer Portal at https://access.redhat.com/home. If you are not logged in, click LOG
IN on the right side of the page. Enter your account credentials when prompted.
2. Click DOWNLOADS at the top of the page.
3. Click Red Hat Enterprise Linux.
4. Ensure that you select the appropriate Product Variant and Architecture for your
installation target. By default, Red Hat Enterprise Linux Server and x86_64 are
selected. If you are not sure which variant best suits your needs, see
http://www.redhat.com/en/technologies/linux-platforms/enterprise-linux. Additionally, a list of
packages available for every variant is available in the Red Hat Enterprise Linux 7 Package
Manifest.
5. A list of available downloads is displayed; most notably, a minimal Boot ISO image and a full
installation Binary DVD ISO image. These files are described above. Additional images can be
CHAPTER 2. DOWNLOADING RED HAT ENTERPRISE LINUX
9

available, such as preconfigured virtual machine images, which are beyond the scope of this
document.
6. Choose the image file that you want to use. You have two ways to download it from the
Customer Portal:
Click its name to begin downloading it to your computer using your web browser.
Right-click the name and then click Copy Link Location or a similar menu item, the exact
wording of which depends on the browser that you are using. This action copies the URL of
the file to your clipboard, which allows you to use an alternative application to download the
file to your computer. This approach is especially useful if your Internet connection is
unstable: in that case, you browser might fail to download the whole file, and an attempt to
resume the interrupted download process fails because the download link contains an
authentication key which is only valid for a short time. Specialized applications such as curl
can, however, be used to resume interrupted download attempts from the Customer Portal,
which means that you need not download the whole file again and thus you save your time
and bandwidth consumption.
Procedure 2.2. Using curl to Download Installation Media
1. Make sure the curl package is installed by running the following command as root:
# yum install curl
If your Linux distribution does not use yum, or if you do not use Linux at all, download
the most appropriate software package from the curl web site.
2. Open a terminal window, enter a suitable directory, and type the following command:
$ curl -o filename.iso 'copied_link_location'
Replace filename.iso with the ISO image name as displayed in the Customer Portal,
such as rhel-server-7.0-x86_64-dvd.iso. This is important because the
download link in the Customer Portal contains extra characters which curl would
otherwise use in the downloaded file name, too. Then, keep the single quotation mark in
front of the next parameter, and replace copied_link_location with the link that you have
copied from the Customer Portal; copy it again if you copied the commands above in the
meantime. Note that in Linux, you can paste the content of the clipboard into the
terminal window by middle-clicking anywhere in the window, or by pressing
Shift+Insert. Finally, use another single quotation mark after the last parameter, and
press Enter to run the command and start transferring the ISO image. The single
quotation marks prevent the command line interpreter from misinterpreting any special
characters that might be included in the download link.
Example 2.1. Downloading an ISO image with curl
The following is an example of a curl command line:
$ curl -o rhel-server-7.0-x86_64-dvd.iso
'https://access.cdn.redhat.com//content/origin/files/sha256/
85/85a...46c/rhel-server-7.0-x86_64-dvd.iso?
_auth_=141...7bf'
Installation Guide
10

Note that the actual download link is much longer because it contains complicated
identifiers.
3. If your Internet connection does drop before the transfer is complete, refresh the
download page in the Customer Portal; log in again if necessary. Copy the new
download link, use the same basic curl command line parameters as earlier but be
sure to use the new download link, and add -C - to instruct curl to automatically
determine where it should continue based on the size of the already downloaded file.
Example 2.2. Resuming an interrupted download attempt
The following is an example of a curl command line that you use if you have only
partially downloaded the ISO image of your choice:
$ curl -o rhel-server-7.0-x86_64-dvd.iso
'https://access.cdn.redhat.com//content/origin/files/sha256/
85/85a...46c/rhel-server-7.0-x86_64-dvd.iso?
_auth_=141...963' -C -
7. Optionally, you can use a checksum utility such as sha256sum to verify the integrity of the
image file after the download finishes. All downloads on the Download Red Hat Enterprise Linux
page are provided with their checksums for reference:
$ sha256sum rhel-server-7.0-x86_64-dvd.iso
85a...46c rhel-server-7.0-x86_64-dvd.iso
Similar tools are available for Microsoft Windows and Mac OS X. You can also use the
installation program to verify the media when starting the installation; see Section 22.2.2,
“Verifying Boot Media” for details.
After you have downloaded an ISO image file from the Customer Portal, you can:
Burn it to a CD or DVD as described in Section 3.1, “Making an Installation CD or DVD”.
Use it to create a bootable USB drive; see Section 3.2, “Making Installation USB Media”.
Place it on a server to prepare for a network installation. For specific directions, see
Section 3.3.3, “Installation Source on a Network”.
Place it on a hard drive to use the drive as an installation source. For specific instructions, see
Section 3.3.2, “Installation Source on a Hard Drive”.
Use it to prepare a Preboot Execution Environment (PXE) server, which allows you to boot the
installation system over a network. See Chapter 23, Preparing for a Network Installation for
instructions.
CHAPTER 2. DOWNLOADING RED HAT ENTERPRISE LINUX
11

CHAPTER 3. MAKING MEDIA
This chapter describes how to use ISO image files obtained by following the steps in Chapter 2,
Downloading Red Hat Enterprise Linux to create bootable physical media, such as a DVD or a USB flash
drive. You can then use these media to boot the installation program and start the installation. These
steps only apply if you plan to install Red Hat Enterprise Linux on a 64-bit AMD, Intel, or ARM system, or
an IBM Power Systems server using physical boot media. For information about installing Red Hat
Enterprise Linux on an IBM Z server, see Chapter 16, Booting the Installation on IBM Z. For instructions
on how to set up a Preboot Execution Environment (PXE) server to perform a PXE-based installation
over a network, see Chapter 23, Preparing for a Network Installation.
NOTE
By default, the inst.stage2= boot option is used on the installation media and set to a
specific label (for example, inst.stage2=hd:LABEL=RHEL7\x20Server.x86_64). If
you modify the default label of the file system containing the runtime image, or if using a
customized procedure to boot the installation system, you must ensure this option is set
to the correct value. See Specifying the Installation Source for details.
3.1. MAKING AN INSTALLATION CD OR DVD
You can make an installation CD or DVD using burning software on your computer and a CD/DVD
burner. The exact series of steps that produces an optical disc from an ISO image file varies greatly from
computer to computer, depending on the operating system and disc burning software installed. Consult
your burning software's documentation for the exact steps needed to burn a CD or DVD from an ISO
image file.
NOTE
It is possible to use optical discs (CDs and DVDs) to create both minimal boot media and
full installation media. However, it is important to note that due to the large size of the full
installation ISO image (between 4 and 4.5 GB), only a DVD can be used to create a full
installation disc. Minimal boot ISO is roughly 300 MB, allowing it to be burned to either a
CD or a DVD.
Make sure that your disc burning software is capable of burning discs from image files. Although this is
true of most disc burning software, exceptions exist. In particular, note that the disc burning feature built
into Windows XP and Windows Vista cannot burn DVDs; and that earlier Windows operating systems
did not have any disc burning capability installed by default at all. Therefore, if your computer has a
Windows operating system prior to Windows 7 installed on it, you need a separate piece of software for
this task. Examples of popular disc burning software for Windows that you might already have on your
computer include Nero Burning ROM and Roxio Creator. Most widely used disc burning software for
Linux, such as Brasero and K3b, also has the built-in ability to burn discs from ISO image files.
On some computers, the option to burn a disc from an ISO file is integrated into a context menu in the
file browser. For example, when you right-click an ISO file on a computer with a Linux or UNIX operating
system which runs the GNOME desktop, the Nautilus file browser presents you with the option to Write
to disk.
3.2. MAKING INSTALLATION USB MEDIA
You can use a USB drive or an SD card instead of a CD or DVD to create bootable media for installing
Red Hat Enterprise Linux on 64-bit AMD, Intel, or ARM systems. The exact procedure varies depending
Installation Guide
12

on whether you want to perform it on a Linux or Windows system. You can create minimal boot media
and full installation media using the same procedure; the only limitation is the capacity of the USB drive -
it must have enough space to fit the entire image, which means roughly 450 MB for minimal boot media
and 4.8 GB for full installation media.
3.2.1. Making Installation USB Media on Linux
The following procedure assumes you are using a Linux system and that you have downloaded an
appropriate ISO image as described in Chapter 2, Downloading Red Hat Enterprise Linux. On most
Linux distributions, it will work without the need for installing any additional packages.
WARNING
This procedure is destructive. Any data on the USB flash drive will be destroyed with
no warning. Make sure that you specify the correct drive, and make sure that this
drive does not contain any data you want to preserve.
Many Linux distributions provide their own tools for creating live USB media: liveusb-creator on Fedora,
usb-creator on Ubuntu, and others. Describing these tools is beyond the scope of this book; the following
procedure will work on most Linux systems.
Procedure 3.1. Making USB Media on Linux
1. Connect a USB flash drive to the system and execute the dmesg command. A log detailing all
recent events will be displayed. At the bottom of this log, you will see a set of messages caused
by the USB flash drive you just connected. It will look like a set of lines similar to the following:
[ 170.171135] sd 5:0:0:0: [sdb] Attached SCSI removable disk
Note the name of the connected device - in the above example, it is sdb.
2. Log in as root:
$ su -
Provide your root password when prompted.
3. Make sure that the device is not mounted. First, use the findmnt device command and the
device name you found in the earlier steps. For example, if the device name is sdb, use the
following command:
# findmnt /dev/sdb
If the command displays no output, you can proceed with the next step. However, if the
command does provide output, it means that the device was automatically mounted and you
must unmount it before proceeding. A sample output will look similar to the following:
CHAPTER 3. MAKING MEDIA
13
# findmnt /dev/sdb
TARGET SOURCE FSTYPE OPTIONS
/mnt/iso /dev/sdb iso9660 ro,relatime
Note the TARGET column. Next, use the umount target command to unmount the device:
# umount /mnt/iso
4. Use the dd command to write the installation ISO image directly to the USB device:
# dd if=/image_directory/image.iso of=/dev/device bs=blocksize
Replace /image_directory/image.iso with the full path to the ISO image file you downloaded,
device with the device name as reported by the dmesg command earlier, and blocksize with a
reasonable block size (for example, 512k) to speed up the writing process. The bs parameter is
optional, but it can speed up the process considerably.
IMPORTANT
Make sure to specify the output as the device name (for example, /dev/sda),
not as a name of a partition on the device (for example, /dev/sda1).
For example, if the ISO image is located in /home/testuser/Downloads/rhel-server-7-
x86_64-boot.iso and the detected device name is sdb, the command will look like the
following:
# dd if=/home/testuser/Downloads/rhel-server-7-x86_64-boot.iso
of=/dev/sdb bs=512k
5. Wait for dd to finish writing the image to the device. Note that no progress bar is displayed; the
data transfer is finished when the # prompt appears again. After the prompt is displayed, log out
from the root account and unplug the USB drive.
The USB drive is now ready to be used as a boot device. You can continue with Chapter 7, Booting the
Installation on 64-bit AMD, Intel, and ARM systems on AMD, Intel, and ARM systems, or Chapter 12,
Booting the Installation on IBM Power Systems on IBM Power Systems servers.
NOTE
Non-virtualized installations (known as "bare metal" installations) on IBM Power Systems
servers require that the inst.stage2= boot option is specified. Refer to Section 22.1,
“Configuring the Installation System at the Boot Menu” for information about the
inst.stage2= boot option.
3.2.2. Making Installation USB Media on Windows
The procedure of creating bootable USB media on Windows depends on which tool you use. There are
many different utilities which allow you to write an ISO image to a USB drive. Red Hat recommends
using the Fedora Media Writer, available for download at
https://github.com/MartinBriza/MediaWriter/releases.
Installation Guide
14
IMPORTANT
Transferring the ISO image file to the USB drive using Windows Explorer or a similar file
manager will not work - you will not be able to boot from the device.
Procedure 3.2. Making USB Media on Windows
1. Download and install Fedora Media Writer.
2. Download the Red Hat Enterprise Linux ISO image you want to use to create the media. (See
Chapter 2, Downloading Red Hat Enterprise Linux for instructions on obtaining ISO images.)
3. Plug in the USB drive you will be using to create bootable media.
4. Open Fedora Media Writer.
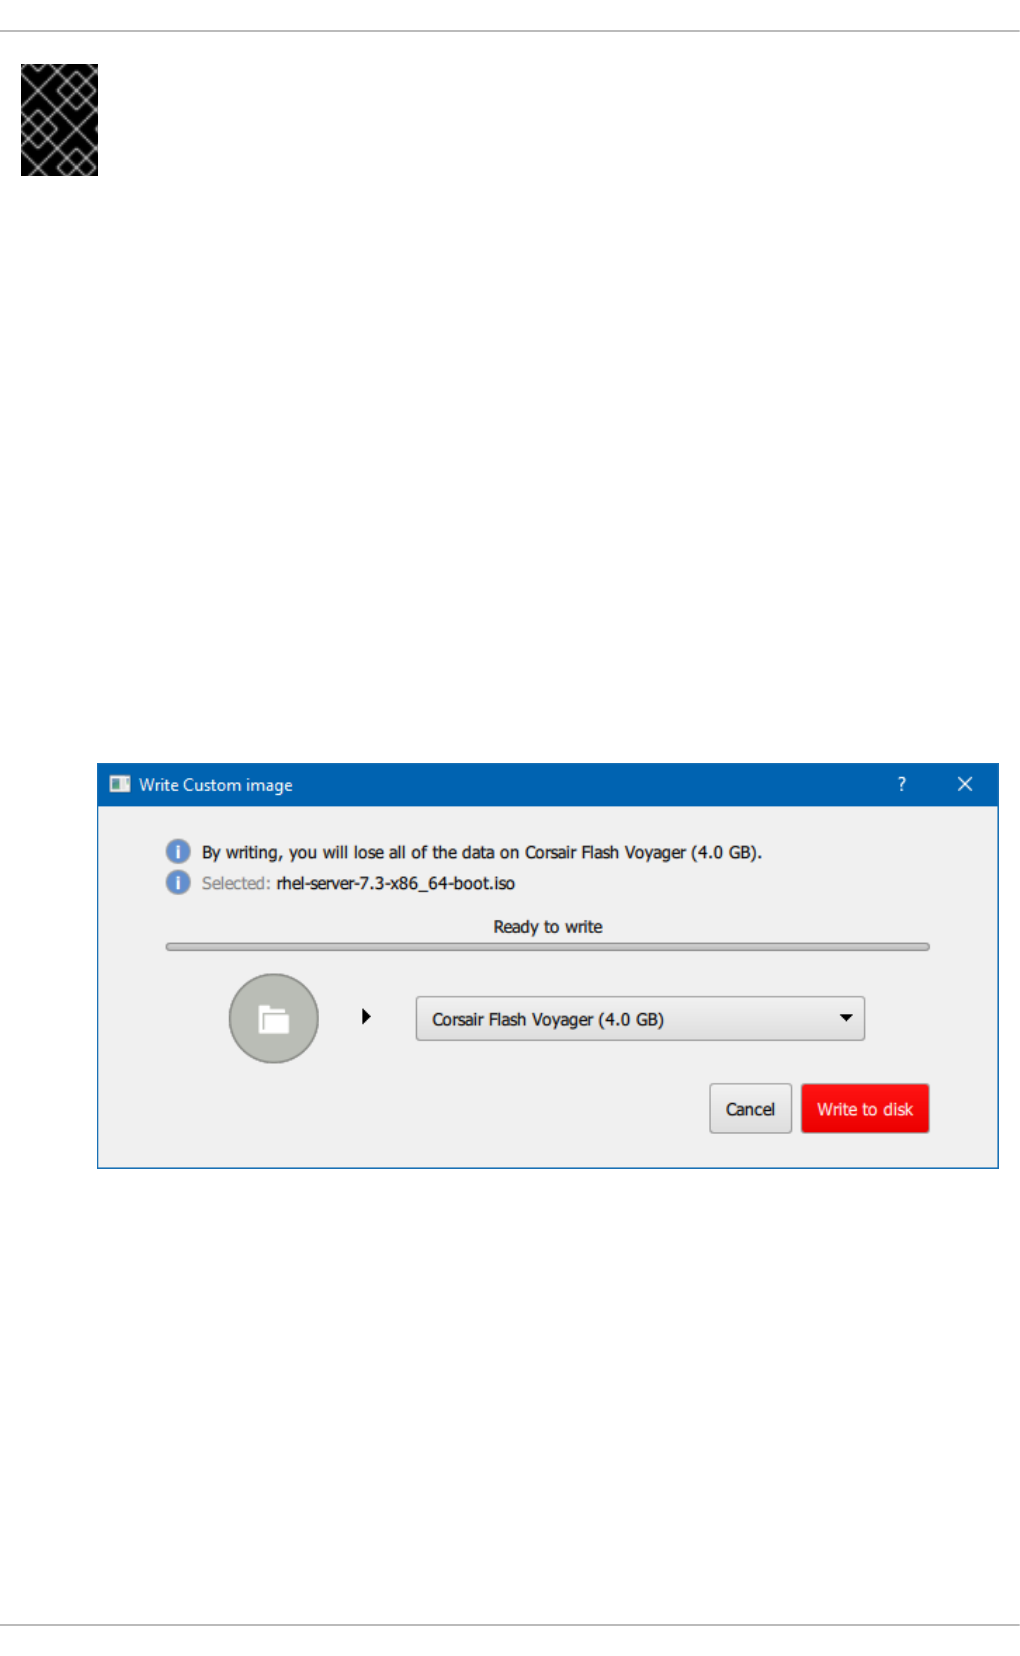
5. In the main window, click Custom Image and select the downloaded Red Hat Enterprise Linux
ISO image.
6. From the drop-down menu, select the drive you want to use. If the drive does not appear, verify
that the USB drive is connected and restart Fedora Media Writer.
7. Click Write to disk. The boot media creation process will begin. Do not unplug the drive until
the operation completes. Depending on the size of the ISO image and the write speed of the
USB drive, writing the image can take several minutes.
Figure 3.1. Fedora Media Writer
8. When the creation process finishes and the Complete! message appears, unmount the USB
drive using the Safely remove hardware icon in the system's notification area.
The USB drive is now ready to be used as a boot device. You can continue with Chapter 7, Booting the
Installation on 64-bit AMD, Intel, and ARM systems on AMD, Intel, and ARM systems, or Chapter 12,
Booting the Installation on IBM Power Systems on IBM Power Systems servers.
3.2.3. Making Installation USB Media on Mac OS X
CHAPTER 3. MAKING MEDIA
15

This procedure involves using the dd command line tool to write the installation image to a USB flash
drive. Note that some steps involve use of the sudo command, which is only available when logged in
with an administrator account that requires a password.
WARNING
All data on the USB flash drive will be deleted by this procedure.
Procedure 3.3. Making USB Media on Mac OS X
1. Connect a USB flash drive to the system and identify the device path with the diskutil list
command. The device path has the format of /dev/disknumber, where number is the number
of the disk. The disks are numbered starting at zero (0). Disk 0 is likely to be the OS X recovery
disk, and Disk 1 is likely to be your main OS X installation. In the following example, it is disk2:
$ diskutil list
/dev/disk0
#: TYPE NAME SIZE
IDENTIFIER
0: GUID_partition_scheme *500.3 GB
disk0
1: EFI EFI 209.7 MB
disk0s1
2: Apple_CoreStorage 400.0 GB
disk0s2
3: Apple_Boot Recovery HD 650.0 MB
disk0s3
4: Apple_CoreStorage 98.8 GB
disk0s4
5: Apple_Boot Recovery HD 650.0 MB
disk0s5
/dev/disk1
#: TYPE NAME SIZE
IDENTIFIER
0: Apple_HFS YosemiteHD *399.6 GB
disk1
Logical Volume on disk0s1
8A142795-8036-48DF-9FC5-84506DFBB7B2
Unlocked Encrypted
/dev/disk2
#: TYPE NAME SIZE
IDENTIFIER
0: FDisk_partition_scheme *8.0 GB
disk2
1: Windows_NTFS SanDisk USB 8.0 GB
disk2s1
To identify your USB flash drive, compare the NAME, TYPE and SIZE columns to what you know
about your flash drive. For example, the NAME should be the same as the title of the flash drive
icon in the Finder. You can also compare these values to those in the flash drive's information
Installation Guide
16
panel; right-click on the drive icon and select Get Info.
2. Use the diskutil unmountDisk command to unmount the flash drive's filesystem volumes:
$ diskutil unmountDisk /dev/disknumber
Unmount of all volumes on disknumber was successful
When you do this, the icon for the flash drive disappears from your desktop. If it does not, you
might have identified the wrong disk. If you attempt to unmount the system disk accidentally, you
get a failed to unmount error.
3. Use the dd command as a parameter of the sudo command to write the ISO image to the flash
drive:
$ sudo dd if=/path/to/image.iso of=/dev/rdisknumber bs=1m>
NOTE
Mac OS X provides both a block (/dev/disk*) and character device
(/dev/rdisk*) file for each storage device. Writing an image to the
/dev/rdisknumber character device is faster than to the /dev/disknumber
block device.
Example 3.1. Writing an ISO Image to a Disk
To write the /Users/user_name/Downloads/rhel-server-7-x86_64-boot.iso file
to the /dev/rdisk2 device:
$ sudo dd if=/Users/user_name/Downloads/rhel-server-7-x86_64-
boot.iso of=/dev/rdisk2
4. Wait for the command to finish. Note that no progress bar is displayed; however, to check the
status of the operation while it is still running, press Ctrl+t in the terminal:
load: 1.02 cmd: dd 3668 uninterruptible 0.00u 1.91s
112+0 records in
111+0 records out
116391936 bytes transferred in 114.834860 secs (1013559 bytes/sec)
5. The speed of the data transfer depends on the speed of your USB ports and the flash drive. After
the prompt is displayed again, the data transfer is finished. You can then unplug the flash drive.
The flash drive is now ready to be used as a boot device. You can continue with Chapter 7, Booting the
Installation on 64-bit AMD, Intel, and ARM systems on AMD64 and Intel 64 systems or Chapter 12,
Booting the Installation on IBM Power Systems on IBM Power Systems servers.
3.3. PREPARING INSTALLATION SOURCES
As explained in Chapter 2, Downloading Red Hat Enterprise Linux, two basic types of media are
available for Red Hat Enterprise Linux: a minimal boot image and a full installation image (also known as
CHAPTER 3. MAKING MEDIA
17

a binary DVD). If you downloaded the binary DVD and created a boot DVD-ROM or USB drive from it,
you can proceed with the installation immediately, as this image contains everything you need to install
the system.
However, if you use the minimal boot image, you must also configure an additional source of the
installation. This is because the minimal boot image only contains the installation program itself and tools
needed to boot your system and start the installation; it does not include the software packages to be
installed on your system.
The full installation DVD ISO image can be used as the source for the installation. If your system will
require additional software not provided by Red Hat, you should configure additional repositories and
install these packages after the installation is finished. For information about configuring additional Yum
repositories on an installed system, see the Red Hat Enterprise Linux 7 System Administrator's Guide.
The installation source can be any of the following:
DVD: You can burn the binary DVD ISO image onto a DVD and configure the installation program
to install packages from this disk.
Hard drive: You can place the binary DVD ISO image on a hard drive and install packages
from it.
Network location: You can copy the binary DVD ISO image or the installation tree
(extracted contents of the binary DVD ISO image) to a network location accessible from the
installation system and perform the installation over the network using the following protocols:
NFS: The binary DVD ISO image is placed into a Network File System (NFS) share.
HTTPS, HTTP or FTP: The installation tree is placed on a network location accessible over
HTTP, HTTPS, or FTP.
When booting the installation from minimal boot media, you must always configure an additional
installation source. When booting the installation from the full binary DVD, it is also possible to configure
another installation source, but it is not necessary - the binary DVD ISO image itself contains all
packages you need to install the system, and the installation program will automatically configure the
binary DVD as the source.
You can specify an installation source in any of the following ways:
In the installation program's graphical interface: After the graphical installation begins and you
select your preferred language, the Installation Summary screen will appear. Navigate to
the Installation Source screen and select the source you want to configure. For details,
see:
Section 8.11, “Installation Source” for 64-bit AMD, Intel, and ARM systems
Section 13.12, “Installation Source” for IBM Power Systems servers
Section 17.12, “Installation Source” for IBM Z
Using a boot option: You can specify custom boot options to configure the installation program
before it starts. One of these options allows you to specify the installation source to be used.
See the inst.repo= option in Section 22.1, “Configuring the Installation System at the Boot
Menu” for details.
Using a Kickstart file: You can use the install command in a Kickstart file and specify an
installation source. See Section 26.3.1, “Kickstart Commands and Options” for details on the
Installation Guide
18

install Kickstart command, and Chapter 26, Kickstart Installations for information about
Kickstart installations in general.
3.3.1. Installation Source on a DVD
You can burn the binary DVD ISO image onto a DVD and configure the installation program to install
packages from this disk while booting the installation from another drive (for example, a minimal boot
ISO on a USB flash drive). This procedure is the same as creating bootable optical media - see
Section 3.1, “Making an Installation CD or DVD” for more information.
When using a DVD as an installation source, make sure the DVD is in the drive when the installation
begins. The Anaconda installation program is not able to detect media inserted after the installation
begins.
3.3.2. Installation Source on a Hard Drive
Hard drive installations use an ISO image of the binary installation DVD. To use a hard drive as the
installation source, transfer the binary DVD ISO image to the drive and connect it to the installation
system. Then, boot the Anaconda installation program.
You can use any type of hard drive accessible to the installation program, including USB flash drives.
The binary ISO image can be in any directory of the hard drive, and it can have any name; however, if
the ISO image is not in the top-level directory of the drive, or if there is more than one image in the top-
level directory of the drive, you will be required to specify the image to be used. This can be done using a
boot option, an entry in a Kickstart file, or manually in the Installation Source screen during a
graphical installation.
A limitation of using a hard drive as the installation source is that the binary DVD ISO image on the hard
drive must be on a partition with a file system which Anaconda can mount. These file systems are xfs,
ext2, ext3, ext4, and vfat (FAT32). Note that on Microsoft Windows systems, the default file system
used when formatting hard drives is NTFS, and the exFAT file system is also available; however, neither
of these file systems can be mounted during the installation. If you are creating a hard drive or a USB
drive to be used as an installation source on Microsoft Windows, make sure to format the drive as
FAT32.
IMPORTANT
The FAT32 file system does not support files larger than 4 GiB. Some Red Hat
Enterprise Linux 7 installation media can be larger than that, which means you cannot
copy them to a drive with this file system.
When using a hard drive or a USB flash drive as an installation source, make sure it is connected to the
system when the installation begins. The installation program is not able to detect media inserted after
the installation begins.
3.3.3. Installation Source on a Network
Placing the installation source on a network has the advantage of allowing you to install multiple systems
from a single source, without having to connect and disconnect any physical media. Network-based
installations can be especially useful when used together with a TFTP server, which allows you to boot
the installation program from the network as well. This approach completely eliminates the need for
creating physical media, allowing easy deployment of Red Hat Enterprise Linux on multiple systems at
the same time. For further information about setting up a TFTP server, see Chapter 23, Preparing for a
Network Installation.
CHAPTER 3. MAKING MEDIA
19

3.3.3.1. Installation Source on an NFS Server
The NFS installation method uses an ISO image of the Red Hat Enterprise Linux binary DVD placed in a
Network File System server's exported directory, which the installation system must be able to read.
To perform an NFS-based installation, you will need another running system which will act as the NFS
host.
For more information about NFS servers, see the Red Hat Enterprise Linux 7 Storage Administration
Guide.
The following procedure is only meant as a basic outline of the process. The precise steps you must
take to set up an NFS server will vary based on the system's architecture, operating system, package
manager, service manager, and other factors. On Red Hat Enterprise Linux 7 systems, the procedure
can be followed exactly as documented. For procedures describing the installation source creation
process on earlier releases of Red Hat Enterprise Linux, see the appropriate Installation Guide for that
release.
Procedure 3.4. Preparing for Installation Using NFS
1. Install the nfs-utils package by running the following command as root:
# yum install nfs-utils
2. Copy the full Red Hat Enterprise Linux 7 binary DVD ISO image to a suitable directory on the
NFS server. For example, you can create directory /rhel7-install/ for this purpose and
save the ISO image here.
3. Open the /etc/exports file using a text editor and add a line with the following syntax:
/exported_directory/ clients
Replace /exported_directory/ with the full path to the directory holding the ISO image. Instead of
clients, use the host name or IP address of the computer which is to be installed from this NFS
server, the subnetwork from which all computers are to have access the ISO image, or the
asterisk sign (*) if you want to allow any computer with network access to the NFS server to use
the ISO image. See the exports(5) man page for detailed information about the format of this
field.
The following is a basic configuration which makes the /rhel7-install/ directory available
as read-only to all clients:
/rhel7-install *
4. Save the /etc/exports file after finishing the configuration and exit the text editor.
5. Start the nfs service:
# systemctl start nfs.service
If the service was already running before you changed the /etc/exports file, enter the
following command instead, in order for the running NFS server to reload its configuration:
# systemctl reload nfs.service
Installation Guide
20

After completing the procedure above, the ISO image is accessible over NFS and ready to be used as an
installation source.
When configuring the installation source before or during the installation, use nfs: as the protocol, the
server's host name or IP address, the colon sign (:), and the directory holding the ISO image. For
example, if the server's host name is myserver.example.com and you have saved the ISO image in
/rhel7-install/, specify nfs:myserver.example.com:/rhel7-install/ as the installation
source.
3.3.3.2. Installation Source on an HTTP, HTTPS or FTP Server
This installation method allows for a network-based installation using an installation tree, which is a
directory containing extracted contents of the binary DVD ISO image and a valid .treeinfo file. The
installation source is accessed over HTTP, HTTPS, or FTP.
For more information about HTTP and FTP servers, see the Red Hat Enterprise Linux 7 System
Administrator's Guide.
The following procedure is only meant as a basic outline of the process. The precise steps you must
take to set up an FTP server will vary based on the system's architecture, operating system, package
manager, service manager, and other factors. On Red Hat Enterprise Linux 7 systems, the procedure
can be followed exactly as documented. For procedures describing the installation source creation
process on earlier releases of Red Hat Enterprise Linux, see the appropriate Installation Guide for that
release.
Procedure 3.5. Preparing Installation Using HTTP or HTTPS
1. Install the httpd package by running the following command as root:
# yum install httpd
An HTTPS server needs additional configuration. For detailed information, see section Setting
Up an SSL Server in the Red Hat Enterprise Linux 7 System Administrator's Guide. However,
HTTPS is not necessary in most cases, because no sensitive data is sent between the
installation source and the installer, and HTTP is sufficient.
WARNING
If your Apache web server configuration enables SSL security, make sure
to only enable the TLSv1 protocol, and disable SSLv2 and SSLv3. This is
due to the POODLE SSL vulnerability (CVE-2014-3566). See
https://access.redhat.com/solutions/1232413 for details.
IMPORTANT
If you decide to use HTTPS and the server is using a self-signed certificate, you
must boot the installer with the noverifyssl option.
CHAPTER 3. MAKING MEDIA
21

2. Copy the full Red Hat Enterprise Linux 7 binary DVD ISO image to the HTTP(S) server.
3. Mount the binary DVD ISO image, using the mount command, to a suitable directory:
# mount -o loop,ro -t iso9660 /image_directory/image.iso
/mount_point/
Replace /image_directory/image.iso with the path to the binary DVD ISO image, and
/mount_point/ with the path to the directory in which you want the content of the ISO image to
appear. For example, you can create directory /mnt/rhel7-install/ for this purpose and
use that as the parameter of the mount command.
4. Copy the files from the mounted image to the HTTP server root.
# cp -r /mnt/rhel7-install/ /var/www/html/
This command creates the /var/www/html/rhel7-install/ directory with the content of
the image.
5. Start the httpd service:
# systemctl start httpd.service
After completing the procedure above, the installation tree is accessible and ready to be used as the
installation source.
When configuring the installation source before or during the installation, use http:// or https:// as
the protocol, the server's host name or IP address, and the directory in which you have stored the files
from the ISO image, relative to the HTTP server root. For example, if you are using HTTP, the server's
host name is myserver.example.com, and you have copied the files from the image to
/var/www/html/rhel7-install/, specify http://myserver.example.com/rhel7-install/
as the installation source.
Procedure 3.6. Preparing for Installation Using FTP
1. Install the vsftpd package by running the following command as root:
# yum install vsftpd
2. Optionally, open the /etc/vsftpd/vsftpd.conf configuration file in a text editor, and edit
any options you want to change. For available options, see the vsftpd.conf(5) man page.
The rest of this procedure assumes that default options are used; notably, to follow the rest of
the procedure, anonymous users of the FTP server must be permitted to download files.
Installation Guide
22

WARNING
If you configured SSL/TLS security in your vsftpd.conf file, make sure to
only enable the TLSv1 protocol, and disable SSLv2 and SSLv3. This is due
to the POODLE SSL vulnerability (CVE-2014-3566). See
https://access.redhat.com/solutions/1234773 for details.
3. Copy the full Red Hat Enterprise Linux 7 binary DVD ISO image to the FTP server.
4. Mount the binary DVD ISO image, using the mount command, to a suitable directory:
# mount -o loop,ro -t iso9660 /image_directory/image.iso
/mount_point
Replace /image_directory/image.iso with the path to the binary DVD ISO image, and
/mount_point with the path to the directory in which you want the content of the ISO image to
appear. For example, you can create directory /mnt/rhel7-install/ for this purpose and
use that as the parameter of the mount command.
5. Copy the files from the mounted image to the FTP server root:
# cp -r /mnt/rhel7-install/ /var/ftp/
This command creates the /var/ftp/rhel7-install/ directory with the content of the
image.
6. Start the vsftpd service:
# systemctl start vsftpd.service
If the service was already running before you changed the /etc/vsftpd/vsftpd.conf file,
restart it to ensure the edited file is loaded. To restart, execute the following command:
# systemctl restart vsftpd.service
After completing the procedure above, the installation tree is accessible and ready to be used as the
installation source.
When configuring the installation source before or during the installation, use ftp:// as the protocol,
the server's host name or IP address, and the directory in which you have stored the files from the ISO
image, relative to the FTP server root. For example, if the server's host name is
myserver.example.com and you have copied the files from the image to /var/ftp/rhel7-
install/, specify ftp://myserver.example.com/rhel7-install/ as the installation source.
3.3.3.3. Firewall Considerations for Network-based Installations
CHAPTER 3. MAKING MEDIA
23

When using a network-based installation source, make sure that your firewall allows the server you are
installing to access the remote installation source. The following table shows which ports must be open
for each type of network-based installation
Table 3.1. Ports Used by Network Protocols
Protocol used Ports to open
FTP 21
HTTP 80
HTTPS 443
NFS 2049, 111, 20048
TFTP 69
For information about opening specific firewall ports, see the Red Hat Enterprise Linux 7 Security Guide.
Installation Guide
24

PART I. AMD64, INTEL 64, AND ARM 64 - INSTALLATION AND
BOOTING
This part of the Red Hat Enterprise Linux Installation Guide discusses the installation of Red Hat
Enterprise Linux 7 on 64-bit AMD, Intel, and ARM systems as well as some basic troubleshooting. For
advanced installation options, see Part IV, “Advanced Installation Options”.
PART I. AMD64, INTEL 64, AND ARM 64 - INSTALLATION AND BOOTING
25
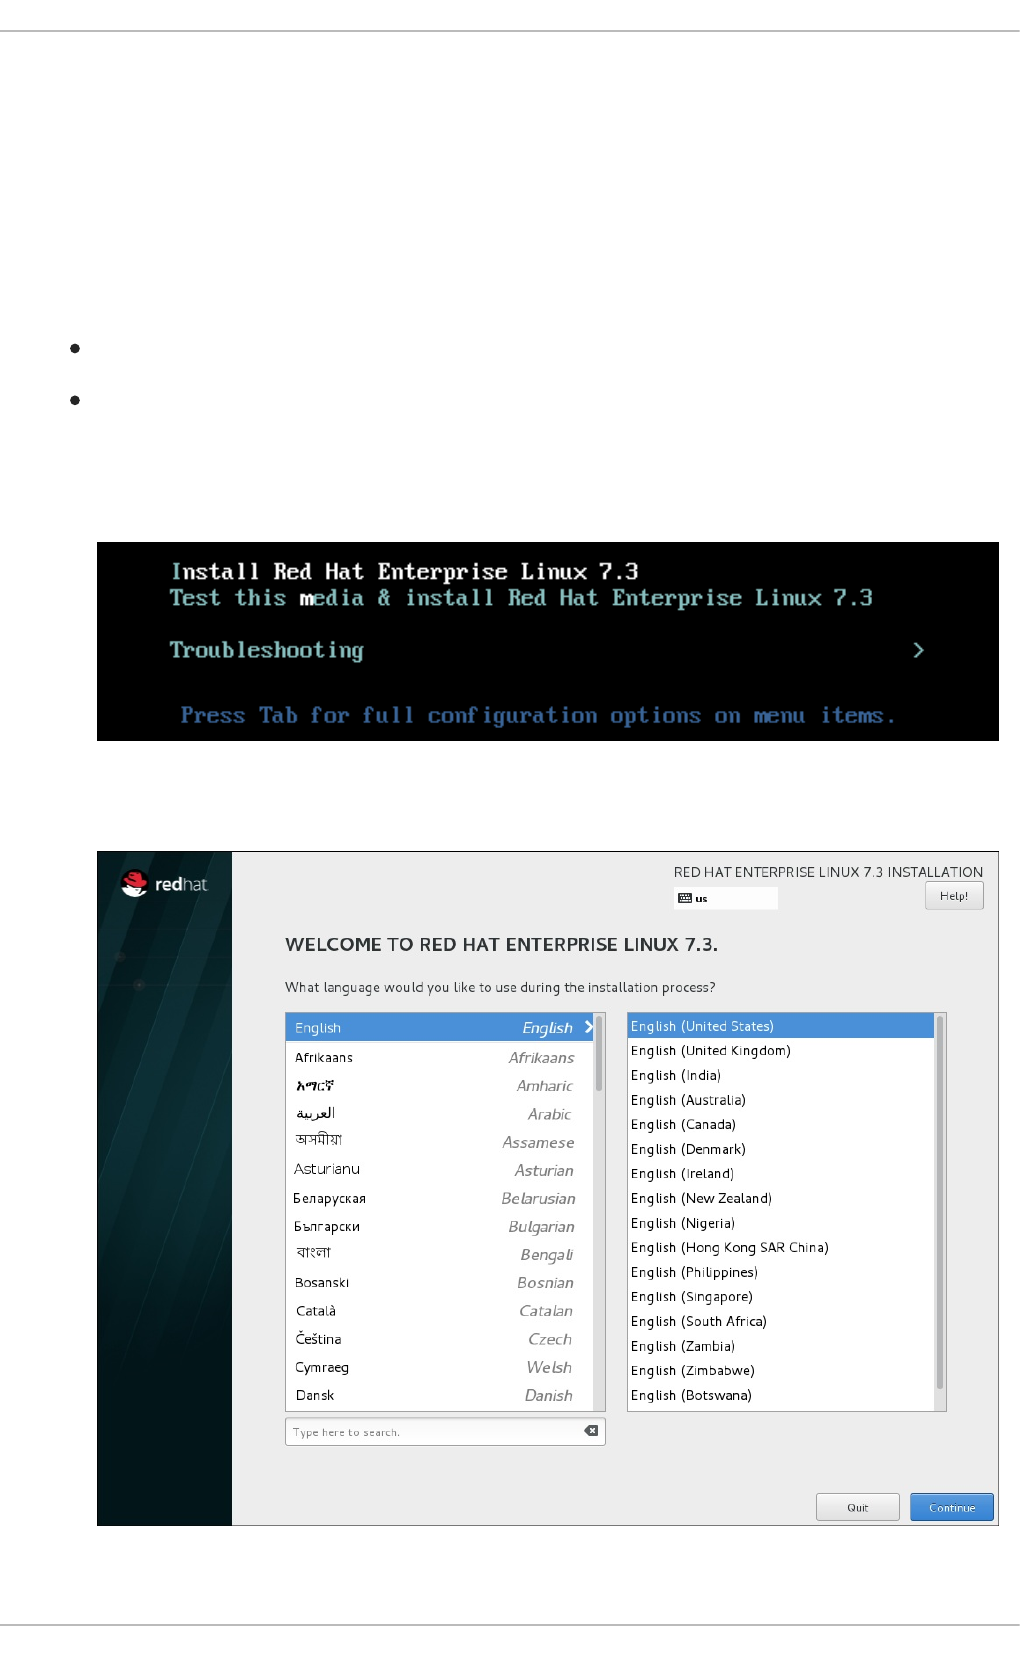
CHAPTER 4. QUICK INSTALLATION GUIDE
4.1. INTERACTIVE INSTALLATION
This section describes the simple procedure to install and register Red Hat Enterprise Linux after you
have created and booted from an installation USB drive.
Prerequisites: Create an installation USB drive and boot it. For details, see:
Chapter 3, Making Media.
Chapter 7, Booting the Installation on 64-bit AMD, Intel, and ARM systems.
After booting the installation USB drive:
1. Select Install Red Hat Enterprise Linux in the boot menu and press Enter.
2. After Anaconda, the Red Hat Enterprise Linux installer, started, select your language and
region, and click Continue.
3. The Installation Summary is the central screen to set configuration options:
Installation Guide
26
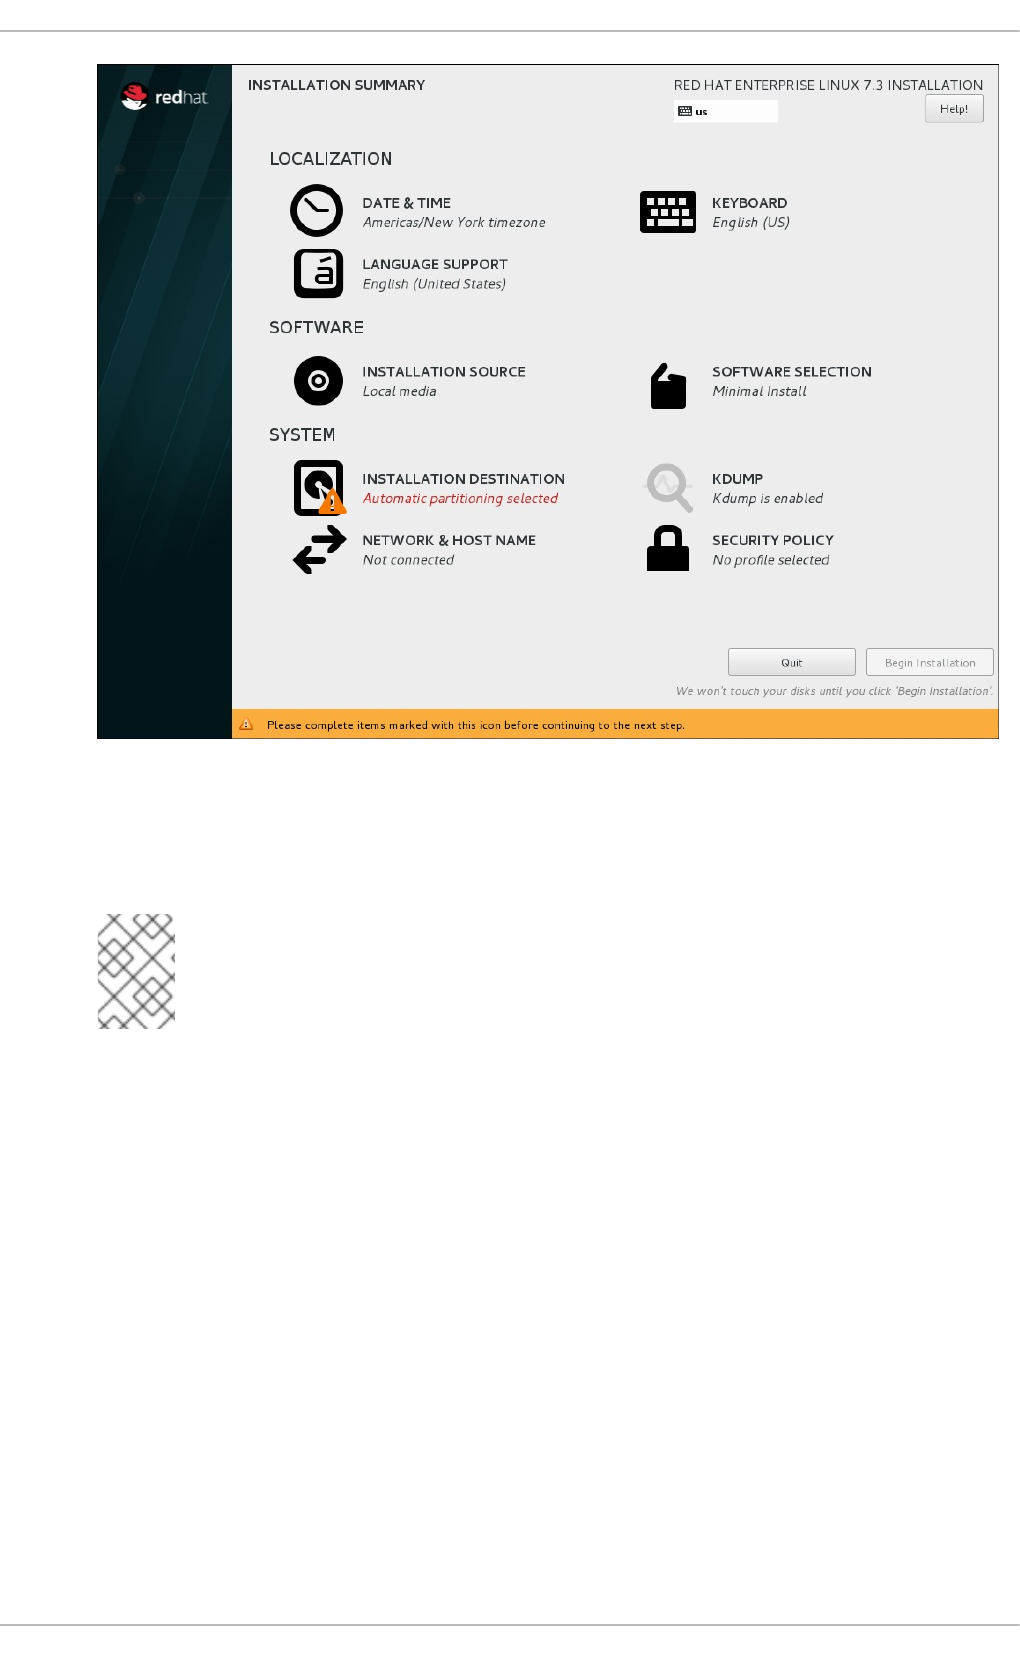
You can display and modify the individual options in any order. If a configuration option was
automatically configured correctly, no further action is required. However, if items are marked
with an exclamation point icon, you must complete the configuration for these items before you
can begin the installation.
NOTE
Nothing will be written to the disk until you click the Begin Installation
button.
4. Select Date & Time:
a. Set your region and the nearest city in your time zone.
b. Click Done to return to the Installation Summary.
CHAPTER 4. QUICK INSTALLATION GUIDE
27
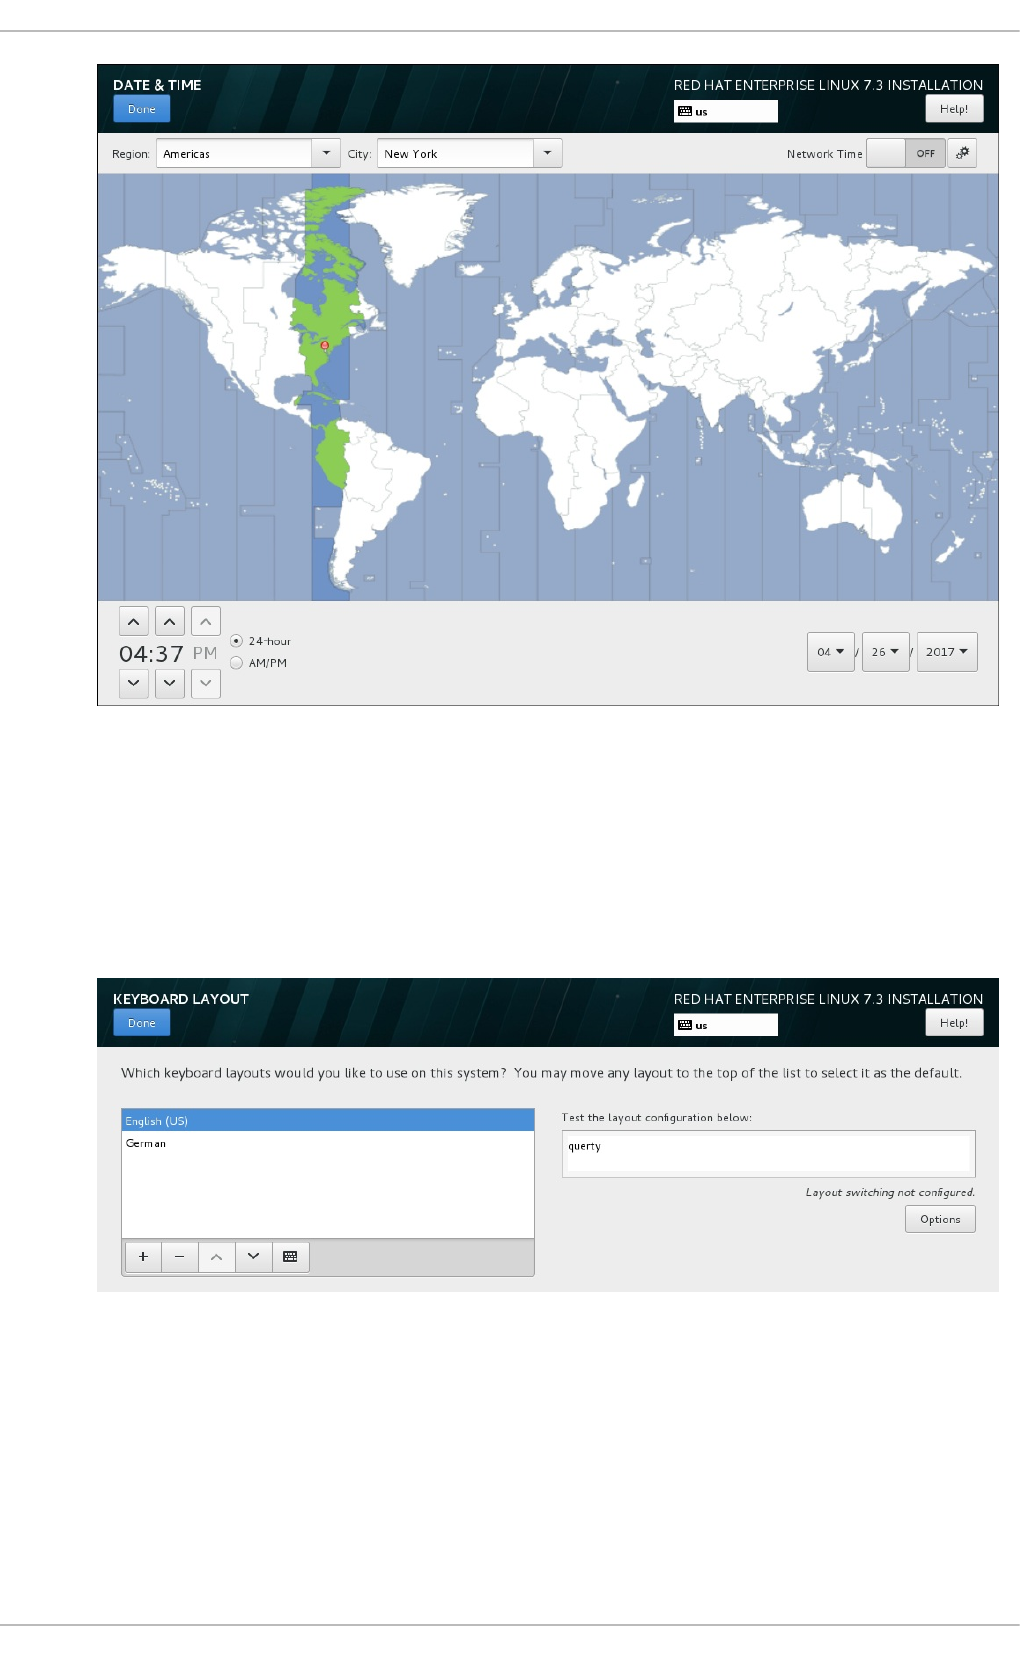
5. Select Keyboard Layout:
a. Use the + and - buttons to add and remove keyboard layouts.
b. If you enable multiple keyboard layouts, move your preferred layout to the top of the list
using the ↑ button to set it as default.
c. Click Done to return to the Installation Summary.
6. Select Installation Destination:
a. Select the target disk. A check mark is displayed next to the selected target.
The selected disk is partitioned automatically.
b. Click Done to return to the Installation Summary.
Installation Guide
28
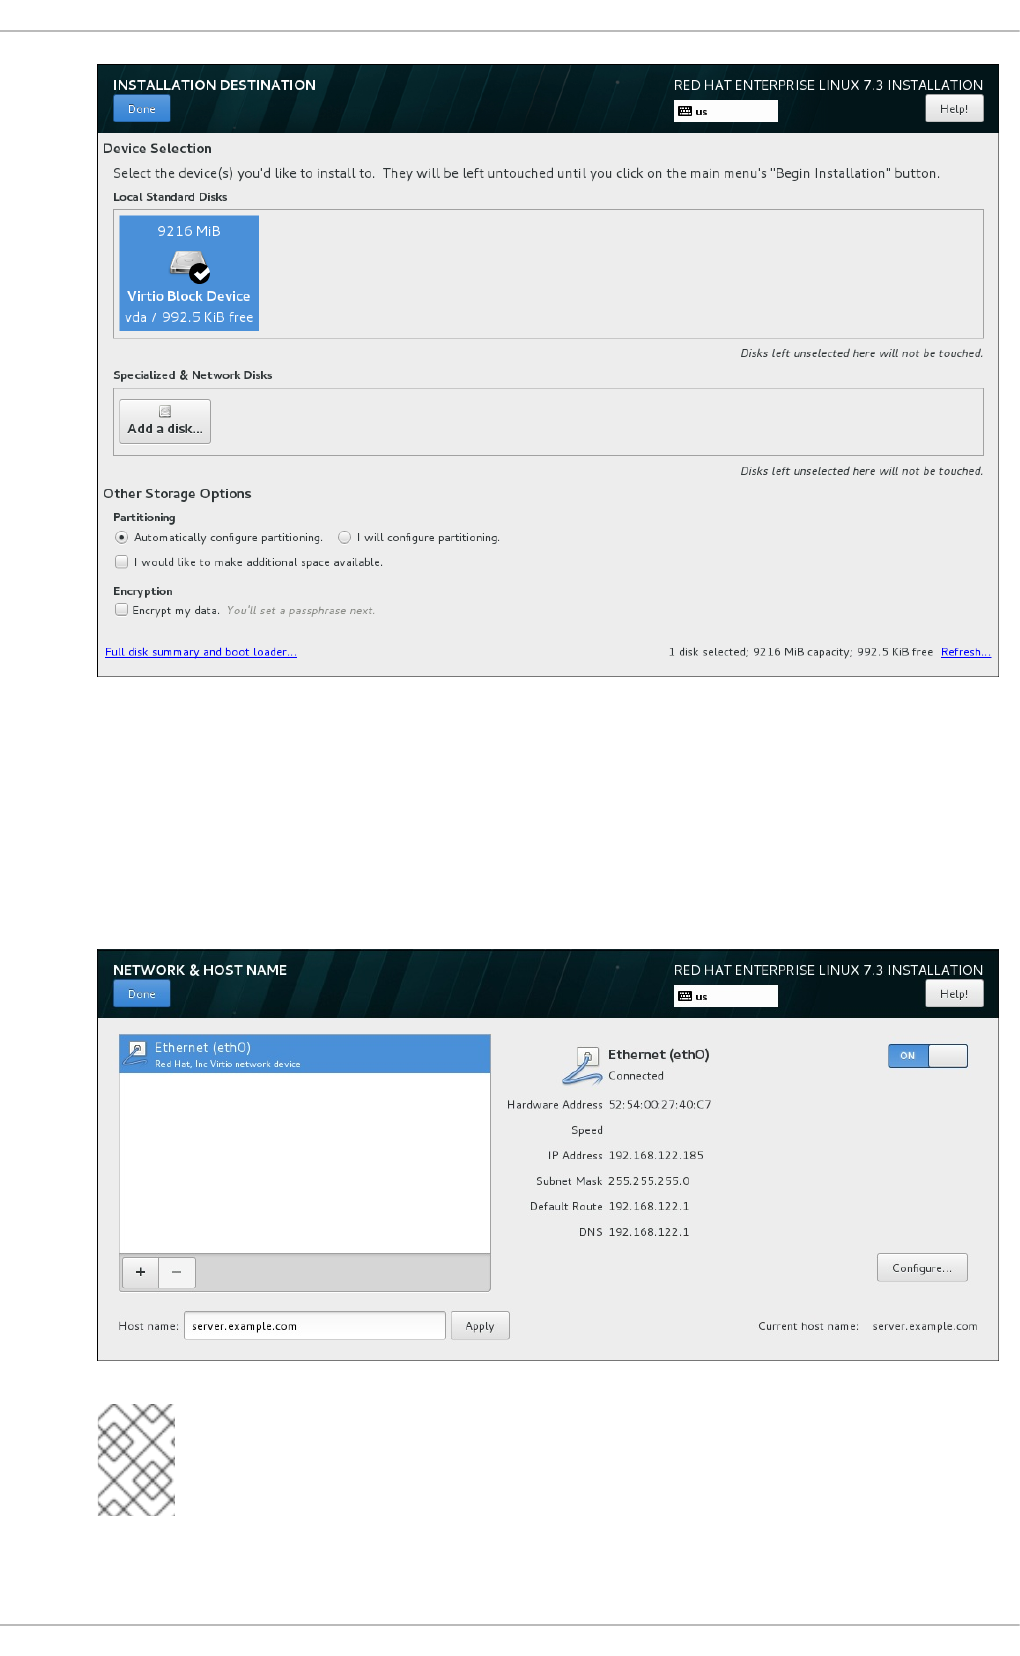
7. Select Network and Hostname:
a. Click the Ethernet sliding switch in the top right corner to enable the network configuration.
b. Optional, select the device and click Configure to update the network interface
configuration.
c. Click Done to return to the Installation Summary.
NOTE
Anaconda applies the network settings immediately. They are used during the
setup and after the installation.
8. On the Installation Summary screen, click Begin Installation.
CHAPTER 4. QUICK INSTALLATION GUIDE
29
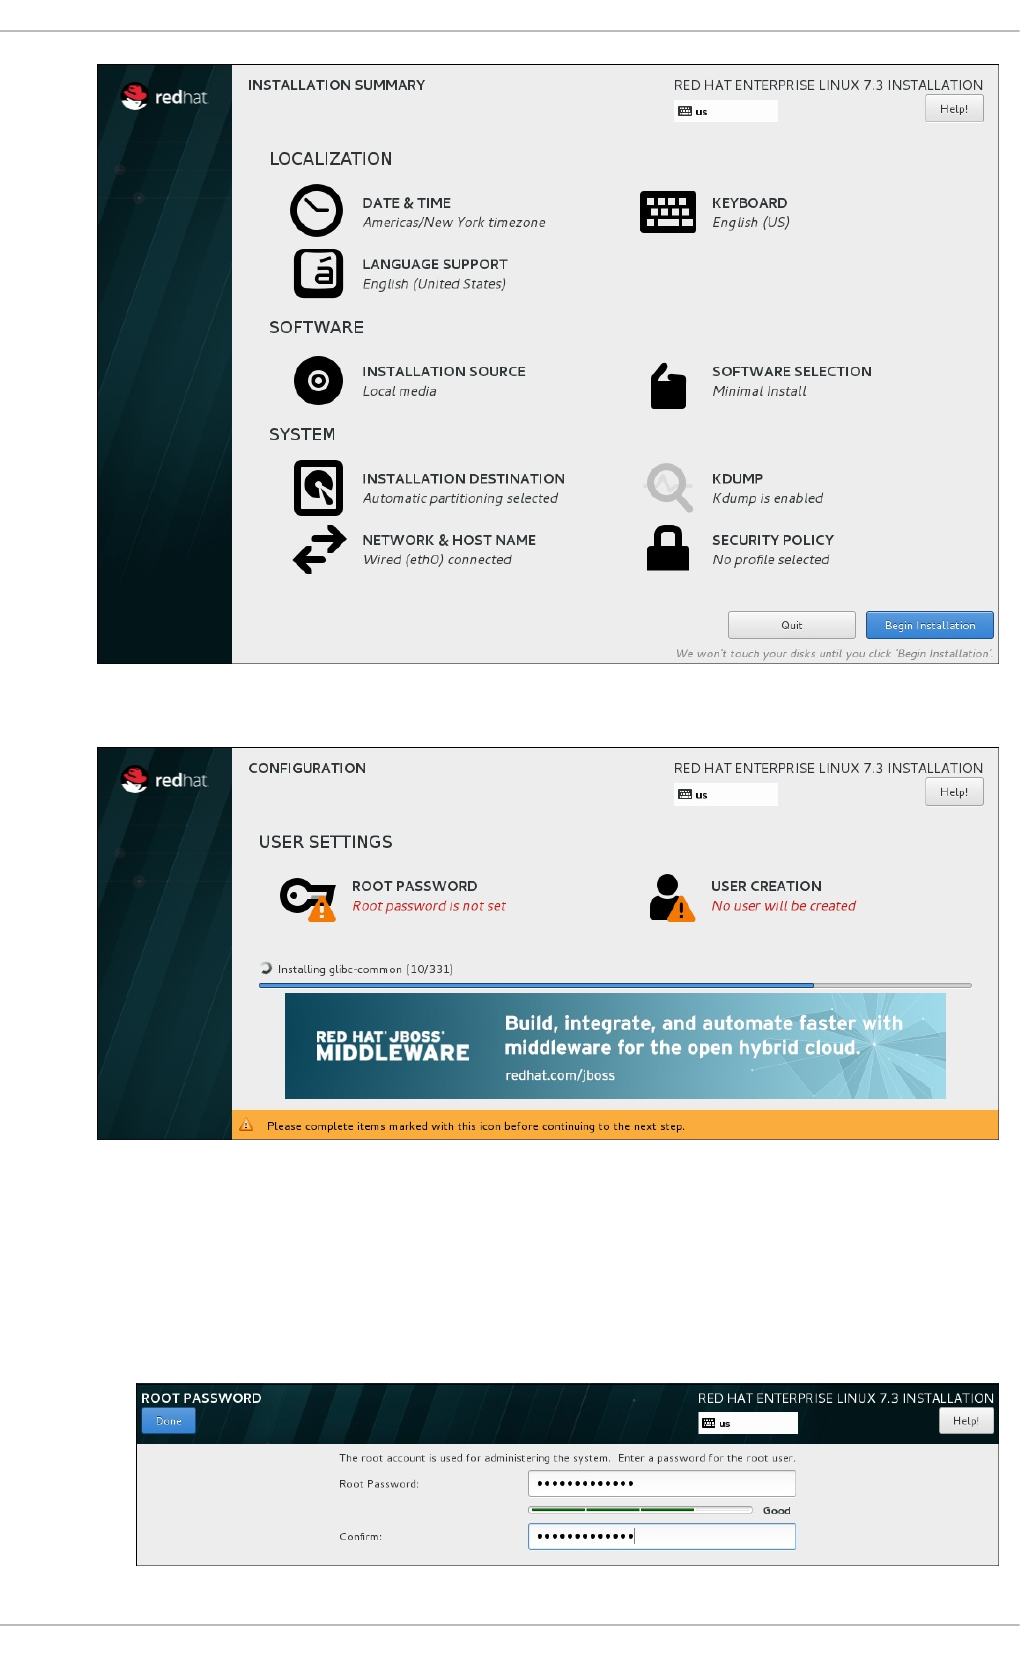
9. The installation starts and the Configuration screen is displayed:
During the installation:
a. Select Root Password:
i. Enter the password for the root user and confirm it.
ii. Click Done to return to the Configuration screen.
Installation Guide
30
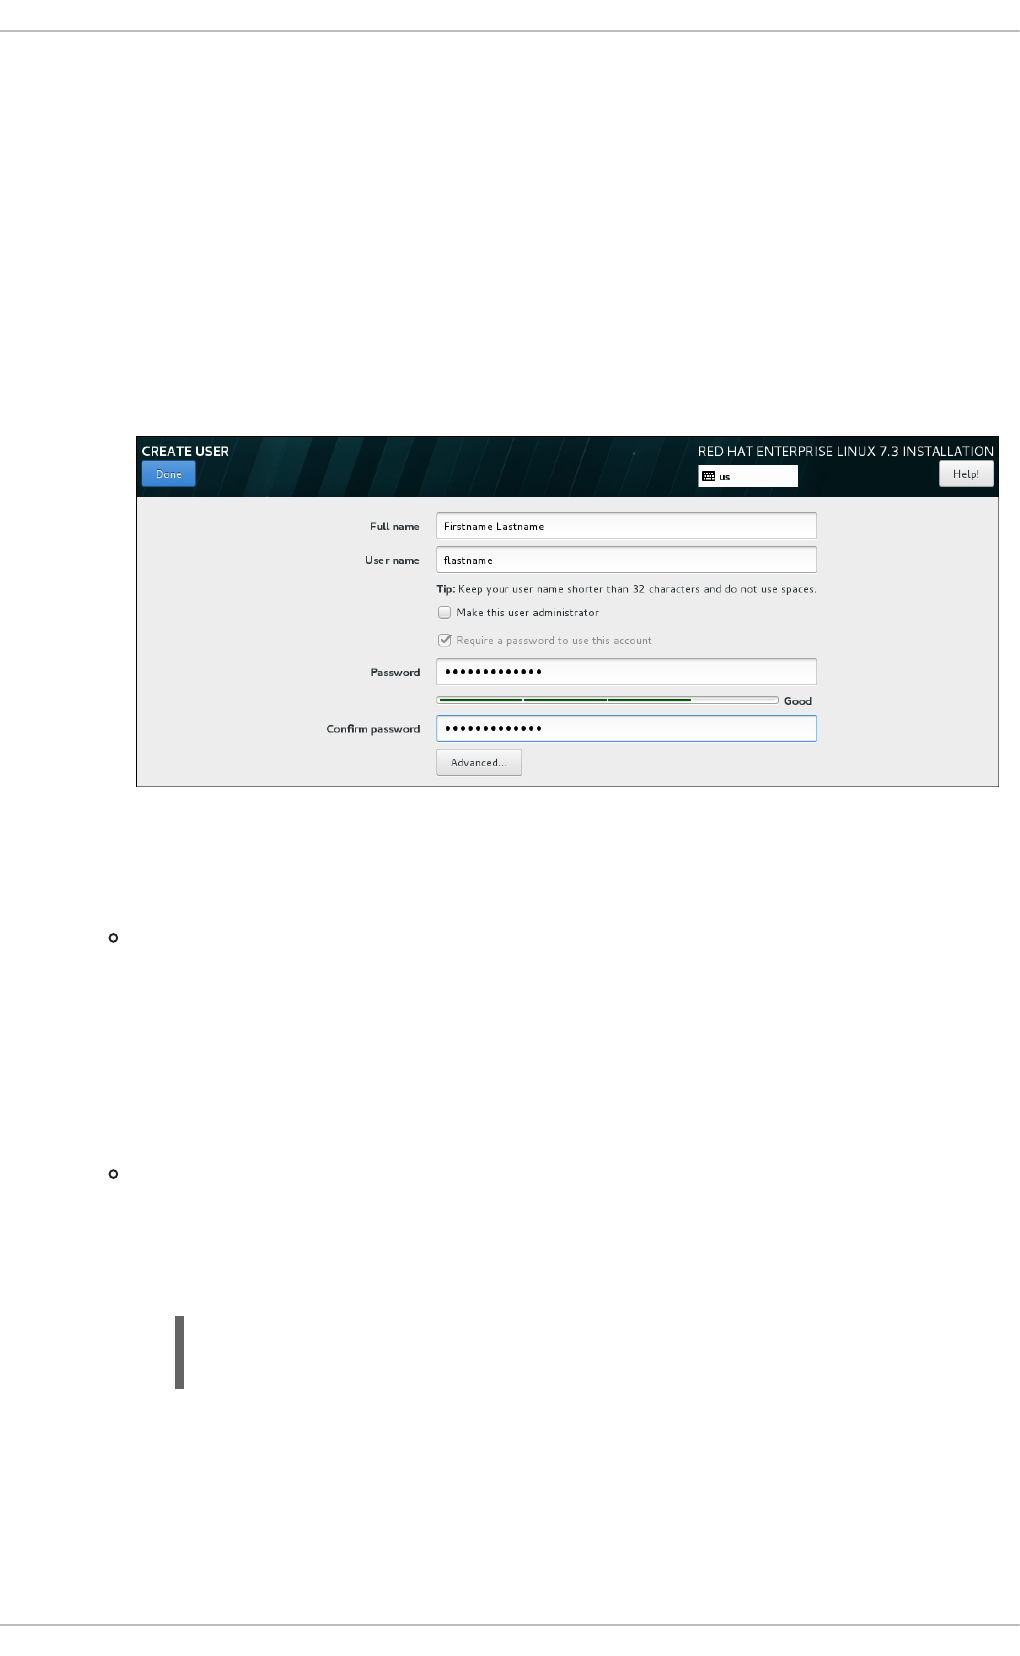
b. Select User Creation:
i. Enter the user's full name.
ii. Optionally, update the automatically generated user name.
iii. Set the password and confirm it.
iv. Optionally, check the Make this user administrator check box. This will add the
user to the wheel group and allow this account to use sudo without any further
configuration.
v. Click Done to return to the Configuration screen.
c. Wait until the installation completes and click Reboot.
10. After the installed system has been started:
If you installed the server using the Server with GUI base environment, the Initial Setup
application is started automatically:
1. Accept the license agreement.
2. Register the system.
For details, see Chapter 30, Initial Setup.
If you selected any other base environment during the installation:
1. Log into the system as the root user.
2. Register the system and automatically attach a subscription:
# subscription-manager register --auto-attach \
--username=user_name --password=password
4.2. AUTOMATIC INSTALLATION
This section describes a simple procedure on how to add a Kickstart file to the installation USB drive,
which automatically installs and registers Red Hat Enterprise Linux. You can use this procedure to
deploy Red Hat Enterprise Linux on multiple machines.
CHAPTER 4. QUICK INSTALLATION GUIDE
31

Generating the USB Boot Media
1. Record an installation in a Kickstart file:
a. Manually install Red Hat Enterprise Linux once. For details see Section 4.1, “Interactive
Installation”.
b. Boot the installed system. During the installation, Anaconda created a Kickstart file with the
settings in the /root/anaconda-ks.cfg file.
2. Download the Red Hat Enterprise Linux installation DVD ISO file to the /tmp/ directory.
3. Mount the installation ISO file to the /mnt/ directory. For example:
# mount -o loop /tmp/rhel-server-7.3-x86_64-dvd.iso /mnt/
4. Create a working directory and copy the DVD content to it. For example:
# mkdir /root/rhel-install/
# shopt -s dotglob
# cp -avRf /mnt/* /root/rhel-install/
5. Unmount the ISO file:
# umount /mnt/
6. Copy the Kickstart file generated during the installation to the working directory:
# cp /root/anaconda-ks.cfg /root/rhel-install/
7. To register Red Hat Enterprise Linux after the installation automatically and attach a
subscription, append the following to the /root/rhel-install/anaconda-ks.cfg file:
%post
subscription-manager register --auto-attach --username=user_name --
password=password
%end
8. Display the installation DVD volume name:
# isoinfo -d -i rhel-server-7.3-x86_64-dvd.iso | grep "Volume id" |
\
sed -e 's/Volume id: //' -e 's/ /\\x20/g'
RHEL-7.3\x20Server.x86_64
9. Add a new menu entry to the boot /root/rhel-install/isolinux/isolinux.cfg file that
uses the Kickstart file. For example:
#######################################
label kickstart
menu label ^Kickstart Installation of RHEL7.3
kernel vmlinuz
Installation Guide
32
append initrd=initrd.img inst.stage2=hd:LABEL=RHEL-
7.3\x20Server.x86_64 inst.ks=cdrom:/anaconda-ks.cfg
#######################################
NOTE
Set the inst.stage2=hd:LABEL= option to the DVD volume name retrieved in
the previous step.
10. Create the /root/rhel-ks.iso file from the working directory:
# mkisofs -J -T -o /root/rhel-ks.iso -b isolinux/isolinux.bin \
-c isolinux/boot.cat -no-emul-boot -boot-load-size 4 -boot-info-
table \
-R -m TRANS.TBL -graft-points -V "RHEL-7.3 Server.x86_64" \
/root/rhel-install/
NOTE
Set the -V option to the DVD volume name retrieved in an earlier step and
replace \x20 in the string with a space.
11. Create an installation USB drive. For details, see Section 3.2.1, “Making Installation USB Media
on Linux”.
Install Red Hat Enterprise Linux Using the Kickstart File
1. Boot the installation USB drive. See Chapter 7, Booting the Installation on 64-bit AMD, Intel, and
ARM systems.
2. Select the entry, that contains the Kickstart configuration, you created in the section called
“Generating the USB Boot Media”.
CHAPTER 4. QUICK INSTALLATION GUIDE
33

CHAPTER 5. PLANNING FOR INSTALLATION ON 64-BIT AMD,
INTEL, AND ARM SYSTEMS
This chapter outlines the decisions and preparations you will need to make when deciding how to
proceed with the installation.
5.1. UPGRADE OR INSTALL?
There are two procedures available for upgrading your current system to the next major version of
Red Hat Enterprise Linux. To decide which procedure is the right one for your system, read the following
descriptions:
Clean Install
A clean install is performed by backing up all data from the system, formatting disk partitions,
performing an installation of Red Hat Enterprise Linux from installation media, and then restoring any
user data.
NOTE
This is the recommended method for upgrading between major versions of Red Hat
Enterprise Linux.
In-Place Upgrade
An in-place upgrade is a way of upgrading your system without removing the older version first. The
procedure requires installing the migration utilities available for your system and running them as any
other software. In Red Hat Enterprise Linux, the Preupgrade Assistant assesses your current
system and identifies potential problems you might encounter during or after the upgrade. It also
performs minor fixes and modifications to the system. The Red Hat Upgrade Tool utility downloads
the packages and performs the actual upgrade. An in-place upgrade requires a lot of troubleshooting
and planning and should only be done if there is no other choice. For more information on the
Preupgrade Assistant, see Chapter 29, Upgrading Your Current System.
WARNING
Never perform an in-place upgrade on a production system without first testing it
on a cloned backup copy of the system.
5.2. IS YOUR HARDWARE COMPATIBLE?
Red Hat Enterprise Linux 7 should be compatible with most hardware in systems that were factory built
within the last two years. Hardware compatibility is a particularly important concern if you have an older
or custom-built system. Because hardware specifications change almost daily, it is recommended that all
systems be checked for compatibility.
Installation Guide
34

The most recent list of supported hardware can be found in the Red Hat Hardware Compatibility List,
available online at https://access.redhat.com/ecosystem/search/#/category/Server. Also see Red Hat
Enterprise Linux technology capabilities and limits for general information about system requirements.
5.3. SUPPORTED INSTALLATION TARGETS
An installation target is a storage device that will store Red Hat Enterprise Linux and boot the system.
Red Hat Enterprise Linux supports the following installation targets for AMD, Intel, and ARM systems:
Storage connected by a standard internal interface, such as SCSI, SATA, or SAS
BIOS/firmware RAID devices
NVDIMM devices in sector mode on the Intel64 and AMD64 architectures, supported by the
nd_pmem driver.
Fibre Channel Host Bus Adapters and multipath devices. Some can require vendor-provided
drivers.
Xen block devices on Intel processors in Xen virtual machines.
VirtIO block devices on Intel processors in KVM virtual machines.
Red Hat does not support installation to USB drives or SD memory cards. For information about the
support for third-party virtualization technologies, see the Red Hat Hardware Compatibility List, available
online at https://hardware.redhat.com.
5.4. SYSTEM SPECIFICATIONS LIST
The installation program automatically detects and installs your computer's hardware and you do not
usually need to supply the installation program with any specific details about your system. However,
when performing certain types of installation, it is important to know specific details about your hardware.
For this reason, it is recommended that you record the following system specifications for reference
during the installation, depending on your installation type.
If you plan to use a customized partition layout, record:
The model numbers, sizes, types, and interfaces of the hard drives attached to the system.
For example, Seagate ST3320613AS 320 GB on SATA0, Western Digital WD7500AAKS
750 GB on SATA1. This will allow you to identify specific hard drives during the partitioning
process.
If you are installing Red Hat Enterprise Linux as an additional operating system on an existing
system, record:
Information about the partitions used on the system. This information can include file system
types, device node names, file system labels, and sizes. This will allow you to identify
specific partitions during the partitioning process. Remember that different operating
systems identify partitions and drives differently, therefore even if the other operating system
is a Unix operating system, the device names can be reported by Red Hat Enterprise Linux
differently. This information can usually be found by executing the equivalent of the mount
command and blkid command and in the /etc/fstab file.
If you have other operating systems already installed, the Red Hat Enterprise Linux 7
installation program attempts to automatically detect and configure to boot them. You can
manually configure any additional operating systems if they are not detected properly. For
CHAPTER 5. PLANNING FOR INSTALLATION ON 64-BIT AMD, INTEL, AND ARM SYSTEMS
35

more information, see Section 8.14.1, “Boot Loader Installation”.
If you plan to install from an image on a local hard drive:
The hard drive and directory that holds the image.
If you plan to install from a network location:
The make and model numbers of the network adapters on your system. For example,
Netgear GA311. This will allow you to identify adapters when manually configuring the
network.
IP, DHCP, and BOOTP addresses
Netmask
Gateway IP address
One or more name server IP addresses (DNS)
The location of the installation source on an FTP server, HTTP (web) server, HTTPS (web)
server, or NFS server.
If any of these networking requirements or terms are unfamiliar to you, contact your network
administrator for assistance.
If you plan to install on an iSCSI target:
The location of the iSCSI target. Depending on your network, you might also need a CHAP
user name and password, and perhaps a reverse CHAP user name and password.
If your computer is part of a domain:
You should verify that the domain name will be supplied by the DHCP server. If not, you will
need to input the domain name manually during installation.
5.5. DISK SPACE AND MEMORY REQUIREMENTS
Red Hat Enterprise Linux, like most modern operating systems, uses disk partitions. When you install
Red Hat Enterprise Linux, you might have to work with disk partitions. For more information, see
Appendix A, An Introduction to Disk Partitions.
If you have other operating systems installed on your system, the disk space they use must be separate
from the disk space used by Red Hat Enterprise Linux.
NOTE
For AMD64/Intel 64 and ARM systems, at least two partitions (/ and swap) must be
dedicated to Red Hat Enterprise Linux.
To install Red Hat Enterprise Linux, you must have a minimum of 10 GiB of space in either unpartitioned
disk space or in partitions which can be deleted. For more information on partition and disk space
recommendations, see the recommended partitioning sizes discussed in Section 8.14.4.4,
“Recommended Partitioning Scheme”.
Red Hat Enterprise Linux requires minimum the following amount of RAM:
Installation Guide
36

Installation type Minimum required RAM
Local media installation (USB, DVD) 768 MiB
NFS network installation 768 MiB
HTTP, HTTPS, or FTP network installation 1.5 GiB
NOTE
It may be possible to perform the installation with less memory than listed in this section.
However, the exact requirements depend heavily on your environment and exact
installation path, and they also change with each new release. Determining the absolute
minimum required RAM for your specific use case therefore requires you to test various
configurations, and periodically re-test with each new release.
Installing Red Hat Enterprise Linux using a Kickstart file has the same minimum RAM requirements as a
manual installation. However, if you use a Kickstart file that runs commands which require additional
memory or write data to the RAM disk, additional RAM might be necessary.
For more information about the minimum requirements and technology limits of Red Hat
Enterprise Linux 7, see the Red Hat Enterprise Linux technology capabilities and limits article on the
Red Hat Customer Portal.
5.6. RAID AND OTHER DISK DEVICES
Some storage technology requires special consideration when using Red Hat Enterprise Linux.
Generally, it is important to understand how these technologies are configured, visible to Red Hat
Enterprise Linux, and how support for them might have changed between major versions.
5.6.1. Hardware RAID
RAID (Redundant Array of Independent Disks) allows a group, or array, of drives to act as a single
device. Configure any RAID functions provided by the mainboard of your computer, or attached
controller cards, before you begin the installation process. Each active RAID array appears as one drive
within Red Hat Enterprise Linux.
5.6.2. Software RAID
On systems with more than one hard drive, you can use the Red Hat Enterprise Linux installation
program to operate several of the drives as a Linux software RAID array. With a software RAID array,
RAID functions are controlled by the operating system rather than dedicated hardware. These functions
are explained in detail in Section 8.14.4, “Manual Partitioning”.
NOTE
When a pre-existing RAID array's member devices are all unpartitioned disks/drives, the
installer will treat the array itself as a disk and will not provide a way to remove the array.
5.6.3. USB Disks
CHAPTER 5. PLANNING FOR INSTALLATION ON 64-BIT AMD, INTEL, AND ARM SYSTEMS
37

You can connect and configure external USB storage after installation. Most such devices are
recognized by the kernel and available for use at that time.
Some USB drives might not be recognized by the installation program. If configuration of these disks at
installation time is not vital, disconnect them to avoid potential problems.
5.6.4. NVDIMM devices
To use a Non-Volatile Dual In-line Memory Module (NVDIMM) device as storage, the following
conditions must be satisfied:
Version of Red Hat Enterprise Linux is 7.6 or later.
The architecture of the system is Intel 64 or AMD64.
The device is configured to sector mode. Anaconda can reconfigure NVDIMM devices to this
mode.
The device must be supported by the nd_pmem driver.
Booting from a NVDIMM device is possible under the following additional conditions:
The system uses UEFI.
The device must be supported by firmware available on the system, or by a UEFI driver. The
UEFI driver may be loaded from an option ROM of the device itself.
The device must be made available under a namespace.
To take advantage of the high performance of NVDIMM devices during booting, place the /boot and
/boot/efi directories on the device. See Section 8.14.4, “Manual Partitioning” for more information.
Note that the Execute-in-place (XIP) feature of NVDIMM devices is not supported during booting and the
kernel is loaded into conventional memory.
5.6.5. Considerations for Intel BIOS RAID Sets
Red Hat Enterprise Linux 7 uses mdraid for installation onto Intel BIOS RAID sets. These sets are
detected automatically during the boot process and their device node paths can change from boot to
boot. For this reason, local modifications to /etc/fstab, /etc/crypttab or other configuration files
which refer to devices by their device node paths might not work in Red Hat Enterprise Linux 7.
Therefore, you should replace device node paths (such as /dev/sda) with file system labels or device
UUIDs instead. You can find the file system labels and device UUIDs using the blkid command.
5.6.6. Considerations for Intel BIOS iSCSI Remote Boot
If you are installing using Intel iSCSI Remote Boot, all attached iSCSI storage devices must be disabled,
otherwise the installation will succeed but the installed system will not boot.
5.7. CHOOSE AN INSTALLATION BOOT METHOD
You can use several methods to boot the Red Hat Enterprise Linux 7 installation program. The method
you choose depends upon your installation media.
Installation Guide
38

Your system's firmware (BIOS of UEFI) settings might need to be changed to allow booting from
removable media such as a DVD or a USB flash drive. See Section 7.1.1, “Booting from Physical Media”
for information.
NOTE
Installation media must remain mounted throughout installation, including during
execution of the %post section of a kickstart file.
Full installation DVD or USB drive
You can create bootable media from the full installation DVD ISO image. In this case, a single DVD or
USB drive can be used to complete the entire installation - it will serve both as a boot device and as
an installation source for installing software packages. See Chapter 3, Making Media for instructions
on how to make a full installation DVD or USB drive.
Minimal boot CD, DVD or USB Flash Drive
A minimal boot CD, DVD or USB flash drive is created using a small ISO image, which only contains
data necessary to boot the system and start the installation. If you use this boot media, you will need
an additional installation source from which packages will be installed. See Section 3.2, “Making
Installation USB Media” for instructions on making boot CDs, DVDs and USB flash drives.
PXE Server
A preboot execution environment (PXE) server allows the installation program to boot over the
network. After you boot the system, you complete the installation from a different installation source,
such as a local hard drive or a location on a network. For more information on PXE servers, see
Chapter 23, Preparing for a Network Installation.
5.8. AUTOMATING THE INSTALLATION WITH KICKSTART
Red Hat Enterprise Linux 7 offers a way to partially or fully automate the installation process using a
Kickstart file. Kickstart files contain answers to all questions normally asked by the installation program,
such as what time zone do you want the system to use, how should the drives be partitioned or which
packages should be installed. Providing a prepared Kickstart file at the beginning of the installation
therefore allows you to perform the entire installation (or parts of it) automatically, without need for any
intervention from the user. This is especially useful when deploying Red Hat Enterprise Linux on a large
number of systems at once.
In addition to allowing you to automate the installation, Kickstart files also provide more options regarding
software selection. When installing Red Hat Enterprise Linux manually using the graphical installation
interface, your software selection is limited to pre-defined environments and add-ons. A Kickstart file
allows you to install or remove individual packages as well.
For instructions about creating a Kickstart file and using it to automate the installation, see Chapter 26,
Kickstart Installations.
5.9. USING A BETA RELEASE WITH UEFI SECURE BOOT
NOTE
This section only concerns Beta releases of Red Hat Enterprise Linux 7.
CHAPTER 5. PLANNING FOR INSTALLATION ON 64-BIT AMD, INTEL, AND ARM SYSTEMS
39

The UEFI Secure Boot technology requires that the operating system kernel must be signed with a
recognized private key in order to be able to boot. In every beta release of Red Hat Enterprise Linux 7,
the kernel is signed with a Red Hat Beta-specific private key, which is different from the more common
Red Hat key used to sign kernels in a General Availability (non-Beta) releases.
The Beta private key will likely not be recognized by your hardware, which means that any Beta release
of Red Hat Enterprise Linux 7 will not be able to boot. In order to use a Beta release with UEFI Secure
Boot enabled, you need to add the Red Hat Beta public key to your system using the Machine Owner
Key (MOK) facility.
The procedure to add the Red Hat Beta key to your system is below.
Procedure 5.1. Adding a Custom Private Key for UEFI Secure Boot
1. First, disable UEFI Secure Boot on the system, and install Red Hat Enterprise Linux 7 normally.
2. After the installation finishes, the system will reboot. Secure Boot should still be disabled at this
point. Reboot the system, log in and, if applicable, go through the Initial Setup screens as
described in Chapter 30, Initial Setup.
3. After finishing the first boot and going through Initial Setup, install the kernel-doc package if not
installed already:
# yum install kernel-doc
This package provides a certificate file which contains the Red Hat CA public Beta key, located
in /usr/share/doc/kernel-keys/kernel-version/kernel-signing-ca.cer, where
kernel-version is the kernel version string without the platform architecture suffix - for example,
3.10.0-686.el7.
4. Execute the following commands to enroll the public key into the system Machine Owner Key
(MOK) list:
# kr=$(uname -r)
# mokutil --import /usr/share/doc/kernel-keys/${kr%.$(uname -
p)}/kernel-signing-ca.cer
Enter a password of your choosing when prompted.
NOTE
Make sure to remember the password. It is required to finish this procedure as
well as to remove the imported key when it is no longer needed.
5. Reboot the system again. During startup you will be prompted to confirm that you want to
complete the pending key enrollment request. Select yes, and provide the password which you
set earlier using the mokutil command in the previous step. The system will reboot again after
you do so, and the key will be imported into the system firmware. You can turn on Secure Boot
on this or any subsequent reboot.
Installation Guide
40

WARNING
Remove the imported Beta public key when you no longer need it.
If you install a final (General Availability) release of Red Hat Enterprise Linux 7, or
when you install a different operating system, you should remove the imported key.
If you have only imported this public key, you can use the following command to
reset the MOK:
# mokutil --reset
After the next reboot, the firmware will prompt you for a confirmation and the
password you created when importing the key. The key will be removed from the
MOK after providing the correct password, and the system will revert to its original
state.
CHAPTER 5. PLANNING FOR INSTALLATION ON 64-BIT AMD, INTEL, AND ARM SYSTEMS
41

CHAPTER 6. UPDATING DRIVERS DURING INSTALLATION ON
AMD64 AND INTEL 64 SYSTEMS
In most cases, Red Hat Enterprise Linux already includes drivers for the devices that make up your
system. However, if your system contains hardware that has been released very recently, drivers for this
hardware might not yet be included. Sometimes, a driver update that provides support for a new device
might be available from Red Hat or your hardware vendor on a driver disc that contains RPM packages.
Typically, the driver disc is available for download as an ISO image file.
IMPORTANT
Driver updates should only be performed if a missing driver prevents you to complete the
installation successfully. The drivers included in the kernel should always be preferred
over drivers provided by other means.
Often, you do not need the new hardware during the installation process. For example, if you use a DVD
to install to a local hard drive, the installation will succeed even if drivers for your network card are not
available. In such a situation, complete the installation and add support for the new hardware afterward -
see Red Hat Enterprise Linux 7 System Administrator's Guide for details of adding this support.
In other situations, you might want to add drivers for a device during the installation process to support a
particular configuration. For example, you might want to install drivers for a network device or a storage
adapter card to give the installation program access to the storage devices that your system uses. You
can use a driver disc to add this support during installation in one of two ways:
1. place the ISO image file of the driver disc in a location accessible to the installation program, on
a local hard drive, on a USB flash drive, or on a CD or DVD.
2. create a driver disc by extracting the image file onto a CD or a DVD, or a USB flash drive. See
the instructions for making installation discs in Section 3.1, “Making an Installation CD or DVD”
for more information on burning ISO image files to a CD or DVD, and Section 3.2, “Making
Installation USB Media” for instructions on writing ISO images to USB drives.
If Red Hat, your hardware vendor, or a trusted third party told you that you will require a driver update
during the installation process, choose a method to supply the update from the methods described in this
chapter and test it before beginning the installation. Conversely, do not perform a driver update during
installation unless you are certain that your system requires it. The presence of a driver on a system for
which it was not intended can complicate support.
WARNING
Driver update disks sometimes disable conflicting kernel drivers, where necessary.
In rare cases, unloading a kernel module in this way can cause installation errors.
6.1. LIMITATIONS OF DRIVER UPDATES DURING INSTALLATION
On UEFI systems with the Secure Boot technology enabled, all drivers being loaded must be signed with
a valid certificate, otherwise the system will refuse them. All drivers provided by Red Hat are signed by
one of Red Hat's private keys and authenticated by the corresponding Red Hat public key in the kernel. If
Installation Guide
42

you load any other drivers (ones not provided on the Red Hat Enterprise Linux installation DVD), you
must make sure that they are signed as well.
More information about signing custom drivers can be found in the Working with Kernel Modules chapter
in the Red Hat Enterprise Linux 7 System Administrator's Guide.
6.2. PREPARING FOR A DRIVER UPDATE DURING INSTALLATION
If a driver update is necessary and available for your hardware, Red Hat, your hardware vendor, or
another trusted third party will typically provide it in the form of an image file in ISO format. Once you
obtain the ISO image, you must decide on the method you want to use to perform the driver update.
The available methods are:
Automatic driver update
When starting the installation, the Anaconda installation program will attempt to detect all attached
storage devices. If there is a storage device labeled OEMDRV present when the installation begins,
Anaconda will always treat it like a driver update disc and attempt to load drivers present on it.
Assisted driver update
You can specify the inst.dd boot option when starting the installation. If you use this option without
any parameters, Anaconda will display a list of all storage devices connected to the system, and it
will prompt you to select a device which contains a driver update.
Manual driver update
You can specify the inst.dd=location boot option when starting the installation, where location is
the path to a driver update disc or ISO image. When you specify this option, Anaconda will attempt
to load any driver updates it finds at the specified location. With manual driver updates, you can
specify either locally available storage devices, or a network location (an HTTP, HTTPS or FTP
server).
NOTE
You can also use both inst.dd=location and inst.dd at the same time. However,
what Anaconda does in this case depends on the type of location that you use. If it is a
device, Anaconda prompts you to select drivers to update from the specified device and
then it offers you additional devices. If location is a network location, Anaconda first
prompts you to select a device containing a driver update and then it lets you update
drivers from the specified network location.
If you want to use the automatic driver update method, you must create a storage device labeled
OEMDRV, and it must be physically connected to the installation system. To use the assisted method, you
can use any local storage device any label other than OEMDRV. To use the manual method, you can use
any local storage with a different label, or a network location accessible from the installation system.
IMPORTANT
Make sure to initialize the network using the ip= option when loading a driver update from
a network location. See Section 22.1, “Configuring the Installation System at the Boot
Menu” for details.
CHAPTER 6. UPDATING DRIVERS DURING INSTALLATION ON AMD64 AND INTEL 64 SYSTEMS
43

6.2.1. Preparing to Use a Driver Update Image File on Local Storage
If you use a local storage device to provide the ISO file, such as a hard drive or USB flash drive, you can
make the installation program to recognize it automatically by properly labeling the device. Only if it is
not possible, install the update manually as described below.
In order for the installation program to automatically recognize the driver disk, the volume label
of the storage device must be OEMDRV. Also, you will need to extract the contents of the ISO
image file to the root directory of the storage device rather than copy the ISO image itself. See
Section 6.3.1, “Automatic Driver Update”. Note that installation of a driver from a device labeled
OEMDRV is always recommended and preferable to the manual installation.
For manual installation, simply copy the ISO image, as a single file, onto the storage device. You
can rename the file if you find it helpful but you must not change the file name extension, which
must remain .iso, for example dd.iso. See Section 6.3.3, “Manual Driver Update” to learn
how to select the driver update manually during installation.
6.2.2. Preparing a Driver Disc
You can create a driver update disc on a CD or DVD. See Section 3.1, “Making an Installation CD or
DVD” to learn more about burning discs from image files.
After you burn a driver update disc CD or DVD, verify that the disc was created successfully by inserting
it into your system and browsing to it using the file manager. You should see a single file named rhdd3,
which is a signature file that contains the driver disc's description, and a directory named rpms, which
contains the RPM packages with the actual drivers for various architectures.
If you see only a single file ending in .iso, then you have not created the disc correctly and should try
again. Ensure that you choose an option similar to Burn from Image if you use a Linux desktop other
than GNOME, or if you use a different operating system.
6.3. PERFORMING A DRIVER UPDATE DURING INSTALLATION
At the very beginning of the installation process, you can perform a driver update in the following ways:
let the installation program automatically find and offer a driver update for installation,
let the installation program prompt you to locate a driver update,
manually specify a path to a driver update image or an RPM package.
IMPORTANT
Always make sure to put your driver update discs on a standard disk partition. Advanced
storage, such as RAID or LVM volumes, might not be accessible during the early stage of
the installation when you perform driver updates.
6.3.1. Automatic Driver Update
To have the installation program automatically recognize a driver update disc, connect a block device
with the OEMDRV volume label to your computer before starting the installation process.
Installation Guide
44
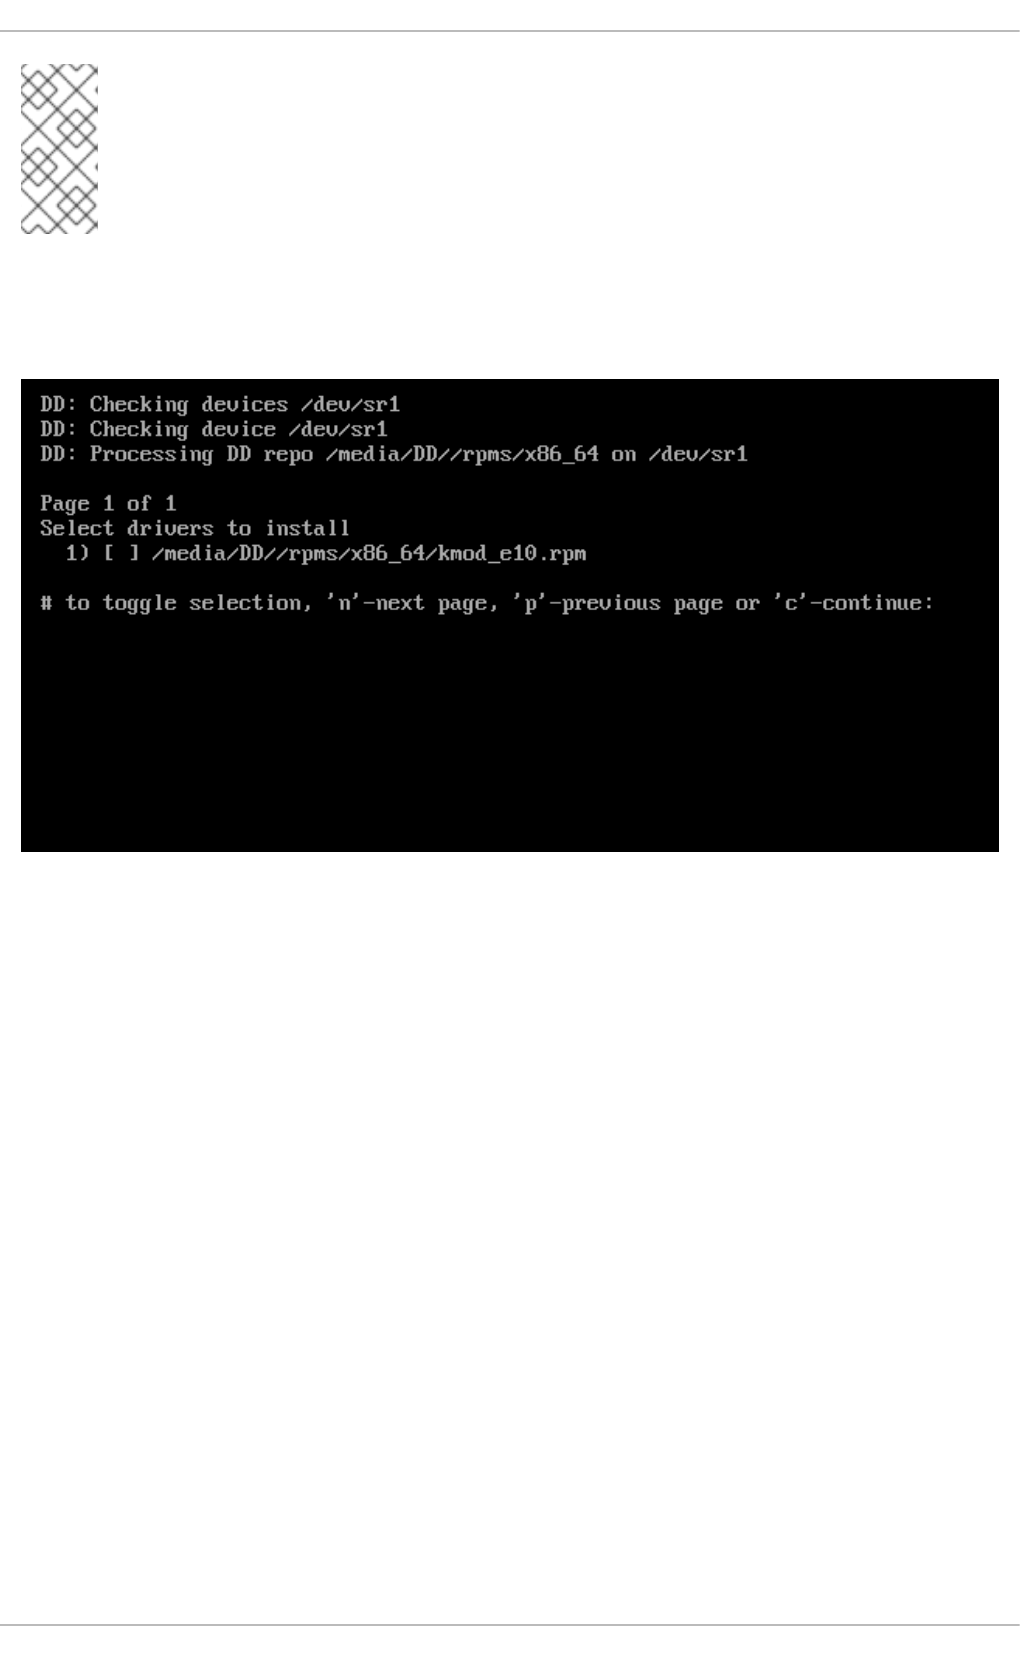
NOTE
Starting with Red Hat Enterprise Linux 7.2, you can also use the OEMDRV block device to
automatically load a Kickstart file. This file must be named ks.cfg and placed in the root
of the device to be loaded. See Chapter 26, Kickstart Installations for more information
about Kickstart installations.
When the installation begins, the installation program detects all available storage connected to the
system. If it finds a storage device labeled OEMDRV, it will treat it as a driver update disc and attempt to
load driver updates from this device. You will be prompted to select which drivers to load:
Figure 6.1. Selecting a Driver
Use number keys to toggle selection on individual drivers. When ready, press c to install the selected
drivers and proceed to the Anaconda graphical user interface.
6.3.2. Assisted Driver Update
It is always recommended to have a block device with the OEMDRV volume label available to install a
driver during installation. However, if no such device is detected and the inst.dd option was specified
at the boot command line, the installation program lets you find the driver disk in interactive mode. In the
first step, select a local disk partition from the list for Anaconda to scan for ISO files. Then, select one of
the detected ISO files. Finally, select one or more available drivers. The image below demonstrates the
process in the text user interface with individual steps highlighted.
CHAPTER 6. UPDATING DRIVERS DURING INSTALLATION ON AMD64 AND INTEL 64 SYSTEMS
45

Figure 6.2. Selecting a Driver Interactively
NOTE
If you extracted your ISO image file and burned it on a CD or DVD but the media does not
have the OEMDRV volume label, either use the inst.dd option with no arguments and
use the menu to select the device, or use the following boot option for the installation
program to scan the media for drivers:
inst.dd=/dev/sr0
Hit number keys to toggle selection on individual drivers. When ready, press c to install the selected
drivers and proceed to the Anaconda graphical user interface.
6.3.3. Manual Driver Update
For manual driver installation, prepare an ISO image file containing your drivers to an accessible
location, such a USB flash drive or a web server, and connect it to your computer. At the welcome
screen, hit Tab to display the boot command line and append the inst.dd=location to it, where
location is a path to the driver update disc:
Installation Guide
46
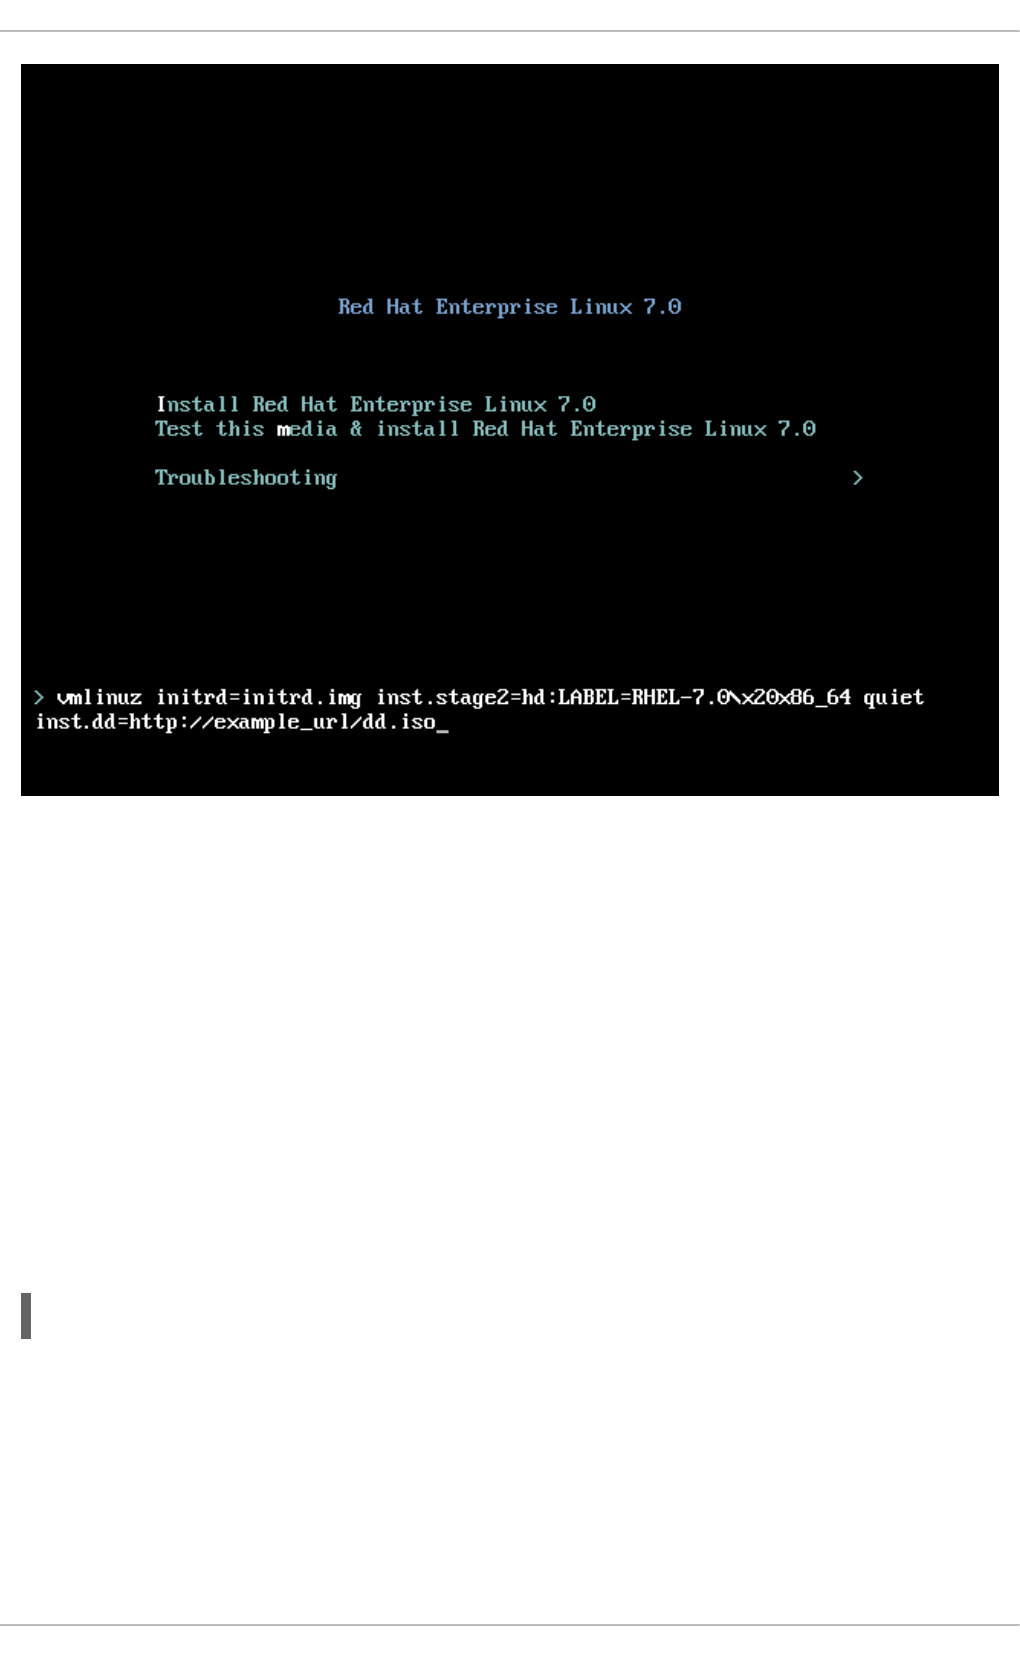
Figure 6.3. Specifying a Path to a Driver Update
Typically, the image file is located on a web server (for example, http://server.example.com/dd.iso) or on
a USB flash drive (for example, /dev/sdb1). It is also possible to specify an RPM package containing the
driver update (for example http://server.example.com/dd.rpm).
When ready, hit Enter to execute the boot command. Then, your selected drivers will be loaded and the
installation process will proceed normally.
6.3.4. Blacklisting a Driver
A malfunctioning driver can prevent a system from booting normally during installation. When this
happens, you can disable (or blacklist) the driver by customizing the boot command line. At the boot
menu, display the boot command line by hitting the Tab key. Then, append the
modprobe.blacklist=driver_name option to it. Replace driver_name with names of a driver or
drivers you want to disable, for example:
modprobe.blacklist=ahci
Note that the drivers blacklisted during installation using the modprobe.blacklist= boot option will
remain disabled on the installed system and appear in the /etc/modprobe.d/anaconda-
blacklist.conf file. See Chapter 22, Boot Options for more information about blacklisting drivers and
other boot options.
CHAPTER 6. UPDATING DRIVERS DURING INSTALLATION ON AMD64 AND INTEL 64 SYSTEMS
47
CHAPTER 7. BOOTING THE INSTALLATION ON 64-BIT AMD,
INTEL, AND ARM SYSTEMS
You can install Red Hat Enterprise Linux from the ISO images stored on hard disk, or from a network
using NFS, FTP, HTTP, or HTTPS methods. Booting and installing from the full installation DVD is the
easiest method to get started with. Other methods require some additional setup but provide different
advantages that might suit your needs better. For example, when installing Red Hat Enterprise Linux on
a large number of computers at the same time, the best approach is booting from a PXE server and
installing from a source in a shared network location.
The following table summarizes the different boot methods and recommended installation methods to
use with each:
Table 7.1. Boot Methods and Installation Sources
Boot method Installation source
Full installation media (DVD or USB) The boot media itself
Minimal boot media (CD or USB) Full installation DVD ISO image or the installation
tree extracted from this image, placed in a network
location or on a hard drive
Network boot (PXE) Full installation DVD ISO image or the installation
tree extracted from this image, placed in a network
location
To create a boot CD-ROM or to prepare your USB flash drive for booting or installation, see Section 3.2,
“Making Installation USB Media”.
This chapter covers the following topics:
Section 7.1.1, “Booting from Physical Media” describes how to boot the installation program
using physical media (Red Hat Enterprise Linux DVD, Boot CD-ROM, USB flash drive).
Section 7.1.2, “Booting from the Network Using PXE” describes how to boot the installation
program using PXE.
Section 7.2, “The Boot Menu” contains information on the boot menu.
7.1. STARTING THE INSTALLATION PROGRAM
To start, first make sure that you have all necessary resources for the installation. If you have already
read through Chapter 5, Planning for Installation on 64-bit AMD, Intel, and ARM Systems, and followed
the instructions, you should be ready to start the installation process. When you have verified that you
are ready to begin, boot the installation program using the Red Hat Enterprise Linux DVD or any boot
media that you have created.
IMPORTANT
Excessive input (for example, clicking the mouse repeatedly) during the boot sequence
can cause the installer to ignore keyboard input later in the installation process.
Installation Guide
48

NOTE
Occasionally, some hardware components require a driver update during the installation.
A driver update adds support for hardware that is not otherwise supported by the
installation program. See Chapter 6, Updating Drivers During Installation on AMD64 and
Intel 64 Systems for more information.
7.1.1. Booting from Physical Media
To start the installation program from a Red Hat Enterprise Linux DVD or from minimal boot media, follow
this procedure:
Procedure 7.1. Booting the Installation from Physical Media
1. Disconnect any drives which you do not need for the installation. See Section 5.6.3, “USB Disks”
for more information.
2. Power on your computer system.
3. Insert the media in your computer.
4. Power off your computer with the boot media still inside.
5. Power on your computer system. Note that you might need to press a specific key or
combination of keys to boot from the media or configure your system's Basic Input/Output
System (BIOS) to boot from the media. For more information, see the documentation that came
with your system.
After a short delay, the boot screen appears, which contains information on a variety of boot options.
Installation program automatically begins if you take no action within the first minute. For a description of
the options available on this screen, see Section 7.2, “The Boot Menu”.
7.1.2. Booting from the Network Using PXE
To boot with PXE, you need a properly configured TFTP server, and a network interface in your
computer that supports PXE. For information on how to configure a PXE server, see Chapter 23,
Preparing for a Network Installation.
Configure the computer to boot from the network interface. This option is in the BIOS, and can be labeled
Network Boot or Boot Services. Also, ensure that the BIOS is configured to boot first from the
correct network interface. Some BIOS systems specify the network interface as a possible boot device,
but do not support the PXE standard. See your hardware's documentation for more information. Once
you properly enable PXE booting, the computer can boot the Red Hat Enterprise Linux installation
system without any other media.
Follow the procedure below to boot the installation program from a PXE server. Note that this procedure
requires the use of a physical network connection, for example Ethernet. It will not work with a wireless
connection.
Procedure 7.2. Booting the Installation from the Network Using PXE
1. Ensure that the network cable is attached. The link indicator light on the network socket should
be lit, even if the computer is not switched on.
2. Switch on the computer.
CHAPTER 7. BOOTING THE INSTALLATION ON 64-BIT AMD, INTEL, AND ARM SYSTEMS
49

3. Depending on your hardware, some network setup and diagnostic information can be displayed
before your computer connects to a PXE server. Once it connects, a menu is displayed
according to the configuration of the PXE server. Press the number key that corresponds to the
desired option. If you are not sure of which option to select, ask your server administrator.
At this point, the installation program starts successfully and the boot screen appears, which contains
information on a variety of boot options. Installation program automatically begins if you take no action
within the first minute. For a description of the options available on this screen, see Section 7.2, “The
Boot Menu”.
7.2. THE BOOT MENU
Once your system has completed loading the boot media, a boot menu is displayed using GRUB2
(GRand Unified Bootloader, version 2). The boot menu provides several options in addition to
launching the installation program. If no key is pressed within 60 seconds, the default boot option (the
one highlighted in white) will be run. To choose the default, either wait for the timer to run out or press
Enter.
Figure 7.1. The Boot Screen
To select a different option than the default, use the arrow keys on your keyboard, and press Enter
when the correct option is highlighted.
To customize the boot options for a particular menu entry:
On BIOS-based systems, the preferred way is to press the Tab key and add custom boot options
to the command line. You can also access the boot: prompt by pressing the Esc key but no
required boot options will be preset in it. In that case, you must always specify the linux option
before using any other boot options.
On UEFI-based systems, press the e key and add custom boot options to the command line.
When ready press Ctrl+X to boot the modified option.
See Chapter 22, Boot Options for more information about additional boot options.
The boot menu options are:
Install Red Hat Enterprise Linux 7.0
Choose this option to install Red Hat Enterprise Linux onto your computer system using the graphical
installation program.
Test this media & install Red Hat Enterprise Linux 7.0
This option is the default. Prior to starting the installation program, a utility is launched to check the
integrity of the installation media.
Installation Guide
50

Troubleshooting >
This item is a separate menu containing options that help resolve various installation issues. When
highlighted, press Enter to display its contents.
Figure 7.2. The Troubleshooting Menu
Install Red Hat Enterprise Linux 7.0 in basic graphics mode
This option allows you to install Red Hat Enterprise Linux in graphical mode even if the installation
program is unable to load the correct driver for your video card. If your screen appears distorted or
goes blank when using the Install Red Hat Enterprise Linux 7.0 option, restart your
computer and try this option instead.
Rescue a Red Hat Enterprise Linux system
Choose this option to repair a problem with your installed Red Hat Enterprise Linux system that
prevents you from booting normally. The rescue environment contains utility programs that allow you
fix a wide variety of these problems.
Run a memory test
This option runs a memory test on your system. For more information, see Section 22.2.1, “Loading
the Memory (RAM) Testing Mode”.
Boot from local drive
This option boots the system from the first installed disk. If you booted this disc accidentally, use this
option to boot from the hard disk immediately without starting the installation program.
CHAPTER 7. BOOTING THE INSTALLATION ON 64-BIT AMD, INTEL, AND ARM SYSTEMS
51

CHAPTER 8. INSTALLING USING ANACONDA
This chapter provides step-by-step instructions for installing Red Hat Enterprise Linux using the
Anaconda installer. The bulk of this chapter describes installation using the graphical user interface. A
text mode is also available for systems with no graphical display, but this mode is limited in certain
aspects (for example, custom partitioning is not possible in text mode).
If your system does not have the ability to use the graphical mode, you can:
Use Kickstart to automate the installation as described in Chapter 26, Kickstart Installations
Perform the graphical installation remotely by connecting to the installation system from another
computer with a graphical display using the VNC (Virtual Network Computing) protocol - see
Chapter 24, Using VNC
8.1. INTRODUCTION TO ANACONDA
The Red Hat Enterprise Linux installer, Anaconda, is different from most other operating system
installation programs due to its parallel nature. Most installers follow a fixed path: you must choose your
language first, then you configure network, then installation type, then partitioning, and so on. There is
usually only one way to proceed at any given time.
In Anaconda you are only required to select your language and locale first, and then you are presented
with a central screen, where you can configure most aspects of the installation in any order you like.
This does not apply to all parts of the installation process, however - for example, when installing from a
network location, you must configure the network before you can select which packages to install.
Some screens will be automatically configured depending on your hardware and the type of media you
used to start the installation. You can still change the detected settings in any screen. Screens which
have not been automatically configured, and therefore require your attention before you begin the
installation, are marked by an exclamation mark. You cannot start the actual installation process before
you finish configuring these settings.
Additional differences appear in certain screens; notably the custom partitioning process is very different
from other Linux distributions. These differences are described in each screen's subsection.
8.2. CONSOLES AND LOGGING DURING THE INSTALLATION
The following sections describe how to access logs and an interactive shell during the installation. This is
useful when troubleshooting problems, but should not be necessary in most cases.
8.2.1. Accessing Consoles
The Red Hat Enterprise Linux installer uses the tmux terminal multiplexer to display and control several
windows you can use in addition to the main interface. Each of these windows serves a different purpose
- they display several different logs, which can be used to troubleshoot any issues during the installation,
and one of the windows provides an interactive shell prompt with root privileges, unless this prompt was
specifically disabled using a boot option or a Kickstart command.
NOTE
In general, there is no reason to leave the default graphical installation environment
unless you need to diagnose an installation problem.
Installation Guide
52

The terminal multiplexer is running in virtual console 1. To switch from the graphical installation
environment to tmux, press Ctrl+Alt+F1. To go back to the main installation interface which runs in
virtual console 6, press Ctrl+Alt+F6.
NOTE
If you choose text mode installation, you will start in virtual console 1 (tmux), and
switching to console 6 will open a shell prompt instead of a graphical interface.
The console running tmux has 5 available windows; their contents are described in the table below,
along with keyboard shortcuts used to access them. Note that the keyboard shortcuts are two-part: first
press Ctrl+b, then release both keys, and press the number key for the window you want to use.
You can also use Ctrl+b n and Ctrl+b p to switch to the next or previous tmux window, respectively.
Table 8.1. Available tmux Windows
Shortcut Contents
Ctrl+b 1Main installation program window. Contains text-based prompts (during text mode installation
or if you use VNC Direct Mode), and also some debugging information.
Ctrl+b 2Interactive shell prompt with root privileges.
Ctrl+b 3Installation log; displays messages stored in /tmp/anaconda.log.
Ctrl+b 4Storage log; displays messages related storage devices from kernel and system services,
stored in /tmp/storage.log.
Ctrl+b 5Program log; displays messages from other system utilities, stored in
/tmp/program.log.
In addition to displaying diagnostic information in tmux windows, Anaconda also generates several log
files, which can be transferred from the installation system. These log files are described in Table 9.1,
“Log Files Generated During the Installation”, and directions for transferring them from the installation
system are available in Chapter 9, Troubleshooting Installation on 64-bit AMD, Intel, and ARM Systems.
8.2.2. Saving Screenshots
You can press Shift+Print Screen at any time during the graphical installation to capture the
current screen. These screenshots are saved to /tmp/anaconda-screenshots/.
Additionally, you can use the autostep --autoscreenshot command in a Kickstart file to capture
and save each step of the installation automatically. See Section 26.3.1, “Kickstart Commands and
Options” for details.
8.3. INSTALLING IN TEXT MODE
Text mode installation offers an interactive, non-graphical interface for installing Red Hat
Enterprise Linux. This can be useful on systems with no graphical capabilities; however, you should
always consider the available alternatives before starting a text-based installation. Text mode is limited in
CHAPTER 8. INSTALLING USING ANACONDA
53

the amount of choices you can make during the installation.
IMPORTANT
Red Hat recommends that you install Red Hat Enterprise Linux using the graphical
interface. If you are installing Red Hat Enterprise Linux on a system that lacks a graphical
display, consider performing the installation over a VNC connection - see Chapter 24,
Using VNC. The text mode installation program will prompt you to confirm the use of text
mode if it detects that a VNC-based installation is possible.
If your system has a graphical display, but graphical installation fails, try booting with the
inst.xdriver=vesa option - see Chapter 22, Boot Options.
Alternatively, consider a Kickstart installation. See Chapter 26, Kickstart Installations for
more information.
Figure 8.1. Text Mode Installation
Installation in text mode follows a pattern similar to the graphical installation: There is no single fixed
progression; you can configure many settings in any order you want using the main status screen.
Screens which have already been configured, either automatically or by you, are marked as [x], and
screens which require your attention before the installation can begin are marked with [!]. Available
commands are displayed below the list of available options.
NOTE
When related background tasks are being run, certain menu items can be temporarily
unavailable or display the Processing... label. To refresh to the current status of text
menu items, use the r option at the text mode prompt.
At the bottom of the screen in text mode, a green bar is displayed showing five menu options. These
options represent different screens in the tmux terminal multiplexer; by default you start in screen 1, and
you can use keyboard shortcuts to switch to other screens which contain logs and an interactive
command prompt. For information about available screens and shortcuts to switch to them, see
Section 8.2.1, “Accessing Consoles”.
Installation Guide
54

Limits of interactive text mode installation include:
The installer will always use the English language and the US English keyboard layout. You can
configure your language and keyboard settings, but these settings will only apply to the installed
system, not to the installation.
You cannot configure any advanced storage methods (LVM, software RAID, FCoE, zFCP and
iSCSI).
It is not possible to configure custom partitioning; you must use one of the automatic partitioning
settings. You also cannot configure where the boot loader will be installed.
You cannot select any package add-ons to be installed; they must be added after the installation
finishes using the Yum package manager.
To start a text mode installation, boot the installation with the inst.text boot option used either at the
boot command line in the boot menu, or in your PXE server configuration. See Chapter 7, Booting the
Installation on 64-bit AMD, Intel, and ARM systems for information about booting and using boot options.
8.4. INSTALLING IN THE GRAPHICAL USER INTERFACE
The graphical installation interface is the preferred method of manually installing Red Hat
Enterprise Linux. It allows you full control over all available settings, including custom partitioning and
advanced storage configuration, and it is also localized to many languages other than English, allowing
you to perform the entire installation in a different language. The graphical mode is used by default when
you boot the system from local media (a CD, DVD or a USB flash drive).
Figure 8.2. The Installation Summary Screen
CHAPTER 8. INSTALLING USING ANACONDA
55
The sections below discuss each screen available in the installation process. Note that due to the
installer's parallel nature, most of the screens do not have to be completed in the order in which they are
described here.
Each screen in the graphical interface contains a Help button. This button opens the Yelp help browser
displaying the section of the Red Hat Enterprise Linux Installation Guide relevant to the current screen.
You can also control the graphical installer with your keyboard. Following table shows you the shortcuts
you can use.
Table 8.2. Graphical installer keyboard shortcuts
Shortcut keys Usage
Tab and Shift+Tab Cycle through active control elements (buttons, check boxes, and so on.) on the
current screen
Up and Down Scroll through lists
Left and Right Scroll through horizontal toolbars and table entries
Space and Enter Select or remove a highlighted item from selection and expand and collapse drop-
down menus
Additionally, elements in each screen can be toggled using their respective shortcuts. These shortcuts
are highlighted (underlined) when you hold down the Alt key; to toggle that element, press Alt+X,
where X is the highlighted letter.
Your current keyboard layout is displayed in the top right hand corner. Only one layout is configured by
default; if you configure more than layout in the Keyboard Layout screen (Section 8.9, “Keyboard
Configuration”), you can switch between them by clicking the layout indicator.
8.5. WELCOME SCREEN AND LANGUAGE SELECTION
The first screen of the installation program is the Welcome to Red Hat Enterprise Linux screen.
Here you select the language that Anaconda will use for the rest of the installation. This selection will
also become the default for the installated system, unless changed later. In the left panel, select your
language of choice, for example English. Then you can select a locale specific to your region in the
right panel, for example English (United States).
NOTE
One language is pre-selected by default on top of the list. If network access is configured
at this point (for example, if you booted from a network server instead of local media), the
pre-selected language will be determined based on automatic location detection using the
GeoIP module.
Alternatively, type your preferred language into the search box as shown below.
Once you have made your selection, click the Continue button to proceed to the Installation
Summary screen.
Installation Guide
56
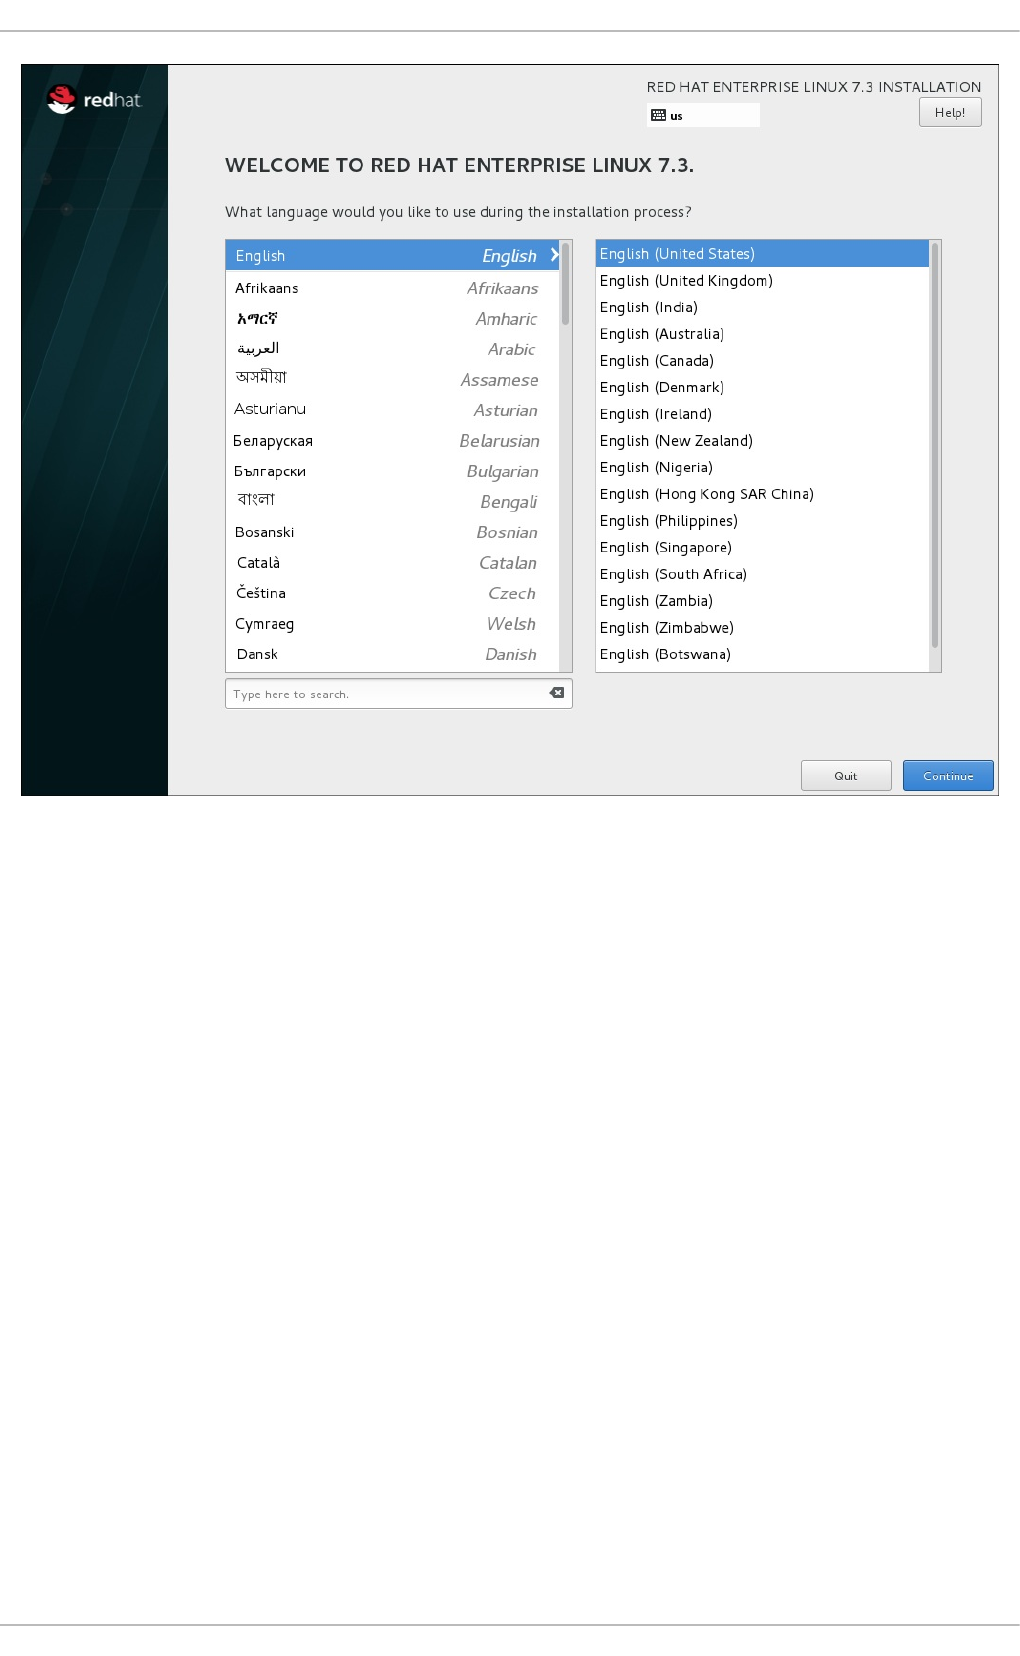
Figure 8.3. Language Configuration
After you click the Continue button, the unsupported hardware dialog may appear. This happens if you
are using hardware that the kernel does not support.
8.6. THE INSTALLATION SUMMARY SCREEN
The Installation Summary screen is the central location for setting up an installation.
CHAPTER 8. INSTALLING USING ANACONDA
57
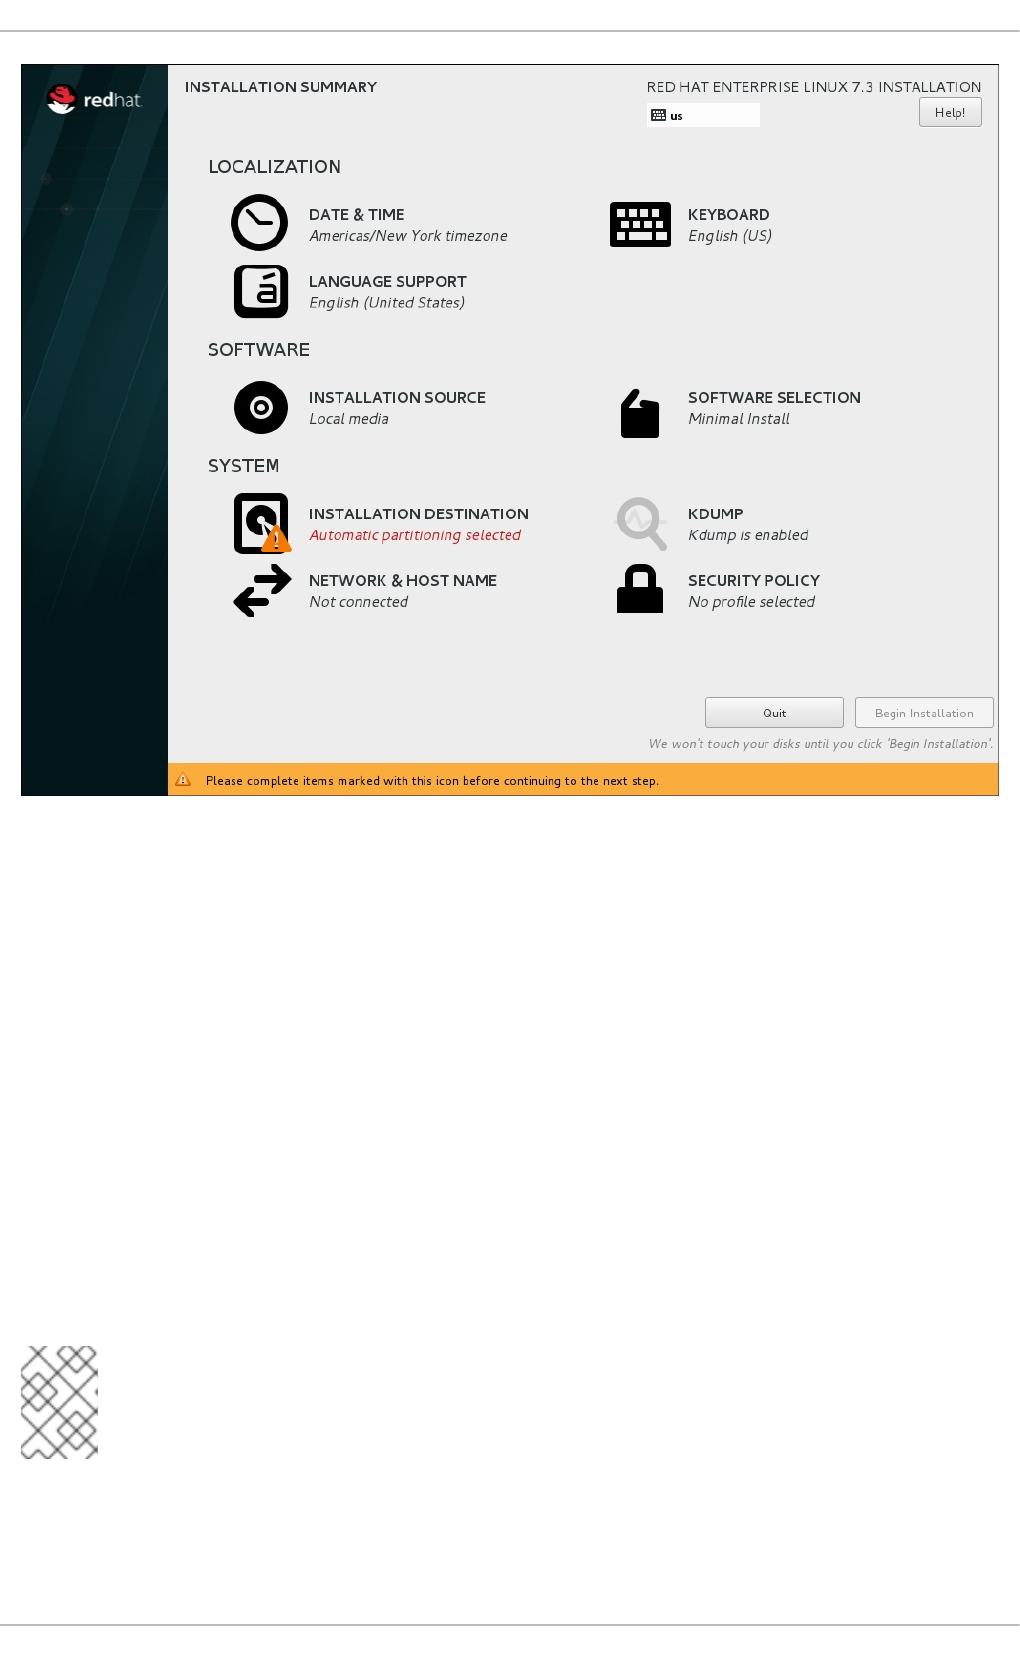
Figure 8.4. The Installation Summary Screen
Instead of directing you through consecutive screens, the Red Hat Enterprise Linux installation program
allows you to configure your installation in the order you choose.
Use your mouse to select a menu item to configure a section of the installation. When you have
completed configuring a section, or if you would like to complete that section later, click the Done button
located in the upper left corner of the screen.
Only sections marked with a warning symbol are mandatory. A note at the bottom of the screen warns
you that these sections must be completed before the installation can begin. The remaining sections are
optional. Beneath each section's title, the current configuration is summarized. Using this you can
determine whether you need to visit the section to configure it further.
Once all required sections are complete, click the Begin Installation button. Also see Section 8.17,
“Begin Installation”.
To cancel the installation, click the Quit button.
NOTE
When related background tasks are running, certain menu items might be temporarily
unavailable.
If you used a Kickstart option or a boot command-line option to specify an installation repository on a
network, but no network is available at the start of the installation, the installation program will display the
configuration screen for you to set up a network connection prior to displaying the Installation
Installation Guide
58
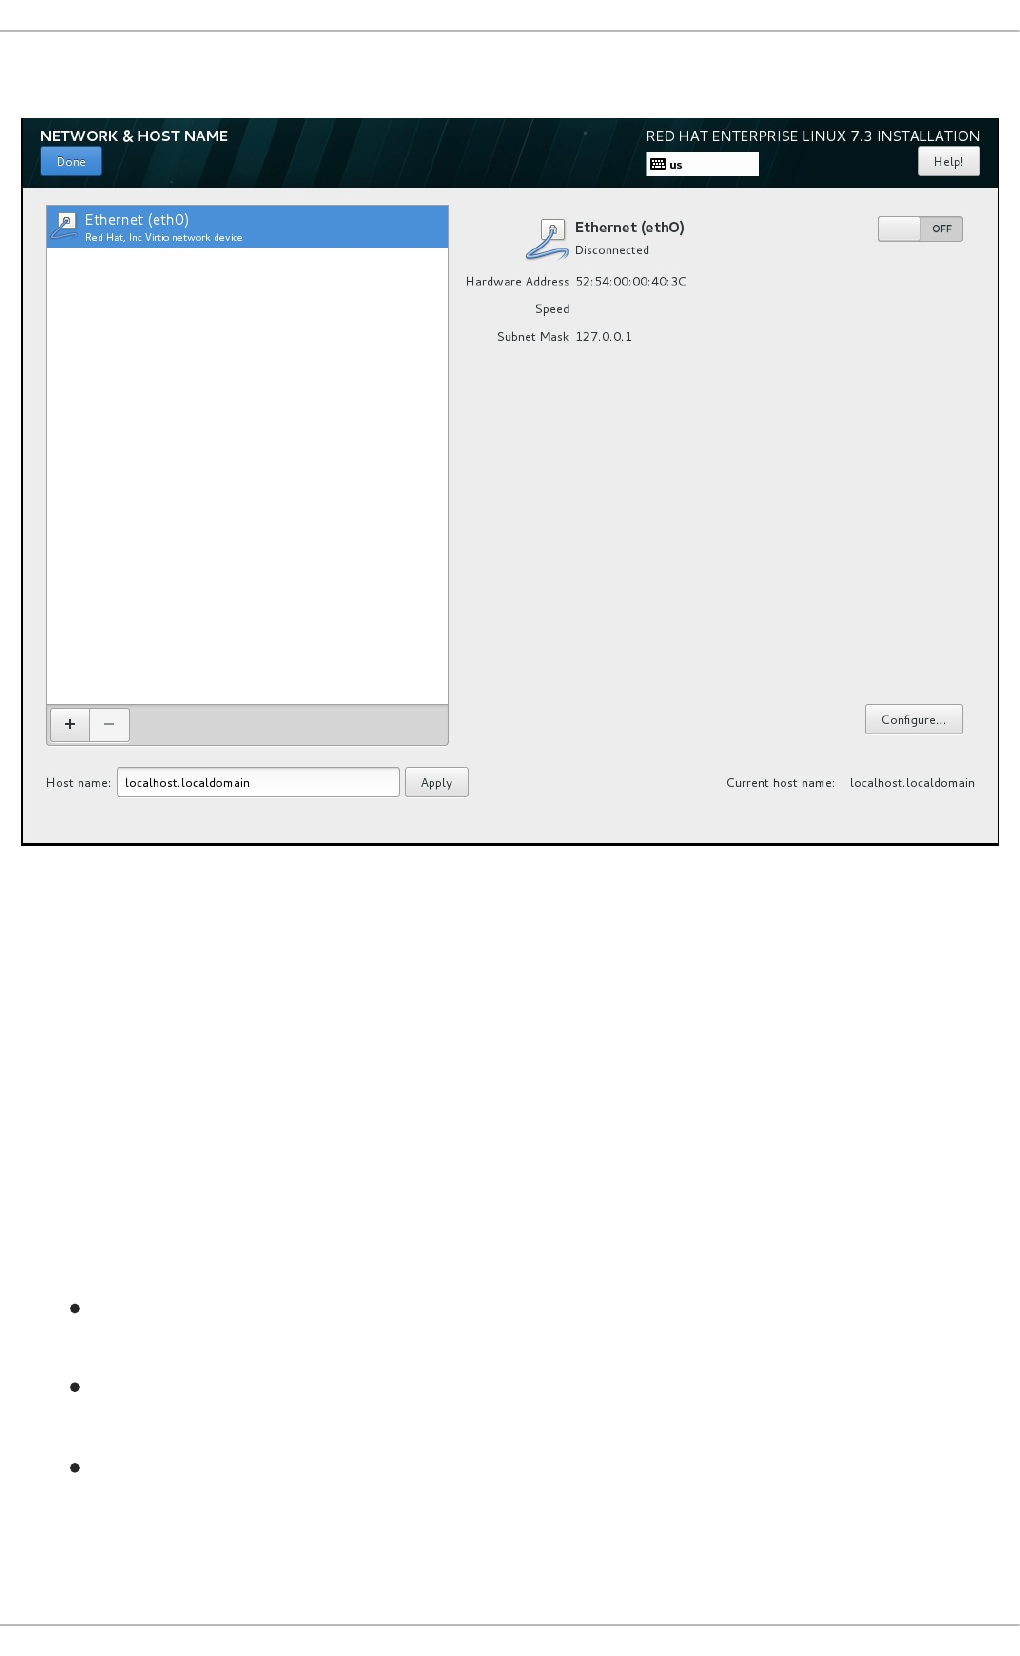
Summary screen.
Figure 8.5. Network Configuration Screen When No Network Is Detected
You can skip this step if you are installing from an installation DVD or other locally accessible media,
and you are certain you will not need network to finish the installation. However, network connectivity is
necessary for network installations (see Section 8.11, “Installation Source”) or for setting up advanced
storage devices (see Section 8.15, “Storage Devices”). For more details about configuring a network in
the installation program, see Section 8.12, “Network & Hostname”.
8.7. DATE & TIME
To configure time zone, date, and optionally settings for network time, select Date & Time at the
Installation Summary screen.
There are three ways for you to select a time zone:
Using your mouse, click on the interactive map to select a specific city. A red pin appears
indicating your selection.
You can also scroll through the Region and City drop-down menus at the top of the screen to
select your time zone.
Select Etc at the bottom of the Region drop-down menu, then select your time zone in the next
menu adjusted to GMT/UTC, for example GMT+1.
If your city is not available on the map or in the drop-down menu, select the nearest major city in the
CHAPTER 8. INSTALLING USING ANACONDA
59

same time zone. Alternatively you can use a Kickstart file, which will allow you to specify some additional
time zones which are not available in the graphical interface. See the timezone command in timezone
(required) for details.
NOTE
The list of available cities and regions comes from the Time Zone Database (tzdata) public
domain, which is maintained by the Internet Assigned Numbers Authority (IANA). Red Hat
cannot add cities or regions into this database. You can find more information at the
official website, available at http://www.iana.org/time-zones.
Specify a time zone even if you plan to use NTP (Network Time Protocol) to maintain the accuracy of the
system clock.
Figure 8.6. Time zone configuration screen
If you are connected to the network, the Network Time switch will be enabled. To set the date and time
using NTP, leave the Network Time switch in the ON position and click the configuration icon to select
which NTP servers Red Hat Enterprise Linux should use. To set the date and time manually, move the
switch to the OFF position. The system clock should use your time zone selection to display the correct
date and time at the bottom of the screen. If they are still incorrect, adjust them manually.
Note that NTP servers might be unavailable at the time of installation. In such a case, enabling them will
not set the time automatically. When the servers become available, the date and time will update.
Once you have made your selection, click Done to return to the Installation Summary screen.
Installation Guide
60
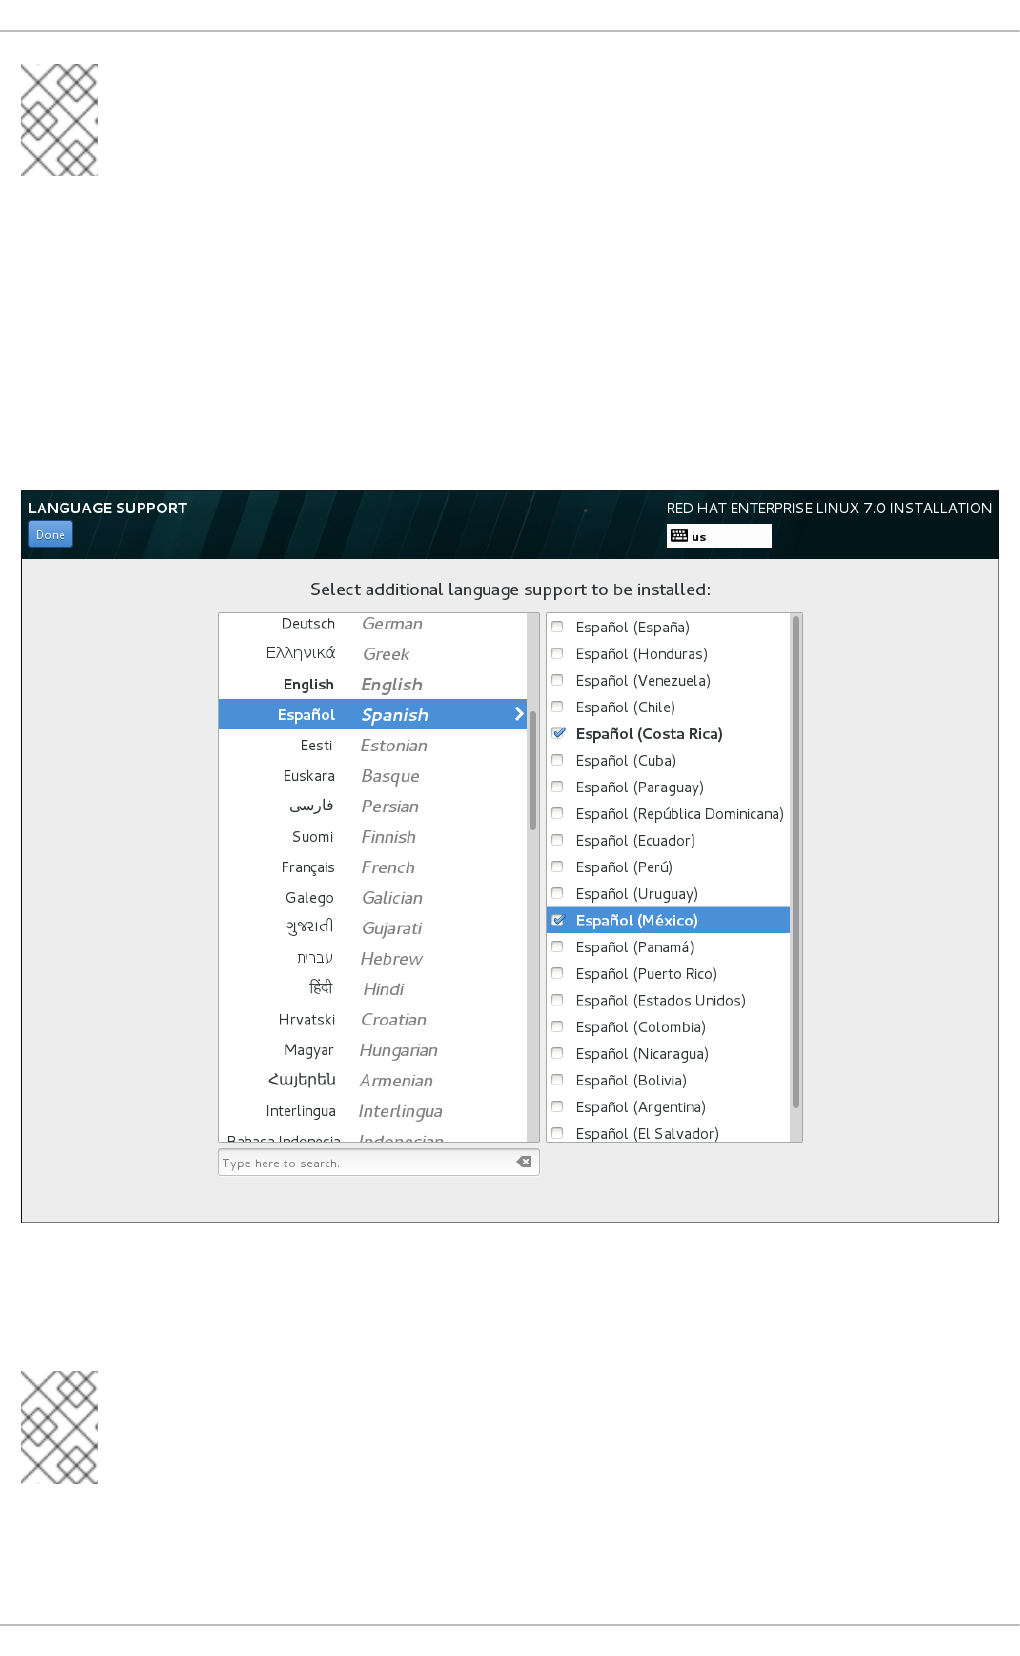
NOTE
To change your time zone configuration after you have completed the installation, visit the
Date & Time section of the Settings dialog window.
8.8. LANGUAGE SUPPORT
To install support for additional locales and language dialects, select Language Support from the
Installation Summary screen.
Use your mouse to select the language for which you would like to install support. In the left panel, select
your language of choice, for example Español. Then you can select a locale specific to your region in
the right panel, for example Español (Costa Rica). You can select multiple languages and multiple
locales. The selected languages are highlighted in bold in the left panel.
Figure 8.7. Configuring Language Support
Once you have made your selections, click Done to return to the Installation Summary screen.
NOTE
To change your language support configuration after you have completed the installation,
visit the Region & Language section of the Settings dialog window.
8.9. KEYBOARD CONFIGURATION
CHAPTER 8. INSTALLING USING ANACONDA
61
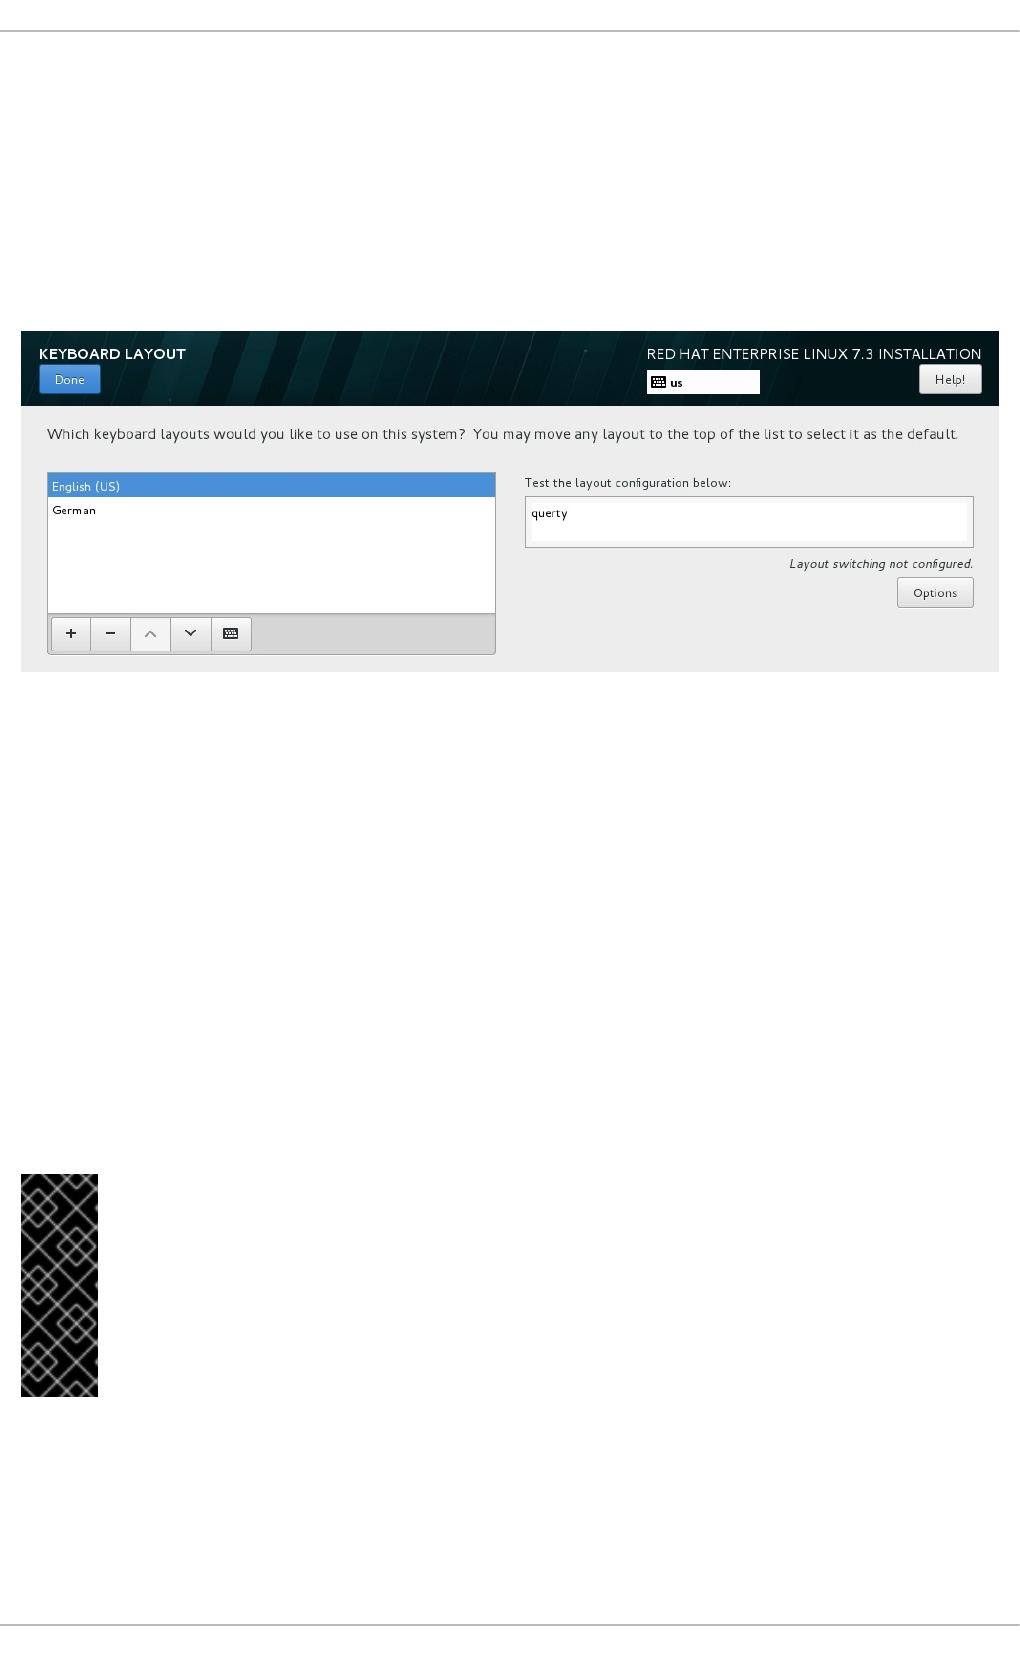
To add multiple keyboard layouts to your system, select Keyboard from the Installation Summary
screen. Upon saving, the keyboard layouts are immediately available in the installation program and you
can switch between them by using the keyboard icon located at all times in the upper right corner of the
screen.
Initially, only the language you selected in the welcome screen is listed as the keyboard layout in the left
pane. You can either replace the initial layout or add more layouts. However, if your language does not
use ASCII characters, you might need to add a keyboard layout that does, to be able to properly set a
password for an encrypted disk partition or the root user, among other things.
Figure 8.8. Keyboard Configuration
To add an additional layout, click the + button, select it from the list, and click Add. To delete a layout,
select it and click the - button. Use the arrow buttons to arrange the layouts in order of preference. For a
visual preview of the keyboard layout, select it and click the keyboard button.
To test a layout, use the mouse to click inside the text box on the right. Type some text to confirm that
your selection functions correctly.
To test additional layouts, you can click the language selector at the top on the screen to switch them.
However, it is recommended to set up a keyboard combination for switching layout. Click the Options
button at the right to open the Layout Switching Options dialog and choose a combination from the
list by selecting its check box. The combination will then be displayed above the Options button. This
combination applies both during the installation and on the installed system, so you must configure a
combination here in order to use one after installation. You can also select more than one combination to
switch between layouts.
IMPORTANT
If you use a layout that cannot accept Latin characters, such as Russian, Red Hat
recommends additionally adding the English (United States) layout and
configuring a keyboard combination to switch between the two layouts. If you only select a
layout without Latin characters, you might be unable to enter a valid root password and
user credentials later in the installation process. This can prevent you from completing the
installation.
Once you have made your selection, click Done to return to the Installation Summary screen.
Installation Guide
62

NOTE
To change your keyboard configuration after you have completed the installation, visit the
Keyboard section of the Settings dialogue window.
8.10. SECURITY POLICY
The Security Policy spoke allows you to configure the installed system following restrictions and
recommendations (compliance policies) defined by the Security Content Automation Protocol (SCAP)
standard. This functionality is provided by an add-on which has been enabled by default since Red Hat
Enterprise Linux 7.2. When enabled, the packages necessary to provide this functionality will
automatically be installed. However, by default, no policies are enforced, meaning that no checks are
performed during or after installation unless specifically configured.
The Red Hat Enterprise Linux 7 Security Guide provides detailed information about security compliance
including background information, practical examples, and additional resources.
IMPORTANT
Applying a security policy is not necessary on all systems. This screen should only be
used when a specific policy is mandated by your organization rules or governemnt
regulations.
If you apply a security policy to the system, it will be installed using restrictions and recommendations
defined in the selected profile. The openscap-scanner package will also be added to your package
selection, providing a preinstalled tool for compliance and vulnerability scanning. After the installation
finishes, the system will be automatically scanned to verify compliance. The results of this scan will be
saved to the /root/openscap_data directory on the installed system.
Pre-defined policies which are available in this screen are provided by SCAP Security Guide. See the
OpenSCAP Portal for links to detailed information about each available profile.
You can also load additional profiles from an HTTP, HTTPS or FTP server.
CHAPTER 8. INSTALLING USING ANACONDA
63
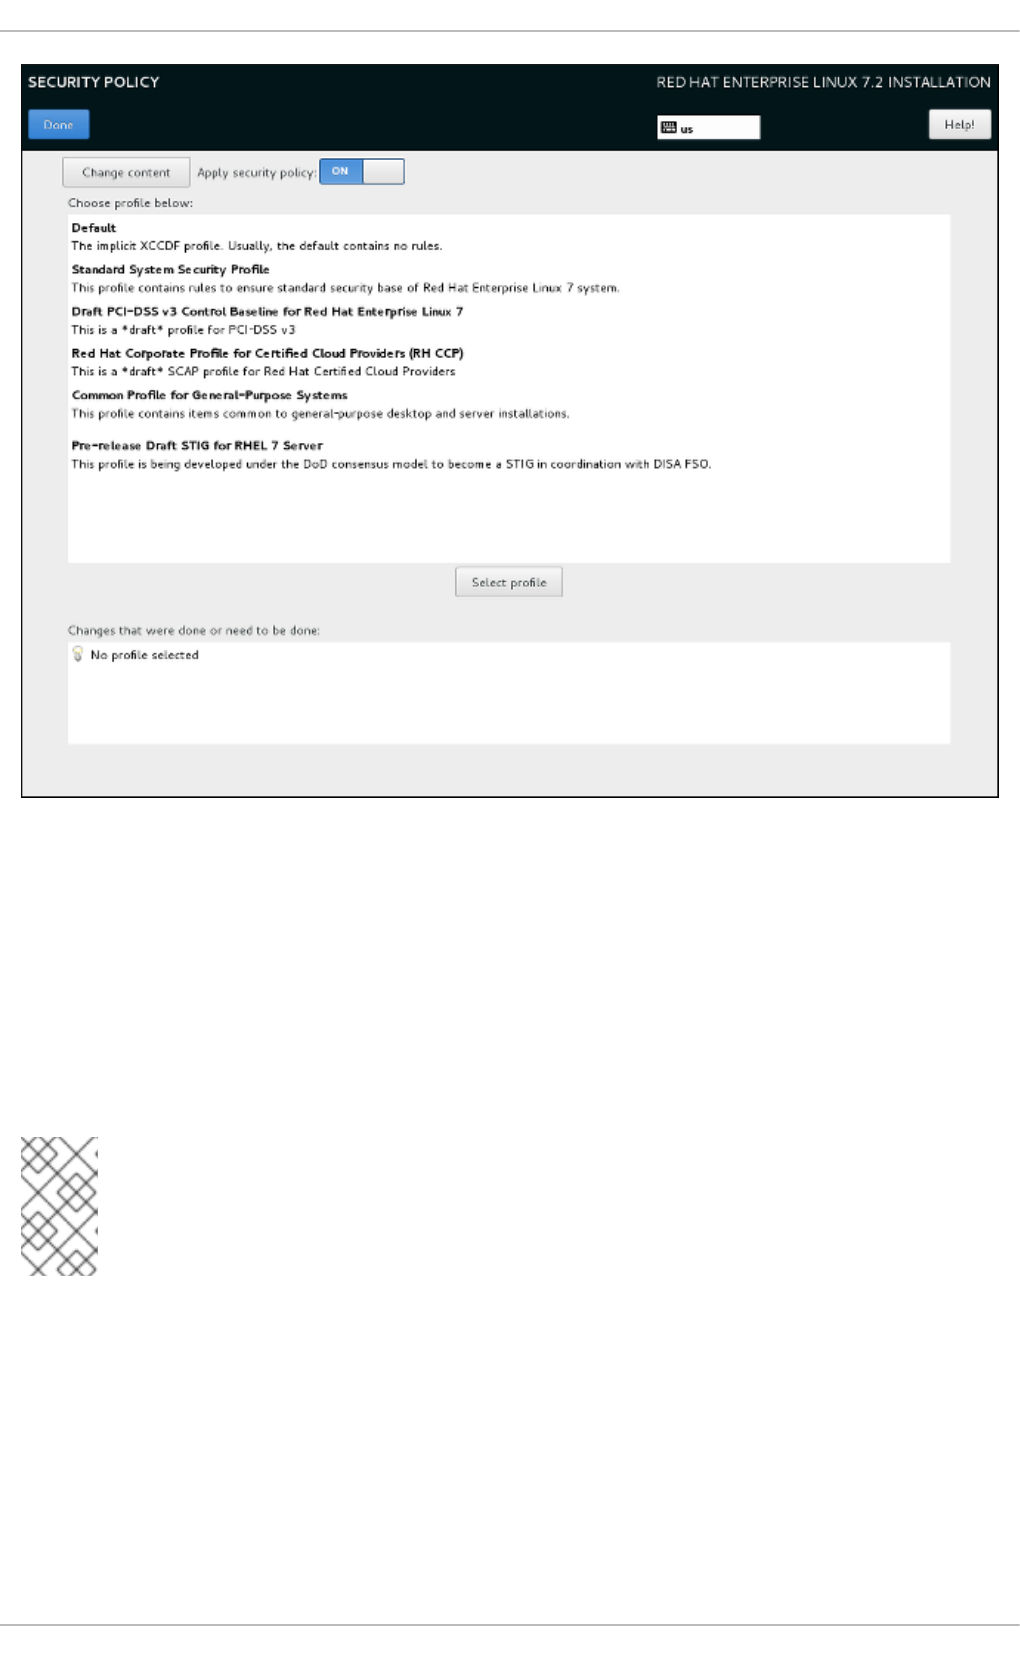
Figure 8.9. Security policy selection screen
To configure the use of security policies on the system, first enable configuration by setting the Apply
security policy switch to ON. If the switch is in the OFF position, controls in the rest of this screen
have no effect.
After enabling security policy configuration using the switch, select one of the profiles listed in the top
window of the screen, and click the Select profile below. When a profile is selected, a green check
mark will appear on the right side, and the bottom field will display whether any changes will be made
before beginning the installation.
NOTE
None of the profiles available by default perform any changes before the installation
begins. However, loading a custom profile as described below can require some pre-
installation actions.
To use a custom profile, click the Change content button in the top left corner. This will open another
screen where you can enter an URL of a valid security content. To go back to the default security content
selection screen, click Use SCAP Security Guide in the top left corner.
Custom profiles can be loaded from an HTTP, HTTPS or FTP server. Use the full address of the content,
including the protocol (such as http://). A network connection must be active (enabled in
Section 8.12, “Network & Hostname”) before you can load a custom profile. The content type will be
detected automatically by the installer.
After you select a profile, or if you want to leave the screen, click Done in the top left corner to return to
Installation Guide
64

Section 8.6, “The Installation Summary Screen”.
8.11. INSTALLATION SOURCE
To specify a file or a location to install Red Hat Enterprise Linux from, select Installation Source
from the Installation Summary screen. On this screen, you can choose between locally available
installation media, such as a DVD or an ISO file, or a network location.
Figure 8.10. Installation Source Screen
Select one of the following options:
Auto-detected installation media
If you started the installation using the full installation DVD or USB drive, the installation program will
detect it and display basic information under this option. Click the Verify button to ensure that the
media is suitable for installation. This integrity test is the same as the one performed if you selected
Test this media & Install Red Hat Enterprise Linux in the boot menu, or if you used
the rd.live.check boot option.
ISO file
This option will appear if the installation program detected a partitioned hard drive with mountable file
systems. Select this option, click the Choose an ISO button, and browse to the installation ISO file's
location on your system. Then click Verify to ensure that the file is suitable for installation.
On the network
To specify a network location, select this option and choose from the following options in the drop-
down menu:
http://
https://
ftp://
CHAPTER 8. INSTALLING USING ANACONDA
65

nfs
Using your selection as the start of the location URL, type the rest into the address box. If you choose
NFS, another box will appear for you to specify any NFS mount options.
IMPORTANT
When selecting an NFS-based installation source, you must specify the address with a
colon (:) character separating the host name from the path. For example:
server.example.com:/path/to/directory
To configure a proxy for an HTTP or HTTPS source, click the Proxy setup button. Check Enable
HTTP proxy and type the URL into the Proxy URL box. If your proxy requires authentication, check
Use Authentication and enter a user name and password. Click Add.
If your HTTP or HTTPS URL refers to a repository mirror list, mark the check box under the input
field.
You can also specify additional repositories to gain access to more installation environments and
software add-ons. See Section 8.13, “Software Selection” for more information.
To add a repository, click the + button. To delete a repository, click the - button. Click the arrow icon to
revert to the previous list of repositories, that is, to replace current entries with those that were present at
the time you entered the Installation Source screen. To activate or deactivate a repository, click
the check box in the Enabled column at each entry in the list.
In the right part of the form, you can name your additional repository and configure it the same way as
the primary repository on the network.
Once you have selected your installation source, click Done to return to the Installation Summary
screen.
8.12. NETWORK & HOSTNAME
To configure essential networking features for your system, select Network & Hostname at the
Installation Summary screen.
IMPORTANT
When the installation finishes and the system boots for the first time, any network
interfaces which you configured during the installation will be activated. However, the
installation does not prompt you to configure network interfaces on some common
installation paths - for example, when you install Red Hat Enterprise Linux from a DVD to
a local hard drive.
When you install Red Hat Enterprise Linux from a local installation source to a local
storage device, be sure to configure at least one network interface manually if you require
network access when the system boots for the first time. You will also need to set the
connection to connect automatically after boot when editing the configuration.
Locally accessible interfaces are automatically detected by the installation program and cannot be
Installation Guide
66

manually added or deleted. The detected interfaces are listed in the left pane. Click an interface in the
list to display more details about in on the right. To activate or deactivate a network interface, move the
switch in the top right corner of the screen to either ON or OFF.
NOTE
There are several types of network device naming standards used to identify network
devices with persistent names such as em1 or wl3sp0. For information about these
standards, see the Red Hat Enterprise Linux 7 Networking Guide.
Figure 8.11. Network & Hostname Configuration Screen
Below the list of connections, enter a host name for this computer in the Hostname input field. The host
name can be either a fully-qualified domain name (FQDN) in the format hostname.domainname or a
short host name in the format hostname. Many networks have a Dynamic Host Configuration Protocol
(DHCP) service that automatically supplies connected systems with a domain name. To allow the DHCP
service to assign the domain name to this machine, only specify the short host name. The value
localhost.localdomain means that no specific static host name for target system is configured, and
the actual host name of installed system will be configured during process of network configuration (for
example, by NetworkManager using DHCP or DNS).
IMPORTANT
If you want to manually assign the host name, make sure you do not use a domain name
that is not delegated to you, as this can result in network resources becoming
unavailable. For more information, see the recommended naming practices in the
Red Hat Enterprise Linux 7 Networking Guide.
NOTE
You can use the Network section of the system Settings dialog to change your network
configuration after you have completed the installation.
Once you have finished network configuration, click Done to return to the Installation Summary
screen.
CHAPTER 8. INSTALLING USING ANACONDA
67
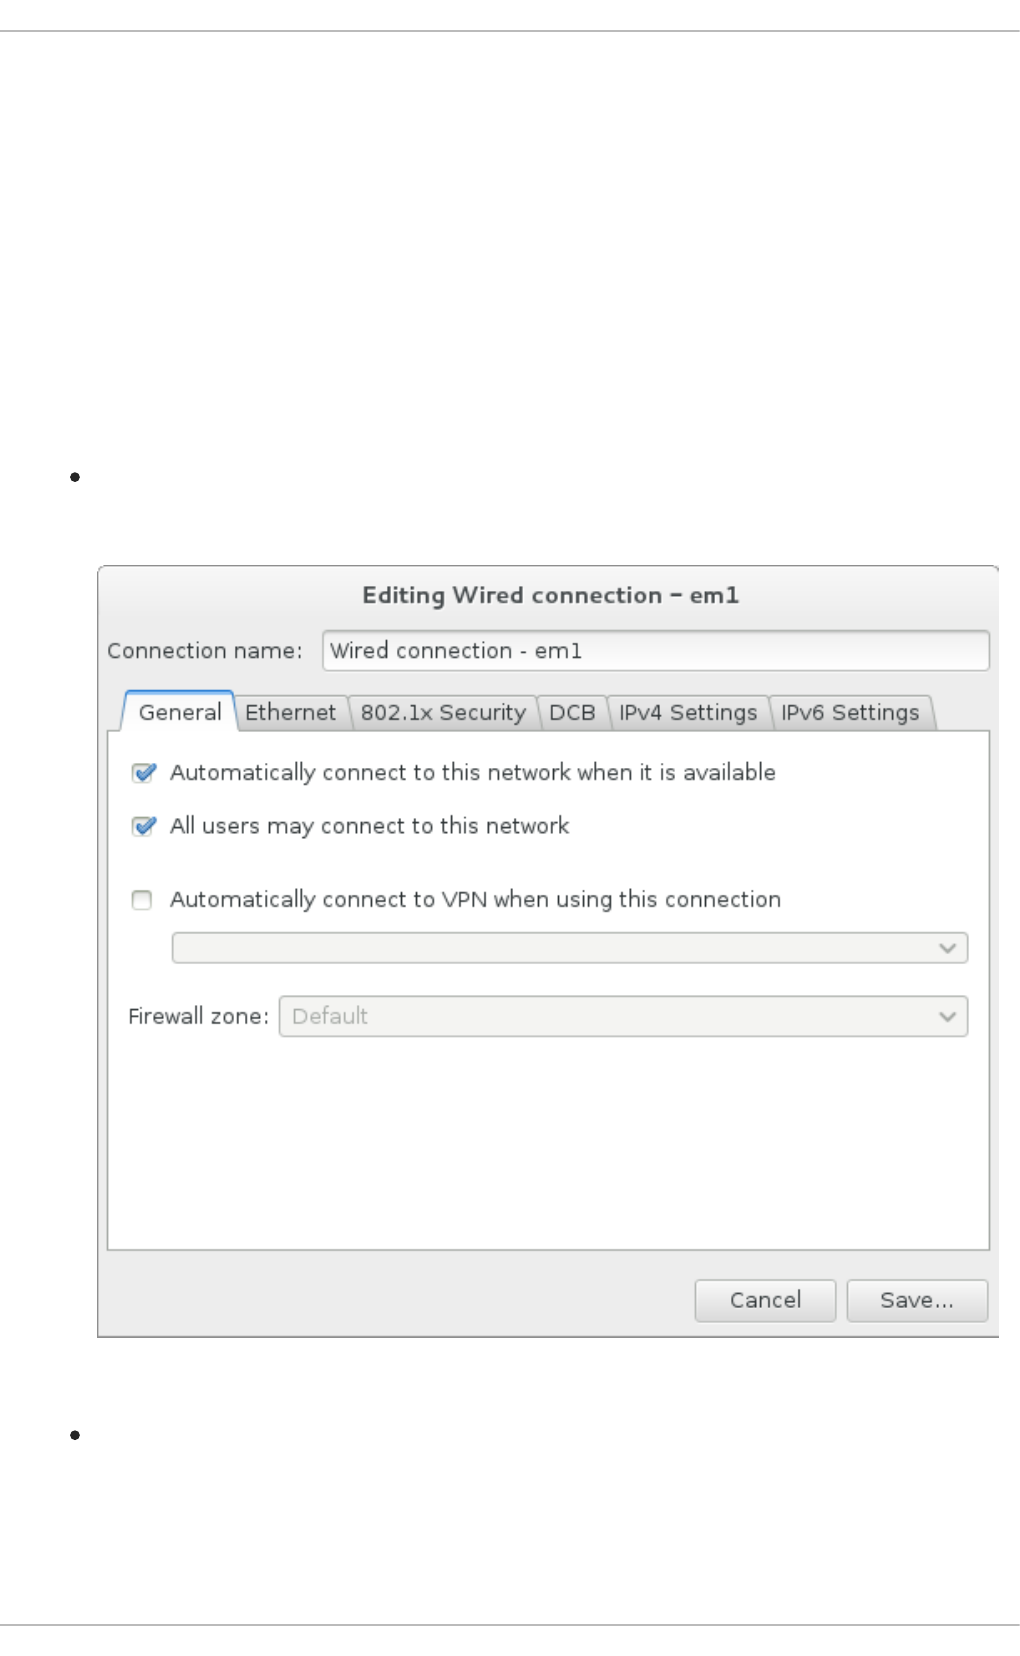
8.12.1. Edit Network Connections
This section only details the most important settings for a typical wired connection used during
installation. Many of the available options do not have to be changed in most installation scenarios and
are not carried over to the installed system. Configuration of other types of network is broadly similar,
although the specific configuration parameters are necessarily different. To learn more about network
configuration after installation, see the Red Hat Enterprise Linux 7 Networking Guide.
To configure a network connection manually, click the Configure button in the lower right corner of the
screen. A dialog appears that allows you to configure the selected connection. The configuration options
presented depends on whether the connection is wired, wireless, mobile broadband, VPN, or DSL. If
required, see the Networking Guide for more detailed information on network settings.
The most useful network configuration options to consider during installation are:
Mark the Automatically connect to this network when it is available check
box if you want to use the connection every time the system boots. You can use more than one
connection that will connect automatically. This setting will carry over to the installed system.
Figure 8.12. Network Auto-Connection Feature
By default, IPv4 parameters are configured automatically by the DHCP service on the network.
At the same time, the IPv6 configuration is set to the Automatic method. This combination is
suitable for most installation scenarios and usually does not require any changes.
Installation Guide
68

Figure 8.13. IP Protocol Settings
When you have finished editing network settings, click Save to save the new configuration. If you
reconfigured a device that was already active during installation, you must restart the device in order to
use the new configuration in the installation environment. Use the ON/OFF switch on the Network &
Host Name screen to restart the device.
8.12.2. Advanced Network Interfaces
Advanced network interfaces are also available for installation. This includes virtual local area networks
(VLANs) and three methods to use aggregated links. Detailed description of these interfaces is beyond
the scope of this document; read the Red Hat Enterprise Linux 7 Networking Guide for more information.
To create an advanced network interface, click the + button in the lower left corner of the Network &
Hostname screen.
Figure 8.14. Network & Hostname Configuration Screen
A dialog appears with a drop-down menu with the following options:
CHAPTER 8. INSTALLING USING ANACONDA
69
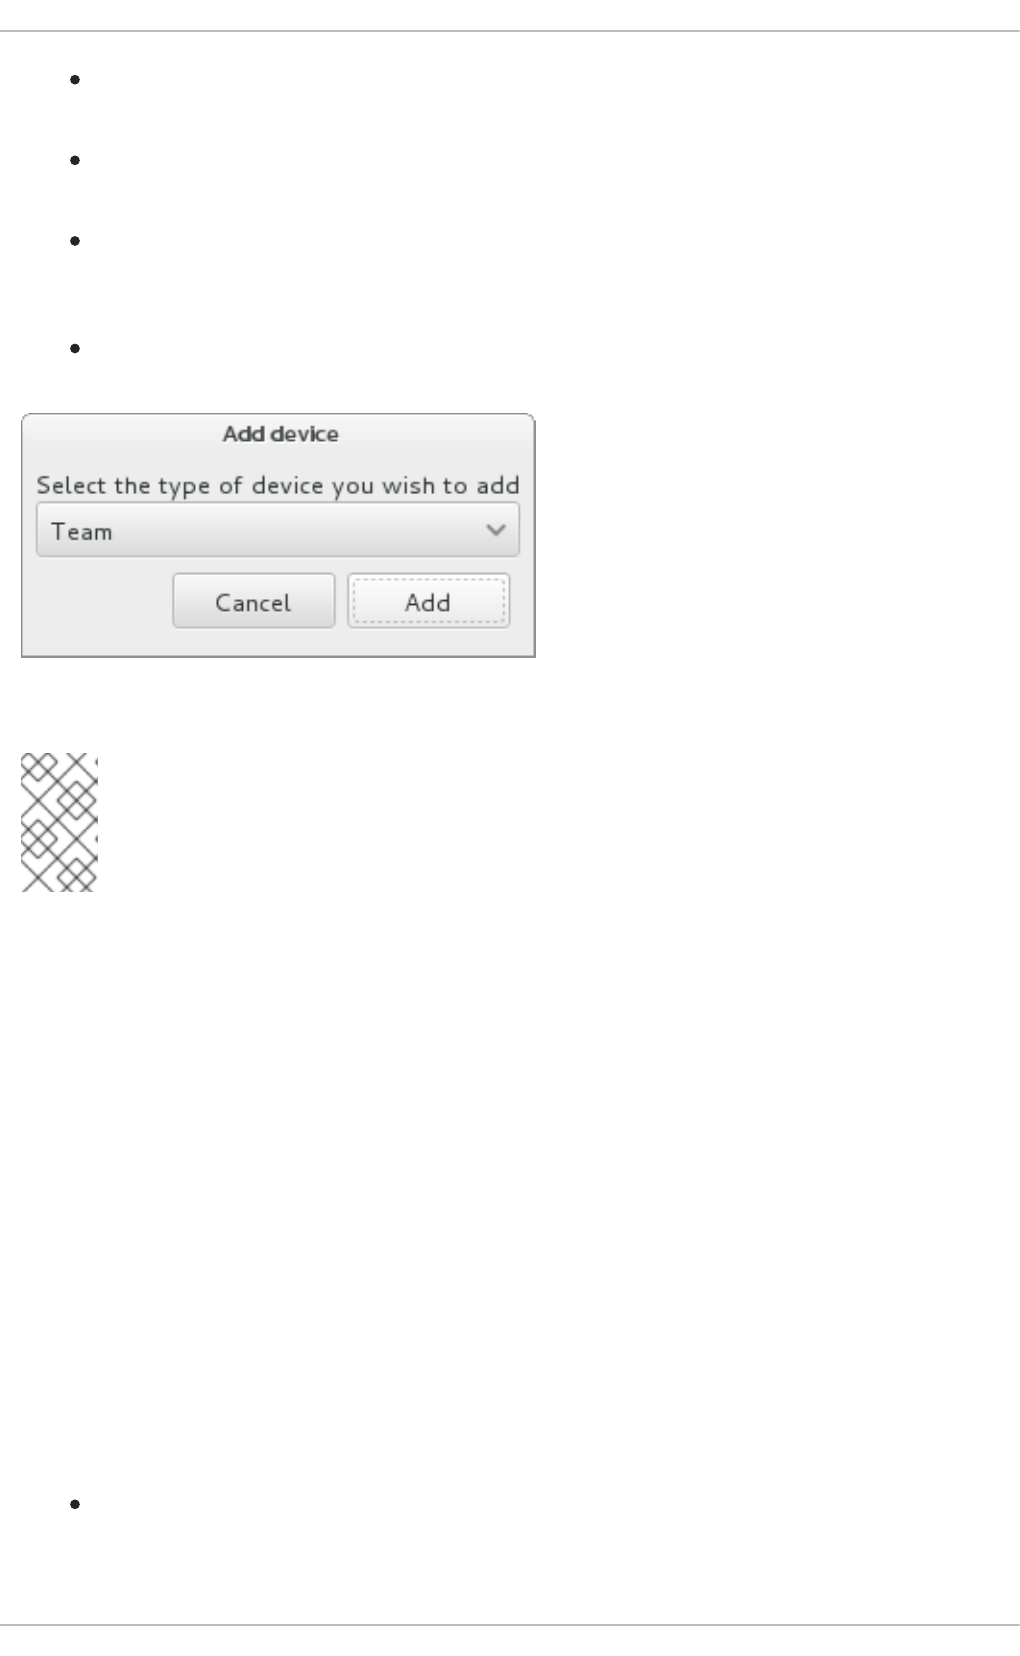
Bond - represents NIC (Network Interface Controller) Bonding, a method to bind multiple
network interfaces together into a single, bonded, channel.
Bridge - represents NIC Bridging, a method to connect multiple separate network into one
aggregate network.
Team - represents NIC Teaming, a new implementation to aggregate links, designed to provide
a small kernel driver to implement the fast handling of packet flows, and various applications to
do everything else in user space.
VLAN - represents a method to create multiple distinct broadcast domains, which are mutually
isolated.
Figure 8.15. Advanced Network Interface Dialog
NOTE
Note that locally accessible interfaces, wired or wireless, are automatically detected by
the installation program and cannot be manually added or deleted by using these
controls.
Once you have selected an option and clicked the Add button, another dialog appears for you to
configure the new interface. See the respective chapters in the Red Hat Enterprise Linux 7 Networking
Guide for detailed instructions. To edit configuration on an existing advanced interface, click the
Configure button in the lower right corner of the screen. You can also remove a manually-added
interface by clicking the - button.
8.13. SOFTWARE SELECTION
To specify which packages will be installed, select Software Selection at the Installation
Summary screen. The package groups are organized into Base Environments. These environments are
pre-defined sets of packages with a specific purpose; for example, the Virtualization Host
environment contains a set of software packages needed for running virtual machines on the system.
Only one software environment can be selected at installation time.
For each environment, there are additional packages available in the form of Add-ons. Add-ons are
presented in the right part of the screen and the list of them is refreshed when a new environment is
selected. You can select multiple add-ons for your installation environment.
A horizontal line separates the list of add-ons into two areas:
Add-ons listed above the horizontal line are specific to the environment you selected. If you
select any add-ons in this part of the list and then select a different environment, your selection
will be lost.
Installation Guide
70
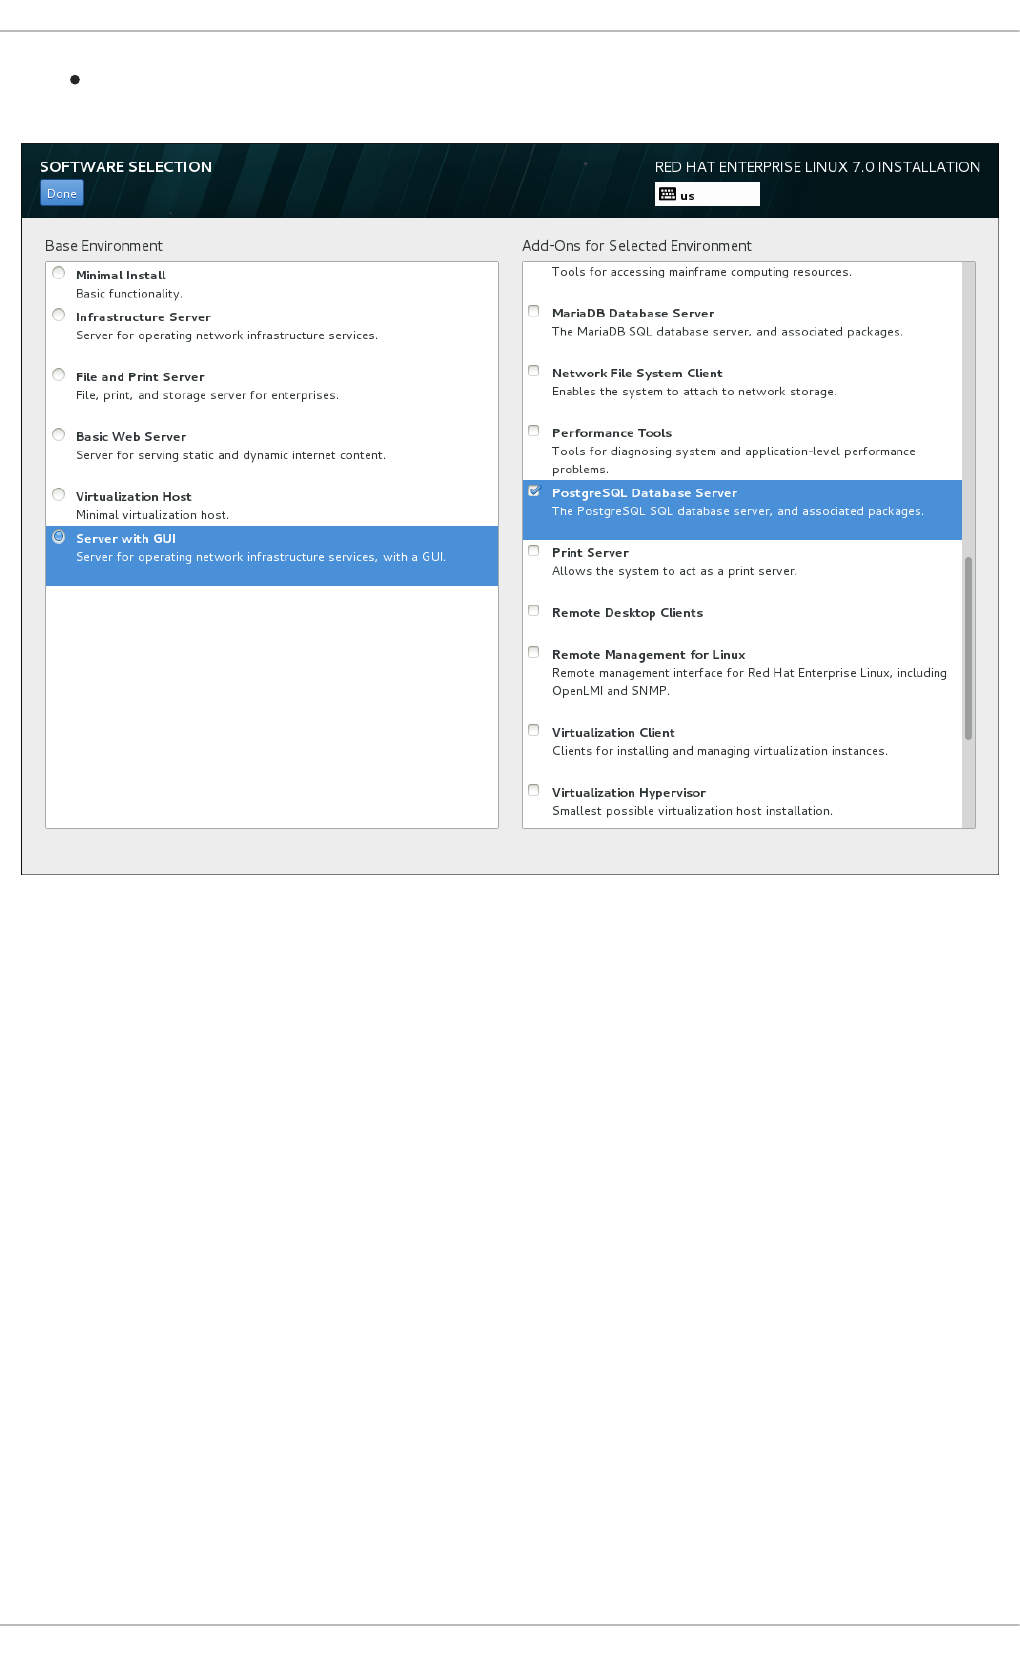
Add-ons listed below the horizontal line are available for all environments. Selecting a different
environment will not impact the selections made in this part of the list.
Figure 8.16. Example of a Software Selection for a Server Installation
The availability of base environments and add-ons depends on the variant of the installation ISO image
which you are using as the installation source. For example, the server variant provides environments
designed for servers, while the workstation variant has several choices for deployment as a
developer workstation, and so on.
The installation program does not show which packages are contained in the available environments. To
see which packages are contained in a specific environment or add-on, see the repodata/*-
comps-variant.architecture.xml file on the Red Hat Enterprise Linux Installation DVD which you
are using as the installation source. This file contains a structure describing available environments
(marked by the <environment> tag) and add-ons (the <group> tag).
CHAPTER 8. INSTALLING USING ANACONDA
71
IMPORTANT
The pre-defined environments and add-ons allow you to customize your system, but in a
manual installation, there is no way to select individual packages to install. If you are not
sure what package should be installed, Red Hat recommends you to select the Minimal
Install environment. Minimal install only installs a basic version of Red Hat
Enterprise Linux with only a minimal amount of additional software. This will substantially
reduce the chance of the system being affected by a vulnerability. After the system
finishes installing and you log in for the first time, you can use the Yum package manager
to install any additional software you need. For more details on Minimal install, see
the Installing the Minimum Amount of Packages Required section of the Red Hat
Enterprise Linux 7 Security Guide.
Alternatively, automating the installation with a Kickstart file allows for a much higher degree of control
over installed packages. You can specify environments, groups and individual packages in the
%packages section of the Kickstart file. See Section 26.3.2, “Package Selection” for instructions on
selecting packages to install in a Kickstart file, and Chapter 26, Kickstart Installations for general
information about automating the installation with Kickstart.
Once you have selected an environment and add-ons to be installed, click Done to return to the
Installation Summary screen.
8.13.1. Core Network Services
All Red Hat Enterprise Linux installations include the following network services:
centralized logging through the rsyslog service
email through SMTP (Simple Mail Transfer Protocol)
network file sharing through NFS (Network File System)
remote access through SSH (Secure SHell)
resource advertising through mDNS (multicast DNS)
Some automated processes on your Red Hat Enterprise Linux system use the email service to send
reports and messages to the system administrator. By default, the email, logging, and printing services
do not accept connections from other systems.
You can configure your Red Hat Enterprise Linux system after installation to offer email, file sharing,
logging, printing, and remote desktop access services. The SSH service is enabled by default. You can
also use NFS to access files on other systems without enabling the NFS sharing service.
8.14. INSTALLATION DESTINATION
To select the disks and partition the storage space on which you will install Red Hat Enterprise Linux,
select Installation Destination in the Installation Summary screen. If you are unfamiliar
with disk partitions, see Appendix A, An Introduction to Disk Partitions for more information.
Installation Guide
72

WARNING
Red Hat recommends that you always back up any data that you have on your
systems. For example, if you are upgrading or creating a dual-boot system, you
should back up any data you want to keep on your storage devices. Unforeseen
circumstances can result in loss of all your data.
IMPORTANT
If you install Red Hat Enterprise Linux in text mode, you can only use the default
partitioning schemes described in this section. You cannot add or remove partitions or file
systems beyond those that the installation program automatically adds or removes.
IMPORTANT
Special cases
If you have a RAID card, be aware that some BIOS types do not support booting
from the RAID card. In such a case, the /boot partition must be created on a
partition outside of the RAID array, such as on a separate hard drive. It is
necessary to use an internal hard drive for partition creation with problematic
RAID cards. A /boot partition is also necessary for software RAID setups. If you
have chosen to automatically partition your system, you should manually edit your
/boot partition; see Section 8.14.4, “Manual Partitioning” for more details.
To configure the Red Hat Enterprise Linux boot loader to chain load from a
different boot loader, you must specify the boot drive manually by clicking the
Full disk summary and bootloader link from the Installation
Destination screen. See Section 8.14.1, “Boot Loader Installation” for
instructions on specifying a boot drive.
When you install Red Hat Enterprise Linux on a system with both multipath and
non-multipath storage devices, the automatic partitioning layout in the installation
program might create volume groups that contain a mix of multipath and non-
multipath devices. This defeats the purpose of multipath storage. We advise that
you select only multipath or only non-multipath devices on the Installation
Destination screen. Alternatively, proceed to manual partitioning.
CHAPTER 8. INSTALLING USING ANACONDA
73
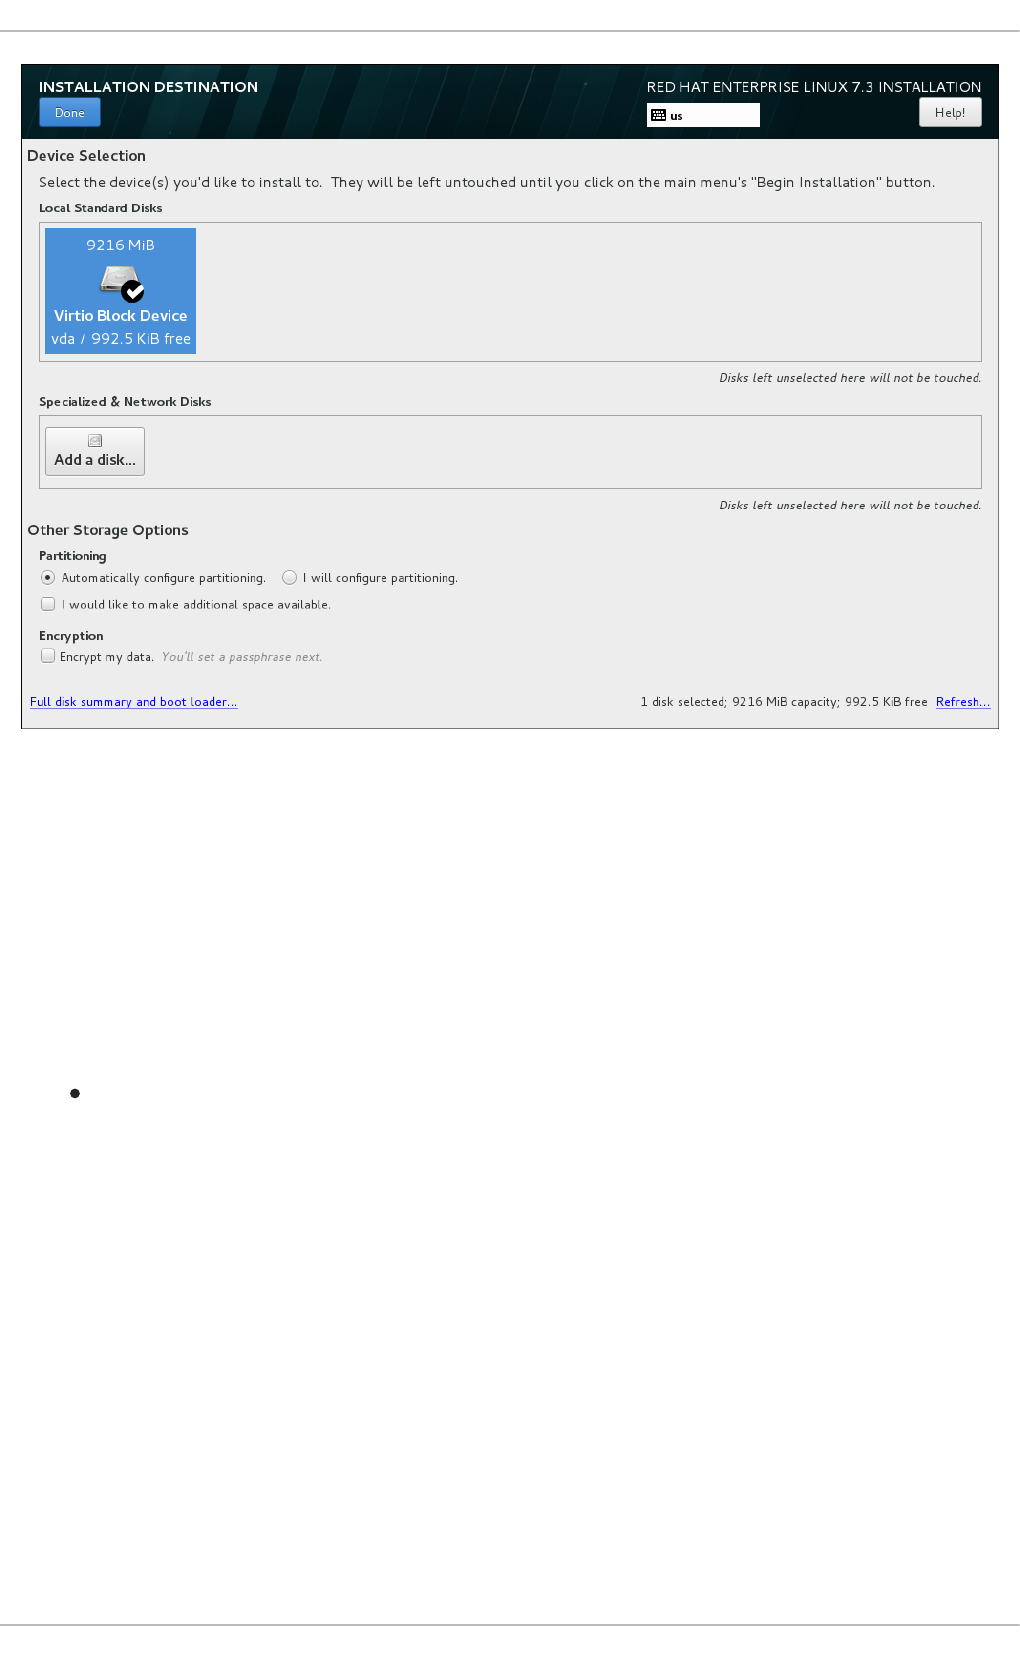
Figure 8.17. Storage Space Overview
On this screen, you can see storage devices available locally on your computer. You can also add
additional specialized or network devices by clicking the Add a disk button. To learn more about these
devices see Section 8.15, “Storage Devices”.
Choose the disks to install Red Hat Enterprise Linux on by clicking their icons in the pane at the top of the
screen. Each disk is marked with its label, size, and available space. Disks left unselected on the screen
will not be touched once the installation begins.
Below the panes for storage devices is a form of additional controls labeled Other Storage Options:
In the Partitioning section, you can select how storage devices are partitioned and how
volumes are created. You can configure the partitions, manually or allow the installation program
to do it automatically.
Automatic partitioning is recommended if you are doing a clean installation on previously unused
storage or do not need to keep any data that might be present on the storage. To proceed this
way, leave the default selection of the Automatically configure partitioning radio
button, and the installation program will create the necessary partitions and volumes on the
storage space for you.
For automatic partitioning, you can also select the I would like to make additional
space available check box to choose how to reassign space from other file systems to this
installation. After you click Done, there are two dialogs that can appear. If you selected
automatic partitioning but there is not enough storage space to complete the installation using
the recommended partitioning configuration, a dialog will appear:
Installation Guide
74
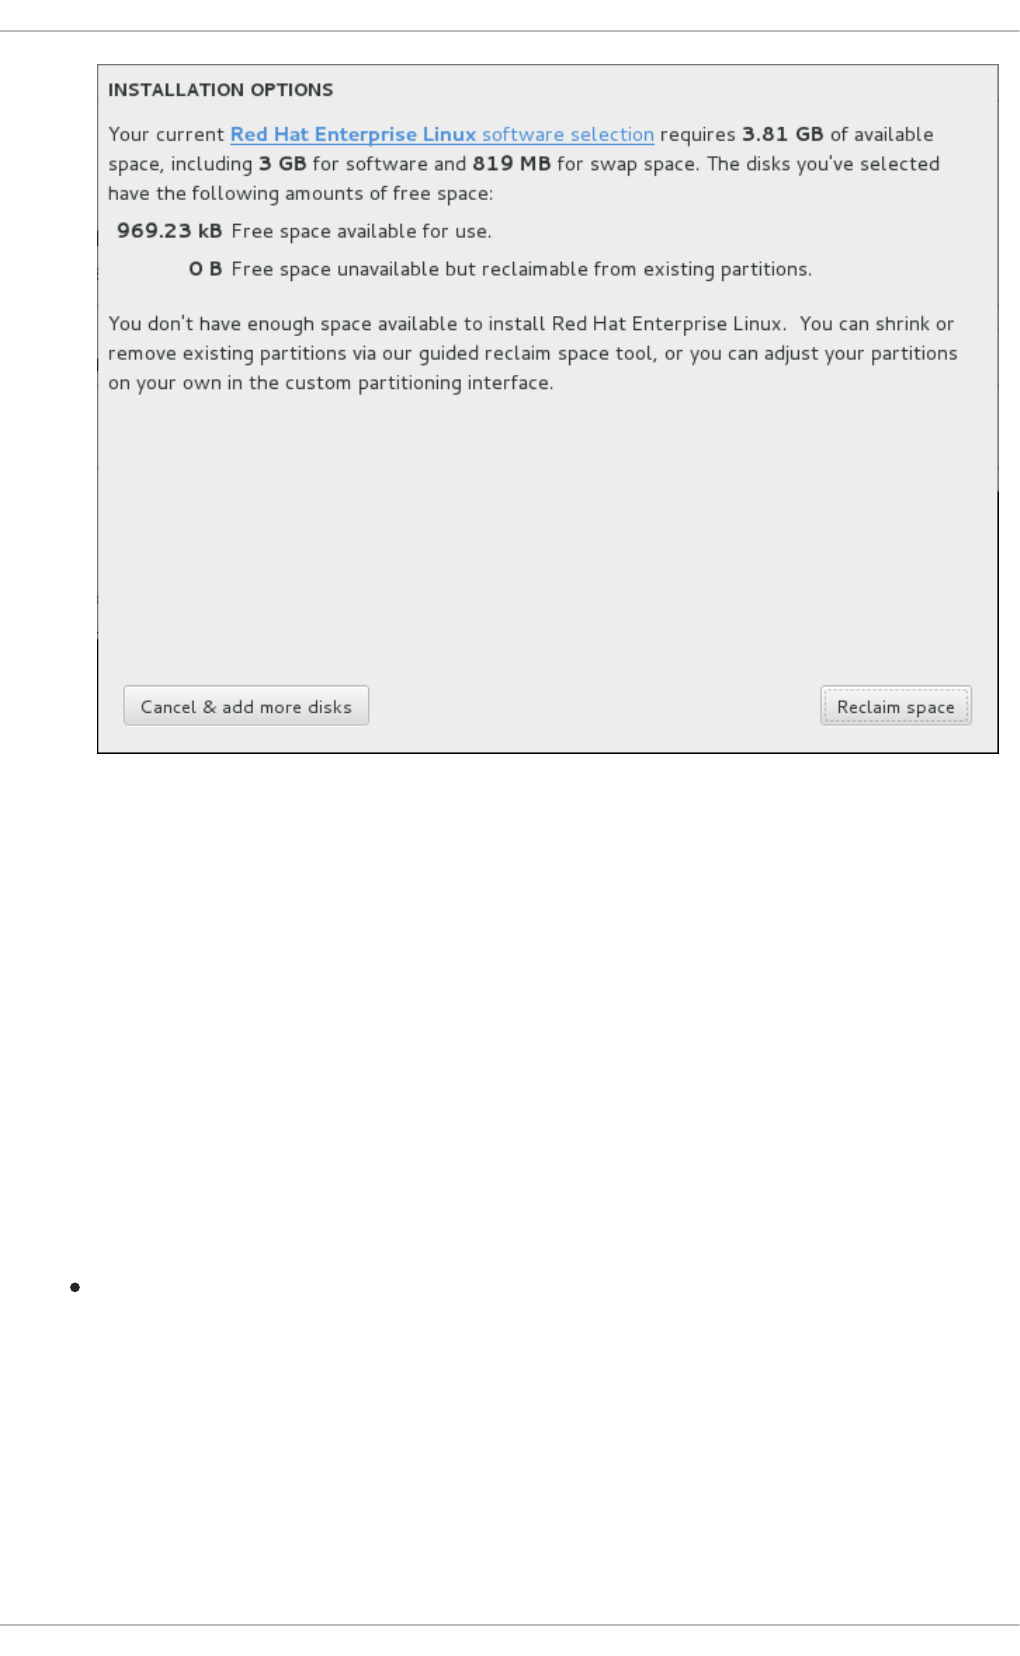
Figure 8.18. Installation Options Dialog with Option to Reclaim Space
You can click to the Red Hat Enterprise Linux software selection link. The link will
navigate you to the Software selection section, where you can change what software you
want to install, and free some aditional storage space.
Alternatively, you can click Cancel & add more disks to return to the Installation
Destination screen, where it is possible to add more storage devices, or to choose to
configure partitioning manually. Click Reclaim space to free some storage space from existing
file systems. See Section 8.14.3, “Reclaim Disk Space” for details.
The second dialog appears if you cannot create enough free space. In this case, you have to
add more disks on the initial storage screen or quit the installation.
If you select the I will configure partitioning radio button for manual setup, you will
be brought to the Manual Partitioning screen after clicking Done. See Section 8.14.4,
“Manual Partitioning” for details.
In the Encryption section, you can select the Encrypt my data check box to encrypt all
partitions except for the /boot partition. See the Red Hat Enterprise Linux 7 Security Guide for
information on encryption.
At the bottom of the screen is the Full disk summary and bootloader button for you to configure
a disk on which a boot loader will be installed.
See Section 8.14.1, “Boot Loader Installation” for more information.
Click the Done button once you have made your selections to either return to the Installation
Summary screen or to proceed to the Manual Partitioning screen.
CHAPTER 8. INSTALLING USING ANACONDA
75
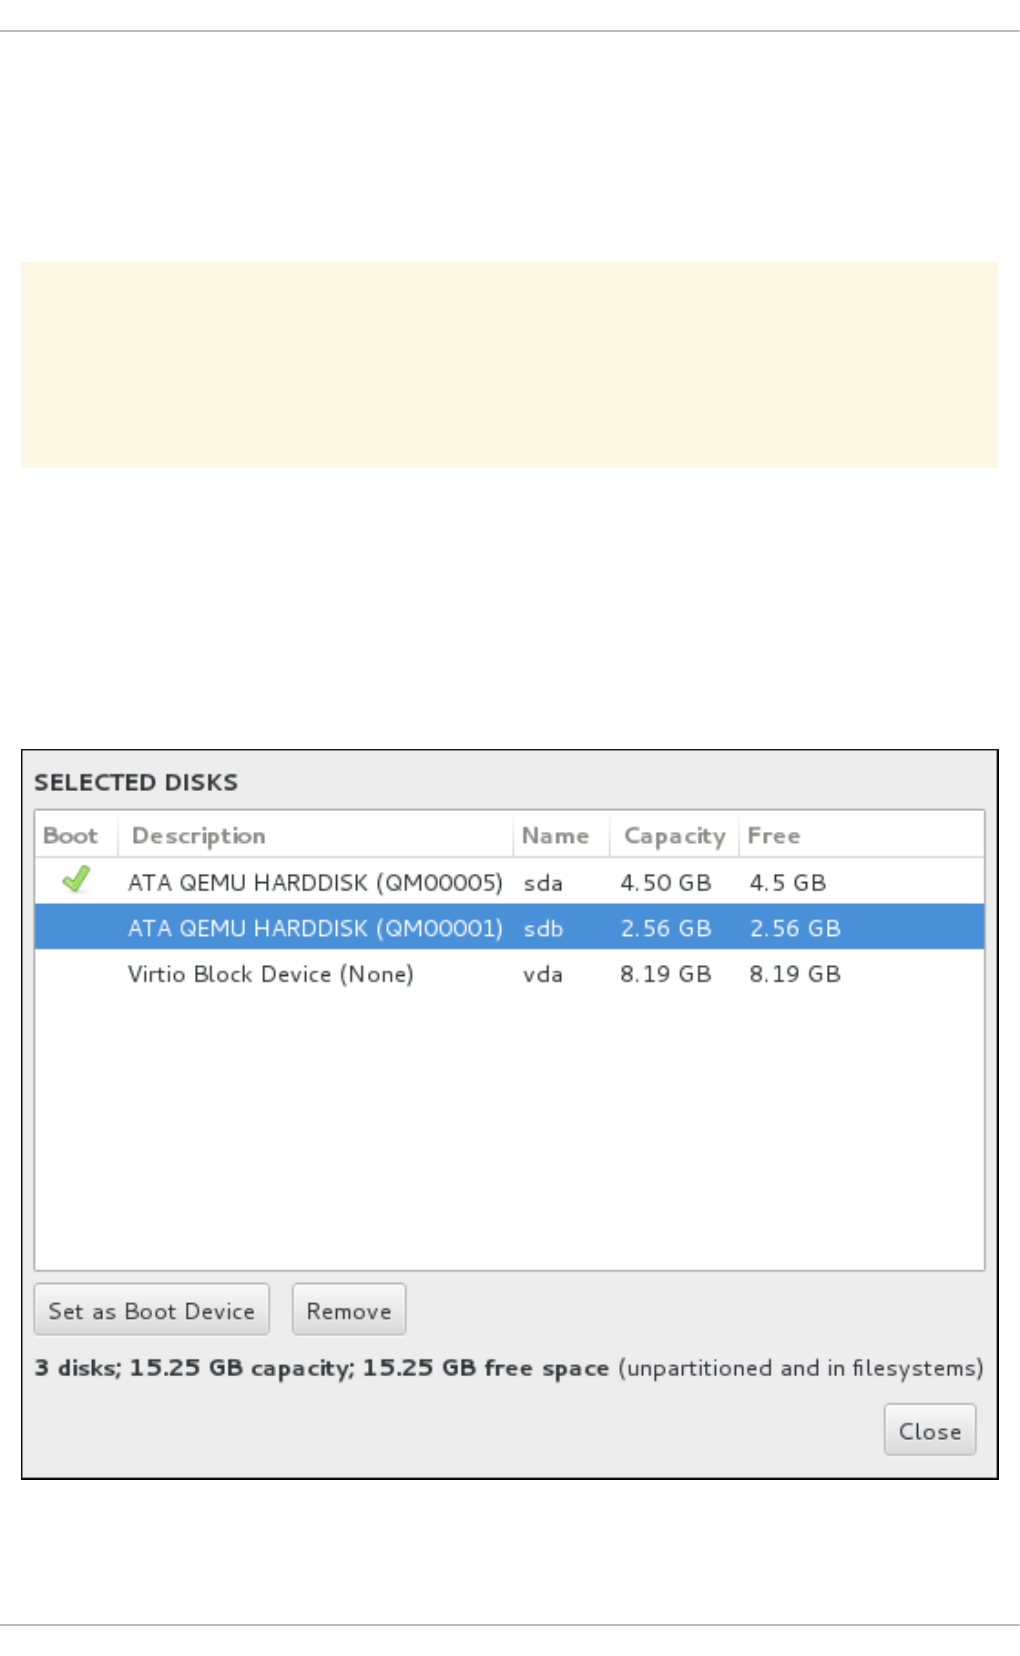
8.14.1. Boot Loader Installation
Red Hat Enterprise Linux uses GRUB2 (GRand Unified Bootloader version 2) as its boot loader. The
boot loader is the first program that runs when the computer starts and is responsible for loading and
transferring control to an operating system. GRUB2 can boot any compatible operating system and can
also use chain loading to transfer control to other boot loaders for unsupported operating systems.
WARNING
Installing GRUB2 can overwrite your existing boot loader.
If you have other operating systems already installed, Red Hat Enterprise Linux attempts to automatically
detect and configure GRUB2 to boot them. You can manually configure any additional operating systems
if they are not detected properly.
To specify which device the boot loader should be installed on, click the Full disk summary and
bootloader link at the bottom of the Installation Destination screen. The Selected Disks
dialog will appear. If you are partitioning the drive manually, this dialog can be reached by clicking
Storage device/s selected on the Manual Partitioning screen.
Figure 8.19. Summary of Selected Disks
Installation Guide
76

In the Boot column, a green tick icon marks one of the devices as the intended boot device. To change
the boot device, select a device from the list and click the Set as Boot Device button to install the
boot loader there instead.
To decline installation of a new boot loader, select the marked device and click the Do not install
bootloader button. This will remove the tick and ensure GRUB2 is not installed on any device.
WARNING
If you choose not to install a boot loader for any reason, you will not be able to boot
the system directly, and you must use another boot method, such as a commercial
boot loader application. Use this option only if you are sure you have another way to
boot your system.
8.14.1.1. MBR and GPT Considerations
The installation program installs GRUB2 either in the master boot record (MBR) or the GUID partition
table (GPT) of the device for the root file system. In order to determine which of these methods to use,
the installation program considers the following variations:
BIOS systems, and UEFI systems in BIOS compatibility mode
If the disk is already formatted, the partitioning scheme is retained.
If the disk is not formatted, or the user erased all partitions from the disk, Anaconda will use:
MBR if the disk has less than 232 sectors. Most commonly, disks sectors are 512 bytes in
size, in which case this would be equivalent to 2 TiB.
GPT if the disk has 232 sectors or more.
NOTE
Append the inst.gpt option to the boot command line to override the default
behavior and use GPT on a disk of less than 232 sectors in size. Note that you
cannot manually override Anaconda to use MBR on a disk which is 232
sectors in size or larger.
You need to create a BIOS Boot (biosboot) partition to install on a BIOS system where the disk
containing the boot loader uses GPT. The biosboot partition should be 1 MiB in size. However, you
do not need the biosboot partition if the disk containing the boot loader uses MBR.
UEFI systems
Only GPT is allowed on UEFI systems. In order to install on a formatted disk with a MBR, you must
first reformat it.
You need to create an EFI System Partition (/boot/efi), regardless of the partitioning scheme. The
/boot/efi partition should be at least 50 MiB in size; its recommended size is 200 MiB.
CHAPTER 8. INSTALLING USING ANACONDA
77
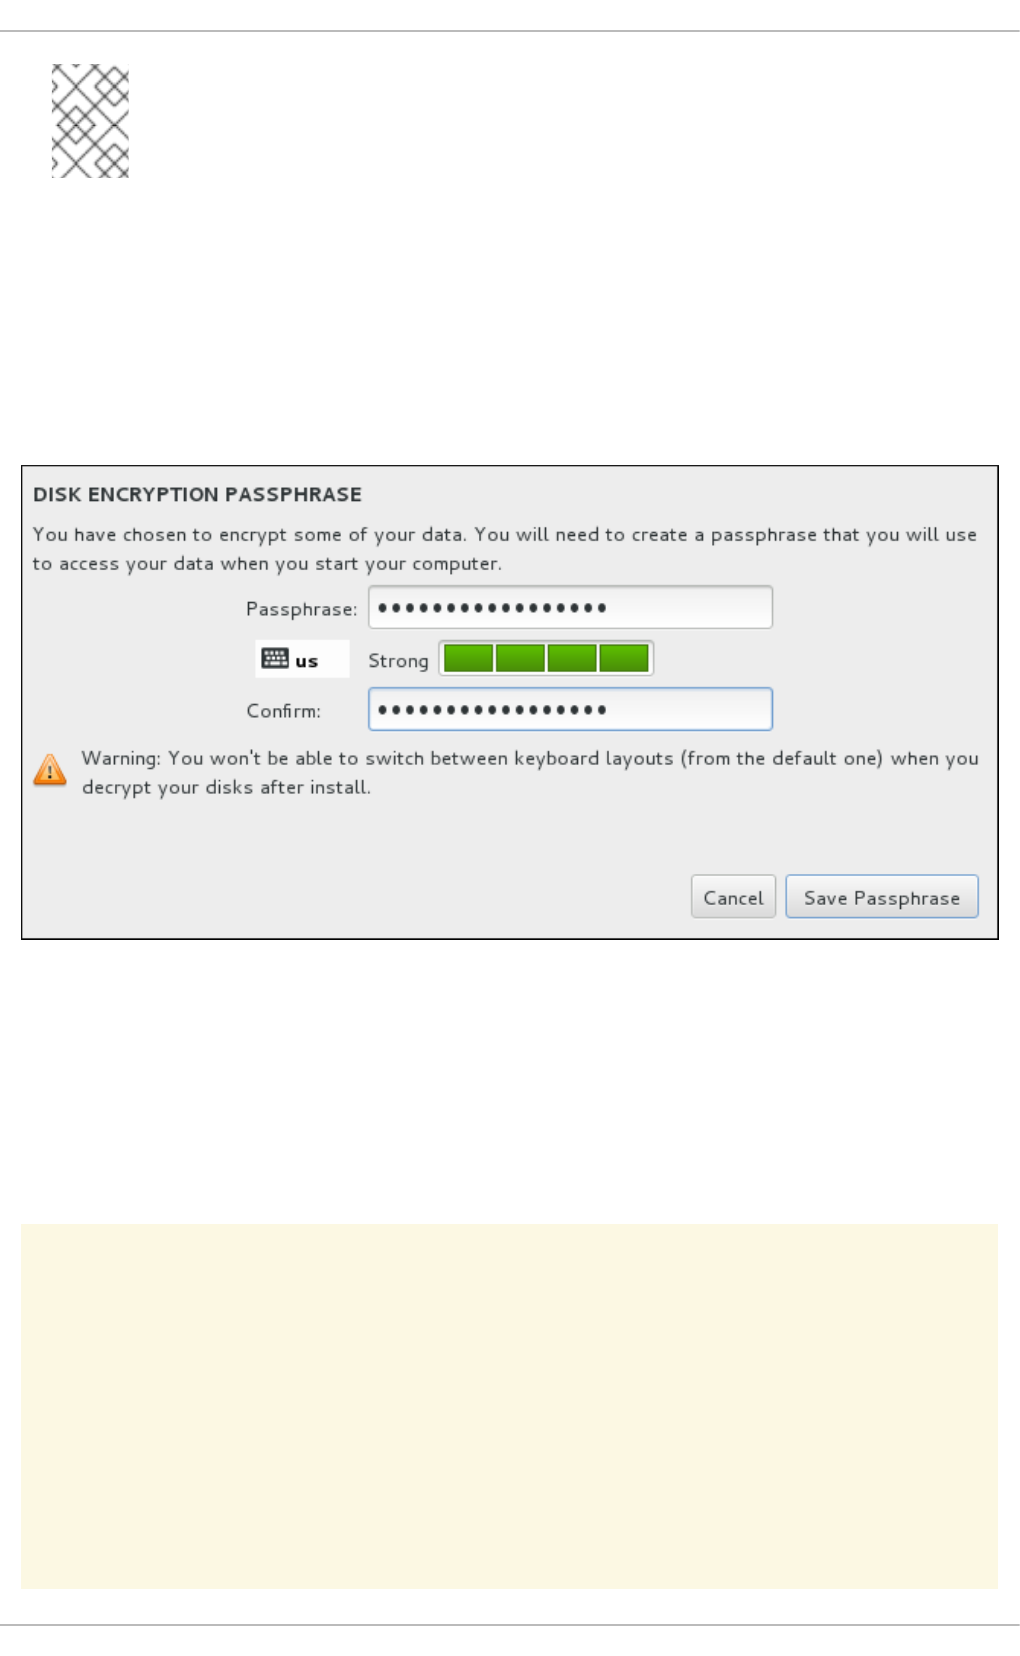
NOTE
Neither the biosboot nor efi partition can reside on an LVM volume. Use standard
physical partitions for them.
8.14.2. Encrypt Partitions
If you selected the Encrypt my data option, when you click to proceed to the next screen the
installation program will prompt you for a passphrase with which to encrypt the partitions on the system.
Partitions are encrypted using the Linux Unified Key Setup - see the Red Hat Enterprise Linux 7 Security
Guide for more information.
Figure 8.20. Enter Passphrase for an Encrypted Partition
Choose a passphrase and type it into each of the two fields in the dialog box. Note that you need to use
the same keyboard layout for setting up this passphrase that you will use to unlock partitions later. Use
the language layout icon to ensure the correct layout is selected. You must provide this passphrase
every time that the system boots. Press Tab while in the Passphrase input field to retype it. If the
passphrase is too weak, a warning icon appears in the field and you will not be allowed to type in the
second field. Hover your mouse cursor over the warning icon to learn how to improve the passphrase.
WARNING
If you lose this passphrase, any encrypted partitions and the data on them will
become completely inaccessible. There is no way to recover a lost passphrase.
Note that if you perform a Kickstart installation, you can save encryption
passphrases and create backup encryption passphrases during installation. See the
Red Hat Enterprise Linux 7 Security Guide for more information about disk
encryption.
Installation Guide
78
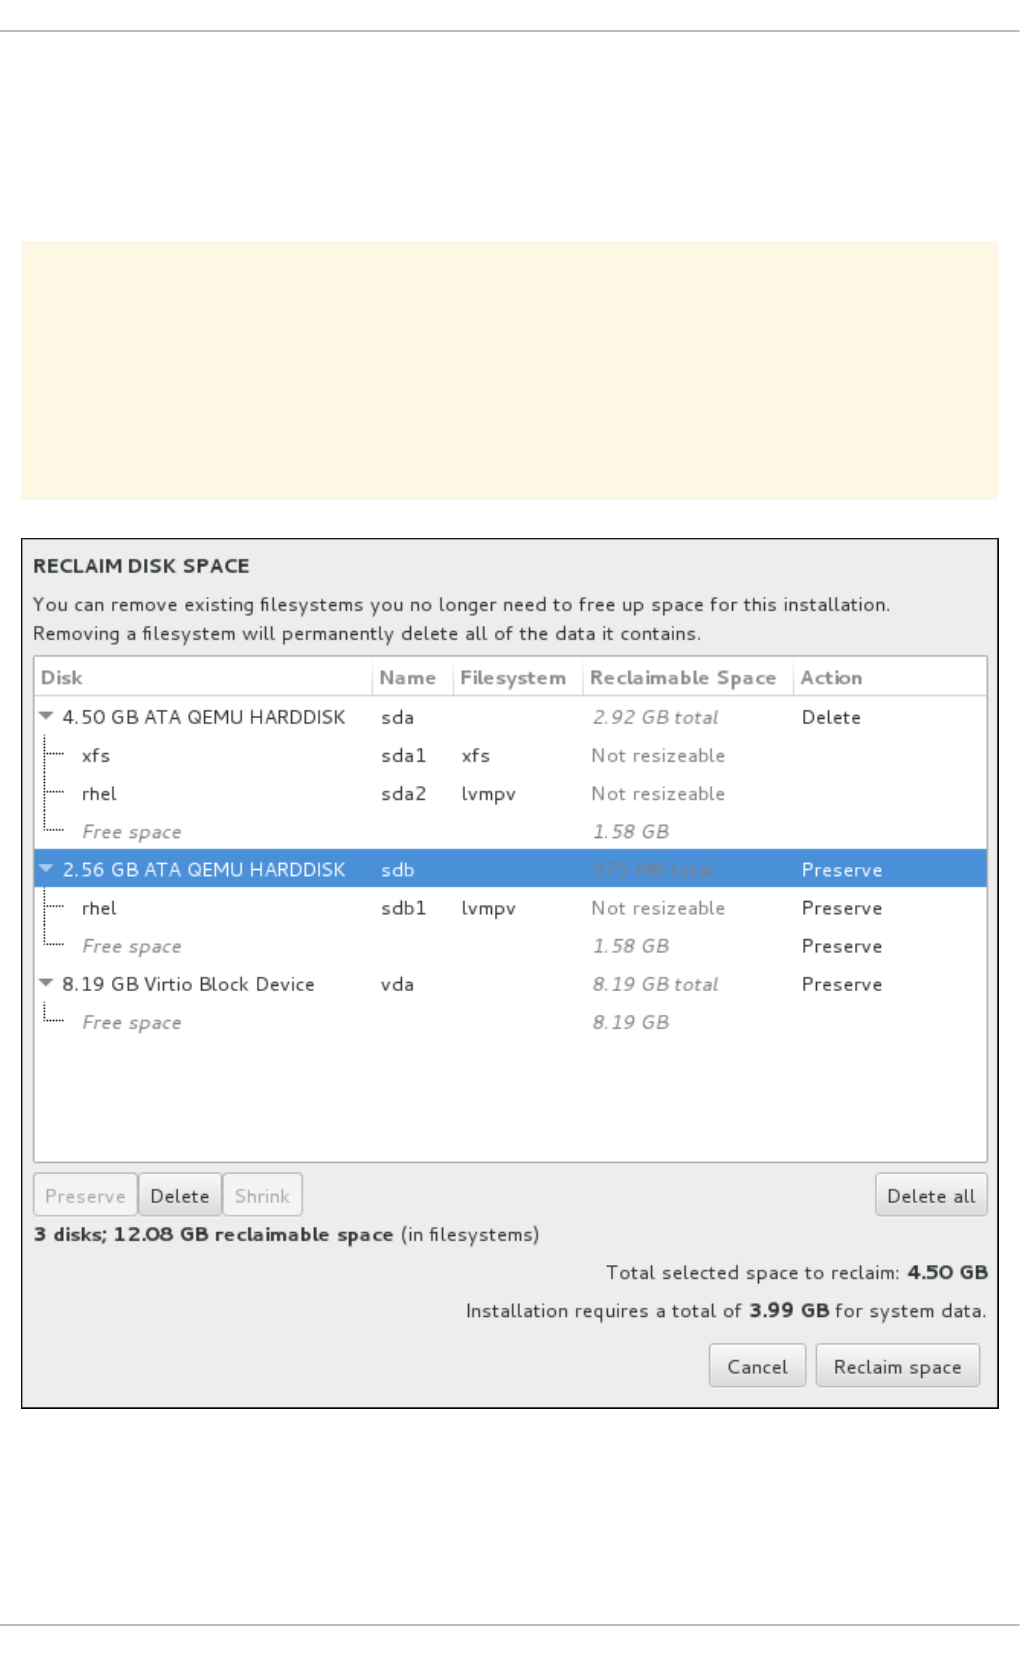
8.14.3. Reclaim Disk Space
If there is insufficient space to install Red Hat Enterprise Linux on the disks selected in Installation
Destination and you selected Reclaim Space at the Installation Options dialog, the
Reclaim Disk Space dialog appears.
WARNING
Unless you select to shrink a partition, reclaiming space on a partition involves
deleting all the data on it and you should always verify that any data you need to
keep was backed up.
Figure 8.21. Reclaim Disk Space from Existing File Systems
The existing file systems Red Hat Enterprise Linux has detected are listed in a table as part of their
respective disks. The Reclaimable Space column lists the space that could be reassigned to this
installation. The Action column lists what action will be taken with the file system to reclaim space.
CHAPTER 8. INSTALLING USING ANACONDA
79

Beneath the table are four buttons:
Preserve - leaves the file system untouched and no data will be deleted. This is the default
action.
Delete - removes the file system entirely. All the space it takes up on the disk will be made
available for the installation.
Shrink - recovers free space from the file system and makes it available for this installation.
Use the slider to set a new size for the selected partition. Can only be used on resizable
partitions where LVM or RAID is not used.
Delete all/Preserve all - this button, located on the right, marks all file systems for
deletion by default. Upon clicking, it changes the label and allows you to mark all file systems to
be preserved again.
Select a file system or a whole disk in the table with your mouse and click one of the buttons. The label
in the Action column will change to match your selection and the amount of Total selected space
to reclaim displayed beneath the table will adjust accordingly. Beneath this value is the amount of
space the installation requires based on the packages you have selected to install.
When enough space has been reclaimed for the installation to proceed, the Reclaim Space button will
become available. Click this button to return to the Installation Summary screen and proceed with the
installation.
8.14.4. Manual Partitioning
The Manual Partitioning screen is displayed when you click Done from Installation Destination if
you selected the I will configure partitioning option. On this screen you configure your disk
partitions and mount points. This defines the file system that Red Hat Enterprise Linux will be installed
on.
WARNING
Red Hat recommends that you always back up any data that you have on your
systems. For example, if you are upgrading or creating a dual-boot system, you
should back up any data you want to keep on your storage devices. Unforeseen
circumstances can result in loss of all your data.
Installation Guide
80
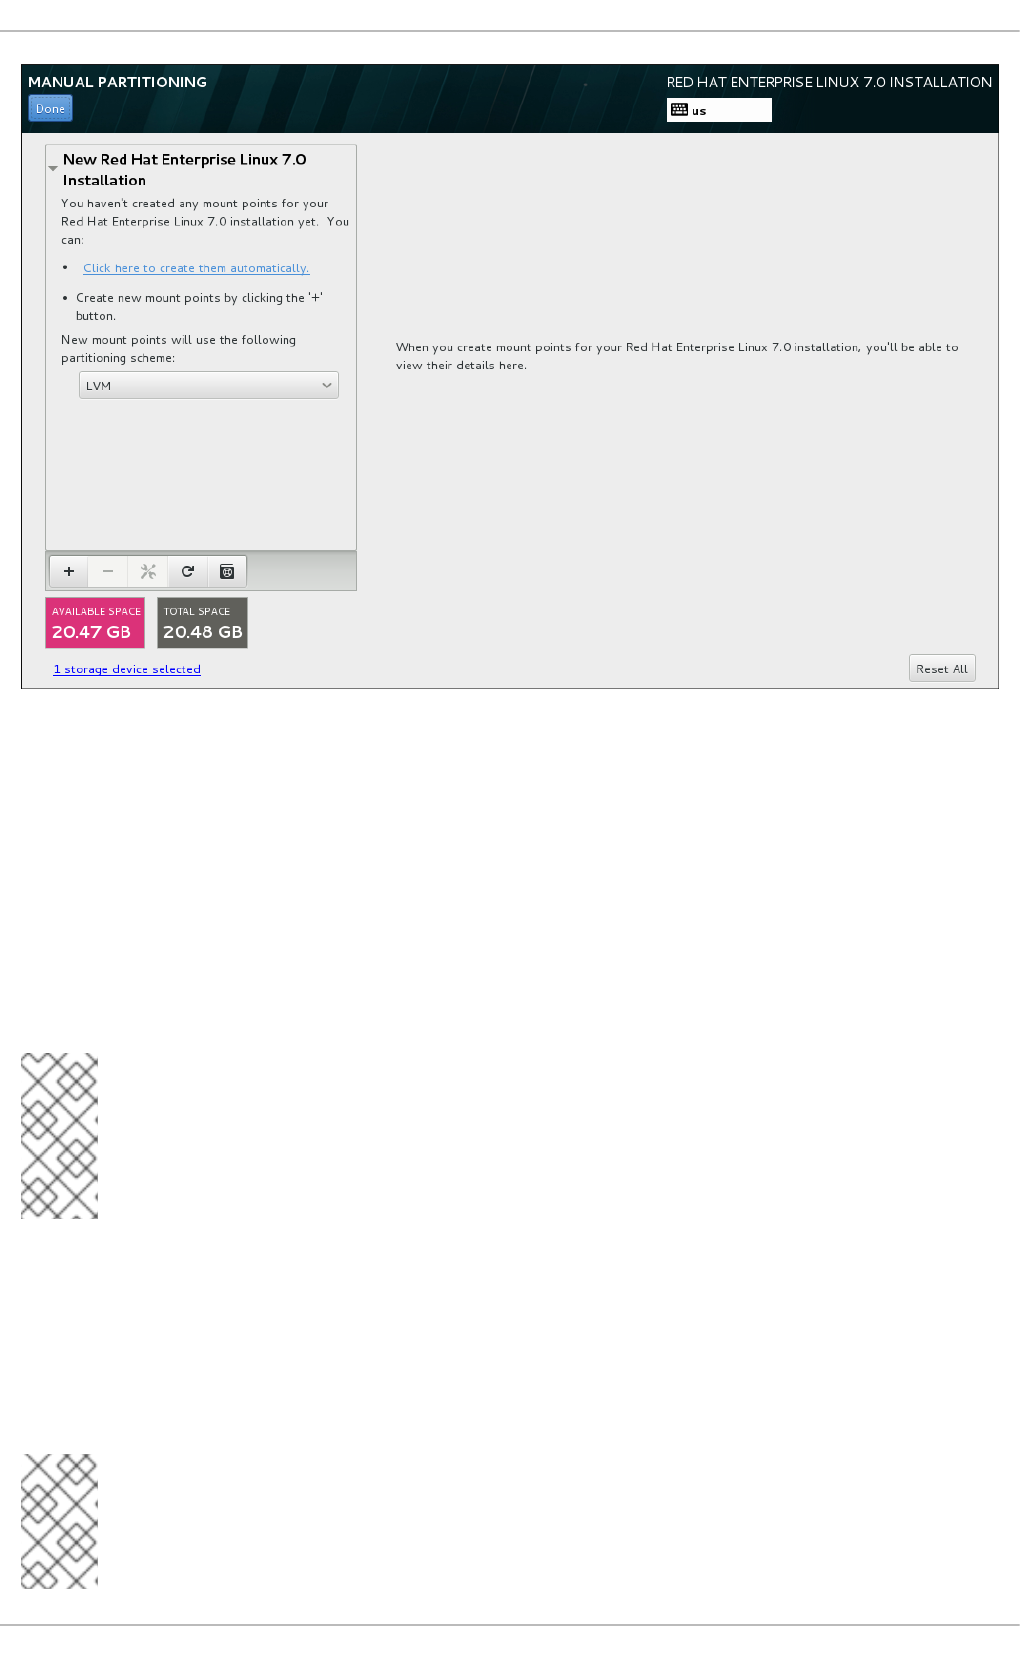
Figure 8.22. The Manual Partitioning Screen
The Manual Partitioning screen initially features a single pane on the left for the mount points. The
pane is either empty except for information about creating mount points, or it displays existing mount
points that the installation program has detected. These mount points are organized by detected
operating system installations. Therefore, some file systems might be displayed multiple times if a
partition is shared among several installations. The total space and available space on selected storage
devices are displayed beneath this pane.
If your system contains existing file systems, ensure that enough space will be available for the
installation. Use the - button to remove unneeded partitions.
NOTE
For recommendations and additional information about disk partitions, see Appendix A,
An Introduction to Disk Partitions and Section 8.14.4.4, “Recommended Partitioning
Scheme”. At a bare minimum, you need an appropriately sized root partition, and usually
a swap partition appropriate to the amount of RAM you have on your system.
8.14.4.1. Adding File Systems and Configuring Partitions
An installation of Red Hat Enterprise Linux requires a minimum of one partition but Red Hat recommends
using at least the following partitions or volumes: /, /home, /boot, and swap. You can also create
additional partitions and volumes as you require. See Section 8.14.4.4, “Recommended Partitioning
Scheme” for further details.
NOTE
CHAPTER 8. INSTALLING USING ANACONDA
81
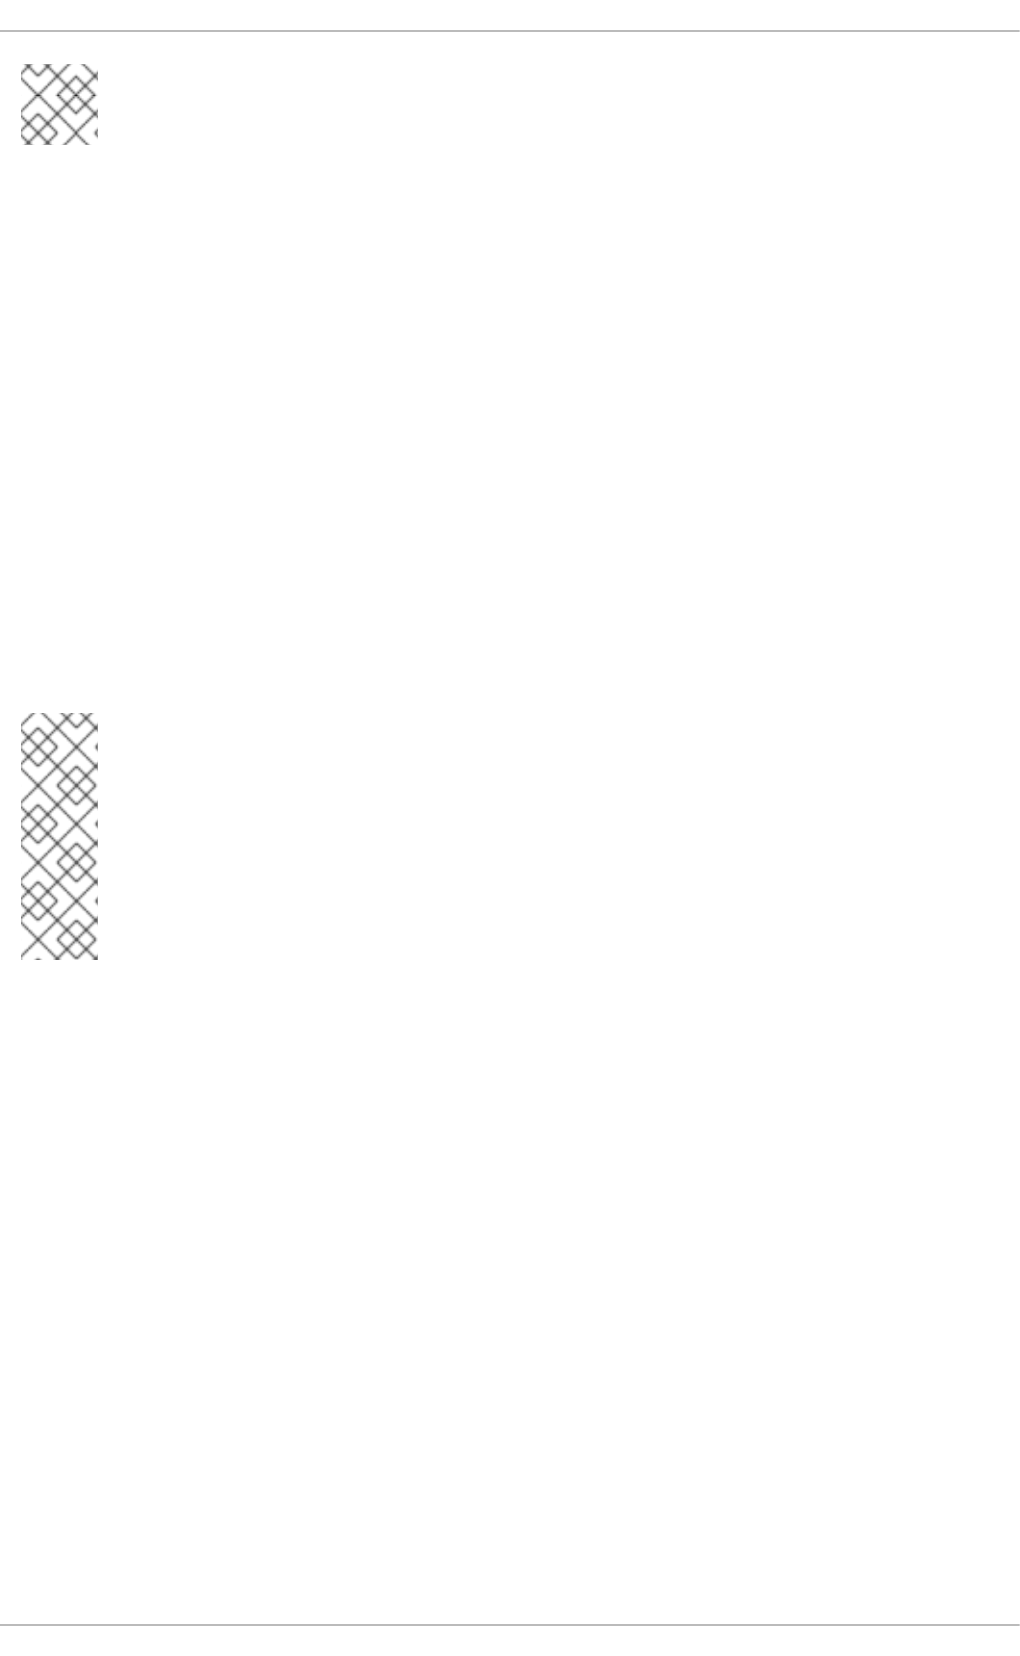
If you have any specific requirements for some partitions (for example, requiring that a
particular partition be on a specific disk) and less specific requirements for other
partitions, create the partitions first which have more specific requirements.
Adding a file system is a two-step process. You first create a mount point in a certain partitioning
scheme. The mount point appears in the left pane. Next, you can customize it using the options in the
right pane, where you can change the mount point, capacity, the device type, file system type, label, and
whether to encrypt or reformat the corresponding partition.
If you have no existing file systems and want the installation program to create the required file systems
and their mount points for you, select your preferred partitioning scheme from the drop-down menu in
the left pane (default for Red Hat Enterprise Linux is LVM), then click the link on top of the pane for
creating mount points automatically. This will generate a /boot partition, a / (root) volume, and a swap
volume proportionate to the size of the available storage. These are the recommended file systems for a
typical installation, but you can add additional file systems and mount points if you need to.
Alternatively, create individual mount points using the + button at the bottom of the pane. The Add a
New Mount Point dialog then opens. Either select one of the preset paths from the Mount Point
drop-down menu or type your own; for example, select / for the root partition or /boot for the boot
partition. Then enter the size of the file system in the Desired Capacity text field; for example, 2GiB.
If you leave the field empty or if you specify a size bigger than available space, all remaining free space
is used instead. After entering these details, click the Add mount point button to create the partition.
NOTE
To avoid problems with space allocation, first create small partitions with known fixed
sizes, such as /boot, and then create the rest of the partitions, letting the installation
program allocate the remaining capacity to them.
Similarly, if you have multiple disks that the system is to reside on, they differ in size, and
a particular partition must be created on the first disk detected by BIOS, be sure to start by
creating such a partition.
For each new mount point you create manually, you can set its partitioning scheme from the drop-down
menu located in the left pane. The available options are Standard Partition, BTRFS, LVM, and LVM
Thin Provisioning. Note that the /boot partition will always be located on a standard partition,
regardless of the value selected in this menu.
To change on which devices a single non-LVM mount point should be located, select the mount point
and click the Modify... button in the right pane to open the Configure Mount Point dialog. Select
one or more devices and click Select. After the dialog closes, note that you also need to confirm this
setting by clicking the Update Settings button on the right side of the Manual Partitioning
screen.
Installation Guide
82
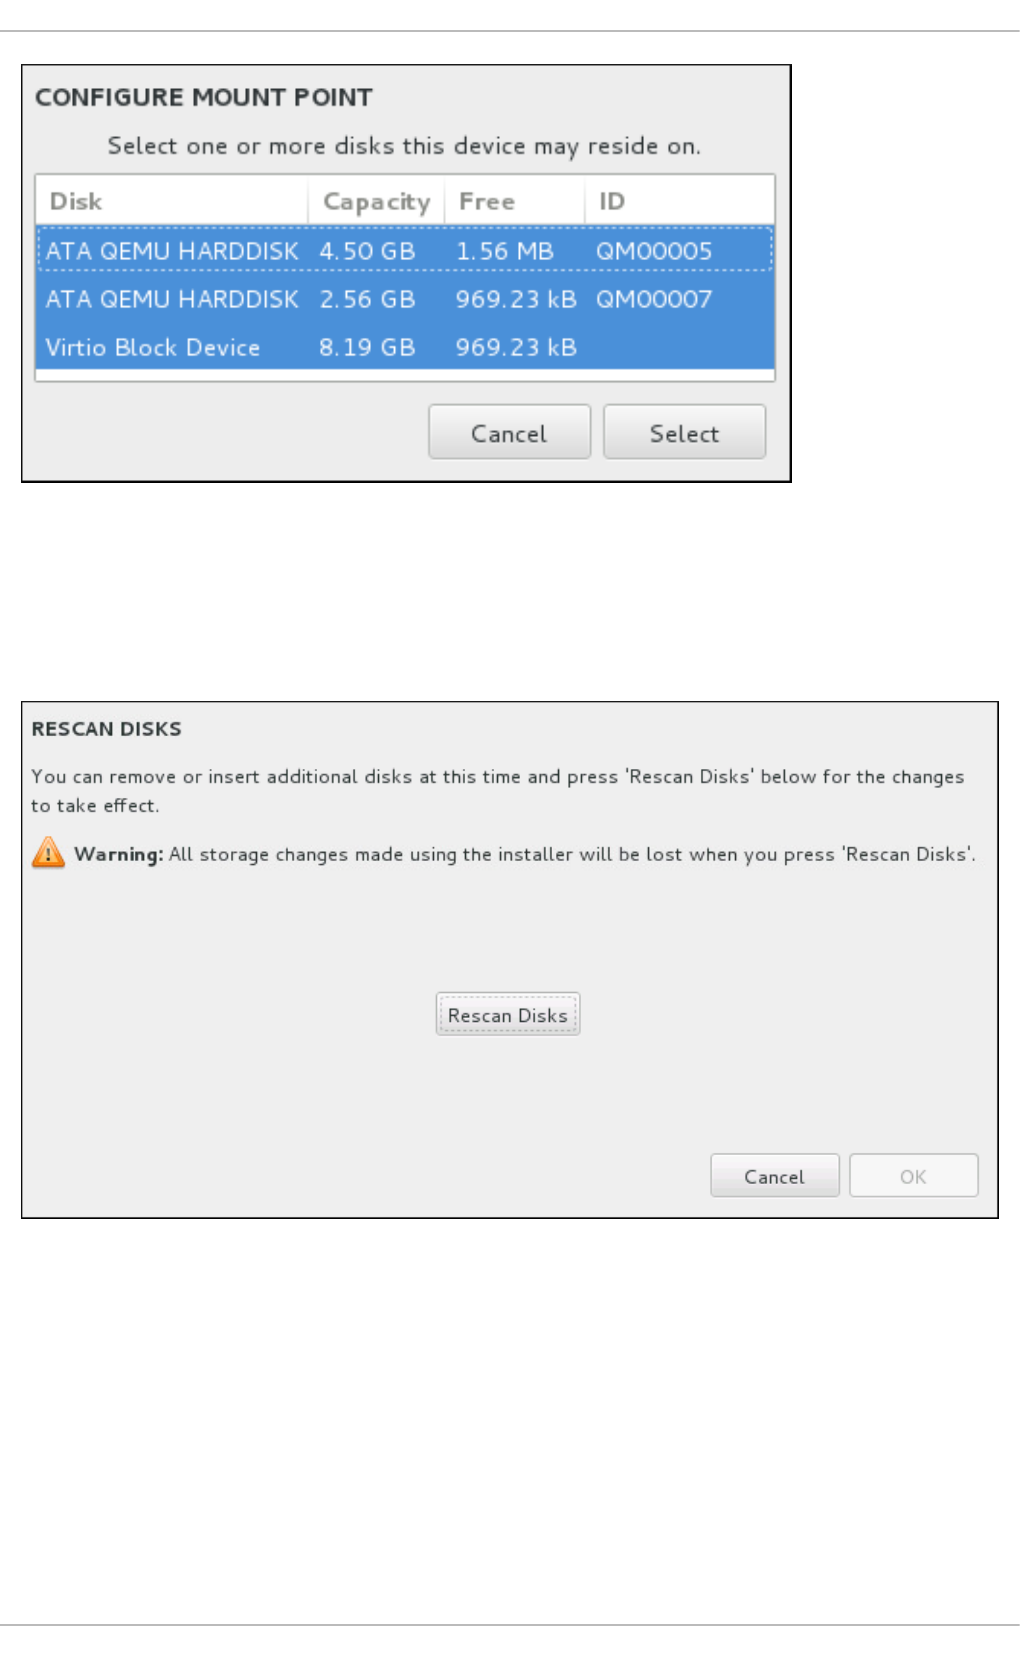
Figure 8.23. Configuring Mount Points
To refresh information about all local disks and partitions on them, click the Rescan button (with the
circular arrow icon on it) in the toolbar. You only need to do this action after performing advanced
partition configuration outside the installation program. Note that if you click the Rescan Disks button,
all configuration changes you previously made in the installation program will be lost.
Figure 8.24. Rescanning Disks
At the bottom of the screen, a link states how many storage devices have been selected in
Installation Destination (see Section 8.14, “Installation Destination”). Clicking on this link opens
the Selected Disks dialog, where you review the information about the disks. See Section 8.14.1,
“Boot Loader Installation” for more information.
To customize a partition or a volume, select its mount point in the left pane and the following
customizable features then appear to the right:
CHAPTER 8. INSTALLING USING ANACONDA
83

Figure 8.25. Customizing Partitions
Mount Point - enter the file system's mount point. For example, if a file system should be the
root file system, enter /; enter /boot for the /boot file system, and so on. For a swap file
system, the mount point should not be set - setting the file system type to swap is sufficient.
Desired Capacity - enter the desired size of the file system. You can use common size units
such as KiB or GiB. The default is MiB if no other unit is specified.
Device type - choose one of these types: Standard Partition, LVM, RAID, LVM Thin
Provisioning, or BTRFS. Check the adjacent Encrypt box to encrypt the partition or volume.
You will be prompted to set a password later. RAID is only available if two or more disks are
selected for partitioning, and if you choose this type, you can also set the RAID Level.
Similarly, if you select LVM, you can specify the Volume Group.
File system - in the drop-down menu, select the appropriate file system type for this partition
or volume. Check the adjacent Reformat box to format an existing partition, or leave it
unchecked to retain your data. Note that newly created partitions and volumes must be
reformatted, and the check box cannot be unchecked in this case.
Label - assign a label to the partition. Labels are used for you to easily recognize and address
individual partitions.
Name - assign a name to an LVM or Btrfs volume. Note that standard partitions are named
automatically when they are created and their name cannot be edited, such as /home being
assigned the name sda1.
Installation Guide
84

See Section 8.14.4.1.1, “File System Types” for more information about file system and device types.
Click the Update Settings button to save your changes and select another partition to customize.
Note that the changes will not be applied until you actually start the installation from the Installation
summary page. Click the Reset All button to discard all changes to all partitions and start over.
When all file systems and mount points have been created and customized, click the Done button. If you
chose to encrypt any file system, you will now be prompted to create a passphrase. Then, a dialog
appears, showing a summary of all actions related to storage that the installation program will take. This
includes creating, resizing, or deleting partitions and file systems. You can review all the changes and
click Cancel & Return to Custom Partitioning to go back. To confirm your changes, click
Accept Changes to return to the Installation Summary page. To partition additional devices, select
them in the Installation Destination screen, return to the Manual Partitioning screen,
repeat the steps outlined in this section for the additional devices.
IMPORTANT
If /usr or /var is partitioned separately from the rest of the root volume, the boot process
becomes much more complex because these directories contain components critical to it.
In some situations, such as when these directories are placed on an iSCSI drive or an
FCoE location, the system can either be unable to boot, or hang with a Device is
busy error when powering off or rebooting.
This limitation only applies to /usr or /var, not to directories below them. For example,
a separate partition for /var/www will work without issues.
8.14.4.1.1. File System Types
Red Hat Enterprise Linux allows you to create different device types and file systems. The following is a
brief description of the different device types and file systems available, and how they can be used.
Device Types
standard partition - A standard partition can contain a file system or swap space, or it can
provide a container for software RAID or an LVM physical volume.
logical volume (LVM) - Creating an LVM partition automatically generates an LVM logical
volume. LVM can improve performance when using physical disks. For information on how to
create a logical volume, see Section 8.14.4.3, “Create LVM Logical Volume”. For more
information regarding LVM, see the Red Hat Enterprise Linux 7 Logical Volume Manager
Administration guide.
LVM thin provisioning - Using thin provisioning, you can manage a storage pool of free
space, known as a thin pool, which can be allocated to an arbitrary number of devices when
needed by applications. The thin pool can be expanded dynamically when needed for cost-
effective allocation of storage space. For more information regarding LVM, see the Red Hat
Enterprise Linux 7 Logical Volume Manager Administration guide.
NOTE
The installer will automatically reserve 20% of any requested space for an LVM
thin pool logical volume in the volume group containing it. This is a safety
measure to ensure that you can extend either the metadata volume or the data
volume of your thinly provisioned logical volume.
CHAPTER 8. INSTALLING USING ANACONDA
85

software RAID - Creating two or more software RAID partitions allows you to create a RAID
device. One RAID partition is assigned to each disk on the system. To create a RAID device,
see Section 8.14.4.2, “Create Software RAID”. For more information regarding RAID, see the
Red Hat Enterprise Linux 7 Storage Administration Guide.
File Systems
xfs - XFS is a highly scalable, high-performance file system that supports file systems up to 16
EiB (approximately 16 billion GiB), files up to 8 EiB (approximately 8 billion GiB), and directory
structures containing tens of millions of entries. XFS supports metadata journaling, which
facilitates quicker crash recovery. The XFS file system can also be defragmented and resized
while mounted and active. This file system is selected by default and is highly recommended.
For information on how to translate common commands from previously used ext4 file system to
XFS, see Appendix E, Reference Table for ext4 and XFS Commands.
The maximum supported size of an XFS file system in Red Hat Enterprise Linux is currently 500
TiB.
ext4 - The ext4 file system is based on the ext3 file system and features a number of
improvements. These include support for larger file systems and larger files, faster and more
efficient allocation of disk space, no limit on the number of subdirectories within a directory,
faster file system checking, and more robust journaling.
The maximum supported size of an ext4 file system in Red Hat Enterprise Linux is currently 50
TiB.
ext3 - The ext3 file system is based on the ext2 file system and has one main advantage -
journaling. Using a journaling file system reduces time spent recovering a file system after a
crash as there is no need to check the file system for metadata consistency by running the fsck
utility every time a crash occurs.
ext2 - An ext2 file system supports standard Unix file types, including regular files, directories,
or symbolic links. It provides the ability to assign long file names, up to 255 characters.
vfat - The VFAT file system is a Linux file system that is compatible with Microsoft Windows
long file names on the FAT file system.
swap - Swap partitions are used to support virtual memory. In other words, data is written to a
swap partition when there is not enough RAM to store the data your system is processing.
BIOS Boot - A very small partition required for booting a device with a GUID partition table
(GPT) on a BIOS system. See Section 8.14.1, “Boot Loader Installation” for details.
EFI System Partition - A small partition required for booting a device with a GUID partition
table (GPT) on a UEFI system. See Section 8.14.1, “Boot Loader Installation” for details.
Each file system has different size limits for the file system itself as well as individual files contained
within. For a list of maximum supported file and file system sizes, see the Red Hat Enterprise Linux
technology capabilities and limits page, available on the Customer Portal at
https://access.redhat.com/site/articles/rhel-limits.
8.14.4.2. Create Software RAID
Redundant arrays of independent disks (RAIDs) are constructed from multiple storage devices that are
arranged to provide increased performance and, in some configurations, greater fault tolerance. See
below for a description of different kinds of RAIDs.
Installation Guide
86
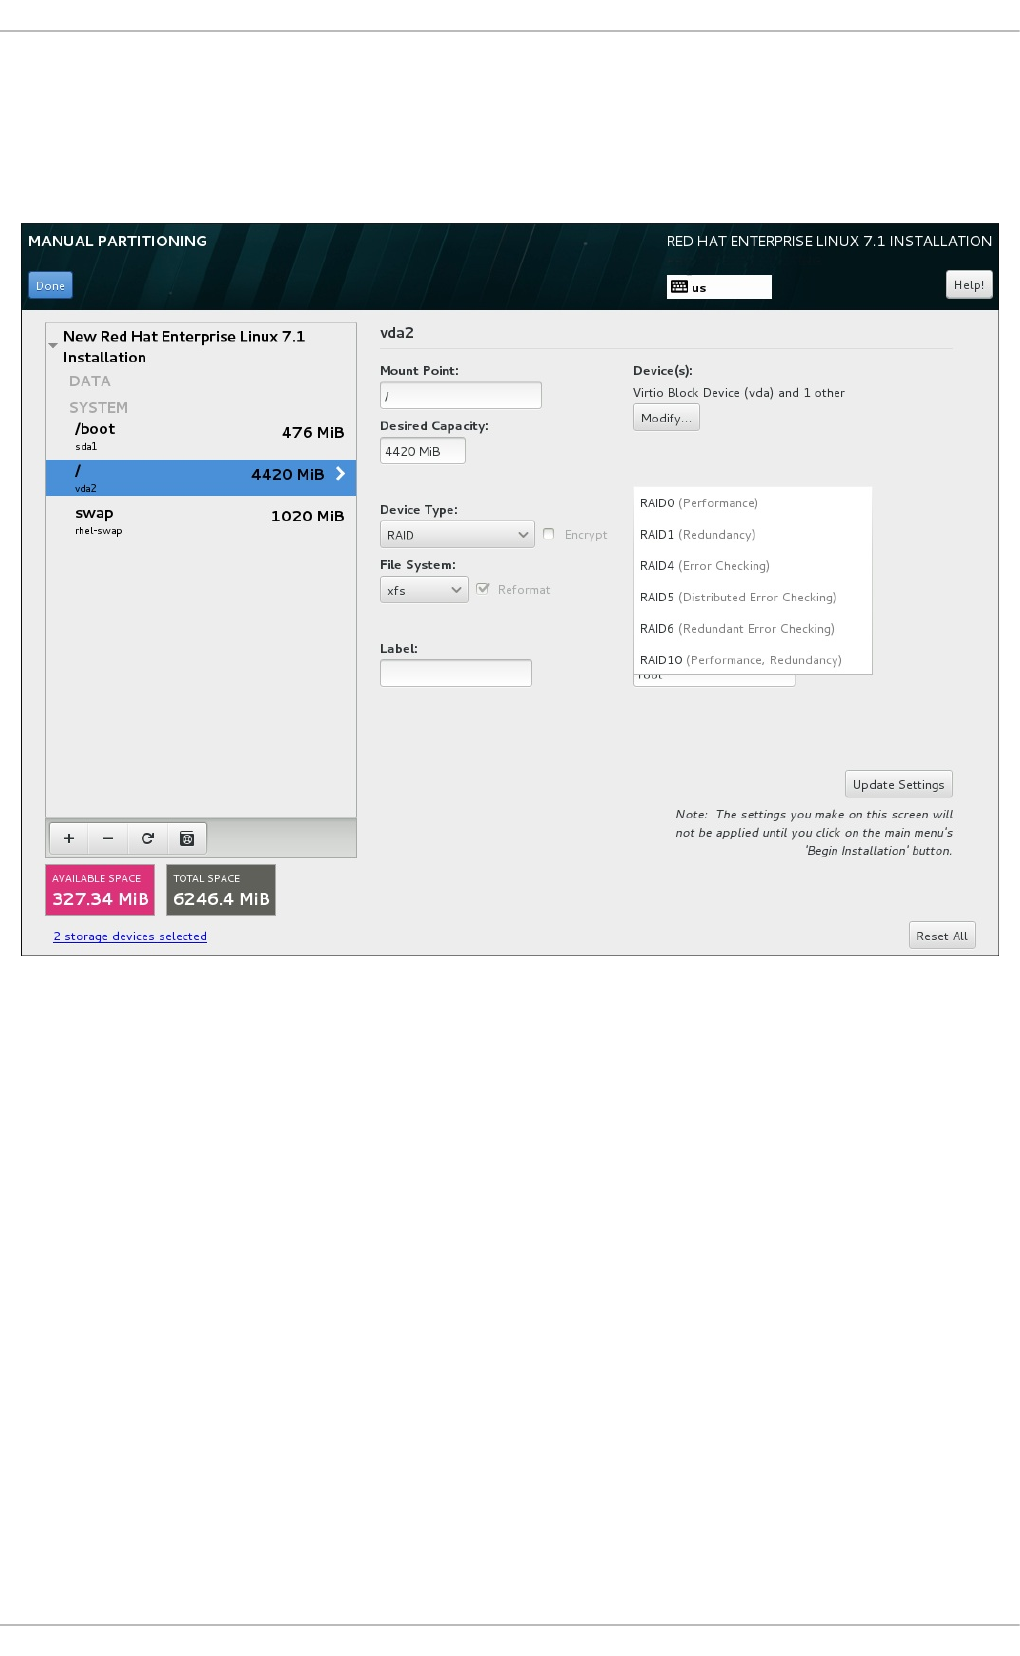
A RAID device is created in one step and disks are added or removed as necessary. One RAID partition
per physical disk is allowed for each device, so the number of disks available to the installation program
determines which levels of RAID device are available to you. For example, if your system has two hard
drives, the installation program will not allow you to create a RAID10 device, which requires 4 separate
partitions.
Figure 8.26. Creating a Software RAID Partition - the Device Type Menu Expanded
RAID configuration options are only visible if you have selected two or more disks for installation. At least
two disks are required to create a RAID device.
To create a RAID device:
1. Create a mount point as described in Section 8.14.4.1, “Adding File Systems and Configuring
Partitions”. By configuring this mount point, you configure the RAID device.
2. Keeping the partition selected in the left pane, select the configuration button below the pane to
open the Configure Mount Point dialog. Select which disks will be included in the RAID
device and click Select.
3. Click the Device Type drop-down menu and select RAID.
4. Click the File System drop-down menu and select your preferred file system type (see
Section 8.14.4.1.1, “File System Types”.
5. Click the RAID Level drop-down menu and select your preferred level of RAID.
The available RAID levels are:
CHAPTER 8. INSTALLING USING ANACONDA
87

RAID0 - Optimized performance (stripe)
Distributes data across multiple disks. Level 0 RAIDs offer increased performance over
standard partitions, and can be used to pool the storage of multiple disks into one large
virtual device. Note that Level 0 RAIDs offer no redundancy, and that the failure of one device
in the array destroys data in the entire array. RAID 0 requires at least two RAID partitions.
RAID1 - Redundancy (mirror)
Mirrors all data on one disk onto one or more other disks. Additional devices in the array
provide increasing levels of redundancy. RAID 1 requires at least two RAID partitions.
RAID4 - Error detection (parity)
Distributes data across multiple disks, and uses one disk in the array to store parity
information that safeguards the array in case any disk within the array fails. Because all parity
information is stored on one disk, access to this disk creates a bottleneck in the performance
of the array. RAID 4 requires at least three RAID partitions.
RAID5 - Distributed error detection
Distributes data and parity information across multiple disks. Level 5 RAIDs therefore offer
the performance advantages of distributing data across multiple disks, but do not share the
performance bottleneck of level 4 RAIDs because the parity information is also distributed
through the array. RAID 5 requires at least three RAID partitions.
RAID6 - Redundant
Level 6 RAIDs are similar to level 5 RAIDs, but instead of storing only one set of parity data,
they store two sets. RAID 6 requires at least four RAID partitions.
RAID10 - Redundancy (mirror) and Optimized performance (stripe)
Level 10 RAIDs are nested RAIDs or hybrid RAIDs. They are constructed by distributing data
over mirrored sets of disks. For example, a level 10 RAID array constructed from four RAID
partitions consists of two mirrored pairs of striped partitions. RAID 10 requires at least four
RAID partitions.
6. Click Update Settings to save your changes, and either continue with another partition or
click Done to return to the Installation Summary screen.
If fewer disks are included than the specified RAID level requires, a message will be displayed at the
bottom of the window, informing you how many disks are actually required for your selected
configuration.
8.14.4.3. Create LVM Logical Volume
Logical Volume Management (LVM) presents a simple logical view of underlying physical storage space,
such as hard drives or LUNs. Partitions on physical storage are represented as physical volumes that
can be grouped together into volume groups. Each volume group can be divided into multiple logical
volumes, each of which is analogous to a standard disk partition. Therefore, LVM logical volumes
function as partitions that can span multiple physical disks.
To learn more about LVM, see Appendix C, Understanding LVM or read the Red Hat Enterprise Linux 7
Logical Volume Manager Administration guide. Note that LVM configuration is only available in the
graphical installation program.
Installation Guide
88
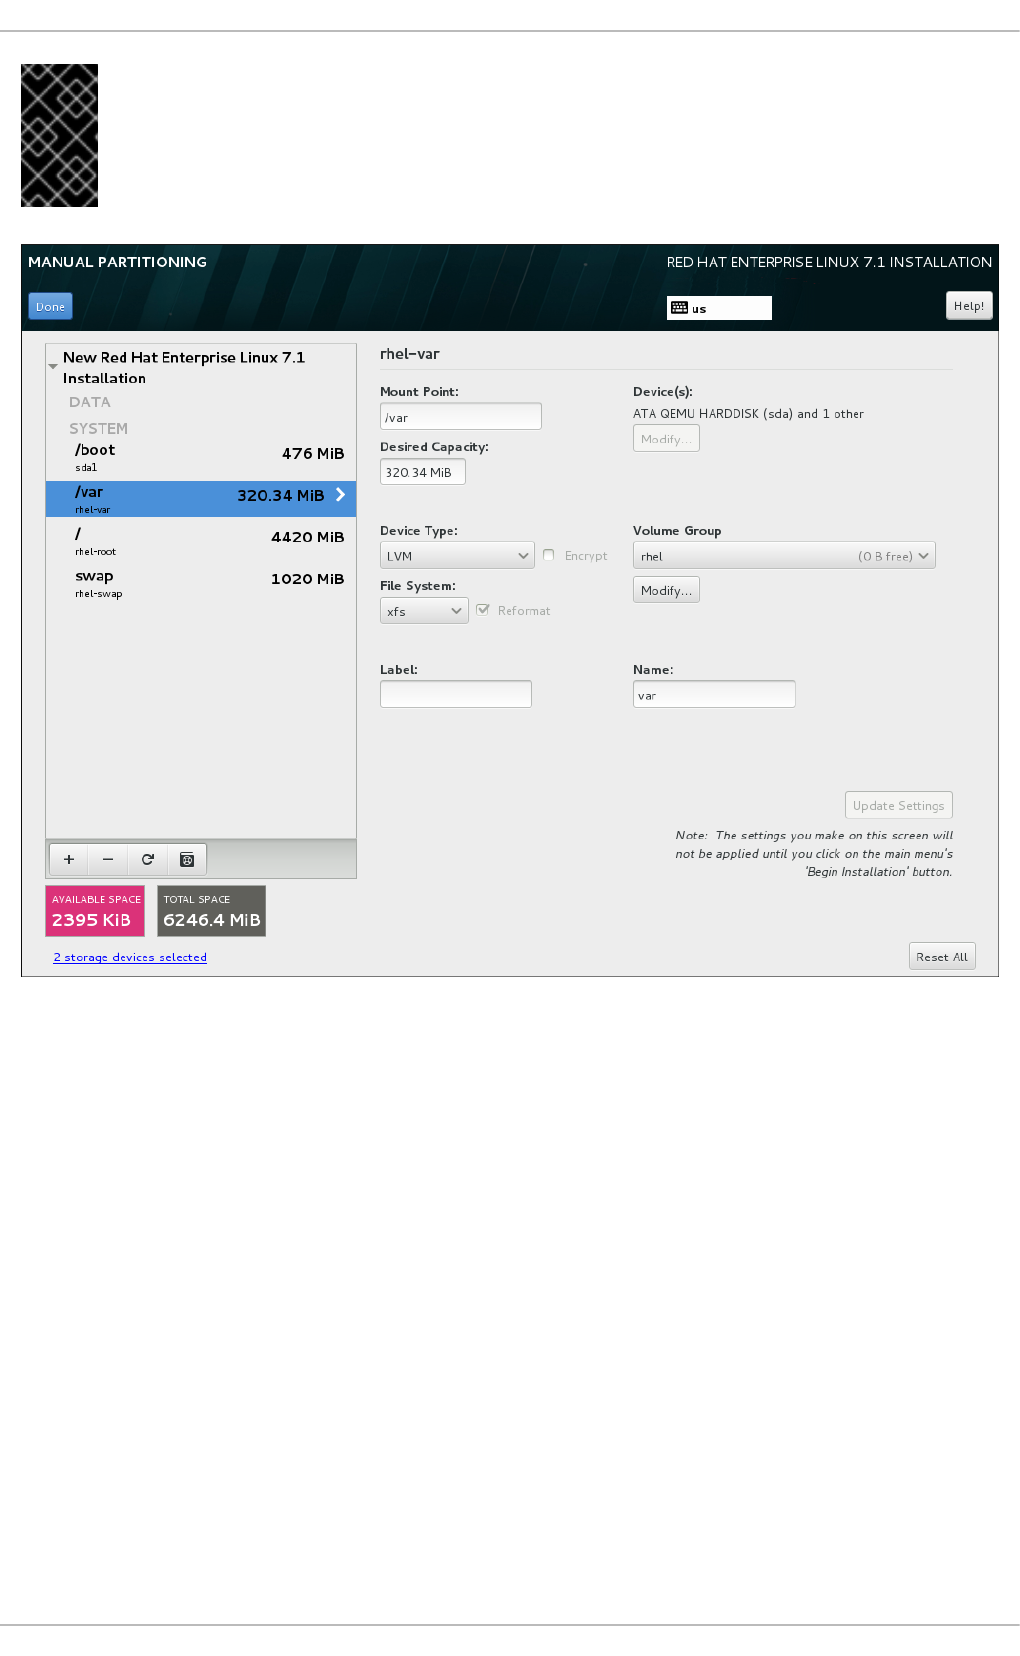
IMPORTANT
During text-mode installation, LVM configuration is not available. If you need to create an
LVM configuration from scratch, press Ctrl+Alt+F2 to use a different virtual console,
and run the lvm command. To return to the text-mode installation, press Ctrl+Alt+F1.
Figure 8.27. Configuring a Logical Volume
To create a logical volume and add it to a new or existing volume group:
1. Create a mount point for the LVM volume as described in Section 8.14.4.1, “Adding File
Systems and Configuring Partitions”.
2. Click the Device Type drop-down menu and select LVM. The Volume Group drop-down
menu appears and displays the newly-created volume group name.
3. Optionally, either click the menu and select Create a new volume group or click Modify to
configure the newly-created volume group, if you need to. Both the Create a new volume
group option and the Modify button lead to the Configure Volume Group dialog, where
you can rename the logical volume group and select which disks will be included.
CHAPTER 8. INSTALLING USING ANACONDA
89

NOTE
The configuration dialog does not allow you to specify the size of the volume
group's physical extents. The size will always be set to the default value of 4 MiB.
If you want to create a volume group with different physical extents, create it
manually by switching to an interactive shell and using the vgcreate command,
or use a Kickstart file with the volgroup --pesize=size command.
Figure 8.28. Customizing an LVM Volume Group
The available RAID levels are the same as with actual RAID devices. See Section 8.14.4.2,
“Create Software RAID” for more information. You can also mark the volume group for
encryption and set the size policy for it. The available policy options are:
Automatic - the size of the volume group is set automatically so that it is just large enough
to contain the configured logical volumes. This is optimal if you do not need free space within
the volume group.
As large as possible - the volume group is created with maximum size, regardless of
the size of the configured logical volumes it contains. This is optimal if you plan to keep most
of your data on LVM and later need to increase the size of some existing logical volumes, or
if you need to create additional logical volumes within this group.
Fixed - with this option, you can set an exact size of the volume group. Any configured
logical volumes must then fit within this fixed size. This is useful if you know exactly how
large you would like the volume group to be.
Click Save when the group is configured.
Installation Guide
90
4. Click Update Settings to save your changes, and either continue with another partition or
click Done to return to the Installation Summary screen.
WARNING
Placing the /boot partition on an LVM volume is not supported.
8.14.4.4. Recommended Partitioning Scheme
Red Hat recommends that you create separate file systems at the following mount points:
/boot
/ (root)
/home
swap
/boot partition - recommended size at least 1 GiB
The partition mounted on /boot contains the operating system kernel, which allows your system to
boot Red Hat Enterprise Linux, along with files used during the bootstrap process. Due to the
limitations of most firmwares, creating a small partition to hold these is recommended. In most
scenarios, a 1 GiB boot partition is adequate. Unlike other mount points, using an LVM volume for
/boot is not possible - /boot must be located on a separate disk partition.
WARNING
Normally, the /boot partition is created automatically by the installation
program. However, if the / (root) partition is larger than 2 TiB and (U)EFI is used
for booting, you need to create a separate /boot partition that is smaller than
2 TiB to boot the machine successfully.
NOTE
If you have a RAID card, be aware that some BIOS types do not support booting from
the RAID card. In such a case, the /boot partition must be created on a partition
outside of the RAID array, such as on a separate hard drive.
root - recommended size of 10 GiB
This is where "/", or the root directory, is located. The root directory is the top-level of the directory
structure. By default, all files are written to this file system unless a different file system is mounted in
the path being written to (for example, /boot or /home).
CHAPTER 8. INSTALLING USING ANACONDA
91

While a 5 GiB root file system allows you to install a minimal installation, it is recommended to
allocate at least 10 GiB so that you can install as many package groups as you want.
IMPORTANT
Do not confuse the / directory with the /root directory. The /root directory is the
home directory of the root user. The /root directory is sometimes referred to as slash
root to distinguish it from the root directory.
/home - recommended size at least 1 GiB
To store user data separately from system data, create a dedicated file system for the /home
directory. This file system should be sized based on the amount of data that will be stored locally,
number of users, and so on. This will enable you to upgrade or reinstall Red Hat Enterprise Linux
without erasing user data files. If you select automatic partitioning, it is recommended to have at least
55GiB of disk space available for the installation, to ensure that the /home file system is created.
swap partition - recommended size at least 1 GB
Swap file systems support virtual memory; data is written to a swap file system when there is not
enough RAM to store the data your system is processing. Swap size is a function of system memory
workload, not total system memory and therefore is not equal to the total system memory size.
Therefore, it is important to analyze what applications a system will be running and the load those
applications will serve in order to determine the system memory workload. Application providers and
developers should be able to provide some guidance.
When the system runs out of swap space, the kernel terminates processes as the system RAM
memory is exhausted. Configuring too much swap space results in storage devices being allocated
but idle and is a poor use of resources. Too much swap space can also hide memory leaks. The
maximum size for a swap partition and other additional information can be found in the mkswap(8)
manual page.
The following table provides the recommended size of a swap partition depending on the amount of
RAM in your system and whether you want sufficient memory for your system to hibernate. If you let
the installation program partition your system automatically, the swap partition size will be established
using these guidelines. Automatic partitioning setup assumes hibernation is not in use. The maximum
size of the swap partition is limited to 10% of the total size of the hard drive, and the installer cannot
create swap partitions more than 128GB in size. If you want to set up enough swap space to allow for
hibernation, or if you want to set the swap partition size to more than 10% of the system's storage
space, or more than 128GB, you must edit the partitioning layout manually.
Table 8.3. Recommended System Swap Space
Amount of RAM in the system Recommended swap space Recommended swap space if
allowing for hibernation
less than 2 GB 2 times the amount of RAM 3 times the amount of RAM
2 GB - 8 GB Equal to the amount of RAM 2 times the amount of RAM
8 GB - 64 GB 4GB to 0.5 times the amount of
RAM
1.5 times the amount of RAM
Installation Guide
92
more than 64 GB workload dependent (at least
4GB)
hibernation not recommended
Amount of RAM in the system Recommended swap space Recommended swap space if
allowing for hibernation
At the border between each range listed above (for example, a system with 2 GB, 8 GB, or 64 GB of
system RAM), discretion can be exercised with regard to chosen swap space and hibernation
support. If your system resources allow for it, increasing the swap space can lead to better
performance.
Distributing swap space over multiple storage devices - particularly on systems with fast drives,
controllers and interfaces - also improves swap space performance.
Many systems have more partitions and volumes than the minimum listed above. Choose partitions
based on your particular system needs. See Section 8.14.4.4.1, “Advice on Partitions” for more
information.
NOTE
Only assign storage capacity to those partitions you require immediately. You can
allocate free space at any time, to meet needs as they occur. To learn about a more
flexible method for storage management, see Appendix C, Understanding LVM.
If you are not sure how best to configure the partitions for your computer, accept the automatic default
partition layout provided by the installation program.
8.14.4.4.1. Advice on Partitions
Optimal partition setup depends on the usage for the Linux system in question. Use these tips to decide
how to configure your disk space.
Consider encrypting any partitions that might contain sensitive data. Encryption prevents
unauthorized people from accessing the data on the partitions, even if they have access to the
physical storage device. In most cases, you should at least encrypt the /home partition.
Each kernel installed on your system requires approximately 20 MiB on the /boot partition. The
default partition size of 1 GiB for /boot should suffice for most common uses; increase the size
of this partition if you plan to keep many kernels installed at the same time.
The /var directory holds content for a number of applications, including the Apache web server.
It also is used to store downloaded update packages on a temporary basis. Ensure that the
partition containing the /var directory has enough space to download pending updates and hold
your other content.
The PackageKit update software downloads updated packages to /var/cache/yum/ by
default. If you create a separate partition or volume for /var, ensure that it is at least 3GB in
size to accommodate downloaded package updates.
The /usr directory holds the majority of software content on a Red Hat Enterprise Linux system.
For an installation of the default set of software, allocate at least 5 GB of space. If the system will
be used as a software development workstation, allocate at least 10GB.
CHAPTER 8. INSTALLING USING ANACONDA
93

If /usr or /var is partitioned separately from the rest of the root volume, the boot process
becomes much more complex because these directories contain components critical to it. In
some situations, such as when these directories are placed on an iSCSI drive or an FCoE
location, the system can either be unable to boot, or it can hang with a Device is busy error
when powering off or rebooting.
This limitation only applies to /usr or /var, not to directories below them. For example, a
separate partition for /var/www will work without issues.
Consider leaving a portion of the space in an LVM volume group unallocated. This unallocated
space gives you flexibility if your space requirements change but you do not want to remove data
from other partitions to reallocate storage. You can also select the Thin provisioning
device type for the partition to have the unused space handled automatically by the volume.
If you separate subdirectories into partitions, you can retain content in those subdirectories if
you decide to install a new version of Red Hat Enterprise Linux over your current system. For
instance, if you intend to run a MySQL database in /var/lib/mysql/, make a separate
partition for that directory in case you need to reinstall later.
On a BIOS system with its boot loader using GPT (GUID partition table), you need to create the
biosboot partition of 1 MiB in size. See Section 8.14.1, “Boot Loader Installation” for more
details.
UEFI systems need to contain a small partition with a mount point of /boot/efi/ containing an
EFI System Partition file system. Its recommended size is 200 MiB, which is also the default
value for automatic partitioning.
8.15. STORAGE DEVICES
You can install Red Hat Enterprise Linux on a large variety of storage devices. You can see basic, locally
accessible, storage devices in the Installation Destination page, as described in Section 8.14,
“Installation Destination”. To add a specialized storage device, click the Add a disk button in the
Specialized & Network Disks section of the screen.
Installation Guide
94

Figure 8.29. Storage Space Overview
NOTE
Monitoring of LVM and software RAID devices by the dmeventd daemon is not
performed during installation.
8.15.1. The Storage Devices Selection Screen
The storage device selection screen displays all storage devices to which the Anaconda installation
program has access.
The devices are grouped under the following tabs:
Multipath Devices
Storage devices accessible through more than one path, such as through multiple SCSI controllers or
Fiber Channel ports on the same system.
The installation program only detects multipath storage devices with serial numbers that are 16 or 32
characters long.
Other SAN Devices
Devices available on a Storage Area Network (SAN).
NVDIMM Devices
Non-Volatile Dual In-line Memory Module (NVDIMM) storage devices on the machine.
CHAPTER 8. INSTALLING USING ANACONDA
95
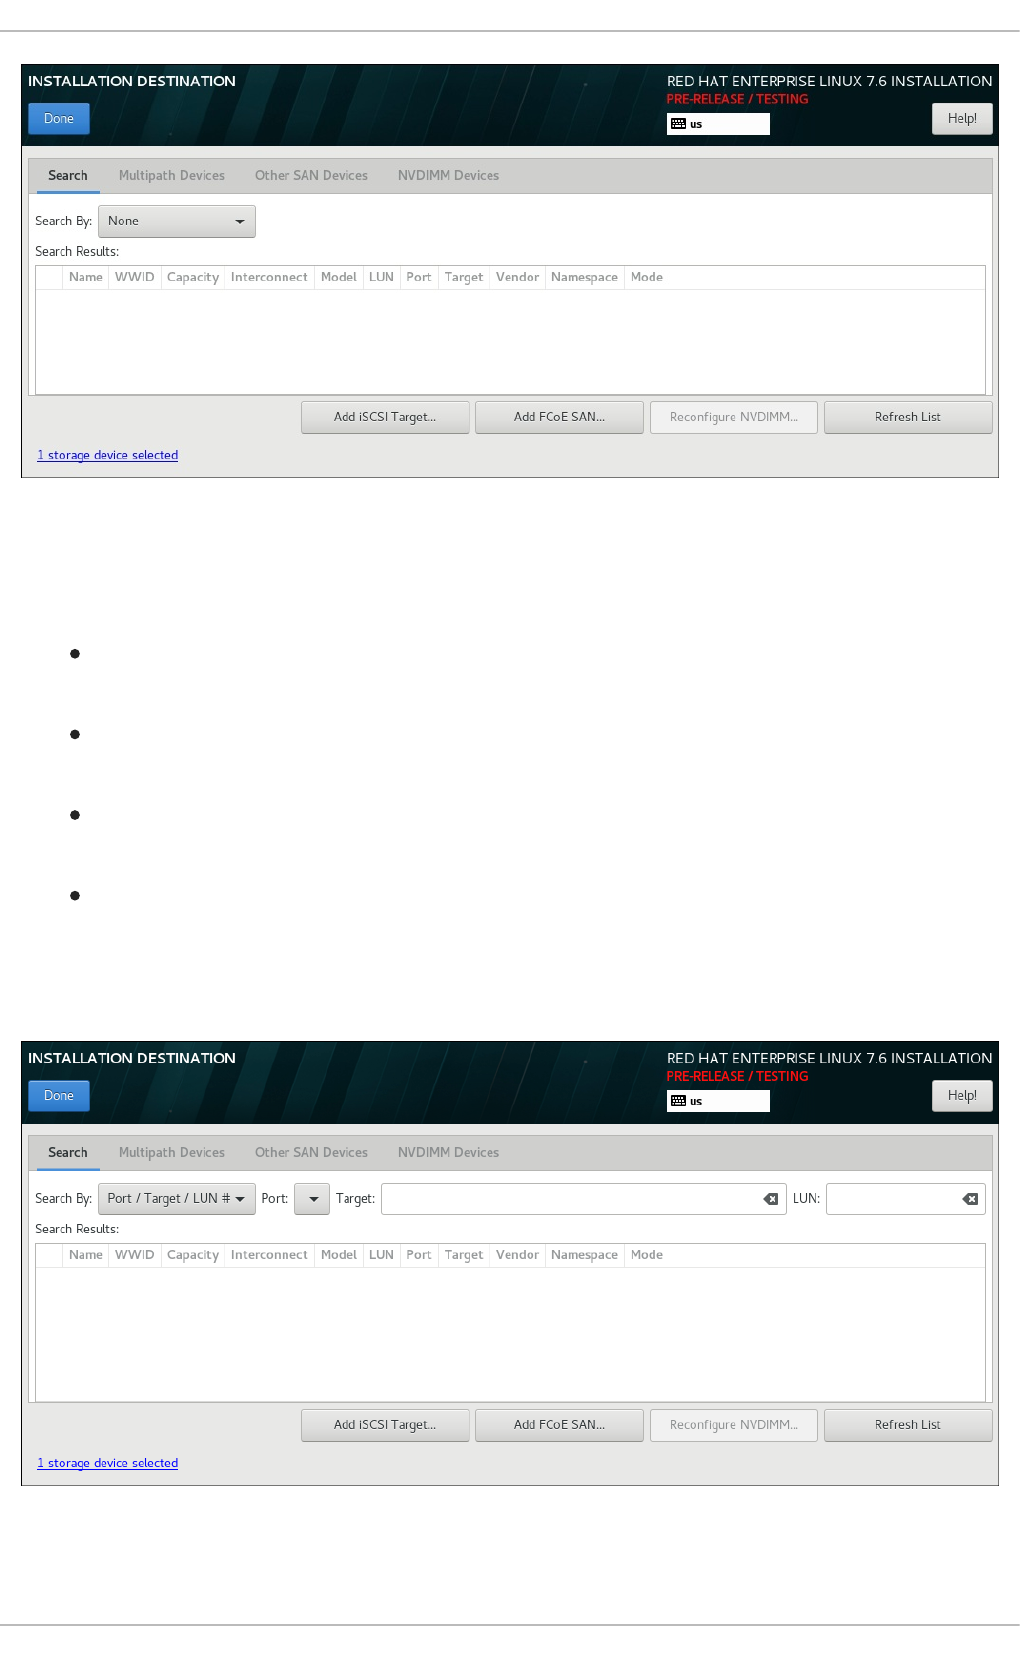
Figure 8.30. Tabbed Overview of Specialized Storage Devices
A set of buttons is available in the bottom right corner of the screen. Use these buttons to add additional
storage devices. The available buttons are:
Add iSCSI Target - use to attach iSCSI devices; continue with Section 8.15.1.1.1,
“Configuring iSCSI Parameters”
Add FCoE SAN - use to configure a Fibre Channel Over Internet storage device; continue with
Section 8.15.1.1.2, “Configuring FCoE Parameters”
Reconfigure NVDIMM - use to reconfigure a NVDIMM device into sector mode; continue with
Section 8.15.1.1.3, “Configuring NVDIMM Devices”
Refresh List - use to reload the list when a device is added after the installer starts.
The overview page also contains the Search tab that allows you to filter storage devices either by their
World Wide Identifier (WWID) or by the port, target, or logical unit number (LUN) at which they are
accessed.
Figure 8.31. The Storage Devices Search Tab
Installation Guide
96

The Search tab contains the Search By drop-down menu to select searching by port, target, LUN, or
WWID. Searching by WWID or LUN requires additional values in the corresponding input text fields.
Click the Find button to start the search.
Each device is presented on a separate row, with a check box to its left. Click the check box to make the
device available during the installation process. Later in the installation process, you can choose to
install Red Hat Enterprise Linux onto any of the devices selected here, and can choose to automatically
mount any of the other devices selected here as part of the installed system.
Note that the devices that you select here are not automatically erased by the installation process.
Selecting a device on this screen does not, in itself, place data stored on the device at risk. Also note that
any devices that you do not select here to form part of the installed system can be added to the system
after installation by modifying the /etc/fstab file.
IMPORTANT
Any storage devices that you do not select on this screen are hidden from Anaconda
entirely. To chain load the Red Hat Enterprise Linux boot loader from a different boot
loader, select all the devices presented in this screen.
When you have selected the storage devices to make available during installation, click Done to return to
the Installation Destination screen.
8.15.1.1. Advanced Storage Options
To use an advanced storage device, you can configure a SCSI over TCP/IP (iSCSI) target, Fibre
Channel over Ethernet (FCoE) Storage Area Network (SAN), or Non-Volatile Dual In-line Memory
Module (NVDIMM) device by clicking the appropriate button in the lower right corner of the Installation
Destination screen. For an introduction to iSCSI, see Appendix B, iSCSI Disks.
Figure 8.32. Advanced Storage Options
8.15.1.1.1. Configuring iSCSI Parameters
When you click the Add iSCSI target... button, the Add iSCSI Storage Target dialog
appears.
CHAPTER 8. INSTALLING USING ANACONDA
97

Figure 8.33. The iSCSI Discovery Details Dialog
To use iSCSI storage devices for the installation, Anaconda must be able to discover them as iSCSI
targets and be able to create an iSCSI session to access them. Each of these steps might require a user
name and password for CHAP (Challenge Handshake Authentication Protocol) authentication.
Additionally, you can configure an iSCSI target to authenticate the iSCSI initiator on the system to which
the target is attached (reverse CHAP), both for discovery and for the session. Used together, CHAP and
reverse CHAP are called mutual CHAP or two-way CHAP . Mutual CHAP provides the greatest level of
security for iSCSI connections, particularly if the user name and password are different for CHAP
authentication and reverse CHAP authentication.
NOTE
Repeat the iSCSI discovery and iSCSI login steps as many times as necessary to add all
required iSCSI storage. However, you cannot change the name of the iSCSI initiator after
you attempt discovery for the first time. To change the iSCSI initiator name, you must
restart the installation.
Procedure 8.1. iSCSI Discovery and Starting an iSCSI Session
Use the Add iSCSI Storage Target dialog to provide Anaconda with the information necessary to
discover the iSCSI target.
Installation Guide
98

1. Enter the IP address of the iSCSI target in the Target IP Address field.
2. Provide a name in the iSCSI Initiator Name field for the iSCSI initiator in iSCSI qualified
name (IQN) format. A valid IQN entry contains:
the string iqn. (note the period)
a date code that specifies the year and month in which your organization's Internet domain
or subdomain name was registered, represented as four digits for the year, a dash, and two
digits for the month, followed by a period. For example, represent September 2010 as
2010-09.
your organization's Internet domain or subdomain name, presented in reverse order with the
top-level domain first. For example, represent the subdomain storage.example.com as
com.example.storage
a colon followed by a string that uniquely identifies this particular iSCSI initiator within your
domain or subdomain. For example, :diskarrays-sn-a8675309
A complete IQN can therefore look as follows: iqn.2010-
09.storage.example.com:diskarrays-sn-a8675309 . Anaconda prepopulates the
iSCSI Initiator Name field with a name in this format to help you with the structure.
For more information on IQNs , see 3.2.6. iSCSI Names in RFC 3720 - Internet Small Computer
Systems Interface (iSCSI) available from http://tools.ietf.org/html/rfc3720#section-3.2.6 and 1.
iSCSI Names and Addresses in RFC 3721 - Internet Small Computer Systems Interface (iSCSI)
Naming and Discovery available from http://tools.ietf.org/html/rfc3721#section-1.
3. Use the Discovery Authentication Type drop-down menu to specify the type of
authentication to use for iSCSI discovery. The following options are available:
no credentials
CHAP pair
CHAP pair and a reverse pair
4. If you selected CHAP pair as the authentication type, provide the user name and password
for the iSCSI target in the CHAP Username and CHAP Password fields.
If you selected CHAP pair and a reverse pair as the authentication type, provide the user
name and password for the iSCSI target in the CHAP Username and CHAP Password field
and the user name and password for the iSCSI initiator in the Reverse CHAP Username
and Reverse CHAP Password fields.
5. Optionally check the box labeled Bind targets to network interfaces.
6. Click the Start Discovery button. Anaconda attempts to discover an iSCSI target based on
the information that you provided. If discovery succeeds, the dialog displays a list of all iSCSI
nodes discovered on the target.
7. Each node is presented with a check box beside it. Click the check boxes to select the nodes to
use for installation.
CHAPTER 8. INSTALLING USING ANACONDA
99

Figure 8.34. The Dialog of Discovered iSCSI Nodes
8. The Node login authentication type menu provides the same options as the
Discovery Authentication Type menu described in step 3. However, if you needed
credentials for discovery authentication, it is typical to use the same credentials to log into a
discovered node. To do that, use the additional Use the credentials from discovery option
from the menu. When the proper credentials have been provided, the Log In button becomes
available.
9. Click Log In to initiate an iSCSI session.
8.15.1.1.2. Configuring FCoE Parameters
When you click the Add FCoE SAN... button, a dialog appears for you to configure network interfaces
for discovering FCoE storage devices.
First, select a network interface that is connected to a FCoE switch in the NIC drop-down menu and click
the Add FCoE disk(s) button to scan the network for SAN devices.
Installation Guide
100

Figure 8.35. Configure FCoE Parameters
There are check boxes with additional options to consider:
Use DCB
Data Center Bridging (DCB) is a set of enhancements to the Ethernet protocols designed to increase
the efficiency of Ethernet connections in storage networks and clusters. Enable or disable the
installation program's awareness of DCB with the check box in this dialog. This option should only be
enabled for network interfaces that require a host-based DCBX client. Configurations on interfaces
that implement a hardware DCBX client should leave this check box empty.
Use auto vlan
Auto VLAN indicates whether VLAN discovery should be performed. If this box is checked, then the
FIP (FCoE Initiation Protocol) VLAN discovery protocol will run on the Ethernet interface once the link
configuration has been validated. If they are not already configured, network interfaces for any
discovered FCoE VLANs will be automatically created and FCoE instances will be created on the
VLAN interfaces. This option is enabled by default.
Discovered FCoE devices will be displayed under the Other SAN Devices tab in the Installation
Destination screen.
8.15.1.1.3. Configuring NVDIMM Devices
When you click the Reconfigure NVDIMM button, a dialog appears for you to reconfigure the selected
NVDIMM devices into sector mode. The reconfiguration lets you use this NVDIMM device as an
installation destination.
CHAPTER 8. INSTALLING USING ANACONDA
101
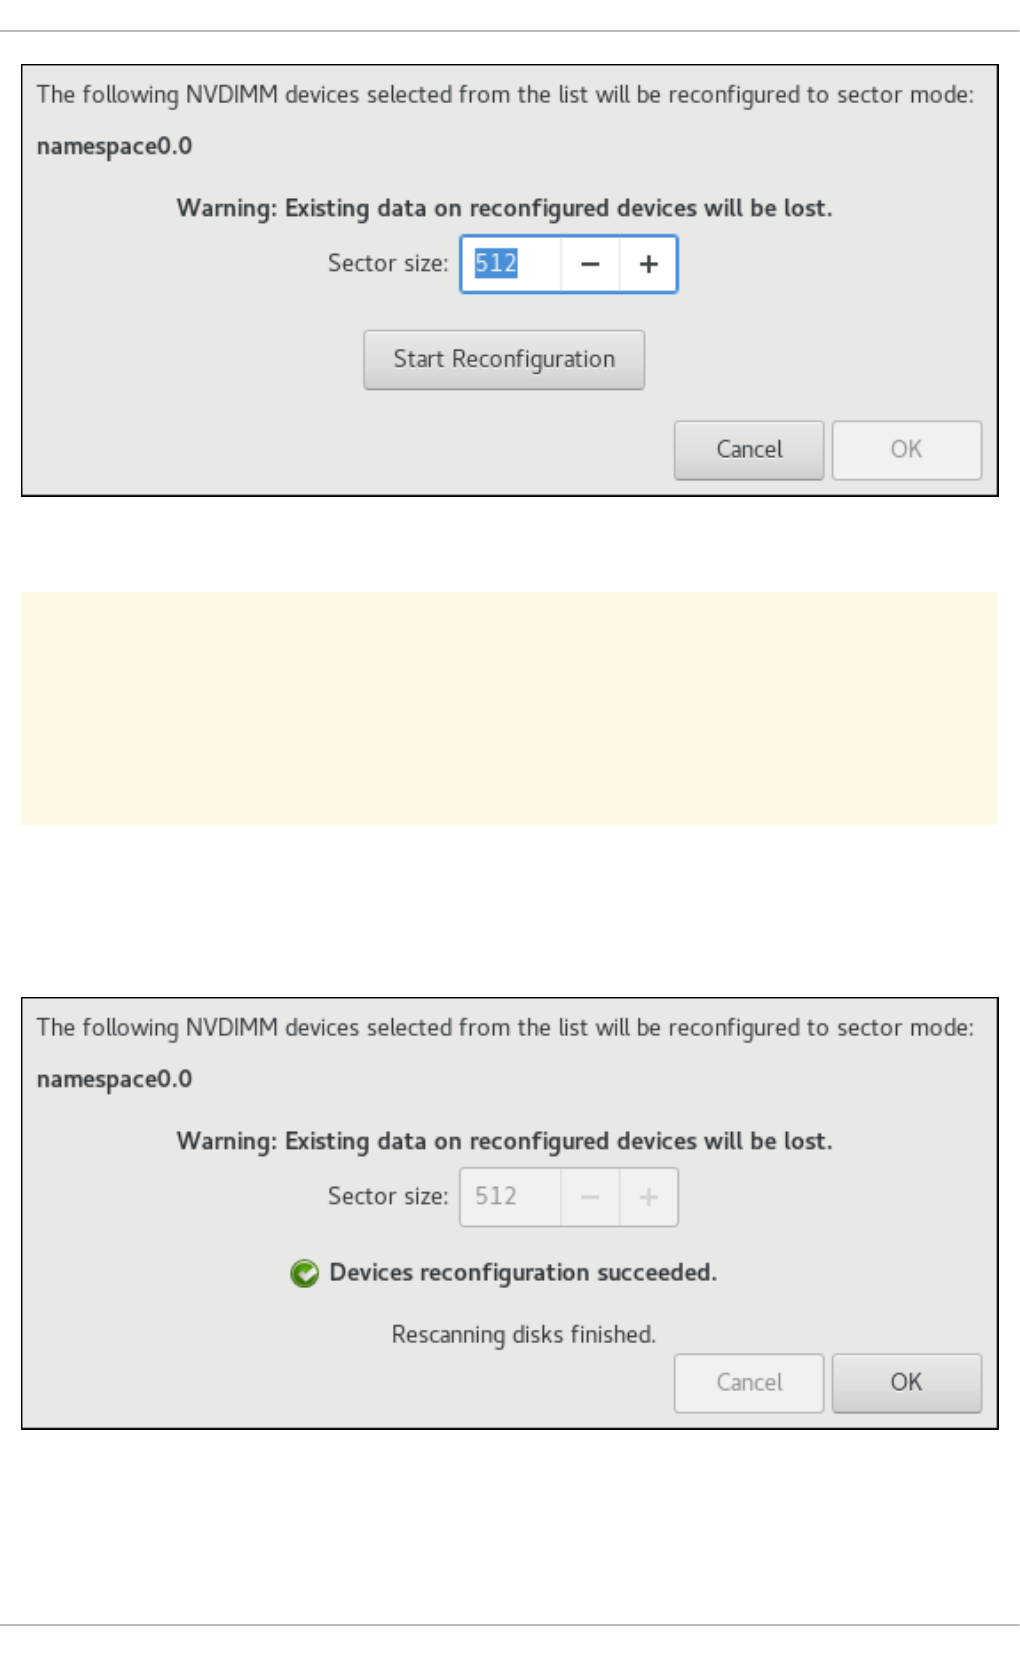
Figure 8.36. Reconfigure NVDIMM
WARNING
Reconfiguration of a NVDIMM device process destroys any data stored on the
device.
Select the sector size and press the Start reconfiguration button. The supported sector sizes are
512 and 4096 bytes.
Once the device is configured, press OK to return to the Installation Destination screen.
Figure 8.37. Successfully reconfigured NVDIMM
NVDIMM devices in sector mode will be displayed under the NVDIMM Devices tab in the Installation
Destination screen and can now be selected for installation.
Installation Guide
102
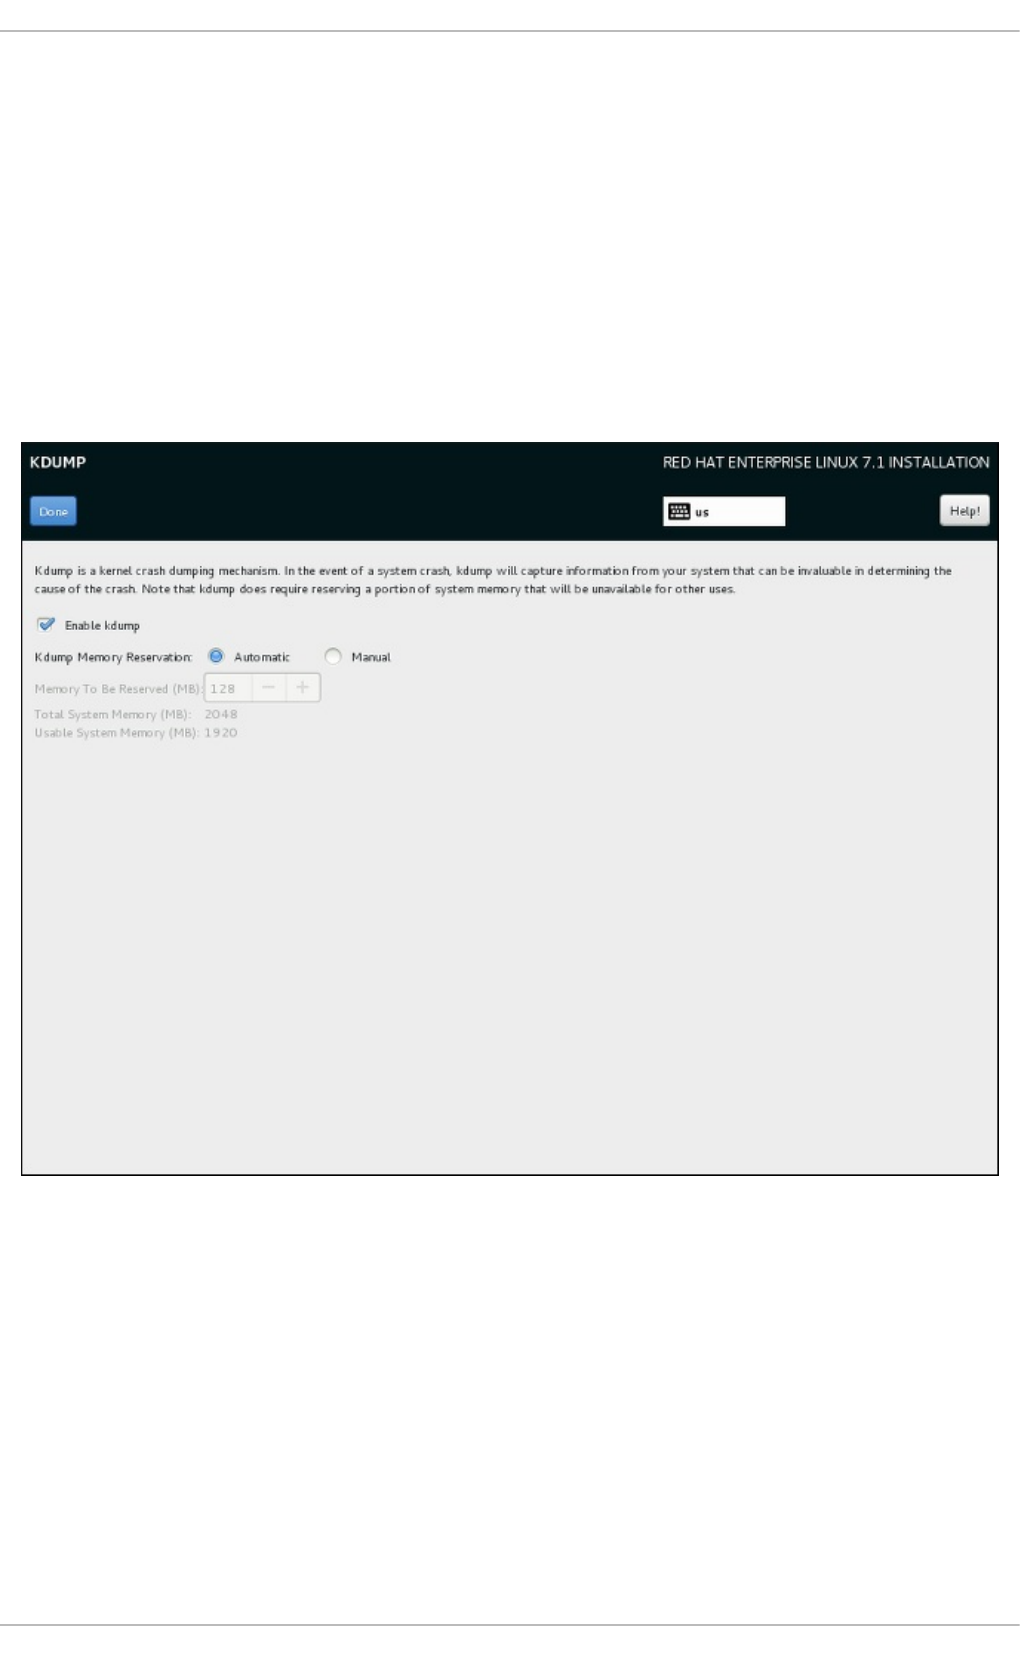
8.16. KDUMP
Use this screen to select whether or not to use Kdump on this system. Kdump is a kernel crash
dumping mechanism which, in the event of a system crash, captures information that can be invaluable
in determining the cause of the crash.
Note that if you enable Kdump, you must reserve a certain amount of system memory for it. As a result,
less memory is available for your processes.
If you do not want to use Kdump on this system, uncheck Enable kdump. Otherwise, set the amount
of memory to reserve for Kdump. You can let the installer reserve a reasonable amount automatically,
or you can set any amount manually. When your are satisfied with the settings, click Done to save the
configuration and return to the previous screen.
Figure 8.38. Kdump Enablement and Configuration
8.17. BEGIN INSTALLATION
When all required sections of the Installation Summary screen have been completed, the
admonition at the bottom of the menu screen disappears and the Begin Installation button
becomes available.
CHAPTER 8. INSTALLING USING ANACONDA
103
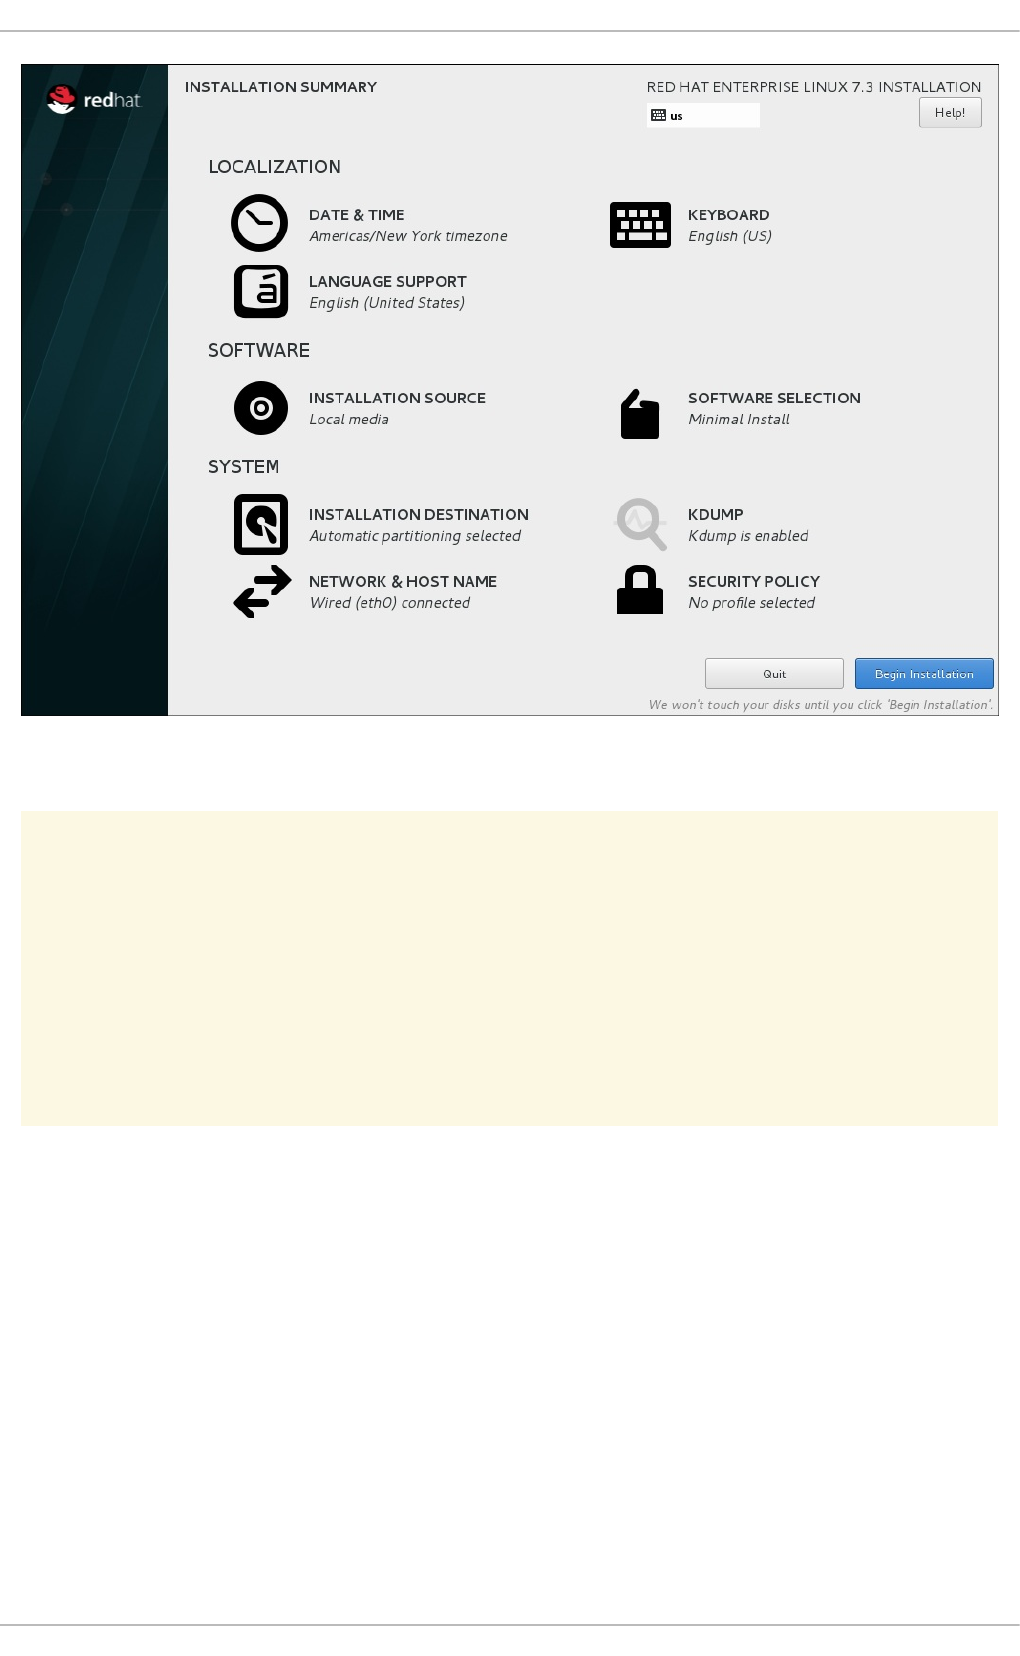
Figure 8.39. Ready to Install
WARNING
Up to this point in the installation process, no lasting changes have been made on
your computer. When you click Begin Installation, the installation program will
allocate space on your hard drive and start to transfer Red Hat Enterprise Linux into
this space. Depending on the partitioning option that you chose, this process might
include erasing data that already exists on your computer.
To revise any of the choices that you made up to this point, return to the relevant section of the
Installation Summary screen. To cancel installation completely, click Quit or switch off your
computer. To switch off most computers at this stage, press the power button and hold it down for a few
seconds.
If you have finished customizing your installation and are certain that you want to proceed, click Begin
Installation.
After you click Begin Installation, allow the installation process to complete. If the process is
interrupted, for example, by you switching off or resetting the computer, or by a power outage, you will
probably not be able to use your computer until you restart and complete the Red Hat Enterprise Linux
installation process, or install a different operating system.
8.18. THE CONFIGURATION MENU AND PROGRESS SCREEN
Installation Guide
104

Once you click Begin Installation at the Installation Summary screen, the progress screen
appears. Red Hat Enterprise Linux reports the installation progress on the screen as it writes the
selected packages to your system.
Figure 8.40. Installing Packages
For your reference, a complete log of your installation can be found in the
/var/log/anaconda/anaconda.packaging.log file, once you reboot your system.
If you chose to encrypt one or more partitions during partitioning setup, a dialog window with a progress
bar will be displayed during the early stage of the installation process. This window informs that the
installer is attempting to gather enough entropy (random data) to ensure that the encryption is secure.
This window will disappear after 256 bits of entropy are gathered, or after 10 minutes. You can speed up
the gathering process by moving your mouse or randomly typing on the keyboard. After the window
disappears, the installation process will continue.
Figure 8.41. Gathering Entropy for Encryption
While the packages are being installed, more configuration is required. Above the installation progress
bar are the Root Password and User Creation menu items.
The Root Password screen is used to configure the system's root account. This account can be used
to perform critical system management and administration tasks. The same tasks can also be performed
with a user account with the wheel group membership; if such an user account is created during
installation, setting up a root password is not mandatory.
Creating a user account is optional and can be done after installation, but it is recommended to do it on
this screen. A user account is used for normal work and to access the system. Best practice suggests
that you always access the system through a user account, not the root account.
CHAPTER 8. INSTALLING USING ANACONDA
105
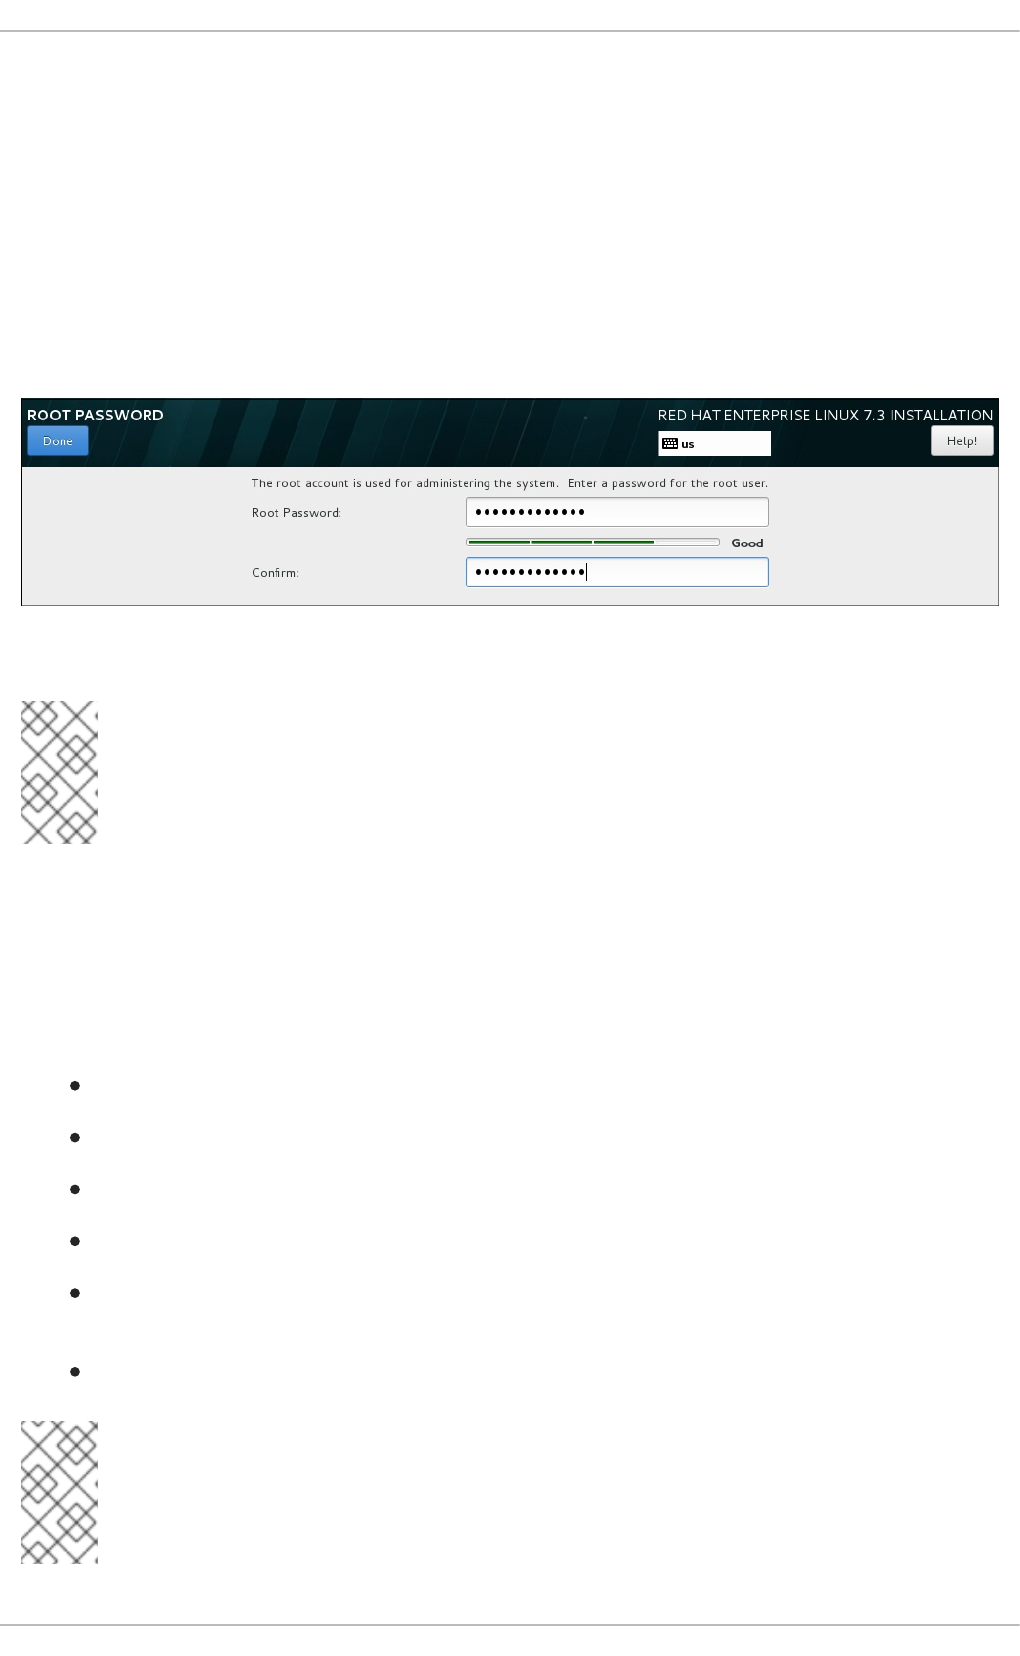
It is possible to disable access to the Root Password or Create User screens. To do so, use a
Kickstart file which includes the rootpw --lock or user --lock commands. See Section 26.3.1,
“Kickstart Commands and Options” for more information these commands.
8.18.1. Set the Root Password
Setting up a root account and password is an important step during your installation. The root account
(also known as the superuser) is used to install packages, upgrade RPM packages, and perform most
system maintenance. The root account gives you complete control over your system. For this reason,
the root account is best used only to perform system maintenance or administration. See the Red Hat
Enterprise Linux 7 System Administrator's Guide for more information about becoming root.
Figure 8.42. Root Password Screen
NOTE
You must always set up at least one way to gain root privileges to the installed system:
either using a root account, or by creating a user account with administrative privileges
(member of the wheel group), or both.
Click the Root Password menu item and enter your new password into the Root Password field.
Red Hat Enterprise Linux displays the characters as asterisks for security. Type the same password into
the Confirm field to ensure it is set correctly. After you set the root password, click Done to return to the
User Settings screen.
The following are the requirements and recommendations for creating a strong root password:
must be at least eight characters long
may contain numbers, letters (upper and lower case) and symbols
is case-sensitive and should contain a mix of cases
something you can remember but that is not easily guessed
should not be a word, abbreviation, or number associated with you, your organization, or found
in a dictionary (including foreign languages)
should not be written down; if you must write it down keep it secure
NOTE
To change your root password after you have completed the installation, run the passwd
command as root. If you forget the root password, see Section 32.1.3, “Resetting the
Root Password” for instructions on how to use the rescue mode to set a new one.
Installation Guide
106

8.18.2. Create a User Account
To create a regular (non-root) user account during the installation, click User Settings on the
progress screen. The Create User screen appears, allowing you to set up the regular user account
and configure its parameters. Though recommended to do during installation, this step is optional and
can be performed after the installation is complete.
NOTE
You must always set up at least one way to gain root privileges to the installed system:
either using a root account, or by creating a user account with administrative privileges
(member of the wheel group), or both.
To leave the user creation screen after you have entered it, without creating a user, leave all the fields
empty and click Done.
Figure 8.43. User Account Configuration Screen
Enter the full name and the user name in their respective fields. Note that the system user name must be
shorter than 32 characters and cannot contain spaces. It is highly recommended to set up a password for
the new account.
When setting up a strong password even for a non-root user, follow the guidelines described in
Section 8.18.1, “Set the Root Password”.
Click the Advanced button to open a new dialog with additional settings.
CHAPTER 8. INSTALLING USING ANACONDA
107
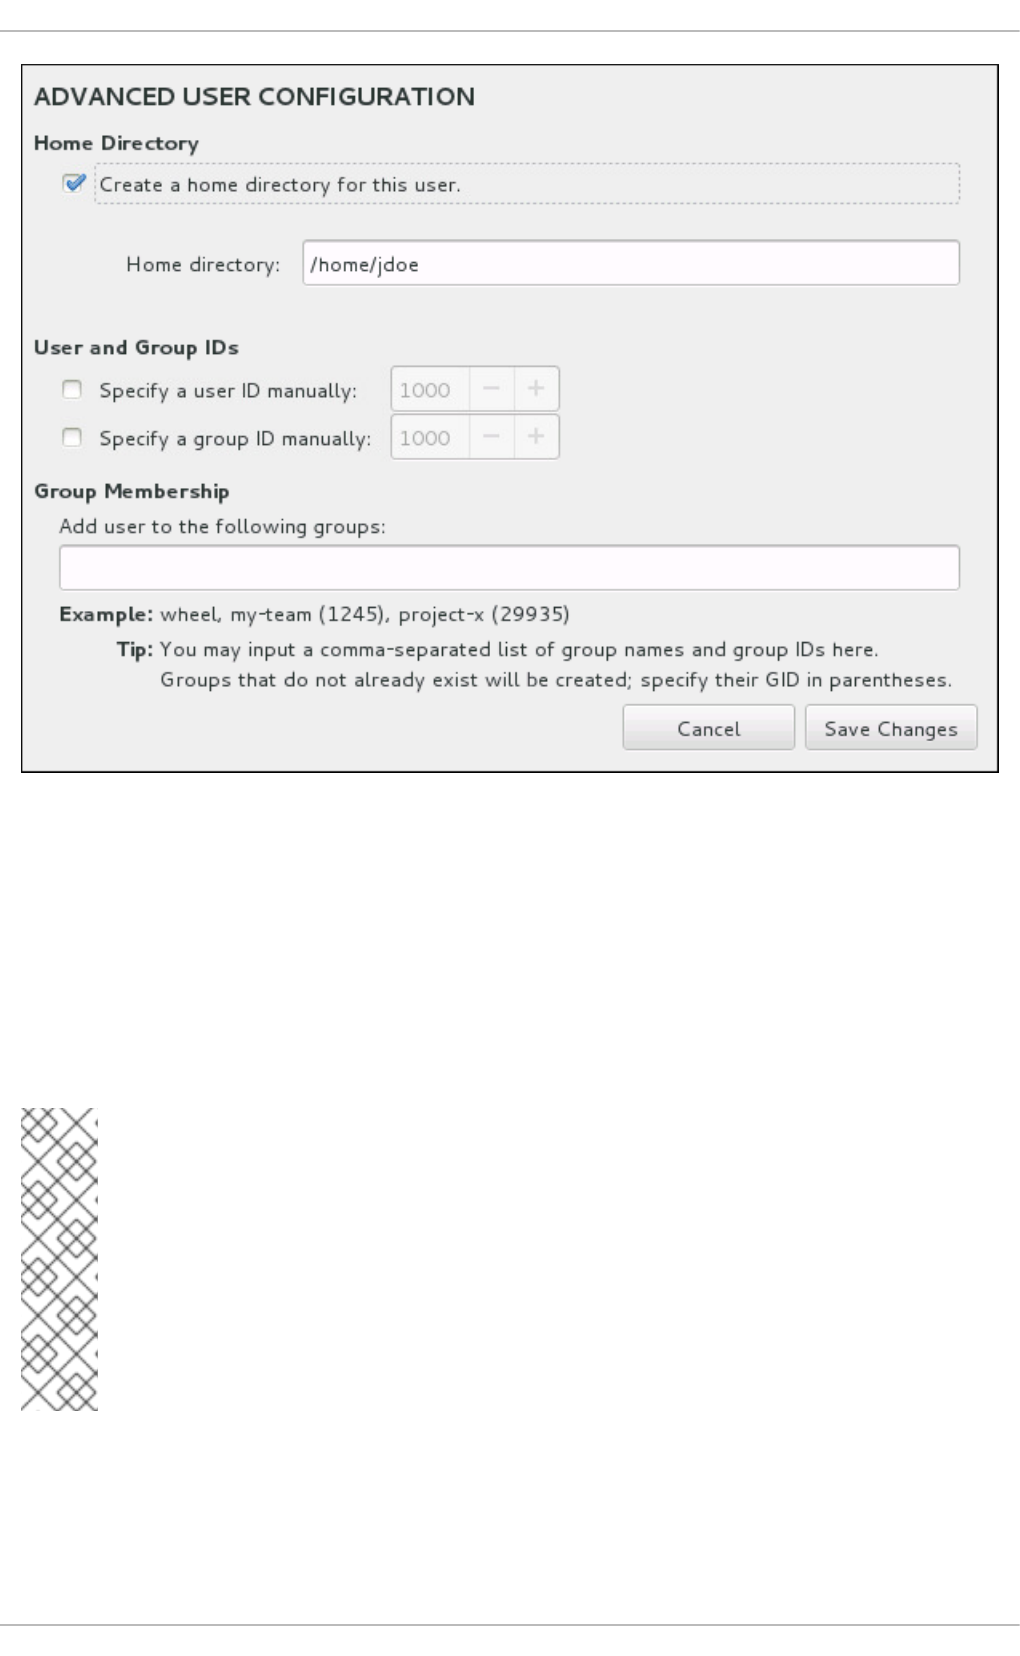
Figure 8.44. Advanced User Account Configuration
By default, each user gets a home directory corresponding to their user name. In most scenarios, there
is no need to change this setting.
You can also manually define a system identification number for the new user and their default group by
selecting the check boxes. The range for regular user IDs starts at the number 1000. At the bottom of the
dialog, you can enter the comma-separated list of additional groups, to which the new user shall belong.
The new groups will be created in the system. To customize group IDs, specify the numbers in
parenthesis.
NOTE
Consider setting IDs of regular users and their default groups at range starting at 5000
instead of 1000. That is because the range reserved for system users and groups, 0-999,
might increase in the future and thus overlap with IDs of regular users.
For creating users with custom IDs using kickstart, see user (optional) .
For changing the minimum UID and GID limits after the installation, which ensures that
your chosen UID and GID ranges are applied automatically on user creation, see the
Users and Groups chapter of the System Administrator's Guide.
Once you have customized the user account, click Save Changes to return to the User Settings
screen.
8.19. INSTALLATION COMPLETE
Installation Guide
108

Congratulations! Your Red Hat Enterprise Linux installation is now complete!
Click the Reboot button to reboot your system and begin using Red Hat Enterprise Linux. Remember to
remove any installation media if it is not ejected automatically upon reboot.
After your computer's normal power-up sequence has completed, Red Hat Enterprise Linux loads and
starts. By default, the start process is hidden behind a graphical screen that displays a progress bar.
Eventually, a GUI login screen (or if the X Window System is not installed, a login: prompt) appears.
If your system was installed with the X Window System during this installation process, the first time you
start your Red Hat Enterprise Linux system, applications to set up your system are launched. These
applications guide you through initial configuration of Red Hat Enterprise Linux and allow you to set your
system time and date, register your machine with Red Hat Network, and more.
See Chapter 30, Initial Setup for information about the configuration process. For instructions on post-
installation procedures, configuration and updates for Red Hat Enterprise Linux Atomic Host, see the
Getting Started withRed Hat Enterprise Linux Atomic Host document.
CHAPTER 8. INSTALLING USING ANACONDA
109

CHAPTER 9. TROUBLESHOOTING INSTALLATION ON 64-BIT
AMD, INTEL, AND ARM SYSTEMS
This chapter discusses some common installation problems and their solutions.
For debugging purposes, Anaconda logs installation actions into files in the /tmp directory. These files
are listed in the following table.
Table 9.1. Log Files Generated During the Installation
Log file Contents
/tmp/anaconda.log general Anaconda messages
/tmp/program.log all external programs run during the installation
/tmp/storage.log extensive storage module information
/tmp/packaging.log yum and rpm package installation messages
/tmp/syslog hardware-related system messages
If the installation fails, the messages from these files are consolidated into /tmp/anaconda-
tb-identifier, where identifier is a random string.
After successful installation, by default, these files will be copied to the installed system under the
directory /var/log/anaconda/. However, if installation is unsuccessful, or if the inst.nosave=all
or inst.nosave=logs options are used when booting the installation system, these logs will only exist
in the installation program's RAM disk. This means they are not saved permanently and will be lost once
the system is powered down. To store them permanently, copy those files to another system on the
network by using scp on the system running the installation program, or copy them to a mounted storage
device (such as an USB flash drive). Details on how to transfer the log files over the network are below.
Note that if you use an USB flash drive or other removable media, you should make sure to back up any
data on it before starting the procedure.
Procedure 9.1. Transferring Log Files Onto a USB Drive
1. On the system you are installing, press Ctrl+Alt+F2 to access a shell prompt. You will be
logged into a root account and you will have access to the installation program's temporary file
system.
2. Connect a USB flash drive to the system and execute the dmesg command. A log detailing all
recent events will be displayed. At the bottom of this log, you will see a set of messages caused
by the USB flash drive you just connected. It will look like a set of lines similar to the following:
[ 170.171135] sd 5:0:0:0: [sdb] Attached SCSI removable disk
Note the name of the connected device - in the above example, it is sdb.
Installation Guide
110

3. Go to the /mnt directory and once there, create new directory which will serve as the mount
target for the USB drive. The name of the directory does not matter; this example uses the name
usb.
# mkdir usb
4. Mount the USB flash drive onto the newly created directory. Note that in most cases, you do not
want to mount the whole drive, but a partition on it. Therefore, do not use the name sdb - use
the name of the partition you want to write the log files to. In this example, the name sdb1 is
used.
# mount /dev/sdb1 /mnt/usb
You can now verify that you mounted the correct device and partition by accessing it and listing
its contents - the list should match what you expect to be on the drive.
# cd /mnt/usb
# ls
5. Copy the log files to the mounted device.
# cp /tmp/*log /mnt/usb
6. Unmount the USB flash drive. If you get an error message saying that the target is busy, change
your working directory to outside the mount (for example, /).
# umount /mnt/usb
The log files from the installation are now saved on the USB flash drive.
Procedure 9.2. Transferring Log Files Over the Network
1. On the system you are installing, press Ctrl+Alt+F2 to access a shell prompt. You will be
logged into a root account and you will have access to the installation program's temporary file
system.
2. Switch to the /tmp directory where the log files are located:
# cd /tmp
3. Copy the log files onto another system on the network using the scp command:
# scp *log user@address:path
Replace user with a valid user name on the target system, address with the target system's
address or host name, and path with the path to the directory you want to save the log files into.
For example, if you want to log in as john to a system with an IP address of 192.168.0.122
and place the log files into the /home/john/logs/ directory on that system, the command will
have the following form:
CHAPTER 9. TROUBLESHOOTING INSTALLATION ON 64-BIT AMD, INTEL, AND ARM SYSTEMS
111

# scp *log john@192.168.0.122:/home/john/logs/
When connecting to the target system for the first time, the SSH client asks you to confirm that
the fingerprint of the remote system is correct and that you want to continue:
The authenticity of host '192.168.0.122 (192.168.0.122)' can't be
established.
ECDSA key fingerprint is
a4:60:76:eb:b2:d0:aa:23:af:3d:59:5c:de:bb:c4:42.
Are you sure you want to continue connecting (yes/no)?
Type yes and press Enter to continue. Then, provide a valid password when prompted. The
files will start transferring to the specified directory on the target system.
The log files from the installation are now permanently saved on the target system and available for
review.
9.1. TROUBLE BEGINNING THE INSTALLATION
9.1.1. System Does Not Boot When UEFI Secure Boot Is Enabled
Beta releases of Red Hat Enterprise Linux 7 have their kernels signed with a special public key which is
not recognized by standard UEFI Secure Boot implementations. This prevents the system from booting
when the Secure Boot technology is enabled.
To fix this issue, you must disable UEFI Secure Boot, install the system, and then import the Beta public
key using the Machine Owner Key facility. See Section 5.9, “Using a Beta Release with UEFI Secure
Boot” for instructions.
9.1.2. Problems with Booting into the Graphical Installation
Systems with some video cards have trouble booting into the graphical installation program. If the
installation program does not run using its default settings, it attempts to run in a lower resolution mode.
If that still fails, the installation program attempts to run in text mode.
There are several possible solutions to display issues, most of which involve specifying custom boot
options. For more information, see Section 22.1, “Configuring the Installation System at the Boot Menu”.
Use the basic graphics mode
You can attempt to perform the installation using the basic graphics driver. To do this, either select
Troubleshooting > Install Red Hat Enterprise Linux in basic graphics mode in the boot menu, or
edit the installation program's boot options and append inst.xdriver=vesa at the end of the
command line.
Specify the display resolution manually
If the installation program fails to detect your screen resolution, you can override the automatic
detection and specify it manually. To do this, append the inst.resolution=x option at the boot
menu, where x is your display's resolution (for example, 1024x768).
Use an alternate video driver
Installation Guide
112

You can also attempt to specify a custom video driver, overriding the installation program's automatic
detection. To specify a driver, use the inst.xdriver=x option, where x is the device driver you
want to use (for example, nouveau).
NOTE
If specifying a custom video driver solves your problem, you should report it as a bug
at https://bugzilla.redhat.com under the anaconda component. Anaconda should be
able to detect your hardware automatically and use the appropriate driver without your
intervention.
Perform the installation using VNC
If the above options fail, you can use a separate system to access the graphical installation over the
network, using the Virtual Network Computing (VNC) protocol. For details on installing using VNC,
see Chapter 24, Using VNC.
9.1.3. Serial Console Not Detected
In some cases, attempting to install in text mode using a serial console will result in no output on the
console. This happens on systems which have a graphics card, but no monitor connected. If Anaconda
detects a graphics card, it will attempt to use it for a display, even if no display is connected.
If you want to perform a text-based installation on a serial console, use the inst.text and console=
boot options. See Chapter 22, Boot Options for more details.
9.2. TROUBLE DURING THE INSTALLATION
9.2.1. No Disks Detected
In the Installation Destination screen, the following error message can appear at the bottom: No
disks detected. Please shut down the computer, connect at least one disk, and
restart to complete installation.
The message indicates that Anaconda did not find any writable storage devices to install to. In that case,
first make sure that your system does have at least one storage device attached.
If your system uses a hardware RAID controller, verify that the controller is properly configured and
working. See your controller's documentation for instructions.
If you are installing into one or more iSCSI devices and there is no local storage present on the system,
make sure that all required LUNs (Logical Unit Numbers) are being presented to the appropriate HBA
(Host Bus Adapter). For additional information about iSCSI, see Appendix B, iSCSI Disks.
If you made sure you have a connected and properly configured storage device and the message still
appears after you reboot the system and start the installation again, it means that the installation
program failed to detect the storage. In most cases this message appears when you attempt to install on
an SCSI device which has not been recognized by the installation program.
In that case, you will have to perform a driver update before starting the installation. Check your
hardware vendor's website to determine if a driver update is available that fixes your problem. For more
general information on driver updates, see Chapter 6, Updating Drivers During Installation on AMD64
and Intel 64 Systems.
CHAPTER 9. TROUBLESHOOTING INSTALLATION ON 64-BIT AMD, INTEL, AND ARM SYSTEMS
113

You can also consult the Red Hat Hardware Compatibility List, available online at
https://hardware.redhat.com.
9.2.2. Reporting Traceback Messages
If the graphical installation program encounters an error, it presents you with a crash reporting dialog
box. You can then choose to send information about the problem you encountered to Red Hat. To send
a crash report, you will need to enter your Customer Portal credentials. If you do not have a Customer
Portal account, you can register at https://www.redhat.com/wapps/ugc/register.html. Automated crash
reporting also requires a working network connection.
Figure 9.1. The Crash Reporting Dialog Box
When the dialog appears, select Report Bug to report the problem, or Quit to exit the installation.
Optionally, click More Info to display detailed output that can help determine the cause of the error. If
you are familiar with debugging, click Debug. This will take you to virtual terminal tty1, where you can
request more precise information that will enhance the bug report. To return to the graphical interface
from tty1, use the continue command.
Installation Guide
114

Figure 9.2. The Expanded Crash Reporting Dialog Box
If you want to report the bug to the customer portal, follow the procedure below.
Procedure 9.3. Reporting Errors to Red Hat Customer Support
1. In the menu that appears, select Report a bug to Red Hat Customer Portal.
2. To report the bug to Red Hat, you first need to provide your Customer Portal credentials. Click
Configure Red Hat Customer Support.
Figure 9.3. Customer Portal Credentials
3. A new window is now open, prompting you to enter your Customer Portal user name and
password. Enter your Red Hat Customer Portal credentials.
CHAPTER 9. TROUBLESHOOTING INSTALLATION ON 64-BIT AMD, INTEL, AND ARM SYSTEMS
115
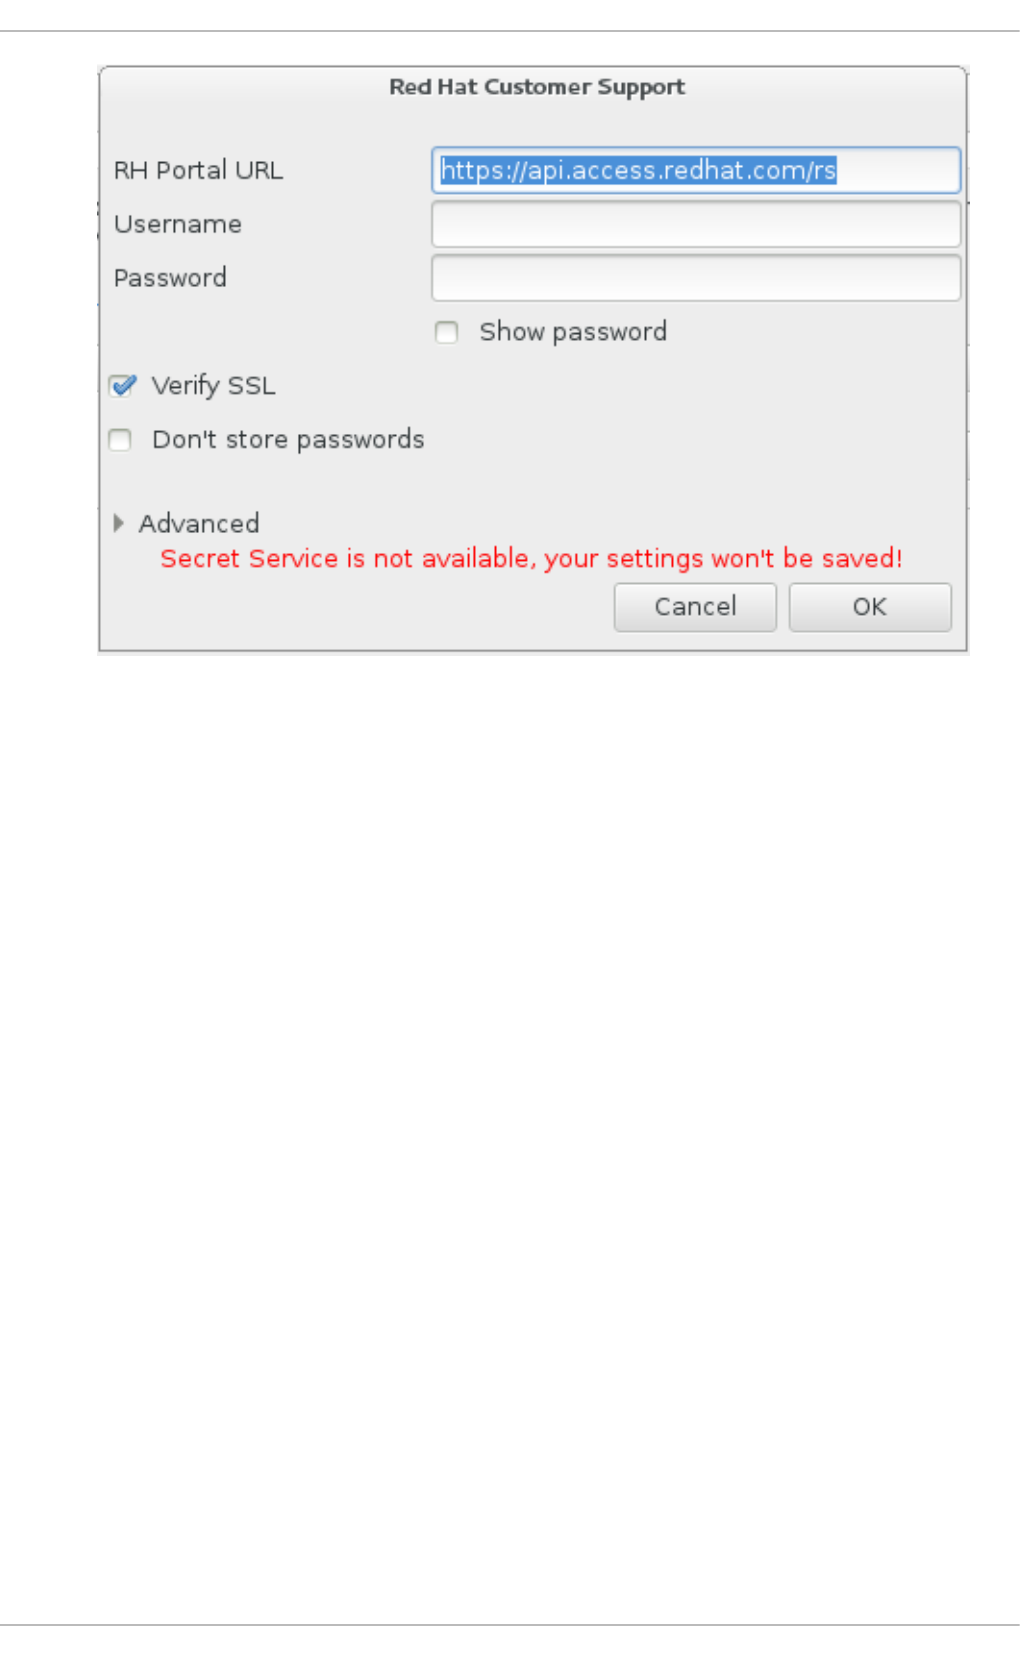
Figure 9.4. Configure Red Hat Customer Support
If your network settings require you to use a HTTP or HTTPS proxy, you can configure it by
expanding the Advanced menu and entering the address of the proxy server.
When you put in all required credentials, click OK to proceed.
4. A new window appears, containing a text field. Write down any useful information and comments
here. Describe how the error can be reproduced by explaining each step you took before the
crash reporting dialog appeared. Provide as much relevant detail as possible, including any
information you acquired when debugging. Be aware that the information you provide here can
become publicly visible on the Customer Portal.
If you do not know what caused the error, check the box labeled I don't know what
caused this problem at the bottom of the dialog.
Then, click Forward.
Installation Guide
116
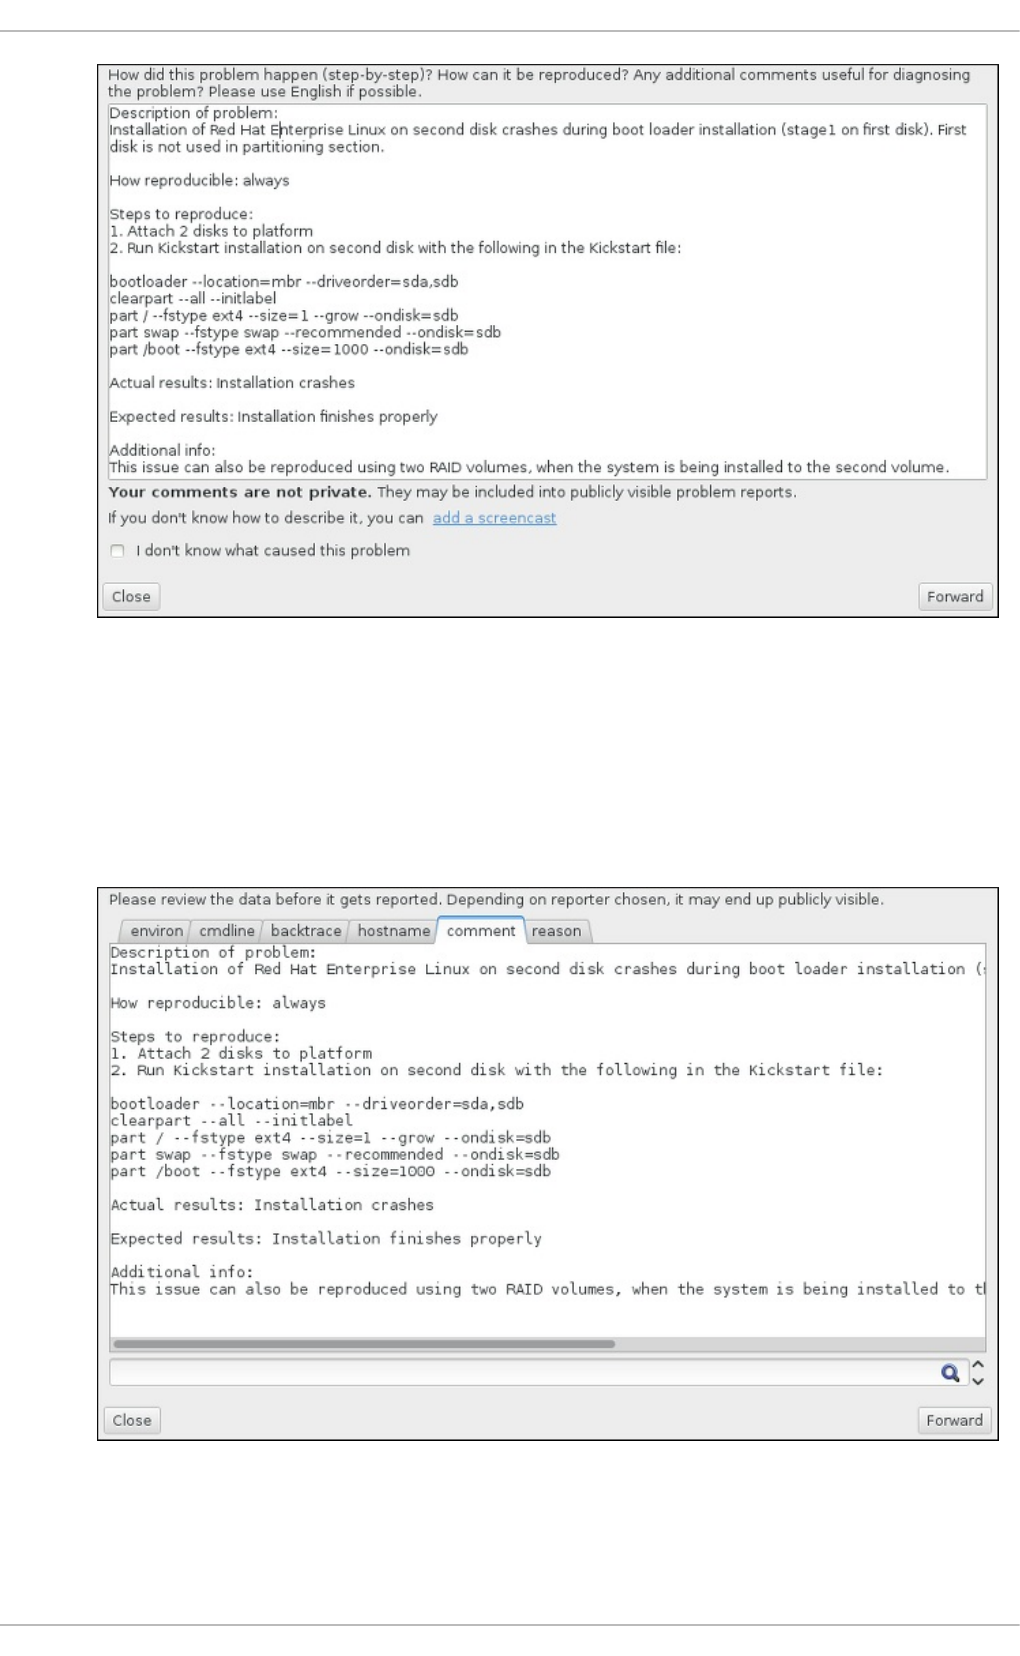
Figure 9.5. Describe the Problem
5. Next, review the information that will be sent to the Customer Portal. The explanation you
provided is in the comment tab. Other tabs include such information as your system's host name
and other details about the installation environment. You can remove any items you do not want
sent to Red Hat, but be aware that providing less detail can affect the investigation of the issue.
Click Forward when you finish reviewing the information to be sent.
Figure 9.6. Review the Data to Be Sent
6. Review the list of files that will be sent and included in the bug report as individual attachments.
These files provide system information that will assist the investigation. If you do not want to
CHAPTER 9. TROUBLESHOOTING INSTALLATION ON 64-BIT AMD, INTEL, AND ARM SYSTEMS
117
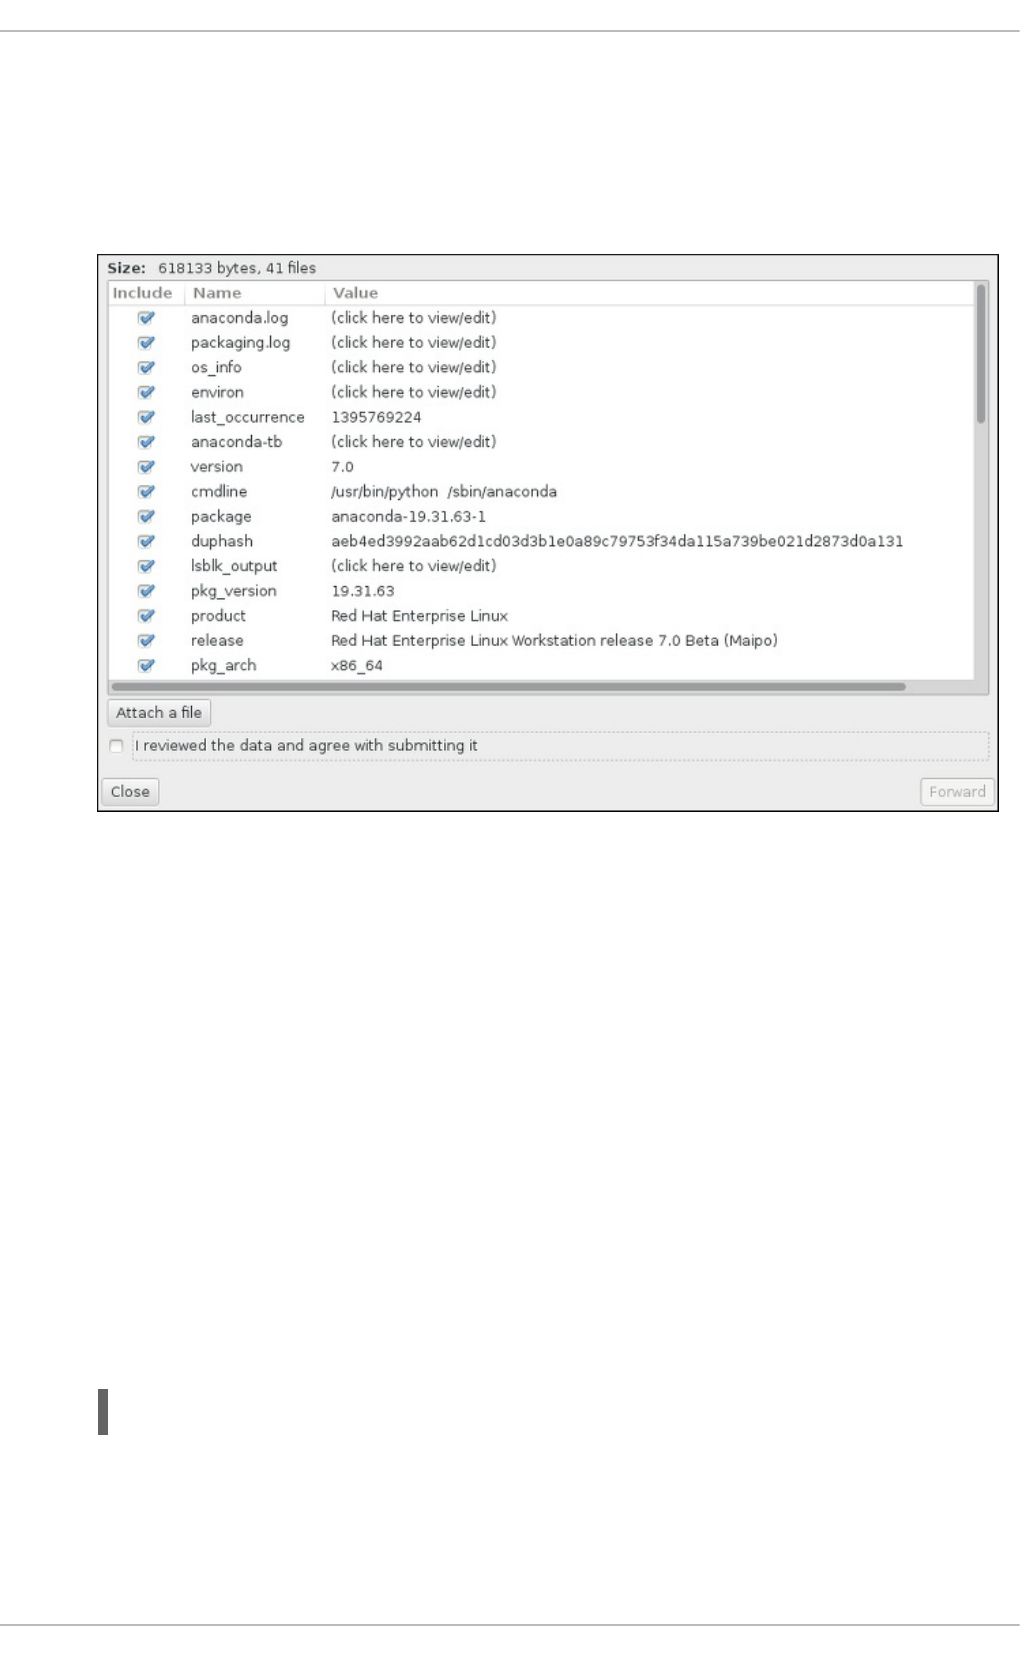
send certain files, uncheck the box next to each one. To provide additional files that can help
find the problem, click Attach a file.
Once you have reviewed the files to be sent, check the box labeled I have reviewed the
data and agree with submitting it. Then, click Forward to send the report and
attachments to the Customer Portal.
Figure 9.7. Review the Files to Be Sent
7. When the dialog reports that processing has finished, you can click Show log to view details of
the reporting process or Close to return to the initial crash reporting dialog box. There, click
Quit to exit the installation.
9.2.3. Creating Pre-installation Log Files
To debug installation problems you can set the inst.debug option to create log files from the
environment before the installation starts. These log files contain, for example, the current storage
configuration.
To set the option in the Red Hat Enterprise Linux installation boot menu:
1. Select the Install Red Hat Enterprise Linux 7.3 entry.
2. Press the Tab key to edit the boot options.
3. Append inst.debug to the options. For example:
> vmlinuz ... inst.debug
For further details, see Chapter 22, Boot Options.
4. Press Enter to start the setup.
Installation Guide
118

The system stores the pre-installation log files in the /tmp/pre-anaconda-logs/ directory before
Anaconda starts. To access the log files:
1. Switch to the console. See Section 8.2.1, “Accessing Consoles”.
2. Change into the /tmp/pre-anaconda-logs/ directory:
# cd /tmp/pre-anaconda-logs/
9.3. PROBLEMS AFTER INSTALLATION
9.3.1. Are You Unable to Boot With Your RAID Card?
If you have performed an installation and cannot boot your system properly, you might need to reinstall
and partition your system's storage differently.
Some BIOS types do not support booting from RAID cards. After you finish the installation and reboot the
system for the first time, a text-based screen showing the boot loader prompt (for example, grub>) and
a flashing cursor might be all that appears. If this is the case, you must repartition your system and move
your /boot partition and the boot loader outside the RAID array. The /boot partition and the boot loader
must be on the same drive.
Once these changes have been made, you should be able to finish your installation and boot the system
properly. For more information about partitioning, see Section 8.14, “Installation Destination”.
9.3.2. Trouble With the Graphical Boot Sequence
After you finish the installation and reboot your system for the first time, it is possible that the system
stops responding during the graphical boot sequence, requiring a reset. In this case, the boot loader is
displayed successfully, but selecting any entry and attempting to boot the system results in a halt. This
usually means a problem with the graphical boot sequence; to solve this issue, you must disable
graphical boot. To do this, temporarily alter the setting at boot time before changing it permanently.
Procedure 9.4. Disabling Graphical Boot Temporarily
1. Start your computer and wait until the boot loader menu appears. If you set your boot loader
timeout period to 0, hold down the Esc key to access it.
2. When the boot loader menu appears, use your cursor keys to highlight the entry you want to
boot and press the e key to edit this entry's options.
3. In the list of options, find the kernel line - that is, the line beginning with the keyword linux (or,
in some cases, linux16 or linuxefi). On this line, locate the rhgb option and delete it. The
option might not be immediately visible; use the cursor keys to scroll up and down.
4. Press F10 or Ctrl+X to boot your system with the edited options.
If the system started successfully, you can log in normally. Then you will need to disable the graphical
boot permanently - otherwise you will have to perform the previous procedure every time the system
boots. To permanently change boot options, do the following.
Procedure 9.5. Disabling Graphical Boot Permanently
1. Log in to the root account using the su - command:
CHAPTER 9. TROUBLESHOOTING INSTALLATION ON 64-BIT AMD, INTEL, AND ARM SYSTEMS
119

$ su -
2. Use the grubby tool to find the default GRUB2 kernel:
# grubby --default-kernel
/boot/vmlinuz-3.10.0-229.4.2.el7.x86_64
3. Use the grubby tool to remove the rhgb boot option from the default kernel, identified in the last
step, in your GRUB2 configuration. For example:
# grubby --remove-args="rhgb" --update-kernel /boot/vmlinuz-3.10.0-
229.4.2.el7.x86_64
After you finish this procedure, you can reboot your computer. Red Hat Enterprise Linux will not use the
graphical boot sequence any more. If you want to enable graphical boot in the future, follow the same
procedure, replacing the --remove-args="rhgb" parameter with the --args="rhgb" paramter.
This will restore the rhgb boot option to the default kernel in your GRUB2 configuration.
See the Red Hat Enterprise Linux 7 System Administrator's Guide for more information about working
with the GRUB2 boot loader.
9.3.3. Booting into a Graphical Environment
If you have installed the X Window System but are not seeing a graphical desktop environment once
you log into your system, you can start it manually using the startx command. Note, however, that this
is just a one-time fix and does not change the log in process for future log ins.
To set up your system so that you can log in at a graphical login screen, you must change the default
systemd target to graphical.target. When you are finished, reboot the computer. You will
presented with a graphical login prompt after the system restarts.
Procedure 9.6. Setting Graphical Login as Default
1. Open a shell prompt. If you are in your user account, become root by typing the su - command.
2. Change the default target to graphical.target. To do this, execute the following command:
# systemctl set-default graphical.target
Graphical login is now enabled by default - you will be presented with a graphical login prompt after the
next reboot. If you want to reverse this change and keep using the text-based login prompt, execute the
following command as root:
# systemctl set-default multi-user.target
For more information about targets in systemd, see the Red Hat Enterprise Linux 7 System
Administrator's Guide.
9.3.4. No Graphical User Interface Present
Installation Guide
120

If you are having trouble getting X (the X Window System) to start, it is possible that it has not been
installed. Some of the preset base environments you can select during the installation, such as Minimal
install or Web Server, do not include a graphical interface - it has to be installed manually.
If you want X, you can install the necessary packages afterwards. See the Knowledgebase article at
https://access.redhat.com/site/solutions/5238 for information on installing a graphical desktop
environment.
9.3.5. X Server Crashing After User Logs In
If you are having trouble with the X server crashing when a user logs in, one or more of your file systems
can be full or nearly full. To verify that this is the problem you are experiencing, execute the following
command:
$ df -h
The output will help you diagnose which partition is full - in most cases, the problem will be on the /home
partition. The following is a sample output of the df command:
Filesystem Size Used Avail Use%
Mounted on
/dev/mapper/vg_rhel-root 20G 6.0G 13G 32% /
devtmpfs 1.8G 0 1.8G 0% /dev
tmpfs 1.8G 2.7M 1.8G 1%
/dev/shm
tmpfs 1.8G 1012K 1.8G 1% /run
tmpfs 1.8G 0 1.8G 0%
/sys/fs/cgroup
tmpfs 1.8G 2.6M 1.8G 1% /tmp
/dev/sda1 976M 150M 760M 17% /boot
/dev/dm-4 90G 90G 0 100% /home
In the above example, you can see that the /home partition is full, which causes the crash. You can
make some room on the partition by removing unneeded files. After you free up some disk space, start X
using the startx command.
For additional information about df and an explanation of the options available (such as the -h option
used in this example), see the df(1) man page.
9.3.6. Is Your RAM Not Being Recognized?
In some cases the kernel does not recognize all of your memory (RAM), which causes the system to use
less memory than is installed. You can find out how much RAM is being utilized using the free -m
command. If the displayed total amount of memory does not match your expectations, it is likely that at
least one of your memory modules is faulty. On BIOS-based systems, you can use the Memtest86+
utility to test your system's memory - see Section 22.2.1, “Loading the Memory (RAM) Testing Mode” for
details.
CHAPTER 9. TROUBLESHOOTING INSTALLATION ON 64-BIT AMD, INTEL, AND ARM SYSTEMS
121

NOTE
Some hardware configurations have a part of the system's RAM reserved and unavailable
to the main system. Notably, laptop computers with integrated graphics cards will reserve
some memory for the GPU. For example, a laptop with 4 GiB of RAM and an integrated
Intel graphics card will show only roughly 3.7 GiB of available memory.
Additionally, the kdump crash kernel dumping mechanism, which is enabled by default on
most Red Hat Enterprise Linux systems, reserves some memory for the secondary kernel
used in case of the primary kernel crashing. This reserved memory will also not be
displayed as available when using the free command. For details about kdump and its
memory requirements, see the Red Hat Enterprise Linux 7 Kernel Crash Dump Guide.
If you made sure that your memory does not have any issues, you can try and set the amount of memory
manually using the mem= kernel option.
Procedure 9.7. Configuring the Memory Manually
1. Start your computer and wait until the boot loader menu appears. If you set your boot loader
timeout period to 0, hold down the Esc key to access it.
2. When the boot loader menu appears, use your cursor keys to highlight the entry you want to
boot and press the e key to edit this entry's options.
3. In the list of options, find the kernel line - that is, the line beginning with the keyword linux (or,
in some cases, linux16). Append the following option to the end of this line:
mem=xxM
Replace xx with the amount of RAM you have in MiB.
4. Press F10 or Ctrl+X to boot your system with the edited options.
5. Wait for the system to boot and log in. Then, open a command line and execute the free -m
command again. If total amount of RAM displayed by the command matches your expectations,
append the following to the line beginning with GRUB_CMDLINE_LINUX in the
/etc/default/grub file to make the change permanent:
mem=xxM
Replace xx with the amount of RAM you have in MiB.
6. After you updated the file and saved it, refresh the boot loader configuration so that the change
will take effect. Run the following command with root privileges:
# grub2-mkconfig --output=/boot/grub2/grub.cfg
In /etc/default/grub, the above example would look similar to the following:
GRUB_TIMEOUT=5
GRUB_DISTRIBUTOR="$(sed 's, release.*$,,g' /etc/system-release)"
GRUB_DEFAULT=saved
GRUB_DISABLE_SUBMENU=true
Installation Guide
122

GRUB_TERMINAL_OUTPUT="console"
GRUB_CMDLINE_LINUX="rd.lvm.lv=rhel/root vconsole.font=latarcyrheb-sun16
rd.lvm.lv=rhel/swap $([ -x /usr/sbin/rhcrashkernel.param ] &&
/usr/sbin/rhcrashkernel-param || :) vconsole.keymap=us rhgb quiet
mem=1024M"
GRUB_DISABLE_RECOVERY="true"
See the Red Hat Enterprise Linux 7 System Administrator's Guide for more information about working
with the GRUB2 boot loader.
9.3.7. Is Your System Displaying Signal 11 Errors?
A signal 11 error, commonly known as a segmentation fault, means that a program accessed a memory
location that was not assigned to it. A signal 11 error can occur due to a bug in one of the software
programs that is installed, or faulty hardware.
If you receive a fatal signal 11 error during the installation, first make sure you are using the most recent
installation images, and let Anaconda verify them to make sure they are not corrupted. Bad installation
media (such as an improperly burned or scratched optical disk) are a common cause of signal 11 errors.
Verifying the integrity of the installation media is recommended before every installation.
For information about obtaining the most recent installation media, see Chapter 2, Downloading Red Hat
Enterprise Linux. To perform a media check before the installation starts, append the rd.live.check
boot option at the boot menu. See Section 22.2.2, “Verifying Boot Media” for details.
If you performed a media check without any errors and you still have issues with segmentation faults, it
usually means that your system encountered a hardware error. In this case, the problem is most likely in
the system's memory (RAM). This can be a problem even if you previously used a different operating
system on the same computer without any errors. On BIOS-based systems, you can use the
Memtest86+ memory testing module included on the installation media to perform a thorough test of
your system's memory. See Section 22.2.1, “Loading the Memory (RAM) Testing Mode” for details.
Other possible causes are beyond this document's scope. Consult your hardware manufacturer's
documentation and also see the Red Hat Hardware Compatibility List, available online at
https://hardware.redhat.com.
CHAPTER 9. TROUBLESHOOTING INSTALLATION ON 64-BIT AMD, INTEL, AND ARM SYSTEMS
123

PART II. IBM POWER SYSTEMS - INSTALLATION AND
BOOTING
This part of the Red Hat Enterprise Linux Installation Guide includes information about installation and
basic post-installation troubleshooting for IBM Power Systems servers. IBM Power Systems servers
include IBM PowerLinux servers and POWER7, POWER8, and POWER9 Power Systems servers
running Linux. For advanced installation options, see Part IV, “Advanced Installation Options”.
IMPORTANT
Previous releases of Red Hat Enterprise Linux supported 32-bit and 64-bit
Power Systems servers (ppc and ppc64, respectively). Red Hat Enterprise Linux 7
supports only 64-bit Power Systems servers (ppc64).
Installation Guide
124

CHAPTER 10. PLANNING FOR INSTALLATION ON IBM
POWER SYSTEMS
This chapter outlines the decisions and preparations you will need to make when deciding how to
proceed with the installation.
10.1. UPGRADE OR INSTALL?
While automated in-place upgrades are now supported, the support is currently limited to AMD64 and
Intel 64 systems. If you have an existing installation of a previous release of Red Hat Enterprise Linux on
an IBM Power Systems server, you must perform a clean install to migrate to Red Hat
Enterprise Linux 7. A clean install is performed by backing up all data from the system, formatting disk
partitions, performing an installation of Red Hat Enterprise Linux from installation media, and then
restoring any user data.
10.2. IS YOUR HARDWARE COMPATIBLE?
Red Hat Enterprise Linux 7 (big endian) is compatible with IBM Power Systems servers which use the
POWER7, POWER8, and POWER9 processor series. POWER6 processors and older are no longer
supported.
Red Hat Enterprise Linux also offers a little endian variant for IBM Power Systems. This variant is
currently compatible with POWER8 and POWER9 processors, and is supported as a KVM guest on
Red Hat Enterprise Virtualization for Power, on PowerVM, and PowerNV (bare metal).
The most recent list of supported hardware can be found in the Red Hat Hardware Compatibility List,
available online at https://access.redhat.com/ecosystem/search/#/category/Server. Also see Red Hat
Enterprise Linux technology capabilities and limits for general information about system requirements.
10.3. IBM INSTALLATION TOOLS
IBM Installation Toolkit is an optional utility that speeds up the installation of Linux on IBM
Power Systems and is especially helpful for those unfamiliar with Linux. You can use the IBM
Installation Toolkit to: [1]
Install and configure Linux on a non-virtualized IBM Power Systems server.
Install and configure Linux on servers with previously-configured logical partitions (LPARs, also
known as virtualized servers).
Install IBM service and productivity tools on a new or previously installed Linux system. The IBM
service and productivity tools include dynamic logical partition (DLPAR) utilities.
Upgrade system firmware level on IBM Power Systems servers.
Perform diagnostics or maintenance operations on previously installed systems.
Migrate a LAMP server (software stack) and application data from a System x to a System p
system. A LAMP server is a bundle of open source software. LAMP is an acronym for Linux,
Apache HTTP Server, MySQL relational database, and the PHP (or sometimes Perl, or Python)
language.
Documentation for the IBM Installation Toolkit for PowerLinux is available in the Linux Information
Center at http://publib.boulder.ibm.com/infocenter/lnxinfo/v3r0m0/topic/liaan/powerpack.htm
CHAPTER 10. PLANNING FOR INSTALLATION ON IBM POWER SYSTEMS
125

PowerLinux service and productivity tools is an optional set of tools that include hardware service
diagnostic aids, productivity tools, and installation aids for Linux operating systems on IBM servers based
on POWER7, POWER6, POWER5, and POWER4 technology.
Documentation for the service and productivity tools is available in the Linux Information Center at
http://publib.boulder.ibm.com/infocenter/lnxinfo/v3r0m0/topic/liaau/liaauraskickoff.htm
10.4. PREPARATION FOR IBM POWER SYSTEMS SERVERS
IMPORTANT
Ensure that the real-base boot parameter is set to c00000, otherwise you might see
errors such as:
DEFAULT CATCH!, exception-handler=fff00300
IBM Power Systems servers offer many options for partitioning, virtual or native devices, and consoles.
If you are using a non-partitioned system, you do not need any pre-installation setup. For systems using
the HVSI serial console, hook up your console to the T2 serial port.
If using a partitioned system the steps to create the partition and start the installation are largely the
same. You should create the partition at the HMC and assign some CPU and memory resources, as well
as SCSI and Ethernet resources, which can be either virtual or native. The HMC create partition wizard
steps you through the creation.
For more information on creating the partition, see the Partitioning for Linux with an HMC PDF in the IBM
Systems Hardware Information Center at:
http://publib.boulder.ibm.com/infocenter/powersys/v3r1m5/topic/iphbi_p5/iphbibook.pdf
If you are using virtual SCSI resources, rather than native SCSI, you must configure a 'link' to the virtual
SCSI serving partition, and then configure the virtual SCSI serving partition itself. You create a 'link'
between the virtual SCSI client and server slots using the HMC. You can configure a virtual SCSI server
on either Virtual I/O Server (VIOS) or IBM i, depending on which model and options you have.
If you are installing using Intel iSCSI Remote Boot, all attached iSCSI storage devices must be disabled.
Otherwise, the installation will succeed but the installed system will not boot.
For more information on using virtual devices, see the IBM Redbooks publication Virtualizing an
Infrastructure with System p and Linux at: http://publib-b.boulder.ibm.com/abstracts/sg247499.html
Once you have your system configured, you need to Activate from the HMC or power it on. Depending
on the type of installation, you need to configure SMS to correctly boot the system into the installation
program.
10.5. SUPPORTED INSTALLATION TARGETS
An installation target is a storage device that will store Red Hat Enterprise Linux and boot the system.
Red Hat Enterprise Linux supports the following installation targets for AMD64 and Intel 64 systems:
Storage connected by a standard internal interface, such as SCSI, SATA, or SAS
Fibre Channel Host Bus Adapters and multipath devices. Some can require vendor-provided
drivers.
Installation Guide
126

Virtualized installation on IBM Power Systems servers is also supported when using Virtual SCSI
(vSCSI) adapters in virtual client LPARs
Red Hat does not support installation to USB drives or SD memory cards. For information about the
support for third-party virtualization technologies, see the Red Hat Hardware Compatibility List, available
online at https://hardware.redhat.com.
IMPORTANT
On IBM Power Systems servers, the eHEA module fails to initialize if 16GB huge pages
are assigned to a system or partition and the kernel command line does not contain the
huge page parameters. Therefore, when you perform a network installation through an
IBM eHEA ethernet adapter, you cannot assign huge pages to the system or partition
during the installation. Use large pages instead.
10.6. SYSTEM SPECIFICATIONS LIST
The installation program automatically detects and installs your computer's hardware and you do not
usually need to supply the installation program with any specific details about your system. However,
when performing certain types of installation, it is important to know specific details about your hardware.
For this reason, it is recommended that you record the following system specifications for reference
during the installation, depending on your installation type.
If you plan to use a customized partition layout, record:
The model numbers, sizes, types, and interfaces of the hard drives attached to the system.
For example, Seagate ST3320613AS 320 GB on SATA0, Western Digital WD7500AAKS
750 GB on SATA1. This will allow you to identify specific hard drives during the partitioning
process.
If you are installing Red Hat Enterprise Linux as an additional operating system on an existing
system, record:
Information about the partitions used on the system. This information can include file system
types, device node names, file system labels, and sizes. This will allow you to identify
specific partitions during the partitioning process. Remember that different operating
systems identify partitions and drives differently, therefore even if the other operating system
is a Unix operating system, the device names can be reported by Red Hat Enterprise Linux
differently. This information can usually be found by executing the equivalent of the mount
command and blkid command and in the /etc/fstab file.
If you have other operating systems already installed, the Red Hat Enterprise Linux 7
installation program attempts to automatically detect and configure to boot them. You can
manually configure any additional operating systems if they are not detected properly. For
more information, see Section 13.15.1, “Boot Loader Installation”.
If you plan to install from an image on a local hard drive:
The hard drive and directory that holds the image.
If you plan to install from a network location:
The make and model numbers of the network adapters on your system. For example,
Netgear GA311. This will allow you to identify adapters when manually configuring the
network.
CHAPTER 10. PLANNING FOR INSTALLATION ON IBM POWER SYSTEMS
127
IP, DHCP, and BOOTP addresses
Netmask
Gateway IP address
One or more name server IP addresses (DNS)
The location of the installation source on an FTP server, HTTP (web) server, HTTPS (web)
server, or NFS server.
If any of these networking requirements or terms are unfamiliar to you, contact your network
administrator for assistance.
If you plan to install on an iSCSI target:
The location of the iSCSI target. Depending on your network, you might also need a CHAP
user name and password, and perhaps a reverse CHAP user name and password.
If your computer is part of a domain:
You should verify that the domain name will be supplied by the DHCP server. If not, you will
need to input the domain name manually during installation.
10.7. DISK SPACE AND MEMORY REQUIREMENTS
Red Hat Enterprise Linux, like most current operating systems, uses disk partitions. When you install
Red Hat Enterprise Linux, you have to work with disk partitions. For more information about disk
partitions, see Appendix A, An Introduction to Disk Partitions.
The disk space used by Red Hat Enterprise Linux must be separate from the disk space used by other
operating systems you might have installed on your system.
NOTE
For IBM Power Systems servers, at least three partitions (/, swap and a PReP boot
partition) must be dedicated to Red Hat Enterprise Linux.
To install Red Hat Enterprise Linux you must have a minimum of 10 GB of space in either unpartitioned
disk space or in partitions which can be deleted. For more information on partition and disk space
recommendations, see the recommended partitioning sizes discussed in Section 13.15.4.4,
“Recommended Partitioning Scheme”.
Red Hat Enterprise Linux requires minimum the following amount of RAM:
Installation type Minimum required RAM
Local media installation (USB, DVD) 1,280 MiB
NFS network installation 1,280 MiB
HTTP, HTTPS, or FTP network installation 1,664 MiB
Installation Guide
128

Installing Red Hat Enterprise Linux using a Kickstart file has the same minimum RAM requirements as a
manual installation. However, if you use a Kickstart file that runs commands which require additional
memory or write data to the RAM disk, additional RAM might be necessary.
For more information about the minimum requirements and technology limits of Red Hat
Enterprise Linux 7, see the Red Hat Enterprise Linux technology capabilities and limits article on the
Red Hat Customer Portal.
10.8. RAID AND OTHER DISK DEVICES
Some storage technology requires special consideration when using Red Hat Enterprise Linux.
Generally, it is important to understand how these technologies are configured, visible to Red Hat
Enterprise Linux, and how support for them might have changed between major versions.
10.8.1. Hardware RAID
RAID (Redundant Array of Independent Disks) allows a group, or array, of drives to act as a single
device. Configure any RAID functions provided by the mainboard of your computer, or attached
controller cards, before you begin the installation process. Each active RAID array appears as one drive
within Red Hat Enterprise Linux.
10.8.2. Software RAID
On systems with more than one hard drive, you can use the Red Hat Enterprise Linux installation
program to operate several of the drives as a Linux software RAID array. With a software RAID array,
RAID functions are controlled by the operating system rather than dedicated hardware. These functions
are explained in detail in Section 13.15.4, “Manual Partitioning”.
NOTE
When a pre-existing RAID array's member devices are all unpartitioned disks/drives, the
installer will treat the array itself as a disk and will not provide a way to remove the array.
10.8.3. USB Disks
You can connect and configure external USB storage after installation. Most such devices are
recognized by the kernel and available for use at that time.
Some USB drives might not be recognized by the installation program. If configuration of these disks at
installation time is not vital, disconnect them to avoid potential problems.
10.9. CHOOSE AN INSTALLATION BOOT METHOD
You can use several methods to boot the Red Hat Enterprise Linux 7 installation program. The method
you choose depends upon your installation media.
NOTE
Installation media must remain mounted throughout installation, including during
execution of the %post section of a kickstart file.
Full installation DVD or USB drive
CHAPTER 10. PLANNING FOR INSTALLATION ON IBM POWER SYSTEMS
129

You can create bootable media from the full installation DVD ISO image. In this case, a single DVD or
USB drive can be used to complete the entire installation - it will serve both as a boot device and as
an installation source for installing software packages. See Chapter 3, Making Media for instructions
on how to make a full installation DVD or USB drive.
Minimal boot CD, DVD or USB Flash Drive
A minimal boot CD, DVD or USB flash drive is created using a small ISO image, which only contains
data necessary to boot the system and start the installation. If you use this boot media, you will need
an additional installation source from which packages will be installed. See Chapter 3, Making Media
for instructions on making boot CDs, DVDs and USB flash drives.
PXE Server
A preboot execution environment (PXE) server allows the installation program to boot over the
network. After you boot the system, you complete the installation from a different installation source,
such as a local hard drive or a location on a network. For more information on PXE servers, see
Chapter 23, Preparing for a Network Installation.
10.10. AUTOMATING THE INSTALLATION WITH KICKSTART
Red Hat Enterprise Linux 7 offers a way to partially or fully automate the installation process using a
Kickstart file. Kickstart files contain answers to all questions normally asked by the installation program,
such as what time zone do you want the system to use, how should the drives be partitioned or which
packages should be installed. Providing a prepared Kickstart file at the beginning of the installation
therefore allows you to perform the entire installation (or parts of it) automatically, without need for any
intervention from the user. This is especially useful when deploying Red Hat Enterprise Linux on a large
number of systems at once.
In addition to allowing you to automate the installation, Kickstart files also provide more options regarding
software selection. When installing Red Hat Enterprise Linux manually using the graphical installation
interface, your software selection is limited to pre-defined environments and add-ons. A Kickstart file
allows you to install or remove individual packages as well.
For instructions about creating a Kickstart file and using it to automate the installation, see Chapter 26,
Kickstart Installations.
[1] Parts of this section were previously published at IBM's Linux information for IBM systems resource at
http://publib.boulder.ibm.com/infocenter/lnxinfo/v3r0m0/index.jsp?topic=%2Fliaay%2Ftools_overview.htm
Installation Guide
130

CHAPTER 11. UPDATING DRIVERS DURING INSTALLATION
ON IBM POWER SYSTEMS
In most cases, Red Hat Enterprise Linux already includes drivers for the devices that make up your
system. However, if your system contains hardware that has been released very recently, drivers for this
hardware might not yet be included. Sometimes, a driver update that provides support for a new device
might be available from Red Hat or your hardware vendor on a driver disc that contains RPM packages.
Typically, the driver disc is available for download as an ISO image file.
IMPORTANT
Driver updates should only be performed if a missing driver prevents you to complete the
installation successfully. The drivers included in the kernel should always be preferred
over drivers provided by other means.
Often, you do not need the new hardware during the installation process. For example, if you use a DVD
to install to a local hard drive, the installation will succeed even if drivers for your network card are not
available. In such a situation, complete the installation and add support for the new hardware afterward -
see Red Hat Enterprise Linux 7 System Administrator's Guide for details of adding this support.
In other situations, you might want to add drivers for a device during the installation process to support a
particular configuration. For example, you might want to install drivers for a network device or a storage
adapter card to give the installation program access to the storage devices that your system uses. You
can use a driver disc to add this support during installation in one of two ways:
1. place the ISO image file of the driver disc in a location accessible to the installation program, on
a local hard drive, on a USB flash drive, or on a CD or DVD.
2. create a driver disc by extracting the image file onto a CD or a DVD, or a USB flash drive. See
the instructions for making installation discs in Section 3.1, “Making an Installation CD or DVD”
for more information on burning ISO image files to a CD or DVD, and Section 3.2, “Making
Installation USB Media” for instructions on writing ISO images to USB drives.
If Red Hat, your hardware vendor, or a trusted third party told you that you will require a driver update
during the installation process, choose a method to supply the update from the methods described in this
chapter and test it before beginning the installation. Conversely, do not perform a driver update during
installation unless you are certain that your system requires it. The presence of a driver on a system for
which it was not intended can complicate support.
WARNING
Driver update disks sometimes disable conflicting kernel drivers, where necessary.
In rare cases, unloading a kernel module in this way can cause installation errors.
11.1. PREPARING FOR A DRIVER UPDATE DURING INSTALLATION
If a driver update is necessary and available for your hardware, Red Hat, your hardware vendor, or
another trusted third party will typically provide it in the form of an image file in ISO format. Once you
obtain the ISO image, you must decide on the method you want to use to perform the driver update.
CHAPTER 11. UPDATING DRIVERS DURING INSTALLATION ON IBM POWER SYSTEMS
131
The available methods are:
Automatic driver update
When starting the installation, the Anaconda installation program will attempt to detect all attached
storage devices. If there is a storage device labeled OEMDRV present when the installation begins,
Anaconda will always treat it like a driver update disc and attempt to load drivers present on it.
Assisted driver update
You can specify the inst.dd boot option when starting the installation. If you use this option without
any parameters, Anaconda will display a list of all storage devices connected to the system, and it
will prompt you to select a device which contains a driver update.
Manual driver update
You can specify the inst.dd=location boot option when starting the installation, where location is
the path to a driver update disc or ISO image. When you specify this option, Anaconda will attempt
to load any driver updates it finds at the specified location. With manual driver updates, you can
specify either locally available storage devices, or a network location (an HTTP, HTTPS or FTP
server).
NOTE
You can also use both inst.dd=location and inst.dd at the same time. However,
what Anaconda does in this case depends on the type of location that you use. If it is a
device, Anaconda prompts you to select drivers to update from the specified device and
then it offers you additional devices. If location is a network location, Anaconda first
prompts you to select a device containing a driver update and then it lets you update
drivers from the specified network location.
If you want to use the automatic driver update method, you must create a storage device labeled
OEMDRV, and it must be physically connected to the installation system. To use the assisted method, you
can use any local storage device any label other than OEMDRV. To use the manual method, you can use
any local storage with a different label, or a network location accessible from the installation system.
IMPORTANT
Make sure to initialize the network using the ip= option when loading a driver update from
a network location. See Section 22.1, “Configuring the Installation System at the Boot
Menu” for details.
11.1.1. Preparing to Use a Driver Update Image File on Local Storage
If you use a local storage device to provide the ISO file, such as a hard drive or USB flash drive, you can
make the installation program to recognize it automatically by properly labeling the device. Only if it is
not possible, install the update manually as described below.
In order for the installation program to automatically recognize the driver disk, the volume label
of the storage device must be OEMDRV. Also, you will need to extract the contents of the ISO
image file to the root directory of the storage device rather than copy the ISO image itself. See
Section 11.2.1, “Automatic Driver Update”. Note that installation of a driver from a device labeled
OEMDRV is always recommended and preferable to the manual installation.
Installation Guide
132
For manual installation, simply copy the ISO image, as a single file, onto the storage device. You
can rename the file if you find it helpful but you must not change the file name extension, which
must remain .iso, for example dd.iso. See Section 11.2.2, “Assisted Driver Update” to learn
how to select the driver update manually during installation.
11.1.2. Preparing a Driver Disc
You can create a driver update disc on a CD or DVD. See Section 3.1, “Making an Installation CD or
DVD” to learn more about burning discs from image files.
After you burn a driver update disc CD or DVD, verify that the disc was created successfully by inserting
it into your system and browsing to it using the file manager. You should see a single file named rhdd3,
which is a signature file that contains the driver disc's description, and a directory named rpms, which
contains the RPM packages with the actual drivers for various architectures.
If you see only a single file ending in .iso, then you have not created the disc correctly and should try
again. Ensure that you choose an option similar to Burn from Image if you use a Linux desktop other
than GNOME, or if you use a different operating system.
11.2. PERFORMING A DRIVER UPDATE DURING INSTALLATION
At the very beginning of the installation process, you can perform a driver update in the following ways:
let the installation program automatically find and offer a driver update for installation,
let the installation program prompt you to locate a driver update,
manually specify a path to a driver update image or an RPM package.
IMPORTANT
Always make sure to put your driver update discs on a standard disk partition. Advanced
storage, such as RAID or LVM volumes, might not be accessible during the early stage of
the installation when you perform driver updates.
11.2.1. Automatic Driver Update
To have the installation program automatically recognize a driver update disc, connect a block device
with the OEMDRV volume label to your computer before starting the installation process.
NOTE
Starting with Red Hat Enterprise Linux 7.2, you can also use the OEMDRV block device to
automatically load a Kickstart file. This file must be named ks.cfg and placed in the root
of the device to be loaded. See Chapter 26, Kickstart Installations for more information
about Kickstart installations.
When the installation begins, the installation program detects all available storage connected to the
system. If it finds a storage device labeled OEMDRV, it will treat it as a driver update disc and attempt to
load driver updates from this device. You will be prompted to select which drivers to load:
CHAPTER 11. UPDATING DRIVERS DURING INSTALLATION ON IBM POWER SYSTEMS
133

Figure 11.1. Selecting a Driver
Use number keys to toggle selection on individual drivers. When ready, press c to install the selected
drivers and proceed to the Anaconda graphical user interface.
11.2.2. Assisted Driver Update
It is always recommended to have a block device with the OEMDRV volume label available to install a
driver during installation. However, if no such device is detected and the inst.dd option was specified
at the boot command line, the installation program lets you find the driver disk in interactive mode. In the
first step, select a local disk partition from the list for Anaconda to scan for ISO files. Then, select one of
the detected ISO files. Finally, select one or more available drivers. The image below demonstrates the
process in the text user interface with individual steps highlighted.
Installation Guide
134
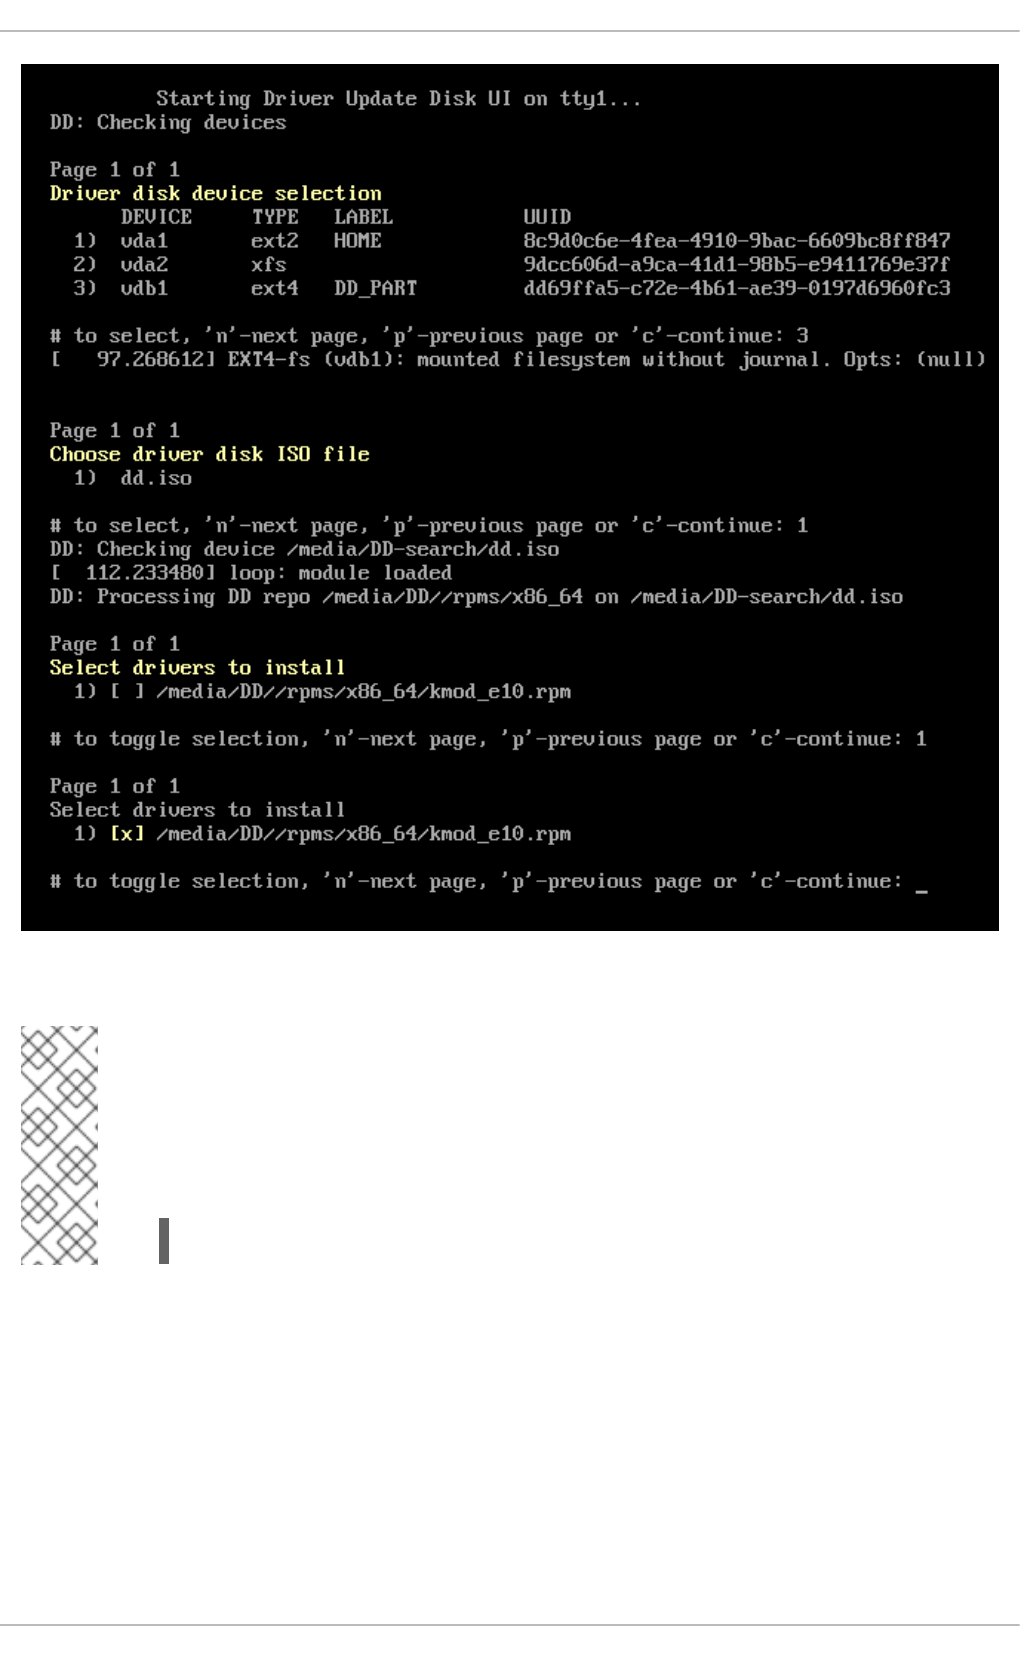
Figure 11.2. Selecting a Driver Interactively
NOTE
If you extracted your ISO image file and burned it on a CD or DVD but the media does not
have the OEMDRV volume label, either use the inst.dd option with no arguments and
use the menu to select the device, or use the following boot option for the installation
program to scan the media for drivers:
inst.dd=/dev/sr0
Hit number keys to toggle selection on individual drivers. When ready, press c to install the selected
drivers and proceed to the Anaconda graphical user interface.
11.2.3. Manual Driver Update
For manual driver installation, prepare an ISO image file containing your drivers to an accessible
location, such a USB flash drive or a web server, and connect it to your computer. At the welcome
screen, hit Tab to display the boot command line and append the inst.dd=location to it, where
location is a path to the driver update disc:
CHAPTER 11. UPDATING DRIVERS DURING INSTALLATION ON IBM POWER SYSTEMS
135

Figure 11.3. Specifying a Path to a Driver Update
Typically, the image file is located on a web server (for example, http://server.example.com/dd.iso) or on
a USB flash drive (for example, /dev/sdb1). It is also possible to specify an RPM package containing the
driver update (for example http://server.example.com/dd.rpm).
When ready, hit Enter to execute the boot command. Then, your selected drivers will be loaded and the
installation process will proceed normally
11.2.4. Blacklisting a Driver
A malfunctioning driver can prevent a system from booting normally during installation. When this
happens, you can disable (or blacklist) the driver by customizing the boot command line. At the boot
menu, display the boot command line by hitting the Tab key. Then, append the
modprobe.blacklist=driver_name option to it. Replace driver_name with names of a driver or
drivers you want to disable, for example:
modprobe.blacklist=ahci
Note that the drivers blacklisted during installation using the modprobe.blacklist= boot option will
remain disabled on the installed system and appear in the /etc/modprobe.d/anaconda-
blacklist.conf file. See Chapter 22, Boot Options for more information about blacklisting drivers and
other boot options.
Installation Guide
136

CHAPTER 12. BOOTING THE INSTALLATION ON IBM
POWER SYSTEMS
To boot an IBM Power Systems server from a DVD, you must specify the install boot device in the
System Management Services (SMS) menu.
To enter the System Management Services GUI, press the 1 key during the boot process when you
hear the chime sound. This brings up a graphical interface similar to the one described in this section.
On a text console, press 1 when the self test is displaying the banner along with the tested components:
Figure 12.1. The SMS Console
Once in the SMS menu, select the option for Select Boot Options. In that menu, specify Select
Install or Boot a Device. There, select CD/DVD, and then the bus type (in most cases SCSI). If
you are uncertain, you can select to view all devices. This scans all available buses for boot devices,
including network adapters and hard drives.
Finally, select the device containing the installation DVD. The boot menu will now load.
IMPORTANT
Because IBM Power Systems servers primarily use text consoles, Anaconda will not
automatically start a graphical installation. However, the graphical installation program
offers more features and customization and is recommended if your system has a
graphical display.
To start a graphical installation, pass the inst.vnc boot option (see Enabling Remote
Access).
CHAPTER 12. BOOTING THE INSTALLATION ON IBM POWER SYSTEMS
137
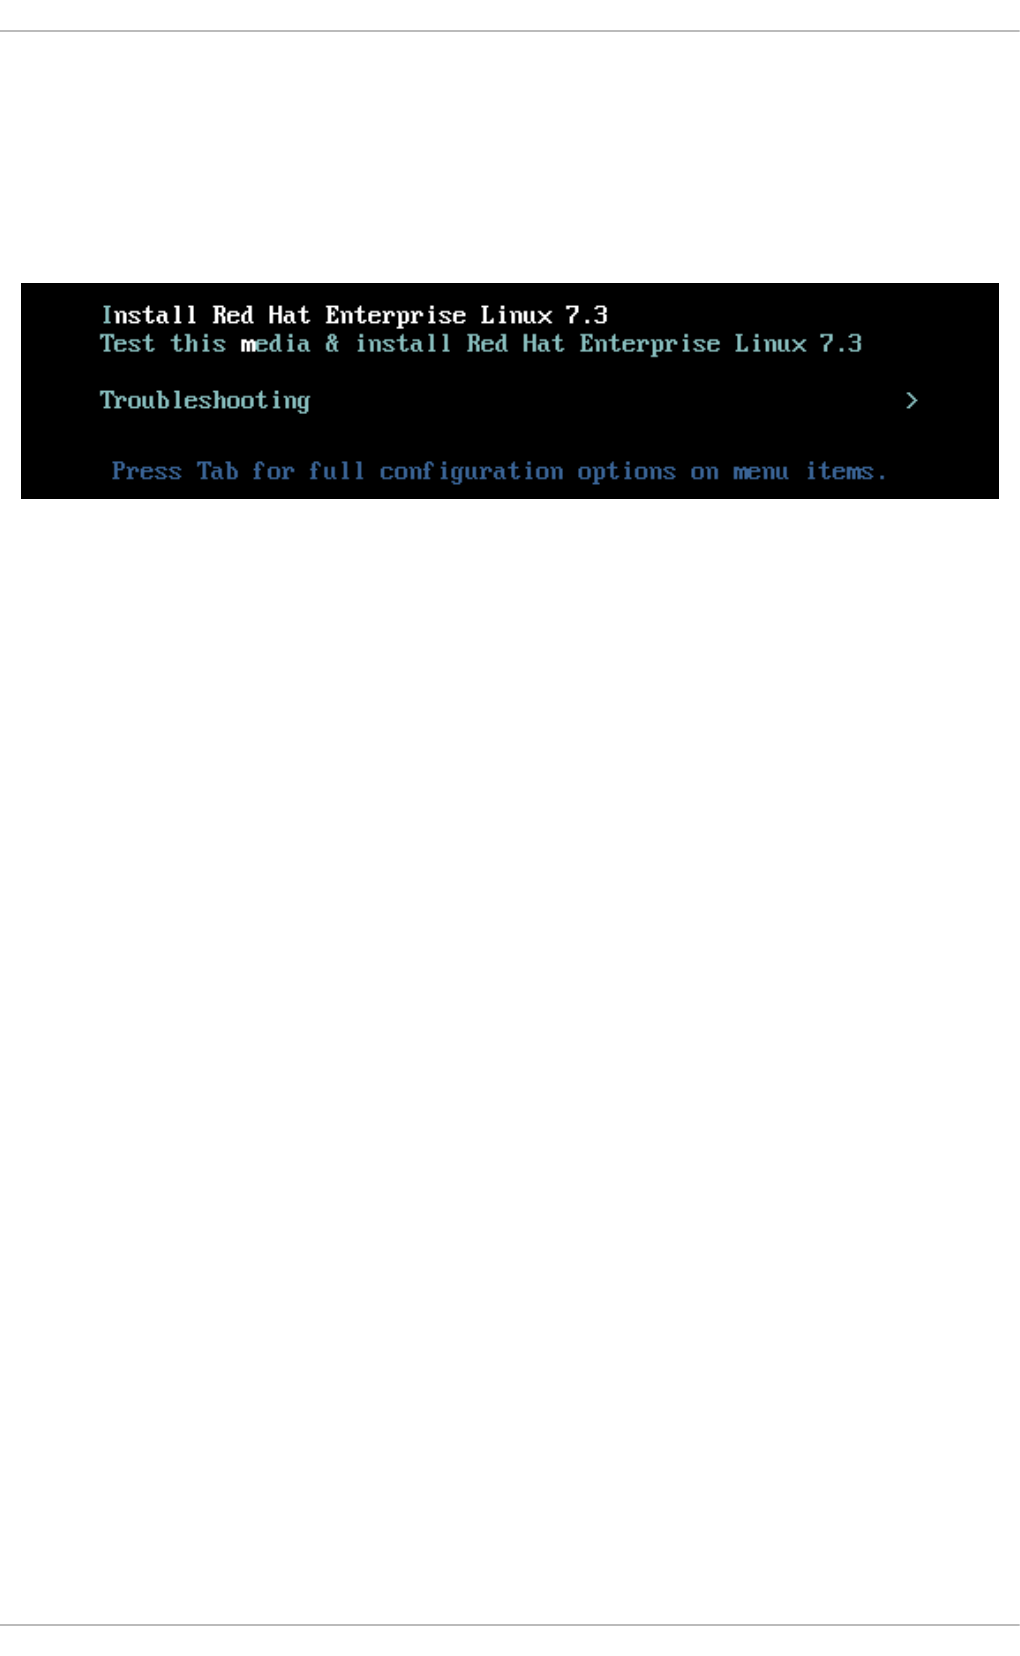
12.1. THE BOOT MENU
Once your system has completed loading the boot media, a boot menu is displayed using GRUB2
(GRand Unified Bootloader, version 2). The boot menu provides several options in addition to
launching the installation program. If no key is pressed within 60 seconds, the default boot option (the
one highlighted in white) will be run. To choose the default, either wait for the timer to run out or press
Enter.
Figure 12.2. The Boot Screen
To select a different option than the default, use the arrow keys on your keyboard, and press Enter
when the correct option is highlighted.
To customize the boot options for a particular menu entry, press the e key and add custom boot options
to the command line. When ready press Ctrl+X to boot the modified option.
See Chapter 22, Boot Options for more information about additional boot options.
The boot menu options are:
Install Red Hat Enterprise Linux 7.0
Choose this option to install Red Hat Enterprise Linux onto your computer system using the graphical
installation program.
Test this media & install Red Hat Enterprise Linux 7.0
This option is the default. Prior to starting the installation program, a utility is launched to check the
integrity of the installation media.
Troubleshooting >
This item is a separate menu containing options that help resolve various installation issues. When
highlighted, press Enter to display its contents.
Installation Guide
138
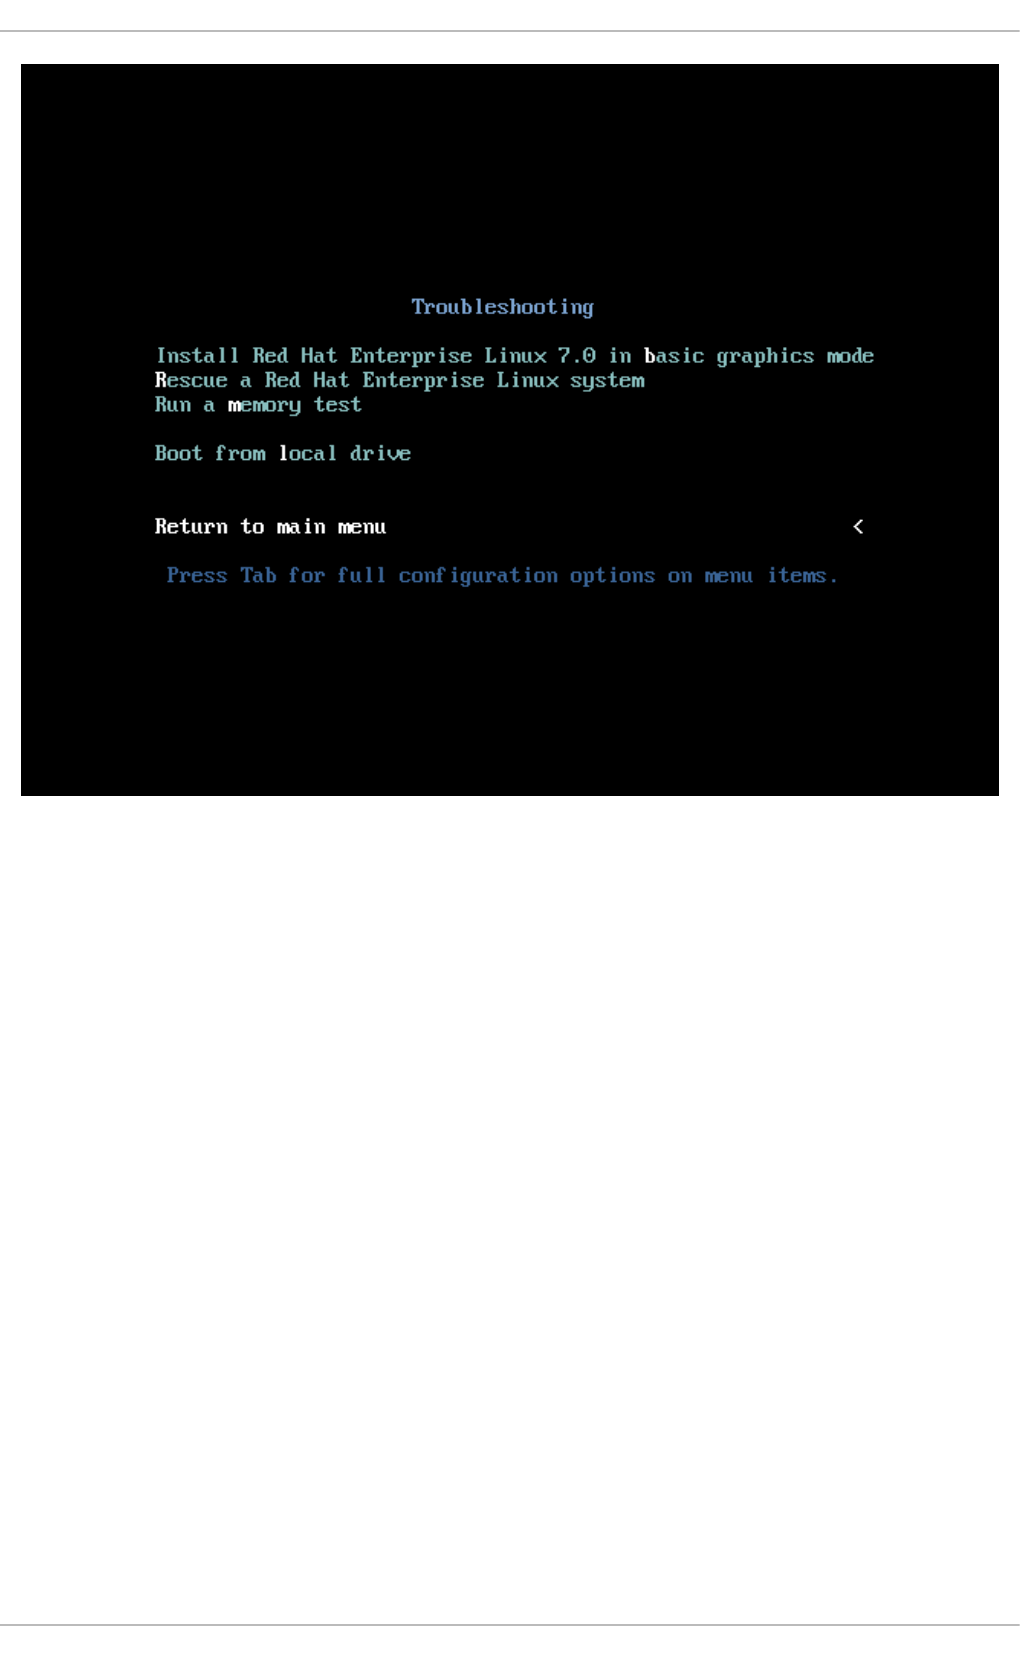
Figure 12.3. The Troubleshooting Menu
Install Red Hat Enterprise Linux 7.0 in basic graphics mode
This option allows you to install Red Hat Enterprise Linux in graphical mode even if the installation
program is unable to load the correct driver for your video card. If your screen appears distorted or
goes blank when using the Install Red Hat Enterprise Linux 7.0 option, restart your
computer and try this option instead.
Rescue a Red Hat Enterprise Linux system
Choose this option to repair a problem with your installed Red Hat Enterprise Linux system that
prevents you from booting normally. The rescue environment contains utility programs that allow you
fix a wide variety of these problems.
Run a memory test
This option runs a memory test on your system. For more information, see Section 22.2.1, “Loading
the Memory (RAM) Testing Mode”.
Boot from local drive
This option boots the system from the first installed disk. If you booted this disc accidentally, use this
option to boot from the hard disk immediately without starting the installation program.
12.2. INSTALLING FROM A DIFFERENT SOURCE
CHAPTER 12. BOOTING THE INSTALLATION ON IBM POWER SYSTEMS
139

You can install Red Hat Enterprise Linux from the ISO images stored on hard disk, or from a network
using NFS, FTP, HTTP, or HTTPS methods. Experienced users frequently use one of these methods
because it is often faster to read data from a hard disk or network server than from a DVD.
The following table summarizes the different boot methods and recommended installation methods to
use with each:
Table 12.1. Boot Methods and Installation Sources
Boot method Installation source
Full installation media (DVD) The boot media itself
Minimal boot media (CD or DVD) Full installation DVD ISO image or the installation
tree extracted from this image, placed in a network
location or on a hard drive
Network boot Full installation DVD ISO image or the installation
tree extracted from this image, placed in a network
location
12.3. BOOTING FROM THE NETWORK USING AN INSTALLATION
SERVER
For network boot, you need a properly configured server, and a network interface in your computer that
can support an installation server. For information on how to configure an installation server, see
Section 23.1.3, “Configuring Network Boot for IBM Power Systems Using GRUB2”.
Configure the computer to boot from the network interface by selecting Select Boot Options in the
SMS menu, then Select Boot/Install Device. Finally, select your network device from the list of
available devices.
Once you properly configure booting from an installation server, the computer can boot the Red Hat
Enterprise Linux installation system without any other media.
To boot a computer from a server:
Procedure 12.1. How to Start the Installation Program from the Network
1. Ensure that the network cable is attached. The link indicator light on the network socket should
be lit, even if the computer is not switched on.
2. Switch on the computer.
3. Networking setup and diagnostic information usually appears before your computer connects to
the server, although this depends on the hardware in use. Then you will see a menu with options
specifying how the network boot server is setup. Press the number key that corresponds to the
desired option. In case you are not sure which option you should select, ask your server
administrator.
If your system does not boot from the network installation server, ensure that the SMS is configured to
boot first from the correct network interface. See your hardware's documentation for more information.
Installation Guide
140

IMPORTANT
Use the vmlinuz and initrd.img images to boot your system over a network. You
cannot use the ppc64.img image to boot over a network; the file is too large for TFTP.
CHAPTER 12. BOOTING THE INSTALLATION ON IBM POWER SYSTEMS
141

CHAPTER 13. INSTALLING USING ANACONDA
This chapter provides step-by-step instructions for installing Red Hat Enterprise Linux using the
Anaconda installer. The bulk of this chapter describes installation using the graphical user interface. A
text mode is also available for systems with no graphical display, but this mode is limited in certain
aspects (for example, custom partitioning is not possible in text mode).
If your system does not have the ability to use the graphical mode, you can:
Use Kickstart to automate the installation as described in Chapter 26, Kickstart Installations
Perform the graphical installation remotely by connecting to the installation system from another
computer with a graphical display using the VNC (Virtual Network Computing) protocol - see
Chapter 24, Using VNC
13.1. INTRODUCTION TO ANACONDA
The Red Hat Enterprise Linux installer, Anaconda, is different from most other operating system
installation programs due to its parallel nature. Most installers follow a fixed path: you must choose your
language first, then you configure network, then installation type, then partitioning, and so on. There is
usually only one way to proceed at any given time.
In Anaconda you are only required to select your language and locale first, and then you are presented
with a central screen, where you can configure most aspects of the installation in any order you like.
This does not apply to all parts of the installation process, however - for example, when installing from a
network location, you must configure the network before you can select which packages to install.
Some screens will be automatically configured depending on your hardware and the type of media you
used to start the installation. You can still change the detected settings in any screen. Screens which
have not been automatically configured, and therefore require your attention before you begin the
installation, are marked by an exclamation mark. You cannot start the actual installation process before
you finish configuring these settings.
Additional differences appear in certain screens; notably the custom partitioning process is very different
from other Linux distributions. These differences are described in each screen's subsection.
13.2. CONSOLES AND LOGGING DURING THE INSTALLATION
The following sections describe how to access logs and an interactive shell during the installation. This is
useful when troubleshooting problems, but should not be necessary in most cases.
13.2.1. Accessing Consoles
The Red Hat Enterprise Linux installer uses the tmux terminal multiplexer to display and control several
windows you can use in addition to the main interface. Each of these windows serves a different purpose
- they display several different logs, which can be used to troubleshoot any issues during the installation,
and one of the windows provides an interactive shell prompt with root privileges, unless this prompt was
specifically disabled using a boot option or a Kickstart command.
NOTE
In general, there is no reason to leave the default graphical installation environment
unless you need to diagnose an installation problem.
Installation Guide
142
The terminal multiplexer is running in virtual console 1. To switch from the graphical installation
environment to tmux, press Ctrl+Alt+F1. To go back to the main installation interface which runs in
virtual console 6, press Ctrl+Alt+F6.
NOTE
If you choose text mode installation, you will start in virtual console 1 (tmux), and
switching to console 6 will open a shell prompt instead of a graphical interface.
The console running tmux has 5 available windows; their contents are described in the table below,
along with keyboard shortcuts used to access them. Note that the keyboard shortcuts are two-part: first
press Ctrl+b, then release both keys, and press the number key for the window you want to use.
You can also use Ctrl+b n and Ctrl+b p to switch to the next or previous tmux window, respectively.
Table 13.1. Available tmux Windows
Shortcut Contents
Ctrl+b 1Main installation program window. Contains text-based prompts (during text mode installation
or if you use VNC Direct Mode), and also some debugging information.
Ctrl+b 2Interactive shell prompt with root privileges.
Ctrl+b 3Installation log; displays messages stored in /tmp/anaconda.log.
Ctrl+b 4Storage log; displays messages related storage devices from kernel and system services,
stored in /tmp/storage.log.
Ctrl+b 5Program log; displays messages from other system utilities, stored in
/tmp/program.log.
In addition to displaying diagnostic information in tmux windows, Anaconda also generates several log
files, which can be transferred from the installation system. These log files are described in Table 14.1,
“Log Files Generated During the Installation”, and directions for transferring them from the installation
system are available in Chapter 14, Troubleshooting Installation on IBM Power Systems.
13.2.2. Saving Screenshots
You can press Shift+Print Screen at any time during the graphical installation to capture the
current screen. These screenshots are saved to /tmp/anaconda-screenshots/.
Additionally, you can use the autostep --autoscreenshot command in a Kickstart file to capture
and save each step of the installation automatically. See Section 26.3.1, “Kickstart Commands and
Options” for details.
13.3. INSTALLING IN TEXT MODE
Text mode installation offers an interactive, non-graphical interface for installing Red Hat
Enterprise Linux. This can be useful on systems with no graphical capabilities; however, you should
always consider the available alternatives before starting a text-based installation. Text mode is limited in
CHAPTER 13. INSTALLING USING ANACONDA
143
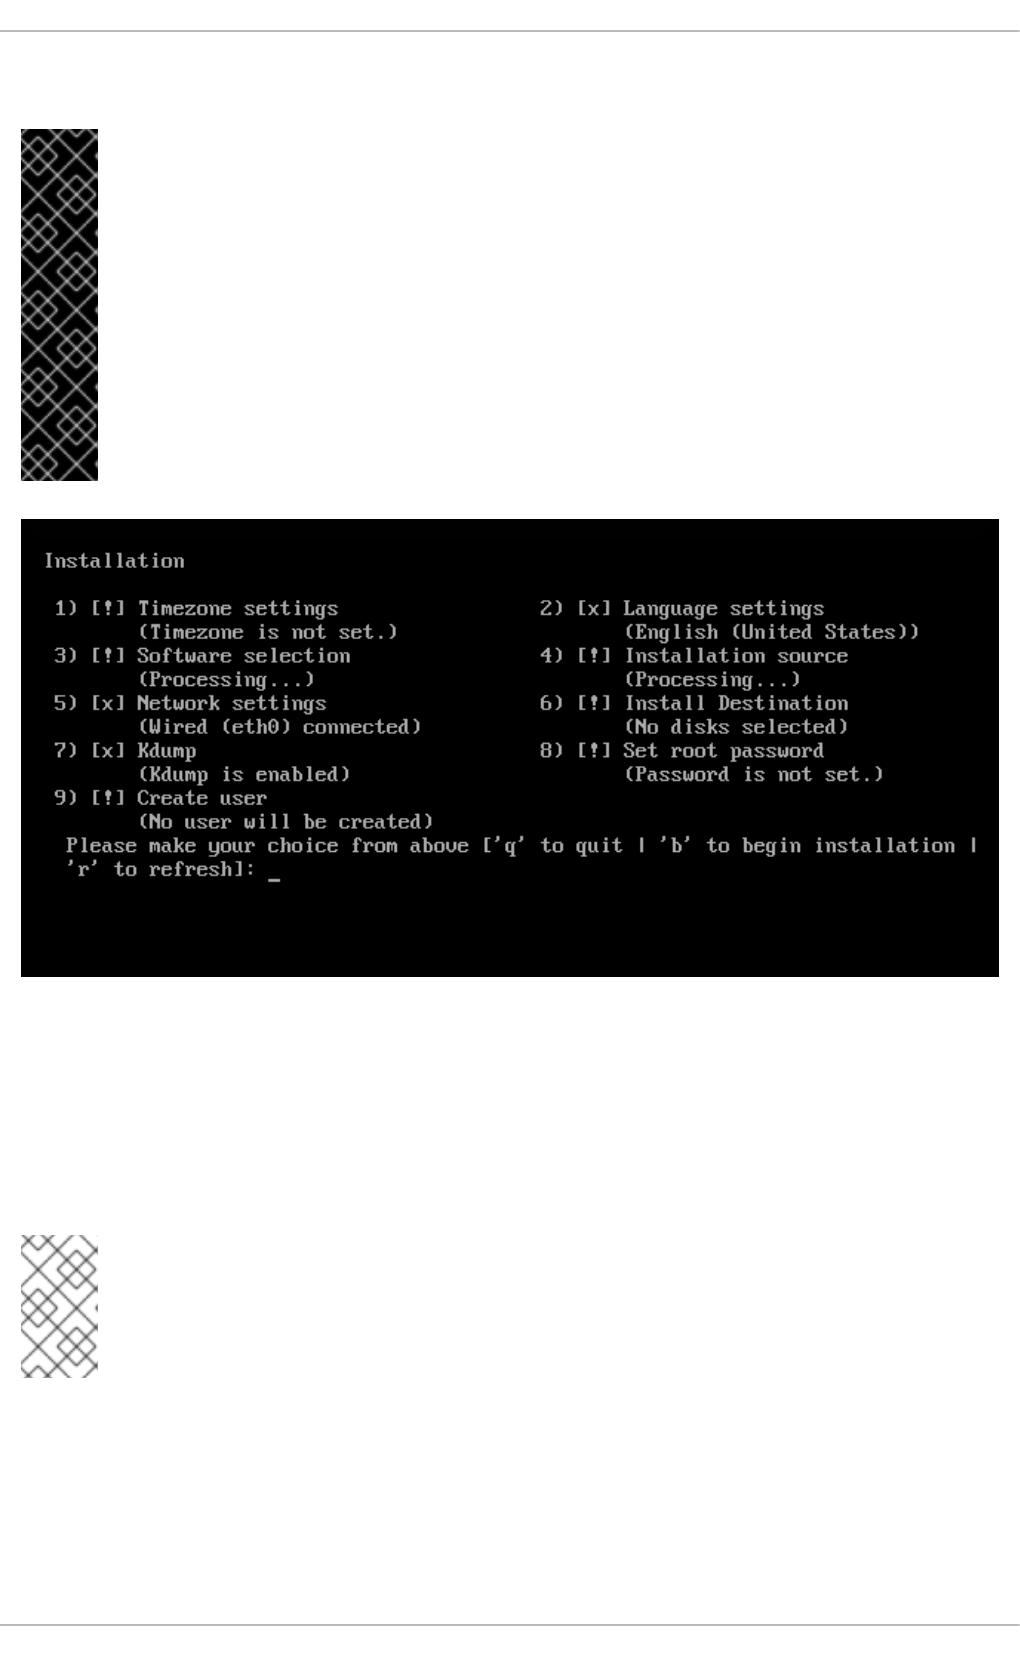
the amount of choices you can make during the installation.
IMPORTANT
Red Hat recommends that you install Red Hat Enterprise Linux using the graphical
interface. If you are installing Red Hat Enterprise Linux on a system that lacks a graphical
display, consider performing the installation over a VNC connection - see Chapter 24,
Using VNC. The text mode installation program will prompt you to confirm the use of text
mode if it detects that a VNC-based installation is possible.
If your system has a graphical display, but graphical installation fails, try booting with the
inst.xdriver=vesa option - see Chapter 22, Boot Options.
Alternatively, consider a Kickstart installation. See Chapter 26, Kickstart Installations for
more information.
Figure 13.1. Text Mode Installation
Installation in text mode follows a pattern similar to the graphical installation: There is no single fixed
progression; you can configure many settings in any order you want using the main status screen.
Screens which have already been configured, either automatically or by you, are marked as [x], and
screens which require your attention before the installation can begin are marked with [!]. Available
commands are displayed below the list of available options.
NOTE
When related background tasks are being run, certain menu items can be temporarily
unavailable or display the Processing... label. To refresh to the current status of text
menu items, use the r option at the text mode prompt.
At the bottom of the screen in text mode, a green bar is displayed showing five menu options. These
options represent different screens in the tmux terminal multiplexer; by default you start in screen 1, and
you can use keyboard shortcuts to switch to other screens which contain logs and an interactive
command prompt. For information about available screens and shortcuts to switch to them, see
Section 13.2.1, “Accessing Consoles”.
Installation Guide
144

Limits of interactive text mode installation include:
The installer will always use the English language and the US English keyboard layout. You can
configure your language and keyboard settings, but these settings will only apply to the installed
system, not to the installation.
You cannot configure any advanced storage methods (LVM, software RAID, FCoE, zFCP and
iSCSI).
It is not possible to configure custom partitioning; you must use one of the automatic partitioning
settings. You also cannot configure where the boot loader will be installed.
You cannot select any package add-ons to be installed; they must be added after the installation
finishes using the Yum package manager.
To start a text mode installation, boot the installation with the inst.text boot option used either at the
boot command line in the boot menu, or in your PXE server configuration. See Chapter 12, Booting the
Installation on IBM Power Systems for information about booting and using boot options.
13.4. USING THE HMC VTERM
The HMC vterm is the console for any partitioned IBM Power system. Open the console by right-clicking
on the partition on the HMC, and then selecting Open Terminal Window. Only a single vterm can be
connected to the console at a time and there is no console access for partitioned system besides the
vterm. This often is referred to as a virtual console, but is different from the virtual consoles in
Section 13.2.1, “Accessing Consoles”.
13.5. INSTALLING IN THE GRAPHICAL USER INTERFACE
The graphical installation interface is the preferred method of manually installing Red Hat
Enterprise Linux. It allows you full control over all available settings, including custom partitioning and
advanced storage configuration, and it is also localized to many languages other than English, allowing
you to perform the entire installation in a different language. The graphical mode is used by default when
you boot the system from local media (a CD, DVD or a USB flash drive).
CHAPTER 13. INSTALLING USING ANACONDA
145
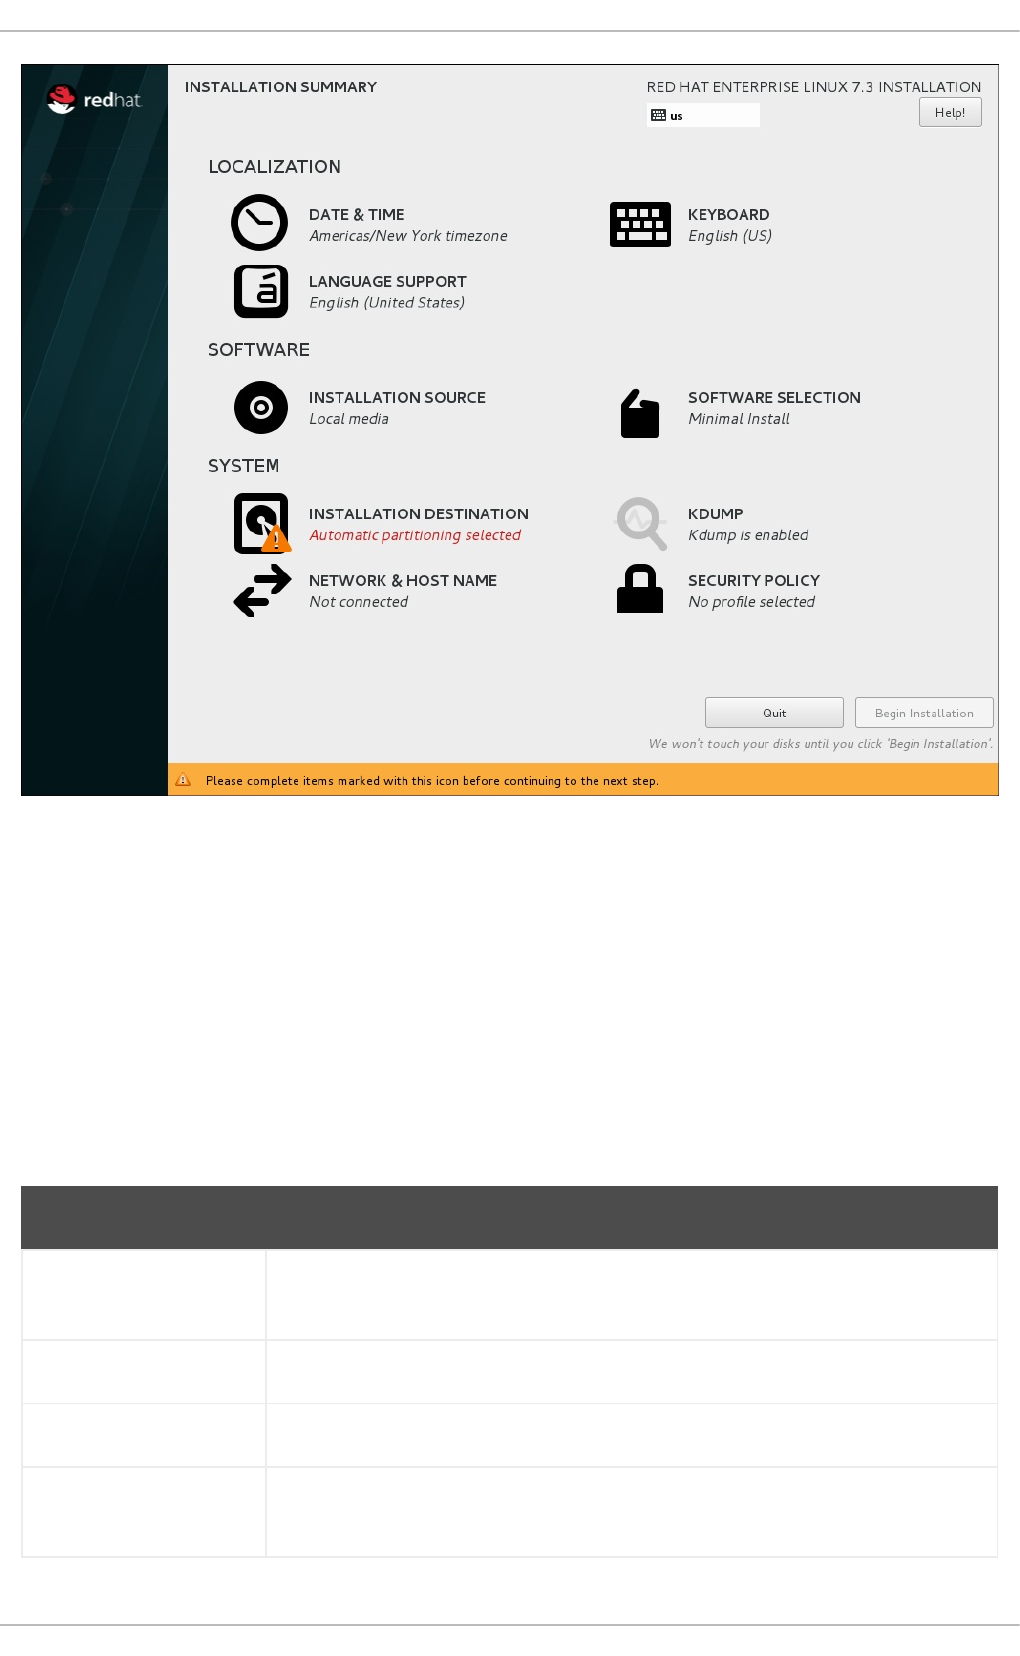
Figure 13.2. The Installation Summary Screen
The sections below discuss each screen available in the installation process. Note that due to the
installer's parallel nature, most of the screens do not have to be completed in the order in which they are
described here.
Each screen in the graphical interface contains a Help button. This button opens the Yelp help browser
displaying the section of the Red Hat Enterprise Linux Installation Guide relevant to the current screen.
You can also control the graphical installer with your keyboard. Following table shows you the shortcuts
you can use.
Table 13.2. Graphical installer keyboard shortcuts
Shortcut keys Usage
Tab and Shift+Tab Cycle through active control elements (buttons, check boxes, and so on.) on the
current screen
Up and Down Scroll through lists
Left and Right Scroll through horizontal toolbars and table entries
Space and Enter Select or remove a highlighted item from selection and expand and collapse drop-
down menus
Installation Guide
146

Additionally, elements in each screen can be toggled using their respective shortcuts. These shortcuts
are highlighted (underlined) when you hold down the Alt key; to toggle that element, press Alt+X,
where X is the highlighted letter.
Your current keyboard layout is displayed in the top right hand corner. Only one layout is configured by
default; if you configure more than layout in the Keyboard Layout screen (Section 13.10, “Keyboard
Configuration”), you can switch between them by clicking the layout indicator.
13.6. WELCOME SCREEN AND LANGUAGE SELECTION
The first screen of the installation program is the Welcome to Red Hat Enterprise Linux screen.
Here you select the language that Anaconda will use for the rest of the installation. This selection will
also become the default for the installated system, unless changed later. In the left panel, select your
language of choice, for example English. Then you can select a locale specific to your region in the
right panel, for example English (United States).
NOTE
One language is pre-selected by default on top of the list. If network access is configured
at this point (for example, if you booted from a network server instead of local media), the
pre-selected language will be determined based on automatic location detection using the
GeoIP module.
Alternatively, type your preferred language into the search box as shown below.
Once you have made your selection, click the Continue button to proceed to the Installation
Summary screen.
CHAPTER 13. INSTALLING USING ANACONDA
147

Figure 13.3. Language Configuration
After you click the Continue button, the unsupported hardware dialog may appear. This happens if you
are using hardware that the kernel does not support.
13.7. THE INSTALLATION SUMMARY SCREEN
The Installation Summary screen is the central location for setting up an installation.
Installation Guide
148

Figure 13.4. The Installation Summary Screen
Instead of directing you through consecutive screens, the Red Hat Enterprise Linux installation program
allows you to configure your installation in the order you choose.
Use your mouse to select a menu item to configure a section of the installation. When you have
completed configuring a section, or if you would like to complete that section later, click the Done button
located in the upper left corner of the screen.
Only sections marked with a warning symbol are mandatory. A note at the bottom of the screen warns
you that these sections must be completed before the installation can begin. The remaining sections are
optional. Beneath each section's title, the current configuration is summarized. Using this you can
determine whether you need to visit the section to configure it further.
Once all required sections are complete, click the Begin Installation button. Also see
Section 13.18, “Begin Installation”.
To cancel the installation, click the Quit button.
NOTE
When related background tasks are running, certain menu items might be temporarily
unavailable.
If you used a Kickstart option or a boot command-line option to specify an installation repository on a
network, but no network is available at the start of the installation, the installation program will display the
configuration screen for you to set up a network connection prior to displaying the Installation
CHAPTER 13. INSTALLING USING ANACONDA
149

Summary screen.
Figure 13.5. Network Configuration Screen When No Network Is Detected
You can skip this step if you are installing from an installation DVD or other locally accessible media,
and you are certain you will not need network to finish the installation. However, network connectivity is
necessary for network installations (see Section 8.11, “Installation Source”) or for setting up advanced
storage devices (see Section 8.15, “Storage Devices”). For more details about configuring a network in
the installation program, see Section 8.12, “Network & Hostname”.
13.8. DATE & TIME
To configure time zone, date, and optionally settings for network time, select Date & Time at the
Installation Summary screen.
There are three ways for you to select a time zone:
Using your mouse, click on the interactive map to select a specific city. A red pin appears
indicating your selection.
You can also scroll through the Region and City drop-down menus at the top of the screen to
select your time zone.
Select Etc at the bottom of the Region drop-down menu, then select your time zone in the next
menu adjusted to GMT/UTC, for example GMT+1.
If your city is not available on the map or in the drop-down menu, select the nearest major city in the
Installation Guide
150
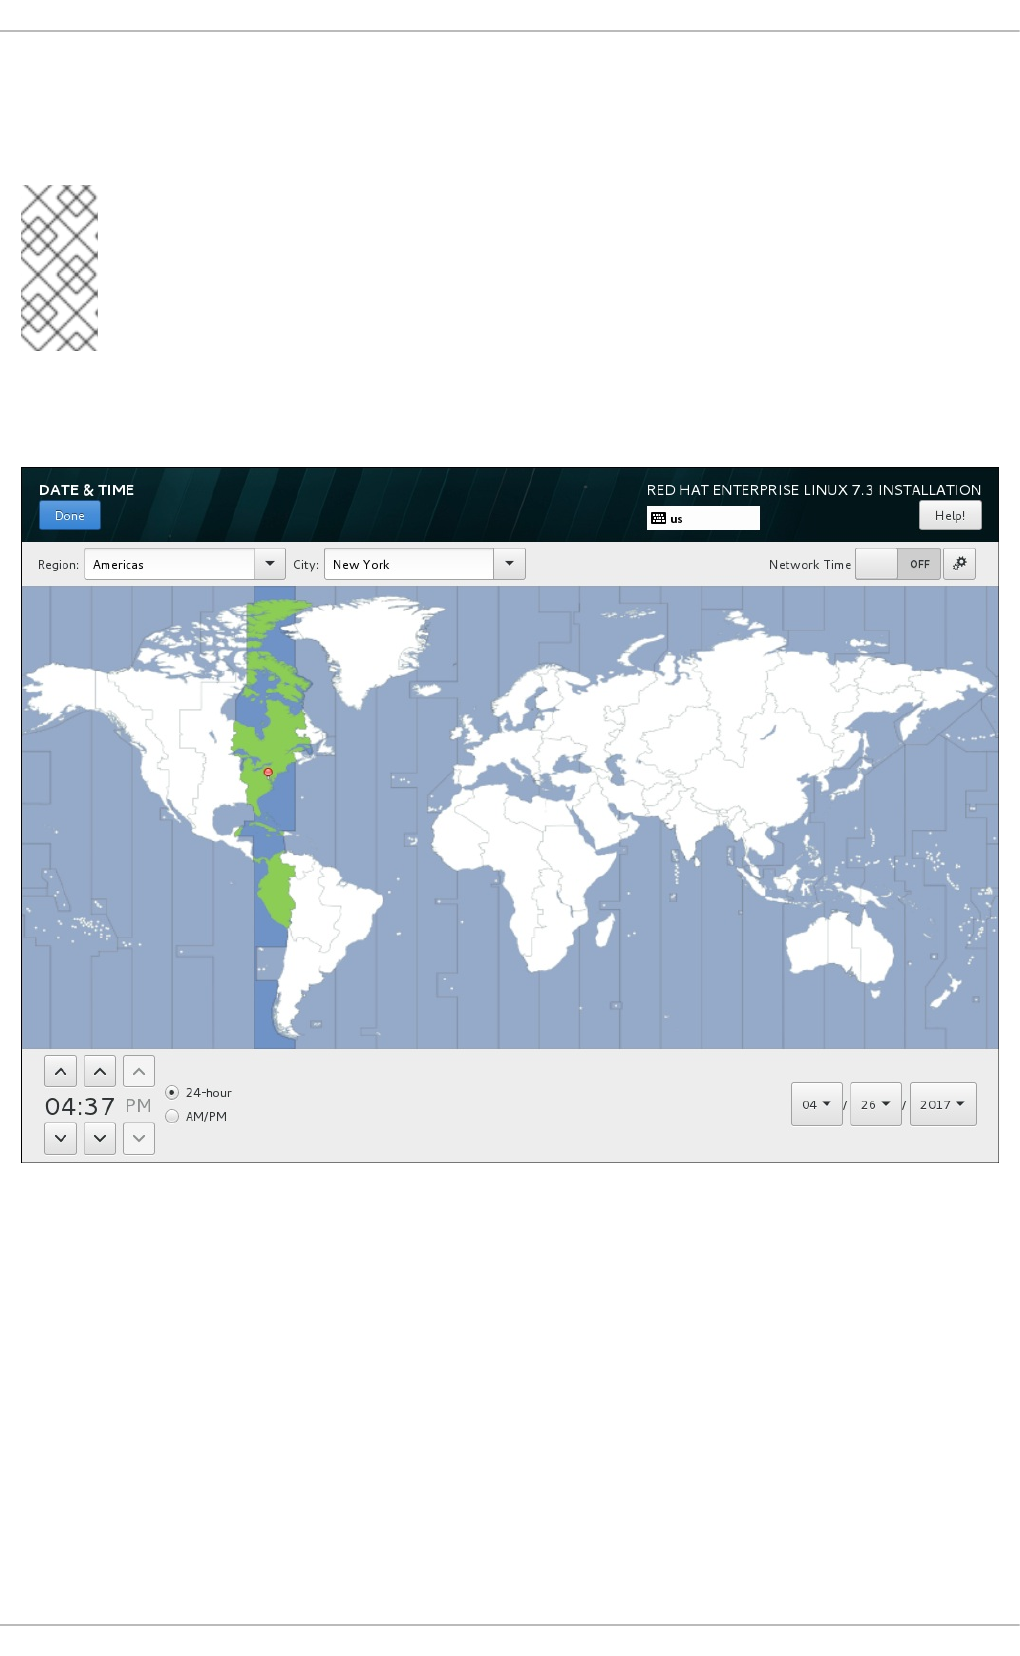
same time zone. Alternatively you can use a Kickstart file, which will allow you to specify some additional
time zones which are not available in the graphical interface. See the timezone command in timezone
(required) for details.
NOTE
The list of available cities and regions comes from the Time Zone Database (tzdata) public
domain, which is maintained by the Internet Assigned Numbers Authority (IANA). Red Hat
cannot add cities or regions into this database. You can find more information at the
official website, available at http://www.iana.org/time-zones.
Specify a time zone even if you plan to use NTP (Network Time Protocol) to maintain the accuracy of the
system clock.
Figure 13.6. Time zone configuration screen
If you are connected to the network, the Network Time switch will be enabled. To set the date and time
using NTP, leave the Network Time switch in the ON position and click the configuration icon to select
which NTP servers Red Hat Enterprise Linux should use. To set the date and time manually, move the
switch to the OFF position. The system clock should use your time zone selection to display the correct
date and time at the bottom of the screen. If they are still incorrect, adjust them manually.
Note that NTP servers might be unavailable at the time of installation. In such a case, enabling them will
not set the time automatically. When the servers become available, the date and time will update.
Once you have made your selection, click Done to return to the Installation Summary screen.
CHAPTER 13. INSTALLING USING ANACONDA
151

NOTE
To change your time zone configuration after you have completed the installation, visit the
Date & Time section of the Settings dialog window.
13.9. LANGUAGE SUPPORT
To install support for additional locales and language dialects, select Language Support from the
Installation Summary screen.
Use your mouse to select the language for which you would like to install support. In the left panel, select
your language of choice, for example Español. Then you can select a locale specific to your region in
the right panel, for example Español (Costa Rica). You can select multiple languages and multiple
locales. The selected languages are highlighted in bold in the left panel.
Figure 13.7. Configuring Language Support
Once you have made your selections, click Done to return to the Installation Summary screen.
NOTE
To change your language support configuration after you have completed the installation,
visit the Region & Language section of the Settings dialog window.
13.10. KEYBOARD CONFIGURATION
Installation Guide
152

To add multiple keyboard layouts to your system, select Keyboard from the Installation Summary
screen. Upon saving, the keyboard layouts are immediately available in the installation program and you
can switch between them by using the keyboard icon located at all times in the upper right corner of the
screen.
Initially, only the language you selected in the welcome screen is listed as the keyboard layout in the left
pane. You can either replace the initial layout or add more layouts. However, if your language does not
use ASCII characters, you might need to add a keyboard layout that does, to be able to properly set a
password for an encrypted disk partition or the root user, among other things.
Figure 13.8. Keyboard Configuration
To add an additional layout, click the + button, select it from the list, and click Add. To delete a layout,
select it and click the - button. Use the arrow buttons to arrange the layouts in order of preference. For a
visual preview of the keyboard layout, select it and click the keyboard button.
To test a layout, use the mouse to click inside the text box on the right. Type some text to confirm that
your selection functions correctly.
To test additional layouts, you can click the language selector at the top on the screen to switch them.
However, it is recommended to set up a keyboard combination for switching layout. Click the Options
button at the right to open the Layout Switching Options dialog and choose a combination from the
list by selecting its check box. The combination will then be displayed above the Options button. This
combination applies both during the installation and on the installed system, so you must configure a
combination here in order to use one after installation. You can also select more than one combination to
switch between layouts.
IMPORTANT
If you use a layout that cannot accept Latin characters, such as Russian, Red Hat
recommends additionally adding the English (United States) layout and
configuring a keyboard combination to switch between the two layouts. If you only select a
layout without Latin characters, you might be unable to enter a valid root password and
user credentials later in the installation process. This can prevent you from completing the
installation.
Once you have made your selection, click Done to return to the Installation Summary screen.
CHAPTER 13. INSTALLING USING ANACONDA
153

NOTE
To change your keyboard configuration after you have completed the installation, visit the
Keyboard section of the Settings dialogue window.
13.11. SECURITY POLICY
The Security Policy spoke allows you to configure the installed system following restrictions and
recommendations (compliance policies) defined by the Security Content Automation Protocol (SCAP)
standard. This functionality is provided by an add-on which has been enabled by default since Red Hat
Enterprise Linux 7.2. When enabled, the packages necessary to provide this functionality will
automatically be installed. However, by default, no policies are enforced, meaning that no checks are
performed during or after installation unless specifically configured.
The Red Hat Enterprise Linux 7 Security Guide provides detailed information about security compliance
including background information, practical examples, and additional resources.
IMPORTANT
Applying a security policy is not necessary on all systems. This screen should only be
used when a specific policy is mandated by your organization rules or governemnt
regulations.
If you apply a security policy to the system, it will be installed using restrictions and recommendations
defined in the selected profile. The openscap-scanner package will also be added to your package
selection, providing a preinstalled tool for compliance and vulnerability scanning. After the installation
finishes, the system will be automatically scanned to verify compliance. The results of this scan will be
saved to the /root/openscap_data directory on the installed system.
Pre-defined policies which are available in this screen are provided by SCAP Security Guide. See the
OpenSCAP Portal for links to detailed information about each available profile.
You can also load additional profiles from an HTTP, HTTPS or FTP server.
Installation Guide
154

Figure 13.9. Security policy selection screen
To configure the use of security policies on the system, first enable configuration by setting the Apply
security policy switch to ON. If the switch is in the OFF position, controls in the rest of this screen
have no effect.
After enabling security policy configuration using the switch, select one of the profiles listed in the top
window of the screen, and click the Select profile below. When a profile is selected, a green check
mark will appear on the right side, and the bottom field will display whether any changes will be made
before beginning the installation.
NOTE
None of the profiles available by default perform any changes before the installation
begins. However, loading a custom profile as described below can require some pre-
installation actions.
To use a custom profile, click the Change content button in the top left corner. This will open another
screen where you can enter an URL of a valid security content. To go back to the default security content
selection screen, click Use SCAP Security Guide in the top left corner.
Custom profiles can be loaded from an HTTP, HTTPS or FTP server. Use the full address of the content,
including the protocol (such as http://). A network connection must be active (enabled in
Section 13.13, “Network & Hostname”) before you can load a custom profile. The content type will be
detected automatically by the installer.
After you select a profile, or if you want to leave the screen, click Done in the top left corner to return to
CHAPTER 13. INSTALLING USING ANACONDA
155
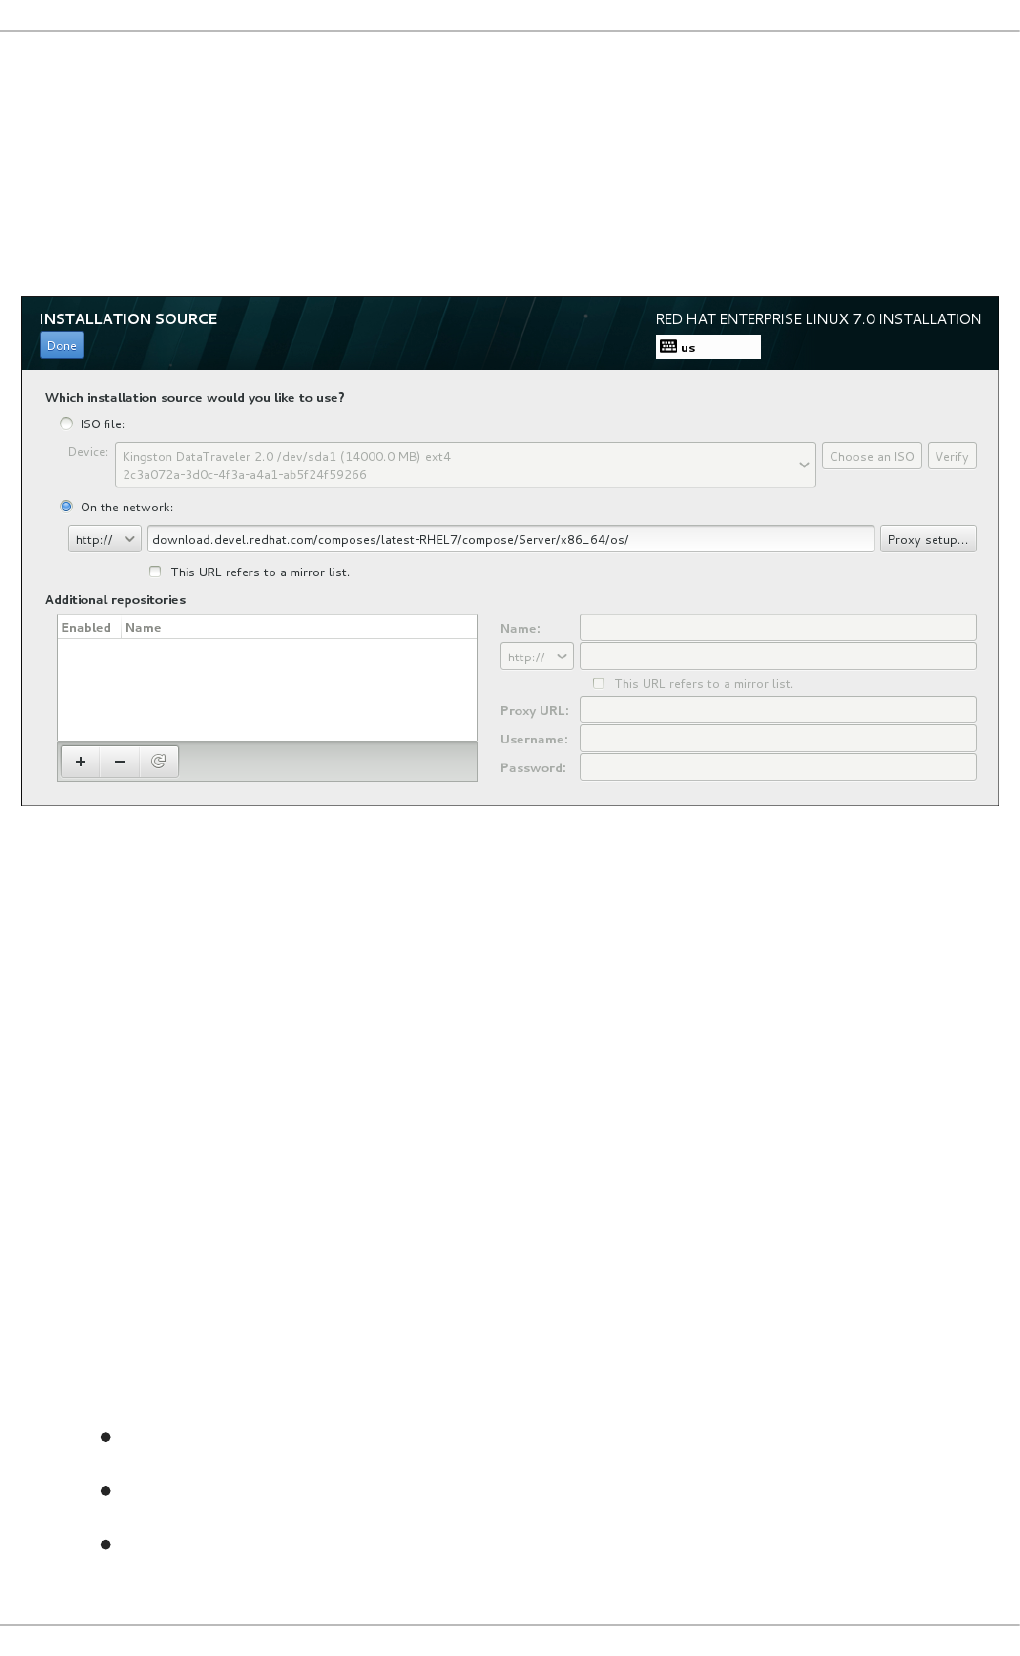
Section 13.7, “The Installation Summary Screen”.
13.12. INSTALLATION SOURCE
To specify a file or a location to install Red Hat Enterprise Linux from, select Installation Source
from the Installation Summary screen. On this screen, you can choose between locally available
installation media, such as a DVD or an ISO file, or a network location.
Figure 13.10. Installation Source Screen
Select one of the following options:
Auto-detected installation media
If you started the installation using the full installation DVD or USB drive, the installation program will
detect it and display basic information under this option. Click the Verify button to ensure that the
media is suitable for installation. This integrity test is the same as the one performed if you selected
Test this media & Install Red Hat Enterprise Linux in the boot menu, or if you used
the rd.live.check boot option.
ISO file
This option will appear if the installation program detected a partitioned hard drive with mountable file
systems. Select this option, click the Choose an ISO button, and browse to the installation ISO file's
location on your system. Then click Verify to ensure that the file is suitable for installation.
On the network
To specify a network location, select this option and choose from the following options in the drop-
down menu:
http://
https://
ftp://
Installation Guide
156

nfs
Using your selection as the start of the location URL, type the rest into the address box. If you choose
NFS, another box will appear for you to specify any NFS mount options.
IMPORTANT
When selecting an NFS-based installation source, you must specify the address with a
colon (:) character separating the host name from the path. For example:
server.example.com:/path/to/directory
To configure a proxy for an HTTP or HTTPS source, click the Proxy setup button. Check Enable
HTTP proxy and type the URL into the Proxy URL box. If your proxy requires authentication, check
Use Authentication and enter a user name and password. Click Add.
If your HTTP or HTTPS URL refers to a repository mirror list, mark the check box under the input
field.
You can also specify additional repositories to gain access to more installation environments and
software add-ons. See Section 13.14, “Software Selection” for more information.
To add a repository, click the + button. To delete a repository, click the - button. Click the arrow icon to
revert to the previous list of repositories, that is, to replace current entries with those that were present at
the time you entered the Installation Source screen. To activate or deactivate a repository, click
the check box in the Enabled column at each entry in the list.
In the right part of the form, you can name your additional repository and configure it the same way as
the primary repository on the network.
Once you have selected your installation source, click Done to return to the Installation Summary
screen.
13.13. NETWORK & HOSTNAME
To configure essential networking features for your system, select Network & Hostname at the
Installation Summary screen.
IMPORTANT
When the installation finishes and the system boots for the first time, any network
interfaces which you configured during the installation will be activated. However, the
installation does not prompt you to configure network interfaces on some common
installation paths - for example, when you install Red Hat Enterprise Linux from a DVD to
a local hard drive.
When you install Red Hat Enterprise Linux from a local installation source to a local
storage device, be sure to configure at least one network interface manually if you require
network access when the system boots for the first time. You will also need to set the
connection to connect automatically after boot when editing the configuration.
Locally accessible interfaces are automatically detected by the installation program and cannot be
CHAPTER 13. INSTALLING USING ANACONDA
157

manually added or deleted. The detected interfaces are listed in the left pane. Click an interface in the
list to display more details about in on the right. To activate or deactivate a network interface, move the
switch in the top right corner of the screen to either ON or OFF.
NOTE
There are several types of network device naming standards used to identify network
devices with persistent names such as em1 or wl3sp0. For information about these
standards, see the Red Hat Enterprise Linux 7 Networking Guide.
Figure 13.11. Network & Hostname Configuration Screen
Below the list of connections, enter a host name for this computer in the Hostname input field. The host
name can be either a fully-qualified domain name (FQDN) in the format hostname.domainname or a
short host name in the format hostname. Many networks have a Dynamic Host Configuration Protocol
(DHCP) service that automatically supplies connected systems with a domain name. To allow the DHCP
service to assign the domain name to this machine, only specify the short host name. The value
localhost.localdomain means that no specific static host name for target system is configured, and
the actual host name of installed system will be configured during process of network configuration (for
example, by NetworkManager using DHCP or DNS).
IMPORTANT
If you want to manually assign the host name, make sure you do not use a domain name
that is not delegated to you, as this can result in network resources becoming
unavailable. For more information, see the recommended naming practices in the
Red Hat Enterprise Linux 7 Networking Guide.
NOTE
You can use the Network section of the system Settings dialog to change your network
configuration after you have completed the installation.
Once you have finished network configuration, click Done to return to the Installation Summary
screen.
Installation Guide
158

13.13.1. Edit Network Connections
This section only details the most important settings for a typical wired connection used during
installation. Many of the available options do not have to be changed in most installation scenarios and
are not carried over to the installed system. Configuration of other types of network is broadly similar,
although the specific configuration parameters are necessarily different. To learn more about network
configuration after installation, see the Red Hat Enterprise Linux 7 Networking Guide.
To configure a network connection manually, click the Configure button in the lower right corner of the
screen. A dialog appears that allows you to configure the selected connection. The configuration options
presented depends on whether the connection is wired, wireless, mobile broadband, VPN, or DSL. If
required, see the Networking Guide for more detailed information on network settings.
The most useful network configuration options to consider during installation are:
Mark the Automatically connect to this network when it is available check
box if you want to use the connection every time the system boots. You can use more than one
connection that will connect automatically. This setting will carry over to the installed system.
Figure 13.12. Network Auto-Connection Feature
By default, IPv4 parameters are configured automatically by the DHCP service on the network.
At the same time, the IPv6 configuration is set to the Automatic method. This combination is
suitable for most installation scenarios and usually does not require any changes.
CHAPTER 13. INSTALLING USING ANACONDA
159
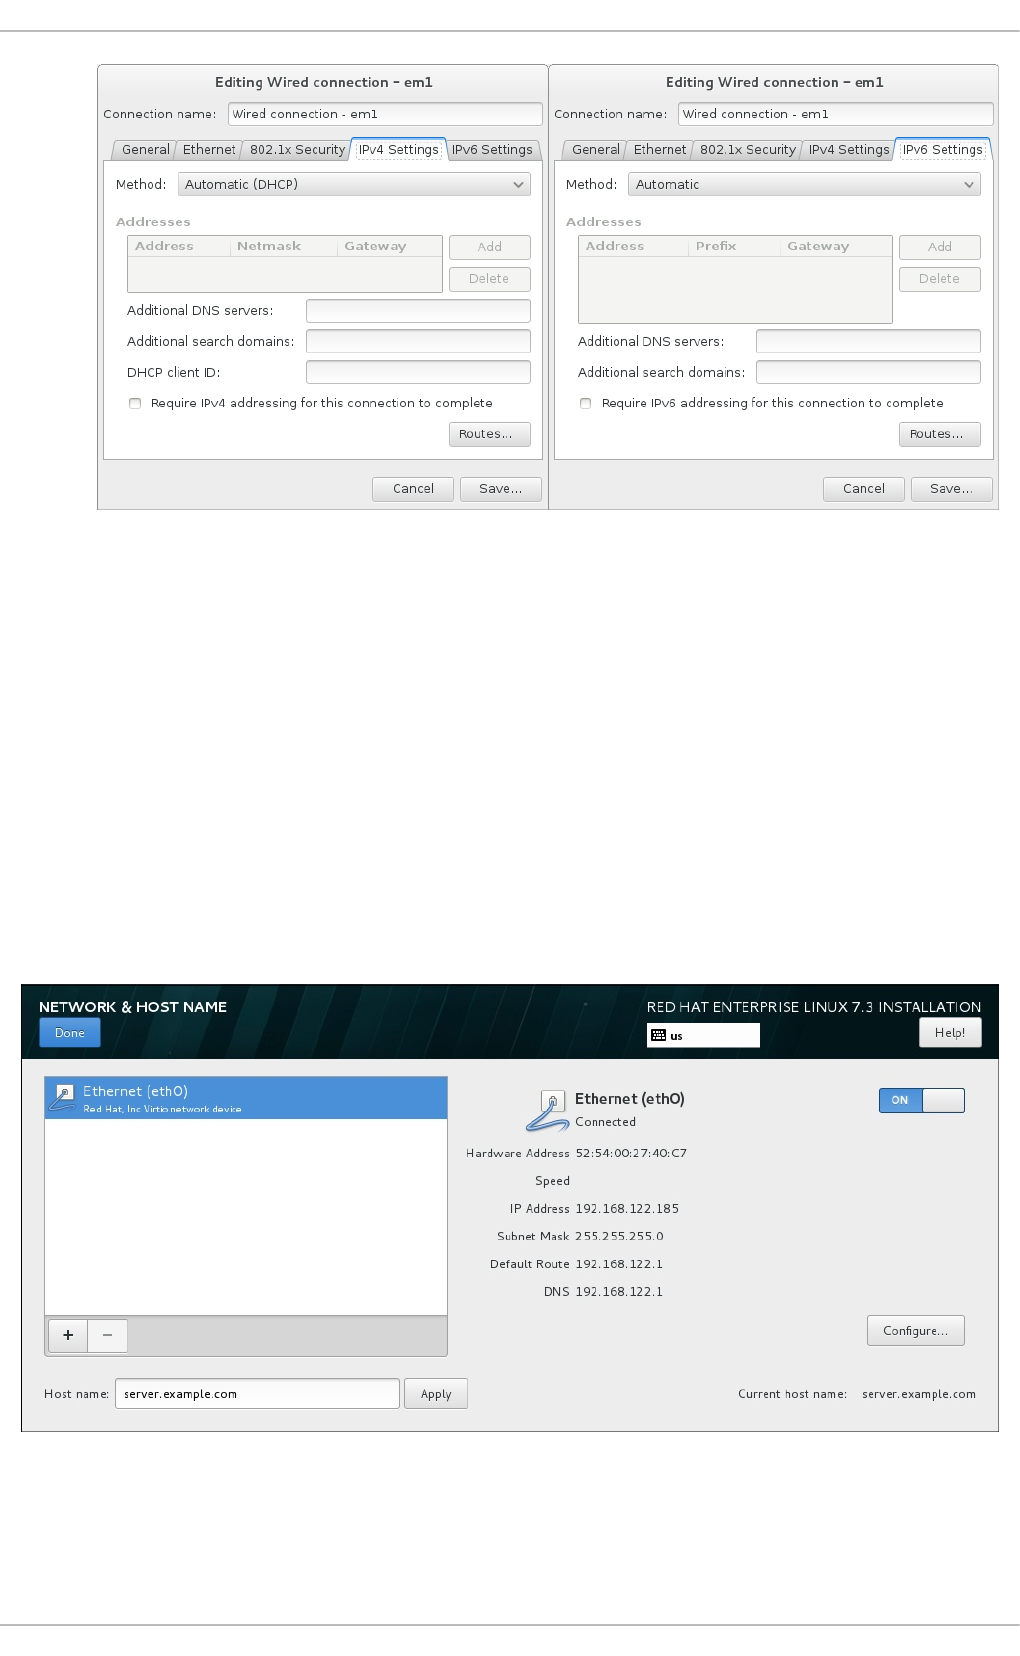
Figure 13.13. IP Protocol Settings
When you have finished editing network settings, click Save to save the new configuration. If you
reconfigured a device that was already active during installation, you must restart the device in order to
use the new configuration in the installation environment. Use the ON/OFF switch on the Network &
Host Name screen to restart the device.
13.13.2. Advanced Network Interfaces
Advanced network interfaces are also available for installation. This includes virtual local area networks
(VLANs) and three methods to use aggregated links. Detailed description of these interfaces is beyond
the scope of this document; read the Red Hat Enterprise Linux 7 Networking Guide for more information.
To create an advanced network interface, click the + button in the lower left corner of the Network &
Hostname screen.
Figure 13.14. Network & Hostname Configuration Screen
A dialog appears with a drop-down menu with the following options:
Installation Guide
160

Bond - represents NIC (Network Interface Controller) Bonding, a method to bind multiple
network interfaces together into a single, bonded, channel.
Bridge - represents NIC Bridging, a method to connect multiple separate network into one
aggregate network.
Team - represents NIC Teaming, a new implementation to aggregate links, designed to provide
a small kernel driver to implement the fast handling of packet flows, and various applications to
do everything else in user space.
VLAN - represents a method to create multiple distinct broadcast domains, which are mutually
isolated.
Figure 13.15. Advanced Network Interface Dialog
NOTE
Note that locally accessible interfaces, wired or wireless, are automatically detected by
the installation program and cannot be manually added or deleted by using these
controls.
Once you have selected an option and clicked the Add button, another dialog appears for you to
configure the new interface. See the respective chapters in the Red Hat Enterprise Linux 7 Networking
Guide for detailed instructions. To edit configuration on an existing advanced interface, click the
Configure button in the lower right corner of the screen. You can also remove a manually-added
interface by clicking the - button.
13.14. SOFTWARE SELECTION
To specify which packages will be installed, select Software Selection at the Installation
Summary screen. The package groups are organized into Base Environments. These environments are
pre-defined sets of packages with a specific purpose; for example, the Virtualization Host
environment contains a set of software packages needed for running virtual machines on the system.
Only one software environment can be selected at installation time.
For each environment, there are additional packages available in the form of Add-ons. Add-ons are
presented in the right part of the screen and the list of them is refreshed when a new environment is
selected. You can select multiple add-ons for your installation environment.
A horizontal line separates the list of add-ons into two areas:
Add-ons listed above the horizontal line are specific to the environment you selected. If you
select any add-ons in this part of the list and then select a different environment, your selection
will be lost.
CHAPTER 13. INSTALLING USING ANACONDA
161

Add-ons listed below the horizontal line are available for all environments. Selecting a different
environment will not impact the selections made in this part of the list.
Figure 13.16. Example of a Software Selection for a Server Installation
The availability of base environments and add-ons depends on the variant of the installation ISO image
which you are using as the installation source. For example, the server variant provides environments
designed for servers, while the workstation variant has several choices for deployment as a
developer workstation, and so on.
The installation program does not show which packages are contained in the available environments. To
see which packages are contained in a specific environment or add-on, see the repodata/*-
comps-variant.architecture.xml file on the Red Hat Enterprise Linux Installation DVD which you
are using as the installation source. This file contains a structure describing available environments
(marked by the <environment> tag) and add-ons (the <group> tag).
Installation Guide
162

IMPORTANT
The pre-defined environments and add-ons allow you to customize your system, but in a
manual installation, there is no way to select individual packages to install. If you are not
sure what package should be installed, Red Hat recommends you to select the Minimal
Install environment. Minimal install only installs a basic version of Red Hat
Enterprise Linux with only a minimal amount of additional software. This will substantially
reduce the chance of the system being affected by a vulnerability. After the system
finishes installing and you log in for the first time, you can use the Yum package manager
to install any additional software you need. For more details on Minimal install, see
the Installing the Minimum Amount of Packages Required section of the Red Hat
Enterprise Linux 7 Security Guide.
Alternatively, automating the installation with a Kickstart file allows for a much higher degree of control
over installed packages. You can specify environments, groups and individual packages in the
%packages section of the Kickstart file. See Section 26.3.2, “Package Selection” for instructions on
selecting packages to install in a Kickstart file, and Chapter 26, Kickstart Installations for general
information about automating the installation with Kickstart.
Once you have selected an environment and add-ons to be installed, click Done to return to the
Installation Summary screen.
13.14.1. Core Network Services
All Red Hat Enterprise Linux installations include the following network services:
centralized logging through the rsyslog service
email through SMTP (Simple Mail Transfer Protocol)
network file sharing through NFS (Network File System)
remote access through SSH (Secure SHell)
resource advertising through mDNS (multicast DNS)
Some automated processes on your Red Hat Enterprise Linux system use the email service to send
reports and messages to the system administrator. By default, the email, logging, and printing services
do not accept connections from other systems.
You can configure your Red Hat Enterprise Linux system after installation to offer email, file sharing,
logging, printing, and remote desktop access services. The SSH service is enabled by default. You can
also use NFS to access files on other systems without enabling the NFS sharing service.
13.15. INSTALLATION DESTINATION
To select the disks and partition the storage space on which you will install Red Hat Enterprise Linux,
select Installation Destination in the Installation Summary screen. If you are unfamiliar
with disk partitions, see Appendix A, An Introduction to Disk Partitions for more information.
CHAPTER 13. INSTALLING USING ANACONDA
163

WARNING
Red Hat recommends that you always back up any data that you have on your
systems. For example, if you are upgrading or creating a dual-boot system, you
should back up any data you want to keep on your storage devices. Unforeseen
circumstances can result in loss of all your data.
IMPORTANT
If you install Red Hat Enterprise Linux in text mode, you can only use the default
partitioning schemes described in this section. You cannot add or remove partitions or file
systems beyond those that the installation program automatically adds or removes.
IMPORTANT
Special cases
If you have a RAID card, be aware that some BIOS types do not support booting
from the RAID card. In such a case, the /boot partition must be created on a
partition outside of the RAID array, such as on a separate hard drive. It is
necessary to use an internal hard drive for partition creation with problematic
RAID cards. A /boot partition is also necessary for software RAID setups. If you
have chosen to automatically partition your system, you should manually edit your
/boot partition; see Section 13.15.4, “Manual Partitioning” for more details.
When you install Red Hat Enterprise Linux on a system with both multipath and
non-multipath storage devices, the automatic partitioning layout in the installation
program might create volume groups that contain a mix of multipath and non-
multipath devices. This defeats the purpose of multipath storage. We advise that
you select only multipath or only non-multipath devices on the Installation
Destination screen. Alternatively, proceed to manual partitioning.
Installation Guide
164
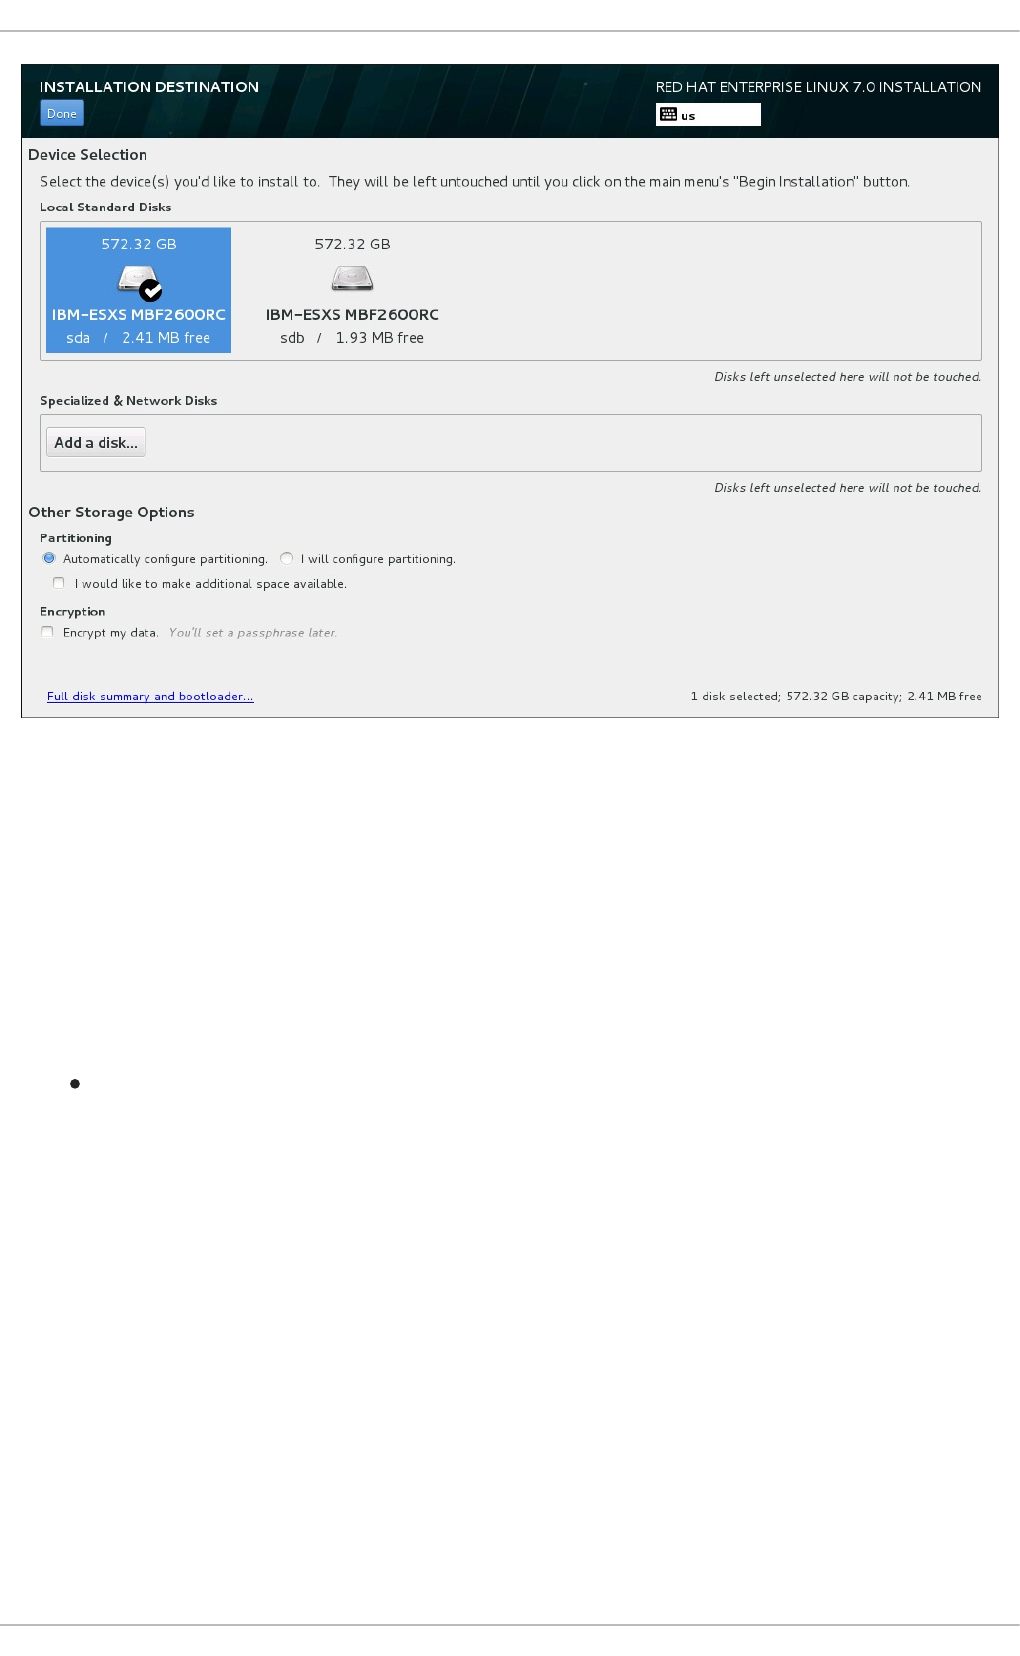
Figure 13.17. Storage Space Overview
On this screen, you can see storage devices available locally on your computer. You can also add
additional specialized or network devices by clicking the Add a disk button. To learn more about these
devices see Section 13.16, “Storage Devices”.
If you do not feel comfortable with partitioning your system, leave the default selection of the
Automatically configure partitioning radio button to let the installation program partition the
storage devices for you.
Below the panes for storage devices is a form of additional controls labeled Other Storage Options:
In the Partitioning section, you can select how storage devices are partitioned and how
volumes are created. You can configure the partitions, manually or allow the installation program
to do it automatically.
Automatic partitioning is recommended if you are doing a clean installation on previously unused
storage or do not need to keep any data that might be present on the storage. To proceed this
way, leave the default selection of the Automatically configure partitioning radio
button, and the installation program will create the necessary partitions and volumes on the
storage space for you.
For automatic partitioning, you can also select the I would like to make additional
space available check box to choose how to reassign space from other file systems to this
installation. After you click Done, there are two dialogs that can appear. If you selected
automatic partitioning but there is not enough storage space to complete the installation using
the recommended partitioning configuration, a dialog will appear:
CHAPTER 13. INSTALLING USING ANACONDA
165

Figure 13.18. Installation Options Dialog with Option to Reclaim Space
You can click to the Red Hat Enterprise Linux software selection link. The link will
navigate you to the Software selection section, where you can change what software you
want to install, and free some aditional storage space.
Alternatively, you can click Cancel & add more disks to return to the Installation
Destination screen, where it is possible to add more storage devices or choose to configure
partitioning manually. Click Reclaim space to free some storage space from existing file
systems. See Section 13.15.3, “Reclaim Disk Space” for details.
The second dialog appears if you cannot create enough free space. In this case, you have to
add more disks on the initial storage screen or quit the installation.
If you select the I will configure partitioning radio button for manual setup, you will
be brought to the Manual Partitioning screen after clicking Done. See Section 13.15.4,
“Manual Partitioning” for details.
In the Encryption section, you can select the Encrypt my data check box to encrypt all
partitions except for the /boot partition. See the Red Hat Enterprise Linux 7 Security Guide for
information on encryption.
At the bottom of the screen is the Full disk summary and bootloader button for you to configure
a disk on which a boot loader will be installed.
See Section 13.15.1, “Boot Loader Installation” for more information.
Click the Done button once you have made your selections to either return to the Installation
Summary screen or to proceed to the Manual Partitioning screen.
Installation Guide
166
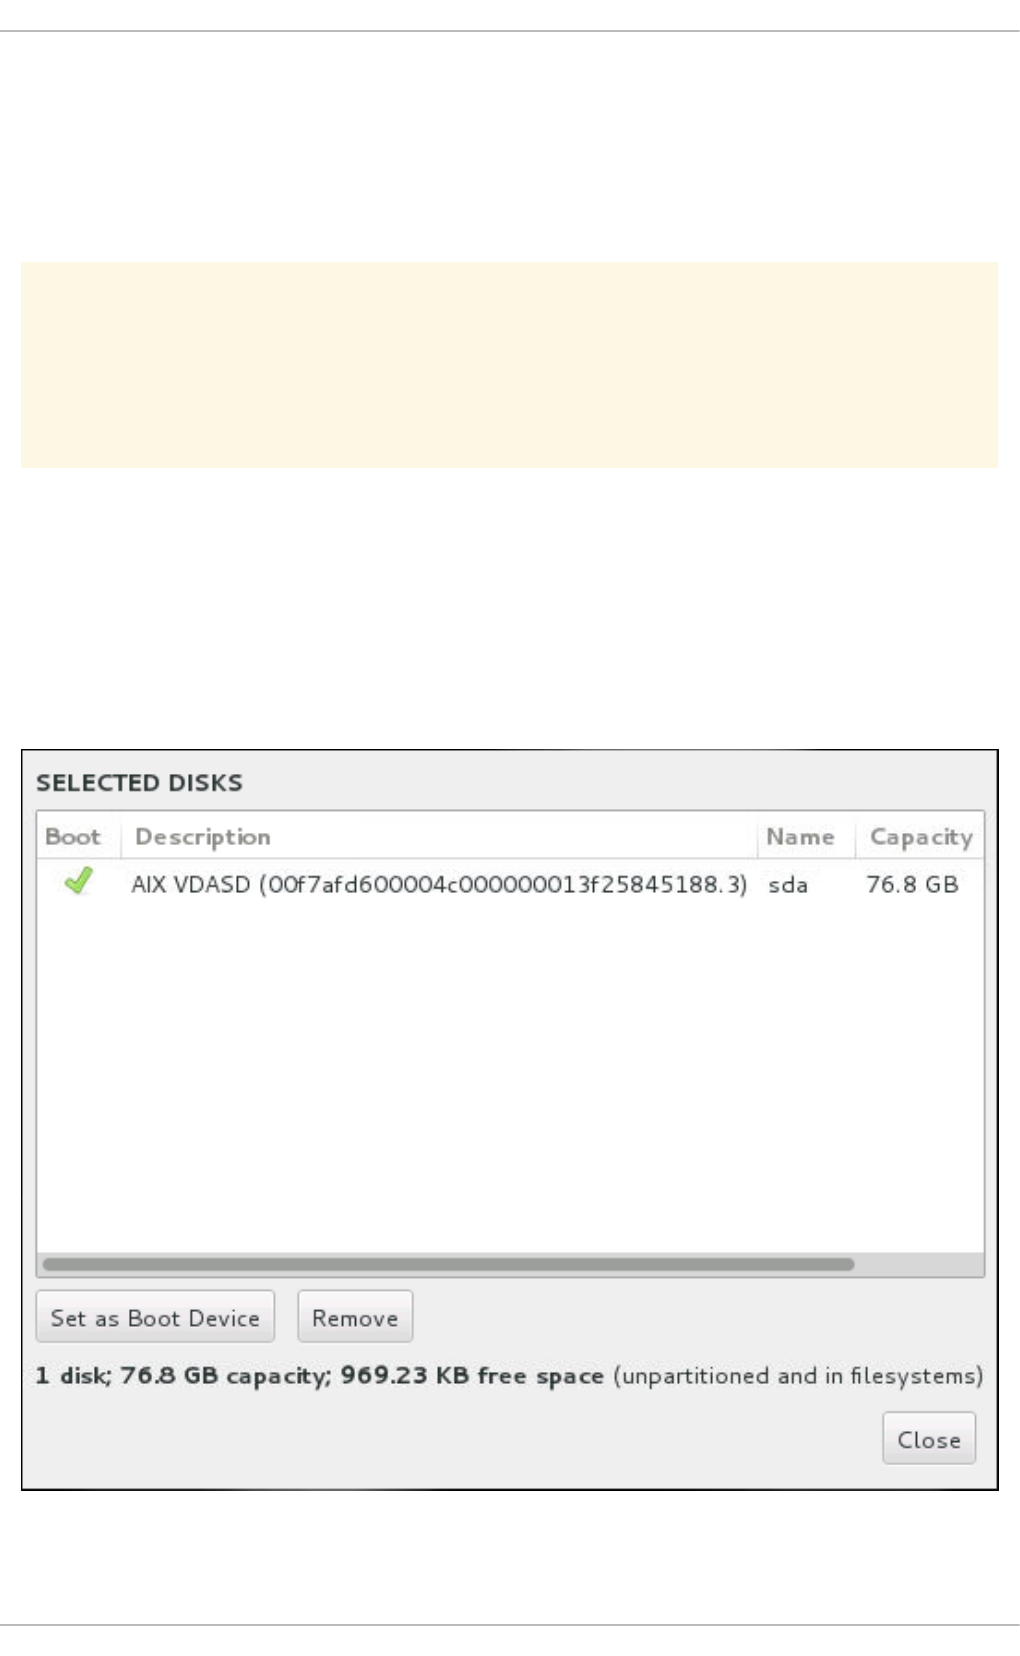
13.15.1. Boot Loader Installation
Red Hat Enterprise Linux uses GRUB2 (GRand Unified Bootloader version 2) as its boot loader. The
boot loader is the first program that runs when the computer starts and is responsible for loading and
transferring control to an operating system. GRUB2 can boot any compatible operating system and can
also use chain loading to transfer control to other boot loaders for unsupported operating systems.
WARNING
Installing GRUB2 can overwrite your existing boot loader.
If you have other operating systems already installed, Red Hat Enterprise Linux attempts to automatically
detect and configure GRUB2 to boot them. You can manually configure any additional operating systems
if they are not detected properly.
To specify which device the boot loader should be installed on, click the Full disk summary and
bootloader link at the bottom of the Installation Destination screen. The Selected Disks
dialog will appear. If you are partitioning the drive manually, this dialog can be reached by clicking
Storage device/s selected on the Manual Partitioning screen.
Figure 13.19. Summary of Selected Disks
CHAPTER 13. INSTALLING USING ANACONDA
167
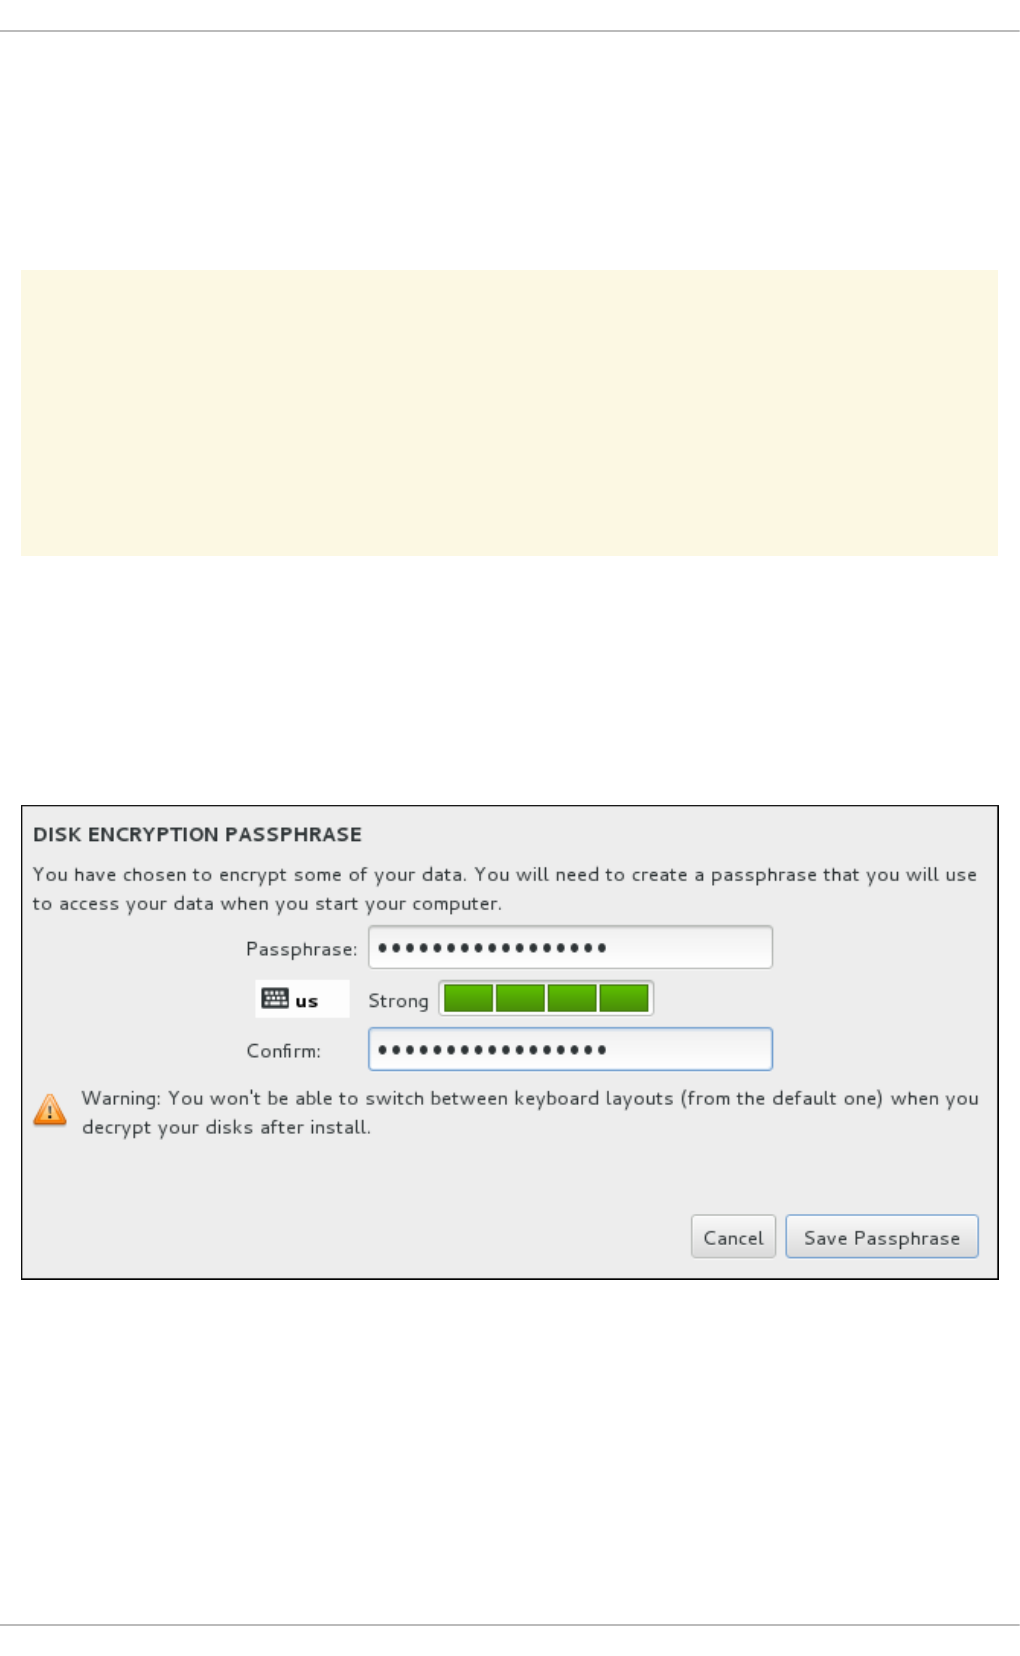
In the Boot column, a green tick icon marks one of the devices as the intended boot device. To change
the boot device, select a device from the list and click the Set as Boot Device button to install the
boot loader there instead.
To decline installation of a new boot loader, select the marked device and click the Do not install
bootloader button. This will remove the tick and ensure GRUB2 is not installed on any device.
WARNING
If you choose not to install a boot loader for any reason, you will not be able to boot
the system directly, and you must use another boot method, such as a commercial
boot loader application. Use this option only if you are sure you have another way to
boot your system.
13.15.2. Encrypt Partitions
If you selected the Encrypt my data option, when you click to proceed to the next screen the
installation program will prompt you for a passphrase with which to encrypt the partitions on the system.
Partitions are encrypted using the Linux Unified Key Setup - see the Red Hat Enterprise Linux 7 Security
Guide for more information.
Figure 13.20. Enter Passphrase for an Encrypted Partition
Choose a passphrase and type it into each of the two fields in the dialog box. Note that you need to use
the same keyboard layout for setting up this passphrase that you will use to unlock partitions later. Use
the language layout icon to ensure the correct layout is selected. You must provide this passphrase
every time that the system boots. Press Tab while in the Passphrase input field to retype it. If the
passphrase is too weak, a warning icon appears in the field and you will not be allowed to type in the
second field. Hover your mouse cursor over the warning icon to learn how to improve the passphrase.
Installation Guide
168

WARNING
If you lose this passphrase, any encrypted partitions and the data on them will
become completely inaccessible. There is no way to recover a lost passphrase.
Note that if you perform a Kickstart installation, you can save encryption
passphrases and create backup encryption passphrases during installation. See the
Red Hat Enterprise Linux 7 Security Guide for more information about disk
encryption.
13.15.3. Reclaim Disk Space
If there is insufficient space to install Red Hat Enterprise Linux on the disks selected in Installation
Destination and you selected Reclaim Space at the Installation Options dialog, the
Reclaim Disk Space dialog appears.
WARNING
Unless you select to shrink a partition, reclaiming space on a partition involves
deleting all the data on it and you should always verify that any data you need to
keep was backed up.
CHAPTER 13. INSTALLING USING ANACONDA
169
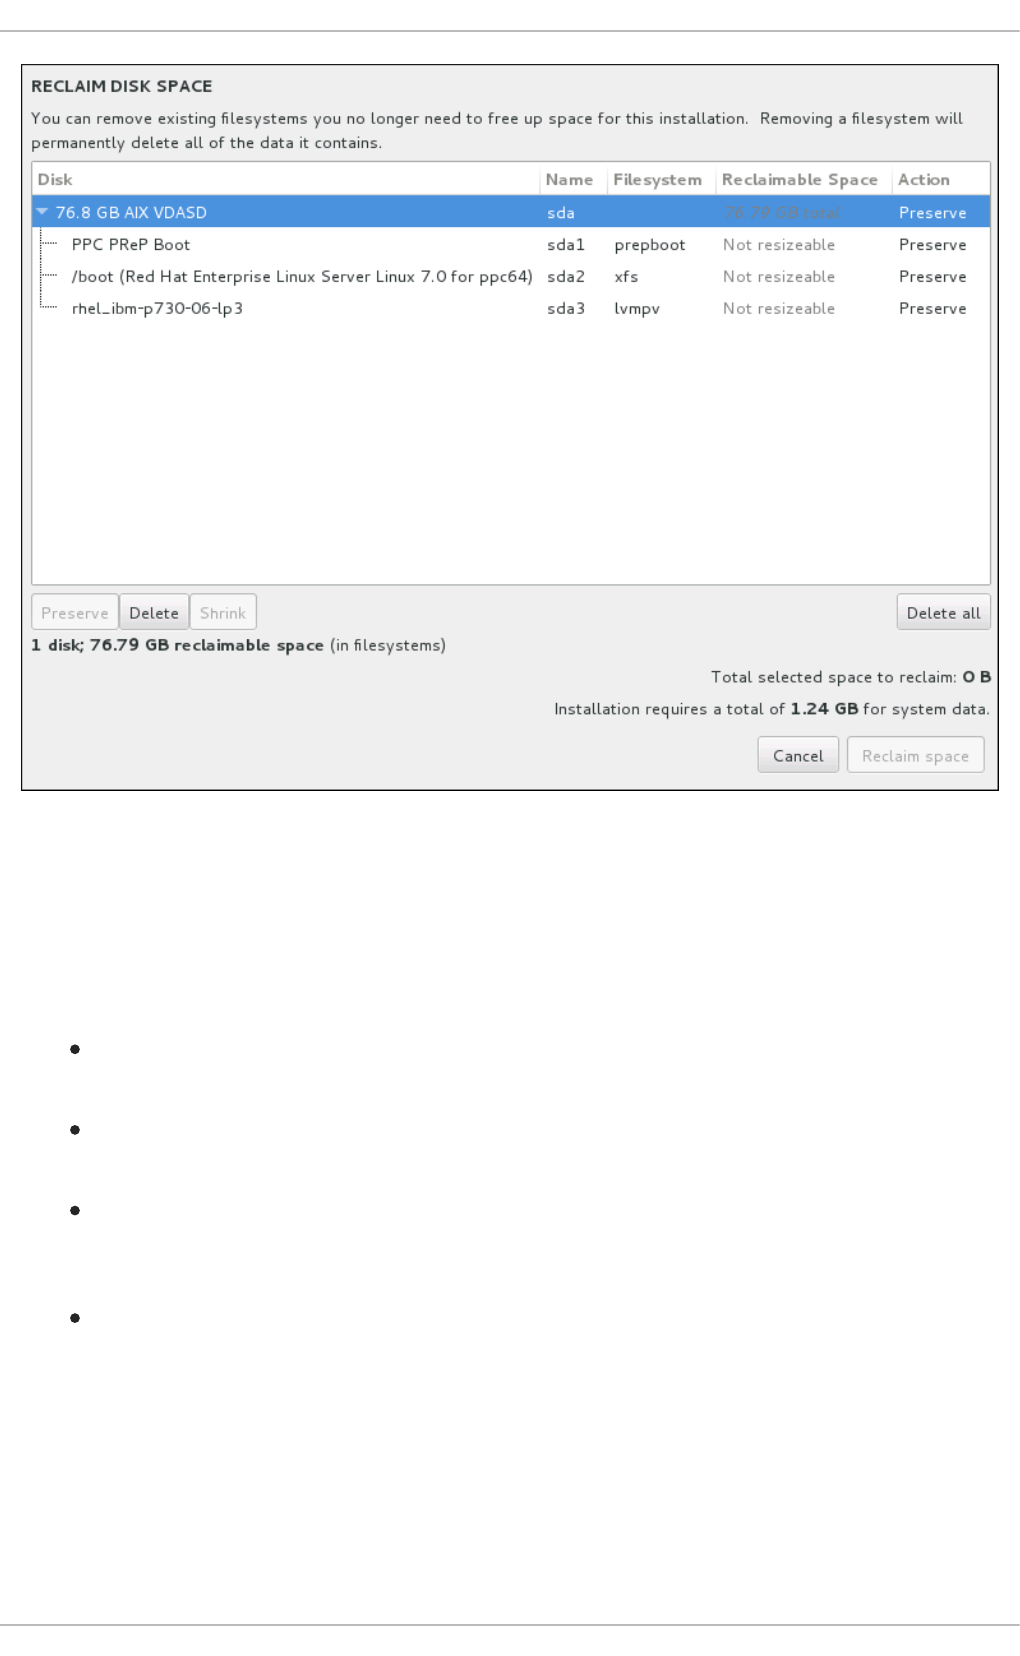
Figure 13.21. Reclaim Disk Space from Existing File Systems
The existing file systems Red Hat Enterprise Linux has detected are listed in a table as part of their
respective disks. The Reclaimable Space column lists the space that could be reassigned to this
installation. The Action column lists what action will be taken with the file system to reclaim space.
Beneath the table are four buttons:
Preserve - leaves the file system untouched and no data will be deleted. This is the default
action.
Delete - removes the file system entirely. All the space it takes up on the disk will be made
available for the installation.
Shrink - recovers free space from the file system and makes it available for this installation.
Use the slider to set a new size for the selected partition. Can only be used on resizable
partitions where LVM or RAID is not used.
Delete all/Preserve all - this button, located on the right, marks all file systems for
deletion by default. Upon clicking, it changes the label and allows you to mark all file systems to
be preserved again.
Select a file system or a whole disk in the table with your mouse and click one of the buttons. The label
in the Action column will change to match your selection and the amount of Total selected space
to reclaim displayed beneath the table will adjust accordingly. Beneath this value is the amount of
space the installation requires based on the packages you have selected to install.
Installation Guide
170
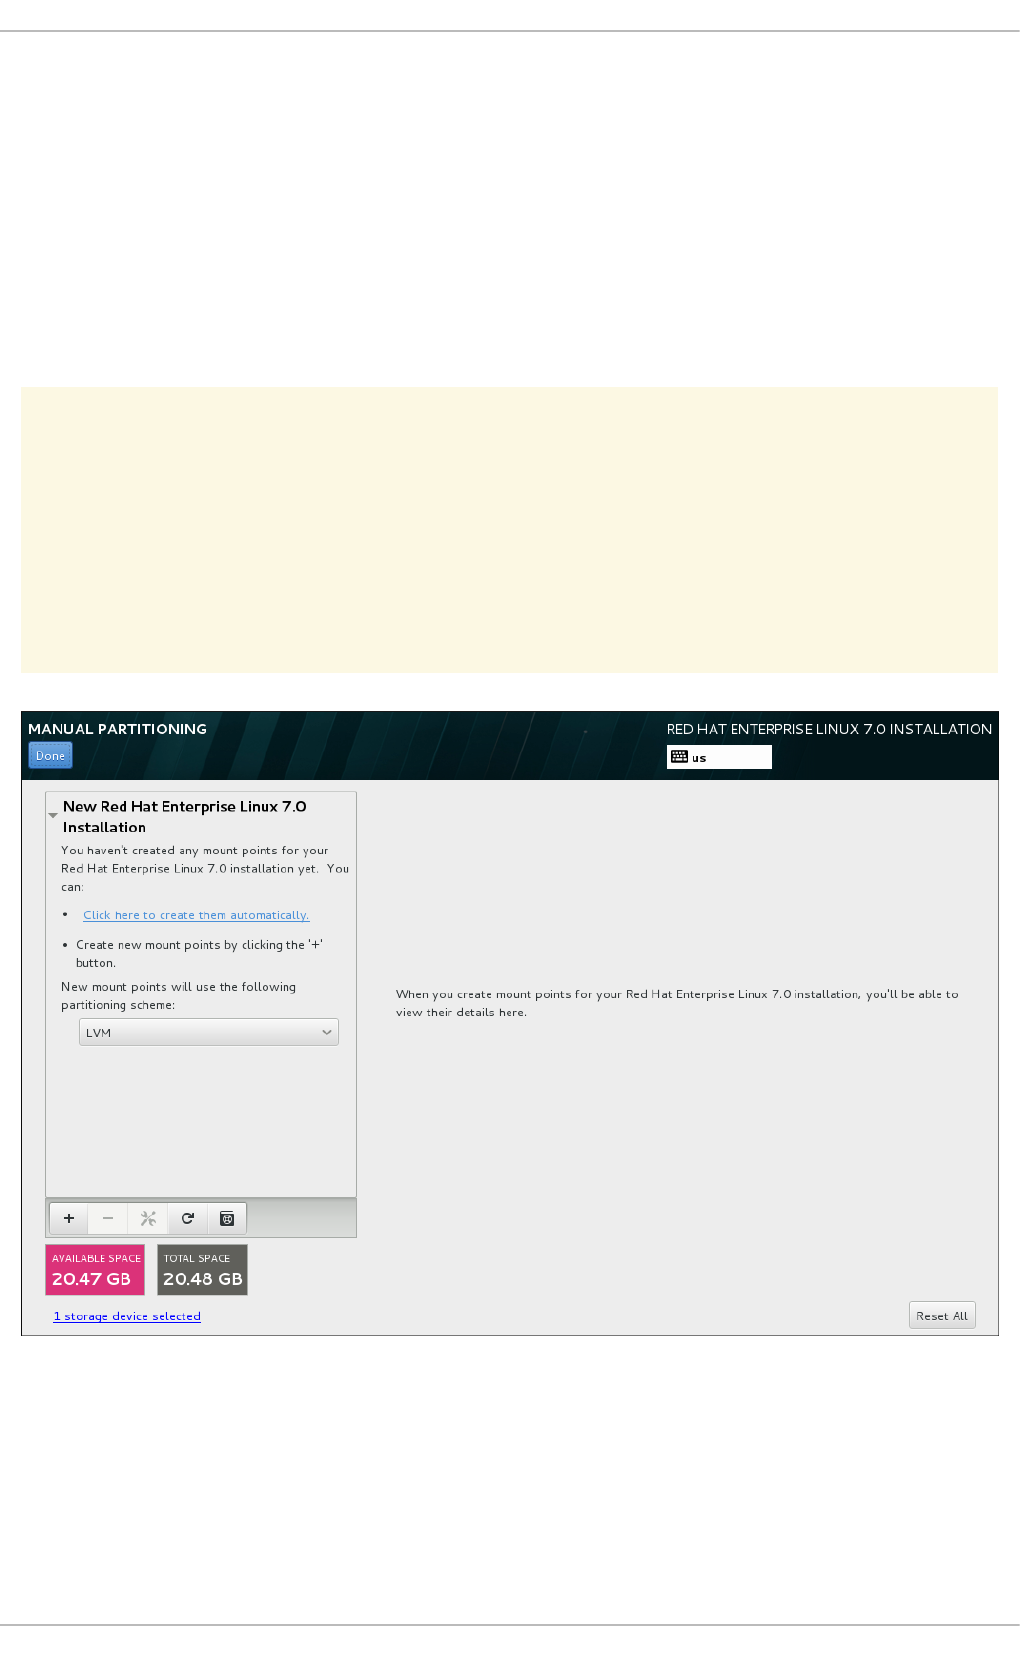
When enough space has been reclaimed for the installation to proceed, the Reclaim Space button will
become available. Click this button to return to the Installation Summary screen and proceed with the
installation.
13.15.4. Manual Partitioning
The Manual Partitioning screen is displayed when you click Done from Installation Destination if
you selected the I will configure partitioning option. On this screen you configure your disk
partitions and mount points. This defines the file system that Red Hat Enterprise Linux will be installed
on.
WARNING
Red Hat recommends that you always back up any data that you have on your
systems. For example, if you are upgrading or creating a dual-boot system, you
should back up any data you want to keep on your storage devices. Unforeseen
circumstances can result in loss of all your data.
Figure 13.22. The Manual Partitioning Screen
The Manual Partitioning screen initially features a single pane on the left for the mount points. The
pane is either empty except for information about creating mount points, or it displays existing mount
points that the installation program has detected. These mount points are organized by detected
operating system installations. Therefore, some file systems might be displayed multiple times if a
partition is shared among several installations. The total space and available space on selected storage
devices are displayed beneath this pane.
CHAPTER 13. INSTALLING USING ANACONDA
171
If your system contains existing file systems, ensure that enough space will be available for the
installation. Use the - button to remove unneeded partitions.
NOTE
For recommendations and additional information about disk partitions, see Appendix A,
An Introduction to Disk Partitions and Section 13.15.4.4, “Recommended Partitioning
Scheme”. At a bare minimum, you need an appropriately sized root partition, and usually
a swap partition appropriate to the amount of RAM you have on your system.
13.15.4.1. Adding File Systems and Configuring Partitions
An installation of Red Hat Enterprise Linux requires a PReP boot partition and one other partition but
Red Hat recommends at least five: PReP, /, /home, /boot, and swap. You can also create additional
partitions you require. See Section 13.15.4.4, “Recommended Partitioning Scheme” for further details.
NOTE
If you have any specific requirements for some partitions (for example, requiring that a
particular partition be on a specific disk) and less specific requirements for other
partitions, create the partitions first which have more specific requirements.
Adding a file system is a two-step process. You first create a mount point in a certain partitioning
scheme. The mount point appears in the left pane. Next, you can customize it using the options in the
right pane, where you can change the mount point, capacity, the device type, file system type, label, and
whether to encrypt or reformat the corresponding partition.
If you have no existing file systems and want the installation program to create the required file systems
and their mount points for you, select your preferred partitioning scheme from the drop-down menu in
the left pane (default for Red Hat Enterprise Linux is LVM), then click the link on top of the pane for
creating mount points automatically. This will generate a /boot partition, a / (root) volume, and a swap
volume proportionate to the size of the available storage. These are the recommended file systems for a
typical installation, but you can add additional file systems and mount points if you need to.
Alternatively, create individual mount points using the + button at the bottom of the pane. The Add a
New Mount Point dialog then opens. Either select one of the preset paths from the Mount Point
drop-down menu or type your own; for example, select / for the root partition or /boot for the boot
partition. Then enter the size of the file system in the Desired Capacity text field; for example, 2GiB.
If you leave the field empty or if you specify a size bigger than available space, all remaining free space
is used instead. After entering these details, click the Add mount point button to create the partition.
NOTE
To avoid problems with space allocation, first create small partitions with known fixed
sizes, such as /boot, and then create the rest of the partitions, letting the installation
program allocate the remaining capacity to them.
Similarly, if you have multiple disks that the system is to reside on, they differ in size, and
a particular partition must be created on the first disk detected by BIOS, be sure to start by
creating such a partition.
For each new mount point you create manually, you can set its partitioning scheme from the drop-down
menu located in the left pane. The available options are Standard Partition, BTRFS, LVM, and LVM
Installation Guide
172

Thin Provisioning. Note that the /boot partition will always be located on a standard partition,
regardless of the value selected in this menu.
To change on which devices a single non-LVM mount point should be located, select the mount point
and click the Modify... button in the right pane to open the Configure Mount Point dialog. Select
one or more devices and click Select. After the dialog closes, note that you also need to confirm this
setting by clicking the Update Settings button on the right side of the Manual Partitioning
screen.
Figure 13.23. Configuring Mount Points
To refresh information about all local disks and partitions on them, click the Rescan button (with the
circular arrow icon on it) in the toolbar. You only need to do this action after performing advanced
partition configuration outside the installation program. Note that if you click the Rescan Disks button,
all configuration changes you previously made in the installation program will be lost.
Figure 13.24. Rescanning Disks
At the bottom of the screen, a link states how many storage devices have been selected in
CHAPTER 13. INSTALLING USING ANACONDA
173

Installation Destination (see Section 13.15, “Installation Destination”). Clicking on this link
opens the Selected Disks dialog, where you review the information about the disks. See
Section 13.15.1, “Boot Loader Installation” for more information.
To customize a partition or a volume, select its mount point in the left pane and the following
customizable features then appear to the right:
Figure 13.25. Customizing Partitions
Mount Point - enter the file system's mount point. For example, if a file system should be the
root file system, enter /; enter /boot for the /boot file system, and so on. For a swap file
system, the mount point should not be set - setting the file system type to swap is sufficient.
Desired Capacity - enter the desired size of the file system. You can use common size units
such as KiB or GiB. The default is MiB if no other unit is specified.
Device type - choose one of these types: Standard Partition, LVM, RAID, LVM Thin
Provisioning, or BTRFS. Check the adjacent Encrypt box to encrypt the partition or volume.
You will be prompted to set a password later. RAID is only available if two or more disks are
selected for partitioning, and if you choose this type, you can also set the RAID Level.
Similarly, if you select LVM, you can specify the Volume Group.
File system - in the drop-down menu, select the appropriate file system type for this partition
or volume. Check the adjacent Reformat box to format an existing partition, or leave it
unchecked to retain your data. Note that newly created partitions and volumes must be
reformatted, and the check box cannot be unchecked in this case.
Installation Guide
174

Label - assign a label to the partition. Labels are used for you to easily recognize and address
individual partitions.
Name - assign a name to an LVM or Btrfs volume. Note that standard partitions are named
automatically when they are created and their name cannot be edited, such as /home being
assigned the name sda1.
See Section 13.15.4.1.1, “File System Types” for more information about file system and device types.
Click the Update Settings button to save your changes and select another partition to customize.
Note that the changes will not be applied until you actually start the installation from the Installation
summary page. Click the Reset All button to discard all changes to all partitions and start over.
When all file systems and mount points have been created and customized, click the Done button. If you
chose to encrypt any file system, you will now be prompted to create a passphrase. Then, a dialog
appears, showing a summary of all actions related to storage that the installation program will take. This
includes creating, resizing, or deleting partitions and file systems. You can review all the changes and
click Cancel & Return to Custom Partitioning to go back. To confirm your changes, click
Accept Changes to return to the Installation Summary page. To partition additional devices, select
them in the Installation Destination screen, return to the Manual Partitioning screen,
repeat the steps outlined in this section for the additional devices.
IMPORTANT
If /usr or /var is partitioned separately from the rest of the root volume, the boot process
becomes much more complex because these directories contain components critical to it.
In some situations, such as when these directories are placed on an iSCSI drive or an
FCoE location, the system can either be unable to boot, or hang with a Device is
busy error when powering off or rebooting.
This limitation only applies to /usr or /var, not to directories below them. For example,
a separate partition for /var/www will work without issues.
13.15.4.1.1. File System Types
Red Hat Enterprise Linux allows you to create different device types and file systems. The following is a
brief description of the different device types and file systems available, and how they can be used.
Device Types
standard partition - A standard partition can contain a file system or swap space, or it can
provide a container for software RAID or an LVM physical volume.
logical volume (LVM) - Creating an LVM partition automatically generates an LVM logical
volume. LVM can improve performance when using physical disks. For information on how to
create a logical volume, see Section 13.15.4.3, “Create LVM Logical Volume” . For more
information regarding LVM, see the Red Hat Enterprise Linux 7 Logical Volume Manager
Administration guide.
LVM thin provisioning - Using thin provisioning, you can manage a storage pool of free
space, known as a thin pool, which can be allocated to an arbitrary number of devices when
needed by applications. The thin pool can be expanded dynamically when needed for cost-
effective allocation of storage space. For more information regarding LVM, see the Red Hat
Enterprise Linux 7 Logical Volume Manager Administration guide.
CHAPTER 13. INSTALLING USING ANACONDA
175
NOTE
The installer will automatically reserve 20% of any requested space for an LVM
thin pool logical volume in the volume group containing it. This is a safety
measure to ensure that you can extend either the metadata volume or the data
volume of your thinly provisioned logical volume.
software RAID - Creating two or more software RAID partitions allows you to create a RAID
device. One RAID partition is assigned to each disk on the system. To create a RAID device,
see Section 13.15.4.2, “Create Software RAID”. For more information regarding RAID, see the
Red Hat Enterprise Linux 7 Storage Administration Guide.
File Systems
xfs - XFS is a highly scalable, high-performance file system that supports file systems up to 16
EiB (approximately 16 billion GiB), files up to 8 EiB (approximately 8 billion GiB), and directory
structures containing tens of millions of entries. XFS supports metadata journaling, which
facilitates quicker crash recovery. The XFS file system can also be defragmented and resized
while mounted and active. This file system is selected by default and is highly recommended.
For information on how to translate common commands from previously used ext4 file system to
XFS, see Appendix E, Reference Table for ext4 and XFS Commands.
The maximum supported size of an XFS file system in Red Hat Enterprise Linux is currently 500
TiB.
ext4 - The ext4 file system is based on the ext3 file system and features a number of
improvements. These include support for larger file systems and larger files, faster and more
efficient allocation of disk space, no limit on the number of subdirectories within a directory,
faster file system checking, and more robust journaling.
The maximum supported size of an ext4 file system in Red Hat Enterprise Linux is currently 50
TiB.
ext3 - The ext3 file system is based on the ext2 file system and has one main advantage -
journaling. Using a journaling file system reduces time spent recovering a file system after a
crash as there is no need to check the file system for metadata consistency by running the fsck
utility every time a crash occurs.
ext2 - An ext2 file system supports standard Unix file types, including regular files, directories,
or symbolic links. It provides the ability to assign long file names, up to 255 characters.
vfat - The VFAT file system is a Linux file system that is compatible with Microsoft Windows
long file names on the FAT file system.
swap - Swap partitions are used to support virtual memory. In other words, data is written to a
swap partition when there is not enough RAM to store the data your system is processing.
PReP - this small boot partition is located on the first partition of the hard drive. The PReP boot
partition contains the GRUB2 boot loader, which allows other IBM Power Systems servers to
boot Red Hat Enterprise Linux.
Each file system has different size limits for the file system itself as well as individual files contained
within. For a list of maximum supported file and file system sizes, see the Red Hat Enterprise Linux
technology capabilities and limits page, available on the Customer Portal at
https://access.redhat.com/site/articles/rhel-limits.
Installation Guide
176
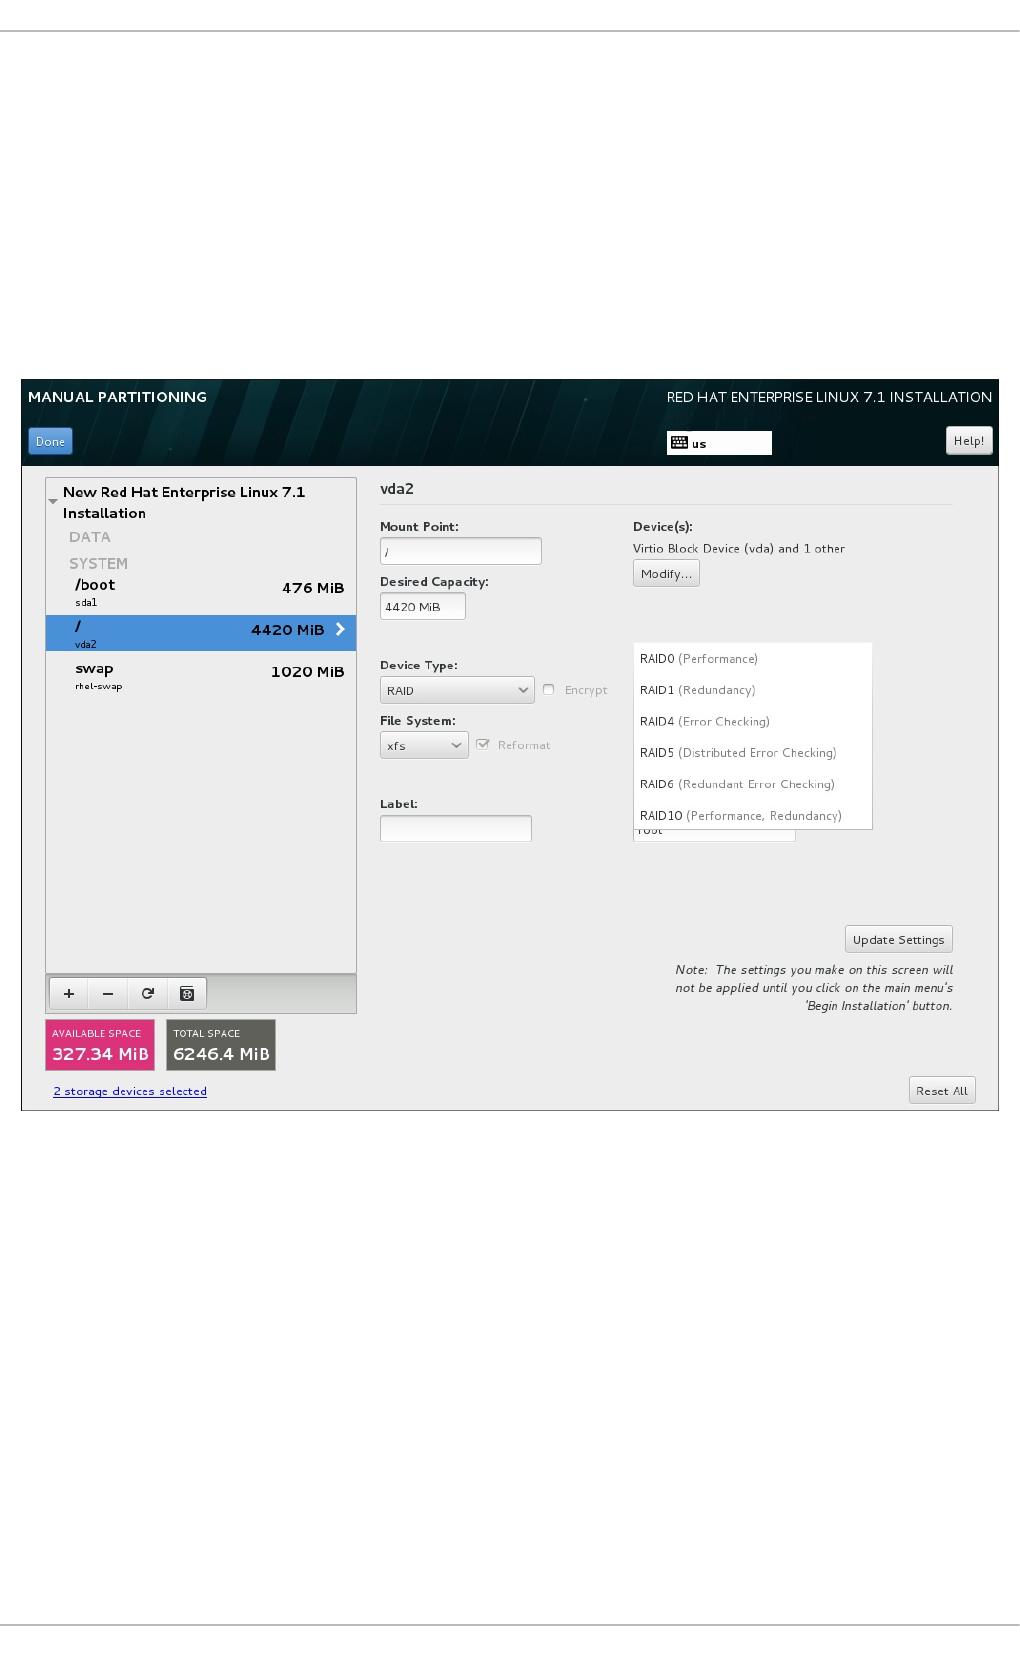
13.15.4.2. Create Software RAID
Redundant arrays of independent disks (RAIDs) are constructed from multiple storage devices that are
arranged to provide increased performance and, in some configurations, greater fault tolerance. See
below for a description of different kinds of RAIDs.
A RAID device is created in one step and disks are added or removed as necessary. One RAID partition
per physical disk is allowed for each device, so the number of disks available to the installation program
determines which levels of RAID device are available to you. For example, if your system has two hard
drives, the installation program will not allow you to create a RAID10 device, which requires 4 separate
partitions.
Figure 13.26. Creating a Software RAID Partition - the Device Type Menu Expanded
RAID configuration options are only visible if you have selected two or more disks for installation. At least
two disks are required to create a RAID device.
To create a RAID device:
1. Create a mount point as described in Section 13.15.4.1, “Adding File Systems and Configuring
Partitions”. By configuring this mount point, you configure the RAID device.
2. Keeping the partition selected in the left pane, select the configuration button below the pane to
open the Configure Mount Point dialog. Select which disks will be included in the RAID
device and click Select.
3. Click the Device Type drop-down menu and select RAID.
CHAPTER 13. INSTALLING USING ANACONDA
177

4. Click the File System drop-down menu and select your preferred file system type (see
Section 8.14.4.1.1, “File System Types”.
5. Click the RAID Level drop-down menu and select your preferred level of RAID.
The available RAID levels are:
RAID0 - Optimized performance (stripe)
Distributes data across multiple disks. Level 0 RAIDs offer increased performance over
standard partitions, and can be used to pool the storage of multiple disks into one large
virtual device. Note that Level 0 RAIDs offer no redundancy, and that the failure of one device
in the array destroys data in the entire array. RAID 0 requires at least two RAID partitions.
RAID1 - Redundancy (mirror)
Mirrors all data on one disk onto one or more other disks. Additional devices in the array
provide increasing levels of redundancy. RAID 1 requires at least two RAID partitions.
RAID4 - Error detection (parity)
Distributes data across multiple disks, and uses one disk in the array to store parity
information that safeguards the array in case any disk within the array fails. Because all parity
information is stored on one disk, access to this disk creates a bottleneck in the performance
of the array. RAID 4 requires at least three RAID partitions.
RAID5 - Distributed error detection
Distributes data and parity information across multiple disks. Level 5 RAIDs therefore offer
the performance advantages of distributing data across multiple disks, but do not share the
performance bottleneck of level 4 RAIDs because the parity information is also distributed
through the array. RAID 5 requires at least three RAID partitions.
RAID6 - Redundant
Level 6 RAIDs are similar to level 5 RAIDs, but instead of storing only one set of parity data,
they store two sets. RAID 6 requires at least four RAID partitions.
RAID10 - Redundancy (mirror) and Optimized performance (stripe)
Level 10 RAIDs are nested RAIDs or hybrid RAIDs. They are constructed by distributing data
over mirrored sets of disks. For example, a level 10 RAID array constructed from four RAID
partitions consists of two mirrored pairs of striped partitions. RAID 10 requires at least four
RAID partitions.
6. Click Update Settings to save your changes, and either continue with another partition or
click Done to return to the Installation Summary screen.
If fewer disks are included than the specified RAID level requires, a message will be displayed at the
bottom of the window, informing you how many disks are actually required for your selected
configuration.
13.15.4.3. Create LVM Logical Volume
Logical Volume Management (LVM) presents a simple logical view of underlying physical storage space,
such as hard drives or LUNs. Partitions on physical storage are represented as physical volumes that
can be grouped together into volume groups. Each volume group can be divided into multiple logical
Installation Guide
178
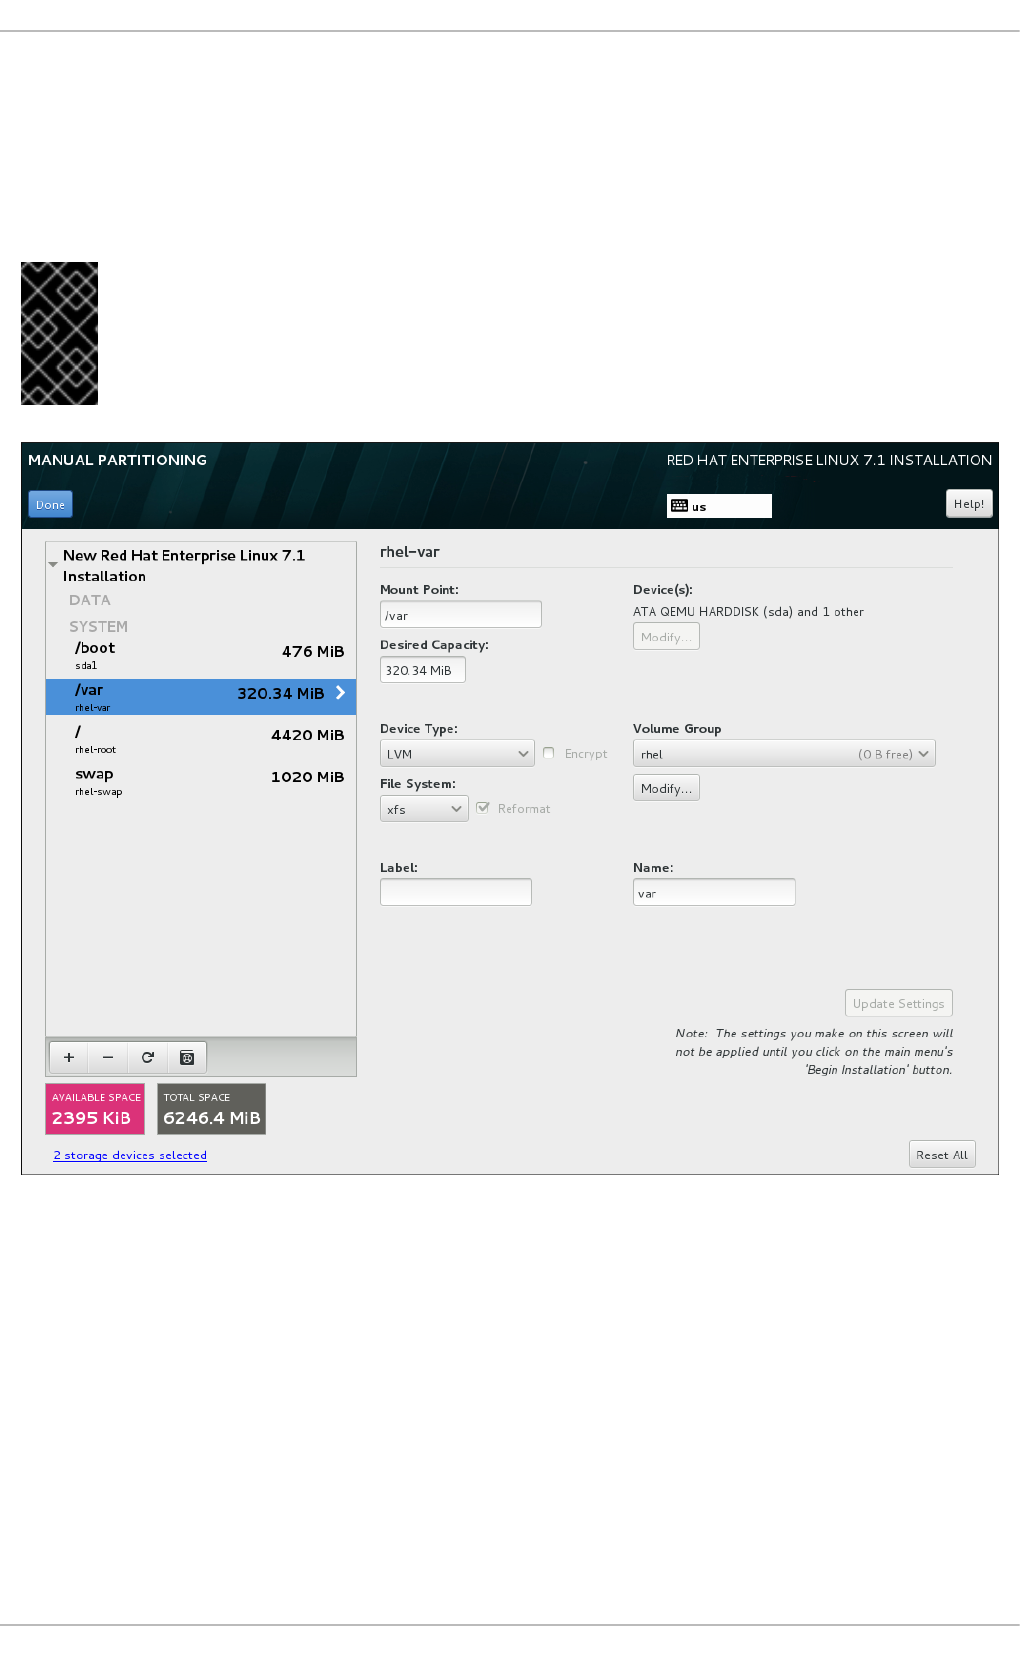
volumes, each of which is analogous to a standard disk partition. Therefore, LVM logical volumes
function as partitions that can span multiple physical disks.
To learn more about LVM, see Appendix C, Understanding LVM or read the Red Hat Enterprise Linux 7
Logical Volume Manager Administration guide. Note that LVM configuration is only available in the
graphical installation program.
IMPORTANT
During text-mode installation, LVM configuration is not available. If you need to create an
LVM configuration from scratch, press Ctrl+Alt+F2 to use a different virtual console,
and run the lvm command. To return to the text-mode installation, press Ctrl+Alt+F1.
Figure 13.27. Configuring a Logical Volume
To create a logical volume and add it to a new or existing volume group:
1. Create a mount point for the LVM volume as described in Section 13.15.4.1, “Adding File
Systems and Configuring Partitions”.
2. Click the Device Type drop-down menu and select LVM. The Volume Group drop-down
menu appears and displays the newly-created volume group name.
3. Optionally, either click the menu and select Create a new volume group or click Modify to
configure the newly-created volume group, if you need to. Both the Create a new volume
group option and the Modify button lead to the Configure Volume Group dialog, where
you can rename the logical volume group and select which disks will be included.
CHAPTER 13. INSTALLING USING ANACONDA
179
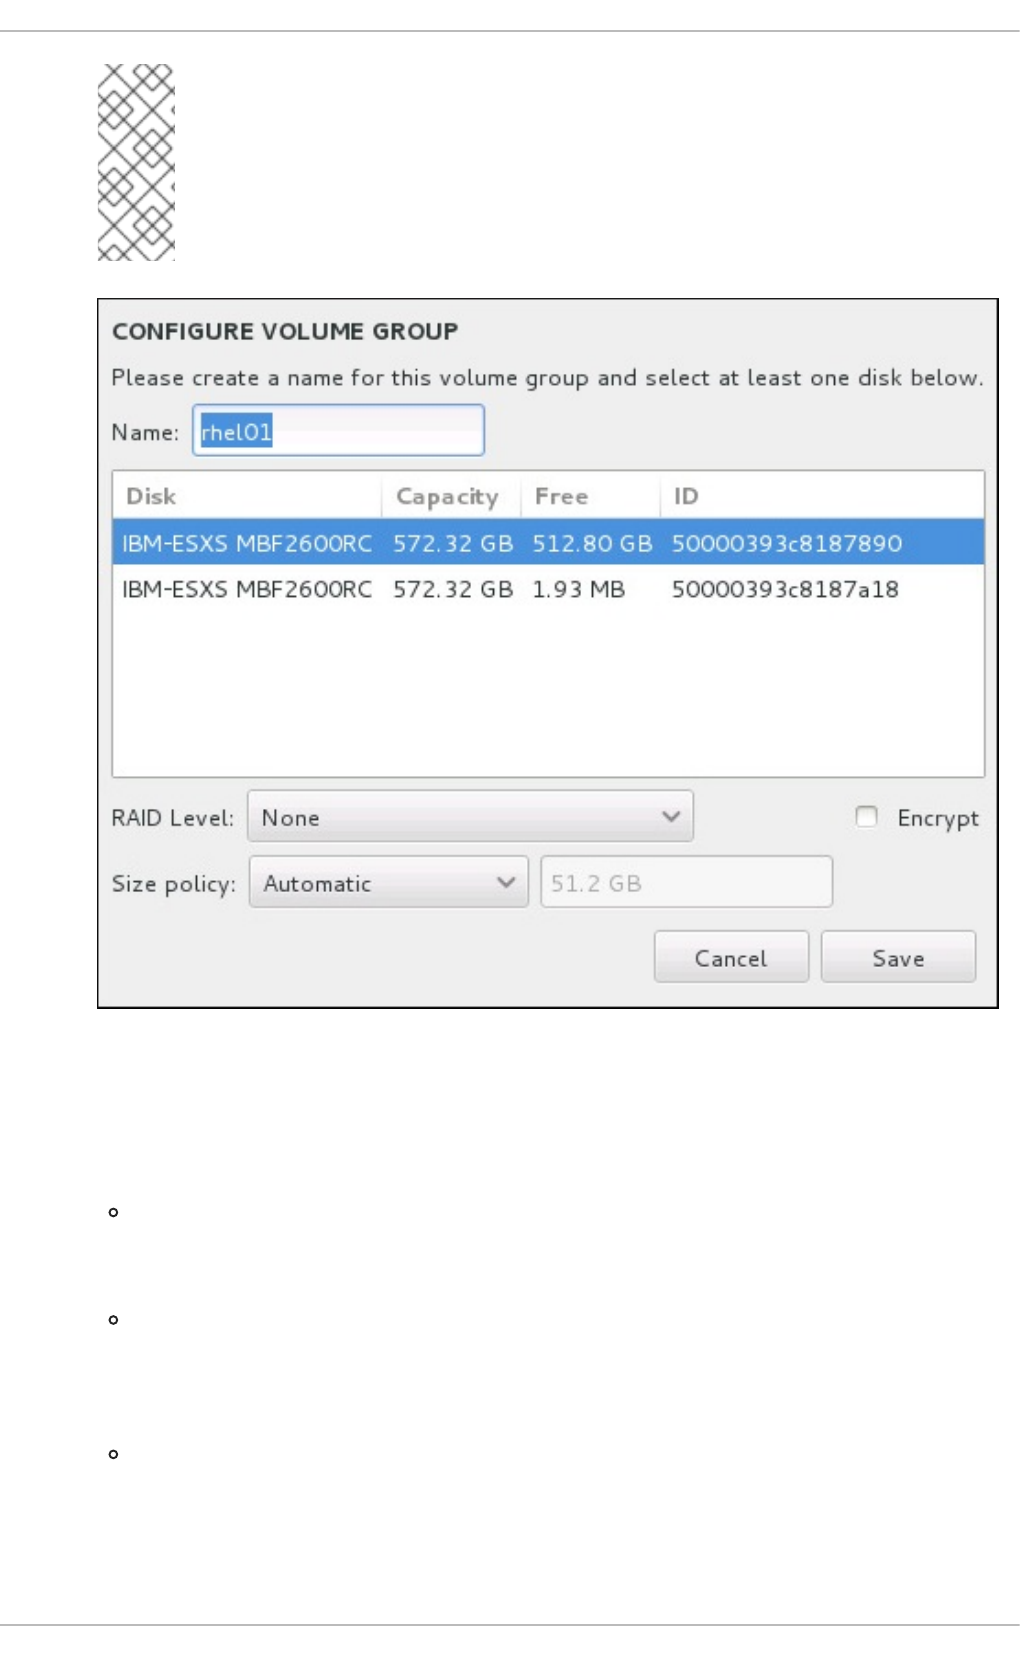
NOTE
The configuration dialog does not allow you to specify the size of the volume
group's physical extents. The size will always be set to the default value of 4 MiB.
If you want to create a volume group with different physical extents, create it
manually by switching to an interactive shell and using the vgcreate command,
or use a Kickstart file with the volgroup --pesize=size command.
Figure 13.28. Customizing an LVM Volume Group
The available RAID levels are the same as with actual RAID devices. See Section 13.15.4.2,
“Create Software RAID” for more information. You can also mark the volume group for
encryption and set the size policy for it. The available policy options are:
Automatic - the size of the volume group is set automatically so that it is just large enough
to contain the configured logical volumes. This is optimal if you do not need free space within
the volume group.
As large as possible - the volume group is created with maximum size, regardless of
the size of the configured logical volumes it contains. This is optimal if you plan to keep most
of your data on LVM and later need to increase the size of some existing logical volumes, or
if you need to create additional logical volumes within this group.
Fixed - with this option, you can set an exact size of the volume group. Any configured
logical volumes must then fit within this fixed size. This is useful if you know exactly how
large you would like the volume group to be.
Click Save when the group is configured.
Installation Guide
180

4. Click Update Settings to save your changes, and either continue with another partition or
click Done to return to the Installation Summary screen.
WARNING
Placing the /boot partition on an LVM volume is not supported.
13.15.4.4. Recommended Partitioning Scheme
Unless you have a reason for doing otherwise, Red Hat recommends that you create the following
partitions:
A PReP boot partition - recommended size of 4 to 8 MiB
The first partition of the hard drive should include a PReP boot partition. This contains the GRUB2
boot loader, which allows other IBM Power Systems servers to boot Red Hat Enterprise Linux.
/boot partition - recommended size at least 1 GiB
The partition mounted on /boot contains the operating system kernel, which allows your system to
boot Red Hat Enterprise Linux, along with files used during the bootstrap process. Due to the
limitations of most firmwares, creating a small partition to hold these is recommended. In most
scenarios, a 1 GiB boot partition is adequate. Unlike other mount points, using an LVM volume for
/boot is not possible - /boot must be located on a separate disk partition.
NOTE
If you have a RAID card, be aware that some BIOS types do not support booting from
the RAID card. In such a case, the /boot partition must be created on a partition
outside of the RAID array, such as on a separate hard drive.
WARNING
If you have a RAID card, be aware that Red Hat Enterprise Linux does not
support setting up hardware RAID on an IPR card. You can boot the standalone
diagnostics CD prior to installation to create a RAID array and then install to that
RAID array.
root - recommended size of 10 GiB
This is where "/", or the root directory, is located. The root directory is the top-level of the directory
structure. By default, all files are written to this file system unless a different file system is mounted in
the path being written to (for example, /boot or /home).
CHAPTER 13. INSTALLING USING ANACONDA
181

While a 5 GiB root file system allows you to install a minimal installation, it is recommended to
allocate at least 10 GiB so that you can install as many package groups as you want.
IMPORTANT
Do not confuse the / directory with the /root directory. The /root directory is the
home directory of the root user. The /root directory is sometimes referred to as slash
root to distinguish it from the root directory.
/home - recommended size at least 1 GiB
To store user data separately from system data, create a dedicated file system for the /home
directory. This file system should be sized based on the amount of data that will be stored locally,
number of users, and so on. This will enable you to upgrade or reinstall Red Hat Enterprise Linux
without erasing user data files. If you select automatic partitioning, it is recommended to have at least
55GiB of disk space available for the installation, to ensure that the /home file system is created.
swap partition - recommended size at least 1 GB
Swap file systems support virtual memory; data is written to a swap file system when there is not
enough RAM to store the data your system is processing. Swap size is a function of system memory
workload, not total system memory and therefore is not equal to the total system memory size.
Therefore, it is important to analyze what applications a system will be running and the load those
applications will serve in order to determine the system memory workload. Application providers and
developers should be able to provide some guidance.
When the system runs out of swap space, the kernel terminates processes as the system RAM
memory is exhausted. Configuring too much swap space results in storage devices being allocated
but idle and is a poor use of resources. Too much swap space can also hide memory leaks. The
maximum size for a swap partition and other additional information can be found in the mkswap(8)
manual page.
The following table provides the recommended size of a swap partition depending on the amount of
RAM in your system. If you let the installation program partition your system automatically, the swap
partition size will be established using these guidelines. Automatic partitioning setup assumes that
the maximum size of the swap partition is limited to 10% of the total size of the hard drive, and the
installer cannot create swap partitions more than 128GB in size. If you want to set the swap partition
size to more than 10% of the system's storage space, or more than 128GB, you must edit the
partitioning layout manually.
Table 13.3. Recommended System Swap Space
Amount of RAM in the system Recommended swap space Recommended swap space if
allowing for hibernation
less than 2 GB 2 times the amount of RAM 3 times the amount of RAM
2 GB - 8 GB Equal to the amount of RAM 2 times the amount of RAM
8 GB - 64 GB 4GB to 0.5 times the amount of
RAM
1.5 times the amount of RAM
Installation Guide
182

more than 64 GB workload dependent (at least
4GB)
hibernation not recommended
Amount of RAM in the system Recommended swap space Recommended swap space if
allowing for hibernation
At the border between each range listed above (for example, a system with 2 GB, 8 GB, or 64 GB of
system RAM), discretion can be exercised with regard to chosen swap space. If your system
resources allow for it, increasing the swap space can lead to better performance.
Distributing swap space over multiple storage devices - particularly on systems with fast drives,
controllers and interfaces - also improves swap space performance.
WARNING
The PackageKit update software downloads updated packages to
/var/cache/yum/ by default. If you create a separate partition or volume for
/var, ensure that it is at least 3GB in size to accommodate downloaded package
updates.
13.16. STORAGE DEVICES
You can install Red Hat Enterprise Linux on a large variety of storage devices. You can see basic, locally
accessible, storage devices in the Installation Destination page, as described in Section 13.15,
“Installation Destination”. To add a specialized storage device, click the Add a disk button in the
Specialized & Network Disks section of the screen.
CHAPTER 13. INSTALLING USING ANACONDA
183

Figure 13.29. Storage Space Overview
13.16.1. The Storage Devices Selection Screen
The storage device selection screen displays all storage devices to which the Anaconda installation
program has access.
The devices are grouped under the following tabs:
Multipath Devices
Storage devices accessible through more than one path, such as through multiple SCSI controllers or
Fiber Channel ports on the same system.
The installation program only detects multipath storage devices with serial numbers that are 16 or 32
characters long.
Other SAN Devices
Devices available on a Storage Area Network (SAN).
Firmware RAID
Storage devices attached to a firmware RAID controller.
Installation Guide
184

Figure 13.30. Tabbed Overview of Specialized Storage Devices
A set of buttons is available in the bottom right corner of the screen. Use these buttons to add additional
storage devices. The available buttons are:
Add iSCSI Target - use to attach iSCSI devices; continue with Section 13.16.1.1.1,
“Configure iSCSI Parameters”
Add FCoE SAN - use to configure a Fibre Channel Over Internet storage device; continue with
Section 13.16.1.1.2, “Configure FCoE Parameters”
The overview page also contains the Search tab that allows you to filter storage devices either by their
World Wide Identifier (WWID) or by the port, target, or logical unit number (LUN) at which they are
accessed.
Figure 13.31. The Storage Devices Search Tab
The Search tab contains the Search By drop-down menu to select searching by port, target, LUN, or
WWID. Searching by WWID or LUN requires additional values in the corresponding input text fields.
Click the Find button to start the search.
Each device is presented on a separate row, with a check box to its left. Click the check box to make the
CHAPTER 13. INSTALLING USING ANACONDA
185
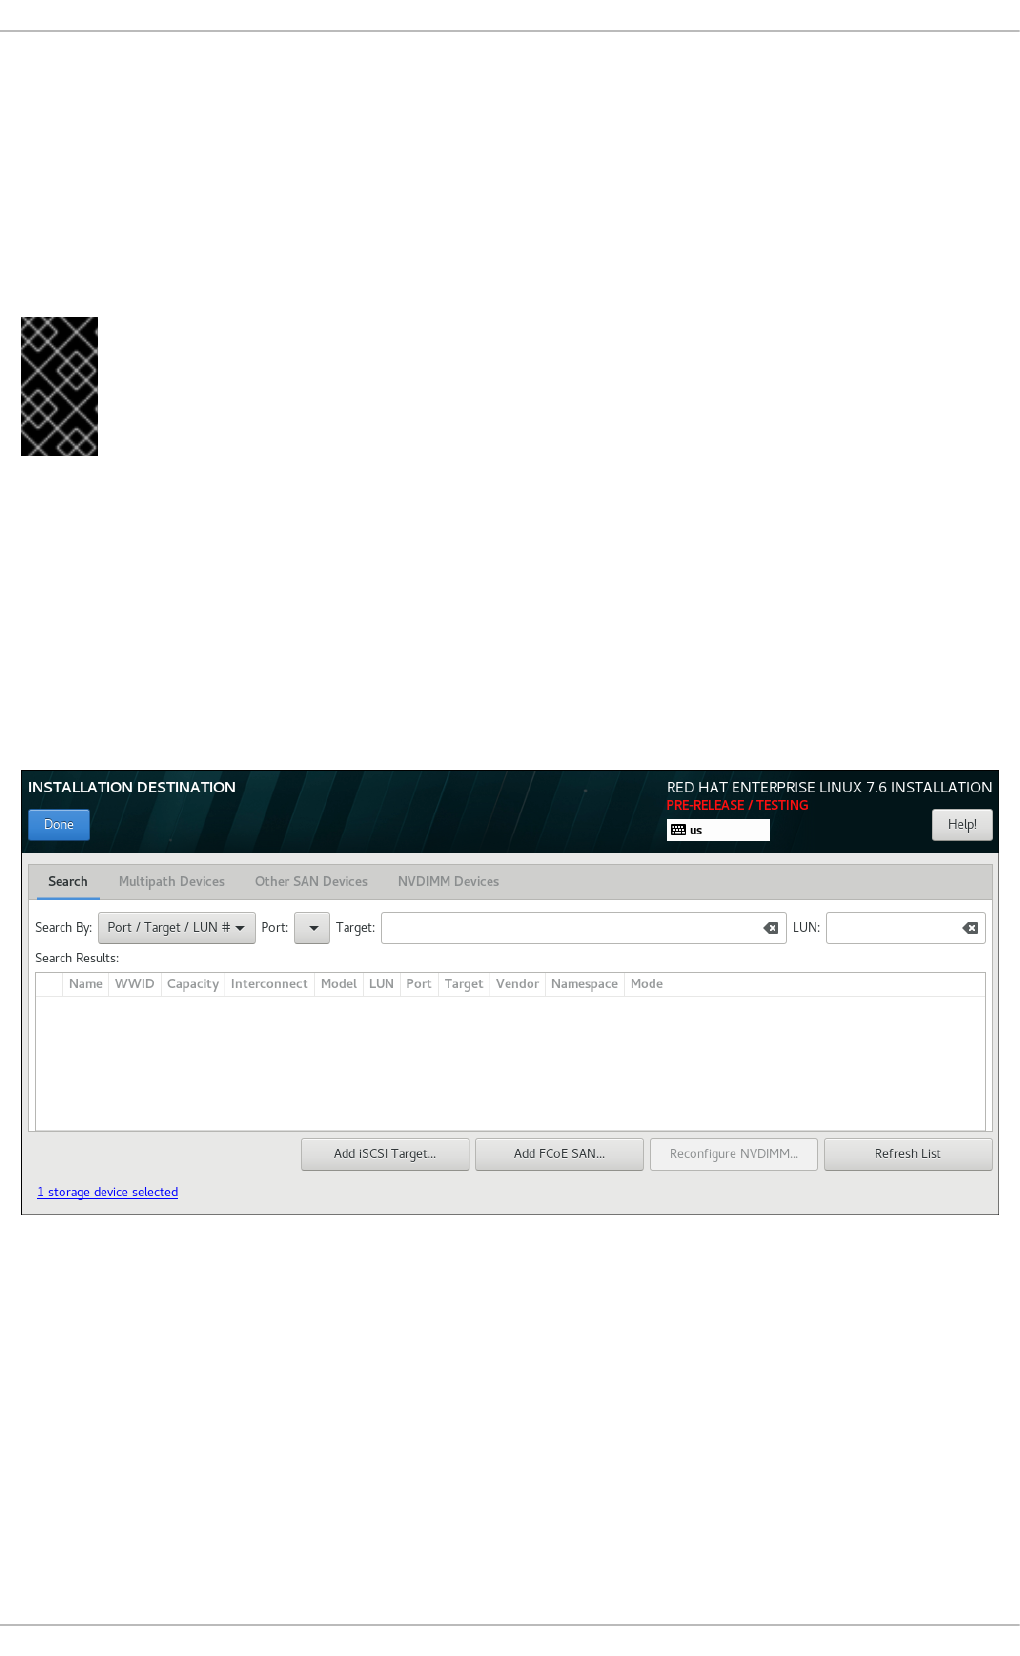
device available during the installation process. Later in the installation process, you can choose to
install Red Hat Enterprise Linux onto any of the devices selected here, and can choose to automatically
mount any of the other devices selected here as part of the installed system.
Note that the devices that you select here are not automatically erased by the installation process.
Selecting a device on this screen does not, in itself, place data stored on the device at risk. Also note that
any devices that you do not select here to form part of the installed system can be added to the system
after installation by modifying the /etc/fstab file.
IMPORTANT
Any storage devices that you do not select on this screen are hidden from Anaconda
entirely. To chain load the Red Hat Enterprise Linux boot loader from a different boot
loader, select all the devices presented in this screen.
When you have selected the storage devices to make available during installation, click Done to return to
the Installation Destination screen.
13.16.1.1. Advanced Storage Options
To use an advanced storage device, you can configure an iSCSI (SCSI over TCP/IP) target or FCoE
(Fibre Channel over Ethernet) SAN (Storage Area Network) by clicking the appropriate button in the
lower right corner of the Installation Destination screen. See Appendix B, iSCSI Disks for an introduction
to iSCSI.
Figure 13.32. Advanced Storage Options
13.16.1.1.1. Configure iSCSI Parameters
When you click the Add iSCSI target... button, the Add iSCSI Storage Target dialog
appears.
Installation Guide
186
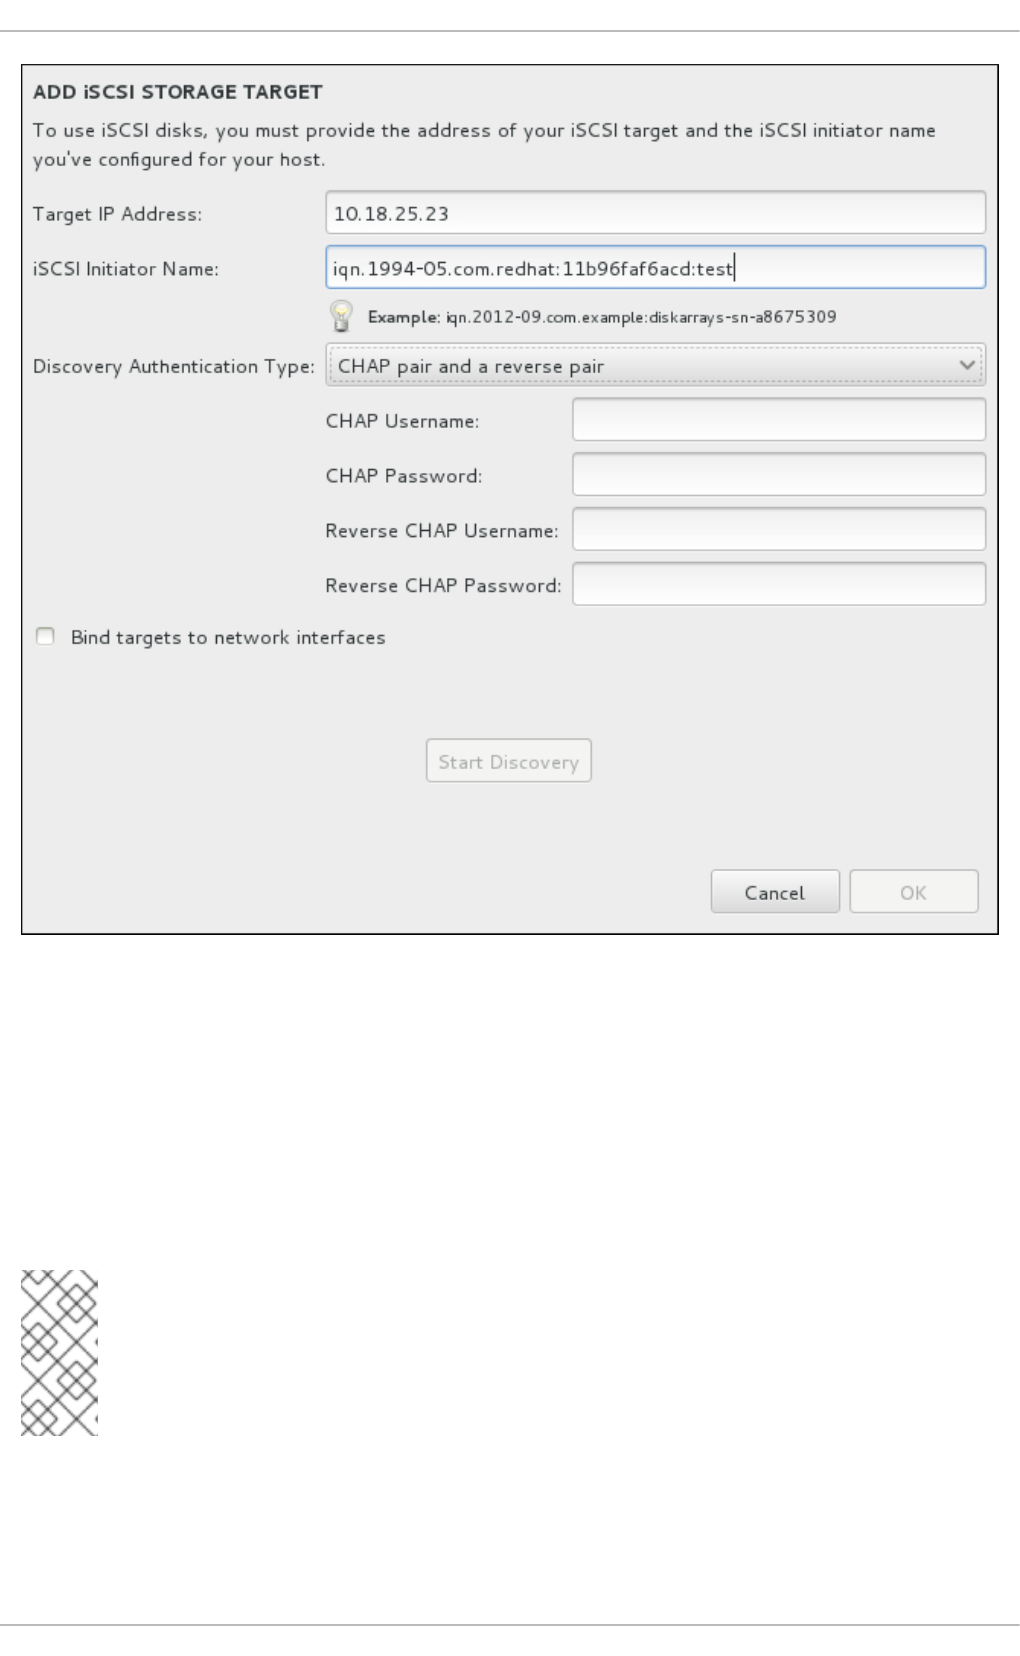
Figure 13.33. The iSCSI Discovery Details Dialog
To use iSCSI storage devices for the installation, Anaconda must be able to discover them as iSCSI
targets and be able to create an iSCSI session to access them. Each of these steps might require a user
name and password for CHAP (Challenge Handshake Authentication Protocol) authentication.
Additionally, you can configure an iSCSI target to authenticate the iSCSI initiator on the system to which
the target is attached (reverse CHAP), both for discovery and for the session. Used together, CHAP and
reverse CHAP are called mutual CHAP or two-way CHAP . Mutual CHAP provides the greatest level of
security for iSCSI connections, particularly if the user name and password are different for CHAP
authentication and reverse CHAP authentication.
NOTE
Repeat the iSCSI discovery and iSCSI login steps as many times as necessary to add all
required iSCSI storage. However, you cannot change the name of the iSCSI initiator after
you attempt discovery for the first time. To change the iSCSI initiator name, you must
restart the installation.
Procedure 13.1. iSCSI Discovery and Starting an iSCSI Session
Use the Add iSCSI Storage Target dialog to provide Anaconda with the information necessary to
discover the iSCSI target.
CHAPTER 13. INSTALLING USING ANACONDA
187

1. Enter the IP address of the iSCSI target in the Target IP Address field.
2. Provide a name in the iSCSI Initiator Name field for the iSCSI initiator in iSCSI qualified
name (IQN) format. A valid IQN entry contains:
the string iqn. (note the period)
a date code that specifies the year and month in which your organization's Internet domain
or subdomain name was registered, represented as four digits for the year, a dash, and two
digits for the month, followed by a period. For example, represent September 2010 as
2010-09.
your organization's Internet domain or subdomain name, presented in reverse order with the
top-level domain first. For example, represent the subdomain storage.example.com as
com.example.storage
a colon followed by a string that uniquely identifies this particular iSCSI initiator within your
domain or subdomain. For example, :diskarrays-sn-a8675309
A complete IQN can therefore look as follows: iqn.2010-
09.storage.example.com:diskarrays-sn-a8675309 . Anaconda prepopulates the
iSCSI Initiator Name field with a name in this format to help you with the structure.
For more information on IQNs , see 3.2.6. iSCSI Names in RFC 3720 - Internet Small Computer
Systems Interface (iSCSI) available from http://tools.ietf.org/html/rfc3720#section-3.2.6 and 1.
iSCSI Names and Addresses in RFC 3721 - Internet Small Computer Systems Interface (iSCSI)
Naming and Discovery available from http://tools.ietf.org/html/rfc3721#section-1.
3. Use the Discovery Authentication Type drop-down menu to specify the type of
authentication to use for iSCSI discovery. The following options are available:
no credentials
CHAP pair
CHAP pair and a reverse pair
4. If you selected CHAP pair as the authentication type, provide the user name and password
for the iSCSI target in the CHAP Username and CHAP Password fields.
If you selected CHAP pair and a reverse pair as the authentication type, provide the user
name and password for the iSCSI target in the CHAP Username and CHAP Password field
and the user name and password for the iSCSI initiator in the Reverse CHAP Username
and Reverse CHAP Password fields.
5. Optionally check the box labeled Bind targets to network interfaces.
6. Click the Start Discovery button. Anaconda attempts to discover an iSCSI target based on
the information that you provided. If discovery succeeds, the dialog displays a list of all iSCSI
nodes discovered on the target.
7. Each node is presented with a check box beside it. Click the check boxes to select the nodes to
use for installation.
Installation Guide
188

Figure 13.34. The Dialog of Discovered iSCSI Nodes
8. The Node login authentication type menu provides the same options as the
Discovery Authentication Type menu described in step 3. However, if you needed
credentials for discovery authentication, it is typical to use the same credentials to log into a
discovered node. To do that, use the additional Use the credentials from discovery option
from the menu. When the proper credentials have been provided, the Log In button becomes
available.
9. Click Log In to initiate an iSCSI session.
13.16.1.1.2. Configure FCoE Parameters
When you click the Add FCoE SAN... button, a dialog appears for you to configure network interfaces
for discovering FCoE storage devices.
First, select a network interface that is connected to a FCoE switch in the NIC drop-down menu and click
the Add FCoE disk(s) button to scan the network for SAN devices.
CHAPTER 13. INSTALLING USING ANACONDA
189

Figure 13.35. Configure FCoE Parameters
There are check boxes with additional options to consider:
Use DCB
Data Center Bridging (DCB) is a set of enhancements to the Ethernet protocols designed to increase
the efficiency of Ethernet connections in storage networks and clusters. Enable or disable the
installation program's awareness of DCB with the check box in this dialog. This option should only be
enabled for network interfaces that require a host-based DCBX client. Configurations on interfaces
that implement a hardware DCBX client should leave this check box empty.
Use auto vlan
Auto VLAN indicates whether VLAN discovery should be performed. If this box is checked, then the
FIP (FCoE Initiation Protocol) VLAN discovery protocol will run on the Ethernet interface once the link
configuration has been validated. If they are not already configured, network interfaces for any
discovered FCoE VLANs will be automatically created and FCoE instances will be created on the
VLAN interfaces. This option is enabled by default.
Discovered FCoE devices will be displayed under the Other SAN Devices tab in the Installation
Destination screen.
13.17. KDUMP
Use this screen to select whether or not to use Kdump on this system. Kdump is a kernel crash
dumping mechanism which, in the event of a system crash, captures information that can be invaluable
in determining the cause of the crash.
Note that if you enable Kdump, you must reserve a certain amount of system memory for it. As a result,
less memory is available for your processes.
IBM Power System LPARs support firmware-assisted dump (fadump), an alternate dump capture
mechanism to Kdump. With fadump, dump capture takes place from a fully reset system that is loaded
with a fresh copy of the kernel. In particular, PCI and I/O devices are reinitialized and are in a clean,
consistent state making it a reliable alternative to Kdump. Note that although fadump is an alternative to
Kdump, fadump requires Kdump to be enabled. You can enable fadump on this screen.
If you do not want to use Kdump on this system, uncheck Enable kdump. Otherwise, set the amount
Installation Guide
190
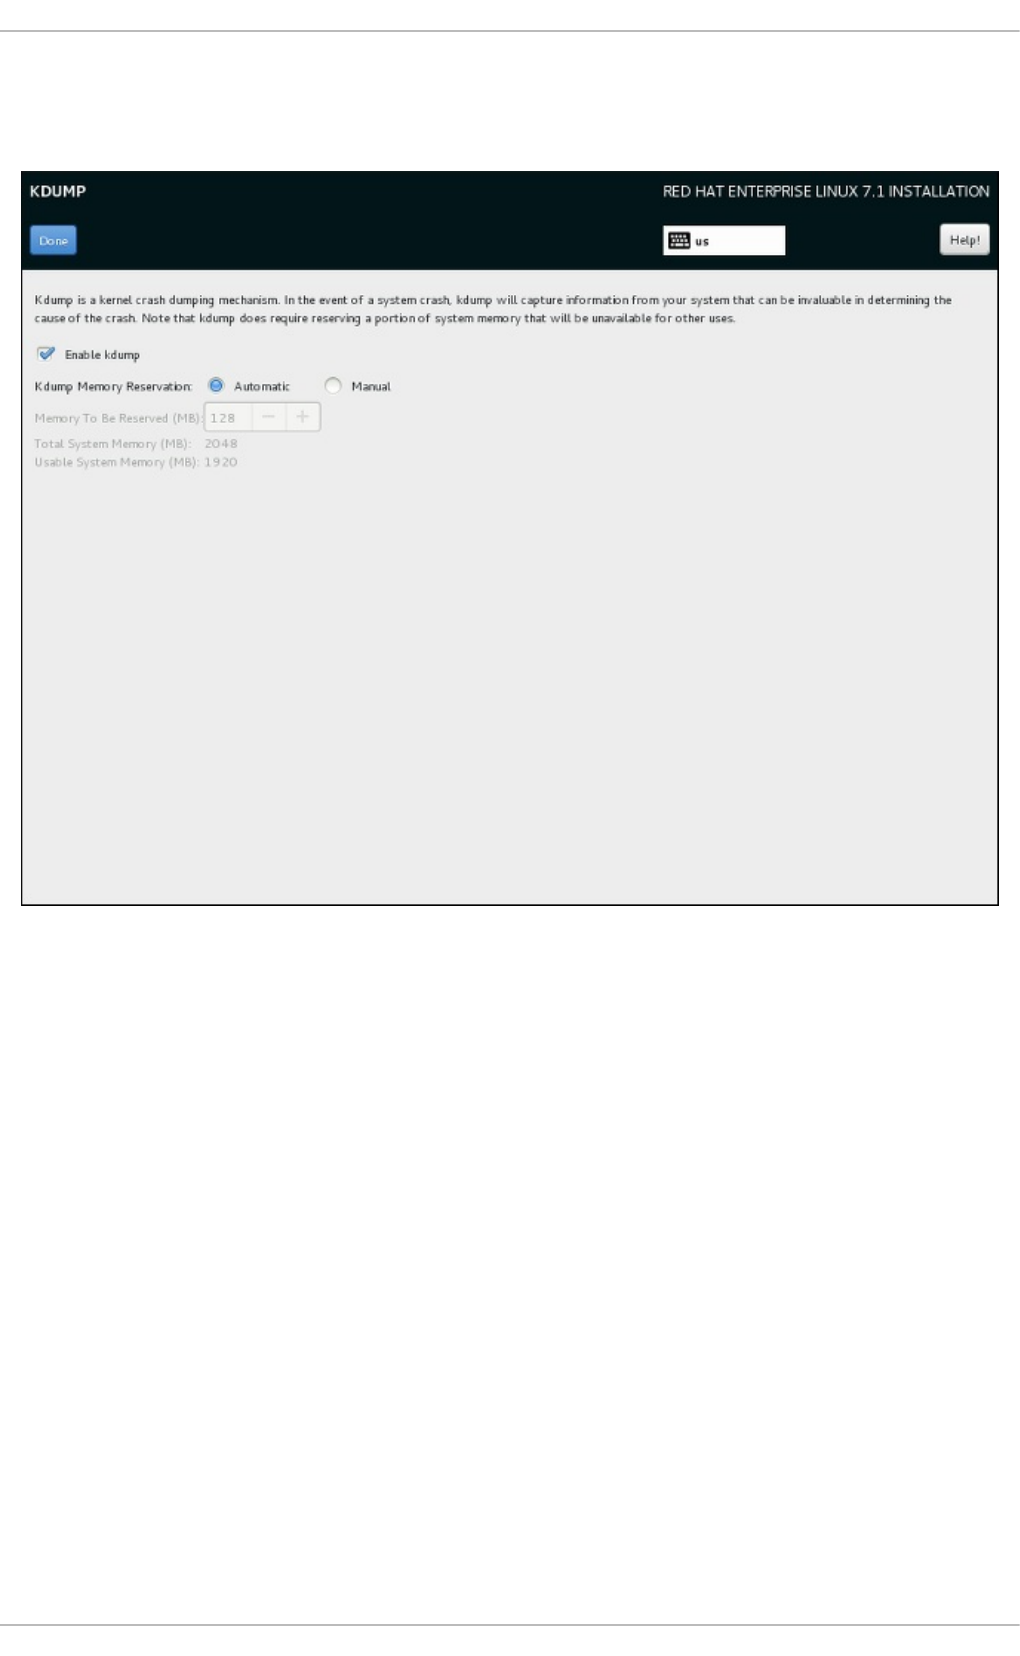
of memory to reserve for Kdump. You can let the installer reserve a reasonable amount automatically,
or you can set any amount manually. When your are satisfied with the settings, click Done to save the
configuration and return to the previous screen.
Figure 13.36. Kdump Enablement and Configuration
13.18. BEGIN INSTALLATION
When all required sections of the Installation Summary screen have been completed, the
admonition at the bottom of the menu screen disappears and the Begin Installation button
becomes available.
CHAPTER 13. INSTALLING USING ANACONDA
191

Figure 13.37. Ready to Install
WARNING
Up to this point in the installation process, no lasting changes have been made on
your computer. When you click Begin Installation, the installation program will
allocate space on your hard drive and start to transfer Red Hat Enterprise Linux into
this space. Depending on the partitioning option that you chose, this process might
include erasing data that already exists on your computer.
To revise any of the choices that you made up to this point, return to the relevant section of the
Installation Summary screen. To cancel installation completely, click Quit or switch off your
computer. To switch off most computers at this stage, press the power button and hold it down for a few
seconds.
If you have finished customizing your installation and are certain that you want to proceed, click Begin
Installation.
After you click Begin Installation, allow the installation process to complete. If the process is
interrupted, for example, by you switching off or resetting the computer, or by a power outage, you will
probably not be able to use your computer until you restart and complete the Red Hat Enterprise Linux
installation process, or install a different operating system.
13.19. THE CONFIGURATION MENU AND PROGRESS SCREEN
Installation Guide
192
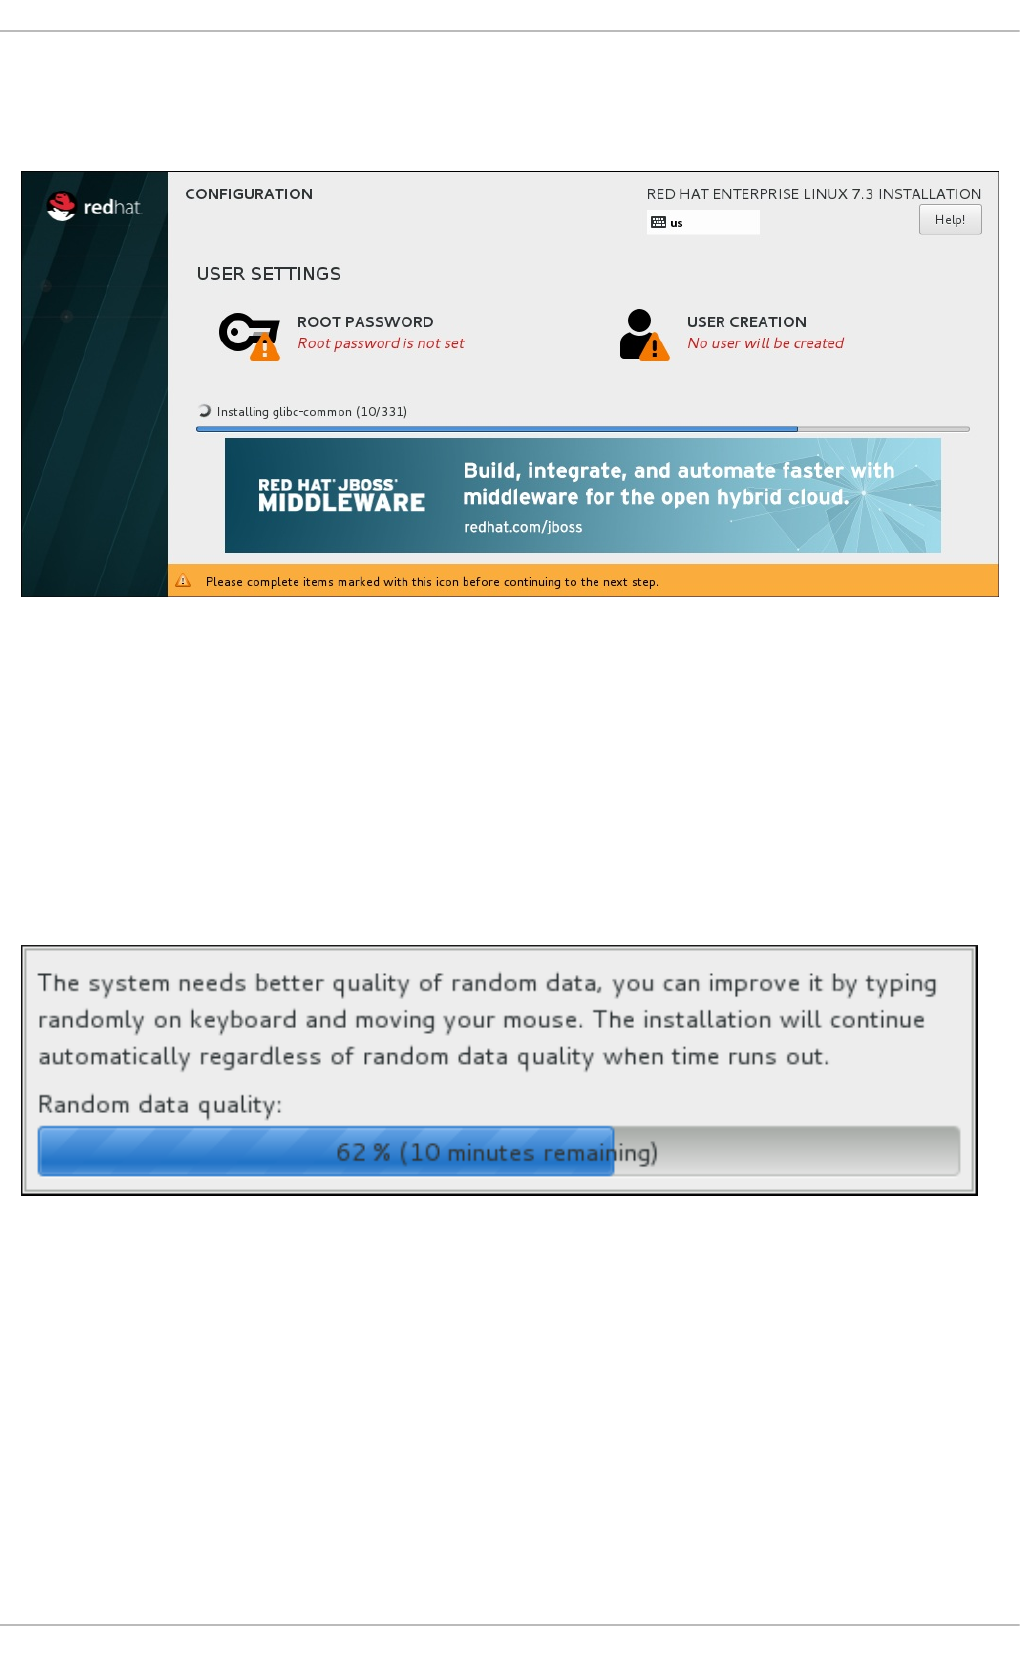
Once you click Begin Installation at the Installation Summary screen, the progress screen
appears. Red Hat Enterprise Linux reports the installation progress on the screen as it writes the
selected packages to your system.
Figure 13.38. Installing Packages
For your reference, a complete log of your installation can be found in the
/var/log/anaconda/anaconda.packaging.log file, once you reboot your system.
If you chose to encrypt one or more partitions during partitioning setup, a dialog window with a progress
bar will be displayed during the early stage of the installation process. This window informs that the
installer is attempting to gather enough entropy (random data) to ensure that the encryption is secure.
This window will disappear after 256 bits of entropy are gathered, or after 10 minutes. You can speed up
the gathering process by moving your mouse or randomly typing on the keyboard. After the window
disappears, the installation process will continue.
Figure 13.39. Gathering Entropy for Encryption
While the packages are being installed, more configuration is required. Above the installation progress
bar are the Root Password and User Creation menu items.
The Root Password screen is used to configure the system's root account. This account can be used
to perform critical system management and administration tasks. The same tasks can also be performed
with a user account with the wheel group membership; if such an user account is created during
installation, setting up a root password is not mandatory.
Creating a user account is optional and can be done after installation, but it is recommended to do it on
this screen. A user account is used for normal work and to access the system. Best practice suggests
that you always access the system through a user account, not the root account.
CHAPTER 13. INSTALLING USING ANACONDA
193
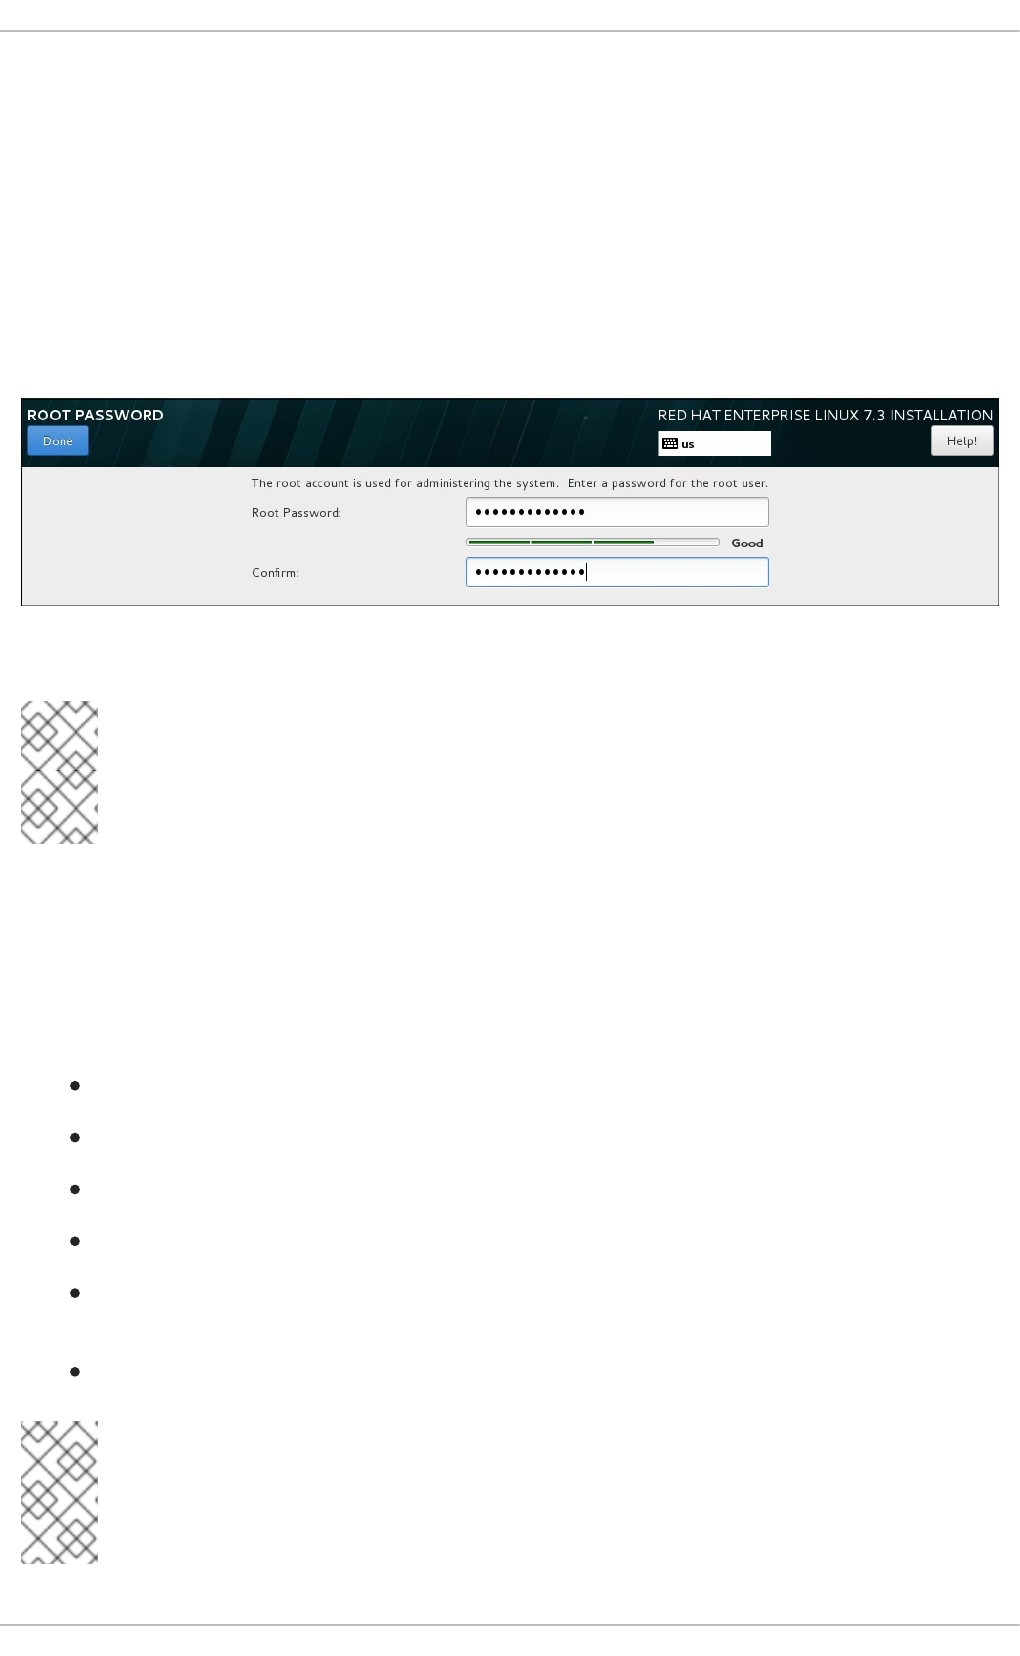
It is possible to disable access to the Root Password or Create User screens. To do so, use a
Kickstart file which includes the rootpw --lock or user --lock commands. See Section 26.3.1,
“Kickstart Commands and Options” for more information these commands.
13.19.1. Set the Root Password
Setting up a root account and password is an important step during your installation. The root account
(also known as the superuser) is used to install packages, upgrade RPM packages, and perform most
system maintenance. The root account gives you complete control over your system. For this reason,
the root account is best used only to perform system maintenance or administration. See the Red Hat
Enterprise Linux 7 System Administrator's Guide for more information about becoming root.
Figure 13.40. Root Password Screen
NOTE
You must always set up at least one way to gain root privileges to the installed system:
either using a root account, or by creating a user account with administrative privileges
(member of the wheel group), or both.
Click the Root Password menu item and enter your new password into the Root Password field.
Red Hat Enterprise Linux displays the characters as asterisks for security. Type the same password into
the Confirm field to ensure it is set correctly. After you set the root password, click Done to return to the
User Settings screen.
The following are the requirements and recommendations for creating a strong root password:
must be at least eight characters long
may contain numbers, letters (upper and lower case) and symbols
is case-sensitive and should contain a mix of cases
something you can remember but that is not easily guessed
should not be a word, abbreviation, or number associated with you, your organization, or found
in a dictionary (including foreign languages)
should not be written down; if you must write it down keep it secure
NOTE
To change your root password after you have completed the installation, run the passwd
command as root. If you forget the root password, see Section 32.1.3, “Resetting the
Root Password” for instructions on how to use the rescue mode to set a new one.
Installation Guide
194
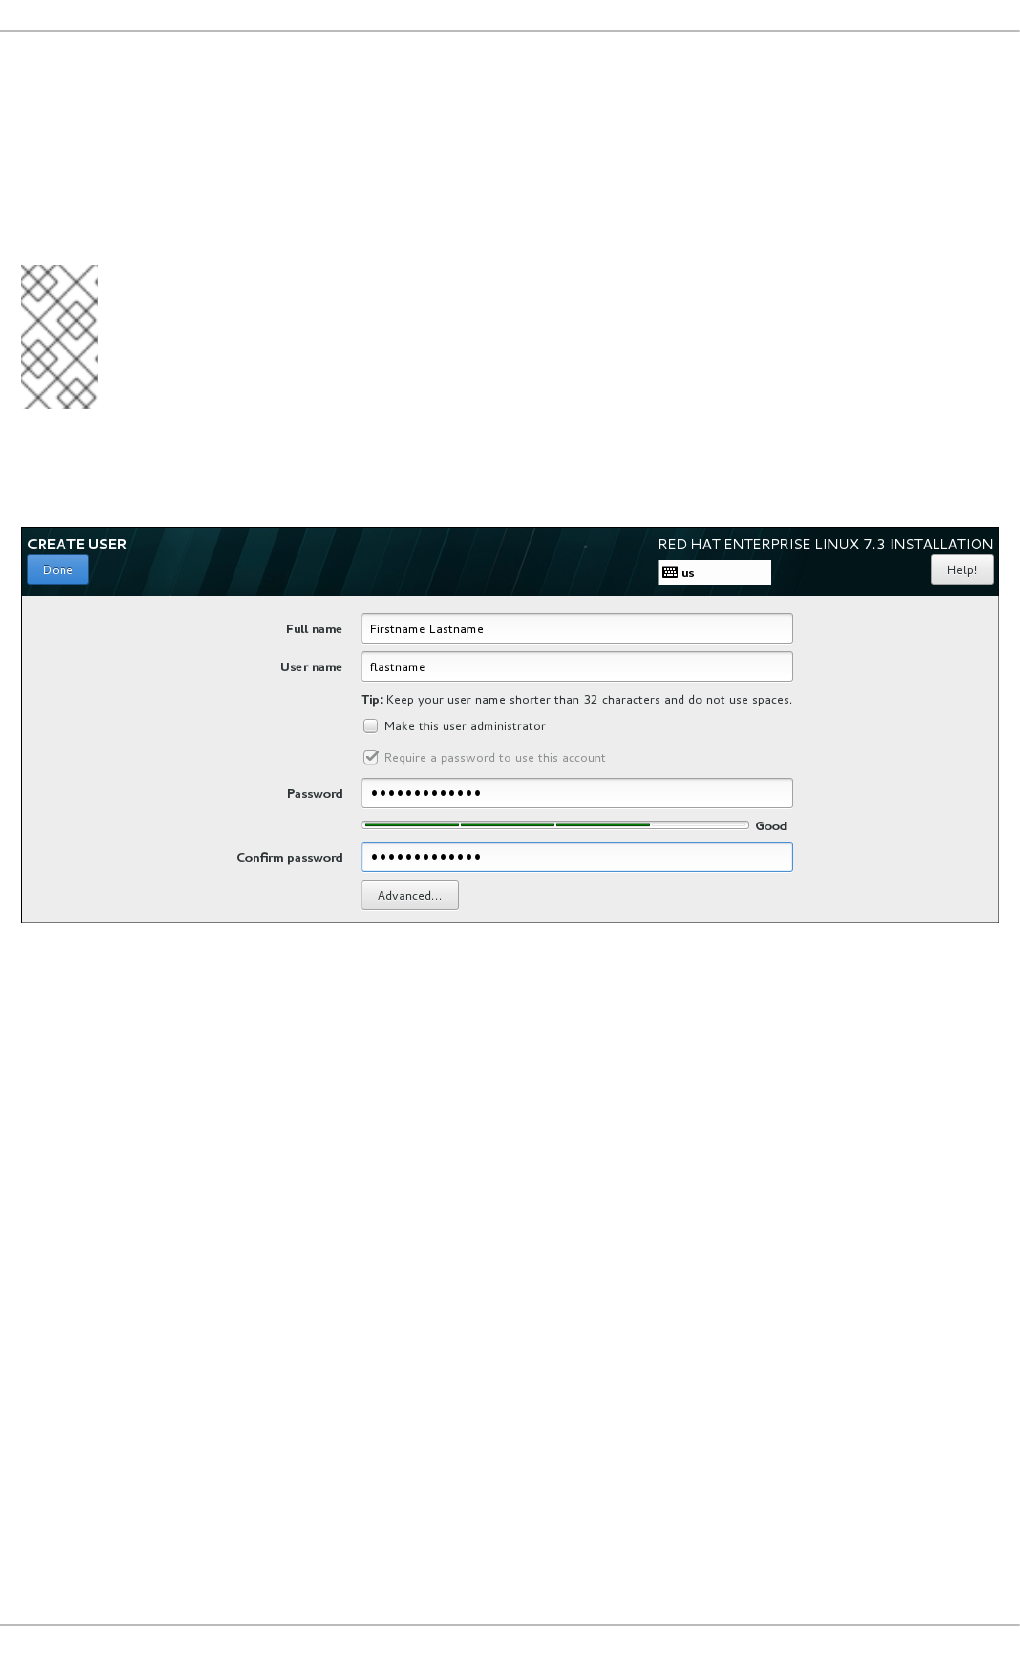
13.19.2. Create a User Account
To create a regular (non-root) user account during the installation, click User Settings on the
progress screen. The Create User screen appears, allowing you to set up the regular user account
and configure its parameters. Though recommended to do during installation, this step is optional and
can be performed after the installation is complete.
NOTE
You must always set up at least one way to gain root privileges to the installed system:
either using a root account, or by creating a user account with administrative privileges
(member of the wheel group), or both.
To leave the user creation screen after you have entered it, without creating a user, leave all the fields
empty and click Done.
Figure 13.41. User Account Configuration Screen
Enter the full name and the user name in their respective fields. Note that the system user name must be
shorter than 32 characters and cannot contain spaces. It is highly recommended to set up a password for
the new account.
When setting up a strong password even for a non-root user, follow the guidelines described in
Section 13.19.1, “Set the Root Password”.
Click the Advanced button to open a new dialog with additional settings.
CHAPTER 13. INSTALLING USING ANACONDA
195
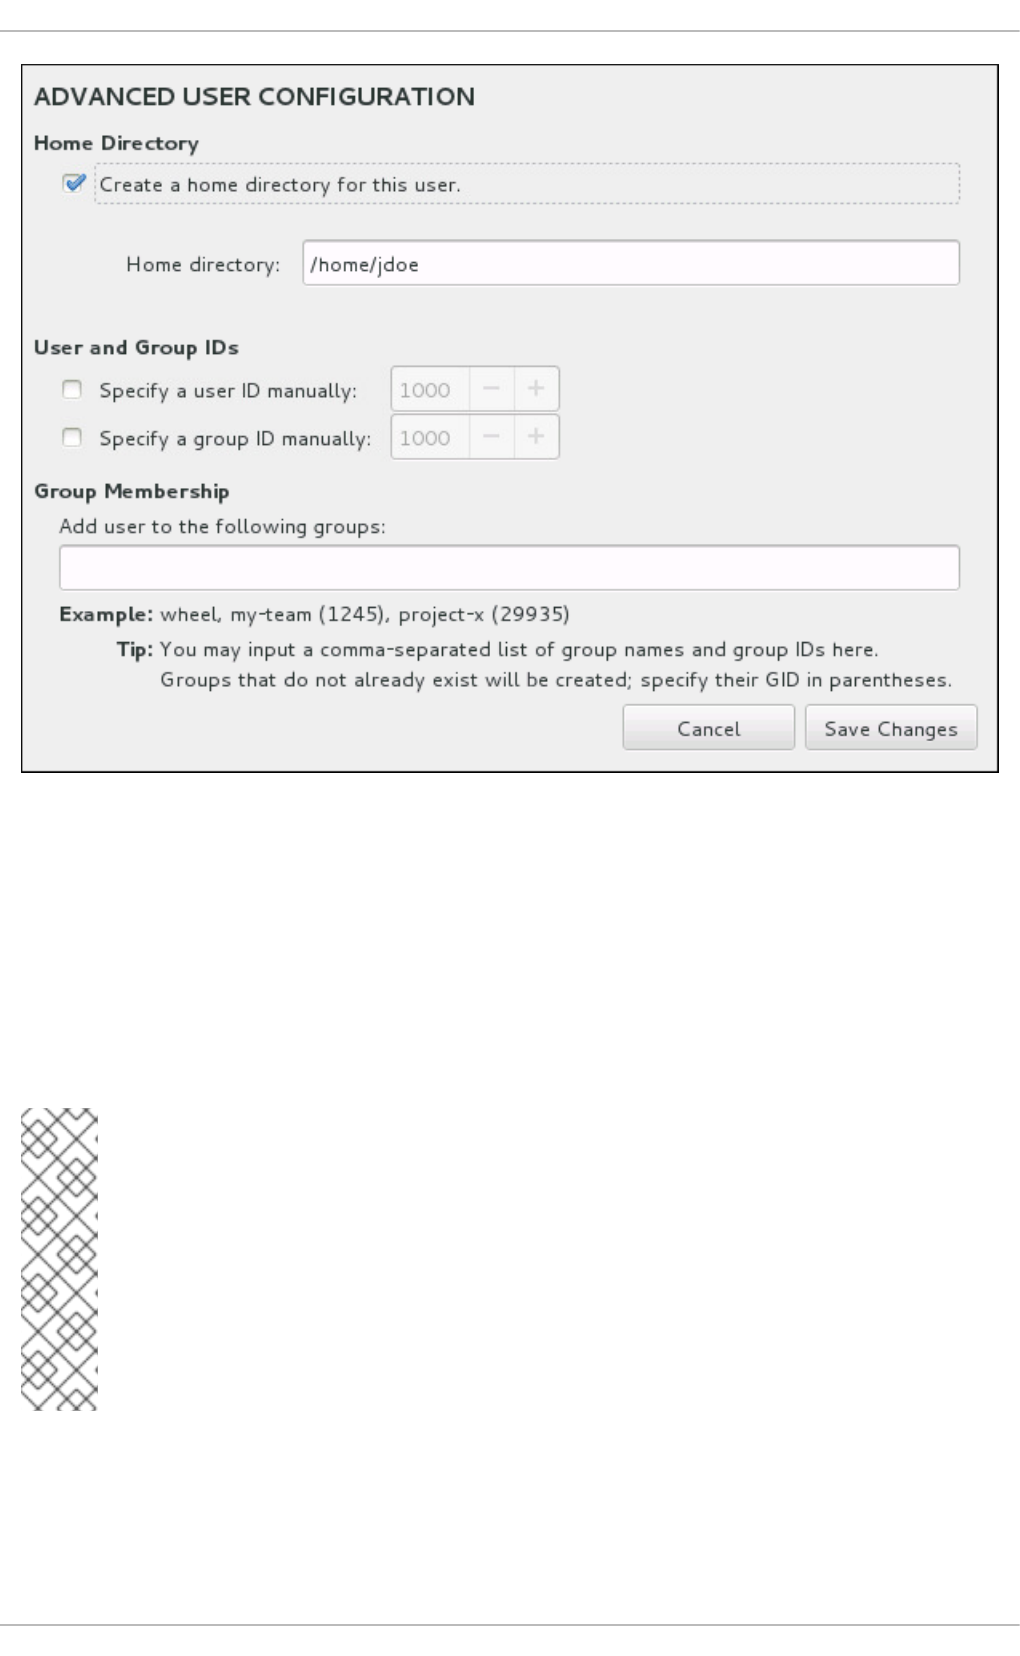
Figure 13.42. Advanced User Account Configuration
By default, each user gets a home directory corresponding to their user name. In most scenarios, there
is no need to change this setting.
You can also manually define a system identification number for the new user and their default group by
selecting the check boxes. The range for regular user IDs starts at the number 1000. At the bottom of the
dialog, you can enter the comma-separated list of additional groups, to which the new user shall belong.
The new groups will be created in the system. To customize group IDs, specify the numbers in
parenthesis.
NOTE
Consider setting IDs of regular users and their default groups at range starting at 5000
instead of 1000. That is because the range reserved for system users and groups, 0-999,
might increase in the future and thus overlap with IDs of regular users.
For creating users with custom IDs using kickstart, see user (optional) .
For changing the minimum UID and GID limits after the installation, which ensures that
your chosen UID and GID ranges are applied automatically on user creation, see the
Users and Groups chapter of the System Administrator's Guide.
Once you have customized the user account, click Save Changes to return to the User Settings
screen.
13.20. INSTALLATION COMPLETE
Installation Guide
196

Congratulations! Your Red Hat Enterprise Linux installation is now complete!
Click the Reboot button to reboot your system and begin using Red Hat Enterprise Linux. Remember to
remove any installation media if it is not ejected automatically upon reboot.
After your computer's normal power-up sequence has completed, Red Hat Enterprise Linux loads and
starts. By default, the start process is hidden behind a graphical screen that displays a progress bar.
Eventually, a GUI login screen (or if the X Window System is not installed, a login: prompt) appears.
If your system was installed with the X Window System during this installation process, the first time you
start your Red Hat Enterprise Linux system, applications to set up your system are launched. These
applications guide you through initial configuration of Red Hat Enterprise Linux and allow you to set your
system time and date, register your machine with Red Hat Network, and more.
See Chapter 30, Initial Setup for information about the configuration process.
CHAPTER 13. INSTALLING USING ANACONDA
197
CHAPTER 14. TROUBLESHOOTING INSTALLATION ON IBM
POWER SYSTEMS
This chapter discusses some common installation problems and their solutions.
For debugging purposes, Anaconda logs installation actions into files in the /tmp directory. These files
are listed in the following table.
Table 14.1. Log Files Generated During the Installation
Log file Contents
/tmp/anaconda.log general Anaconda messages
/tmp/program.log all external programs run during the installation
/tmp/storage.log extensive storage module information
/tmp/packaging.log yum and rpm package installation messages
/tmp/syslog hardware-related system messages
If the installation fails, the messages from these files are consolidated into /tmp/anaconda-
tb-identifier, where identifier is a random string.
After successful installation, by default, these files will be copied to the installed system under the
directory /var/log/anaconda/. However, if installation is unsuccessful, or if the inst.nosave=all
or inst.nosave=logs options are used when booting the installation system, these logs will only exist
in the installation program's RAM disk. This means they are not saved permanently and will be lost once
the system is powered down. To store them permanently, copy those files to another system on the
network by using scp on the system running the installation program, or copy them to a mounted storage
device (such as an USB flash drive). Details on how to transfer the log files over the network are below.
NOTE
The following procedure requires the installation system to be able to access the network
and the target system to be able to receive files over the ssh protocol.
Procedure 14.1. Transferring Log Files Over the Network
1. On the system you are installing, press Ctrl+Alt+F2 to access a shell prompt. You will be
logged into a root account and you will have access to the installation program's temporary file
system.
2. Switch to the /tmp directory where the log files are located:
# cd /tmp
3. Copy the log files onto another system on the network using the scp command:
Installation Guide
198

# scp *log user@address:path
Replace user with a valid user name on the target system, address with the target system's
address or host name, and path with the path to the directory you want to save the log files into.
For example, if you want to log in as john to a system with an IP address of 192.168.0.122
and place the log files into the /home/john/logs/ directory on that system, the command will
have the following form:
# scp *log john@192.168.0.122:/home/john/logs/
When connecting to the target system for the first time, the SSH client asks you to confirm that
the fingerprint of the remote system is correct and that you want to continue:
The authenticity of host '192.168.0.122 (192.168.0.122)' can't be
established.
ECDSA key fingerprint is
a4:60:76:eb:b2:d0:aa:23:af:3d:59:5c:de:bb:c4:42.
Are you sure you want to continue connecting (yes/no)?
Type yes and press Enter to continue. Then, provide a valid password when prompted. The
files will start transferring to the specified directory on the target system.
The log files from the installation are now permanently saved on the target system and available for
review.
14.1. TROUBLE BEGINNING THE INSTALLATION
14.1.1. Problems with Booting into the Graphical Installation
Systems with some video cards have trouble booting into the graphical installation program. If the
installation program does not run using its default settings, it attempts to run in a lower resolution mode.
If that still fails, the installation program attempts to run in text mode.
There are several possible solutions to display issues, most of which involve specifying custom boot
options. For more information, see Section 22.1, “Configuring the Installation System at the Boot Menu”.
Use the basic graphics mode
You can attempt to perform the installation using the basic graphics driver. To do this, edit the
installation program's options at the boot: prompt and append inst.xdriver=vesa at the end of
the command line.
Specify the display resolution manually
If the installation program fails to detect your screen resolution, you can override the automatic
detection and specify it manually. To do this, append the inst.resolution=x option at the boot
menu, where x is your display's resolution (for example, 1024x768).
14.1.2. Serial Console Not Detected
In some cases, attempting to install in text mode using a serial console will result in no output on the
console. This happens on systems which have a graphics card, but no monitor connected. If Anaconda
detects a graphics card, it will attempt to use it for a display, even if no display is connected.
CHAPTER 14. TROUBLESHOOTING INSTALLATION ON IBM POWER SYSTEMS
199

If you want to perform a text-based installation on a serial console, use the inst.text and console=
boot options. See Chapter 22, Boot Options for more details.
14.2. TROUBLE DURING THE INSTALLATION
14.2.1. No Disks Detected
In the Installation Destination screen, the following error message can appear at the bottom: No
disks detected. Please shut down the computer, connect at least one disk, and
restart to complete installation.
The message indicates that Anaconda did not find any writable storage devices to install to. In that case,
first make sure that your system does have at least one storage device attached.
If your system uses a hardware RAID controller, verify that the controller is properly configured and
working. See your controller's documentation for instructions.
If you are installing into one or more iSCSI devices and there is no local storage present on the system,
make sure that all required LUNs (Logical Unit Numbers) are being presented to the appropriate HBA
(Host Bus Adapter). For additional information about iSCSI, see Appendix B, iSCSI Disks.
If you made sure you have a connected and properly configured storage device and the message still
appears after you reboot the system and start the installation again, it means that the installation
program failed to detect the storage. In most cases this message appears when you attempt to install on
an SCSI device which has not been recognized by the installation program.
In that case, you will have to perform a driver update before starting the installation. Check your
hardware vendor's website to determine if a driver update is available that fixes your problem. For more
general information on driver updates, see Chapter 11, Updating Drivers During Installation on IBM
Power Systems.
You can also consult the Red Hat Hardware Compatibility List, available online at
https://hardware.redhat.com.
14.2.2. Reporting Traceback Messages
If the graphical installation program encounters an error, it presents you with a crash reporting dialog
box. You can then choose to send information about the problem you encountered to Red Hat. To send
a crash report, you will need to enter your Customer Portal credentials. If you do not have a Customer
Portal account, you can register at https://www.redhat.com/wapps/ugc/register.html. Automated crash
reporting also requires a working network connection.
Installation Guide
200

Figure 14.1. The Crash Reporting Dialog Box
When the dialog appears, select Report Bug to report the problem, or Quit to exit the installation.
Optionally, click More Info to display detailed output that can help determine the cause of the error. If
you are familiar with debugging, click Debug. This will take you to virtual terminal tty1, where you can
request more precise information that will enhance the bug report. To return to the graphical interface
from tty1, use the continue command.
Figure 14.2. The Expanded Crash Reporting Dialog Box
If you want to report the bug to the customer portal, follow the procedure below.
Procedure 14.2. Reporting Errors to Red Hat Customer Support
1. In the menu that appears, select Report a bug to Red Hat Customer Portal.
CHAPTER 14. TROUBLESHOOTING INSTALLATION ON IBM POWER SYSTEMS
201
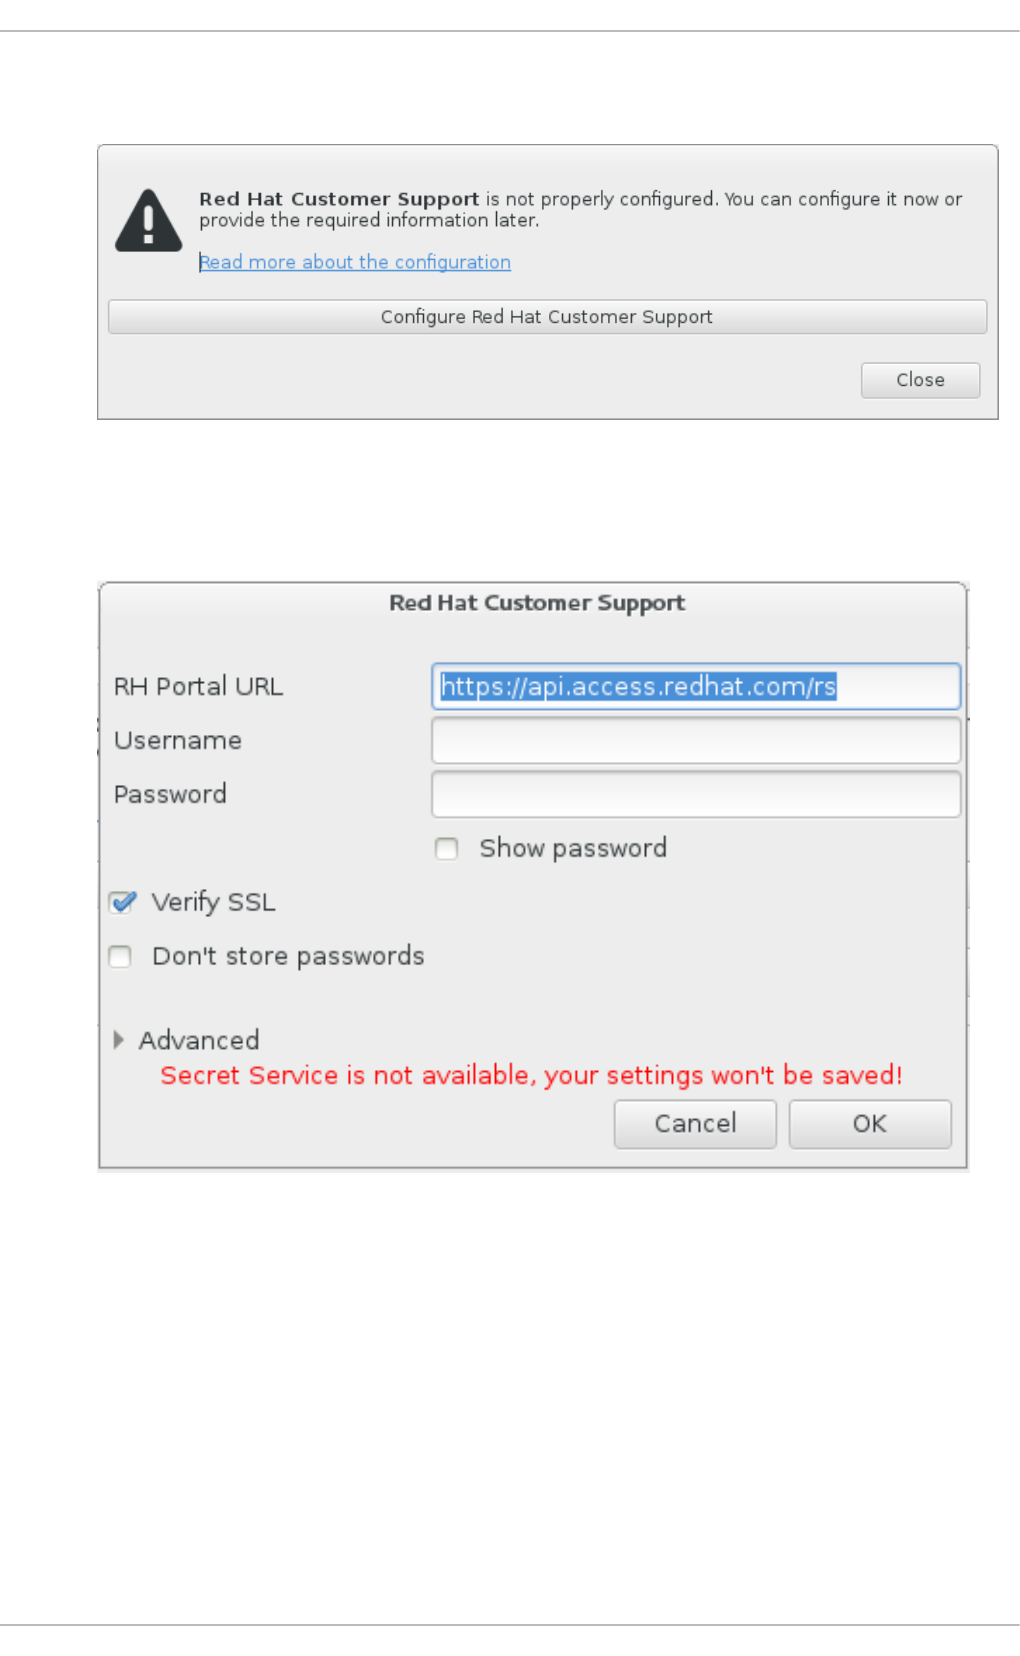
2. To report the bug to Red Hat, you first need to provide your Customer Portal credentials. Click
Configure Red Hat Customer Support.
Figure 14.3. Customer Portal Credentials
3. A new window is now open, prompting you to enter your Customer Portal user name and
password. Enter your Red Hat Customer Portal credentials.
Figure 14.4. Configure Red Hat Customer Support
If your network settings require you to use a HTTP or HTTPS proxy, you can configure it by
expanding the Advanced menu and entering the address of the proxy server.
When you put in all required credentials, click OK to proceed.
4. A new window appears, containing a text field. Write down any useful information and comments
here. Describe how the error can be reproduced by explaining each step you took before the
crash reporting dialog appeared. Provide as much relevant detail as possible, including any
information you acquired when debugging. Be aware that the information you provide here can
become publicly visible on the Customer Portal.
Installation Guide
202

If you do not know what caused the error, check the box labeled I don't know what
caused this problem at the bottom of the dialog.
Then, click Forward.
Figure 14.5. Describe the Problem
5. Next, review the information that will be sent to the Customer Portal. The explanation you
provided is in the comment tab. Other tabs include such information as your system's host name
and other details about the installation environment. You can remove any items you do not want
sent to Red Hat, but be aware that providing less detail can affect the investigation of the issue.
Click Forward when you finish reviewing the information to be sent.
CHAPTER 14. TROUBLESHOOTING INSTALLATION ON IBM POWER SYSTEMS
203
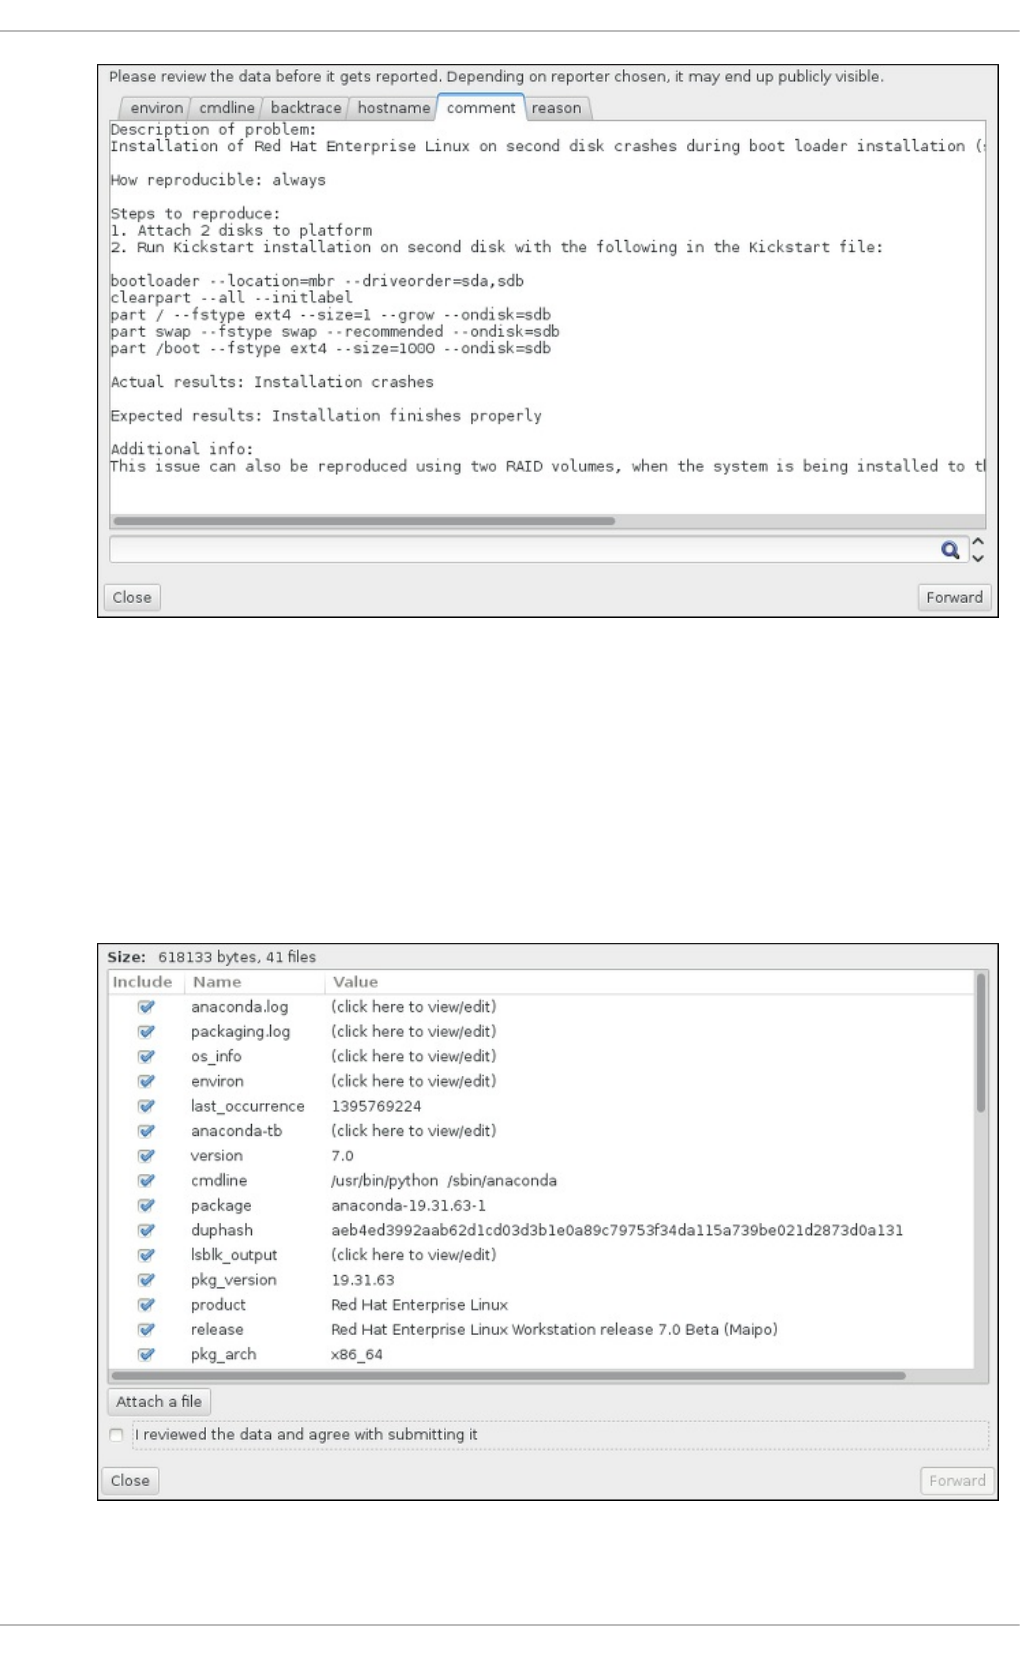
Figure 14.6. Review the Data to Be Sent
6. Review the list of files that will be sent and included in the bug report as individual attachments.
These files provide system information that will assist the investigation. If you do not want to
send certain files, uncheck the box next to each one. To provide additional files that can help
find the problem, click Attach a file.
Once you have reviewed the files to be sent, check the box labeled I have reviewed the
data and agree with submitting it. Then, click Forward to send the report and
attachments to the Customer Portal.
Figure 14.7. Review the Files to Be Sent
Installation Guide
204

7. When the dialog reports that processing has finished, you can click Show log to view details of
the reporting process or Close to return to the initial crash reporting dialog box. There, click
Quit to exit the installation.
14.2.3. Creating Pre-installation Log Files
To debug installation problems you can set the inst.debug option to create log files from the
environment before the installation starts. These log files contain, for example, the current storage
configuration.
To set the option in the Red Hat Enterprise Linux installation boot menu:
1. Select the Install Red Hat Enterprise Linux 7.3 entry.
2. Press the Tab key to edit the boot options.
3. Append inst.debug to the options. For example:
> vmlinuz ... inst.debug
For further details, see Chapter 22, Boot Options.
4. Press Enter to start the setup.
The system stores the pre-installation log files in the /tmp/pre-anaconda-logs/ directory before
Anaconda starts. To access the log files:
1. Switch to the console. See Section 8.2.1, “Accessing Consoles”.
2. Change into the /tmp/pre-anaconda-logs/ directory:
# cd /tmp/pre-anaconda-logs/
14.2.4. Other Partitioning Problems for IBM Power Systems Users
If you create partitions manually, but cannot move to the next screen, you probably have not created all
the partitions necessary for installation to proceed.
You must have the following partitions as a bare minimum:
A / (root) partition
A PReP Boot partition
A /boot partition (only if the root partition is a LVM logical volume or Btrfs subvolume)
See Section 13.15.4.4, “Recommended Partitioning Scheme” for more information.
14.3. PROBLEMS AFTER INSTALLATION
14.3.1. Trouble With the Graphical Boot Sequence
After you finish the installation and reboot your system for the first time, it is possible that the system
CHAPTER 14. TROUBLESHOOTING INSTALLATION ON IBM POWER SYSTEMS
205

stops responding during the graphical boot sequence, requiring a reset. In this case, the boot loader is
displayed successfully, but selecting any entry and attempting to boot the system results in a halt. This
usually means a problem with the graphical boot sequence; to solve this issue, you must disable
graphical boot. To do this, temporarily alter the setting at boot time before changing it permanently.
Procedure 14.3. Disabling Graphical Boot Temporarily
1. Start your computer and wait until the boot loader menu appears. If you set your boot loader
timeout period to 0, hold down the Esc key to access it.
2. When the boot loader menu appears, use your cursor keys to highlight the entry you want to
boot and press the e key to edit this entry's options.
3. In the list of options, find the kernel line - that is, the line beginning with the keyword linux. On
this line, locate the rhgb option and delete it. The option might not be immediately visible; use
the cursor keys to scroll up and down.
4. Press F10 or Ctrl+X to boot your system with the edited options.
If the system started successfully, you can log in normally. Then you will need to disable the graphical
boot permanently - otherwise you will have to perform the previous procedure every time the system
boots. To permanently change boot options, do the following.
Procedure 14.4. Disabling Graphical Boot Permanently
1. Log in to the root account using the su - command:
$ su -
2. Use the grubby tool to find the default GRUB2 kernel:
# grubby --default-kernel
/boot/vmlinuz-3.10.0-229.4.2.el7.ppc64
3. Use the grubby tool to remove the rhgb boot option from the default kernel, identified in the last
step, in your GRUB2 configuration. For example:
# grubby --remove-args="rhgb" --update-kernel /boot/vmlinuz-3.10.0-
229.4.2.el7.ppc64
After you finish this procedure, you can reboot your computer. Red Hat Enterprise Linux will not use the
graphical boot sequence any more. If you want to enable graphical boot in the future, follow the same
procedure, replacing the --remove-args="rhgb" parameter with the --args="rhgb" paramter.
This will restore the rhgb boot option to the default kernel in your GRUB2 configuration.
See the Red Hat Enterprise Linux 7 System Administrator's Guide for more information about working
with the GRUB2 boot loader.
14.3.2. Booting into a Graphical Environment
If you have installed the X Window System but are not seeing a graphical desktop environment once
you log into your system, you can start it manually using the startx command. Note, however, that this
is just a one-time fix and does not change the log in process for future log ins.
Installation Guide
206

To set up your system so that you can log in at a graphical login screen, you must change the default
systemd target to graphical.target. When you are finished, reboot the computer. You will
presented with a graphical login prompt after the system restarts.
Procedure 14.5. Setting Graphical Login as Default
1. Open a shell prompt. If you are in your user account, become root by typing the su - command.
2. Change the default target to graphical.target. To do this, execute the following command:
# systemctl set-default graphical.target
Graphical login is now enabled by default - you will be presented with a graphical login prompt after the
next reboot. If you want to reverse this change and keep using the text-based login prompt, execute the
following command as root:
# systemctl set-default multi-user.target
For more information about targets in systemd, see the Red Hat Enterprise Linux 7 System
Administrator's Guide.
14.3.3. No Graphical User Interface Present
If you are having trouble getting X (the X Window System) to start, it is possible that it has not been
installed. Some of the preset base environments you can select during the installation, such as Minimal
install or Web Server, do not include a graphical interface - it has to be installed manually.
If you want X, you can install the necessary packages afterwards. See the Knowledgebase article at
https://access.redhat.com/site/solutions/5238 for information on installing a graphical desktop
environment.
14.3.4. X Server Crashing After User Logs In
If you are having trouble with the X server crashing when a user logs in, one or more of your file systems
can be full or nearly full. To verify that this is the problem you are experiencing, execute the following
command:
$ df -h
The output will help you diagnose which partition is full - in most cases, the problem will be on the /home
partition. The following is a sample output of the df command:
Filesystem Size Used Avail Use%
Mounted on
/dev/mapper/vg_rhel-root 20G 6.0G 13G 32% /
devtmpfs 1.8G 0 1.8G 0% /dev
tmpfs 1.8G 2.7M 1.8G 1%
/dev/shm
tmpfs 1.8G 1012K 1.8G 1% /run
tmpfs 1.8G 0 1.8G 0%
/sys/fs/cgroup
CHAPTER 14. TROUBLESHOOTING INSTALLATION ON IBM POWER SYSTEMS
207

tmpfs 1.8G 2.6M 1.8G 1% /tmp
/dev/sda1 976M 150M 760M 17% /boot
/dev/dm-4 90G 90G 0 100% /home
In the above example, you can see that the /home partition is full, which causes the crash. You can
make some room on the partition by removing unneeded files. After you free up some disk space, start X
using the startx command.
For additional information about df and an explanation of the options available (such as the -h option
used in this example), see the df(1) man page.
14.3.5. Is Your System Displaying Signal 11 Errors?
A signal 11 error, commonly known as a segmentation fault, means that a program accessed a memory
location that was not assigned to it. A signal 11 error can occur due to a bug in one of the software
programs that is installed, or faulty hardware.
If you receive a fatal signal 11 error during the installation, first make sure you are using the most recent
installation images, and let Anaconda verify them to make sure they are not corrupted. Bad installation
media (such as an improperly burned or scratched optical disk) are a common cause of signal 11 errors.
Verifying the integrity of the installation media is recommended before every installation.
For information about obtaining the most recent installation media, see Chapter 2, Downloading Red Hat
Enterprise Linux. To perform a media check before the installation starts, append the rd.live.check
boot option at the boot menu. See Section 22.2.2, “Verifying Boot Media” for details.
Other possible causes are beyond this document's scope. Consult your hardware manufacturer's
documentation for more information.
14.3.6. Unable to IPL from Network Storage Space (*NWSSTG)
If you are experiencing difficulties when trying to IPL from Network Storage Space (*NWSSTG), in most
cases the reason is a missing PReP partition. In this case, you must reinstall the system and make sure
to create this partition during the partitioning phase or in the Kickstart file.
14.3.7. The GRUB2 next_entry variable can behave unexpectedly in a virtualized
environment
IBM Power System users booting their virtual environment with SLOF firmware must manually unset the
next_entry grub environment variable after a system reboot. The SLOF firmware does not support
block writes at boot time by design thus the bootloader is unable to clear this variable at boot time.
Installation Guide
208

PART III. IBM Z ARCHITECTURE - INSTALLATION AND
BOOTING
This part discusses booting, or initial program load (IPL), and installation of Red Hat Enterprise Linux on
IBM Z.
PART III. IBM Z ARCHITECTURE - INSTALLATION AND BOOTING
209
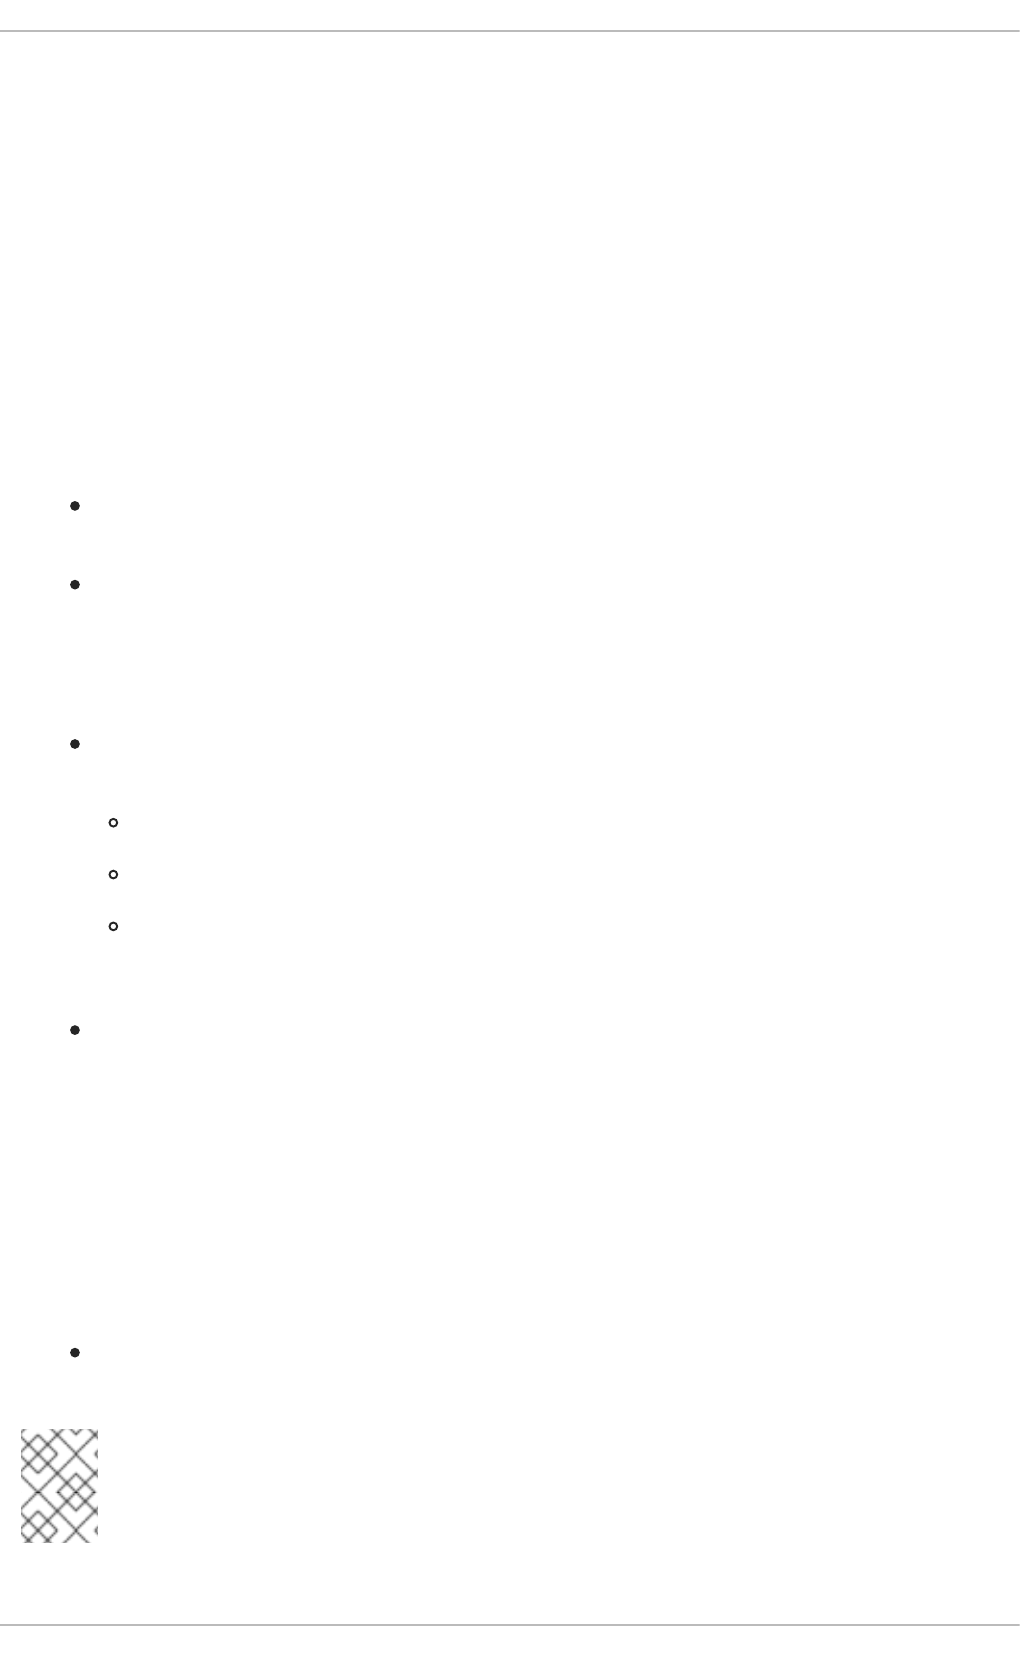
CHAPTER 15. PLANNING FOR INSTALLATION ON IBM Z
15.1. PRE-INSTALLATION
Red Hat Enterprise Linux 7 runs on zEnterprise 196 or later IBM mainframe systems.
The installation process assumes that you are familiar with the IBM Z and can set up logical partitions
(LPARs) and z/VM guest virtual machines. For additional information on IBM Z, see
http://www.ibm.com/systems/z.
For installation of Red Hat Enterprise Linux on IBM Z, Red Hat supports DASD (Direct Access Storage
Device) and FCP (Fiber Channel Protocol) storage devices.
Before you install Red Hat Enterprise Linux, you must decide on the following:
Decide whether you want to run the operating system on an LPAR or as a z/VM guest operating
system.
Decide if you need swap space and if so, how much. Although it is possible (and recommended)
to assign enough memory to a z/VM guest virtual machine and let z/VM do the necessary
swapping, there are cases where the amount of required RAM is hard to predict. Such instances
should be examined on a case-by-case basis. See Section 17.15.3.4, “Recommended
Partitioning Scheme”.
Decide on a network configuration. Red Hat Enterprise Linux 7 for IBM Z supports the following
network devices:
Real and virtual Open Systems Adapter (OSA)
Real and virtual HiperSockets
LAN channel station (LCS) for real OSA
You require the following hardware:
Disk space. Calculate how much disk space you need and allocate sufficient disk space on
DASDs[2] or SCSI[3] disks. You require at least 10 GB for a server installation, and 20 GB if you
want to install all packages. You also require disk space for any application data. After the
installation, you can add or delete more DASD or SCSI disk partitions.
The disk space used by the newly installed Red Hat Enterprise Linux system (the Linux
instance) must be separate from the disk space used by other operating systems you have
installed on your system.
For more information about disks and partition configuration, see Section 17.15.3.4,
“Recommended Partitioning Scheme”.
RAM. Acquire 1 GB (recommended) for the Linux instance. With some tuning, an instance might
run with as little as 512 MB RAM.
NOTE
When initializing swap space on an FBA (Fixed Block Architecture) DASD using the
SWAPGEN utility, the FBAPART option must be used.
Installation Guide
210

15.2. OVERVIEW OF THE IBM Z INSTALLATION PROCEDURE
You can install Red Hat Enterprise Linux on IBM Z interactively or in unattended mode. Installation on
IBM Z differs from installation on other architectures in that it is typically performed over a network and
not from a local media. The installation consists of two phases:
1. Booting the Installation
Connect with the mainframe, then perform an initial program load (IPL), or boot, from the
medium containing the installation program. See Chapter 16, Booting the Installation on IBM Z
for details.
2. Anaconda
Use the Anaconda installation program to configure network, specify language support,
installation source, software packages to be installed, and to perform the rest of the installation.
See Chapter 17, Installing Using Anaconda for more information.
15.2.1. Booting the Installation
After establishing a connection with the mainframe, you need to perform an initial program load (IPL), or
boot, from the medium containing the installation program. This document describes the most common
methods of installing Red Hat Enterprise Linux on IBM Z. In general, you can use any method to boot the
Linux installation system, which consists of a kernel (kernel.img) and initial RAM disk (initrd.img)
with at least the parameters in the generic.prm file. Additionally, a generic.ins file is loaded which
determines file names and memory addresses for the initrd, kernel and generic.prm.
The Linux installation system is also called the installation program in this book.
The control point from where you can start the IPL process depends on the environment where your
Linux is to run. If your Linux is to run as a z/VM guest operating system, the control point is the control
program (CP) of the hosting z/VM. If your Linux is to run in LPAR mode, the control point is the
mainframe's Support Element (SE) or an attached IBM Z Hardware Management Console (HMC).
You can use the following boot media only if Linux is to run as a guest operating system under z/VM:
z/VM reader - see Section 16.3.1, “Using the z/VM Reader” for details.
You can use the following boot media only if Linux is to run in LPAR mode:
SE or HMC through a remote FTP server - see Section 16.4.1, “Using an FTP Server” for
details.
SE or HMC DVD - see Section 16.4.4, “Using an FCP-attached SCSI DVD Drive” for details.
You can use the following boot media for both z/VM and LPAR:
DASD - see Section 16.3.2, “Using a Prepared DASD” for z/VM or Section 16.4.2, “Using a
Prepared DASD” for LPAR.
SCSI device that is attached through an FCP channel - see Section 16.3.3, “Using a Prepared
FCP-attached SCSI Disk” for z/VM or Section 16.4.3, “Using a Prepared FCP-attached SCSI
Disk” for LPAR.
FCP-attached SCSI DVD - see Section 16.3.4, “Using an FCP-attached SCSI DVD Drive” for
z/VM or Section 16.4.4, “Using an FCP-attached SCSI DVD Drive” for LPAR
CHAPTER 15. PLANNING FOR INSTALLATION ON IBM Z
211

If you use DASD and FCP-attached SCSI devices (except SCSI DVDs) as boot media, you must have a
configured zipl boot loader.
15.2.2. Installation using Anaconda
In the second installation phase, you will use the Anaconda installation program in graphical, text-based,
or command-line mode:
Graphical Mode
Graphical installation is done through a VNC client. You can use your mouse and keyboard to
navigate through the screens, click buttons, and type into text fields. For more information on
performing a graphical installation using VNC, see Chapter 24, Using VNC.
Text-based Mode
This interface does not offer all interface elements of the GUI and does not support all settings. Use
this for interactive installations if you cannot use a VNC client. For more information about text-based
installations, see Section 17.4, “Installing in Text Mode”.
Command-line Mode
This is intended for automated and non-interactive installations on IBM Z. Note that if the installation
program encounters an invalid or missing kickstart command, the system will reboot. For more
information about automated installation, see Chapter 26, Kickstart Installations.
In Red Hat Enterprise Linux 7 the text-based installation has been reduced to minimize user interaction.
Features like installation on FCP-attached SCSI devices, customizing partition layout, or package add-on
selection are only available with the graphical user interface installation. Use the graphical installation
whenever possible. See Chapter 17, Installing Using Anaconda for more details.
[2] Direct Access Storage Devices (DASDs) are hard disks that allow a maximum of three partitions per device. For
example, dasda can have partitions dasda1, dasda2, and dasda3.
[3] Using the SCSI-over-Fibre Channel device driver (the zfcp device driver) and a switch, SCSI LUNs can be
presented to Linux on IBM Z as if they were locally attached SCSI drives.
Installation Guide
212

CHAPTER 16. BOOTING THE INSTALLATION ON IBM Z
The steps to perform the initial program boot (IPL) of the Anaconda installation program depend on the
environment (either z/VM or LPAR) in which Red Hat Enterprise Linux will run.
16.1. CUSTOMIZING BOOT PARAMETERS
Before you can begin the installation, you must configure some mandatory boot parameters. When
installing through z/VM, these parameters must be configured before you boot in the generic.prm file.
When installing on an LPAR, the rd.cmdline parameter is set to ask by default, meaning that you will
be given a prompt on which you can enter these boot parameters. In both cases, the required
parameters are the same.
NOTE
Unlike Red Hat Enterprise Linux 6, which featured an interactive utility to assist network
configuration, all network configuration must now be specified by the use of the following
parameters, either by using a parameter file, or at the prompt.
Installation source
An installation source must always be configured. Use the inst.repo= option to specify the
package source for the installation. See Specifying the Installation Source for details and syntax.
Network devices
Network configuration must be provided if network access will be required during the installation. If
you plan to perform an unattended (Kickstart-based) installation using only local media such as a
hard drive, network configuration can be omitted.
Use the ip= option for basic network configuration, and other options listed in Network Boot Options
as required.
Also use the rd.znet= kernel option, which takes a network protocol type, a comma delimited list of
sub-channels, and, optionally, comma delimited sysfs parameter and value pairs. This parameter
can be specified multiple times to activate multiple network devices.
For example:
rd.znet=qeth,0.0.0600,0.0.0601,0.0.0602,layer2=1,portname=foo
rd.znet=ctc,0.0.0600,0.0.0601,protocol=bar
Storage devices
At least one storage device must always be configured.
The rd.dasd= option takes a Direct Access Storage Device (DASD) adapter device bus identifier
and, optionally, comma separated sysfs parameter and value pairs, then activates the device. This
parameter can be specified multiple times to activate multiple DASDs. Example:
rd.dasd=0.0.0200,readonly=0
rd.dasd=0.0.0202,readonly=0
CHAPTER 16. BOOTING THE INSTALLATION ON IBM Z
213

The rd.zfcp= option takes a SCSI over FCP (zFCP) adapter device bus identifier, a world wide port
name (WWPN), and a FCP LUN, then activates the device. This parameter can be specified multiple
times to activate multiple zFCP devices. Example:
rd.zfcp=0.0.4000,0x5005076300C213e9,0x5022000000000000
Kickstart options
If you are using a Kickstart file to perform an automatic installation, you must always specify the
location of the Kickstart file using the inst.ks= option. For an unattended, fully automatic Kickstart
installation, the inst.cmdline option is also useful. See Section 20.4, “Parameters for Kickstart
Installations” for additional information.
An example customized generic.prm file containing all mandatory parameters look similar to the
following example:
Example 16.1. Customized generic.prm file
ro ramdisk_size=40000 cio_ignore=all,!condev
inst.repo=http://example.com/path/to/repository
rd.znet=qeth,0.0.0600,0.0.0601,0.0.0602,layer2=1,portno=0,portname=foo
ip=192.168.17.115::192.168.17.254:24:foobar.systemz.example.com:enccw0.0
.0600:none
nameserver=192.168.17.1
rd.dasd=0.0.0200 rd.dasd=0.0.0202
rd.zfcp=0.0.4000,0x5005076300C213e9,0x5022000000000000
inst.ks=http://example.com/path/to/kickstart
Some installation methods also require a file with a mapping of the location of installation data in the file
system of the DVD or FTP server and the memory locations where the data is to be copied. The file is
typically named generic.ins, and contains file names for the initial RAM disk, kernel image, and
parameter file (generic.prm) and a memory location for each file. An example generic.ins will look
similar to the following example:
Example 16.2. Sample generic.ins file
images/kernel.img 0x00000000
images/initrd.img 0x02000000
images/genericdvd.prm 0x00010480
images/initrd.addrsize 0x00010408
A valid generic.ins file is provided by Red Hat along with all other files required to boot the installer.
Modify this file only if you want to, for example, load a different kernel version than default.
16.2. CONSIDERATIONS FOR HARD DRIVE INSTALLATION ON IBM Z
If you want to boot the installation program from a hard drive, you can optionally install the zipl boot
loader on the same (or a different) disk. Be aware that zipl only supports one boot record per disk. If you
have multiple partitions on a disk, they all "share" the disk's single boot record.
Installation Guide
214
To prepare a hard drive to boot the installation program, install the zipl boot loader on the hard drive by
entering the following command:
# zipl -V -t /mnt/ -i /mnt/images/kernel.img -r /mnt/images/initrd.img -p
/mnt/images/generic.prm
See Section 16.1, “Customizing boot parameters” for details on customizing boot parameters in the
generic.prm configuration file.
16.3. INSTALLING UNDER Z/VM
When installing under z/VM, you can boot from:
the z/VM virtual reader
a DASD or an FCP-attached SCSI device prepared with the zipl boot loader
an FCP-attached SCSI DVD drive
Log on to the z/VM guest virtual machine chosen for the Linux installation. You can use the x3270 or
c3270 terminal emulator, available in the x3270-text package in Red Hat Enterprise Linux, to log in to
z/VM from other Linux systems. Alternatively, use the IBM 3270 terminal emulator on the IBM Z
Hardware Management Console (HMC). If you are working from a machine with a Microsoft Windows
operating system, Jolly Giant (http://www.jollygiant.com/) offers an SSL-enabled 3270 emulator. A free
native Windows port of c3270 called wc3270 also exists.
NOTE
If your 3270 connection is interrupted and you cannot log in again because the previous
session is still active, you can replace the old session with a new one by entering the
following command on the z/VM logon screen:
logon user here
Replace user with the name of the z/VM guest virtual machine. Depending on whether an
external security manager, for example RACF, is used, the logon command might vary.
If you are not already running CMS (single-user operating system shipped with z/VM) in your guest, boot
it now by entering the command:
cp ipl cms
Be sure not to use CMS disks such as your A disk (often device number 0191) as installation targets. To
find out which disks are in use by CMS, use the following query:
query disk
You can use the following CP (z/VM Control Program, which is the z/VM hypervisor) query commands to
find out about the device configuration of your z/VM guest virtual machine:
Query the available main memory, which is called storage in IBM Z terminology. Your guest
should have at least 1 GB of main memory.
CHAPTER 16. BOOTING THE INSTALLATION ON IBM Z
215
cp query virtual storage
Query available network devices by type:
osa
OSA - CHPID type OSD, real or virtual (VSWITCH or GuestLAN), both in QDIO mode
hsi
HiperSockets - CHPID type IQD, real or virtual (GuestLAN type Hipers)
lcs
LCS - CHPID type OSE
For example, to query all of the network device types mentioned above, run:
cp query virtual osa
Query available DASDs. Only those that are flagged RW for read-write mode can be used as
installation targets:
cp query virtual dasd
Query available FCP channels:
cp query virtual fcp
16.3.1. Using the z/VM Reader
Perform the following steps to boot from the z/VM reader:
1. If necessary, add the device containing the z/VM TCP/IP tools to your CMS disk list. For
example:
cp link tcpmaint 592 592
acc 592 fm
Replace fm with any FILEMODE letter.
2. Execute the command:
ftp host
Where host is the host name or IP address of the FTP server that hosts the boot images
(kernel.img and initrd.img).
3. Log in and execute the following commands. Use the (repl option if you are overwriting
existing kernel.img, initrd.img, generic.prm, or redhat.exec files:
cd /location/of/install-tree/images/
ascii
Installation Guide
216

get generic.prm (repl
get redhat.exec (repl
locsite fix 80
binary
get kernel.img (repl
get initrd.img (repl
quit
4. Optionally, check whether the files were transferred correctly by using the CMS command
filelist to show the received files and their format. It is important that kernel.img and
initrd.img have a fixed record length format denoted by F in the Format column and a record
length of 80 in the Lrecl column. For example:
VMUSER FILELIST A0 V 169 Trunc=169 Size=6 Line=1 Col=1 Alt=0
Cmd Filename Filetype Fm Format Lrecl Records Blocks Date Time
REDHAT EXEC B1 V 22 1 1 4/15/10 9:30:40
GENERIC PRM B1 V 44 1 1 4/15/10 9:30:32
INITRD IMG B1 F 80 118545 2316 4/15/10 9:30:25
KERNEL IMG B1 F 80 74541 912 4/15/10 9:30:17
Press PF3 to quit filelist and return to the CMS prompt.
5. Customize boot parameters in generic.prm as necessary. See Section 16.1, “Customizing
boot parameters” for details.
Another way to configure storage and network devices is by using a CMS configuration file. In
such a case, add the CMSDASD= and CMSCONFFILE= parameters to generic.prm. See
Section 20.2, “The z/VM Configuration File” for more details.
6. Finally, execute the REXX script redhat.exec to boot the installation program:
redhat
16.3.2. Using a Prepared DASD
Boot from the prepared DASD and select the zipl boot menu entry referring to the Red Hat
Enterprise Linux installation program. Use a command of the following form:
cp ipl DASD_device_number loadparm boot_entry_number
Replace DASD_device_number with the device number of the boot device, and boot_entry_number with
the zipl configuration menu for this device. For example:
cp ipl eb1c loadparm 0
16.3.3. Using a Prepared FCP-attached SCSI Disk
Perform the following steps to boot from a prepared FCP-attached SCSI disk:
1. Configure the SCSI boot loader of z/VM to access the prepared SCSI disk in the FCP Storage
Area Network. Select the prepared zipl boot menu entry referring to the Red Hat
Enterprise Linux installation program. Use a command of the following form:
CHAPTER 16. BOOTING THE INSTALLATION ON IBM Z
217
cp set loaddev portname WWPN lun LUN bootprog boot_entry_number
Replace WWPN with the World Wide Port Name of the storage system and LUN with the Logical
Unit Number of the disk. The 16-digit hexadecimal numbers must be split into two pairs of eight
digits each. For example:
cp set loaddev portname 50050763 050b073d lun 40204011 00000000
bootprog 0
2. Optionally, confirm your settings with the command:
query loaddev
3. Boot the FCP device connected with the storage system containing the disk with the following
command:
cp ipl FCP_device
For example:
cp ipl fc00
16.3.4. Using an FCP-attached SCSI DVD Drive
This requires a SCSI DVD drive attached to an FCP-to-SCSI bridge which is in turn connected to an
FCP adapter in your IBM Z. The FCP adapter must be configured and available under z/VM.
1. Insert your Red Hat Enterprise Linux for IBM Z DVD into the DVD drive.
2. Configure the SCSI boot loader of z/VM to access the DVD drive in the FCP Storage Area
Network and specify 1 for the boot entry on the Red Hat Enterprise Linux for IBM Z DVD. Use a
command of the following form:
cp set loaddev portname WWPN lun FCP_LUN bootprog 1
Replace WWPN with the WWPN of the FCP-to-SCSI bridge and FCP_LUN with the LUN of the
DVD drive. The 16-digit hexadecimal numbers must be split into two pairs of eight characters
each. For example:
cp set loaddev portname 20010060 eb1c0103 lun 00010000 00000000
bootprog 1
3. Optionally, confirm your settings with the command:
cp query loaddev
4. IPL on the FCP device connected with the FCP-to-SCSI bridge.
cp ipl FCP_device
For example:
Installation Guide
218
cp ipl fc00
16.4. INSTALLING IN AN LPAR
When installing in a logical partition (LPAR), you can boot from:
an FTP server
a DASD or an FCP-attached SCSI drive prepared with the zipl boot loader
an FCP-attached SCSI DVD drive
Perform these common steps first:
1. Log in on the IBM Z Hardware Management Console (HMC) or the Support Element (SE) as a
user with sufficient privileges to install a new operating system to an LPAR. The SYSPROG user is
recommended.
2. Select Images, then select the LPAR to which you want to install. Use the arrows in the frame
on the right side to navigate to the CPC Recovery menu.
3. Double-click Operating System Messages to show the text console on which Linux boot
messages will appear.
Continue with the procedure for your installation source.
NOTE
Once you finish this procedure and one of the following ones depending on your
installation source, the installation will begin. The installer will then prompt you to provide
additional boot parameters. Required parameters are described in Section 16.1,
“Customizing boot parameters”.
16.4.1. Using an FTP Server
1. Double-click Load from CD-ROM, DVD, or Server.
2. In the dialog box that follows, select FTP Source, and enter the following information:
Host Computer - Host name or IP address of the FTP server you want to install from, for
example ftp.redhat.com
User ID - Your user name on the FTP server. Or, specify anonymous.
Password - Your password. Use your email address if you are logging in as anonymous.
Account (optional) - Leave this field empty.
File location (optional) - Directory on the FTP server holding the Red Hat
Enterprise Linux for IBM Z, for example /rhel/s390x/.
3. Click Continue.
4. In the dialog that follows, keep the default selection of generic.ins and click Continue.
CHAPTER 16. BOOTING THE INSTALLATION ON IBM Z
219

16.4.2. Using a Prepared DASD
1. Double-click Load.
2. In the dialog box that follows, select Normal as the Load type.
3. As Load address, fill in the device number of the DASD.
4. As Load parameter, fill in the number corresponding the zipl boot menu entry that you
prepared for booting the Red Hat Enterprise Linux installation program.
5. Click the OK button.
16.4.3. Using a Prepared FCP-attached SCSI Disk
1. Double-click Load.
2. In the dialog box that follows, select SCSI as the Load type.
3. As Load address, fill in the device number of the FCP channel connected with the SCSI disk.
4. As World wide port name, fill in the WWPN of the storage system containing the disk as a
16-digit hexadecimal number.
5. As Logical unit number, fill in the LUN of the disk as a 16-digit hexadecimal number.
6. As Boot program selector, fill in the number corresponding the zipl boot menu entry that
you prepared for booting the Red Hat Enterprise Linux installation program.
7. Leave the Boot record logical block address as 0 and the Operating system
specific load parameters empty.
8. Click the OK button.
16.4.4. Using an FCP-attached SCSI DVD Drive
This requires a SCSI DVD drive attached to an FCP-to-SCSI bridge which is in turn connected to an
FCP adapter in your IBM Z machine. The FCP adapter must be configured and available in your LPAR.
1. Insert your Red Hat Enterprise Linux for IBM Z DVD into the DVD drive.
2. Double-click Load.
3. In the dialog box that follows, select SCSI as the Load type.
4. As Load address, fill in the device number of the FCP channel connected with the FCP-to-
SCSI bridge.
5. As World wide port name, fill in the WWPN of the FCP-to-SCSI bridge as a 16-digit
hexadecimal number.
6. As Logical unit number, fill in the LUN of the DVD drive as a 16-digit hexadecimal number.
7. As Boot program selector, fill in the number 1 to select the boot entry on the Red Hat
Enterprise Linux for IBM Z DVD.
Installation Guide
220

8. Leave the Boot record logical block address as 0 and the Operating system
specific load parameters empty.
9. Click the OK button.
CHAPTER 16. BOOTING THE INSTALLATION ON IBM Z
221

CHAPTER 17. INSTALLING USING ANACONDA
This chapter provides step-by-step instructions for installing Red Hat Enterprise Linux using the
Anaconda installer. The bulk of this chapter describes installation using the graphical user interface; on
IBM Z, the graphical interface is accessed over the VNC protocol from another system. A text mode is
also available for systems with no graphical display, but this mode is limited in certain aspects (for
example, custom partitioning is not possible in text mode).
If you cannot use VNC mode with a graphical interface, consider using Kickstart to automate the
installation. See Chapter 26, Kickstart Installations for information about Kickstart.
17.1. INTRODUCTION TO ANACONDA
The Red Hat Enterprise Linux installer, Anaconda, is different from most other operating system
installation programs due to its parallel nature. Most installers follow a fixed path: you must choose your
language first, then you configure network, then installation type, then partitioning, and so on. There is
usually only one way to proceed at any given time.
In Anaconda you are only required to select your language and locale first, and then you are presented
with a central screen, where you can configure most aspects of the installation in any order you like.
This does not apply to all parts of the installation process, however - for example, when installing from a
network location, you must configure the network before you can select which packages to install.
Some screens will be automatically configured depending on your hardware and the type of media you
used to start the installation. You can still change the detected settings in any screen. Screens which
have not been automatically configured, and therefore require your attention before you begin the
installation, are marked by an exclamation mark. You cannot start the actual installation process before
you finish configuring these settings.
Additional differences appear in certain screens; notably the custom partitioning process is very different
from other Linux distributions. These differences are described in each screen's subsection.
17.2. CONSOLES AND LOGGING DURING THE INSTALLATION
The following sections describe how to access logs and an interactive shell during the installation. This is
useful when troubleshooting problems, but should not be necessary in most cases.
17.2.1. Accessing Consoles
The Red Hat Enterprise Linux installer uses the tmux terminal multiplexer to display and control several
windows you can use in addition to the main interface. Each of these windows serves a different purpose
- they display several different logs, which can be used to troubleshoot any issues during the installation,
and one of the windows provides an interactive shell prompt with root privileges, unless this prompt was
specifically disabled using a boot option or a Kickstart command.
NOTE
In general, there is no reason to leave the default graphical installation environment
unless you need to diagnose an installation problem.
The terminal multiplexer is running in virtual console 1. To switch from the graphical installation
environment to tmux, press Ctrl+Alt+F1. To go back to the main installation interface which runs in
virtual console 6, press Ctrl+Alt+F6.
Installation Guide
222

NOTE
If you choose text mode installation, you will start in virtual console 1 (tmux), and
switching to console 6 will open a shell prompt instead of a graphical interface.
The console running tmux has 5 available windows; their contents are described in the table below,
along with keyboard shortcuts used to access them. Note that the keyboard shortcuts are two-part: first
press Ctrl+b, then release both keys, and press the number key for the window you want to use.
You can also use Ctrl+b n and Ctrl+b p to switch to the next or previous tmux window, respectively.
Table 17.1. Available tmux Windows
Shortcut Contents
Ctrl+b 1Main installation program window. Contains text-based prompts (during text mode installation
or if you use VNC Direct Mode), and also some debugging information.
Ctrl+b 2Interactive shell prompt with root privileges.
Ctrl+b 3Installation log; displays messages stored in /tmp/anaconda.log.
Ctrl+b 4Storage log; displays messages related storage devices from kernel and system services,
stored in /tmp/storage.log.
Ctrl+b 5Program log; displays messages from other system utilities, stored in
/tmp/program.log.
In addition to displaying diagnostic information in tmux windows, Anaconda also generates several log
files, which can be transferred from the installation system. These log files are described in Table 18.1,
“Log Files Generated During the Installation”, and directions for transferring them from the installation
system are available in Chapter 18, Troubleshooting Installation on IBM Z.
17.2.2. Saving Screenshots
You can press Shift+Print Screen at any time during the graphical installation to capture the
current screen. These screenshots are saved to /tmp/anaconda-screenshots/.
Additionally, you can use the autostep --autoscreenshot command in a Kickstart file to capture
and save each step of the installation automatically. See Section 26.3.1, “Kickstart Commands and
Options” for details.
17.3. INSTALLATION IN NON-INTERACTIVE LINE MODE
If the inst.cmdline option was specified as a boot option in your parameter file (see Section 20.4,
“Parameters for Kickstart Installations”) or the cmdline option was specified in your Kickstart file (see
Chapter 26, Kickstart Installations), Anaconda starts with non-interactive text line mode. In this mode, all
necessary information must be provided in the Kickstart file. The installation program will not allow user
interaction and it will stop if any required commands are missing.
17.4. INSTALLING IN TEXT MODE
CHAPTER 17. INSTALLING USING ANACONDA
223
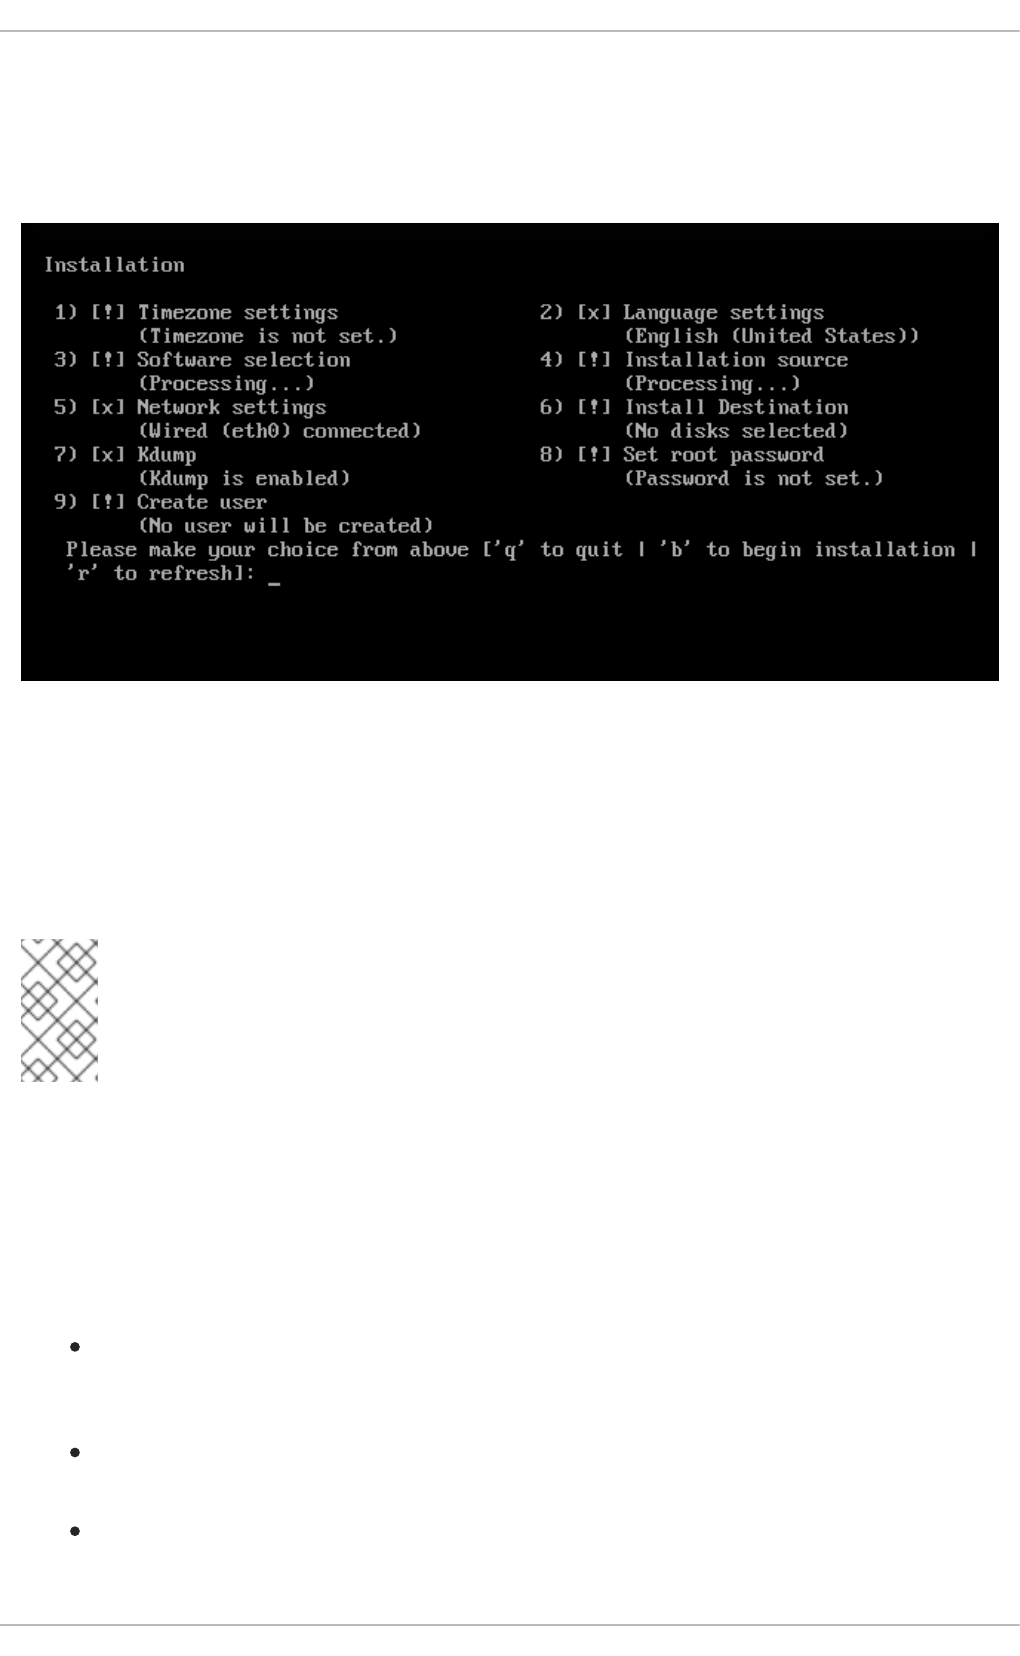
Text mode installation offers an interactive, non-graphical interface for installing Red Hat
Enterprise Linux. This can be useful on systems with no graphical capabilities; however, you should
always consider the available alternatives (an automated Kickstart installation or using the graphical user
interface over VNC) before starting a text-based installation. Text mode is limited in the amount of
choices you can make during the installation.
Figure 17.1. Text Mode Installation
Installation in text mode follows a pattern similar to the graphical installation: There is no single fixed
progression; you can configure many settings in any order you want using the main status screen.
Screens which have already been configured, either automatically or by you, are marked as [x], and
screens which require your attention before the installation can begin are marked with [!]. Available
commands are displayed below the list of available options.
NOTE
When related background tasks are being run, certain menu items can be temporarily
unavailable or display the Processing... label. To refresh to the current status of text
menu items, use the r option at the text mode prompt.
At the bottom of the screen in text mode, a green bar is displayed showing five menu options. These
options represent different screens in the tmux terminal multiplexer; by default you start in screen 1, and
you can use keyboard shortcuts to switch to other screens which contain logs and an interactive
command prompt. For information about available screens and shortcuts to switch to them, see
Section 17.2.1, “Accessing Consoles”.
Limits of interactive text mode installation include:
The installer will always use the English language and the US English keyboard layout. You can
configure your language and keyboard settings, but these settings will only apply to the installed
system, not to the installation.
You cannot configure any advanced storage methods (LVM, software RAID, FCoE, zFCP and
iSCSI).
It is not possible to configure custom partitioning; you must use one of the automatic partitioning
settings. You also cannot configure where the boot loader will be installed.
Installation Guide
224
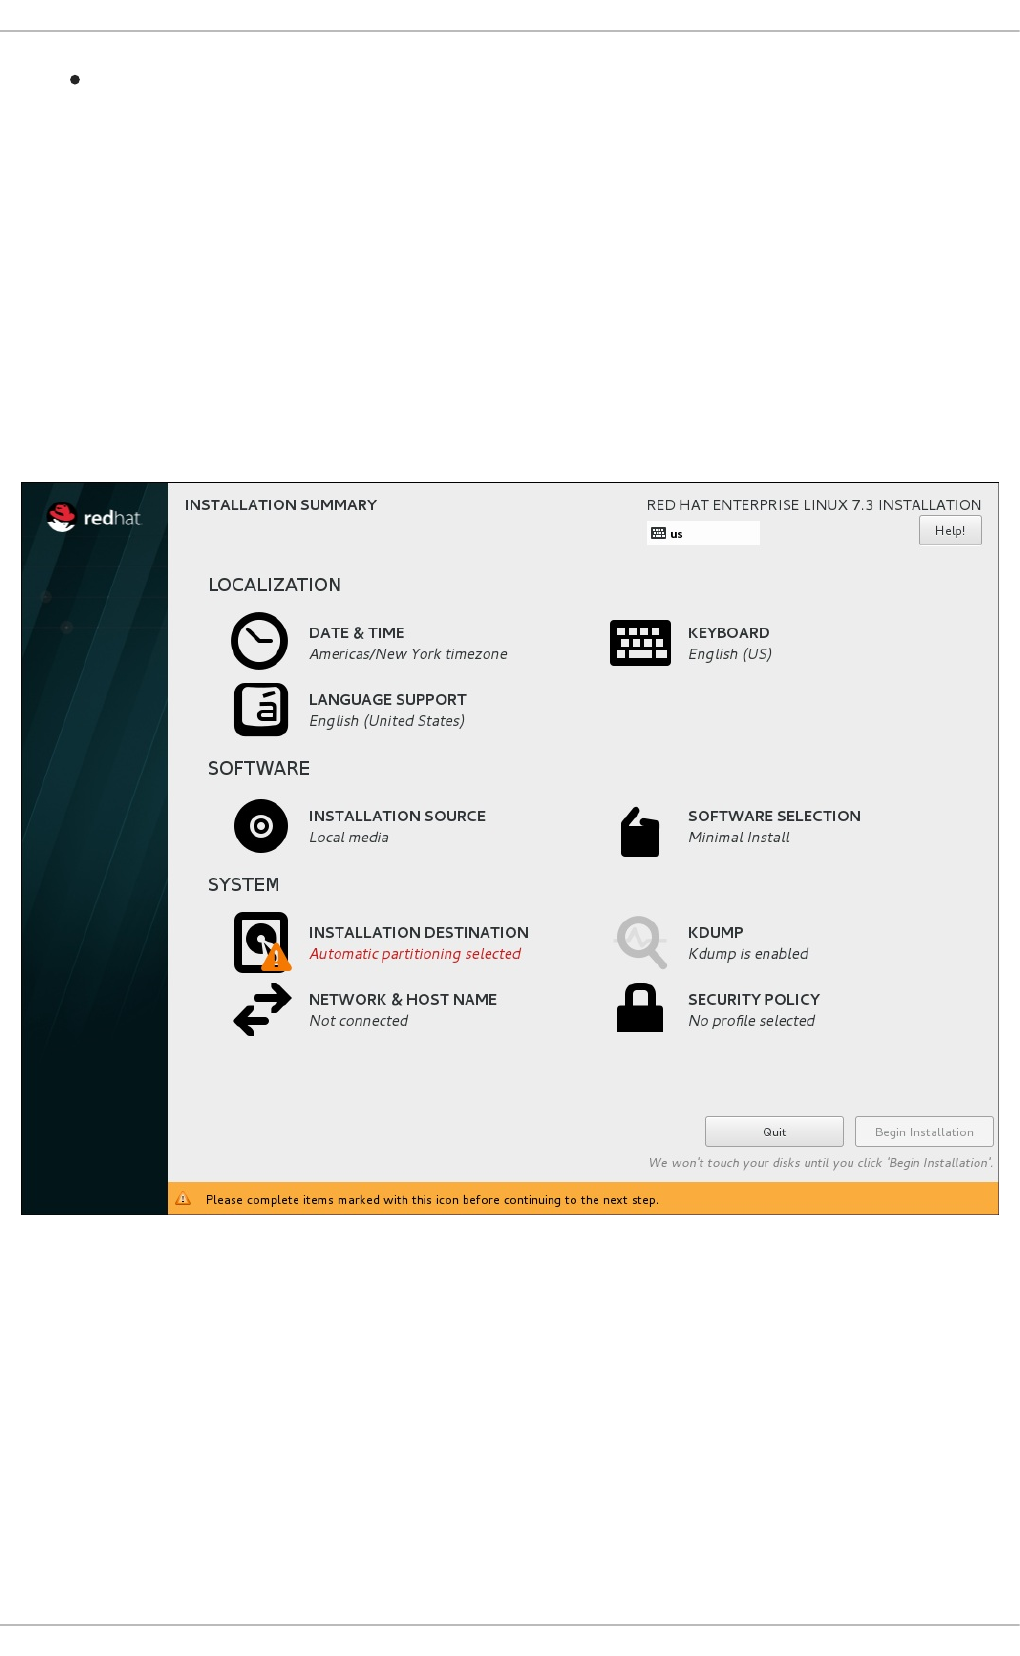
You cannot select any package add-ons to be installed; they must be added after the installation
finishes using the Yum package manager.
To start a text mode installation, boot the installation with the inst.text boot option used in the
parameter file (generic.prm). See Chapter 20, Parameter and Configuration Files on IBM Z for
information about the parameter file.
17.5. INSTALLING IN THE GRAPHICAL USER INTERFACE
The graphical installation interface is the preferred method of manually installing Red Hat
Enterprise Linux. It allows you full control over all available settings, including custom partitioning and
advanced storage configuration, and it is also localized to many languages other than English, allowing
you to perform the entire installation in a different language. The graphical mode is used by default when
you boot the system from local media (a CD, DVD or a USB flash drive).
Figure 17.2. The Installation Summary Screen
The sections below discuss each screen available in the installation process. Note that due to the
installer's parallel nature, most of the screens do not have to be completed in the order in which they are
described here.
Each screen in the graphical interface contains a Help button. This button opens the Yelp help browser
displaying the section of the Red Hat Enterprise Linux Installation Guide relevant to the current screen.
You can also control the graphical installer with your keyboard. Following table shows you the shortcuts
you can use.
CHAPTER 17. INSTALLING USING ANACONDA
225

Table 17.2. Graphical installer keyboard shortcuts
Shortcut keys Usage
Tab and Shift+Tab Cycle through active control elements (buttons, check boxes, and so on.) on the
current screen
Up and Down Scroll through lists
Left and Right Scroll through horizontal toolbars and table entries
Space and Enter Select or remove a highlighted item from selection and expand and collapse drop-
down menus
Additionally, elements in each screen can be toggled using their respective shortcuts. These shortcuts
are highlighted (underlined) when you hold down the Alt key; to toggle that element, press Alt+X,
where X is the highlighted letter.
Your current keyboard layout is displayed in the top right hand corner. Only one layout is configured by
default; if you configure more than layout in the Keyboard Layout screen (Section 17.10, “Keyboard
Configuration”), you can switch between them by clicking the layout indicator.
17.6. WELCOME SCREEN AND LANGUAGE SELECTION
The first screen of the installation program is the Welcome to Red Hat Enterprise Linux screen.
Here you select the language that Anaconda will use for the rest of the installation. This selection will
also become the default for the installated system, unless changed later. In the left panel, select your
language of choice, for example English. Then you can select a locale specific to your region in the
right panel, for example English (United States).
NOTE
One language is pre-selected by default on top of the list. If network access is configured
at this point (for example, if you booted from a network server instead of local media), the
pre-selected language will be determined based on automatic location detection using the
GeoIP module.
Alternatively, type your preferred language into the search box as shown below.
Once you have made your selection, click the Continue button to proceed to the Installation
Summary screen.
Installation Guide
226

Figure 17.3. Language Configuration
After you click the Continue button, the unsupported hardware dialog may appear. This happens if you
are using hardware that the kernel does not support.
17.7. THE INSTALLATION SUMMARY SCREEN
The Installation Summary screen is the central location for setting up an installation.
CHAPTER 17. INSTALLING USING ANACONDA
227

Figure 17.4. The Installation Summary Screen
Instead of directing you through consecutive screens, the Red Hat Enterprise Linux installation program
allows you to configure your installation in the order you choose.
Use your mouse to select a menu item to configure a section of the installation. When you have
completed configuring a section, or if you would like to complete that section later, click the Done button
located in the upper left corner of the screen.
Only sections marked with a warning symbol are mandatory. A note at the bottom of the screen warns
you that these sections must be completed before the installation can begin. The remaining sections are
optional. Beneath each section's title, the current configuration is summarized. Using this you can
determine whether you need to visit the section to configure it further.
Once all required sections are complete, click the Begin Installation button. Also see
Section 17.18, “Begin Installation”.
To cancel the installation, click the Quit button.
NOTE
When related background tasks are running, certain menu items might be temporarily
unavailable.
17.8. DATE & TIME
Installation Guide
228
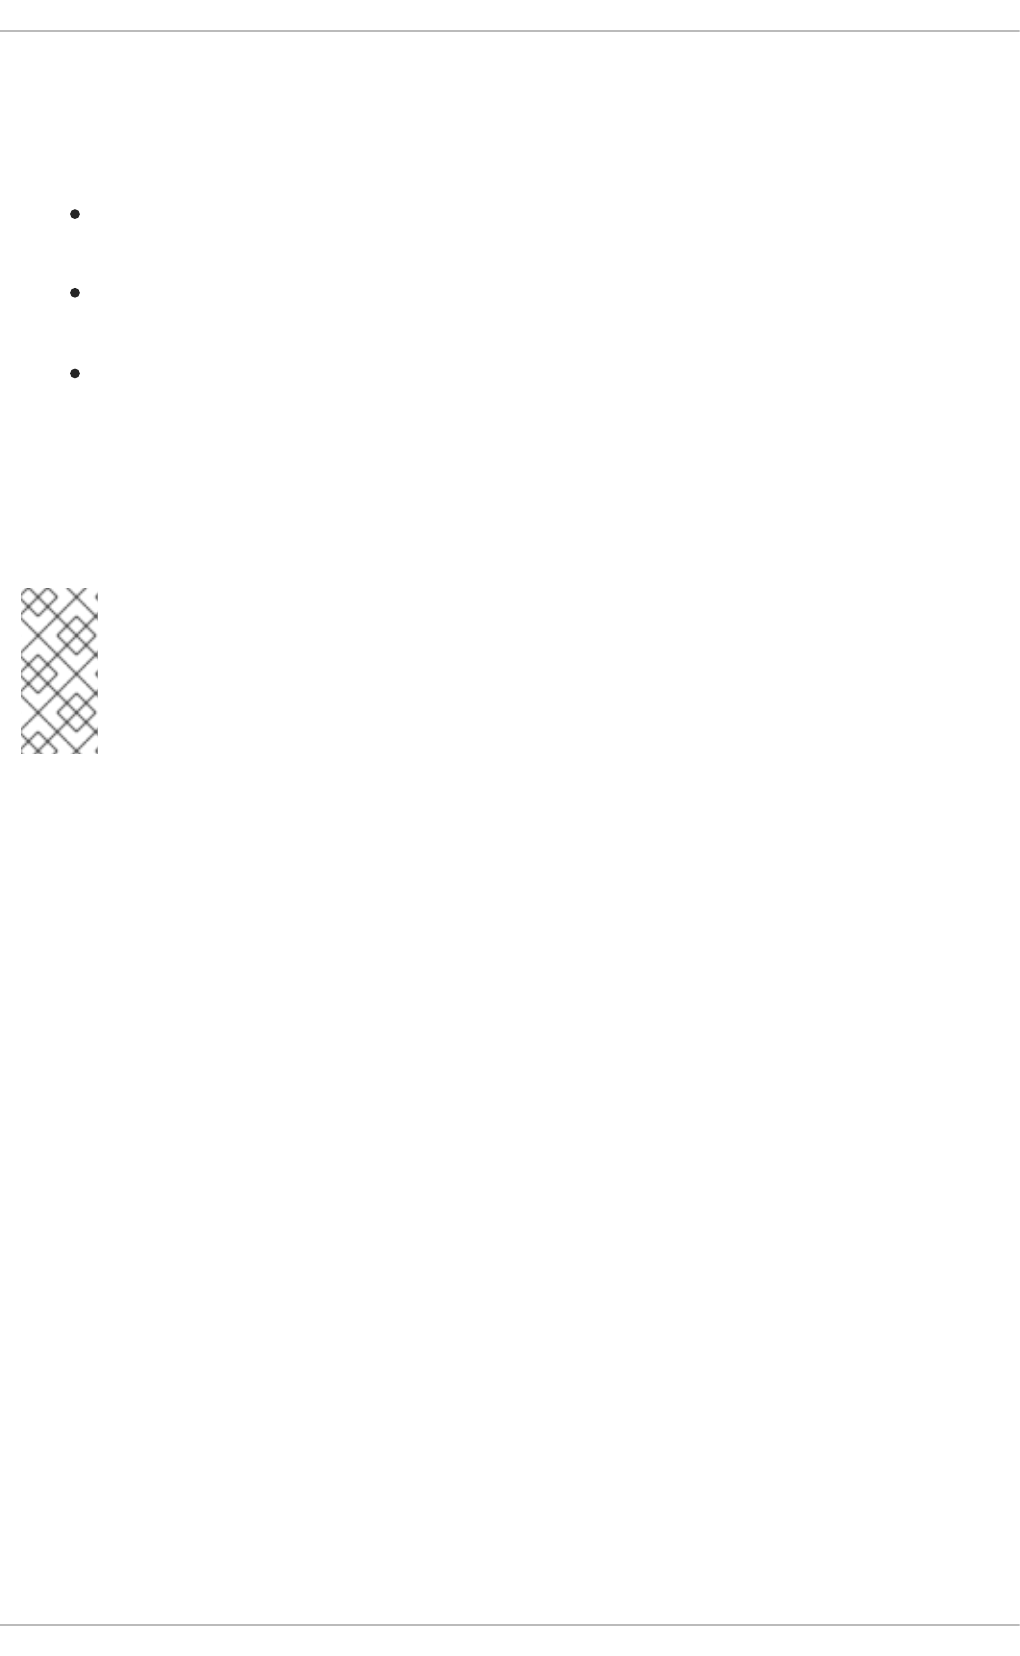
To configure time zone, date, and optionally settings for network time, select Date & Time at the
Installation Summary screen.
There are three ways for you to select a time zone:
Using your mouse, click on the interactive map to select a specific city. A red pin appears
indicating your selection.
You can also scroll through the Region and City drop-down menus at the top of the screen to
select your time zone.
Select Etc at the bottom of the Region drop-down menu, then select your time zone in the next
menu adjusted to GMT/UTC, for example GMT+1.
If your city is not available on the map or in the drop-down menu, select the nearest major city in the
same time zone. Alternatively you can use a Kickstart file, which will allow you to specify some additional
time zones which are not available in the graphical interface. See the timezone command in timezone
(required) for details.
NOTE
The list of available cities and regions comes from the Time Zone Database (tzdata) public
domain, which is maintained by the Internet Assigned Numbers Authority (IANA). Red Hat
cannot add cities or regions into this database. You can find more information at the
official website, available at http://www.iana.org/time-zones.
Specify a time zone even if you plan to use NTP (Network Time Protocol) to maintain the accuracy of the
system clock.
CHAPTER 17. INSTALLING USING ANACONDA
229
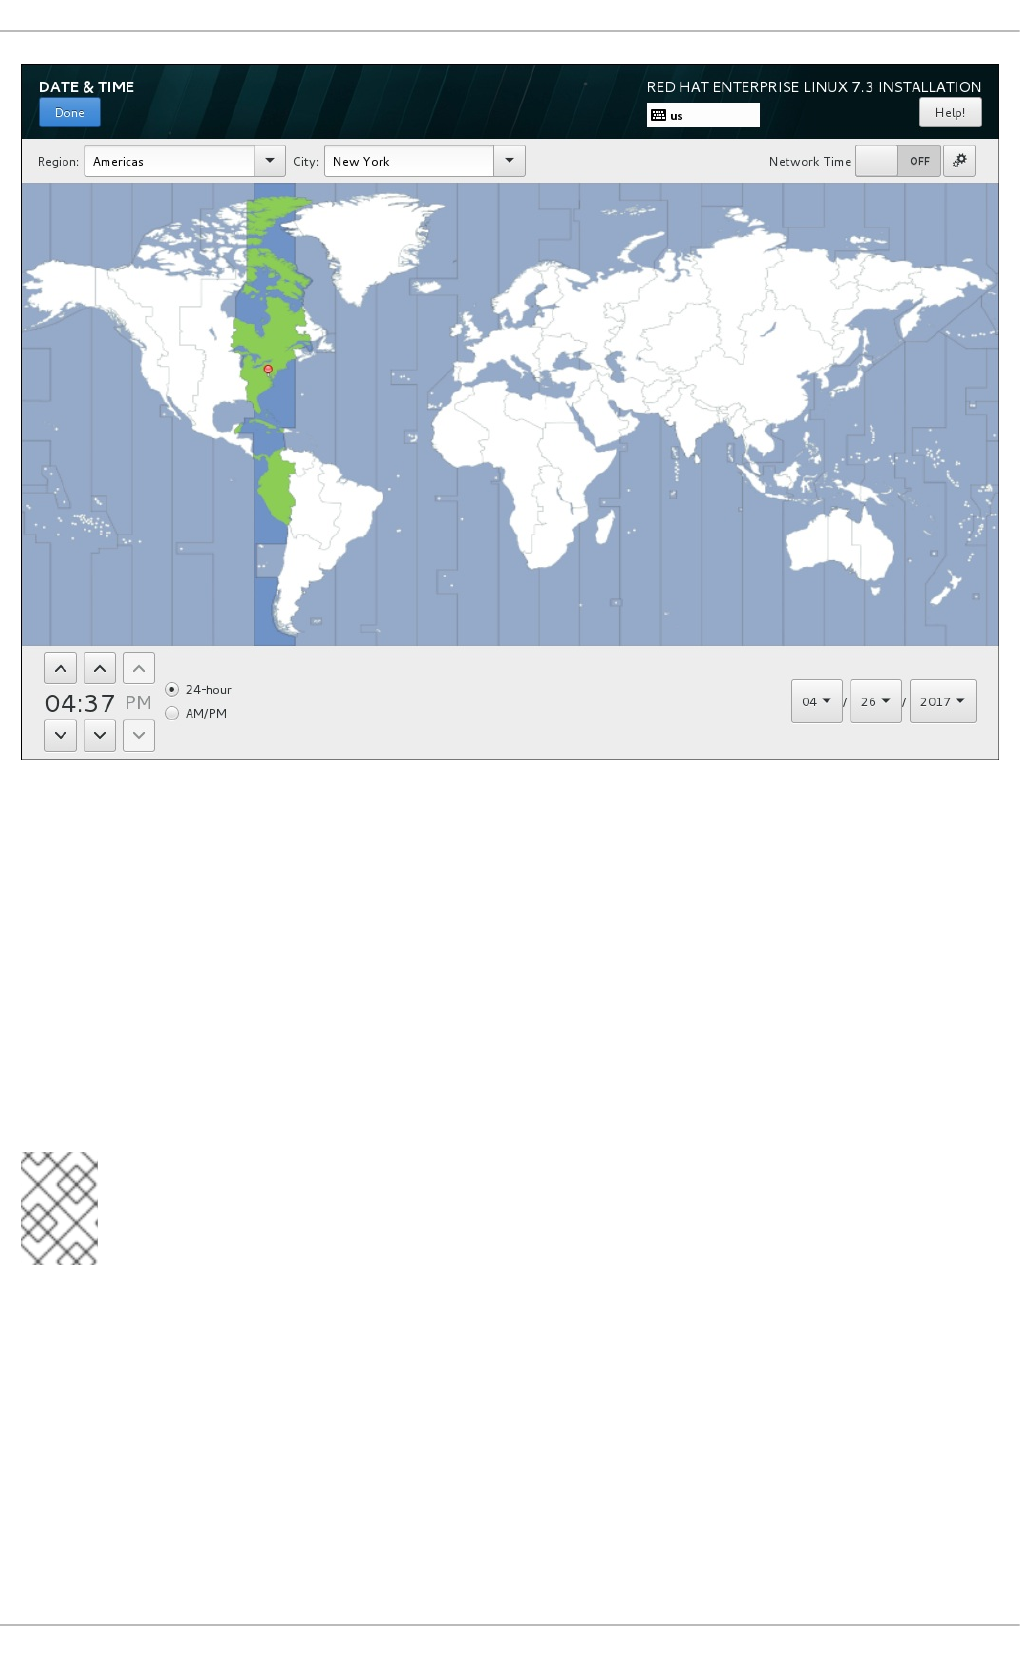
Figure 17.5. Time zone configuration screen
If you are connected to the network, the Network Time switch will be enabled. To set the date and time
using NTP, leave the Network Time switch in the ON position and click the configuration icon to select
which NTP servers Red Hat Enterprise Linux should use. To set the date and time manually, move the
switch to the OFF position. The system clock should use your time zone selection to display the correct
date and time at the bottom of the screen. If they are still incorrect, adjust them manually.
Note that NTP servers might be unavailable at the time of installation. In such a case, enabling them will
not set the time automatically. When the servers become available, the date and time will update.
Once you have made your selection, click Done to return to the Installation Summary screen.
NOTE
To change your time zone configuration after you have completed the installation, visit the
Date & Time section of the Settings dialog window.
17.9. LANGUAGE SUPPORT
To install support for additional locales and language dialects, select Language Support from the
Installation Summary screen.
Use your mouse to select the language for which you would like to install support. In the left panel, select
your language of choice, for example Español. Then you can select a locale specific to your region in
the right panel, for example Español (Costa Rica). You can select multiple languages and multiple
locales. The selected languages are highlighted in bold in the left panel.
Installation Guide
230
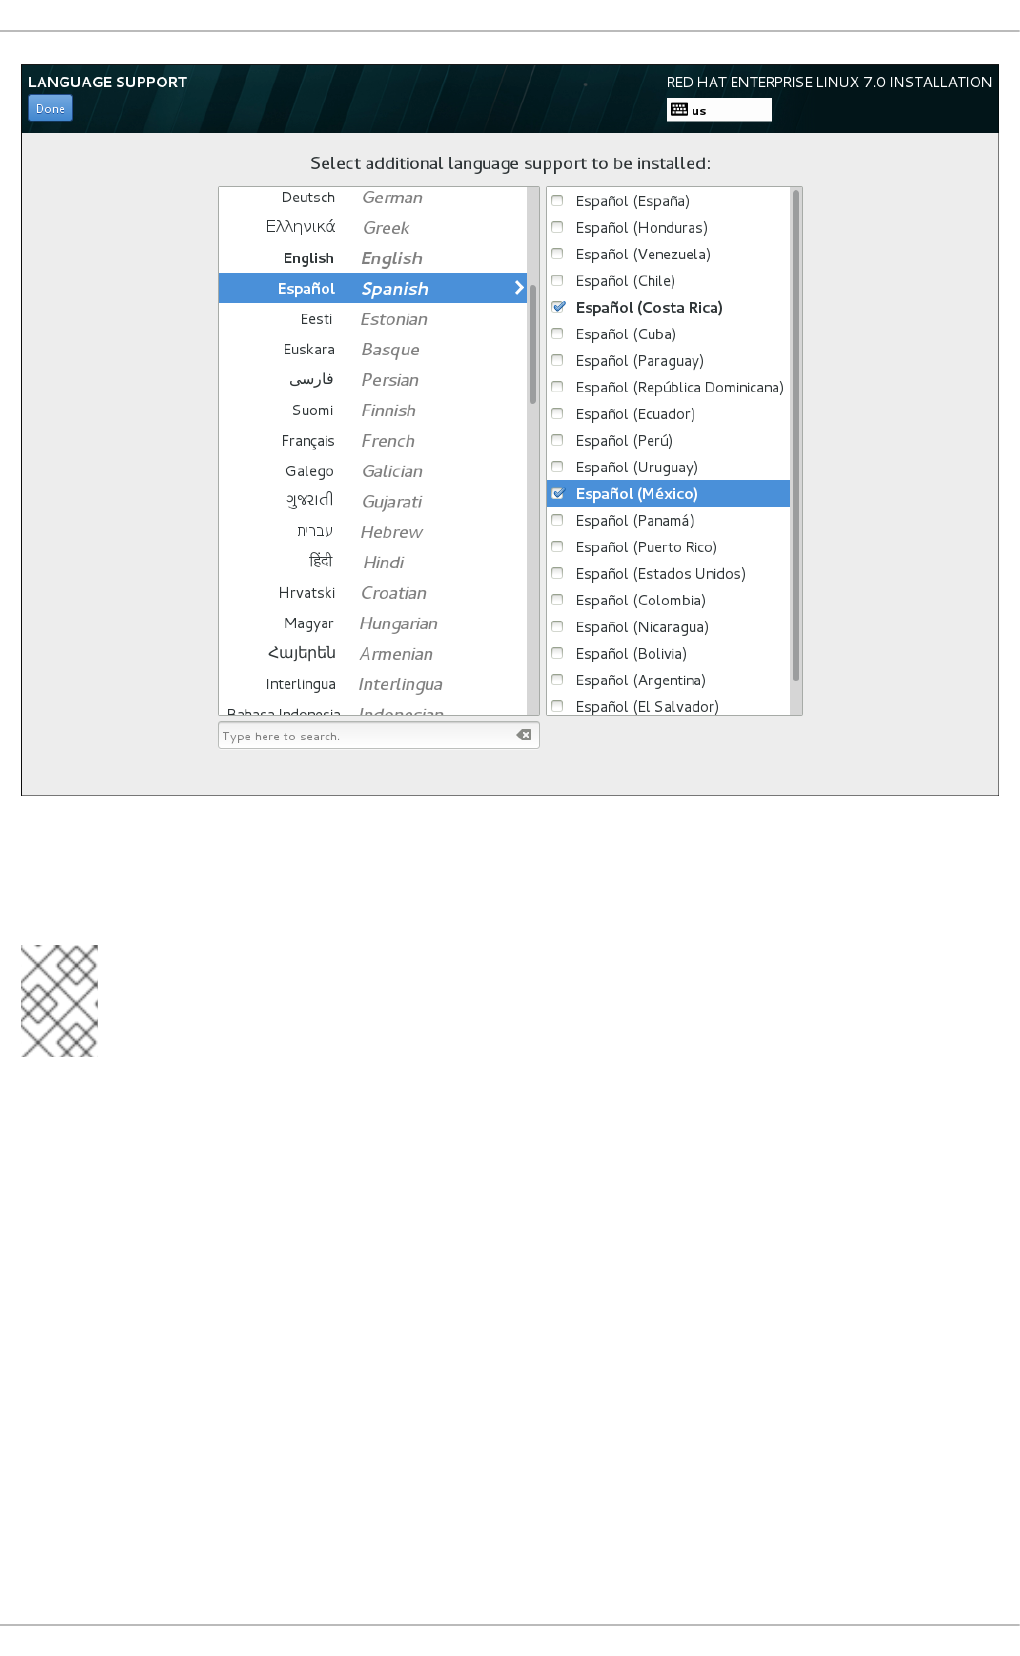
Figure 17.6. Configuring Language Support
Once you have made your selections, click Done to return to the Installation Summary screen.
NOTE
To change your language support configuration after you have completed the installation,
visit the Region & Language section of the Settings dialog window.
17.10. KEYBOARD CONFIGURATION
To add multiple keyboard layouts to your system, select Keyboard from the Installation Summary
screen. Upon saving, the keyboard layouts are immediately available in the installation program and you
can switch between them by using the keyboard icon located at all times in the upper right corner of the
screen.
Initially, only the language you selected in the welcome screen is listed as the keyboard layout in the left
pane. You can either replace the initial layout or add more layouts. However, if your language does not
use ASCII characters, you might need to add a keyboard layout that does, to be able to properly set a
password for an encrypted disk partition or the root user, among other things.
CHAPTER 17. INSTALLING USING ANACONDA
231
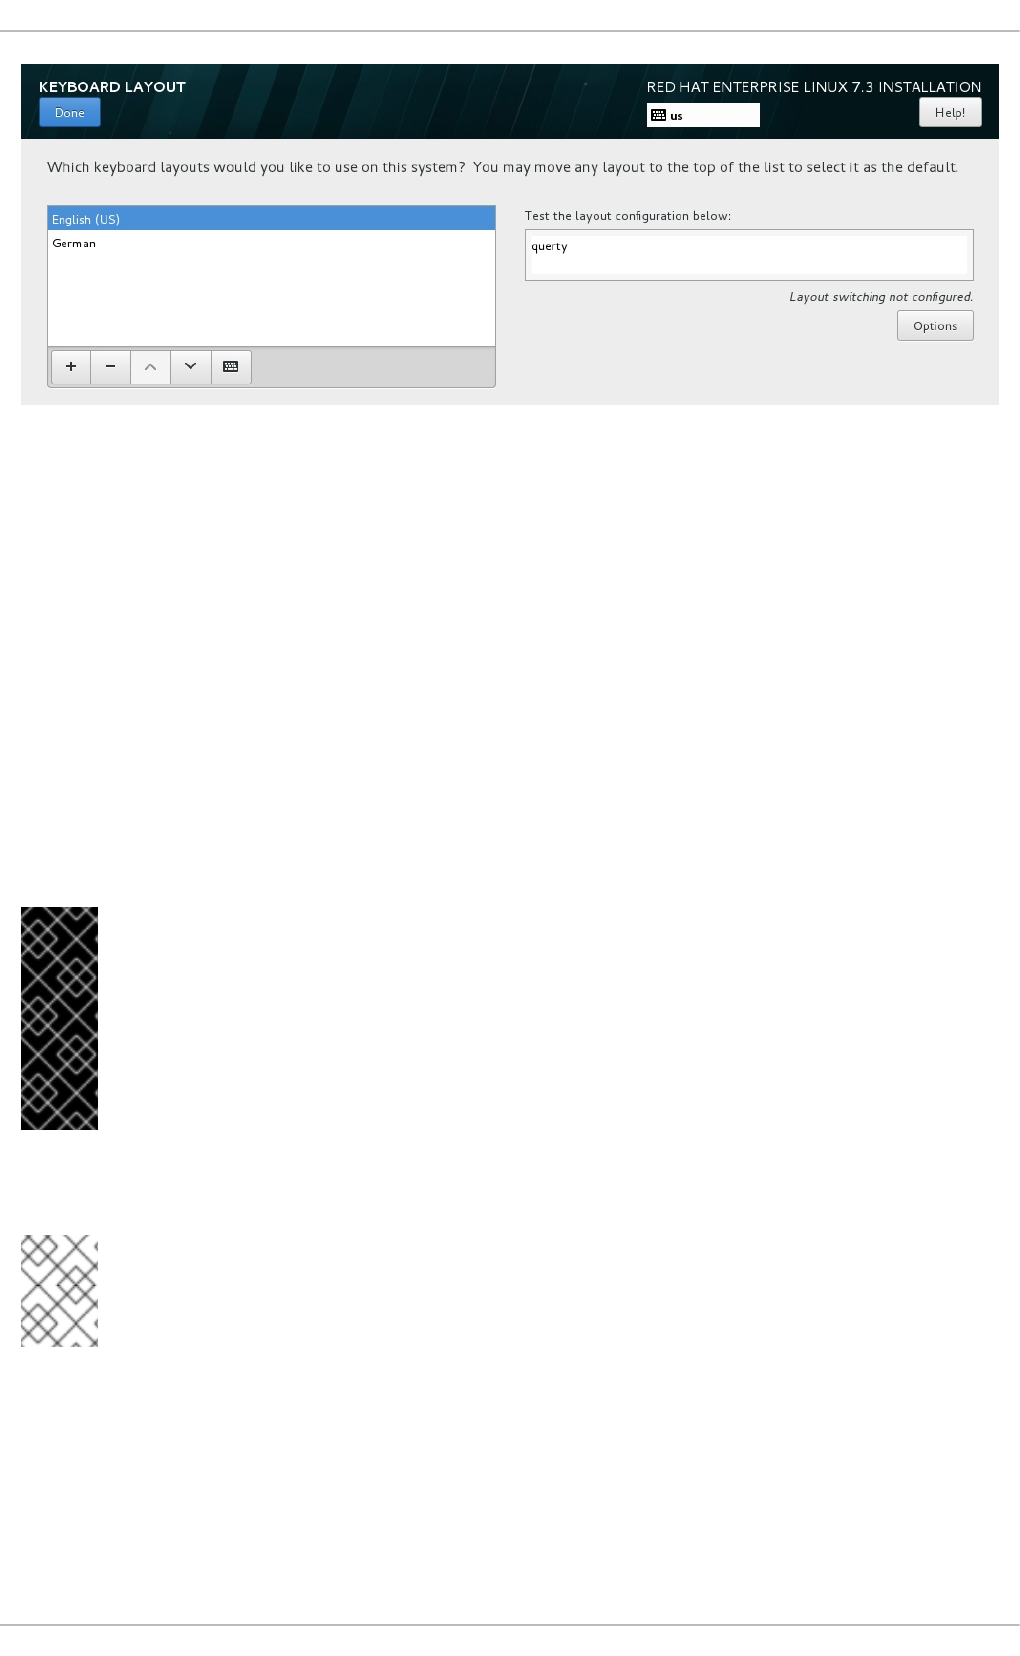
Figure 17.7. Keyboard Configuration
To add an additional layout, click the + button, select it from the list, and click Add. To delete a layout,
select it and click the - button. Use the arrow buttons to arrange the layouts in order of preference. For a
visual preview of the keyboard layout, select it and click the keyboard button.
To test a layout, use the mouse to click inside the text box on the right. Type some text to confirm that
your selection functions correctly.
To test additional layouts, you can click the language selector at the top on the screen to switch them.
However, it is recommended to set up a keyboard combination for switching layout. Click the Options
button at the right to open the Layout Switching Options dialog and choose a combination from the
list by selecting its check box. The combination will then be displayed above the Options button. This
combination applies both during the installation and on the installed system, so you must configure a
combination here in order to use one after installation. You can also select more than one combination to
switch between layouts.
IMPORTANT
If you use a layout that cannot accept Latin characters, such as Russian, Red Hat
recommends additionally adding the English (United States) layout and
configuring a keyboard combination to switch between the two layouts. If you only select a
layout without Latin characters, you might be unable to enter a valid root password and
user credentials later in the installation process. This can prevent you from completing the
installation.
Once you have made your selection, click Done to return to the Installation Summary screen.
NOTE
To change your keyboard configuration after you have completed the installation, visit the
Keyboard section of the Settings dialogue window.
17.11. SECURITY POLICY
The Security Policy spoke allows you to configure the installed system following restrictions and
recommendations (compliance policies) defined by the Security Content Automation Protocol (SCAP)
standard. This functionality is provided by an add-on which has been enabled by default since Red Hat
Installation Guide
232

Enterprise Linux 7.2. When enabled, the packages necessary to provide this functionality will
automatically be installed. However, by default, no policies are enforced, meaning that no checks are
performed during or after installation unless specifically configured.
The Red Hat Enterprise Linux 7 Security Guide provides detailed information about security compliance
including background information, practical examples, and additional resources.
IMPORTANT
Applying a security policy is not necessary on all systems. This screen should only be
used when a specific policy is mandated by your organization rules or governemnt
regulations.
If you apply a security policy to the system, it will be installed using restrictions and recommendations
defined in the selected profile. The openscap-scanner package will also be added to your package
selection, providing a preinstalled tool for compliance and vulnerability scanning. After the installation
finishes, the system will be automatically scanned to verify compliance. The results of this scan will be
saved to the /root/openscap_data directory on the installed system.
Pre-defined policies which are available in this screen are provided by SCAP Security Guide. See the
OpenSCAP Portal for links to detailed information about each available profile.
You can also load additional profiles from an HTTP, HTTPS or FTP server.
Figure 17.8. Security policy selection screen
CHAPTER 17. INSTALLING USING ANACONDA
233
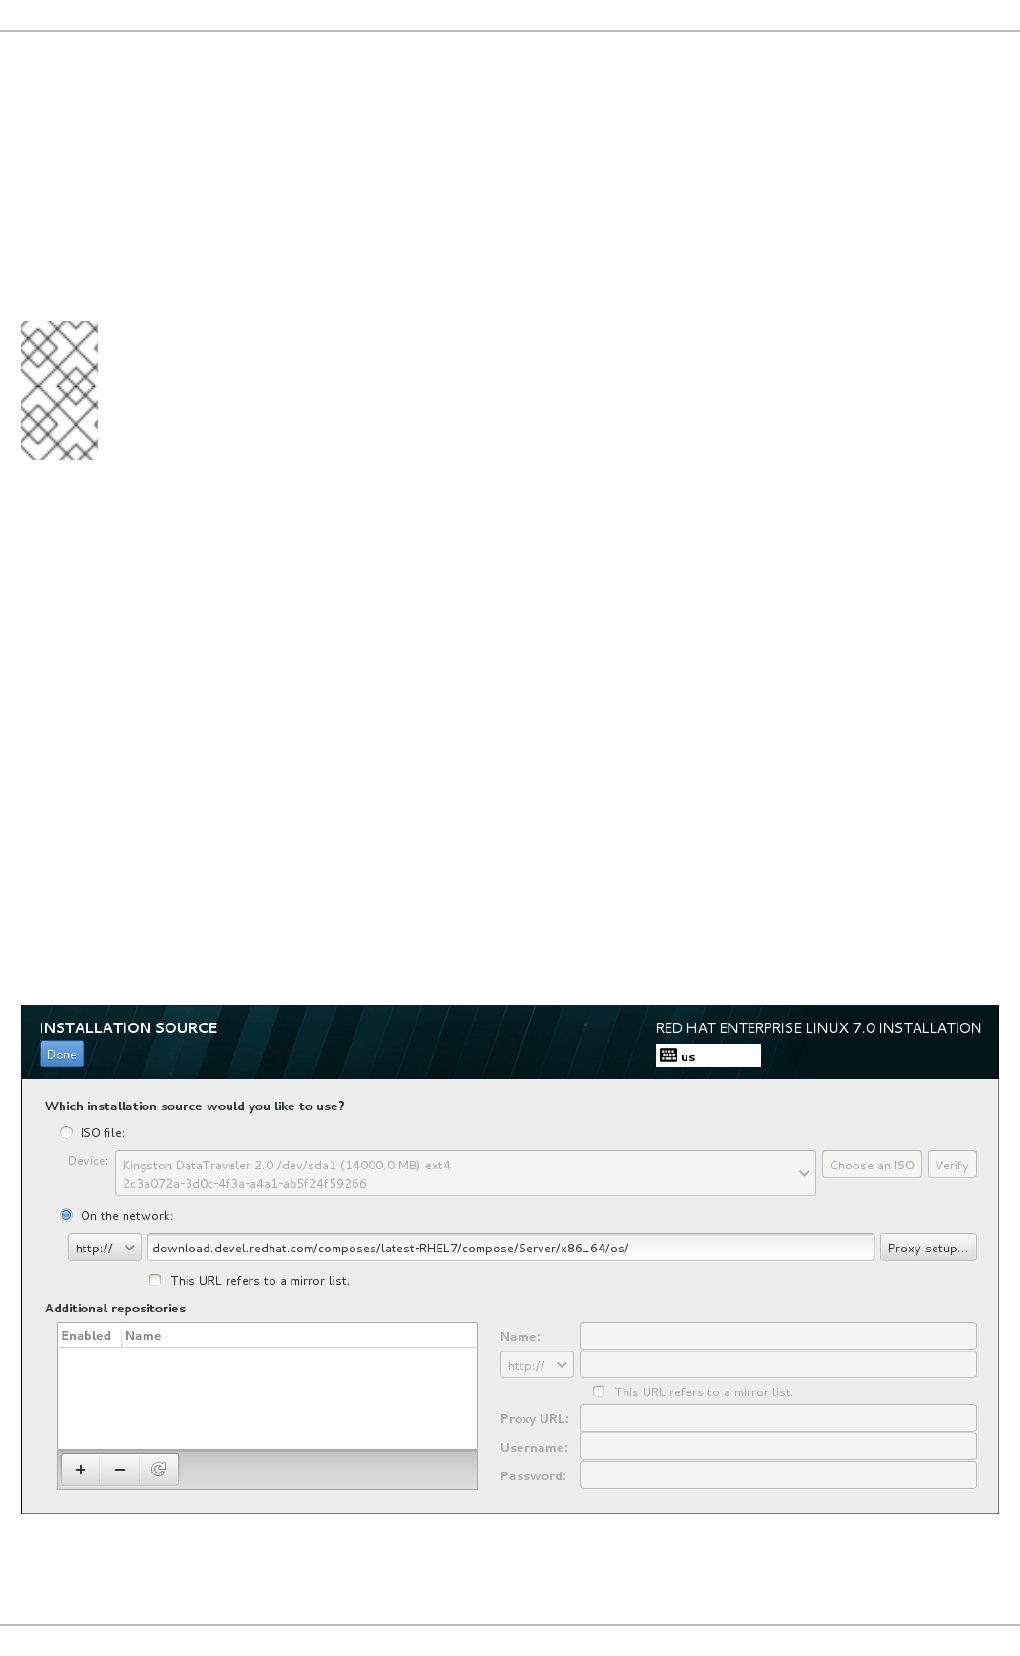
To configure the use of security policies on the system, first enable configuration by setting the Apply
security policy switch to ON. If the switch is in the OFF position, controls in the rest of this screen
have no effect.
After enabling security policy configuration using the switch, select one of the profiles listed in the top
window of the screen, and click the Select profile below. When a profile is selected, a green check
mark will appear on the right side, and the bottom field will display whether any changes will be made
before beginning the installation.
NOTE
None of the profiles available by default perform any changes before the installation
begins. However, loading a custom profile as described below can require some pre-
installation actions.
To use a custom profile, click the Change content button in the top left corner. This will open another
screen where you can enter an URL of a valid security content. To go back to the default security content
selection screen, click Use SCAP Security Guide in the top left corner.
Custom profiles can be loaded from an HTTP, HTTPS or FTP server. Use the full address of the content,
including the protocol (such as http://). A network connection must be active (enabled in
Section 17.13, “Network & Hostname”) before you can load a custom profile. The content type will be
detected automatically by the installer.
After you select a profile, or if you want to leave the screen, click Done in the top left corner to return to
Section 17.7, “The Installation Summary Screen”.
17.12. INSTALLATION SOURCE
To specify a file or a location to install Red Hat Enterprise Linux from, select Installation Source
from the Installation Summary screen. On this screen, you can choose between locally available
installation media such an ISO file, or a network location.
Figure 17.9. Installation Source Screen
Installation Guide
234

Select one of the following options:
ISO file
This option will appear if the installation program detected a partitioned hard drive with mountable file
systems. Select this option, click the Choose an ISO button, and browse to the installation ISO file's
location on your system. Then click Verify to ensure that the file is suitable for installation.
On the network
To specify a network location, select this option and choose from the following options in the drop-
down menu:
http://
https://
ftp://
nfs
Using your selection as the start of the location URL, type the rest into the address box. If you choose
NFS, another box will appear for you to specify any NFS mount options.
IMPORTANT
When selecting an NFS-based installation source, you must specify the address with a
colon (:) character separating the host name from the path. For example:
server.example.com:/path/to/directory
To configure a proxy for an HTTP or HTTPS source, click the Proxy setup button. Check Enable
HTTP proxy and type the URL into the Proxy URL box. If your proxy requires authentication, check
Use Authentication and enter a user name and password. Click Add.
If your HTTP or HTTP URL refers to a repository mirror list, mark the check box under the input field.
You can also specify additional repositories to gain access to more installation environments and
software add-ons. See Section 17.14, “Software Selection” for more information.
To add a repository, click the + button. To delete a repository, click the - button. Click the arrow icon to
revert to the previous list of repositories, that is, to replace current entries with those that were present at
the time you entered the Installation Source screen. To activate or deactivate a repository, click
the check box in the Enabled column at each entry in the list.
In the right part of the form, you can name your additional repository and configure it the same way as
the primary repository on the network.
Once you have selected your installation source, click Done to return to the Installation Summary
screen.
17.13. NETWORK & HOSTNAME
CHAPTER 17. INSTALLING USING ANACONDA
235
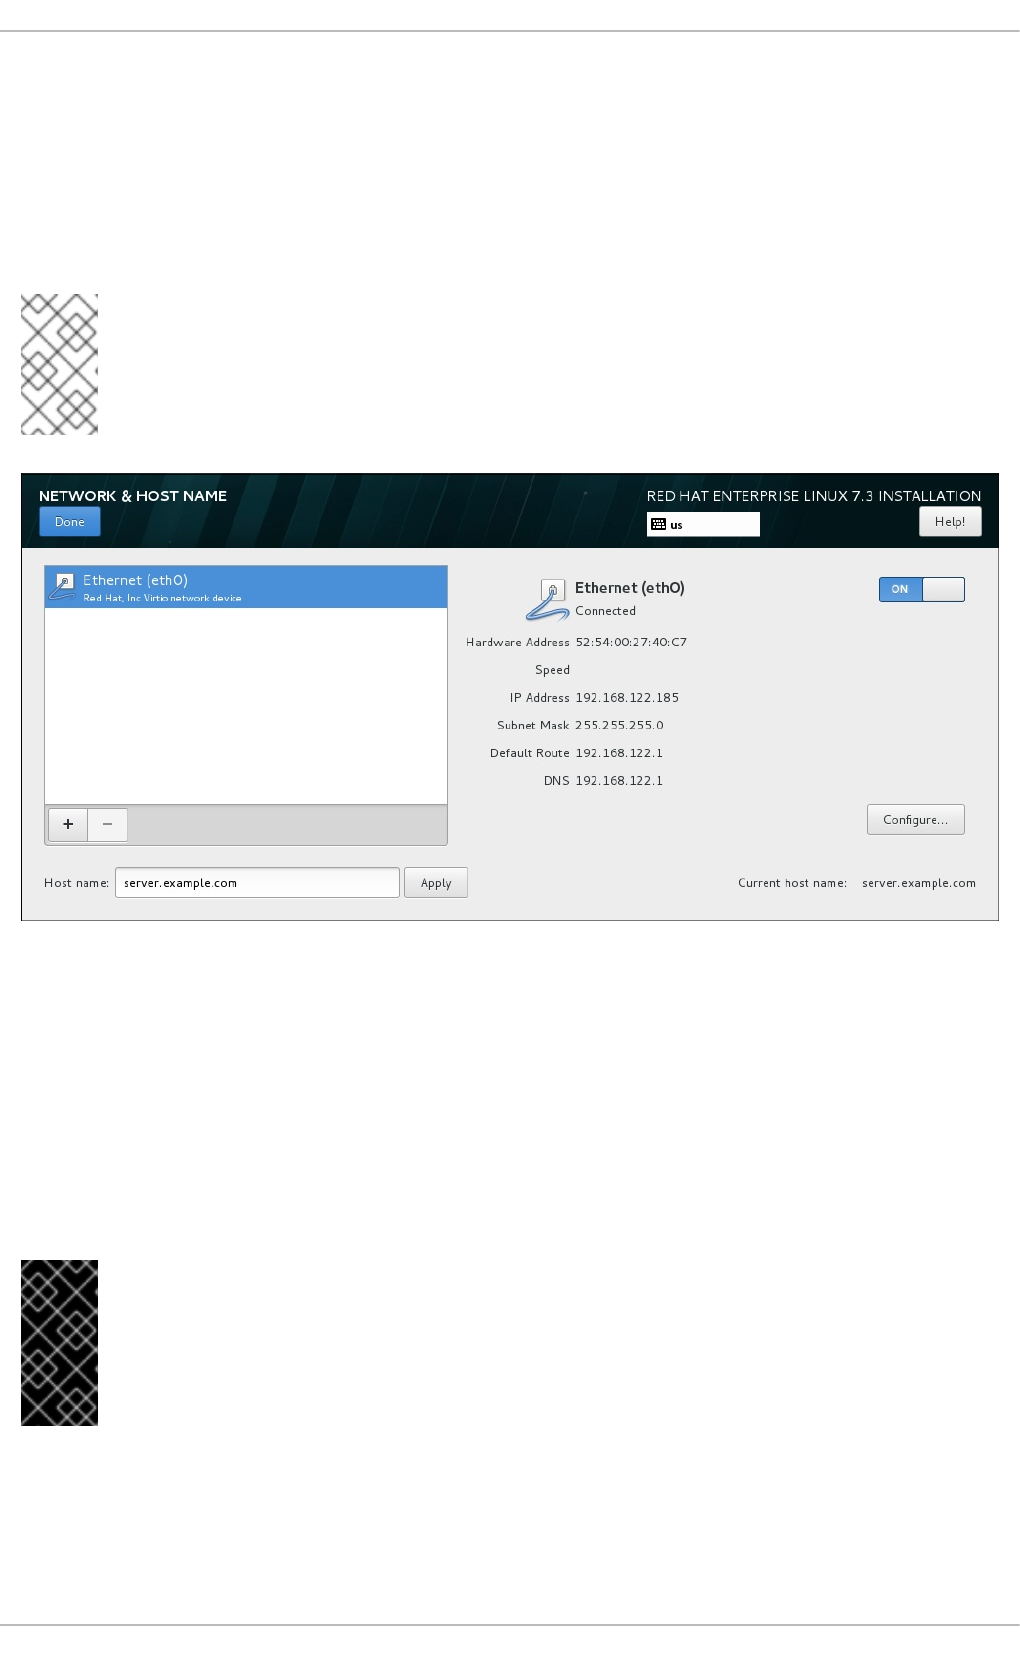
To configure essential networking features for your system, select Network & Hostname at the
Installation Summary screen.
Locally accessible interfaces are automatically detected by the installation program and cannot be
manually added or deleted. The detected interfaces are listed in the left pane. Click an interface in the
list to display more details about in on the right. To activate or deactivate a network interface, move the
switch in the top right corner of the screen to either ON or OFF.
NOTE
There are several types of network device naming standards used to identify network
devices with persistent names such as em1 or wl3sp0. For information about these
standards, see the Red Hat Enterprise Linux 7 Networking Guide.
Figure 17.10. Network & Hostname Configuration Screen
Below the list of connections, enter a host name for this computer in the Hostname input field. The host
name can be either a fully-qualified domain name (FQDN) in the format hostname.domainname or a
short host name in the format hostname. Many networks have a Dynamic Host Configuration Protocol
(DHCP) service that automatically supplies connected systems with a domain name. To allow the DHCP
service to assign the domain name to this machine, only specify the short host name. The value
localhost.localdomain means that no specific static host name for target system is configured, and
the actual host name of installed system will be configured during process of network configuration (for
example, by NetworkManager using DHCP or DNS).
IMPORTANT
If you want to manually assign the host name, make sure you do not use a domain name
that is not delegated to you, as this can result in network resources becoming
unavailable. For more information, see the recommended naming practices in the
Red Hat Enterprise Linux 7 Networking Guide.
Change the default setting localhost.localdomain to a unique host name for each of your Linux instances.
Once you have finished network configuration, click Done to return to the Installation Summary
screen.
Installation Guide
236

17.13.1. Edit Network Connections
All network connections on IBM Z are listed in the Network & Hostname screen. By default, the list
contains the connection configured earlier in the booting phase and is either OSA, LCS, or HiperSockets.
All of these interface types use names in the form of enccwdevice_id, for example enccw0.0.0a00.
Note that on IBM Z, you cannot add a new connection because the network subchannels need to be
grouped and set online beforehand, and this is currently only done in the booting phase. See Chapter 16,
Booting the Installation on IBM Z for details.
Usually, the network connection configured earlier in the booting phase does not need to be modified
during the rest of the installation. However, if you do need to modify the existing connection, click the
Configure button. A NetworkManager dialog appears with a set of tabs appropriate to wired
connections, as described below. Here, you can configure network connections for the system, not all of
which are relevant to IBM Z.
This section only details the most important settings for a typical wired connection used during
installation. Many of the available options do not have to be changed in most installation scenarios and
are not carried over to the installed system. Configuration of other types of network is broadly similar,
although the specific configuration parameters are necessarily different. To learn more about network
configuration after installation, see the Red Hat Enterprise Linux 7 Networking Guide.
To configure a network connection manually, click the Configure button in the lower right corner of the
screen. A dialog appears that allows you to configure the selected connection. If required, see the
Networking Guide for more detailed information on network settings.
The most useful network configuration options to consider during installation are:
Mark the Automatically connect to this network when it is available check
box if you want to use the connection every time the system boots. You can use more than one
connection that will connect automatically. This setting will carry over to the installed system.
CHAPTER 17. INSTALLING USING ANACONDA
237

Figure 17.11. Network Auto-Connection Feature
By default, IPv4 parameters are configured automatically by the DHCP service on the network.
At the same time, the IPv6 configuration is set to the Automatic method. This combination is
suitable for most installation scenarios and usually does not require any changes.
Figure 17.12. IP Protocol Settings
When you have finished editing network settings, click Save to save the new configuration. If you
Installation Guide
238
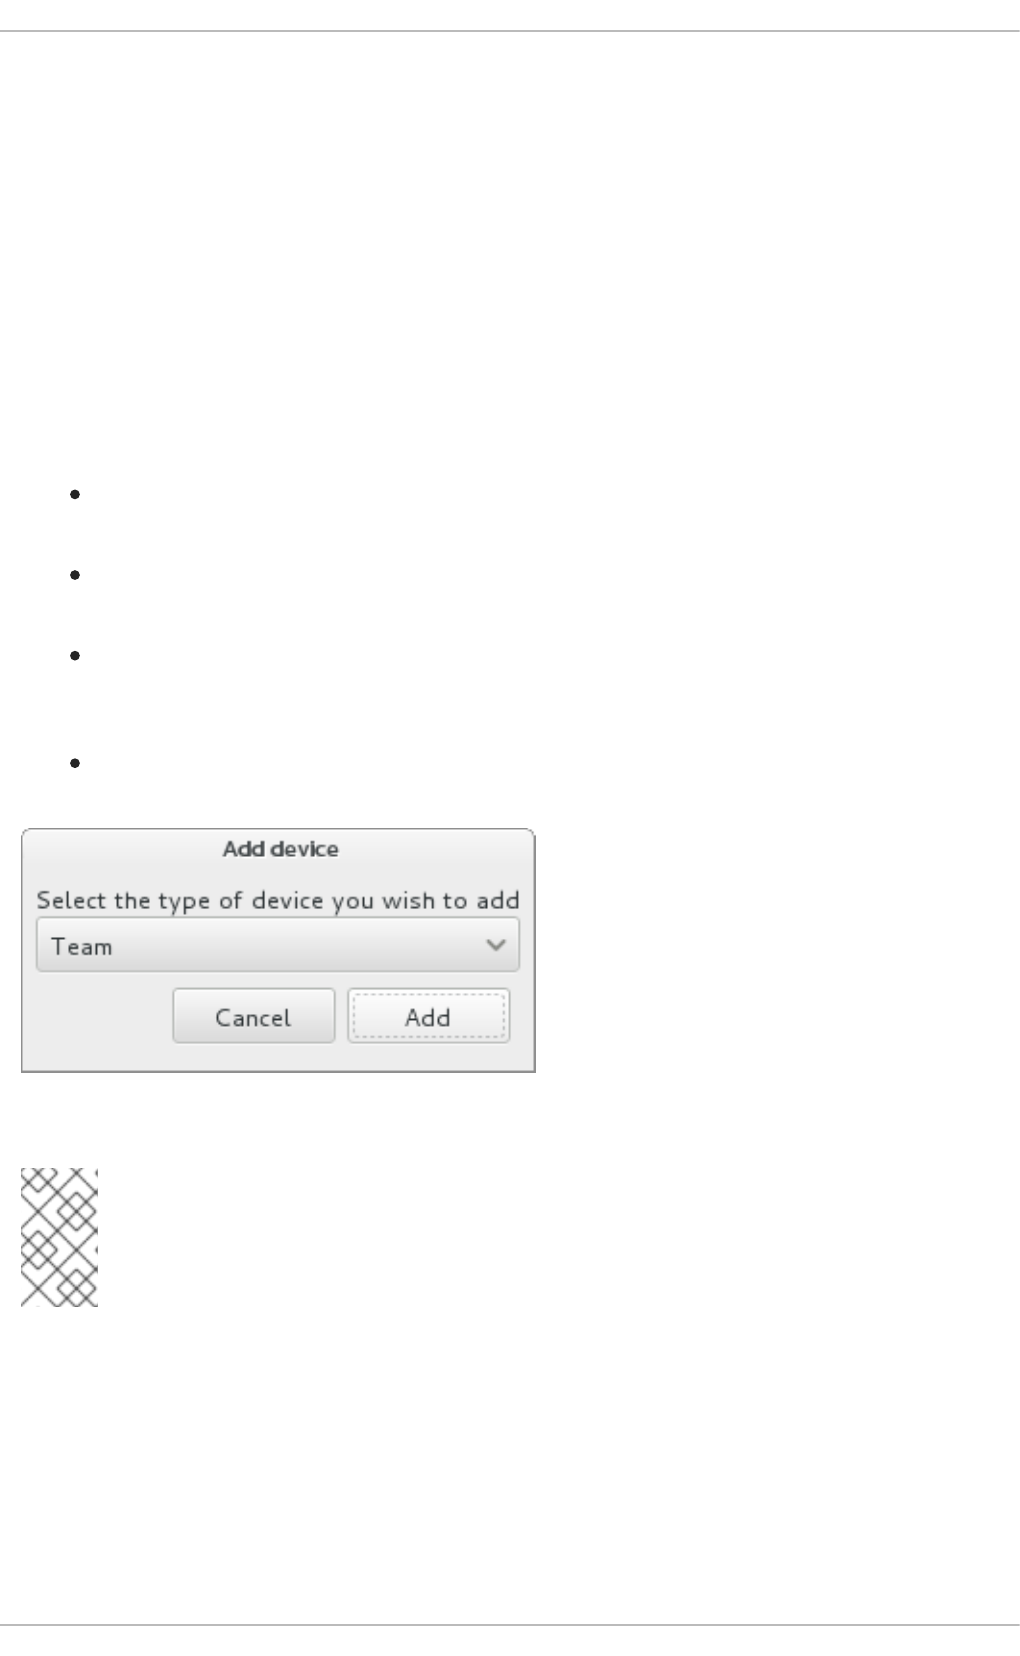
reconfigured a device that was already active during installation, you must restart the device in order to
use the new configuration in the installation environment. Use the ON/OFF switch on the Network &
Host Name screen to restart the device.
17.13.2. Advanced Network Interfaces
Advanced network interfaces are also available for installation. This includes virtual local area networks
(VLANs) and three methods to use aggregated links. Detailed description of these interfaces is beyond
the scope of this document; read the Red Hat Enterprise Linux 7 Networking Guide for more information.
To create an advanced network interface, click the + button in the lower left corner of the Network &
Hostname screen.
A dialog appears with a drop-down menu with the following options:
Bond - represents NIC (Network Interface Controller) Bonding, a method to bind multiple
network interfaces together into a single, bonded, channel.
Bridge - represents NIC Bridging, a method to connect multiple separate network into one
aggregate network.
Team - represents NIC Teaming, a new implementation to aggregate links, designed to provide
a small kernel driver to implement the fast handling of packet flows, and various applications to
do everything else in user space.
VLAN - represents a method to create multiple distinct broadcast domains, which are mutually
isolated.
Figure 17.13. Advanced Network Interface Dialog
NOTE
Note that locally accessible interfaces, wired or wireless, are automatically detected by
the installation program and cannot be manually added or deleted by using these
controls.
Once you have selected an option and clicked the Add button, another dialog appears for you to
configure the new interface. See the respective chapters in the Red Hat Enterprise Linux 7 Networking
Guide for detailed instructions. To edit configuration on an existing advanced interface, click the
Configure button in the lower right corner of the screen. You can also remove a manually-added
interface by clicking the - button.
17.14. SOFTWARE SELECTION
CHAPTER 17. INSTALLING USING ANACONDA
239

To specify which packages will be installed, select Software Selection at the Installation
Summary screen. The package groups are organized into Base Environments. These environments are
pre-defined sets of packages with a specific purpose; for example, the Virtualization Host
environment contains a set of software packages needed for running virtual machines on the system.
Only one software environment can be selected at installation time.
For each environment, there are additional packages available in the form of Add-ons. Add-ons are
presented in the right part of the screen and the list of them is refreshed when a new environment is
selected. You can select multiple add-ons for your installation environment.
A horizontal line separates the list of add-ons into two areas:
Add-ons listed above the horizontal line are specific to the environment you selected. If you
select any add-ons in this part of the list and then select a different environment, your selection
will be lost.
Add-ons listed below the horizontal line are available for all environments. Selecting a different
environment will not impact the selections made in this part of the list.
Figure 17.14. Example of a Software Selection for a Server Installation
The availability of base environments and add-ons depends on the variant of the installation ISO image
which you are using as the installation source. For example, the server variant provides environments
designed for servers, while the workstation variant has several choices for deployment as a
developer workstation, and so on.
The installation program does not show which packages are contained in the available environments. To
see which packages are contained in a specific environment or add-on, see the repodata/*-
Installation Guide
240

comps-variant.architecture.xml file on the Red Hat Enterprise Linux Installation DVD which you
are using as the installation source. This file contains a structure describing available environments
(marked by the <environment> tag) and add-ons (the <group> tag).
IMPORTANT
The pre-defined environments and add-ons allow you to customize your system, but in a
manual installation, there is no way to select individual packages to install. If you are not
sure what package should be installed, Red Hat recommends you to select the Minimal
Install environment. Minimal install only installs a basic version of Red Hat
Enterprise Linux with only a minimal amount of additional software. This will substantially
reduce the chance of the system being affected by a vulnerability. After the system
finishes installing and you log in for the first time, you can use the Yum package manager
to install any additional software you need. For more details on Minimal install, see
the Installing the Minimum Amount of Packages Required section of the Red Hat
Enterprise Linux 7 Security Guide.
Alternatively, automating the installation with a Kickstart file allows for a much higher degree of control
over installed packages. You can specify environments, groups and individual packages in the
%packages section of the Kickstart file. See Section 26.3.2, “Package Selection” for instructions on
selecting packages to install in a Kickstart file, and Chapter 26, Kickstart Installations for general
information about automating the installation with Kickstart.
Once you have selected an environment and add-ons to be installed, click Done to return to the
Installation Summary screen.
17.14.1. Core Network Services
All Red Hat Enterprise Linux installations include the following network services:
centralized logging through the rsyslog service
email through SMTP (Simple Mail Transfer Protocol)
network file sharing through NFS (Network File System)
remote access through SSH (Secure SHell)
resource advertising through mDNS (multicast DNS)
Some automated processes on your Red Hat Enterprise Linux system use the email service to send
reports and messages to the system administrator. By default, the email, logging, and printing services
do not accept connections from other systems.
You can configure your Red Hat Enterprise Linux system after installation to offer email, file sharing,
logging, printing, and remote desktop access services. The SSH service is enabled by default. You can
also use NFS to access files on other systems without enabling the NFS sharing service.
17.15. INSTALLATION DESTINATION
To select the disks and partition the storage space on which you will install Red Hat Enterprise Linux,
select Installation Destination in the Installation Summary screen. If you are unfamiliar
with disk partitions, see Appendix A, An Introduction to Disk Partitions for more information.
CHAPTER 17. INSTALLING USING ANACONDA
241
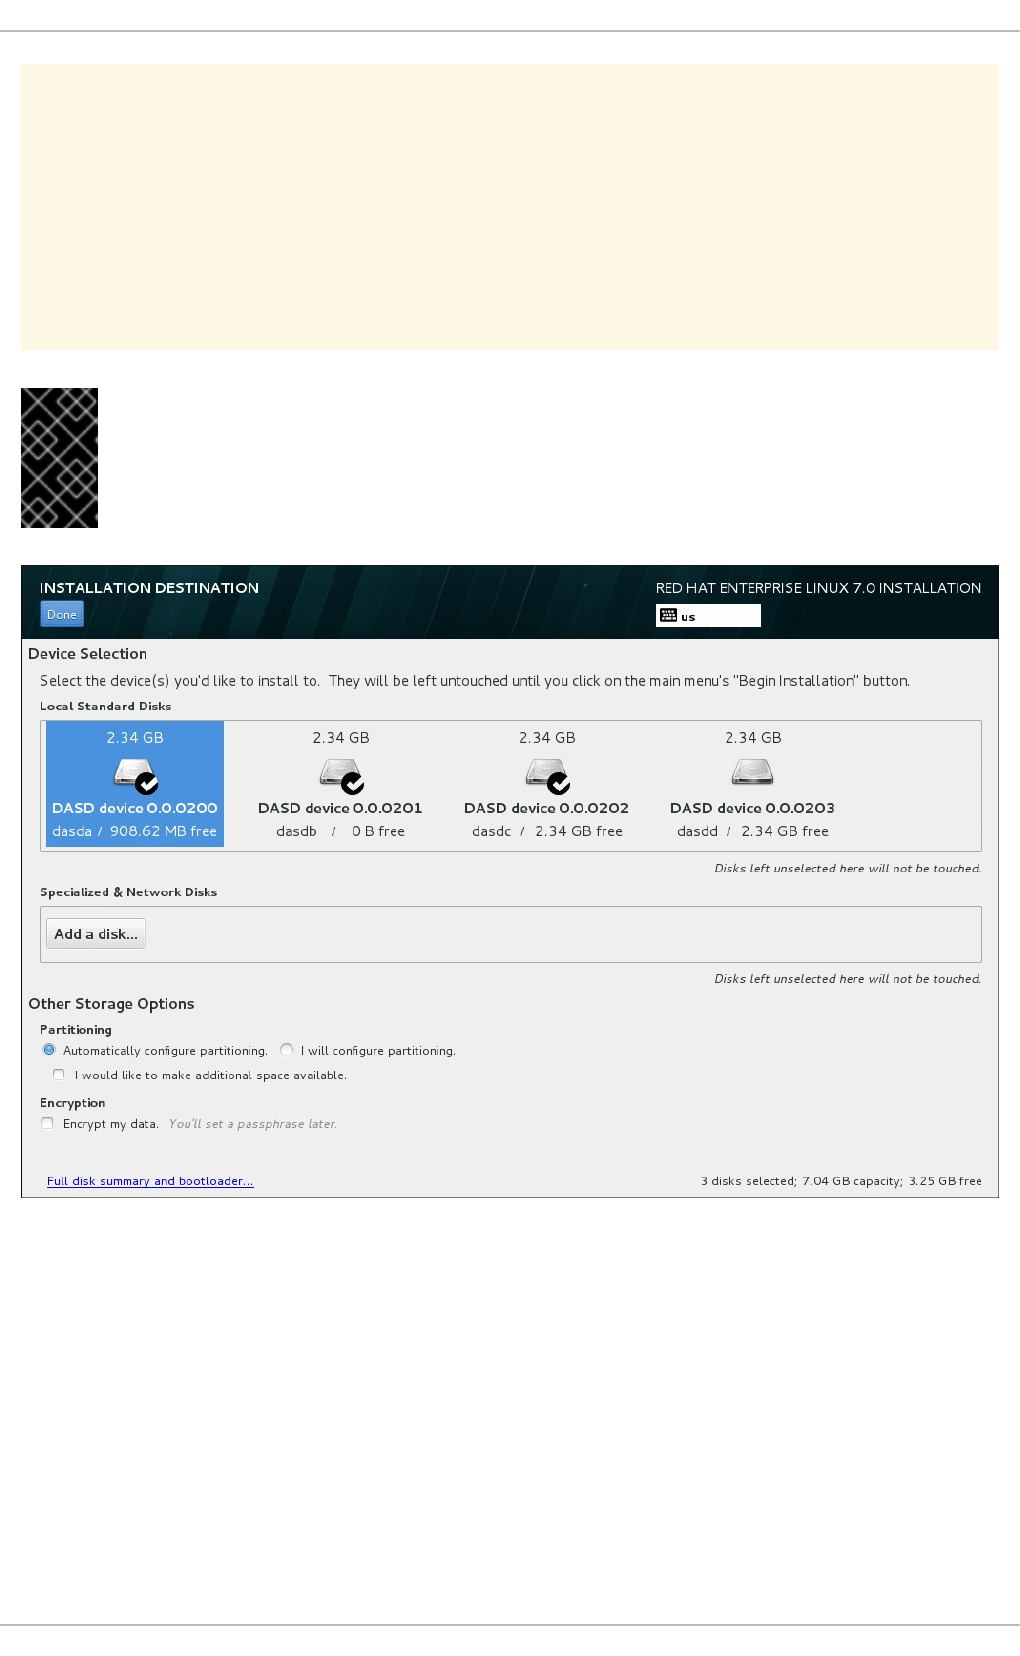
WARNING
Red Hat recommends that you always back up any data that you have on your
systems. For example, if you are upgrading or creating a dual-boot system, you
should back up any data you want to keep on your storage devices. Unforeseen
circumstances can result in loss of all your data.
IMPORTANT
If you install Red Hat Enterprise Linux in text mode, you can only use the default
partitioning schemes described in this section. You cannot add or remove partitions or file
systems beyond those that the installation program automatically adds or removes.
Figure 17.15. Storage Space Overview
On this screen, you can see storage devices available locally on your computer. You can also add
additional specialized or network devices by clicking the Add a disk button. To learn more about these
devices see Section 17.16, “Storage Devices”.
Installation Guide
242

WARNING
A known issue prevents DASDs configured as HyperPAV aliases to be automatically
attached to the system after the installation finishes. These storage devices will be
available on this screen during the installation, but will not be immediately accessible
after you finish installing and reboot. To attach HyperPAV alias devices, add them
manually to the system's /etc/dasd.conf configuration file as described in
Section 19.1.3, “Persistently Setting DASDs Online”.
If you do not feel comfortable with partitioning your system, leave the default selection of the
Automatically configure partitioning radio button to let the installation program partition the
storage devices for you.
Below the panes for storage devices is a form of additional controls labeled Other Storage Options:
In the Partitioning section, you can select how storage devices are partitioned and how
volumes are created. You can configure the partitions, manually or allow the installation program
to do it automatically.
Automatic partitioning is recommended if you are doing a clean installation on previously unused
storage or do not need to keep any data that might be present on the storage. To proceed this
way, leave the default selection of the Automatically configure partitioning radio
button, and the installation program will create the necessary partitions and volumes on the
storage space for you.
For automatic partitioning, you can also select the I would like to make additional
space available check box to choose how to reassign space from other file systems to this
installation. After you click Done, there are two dialogs that can appear. If you selected
automatic partitioning but there is not enough storage space to complete the installation using
the recommended partitioning configuration, a dialog will appear:
CHAPTER 17. INSTALLING USING ANACONDA
243

Figure 17.16. Installation Options Dialog with Option to Reclaim Space
You can click to the Red Hat Enterprise Linux software selection link. The link will
navigate you to the Software selection section, where you can change what software you
want to install, and free some aditional storage space.
Alternatively, you can click Cancel & add more disks to return to the Installation
Destination screen, where it is possible to add more storage devices, or to choose to
configure partitioning manually. Click Reclaim space to free some storage space from existing
file systems. See Section 17.15.2, “Reclaim Disk Space” for details.
The second dialog appears if you cannot create enough free space. In this case, you have to
add more disks on the initial storage screen or quit the installation.
If you select the I will configure partitioning radio button for manual setup, you will
be brought to the Manual Partitioning screen after clicking Done. See Section 17.15.3,
“Manual Partitioning” for details.
In the Encryption section, you can select the Encrypt my data check box to encrypt all
partitions except for the /boot partition. See the Red Hat Enterprise Linux 7 Security Guide for
information on encryption.
At the bottom of the screen is the Full disk summary and bootloader button for you to configure
a disk on which a boot loader will be installed.
Click the Done button once you have made your selections to either return to the Installation
Summary screen or to proceed to the Manual Partitioning screen.
Installation Guide
244
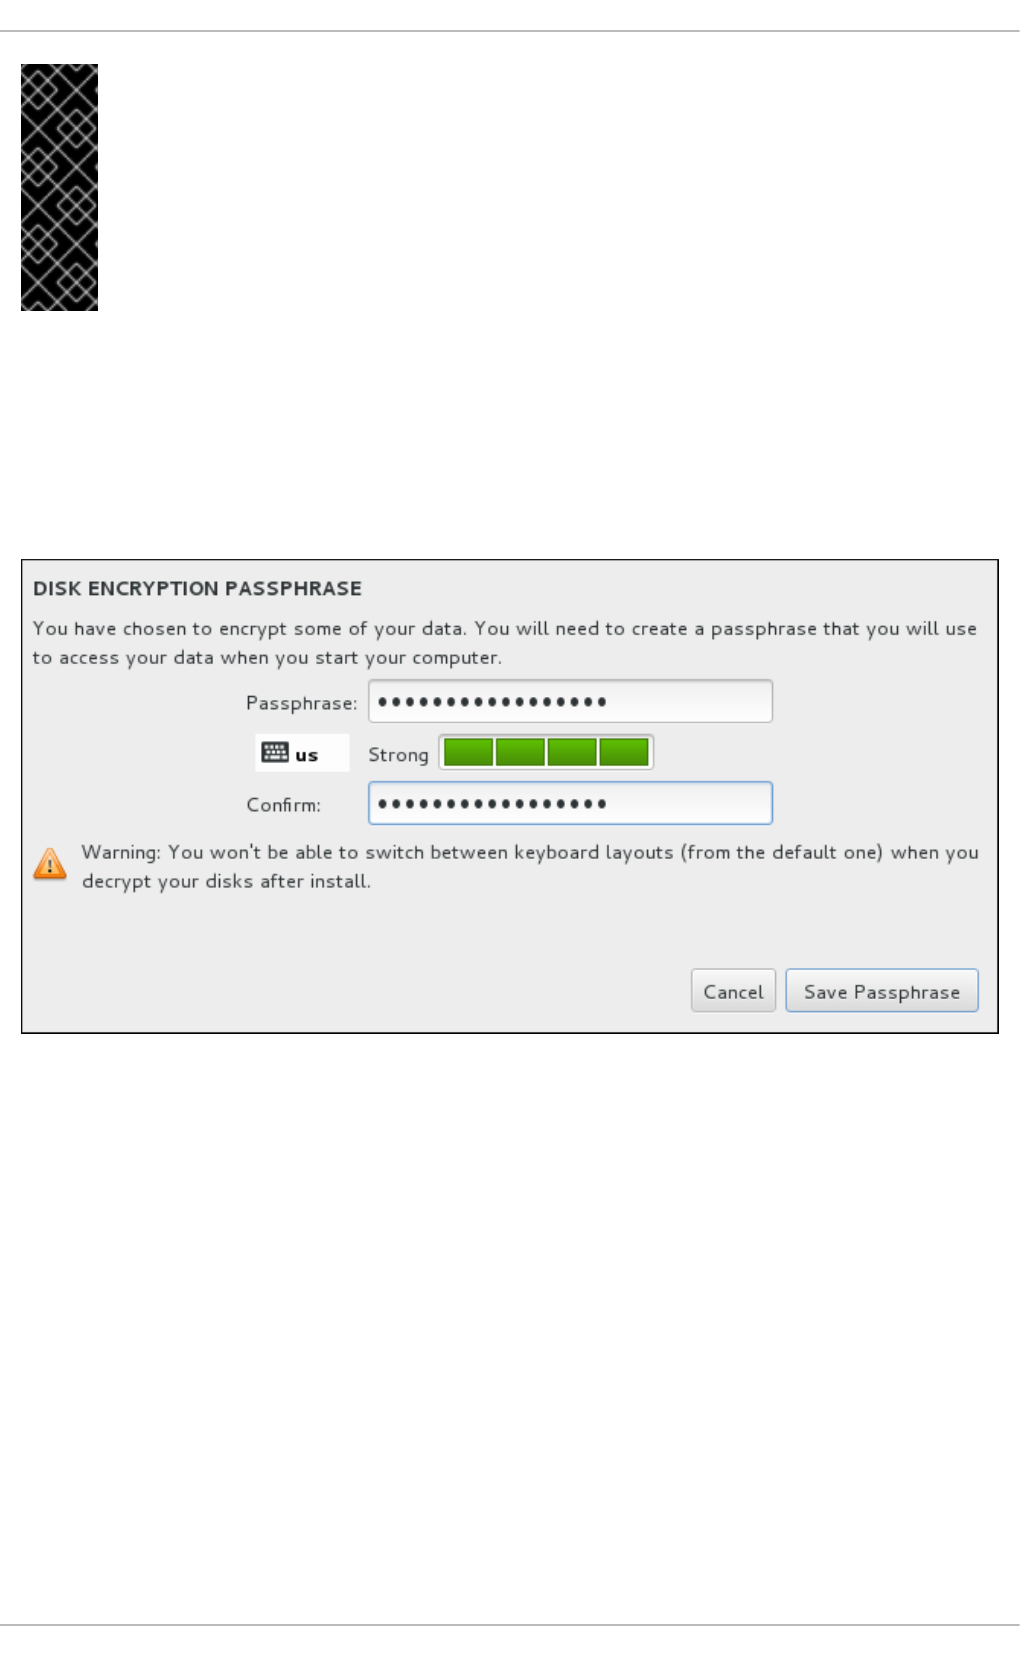
IMPORTANT
When you install Red Hat Enterprise Linux on a system with both multipath and non-
multipath storage devices, the automatic partitioning layout in the installation program
might create volume groups that contain a mix of multipath and non-multipath devices.
This defeats the purpose of multipath storage.
We advise that you select only multipath or only non-multipath devices on the
Installation Destination screen. Alternatively, proceed to manual partitioning.
17.15.1. Encrypt Partitions
If you selected the Encrypt my data option, when you click to proceed to the next screen the
installation program will prompt you for a passphrase with which to encrypt the partitions on the system.
Partitions are encrypted using the Linux Unified Key Setup - see the Red Hat Enterprise Linux 7 Security
Guide for more information.
Figure 17.17. Enter Passphrase for an Encrypted Partition
Choose a passphrase and type it into each of the two fields in the dialog box. Note that you need to use
the same keyboard layout for setting up this passphrase that you will use to unlock partitions later. Use
the language layout icon to ensure the correct layout is selected. You must provide this passphrase
every time that the system boots. Press Tab while in the Passphrase input field to retype it. If the
passphrase is too weak, a warning icon appears in the field and you will not be allowed to type in the
second field. Hover your mouse cursor over the warning icon to learn how to improve the passphrase.
CHAPTER 17. INSTALLING USING ANACONDA
245

WARNING
If you lose this passphrase, any encrypted partitions and the data on them will
become completely inaccessible. There is no way to recover a lost passphrase.
Note that if you perform a Kickstart installation, you can save encryption
passphrases and create backup encryption passphrases during installation. See the
Red Hat Enterprise Linux 7 Security Guide for more information about disk
encryption.
17.15.2. Reclaim Disk Space
If there is insufficient space to install Red Hat Enterprise Linux on the disks selected in Installation
Destination and you selected Reclaim Space at the Installation Options dialog, the
Reclaim Disk Space dialog appears.
WARNING
Unless you select to shrink a partition, reclaiming space on a partition involves
deleting all the data on it and you should always verify that any data you need to
keep was backed up.
Installation Guide
246
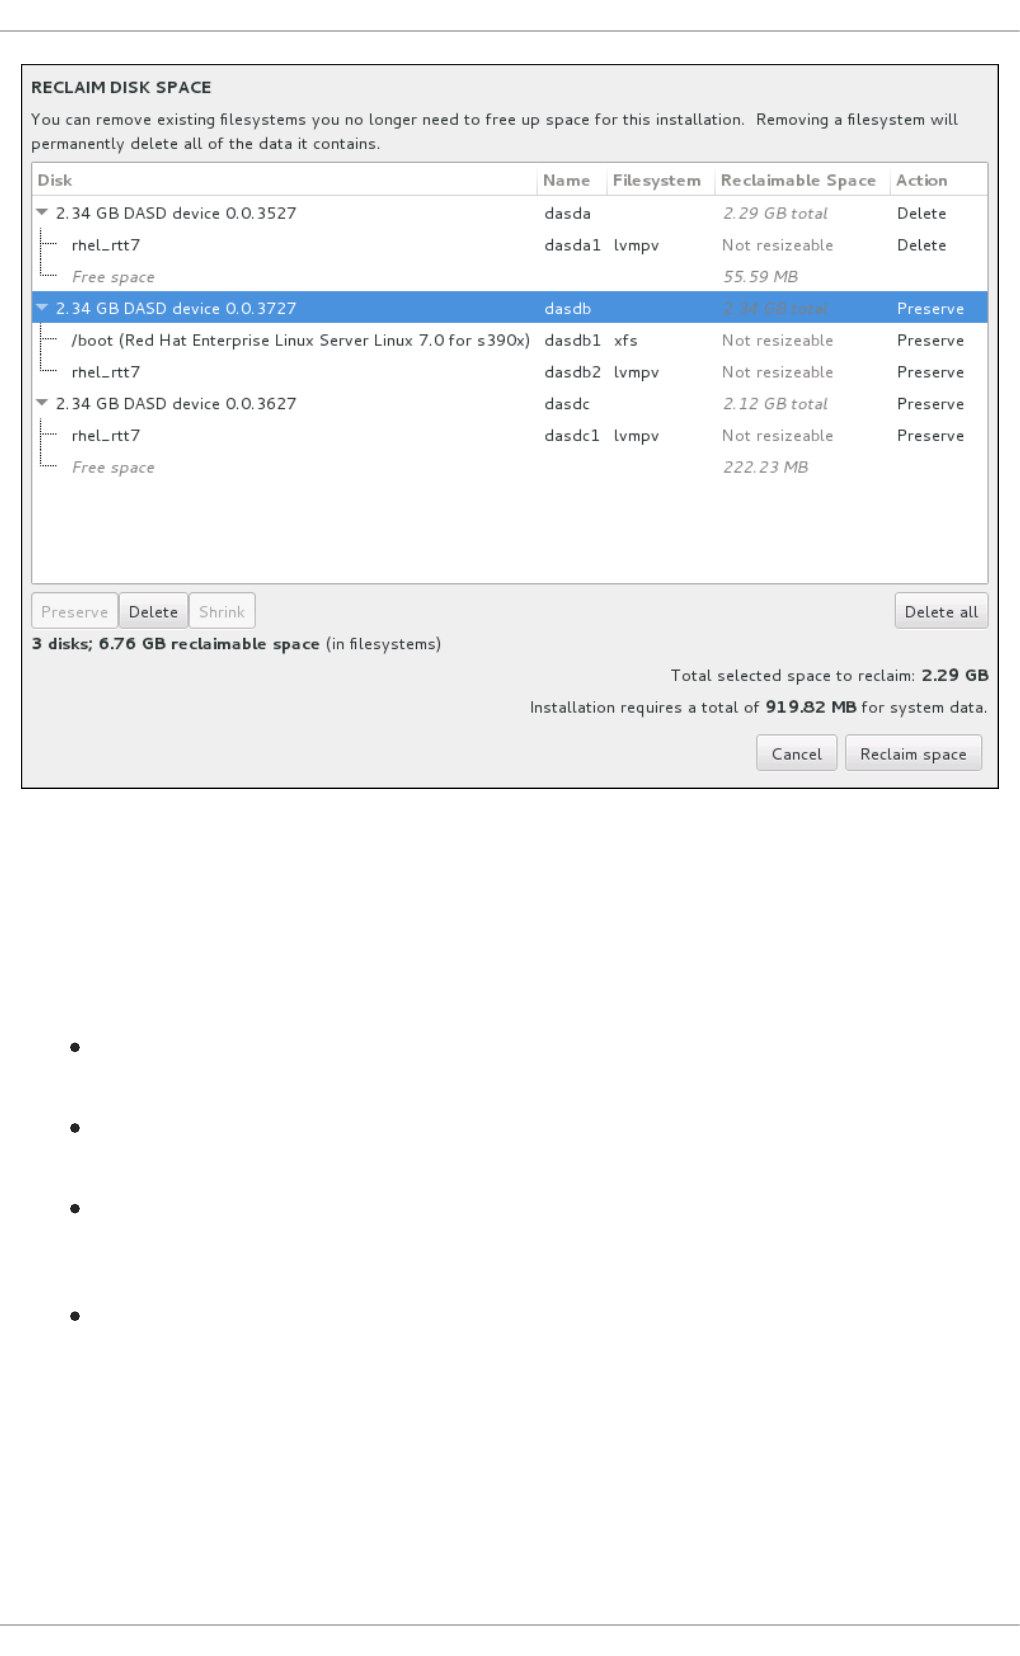
Figure 17.18. Reclaim Disk Space from Existing File Systems
The existing file systems Red Hat Enterprise Linux has detected are listed in a table as part of their
respective disks. The Reclaimable Space column lists the space that could be reassigned to this
installation. The Action column lists what action will be taken with the file system to reclaim space.
Beneath the table are four buttons:
Preserve - leaves the file system untouched and no data will be deleted. This is the default
action.
Delete - removes the file system entirely. All the space it takes up on the disk will be made
available for the installation.
Shrink - recovers free space from the file system and makes it available for this installation.
Use the slider to set a new size for the selected partition. Can only be used on resizable
partitions where LVM or RAID is not used.
Delete all/Preserve all - this button, located on the right, marks all file systems for
deletion by default. Upon clicking, it changes the label and allows you to mark all file systems to
be preserved again.
Select a file system or a whole disk in the table with your mouse and click one of the buttons. The label
in the Action column will change to match your selection and the amount of Total selected space
to reclaim displayed beneath the table will adjust accordingly. Beneath this value is the amount of
space the installation requires based on the packages you have selected to install.
CHAPTER 17. INSTALLING USING ANACONDA
247

When enough space has been reclaimed for the installation to proceed, the Reclaim Space button will
become available. Click this button to return to the Installation Summary screen and proceed with the
installation.
17.15.3. Manual Partitioning
The Manual Partitioning screen is displayed when you click Done from Installation Destination if
you selected the I will configure partitioning option. On this screen you configure your disk
partitions and mount points. This defines the file system that Red Hat Enterprise Linux will be installed
on.
WARNING
Red Hat recommends that you always back up any data that you have on your
systems. For example, if you are upgrading or creating a dual-boot system, you
should back up any data you want to keep on your storage devices. Unforeseen
circumstances can result in loss of all your data.
Figure 17.19. The Manual Partitioning Screen
The Manual Partitioning screen initially features a single pane on the left for the mount points. The
pane is either empty except for information about creating mount points, or it displays existing mount
points that the installation program has detected. These mount points are organized by detected
operating system installations. Therefore, some file systems might be displayed multiple times if a
partition is shared among several installations. The total space and available space on selected storage
devices are displayed beneath this pane.
Installation Guide
248
If your system contains existing file systems, ensure that enough space will be available for the
installation. Use the - button to remove unneeded partitions.
NOTE
For recommendations and additional information about disk partitions, see Appendix A,
An Introduction to Disk Partitions and Section 17.15.3.4, “Recommended Partitioning
Scheme”. At a bare minimum, you need an appropriately sized root partition, and usually
a swap partition appropriate to the amount of RAM you have on your system.
Note which device is associated with /boot. The kernel files and boot loader sector will be associated
with this device. The first DASD or SCSI LUN will be used, and the device number will be used when re-
IPLing the post-installed system.
17.15.3.1. Adding File Systems and Configuring Partitions
An installation of Red Hat Enterprise Linux requires a minimum of one partition but Red Hat recommends
using at least the following partitions or volumes: /, /home, /boot, and swap. You can also create
additional partitions and volumes as you require. See Section 17.15.3.4, “Recommended Partitioning
Scheme” for further details.
NOTE
If you have any specific requirements for some partitions (for example, requiring that a
particular partition be on a specific disk) and less specific requirements for other
partitions, create the partitions first which have more specific requirements.
Adding a file system is a two-step process. You first create a mount point in a certain partitioning
scheme. The mount point appears in the left pane. Next, you can customize it using the options in the
right pane, where you can change the mount point, capacity, the device type, file system type, label, and
whether to encrypt or reformat the corresponding partition.
If you have no existing file systems and want the installation program to create the required file systems
and their mount points for you, select your preferred partitioning scheme from the drop-down menu in
the left pane (default for Red Hat Enterprise Linux is LVM), then click the link on top of the pane for
creating mount points automatically. This will generate a /boot partition, a / (root) volume, and a swap
volume proportionate to the size of the available storage. These are the recommended file systems for a
typical installation, but you can add additional file systems and mount points if you need to.
Alternatively, create individual mount points using the + button at the bottom of the pane. The Add a
New Mount Point dialog then opens. Either select one of the preset paths from the Mount Point
drop-down menu or type your own; for example, select / for the root partition or /boot for the boot
partition. Then enter the size of the file system in the Desired Capacity text field; for example, 2GiB.
If you leave the field empty or if you specify a size bigger than available space, all remaining free space
is used instead. After entering these details, click the Add mount point button to create the partition.
CHAPTER 17. INSTALLING USING ANACONDA
249
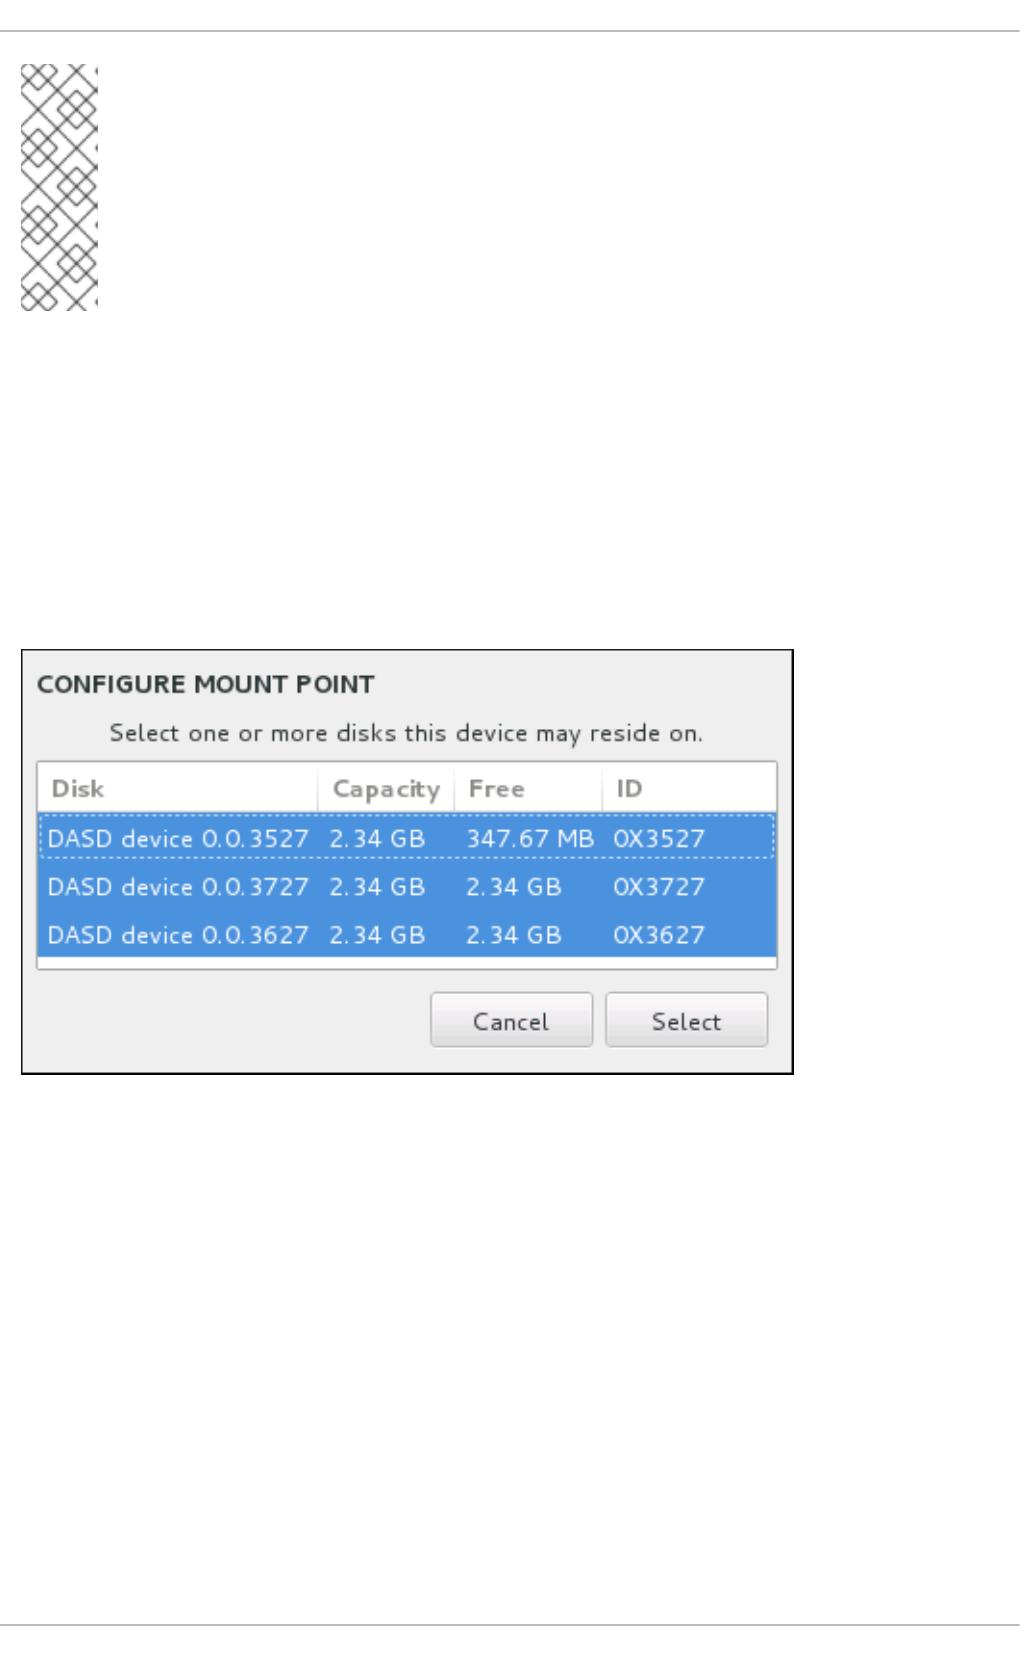
NOTE
To avoid problems with space allocation, first create small partitions with known fixed
sizes, such as /boot, and then create the rest of the partitions, letting the installation
program allocate the remaining capacity to them.
Similarly, if you have multiple disks that the system is to reside on, they differ in size, and
a particular partition must be created on the first disk detected by BIOS, be sure to start by
creating such a partition.
For each new mount point you create manually, you can set its partitioning scheme from the drop-down
menu located in the left pane. The available options are Standard Partition, BTRFS, LVM, and LVM
Thin Provisioning. Note that the /boot partition will always be located on a standard partition,
regardless of the value selected in this menu.
To change on which devices a single non-LVM mount point should be located, select the mount point
and click the Modify... button in the right pane to open the Configure Mount Point dialog. Select
one or more devices and click Select. After the dialog closes, note that you also need to confirm this
setting by clicking the Update Settings button on the right side of the Manual Partitioning
screen.
Figure 17.20. Configuring Mount Points
To refresh information about all local disks and partitions on them, click the Rescan button (with the
circular arrow icon on it) in the toolbar. You only need to do this action after performing advanced
partition configuration outside the installation program. Note that if you click the Rescan Disks button,
all configuration changes you previously made in the installation program will be lost.
Installation Guide
250

Figure 17.21. Rescanning Disks
At the bottom of the screen, a link states how many storage devices have been selected in
Installation Destination (see Section 17.15, “Installation Destination”). Clicking on this link
opens the Selected Disks dialog, where you review the information about the disks.
To customize a partition or a volume, select its mount point in the left pane and the following
customizable features then appear to the right:
CHAPTER 17. INSTALLING USING ANACONDA
251
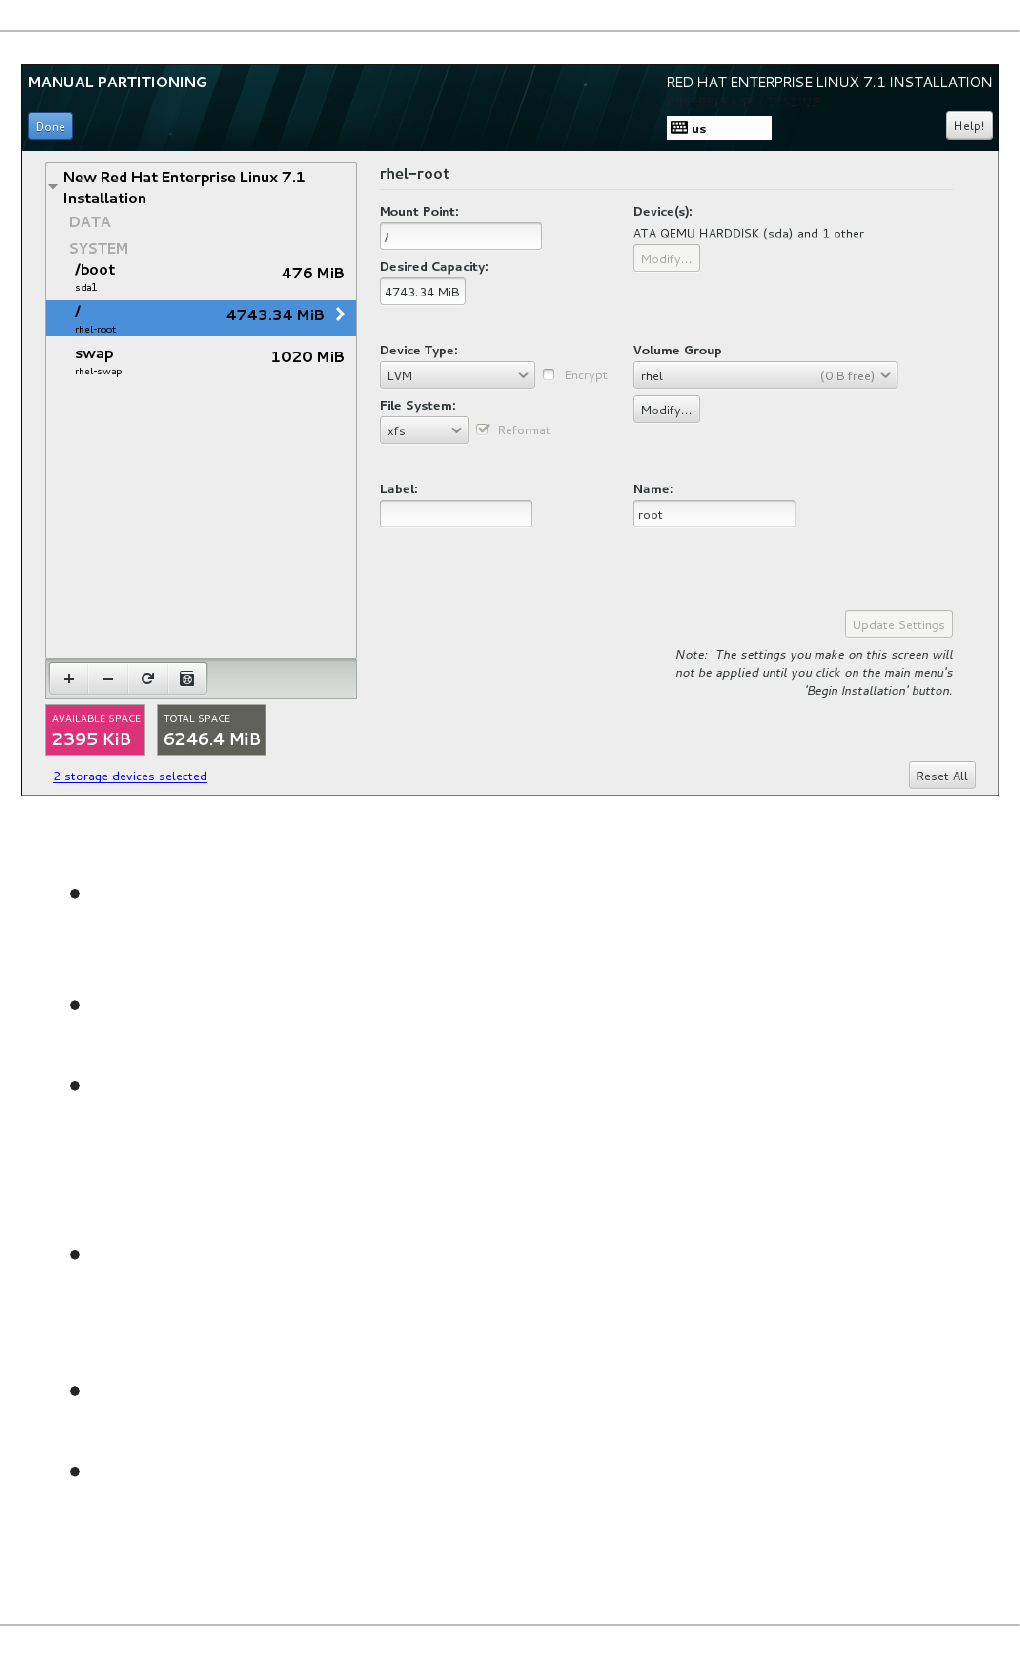
Figure 17.22. Customizing Partitions
Mount Point - enter the file system's mount point. For example, if a file system should be the
root file system, enter /; enter /boot for the /boot file system, and so on. For a swap file
system, the mount point should not be set - setting the file system type to swap is sufficient.
Desired Capacity - enter the desired size of the file system. You can use common size units
such as KiB or GiB. The default is MiB if no other unit is specified.
Device type - choose one of these types: Standard Partition, LVM, RAID, LVM Thin
Provisioning, or BTRFS. Check the adjacent Encrypt box to encrypt the partition or volume.
You will be prompted to set a password later. RAID is only available if two or more disks are
selected for partitioning, and if you choose this type, you can also set the RAID Level.
Similarly, if you select LVM, you can specify the Volume Group.
File system - in the drop-down menu, select the appropriate file system type for this partition
or volume. Check the adjacent Reformat box to format an existing partition, or leave it
unchecked to retain your data. Note that newly created partitions and volumes must be
reformatted, and the check box cannot be unchecked in this case.
Label - assign a label to the partition. Labels are used for you to easily recognize and address
individual partitions.
Name - assign a name to an LVM or Btrfs volume. Note that standard partitions are named
automatically when they are created and their name cannot be edited, such as /home being
assigned the name sda1.
Installation Guide
252

See Section 17.15.3.1.1, “File System Types” for more information about file system and device types.
Click the Update Settings button to save your changes and select another partition to customize.
Note that the changes will not be applied until you actually start the installation from the Installation
summary page. Click the Reset All button to discard all changes to all partitions and start over.
When all file systems and mount points have been created and customized, click the Done button. If you
chose to encrypt any file system, you will now be prompted to create a passphrase. Then, a dialog
appears, showing a summary of all actions related to storage that the installation program will take. This
includes creating, resizing, or deleting partitions and file systems. You can review all the changes and
click Cancel & Return to Custom Partitioning to go back. To confirm your changes, click
Accept Changes to return to the Installation Summary page. To partition additional devices, select
them in the Installation Destination screen, return to the Manual Partitioning screen,
repeat the steps outlined in this section for the additional devices.
IMPORTANT
If /usr or /var is partitioned separately from the rest of the root volume, the boot process
becomes much more complex because these directories contain components critical to it.
In some situations, such as when these directories are placed on an iSCSI drive or an
FCoE location, the system can either be unable to boot, or hang with a Device is
busy error when powering off or rebooting.
This limitation only applies to /usr or /var, not to directories below them. For example,
a separate partition for /var/www will work without issues.
17.15.3.1.1. File System Types
Red Hat Enterprise Linux allows you to create different device types and file systems. The following is a
brief description of the different device types and file systems available, and how they can be used.
Device Types
standard partition - A standard partition can contain a file system or swap space, or it can
provide a container for software RAID or an LVM physical volume.
logical volume (LVM) - Creating an LVM partition automatically generates an LVM logical
volume. LVM can improve performance when using physical disks. For information on how to
create a logical volume, see Section 17.15.3.3, “Create LVM Logical Volume” . For more
information regarding LVM, see the Red Hat Enterprise Linux 7 Logical Volume Manager
Administration guide.
LVM thin provisioning - Using thin provisioning, you can manage a storage pool of free
space, known as a thin pool, which can be allocated to an arbitrary number of devices when
needed by applications. The thin pool can be expanded dynamically when needed for cost-
effective allocation of storage space. For more information regarding LVM, see the Red Hat
Enterprise Linux 7 Logical Volume Manager Administration guide.
NOTE
The installer will automatically reserve 20% of any requested space for an LVM
thin pool logical volume in the volume group containing it. This is a safety
measure to ensure that you can extend either the metadata volume or the data
volume of your thinly provisioned logical volume.
CHAPTER 17. INSTALLING USING ANACONDA
253

software RAID - Creating two or more software RAID partitions allows you to create a RAID
device. One RAID partition is assigned to each disk on the system. To create a RAID device,
see Section 17.15.3.2, “Create Software RAID”. For more information regarding RAID, see the
Red Hat Enterprise Linux 7 Storage Administration Guide.
File Systems
xfs - XFS is a highly scalable, high-performance file system that supports file systems up to 16
EiB (approximately 16 billion GiB), files up to 8 EiB (approximately 8 billion GiB), and directory
structures containing tens of millions of entries. XFS supports metadata journaling, which
facilitates quicker crash recovery. The XFS file system can also be defragmented and resized
while mounted and active. This file system is selected by default and is highly recommended.
For information on how to translate common commands from previously used ext4 file system to
XFS, see Appendix E, Reference Table for ext4 and XFS Commands.
The maximum supported size of an XFS file system in Red Hat Enterprise Linux is currently 500
TiB.
ext4 - The ext4 file system is based on the ext3 file system and features a number of
improvements. These include support for larger file systems and larger files, faster and more
efficient allocation of disk space, no limit on the number of subdirectories within a directory,
faster file system checking, and more robust journaling.
The maximum supported size of an ext4 file system in Red Hat Enterprise Linux is currently 50
TiB.
ext3 - The ext3 file system is based on the ext2 file system and has one main advantage -
journaling. Using a journaling file system reduces time spent recovering a file system after a
crash as there is no need to check the file system for metadata consistency by running the fsck
utility every time a crash occurs.
ext2 - An ext2 file system supports standard Unix file types, including regular files, directories,
or symbolic links. It provides the ability to assign long file names, up to 255 characters.
vfat - The VFAT file system is a Linux file system that is compatible with Microsoft Windows
long file names on the FAT file system.
swap - Swap partitions are used to support virtual memory. In other words, data is written to a
swap partition when there is not enough RAM to store the data your system is processing.
Each file system has different size limits for the file system itself as well as individual files contained
within. For a list of maximum supported file and file system sizes, see the Red Hat Enterprise Linux
technology capabilities and limits page, available on the Customer Portal at
https://access.redhat.com/site/articles/rhel-limits.
17.15.3.2. Create Software RAID
NOTE
On IBM Z, the storage subsystem uses RAID transparently. There is no need to set up a
software RAID manually.
Installation Guide
254
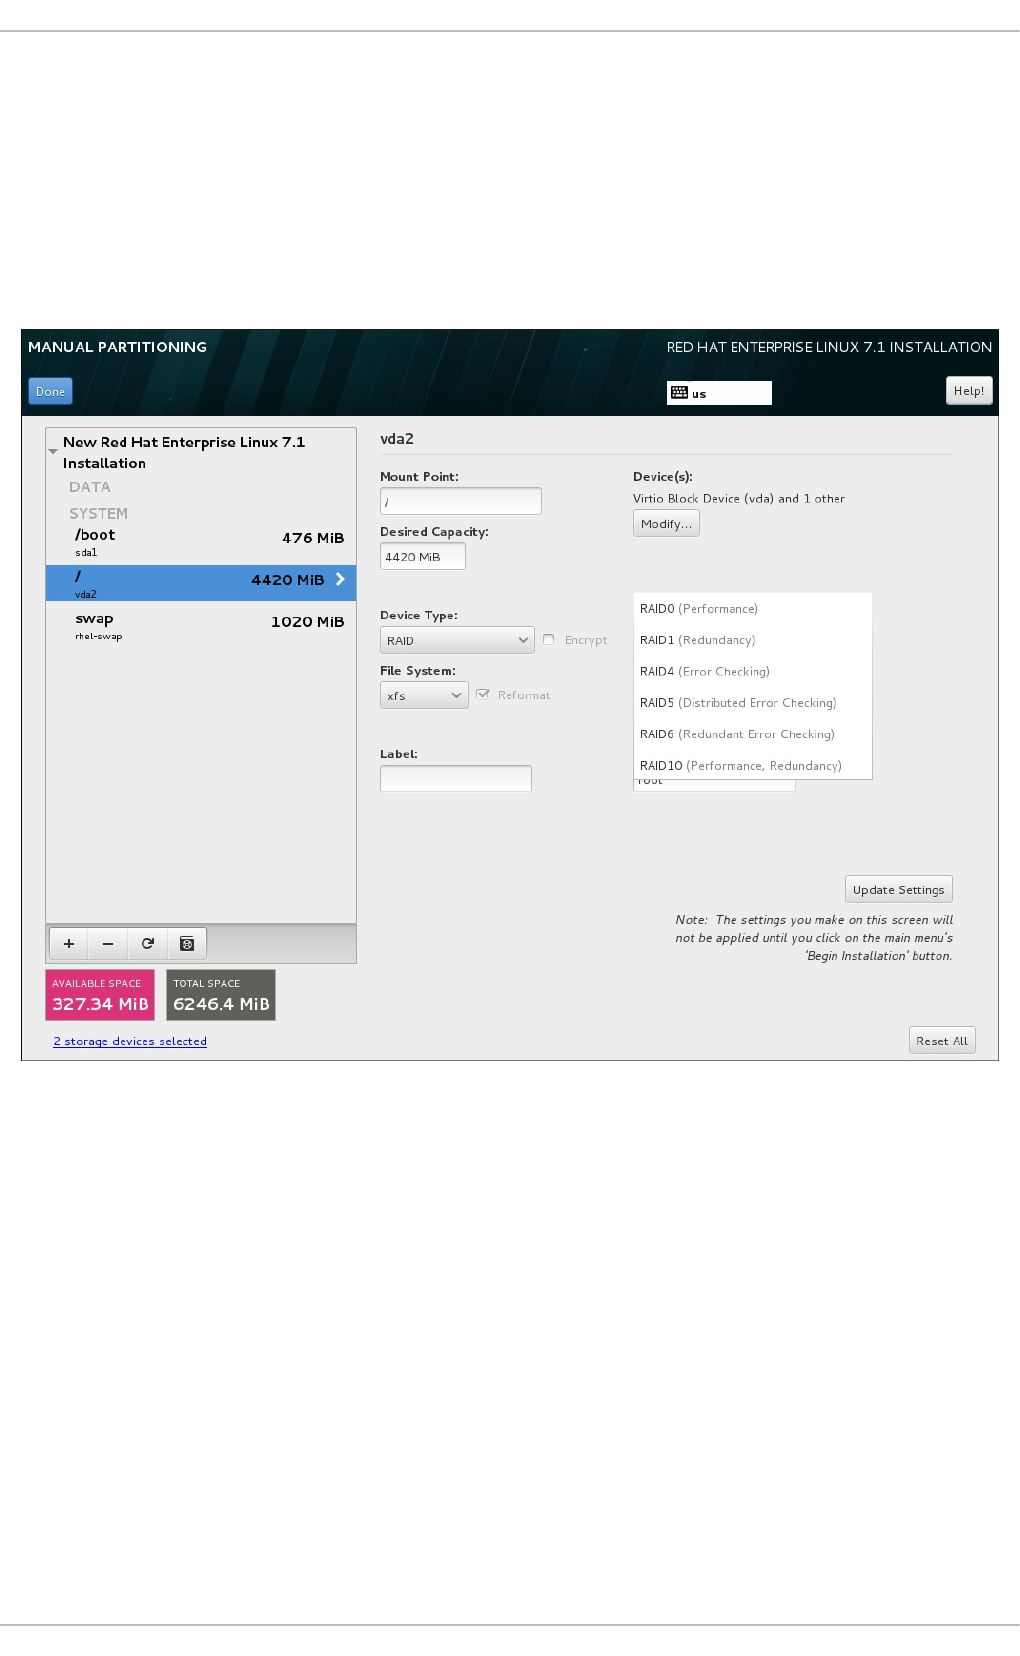
Redundant arrays of independent disks (RAIDs) are constructed from multiple storage devices that are
arranged to provide increased performance and, in some configurations, greater fault tolerance. See
below for a description of different kinds of RAIDs.
A RAID device is created in one step and disks are added or removed as necessary. One RAID partition
per physical disk is allowed for each device, so the number of disks available to the installation program
determines which levels of RAID device are available to you. For example, if your system has two hard
drives, the installation program will not allow you to create a RAID10 device, which requires 4 separate
partitions.
Figure 17.23. Creating a Software RAID Partition - the Device Type Menu Expanded
RAID configuration options are only visible if you have selected two or more disks for installation. At least
two disks are required to create a RAID device.
To create a RAID device:
1. Create a mount point as described in Section 17.15.3.1, “Adding File Systems and Configuring
Partitions”. By configuring this mount point, you configure the RAID device.
2. Keeping the partition selected in the left pane, select the configuration button below the pane to
open the Configure Mount Point dialog. Select which disks will be included in the RAID
device and click Select.
3. Click the Device Type drop-down menu and select RAID.
4. Click the File System drop-down menu and select your preferred file system type (see
Section 8.14.4.1.1, “File System Types”.
CHAPTER 17. INSTALLING USING ANACONDA
255

5. Click the RAID Level drop-down menu and select your preferred level of RAID.
The available RAID levels are:
RAID0 - Optimized performance (stripe)
Distributes data across multiple disks. Level 0 RAIDs offer increased performance over
standard partitions, and can be used to pool the storage of multiple disks into one large
virtual device. Note that Level 0 RAIDs offer no redundancy, and that the failure of one device
in the array destroys data in the entire array. RAID 0 requires at least two RAID partitions.
RAID1 - Redundancy (mirror)
Mirrors all data on one disk onto one or more other disks. Additional devices in the array
provide increasing levels of redundancy. RAID 1 requires at least two RAID partitions.
RAID4 - Error detection (parity)
Distributes data across multiple disks, and uses one disk in the array to store parity
information that safeguards the array in case any disk within the array fails. Because all parity
information is stored on one disk, access to this disk creates a bottleneck in the performance
of the array. RAID 4 requires at least three RAID partitions.
RAID5 - Distributed error detection
Distributes data and parity information across multiple disks. Level 5 RAIDs therefore offer
the performance advantages of distributing data across multiple disks, but do not share the
performance bottleneck of level 4 RAIDs because the parity information is also distributed
through the array. RAID 5 requires at least three RAID partitions.
RAID6 - Redundant
Level 6 RAIDs are similar to level 5 RAIDs, but instead of storing only one set of parity data,
they store two sets. RAID 6 requires at least four RAID partitions.
RAID10 - Redundancy (mirror) and Optimized performance (stripe)
Level 10 RAIDs are nested RAIDs or hybrid RAIDs. They are constructed by distributing data
over mirrored sets of disks. For example, a level 10 RAID array constructed from four RAID
partitions consists of two mirrored pairs of striped partitions. RAID 10 requires at least four
RAID partitions.
6. Click Update Settings to save your changes, and either continue with another partition or
click Done to return to the Installation Summary screen.
If fewer disks are included than the specified RAID level requires, a message will be displayed at the
bottom of the window, informing you how many disks are actually required for your selected
configuration.
17.15.3.3. Create LVM Logical Volume
Logical Volume Management (LVM) presents a simple logical view of underlying physical storage space,
such as hard drives or LUNs. Partitions on physical storage are represented as physical volumes that
can be grouped together into volume groups. Each volume group can be divided into multiple logical
volumes, each of which is analogous to a standard disk partition. Therefore, LVM logical volumes
function as partitions that can span multiple physical disks.
Installation Guide
256
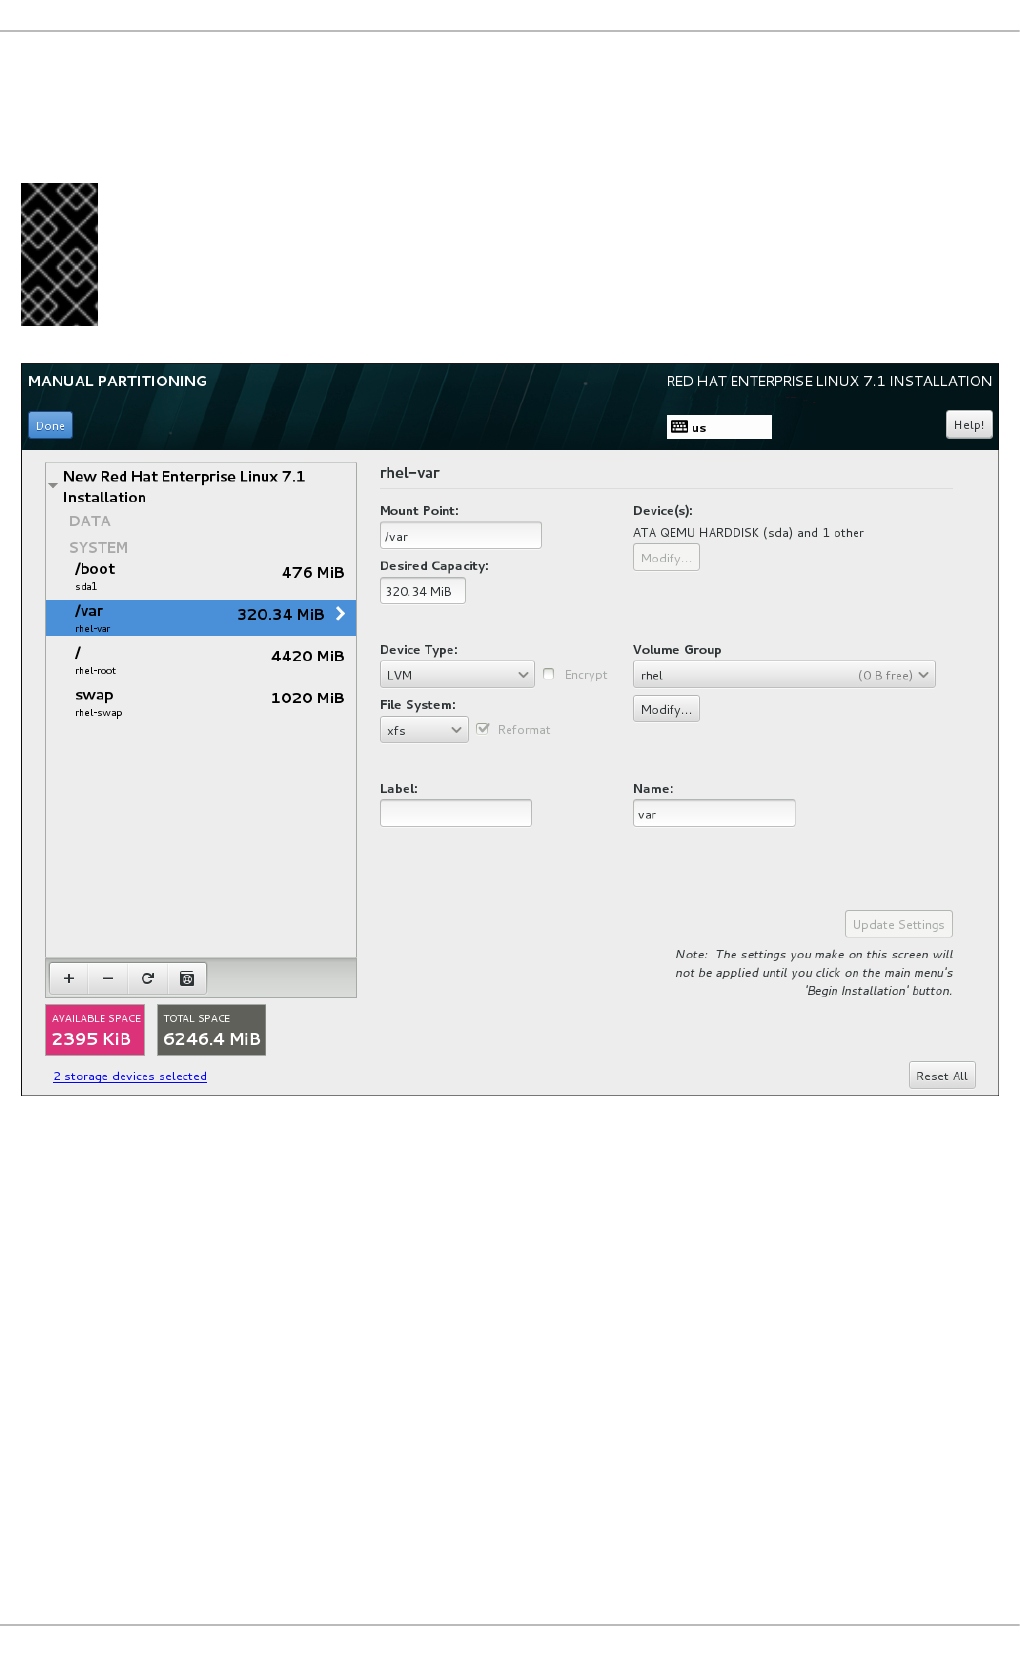
To learn more about LVM, see Appendix C, Understanding LVM or read the Red Hat Enterprise Linux 7
Logical Volume Manager Administration guide. Note that LVM configuration is only available in the
graphical installation program.
IMPORTANT
During text-mode installation, LVM configuration is not available. If you need to create an
LVM configuration from scratch, press Ctrl+Alt+F2 to use a different virtual console,
and run the lvm command. To return to the text-mode installation, press Ctrl+Alt+F1.
Figure 17.24. Configuring a Logical Volume
To create a logical volume and add it to a new or existing volume group:
1. Create a mount point for the LVM volume as described in Section 17.15.3.1, “Adding File
Systems and Configuring Partitions”.
2. Click the Device Type drop-down menu and select LVM. The Volume Group drop-down
menu appears and displays the newly-created volume group name.
3. Optionally, either click the menu and select Create a new volume group or click Modify to
configure the newly-created volume group, if you need to. Both the Create a new volume
group option and the Modify button lead to the Configure Volume Group dialog, where
you can rename the logical volume group and select which disks will be included.
CHAPTER 17. INSTALLING USING ANACONDA
257

NOTE
The configuration dialog does not allow you to specify the size of the volume
group's physical extents. The size will always be set to the default value of 4 MiB.
If you want to create a volume group with different physical extents, create it
manually by switching to an interactive shell and using the vgcreate command,
or use a Kickstart file with the volgroup --pesize=size command.
Figure 17.25. Customizing an LVM Volume Group
The available RAID levels are the same as with actual RAID devices. See Section 17.15.3.2,
“Create Software RAID” for more information. You can also mark the volume group for
encryption and set the size policy for it. The available policy options are:
Automatic - the size of the volume group is set automatically so that it is just large enough
to contain the configured logical volumes. This is optimal if you do not need free space within
the volume group.
As large as possible - the volume group is created with maximum size, regardless of
the size of the configured logical volumes it contains. This is optimal if you plan to keep most
of your data on LVM and later need to increase the size of some existing logical volumes, or
if you need to create additional logical volumes within this group.
Fixed - with this option, you can set an exact size of the volume group. Any configured
logical volumes must then fit within this fixed size. This is useful if you know exactly how
large you would like the volume group to be.
Click Save when the group is configured.
Installation Guide
258

4. Click Update Settings to save your changes, and either continue with another partition or
click Done to return to the Installation Summary screen.
WARNING
Placing the /boot partition on an LVM volume is not supported.
17.15.3.4. Recommended Partitioning Scheme
Configuring efficient swap space for Linux on IBM Z is a complex task. It very much depends on the
specific environment and should be tuned to the actual system load.
Consult the following resources for more information and to guide your decision:
'Chapter 7. Linux Swapping' in the IBM Redbooks publication Linux on IBM System z:
Performance Measurement and Tuning [IBM Form Number SG24-6926-01], [ISBN
0738485586], available from http://www.redbooks.ibm.com/abstracts/sg246926.html
Linux Performance when running under VM, available from
http://www.vm.ibm.com/perf/tips/linuxper.html
17.16. STORAGE DEVICES
You can install Red Hat Enterprise Linux on a large variety of storage devices. You can see basic, locally
accessible, storage devices in the Installation Destination page, as described in Section 17.15,
“Installation Destination”. To add a specialized storage device, click the Add a disk button in the
Specialized & Network Disks section of the screen.
Basic storage devices directly connected to the local system, such as hard disk drives and solid-state
drives, are seen in the Local Standard Disks section of the screen. On IBM Z, this contains
activated Direct Access Storage Devices (DASDs).
WARNING
A known issue prevents DASDs configured as HyperPAV aliases to be automatically
attached to the system after the installation finishes. These storage devices will be
available on this screen during the installation, but will not be immediately accessible
after you finish installing and reboot. To attach HyperPAV alias devices, add them
manually to the system's /etc/dasd.conf configuration file as described in
Section 19.1.3, “Persistently Setting DASDs Online”.
CHAPTER 17. INSTALLING USING ANACONDA
259

Figure 17.26. Storage Space Overview
17.16.1. The Storage Devices Selection Screen
The storage device selection screen displays all storage devices to which the Anaconda installation
program has access.
The devices are grouped under the following tabs:
Multipath Devices
Storage devices accessible through more than one path, such as through multiple SCSI controllers or
Fiber Channel ports on the same system.
IMPORTANT
The installation program only detects multipath storage devices with serial numbers
that are 16 or 32 characters long.
Other SAN Devices
Any other devices available on a Storage Area Network (SAN) such as FCP LUNs attached over one
single path.
Firmware RAID
Storage devices attached to a firmware RAID controller. This tab does not apply to IBM Z.
System z Devices
This tab contains storage devices, or Logical Units (LUNs), attached through the zSeries Linux FCP
(Fiber Channel Protocol) driver.
Installation Guide
260
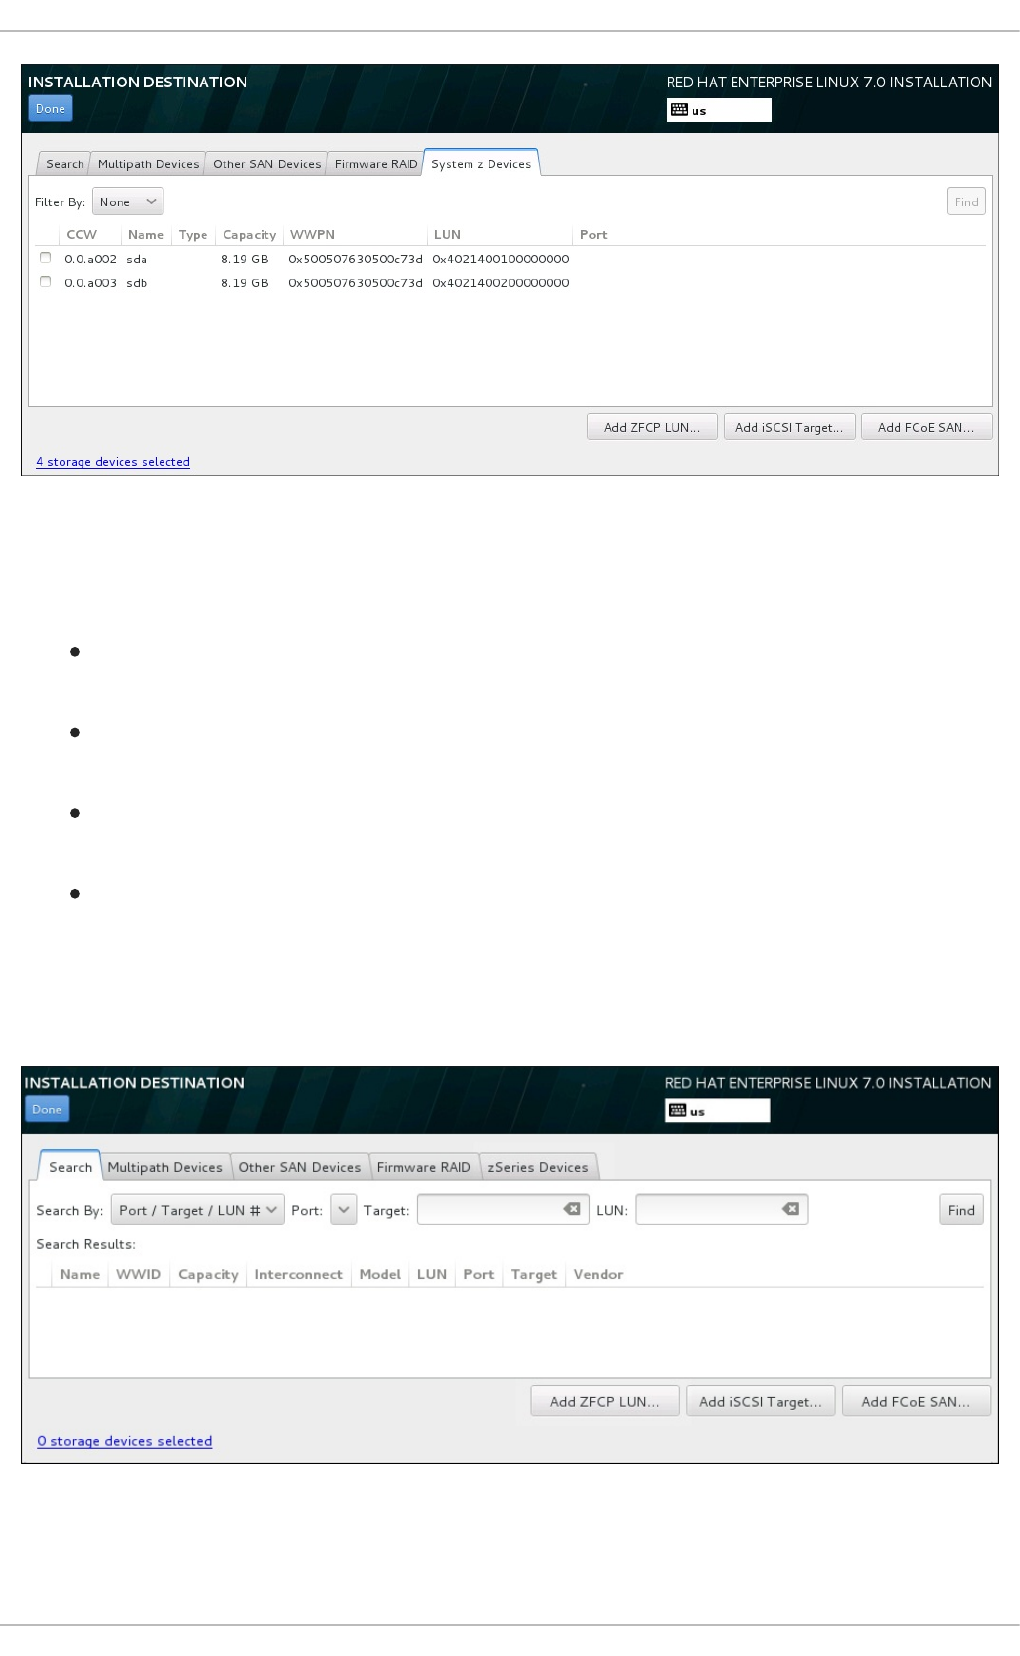
Figure 17.27. Tabbed Overview of Specialized Storage Devices
A set of buttons is available in the bottom right corner of the screen. Use these buttons to add additional
storage devices. The available buttons are:
Add ZFCP LUN - press this button to add a zFCP storage device, and continue with
Section 17.16.1.2.3, “FCP Devices”
Add DASD - press this to add additional DASD devices, and continue with Section 17.16.1.2.2,
“DASD storage devices”
Add iSCSI Target - use to attach iSCSI devices; continue with Section 17.16.1.2.1,
“Configuring iSCSI Parameters”
Add FCoE SAN - use to configure a Fibre Channel Over Internet storage device; continue with
Section 17.16.1.2.4, “Configure FCoE Parameters”
The overview page also contains the Search tab that allows you to filter storage devices either by their
World Wide Identifier (WWID) or by the port, target, or logical unit number (LUN) at which they are
accessed.
Figure 17.28. The Storage Devices Search Tab
CHAPTER 17. INSTALLING USING ANACONDA
261
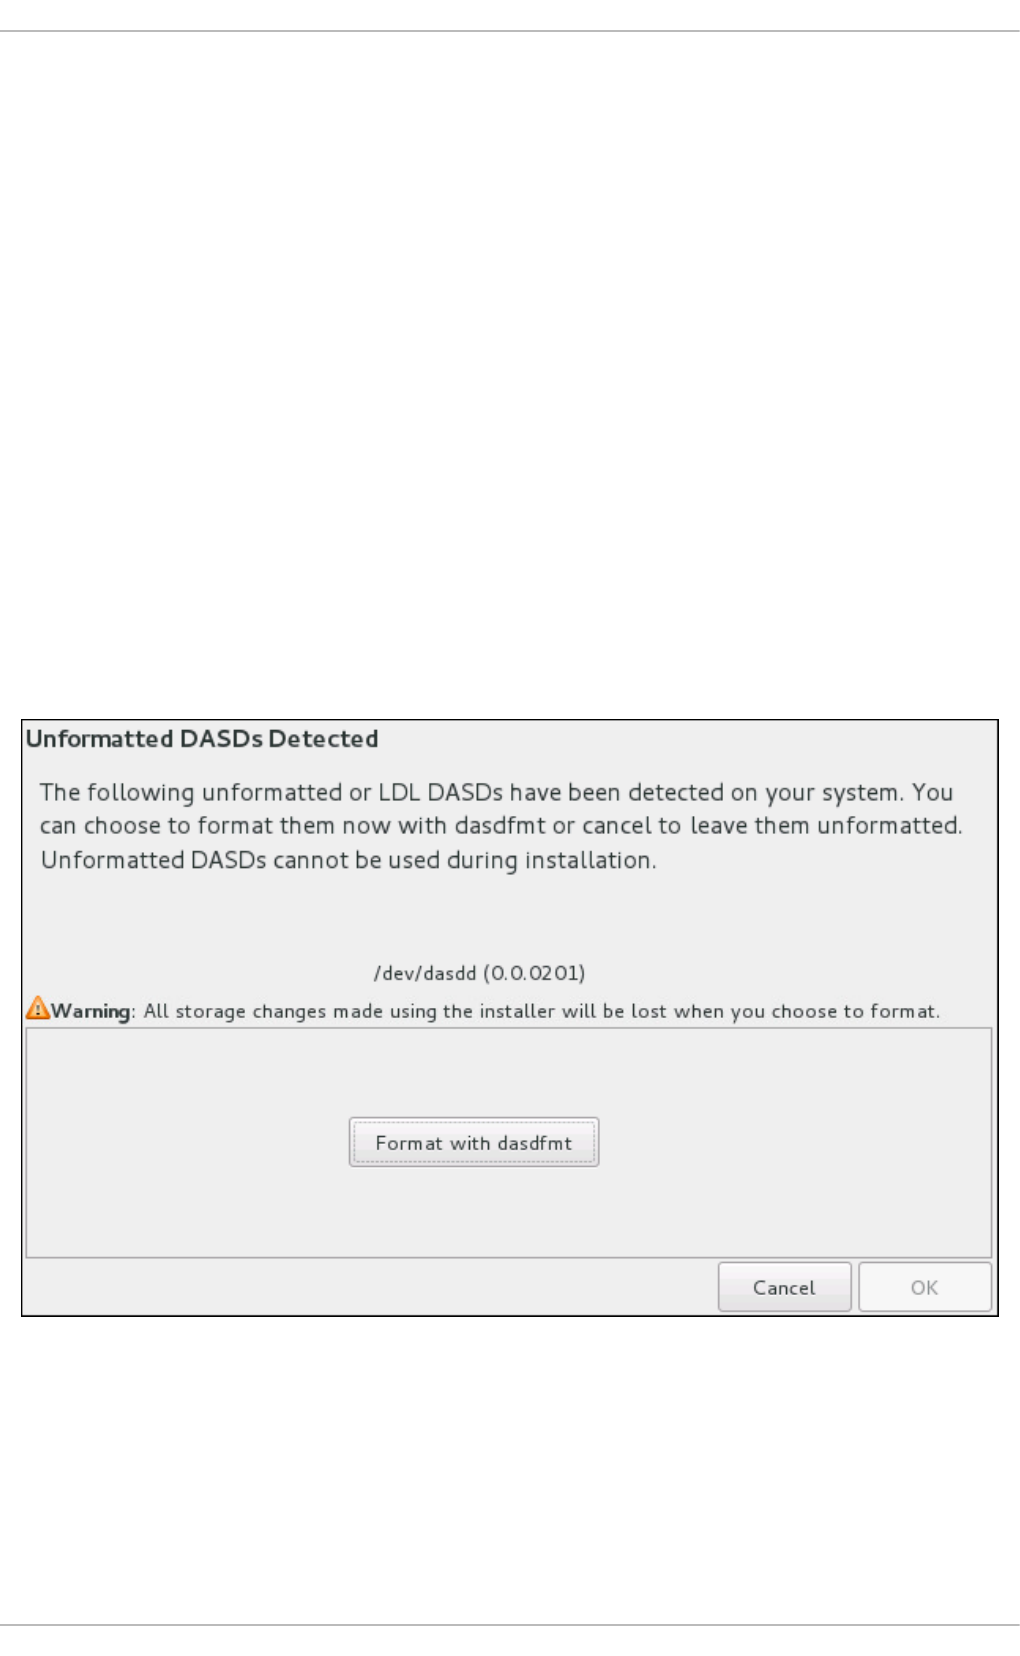
The Search tab contains the Search By drop-down menu to select searching by port, target, LUN, or
WWID. Searching by WWID or LUN requires additional values in the corresponding input text fields.
Click the Find button to start the search.
Each device is presented on a separate row, with a check box to its left. Click the check box to make the
device available during the installation process. Later in the installation process, you can choose to
install Red Hat Enterprise Linux onto any of the devices selected here, and can choose to automatically
mount any of the other devices selected here as part of the installed system.
Note that the devices that you select here are not automatically erased by the installation process.
Selecting a device on this screen does not, in itself, place data stored on the device at risk. Also note that
any devices that you do not select here to form part of the installed system can be added to the system
after installation by modifying the /etc/fstab file.
When you have selected the storage devices to make available during installation, click Done to return to
the Installation Destination screen.
17.16.1.1. DASD Low-level Formatting
For installation on a DASD, formatting on a low level in the Compatible Disk Layout (CDL) format is
recommended. However, it is also possible to use a FBA DASD formatted in the CMS format. When you
select DASDs in the Installation Destination screen and click Done, the installation program
detects any unformatted or incompatibly formatted disks, and the following dialog appears:
Figure 17.29. Dialog for Formatting DASD Devices
In the dialog, you can click Cancel to return to the Installation Destination screen and edit disk
selection. If the selection is correct, click the Format with dasdfmt button to launch the dasdfmt
utility on all unformatted DASDs.
Installation Guide
262
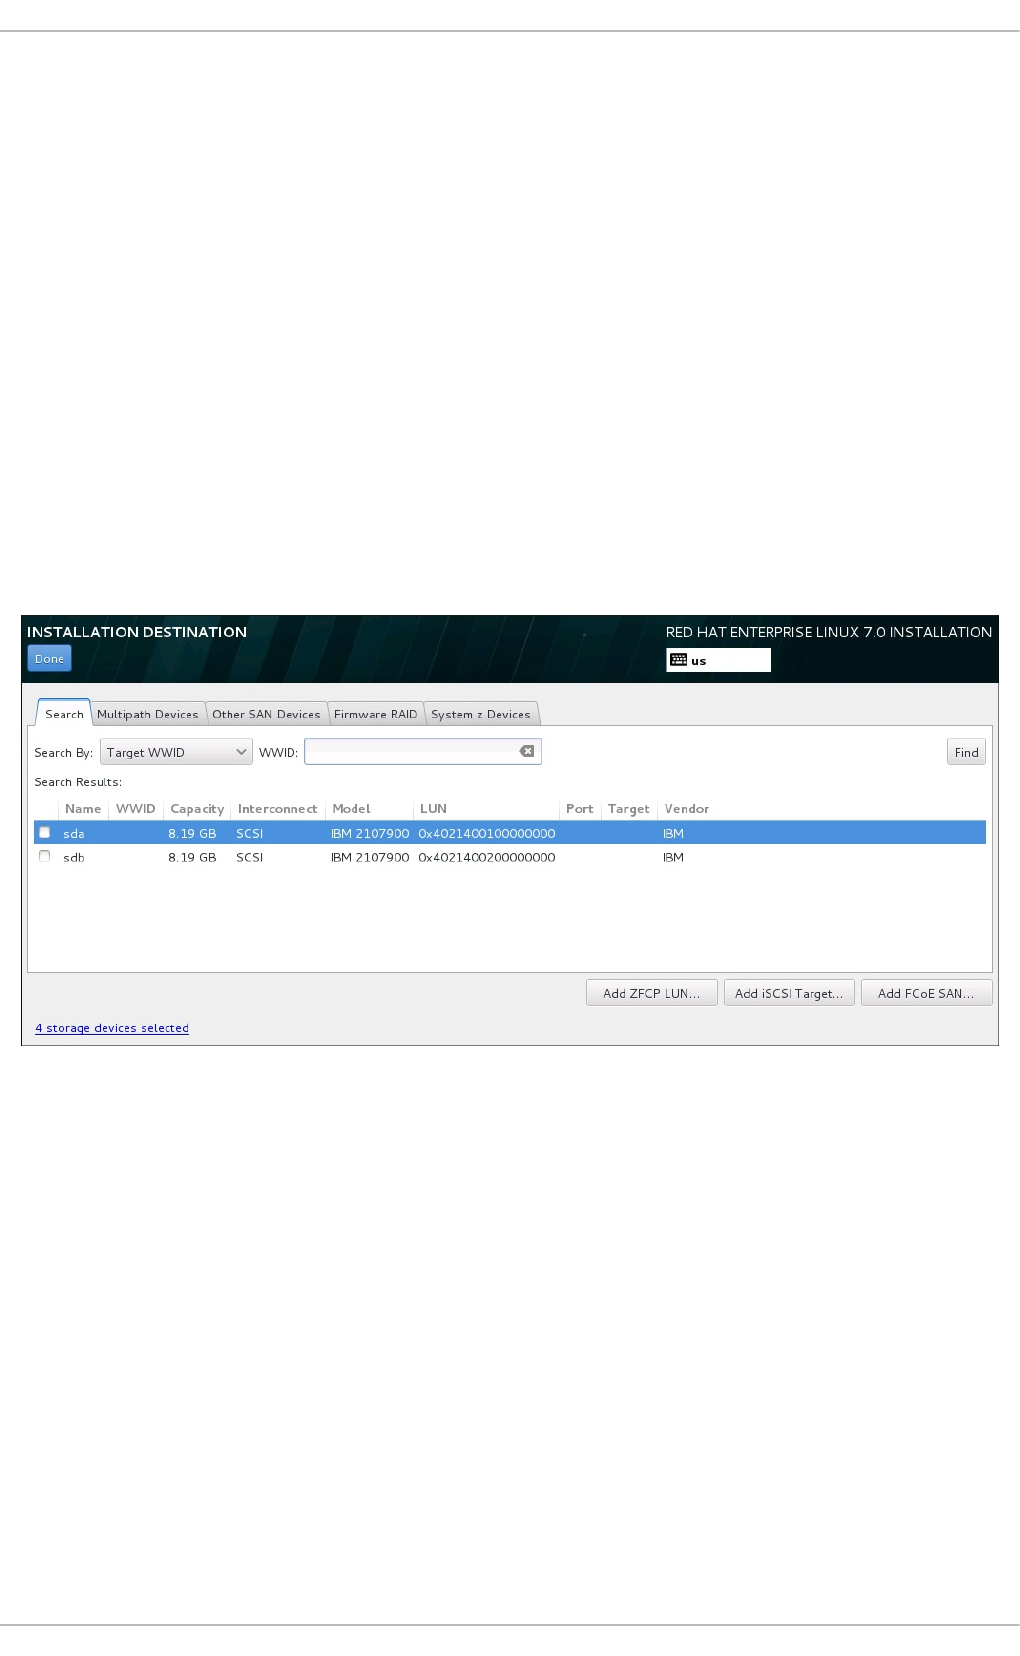
When the formatting process is complete, clicking the OK button brings you back to the Installation
Destination screen where the list of DASDs will be refreshed. You then need to re-select your disks
for the installation to proceed.
To automatically allow low-level formatting of unformatted online DASDs, specify the Kickstart command
zerombr. See zerombr (optional) for more details.
When installing Red Hat Enterprise Linux on IBM Z with the FBA DASD CMS disk layout as the target,
only three partitions are allowed. The installer first creates an msdos partition table on the target DASD.
The table does not allow more than three partitions on one DASD device. You can create the partitions
manually or use the autopart --nohome Kickstart option, which ensures that the installer does not
create a separate /home/ partition. The absence of the home directory keeps the number of partitions at
three.
17.16.1.2. Advanced Storage Options
To use an advanced storage device, you can configure an iSCSI (SCSI over TCP/IP) target or zFCP
(zSeries Fibre Channel Protocol) LUN (logical unit) by clicking the appropriate button in the lower right
corner of the Installation Destination screen. See Appendix B, iSCSI Disks for an introduction to iSCSI.
Figure 17.30. Advanced Storage Options
17.16.1.2.1. Configuring iSCSI Parameters
When you click the Add iSCSI target... button, the Add iSCSI Storage Target dialog
appears.
CHAPTER 17. INSTALLING USING ANACONDA
263

Figure 17.31. The iSCSI Discovery Details Dialog
To use iSCSI storage devices for the installation, Anaconda must be able to discover them as iSCSI
targets and be able to create an iSCSI session to access them. Each of these steps might require a user
name and password for CHAP (Challenge Handshake Authentication Protocol) authentication.
Additionally, you can configure an iSCSI target to authenticate the iSCSI initiator on the system to which
the target is attached (reverse CHAP), both for discovery and for the session. Used together, CHAP and
reverse CHAP are called mutual CHAP or two-way CHAP . Mutual CHAP provides the greatest level of
security for iSCSI connections, particularly if the user name and password are different for CHAP
authentication and reverse CHAP authentication.
NOTE
Repeat the iSCSI discovery and iSCSI login steps as many times as necessary to add all
required iSCSI storage. However, you cannot change the name of the iSCSI initiator after
you attempt discovery for the first time. To change the iSCSI initiator name, you must
restart the installation.
Procedure 17.1. iSCSI Discovery and Starting an iSCSI Session
Use the Add iSCSI Storage Target dialog to provide Anaconda with the information necessary to
discover the iSCSI target.
Installation Guide
264

1. Enter the IP address of the iSCSI target in the Target IP Address field.
2. Provide a name in the iSCSI Initiator Name field for the iSCSI initiator in iSCSI qualified
name (IQN) format. A valid IQN entry contains:
the string iqn. (note the period)
a date code that specifies the year and month in which your organization's Internet domain
or subdomain name was registered, represented as four digits for the year, a dash, and two
digits for the month, followed by a period. For example, represent September 2010 as
2010-09.
your organization's Internet domain or subdomain name, presented in reverse order with the
top-level domain first. For example, represent the subdomain storage.example.com as
com.example.storage
a colon followed by a string that uniquely identifies this particular iSCSI initiator within your
domain or subdomain. For example, :diskarrays-sn-a8675309
A complete IQN can therefore look as follows: iqn.2010-
09.storage.example.com:diskarrays-sn-a8675309 . Anaconda prepopulates the
iSCSI Initiator Name field with a name in this format to help you with the structure.
For more information on IQNs , see 3.2.6. iSCSI Names in RFC 3720 - Internet Small Computer
Systems Interface (iSCSI) available from http://tools.ietf.org/html/rfc3720#section-3.2.6 and 1.
iSCSI Names and Addresses in RFC 3721 - Internet Small Computer Systems Interface (iSCSI)
Naming and Discovery available from http://tools.ietf.org/html/rfc3721#section-1.
3. Use the Discovery Authentication Type drop-down menu to specify the type of
authentication to use for iSCSI discovery. The following options are available:
no credentials
CHAP pair
CHAP pair and a reverse pair
4. If you selected CHAP pair as the authentication type, provide the user name and password
for the iSCSI target in the CHAP Username and CHAP Password fields.
If you selected CHAP pair and a reverse pair as the authentication type, provide the user
name and password for the iSCSI target in the CHAP Username and CHAP Password field
and the user name and password for the iSCSI initiator in the Reverse CHAP Username
and Reverse CHAP Password fields.
5. Optionally check the box labeled Bind targets to network interfaces.
6. Click the Start Discovery button. Anaconda attempts to discover an iSCSI target based on
the information that you provided. If discovery succeeds, the dialog displays a list of all iSCSI
nodes discovered on the target.
7. Each node is presented with a check box beside it. Click the check boxes to select the nodes to
use for installation.
CHAPTER 17. INSTALLING USING ANACONDA
265
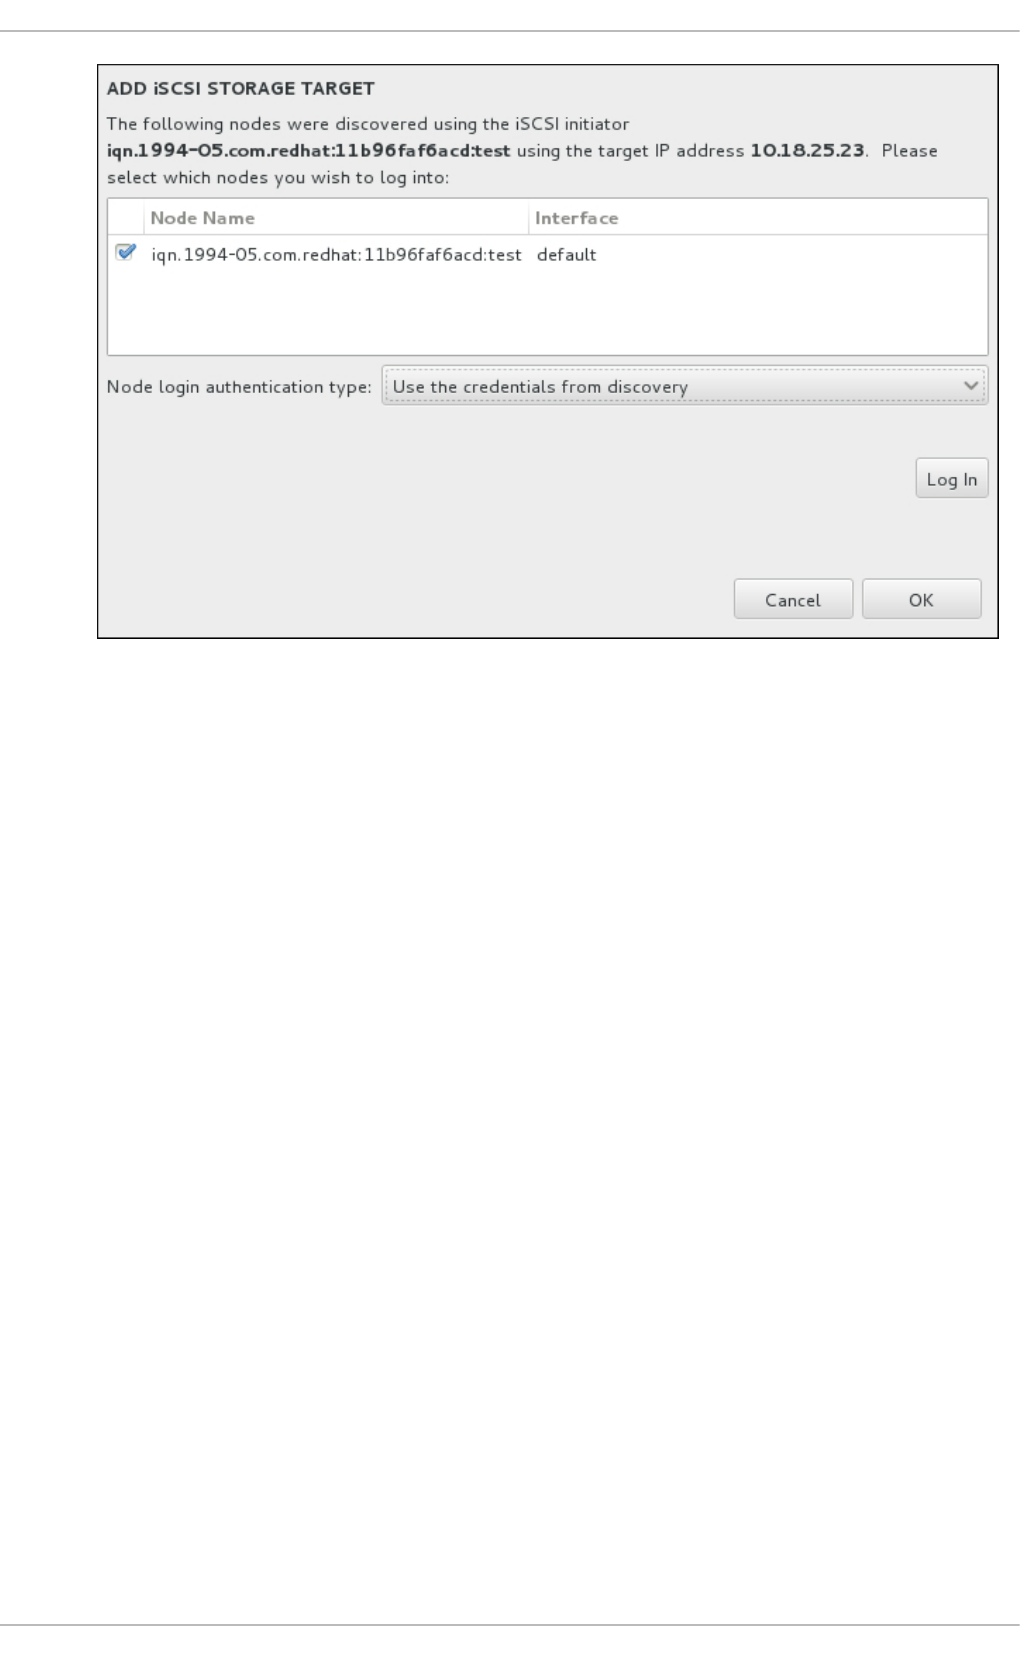
Figure 17.32. The Dialog of Discovered iSCSI Nodes
8. The Node login authentication type menu provides the same options as the
Discovery Authentication Type menu described in step 3. However, if you needed
credentials for discovery authentication, it is typical to use the same credentials to log into a
discovered node. To do that, use the additional Use the credentials from discovery option
from the menu. When the proper credentials have been provided, the Log In button becomes
available.
9. Click Log In to initiate an iSCSI session.
17.16.1.2.2. DASD storage devices
After clicking the Add DASD button at the Installation Destination screen, a dialog appears for
you to add a DASD (Direct Access Storage Device) storage device. This dialog allows you to attach
additional DASDs which were not detected when the installation started.
Installation Guide
266
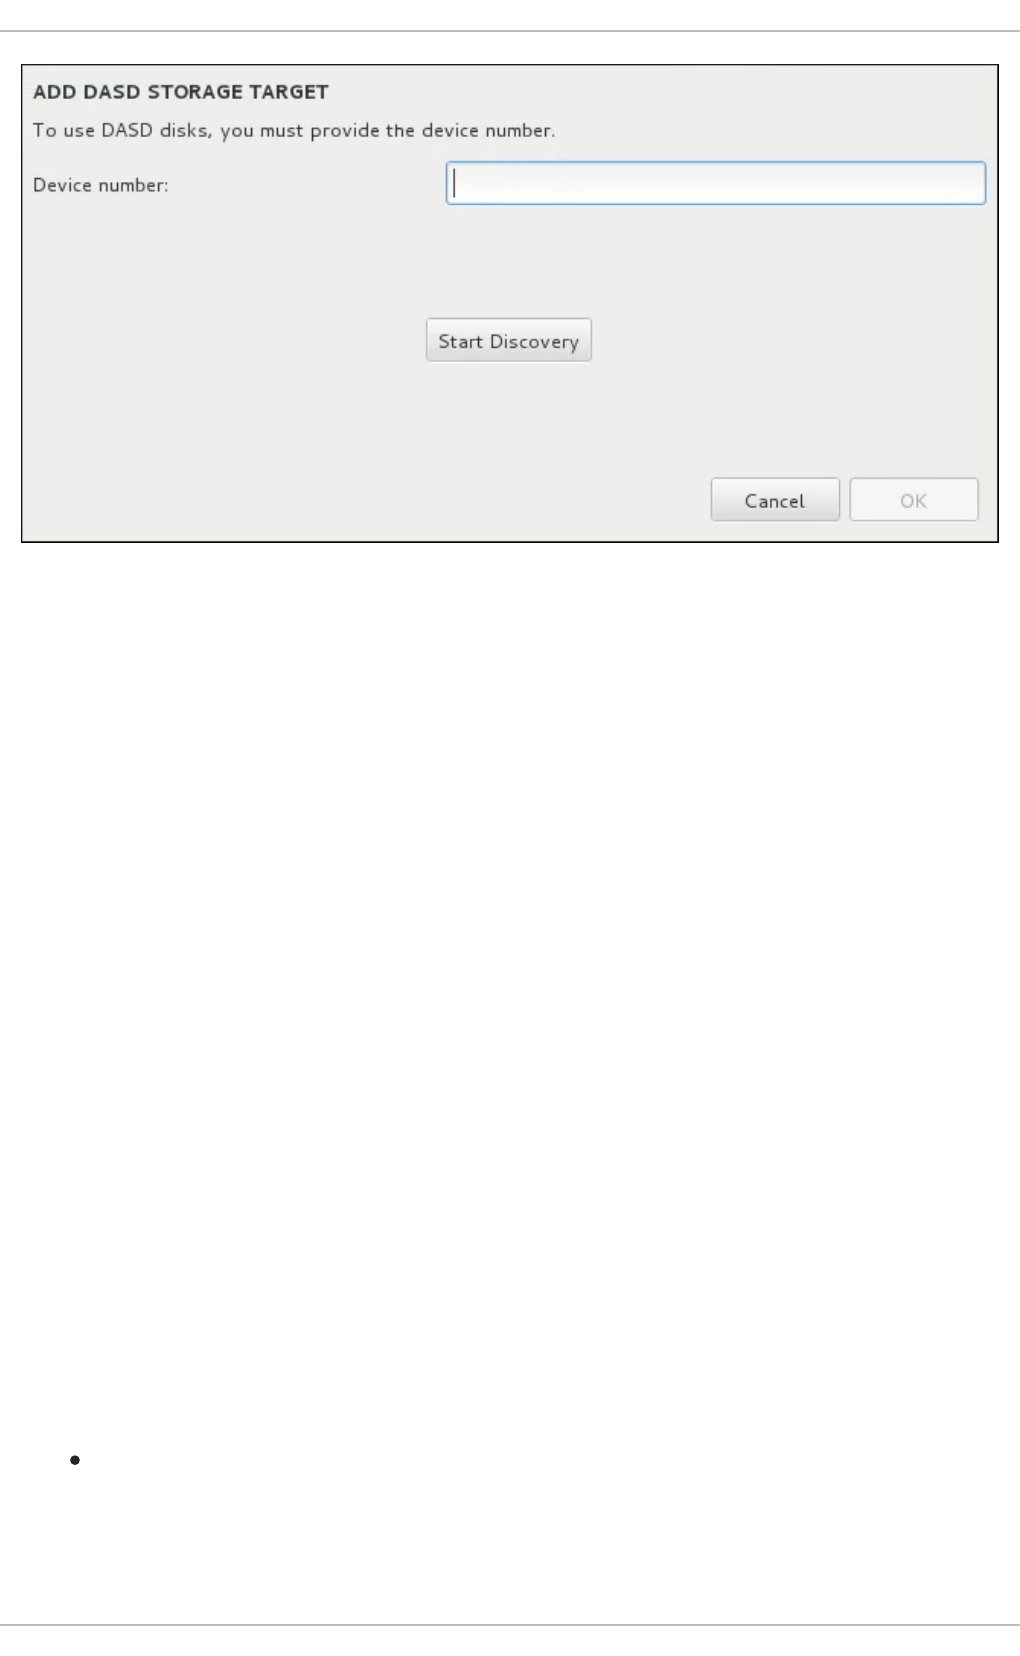
Figure 17.33. Add DASD Storage Target
The Add DASD Storage Target dialog prompts you to specify a device number, such as 0.0.0204.
Enter the device number of the DASD you want to attach, and click Start Discovery.
If a DASD with the specified device number is found, and if it is not already attached, the dialog window
will close and the newly discovered drives will appear in the list of drives in Section 17.16.1, “The Storage
Devices Selection Screen”. There, you can use the check boxes on the left side of the screen to select
which of the drives should be made available; after you do so, press Done in the top left corner to return
to Section 17.15, “Installation Destination”. The new DASDs will then be available for selection (marked
as DASD device 0.0.xxxx) in the Local Standard Disks section of the screen.
If you entered an invalid device number, or if the DASD with the specified device number is already
attached to the system, an error message will appear within the dialog window, explaining the error and
prompting you to try again with a different device number.
17.16.1.2.3. FCP Devices
When you click the Add ZFCP LUN button, a dialog appears for you to add a FCP (Fibre Channel
Protocol) storage device.
FCP devices enable IBM Z to use SCSI devices rather than, or in addition to, Direct Access Storage
Device (DASD) devices. FCP devices provide a switched fabric topology that enables IBM Z systems to
use SCSI LUNs as disk devices in addition to traditional DASD devices.
IBM Z requires that any FCP device is entered manually for the installation program to activate FCP
LUNs. This can be done either in Anaconda interactively, or specified as a unique parameter entry in
the parameter or CMS configuration file. The values entered here are unique to each site in which they
are set up.
Notes
Interactive creation of an FCP device is only possible in graphical mode. It is not possible to
interactively configure an FCP device in a text mode installation.
CHAPTER 17. INSTALLING USING ANACONDA
267

Use only lower-case letters in hex values. If you enter an incorrect value and hit the Start
discovery button, the installation program will display a warning and allow you to edit the
configuration information and retry the discovery attempt.
For more information on these values, consult the hardware documentation and check with the
system administrator who set up the network for this system.
To configure a Fiber Channel Protocol SCSI device, fill in the 16-bit device number, 64-bit World Wide
Port Number (WWPN), and 64-bit FCP LUN identifier. Click the Start Discovery button to connect to
the FCP device using this information.
Figure 17.34. Add FCP Device
The newly added devices are displayed in the System z Devices tab of the Installation Destination
screen.
IMPORTANT
For a SCSI-only installation, remove the DASD= from the parameter or CMS configuration
file to indicate no DASD is present.
17.16.1.2.4. Configure FCoE Parameters
When you click the Add FCoE SAN... button, a dialog appears for you to configure network interfaces
for discovering FCoE storage devices.
First, select a network interface that is connected to a FCoE switch in the NIC drop-down menu and click
the Add FCoE disk(s) button to scan the network for SAN devices.
Installation Guide
268

Figure 17.35. Configure FCoE Parameters
There are check boxes with additional options to consider:
Use DCB
Data Center Bridging (DCB) is a set of enhancements to the Ethernet protocols designed to increase
the efficiency of Ethernet connections in storage networks and clusters. Enable or disable the
installation program's awareness of DCB with the check box in this dialog. This option should only be
enabled for network interfaces that require a host-based DCBX client. Configurations on interfaces
that implement a hardware DCBX client should leave this check box empty.
Use auto vlan
Auto VLAN indicates whether VLAN discovery should be performed. If this box is checked, then the
FIP (FCoE Initiation Protocol) VLAN discovery protocol will run on the Ethernet interface once the link
configuration has been validated. If they are not already configured, network interfaces for any
discovered FCoE VLANs will be automatically created and FCoE instances will be created on the
VLAN interfaces. This option is enabled by default.
Discovered FCoE devices will be displayed under the Other SAN Devices tab in the Installation
Destination screen.
17.17. KDUMP
Use this screen to select whether or not to use Kdump on this system. Kdump is a kernel crash
dumping mechanism which, in the event of a system crash, captures information that can be invaluable
in determining the cause of the crash.
Note that if you enable Kdump, you must reserve a certain amount of system memory for it. As a result,
less memory is available for your processes.
If you do not want to use Kdump on this system, uncheck Enable kdump. Otherwise, set the amount
of memory to reserve for Kdump. You can let the installer reserve a reasonable amount automatically,
or you can set any amount manually. When your are satisfied with the settings, click Done to save the
configuration and return to the previous screen.
CHAPTER 17. INSTALLING USING ANACONDA
269
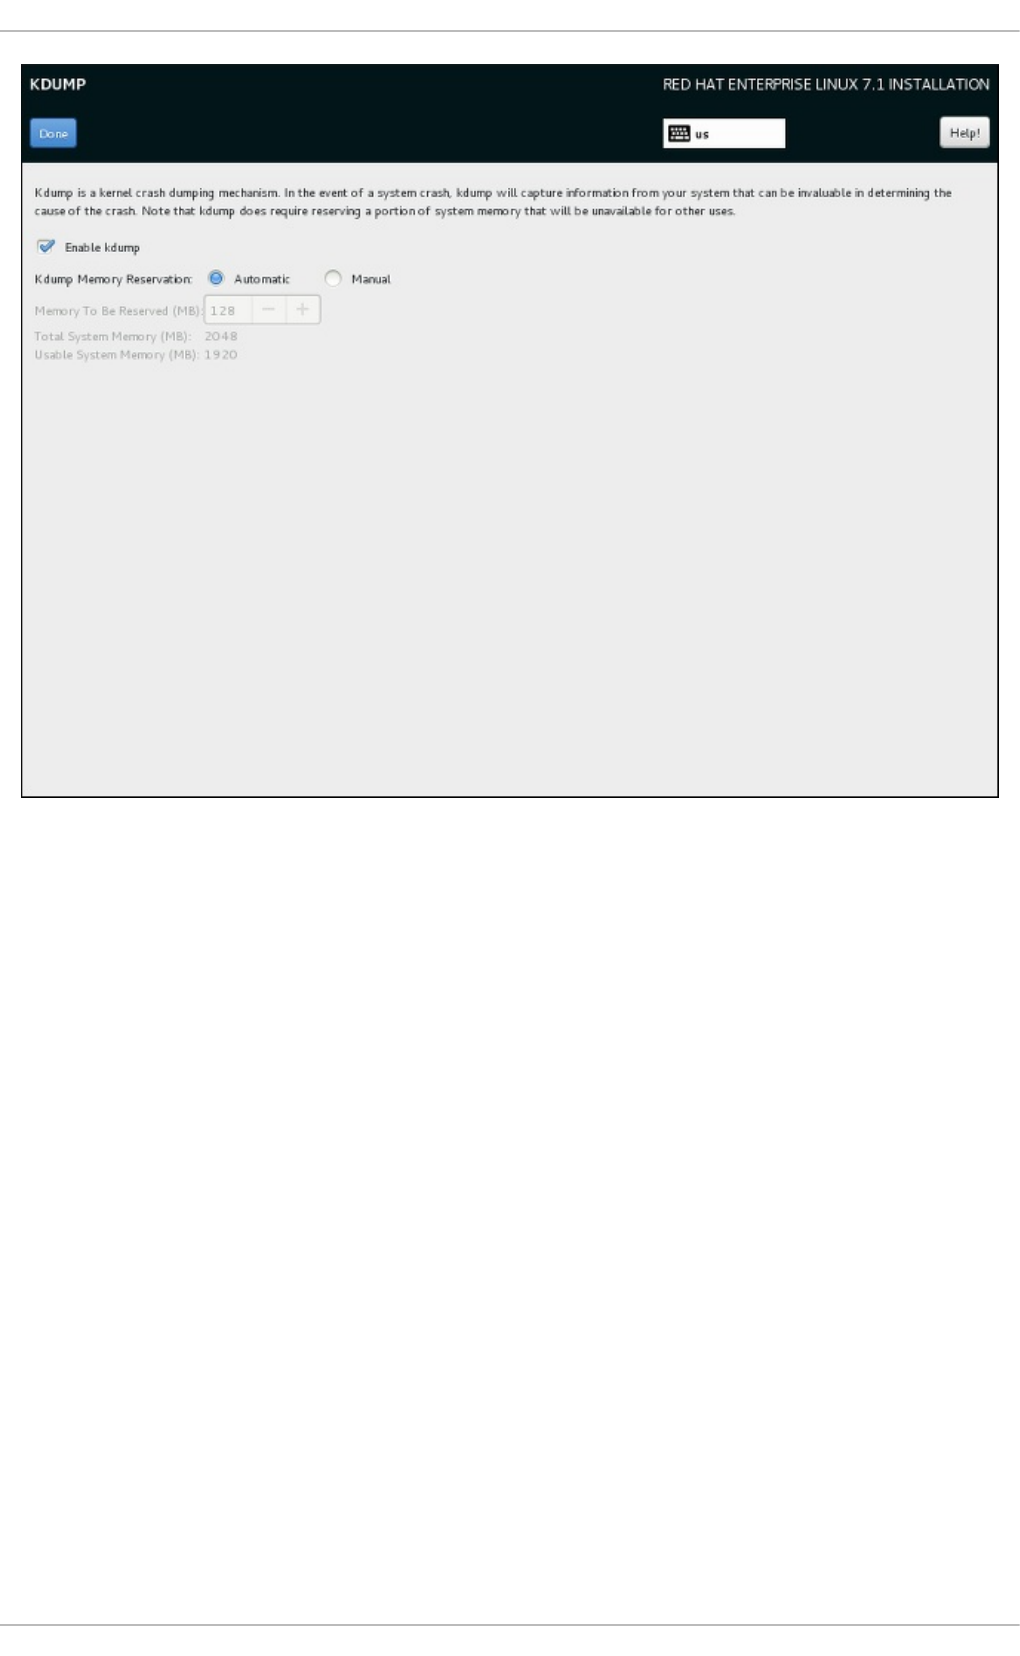
Figure 17.36. Kdump Enablement and Configuration
17.18. BEGIN INSTALLATION
When all required sections of the Installation Summary screen have been completed, the
admonition at the bottom of the menu screen disappears and the Begin Installation button
becomes available.
Installation Guide
270

Figure 17.37. Ready to Install
WARNING
Up to this point in the installation process, no lasting changes have been made on
your computer. When you click Begin Installation, the installation program will
allocate space on your hard drive and start to transfer Red Hat Enterprise Linux into
this space. Depending on the partitioning option that you chose, this process might
include erasing data that already exists on your computer.
To revise any of the choices that you made up to this point, return to the relevant section of the
Installation Summary screen. To cancel installation completely, click Quit or switch off your
computer. To switch off most computers at this stage, press the power button and hold it down for a few
seconds.
If you have finished customizing your installation and are certain that you want to proceed, click Begin
Installation.
After you click Begin Installation, allow the installation process to complete. If the process is
interrupted, for example, by you switching off or resetting the computer, or by a power outage, you will
probably not be able to use your computer until you restart and complete the Red Hat Enterprise Linux
installation process, or install a different operating system.
17.19. THE CONFIGURATION MENU AND PROGRESS SCREEN
CHAPTER 17. INSTALLING USING ANACONDA
271

Once you click Begin Installation at the Installation Summary screen, the progress screen
appears. Red Hat Enterprise Linux reports the installation progress on the screen as it writes the
selected packages to your system.
Figure 17.38. Installing Packages
For your reference, a complete log of your installation can be found in the
/var/log/anaconda/anaconda.packaging.log file, once you reboot your system.
If you chose to encrypt one or more partitions during partitioning setup, a dialog window with a progress
bar will be displayed during the early stage of the installation process. This window informs that the
installer is attempting to gather enough entropy (random data) to ensure that the encryption is secure.
This window will disappear after 256 bits of entropy are gathered, or after 10 minutes. You can speed up
the gathering process by moving your mouse or randomly typing on the keyboard. After the window
disappears, the installation process will continue.
Figure 17.39. Gathering Entropy for Encryption
While the packages are being installed, more configuration is required. Above the installation progress
bar are the Root Password and User Creation menu items.
The Root Password screen is used to configure the system's root account. This account can be used
to perform critical system management and administration tasks. The same tasks can also be performed
with a user account with the wheel group membership; if such an user account is created during
installation, setting up a root password is not mandatory.
Creating a user account is optional and can be done after installation, but it is recommended to do it on
this screen. A user account is used for normal work and to access the system. Best practice suggests
that you always access the system through a user account, not the root account.
Installation Guide
272

It is possible to disable access to the Root Password or Create User screens. To do so, use a
Kickstart file which includes the rootpw --lock or user --lock commands. See Section 26.3.1,
“Kickstart Commands and Options” for more information these commands.
17.19.1. Set the Root Password
Setting up a root account and password is an important step during your installation. The root account
(also known as the superuser) is used to install packages, upgrade RPM packages, and perform most
system maintenance. The root account gives you complete control over your system. For this reason,
the root account is best used only to perform system maintenance or administration. See the Red Hat
Enterprise Linux 7 System Administrator's Guide for more information about becoming root.
Figure 17.40. Root Password Screen
NOTE
You must always set up at least one way to gain root privileges to the installed system:
either using a root account, or by creating a user account with administrative privileges
(member of the wheel group), or both.
Click the Root Password menu item and enter your new password into the Root Password field.
Red Hat Enterprise Linux displays the characters as asterisks for security. Type the same password into
the Confirm field to ensure it is set correctly. After you set the root password, click Done to return to the
User Settings screen.
The following are the requirements and recommendations for creating a strong root password:
must be at least eight characters long
may contain numbers, letters (upper and lower case) and symbols
is case-sensitive and should contain a mix of cases
something you can remember but that is not easily guessed
should not be a word, abbreviation, or number associated with you, your organization, or found
in a dictionary (including foreign languages)
should not be written down; if you must write it down keep it secure
NOTE
To change your root password after you have completed the installation, run the passwd
command as root. If you forget the root password, see Section 32.1.3, “Resetting the
Root Password” for instructions on how to use the rescue mode to set a new one.
CHAPTER 17. INSTALLING USING ANACONDA
273

17.19.2. Create a User Account
To create a regular (non-root) user account during the installation, click User Settings on the
progress screen. The Create User screen appears, allowing you to set up the regular user account
and configure its parameters. Though recommended to do during installation, this step is optional and
can be performed after the installation is complete.
NOTE
You must always set up at least one way to gain root privileges to the installed system:
either using a root account, or by creating a user account with administrative privileges
(member of the wheel group), or both.
To leave the user creation screen after you have entered it, without creating a user, leave all the fields
empty and click Done.
Figure 17.41. User Account Configuration Screen
Enter the full name and the user name in their respective fields. Note that the system user name must be
shorter than 32 characters and cannot contain spaces. It is highly recommended to set up a password for
the new account.
When setting up a strong password even for a non-root user, follow the guidelines described in
Section 17.19.1, “Set the Root Password”.
Click the Advanced button to open a new dialog with additional settings.
Installation Guide
274

Figure 17.42. Advanced User Account Configuration
By default, each user gets a home directory corresponding to their user name. In most scenarios, there
is no need to change this setting.
You can also manually define a system identification number for the new user and their default group by
selecting the check boxes. The range for regular user IDs starts at the number 1000. At the bottom of the
dialog, you can enter the comma-separated list of additional groups, to which the new user shall belong.
The new groups will be created in the system. To customize group IDs, specify the numbers in
parenthesis.
NOTE
Consider setting IDs of regular users and their default groups at range starting at 5000
instead of 1000. That is because the range reserved for system users and groups, 0-999,
might increase in the future and thus overlap with IDs of regular users.
For creating users with custom IDs using kickstart, see user (optional) .
For changing the minimum UID and GID limits after the installation, which ensures that
your chosen UID and GID ranges are applied automatically on user creation, see the
Users and Groups chapter of the System Administrator's Guide.
Once you have customized the user account, click Save Changes to return to the User Settings
screen.
17.20. INSTALLATION COMPLETE
CHAPTER 17. INSTALLING USING ANACONDA
275

Congratulations! Your Red Hat Enterprise Linux installation is now complete!
The installation program prompts you to prepare your system for reboot.
The installation program automatically reboots into the installed system.
Should the installation program not reboot, the installation program shows information from which device
to do an IPL (boot). Accept the shutdown option and after shutdown, IPL from the DASD or SCSI LUN
where the /boot partition for Red Hat Enterprise Linux has been installed.
17.20.1. IPL under z/VM
To IPL from a DASD, for example using the DASD device 200 on the 3270 console, issue the command:
#cp i 200
In DASD only environments where automatic partitioning (clearing data from all partitions) was used, the
first activated DASD is where the /boot partition is typically located.
Using /boot on an FCP LUN, you must provide the WWPN and LUN for the FCP-attached device from
which to IPL.
To IPL from an FCP-attached device:
1. Provide FCP routing information to an FCP-attached device, for example, where
0x50050763050B073D is the WWPN, and 0x4020400100000000 is the FCP LUN:
#cp set loaddev portname 50050763 050B073D lun 40204001 00000000
2. IPL the FCP adapter, for example FC00:
#cp ipl FC00
NOTE
To disconnect from the 3270 terminal without stopping the Linux running in your virtual
machine, use #cp disconnect instead of #cp logoff. When your virtual machine is
re-connected using the usual logon procedure, it might be placed in CP console function
mode (CP READ). If so, to resume execution on your virtual machine, enter the BEGIN
command.
17.20.2. IPL on an LPAR
For LPAR-based installations, on the HMC, issue a load command to the LPAR, specifying the particular
DASD, or the FCP adapter, WWPN, and FCP LUN where the /boot partition is located.
17.20.3. Continuing after Reboot (re-IPL)
Following the automatic reboot or the manual IPL of the installed Red Hat Enterprise Linux operating
system, you can log on to the system through ssh. Note that the only place from which you can log in as
root is from the 3270 terminal or from other terminal devices listed in /etc/securetty.
The first time you start your Red Hat Enterprise Linux system in a graphical environment, you can use
Installation Guide
276

Initial Setup to guide you through Red Hat Enterprise Linux configuration. Initial Setup lets you
configure your environment at the beginning, so that you can get started using your Red Hat
Enterprise Linux system quickly.
See Chapter 30, Initial Setup for information about the configuration process.
CHAPTER 17. INSTALLING USING ANACONDA
277
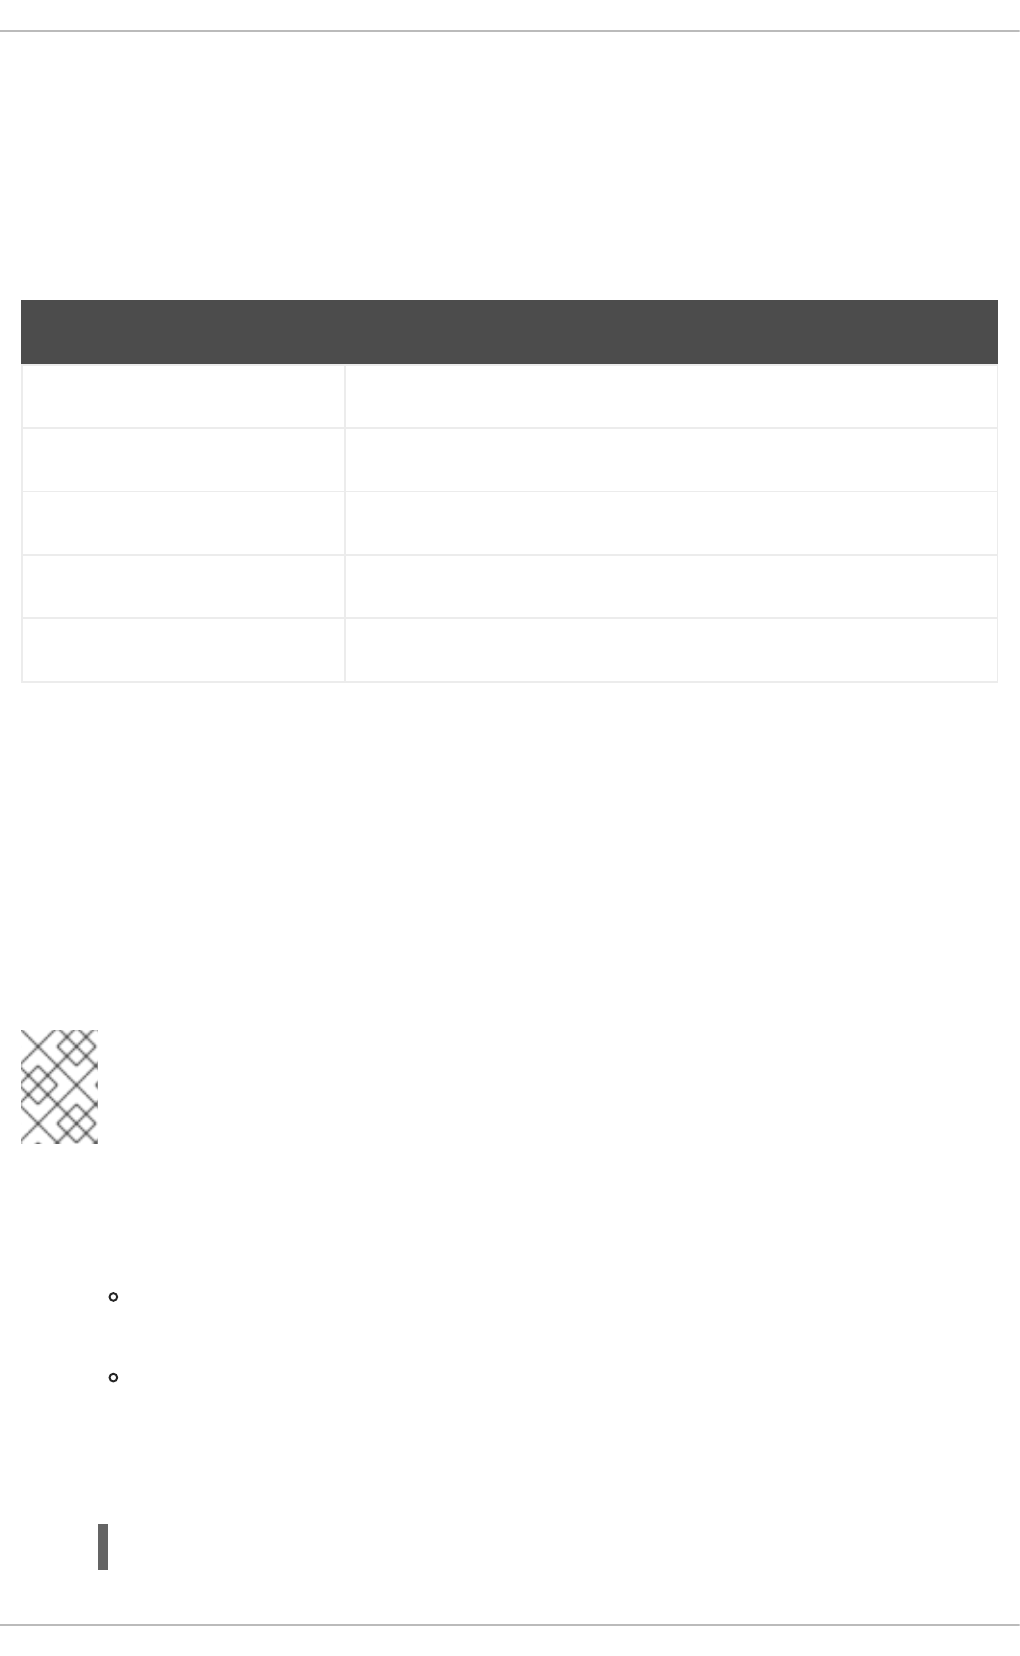
CHAPTER 18. TROUBLESHOOTING INSTALLATION ON IBM Z
This chapter discusses some common installation problems and their solutions.
For debugging purposes, Anaconda logs installation actions into files in the /tmp directory. These files
are listed in the following table.
Table 18.1. Log Files Generated During the Installation
Log file Contents
/tmp/anaconda.log general Anaconda messages
/tmp/program.log all external programs run during the installation
/tmp/storage.log extensive storage module information
/tmp/packaging.log yum and rpm package installation messages
/tmp/syslog hardware-related system messages
If the installation fails, the messages from these files are consolidated into /tmp/anaconda-
tb-identifier, where identifier is a random string.
After successful installation, by default, these files will be copied to the installed system under the
directory /var/log/anaconda/. However, if installation is unsuccessful, or if the inst.nosave=all
or inst.nosave=logs options are used when booting the installation system, these logs will only exist
in the installation program's RAM disk. This means they are not saved permanently and will be lost once
the system is powered down. To store them permanently, copy those files to another system on the
network by using scp on the system running the installation program, or copy them to a mounted storage
device (such as an USB flash drive). Details on how to transfer the log files over the network are below.
NOTE
The following procedure requires the installation system to be able to access the network
and the target system to be able to receive files over the ssh protocol.
Procedure 18.1. Transferring Log Files Over the Network
1. Access the shell prompt on the installation system. This can be done in the following ways:
In a running tmux session on the installation system, press Ctrl+b p and Ctrl+b n to
switch to the previous or next terminal, respectively, and find the terminal with a root shell.
Connect to the installation system over ssh.
In both cases, you will be able to use the installation system's shell as root.
2. Switch to the /tmp directory where the log files are located:
# cd /tmp
Installation Guide
278

3. Copy the log files onto another system on the network using the scp command:
# scp *log user@address:path
Replace user with a valid user name on the target system, address with the target system's
address or host name, and path with the path to the directory you want to save the log files into.
For example, if you want to log in as john to a system with an IP address of 192.168.0.122
and place the log files into the /home/john/logs/ directory on that system, the command will
have the following form:
# scp *log john@192.168.0.122:/home/john/logs/
When connecting to the target system for the first time, the SSH client asks you to confirm that
the fingerprint of the remote system is correct and that you want to continue:
The authenticity of host '192.168.0.122 (192.168.0.122)' can't be
established.
ECDSA key fingerprint is
a4:60:76:eb:b2:d0:aa:23:af:3d:59:5c:de:bb:c4:42.
Are you sure you want to continue connecting (yes/no)?
Type yes and press Enter to continue. Then, provide a valid password when prompted. The
files will start transferring to the specified directory on the target system.
The log files from the installation are now permanently saved on the target system and available for
review.
18.1. TROUBLE DURING THE INSTALLATION
18.1.1. No Disks Detected
In the Installation Destination screen, the following error message can appear at the bottom: No
disks detected. Please shut down the computer, connect at least one disk, and
restart to complete installation.
This message usually indicates that there is an issue with your DASD (Direct Access Storage Device)
devices. If you encounter this error, add the DASD=<disks> parameter to your parameter file or CMS
configuration file (where disks is the DASD range reserved for installation) and start the installation
again.
Additionally, make sure you format the DASDs using the dasdfmt command within a Linux root shell,
instead of formatting the DASDs using CMS. Anaconda automatically detects any DASD devices that
are not yet formatted and asks you whether to format the devices.
If you are installing into one or more iSCSI devices and there is no local storage present on the system,
make sure that all required LUNs (Logical Unit Numbers) are being presented to the appropriate HBA
(Host Bus Adapter). For additional information about iSCSI, see Appendix B, iSCSI Disks.
18.1.2. Reporting Traceback Messages
If the graphical installation program encounters an error, it presents you with a crash reporting dialog
box. You can then choose to send information about the problem you encountered to Red Hat. To send
a crash report, you will need to enter your Customer Portal credentials. If you do not have a Customer
CHAPTER 18. TROUBLESHOOTING INSTALLATION ON IBM Z
279
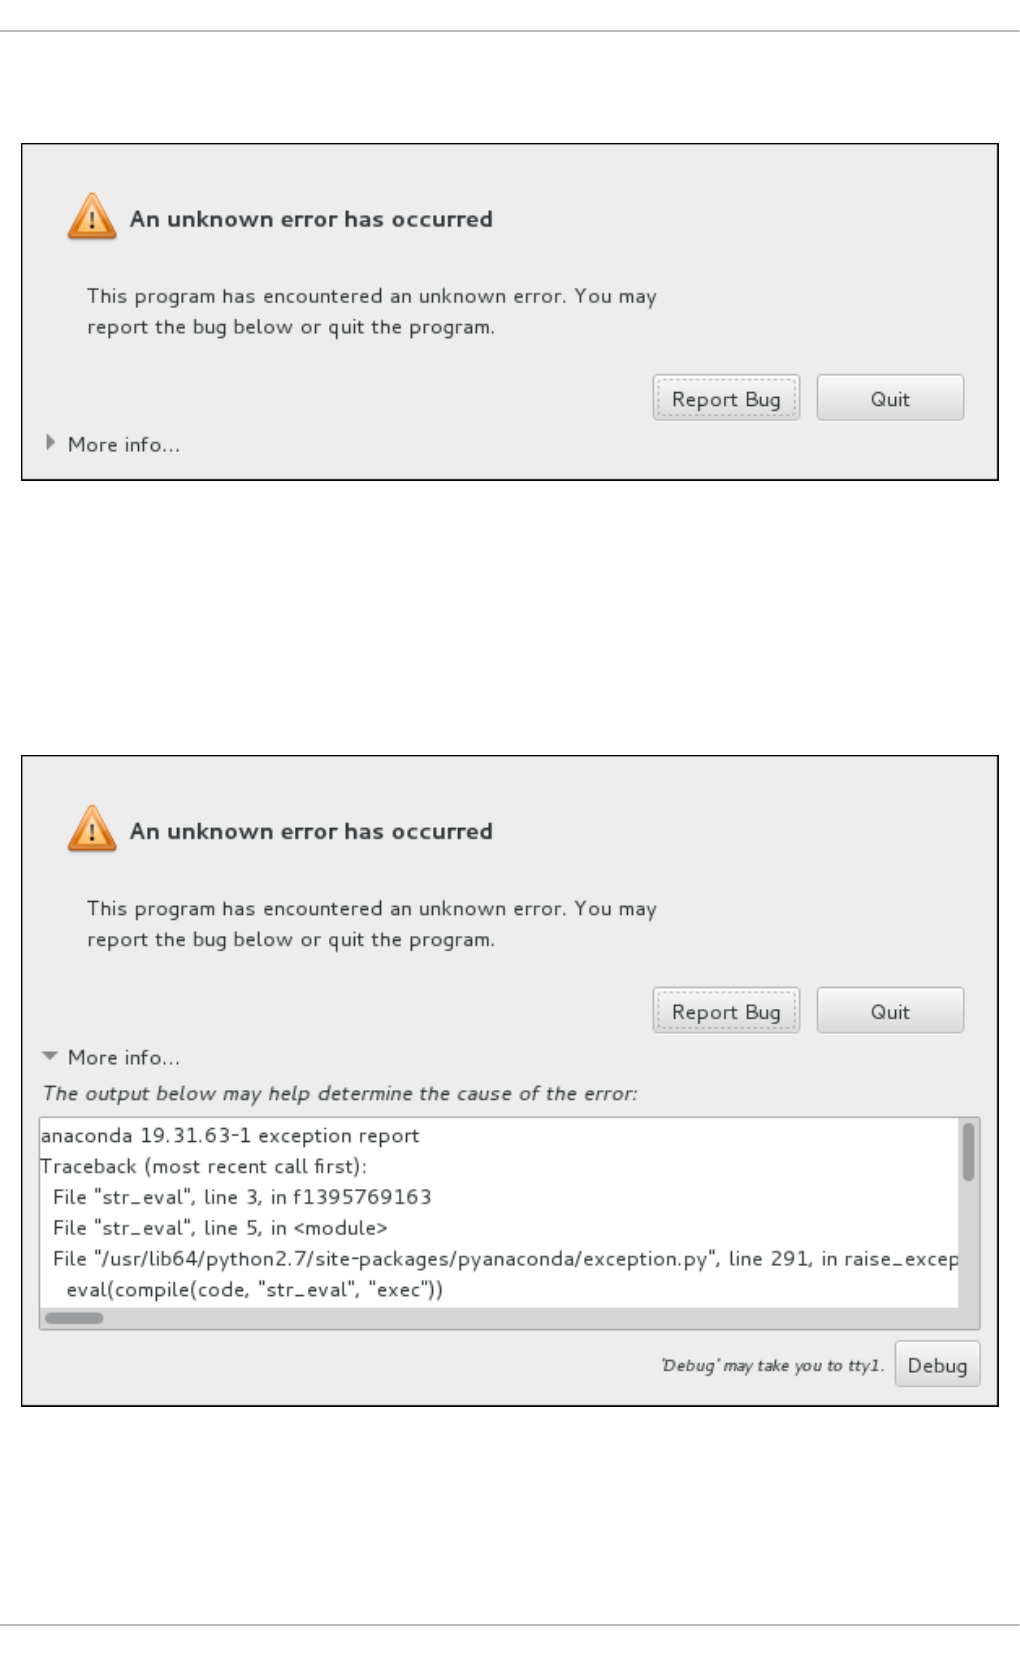
Portal account, you can register at https://www.redhat.com/wapps/ugc/register.html. Automated crash
reporting also requires a working network connection.
Figure 18.1. The Crash Reporting Dialog Box
When the dialog appears, select Report Bug to report the problem, or Quit to exit the installation.
Optionally, click More Info to display detailed output that can help determine the cause of the error. If
you are familiar with debugging, click Debug. This will take you to virtual terminal tty1, where you can
request more precise information that will enhance the bug report. To return to the graphical interface
from tty1, use the continue command.
Figure 18.2. The Expanded Crash Reporting Dialog Box
If you want to report the bug to the customer portal, follow the procedure below.
Procedure 18.2. Reporting Errors to Red Hat Customer Support
Installation Guide
280

1. In the menu that appears, select Report a bug to Red Hat Customer Portal.
2. To report the bug to Red Hat, you first need to provide your Customer Portal credentials. Click
Configure Red Hat Customer Support.
Figure 18.3. Customer Portal Credentials
3. A new window is now open, prompting you to enter your Customer Portal user name and
password. Enter your Red Hat Customer Portal credentials.
Figure 18.4. Configure Red Hat Customer Support
If your network settings require you to use a HTTP or HTTPS proxy, you can configure it by
expanding the Advanced menu and entering the address of the proxy server.
When you put in all required credentials, click OK to proceed.
4. A new window appears, containing a text field. Write down any useful information and comments
here. Describe how the error can be reproduced by explaining each step you took before the
crash reporting dialog appeared. Provide as much relevant detail as possible, including any
information you acquired when debugging. Be aware that the information you provide here can
become publicly visible on the Customer Portal.
CHAPTER 18. TROUBLESHOOTING INSTALLATION ON IBM Z
281
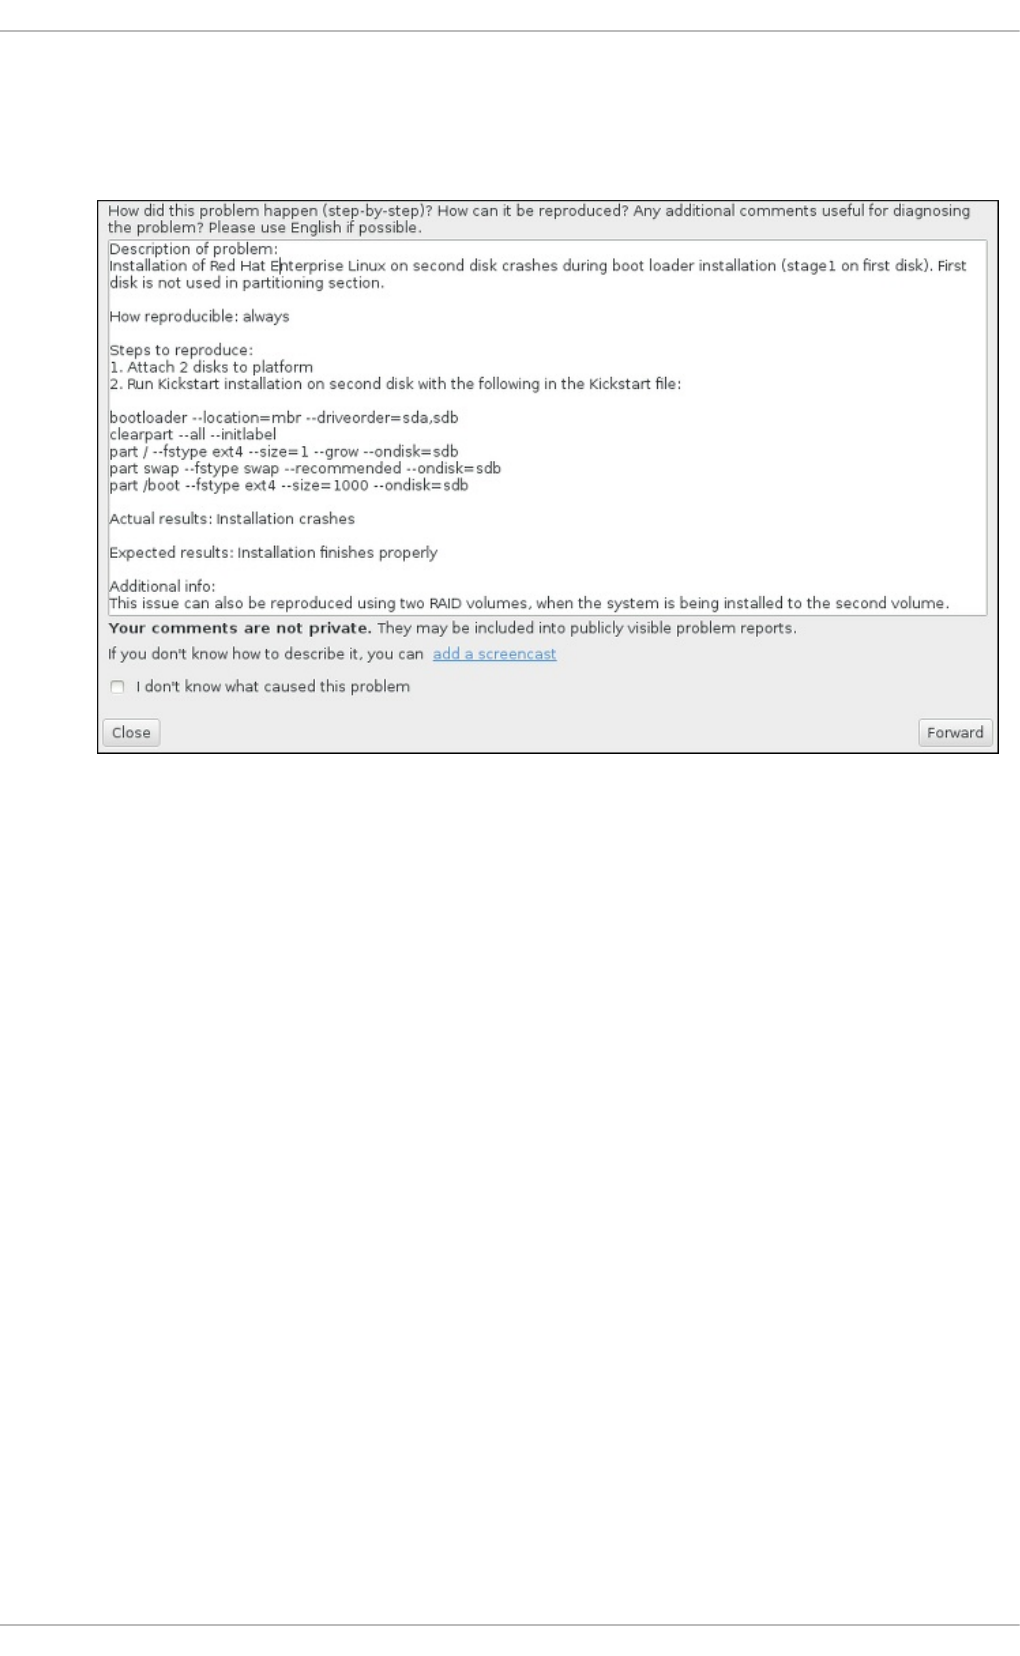
If you do not know what caused the error, check the box labeled I don't know what
caused this problem at the bottom of the dialog.
Then, click Forward.
Figure 18.5. Describe the Problem
5. Next, review the information that will be sent to the Customer Portal. The explanation you
provided is in the comment tab. Other tabs include such information as your system's host name
and other details about the installation environment. You can remove any items you do not want
sent to Red Hat, but be aware that providing less detail can affect the investigation of the issue.
Click Forward when you finish reviewing the information to be sent.
Installation Guide
282

Figure 18.6. Review the Data to Be Sent
6. Review the list of files that will be sent and included in the bug report as individual attachments.
These files provide system information that will assist the investigation. If you do not want to
send certain files, uncheck the box next to each one. To provide additional files that can help
find the problem, click Attach a file.
Once you have reviewed the files to be sent, check the box labeled I have reviewed the
data and agree with submitting it. Then, click Forward to send the report and
attachments to the Customer Portal.
Figure 18.7. Review the Files to Be Sent
CHAPTER 18. TROUBLESHOOTING INSTALLATION ON IBM Z
283

7. When the dialog reports that processing has finished, you can click Show log to view details of
the reporting process or Close to return to the initial crash reporting dialog box. There, click
Quit to exit the installation.
18.1.3. Creating Pre-installation Log Files
To debug installation problems you can set the inst.debug option to create log files from the
environment before the installation starts. These log files contain, for example, the current storage
configuration.
To set the option in the Red Hat Enterprise Linux installation boot menu:
1. Select the Install Red Hat Enterprise Linux 7.3 entry.
2. Press the Tab key to edit the boot options.
3. Append inst.debug to the options. For example:
> vmlinuz ... inst.debug
For further details, see Chapter 22, Boot Options.
4. Press Enter to start the setup.
The system stores the pre-installation log files in the /tmp/pre-anaconda-logs/ directory before
Anaconda starts. To access the log files:
1. Switch to the console. See Section 8.2.1, “Accessing Consoles”.
2. Change into the /tmp/pre-anaconda-logs/ directory:
# cd /tmp/pre-anaconda-logs/
18.2. PROBLEMS AFTER INSTALLATION
18.2.1. Remote Graphical Desktops and XDMCP
If you have installed the X Window System and would like to log in to your Red Hat Enterprise Linux
system using a graphical login manager, enable the X Display Manager Control Protocol (XDMCP). This
protocol allows users to remotely log in to a desktop environment from any X-compatible client, such as
a network-connected workstation or X11 terminal. The procedure below explains how to enable XDMCP.
Procedure 18.3. Enabling XDMCP on IBM Z
1. Open the /etc/gdm/custom.conf configuration file in a plain text editor such as vi or nano.
2. In the custom.conf file, locate the section starting with [xdmcp]. In this section, add the
following line:
Enable=true
3. Save the file, and exit the text editor.
Installation Guide
284

4. Restart the X Window System. To do this, either reboot the whole system, or restart the
GNOME Display Manager using the following command as root:
# systemctl restart gdm.service
Wait for the login prompt to appear again, and log in using your normal user name and
password.
The IBM Z server is now configured for XDMCP. You can connect to it from another workstation (client)
by starting a remote X session using the X command on the client workstation. For example:
$ X :1 -query address
Replace address with the host name of the remote X11 server. The command connects to the remote
X11 server using XDMCP and displays the remote graphical login screen on display :1 of the X11
server system (usually accessible by pressing Ctrl-Alt-F8).
You can also access remote desktop sessions using a nested X11 server, which opens the remote
desktop as a window in your current X11 session. Xnest allows users to open a remote desktop nested
within their local X11 session. For example, run Xnest using the following command, replacing address
with the host name of the remote X11 server:
$ Xnest :1 -query address
For more information about XDMCP, see the X Window System documentation at
http://www.x.org/releases/X11R7.6/doc/libXdmcp/xdmcp.html.
18.2.2. Is Your System Displaying Signal 11 Errors?
A signal 11 error, commonly known as a segmentation fault, means that a program accessed a memory
location that was not assigned to it. A signal 11 error can occur due to a bug in one of the software
programs that is installed, or faulty hardware.
If you receive a fatal signal 11 error during the installation, first make sure you are using the most recent
installation images, and let Anaconda verify them to make sure they are not corrupted. Bad installation
media (such as an improperly burned or scratched optical disk) are a common cause of signal 11 errors.
Verifying the integrity of the installation media is recommended before every installation.
For information about obtaining the most recent installation media, see Chapter 2, Downloading Red Hat
Enterprise Linux. To perform a media check before the installation starts, append the rd.live.check
boot option at the boot menu. See Section 22.2.2, “Verifying Boot Media” for details.
Other possible causes are beyond this document's scope. Consult your hardware manufacturer's
documentation for more information.
CHAPTER 18. TROUBLESHOOTING INSTALLATION ON IBM Z
285
CHAPTER 19. CONFIGURING AN INSTALLED LINUX ON IBM Z
INSTANCE
For more information about Linux on IBM Z, see the publications listed in Chapter 21, IBM Z References.
Some of the most common tasks are described here.
19.1. ADDING DASDS
DASDs (Direct Access Storage Devices) are a type of storage commonly used with IBM Z. Additional
information about working with these storage devices can be found at the IBM Knowledge Center at
http://www-01.ibm.com/support/knowledgecenter/linuxonibm/com.ibm.linux.z.lgdd/lgdd_t_dasd_wrk.html.
The following is an example of how to set a DASD online, format it, and make the change persistent.
NOTE
Make sure the device is attached or linked to the Linux system if running under z/VM.
CP ATTACH EB1C TO *
To link a mini disk to which you have access, issue, for example:
CP LINK RHEL7X 4B2E 4B2E MR
DASD 4B2E LINKED R/W
See z/VM: CP Commands and Utilities Reference, SC24-6175 for details about the
commands.
19.1.1. Dynamically Setting DASDs Online
To set a DASD online, follow these steps:
1. Use the cio_ignore utility to remove the DASD from the list of ignored devices and make it
visible to Linux:
# cio_ignore -r device_number
Replace device_number with the device number of the DASD. For example:
# cio_ignore -r 4b2e
2. Set the device online. Use a command of the following form:
# chccwdev -e device_number
Replace device_number with the device number of the DASD. For example:
# chccwdev -e 4b2e
As an alternative, you can set the device online using sysfs attributes:
Installation Guide
286

1. Use the cd command to change to the /sys/ directory that represents that volume:
# cd /sys/bus/ccw/drivers/dasd-eckd/0.0.4b2e/
# ls -l
total 0
-r--r--r-- 1 root root 4096 Aug 25 17:04 availability
-rw-r--r-- 1 root root 4096 Aug 25 17:04 cmb_enable
-r--r--r-- 1 root root 4096 Aug 25 17:04 cutype
-rw-r--r-- 1 root root 4096 Aug 25 17:04 detach_state
-r--r--r-- 1 root root 4096 Aug 25 17:04 devtype
-r--r--r-- 1 root root 4096 Aug 25 17:04 discipline
-rw-r--r-- 1 root root 4096 Aug 25 17:04 online
-rw-r--r-- 1 root root 4096 Aug 25 17:04 readonly
-rw-r--r-- 1 root root 4096 Aug 25 17:04 use_diag
2. Check to see if the device is already online:
# cat online
0
3. If it is not online, enter the following command to bring it online:
# echo 1 > online
# cat online
1
3. Verify which block devnode it is being accessed as:
# ls -l
total 0
-r--r--r-- 1 root root 4096 Aug 25 17:04 availability
lrwxrwxrwx 1 root root 0 Aug 25 17:07 block ->
../../../../block/dasdb
-rw-r--r-- 1 root root 4096 Aug 25 17:04 cmb_enable
-r--r--r-- 1 root root 4096 Aug 25 17:04 cutype
-rw-r--r-- 1 root root 4096 Aug 25 17:04 detach_state
-r--r--r-- 1 root root 4096 Aug 25 17:04 devtype
-r--r--r-- 1 root root 4096 Aug 25 17:04 discipline
-rw-r--r-- 1 root root 0 Aug 25 17:04 online
-rw-r--r-- 1 root root 4096 Aug 25 17:04 readonly
-rw-r--r-- 1 root root 4096 Aug 25 17:04 use_diag
As shown in this example, device 4B2E is being accessed as /dev/dasdb.
These instructions set a DASD online for the current session, but this is not persistent across reboots.
For instructions on how to set a DASD online persistently, see Section 19.1.3, “Persistently Setting
DASDs Online”. When you work with DASDs, use the persistent device symbolic links under
/dev/disk/by-path/. See the chapter about persistent storage device naming in the Red Hat
Enterprise Linux 7 Storage Administration Guide for more in-depth information about different ways to
consistently refer to storage devices.
19.1.2. Preparing a New DASD with Low-level Formatting
CHAPTER 19. CONFIGURING AN INSTALLED LINUX ON IBM Z INSTANCE
287

Once the disk is online, change back to the /root directory and low-level format the device. This is only
required once for a DASD during its entire lifetime:
# cd /root
# dasdfmt -b 4096 -d cdl -p /dev/disk/by-path/ccw-0.0.4b2e
Drive Geometry: 10017 Cylinders * 15 Heads = 150255 Tracks
I am going to format the device /dev/disk/by-path/ccw-0.0.4b2e in the
following way:
Device number of device : 0x4b2e
Labelling device : yes
Disk label : VOL1
Disk identifier : 0X4B2E
Extent start (trk no) : 0
Extent end (trk no) : 150254
Compatible Disk Layout : yes
Blocksize : 4096
--->> ATTENTION! <<---
All data of that device will be lost.
Type "yes" to continue, no will leave the disk untouched: yes
cyl 97 of 3338 |#----------------------------------------------|
2%
When the progress bar reaches the end and the format is complete, dasdfmt prints the following output:
Rereading the partition table...
Exiting...
Now, use fdasd to partition the DASD. You can create up to three partitions on a DASD. In our example
here, we create one partition spanning the whole disk:
# fdasd -a /dev/disk/by-path/ccw-0.0.4b2e
auto-creating one partition for the whole disk...
writing volume label...
writing VTOC...
checking !
wrote NATIVE!
rereading partition table...
After a (low-level formatted) DASD is online, it can be used like any other disk under Linux. For instance,
you can create file systems, LVM physical volumes, or swap space on its partitions, for example
/dev/disk/by-path/ccw-0.0.4b2e-part1. Never use the full DASD device (dev/dasdb) for
anything but the commands dasdfmt and fdasd. If you want to use the entire DASD, create one
partition spanning the entire drive as in the fdasd example above.
To add additional disks later without breaking existing disk entries in, for example, /etc/fstab, use the
persistent device symbolic links under /dev/disk/by-path/.
19.1.3. Persistently Setting DASDs Online
The above instructions described how to activate DASDs dynamically in a running system. However,
such changes are not persistent and do not survive a reboot. Making changes to the DASD configuration
persistent in your Linux system depends on whether the DASDs belong to the root file system. Those
Installation Guide
288

DASDs required for the root file system need to be activated very early during the boot process by the
initramfs to be able to mount the root file system.
The cio_ignore commands are handled transparently for persistent device configurations and you do
not need to free devices from the ignore list manually.
19.1.3.1. DASDs That Are Part of the Root File System
The only file you have to modify to add DASDs that are part of the root file system is /etc/zipl.conf.
Then run the zipl boot loader tool. There is no need to recreate the initramfs.
There is one boot option to activate DASDs early in the boot process: rd.dasd=. This option takes a
comma-separated list as input. The list contains a device bus ID and optional additional parameters
consisting of key-value pairs that correspond to DASD sysfs attributes.
Below is an example zipl.conf for a system that uses physical volumes on partitions of two DASDs
for an LVM volume group vg_devel1 that contains a logical volume lv_root for the root file system.
[defaultboot]
default=linux
target=/boot/
[linux]
image=/boot/vmlinuz-2.6.32-19.el7.s390x
ramdisk=/boot/initramfs-2.6.32-19.el7.s390x.img
parameters="root=/dev/mapper/vg_devel1-lv_root
rd.dasd=0.0.0200,use_diag=0,readonly=0,erplog=0,failfast=0
rd.dasd=0.0.0207,use_diag=0,readonly=0,erplog=0,failfast=0
rd_LVM_LV=vg_devel1/lv_root rd_NO_LUKS rd_NO_MD rd_NO_DM LANG=en_US.UTF-8
SYSFONT=latarcyrheb-sun16 KEYTABLE=us cio_ignore=all,!condev"
Suppose that you want to add another physical volume on a partition of a third DASD with device bus ID
0.0.202b. To do this, add rd.dasd=0.0.202b to the parameters line of your boot kernel in
zipl.conf:
[defaultboot]
default=linux
target=/boot/
[linux]
image=/boot/vmlinuz-2.6.32-19.el7.s390x
ramdisk=/boot/initramfs-2.6.32-19.el7.s390x.img
parameters="root=/dev/mapper/vg_devel1-lv_root
rd.dasd=0.0.0200,use_diag=0,readonly=0,erplog=0,failfast=0
rd.dasd=0.0.0207,use_diag=0,readonly=0,erplog=0,failfast=0
rd.dasd=0.0.202b rd_LVM_LV=vg_devel1/lv_root rd_NO_LUKS rd_NO_MD rd_NO_DM
LANG=en_US.UTF-8 SYSFONT=latarcyrheb-sun16 KEYTABLE=us
cio_ignore=all,!condev"
CHAPTER 19. CONFIGURING AN INSTALLED LINUX ON IBM Z INSTANCE
289

WARNING
Make sure the length of the kernel command line in /etc/zipl.conf does not
exceed 896 bytes. Otherwise, the boot loader cannot be saved, and the installation
fails.
Run zipl to apply the changes of /etc/zipl.conf for the next IPL:
# zipl -V
Using config file '/etc/zipl.conf'
Target device information
Device..........................: 5e:00
Partition.......................: 5e:01
Device name.....................: dasda
DASD device number..............: 0201
Type............................: disk partition
Disk layout.....................: ECKD/compatible disk layout
Geometry - heads................: 15
Geometry - sectors..............: 12
Geometry - cylinders............: 3308
Geometry - start................: 24
File system block size..........: 4096
Physical block size.............: 4096
Device size in physical blocks..: 595416
Building bootmap in '/boot/'
Building menu 'rh-automatic-menu'
Adding #1: IPL section 'linux' (default)
kernel image......: /boot/vmlinuz-2.6.32-19.el7.s390x
kernel parmline...: 'root=/dev/mapper/vg_devel1-lv_root
rd.dasd=0.0.0200,use_diag=0,readonly=0,erplog=0,failfast=0
rd.dasd=0.0.0207,use_diag=0,readonly=0,erplog=0,failfast=0
rd.dasd=0.0.202b rd_LVM_LV=vg_devel1/lv_root rd_NO_LUKS rd_NO_MD rd_NO_DM
LANG=en_US.UTF-8 SYSFONT=latarcyrheb-sun16 KEYTABLE=us
cio_ignore=all,!condev'
initial ramdisk...: /boot/initramfs-2.6.32-19.el7.s390x.img
component address:
kernel image....: 0x00010000-0x00a70fff
parmline........: 0x00001000-0x00001fff
initial ramdisk.: 0x02000000-0x022d2fff
internal loader.: 0x0000a000-0x0000afff
Preparing boot device: dasda (0201).
Preparing boot menu
Interactive prompt......: enabled
Menu timeout............: 15 seconds
Default configuration...: 'linux'
Syncing disks...
Done.
19.1.3.2. DASDs That Are Not Part of the Root File System
Installation Guide
290

DASDs that are not part of the root file system, that is, data disks, are persistently configured in the file
/etc/dasd.conf. It contains one DASD per line. Each line begins with the device bus ID of a DASD.
Optionally, each line can continue with options separated by space or tab characters. Options consist of
key-value-pairs, where the key and value are separated by an equals sign.
The key corresponds to any valid sysfs attribute a DASD can have. The value will be written to the
key's sysfs attribute. Entries in /etc/dasd.conf are activated and configured by udev when a DASD
is added to the system. At boot time, all DASDs visible to the system get added and trigger udev.
Example content of /etc/dasd.conf:
0.0.0207
0.0.0200 use_diag=1 readonly=1
Modifications of /etc/dasd.conf only become effective after a reboot of the system or after the
dynamic addition of a new DASD by changing the system's I/O configuration (that is, the DASD is
attached under z/VM). Alternatively, you can trigger the activation of a new entry in /etc/dasd.conf
for a DASD which was previously not active, by executing the following commands:
1. Use the cio_ignore utility to remove the DASD from the list of ignored devices and make it
visible to Linux:
# cio_ignore -r device_number
For example:
# cio_ignore -r 021a
2. Trigger the activation by writing to the uevent attribute of the device:
# echo add > /sys/bus/ccw/devices/device-bus-ID/uevent
For example:
# echo add > /sys/bus/ccw/devices/0.0.021a/uevent
19.2. ADDING FCP-ATTACHED LOGICAL UNITS (LUNS)
The following is an example of how to add an FCP LUN.
NOTE
If running under z/VM, make sure the FCP adapter is attached to the z/VM guest virtual
machine. For multipathing in production environments there would be at least two FCP
devices on two different physical adapters (CHPIDs). For example:
CP ATTACH FC00 TO *
CP ATTACH FCD0 TO *
19.2.1. Dynamically Activating an FCP LUN
CHAPTER 19. CONFIGURING AN INSTALLED LINUX ON IBM Z INSTANCE
291

Follow these steps to activate a LUN:
1. Use the cio_ignore utility to remove the FCP adapter from the list of ignored devices and
make it visible to Linux:
# cio_ignore -r device_number
Replace device_number with the device number of the FCP adapter. For example:
2. To bring the FCP adapter device online, use the following command:
# chccwdev -e fc00
3. Verify that the required WWPN was found by the automatic port scanning of the zfcp device
driver:
# ls -l /sys/bus/ccw/drivers/zfcp/0.0.fc00/
drwxr-xr-x. 3 root root 0 Apr 28 18:19 0x500507630040710b
drwxr-xr-x. 3 root root 0 Apr 28 18:19 0x50050763050b073d
drwxr-xr-x. 3 root root 0 Apr 28 18:19 0x500507630e060521
drwxr-xr-x. 3 root root 0 Apr 28 18:19 0x500507630e860521
-r--r--r--. 1 root root 4096 Apr 28 18:17 availability
-r--r--r--. 1 root root 4096 Apr 28 18:19 card_version
-rw-r--r--. 1 root root 4096 Apr 28 18:17 cmb_enable
-r--r--r--. 1 root root 4096 Apr 28 18:17 cutype
-r--r--r--. 1 root root 4096 Apr 28 18:17 devtype
lrwxrwxrwx. 1 root root 0 Apr 28 18:17 driver ->
../../../../bus/ccw/drivers/zfcp
-rw-r--r--. 1 root root 4096 Apr 28 18:17 failed
-r--r--r--. 1 root root 4096 Apr 28 18:19 hardware_version
drwxr-xr-x. 35 root root 0 Apr 28 18:17 host0
-r--r--r--. 1 root root 4096 Apr 28 18:17 in_recovery
-r--r--r--. 1 root root 4096 Apr 28 18:19 lic_version
-r--r--r--. 1 root root 4096 Apr 28 18:17 modalias
-rw-r--r--. 1 root root 4096 Apr 28 18:17 online
-r--r--r--. 1 root root 4096 Apr 28 18:19 peer_d_id
-r--r--r--. 1 root root 4096 Apr 28 18:19 peer_wwnn
-r--r--r--. 1 root root 4096 Apr 28 18:19 peer_wwpn
--w-------. 1 root root 4096 Apr 28 18:19 port_remove
--w-------. 1 root root 4096 Apr 28 18:19 port_rescan
drwxr-xr-x. 2 root root 0 Apr 28 18:19 power
-r--r--r--. 1 root root 4096 Apr 28 18:19 status
lrwxrwxrwx. 1 root root 0 Apr 28 18:17 subsystem ->
../../../../bus/ccw
-rw-r--r--. 1 root root 4096 Apr 28 18:17 uevent
4. Activate the FCP LUN by adding it to the port (WWPN) through which you would like to access
the LUN:
# echo 0x4020400100000000 >
/sys/bus/ccw/drivers/zfcp/0.0.fc00/0x50050763050b073d/unit_add
5. Find out the assigned SCSI device name:
Installation Guide
292

# lszfcp -DV
/sys/devices/css0/0.0.0015/0.0.fc00/0x50050763050b073d/0x40204001000
00000
/sys/bus/ccw/drivers/zfcp/0.0.fc00/host0/rport-0:0-
21/target0:0:21/0:0:21:1089355792
19.2.2. Persistently activating FCP LUNs
The above instructions described how to activate FCP LUNs dynamically in a running system. However,
such changes are not persistent and do not survive a reboot. How you make the changes to the FCP
configuration persistent in your Linux system depends on whether the FCP LUNs belong to the root file
system. Those required for the root file system need to be activated very early during the boot process
by the initramfs to be able to mount the root file system. The cio_ignore commands are handled
transparently for persistent device configurations and you do not need to free devices from the ignore list
manually.
19.2.2.1. FCP LUNs That Are Part of the Root File System
The only file you have to modify for adding FCP LUNs that are part of the root file system is
/etc/zipl.conf followed by a run of the zipl boot loader tool. There is no more need to recreate the
initramfs.
Red Hat Enterprise Linux provides a parameter to activate FCP LUNs early in the boot process:
rd.zfcp=. The value is a comma-separated list containing the device bus ID, the WWPN as 16 digit
hexadecimal number prefixed with 0x, and the FCP LUN prefixed with 0x and padded with zeroes to the
right to have 16 hexadecimal digits.
The following example zipl.conf is for a system that uses physical volumes on partitions of two FCP
LUNs for an LVM volume group vg_devel1 that contains a logical volume lv_root for the root file
system. For simplicity, the example shows a configuration without multipathing.
[defaultboot]
default=linux
target=/boot/
[linux]
image=/boot/vmlinuz-2.6.32-19.el7.s390x
ramdisk=/boot/initramfs-2.6.32-19.el7.s390x.img
parameters="root=/dev/mapper/vg_devel1-lv_root
rd.zfcp=0.0.fc00,0x5105074308c212e9,0x401040a000000000
rd.zfcp=0.0.fc00,0x5105074308c212e9,0x401040a100000000
rd_LVM_LV=vg_devel1/lv_root rd_NO_LUKS rd_NO_MD rd_NO_DM LANG=en_US.UTF-8
SYSFONT=latarcyrheb-sun16 KEYTABLE=us cio_ignore=all,!condev"
To add another physical volume on a partition of a third FCP LUN with device bus ID 0.0.fc00, WWPN
0x5105074308c212e9 and FCP LUN 0x401040a300000000, add
rd.zfcp=0.0.fc00,0x5105074308c212e9,0x401040a300000000 to the parameters line of your
boot kernel in zipl.conf. For example:
[defaultboot]
default=linux
target=/boot/
[linux]
CHAPTER 19. CONFIGURING AN INSTALLED LINUX ON IBM Z INSTANCE
293

image=/boot/vmlinuz-2.6.32-19.el7.s390x
ramdisk=/boot/initramfs-2.6.32-19.el7.s390x.img
parameters="root=/dev/mapper/vg_devel1-lv_root
rd.zfcp=0.0.fc00,0x5105074308c212e9,0x401040a000000000
rd.zfcp=0.0.fc00,0x5105074308c212e9,0x401040a100000000
rd.zfcp=0.0.fc00,0x5105074308c212e9,0x401040a300000000
rd_LVM_LV=vg_devel1/lv_root rd_NO_LUKS rd_NO_MD rd_NO_DM LANG=en_US.UTF-8
SYSFONT=latarcyrheb-sun16 KEYTABLE=us cio_ignore=all,!condev"
WARNING
Make sure the length of the kernel command line in /etc/zipl.conf does not
exceed 896 bytes. Otherwise, the boot loader cannot be saved, and the installation
fails.
Run zipl to apply the changes of /etc/zipl.conf for the next IPL:
# zipl -V
Using config file '/etc/zipl.conf'
Target device information
Device..........................: 08:00
Partition.......................: 08:01
Device name.....................: sda
Device driver name..............: sd
Type............................: disk partition
Disk layout.....................: SCSI disk layout
Geometry - start................: 2048
File system block size..........: 4096
Physical block size.............: 512
Device size in physical blocks..: 10074112
Building bootmap in '/boot/'
Building menu 'rh-automatic-menu'
Adding #1: IPL section 'linux' (default)
kernel image......: /boot/vmlinuz-2.6.32-19.el7.s390x
kernel parmline...: 'root=/dev/mapper/vg_devel1-lv_root
rd.zfcp=0.0.fc00,0x5105074308c212e9,0x401040a000000000
rd.zfcp=0.0.fc00,0x5105074308c212e9,0x401040a100000000
rd.zfcp=0.0.fc00,0x5105074308c212e9,0x401040a300000000
rd_LVM_LV=vg_devel1/lv_root rd_NO_LUKS rd_NO_MD rd_NO_DM LANG=en_US.UTF-8
SYSFONT=latarcyrheb-sun16 KEYTABLE=us cio_ignore=all,!condev'
initial ramdisk...: /boot/initramfs-2.6.32-19.el7.s390x.img
component address:
kernel image....: 0x00010000-0x007a21ff
parmline........: 0x00001000-0x000011ff
initial ramdisk.: 0x02000000-0x028f63ff
internal loader.: 0x0000a000-0x0000a3ff
Preparing boot device: sda.
Detected SCSI PCBIOS disk layout.
Installation Guide
294

Writing SCSI master boot record.
Syncing disks...
Done.
19.2.2.2. FCP LUNs That Are Not Part of the Root File System
FCP LUNs that are not part of the root file system, such as data disks, are persistently configured in the
file /etc/zfcp.conf. It contains one FCP LUN per line. Each line contains the device bus ID of the
FCP adapter, the WWPN as 16 digit hexadecimal number prefixed with 0x, and the FCP LUN prefixed
with 0x and padded with zeroes to the right to have 16 hexadecimal digits, separated by a space or tab.
Entries in /etc/zfcp.conf are activated and configured by udev when an FCP adapter is added to the
system. At boot time, all FCP adapters visible to the system are added and trigger udev.
Example content of /etc/zfcp.conf:
0.0.fc00 0x5105074308c212e9 0x401040a000000000
0.0.fc00 0x5105074308c212e9 0x401040a100000000
0.0.fc00 0x5105074308c212e9 0x401040a300000000
0.0.fcd0 0x5105074308c2aee9 0x401040a000000000
0.0.fcd0 0x5105074308c2aee9 0x401040a100000000
0.0.fcd0 0x5105074308c2aee9 0x401040a300000000
Modifications of /etc/zfcp.conf only become effective after a reboot of the system or after the
dynamic addition of a new FCP channel by changing the system's I/O configuration (for example, a
channel is attached under z/VM). Alternatively, you can trigger the activation of a new entry in
/etc/zfcp.conf for an FCP adapter which was previously not active, by executing the following
commands:
1. Use the cio_ignore utility to remove the FCP adapter from the list of ignored devices and
make it visible to Linux:
# cio_ignore -r device_number
Replace device_number with the device number of the FCP adapter. For example:
# cio_ignore -r fcfc
2. To trigger the uevent that activates the change, issue:
# echo add > /sys/bus/ccw/devices/device-bus-ID/uevent
For example:
# echo add > /sys/bus/ccw/devices/0.0.fcfc/uevent
19.3. ADDING A NETWORK DEVICE
Network device driver modules are loaded automatically by udev.
You can add a network interface on IBM Z dynamically or persistently.
Dynamically
CHAPTER 19. CONFIGURING AN INSTALLED LINUX ON IBM Z INSTANCE
295

1. Load the device driver
2. Remove the network devices from the list of ignored devices.
3. Create the group device.
4. Configure the device.
5. Set the device online.
Persistently
1. Create a configuration script.
2. Activate the interface.
The following sections provide basic information for each task of each IBM Z network device driver.
Section 19.3.1, “Adding a qeth Device” describes how to add a qeth device to an existing instance of
Red Hat Enterprise Linux. Section 19.3.2, “Adding an LCS Device” describes how to add an lcs device to
an existing instance of Red Hat Enterprise Linux.
19.3.1. Adding a qeth Device
The qeth network device driver supports IBM Z OSA-Express features in QDIO mode, HiperSockets,
z/VM guest LAN, and z/VM VSWITCH.
The qeth device driver assigns the same interface name for Ethernet and Hipersockets devices:
enccwbus_ID. The bus ID is composed of the channel subsystem ID, subchannel set ID, and device
number, for example enccw0.0.0a00.
19.3.1.1. Dynamically Adding a qeth Device
To add a qeth device dynamically, follow these steps:
1. Determine whether the qeth device driver modules are loaded. The following example shows
loaded qeth modules:
# lsmod | grep qeth
qeth_l3 127056 9
qeth_l2 73008 3
ipv6 492872
155ip6t_REJECT,nf_conntrack_ipv6,qeth_l3
qeth 115808 2 qeth_l3,qeth_l2
qdio 68240 1 qeth
ccwgroup 12112 2 qeth
If the output of the lsmod command shows that the qeth modules are not loaded, run the
modprobe command to load them:
# modprobe qeth
2. Use the cio_ignore utility to remove the network channels from the list of ignored devices and
make them visible to Linux:
Installation Guide
296

# cio_ignore -r
read_device_bus_id,write_device_bus_id,data_device_bus_id
Replace read_device_bus_id,write_device_bus_id,data_device_bus_id with the three device
bus IDs representing a network device. For example, if the read_device_bus_id is 0.0.f500,
the write_device_bus_id is 0.0.f501, and the data_device_bus_id is 0.0.f502:
# cio_ignore -r 0.0.f500,0.0.f501,0.0.f502
3. Use the znetconf utility to sense and list candidate configurations for network devices:
# znetconf -u
Scanning for network devices...
Device IDs Type Card Type CHPID Drv.
------------------------------------------------------------
0.0.f500,0.0.f501,0.0.f502 1731/01 OSA (QDIO) 00 qeth
0.0.f503,0.0.f504,0.0.f505 1731/01 OSA (QDIO) 01 qeth
0.0.0400,0.0.0401,0.0.0402 1731/05 HiperSockets 02 qeth
4. Select the configuration you want to work with and use znetconf to apply the configuration and
to bring the configured group device online as network device.
# znetconf -a f500
Scanning for network devices...
Successfully configured device 0.0.f500 (enccw0.0.f500)
5. Optionally, you can also pass arguments that are configured on the group device before it is set
online:
# znetconf -a f500 -o portname=myname
Scanning for network devices...
Successfully configured device 0.0.f500 (enccw0.0.f500)
Now you can continue to configure the enccw0.0.f500 network interface.
Alternatively, you can use sysfs attributes to set the device online as follows:
1. Create a qeth group device:
# echo read_device_bus_id,write_device_bus_id,data_device_bus_id >
/sys/bus/ccwgroup/drivers/qeth/group
For example:
# echo 0.0.f500,0.0.f501,0.0.f502 >
/sys/bus/ccwgroup/drivers/qeth/group
2. Next, verify that the qeth group device was created properly by looking for the read channel:
# ls /sys/bus/ccwgroup/drivers/qeth/0.0.f500
CHAPTER 19. CONFIGURING AN INSTALLED LINUX ON IBM Z INSTANCE
297

You can optionally set additional parameters and features, depending on the way you are setting
up your system and the features you require, such as:
portno
layer2
portname
3. Bring the device online by writing 1 to the online sysfs attribute:
# echo 1 > /sys/bus/ccwgroup/drivers/qeth/0.0.f500/online
4. Then verify the state of the device:
# cat /sys/bus/ccwgroup/drivers/qeth/0.0.f500/online
1
A return value of 1 indicates that the device is online, while a return value 0 indicates that the
device is offline.
5. Find the interface name that was assigned to the device:
# cat /sys/bus/ccwgroup/drivers/qeth/0.0.f500/if_name
enccw0.0.f500
Now you can continue to configure the enccw0.0.f500 network interface.
The following command from the s390utils package shows the most important settings of your
qeth device:
# lsqeth enccw0.0.f500
Device name : enccw0.0.f500
-------------------------------------------------
card_type : OSD_1000
cdev0 : 0.0.f500
cdev1 : 0.0.f501
cdev2 : 0.0.f502
chpid : 76
online : 1
portname : OSAPORT
portno : 0
state : UP (LAN ONLINE)
priority_queueing : always queue 0
buffer_count : 16
layer2 : 1
isolation : none
19.3.1.2. Dynamically Removing a qeth Device
To remove a qeth device, use the znetconf utility. For example:
1. Use the znetconf utility to show you all configured network devices:
Installation Guide
298

# znetconf -c
Device IDs Type Card Type CHPID Drv. Name
State
----------------------------------------------------------------
----------------------
0.0.8036,0.0.8037,0.0.8038 1731/05 HiperSockets FB qeth hsi1
online
0.0.f5f0,0.0.f5f1,0.0.f5f2 1731/01 OSD_1000 76 qeth
enccw0.0.09a0 online
0.0.f500,0.0.f501,0.0.f502 1731/01 GuestLAN QDIO 00 qeth
enccw0.0.f500 online
2. Select the network device to be removed and run znetconf to set the device offline and
ungroup the ccw> group device.
# znetconf -r f500
Remove network device 0.0.f500 (0.0.f500,0.0.f501,0.0.f502)?
Warning: this may affect network connectivity!
Do you want to continue (y/n)?y
Successfully removed device 0.0.f500 (enccw0.0.f500)
3. Verify the success of the removal:
# znetconf -c
Device IDs Type Card Type CHPID Drv. Name
State
----------------------------------------------------------------
----------------------
0.0.8036,0.0.8037,0.0.8038 1731/05 HiperSockets FB qeth hsi1
online
0.0.f5f0,0.0.f5f1,0.0.f5f2 1731/01 OSD_1000 76 qeth
enccw0.0.09a0 online
19.3.1.3. Persistently Adding a qeth Device
To make your new qeth device persistent, you need to create the configuration file for your new
interface. The network interface configuration files are placed in the /etc/sysconfig/network-
scripts/ directory.
The network configuration files use the naming convention ifcfg-device, where device is the value
found in the if_name file in the qeth group device that was created earlier, for example
enccw0.0.09a0. The cio_ignore commands are handled transparently for persistent device
configurations and you do not need to free devices from the ignore list manually.
If a configuration file for another device of the same type already exists, the simplest way is to copy it to
the new name and then edit it:
# cd /etc/sysconfig/network-scripts
# cp ifcfg-enccw0.0.09a0 ifcfg-enccw0.0.0600
To learn IDs of your network devices, use the lsqeth utility:
# lsqeth -p
CHAPTER 19. CONFIGURING AN INSTALLED LINUX ON IBM Z INSTANCE
299

devices CHPID interface cardtype port
chksum prio-q'ing rtr4 rtr6 lay'2 cnt
-------------------------- ----- ---------------- -------------- ---- -
----- ---------- ---- ---- ----- -----
0.0.09a0/0.0.09a1/0.0.09a2 x00 enccw0.0.09a0 Virt.NIC QDIO 0 sw
always_q_2 n/a n/a 1 64
0.0.0600/0.0.0601/0.0.0602 x00 enccw0.0.0600 Virt.NIC QDIO 0 sw
always_q_2 n/a n/a 1 64
If you do not have a similar device defined, you must create a new file. Use this example of
/etc/sysconfig/network-scripts/ifcfg-0.0.09a0 as a template:
# IBM QETH
DEVICE=enccw0.0.09a0
BOOTPROTO=static
IPADDR=10.12.20.136
NETMASK=255.255.255.0
ONBOOT=yes
NETTYPE=qeth
SUBCHANNELS=0.0.09a0,0.0.09a1,0.0.09a2
PORTNAME=OSAPORT
OPTIONS='layer2=1 portno=0'
MACADDR=02:00:00:23:65:1a
TYPE=Ethernet
Edit the new ifcfg-0.0.0600 file as follows:
1. Modify the DEVICE statement to reflect the contents of the if_name file from your ccw group.
2. Modify the IPADDR statement to reflect the IP address of your new interface.
3. Modify the NETMASK statement as needed.
4. If the new interface is to be activated at boot time, then make sure ONBOOT is set to yes.
5. Make sure the SUBCHANNELS statement matches the hardware addresses for your qeth device.
6. Modify the PORTNAME statement or leave it out if it is not necessary in your environment.
7. You can add any valid sysfs attribute and its value to the OPTIONS parameter. The Red Hat
Enterprise Linux installation program currently uses this to configure the layer mode (layer2)
and the relative port number (portno) of qeth devices.
The qeth device driver default for OSA devices is now layer 2 mode. To continue using old
ifcfg definitions that rely on the previous default of layer 3 mode, add layer2=0 to the
OPTIONS parameter.
/etc/sysconfig/network-scripts/ifcfg-0.0.0600
# IBM QETH
DEVICE=enccw0.0.0600
BOOTPROTO=static
IPADDR=192.168.70.87
NETMASK=255.255.255.0
ONBOOT=yes
Installation Guide
300

NETTYPE=qeth
SUBCHANNELS=0.0.0600,0.0.0601,0.0.0602
PORTNAME=OSAPORT
OPTIONS='layer2=1 portno=0'
MACADDR=02:00:00:b3:84:ef
TYPE=Ethernet
Changes to an ifcfg file only become effective after rebooting the system or after the dynamic addition
of new network device channels by changing the system's I/O configuration (for example, attaching
under z/VM). Alternatively, you can trigger the activation of a ifcfg file for network channels which were
previously not active yet, by executing the following commands:
1. Use the cio_ignore utility to remove the network channels from the list of ignored devices and
make them visible to Linux:
# cio_ignore -r
read_device_bus_id,write_device_bus_id,data_device_bus_id
Replace read_device_bus_id,write_device_bus_id,data_device_bus_id with the three device
bus IDs representing a network device. For example, if the read_device_bus_id is 0.0.0600,
the write_device_bus_id is 0.0.0601, and the data_device_bus_id is 0.0.0602:
# cio_ignore -r 0.0.0600,0.0.0601,0.0.0602
2. To trigger the uevent that activates the change, issue:
# echo add > /sys/bus/ccw/devices/read-channel/uevent
For example:
# echo add > /sys/bus/ccw/devices/0.0.0600/uevent
3. Check the status of the network device:
# lsqeth
4. Now start the new interface:
# ifup enccw0.0.0600
5. Check the status of the interface:
# ip addr show enccw0.0.0600
3: enccw0.0.0600: <BROADCAST,MULTICAST,UP,LOWER_UP> mtu 1500 qdisc
pfifo_fast state UP group default qlen 1000
link/ether 3c:97:0e:51:38:17 brd ff:ff:ff:ff:ff:ff
inet 10.85.1.245/24 brd 10.34.3.255 scope global dynamic
enccw0.0.0600
valid_lft 81487sec preferred_lft 81487sec
inet6 1574:12:5:1185:3e97:eff:fe51:3817/64 scope global
noprefixroute dynamic
valid_lft 2591994sec preferred_lft 604794sec
inet6 fe45::a455:eff:d078:3847/64 scope link
CHAPTER 19. CONFIGURING AN INSTALLED LINUX ON IBM Z INSTANCE
301

valid_lft forever preferred_lft forever
6. Check the routing for the new interface:
# ip route
default via 10.85.1.245 dev enccw0.0.0600 proto static metric 1024
12.34.4.95/24 dev enp0s25 proto kernel scope link src 12.34.4.201
12.38.4.128 via 12.38.19.254 dev enp0s25 proto dhcp metric 1
192.168.122.0/24 dev virbr0 proto kernel scope link src
192.168.122.1
7. Verify your changes by using the ping utility to ping the gateway or another host on the subnet
of the new device:
# ping -c 1 192.168.70.8
PING 192.168.70.8 (192.168.70.8) 56(84) bytes of data.
64 bytes from 192.168.70.8: icmp_seq=0 ttl=63 time=8.07 ms
8. If the default route information has changed, you must also update
/etc/sysconfig/network accordingly.
19.3.2. Adding an LCS Device
The LAN channel station (LCS) device driver supports 1000Base-T Ethernet on the OSA-Express2 and
OSA-Express 3 features.
The LCS device driver assigns the following interface name for OSA-Express Fast Ethernet and Gigabit
Ethernet devices: enccwbus_ID. The bus ID is composed of the channel subsystem ID, subchannel set
ID, and device number, for example enccw0.0.0a00.
19.3.2.1. Dynamically Adding an LCS Device
1. Load the device driver:
# modprobe lcs
2. Use the cio_ignore utility to remove the network channels from the list of ignored devices and
make them visible to Linux:
# cio_ignore -r read_device_bus_id,write_device_bus_id
Replace read_device_bus_id and write_device_bus_id with the two device bus IDs representing
a network device. For example:
# cio_ignore -r 0.0.09a0,0.0.09a1
3. Create the group device:
# echo read_device_bus_id,write_device_bus_id >
/sys/bus/ccwgroup/drivers/lcs/group
Installation Guide
302

4. Configure the device. OSA cards can provide up to 16 ports for a single CHPID. By default, the
LCS group device uses port 0. To use a different port, issue a command similar to the following:
# echo portno > /sys/bus/ccwgroup/drivers/lcs/device_bus_id/portno
Replace portno with the port number you want to use.
5. Set the device online:
# echo 1 > /sys/bus/ccwgroup/drivers/lcs/read_device_bus_id/online
6. To find out what network device name has been assigned, enter the command:
# ls -l /sys/bus/ccwgroup/drivers/lcs/read_device_bus_ID/net/
drwxr-xr-x 4 root root 0 2010-04-22 16:54 enccw0.0.0600
19.3.2.2. Persistently Adding an LCS Device
The cio_ignore commands are handled transparently for persistent device configurations and you do
not need to free devices from the ignore list manually.
To add an LCS device persistently, follow these steps:
1. Create a configuration script as file in /etc/sysconfig/network-scripts/ with a name
like ifcfg-device, where device is the value found in the if_name file in the qeth group
device that was created earlier, for example enccw0.0.09a0. The file should look similar to the
following:
# IBM LCS
DEVICE=enccw0.0.09a0
BOOTPROTO=static
IPADDR=10.12.20.136
NETMASK=255.255.255.0
ONBOOT=yes
NETTYPE=lcs
SUBCHANNELS=0.0.09a0,0.0.09a1
PORTNAME=0
OPTIONS=''
TYPE=Ethernet
2. Modify the value of PORTNAME to reflect the LCS port number (portno) you would like to use.
You can add any valid lcs sysfs attribute and its value to the optional OPTIONS parameter. See
Section 19.3.1.3, “Persistently Adding a qeth Device” for the syntax.
3. Set the DEVICE parameter as follows:
DEVICE=enccwbus_ID
4. Issue an ifup command to activate the device:
# ifup enccwbus_ID
CHAPTER 19. CONFIGURING AN INSTALLED LINUX ON IBM Z INSTANCE
303

Changes to an ifcfg file only become effective after rebooting the system. You can trigger the
activation of a ifcfg file for network channels by executing the following commands:
1. Use the cio_ignore utility to remove the LCS device adapter from the list of ignored devices
and make it visible to Linux:
# cio_ignore -r read_device_bus_id,write_device_bus_id
Replace read_device_bus_id and write_device_bus_id with the device bus IDs of the LCS
device. For example:
# cio_ignore -r 0.0.09a0,0.0.09a1
2. To trigger the uevent that activates the change, issue:
# echo add > /sys/bus/ccw/devices/read-channel/uevent
For example:
# echo add > /sys/bus/ccw/devices/0.0.09a0/uevent
19.3.3. Configuring a IBM Z Network Device for Network Root File System
To add a network device that is required to access the root file system, you only have to change the boot
options. The boot options can be in a parameter file (see Chapter 20, Parameter and Configuration Files
on IBM Z) or part of a zipl.conf on a DASD or FCP-attached SCSI LUN prepared with the zipl boot
loader. There is no need to recreate the initramfs.
Dracut, the mkinitrd successor that provides the functionality in the initramfs that in turn replaces initrd,
provides a boot parameter to activate network devices on IBM Z early in the boot process: rd.znet=.
As input, this parameter takes a comma-separated list of the NETTYPE (qeth, lcs, ctc), two (lcs, ctc) or
three (qeth) device bus IDs, and optional additional parameters consisting of key-value pairs
corresponding to network device sysfs attributes. This parameter configures and activates the IBM Z
network hardware. The configuration of IP addresses and other network specifics works the same as for
other platforms. See the dracut documentation for more details.
The cio_ignore commands for the network channels are handled transparently on boot.
Example boot options for a root file system accessed over the network through NFS:
root=10.16.105.196:/nfs/nfs_root cio_ignore=all,!condev
rd.znet=qeth,0.0.0a00,0.0.0a01,0.0.0a02,layer2=1,portno=0,portname=OSAPORT
ip=10.16.105.197:10.16.105.196:10.16.111.254:255.255.248.0:nfs‑server.subd
omain.domain:enccw0.0.09a0:none rd_NO_LUKS rd_NO_LVM rd_NO_MD rd_NO_DM
LANG=en_US.UTF-8 SYSFONT=latarcyrheb-sun16 KEYTABLE=us
Installation Guide
304

CHAPTER 20. PARAMETER AND CONFIGURATION FILES ON
IBM Z
The IBM Z architecture can use a customized parameter file to pass boot parameters to the kernel and
the installation program. This section describes the contents of this parameter file.
You need only read this section if you intend to change the shipped parameter file. You need to change
the parameter file if you want to:
install unattended with Kickstart.
choose non-default installation settings that are not accessible through the installation program"s
interactive user interface, such as rescue mode.
The parameter file can be used to set up networking non-interactively before the installation program
(loader and Anaconda) starts.
The kernel parameter file is limited to 895 characters plus an end-of-line character. The parameter file
can be variable or fixed record format. Fixed record format increases the file size by padding each line
up to the record length. Should you encounter problems with the installation program not recognizing all
specified parameters in LPAR environments, you can try to put all parameters in one single line or start
and end each line with a space character.
The parameter file contains kernel parameters, such as ro, and parameters for the installation process,
such as vncpassword=test or vnc.
20.1. REQUIRED PARAMETERS
The following parameters are required and must be included in the parameter file. They are also
provided in the file generic.prm in directory images/ of the installation DVD:
ro
mounts the root file system, which is a RAM disk, read-only.
ramdisk_size=size
modifies the memory size reserved for the RAM disk to ensure that the Red Hat Enterprise Linux
installation program fits within it. For example: ramdisk_size=40000.
The generic.prm file also contains the additional parameter cio_ignore=all,!condev. This
setting speeds up boot and device detection on systems with many devices. The installation program
transparently handles the activation of ignored devices.
IMPORTANT
To avoid installation problems arising from cio_ignore support not being implemented
throughout the entire stack, adapt the cio_ignore= parameter value to your system or
remove the parameter entirely from your parameter file used for booting (IPL) the
installation program.
20.2. THE Z/VM CONFIGURATION FILE
This applies only if installing under z/VM. Under z/VM, you can use a configuration file on a CMS-
CHAPTER 20. PARAMETER AND CONFIGURATION FILES ON IBM Z
305

formatted disk. The purpose of the CMS configuration file is to save space in the parameter file by
moving the parameters that configure the initial network setup, the DASD, and the FCP specification out
of the parameter file (see Section 20.3, “Installation Network Parameters”).
Each line of the CMS configuration file contains a single variable and its associated value, in the
following shell-style syntax: variable=value .
You must also add the CMSDASD and CMSCONFFILE parameters to the parameter file. These
parameters point the installation program to the configuration file:
CMSDASD=cmsdasd_address
Where cmsdasd_address is the device number of a CMS-formatted disk that contains the
configuration file. This is usually the CMS user"s A disk.
For example: CMSDASD=191
CMSCONFFILE=configuration_file
Where configuration_file is the name of the configuration file. This value must be specified in lower
case. It is specified in a Linux file name format: CMS_file_name.CMS_file_type.
The CMS file REDHAT CONF is specified as redhat.conf. The CMS file name and the file type can
each be from one to eight characters that follow the CMS conventions.
For example: CMSCONFFILE=redhat.conf
20.3. INSTALLATION NETWORK PARAMETERS
The following parameters can be used to set up the preliminary network automatically and can be
defined in the CMS configuration file. The parameters in this section are the only parameters that can
also be used in a CMS configuration file. All other parameters in other sections must be specified in the
parameter file.
NETTYPE="type"
Where type must be one of the following: qeth, lcs, or ctc. The default is qeth.
Choose lcs for:
OSA-2 Ethernet/Token Ring
OSA-Express Fast Ethernet in non-QDIO mode
OSA-Express High Speed Token Ring in non-QDIO mode
Gigabit Ethernet in non-QDIO mode
Choose qeth for:
OSA-Express Fast Ethernet
Gigabit Ethernet (including 1000Base-T)
High Speed Token Ring
HiperSockets
Installation Guide
306

ATM (running Ethernet LAN emulation)
SUBCHANNELS="device_bus_IDs"
Where device_bus_IDs is a comma-separated list of two or three device bus IDs. The IDs must be
specified in lowercase.
Provides required device bus IDs for the various network interfaces:
qeth:
SUBCHANNELS="read_device_bus_id,write_device_bus_id,data_device_bus_id"
lcs or ctc: SUBCHANNELS="read_device_bus_id,write_device_bus_id"
For example (a sample qeth SUBCHANNEL statement):
SUBCHANNELS="0.0.f5f0,0.0.f5f1,0.0.f5f2"
PORTNAME="osa_portname" , PORTNAME="lcs_portnumber"
This variable supports OSA devices operating in qdio mode or in non-qdio mode.
When using qdio mode (NETTYPE="qeth"), osa_portname is the portname specified on the OSA
device when operating in qeth mode.
When using non-qdio mode (NETTYPE="lcs"), lcs_portnumber is used to pass the relative port
number as a decimal integer in the range of 0 through 15.
PORTNO="portnumber"
You can add either PORTNO="0" (to use port 0) or PORTNO="1" (to use port 1 of OSA features with
two ports per CHPID) to the CMS configuration file to avoid being prompted for the mode.
LAYER2="value"
Where value can be 0 or 1.
Use LAYER2="0" to operate an OSA or HiperSockets device in layer 3 mode (NETTYPE="qeth").
Use LAYER2="1" for layer 2 mode. For virtual network devices under z/VM this setting must match
the definition of the GuestLAN or VSWITCH to which the device is coupled.
To use network services that operate on layer 2 (the Data Link Layer or its MAC sublayer) such as
DHCP, layer 2 mode is a good choice.
The qeth device driver default for OSA devices is now layer 2 mode. To continue using the previous
default of layer 3 mode, set LAYER2="0" explicitly.
VSWITCH="value"
Where value can be 0 or 1.
Specify VSWITCH="1" when connecting to a z/VM VSWITCH or GuestLAN, or VSWITCH="0" (or
nothing at all) when using directly attached real OSA or directly attached real HiperSockets.
MACADDR="MAC_address"
CHAPTER 20. PARAMETER AND CONFIGURATION FILES ON IBM Z
307

If you specify LAYER2="1" and VSWITCH="0", you can optionally use this parameter to specify a
MAC address. Linux requires six colon-separated octets as pairs lower case hex digits - for example,
MACADDR=62:a3:18:e7:bc:5f. Note that this is different from the notation used by z/VM.
If you specify LAYER2="1" and VSWITCH="1", you must not specify the MACADDR, because z/VM
assigns a unique MAC address to virtual network devices in layer 2 mode.
CTCPROT="value"
Where value can be 0, 1, or 3.
Specifies the CTC protocol for NETTYPE="ctc". The default is 0.
HOSTNAME="string"
Where string is the host name of the newly-installed Linux instance.
IPADDR="IP"
Where IP is the IP address of the new Linux instance.
NETMASK="netmask"
Where netmask is the netmask.
The netmask supports the syntax of a prefix integer (from 1 to 32) as specified in IPv4 classless
interdomain routing (CIDR). For example, you can specify 24 instead of 255.255.255.0, or 20
instead of 255.255.240.0.
GATEWAY="gw"
Where gw is the gateway IP address for this network device.
MTU="mtu"
Where mtu is the Maximum Transmission Unit (MTU) for this network device.
DNS="server1:server2:additional_server_terms:serverN"
Where "server1:server2:additional_server_terms:serverN" is a list of DNS servers, separated by
colons. For example:
DNS="10.1.2.3:10.3.2.1"
SEARCHDNS="domain1:domain2:additional_dns_terms:domainN"
Where "domain1:domain2:additional_dns_terms:domainN" is a list of the search domains, separated
by colons. For example:
SEARCHDNS="subdomain.domain:domain"
You only need to specify SEARCHDNS= if you specify the DNS= parameter.
DASD=
Defines the DASD or range of DASDs to configure for the installation.
The installation program supports a comma-separated list of device bus IDs or of ranges of device
Installation Guide
308
bus IDs with the optional attributes ro, diag, erplog, and failfast. Optionally, you can
abbreviate device bus IDs to device numbers with leading zeros stripped. Any optional attributes
should be separated by colons and enclosed in parentheses. Optional attributes follow a device bus
ID or a range of device bus IDs.
The only supported global option is autodetect. This does not support the specification of non-
existent DASDs to reserve kernel device names for later addition of DASDs. Use persistent DASD
device names (for example /dev/disk/by-path/...) to enable transparent addition of disks
later. Other global options such as probeonly, nopav, or nofcx are not supported by the
installation program.
Only specify those DASDs that you really need to install your system. All unformatted DASDs
specified here must be formatted after a confirmation later on in the installation program (see
Section 17.16.1.1, “DASD Low-level Formatting”). Add any data DASDs that are not needed for the
root file system or the /boot partition after installation as described in Section 19.1.3.2, “DASDs
That Are Not Part of the Root File System”.
For example:
DASD="eb1c,0.0.a000-0.0.a003,eb10-eb14(diag),0.0.ab1c(ro:diag)"
For FCP-only environments, remove the DASD= option from the CMS configuration file to indicate no
DASD is present.
FCP_n="device_bus_ID WWPN FCP_LUN"
Where:
n is typically an integer value (for example FCP_1 or FCP_2) but could be any string with
alphabetic or numeric characters or underscores.
device_bus_ID specifies the device bus ID of the FCP device representing the host bus
adapter (HBA) (for example 0.0.fc00 for device fc00).
WWPN is the world wide port name used for routing (often in conjunction with multipathing)
and is as a 16-digit hex value (for example 0x50050763050b073d).
FCP_LUN refers to the storage logical unit identifier and is specified as a 16-digit
hexadecimal value padded with zeroes to the right (for example 0x4020400100000000).
These variables can be used on systems with FCP devices to activate FCP LUNs such as SCSI
disks. Additional FCP LUNs can be activated during the installation interactively or by means of a
Kickstart file. An example value looks similar to the following:
FCP_1="0.0.fc00 0x50050763050b073d 0x4020400100000000"
IMPORTANT
Each of the values used in the FCP parameters (for example FCP_1 or FCP_2) are
site-specific and are normally supplied by the FCP storage administrator.
The installation program prompts you for any required parameters not specified in the parameter or
configuration file except for FCP_n.
CHAPTER 20. PARAMETER AND CONFIGURATION FILES ON IBM Z
309

20.4. PARAMETERS FOR KICKSTART INSTALLATIONS
The following parameters can be defined in a parameter file but do not work in a CMS configuration file.
inst.ks=URL
References a Kickstart file, which usually resides on the network for Linux installations on IBM Z.
Replace URL with the full path including the file name of the Kickstart file. This parameter activates
automatic installation with Kickstart. See Kickstart Boot Options and Section 26.2.5, “Starting the
Kickstart Installation” for more details.
RUNKS=value
IMPORTANT
This parameter is deprecated. If you use it in a Kickstart file, it will be ignored. Only the
inst.ks= parameter is necessary to start a Kickstart installation on IBM Z.
Where value is defined as 1 if you want to run the loader automatically on the Linux console without
having to log in over the network with SSH. To use RUNKS=1, the console must either support full-
screen or the inst.cmdline option (below) should be used. The latter applies for the 3270 terminal
under z/VM or the operating system messages console for LPAR. We recommend RUNKS=1 for fully
automatic installations with Kickstart. When RUNKS=1 is set, the installation program automatically
continues in case of parameter errors and does not interrupt unattended installations by prompting for
user interaction.
Leave out the parameter or specify RUNKS=0 otherwise.
inst.cmdline
When this option is specified, output on line-mode terminals (such as 3270 under z/VM or operating
system messages for LPAR) becomes readable, as the installation program disables escape terminal
sequences that are only applicable to UNIX-like consoles. This requires installation with a Kickstart
file that answers all questions, because the installation program does not support interactive user
input in cmdline mode.
Ensure that your Kickstart file contains all required parameters before you use the inst.cmdline
option. If a required command is missing, the installation will fail. See Chapter 26, Kickstart Installations
for details.
20.5. MISCELLANEOUS PARAMETERS
The following parameters can be defined in a parameter file but do not work in a CMS configuration file.
rd.live.check
Turns on testing of an ISO-based installation source; for example, when booted from an FCP-
attached DVD or using inst.repo= with an ISO on local hard disk or mounted with NFS.
nompath
Disables support for multipath devices.
proxy=[protocol://][username[:password]@]host[:port]
Installation Guide
310

Specify a proxy to use with installation over HTTP, HTTPS, or FTP.
inst.rescue
Boot into a rescue system running from a RAM disk that can be used to fix and restore an installed
system.
inst.stage2=URL
Specifies a path to an install.img file instead of to an installation source. Otherwise, follows the
same syntax as inst.repo=. If inst.stage2 is specified, it typically takes precedence over other
methods of finding install.img. However, if Anaconda finds install.img on local media, the
inst.stage2 URL will be ignored.
If inst.stage2 is not specified and install.img cannot be found locally, Anaconda looks to the
location given by inst.repo= or method=.
If only inst.stage2= is given without inst.repo= or method=, Anaconda uses whatever repos
the installed system would have enabled by default for installation.
Use the option multiple times to specify multiple HTTP, HTTPS or FTP sources. The HTTP, HTTPS
or FTP paths are then tried sequentially until one succeeds:
inst.stage2=host1/install.img inst.stage2=host2/install.img
inst.stage3=host3/install.img
inst.syslog=IP/hostname[:port]
Sends log messages to a remote syslog server.
The boot parameters described here are the most useful for installations and trouble shooting on IBM Z,
but only a subset of those that influence the installation program. See Chapter 22, Boot Options for a
more complete list of available boot parameters.
20.6. SAMPLE PARAMETER FILE AND CMS CONFIGURATION FILE
To change the parameter file, begin by extending the shipped generic.prm file.
Example of generic.prm file:
ro ramdisk_size=40000 cio_ignore=all,!condev
CMSDASD="191" CMSCONFFILE="redhat.conf"
vnc
inst.repo=http://example.com/path/to/repository
Example of redhat.conf file configuring a QETH network device (pointed to by CMSCONFFILE in
generic.prm):
NETTYPE="qeth"
SUBCHANNELS="0.0.0600,0.0.0601,0.0.0602"
PORTNAME="FOOBAR"
PORTNO="0"
LAYER2="1"
MACADDR="02:00:be:3a:01:f3"
CHAPTER 20. PARAMETER AND CONFIGURATION FILES ON IBM Z
311

HOSTNAME="foobar.systemz.example.com"
IPADDR="192.168.17.115"
NETMASK="255.255.255.0"
GATEWAY="192.168.17.254"
DNS="192.168.17.1"
SEARCHDNS="systemz.example.com:example.com"
DASD="200-203"
Installation Guide
312

CHAPTER 21. IBM Z REFERENCES
21.1. IBM Z PUBLICATIONS
Current versions of the Linux on IBM Z publications can be found at
http://www.ibm.com/developerworks/linux/linux390/documentation_red_hat.html. They include:
Linux on System z - How to use FC-attached SCSI devices with Linux on System z9 and zSeries.
IBM . 2008. SC33-8413.
Linux on System z - How to Improve Performance with PAV. IBM . 2008. SC33-8414.
z/VM - Getting Started with Linux on System z. IBM . 2009. SC24-6194.
21.2. IBM REDBOOKS PUBLICATIONS FOR IBM Z
Current versions of IBM Redbooks publications can be found at http://www.redbooks.ibm.com/. They
include:
Introductory publications
Introduction to the New Mainframe: z/VM Basics. IBM Redbooks . 2007. SG24-7316.
Practical Migration to Linux on System z. IBM Redbooks . 2009. SG24-7727.
Performance and high availability
Linux on IBM System z: Performance Measurement and Tuning. IBM Redbooks . 2011. SG24-6926.
Achieving High Availability on Linux for System z with Linux-HA Release 2. IBM Redbooks . 2009.
SG24-7711.
Security
Security for Linux on System z. IBM Redbooks . 2013. SG24-7728.
Networking
IBM System z Connectivity Handbook. IBM Redbooks . 2013. SG24-5444.
OSA Express Implementation Guide. IBM Redbooks . 2009. SG24-5948.
HiperSockets Implementation Guide. IBM Redbooks . 2007. SG24-6816.
Fibre Channel Protocol for Linux and z/VM on IBM System z. IBM Redbooks . 2007. SG24-7266.
21.3. ONLINE RESOURCES
For z/VM publications, refer to http://www.vm.ibm.com/library/ .
For IBM Z I/O connectivity information, refer to
http://www.ibm.com/systems/z/hardware/connectivity/index.html .
For IBM Z cryptographic coprocessor information, refer to http://www.ibm.com/security/cryptocards/ .
CHAPTER 21. IBM Z REFERENCES
313


PART IV. ADVANCED INSTALLATION OPTIONS
This part of the Red Hat Enterprise Linux Installation Guide covers more advanced or uncommon
methods of installing Red Hat Enterprise Linux, including:
customizing the installation program's behavior by specifying boot options
setting up a PXE server to boot the installation program over a network
installing with remote access through VNC
using a Kickstart file to automate the installation process
installing into a disk image instead of a physical drive
upgrading a previous release of Red Hat Enterprise Linux to the current version
PART IV. ADVANCED INSTALLATION OPTIONS
315
CHAPTER 22. BOOT OPTIONS
The Red Hat Enterprise Linux installation system includes a range of boot options for administrators,
which modify the default behavior of the installation program by enabling (or disabling) certain functions.
To use boot options, append them to the boot command line, as described in Section 22.1, “Configuring
the Installation System at the Boot Menu”. Multiple options added to the boot line need to be separated
by a single space.
There are two basic types of options described in this chapter:
Options presented as ending with an "equals" sign (=) require a value to be specified - they
cannot be used on their own. For example, the inst.vncpassword= option must also contain
a value (in this case, a password). The correct form is therefore
inst.vncpassword=password. On its own, without a password specified, the option is
invalid.
Options presented without the "=" sign do not accept any values or parameters. For example,
the rd.live.check option forces Anaconda to verify the installation media before starting the
installation; if this option is present, the check will be performed, and if it is not present, the
check will be skipped.
22.1. CONFIGURING THE INSTALLATION SYSTEM AT THE BOOT
MENU
NOTE
The exact way to specify custom boot options is different on every system architecture.
For architecture-specific instructions about editing boot options, see:
Section 7.2, “The Boot Menu” for 64-bit AMD, Intel and ARM systems
Section 12.1, “The Boot Menu” for IBM Power Systems servers
Chapter 20, Parameter and Configuration Files on IBM Z for IBM Z
There are several different ways to edit boot options at the boot menu (that is, the menu which appears
after you boot the installation media):
The boot: prompt, accessed by pressing the Esc key anywhere in the boot menu. When using
this prompt, the first option must always specify the installation program image file to be loaded.
In most cases, the image can be specified using the linux keyword. After that, additional
options can be specified as needed.
Pressing the Tab key at this prompt will display help in the form of usable commands where
applicable. To start the installation with your options, press the Enter key. To return from the
boot: prompt to the boot menu, restart the computer and boot from the installation media again.
The > prompt on BIOS-based AMD64 and Intel 64 systems, accessed by highlighting an entry in
the boot menu and pressing the Tab key. Unlike the boot: prompt, this prompt allows you to
edit a predefined set of boot options. For example, if you highlight the entry labeled Test this
media & install Red Hat Enterprise Linux 7.5, a full set of options used by this menu entry will
be displayed on the prompt, allowing you to add your own options.
Pressing Enter will start the installation using the options you specified. To cancel editing and
Installation Guide
316
return to the boot menu, press the Esc key at any time.
The GRUB2 menu on UEFI-based 64-bit AMD, Intel and ARM systems. If your system uses
UEFI, you can edit boot options by highlighting an entry and pressing the e key. When you finish
editing, press F10 or Ctrl+X to start the installation using the options you specified.
In addition to the options described in this chapter, the boot prompt also accepts dracut kernel options.
A list of these options is available as the dracut.cmdline(7) man page.
NOTE
Boot options specific to the installation program always start with inst. in this guide.
Currently, this prefix is optional, for example, resolution=1024x768 will work exactly
the same as inst.resolution=1024x768. However, it is expected that the inst.
prefix will be mandatory in future releases.
Specifying the Installation Source
inst.repo=
Specifies the installation source - that is, a location where the installation program can find the
images and packages it requires. For example:
inst.repo=cdrom
The target must be either:
an installable tree, which is a directory structure containing the installation program's images,
packages and repodata as well as a valid .treeinfo file
a DVD (a physical disk present in the system's DVD drive)
an ISO image of the full Red Hat Enterprise Linux installation DVD, placed on a hard drive or
a network location accessible from the installation system
This option allows for the configuration of different installation methods using different formats. The
syntax is described in the table below.
Table 22.1. Installation Sources
Installation source Option format
Any CD/DVD drive inst.repo=cdrom
Specific CD/DVD drive inst.repo=cdrom:device
Hard Drive inst.repo=hd:device:/path
HMC inst.repo=hmc
HTTP Server inst.repo=http://host/path
HTTPS Server inst.repo=https://host/path
CHAPTER 22. BOOT OPTIONS
317
FTP Server inst.repo=ftp://username:password@host/path
NFS Server inst.repo=nfs:[options:]server:/path [a]
[a] This option uses NFS protocol version 3 by default. To use a different version, add +nfsvers=X to options.
Installation source Option format
NOTE
In previous releases of Red Hat Enterprise Linux, there were separate options for an
installable tree accessible by NFS (the nfs option) and an ISO image located on an
NFS source (the nfsiso option). In Red Hat Enterprise Linux 7, the installation
program can automatically detect whether the source is an installable tree or a
directory containing an ISO image, and the nfsiso option is deprecated.
Disk device names can be set using the following formats:
Kernel device name, for example /dev/sda1 or sdb2
File system label, for example LABEL=Flash or LABEL=RHEL7
File system UUID, for example UUID=8176c7bf-04ff-403a-a832-9557f94e61db
Non-alphanumeric characters must be represented as \xNN, where NN is the hexadecimal
representation of the character. For example, \x20 is a white space (" ").
inst.stage2=
Specifies the location of the installation program runtime image to be loaded. The syntax is the same
as in Specifying the Installation Source. This option expects a path to a directory containing a valid
.treeinfo file; the location of the runtime image will be read from this file if found. If a .treeinfo
file is not available, Anaconda will try to load the image from LiveOS/squashfs.img.
Use the option multiple times to specify multiple HTTP, HTTPS or FTP sources.
inst.stage2=host1/install.img inst.stage2=host2/install.img
inst.stage2=host3/install.img
NOTE
By default, the inst.stage2= boot option is used on the installation media and set to
a specific label (for example,
inst.stage2=hd:LABEL=RHEL7\x20Server.x86_64). If you modify the default
label of the file system containing the runtime image, or if you use a customized
procedure to boot the installation system, you must ensure this option is set to the
correct value.
Installation Guide
318

inst.dd=
If you need to perform a driver update during the installation, use the inst.dd= option. It can be
used multiple times. The location of a driver RPM package can be specified using any of the formats
detailed in Specifying the Installation Source. With the exception of the inst.dd=cdrom option, the
device name must always be specified. For example:
inst.dd=/dev/sdb1
Using this option without any parameters (only as inst.dd) will prompt the installation program to
ask you for a driver update disk with an interactive menu.
Driver disks can also be loaded from a hard disk drive or a similar device instead of being loaded over
the network or from initrd. Follow this procedure:
1. Load the driver disk on a hard disk drive, a USB or any similar device.
2. Set the label, for example, DD, to this device.
3. Start the installation with:
inst.dd=hd:LABEL=DD:/dd.rpm
as the boot argument.
Replace DD with a specific label and replace dd.rpm with a specific name. Use anything supported
by the inst.repo command instead of LABEL to specify your hard disk drive.
For more information about driver updates during the installation, see Chapter 6, Updating Drivers
During Installation on AMD64 and Intel 64 Systems for AMD64 and Intel 64 systems and Chapter 11,
Updating Drivers During Installation on IBM Power Systems for IBM Power Systems servers.
Kickstart Boot Options
inst.ks=
Gives the location of a Kickstart file to be used to automate the installation. Locations can be specified
using any of the formats valid for inst.repo. See Specifying the Installation Source for details.
Use the option multiple times to specify multiple HTTP, HTTPS and FTP sources. If multiple HTTP,
HTTPS and FTP locations are specified, the locations are tried sequentially until one succeeds:
inst.ks=host1/directory/ks.cfg inst.ks=host2/directory/ks.cfg
inst.ks=host3/directory/ks.cfg
If you only specify a device and not a path, the installation program will look for the Kickstart file in
/ks.cfg on the specified device. If you use this option without specifying a device, the installation
program will use the following:
inst.ks=nfs:next-server:/filename
In the above example, next-server is the DHCP next-server option or the IP address of the DHCP
server itself, and filename is the DHCP filename option, or /kickstart/. If the given file name
ends with the / character, ip-kickstart is appended. For example:
CHAPTER 22. BOOT OPTIONS
319

Table 22.2. Default Kickstart File Location
DHCP server
address
Client address Kickstart file location
192.168.122.
1
192.168.122.
100
192.168.122.1:/kickstart/192.168.122.100-
kickstart
Additionally, starting with Red Hat Enterprise Linux 7.2, the installer will attempt to load a Kickstart file
named ks.cfg from a volume with a label of OEMDRV if present. If your Kickstart file is in this
location, you do not need to use the inst.ks= boot option at all.
inst.ks.sendmac
Adds headers to outgoing HTTP requests with the MAC addresses of all network interfaces. For
example:
X-RHN-Provisioning-MAC-0: eth0 01:23:45:67:89:ab
This can be useful when using inst.ks=http to provision systems.
inst.ks.sendsn
Adds a header to outgoing HTTP requests. This header will contain the system's serial number, read
from /sys/class/dmi/id/product_serial. The header has the following syntax:
X-System-Serial-Number: R8VA23D
Console, Environment and Display Options
console=
This kernel option specifies a device to be used as the primary console. For example, to use a
console on the first serial port, use console=ttyS0. This option should be used along with the
inst.text option.
You can use this option multiple times. In that case, the boot message will be displayed on all
specified consoles, but only the last one will be used by the installation program afterwards. For
example, if you specify console=ttyS0 console=ttyS1, the installation program will use ttyS1.
noshell
Disables access to the root shell during the installation. This is useful with automated (Kickstart)
installations - if you use this option, a user can watch the installation progress, but they cannot
interfere with it by accessing the root shell by pressing Ctrl+Alt+F2.
inst.lang=
Sets the language to be used during the installation. Language codes are the same as the ones used
in the lang Kickstart command as described in Section 26.3.1, “Kickstart Commands and Options”.
On systems where the system-config-language package is installed, a list of valid values can also be
found in /usr/share/system-config-language/locale-list.
Installation Guide
320

inst.geoloc=
Configures geolocation usage in the installation program. Geolocation is used to preset the language
and time zone, and uses the following syntax: inst.geoloc=value
The value parameter can be any of the following:
Table 22.3. Valid Values for the inst.geoloc Option
Disable geolocation inst.geoloc=0
Use the Fedora GeoIP API inst.geoloc=provider_fedora_geoip
Use the Hostip.info GeoIP API inst.geoloc=provider_hostip
If this option is not specified, Anaconda will use provider_fedora_geoip.
inst.keymap=
Specifies the keyboard layout to be used by the installation program. Layout codes are the same as
the ones used in the keyboard Kickstart command as described in Section 26.3.1, “Kickstart
Commands and Options”.
inst.text
Forces the installation program to run in text mode instead of graphical mode. The text user interface
is limited, for example, it does not allow you to modify the partition layout or set up LVM. When
installing a system on a machine with a limited graphical capabilities, it is recommended to use VNC
as described in Enabling Remote Access.
inst.cmdline
Forces the installation program to run in command line mode. This mode does not allow any
interaction, all options must be specified in a Kickstart file or on the command line.
inst.graphical
Forces the installation program to run in graphical mode. This mode is the default.
inst.resolution=
Specifies the screen resolution in graphical mode. The format is NxM, where N is the screen width
and M is the screen height (in pixels). The lowest supported resolution is 800x600.
inst.headless
Specifies that the machine being installed onto does not have any display hardware. In other words,
this option prevents the installation program from trying to detect a screen.
inst.xdriver=
Specifies the name of the X driver to be used both during the installation and on the installed system.
inst.usefbx
Tells the installation program to use the frame buffer X driver instead of a hardware-specific driver.
This option is equivalent to inst.xdriver=fbdev.
CHAPTER 22. BOOT OPTIONS
321

modprobe.blacklist=
Blacklists (completely disables) one or more drivers. Drivers (mods) disabled using this option will be
prevented from loading when the installation starts, and after the installation finishes, the installed
system will keep these settings. The blacklisted drivers can then be found in the
/etc/modprobe.d/ directory.
Use a comma-separated list to disable multiple drivers. For example:
modprobe.blacklist=ahci,firewire_ohci
inst.sshd=0
By default, sshd is only automatically started on IBM Z, and on other architectures, sshd is not
started unless the inst.sshd option is used. This option prevents sshd from starting automatically
on IBM Z.
inst.sshd
Starts the sshd service during the installation, which allows you to connect to the system during the
installation using SSH and monitor its progress. For more information on SSH, see the ssh(1) man
page and the corresponding chapter in the Red Hat Enterprise Linux 7 System Administrator's Guide.
By default, sshd is only automatically started on IBM Z, and on other architectures, sshd is not
started unless the inst.sshd option is used.
NOTE
During the installation, the root account has no password by default. You can set a
root password to be used during the installation with the sshpw Kickstart command as
described in Section 26.3.1, “Kickstart Commands and Options”.
inst.kdump_addon=
Enables or disables the Kdump configuration screen (add-on) in the installer. This screen is enabled
by default; use inst.kdump_addon=off to disable it. Note that disabling the add-on will disable the
Kdump screens in both the graphical and text-based interface as well as the %addon
com_redhat_kdump Kickstart command.
Network Boot Options
Initial network initialization is handled by dracut. This section only lists some of the more commonly
used options; for a complete list, see the dracut.cmdline(7) man page. Additional information on
networking is also available in Red Hat Enterprise Linux 7 Networking Guide.
ip=
Configures one or more network interfaces. To configure multiple interfaces, you can use the ip
option multiple times - once for each interface. If multiple interfaces are configured, you must also
use the option rd.neednet=1, and you must specify a primary boot interface using the bootdev
option, described below. Alternatively, you can use the ip option once, and then use Kickstart to set
up further interfaces.
This option accepts several different formats. The most common are described in Table 22.4,
“Network Interface Configuration Formats”.
Installation Guide
322
Table 22.4. Network Interface Configuration Formats
Configuration Method Option format
Automatic configuration of any
interface
ip=method
Automatic configuration of a
specific interface
ip=interface:method
Static configuration ip=ip::gateway:netmask:hostname:interface:none
Automatic configuration of a
specific interface with an
override [a]
ip=ip::gateway:netmask:hostname:interface:metho
d:mtu
[a] Brings up the specified interface using the specified method of automatic configuration, such as dhcp, but
overrides the automatically obtained IP address, gateway, netmask, host name or other specified parameter. All
parameters are optional; only specify the ones you want to override and automatically obtained values will be used for
the others.
The method parameter can be any the following:
Table 22.5. Automatic Interface Configuration Methods
Automatic configuration method Value
DHCP dhcp
IPv6 DHCP dhcp6
IPv6 automatic configuration auto6
iBFT (iSCSI Boot Firmware Table) ibft
NOTE
If you use a boot option which requires network access, such as
inst.ks=http://host:/path, without specifying the ip option, the installation
program will use ip=dhcp.
IMPORTANT
To connect automatically to an iSCSI target, a network device for accessing the target
needs to be activated. The recommended way to do so is to use ip=ibft boot option.
In the above tables, the ip parameter specifies the client's IP address. IPv6 addresses can be
specified by putting them in square brackets, for example, [2001:DB8::1].
CHAPTER 22. BOOT OPTIONS
323

The gateway parameter is the default gateway. IPv6 addresses are accepted here as well.
The netmask parameter is the netmask to be used. This can either be a full netmask (for example
255.255.255.0) or a prefix (for example 64).
The hostname parameter is the host name of the client system. This parameter is optional.
nameserver=
Specifies the address of the name server. This option can be used multiple times.
rd.neednet=
You must use the option rd.neednet=1 if you use more than one ip option. Alternatively, to set up
multiple network interfaces you can use the ip once, and then set up further interfaces using
Kickstart.
bootdev=
Specifies the boot interface. This option is mandatory if you use more than one ip option.
ifname=
Assigns a given interface name to a network device with a given MAC address. Can be used multiple
times. The syntax is ifname=interface:MAC. For example:
ifname=eth0:01:23:45:67:89:ab
NOTE
Using the ifname= option is the only supported way to set custom network interface
names during installation.
inst.dhcpclass=
Specifies the DHCP vendor class identifier. The dhcpd service will see this value as vendor-
class-identifier. The default value is anaconda-$(uname -srm).
inst.waitfornet=
Using the inst.waitfornet=SECONDS boot option causes the installation system to wait for network
connectivity before installation. The value given in the SECONDS argument specifies maximum
amount of time to wait for network connectivity before timing out and continuing the installation
process even if network connectivity is not present.
vlan=
Sets up a Virtual LAN (VLAN) device on a specified interface with a given name. The syntax is
vlan=name:interface. For example:
vlan=vlan5:em1
The above will set up a VLAN device named vlan5 on the em1 interface. The name can take the
following forms:
Table 22.6. VLAN Device Naming Conventions
Installation Guide
324

Naming scheme Example
VLAN_PLUS_VID vlan0005
VLAN_PLUS_VID_NO_PAD vlan5
DEV_PLUS_VID em1.0005.
DEV_PLUS_VID_NO_PAD em1.5.
bond=
Set up a bonding device with the following syntax: bond=name[:slaves][:options]. Replace
name with the bonding device name, slaves with a comma-separated list of physical (ethernet)
interfaces, and options with a comma-separated list of bonding options. For example:
bond=bond0:em1,em2:mode=active-backup,tx_queues=32,downdelay=5000
For a list of available options, execute the modinfo bonding command.
Using this option without any parameters will assume bond=bond0:eth0,eth1:mode=balance-
rr.
team=
Set up a team device with the following syntax: team=master:slaves. Replace master with the
name of the master team device and slaves with a comma-separated list of physical (ethernet)
devices to be used as slaves in the team device. For example:
team=team0:em1,em2
Advanced Installation Options
inst.kexec
If this option is specified, the installer will use the kexec system call at the end of the installation,
instead of performing a reboot. This loads the new system immediately, and bypasses the hardware
initialization normally performed by the BIOS or firmware.
IMPORTANT
Due to the complexities involved with booting systems using kexec, it cannot be
explicitly tested and guaranteed to function in every situation.
When kexec is used, device registers (which would normally be cleared during a full
system reboot) might stay filled with data, which could potentially create issues for
some device drivers.
inst.gpt
CHAPTER 22. BOOT OPTIONS
325

Force the installation program to install partition information into a GUID Partition Table (GPT) instead
of a Master Boot Record (MBR). This option is meaningless on UEFI-based systems, unless they are
in BIOS compatibility mode.
Normally, BIOS-based systems and UEFI-based systems in BIOS compatibility mode will attempt to
use the MBR schema for storing partitioning information, unless the disk is 232 sectors in size or
larger. Most commonly, disk sectors are 512 bytes in size, meaning that this is usually equivalent to 2
TiB. Using this option will change this behavior, allowing a GPT to be written to disks smaller than
this.
See Section 8.14.1.1, “MBR and GPT Considerations” for more information about GPT and MBR,
and Section A.1.4, “GUID Partition Table (GPT)” for more general information about GPT, MBR and
disk partitioning in general.
inst.multilib
Configure the system for multilib packages (that is, to allow installing 32-bit packages on a 64-bit
AMD64 or Intel 64 system) and install packages specified in this section as such.
Normally, on an AMD64 or Intel 64 system, only packages for this architecture (marked as x86_64)
and packages for all architectures (marked as noarch would be installed. When you use this option,
packages for 32-bit AMD or Intel systems (marked as i686) will be automatically installed as well if
available.
This only applies to packages directly specified in the %packages section. If a package is only
installed as a dependency, only the exact specified dependency will be installed. For example, if you
are installing package bash which depends on package glibc, the former will be installed in multiple
variants, while the latter will only be installed in variants specifically required.
selinux=0
By default, SELinux operates in permissive mode in the installer, and in enforcing mode in the
installed system. This option disables the use of SELinux in the installer and the installed system
entirely.
NOTE
The selinux=0 and inst.selinux=0 options are not the same. The selinux=0
option disables the use of SELinux in the installer and the installed system, whereas
inst.selinux=0 disables SELinux only in the installer. By default, SELinux is set to
operate in permissive mode in the installer, so disabling it has little effect.
inst.nosave=
This option, introduced in Red Hat Enterprise Linux 7.3, controls which Kickstart files and installation
logs are saved to the installed system. It can be especially useful to disable saving such data when
performing OEM operating system installations, or when generating images using sensitive resources
(such as internal repository URLs), as these resources might otherwise be mentioned in kickstart
files, or in logs on the image, or both. Possible values for this option are:
input_ks - disables saving of the input Kickstart file (if any).
output_ks - disables saving of the output Kickstart file generated by Anaconda.
all_ks - disables saving of both input and output Kickstart files.
Installation Guide
326

logs - disables saving of all installation logs.
all - disables saving of all Kickstart files and all installation logs.
Multiple values can be combined as a comma separated list, for example: input_ks,logs
inst.zram
This option controls the usage of zRAM swap during the installation. It creates a compressed block
device inside the system RAM and uses it for swap space instead of the hard drive. This allows the
installer to essentially increase the amount of memory available, which makes the installation faster
on systems with low memory.
By default, swap on zRAM is enabled on systems with 2 GiB or less RAM, and disabled on systems
with more than 2 GiB of memory. You can use this option to change this behavior - on a system with
more than 2 GiB RAM, use inst.zram=1 to enable it, and on systems with 2 GiB or less memory,
use inst.zram=0 to disable this feature.
Enabling Remote Access
The following options are necessary to configure Anaconda for remote graphical installation. See
Chapter 24, Using VNC for more details.
inst.vnc
Specifies that the installation program's graphical interface should be run in a VNC session. If you
specify this option, you will need to connect to the system using a VNC client application to be able to
interact with the installation program. VNC sharing is enabled, so multiple clients can connect to the
system at the same time.
NOTE
A system installed using VNC will start in text mode by default.
inst.vncpassword=
Sets a password on the VNC server used by the installation program. Any VNC client attempting to
connecting to the system will have to provide the correct password to gain access. For example,
inst.vncpassword=testpwd will set the password to testpwd. The VNC password must be
between 6 and 8 characters long.
NOTE
If you specify an invalid password (one that is too short or too long), you will be
prompted to specify a new one by a message from the installation program:
VNC password must be six to eight characters long.
Please enter a new one, or leave blank for no password.
Password:
inst.vncconnect=
CHAPTER 22. BOOT OPTIONS
327

Connect to a listening VNC client at a specified host and port once the installation starts. The correct
syntax is inst.vncconnect=host:port, where host is the address to the VNC client's host, and
port specifies which port to use. The port parameter is optional, if you do not specify one, the
installation program will use 5900.
Debugging and Troubleshooting
inst.updates=
Specifies the location of the updates.img file to be applied to the installation program runtime. The
syntax is the same as in the inst.repo option - see Table 22.1, “Installation Sources” for details. In
all formats, if you do not specify a file name but only a directory, the installation program will look for a
file named updates.img.
inst.loglevel=
Specifies the minimum level for messages to be logged on a terminal. This only concerns terminal
logging; log files will always contain messages of all levels.
Possible values for this option from the lowest to highest level are: debug, info, warning, error
and critical. The default value is info, which means that by default, the logging terminal will
display messages ranging from info to critical.
inst.syslog=
Once the installation starts, this option sends log messages to the syslog process on the specified
host. The remote syslog process must be configured to accept incoming connections. For information
on how to configure a syslog service to accept incoming connections, see the Red Hat
Enterprise Linux 7 System Administrator's Guide.
inst.virtiolog=
Specifies a virtio port (a character device at /dev/virtio-ports/name) to be used for
forwarding logs. The default value is org.fedoraproject.anaconda.log.0; if this port is
present, it will be used.
rd.live.ram
If this option is specified, the stage 2 image will be copied into RAM. When the stage2 image on NFS
repository is used, this option may make the installation proceed smoothly, since the installation is
sometimes affected by reconfiguring network in an environment built upon the stage 2 image on NFS.
Note that using this option when the stage 2 image is on an NFS server will increase the minimum
required memory by the size of the image - roughly 500 MiB.
inst.nokill
A debugging option that prevents anaconda from and rebooting when a fatal error occurs or at the end
of the installation process. This allows you to capture installation logs which would be lost upon
reboot.
22.1.1. Deprecated and Removed Boot Options
Deprecated Boot Options
Installation Guide
328

Options in this list are deprecated. They will still work, but there are other options which offer the same
functionality. Using deprecated options is not recommended and they are expected to be removed in
future releases.
NOTE
Note that as Section 22.1, “Configuring the Installation System at the Boot Menu”
describes, options specific to the installation program now use the inst. prefix. For
example, the vnc= option is considered deprecated and replaced by the inst.vnc=
option. These changes are not listed here.
method=
Configured the installation method. Use the inst.repo= option instead.
repo=nfsiso:server:/path
In NFS installations, specified that the target is an ISO image located on an NFS server instead of an
installable tree. The difference is now detected automatically, which means this option is the same as
inst.repo=nfs:server:/path.
dns=
Configured the Domain Name Server (DNS). Use the nameserver= option instead.
netmask=, gateway=, hostname=, ip=, ipv6=
These options have been consolidated under the ip= option.
ksdevice=
Select network device to be used at early stage of installation. Different values have been replaced
with different options; see the table below.
Table 22.7. Automatic Interface Configuration Methods
Value Current behavior
Not present Activation of all devices is attempted using dhcp, unless the desired
device and configuration is specified by the ip= option or the
BOOTIF option.
ksdevice=link Similar to the above, with the difference that network will always be
activated in the initramfs, whether it is needed or not. The supported
rd.neednet dracut option should be used to achieve the same
result.
ksdevice=bootif Ignored (the BOOTID= option is used by default when specified)
ksdevice=ibft Replaced with the ip=ibft dracut option
ksdevice=MAC Replaced with BOOTIF=MAC
CHAPTER 22. BOOT OPTIONS
329

ksdevice=device Replaced by specifying the device name using the ip= dracut
option.
Value Current behavior
blacklist=
Used to disable specified drivers. This is now handled by the modprobe.blacklist= option.
nofirewire=
Disabled support for the FireWire interface. You can disable the FireWire driver (firewire_ohci)
by using the modprobe.blacklist= option instead:
modprobe.blacklist=firewire_ohci
nicdelay=
Used to indicate the delay after which the network was considered active; the system waited until
either the gateway was successfully pinged, or until the amount of seconds specified in this
parameter passed. In RHEL 7, network devices are configured and activated during the early stage of
installation by the dracut modules which ensure that the gateway is accessible before proceeding.
For more information about dracut, see the dracut.cmdline(7) man page.
linksleep=
Used to configure how long anaconda should wait for a link on a device before activating it. This
functionality is now available in the dracut modules where specific rd.net.timeout.* options can
be configured to handle issues caused by slow network device initialization. For more information
about dracut, see the dracut.cmdline(7) man page.
Removed Boot Options
The following options are removed. They were present in previous releases of Red Hat Enterprise Linux,
but they cannot be used anymore.
askmethod, asknetwork
The installation program's initramfs is now completely non-interactive, which means that these
options are not available anymore. Instead, use the inst.repo= to specify the installation method
and ip= to configure network settings.
serial
This option forced Anaconda to use the /dev/ttyS0 console as the output. Use the
console=/dev/ttyS0 (or similar) instead.
updates=
Specified the location of updates for the installation program. Use the inst.updates= option
instead.
essid=, wepkey=, wpakey=
Installation Guide
330

Configured wireless network access. Network configuration is now being handled by dracut, which
does not support wireless networking, rendering these options useless.
ethtool=
Used in the past to configure additional low-level network settings. All network settings are now
handled by the ip= option.
gdb
Allowed you to debug the loader. Use rd.debug instead.
mediacheck
Verified the installation media before starting the installation. Replaced with the rd.live.check
option.
ks=floppy
Specified a 3.5 inch diskette as the Kickstart file source. These drives are not supported anymore.
display=
Configured a remote display. Replaced with the inst.vnc option.
utf8
Added UTF8 support when installing in text mode. UTF8 support now works automatically.
noipv6
Used to disable IPv6 support in the installation program. IPv6 is now built into the kernel so the driver
cannot be blacklisted; however, it is possible to disable IPv6 using the ipv6.disable dracut option.
upgradeany
Upgrades are done in a different way in Red Hat Enterprise Linux 7. For more information about
upgrading your system, see Chapter 29, Upgrading Your Current System.
vlanid=
Used to configure Virtual LAN (802.1q tag) devices. Use the vlan= dracut option instead.
22.2. USING THE MAINTENANCE BOOT MODES
22.2.1. Loading the Memory (RAM) Testing Mode
Faults in memory (RAM) modules can cause your system to freeze or crash unpredictably. In certain
situations, memory faults might only cause errors with particular combinations of software. For this
reason, you should test the memory of a computer before you install Red Hat Enterprise Linux for the
first time, even if it has previously run other operating systems.
Red Hat Enterprise Linux includes the Memtest86+ memory testing application. To start memory testing
mode, choose Troubleshooting > Memory test at the boot menu. Testing will begin immediately. By
default, Memtest86+ carries out ten tests in every pass; a different configuration can be specified by
CHAPTER 22. BOOT OPTIONS
331
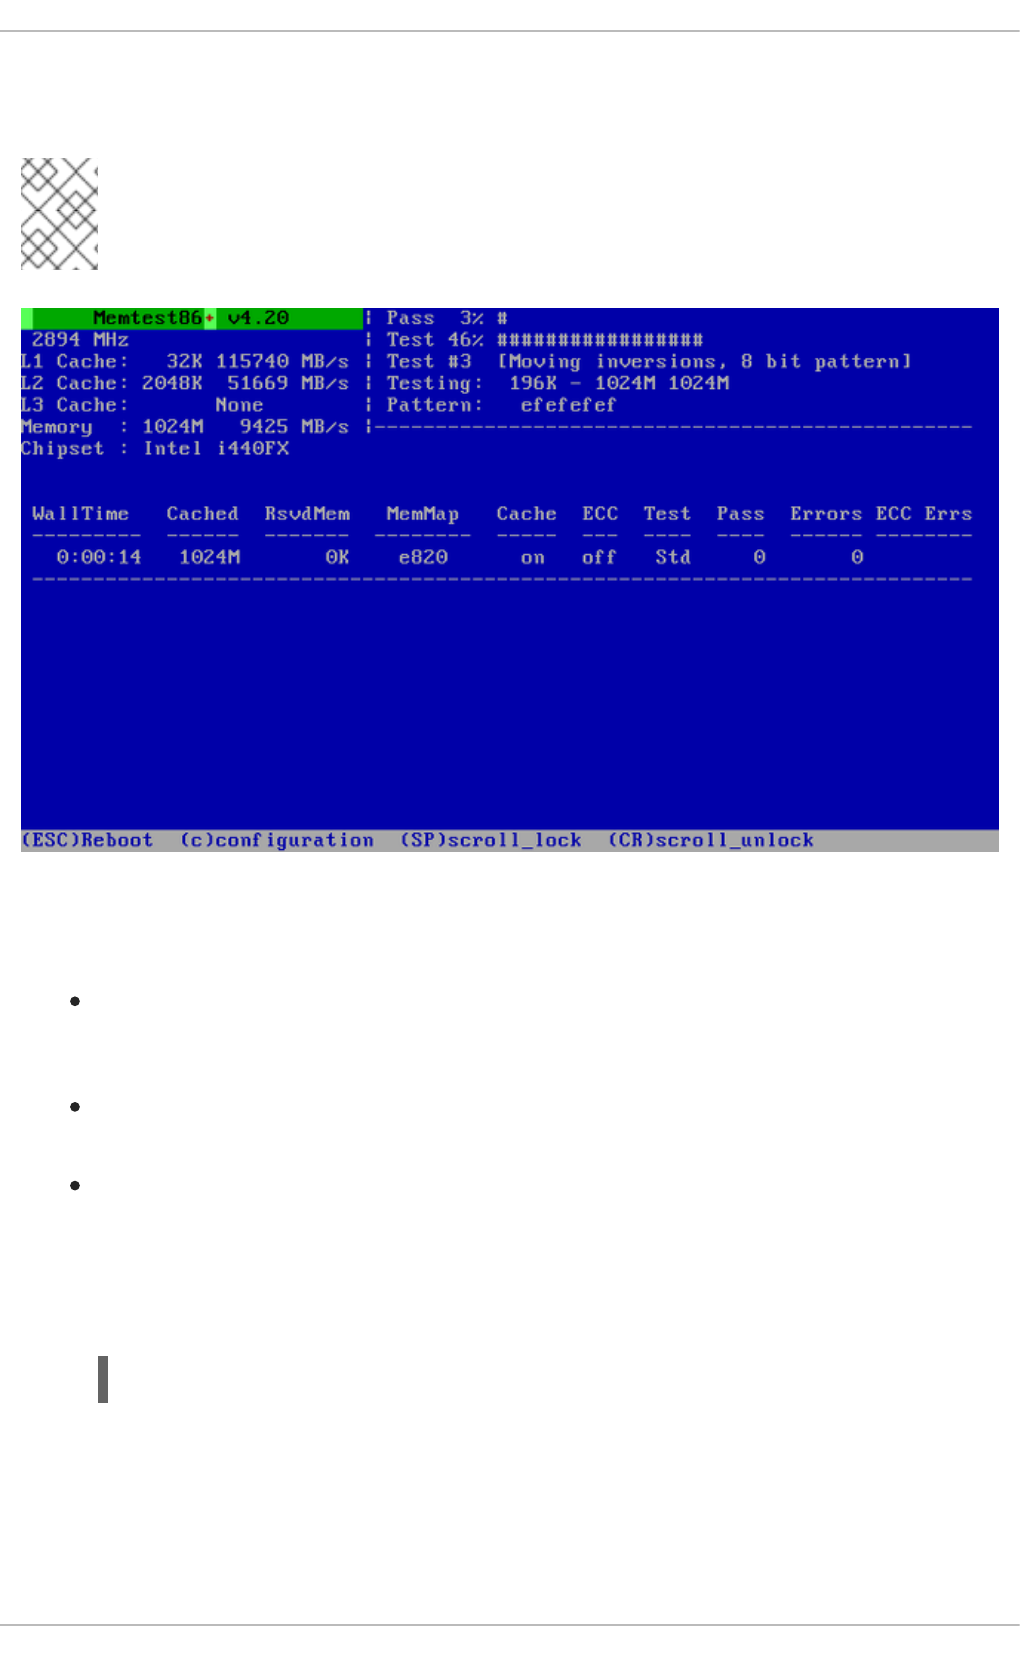
accessing the configuration screen using the c key. After the first pass completes, a message will appear
at the bottom informing you of the current status, and another pass will start automatically.
NOTE
Memtest86+ only works on BIOS systems. Support for UEFI systems is currently
unavailable.
Figure 22.1. Memory Check Using Memtest86+
The main screen displayed while testing is in progress is divided into three main areas:
The upper left corner shows information about your system's memory configuration - the amount
of detected memory and processor cache and their throughputs and processor and chipset
information. This information is detected when Memtest86+ starts.
The upper right corner displays information about the tests - progress of the current pass and the
currently running test in that pass as well as a description of the test.
The central part of the screen is used to display information about the entire set of tests from the
moment when the tool has started, such as the total time, the number of completed passes,
number of detected errors and your test selection. On some systems, detailed information about
the installed memory (such as the number of installed modules, their manufacturer, frequency
and latency) will be also displayed here. After the each pass completes, a short summary will
appear in this location. For example:
** Pass complete, no errors, press Esc to exit **
If Memtest86+ detects an error, it will also be displayed in this area and highlighted red. The
message will include detailed information such as which test detected a problem, the memory
location which is failing, and others.
In most cases, a single successful pass (that is, a single run of all 10 tests) is sufficient to verify that your
RAM is in good condition. In some rare circumstances, however, errors that went undetected on the first
Installation Guide
332

pass might appear on subsequent passes. To perform a thorough test on an important system, leave the
tests running overnight or even for a few days in order to complete multiple passes.
NOTE
The amount of time it takes to complete a single full pass of Memtest86+ varies
depending on your system's configuration (notably the RAM size and speed). For
example, on a system with 2 GiB of DDR2 memory at 667 MHz, a single pass will take
roughly 20 minutes to complete.
To halt the tests and reboot your computer, press the Esc key at any time.
For more information about using Memtest86+, see the official website at http://www.memtest.org/. A
README file is also located in /usr/share/doc/memtest86+-version/ on Red Hat Enterprise Linux
systems with the memtest86+ package installed.
22.2.2. Verifying Boot Media
You can test the integrity of an ISO-based installation source before using it to install Red Hat
Enterprise Linux. These sources include DVD, and ISO images stored on a hard drive or NFS server.
Verifying that the ISO images are intact before you attempt an installation helps to avoid problems that
are often encountered during installation.
To test the checksum integrity of an ISO image, append the rd.live.check to the boot loader
command line. Note that this option is used automatically if you select the default installation option from
the boot menu (Test this media & install Red Hat Enterprise Linux 7.0 ).
22.2.3. Booting Your Computer in Rescue Mode
You can boot a command-line Linux system from an installation disc without actually installing Red Hat
Enterprise Linux on the computer. This enables you to use the utilities and functions of a running Linux
system to modify or repair already installed operating systems.
To load the rescue system with the installation disk or USB drive, choose Rescue a Red Hat
Enterprise Linux system from the Troubleshooting submenu in the boot menu, or use the
inst.rescue boot option.
Specify the language, keyboard layout and network settings for the rescue system with the screens that
follow. The final setup screen configures access to the existing system on your computer.
By default, rescue mode attaches an existing operating system to the rescue system under the directory
/mnt/sysimage/.
For additional information about rescue mode and other maintenance modes, see Chapter 32, Basic
System Recovery.
CHAPTER 22. BOOT OPTIONS
333

CHAPTER 23. PREPARING FOR A NETWORK INSTALLATION
A network installation using an installation server allows you to install Red Hat Enterprise Linux on
multiple systems using a network boot server. This way, all systems configured to do so will boot using
an image provided by this server and start the installation program automatically.
NOTE
Red Hat Satellite has the ability to automate the setup of a PXE server. See the Red Hat
Satellite User Guide for more information.
A minimum of two systems is required for a network installation:
A server - a system running a DHCP server, a TFTP server to provide boot files, and an HTTP,
FTP or NFS server which hosts the installation image. Theoretically, each of the servers can run
on a different physical system; procedures in this section assume a single system runs all of
them for simplicity.
A client - the system which you are installing Red Hat Enterprise Linux to. When the installation
begins, the client will query the DHCP server, obtain boot files from the TFTP server, and
download the installation image from the HTTP, FTP or NFS server.
Unlike most other means of installation, no physical boot media is required to be plugged in the client
(that is, the system you are installing into) in order to begin the installation. This chapter describes the
steps you must take to prepare for network installations.
The following steps must be performed to prepare for a network installation:
1. Configure the network server (NFS, HTTPS, HTTP, or FTP) to export the installation tree or the
installation ISO image. For procedures describing the configuration, see Section 3.3.3,
“Installation Source on a Network”.
2. Configure the files on the tftp server necessary for network boot, configure DHCP, and start the
tftp service on the PXE server. See Section 23.1, “Configuring Network Boot Services” for
details.
IMPORTANT
The GRUB2 boot loader supports network boot from HTTP in addition to a tftp
server. However, obtaining boot files (the kernel and initial ram disk for the
installer) over this protocol is very slow and suffers a risk of timeout failures. Using
a tftp server to provide the boot files is recommended.
This warning only applies to the kernel and initial ram disk (vmlinuz and
initrd). Obtaining the installation source from an HTTP server does not carry
this risk.
3. Boot the client (the system you want to install Red Hat Enterprise Linux on) and start the
installation.
Installation Guide
334
NOTE
The procedures in this chapter describe setting up a network boot server on a Red Hat
Enterprise Linux 7 system. For details about configuring network boot on earlier releases
of Red Hat Enterprise Linux, see the appropriate Installation Guide for that release.
23.1. CONFIGURING NETWORK BOOT SERVICES
After setting up a network server containing the package repositories to be used in the installation, the
next step is to configure the PXE server itself. This server will contain files necessary to boot the Red Hat
Enterprise Linux and start the installation. Additionally, a DHCP server must be configured, and all
necessary services must be enabled and started.
NOTE
The network boot configuration procedure differs based on whether the AMD64/Intel 64
system you want to install Red Hat Enterprise Linux on uses BIOS or UEFI. Consult your
hardware's documentation to see which system is used on your hardware, and then follow
the appropriate procedure in this chapter.
A separate procedure is provided for booting IBM Power Systems from a network location
with the GRUB2 boot loader. See Section 23.1.3, “Configuring Network Boot for IBM
Power Systems Using GRUB2” for details.
For more information on configuring a network boot server for use with headless systems (systems
without a directly connected display, keyboard and mouse), see Chapter 25, Headless Systems.
23.1.1. Configuring a TFTP Server for BIOS-based AMD64 and Intel 64 Clients
The following procedure will prepare the PXE server for booting BIOS-based AMD64 and Intel 64
systems. For information on UEFI-based systems, see Section 23.1.2, “Configuring a TFTP Server for
UEFI-based AMD64/Intel 64 and ARM Clients”.
Procedure 23.1. Configuring a TFTP Boot Server for BIOS-based Systems
1. Install the tftp-server package. To do this, enter the following command as root:
# yum install tftp-server
2. Allow incoming connections to the tftp service in the firewall:
# firewall-cmd --add-service=tftp
NOTE
The above command only enables access until the next server reboot. To allow
access permanently, add the --permanent option. For more information about
firewall configuration, see the Red Hat Enterprise Linux 7 Security Guide.
3. Configure your DHCP server to use the boot images packaged with SYSLINUX. If you do not
have one installed, see the Red Hat Enterprise Linux 7 Networking Guide for instructions.
CHAPTER 23. PREPARING FOR A NETWORK INSTALLATION
335

A sample configuration in the /etc/dhcp/dhcpd.conf file might look like:
option space pxelinux;
option pxelinux.magic code 208 = string;
option pxelinux.configfile code 209 = text;
option pxelinux.pathprefix code 210 = text;
option pxelinux.reboottime code 211 = unsigned integer 32;
option architecture-type code 93 = unsigned integer 16;
subnet 10.0.0.0 netmask 255.255.255.0 {
option routers 10.0.0.254;
range 10.0.0.2 10.0.0.253;
class "pxeclients" {
match if substring (option vendor-class-identifier, 0, 9) =
"PXEClient";
next-server 10.0.0.1;
if option architecture-type = 00:07 {
filename "uefi/shim.efi";
} else {
filename "pxelinux/pxelinux.0";
}
}
}
4. You now need the pxelinux.0 file from the SYSLINUX package in the ISO image file of the full
installation DVD. To access it, enter the following commands as root:
# mount -t iso9660 /path_to_image/name_of_image.iso /mount_point -o
loop,ro
# cp -pr /mount_point/Packages/syslinux-version-architecture.rpm
/publicly_available_directory
# umount /mount_point
Extract the package:
# rpm2cpio syslinux-version-architecture.rpm | cpio -dimv
5. Create a pxelinux/ directory within tftpboot/ and copy the pxelinux.0 file into it:
# mkdir /var/lib/tftpboot/pxelinux
# cp publicly_available_directory/usr/share/syslinux/pxelinux.0
/var/lib/tftpboot/pxelinux
6. Create the directory pxelinux.cfg/ in the pxelinux/ directory:
# mkdir /var/lib/tftpboot/pxelinux/pxelinux.cfg
Installation Guide
336

Add a configuration file named default to the pxelinux.cfg/ directory.
A sample configuration file at /var/lib/tftpboot/pxelinux/pxelinux.cfg/default
might look like:
default vesamenu.c32
prompt 1
timeout 600
display boot.msg
label linux
menu label ^Install system
menu default
kernel images/RHEL-7.1/vmlinuz
append initrd=images/RHEL-7.1/initrd.img ip=dhcp
inst.repo=http://10.32.5.1/mnt/archive/RHEL-7/7.x/Server/x86_64/os/
label vesa
menu label Install system with ^basic video driver
kernel images/RHEL-7.1/vmlinuz
append initrd=images/RHEL-7.1/initrd.img ip=dhcp inst.xdriver=vesa
nomodeset inst.repo=http://10.32.5.1/mnt/archive/RHEL-
7/7.x/Server/x86_64/os/
label rescue
menu label ^Rescue installed system
kernel images/RHEL-7.1/vmlinuz
append initrd=images/RHEL-7.1/initrd.img rescue
label local
menu label Boot from ^local drive
localboot 0xffff
IMPORTANT
The inst.repo= Anaconda option, shown in the example above, must always
be used to specify the installation program's image as well as the installation
source. Without this option, the installation program will be unable to boot. For
more information about boot options for Anaconda, see Section 22.1,
“Configuring the Installation System at the Boot Menu”.
7. Create a subdirectory to store the boot image files within the /var/lib/tftpboot/ directory,
and copy the boot image files to it. In this example, we use the directory
/var/lib/tftpboot/images/RHEL-7.1/:
# mkdir -p /var/lib/tftpboot/images/RHEL-7.1/
# cp /path_to_x86_64_images/pxeboot/{vmlinuz,initrd.img}
/var/lib/tftpboot/images/RHEL-7.1/
8. Finally, start and enable the services:
The dhcpd service:
# systemctl start dhcpd
# systemctl enable dhcpd
CHAPTER 23. PREPARING FOR A NETWORK INSTALLATION
337
The xinetd service, that manages the tftpd service:
# systemctl start xinetd
# systemctl enable xinetd
After finishing this procedure, the PXE boot server is ready to serve PXE clients. You can now start the
system you want to install Red Hat Enterprise Linux on, select PXE Boot when prompted to specify a
boot source, and start the network installation. For more information, see Section 7.1.2, “Booting from the
Network Using PXE”.
23.1.2. Configuring a TFTP Server for UEFI-based AMD64/Intel 64 and ARM Clients
The following procedure will prepare the PXE server for booting UEFI-based AMD64/Intel 64 and ARM
systems. For information on BIOS-based systems, see Section 23.1.1, “Configuring a TFTP Server for
BIOS-based AMD64 and Intel 64 Clients”.
Procedure 23.2. Configuring TFTP Boot for UEFI-based Systems
1. Install the tftp-server package. To do this, enter the following command as root:
# yum install tftp-server
2. Allow incoming connections to the tftp service in the firewall:
# firewall-cmd --add-service=tftp
NOTE
The above command only enables access until the next server reboot. To allow
access permanently, add the --permanent option. For more information about
firewall configuration, see the Red Hat Enterprise Linux 7 Security Guide.
3. Configure your DHCP server to use the EFI boot images packaged with shim. If you do not have
one installed, see the Red Hat Enterprise Linux 7 Networking Guide for instructions.
A sample configuration in the /etc/dhcp/dhcpd.conf file might look like:
option space pxelinux;
option pxelinux.magic code 208 = string;
option pxelinux.configfile code 209 = text;
option pxelinux.pathprefix code 210 = text;
option pxelinux.reboottime code 211 = unsigned integer 32;
option architecture-type code 93 = unsigned integer 16;
subnet 10.0.0.0 netmask 255.255.255.0 {
option routers 10.0.0.254;
range 10.0.0.2 10.0.0.253;
class "pxeclients" {
match if substring (option vendor-class-identifier, 0, 9) =
"PXEClient";
next-server 10.0.0.1;
Installation Guide
338

if option architecture-type = 00:07 {
filename "shim.efi";
} else {
filename "pxelinux/pxelinux.0";
}
}
}
4. You now need the shim.efi file from the shim package and the grubx64.efi file from the
grub2-efi package in the ISO image file. To access them, enter the following commands as root:
# mount -t iso9660 /path_to_image/name_of_image.iso /mount_point -o
loop,ro
# cp -pr /mount_point/Packages/shim-version-architecture.rpm
/publicly_available_directory
# cp -pr /mount_point/Packages/grub2-efi-version-architecture.rpm
/publicly_available_directory
# umount /mount_point
Extract the packages:
# rpm2cpio shim-version-architecture.rpm | cpio -dimv
# rpm2cpio grub2-efi-version-architecture.rpm | cpio -dimv
5. Copy the EFI boot images from your boot directory:
# cp publicly_available_directory/boot/efi/EFI/redhat/shim.efi
/var/lib/tftpboot/
# cp publicly_available_directory/boot/efi/EFI/redhat/grubx64.efi
/var/lib/tftpboot/
6. Add a configuration file named grub.cfg to the tftpboot/ directory. A sample configuration
file at /var/lib/tftpboot/grub.cfg might look like:
set timeout=60
menuentry 'RHEL 7' {
linuxefi images/RHEL-7.1/vmlinuz ip=dhcp
inst.repo=http://10.32.5.1/mnt/archive/RHEL-7/7.1/Server/x86_64/os/
initrdefi images/RHEL-7.1/initrd.img
}
CHAPTER 23. PREPARING FOR A NETWORK INSTALLATION
339
IMPORTANT
The inst.repo= Anaconda option, shown in the example above, must always
be used to specify the installation program's image as well as the installation
source. Without this option, the installation program will be unable to boot. For
more information about boot options for Anaconda, see Section 22.1,
“Configuring the Installation System at the Boot Menu”.
7. Create a subdirectory to store the boot image files within the /var/lib/tftpboot/ directory,
and copy the boot image files to it. In this example, we use the directory
/var/lib/tftpboot/images/RHEL-7.1/:
# mkdir -p /var/lib/tftpboot/images/RHEL-7.1/# cp
/path_to_x86_64_images/pxeboot/{vmlinuz,initrd.img}
/var/lib/tftpboot/images/RHEL-7.1/
8. Finally, start and enable the services:
The dhcpd service:
# systemctl start dhcpd
# systemctl enable dhcpd
The xinetd service, that manages the tftpd service:
# systemctl start xinetd
# systemctl enable xinetd
After finishing this procedure, the PXE boot server is ready to serve PXE clients. You can now start the
system you want to install Red Hat Enterprise Linux on, select PXE Boot when prompted to specify a
boot source, and start the network installation. For more information, see Section 7.1.2, “Booting from the
Network Using PXE”.
23.1.3. Configuring Network Boot for IBM Power Systems Using GRUB2
Procedure 23.3. Configuring a Network Boot Server for IBM Power Systems Using GRUB2
1. Install the tftp-server package. To do this, enter the following command as root:
# yum install tftp-server
2. Allow incoming connections to the tftp service in the firewall:
# firewall-cmd --add-service=tftp
NOTE
The above command only enables access until the next server reboot. To allow
access permanently, add the --permanent option. For more information about
firewall configuration, see the Red Hat Enterprise Linux 7 Security Guide.
Installation Guide
340

3. Create a GRUB2 network boot directory inside the tftp root:
# grub2-mknetdir --net-directory=/var/lib/tftpboot
Netboot directory for powerpc-ieee1275 created. Configure your DHCP
server to point to /boot/grub2/powerpc-ieee1275/core.elf
Note the command's output, which informs you about which file needs to be configured as the
filename in your DHCP configuration. This will become important further in the procedure.
4. Create a GRUB2 configuration file: /var/lib/tftpboot/boot/grub2/grub.cfg. The
grub.cfg syntax is described in the Red Hat Enterprise Linux 7 System Administrator's Guide.
Below is an example configuration file:
set default=0
set timeout=5
echo -e "\nWelcome to the Red Hat Enterprise Linux 7 installer!\n\n"
menuentry 'Red Hat Enterprise Linux 7' {
linux grub2-ppc64/vmlinuz ro ip=dhcp
inst.repo=http://10.32.5.1/mnt/archive/RHEL-7/7.6-
Beta/Server/ppc64/os/
initrd grub2-ppc64/initrd.img
}
IMPORTANT
The inst.repo= Anaconda option, shown in the example above, must always
be used to specify the installation program's image as well as the installation
source. Without this option, the installation program will be unable to boot. For
more information about boot options for Anaconda, see Section 22.1,
“Configuring the Installation System at the Boot Menu”.
5. Configure your DHCP server to use the boot images packaged with GRUB2. If you do not have
one installed, see the Red Hat Enterprise Linux 7 Networking Guide for instructions.
A sample configuration in the /etc/dhcp/dhcpd.conf file might look like:
subnet 192.168.0.1 netmask 255.255.255.0 {
allow bootp;
option routers 192.168.0.5;
group { #BOOTP POWER clients
filename "boot/grub2/powerpc-ieee1275/core.elf";
host client1 {
hardware ethernet 01:23:45:67:89:ab;
fixed-address 192.168.0.112;
}
}
}
CHAPTER 23. PREPARING FOR A NETWORK INSTALLATION
341

Adjust the sample parameters (subnet, netmask, routers, fixed-address and hardware
ethernet) to fit your network configuration. Also note the filename parameter; this is the file
name which was output by the grub2-mknetdir command earlier in the procedure.
6. Finally, start and enable the services:
The dhcpd service:
# systemctl start dhcpd
# systemctl enable dhcpd
The xinetd service that manages the tftpd service:
# systemctl start xinetd
# systemctl enable xinetd
After finishing this procedure, the PXE boot server is ready to serve PXE clients. You can now follow the
steps described in Chapter 12, Booting the Installation on IBM Power Systems to boot your
Power Systems client from this server.
Additional information about setting up network boot for IBM Power Systems clients can be found in the
Netbooting on POWER - An Introduction at the IBM DeveloperWorks website.
Installation Guide
342

CHAPTER 24. USING VNC
The graphical installation interface is the recommended method of installing Red Hat Enterprise Linux.
However, in some cases, accessing the graphical interface directly is difficult or impossible. Many
enterprise systems, notably servers (IBM Power Systems and IBM Z), lack the capability to connect a
display and a keyboard, making VNC a necessity for manual (non-Kickstart) installations.
To allow manual installations on headless systems (systems without a directly connected display,
keyboard and mouse), the Anaconda installation program includes a Virtual Network Computing (VNC)
installation which allows the graphical mode of the installation program to run locally, but display on a
system connected to the network. The VNC installation provides you with the full range of installation
options, even in situations where the system lacks a display or input devices.
This chapter provides instructions on activating VNC mode on the installation system and connecting to
it using a VNC viewer.
24.1. INSTALLING A VNC VIEWER
Performing a VNC installation requires a VNC viewer running on your workstation or another terminal
computer. VNC viewers are available in the repositories of most Linux distributions; free VNC viewers
are also available for other operating systems such as Windows. On Linux systems, use your package
manager to search for a viewer for your distribution.
The following VNC viewers are available in Red Hat Enterprise Linux:
TigerVNC - A basic viewer independent of your desktop environment. Installed as the tigervnc
package.
Vinagre - A viewer for the GNOME desktop environment. Installed as the vinagre package.
KRDC - A viewer integrated with the KDE desktop environment. Installed as the kdenetwork-
krdc package.
To install any of the viewers listed above, execute the following command as root:
# yum install package
Replace package with the package name of the viewer you want to use (for example, tigervnc).
NOTE
Procedures in this chapter assume you are using TigerVNC as your VNC viewer. Specific
instructions for other viewers can differ, but the general principles still apply.
24.2. PERFORMING A VNC INSTALLATION
The Anaconda installation program offers two modes for VNC installation. The modes are Direct Mode
and Connect Mode. Direct Mode requires the VNC viewer to initiate the connection to the system being
installed. Connect Mode requires the system being installed to initiate the connection to the VNC viewer.
Once the connection is established, the two modes do not differ. The mode you select depends on the
configuration in your environment.
Direct Mode
In this mode, Anaconda is configured to start the installation and wait for a VNC viewer before
CHAPTER 24. USING VNC
343
proceeding. The IP address and port are displayed on the system being installed. Using this
information, you can connect to the installation system from a different computer. For this reason you
must have visual and interactive access to the system being installed.
Connect Mode
In this mode, the VNC viewer is started on the remote system in listening mode. The VNC viewer
waits for an incoming connection on a specified port. Then, Anaconda is started and the host name
and port number are provided using a boot option or a Kickstart command. When the installation
begins, the installation program establishes a connection with the listening VNC viewer using the
specified host name and port number. For this reason, your remote system must be able to accept
incoming network connections.
Considerations for choosing a VNC installation mode
Visual and Interactive access to the system
If visual and interactive access to the system being installed is not available, then you must
use Connect Mode.
Network Connection Rules and Firewalls
If the system being installed is not allowed inbound connections by a firewall, then you must
use Connect Mode or disable the firewall. Disabling a firewall can have security implications.
If the remote system running the VNC viewer is not allowed incoming connections by a
firewall, then you must use Direct Mode, or disable the firewall. Disabling a firewall can have
security implications. See the Red Hat Enterprise Linux 7 Security Guide for information
about configuring the firewall.
NOTE
You must specify custom boot options to start a VNC installation. The exact way to do this
differs depending on the system architecture. For architecture-specific instructions about
editing boot options, see:
Section 7.2, “The Boot Menu” for 64-bit AMD, Intel, and ARM systems
Section 12.1, “The Boot Menu” for IBM Power Systems servers
Chapter 20, Parameter and Configuration Files on IBM Z for IBM Z
24.2.1. Installing in VNC Direct Mode
The Direct Mode expects the VNC viewer to initiate a connection to the system being installed.
Anaconda asks you to initiate this connection.
Procedure 24.1. Starting VNC in Direct Mode
1. Run the VNC viewer of your choice on the workstation you are using to connect to the system
being installed. For example, if you use TigerVNC:
Installation Guide
344

Figure 24.1. TigerVNC Connection Details
2. Boot the installation system and wait for the boot menu to appear. In the menu, press the Tab
key to edit boot options. Append the inst.vnc option to the end of the command line.
Optionally, if you want to restrict VNC access to the installation system, add the
inst.vncpassword=PASSWORD boot option as well. Replace PASSWORD with the password
you want to use for the installation. The VNC password must be between 6 and 8 characters
long.
IMPORTANT
Use a temporary password for the inst.vncpassword= option. It should not be
a real or root password you use on any system.
CHAPTER 24. USING VNC
345

Figure 24.2. Adding VNC Boot Options on AMD, Intel, and ARM Systems
3. Press Enter to start the installation. The system initializes the installation program and starts
the necessary services. When the system is ready, you get a message on the screen similar to
the following:
13:14:47 Please manually connect your VNC viewer to
192.168.100.131:1 to begin the install.
Note the IP address and port number (in the above example, 192.168.100.131:1).
4. On the system running the VNC Viewer, enter the IP address and port number obtained in the
previous step into the Connection Details dialog in the same format as it was displayed on
the screen by Anaconda. Then, click Connect. The VNC viewer connects to the installation
system. If you set up a VNC password, enter it when prompted and click OK.
For further details about using a VNC client, see the corresponding section in the Red Hat
Enterprise Linux 7 System Administrator's Guide.
After you finish the procedure, a new window opens with the VNC connection established, displaying the
installation menu. In this window, you can use the Anaconda graphical interface the same way you
would use it when installing directly on the system.
You can proceed with:
Chapter 8, Installing Using Anaconda for 64-bit AMD, Intel, and ARM systems
Chapter 13, Installing Using Anaconda for IBM Power Systems servers
Chapter 17, Installing Using Anaconda for IBM Z
Installation Guide
346

24.2.2. Installing in VNC Connect Mode
In Connect Mode, the system being installed initiates a connection to the VNC viewer running on a
remote system. Before you start, make sure the remote system is configured to accept an incoming
connection on the port you want to use for VNC. The exact way to make sure the connection is not
blocked depends on your network and on your workstation's configuration. Information about configuring
the firewall is available in the Red Hat Enterprise Linux 7 Security Guide.
Procedure 24.2. Starting VNC in Connect Mode
1. Start the VNC viewer on the client system in listening mode. For example, on Red Hat
Enterprise Linux using TigerVNC, execute the following command:
$ vncviewer -listen PORT
Replace PORT with the port number you want to use for the connection.
The terminal displays a message similar to the following example:
Example 24.1. TigerVNC Viewer Listening
TigerVNC Viewer 64-bit v1.3.0 (20130924)
Built on Sep 24 2013 at 16:32:56
Copyright (C) 1999-2011 TigerVNC Team and many others (see
README.txt)
See http://www.tigervnc.org for information on TigerVNC.
Thu Feb 20 15:23:54 2014
main: Listening on port 5901
The VNC viewer is now ready and waiting for an incoming connection from the installation
system.
2. Boot the system being installed and wait for the boot menu to appear. In the menu, press the
Tab key to edit boot options. Append the following options to the command line:
inst.vnc inst.vncconnect=HOST:PORT
Replace HOST with the IP address of the system running the listening VNC viewer, and PORT
with the port number that the VNC viewer is listening on.
3. Press Enter to start the installation. The system initializes the installation program and starts
the necessary services. Once the initialization is finished, Anaconda attempts to connect to the
IP address and port you provided in the previous step.
When the connection is successfully established, a new window opens on the system running
the VNC viewer, displaying the installation menu. In this window, you can use the Anaconda
graphical interface the same way you would use it when installing directly on the system.
Afer you finish the procedure, you can proceed with:
Chapter 8, Installing Using Anaconda for 64-bit AMD, Intel, and ARM systems
Chapter 13, Installing Using Anaconda for IBM Power Systems servers
CHAPTER 24. USING VNC
347

Chapter 17, Installing Using Anaconda for IBM Z
24.3. KICKSTART CONSIDERATIONS
Commands for using VNC are also available in Kickstart installations. Using only the vnc command
results in an installation using Direct Mode. Additional options are available to set up an installation using
Connect Mode. For more information about the vnc command and options used in Kickstart files, see
Section 26.3.1, “Kickstart Commands and Options”.
Installation Guide
348

CHAPTER 25. HEADLESS SYSTEMS
When installing headless systems, you can only choose between an automated Kickstart installation and
an interactive VNC installation using Connect Mode. For more information about automated Kickstart
installation, see Section 26.3.1, “Kickstart Commands and Options”. The general process for interactive
VNC installation is described below.
1. Set up a network boot server to start the installation. Information about installing and performing
basic configurating of a network boot server can be found in Chapter 23, Preparing for a
Network Installation.
2. Configure the server to use the boot options for a Connect Mode VNC installation. For
information on these boot options, see Section 24.2.2, “Installing in VNC Connect Mode”.
3. Follow the procedure for VNC Installation using Connect Mode as described in the procedure
Procedure 24.2, “Starting VNC in Connect Mode”. However, when directed to boot the system,
boot it from the network server instead of local media.
CHAPTER 25. HEADLESS SYSTEMS
349

CHAPTER 26. KICKSTART INSTALLATIONS
26.1. WHAT ARE KICKSTART INSTALLATIONS?
Kickstart installations offer a means to automate the installation process, either partially or fully. Kickstart
files contain answers to all questions normally asked by the installation program, such as what time zone
you want the system to use, how the drives should be partitioned, or which packages should be installed.
Providing a prepared Kickstart file when the installation begins therefore allows you to perform the
installation automatically, without need for any intervention from the user. This is especially useful when
deploying Red Hat Enterprise Linux on a large number of systems at once.
Kickstart files can be kept on a single server system and read by individual computers during the
installation. This installation method can support the use of a single Kickstart file to install Red Hat
Enterprise Linux on multiple machines, making it ideal for network and system administrators.
All Kickstart scripts and the log files of their execution are stored in the /tmp directory to assist with
debugging installation failures.
NOTE
In previous versions of Red Hat Enterprise Linux, Kickstart allowed for upgrading the
system as well. In Red Hat Enterprise Linux 7, this functionality has been removed and
system upgrades are instead handled by specialized tools. See Chapter 29, Upgrading
Your Current System for details.
26.2. HOW DO YOU PERFORM A KICKSTART INSTALLATION?
Kickstart installations can be performed using a local DVD, a local hard drive, NFS, FTP, HTTP, or
HTTPS.
To use Kickstart, you must:
1. Create a Kickstart file.
2. Make the Kickstart file available on removable media, a hard drive or a network location.
3. Create boot media, which will be used to begin the installation.
4. Make the installation source available.
5. Start the Kickstart installation.
This chapter explains these steps in detail.
26.2.1. Creating a Kickstart File
The Kickstart file itself is a plain text file, containing keywords listed in Section 26.3, “Kickstart Syntax
Reference”, which serve as directions for the installation. Any text editor able to save files as ASCII text,
such as Gedit or vim on Linux systems or Notepad on Windows systems, can be used to create and
edit Kickstart files. The file name of your Kickstart configuration does not matter; however, it is
recommended to use a simple name as you will need to specify this name later in other configuration
files or dialogs.
The recommended approach to creating Kickstart files is to perform a manual installation on one system
Installation Guide
350
first. After the installation completes, all choices made during the installation are saved into a file named
anaconda-ks.cfg, located in the /root/ directory on the installed system. You can then copy this file,
make any changes you need, and use the resulting configuration file in further installations.
IMPORTANT
If you have a Red Hat Customer Portal account, you can use the Kickstart
Configuration Tool available at https://access.redhat.com/labs/kickstartconfig/ in the
Customer Portal Labs. This tool will walk you through basic configuration and allows you
to download the resulting Kickstart file. However, the tool currently does not supported
any advanced partitioning.
Kickstart Configurator, the graphical tool for creating Kickstart files, is still available.
However, it is no longer being updated and it does not reflect changes in Kickstart syntax
between Red Hat Enterprise Linux 6 and 7.
When creating a Kickstart file, keep in mind the following:
Sections must be specified in order. Items within the sections do not have to be in a specific
order unless otherwise specified. The section order is:
Command section - See Section 26.3.1, “Kickstart Commands and Options” for a list of
Kickstart options. You must include the required options.
Add-ons for Anaconda which expand the functionality of the installer can also be used in the
command section by using the %addon addon_name command. See Section 26.3.7,
“Kickstart Add-ons” for details.
The %packages section - See Section 26.3.2, “Package Selection” for details.
The %pre and %post sections, and the %onerror section - these sections can be in any
order and are not required. See Section 26.3.3, “Pre-installation Script”, Section 26.3.5,
“Post-installation Script” and Section 26.3.6, “Kickstart error handling” for details.
IMPORTANT
Sections %addon, %packages, %onerror, %pre and %post must end with
%end, otherwise the installation program will refuse the Kickstart file.
Items that are not required can be omitted.
Omitting any required item results in the installation program prompting the user for an answer to
the related item, just as the user would be prompted during a typical installation. Once the
answer is given, the installation continues unattended (unless it finds another missing item).
Lines starting with a pound (also known as number) sign (#) are treated as comments and are
ignored.
26.2.2. Maintaining the Kickstart File
26.2.2.1. Verifying the Kickstart File
When creating or customizing your Kickstart file, it is useful to verify that it is valid before attempting to
CHAPTER 26. KICKSTART INSTALLATIONS
351

use it in an installation. Red Hat Enterprise Linux 7 includes the ksvalidator command line utility which
can be used to do this. This tool is a part of the pykickstart package. To install this package, execute the
following command as root:
# yum install pykickstart
After installing the package, you can validate a Kickstart file using the following command:
$ ksvalidator /path/to/kickstart.ks
Replace /path/to/kickstart.ks with the path to the Kickstart file you want to verify.
For more information about this tool, see the ksvalidator(1) man page.
IMPORTANT
Keep in mind that the validation tool has its limitations. The Kickstart file can be very
complicated; ksvalidator can make sure the syntax is correct and that the file does not
include deprecated options, but it cannot guarantee the installation will be successful. It
also does not attempt to validate the %pre, %post and %packages sections of the
Kickstart file.
26.2.2.2. Changes in Kickstart Syntax
While the general principles of Kickstart installations tend to stay the same, the commands and options
can change between major releases of Red Hat Enterprise Linux. You can use the ksverdiff
command to display the differences between two versions of the Kickstart syntax. This is useful when
updating an existing Kickstart file to be used with a new release. To display a list of changes in syntax
between Red Hat Enterprise Linux 6 and 7, use the following command:
$ ksverdiff -f RHEL6 -t RHEL7
The -f option specifies the release to start the comparison with, and the -t option to specify the release
to end with. For additional information, see the ksverdiff(1) man page.
26.2.3. Making the Kickstart File Available
A Kickstart file must be placed in one of the following locations:
On removable media, such as a DVD or USB flash drive
On a hard drive connected to the installation system
On a network share reachable from the installation system
Normally, a Kickstart file is copied to removable media or a hard drive, or made available on the network.
Placing the file in a network location complements the usual approach to Kickstart installations, which is
also network-based: the system is booted using a PXE server, the Kickstart file is downloaded from a
network share, and software packages specified in the file are downloaded from remote repositories.
Making the Kickstart file available and reachable from the installation system is exactly the same as
making the installation source available, only with the Kickstart file instead of the installation ISO image
or tree. For full procedures, see Section 3.3, “Preparing Installation Sources”.
Installation Guide
352

26.2.4. Making the Installation Source Available
The Kickstart installation must access an installation source in order to install the packages needed by
your system. The source can be either the full Red Hat Enterprise Linux installation DVD ISO image, or
an installation tree. An installation tree is a copy of the binary Red Hat Enterprise Linux DVD with the
same directory structure.
If you are performing a DVD-based installation, insert the Red Hat Enterprise Linux installation DVD into
the computer before starting the Kickstart installation. See Section 3.3.1, “Installation Source on a DVD”
for information about using a Red Hat Enterprise Linux DVD as the installation source.
If you are performing a hard drive installation (using either a hard drive or an USB flash drive), make
sure the ISO images of the binary Red Hat Enterprise Linux DVD are on a hard drive in the computer.
See Section 3.3.2, “Installation Source on a Hard Drive” for details about using a hard drive as the
installation source.
If you are performing a network-based (NFS, FTP or HTTP) installation, you must make the installation
tree or the binary DVD ISO image (depending on the protocol used) available over the network. See
Section 3.3.3, “Installation Source on a Network” for details.
26.2.5. Starting the Kickstart Installation
NOTE
To load your Kickstart file automatically without having to specify the inst.ks= boot
option, name the file ks.cfg and place it on a storage volume labeled OEMDRV.
To start a Kickstart installation, use the boot option inst.ks=location when booting the installation
system, replacing location with the location of your Kickstart file. The exact way to specify the boot option
depends on your system's architecture - see Chapter 22, Boot Options for details.
64-bit AMD, Intel and ARM systems and IBM Power Systems servers have the ability to boot using a
PXE server. When you configure the PXE server, you can add the boot option into the boot loader
configuration file, which in turn allows you to start the installation automatically. Using this approach, it is
possible to automate the installation completely, including the boot process. For information about setting
up a PXE server, see Chapter 23, Preparing for a Network Installation.
Procedures in this section assume that you already have a Kickstart file ready in a location accessible
from the installation system, as well as boot media or a PXE server which can be used to boot the
system and begin the installation. The procedures are intended as a general reference; some steps differ
based on your system's architecture, and not all options are available on all architectures (for example,
you cannot use PXE boot on IBM Z).
26.2.5.1. Starting the Kickstart Installation Manually
This section explains how to start a Kickstart installation manually, which means some user interaction
(adding boot options at the boot: prompt) will be required.
Procedure 26.1. Starting the Kickstart Installation Using a Boot Option
1. Boot the system using either local media (a CD, DVD, or a USB flash drive). For architecture-
specific instructions, see:
CHAPTER 26. KICKSTART INSTALLATIONS
353
Chapter 7, Booting the Installation on 64-bit AMD, Intel, and ARM systems for 64-bit AMD,
Intel, and ARM systems
Chapter 12, Booting the Installation on IBM Power Systems for IBM Power Systems servers
Chapter 16, Booting the Installation on IBM Z for IBM Z
2. At the boot prompt, specify the inst.ks= boot option and the location of the Kickstart file. If the
Kickstart file is in a network location, you must also configure the network using the ip= option.
In some cases, the inst.repo= option is also necessary in order to access a software source
from which necessary packages will be installed.
For details about boot options and valid syntax, see Chapter 22, Boot Options.
3. Start the installation by confirming your added boot options.
The installation begins now, using the options specified in the Kickstart file. If the Kickstart file is valid and
contains all required commands, the installation is completely automated from this point forward.
26.2.5.2. Starting the Kickstart Installation Automatically
The following procedure explains how to completely automate the Kickstart installation, using a network
boot (PXE) server and a properly configured boot loader. If you follow this procedure, you only need to
turn on the system; no other interaction will be required from that moment until the installation finishes.
NOTE
PXE installations are not available on IBM Z.
Procedure 26.2. Starting the Kickstart Installation by Editing Boot Loader Configuration
1. Open the boot loader configuration file on your PXE server, and add the inst.ks= boot option
to the appropriate line. The name of the file and its syntax depends on your system's architecture
and hardware:
On AMD64 and Intel 64 systems with BIOS, the file name can be either default or based
on your system's IP address. In this case, add the inst.ks= option to the append line in
the installation entry. A sample append line in the configuration file looks similar to the
following:
append initrd=initrd.img
inst.ks=http://10.32.5.1/mnt/archive/RHEL-
7/7.x/Server/x86_64/kickstarts/ks.cfg
On systems using the GRUB2 boot loader (64-bit AMD, Intel, and ARM systems with UEFI
firmware and IBM Power Systems servers), the file name will be grub.cfg. In this file,
append the inst.ks= option to the kernel line in the installation entry. A sample kernel
line in the configuration file will look similar to the following:
kernel vmlinuz inst.ks=http://10.32.5.1/mnt/archive/RHEL-
7/7.x/Server/x86_64/kickstarts/ks.cfg
2. Boot the installation from the network server. For architecture-specific instructions, see:
Installation Guide
354

Section 7.1.2, “Booting from the Network Using PXE” for 64-bit AMD, Intel, and ARM
systems
Section 12.3, “Booting from the Network Using an Installation Server” for IBM
Power Systems servers
The installation begins now, using the installation options specified in the Kickstart file. If the Kickstart file
is valid and contains all required commands, the installation is completely automated.
26.3. KICKSTART SYNTAX REFERENCE
26.3.1. Kickstart Commands and Options
NOTE
If an option is followed by an equals mark (=), a value must be specified after it. In the
example commands, options in square brackets ([ ]) are optional arguments for the
command.
auth or authconfig (optional)
Sets up the authentication options for the system using the authconfig command, which can also
be run on the command line after the installation finishes. See the authconfig(8) manual page and
the authconfig --help command for more details. Passwords are shadowed by default.
WARNING
When using OpenLDAP with the SSL protocol for security, make sure that the
SSLv2 and SSLv3 protocols are disabled in the server configuration. This is due
to the POODLE SSL vulnerability (CVE-2014-3566). See
https://access.redhat.com/solutions/1234843 for details.
--enablenis - Turns on NIS support. By default, --enablenis uses whatever domain it
finds on the network. A domain should almost always be set by hand with the --
nisdomain= option.
--nisdomain= - NIS domain name to use for NIS services.
--nisserver= - Server to use for NIS services (broadcasts by default).
--useshadow or --enableshadow - Use shadow passwords.
--enableldap - Turns on LDAP support in /etc/nsswitch.conf, allowing your system
to retrieve information about users (for example, their UIDs, home directories, and shells)
from an LDAP directory. To use this option, you must install the nss-pam-ldapd package.
You must also specify a server and a base DN (distinguished name) with --ldapserver=
and --ldapbasedn=.
CHAPTER 26. KICKSTART INSTALLATIONS
355

--enableldapauth - Use LDAP as an authentication method. This enables the pam_ldap
module for authentication and changing passwords, using an LDAP directory. To use this
option, you must have the nss-pam-ldapd package installed. You must also specify a server
and a base DN with --ldapserver= and --ldapbasedn=. If your environment does not
use TLS (Transport Layer Security), use the --disableldaptls switch to ensure that the
resulting configuration file works.
--ldapserver= - If you specified either --enableldap or --enableldapauth, use this
option to specify the name of the LDAP server to use. This option is set in the
/etc/ldap.conf file.
--ldapbasedn= - If you specified either --enableldap or --enableldapauth, use this
option to specify the DN in your LDAP directory tree under which user information is stored.
This option is set in the /etc/ldap.conf file.
--enableldaptls - Use TLS (Transport Layer Security) lookups. This option allows LDAP
to send encrypted user names and passwords to an LDAP server before authentication.
--disableldaptls - Do not use TLS (Transport Layer Security) lookups in an
environment that uses LDAP for authentication.
--enablekrb5 - Use Kerberos 5 for authenticating users. Kerberos itself does not know
about home directories, UIDs, or shells. If you enable Kerberos, you must make users'
accounts known to this workstation by enabling LDAP, NIS, or Hesiod or by using the
useradd command. If you use this option, you must have the pam_krb5 package installed.
--krb5realm= - The Kerberos 5 realm to which your workstation belongs.
--krb5kdc= - The KDC (or KDCs) that serve requests for the realm. If you have multiple
KDCs in your realm, use a comma-separated list without spaces.
--krb5adminserver= - The KDC in your realm that is also running kadmind. This server
handles password changing and other administrative requests. This server must be run on
the master KDC if you have more than one KDC.
--enablehesiod - Enables Hesiod support for looking up user home directories, UIDs, and
shells. More information on setting up and using Hesiod on your network is in
/usr/share/doc/glibc-2.x.x/README.hesiod, which is included in the glibc
package. Hesiod is an extension of DNS that uses DNS records to store information about
users, groups, and various other items.
--hesiodlhs and --hesiodrhs - The Hesiod LHS (left-hand side) and RHS (right-hand
side) values, set in /etc/hesiod.conf. The Hesiod library uses these values to search
DNS for a name, similar to the way that LDAP uses a base DN.
To look up user information for the user name jim, the Hesiod library looks up
jim.passwdLHSRHS, which should resolve to a TXT record that contains a string identical to
an entry for that user in the passwd file: jim:*:1001:1001:Jungle
Jim:/home/jim:/bin/bash. To look up groups, the Hesiod library looks up
jim.groupLHSRHS instead.
To look up users and groups by number, make 1001.uid a CNAME for jim.passwd, and
1001.gid a CNAME for jim.group. Note that the library does not place a period (.) in
front of the LHS and RHS values when performing a search. Therefore, if the LHS and RHS
Installation Guide
356

values need to have a period placed in front of them, you must include the period in the
values you set for --hesiodlhs and --hesiodrhs.
--enablesmbauth - Enables authentication of users against an SMB server (typically a
Samba or Windows server). SMB authentication support does not know about home
directories, UIDs, or shells. If you enable SMB, you must make users' accounts known to the
workstation by enabling LDAP, NIS, or Hesiod or by using the useradd command.
--smbservers= - The name of the servers to use for SMB authentication. To specify more
than one server, separate the names with commas (,).
--smbworkgroup= - The name of the workgroup for the SMB servers.
--enablecache - Enables the nscd service. The nscd service caches information about
users, groups, and various other types of information. Caching is especially helpful if you
choose to distribute information about users and groups over your network using NIS, LDAP,
or Hesiod.
--passalgo= - Specify sha256 to set up the SHA-256 hashing algorithm or sha512 to set
up the SHA-512 hashing algorithm.
autopart (optional)
Automatically creates partitions: a root (/) partition (1 GB or larger), a swap partition, and an
appropriate /boot partition for the architecture. On large enough drives (50 GB and larger), this also
creates a /home partition.
IMPORTANT
The autopart option cannot be used together with the part/partition, raid,
logvol, or volgroup options in the same Kickstart file.
--type= - Selects one of the predefined automatic partitioning schemes you want to use.
Accepts the following values:
lvm: The LVM partitioning scheme.
btrfs: The Btrfs partitioning scheme.
plain: Regular partitions with no LVM or Btrfs.
thinp: The LVM Thin Provisioning partitioning scheme.
For a description of the available partition schemes, see Section 8.14.4.1.1, “File System
Types”.
--fstype= - Selects one of the available file system types. The available values are ext2,
ext3, ext4, xfs, and vfat. The default file system is xfs. For information about these file
systems, see Section 8.14.4.1.1, “File System Types”.
--nohome - Disables automatic creation of the /home partition.
--nolvm - Do not use LVM or Btrfs for automatic partitioning. This option is equal to --
type=plain.
CHAPTER 26. KICKSTART INSTALLATIONS
357
--encrypted - Encrypts all partitions. This is equivalent to checking the Encrypt
partitions check box on the initial partitioning screen during a manual graphical
installation.
NOTE
When encrypting one or more partitions, Anaconda attempts to gather 256
bits of entropy to ensure the partitions are encrypted securely. Gathering
entropy can take some time - the process will stop after a maximum of 10
minutes, regardless of whether sufficient entropy has been gathered.
The process can be sped up by interacting with the installation system (typing
on the keyboard or moving the mouse). If you are installing in a virtual
machine, you can also attach a virtio-rng device (a virtual random number
generator) to the guest as described in the Red Hat Enterprise Linux 7
Virtualization Deployment and Administration Guide.
--passphrase= - Provides a default system-wide passphrase for all encrypted devices.
--escrowcert=URL_of_X.509_certificate - Stores data encryption keys of all
encrypted volumes as files in /root, encrypted using the X.509 certificate from the URL
specified with URL_of_X.509_certificate. The keys are stored as a separate file for each
encrypted volume. This option is only meaningful if --encrypted is specified.
--backuppassphrase - Adds a randomly-generated passphrase to each encrypted
volume. Store these passphrases in separate files in /root, encrypted using the X.509
certificate specified with --escrowcert. This option is only meaningful if --escrowcert is
specified.
--cipher= - Specifies the type of encryption to use if the Anaconda default aes-xts-
plain64 is not satisfactory. You must use this option together with the --encrypted
option; by itself it has no effect. Available types of encryption are listed in the Red Hat
Enterprise Linux 7 Security Guide, but Red Hat strongly recommends using either aes-xts-
plain64 or aes-cbc-essiv:sha256.
NOTE
It is recommended to use the autopart --nohome Kickstart option when
installing on a single FBA DASD of the CMS type. This ensures that the
installer does not create a separate /home partition. The installation then
proceeds successfully.
autostep (optional)
Normally, Kickstart installations skip unnecessary screens. This option makes the installation program
step through every screen, displaying each briefly. This option should not be used when deploying a
system because it can disrupt package installation.
--autoscreenshot - Take a screenshot at every step during installation. These
screenshots are stored in /tmp/anaconda-screenshots/ during the installation, and
after the installation finishes you can find them in /root/anaconda-screenshots.
Each screen is only captured right before the installer switches to the next one. This is
important, because if you do not use all required Kickstart options and the installation
Installation Guide
358
therefore does not begin automatically, you can go to the screens which were not
automatically configured, perform any configuration you want. Then, when you click Done to
continue, the screen is captured including the configuration you just provided.
bootloader (required)
Specifies how the boot loader should be installed.
IMPORTANT
Red Hat recommends setting up a boot loader password on every system. An
unprotected boot loader can allow a potential attacker to modify the system's boot
options and gain unauthorized access to the system.
IMPORTANT
Device names in the sdX (or /dev/sdX) format are not guaranteed to be consistent
across reboots, which can complicate usage of some Kickstart commands. When a
command calls for a device node name, you can instead use any item from
/dev/disk. For example, instead of:
part / --fstype=xfs --onpart=sda1
You could use an entry similar to one of the following:
part / --fstype=xfs --onpart=/dev/disk/by-path/pci-
0000:00:05.0-scsi-0:0:0:0-part1
part / --fstype=xfs --onpart=/dev/disk/by-id/ata-
ST3160815AS_6RA0C882-part1
This way the command will always target the same storage device. This is especially
useful in large storage environments. See the chapter about persistent storage device
naming in the Red Hat Enterprise Linux 7 Storage Administration Guide for more in-
depth information about different ways to consistently refer to storage devices.
NOTE
In some cases, a special partition is required to install the boot loader on 64-bit AMD,
Intel, and ARM systems. The type and size of this partition depends on whether the
disk you are installing the boot loader to uses the Master Boot Record (MBR) or a
GUID Partition Table (GPT) schema. For more information, see Section 8.14.1, “Boot
Loader Installation”.
--append= - Specifies additional kernel parameters. To specify multiple parameters,
separate them with spaces. For example:
bootloader --location=mbr --append="hdd=ide-scsi ide=nodma"
The rhgb and quiet parameters are always used, even if you do not specify them here or
do not use the --append= command at all.
CHAPTER 26. KICKSTART INSTALLATIONS
359

This option is useful for disabling mechanisms which were implemented to mitigate the
Meltdown and Spectre speculative execution vulnerabilities found in most modern
processors (CVE-2017-5754, CVE-2017-5753, and CVE-2017-5715). In some cases, these
mechanisms may be unnecessary, and keeping them enabled causes decreased
performance with no improvement in security. To disable these mechanisms, add the options
to do so into your Kickstart file - for example, bootloader --append="nopti noibrs
noibpb" on AMD64/Intel 64 systems.
WARNING
Ensure your system is not at risk of attack before disabling any of the
vulnerability mitigation mechanisms. See the Red Hat vulnerability
response article for information about the Meltdown and Spectre
vulnerabilities.
--boot-drive= - Specifies which drive the boot loader should be written to, and therefore
which drive the computer will boot from. If you use a multipath device as the boot drive,
specify only one member of the device.
IMPORTANT
The --boot-drive= option is currently being ignored in Red Hat
Enterprise Linux installations on IBM Z systems using the zipl boot loader.
When zipl is installed, it determines the boot drive on its own.
--leavebootorder - The installer will add Red Hat Enterprise Linux 7 to the top of the list
of installed systems in the boot loader, and preserve all existing entries as well as their order.
--driveorder= - Specifies which drive is first in the BIOS boot order. For example:
bootloader --driveorder=sda,hda
--location= - Specifies where the boot record is written. Valid values are the following:
mbr - The default option. Depends on whether the drive uses the Master Boot Record
(MBR) or GUID Partition Table (GPT) scheme:
On a GPT-formatted disk, this option installs stage 1.5 of the boot loader into the
BIOS boot partition.
On an MBR-formatted disk, stage 1.5 is installed into the empty space between the
MBR and the first partition.
partition - Install the boot loader on the first sector of the partition containing the
kernel.
none - Do not install the boot loader.
In most cases, this option does not need to be specified.
Installation Guide
360

--password= - If using GRUB2, sets the boot loader password to the one specified with this
option. This should be used to restrict access to the GRUB2 shell, where arbitrary kernel
options can be passed.
If a password is specified, GRUB2 also asks for a user name. The user name is always
root.
--iscrypted - Normally, when you specify a boot loader password using the --
password= option, it is stored in the Kickstart file in plain text. If you want to encrypt the
password, use this option and an encrypted password.
To generate an encrypted password, use the grub2-mkpasswd-pbkdf2 command, enter
the password you want to use, and copy the command's output (the hash starting with
grub.pbkdf2) into the Kickstart file. An example bootloader Kickstart entry with an
encrypted password looks similar to the following:
bootloader --iscrypted --
password=grub.pbkdf2.sha512.10000.5520C6C9832F3AC3D149AC0B24BE69E2
D4FB0DBEEDBD29CA1D30A044DE2645C4C7A291E585D4DC43F8A4D82479F8B95CA4
BA4381F8550510B75E8E0BB2938990.C688B6F0EF935701FF9BD1A8EC7FE5BD233
3799C98F28420C5CC8F1A2A233DE22C83705BB614EA17F3FDFDF4AC2161CEA3384
E56EB38A2E39102F5334C47405E
--timeout= - Specifies the amount of time the boot loader waits before booting the default
option (in seconds).
--default= - Sets the default boot image in the boot loader configuration.
--extlinux - Use the extlinux boot loader instead of GRUB2. This option only works on
systems supported by extlinux.
--disabled — This option is a stronger version of --location=none. While --
location=none simply disables boot loader installation, --disabled disables boot loader
installation and also disables installation of the package containing the boot loader, thus
saving space.
btrfs (optional)
Create a Btrfs volume or subvolume. For a volume, the syntax is:
btrfs mntpoint --data=level --metadata=level --label=label partitions
One or more partitions can be specified in partitions. When specifying more than one partitions, the
entries must be separated by a single space. See Example 26.1, “Creating Btrfs Volumes and
Subvolumes” for a demonstration.
For a subvolume, the syntax is:
btrfs mntpoint --subvol --name=path parent
parent should be the identifier of the subvolume's parent volume and mntpoint is the location where
the file system is mounted.
--data= - RAID level to use for file system data (such as 0, 1, or 10). This parameter is
optional, has no meaning for subvolumes, and requires more than one physical disk.
CHAPTER 26. KICKSTART INSTALLATIONS
361

--metadata= - RAID level to use for file system/volume metadata (such as 0, 1, or 10).
Optional. This option has no meaning for subvolumes and requires more than one physical
disk.
--label= - Specify a label for the Btrfs file system. If the given label is already in use by
another file system, a new label is created. This option has no meaning for subvolumes.
--noformat or --useexisting - Use an existing Btrfs volume (or subvolume) and do not
reformat the file system.
--mkfsoptions= - Specifies additional parameters to be passed to the program that makes
a filesystem on this partition. No processing is done on the list of arguments, so they must be
supplied in a format that can be passed directly to the mkfs program. This means multiple
options should be comma-separated or surrounded by double quotes, depending on the
filesystem.
The following example shows how to create a Btrfs volume from member partitions on three disks
with subvolumes for / and /home. The main volume is not mounted or used directly in this example.
Example 26.1. Creating Btrfs Volumes and Subvolumes
part btrfs.01 --size=6000 --ondisk=sda
part btrfs.02 --size=6000 --ondisk=sdb
part btrfs.03 --size=6000 --ondisk=sdc
btrfs none --data=0 --metadata=1 --label=rhel7 btrfs.01 btrfs.02
btrfs.03
btrfs / --subvol --name=root LABEL=rhel7
btrfs /home --subvol --name=home rhel7
clearpart (optional)
Removes partitions from the system, prior to creation of new partitions. By default, no partitions are
removed.
Installation Guide
362
IMPORTANT
Device names in the sdX (or /dev/sdX) format are not guaranteed to be consistent
across reboots, which can complicate usage of some Kickstart commands. When a
command calls for a device node name, you can instead use any item from
/dev/disk. For example, instead of:
part / --fstype=xfs --onpart=sda1
You could use an entry similar to one of the following:
part / --fstype=xfs --onpart=/dev/disk/by-path/pci-
0000:00:05.0-scsi-0:0:0:0-part1
part / --fstype=xfs --onpart=/dev/disk/by-id/ata-
ST3160815AS_6RA0C882-part1
This way the command will always target the same storage device. This is especially
useful in large storage environments. See the chapter about persistent storage device
naming in the Red Hat Enterprise Linux 7 Storage Administration Guide for more in-
depth information about different ways to consistently refer to storage devices.
NOTE
If the clearpart command is used, then the part --onpart command cannot be
used on a logical partition.
For a detailed example of partitioning including the clearpart command, see Section 26.4.1,
“Advanced Partitioning Example”.
--all - Erases all partitions from the system.
WARNING
This option will erase all disks which can be reached by the installer,
including any attached network storage. Use this option with caution.
You can prevent clearpart from wiping storage you want to preserve
by using the --drives= option and specifying only the drives you want
to clear, by attaching network storage later (for example, in the %post
section of the Kickstart file), or by blacklisting the kernel modules used to
access network storage.
--drives= - Specifies which drives to clear partitions from. For example, the following
clears all the partitions on the first two drives on the primary IDE controller:
clearpart --drives=hda,hdb --all
CHAPTER 26. KICKSTART INSTALLATIONS
363
To clear a multipath device, use the format disk/by-id/scsi-WWID, where WWID is the
world-wide identifier for the device. For example, to clear a disk with WWID
58095BEC5510947BE8C0360F604351918, use:
clearpart --drives=disk/by-id/scsi-
58095BEC5510947BE8C0360F604351918
This format is preferable for all multipath devices, but if errors arise, multipath devices that do
not use logical volume management (LVM) can also be cleared using the format disk/by-
id/dm-uuid-mpath-WWID, where WWID is the world-wide identifier for the device. For
example, to clear a disk with WWID 2416CD96995134CA5D787F00A5AA11017, use:
clearpart --drives=disk/by-id/dm-uuid-mpath-
2416CD96995134CA5D787F00A5AA11017
WARNING
Never specify multipath devices by device names like mpatha. Device
names such as this are not specific to a particular disk. The disk named
/dev/mpatha during installation might not be the one that you expect it
to be. Therefore, the clearpart command could target the wrong disk.
--initlabel - Initializes a disk (or disks) by creating a default disk label for all disks in their
respective architecture that have been designated for formatting (for example, msdos for
x86). Because --initlabel can see all disks, it is important to ensure only those drives
that are to be formatted are connected.
clearpart --initlabel --drives=names_of_disks
For example:
clearpart --initlabel --drives=dasda,dasdb,dasdc
--list= - Specifies which partitions to clear. This option overrides the --all and --
linux options if used. Can be used across different drives. For example:
clearpart --list=sda2,sda3,sdb1
--linux - Erases all Linux partitions.
--none (default) - Do not remove any partitions.
Installation Guide
364
NOTE
Using the clearpart --all command in a Kickstart file to remove all existing
partitions during the installation can cause Anaconda to pause and prompt you for a
confirmation in certain cases. If you need to perform the installation automatically with
no interaction, add the zerombr command to your Kickstart file.
cmdline (optional)
Perform the installation in a completely non-interactive command line mode. Any prompt for
interaction halts the installation. This mode is useful on IBM Z systems with the x3270 terminal. See
Section 20.4, “Parameters for Kickstart Installations”.
IMPORTANT
For a fully automatic installation, you must either specify one of the available modes
(graphical, text, or cmdline) in the Kickstart file, or you must use the console=
boot option as described in Console, Environment and Display Options. If no mode is
specified, the system will prompt you to choose one before continuing.
device (optional)
On most PCI systems, the installation program automatically detects Ethernet and SCSI cards.
However, on older systems and some PCI systems, Kickstart requires a hint to find the proper
devices. The device command, which tells the installation program to install extra modules, uses the
following format:
device moduleName --opts=options
moduleName - Replace with the name of the kernel module which should be installed.
--opts= - Options to pass to the kernel module. For example:
device --opts="aic152x=0x340 io=11"
driverdisk (optional)
Driver disks can be used during Kickstart installations to provide additional drivers not included by
default. You must copy the driver disks's contents to the root directory of a partition on the system's
hard drive. Then, you must use the driverdisk command to specify that the installation program
should look for a driver disk and its location.
driverdisk [partition|--source=url|--biospart=biospart]
Alternatively, a network location can be specified for the driver disk:
driverdisk --source=ftp://path/to/dd.img
driverdisk --source=http://path/to/dd.img
driverdisk --source=nfs:host:/path/to/img
partition - Partition containing the driver disk. Note that the partition must be specified as a full
path (for example, /dev/sdb1), not just the partition name (for example, sdb1).
CHAPTER 26. KICKSTART INSTALLATIONS
365
--source= - URL for the driver disk. NFS locations can be given in the form of
nfs:host:/path/to/img.
--biospart= - BIOS partition containing the driver disk (for example, 82p2).
Driver disks can also be loaded from a hard disk drive or a similar device instead of being loaded over
the network or from initrd. Follow this procedure:
1. Load the driver disk on a hard disk drive, a USB or any similar device.
2. Set the label, for example, DD, to this device.
3. Add the following line to your Kickstart file:
driverdisk LABEL=DD:/e1000.rpm
Replace DD with a specific label and replace dd.rpm with a specific name. Use anything supported
by the inst.repo command instead of LABEL to specify your hard disk drive.
eula (optional)
Use this option to accept the End User License Agreement (EULA) without user interaction.
Specifying this option prevents Initial Setup from prompting you to accept the license agreement
after you finish the installation and reboot the system for the first time. See Chapter 30, Initial Setup
for more information.
--agreed (required) - Accept the EULA. This option must always be used, otherwise the
eula command is meaningless.
fcoe (optional)
Specify which FCoE devices should be activated automatically in addition to those discovered by
Enhanced Disk Drive Services (EDD).
fcoe --nic=name [options]
--nic= (required) - The name of the device to be activated.
--dcb= - Establish Data Center Bridging (DCB) settings.
--autovlan - Discover VLANs automatically.
firewall (optional)
Specify the firewall configuration for the installed system.
firewall --enabled|--disabled device [options]
--enabled or --enable - Reject incoming connections that are not in response to
outbound requests, such as DNS replies or DHCP requests. If access to services running on
this machine is needed, you can choose to allow specific services through the firewall.
--disabled or --disable - Do not configure any iptables rules.
--trust= - Listing a device here, such as em1, allows all traffic coming to and from that
device to go through the firewall. To list more than one device, use --trust em1 --trust
Installation Guide
366

em2. Do NOT use a comma-separated format such as --trust em1, em2.
incoming - Replace with one or more of the following to allow the specified services through
the firewall.
--ssh
--smtp
--http
--ftp
--port= - You can specify that ports be allowed through the firewall using the port:protocol
format. For example, to allow IMAP access through your firewall, specify imap:tcp. Numeric
ports can also be specified explicitly; for example, to allow UDP packets on port 1234
through, specify 1234:udp. To specify multiple ports, separate them by commas.
--service= - This option provides a higher-level way to allow services through the firewall.
Some services (like cups, avahi, and so on.) require multiple ports to be open or other
special configuration in order for the service to work. You can specify each individual port
with the --port option, or specify --service= and open them all at once.
Valid options are anything recognized by the firewall-offline-cmd program in the firewalld
package. If firewalld is running, firewall-cmd --get-services provides a list of
known service names.
firstboot (optional)
Determine whether the Initial Setup application starts the first time the system is booted. If enabled,
the initial-setup package must be installed. If not specified, this option is disabled by default.
--enable or --enabled - Initial Setup is started the first time the system boots.
--disable or --disabled - Initial Setup is not started the first time the system boots.
--reconfig - Enable the Initial Setup to start at boot time in reconfiguration mode. This
mode enables the language, mouse, keyboard, root password, security level, time zone and
networking configuration options in addition to the default ones.
group (optional)
Creates a new user group on the system. If a group with the given name or GID already exists, this
command fails. In addition, the user command can be used to create a new group for the newly
created user.
group --name=name [--gid=gid]
--name= - Provides the name of the group.
--gid= - The group's GID. If not provided, defaults to the next available non-system GID.
graphical (optional)
Perform the installation in graphical mode. This is the default.
CHAPTER 26. KICKSTART INSTALLATIONS
367
IMPORTANT
For a fully automatic installation, you must either specify one of the available modes
(graphical, text, or cmdline) in the Kickstart file, or you must use the console=
boot option as described in Console, Environment and Display Options. If no mode is
specified, the system will prompt you to choose one before continuing.
halt (optional)
Halt the system after the installation has successfully completed. This is similar to a manual
installation, where Anaconda displays a message and waits for the user to press a key before
rebooting. During a Kickstart installation, if no completion method is specified, this option is used as
the default.
The halt command is equivalent to the shutdown -h command.
For other completion methods, see the poweroff, reboot, and shutdown commands.
ignoredisk (optional)
Causes the installation program to ignore the specified disks. This is useful if you use automatic
partitioning and want to be sure that some disks are ignored. For example, without ignoredisk,
attempting to deploy on a SAN-cluster the Kickstart would fail, as the installation program detects
passive paths to the SAN that return no partition table.
ignoredisk --drives=drive1,drive2,...
where driveN is one of sda, sdb,..., hda,... and so on.
IMPORTANT
Device names in the sdX (or /dev/sdX) format are not guaranteed to be consistent
across reboots, which can complicate usage of some Kickstart commands. When a
command calls for a device node name, you can instead use any item from
/dev/disk. For example, instead of:
part / --fstype=xfs --onpart=sda1
You could use an entry similar to one of the following:
part / --fstype=xfs --onpart=/dev/disk/by-path/pci-
0000:00:05.0-scsi-0:0:0:0-part1
part / --fstype=xfs --onpart=/dev/disk/by-id/ata-
ST3160815AS_6RA0C882-part1
This way the command will always target the same storage device. This is especially
useful in large storage environments. See the chapter about persistent storage device
naming in the Red Hat Enterprise Linux 7 Storage Administration Guide for more in-
depth information about different ways to consistently refer to storage devices.
Installation Guide
368
To ignore a multipath device that does not use logical volume management (LVM), use the format
disk/by-id/dm-uuid-mpath-WWID, where WWID is the world-wide identifier for the device. For
example, to ignore a disk with WWID 2416CD96995134CA5D787F00A5AA11017, use:
ignoredisk --drives=disk/by-id/dm-uuid-mpath-
2416CD96995134CA5D787F00A5AA11017
Multipath devices that use LVM are not assembled until after Anaconda has parsed the Kickstart file.
Therefore, you cannot specify these devices in the format dm-uuid-mpath. Instead, to ignore a
multipath device that uses LVM, use the format disk/by-id/scsi-WWID, where WWID is the
world-wide identifier for the device. For example, to ignore a disk with WWID
58095BEC5510947BE8C0360F604351918, use:
ignoredisk --drives=disk/by-id/scsi-58095BEC5510947BE8C0360F604351918
WARNING
Never specify multipath devices by device names like mpatha. Device names
such as this are not specific to a particular disk. The disk named /dev/mpatha
during installation might not be the one that you expect it to be. Therefore, the
clearpart command could target the wrong disk.
--only-use - Specifies a list of disks for the installation program to use. All other disks are
ignored. For example, to use disk sda during installation and ignore all other disks:
ignoredisk --only-use=sda
To include a multipath device that does not use LVM:
ignoredisk --only-use=disk/by-id/dm-uuid-mpath-
2416CD96995134CA5D787F00A5AA11017
To include a multipath device that uses LVM:
ignoredisk --only-use=disk/by-id/scsi-
58095BEC5510947BE8C0360F604351918
--interactive - Allows you to manually navigate the advanced storage screen.
install (optional)
The default installation mode. You must specify the type of installation from cdrom, harddrive,
nfs, liveimg, or url (for FTP, HTTP, or HTTPS installations). The install command and the
installation method command must be on separate lines. For example:
install
liveimg --url=file:///images/install/squashfs.img --noverifyssl
CHAPTER 26. KICKSTART INSTALLATIONS
369
cdrom - Install from the first optical drive on the system.
harddrive - Install from a Red Hat installation tree or full installation ISO image on a local
drive. The drive must contain a file system the installation program can mount: ext2, ext3,
ext4, vfat, or xfs.
--biospart= - BIOS partition to install from (such as 82).
--partition= - Partition to install from (such as sdb2).
--dir= - Directory containing the variant directory of the installation tree, or the ISO
image of the full installation DVD.
For example:
harddrive --partition=hdb2 --dir=/tmp/install-tree
liveimg - Install from a disk image instead of packages. The image can be the
squashfs.img file from a live ISO image, a compressed tar file (.tar, .tbz, .tgz, .txz,
.tar.bz2, .tar.gz, or .tar.xz.), or any file system that the installation media can
mount. Supported file systems are ext2, ext3, ext4, vfat, and xfs.
NOTE
When using the liveimg installation mode with a driver disk, drivers on the
disk will not automatically be included in the installed system. If necessary,
these drivers should be installed manually, or in the %post section of a
kickstart script.
--url= - The location to install from. Supported protocols are HTTP, HTTPS, FTP, and
file.
--proxy= - Specify an HTTP, HTTPS or FTP proxy to use while performing the
installation.
--checksum= - An optional argument with the SHA256 checksum of the image file, used
for verification.
--noverifyssl - Disable SSL verification when connecting to an HTTPS server.
For example:
liveimg --url=file:///images/install/squashfs.img --
checksum=03825f567f17705100de3308a20354b4d81ac9d8bed4bb4692b238104
5e56197 --noverifyssl
nfs - Install from the NFS server specified.
--server= - Server from which to install (host name or IP).
--dir= - Directory containing the variant directory of the installation tree.
--opts= - Mount options to use for mounting the NFS export. (optional)
Installation Guide
370
For example:
nfs --server=nfsserver.example.com --dir=/tmp/install-tree
url - Install from an installation tree on a remote server using FTP, HTTP, or HTTPS.
--url= - The location to install from. Supported protocols are HTTP, HTTPS, FTP, and
file.
--mirrorlist= - The mirror URL to install from.
--proxy= - Specify an HTTP, HTTPS or FTP proxy to use while performing the
installation.
--noverifyssl - Disable SSL verification when connecting to an HTTPS server.
For example:
url --url http://server/path
or:
url --url ftp://username:password@server/path
iscsi (optional)
iscsi --ipaddr=address [options]
Specifies additional iSCSI storage to be attached during installation. If you use the iscsi command,
you must also assign a name to the iSCSI node, using the iscsiname command. The iscsiname
command must appear before the iscsi command in the Kickstart file.
We recommend that wherever possible you configure iSCSI storage in the system BIOS or firmware
(iBFT for Intel systems) rather than use the iscsi command. Anaconda automatically detects and
uses disks configured in BIOS or firmware and no special configuration is necessary in the Kickstart
file.
If you must use the iscsi command, ensure that networking is activated at the beginning of the
installation, and that the iscsi command appears in the Kickstart file before you refer to iSCSI disks
with commands such as clearpart or ignoredisk.
--ipaddr= (required) - the IP address of the target to connect to.
--port= (required) - the port number (typically, --port=3260)
--target= - the target IQN (iSCSI Qualified Name).
--iface= - bind the connection to a specific network interface instead of using the default
one determined by the network layer. Once used, it must be specified in all instances of the
iscsi command in the entire Kickstart file.
--user= - the user name required to authenticate with the target
CHAPTER 26. KICKSTART INSTALLATIONS
371
--password= - the password that corresponds with the user name specified for the target
--reverse-user= - the user name required to authenticate with the initiator from a target
that uses reverse CHAP authentication
--reverse-password= - the password that corresponds with the user name specified for
the initiator
iscsiname (optional)
Assigns a name to an iSCSI node specified by the iscsi parameter. If you use the iscsi parameter in
your Kickstart file, you must specify iscsiname earlier in the Kickstart file.
iscsiname iqn
%addon com_redhat_kdump (optional)
This command configures the kdump kernel crash dumping mechanism.
NOTE
The syntax for this command is unusual because it is an add-on rather than a built-in
Kickstart command. For more information about add-ons, see Section 26.3.7,
“Kickstart Add-ons”.
Kdump is a kernel crash dumping mechanism that allows you to save the contents of the system's
memory for later analysis. It relies on kexec, which can be used to boot a Linux kernel from the
context of another kernel without rebooting the system, and preserve the contents of the first kernel's
memory that would otherwise be lost.
In case of a system crash, kexec boots into a second kernel (a capture kernel). This capture kernel
resides in a reserved part of the system memory that is inaccessible to the first kernel. Kdump then
captures the contents of the crashed kernel's memory (a crash dump) and saves it to a specified
location. The location cannot be configured using this Kickstart command; it must be configured after
the installation by editing the /etc/kdump.conf configuration file.
For more information about Kdump, see the Red Hat Enterprise Linux 7 Kernel Crash Dump Guide.
Available options are:
--enable - Enable kdump on the installed system.
--disable - Disable kdump on the installed system.
--reserve-mb= - The amount of memory you want to reserve for kdump, in MiB. For
example:
%addon com_redhat_kdump --enable --reserve-mb=128
%end
You can also specify auto instead of a numeric value. In that case, the installer will
determine the amount of memory automatically based on the criteria described in the
Red Hat Enterprise Linux 7 Kernel Crash Dump Guide.
Installation Guide
372

If you enable kdump and do not specify a --reserve-mb= option, the value auto will be
used.
--enablefadump - Enable firmware-assisted dumping on systems which allow it (notably,
IBM Power Systems servers).
keyboard (required)
Sets one or more available keyboard layouts for the system.
--vckeymap= - Specify a VConsole keymap which should be used. Valid names
correspond to the list of files in the /usr/lib/kbd/keymaps/ directory, without the
.map.gz extension.
--xlayouts= - Specify a list of X layouts that should be used as a comma-separated list
without spaces. Accepts values in the same format as setxkbmap(1), either in the layout
format (such as cz), or in the layout (variant) format (such as cz (qwerty)).
All available layouts can be viewed on the xkeyboard-config(7) man page under
Layouts.
--switch= - Specify a list of layout-switching options (shortcuts for switching between
multiple keyboard layouts). Multiple options must be separated by commas without spaces.
Accepts values in the same format as setxkbmap(1).
Available switching options can be viewed on the xkeyboard-config(7) man page under
Options.
The following example sets up two keyboard layouts (English (US) and Czech (qwerty)) using
the --xlayouts= option, and allows to switch between them using Alt+Shift:
keyboard --xlayouts=us,'cz (qwerty)' --switch=grp:alt_shift_toggle
IMPORTANT
Either the --vckeymap= or the --xlayouts= option must be used.
lang (required)
Sets the language to use during installation and the default language to use on the installed system.
For example, to set the language to English, the Kickstart file should contain the following line:
lang en_US
The file /usr/share/system-config-language/locale-list provides a list of the valid
language codes in the first column of each line and is part of the system-config-language package.
Certain languages (for example, Chinese, Japanese, Korean, and Indic languages) are not supported
during text-mode installation. If you specify one of these languages with the lang command, the
installation process continues in English, but the installed system uses your selection as its default
language.
--addsupport= - Add support for additional languages. Takes the form of comma-
separated list without spaces. For example:
CHAPTER 26. KICKSTART INSTALLATIONS
373
lang en_US --addsupport=cs_CZ,de_DE,en_UK
logging (optional)
Controls the error logging of Anaconda during installation. It has no effect on the installed system.
logging [--host=host] [--port=port] [--level=debug|info|error|critical]
--host= - Send logging information to the given remote host, which must be running a
syslogd process configured to accept remote logging.
--port= - If the remote syslogd process uses a port other than the default, set it using this
option.
--level= - Specify the minimum level of messages that appear on tty3. All messages are
still sent to the log file regardless of this level, however. Possible values are debug, info,
warning, error, or critical.
logvol (optional)
Create a logical volume for Logical Volume Management (LVM). For more information regarding
LVM, see the Red Hat Enterprise Linux 7 Logical Volume Manager Administration guide. This
command uses the following syntax:
logvol mntpoint --vgname=name --name=name [options]
NOTE
Do not use the dash (-) character in logical volume and volume group names when
installing Red Hat Enterprise Linux using Kickstart. If this character is used, the
installation finishes normally, but the /dev/mapper/ directory will list these volumes
and volume groups with every dash doubled. For example, a volume group named
volgrp-01 containing a logical volume named logvol-01 will be listed as
/dev/mapper/volgrp--01-logvol--01.
This limitation only applies to newly created logical volume and volume group names. If
you are reusing existing ones using the --noformat option, their names will not be
changed.
For a detailed example of logvol in action, see Section 26.4.1, “Advanced Partitioning Example”.
The mntpoint is where the partition is mounted and must be of one of the following forms:
/path
For example, / or /home
swap
The partition is used as swap space.
To determine the size of the swap partition automatically, use the --recommended
option:
Installation Guide
374

swap --recommended
To determine the size of the swap partition automatically and also allow extra space for
your system to hibernate, use the --hibernation option:
swap --hibernation
The size assigned will be equivalent to the swap space assigned by --recommended
plus the amount of RAM on your system.
For the swap sizes assigned by these commands, see Section 8.14.4.4, “Recommended
Partitioning Scheme” for 64-bit AMD, Intel, and ARM systems, Section 13.15.4.4,
“Recommended Partitioning Scheme” for IBM Power Systems servers, and
Section 17.15.3.4, “Recommended Partitioning Scheme” for IBM Z.
The options are as follows:
--noformat - Use an existing logical volume and do not format it.
--useexisting - Use an existing logical volume and reformat it.
--fstype= - Sets the file system type for the logical volume. Valid values are xfs, ext2,
ext3, ext4, swap, and vfat.
--fsoptions= - Specifies a free form string of options to be used when mounting the
filesystem. This string will be copied into the /etc/fstab file of the installed system and
should be enclosed in quotes.
--mkfsoptions= - Specifies additional parameters to be passed to the program that makes
a filesystem on this partition. No processing is done on the list of arguments, so they must be
supplied in a format that can be passed directly to the mkfs program. This means multiple
options should be comma-separated or surrounded by double quotes, depending on the
filesystem.
--label= - Sets a label for the logical volume.
--grow - Tells the logical volume to grow to fill available space (if any), or up to the maximum
size setting, if one is specified. A minimum size must be given, using either the --percent=
option or the --size= option.
--size= - The size of the logical volume in MiB. This option cannot be used together with
the --percent= option.
--percent= - The size of the logical volume, as a percentage of the free space in the
volume group after any statically-sized logical volumes are taken into account. This option
cannot be used together with the --size= option.
CHAPTER 26. KICKSTART INSTALLATIONS
375

IMPORTANT
When creating a new logical volume, you must either specify its size statically
using the --size= option, or as a percentage of remaining free space using
the --percent= option. You cannot use both of these options on the same
logical volume.
Note that this behavior is only applies to Red Hat Enterprise Linux 7.1 and
later. In Red Hat Enterprise Linux 7.0, these two options interacted differently.
--maxsize= - The maximum size in MiB when the logical volume is set to grow. Specify an
integer value here such as 500 (do not include the unit).
--recommended - Use this option when creating a swap logical volume to determine the
size of this volume automatically, based on your system's hardware. For details about the
recommended scheme, see Section 8.14.4.4, “Recommended Partitioning Scheme” for 64-
bit AMD, Intel, and ARM systems, Section 13.15.4.4, “Recommended Partitioning Scheme”
for IBM Power Systems, and Section 17.15.3.4, “Recommended Partitioning Scheme” for
IBM Z.
--resize - Resize a logical volume. If you use this option, you must also specify --
useexisting and --size.
--encrypted - Specifies that this logical volume should be encrypted, using the passphrase
provided in the --passphrase= option. If you do not specify a passphrase, the installation
program uses the default, system-wide passphrase set with the autopart --passphrase
command, or stops the installation and prompts you to provide a passphrase if no default is
set.
NOTE
When encrypting one or more partitions, Anaconda attempts to gather 256
bits of entropy to ensure the partitions are encrypted securely. Gathering
entropy can take some time - the process will stop after a maximum of 10
minutes, regardless of whether sufficient entropy has been gathered.
The process can be sped up by interacting with the installation system (typing
on the keyboard or moving the mouse). If you are installing in a virtual
machine, you can also attach a virtio-rng device (a virtual random number
generator) to the guest as described in the Red Hat Enterprise Linux 7
Virtualization Deployment and Administration Guide.
--passphrase= - Specifies the passphrase to use when encrypting this logical volume.
You must use this option together with the --encrypted option; it has no effect by itself.
--cipher= - Specifies which type of encryption will be used if the Anaconda default aes-
xts-plain64 is not satisfactory. You must use this option together with the --encrypted
option; by itself it has no effect. Available types of encryption are listed in the Red Hat
Enterprise Linux 7 Security Guide, but Red Hat strongly recommends using either aes-xts-
plain64 or aes-cbc-essiv:sha256.
--escrowcert=URL_of_X.509_certificate - Store data encryption keys of all
encrypted volumes as files in /root, encrypted using the X.509 certificate from the URL
specified with URL_of_X.509_certificate. The keys are stored as a separate file for each
Installation Guide
376
encrypted volume. This option is only meaningful if --encrypted is specified.
--backuppassphrase - Add a randomly-generated passphrase to each encrypted volume.
Store these passphrases in separate files in /root, encrypted using the X.509 certificate
specified with --escrowcert. This option is only meaningful if --escrowcert is specified.
--thinpool - Creates a thin pool logical volume. (Use a mount point of none)
--metadatasize=size - Specify the metadata area size (in MiB) for a new thin pool
device.
--chunksize=size - Specify the chunk size (in KiB) for a new thin pool device.
--thin - Create a thin logical volume. (Requires use of --poolname)
--poolname=name - Specify the name of the thin pool in which to create a thin logical
volume. Requires the --thin option.
--profile=name - Specify the configuration profile name to use with thin logical volumes.
If used, the name will also be included in the metadata for the given logical volume. By
default, the available profiles are default and thin-performance and are defined in the
/etc/lvm/profile/ directory. See the lvm(8) man page for additional information.
--cachepvs= - A comma-separated list of physical volumes which should be used as a
cache for this volume.
--cachemode= - Specify which mode should be used to cache this logical volume - either
writeback or writethrough.
NOTE
For more information about cached logical volumes and their modes, see the
lvmcache(7) man page.
--cachesize= - Size of cache attached to the logical volume, specified in MiB. This option
requires the --cachepvs= option.
Create the partition first, create the logical volume group, and then create the logical volume. For
example:
part pv.01 --size 3000
volgroup myvg pv.01
logvol / --vgname=myvg --size=2000 --name=rootvol
Create the partition first, create the logical volume group, and then create the logical volume to
occupy 90% of the remaining space in the volume group. For example:
part pv.01 --size 1 --grow
volgroup myvg pv.01
logvol / --vgname=myvg --name=rootvol --percent=90
mediacheck (optional)
CHAPTER 26. KICKSTART INSTALLATIONS
377

If given, this command forces the installation program to perform a media check (rd.live.check)
before starting the installation. This command requires that installations be attended, so it is disabled
by default.
mount (optional)
Assigns a mount point to an existing block device, and optionally reformats it to a given format.
mount [--reformat [REFORMAT]] [--mkfsoptions MKFS_OPTS] [--mountoptions
MOUNT_OPTS] device mntpoint
Unlike most other storage configuration commands in Kickstart, mount does not require you to
describe the entire storage configuration in the Kickstart file. You only need to ensure that the
described block device exists on the system. However, if you want to create the storage stack with all
the devices mounted, you must use other commands such as part to do so.
IMPORTANT
You can not use mount together with other storage-related commands such as part,
logvol, or autopart in the same Kickstart file.
Mandatory arguments:
device - The block device to mount.
mntpoint - Where to mount the device. It must be a valid mount point, such as / or /usr,
or none if the device is unmountable (for example swap).
Optional arguments:
--reformat= - Specifies a new format (such as ext4) to which the device should be
reformatted.
--mkfsoptions= - Specifies additional argument to be passed to the command which
creates the new file system specified in --reformat=. The list of arguments provided here
is not processed, so they must be specified in a format that can be passed directly to the
mkfs program. The list of options should be either comma-separated or surrounded by
double quotes, depending on the file system. Check the mkfs man page for the file system
you want to create (for example mkfs.ext4(8) or mkfs.xfs(8)) for specific details.
--mountoptions= - Specifies a free form string that contains options to be used when
mounting the file system. The string will be copied to the /etc/fstab file on the installed
system and should be enclosed in double quotes. See the mount(8) man page for a full list
of mount options, and fstab(5) for basics.
network (optional)
Configures network information for the target system and activates network devices in the installation
environment. The device specified in the first network command is activated automatically.
Activation of the device can be also explicitly required by the --activate option.
Installation Guide
378
NOTE
There are several types of network device naming standards used to identify network
devices with persistent names such as em1 or wl3sp0. For information about these
standards, see the Red Hat Enterprise Linux 7 Networking Guide.
--activate - activate this device in the installation environment.
If you use the --activate option on a device that has already been activated (for example,
an interface you configured with boot options so that the system could retrieve the Kickstart
file) the device is reactivated to use the details specified in the Kickstart file.
Use the --nodefroute option to prevent the device from using the default route.
--no-activate - do not activate this device in the installation environment.
By default, Anaconda activates the first network device in the Kickstart file regardless of the -
-activate option. You can disable the default setting by using the --no-activate
option.
--bootproto= - One of dhcp, bootp, ibft, or static. The default option is dhcp; the
dhcp and bootp options are treated the same. To disable ipv4 configuration of the device,
use --noipv4 option.
NOTE
This option configures ipv4 configuration of the device. For ipv6 configuration
use --ipv6 and --ipv6gateway options.
The DHCP method uses a DHCP server system to obtain its networking configuration. The
BOOTP method is similar, requiring a BOOTP server to supply the networking configuration.
To direct a system to use DHCP:
network --bootproto=dhcp
To direct a machine to use BOOTP to obtain its networking configuration, use the following
line in the Kickstart file:
network --bootproto=bootp
To direct a machine to use the configuration specified in iBFT, use:
network --bootproto=ibft
The static method requires that you specify at least the IP address and netmask in the
Kickstart file. This information is static and is used during and after the installation.
All static networking configuration information must be specified on one line; you cannot wrap
lines using a backslash (\) as you can on a command line.
network --bootproto=static --ip=10.0.2.15 --netmask=255.255.255.0
--gateway=10.0.2.254 --nameserver=10.0.2.1
CHAPTER 26. KICKSTART INSTALLATIONS
379
You can also configure multiple nameservers at the same time. To do so, use the --
nameserver= option once, and specify each of their IP addresses, separated by commas.
network --bootproto=static --ip=10.0.2.15 --netmask=255.255.255.0
--gateway=10.0.2.254 --nameserver=192.168.2.1,192.168.3.1
--device= - specifies the device to be configured (and eventually activated in Anaconda)
with the network command.
If the --device= option is missing on the first use of the network command, the value of
the ksdevice= Anaconda boot option is used, if available. Note that this is considered
deprecated behavior; in most cases, you should always specify a --device= for every
network command.
The behavior of any subsequent network command in the same Kickstart file is unspecified
if its --device= option is missing. Make sure you specify this option for any network
command beyond the first.
You can specify a device to be activated in any of the following ways:
the device name of the interface, for example, em1
the MAC address of the interface, for example, 01:23:45:67:89:ab
the keyword link, which specifies the first interface with its link in the up state
the keyword bootif, which uses the MAC address that pxelinux set in the BOOTIF
variable. Set IPAPPEND 2 in your pxelinux.cfg file to have pxelinux set the BOOTIF
variable.
For example:
network --bootproto=dhcp --device=em1
--ip= - IP address of the device.
--ipv6= - IPv6 address of the device, in the form of address[/prefix length] - for example,
3ffe:ffff:0:1::1/128 . If prefix is omitted, 64 is used. You can also use auto for
automatic configuration, or dhcp for DHCPv6-only configuration (no router advertisements).
--gateway= - Default gateway as a single IPv4 address.
--ipv6gateway= - Default gateway as a single IPv6 address.
--nodefroute - Prevents the interface being set as the default route. Use this option when
you activate additional devices with the --activate= option, for example, a NIC on a
separate subnet for an iSCSI target.
--nameserver= - DNS name server, as an IP address. To specify more than one name
server, use this option once, and separate each IP address with a comma.
--nodns - Do not configure any DNS server.
--netmask= - Network mask for the installed system.
Installation Guide
380
--hostname= - The host name for the installed system. The host name can either be a
fully-qualified domain name (FQDN) in the format host_name.domainname, or a short host
name with no domain. Many networks have a Dynamic Host Configuration Protocol (DHCP)
service which automatically supplies connected systems with a domain name; to allow DHCP
to assign the domain name, only specify a short host name.
IMPORTANT
If your network does not provide a DHCP service, always use the FQDN as
the system's host name.
--ethtool= - Specifies additional low-level settings for the network device which will be
passed to the ethtool program.
--essid= - The network ID for wireless networks.
--wepkey= - The WEP encryption key for wireless networks.
--wpakey= - The WPA encryption key for wireless networks.
--onboot= - Whether or not to enable the device at boot time.
--dhcpclass= - The DHCP class.
--mtu= - The MTU of the device.
--noipv4 - Disable IPv4 on this device.
--noipv6 - Disable IPv6 on this device.
--bondslaves= - When this option is used, the network device specified in the --
device= option is created using slaves defined in the --bondslaves= option. For
example:
network --device=mynetwork --bondslaves=em1,em2
The above command creates a bond device named mynetwork using the em1 and em2
interfaces as its slaves.
--bondopts= - a list of optional parameters for a bonded interface, which is specified using
the --bondslaves= and --device= options. Options in this list must be separated by
commas (",") or semicolons (";"). If an option itself contains a comma, use a semicolon to
separate the options. For example:
network --bondopts=mode=active-backup,balance-rr;primary=eth1
Available optional parameters are listed in the Working with Kernel Modules chapter of the
Red Hat Enterprise Linux 7 System Administrator's Guide.
CHAPTER 26. KICKSTART INSTALLATIONS
381
IMPORTANT
The --bondopts=mode= parameter only supports full mode names such as
balance-rr or broadcast, not their numerical representations such as 0 or
3.
--vlanid= - Specifies virtual LAN (VLAN) ID number (802.1q tag) for the device created
using the device specified in --device= as a parent. For example, network --
device=em1 --vlanid=171 creates a virtual LAN device em1.171.
--interfacename= - Specify a custom interface name for a virtual LAN device. This option
should be used when the default name generated by the --vlanid= option is not desirable.
This option must be used along with --vlanid=. For example:
network --device=em1 --vlanid=171 --interfacename=vlan171
The above command creates a virtual LAN interface named vlan171 on the em1 device with
an ID of 171.
The interface name can be arbitrary (for example, my-vlan), but in specific cases, the
following conventions must be followed:
If the name contains a dot (.), it must take the form of NAME.ID. The NAME is arbitrary,
but the ID must be the VLAN ID. For example: em1.171 or my-vlan.171.
Names starting with vlan must take the form of vlanID - for example, vlan171.
--teamslaves= - Team device specified by the --device= option will be created using
slaves specified in this option. Slaves are separated by commas. A slave can be followed by
its configuration, which is a single-quoted JSON string with double quotes escaped by the \
character. For example:
network --teamslaves="p3p1'{\"prio\": -10, \"sticky\":
true}',p3p2'{\"prio\": 100}'"
See also the --teamconfig= option.
--teamconfig= - Double-quoted team device configuration which is a single-quoted JSON
string with double quotes escaped by the \ character. The device name is specified by --
device= option and its slaves and their configuration by --teamslaves= option. For
example:
network --device team0 --activate --bootproto static --
ip=10.34.102.222 --netmask=255.255.255.0 --gateway=10.34.102.254 -
-nameserver=10.34.39.2 --teamslaves="p3p1'{\"prio\": -10,
\"sticky\": true}',p3p2'{\"prio\": 100}'" --teamconfig="
{\"runner\": {\"name\": \"activebackup\"}}"
--bridgeslaves= - When this option is used, the network bridge with device name
specified using the --device= option will be created and devices defined in the --
bridgeslaves= option will be added to the bridge. For example:
network --device=bridge0 --bridgeslaves=em1
Installation Guide
382

--bridgeopts= - An optional comma-separated list of parameters for the bridged interface.
Available values are stp, priority, forward-delay, hello-time, max-age, and
ageing-time. For information about these parameters, see the bridge setting table in the
nm-settings(5) man page or at https://developer.gnome.org/NetworkManager/0.9/ref-
settings.html.
Also see the Red Hat Enterprise Linux 7 Networking Guide for general information about
network bridging.
--bindto=mac - Bind the device configuration (ifcfg) file on the installed system to the
device MAC address (HWADDR) instead of the default binding to the interface name
(DEVICE). Note that this option is independent of the --device= option - --bindto=mac
will be applied even if the same network command also specifies a device name, link, or
bootif.
nvdimm (optional)
Performs an action on Non-Volatile Dual In-line Memory Module (NVDIMM) devices. This command
uses the following format:
nvdimm action [options]
NOTE
By default, all NVDIMM devices are ignored by the installer. You must use the
nvdimm command to enable installation on these devices.
The following actions are available:
reconfigure - Reconfigure a specific NVDIMM device into a given mode. Additionally, the
specified device is implicitly marked as to be used, so a subsequent nvdimm use command
for the same device is redundant. This action uses the following format:
nvdimm reconfigure [--namespace=NAMESPACE] [--mode=MODE] [--
sectorsize=SECTORSIZE]
--namespace= - The device specification by namespace. For example:
nvdimm reconfigure --namespace=namespace0.0 --mode=sector --
sectorsize=512
--mode= - The mode specification. Currently, only the value sector is available.
--sectorsize= - Size of a sector for sector mode. For example:
nvdimm reconfigure --namespace=namespace0.0 --mode=sector --
sectorsize=512
The supported sector sizes are 512 and 4096 bytes.
CHAPTER 26. KICKSTART INSTALLATIONS
383
use - Specify a NVDIMM device as a target for installation. The device must be already
configured to the sector mode by the nvdimm reconfigure command. This action uses
the following format:
nvdimm use [--namespace=NAMESPACE|--blockdevs=DEVICES]
--namespace= - Specifies the device by namespace. For example:
nvdimm use --namespace=namespace0.0
--blockdevs= - Specifies a comma-separated list of block devices corresponding to
the NVDIMM devices to be used. The asterisk * wildcard is supported. For example:
nvdimm use --blockdevs=pmem0s,pmem1s
nvdimm use --blockdevs=pmem*
%addon org_fedora_oscap (optional)
The OpenSCAP installer add-on is used to apply SCAP (Security Content Automation Protocol)
content - security policies - on the installed system. This add-on has been enabled by default since
Red Hat Enterprise Linux 7.2. When enabled, the packages necessary to provide this functionality will
automatically be installed. However, by default, no policies are enforced, meaning that no checks are
performed during or after installation unless specifically configured.
IMPORTANT
Applying a security policy is not necessary on all systems. This screen should only be
used when a specific policy is mandated by your organization rules or government
regulations.
Unlike most other commands, this add-on does not accept regular options, but uses key-value pairs
in the body of the %addon definition instead. These pairs are whitespace-agnostic. Values can be
optionally enclosed in single quotes (') or double quotes (").
The following keys are recognized by the add-on:
content-type - Type of the security content. Possible values are datastream, archive,
rpm, and scap-security-guide.
If the content-type is scap-security-guide, the add-on will use content provided by
the scap-security-guide package, which is present on the boot media. This means that all
other keys except profile will have no effect.
content-url - Location of the security content. The content must be accessible using
HTTP, HTTPS, or FTP; local storage is currently not supported. A network connection must
be available to reach content definitions in a remote location.
datastream-id - ID of the data stream referenced in the content-url value. Used only if
content-type is datastream.
xccdf-id - ID of the benchmark you want to use.
Installation Guide
384

xccdf-path - Path to the XCCDF file which should be used; given as a relative path in the
archive.
profile - ID of the profile to be applied. Use default to apply the default profile.
fingerprint - A MD5, SHA1 or SHA2 checksum of the content referenced by content-
url.
tailoring-path - Path to a tailoring file which should be used, given as a relative path in
the archive.
The following is an example %addon org_fedora_oscap section which uses content from the
scap-security-guide on the installation media:
Example 26.2. Sample OpenSCAP Add-on Definition Using SCAP Security Guide
%addon org_fedora_oscap
content-type = scap-security-guide
profile = pci-dss
%end
The following is a more complex example which loads a custom profile from a web server:
Example 26.3. Sample OpenSCAP Add-on Definition Using a Datastream
%addon org_fedora_oscap
content-type = datastream
content-url = http://www.example.com/scap/testing_ds.xml
datastream-id = scap_example.com_datastream_testing
xccdf-id = scap_example.com_cref_xccdf.xml
profile = xccdf_example.com_profile_my_profile
fingerprint = 240f2f18222faa98856c3b4fc50c4195
%end
Additional information about the OpenSCAP installer add-on is available at https://www.open-
scap.org/tools/oscap-anaconda-addon/. For more information about the profiles available in the
SCAP Security Guide and what they do, see the OpenSCAP Portal.
part or partition (required)
Creates a partition on the system.
WARNING
All partitions created are formatted as part of the installation process unless --
noformat and --onpart are used.
CHAPTER 26. KICKSTART INSTALLATIONS
385
IMPORTANT
Device names in the sdX (or /dev/sdX) format are not guaranteed to be consistent
across reboots, which can complicate usage of some Kickstart commands. When a
command calls for a device node name, you can instead use any item from
/dev/disk. For example, instead of:
part / --fstype=xfs --onpart=sda1
You could use an entry similar to one of the following:
part / --fstype=xfs --onpart=/dev/disk/by-path/pci-
0000:00:05.0-scsi-0:0:0:0-part1
part / --fstype=xfs --onpart=/dev/disk/by-id/ata-
ST3160815AS_6RA0C882-part1
This way the command will always target the same storage device. This is especially
useful in large storage environments. See the chapter about persistent storage device
naming in the Red Hat Enterprise Linux 7 Storage Administration Guide for more in-
depth information about different ways to consistently refer to storage devices.
For a detailed example of part in action, see Section 26.4.1, “Advanced Partitioning Example”.
part|partition mntpoint --name=name --device=device --rule=rule
[options]
mntpoint - Where the partition is mounted. The value must be of one of the following forms:
/path
For example, /, /usr, /home
swap
The partition is used as swap space.
To determine the size of the swap partition automatically, use the --recommended
option:
swap --recommended
The size assigned will be effective but not precisely calibrated for your system.
To determine the size of the swap partition automatically but also allow extra space for
your system to hibernate, use the --hibernation option:
swap --hibernation
The size assigned will be equivalent to the swap space assigned by --recommended
plus the amount of RAM on your system.
For the swap sizes assigned by these commands, see Section 8.14.4.4, “Recommended
Installation Guide
386

Partitioning Scheme” for 64-bit AMD, Intel, and ARM systems, Section 13.15.4.4,
“Recommended Partitioning Scheme” for IBM Power Systems servers, and
Section 17.15.3.4, “Recommended Partitioning Scheme” for IBM Z.
raid.id
The partition is used for software RAID (see raid).
pv.id
The partition is used for LVM (see logvol).
biosboot
The partition will be used for a BIOS Boot partition. A 1 MiB BIOS boot partition is
necessary on BIOS-based AMD64 and Intel 64 systems using a GUID Partition Table
(GPT); the boot loader will be installed into it. It is not necessary on UEFI systems. See
also the bootloader command.
/boot/efi
An EFI System Partition. A 50 MiB EFI partition is necessary on UEFI-based AMD, Intel,
and ARM; the recommended size is 200 MiB. It is not necessary on BIOS systems. See
also the bootloader command.
--size= - The minimum partition size in MiB. Specify an integer value here such as 500
(do not include the unit).
IMPORTANT
If the --size value is too small, the installation fails. Set the --size value as
the minimum amount of space you require. For size recommendations, see
Section 8.14.4.4, “Recommended Partitioning Scheme”.
--grow - Tells the logical volume to grow to fill available space (if any), or up to the maximum
size setting, if one is specified.
NOTE
If you use --grow= without setting --maxsize= on a swap partition,
Anaconda limits the maximum size of the swap partition. For systems that
have less than 2 GB of physical memory, the imposed limit is twice the
amount of physical memory. For systems with more than 2 GB, the imposed
limit is the size of physical memory plus 2GB.
--maxsize= - The maximum partition size in MiB when the partition is set to grow. Specify
an integer value here such as 500 (do not include the unit).
--noformat - Specifies that the partition should not be formatted, for use with the --
onpart command.
--onpart= or --usepart= - Specifies the device on which to place the partition. For
example:
CHAPTER 26. KICKSTART INSTALLATIONS
387

partition /home --onpart=hda1
puts /home on /dev/hda1.
These options can also add a partition to a logical volume. For example:
partition pv.1 --onpart=hda2
The device must already exist on the system; the --onpart option will not create it.
It is also possible to specify an entire drive, rather than a partition, in which case Anaconda
will format and use the drive without creating a partition table. Note, however, that installation
of GRUB2 is not supported on a device formatted in this way, and must be placed on a drive
with a partition table.
--ondisk= or --ondrive= - Forces the partition to be created on a particular disk. For
example, --ondisk=sdb puts the partition on the second SCSI disk on the system.
To specify a multipath device that does not use logical volume management (LVM), use the
format disk/by-id/dm-uuid-mpath-WWID, where WWID is the world-wide identifier for
the device. For example, to specify a disk with WWID
2416CD96995134CA5D787F00A5AA11017, use:
part / --fstype=xfs --grow --asprimary --size=8192 --
ondisk=disk/by-id/dm-uuid-mpath-2416CD96995134CA5D787F00A5AA11017
Multipath devices that use LVM are not assembled until after Anaconda has parsed the
Kickstart file. Therefore, you cannot specify these devices in the format dm-uuid-mpath.
Instead, to specify a multipath device that uses LVM, use the format disk/by-
id/scsi-WWID, where WWID is the world-wide identifier for the device. For example, to
specify a disk with WWID 58095BEC5510947BE8C0360F604351918, use:
part / --fstype=xfs --grow --asprimary --size=8192 --
ondisk=disk/by-id/scsi-58095BEC5510947BE8C0360F604351918
WARNING
Never specify multipath devices by device names like mpatha. Device
names such as this are not specific to a particular disk. The disk named
/dev/mpatha during installation might not be the one that you expect it
to be. Therefore, the clearpart command could target the wrong disk.
--asprimary - Forces the partition to be allocated as a primary partition. If the partition
cannot be allocated as primary (usually due to too many primary partitions being already
allocated), the partitioning process fails. This option only makes sense when the disk uses a
Master Boot Record (MBR); for GUID Partition Table (GPT)-labeled disks this option has no
meaning. For information about primary (and extended) partitions, see Section A.1.2,
“Partitions: Turning One Drive Into Many”.
Installation Guide
388
--fsprofile= - Specifies a usage type to be passed to the program that makes a
filesystem on this partition. A usage type defines a variety of tuning parameters to be used
when making a filesystem. For this option to work, the filesystem must support the concept of
usage types and there must be a configuration file that lists valid types. For ext2, ext3,
ext4, this configuration file is /etc/mke2fs.conf.
--mkfsoptions= - Specifies additional parameters to be passed to the program that makes
a filesystem on this partition. This is similar to --fsprofile but works for all filesystems,
not just the ones that support the profile concept. No processing is done on the list of
arguments, so they must be supplied in a format that can be passed directly to the mkfs
program. This means multiple options should be comma-separated or surrounded by double
quotes, depending on the filesystem.
--fstype= - Sets the file system type for the partition. Valid values are xfs, ext2, ext3,
ext4, swap, vfat, efi and biosboot.
--fsoptions - Specifies a free form string of options to be used when mounting the
filesystem. This string will be copied into the /etc/fstab file of the installed system and
should be enclosed in quotes.
--label= - assign a label to an individual partition.
--recommended - Determine the size of the partition automatically. For details about the
recommended scheme, see Section 8.14.4.4, “Recommended Partitioning Scheme” for 64-
bit AMD, Intel, and ARM, Section 13.15.4.4, “Recommended Partitioning Scheme” for IBM
Power Systems, and Section 17.15.3.4, “Recommended Partitioning Scheme” for IBM Z.
IMPORTANT
This option can only be used for partitions which result in a file system such
as the /boot partition and swap space. It cannot be used to create LVM
physical volumes or RAID members.
--onbiosdisk - Forces the partition to be created on a particular disk as discovered by the
BIOS.
--encrypted - Specifies that this partition should be encrypted, using the passphrase
provided in the --passphrase option. If you do not specify a passphrase, Anaconda uses
the default, system-wide passphrase set with the autopart --passphrase command, or
stops the installation and prompts you to provide a passphrase if no default is set.
NOTE
When encrypting one or more partitions, Anaconda attempts to gather 256
bits of entropy to ensure the partitions are encrypted securely. Gathering
entropy can take some time - the process will stop after a maximum of 10
minutes, regardless of whether sufficient entropy has been gathered.
The process can be sped up by interacting with the installation system (typing
on the keyboard or moving the mouse). If you are installing in a virtual
machine, you can also attach a virtio-rng device (a virtual random number
generator) to the guest as described in the Red Hat Enterprise Linux 7
Virtualization Deployment and Administration Guide.
CHAPTER 26. KICKSTART INSTALLATIONS
389
--passphrase= - Specifies the passphrase to use when encrypting this partition. You must
use this option together with the --encrypted option; by itself it has no effect.
--cipher= - Specifies which type of encryption will be used if the Anaconda default aes-
xts-plain64 is not satisfactory. You must use this option together with the --encrypted
option; by itself it has no effect. Available types of encryption are listed in the Red Hat
Enterprise Linux 7 Security Guide, but Red Hat strongly recommends using either aes-xts-
plain64 or aes-cbc-essiv:sha256.
--escrowcert=URL_of_X.509_certificate - Store data encryption keys of all
encrypted partitions as files in /root, encrypted using the X.509 certificate from the URL
specified with URL_of_X.509_certificate. The keys are stored as a separate file for each
encrypted partition. This option is only meaningful if --encrypted is specified.
--backuppassphrase - Add a randomly-generated passphrase to each encrypted
partition. Store these passphrases in separate files in /root, encrypted using the X.509
certificate specified with --escrowcert. This option is only meaningful if --escrowcert is
specified.
--resize= - Resize an existing partition. When using this option, specify the target size (in
MiB) using the --size= option and the target partition using the --onpart= option.
NOTE
If partitioning fails for any reason, diagnostic messages appear on virtual console 3.
pwpolicy (optional)
This command can be used to enforce a custom password policy, which specifies requirements for
passwords created during installation, based on factors such as password length and strength.
pwpolicy name [--minlen=length] [--minquality=quality] [--strict|--
nostrict] [--emptyok|--noempty] [--changesok|--nochanges]
Replace name with either root, user or luks to enforce the policy for the root password, user
passwords, or LUKS passphrase, respectively.
The libpwquality library is used to check minimum password requirements (length and quality).
You can use the pwscore and pwmake commands provided by the libpwquality package to check
the quality score of a password, or to create a random password with a given score. See the
pwscore(1) and pwmake(1) man page for details about these commands.
IMPORTANT
This command can only be used inside the %anaconda section.
--minlen= - Sets the minimum allowed password length, in characters. The default is 6.
--minquality= - Sets the minimum allowed password quality as defined by the
libpwquality library. The default value is 1.
Installation Guide
390
--strict - Enables strict password enforcement. Passwords which do not meet the
requirements specified in --minquality= and --minlen= will not be accepted. This
option is disabled by default.
--notstrict - Passwords which do not meet the minimum quality requirements specified
by the --minquality= and -minlen= options will be allowed, after Done is clicked twice.
--emptyok - Allows the use of empty passwords. Enabled by default for user passwords.
--notempty - Disallows the use of empty passwords. Enabled by default for the root
password and the LUKS passphrase.
--changesok - Allows changing the password in the user interface, even if the Kickstart file
already specifies a password. Disabled by default.
--nochanges - Disallows changing passwords which are already set in the Kickstart file.
Enabled by default.
poweroff (optional)
Shut down and power off the system after the installation has successfully completed. Normally
during a manual installation, Anaconda displays a message and waits for the user to press a key
before rebooting. During a Kickstart installation, if no completion method is specified, the halt option
is used as default.
The poweroff option is equivalent to the shutdown -p command.
NOTE
The poweroff command is highly dependent on the system hardware in use.
Specifically, certain hardware components such as the BIOS, APM (advanced power
management), and ACPI (advanced configuration and power interface) must be able
to interact with the system kernel. Consult your hardware documentation for more
information on you system's APM/ACPI abilities.
For other completion methods, see the halt, reboot, and shutdown Kickstart commands.
raid (optional)
Assembles a software RAID device. This command is of the form:
raid mntpoint --level=level --device=device-name partitions*
mntpoint - Location where the RAID file system is mounted. If it is /, the RAID level must be
1 unless a boot partition (/boot) is present. If a boot partition is present, the /boot partition
must be level 1 and the root (/) partition can be any of the available types. The partitions*
(which denotes that multiple partitions can be listed) lists the RAID identifiers to add to the
RAID array.
CHAPTER 26. KICKSTART INSTALLATIONS
391
IMPORTANT
On IBM Power Systems, if a RAID device has been prepared and has not
been reformatted during the installation, ensure that the RAID metadata
version is 0.90 if you intend to put the /boot and PReP partitions on the
RAID device.
The default Red Hat Enterprise Linux 7 mdadm metadata version is not
supported for the boot device.
For a detailed example of raid in action, see Section 26.4.1, “Advanced Partitioning
Example”.
--level= - RAID level to use (0, 1, 4, 5, 6, or 10). See Section 8.14.4.2, “Create Software
RAID” for information about various available RAID levels.
--device= - Name of the RAID device to use - for example, --device=root.
IMPORTANT
Do not use mdraid names in the form of md0 - these names are not
guaranteed to be persistent. Instead, use meaningful names such as root or
swap. Using meaningful names creates a symbolic link from /dev/md/name
to whichever /dev/mdX node is assigned to the array.
If you have an old (v0.90 metadata) array that you cannot assign a name to,
you can specify the array by a filesystem label or UUID (for example, --
device=rhel7-root --label=rhel7-root).
--chunksize= - Sets the chunk size of a RAID storage in KiB. In certain situations, using a
different chunk size than the default (512 Kib) can improve the performance of the RAID.
--spares= - Specifies the number of spare drives allocated for the RAID array. Spare drives
are used to rebuild the array in case of drive failure.
--fsprofile= - Specifies a usage type to be passed to the program that makes a
filesystem on this partition. A usage type defines a variety of tuning parameters to be used
when making a filesystem. For this option to work, the filesystem must support the concept of
usage types and there must be a configuration file that lists valid types. For ext2, ext3, and
ext4, this configuration file is /etc/mke2fs.conf.
--fstype= - Sets the file system type for the RAID array. Valid values are xfs, ext2,
ext3, ext4, swap, and vfat.
--fsoptions= - Specifies a free form string of options to be used when mounting the
filesystem. This string will be copied into the /etc/fstab file of the installed system and
should be enclosed in quotes.
--mkfsoptions= - Specifies additional parameters to be passed to the program that makes
a filesystem on this partition. No processing is done on the list of arguments, so they must be
supplied in a format that can be passed directly to the mkfs program. This means multiple
options should be comma-separated or surrounded by double quotes, depending on the
filesystem.
Installation Guide
392
--label= - Specify the label to give to the filesystem to be made. If the given label is
already in use by another filesystem, a new label will be created.
--noformat - Use an existing RAID device and do not format the RAID array.
--useexisting - Use an existing RAID device and reformat it.
--encrypted - Specifies that this RAID device should be encrypted, using the passphrase
provided in the --passphrase option. If you do not specify a passphrase, Anaconda uses
the default, system-wide passphrase set with the autopart --passphrase command, or
stops the installation and prompts you to provide a passphrase if no default is set.
NOTE
When encrypting one or more partitions, Anaconda attempts to gather 256
bits of entropy to ensure the partitions are encrypted securely. Gathering
entropy can take some time - the process will stop after a maximum of 10
minutes, regardless of whether sufficient entropy has been gathered.
The process can be sped up by interacting with the installation system (typing
on the keyboard or moving the mouse). If you are installing in a virtual
machine, you can also attach a virtio-rng device (a virtual random number
generator) to the guest as described in the Red Hat Enterprise Linux 7
Virtualization Deployment and Administration Guide.
--cipher= - Specifies which type of encryption will be used if the Anaconda default aes-
xts-plain64 is not satisfactory. You must use this option together with the --encrypted
option; by itself it has no effect. Available types of encryption are listed in the Red Hat
Enterprise Linux 7 Security Guide, but Red Hat strongly recommends using either aes-xts-
plain64 or aes-cbc-essiv:sha256.
--passphrase= - Specifies the passphrase to use when encrypting this RAID device. You
must use this option together with the --encrypted option; by itself it has no effect.
--escrowcert=URL_of_X.509_certificate - Store the data encryption key for this
device in a file in /root, encrypted using the X.509 certificate from the URL specified with
URL_of_X.509_certificate. This option is only meaningful if --encrypted is specified.
--backuppassphrase - Add a randomly-generated passphrase to this device. Store the
passphrase in a file in /root, encrypted using the X.509 certificate specified with --
escrowcert. This option is only meaningful if --escrowcert is specified.
The following example shows how to create a RAID level 1 partition for /, and a RAID level 5 for
/home, assuming there are three SCSI disks on the system. It also creates three swap partitions, one
on each drive.
Example 26.4. Using the raid Kickstart command
part raid.01 --size=6000 --ondisk=sda
part raid.02 --size=6000 --ondisk=sdb
part raid.03 --size=6000 --ondisk=sdc
part swap --size=512 --ondisk=sda
part swap --size=512 --ondisk=sdb
CHAPTER 26. KICKSTART INSTALLATIONS
393

part swap --size=512 --ondisk=sdc
part raid.11 --size=1 --grow --ondisk=sda
part raid.12 --size=1 --grow --ondisk=sdb
part raid.13 --size=1 --grow --ondisk=sdc
raid / --level=1 --device=rhel7-root --label=rhel7-root raid.01
raid.02 raid.03
raid /home --level=5 --device=rhel7-home --label=rhel7-home raid.11
raid.12 raid.13
realm (optional)
Join an Active Directory or IPA domain. For more information about this command, see the join
section of the realm(8) man page.
realm join [options] domain
--computer-ou=OU= - Provide the distinguished name of an organizational unit in order to
create the computer account. The exact format of the distinguished name depends on the
client software and membership software. The root DSE portion of the distinguished name
can usually be left out.
--no-password - Join automatically without a password.
--one-time-password= - Join using a one-time password. This is not possible with all
types of realm.
--client-software= - Only join realms which can run this client software. Valid values
include sssd and winbind. Not all realms support all values. By default, the client software
is chosen automatically.
--server-software= - Only join realms which can run this server software. Possible
values include active-directory or freeipa.
--membership-software= - Use this software when joining the realm. Valid values
include samba and adcli. Not all realms support all values. By default, the membership
software is chosen automatically.
reboot (optional)
Reboot after the installation is successfully completed (no arguments). Normally, Kickstart displays a
message and waits for the user to press a key before rebooting.
The reboot option is equivalent to the shutdown -r command.
Specify reboot to automate installation fully when installing in command line mode on IBM Z.
For other completion methods, see the halt, poweroff, and shutdown Kickstart options.
The halt option is the default completion method if no other methods are explicitly specified in the
Kickstart file.
Installation Guide
394

NOTE
Use of the reboot option might result in an endless installation loop, depending on
the installation media and method.
--eject - Attempt to eject the bootable media (DVD, USB, or other media) before
rebooting.
--kexec - Uses the kexec system call instead of performing a full reboot, which
immediately loads the installed system into memory, bypassing the hardware initialization
normally performed by the BIOS or firmware.
IMPORTANT
Due to the complexities involved with booting systems using kexec, it cannot
be explicitly tested and guaranteed to function in every situation.
When kexec is used, device registers (which would normally be cleared
during a full system reboot) might stay filled with data, which could potentially
create issues for some device drivers.
repo (optional)
Configures additional yum repositories that can be used as sources for package installation. You can
add multiple repo lines.
repo --name=repoid [--baseurl=<url>|--mirrorlist=url] [options]
--name= - The repository id. This option is required. If a repository has a name which
conflicts with another previously added repository, it is ignored. Because the installation
program uses a list of preset repositories, this means that you cannot add repositories with
the same names as the preset ones.
--baseurl= - The URL to the repository. The variables that can be used in yum repo config
files are not supported here. This option cannot be used together with the --mirrorlist
option in the same repository definition.
--mirrorlist= - The URL pointing at a list of mirrors for the repository. The variables that
can be used in yum repository configuration files are not supported here. This option cannot
be used together with the --baseurl option in the same repository definition.
--install - Save the provided repository configuration on the installed system in the
/etc/yum.repos.d/ directory. Without using this option, a repository configured in a
Kickstart file will only be available during the installation process, not on the installed system.
--cost= - An integer value to assign a cost to this repository. If multiple repositories provide
the same packages, this number is used to prioritize which repository will be used before
another. Repositories with a lower cost take priority over repositories with higher cost.
--excludepkgs= - A comma-separated list of package names that must not be pulled from
this repository. This is useful if multiple repositories provide the same package and you want
to make sure it comes from a particular repository. Both full package names (such as
publican) and globs (such as gnome-*) are accepted.
CHAPTER 26. KICKSTART INSTALLATIONS
395
--includepkgs= - A comma-separated list of package names and globs that must be
pulled from this repository. This is useful if multiple repositories provide the same package
and you want to make sure it comes from this repository.
--proxy=[protocol://][username[:password]@]host[:port] - Specify an
HTTP/HTTPS/FTP proxy to use just for this repository. This setting does not affect any other
repositories, nor how the install.img is fetched on HTTP installations.
--ignoregroups=true - This option is used when composing installation trees and has no
effect on the installation process itself. It tells the compose tools to not look at the package
group information when mirroring trees so as to avoid mirroring large amounts of unnecessary
data.
--noverifyssl - Disable SSL verification when connecting to an HTTPS server.
IMPORTANT
Repositories used for installation must be stable. The installation can fail if a repository
is modified before the installation concludes.
rescue (optional)
Automatically enters the installation program's rescue mode. This gives you a chance to repair the
system in case of any problems.
rescue [--nomount|--romount]
--nomount or --romount - Controls how the installed system is mounted in the rescue
environment. By default, the installation program finds your system and mount it in read-write
mode, telling you where it has performed this mount. You can optionally select to not mount
anything (the --nomount option) or mount in read-only mode (the --romount option).
Only one of these two options can be used.
reqpart (optional)
Automatically creates partitions required by your hardware platform. These include a /boot/efi
partition for systems with UEFI firmware, a biosboot partition for systems with BIOS firmware and
GPT, and a PRePBoot partition for IBM Power Systems.
reqpart [--add-boot]
--add-boot - Creates a separate /boot partition in addition to the platform-specific
partition created by the base command.
NOTE
This command cannot be used toegether with autopart, because autopart does
everything the reqpart command does and, in addition, creates other partitions or
logical volumes such as / and swap. In contrast with autopart, this command only
creates platform-specific partitions and leaves the rest of the drive empty, allowing you
to create a custom layout.
rootpw (required)
Installation Guide
396
Sets the system's root password to the password argument.
rootpw [--iscrypted|--plaintext] [--lock] password
--iscrypted - If this option is present, the password argument is assumed to already be
encrypted. This option is mutually exclusive with --plaintext. To create an encrypted
password, you can use python:
$ python -c 'import
crypt,getpass;pw=getpass.getpass();print(crypt.crypt(pw) if
(pw==getpass.getpass("Confirm: ")) else exit())'
This generates a sha512 crypt-compatible hash of your password using a random salt.
--plaintext - If this option is present, the password argument is assumed to be in plain
text. This option is mutually exclusive with --iscrypted.
--lock - If this option is present, the root account is locked by default. This means that the
root user will not be able to log in from the console. This option will also disable the Root
Password screens in both the graphical and text-based manual installation.
selinux (optional)
Sets the state of SELinux on the installed system. The default SELinux policy is enforcing.
selinux [--disabled|--enforcing|--permissive]
--enforcing - Enables SELinux with the default targeted policy being enforcing.
--permissive - Outputs warnings based on the SELinux policy, but does not actually
enforce the policy.
--disabled - Disables SELinux completely on the system.
For more information regarding SELinux, see the Red Hat Enterprise Linux 7 SELinux User's and
Administrator's Guide.
services (optional)
Modifies the default set of services that will run under the default systemd target. The list of disabled
services is processed before the list of enabled services. Therefore, if a service appears on both lists,
it will be enabled.
services [--disabled=list] [--enabled=list]
--disabled= - Disable the services given in the comma separated list.
--enabled= - Enable the services given in the comma separated list.
CHAPTER 26. KICKSTART INSTALLATIONS
397
IMPORTANT
Do not include spaces in the list of services. If you do, Kickstart will enable or disable
only the services up to the first space. For example:
services --disabled=auditd, cups,smartd, nfslock
disables only the auditd service. To disable all four services, this entry should include
no spaces:
services --disabled=auditd,cups,smartd,nfslock
shutdown (optional)
Shut down the system after the installation has successfully completed. During a Kickstart installation,
if no completion method is specified, the halt command is used.
The shutdown Kickstart option is equivalent to the shutdown command.
For other completion methods, see the halt, poweroff, and reboot Kickstart options.
skipx (optional)
If present, X is not configured on the installed system.
IMPORTANT
If you install a display manager among your package selection options, this package
creates an X configuration, and the installed system defaults to graphical.target.
The effect of the skipx option is overridden.
snapshot (optional)
Using the snapshot command, you can create LVM thin volume snapshots during the installation
process. This enables you to back up a logical volume before or after the installation.
To create multiple snapshots, add the snaphost Kickstart command multiple times.
snapshots vg_name/lv_name --name=snapshot_name --when=pre-install|post-
install
vg_name/lv_name - Sets the name of the volume group and logical volume to create the
snapshot from.
--name=snapshot_name - Sets the name of the snapshot. This name must be unique
within the volume group.
--when=pre-install|post-install - Sets if the snapshot is created before the
installation begins or after the installation is completed.
sshpw (optional)
During the installation, you can interact with the installation program and monitor its progress over an
SSH connection. Use the sshpw command to create temporary accounts through which to log on.
Installation Guide
398
Each instance of the command creates a separate account that exists only in the installation
environment. These accounts are not transferred to the installed system.
sshpw --username=name password [--iscrypted|--plaintext] [--lock]
--username - Provides the name of the user. This option is required.
--iscrypted - If this option is present, the password argument is assumed to already be
encrypted. This option is mutually exclusive with --plaintext. To create an encrypted
password, you can use python:
$ python -c 'import
crypt,getpass;pw=getpass.getpass();print(crypt.crypt(pw) if
(pw==getpass.getpass("Confirm: ")) else exit())'
This generates a sha512 crypt-compatible hash of your password using a random salt.
--plaintext - If this option is present, the password argument is assumed to be in plain
text. This option is mutually exclusive with --iscrypted
--lock - If this option is present, this account is locked by default. This means that the user
will not be able to log in from the console.
IMPORTANT
By default, the ssh server is not started during the installation. To make ssh available
during the installation, boot the system with the kernel boot option inst.sshd. See
Console, Environment and Display Options for details.
NOTE
If you want to disable root ssh access, while allowing another user ssh access, use
the following:
sshpw --username=example_username example_password --
plaintext
sshpw --username=root example_password --lock
To simply disable root ssh access, use the following:
sshpw --username=root --lock
text (optional)
Perform the Kickstart installation in text mode. Kickstart installations are performed in graphical mode
by default.
CHAPTER 26. KICKSTART INSTALLATIONS
399
IMPORTANT
For a fully automatic installation, you must either specify one of the available modes
(graphical, text, or cmdline) in the Kickstart file, or you must use the console=
boot option as described in Console, Environment and Display Options. If no mode is
specified, the system will prompt you to choose one before continuing.
timezone (required)
Sets the system time zone to timezone.
timezone timezone [options]
--utc - If present, the system assumes the hardware clock is set to UTC (Greenwich Mean)
time.
--nontp - Disable the NTP service automatic starting.
--ntpservers= - Specify a list of NTP servers to be used as a comma-separated list
without spaces.
Starting with Red Hat Entrerprise Linux 7.5, time zone names are validated using the
pytz.all_timezones list, provided by the pytz package. In previous releases, the names were
validated against pytz.common_timezones, which is a subset of the currently used list. Note that
the graphical and text mode interfaces still use the more restricted pytz.common_timezones list;
you must use a Kickstart file to use additional time zone definitions.
unsupported_hardware (optional)
Tells the installation program to suppress the Unsupported Hardware Detected alert. If this
command is not included and unsupported hardware is detected, the installation stalls at this alert.
user (optional)
Creates a new user on the system.
user --name=username [options]
--name= - Provides the name of the user. This option is required.
--gecos= - Provides the GECOS information for the user. This is a string of various system-
specific fields separated by a comma. It is frequently used to specify the user's full name,
office number, and so on. See the passwd(5) man page for more details.
--groups= - In addition to the default group, a comma separated list of group names the
user should belong to. The groups must exist before the user account is created. See the
group command.
--homedir= - The home directory for the user. If not provided, this defaults to
/home/username.
--lock - If this option is present, this account is locked by default. This means that the user
will not be able to log in from the console. This option will also disable the Create User
screens in both the graphical and text-based manual installation.
Installation Guide
400
--password= - The new user's password. If not provided, the account will be locked by
default.
--iscrypted - If this option is present, the password argument is assumed to already be
encrypted. This option is mutually exclusive with --plaintext. To create an encrypted
password, you can use python:
$ python -c 'import
crypt,getpass;pw=getpass.getpass();print(crypt.crypt(pw) if
(pw==getpass.getpass("Confirm: ")) else exit())'
This generates a sha512 crypt-compatible hash of your password using a random salt.
--plaintext - If this option is present, the password argument is assumed to be in plain
text. This option is mutually exclusive with --iscrypted
--shell= - The user's login shell. If not provided, the system default is used.
--uid= - The user's UID (User ID). If not provided, this defaults to the next available non-
system UID.
--gid= - The GID (Group ID) to be used for the user's group. If not provided, this defaults to
the next available non-system group ID.
NOTE
Consider using the --uid and --gid options to set IDs of regular users and
their default groups at range starting at 5000 instead of 1000. That is because
the range reserved for system users and groups, 0-999, might increase in the
future and thus overlap with IDs of regular users.
For changing the minimum UID and GID limits after the installation, which
ensures that your chosen UID and GID ranges are applied automatically on
user creation, see the Users and Groups chapter of the System
Administrator's Guide.
NOTE
Files and directories are created with various permissions, dictated by the application
used to create the file or directory. For example, the mkdir command creates
directories with all permissions enabled. However, applications are prevented from
granting certain permissions to newly created files, as specified by the user file-
creation mask setting.
The user file-creation mask can be controlled with the umask command. The
default setting of the user file-creation mask for new users is defined by the
UMASK variable in the /etc/login.defs configuration file on the installed system. If
unset, it defaults to 022. This means that by default when an application creates a file,
it is prevented from granting write permission to users other than the owner of the file.
However, this can be overridden by other settings or scripts. More information can be
found in the Red Hat Enterprise Linux 7 System Administrator's Guide.
vnc (optional)
CHAPTER 26. KICKSTART INSTALLATIONS
401
Allows the graphical installation to be viewed remotely through VNC. This method is usually preferred
over text mode, as there are some size and language limitations in text installations. With no
additional options, this command starts a VNC server on the installation system with no password
and displays the details required to connect to it.
vnc [--host=host_name] [--port=port] [--password=password]
--host= - Connect to the VNC viewer process listening on the given host name.
--port= - Provide a port that the remote VNC viewer process is listening on. If not provided,
Anaconda uses the VNC default port of 5900.
--password= - Set a password which must be provided to connect to the VNC session.
This is optional, but recommended.
For more information about VNC installations, including instructions on how to connect to the
installation system, see Chapter 24, Using VNC.
volgroup (optional)
Creates a Logical Volume Management (LVM) group.
volgroup name partition [options]
IMPORTANT
Do not use the dash (-) character in logical volume and volume group names when
installing Red Hat Enterprise Linux using Kickstart. If this character is used, the
installation finishes normally, but the /dev/mapper/ directory will list these volumes
and volume groups with every dash doubled. For example, a volume group named
volgrp-01 containing a logical volume named logvol-01 will be listed as
/dev/mapper/volgrp--01-logvol--01.
This limitation only applies to newly created logical volume and volume group names. If
you are reusing existing ones using the --noformat option, their names will not be
changed.
For a detailed partitioning example including volgroup, see Section 26.4.1, “Advanced Partitioning
Example”.
The options are as follows:
--noformat - Use an existing volume group and do not format it.
--useexisting - Use an existing volume group and reformat it. If you use this option, do
not specify a partition. For example:
volgroup rhel00 --useexisting --noformat
--pesize= - Set the size of the volume group's physical extents in KiB. The default value is
4096 (4 MiB), and the minimum value is 1024 (1 MiB).
Installation Guide
402

--reserved-space= - Specify an amount of space to leave unused in a volume group in
MiB. Applicable only to newly created volume groups.
--reserved-percent= - Specify a percentage of total volume group space to leave
unused. Applicable only to newly created volume groups.
Create the partition first, then create the logical volume group, and then create the logical volume. For
example:
part pv.01 --size 10000
volgroup volgrp pv.01
logvol / --vgname=volgrp --size=2000 --name=root
xconfig (optional)
Configures the X Window System. If you install the X Window System with a Kickstart file that does
not include the xconfig command, you must provide the X configuration manually during
installation.
Do not use this command in a Kickstart file that does not install the X Window System.
--defaultdesktop= - Specify either GNOME or KDE to set the default desktop (assumes
that the chosen environment, either the GNOME Desktop Environment or the KDE
Desktop Environment, has been installed in the %packages section).
IMPORTANT
It is currently not possible to specify KDE as your default desktop environment
using this option. This is a known issue. See
https://access.redhat.com/solutions/1125833 for a workaround. The
workaround can be used as a Kickstart post-installation script as described in
Section 26.3.5, “Post-installation Script”.
--startxonboot - Use a graphical login on the installed system.
zerombr (optional)
If zerombr is specified, any invalid partition tables found on disks are initialized. This destroys all of
the contents of disks with invalid partition tables. This command is required when performing an
unattended installation on a system with previously initialized disks.
CHAPTER 26. KICKSTART INSTALLATIONS
403
WARNING
On IBM Z, if zerombr is specified, any Direct Access Storage Device (DASD)
visible to the installation program which is not already low-level formatted is
automatically low-level formatted with dasdfmt. The command also prevents
user choice during interactive installations.
If zerombr is not specified and there is at least one unformatted DASD visible to
the installation program, a non-interactive Kickstart installation exits
unsuccessfully.
If zerombr is not specified and there is at least one unformatted DASD visible to
the installation program, an interactive installation exits if the user does not agree
to format all visible and unformatted DASDs. To circumvent this, only activate
those DASDs that you will use during installation. You can always add more
DASDs after installation is complete.
zfcp (optional)
Define a Fibre channel device. This option only applies on IBM Z. All of the options described below
must be specified.
zfcp --devnum=devnum --wwpn=wwpn --fcplun=lun
--devnum - The device number (zFCP adapter device bus ID).
--wwpn - The device's World Wide Port Name (WWPN). Takes the form of a 16-digit
number, preceded by 0x.
--fcplun - The device's Logical Unit Number (LUN). Takes the form of a 16-digit number,
preceded by 0x.
For example:
zfcp --devnum=0.0.4000 --wwpn=0x5005076300C213e9 --
fcplun=0x5022000000000000
%include (optional)
Use the %include /path/to/file command to include the contents of another file in the
Kickstart file as though the contents were at the location of the %include command in the Kickstart
file.
26.3.2. Package Selection
Use the %packages command to begin a Kickstart section which describes the software packages to be
installed.
You can specify packages by environment, group, or by their package names. Several environments and
Installation Guide
404

groups that contain related packages are defined. See the repodata/*-
comps-variant.architecture.xml file on the Red Hat Enterprise Linux 7 Installation DVD for a list
of environments and groups.
The *-comps-variant.architecture.xml file contains a structure describing available
environments (marked by the <environment> tag) and groups (the <group> tag). Each entry has an
ID, user visibility value, name, description, and package list. If the group is selected for installation, the
packages marked mandatory in the package list are always installed, the packages marked default
are installed if they are not specifically excluded elsewhere, and the packages marked optional must
be specifically included elsewhere even when the group is selected.
You can specify a package group or environment using either its ID (the <id> tag) or name (the <name>
tag).
IMPORTANT
If you are not sure what package should be installed, Red Hat recommends you to select
the Minimal Install environment. Minimal install provides only the packages
which are essential for running Red Hat Enterprise Linux 7. This will substantially reduce
the chance of the system being affected by a vulnerability. If necessary, additional
packages can be added later after the installation. For more details on Minimal
install, see the Installing the Minimum Amount of Packages Required section of the
Red Hat Enterprise Linux 7 Security Guide.
IMPORTANT
To install a 32-bit package on a 64-bit system, append the package name with the 32-bit
architecture for which the package was built; for example, glibc.i686. The --multilib
option also must be specified in the Kickstart file; see the available options below.
IMPORTANT
Initial Setup does not run after a system is installed from a Kickstart file unless a desktop
environment and the X Window System were included in the installation and graphical
login was enabled. This means that by default, no users except for root are created. You
can either create a user with the user option in the Kickstart file before installing
additional systems from it (see Section 26.3.1, “Kickstart Commands and Options” for
details) or log into the installed system with a virtual console as root and add users with
the useradd command.
The %packages section must end with the %end command.
Specifying an Environment
In addition to groups, you specify an entire environment to be installed:
%packages
@^Infrastructure Server
%end
This command installs all packages which are part of the Infrastracture Server environment.
All available environments are described in the repodata/*-
comps-variant.architecture.xml file on the Red Hat Enterprise Linux 7 Installation DVD.
CHAPTER 26. KICKSTART INSTALLATIONS
405

Only a single environment can be specified in the Kickstart file.
Specifying Groups
Specify groups, one entry to a line, starting with an @ symbol, and then the full group name or group
id as given in the *-comps-variant.architecture.xml file. For example:
%packages
@X Window System
@Desktop
@Sound and Video
%end
The Core group is always selected - it is not necessary to specify it in the %packages section.
The *-comps-variant.architecture.xml file also defines groups called Conflicts
(variant) for each variant of Red Hat Enterprise Linux. This group contains all packages which are
known to cause file conflicts, and is intended to be excluded.
Specifying Individual Packages
Specify individual packages by name, one entry to a line. You can use the asterisk character (*) as a
wildcard in package names. For example:
%packages
sqlite
curl
aspell
docbook*
%end
The docbook* entry includes the packages docbook-dtds, docbook-simple, docbook-slides and
others that match the pattern represented with the wildcard.
Excluding Environments, Groups, or Packages
Use a leading dash (-) to specify packages or groups to exclude from the installation. For example:
%packages
-@Graphical Internet
-autofs
-ipa*fonts
%end
IMPORTANT
Installing all available packages using only * in a Kickstart file is not supported, even if
you exclude the @Conflicts (variant) group.
You can change the default behavior of the %packages section by using several options. Some options
work for the entire package selection, others are used with only specific groups.
Common Package Selection Options
Installation Guide
406

The following options are available for the %packages. To use an option, append it to the start of the
package selection section. For example:
%packages --multilib --ignoremissing
--default
Install the default set of packages. This corresponds to the package set which would be installed if no
other selections were made in the Package Selection screen during an interactive installation.
--excludedocs
Do not install any documentation contained within packages. In most cases, this excludes any files
normally installed in the /usr/share/doc directory, but the specific files to be excluded depend on
individual packages.
--ignoremissing
Ignore any packages, groups and environments missing in the installation source, instead of halting
the installation to ask if the installation should be aborted or continued.
--instLangs=
Specify a list of languages to install. Note that this is different from package group level selections.
This option does not describe which package groups should be installed; instead, it sets RPM macros
controlling which translation files from individual packages should be installed.
--multilib
Configure the installed system for multilib packages (that is, to allow installing 32-bit packages on a
64-bit system) and install packages specified in this section as such.
Normally, on an AMD64 and Intel 64 system, only packages for this architecture (marked as x86_64)
and packages for all architectures (marked as noarch) would be installed. When you use this option,
packages for 32-bit AMD and Intel systems (marked as i686) are automatically installed as well, if
available.
This only applies to packages explicitly specified in the %packages section. Packages which are only
being installed as dependencies without being specified in the Kickstart file are only installed in
architecture versions in which they are needed, even if they are available for more architectures.
--nocore
Disables installation of the @Core package group which is otherwise always installed by default.
Disabling the @Core package group should be only used for creating lightweight containers; installing
a desktop or server system with --nocore will result in an unusable system.
NOTE
Using -@Core to exclude packages in the @Core package group does not work. The
only way to exclude the @Core package group is with the --nocore option.
--retries=
CHAPTER 26. KICKSTART INSTALLATIONS
407

Sets the number of times Yum will attempt to download packages (retries). The default value is 10.
This option only applies during the installation, and will not affect Yum configuration on the installed
system.
--timeout=
Sets the Yum timeout in seconds. The default value is 30. This option only applies during the
installation, and will not affect Yum configuration on the installed system.
Options for Specific Package Groups
The options in this list only apply to a single package group. Instead of using them at the %packages
command in the Kickstart file, append them to the group name. For example:
%packages
@Graphical Internet --optional
%end
--nodefaults
Only install the group's mandatory packages, not the default selections.
--optional
Install packages marked as optional in the group definition in the *-
comps-variant.architecture.xml file, in addition to installing the default selections.
Note that some package groups, such as Scientific Support, do not have any mandatory or
default packages specified - only optional packages. In this case the --optional option must
always be used, otherwise no packages from this group will be installed.
26.3.3. Pre-installation Script
The %pre script is run on the system immediately after the Kickstart file has been parsed, but before
installation begins. This section must be placed towards the end of the Kickstart file, after the Kickstart
commands described in Section 26.3.1, “Kickstart Commands and Options”, and must start with %pre
and end with %end. If your Kickstart file also includes a %post section, the order in which the %pre and
%post sections are included does not matter.
The %pre script can be used for activation and configuration of networking and storage devices. It is also
possible to run scripts, using interpreters available in the installation environment. Adding a %pre script
can be useful if you have networking and storage that needs special configuration before proceeding
with the installation, or have a script that, for example, sets up additional logging parameters or
environment variables. Debugging problems with %pre scripts can be difficult, so it is recommended only
to use a %pre script when necessary.
Commands related to networking, storage, and file systems are available to use in the %pre script, in
addition to most of the utilities in the installation environment's /sbin and /bin directories.
You can access the network in the %pre section. However, the name service has not been configured at
this point, so only IP addresses work, not URLs.
Installation Guide
408

The pre-installation script section of Kickstart cannot manage multiple install trees or source media. This
information must be included for each created Kickstart file, as the pre-installation script occurs during
the second stage of the installation process.
NOTE
Unlike the post-installation script, the pre-installation script is not run in the chroot
environment.
The following options can be used to change the behavior of pre-installation scripts. To use an option,
append it to the %pre line at the beginning of the script. For example:
%pre --interpreter=/usr/bin/python
--- Python script omitted --
%end
--interpreter=
Allows you to specify a different scripting language, such as Python. Any scripting language available
on the system can be used; in most cases, these are /usr/bin/sh, /usr/bin/bash, and
/usr/bin/python.
--erroronfail
Display an error and halt the installation if the script fails. The error message will direct you to where
the cause of the failure is logged.
--log=
Logs the script's output into the specified log file. For example:
%pre --log=/mnt/sysimage/root/ks-pre.log
The following is an example %pre section:
Example 26.5. Sample %pre Script
%pre
#!/bin/sh
hds=""
mymedia=""
for file in /proc/ide/h* do
mymedia=`cat $file/media`
if [ $mymedia == "disk" ] ; then
hds="$hds `basename $file`"
fi
done
set $hds
numhd=`echo $#`
drive1=`echo $hds | cut -d' ' -f1`
drive2=`echo $hds | cut -d' ' -f2`
#Write out partition scheme based on whether there are 1 or 2 hard
drives
CHAPTER 26. KICKSTART INSTALLATIONS
409

if [ $numhd == "2" ] ; then
#2 drives
echo "#partitioning scheme generated in %pre for 2 drives" > /tmp/part-
include
echo "clearpart --all" >> /tmp/part-include
echo "part /boot --fstype xfs --size 75 --ondisk hda" >> /tmp/part-
include
echo "part / --fstype xfs --size 1 --grow --ondisk hda" >> /tmp/part-
include
echo "part swap --recommended --ondisk $drive1" >> /tmp/part-include
echo "part /home --fstype xfs --size 1 --grow --ondisk hdb" >>
/tmp/part-include
else
#1 drive
echo "#partitioning scheme generated in %pre for 1 drive" > /tmp/part-
include
echo "clearpart --all" >> /tmp/part-include
echo "part /boot --fstype xfs --size 75" >> /tmp/part-include
echo "part swap --recommended" >> /tmp/part-include
echo "part / --fstype xfs --size 2048" >> /tmp/part-include
echo "part /home --fstype xfs --size 2048 --grow" >> /tmp/part-include
fi
%end
This script determines the number of hard drives in the system and writes a text file with a different
partitioning scheme depending on whether it has one or two drives. Instead of having a set of
partitioning commands in the Kickstart file, include the following line:
%include /tmp/part-include
The partitioning commands selected in the script will be used.
26.3.4. Anaconda configuration
Additional installation options can be configured in the %anaconda section of your Kickstart file. This
section controls the behavior of the user interface of the installation system.
This section must be placed towards the end of the Kickstart file, after the Kickstart commands described
in Section 26.3.1, “Kickstart Commands and Options”, and must start with %anaconda and end with
%end.
Currently, the only command that can be used in the %anaconda section is pwpolicy. See
Section 26.3.1, “Kickstart Commands and Options” for more details.
The following is an example %anaconda section:
Example 26.6. Sample %anaconda Script
%anaconda
pwpolicy root --minlen=10 --strict
%end
Installation Guide
410

This example %anaconda section sets a password policy which requires that the root password be at
least 10 characters long, and strictly forbids passwords which do not match this requirement.
26.3.5. Post-installation Script
You have the option of adding commands to run on the system once the installation is complete, but
before the system is rebooted for the first time. This section must be placed towards the end of the
Kickstart file, after the Kickstart commands described in Section 26.3.1, “Kickstart Commands and
Options”, and must start with %post and end with %end. If your Kickstart file also includes a %pre
section, the order of the %pre and %post sections does not matter.
This section is useful for functions such as installing additional software or configuring an additional
name server. The post-install script is run in a chroot environment, therefore, performing tasks such as
copying scripts or RPM packages from the installation media do not work by default. You can change
this behavior using the --nochroot option as described below.
Because post-install script runs in a chroot environment, most systemctl commands will refuse to
perform any action. For more information, see the "Behavior of systemctl in a chroot Environment"
section of System Administrator's Guide for Red Hat Enterprise Linux 7.
IMPORTANT
If you configured the network with static IP information, including a name server, you can
access the network and resolve IP addresses in the %post section. If you configured the
network for DHCP, the /etc/resolv.conf file has not been completed when the
installation executes the %post section. You can access the network, but you cannot
resolve IP addresses. Thus, if you are using DHCP, you must specify IP addresses in the
%post section.
The following options can be used to change the behavior of post-installation scripts. To use an option,
append it to the %post line at the beginning of the script. For example:
%post --interpreter=/usr/bin/python
--- Python script omitted --
%end
--interpreter=
Allows you to specify a different scripting language, such as Python. For example:
%post --interpreter=/usr/bin/python
Any scripting language available on the system can be used; in most cases, these are
/usr/bin/sh, /usr/bin/bash, and /usr/bin/python.
--nochroot
Allows you to specify commands that you would like to run outside of the chroot environment.
The following example copies the file /etc/resolv.conf to the file system that was just installed.
%post --nochroot
cp /etc/resolv.conf /mnt/sysimage/etc/resolv.conf
CHAPTER 26. KICKSTART INSTALLATIONS
411

%end
--erroronfail
Display an error and halt the installation if the script fails. The error message will direct you to where
the cause of the failure is logged.
--log=
Logs the script's output into the specified log file. Note that the path of the log file must take into
account whether or not you use the --nochroot option. For example, without --nochroot:
%post --log=/root/ks-post.log
with --nochroot:
%post --nochroot --log=/mnt/sysimage/root/ks-post.log
The following is an example %post section:
Example 26.7. Sample %post Script
# Start of the %post section with logging into /root/ks-post.log
%post --log=/root/ks-post.log
# Mount an NFS share
mkdir /mnt/temp
mount -o nolock 10.10.0.2:/usr/new-machines /mnt/temp
openvt -s -w -- /mnt/temp/runme
umount /mnt/temp
# End of the %post section
%end
The above example mounts an NFS share and executes a script named runme located at
/usr/new-machines/ on the share. Note that NFS file locking is not supported while in Kickstart
mode, therefore the -o nolock option is required.
One of the most common uses of post-installation scripts in Kickstart installations is automatic
registration of the installed system using Red Hat Subscription Manager. The following is an example of
automatic subscription in a %post script:
Example 26.8. Running subscription-manager as a Post-Install Script
%post --log=/root/ks-post.log
/usr/sbin/subscription-manager register --username=admin@example.com --
password=secret --serverurl=sam-server.example.com --org="Admin Group" -
-environment="Dev" --servicelevel=standard --release="7.0"
%end
The subscription-manager command-line script registers a system to a Red Hat Subscription
Management server (Customer Portal Subscription Management, Subscription Asset Manager, or
Installation Guide
412

CloudForms System Engine). This script can also be used to assign or attach subscriptions
automatically to the system that best-match that system.
When registering to the Customer Portal, use the Red Hat Network login credentials. When
registering to Subscription Asset Manager or CloudForms System Engine, use a user account
created by the local administrator.
Additional options can be used with the registration command to set a preferred service level for the
system and to restrict updates and errata to a specific operating system version.
Also see the How do I use subscription-manager in a kickstart file? article on the Red Hat Customer
Portal for additional information about using subscription-manager in a Kickstart %post section.
26.3.6. Kickstart error handling
Starting with Red Hat Enterprise Linux 7, Kickstart installations can contain custom scripts which are run
when the installer encounters a fatal error - for example, an error in a package that has been requested
for installation, failure to start VNC when specified, or an error when scanning storage devices.
Installation cannot continue after such an error has occured. The installer will run all %onerror scripts in
the order they are provided in the Kickstart file. In addition, %onerror scripts will be run in the event of a
traceback.
Each %onerror script is required to end with %end.
--erroronfail
Display an error and halt the installation if the script fails. The error message will direct you to where
the cause of the failure is logged.
--interpreter=
Allows you to specify a different scripting language, such as Python. For example:
%post --interpreter=/usr/bin/python
Any scripting language available on the system can be used; in most cases, these are
/usr/bin/sh, /usr/bin/bash, and /usr/bin/python.
--log=
Logs the script's output into the specified log file.
26.3.7. Kickstart Add-ons
Starting with Red Hat Enterprise Linux 7, Kickstart installations support add-ons. These add-ons can
expand the basic Kickstart (and Anaconda) functionality in many ways.
To use an add-on in your Kickstart file, use the %addon addon_name options command, and finish
the command with an %end statement, similar to pre-installation and post-installation scripts described in
previous sections. For example, if you want to use the Kdump add-on, which is distributed with
Anaconda by default, use the following commands:
%addon com_redhat_kdump --enable --reserve-mb=auto
%end
CHAPTER 26. KICKSTART INSTALLATIONS
413

The %addon command does not include any options of its own - all options are dependent on the actual
add-on. For more information about add-ons, see the Red Hat Enterprise Linux 7 Anaconda
Customization Guide.
26.4. SAMPLE KICKSTART CONFIGURATIONS
26.4.1. Advanced Partitioning Example
The following is an integrated example showing the clearpart, zerombr, part, raid, volgroup,
and logvol Kickstart options in action:
Example 26.9. Advanced Partitioning Example
clearpart --drives=hda,hdc
zerombr
# Raid 1 IDE config
part raid.11 --size 1000 --asprimary --ondrive=hda
part raid.12 --size 1000 --asprimary --ondrive=hda
part raid.13 --size 2000 --asprimary --ondrive=hda
part raid.14 --size 8000 --ondrive=hda
part raid.15 --size 16384 --grow --ondrive=hda
part raid.21 --size 1000 --asprimary --ondrive=hdc
part raid.22 --size 1000 --asprimary --ondrive=hdc
part raid.23 --size 2000 --asprimary --ondrive=hdc
part raid.24 --size 8000 --ondrive=hdc
part raid.25 --size 16384 --grow --ondrive=hdc
# You can add --spares=x
raid / --fstype xfs --device root --level=RAID1 raid.11 raid.21
raid /safe --fstype xfs --device safe --level=RAID1 raid.12 raid.22
raid swap --fstype swap --device swap --level=RAID1 raid.13 raid.23
raid /usr --fstype xfs --device usr --level=RAID1 raid.14 raid.24
raid pv.01 --fstype xfs --device pv.01 --level=RAID1 raid.15 raid.25
# LVM configuration so that we can resize /var and /usr/local later
volgroup sysvg pv.01
logvol /var --vgname=sysvg --size=8000 --name=var
logvol /var/freespace --vgname=sysvg --size=8000 --name=freespacetouse
logvol /usr/local --vgname=sysvg --size=1 --grow --name=usrlocal
This advanced example implements LVM over RAID, as well as the ability to resize various
directories for future growth.
First, the clearpart command is used on drives hda and hdc to wipe them. The zerombr
command initializes unused partition tables.
Then, the two drives are partitioned to prepare them for RAID configuration. Each drive is divided into
five partitions, and each drive is partitioned into an identical layout.
The next part uses these pairs of physical partitions to create a software RAID device with RAID1
level (mirroring). The first four RAID devices are used for / (root), /safe, swap and /usr. The fifth,
largest pair of partitions is named pv.01 and will be used in the following part as a physical volume
for LVM.
Installation Guide
414

Finally, the last set of commands first creates a volume group named sysvg on the pv.01 physical
volume. Then, three logical volumes (/var, /var/freespace and /usr/local) are created and
added to the sysvg volume group. The /var and /var/freespace volumes have a set size of 8
GB, and the /usr/local volume uses the --grow option to fill all remaining available space.
26.4.2. User Input Example
The following is an example showing how to prompt the user for input, and then read that input and save
it as a variable, using bash:
Example 26.10. User Input Example
exec < /dev/tty6 > /dev/tty6 2> /dev/tty6
chvt 6
IFS=$'\n'
echo -n "Enter input: "
read USERINPUT
echo
echo -n "You entered:" "$USERINPUT"
echo
chvt 1
exec < /dev/tty1 > /dev/tty1 2> /dev/tty1
Due to the way Kickstart operates, the script must switch to a new virtual terminal before reading
input from the user. This is accomplished by the exec < /dev/tty6 > /dev/tty6 2>
/dev/tty6 and chvt 6 commands. The read USERINPUT reads input from the user until enter is
pressed, and stores it in the variable USERINPUT. The echo -n "You entered:"
"$USERINPUT" command displays the text You entered: followed by the user's input. Finally, the
chvt 1 and exec < /dev/tty1 > /dev/tty1 2> /dev/tty1 commands switch back to the
original terminal and allow Kickstart to continue installation.
26.4.3. Example Kickstart file for installing and starting the RNG daemon
The following is an example Kickstart file which demonstrates how to install and enable a service, in this
case the Random Number Generator (RNG) daemon, which supplies entropy to the system kernel:
Example 26.11. Example Kickstart file for installing and starting the RNG daemon
services --enabled=rngd
%packages
rng-tools
%end
The services --enabled=rngd command instructs the installed system to start the RNG daemon
each time the system starts. The rng-tools package, which contains the RNG daemon, is then
designated for installation.
CHAPTER 26. KICKSTART INSTALLATIONS
415

CHAPTER 27. INSTALLING INTO A DISK IMAGE
This chapter describes the process of creating custom, bootable images of several different types, and
other related topics. The image creation and installation process can be either performed manually in a
procedure similar to a normal hard drive installation, or it can be automated using a Kickstart file and the
livemedia-creator tool.
NOTE
Creating custom images using livemedia-creator is currently supported only on AMD64
and Intel 64 (x86_64) and IBM POWER (big endian) systems.
Additionally, Red Hat only supports creating custom images of Red Hat
Enterprise Linux 7.
If you choose the manual approach, you will be able to perform the installation interactively, using the
graphical installation program. The process is similar to installing using Red Hat Enterprise Linux
bootable media and the graphical installation program; however, before you begin the installation, you
must create one or more empty image files manually.
Automated disk image installations using livemedia-creator are somewhat similar to Kickstart
installations with network boot. To use this approach, you must prepare a valid Kickstart file, which will
be used by livemedia-creator to perform the installation. The disk image file will be created
automatically.
Both approaches to disk image installations require a separate installation source. In most cases, the
best approach is to use an ISO image of the binary Red Hat Enterprise Linux DVD. See Chapter 2,
Downloading Red Hat Enterprise Linux for information about obtaining installation ISO images.
IMPORTANT
It is not currently possible to use an installation ISO image of Red Hat Enterprise Linux
without any additional preparation. The installation source for a disk image installation
must be prepared the same way it would be prepared when performing a normal
installation. See Section 3.3, “Preparing Installation Sources” for information about
preparing installation sources.
27.1. MANUAL DISK IMAGE INSTALLATION
A manual installation into a disk image is performed by executing the Anaconda installation program on
an existing system and specifying one or more disk image files as installation targets. Additional options
can also be used to configure Anaconda further. A list of available options can be obtained by using the
anaconda -h command.
Installation Guide
416
WARNING
Image installation using Anaconda is potentially dangerous, because it uses the
installation program on an already installed system. While no bugs are known at this
moment which could cause any problems, it is possible that this process could
render the entire system unusable. Installation into disk images should always be
performed on systems or virtual machines specifically reserved for this purpose, and
not on systems containing any valuable data.
This section provides information about creating empty disk images and using the Anaconda installation
program to install Red Hat Enterprise Linux into these images.
27.1.1. Preparing a Disk Image
The first step in manual disk image installation is creating one or more image files, which will later be
used as installation targets similar to physical storage devices. On Red Hat Enterprise Linux, a disk
image file can be created using the following command:
$ fallocate -l size name
Replace size with a value representing the size of the image (such as 10G or 5000M), and name with the
file name of the image to be created. For example, to create a disk image file named myimage.raw
with the size of 30GB, use the following command:
$ fallocate -l 30G myimage.raw
NOTE
The fallocate command allows you to specify the size of the file to be created in
different ways, depending on the suffix used. For details about specifying the size, see
the fallocate(1) man page.
The size of the disk image file you create will limit the maximum capacity of file systems created during
the installation. The image must always have a minimum size of 3GB, but in most cases, the space
requirements will be larger. The exact size you will need for your installation will vary depending on the
software you want to install, the amount of swap space, and the amount of space you will need to be
available after the installation. More details about partitioning are available in:
Section 8.14.4.4, “Recommended Partitioning Scheme” for 64-bit AMD, Intel, and ARM systems
Section 13.15.4.4, “Recommended Partitioning Scheme” for IBM Power Systems servers
After you create one or more empty disk image files, continue with Section 27.1.2, “Installing Red Hat
Enterprise Linux into a Disk Image”.
27.1.2. Installing Red Hat Enterprise Linux into a Disk Image
CHAPTER 27. INSTALLING INTO A DISK IMAGE
417

IMPORTANT
Set Security Enhanced Linux (SELinux) to permissive (or disabled) mode before creating
custom images with Anaconda. See Red Hat Enterprise Linux 7 SELinux User's and
Administrator's Guide for information on setting SELinux modes.
To start the installation into a disk image file, execute the following command as root:
# anaconda --image=/path/to/image/file
Replace /path/to/image/file with the full path to the image file you created earlier.
After executing this command, Anaconda will start on your system. The installation interface will be the
same as if you performed the installation normally (booting the system from Red Hat Enterprise Linux
media), but the graphical installation will start directly, skipping the boot menu. This means that boot
options must be specified as additional arguments to the anaconda command. You can view the full list
of supported commands by executing anaconda -h on a command line.
One of the most important options is --repo=, which allows you to specify an installation source. This
option uses the same syntax as the inst.repo= boot option. See Section 22.1, “Configuring the
Installation System at the Boot Menu” for more information.
When you use the --image= option, only the disk image file specified will be available as the installation
target. No other devices will be visible in the Installation Destination dialog. If you want to use
multiple disk images, you must specify the --image= option separately for each image file separately.
For example:
# anaconda --image=/home/testuser/diskinstall/image1.raw --
image=/home/testuser/diskinstall/image2.raw
The above command will start Anaconda, and in the Installation Destination screen, both
image files specified will be available as installation targets.
Optionally, you can also assign custom names to the disk image files used in the installation. To assign
a name to a disk image file, append :name to the end of the disk image file name. For example, to use a
disk image file located in /home/testuser/diskinstall/image1.raw and assign the name
myimage to it, execute the following command:
# anaconda --image=/home/testuser/diskinstall/image1.raw:myimage
27.2. AUTOMATIC DISK IMAGE INSTALLATION
Creation of disk images and the installation into them can be automated using livemedia-creator. To
perform an automatic installation, you will need an installed Red Hat Enterprise Linux system and a
Kickstart file. The disk images themselves do not need to be created manually. For information about
creating and using Kickstart files, see Chapter 26, Kickstart Installations.
27.2.1. Overview of livemedia-creator
Creating custom images using livemedia-creator is usually a two stage process. In the first stage, a
temporary disk image file is created and Anaconda, the Red Hat Enterprise Linux installation program,
installs a system on this image based on the parameters provided in a Kickstart file. Then, in the second
Installation Guide
418

stage, livemedia-creator uses this temporary system to create the final, bootable image.
This behavior can be changed by specifying additional options. For example, it is possible to go through
the first stage only, with the result being a disk image file, or to skip the first stage and use an existing
disk or file system image to create the final bootable ISO image.
Sample usage of livemedia-creator is described in Section 27.2.4, “Creating Custom Images”. On a
system where the lorax package is installed, a list of all available options can be displayed using the
livemedia-creator --help command. Additional documentation is also installed along with the
lorax package: the livemedia-creator(1) man page and the README.livemedia-creator file
located in the /usr/share/doc/lorax-version/ directory, where version is the version of the lorax
package you have installed.
27.2.2. Installing livemedia-creator
The livemedia-creator tool is a part of the lorax package. To install the package, execute the following
command as root:
# yum install lorax
You will also need to install several other packages in addition to lorax itself. These packages are not
dependencies of lorax and therefore they are not installed automatically, but you might need them
depending on what exactly are you using livemedia-creator for. Among these packages are:
virt-install: a package providing tools to build new virtual machines, used in the first stage of live
media creation unless the --no-virt option is specified.
libvirt, qemu-kvm, libvirt-client and other virtualization tools: when using virt-install, your system
must be prepared to create, run and manage a virtual machine. See the Red Hat
Enterprise Linux 7 Virtualization Deployment and Administration Guide for information on
virtualization in Red Hat Enterprise Linux and for documentation about installing and working
with virtualization tools.
anaconda: the Red Hat Enterprise Linux installation program, used in the first stage instead of
virt-install if the --no-virt option is used.
Other applications, which are beyond the scope of this chapter, might be necessary. If you attempt to
execute livemedia-creator and a package required with the options you specified is missing, the
program will stop and an error message will be displayed informing you of packages you need to install
before proceeding.
27.2.3. Sample Kickstart Files
To successfully create a custom live image, you will need a valid Kickstart configuration file. Two
samples are automatically installed along with lorax. You can use these samples as a reference when
creating your own custom images, or you can copy them and modify them to suit your intended usage.
Both provided samples are located in the /usr/share/doc/lorax-version/ directory, where
version is the version number of the lorax package installed on your system.
The available samples are:
rhel7-minimal.ks: a configuration file which provides only a minimal installation (the @core
group) and other essentials such as the kernel and the GRUB2 boot loader. No users apart from
root are created, and no graphical interface or additional packages are installed.
CHAPTER 27. INSTALLING INTO A DISK IMAGE
419
rhel7-livemedia.ks: a more advanced configuration file which creates a live system with a
graphical interface. A user named liveuser is created along with root.
Both sample configurations need to be modified to use a valid location as the installation source. To do
this edit the file and update the url command to refer to a valid installation source. See Chapter 26,
Kickstart Installations for more information about Kickstart. No other changes are necessary for these
samples to work.
IMPORTANT
Do not modify the samples in their original location. Copy them to another directory and
modify the copies instead.
NOTE
Red Hat only supports the repositories provided by Red as installation source.
NOTE
When modifying the provided samples or making a Kickstart file from scratch, do not use
the %include statement as they are not supported by livemedia-creator. All
Kickstart files must be flattened either manually or using the ksflatten tool before they
can be used.
27.2.4. Creating Custom Images
This section describes several common usage patterns for tools in the lorax package. It is not intended
to be a complete list of available options. To view every available option for livemedia-creator, execute
livemedia-creator --help or see the livemedia-creator(1) man page. For more information
about lorax, see https://rhinstaller.github.io/lorax/lorax.html.
27.2.4.1. Using lorax to create a boot.iso file
The installation system of Red Hat Enterprise Linux is created by a tool named lorax. The lorax tool can
also be used to create your own installation media, for example containing an updated kernel or
additional packages.
NOTE
It is recommended to use lorax on a system that is the same release of Red Hat
Enterprise Linux as the image being created.
After running the following as root, an installation image named boot.iso will exist in the
results/images directory. The --repo= command loads a Yum repository configuration file, in this
case the default one, and use it to download package from Red Hat's content delivery network the same
way they would be downloaded during a system update.
# yum install lorax
# setenforce 0
# lorax -p RHEL -v 7.4 -r 7.4 --repo=/etc/yum.repos.d/redhat.repo
./results/
# setenforce 1
Installation Guide
420
NOTE
The above commands require that the system they are executed on has been registered
and subscribed with Red Hat Subscription Manager. For more information, see Red Hat
Subscription Management.
27.2.4.2. Creating a Live Image Using virt-install
Perhaps the most common use of livemedia-creator involves using virt-install to create a temporary
virtual machine to be used for the live image creation process. To create a live ISO using virt-install, you
will need a valid Kickstart file and a bootable ISO image which contains the Anaconda installation
program. Such images are provided by Red Hat as "minimal boot media"; see Section 3.2, “Making
Installation USB Media” for details.
The following command is the bare minimum you need to create a live image using virt-install:
# livemedia-creator --make-iso --iso=/path/to/boot.iso --
ks=/path/to/valid/kickstart.ks
Replace /path/to/boot.iso with a path to a minimal boot image and /path/to/valid/kickstart.ks with a path to
a valid Kickstart file to be used in the image creation process.
Other frequently used options in this particular use case are:
--vnc vnc: this option allows you to watch the installation process using a VNC client such as
TigerVNC. The option is passed to virt-install's --graphics option. See Chapter 24, Using
VNC for more information.
--ram x: allows you to specify the amount of RAM for the temporary virtual machine in MiB.
--vcpus x: the amount of the virtual machine's processors.
27.2.4.3. Creating a Live Image Using Anaconda's Image Install
The livemedia-creator application can create a live image using the Anaconda package if virt-install is
not available. In this case, no image containing the installation program is needed, but the Anaconda
package must be installed on the system. Again, the process has two stages: first, a temporary disk
image is created and a system is installed into it, and then this image is used to create the final bootable
ISO.
WARNING
Live image creation using Anaconda is potentially dangerous, because it uses the
installation program on the system itself instead of inside a virtual machine. While no
bugs are known at this moment that would cause any problems, it is possible that
this process could render the entire system unusable. Running livemedia-creator
with the --no-virt option is therefore only recommended on virtual machines
(guests) specifically reserved for this purpose.
CHAPTER 27. INSTALLING INTO A DISK IMAGE
421

IMPORTANT
Set Security Enhanced Linux (SELinux) to permissive (or disabled) mode before creating
custom images with Anaconda. See Red Hat Enterprise Linux 7 SELinux User's and
Administrator's Guide for information on setting SELinux modes.
To create a live image using Anaconda, use the --no-virt option. For example:
# livemedia-creator --make-iso --ks=/path/to/valid/kickstart.ks --no-virt
27.2.4.4. Creating a Disk or File System Image
You can also use livemedia-creator to create a disk or file system image. This means running only the
first stage of the image creation process. The final ISO will not be created, the program will stop after
finishing the installation process on the temporary disk or file system image file. You can then mount and
inspect this image for errors, which can be useful when troubleshooting a modified Kickstart file, and you
can also keep it for future use to save time when creating images in the future.
NOTE
It is also possible to use the --no-virt option in all examples in this section.
There are several ways to stop the creation process after the first stage. You can use the --image-
only option as illustrated in the following example:
# livemedia-creator --make-iso --ks=/path/to/valid/kickstart.ks --
iso=/path/to/boot.iso --image-only
Alternatively, you can use the --make-disk option instead of --make-iso:
# livemedia-creator --make-disk --ks=/path/to/valid/kickstart.ks --
iso=/path/to/boot.iso
You can also create a file system image instead of partitioned disk image using the --make-fsimage
option:
# livemedia-creator --make-fsimage --ks=/path/to/valid/kickstart.ks --
iso=/path/to/boot.iso
In all cases, the result will be a partitioned disk image or a file system image, located in the /var/tmp/
directory by default. To change the location of the result, use the --tmp
/path/to/temporary/directory/ option, where /path/to/temporary/directory/ is the path to the
target directory.
27.2.4.5. Using a Previously Created Disk or File System Image
If you already have a disk or file system image (see Section 27.2.4.4, “Creating a Disk or File System
Image”), you can supply it to livemedia-creator to produce the final bootable ISO image. In this case no
Kickstart File or Anaconda installation image is necessary; these are only needed in the first stage of
the image creation process, which is skipped in this case.
Installation Guide
422

To create a final image from an existing partitioned disk image file, use the --disk-image option. For
example:
# livemedia-creator --make-iso --disk-image=/path/to/disk/image.img
If you want to use a file system image instead of a disk image, use the --fs-image option instead:
# livemedia-creator --make-iso --fs-image=/path/to/filesystem/image.img
27.2.4.6. Creating an Appliance
The livemedia-creator utility can be used to create appliance images (a partitioned disk image),
including an XML file containing its description, generated using a template. Virtual machine installations
as well as image installations are supported in this case. To create an appliance image and description,
use the --make-appliance option instead of --make-iso. For example:
# livemedia-creator --make-appliance --ks=/path/to/valid/kickstart.ks --
iso=/path/to/boot.iso
Both the image and the description XML file will be stored in the /var/tmp/ directory unless a different
one is specified using the --resultdir option.
Additional options specific to appliance creation are:
--app-name name: specifies the name of the appliance, which will appear in the XML
description file marked by the <name> tag. The default value is None.
--app-template /path/to/template.tmpl: specifies the template to be used. The
default is /usr/share/lorax/appliance/libvirt.tmpl.
--app-file /path/to/app/file.xml: specifies name of the generated description XML
file. The default value is appliance.xml.
27.2.4.7. Creating an Amazon Machine Image (AMI)
To create an Amazon Machine Image (AMI) for use within the Amazon Elastic Compute Cloud (EC2),
use the --make-ami option. Virtualized and image installations are both supported.
# livemedia-creator --make-ami --ks=/path/to/valid/kickstart.ks --
iso=/path/to/boot.iso
The result will be an image file named ami-root.img, located in the /var/tmp/ directory, unless you
used the --resultdir option to specify a different one.
27.2.4.8. Additional Arguments
The following options can be used with all use cases listed above (virtual installations, Anaconda image
installations and others).
--keep-image: when you specify this option, the temporary disk image file used in the first
stage of the installation will not be deleted. It will be located in the /var/tmp/ directory and it
will have a randomly generated name such as diskgU42Cq.img.
CHAPTER 27. INSTALLING INTO A DISK IMAGE
423

--image-only: using this option means that only the first stage of the image creation process
will be executed. Instead of producing the final bootable ISO image, livemedia-creator will only
create the temporary disk image file and perform an installation on it. This option allows you to
save time when testing modifications to your Kickstart file, because you can skip the time-
consuming second stage and inspect the temporary disk image file.
--image-name name: allows you to specify a custom name for the temporary disk image file.
The default name is randomly generated (for example, disk1Fac8G.img).
--tmp /path/to/temporary/directory/: specifies the top level temporary directory. The
default value is /var/tmp/. When using this option, you must specify a directory which already
exists.
--resultdir /path/to/results/directory/: specifies the directory where the results
(the bootable ISO image) will appear after livemedia-creator finishes. An already existing
directory cannot be specified. The default is /var/tmp/. This option only applies to the final ISO
image; if you are creating a disk or file system image and want it to be saved at a specific
location, use the --tmp option.
--logfile /path/to/log/file/: specifies the location of the program's log file.
27.2.5. Troubleshooting livemedia-creator Problems
This section offers suggestions on solving various issues commonly encountered when using livemedia-
creator. If you encounter a problem not described here, you can look into the program's log files, which
are automatically generated during every run and saved into the directory from which you executed the
tool, unless you specify a different directory using the --logfile option. The log files will be different
based on the options you used - for example, virt-install.log will not be generated when you use
the --no-virt option (instead, you will get log files from Anaconda, located in the anaconda/
directory). Other files, namely livemedia.log and program.log, are generated every time.
Another way to find and solve problems is using the --image-only option when running the utility. This
option will stop the program after the first stage, so only a disk image file will be generated instead of the
final bootable ISO. You can then mount the disk image file and examine its contents without having to
wait for the second stage to finish. Alternatively, you can use the --keep-image option, which will
execute both stages, but keep the temporary disk image for later analysis.
Using the --vnc option is recommended when testing changes to the Kickstart file. This option will allow
you to use a VNC client to connect to the virtual machine and watch the installation progress. See
Chapter 24, Using VNC for details.
27.2.5.1. Stuck Virtual Machine Installation
If the installation program stops for any reason during the first stage of a virtual installation, livemedia-
creator will stop as well, waiting for the installation to finish. You can either interrupt the program
directly, or you can solve this problem by stopping the temporary virtual machine. Livemedia-creator
will detect that the guest operating system has been stopped, delete all temporary files and exit.
To stop the temporary virtual machine, follow this procedure:
Procedure 27.1. Stopping the Temporary Virtual Machine
1. Use virsh to list all virtual machines (guests) currently available on the system. The output will
be similar to the following:
Installation Guide
424

# virsh list --all
Id Name State
----------------------------------------------------
93 LiveOS-2a198971-ba97-454e-a056-799f453e1bd7 running
- RHEL7 shut off
Identify the temporary virtual machine. Its name will always start with LiveOS, followed by a
string of random numbers and characters.
2. Once you have identified the temporary virtual machine, stop it using the virsh destroy
name command, where name is the virtual machine's name:
# virsh destroy LiveOS-2a198971-ba97-454e-a056-799f453e1bd7
Domain LiveOS-2a198971-ba97-454e-a056-799f453e1bd7 destroyed
27.2.5.2. Failed installation using a Virtual Machine
If you were performing a virtual installation and the process was interrupted for any reason (such as
hardware failure, power outage or a keyboard interrupt) during the first stage, virt-install will not be able
to start again until the previously created temporary disk image and virtual machine have been removed.
The following procedure explains how to do this.
Not all steps might be necessary every time. For example, if you are recovering after a system crash,
you will not have to stop the temporary virtual machine, instead you can just use the virsh undefine
name command. You can also use steps 4 and 5 if you only want to clean up temporary files created by
livemedia-creator and nothing else.
Procedure 27.2. Removing Temporary Guests And Disk Image Files
1. Use virsh to list all virtual machines (guests) currently available on the system. The output will
be similar to the following:
# virsh list --all
Id Name State
----------------------------------------------------
93 LiveOS-2a198971-ba97-454e-a056-799f453e1bd7 running
- RHEL7 shut off
Identify the temporary virtual machine. Its name will always start with LiveOS, followed by a
string of random numbers and characters.
2. Once you have identified the temporary virtual machine, stop it using the virsh destroy
name command, where name is the virtual machine's name:
# virsh destroy LiveOS-2a198971-ba97-454e-a056-799f453e1bd7
Domain LiveOS-2a198971-ba97-454e-a056-799f453e1bd7 destroyed
3. Delete the temporary virtual machine using virsh undefine name, using the same name as
in the previous step.
# virsh undefine LiveOS-2a198971-ba97-454e-a056-799f453e1bd7
Domain LiveOS-2a198971-ba97-454e-a056-799f453e1bd7 has been
undefined
CHAPTER 27. INSTALLING INTO A DISK IMAGE
425

4. Find the temporary file system's mount. It will be targeted to the /var/tmp/ directory and its
name will be lorax.imgutils followed by six random numbers or characters.
# findmnt -T /var/tmp/lorax.imgutils*
TARGET SOURCE FSTYPE OPTIONS
/var/tmp/lorax.imgutils.bg6iPJ /dev/loop1 iso9660 ro,relatime
Then, unmount it using the umount command:
# umount /var/tmp/lorax.imgutils.bg6iPJ
5. Find the temporary disk image created by virt-install in the /var/tmp/ directory. The name of
this file is printed to command line at the beginning of the installation process and is randomly
generated, unless you specify a name using the --image-name option. For example:
2013-10-30 09:53:03,161: disk_size = 5GB
2013-10-30 09:53:03,161: disk_img = /var/tmp/diskQBkzRz.img
2013-10-30 09:53:03,161: install_log = /home/pbokoc/lorax/virt-
install.log
mount: /dev/loop1 is write-protected, mounting read-only
In the above example, the temporary disk image is /var/tmp/diskQBkzRz.img.
If you cannot find the initial messages, you can identify the temporary files manually. List all
contents of the /var/tmp/ directory using the ls command and filter the output for files
containing disk in their names:
# ls /var/tmp/ | grep disk
diskQBkzRz.img
Then, delete the temporary disk image:
# rm -f /var/tmp/diskQBkzRz.img
If you followed all steps in this procedure, you are now able to start a new installation with virt-install.
27.2.5.3. Failed Installation Using Anaconda
Recovery from an interrupted installation using Anaconda image install feature (the --no-virt option)
can be achieved by executing the anaconda-cleanup script, which is installed along with the
anaconda package. This script is located in the /usr/bin/ directory.
Use the following command to execute the cleanup script. You will need root privileges to do this.
# anaconda-cleanup
Installation Guide
426
CHAPTER 28. BUILDING CUSTOM SYSTEM IMAGES WITH
COMPOSER
Composer is a tool for creating custom system images. The following sections describe how to install it
and how to use it.
28.1. INTRODUCTION TO COMPOSER
Composer is a tool that enables users to create customized system images of Red Hat Enterprise Linux.
On Red Hat Enterprise Linux 7.6, Composer is available in the Extras channel as a Technology Preview
in the lorax-composer package.
IMPORTANT
Composer is available as a Technology Preview. See the Technology Preview Features
Support Scope for more details.
Customers deploying Composer are encouraged to provide feedback to Red Hat.
Composer Output Formats
Composer can create these output formats:
Description CLI name file extension
QEMU QCOW2 Image qcow2 .qcow2
Ext4 File System Image ext4-filesystem .img
Raw Partitioned Disk Image partitioned-disk .img
Live Bootable ISO live-iso .iso
TAR Archive tar .tar
Composer User Interfaces
The Composer back end runs as a system service lorax-composer. Users can interact with this
service through two front ends:
GUI available as a Cockpit plugin. This is the preferred method.
CLI available as the composer-cli tool for running commands.
Composer Blueprints
In Composer, a blueprint defines a customized system image by listing packages that will be part of the
system. Blueprints can be edited and they are versioned.
When a system image is created from a blueprint, the image is associated with the blueprint in
Composer Cockpit interface.
28.2. COMPOSER SYSTEM REQUIREMENTS
CHAPTER 28. BUILDING CUSTOM SYSTEM IMAGES WITH COMPOSER
427
Use a virtual machine to run Composer, because the underlying lorax tool performs a number of
potentially insecure and unsafe actions while creating the system images. The environment where
Composer runs should meet these requirements:
Parameter Minimal Required Value
System type A dedicated virtual machine
Processor 2 cores
Memory 4 GiB
Disk space 20 GiB
Access privileges Administrator level (root)
SElinux Off (permissive mode)
Network Connectivity to Internet and to a system with repository mirrors
Apart from the virtual machine that runs Composer itself, another system is needed to provide mirrors of
Red Hat content delivery network (CDN) package repositories.
IMPORTANT
Composer is available as a Technology Preview. See the Technology Preview Features
Support Scope for more details.
Customers deploying Composer are encouraged to provide feedback to Red Hat.
28.3. PREPARING A REPOSITORY MIRROR FOR COMPOSER
For technical reasons, Composer cannot directly use the Red Hat content delivery network (CDN). This
procedure describes how to prepare a mirror of such content on a system different from the one running
Composer.
Prerequisites
The file system containing the /var/www directory must have at least 50 GiB of free space
available. To check this:
$ df -h /var/www/
The system must use the same version of Red Hat Enterprise Linux as the system using
Composer and be fully subscribed.
Procedure
1. Install the tools for handling packages and repositories, and the Apache web server:
# yum install yum-utils createrepo httpd
Installation Guide
428
2. List the repositories enabled on this machine and note their identifiers:
# yum repolist
3. Create local mirrors of the repositories that you want to use in Composer. For each of these
repositories, run:
# mkdir -p /var/www/html
# reposync --gpgcheck -l --download_path=/var/www/html --repoid
REPO-ID --downloadcomps --download-metadata
$ cd /var/www/html/REPO-ID
$ createrepo -v /var/www/html/REPO-ID -g comps.xml
Replace REPO-ID with the identifier you noted in the previous step.
4. Make sure that the repositories have the correct SELinux context so that the httpd Apache web
server can access the repository mirrors:
# chcon -vR -t httpd_sys_content_t /var/www/html/
5. Enable the web server to start after each reboot, configure the system firewall, and start the
server for the first time:
# systemctl enable httpd
# firewall-cmd --add-service=http --permanent
# firewall-cmd --add-service=http
# systemctl start httpd
28.4. INSTALLING COMPOSER
To install Composer on a dedicated virtual machine, follow these steps.
IMPORTANT
Composer is available as a Technology Preview. See the Technology Preview Features
Support Scope for more details.
Customers deploying Composer are encouraged to provide feedback to Red Hat.
Prerequisites
The virtual machine for Composer must be already installed, meet the requirements, be
subscribed, and be running.
The system with repository mirrors must be accessible on network.
The Composer system must use the same version of Red Hat Enterprise Linux as the system
containing repository mirrors.
You must be connected to the virtual machine and run all the commands there.
The repository RHEL-7-Extras must be enabled on the system.
CHAPTER 28. BUILDING CUSTOM SYSTEM IMAGES WITH COMPOSER
429

Procedure
1. Install the Composer packages:
# yum install lorax-composer composer-cli cockpit-composer
NOTE
If Cockpit is not installed yet, it is implicitly installed as a dependency of the
cockpit-composer package.
2. List the repositories enabled on this machine and note their identifiers:
# yum repolist
3. Create a repository configuration file in the /etc/yum.repos.d directory which points to the
mirrored repositories. Include the IP address or host name of the virtual machine system. For
each of the repository mirrors, run:
# cat >> /etc/yum.repos.d/mirror.repo <<EOF
[mirror-REPO-ID]
name=NAME
baseurl=http://IP-ADDR/cdrom/
enabled=1
gpgcheck=1
gpgkey=file:///etc/pki/rpm-gpg/RPM-GPG-KEY-redhat-release
EOF
Replace REPO-ID with the repository identifier, NAME with the repository name, and IP-ADDR
with the IP address or host name. This will present the repository mirrors to the system with an
identifier containing the prefix mirror-.
4. Verify the repository configuration:
# yum clean all
# yum repolist
5. Disable the original subscribed repositories from Red Hat content delivery network. For each of
the mirrored repositories, run:
# yum-config-manager --disable REPO-ID
Replace REPO-ID with the repository identifier.
6. Enable Composer to start after each reboot and configure the system firewall:
# systemctl enable lorax-composer.socket
# systemctl enable cockpit.socket
# firewall-cmd --add-service=cockpit && firewall-cmd --add-
service=cockpit --permanent
Installation Guide
430
7. The Composer and Cockpit services are started automatically on each system reboot. For this
first session after installation, start these services manually:
# systemctl start lorax-composer
# systemctl start cockpit
28.5. ACCESSING COMPOSER GUI IN COCKPIT
Using Cockpit is the recommended way of accessing Composer functionality.
IMPORTANT
Composer is available as a Technology Preview. See the Technology Preview Features
Support Scope for more details.
Customers deploying Composer are encouraged to provide feedback to Red Hat.
Prerequisites
You must have root access to the system.
Procedure
1. Open https://localhost:9090/ in a web browser on the system with Composer.
NOTE
Accessing Composer from another system falls under the topic of remote access
to Cockpit. For more information, see the Getting Started with Cockpit guide.
2. Log into the Cockpit with credentials for an user account with sufficient privileges on the system.
3. On the left, click the Image Builder icon to display the Composer controls.
The Composer view opens, listing existing blueprints.
28.6. CREATING A COMPOSER BLUEPRINT
These are the steps for creating a blueprint.
IMPORTANT
Composer is available as a Technology Preview. See the Technology Preview Features
Support Scope for more details.
Customers deploying Composer are encouraged to provide feedback to Red Hat.
Prerequisites
You have opened the Composer Cockpit interface in a browser.
Procedure
CHAPTER 28. BUILDING CUSTOM SYSTEM IMAGES WITH COMPOSER
431

1. Click Create Blueprint in the top right corner.
A pop-up appears with fields for the blueprint name and description.
2. Fill in the name of the blueprint and its description, then click Create.
The screen changes to blueprint editing mode.
3. Add components that you want to include in the system image:
1. On the left, enter component name or a part of it into the field under the heading
Available Components and press Enter.
The search is added to the list of filters under the text entry field, and the list of components
below is reduced to these that match the search.
If the list of components is too long, add further search terms in the same way.
2. The list of components is paged. To move to other result pages, use the arrows and entry
field above the component list.
3. Click on name of the component you intend to use to display its details. The right pane fills
with details of the components, such as its version and dependencies.
4. Select the version you want to use in the Component Options box, with the Version
Release drop-down menu.
5. Click Add in the top left.
6. If you added a component by mistake, remove it by clicking the button at the far right of its
entry in the right pane, and select Remove in the menu.
NOTE
If you do not intend to select version for some components, you can skip the
component details screen and version selection by clicking the + buttons on the
right side of the component list.
4. To save the blueprint, click Commit in the top left. A dialog with a summary of the changes pops
up. Click Commit.
A small pop-up on the right informs you of the saving progress and then result.
5. In the top left, click Back to Blueprints to exit the editing screen.
The Composer view opens, listing existing blueprints.
28.7. EDITING A COMPOSER BLUEPRINT
These are the steps for editing a blueprint.
Installation Guide
432

IMPORTANT
Composer is available as a Technology Preview. See the Technology Preview Features
Support Scope for more details.
Customers deploying Composer are encouraged to provide feedback to Red Hat.
Prerequisites
You have opened the Composer Cockpit interface in a browser.
A blueprint exists.
Procedure
1. Locate the blueprint that you want to edit by entering its name or a part of it into the search box
at top left, and press Enter.
The search is added to the list of filters under the text entry field, and the list of blueprints below
is reduced to these that match the search.
If the list of blueprints is too long, add further search terms in the same way.
2. On the left side of the blueprint, press the Edit Blueprint button that belongs to the
blueprint.
The view changes to the blueprint editing screen.
3. Remove unwanted components by clicking their button at the far right of its entry in the right
pane, and select Remove in the menu.
4. Change version of existing components:
1. On the left, enter component name or a part of it into the field under the heading
Blueprint Components and press Enter.
The search is added to the list of filters under the text entry field, and the list of components
below is reduced to these that match the search.
If the list of components is too long, add further search terms in the same way.
2. Click the button at the far right of the component entry, and select Edit in the menu.
A component details screen opens in the right pane.
3. Select the required version in the Version Release drop-down menu and click Apply
Change in top left.
The change is saved and the right pane returns to listing the blueprint components.
5. Add new components:
1. On the left, enter component name or a part of it into the field under the heading
Available Components and press Enter.
CHAPTER 28. BUILDING CUSTOM SYSTEM IMAGES WITH COMPOSER
433

The search is added to the list of filters under the text entry field, and the list of components
below is reduced to these that match the search.
If the list of components is too long, add further search terms in the same way.
2. The list of components is paged. To move to other result pages, use the arrows and entry
field above the component list.
3. Click on name of the component you intend to use to display its details. The right pane fills
with details of the components, such as its version and dependencies.
4. Select the version you want to use in the Component Options box, with the Version
Release drop-down menu.
5. Click Add in the top left.
6. If you added a component by mistake, remove it by clicking the button at the far right of its
entry in the right pane, and select Remove in the menu.
NOTE
If you do not intend to select version for some components, you can skip the
component details screen and version selection by clicking the + buttons on the
right side of the component list.
6. Commit a new version of the blueprint with your changes:
1. Click the Commit button in top left.
A pop-up window with a summary of your changes appears.
2. Review your changes and confirm them by clicking Commit.
A small pop-up on the right informs you of the saving progress and then result. A new
version of the blueprint is created.
7. In the top left, click Back to Blueprints to exit the editing screen.
The Composer view opens, listing existing blueprints.
28.8. CREATING A SYSTEM IMAGE WITH COMPOSER
The following steps below describe creating a system image.
IMPORTANT
Composer is available as a Technology Preview. See the Technology Preview Features
Support Scope for more details.
Customers deploying Composer are encouraged to provide feedback to Red Hat.
Prerequisites
You have opened the Composer Cockpit interface in a browser.
Installation Guide
434

A blueprint exists.
Procedure
1. Locate the blueprint that you want to edit by entering its name or a part of it into the search box
at top left, and press Enter.
The search is added to the list of filters under the text entry field, and the list of blueprints below
is reduced to these that match the search.
If the list of blueprints is too long, add further search terms in the same way.
2. On the left side of the blueprint, press the Create Image button that belongs to the blueprint.
A pop-up window appears.
3. Select the image type and architecture and press Create.
A small pop-up in the top left informs you that the image creation has been added to the queue.
4. Click the name of the blueprint.
A screen with details of the blueprint opens.
5. Click the Images tab to switch to it.
6. The image that is being created is listed with the status Pending.
NOTE
Image creation takes a longer time, measured in minutes. There is no indication
of progress while the image is created.
To abort image creation, press its Stop button on the right.
7. Once the image is successfully created, the Stop button is replaced by a Download button.
Click this button to download the image to your system.
28.9. ADDITIONAL RESOURCES
Upstream Weldr documentation: https://weldr.io/
CHAPTER 28. BUILDING CUSTOM SYSTEM IMAGES WITH COMPOSER
435

CHAPTER 29. UPGRADING YOUR CURRENT SYSTEM
The procedure for performing an in-place upgrade on your current system is handled by the following
utilities:
The Preupgrade Assistant, which is a diagnostics utility that assesses your current system and
identifies potential problems you might encounter during or after the upgrade.
The Red Hat Upgrade Tool utility, which is used to upgrade a system from Red Hat
Enterprise Linux version 6 to version 7.
NOTE
In-place upgrades are currently only supported on AMD64 and Intel 64 (x86_64) systems
and on IBM Z (s390x). Additionally, only the Server variant can be upgraded with
Red Hat Upgrade Tool.
Full documentation covering the process of upgrading from an earlier release of Red Hat
Enterprise Linux to Red Hat Enterprise Linux 7 is available in the Red Hat Enterprise Linux 7 Migration
Planning Guide.
You can also use the Red Hat Enterprise Linux Upgrade Helper to guide you through migration from
Red Hat Enterprise Linux 6 to 7.
Installation Guide
436

PART V. AFTER INSTALLATION
This part of the Red Hat Enterprise Linux Installation Guide covers finalizing the installation, as well as
some installation tasks related to installation that you might perform at some time in the future. These
include:
performing common post-installation tasks, such as registering the system to Red Hat
Subscription Management services
using a Red Hat Enterprise Linux installation disc to rescue a damaged system
removing Red Hat Enterprise Linux from your computer
PART V. AFTER INSTALLATION
437

CHAPTER 30. INITIAL SETUP
After you started a new Red Hat Enterprise Linux system the first time, the Initial Setup application
launches, if you installed the server:
Using the Server with GUI base environment in the Red Hat Enterprise Linux setup.
Using a Kickstart file that contains one of the following entries in the %packages section:
the initial-setup-gui package for graphical mode
the initial-setup package for text mode
the x11 group
the gnome-desktop group
the kde-desktop group
Options in the Initial Setup
The Initial Setup application can display the following options:
Option Graphical User
Interface
Text User Interface
License agreement [a] Yes Yes
Language settings [b] No Yes
Date & time [b] Yes Yes [c]
Subscription Manager Yes No
Network & host name [b] Yes No
Root password [b] Yes Yes [c]
User creation [b] Yes Yes
[a] This option is only displayed if you did not previously agreed to the license.
[b] This option is only displayed if you did not previously set it.
[c] This option is only available if you run Initial Setup in reconfiguration mode
Installation Guide
438
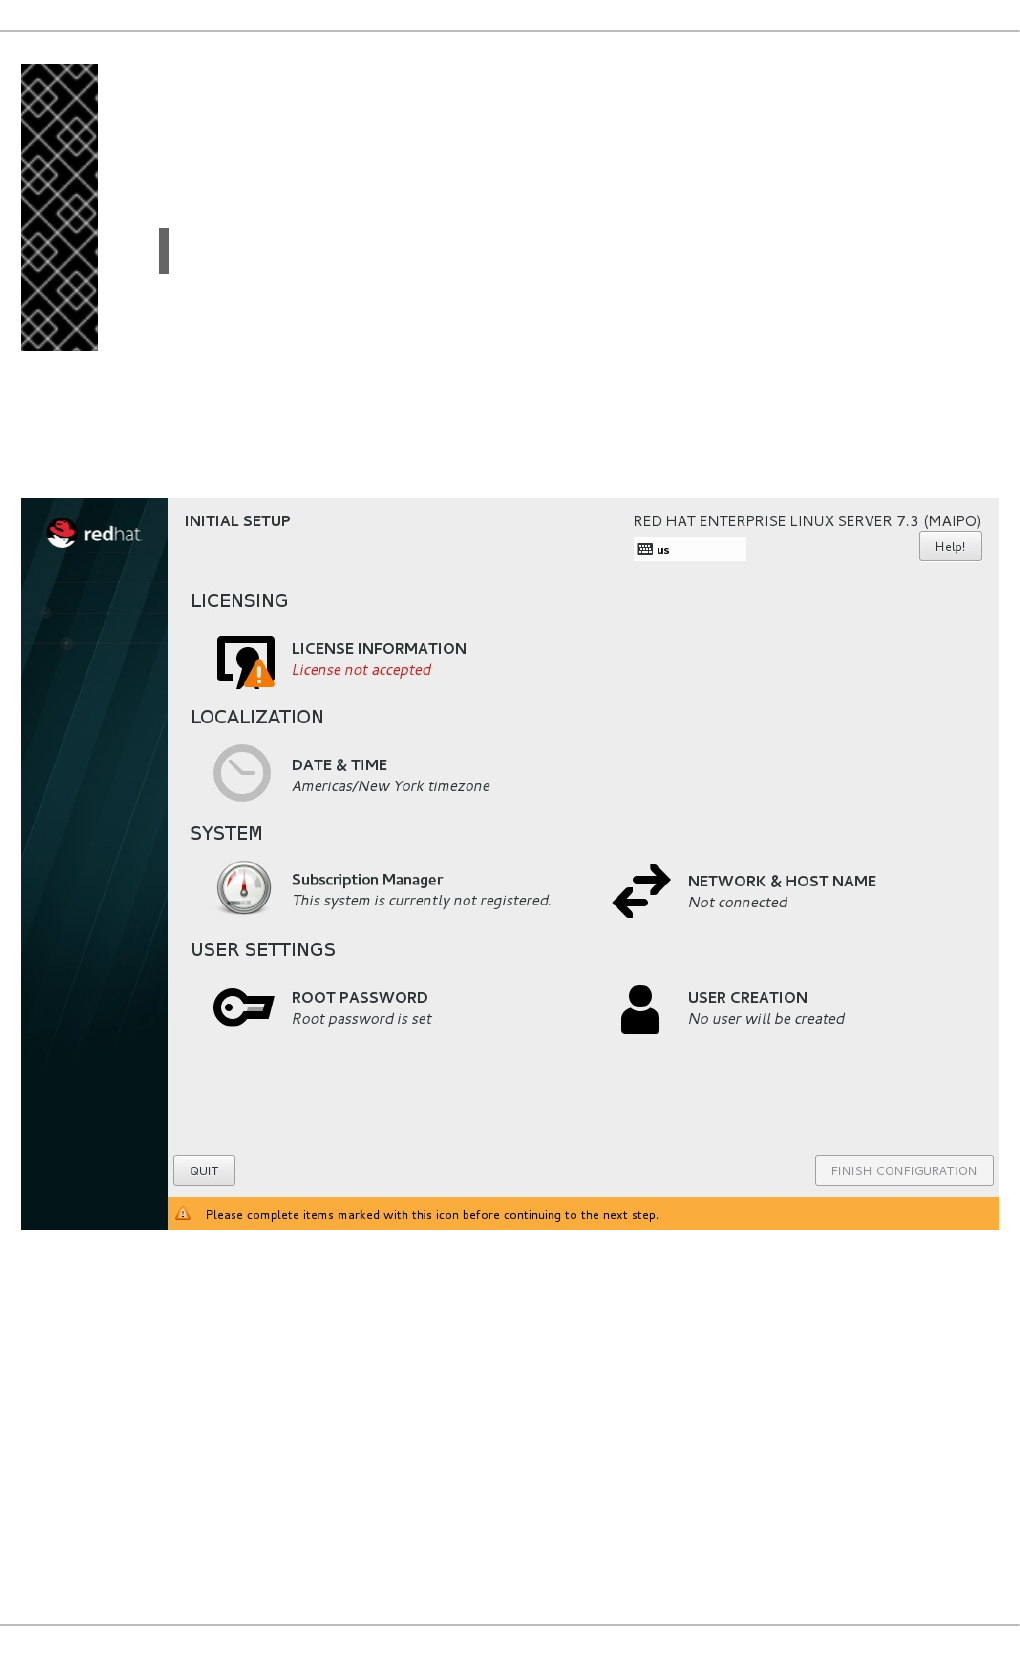
IMPORTANT
Options set during the setup are not displayed in the Initial Setup. To display all options
in Initial Setup, you must install Red Hat Enterprise Linux using a Kickstart file that
contains the following command:
firstboot --enable --reconfig
The --reconfig option specifies that all options should be displayed. For further details
about Kickstart installations, see Chapter 26, Kickstart Installations.
30.1. GRAPHICAL MODE
In graphical mode, the Initial Setup displays the following screen:
Figure 30.1. Main Initial Setup Screen
The License Agreement screen displays the overall licensing terms for Red Hat Enterprise Linux.
CHAPTER 30. INITIAL SETUP
439
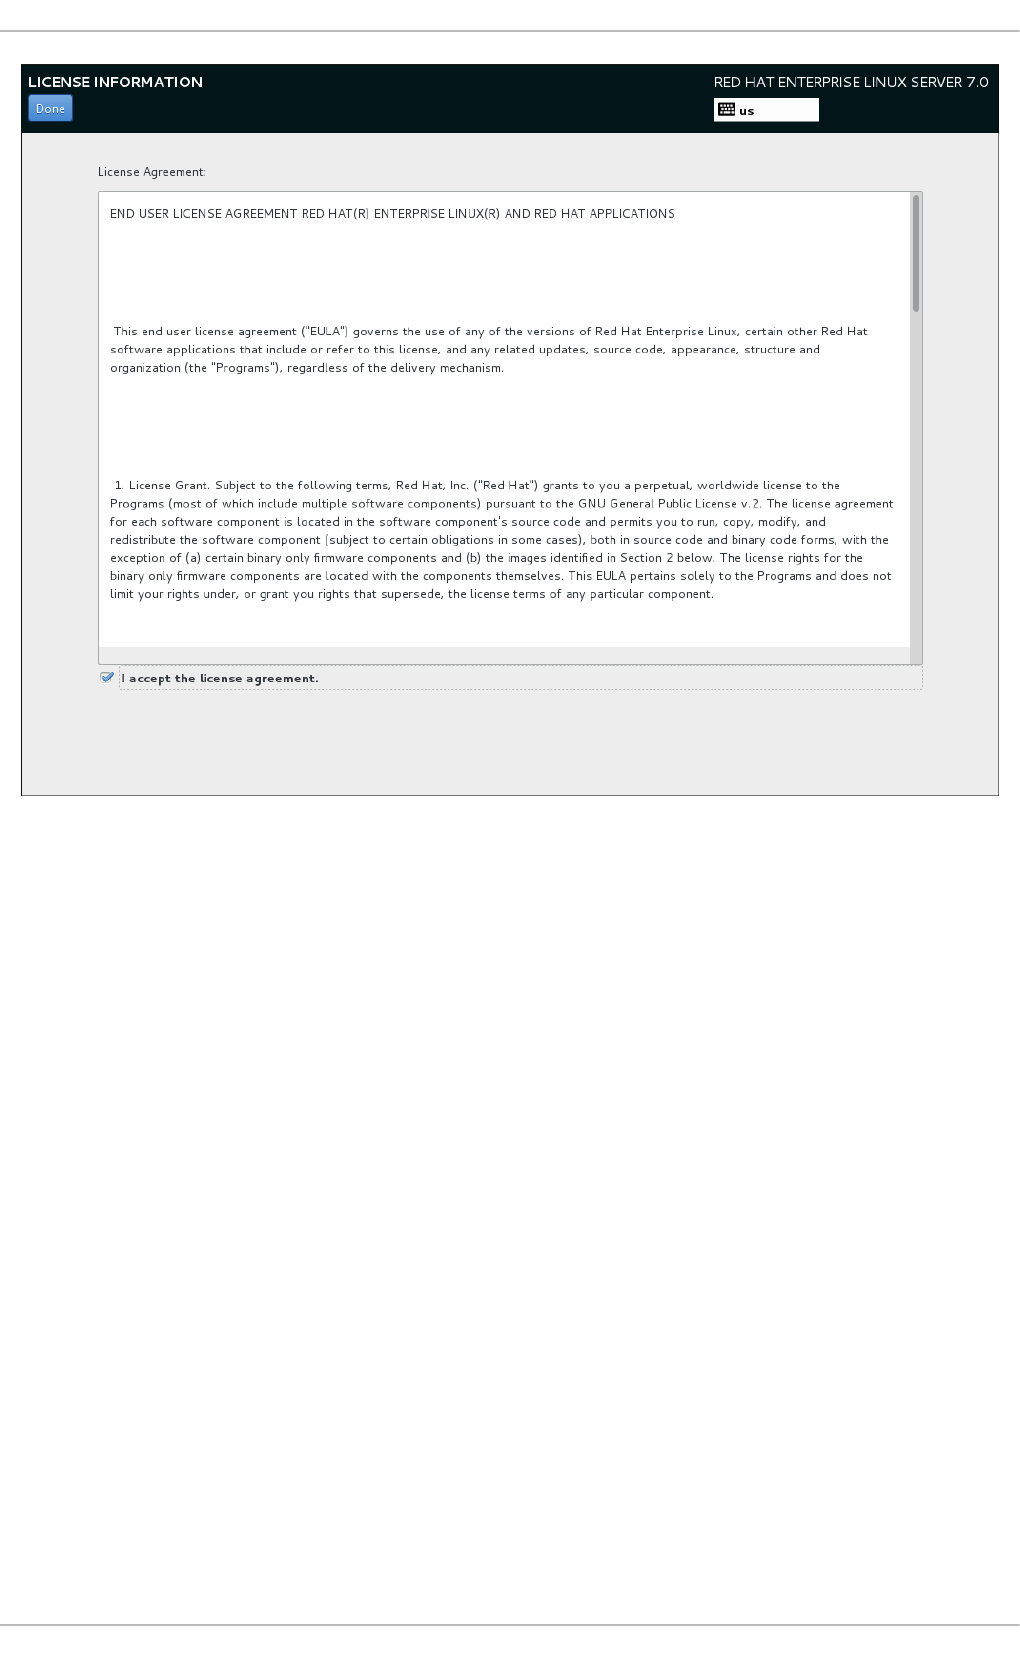
Figure 30.2. License Information Screen
In order to continue with the configuration process, the license agreement must be accepted. Exiting
Initial Setup without completing this step will cause the system to restart, and once the system finishes
rebooting, you will be prompted to accept the agreement again.
Review the license agreement. Then, select I accept the license agreement. and click Done to
continue.
The User Creation screen is the same as the one used when creating an account during the
installation. See Section 8.18.2, “Create a User Account” for detailed information.
Similarly, the Network & Host Name screen is the same as the one used when setting up network.
See Section 8.12, “Network & Hostname” for information.
The Subscription Manager screen allows you to register your system with Red Hat to receive
updates and install additional packages from repositories provided by Red Hat. For information about
how to register your system, see Section 30.1.1, “Subscription Manager”.
Once ready, click the FINISH CONFIGURATION button to register your system, before completing the
Initial Setup configuration process.
To start the Initial Setup again, see Section 30.3, “Starting Initial Setup Manually”.
30.1.1. Subscription Manager
The Subscription Manager screen allows you to register your system with Red Hat in order to
receive updates and access to package repositories.
Installation Guide
440
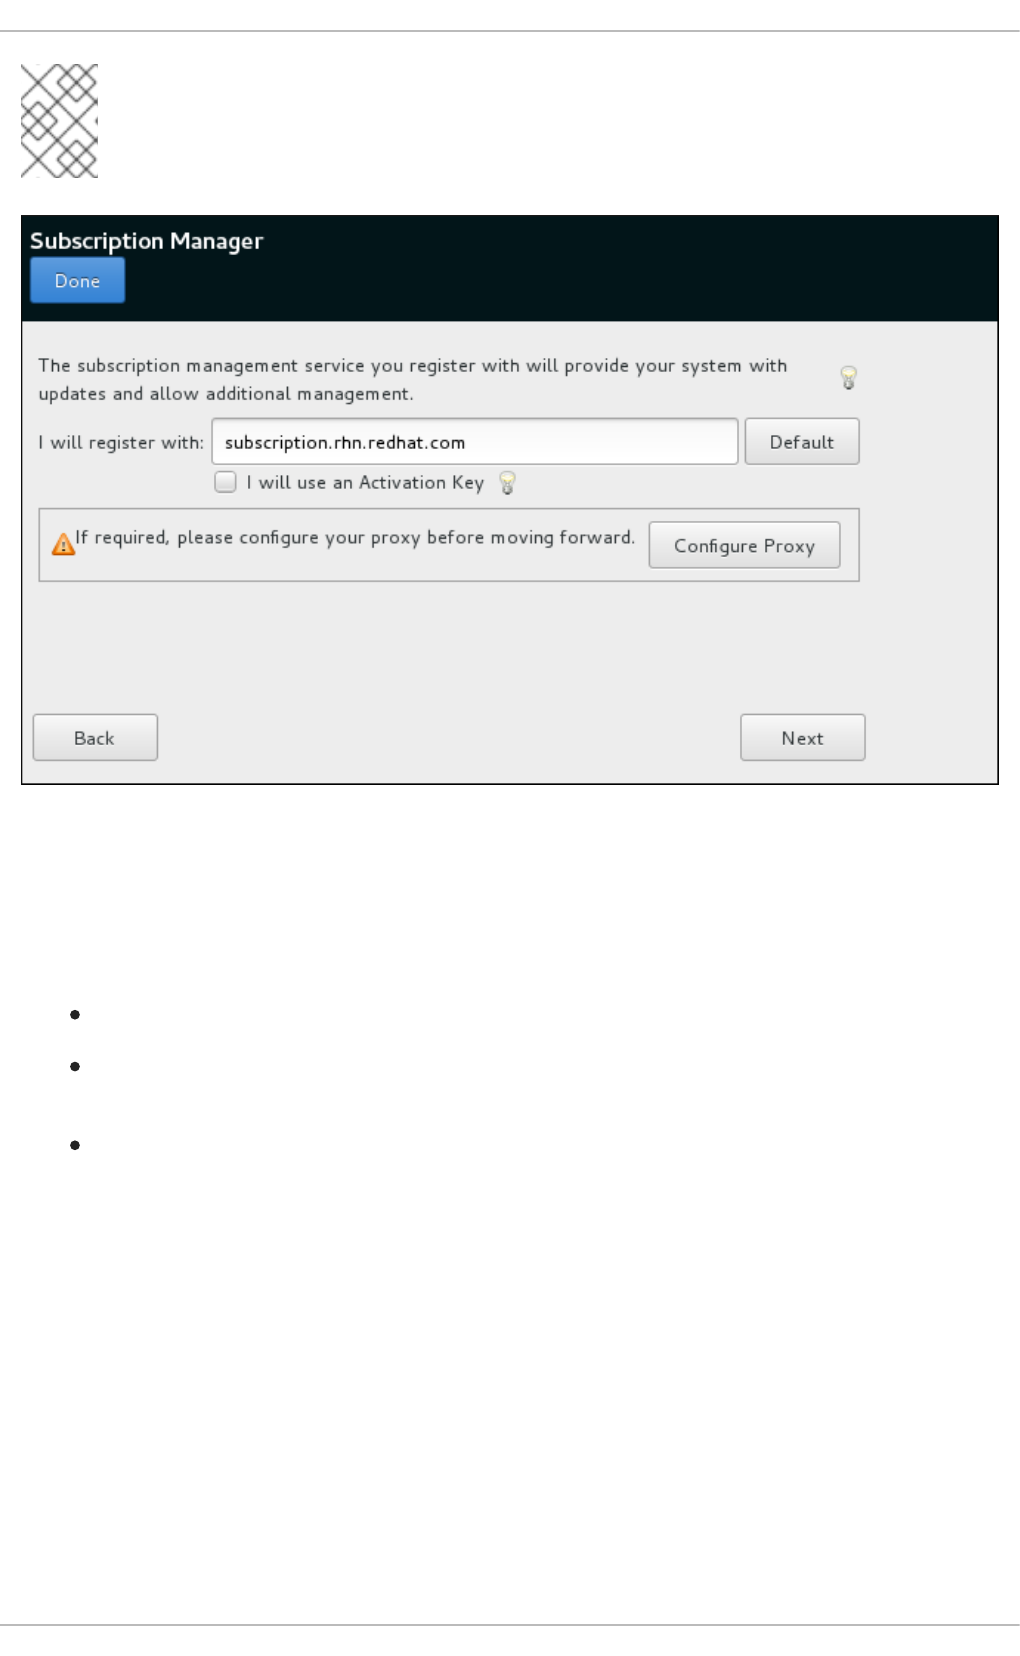
NOTE
The Subscription Manager screen in Initial Setup replaces the Firstboot tool, which
was used to register systems in Red Hat Enterprise Linux 7.1 and earlier.
Figure 30.3. Subscription Manager Screen
The products installed on a system (including the operating system itself) are covered by subscriptions. A
subscription service is used to track registered systems, the products installed on those systems, and the
subscriptions attached to the system to cover those products. Red Hat provides several different
subscription services which a system can registered with:
Customer Portal Subscription Management, hosted services from Red Hat (the default)
Subscription Asset Manager, an on-premise subscription server which proxies content delivery
back to the Customer Portal's services
CloudForms System Engine, an on-premise service which handles both subscription services
and content delivery
The Subscription Manager screen provides a basic interface which is suitable for most use cases.
In some scenarios, you require options which are not present in Initial Setup; in that case, you can skip
the post-installation registration process and use Subscription Manager from the command line or using
the subscription-manager-gui package which provides a graphical interface.
Also note that some registration scenarios, such as registering using CloudForms System Engine,
require additional setup steps - you must have a registration server ready before registering your system.
To register your system, follow on-screen instructions, providing your credentials when prompted. Note
that if you want to leave the Subscription Manager screen and return to the main Initial Setup
screen, you must use the Done button in the top left corner of the screen, not the Back or Next buttons
in the main window.
CHAPTER 30. INITIAL SETUP
441

For full documentation concerning various tools for system registration and management, see the
Red Hat Subscription Management section of the Red Hat Customer Portal. Additionally, you can use
the Registration Assistant for an interactive guide through the registration process.
30.2. TEXT MODE
If you installed Red Hat Enterprise Linux without the X Window System, the Initial Setup starts in text
mode:
Figure 30.4. Initial Setup in text mode
To configure an entry, enter the menu number and press Enter. Additionally, you can press the
following keys:
q to close the application. Until you accepted the license agreement, closing the application
causes the system to reboot.
c to continue. Pressing this key in a submenu returns you to the main menu. In the main menu,
pressing the c key stores the settings and closes the application. Note that you cannot continue
without accepting the license agreement.
r to refresh the menu.
Menu entries can have different statuses:
[x]: This setting is already configured. However, you can change the setting.
[!]: This setting is mandatory but not yet set.
[ ]: This setting is optional and not yet set.
To start the Initial Setup again, see Section 30.3, “Starting Initial Setup Manually”.
30.3. STARTING INITIAL SETUP MANUALLY
Once you once finished the Initial Setup, the application does not start again when you boot the system.
To manually start the Initial Setup on system boot:
1. Enable the service:
# systemctl enable initial-setup.service
Installation Guide
442

2. Optionally, to display all menu options, including the ones previously set, create an empty
/.unconfigured file to start Initial Setup in reconfiguration mode:
# touch /.unconfigured
Note that, regardless of this setting, the license agreement entry is not displayed again if you
previously accepted it.
3. Reboot the system.
NOTE
The initial-setup-gui (graphical mode) or initial-setup (text mode) packages must be
installed for to run Initial Setup.
CHAPTER 30. INITIAL SETUP
443

CHAPTER 31. YOUR NEXT STEPS
This chapter lists common steps that might be required after installation. Not all steps listed here are
always necessary. You can use this list to find other manuals, describing how to perform the tasks you
need.
Find help, answers, and utilize diagnostic services
Red Hat Access is a GUI application which allows you to conveniently access Red Hat knowledge
and solutions. It can be used to search for error codes, messages, or any topic of interest, and view
related knowledge from the Red Hat Customer Portal. More information about Red Hat Access can
be found in the Red Hat Access GUI article on the Red Hat Customer Portal.
Recover a lost root password
The root password, which is configured during the installation, is required for accessing the system as
the root user. Without the root password you will not be able to configure your system or install
additional software. If you lost or forgot your root password, you can reset it by following the steps
described in Section 32.1.3, “Resetting the Root Password”.
Install driver updates
Usually, drivers for system devices are already supported in the kernel provided by Red Hat
Enterprise Linux. However, occasionally, support for devices that have been released recently can be
missing. In these cases, a driver update enabling your device might be available.
Devices necessary to complete the installation can have driver updates provided before the
installation begins. If a device is missing a driver, but it is not essential during the installation, it is
recommended to wait until after the installation completes, and install additional drivers afterwards.
For instructions on installing and enabling additional drivers on the installed system using RPM and
Yum, see the Red Hat Enterprise Linux 7 System Administrator's Guide.
Configure the network
In most cases network access is configured during the installation process, either in the installation
program or in a Kickstart file. For information on configuring the network after the installation, see the
Red Hat Enterprise Linux 7 Networking Guide.
Set up Kdump
Kdump is a kernel crash dumping mechanism. If your system encounters a significant error, Kdump
can save the contents of the system's memory into a kernel crash dump, which can then be analyzed
to find the cause of the error.
Kdump can be enabled during the installation process (see Section 8.16, “Kdump”). It can also be
configured at any time afterwards. Red Hat Enterprise Linux 7 Kernel Crash Dump Guide provides all
information necessary to understand how Kdump works and how to configure it on your system.
Register the system
The products installed on a system (including the operating system itself) are covered by
subscriptions. A subscription service is used to track registered systems, the products installed on
those systems, and the subscriptions attached to those products. Registration is a part of the Initial
Setup configuration process (see Section 30.1.1, “Subscription Manager”).
However, if you have not registered your system during Initial Setup, you can register it afterwards.
See Using and Configuring Red Hat Subscription Manager and Red Hat Satellite User Guide for more
information.
Installation Guide
444
NOTE
You can also use the Registration Assistant application to guide you through the
registration process.
Automate the initial configuration of cloud instances using cloud-init
For the initial configuration of cloud instances, you can use the cloud-init package. On a new cloud
instance, cloud-init can automatically:
set the default locale
configure the host name
configure network interfaces
generate private SSH keys
add SSH keys to the user's .ssh/authorized_keys file
set up ephemeral mount points
Cloud-init is used with Red Hat's cloud products. See documentation on using cloud-init with
Red Hat products:
Red Hat Enterprise Linux Atomic Host 7 Installation and Configuration Guide
Red Hat OpenStack Platform 8 Instances and Images Guide
Red Hat Enterprise Virtualization Virtual Machine Management Guide
Red Hat CloudForms Provisioning Virtual Machines and Hosts Guide
See also upstream cloud-init documentation
Perform an initial system update
After the installation is complete, Red Hat recommends that you perform an initial system update.
During this process, all installed packages are updated to their latest available versions. Updates to
packages provide security fixes, bug fixes and enhancements.
In Red Hat Enterprise Linux, the Yum package manager is used for updating the installed packages.
For more information about updating your system with Yum, see the Red Hat Enterprise Linux 7
System Administrator's Guide.
Configure additional repositories
New software is installed from package repositories. Package repositories are organized sets of
software and metadata that can be accessed by the Yum package manager. If you registered your
system with Red Hat, update repositories are configured automatically and you can install updates
and additional software from those. However, if you want to set up additional repositories, for
example containing your own software, some extra steps are needed.
For information about configuring additional software repositories, see the Red Hat Enterprise Linux 7
System Administrator's Guide.
Install additional packages
CHAPTER 31. YOUR NEXT STEPS
445

You can control which packages will be installed by selecting an environment in the Software
Selection dialog in the graphical installation. This dialog does not provide a way to choose
individual packages, only predefined sets. However, you can use the Yum packages manager to
install additional packages after the installation. See the Red Hat Enterprise Linux 7 System
Administrator's Guide for more information.
Switch to a graphical login
Depending on the options you chose during the installation process, it is possible that your system
does not have a graphical interface, instead offering only a text-based prompt. If this is the case and
you want to enable a graphical desktop after the installation, you must install the X Window System
and your preferred desktop environment (either GNOME or KDE).
As with all other software, these packages can be installed using the Yum package manager. For
information about using Yum to install new packages, see the Red Hat Enterprise Linux 7 System
Administrator's Guide. For information on how to enable graphical login by default, see Section 9.3.3,
“Booting into a Graphical Environment”.
Enable or disable GNOME 3 extensions
The default desktop environment in Red Hat Enterprise Linux 7 is GNOME 3 which provides GNOME
Shell and GNOME Classic user interfaces. It is possible to customize these interfaces by enabling
and disabling GNOME 3 extensions. See the Red Hat Enterprise Linux 7 Desktop Migration and
Administration Guide for more information.
Installation Guide
446

CHAPTER 32. BASIC SYSTEM RECOVERY
When things go wrong, there are ways to fix problems. However, these methods require that you
understand the system well. This chapter contains information on common problems you might face and
it also describes installation program rescue mode, which can be used to fix these problems.
32.1. COMMON PROBLEMS
You might need to boot into installation program rescue mode for any of the following reasons:
You are unable to boot into Red Hat Enterprise Linux normally.
You are having hardware or software problems, and you want to recover data from your
system's hard drive.
You forgot the root password.
32.1.1. Unable to Boot into Red Hat Enterprise Linux
This problem is often caused by the installation of another operating system after you have installed
Red Hat Enterprise Linux. Some other operating systems assume that you have no other operating
system(s) on your computer. They overwrite the Master Boot Record (MBR) that originally contained the
GRUB2 boot loader. If the boot loader is overwritten in this manner, you cannot boot Red Hat
Enterprise Linux unless you can boot into installation program rescue mode and reconfigure the boot
loader.
Another common problem occurs when using a partitioning tool to resize a partition or create a new
partition from free space after installation, and it changes the order of your partitions. If the partition
number of your / partition changes, the boot loader might not be able to find it to mount the partition. To
fix this problem, you will need to reinstall the boot loader. See Section 32.2.2, “Reinstalling the Boot
Loader” for instructions on how to do this.
32.1.2. Hardware and Software Problems
This category includes a wide variety of different situations. Two examples include failing hard drives and
specifying an invalid root device or kernel in the boot loader configuration file. If either of these occur,
you might not be able to reboot into Red Hat Enterprise Linux. However, if you boot into installation
program rescue mode, you might be able to resolve the problem or at least get copies of your most
important files.
32.1.3. Resetting the Root Password
See the corresponding section in the Red Hat Enterprise Linux 7 System Administrator's Guide.
32.2. ANACONDA RESCUE MODE
The Anaconda installation program's rescue mode is a minimal Linux environment that can be booted
from the Red Hat Enterprise Linux 7 DVD or other boot media. It contains command-line utilities for
repairing a wide variety of issues. This rescue mode can be accessed from the Troubleshooting
submenu of the boot menu. In this mode, you can mount file systems as read-only or even to not mount
them at all, blacklist or add a driver provided on a driver disc, install or upgrade system packages, or
manage partitions.
CHAPTER 32. BASIC SYSTEM RECOVERY
447
NOTE
Anaconda rescue mode is different from rescue mode (an equivalent to single-user
mode) and emergency mode, which are provided as parts of the systemd system and
service manager. For more information about these modes, see Red Hat
Enterprise Linux 7 System Administrator's Guide.
To boot into Anaconda rescue mode, you must be able to boot the system using one Red Hat
Enterprise Linux boot media, such as a minimal boot disc or USB drive, or a full installation DVD.
For detailed information about booting the system using media provided by Red Hat, see the appropriate
chapters:
Chapter 7, Booting the Installation on 64-bit AMD, Intel, and ARM systems for 64-bit AMD, Intel,
and ARM systems
Chapter 12, Booting the Installation on IBM Power Systems for IBM Power Systems servers
Chapter 16, Booting the Installation on IBM Z for IBM Z
IMPORTANT
Advanced storage, such as iSCSI or zFCP devices, must be configured either using
dracut boot options (such as rd.zfcp= or root=iscsi:options), or in the CMS
configuration file on IBM Z. It is not possible to configure these storage devices
interactively after booting into rescue mode.
For information about dracut boot options, see the dracut.cmdline(7) man page.
For information about the CMS configuration file, see Chapter 20, Parameter and
Configuration Files on IBM Z.
Procedure 32.1. Booting into Anaconda Rescue Mode
1. Boot the system from either minimal boot media, or a full installation DVD or USB drive, and wait
for the boot menu to appear.
2. From the boot menu, either select the Rescue a Red Hat Enterprise Linux system option from
the Troubleshooting submenu, or append the inst.rescue option to the boot command line.
To enter the boot command line, press the Tab key on BIOS-based systems or the e key on the
UEFI-based systems.
3. If your system requires a third-party driver provided on a driver disc to boot, append the
inst.dd=driver_name to the boot command line:
inst.rescue inst.dd=driver_name
For more information on using a driver disc at boot time, see Section 6.3.3, “Manual Driver
Update” for AMD64 and Intel 64 systems or Section 11.2.3, “Manual Driver Update” for IBM
Power Systems servers.
4. If a driver that is part of the Red Hat Enterprise Linux 7 distribution prevents the system from
booting, append the modprobe.blacklist= option to the boot command line:
inst.rescue modprobe.blacklist=driver_name
Installation Guide
448

For more information about blacklisting drivers, see Section 6.3.4, “Blacklisting a Driver”.
5. When ready, press Enter (BIOS-based systems) or Ctrl+X (UEFI-based systems) to boot the
modified option. Then wait until the following message is displayed:
The rescue environment will now attempt to find your Linux
installation and mount it under the /mnt/sysimage/ directory. You
can then make any changes required to your system. If you want to
proceed with this step choose 'Continue'. You can also choose to
mount your file systems read-only instead of read-write by choosing
'Read-only'. If for some reason this process fails you can choose
'Skip' and this step will be skipped and you will go directly to a
command line.
If you select Continue, it attempts to mount your file system under the directory
/mnt/sysimage/. If it fails to mount a partition, you will be notified. If you select Read-Only, it
attempts to mount your file system under the directory /mnt/sysimage/, but in read-only
mode. If you select Skip, your file system is not mounted. Choose Skip if you think your file
system is corrupted.
6. Once you have your system in rescue mode, a prompt appears on VC (virtual console) 1 and VC
2 (use the Ctrl+Alt+F1 key combination to access VC 1 and Ctrl+Alt+F2 to access VC 2):
sh-4.2#
Even if your file system is mounted, the default root partition while in Anaconda rescue mode is a
temporary root partition, not the root partition of the file system used during normal user mode (multi-
user.target or graphical.target). If you selected to mount your file system and it mounted
successfully, you can change the root partition of the Anaconda rescue mode environment to the root
partition of your file system by executing the following command:
sh-4.2# chroot /mnt/sysimage
This is useful if you need to run commands, such as rpm, that require your root partition to be mounted
as /. To exit the chroot environment, type exit to return to the prompt.
If you selected Skip, you can still try to mount a partition or LVM2 logical volume manually inside
Anaconda rescue mode by creating a directory, such as /directory/, and typing the following
command:
sh-4.2# mount -t xfs /dev/mapper/VolGroup00-LogVol02 /directory
In the above command, /directory/ is a directory that you have created and
/dev/mapper/VolGroup00-LogVol02 is the LVM2 logical volume you want to mount. If the partition
is a different type than XFS, replace the xfs string with the correct type (such as ext4).
If you do not know the names of all physical partitions, use the following command to list them:
sh-4.2# fdisk -l
If you do not know the names of all LVM2 physical volumes, volume groups, or logical volumes, use the
pvdisplay, vgdisplay or lvdisplay commands, respectively.
CHAPTER 32. BASIC SYSTEM RECOVERY
449

From the prompt, you can run many useful commands, such as:
ssh, scp, and ping if the network is started
For details, see the Red Hat Enterprise Linux 7 System Administrator's Guide.
dump and restore for users with tape drives
For details, see the RHEL Backup and Restore Assistant.
parted and fdisk for managing partitions
For details, see the Red Hat Enterprise Linux 7 Storage Administration Guide.
yum for installing or upgrading software
For details, see the Red Hat Enterprise Linux 7 Administrator's Guide
32.2.1. Capturing an sosreport
The sosreport command-line utility collects configuration and diagnostic information, such as the
running kernel version, loaded modules, and system and service configuration files, from the system.
The utility output is stored in a tar archive in the /var/tmp/ directory.
The sosreport utility is useful for analyzing the system errors and can make troubleshooting easier.
The following procedure describes how to capture an sosreport output in Anaconda rescue mode:
Procedure 32.2. Using sosreport in Anaconda Rescue Mode
1. Follow steps in Procedure 32.1, “Booting into Anaconda Rescue Mode” to boot into Anaconda
rescue mode. Ensure that you mount the installed system / (root) partition in read-write mode.
2. Change the root directory to the /mnt/sysimage/ directory:
sh-4.2# chroot /mnt/sysimage/
3. Execute sosreport to generate an archive with system configuration and diagnostic
information:
sh-4.2# sosreport
IMPORTANT
When running, sosreport will prompt you to enter your name and case number
that you get when you contact Red Hat Support service and open a new support
case. Use only letters and numbers because adding any of the following
characters or spaces could render the report unusable:
# % & { } \ < > > * ? / $ ~ ' " : @ + ` | =
4. Optional. If you want to transfer the generated archive to a new location using the network, it is
necessary to have a network interface configured. In case you use the dynamic IP addressing,
Installation Guide
450
there are no other steps required. However, when using the static addressing, enter the following
command to assign an IP address (for example 10.13.153.64/23) to a network interface (for
example dev eth0):
bash-4.2# ip addr add 10.13.153.64/23 dev eth0
See the Red Hat Enterprise Linux 7 Networking Guide for additional information about static
addressing.
5. Exit the chroot environment:
sh-4.2# exit
6. Store the generated archive in a new location, from where it can be easily accessible:
sh-4.2# cp /mnt/sysimage/var/tmp/sosreport new_location
For transferring the archive through the network, use the scp utility:
sh-4.2# scp /mnt/sysimage/var/tmp/sosreport
username@hostname:sosreport
See the references below for further information:
For general information about sosreport, see What is a sosreport and how to create one in
Red Hat Enterprise Linux 4.6 and later?.
For information about using sosreport within Anaconda rescue mode, see How to generate
sosreport from the rescue environment.
For information about generating an sosreport to a different location than /tmp, see How do I
make sosreport write to an alternative location?.
For information about collecting an sosreport manually, see Sosreport fails. What data should
I provide in its place?.
32.2.2. Reinstalling the Boot Loader
In some cases, the GRUB2 boot loader can mistakenly be deleted, corrupted, or replaced by other
operating systems. The following steps detail the process on how GRUB is reinstalled on the master boot
record:
Procedure 32.3. Reinstalling the GRUB2 Boot Loader
1. Follow instructions in Procedure 32.1, “Booting into Anaconda Rescue Mode” to boot into
Anaconda rescue mode. Ensure that you mount the installed system's / (root) partition in read-
write mode.
2. Change the root partition:
sh-4.2# chroot /mnt/sysimage/
CHAPTER 32. BASIC SYSTEM RECOVERY
451

3. Use the following command to reinstall the GRUB2 boot loader, where install_device is the boot
device (typically, /dev/sda):
sh-4.2# /sbin/grub2-install install_device
4. Reboot the system.
32.2.3. Using RPM to Add, Remove, or Replace a Driver
Missing or malfunctioning drivers can cause problems when booting the system. Anaconda rescue
mode provides an environment in which you can add, remove, or replace a driver even when the system
fails to boot. Wherever possible, we recommend that you use the RPM package manager to remove
malfunctioning drivers or to add updated or missing drivers.
NOTE
When you install a driver from a driver disc, the driver disc updates all initramfs images
on the system to use this driver. If a problem with a driver prevents a system from
booting, you cannot rely on booting the system from another initramfs image.
Procedure 32.4. Using RPM to Remove a Driver
1. Boot the system into Anaconda rescue mode. Follow the instructions in Procedure 32.1,
“Booting into Anaconda Rescue Mode”. Ensure that you mount the installed system in read-write
mode.
2. Change the root directory to /mnt/sysimage/:
sh-4.2# chroot /mnt/sysimage/
3. Use the rpm -e command to remove the driver package. For example, to remove the xorg-x11-
drv-wacom driver package, run:
sh-4.2# rpm -e xorg-x11-drv-wacom
4. Exit the chroot environment:
sh-4.2# exit
If you cannot remove a malfunctioning driver for some reason, you can instead blacklist the driver so
that it does not load at boot time. See Section 6.3.4, “Blacklisting a Driver” and Chapter 22, Boot Options
for more information about blacklisting drivers.
Installing a driver is a similar process but the RPM package must be available on the system:
Procedure 32.5. Installing a Driver from an RPM package
1. Boot the system into Anaconda rescue mode. Follow the instructions in Procedure 32.1,
“Booting into Anaconda Rescue Mode”. Do not choose to mount the installed system as read
only.
Installation Guide
452

2. Make the RPM package that contains the driver available. For example, mount a CD or USB
flash drive and copy the RPM package to a location of your choice under /mnt/sysimage/, for
example: /mnt/sysimage/root/drivers/
3. Change the root directory to /mnt/sysimage/:
sh-4.2# chroot /mnt/sysimage/
4. Use the rpm -ivh command to install the driver package. For example, to install the xorg-x11-
drv-wacom driver package from /root/drivers/, run:
sh-4.2# rpm -ivh /root/drivers/xorg-x11-drv-wacom-0.23.0-
6.el7.x86_64.rpm
NOTE
The /root/drivers/ directory in this chroot environment is the
/mnt/sysimage/root/drivers/ directory in the original rescue environment.
5. Exit the chroot environment:
sh-4.2# exit
When you have finished removing and installing drivers, reboot the system.
CHAPTER 32. BASIC SYSTEM RECOVERY
453

CHAPTER 33. UNREGISTERING FROM RED HAT
SUBSCRIPTION MANAGEMENT SERVICES
A system can only be registered with one subscription service. If you need to change which service your
system is registered with or need to delete the registration in general, then the method to unregister
depends on which type of subscription service the system was originally registered with.
33.1. SYSTEMS REGISTERED WITH RED HAT SUBSCRIPTION
MANAGEMENT
Several different subscription services use the same, certificate-based framework to identify systems,
installed products, and attached subscriptions. These services are Customer Portal Subscription
Management (hosted), Subscription Asset Manager (on-premise subscription service), and CloudForms
System Engine (on-premise subscription and content delivery services). These are all part of Red Hat
Subscription Management.
For all services within Red Hat Subscription Management, the systems are managed with the Red Hat
Subscription Manager client tools.
To unregister a system registered with a Red Hat Subscription Management server, use the
unregister command as root without any additional parameters:
# subscription-manager unregister
For additional information, see Using and Configuring Red Hat Subscription Manager.
33.2. SYSTEMS REGISTERED WITH RED HAT SATELLITE
For a Satellite registration on the server, locate the system in the Systems tab and delete the
appropriate profile.
For additional information, see Red Hat Satellite User Guide.
Installation Guide
454

CHAPTER 34. UNINSTALLING RED HAT ENTERPRISE LINUX
34.1. REMOVING RED HAT ENTERPRISE LINUX FROM 64-BIT AMD,
INTEL, AND ARM SYSTEMS
The method for removing Red Hat Enterprise Linux from your computer varies, depending on whether
Red Hat Enterprise Linux is the only operating system installed on the computer.
Before proceeding be sure you have considered the following information:
In certain situations you need the install media for any non-Red Hat Enterprise Linux operating
system you are going to be using on the system after you complete this process.
If you have multiple operating systems installed, ensure that you can boot each one separately
and have all administrator passwords, including any passwords that might have been set
automatically by your computer manufacturer or the manufacturer of the operating system.
If you want to retain any data from the installation of Red Hat Enterprise Linux that you are going
to remove, it will need to be backed up to a different location. If you are deleting an installation
that contains sensitive data, ensure that you destroy the data according to your security policy.
Ensure that any backup medium is readable on the operating system where you will restore the
data. For example, without extra third-party software, Microsoft Windows cannot read an
external hard drive that you have formatted with Red Hat Enterprise Linux to use the ext2, ext3,
ext4 or XFS file system.
WARNING
As a precaution, back up all data from any operating systems, including
Red Hat Enterprise Linux, that are installed on the same computer.
Unforeseen circumstances can result in loss of all your data.
If you are only uninstalling Red Hat Enterprise Linux and not reinstalling the entire computer, you
should familiarize yourself with your partition layout. In particular, the output of the mount
command can be helpful. It can also be helpful to note which menuitem is used to boot your
Red Hat Enterprise Linux installation in grub.cfg.
In general, to uninstall Red Hat Enterprise Linux from your system, you perform two steps:
1. Remove the Red Hat Enterprise Linux boot loader information from your master boot record
(MBR).
2. Remove any partitions that contain the Red Hat Enterprise Linux operating system.
These instructions cannot cover every possible computer configuration, common configurations are
listed here.
only Red Hat Enterprise Linux
See Section 34.1.1, “Only Red Hat Enterprise Linux is Installed”.
CHAPTER 34. UNINSTALLING RED HAT ENTERPRISE LINUX
455

Red Hat Enterprise Linux and different Linux Distribution
See Section 34.1.2, “Red Hat Enterprise Linux installed with a Different Linux Distribution”.
Red Hat Enterprise Linux and Windows 2000, Windows Server 2000, Windows XP, Windows
Vista, Windows Server 2003 and Windows Server 2008
See Section 34.1.3, “Red Hat Enterprise Linux installed with a Microsoft Windows Operating
System”.
If your configuration is not listed or has a highly-customized partition scheme, use the following sections
as a general guide. In these situations, you will also need to learn to configure your chosen boot loader.
See Red Hat Enterprise Linux 7 System Administrator's Guide for more information on the GRUB2 boot
loader.
To keep neither Red Hat Enterprise Linux nor the other operating system, follow the steps described for
a computer with only Red Hat Enterprise Linux installed.
34.1.1. Only Red Hat Enterprise Linux is Installed
The following procedure shows how to remove Red Hat Enterprise Linux on systems where it is the only
operating system installed. You will use the installation media for the replacement operating system to
remove Red Hat Enterprise Linux. Examples of installation media include the Windows XP installation
CD, Windows Vista installation DVD, or the installation CD, CDs, or DVD of another Linux distribution.
Note that some manufacturers of factory-built computers pre-installed with Microsoft Windows do not
supply the Windows installation CD or DVD with the computer. In this case the manufacturer usually
supplied their own "system restore disc" instead, or have included software with the computer that
allowed you to create your own "system restore disc" when you first started the computer. In some
cases, the system restore software is stored on a separate partition on the system's hard drive. If you
cannot identify the installation media for an operating system that was pre-installed on your computer,
consult the documentation supplied with the machine, or contact the manufacturer.
When you have located the installation media for your chosen operating system:
1. Back up any data that you want to keep.
2. Shut down the computer.
3. Boot your computer with the installation disc for the replacement operating system.
4. Follow the prompts presented during the installation process. Windows, OS X, and most Linux
installation discs allow you to manually partition your hard drive during the installation process,
or will offer you the option to remove all partitions and start with a fresh partition scheme. At this
point, remove any existing partitions that the installation software detects or allow the installation
program to remove the partitions automatically. "System restore" media for computers pre-
installed with Microsoft Windows might create a default partition layout automatically without
input from you.
Installation Guide
456

WARNING
If your computer has system restore software stored on a partition on a hard
drive, take care when removing partitions while installing an operating
system from other media. Under these circumstances, you could destroy the
partition holding the system restore software.
34.1.2. Red Hat Enterprise Linux installed with a Different Linux Distribution
The following procedure shows how to remove Red Hat Enterprise Linux on systems also installed with
another Linux distribution. You can use the other Linux distribution to remove the boot loader entry (or
entries) and to remove any Red Hat Enterprise Linux partitions.
Because of the differences between the many different Linux distributions, these instructions are a
general guide only. Specific details vary according to the configuration of your particular system and the
Linux distribution that dual-boots with Red Hat Enterprise Linux.
IMPORTANT
These instructions assume that your system uses the GRUB2 boot loader. If you use a
different boot loader (such as LILO), consult the documentation for that software to
identify and remove Red Hat Enterprise Linux entries from its list of boot targets and to
ensure that your default operating system is correctly specified.
1. Remove Red Hat Enterprise Linux Entries from Your Boot Loader
a. Boot the Linux Distribution you are keeping on your computer, not Red Hat Enterprise Linux.
b. At the command line, type su - and press Enter. When the system prompts you for the
root password, type the password and press Enter.
c. Use a text editor such as vim to open the /boot/grub2/grub.cfg configuration file. In
this file, find the entry of the system you are removing. A typical Red Hat Enterprise Linux
entry in the grub.cfg file looks similar to the following example:
Example 34.1. A Red Hat Enterprise Linux Entry in grub.cfg
menuentry 'Red Hat Enterprise Linux Server (3.10.0-
57.el7.x86_64) 7 (Maipo)' --class red --class gnu-linux --class
gnu --class os $menuentry_id_option 'gnulinux-3.10.0-
53.el7.x86_64-advanced-9eecdce6-58ce-439b-bfa4-76a9ea6b0906' {
load_video
set gfxpayload=keep
insmod gzio
insmod part_msdos
insmod xfs
set root='hd0,msdos1'
if [x$feature_platform_search_hint = xy ]; then
search --no-floppy --fs-uuid --set=root --
hint='hd0,msdos1' 0c70bc74-7675-4989-9dc8-bbcf5418ddf1
CHAPTER 34. UNINSTALLING RED HAT ENTERPRISE LINUX
457
else
search --no-floppy --fs-uuid --set=root 0c70bc74-7675-
4989-9dc8-bbcf5418ddf1
fi
linux16 /vmlinuz-3.10.0-57.el7.x86_64 root=/dev/mapper/rhel-
root ro rd.lvm.lv=rhel/root vconsole.font=latarcyrheb-sun16
rd.lvm.lv=rhel/swap crashkernel=auto vconsole.keymap=us rhgb
quiet LANG=en_US.UTF-8
initrd16 /initramfs-3.10.0-57.el7.x86_64.img
}
d. Delete the entire entry, starting with the menuentry keyword and ending with }.
Depending on the configuration of your system, there might be multiple Red Hat
Enterprise Linux entries in grub.cfg, each corresponding to a different version of the Linux
kernel. Delete each of the Red Hat Enterprise Linux entries from the file.
e. Save the updated grub.cfg file and close vim
2. Remove Red Hat Enterprise Linux partitions on multi-boot environments:
NOTE
Be careful not to remove partitions that are still in use by the other installations.
a. Boot the Linux Distribution you are keeping on your computer, not Red Hat Enterprise Linux.
b. Remove any unwanted and unnecessary partitions, for example, using:, for example, with
fdisk for standard partitions, or lvremove and vgremove to remove logical volumes and
volume groups. Additional information on these utilities can be found in their respective man
pages, or the Red Hat Enterprise Linux 7 System Administrator's Guide.
fdisk for standard partitions. For details, see How do you use fdisk to delete a partition?
lvremove and vgremove to remove logical volumes and volume groups. For details,
see the Red Hat Storage Administration Guide.
34.1.3. Red Hat Enterprise Linux installed with a Microsoft Windows Operating
System
The following procedure shows how to remove Red Hat Enterprise Linux on systems also installed with
Windows 2000, Windows Server 2000, Windows XP, Windows Server 2003, Windows Vista or Windows
Server 2008. You can use the Microsoft Windows installation and its installation media to remove the
boot loader and to remove any Red Hat Enterprise Linux partitions.
The removal of Red Hat Enterprise Linux on systems also installed with MS-DOS or versions of Microsoft
Windows prior to Windows XP (except Windows 2000) is not covered in this document. These operating
systems do not have robust partition management and cannot remove Linux partitions.
Because of the differences between each version of Microsoft Windows, these instructions need to be
reviewed completely before being followed. It can be helpful to consult the documentation for your
Microsoft Windows operating system as only utilities from that operating system are used in this
procedure.
Installation Guide
458

WARNING
This procedure relies on the Windows Recovery Console or the Windows
Recovery Environment that loads from the Windows installation disk, therefore,
you will not be able to complete the procedure without access to this disk. If you
start this procedure and do not complete it, you could leave your computer in a
condition where you cannot boot it. The "system restore disk" supplied with some
factory-built computers that are sold with Windows pre-installed on them might not
include the Windows Recovery Console or Windows Recovery Environment.
Users of Windows 2000, Windows Server 2000, Windows XP, and Windows Server
2003 following this procedure will be prompted for the Administrator password for
their Windows system. Do not follow these instructions unless you know the
Administrator password for your system or are certain that an Administrator
password has never been created, even by the computer manufacturer.
1. Remove the Red Hat Enterprise Linux partitions
a. Boot your computer into your Microsoft Windows environment.
b. Click Start>Run, type diskmgmt.msc and press Enter. The Disk Management tool
opens.
The tool displays a graphical representation of your disk, with bars representing each
partition. The first partition is usually labeled NTFS and corresponds to your C: drive. At least
two Red Hat Enterprise Linux partitions will be visible. Windows will not display a file system
type for these partitions, but can allocate drive letters to some of them.
c. Right-click on one of the Red Hat Enterprise Linux partitions, then click Delete Partition
and click Yes to confirm the deletion. Repeat this process for the other Red Hat
Enterprise Linux partitions on your system. As you delete partitions, Windows labels the
space on the hard drive previously occupied by those partitions as unallocated.
You can add this unallocated space to an existing Windows partition or to use this space in
some other way. Directions for doing this can be found in the manuals for your non-Red Hat
Enterprise Linux operating system.
2. Restore the Windows boot loader
a. On Windows 2000, Windows Server 2000, Windows XP, and Windows Server 2003:
i. Insert the Windows installation disk and restart your computer. As your computer starts,
the following message will appear on the screen for a few seconds:
Press any key to boot from CD
Press any key while the message is still showing and the Windows installation software
will load.
ii. When the Welcome to Setup screen appears, you can start the Windows Recovery
Console. The procedure is slightly different on different versions of Windows:
CHAPTER 34. UNINSTALLING RED HAT ENTERPRISE LINUX
459

A. On Windows 2000 and Windows Server 2000, press the R key, then the C key.
B. On Windows XP and Windows Server 2003, press the R key.
iii. The Windows Recovery Console scans your hard drives for Windows installations,
and assigns a number to each one. It displays a list of Windows installations and
prompts you to select one. Type the number corresponding to the Windows installation
that you want to restore.
iv. The Windows Recovery Console prompts you for the Administrator password for your
Windows installation. Type the Administrator password and press the Enter key. If
there is no administrator password for this system, press only the Enter key.
v. At the prompt, type the command fixmbr and press the Enter. The fixmbr tool now
restores the Master Boot Record for the system.
vi. When the prompt reappears, type exit and press the Enter key.
vii. Your computer will restart and boot your Windows operating system.
b. On Windows Vista and Windows Server 2008:
i. Insert the Windows installation disk and restart your computer. As your computer starts,
the following message will appear on the screen for a few seconds:
Press any key to boot from CD or DVD
Press any key while the message is still showing and the Windows installation software
will load.
ii. In the Install Windows dialog, select a language, time and currency format, and
keyboard type. Click Next
iii. Click Repair your computer.
iv. The Windows Recovery Environment (WRE) shows you the Windows installations
that it can detect on your system. Select the installation that you want to restore, then
click Next.
v. Click Command prompt. A command window will open.
vi. Type bootrec /fixmbr and press Enter.
vii. When the prompt reappears, close the command window, then click Restart.
viii. Your computer will restart and boot your Windows operating system.
34.2. REMOVING RED HAT ENTERPRISE LINUX FROM IBM Z
If you want to delete the existing operating system data, first, if any Linux disks contain sensitive data,
ensure that you destroy the data according to your security policy. To proceed you can consider these
options:
Overwrite the disks with a new installation.
Installation Guide
460

Make the DASD or SCSI disk where Linux was installed visible from another system, then delete
the data. However, this might require special privileges. Ask your system administrator for
advice. You can use Linux commands such as dasdfmt (DASD only), parted, mke2fs or dd.
For more details about the commands, see the respective man pages.
34.2.1. Running a Different Operating System on Your z/VM Guest or LPAR
If you want to boot from a DASD or SCSI disk different from where the currently installed system resides
under a z/VM guest virtual machine or an LPAR, shut down the Red Hat Enterprise Linux installed and
use the desired disk, where another Linux instance is installed, to boot from. This leaves the contents of
the installed system unchanged.
CHAPTER 34. UNINSTALLING RED HAT ENTERPRISE LINUX
461

PART VI. TECHNICAL APPENDIXES
The appendixes in this section do not contain instructions on installing Red Hat Enterprise Linux. Instead,
they provide technical background that you might find helpful to understand the options that Red Hat
Enterprise Linux offers you at various points in the installation process.
Installation Guide
462
APPENDIX A. AN INTRODUCTION TO DISK PARTITIONS
NOTE
This appendix is not necessarily applicable to architectures other than AMD64 and
Intel 64. However, the general concepts mentioned here might apply.
This section discusses basic disk concepts, disk repartitioning strategies, the partition naming scheme
used by Linux systems, and related topics.
If you are comfortable with disk partitions, you can skip ahead to Section A.2, “Strategies for Disk
Repartitioning” for more information on the process of freeing up disk space to prepare for a Red Hat
Enterprise Linux installation.
NOTE
Before installation, you should consider whether you want to use partitioned or
unpartitioned disk devices. For more information, see the Knowledgebase article at
https://access.redhat.com/solutions/163853.
A.1. HARD DISK BASIC CONCEPTS
Hard disks perform a very simple function - they store data and reliably retrieve it on command.
When discussing issues such as disk partitioning, it is important to have a understanding of the
underlying hardware; however, since the theory is very complicated and expansive, only the basic
concepts will be explained here. This appendix uses a set of simplified diagrams of a disk drive to help
explain what is the process and theory behind partitions.
Figure A.1, “An Unused Disk Drive”, shows a brand-new, unused disk drive.
Figure A.1. An Unused Disk Drive
A.1.1. File Systems
To store data on a disk drive, it is necessary to format the disk drive first. Formatting (usually known as
"making a file system") writes information to the drive, creating order out of the empty space in an
unformatted drive.
Figure A.2. Disk Drive with a File System
APPENDIX A. AN INTRODUCTION TO DISK PARTITIONS
463
As the previous diagram implies, the order imposed by a file system involves some trade-offs:
A small percentage of the driver's available space is used to store file system-related data and
can be considered as overhead.
A file system splits the remaining space into small, consistently-sized segments. For Linux,
these segments are known as blocks. [4]
Note that there is no single, universal file system. As the following diagram shows, a disk drive can have
one of many different file systems written on it. Different file systems tend to be incompatible; that is, an
operating system that supports one file system (or a handful of related file system types) might not
support another. However, for example, Red Hat Enterprise Linux supports a wide variety of file systems
(including many commonly used by other operating systems), making data interchange between different
file systems easy.
Figure A.3. Disk Drive with a Different File System
Writing a file system to disk is only the first step. The goal of this process is to actually store and retrieve
data. The figure below shows a drive disk after some data have been written to it:
Figure A.4. Disk Drive with Data Written to It
As the previous diagram shows, some of the previously empty blocks are now holding data. However, by
just looking at this picture, we cannot determine exactly how many files reside on this drive. There might
only be one file or many, as all files use at least one block and some files use multiple blocks. Another
important point to note is that the used blocks do not have to form a contiguous region; used and unused
blocks can be interspersed. This is known as fragmentation. Fragmentation can play a part when
attempting to resize an existing partition.
As with most computer-related technologies, disk drives changed over time after their introduction. In
particular, they got bigger. Not larger in physical size, but bigger in their capacity to store information.
And, this additional capacity drove a fundamental change in the way disk drives were used.
A.1.2. Partitions: Turning One Drive Into Many
Disk drives can be divided into partitions. Each partition can be accessed as if it was a separate disk.
This is done through the addition of a partition table.
There are several reasons for allocating disk space into separate disk partitions, for example:
Logical separation of the operating system data from the user data
Installation Guide
464
Ability to use different file systems
Ability to run multiple operating systems on one machine
There are currently two partitioning layout standards for physical hard disks: Master Boot Record (MBR)
and GUID Partition Table (GPT). MBR is an older method of disk partitioning used with BIOS-based
computers. GPT is a newer partitioning layout that is a part of the Unified Extensible Firmware Interface
(UEFI). This section and Section A.1.3, “Partitions Within Partitions - An Overview of Extended
Partitions” mainly describe the Master Boot Record (MBR) disk partitioning scheme. For information
about the GUID Partition Table (GPT) partitioning layout, see Section A.1.4, “GUID Partition Table
(GPT)”.
NOTE
While the diagrams in this chapter show the partition table as being separate from the
actual disk drive, this is not entirely accurate. In reality, the partition table is stored at the
very start of the disk, before any file system or user data. But for clarity, they are separate
in our diagrams.
Figure A.5. Disk Drive with Partition Table
As the previous diagram shows, the partition table is divided into four sections or four primary partitions.
A primary partition is a partition on a hard drive that can contain only one logical drive (or section). Each
section can hold the information necessary to define a single partition, meaning that the partition table
can define no more than four partitions.
Each partition table entry contains several important characteristics of the partition:
The points on the disk where the partition starts and ends
Whether the partition is "active"
The partition's type
The starting and ending points define the partition's size and location on the disk. The "active" flag is
used by some operating systems' boot loaders. In other words, the operating system in the partition that
is marked "active" is booted.
The type is a number that identifies the partition's anticipated usage. Some operating systems use the
partition type to denote a specific file system type, to flag the partition as being associated with a
particular operating system, to indicate that the partition contains a bootable operating system, or some
combination of the three.
The following shows an example of a disk drive with single partition:
APPENDIX A. AN INTRODUCTION TO DISK PARTITIONS
465

Figure A.6. Disk Drive With Single Partition
The single partition in this example is labeled as DOS. This label shows the partition type, with DOS being
one of the most common ones. The table below shows a list of some of the commonly used partition
types and hexadecimal numbers used to represent them.
Table A.1. Partition Types
Partition Type Value Partition Type Value
Empty 00 Novell Netware 386 65
DOS 12-bit FAT 01 PIC/IX 75
XENIX root 02 Old MINIX 80
XENIX usr 03 Linux/MINUX 81
DOS 16-bit <=32M 04 Linux swap 82
Extended 05 Linux native 83
DOS 16-bit >=32 06 Linux extended 85
OS/2 HPFS 07 Amoeba 93
AIX 08 Amoeba BBT 94
AIX bootable 09 BSD/386 a5
OS/2 Boot Manager 0a OpenBSD a6
Win95 FAT32 0b NEXTSTEP a7
Win95 FAT32 (LBA) 0c BSDI fs b7
Win95 FAT16 (LBA) 0e BSDI swap b8
Win95 Extended (LBA) 0f Syrinx c7
Venix 80286 40 CP/M db
Installation Guide
466
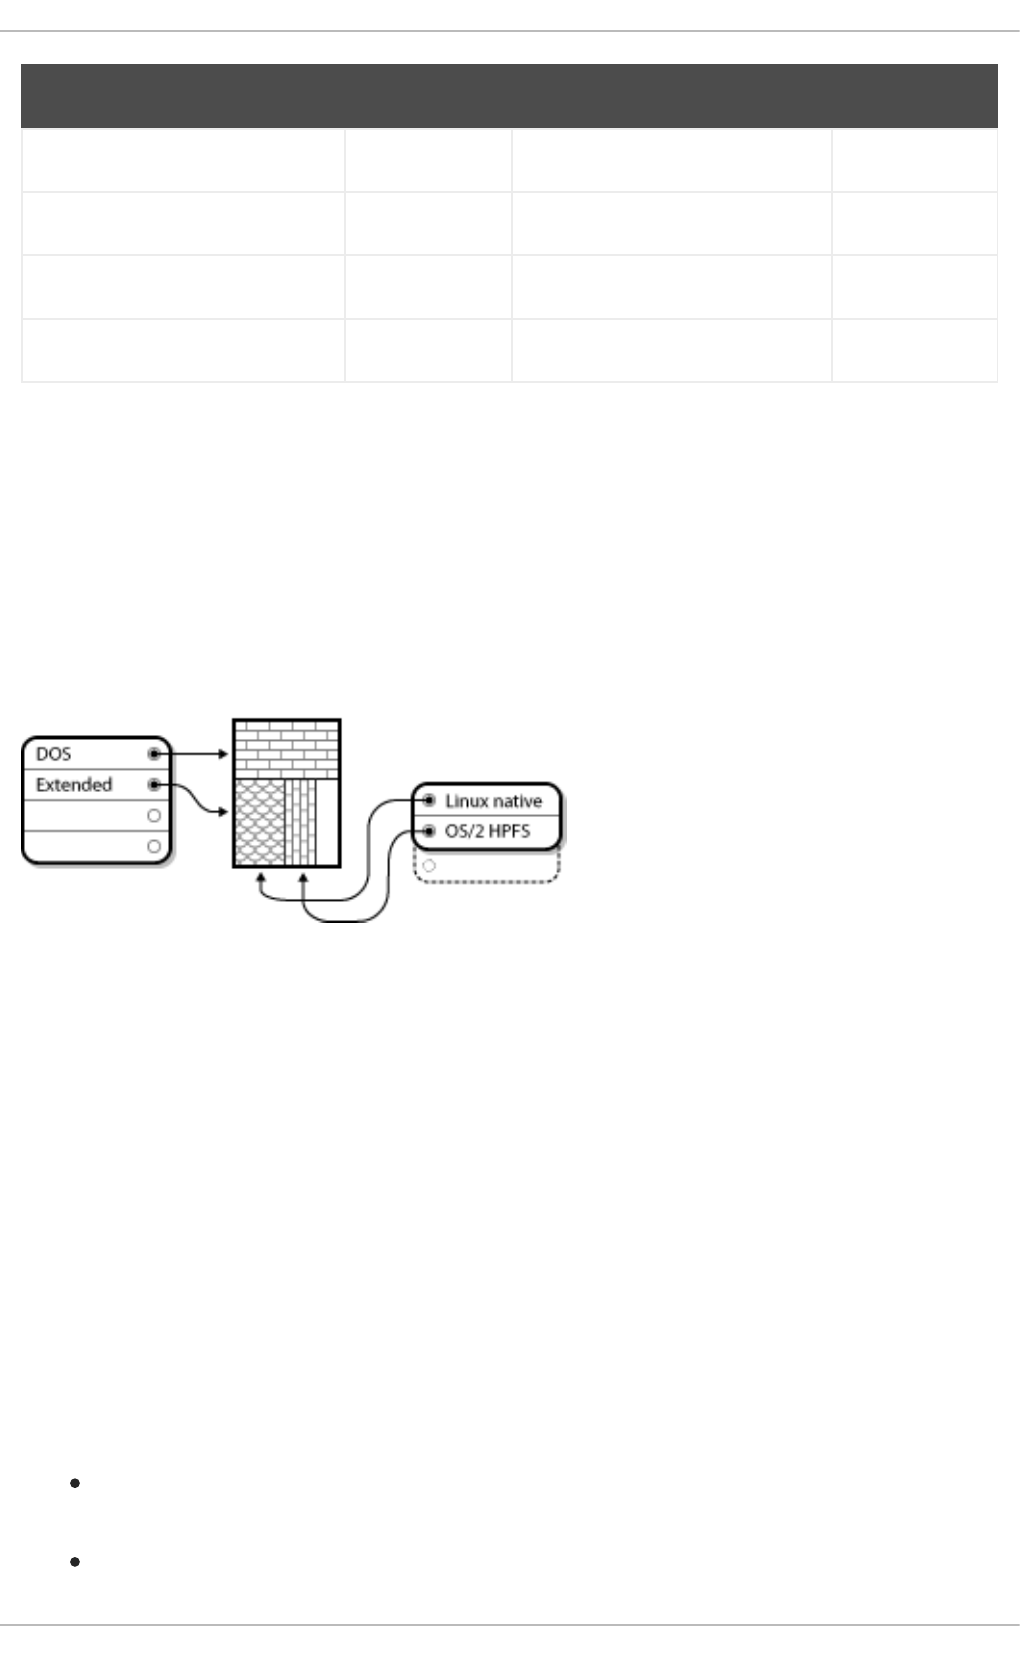
Novell 51 DOS access e1
PReP Boot 41 DOS R/O e3
GNU HURD 63 DOS secondary f2
Novell Netware 286 64 BBT ff
Partition Type Value Partition Type Value
A.1.3. Partitions Within Partitions - An Overview of Extended Partitions
In case four partitions are insufficient for your needs, you can use extended partitions to create up
additional partitions. You do this by setting the type of a partition to "Extended".
An extended partition is like a disk drive in its own right - it has its own partition table which points to one
or more partitions (now called logical partitions, as opposed to the four primary partitions) contained
entirely within the extended partition itself. The following diagram shows a disk drive with one primary
partition and one extended partition containing two logical partitions (along with some unpartitioned free
space):
Figure A.7. Disk Drive With Extended Partition
As this figure implies, there is a difference between primary and logical partitions - there can only be four
primary partitions, but there is no fixed limit to the number of logical partitions that can exist. However,
due to the way in which partitions are accessed in Linux, no more than 12 logical partitions should be
defined on a single disk drive.
A.1.4. GUID Partition Table (GPT)
GUID Partition Table (GPT) is a newer partitioning scheme based on using Globally Unique Identifiers
(GUID). GPT was developed to cope with limitations of the MBR partition table, especially with the
limited maximum addressable storage space of a disk. Unlike MBR, which is unable to address storage
space larger than 2 TiB (equivalent to approximately 2.2 TB), GPT can be used with hard disks larger
than this; the maximum addressable disk size is 2.2 ZiB. In addition GPT, by default, supports creating
up to 128 primary partitions. This number could be extended by allocating more space to the partition
table.
GPT disks use logical block addressing (LBA) and the partition layout is as follows:
To preserve backward compatibility with MBR disks, the first sector (LBA 0) of GPT is reserved
for MBR data and it is called “protective MBR”.
The primary GPT header begins on the second logical block (LBA 1) of the device. The header
APPENDIX A. AN INTRODUCTION TO DISK PARTITIONS
467

contains the disk GUID, the location of the primary partition table, the location of the secondary
GPT header, and CRC32 checksums of itself and the primary partition table. It also specifies the
number of partition entries of the table.
The primary GPT table includes, by default, 128 partition entries, each with an entry size 128
bytes, its partition type GUID and unique partition GUID.
The secondary GPT table is identical to the primary GPT table. It is used mainly as a backup
table for recovery in case the primary partition table is corrupted.
The secondary GPT header is located on the last logical sector of the disk and it can be used to
recover GPT information in case the primary header is corrupted. It contains the disk GUID, the
location of the secondary partition table and the primary GPT header, CRC32 checksums of
itself and the secondary partition table, and the number of possible partition entries.
IMPORTANT
There must be a BIOS boot partition for the boot loader to be installed successfully onto a
disk that contains a GPT (GUID Partition Table). This includes disks initialized by
Anaconda. If the disk already contains a BIOS boot partition, it can be reused.
A.2. STRATEGIES FOR DISK REPARTITIONING
There are several different ways that a disk can be repartitioned. This section discusses the following
possible approaches:
Unpartitioned free space is available
An unused partition is available
Free space in an actively used partition is available
Note that this section discusses the aforementioned concepts only theoretically and it does not include
any procedures showing how to perform disk repartitioning step-by-step. Such detailed information are
beyond the scope of this document.
NOTE
Keep in mind that the following illustrations are simplified in the interest of clarity and do
not reflect the exact partition layout that you encounter when actually installing Red Hat
Enterprise Linux.
A.2.1. Using Unpartitioned Free Space
In this situation, the partitions already defined do not span the entire hard disk, leaving unallocated space
that is not part of any defined partition. The following diagram shows what this might look like:
Installation Guide
468
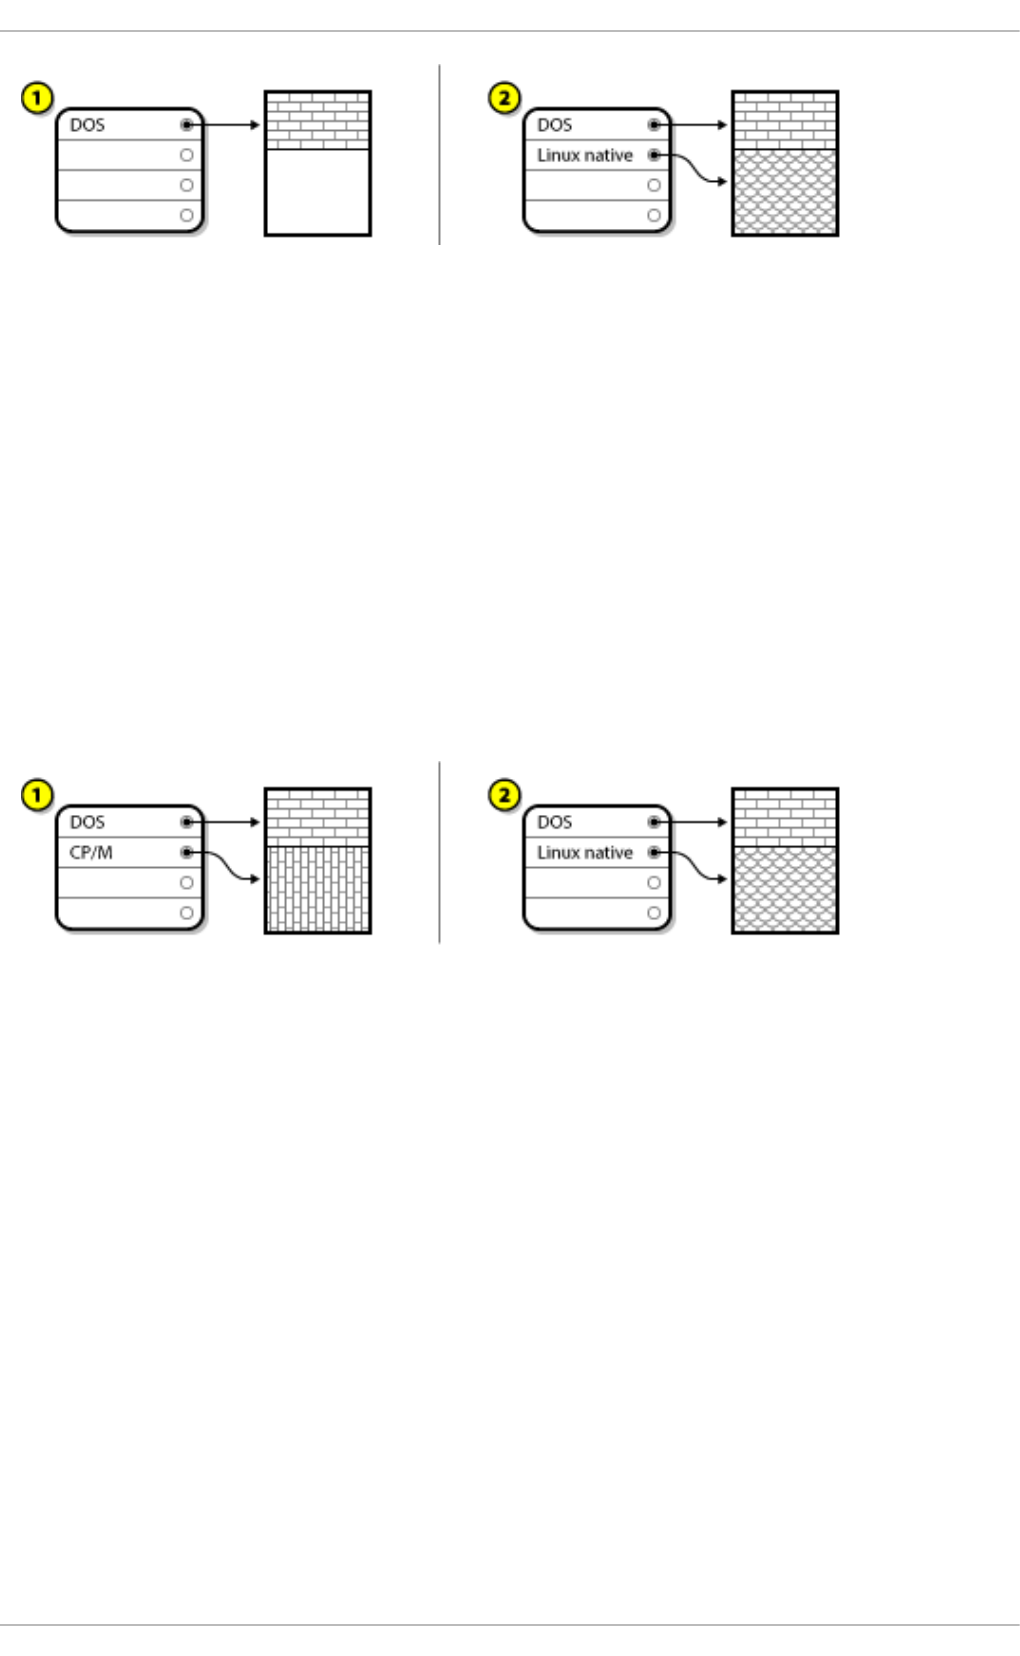
Figure A.8. Disk Drive with Unpartitioned Free Space
In the above example, 1 represents an undefined partition with unallocated space and 2 represents a
defined partition with allocated space.
An unused hard disk also falls into this category. The only difference is that all the space is not part of
any defined partition.
In any case, you can create the necessary partitions from the unused space. Unfortunately, this
scenario, although very simple, is not very likely (unless you have just purchased a new disk just for
Red Hat Enterprise Linux). Most pre-installed operating systems are configured to take up all available
space on a disk drive (see Section A.2.3, “Using Free Space from an Active Partition”).
A.2.2. Using Space from an Unused Partition
In this case, maybe you have one or more partitions that you do not use any longer. The following
diagram illustrates such a situation.
Figure A.9. Disk Drive with an Unused Partition
In the above example, 1 represents an unused partition and 2 represents reallocating an unused partition
for Linux.
In this situation, you can use the space allocated to the unused partition. You first must delete the
partition and then create the appropriate Linux partition(s) in its place. You can delete the unused
partition and manually create new partitions during the installation process.
A.2.3. Using Free Space from an Active Partition
This is the most common situation. It is also, unfortunately, the hardest to handle. The main problem is
that, even if you have enough free space, it is presently allocated to a partition that is already in use. If
you purchased a computer with pre-installed software, the hard disk most likely has one massive
partition holding the operating system and data.
Aside from adding a new hard drive to your system, you have two choices:
Destructive Repartitioning
In this case, the single large partition is deleted and several smaller ones are created instead. Any
data held in the original partition is destroyed. This means that making a complete backup is
APPENDIX A. AN INTRODUCTION TO DISK PARTITIONS
469
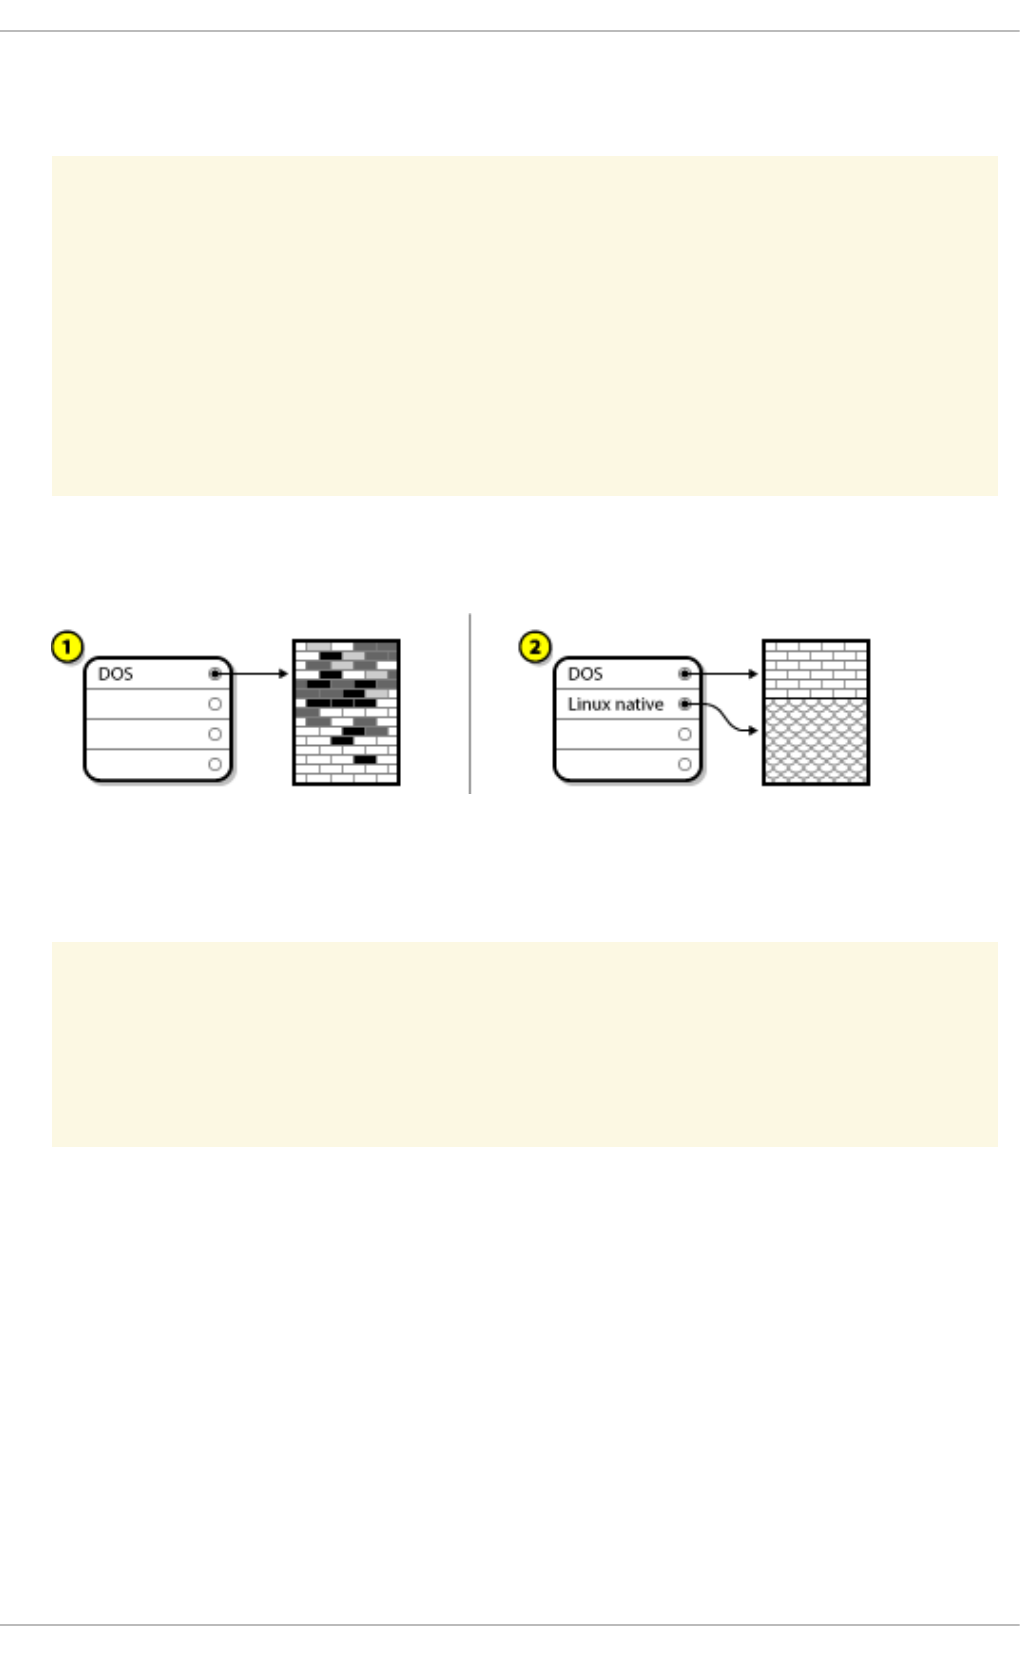
necessary. It is highly recommended to make two backups, use verification (if available in your
backup software), and try to read data from the backup before deleting the partition.
WARNING
If an operating system was installed on that partition, it must be reinstalled if you
want to use that system as well. Be aware that some computers sold with pre-
installed operating systems might not include the installation media to reinstall
the original operating system. You should check whether this applies to your
system is before you destroy your original partition and its operating system
installation.
After creating a smaller partition for your existing operating system, you can reinstall software, restore
your data, and start your Red Hat Enterprise Linux installation.
Figure A.10. Disk Drive Being Destructively Repartitioned
In the above example, 1 represents before and 2 represents after.
WARNING
Any data previously present in the original partition is lost.
Non-Destructive Repartitioning
With non-destructive repartitioning you execute a program that makes a big partition smaller without
losing any of the files stored in that partition. This method is usually reliable, but can be very time-
consuming on large drives.
While the process of non-destructive repartitioning is rather straightforward, there are three steps
involved:
1. Compress and backup existing data
2. Resize the existing partition
3. Create new partition(s)
Installation Guide
470
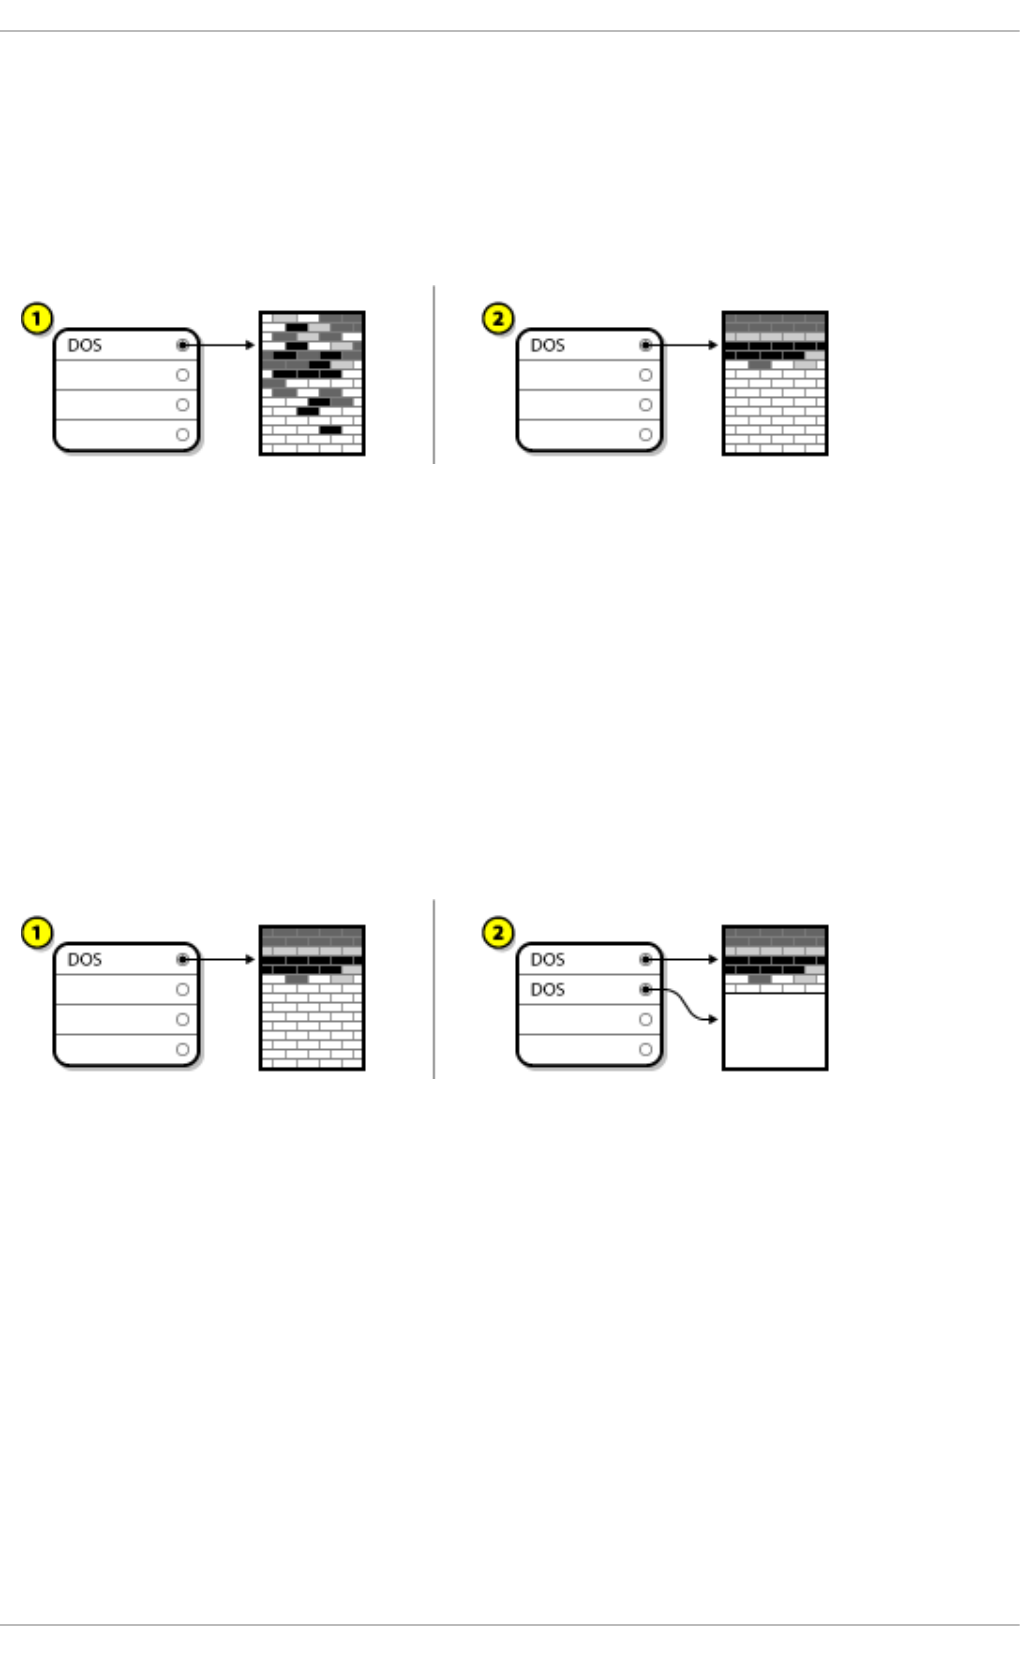
Each step is described further in more detail.
A.2.3.1. Compress Existing Data
As the following figure shows, the first step is to compress the data in your existing partition. The reason
for doing this is to rearrange the data such that it maximizes the available free space at the "end" of the
partition.
Figure A.11. Disk Drive Being Compressed
In the above example, 1 represents before and 2 represents after.
This step is crucial. Without it, the location of the data could prevent the partition from being resized to
the extent desired. Note also that, for one reason or another, some data cannot be moved. If this is the
case (and it severely restricts the size of your new partitions), you might be forced to destructively
repartition your disk.
A.2.3.2. Resize the Existing Partition
Figure A.12, “Disk Drive with Partition Resized” shows the actual resizing process. While the actual
result of the resizing operation varies depending on the software used, in most cases the newly freed
space is used to create an unformatted partition of the same type as the original partition.
Figure A.12. Disk Drive with Partition Resized
In the above example, 1 represents before and 2 represents after.
It is important to understand what the resizing software you use does with the newly freed space, so that
you can take the appropriate steps. In the case illustrated here, it would be best to delete the new DOS
partition and create the appropriate Linux partition(s).
A.2.3.3. Create new partitions
As the previous step implied, it might or might not be necessary to create new partitions. However,
unless your resizing software supports systems with Linux installed, it is likely that you must delete the
partition that was created during the resizing process.
APPENDIX A. AN INTRODUCTION TO DISK PARTITIONS
471
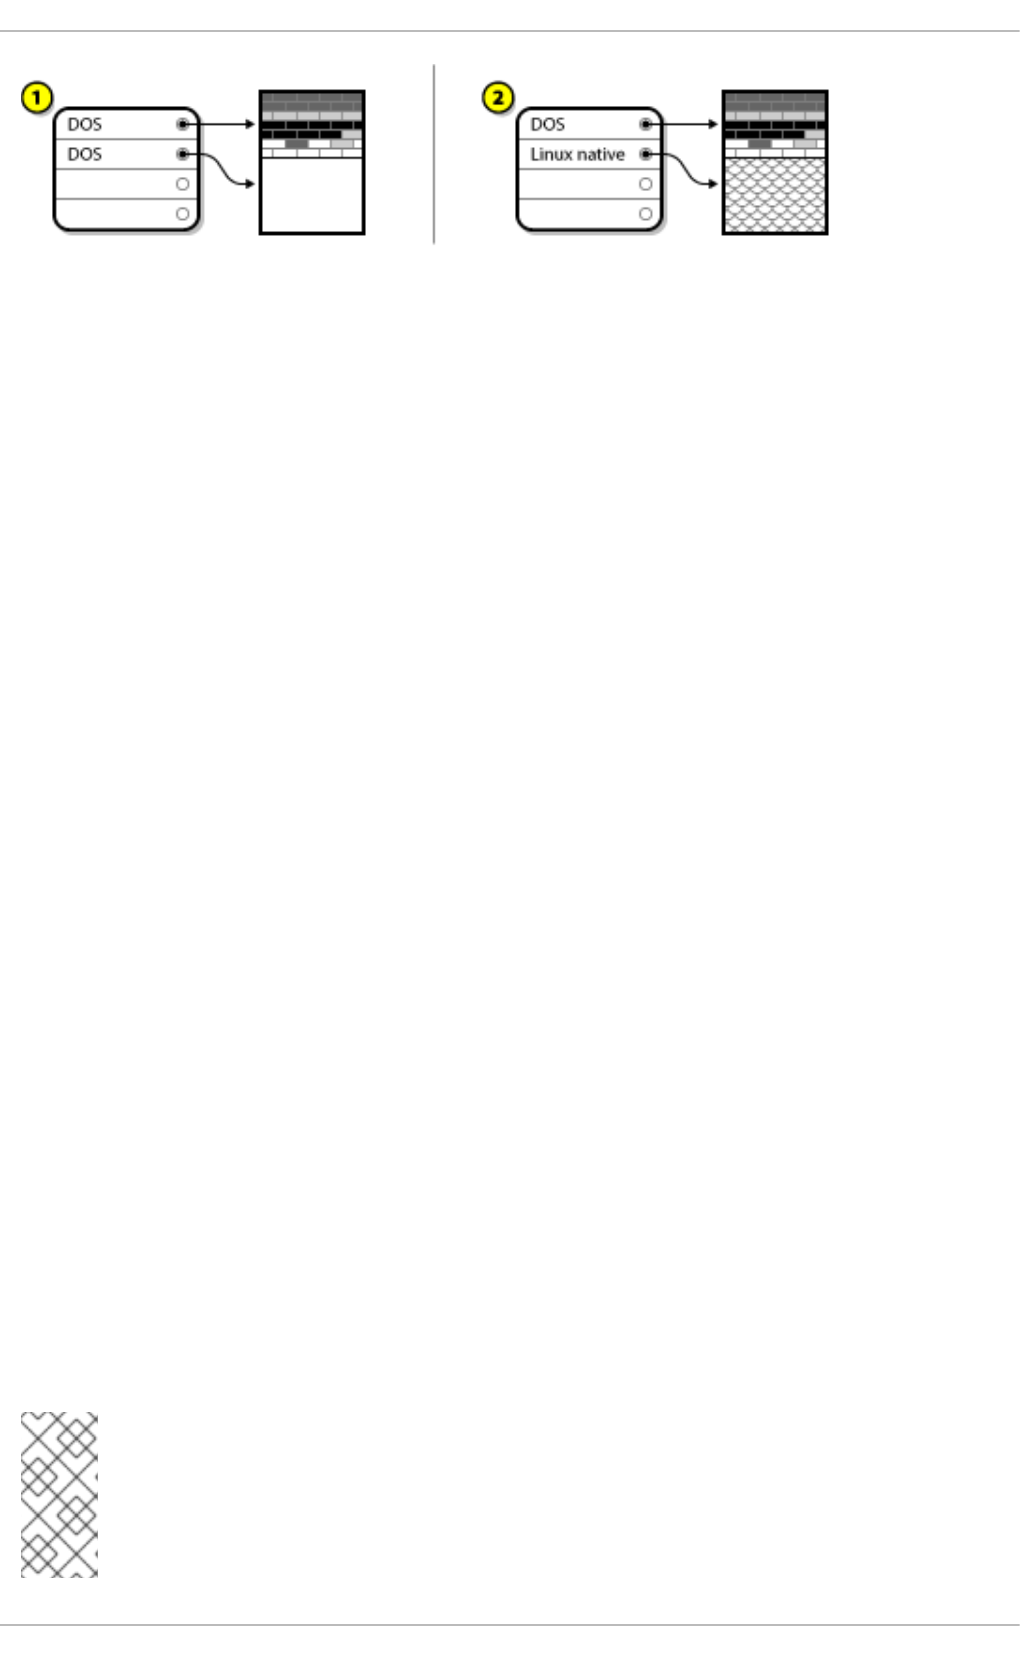
Figure A.13. Disk Drive with Final Partition Configuration
In the above example, 1 represents before and 2 represents after.
A.3. PARTITION NAMING SCHEMES AND MOUNT POINTS
A common source of confusion for users unfamiliar with Linux is the matter of how partitions are used
and accessed by the Linux operating system. In DOS/Windows, it is relatively simple: Each partition gets
a "drive letter." You then use the correct drive letter to refer to files and directories on its corresponding
partition. This is entirely different from how Linux deals with partitions and, for that matter, with disk
storage in general. This section describes the main principles of partition naming scheme and the way
how partitions are accessed in Red Hat Enterprise Linux.
A.3.1. Partition Naming Scheme
Red Hat Enterprise Linux uses a naming scheme that is file-based, with file names in the form of
/dev/xxyN.
Device and partition names consist of the following:
/dev/
This is the name of the directory in which all device files reside. Because partitions reside on hard
disks, and hard disks are devices, the files representing all possible partitions reside in /dev/.
xx
The first two letters of the partition name indicate the type of device on which the partition resides,
usually sd.
y
This letter indicates which device the partition is on. For example, /dev/sda for the first hard disk,
/dev/sdb for the second, and so on.
N
The final number denotes the partition. The first four (primary or extended) partitions are numbered 1
through 4. Logical partitions start at 5. So, for example, /dev/sda3 is the third primary or extended
partition on the first hard disk, and /dev/sdb6 is the second logical partition on the second hard disk.
NOTE
Even if Red Hat Enterprise Linux can identify and refer to all types of disk partitions, it
might not be able to read the file system and therefore access stored data on every
partition type. However, in many cases, it is possible to successfully access data on a
partition dedicated to another operating system.
Installation Guide
472

A.3.2. Disk Partitions and Mount Points
In Red Hat Enterprise Linux each partition is used to form part of the storage necessary to support a
single set of files and directories. This is done by associating a partition with a directory through a
process known as mounting. Mounting a partition makes its storage available starting at the specified
directory (known as a mount point).
For example, if partition /dev/sda5 is mounted on /usr/, that would mean that all files and directories
under /usr/ physically reside on /dev/sda5. So the file /usr/share/doc/FAQ/txt/Linux-FAQ
would be stored on /dev/sda5, while the file /etc/gdm/custom.conf would not.
Continuing the example, it is also possible that one or more directories below /usr/ would be mount
points for other partitions. For instance, a partition (say, /dev/sda7) could be mounted on
/usr/local/, meaning that /usr/local/man/whatis would then reside on /dev/sda7 rather than
/dev/sda5.
A.3.3. How Many Partitions?
At this point in the process of preparing to install Red Hat Enterprise Linux, you must give some
consideration to the number and size of the partitions to be used by your new operating system.
However, there is no one right answer to this question. It depends on your needs and requirements.
Keeping this in mind, Red Hat recommends that, unless you have a reason for doing otherwise, you
should at least create the following partitions: swap, /boot/, and / (root).
For more information, see Section 8.14.4.4, “Recommended Partitioning Scheme” for AMD64 and
Intel 64 systems, Section 13.15.4.4, “Recommended Partitioning Scheme” for IBM Power Systems
servers, and Section 17.15.3.4, “Recommended Partitioning Scheme” for IBM Z.
[4] Blocks really are consistently sized, unlike our illustrations. Keep in mind, also, that an average disk drive
contains thousands of blocks. The picture is simplified for the purposes of this discussion.
APPENDIX A. AN INTRODUCTION TO DISK PARTITIONS
473

APPENDIX B. ISCSI DISKS
Internet Small Computer System Interface (iSCSI) is a protocol that allows computers to communicate
with storage devices by SCSI requests and responses carried over TCP/IP. Because iSCSI is based on
the standard SCSI protocols, it uses some terminology from SCSI. The device on the SCSI bus to which
requests get sent, and which answers these requests, is known as the target and the device issuing
requests is known as the initiator. In other words, an iSCSI disk is a target and the iSCSI software
equivalent of a SCSI controller or SCSI Host Bus Adapter (HBA) is called an initiator. This appendix only
covers Linux as an iSCSI initiator; how Linux uses iSCSI disks, but not how Linux hosts iSCSI disks.
Linux has a software iSCSI initiator in the kernel that takes the place and form of a SCSI HBA driver and
therefore allows Linux to use iSCSI disks. However, as iSCSI is a fully network-based protocol, iSCSI
initiator support requires more than just the ability to send SCSI packets over the network. Before Linux
can use an iSCSI target, Linux must find the target on the network and make a connection to it. In some
cases, Linux must send authentication information to gain access to the target. Linux must also detect
any failure of the network connection and must establish a new connection, including logging in again if
necessary.
The discovery, connection, and logging in is handled in user space by the iscsiadm utility, while errors
are handled, also in user space, by the iscsid utility.
Both iscsiadm and iscsid are part of the iscsi-initiator-utils package under Red Hat Enterprise Linux.
B.1. ISCSI DISKS IN ANACONDA
The Anaconda installation program can discover and log in to iSCSI disks in two ways:
1. When Anaconda starts, it checks if the BIOS or add-on boot ROMs of the system support iSCSI
Boot Firmware Table (iBFT), a BIOS extension for systems which can boot from iSCSI. If the
BIOS supports iBFT, Anaconda will read the iSCSI target information for the configured boot
disk from the BIOS and log in to this target, making it available as an installation target.
IMPORTANT
To connect automatically to an iSCSI target, a network device for accessing the
target needs to be activated. The recommended way to do so is to use ip=ibft
boot option.
2. You can discover and add iSCSI targets manually in the graphical user interface in anaconda.
From the main menu, the Installation Summary screen, click the Installation Destination option.
Then click the Add a disk in the Specialized & Network Disks section of the screen. A
tabbed list of available storage devices appears. In the lower right corner, click the Add iSCSI
Target button and proceed with the discovery process. See Section 8.15.1, “The Storage
Devices Selection Screen” for more information.
Installation Guide
474

IMPORTANT
Restriction: The /boot partition cannot be placed on iSCSI targets that have
been manually added using this method - an iSCSI target containing a /boot
partition must be configured for use with iBFT.
However, in instances where the installed system is expected to boot from iSCSI
with iBFT configuration provided by a method other than firmware iBFT, for
example using iPXE, the /boot partition restriction can be disabled using the
inst.nonibftiscsiboot installer boot option.
While Anaconda uses iscsiadm to find and log into iSCSI targets, iscsiadm automatically stores any
information about these targets in the iscsiadm iSCSI database. Anaconda then copies this database to
the installed system and marks any iSCSI targets not used for / so that the system will automatically log
in to them when it starts. If / is placed on an iSCSI target, initrd will log into this target and Anaconda
does not include this target in start up scripts to avoid multiple attempts to log into the same target.
B.2. ISCSI DISKS DURING START UP
Events related to iSCSI might occur at a number of points while the system is starting:
1. The init script in the initrd will log into iSCSI targets used for /, if any. This is done using the
iscsistart utility, without requiring iscsid to run.
NOTE
If the root file system is on an iSCSI disk connected using IPv6, ensure that the
installed system is using the correct ip= boot option, for example
ip=eth0:auto6. If this option is not set, the installed system can spend up to 20
minutes at boot time attempting to establish a connection, before eventually
succeeding. Using the correct ip= option eliminates this delay.
2. When the root file system has been mounted and the various service init scripts are running, the
iscsi init script will get called. This script then starts the iscsid daemon if any iSCSI targets are
used for /, or if any targets in the iSCSI database are marked to be logged into automatically.
3. After the classic network service script has been run, the iscsi init script will run. If the network is
accessible, this will log into any targets in the iSCSI database that are marked to be logged into
automatically. If the network is not accessible, this script will exit quietly.
4. When using NetworkManager to access the network, instead of the classic network service
script, NetworkManager will call the iscsi init script. Also see the
/etc/NetworkManager/dispatcher.d/04-iscsi file for further reference.
IMPORTANT
Because NetworkManager is installed in the /usr directory, you cannot use it to
configure network access if /usr is on network-attached storage such as an
iSCSI target.
If iscsid is not needed as the system starts, it will not start automatically. If you start iscsiadm, iscsiadm
will start iscsid in turn.
APPENDIX B. ISCSI DISKS
475

APPENDIX C. UNDERSTANDING LVM
LVM (Logical Volume Management) partitions provide a number of advantages over standard partitions.
LVM partitions are formatted as physical volumes. One or more physical volumes are combined to form
a volume group. Each volume group's total storage is then divided into one or more logical volumes. The
logical volumes function much like standard partitions. They have a file system type, such as xfs, and a
mount point.
IMPORTANT
On AMD, Intel, and ARM systems and IBM Power Systems servers, the boot loader
cannot read LVM volumes. You must make a standard, non-LVM disk partition for your
/boot partition.
On IBM Z, the zipl boot loader supports /boot on LVM logical volumes with linear
mapping.
By default, the installation process always creates the / and swap partitions within LVM
volumes, with a separate /boot partition on a physical volume.
To understand LVM better, imagine the physical volume as a pile of blocks. A block is a storage unit
used to store data. Several piles of blocks can be combined to make a much larger pile, just as physical
volumes are combined to make a volume group. The resulting pile can be subdivided into several
smaller piles of arbitrary size, just as a volume group is allocated to several logical volumes.
An administrator can grow or shrink logical volumes without destroying data, unlike standard disk
partitions. If the physical volumes in a volume group are on separate drives or RAID arrays, then
administrators can also spread a logical volume across the storage devices.
You can lose data if you shrink a logical volume to a smaller capacity than the data on the volume
requires. To ensure maximum flexibility, create logical volumes to meet your current needs, and leave
excess storage capacity unallocated. You can safely extend logical volumes to use unallocated space,
depending on your needs.
Installation Guide
476

APPENDIX D. OTHER TECHNICAL DOCUMENTATION
Both Anaconda and Red Hat Enterprise Linux systems use a common set of software components. For
detailed information on key technologies, see the web sites listed below.
Boot Loader
Red Hat Enterprise Linux uses the GRUB2 boot loader. See the corresponding chapter in the
RRed Hat Enterprise Linux 7 System Administrator's Guide.
Storage Management
Logical Volume Management (LVM) provides administrators with a range of facilities to manage
storage. By default, the Red Hat Enterprise Linux installation process formats drives as LVM
volumes. For further details about LVM, see the Red Hat Enterprise Linux 7 Logical Volume Manager
Administration Guide.
Remote Displays
Red Hat Enterprise Linux and Anaconda include VNC (Virtual Network Computing) software to
enable remote access to graphical displays. For more information about VNC, see the TigerVNC
chapter in the Red Hat Enterprise Linux 7 System Administrator's Guide.
You can also use the VNC Configurator application on the Red Hat Customer Portal to guide you
through VNC server and client setup.
Remote System Access
Red Hat Enterprise Linux incorporates the OpenSSH suite to provide remote access to the system.
The SSH service enables a number of functions, which include access to the command-line from
other systems, remote command execution, and network file transfers. During the installation
process, Anaconda might use the scp feature of OpenSSH to transfer crash reports to remote
systems. For further details about OpenSSH, see the corresponding section in the Red Hat
Enterprise Linux 7 System Administrator's Guide.
Access Control
SELinux provides Mandatory Access Control (MAC) capabilities that supplement the standard Linux
security features. See the Red Hat Enterprise Linux 7 SELinux User's and Administrator's Guide for
further information.
Firewall
Red Hat Enterprise Linux uses firewalld to provide firewall features. For further information, see the
corresponding chapter in the Red Hat Enterprise Linux 7 Security Guide.
Software Installation
Red Hat Enterprise Linux uses yum to manage the RPM packages that make up the system. See the
corresponding chapter in the Red Hat Enterprise Linux 7 Administrator's Guide for further information.
Virtualization
Virtualization provides the capability to simultaneously run multiple operating systems on the same
computer. Red Hat Enterprise Linux also includes tools to install and manage the secondary systems
on a Red Hat Enterprise Linux host. You can select virtualization support during the installation
process, or at any time thereafter. See the Red Hat Enterprise Linux 7 Virtualization Deployment and
Administration Guide for more information.
APPENDIX D. OTHER TECHNICAL DOCUMENTATION
477

APPENDIX E. REFERENCE TABLE FOR EXT4 AND XFS
COMMANDS
XFS replaces ext4 as the default file system in Red Hat Enterprise Linux 7. This table serves as a cross
reference listing common file system manipulation tasks and any changes in these commands between
ext4 and XFS.
Table E.1. Reference Table for ext4 and XFS Commands
Task ext4 XFS
Creating a file system mkfs.ext4 mkfs.xfs
Mounting a file system mount mount
Resizing a file system resize2fs xfs_growfs [a]
Repairing a file system e2fsck xfs_repair
Changing the label on a file system e2label xfs_admin -L
Reporting on disk space and file usage quota quota
Debugging a file system debugfs xfs_db
Saving critical file system metadata to a file e2image xfs_metadump
[a] The size of XFS file systems cannot be reduced; the command is used only to increase the size.
Installation Guide
478

APPENDIX F. DATA SIZE TERMINOLOGY REFERENCE TABLE
Table F.1. Data Size Terminology Reference Table
Term Abbreviation Size (in bytes)
Binary (Bytes)
Kibibyte KiB 1024
Mebibyte MiB 10242
Gibibyte GiB 10243
Tebibyte TiB 10244
Pebibyte PiB 10245
Exbibyte EiB 10246
Zebibyte ZiB 10247
Yobibyte YiB 10248
Decimal (Bytes)
Kilobyte KB 1000
Megabyte MB 10002
Gigabyte GB 10003
Terabyte TB 10004
Petabyte PB 10005
Exabyte EB 10006
Zettabyte ZB 10007
Yottabyte YB 10008
Decimal (Bits)
Kilobit Kb 125
APPENDIX F. DATA SIZE TERMINOLOGY REFERENCE TABLE
479

Megabit Mb 125,000
Gigabit Gb 125,000,000
Term Abbreviation Size (in bytes)
Installation Guide
480

APPENDIX G. REVISION HISTORY
Note that revision numbers relate to the edition of this manual, not to version numbers of Red Hat
Enterprise Linux.
Revision 1.5-3 Tue Oct 30 2018 Vladimír Slávik
Preparing document for 7.6 GA publication.
Revision 1.5-2 Tue Aug 21 2018 Vladimír Slávik
Preparing document for 7.6 Beta publication.
Revision 1.5-1 Fri Apr 6 2018 Petr Bokoč
Preparing document for 7.5 GA publication.
Revision 1.5-0 Fri Dec 15 2017 Petr Bokoč
Preparing document for 7.5 Beta publication.
Revision 1.4-2 Thu Nov 23 2017 Petr Bokoč
Asynchronous update.
Revision 1.4-1 Fri Oct 13 2017 Petr Bokoč
Asynchronous update.
Revision 1.4-0 Tue Aug 1 2017 Petr Bokoč
Preparing document for 7.4 GA publication.
Revision 1.3-9 Mon May 15 2017 Petr Bokoč
Preparing document for 7.4 Beta publication.
Revision 1.3-8 Tue Apr 4 2017 Petr Bokoč
Asynchronous update.
Revision 1.3-7 Sun Nov 6 2016 Robert Kratky
Version for 7.3 GA publication.
Revision 1.3-4 Mon Nov 16 2015 Petr Bokoč
Version for 7.2 GA publication.
Revision 1.2-2 Wed Feb 18 2015 Petr Bokoč
Version for 7.1 GA publication.
Revision 1.0-0 Tue Jun 03 2014 Petr Bokoč
Version for 7.0 GA publication.
APPENDIX G. REVISION HISTORY
481

INDEX
Symbols
/boot partition
recommended partitioning, Recommended Partitioning Scheme, Recommended Partitioning
Scheme
/var/ partition
recommended partitioning, Recommended Partitioning Scheme, Recommended Partitioning
Scheme
A
adding partitions
adding volumes, Adding File Systems and Configuring Partitions, Adding File Systems and
Configuring Partitions, Adding File Systems and Configuring Partitions
file system type, File System Types, File System Types, File System Types
anaconda.log
AMD64 and Intel 64, Troubleshooting Installation on 64-bit AMD, Intel, and ARM Systems
IBM Power Systems, Troubleshooting Installation on IBM Power Systems
IBM Z, Troubleshooting Installation on IBM Z
anaconda.packaging.log
install log file location, The Configuration Menu and Progress Screen , The Configuration
Menu and Progress Screen, The Configuration Menu and Progress Screen
array (see RAID)
automatic partitioning, Installation Destination, Installation Destination, Installation Destination
B
BIOS (Basic Input/Output System), Booting the Installation on 64-bit AMD, Intel, and ARM
systems
boot loader, Boot Loader Installation, Boot Loader Installation
GRUB2, Boot Loader Installation, Boot Loader Installation
installation, Boot Loader Installation, Boot Loader Installation
boot menu
options, Boot Options
boot options, Boot Options
console, Configuring the Installation System at the Boot Menu
debugging, Configuring the Installation System at the Boot Menu
disk device names, Configuring the Installation System at the Boot Menu
driver updates, Configuring the Installation System at the Boot Menu
gpt, Configuring the Installation System at the Boot Menu
Installation Guide
482

GUID Partition Table, Configuring the Installation System at the Boot Menu
installation program runtime image, Configuring the Installation System at the Boot Menu
installation source, Configuring the Installation System at the Boot Menu
kexec, Configuring the Installation System at the Boot Menu
logging, Configuring the Installation System at the Boot Menu
media verification, Verifying Boot Media
memory testing mode, Loading the Memory (RAM) Testing Mode
multilib, Configuring the Installation System at the Boot Menu
network, Configuring the Installation System at the Boot Menu
remote access, Configuring the Installation System at the Boot Menu
rescue mode, Booting Your Computer in Rescue Mode
selinux, Configuring the Installation System at the Boot Menu
text mode, Configuring the Installation System at the Boot Menu
troubleshooting, Configuring the Installation System at the Boot Menu
VNC, Configuring the Installation System at the Boot Menu
zram, Configuring the Installation System at the Boot Menu
zRAM, Configuring the Installation System at the Boot Menu
booting
installation program
AMD64 and Intel 64, Booting from Physical Media
rescue mode, Anaconda Rescue Mode
booting the installation program
IBM Power Systems, Booting the Installation on IBM Power Systems
C
CD/DVD media
booting, Booting the Installation on 64-bit AMD, Intel, and ARM systems, Booting the
Installation on IBM Power Systems
making, Making an Installation CD or DVD
(see also ISO images)
Chain loading, The Storage Devices Selection Screen , The Storage Devices Selection Screen
clock, Date & Time, Date & Time, Date & Time
CMS configuration files, Parameter and Configuration Files on IBM Z
sample CMS configuration file, Sample Parameter File and CMS Configuration File
configuration
hardware, System Specifications List, System Specifications List
time, Date & Time, Date & Time, Date & Time
time zone, Date & Time, Date & Time, Date & Time
INDEX
483

configuration files
CMS configuration files, Parameter and Configuration Files on IBM Z
the z/VM configuration file, The z/VM Configuration File
custom image
creating, Installing into a Disk Image
D
DASD, DASD storage devices
DHCP (Dynamic Host Configuration Protocol), Network & Hostname, Network & Hostname,
Network & Hostname
Disk Partitioner
adding partitions
adding volumes, Adding File Systems and Configuring Partitions, Adding File Systems and
Configuring Partitions, Adding File Systems and Configuring Partitions
disk partitioning, Installation Destination, Installation Destination, Installation Destination
disk space, Disk Space and Memory Requirements, Disk Space and Memory Requirements
DVD media
downloading, Downloading Red Hat Enterprise Linux
(see also ISO images)
E
extended partitions, Partitions Within Partitions - An Overview of Extended Partitions
F
FCoE
installation, Advanced Storage Options, Advanced Storage Options, Advanced Storage
Options
fcoe
via Kickstart, Kickstart Commands and Options
FCP devices, FCP Devices
file system
formats, overview of, File Systems
file system types, File System Types, File System Types, File System Types
firewall
documentation, Other Technical Documentation
G
Installation Guide
484

GRUB2, Boot Loader Installation, Boot Loader Installation
documentation, Other Technical Documentation
installation, Boot Loader Installation, Boot Loader Installation
GUID Partition Table
specifying as a boot option, Configuring the Installation System at the Boot Menu
H
hard disk
basic concepts, Hard Disk Basic Concepts
extended partitions, Partitions Within Partitions - An Overview of Extended Partitions
file system formats, File Systems
partition introduction, Partitions: Turning One Drive Into Many
partition types, Partitions: Turning One Drive Into Many
partitioning of, An Introduction to Disk Partitions
hardware
compatibility, Is Your Hardware Compatible?, Is Your Hardware Compatible?
configuration, System Specifications List, System Specifications List
support, Supported Installation Targets, Supported Installation Targets
hardware preparation, IBM Power Systems servers, Preparation for IBM Power Systems Servers
HMC vterm, Using the HMC vterm
hostname, Network & Hostname, Network & Hostname, Network & Hostname
I
Initial Setup
subscriptions, Subscription Manager
via Kickstart, Kickstart Commands and Options
install log file
anaconda.packaging.log , The Configuration Menu and Progress Screen , The Configuration
Menu and Progress Screen, The Configuration Menu and Progress Screen
installation
disk space, Disk Space and Memory Requirements, Disk Space and Memory Requirements
getting started, Getting Started
GRUB2, Boot Loader Installation, Boot Loader Installation
Kickstart (see Kickstart installations)
memory requirements, Disk Space and Memory Requirements, Disk Space and Memory
Requirements
partitioning, Manual Partitioning, Manual Partitioning, Manual Partitioning
program
starting, Starting the Installation Program
INDEX
485

text mode, Configuring the Installation System at the Boot Menu
using VNC, Using VNC
Installation media
downloading, Downloading Red Hat Enterprise Linux
installation program
AMD64 and Intel 64
booting, Booting from Physical Media
installation program rescue mode
definition of, Anaconda Rescue Mode
utilities available, Anaconda Rescue Mode
installing packages, Software Selection, Software Selection, Software Selection
IPv4, Network & Hostname, Network & Hostname, Network & Hostname
iscsi
installation, Advanced Storage Options, Advanced Storage Options, Advanced Storage
Options
ISO images
downloading, Downloading Red Hat Enterprise Linux
K
kdump, Kdump, Kdump, Kdump
kexec
enabling, Configuring the Installation System at the Boot Menu
keyboard
configuration, Keyboard Configuration, Keyboard Configuration, Keyboard Configuration
keymap
selecting language, Welcome Screen and Language Selection, Welcome Screen and
Language Selection, Welcome Screen and Language Selection
selecting type of keyboard, Keyboard Configuration, Keyboard Configuration, Keyboard
Configuration
Kickstart
how the file is found, Starting the Kickstart Installation
parameters for IBM Z parameter files, Parameters for Kickstart Installations
subscriptions, Post-installation Script
Kickstart file
%anaconda, Anaconda configuration
%include, Kickstart Commands and Options
Installation Guide
486

%post, Post-installation Script
%pre, Pre-installation Script
anaconda configuration, Anaconda configuration
auth, Kickstart Commands and Options
authconfig, Kickstart Commands and Options
autopart, Kickstart Commands and Options
autostep, Kickstart Commands and Options
bootloader, Kickstart Commands and Options
btrfs, Kickstart Commands and Options
changes in syntax, Changes in Kickstart Syntax
clearpart, Kickstart Commands and Options
cmdline, Kickstart Commands and Options
creating, Kickstart Commands and Options
creating required partitions, Kickstart Commands and Options
device, Kickstart Commands and Options
driverdisk, Kickstart Commands and Options
eula, Kickstart Commands and Options
fcoe, Kickstart Commands and Options
firewall, Kickstart Commands and Options
firstboot, Kickstart Commands and Options
format of, Creating a Kickstart File
graphical, Kickstart Commands and Options
group, Kickstart Commands and Options
halt, Kickstart Commands and Options
ignoredisk, Kickstart Commands and Options
include contents of another file, Kickstart Commands and Options
install, Kickstart Commands and Options
installation methods, Kickstart Commands and Options
installation source, Kickstart Commands and Options
iscsi, Kickstart Commands and Options
iscsiname, Kickstart Commands and Options
kdump, Kickstart Commands and Options
keyboard, Kickstart Commands and Options
lang, Kickstart Commands and Options
logging, Kickstart Commands and Options
logvol, Kickstart Commands and Options
mediacheck, Kickstart Commands and Options
mount, Kickstart Commands and Options
network, Kickstart Commands and Options
network-based, Making the Installation Source Available
nvdimm, Kickstart Commands and Options
options, Kickstart Commands and Options
INDEX
487

partitioning examples, Advanced Partitioning Example
user input, User Input Example
org_fedora_oscap, Kickstart Commands and Options
package selection specification, Package Selection
part, Kickstart Commands and Options
partition, Kickstart Commands and Options
post-installation configuration, Post-installation Script
poweroff, Kickstart Commands and Options
pre-installation configuration, Pre-installation Script
pwpolicy, Kickstart Commands and Options
raid , Kickstart Commands and Options
realm, Kickstart Commands and Options
reboot, Kickstart Commands and Options
repository configuration, Kickstart Commands and Options
rescue, Kickstart Commands and Options
rootpw, Kickstart Commands and Options
selinux, Kickstart Commands and Options
services , Kickstart Commands and Options
shutdown, Kickstart Commands and Options
skipx, Kickstart Commands and Options
snapshot, Kickstart Commands and Options
sshpw, Kickstart Commands and Options
text, Kickstart Commands and Options
timezone, Kickstart Commands and Options
unsupported_hardware, Kickstart Commands and Options
user, Kickstart Commands and Options
vnc, Kickstart Commands and Options
volgroup, Kickstart Commands and Options
what it looks like, Creating a Kickstart File
xconfig, Kickstart Commands and Options
zerombr, Kickstart Commands and Options
zfcp, Kickstart Commands and Options
Kickstart installations, Kickstart Installations
file format, Creating a Kickstart File
file locations, Making the Kickstart File Available
installation source, Making the Installation Source Available
LVM, Kickstart Commands and Options
network-based, Making the Installation Source Available
starting, Starting the Kickstart Installation
kickstart installations
Installation Guide
488

validation, Verifying the Kickstart File
verification, Verifying the Kickstart File
KRDC, Installing a VNC Viewer
L
language
configuration, Welcome Screen and Language Selection, Language Support, Welcome Screen
and Language Selection, Language Support, Welcome Screen and Language Selection,
Language Support
live image
creating, Installing into a Disk Image
livemedia-creator, Installing into a Disk Image
additional packages, Installing livemedia-creator
examples, Creating Custom Images
installation, Installing livemedia-creator
Kickstart files, Sample Kickstart Files
log files, Troubleshooting livemedia-creator Problems
troubleshooting, Troubleshooting livemedia-creator Problems
usage, Creating Custom Images
log files
AMD64 and Intel 64, Troubleshooting Installation on 64-bit AMD, Intel, and ARM Systems
IBM Power Systems, Troubleshooting Installation on IBM Power Systems
IBM Z, Troubleshooting Installation on IBM Z
Kickstart installations, What are Kickstart Installations?
LVM
documentation, Other Technical Documentation
logical volume, Understanding LVM
physical volume, Understanding LVM
understanding, Understanding LVM
volume group, Understanding LVM
with Kickstart, Kickstart Commands and Options
M
master boot record, Boot Loader Installation, Boot Loader Installation
Master Boot Record, Unable to Boot into Red Hat Enterprise Linux
reinstalling, Reinstalling the Boot Loader
memory
minimum requirements, Disk Space and Memory Requirements, Disk Space and Memory
Requirements
INDEX
489

memory testing mode, Loading the Memory (RAM) Testing Mode
mount points
partitions and, Disk Partitions and Mount Points
multilib
enabling during installation, Configuring the Installation System at the Boot Menu
Multipath devices
Mixing with non-multipath devices, Installation Destination
N
Network boot installations
configuration, Configuring Network Boot Services
overview, Preparing for a Network Installation
NTP (Network Time Protocol), Date & Time, Date & Time, Date & Time
NVDIMM
hardware, RAID and Other Disk Devices
O
OpenSSH, Other Technical Documentation
(see also SSH)
P
packages
groups, Software Selection, Software Selection, Software Selection
selecting, Software Selection, Software Selection, Software Selection
installing, Software Selection, Software Selection, Software Selection
selecting, Software Selection, Software Selection, Software Selection
packaging.log
AMD64 and Intel 64, Troubleshooting Installation on 64-bit AMD, Intel, and ARM Systems
IBM Power Systems, Troubleshooting Installation on IBM Power Systems
IBM Z, Troubleshooting Installation on IBM Z
parameter files, Parameter and Configuration Files on IBM Z
installation network parameters, Installation Network Parameters
Kickstart parameters, Parameters for Kickstart Installations
required parameters, Required Parameters
sample parameter file, Sample Parameter File and CMS Configuration File
parm files (see parameter files)
Installation Guide
490

partition
extended, Partitions Within Partitions - An Overview of Extended Partitions
partitioning, Manual Partitioning, Manual Partitioning, Manual Partitioning
automatic, Installation Destination, Installation Destination, Installation Destination
basic concepts, An Introduction to Disk Partitions
creating new, Adding File Systems and Configuring Partitions, Adding File Systems and
Configuring Partitions, Adding File Systems and Configuring Partitions
file system type, File System Types, File System Types, File System Types
destructive, Using Free Space from an Active Partition
extended partitions, Partitions Within Partitions - An Overview of Extended Partitions
how many partitions, Partitions: Turning One Drive Into Many, How Many Partitions?
introduction to, Partitions: Turning One Drive Into Many
making room for partitions, Strategies for Disk Repartitioning
mount points and, Disk Partitions and Mount Points
naming partitions, Partition Naming Scheme
non-destructive, Using Free Space from an Active Partition
numbering partitions, Partition Naming Scheme
primary partitions, Partitions: Turning One Drive Into Many
recommended, Recommended Partitioning Scheme, Recommended Partitioning Scheme
types of partitions, Partitions: Turning One Drive Into Many
using free space, Using Unpartitioned Free Space
using in-use partition, Using Free Space from an Active Partition
using unused partition, Using Space from an Unused Partition
Partitioning , Manual Partitioning, Manual Partitioning, Manual Partitioning
adding partitions
file system type, File System Types, File System Types, File System Types
password
setting root, Set the Root Password, Set the Root Password, Set the Root Password
Planning for Installation
IBM Z, Pre-installation
program.log
AMD64 and Intel 64, Troubleshooting Installation on 64-bit AMD, Intel, and ARM Systems
IBM Power Systems, Troubleshooting Installation on IBM Power Systems
IBM Z, Troubleshooting Installation on IBM Z
PXE (Pre-boot eXecution Environment), Booting from the Network Using PXE
R
INDEX
491

RAID
hardware, RAID and Other Disk Devices, RAID and Other Disk Devices
Kickstart installations, Kickstart Commands and Options
software, RAID and Other Disk Devices, RAID and Other Disk Devices
trouble booting from drive attached to RAID card
AMD64 and Intel 64, Are You Unable to Boot With Your RAID Card?
registration
with Initial Setup, Subscription Manager
with Kickstart, Post-installation Script
remote installation
using VNC, Using VNC
removing
Red Hat Enterprise Linux
from IBM Z, Removing Red Hat Enterprise Linux from IBM Z
from x86_64-based systems, Removing Red Hat Enterprise Linux from 64-bit AMD, Intel,
and ARM Systems
rescue mode, Booting Your Computer in Rescue Mode
using the installation program, Anaconda Rescue Mode
root / partition
recommended partitioning, Recommended Partitioning Scheme, Recommended Partitioning
Scheme
root password, Set the Root Password, Set the Root Password, Set the Root Password
S
scp, Other Technical Documentation
(see also SSH)
selecting
packages, Software Selection, Software Selection, Software Selection
SELinux
documentation, Other Technical Documentation
SSH (Secure SHell)
documentation, Other Technical Documentation
starting
installation, Starting the Installation Program
steps
Installation Guide
492

booting with CD-ROM or DVD, Choose an Installation Boot Method, Choose an Installation
Boot Method
disk space, Disk Space and Memory Requirements, Disk Space and Memory Requirements
hardware compatibility, Is Your Hardware Compatible?, Is Your Hardware Compatible?
IBM Power Systems servers hardware preparation, Preparation for IBM Power Systems
Servers
supported hardware, Supported Installation Targets, Supported Installation Targets
storage devices
basic storage devices, Storage Devices, Storage Devices, Storage Devices
specialized storage devices, Storage Devices, Storage Devices, Storage Devices
storage.log
AMD64 and Intel 64, Troubleshooting Installation on 64-bit AMD, Intel, and ARM Systems
IBM Power Systems, Troubleshooting Installation on IBM Power Systems
IBM Z, Troubleshooting Installation on IBM Z
subscription
with Kickstart, Post-installation Script
subscription service, Unregistering from Red Hat Subscription Management Services
subscriptions
after the installation, Subscription Manager
in Initial Setup, Subscription Manager
swap partition
recommended partitioning, Recommended Partitioning Scheme, Recommended Partitioning
Scheme
syslog
AMD64 and Intel 64, Troubleshooting Installation on 64-bit AMD, Intel, and ARM Systems
IBM Power Systems, Troubleshooting Installation on IBM Power Systems
IBM Z, Troubleshooting Installation on IBM Z
system recovery, Basic System Recovery
common problems, Common Problems
hardware and software problems, Hardware and Software Problems
reinstalling the boot loader, Reinstalling the Boot Loader
sosreport, Capturing an sosreport
unable to boot into Red Hat Enterprise Linux, Unable to Boot into Red Hat Enterprise Linux
T
text mode
installation, Configuring the Installation System at the Boot Menu
INDEX
493

TigerVNC, Installing a VNC Viewer
time zone
configuration, Date & Time, Date & Time, Date & Time
traceback messages
saving traceback messages without removable media
AMD64 and Intel 64, Reporting Traceback Messages
IBM Power Systems, Reporting Traceback Messages
IBM Z, Reporting Traceback Messages
troubleshooting
after the installation
AMD64 and Intel 64, Problems After Installation
IBM Power Systems, Problems After Installation
IBM Z, Problems After Installation
AMD64 and Intel 64, Troubleshooting Installation on 64-bit AMD, Intel, and ARM Systems
beginning the installation
AMD64 and Intel 64, Trouble Beginning the Installation
IBM Power Systems, Trouble Beginning the Installation
booting
RAID cards, Are You Unable to Boot With Your RAID Card?
booting into a graphical environment
AMD64 and Intel 64, Booting into a Graphical Environment
IBM Power Systems, Booting into a Graphical Environment
booting into GNOME or KDE
AMD64 and Intel 64, Booting into a Graphical Environment
IBM Power Systems, Booting into a Graphical Environment
booting into the X Window System
AMD64 and Intel 64, Booting into a Graphical Environment
IBM Power Systems, Booting into a Graphical Environment
completing partitions
IBM Power Systems, Other Partitioning Problems for IBM Power Systems Users
Console unavailable
AMD64 and Intel 64, Serial Console Not Detected
IBM Power Systems, Serial Console Not Detected
during the installation
AMD64 and Intel 64, Trouble During the Installation
Installation Guide
494

IBM Power Systems, Trouble During the Installation
IBM Z, Trouble During the Installation
graphical boot
AMD64 and Intel 64, Trouble With the Graphical Boot Sequence
IBM Power Systems, Trouble With the Graphical Boot Sequence
graphical login
IBM Z, Remote Graphical Desktops and XDMCP
GRUB2
next_entry, The GRUB2 next_entry variable can behave unexpectedly in a virtualized
environment
GUI installation method unavailable
AMD64 and Intel 64, Problems with Booting into the Graphical Installation
IBM Power Systems, Problems with Booting into the Graphical Installation
IBM Power Systems, Troubleshooting Installation on IBM Power Systems
IBM Z, Troubleshooting Installation on IBM Z
IPL NWSSTG
IBM Power Systems, Unable to IPL from Network Storage Space (*NWSSTG)
no disks detected
AMD64 and Intel 64, No Disks Detected
IBM Power Systems, No Disks Detected
IBM Z, No Disks Detected
RAM not recognized
AMD64 and Intel 64, Is Your RAM Not Being Recognized?
remote desktop
IBM Z, Remote Graphical Desktops and XDMCP
saving traceback messages without removable media
AMD64 and Intel 64, Reporting Traceback Messages
IBM Power Systems, Reporting Traceback Messages
IBM Z, Reporting Traceback Messages
signal 11 error
AMD64 and Intel 64, Is Your System Displaying Signal 11 Errors?
IBM Power Systems, Is Your System Displaying Signal 11 Errors?
IBM Z, Is Your System Displaying Signal 11 Errors?
X (X Window System)
AMD64 and Intel 64, No Graphical User Interface Present
INDEX
495

IBM Power Systems, No Graphical User Interface Present
X server crashes
AMD64 and Intel 64, X Server Crashing After User Logs In
IBM Power Systems, X Server Crashing After User Logs In
U
UEFI (Unified Extensible Firmware Interface), Booting the Installation on 64-bit AMD, Intel, and
ARM systems
uninstalling
from IBM Z, Removing Red Hat Enterprise Linux from IBM Z
from x86_64-based systems, Removing Red Hat Enterprise Linux from 64-bit AMD, Intel, and
ARM Systems
unregister, Unregistering from Red Hat Subscription Management Services
upgrade
from Red Hat Enterprise Linux 6, Upgrading Your Current System
using Preupgrade Assistant, Upgrading Your Current System
using Red Hat Upgrade, Upgrading Your Current System
USB boot media
creating
on Linux, Making Installation USB Media on Linux
on Mac OS X, Making Installation USB Media on Mac OS X
on Windows, Making Installation USB Media on Windows
USB flash media
creating, Making Installation USB Media
downloading, Downloading Red Hat Enterprise Linux
USB media
booting, Booting the Installation on 64-bit AMD, Intel, and ARM systems, Booting the
Installation on IBM Power Systems
V
Vinagre, Installing a VNC Viewer
Virtualization
documentation, Other Technical Documentation
VNC
Connect Mode, Installing in VNC Connect Mode
Direct Mode, Installing in VNC Direct Mode
usage during installation, Using VNC
Installation Guide
496

