Linux Network Administrator's Guide ( PDFDrive.com )
User Manual:
Open the PDF directly: View PDF ![]() .
.
Page Count: 364 [warning: Documents this large are best viewed by clicking the View PDF Link!]
- Table of Contents
- Preface
- Introduction to Networking
- Issues of TCP/IP Networking
- Configuring the Serial Hardware
- Configuring TCP/IP Networking
- Understanding the /proc Filesystem
- Installing the Tools
- Setting the Hostname
- Assigning IP Addresses
- Using DHCP to Obtain an IP Address
- Creating Subnets
- Writing Hosts and Networks Files
- Interface Configuration for IP
- The Loopback Interface
- Ethernet Interfaces
- Routing Through a Gateway
- Configuring a Gateway
- The Point-to-Point Interface
- The PPP Interface
- IP Alias
- All About ifconfig
- The netstat Command
- Testing Connectivity with traceroute
- Checking the ARP Tables
- Understanding the /proc Filesystem
- Name Service and Configuration
- The Point-to-Point Protocol
- TCP/IP Firewall
- IP Accounting
- IP Masquerade and Network Address Translation
- Important Network Features
- Administration Issues with Electronic Mail
- sendmail
- Configuring IPv6 Networks
- Configuring the Apache Web Server
- IMAP
- Samba
- OpenLDAP
- Wireless Networking
- Example Network: The Virtual Brewery
- Index

LINUX
Network
Administrator’s
Guide

Other Linux resources from O’Reilly
Related titles
Apache Cookbook
DNS and BIND Cookbook
Linux Server Cookbook
Linux Server Hacks
Linux Server Security
Network Troubleshooting
Tools
Running Linux
Using Samba
Linux Books
Resource Center
linux.oreilly.com is a complete catalog of O’Reilly’s books on
Linux and Unix and related technologies, including sample
chapters and code examples.
ONLamp.com is the premier site for the open source web plat-
form: Linux, Apache, MySQL, and either Perl, Python, or PHP.
Conferences
O’Reilly brings diverse innovators together to nurture the ideas
that spark revolutionary industries. We specialize in document-
ing the latest tools and systems, translating the innovator’s
knowledge into useful skills for those in the trenches. Visit con-
ferences.oreilly.com for our upcoming events.
Safari Bookshelf (safari.oreilly.com) is the premier online refer-
ence library for programmers and IT professionals. Conduct
searches across more than 1,000 books. Subscribers can zero in
on answers to time-critical questions in a matter of seconds.
Read the books on your Bookshelf from cover to cover or sim-
ply flip to the page you need. Try it today with a free trial.

LINUX
Network
Administrator’s
Guide
THIRD EDITION
Tony Bautts, Terry Dawson,
and Gregor N. Purdy
Beijing
•
Cambridge
•
Farnham
•
Köln
•
Paris
•
Sebastopol
•
Taipei
•
Tokyo

Linux Network Administrator’s Guide, Third Edition
by Tony Bautts, Terry Dawson, and Gregor N. Purdy
Copyright © 2005 O’Reilly Media, Inc. All rights reserved.
Copyright © 1995 Olaf Kirch. Copyright © 2000 Terry Dawson. Copyright on O’Reilly printed version
© 2000 O’Reilly Media, Inc. Rights to copy the O’Reilly printed version are reserved.
Printed in the United States of America.
Published by O’Reilly Media, Inc., 1005 Gravenstein Highway North, Sebastopol, CA 95472.
O’Reilly books may be purchased for educational, business, or sales promotional use. Online editions
are also available for most titles (safari.oreilly.com). For more information, contact our corporate/insti-
tutional sales department: (800) 998-9938 or corporate@oreilly.com.
Editor:
Andy Oram
Production Editor:
Adam Witwer
Cover Designer:
Edie Freedman
Interior Designer:
David Futato
Printing History:
January 1995: First Edition.
June 2000: Second Edition.
February 2005: Third Edition.
Nutshell Handbook, the Nutshell Handbook logo, and the O’Reilly logo are registered trademarks of
O’Reilly Media, Inc. The Linux series designations, Linux Network Administrator’s Guide, Third
Edition, images of the American West, and related trade dress are trademarks of O’Reilly Media, Inc.
Many of the designations used by manufacturers and sellers to distinguish their products are claimed as
trademarks. Where those designations appear in this book, and O’Reilly Media, Inc. was aware of a
trademark claim, the designations have been printed in caps or initial caps.
While every precaution has been taken in the preparation of this book, the publisher and authors
assume no responsibility for errors or omissions, or for damages resulting from the use of the
information contained herein.
This work is licensed under the Creative Commons Attribution-NonCommercial-ShareAlike 2.0
License. To view a copy of this license, visit http://creativecommons.org/licenses/by-sa/2.0/ or send a
letter to Creative Commons, 559 Nathan Abbott Way, Stanford, California 94305, USA.
This book uses RepKover™
, a durable and flexible lay-flat binding.
ISBN: 0-596-00548-2
[M] [5/05]

v
Table of Contents
Preface
. . . . . . . . . . . . . . . . . . . . . . . . . . . . . . . . . . . . . . . . . . . . . . . . . . . . . . . . . . . . . . . . .
ix
1. Introduction to Networking
. . . . . . . . . . . . . . . . . . . . . . . . . . . . . . . . . . . . . . . . . .
1
History 1
TCP/IP Networks 2
Linux Networking 11
Maintaining Your System 13
2. Issues of TCP/IP Networking
. . . . . . . . . . . . . . . . . . . . . . . . . . . . . . . . . . . . . . . .
16
Networking Interfaces 16
IP Addresses 17
The Internet Control Message Protocol 26
3. Configuring the Serial Hardware
. . . . . . . . . . . . . . . . . . . . . . . . . . . . . . . . . . . . .
29
Communications Software for Modem Links 29
Accessing Serial Devices 30
Using the Configuration Utilities 34
Serial Devices and the login: Prompt 38
4. Configuring TCP/IP Networking
. . . . . . . . . . . . . . . . . . . . . . . . . . . . . . . . . . . . . .
42
Understanding the /proc Filesystem 43
5. Name Service and Configuration
. . . . . . . . . . . . . . . . . . . . . . . . . . . . . . . . . . . . .
66
The Resolver Library 67
How DNS Works 71
Alternatives to BIND 92

vi | Table of Contents
6. The Point-to-Point Protocol
. . . . . . . . . . . . . . . . . . . . . . . . . . . . . . . . . . . . . . . . .
96
PPP on Linux 97
Running pppd 98
Using Options Files 99
Using chat to Automate Dialing 100
IP Configuration Options 102
Link Control Options 105
General Security Considerations 107
Authentication with PPP 108
Debugging Your PPP Setup 112
More Advanced PPP Configurations 112
PPPoE Options in Linux 116
7. TCP/IP Firewall
. . . . . . . . . . . . . . . . . . . . . . . . . . . . . . . . . . . . . . . . . . . . . . . . . . .
119
Methods of Attack 120
What Is a Firewall? 122
What Is IP Filtering? 124
Netfilter and iptables 125
iptables Concepts 127
Setting Up Linux for Firewalling 133
Using iptables 134
The iptables Subcommands 136
Basic iptables Matches 137
A Sample Firewall Configuration 141
References 144
8. IP Accounting
. . . . . . . . . . . . . . . . . . . . . . . . . . . . . . . . . . . . . . . . . . . . . . . . . . . .
146
Configuring the Kernel for IP Accounting 146
Configuring IP Accounting 146
Using IP Accounting Results 151
Resetting the Counters 151
Flushing the Rule Set 152
Passive Collection of Accounting Data 152
9. IP Masquerade and Network Address Translation
. . . . . . . . . . . . . . . . . . . . .
154
Side Effects and Fringe Benefits 156
Configuring the Kernel for IP Masquerade 157
Configuring IP Masquerade 157
Handling Nameserver Lookups 158
More About Network Address Translation 159

Table of Contents | vii
10. Important Network Features
. . . . . . . . . . . . . . . . . . . . . . . . . . . . . . . . . . . . . . .
160
The inetd Super Server 160
The tcpd Access Control Facility 163
The xinetd Alternative 164
The Services and Protocols Files 167
Remote Procedure Call 169
Configuring Remote Login and Execution 170
11. Administration Issues with Electronic Mail
. . . . . . . . . . . . . . . . . . . . . . . . . . .
179
What Is a Mail Message? 180
How Is Mail Delivered? 182
Email Addresses 183
How Does Mail Routing Work? 184
Mail Routing on the Internet 184
12. sendmail
. . . . . . . . . . . . . . . . . . . . . . . . . . . . . . . . . . . . . . . . . . . . . . . . . . . . . . . .
186
Installing the sendmail Distribution 186
sendmail Configuration Files 192
sendmail.cf Configuration Language 198
Creating a sendmail Configuration 203
sendmail Databases 210
Testing Your Configuration 222
Running sendmail 227
Tips and Tricks 228
More Information 231
13. Configuring IPv6 Networks
. . . . . . . . . . . . . . . . . . . . . . . . . . . . . . . . . . . . . . . .
233
The IPv4 Problem and Patchwork Solutions 234
IPv6 as a Solution 235
14. Configuring the Apache Web Server
. . . . . . . . . . . . . . . . . . . . . . . . . . . . . . . . .
244
Apache HTTPD Server—An Introduction 244
Configuring and Building Apache 244
Configuration File Options 247
VirtualHost Configuration Options 250
Apache and OpenSSL 252
Troubleshooting 256

viii | Table of Contents
15. IMAP
. . . . . . . . . . . . . . . . . . . . . . . . . . . . . . . . . . . . . . . . . . . . . . . . . . . . . . . . . . . .
258
IMAP—An Introduction 258
Cyrus IMAP 263
16. Samba
. . . . . . . . . . . . . . . . . . . . . . . . . . . . . . . . . . . . . . . . . . . . . . . . . . . . . . . . . .
266
Samba—An Introduction 266
17. OpenLDAP
. . . . . . . . . . . . . . . . . . . . . . . . . . . . . . . . . . . . . . . . . . . . . . . . . . . . . . .
278
Understanding LDAP 278
Obtaining OpenLDAP 280
18. Wireless Networking
. . . . . . . . . . . . . . . . . . . . . . . . . . . . . . . . . . . . . . . . . . . . . .
294
History 294
The Standards 295
802.11b Security Concerns 296
Appendix: Example Network: The Virtual Brewery
. . . . . . . . . . . . . . . . . . . . . . . . . .
309
Index
. . . . . . . . . . . . . . . . . . . . . . . . . . . . . . . . . . . . . . . . . . . . . . . . . . . . . . . . . . . . . . . . .
311

This is the Title of the Book, eMatter Edition
Copyright © 2007 O’Reilly & Associates, Inc. All rights reserved.
ix
Preface
The Internet is now a household term in many countries and has become a part of
life for most of the business world. With millions of people connecting to the World
Wide Web, computer networking has moved to the status of TV sets and microwave
ovens. You can purchase and install a wireless hub with just about an equal amount
of effort. The Internet has unusually high media coverage, with weblogs often
“scooping” traditional media outlets for news stories, while virtual reality environ-
ments such as online games and the rest have developed into the “Internet culture.”
Of course, networking has been around for a long time. Connecting computers to
form local area networks has been common practice, even at small installations, and
so have long-haul links using transmission lines provided by telecommunications
companies. A rapidly growing conglomerate of worldwide networks has, however,
made joining the global village a perfectly reasonable option for nearly everyone with
access to a computer. Setting up a broadband Internet host with fast mail and web
access is becoming more and more affordable.
Talking about computer networks often means talking about Unix. Of course, Unix
is not the only operating system with network capabilities, nor will it remain a
frontrunner forever, but it has been in the networking business for a long time and
will surely continue to be for some time to come. What makes Unix particularly
interesting to private users is that there has been much activity to bring free Unix-like
operating systems to the PC, such as NetBSD, FreeBSD, and Linux.
Linux is a freely distributable Unix clone for personal computers that currently runs
on a variety of machines that includes the Intel family of processors, but also Pow-
erPC architectures such as the Apple Macintosh; it can also run on Sun SPARC and
Ultra-SPARC machines; Compaq Alphas; MIPS; and even a number of video game
consoles, such as the Sony PlayStation 2, the Nintendo Gamecube, and the Microsoft
Xbox. Linux has also been ported to some relatively obscure platforms, such as the
Fujitsu AP-1000 and the IBM System 3/90. Ports to other interesting architectures
are currently in progress in developers’ labs, and the quest to move Linux into the
embedded controller space promises success.

This is the Title of the Book, eMatter Edition
Copyright © 2007 O’Reilly & Associates, Inc. All rights reserved.
x|Preface
Linux was developed by a large team of volunteers across the Internet. The project
was started in 1990 by Linus Torvalds, a Finnish college student, as an operating sys-
tems course project. Since that time, Linux has snowballed into a full-featured Unix
clone capable of running applications as diverse as simulation and modeling pro-
grams, word processors, speech-recognition systems, World Wide Web browsers,
and a horde of other software, including a variety of excellent games. A great deal of
hardware is supported, and Linux contains a complete implementation of TCP/IP
networking, including PPP, firewalls, and many features and protocols not found in
any other operating system. Linux is powerful, fast, and free, and its popularity in
the world beyond the Internet is growing rapidly.
The Linux operating system itself is covered by the GNU General Public License, the
same copyright license used by software developed by the Free Software Founda-
tion. This license allows anyone to redistribute or modify the software (free of charge
or for a profit) as long as all modifications and distributions are freely distributable
as well. The term “free software” refers to freedom of application, not freedom of
cost.
Purpose and Audience for This Book
This book was written to provide a single reference for network administration in a
Linux environment. Beginners and experienced users alike should find the informa-
tion they need to cover nearly all important administration activities required to
manage a Linux network configuration. The possible range of topics to cover is
nearly limitless, so of course it has been impossible to include everything there is to
say on all subjects. We’ve tried to cover the most important and common ones.
Beginners to Linux networking, even those with no prior exposure to Unix-like oper-
ating systems, have found earlier editions of this book good enough to help them
successfully get their Linux network configurations up and running and get them
ready to learn more.
There are many books and other sources of information from which you can learn
any of the topics covered in this book in greater depth. We’ve provided a bibliogra-
phy when you are ready to explore more.
Sources of Information
If you are new to the world of Linux, there are a number of resources to explore and
become familiar with. Having access to the Internet is helpful, but not essential.

This is the Title of the Book, eMatter Edition
Copyright © 2007 O’Reilly & Associates, Inc. All rights reserved.
Preface |xi
Linux Documentation Project Guides
The Linux Documentation Project is a group of volunteers who have worked to pro-
duce books (guides), HOWTO documents, and manpages on topics ranging from
installation to kernel programming.
Books
Linux Installation and Getting Started
By Matt Welsh, et al. This book describes how to obtain, install, and use Linux.
It includes an introductory Unix tutorial and information on systems administra-
tion, the X Window System, and networking.
Linux System Administrators Guide
By Lars Wirzenius and Joanna Oja. This book is a guide to general Linux system
administration and covers topics such as creating and configuring users, per-
forming system backups, configuring of major software packages, and installing
and upgrading software.
Linux System Adminstration Made Easy
By Steve Frampton. This book describes day-to-day administration and mainte-
nance issues of relevance to Linux users.
Linux Programmers Guide
By B. Scott Burkett, Sven Goldt, John D. Harper, Sven van der Meer, and Matt
Welsh. This book covers topics of interest to people who wish to develop appli-
cation software for Linux.
The Linux Kernel
By David A. Rusling. This book provides an introduction to the Linux kernel,
how it is constructed, and how it works. Take a tour of your kernel.
The Linux Kernel Module Programming Guide
By Ori Pomerantz. This guide explains how to write Linux kernel modules. This
book also originated in the LDP. The text of the current version is released under
the Creative Commons Attribution-Share Alike License, so it can be freely
altered and distributed.
More manuals are in development. For more information about the LDP, consult
their server at http://www.linuxdoc.org/ or one of its many mirrors.
HOWTO documents
The Linux HOWTOs are a comprehensive series of papers detailing various aspects
of the system—such as how to install and configure the X Window System software,
or write in assembly language programming under Linux. These are available online
at one of the many Linux Documentation Project mirror sites (see next section). See
the file HOWTO-INDEX for a list of what’s available.

This is the Title of the Book, eMatter Edition
Copyright © 2007 O’Reilly & Associates, Inc. All rights reserved.
xii |Preface
You might want to obtain the Installation HOWTO, which describes how to install
Linux on your system; the Hardware Compatibility HOWTO, which contains a list of
hardware known to work with Linux; and the Distribution HOWTO, which lists
software vendors selling Linux on diskette and CD-ROM.
Linux Frequently Asked Questions
The Linux Frequently Asked Questions with Answers (FAQ) contains a wide assort-
ment of questions and answers about the system. It is a must-read for all newcomers.
Documentation Available via WWW
There are many Linux-based WWW sites available. The home site for the Linux
Documentation Project can be accessed at http://www.tldp.org/.
Any additional information can probably be found with a quick Google search. It
seems that almost everything has been tried and likely written up by someone in the
Linux community.
Documentation Available Commercially
A number of publishing companies and software vendors publish the works of the
Linux Documentation Project. Two such vendors are Specialized Systems Consult-
ants, Inc. (SSC) (http://www.ssc.com) and Linux Systems Labs (http://www.lsl.com).
Both companies sell compendiums of Linux HOWTO documents and other Linux
documentation in printed and bound form.
O’Reilly Media publishes a series of Linux books. This one is a work of the Linux
Documentation Project, but most have been authored independently:
Running Linux
An installation and user guide to the system describing how to get the most out
of personal computing with Linux.
Linux Server Security
An excellent guide to configuring airtight Linux servers. Administrators who are
building web servers or other bastion hosts should consider this book a great
source of information.
Linux in a Nutshell
Another in the successful “in a Nutshell” series, this book focuses on providing a
broad reference text for Linux.
Linux iptables Pocket Reference
A brief but complete compendium of features in the Linux firewall system.

This is the Title of the Book, eMatter Edition
Copyright © 2007 O’Reilly & Associates, Inc. All rights reserved.
Preface |xiii
Linux Journal and Linux Magazine
Linux Journal and Linux Magazine are monthly magazines for the Linux commu-
nity, written and published by a number of Linux activists. They contain articles
ranging from novice questions and answers to kernel programming internals. Even if
you have Usenet access, these magazines are a good way to stay in touch with the
Linux community.
Linux Journal is the oldest magazine and is published by SSC, for which details were
listed in the previous section. You can also find the magazine at http://www.
linuxjournal.com/.
LinuxMagazine is a newer, independent publication. The home web site for the mag-
azine is http://www.linuxmagazine.com/.
Linux Usenet Newsgroups
If you have access to Usenet news, the following Linux-related newsgroups are avail-
able:
comp.os.linux.announce
A moderated newsgroup containing announcements of new software, distribu-
tions, bug reports, and goings-on in the Linux community. All Linux users
should read this group.
comp.os.linux.help
General questions and answers about installing or using Linux.
comp.os.linux.admin
Discussions relating to systems administration under Linux.
comp.os.linux.networking
Discussions relating to networking with Linux.
comp.os.linux.development
Discussions about developing the Linux kernel and system itself.
comp.os.linux.misc
A catch-all newsgroup for miscellaneous discussions that don’t fall under the
previous categories.
There are also several newsgroups devoted to Linux in languages other than English,
such as fr.comp.os.linux in French and de.comp.os.linux in German.
Linux Mailing Lists
There are a large number of specialist Linux mailing lists on which you will find
many people willing to help with your questions.

This is the Title of the Book, eMatter Edition
Copyright © 2007 O’Reilly & Associates, Inc. All rights reserved.
xiv |Preface
The best-known of these is the Linux Kernel Mailing List. It’s a very busy and dense
mailing list, with an enormous volume of information posted daily. For more infor-
mation, visit http://www.tux.org/lkml.
Linux User Groups
Many Linux User Groups around the world offer direct support to users, engaging in
activities such as installation days, talks and seminars, demonstration nights, and
other social events. Linux User Groups are a great way to meet other Linux users in
your area. There are a number of published lists of Linux User Groups. One of the
most comprehensive is Linux Users Groups Worldwide (http://lugww.counter.li.org/
index.cms).
Obtaining Linux
There is no single distribution of the Linux software; instead, there are many distri-
butions, such as Debian, Fedora, Red Hat, SUSE, Gentoo, and Slackware. Each dis-
tribution contains everything you need to run a complete Linux system: the kernel,
basic utilities, libraries, support files, and applications software.
Linux distributions may be obtained via a number of online sources, such as the
Internet. Each of the major distributions has its own FTP and web site. Some of these
sites are as follows:
Debian
http://www.debian.org/
Gentoo
http://www.gentoo.org/
Red Hat
http://www.redhat.com/
Fedora
http://fedora.redhat.com/
Slackware
http://www.slackware.com/
SUSE
http://www.suse.com/
Many of the popular general WWW archive sites also mirror various Linux distribu-
tions. The best-known of these sites is http://www.linuxiso.org.
Every major distribution can be downloaded directly from the Internet, but Linux
may be purchased on CD-ROM from an increasing number of software vendors. If
your local computer store doesn’t have it, perhaps you should ask them to stock it!
Most of the popular distributions can be obtained on CD-ROM. Some vendors

This is the Title of the Book, eMatter Edition
Copyright © 2007 O’Reilly & Associates, Inc. All rights reserved.
Preface |xv
produce products containing multiple CD-ROMs, each of which provides a different
Linux distribution. This is an ideal way to try a number of different distributions
before settling on your favorite.
Filesystem Standards
In the past, one of the problems that afflicted Linux distributions, as well as the
packages of software running on Linux, was the lack of a single accepted filesystem
layout. This resulted in incompatibilities between different packages, and con-
fronted users and administrators with the task of locating various files and programs.
To improve this situation, in August 1993, several people formed the Linux File Sys-
tem Standard Group (FSSTND). After six months of discussion, the group created a
draft that presents a coherent filesystem structure and defines the location of the
most essential programs and configuration files.
This standard was supposed to have been implemented by most major Linux distri-
butions and packages. It is a little unfortunate that, while most distributions have
made some attempt to work toward the FSSTND, there is a very small number of
distributions that has actually adopted it fully. Throughout this book, we will
assume that any files discussed reside in the location specified by the standard; alter-
native locations will be mentioned only when there is a long tradition that conflicts
with this specification.
The Linux FSSTND continued to develop, but was replaced by the Linux File Hierar-
chy Standard (FHS) in 1997. The FHS addresses the multi-architecture issues that
the FSSTND did not. The FHS can be obtained from http://www.freestandards.org.
Standard Linux Base
The vast number of different Linux distributions, while providing lots of healthy
choices for Linux users, has created a problem for software developers—particularly
developers of non-free software.
Each distribution packages and supplies certain base libraries, configuration tools,
system applications, and configuration files. Unfortunately, differences in their ver-
sions, names, and locations make it very difficult to know what will exist on any dis-
tribution. This makes it hard to develop binary applications that will work reliably
on all Linux distribution bases.
To help overcome this problem, a new project sprang up called the Linux Standard
Base. It aims to describe a standard base distribution that complying distributions
will use. If a developer designs an application to work with the standard base plat-
form, the application will work with, and be portable to, any complying Linux distri-
bution.

This is the Title of the Book, eMatter Edition
Copyright © 2007 O’Reilly & Associates, Inc. All rights reserved.
xvi |Preface
You can find information on the status of the Linux Standard Base project at its
home web site at http://www.linuxbase.org/.
If you’re concerned about interoperability, particularly of software from commercial
vendors, you should ensure that your Linux distribution is making an effort to par-
ticipate in the standardization project.
About This Book
When Olaf Kirche joined the LDP in 1992, he wrote two small chapters on UUCP
and smail, which he meant to contribute to the System Administrator’s Guide.
Development of TCP/IP networking was just beginning, and when those “small
chapters” started to grow, he wondered aloud whether it would be nice to have a
Networking Guide. “Great!” everyone said. “Go for it!” So he went for it and wrote
the first version of the Networking Guide, which was released in September 1993.
Olaf continued work on the Networking Guide and eventually produced a much
enhanced version of the guide. Vince Skahan contributed the original sendmail mail
chapter, which was completely replaced in that edition because of a new interface to
the sendmail configuration.
In March of 2000, Terry Dawson updated Olaf’s original, adding several new chap-
ters and bringing it into the new millennium.
The version of the guide that you are reading now is a fairly large revision and update
prompted by O’Reilly Media and undertaken by Tony Bautts. Tony has been enthu-
siastic Linux user and information security consultant for longer than he would care
to admit. He is coauthor of several other computer security-related books and likes
to give talks on the subject as well. Tony is a big proponent of Linux in the commer-
cial environment and routinely attempts to convert people to Gentoo Linux. For this
edition he has added a few new chapters describing features of Linux networking
that have been developed since the second edition, plus a bunch of changes to bring
the rest of the book up to date.
The three iptables chapters (Chapters 7, 8, and 9) were updated by Gregor Purdy for
this edition.
The book is organized roughly along the sequence of steps that you have to take to
configure your system for networking. It starts by discussing basic concepts of net-
works, and TCP/IP-based networks in particular. It then slowly works its way up
from configuring TCP/IP at the device level to firewall, accounting, and masquerade
configuration, to the setup of common applications such as SSH, Apache, and
Samba. The email part features an introduction to the more intimate parts of mail
transport and routing and the myriad of addressing schemes that you may be con-
fronted with. It describes the configuration and management of sendmail, the most
common mail transport agent, and IMAP, used for delivery to individual mail users.

This is the Title of the Book, eMatter Edition
Copyright © 2007 O’Reilly & Associates, Inc. All rights reserved.
Preface |xvii
Chapters on LDAP and wireless networking round out the infrastructure for modern
network administration.
Of course, a book can never exhaustively answer all questions you might have. So if
you follow the instructions in this book and something still does not work, please be
patient. Some of your problems may be due to mistakes on our part (see “How to
Contact Us,” later in this Preface), but they also may be caused by changes in the
networking software. Therefore, you should check the listed information resources
first. There’s a good chance that you are not alone with your problems, so a fix or at
least a proposed workaround is likely to be known—this is where search engines are
particularly handy! If you have the opportunity, you should also try to get the latest
kernel and network release from http://www.kernel.org. Many problems are caused
by software from different stages of development, which fail to work together prop-
erly. After all, Linux is a “work in progress.”
The Official Printed Version
In Autumn 1993, Andy Oram, who had been around the LDP mailing list from
almost the very beginning, asked Olaf about publishing this book at O’Reilly &
Associates. He was excited about this book, but never imagined that it would
become as successful as it has. He and Andy finally agreed that O’Reilly would pro-
duce an enhanced Official Printed Version of the Networking Guide, while Olaf
retained the original copyright so that the source of the book could be freely distrib-
uted. This means that you can choose freely: you can get the various free forms of the
document from your nearest LDP mirror site and print it out, or you can purchase
the official printed version from O’Reilly.
Why, then, would you want to pay money for something you can get for free? Is Tim
O’Reilly out of his mind for publishing something everyone can print and even sell
themselves?* Is there any difference between these versions?
The answers are “It depends,” “No, definitely not,” and “Yes and no.” O’Reilly
Media does take a risk in publishing the Network Administrator’s Guide, but it
seems to have paid off for them (since they’ve asked us to do it two more times). We
believe this project serves as a fine example of how the free software world and com-
panies can cooperate to produce something both can benefit from. In our view, the
great service O’Reilly provides the Linux community (apart from the book becoming
readily available in your local bookstore) is that it has helped Linux become recog-
nized as something to be taken seriously: a viable and useful alternative to other
commercial operating systems. It’s a sad technical bookstore that doesn’t have at
least one shelf stacked with O’Reilly Linux books.
* Note that while you are allowed to print out the online version, you may not run the O’Reilly book through
a photocopier, much less sell any of its (hypothetical) copies.

This is the Title of the Book, eMatter Edition
Copyright © 2007 O’Reilly & Associates, Inc. All rights reserved.
xviii |Preface
Why are they publishing it? They see it as their kind of book. It’s what they would
hope to produce if they contracted with an author to write about Linux. The pace,
level of detail, and style fit in well with their other offerings.
The point of the LDP license is to make sure no one gets shut out. Other people can
print out copies of this book, and no one will blame you if you get one of these cop-
ies. But if you haven’t gotten a chance to see the O’Reilly version, try to get to a
bookstore or look at a friend’s copy. We think you’ll like what you see and will want
to buy it for yourself.
So what about the differences between the printed and online versions? Andy Oram
has made great efforts at transforming our ramblings into something actually worth
printing. (He has also reviewed a few other books produced by the LDP, contribut-
ing whatever professional skills he can to the Linux community.)
Since Andy started reviewing the Networking Guide and editing the copies sent to
him, the book has improved vastly from its original form, and with every round of
submission and feedback, it improves again. The opportunity to take advantage of a
professional editor’s skill is not to be wasted. In many ways, Andy’s contribution has
been as important as that of the authors. The same is also true of the production
staff, who got the book into the shape that you see now. All these edits have been fed
back into the online version, so there is no difference in content.
Still, the O’Reilly version will be different. It will be professionally bound, and while
you may go to the trouble to print the free version, it is unlikely that you will get the
same quality result. Secondly, our amateurish attempts at illustration will have been
replaced with nicely redone figures by O’Reilly’s professional artists. Indexers have
generated an improved index, which makes locating information in the book a much
simpler process. If this book is something you intend to read from start to finish, you
should consider reading the official printed version.
Overview
Chapter 1, Introduction to Networking, discusses the history of Linux and covers
basic networking information on UUCP, TCP/IP, various protocols, hardware, and
security. The next few chapters deal with configuring Linux for TCP/IP networking
and running some major applications.
Chapter 2, Issues of TCP/IP Networking, examines IP a little more closely before we
get our hands dirty with file editing and the like. If you already know how IP routing
works and how address resolution is performed, you can skip this chapter.
Chapter 3, Configuring the Serial Hardware, deals with the configuration of your
serial ports.
Chapter 4, Configuring TCP/IP Networking, helps you set up your machine for TCP/
IP networking. It contains installation hints for standalone hosts and those

This is the Title of the Book, eMatter Edition
Copyright © 2007 O’Reilly & Associates, Inc. All rights reserved.
Preface |xix
connected to a network. It also introduces you to a few useful tools you can use to
test and debug your setup.
Chapter 5, Name Service and Configuration, discusses how to configure hostname
resolution and explains how to set up a name server.
Chapter 6, The Point-to-Point Protocol, covers PPP and pppd, the PPP daemon.
Chapter 7, TCP/IP Firewall, extends our discussion on network security and
describes the Linux TCP/IP firewall iptables. IP firewalling provides a means of very
precisely controlling who can access your network and hosts.
Chapter 8, IP Accounting, explains how to configure IP Accounting in Linux so that
you can keep track of how much traffic is going where and who is generating it.
Chapter 9, IP Masquerade and Network Address Translation, covers a feature of the
Linux networking software called IP masquerade, or NAT, which allows whole IP
networks to connect to and use the Internet through a single IP address, hiding inter-
nal systems from outsiders in the process.
Chapter 10, Important Network Features, gives a short introduction to setting up
some of the most important network infrastructure and applications, such as SSH.
This chapter also covers how services are managed by the inetd superuser and how
you may restrict certain security-relevant services to a set of trusted hosts.
Chapter 11, Administration Issues with Electronic Mail, introduces you to the central
concepts of electronic mail, such as what a mail address looks like and how the mail
handling system manages to get your message to the recipient.
Chapter 12, sendmail, covers the configuration of sendmail, a mail transport agent
that you can use for Linux.
Chapter 13, Configuring IPv6 Networks, covers new ground by explaining how to
configure IPv6 and connect to the IPv6 backbone.
Chapter 14, Configuring the Apache Web Server, describes the steps necessary to
build an Apache web server and host basic web services.
Chapter 15, IMAP, explains the steps necessary to configure an IMAP mail server,
and discusses its advantages over the traditional POP mail solution.
Chapter 16, Samba, helps you understand how to configure your Linux server to
play nicely in the Windows networking world—so nicely, in fact, that your Win-
dows users might not be able to tell the difference.*
Chapter 17, OpenLDAP, introduces OpenLDAP and discusses the configuration and
potential uses of this service
Chapter 18, Wireless Networking, finally, details the steps required to configure wire-
less networking and build a Wireless Access Point on a Linux server.
* The obvious joke here is left to the reader.

This is the Title of the Book, eMatter Edition
Copyright © 2007 O’Reilly & Associates, Inc. All rights reserved.
xx |Preface
Conventions Used in This Book
All examples presented in this book assume that you are using an sh-compatible
shell. The bash shell is sh compatible and is the standard shell of all Linux distribu-
tions. If you happen to be a csh user, you will have to make appropriate adjustments.
The following is a list of the typographical conventions used in this book:
Italic
Used for file and directory names, program and command names, email
addresses and pathnames, URLs, and for emphasizing new terms.
Boldface
Used for machine names, hostnames, site names, and for occasional emphasis.
Constant Width
Used in examples to show the contents of code files or the output from com-
mands and to indicate environment variables and keywords that appear in code.
Constant Width Italic
Used to indicate variable options, keywords, or text that the user is to replace
with an actual value.
Constant Width Bold
Used in examples to show commands or other text that should be typed literally
by the user.
Indicates a tip, suggestion, or general note.
Text appearing in this manner offers a warning. You can make a mis-
take here that hurts your system or is hard to recover from.
Safari Enabled
When you see a Safari® Enabled icon on the cover of your favorite tech-
nology book, that means the book is available online through the
O’Reilly Network Safari Bookshelf.
Safari offers a solution that’s better than e-books. It’s a virtual library that lets you
easily search thousands of top tech books, cut and paste code samples, download
chapters, and find quick answers when you need the most accurate, current informa-
tion. Try it for free at http://safari.oreilly.com.

This is the Title of the Book, eMatter Edition
Copyright © 2007 O’Reilly & Associates, Inc. All rights reserved.
Preface |xxi
How to Contact Us
We have tested and verified the information in this book to the best of our ability,
but you may find that features have changed (or even that we have made mistakes!).
Please let us know about any errors you find, as well as your suggestions for future
editions, by writing to:
O’Reilly Media, Inc.
1005 Gravenstein Highway North
Sebastopol, CA 95472
(800) 998-9938 (in the United States or Canada)
(707) 829-0515 (international or local)
(707) 829-0104 (fax)
You can send us messages electronically. To be put on the mailing list or request a
catalog, send email to:
info@oreilly.com
To ask technical questions or comment on the book, send email to:
bookquestions@oreilly.com
We have a web site for the book, where we’ll list examples, errata, and any plans for
future editions. You can access this page at:
http://www.oreilly.com/catalog/linag3
For more information about this book and others, see the O’Reilly web site:
http://www.oreilly.com
Acknowledgments
This edition of the Networking Guide owes much to the outstanding work of Olaf,
Vince, and Terry. It is difficult to appreciate the effort that goes into researching and
writing a book of this nature until you’ve had a chance to work on one yourself.
Updating the book was a challenging task, but with an excellent base to work from,
it was an enjoyable one.
This book owes very much to the numerous people who took the time to proofread
it and help iron out many mistakes. Phil Hughes, John Macdonald, and Kenneth
Geisshirt all provided very helpful (and on the whole, quite consistent) feedback on
the content of the third edition of this book. Andres Sepúlveda, Wolfgang Michaelis,
and Michael K. Johnson offered invaluable help on the second edition. Finally, the
book would not have been possible without the support of Holger Grothe, who pro-
vided Olaf with the Internet connectivity he needed to make the original version hap-
pen.

This is the Title of the Book, eMatter Edition
Copyright © 2007 O’Reilly & Associates, Inc. All rights reserved.
xxii |Preface
Terry thanks his wife, Maggie, who patiently supported him throughout his partici-
pation in the project despite the challenges presented by the birth of their first child,
Jack. Additionally, he thanks the many people of the Linux community who either
nurtured or suffered him to the point at which he could actually take part and
actively contribute. “I’ll help you if you promise to help someone else in return.”
Tony would like to thank Linux gurus Dan Ginsberg and Nicolas Lidzborski for their
support and technical expertise in proofreading the new chapters. Additionally, he
thanks Katherine for her input with each chapter, when all she really wanted to do
was check her email. Thanks to Mick Bauer for getting me involved with this project
and supporting me along the way. Finally, many thanks to the countless Linux users
who have very helpfully documented their perils in getting things to work, not to
mention the countless others who respond on a daily basis to questions posted on
the mailing lists. Without this kind of community support, Linux would be nowhere.

This is the Title of the Book, eMatter Edition
Copyright © 2007 O’Reilly & Associates, Inc. All rights reserved.
1
Chapter 1
CHAPTER 1
Introduction to
Networking
History
The idea of networking is probably as old as telecommunications itself. Consider
people living in the Stone Age, when drums may have been used to transmit mes-
sages between individuals. Suppose caveman A wants to invite caveman B over for a
game of hurling rocks at each other, but they live too far apart for B to hear A bang-
ing his drum. What are A’s options? He could 1) walk over to B’s place, 2) get a big-
ger drum, or 3) ask C, who lives halfway between them, to forward the message. The
last option is called networking.
Of course, we have come a long way from the primitive pursuits and devices of our
forebears. Nowadays, we have computers talk to each other over vast assemblages of
wires, fiber optics, microwaves, and the like, to make an appointment for Saturday’s
soccer match.*In the following description, we will deal with the means and ways by
which this is accomplished, but leave out the wires, as well as the soccer part.
We define a network as a collection of hosts that are able to communicate with each
other, often by relying on the services of a number of dedicated hosts that relay data
between the participants. Hosts are often computers, but need not be; one can also
think of X terminals or intelligent printers as hosts. A collection of hosts is also called
asite.
Communication is impossible without some sort of language or code. In computer
networks, these languages are collectively referred to as protocols. However, you
shouldn’t think of written protocols here, but rather of the highly formalized code of
behavior observed when heads of state meet, for instance. In a very similar fashion,
the protocols used in computer networks are nothing but very strict rules for the
exchange of messages between two or more hosts.
* The original spirit of which (see above) still shows on some occasions in Europe.

This is the Title of the Book, eMatter Edition
Copyright © 2007 O’Reilly & Associates, Inc. All rights reserved.
2|Chapter 1: Introduction to Networking
TCP/IP Networks
Modern networking applications require a sophisticated approach to carry data from
one machine to another. If you are managing a Linux machine that has many users,
each of whom may wish to simultaneously connect to remote hosts on a network,
you need a way of allowing them to share your network connection without interfer-
ing with each other. The approach that a large number of modern networking proto-
cols use is called packet switching. A packet is a small chunk of data that is
transferred from one machine to another across the network. The switching occurs
as the datagram is carried across each link in the network. A packet-switched net-
work shares a single network link among many users by alternately sending packets
from one user to another across that link.
The solution that Unix systems, and subsequently many non-Unix systems, have
adopted is known as TCP/IP. When learning about TCP/IP networks, you will hear
the term datagram, which technically has a special meaning but is often used inter-
changeably with packet. In this section, we will have a look at underlying concepts of
the TCP/IP protocols.
Introduction to TCP/IP Networks
TCP/IP traces its origins to a research project funded by the United States Defense
Advanced Research Projects Agency (DARPA) in 1969. The ARPANET was an
experimental network that was converted into an operational one in 1975 after it had
proven to be a success.
In 1983, the new protocol suite TCP/IP was adopted as a standard, and all hosts on
the network were required to use it. When ARPANET finally grew into the Internet
(with ARPANET itself passing out of existence in 1990), the use of TCP/IP had
spread to networks beyond the Internet itself. Many companies have now built cor-
porate TCP/IP networks, and the Internet has become a mainstream consumer tech-
nology. It is difficult to read a newspaper or magazine now without seeing references
to the Internet; almost everyone can use it now.
For something concrete to look at as we discuss TCP/IP throughout the following
sections, we will consider Groucho Marx University (GMU), situated somewhere in
Freedonia, as an example. Most departments run their own Local Area Networks,
while some share one and others run several of them. They are all interconnected
and hooked to the Internet through a single high-speed link.
Suppose your Linux box is connected to a LAN of Unix hosts at the mathematics
department, and its name is erdos. To access a host at the physics department, say
quark, you enter the following command:
$ ssh quark.school.edu
Enter password:
Last login: Wed Dec 3 18:21:25 2003 from 10.10.0.1
quark$

This is the Title of the Book, eMatter Edition
Copyright © 2007 O’Reilly & Associates, Inc. All rights reserved.
TCP/IP Networks |3
At the prompt, you enter your password. You are then given a shell*on quark,to
which you can type as if you were sitting at the system’s console. After you exit the
shell, you are returned to your own machine’s prompt. You have just used one of the
instantaneous, interactive applications that uses TCP/IP: secure shell.
While being logged into quark, you might also want to run a graphical user interface
application, like a word processing program, a graphics drawing program, or even a
World Wide Web browser. The X Windows System is a fully network-aware graphi-
cal user environment, and it is available for many different computing systems. To
tell this application that you want to have its windows displayed on your host’s
screen, you will need to make sure that you’re SSH server and client are capable of
tunneling X. To do this, you can check the sshd_config file on the system, which
should contain a line like this:
X11Forwarding yes
If you now start your application, it will tunnel your X Window System applications
so that they will be displayed on your X server instead of quark’s. Of course, this
requires that you have X11 runnning on erdos. The point here is that TCP/IP allows
quark and erdos to send X11 packets back and forth to give you the illusion that
you’re on a single system. The network is almost transparent here.
Of course, these are only examples of what you can do with TCP/IP networks. The
possibilities are almost limitless, and we’ll introduce you to more as you read on
through the book.
We will now have a closer look at the way TCP/IP works. This information will help
you understand how and why you have to configure your machine. We will start by
examining the hardware and slowly work our way up.
Ethernets
The most common type of LAN hardware is known as Ethernet. In its simplest form,
it consists of a single cable with hosts attached to it through connectors, taps, or
transceivers. Simple Ethernets are relatively inexpensive to install, which together
with a net transfer rate of 10, 100, 1,000, and now even 10,000 megabits per second
(Mbps), accounts for much of its popularity.
Ethernets come in many flavors: thick,thin, and twisted pair. Older Ethernet types
such as thin and thick Ethernet, rarely in use today, each use a coaxial cable, differ-
ing in diameter and the way you may attach a host to this cable. Thin Ethernet uses a
T-shaped “BNC” connector, which you insert into the cable and twist onto a plug on
the back of your computer. Thick Ethernet requires that you drill a small hole into
* The shell is a command-line interface to the Unix operating system. It’s similar to the DOS prompt in a
Microsoft Windows environment, albeit much more powerful.

This is the Title of the Book, eMatter Edition
Copyright © 2007 O’Reilly & Associates, Inc. All rights reserved.
4|Chapter 1: Introduction to Networking
the cable and attach a transceiver using a “vampire tap.” One or more hosts can then
be connected to the transceiver. Thin and thick Ethernet cable can run for a maxi-
mum of 200 and 500 meters, respectively, and are also called 10-base2 and 10-base5.
The “base” refers to “baseband modulation” and simply means that the data is
directly fed onto the cable without any modem. The number at the start refers to the
speed in megabits per second, and the number at the end is the maximum length of
the cable in hundreds of metres. Twisted pair uses a cable made of two pairs of cop-
per wires and usually requires additional hardware known as active hubs. Twisted
pair is also known as 10-baseT, the “T” meaning twisted pair. The 100 Mbps ver-
sion is known as 100-baseT, and not surprisingly, 1000 Mbps is called 1000-baseT or
gigabit.
To add a host to a thin Ethernet installation, you have to disrupt network service for
at least a few minutes because you have to cut the cable to insert the connector.
Although adding a host to a thick Ethernet system is a little complicated, it does not
typically bring down the network. Twisted pair Ethernet is even simpler. It uses a
device called a hub or switch that serves as an interconnection point. You can insert
and remove hosts from a hub or switch without interrupting any other users at all.
Thick and thin Ethernet deployments are somewhat difficult to find anymore
because they have been mostly replaced by twisted pair deployments. This has likely
become a standard because of the cheap networking cards and cables—not to men-
tion that it’s almost impossible to find an old BNC connector in a modern laptop
machine.
Wireless LANs are also very popular. These are based on the 802.11a/b/g specifica-
tion and provide Ethernet over radio transmission. Offering similar functionality to
its wired counterpart, wireless Ethernet has been subject to a number of security
issues, namely surrounding encryption. However, advances in the protocol specifica-
tion combined with different encryption keying methods are quickly helping to alle-
viate some of the more serious security concerns. Wireless networking for Linux is
discussed in detail in Chapter 18.
Ethernet works like a bus system, where a host may send packets (or frames)ofupto
1,500 bytes to another host on the same Ethernet. A host is addressed by a 6-byte
address hardcoded into the firmware of its Ethernet network interface card (NIC).
These addresses are usually written as a sequence of two-digit hex numbers sepa-
rated by colons, as in aa:bb:cc:dd:ee:ff.
A frame sent by one station is seen by all attached stations, but only the destination
host actually picks it up and processes it. If two stations try to send at the same time,
acollision occurs. Collisions on an Ethernet are detected very quickly by the electron-
ics of the interface cards and are resolved by the two stations aborting the send, each
waiting a random interval and re-attempting the transmission. You’ll hear lots of sto-
ries about collisions on Ethernet being a problem and that utilization of Ethernets is
only about 30 percent of the available bandwidth because of them. Collisions on

This is the Title of the Book, eMatter Edition
Copyright © 2007 O’Reilly & Associates, Inc. All rights reserved.
TCP/IP Networks |5
Ethernet are a normal phenomenon, and on a very busy Ethernet network you
shouldn’t be surprised to see collision rates of up to about 30 percent. Ethernet net-
works need to be more realistically limited to about 60 percent before you need to
start worrying about it.*
Other Types of Hardware
In larger installations, or in legacy corporate environments, Ethernet is usually not
the only type of equipment used. There are many other data communications proto-
cols available and in use. All of the protocols listed are supported by Linux, but due
to space constraints we’ll describe them briefly. Many of the protocols have
HOWTO documents that describe them in detail, so you should refer to those if
you’re interested in exploring those that we don’t describe in this book.
One older and quickly disappearing technology is IBM’s Token Ring network.
Token Ring is used as an alternative to Ethernet in some LAN environments, and
runs at lower speeds (4 Mbps or 16 Mbps). In Linux, Token Ring networking is con-
figured in almost precisely the same way as Ethernet, so we don’t cover it specifi-
cally.
Many national networks operated by telecommunications companies support
packet-switching protocols. Previously, the most popular of these was a standard
named X.25. It defines a set of networking protocols that describes how data termi-
nal equipment, such as a host, communicates with data communications equipment
(an X.25 switch). X.25 requires a synchronous data link and therefore special syn-
chronous serial port hardware. It is possible to use X.25 with normal serial ports if
you use a special device called a Packet Assembler Disassembler (PAD). The PAD is a
standalone device that provides asynchronous serial ports and a synchronous serial
port. It manages the X.25 protocol so that simple terminal devices can make and
accept X.25 connections. X.25 is often used to carry other network protocols, such
as TCP/IP. Since IP datagrams cannot simply be mapped onto X.25 (or vice versa),
they are encapsulated in X.25 packets and sent over the network. There is an imple-
mentation of the X.25 protocol available for Linux, but it will not be discussed in
depth here.
A protocol commonly used by telecommunications companies is called Frame Relay.
The Frame Relay protocol shares a number of technical features with the X.25 proto-
col, but is much more like the IP protocol in behavior. Like X.25, Frame Relay
requires special synchronous serial hardware. Because of their similarities, many
cards support both of these protocols. An alternative is available that requires no
* The Ethernet FAQ at http://www.faqs.org/faqs/LANs/ethernet-faq/talks about this issue, and a wealth of
detailed historical and technical information is available at Charles Spurgeon’s Ethernet web site at http://
www.ethermanage.com/ethernet/ethernet.htm/.

This is the Title of the Book, eMatter Edition
Copyright © 2007 O’Reilly & Associates, Inc. All rights reserved.
6|Chapter 1: Introduction to Networking
special internal hardware, again relying on an external device called a Frame Relay
Access Device (FRAD) to manage the encapsulation of Ethernet packets into Frame
Relay packets for transmission across a network. Frame Relay is ideal for carrying
TCP/IP between sites. Linux provides drivers that support some types of internal
Frame Relay devices.
If you need higher-speed networking that can carry many different types of data,
such as digitized voice and video, alongside your usual data, Asynchronous Transfer
Mode (ATM) is probably what you’ll be interested in. ATM is a new network tech-
nology that has been specifically designed to provide a manageable, high-speed, low-
latency means of carrying data and control over the Quality of Service (QoS). Many
telecommunications companies are deploying ATM network infrastructure because
it allows the convergence of a number of different network services into one plat-
form, in the hope of achieving savings in management and support costs. ATM is
often used to carry TCP/IP. The Networking HOWTO offers information on the
Linux support available for ATM.
Frequently, radio amateurs use their radio equipment to network their computers;
this is commonly called packet radio. One of the protocols used by amateur radio
operators is called AX.25 and is loosely derived from X.25. Amateur radio operators
use the AX.25 protocol to carry TCP/IP and other protocols, too. AX.25, like X.25,
requires serial hardware capable of synchronous operation, or an external device
called a Terminal Node Controller to convert packets transmitted via an asynchro-
nous serial link into packets transmitted synchronously. There are a variety of differ-
ent sorts of interface cards available to support packet radio operation; these cards
are generally referred to as being “Z8530 SCC based,” named after the most popular
type of communications controller used in the designs. Two of the other protocols
that are commonly carried by AX.25 are the NetRom and Rose protocols, which are
network layer protocols. Since these protocols run over AX.25, they have the same
hardware requirements. Linux supports a fully featured implementation of the AX.
25, NetRom, and Rose protocols. The AX25 HOWTO is a good source of informa-
tion on the Linux implementation of these protocols.
Other types of Internet access involve dialing up a central system over slow but
cheap serial lines (telephone, ISDN, and so on). These require yet another protocol
for transmission of packets, such as SLIP or PPP, which will be described later.
The Internet Protocol
Of course, you wouldn’t want your networking to be limited to one Ethernet or one
point-to-point data link. Ideally, you would want to be able to communicate with a
host computer regardless of what type of physical network it is connected to. For
example, in larger installations such as Groucho Marx University, you usually have a
number of separate networks that have to be connected in some way. At GMU, the
This is the Title of the Book, eMatter Edition
Copyright © 2007 O’Reilly & Associates, Inc. All rights reserved.
TCP/IP Networks |7
math department runs two Ethernets: one with fast machines for professors and
graduates, and another with slow machines for students.
This connection is handled by a dedicated host called a gateway that handles incom-
ing and outgoing packets by copying them between the two Ethernets and the FDDI
fiber optic cable. For example, if you are at the math department and want to access
quark on the physics department’s LAN from your Linux box, the networking soft-
ware will not send packets to quark directly because it is not on the same Ethernet.
Therefore, it has to rely on the gateway to act as a forwarder. The gateway (named
sophus) then forwards these packets to its peer gateway niels at the physics depart-
ment, using the backbone network, with niels delivering it to the destination
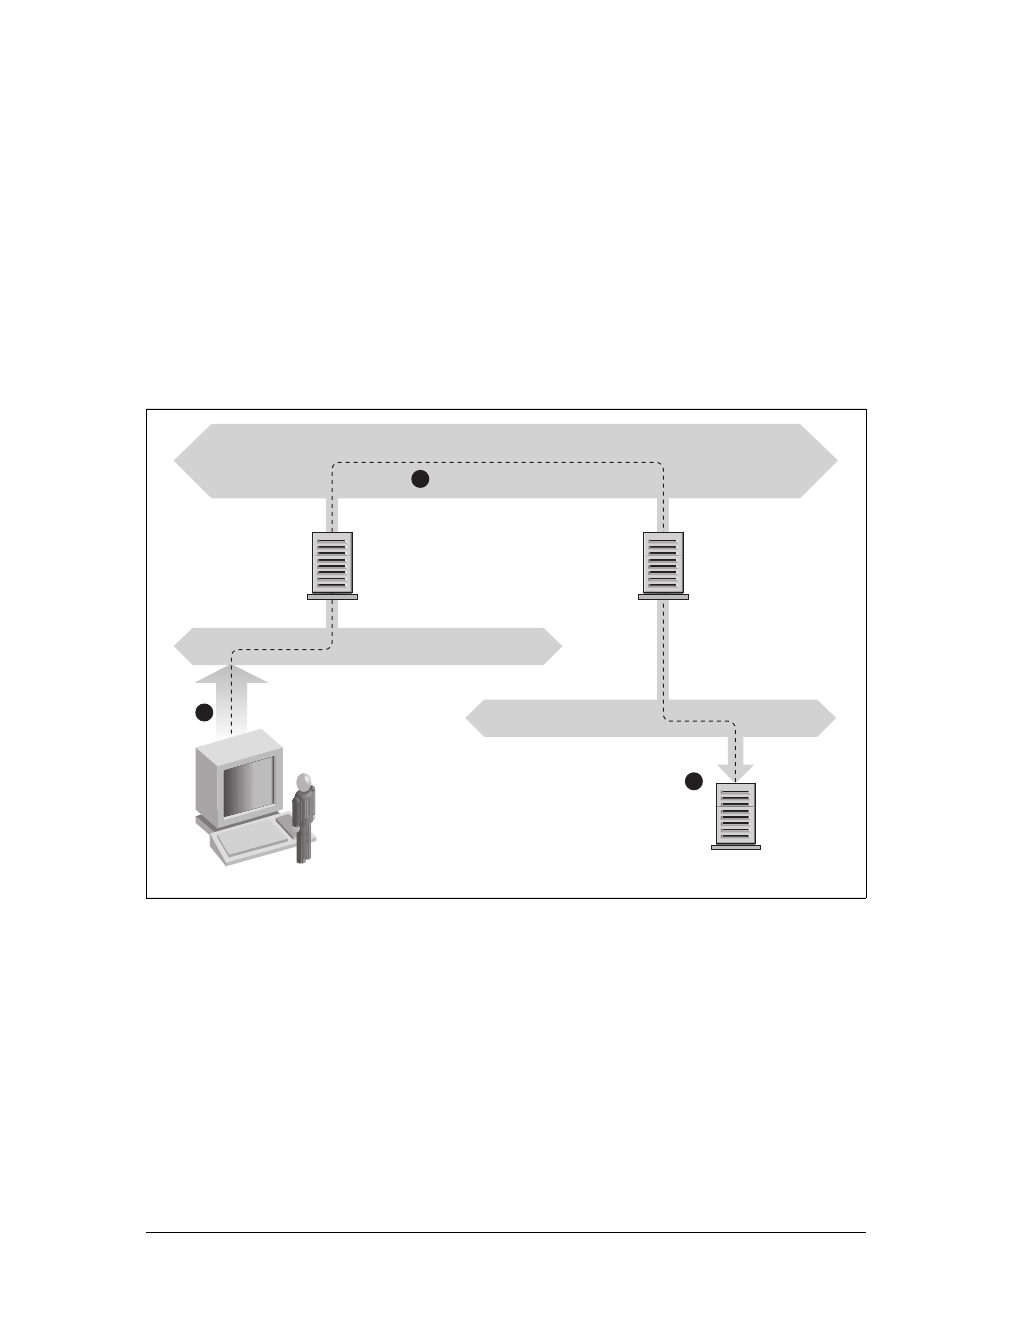
machine. Data flow between erdos and quark is shown in Figure 1-1.
This scheme of directing data to a remote host is called routing, and packets are often
referred to as datagrams in this context. To facilitate things, datagram exchange is
governed by a single protocol that is independent of the hardware used: IP, or Inter-
net Protocol. In Chapter 2, we will cover IP and the issues of routing in greater detail.
The main benefit of IP is that it turns physically dissimilar networks into one appar-
ently homogeneous network. This is called internetworking, and the resulting “meta-
network” is called an internet. Note the subtle difference here between an internet
and the Internet. The latter is the official name of one particular global internet.
Figure 1-1. The three steps of sending a datagram from erdos to quark
1
2
3
Physics Ethernet
Mathematics Ethernet
FDDI Campus Backbone
erdos quark
nielssophus

This is the Title of the Book, eMatter Edition
Copyright © 2007 O’Reilly & Associates, Inc. All rights reserved.
8|Chapter 1: Introduction to Networking
Of course, IP also requires a hardware-independent addressing scheme. This is
achieved by assigning each host a unique 32-bit number called the IP address.AnIP
address is usually written as four decimal numbers, one for each 8-bit portion, sepa-
rated by dots. For example, quark might have an IP address of 0x954C0C04, which
would be written as 149.76.12.4. This format is also called dotted decimal notation
and sometimes dotted quad notation. It is increasingly going under the name IPv4 (for
Internet Protocol, Version 4) because a new standard called IPv6 offers much more
flexible addressing, as well as other modern features. It will be at least a year after the
release of this edition before IPv6 is in use.
You will notice that we now have three different types of addresses: first there is the
host’s name, like quark, then there is an IP address, and finally, there is a hardware
address, such as the 6-byte Ethernet address. All these addresses somehow have to
match so that when you type ssh quark, the networking software can be given
quark’s IP address; and when IP delivers any data to the physics department’s Ether-
net, it somehow has to find out what Ethernet address corresponds to the IP address.
We will deal with these situations in Chapter 2. For now, it’s enough to remember
that these steps of finding addresses are called hostname resolution, for mapping
hostnames onto IP addresses, and address resolution, for mapping the latter to hard-
ware addresses.
IP over Serial Lines
On serial lines, a “de facto” standard exists known as Serial Line IP (SLIP). A
modification of SLIP known as Compressed SLIP (CSLIP), performs compression of
IP headers to make better use of the relatively low bandwidth provided by most serial
links. Another serial protocol is Point-to-Point Protocol (PPP). PPP is more modern
than SLIP and includes a number of features that make it more attractive. Its main
advantage over SLIP is that it isn’t limited to transporting IP datagrams, but is
designed to allow just about any protocol to be carried across it. This book discusses
PPP in Chapter 6.
The Transmission Control Protocol
Sending datagrams from one host to another is not the whole story. If you log in to
quark, you want to have a reliable connection between your ssh process on erdos
and the shell process on quark. Thus, the information sent to and fro must be split
into packets by the sender and reassembled into a character stream by the receiver.
Trivial as it seems, this involves a number of complicated tasks.
A very important thing to know about IP is that, by intent, it is not reliable. Assume
that 10 people on your Ethernet started downloading the latest release of the Mozilla
web browser source code from GMU’s FTP server. The amount of traffic generated
might be too much for the gateway to handle because it’s too slow and it’s tight on

This is the Title of the Book, eMatter Edition
Copyright © 2007 O’Reilly & Associates, Inc. All rights reserved.
TCP/IP Networks |9
memory. Now if you happen to send a packet to quark,sophus might be out of
buffer space for a moment and therefore unable to forward it. IP solves this problem
by simply discarding it. The packet is irrevocably lost. It is therefore the responsibil-
ity of the communicating hosts to check the integrity and completeness of the data
and retransmit it in case of error.
This process is performed by yet another protocol, Transmission Control Protocol
(TCP), which builds a reliable service on top of IP. The essential property of TCP is
that it uses IP to give you the illusion of a simple connection between the two pro-
cesses on your host and the remote machine so that you don’t have to care about
how and along which route your data actually travels. A TCP connection works
essentially like a two-way pipe that both processes may write to and read from.
Think of it as a telephone conversation.
TCP identifies the end points of such a connection by the IP addresses of the two
hosts involved and the number of a port on each host. Ports may be viewed as attach-
ment points for network connections. If we are to strain the telephone example a lit-
tle more, and you imagine that cities are like hosts, one might compare IP addresses
to area codes (where numbers map to cities), and port numbers to local codes (where
numbers map to individual people’s telephones). An individual host may support
many different services, each distinguished by its own port number.
In the ssh example, the client application (ssh) opens a port on erdos and connects to
port 22 on quark, to which the sshd server is known to listen. This action estab-
lishes a TCP connection. Using this connection, sshd performs the authorization pro-
cedure and then spawns the shell. The shell’s standard input and output are
redirected to the TCP connection so that anything you type to ssh on your machine
will be passed through the TCP stream and be given to the shell as standard input.
The User Datagram Protocol
Of course, TCP isn’t the only user protocol in TCP/IP networking. Although suit-
able for applications like ssh, the overhead involved is prohibitive for applications
like NFS, which instead uses a sibling protocol of TCP called User Datagram Proto-
col (UDP). Just like TCP, UDP allows an application to contact a service on a certain
port of the remote machine, but it doesn’t establish a connection for this. Instead,
you use it to send single packets to the destination service—hence its name.
Assume that you want to request a small amount of data from a database server. It
takes at least three datagrams to establish a TCP connection, another three to send
and confirm a small amount of data each way, and another three to close the connec-
tion. UDP provides us with a means of using only two datagrams to achieve almost
the same result. UDP is said to be connectionless, and it doesn’t require us to estab-
lish and close a session. We simply put our data into a datagram and send it to the
server; the server formulates its reply, puts the data into a datagram addressed back

This is the Title of the Book, eMatter Edition
Copyright © 2007 O’Reilly & Associates, Inc. All rights reserved.
10 |Chapter 1: Introduction to Networking
to us, and transmits it back. While this is both faster and more efficient than TCP for
simple transactions, UDP was not designed to deal with datagram loss. It is up to the
application, a nameserver, for example, to take care of this.
More on Ports
Ports may be viewed as attachment points for network connections. If an applica-
tion wants to offer a certain service, it attaches itself to a port and waits for clients
(this is also called listening on the port). A client who wants to use this service allo-
cates a port on its local host and connects to the server’s port on the remote host.
The same port may be open on many different machines, but on each machine only
one process can open a port at any one time.
An important property of ports is that once a connection has been established
between the client and the server, another copy of the server may attach to the server
port and listen for more clients. This property permits, for instance, several concur-
rent remote logins to the same host, all using the same port 513. TCP is able to tell
these connections from one another because they all come from different ports or
hosts. For example, if you log in twice to quark from erdos, the first ssh client may
use the local port 6464, and the second one could use port 4235. Both, however, will
connect to the same port 513 on quark. The two connections will be distinguished
by use of the port numbers used at erdos.
This example shows the use of ports as rendezvous points, where a client contacts a
specific port to obtain a specific service. In order for a client to know the proper port
number, an agreement has to be reached between the administrators of both sys-
tems on the assignment of these numbers. For services that are widely used, such as
ssh, these numbers have to be administered centrally. This is done by the Internet
Engineering Task Force (IETF), which regularly releases an RFC titled Assigned
Numbers (RFC-1700). It describes, among other things, the port numbers assigned to
well-known services. Linux uses a file called /etc/services that maps service names to
numbers.
It is worth noting that, although both TCP and UDP connections rely on ports, these
numbers do not conflict. This means that TCP port 22, for example, is different from
UDP port 22.
The Socket Library
In Unix operating systems, the software performing all the tasks and protocols
described above is usually part of the kernel, and so it is in Linux. The programming
interface most common in the Unix world is the Berkeley Socket Library. Its name
derives from a popular analogy that views ports as sockets and connecting to a port
as plugging in. It provides the bind call to specify a remote host, a transport proto-
col, and a service that a program can connect or listen to (using connect, listen, and

This is the Title of the Book, eMatter Edition
Copyright © 2007 O’Reilly & Associates, Inc. All rights reserved.
Linux Networking |11
accept). The socket library is somewhat more general in that it provides not only a
class of TCP/IP-based sockets (the AF_INET sockets), but also a class that handles
connections local to the machine (the AF_UNIX class). Some implementations can
also handle other classes, like the Xerox Networking System (XNS) protocol or X.25.
In Linux, the socket library is part of the standard libc C library. It supports the
AF_INET and AF_INET6 sockets for TCP/IP and AF_UNIX for Unix domain sock-
ets. It also supports AF_IPX for Novell’s network protocols, AF_ X25 for the X.25
network protocol, AF_ATMPVC and AF_ATMSVC for the ATM network protocol
and AF_AX25,AF_NETROM, and AF_ ROSE sockets for Amateur Radio protocol
support. Other protocol families are being developed and will be added in time.
Linux Networking
As it is the result of a concerted effort of programmers around the world, Linux
wouldn’t have been possible without the global network. So it’s not surprising that
in the early stages of development, several people started to work on providing it
with network capabilities. A UUCP implementation was running on Linux almost
from the very beginning, and work on TCP/IP-based networking started around
autumn 1992, when Ross Biro and others created what has now become known as
Net-1.
After Ross quit active development in May 1993, Fred van Kempen began to work on
a new implementation, rewriting major parts of the code. This project was known as
Net-2. The first public release, Net-2d, was made in the summer of 1993 (as part of
the 0.99.10 kernel), and has since been maintained and expanded by several people,
most notably Alan Cox. Alan’s original work was known as Net-2Debugged. After
heavy debugging and numerous improvements to the code, he changed its name to
Net-3 after Linux 1.0 was released. The Net-3 code was further developed for Linux
1.2 and Linux 2.0. The 2.2 and later kernels use the Net-4 version network support,
which remains the standard official offering today.
The Net-4 Linux Network code offers a wide variety of device drivers and advanced
features. Standard Net-4 protocols include SLIP and PPP (for sending network traffic
over serial lines), PLIP (for parallel lines), IPX (for Novell compatible networks),
Appletalk (for Apple networks) and AX.25, NetRom, and Rose (for amateur radio
networks). Other standard Net-4 features include IP firewalling (discussed in
Chapter 7), IP accounting (Chapter 8), and IP Masquerade (Chapter 9). IP tunneling
in a couple of different flavors and advanced policy routing are supported. A very
large variety of Ethernet devices are supported, in addition to support for some
FDDI, Token Ring, Frame Relay, and ISDN, and ATM cards.
Additionally, there are a number of other features that greatly enhance the flexibility
of Linux. These features include interoperability with the Microsoft Windows

This is the Title of the Book, eMatter Edition
Copyright © 2007 O’Reilly & Associates, Inc. All rights reserved.
12 |Chapter 1: Introduction to Networking
network environment, in a project called Samba, discussed in Chapter 16, and an
implementation of the Novell NCP (NetWare Core Protocol).*
Different Streaks of Development
There have been, at various times, varying network development efforts active for
Linux.
Fred continued development after Net-2Debugged was made the official network
implementation. This development led to the Net-2e, which featured a much revised
design of the networking layer. Fred was working toward a standardized Device
Driver Interface (DDI), but the Net-2e work has ended now.
Yet another implementation of TCP/IP networking came from Matthias Urlichs, who
wrote an ISDN driver for Linux and FreeBSD. For this driver, he integrated some of
the BSD networking code in the Linux kernel. That project, too, is no longer being
worked on.
There has been a lot of rapid change in the Linux kernel networking implementa-
tion, and change is still the watchword as development continues. Sometimes this
means that changes also have to occur in other software, such as the network config-
uration tools. While this is no longer as large a problem as it once was, you may still
find that upgrading your kernel to a later version means that you must upgrade your
network configuration tools, too. Fortunately, with the large number of Linux distri-
butions available today, this is a quite simple task.
The Net-4 network implementation is now a standard and is in use at a very large
number of sites around the world. Much work has been done on improving the per-
formance of the Net-4 implementation, and it now competes with the best imple-
mentations available for the same hardware platforms. Linux is proliferating in the
Internet Service Provider environment, and is often used to build cheap and reliable
World Wide Web servers, mail servers, and news servers for these sorts of organiza-
tions. There is now sufficient development interest in Linux that it is managing to
keep abreast of networking technology as it changes, and current releases of the
Linux kernel offer the next generation of the IP protocol, IPv6, as a standard offer-
ing, which will be discussed at greater detail in Chapter 13.
Where to Get the Code
It seems odd now to remember that in the early days of the Linux network code
development, the standard kernel required a huge patch kit to add the networking
support to it. Today, network development occurs as part of the mainstream Linux
kernel development process. The latest stable Linux kernels can be found on ftp://ftp.
* NCP is the protocol on which Novell file and print services are based.

This is the Title of the Book, eMatter Edition
Copyright © 2007 O’Reilly & Associates, Inc. All rights reserved.
Maintaining Your System |13
kernel.org in /pub/linux/kernel/v2.x/, where xis an even number. The latest experi-
mental Linux kernels can be found on ftp://ftp.kernel.org in /pub/linux/kernel/v2.y/,
where y is an odd number. The kernel.org distributions can also be accessed via
HTTP at http://www.kernel.org. There are Linux kernel source mirrors all over the
world.
Maintaining Your System
Throughout this book, we will mainly deal with installation and configuration issues.
Administration is, however, much more than that—after setting up a service, you
have to keep it running, too. For most services, only a little attendance will be neces-
sary, while some, such as mail, require that you perform routine tasks to keep your
system up to date. We will discuss these tasks in later chapters.
The absolute minimum in maintenance is to check system and per-application log-
files regularly for error conditions and unusual events. Often, you will want to do
this by writing a couple of administrative shell scripts and periodically running them
from cron. The source distributions of some major applications contain such scripts.
You only have to tailor them to suit your needs and preferences.
The output from any of your cron jobs should be mailed to an administrative
account. By default, many applications will send error reports, usage statistics, or
logfile summaries to the root account. This makes sense only if you log in as root fre-
quently; a much better idea is to forward root’s mail to your personal account by set-
ting up a mail alias as described in Chapters 11 and 12.
However carefully you have configured your site, Murphy’s Law guarantees that
some problem will surface eventually. Therefore, maintaining a system also means
being available for complaints. Usually, people expect that the system administrator
can at least be reached via email as root, but there are also other addresses that are
commonly used to reach the person responsible for a specific aspect of maintenence.
For instance, complaints about a malfunctioning mail configuration will usually be
addressed to postmaster, and problems with the news system may be reported to
newsmaster or usenet. Mail to hostmaster should be redirected to the person in
charge of the host’s basic network services, and the DNS name service if you run a
nameserver.
System Security
Another very important aspect of system administration in a network environment is
protecting your system and users from intruders. Carelessly managed systems offer
malicious people many targets. Attacks range from password guessing to Ethernet
snooping, and the damage caused may range from faked mail messages to data loss
or violation of your users’ privacy. We will mention some particular problems when

This is the Title of the Book, eMatter Edition
Copyright © 2007 O’Reilly & Associates, Inc. All rights reserved.
14 |Chapter 1: Introduction to Networking
discussing the context in which they may occur and some common defenses against
them.
This section will discuss a few examples and basic techniques for dealing with sys-
tem security. Of course, the topics covered cannot treat all security issues in detail;
they merely serve to illustrate the problems that may arise. Therefore, reading a good
book on security is an absolute must, especially in a networked system.
System security starts with good system administration. This includes checking the
ownership and permissions of all vital files and directories and monitoring use of
privileged accounts. The COPS program, for instance, will check your filesystem and
common configuration files for unusual permissions or other anomalies. Another
tool, Bastille Linux, developed by Jay Beale and found at http://www.bastille-linux.
org, contains a number of scripts and programs that can be used to lock down a
Linux system. It is also wise to use a password suite that enforces certain rules on the
users’ passwords that make them hard to guess. The shadow password suite, now a
default, requires a password to have at least five letters and to contain both upper-
and lowercase numbers, as well as nonalphabetic characters.
When making a service accessible to the network, make sure to give it “least privi-
lege”; don’t permit it to do things that aren’t required for it to work as designed. For
example, you should make programs setuid to root or some other privileged account
only when necessary. Also, if you want to use a service for only a very limited appli-
cation, don’t hesitate to configure it as restrictively as your special application
allows. For instance, if you want to allow diskless hosts to boot from your machine,
you must provide Trivial File Transfer Protocol (TFTP) so that they can download
basic configuration files from the /boot directory. However, when used unrestric-
tively, TFTP allows users anywhere in the world to download any world-readable file
from your system. If this is not what you want, restrict TFTP service to the /boot
directory (we’ll come back to this in Chapter 10). You might also want to restrict cer-
tain services to users from certain hosts, say from your local network. In Chapter 10,
we introduce tcpd, which does this for a variety of network applications. More
sophisticated methods of restricting access to particular hosts or services will be
explored in Chapter 7.
Another important point is to avoid “dangerous” software. Of course, any software
you use can be dangerous because software may have bugs that clever people might
exploit to gain access to your system. Things like this happen, and there’s no com-
plete protection against it. This problem affects free software and commercial prod-
ucts alike.*However, programs that require special privilege are inherently more
dangerous than others because any loophole can have drastic consequences.†If you
* There have been commercial Unix systems (that you have to pay lots of money for) that came with a setuid
root shell script, which allowed users to gain root privilege using a simple standard trick.
† In 1988, the RTM worm brought much of the Internet to a grinding halt, partly by exploiting a gaping hole
in some programs, including the sendmail program. This hole has long since been fixed.

This is the Title of the Book, eMatter Edition
Copyright © 2007 O’Reilly & Associates, Inc. All rights reserved.
Maintaining Your System |15
install a setuid program for network purposes, be doubly careful to check the docu-
mentation so that you don’t create a security breach by accident.
Another source of concern should be programs that enable login or command execu-
tion with limited authentication. The rlogin,rsh, and rexec commands are all very
useful, but offer very limited authentication of the calling party. Authentication is
based on trust of the calling hostname obtained from a nameserver (we’ll talk about
these later), which can be faked. Today it should be standard practice to disable the r
commands completely and replace them with the ssh suite of tools. The ssh tools use
a much more reliable authentication method and provide other services, such as
encryption and compression, as well.
You can never rule out the possibility that your precautions might fail, regardless of
how careful you have been. You should therefore make sure that you detect intrud-
ers early. Checking the system logfiles is a good starting point, but the intruder is
probably clever enough to anticipate this action and will delete any obvious traces he
or she left. However, there are tools like tripwire, written by Gene Kim and Gene
Spafford, that allow you to check vital system files to see if their contents or permis-
sions have been changed. tripwire computes various strong checksums over these
files and stores them in a database. During subsequent runs, the checksums are
recomputed and compared to the stored ones to detect any modifications.
Finally, it’s always important to be proactive about security. Monitoring the mailing
lists for updates and fixes to the applications that you use is critical in keeping cur-
rent with new releases. Failing to update something such as Apache or OpenSSL can
lead directly to system compromise. One fairly recent example of this was found
with the Linux Slapper worm, which propagated using an OpenSSL vulnerability.
While keeping up to date can seem a daunting and time-consuming effort, adminis-
trators who were quick to react and upgrade their OpenSSL implementations ended
up saving a great deal of time because they did not have to restore compromised sys-
tems!

This is the Title of the Book, eMatter Edition
Copyright © 2007 O’Reilly & Associates, Inc. All rights reserved.
16
Chapter 2
CHAPTER 2
Issues of TCP/IP
Networking
In this chapter we turn to the configuration decisions that you’ll need to make when
connecting your Linux machine to a TCP/IP network, including dealing with IP
addresses, hostnames, and routing issues. This chapter gives you the background
you need in order to understand what your setup requires, while the next chapters
cover the tools that you will use.
To learn more about TCP/IP and the reasons behind it, refer to the three-volume set
Internetworking with TCP/IP (Prentice Hall) by Douglas R. Comer. For a more
detailed guide to managing a TCP/IP network, see TCP/IP Network Administration
(O’Reilly) by Craig Hunt.
Networking Interfaces
To hide the diversity of equipment that may be used in a networking environment,
TCP/IP defines an abstract interface through which the hardware is accessed. This
interface offers a set of operations that is the same for all types of hardware and basi-
cally deals with sending and receiving packets.
For each peripheral networking device, a corresponding interface has to be present in
the kernel. For example, Ethernet interfaces in Linux are called by such names as
eth0 and eth1; PPP (discussed in Chapter 6) interfaces are named ppp0 and ppp1; and
FDDI interfaces are given names such as fddi0 and fddi1. These interface names are
used for configuration purposes when you want to specify a particular physical
device in a configuration command, and they have no meaning beyond this use.
Before being used by TCP/IP networking, an interface must be assigned an IP
address that serves as its identification when communicating with the rest of the
world. This address is different from the interface name mentioned previously; if you
compare an interface to a door, the address is like the nameplate pinned on it.
Other device parameters may be set, such as the maximum size of datagrams that
can be processed by a particular piece of hardware, which is referred to as Maximum

This is the Title of the Book, eMatter Edition
Copyright © 2007 O’Reilly & Associates, Inc. All rights reserved.
IP Addresses |17
Transfer Unit (MTU). Other attributes will be introduced later. Fortunately, most
attributes have sensible defaults.
IP Addresses
As mentioned in Chapter 1, the IP networking protocol understands addresses as 32-
bit numbers. Each machine must be assigned a number unique to the networking
environment. If you are running a local network that does not have TCP/IP traffic
with other networks, you may assign these numbers according to your personal pref-
erences. There are some IP address ranges that have been reserved for such private
networks. These ranges are listed in Table 2-1. However, for sites on the Internet,
numbers are assigned by a central authority, the Network Information Center (NIC).
IP addresses are split up into four 8-bit numbers called octets for readability. For
example, quark.physics.groucho.edu has an IP address of 0x954C0C04, which is
written as 149.76.12.4. This format is often referred to as dotted quad notation.
Another reason for this notation is that IP addresses are split into a network number,
which is contained in the leading octets, and a host number, which is the remainder.
When applying to the NIC for IP addresses, you are not assigned an address for each
single host you plan to use. Instead, you are given a network number and allowed to
assign all valid IP addresses within this range to hosts on your network according to
your preferences.
The size of the host partly depends on the size of the network. To accommodate dif-
ferent needs, several classes of networks have been defined, with different places to
split IP addresses. The class networks are described here:
Class A
Class A comprises networks 1.0.0.0 through 127.0.0.0. The network number is
contained in the first octet. This class provides for a 24-bit host part, allowing
roughly 1.6 million hosts per network.
Class B
Class B contains networks 128.0.0.0 through 191.255.0.0; the network number
is in the first two octets. This class allows for 16,320 nets with 65,024 hosts
each.
Class C
Class C networks range from 192.0.0.0 through 223.255.255.0, with the net-
work number contained in the first three octets. This class allows for nearly 2
million networks with up to 254 hosts.
Classes D, E, and F
Addresses falling into the range of 224.0.0.0 through 254.0.0.0 are either exper-
imental or are reserved for special purpose use and don’t specify any network. IP

This is the Title of the Book, eMatter Edition
Copyright © 2007 O’Reilly & Associates, Inc. All rights reserved.
18 |Chapter 2: Issues of TCP/IP Networking
Multicast, which is a service that allows material to be transmitted to many
points on an internet at one time, has been assigned addresses from within this
range.
If we go back to the example in Chapter 1, we find that 149.76.12.4, the address of
quark, refers to host 12.4 on the class B network 149.76.0.0.
You may have noticed that not all possible values in the previous list were allowed
for each octet in the host part. This is because octets 0and 255 are reserved for spe-
cial purposes. An address where all host part bits are 0 refers to the network, and an
address where all bits of the host part are 1 is called a broadcast address. This refers
to all hosts on the specified network simultaneously. Thus, 149.76.255.255 is not a
valid host address, but refers to all hosts on network 149.76.0.0.
A number of network addresses are reserved for special purposes. 0.0.0.0 and 127.0.
0.0 are two such addresses. The first is called the default route, and the second is the
loopback address. The default route is a place holder for the router your local area
network uses to reach the outside world.
Network 127.0.0.0 is reserved for IP traffic local to your host. Usually, address 127.
0.0.1 will be assigned to a special interface on your host, the loopback interface,
which acts like a closed circuit. Any IP packet handed to this interface from TCP or
UDP will be returned as if it had just arrived from some network. This allows you to
develop and test networking software without ever using a “real” network. The loop-
back network also allows you to use networking software on a standalone host. This
may not be as uncommon as it sounds; for instance, services such as MySQL, which
may only be used by other applications resident on the server, can be bound to the
local host interface to provide an added layer of security.
Some address ranges from each of the network classes have been set aside and desig-
nated “reserved” or “private” address ranges. Sometimes referred to as RFC-1918
addresses, these are reserved for use by private networks and are not routed on the
Internet. They are commonly used by organizations building their own intranet, but
even small networks often find them useful. The reserved network addresses appear
in Table 2-1.
Table 2-1. IP address ranges reserved for private use
Class Networks
A 10.0.0.0 through 10.255.255.255
B 172.16.0.0 through 172.31.0.0
C 192.168.0.0 through 192.168.255.0

This is the Title of the Book, eMatter Edition
Copyright © 2007 O’Reilly & Associates, Inc. All rights reserved.
IP Addresses |19
Classless Inter-Domain Routing
Classless Inter-Domain routing (CIDR), discussed more in Chapter 4, is a newer and
more efficient method of allocating IP addresses. With CIDR, network
administrators can assign networks containing as few as two IP addresses, rather
than the previous method of assigning an entire 254 addresses with a class C block.
CIDR was designed for a number of reasons, but the primary reasons are the rapid
depletion of IP addresses and various capacity issues with the global routing tables.
CIDR addresses are written using a new notation, not surprisingly called the CIDR
block notation. An example is 172.16.0.0/24, which represents the range of
addresses from 172.16.0.0 to 172.16.0.255. The 24 in the notation means that there
are 24 address bits set, which leaves usable 8 bits of the 32-bit IP address. To reduce
the number of addresses in this range, we could add three to the number of address
bits, giving us a network address of 172.16.0.0/27. This means that we would now
have only five usable host bits, giving us a total of 32 addresses. CIDR addresses can
also be used to create ranges larger than a class C. For example, removing two bits
from the above 24-bit network example yields 172.16.0.0/22. This provides a net-
work space a network of 1,024 addresses, four times the size of a traditional class C
space. Some common CIDR configurations are shown in Table 2-2.
Address Resolution
Now that you’ve seen how IP addresses are composed, you may be wondering how
they are used on an Ethernet or Token Ring network to address different hosts. After
all, these protocols have their own addresses to identify hosts that have absolutely
nothing in common with an IP address, don’t they? Right.
A mechanism is needed to map IP addresses onto the addresses of the underlying
network. The mechanism used is the Address Resolution Protocol (ARP). In fact, ARP
is not confined to Ethernet or Token Ring, but is used on other types of networks,
such as the amateur radio AX.25 protocol. The idea underlying ARP is exactly what
most people do when they have to find Mr. X in a throng of 150 people: the person
who wants him calls out loudly enough that everyone in the room can hear her,
Table 2-2. Common CIDR block notations
CIDR block prefix Host bits Number of addresses
/29 3 bits 8
/28 4 bits 16
/27 5 bits 32
/25 6 bits 128
/24 8 bits 256
/22 10 bits 1024

This is the Title of the Book, eMatter Edition
Copyright © 2007 O’Reilly & Associates, Inc. All rights reserved.
20 |Chapter 2: Issues of TCP/IP Networking
expecting him to respond if he is there. When he responds, she knows which person
he is.
When ARP wants to find the Ethernet address corresponding to a given IP address, it
uses an Ethernet feature called broadcasting, in which a datagram is addressed to all
stations on the network simultaneously. The broadcast datagram sent by ARP con-
tains a query for the IP address. Each receiving host compares this query to its own
IP address and if it matches, returns an ARP reply to the inquiring host. The inquir-
ing host can now extract the sender’s Ethernet address from the reply. A useful util-
ity to assist you in determining ARP addresses on your network is the arp utility.
When run without any options, the command will return output similar to the fol-
lowing:
vbrew root # arp
Address HWtype HWaddress Flags Mask Iface
172.16.0.155 ether 00:11:2F:53:4D:EF C eth0
172.16.0.65 ether 00:90:4B:C1:4A:E5 C eth0
vlager.vbrew.com ether 00:10:67:00:C3:7B C eth1
172.16.0.207 ether 00:0B:DB:53:E7:D4 C eth0
It is also possible to request specific ARP addresses from hosts on your network, and
should it be necessary, network administrators can also modify, add, or remove ARP
entries from their local cache.
Let’s talk a little more about ARP. Once a host has discovered an Ethernet address, it
stores it in its ARP cache so that it doesn’t have to query for it again the next time it
wants to send a datagram to the host in question. However, it is unwise to keep this
information forever; the remote host’s Ethernet card may be replaced because of
technical problems, so the ARP entry would become invalid. Therefore, entries in
the ARP cache are discarded after some time to force another query for the IP
address.
Sometimes it is also necessary to find the IP address associated with a given Ethernet
address. This happens when a diskless machine wants to boot from a server on the
network, which is a common situation on Local Area Networks. A diskless client,
however, has virtually no information about itself—except for its Ethernet address!
So it broadcasts a message containing a request asking a boot server to provide it
with an IP address. There’s another protocol for this situation named Reverse
Address Resolution Protocol (RARP). Along with the BOOTP protocol, it serves to
define a procedure for bootstrapping diskless clients over the network.
IP Routing
We now take up the question of finding the host that datagrams go to based on the
IP address. Different parts of the address are handled in different ways; it is your job
to set up the files that indicate how to treat each part.

This is the Title of the Book, eMatter Edition
Copyright © 2007 O’Reilly & Associates, Inc. All rights reserved.
IP Addresses |21
IP networks
When you write a letter to someone, you usually put a complete address on the enve-
lope specifying the country, state, and Zip Code. After you put it in the mailbox, the
post office will deliver it to its destination: it will be sent to the country indicated,
where the national service will dispatch it to the proper state and region. The advan-
tage of this hierarchical scheme is obvious: wherever you post the letter, the local
postmaster knows roughly which direction to forward the letter, but the postmaster
doesn’t care which way the letter will travel once it reaches its country of destination.
IP networks are structured similarly. The whole Internet consists of a number of
proper networks, called autonomous systems. Each system performs routing between
its member hosts internally so that the task of delivering a datagram is reduced to
finding a path to the destination host’s network. As soon as the datagram is handed
to any host on that particular network, further processing is done exclusively by the
network itself.
Subnetworks
This structure is reflected by splitting IP addresses into a host and network part, as
explained earlier in this chapter. By default, the destination network is derived from
the network part of the IP address. Thus, hosts with identical IP network numbers
should be found within the same network.*
It makes sense to offer a similar scheme inside the network, too, since it may consist
of a collection of hundreds of smaller networks, with the smallest units being physi-
cal networks like Ethernets. Therefore, IP allows you to subdivide an IP network into
several subnets.
A subnet takes responsibility for delivering datagrams to a certain range of IP
addresses. It is an extension of the concept of splitting bit fields, as in the A, B, and C
classes. However, the network part is now extended to include some bits from the
host part. The number of bits that are interpreted as the subnet number is given by
the so-called subnet mask,ornetmask. This is a 32-bit number too, which specifies
the bit mask for the network part of the IP address.
The campus network of Groucho Marx University (GMU) is an example of such a
network. It has a class B network number of 149.76.0.0, and its netmask is there-
fore 255.255.0.0.
Internally, GMU’s campus network consists of several smaller networks, such as var-
ious departments’ LANs. So the range of IP addresses is broken up into 254 subnets,
149.76.1.0 through 149.76.254.0. For example, the department of Theoretical
Physics has been assigned 149.76.12.0. The campus backbone is a network in its
* Autonomous systems are slightly more general. They may comprise more than one IP network.

This is the Title of the Book, eMatter Edition
Copyright © 2007 O’Reilly & Associates, Inc. All rights reserved.
22 |Chapter 2: Issues of TCP/IP Networking
own right, and is given 149.76.1.0. These subnets share the same IP network num-
ber, while the third octet is used to distinguish between them. They will thus use a
subnet mask of 255.255.255.0.
Figure 2-1 shows how 149.76.12.4, the address of quark, is interpreted differently
when the address is taken as an ordinary class B network and when used with sub-
netting.
It is worth noting that subnetting (the technique of generating subnets) is only an
internal division of the network. Subnets are generated by the network owner (or the
administrators). Frequently, subnets are created to reflect existing boundaries, be
they physical (between two Ethernets), administrative (between two departments),
or geographical (between two locations), and authority over each subnet is dele-
gated to some contact person. However, this structure affects only the network’s
internal behavior and is completely invisible to the outside world.
Gateways
Subnetting is not only a benefit to the organization; it is frequently a natural conse-
quence of hardware boundaries. The viewpoint of a host on a given physical net-
work, such as an Ethernet, is a very limited one: it can only talk to the host of the
network it is on. All other hosts can be accessed only through special-purpose
machines called gateways. A gateway is a host that is connected to two or more phys-
ical networks simultaneously and is configured to switch packets between them.
Figure 2-2 shows part of the network topology at GMU. Hosts that are on two sub-
nets at the same time are shown with both addresses.
Different physical networks have to belong to different IP networks for IP to be able
to recognize if a host is on a local network. For example, the network number 149.
76.4.0 is reserved for hosts on the mathematics LAN. When sending a datagram to
quark, the network software on erdos immediately sees from the IP address 149.76.
Figure 2-1. Subnetting a class B network
Network Part Host Part
Network Part Host PartSubnet
Class B
Class B with Subnet
149 76 12 4
149 76 12 4
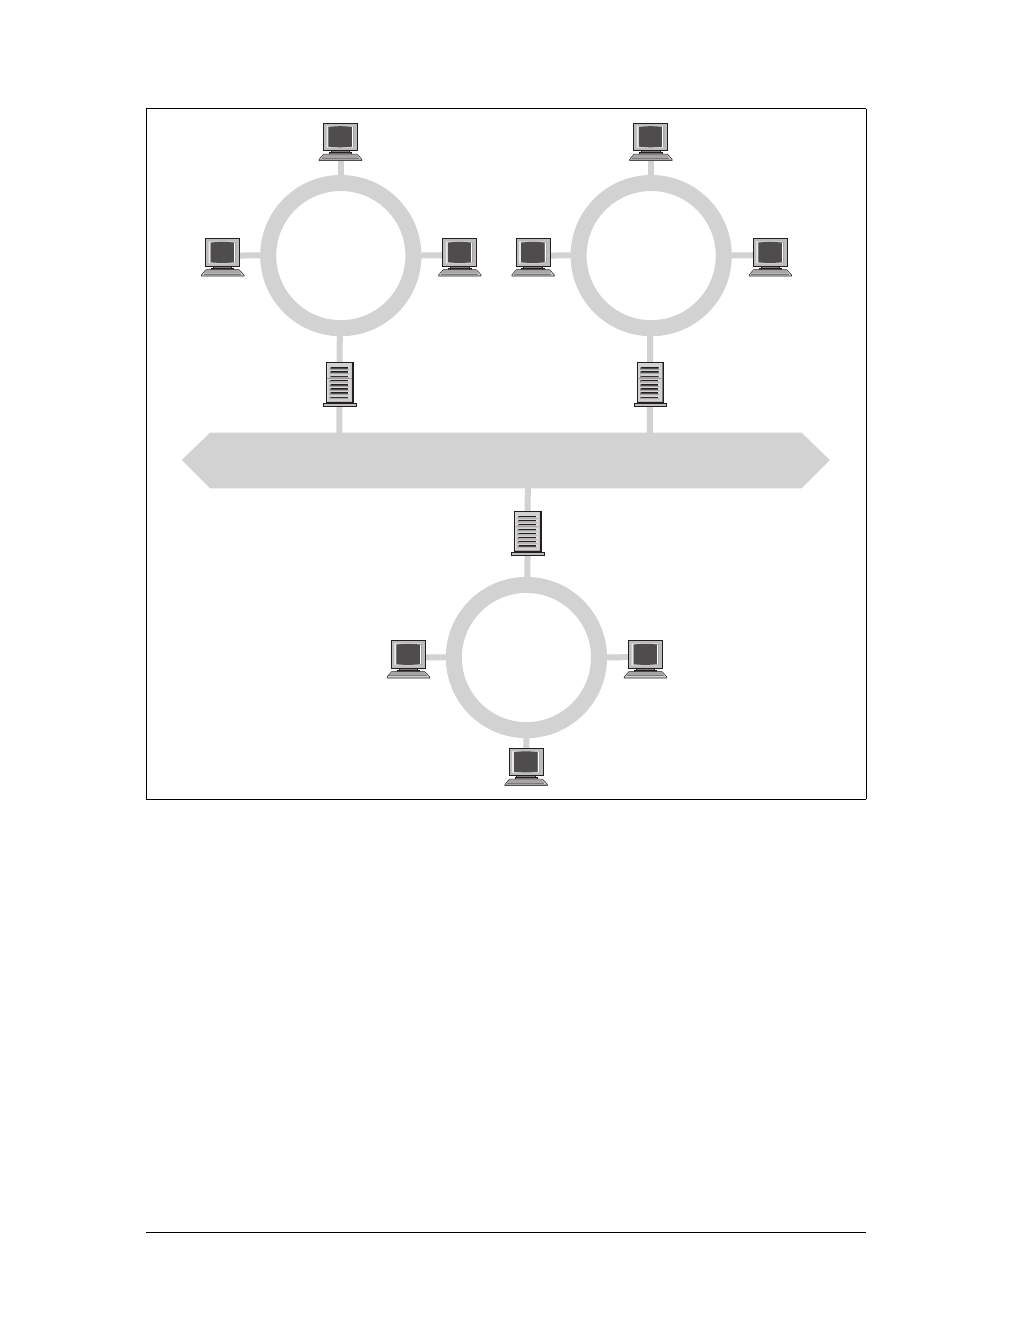
This is the Title of the Book, eMatter Edition
Copyright © 2007 O’Reilly & Associates, Inc. All rights reserved.
IP Addresses |23
12.4 that the destination host is on a different physical network, and therefore can be
reached only through a gateway (sophus by default).
sophus itself is connected to two distinct subnets: the Mathematics department and
the campus backbone. It accesses each through a different interface, eth0 and fddi0,
respectively. Now, what IP address do we assign it? Should we give it one on subnet
149.76.1.0 or on 149.76.4.0?
The answer is: “both.” sophus has been assigned the address 149.76.1.1 for use on
the 149.76.1.0 network and address 149.76.4.1 for use on the 149.76.4.0 network.
A gateway must be assigned one IP address for each network it belongs to. These
addresses—along with the corresponding netmask—are tied to the interface through
which the subnet is accessed. Thus, the interface and address mapping for sophus
would be as shown in Table 2-3.
Figure 2-2. A part of the net topology at Groucho Marx University
FDDI Campus Backbone
4.0
Mathematics
Department
12.0
Theoretical
Physics
Department
erdos
(4.17)
gauss
(4.23)
sophus
quark
(12.4)
niels
(1.1)
(4.1)
(1.12)
(12.1)
gcc1
(2.1)
(1.2)
2.0
Groucho
Computing
Center

This is the Title of the Book, eMatter Edition
Copyright © 2007 O’Reilly & Associates, Inc. All rights reserved.
24 |Chapter 2: Issues of TCP/IP Networking
The last entry describes the loopback interface lo, which we talked about earlier in
this chapter.
Generally, you can ignore the subtle difference between attaching an address to a
host or its interface. For hosts that are on one network only, such as erdos, you
would generally refer to the host as having this-and-that IP address, although strictly
speaking, it’s the Ethernet interface that has this IP address. The distinction is really
important only when you refer to a gateway.
The Routing Table
We now focus our attention on how IP chooses a gateway to use to deliver a data-
gram to a remote network.
We have seen that erdos, when given a datagram for quark, checks the destination
address and finds that it is not on the local network. erdos therefore sends the data-
gram to the default gateway sophus, which is now faced with the same task. sophus
recognizes that quark is not on any of the networks it is connected to directly, so it
has to find yet another gateway to forward it through. The correct choice would be
niels, the gateway to the physics department. sophus thus needs information to asso-
ciate a destination network with a suitable gateway.
IP uses a table for this task that associates networks with the gateways by which they
may be reached. A catch-all entry (the default route) must generally be supplied too;
this is the gateway associated with network 0.0.0.0. All destination addresses match
this route, since none of the 32 bits are required to match, and therefore packets to
an unknown network are sent through the default route. On sophus, the table might
look as shown in Table 2-4.
Table 2-3. Sample interfaces and addresses
Interface Address Netmask
eth0 149.76.4.1 255.255.255.0
fddi0 149.76.1.1 255.255.255.0
lo 127.0.0.1 255.0.0.0
Table 2-4. Sample routing table
Network Netmask Gateway Interface
149.76.1.0 255.255.255.0 - eth1
149.76.2.0 255.255.255.0 149.76.1.2 eth1
149.76.3.0 255.255.255.0 149.76.1.3 eth1
149.76.4.0 255.255.255.0 - eth0
149.76.5.0 255.255.255.0 149.76.1.5 eth1
0.0.0.0 0.0.0.0 149.76.1.2 eth1

This is the Title of the Book, eMatter Edition
Copyright © 2007 O’Reilly & Associates, Inc. All rights reserved.
IP Addresses |25
If you need to use a route to a network that sophus is directly connected to, you
don’t need a gateway; the gateway column here contains a hyphen.
It is possible to determine this information from the routing table by using the route
command and the -n option, which will display IP addresses, rather than DNS
names.
The process for identifying whether a particular destination address matches a route
is a mathematical operation. The process is quite simple, but it requires an under-
standing of binary arithmetic and logic: a route matches a destination if the network
address logically ANDed with the netmask precisely equals the destination address
logically ANDed with the netmask.
Translation: a route matches if the number of bits of the network address specified
by the netmask (starting from the left-most bit, the high order bit of byte one of the
address) match that same number of bits in the destination address.
When the IP implementation is searching for the best route to a destination, it may
find a number of routing entries that match the target address. For example, we
know that the default route matches every destination, but datagrams destined for
locally attached networks will match their local route, too. How does IP know which
route to use? It is here that the netmask plays an important role. While both routes
match the destination, one of the routes has a larger netmask than the other. We pre-
viously mentioned that the netmask was used to break up our address space into
smaller networks. The larger a netmask is, the more specifically a target address is
matched; when routing datagrams, we should always choose the route that has the
largest netmask. The default route has a netmask of zero bits, and in the configura-
tion presented above, the locally attached networks have a 24-bit netmask. If a data-
gram matches a locally attached network, it will be routed to the appropriate device
in preference to following the default route because the local network route matches
with a greater number of bits. The only datagrams that will be routed via the default
route are those that don’t match any other route.
You can build routing tables by a variety of means. For small LANs, it is usually most
efficient to construct them by hand and feed them to IP using the route command at
boot time (see Chapter 4). For larger networks, they are built and adjusted at runt-
ime by routing daemons; these daemons run on central hosts of the network and
exchange routing information to compute “optimal” routes between the member
networks.
Depending on the size of the network, you’ll need to use different routing protocols.
For routing inside autonomous systems (such as the Groucho Marx campus), the
internal routing protocols are used. The most prominent one of these is the Routing
Information Protocol (RIP), which is implemented by the BSD routed daemon. For
routing between autonomous systems, external routing protocols such as External

This is the Title of the Book, eMatter Edition
Copyright © 2007 O’Reilly & Associates, Inc. All rights reserved.
26 |Chapter 2: Issues of TCP/IP Networking
Gateway Protocol (EGP) or Border Gateway Protocol (BGP) have to be used; these
protocols, including RIP, have been implemented in the University of Cornell’s gated
daemon.
Metric Values
We depend on dynamic routing to choose the best route to a destination host or net-
work based on the number of hops. Hops are the gateways a datagram has to pass
before reaching a host or network. The shorter a route is, the better RIP rates it. Very
long routes with 16 or more hops are regarded as unusable and are discarded.
RIP manages routing information internal to your local network, but you have to run
gated on all hosts. At boot time, gated checks for all active network interfaces. If
there is more than one active interface (not counting the loopback interface), it
assumes that the host is switching packets between several networks and will actively
exchange and broadcast routing information. Otherwise, it will only passively receive
RIP updates and update the local routing table.
When broadcasting information from the local routing table, gated computes the
length of the route from the so-called metric value associated with the routing table
entry. This metric value is set by the system administrator when configuring the
route, and should reflect the actual route cost.*Therefore, the metric of a route to a
subnet that the host is directly connected to should always be zero, while a route
going through two gateways should have a metric of two. You don’t have to bother
with metrics if you don’t use RIP or gated.
The Internet Control Message Protocol
IP has a companion protocol that we haven’t talked about yet. This is the Internet
Control Message Protocol (ICMP), used by the kernel networking code to communi-
cate error messages to other hosts. For instance, assume that you are on erdos again
and want to telnet to port 12345 on quark, but there’s no process listening on that
port. When the first TCP packet for this port arrives on quark, the networking layer
will recognize this arrival and immediately return an ICMP message to erdos stating
“Port Unreachable.”
The ICMP protocol provides several different messages, many of which deal with
error conditions. However, there is one very interesting message called the Redirect
message. It is generated by the routing module when it detects that another host is
using it as a gateway, even though a much shorter route exists. For example, after
booting, the routing table of sophus may be incomplete. It might contain the routes
* The cost of a route can be thought of, in a simple case, as the number of hops required to reach the destina-
tion. Proper calculation of route costs can be a fine art in complex network designs.

This is the Title of the Book, eMatter Edition
Copyright © 2007 O’Reilly & Associates, Inc. All rights reserved.
The Internet Control Message Protocol |27
to the math department’s network, to the FDDI backbone, and the default route
pointing at the Groucho Computing Center’s gateway (gcc1). Thus, packets for
quark would be sent to gcc1 rather than to niels, the gateway to the physics depart-
ment. When receiving such a datagram, gcc1 will notice that this is a poor choice of
route and will forward the packet to niels, meanwhile returning an ICMP Redirect
message to sophus telling it of the superior route.
This seems to be a very clever way to avoid manually setting up any but the most
basic routes. However, be warned that relying on dynamic routing schemes, be it RIP
or ICMP Redirect messages, is not always a good idea. ICMP Redirect and RIP offer
you little or no choice in verifying that some routing information is indeed authen-
tic. This situation allows malicious good-for-nothings to disrupt your entire network
traffic, or even worse. Consequently, the Linux networking code treats Network
Redirect messages as if they were Host Redirects. This minimizes the damage of an
attack by restricting it to just one host, rather than the whole network. On the flip
side, it means that a little more traffic is generated in the event of a legitimate condi-
tion, as each host causes the generation of an ICMP Redirect message. It is generally
considered bad practice to rely on ICMP redirects for anything these days.
Resolving Hostnames
As described earlier in this chapter, addressing in TCP/IP networking, at least for IP
Version 4, revolves around 32-bit numbers. However, you will have a hard time
remembering more than a few of these numbers. Therefore, hosts are generally
known by “ordinary” names, such as gauss or strange. It becomes the application’s
duty to find the IP address corresponding to this name. This process is called host-
name resolution. When an application needs to find the IP address of a given host, it
relies on the library functions gethostbyname(3) and gethostbyaddr(3). Traditionally,
these and a number of related procedures were grouped in a separate library called
the resolverlibrary; on Linux, these functions are part of the standard libc. Colloqui-
ally, this collection of functions is therefore referred to as “the resolver.” Resolver
name configuration is detailed in Chapter 5.
On a small network like an Ethernet or even a cluster of Ethernets, it is not very diffi-
cult to maintain tables mapping hostnames to addresses. This information is usually
kept in a file named /etc/hosts. When adding or removing hosts, or reassigning
addresses, all you have to do is update the hosts file on all hosts. Obviously, this will
become burdensome with networks that comprise more than a handful of machines.
On the Internet, address information was initially stored in a single HOSTS.TXT
database, too. This file was maintained at the NIC, and had to be downloaded and
installed by all participating sites. When the network grew, several problems with
this scheme arose. Besides the administrative overhead involved in installing HOSTS.
TXT regularly, the load on the servers that distributed it became too high. Even more

This is the Title of the Book, eMatter Edition
Copyright © 2007 O’Reilly & Associates, Inc. All rights reserved.
28 |Chapter 2: Issues of TCP/IP Networking
severe, all names had to be registered with the NIC, which made sure that no name
was issued twice.
This is why a new name resolution scheme was adopted in 1994: the Domain Name
System. DNS was designed by Paul Mockapetris and addresses both problems simul-
taneously. We discuss the Domain Name System in detail in Chapter 5.

This is the Title of the Book, eMatter Edition
Copyright © 2007 O’Reilly & Associates, Inc. All rights reserved.
29
Chapter 3
CHAPTER 3
Configuring the Serial
Hardware
The Internet is growing at an incredible rate. Much of this growth is attributed to
Internet users who have cheap and easy access to DSL, cable, and other high-speed
permanent network connections and who use protocols such as PPP to dial in to a
network provider to retrieve their daily dose of email and news.
This chapter is intended to help all people who rely on modems to maintain their
link to the outside world. We won’t cover the mechanics of how to configure your
modem, as you can find detailed documentation of this in many of the available
modem HOWTO documents on the web. We will cover most of the Linux-specific
aspects of managing devices that use serial ports. Topics include serial communica-
tions software, creating the serial device files, serial hardware, and configuring serial
devices using the setserialand stty commands. Many other related topics are covered
in the Serial HOWTO by David Lawyer.
Communications Software for Modem Links
There are a number of communications packages available for Linux. Many of these
packages are terminal programs, which allow a user to dial in to another computer as
if she were sitting in front of a simple terminal. The traditional terminal program for
Unix-like environments is kermit. It is, however, ancient now, and would probably
be considered difficult to use. There are more comfortable programs available that
support features such as telephone-dialing dictionaries, script languages to automate
dialing and logging in to remote computer systems, and a variety of file exchange
protocols. One of these programs is minicom, which was modeled after some of the
most popular DOS terminal programs. X11 users are accommodated, too. seyon is a
fully featured X11-based communications program.
Terminal programs aren’t the only type of serial communication programs available.
Other programs let you connect to a host and download email in a single bundle, to
read and reply to later at your leisure. This can save a lot of time and is especially
useful if you are unfortunate enough to live in an area where your connectivity is

This is the Title of the Book, eMatter Edition
Copyright © 2007 O’Reilly & Associates, Inc. All rights reserved.
30 |Chapter 3: Configuring the Serial Hardware
time charged. All of the reading and replying time can be spent offline, and when you
are ready, you can reconnect and upload your responses in a single bundle.
PPP is in-between, allowing both interactive and noninteractive use. Many people
use PPP to dial in to their campus network or other Internet Service Provider to
access the Internet. PPP (in the form of PPPoE) is also, however, commonly used
over permanent or semipermanent connections like cable or DSL modems. We’ll dis-
cuss PPPoE in Chapter 7.
Introduction to Serial Devices
The Unix kernel provides devices for accessing serial hardware, typically called tty
devices (pronounced as it is spelled: T-T-Y).
This is an abbreviation for Teletype device, which used to be one of the major manu-
facturers of terminal devices in the early days of Unix. The term is used now for any
character-based data terminal. Throughout this chapter, we use the term to refer
exclusively to the Linux device files rather than the physical terminal.
Linux provides three classes of tty devices: serial devices, virtual terminals (all of
which you can access by pressing Alt-F1 through Alt-Fnn on the local console), and
pseudo-terminals (similar to a two-way pipe, used by applications such as X11). The
former were called tty devices because the original character-based terminals were
connected to the Unix machine by a serial cable or telephone line and modem. The
latter two were named after the tty device because they were created to behave in a
similar fashion from the programmer’s perspective.
PPP is most commonly implemented in the kernel. The kernel doesn’t really treat the
tty device as a network device that you can manipulate like an Ethernet device, using
commands such as ifconfig. However, it does treat tty devices as places where net-
work devices can be bound. To do this, the kernel changes what is called the “line
discipline” of the tty device. PPP is a line discipline that may be enabled on tty
devices. The general idea is that the serial driver handles data given to it differently,
depending on the line discipline it is configured for. In its default line discipline, the
driver simply transmits each character it is given in turn. When the PPP line disci-
pline is selected, the driver instead reads a block of data, wraps a special header
around it that allows the remote end to identify that block of data in a stream, and
transmits the new data block. It isn’t too important to understand this yet; we’ll
cover PPP in a later chapter, and it all happens automatically anyway.
Accessing Serial Devices
Like all devices in a Unix system, serial ports are accessed through device special
files, located in the /dev directory. There are two varieties of device files related to
serial drivers, and there is one device file of each type for each port. The device will

This is the Title of the Book, eMatter Edition
Copyright © 2007 O’Reilly & Associates, Inc. All rights reserved.
Accessing Serial Devices |31
behave slightly differently, depending on which of its device files we open. We’ll
cover the differences because it will help you understand some of the configurations
and advice that you might see relating to serial devices, but in practice you need to
use only one of these. At some point in the future, one of them may even disappear
completely.
The most important of the two classes of serial device has a major number of 4, and
its device special files are named ttyS0,ttyS1, etc. The second variety has a major
number of 5 and was designed for use when dialing out (calling out) through a port;
its device special files are called cua0,cua1, etc. In the Unix world, counting gener-
ally starts at zero, while laypeople tend to start at one. This creates a small amount of
confusion for people because COM1: is represented by /dev/ttyS0,COM2: by /dev/ttyS1,
etc. Anyone familiar with IBM PC-style hardware knows that COM3: and greater were
never really standardized anyway.
The cua, or “callout,” devices were created to solve the problem of avoiding con-
flicts on serial devices for modems that have to support both incoming and outgoing
connections. Unfortunately, they’ve created their own problems and are now likely
to be discontinued. Let’s briefly look at the problem.
Linux, like Unix, allows a device, or any other file, to be opened by more than one
process simultaneously. Unfortunately, this is rarely useful with tty devices, as the
two processes will almost certainly interfere with each other. Luckily, a mechanism
was devised to allow a process to check if a tty device had already been opened by
another device. The mechanism uses what are called lock files. The idea was that
when a process wanted to open a tty device, it would check for the existence of a file
in a special location, named similarly to the device it intends to open. If the file did
not exist, the process created it and opened the tty device. If the file did exist, the
process assumed that another process already had the tty device open and took
appropriate action. One last clever trick to make the lock file management system
work was writing the process ID (pid) of the process that had created the lock file
into the lock file itself; we’ll talk more about that in a moment.
The lock file mechanism works perfectly well in circumstances in which you have a
defined location for the lock files and all programs know where to find them. Alas,
this wasn’t always the case for Linux. It wasn’t until the Linux Filesystem Standard
defined a standard location for lock files when tty lock files began to work correctly.
At one time there were at least four, and possibly more, locations chosen by soft-
ware developers to store lock files: /usr/spool/locks/,/var/spool/locks/,/var/lock/, and
/usr/lock/. Confusion caused chaos. Programs were opening lock files in different
locations that were meant to control a single tty device; it was as if lock files weren’t
being used at all.
The cua devices were created to provide a solution to this problem. Rather than rely-
ing on the use of lock files to prevent clashes between programs wanting to use the
serial devices, it was decided that the kernel could provide a simple means of

This is the Title of the Book, eMatter Edition
Copyright © 2007 O’Reilly & Associates, Inc. All rights reserved.
32 |Chapter 3: Configuring the Serial Hardware
arbitrating who should be given access. If the ttyS device were already opened, an
attempt to open the cua would result in an error that a program could interpret to
mean the device was already being used. If the cua device were already open and an
attempt was made to open the ttyS, the request would block; that is, it would be put
on hold and wait until the cua device was closed by the other process. This worked
quite well if you had a single modem that you had configured for dial-in access and
you occasionally wanted to dial out on the same device. But it did not work very well
in environments where you had multiple programs wanting to call out on the same
device. The only way to solve the contention problem was to use lock files! Back to
square one.
Suffice it to say that the Linux Filesystem Standard came to the rescue and now man-
dates that lock files be stored in the /var/lock directory, and that by convention, the
lock filename for the ttyS1 device, for instance, is LCK..ttyS1. The cua lock files
should also go in this directory, but use of cua devices is now discouraged.
The cua devices will probably still be around for some time to provide a period of
backward compatibility, but in time they will be retired. If you are wondering what
to use, stick to the ttyS device and make sure that your system is Linux FSSTND
compliant, or at the very least that all programs using the serial devices agree on
where the lock files are located. Most software dealing with serial tty devices pro-
vides a compile-time option to specify the location of the lock files. More often than
not, this will appear as a variable called something like LOCKDIR in the Makefile or in
a configuration header file. If you’re compiling the software yourself, it is best to
change this to agree with the FSSTND-specified location. If you’re using a precom-
piled binary and you’re not sure where the program will write its lock files, you can
use the following command to gain a hint:
strings binaryfile | grep lock
If the location found does not agree with the rest of your system, you can try creat-
ing a symbolic link from the lock directory that the foreign executable wants to use
back to /var/lock/. This is ugly, but it will work.
The Serial Device Special Files
Minor numbers are identical for both types of serial devices. If you have your modem
on one of the ports COM1: through COM4:, its minor number will be the COM port
number plus 63. If you are using special serial hardware, such as a high-performance
multiple port serial controller, you will probably need to create special device files for
it; it probably won’t use the standard device driver. The Serial HOWTO should be
able to assist you in finding the appropriate details.
Assume your modem is on COM2:. Its minor number will be 65, and its major num-
ber will be 4 for normal use. There should be a device called ttyS1 that has these

This is the Title of the Book, eMatter Edition
Copyright © 2007 O’Reilly & Associates, Inc. All rights reserved.
Accessing Serial Devices |33
numbers. List the serial ttys in the /dev/ directory. The fifth and sixth columns show
the major and minor numbers, respectively:
$ls -l /dev/ttyS*
0 crw-rw---- 1 uucp dialout 4, 64 Oct 13 1997 /dev/ttyS0
0 crw-rw---- 1 uucp dialout 4, 65 Jan 26 21:55 /dev/ttyS1
0 crw-rw---- 1 uucp dialout 4, 66 Oct 13 1997 /dev/ttyS2
0 crw-rw---- 1 uucp dialout 4, 67 Oct 13 1997 /dev/ttyS3
If there is no device with major number 4 and minor number 65, you will have to
create one. Become the superuser and type:
#mknod -m 666 /dev/ttyS1 c 4 65
#chown uucp.dialout /dev/ttyS1
The various Linux distributions use slightly differing strategies for who should own
the serial devices. Sometimes they will be owned by root, and other times they will
be owned by another user. Most distributions have a group specifically for dial-out
devices, and any users who are allowed to use them are added to this group.
Some people suggest making /dev/modem a symbolic link to your modem device so
that casual users don’t have to remember the somewhat unintuitive ttyS1. However,
you cannot use modem in one program and the real device filename in another. Their
lock files would have different names and the locking mechanism wouldn’t work.
Serial Hardware
RS-232 is currently the most common standard for serial communications in the PC
world. It uses a number of circuits for transmitting single bits, as well as for synchro-
nization. Additional lines may be used for signaling the presence of a carrier (used by
modems) and for handshaking. Linux supports a wide variety of serial cards that use
the RS-232 standard.
Hardware handshake is optional, but very useful. It allows either of the two stations
to signal whether it is ready to receive more data, or if the other station should pause
until the receiver is done processing the incoming data. The lines used for this are
called Clear to Send (CTS) and Request to Send (RTS), respectively, which explains
the colloquial name for hardware handshake: RTS/CTS.
The other type of handshake you might be familiar with is called XON/XOFF hand-
shaking. XON/XOFF uses two nominated characters, conventionally Ctrl-S and Ctrl-
Q, to signal to the remote end that it should stop and start transmitting data, respec-
tively. While this method is simple to implement and okay for use by dumb termi-
nals, it causes great confusion when you are dealing with binary data, as you may
want to transmit those characters as part of your data stream, and not have them
interpreted as flow control characters. It is also somewhat slower to take effect than
hardware handshake. Hardware handshake is clean, fast, and recommended in pref-
erence to XON/XOFF when you have a choice.

This is the Title of the Book, eMatter Edition
Copyright © 2007 O’Reilly & Associates, Inc. All rights reserved.
34 |Chapter 3: Configuring the Serial Hardware
In the original IBM PC, the RS-232 interface was driven by a UART chip called the
8250. PCs around the time of the 486 used a newer version of the UART called the
16450. It was slightly faster than the 8250. Nearly all Pentium-based machines have
been supplied with an even newer version of the UART called the 16550. Some
brands (most notably internal modems equipped with the Rockwell chip set) use
completely different chips that emulate the behavior of the 16550 and can be treated
similarly. Linux supports all of these in its standard serial port driver.*
The 16550 was a significant improvement over the 8250 and the 16450 because it
offered a 16-byte FIFO buffer. The 16550 is actually a family of UART devices, com-
prising the 16550, the 16550A, and the 16550AFN (later renamed PC16550DN).
The differences relate to whether the FIFO actually works; the 16550AFN is the one
that is sure to work. There was also an NS16550, but its FIFO never really worked
either.
The 8250 and 16450 UARTs had a simple 1-byte buffer. This means that a 16450
generates an interrupt for every character transmitted or received. Each interrupt
takes a short period of time to service, and this small delay limits 16450s to a reli-
able maximum bit speed of about 9,600 bps in a typical ISA bus machine.
In the default configuration, the kernel checks the four standard serial ports, COM1:
through COM4:. The kernel is also able to automatically detect what UART is used for
each of the standard serial ports and will make use of the enhanced FIFO buffer of
the 16550, if it is available.
Using the Configuration Utilities
Now let’s spend some time looking at the two most useful serial device configura-
tion utilities: setserial and stty.
The setserial Command
The kernel will make its best effort to correctly determine how your serial hardware
is configured, but the variations on serial device configuration makes this determina-
tion difficult to achieve 100 percent reliably in practice. A good example of where
this is a problem is the internal modems we talked about earlier. The UART they use
has a 16-byte FIFO buffer, but it looks like a 16450 UART to the kernel device
driver: unless we specifically tell the driver that this port is a 16550 device, the ker-
nel will not make use of the extended buffer. Yet another example is that of the
* Note that we are not talking about WinModem™ here! WinModems have very simple hardware and rely
completely on the main CPU of your computer instead of dedicated hardware to do all of the hard work. If
you’re purchasing a modem, it is our strongest recommendation to not purchase such a modem; get a real
modem, though if you’re stuck with a WinModem, there’s hope! Check out http://linmodems.org for drivers,
instructions, and the LINMODEM HOWTO.

This is the Title of the Book, eMatter Edition
Copyright © 2007 O’Reilly & Associates, Inc. All rights reserved.
Using the Configuration Utilities |35
dumb 4-port cards that allow sharing of a single IRQ among a number of serial
devices. We may have to specifically tell the kernel which IRQ port it’s supposed to
use, and that IRQs may be shared.
setserial was created to configure the serial driver at runtime. The setserial command
is most commonly executed at boot time from a script called rc.serial on some distri-
butions, though yours may very. This script is charged with the responsibility of ini-
tializing the serial driver to accommodate any nonstandard or unusual serial
hardware in the machine.
The general syntax for the setserial command is:
setserial device [parameters]
in which the device is one of the serial devices, such as ttyS0.
The setserial command has a large number of parameters. The most common of
these are described in Table 3-1. For information on the remainder of the parame-
ters, you should refer to the setserial manpage.
Table 3-1. setserial command-line parameters
Parameter Description
port port_number Specify the I/O port address of the serial device. Port numbers should be specified in
hexadecimal notation, e.g., 0x2f8.
irq num Specify the interrupt request line the serial device is using.
uart uart_type Specify the UART type of the serial device. Common values are 16450,16550, etc.
Setting this value to none will disable this serial device.
fourport Specifying this parameter instructs the kernel serial driver that this port is one port
of an AST Fourport card.
spd_hi Program the UART to use a speed of 57.6 kbps when a process requests 38.4 kbps.
spd_vhi Program the UART to use a speed of 115 kbps when a process requests 38.4 kbps.
spd_normal Program the UART to use the default speed of 38.4 kbps when requested. This
parameter is used to reverse the effect of a spd_hi or spd_vhi performed on the
specified serial device.
auto_irq This parameter will cause the kernel to attempt to automatically determine the IRQ
of the specified device. This attempt may not be completely reliable, so it is probably
better to think of this as a request for the kernel to guess the IRQ. If you know the
IRQ of the device, you should specify that it use the irq parameter instead.
autoconfig This parameter must be specified in conjunction with the port parameter. When
this parameter is supplied, setserial instructs the kernel to attempt to automat-
ically determine the UART type located at the supplied port address. If the auto_
irq parameter is also supplied, the kernel attempts to automatically determine the
IRQ, too.
skip_test This parameter instructs the kernel not to bother performing the UART type test dur-
ing auto-configuration. This is necessary when the UART is incorrectly detected by
the kernel.

This is the Title of the Book, eMatter Edition
Copyright © 2007 O’Reilly & Associates, Inc. All rights reserved.
36 |Chapter 3: Configuring the Serial Hardware
A typical and simple rc file to configure your serial ports at boot time might look
something like that shown in Example 3-1. Most Linux distributions will include
something slightly more sophisticated than this one.
The -bg /dev/ttyS* argument in the last command will print a neatly formatted sum-
mary of the hardware configuration of all active serial devices. The output will look
like that shown in Example 3-2.
The stty Command
The name stty probably means “set tty,” but the stty command can also be used to
display a terminal’s configuration. Perhaps even more so than setserial, the stty com-
mand provides a bewildering number of characteristics that you can configure. We’ll
cover the most important of these in a moment. You can find the rest described in
the stty manpage.
The stty command is most commonly used to configure terminal parameters, such as
whether characters will be echoed or what key should generate a break signal. We
explained earlier that serial devices are tty devices and the stty command is therefore
equally applicable to them.
One of the more important uses of the stty for serial devices is to enable hardware
handshaking on the device. We talked briefly about hardware handshaking earlier in
this chapter. The default configuration for serial devices is for hardware handshak-
ing to be disabled. This setting allows “three wire” serial cables to work; they don’t
support the necessary signals for hardware handshaking, and if it were enabled by
default, they’d be unable to transmit any characters to change it.
Surprisingly, some serial communications programs don’t enable hardware hand-
shaking, so if your modem supports hardware handshaking, you should configure
the modem to use it (check your modem manual for what command to use), and
Example 3-1. rc.serial setserial commands
# /etc/rc.serial - serial line configuration script.
#
# Configure serial devices
/sbin/setserial /dev/ttyS0 auto_irq skip_test autoconfig
/sbin/setserial /dev/ttyS1 auto_irq skip_test autoconfig
/sbin/setserial /dev/ttyS2 auto_irq skip_test autoconfig
/sbin/setserial /dev/ttyS3 auto_irq skip_test autoconfig
#
# Display serial device configuration
/sbin/setserial -bg /dev/ttyS*
Example 3-2. Output of setserial -bg /dev/ttyS command
/dev/ttyS0 at 0x03f8 (irq = 4) is a 16550A
/dev/ttyS1 at 0x02f8 (irq = 3) is a 16550A

This is the Title of the Book, eMatter Edition
Copyright © 2007 O’Reilly & Associates, Inc. All rights reserved.
Using the Configuration Utilities |37
also configure your serial device to use it. The stty command has a crtscts flag that
enables hardware handshaking on a device; you’ll need to use this. The command is
probably best issued from the rc.serial file (or equivalent) at boot time using com-
mands such as those shown in Example 3-3.
The stty command works on the current terminal by default, but by using the input
redirection (<) feature of the shell, we can have stty manipulate any tty device. It’s a
common mistake to forget whether you are supposed to use < or >; modern versions
of the stty command have a much cleaner syntax for doing this. To use the new syn-
tax, we’d rewrite our sample configuration to look like that shown in Example 3-4.
We mentioned that the stty command can be used to display the terminal configura-
tion parameters of a tty device. To display all of the active settings on a tty device,
use:
$ stty -a -F /dev/ttyS1
The output of this command, shown in Example 3-5, gives you the status of all flags
for that device; a flag shown with a preceding minus, as in -crtscts, means that the
flag has been turned off.
Example 3-3. rc.serial stty commands
#
stty crtscts < /dev/ttyS0
stty crtscts < /dev/ttyS1
stty crtscts < /dev/ttyS2
stty crtscts < /dev/ttyS3
#
Example 3-4. rc.serial stty commands using modern syntax
#
stty crtscts -F /dev/ttyS0
stty crtscts -F /dev/ttyS1
stty crtscts -F /dev/ttyS2
stty crtscts -F /dev/ttyS3
#
Example 3-5. Output of stty -a command
speed 19200 baud; rows 0; columns 0; line = 0;
intr = ^C; quit = ^\; erase = ^?; kill = ^U; eof = ^D; eol = <undef>;
eol2 = <undef>; start = ^Q; stop = ^S; susp = ^Z; rprnt = ^R;
werase = ^W; lnext = ^V; flush = ^O; min = 1; time = 0;
-parenb -parodd cs8 hupcl -cstopb cread clocal -crtscts
-ignbrk -brkint -ignpar -parmrk -inpck -istrip -inlcr -igncr -icrnl -ixon
-ixoff -iuclc -ixany -imaxbel
-opost -olcuc -ocrnl onlcr -onocr -onlret -ofill -ofdel nl0 cr0 tab0
bs0 vt0 ff0
-isig -icanon iexten echo echoe echok -echonl -noflsh -xcase -tostop
-echoprt echoctl echoke

This is the Title of the Book, eMatter Edition
Copyright © 2007 O’Reilly & Associates, Inc. All rights reserved.
38 |Chapter 3: Configuring the Serial Hardware
A description of the most important of these flags is given in Table 3-2. Each of these
flags is enabled by supplying it to stty and disabled by supplying it to stty with the -
character in front of it. Thus, to disable hardware handshaking on the ttyS0 device,
you would use:
$stty -crtscts -F /dev/ttyS0
The next example combines some of these flags and sets the ttyS0 device to 19,200
bps, 8 data bits, no parity, and hardware handshaking with echo disabled:
$stty 19200 cs8 -parenb crtscts -echo -F /dev/ttyS0
Serial Devices and the login: Prompt
It was once very common that a Unix installation involved one server machine and
many “dumb” character mode terminals or dial-up modems. Today that sort of
installation is less common, which is good news for many people interested in oper-
ating this way, because the “dumb” terminals are now very cheap to acquire. Dial-up
modem configurations are no less common, but these days they would probably be
used to support a PPP login (discussed in Chapter 6) rather than a simple login. Nev-
ertheless, each of these configurations can make use of a simple program called a
getty program.
The term getty is probably a contraction of “get tty.” A getty program opens a serial
device, configures it appropriately, optionally configures a modem, and waits for a
connection to be made. An active connection on a serial device is usually indicated
by the Data Carrier Detect (DCD) pin on the serial device being raised. When a con-
nection is detected, the getty program issues a login: prompt, and then invokes the
login program to handle the actual system login. Each of the virtual terminals (e.g., /
dev/tty1) in Linux has a getty running against it.
Table 3-2. stty flags most relevant to configuring serial devices
Flags Description
NSet the line speed to N bits per second.
crtsdts Enable/disable hardware handshaking.
ixon Enable/disable XON/XOFF flow control.
clocal Enable/disable modem control signals such as DTR/DTS and DCD. This is necessary if you
are using a “three wire” serial cable because it does not supply these signals.
cs5 cs6 cs7 cs8 Set number of data bits to 5, 6, 7, or 8, respectively.
parodd Enable odd parity. Disabling this flag enables even parity.
parenb Enable parity checking. When this flag is negated, no parity is used.
cstopb Enable use of two stop bits per character. When this flag is negated, one stop bit per
character is used.
echo Enable/disable echoing of received characters back to sender.

This is the Title of the Book, eMatter Edition
Copyright © 2007 O’Reilly & Associates, Inc. All rights reserved.
Serial Devices and the login: Prompt |39
There are a number of different getty implementations, each designed to suit some
configurations better than others. The getty that we’ll describe here is called mgetty,
which is quite popular because it has all sorts of features that make it especially
modem-friendly, including support for automatic fax programs and voice modems.
We’ll concentrate on configuring mgetty to answer conventional data calls and leave
the rest for you to explore at your convenience.
Configuring the mgetty Daemon
The mgetty daemon is available in just about all Linux distributions in prepackaged
form. The mgetty daemon differs from most other getty implementations in that it
has been designed specifically for modems with the AT command set.
It still supports direct terminal connections but is best suited for dialup applications.
Rather than using the DCD line to detect an incoming call, it listens for the RING mes-
sage generated by modern modems when they detect an incoming call and are not
configured for auto-answer.
The main executable program is called /usr/sbin/mgetty, and its main configuration
file is called /etc/mgetty/mgetty.config. There are a number of other binary programs
and configuration files that cover other mgetty features.
For most installations, configuration is a matter of editing the /etc/mgetty/ mgetty.
config file and adding appropriate entries to the /etc/inittab file to execute mgetty
automatically.
Example 3-6 shows a very simple mgetty configuration file. This example configures
two serial devices. The first, /dev/ttyS0, supports a Hayes-compatible modem at
38,400 bps. The second, /dev/ttyS0, supports a directly connected VT100 terminal at
19,200 bps.
Example 3-6. Sample /etc/mgetty/mgetty.config file
#
# mgetty configuration file
#
# this is a sample configuration file, see mgetty.info for details
#
# comment lines start with a "#", empty lines are ignored
#
# ----- global section -----
#
# In this section, you put the global defaults, per-port stuff is below
#
# access the modem(s) with 38400 bps
speed 38400
#
# set the global debug level to "4" (default from policy.h)
debug 4
#

This is the Title of the Book, eMatter Edition
Copyright © 2007 O’Reilly & Associates, Inc. All rights reserved.
40 |Chapter 3: Configuring the Serial Hardware
The configuration file supports global and port-specific options. In our example we
used a global option to set the speed to 38,400 bps. This value is inherited by the
ttyS0 port. Ports we apply mgetty to use this speed setting unless it is overwritten by
a port-specific speed setting, as we have done in the ttyS1 configuration.
The debug keyword controls the verbosity of mgetty logging. The data-only keyword
in the ttyS0 configuration causes mgetty to ignore any modem fax features, to oper-
ate just as a data modem. The direct keyword in the ttyS1 configuration instructs
mgetty not to attempt any modem initialization on the port. Finally, the toggle-dtr
keyword instructs mgetty not to attempt to hang up the line by dropping the Data
Terminal Ready (DTR) pin on the serial interface; some terminals don’t like this to
happen.
You can also choose to leave the mgetty.config file empty and use command-line
arguments to specify most of the same parameters. The documentation accompany-
ing the application includes a complete description of the mgetty configuration file
parameters and command-line arguments. See the following example.
We need to add two entries to the /etc/inittab file to activate this configuration. The
inittab file is the configuration file of the Unix System V init command. The init com-
mand is responsible for system initialization; it provides a means of automatically
executing programs at boot time and re-executing them when they terminate. This is
ideal for the goals of running a getty program.
T0:23:respawn:/sbin/mgetty ttyS0
T1:23:respawn:/sbin/mgetty ttyS1
Each line of the /etc/inittab file contains four fields, separated by colons. The first
field is an identifier that uniquely labels an entry in the file; traditionally it is two
characters, but modern versions allow four. The second field is the list of run levels
# ----- port specific section -----
#
# Here you can put things that are valid only for one line, not the others
#
#
# Hayes modem connected to ttyS0: don't do fax, less logging
#
port ttyS0
debug 3
data-only y
#
# direct connection of a VT100 terminal which doesn't like DTR drops
#
port ttyS1
direct y
speed 19200
toggle-dtr n
#
Example 3-6. Sample /etc/mgetty/mgetty.config file (continued)

This is the Title of the Book, eMatter Edition
Copyright © 2007 O’Reilly & Associates, Inc. All rights reserved.
Serial Devices and the login: Prompt |41
at which this entry should be active. A run level is a means of providing alternate
machine configurations and is generally implemented using trees of startup scripts
stored in directories called /etc/rc1.d,/etc/rc2.d, etc. This feature is typically imple-
mented very simply, and you should model your entries on others in the file or refer
to your system documentation for more information. The third field describes when
to take action. For the purposes of running a getty program, this field should be set
to respawn, meaning that the command should be re-executed automatically when it
dies. There are several other options, as well, but they are not useful for our pur-
poses here. The fourth field is the actual command to execute; this is where we spec-
ify the mgetty command and any arguments we wish to pass it. In our simple
example we’re starting and restarting mgetty whenever the system is operating at
either of run levels two or three, and are supplying as an argument just the name of
the device we wish it to use. The mgetty command assumes the /dev/, so we don’t
need to supply it.
This chapter was a quick introduction to mgetty and how to offer login prompts to
serial devices. You can find more extensive information in the Serial HOWTO.
After you’ve edited the configuration files, you need to reload init to make the
changes take effect. Simply send a hangup signal to the init process; it always has a
process ID of one, so you can use the following command safely:
#kill -HUP 1

This is the Title of the Book, eMatter Edition
Copyright © 2007 O’Reilly & Associates, Inc. All rights reserved.
42
Chapter 4
CHAPTER 4
Configuring TCP/IP
Networking
In this chapter, we walk you through all the necessary steps to set up TCP/IP net-
working on your machine. Starting with the assignment of IP addresses, we slowly
work our way through the configuration of TCP/IP network interfaces and intro-
duce a few tools that come in handy when hunting down network installation prob-
lems.
Most of the tasks covered in this chapter will generally have to be done only once.
Afterward, you have to touch most configuration files only when adding a new sys-
tem to your network or reconfiguring your system entirely. Some of the commands
used to configure TCP/IP, however, have to be executed each time the system is
booted. This is usually done by invoking them from the system /etc/rc scripts.
Commonly, the network-specific part of this procedure is contained in a script. The
name of this script varies in different Linux distributions. In many older Linux distri-
butions, it is known as rc.net or rc.inet. Sometimes you will also see two scripts
named rc.inet1 and rc.inet2; the former initializes the kernel part of networking and
the latter starts basic networking services and applications. In modern distributions,
the rc files are structured in a more sophisticated arrangement; here you may find
scripts in the /etc/init.d/ (or /etc/rc.d/init.d/) directory that create the network devices
and other rc files that run the network application programs. This book’s examples
are based on the latter arrangement.
This chapter discusses parts of the script that configure your network interfaces.
After finishing this chapter, you should have established a sequence of commands
that properly configure TCP/IP networking on your computer. You should then
replace any sample commands in the configuration scripts with your commands,
make sure the script is executed from the basic rc script at startup time, and reboot
your machine. The networking rc scripts that come along with your favorite Linux
distribution should provide a solid example from which to work.

This is the Title of the Book, eMatter Edition
Copyright © 2007 O’Reilly & Associates, Inc. All rights reserved.
Understanding the /proc Filesystem |43
Understanding the /proc Filesystem
Linux 2.4 distributions rely on the /proc filesystem for communicating with the ker-
nel, 2.6 uses the new sysfs. Both interfaces permit access to kernel runtime informa-
tion through a filesystem-like mechanism. For purposes of this chapter, we’ll focus
more on the /proc filesystem, as it is currently more widely used. This filesystem,
when mounted, can list files like any other filesystem, or display their contents. Typi-
cal items include the loadavg file, which contains the system load average, and mem-
info, which shows current core memory and swap usage.
To this, the networking code adds the net directory. It contains a number of files that
show things such as the kernel ARP tables, the state of TCP connections, and the
routing tables. Most network administration tools get their information from these
files.
The proc filesystem (or procfs, as it is also known) is usually mounted on /proc at sys-
tem boot time. The best method is to add the following line to /etc/fstab:
# procfs mount point:
none /proc proc defaults
Then execute mount /proc from your /etc/rc script.
The procfs is now configured into most kernels by default.
Installing the Tools
Prepackaged Linux distributions contain the major networking applications and util-
ities along with a coherent set of sample files. The only case in which you might have
to obtain and install new utilities is when you install a new kernel release. Because
they occasionally involve changes in the kernel networking layer, you will need to
update the basic configuration tools. This update at least involves recompiling, but
sometimes you may also be required to obtain the latest set of binaries. These bina-
ries are available at their official home site at ftp://ftp.inka.de/pub/comp/Linux/
networking/NetTools/, packaged in an archive called net-tools-XXX.tar.gz, where
XXX is the version number.
If you want to compile and install the standard TCP/IP network applications your-
self, you can obtain the sources from most Linux FTP servers. All modern Linux dis-
tributions include a fairly comprehensive range of TCP/IP network applications,
such as World Wide Web browsers, Telnet and FTP programs, and other network
applications such as talk. If you do find something that you need to compile your-
self, the chances are good that it will compile under Linux from source quite easily if
you follow the instructions included in the source package.

This is the Title of the Book, eMatter Edition
Copyright © 2007 O’Reilly & Associates, Inc. All rights reserved.
44 |Chapter 4: Configuring TCP/IP Networking
Setting the Hostname
Most, if not all, network applications rely on you to set the local host’s name to some
reasonable value. This setting is usually made during the boot procedure by execut-
ing the hostname command. To set the hostname to name, enter:
#hostname name
It is common practice to use the unqualified hostname without specifying the
domain name. For instance, if we had a site called the Virtual Brewery (an imaginary
but typical small network used in several chapters of this book) a host might be
called vale.vbrew.com or vlager.vbrew.com. These are their official fully qualified
domain names (FQDNs). Their local hostnames would be the first component of the
name, such as vale. However, because the local hostname is frequently used to look
up the host’s IP address, you have to make sure that the resolver library is able to
look up the host’s IP address. This usually means that you have to enter the name in
/etc/hosts.
Some people suggest using the domainname command to set the kernel’s idea of a
domain name to the remaining part of the FQDN. This way you could combine the
output from hostname and domainname to get the FQDN again. However, this is at
best only half correct. domainname is generally used to set the host’s NIS domain,
which may be entirely different from the DNS domain to which your host belongs.
Instead, to ensure that the short form of your hostname is resolvable with all recent
versions of the hostname command, either add it as an entry in your local Domain
Name Server or place the fully qualified domain name in the /etc/hosts file. You may
then use the --fqdn argument to the hostname command, and it will print the fully
qualified domain name.
Assigning IP Addresses
If you configure the networking software on your host for standalone operation, you
can safely skip this section, because the only IP address you will need is for the loop-
back interface, which is always 127.0.0.1.
Things are a little more complicated with real networks such as Ethernets. If you
want to connect your host to an existing network, you have to ask its administrators
to give you an IP address on this network, though this is not always the case. Many
networks now have a system of dynamically assigned IPs called Dynamic Host Con-
figuration Protocol (DHCP), which we will discuss in the next section. When setting
up a network all by yourself, you have to assign IP addresses by hand or by configur-
ing a DHCP server. If you have a machine connected directly to the Internet, you will
need to obtain an IP address from your ISP, DSL provider, or cable network.

This is the Title of the Book, eMatter Edition
Copyright © 2007 O’Reilly & Associates, Inc. All rights reserved.
Understanding the /proc Filesystem |45
Hosts within a local network usually share addresses from the same logical IP net-
work, meaning that the first octets of their IP addresses are usually the same. If you
have several physical networks, you have to either assign them different network
numbers, or use subnetting to split your IP address range into several subnetworks.
Subnetting will be revisited in the “Creating Subnets” section later in this chapter.
If your network is not connected to the Internet or will use network address transla-
tion to connect, you are free to choose any legal network address. Just make sure no
packets from your internal network escape to the real Internet. To make sure no
harm can be done even if packets do escape, you should use one of the network num-
bers reserved for private use. The Internet Assigned Numbers Authority (IANA) has
set aside several network numbers from classes A, B, and C that you can use without
registering. These addresses are valid only within your private network and are not
routed between real Internet sites. The numbers are defined by RFC 1918 and are
listed in Table 2-1 in Chapter 2. Note that the second and third blocks contain 16
and 256 networks, respectively.
Picking your addresses from one of these network numbers is not only useful for net-
works completely unconnected to the Internet; you can still implement restricted
access to the Internet using a single host as a gateway. To your local network, the
gateway is accessible by its internal IP address, while the outside world knows it by
an officially registered address (assigned to you by your provider). We come back to
this concept in connection with the IP masquerade facility in Chapter 9.
Throughout the remainder of the book, we will assume that the brewery’s network
manager uses a class B network number, say 172.16.0.0. Of course, a class C net-
work number would definitely suffice to accommodate both the brewery’s and the
winery’s networks. We’ll use a class B network here for the sake of simplicity; it will
make the subnetting examples in the next section of this chapter a little more intui-
tive.
Using DHCP to Obtain an IP Address
Many networks now use the Dynamic Host Configuration Protocol (DHCP). This
protocol runs on network layer two and listens for DHCP requests. The DHCP
server has a predefined listing of IP address assigned by the network administrator,
which can be assigned to users. When the DHCP receives a request for an IP address,
it replies by issuing a DHCP lease. The lease means that the IP address is assigned to
the requesting client for a predetermined amount of time. Busy networks often set
the lease for a fixed number of hours to prevent the use of an address by an idle
machine. Some networks set the threshold as low as two hours. Smaller networks
may wish to set the DHCP lease times to a longer value, perhaps a day, or even a
week. The value is entirely up to the network administrator and should be based on
network usage.

This is the Title of the Book, eMatter Edition
Copyright © 2007 O’Reilly & Associates, Inc. All rights reserved.
46 |Chapter 4: Configuring TCP/IP Networking
To request a DHCP lease on a network, you will need to have the dhcpcd software.
The latest version of the software can be obtained by visiting its home site http://
www.phystech.com/download/dhcpcd.html. There you will find the latest versions of
the software as well as supporting documentation. Many modern Linux distribu-
tions will come with this software preinstalled and will even allow you to configure
your interfaces with DHCP during the initial setup and configuration of the system.
Obtaining an IP address via DHCP is simple and is accomplished by issuing the fol-
lowing command:
vlager# dhcpcd eth0
vlager#
The daemon will at this point, reconfigure your eth0 interface, not only assigning an
IP address, but also properly configuring the subnetting. Many DHCP servers will
also provide default route and DNS information. In the case of the latter, your /etc/
resolv.conf file will be rewritten with the updated DNS server information. If for
some reason you do not want the daemon to rewrite your resolv.conf file, you can
specify -R on the command line. There are a number of additional command-line
options available for dhcpcd, which may be needed in some environments. For a list
of these, please contact the dhcpcd manpage. The resolv.conf file will be discussed in
greater detail in the chapter on DNS.
Running a DHCP server
With larger, more dynamic networks, DHCP is essential. However, in order for this
service to be offered, the clients must receive their IP address from a DHCP server.
While a number of routers, firewalls, and other network devices will offer this func-
tionality, a network administrator may wish to consider using a Linux machine to
provide it. Linux DHCP servers tend to provide a greater flexibility with their config-
uration options. There are a number of DHCP servers available, but one of the more
popular and better recommended offerings comes from the ISC and can be found at
ftp://ftp.isc.org/isc/dhcp/. The configuration and installation of this is very standard
and uses the well-known automake configuration script. When the software has been
compiled and installed, you are ready to begin configuration.
First, though, you need to make sure that your network interfaces are configured for
multicast support. This is most easily checked by using the ifconfig command:
ticktock root # ifconfig
eth0 Link encap:Ethernet HWaddr C0:FF:EE:C0:FF:EE
inet addr:172.16.1.1 Bcast:172.16.1.255 Mask:255.255.255.0
UP BROADCAST RUNNING MULTICAST MTU:1500 Metric:1
RX packets:80272 errors:0 dropped:0 overruns:0 frame:0
TX packets:55339 errors:0 dropped:0 overruns:0 carrier:0
collisions:0 txqueuelen:100
RX bytes:8522502 (8.1 Mb) TX bytes:9203192 (8.7 Mb)
Interrupt:10 Base address:0x4000

This is the Title of the Book, eMatter Edition
Copyright © 2007 O’Reilly & Associates, Inc. All rights reserved.
Understanding the /proc Filesystem |47
If you don’t see MULTICAST specified in the output, you need to reconfigure your ker-
nel to support network multicast. The likelihood of this is slim because most kernel
configurations contain this as a default option.
Now you’re ready to write a dhcpd.conf file. A sample dhcpd.conf file looks like this:
# Sample DHCP Server Configuration
option domain-name "vbrew.com";
option domain-name-servers ns1.vbrew.com, ns2.vbrew.com;
default-lease-time 1600;
max-lease-time 7200;
log-facility local7;
# This is a very basic subnet declaration.
subnet 172.16.1.0 netmask 255.255.255.0 {
range 172.16.1.10 172.16.1.50;
option routers router1.vbrew.com;
}
This configuration will create which will assign addresses on the 172.16.1.0 net-
work. It can assign a total of 40 IP addresses from 172.16.1.10 to 172.16.1.50. The
option routers and domain-name-servers commands allow you to set the default
router and DNS servers for the clients.
Here’s a brief listing of some of the more useful DHCP server configuration options:
option domain-name
Between quotes, you have the ability to specify the domain name for your net-
work. This isn’t necessary, but may be useful to speed up local name lookups.
option domain-name-servers
While considered optional, in most cases it is not. This is where the IP addresses
or the FQDN domain name servers are listed.
default-lease-time
When a host asks for a lease and does not request a specific amount of time, this
value, in seconds, is assigned.
max-lease-time
This option specifies the maximum amount of time that will be assigned as a
lease.
fixed-address
The fixed address option lets you assign a fixed IP address to specific clients.
This option is generally paired with the MAC address filtering options.
hardware Ethernet
With this option, network administrators can specify which MAC addresses will
receive IP address allocations. This can be used to secure a DHCP range, or can
be used to pair MAC addresses with specific IP addresses.

This is the Title of the Book, eMatter Edition
Copyright © 2007 O’Reilly & Associates, Inc. All rights reserved.
48 |Chapter 4: Configuring TCP/IP Networking
The DHCP server can use the client MAC address as a method to restrict or assign IP
addresses. This type of configuration might be necessary in higher security environ-
ments where only known machines are to be assigned addresses. The following
example shows how the DHCP server can assign a specific address to a host based
on its MAC address, also important to note is that the range directive can be used
here as well:
host vale {
hardware ethernet 0:0f:d0:ee:ag:4e;
fixed-address 172.16.1.55;
}
Make sure that your DHCP address pool ranges do not contain statically assigned
addresses, otherwise IP address conflict problems are sure to follow.
Creating Subnets
To operate several Ethernets, you have to split your network into subnets. Note that
subnetting is required only if you have more than one broadcast network—point-to-
point links don’t count. For instance, if you have one Ethernet, and one or more PPP
links to the outside world, you don’t need to subnet your network. This is explained
in more detail in Chapter 6.
To accommodate the two Ethernets, the brewery’s network manager decides to use 8
bits of the host part as additional subnet bits. This leaves another 8 bits for the host
part, allowing for 254 hosts on each of the subnets. She then assigns subnet number
1 to the brewery and gives the winery number 2. Their respective network addresses
are thus 172.16.1.0 and 172.16.2.0. The subnet mask is 255.255.255.0.
vlager, which is the gateway between the two networks, is assigned a host number of
1 on both of them, which gives it the IP addresses 172.16.1.1 and 172.16.2.1,
respectively.
Note that in this example we are using a class B network to keep things simple, but a
class C network would be more realistic. With the new networking code, subnetting
is not limited to byte boundaries, so even a class C network may be split into several
subnets. For instance, you could use two bits of the host part for the netmask, giving
you 4 possible subnets with 64 hosts on each.*
Writing Hosts and Networks Files
After you have subnetted your network, you should prepare for some simple sort of
hostname resolution using the /etc/hosts file. If you are not going to use DNS or NIS
for address resolution, you have to put all hosts in the hosts file.
* The first number on each subnet is the subnetwork address, and the last number on each subnet, is reserved
as the broadcast address, so it’s actually 62 hosts per subnet.

This is the Title of the Book, eMatter Edition
Copyright © 2007 O’Reilly & Associates, Inc. All rights reserved.
Understanding the /proc Filesystem |49
Even if you want to run DNS during normal operation, you should have some sub-
set of all hostnames in /etc/hosts. You should have some sort of name resolution,
even when no network interfaces are running, for example, during boot time. This is
not only a matter of convenience, but it allows you to use symbolic hostnames in
your network rc scripts. Thus, when changing IP addresses, you only have to copy an
updated hosts file to all machines and reboot, rather than edit a large number of rc
files separately. Usually you put all local hostnames and addresses in hosts, adding
those of any gateways and NIS servers used.
You should make sure that your resolver uses information from the hosts file only
during initial testing. Sample files that come with your DNS software may produce
strange results. To make all applications use /etc/hosts exclusively when looking up
the IP address of a host, you have to edit the /etc/host.conf file. Comment out any
lines that begin with the keyword order by preceding them with a hash sign, and
insert the line:
order hosts
The configuration of the resolver library is covered in detail in Chapter 6.
The hosts file contains one entry per line, consisting of an IP address, a hostname,
and an optional list of aliases for the hostname. The fields are separated by spaces or
tabs, and the address field must begin in the first column. Anything following a hash
sign (#) is regarded as a comment and is ignored.
Hostnames can be either fully qualified or relative to the local domain. For vale, you
would usually enter the fully qualified name, vale.vbrew.com, and vale by itself in
the hosts file, so that it is known by both its official name and the shorter local name.
This is an example how a hosts file at the Virtual Brewery might look. Two special
names are included, vlager-if1 and vlager-if2, which give the addresses for both
interfaces used on vlager:
#
# Hosts file for Virtual Brewery/Virtual Winery
#
# IP FQDN aliases
#
127.0.0.1 localhost
#
172.16.1.1 vlager.vbrew.com vlager vlager-if1
172.16.1.2 vstout.vbrew.com vstout
172.16.1.3 vale.vbrew.com vale
#
172.16.2.1 vlager-if2
172.16.2.2 vbeaujolais.vbrew.com vbeaujolais
172.16.2.3 vbardolino.vbrew.com vbardolino
172.16.2.4 vchianti.vbrew.com vchianti

This is the Title of the Book, eMatter Edition
Copyright © 2007 O’Reilly & Associates, Inc. All rights reserved.
50 |Chapter 4: Configuring TCP/IP Networking
Just as with a host’s IP address, you should sometimes use a symbolic name for net-
work numbers, too. Therefore, the hosts file has a companion called /etc/networks
that maps network names to network numbers, and vice versa. At the Virtual Brew-
ery, we might install a networks file as shown in the following.*
# /etc/networks for the Virtual Brewery
brew-net 172.16.1.0
wine-net 172.16.2.0
Interface Configuration for IP
After setting up your hardware as explained in Chapter 3, you have to make these
devices known to the kernel networking software. A couple of commands are used to
configure the network interfaces and initialize the routing table. These tasks are usu-
ally performed from the network initialization script each time you boot the system.
The basic tools for this process are called ifconfig (where “if” stands for interface)
and route.
ifconfig is used to make an interface accessible to the kernel networking layer. This
involves the assignment of an IP address and other parameters, and activation of the
interface, also known as “bringing up” the interface. Being active here means that the
kernel will send and receive IP datagrams through the interface. The simplest way to
invoke it is with:
ifconfig interface ip-address
This command assigns ip-address to interface and activates it. All other parameters
are set to default values. For instance, the default network mask is derived from the
network class of the IP address, such as 255.255.0.0 for a class B address. ifconfig is
described in detail later in this chapter.
route allows you to add or remove routes from the kernel routing table. It can be
invoked as:
route [add|del] [-net|-host] target [if]
The add and del arguments determine whether to add or delete the route to target.
The -net and -host arguments tell the route command whether the target is a net-
work or a host. The if argument is again optional, and allows you to specify to
which network interface the route should be directed—the Linux kernel makes a
sensible guess if you don’t supply this information. This topic will be explained in
more detail in succeeding sections.
* Note that names in networks must not collide with hostnames from the hosts file, or else some programs may
produce strange results.

This is the Title of the Book, eMatter Edition
Copyright © 2007 O’Reilly & Associates, Inc. All rights reserved.
Understanding the /proc Filesystem |51
The Loopback Interface
Almost always, the very first interface to be activated is the loopback interface:
#ifconfig lo 127.0.0.1
Occasionally, you will see the dummy hostname localhost being used instead of the
IP address. ifconfig will look up the name in the hosts file, where an entry should
declare it as the hostname for 127.0.0.1:
# Sample /etc/hosts entry for localhost
localhost 127.0.0.1
To view the configuration of an interface, you invoke ifconfig, giving it only the
interface name as argument:
$ifconfig lo
lo Link encap:Local Loopback
inet addr:127.0.0.1 Mask:255.0.0.0
UP LOOPBACK RUNNING MTU:3924 Metric:1
RX packets:0 errors:0 dropped:0 overruns:0 frame:0
TX packets:0 errors:0 dropped:0 overruns:0 carrier:0
Collisions:0
As you can see, the loopback interface has been assigned a netmask of 255.0.0.0,
since 127.0.0.1 is a class A address.
Now you can almost start playing with your mini-network. What is still missing is an
entry in the routing table that tells IP that it may use this interface as a route to desti-
nation 127.0.0.1. This is accomplished by using:
#route add 127.0.0.1
Again, you can use localhost instead of the IP address, provided you’ve entered it
into your /etc/hosts.
Next, you should check that everything works fine, for example, by using ping.ping
is the networking equivalent of a sonar device. The command is used to verify that a
given address is actually reachable, and to measure the delay that occurs when send-
ing a datagram to it and back again. The time required for this process is often
referred to as the “round-trip time”:
#ping localhost
PING localhost (127.0.0.1): 56 data bytes
64 bytes from 127.0.0.1: icmp_seq=0 ttl=255 time=0.4 ms
64 bytes from 127.0.0.1: icmp_seq=1 ttl=255 time=0.4 ms
64 bytes from 127.0.0.1: icmp_seq=2 ttl=255 time=0.4 ms
^C
--- localhost ping statistics ---
3 packets transmitted, 3 packets received, 0% packet loss
round-trip min/avg/max = 0.4/0.4/0.4 ms
#

This is the Title of the Book, eMatter Edition
Copyright © 2007 O’Reilly & Associates, Inc. All rights reserved.
52 |Chapter 4: Configuring TCP/IP Networking
When you invoke ping as shown here, it will continue emitting packets forever,
unless interrupted by the user. The ^C marks the place where we pressed Ctrl-C.
The previous example shows that packets for 127.0.0.1 are properly delivered and a
reply is returned to ping almost instantaneously. This shows that you have success-
fully set up your first network interface.
If the output you get from ping does not resemble that shown in the previous exam-
ple, you are in trouble. Check any errors if they indicate that some file hasn’t been
installed properly. Check that the ifconfig and route binaries you use are compatible
with the kernel release you run, and above all, that the kernel has been compiled
with networking enabled (you see this from the presence of the /proc/net directory).
If you get an error message saying “Network unreachable,” you probably got the
route command wrong. Make sure you use the same address that you gave to ifcon-
fig.
The steps previously described are enough to use networking applications on a stan-
dalone host. After adding the lines mentioned earlier to your network initialization
script and making sure it will be executed at boot time, you may reboot your
machine and try out various applications. For instance, ssh localhost should estab-
lish an ssh connection to your host, giving you an SSH login prompt.
However, the loopback interface is useful not only as an example in networking
books, or as a test bed during development, but is actually used by some applica-
tions during normal operation.*Therefore, you always have to configure it, regard-
less of whether your machine is attached to a network or not.
Ethernet Interfaces
Configuring an Ethernet interface is pretty much the same as the loopback interface;
it just requires a few more parameters when you are using subnetting.
At the Virtual Brewery, we have subnetted the IP network, which was originally a
class B network, into class C subnetworks. To make the interface recognize this, the
ifconfig incantation would look like this:
#ifconfig eth0 vstout netmask 255.255.255.0
This command assigns the eth0 interface the IP address of vstout (172.16.1.2). If we
omitted the netmask, ifconfig would deduce the netmask from the IP network class,
which would result in an incorrect netmask of 255.255.0.0. Now a quick check
shows:
#ifconfig eth0
eth0 Link encap 10Mps Ethernet HWaddr 00:00:C0:90:B3:42
* For example, all applications based on RPC use the loopback interface to register themselves with the port-
mapper daemon at startup. These applications include NIS and NFS.

This is the Title of the Book, eMatter Edition
Copyright © 2007 O’Reilly & Associates, Inc. All rights reserved.
Understanding the /proc Filesystem |53
inet addr 172.16.1.2 Bcast 172.16.1.255 Mask 255.255.255.0
UP BROADCAST RUNNING MTU 1500 Metric 1
RX packets 0 errors 0 dropped 0 overrun 0
TX packets 0 errors 0 dropped 0 overrun 0
You can see that ifconfig automatically sets the broadcast address (the Bcast field) to
the usual value, which is the host’s network number with all the host bits set. Also,
the maximum transmission unit (the maximum size of IP datagrams the kernel will
generate for this interface) has been set to the maximum size of Ethernet packets:
1,500 bytes. The defaults are usually what you will use, but all these values can be
overidden if required, with special options that will be described under later in this
chapter.
Just as for the loopback interface, you now have to install a routing entry that
informs the kernel about the network that can be reached through eth0. For the Vir-
tual Brewery, you might invoke route as:
#route add -net 172.16.1.0
At first this looks a little like magic, because it’s not really clear how route detects
which interface to route through. However, the trick is rather simple: the kernel
checks all interfaces that have been configured so far and compares the destination
address (172.16.1.0 in this case) to the network part of the interface address (that is,
the bitwise AND of the interface address and the netmask). The only interface that
matches is eth0.
Now, what’s that -net option for? This is used because route can handle both routes
to networks and routes to single hosts (as you saw before with localhost). When
given an address in dotted quad notation, route attempts to guess whether it is a net-
work or a hostname by looking at the host part bits. If the address’s host part is zero,
route assumes it denotes a network; otherwise, route takes it as a host address.
Therefore, route would think that 172.16.1.0 is a host address rather than a net-
work number because it cannot know that we use subnetting. We have to tell route
explicitly that it denotes a network, so we give it the -net flag.
Of course, the route command is a little tedious to type, and it’s prone to spelling
mistakes. A more convenient approach is to use the network names we defined in
/etc/networks. This approach makes the command much more readable; even the
-net flag can be omitted because route knows that 172.16.1.0 denotes a network:
#route add brew-net
Now that you’ve finished the basic configuration steps, we want to make sure that
your Ethernet interface is indeed running happily. Choose a host from your Ether-
net, for instance vlager, and type:
#ping vlager
PING vlager: 64 byte packets
64 bytes from 172.16.1.1: icmp_seq=0. time=11. ms
64 bytes from 172.16.1.1: icmp_seq=1. time=7. ms

This is the Title of the Book, eMatter Edition
Copyright © 2007 O’Reilly & Associates, Inc. All rights reserved.
54 |Chapter 4: Configuring TCP/IP Networking
64 bytes from 172.16.1.1: icmp_seq=2. time=12. ms
64 bytes from 172.16.1.1: icmp_seq=3. time=3. ms
^C
----vstout.vbrew.com PING Statistics----
4 packets transmitted, 4 packets received, 0
round-trip (ms) min/avg/max = 3/8/12
If you don’t see similar output, something is broken. If you encounter unusual
packet loss rates, this hints at a hardware problem, such as bad or missing termina-
tors. If you don’t receive any replies at all, you should check the interface configura-
tion with netstat, described later in the chapter. The packet statistics displayed by
ifconfig should tell you whether any packets have been sent out on the interface at
all. If you have access to the remote host too, you should go over to that machine
and check the interface statistics. This way you can determine exactly where the
packets got dropped. In addition, you should display the routing information with
route to see whether both hosts have the correct routing entry. route prints out the
complete kernel routing table when invoked without any arguments (-n just makes it
print addresses as dotted quad instead of using the hostname):
#route -n
Kernel routing table
Destination Gateway Genmask Flags Metric Ref Use Iface
127.0.0.1 * 255.255.255.255 UH 1 0 112 lo
172.16.1.0 * 255.255.255.0 U 1 0 10 eth0
The detailed meaning of these fields is explained later in the chapter. The Flags col-
umn contains a list of flags set for each interface. Uis always set for active interfaces,
and Hsays the destination address denotes a host. If the Hflag is set for a route that
you meant to be a network route, you have to reissue the route command with the
-net option. To check whether a route you have entered is used at all, check to see if
the Use field in the second to last column increases between two invocations of ping.
Routing Through a Gateway
In the previous section, we covered only the case of setting up a host on a single
Ethernet. Quite frequently, however, one encounters networks connected to one
another by gateways. These gateways may simply link two or more Ethernets but
may also provide a link to the outside world, such as the Internet. In order to use a
gateway, you have to provide additional routing information to the networking layer.
The Ethernets of the Virtual Brewery and the Virtual Winery are linked through such
a gateway, namely the host vlager. Assuming that vlager has already been config-
ured, we just have to add another entry to vstout’s routing table that tells the kernel
it can reach all hosts on the winery’s network through vlager. The appropriate incan-
tation of route is shown below; the gw keyword tells it that the next argument
denotes a gateway:
#route add wine-net gw vlager

This is the Title of the Book, eMatter Edition
Copyright © 2007 O’Reilly & Associates, Inc. All rights reserved.
Understanding the /proc Filesystem |55
Of course, any host on the winery network you wish to talk to must have a routing
entry for the brewery’s network. Otherwise you would only be able to send data to
the winery network from the brewery network, but the hosts on the winery would be
unable to reply.
This example describes only a gateway that switches packets between two isolated
Ethernets. Now assume that vlager also has a connection to the Internet (say,
through an additional SLIP link). Then we would want datagrams to any destination
network other than the brewery to be handed to vlager. This action can be accom-
plished by making it the default gateway for vstout:
#route add default gw vlager
The network name default is shorthand for 0.0.0.0, which denotes the default route.
The default route matches every destination and will be used if there is no more spe-
cific route that matches. You do not have to add this name to /etc/networks because
it is built into route.
If you see high packet loss rates when pinging a host behind one or more gateways,
this may hint at a very congested network. Packet loss is not so much due to techni-
cal deficiencies as to temporary excess loads on forwarding hosts, which makes them
delay or even drop incoming datagrams.
Configuring a Gateway
Configuring a machine to switch packets between two Ethernets is pretty straightfor-
ward. Assume we’re back at vlager, which is equipped with two Ethernet cards, each
connected to one of the two networks. All you have to do is configure both inter-
faces separately, giving them their respective IP addresses and matching routes, and
that’s it.
It is quite useful to add information on the two interfaces to the hosts file as shown in
the following example, so we have handy names for them, too:
172.16.1.1 vlager.vbrew.com vlager vlager-if1
172.16.2.1 vlager-if2
The sequence of commands to set up the two interfaces is then:
#ifconfig eth0 vlager-if1
#route add brew-net
#ifconfig eth1 vlager-if2
#route add wine-net
If this sequence doesn’t work, make sure your kernel has been compiled with sup-
port for IP forwarding enabled. One good way to do this is to ensure that the first
number on the second line of /proc/net/snmp is set to 1.

This is the Title of the Book, eMatter Edition
Copyright © 2007 O’Reilly & Associates, Inc. All rights reserved.
56 |Chapter 4: Configuring TCP/IP Networking
The Point-to-Point Interface
A PLIP link used to connect two machines is a little different from an Ethernet. PLIP
links are an example of what are called point-to-point links, meaning that there is a
single host at each end of the link. Networks like Ethernet are called broadcast net-
works. Configuration of point-to-point links is different because unlike broadcast
networks, point-to-point links don’t support a network of their own.
PLIP provides very cheap and portable links between computers. As an example,
we’ll consider the laptop computer of an employee at the Virtual Brewery that is con-
nected to vlager via PLIP. The laptop itself is called vlite and has only one parallel
port. At boot time, this port will be registered as plip1. To activate the link, you have
to configure the plip1 interface using the following commands:*
#ifconfig plip1 vlite pointopoint vlager
#route add default gw vlager
The first command configures the interface, telling the kernel that this is a point-to-
point link, with the remote side having the address of vlager. The second installs the
default route, using vlager as gateway. On vlager, a similar ifconfig command is nec-
essary to activate the link (a route invocation is not needed):
#ifconfig plip1 vlager pointopoint vlite
Note that the plip1 interface on vlager does not need a separate IP address, but may
also be given the address 172.16.1.1. Point-to-point networks don’t support a net-
work directly, so the interfaces don’t require an address on any supported network.
The kernel uses the interface information in the routing table to avoid any possible
confusion.†Now we have configured routing from the laptop to the brewery’s net-
work; what’s still missing is a way to route from any of the brewery’s hosts to vlite.
One particularly cumbersome way is to add a specific route to every host’s routing
table that names vlager as a gateway to vlite:
#route add vlite gw vlager
Dynamic routing offers a much better option for temporary routes. You could use
gated, a routing daemon, which you would have to install on each host in the net-
work in order to distribute routing information dynamically. The easiest option,
however, is to use proxy ARP (Address Resolution Protocol). With proxy ARP,
vlager will respond to any ARP query for vlite by sending its own Ethernet address.
All packets for vlite will wind up at vlager, which then forwards them to the laptop.
We will come back to proxy ARP in the section “Checking the ARP Tables,” later in
the chapter.
* Note that pointopoint is not a typo. It really is spelled like this.
† As a matter of caution, you should configure a PLIP link only after you have completely set up the routing
table entries for your Ethernets. With some older kernels, your network route might otherwise end up point-
ing at the point-to-point link.

This is the Title of the Book, eMatter Edition
Copyright © 2007 O’Reilly & Associates, Inc. All rights reserved.
Understanding the /proc Filesystem |57
Current net-tools releases contain a tool called plipconfig, which allows you to set cer-
tain PLIP timing parameters. The IRQ to be used for the printer port can be set using
the ifconfig command.
The PPP Interface
Although PPP links are only simple point-to-point links like PLIP connections, there
is much more to be said about them. We discuss PPP in detail in Chapter 6.
IP Alias
The Linux kernel supports a feature that completely replaces the old dummy inter-
face and serves other useful functions. IP Alias allows you to configure multiple IP
addresses onto a physical device. In most cases, you could configure your host to
look like many different hosts, each with its own IP address. This configuration is
sometimes called virtual hosting, although technically it is also used for a variety of
other techniques.*
To configure an alias for an interface, you must first ensure that your kernel has been
compiled with support for IP Alias (check that you have a /proc/net/ip_alias file; if
not, you will have to recompile your kernel). Configuration of an IP alias is virtually
identical to configuring a real network device; you use a special name to indicate it’s
an alias that you want. For example:
#ifconfig eth0:0 172.16.1.1
This command would produce an alias for the eth0 interface with the address 172.
16.1.1. IP aliases are referred to by appending :nto the actual network device, in
which “n” is an integer. In our example, the network device we are creating the alias
on is eth0, and we are creating an alias numbered zero for it. This way, a single physi-
cal device may support a number of aliases.
Each alias may be treated as though it is a separate device, and as far as the kernel IP
software is concerned, it will be; however, it will be sharing its hardware with
another interface.
All About ifconfig
There are many more parameters to ifconfig than we have described so far. Its nor-
mal invocation is this:
ifconfig interface [address [parameters]]
* More correctly, using IP aliasing is known as network layer virtual hosting. It is more common in the WWW
and STMP worlds to use application layer virtual hosting, in which the same IP address is used for each vir-
tual host, but a different hostname is passed with each application layer request.

This is the Title of the Book, eMatter Edition
Copyright © 2007 O’Reilly & Associates, Inc. All rights reserved.
58 |Chapter 4: Configuring TCP/IP Networking
interface is the interface name, and address is the IP address to be assigned to the
interface. This may be either an IP address in dotted quad notation or a name that
ifconfig will look up in /etc/hosts.
If ifconfig is invoked with only the interface name, it displays that interface’s config-
uration. When invoked without any parameters, it displays all interfaces you have
configured so far; a -a option forces it to show the inactive ones as well. A sample
invocation for the Ethernet interface eth0 may look like this:
#ifconfig eth0
eth0 Link encap 10Mbps Ethernet HWaddr 00:00:C0:90:B3:42
inet addr 172.16.1.2 Bcast 172.16.1.255 Mask 255.255.255.0
UP BROADCAST RUNNING MTU 1500 Metric 0
RX packets 3136 errors 217 dropped 7 overrun 26
TX packets 1752 errors 25 dropped 0 overrun 0
The MTU and Metric fields show the current maximum transmission unit size and
metric value for that interface. The metric value is traditionally used by some operat-
ing systems to compute the cost of a route.
The RX and TX lines show how many packets have been received or transmitted error
free, how many errors occurred, how many packets were dropped (probably because
of low memory), and how many were lost because of an overrun. Receiver overruns
usually occur when packets come in faster than the kernel can service the last inter-
rupt. The flag values printed by ifconfig roughly correspond to the names of its com-
mand-line options; they will be explained later.
The following is a list of parameters recognized by ifconfig, with the corresponding
flag names. Options that simply turn on a feature also allow it to be turned off again
by preceding the option name by a dash (-).
up
This option makes an interface accessible to the IP layer. This option is implied
when an address is given on the command line. It may also be used to reenable
an interface that has been taken down temporarily using the down option.
This option corresponds to the flags UP and RUNNING.
down
This option marks an interface inaccessible to the IP layer. This effectively dis-
ables any IP traffic through the interface. Note that this option also automati-
cally deletes all routing entries that use this interface.
netmask mask
This option assigns a subnet mask to be used by the interface. It may be given as
either a 32-bit hexadecimal number preceded by 0x, or as a dotted quad of deci-
mal numbers. While the dotted quad format is more common, the hexadecimal
representation is often easier to work with. Netmasks are essentially binary, and
it is easier to do binary-to-hexadecimal than binary-to-decimal conversion.

This is the Title of the Book, eMatter Edition
Copyright © 2007 O’Reilly & Associates, Inc. All rights reserved.
Understanding the /proc Filesystem |59
pointopoint address
This option is used for point-to-point IP links that involve only two hosts. This
option is needed to configure SLIP or PLIP interfaces, for example. If a point-to-
point address has been set, ifconfig displays the POINTOPOINT flag.
broadcast address
The broadcast address is usually made up from the network number by setting
all bits of the host part. Some IP implementations (systems derived from BSD 4.2,
for instance) use a different scheme in which all host part bits are cleared instead.
The broadcast option adapts to these strange environments. If a broadcast
address has been set, ifconfig displays the BROADCAST flag.
irq
This option allows you to set the IRQ line used by certain devices. This is espe-
cially useful for PLIP, but may also be useful for certain Ethernet cards.
metric number
This option may be used to assign a metric value to the routing table entry cre-
ated for the interface. This metric is used by the RIP to build routing tables for
the network.*The default metric used by ifconfig is zero. If you don’t run a RIP
daemon, you don’t need this option at all; if you do, you will rarely need to
change the metric value.
mtu bytes
This sets the Maximum Transmission Unit, which is the maximum number of
octets the interface is able to handle in one transaction. For Ethernets, the MTU
defaults to 1,500 (the largest allowable size of an Ethernet packet); for SLIP
interfaces, it is 296. (There is no constraint on the MTU of SLIP links; this value
is a good compromise.)
arp
This is an option specific to broadcast networks such as Ethernets or packet
radio. It enables the use of the ARP to detect the physical addresses of hosts
attached to the network. For broadcast networks, it is on by default. If ARP is
disabled, ifconfig displays the NOARP flag.
-arp
This option disables the use of ARP on this interface.
promisc
This option puts the interface in promiscuous mode. On a broadcast network,
this makes the interface receive all packets, regardless of whether they were des-
tined for this host. This allows network traffic analysis using packet filters and
* RIP chooses the optimal route to a given host based on the “length” of the path. It is computed by summing
up the individual metric values of each host-to-host link. By default, a hop has length 1, but this may be any
positive integer less than 16. (A route length of 16 is equal to infinity. Such routes are considered unusable.)
The metric parameter sets this hop cost, which is then broadcast by the routing daemon.

This is the Title of the Book, eMatter Edition
Copyright © 2007 O’Reilly & Associates, Inc. All rights reserved.
60 |Chapter 4: Configuring TCP/IP Networking
such, also called Ethernet snooping. Usually, this is a good technique for hunting
down network problems that are otherwise hard to detect. Tools such as tcp-
dump rely on this.
On the other hand, this option allows attackers to do nasty things, such as skim
the traffic of your network for passwords. You can protect against this type of
attack by prohibiting just anyone from plugging their computers into your Ether-
net. You could also use secure authentication protocols, such as Kerberos or the
secure shell login suite.* This option corresponds to the PROMISC flag.
-promisc
This option turns promiscuous mode off.
allmulti
Multicast addresses are like Ethernet broadcast addresses, except that instead of
automatically including everybody, the only people who receive packets sent to a
multicast address are those programmed to listen to it. This is useful for applica-
tions such as Ethernet-based video conferencing or network audio, to which
only those interested can listen. Multicast addressing is supported by most, but
not all, Ethernet drivers. When this option is enabled, the interface receives and
passes multicast packets for processing. This option corresponds to the ALLMULTI
flag.
-allmulti
This option turns multicast addresses off.
The netstat Command
netstat is a useful tool for checking your network configuration and activity. It is in
fact a collection of several tools lumped together. We discuss each of its functions in
the following sections.
Displaying the routing table
When you invoke netstat with the -r flag, it displays the kernel routing table in the
way we’ve been doing with route. On vstout, it produces:
#netstat -nr
Kernel IP routing table
Destination Gateway Genmask Flags MSS Window irtt Iface
127.0.0.1 * 255.255.255.255 UH 0 0 0 lo
172.16.1.0 * 255.255.255.0 U 0 0 0 eth0
172.16.2.0 172.16.1.1 255.255.255.0 UG 0 0 0 eth0
* OpenSSH can be obtained from ftp://ftp.openbsd.org/OpenBSD/OpenSSH/portable.

This is the Title of the Book, eMatter Edition
Copyright © 2007 O’Reilly & Associates, Inc. All rights reserved.
Understanding the /proc Filesystem |61
The -n option makes netstat print addresses as dotted quad IP numbers rather than
the symbolic host and network names. This option is especially useful when you
want to avoid address lookups over the network (e.g., to a DNS or NIS server).
The second column of netstat’s output shows the gateway to which the routing entry
points. If no gateway is used, an asterisk is printed instead. The third column shows
the “generality” of the route, i.e., the network mask for this route. When given an IP
address to find a suitable route for, the kernel steps through each of the routing table
entries, taking the bitwise AND of the address and the genmask before comparing it
to the target of the route. The most specific match is used.
The fourth column displays the following flags that describe the route:
GThe route uses a gateway.
UThe interface to be used is up.
HOnly a single host can be reached through the route. For example, this is the
case for the loopback entry 127.0.0.1.
DThis route is dynamically created. It is set if the table entry has been generated
by a routing daemon such as gated or by an ICMP redirect message (see
Chapter 2).
MThis route is set if the table entry was modified by an ICMP redirect message.
!The route is a reject route and datagrams will be dropped.
The next three columns show the MSS, Window, and irtt that will be applied to TCP
connections established via this route. The MSS is the Maximum Segment Size and is
the size of the largest datagram the kernel will construct for transmission via this
route. The Window is the maximum amount of data the system will accept in a sin-
gle burst from a remote host. The acronym irtt stands for “initial round trip time.”
The TCP protocol ensures that data is reliably delivered between hosts by retransmit-
ting a datagram if it has been lost. The TCP protocol keeps a running count of how
long it takes for a datagram to be delivered to the remote end and an acknowledge-
ment to be received, so that it knows how long to wait before assuming a datagram
needs to retransmitted; this process is called the round-trip time. The initial round-
trip time is the value that the TCP protocol uses when a connection is first estab-
lished. For most network types, the default value is okay, but for some slow net-
works, notably certain types of amateur packet radio networks, the time is too short
and causes unnecessary retransmission. The irtt value can be set using the route com-
mand. Values of zero in these fields mean that the default is being used.
Finally, the last field displays the network interface that this route will use.

This is the Title of the Book, eMatter Edition
Copyright © 2007 O’Reilly & Associates, Inc. All rights reserved.
62 |Chapter 4: Configuring TCP/IP Networking
Displaying interface statistics
When invoked with the -i flag, netstat displays statistics for the network interfaces
currently configured. If the -a option is also given, it prints all interfaces present in
the kernel, not only those that have been configured currently. On vstout, the out-
put from netstat will look like this:
#netstat -i
Kernel Interface table
Iface MTU Met RX-OK RX-ERR RX-DRP RX-OVR TX-OK TX-ERR TX-DRP TX-OVR Flags
lo 0 0 3185 0 0 0 3185 0 0 0 BLRU
eth0 1500 0 972633 17 20 120 628711 217 0 0 BRU
The MTU and Met fields show the current MTU and metric values for that interface.
The RX and TX columns show how many packets have been received or transmitted
error-free (RX-OK/TX-OK) or damaged (RX-ERR/TX-ERR); how many were dropped (RX-
DRP/TX-DRP); and how many were lost because of an overrun (RX-OVR/TX-OVR).
The last column shows the flags that have been set for this interface. These charac-
ters are one-character versions of the long flag names that are printed when you dis-
play the interface configuration with ifconfig:
BA broadcast address has been set.
LThis interface is a loopback device.
MAll packets are received (promiscuous mode).
OARP is turned off for this interface.
PThis is a point-to-point connection.
RInterface is running.
UInterface is up.
Displaying connections
netstat supports a set of options to display active or passive sockets. The options -t,
-u,-w, and -x show active TCP, UDP, RAW, and Unix socket connections. If you
provide the -a flag in addition, sockets that are waiting for a connection (i.e., listen-
ing) are displayed as well. This display will give you a list of all servers that are cur-
rently running on your system.
Invoking netstat -ta on vlager produces this output:
$netstat -ta
Active Internet connections (servers and established)
Proto Recv-Q Send-Q Local Address Foreign Address State
tcp 0 0 localhost:mysql *:* LISTEN
tcp 0 0 localhost:webcache *:* LISTEN
tcp 0 0 *:www *:* LISTEN
tcp 0 0 *:ssh *:* LISTEN
tcp 0 0 *:https *:* LISTEN

This is the Title of the Book, eMatter Edition
Copyright © 2007 O’Reilly & Associates, Inc. All rights reserved.
Understanding the /proc Filesystem |63
tcp 0 0 ::ffff:1.2.3.4:ssh ::ffff:4.5.6.:49152 ESTABLISHED
tcp 0 652 ::ffff:1.2.3.4:ssh ::ffff:4.5.6.:31996 ESTABLISHED
This output shows most servers simply waiting for an incoming connection. How-
ever, the fourth line shows an incoming SMTP connection from vstout, and the sixth
line tells you there is an outgoing telnet connection to vbardolino.*
Using the -a flag by itself will display all sockets from all families.
Testing Connectivity with traceroute
A very simple way to test connectivity between hosts, and to verify routing paths is to
use the traceroute tool. traceroute uses UDP datagrams (or ICMP if the -I option is
specified) to determine the path which packets take over the network. The com-
mand can be invoked as follows:
#traceroute -n www.oreilly.com
traceroute to www.oreilly.com (208.201.239.37), 30 hops max, 40 byte packets
1 22.44.55.23 187.714 ms 178.548 ms 177.132 ms
2 206.171.134.130 186.730 ms 168.750 ms 150.769 ms
3 216.102.176.193 168.499 ms 209.232.130.82 194.629 ms 209.232.130.28 185.999 ms
4 151.164.243.121 212.852 ms 230.590 ms 132.040 ms
5 151.164.240.134 80.049 ms 71.191 ms 53.450 ms
6 151.164.40.150 45.320 ms 44.579 ms 176.651 ms
7 151.164.191.82 168.499 ms 194.864 ms 149.789 ms
8 151.164.248.90 80.065 ms 71.185 ms 88.922 ms
9 69.22.143.178 228.883 ms 222.204 ms 179.093 ms
10 69.22.143.6 131.573 ms 89.394 ms 71.180 ms
.
.
Checking the ARP Tables
On some occasions, it is useful to view or alter the contents of the kernel’s ARP
tables, for example, when you suspect a duplicate Internet address is the cause for
some intermittent network problem. The arp tool was made for situations like this.
Its command-line options are:
arp [-v] [-t hwtype] -a [hostname]
arp [-v] [-t hwtype] -s hostname hwaddr
arp [-v] -d hostname [hostname]
All hostname arguments may be either symbolic hostnames or IP addresses in dotted
quad notation.
* You can tell whether a connection is outgoing from the port numbers. The port number shown for the calling
host will always be a simple integer. The host being called will use a well-known service port will be in use
for which netstat uses the symbolic name such as smtp, found in /etc/services. Of course, it is possible to spec-
ify your source port in a number of applications these days, so this isn’t a guarantee!

This is the Title of the Book, eMatter Edition
Copyright © 2007 O’Reilly & Associates, Inc. All rights reserved.
64 |Chapter 4: Configuring TCP/IP Networking
The first invocation displays the ARP entry for the IP address or host specified, or all
hosts known if no hostname is given. For example, invoking arp on vlager may yield
something similar to:
#arp -e
Address HWtype HWaddress Flags Mask Iface
172.16.0.1 (incomplete) eth0
172.16.0.155 ether 00:11:2F:38:4E:4F C eth0
172.16.0.69 ether 00:90:4B:F1:3A:B5 C eth0
vale.vbrew.com ether 00:10:67:30:C5:7B C eth1
172.16.0.207 ether 00:0B:DB:1A:C7:E2 C eth0
which shows the Ethernet addresses of several hosts.
The -s option is used to permanently add hostname’s Ethernet address to the ARP
tables. The hwaddr argument specifies the hardware address, which is by default
expected to be an Ethernet address specified as six hexadecimal bytes separated by
colons. You may also set the hardware address for other types of hardware, using the
-t option.
For some reason, ARP queries for the remote host sometimes fail, for instance, when
its ARP driver is buggy or there is another host in the network that erroneously iden-
tifies itself with that host’s IP address; this problem requires you to manually add an
IP address to the ARP table. Hard-wiring IP addresses in the ARP table is also a (very
drastic) measure to protect yourself from hosts on your Ethernet that pose as some-
one else.
Invoking arp using the -d switch deletes all ARP entries relating to the given host.
This switch may be used to force the interface to reattempt obtaining the Ethernet
address for the IP address in question. This is useful when a misconfigured system
has broadcasted wrong ARP information (of course, you have to reconfigure the bro-
ken host first).
The -s option may also be used to implement proxy ARP. This is a special technique
through which a host, say gate, acts as a gateway to another host named fnord by
pretending that both addresses refer to the same host, namely gate. It does so by
publishing an ARP entry for fnord that points to its own Ethernet interface. Now
when a host sends out an ARP query for fnord,gate will return a reply containing its
own Ethernet address. The querying host will then send all datagrams to gate, which
dutifully forwards them to fnord.
These contortions may be necessary when you want to access fnord from a DOS
machine with a broken TCP implementation that doesn’t understand routing too
well. When you use proxy ARP, it will appear to the DOS machine as if fnord was on
the local subnet, so it doesn’t have to know about how to route through a gateway.
Another useful application of proxy ARP is when one of your hosts acts as a gateway
to some other host only temporarily, for instance, through a dial-up link. In a previ-
ous example, we encountered the laptop vlite, which was connected to vlager

This is the Title of the Book, eMatter Edition
Copyright © 2007 O’Reilly & Associates, Inc. All rights reserved.
Understanding the /proc Filesystem |65
through a PLIP link from time to time. Of course, this application will work only if
the address of the host you want to provide proxy ARP for is on the same IP subnet
as your gateway. vstout could proxy ARP for any host on the brewery subnet (172.
16.1.0), but never for a host on the winery subnet (172.16.2.0).
The proper invocation to provide proxy ARP for fnord is given below; of course, the
given Ethernet address must be that of gate:
#arp -s fnord 00:00:c0:a1:42:e0 pub
The proxy ARP entry may be removed again by invoking:
#arp -d fnord

This is the Title of the Book, eMatter Edition
Copyright © 2007 O’Reilly & Associates, Inc. All rights reserved.
66
Chapter 5
CHAPTER 5
Name Service and
Configuration
As we discussed in Chapter 2, TCP/IP networking may rely on different schemes to
convert names into addresses. The simplest way is to use a host table stored in /etc/
hosts. This is useful only for a small LAN that is run by a single administrator and no
IP traffic with the outside world. The format of the hosts file has already been
described in Chapter 4.
While a hosts file approach may be appropriate on a small network, most administra-
tors will need to investigate a DNS server. There are multiple services that you can
use to resolve IP addresses. The most commonly used is the Berkeley Internet Name
Domain service (BIND) Version 8.x. BIND v9.x has been available for some time
now and seeks to add a variety of new features, as well as contend with security
issues in BIND v8.x. The jump from BIND 8 to BIND 9 isn’t quite as significant as
was the leap from BIND 4 to 8; many of the configuration files and options are the
same. Configuring BIND can be a real chore, but once you’ve done it, you can easily
make changes in the network topology. On Linux, as on many other Unix-ish sys-
tems, BIND service is provided through a program called named. At startup, it loads
a set of master files into its internal cache and waits for queries from remote or local
user processes. There are different ways to set up BIND, and not all require you to
run a nameserver on every host.
We will also discuss a simpler and more secure option, djbdns, written by David J.
Bernstein. This resolver was written from scratch with security in mind and simpli-
fies server setup in a number of ways, primarily by eliminating the need for multiple
confusing zone files.
This chapter can do little more than give a rough sketch of how DNS works and how
to operate a nameserver. It should be sufficient for readers with a small LAN and an
Internet connection. For the most current information, you may want to check the
documentation contained in the BIND or djbdns source packages, which supply
manual pages, release notes, and in the BIND package, the BIND Operator’s Guide
(BOG). Don’t let this name scare you off; it’s actually a very useful document. For

This is the Title of the Book, eMatter Edition
Copyright © 2007 O’Reilly & Associates, Inc. All rights reserved.
The Resolver Library |67
more comprehensive coverage of DNS and associated issues, you may find DNS and
BIND by Paul Albitz and Cricket Liu (O’Reilly) a useful reference. DNS questions
may be answered in a newsgroup called comp.protocols.tcp-ip.domains. For technical
details, the Domain Name System is defined by RFC numbers 1033, 1034, and 1035.
The Resolver Library
The term resolver refers not to a special application, but to the resolver library. This
is a collection of functions that can be found in the standard C library and are
invoked by a wide range of networking applications. The central routines are gethost-
byname(2) and gethostbyaddr(2), which look up all IP addresses associated with a
hostname, and vice versa. They may be configured to simply look up the informa-
tion in hosts, or to query a number of DNS nameservers.
The resolver functions read configuration files when they are invoked. From these
configuration files, they determine what databases to query, in which order, and
other details relevant to how you’ve configured your environment. The older Linux
standard library, libc, used /etc/host.conf as its master configuration file, but since
Version 2 of the GNU standard library, glibc, uses /etc/nsswitch.conf.
The nsswitch.conf File
The nsswitch.conf file allows the system administrator to configure a wide variety of
different databases. We’ll limit our discussion to options that relate to host and net-
work IP address resolution. You can easily find more information about the other
features by reading the GNU standard library documentation.
Options in nsswitch.conf must appear on separate lines. Fields may be separated by
whitespace (spaces or tabs). A hash sign (#) introduces a comment that extends to
the next newline. Each line describes a particular service; hostname resolution is one
of these. The first field in each line is the name of the database, ending with a colon.
The database name associated with host address resolution is hosts. A related data-
base is networks, which is used for resolution of network names into network
addresses. The remainder of each line stores options that determine the way lookups
for that database are performed.
The following options are available:
dns
Use the DNS service to resolve the address. This makes sense only for host
address resolution, not network address resolution. This mechanism uses the fs
file that we’ll describe later in the chapter.
files
Search a local file for the host or network name and its corresponding address.
This option uses the traditional /etc/hosts and /etc/networks files.

This is the Title of the Book, eMatter Edition
Copyright © 2007 O’Reilly & Associates, Inc. All rights reserved.
68 |Chapter 5: Name Service and Configuration
The order in which the services to be queried are listed determines the order in
which they are queried when attempting to resolve a name. The query-order list is in
the service description in the /etc/nsswitch.conf file. The services are queried from left
to right and by default searching stops when a resolution is successful.
A simple example of host and network database specification that would mimic our
configuration using the older libc standard library is shown in Example 5-1.
This example causes the system to look up hosts first in the DNS and, if that can’t
find them, the /etc/hosts file. Network name lookups would be attempted using only
the /etc/networks file.
You are able to control the lookup behavior more precisely using “action items” that
describe what action to take given the result of the previous lookup attempt. Action
items appear between service specifications and are enclosed within square brackets,
[]. The general syntax of the action statement is:
[ [!] status = action ... ]
There are two possible actions:
return
Controls returns to the program that attempted the name resolution. If a lookup
attempt was successful, the resolver will return with the details; otherwise, it will
return a zero result.
continue
The resolver will move on to the next service in the list and use it to attempt res-
olution.
The optional (!) character specifies that the status value should be inverted before
testing; that is, it means “not.”
The available status values on which we can act are as follows:
success
The requested entry was found without error. The default action for this status is
return.
notfound
There was no error in the lookup, but the target host or network could not be
found. The default action for this status is continue.
Example 5-1. Sample nsswitch.conf file
# /etc/nsswitch.conf
#
# Example configuration of GNU Name Service Switch functionality.
# Information about this file is available in the `libc6-doc' package.
hosts: dns files
networks: files

This is the Title of the Book, eMatter Edition
Copyright © 2007 O’Reilly & Associates, Inc. All rights reserved.
The Resolver Library |69
unavail
The service queried was unavailable. This could mean that the hosts or networks
file was unreadable for the files service or that a nameserver or NIS server did
not respond for the dns or nis services. The default action for this status is
continue.
tryagain
This status means that the service is temporarily unavailable. For the files ser-
vice, this would usually indicate that the relevant file was locked by some pro-
cess. For other services, it may mean the server was temporarily unable to accept
connections. The default action for this status is continue.
A simple example of how you might use this mechanism is shown in Example 5-2.
This example attempts host resolution using DNS. If the return status is anything
other than unavailable, the resolver returns whatever it has found. If, and only if, the
DNS lookup attempt returns an unavailable status, the resolver attempts to use the
local /etc/hosts. This means that we should use the hosts file only if our nameserver is
unavailable for some reason.
Configuring Nameserver Lookups Using resolv.conf
When configuring the resolver library to use the DNS name service for host lookups,
you also have to tell it which nameservers to use. There is a separate file for this
called resolv.conf. If this file does not exist or is empty, the resolver assumes the
nameserver is on your local host.
To run a nameserver on your local host, you have to set it up separately, as will be
explained in the following section, “How DNS Works.” If you are on a local net-
work and have the opportunity to use an existing nameserver, this should always be
preferred. If you use a dialup IP connection to the Internet, you would normally
specify the nameserver of your service provider in the resolv.conf file.
The most important option in resolv.conf is nameserver, which gives the IP address of
a nameserver to use. If you specify several nameservers by giving the nameserver
option several times, they are tried in the order given. You should therefore put the
most reliable server first. The current implementation allows you to have up to three
Example 5-2. Sample nsswitch.conf file using an action statement
# /etc/nsswitch.conf
#
# Example configuration of GNU Name Service Switch functionality.
# Information about this file is available in the `libc6-doc' package.
hosts: dns [!UNAVAIL=return] files
networks: files

This is the Title of the Book, eMatter Edition
Copyright © 2007 O’Reilly & Associates, Inc. All rights reserved.
70 |Chapter 5: Name Service and Configuration
nameserver statements in resolv.conf.Ifnonameserver option is given, the resolver
attempts to connect to the nameserver on the local host.
Two other options, domain and search, let you use shortcut names for hosts in your
local domain. Usually, when just contacting another host in your local domain, you
don’t want to type in the fully qualified hostname, but use a name such as gauss on
the command line and have the resolver tack on the mathematics.groucho.edu part.
This is just the domain statement’s purpose. It lets you specify a default domain name
to be appended when DNS fails to look up a hostname. For instance, when given the
name gauss, the resolver first tries to find gauss. in DNS and fails, because there is
no such top-level domain. When given mathematics.groucho.edu as a default
domain, the resolver repeats the query for gauss with the default domain appended,
this time succeeding.
That’s just fine, you may think, but as soon you get out of the math department’s
domain, you’re back to those fully qualified domain names. Of course, you would
also want to have shorthands like quark.physics for hosts in the physics depart-
ment’s domain.
This is where the search list comes in. A search list can be specified using the search
option, which is a generalization of the domain statement. Where the latter gives a
single default domain, the former specifies a whole list of them, each to be tried in
turn until a lookup succeeds. This list must be separated by blanks or tabs.
The search and domain statements are mutually exclusive and may not appear more
than once. If neither option is given, the resolver will try to guess the default domain
from the local hostname using the getdomainname(2) system call. If the local host-
name doesn’t have a domain part, the root domain is the default.
Assume you’re at the Virtual Brewery and want to log in to foot.groucho.edu.Bya
slip of your fingers, you mistype foot as foo, which doesn’t exist. GMU’s nameserver
will therefore tell you that it knows no such host. Using older search methods, the
resolver used to keep trying the name with vbrew.com and com appended. The lat-
ter is problematic because groucho.edu.com might actually be a valid domain name.
Their nameserver might then even find foo in their domain, pointing you to one of
their hosts, which is not what you’re looking for.
For some applications, these bogus host lookups can be a security problem. There-
fore, you should usually limit the domains on your search list to your local organiza-
tion or something comparable. At the mathematics department of Groucho Marx
University, the search list would commonly be set to maths.groucho.edu and grou-
cho.edu.
If default domains sound confusing to you, consider this sample resolv.conf file for
the Virtual Brewery:
# /etc/resolv.conf
# Our domain

This is the Title of the Book, eMatter Edition
Copyright © 2007 O’Reilly & Associates, Inc. All rights reserved.
How DNS Works |71
domain vbrew.com
#
# We use vlager as central name server:
nameserver 172.16.1.1
When resolving the name vale, the resolver looks up vale. and, failing this, vale.
vbrew.com.
Resolver Robustness
When running a LAN inside a larger network, you definitely should use central
nameservers if they are available. The nameservers develop rich caches that speed up
repeat queries, since all queries are forwarded to them. However, this scheme has a
drawback: when a fire destroyed the backbone cable at one author’s university, no
more work was possible on his department’s LAN because the resolver could no
longer reach any of the nameservers. This situation caused difficulties with most net-
work services, such as X terminal logins and printing.
Although it is not very common for campus backbones to go down in flames, one
might want to take precautions against such cases.
One option is to set up a local nameserver that resolves hostnames from your local
domain and forwards all queries for other hostnames to the main servers. Of course,
this is applicable only if you are running your own domain.
Alternatively, you can maintain a backup host table for your domain or LAN in /etc/
hosts. This is very simple to do. You simply ensure that the resolver library queries
DNS first and the hosts file next. In the /etc/nsswitch.conf file you’d use hosts: dns
files to make the resolver fall back to the hosts file if the central nameserver is
unreachable.
How DNS Works
DNS organizes hostnames in a domain hierarchy. A domain is a collection of sites that
are related in some sense—because they form a proper network (e.g., all machines on
a campus), because they all belong to a certain organization (e.g., the U.S. govern-
ment), or because they’re simply geographically close. For instance, universities are
commonly grouped in the edu domain, with each university or college using a sepa-
rate subdomain, below which their hosts are subsumed. Groucho Marx University
the groucho.edu domain, while the LAN of the mathematics department is assigned
maths.groucho.edu. Hosts on the departmental network would have this domain
name tacked onto their hostname, so erdos would be known as erdos.maths.grou-
cho.edu, which would be the FQDN (see “Setting the Hostname” in Chapter 4).
Figure 5-1 shows a section of the namespace. The entry at the root of this tree, which
is denoted by a single dot, is quite appropriately called the root domain and
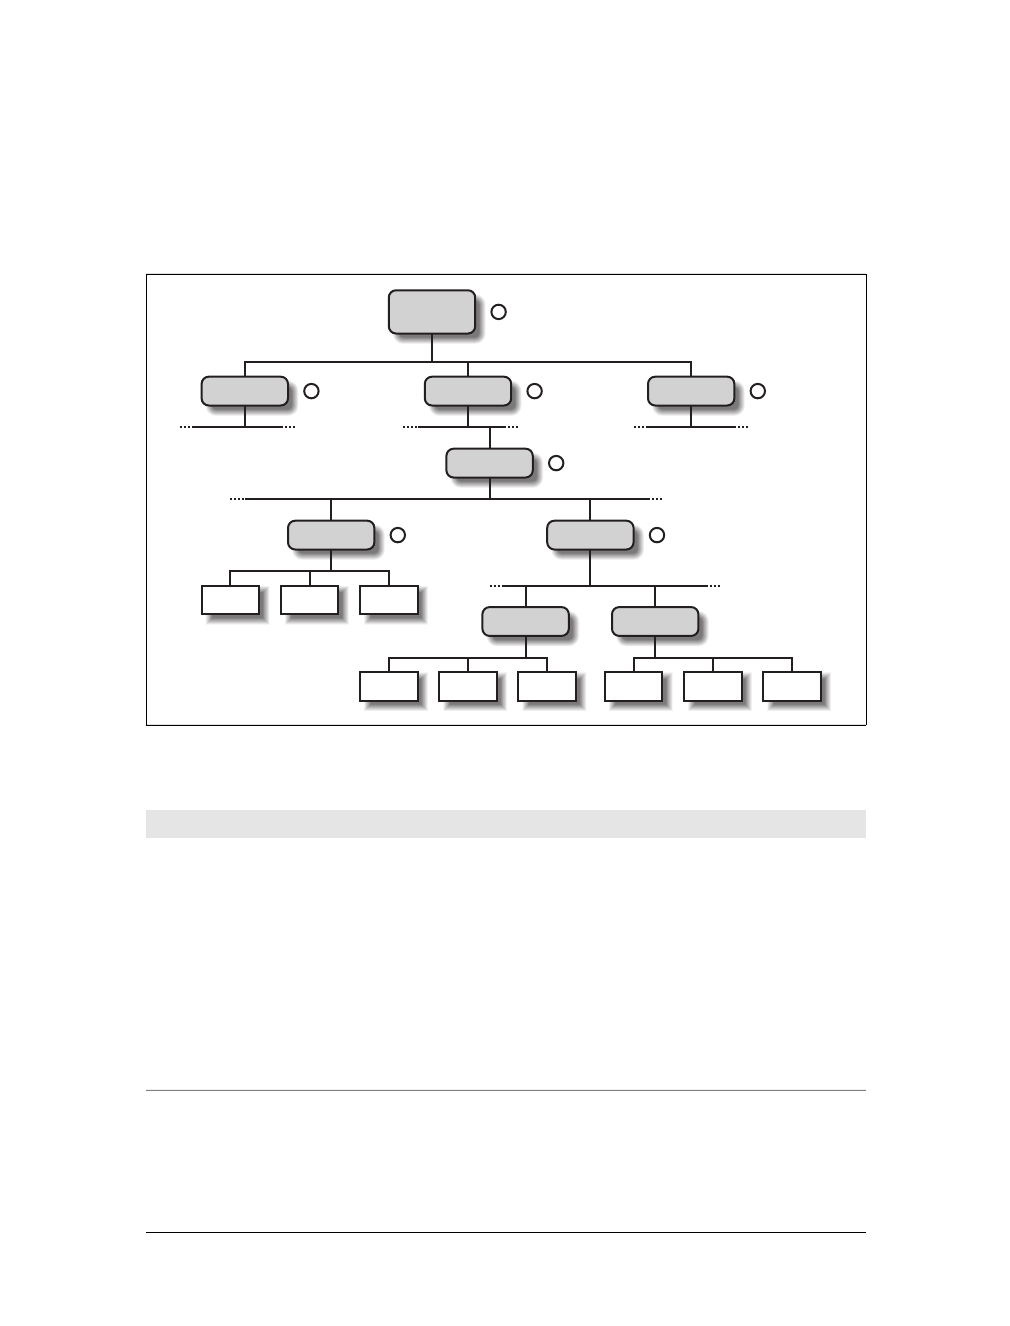
This is the Title of the Book, eMatter Edition
Copyright © 2007 O’Reilly & Associates, Inc. All rights reserved.
72 |Chapter 5: Name Service and Configuration
encompasses all other domains. To indicate that a hostname is a FQDN, rather than
a name relative to some (implicit) local domain, it is sometimes written with a trail-
ing dot. This dot signifies that the name’s last component is the root domain.
Depending on its location in the name hierarchy, a domain may be called top-level,
second-level, or third-level. More levels of subdivision occur, but they are rare.
Table 5-1 lists several top-level domains that you may see frequently.
Historically, the first four of these were assigned to the U.S., but changes in policy
have meant that these domains, named global Top-Level Domains (gTLD), are now
Figure 5-1. A part of the domain namespace
Table 5-1. Common top-level domains
Domain Description
edu (Mostly U.S.) educational institutions such as universities.
com Commercial organizations and companies.
org Noncommercial organizations.
net Originally for gateways and other administrative entities, now commercial organizations and companies as well.
mil U.S. military institutions.
gov U.S. government institutions.
biz For use by companies or commercial entities
name Designated for individuals to use for personal web sites
info Established for informational resource sites
.
.com .edu .net
.groucho
.physics.maths
gauss erdos sophus
theory collider
quark otto niels up down strange

This is the Title of the Book, eMatter Edition
Copyright © 2007 O’Reilly & Associates, Inc. All rights reserved.
How DNS Works |73
considered global in nature. Recent negotiations to broaden the range of gTLDs
resulted in the last three additions. However, these new options have so far proven to
be quite unpopular.
Outside the U.S., each country generally uses a top-level domain of its own named
after the two-letter country code defined in ISO-3166. Finland, for instance, uses the
fi domain; fr is used by France, de by Germany, and aq by Antarctica. Below this
top-level domain, each country’s NIC is free to organize hostnames in whatever way
they want. Australia has second-level domains similar to the international top-level
domains, named com.au and edu.au. Other countries, such as Germany, don’t use
this extra level, but have slightly long names that refer directly to the organizations
running a particular domain. It’s not uncommon to see hostnames such as ftp://ftp.
informatik.uni-erlangen.de. Chalk that up to German efficiency.
Of course, these national domains do not necessarily mean that a host below that
domain is actually located in that country; it means only that the host has been regis-
tered with that country’s NIC. A Swedish manufacturer might have a branch in Aus-
tralia and still have all its hosts registered with the se top-level domain.
This practice has become more popular in recent years, with countries such as
Tuvalu (tv) and Togo (to) selling TLDs to enterprising agents who resell domain
names such as go.to or watch.tv.
Organizing the namespace in a hierarchy of domain names nicely solves the problem
of name uniqueness; with DNS, a hostname has to be unique only within its domain
to give it a name different from all other hosts worldwide. Furthermore, fully quali-
fied names are easy to remember. Taken by themselves, these are already very good
reasons to split up a large domain into several subdomains.
DNS does even more for you than this. It also allows you to delegate authority over a
subdomain to its administrators. For example, the maintainers at the Groucho Com-
puting Center might create a subdomain for each department; we already encoun-
tered the math and physics subdomains above. When they find the network at the
physics department too large and chaotic to manage from outside (after all, physi-
cists are known to be an unruly bunch), they may simply pass control of the physics.
groucho.edu domain to the administrators of this network. These administrators are
free to use whatever hostnames they like and assign them IP addresses from their net-
work in whatever fashion they desire, without outside interference.
To this end, the namespace is split up into zones, each rooted at a domain. Note the
subtle difference between a zone and a domain: the domain groucho.edu encom-
passes all hosts at Groucho Marx University, while the zone groucho.edu includes
only the hosts that are managed by the Computing Center directly—those at the
mathematics department, for example. The hosts at the physics department belong
to a different zone, namely physics.groucho.edu. In Figure 5-1, the start of a zone is
marked by a small circle to the right of the domain name.

This is the Title of the Book, eMatter Edition
Copyright © 2007 O’Reilly & Associates, Inc. All rights reserved.
74 |Chapter 5: Name Service and Configuration
Name Lookups with DNS
At first glance, all this domain and zone fuss seems to make name resolution an
awfully complicated business. After all, if no central authority controls what names
are assigned to which hosts, how is a humble application supposed to know?
Now comes the really ingenious part about DNS. If you want to find the IP address
of erdos, for example, DNS says, “Go ask the people who manage it, and they will
tell you.”
In fact, DNS is a giant distributed database. It is implemented by so-called nameserv-
ers that supply information on a given domain or set of domains. For each zone there
are at least two, or at most a few, nameservers that hold all authoritative informa-
tion on hosts in that zone. To obtain the IP address of erdos, all you have to do is
contact the nameserver for the groucho.edu zone, which will then return the desired
data.
Easier said than done, you might think. So how do I know how to reach the
nameserver at Groucho Marx University? In case your computer isn’t equipped with
an address-resolving oracle, DNS provides for this, too. When your application
wants to look up information on erdos, it contacts a local nameserver, which con-
ducts a so-called iterative query for it. It starts off by sending a query to a nameserver
for the root domain, asking for the address of erdos.maths.groucho.edu. The root
nameserver recognizes that this name does not belong to its zone of authority, but
rather to one below the edu domain. Thus, it tells you to contact an edu zone
nameserver for more information and encloses a list of all edu nameservers along
with their addresses. Your local nameserver will then go on and query one of those—
for instance, a.isi.edu. In a manner similar to the root nameserver, a.isi.edu knows
that the groucho.edu people run a zone of their own and points you to their servers.
The local nameserver will then present its query for erdos to one of these, which will
finally recognize the name as belonging to its zone and return the corresponding IP
address.
This looks like a lot of traffic for looking up a measly IP address, but it’s miniscule
considering the speed of networking today. There’s still room for improvement with
this scheme, however.
To improve response time during future queries, the nameserver stores the informa-
tion obtained in its local cache. So the next time anyone on your local network wants
to look up the address of a host in the groucho.edu domain, your nameserver will go
directly to the groucho.edu nameserver.*
* If information weren’t cached, DNS would be as inefficient as any other method because each query would
involve the root name servers.

This is the Title of the Book, eMatter Edition
Copyright © 2007 O’Reilly & Associates, Inc. All rights reserved.
How DNS Works |75
Of course, the nameserver will not keep this information forever; it will discard it
after some time. The expiration interval is called the time to live (ttl). Each datum in
the DNS database is assigned such a ttl by administrators of the responsible zone.
Types of Nameservers
Nameservers that hold all information on hosts within a zone are called authoritative
for this zone. Any query for a host within this zone will end up at one of these
nameservers.
Authoritative servers must be fairly well synchronized. Thus, the zone’s network
administrator must make one the primary server, which loads its zone information
from datafiles, and make the others secondary servers, which transfer the zone data
from the primary server at regular intervals.
Having several nameservers distributes workload; it also provides backup. When one
nameserver machine fails in a benign way, such as crashing or losing its network con-
nection, all queries fall back to the other servers. Of course, this scheme doesn’t pro-
tect you from server malfunctions that produce wrong replies to all DNS requests,
such as from software bugs in the server program itself.
You can also run a nameserver that is not authoritative for any domain.*This is use-
ful since the nameserver will still be able to conduct DNS queries for the applica-
tions running on the local network and cache the information. Hence, it is called a
caching-only server.
The DNS Database
We have seen that DNS not only deals with IP addresses of hosts, but also exchanges
information on nameservers. DNS databases may have, in fact, many different types
of entries.
A single piece of information from the DNS database is called a resource record (RR).
Each record has a type associated with it describing the sort of data it represents, and
a class specifying the type of network it applies to. The latter accommodates the
needs of different addressing schemes, including IP addresses (the IN class), Hesiod
addresses (used by MIT’s Kerberos system), and a few more. The prototypical
resource record type is the A record, which associates a fully qualified domain name
with an IP address.
A host may be known by more than one name. For example you might have a server
that provides both FTP and World Wide Web servers, which you give two names:
ftp.machine.org and www.machine.org. However, one of these names must be
* Well, almost. A nameserver has to provide at least name service for localhost and reverse lookups of 127.0.
0.1.

This is the Title of the Book, eMatter Edition
Copyright © 2007 O’Reilly & Associates, Inc. All rights reserved.
76 |Chapter 5: Name Service and Configuration
identified as the official or canonical hostname, while the others are simply aliases
referring to the official hostname. The difference is that the canonical hostname is
the one with an associated A record, while the others only have a record of type
CNAME that points to the canonical hostname.
We will not go through all record types here, but we will give you a brief example.
Example 5-3 shows a part of the domain database that is loaded into the nameserv-
ers for the physics.groucho.edu zone.
Apart from the A and CNAME records, you can see a special record at the top of the
file, stretching several lines. This is the SOA resource record signaling the Start of
Authority, which holds general information on the zone that the server is
authoritative for. The SOA record comprises, for instance, the default time to live for
all records.
Note that all names in the sample file that do not end with a dot should be inter-
preted relative to the physics.groucho.edu domain. The special name (@) used in
the SOA record refers to the domain name by itself.
Example 5-3. An excerpt from a BIND zone file for the physics department
; Authoritative Information on physics.groucho.edu.
$TTL 3D
@ IN SOA niels.physics.groucho.edu. janet.niels.physics.groucho.edu. {
2004010200 ; serial no
8H ; refresh
2H ; retry
4W ; expire
1D ; default ttl
}
;
; Name servers
IN NS niels
IN NS gauss.maths.groucho.edu.
gauss.maths.groucho.edu. IN A 149.76.4.23
;
; Theoretical Physics (subnet 12)
niels IN A 149.76.12.1
IN A 149.76.1.12
nameserver IN CNAME niels
otto IN A 149.76.12.2
quark IN A 149.76.12.4
down IN A 149.76.12.5
iowa IN AAAA 2001:30fa::3
strange IN A 149.76.12.6
...
; Collider Lab. (subnet 14)
boson IN A 149.76.14.1
muon IN A 149.76.14.7
bogon IN A 149.76.14.12
...

This is the Title of the Book, eMatter Edition
Copyright © 2007 O’Reilly & Associates, Inc. All rights reserved.
How DNS Works |77
We have seen earlier that the nameservers for the groucho.edu domain somehow
have to know about the physics zone so that they can point queries to their
nameservers. This is usually achieved by a pair of records: the NS record that gives
the server’s FQDN, and an A record that associates an address with that name. Since
these records are what holds the namespace together, they are frequently called glue
records. They are the only instances of records in which a parent zone actually holds
information on hosts in the subordinate zone. The glue records pointing to the
nameservers for physics.groucho.edu are shown in Example 5-4.
The BIND named.conf File
The primary configuration file of BIND is /etc/named.conf. This style of configura-
tion file has been in use by BIND since Version 8 replaced the old named.boot file.
The syntax is somewhat complex and supports a wide range of functions, but is
fairly straightforward when configured to provide basic functionality. Example 5-5
shows a simple configuration file for the vbrew domain.
Example 5-4. An excerpt from a zone file for GMU
; Zone data for the groucho.edu zone.
....
;
; Glue records for the physics.groucho.edu zone
physics IN NS niels.physics.groucho.edu.
IN NS gauss.maths.groucho.edu.
niels.physics IN A 149.76.12.1
gauss.maths IN A 149.76.4.23
...
Example 5-5. The BIND named.conf file for vlager
// This is the primary configuration file for the BIND DNS server named.
//
options {
directory "/var/cache/bind";
allow-query { any; };
recursion no;
zone "localhost" {
type master;
file "/etc/bind/db.local";
};
zone "127.in-addr.arpa" {
type master;
file "/etc/bind/db.127";
};

This is the Title of the Book, eMatter Edition
Copyright © 2007 O’Reilly & Associates, Inc. All rights reserved.
78 |Chapter 5: Name Service and Configuration
If you take a close look, you will see that each of the statements is written similar to a
C-like statement with attributes enclosed within {} characters in the named.conf file.
The comments, often indicated by a pound character (#) in Linux, are indicated by
two forward slashes (//) instead.
One of the most important options in this configuration file is zone. This is how you
tell BIND what it’s supposed to know. Beneath zone is another very important
option, allow-transfer. This option allows you to set the IP addresses permitted to
perform a zone transfer. It is important to restrict this to authorized entities only
because it contains a lot of information that could be useful to potential attackers. In
the example configuration files, we’ve restricted zone transfers to the three IP
addresses listed.
In the option statement, we’ve also disabled DNS recursion. This allows us to sepa-
rate the DNS server functionality from the DNS cache functionality. For security rea-
sons it’s a good idea to do this. There have been many papers written on this subject,
with one of the best explanations found at http://cr.yp.to/djbdns/separation.html.If
you need recursive functionality, it is best to configure a caching-only server on an IP
address separate from your DNS server. We’ll discuss how to make a caching-only
server with BIND a little bit later.
If you’ve decided that you can’t live without recursion on the same server, there are
ways within the named.conf to restrict recursion to specified domains. By using the
allow-recursion option in place of the recursion no, you can specify a range of IP
addresses allowed to perform recursive queries.
You’ve probably noticed that in this file we’ve included quite a few other entries than
just the vbrew.com domain. These are present to be compliant with the
specifications established in RFC 1912, “Common DNS Operational and Configura-
tion Errors.” This specification requests that sites be authoritative for the localhost
forward and reverse zones, and for broadcast zones.
zone "vbrew.com" {
type master;
allow-transfer { 10.10.0.5;
172.16.90.4;
1.2.3.4;
};
file "/etc/bind/db.vbrew.com";
};
zone "0.168.192.in-addr.arpa" {
type master;
file "/etc/bind/db.192.168.0";
};
Example 5-5. The BIND named.conf file for vlager (continued)

This is the Title of the Book, eMatter Edition
Copyright © 2007 O’Reilly & Associates, Inc. All rights reserved.
How DNS Works |79
The BIND configuration supports many more options that we haven’t covered here.
If you’d like information all of the options, the best source of information is the doc-
umentation supplied with the BIND Version 8 or 9 source package.
The DNS Database Files
Master files included with named, zone files, always have a domain associated with
them, which is called the origin. This is the domain name specified with the cache
and primary options. Within a master file, you are allowed to specify domain and
hostnames relative to this domain. A name given in a configuration file is considered
absolute if it ends in a single dot; otherwise, it is considered relative to the origin. The
origin by itself may be referred to using (@).
The data contained in a master file is split up in RRs, the smallest units of informa-
tion available through DNS. Each RR has a type. A records, for instance, map a host-
name to an IP address, and a CNAME record associates an alias for a host with its
official hostname. Examples appear later in the chapter when a complete set of con-
figuation and zone files are shown.
RR representations in master files share a common format:
[domain] [ttl] [class]type rdata
Fields are separated by spaces or tabs. An entry may be continued across several lines
if an opening brace occurs before the first newline and the last field is followed by a
closing brace. Anything between a semicolon and a newline is ignored. A description
of the format terms follows:
domain
This term is the domain name to which the entry applies. If no domain name is
given, the RR is assumed to apply to the domain of the previous RR.
ttl
In order to force resolvers to discard information after a certain time, each RR is
associated a time to live (ttl). The ttl field specifies the time in seconds that the
information is valid after it has been retrieved from the server. It is a decimal
number with at most eight digits.
If no ttl value is given, the field value defaults to that of the minimum field of the
preceding SOA record.
class
This is an address class, such as IN for IP addresses or HS for objects in the
Hesiod class. For TCP/IP networking, you have to specify IN.
If no class field is given, the class of the preceding RR is assumed.

This is the Title of the Book, eMatter Edition
Copyright © 2007 O’Reilly & Associates, Inc. All rights reserved.
80 |Chapter 5: Name Service and Configuration
type
This describes the type of the RR. The most common types are A, SOA, PTR,
and NS. The following sections describe the various types of RRs.
rdata
This holds the data associated with the RR. The format of this field depends on
the type of RR. In the following discussion, it will be described for each RR sepa-
rately.
The following is partial list of RRs to be used in DNS master files. There are a couple
more of them that we will not explain; they are experimental and of little use, gener-
ally.
SOA
This RR describes a zone of authority. It signals that the records following the
SOA RR contain authoritative information for the domain. Every master file
included by a primary statement must contain an SOA record for this zone. The
resource data contains the following fields:
origin
This field is the canonical hostname of the primary nameserver for this
domain. It is usually given as an absolute name.
contact
This field is the email address of the person responsible for maintaining the
domain, with the “@” sign replaced by a dot. For instance, if the responsible
person at the Virtual Brewery were janet, this field would contain janet.
vbrew.com.
serial
This field is the version number of the zone file, expressed as a single deci-
mal number. Whenever data is changed in the zone file, this number should
be incremented. A common convention is to use a number that reflects the
date of the last update, with a version number appended to it to cover the
case of multiple updates occurring on a single day, e.g., 2000012600 being
update 00 that occurred on January 26, 2000.
The serial number is used by secondary nameservers to recognize zone infor-
mation changes. To stay up to date, secondary servers request the primary
server’s SOA record at certain intervals and compare the serial number to
that of the cached SOA record. If the number has changed, the secondary
servers transfer the whole zone database from the primary server.
refresh
This field specifies the interval in seconds that the secondary servers should
wait between checking the SOA record of the primary server. Again, this is a
decimal number with at most eight digits.

This is the Title of the Book, eMatter Edition
Copyright © 2007 O’Reilly & Associates, Inc. All rights reserved.
How DNS Works |81
Generally, the network topology doesn’t change too often, so this number
should specify an interval of roughly a day for larger networks, and even
more for smaller ones.
retry
This number determines the intervals at which a secondary server should
retry contacting the primary server if a request or a zone refresh fails. It must
not be too low, or a temporary failure of the server or a network problem
could cause the secondary server to waste network resources. One hour, or
perhaps one-half hour, might be a good choice.
expire
This field specifies the time in seconds after which a secondary server should
finally discard all zone data if it hasn’t been able to contact the primary
server. You should normally set this field to at least a week (604,800 sec-
onds), but increasing it to a month or more is also reasonable.
minimum
This field is the default time to live value for resource records that do not
explicitly contain one. The ttl value specifies the maximum amount of time
other nameservers may keep the RR in their cache. This time applies only to
normal lookups, and has nothing to do with the time after which a second-
ary server should try to update the zone information.
If the topology of your network does not change frequently, a week or even
more is probably a good choice. If single RRs change more frequently, you
could still assign them smaller ttls individually. If your network changes fre-
quently, you may want to set minimum to one day (86,400 seconds).
A
This record associates an IP address with a hostname. The resource data field
contains the address in dotted quad notation.
For each hostname, there must be only one A record. The hostname used in this
A record is considered the canonical hostname. All other hostnames are aliases
and must be mapped onto the canonical hostname using a CNAME record. If
the canonical name of our host were vlager, we’d have an A record that associ-
ated that hostname with its IP address. Since we may also want another name
associated with that address, say news, we’d create a CNAME record that asso-
ciates this alternate name with the canonical name. We’ll talk more about
CNAME records shortly.
AAAA
This record is exactly the same as the A record, but is used exclusively for IPv6
addresses.

This is the Title of the Book, eMatter Edition
Copyright © 2007 O’Reilly & Associates, Inc. All rights reserved.
82 |Chapter 5: Name Service and Configuration
NS
NS records are used to specify a zone’s primary server and all its secondary serv-
ers. An NS record points to a master nameserver of the given zone, with the
resource data field containing the hostname of the nameserver.
You will meet NS records in two situations: the first is when you delegate
authority to a subordinate zone; the second is within the master zone database
of the subordinate zone itself. The sets of servers specified in both the parent and
delegated zones should match.
The NS record specifies the name of the primary and secondary nameservers for
a zone. These names must be resolved to an address so they can be used. Some-
times the servers belong to the domain, they are serving, which causes a
“chicken-and-egg” problem; we can’t resolve the address until the nameserver is
reachable, but we can’t reach the nameserver until we resolve its address. To
solve this dilemma, we can configure special A records directly into the
nameserver of the parent zone. The A records allow the nameservers of the par-
ent domain to resolve the IP address of the delegated zone nameservers. These
records are commonly called glue records because they provide the “glue” that
binds a delegated zone to its parent. Refer to the “DNS Database” section earlier
for an explanation of how this works.
CNAME
This record associates an alias with a host’s canonical hostname. It provides an
alternate name by which users can refer to the host whose canonical name is
supplied as a parameter. The canonical hostname is the one the master file pro-
vides an A record for; aliases are simply linked to that name by a CNAME
record, but don’t have any other records of their own.
PTR
This type of record is used to associate names in the in-addr.arpa domain with
hostnames. It is used for reverse mapping of IP addresses to hostnames. The
hostname given must be the canonical hostname.
MX
This RR announces a mail exchanger for a domain. Mail exchangers are dis-
cussed in Chapter 11,“Mail Routing on the Internet.” The syntax of an MX
record is
[domain] [ttl] [class] MX preference host
host names the MX for domain. Every MX has an integer preference associated
with it. A mail transport agent that wants to deliver mail to domain tries all hosts
that have an MX record for this domain until it succeeds. The one with the low-
est preference value is tried first, and then the others, in order of increasing pref-
erence value.

This is the Title of the Book, eMatter Edition
Copyright © 2007 O’Reilly & Associates, Inc. All rights reserved.
How DNS Works |83
HINFO
This record provides information on the system’s hardware and software. Its
syntax is:
[domain] [ttl] [class] HINFO hardware software
The hardware field identifies the hardware used by this host. Special conventions
are used to specify this. If the field contains any blanks, it must be enclosed in
double quotes. The software field names the operating system software used by
the system. However, for security reasons, it’s not a great idea to have this infor-
mation publicly available, as it provides potentially valuable information to
attackers. It’s very uncommon to see it used lately, but some administrators like
to use it to provide spurious or humorous information about their hosts.
Example HINFO records to describe machines look something like:
tao 36500 IN HINFO SEGA-DREAMCAST LINUX2.6
cevad 36500 IN HINFO ATARI-104ST LINUX2.0
jedd 36500 IN HINFO TIMEX-SINCLAIR LINUX2.6
Caching-Only named Configuration
There is a special type of named configuration that we’ll talk about before we explain
how to build a full nameserver configuration. It is called a caching-only configura-
tion. It doesn’t really serve a domain, but acts as a relay for all DNS queries pro-
duced on your host. The advantage of this scheme is that it builds up a cache so that
only the first query for a particular host is actually sent to the nameservers on the
Internet. Any repeated request will be answered directly from the cache in your local
nameserver. It’s also important to note here that a cache server should not be run
from the same IP address as the DNS server.
Anamed.conf file for a caching-only server looks like this:
// Define networks to allow queries from.
acl allowednets { 192.168.99.0/24; 192.168.44.0/24; };
options {
directory "/etc/bind"; // Working directory
allow-query { allowednets; };
};
// Root server hints
zone "." { type hint;
file "root.hint"; };
// Provide a reverse mapping for the loopback address 127.0.0.1
zone "0.0.127.in-addr.arpa" {
type master;
file "localhost.rev";
notify no;
};

This is the Title of the Book, eMatter Edition
Copyright © 2007 O’Reilly & Associates, Inc. All rights reserved.
84 |Chapter 5: Name Service and Configuration
In addition to this named.conf file, you must set up the root.hint file with a valid list
of root nameservers. You could copy and use Example 6.10 for this purpose, or, bet-
ter yet, you could use a BIND tool called dig to get the most current version of this
file. No other files are needed for a caching-only server configuration. We’ll discuss
dig in more detail later in this chapter, but for now, to obtain the information to cre-
ate the root.hint file, you can use the following command:
vbrew# dig at e.root-servers.net . ns
Writing the Master Files
Examples 5-6, 5-7, 5-8, and 5-9 give sample configuration and zone files for a
nameserver at the brewery, located on vlager. Due to the nature of the network dis-
cussed (a single LAN), the example is pretty straightforward.
The root.hint cache file shown in Example 5-6 shows sample hint records for a root
nameserver. A typical cache file usually describes about a dozen nameservers. You
can obtain the current list of nameservers for the root domain using the dig tool as
described above.
Example 5-6. The root.hint file
; <<>> DiG 9.2.2 <<>> at e.root-servers.net . ns
;; global options: printcmd
;; Got answer:
;; ->>HEADER<<- opcode: QUERY, status: NOERROR, id: 21972
;; flags: qr aa rd ra; QUERY: 1, ANSWER: 0, AUTHORITY: 1, ADDITIONAL: 0
;; QUESTION SECTION:
;at. IN A
;; AUTHORITY SECTION:
;; Query time: 54 msec
;; SERVER: 206.13.28.12#53(206.13.28.12)
;; WHEN: Sat Jan 31 11:28:44 2004
;; MSG SIZE rcvd: 83
;; Got answer:
;; ->>HEADER<<- opcode: QUERY, status: NOERROR, id: 8039
;; flags: qr rd ra; QUERY: 1, ANSWER: 1, AUTHORITY: 4, ADDITIONAL: 4
;; QUESTION SECTION:
;e.root-servers.net. IN A
;; ANSWER SECTION:
e.root-servers.net. 566162 IN A 192.203.230.10
;; AUTHORITY SECTION:
ROOT-SERVERS.net. 134198 IN NS a.ROOT-SERVERS.net.
ROOT-SERVERS.net. 134198 IN NS f.ROOT-SERVERS.net.

This is the Title of the Book, eMatter Edition
Copyright © 2007 O’Reilly & Associates, Inc. All rights reserved.
How DNS Works |85
ROOT-SERVERS.net. 134198 IN NS j.ROOT-SERVERS.net.
ROOT-SERVERS.net. 134198 IN NS k.ROOT-SERVERS.net.
;; ADDITIONAL SECTION:
a.ROOT-SERVERS.net. 566162 IN A 198.41.0.4
f.ROOT-SERVERS.net. 566162 IN A 192.5.5.241
j.ROOT-SERVERS.net. 566162 IN A 192.58.128.30
k.ROOT-SERVERS.net. 566162 IN A 193.0.14.129
;; Query time: 12 msec
;; SERVER: 206.13.28.12#53(206.13.28.12)
;; WHEN: Sat Jan 31 11:28:44 2004
;; MSG SIZE rcvd: 196
;; Got answer:
;; ->>HEADER<<- opcode: QUERY, status: NOERROR, id: 61551
;; flags: qr rd ra; QUERY: 1, ANSWER: 13, AUTHORITY: 0, ADDITIONAL: 13
;; QUESTION SECTION:
;. IN NS
;; ANSWER SECTION:
. 479762 IN NS F.ROOT-SERVERS.NET.
. 479762 IN NS B.ROOT-SERVERS.NET.
. 479762 IN NS J.ROOT-SERVERS.NET.
. 479762 IN NS K.ROOT-SERVERS.NET.
. 479762 IN NS L.ROOT-SERVERS.NET.
. 479762 IN NS M.ROOT-SERVERS.NET.
. 479762 IN NS I.ROOT-SERVERS.NET.
. 479762 IN NS E.ROOT-SERVERS.NET.
. 479762 IN NS D.ROOT-SERVERS.NET.
. 479762 IN NS A.ROOT-SERVERS.NET.
. 479762 IN NS H.ROOT-SERVERS.NET.
. 479762 IN NS C.ROOT-SERVERS.NET.
. 479762 IN NS G.ROOT-SERVERS.NET.
;; ADDITIONAL SECTION:
F.ROOT-SERVERS.NET. 566162 IN A 192.5.5.241
B.ROOT-SERVERS.NET. 566162 IN A 192.228.79.201
J.ROOT-SERVERS.NET. 566162 IN A 192.58.128.30
K.ROOT-SERVERS.NET. 566162 IN A 193.0.14.129
L.ROOT-SERVERS.NET. 566162 IN A 198.32.64.12
M.ROOT-SERVERS.NET. 566162 IN A 202.12.27.33
I.ROOT-SERVERS.NET. 566162 IN A 192.36.148.17
E.ROOT-SERVERS.NET. 566162 IN A 192.203.230.10
D.ROOT-SERVERS.NET. 566162 IN A 128.8.10.90
A.ROOT-SERVERS.NET. 566162 IN A 198.41.0.4
H.ROOT-SERVERS.NET. 566162 IN A 128.63.2.53
C.ROOT-SERVERS.NET. 566162 IN A 192.33.4.12
G.ROOT-SERVERS.NET. 566162 IN A 192.112.36.4
;; Query time: 17 msec
Example 5-6. The root.hint file (continued)

This is the Title of the Book, eMatter Edition
Copyright © 2007 O’Reilly & Associates, Inc. All rights reserved.
86 |Chapter 5: Name Service and Configuration
;; SERVER: 206.13.28.12#53(206.13.28.12)
;; WHEN: Sat Jan 31 11:28:44 2004
;; MSG SIZE rcvd: 436
Example 5-7. The vbrew.com zone file
;
; Hosts at the brewery
; /etc/bind/zone/vbrew.com
; Origin is vbrew.com
;
$TTL 3D
@ IN SOA vlager.vbrew.com. janet.vbrew.com. (
200401206 ; serial, date + todays serial #
8H ; refresh, seconds
2H ; retry, seconds
4W ; expire, seconds
1D ) ; minimum, seconds
IN NS vlager.vbrew.com.
;
; local mail is distributed on vlager
IN MX 10 vlager
;
; loopback address
localhost. IN A 127.0.0.1
;
; Virtual Brewery Ethernet
vlager IN A 172.16.1.1
vlager-if1 IN CNAME vlager
; vlager is also news server
news IN CNAME vlager
vstout IN A 172.16.1.2
vale IN A 172.16.1.3
;
; Virtual Winery Ethernet
vlager-if2 IN A 172.16.2.1
vbardolino IN A 172.16.2.2
vchianti IN A 172.16.2.3
vbeaujolais IN A 172.16.2.4
;
; Virtual Spirits (subsidiary) Ethernet
vbourbon IN A 172.16.3.1
vbourbon-if1 IN CNAME vbourbon
Example 5-8. The loopback zone file
;
; /etc/bind/zone/127.0.0 Reverse mapping of 127.0.0
; Origin is 0.0.127.in-addr.arpa.
;
Example 5-6. The root.hint file (continued)

This is the Title of the Book, eMatter Edition
Copyright © 2007 O’Reilly & Associates, Inc. All rights reserved.
How DNS Works |87
Verifying the Nameserver Setup
dig is the current nameserver query tool of choice, replacing the commonly known
nslookup. It is flexible, fast, and can be used to query almost anything from a DNS
server. The syntax for dig is very straightforward.
vbrew# dig nameserver name type
The command-line parameters are defined as follows:
nameserver
This is the name of the server that you are querying. It can be entered as a name
or as an IP address. If you leave this blank, dig will use the DNS server listed in
the resolv.conf file.
$TTL 3D
@ IN SOA vlager.vbrew.com. joe.vbrew.com. (
1 ; serial
360000 ; refresh: 100 hrs
3600 ; retry: one hour
3600000 ; expire: 42 days
360000 ; minimum: 100 hrs
)
IN NS vlager.vbrew.com.
1 IN PTR localhost.
Example 5-9. The vbrew reverse lookup file
;
; /etc/bind/zones/16.172.in-addr.arpa
; Origin is 16.172.in-addr.arpa.
;
$TTL 3D
@ IN SOA vlager.vbrew.com. joe.vbrew.com. (
16 ; serial
86400 ; refresh: once per day
3600 ; retry: one hour
3600000 ; expire: 42 days
604800 ; minimum: 1 week
)
IN NS vlager.vbrew.com.
; brewery
1.1 IN PTR vlager.vbrew.com.
2.1 IN PTR vstout.vbrew.com.
3.1 IN PTR vale.vbrew.com.
; winery
1.2 IN PTR vlager-if2.vbrew.com.
2.2 IN PTR vbardolino.vbrew.com.
3.2 IN PTR vchianti.vbrew.com.
4.2 IN PTR vbeaujolais.vbrew.com.
Example 5-8. The loopback zone file (continued)

This is the Title of the Book, eMatter Edition
Copyright © 2007 O’Reilly & Associates, Inc. All rights reserved.
88 |Chapter 5: Name Service and Configuration
name
This is the name of the DNS record that you want to look up.
type
This is the type of query you want to execute. Common types are ANY, MX, and
TXT. If left blank, dig will default to looking for an A record.
So, using this, if we wanted to see which servers handle mail for the Virtual Brewery,
we would create the following dig query:
vbrew# dig vlager.vbrew.com MX
; <<>> DiG 9.2.2 <<>> vlager.vbrew.com MX
;; global options: printcmd
;; Got answer:
;; ->>HEADER<<- opcode: QUERY, status: NOERROR, id: 40590
;; flags: qr rd ra; QUERY: 1, ANSWER: 0, AUTHORITY: 1, ADDITIONAL: 0
;; QUESTION SECTION:
;vlager.vbrew.com. IN MX
;; AUTHORITY SECTION:
vbrew.com. 10794 IN SOA vlager.vbrew.com. vlager.vbrew.com.
2003080803 10800 3600 604800 86400
;; Query time: 14 msec
;; SERVER: 192.168.28.12#53(192.168.28.12)
;; WHEN: Sun Feb 1 12:19:06 2004
;; MSG SIZE rcvd: 104
Another example of an interesting query type which can be useful is the BIND ver-
sion query. This is easily done with dig with the following syntax:
vlager# dig @vlager.vbrew.com version.bind. CHAOS TXT
.
.
; QUERY: 1, ANSWER: 1, AUTHORITY: 0, ADDITIONAL: 0
;; QUESTION SECTION:
;version.bind. CH TXT
;; ANSWER SECTION:
VERSION.BIND. 0 CH TXT "BIND 8.2.2-P5"
.
.
Using nslookup
nslookup, while now deprecated, is still a good tool for checking the operation of
your nameserver setup. It can be used both interactively with prompts and as a sin-
gle command with immediate output. In the latter case, you simply invoke it as:
$nslookup hostname

This is the Title of the Book, eMatter Edition
Copyright © 2007 O’Reilly & Associates, Inc. All rights reserved.
How DNS Works |89
nslookup queries the nameserver specified in resolv.conf for hostname. (If this file
names more than one server, nslookup chooses one at random.)
The interactive mode, however, is much more exciting. Besides looking up individ-
ual hosts, you may query for any type of DNS record and transfer the entire zone
information for a domain.
When invoked without an argument, nslookup displays the nameserver it uses and
enters interactive mode. At the prompt, you may type any domain name that you
want to query. By default, it asks for class A records—those containing the IP
address relating to the domain name.
You can look for record types by issuing:
>set type=type
in which type is one of the RRs names described earlier, or ANY.
For instance, you might have the following nslookup session:
$nslookup
Default Server: tao.linux.org.au
Address: 203.41.101.121
>metalab.unc.edu
Server: tao.linux.org.au
Address: 203.41.101.121
Name: metalab.unc.edu
Address: 152.2.254.81
>
The output first displays the DNS server being queried, and then the result of the
query.
If you try to query for a name that has no IP address associated with it, but other
records were found in the DNS database, nslookup returns with an error message say-
ing “No type A records found.” However, you can make it query for records other
than type A by issuing the set type command. To get the SOA record of unc.edu, you
would issue:
>unc.edu
Server: tao.linux.org.au
Address: 203.41.101.121
*** No address (A) records available for unc.edu
>set type=SOA
>unc.edu
Server: tao.linux.org.au
Address: 203.41.101.121
unc.edu
origin = ns.unc.edu

This is the Title of the Book, eMatter Edition
Copyright © 2007 O’Reilly & Associates, Inc. All rights reserved.
90 |Chapter 5: Name Service and Configuration
mail addr = host-reg.ns.unc.edu
serial = 1998111011
refresh = 14400 (4H)
retry = 3600 (1H)
expire = 1209600 (2W)
minimum ttl = 86400 (1D)
unc.edu name server = ns2.unc.edu
unc.edu name server = ncnoc.ncren.net
unc.edu name server = ns.unc.edu
ns2.unc.edu internet address = 152.2.253.100
ncnoc.ncren.net internet address = 192.101.21.1
ncnoc.ncren.net internet address = 128.109.193.1
ns.unc.edu internet address = 152.2.21.1
In a similar fashion, you can query for MX records:
>set type=MX
>unc.edu
Server: tao.linux.org.au
Address: 203.41.101.121
unc.edu preference = 0, mail exchanger = conga.oit.unc.edu
unc.edu preference = 10, mail exchanger = imsety.oit.unc.edu
unc.edu name server = ns.unc.edu
unc.edu name server = ns2.unc.edu
unc.edu name server = ncnoc.ncren.net
conga.oit.unc.edu internet address = 152.2.22.21
imsety.oit.unc.edu internet address = 152.2.21.99
ns.unc.edu internet address = 152.2.21.1
ns2.unc.edu internet address = 152.2.253.100
ncnoc.ncren.net internet address = 192.101.21.1
ncnoc.ncren.net internet address = 128.109.193.1
Using a type of ANY returns all resource records associated with a given name.
A practical application of nslookup, besides debugging, is to obtain the current list
of root nameservers. You can obtain this list by querying for all NS records associ-
ated with the root domain:
>set type=NS
> .
Server: tao.linux.org.au
Address: 203.41.101.121
Non-authoritative answer:
(root) name server = A.ROOT-SERVERS.NET
(root) name server = H.ROOT-SERVERS.NET
(root) name server = B.ROOT-SERVERS.NET
(root) name server = C.ROOT-SERVERS.NET
(root) name server = D.ROOT-SERVERS.NET
(root) name server = E.ROOT-SERVERS.NET
(root) name server = I.ROOT-SERVERS.NET
(root) name server = F.ROOT-SERVERS.NET
(root) name server = G.ROOT-SERVERS.NET

This is the Title of the Book, eMatter Edition
Copyright © 2007 O’Reilly & Associates, Inc. All rights reserved.
How DNS Works |91
(root) name server = J.ROOT-SERVERS.NET
(root) name server = K.ROOT-SERVERS.NET
(root) name server = L.ROOT-SERVERS.NET
(root) name server = M.ROOT-SERVERS.NET
Authoritative answers can be found from:
A.ROOT-SERVERS.NET internet address = 198.41.0.4
H.ROOT-SERVERS.NET internet address = 128.63.2.53
B.ROOT-SERVERS.NET internet address = 128.9.0.107
C.ROOT-SERVERS.NET internet address = 192.33.4.12
D.ROOT-SERVERS.NET internet address = 128.8.10.90
E.ROOT-SERVERS.NET internet address = 192.203.230.10
I.ROOT-SERVERS.NET internet address = 192.36.148.17
F.ROOT-SERVERS.NET internet address = 192.5.5.241
G.ROOT-SERVERS.NET internet address = 192.112.36.4
J.ROOT-SERVERS.NET internet address = 198.41.0.10
K.ROOT-SERVERS.NET internet address = 193.0.14.129
L.ROOT-SERVERS.NET internet address = 198.32.64.12
M.ROOT-SERVERS.NET internet address = 202.12.27.33
To see the complete set of available commands, use the help command in nslookup.
Other Useful Tools
There are a few other tools that can help you with your tasks as a BIND administra-
tor. We will briefly describe two of them here. Please refer to the documentation that
comes with these tools for more information on how to use them.
hostcvt helps you with your initial BIND configuration by converting your /etc/hosts
file into master files for named. It generates both the forward (A) and reverse map-
ping (PTR) entries, and takes care of aliases. Of course, it won’t do the whole job for
you, as you may still want to tune the timeout values in the SOA record, for exam-
ple, or add MX records. Still, it may save you a few aspirins. hostcvt is part of the
BIND source, but can also be found as a standalone package.
After setting up your nameserver, you may want to test your configuration. Some
good tools that make this job much simpler; the first is called dnswalk, which is a
Perl-based package. The second is called nslint. They both examine your DNS data-
base for common mistakes and verify that the information is consistent. Two other
useful tools are host, which is a general purpose DNS database query tool. You can
use this tool to manually inspect and diagnose DNS database entries.
This tool is likely to be available in prepackaged form. dnswalk and nslint are avail-
able in source from http://www.visi.com/~barr/dnswalk/ and ftp://ftp.ee.lbl.gov/
nslint.tar.Z. The host’s source code can be found at ftp://ftp.nikhef.nl/pub/network/
and ftp://ftp.is.co.za/networking/ip/dns/dig/.

This is the Title of the Book, eMatter Edition
Copyright © 2007 O’Reilly & Associates, Inc. All rights reserved.
92 |Chapter 5: Name Service and Configuration
Alternatives to BIND
Those who have been concerned with the number of security vulnerabilities found in
the BIND server through the years, or who prefer an easier DNS solution, may wish
to investigate an alternative, djbdns. This software, written from scratch by D.J.
Bernstein, provides a much more robust, simplified and secure framework for DNS.
djbdns is easy to install and configure, and is much less complex than BIND, essen-
tially the same functionality. In this next section, we’ll cover the basics of installing
and configuring a DNS server using djbdns. It is important to note that a djbdns
DNS server is designed to be just that, a DNS server, meaning that by default it won’t
be resolving queries for machines outside of your authority. For that, you will need
to build a separate caching server on a separate machine or IP address. As recom-
mended earlier, caches and DNS servers should be separated for security reasons. To
read more about this topic, please refer to the djbdns web site at http://cr.yp.to/
djbdns.html.
Installing djbdns
To run djbdns, you first need to install another DJB program called daemontools,
which is basically a collection of tools used to manage various Unix daemons. To
view full documentation and source code for daemontools, visit its webpage at http://
cr.yp.to/daemontools.html. When you’ve successfully downloaded the software,
extract it to a directory on your machine and compile the software. daemontools
comes with a script that will automatically compile and install the software. It can be
launched as follows:
vlager# mkdir software
vlager# cd software
vlager# tar xzpf daemontools-0.76.tar.gz
vlager# cd admin/daemontools-0.76
vlager# package/install
When the script finishes, you can remove the installation directories, and begin
installing the next dependency, ucspi-tcp, which is DJB’s very own TCP client-server
handling program. It is also very easy to install:
vlager# mkdir software
vlager# cd software
vlager# tar xzpf ucspi-tcp-0.88.tar.gz
vlager# cd ucspi-tcp-0.88
vlager# make
vlager# make setup check
This will install the software to the /usr/local directory on your machine. You won’t
need to do anything else with the operation or configuration of this software for the
moment.

This is the Title of the Book, eMatter Edition
Copyright © 2007 O’Reilly & Associates, Inc. All rights reserved.
Alternatives to BIND |93
Once it is installed, you are ready to install the djbdns software. The djbdns installa-
tion is accomplished using the same steps documented above for ucspi-tcp. This
process will also install djbdns to the /usr/local directory. You will need to make sure
that the svscan process is running before configuring djbdns. svscan is part of the
daemontools package and must be running for djbdns to function.
When you’ve verified that svscan is running, you can start the configuration of the
DNS server. The first step is to create two user accounts, tinydns and dnslog. djbdns
will use both of these to conduct its business, rather than run as root, as BIND instal-
lations often do.
Next, you will need to create a directory for your DNS server’s configuration files
and logs, and then configure it as follows:
vlager# mkdir /etc/tinydns
vlager# tinydns-conf tinydns dnslog /etc/tinydns 172.16.0.2
The IP address 172.16.0.2 in the example should be replaced with your DNS server’s
external IP address. Following this, svscan needs to be informed of the new service.
This process accomplished with three commands:
vlager# ln -s /etc/tinydns /service
vlager# svstat /service/tinydns
This will complete the installation of your djbdns server; all that’s left is to do is con-
figure your hosts. Under BIND, this is where a majority of the complexity and confu-
sion exists; dbjdns, however, makes adding new DNS records much easier.
Adding Hosts
You will need to configure your host information so that your DNS server is provid-
ing a service. The first step in this process is to establish yourself as an authority over
your domain. For our example, the Virtual Brewery, we will want to configure our
DNS server to answer all queries for the vbrew.com domain. Rather than hassle with
long zone files, this can be done with a few short steps.
vlager# cd /service/tinydns/root
vlager# ./add-ns vlager.com 172.16.1.1
vlager# ./add-ns 1.16.172.in-addr.arpa 172.16.1.1
vlager# make
Now that the server will handle queries for our vbrew domain, we can use it to con-
figure individual hosts on our network. Fortuantely, this is just as easy as the previ-
ous step. To associate an address to our favorite host, vlager, and to our web server,
we need to use the following commands:
vlager# cd /service/tinydns/root
vlager# ./add-host vlager.vbrew.com 172.16.1.10
vlager# ./add-host www.vlager.com 172.16.1.11
vlager# ./add-alias mail.vbrew.com 172.16.1.10
vlager# make

This is the Title of the Book, eMatter Edition
Copyright © 2007 O’Reilly & Associates, Inc. All rights reserved.
94 |Chapter 5: Name Service and Configuration
Using the add-host command, we enter the FDQN followed by the IP addresss to cre-
ate our DNS records. You might have noticed the other command used in the exam-
ple, add-alias. This command adds an alias to an already assigned IP. In the example,
we have our host vlager set to also answer to the name mail. This is useful if a server
serves multiple purposes. Take special notice of the last command executed in the
series, make. Things won’t work if you forget to execute this command, since it is
responsible for compiling the raw configuration file, into one readable by the server.
If you’re having problems with your installation, check this first.
The commands add-host,add-ns, and add-alias just edit the master djbdns configura-
tion file called data located in /service/tinydns/root. If you want to do this manually,
you can just open the datafile in your browser and add the following lines:
=vlager.vbrew.com:172.16.1.10
=www.vlager.com:172.16.1.11
+mail.vbrew.com:172.16.1.10
You’ll notice that the host entry lines begin with = and the alias lines begin with a +
character. While the manual method does work, it adds more complexity, since you
will now be required to also manually check your datafile for duplicate entries. Most
administrators will just want to stick with the automated tools to avoid complica-
tions.
Installing an External DNS Cache
When you’ve successfully created your DNS server and have everything functioning
properly, you may want to craete an external DNS cache, so hosts on your network
can resolve the IP addresses of external machines. This is done by installing a DNS
cache, which again with djbdns is simple. Assuming that you have svscan running,
you must first create (or verify the existance of) two system accounts, one for the
cache program and one for the logging mechanism. Though it isn’t necessary to do
so, it is a good idea to call them something meaningful, such as dnscache and dnslog,
respectively.
Next, you’ll need to determine the IP address on which to run your DNS cache.
Remember this should be a different IP address than you’re using for your DNS
server. Now, as root, create a directory for the DNS service and configure it with the
following commands:
vstout# mkdir /etc/dnscache
vstout# dnscache-conf dnscache dnslog /etc/dnscache <cache.ip.address>
Again, as root, you now need to inform svscan that you have a new service for it to
run:
vstout# ln -s /etc/dnscache /service

This is the Title of the Book, eMatter Edition
Copyright © 2007 O’Reilly & Associates, Inc. All rights reserved.
Alternatives to BIND |95
Now, to be certain that the new service is running, wait a few moments and issue the
following command:
vstout# svstat /service/dnscache
/service/dnscache: up (pid 1139) 149 seconds
When you’ve made certain that the service is running, you need to tell it which IP
addresses are authorized to access the cache. In the case of the Virtual Brewery, we
want to authorize the entire 172.16 network, so we’ll enter the following command:
vstout# touch /etc/dnscache/root/ip/172.16
Of course, you’ll want to make sure that your /etc/resolv.conf knows about your new
DNS cache. You can test to see whether or not your cache is working with nslookup,
dig, or one of the included djbdns tools, dnsip:
vlager# dnsip www.google.com
216.239.57.104 216.239.57.99
vlager#

This is the Title of the Book, eMatter Edition
Copyright © 2007 O’Reilly & Associates, Inc. All rights reserved.
96
Chapter 6
CHAPTER 6
The Point-to-Point
Protocol
Point-to-point protocol (PPP) is a protocol used to send datagrams across a serial
connection. In this chapter, we briefly cover its basic building blocks. We will also
cover PPP over Ethernet (PPPoE), which is now commonly used by telecom provid-
ers to establish DSL sessions. There is also a comprehensive O’Reilly book on the
topic, Using & Managing PPP, by Andrew Sun.
At the very bottom of PPP is the High-Level Data Link Control (HDLC) protocol,
which defines the boundaries around the individual PPP frames and provides a 16-bit
checksum.*A PPP frame is capable of holding packets from protocols other than IP,
such as Novell’s IPX or Appletalk. PPP achieves this by adding a protocol field to the
basic HDLC frame that identifies the type of packet carried by the frame.
The Link Control Protocol (LCP) is used on top of HDLC to negotiate options per-
taining to the data link. For instance, the Maximum Receive Unit (MRU) states the
maximum datagram size that one side of the link agrees to receive.
An important step at the configuration stage of a PPP link is client authorization.
Although it is not mandatory, it is really a must for dial-up lines in order to keep out
intruders. Usually the called host (the server) asks the client to authorize itself by
proving it knows some secret key. If the caller fails to produce the correct secret, the
connection is terminated. With PPP, authorization works both ways; the caller may
also ask the server to authenticate itself. These authentication procedures are totally
independent of each other. There are two protocols for different types of authoriza-
tion, which we will discuss further in this chapter: Password Authentication Protocol
(PAP) and Challenge Handshake Authentication Protocol (CHAP).
Each network protocol that is routed across the data link (like IP and AppleTalk) is
configured dynamically using a corresponding Network Control Protocol (NCP). To
send IP datagrams across the link, both sides running PPP must first negotiate which
* In fact, HDLC is a much more general protocol devised by the International Standards Organization (ISO)
and is also an essential component of the X.25 specification.

This is the Title of the Book, eMatter Edition
Copyright © 2007 O’Reilly & Associates, Inc. All rights reserved.
PPP on Linux |97
IP address each of them uses. The control protocol used for this negotiation is the
Internet Protocol Control Protocol (IPCP).
Besides sending standard IP datagrams across the link, PPP also supports Van Jacob-
son header compression of IP datagrams. This technique shrinks the headers of TCP
packets to as little as 3 bytes. It is more colloquially referred to as VJ header com-
pression. The use of compression may be negotiated at startup time through IPCP, as
well.
PPP on Linux
On Linux, PPP functionality is split into two parts: a kernel component that handles
the low-level protocols (HDLC, IPCP, IPXCP, etc.) and the user space pppd daemon
that handles the various higher-level protocols, such as PAP and CHAP. The current
release of the PPP software for Linux contains the PPP daemon pppd and a program
named chat that automates the dialing of the remote system.
The PPP kernel driver was written by Michael Callahan and reworked by Paul Mack-
erras. pppd was derived from a free PPP implementation for Sun and 386BSD
machines that was written by Drew Perkins and others, and is maintained by Paul
Mackerras. It was ported to Linux by Al Longyear. chat was written by Karl Fox.
PPP is implemented by a special line discipline. To use a serial line as a PPP link, you
first establish the connection over your modem as usual and subsequently convert
the line to PPP mode. In this mode, all incoming data is passed to the PPP driver,
which checks the incoming HDLC frames for validity (each HDLC frame carries a
16-bit checksum), and unwraps and dispatches them. Currently, PPP is able to trans-
port both the IP protocol, optionally using Van Jacobson header compression, and
the IPX protocol.
pppd aids the kernel driver, performing the initialization and authentication phase
that is necessary before actual network traffic can be sent across the link. pppd’s
behavior may be fine-tuned using a number of options. As PPP is rather complex, it
is impossible to explain all of them in a single chapter. This book therefore cannot
cover all aspects of pppd, but only gives you an introduction. For more information,
consult Using & Managing PPP or the pppd manpages, or READMEs in the pppd
source distribution, which should help you sort out most questions this chapter fails
to discuss. The PPP HOWTO might also be of use.
Probably the greatest help you will find in configuring PPP will come from other
users of the same Linux distribution. PPP configuration questions are very common,
so try your local usergroup mailing list or the IRC Linux channel. If your problems
persist even after reading the documentation, you could try the comp.protocols.ppp
newsgroup. This is the place where you can find most of the people involved in pppd
development.

This is the Title of the Book, eMatter Edition
Copyright © 2007 O’Reilly & Associates, Inc. All rights reserved.
98 |Chapter 6: The Point-to-Point Protocol
Running pppd
When you want to connect to the Internet through a PPP link, you have to set up
basic networking capabilities, such as the loopback device and the resolver. Both
have been covered in Chapters 4 and 5. You can simply configure the nameserver of
your Internet Service Provider in the /etc/resolv.conf file, but this will mean that every
DNS request is sent across your serial link. This situation is not optimal; the closer
(network-wise) you are to your nameserver, the faster the name lookups will be. An
alternative solution is to configure a caching-only nameserver at a host on your net-
work. This means that the first time you make a DNS query for a particular host,
your request will be sent across your serial link, but every subsequent request will be
answered directly by your local nameserver, and will be much faster. This configura-
tion is described in Chapter 5.
As an introductory example of how to establish a PPP connection with pppd, assume
you are at vlager again. First, dial in to the PPP server c3po and log in to the ppp
account. c3po will execute its PPP driver. After exiting the communications program
you used for dialing, execute the following command, substituting the name of the
serial device you used for the ttyS3 shown here:
#pppd /dev/ttyS3 38400 crtscts defaultroute
This command flips the serial line ttyS3 to the PPP line discipline and negotiates an
IP link with c3po. The transfer speed used on the serial port will be 38,400 bps. The
crtscts option turns on hardware handshake on the port, which is an absolute must
at speeds above 9,600 bps.
The first thing pppd does after starting up is negotiate several link characteristics with
the remote end using LCP. Usually, the default set of options pppd tries to negotiate
will work, so we won’t go into this here, except to say that part of this negotiation
involves requesting or assigning the IP addresses at each end of the link.
For the time being, we also assume that c3po doesn’t require any authentication
from us, so the configuration phase is completed successfully.
pppd will then negotiate the IP parameters with its peer using IPCP, the IP control
protocol. Since we didn’t specify any particular IP address to pppd earlier, it will try
to use the address obtained by having the resolver look up the local hostname. Both
will then announce their addresses to each other.
Usually, there’s nothing wrong with these defaults. Even if your machine is on an
Ethernet, you can use the same IP address for both the Ethernet and the PPP inter-
face. Nevertheless, pppd allows you to use a different address, or even to ask your
peer to use some specific address. These options are discussed in “Choosing IP
Addresses,” later in this chapter.

This is the Title of the Book, eMatter Edition
Copyright © 2007 O’Reilly & Associates, Inc. All rights reserved.
Using Options Files |99
After going through the IPCP setup phase, pppd will prepare your host’s networking
layer to use the PPP link. It first configures the PPP network interface as a point-to-
point link, using ppp0 for the first PPP link that is active, ppp1 for the second, and so
on. Next, it sets up a routing table entry that points to the host at the other end of
the link. In the previous example, pppd made the default network route point to
c3po, because we gave it the defaultroute option.*The default route simplifies your
routing by causing any IP datagram destined to a nonlocal host to be sent to c3po;
this makes sense since it is the only way they can be reached. There are a number of
different routing schemes pppd supports, which we will cover in detail later in this
chapter.
Using Options Files
Before pppd parses its command-line arguments, it scans several files for default
options. These files may contain any valid command-line arguments spread out
across an arbitrary number of lines. Hash signs introduce comments.
The first options file is /etc/ppp/options, which is always scanned when pppd starts
up. Using it to set some global defaults is a good idea, because it allows you to keep
your users from doing several things that may compromise security. For instance, to
make pppd require some kind of authentication (either PAP or CHAP) from the peer,
you add the auth option to this file. This option cannot be overridden by the user, so
it becomes impossible to establish a PPP connection with any system that is not in
your authentication databases. Note, however, that some options can be overridden;
the connect string is a good example.
The other options file, which is read after /etc/ppp/options,is.ppprc in the user’s
home directory. It allows each user to specify her own set of default options.
A sample /etc/ppp/options file might look like this:
# Global options for pppd running on vlager.vbrew.com
lock # use UUCP-style device locking
auth # require authentication
usehostname # use local hostname for CHAP
domain vbrew.com # our domain name
The lock keyword makes pppd comply to the standard UUCP method of device lock-
ing. With this convention, each process that accesses a serial device, say /dev/ttyS3,
creates a lock file with a name such as LCK..ttyS3 in a special lock-file directory to
signal that the device is in use. This is necessary to prevent other programs, such as
minicom or uucico, from opening the serial device while it is used by PPP.
* The default network route is installed only if none is already present.

This is the Title of the Book, eMatter Edition
Copyright © 2007 O’Reilly & Associates, Inc. All rights reserved.
100 |Chapter 6: The Point-to-Point Protocol
The next three options relate to authentication and, therefore, to system security.
The authentication options are best placed in the global configuration file because
they are “privileged” and cannot be overridden by users’ ~/.ppprc options files.
Using chat to Automate Dialing
One of the things that may have struck you as inconvenient in the previous example
is that you had to establish the connection manually before you could fire up pppd.
pppd relies on an external program or shell script to log in and connect to the remote
system. The command to be executed can be given to pppd with the connect com-
mand-line option. pppd will redirect the command’s standard input and output to
the serial line.
The pppd software package is supplied with a very simple program called chat, which
is capable of being used in this way to automate simple login sequences. We’ll talk
about this command in some detail.
If your login sequence is complex, you will need something more powerful than chat.
One useful alternative you might consider is expect, written by Don Libes. It has a
very powerful language based on Tcl and was designed exactly for this sort of appli-
cation. Those of you whose login sequence requires, for example, challenge/response
authentication involving calculator-like key generators will find expect powerful
enough to handle the task. Since there are so many possible variations on this theme,
we won’t describe how to develop an appropriate expect script in this book. Suffice it
to say, you’d call your expect script by specifying its name using the pppd connect
option. It’s also important to note that when the script is running, the standard input
and output will be attached to the modem, not to the terminal that invoked pppd.If
you require user interaction, you should manage it by opening a spare virtual termi-
nal, or arrange some other means.
The chat command lets you specify a chat script. Basically, a chat script consists of
an alternating sequence of strings that we expect to receive from the remote system,
and the answers we are to send. We will call them expect and send strings, respec-
tively. This is a typical excerpt from a chat script:
ogin: b1ff ssword: s3|<r1t
This script tells chat to wait for the remote system to send the login prompt and
return the login name b1ff. We wait only for ogin: so that it doesn’t matter if the
login prompt starts with an uppercase or lowercase l, or if it arrives garbled. The fol-
lowing string is another expect string that makes chat wait for the password prompt
and send our response password.
This is basically what chat scripts are all about. A complete script to dial up a PPP
server would, of course, also have to include the appropriate modem commands.
Assume that your modem understands the Hayes command set, and the server’s

This is the Title of the Book, eMatter Edition
Copyright © 2007 O’Reilly & Associates, Inc. All rights reserved.
Using chat to Automate Dialing |101
telephone number is 318714. The complete chat invocation to establish a connec-
tion with c3po would then be:
$ chat -v '' ATZ OK ATDT318714 CONNECT '' ogin: ppp word: GaGariN
By definition, the first string must be an expect string, but as the modem won’t say
anything before we have kicked it, we make chat skip the first expect by specifying
an empty string. We then send ATZ, the reset command for Hayes-compatible
modems and wait for its response (OK). The next string sends the dial command
along with the phone number to chat and expects the CONNECT message in response.
This is followed by an empty string again because we don’t want to send anything
now, but rather wait for the login prompt. The remainder of the chat script works
exactly as described previously. This description probably looks a bit confusing, but
we’ll see in a moment that there is a way to make chat scripts a lot easier to under-
stand.
The -v option makes chat log all activities to the syslog daemon local2 facility.*
Specifying the chat script on the command line bears a certain risk because users can
view a process’s command line with the ps command. You can avoid this risk by put-
ting the chat script in a file such as dial-c3po. You make chat read the script from the
file instead of the command line by giving it the -f option, followed by the filename.
This action has the added benefit of making our chat expect sequences easier to
understand. To convert our example, our dial-c3po file would look like this:
'' ATZ
OK ATDT318714
CONNECT ''
ogin: ppp
word: GaGariN
When we use a chat script file in this way, the string we expect to receive is on the
left and the response we will send is on the right. They are much easier to read and
understand when presented this way.
The complete pppd incantation would now look like this:
#pppd connect "chat -f dial-c3po" /dev/ttyS3 38400 -detach \
crtscts modem defaultroute
Besides the connect option that specifies the dial-up script, we have added two more
options to the command line: -detach, which tells pppd not to detach from the con-
sole and become a background process, and the modem keyword, which makes it per-
form modem-specific actions on the serial device, such as disconnecting the line
before and after the call. If you don’t use this keyword, pppd will not monitor the
* If you edit syslog.conf to redirect these log messages to a file, make sure this file isn’t world readable, as chat
also logs the entire chat script by default—including passwords.

This is the Title of the Book, eMatter Edition
Copyright © 2007 O’Reilly & Associates, Inc. All rights reserved.
102 |Chapter 6: The Point-to-Point Protocol
port’s DCD line and will therefore not detect whether the remote end hangs up
unexpectedly.
The examples we have shown are rather simple; chat allows for much more complex
scripts. For instance, it can specify strings on which to abort the chat with an error.
Typical abort strings are messages such as BUSY or NO CARRIER that your modem usu-
ally generates when the called number is busy or doesn’t answer. To make chat rec-
ognize these messages immediately rather than timing out, you can specify them at
the beginning of the script using the ABORT keyword:
$chat -v ABORT BUSY ABORT 'NO CARRIER' '' ATZ OK ...
Similarly, you can change the timeout value for parts of the chat scripts by inserting
TIMEOUT options.
Sometimes you also need to have conditional execution for parts of the chat script:
when you don’t receive the remote end’s login prompt, you might want to send a
BREAK or a carriage return. You can achieve this by appending a subscript to an
expect string. The subscript consists of a sequence of send and expect strings, just
like the overall script itself, which are separated by hyphens. The subscript is exe-
cuted whenever the expected string it is appended to is not received in time. In the
example above, we would modify the chat script as follows:
ogin:-BREAK-ogin: ppp ssword: GaGariN
When chat doesn’t see the remote system send the login prompt, the subscript is exe-
cuted by first sending a BREAK and then waiting for the login prompt again. If the
prompt now appears, the script continues as usual; otherwise, it will terminate with
an error.
IP Configuration Options
IPCP is used to negotiate a number of IP parameters at link configuration time. Usu-
ally, each peer sends an IPCP configuration request packet, indicating which values it
wants to change from the defaults and the new value. Upon receipt, the remote end
inspects each option in turn and either acknowledges or rejects it.
pppd gives you a lot of control over which IPCP options it will try to negotiate. You
can tune it through various command-line options that we will discuss in this sec-
tion.
Choosing IP Addresses
All IP interfaces require that IP addresses be assigned to them; a PPP device always
has an IP address. The PPP suite of protocols provides a mechanism that allows the
automatic assignment of IP addresses to PPP interfaces. It is possible for the PPP

This is the Title of the Book, eMatter Edition
Copyright © 2007 O’Reilly & Associates, Inc. All rights reserved.
IP Configuration Options |103
program at one end of a point-to-point link to assign an IP address for the remote
end to use, or each may use its own.
Some PPP servers that handle a lot of client sites assign addresses dynamically;
addresses are assigned to systems only when calling in and are reclaimed after they
have logged off again. This allows the number of IP addresses required to be limited
to the number of dial-up lines. While limitation is convenient for managers of the
PPP dial-up server, it is often less convenient for users who are dialing in. We dis-
cussed the way that hostnames are mapped to IP addresses by use of a database in
Chapter 5. In order for people to connect to your host, they must know your IP
address or the hostname associated with it. If you are a user of a PPP service that
assigns you an IP address dynamically, this knowledge is difficult without providing
some means of allowing the DNS database to be updated after you are assigned an IP
address. Such systems do exist, but we won’t cover them in detail here; instead, we
will look at the preferable approach, which involves you being able to use the same
IP address each time you establish a network connection.*
In the previous example, we had pppd dial up c3po and establish an IP link. No pro-
visions were taken to choose a particular IP address on either end of the link.
Instead, we let pppd take its default action. It attempts to resolve the local hostname,
vlager in our example, to an IP address, which it uses for the local end, while letting
the remote machine, c3po, provide its own. PPP supports several alternatives to this
arrangement.
To ask for particular addresses, you generally provide pppd with the following
option:
local_addr:remote_addr
local_addr and remote_addr may be specified either in dotted quad notation or as
hostnames.†This option makes pppd attempt to use the first address supplied as its
own IP address, and the second as the peer’s. If the peer rejects either of the
addresses during IPCP negotiation, no IP link will be established.‡
If you are dialing in to a server and expect it to assign you an IP address, you should
ensure that pppd does not attempt to negotiate one for itself. To do this, use the
noipdefault option and leave the local_addr blank. The noipdefault option will stop
pppd from trying to use the IP address associated with the hostname as the local
address.
* More information on two dynamic host assignment mechanisms can be found at http://www.dynip.com/.
† Using hostnames in this option has consequences for CHAP authentication. Please refer to the section “The
CHAP Secrets File” later in this chapter.
‡ The ipcp-accept-local and ipcp-accept-remote options instruct your pppd to accept the local and remote IP
addresses being offered by the remote PPP, even if you’ve supplied some in your configuration. If these
options are not configured, your pppd will reject any attempt to negotiate the IP addresses used.

This is the Title of the Book, eMatter Edition
Copyright © 2007 O’Reilly & Associates, Inc. All rights reserved.
104 |Chapter 6: The Point-to-Point Protocol
If you want to set only the local address but accept any address the peer uses, simply
leave out the remote_addr part. To make vlager use the IP address 130.83.4.27
instead of its own, give it 130.83.4.27: on the command line. Similarly, to set the
remote address only, leave the local_addr field blank. By default, pppd will then use
the address associated with your hostname.
Routing Through a PPP Link
After setting up the network interface, pppd will usually set up a host route to its peer
only. If the remote host is on a LAN, you certainly want to be able to connect to
hosts “behind” your peer as well; in that case, a network route must be set up.
We have already seen that pppd can be asked to set the default route using the
defaultroute option. This option is very useful if the PPP server you dialed up acts as
your Internet gateway.
The reverse case, in which your system acts as a gateway for a single host, is also rela-
tively easy to accomplish. For example, take some employee at the Virtual Brewery
whose home machine is called oneshot. Let’s also assume that we’ve configured
vlager as a dial-in PPP server. If we’ve configured vlager to dynamically assign an IP
address that belongs to the Brewery’s subnet, we can use the proxyarp option with
pppd, which will install a proxy ARP entry for oneshot. This automatically makes
oneshot accessible from all hosts at the brewery and the winery.
However, things aren’t always that simple. Linking two local area networks usually
requires adding a specific network route because these networks may have their own
default routes. Besides, having both peers use the PPP link as the default route would
generate a loop, through which packets to unknown destinations would ping-pong
between the peers until their time to live expired.
Suppose the Virtual Brewery opens a branch in another city. The subsidiary runs an
Ethernet of its own using the IP network number 172.16.3.0, which is subnet 3 of
the brewery’s class B network. The subsidiary wants to connect to the brewery’s net-
work via PPP to update customer databases. Again, vlager acts as the gateway for the
brewery network and will support the PPP link; its peer at the new branch is called
vbourbon and has an IP address of 172.16.3.1.
When vbourbon connects to vlager, it makes the default route point to vlager as
usual. On vlager, however, we will have only the point-to-point route to vbourbon
and will have to specially configure a network route for subnet 3 that uses vbourbon
as its gateway. We could do this manually using the route command by hand after
the PPP link is established, but this is not a very practical solution. Fortunately, we
can configure the route automatically by using a feature of pppd that we haven’t dis-
cussed yet—the ip-up command. This command is a shell script or program located
in /etc/ppp that is executed by pppd after the PPP interface has been configured.
When present, it is invoked with the following parameters:
ip-up iface device speed local_addr remote_addr

This is the Title of the Book, eMatter Edition
Copyright © 2007 O’Reilly & Associates, Inc. All rights reserved.
Link Control Options |105
Table 6-1 summarizes the meaning of each of the arguments (in the first column, we
show the number used by the shell script to refer to each argument).
In our case, the ip-up script may contain the following code fragment:*
#!/bin/sh
case $5 in
172.16.3.1) # this is vbourbon
route add -net 172.16.3.0 gw 172.16.3.1;;
...
esac
exit 0
Similarly, /etc/ppp/ip-down can be used to undo any actions of ip-up after the PPP
link has been taken down again. So in our /etc/ppp/ip-down script we would have a
route command that removed the route we created in the /etc/ppp/ip-up script.
However, the routing scheme is not yet complete. We have set up routing table
entries on both PPP hosts, but so far none of the hosts on either network knows any-
thing about the PPP link. This is not a big problem if all hosts at the subsidiary have
their default route pointing at vbourbon and all brewery hosts route to vlager by
default.
Link Control Options
We already encountered LCP, which is used to negotiate link characteristics and test
the link.
The two most important options negotiated by LCP are the Asynchronous Control
Character Map and the Maximum Receive Unit. There are a number of other LCP
configuration options, but they are far too specialized to discuss here.
The Asynchronous Control Character Map, colloquially called the async map,is
used on asynchronous links, such as telephone lines, to identify control characters
that must be escaped (replaced by a specific two-character sequence) to avoid them
Table 6-1. ip-up arguments
Name Purpose
iface The network interface used, e.g., ppp0
device The pathname of the serial device file used (/dev/tty, if stdin/stdout are used)
speed The speed of the serial device in bits per second
local_addr The IP address of the link’s remote end in dotted quad notation
remote_addr The IP address of the remote end of the link in dotted quad notation
* If we wanted to have routes for other sites created when they dial in, we’d add appropriate case statements
to cover those where the ... appears in the example.

This is the Title of the Book, eMatter Edition
Copyright © 2007 O’Reilly & Associates, Inc. All rights reserved.
106 |Chapter 6: The Point-to-Point Protocol
being interpreted by equipment used to establish the link. For instance, you may
want to avoid the XON and XOFF characters used for software handshake because a
misconfigured modem might choke upon receipt of an XOFF. Other candidates
include Ctrl-l (the telnet escape character). PPP allows you to escape any of the char-
acters with ASCII codes 0 through 31 by specifying them in the async map.
The async map is a 32-bit-wide bitmap expressed in hexadecimal. The least signifi-
cant bit corresponds to the ASCII NULL character, and the most significant bit cor-
responds to ASCII 31 decimal. These 32 ASCII characters are the control characters.
If a bit is set in the bitmap, it signals that the corresponding character must be
escaped before it is transmitted across the link.
To tell your peer that it doesn’t have to escape all control characters, but only a few
of them, you can specify an async map to pppd using the asyncmap option. For exam-
ple, if only ^S and ^Q (ASCII 17 and 19, commonly used for XON and XOFF) must
be escaped, use the following option:
asyncmap 0x000A0000
The conversion is simple as long as you can convert binary to hex. Lay out 32 bits in
front of you. The right-most bit corresponds to ASCII 00 (NULL), and the left-most
bit corresponds to ASCII 32 decimal. Set the bits corresponding to the characters you
want escaped to one, and all others to zero. To convert that into the hexadecimal
number pppd expects, simply take each set of 4 bits and convert them into hex. You
should end up with eight hexadecimal figures. String them all together and preprend
“0x” to signify it is a hexadecimal number, and you are done.
Initially, the async map is set to 0xffffffff—that is, all control characters will be
escaped. This is a safe default, but is usually much more than you need. Each charac-
ter that appears in the async map results in two characters being transmitted across
the link, so escaping comes at the cost of increased link utilization and a correspond-
ing performance reduction.
In most circumstances, an async map of 0x0 works fine. No escaping is performed.
The Maximum Receive Unit (MRU) signals to the peer the maximum size of HDLC
frames that we want to receive. Although this may remind you of the Maximum
Transfer Unit (MTU) value, these two have little in common. The MTU is a parame-
ter of the kernel networking device and describes the maximum frame size that the
interface is able to transmit. The MRU is more of an advice to the remote end not to
generate frames larger than the MRU; the interface must nevertheless be able to
receive frames of up to 1,500 bytes.
Choosing an MRU is therefore not so much a question of what the link is capable of
transferring, but of what gives you the best throughput. If you intend to run interac-
tive applications over the link, setting the MRU to values as low as 296 is a good
idea, so that an occasional larger packet (say, from an FTP session) doesn’t make
your cursor “jump.” To tell pppd to request an MRU of 296, you give it the option

This is the Title of the Book, eMatter Edition
Copyright © 2007 O’Reilly & Associates, Inc. All rights reserved.
General Security Considerations |107
mru 296. Small MRUs, however, make sense only if you have VJ header compression
(it is enabled by default), because otherwise you’d waste a large amount of your
bandwidth just carrying the IP header for each datagram.
pppd also understands a couple of LCP options that configure the overall behavior of
the negotiation process, such as the maximum number of configuration requests that
may be exchanged before the link is terminated. Unless you know exactly what you
are doing, you should leave these options alone.
Finally, there are two options that apply to LCP echo messages. PPP defines two
messages, Echo Request and Echo Response.pppd uses this feature to check whether a
link is still operating. You can enable this by using the lcp-echo-interval option
together with a time in seconds. If no frames are received from the remote host
within this interval, pppd generates an Echo Request and expects the peer to return
an Echo Response. If the peer does not produce a response, the link is terminated
after a certain number of requests are sent. This number can be set using the lcp-
echo-failure option. By default, this feature is disabled altogether.
General Security Considerations
A misconfigured PPP daemon can be a devastating security breach. It can be as bad
as letting anyone plug their machine into your Ethernet (and that can be very bad).
In this section, we discuss a few measures that should make your PPP configuration
safe.
Root privilege is required to configure the network device and routing
table. You will usually solve this by running pppd setuid root. How-
ever, pppd allows users to set various security-relevant options.
To protect against any attacks a user may launch by manipulating pppd options, you
should set a couple of default values in the global /etc/ppp/options file, like those
shown in the sample file in “Using Options Files,” earlier in this chapter. Some of
them, such as the authentication options, cannot be overridden by the user, and thus
provide reasonable protection against manipulations. An important option to pro-
tect is the connect option. If you intend to allow non-root users to invoke pppd to
connect to the Internet, you should always add the connect and noauth options to the
global options file /etc/ppp/options. If you fail to do this, users will be able to execute
arbitrary commands with root privileges by specifying the command as their con-
nect command on the pppd line or in their personal options file.
Another good idea is to restrict which users may execute pppd by creating a group in
/etc/group and adding only those users who you wish to have the ability to execute
the PPP daemon. You should then change group ownership of the pppd daemon to

This is the Title of the Book, eMatter Edition
Copyright © 2007 O’Reilly & Associates, Inc. All rights reserved.
108 |Chapter 6: The Point-to-Point Protocol
that group and remove the world execute privileges. To do this, assuming you’ve
called your group dialout, you could use something like:
#chown root /usr/sbin/pppd
#chgrp dialout /usr/sbin/pppd
#chmod 4750 /usr/sbin/pppd
Of course, you have to protect yourself from the systems you speak PPP with, too.
To fend off hosts posing as someone else, you should always require some sort of
authentication from your peer. Additionally, you should not allow foreign hosts to
use any IP address they choose, but restrict them to at most a few. The following sec-
tion will deal with these topics in detail.
Authentication with PPP
With PPP, each system may require its peer to authenticate itself using one of two
authentication protocols: the Password Authentication Protocol (PAP) or the Chal-
lenge Handshake Authentication Protocol (CHAP). When a connection is established,
each end can request the other to authenticate itself, regardless of whether it is the
caller or the callee. In the description that follows, we will loosely talk of “client” and
“server” when we want to distinguish between the system sending authentication
requests and the system responding to them. A PPP daemon can ask its peer for
authentication by sending yet another LCP configuration request identifying the
desired authentication protocol.
PAP Versus CHAP
PAP, which is offered by many Internet Service Providers, works basically the same
way as the normal login procedure. The client authenticates itself by sending a user-
name and a (optionally encrypted) password to the server, which the server com-
pares to its secrets database. This technique is vulnerable to eavesdroppers, who may
try to obtain the password by listening in on the serial line, and to repeated trial and
error attacks.
CHAP does not have these deficiencies. With CHAP, the server sends a randomly
generated “challenge” string to the client along with its hostname. The client uses the
hostname to look up the appropriate secret, combines it with the challenge, and
encrypts the string using a one-way hashing function. The result is returned to the
server along with the client’s hostname. The server now performs the same computa-
tion and acknowledges the client if it arrives at the same result.
CHAP also doesn’t require the client to authenticate itself only at startup time, but
sends challenges at regular intervals to make sure that the client hasn’t been replaced
by an intruder, for instance, by switching phone lines or because of a modem config-
uration error that causes the PPP daemon not to notice that the original phone call
has dropped out and someone else has dialed in.

This is the Title of the Book, eMatter Edition
Copyright © 2007 O’Reilly & Associates, Inc. All rights reserved.
Authentication with PPP |109
pppd keeps the secret keys for PAP and CHAP in two separate files called /etc/ppp/
pap-secrets and /etc/ppp/chap-secrets. By entering a remote host in one or the other
file, you have fine control over whether PAP or CHAP is used to authenticate your-
self with your peer, and vice versa.
By default, pppd doesn’t require authentication from the remote host, but it will
agree to authenticate itself when requested by the remote host. Since CHAP is so
much stronger than PAP, pppd tries to use the former whenever possible. If the peer
does not support it, or if pppd can’t find a CHAP secret for the remote system in its
chap-secrets file, it reverts to PAP. If it doesn’t have a PAP secret for its peer either, it
refuses to authenticate altogether. As a consequence, the connection is shut down.
You can modify this behavior in several ways. When given the auth keyword, pppd
requires the peer to authenticate itself. pppd agrees to use either CHAP or PAP as
long as it has a secret for the peer in its CHAP or PAP database. There are other
options to turn a particular authentication protocol on or off, but I won’t describe
them here.
If all systems you talk to with PPP agree to authenticate themselves with you, you
should put the auth option in the global /etc/ppp/options file and define passwords for
each system in the chap-secrets file. If a system doesn’t support CHAP, add an entry
for it to the pap-secrets file. That way, you can make sure no unauthenticated system
connects to your host.
The next two sections discuss the two PPP secrets files, pap-secrets and chap-secrets.
They are located in /etc/ppp and contain triplets of clients, servers, and passwords,
optionally followed by a list of IP addresses. The interpretation of the client and
server fields is different for CHAP and PAP, and also depends on whether we authen-
ticate ourselves with the peer or whether we require the server to authenticate itself
with us.
The CHAP Secrets File
When it has to authenticate itself with a server using CHAP, pppd searches the chap-
secrets file for an entry with the client field equal to the local hostname, and the
server field equal to the remote hostname sent in the CHAP challenge. When requir-
ing the peer to authenticate itself, the roles are simply reversed: pppd then looks for
an entry with the client field equal to the remote hostname (sent in the client’s CHAP
response), and the server field equal to the local hostname.
The following is a sample chap-secrets file for vlager:*
# CHAP secrets for vlager.vbrew.com
#
* The double quotes are not part of the secret; they merely serve to protect the whitespace within it.

This is the Title of the Book, eMatter Edition
Copyright © 2007 O’Reilly & Associates, Inc. All rights reserved.
110 |Chapter 6: The Point-to-Point Protocol
# client server secret addrs
#---------------------------------------------------------------------
vlager.vbrew.com c3po.lucas.com "Use The Source Luke" vlager.vbrew.com
c3po.lucas.com vlager.vbrew.com "arttoo! arttoo!" c3po.lucas.com
* vlager.vbrew.com "TuXdrinksVicBitter" pub.vbrew.com
When vlager establishes a PPP connection with c3po,c3po asks vlager to authenti-
cate itself by sending a CHAP challenge. pppd on vlager then scans chap-secrets for
an entry with the client field equal to vlager.vbrew.com and the server field equal to
c3po.lucas.com, and finds the first line shown in the example.*It then produces the
CHAP response from the challenge string and the secret (Use The Source Luke), and
sends it off to c3po.
pppd also composes a CHAP challenge for c3po containing a unique challenge string
and its fully qualified hostname, vlager.vbrew.com.c3po constructs a CHAP
response in the way we discussed, and returns it to vlager.pppd then extracts the cli-
ent hostname (c3po.vbrew.com) from the response and searches the chap-secrets file
for a line matching c3po as a client and vlager as the server. The second line does
this, so pppd combines the CHAP challenge and the secret arttoo! arttoo!, encrypts
them, and compares the result to c3po’s CHAP response.
The optional fourth field lists the IP addresses that are acceptable for the client
named in the first field. The addresses can be given in dotted quad notation or as
hostnames that are looked up with the resolver. For instance, if c3po asks to use an
IP address during IPCP negotiation that is not in this list, the request is rejected and
IPCP is shut down. In the sample file shown above, c3po is therefore limited to using
its own IP address. If the address field is empty, any addresses are allowed; a value of
“-” prevents the use of IP with that client altogether.
The third line of the sample chap-secrets file allows any host to establish a PPP link
with vlager because a client or server field of *is a wildcard matching any hostname.
The only requirements are that the connecting host must know the secret and that it
must use the IP address associated with pub.vbrew.com. Entries with wildcard host-
names may appear anywhere in the secrets file, since pppd will always use the best
match it can find for the server/client pair.
pppd may need some help forming hostnames. As explained before, the remote host-
name is always provided by the peer in the CHAP challenge or response packet. The
local hostname is obtained by calling the gethostname(2) function by default. If you
have set the system name to your unqualified hostname, you also have to provide
pppd with the domain name using the domain option:
#pppd domain vbrew.com
* This hostname is taken from the CHAP challenge.

This is the Title of the Book, eMatter Edition
Copyright © 2007 O’Reilly & Associates, Inc. All rights reserved.
Authentication with PPP |111
This provision appends the Brewery’s domain name to vlager for all authentication
related activities. Other options that modify pppd’s idea of the local hostname are
usehostname and name. When you give the local IP address on the command line
using local:remote and local as a name instead of a dotted quad, pppd uses this as
the local hostname.
The PAP Secrets File
The PAP secrets file is very similar to CHAP’s. The first two fields always contain a
username and a server name; the third holds the PAP secret. When the remote host
sends its authentication information, pppd uses the entry that has a server field equal
to the local hostname, and a user field equal to the username sent in the request.
When it is necessary for us to send our credentials to the peer, pppd uses the secret
that has a user field equal to the local username and the server field equal to the
remote hostname.
A sample PAP secrets file might look like this:
# /etc/ppp/pap-secrets
#
# user server secret addrs
vlager-pap c3po cresspahl vlager.vbrew.com
c3po vlager DonaldGNUth c3po.lucas.com
The first line is used to authenticate ourselves when talking to c3po. The second line
describes how a user named c3po has to authenticate itself with us.
The name vlager-pap in the first column is the username that we send to c3po.By
default, pppd picks the local hostname as the username, but you can also specify a
different name by giving the user option followed by that name.
When picking an entry from the pap-secrets file to identify yourself to a remote host,
pppd must know the remote host’s name. As it has no way of finding that out, you
must specify it on the command line using the remotename keyword followed by the
peer’s hostname. To use the above entry for authentication with c3po, for example,
we must add the following option to pppd’s command line:
#pppd ... remotename c3po user vlager-pap
In the fourth field of the PAP secrets file (and all following fields), you can specify
what IP addresses are allowed for that particular host, just as in the CHAP secrets
file. The peer will be allowed to request only addresses from that list. In the sample
file, the entry that c3po will use when it dials in—the line where c3po is the client—
allows it to use its real IP address and no other.
Note that PAP is a rather weak authentication method, you should use CHAP
instead whenever possible. We will therefore not cover PAP in greater detail here; if
you are interested in using it, you will find more PAP features in the pppd(8)
manpage.

This is the Title of the Book, eMatter Edition
Copyright © 2007 O’Reilly & Associates, Inc. All rights reserved.
112 |Chapter 6: The Point-to-Point Protocol
Debugging Your PPP Setup
By default, pppd logs any warnings and error messages to syslog’s daemon facility. You
have to add an entry to syslog.conf that redirects these messages to a file or even the
console; otherwise, syslog simply discards them. The following entry sends all mes-
sages to /var/log/ppp-log:
daemon.* /var/log/ppp-log
If your PPP setup doesn’t work right away, you should look in this logfile. If the log
messages don’t help, you can also turn on extra debugging output using the debug
option. This output makes pppd log the contents of all control packets sent or
received to syslog. All messages then go to the daemon facility.
Finally, the most drastic way to check a problem is to enable kernel-level debugging
by invoking pppd with the kdebug option. It is followed by a numeric argument that is
the sum of the following values: 1 for general debug messages, 2 for printing the con-
tents of all incoming HDLC frames, and 4 to make the driver print all outgoing
HDLC frames. To capture kernel debugging messages, you must either run a syslogd
daemon that reads the /proc/kmsg file, or the klogd daemon. Either of them directs
kernel debugging to the syslog kernel facility.
More Advanced PPP Configurations
While configuring PPP to dial in to a network like the Internet is the most common
application, some users have more advanced requirements. In this section we’ll talk
about a few of the more advanced configurations possible with PPP under Linux.
PPP Server
Running pppd as a server is just a matter of configuring a serial tty device to invoke
pppd with appropriate options when an incoming data call has been received. One
way to do this is to create a special account, say ppp, and give it a script or program
as a login shell that invokes pppd with these options. Alternatively, if you intend to
support PAP or CHAP authentication, you can use the mgetty program to support
your modem and exploit its “/AutoPPP/” feature.
To build a server using the login method, you add a line similar to the following to
your /etc/passwd file:*
ppp:x:500:200:Public PPP Account:/tmp:/etc/ppp/ppplogin
If your system supports shadow passwords, you also need to add an entry to the /etc/
shadow file:
* The useradd or adduser utility, if you have it, will simplify this task.

This is the Title of the Book, eMatter Edition
Copyright © 2007 O’Reilly & Associates, Inc. All rights reserved.
More Advanced PPP Configurations |113
ppp:!:10913:0:99999:7:::
Of course, the UID and GID you use depends on which user you wish to own the
connection, and how you’ve created it. You also have to set the password for the
mentioned account using the passwd command.
The ppplogin script might look like this:
#!/bin/sh
# ppplogin - script to fire up pppd on login
mesg n
stty -echo
exec pppd -detach silent modem crtscts
The mesg command disables other users from writing to the tty by using, for
instance, the write command. The stty command turns off character echoing. This
command is necessary; otherwise, everything the peer sends would be echoed back
to it. The most important pppd option given is -detach because it prevents pppd from
detaching from the controlling tty. If we didn’t specify this option, it would go to the
background, making the shell script exit. This in turn would cause the serial line to
hang up and the connection to be dropped. The silent option causes pppd to wait
until it receives a packet from the calling system before it starts sending. This option
prevents transmit timeouts from occurring when the calling system is slow in firing
up its PPP client. The modem option makes pppd drive the modem control lines of the
serial port. You should always turn this option on when using pppd with a modem.
The crtscts option turns on hardware handshake.
Besides these options, you might want to force some sort of authentication—for
example, by specifying auth on pppd’s command line or in the global options file.
The manual page also discusses more specific options for turning individual authen-
tication protocols on and off.
If you wish to use mgetty, all you need to do is configure mgetty to support the serial
device your modem is connected to (see Chapter 3 for details), configure pppd for
either PAP or CHAP authentication with appropriate options in its options file, and
finally, add a section similar to the following to your /etc/mgetty/login.config file:
# Configure mgetty to automatically detect incoming PPP calls and invoke
# the pppd daemon to handle the connection.
#
/AutoPPP/ - ppp /usr/sbin/pppd auth -chap +pap login
The first field is a special piece of magic used to detect that an incoming call is a PPP
one. You must not change the case of this string; it is case sensitive. The third col-
umn is the username that appears in who listings when someone has logged in. The
rest of the line is the command to invoke. In our example, we’ve ensured that PAP
authentication is required, disabled CHAP, and specified that the system passwd file
should be used for authenticating users. This is probably similar to what you’ll want.
Remember, you can specify the options in the options file or on the command line if
you prefer.

This is the Title of the Book, eMatter Edition
Copyright © 2007 O’Reilly & Associates, Inc. All rights reserved.
114 |Chapter 6: The Point-to-Point Protocol
Here is a small checklist of tasks to perform and the sequence you should perform
them to get PPP dial in working on your machine. Make sure each step works before
moving on to the next:
1. Configure the modem for auto-answer mode. On Hayes-compatible modems,
this is performed using a command such as ATS0=3. If you’re going to be using
the mgetty daemon, this isn’t necessary.
2. Configure the serial device with a getty-type of command to answer incoming
calls. A commonly used getty variant is mgetty.
3. Consider authentication. Will your callers authenticate using PAP, CHAP, or
system login?
4. Configure pppd as server as described in this section.
5. Consider routing. Will you need to provide a network route to callers? Routing
can be performed using the ip-up script.
Demand Dialing
When there is IP traffic to be carried across the link, demand dialing causes your tele-
phone modem to dial and to establish a connection to a remote host. Demand dial-
ing is most useful when you can’t leave your telephone line permanently switched to
your Internet provider. For example, you might have to pay timed local calls, so it
might be cheaper to have the telephone line switched on only when you need it and
disconnected when you aren’t using the Internet.
In the past, Linux solutions used the diald command, which worked well but was
fairly tricky to configure. Versions 2.3.0 and later of the PPP daemon have built-in
support for demand dialing and make it very simple to configure.
To configure pppd for demand dialing, all you need to do is add options to your
options file or the pppd command line. Table 6-2 summarizes the options related to
demand dialing.
Table 6-2. Demand dialing options
Option Description
demand This option specifies that the PPP link should be placed in demand dial mode. The PPP net-
work device will be created, but the connect command will not be used until a datagram is
transmitted by the local host. This option is mandatory for demand dialing to work.
active-filter
expression
This option allows you to specify which data packets are to be considered active traffic. Any
traffic matching the specified rule will restart the demand dial idle timer, ensuring that pppd
waits again before closing the link. The filter syntax has been borrowed from the tcpdump
command. The default filter matches all datagrams.
holdoff nThis option allows you to specify the minimum amount of time, in seconds, to wait before
reconnecting this link if it terminates. If the connection fails while pppd believes it is in active
use, it will be reestablished after this timer has expired. This timer does not apply to reconnec-
tions after an idle timeout.

This is the Title of the Book, eMatter Edition
Copyright © 2007 O’Reilly & Associates, Inc. All rights reserved.
More Advanced PPP Configurations |115
A simple demand dialing configuration would therefore look something like this:
demand
holdoff 60
idle 180
This configuration would enable demand dialing, wait 60 seconds before reestablish-
ing a failed connection, and drop the link if 180 seconds pass without any active data
on the link.
Persistent Dialing
Persistent dialing is what people who have permanent dial-up connections to a net-
work will want to use. There is a subtle difference between demand dialing and per-
sistent dialing. With persistent dialing, the connection is automatically established as
soon as the PPP daemon is started, and the persistent aspect comes into play when-
ever the telephone call supporting the link fails. Persistent dialing ensures that the
link is always available by automatically rebuilding the connection if it fails.
You might be fortunate to not have to pay for your telephone calls; perhaps they are
local and free, or perhaps they’re paid by your company. The persistent dialing
option is extremely useful in this situation. If you do have to pay for your telephone
calls, then you have to be a little careful. If you pay for your telephone calls on a
time-charged basis, persistent dialing is almost certainly not what you want; unless
you’re very sure you’ll be using the connection fairly steadily 24 hours a day. If you
do pay for calls, but they are not time charged, you need to be careful to protect
yourself against situations that might cause the modem to endlessly redial. The pppd
daemon provides an option that can help reduce the effects of this problem.
To enable persistent dialing, you must include the persist option in one of your
pppd options files. Including this option alone is all you need to have pppd automati-
cally invoke the command specified by the connect option to rebuild the connection
when the link fails. If you are concerned about the modem redialing too rapidly (in
the case of modem or server fault at the other end of the connection), you can use
the holdoff option to set the minimum amount of time that pppd will wait before
attempting to reconnect. This option won’t solve the problem of a fault costing you
money in wasted phone calls, but it will at least serve to reduce the impact of one.
A typical configuration might have persistent dialing options that look like this:
persist
holdoff 600
idle nIf this option is configured, pppd will disconnect the link whenever this timer expires. Idle
times are specified in seconds. Each new active data packet will reset the timer.
Table 6-2. Demand dialing options (continued)
Option Description

This is the Title of the Book, eMatter Edition
Copyright © 2007 O’Reilly & Associates, Inc. All rights reserved.
116 |Chapter 6: The Point-to-Point Protocol
The holdoff time is specified in seconds. In our example, pppd waits a full five min-
utes before redialing after the call drops out.
It is possible to combine persistent dialing with demand dialing, using idle to drop
the link if it has been idle for a specified period of time. We doubt many users would
want to do so, but this scenario is described briefly in the pppd manpage, if you’d
like to pursue it.
PPPoE Options in Linux
PPPoE has become much more important recently, as it is the connection method of
choice by a number of DSL providers. Fortunately for Linux users, a number of func-
tional options are available, most of which are easily configurable. PPPoE is nothing
new; it is simply the same PPP as used over dial-up, except it is used over Ethernet.
For the purposes of this section, we’ll assume that your DSL modem and equipment
are properly configured and ready for use. More information on how this is accom-
plished can be found in the excellent Linux DSL HOWTO, written by David Fannin
and Hal Burgiss (http://www.tldp.org/HOWTO/DSL-HOWTO). Additionally, we’ll
assume that the Ethernet card in your PC is installed and operational.
In most DSL environments the DSL modem is configured to be a bridge, meaning
that it won’t have an IP address. As a result of this, your server will be configured
with a WAN IP address. Before enabling the WAN interface, you should make cer-
tain that you’ve patched all of the listening services on your machine. Additionally,
you should consider using an IPtables or other firewall. Security when connecting
directly to the Internet should be of the utmost importance. It has been reported that
unpatched versions of some Linux distributions survive only a few hours on the
Internet before they’re compromised. Make sure you’ve done as much as possible to
ensure that this doesn’t happen to you!
PPPoE Clients
To get started with configuring PPPoE, you will need to obtain a PPPoE client. There
are a number of clients available, including one from Roaring Penguin that has
become very popular with many users and providers. It can be downloaded from
http://www.roaringpenguin.com in both source format and as pre-compiled RPMs.
When you’ve downloaded and compiled or installed the software, you are ready for
configuration. The client software comes with a very easy to use configuration script
called adsl-setup. It will ask you a number of questions about your system, network,
and PPPoE user information. In some cases it will have already provided the answers,
requiring you to only confirm!
However helpful, the script isn’t foolproof, so we’ll walk through a manual configu-
ration. It’s also a good idea, especially from the network administrator’s viewpoint,

This is the Title of the Book, eMatter Edition
Copyright © 2007 O’Reilly & Associates, Inc. All rights reserved.
PPPoE Options in Linux |117
to have a good idea of how software is configured, just in case something goes wrong
in the future.
PPPoE manual client configuration
Configuring the client is pretty easy, especially if you’ve previously set up a standard
PPP configuration. First, you’ll need to edit the /etc/ppp/pap-secrets file. You will
need to replace the default values with your PPPoE username and password. The file
will look something like this:
#User #Server #Password #IP
groucho@dslcompany.to * my_password *
Next, open the /etc/ppp/pppoe.conf file in your text editor. You will need to tell it
both your WAN interface name, and your PPPoE username. The relevant lines in the
file appear as follows:
# Ethernet card connected to ADSL modem
ETH=eth0
# ADSL user name. You may have to supply "@provider.com"
USER=groucho@dslcompany.to
The file contains a number of additional configuration options. Unless you’re really
certain that you need to change these, you probably shouldn’t. If you are deter-
mined to make some changes, refer to the PPP manpages for more information.
Lastly, if you haven’t already configured your DNS servers in the /etc/resolv.conf file,
this should be done now. Detailed information about DNS configuration can be
found in Chapter 5.
When you’ve finished with the configuration, you can now test the connection to see
if it works. The adsl-start script is used specifically for this purpose. You can call it
from the command line, or, ideally, include it in your system startup scripts. This is
accomplished differently for almost every distribution. Consult documentation spe-
cific to your distribution for specifics on how to install startup scripts.
If the startup script completes without errors, you should be connected to the Inter-
net. A quick and easy way to test this is to ping something that will answer. Success
will look like this:
vlager# ping www.google.com
PING www.google.akadns.net (66.102.7.99) 56(84) bytes of data.
64 bytes from 66.102.7.99: icmp_seq=1 ttl=245 time=5.94 ms
64 bytes from 66.102.7.99: icmp_seq=2 ttl=245 time=5.02 ms
64 bytes from 66.102.7.99: icmp_seq=3 ttl=245 time=5.02 ms
ctrl-c
--- www.google.akadns.net ping statistics ---
3 packets transmitted, 3 received, 0% packet loss, time 2009ms
rtt min/avg/max/mdev = 5.028/5.333/5.945/0.440 ms
vlager#

This is the Title of the Book, eMatter Edition
Copyright © 2007 O’Reilly & Associates, Inc. All rights reserved.
118 |Chapter 6: The Point-to-Point Protocol
Additionally, you can check the configuration by using ifconfig:
vlager# ifconfig -a
eth0 Link encap:Ethernet HWaddr 00:08:02:F0:BB:0E
UP BROADCAST RUNNING MULTICAST MTU:1500 Metric:1
RX packets:8701578 errors:6090 dropped:0 overruns:0 frame:5916
TX packets:3888596 errors:0 dropped:0 overruns:0 carrier:0
collisions:6289 txqueuelen:100
RX bytes:1941625928 (1851.6 Mb) TX bytes:1481305134 (1412.6 Mb)
Interrupt:30
eth1 Link encap:Ethernet HWaddr 00:90:27:FE:02:A0
inet addr:10.10.0.254 Bcast:10.10.0.255 Mask:255.255.255.0
UP BROADCAST RUNNING MULTICAST MTU:1500 Metric:1
RX packets:48920435 errors:0 dropped:0 overruns:0 frame:0
TX packets:55211769 errors:0 dropped:0 overruns:2 carrier:9
collisions:367030 txqueuelen:100
RX bytes:2018181326 (1924.6 Mb) TX bytes:1564406617 (1491.9 Mb)
Interrupt:10 Base address:0x4000
.
ppp0 Link encap:Point-to-Point Protocol
inet addr: 64.168.44.33 P-t-P:64.168.44.1 Mask:255.255.255.255
UP POINTOPOINT RUNNING NOARP MULTICAST MTU:1492 Metric:1
RX packets: 8701576 errors:0 dropped:0 overruns:0 frame:0
TX packets: 3888594 errors:0 dropped:0 overruns:0 carrier:0
collisions:0 txqueuelen:10
If something isn’t working properly at this point, check all of your connections, and
ensure the DSL gear is properly configured. Additionally, recheck your username and
password in the configuration files—a mistyped password is one of the most com-
mon configuration problems!

This is the Title of the Book, eMatter Edition
Copyright © 2007 O’Reilly & Associates, Inc. All rights reserved.
119
Chapter 7
CHAPTER 7
TCP/IP Firewall
Security is increasingly important for companies and individuals alike. The Internet
provides them with a powerful tool to distribute information about themselves and
obtain information from others, but it also exposes them to dangers from which they
were previously exempt. Computer crime, information theft, and malicious damage
are all potential dangers.
This chapter covers the Linux features for setting up a firewall, known both by its
command interface (iptables) and its kernel subsystem name (netfilter). This firewall
implementation was new in the 2.4 kernel and works substantially the same way in
2.6.
A malicious person who gains access to a computer system may guess system pass-
words or exploit the bugs and idiosyncratic behavior of certain programs to obtain a
working account on that host. Once they are able to log in to the host, they may have
access to sensitive information. In a commercial setting, stealing, deleting, or modify-
ing information such as marketing plans, new project details, or customer informa-
tion databases can cause significant damage to the company.
The safest way to avoid such widespread damage is to prevent unauthorized people
from gaining network access to the host. This is where firewalls come in.
Constructing secure firewalls is an art. It involves a good understand-
ing of technology, but equally important, it requires an understanding
of the philosophy behind firewall designs. We won’t cover everything
you need to know in this book; we strongly recommend you do some
additional research before trusting any particular firewall design,
including any we present here.
We will focus on the Linux-specific technical issues in this chapter. Later we will
present a sample firewall configuration that should serve as a useful starting point in
your own configuration, but as with all security-related matters, you’ll want to make
sure that you understand the information well enough to customize it to suit your

This is the Title of the Book, eMatter Edition
Copyright © 2007 O’Reilly & Associates, Inc. All rights reserved.
120 |Chapter 7: TCP/IP Firewall
needs and verify that the result is sufficient. Double-check the design, make sure that
you understand it, and then modify it to suit your requirements. To be safe, be sure.
Methods of Attack
As a network administrator, it is important that you understand the nature of poten-
tial attacks on computer security. We’ll briefly describe the most important types of
attacks so that you can better understand precisely what the Linux IP firewall will
protect you against. You should do some additional reading to ensure that you are
able to protect your network against other types of attacks. Here are some of the
more important methods of attack and ways of protecting yourself against them:
Unauthorized access
This simply means that people who shouldn’t be allowed to use your computer
services are able to connect to and use them. For example, people outside your
company might try to connect to your company accounting host or to your NFS
server.
There are various ways to avoid this attack by carefully specifying who can gain
access through these services. You can prevent network access to all except the
intended users.
Exploitation of known weaknesses in programs
Some programs and network services were not originally designed with strong
security in mind and are inherently vulnerable to attack. The BSD remote ser-
vices (rlogin,rexec, etc.) are an example.
The best way to protect yourself against this type of attack is to disable any vul-
nerable services or find alternatives. A good place to start is to only install, run
and expose services that you absolutely have to. Start with no network services
and work your way up from there. Use the netstat command to determine the
ports that your host is listening on, make sure the list is as small as possible, and
know exactly what each of them is for. Don’t run any network services on the
firewall host, with the possible exception of Secure Shell (SSH)
Track bug databases and patch lists and keep your systems up to date. Two of
the most popular bug databases are the Bugtraq database, available online at
http://www.securityfocus.com/bid (see also http://www.securityfocus.com/rss for
information on accessing Bugtraq via an RSS feed) and the Common Vulnerabili-
ties and Exposures (CVE) database, available online at http://cve.mitre.org/ (see
also the RSS at http://www.opensec.org/feeds/cve/latest.xml). Most Linux distribu-
tors provide tools to download and install updates. Red Hat has a utility called
yum, SuSE has a utility called YaST Online Update (YOU), and Debian uses apt-
get.

This is the Title of the Book, eMatter Edition
Copyright © 2007 O’Reilly & Associates, Inc. All rights reserved.
Methods of Attack |121
Denial of service
Denial of service attacks cause the service or program to cease functioning or
prevent others from making use of the service or program. These may be per-
formed at the network layer by sending carefully crafted and malicious packets
that cause network connections to fail. They may also be performed at the appli-
cation layer, where carefully crafted application commands are given to a pro-
gram that cause it to become extremely busy or stop functioning.
Preventing suspicious network traffic from reaching your hosts and preventing
suspicious program commands and requests (this requires software that under-
stands the underlying protocols, such as proxy servers) are the best ways of mini-
mizing the risk of a denial of service attack. It’s useful to know the details of the
attack method, so you should educate yourself about each new attack as it gets
publicized.
Spoofing
This type of attack involves one host or application pretending to be another.
Typically the attacker’s host pretends to be an innocent host by forging IP
addresses in network packets. For example, a well-documented exploit of the
BSD rlogin service can use this method to mimic a TCP connection from
another host by guessing TCP sequence numbers.
To protect against this type of attack, verify the authenticity of packets and com-
mands (a combination of filtering and proxy servers can help here). Prevent
packet routing with invalid source addresses. Use operating systems (such as
Linux) with unpredictable connection control mechanisms, such as TCP
sequence numbers and the allocation of dynamic port addresses.
Putting hosts with operating systems that have insecure sequence number algo-
rithms behind a Linux firewall performing Network Address Translation allows
you to continue to use them with increased safety, since the firewall host will use
SSH and iptables
With SSH and iptables, you have two easy ways to access hosts and services
inside your network from the outside world without exposing them directly.
First, you can run SSH on the firewall and use SSH’s port forwarding feature to
access internal hosts and services from the outside, without exposing them
directly to the outside. Section 12.1 of Bob Toxen’s book Real World Linux Secu-
rity, Second Edition (Prentice Hall), has additional information on using SSH in
this way. Second, you can use iptables Destination Network Address Translation
to expose SSH for multiple servers as distinct ports on the firewall’s public IP
address, with the connections forwarded to the individual hosts inside the net-
work. See Chapter 9 for more information on Network Address Translation.

This is the Title of the Book, eMatter Edition
Copyright © 2007 O’Reilly & Associates, Inc. All rights reserved.
122 |Chapter 7: TCP/IP Firewall
its own sequence numbering algorithms for communication with the outside
world.
Eavesdropping
This is the simplest type of attack. A host is configured to “listen” to and cap-
ture data not belonging to it (by putting its network interface into “promiscu-
ous” mode and monitoring all packets traversing the network segment).
Carefully written eavesdropping programs can take usernames and passwords
from user login network connections. Broadcast networks such as unswitched
Ethernet are especially vulnerable to this type of attack, although it does require
physical access to the Ethernet network. Wireless networks have similar prob-
lems and can be more dangerous since physical access is not required; proximity
is sufficient.
To protect against this type of threat, avoid use of broadcast network technolo-
gies and enforce the use of data encryption.
It is more complicated, but not impossible, to do packet sniffing in a switched
environment. Some Ethernet switches have administrative settings or even fail-
ure modes that cause them to copy all packets to one or more of their ports.
IP firewalling is very useful in preventing or reducing unauthorized access, network
layer denial of service, and IP spoofing attacks. It not very useful in avoiding exploi-
tation of weaknesses in network services or programs and eavesdropping.
What Is a Firewall?
A firewall is a hardened and trusted host that acts as a choke point among a group of
networks (usually a single private network and a single public network).*All net-
work traffic among the affected networks is routed through the firewall. The firewall
host is configured with a set of rules that determine which network traffic will be
allowed to pass and which will be blocked (dropped without response) or refused
(rejected with a response). In some large organizations, you may even find a firewall
located inside their corporate network to segregate sensitive areas of the organiza-
tion from employees in other areas. Many cases of computer crime originate within
an organization, rather than from outside.
Firewalls can be constructed in a variety of ways. The most sophisticated arrange-
ment involves a number of separate hosts and is known as a perimeter network or
demilitarized zone (DMZ) network. Two hosts act as “filters” (sometimes called
chokes) to allow only certain types of network traffic to pass, and between these
chokes reside network servers such as an email (SMTP) server or a World Wide Web
* The term firewall comes from a device used to protect people from fire. The firewall is a shield of material
resistant to fire that is placed between a potential fire and the people it is protecting.
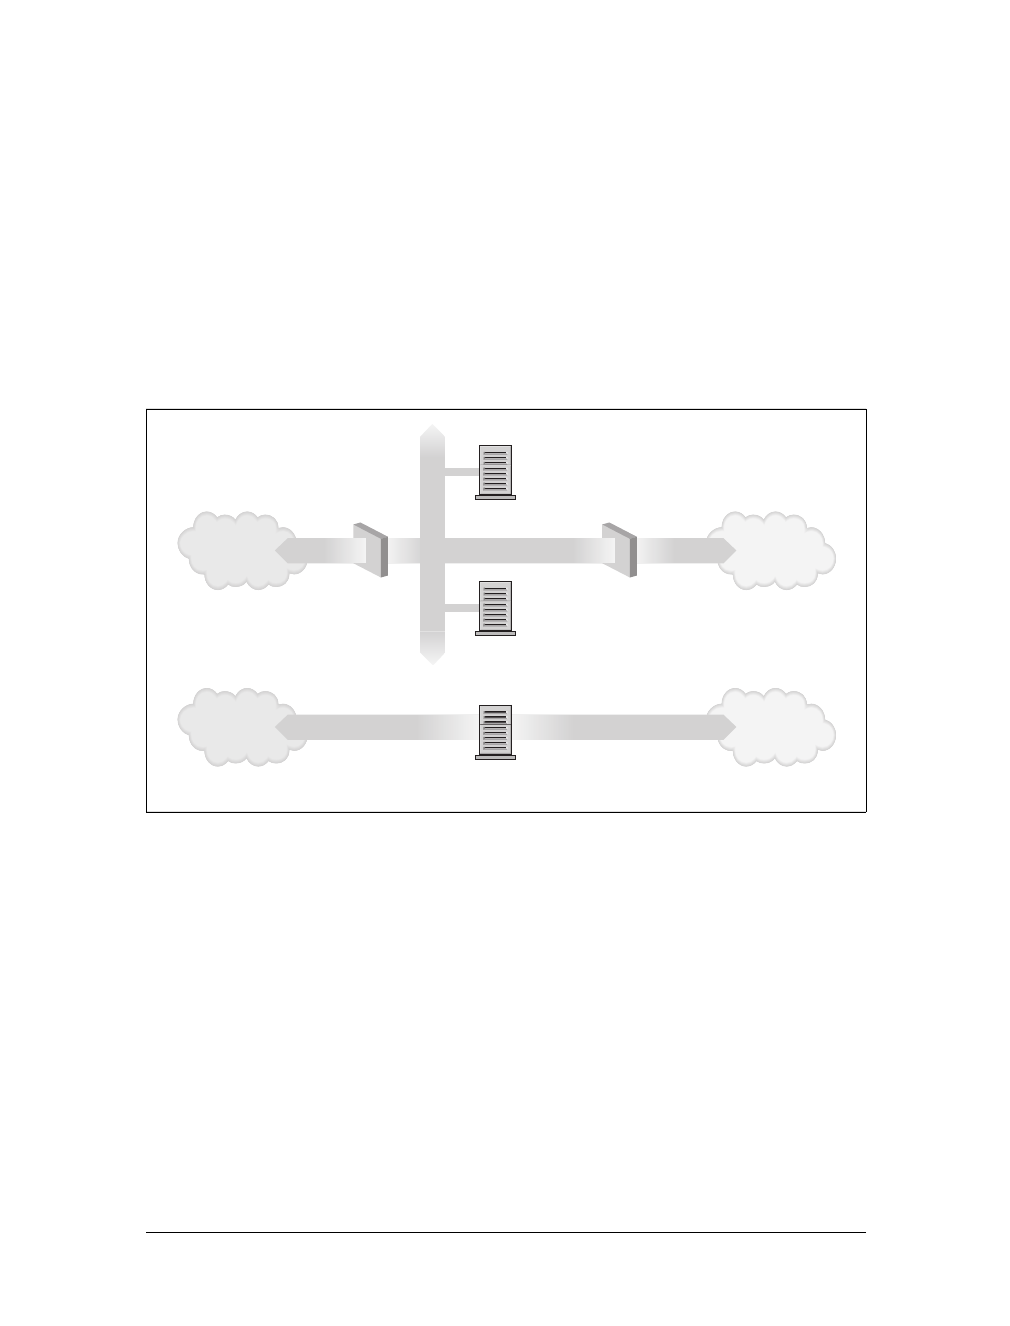
This is the Title of the Book, eMatter Edition
Copyright © 2007 O’Reilly & Associates, Inc. All rights reserved.
What Is a Firewall? |123
(HTTP) proxy server. This configuration can be very safe and allows a great range of
control over who can connect both from the inside to the outside and from the out-
side to the inside. This sort of configuration might be used by large organizations.
In many cases, though, people build firewalls that also provide other services (such
as SMTP or HTTP). These are less secure because if someone exploits a weakness in
one of the extra services running on the firewall, the entire network’s security has
been breached. The attacker could modify the firewall rules to allow more access and
turn off accounting that might have otherwise alerted the network administrator that
there was unusual network activity. Nevertheless, these types of firewalls are cheaper
and easier to manage than the more sophisticated arrangement just described.
Figure 7-1 illustrates the two most common firewall configurations.
The Linux kernel provides a range of built-in features that allow it to function as an
IP firewall. The network implementation includes code (the netfilter subsystem) to
do IP packet processing in a number of different ways, and provides a user-space
mechanism (the iptables command) to configure what sort of rules you’d like to put
in place. A Linux firewall is flexible enough to make it very useful in either of the
configurations illustrated in Figure 7-1. Linux firewall software provides two other
useful features that we’ll discuss in separate chapters: IP Accounting (Chapter 8) and
IP Masquerade and Network Address Translation (Chapter 9).
The three main classes of packet processing are filtering, mangling, and Network
Address Translation (NAT). Filtering is simply deciding, at various points in the
packet flow, whether or not to allow the packets through to the next stage. Packet
mangling is a generic term for modifying packets as they move through the packet
Figure 7-1. The two major classes of firewall design
Internet Intranet
Internet Intranet
LAN
Application
Server
Application
Server
IP Filter
IP Filter and
Application Server

This is the Title of the Book, eMatter Edition
Copyright © 2007 O’Reilly & Associates, Inc. All rights reserved.
124 |Chapter 7: TCP/IP Firewall
flow. NAT is a special application of mangling whereby source or destination IP
addresses and/or ports are modified to transparently redirect traffic.
What Is IP Filtering?
IP filtering is simply a mechanism that decides which types of IP packets will be pro-
cessed normally and which will be dropped or rejected. By dropped we mean that the
packet is deleted and completely ignored, as if it had never been received. By rejected
we mean that the firewall sends an ICMP response to the sender indicating a reason
why the packet was rejected. You can apply many different sorts of criteria to deter-
mine which packets you wish to filter. Some examples of these are:
• Protocol type: TCP, UDP, ICMP, etc.
• Port number (for TCP/UPD)
• Packet type: SYN/ACK, data, ICMP Echo Request, etc.
• Packet source address: where it came from
• Packet destination address: where it is going to
It is important to understand at this point that IP filtering is a network layer facility.
This means that it doesn’t understand anything about the application using the net-
work connections, only about the connections themselves. For example, you may
deny users access to your internal network on the default Telnet port, but if you rely
on IP filtering alone, you can’t stop them from using the Telnet program with a port
that you do allow to pass through your firewall. You can prevent this sort of prob-
lem by using proxy servers for each service that you allow across your firewall. The
proxy servers understand the application that they were designed to proxy and can
therefore prevent abuses, such as using the Telnet program to get past a firewall by
using the World Wide Web port. If your firewall supports a World Wide Web
proxy, outbound Telnet connections on the HTTP port will always be answered by
the proxy and will allow only HTTP requests to pass. A large number of proxy-server
programs exist. Some are free software and many others are commercial products.
The Firewall and Proxy Server HOWTO (available online at http://www.tldp.org/
HOWTO/Firewall-HOWTO.html) discusses one popular set of these, but they are
beyond the scope of this book.
The IP filtering rule set is made up of many combinations of the criteria listed previ-
ously. For example, let’s imagine that you wanted to allow World Wide Web users
within the Virtual Brewery network to have no access to the Internet except to use
other sites’ web servers. You would configure your firewall to allow forwarding of
the following:
• Packets with a source address on Virtual Brewery network, a destination address
of anywhere, and with a destination port of 80 (WWW)

This is the Title of the Book, eMatter Edition
Copyright © 2007 O’Reilly & Associates, Inc. All rights reserved.
Netfilter and iptables |125
• Packets with a destination address of Virtual Brewery network and a source port
of 80 (WWW) from a source address of anywhere
Note that we’ve used two rules here. We have to allow our data to go out, but also
the corresponding reply data to come back in. In practice, as we’ll see in the chapter
on IP masquerade and Network Address Translation (Chapter 9), iptables simplifies
this and allows us to specify this in one command.
Netfilter and iptables
While developing the previous version of Linux IP firewalling (called ipchains), Paul
“Rusty” Russell decided that IP firewalling should be less difficult. He set about the
task of simplifying aspects of packet processing in the kernel firewalling code and
produced a filtering framework that was both much cleaner and much more flexible.
He called this new framework netfilter.
While ipchains was a vast improvement over its predecessor (ipfwadm) for the man-
agement of firewall rules, the way it processed packets was still complex, especially
in conjunction with important features such as IP masquerade (discussed in
Chapter 9) and other forms of address translation. Part of this complexity existed
because IP masquerade and NAT were developed independently of the IP firewalling
code and integrated later, rather than having been designed as a true part of the fire-
wall code from the start. If a developer wanted to add yet more features in the
packet-processing sequence, he would have had difficulty finding a place to insert
the code and would have been forced to make changes in the kernel in order to do
so.
netfilter addresses both the complexity and the rigidity of older solutions by imple-
menting a generic framework in the kernel that streamlines the way packets are pro-
cessed and provides a capability to extend filtering policy without having to modify
the kernel. The Linux 2.4 Packet Filtering HOWTO (available online at http://www.
netfilter.org/documentation/HOWTO/packet-filtering-HOWTO.html) offers a detailed
list of the changes that have been made, so let’s focus on the more practical aspects
here.
To build a Linux IP firewall, it is necessary to have a kernel built with IP firewall (net-
filter) support and the iptables user-space configuration utility. The netfilter code is
the result of a large redesign of the packet handling flow in Linux. netfilter provides
direct backward-compatible support for both of the two older Linux firewalling solu-
tions (ipfwadm and ipchains), as well as a new command called iptables. In this book,
we’ll only cover iptables, but you can refer to previous editions of this book if you
need to understand ipfwadm or ipchains rules.

This is the Title of the Book, eMatter Edition
Copyright © 2007 O’Reilly & Associates, Inc. All rights reserved.
126 |Chapter 7: TCP/IP Firewall
Example iptables Commands
The iptables architecture groups network packet processing rules into tables by func-
tion (packet filtering, network address translation, and other packet mangling), each
of which have chains (sequences) of processing rules. Rules consist of matches (used
to determine which packets the rule will apply to) and targets (which determine what
will be done with the matching packets).
iptables operates at OSI Layer 3 (Network). For OSI Layer 2 (Link), there are other
technologies such as ebtables (Ethernet Bridge Tables). See http://ebtables.
sourceforge.net/ for more information.
This section will give a couple examples of iptables usage with high-level explana-
tions. See the “iptables Concepts” section, later in the chapter, for additional infor-
mation.
A packet-filtering example
This command could be used on a firewall to filter out all non-HTTP traffic, imple-
menting the rules described in the earlier section, “What Is IP Filtering?”, assuming
eth0 is the Ethernet interface on the inside and eth1 is the Ethernet interface to the
Internet.
iptables -t filter -P FORWARD DROP
iptables -t filter -A FORWARD -i eth0 -p tcp --dport 80 -j ACCEPT
iptables -t filter -A FORWARD -i eth1 -p tcp --sport 80 -j ACCEPT
The first command sets the default policy for the FORWARD chain of the filter table to
DROP all packets. Table 7-1 shows how the second command means “allow all out-
bound HTTP requests.” The third command is similar except that it means “allow
all inbound HTTP responses.”
A Masquerading example
The previous section’s packet filtering example doesn’t make the best use of iptables’
functionality. If you have a dynamic IP address on your Internet interface, you’d be
better off using Masquerading (see Chapter 9 for more on Masquerading):
Table 7-1. Decomposed example iptables command arguments
Component Description
-t filter Operate on the filter table (actually, the default)...
-A FORWARD ...by appending the following rule to its FORWARD chain.
-i eth0 Match packets coming in on the eth0 (inside) network interface...
-p tcp ...and using the tcp (TCP/IP) protocol
--dport 80 ...and intended for port 80 on the (outside) destination host.
-j ACCEPT Accept the packet for forwarding.

This is the Title of the Book, eMatter Edition
Copyright © 2007 O’Reilly & Associates, Inc. All rights reserved.
iptables Concepts |127
iptables -t nat -P POSTROUTING DROP
iptables -t nat -A POSTROUTING -o eth1 -p tcp --dport 80 -j MASQUERADE
A network translation example
This command could be used on a firewall to forward incoming HTTP traffic to a
web server on the internal network (see Chapter 9 for more on Network Address
Translation):
iptables -t nat -A PREROUTING -i eth1 -p tcp -dport 80 \
-j DNAT --to-destination 192.168.1.3:8080
Table 7-2 shows what this sample iptables command means.
iptables Concepts
iptables defines five “hook points” in the kernel’s packet processing pathways:
PREROUTING,INPUT,FORWARD,POSTROUTING, and OUTPUT. Built-in chains are attached to
these hook points; you can add a sequence of rules for each of them. Each of these
represents an opportunity to affect or monitor packet flow.
It is common to refer to “the PREROUTING chain of the nat table,” which
makes it seem like chains belong to tables. But chains and tables are
only partially correlated, and neither really “belongs” to the other.
Chains represent hook points in the packet flow, and tables represent
the types of processing that can occur. Figure 7-2 shows all the legal
combinations, and the order in which they are encountered by pack-
ets flowing through the system.
Packet Flow
Figure 7-2 shows how packets traverse the system. The boxes represent the iptables
chains, and inside each box is a list of the tables that have such a chain (in the order
Table 7-2. Decomposed example iptables command arguments
Component Description
-t nat Operate on the nat (Network Address Translation) table...
-A PREROUTING ...by appending the following rule to its PREROUTING chain.
-i eth1 Match packets coming in on the eth1 network interface...
-p tcp ...and using the tcp (TCP/IP) protocol
--dport 80 ...and intended for local port 80.
-j DNAT Jump to the DNAT (Destination Network Address Translation) target...
--to-destination 192.168.1.3:
8080
...and change the destination address to 192.168.1.3 and destination
port to 8080.

This is the Title of the Book, eMatter Edition
Copyright © 2007 O’Reilly & Associates, Inc. All rights reserved.
128 |Chapter 7: TCP/IP Firewall
in which they are invoked). All of these Table and Chain combinations are involved
in packet mangling.
In Figure 7-3, the gray boxes represent chains and tables not involved in NAT.
Figure 7-4 shows how packets traverse the system for packet filtering.
Table 7-3 shows the five “hook points” and describes the points in the packet flow
where they allow you to specify processing.
For the curious, the hook points are defined in the kernel header file
/usr/include/linux/netfilter_ipv4.h with names such as NF_IP_FORWARD,
NF_IP_LOCAL_{IN,OUT}, and NF_IP_{PRE,POST}_ROUTING.
Figure 7-2. All network packet flow hook points
Figure 7-3. Network packet flow and hook points for NAT
Network interface
PREROUTING:
* mangle
* nat
FORWARD:
* mangle
* filter
POSTROUTING:
* mangle
* nat
INPUT:
* mangle
* filter
OUTPUT:
* mangle
* nat
* filter
Local process
Local processNetwork interface
Network interface
PREROUTING:
* mangle
* nat
FORWARD:
* mangle
* filter
POSTROUTING:
* mangle
* nat
INPUT:
* mangle
* filter
OUTPUT:
* mangle
* nat
* filter
Local process
Local processNetwork interface

This is the Title of the Book, eMatter Edition
Copyright © 2007 O’Reilly & Associates, Inc. All rights reserved.
iptables Concepts |129
Your choice of chain will be based on where in the packet lifecycle you need to apply
your rules. For example, if you want to filter outgoing packets, you generally do so in
the OUTPUT chain, since the POSTROUTING chain is not associated with the filter table.
Three Ways We Can Do Filtering
Consider how a Unix host, or in fact any host capable of IP routing, processes IP
packets. The basic steps, shown in Figure 7-5 are:
1. The IP packet is received.
The incoming IP packet is examined to determine if it is destined for a process
on this host.
2. If the packet is for this host, it is processed locally.
3. If it is not destined for this host (and IP forwarding is turned on), a search is
made of the routing table for an appropriate route and the packet is forwarded
to the appropriate interface or rejected if no route can be found.
4. Packets from local processes are sent to the routing software for forwarding to
the appropriate interface.
Figure 7-4. Network packet flow and hook points for filtering
Table 7-3. Hook points
Hook Allows you to process packets...
FORWARD flowing through a gateway computer, coming in one interface and going right back out
another.
INPUT just before they are delivered to a local process.
OUTPUT just after they are generated by a local process.
POSTROUTING just before they go out a network interface.
PREROUTING just as they arrive from a network interface (after dropping any packets resulting from
the interface being in “promiscuous” mode, and after checksum validation).
Network interface
PREROUTING:
* mangle
* nat
FORWARD:
* mangle
* filter
POSTROUTING:
* mangle
* nat
INPUT:
* mangle
* filter
OUTPUT:
* mangle
* nat
* filter
Local process
Local processNetwork interface
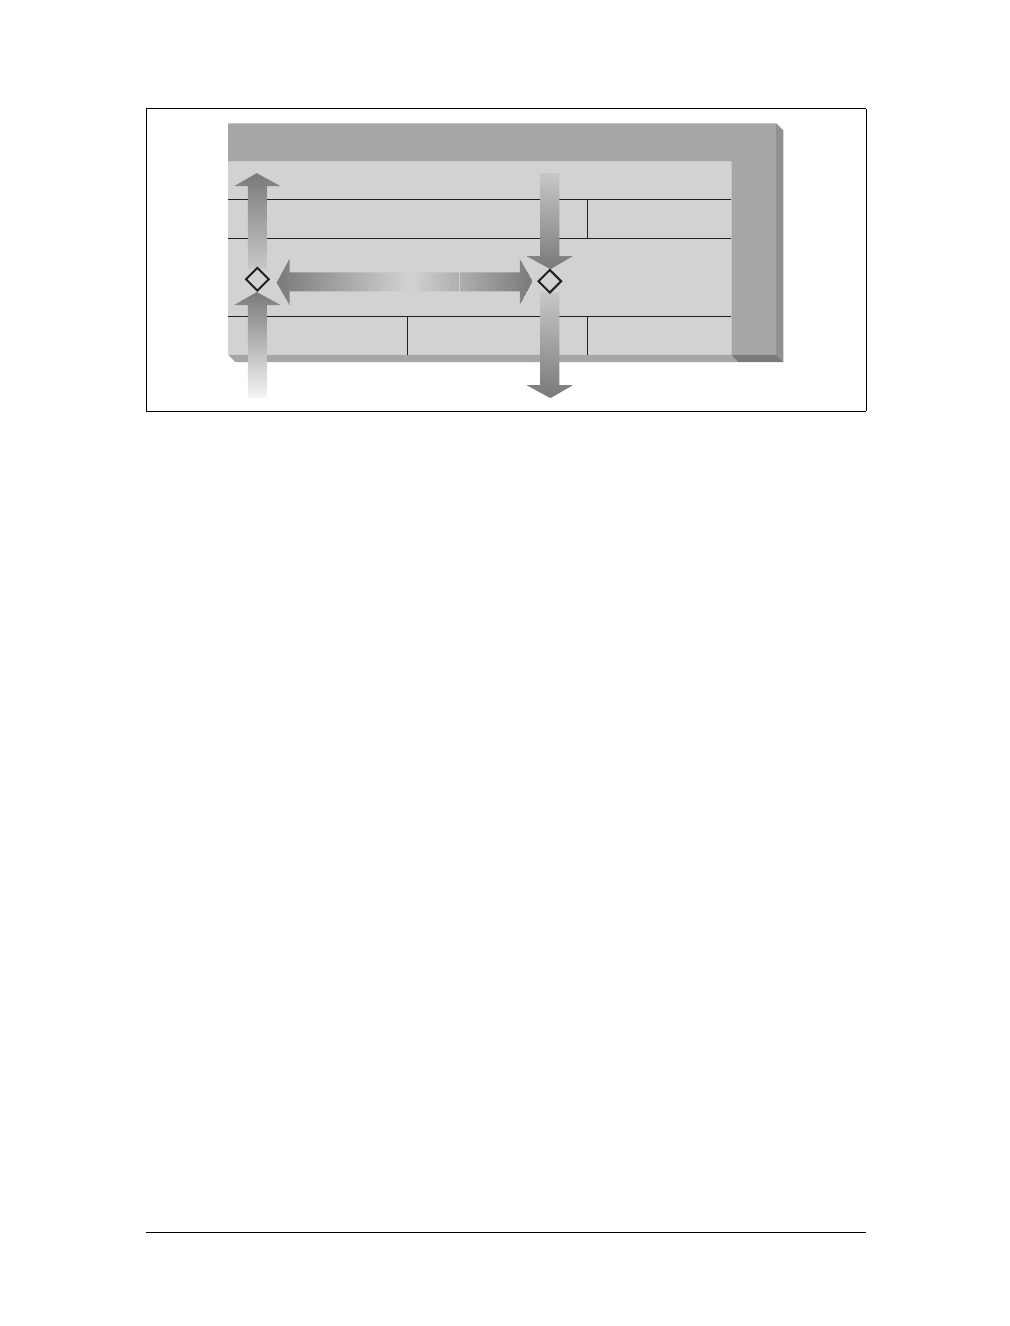
This is the Title of the Book, eMatter Edition
Copyright © 2007 O’Reilly & Associates, Inc. All rights reserved.
130 |Chapter 7: TCP/IP Firewall
The outgoing IP packet is examined to determine if there is a valid route for it to
take; if not, it is dropped (ignored completely) or rejected (ignored after sending
an ICMP message indicating there is no route to the destination host).
5. The IP packet is transmitted.
In our diagram, the flow 1 ➝3➝5 represents our host routing data between a host on
our Ethernet network to a host reachable via our PPP link. The flows 1 ➝2 and 4 ➝5
represent the data input and output flows of a network program running on our local
host. The flow 4 ➝3➝2 would represent data flow via a loopback connection. Natu-
rally, data flows both into and out of network devices. The question marks on the dia-
gram represent the points where the IP layer makes routing decisions.
The Linux kernel IP firewall is capable of applying filtering at various stages in this
process. That is, you can filter the IP packets that come into your host, filter those
packets being forwarded across your host, and filter those packets that are ready to
be transmitted.
This may seem unnecessarily complicated at first, but it provides flexibility that
allows some very sophisticated and powerful configurations to be built.
Tables
iptables comes with three built-in tables: filter,mangle, and nat. Each of these is
preconfigured with chains corresponding to one or more of the hook points
described in Table 7-4 and shown in Figure 7-2.
Figure 7-5. The stages of IP packet processing
Network Sockets
TCP/UDP protocols Other protocols
IP routing software
Ethernet Driver PPP Driver Other Driver
Rest of Kernel
?
1
2
5
4
3?

This is the Title of the Book, eMatter Edition
Copyright © 2007 O’Reilly & Associates, Inc. All rights reserved.
iptables Concepts |131
iptables arranges for the appropriate chains in these tables to be traversed by net-
work packets based on the source and destination, and in the order depicted in
Figure 7-2.
The default table is the filter table; If you do not specify an explicit table in an
iptables command, filter is assumed.
Chains
Packets traverse chains, being presented to the chain’s rules one at a time in order. If
the packet does not match the rule’s criteria, it moves on to the next rule in the
chain. If a packet reaches the last rule in a chain and still does not match, the chain’s
policy is applied to it.
By default, each table has chains (initially empty) for some or all of the hook points.
See Table 7-3 for a list of hook points, and Table 7-4 for a list of built-in chains for
each table.
In addition, you can create your own custom chains to organize your rules.
A chain’s policy is used to determine the fate of packets that reach the end of the
chain without otherwise being sent to a specific target. Only the built-in targets
ACCEPT and DROP (described in “Targets,” later in this chaper) may be used as the pol-
icy for a built-in chain, and the default is ACCEPT. All user-defined chains have an
implicit policy of RETURN, which cannot be changed.
If you want to have a more complicated policy target for a built-in chain, or a policy
other than RETURN for a user-defined chain, you can add a rule to the end of the chain
that matches all packets, with any target you like. You can set the chain’s policy to
DROP just in case you make a mistake in your catch-all rule, or to filter out traffic
while you make modifications to your catch-all rule (by deleting it and re-adding it
with changes).
Table 7-4. Built-in tables
Table Description
filter Used to set policies for the type of traffic allowed into, through, and out of the computer. Unless you
refer to a different table explicitly, iptables will operate on chains within this table by default.
Its built-in chains are FORWARD,INPUT, and OUTPUT.
mangle Used for specialized packet alteration, such as stripping off IP options (as with the IPV4OPTSSTRIP
target extension).
Its built-in chains are FORWARD,INPUT,OUTPUT,POSTROUTING, and PREROUTING.
nat Used in conjunction with connection tracking to redirect connections for NAT, typically based on
source or destination addresses.
Its built-in chains are OUTPUT,POSTROUTING, and PREROUTING.

This is the Title of the Book, eMatter Edition
Copyright © 2007 O’Reilly & Associates, Inc. All rights reserved.
132 |Chapter 7: TCP/IP Firewall
Rules
An iptables rule consists of one or more match criteria to determine which network
packets it will affect and a target specification that determines how the network
packets will be affected. All match options must be satisfied for the rule to match a
packet.
The system maintains packet and byte counters for every rule. Every time a packet
reaches a rule and matches the rule’s criteria, the packet counter is incremented and
the byte counter is increased by the size of the matching packet.
Both the match and the target portion of the rule are optional. If there are no match
criteria, all packets are considered to match. If there is no target specification, noth-
ing is done to the packets (processing will proceed as if the rule did not exist except
that the packet and byte counters will be updated). You can add such a “null” rule to
the FORWARD chain of the filter table with the command iptables -t filter -A
FORWARD.
Matches
There are a wide variety of matches available for use with iptables, although some are
available only for kernels with certain features enabled. Generic Internet Protocol
(IP) matches (such as protocol or source or destination address) are applicable to any
IP packet.
In addition to the generic matches, iptables includes many specialized matches avail-
able through dynamically loaded extensions (you use the iptables -m or --match
option to tell iptables that you want to use one of these extensions).
There is one match extension for dealing with a networking layer below the IP layer.
The mac match extension matches based on Ethernet Media Access Controller
(MAC) addresses.
Targets
Targets are used to specify the action to take when a rule matches a packet, and also
to specify chain policies. There are four targets built into iptables, and extension
modules that provide others. Table 7-5 describes these built-in targets.
Table 7-5. Built-in targets
Target Description
ACCEPT Let the packet through to the next stage of processing. Stop traversing the current chain, and start at
the next stage shown in Figure 7-2.
DROP Discontinue processing the packet completely. Do not check it against any other rules, chains, or tables.
If you want to provide some feedback to the sender, then you can use the REJECT target extension.

This is the Title of the Book, eMatter Edition
Copyright © 2007 O’Reilly & Associates, Inc. All rights reserved.
Setting Up Linux for Firewalling |133
Setting Up Linux for Firewalling
The Linux kernel must be configured to support IP firewalling. There isn’t much
more to it than selecting the appropriate options when performing:
#make menuconfig
of your kernel.* In 2.4 kernels you should select the following options:
Networking options --->
[*] Network packet filtering (replaces ipchains)
IP: Netfilter Configuration --->
.
<M> Userspace queueing via NETLINK (EXPERIMENTAL)
<M> IP tables support (required for filtering/masq/NAT)
<M> limit match support
<M> MAC address match support
<M> netfilter MARK match support
<M> Multiple port match support
<M> TOS match support
<M> Connection state match support
<M> Unclean match support (EXPERIMENTAL)
<M> Owner match support (EXPERIMENTAL)
<M> Packet filtering
<M> REJECT target support
<M> MIRROR target support (EXPERIMENTAL)
.
<M> Packet mangling
<M> TOS target support
<M> MARK target support
<M> LOG target support
<M> ipchains (2.2-style) support
<M> ipfwadm (2.0-style) support
QUEUE Send the packet to userspace (i.e., code not in the kernel).
See the lipipq manpage for more information.
RETURN From a rule in a user-defined chain, discontinue processing this chain, and resume traversing the call-
ing chain at the rule following the one that had this chain as its target.
From a rule in a built-in chain, discontinue processing the packet and apply the chain’s policy to it.
See the “Chains” section earlier in this chapter for more information about chain policies.
* Firewall packet logging is a special feature that writes a line of information about each datagram that matches
a particular firewall rule out to a special device so you can see them.
Table 7-5. Built-in targets (continued)
Target Description

This is the Title of the Book, eMatter Edition
Copyright © 2007 O’Reilly & Associates, Inc. All rights reserved.
134 |Chapter 7: TCP/IP Firewall
Loading the Kernel Module
Before you can use the iptables command, you must load the netfilter kernel module
that provides support for it. The easiest way to do this is to use the modprobe com-
mand as follows:
#modprobe ip_tables
Backward Compatibility with ipfwadm and ipchains
The remarkable flexibility of Linux netfilter is illustrated by its ability to emulate the
ipfwadm and ipchains interfaces. Emulation makes the initial transition to the new
generation of firewall software much easier (although you’d want to rewrite your
rules as iptables eventually).
The two netfilter kernel modules called ipfwadm.o and ipchains.o provide backward
compatibility for ipfwadm and ipchains. You may load only one of these modules at a
time, and use one only if the ip_tables.o module is not loaded. When the appropriate
module is loaded, netfilter works exactly like the former firewall implementation.
netfilter mimics the ipchains interface with the following commands:
#rmmod ip_tables
#modprobe ipchains
#ipchains options
Using iptables
The iptables command is extensible through dynamically loaded libraries. It is
included in the netfilter source package available at http://www.netfilter.org/. It will
also be included in any Linux distribution based on the 2.4 series kernels.
The iptables command is used to configure IP filtering and NAT (along with other
packet-processing applications, including accounting, logging, and mangling). To
facilitate this, there are two tables of rules called filter and nat. The filter table is
assumed if you do not specify the -t option to override it. Five built-in chains are
also provided. The INPUT and FORWARD chains are available for the filter table, the
PREROUTING and POSTROUTING chains are available for the nat table, and the OUTPUT
chain is available for both tables. In this chapter we’ll discuss only the filter table.
We’ll look at the nat table in Chapter 9.
The general syntax of most iptables commands is:
#iptables command rule-specification extensions
Now we’ll take a look at some options in detail, after which we’ll review some exam-
ples.
Most of the options for the iptables command can be grouped into subcommands
and rule match criteria. Table 7-6 describes the other options.

This is the Title of the Book, eMatter Edition
Copyright © 2007 O’Reilly & Associates, Inc. All rights reserved.
Using iptables |135
Getting Help
iptables provides some source of online help. You can get basic information via the
folowing commands:
iptables -h | --help
iptables -m match -h
iptables -j TARGET -h
man iptables
Table 7-6. iptables miscellaneous options
Option Description
-c packets bytes When combined with the -A,-I, or -R subcommand, sets the packet counter to
packets and the byte counter to bytes for the new or modified rule.
--exact Synonym for -x.
-h Displays information on iptables usage. If it appears after -m match or -j target,
then any additional help related to the extension match or target (respectively)
is also displayed.
--help Synonym for -h.
-j target [options]Determines what to do with packets matching this rule. The target can be the
name of a user-defined chain, one of the built-in targets, or an iptables extension (in
which case there may be additional options).
--jump Synonym for -j.
--line-numbers When combined with the -L subcommand, displays numbers for the rules in each
chain, so you can refer to the rules by index when inserting rules into (via -I) or
deleting rules from (via -D) a chain. Be aware that the line numbering changes as
you add and remove rules in the chain.
-m match [options]Invoke extended match, possibly with additional options.
--match Synonym for -m.
-M cmd Used to load an iptables module (with new targets or match extensions) when
appending, inserting, or replacing rules.
--modprobe=cmd Synonym for -M.
-n Displays numeric addresses and ports, instead of looking up domain names for the IP
addresses and service names for the port numbers.
This can be especially useful if your DNS service is slow or down.
--numeric Synonym for -n.
--set-counters Synonym for -c.
-t table Performs the specified subcommand on table. If this option is not used, the sub-
command operates on the filter table by default.
--table Synonym for -t.
-v Produces verbose output.
--verbose Synonym for -v.
-x Displays exact numbers for packet and byte counters, rather than the default abbre-
viated format with metric suffixes (K, M, or G).

This is the Title of the Book, eMatter Edition
Copyright © 2007 O’Reilly & Associates, Inc. All rights reserved.
136 |Chapter 7: TCP/IP Firewall
Sometimes there are contradictions among these sources of informa-
tion.
The iptables Subcommands
Each iptables command can contain one subcommand, which performs an opera-
tion on a particular table (and, in some cases, chain). Table 7-7 lists the options that
are used to specify the subcommand.
The manpage for the iptables command in the 1.2.7a release shows a -C
option in the synopsis section, but there is no -C option to the iptables
command.
Table 7-7. iptables subcommand options
Option Description
-A chain rule Appends rule to chain.
--append Synonym for -A.
-D chain
[index | rule]
Deletes the rule at position index or matching rule from chain.
--delete Synonym for -D.
--delete-chain Synonym for -X.
-E chain newchain Renames chain to newchain.
-F [chain]Flushes (deletes) all rules from chain (or from all chains if no chain is
given).
--flush Synonym for -F.
-I chain [index]
rule
Inserts rule into chain, at the front of the chain, or in front of the rule at
position index.
--insert Synonym for -I.
-L [chain]Lists the rules for chain (or for all chains if no chain is given).
--list Synonym for -L.
-N chain Creates a new user-defined chain.
--new-chain Synonym for -N. Commonly abbreviated --new.
-P chain target Sets the default policy of the built-in chain to target. (applies to built-
in chains and targets only).
--policy Synonym for -P.
-R chain index rule Replaces the rule at position index of chain with the new rule.
--rename-chain Synonym for -E.
--replace Synonym for -R.
-V Displays the version of iptables.

This is the Title of the Book, eMatter Edition
Copyright © 2007 O’Reilly & Associates, Inc. All rights reserved.
Basic iptables Matches |137
Basic iptables Matches
iptables has a small number of built-in matches and targets and a set of extensions
that are loaded if they are referenced. The matches for IP are considered built-in, and
the others are considered match extensions (even though the icmp,tcp and udp match
extensions are automatically loaded when the corresponding protocols are refer-
enced with the -p built-in IP match option).
Some options can have their senses inverted by using an optional
exclamation point surrounded by spaces, immediately before the
option. The options that allow this are annotated with [!]. Only the
non-inverted sense is described in the sections that follow, since the
inverted sense can be inferred from it.
Internet Protocol (IPv4) Matches
These built-in matches are available without a preceding -m argument to iptables.
Table 7-8 shows the layout of the fields in an Internet Protocol (IPv4) packet. These
fields are the subjects of various match and target extensions (including the set of
built-in matches described in this section). Table 7-8 describes the options to this
match.
--version Synonym for -V.
-X [chain]Deletes the user-defined chain, or all user-defined chains if none is
given.
-Z chain Zeros the packet and byte counters for chain (or for all chains if no chain
is given).
--zero Synonym for -Z.
Table 7-8. Internet Protocol match options
Option Description
-d [!] addr[/mask]Destination address addr (or range, if mask is given).
--destination Synonym for -d.
--dst Synonym for -d.
[!] -f Second or further fragment of a packet that has undergone fragmentation.
Connection tracking does automatic defragmentation, so this option is not often
useful. If aren’t using connection tracking, though, you can use it.
--fragments Synonym for -f. Commonly abbreviated (including in the iptables manpage) --
fragment.
Table 7-7. iptables subcommand options (continued)
Option Description

This is the Title of the Book, eMatter Edition
Copyright © 2007 O’Reilly & Associates, Inc. All rights reserved.
138 |Chapter 7: TCP/IP Firewall
You can use the old-style dotted-quad notation for masks such as 192.168.1.0/255.
255.255.0, or the newer Common Inter-Domain Routing (CIDR) notation such as
192.168.1.0/24 (see RFC 1591, available online at http://www.rfc-editor.org/rfc/
rfc1519.txt) for the address specifications of -s and -d.
Ethernet Media Access Controller (MAC) Match
This match is based on the Media Access Controller (MAC) address of the source
Ethernet interface. Table 7-10 describes the single option to this match.
This is actually not an IP match. Ethernet is at a lower level in the network architec-
ture, but since many IP networks run over Ethernet, and the MAC information is
available, this match extension is included anyway.
-i [!] in Input interface in (if in ends with +, any interface having a name that starts with
in will match).
--in-interface Synonym for -i.
-o [!] out Input interface out (if out ends with +,any interface having a name that starts with
out will match).
--out-interface Synonym for -o.
-p [!] proto Protocol name or number proto.
See Table 7-9 for a list of common protocol names and numbers. Your system’s/etc/
protocols file will be consulted to map official names (in a case-insensitive manner)
to numbers. The aliases in /etc/protocols are not available.
See also the official protocol list at http://www.iana.org/assignments/protocol-
numbers.
-p protocol includes an implicit -m protocol when protocol is one of
icmp,tcp, or udp.
--protocol Synonym for -p. Commonly abbreviated --proto.
-s [!] addr[/mask]Source address addr (or range, if mask is given).
--source Synonym for -s.
--src Synonym for -s.
Table 7-9. Common IP protocols
Name Number(s) Description
ALL 1, 6, 17 Equivalent to not specifying protocol at all
icmp 1 Internet Control Message Protocol
tcp 6 Transmission Control Protocol
udp 17 User Datagram Protocol
Table 7-8. Internet Protocol match options (continued)
Option Description

This is the Title of the Book, eMatter Edition
Copyright © 2007 O’Reilly & Associates, Inc. All rights reserved.
Basic iptables Matches |139
This match is available only if your kernel has been configured with
CONFIG_IP_NF_MATCH_MAC enabled.
Use this only with rules on the PREROUTING,FORWARD,orINPUT chains, and only for
packets coming from Ethernet devices.
For example, to allow only a single Ethernet device to communicate over an inter-
face (such as an interface connected to a wireless device):
iptables -A PREROUTING -i eth1 -m mac --mac-source ! 0d:bc:97:02:18:21 -j DROP
Internet Control Message Protocol Match
The Internet Control Message Protocol (ICMP) match extension is automatically
loaded if -p icmp is used. Table 7-11 describes the options to this match.
You can find the official ICMP types and codes at the official database at http://www.
iana.org/assignments/icmp-parameters (per RFC 3232, “Assigned Numbers: RFC
1700 is Replaced by an On-line Database,” available online at http://www.rfc-editor.
org/rfc/rfc3232.txt).
User Datagram Protocol Match
The User Datagram Protocol (UDP) match extension is automatically loaded if -p
udp is used. Table 7-12 describes the options to this match.
Table 7-10. MAC match options
Option Description
--mac-source [!] mac Match when the Ethernet frame source MAC field matches mac.
The format is: XX:XX:XX:XX:XX:XX, where each XX is replaced by two hexadec-
imal digits.
Table 7-11. ICMP match options
Option Description
--icmp-type [!] typename Matches ICMP type typename
--icmp-type [!] type[/code]Matches ICMP type and code given

This is the Title of the Book, eMatter Edition
Copyright © 2007 O’Reilly & Associates, Inc. All rights reserved.
140 |Chapter 7: TCP/IP Firewall
Transmission Control Protocol Match
The Transmission Control Protocol (TCP) match extension is automatically loaded if
-p tcp is used. Table 7-13 describes the options to this match.
Table 7-12. UDP match options
Option Description
--destination-port [!] port[:port]Match when the UDP destination port number is equal to port (if
only one port is given) or in the inclusive range (if both ports are
given).
Ports can be specified by name (from your system’s/etc/services
file) or number.
--dport Synonym for --destination-port.
--source-port [!] port[:port] Match when the UDP source port is equal to port (if only one
port is given) or in the inclusive range (if both ports are given).
Ports can be specified by name (from your system’s/etc/services
file) or number.
--sport Synonym for --source-port.
Table 7-13. TCP match options
Option Description
--destination-port Synonym for --dport.
--dport [!] port[:port]Match when the TCP destination port number is equal to port (if only one
port is given) or in the inclusive range (if both ports are given).
Ports can be specified by name (from your system’s/etc/services file) or num-
ber.
--mss value[:value]Match SYN and ACK packets when the value of the TCP protocol Maximum Seg-
ment Size (MSS) field is equal to value (if only one value is given) or in the
inclusive range (if both values are given).
See also the tcpmss match extension.
--source-port Synonym for --sport.
--sport [!] port[:port] Match when the TCP source port is equal to port (if only one port is given) or
in the inclusive range (if both ports are given).
Ports can be specified by name (from your system’s/etc/services file) or num-
ber.
[!] --syn Synonym for --tcp-flags SYN,RST,ACK SYN. Packets matching this are
called “SYN” packets.
This option can be used to construct rules to block incoming connections while
permitting outgoing connections.
--tcp-flags
[!] mask comp
Check the mask flags, and match if only the comp flags are set.
The mask and comp arguments are comma-separated lists of flag names, or
one of the two special values ALL and NONE.
--tcp-option[!] num Match if TCP option num is set.

This is the Title of the Book, eMatter Edition
Copyright © 2007 O’Reilly & Associates, Inc. All rights reserved.
A Sample Firewall Configuration |141
A Naive Example
Let’s suppose that we have a network in our organization and that we are using a
Linux-based firewall host to allow our users to be able to access WWW (HTTP on
port 80 only, not HTTPS on port 443) servers on the Internet, but to allow no other
traffic to be passed. The commands that follow could be used to set up a simple set
of forwarding rules to implement this policy. Note, however, that while this exam-
ple is simple, the NAT and Masquerading solutions discussed in Chapter 9 are more
often used for this type of application.
If our network has a 24-bit network mask (class C) and has an address of 172.16.1.
0, then we’d use the following iptables rules:
1#modprobe ip_tables
2#iptables -F FORWARD
3#iptables -P FORWARD DROP
4#iptables -A FORWARD -p tcp -s 0/0 --sport 80 \
-d 172.16.1.0/24 --syn -j DROP
5#iptables -A FORWARD -p tcp -s 172.16.1.0/24 \
--dport 80 -d 0/0 -j ACCEPT
6#iptables -A FORWARD -p tcp -d 172.16.1.0/24 \
--sport 80 -s 0/0 -j ACCEPT
Lines 1–3 install iptables into the running kernel, flush the FORWARD chain of the
filter table (the default table if no explicit table is mentioned in the iptables com-
mand’s arguments), and sets the default policy for the FORWARD chain of the filter table
to DROP.
Line 4 prevents Internet hosts establishing connection from to the internal network
by dropping SYN packets (but only if the source port is 80 since those are the only
ones that would be let through by later rules)
Line 5 allows all packets heading from the internal network to port 80 on any host to
get out.
Line 6 allows all packets heading from port 80 on any host to hosts on the internal
network through.
A Sample Firewall Configuration
We’ve discussed the fundamentals of firewall configuration. Let’s now look at an
easily customizable firewall configuration. In this example, the network 172.16.1.0/
24 is treated as if it were a publicly routable network, but it is actually a private, non-
routable network. We are using such a non-routable network in this example
because we have to use some network, and we don’t want to put a real publicly
routable network number here. The commands shown would work for a real class C
publicly routable network.

This is the Title of the Book, eMatter Edition
Copyright © 2007 O’Reilly & Associates, Inc. All rights reserved.
142 |Chapter 7: TCP/IP Firewall
#!/bin/bash
##########################################################################
# This sample configuration is for a single host firewall configuration
# with no services supported by the firewall host itself.
##########################################################################
#
# USER CONFIGURABLE SECTION (Lists are comma-separated)
#
# OURNET Internal network address space
# OURBCAST Internal network broadcast address
# OURDEV Internal network interface name
#
# ANYADDR External network address space
# EXTDEV External network interface name
#
# TCPIN List of TCP ports to allow in (empty = all)
# TCPOUT List of TCP ports to allow out (empty = all)
#
# UDPIN List of TCP ports to allow in (empty = all)
# UDPOUT List of TCP ports to allow out (empty = all)
#
# LOGGING Set to 1 to turn logging on, else leave empty
#
###########################################################################
OURNET="172.29.16.0/24"
OURBCAST="172.29.16.255"
OURDEV="eth0"
ANYADDR="0/0"
EXTDEV="eth1"
TCPIN="smtp,www"
TCPOUT="smtp,www,ftp,ftp-data,irc"
UDPIN="domain"
UDPOUT="domain"
LOGGING=
###########################################################################
#
# IMPLEMENTATION
#
###########################################################################
#
# Install the modules
#
modprobe ip_tables
modprobe ip_conntrack # Means we won't have to deal with fragments
#

This is the Title of the Book, eMatter Edition
Copyright © 2007 O’Reilly & Associates, Inc. All rights reserved.
A Sample Firewall Configuration |143
# Drop all packets destined for this host received from outside.
#
iptables -A INPUT -i $EXTDEV -j DROP
#
# Remove all rules on the FORWARD chain of the filter table, and set th
# policy for that chain to DROP.
#
iptables -F FORWARD # Delete rules
iptables -P FORWARD DROP # Policy = DROP
iptables -A FORWARD -s $OURNET -i $EXTDEV -j DROP # Anti-spoof
iptables -A FORWARD -p icmp -i $EXTDEV -d $OURBCAST -j DROP # Anti-Smurf
#
# TCP - ESTABLISHED CONNECTIONS
#
# We will accept all TCP packets belonging to an existing connection
# (i.e. having the ACK bit set) for the TCP ports we're allowing through.
# This should catch more than 95 % of all valid TCP packets.
#
iptables -A FORWARD -d $OURNET -p tcp --tcp-flags SYN,ACK ACK \
-m multiport --dports $TCPIN -j ACCEPT
iptables -A FORWARD -s $OURNET -p tcp --tcp-flags SYN,ACK ACK \
-m multiport --sports $TCPIN -j ACCEPT
#
# TCP - NEW INCOMING CONNECTIONS
#
# We will accept connection requests from the outside only on the
# allowed TCP ports.
#
iptables -A FORWARD -i $EXTDEV -d $OURNET -p tcp --syn \
-m multiport --sports $TCPIN -j ACCEPT
#
# TCP - NEW OUTGOING CONNECTIONS
#
# We will accept all outgoing tcp connection requests on the allowed /
# TCP ports.
#
iptables -A FORWARD -i $OURDEV -d $ANYADDR -p tcp --syn \
-m multiport --dports $TCPOUT -j ACCEPT
#
# UDP - INCOMING
#
# We will allow UDP packets in on the allowed ports and back.
#

This is the Title of the Book, eMatter Edition
Copyright © 2007 O’Reilly & Associates, Inc. All rights reserved.
144 |Chapter 7: TCP/IP Firewall
iptables -A FORWARD -i $EXTDEV -d $OURNET -p udp \
-m multiport --dports $UDPIN -j ACCEPT
iptables -A FORWARD -i $EXTDEV -s $OURNET -p udp \
-m multiport --sports $UDPIN -j ACCEPT
#
# UDP - OUTGOING
#
# We will allow UDP packets out to the allowed ports and back.
#
iptables -A FORWARD -i $OURDEV -d $ANYADDR -p udp \
-m multiport --dports $UDPOUT -j ACCEPT
iptables -A FORWARD -i $OURDEV -s $ANYADDR -p udp \
-m multiport --sports $UDPOUT -j ACCEPT
#
# DEFAULT and LOGGING
#
# All remaining packets fall through to the default
# rule and are dropped. They will be logged if you've
# configured the LOGGING variable above.
#
if [ "$LOGGING" ]
then
iptables -A FORWARD -p tcp -j LOG # Log barred TCP
iptables -A FORWARD -p udp -j LOG # Log barred UDP
iptables -A FORWARD -p icmp -j LOG # Log barred ICMP
fi
In many simple situations, to use the sample, all you have to do is edit the top sec-
tion of the file labeled “USER CONFIGURABLE section” to specify which protocols and
packets type you wish to allow in and out. For more complex configurations, you
will need to edit the section at the bottom as well. Remember, this is a simple exam-
ple, so scrutinize it very carefully to ensure it does what you want while implement-
ing it.
References
There is enough material on firewall configuration and design to fill a whole book,
and indeed here are some good references that you might like to read to expand your
knowledge on the subject:
Real World Linux Security, Second Edition
by Bob Toxen (Prentice Hall). A great book with broad coverage of many secu-
rity topics, including firewalls.

This is the Title of the Book, eMatter Edition
Copyright © 2007 O’Reilly & Associates, Inc. All rights reserved.
References |145
Building Internet Firewalls, Second Edition
by E. Zwicky, S. Cooper, and D. Chapman (O’Reilly). A guide explaining how to
design and install firewalls for Unix, Linux, and Windows NT, and how to con-
figure Internet services to work with the firewalls.
Firewalls and Internet Security, Second Edition
by W. Cheswick, S. Bellovin, and A. Rubin (Addison Wesley). This book covers
the philosophy of firewall design and implementation.
Practical Unix & Internet Security, Third Edition
by S. Garfinkel, G. Spafford, and A. Schwartz (O’Reilly). This book covers a
wide variety of security topics for popular Unix variants (including Linux), such
as forensics, intrusion detection, firewalls, and more.
Linux Security Cookbook
by D. Barrett, R. Silverman, and R. Byrnes (O’Reilly). This book provides over
150 ready-to-use scripts and configuration files for important security tasks such
as time-of-day network access restrictions, web server firewalling, preventing IP
spoofing, and much more.
Linux iptables Pocket Reference
by G. Purdy (O’Reilly). This book covers firewall concepts, Linux packet pro-
cessing flows, and contains a complete reference to the iptables command,
including an encyclopedic reference to match and target extensions, that you can
use for advanced applications.

This is the Title of the Book, eMatter Edition
Copyright © 2007 O’Reilly & Associates, Inc. All rights reserved.
146
Chapter 8
CHAPTER 8
IP Accounting
In today’s world of commercial Internet service, it is becoming increasingly impor-
tant to know how much data you are transmitting and receiving on your network
connections. If you are an Internet Service Provider and you charge your customers
by volume, this will be essential to your business. If you are a customer of an Inter-
net Service Provider that charges by data volume, you will find it useful to collect
your own data to ensure the accuracy of your Internet charges.
There are other uses for network accounting that have nothing to do with dollars and
bills. If you manage a server that offers a number of different types of network ser-
vices, it might be useful to you to know exactly how much data is being generated by
each one. This sort of information could assist you in making decisions, such as what
hardware to buy or how many servers to run.
The Linux kernel provides a facility that allows you to collect all sorts of useful infor-
mation about the network traffic it sees. This facility is called IP accounting.
Configuring the Kernel for IP Accounting
The Linux IP accounting feature is very closely related to the Linux firewall soft-
ware. The places you want to collect accounting data are the same places that you
would be interested in performing firewall filtering: into and out of a network host
and in the software that does the routing of packets. If you haven’t read the section
on firewalls, now is probably a good time to do so, as we will be using some of the
concepts described in Chapter 7.
Configuring IP Accounting
Because IP accounting is closely related to IP firewall, the same tool was designated
to configure it, so the iptables command is used to configure IP accounting. The
command syntax is very similar to that of the firewall rules, so we won’t focus on it,

This is the Title of the Book, eMatter Edition
Copyright © 2007 O’Reilly & Associates, Inc. All rights reserved.
Configuring IP Accounting |147
but we will discuss what you can discover about the nature of your network traffic
using this feature.
The general command syntax is:
#iptables -A chain rule-specification
The iptables command allows you to specify direction in a manner consistent with
the firewall rules.
The commands are much the same as firewall rules, except that the policy rules do
not apply here. We can add, insert, delete, and list accounting rules. In the case of
ipchains and iptables, all valid rules are accounting rules, and any command that
doesn’t specify the -j option performs accounting only.
The rule specification parameters for IP accounting are the same as those used for IP
firewalls. These are what we use to define precisely what network traffic we wish to
count and total.
Accounting by Address
Let’s work with an example to illustrate how we’d use IP accounting.
Imagine we have a Linux-based router that serves two departments at the Virtual
Brewery. The router has two Ethernet devices, eth0 and eth1, each of which services
a department; and a PPP device, ppp0, that connects us via a high-speed serial link to
the main campus of the Groucho Marx University.
Let’s also imagine that for billing purposes that we want to know the total traffic
generated by each of the departments across the serial link, and for management pur-
poses we want to know the total traffic generated between the two departments.
Table 8-1 shows the interface addresses we will use in our example:
To answer the question, “How much data does each department generate on the PPP
link?”, we could use a rule that looks like this:
#iptables -A FORWARD -i ppp0 -d 172.16.3.0/24
#iptables -A FORWARD -o ppp0 -s 172.16.3.0/24
#iptables -A FORWARD -i ppp0 -d 172.16.4.0/24
#iptables -A FORWARD -o ppp0 -s 172.16.4.0/24
Table 8-1. Interfaces and their addresses
Interface Address Netmask
eth0 172.16.3.0 255.255.255.0
eth1 172.16.4.0 255.255.255.0

This is the Title of the Book, eMatter Edition
Copyright © 2007 O’Reilly & Associates, Inc. All rights reserved.
148 |Chapter 8: IP Accounting
The first two rules say, “Count all data traveling in either direction across the inter-
face named ppp0 with a source or destination address of 172.16.3.0/24.” The second
set of two rules do the same thing, but for the second Ethernet network at our site.
To answer the second question, “How much data travels between the two depart-
ments?”, we need a rule that looks like this:
#iptables -A FORWARD -s 172.16.3.0/24 -d 172.16.4.0/24
#iptables -A FORWARD -s 172.16.4.0/24 -d 172.16.3.0/24
These rules will count all packets with a source address belonging to one of the
department networks and a destination address belonging to the other.
Accounting by Service Port
Okay, let’s suppose we also want a better idea of exactly what sort of traffic is being
carried across our PPP link. We might, for example, want to know how much of the
link the FTP, SMTP, and World Wide Web (HTTP) services are consuming.
A script of rules to enable us to collect this information might look like this:
#!/bin/sh
# Collect ftp, smtp and www volume statistics for data carried on our
# PPP link using iptables.
#
iptables -A FORWARD -i ppp0 -p tcp --sport 20:21
iptables -A FORWARD -o ppp0 -p tcp --dport 20:21
iptables -A FORWARD -i ppp0 -p tcp --sport smtp
iptables -A FORWARD -o ppp0 -p tcp --dport smtp
iptables -A FORWARD -i ppp0 -p tcp --sport www
iptables -A FORWARD -o ppp0 -p tcp --dport www
There are a couple of interesting features to this configuration. First, we’ve specified
the protocol. When we specify ports in our rules, we must also specify a protocol
because TCP and UDP provide separate sets of ports. Since all of these services are
TCP based, we’ve specified it as the protocol. Second, we’ve specified the two ser-
vices ftp and ftp-data in one command. The iptables command allows either single
ports or ranges of ports, which is what we’ve used here. The syntax “20:21” means
“ports 20 (ftp-data) through 21 (ftp),” and is how we encode ranges of ports in ipta-
bles (the tcp match extension allow you to use port names in range specifications,
but the multiport match extension does not—and you are better off using numbers
for ranges anyway so you don’t accidentally include more ports than you intend).
When you have a list of ports in an accounting rule, it means that any data received
for any of the ports in the list will cause the data to be added to that entry’s totals.
Remembering that the FTP service uses two ports, the command port and the data
transfer port; we’ve added them together to total the FTP traffic.
We can expand on the second point a little to give us a different view of the data on
our link. Let’s now imagine that we class FTP, SMTP, and World Wide Web (HTTP)
traffic as essential traffic, and all other traffic as nonessential. If we were interested in

This is the Title of the Book, eMatter Edition
Copyright © 2007 O’Reilly & Associates, Inc. All rights reserved.
Configuring IP Accounting |149
seeing the ratio of essential traffic to nonessential traffic, we could do something like
this:
#iptables -A FORWARD -i ppp0 -p tcp -m multiport \
--sports ftp-data,ftp,smtp,www -j ACCEPT
#iptables -A FORWARD -j ACCEPT
The first rule would count our essential traffic while the second one would count
everything else.
Alternatively, we can use user-defined chains (this would be useful if the rules for
determining essential traffic were more complex):
#iptables -N a-essent
#iptables -N a-noness
#iptables -A a-essent -j ACCEPT
#iptables -A a-noness -j ACCEPT
#iptables -A FORWARD -i ppp0 -p tcp -m multiport \
--sports ftp-data,ftp,smtp,www -j a-essent
#iptables -A FORWARD -j a-noness
Here we create two user-defined chains—one called a-essent, where we capture
accounting data for essential services, and another called a-noness, where we cap-
ture accounting data for nonessential services. We then add rules to our forward
chain that match our essential services and jump to the a-essent chain, where we
have just one rule that accepts all packets and counts them. The last rule in our for-
ward chain is a rule that jumps to our a-noness chain, where again we have just one
rule that accepts all packets and counts them. The rule that jumps to the a-noness
chain will not be reached by any of our essential services, as they will have been
accepted in their own chain. Our tallies for essential and nonessential services will
therefore be available in the rules within those chains. This is just one approach you
could take; there are others.
This looks simple enough. Unfortunately, there is a small but unavoidable problem
when trying to do accounting by service type. You will remember that we discussed
the role the MTU plays in TCP/IP networking in an earlier chapter. The MTU
defines the largest packet that will be transmitted on a network device. When a
packet is received by a router that is larger than the MTU of the interface that needs
to retransmit it, the router performs a trick called fragmentation. The router breaks
the large packet into small pieces no longer than the MTU of the interface and then
transmits these pieces. The router builds new headers to put in front of each of these
pieces, and these are what the remote host uses to reconstruct the original data.
Unfortunately, during the fragmentation process, the port is lost for all but the first
fragment. This means that the IP accounting can’t properly count fragmented pack-
ets. It can reliably count only the first fragment or unfragmented packets. To ensure
that we capture the second and later fragments, we could use a rule like this:
#iptables -A FORWARD -i ppp0 -m tcp -p tcp -f

This is the Title of the Book, eMatter Edition
Copyright © 2007 O’Reilly & Associates, Inc. All rights reserved.
150 |Chapter 8: IP Accounting
These won’t tell us what the original port for this data was, but at least we are able to
see how much of our data is fragments and account for the volume of traffic they
consume.
Connection tracking does automatic defragmenting, so this technique
won’t often be useful. But if you aren’t doing connection tracking, you
can use it.
Accounting of ICMP Packets
The ICMP protocol does not use service port numbers and is therefore a little bit
more difficult to collect details on. ICMP uses a number of different types of pack-
ets. Many of these are harmless and normal, while others should only be seen under
special circumstances. Sometimes people with too much time on their hands attempt
to maliciously disrupt the network access of a user by generating large numbers of
ICMP messages. This is commonly called ping flooding (the generic term for this type
of denial of service attack is packet flooding, but ping flooding is a common one).
While IP accounting cannot do anything to prevent this problem (IP firewalling can
help, though!), we can at least put accounting rules in place that will show us if any-
body has been trying.
ICMP doesn’t use ports as TCP and UDP do. Instead ICMP has ICMP message
types. We can build rules to account for each ICMP message type. We place the
ICMP message and type number in place of the port field in the accounting com-
mands.
An IP accounting rule to collect information about the volume of ping data that is
being sent to you or that you are generating might look like this:
#iptables -A FORWARD -m icmp -p icmp --sports echo-request
#iptables -A FORWARD -m icmp -p icmp --sports echo-reply
#iptables -A FORWARD -m icmp -p icmp -f
The first rule collects information about the “ICMP Echo Request” packets (ping
requests), and the second rule collects information about the “ICMP Echo Reply”
packets (ping replies). The third rule collects information about ICMP packet frag-
ments. This is a trick similar to that described for fragmented TCP and UDP packets.
If you specify source and/or destination addresses in your rules, you can keep track
of where the pings are coming from, such as whether they originate inside or outside
your network. Once you’ve determined where the rogue packets are coming from,
you can decide whether you want to put firewall rules in place to prevent them or
take some other action, such as contacting the owner of the offending network to
advise them of the problem, or perhaps even taking legal action if the problem is a
malicious act.

This is the Title of the Book, eMatter Edition
Copyright © 2007 O’Reilly & Associates, Inc. All rights reserved.
Resetting the Counters |151
Accounting by Protocol
Let’s now imagine that we are interested in knowing how much of the traffic on our
link is TCP, UDP, and ICMP. We would use rules like the following:
#iptables -A FORWARD -i ppp0 -m tcp -p tcp
#iptables -A FORWARD -o ppp0 -m tcp -p tcp
#iptables -A FORWARD -i ppp0 -m udp -p udp
#iptables -A FORWARD -o ppp0 -m udp -p udp
#iptables -A FORWARD -i ppp0 -m icmp -p icmp
#iptables -A FORWARD -o ppp0 -m icmp -p icmp
With these rules in place, all of the traffic flowing across the ppp0 interface will be
analyzed to determine whether it is TCP, UDP, or ICMP traffic, and the appropriate
counters will be updated for each.
Using IP Accounting Results
It is all very well to be collecting this information, but how do we actually get to see
it? To view the collected accounting data and the configured accounting rules, we
use our firewall configuration commands, asking them to list our rules. The packet
and byte counters for each of our rules are listed in the output.
Listing Accounting Data
The iptables command behaves very similarly to the ipchains command. Again, we
must use the -v when listing tour rules to see the accounting counters. To list our
accounting data, we would use:
#iptables -L -v
Just as for the ipchains command, you can use the -x argument to show the output in
expanded format with unit figures.
Resetting the Counters
The IP accounting counters will overflow if you leave them long enough. If they over-
flow, you will have difficulty determining the value they actually represent. To avoid
this problem, you should read the accounting data periodically, record it, and then
reset the counters back to zero to begin collecting accounting information for the
next accounting interval.
The iptables command provides you with a simple means of doing this:
#iptables -Z

This is the Title of the Book, eMatter Edition
Copyright © 2007 O’Reilly & Associates, Inc. All rights reserved.
152 |Chapter 8: IP Accounting
You can even combine the list and zeroing actions together to ensure that no
accounting data is lost in between:
#iptables -L -Z -v
This command will first list the accounting data and then immediately zero the
counters and begin counting again. If you are interested in collecting and using this
information regularly, you would probably want to put this command into a script
that recorded the output and stored it somewhere, and execute the script periodi-
cally using the cron command.
Flushing the Rule Set
One last command that might be useful allows you to flush all the IP accounting
rules that you have configured. This is most useful when you want to radically alter
your rule set without rebooting the host.
The iptables command supports the -F argument, which flushes all the rules of the
type you specify:
#iptables -F
This flushes all of your configured rules (not just your accounting rules), removing
them all and saving you having to remove each of them individually.
Passive Collection of Accounting Data
One last trick you might like to consider: if your Linux host is connected to an Ether-
net, you can apply accounting rules to all of the data from the segment, not only that
which it is transmitted by or destined for it. Your host will passively listen to all of
the data on the segment and count it.
You should first turn IP forwarding off on your Linux host so that it doesn’t try to
route the packets it receives.* You can do so by running this command:
#echo 0 >/proc/sys/net/ipv4/ip_forward
You should then enable promiscuous mode on your Ethernet interface using the ifcon-
fig command. Enabling promiscuous mode for an Ethernet device causes it to deliver
all packets to the operating system rather than only those with its Ethernet address as
the destination. This is only relevant if the device is connected to a broadcast
medium (such as unswitched Ethernet). For example, to enable promiscuous mode
on interface eth1:
#ifconfig eth1 promisc
* This isn’t a good thing to do if your Linux machine serves as a router. If you disable IP forwarding, it will
cease to route! Do this only on a machine with a single physical network interface.

This is the Title of the Book, eMatter Edition
Copyright © 2007 O’Reilly & Associates, Inc. All rights reserved.
Passive Collection of Accounting Data |153
Now you can establish accounting rules that allow you to collect information about
the packets flowing across your Ethernet without involving your Linux accounting
host in the route at all.

This is the Title of the Book, eMatter Edition
Copyright © 2007 O’Reilly & Associates, Inc. All rights reserved.
154
Chapter 9
CHAPTER 9
IP Masquerade and
Network Address
Translation
You don’t have to have a good memory to remember a time when only large organi-
zations could afford to have a number of computers networked together by a LAN.
Today network technology has dropped so much in price that two things have hap-
pened. First, LANs are now commonplace, even in many household environments.
Certainly many Linux users will have two or more computers connected by some
Ethernet. Second, network resources, particularly IP addresses, are now a scarce
resource, and while they used to be free, they are now being bought and sold.
Most people with a LAN will probably also want an Internet connection that every
computer on the LAN can use. The IP routing rules are strict in how they deal with
this situation. Traditional solutions to this problem would have involved requesting
an IP network address, perhaps a class C address for small sites, assigning each host
on the LAN an address from this network and using a router to connect the LAN to
the Internet.
In a commercialized Internet environment, this is an expensive proposition. First,
you’d be required to pay for the network addresses that are assigned to you. Second,
you’d probably have to pay your Internet Service Provider for the privilege of having
a suitable route to your network put in place so that the rest of the Internet knows
how to reach you. This might still be practical for companies, but domestic installa-
tions don’t usually justify the cost.
Fortunately, Linux provides an answer to this dilemma. This answer involves a com-
ponent of a group of advanced networking features called Network Address Transla-
tion (NAT). NAT describes the process of modifying the network addresses (and
sometimes port numbers) contained with packet headers while they are in transit.
This might sound odd at first, but we’ll show that it is ideal for solving the problem
we’ve just described. IP masquerading is the name given to one type of network
address translation that allows all of the hosts on a private network to use the Inter-
net at the price of a single dynamic IP address. When the single address is statically
assigned, the same functionality goes by the name SNAT (Source NAT). We’ll refer
to both of these as “masquerading” in what follows.
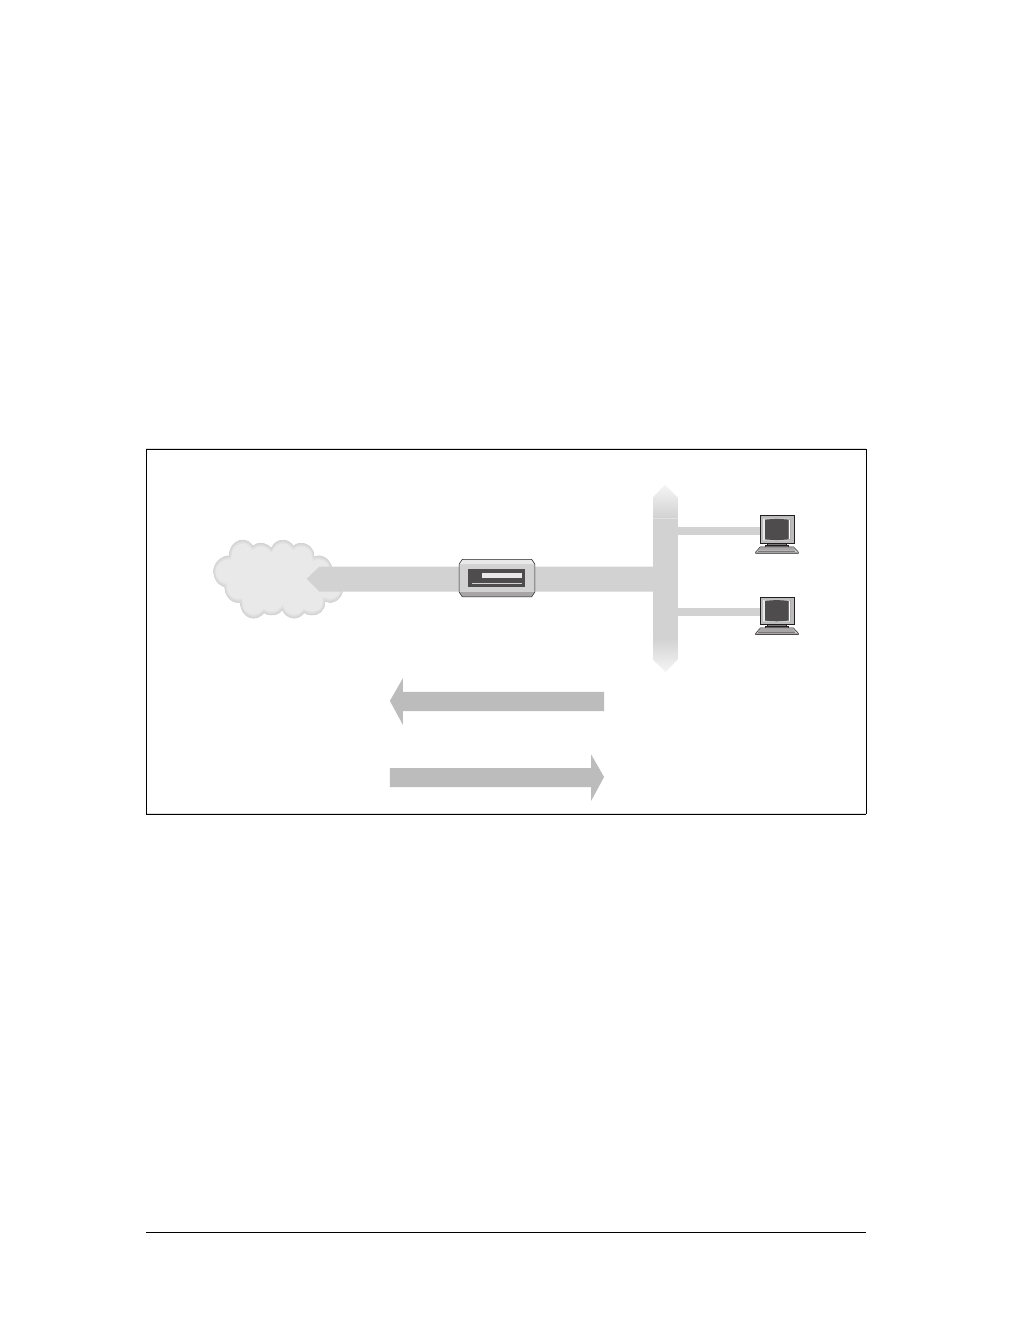
This is the Title of the Book, eMatter Edition
Copyright © 2007 O’Reilly & Associates, Inc. All rights reserved.
IP Masquerade and Network Address Translation |155
IP masquerading allows you to use private (non-routable) IP network addresses for
your hosts on your LAN and have your Linux-based router perform some clever,
real-time translation of IP addresses and ports. When it receives a packet from a
computer on the LAN, it takes note of the type of packet it is, (such as TCP, UDP or
ICMP) and modifies the packet so that it looks like it was generated by the router
host itself (and remembers that it has done so). It then transmits the packet onto the
Internet with its single connection IP address. When the destination host receives
this packet, it believes the packet has come from the routing host and sends any
reply packets back to that address. When the Linux masquerade router receives a
packet from its Internet connection, it looks in its table of established masqueraded
connections to see if this packet actually belongs to a computer on the LAN, and if it
does, it reverses the modification it did on the forward path and transmits the packet
to the LAN computer. A simple example is illustrated in Figure 9-1.
We have a small Ethernet network using one of the reserved network addresses. The
network has a Linux-based masquerade router providing access to the Internet. One
of the workstations on the network (192.168.1.3) wishes to establish a connection
to the remote host 209.1.106.178. The workstation routes its packet to the mas-
querade router, which identifies this connection request as requiring masquerade ser-
vices. It accepts the packet and allocates a port number to use (1035), substitutes its
own IP address and port number for those of the originating host, and transmits the
packet to the destination host. The destination host believes it has received a connec-
tion request from the Linux masquerade host and generates a reply packet. The mas-
querade host, on receiving this packet, finds the association in its masquerade table
and reverses the substitution it performed on the outgoing packet. It then transmits
the reply packet to the originating host.
Figure 9-1. A typical IP masquerade configuration
Masqueraded request
From: 203.10.23.1 port 1035
Internet
192.168.1.2
192.168.1.3
Linux Masquerade
Router
203.10.23.1
ppp0
PPP
192.168.1.1
eth0
192.168.1.0/255.255.255.0
LAN
Original reply
To: 203.10.23.1 port 1035
Original request
From: 192.168.1.3 port 1234
Demasqueraded reply
To: 192.168.1.3 port 1234
Translated by masquerade router at
203.10.23.1

This is the Title of the Book, eMatter Edition
Copyright © 2007 O’Reilly & Associates, Inc. All rights reserved.
156 |Chapter 9: IP Masquerade and Network Address Translation
The local host believes it is speaking directly to the remote host. The remote host
knows nothing about the local host at all and believes it has received a connection
from the Linux masquerade host. The Linux masquerade host knows these two hosts
are speaking to each other, and on what ports, and performs the address and port
translations necessary to allow communication.
This might all seem a little confusing, and it can be, but it works and is actually sim-
ple to configure. So don’t worry if you don’t understand all the details yet.
Side Effects and Fringe Benefits
The IP masquerade facility comes with its own set of side effects, some of which are
useful and some of which might become bothersome.
None of the hosts on the supported network behind the masquerade router are ever
directly seen; consequently, you need only one valid and routable IP address to allow
all hosts to make network connections out onto the Internet. This has a downside:
none of those hosts are visible from the Internet and you can’t directly connect to
them from the Internet; the only host visible on a masqueraded network is the mas-
querade host itself. This is important when you consider services such as mail or
FTP. It helps determine what services should be provided by the masquerade host
and what services it should proxy or otherwise treat specially.
However, you can use DNAT (Destination NAT) on the router to route inbound con-
nections to certain ports to internal servers. This works great for web and mail serv-
ers. You can run those services on hosts on the private network, and use DNAT to
forward inbound connections to port 80 and port 25 to the appropriate internal serv-
ers. This way, the router host is only involved in routing, not in providing any exter-
nally visible services. You can use the same technique to route incoming connections
to a high-numbered port (say, 4022) to the Secure Shell (SSH) port (usually 22) on an
internal host so you can SSH directly into one of your internal hosts through the
router.
Because none of the masqueraded hosts are visible, they are relatively protected from
attacks from outside. You can have one host serve as your firewall and masquerad-
ing router. Your whole network will be only as safe as your masquerade host, so you
should use firewall rules to protect it and you should not run any other externally
visible services on it.
IP masquerade will have some impact on the performance of your networking. In
typical configurations this will probably be barely measurable. If you have large
numbers of active masquerade sessions, though, you may find that the processing
required at the masquerade host begins to impact your network throughput. IP mas-
querade must do a good deal of work for each packet compared to the process of
conventional routing. That low-end host you have been planning on using as a mas-
querade host supporting a personal link to the Internet might be fine, but don’t

This is the Title of the Book, eMatter Edition
Copyright © 2007 O’Reilly & Associates, Inc. All rights reserved.
Configuring IP Masquerade |157
expect too much if you decide you want to use it as a router in your corporate net-
work at Ethernet speeds.
Finally, some network services just won’t work through masquerade, or at least not
without a lot of help. Typically, these are services that rely on incoming sessions to
work, such as some types of Direct Communications Channels (DCC), features in
IRC, or certain types of video and audio multicasting services. Some of these services
have specially developed “helper” kernel modules to provide solutions for these, and
we’ll talk about those in a moment. For others, it is possible that you will find no
support, so be aware—it won’t be suitable in all situations.
Configuring the Kernel for IP Masquerade
To use the IP masquerade facility, your kernel must be compiled with network
packet filtering support. You must select the following options when configuring the
kernel:
Networking options --->
[M] Network packet filtering (replaces ipchains)
The netfilter package includes modules that help perform masquerading functions.
For example, to provide connection tracking of FTP sessions, you’d load and use the
ip_conntrack_ftp and ip_nat_ftp.o modules. This connection tracking support is
required for masquerading to work correctly with protocols that involve multiple
connections for one logical session, since masquerading relies on connection track-
ing.
Configuring IP Masquerade
If you’ve already read the firewall and accounting chapters, it probably comes as no
surprise that the iptables command is used to configure the IP masquerade rules as
well.
Masquerading is a special type of packet mangling (the technical term for modifying
packets). You can masquerade only packets that are received on one interface that
will be routed to another interface. To configure a masquerade rule, construct a rule
very similar to a firewall forwarding rule, but with special options that tell the kernel
to masquerade the packet. The iptables command uses -j MASQUERADE to indicate that
packets matching the rule specification should be masqueraded (this is for a dynamic
IP address; if you have a static IP address, use -j SNAT instead).
Let’s look at an example. A computing science student at Groucho Marx University
has a number of computers at home on a small Ethernet-based LAN. She has chosen
to use one of the reserved private Internet network addresses for her network. She
shares her accommodation with other students, all of whom have an interest in using
the Internet. Because the students’ finances are very tight, they cannot afford to use a

This is the Title of the Book, eMatter Edition
Copyright © 2007 O’Reilly & Associates, Inc. All rights reserved.
158 |Chapter 9: IP Masquerade and Network Address Translation
permanent Internet connection, so instead they use a single Internet connection.
They would all like to be able to share the connection to chat on IRC, surf the Web,
and retrieve files by FTP directly to each of their computers—IP masquerade is the
answer.
The student first configures a Linux host to support the Internet link and to act as a
router for the LAN. The IP address she is assigned when she dials up isn’t impor-
tant. She configures the Linux router with IP masquerade and uses one of the private
network addresses for her LAN: 192.168.1.0. She ensures that each of the hosts on
the LAN has a default route pointing at the Linux router.
The following iptables commands are all that are required to make masquerading
work in her configuration:
#iptables -t nat -P POSTROUTING DROP
#iptables -t nat -A POSTROUTING -o ppp0 -j MASQUERADE
Now whenever any of the LAN hosts try to connect to a service on a remote host,
their packets will be automatically masqueraded by the Linux masquerade router.
The first rule in each example prevents the Linux host from routing any other pack-
ets and also adds some security.
To list the masquerade rules you have created, use the -L argument to the iptables
command, as we described earlier while discussing firewalls:
#iptables -t nat -L
Chain PREROUTING (policy ACCEPT)
target prot opt source destination
Chain POSTROUTING (policy DROP)
target prot opt source destination
MASQUERADE all -- anywhere anywhere MASQUERADE
Chain OUTPUT (policy ACCEPT)
target prot opt source destination
Masquerade rules appear with a target of MASQUERADE.
Handling Nameserver Lookups
Handling domain nameserver lookups from the hosts on the LAN with IP masquer-
ading has always presented a problem. There are two ways of accommodating DNS
in a masquerade environment. You can tell each of the hosts to use the same DNS
that the Linux router host does, and let IP masquerade do its magic on their DNS
requests. Alternatively, you can run a caching nameserver on the Linux host and
have each of the hosts on the LAN use the Linux host as their DNS. Although a more
aggressive action, this is probably the better option because it reduces the volume of
DNS traffic traveling on the Internet link and will be marginally faster for most
requests, since they’ll be served from the cache. The downside to this configuration

This is the Title of the Book, eMatter Edition
Copyright © 2007 O’Reilly & Associates, Inc. All rights reserved.
More About Network Address Translation |159
is that it is more complex. The section “Caching-Only named Configuration” in
Chapter 5 describes how to configure a caching nameserver.
More About Network Address Translation
The netfilter software is capable of many different types of NAT. IP masquerade is
one simple application of it.
It is possible, for example, to build NAT rules that translate only certain addresses or
ranges of addresses and leave all others untouched, or to translate addresses into
pools of addresses rather than just a single address, as masquerade does. You can in
fact use the iptables command to generate NAT rules that map just about anything,
with combinations of matches using any of the standard attributes, such as source
address, destination address, protocol type, port number, etc.
Translating the source address of a packet is referred to as Source NAT, or SNAT,in
iptables. Translating the destination address of a packet is known as Destination
NAT, or DNAT.SNAT and DNAT are targets that you may use with the iptables command
to build more sophisticated rules.

This is the Title of the Book, eMatter Edition
Copyright © 2007 O’Reilly & Associates, Inc. All rights reserved.
160
Chapter 10
CHAPTER 10
Important Network
Features
After successfully setting up IP and the resolver (DNS), you then must look at the
services you want to provide over the network. This chapter covers the configura-
tion of a few simple network applications, including the inetd and xinetd servers and
the programs from the rlogin family. We’ll also deal briefly with the Remote Proce-
dure Call interface, upon which services like the Network File System (NFS) are
based. The configuration of NFS, however, is more complex and is not described in
this book.
Of course, we can’t cover all network applications in this book. If you want to install
one that’s not discussed here, please refer to the manual pages of the server for
details.
The inetd Super Server
Programs that provide application services via the network are called network dae-
mons. A daemon is a program that opens a port, most commonly a well-known ser-
vice port, and waits for incoming connections on it. If one occurs, the daemon
creates a child process that accepts the connection, while the parent continues to lis-
ten for further requests. This mechanism works well but has a few disadvantages; at
least one instance of every possible service that you wish to provide must be active in
memory at all times. In addition, the software routines that do the listening and port
handling must be replicated in every network daemon.
To overcome these inefficiencies, most Unix installations run a special network dae-
mon, what you might consider a “super server.” This daemon creates sockets on
behalf of a number of services and listens on all of them simultaneously. When an
incoming connection is received on any of these sockets, the super server accepts the
connection and spawns the server specified for this port, passing the socket across to
the child to manage. The server then returns to listening.

This is the Title of the Book, eMatter Edition
Copyright © 2007 O’Reilly & Associates, Inc. All rights reserved.
The inetd Super Server |161
The most common super server is called inetd, the Internet Daemon. It is started at
system boot time and takes the list of services it is to manage from a startup file
named /etc/inetd.conf. In addition to those servers, there are a number of trivial ser-
vices performed by inetd itself called internal services. They include chargen, which
simply generates a string of characters, and daytime, which returns the system’s idea
of the time of day.
An entry in this file consists of a single line made up of the following fields:
service type protocol wait user server cmdline
Each of the fields is described in the following list:
service
Gives the service name. The service name has to be translated to a port number
by looking it up in the /etc/services file. This file will be described later in this
chapter in the “The Services and Protocols Files” section later in this chapter.
type
Specifies a socket type, either stream (for connection-oriented protocols) or
dgram (for datagram protocols). TCP-based services should therefore always use
stream, while UDP-based services should always use dgram.
protocol
Names the transport protocol used by the service. This must be a valid protocol
name found in the protocols file, explained later.
wait
This option applies only to dgram sockets. It can be either wait or nowait.Ifwait
is specified, inetd executes only one server for the specified port at any time.
Otherwise, it immediately continues to listen on the port after executing the
server.
This is useful for “single-threaded” servers that read all incoming datagrams
until no more arrive, and then exit. Most RPC servers are of this type and should
therefore specify wait. The opposite type, “multithreaded” servers, allows an
unlimited number of instances to run concurrently. These servers should specify
nowait.
stream sockets should always use nowait.
user
This is the login ID of the user who will own the process when it is executing.
This will frequently be the root user, but some services may use different
accounts. It is a very good idea to apply the principle of least privilege here,
which states that you shouldn’t run a command under a privileged account if the
program doesn’t require this for proper functioning. For example, the NNTP
news server runs as news, while services that may pose a security risk (such as
tftp or finger) are often run as nobody.

This is the Title of the Book, eMatter Edition
Copyright © 2007 O’Reilly & Associates, Inc. All rights reserved.
162 |Chapter 10: Important Network Features
server
Gives the full pathname of the server program to be executed. Internal services
are marked by the keyword internal.
cmdline
This is the command line to be passed to the server. It starts with the name of
the server to be executed and can include any arguments that need to be passed
to it. If you are using the TCP wrapper, you specify the full pathname to the
server here. If not, then you just specify the server name as you’d like it to appear
in a process list. We’ll talk about the TCP wrapper shortly.
This field is empty for internal services.
A sample inetd.conf file is shown in Example 10-1. The finger service is commented
out so that it is not available. This is often done for security reasons because it can be
used by attackers to obtain names and other details of users on your system.
The tftp daemon is shown commented out as well. tftp implements the Trivial File
Transfer Protocol (TFTP), which allows someone to transfer any world-readable
files from your system without password checking. This is especially harmful with
the /etc/passwd file, and even more so when you don’t use shadow passwords.
tftp is commonly used by diskless clients and X terminals to download their code
from a boot server. If you need to run the tftpd daemon for this reason, make sure to
limit its scope to those directories from which clients will retrieve files; you will need
Example 10-1. A sample /etc/inetd.conf file
#
# inetd services
ftp stream tcp nowait root /usr/sbin/ftpd in.ftpd -l
telnet stream tcp nowait root /usr/sbin/telnetd in.telnetd -b/etc/issue
#finger stream tcp nowait bin /usr/sbin/fingerd in.fingerd
#tftp dgram udp wait nobody /usr/sbin/tftpd in.tftpd
#tftp dgram udp wait nobody /usr/sbin/tftpd in.tftpd /boot/diskless
#login stream tcp nowait root /usr/sbin/rlogind in.rlogind
#shell stream tcp nowait root /usr/sbin/rshd in.rshd
#exec stream tcp nowait root /usr/sbin/rexecd in.rexecd
#
# inetd internal services
#
daytime stream tcp nowait root internal
daytime dgram udp nowait root internal
time stream tcp nowait root internal
time dgram udp nowait root internal
echo stream tcp nowait root internal
echo dgram udp nowait root internal
discard stream tcp nowait root internal
discard dgram udp nowait root internal
chargen stream tcp nowait root internal
chargen dgram udp nowait root internal

This is the Title of the Book, eMatter Edition
Copyright © 2007 O’Reilly & Associates, Inc. All rights reserved.
The tcpd Access Control Facility |163
to add those directory names to tftpd’s command line. This is shown in the second
tftp line in the example.
The tcpd Access Control Facility
Since opening a computer to network access involves many security risks, applica-
tions are designed to guard against several types of attacks. Some security features,
however, may be flawed (most drastically demonstrated by the RTM Internet worm,
which exploited a hole in a number of programs, including old versions of the send-
mail mail daemon), or do not distinguish between secure hosts from which requests
for a particular service will be accepted and insecure hosts whose requests should be
rejected. We’ve already briefly discussed the finger and tftp services. A network
administrator would want to limit access to these services to “trusted hosts” only,
which is impossible with the usual setup, for which inetd provides this service either
to all clients or not at all.
A useful tool for managing host-specific access is tcpd, often called the daemon
“wrapper.” For TCP services you want to monitor or protect, it is invoked instead of
the server program. tcpd checks whether the remote host is allowed to use that ser-
vice, and only if this succeeds will it execute the real server program. tcpd also logs
the request to the syslog daemon. Note that this does not work with UDP-based ser-
vices.
For example, to wrap the finger daemon, you have to change the corresponding line
in inetd.conf from this:
# unwrapped finger daemon
finger stream tcp nowait bin /usr/sbin/fingerd in.fingerd
to this:
# wrap finger daemon
finger stream tcp nowait root /usr/sbin/tcpd in.fingerd
Without adding any access control, this will appear to the client as the usual finger
setup, except that any requests are logged to syslog’s auth facility.
Two files called /etc/hosts.allow and /etc/hosts.deny implement access control. They
contain entries that allow and deny access to certain services and hosts. When tcpd
handles a request for a service such as finger from a client host named biff.foobar.
com, it scans hosts.allow and hosts.deny (in this order) for an entry matching both the
service and client host. If a matching entry is found in hosts.allow, access is granted
and tcpd doesn’t consult the hosts.deny file. If no match is found in the hosts.allow
file, but a match is found in hosts.deny, the request is rejected by closing down the
connection. The request is accepted if no match is found at all.
Entries in the access files look like this:
servicelist:hostlist [:shellcmd]

This is the Title of the Book, eMatter Edition
Copyright © 2007 O’Reilly & Associates, Inc. All rights reserved.
164 |Chapter 10: Important Network Features
servicelist is a list of service names from /etc/services, or the keyword ALL. To match
all services except finger and tftp, use ALL EXCEPT finger, tftp.
hostlist is a list of hostnames, IP addresses, or the keywords ALL,LOCAL,UNKNOWN, or
PARANOID.ALL matches any host, while LOCAL matches hostnames that don’t contain a
dot.*UNKNOWN matches any hosts whose name or address lookup failed. PARANOID
matches any host whose hostname does not resolve back to its IP address.†A name
starting with a dot matches all hosts whose domain is equal to this name. For exam-
ple, .foobar.com matches biff.foobar.com, but not nurks.fredsville.com. A pattern
that ends with a dot matches any host whose IP address begins with the supplied
pattern, so 172.16. matches 172.16.32.0, but not 172.15.9.1. A pattern of the form
n.n.n.n/m.m.m.m is treated as an IP address and network mask, so we could specify
our previous example as 172.16.0.0/255.255.0.0 instead. Lastly, any pattern begin-
ning with a “/” character allows you to specify a file that is presumed to contain a list
of hostname or IP address patterns, any of which are allowed to match. So a pattern
that looked like /var/access/trustedhosts would cause the tcpd daemon to read that
file, testing if any of the lines in it matched the connecting host.
To deny access to the finger and tftp services to all but the local hosts, put the follow-
ing in /etc/hosts.deny and leave /etc/hosts.allow empty:
in.tftpd, in.fingerd: ALL EXCEPT LOCAL, .your.domain
The optional shellcmd field may contain a shell command to be invoked when the
entry is matched. This is useful to set up traps that may expose potential attackers.
The following example creates a logfile listing the user and host connecting, and if
the host is not vlager.vbrew.com, it will append the output of a finger to that host:
in.ftpd: ALL EXCEPT LOCAL, .vbrew.com : \
echo "request from %d@%h: >> /var/log/finger.log; \
if [ %h != "vlager.vbrew.com:" ]; then \
finger -l @%h >> /var/log/finger.log \
fi
The %h and %d arguments are expanded by tcpd to the client hostname and service
name, respectively. Please refer to the hosts_access(5) manpage for details.
The xinetd Alternative
An alternative to the standard inetd has emerged and is now widely accepted. It is
considered a more secure and robust program, and provides protection against some
* Usually only local hostnames obtained from lookups in /etc/hosts contain no dots.
† While its name suggests it is an extreme measure, the PARANOID keyword is a good default, as it protects you
against mailicious hosts pretending to be someone they are not. Not all tcpd are supplied with PARANOID com-
piled in; if yours is not, you need to recompile tcpd to use it.

This is the Title of the Book, eMatter Edition
Copyright © 2007 O’Reilly & Associates, Inc. All rights reserved.
The xinetd Alternative |165
DoS attacks used against inetd. The number of features offered by xinetd also makes
it a more appealing alternative. Here is a brief list of features:
• Provides full-featured access control and logging
• Limits to the number of servers run at a single time
• Offers granular service-binding -services, which can be bound to specific IP
addresses
xinetd is now a standard part of most Linux distributions, but if you need to find the
latest source code or information, check the main distribution web site http://www.
xinetd.org. If you are compiling, and use IPv6, you should make certain that you use
the --with-inet6 option.
The configuration of xinetd is somewhat different, but not more complex than inetd.
Rather than forcing one master configuration file for all services, xinetd can be con-
figured to use a master configuration file, /etc/xinetd.conf, and separate configuration
files for each additional service configured. This, aside from simplifying configura-
tion, allows for more granular configuration of each service, leading to xinetd’s
greater flexibility.
The first file you’ll need to configure is /etc/xinetd.conf. A sample file looks like this:
# Sample configuration file for xinetd
defaults
{
only_from = localhost
instances = 60
log_type = SYSLOG authpriv info
log_on_success = HOST PID
log_on_failure = HOST
cps = 25 30
}
includedir /etc/xinetd.d
There are a number of options that can be configured, the options used above are:
only_from
This specifies the IP addresses or hostnames from which you allow connections.
In this example, we’ve restricted connections to the loopback interface only.
instances
This sets the total number of servers that xinetd will run. Having this set to a rea-
sonable number can help prevent malicious users from carrying out a DoS attack
against your machine.
log_type SYSLOG|FILE
This option allows you to set the type of logging you’re planning to use. There
are two options, syslog or file. The first, syslog, will send all log information to

This is the Title of the Book, eMatter Edition
Copyright © 2007 O’Reilly & Associates, Inc. All rights reserved.
166 |Chapter 10: Important Network Features
the system log. The file directive will send logs to a file you specify. For a list of
the additional options under each of these, see the xinetd.conf manpage.
log_on_success
With this option, you can set the type of information logged when a user con-
nection is successful. Here’s a list of some available suboptions:
HOST
This will log the remote host’s IP address.
PID
This logs the new server’s process ID.
DURATION
Enable this to have the total session time logged.
TRAFFIC
This option may be helpful for administrators concerned with network
usage. Enabling this will log the total number of bytes in/out.
log_on_failure
HOST
This will log the remote host’s IP address.
ATTEMPT
This logs all failed attempts to access services.
cps
Another security feature, this option will limit the incoming rate of connections
to a service. It requires two options: the first is the number of connections per
second which are allowed, and the second is the amount of time in seconds the
service will be disabled.
Any of these options can be overridden in the individual service configuration files,
which we’re including in the /etc/xinetd.d directory. These options set in the master
configuration file will serve as default values. Configuration of individual services is
also this simple. Here’s an example of the FTP service, as configured for xinetd:
service ftp
{
socket_type = stream
wait = no
user = root
server = /usr/sbin/vsftpd
server_args = /etc/vsftpd/vsftpd.conf
log_on_success += DURATION USERID
log_on_failure += USERID
nice = 10
disable = no
}
The first thing you will want to note is that in the xinetd.d directory, the individual
services tend to be helpfully named, which makes individual configuration files easier

This is the Title of the Book, eMatter Edition
Copyright © 2007 O’Reilly & Associates, Inc. All rights reserved.
The Services and Protocols Files |167
to identify and manage. In this case, the file is simply called vsftp, referring to the
name of the FTP server we’re using.
Taking a look at this example, the first active configuration line defines the name of
the service that’s being configured. Surprisingly, the service type is not defined by the
service directive. The rest of the configuration is contained in brackets, much like
functions in C. Some of the options used within the service configurations overlap
those found in the defaults section. If an item is defined in the defaults and then
defined again in the individual service configuration, the latter takes priority. There
are a large number of configuration options available and are discussed in detail in
the xinetd.conf manpage, but to get a basic service running, we need only a few:
socket_type
This defines the type of socket used by the service. Administrators familiar with
inetd will recognize the following available options, such as stream,dgram,raw,
and seqpacket.
wait
This option specifies whether the service is single or dual-threaded. yes means
that the service is single threaded and that xinetd will start the service and then
will stop handling requests for new connections until the current session ends.
no means that new session requests can be processed.
user
Here, you set the name of the user that will run the service.
server
This option is used to specify location of the service that’s being run.
server_args
You can use this option to specify any additional options that need to be passed
to the server.
nice
This option determines the server priority. Again, this is an option that can be
used to limit resources used by servers.
disable
Really a very straightforward option, this determines whether or not the service
is enabled.
The Services and Protocols Files
The port numbers on which certain “standard” services are offered are defined in the
Assigned Numbers RFC. To enable server and client programs to convert service
names to these numbers, at least part of the list is kept on each host; it is stored in a
file called /etc/services. An entry is made up like this:
service port/protocol [aliases]

This is the Title of the Book, eMatter Edition
Copyright © 2007 O’Reilly & Associates, Inc. All rights reserved.
168 |Chapter 10: Important Network Features
Here, service specifies the service name, port defines the port the service is offered
on, and protocol defines which transport protocol is used. Commonly, the latter
field is either udp or tcp. It is possible for a service to be offered for more than one
protocol, as well as offering different services on the same port as long as the proto-
cols are different. The aliases field allows you to specify alternative names for the
same service.
Usually, you don’t have to change the services file that comes along with the net-
work software on your Linux system. Nevertheless, we give a small excerpt from that
file in Example 10-2.
Like the services file, the networking library needs a way to translate protocol
names—for example, those used in the services file—to protocol numbers under-
stood by the IP layer on other hosts. This is done by looking up the name in the /etc/
protocols file. It contains one entry per line, each containing a protocol name, and
the associated number. Having to touch this file is even more unlikely than having to
meddle with /etc/services. A sample file is given in Example 10-3.
Example 10-2. A sample /etc/services file
# /etc/services
tcpmux 1/tcp # TCP port service multiplexer
echo 7/tcp
echo 7/udp
discard 9/tcp sink null
discard 9/udp sink null
systat 11/tcp users
daytime 13/tcp
daytime 13/udp
netstat 15/tcp
qotd 17/tcp quote
msp 18/tcp # message send protocol
msp 18/udp # message send protocol
chargen 19/tcp ttytst source
chargen 19/udp ttytst source
ftp-data 20/tcp
ftp 21/tcp
fsp 21/udp fspd
ssh 22/tcp # SSH Remote Login Protocol
ssh 22/udp # SSH Remote Login Protocol
telnet 23/tcp
# 24 - private
smtp 25/tcp mail
# 26 - unassigned
Example 10-3. A sample /etc/protocols file
#
# Internet (IP) protocols
#

This is the Title of the Book, eMatter Edition
Copyright © 2007 O’Reilly & Associates, Inc. All rights reserved.
Remote Procedure Call |169
Remote Procedure Call
The general mechanism for client-server applications is provided by the Remote Pro-
cedure Call (RPC) package. RPC was developed by Sun Microsystems and is a collec-
tion of tools and library functions. An important application built on top of RPC is
NFS.
An RPC server consists of a collection of procedures that a client can call by sending
an RPC request to the server along with the procedure parameters. The server will
invoke the indicated procedure on behalf of the client, handing back the return
value, if there is any. In order to be machine-independent, all data exchanged
between client and server is converted to the External Data Representation format
(XDR) by the sender, and converted back to the machine-local representation by the
receiver. RPC relies on standard UDP and TCP sockets to transport the XDR format-
ted data to the remote host. Sun has graciously placed RPC in the public domain; it
is described in a series of RFCs.
Sometimes improvements to an RPC application introduce incompatible changes in
the procedure call interface. Of course, simply changing the server would crash all
applications that still expect the original behavior. Therefore, RPC programs have
version numbers assigned to them, usually starting with 1, and with each new ver-
sion of the RPC interface, this counter will be bumped up. Often, a server may offer
several versions simultaneously; clients then indicate by the version number in their
requests which implementation of the service they want to use.
The communication between RPC servers and clients is somewhat peculiar. An RPC
server offers one or more collections of procedures; each set is called a program and
is uniquely identified by a program number. A list that maps service names to pro-
gram numbers is usually kept in /etc/rpc, an excerpt of which is shown in
Example 10-4.
ip 0 IP # internet protocol, pseudo protocol number
icmp 1 ICMP # internet control message protocol
igmp 2 IGMP # internet group multicast protocol
tcp 6 TCP # transmission control protocol
udp 17 UDP # user datagram protocol
raw 255 RAW # RAW IP interface
esp 50 ESP # Encap Security Payload for IPv6
ah 51 AH # Authentication Header for IPv6
skip 57 SKIP # SKIP
ipv6-icmp 58 IPv6-ICMP # ICMP for IPv6
ipv6-nonxt 59 IPv6-NoNxt # No Next Header for IPv6
ipv6-opts 60 IPv6-Opts # Destination Options for IPv6
rspf 73 RSPF # Radio Shortest Path First.
Example 10-3. A sample /etc/protocols file (continued)

This is the Title of the Book, eMatter Edition
Copyright © 2007 O’Reilly & Associates, Inc. All rights reserved.
170 |Chapter 10: Important Network Features
In TCP/IP networks, the authors of RPC faced the problem of mapping program
numbers to generic network services. They designed each server to provide both a
TCP and a UDP port for each program and each version. Generally, RPC applica-
tions use UDP when sending data and fall back to TCP only when the data to be
transferred doesn’t fit into a single UDP datagram.
Of course, client programs need to find out to which port a program number maps.
Using a configuration file for this would be too inflexible; since RPC applications
don’t use reserved ports, there’s no guarantee that a port originally meant to be used
by our database application hasn’t been taken by some other process. Therefore,
RPC applications pick any available port and register it with a special program called
the portmapper daemon. The portmapper acts as a service broker for all RPC servers
running on its machine. A client that wishes to contact a service with a given pro-
gram number first queries the portmapper on the server’s host, which returns the
TCP and UDP port numbers the service can be reached at.
This method introduces a single point of failure, much like the inetd daemon does for
the standard Berkeley services. However, this case is even a little worse because when
the portmapper dies, all RPC port information is lost; this usually means that you
have to restart all RPC servers manually or reboot the entire machine.
On Linux, the portmapper is called /sbin/portmap, or sometimes /usr/sbin/rpc.port-
map. Other than making sure it is started from your network boot scripts, the port-
mapper doesn’t require any configuration.
Configuring Remote Login and Execution
It’s often very useful to execute a command on a remote host and have input or out-
put from that command be read from, or written to, a network connection.
The traditional commands used for executing commands on remote hosts are rlogin,
rsh, and rcp. We briefly discussed the security issues associated with it in Chapter 1
Example 10-4. A sample /etc/rpc file
#
# /etc/rpc - miscellaneous RPC-based services
#
portmapper 100000 portmap sunrpc
rstatd 100001 rstat rstat_svc rup perfmeter
rusersd 100002 rusers
nfs 100003 nfsprog
ypserv 100004 ypprog
mountd 100005 mount showmount
ypbind 100007
walld 100008 rwall shutdown
yppasswdd 100009 yppasswd
bootparam 100026
ypupdated 100028 ypupdate

This is the Title of the Book, eMatter Edition
Copyright © 2007 O’Reilly & Associates, Inc. All rights reserved.
Configuring Remote Login and Execution |171
and suggested ssh as a replacement. The ssh package provides replacements called
ssh and scp.
Each of these commands spawns a shell on the remote host and allows the user to
execute commands. Of course, the client needs to have an account on the remote
host where the command is to be executed. Thus, all these commands use an
authentication process. The rcommands use a simple username and password
exchange between the hosts with no encryption, so anyone listening could easily
intercept the passwords. The ssh command suite provides a higher level of security: it
uses a technique called Public Key Cryptography, which provides authentication and
encryption between the hosts to ensure that neither passwords nor session data are
easily intercepted by other hosts.
It is possible to relax authentication checks for certain users even further. For
instance, if you frequently have to log in to other machines on your LAN, you might
want to be admitted without having to type your password every time. This was
always possible with the rcommands, but the ssh suite allows you to do this a little
more easily. It’s still not a great idea because it means that if an account on one
machine is breached, access can be gained to all other accounts that user has config-
ured for password-less login, but it is very convenient and people will use it.
Let’s talk about removing the r commands and getting ssh to work instead.
Disabling the r Commands
Start by removing the rcommands if they’re installed. The easiest way to disable the
old rcommands is to comment out (or remove) their entries in the /etc/inetd.conf file.
The relevant entries will look something like this:
# Shell, login, exec and talk are BSD protocols.
shell stream tcp nowait root /usr/sbin/tcpd /usr/sbin/in.rshd
login stream tcp nowait root /usr/sbin/tcpd /usr/sbin/in.rlogind
exec stream tcp nowait root /usr/sbin/tcpd /usr/sbin/in.rexecd
You can comment them by placing a #character at the start of each line, or delete the
lines completely. Remember, you need to restart the inetd daemon for this change to
take effect. Ideally, you should remove the daemon programs themselves, too.
Installing and Configuring ssh
OpenSSH is a free version of the ssh suite of programs; the Linux port can be found
at ftp://ftp.openbsd.org/pub/OpenBSD/OpenSSH/portable/ and in most modern Linux
distributions.*We won’t describe compilation here; good instructions are included in
* OpenSSH was developed by the OpenBSD project and is a fine example of the benefit of free software.

This is the Title of the Book, eMatter Edition
Copyright © 2007 O’Reilly & Associates, Inc. All rights reserved.
172 |Chapter 10: Important Network Features
the source. If you can install it from a precompiled package, then it’s probably wise
to do so.
There are two parts to an ssh session. There is an ssh client that you need to config-
ure and run on the local host and an ssh daemon that must be running on the remote
host.
The ssh daemon
The sshd daemon is the program that listens for network connections from ssh cli-
ents, manages authentication, and executes the requested command. It has one main
configuration file called /etc/ssh/sshd_config and a special file containing a key used
by the authentication and encryption processes to represent the host end. Each host
and each client has its own key.
A utility called ssh-keygen is supplied to generate a random key. This is usually used
once at installation time to generate the host key, which the system administrator
usually stores in a file called /etc/ssh/ssh_host_key. Keys can be of any length of 512
bits or greater. By default, ssh-keygen generates keys of 1,024 bits in length, and most
people use the default. Using OpenSSH with SSH Version 2, you will need to gener-
ate RSA and DSA keys. To generate the keys, you would invoke the ssh-keygen com-
mand like this:
#ssh-keygen -t rsa1 -f /etc/openssh/ssh_host_key -N ""
#ssh-keygen -t dsa -f /etc/openssh/ssh_host_dsa_key -N ""
#ssh-keygen -t rsa -f /etc/openssh/ssh_host_rsa_key -N ""
You will be prompted to enter a passphrase if you omit the -N option. However, host
keys must not use a passphrase, so just press the return key to leave it blank. The
program output will look something like this:
Generating public/private dsa key pair.
Your identification has been saved in sshkey.
Your public key has been saved in sshkey.pub.
The key fingerprint is:
fb:bf:d1:53:08:7a:29:6f:fb:45:96:63:7a:6e:04:22 tb@eskimo 1024
You’ve probably noticed that three different keys were created. The first one, type
rsa1, is used for SSH protocol Version 1, the next two types, rsa and dsa, are used for
SSH protocol Version 2. It is recommended that SSH protocol Version 2 be used in
place of SSH protocol Version 1 because of potential man-in-the-middle and other
attacks against SSH protocol Version 1.
You will find at the end that two files have been created for each key. The first is
called the private key, which must be kept secret and will be in /etc/openssh/ssh_host_
key. The second is called the public key and is one that you can share; it will be in
/etc/openssh/ssh_host_key.pub.
Armed with the keys for ssh communication, you need to create a configuration file.
The ssh suite is very powerful and the configuration file may contain many options.

This is the Title of the Book, eMatter Edition
Copyright © 2007 O’Reilly & Associates, Inc. All rights reserved.
Configuring Remote Login and Execution |173
We’ll present a simple example to get you started; you should refer to the ssh docu-
mentation to enable other features. The following code shows a safe and minimal
sshd configuration file. The rest of the configuration options are detailed in the
sshd(8) manpage:
# $OpenBSD: sshd_config,v 1.59 2002/09/25 11:17:16 markus Exp $
#Port 22
Protocol 2
#ListenAddress 0.0.0.0
#ListenAddress ::
# HostKeys for protocol version 2
HostKey /etc/openssh/ssh_host_rsa_key
HostKey /etc/openssh/ssh_host_dsa_key
# Lifetime and size of ephemeral version 1 server key
#KeyRegenerationInterval 3600
#ServerKeyBits 768
# Authentication:
#LoginGraceTime 120
#PermitRootLogin yes
#StrictModes yes
#RSAAuthentication yes
#PubkeyAuthentication yes
# Change to yes if you don't trust ~/.ssh/known_hosts for
# RhostsRSAAuthentication and HostbasedAuthentication
#IgnoreUserKnownHosts no
# To disable tunneled clear text passwords, change to no here!
#PasswordAuthentication yes
#PermitEmptyPasswords no
# Change to no to disable s/key passwords
#ChallengeResponseAuthentication yes
#X11Forwarding no
#X11DisplayOffset 10
#X11UseLocalhost yes
#PrintMotd yes
#PrintLastLog yes
#KeepAlive yes
#UseLogin no
#UsePrivilegeSeparation yes
#PermitUserEnvironment no
MaxStartups 10
# no default banner path
#Banner /some/path
#VerifyReverseMapping no

This is the Title of the Book, eMatter Edition
Copyright © 2007 O’Reilly & Associates, Inc. All rights reserved.
174 |Chapter 10: Important Network Features
# override default of no subsystems
Subsystem sftp /usr/lib/misc/sftp-server
It’s important to make sure the permissions of the configuration files are correct to
ensure that system security is maintained. Use the following commands:
#chown -R root:root /etc/ssh
#chmod 755 /etc/ssh
#chmod 600 /etc/ssh/ssh_host_rsa_key
#chmod 600 /etc/ssh/ssh_host_dsa_key
#chmod 644 /etc/ssh/sshd_config
The final stage of sshd administration daemon is to run it. Normally you’d create an
rc file for it or add it to an existing one, so that it is automatically executed at boot
time. The daemon runs standalone and doesn’t require any entry in the /etc/inetd.
conf file. The daemon must be run as the root user. The syntax is very simple:
/usr/sbin/sshd
The sshd daemon will automatically place itself into the background when being run.
You are now ready to accept ssh connections.
The ssh client
There are a number of ssh client programs: slogin,scp, and ssh. They each read the
same configuration file, usually called /etc/openssh/ssh_config. They each also read con-
figuration files from the .ssh directory in the home directory of the user executing them.
The most important of these files is the .ssh/config file, which may contain options that
override those specified in the /etc/openssh/ssh_config file, the .ssh/identity file, which
contains the user’s own private key, and the corresponding .ssh/identity.pub file, con-
taining the user’s public key. Other important files are .ssh/known_hosts and .ssh/
authorized_keys; we’ll talk about those in the next section, “Using ssh.” First, let’s cre-
ate the global configuration file and the user key file.
/etc/ssh/ssh_config is very similar to the server configuration file. Again, there are lots
of features that you can configure, but a minimal configuration looks like that pre-
sented in Example 10-5. The rest of the configuration options are detailed in the
sshd(8) manpage. You can add sections that match specific hosts or groups of hosts.
The parameter to the “Host” statement may be either the full name of a host or a
wildcard specification, as we’ve used in our example, to match all hosts. We could
create an entry that used, for example, Host *.vbrew.com to match any host in the
vbrew.com domain.
Example 10-5. Example ssh client configuration file
# $OpenBSD: ssh_config,v 1.19 2003/08/13 08:46:31 markus Exp $
# Site-wide defaults for various options
# Host *

This is the Title of the Book, eMatter Edition
Copyright © 2007 O’Reilly & Associates, Inc. All rights reserved.
Configuring Remote Login and Execution |175
We mentioned in the server configuration section that every host and user has a key.
The user’s key is stored in his or her ~/.ssh/indentity file. To generate the key, use the
same ssh-keygen command we used to generate the host key, except this time you do
not need to specify the name of the file in which you save the key. The ssh-keygen
defaults to the correct location, but it prompts you to enter a filename in case you’d
like to save it elsewhere. It is sometimes useful to have multiple identity files, so ssh
allows this. Just as before, ssh-keygen will prompt you to entry a passphrase. Pass-
phrases add yet another level of security and are a good idea. Your passphrase won’t
be echoed on the screen when you type it.
There is no way to recover a passphrase if you forget it. Make sure it is
something you will remember, but as with all passwords, make it
something that isn’t obvious, like a proper noun or your name. For a
passphrase to be truly effective, it should be between 10 and 30 char-
acters long and not be plain English prose. Try to throw in some
unusual characters. If you forget your passphrase, you will be forced to
generate a new key.
You should ask each of your users to run the ssh-keygen command just once to
ensure their key file is created correctly. The ssh-keygen will create their ~/.ssh/ direc-
tories for them with appropriate permissions and create their private and public keys
in .ssh/identity and .ssh/identity.pub, respectively. A sample session should look like
this:
$ssh-keygen
Key generation complete.
Enter file in which to save the key (/home/maggie/.ssh/identity):
# ForwardAgent no
# ForwardX11 no
# RhostsRSAAuthentication no
# RSAAuthentication yes
# PasswordAuthentication yes
# HostbasedAuthentication no
# BatchMode no
# CheckHostIP yes
# AddressFamily any
# ConnectTimeout 0
# StrictHostKeyChecking ask
# IdentityFile ~/.ssh/identity
# IdentityFile ~/.ssh/id_rsa
# IdentityFile ~/.ssh/id_dsa
# Port 22
# Protocol 2,1
# Cipher 3des
# Ciphers aes128-cbc,3des-cbc,blowfish-cbc,cast128-cbc,arcfour,aes192-cbc,aes2
56-cbc
# EscapeChar ~
Example 10-5. Example ssh client configuration file (continued)

This is the Title of the Book, eMatter Edition
Copyright © 2007 O’Reilly & Associates, Inc. All rights reserved.
176 |Chapter 10: Important Network Features
Enter passphrase (empty for no passphrase):
Enter same passphrase again:
Your identification has been saved in /home/maggie/.ssh/identity.
Your public key has been saved in /home/maggie/.ssh/identity.pub.
The key fingerprint is:
1024 85:49:53:f4:8a:d6:d9:05:d0:1f:23:c4:d7:2a:11:67 maggie@moria
$
Now ssh is ready to run.
Using ssh
We should now have the ssh command and its associated programs installed and
ready to run. Let’s now take a quick look at how to run them.
First, we’ll try a remote login to a host. The first time you attempt a connection to a
host, the ssh client will retrieve the public key of the host and ask you to confirm its
identity by prompting you with a shortened version of the public key called a finger-
print.
The administrator at the remote host should have supplied you in advance with its
public key fingerprint, which you should add to your .ssh/known_hosts file. If the
remote administrator has not supplied you the appropriate key, you can connect to
the remote host, but ssh will warn you that it does have a key and prompt you
whether you wish to accept the one offered by the remote host. Assuming that you’re
sure no one is engaging in DNS spoofing and you are in fact talking to the correct
host, answer yes to the prompt. The relevant key is then stored automatically in your
.ssh/known_hosts and you will not be prompted for it again. If, on a future connec-
tion attempt, the public key retrieved from that host does not match the one that is
stored, you will be warned, because this represents a potential security breach.
A first-time login to a remote host will look something like this:
$ssh vlager.vbrew.com
The authenticity of host `vlager.vbrew.com' can't be established.
Key fingerprint is 1024 7b:d4:a8:28:c5:19:52:53:3a:fe:8d:95:dd:14:93:f5.
Are you sure you want to continue connecting (yes/no)? yes
Warning: Permanently added 'vchianti.vbrew.com,172.16.2.3' to the list of/
known hosts.
maggie@vlager.vbrew.com's password:
Last login: Tue Feb 1 23:28:58 2004 from vstout.vbrew.com
$
You will be prompted for a password, which you should answer with the password
belonging to the remote account, not the local one. This password is not echoed
when you type it.
Without any special arguments, ssh will attempt to log in with the same user ID used
on the local machine. You can override this using the -l argument, supplying an
alternate login name on the remote host. This is what we did in our example earlier

This is the Title of the Book, eMatter Edition
Copyright © 2007 O’Reilly & Associates, Inc. All rights reserved.
Configuring Remote Login and Execution |177
in the book. Alternately, you can use the userid@hostname.ext format to specify a
different username.
We can copy files to and from the remote host using the scp program. Its syntax is
similar to the conventional cp with the exception that you may specify a hostname
before a filename, meaning that the file path is on the specified host (It is also possi-
ble to use the userid@hostname format previously mentioned). The following exam-
ple illustrates scp syntax by copying a local file called /tmp/fred to the /home/maggie/
of the remote host vlager.vbrew.com:
$ scp /tmp/fred vlager.vbrew.com:/home/maggie/
maggie@vlager.vbrew.com's password:
fred 100% |*****************************| 50165 00:01 ETA
Again, you’ll be prompted for a password. The scp command displays useful
progress messages by default. You can copy a file from a remote host with the same
ease; simply specify its hostname and file path as the source and the local path as the
destination. It’s even possible to copy a file from a remote host to some other remote
host, but it is something you wouldn’t normally want to do, because all of the data
travels via your host.
You can execute commands on remote hosts using the ssh command. Again, its syn-
tax is very simple. Let’s have our user maggie retrieve the root directory of the remote
host vchianti.vbrew.com. She’d do this with the following:
$ssh vchianti.vbrew.com ls -CF /
maggie@vchianti.vbrew.com's password:
bin/ ftp/ mnt/ sbin/ tmp/
boot/ home/ opt/ service/ usr/
dev/ lib/ proc/ stage3-pentium3-1.4-20030726.tar.bz2 var/
etc/ lost+found/ root/
You can place ssh in a command pipeline and pipe program input/output to or from
it just like any other command, except that the input or output is directed to or from
the remote host via the ssh connection. Here is an example of how you might use this
capability in combination with the tar command to copy a whole directory with sub-
directories and files from a remote host to the local host:
$ssh vchianti.vbrew.com "tar cf - /etc/" | tar xvf -
maggie@vchianti.vbrew.com's password:
etc/GNUstep
etc/Muttrc
etc/Net
etc/X11
etc/adduser.conf
..
..
Here we surrounded the command we will execute with quotation marks to make it
clear what is passed as an argument to ssh and what is used by the local shell. This
command executes the tar command on the remote host to archive the /etc/ directory

This is the Title of the Book, eMatter Edition
Copyright © 2007 O’Reilly & Associates, Inc. All rights reserved.
178 |Chapter 10: Important Network Features
and write the output to standard output. We’ve piped to an instance of the tar com-
mand running on our local host in extract mode reading from standard input.
Again, we were prompted for the password. Let’s now configure our local ssh client
so that it won’t prompt for a password when connecting to the vchianti.vbrew.com
host. We mentioned the .ssh/authorized_keys file earlier; this is where it is used. The
.ssh/authorized_keys file contains the public keys on any remote user accounts that
we wish to automatically log in to. You can set up automatic logins by copying the
contents of the .ssh/identity.pub from the remote account into our local .ssh/
authorized_keys file. It is vital that the file permissions of .ssh/authorized_keys allow
only that you read and write it; anyone may steal and use the keys to log in to that
remote account. To ensure the permissions are correct, change .ssh/authorized_keys,
as shown:
$chmod 600 ~/.ssh/authorized_keys
The public keys are a long single line of plain text. If you use copy and paste to dupli-
cate the key into your local file, be sure to remove any end of line characters that
might have been introduced along the way. The .ssh/authorized_keys file may con-
tain many such keys, each on a line of its own.
The ssh suite of tools is very powerful, and there are many other useful features and
options that you will be interested in exploring. Please refer to the manpages and
other documentation that is supplied with the package for more information.

This is the Title of the Book, eMatter Edition
Copyright © 2007 O’Reilly & Associates, Inc. All rights reserved.
179
Chapter 11
CHAPTER 11
Administration Issues
with Electronic Mail
Electronic mail transport has been one of the most prominent uses of networking
since networks were devised. Email started as a simple service that copied a file from
one machine to another and appended it to the recipient’s mailbox file. The concept
remains the same, although an ever-growing net, with its complex routing require-
ments and its ever increasing load of messages, has made a more elaborate scheme
necessary.
Various standards of mail exchange have been devised. Sites on the Internet adhere
to one laid out in RFC 822, augmented by some RFCs that describe a machine-inde-
pendent way of transferring just about anything, including graphics, sound files, and
special characters sets, by email.*CCITT has defined another standard, X.400. It is
still used in some large corporate and government environments, but is progressively
being retired.
Quite a number of mail transport programs have been implemented for Unix sys-
tems. One of the best known is sendmail, which was developed by Eric Allman at the
University of California at Berkeley. Eric Allman now offers sendmail through a com-
mercial venture, but the program remains free software. sendmail is supplied as the
standard mail transfer agent (or MTA) in some Linux distributions. We describe
sendmail configuration in Chapter 12.
sendmail supports a set of configuration files that have to be customized for your sys-
tem. Apart from the information that is required to make the mail subsystem run
(such as the local hostname), there are many parameters that may be tuned. send-
mail’s main configuration file is very hard to understand at first. It looks as if your
cat has taken a nap on your keyboard with the Shift key pressed. Luckily, modern
configuration techniques take away a lot of the head scratching.
* Read RFC 1437 if you don’t believe this statement!

This is the Title of the Book, eMatter Edition
Copyright © 2007 O’Reilly & Associates, Inc. All rights reserved.
180 |Chapter 11: Administration Issues with Electronic Mail
When users retrieve mail on their personal systems, they need another protocol to
use to contact the mail server. In Chapter 15 we discuss a powerful and increasingly
popular type of server called IMAP.
In this chapter, we deal with what email is and what issues administrators have to
deal with. Chapter 12 provides instructions on setting up sendmail for the first time.
The information included should help smaller sites become operational, but there
are several more options and you can spend many happy hours in front of your com-
puter configuring the fanciest features.
For more information about issues specific to electronic mail on Linux, please refer
to the Electronic Mail HOWTO by Guylhem Aznar. The source distribution of send-
mail also contains extensive documentation that should answer most questions on
setting it up.
What Is a Mail Message?
A mail message generally consists of a message body, which is the text of the mes-
sage, and special administrative data specifying recipients, transport medium, etc.,
similar to what you see when you look at a physical letter’s envelope.
This administrative data falls into two categories. In the first category is any data that
is specific to the transport medium, such as the address of sender and recipient. It is
therefore called the envelope. It may be transformed by the transport software as the
message is passed along.
The second variety is any data necessary for handling the mail message, which is not
particular to any transport mechanism, such as the message’s subject line, a list of all
recipients, and the date the message was sent. In many networks, it has become stan-
dard to prepend this data to the mail message, forming the so-called mail header.Itis
offset from the mail body by an empty line.*Most mail transport software in the Unix
world use a header format outlined in RFC 822. Its original purpose was to specify a
standard for use on the ARPANET, but since it was designed to be independent from
any environment, it has been easily adapted to other networks, including many
UUCP-based networks.
RFC 822 is only the lowest common denominator, however. More recent standards
have been conceived to cope with growing needs such as data encryption, interna-
tional character set support, and Multipurpose Internet Mail Extensions (MIME),
described in RFC 1341 and other RFCs.
* It is customary to append a signature or .sig to a mail message, usually containing information on the author.
It is offset from the mail message by a line containing “-- ”, followed by a space. Netiquette dictates, “Keep
it short.”

This is the Title of the Book, eMatter Edition
Copyright © 2007 O’Reilly & Associates, Inc. All rights reserved.
What Is a Mail Message? |181
In all these standards, the header consists of several lines separated by an end-of-line
sequence. A line is made up of a field name, beginning in column one, and the field
itself, offset by a colon and whitespace. The format and semantics of each field vary
depending on the field name. A header field can be continued across a newline if the
next line begins with a whitespace character such as tab. Fields can appear in any
order.
A typical mail header may look like this:
Return-Path: <root@oreilly.com>
X-Original-To: spam@xtivix.com
Delivered-To: spam@ xtivix.com
Received: from smtp2.oreilly.com (smtp2.oreilly.com [209.58.173.10])
by www.berkeleywireless.net (Postfix) with ESMTP id B05C520DF0A
for <spam@ xtivix.com>; Wed, 16 Jul 2003 06:08:44 -0700 (PDT)
Received: (from root@localhost)
by smtp2.oreilly.com (8.11.2/8.11.2) id h6GD5f920140;
Wed, 16 Jul 2003 09:05:41 -0400 (EDT)
Date: Wed, 16 Jul 2003 09:05:41 -0400 (EDT)
Message-Id: <200307161305.h6GD5f920140@smtp2.oreilly.com>
From: Andy Oram <root@oreilly.com>
To: spam@ xtivix.com
Subject: Article on IPv6
Usually, all necessary header fields are generated by the mail reader you use, such as
elm,Outlook,Evolution,orpine. However, some are optional and may be added by
the user. elm, for example, allows you to edit part of the message header. Others are
added by the mail transport software. If you look into a local mailbox file, you may
see each mail message preceded by a “From” line (note: no colon). This is not an
RFC 822 header; it has been inserted by your mail software as a convenience to pro-
grams reading the mailbox. To avoid potential trouble with lines in the message
body that also begin with “From,” it has become standard procedure to escape any
such occurrence in the body of a mail message by preceding it with a > character.
This list is a collection of common header fields and their meanings:
From:
This contains the sender’s email address and possibly the “real name.” Many dif-
ferent formats are used here, as almost every mailer wants to do this a different
way.
To:
This is a list of recipient email addresses. Multiple recipient addresses are sepa-
rated by a comma.
Cc:
This is a list of email addresses that will receive “carbon copies” of the message.
Multiple recipient addresses are separated by a comma.

This is the Title of the Book, eMatter Edition
Copyright © 2007 O’Reilly & Associates, Inc. All rights reserved.
182 |Chapter 11: Administration Issues with Electronic Mail
Bcc:
This is a list of hidden email addresses that will receive “carbon copies” of the
message. The key difference between a “Cc:” and a “Bcc:” is that the addresses
listed in a “Bcc:” will not appear in the header of the mail messages delivered to
any recipient. It’s a way of alerting recipients that you’ve sent copies of the mes-
sage to other people without telling the others. Multiple recipient addresses are
separated by a comma.
Subject:
Describes the content of the mail in a few words.
Date:
Supplies the date and time the mail was sent.
Reply-To:
Specifies the address that the sender wants the recipient’s reply directed to. This
may be useful if you have several accounts, but want to receive the bulk of mail
only on the one you use most frequently. This field is optional.
Organization:
The organization that owns the machine from which the mail originates. If your
machine is owned by you privately, either leave this out, or insert “private” or
some complete nonsense. This field is not described by any RFC and is com-
pletely optional. Some mail programs support it directly, many don’t.
Message-ID:
A string generated by the mail transport on the originating system. It uniquely
identifies this message.
Received:
Every site that processes your mail (including the machines of sender and recipi-
ent) inserts such a field into the header, giving its site name, a message ID, time
and date it received the message, which site it is from, and which transport soft-
ware was used. These lines allow you to trace which route the message took, and
you can complain to the person responsible if something went wrong.
X-anything:
No mail-related programs should complain about any header that starts with X-.
It is used to implement additional features that have not yet made it into an
RFC, or never will. For example, there was once a very large Linux mailing list
server that allowed you to specify which channel you wanted the mail to go to by
adding the string X-Mn-Key: followed by the channel name.
How Is Mail Delivered?
Generally, you will compose mail using a program such as mail or mailx, or more
sophisticated ones such as mutt,tkrat,orpine. These programs are called mail user
agents (MUAs). If you send a mail message, the interface program will in most cases

This is the Title of the Book, eMatter Edition
Copyright © 2007 O’Reilly & Associates, Inc. All rights reserved.
Email Addresses |183
hand it to another program for delivery. This is called the mail transport agent
(MTA). On most systems the same MTA is used for both local and remote delivery
and is usually invoked as /usr/sbin/sendmail, or on non-FSSTND compliant systems
as /usr/lib/sendmail.
Local delivery of mail is, of course, more than just appending the incoming message
to the recipient’s mailbox. Usually, the local MTA understands aliasing (setting up
local recipient addresses pointing to other addresses) and forwarding (redirecting a
user’s mail to some other destination). Also, messages that cannot be delivered must
usually be bounced—that is, returned to the sender along with some error message.
For remote delivery, the transport software used depends on the nature of the link.
Mail delivered over a network using TCP/IP commonly uses Simple Mail Transfer
Protocol (SMTP), which is described in RFC 821. SMTP was designed to deliver mail
directly to a recipient’s machine, negotiating the message transfer with the remote
side’s SMTP daemon. Today it is common practice for organizations to establish spe-
cial hosts that accept all mail for recipients in the organization and for that host to
manage appropriate delivery to the intended recipient.
Email Addresses
Email addresses are made up of at least two parts. One part is the name of a mail
domain that will ultimately translate to either the recipient’s host or some host that
accepts mail on behalf of the recipient. The other part is some form of unique user
identification that may be the login name of that user, the real name of that user in
“Firstname.Lastname” format, or an arbitrary alias that will be translated into a user
or list of users. Other mail addressing schemes, such as X.400, use a more general set
of “attributes” that are used to look up the recipient’s host in an X.500 directory
server.
How email addresses are interpreted depends greatly on what type of network you
use. We’ll concentrate on how TCP/IP networks interpret email addresses.
RFC 822
Internet sites adhere to the RFC 822 standard, which requires the familiar notation
of user@host.domain, for which host.domain is the host’s fully qualified domain
name. The character separating the two is properly called a “commercial at” sign,
but it helps if you read it as “at.” This notation does not specify a route to the desti-
nation host. Routing of the mail message is left to the mechanisms we’ll describe
shortly.

This is the Title of the Book, eMatter Edition
Copyright © 2007 O’Reilly & Associates, Inc. All rights reserved.
184 |Chapter 11: Administration Issues with Electronic Mail
Obsolete Mail Formats
Before moving on, let’s have a look at the way things used to be. In the original
UUCP environment, the prevalent form was path!host!user, for which path described
a sequence of hosts the message had to travel through before reaching the destina-
tion host. This construct is called the bang path notation because an exclamation
mark is colloquially called a “bang.”
Other networks had still different means of addressing. DECnet-based networks, for
example, used two colons as an address separator, yielding an address of host::user.
The X.400 standard uses an entirely different scheme, describing a recipient by a set
of attribute-value pairs, such as country and organization.
Lastly, on FidoNet, each user was identified by a code such as 2:320/204.9, consist-
ing of four numbers denoting zone (2 for Europe), net (320 referred to Paris and Ban-
lieue), node (the local hub), and point (the individual user’s PC). Fidonet addresses
were mapped to RFC 822; the above, for example, was written as Thomas.
Quinot@p9.f204.n320.z2.fidonet.org. Now aren’t you glad we do things with simple
domain names today?
How Does Mail Routing Work?
The process of directing a message to the recipient’s host is called routing. Apart
from finding a path from the sending site to the destination, it involves error check-
ing and may involve speed and cost optimization.
On the Internet, the main job of directing data to the recipient host (once it is known
by its IP address) is done by the IP networking layer.
Mail Routing on the Internet
On the Internet, the destination host’s configuration determines whether any spe-
cific mail routing is performed. The default is to deliver the message to the destina-
tion by first determining what host the message should be sent to and then delivering
it directly to that host. Most Internet sites want to direct all inbound mail to a highly
available mail server that is capable of handling all this traffic and have it distribute
the mail locally. To announce this service, the site publishes a so-called MX record
for its local domain in its DNS database. MX stands for Mail Exchanger and basi-
cally states that the server host is willing to act as a mail forwarder for all mail
addresses in the domain. MX records can also be used to handle traffic for hosts that
are not connected to the Internet themselves. These hosts must have their mail
passed through a gateway. This concept is discussed in greater detail in Chapter 6.
MX records are always assigned a preference. This is a positive integer. If several mail
exchangers exist for one host, the mail transport agent will try to transfer the

This is the Title of the Book, eMatter Edition
Copyright © 2007 O’Reilly & Associates, Inc. All rights reserved.
Mail Routing on the Internet |185
message to the exchanger with the lowest preference value, and only if this fails will
it try a host with a higher value. If the local host is itself a mail exchanger for the des-
tination address, it is allowed to forward messages only to MX hosts with a lower
preference than its own; this is a safe way of avoiding mail loops. If there is no MX
record for a domain, or no MX records left that are suitable, the mail transport agent
is permitted to see if the domain has an IP address associated with it and attempt
delivery directly to that host.
Suppose that an organization, say Foobar, Inc., wants all its mail handled by its
machine mailhub. It will then have MX records like this in the DNS database:
green.foobar.com. IN MX 5 mailhub.foobar.com.
This announces mailhub.foobar.com as a mail exchanger for green.foobar.com with
a preference of 5. A host that wishes to deliver a message to joe@green.foobar.com
checks DNS and finds the MX record pointing at mailhub. If there’s no MX with a
preference smaller than 5, the message is delivered to mailhub, which then dis-
patches it to green.
This is a very simple description of how MX records work. For more information on
mail routing on the Internet, refer to RFC 821, RFC 974, and RFC 1123.

This is the Title of the Book, eMatter Edition
Copyright © 2007 O’Reilly & Associates, Inc. All rights reserved.
186
Chapter 12
CHAPTER 12
sendmail
It’s been said that you aren’t a real Unix system administrator until you’ve edited a
sendmail.cf file. It’s also been said that you’re crazy if you’ve attempted to do so
twice.
Fortunately, you no longer need to directly edit the cryptic sendmail.cf file. The new
versions of sendmail provide a configuration utility that creates the sendmail.cf file for
you based on much simpler macro files. You do not need to understand the complex
syntax of the sendmail.cf file. Instead, you use the macro language to identify the fea-
tures you wish to include in your configuration and specify some of the parameters
that determine how that feature operates. A traditional Unix utility, called m4, then
takes your macro configuration data and mixes it with the data it reads from tem-
plate files containing the actual sendmail.cf syntax to produce your sendmail.cf file.
sendmail is an incredibly powerful mail program that is difficult to master. Any pro-
gram whose definitive reference (sendmail, by Bryan Costales with Eric Allman, pub-
lished by O’Reilly) is 1,200 pages long scares most people off. And any program as
complex as sendmail cannot be completely covered in a single chapter. This chapter
introduces sendmail and describes how to install, configure, and test it, using a basic
configuration for the Virtual Brewery as an example. If the information presented
here helps make the task of configuring sendmail less daunting for you, we hope
you’ll gain the confidence to tackle more complex configurations on your own.
Installing the sendmail Distribution
sendmail is included in prepackaged form in most Linux distributions. Despite this
fact, there are some good reasons to install sendmail from source, especially if you are
security conscious. sendmail changes frequently to fix security problems and to add
new features. Closing security holes and using new features are good reasons to
update the sendmail release on your system. Additionally, compiling sendmail from
source gives you more control over the sendmail environment. Subscribe to the
sendmail-announce mailing list to receive notices of new sendmail releases, and

This is the Title of the Book, eMatter Edition
Copyright © 2007 O’Reilly & Associates, Inc. All rights reserved.
Installing the sendmail Distribution |187
monitor the http://www.sendmail.org/ site to stay informed about potential security
threats and the latest sendmail developments.
Downloading sendmail Source Code
Download the sendmail source code distribution and the source code distribution
signature file from http://www.sendmail.org/current-release.html, from any of the mir-
ror sites, or from ftp://ftp.sendmail.org/pub/sendmail/. Here is an example using ftp:
#ftp ftp.sendmail.org
Connected to ftp.sendmail.org (209.246.26.22).
220 services.sendmail.org FTP server (Version 6.00LS) ready.
Name (ftp.sendmail.org:craig): anonymous
331 Guest login ok, send your email address as password.
Password: win@vstout.com
230 Guest login ok, access restrictions apply.
Remote system type is UNIX.
Using binary mode to transfer files.
ftp> cd /pub/sendmail
250 CWD command successful.
ftp> get sendmail.8.12.11.tar.gz
local: sendmail.8.12.11.tar.gz remote: sendmail.8.12.11.tar.gz
227 Entering Passive Mode (209,246,26,22,244,234)
150 Opening BINARY mode data connection for 'sendmail.8.12.11.tar.gz' (1899112
bytes).
226 Transfer complete.
1899112 bytes received in 5.7 secs (3.3e+02 Kbytes/sec)
ftp> get sendmail.8.12.11.tar.gz.sig
local: sendmail.8.12.11.tar.gz.sig remote: sendmail.8.12.11.tar.gz.sig
227 Entering Passive Mode (209,246,26,22,244,237)
150 Opening BINARY mode data connection for 'sendmail.8.12.11.tar.gz.sig' (152
bytes).
226 Transfer complete.
152 bytes received in 0.000949 secs (1.6e+02 Kbytes/sec)
If you do not have the current sendmail PGP keys on your key ring, download the
PGP keys needed to verify the signature. Adding the following step to the ftp session
downloads the keys for the current year:
ftp> get PGPKEYS
local: PGPKEYS remote: PGPKEYS
227 Entering Passive Mode (209,246,26,22,244,238)
150 Opening BINARY mode data connection for 'PGPKEYS' (61916 bytes).
226 Transfer complete.
61916 bytes received in 0.338 secs (1.8e+02 Kbytes/sec)
ftp> quit
221 Goodbye.
If you downloaded new keys, add the PGP keys to your key ring. In the following
example, gpg (Gnu Privacy Guard) is used:
#gpg --import PGPKEYS
gpg: key 16F4CCE9: not changed

This is the Title of the Book, eMatter Edition
Copyright © 2007 O’Reilly & Associates, Inc. All rights reserved.
188 |Chapter 12: sendmail
gpg: key 95F61771: public key imported
gpg: key 396F0789: not changed
gpg: key 678C0A03: not changed
gpg: key CC374F2D: not changed
gpg: key E35C5635: not changed
gpg: key A39BA655: not changed
gpg: key D432E19D: not changed
gpg: key 12D3461D: not changed
gpg: key BF7BA421: not changed
gpg: key A00E1563: non exportable signature (class 10) - skipped
gpg: key A00E1563: not changed
gpg: key 22327A01: not changed
gpg: Total number processed: 12
gpg: imported: 1 (RSA: 1)
gpg: unchanged: 11
Of the twelve exportable keys in the PGPKEYS file, only one is exported to our key
ring. The not changed comment for the other eleven keys shows that they were
already installed on the key ring. The first time you import PGPKEYS, all twelve keys
will be added to the key ring.
Before using the new key, verify its fingerprint, as in this gpg example:
#gpg --fingerprint 95F61771
pub 1024R/95F61771 2003-12-10 Sendmail Signing Key/2004 <sendmail@Sendmail.ORG>
Key fingerprint = 46 FE 81 99 48 75 30 B1 3E A9 79 43 BB 78 C1 D4
Compare the displayed fingerprint against Table 12-1, which contains fingerprints
for sendmail signing keys.
If the fingerprint is correct, you can sign, and thus validate, the key. In this gpg exam-
ple, we sign the newly imported sendmail key:
#gpg --edit-key 95F61771
gpg (GnuPG) 1.0.7; Copyright (C) 2002 Free Software Foundation, Inc.
This program comes with ABSOLUTELY NO WARRANTY.
This is free software, and you are welcome to redistribute it
under certain conditions. See the file COPYING for details.
Table 12-1. Sendmail signing key fingerprints
Year Fingerprint
1997 CA AE F2 94 3B 1D 41 3C 94 7B 72 5F AE 0B 6A 11
1998 F9 32 40 A1 3B 3A B6 DE B2 98 6A 70 AF 54 9D 26
1999 25 73 4C 8E 94 B1 E8 EA EA 9B A4 D6 00 51 C3 71
2000 81 8C 58 EA 7A 9D 7C 1B 09 78 AC 5E EB 99 08 5D
2001 59 AF DC 3E A2 7D 29 56 89 FA 25 70 90 0D 7E C1
2002 7B 02 F4 AA FC C0 22 DA 47 3E 2A 9A 9B 35 22 45
2003 C4 73 DF 4A 97 9C 27 A9 EE 4F B2 BD 55 B5 E0 0F
2004 46 FE 81 99 48 75 30 B1 3E A9 79 43 BB 78 C1 D4

This is the Title of the Book, eMatter Edition
Copyright © 2007 O’Reilly & Associates, Inc. All rights reserved.
Installing the sendmail Distribution |189
gpg: checking the trustdb
gpg: checking at depth 0 signed=1 ot(-/q/n/m/f/u)=0/0/0/0/0/1
gpg: checking at depth 1 signed=1 ot(-/q/n/m/f/u)=1/0/0/0/0/0
pub 1024R/95F61771 created: 2003-12-10 expires: never trust: -/q
(1). Sendmail Signing Key/2004 <sendmail@Sendmail.ORG>
Command> sign
pub 1024R/95F61771 created: 2003-12-10 expires: never trust: -/q
Fingerprint: 46 FE 81 99 48 75 30 B1 3E A9 79 43 BB 78 C1 D4
Sendmail Signing Key/2004 <sendmail@Sendmail.ORG>
How carefully have you verified the key you are about to sign actually belongs to the
person named above? If you don't know what to answer, enter "0".
(0) I will not answer. (default)
(1) I have not checked at all.
(2) I have done casual checking.
(3) I have done very careful checking.
Your selection? 3
Are you really sure that you want to sign this key
with your key: "Winslow Henson <win.henson@vstout.vbrew.com>"
I have checked this key very carefully.
Really sign? y
You need a passphrase to unlock the secret key for
user: "Winslow Henson <win.henson@vstout.vbrew.com>"
1024-bit DSA key, ID 34C9B515, created 2003-07-23
Command> quit
Save changes? y
After the sendmail keys have been added to the key ring and signed,*verify the send-
mail distribution tarball. Here we use the sendmail.8.12.11.tar.gz.sig signature file to
verify the sendmail.8.12.11.tar.gz compressed tarball:
#gpg --verify sendmail.8.12.11.tar.gz.sig sendmail.8.12.11.tar.gz
gpg: Signature made Sun 18 Jan 2004 01:08:52 PM EST using RSA key ID 95F61771
gpg: Good signature from "Sendmail Signing Key/2004 <sendmail@Sendmail.ORG>"
gpg: checking the trustdb
gpg: checking at depth 0 signed=2 ot(-/q/n/m/f/u)=0/0/0/0/0/1
gpg: checking at depth 1 signed=0 ot(-/q/n/m/f/u)=2/0/0/0/0/0
Based on this, the distribution tarball can be safely restored. The tarball creates a
directory and gives it a name derived from the sendmail release number. The tarball
* It is necessary to download and import the PGPKEYS file only about once a year.

This is the Title of the Book, eMatter Edition
Copyright © 2007 O’Reilly & Associates, Inc. All rights reserved.
190 |Chapter 12: sendmail
downloaded in this example would create a directory named sendmail-8.12.11. The
files and subdirectories used to compile and configure sendmail are all contained
within this directory.
Compiling sendmail
Compile sendmail using the Build utility provided by the sendmail developers. For
most systems, a few commands, similar to the following, are all that is needed to
compile sendmail:
#cd sendmail-8.12.11
#./Build
A basic Build command should work unless you have unique requirements. If you
do, create a custom configuration, called a site configuration, for the Build command
to use. sendmail looks for site configurations in the devtools/Site directory. On a
Linux system, Build looks for site configuration files named site.linux.m4,site.config.
m4, and site.post.m4. If you use another filename, use the -f argument on the Build
command line to identify the file. For example:
$./Build -f ourconfig.m4
As the file extension .m4 file implies, the Build configuration is created with m4 com-
mands. Three commands are used to set the variables used by Build.
define
The define command modifies the current value stored in the variable.
APPENDDEF
The APPENDDEF macro appends a value to an existing list of values stored in a vari-
able.
PREPENDDEF
The PREPENDDEF macro prepends a value to an existing list of values stored in a
variable.
As an example assume that the devtools/OS/Linux file, which defines Build character-
istics for all Linux systems, puts the manpages in /usr/man:*
define(`confMANROOT', `/usr/man/man')
Further assume that our Linux systems stores manpages in /usr/share/man. Adding
the following line to the devtools/Site/site.config.m4 file directs Build to set the
manpage path to /usr/share/man:
define(`confMANROOT', `/usr/share/man/man')
Here is another example. Assume you must configure sendmail to read data from an
LDAP server. Further, assume that you use the command sendmail -bt -d0.1 to
* Notice that m4 uses unbalanced single quotes, i.e., `'.

This is the Title of the Book, eMatter Edition
Copyright © 2007 O’Reilly & Associates, Inc. All rights reserved.
Installing the sendmail Distribution |191
check the sendmail compiler options and the string LDAPMAP does not appear in the
“Compiled with:” list. You need to add LDAP support by setting LDAP values in the
site.config.m4 file and recompiling sendmail as shown below:
#cd devtools/Site
#cat >> site.config.m4
APPENDDEF(`confMAPDEF', `-DLDAPMAP')
APPENDDEF(`confLIBS', `-lldap -llber')
Ctrl-D
#cd ../../
#./Build -c
Notice the Build command. If you make changes to the siteconfig.m4 file and rerun
Build, use the -c command-line argument to alert Build of the changes.
Most custom Build configurations are no more complicated than these examples.
However, there are more than 100 variables that can be set for the Build configura-
tion—far too many to cover in one chapter. See the devtools/README file for a com-
plete list.
Installing the sendmail Binary
Because the sendmail binary is no longer installed as set-user-ID root, you must cre-
ate a special user ID and group ID before installing sendmail. Traditionally, the send-
mail binary was set-user-ID root so that any user could submit mail via the command
line and have it written to the queue directory. However, this does not really require
a set-user-ID root binary. With the proper directory permissions, a set-group-ID
binary works fine, and presents less of a security risk.
Create the smmsp user and group for sendmail to use when it runs as a mail submis-
sion program. Do this using the tools appropriate to your system. Here are the /etc/
passwd and /etc/group entries added to a sample Linux system:
#grep smmsp /etc/passwd
smmsp:x:25:25:Mail Submission:/var/spool/clientmqueue:/sbin/nologin
#grep smmsp /etc/group
smmsp:x:25:
Before installing the freshly compiled sendmail, back up the current sendmail binary,
the sendmail utilities, and your current sendmail configuration files. (You never
know; you might need to drop back to the old sendmail configuration if the new one
doesn’t work as anticipated.) After the system is backed up, install the new sendmail
and utilities as follows:
# ./Build install
Running Build install installs sendmail and the utilities, and produces more than
100 lines of output. It should run without error. Notice that Build uses the smmsp
user and group when it creates the /var/spool/clientmqueue directory and when it

This is the Title of the Book, eMatter Edition
Copyright © 2007 O’Reilly & Associates, Inc. All rights reserved.
192 |Chapter 12: sendmail
installs the sendmail binary. A quick check of the ownership and permissions for the
queue directory and the sendmail binary shows this:
drwxrwx--- 2 smmsp smmsp 4096 Jun 7 16:22 clientmqueue
-r-xr-sr-x 1 root smmsp 568701 Jun 7 16:51 /usr/sbin/sendmail
After sendmail is installed, it must be configured. The topic of most of this chapter is
how to configure sendmail.
sendmail Configuration Files
sendmail reads a configuration file (typically called /etc/mail/sendmail.cf, or in older
distributions, /etc/sendmail.cf, or even /usr/lib/sendmail.cf ) that is simple for send-
mail to parse, but not simple for a system administrator to read or edit. Fortunately,
most sendmail configuration does not involve reading or editing the sendmail.cf file.
Most sendmail configuration is macro driven. The macro method generates configu-
rations to cover most installations, but you always have the option of tuning the
resultant sendmail.cf manually.
The m4 macro processor program processes a macro configuration file to generate
the sendmail.cf file. For our convenience, we refer to the macro configuration file as
the sendmail.mc file throughout this chapter. Do not name your configuration file
sendmail.mc. Instead, give it a descriptive name. For example, you might name it
after the host it was designed for—vstout.m4, in our case. Providing a unique name
for the configuration file allows you to keep all configuration files in the same direc-
tory and is an administrative convenience.
The configuration process is basically a matter of creating a sendmail.mc file that
includes the macros that describe your desired configuration, and then processing
that sendmail.mc file with m4. The sendmail.mc file may include basic m4 com-
mands such as define or divert, but the lines in the file that have the most dramatic
effect on the output file are the sendmail macros. The sendmail developers define the
macros used in the sendmail.mc file. The m4 macro processor expands the macros
into chunks of sendmail.cf syntax. The macro expressions included in the sendmail.
mc file begin with the macro name (written in capital letters), followed by parame-
ters (enclosed in brackets) that are used in the macro expansion. The parameters
may be passed literally into the sendmail.cf output or may be used to govern the way
the macro processing occurs.
Unlike a sendmail.cf file, which may be more than 1,000 lines long, a basic sendmail.
mc file is often less than 10 lines long, excluding comments.
Comments
Lines in the sendmail.mc file that begin with the #character are not parsed by m4,
and, by default, are output directly into the sendmail.cf file. This is useful if you want

This is the Title of the Book, eMatter Edition
Copyright © 2007 O’Reilly & Associates, Inc. All rights reserved.
sendmail Configuration Files |193
to comment on what your configuration is doing in both the sendmail.mc and the
sendmail.cf files.
To put comments in the sendmail.mc that are not placed into the sendmail.cf, use
either m4 divert or dnl commands. divert(-1) causes all output to cease. divert(0)
restores output to the default. Any lines between these will be discarded. Blocks of
comments that should appear only in the sendmail.mc file are usually brackets by
divert(-1) and divert(0) commands. To achieve the same result for a single line,
use the dnl command at the beginning of a line that should appear as a comment
only in the sendmail.mc file. The dnl command means “delete all characters up to
and including the next newline.” Sometimes dnl is added to the end of a macro com-
mand line, so that anything else added to that line is treated as a comment.
Often there are more comments than configuration commands in a sendmail.mc file!
The following sections explain the structure of the sendmail.mc file and the com-
mands used in the file.
Typically Used sendmail.mc Commands
A few commands are used to build most sendmail.mc files. Some of these typically
used commands and the general sequence of these commands in the sendmail.mc are
as follows:
VERSIONID
OSTYPE
DOMAIN
FEATURE
define
MAILER
LOCAL_*
The commands in this list that are written in uppercase are sendmail macros. By con-
vention, the sendmail developers use uppercase letters for the names of the macros
they create. There are more macros than those shown above. See the file cf/README
for a complete list of the sendmail macros. In the list above, everything except the
define command is a sendmail macro. The define command, which is shown in low-
ercase, is a basic m4 command. All basic m4 commands are written in lowercase let-
ters. There are other basic m4 commands used in sendmail.mc files; in fact you can
use any legal m4 command in a sendmail.mc file. However, the commands listed
above are the basic set used to show the general order in which commands occur in a
sendmail.mc file. We examine each of these commands in the following sections.
VERSIONID
The VERSIONID macro defines version control information. This macro is optional,
but is found in most of the sendmail m4 files. The command has no required format

This is the Title of the Book, eMatter Edition
Copyright © 2007 O’Reilly & Associates, Inc. All rights reserved.
194 |Chapter 12: sendmail
for the arguments field. Use any version control information you desire. Generally
this is something compatible with the revision control system you use. If you don’t
use a revision control system, put a descriptive comment in this field. The VERSIONID
macro from a sendmail.mc file on a system that did not use version control might
look something like the following:
VERSIONID(`sendmail.mc, 6/11/2004 18:31 by Win Henson')
Notice that the argument is enclosed in single quotes and that the opening quote is `
and the closing quotes is '. When the argument passed to the sendmail macro con-
tains spaces, special characters or values that may be misinterpreted as m4 com-
mands, the argument is enclosed in quotes, and it must be enclosed using these
specific single quotes. This is true for all macros, not just VERSIONID.
OSTYPE
The OSTYPE macro is a required part of the macro configuration file. The OSTYPE
macro command loads an m4 source file that defines operating system-specific infor-
mation, such as file and directory paths, mailer pathnames, and system-specific
mailer arguments. The only argument passed to the OSTYPE command is the name of
the m4 source file that contains the operating system-specific information. OSTYPE
files are stored in the cf/ostype directory. The command OSTYPE(`linux')processes
the cf/ostype/linux.m4 file.
The sendmail distribution provides more than 40 predefined operating system macro
files in the cf/ostype directory, and you can create your own for a specific Linux dis-
tribution if you like. Some Linux distributions, notably the Debian distribution,
include their own definition file that is completely Linux-FHS compliant. When your
distribution does this, use its definition instead of the generic-linux.m4 file. The
OSTYPE macro should be one of the first commands to appear in the sendmail.mc file,
as many other definitions depend on it.
DOMAIN
The DOMAIN macro processes the specified file from the cf/domain directory. A DOMAIN
file is useful when configuring a large number of machines on the same network in a
standard way, and typically configures items such as the name of mail relay hosts or
hubs that all hosts on your network use.
To make effective use of the DOMAIN macro, you must create your own macro file con-
taining the standard definitions you require for your site, and write it into the domain
subdirectory. If you saved your domain macro file as cf/domain/vbrew.m4, you’d
invoke it in your sendmail.mc using:
DOMAIN(`vbrew')

This is the Title of the Book, eMatter Edition
Copyright © 2007 O’Reilly & Associates, Inc. All rights reserved.
sendmail Configuration Files |195
The sendmail distribution comes with a number of sample domain macro files that
you can use to model your own. One is the domain/generic.m4 file shown later in
Example 12-3.
FEATURE
Use the FEATURE macro to include predefined sendmail features in your configura-
tion. There are a large number of features—the cf/feature directory contains about 50
feature files. In this chapter we’ll talk about only a few of the more commonly used
features. You can find full details of all of the features in the cf/README file
included in the source package.
To use a feature, include a line in the sendmail.mc that looks like:
FEATURE(name)
where name is the feature name. Some features take an optional parameter in a for-
mat like:
FEATURE(name,param)
where param is the parameter to supply.
define
Use the m4 define command to set values for internal sendmail.cf macros, options,
or classes. The first argument passed to the define is the m4 name of the variable
being set and the second field is the value to which the variable is set. Here is an
example of how define is used to set a sendmail.cf macro:
define(`confDOMAIN_NAME', `vstout.vbrew.com')
The define command shown above places the following in the sendmail.cf file.
Djvstout.vbrew.com
This sets the sendmail.cf macro $j, which holds the full domain name of the send-
mail host, to vstout.vbrew.com. Manually setting a value for $j is generally not nec-
essary because, by default, sendmail obtains the correct name for the local host from
the system itself.
Most of the m4 variables default to a reasonable value and thus do not have to be
explicitly set in the m4 source file. The undefine command sets a variable back to its
default. For example:
undefine(`confDOMAIN_NAME')
Resets confDOMAIN_NAME to the default value even if the configuration had previously
set it to a specific hostname.
The list of m4 variables that can be set by define is quite long. The cf/README file
lists all of the variables. The listing includes the m4 variable name, the name of the

This is the Title of the Book, eMatter Edition
Copyright © 2007 O’Reilly & Associates, Inc. All rights reserved.
196 |Chapter 12: sendmail
corresponding sendmail.cf option, macro, or class, a description of the variable, and
the default value that is used if you do not explicitly define a value for the variable.
Note that the define command is not limited to setting values for sendmail.cf mac-
ros, options, and classes. define is also used to modify values used in the m4 configu-
rations and internal sendmail values.
MAILER
If you want sendmail to transport mail in any way other than by local delivery, use
the MAILER macro to tell it which transports to use. sendmail supports a variety of
mail transport protocols; some are essential, some are rarely used, and a few are
experimental. The mailer arguments that can be used with the MAILER macro are
shown in Table 12-2.
Most hosts need only the SMTP transport to send and receive mail among other
hosts, and the local mailer to move mail among users on the system. To achieve this,
include both MAILER(`local')and MAILER(`smtp')in the macro configuration file.
(The local mail transport is included by default, but is usually specified in the macro
configuration file for clarity.)
The MAILER(`local')macro adds the local mailer, which delivers local mail between
users of the system, and the prog mailer, which sends mail files to programs running
on the system. The MAILER(`smtp')macro includes all of the mailers needed to send
SMTP mail over a network. The mailers included in the sendmail.cf file by the
MAILER(`smtp') macro are:
smtp
This mailer handles only traditional 7-bit ASCII SMTP mail.
Table 12-2. Arguments for the MAILER macro
Argument Purpose
local Adds the local and prog mailers
smtp Adds all SMTP mailers: smtp,esmtp,smtp8,dsmtp, and relay
uucp Adds all UUCP mailers: uucp-old (uucp) and uucp-new (suucp)
usenet Adds Usenet news support to sendmail
fax Adds FAX support using HylaFAX software
pop Adds Post Office Protocol (POP) support to sendmail
procmail Adds an interface for procmail
mail11 Adds the DECnet mail11 mailer
phquery Adds the phquery program for CSO phone book
qpage Adds the QuickPage mailer used to send email to a pager
cyrus Adds the cyrus and cyrusbb mailers

This is the Title of the Book, eMatter Edition
Copyright © 2007 O’Reilly & Associates, Inc. All rights reserved.
sendmail Configuration Files |197
esmtp
This mailer supports Extended SMTP (ESMTP), which understands the ESMTP
protocol extensions and the complex message bodies and enhanced data types of
MIME mail. This is the default mailer used for SMTP mail.
smtp8
This mailer sends 8-bit data to the remote server, even if the remote server does
not support ESMTP.
dsmtp
This mailer supports the ESMTP ETRN command that allows the destination
system to retrieve mail queued on the server.
relay
This mailer is used to relay SMTP mail through another mail server.
Every system that connects to or communicates with the Internet needs the
MAILER(`smtp')set of mailers, and most systems on isolated networks use these mail-
ers because they use TCP/IP on their enterprise network. Despite the fact that the
vast majority of sendmail systems require these mailers, installing them is not the
default. To support SMTP mail, you must add the MAILER(smtp) macro to your con-
figuration.
LOCAL_*
The LOCAL_CONFIG,LOCAL_NET_CONFIG,LOCAL_RULESET, and LOCAL_RULE_nmacros allow
you to put sendmail.cf configuration commands directly in the m4 source file. These
commands are copied, exactly as written, into the correct part of the sendmail.cf file.
The list below describes where the macros place the sendmail.cf configuration com-
mands that you provide.
LOCAL_CONFIG
Marks the start of a block of sendmail.cf commands to be added to the local
information section of the sendmail.cf file.
LOCAL_NET_CONFIG
Marks the start of a section of rewrite rules that are to be added to the end of
ruleset 0, which is also called ruleset parse.
LOCAL_RULE_n
Marks the start of a section of rewrite rules to be added to ruleset 0, 1, 2, or 3.
The n identifies the ruleset to which the rewrite rules are to be added.
LOCAL_RULESET
Marks the start of a custom ruleset to be added to the configuration.
These macro mean that everything that can be done in the sendmail.cf file can be
done in the m4 macro configuration file because not only do you have access to all of
the m4 macros, you have access to all of the sendmail.cf commands. Of course,

This is the Title of the Book, eMatter Edition
Copyright © 2007 O’Reilly & Associates, Inc. All rights reserved.
198 |Chapter 12: sendmail
before you can use the sendmail.cf commands you need some idea of how they work.
The next section briefly covers the sendmail.cf configuration commands.
sendmail.cf Configuration Language
There is rarely any need to use sendmail.cf commands in your configuration because
the sendmail macros created by the sendmail developer handle most possible configu-
rations. Yet it is useful to know something about the sendmail.cf command for those
rare occasions when you come across a configuration that requires something that
the sendmail developers just didn’t think of. Table 12-3 lists the sendmail.cf configu-
ration commands.
All of the commands in this table, except the last two, can be used with the LOCAL_
CONFIG macro. The LOCAL_CONFIG macro is the one that heads a section of sendmail.cf
commands used to define values for the configuration. These can be sendmail.cf
database declarations, macros, or class values. Essentially anything except rewrite
rulesets. Despite this, several of the sendmail.cf commands shown in Table 12-3 are
simply not needed in the sendmail.mc file, even when you create a special configura-
tion.
There is no real reason to add sendmail.cf Ocommands to the sendmail.mc configura-
tion because all sendmail.cf options can be set using the define command and m4
variables. Likewise, all necessary Mcommands are added to the sendmail.cf file by the
m4 MAILER macros, and therefore it is very unlikely you would use LOCAL_CONFIG to
add Mcommands to your configuration. The Tand Pcommands have limited roles.
The Tcommand adds usernames to the list of users who are allowed to send mail
Table 12-3. sendmail.cf configuration commands
Command Syntax Meaning
Version Level [Vlevel/vendor] Specify version level.
Define Macro Dxvalue Set macro x to value.
Define Class Ccword1[word2] ... Set class c to word1 word2 ....
Define Class Fcfile Load class c from file.
Key File Kname type [argument] Define database name.
Set Option Ooption=value Set option to value.
Trusted Users Tuser1[user2 ...] Trusted users are user1 user2 ....
Set Precedence Pname=number Set name to precedence number.
Define Mailer Mname, [field=value] Define mailer name.
Define Header H[?mflag ?]name :format Set header format.
Set Ruleset SnStart ruleset number n.
Define Rule Rlhs rhs comment Rewrite lhs patterns to rhs format.

This is the Title of the Book, eMatter Edition
Copyright © 2007 O’Reilly & Associates, Inc. All rights reserved.
sendmail.cf Configuration Language |199
under someone else’s username. Because of security considerations, you should be
very careful about extending this list, and even if you do, you can use the
confTRUSTED_USERS define in the m4 file, or the FEATURE(use_ct_file) macro and
define the usernames in the /etc/mail/trusted-users file. The Pcommand defines mail
precedence, and frankly the default sendmail.cf configuration already has more mail
precedence defined you will ever need.
The sendmail.cf commands that most commonly follow the LOCAL_CONFIG macro are
D,C,F, and K. All of these can be used to define custom values that are later use, in a
custom ruleset. The Dcommand sets the value for a sendmail.cf macro. The Ccom-
mand adds values to a sendmail.cf class from the command line. The Fcommand
adds values to a sendmail.cf class from a file. The Kcommand defines a database from
which sendmail can obtain values. All of the standard sendmail.cf macros, classes,
and databases can be used through standard m4 macros. D,C,F,orKcommands are
added to the sendmail.mc configuration only on those rare occasions when you cre-
ate your own private macros, classes, or databases.
The Hcommand defines a mail header. All of the standard mail headers are already
defined in the default configuration, and it is unlikely you will ever need to define a
new header type. Calling special header processing is the most common reason to
add a header definition to the configuration. (See the cf/cf/knecht.mc file for an exam-
ple of a header definition that calls special processing, and see Recipe 6.9 in the send-
mail Cookbook [O’Reilly] by Craig Hunt for a good description of how special
header processing is invoked.) Of course, if you do call special header processing,
you must also write the ruleset that performs the processing. The Sand Rcommands
used to write custom rulesets are our next topic.
sendmail.cf R and S Commands
Arguably the most powerful feature of sendmail is the rewrite rule. Rewrite rules
determine how sendmail processes a mail message. sendmail passes the addresses
from the headers of a mail message through collections of rewrite rules called
rulesets. In the sendmail.cf file, each ruleset is named using an Scommand, coded as
Sn, where n specifies the name or number that is to be assigned to the current ruleset.
The rules themselves are defined by Rcommands grouped together as rulesets. Each
rule has a left side and a right side, separated by at least one tab character.*When
sendmail is processing a mail address, it scans through the rewrite rules looking for a
match on the left side. If the address matches the left side of a rewrite rule, the
address is replaced by the right side and processed again. In this manner, the rewrite
rules transform a mail address from one form to another. Think of them as being
* Only tabs can separate the left and right side.

This is the Title of the Book, eMatter Edition
Copyright © 2007 O’Reilly & Associates, Inc. All rights reserved.
200 |Chapter 12: sendmail
similar to an editor command that replaces all text matching a specified pattern with
another.
Asendmail ruleset therefore looks like this:
Sn
Rlhs rhs
Rlhs2 rhs2
The Left Side
The left side of a rewrite rule specifies the pattern an address must match to be trans-
formed. The pattern may contain literals, sendmail.cf macros and classes, and the
metasymbols described in the following list:
$@ Match exactly zero tokens
$* Match zero or more tokens
$+ Match one or more tokens
$- Match exactly one token
$=xMatch any value in class x
$~xMatch any value not in class x
A token is either a string of characters delimited by an operator or a delimiting oper-
ator. The operators are defined by the sendmail.cf OperatorChars option, as shown
below:
O OperatorChars=.:%@!^/[ ]+
Assume the following address:
alana@ipa.vbrew.com
This email address contains seven tokens: alana,@,ipa,.,vbrew,., and com. Three of
these tokens, two dots (.), and an @, are operators. The other four tokens are strings.
This address would match the symbol $+ because it contains more than one token,
but it would not match the symbol $- because it does not contain exactly one token.
When a rule matches an address, the text matched by each of the patterns in the
expression is assigned to special variables, called indefinite tokens, which can then be
used in the right side. The only exception to this is the $@, which matches no tokens
and therefore will never generate text to be used on the right side.
The Right Side
When the left side of a rewrite rule matches an address, the original text is deleted
and replaced by the right side of the rule. Literal values in the right side are copied to
the new address verbatim. Righthand side sendmail.cf macros are expanded and

This is the Title of the Book, eMatter Edition
Copyright © 2007 O’Reilly & Associates, Inc. All rights reserved.
sendmail.cf Configuration Language |201
copied to the new address. Just as the left side has a number of metasymbols used for
pattern matching, the right side has a special syntax for transforming an address, as
described in the following list:
$n
This metasymbol is replaced with the n’th indefinite token from the left side.
$[name$]
This string is replaced by the canonical form of the hostname supplied.
$(map key $:default $)
This special syntax returns the result of looking up key in the database named
map. If the lookup is unsuccessful, the value defined for default is returned. If a
default is not supplied and lookup fails, the key value is returned.
$>n
This metasymbol calls ruleset n to process the rest of the line.
A rewrite rule that matches is normally tried repeatedly until it fails to match, then
parsing moves on to the next rule. This behavior can be changed by preceding the
right side with one of two special loop control metasymbols:
$@ This metasymbol terminates the ruleset.
$: This metasymbol terminates this individual rule.
There is also a special right side syntax used to create the mail delivery triple of
mailer, host and user. This syntax is most commonly seen in ruleset 0, which parses
the mail delivery address. These symbols are:
$#mailer
This metasymbol causes ruleset evaluation to halt and specifies the mailer that
should be used to transport this message in the next step of its delivery. The spe-
cial mailer error can be invoked in this manner to return an error message.
$@host
This metasymbol specifies the host to which this message will be delivered. If the
destination host is the local host, this syntax may be omitted from the mail deliv-
ery triple. The host may be a colon-separated list of destination hosts that will be
tried in sequence to deliver the message.
$:user
This metasymbol specifies the recipient user for the mail message.
A Simple Rule Pattern Example
To better see how the macro substitution patterns operate, consider the following
left side:
$* < $+ >

This is the Title of the Book, eMatter Edition
Copyright © 2007 O’Reilly & Associates, Inc. All rights reserved.
202 |Chapter 12: sendmail
This rule matches “Zero or more tokens, followed by the < character, followed by
one or more tokens, followed by the > character.”
If this rule were applied to brewer@vbrew.com or Head Brewer < >, the rule would not
match. The first string would not match because it does not include a < character,
and the second would fail because $+ matches one or more tokens and there are no
tokens between the <> characters. In any case in which a rule does not match, the
right side of the rule is not used.
If the rule were applied to Head Brewer < brewer@vbrew.com >, the rule would match,
and on the right side $1 would be substituted with Head Brewer and $2 would be sub-
stituted with brewer@vbrew.com.
If the rule were applied to < brewer@vbrew.com > the rule would match because $*
matches zero or more tokens, and on the right side $1 would be substituted with the
empty string.
A Complete Rewrite Rule Example
The following example uses the LOCAL_NET_CONFIG macro to declare a local rule and
to insert the rule near the end of ruleset 0. Ruleset 0 resolves a delivery address to a
mail delivery triple specifying the mailer, user, and host. Example 12-1 shows a sam-
ple rewrite rule.
The LOCAL_NET_CONFIG macro is used to direct m4 to place the rewrite rule in ruleset
0. The rule itself is the line beginning with R. Let’s look at the rule’s left side and the
right side in turn.
The left side looks like: $*<@$*.$m.>$*.
<and >are focus characters, inserted by ruleset 3 early on in the address processing,
which enclose the host part of the mail address. All addresses get rewritten with
these focus characters. The @is literally the @ used in an Internet email address to
separate the user part from the host part. The dots (.) are literally the dots used in
domain names. $m is a sendmail.cf macro used to hold the local domain name. The
three remaining items are all $* metasymbols.
This rule matches any mail address that looks like: DestUser<@somehost.ourdomain.>
Some Text. That is, it matches mail for any user at any host within our domain.
Text matched by metasymbols on the left side of a rewrite rule is assigned to indefi-
nite tokens for use on the right side. In this example, the first $* matches all text
from the start of the address until the <@ characters. All of this text is assigned to $1
Example 12-1. Sample rewrite rule
LOCAL_NET_CONFIG
R$*<@$*.$m.>$* $#esmtp $@$2.$m. $:$1<@$2.$m.>$3

This is the Title of the Book, eMatter Edition
Copyright © 2007 O’Reilly & Associates, Inc. All rights reserved.
Creating a sendmail Configuration |203
for use on the right side. Similarly, anything matching the second $* in this rewrite
rule is assigned to $2, and anything matching the last $* is assigned to $3.
When this rule matches an address of any user at any host within our domain, it
assigns the username to $1, the hostname to $2, and any trailing text to $3. The right
side is then used to process these values.
The right side of our example rewrite rule looks like this: $#esmtp $@$2.$m. $:
$1<@$2.$m.>$3.
When the right side of our ruleset is processed, each of the metasymbols are inter-
preted and relevant substitutions are made.
The $# metasymbol causes this rule to resolve to a specific mailer—esmtp, in our
case.
The $@ metasymbol specifies the target host. In our example, the target host is speci-
fied as $2.$m., which is the fully qualified domain name of the host in our domain.
The FQDN is constructed of the hostname component assigned to $2 from our left
side with our domain name (.$m.) appended.
The $: metasymbol specifies the recipient user’s address. This is the full email
address of the recipient, constructed in this case by $1 < @ $2.$m. > $3—user, bracket,
at, host, dot, domain, dot, bracket, trailing text.
Since this rule resolves to a mailer, the message is forwarded to the mailer for deliv-
ery. In our example, the message would be forwarded to the destination host using
the SMTP protocol.
Creating a sendmail Configuration
Using the sendmail.mc and sendmail.cf information covered so far in this chapter you
should be able to read or create a basic sendmail configuration. Let’s get started by
looking at a sample sendmail.mc file.
The sendmail distribution comes with a large number of sample macro configuration
files located in the cf/cf directory. Many are generic configuration files for different
operating systems, including the generic-linux.mc file for Linux. Example 12-2 shows
the contents of this file.
Example 12-2. The generic-linux.mc file
divert(-1)
#
# Copyright (c) 1998, 1999 Sendmail, Inc. and its suppliers.
# All rights reserved.
# Copyright (c) 1983 Eric P. Allman. All rights reserved.
# Copyright (c) 1988, 1993
# The Regents of the University of California. All rights reserved.
#

This is the Title of the Book, eMatter Edition
Copyright © 2007 O’Reilly & Associates, Inc. All rights reserved.
204 |Chapter 12: sendmail
A few things are obvious about this configuration file without knowing anything
about the file syntax. First, the name sendmail.mc is obviously not sacrosanct.
generic-linux.mc works just as well and is clearly a more descriptive name. Second,
the configuration file is very short. The bulk of the lines in Example 12-1 are com-
ments; only the last five lines are really sendmail configuration commands. Third, the
sendmail configuration commands are short with a relatively simple syntax.
The five active lines in the generic-linux.mc file are composed of four different mac-
ros. The VERSIONID macro from the generic-linux.mc file is:
VERSIONID(`$Id: ch12,v 1.6 2005/01/19 03:22:50 free2 Exp adam $')
From this we know that the generic-linux.mc file was last updated in September 1999
by Greg Shapiro, one of the Linux developers.
The OSTYPE(`linux')command in the generic-linux.mc file loads the cf/ostype/linux.
m4 file, which we will look at shortly. The DOMAIN(`generic')macro processes the cf/
domain/generic.m4 file, which is also discussed shortly.
Finally, the MAILER(`local')and MAILER(`smtp')macros are used to add the local,
prog,smtp,esmtp,smtp8,dsmtp, and relay mailers to the sendmail.cf configuration.
These five macro lines create the entire generic Linux sendmail configuration. There
are, however, additional details to be found in the linux.m4 and generic.m4 file.
The linux.m4 OSTYPE File
The cf/ostype/linux.m4 file is shown in Example 12-3.
# By using this file, you agree to the terms and conditions set
# forth in the LICENSE file which can be found at the top level of
# the sendmail distribution.
#
#
#
# This is a generic configuration file for Linux.
# It has support for local and SMTP mail only. If you want to
# customize it, copy it to a name appropriate for your environment
# and do the modifications there.
#
divert(0)dnl
VERSIONID(`$Id: ch12,v 1.6 2005/01/19 03:22:50 free2 Exp adam $')
OSTYPE(`linux')dnl
DOMAIN(`generic')dnl
MAILER(`local')dnl
MAILER(`smtp')dnl
Example 12-2. The generic-linux.mc file (continued)

This is the Title of the Book, eMatter Edition
Copyright © 2007 O’Reilly & Associates, Inc. All rights reserved.
Creating a sendmail Configuration |205
The file begins with a block of comments and a VERSIONID macro. It then defines the
path to the directory that holds executable binaries. The path is stored in the m4
variable confEBINDIR. The linux.m4 file sets that path value to /usr/sbin. Next, if the
path to procmail has not yet been defined, it is set to /usr/bin/procmail. The last line
in the file is a FEATURE macro that loads the local_procmail feature, which cause send-
mail to use procmail as the local mailer. m4 uses the path defined for PROCMAIL_
MAILER_PATH when constructing the local_procmail feature. This is an excellent
example of how a value is first defined and then used in building a configuration.
The linux.m4 file is also a good example of the type of configuration commands nor-
mally found in an OSTYPE file.
The generic.m4 DOMAIN File
The cf/domain/generic.m4 file is a sample DOMAIN file provided by the sendmail devel-
opers. It is used by the generic-linux.mc file shown in Example 12-1. The generic.m4
file is shown in Example 12-4.
Example 12-3. The linux.m4 OSTYPE file
divert(-1)
#
# Copyright (c) 1998, 1999 Sendmail, Inc. and its suppliers.
# All rights reserved.
# Copyright (c) 1983 Eric P. Allman. All rights reserved.
# Copyright (c) 1988, 1993
# The Regents of the University of California. All rights reserved.
#
# By using this file, you agree to the terms and conditions set
# forth in the LICENSE file which can be found at the top level of
# the sendmail distribution.
#
#
divert(0)
VERSIONID(`$Id: ch12,v 1.6 2005/01/19 03:22:50 free2 Exp adam $')
define(`confEBINDIR', `/usr/sbin')
ifdef(`PROCMAIL_MAILER_PATH',,
define(`PROCMAIL_MAILER_PATH', `/usr/bin/procmail'))
FEATURE(local_procmail)
Example 12-4. The generic.m4 DOMAIN file
divert(-1)
#
# Copyright (c) 1998, 1999 Sendmail, Inc. and its suppliers.
# All rights reserved.
# Copyright (c) 1983 Eric P. Allman. All rights reserved.
# Copyright (c) 1988, 1993
# The Regents of the University of California. All rights reserved.
#
# By using this file, you agree to the terms and conditions set

This is the Title of the Book, eMatter Edition
Copyright © 2007 O’Reilly & Associates, Inc. All rights reserved.
206 |Chapter 12: sendmail
Again the file begins with a large block of comments and a VERSIONID macro. This is
followed by a define that sets the search path sendmail will use when looking for a
user’s .forward file. This command sets the ForwardPath option in the sendmail.cf file.
$z,$w, and $h are internal sendmail.cf macros.*
The second define sets the maximum length for all headers in a single piece of mail
to 32,768 bytes. It does this by setting the MaxHeadersLength option in the sendmail.cf
file.
The next two lines add features to the sendmail configuration. The FEATURE(`redirect')
macro adds support for the .REDIRECT pseudo-domain. A pseudo-domain is a domain-
style extension internally added to an email address by sendmail to define special han-
dling for the address. The .REDIRECT pseudo-domain works together with the aliases data-
base to handle mail for people who no longer read mail at your site but who still get mail
sent to an old address.†After enabling this feature, add an alias for each obsolete mailing
address in the form:
old-address new-address.REDIRECT
This returns the following error to the sender telling them to try a new address for
the recipient:
551 User not local; please try <new-address>
# forth in the LICENSE file which can be found at the top level of
# the sendmail distribution.
#
#
#
# The following is a generic domain file. You should be able to
# use it anywhere. If you want to customize it, copy it to a file
# named with your domain and make the edits; then, copy the appropriate
# .mc files and change `DOMAIN(generic)' to reference your updated domain
# files.
#
divert(0)
VERSIONID(`$Id: ch12,v 1.6 2005/01/19 03:22:50 free2 Exp adam $')
define(`confFORWARD_PATH', `$z/.forward.$w+$h:$z/.forward+$h:$z/.forward.$w:$z/.
forward')dnl
define(`confMAX_HEADERS_LENGTH', `32768')dnl
FEATURE(`redirect')dnl
FEATURE(`use_cw_file')dnl
EXPOSED_USER(`root')
* See the cf/README file for more information about these sendmail.cf macros and the Sendmail Installation
and Operations Guide, found in file doc/op.ps, for a full list of all sendmail.cf macros.
† The aliases database is covered later in this chapter.
Example 12-4. The generic.m4 DOMAIN file (continued)

This is the Title of the Book, eMatter Edition
Copyright © 2007 O’Reilly & Associates, Inc. All rights reserved.
Creating a sendmail Configuration |207
The FEATURE(`use_cw_file')command reads /etc/mail/local-host-names and adds the
hostnames listed there to sendmail.cf class $=w. Class $=w contains the names of hosts
for which the local computer will accept local mail. Normally, when a system run-
ning sendmail receives mail from the network that is addressed to another hostname,
it assumes that the mail belongs to that host and forwards the mail to that host if the
local host is configured as a relay, or discards the mail if the local host is not config-
ured as a relay. If the system should accept, as local mail, mail that is addressed to
another host, the name of the other host is added to class $=w. Any hostname listed
in the local-host-names file is added to class $=w when the use_cw_file feature is used.
The last line in the generic.m4 file is the EXPOSED_USER macro. The EXPOSED_USER
macro adds usernames to class $=E. The users listed in class $=E are not masquer-
aded, even when masquerading is enabled. (Masquerading hides the real hostname
in outbound mail and replaces it with the hostname you wish to advertise to the out-
side world.) Some usernames, such as root, occur on many systems and are therefore
not unique across a domain. For those usernames, converting the host portion of the
address makes it difficult to sort out where the message really came from and makes
replies impossible. The EXPOSED_USER command in the generic.m4 file prevents that
from happening by ensuring that root is not masqueraded.
Given the commands contained in the generic-linux.mc file, the linux.m4 file and the
generic.m4 file, the generic Linux configuration does the following:
• Sets /usr/sbin as the path to executable binaries
• Sets the procmail path to /usr/bin/procmail
• Uses procmail as the local mailer
• Defines the search path for .forward files
• Adds support for the .REDIRECT pseudo-domain to the configuration
• Loads class $=w from the /etc/local-host-names file
• Adds root to class $=E
• Adds the local,prog,smtp,esmtp,smtp8,dsmtp, and relay mailers to the configu-
ration
You can configure sendmail by modifying the configuration provided in your Linux
distribution or create a custom configuration by modifying the generic-linux.mc file
provided with the sendmail distribution. In the next section we build a sendmail con-
figuration based on the generic-linux.mc file.
Creating a Sample Linux sendmail Configuration
We begin building our custom configuration by changing to the configuration direc-
tory and copying the generic-linux.mc configuration file to a working file. Because we

This is the Title of the Book, eMatter Edition
Copyright © 2007 O’Reilly & Associates, Inc. All rights reserved.
208 |Chapter 12: sendmail
are creating the configuration for vstout.vbrew.com, we call the working file vstout.
mc.
$cd sendmail-8.12.11/cf/cf
$cp generic-linux.mc vstout.mc
We are configuring vstout to be a mail server for our group. We want it to:
• Accept inbound mail for various clients that plan to store mail on the server. No
modifications to the m4 configuration are needed to support this because the
domain/generic.m4 file used in the Linux configuration already includes the
FEATURE(`use_cw_file') command.
• Relay mail for clients in the vbrew.com domain. Implementing this requires no
changes to the m4 configuration. By default, sendmail configurations support
relaying for any domain defined in the relay-domains file. We will see how to
configure the relay-domains file later in the chapter when we discuss sendmail
databases.
• Rewrite the sender address on outbound mail to a generic format used by every-
one at vbrew.com. We will add support for the genericstable database to do this.
The contents of the genericstable database is covered in the sendmail databases
section of this chapter.
• Provide some anti-spam support. We will use the access database for this task.
• Be easy to configure with additional security measures. The access database
added for its anti-spam capabilities has many other easily configured features.
We will see more about the access database in sendmail databases section later in
this chapter.
To configure sendmail to do the tasks listed above, we edit the vstout.mc file and add
the following features:
FEATURE(`genericstable')
GENERICS_DOMAIN(`vbrew.com')
FEATURE(`generics_entire_domain')
FEATURE(`access_db')
This first line adds support for the genericstable. The second line defines vbrew.com
as the domain to which the genericstable will be applied. The third line tells sendmail
to apply the genericstable to every host in the vbrew.com domain. The final line adds
support for the access database.
After removing unneeded comments, updating the VERSIONID and adding the new
lines, the vstout.mc configuration file is as shown below in Example 12-5:
Example 12-5. Sample custom configuration
VERSIONID(`Sample vstout configuration by Craig Hunt')
OSTYPE(`linux')dnl
DOMAIN(`generic')dnl

This is the Title of the Book, eMatter Edition
Copyright © 2007 O’Reilly & Associates, Inc. All rights reserved.
Creating a sendmail Configuration |209
We now need to build a sendmail.cf file from our master configuration file, install the
new sendmail.cf file, and ensure that sendmail reads it.
Building the sendmail.cf File
The sendmail.cf file is normally built in the same cf/cf directory where the master
configuration file is created. If you’re not currently in that directory, change to the cf/
cf directory before attempting the build.
Run Build to create the sendmail.cf file from the m4 master configuration file. The
Build script is easy to use. Provide the name of the output file you want to create as
an argument on the Build command line. The script replaces the .cf extension of the
output file with the extension .mc and uses the macro configuration file with that
name to create the output file. Thus, putting vstout.cf on the Build command line
means that vstout.mc is used to create vstout.cf. Here is an example:
$./Build vstout.cf
Using M4=/usr/bin/m4
rm -f vstout.cf
/usr/bin/m4 ../m4/cf.m4 vstout.mc > vstout.cf || ( rm -f vstout.cf && exit 1 )
chmod 444 vstout.cf
Despite the simplicity of the Build command, many administrators never use it to
build a sendmail configuration because the m4 command line used to build a send-
mail configuration is also very simple. The m4 command line that would build the
vstout.cf file from the vstout.mc file is:
$m4 ../m4/cf.m4 vstout.mc > vstout.cf
For the average sendmail administrator, the Build script doesn’t offer any critical
advantages. For most of us, deciding to use the Build script or the m4 command is
primarily a matter of personal preference. It is even possible to invoke the Makefile
directly with a basic make command. Use whatever method you prefer.
After building the new .cf file, test it thoroughly as described later in this chapter
before copying that file to the location where sendmail expects to find the sendmail.cf
dnl Add support for the genericstable
FEATURE(`genericstable')
dnl Apply the genericstable to the vbrew.com domain
GENERICS_DOMAIN(`vbrew.com')
dnl Apply the genericstable to every host in the domain
FEATURE(`generics_entire_domain')
dnl Add support for the versatile access database
FEATURE(`access_db')
MAILER(`local')dnl
MAILER(`smtp')dnl
Example 12-5. Sample custom configuration (continued)

This is the Title of the Book, eMatter Edition
Copyright © 2007 O’Reilly & Associates, Inc. All rights reserved.
210 |Chapter 12: sendmail
configuration file, which is usually /etc/mail/sendmail.cf. In most cases this is simply
done with a cp command
#cp vstout.cf /etc/mail/sendmail.cf
However, it can also be done with the Build command, as follows:
#mv vstout.cf sendmail.cf
#./Build install-cf
Using M4=/usr/bin/m4
../../devtools/bin/install.sh -c -o root -g bin -m 0444 sendmail.cf /etc/mail/
sendmail.cf
../../devtools/bin/install.sh -c -o root -g bin -m 0444 submit.cf /etc/mail/submit.cf
The Build install-cf command used above installs two configuration files: the
sendmail.cf file, and a second file named submit.cf.sendmail.cf doesn’t exist unless
you create it. (In this case we created it as vstout.cf and renamed that file sendmail.cf.)
But a full submit.cf file is delivered with the sendmail distribution, and does not nor-
mally need to be created or modified by you. The submit.cf file is the special configu-
ration used by sendmail when it acts as a mail submission program, while sendmail.cf
is the configuration file used by the sendmail daemon. The Build install-cf com-
mand is generally used when a new sendmail distribution is first installed to ensure
that both the sendmail.cf and submit.cf files are installed. Other than the initial instal-
lation, however, there is generally no need to copy both files at the same time
because it is not usually necessary to create a new submit.cf file when you create a
new sendmail.cf file.
Once the configuration is installed, restart sendmail to force it to read the new con-
figuration by sending it a HUP signal. This method of restarting sendmail uses stan-
dard sendmail signal processing that is available on any Linux system:
#kill -HUP `head -1 /var/run/sendmail.pid`
Some Linux systems provide their own tools for managing daemons. For example,
some systems can start sendmail with the service command:
#service sendmail start
Starting sendmail: [ OK ]
Regardless of how sendmail is restarted, when the daemon starts it reads in the con-
figuration file /etc/mail/sendmail.cf, which now contains the new configuration.
sendmail Databases
The sample configuration created above uses several sendmail databases. (Here we
use the term “database” loosely to include both real databases and flat files.) send-
mail databases are an often overlooked component of sendmail configuration. Yet
sendmail databases play an important role in sendmail configuration. It is in these
databases, not in the m4 files or the sendmail.cf file, that day-to-day configuration

This is the Title of the Book, eMatter Edition
Copyright © 2007 O’Reilly & Associates, Inc. All rights reserved.
sendmail Databases |211
changes are made. The sendmail databases used in our sample configuration are as
follows:
aliases
The aliases database is included in the configuration by default. This database is
an essential component in local mail delivery and in mail forwarding. Nothing
needs to be added to the configuration to use the aliases database.
local-host-names
The local-host-names file is added to a configuration by the use_cw_file feature.
This file is used to define which mail is accepted for local delivery.
relay-domains
The relay-domains file is included in the configuration by default. Therefore, no
changes are needed in the sendmail configuration to use this file. The relay-
domains file can authorize relaying, which, by default, is disabled.
genericstable
The genericstable feature adds support for this database. The genericstable is
used to rewrite the email addresses an organization uses internally into the for-
mat it wishes to present to the outside world.
access
The access_db feature adds support for this database. The access database is use-
ful in a wide variety of ways.
Each of these databases, and others not used in the sample configuration, are
described in the following sections.
The aliases Database
Mail aliases are a powerful feature for routing mail on a destination host. For exam-
ple, it is common practice to direct feedback or comments relating to a World Wide
Web server to “webmaster.” Often there isn’t a user known as “webmaster” on the
target machine; instead, it is an alias for another user. Another common use of mail
aliases is to create mailing lists by directing a single alias to many recipients or to use
an alias to direct incoming messages to the list server program. Aliases can:
• Provide a shorthand or well-known name for mail to be addressed to in order to
go to one or more persons. For example, all systems require aliases for the
well-known names Postmaster and MAILER-DAEMON in order to be RFC com-
pliant.
• Invoke a program with the mail message as the input to the program. Always be
extremely aware of security when defining aliases that invoke programs or write
to programs, since sendmail sometimes runs with root permissions.
• Deliver mail to a file.

This is the Title of the Book, eMatter Edition
Copyright © 2007 O’Reilly & Associates, Inc. All rights reserved.
212 |Chapter 12: sendmail
Details concerning mail aliases may be found in the aliases(5) manpage. A sample
aliases file is shown in Example 12-6.
Whenever you update the /etc/aliases text file, be sure to run the command:
#/usr/bin/newaliases
This command rebuilds the database that sendmail uses internally. The newaliases
command is a symbolic link to the sendmail executable, which behaves exactly as if
sendmail was invoked with the -bt command line argument.
The sendmail program consults the aliases database to determine how to handle an
incoming mail message that has been accepted for local delivery. If the user portion
of the delivery address in the mail message matches an entry in the aliases database,
sendmail redirects the message as described by the entry. But this happens only if
sendmail accepts the mail message for local delivery. The local-host-names file helps
sendmail decide which messages should be accepted for local delivery.
The local-host-names File
Inbound mail is either delivered directly to the addressee or relayed to another mail
host for delivery. sendmail accepts only mail for local delivery that is addressed to the
local host. All other mail is relayed. The system checks class $=w to decide whether or
not it should accept inbound mail for local delivery. Class $=w is an array that con-
tains all of the names that sendmail considers valid for local mail delivery.
The use_cw_file feature directs sendmail to load the /etc/mail/local-host-names file
into class $=w. It does this by placing the following F command in the sendmail.cf file:
Fw/etc/mail/local-host-names
Example 12-6. Sample aliases file
#
# The following two aliases must be present to be RFC-compliant.
# It is important to resolve them to 'a person' who reads mail routinely.
#
postmaster: root # required entry
MAILER-DAEMON: postmaster # required entry
#
#
# demonstrate the common types of aliases
#
usenet: janet # alias for a person
admin: joe,janet # alias for several people
newspak-users: :include:/usr/lib/lists/newspak # read recipients from file
changefeed: |/usr/local/lib/gup # alias that invokes program
complaints: /var/log/complaints # alias writes mail to file
#

This is the Title of the Book, eMatter Edition
Copyright © 2007 O’Reilly & Associates, Inc. All rights reserved.
sendmail Databases |213
Once the use_cw_file feature is added to the configuration, sendmail expects to find
the local-host-names file and displays a non-fatal error message when it doesn’t. If
you’re not ready to add hostnames to the file, simply create an empty file.
To configure the sendmail server to accept inbound mail for other hosts, simply add
the hostnames of those hosts to the local-host-names file. The local-host-names file is
just a list of hostnames—one hostname to a line. Here is a sample local-host-names
file for the vbrew.com domain:
vbrew.com
vporter.vbrew.com
vale.vbrew.com
vlager.vbrew.com
vpils.vbrew.com
vipa.vbrew.com
The values stored in the local-host-names file are added to the other values in class
$=w. The other values stored in $=w are all of the hostnames, hostname aliases, and IP
addresses assigned to this host that sendmail was able to determine by probing the
various network interfaces. It is possible to limit the interface probing done by send-
mail by adding the following define to the sendmail configuration:
define(`confDONT_PROBE_INTERFACES', `true')
The confDONT_PROBE_INTERFACES define is generally only used when probing the inter-
faces gives sendmail erroneous information, or when a large number of virtual inter-
faces are used.
It is also possible to add hostnames to class $=w inside the sendmail configuration file
using the LOCAL_DOMAIN macro:
LOCAL_DOMAIN(`vbrew.com')
LOCAL_DOMAIN(`vipa.vbrew.com')
However, every time a LOCAL_DOMAIN macro is added to the configuration the
sendmail.cf file must be rebuilt, tested, and moved to the /etc/mail directory. When
the local-host-names file is used, there is no need to rebuild sendmail.cf just because
the local-host-names file has been edited.
The bestmx_is_local feature
The bestmx_is_local feature is another way to accept mail for local delivery that is
addressed to another hostname. It works well if the only reason why hostnames are
being added to the local-host-names file is because the local host is the preferred mail
exchanger for those hosts. Mail addressed to any system that lists the local host as its
preferred mail exchanger is accepted as local mail when the bestmx_is_local feature is
used. To use this approach, put the following line in the configuration:
FEATURE(`bestmx_is_local', `vbrew.com')

This is the Title of the Book, eMatter Edition
Copyright © 2007 O’Reilly & Associates, Inc. All rights reserved.
214 |Chapter 12: sendmail
The great advantage of the bestmx_is_local feature is that it is easy—the hostnames
of MX clients do not need to be added to the local-host-names file. However, a
potential problem with the bestmx_is_local solution is that it increases the process-
ing overhead for each piece of mail. This is not a problem for a small system, but it
could be a problem if the system deals with a high volume of mail. Another limita-
tion is that bestmx_is_local depends completely on MX records, but it is possible to
have other reasons to accept mail as local mail. The local-host-names file can store
any hostnames that you wish; it is not limited to hosts that define your system as
their mail exchanger.
Mail that is not addressed to the local host is relayed. The relay-domains file is one
way to configure relaying.
The relay-domains File
By default, sendmail does not permit relaying—even relaying from other hosts within
the local domain. Attempts to relay through a system using the default configuration
returns the “Relaying denied” error to the sender. sendmail will, however, relay mail
for any domain listed in class $=R, and anything listed in the relay-domains file is
added to class $=R. For example, the following commands extend the relay-domains
file to enable relaying for the vbrew.com domain:
#cat >> /etc/mail/relay-domains
vbrew.com
Ctrl-D
Restart sendmail to ensure that it reads the relay-domains file:
# kill -HUP `head -1 /var/run/sendmail.pid`
Now, hosts within the local domain are allowed to relay through vstout.vbrew.
com—all without any changes to the m4 configuration or any need to rebuild the
sendmail.cf file. Mail from or to hosts in the vbrew.com domain is relayed. Mail that
is neither from nor to a host in the vbrew.com domain is still blocked from relaying
mail.
There are other ways to enable relaying. However, none is as easy as adding the local
domain to the relay-domains file, and some are potential security risks. A good alter-
native is to add the local domain name to class $=R by using the RELAY_DOMAIN macro.
The following lines added to the macro configuration would have the same effect as
the relay-domains file defined above:
dnl RELAY_DOMAIN adds a domain name to class R
RELAY_DOMAIN(`vbrew.com')
However, the RELAY_DOMAIN command requires modifying the m4 configuration, and
rebuilding and reinstalling the sendmail.cf file. Using the relay-domains file does not,
which makes the relay-domains file simpler to use.

This is the Title of the Book, eMatter Edition
Copyright © 2007 O’Reilly & Associates, Inc. All rights reserved.
sendmail Databases |215
Another good alternative is the relay_entire_domain feature. The following com-
mand added to a macro configuration would enable relaying for hosts in the local
domain:
dnl A feature that relays mail for the local domain
FEATURE(`relay_entire_domain')
The relay_entire_domain feature relays mail from any host in a domain listed in class
$=m. By default, class $=m contains the domain name of the server system, which is
vbrew.com on a server named vstout.vbrew.com. This alternative solution works, but
is slightly more complex than using the relay-domains file. Additionally, the relay-
domains file is very flexible. It is not limited to the local domain. Any domain can be
listed in the relay-domains file and mail from or to any host in that domain will be
relayed.
There are some techniques for enabling relaying that should be avoided for security
reasons. Two such alternatives are:
promiscuous_relay
This feature turns on relaying for all hosts. Of course, this includes the local
domain so this feature would work. However, it would create an open relay for
spammers. Avoid the promiscuous_relay feature even if your host is protected by
a firewall.
relay_local_from
This feature enables relaying for mail if the email address in the envelope sender
address of the mail contains the name of a host in the local domain. Because the
envelope sender address can be faked, spammers can possibly trick your server
into relaying spam.
Once the relay-domains file is configured to relay mail to and from the local domain,
clients on the local network can start sending mail through the server to the outside
world. The genericstable, discussed next, allows you to rewrite the sender address on
the mail as it passes through the server.
The genericstable Database
To provide support for the genericstable, we added the genericstable feature, the
GENERICS_DOMAIN macro, and the generics_entire_domain feature to our sample send-
mail configuration. The following commands were added:
FEATURE(`genericstable')
GENERICS_DOMAIN(`vbrew.com')
FEATURE(`generics_entire_domain')
The genericstable feature adds the code sendmail needs to make use of the
genericstable. The GENERICS_DOMAIN macro adds the value specified on the macro
command line to sendmail class $=G. Normally, the values listed in class $=G are

This is the Title of the Book, eMatter Edition
Copyright © 2007 O’Reilly & Associates, Inc. All rights reserved.
216 |Chapter 12: sendmail
interpreted as hostnames, and only exact matches enable genericstable processing.
The generics_entire_domain feature causes sendmail to interpret the values in class
$=G as domain names, and any host within one of those domains is processed
through the genericstable. Thus the hostname vipa.vbrew.com, because it contains
the domain name vbrew.com, will be processed through the genericstable with this
configuration.
Each entry in the genericstable contains two fields: the key and the value returned for
that key. The key field can be either a full email address or a username. The value
returned is normally a full email address containing both a username and a host-
name. To create the genericstable, first create a text file that contains the database
entries and then run that text file through the makemap command to build the
genericstable database. For the vstout.vbrew.com server, we created the following
genericstable:
#cd /etc/mail
#cat > genericstable
kathy kathy.mccafferty@vbrew.com
win winslow.smiley@vbrew.com
sara sara.henson@vbrew.com
dave david.craig@vbrew.com
becky rebecca.fro@vbrew.com
jay jay.james@vbrew.com
alana@vpils.vbrew.com alana.darling@vbrew.com
alana@vale.vbrew.com alana.henson@vbrew.com
alana alana.sweet@vbrew.com
Ctrl-D
#makemap hash genericstable < genericstable
Given this genericstable, the header sender address win@vipa.vbrew.com is rewritten
to winslow.smiley@vbrew.com, which is the value returned by the genericstable for
the key win. In this example, every win account in the entire vbrew.com domain
belongs to Winslow Smiley. No matter what host in that domain he sends mail from,
when the mail passes through this system it is rewritten into winslow.smiley@vbrew.
com. For replies to the rewritten address to work correctly, the rewritten hostname
must resolve to a host that will accept the mail and that host must have an alias for
winslow.smiley that delivers the mail to the real win account.
The genericstable mapping can be anything you wish. In this example, we map login
names to the user’s real name and the local domain name formatted as firstname.
lastname@domain.*Of course, if mail arrives at the server addressed to firstname.
lastname@domain, aliases are needed to deliver the mail to the users’ real address.
Aliases based on the genericstable entries shown above could be appended to the
aliases database in the following manner:
* The firstname.lastname@domain format is not universally endorsed. See the sendmail FAQ for some reasons
why you might not want to use this address format.

This is the Title of the Book, eMatter Edition
Copyright © 2007 O’Reilly & Associates, Inc. All rights reserved.
sendmail Databases |217
#cd /etc/mail
# cat > aliases
kathy.mccafferty: kathy
win.strong: craig
sara.henson: sara
david.craig: dave
rebecca.fro: becky
alana.smiley: alana
alana.darling: alana@vpils.vbrew.com
alana.henson: alana@vale.vbrew.com
jay.james: jay
Ctrl-D
# newaliases
The aliases that map to a username store the mail on the server, where it is read by
the user or retrieved by the client using POP or IMAP. The aliases that map to full
addresses forward the mail to the host defined in the full address.
Most of the entries in the sample genericstable (kathy,sara,dave,becky, and jay) are
any-to-one mappings that work just like the win entry described above. A more inter-
esting case is the mapping of the username alana. Three people in the vbrew.com
domain have this username: Alana Henson, Alana Darling, and Alana Sweet. The
complete addresses used in the genericstable keys for Alana Darling and Alana Hen-
son make it possible for sendmail to do one-to-one mappings for those addresses.
The key used for Alana Sweet’s entry, however, is just a username. That key matches
any input address that contains the username alana, except for the input addresses
alana@vpils.vbrew.com and alana@vale.vbrew.com. When a system handles mail
that originates from several hosts, it is possible to have duplicate login names. The
fact that the key in the genericstable can contain a full email address allows you to
map these overlapping usernames.
The last database used in the sample Linux sendmail configuration is the access data-
base. This database is so versatile that it should probably be included in the configu-
ration of every mail server.
The access Database
The access database offers great flexibility and control for configuring from which
hosts or users mail is accepted and for which hosts and users mail is relayed. The
access database is a powerful configuration tool for mail relay servers that provides
some protection against spam and that provides much finer control over the relay
process than is provided by the relay_domains file. Unlike the relay_domains file, the
access database is not a default part of the sendmail configuration. To use the access
database, we added the access_db feature to our sample Linux sendmail configura-
tion:
FEATURE(`access_db')dnl

This is the Title of the Book, eMatter Edition
Copyright © 2007 O’Reilly & Associates, Inc. All rights reserved.
218 |Chapter 12: sendmail
The general idea of the access database is simple. When an SMTP connection is
made, sendmail compares information from the envelope header to the information
in the access database to see how it should handle the message.
The access database is a collection of rules that describe what action should be taken
for messages from or to specific users or hosts. The database has a simple format.
Each line in the table contains an access rule. The left side of each rule is a pattern
matched against the envelope header information of the mail message. The right side
is the action to take if the envelope information matches the pattern.
The left pattern can match:
• An individual defined by either a full email address (user@host.domain)ora
username written as username@.
• A host identified by its hostname or its IP address.
• A domain identified by a domain name.
• A network identified by the network portion of an IP address.
By default, the pattern is matched against the envelope sender address, and thus the
action is taken only if the mail comes from the specified address. Adding the
blacklist_recipient feature to the sendmail configuration applies the pattern match to
both source and destination envelope addresses. However, an optional tag field that
can be prepended to the left side to provide finer control over when the pattern
match is applied. Beginning the pattern with an optional tag tells sendmail to limit
pattern matching to certain conditions. The three basic tags are:
To:
The action is taken only when mail is being sent to the specified address.
From:
The action is taken only when mail is received from the specified address.
Connect:
The action is taken only when the specified address is the address of the system
at the remote end of the SMTP connection.
There are five basic actions that may be defined on the right side of an access rule.
These are:
OK
Accept the mail message.
RELAY
Accept the mail messages for relaying.
REJECT
Reject the mail with a generic message.
DISCARD
Discard the message using the $#discard mailer.

This is the Title of the Book, eMatter Edition
Copyright © 2007 O’Reilly & Associates, Inc. All rights reserved.
sendmail Databases |219
ERROR:dsn:code text
Return an error message using the specified DSN code, the specified SMTP error
code, and the specified text as the message.
An example /etc/mail/access might look like this:
friends@cybermail.com REJECT
aol.com REJECT
207.46.131.30 REJECT
postmaster@aol.com OK
linux.org.au RELAY
example.com ERROR:5.7.1:550 Relaying denied to spammers
This example would reject any email received from friends@cybermail.com, any host
in the domain aol.com and the host 207.46.131.30. The next rule would accept
email from postmaster@aol.com, despite the fact that the domain itself has a reject
rule. The fifth rule allows relaying of mail from any host in the linux.org.au domain.
The last rule rejects mail from example.com with a custom error message. The error
message includes delivery status notification code 5.7.1, which is a valid code as
defined by RFC 1893, and SMTP error code 550, which is a valid code from RFC
821.
The access database can do much more than shown here. Note that we explicitly said
“basic” tags and “basic” actions because there are several more values that can be
used in advanced configurations. If you plan to tackle an advanced configuration, see
the “More Information” section later in the chapter.
The access database is the last database we used in our sample configuration. There
are several other databases that are not used in our sample Linux sendmail configura-
tion. These are described in the following section.
Other Databases
Some of the available sendmail databases were not used in our sample configuration
either because their use is discouraged or because they focus on outdated technolo-
gies. These databases are:
define(`confUSERDB_SPEC', `path')
The confUSERDB_SPEC option tells sendmail to apply the user database to local
addresses after the aliases database is applied and before the .forward file is
applied. The path argument tells sendmail where the database is found. The user
database is not widely used because the sendmail developers discourage its use in
their responses to questions 3.3 and 3.4 of the FAQ.
FEATURE(`use_ct_file', `path')
The use_ct_file feature tells sendmail to add trusted usernames from the speci-
fied file to the class $=t. Because users listed in $=t are allowed to send mail
using someone else’s username, they present a security risk. There are fewer files
to secure against tampering if trusted users are defined in the macro configura-

This is the Title of the Book, eMatter Edition
Copyright © 2007 O’Reilly & Associates, Inc. All rights reserved.
220 |Chapter 12: sendmail
tion file using confTRUSTED_USERS, and because so few users should be trusted,
defining them in the macro configuration file is no burden.
FEATURE(`domaintable', `specification')
The domaintable feature tells sendmail to use the domain table to map one
domain name to another. An optional database specification can be provided to
define the database type and pathname, which, by default, are hash type and /etc/
mail/domaintable. The domaintable eases the transition from an old domain
name to a new domain name by translating the old name to the new name on all
mail. Because you are rarely in this situation, this database is rarely used.
FEATURE(`uucpdomain', `specification')
The uucpdomain feature tells sendmail to use the uucpdomain database to map
UUCP site names to Internet domain names. The optional database specifica-
tion overrides the default database type of hash and the default database path of
/etc/mail/uucpdomain. The uucpdomain database converts email addresses from
the .UUCP pseudo-domain into old-fashioned UUCP bang addresses. The key to
the database is the hostname from the .UUCP pseudo-domain. The value returned
for the key is the bang address. It is very unlikely that you will use this database
because even sites that still use UUCP don’t often use bang addresses because
current UUCP mailers handle email addresses that look just like Internet
addresses.
FEATURE('bitdomain', 'specification')
The bitdomain feature tells sendmail to use the bitdomain database to map BIT-
NET hostnames to Internet domain names. BITNET is an outdated IBM main-
frame network that you won’t use, and therefore you won’t use this database.
There are two other databases, mailertable and virtusertable, that, although not
included in the sample configuration, are quite useful.
The mailertable
The mailertable feature adds support to the sendmail configuration for the
mailertable. The syntax of the mailertable feature is:
FEATURE(`mailertable', `specification')
The optional database specification is used to override the default database type of
hash and the default database path is /etc/mail/mailertable.
The mailertable maps domain names to the internal mailer that should handle mail
bound for that domain. Some mailers are used only if they are referenced in the
mailertable. For example, the MAILER(`smtp')command adds the esmtp,relay,smtp,
smtp8, and dsmtp mailers to the configuration. By default, sendmail uses only two of
these mailers. The esmtp mailer is used to send standard SMTP mail, and the relay
mailer is used when mail is relayed through an external server. The other three mail-

This is the Title of the Book, eMatter Edition
Copyright © 2007 O’Reilly & Associates, Inc. All rights reserved.
sendmail Databases |221
ers are unused unless they are reference in a mailertable entry or in a custom rewrite
rule. (Using the mailertable is much easier than writing your own rewrite rules!)
Let’s use the smtp8 mailer as an example. The smtp8 mailer is designed to send 8-bit
MIME data to outdated mail servers that support MIME but cannot understand
Extended SMTP. If the domain example.edu used such a mail server, you could put
the following entry in the mailertable to handle the mail:
.example.edu smtp8:oldserver.example.edu
Amailertable entry contains two fields. The first field is a key containing the host
portion of the delivery address. It can either be a fully qualified hostname—emma.
example.edu—or just a domain name. To specify a domain name, start the name
with a dot, as in the example above. If a domain name is used, it matches every host
in the domain.
The second field is the return value. It normally contains the name of the mailer that
should handle the mail and the name of the server to which the mail should be sent.
Optionally, a username can be specified with the server address in the form
user@server. Also, the selected mailer can be the internal error mailer. If the error
mailer is used, the value following the mailer name is an error message instead of a
server name. Here is an example of each of these alternative entries:
.example.edu smtp8:oldserver.example.edu
vlite.vbrew.com esmtp:postmaster@vstout.vbrew.com
vmead.vbrew.com error:nohost This host is unavailable
Normally, mail passing through the mailertable is sent to the user to which it is
addressed. For example, mail to jane@emma.example.edu is sent through the smtp8
mailer to the server oldserver.example.edu addressed to the user jane@emma.
example.edu. Adding a username to the second field, however, changes this normal
behavior and routes the mail to an individual instead of a mail server. For example,
mail sent to any user at vlite.vbrew.com is sent instead to postmaster@vstout.vbrew.
com. There, presumably, the mail is handled manually. Finally, mail handled by the
mailertable does not have to be delivered at all. Instead, an error message can be
returned to the sender. Any mail sent to vmead.vbrew.com returns the error mes-
sage “This host is unavailable” to the sender.
The virtusertable
The sendmail virtusertable feature adds support for the virtual user table, where vir-
tual email hosting is configured. Virtual email hosting allows the mail server to
accept and deliver mail on behalf of a number of different domains as though it were
a number of separate mail hosts. The virtual user table maps incoming mail destined
for some user@host to some otheruser@otherhost. You can think of this as an
advanced mail alias feature—one that operates using not just the destination user,
but also the destination domain.

This is the Title of the Book, eMatter Edition
Copyright © 2007 O’Reilly & Associates, Inc. All rights reserved.
222 |Chapter 12: sendmail
To configure the virtusertable feature, add the feature to your m4 macro configura-
tion as shown:
FEATURE(`virtusertable')
By default, the virtusertable source file is /etc/mail/virtusertable. You can override this
by supplying an argument to the macro definition; consult a detailed sendmail refer-
ence to learn about what options are available.
The format of the virtual user table is very simple. The left side of each line contains
a pattern representing the original destination mail address; the right side has a pat-
tern representing the mail address that the virtual hosted address will be mapped to.
The following example shows three possible types of entries:
samiam@bovine.net colin
sunny@bovine.net darkhorse@mystery.net
@dairy.org mail@jhm.org
@artist.org $1@red.firefly.com
In this example, we are virtual hosting three domains: bovine.net,dairy.org, and art-
ist.org.
The first entry redirects mail sent to a user in the bovine.net virtual domain to a local
user on the machine. The second entry redirects mail to a user in the same virtual
domain to a user in another domain. The third example redirects all mail addressed
to any user in the dairly.org virtual domain to a single remote mail address. Finally,
the last entry redirects any mail to a user in the artist.org virtual domain to the same
user in another domain; for example, julie@artists.org would be redirected to
julie@red.firefly.com.
Testing Your Configuration
Email is an essential service. It is also a service that can be exploited by intruders
when it is misconfigured. It is very important that you thoroughly test your configu-
ration. Fortunately, sendmail provides a relatively easy way of doing this.
sendmail supports an “address test” mode that allows a full range of tests. In the fol-
lowing examples we specify a destination mail address and a test to apply to that
address. sendmail then processes that destination address displaying the output of
each ruleset as it proceeds. To place sendmail into address test mode, invoke it with
the -bt argument.
The default configuration file used for the address test mode is the /etc/mail/sendmail.
cf file. To specify an alternate configuration file, use the -C argument. This is impor-
tant because you will test a new configuration before moving it to /etc/mail/sendmail.
cf. To test the sample Linux sendmail configuration created earlier in this chapter,
use the following sendmail command:

This is the Title of the Book, eMatter Edition
Copyright © 2007 O’Reilly & Associates, Inc. All rights reserved.
Testing Your Configuration |223
#/usr/sbin/sendmail -bt -Cvstout.cf
ADDRESS TEST MODE (ruleset 3 NOT automatically invoked)
Enter <ruleset> <address>
>
The >prompt shown above indicates that sendmail is ready to accept a test mode
command. While in address test mode, sendmail accepts a variety of commands that
examine the configuration, check settings, and observe how email addresses are pro-
cess by sendmail. Table 12-4 lists the commands that are available in test mode.
Several commands (=S,=M,$v, and $=c) display current sendmail configuration values
defined in the sendmail.cf file, and the /map command displays values set in the send-
mail database files. The -d command can be used to change the amount of informa-
tion displayed. A great many debug levels can be set by -d, but only a few are useful
to the sendmail administrator. See a detailed sendmail reference for valid debug val-
ues.
Two commands, .D and .C, are used to set macro and class values in real time. Use
these commands to try alternate configuration settings before rebuilding the entire
configuration.
Two commands display the interaction between sendmail and DNS. /canon displays
the canonical name returned by DNS for a given hostname. /mx shows the list of mail
exchangers returned by DNS for a given host.
Table 12-4. Sendmail test mode commands
Command Usage
ruleset [,ruleset...] address Process the address through the comma-separated list of rulesets.
=Sruleset Display the contents of the ruleset.
=M Display all of the mailer definitions.
$vDisplay the value of macro v.
$=cDisplay the values in class c.
.Dvvalue Set the macro v to value.
.Ccvalue Add value to class c.
-dvalue Set the debug level to value.
/tryflags flags Set the flags used for address processing by /try.
/try mailer address Process the address for the mailer.
/parse address Return the mailer/host/user delivery triple for the address.
/canon hostname Canonify hostname.
/mx hostname Lookup the MX records for hostname.
/map mapname key Look up key in the database identified by mapname.
/quit Exit address test mode.

This is the Title of the Book, eMatter Edition
Copyright © 2007 O’Reilly & Associates, Inc. All rights reserved.
224 |Chapter 12: sendmail
Most of the remaining commands process an email address through sendmail’s
rewrite rules. /parse displays the processing of a delivery address and shows which
mailer is used to deliver mail sent to the address. /try displays the processing of
addresses for a specific mailer. (The /tryflags command specifies whether the
sender or the recipient address should be processed by the /try command.) Use the
ruleset address command to display the processing of an address through any arbi-
trary list of rulesets that you wish to test.
First we’ll test that sendmail is able to deliver mail to local users on the system. In
these tests we expect all addresses to be rewritten to the local mailer on this machine:
#/usr/sbin/sendmail -bt -Cvstout.cf
ADDRESS TEST MODE (ruleset 3 NOT automatically invoked)
Enter <ruleset> <address>
>/parse issac
Cracked address = $g
Parsing envelope recipient address
canonify input: issac
Canonify2 input: issac
Canonify2 returns: issac
canonify returns: issac
parse input: issac
Parse0 input: issac
Parse0 returns: issac
ParseLocal input: issac
ParseLocal returns: issac
Parse1 input: issac
Parse1 returns: $# local $: issac
parse returns: $# local $: issac
2 input: issac
2 returns: issac
EnvToL input: issac
EnvToL returns: issac
final input: issac
final returns: issac
mailer local, user issac
This output shows us how sendmail processes mail addressed to isaac on this sys-
tem. Each line shows us what information has been supplied to a ruleset or the result
obtained from processing by a ruleset. We told sendmail that we wished to parse the
address for delivery. The last line shows us that the system does indeed direct mail to
isaac to the local mailer.
Next we’ll test mail addressed to our SMTP address: isaac@vstout.vbrew.com.We
should be able to produce the same end result as our last example:
>/parse isaac@vstout.vbrew.com
Cracked address = $g
Parsing envelope recipient address
canonify input: isaac @ vstout . vbrew . com
Canonify2 input: isaac < @ vstout . vbrew . com >
Canonify2 returns: isaac < @ vstout . vbrew . com . >
canonify returns: isaac < @ vstout . vbrew . com . >

This is the Title of the Book, eMatter Edition
Copyright © 2007 O’Reilly & Associates, Inc. All rights reserved.
Testing Your Configuration |225
parse input: isaac < @ vstout . vbrew . com . >
Parse0 input: isaac < @ vstout . vbrew . com . >
Parse0 returns: isaac < @ vstout . vbrew . com . >
ParseLocal input: isaac < @ vstout . vbrew . com . >
ParseLocal returns: isaac < @ vstout . vbrew . com . >
Parse1 input: isaac < @ vstout . vbrew . com . >
Parse1 returns: $# local $: isaac
parse returns: $# local $: isaac
2 input: isaac
2 returns: isaac
EnvToL input: isaac
EnvToL returns: isaac
final input: isaac
final returns: isaac
mailer local, user isaac
Next we will test that mail addressed to other hosts in the vbrew.com domain is
delivered directly to that host using SMTP mail:
>/parse issac@vale.vbrew.com
Cracked address = $g
Parsing envelope recipient address
canonify input: issac @ vale . vbrew . com
Canonify2 input: issac < @ vale . vbrew . com >
Canonify2 returns: issac < @ vale . vbrew . com . >
canonify returns: issac < @ vale . vbrew . com . >
parse input: issac < @ vale . vbrew . com . >
Parse0 input: issac < @ vale . vbrew . com . >
Parse0 returns: issac < @ vale . vbrew . com . >
ParseLocal input: issac < @ vale . vbrew . com . >
ParseLocal returns: issac < @ vale . vbrew . com . >
Parse1 input: issac < @ vale . vbrew . com . >
MailerToTriple input: < > issac < @ vale . vbrew . com . >
MailerToTriple returns: issac < @ vale . vbrew . com . >
Parse1 returns: $# esmtp $@ vale . vbrew . com . $: issac < @ vale . vbrew
. com . >
parse returns: $# esmtp $@ vale . vbrew . com . $: issac < @ vale . vbrew
. com . >
2 input: issac < @ vale . vbrew . com . >
2 returns: issac < @ vale . vbrew . com . >
EnvToSMTP input: issac < @ vale . vbrew . com . >
PseudoToReal input: issac < @ vale . vbrew . com . >
PseudoToReal returns: issac < @ vale . vbrew . com . >
MasqSMTP input: issac < @ vale . vbrew . com . >
MasqSMTP returns: issac < @ vale . vbrew . com . >
EnvToSMTP returns: issac < @ vale . vbrew . com . >
final input: issac < @ vale . vbrew . com . >
final returns: issac @ vale . vbrew . com
mailer esmtp, host vale.vbrew.com., user issac@vale.vbrew.com
We can see that this test has directed the message to the default SMTP mailer (esmtp)
to be sent to the host vale.vbrew.com and the user issac on that host.

This is the Title of the Book, eMatter Edition
Copyright © 2007 O’Reilly & Associates, Inc. All rights reserved.
226 |Chapter 12: sendmail
Our final test checks the genericstable we created for the vstout.cf configuration. We
check the mapping of the username alana for all three people in the vbrew.com
domain that have this username. The following test shows how the genericstable
maps each variation of this name:
#sendmail -bt
ADDRESS TEST MODE (ruleset 3 NOT automatically invoked)
Enter <ruleset> <address>
>/tryflags HS
>/try esmtp alana@vpils.vbrew.com
Trying header sender address alana@vpils.vbrew.com for mailer esmtp
canonify input: alana @ vpils . vbrew . com
Canonify2 input: alana < @ vpils . vbrew . com >
Canonify2 returns: alana < @ vpils . vbrew . com . >
canonify returns: alana < @ vpils . vbrew . com . >
1 input: alana < @ vpils . vbrew . com . >
1 returns: alana < @ vpils . vbrew . com . >
HdrFromSMTP input: alana < @ vpils . vbrew . com . >
PseudoToReal input: alana < @ vpils . vbrew . com . >
PseudoToReal returns: alana < @ vpils . vbrew . com . >
MasqSMTP input: alana < @ vpils . vbrew . com . >
MasqSMTP returns: alana < @ vpils . vbrew . com . >
MasqHdr input: alana < @ vpils . vbrew . com . >
canonify input: alana . darling @ vbrew . com
Canonify2 input: alana . darling < @ vbrew . com >
Canonify2 returns: alana . darling < @ vbrew . com . >
canonify returns: alana . darling < @ vbrew . com . >
MasqHdr returns: alana . darling < @ vbrew . com . >
HdrFromSMTP returns: alana . darling < @ vbrew . com . >
final input: alana . darling < @ vbrew . com . >
final returns: alana . darling @ vbrew . com
Rcode = 0, addr = alana.darling@vbrew.com
>/try esmtp alana@vale.vbrew.com
Trying header sender address alana@vale.vbrew.com for mailer esmtp
canonify input: alana @ vale . vbrew . com
Canonify2 input: alana < @ vale . vbrew . com >
Canonify2 returns: alana < @ vale . vbrew . com . >
canonify returns: alana < @ vale . vbrew . com . >
1 input: alana < @ vale . vbrew . com . >
1 returns: alana < @ vale . vbrew . com . >
HdrFromSMTP input: alana < @ vale . vbrew . com . >
PseudoToReal input: alana < @ vale . vbrew . com . >
PseudoToReal returns: alana < @ vale . vbrew . com . >
MasqSMTP input: alana < @ vale . vbrew . com . >
MasqSMTP returns: alana < @ vale . vbrew . com . >
MasqHdr input: alana < @ vale . vbrew . com . >
canonify input: alana . henson @ vbrew . com
Canonify2 input: alana . henson < @ vbrew . com >
Canonify2 returns: alana . henson < @ vbrew . com . >
canonify returns: alana . henson < @ vbrew . com . >
MasqHdr returns: alana . henson < @ vbrew . com . >
HdrFromSMTP returns: alana . henson < @ vbrew . com . >
final input: alana . henson < @ vbrew . com . >

This is the Title of the Book, eMatter Edition
Copyright © 2007 O’Reilly & Associates, Inc. All rights reserved.
Running sendmail |227
final returns: alana . henson @ vbrew . com
Rcode = 0, addr = alana.henson@vbrew.com
>/try esmtp alana@foobar.vbrew.com
Trying header sender address alana@foobar.vbrew.com for mailer esmtp
canonify input: alana @ foobar . vbrew . com
Canonify2 input: alana < @ foobar . vbrew . com >
Canonify2 returns: alana < @ foobar . vbrew . com . >
canonify returns: alana < @ foobar . vbrew . com . >
1 input: alana < @ foobar . vbrew . com . >
1 returns: alana < @ foobar . vbrew . com . >
HdrFromSMTP input: alana < @ foobar . vbrew . com . >
PseudoToReal input: alana < @ foobar . vbrew . com . >
PseudoToReal returns: alana < @ foobar . vbrew . com . >
MasqSMTP input: alana < @ foobar . vbrew . com . >
MasqSMTP returns: alana < @ foobar . vbrew . com . >
MasqHdr input: alana < @ foobar . vbrew . com . >
canonify input: alana . smiley @ vbrew . com
Canonify2 input: alana . smiley < @ vbrew . com >
Canonify2 returns: alana . smiley < @ vbrew . com . >
canonify returns: alana . smiley < @ vbrew . com . >
MasqHdr returns: alana . smiley < @ vbrew . com . >
HdrFromSMTP returns: alana . smiley < @ vbrew . com . >
final input: alana . smiley < @ vbrew . com . >
final returns: alana . smiley @ vbrew . com
Rcode = 0, addr = alana.smiley@vbrew.com
>/quit
This test uses the /tryflags command that allows us to specify whether we want to
process the header sender address (HS), the header recipient address (HR), the enve-
lope sender address (ES), or the envelope recipient address (ER). In this case, we want
to see how the header sender address is rewritten. The /try command allows us to
specify which mailer the address should be rewritten for and the address to be rewrit-
ten.
This test was also successful. The genericstable tests work for Alana Darling, Alana
Henson, and Alana Smiley.
Running sendmail
The sendmail daemon can be run in either of two ways. One way is to have to have it
run from the inetd daemon; the alternative, and more commonly used method, is to
run sendmail as a standalone daemon. It is also common for mailer programs to
invoke sendmail as a user command to accept locally generated mail for delivery.
When running sendmail in standalone mode, place the sendmail command in a star-
tup file so that it runs at boot time. The syntax used is commonly:
/usr/sbin/sendmail -bd -q10m

This is the Title of the Book, eMatter Edition
Copyright © 2007 O’Reilly & Associates, Inc. All rights reserved.
228 |Chapter 12: sendmail
The -bd argument tells sendmail to run as a daemon. It will fork and run in the back-
ground. The -q10m argument tells sendmail to check its queue every ten minutes. You
may choose to use a different time interval to check the queue.
To run sendmail from the inetd network daemon, you’d use an entry such as this:
smtp stream tcp nowait nobody /usr/sbin/sendmail -bs
The -bs argument here tells sendmail to use the SMTP protocol on stdin/stdout,
which is required for use with inetd.
When sendmail is invoked this way, it processes any mail waiting in the queue to be
transmitted. When running sendmail from inetd, you must also create a cron job that
runs the runq command periodically to service the mail spool periodically. A suit-
able cron table entry would be similar to:
# Run the mail spool every fifteen minutes
0,15,30,45 * * * * /usr/bin/runq
In most installations sendmail processes the queue every 15 minutes as shown in our
crontab example. This example uses the runq command. The runq command is usu-
ally a symlink to the sendmail binary and is a more convenient form of:
#sendmail -q
Tips and Tricks
There are a number of things you can do to make managing a sendmail site efficient.
A number of management tools are provided in the sendmail package; let’s look at
the most important of these.
Managing the Mail Spool
Mail is queued in the /var/spool/mqueue directory before being transmitted. This
directory is called the mail spool. The sendmail program provides the mailq com-
mand as a means of displaying a formatted list of all spooled mail messages and their
status. The /usr/bin/mailq command is a symbolic link to the sendmail executable and
behaves identically to:
#sendmail -bp
The output of the mailq command displays the message ID, its size, the time it was
placed in the queue, who sent it, and a message indicating its current status. The fol-
lowing example shows a mail message stuck in the queue with a problem:
$mailq
Mail Queue (1 request)
--Q-ID-- --Size-- -----Q-Time----- ------------Sender/Recipient------------
RAA00275 124 Wed Dec 9 17:47 root
(host map: lookup (tao.linux.org.au): deferred)
terry@tao.linux.org.au

This is the Title of the Book, eMatter Edition
Copyright © 2007 O’Reilly & Associates, Inc. All rights reserved.
Tips and Tricks |229
This message is still in the mail queue because the destination host IP address could
not be resolved.
To force sendmail to immediately process the queue, issue the /usr/bin/runq com-
mand. sendmail will process the mail queue in the background. The runq command
produces no output, but a subsequent mailq command will tell you if the queue is
clear.
Forcing a Remote Host to Process Its Mail Queue
If you use a temporary dial-up Internet connection with a fixed IP address and rely
on an MX host to collect your mail while you are disconnected, you will find it use-
ful to force the MX host to process its mail queue soon after you establish your con-
nection.
A small perl program is included with the sendmail distribution that makes this sim-
ple for mail hosts that support it. The etrn script has much the same effect on a
remote host as the runq command has on the local server. If we invoke the com-
mand as shown in this example:
#etrn vstout.vbrew.com
we force the host vstout.vbrew.com to process any mail queued for our local
machine.
Typically you’d add this command to your PPP startup script so that it is executed
soon after your network connection is established.
Mail Statistics
sendmail collects data on the volume of mail traffic and some information on the
hosts to which it has delivered mail. There are two commands available to display
this information, mailstats and hoststat.
mailstats
The mailstats command displays statistics on the volume of mail processed by send-
mail. The time at which data collection commenced is printed first, followed by a
table with one row for each configured mailer and one showing a summary total of
all mail. Each line presents eight items of information, which are described in
Table 12-5.
Table 12-5. The fields displayed by mailstat
Field Meaning
MThe mailer (transport protocol) number
msgsfr The number of messages received from the
mailer

This is the Title of the Book, eMatter Edition
Copyright © 2007 O’Reilly & Associates, Inc. All rights reserved.
230 |Chapter 12: sendmail
A sample of the output of the mailstats command is shown in Example 12-7.
This data is collected if the StatusFile option is enabled in the sendmail.cf file and
the status file exists. The StatusFile option is defined in the generic Linux configura-
tion and therefore defined in the vstout.cf file we built from the generic configura-
tion, as shown below:
$grep StatusFile vstout.cf
O StatusFile=/etc/mail/statistics
To restart the statistics collection, make the statistics file zero length and restart send-
mail.
hoststat
The hoststat command displays information about the status of hosts to which send-
mail has attempted to deliver mail. The hoststat command is equivalent to invoking
sendmail as:
sendmail -bh
The output presents each host on a line of its own, and for each the time since deliv-
ery was attempted to it, and the status message received at that time.
Persistent host status is maintained only if a path for the status directory is defined
by the HostStatusDirectory option, which in turn is defined in the m4 macro config-
uration file by confHOST_STATUS_DIRECTORY. By default, no path is defined for the host
status directory and no persistent host status is maintained.
bytes_from The Kbytes of mail from the mailer
msgsto The number of messages sent to the mailer
bytes_to The Kbytes of mail sent to the mailer
msgsreg The number of messages rejected
msgsdis The number of messages discarded
Mailer The name of the mailer
Example 12-7. Sample output of the mailstats command
#/usr/sbin/mailstats
Statistics from Sun Dec 20 22:47:02 1998
M msgsfr bytes_from msgsto bytes_to msgsrej msgsdis Mailer
0 0 0K 19 515K 0 0 prog
3 33 545K 0 0K 0 0 local
5 88 972K 139 1018K 0 0 esmtp
=============================================================
T 121 1517K 158 1533K 0 0
Table 12-5. The fields displayed by mailstat (continued)
Field Meaning

This is the Title of the Book, eMatter Edition
Copyright © 2007 O’Reilly & Associates, Inc. All rights reserved.
More Information |231
Example 12-8 shows the sort of output you can expect from the hoststat command.
Note that most of the results indicate successful delivery. The result for earthlink.
net, on the other hand, indicates that delivery was unsuccessful. The status message
can sometimes help determine the cause of the failure. In this case, the connection
timed out, probably because the host was down or unreachable at the time delivery
was attempted.
The purgestat command flushes the collected host data and is equivalent to invoking
sendmail as:
#sendmail -bH
The statistics will continue to grow until you purge them. You might want to period-
ically run the purgestat command to make it easier to search and find recent entries,
especially if you have a busy site. You could put the command into a crontab file so it
runs automatically, or just do it yourself occasionally.
More Information
sendmail is a complex topic—much too complex to be truly covered by a single
chapter. This chapter should get you started and will help you configure a simple
server. However, if you have a complex configuration or you want to explore
advanced features, you will need more information. Here are some sources to start
you on your quest for knowledge.
• The sendmail distribution is delivered with some excellent README files. The
README file in the top-level directory created when the distribution is installed
is the place to start. It contains a list of other informational files, such as
sendmail/README and cf/README, that provides essential information. (The
Example 12-8. Sample Output of the hoststat Command
#hoststat
-------------- Hostname ---------- How long ago ---------Results---------
mail.telstra.com.au 04:05:41 250 Message accepted for
scooter.eye-net.com.au 81+08:32:42 250 OK id=0zTGai-0008S9-0
yarrina.connect.com.a 53+10:46:03 250 LAA09163 Message acce
happy.optus.com.au 55+03:34:40 250 Mail accepted
mail.zip.com.au 04:05:33 250 RAA23904 Message acce
kwanon.research.canon.com.au 44+04:39:10 250 ok 911542267 qp 21186
linux.org.au 83+10:04:11 250 IAA31139 Message acce
albert.aapra.org.au 00:00:12 250 VAA21968 Message acce
field.medicine.adelaide.edu.au 53+10:46:03 250 ok 910742814 qp 721
copper.fuller.net 65+12:38:00 250 OAA14470 Message acce
amsat.org 5+06:49:21 250 UAA07526 Message acce
mail.acm.org 53+10:46:17 250 TAA25012 Message acce
extmail.bigpond.com 11+04:06:20 250 ok
earthlink.net 45+05:41:09 Deferred: Connection time

This is the Title of the Book, eMatter Edition
Copyright © 2007 O’Reilly & Associates, Inc. All rights reserved.
232 |Chapter 12: sendmail
cf/README file, which covers the sendmail configuration language, is also avail-
able on the Web at http://www.sendmail.org/m4/readme.html.)
• The sendmail Installation and Operations Guide is an excellent source of informa-
tion. It is also delivered with the sendmail source code distribution, and can be
found in doc/op/op.me or doc/op/op.ps, depending on your preferred format.
• The sendmail web site provides several excellent papers and online documents.
The Compiling Sendmail documentation, available at http://www.sendmail.org/
compiling.html, is an excellent example.
• The sendmail site provides a list of available sendmail books at http://www.
sendmail.org/books.html.
• Formal sendmail training is available. Some training classes are listed at http://
www.sendmail.org/classes.html.
Using these resources, you should be able to find out more about sendmail than you
will ever need to know. Go exploring!

This is the Title of the Book, eMatter Edition
Copyright © 2007 O’Reilly & Associates, Inc. All rights reserved.
233
Chapter 13
CHAPTER 13
Configuring IPv6
Networks
IPv4 space is becoming scarcer by the day. By 2005, some estimates place the num-
ber of worldwide Internet users at over one billion. Given the fact that many of those
users will have a cellular phone, a home computer, and possibly a computer at work,
the available IP address space becomes critically tight. China has recently requested
IP addresses for each of their students, for a total of nearly 300 million addresses.
Requests such as these, which cannot be filled, demonstrate this shortage. When
IANA initially began allotting address space, the Internet was a small and little-
known research network. There was very little demand for addresses and class A
address space was freely allocated. However, as the size and importance of the Inter-
net started to grow, the number of available addresses diminished, making obtaining
a new IP difficult and much more expensive. NAT and CIDR are two separate
responses to this scarcity. NAT is an individual solution allowing one site to funnel
its users through a single IP address. CIDR allows for a more efficient division of net-
work address block. Both solutions, however, have limitations.
With new electronic devices such as PDAs and cellular phones, which all need IP
addresses of their own, the NAT address blocks suddenly do not seem quite as large.
Researchers, realizing the potential IP shortage, have redesigned the IPv4 protocol so
that it supports 128-bits worth of address space. The selected 128-bit address space
provides 340 trillion possible addresses, an exponential increase that we hope will
provide adequate addressing into the near (and far) future. This is, in fact, enough
addresses to provide every person on Earth with one billion addresses.
Not only does IPv6 solve some of the address space logistics, it also addresses some
configuration and security issues. In this section, we’ll take a look at the current solu-
tions available with Linux and IPv6.

This is the Title of the Book, eMatter Edition
Copyright © 2007 O’Reilly & Associates, Inc. All rights reserved.
234 |Chapter 13: Configuring IPv6 Networks
The IPv4 Problem and Patchwork Solutions
At the beginning, IANA gave requestors an entire class A network space thereby
granting requestors 16.7 million addresses—many more than necessary. Realizing
their error, they began to assign class B networks—again, providing far too many
addresses for the average requestor. As the Internet grew, it quickly became clear
that allocating class A and class B networks to every requestor did not make sense.
Even their later action of assigning class C banks of addresses still squandered
address space, as most companies didn’t require 254 IP addresses. Since IANA could
not revoke currently allocated address space, it became necessary to deal with the
remaining space in a way that made sense. One of these ways was through the use of
Classless Inter-Domain Routing (CIDR).
CIDR
CIDR allows network blocks to be allocated outside of the well-defined class A/B/C
ranges. In an effort to get more mileage from existing class C network blocks, CIDR
allows administrators to divide their address space into smaller units, which can then
be allocated as individual networks. This made it easier to give IPs to more people
because space could be allocated by need, rather than by predefined size-of-space.
For example, a provider with a class C subnet could choose to divide this network
into 32 individual networks, and would use the network addresses and subnet masks
to delineate the boundaries. A sample CIDR notation looks like this:
10.10.0.64/29
In this example, the /29 denotes the subnet mask, which means that the first 29 bits
of the address are the subnet. It could also be noted as 255.255.255.248, which
gives this network a total of six usable addresses.
While CIDR does deal with the problem in a quick and easy way, it doesn’t actually
create more IP addresses, and it does have some additional disadvantages. First, its
efficiency is compromised since each allocated network requires a broadcast IP and a
network address IP. So if a provider breaks a class C block into 32 separate net-
works, a total of 64 individual IPs are wasted on network and broadcast IPs. Second,
complicated CIDR networks are more prone to configuration errors. A router with
an improper subnet mask can cause an outage for small networks it serves.
NAT
Network Address Translation (NAT) provides some relief for the IP address space
dilemma, and without it, we’d currently be well out of usable IP space. NAT pro-
vides a many-to-one translation, meaning that many machines can share the same IP
address. This also provides some privacy and security for the machines behind the
NAT device, since individually identifying them is more difficult. There are also

This is the Title of the Book, eMatter Edition
Copyright © 2007 O’Reilly & Associates, Inc. All rights reserved.
IPv6 as a Solution |235
some disadvantages to NAT—primarily that some older protocols aren’t designed to
handle redirection.
IPv6 as a Solution
In order to combat the shrinking IP space problem, the concept of IPv6 was born.
Future-minded designers chose to have 128 bits of address space, providing for a
total of 340,282,366,920,938,463,463,374,607,431,768,211,456 (3.4 ×1,038)
addresses or, in more visual terms, 655,570,793,348,866,943,898,599 (6.5 ×1,023)
addresses for every square meter of the earth’s surface. This provides a sizable exten-
sion over the current 32-bits of address space under IPv4.
IPv6 Addressing
The first noticeable difference between IPv4 and IPv6 is how the addresses are writ-
ten. A typical IPv6 address looks like:
fe80:0010:0000:0000:0000:0000:0000:0001
There are eight sets of four hex values in every IP address. These addresses can be
long and cumbersome, which is why a shortening method was developed. A single
string of zeroes can be replaced with the double colon. For example, the previous
example could be written in shortened form as.
fe80:0010::1
However, this can be done only one time in an address in order to avoid ambiguity
about what has been removed. Let us consider the following example IP which has
separate strings of zeroes:
2001:0000:0000:a080:0000:0000:0000:0001
Since only one string of zeroes can be replaced, the IP can not be shortened to:
2001::a080::1
Generally, the longest string is shortened. In this example, with the longest set
replaced, the shortened IP is:
2001:0000:0000:a080::1
Within IPv6, there are several different types of addresses that define the various
functions available within the specification:
Link-local address
This address is automatically configured when the IPv6 stack is initialized using
the MAC address from your network card. This kind of address is generally con-
sidered a client-only type of address, and would not be capable of running a
server or listening for inbound connections. Link-local addresses always begin

This is the Title of the Book, eMatter Edition
Copyright © 2007 O’Reilly & Associates, Inc. All rights reserved.
236 |Chapter 13: Configuring IPv6 Networks
with FE8x, FE9x, FEAx,orFEBx, where the x can be replaced with any hex
digit.
Site-local addresses
While a part of the original specification, and still described in various texts, site-
local addresses have been deprecated and are no longer considered to be part of
IPv6.
Global unicast address
This address type is Internet routable and is expected to be the outward facing IP
on all machines. This kind of address is currently identified by its starting digits
of either 2xxx or 3xxx, though this may be expanded in the future as necessary.
IPv6 Advantages
While the most obvious benefit of IPv6 is the dramatically increased address space,
there are several other key advantages that come with it. For example, there are
numerous performance gains with IPv6. Packets can be processed more efficiently
because option fields in the packet headers are processed only when actual options
are present; additional performance gains come from having removed packet frag-
mentation. A second advantage is a boost in security through the inclusion of
embedded IPSec. As it will be part of the protocol, implementation of encryption and
non-repudiation will be more natural. Quality of Service (QoS) is another advantage
that is developing with IPv6. Enabling this functionality would allow network
administrators to prioritize groups of network traffic. This can be critical on net-
works that handle services like Voice over IP because even small network disrup-
tions can make the service less reliable. Finally, advances in address auto-
configuration make on-the-fly networking much easier. Additional benefits will
emerge as adoption and research continue. Hopefully, some of these will come with
advances in Mobile IP technologies that promise to make it possible for any device to
keep the same IP address regardless of its current network connection.
IPv6 Configuration
IPv6 support has come a long way recently and is now supported in nearly all Linux
distributions. It has been a part of the 2.4 kernel for the last few releases and is
included in kernel 2.6.
Kernel and system configuration
Enabling IPv6 support in Linux has become much easier now that it is distributed
with the kernel sources. Patching is no longer necessary, but you will need to install a
set of tools, which will be described later in this section.

This is the Title of the Book, eMatter Edition
Copyright © 2007 O’Reilly & Associates, Inc. All rights reserved.
IPv6 as a Solution |237
If IPv6 support isn’t already built into your kernel, it may already be compiled as a
module. A quick test to see whether or not the module is present can be accom-
plished with the following command:
vlager# modprobe ipv6
vlager#
If there is no response the module was most likely successfully loaded. There are sev-
eral ways to verify that support is enabled. The fastest is by checking the /proc direc-
tory:
vlager# ls -l /proc/net/if_inet6
-r—r—r-- 1 root root 0 Jul 1 12:12 /proc/net/if_inet6
If you have a compatible version of ifconfig, it can also be used to verify:
vlager# ifconfig eth0 |grep inet6
inet6 addr: fe80::200:ef99:f3df:32ae/10 Scope:Link
If these tests are unsuccessful, you will likely need to recompile your kernel to enable
support. The kernel configuration option for IPv6 in the .config file is:
CONFIG_IPV6=m
By using a “make menuconfig,” the option to enable IPv6 under the 2.4 kernel is
found under “Network Options” section. Under the 2.6 kernel configuration, it is
found under “Network Support/Network Options”. It can either be compiled into
the kernel or built as a module. If you do build as a module, remember that you must
modprobe before attempting to configure the interface.
Interface configuration
In order to configure the interface for IPv6 usage, you will need to have IPv6 ver-
sions of the common network utilities. With most Linux distributions now support-
ing IPv6 out of the box, it’s likely that you’ll already have these tools installed. If
you’re upgrading from an older distribution or using Linux From Scratch, you will
probably need to install a package called net-tools, which can be found at various
places on the Internet. You can find the most recent version by searching for “net-
tools” on Google or FreshMeat.
To verify that you have compatible versions, a quick check can be done with either
ifconfig or netstat. The quick check would look like this:
vlager# /sbin/netstat grep inet6
Before proceeding, you’ll also want to make sure you have the various network con-
nectivity checking tools for IPv6, such as ping6,traceroute6, and tracepath6. They are
found in the iputils package and, again, are generally installed by default on most
current distributions. You can search your path to see whether or not these tools are
available and install them if necessary. Should you need to find them, the author has
placed them at ftp://ftp.inr.ac.ru/ip-routing.

This is the Title of the Book, eMatter Edition
Copyright © 2007 O’Reilly & Associates, Inc. All rights reserved.
238 |Chapter 13: Configuring IPv6 Networks
If everything has gone smoothly, your interface will have been auto-configured using
your MAC address. You can check this by using ifconfig:
vlager# ifconfig eth0
eth0 Link encap:Ethernet HWaddr 00:07:E9:DF:32:AE
inet addr:10.10.10.19 Bcast:10.10.10.255 Mask:255.255.255.0
inet6 addr: fe80::207:e9ff:fedf:32ae/10 Scope:Link
UP BROADCAST RUNNING MULTICAST MTU:1500 Metric:1
RX packets:2272821 errors:0 dropped:0 overruns:0 frame:73
TX packets:478473 errors:0 dropped:0 overruns:0 carrier:0
collisions:4033 txqueuelen:100
RX bytes:516238958 (492.3 Mb) TX bytes:54220361 (51.7 Mb)
Interrupt:20 Base address:0x2000
vlager#
The third line in the output displays the link-local address of vlager. It is easy to iden-
tify it as such because any address starting with fe80 will always be a link-local type
IP address. If you are concerned about privacy issues in using your MAC as your
main IP address, or if you are configuring a server and wish to have an easier IP
address, you can configure your own IP address according to the following example:
vlager# ifconfig eth0 inet6 add 2001:02A0::1/64
vlager#
At this point, however, you may not have a global address type to assign, as we’ve
done above. So, your IP may be a link- or site-local address. These will work per-
fectly for any non-Internet routable traffic that you want to pass, but if you wish to
connect to the rest of the world, you will need to have either a connection directly to
the IPv6 backbone or an IPv6 tunnel through a tunnel broker, which we’ll discuss in
the next section.
Establishing an IPv6 Connection via a Tunnel Broker
To join the wonderful world of IPv6 you will need a path through which to connect.
A tunnel is currently the only way to access the IPv6 backbone for most users, as few
sites have direct IPv6 connectivity. Attempting to route IPv6 traffic directly over IPv4
networks won’t get you very far, as the next-hop router will most likely not know
what to do with your seemingly odd traffic. For most users, the easiest path to estab-
lish a tunnel is through a tunnel broker. There are a number of different brokers on
the Internet who will provide you with your very own IPv6 address space. One of the
fastest and most popular tunnel brokers is Hurricane Electric (Figure 13-1), which
has an automated IPv6 tunnel request form. They require only that you have a “ping-
able” IPv4 address that is constantly connected to the Internet. This is the IPv4
address that they will expect to be the source of your tunnel.
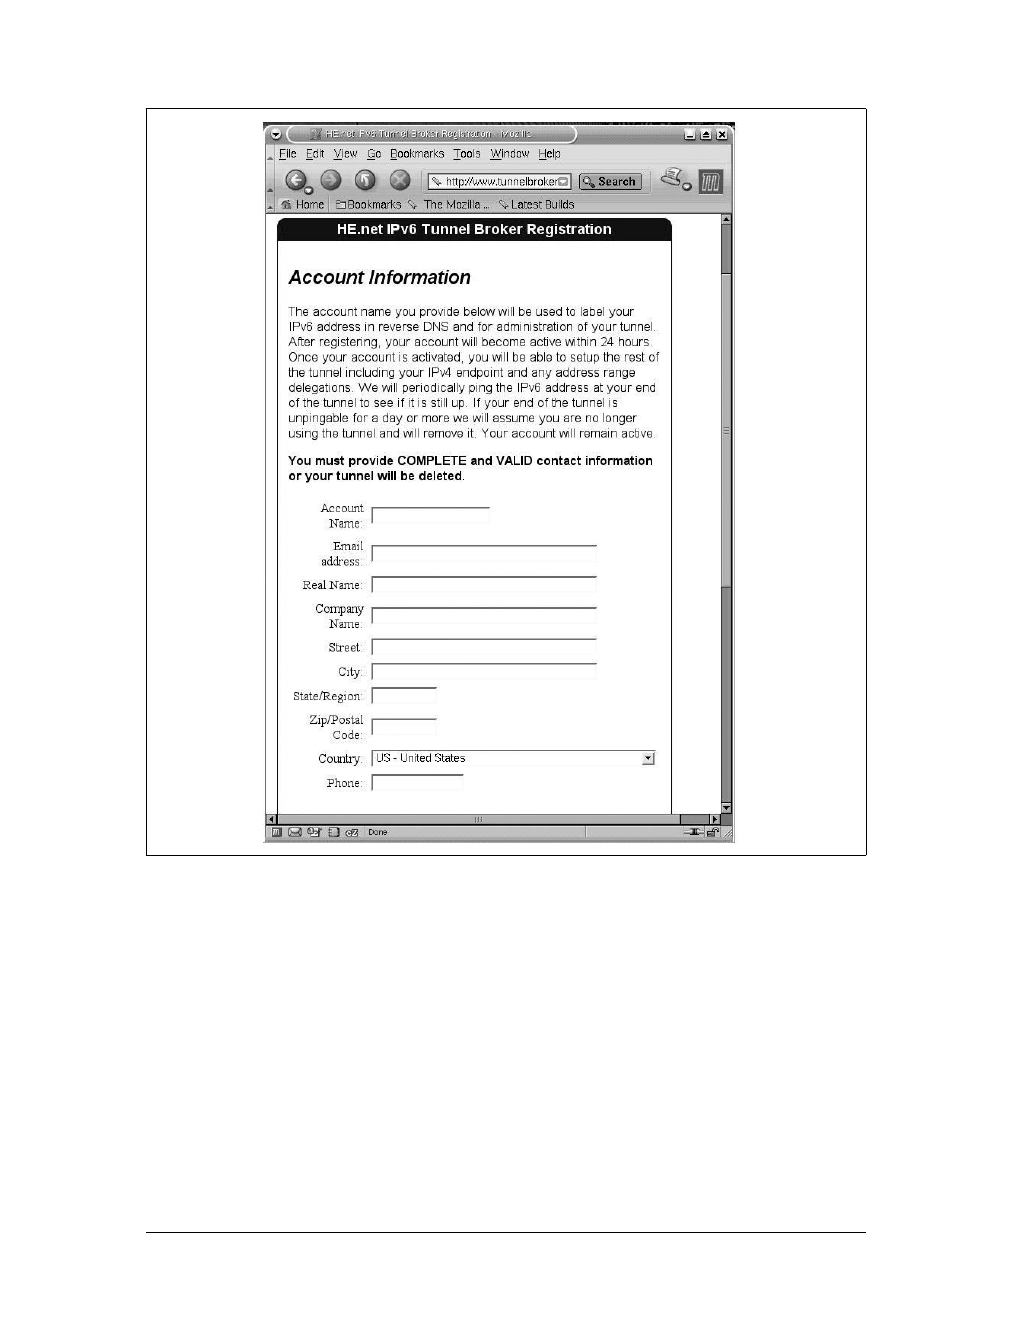
This is the Title of the Book, eMatter Edition
Copyright © 2007 O’Reilly & Associates, Inc. All rights reserved.
IPv6 as a Solution |239
Building your tunnel
Once you have received your IPv6 address space, you’re ready to build your tunnel.
In order to accomplish this, you will need to use the additional Link encapsulation
interfaces that exist after installing the IPv6 module.
To build your tunnel, you will need to configure both the sit0 and sit1 interfaces.
The sit interfaces are considered virtual adapters, because they do not directly repre-
sent hardware in your system. However, from a software perspective, these will be
treated in almost the same way any other interface is treated. We will direct and
route traffic through them. The sit virtual interfaces allow you to map your IPv4
address to an IPv6 address, and then create an IPv6 interface on your machine. This
Figure 13-1. Obtaining a tunnel from he.net

This is the Title of the Book, eMatter Edition
Copyright © 2007 O’Reilly & Associates, Inc. All rights reserved.
240 |Chapter 13: Configuring IPv6 Networks
process is started by enabling the sit0 interface and assigning it your IPv4 address.
For this example, 10.10.0.8 is the tunnel broker’s IPv4 endpoint, and 2001:FEFE:
0F00::4B is vlager’s IPv6 tunnel endpoint IP address.
vlager# ifconfig sit0 up
vlager# ifconfig sit0 inet6 tunnel ::10.10.0.8
This step enables the sit0 interface and binds it to the tunnel broker’s IPv4 address.
The next step is to assign your IPv6 address to the sit1 interface. That is accom-
plished with the following commands:
vlager# ifconfig sit1 up
vlager# ifconfig sit1 inet6 add 2001:FEFE:0F00::4B/127
The tunnel should now be operational. However, in order to test, you will need to
route IPv6 traffic to the sit1 interface. This is most easily handled by using route.
vlager$ route -A inet6 add ::/0 dev sit1
This command tells the OS to send all IPv6 traffic to the sit1 device. With the route
in place, you should now be able to verify your IPv6. The connectivity can now be
tested by using ping6. In this example, we will ping the IPv6 address of the remote
side of our newly created tunnel.
vlager# ping6 2001:470:1f00:ffff::3a
PING 2001:470:1f00:ffff::3a(2001:470:1f00:ffff::3a) 56 data bytes
64 bytes from 2001:470:1f00:ffff::3a: icmp_seq=1 ttl=64 time=26.2 ms
64 bytes from 2001:470:1f00:ffff::3a: icmp_seq=2 ttl=64 time=102 ms
64 bytes from 2001:470:1f00:ffff::3a: icmp_seq=3 ttl=64 time=143 ms
64 bytes from 2001:470:1f00:ffff::3a: icmp_seq=4 ttl=64 time=130 ms
Ctrl-c
--- 2001:470:1f00:ffff::3a ping statistics ---
4 packets transmitted, 4 received, 0% packet loss, time 3013ms
rtt min/avg/max/mdev = 26.295/100.590/143.019/45.339 ms
vlager#
At this point, you now have a system configured to a pubic IPv6 net-
work. You can see the whole IPv6 world, and they can see you. It is
important to note that at this point you should verify exactly which
services are listening, and that they are patched and not exploitable.
While IPv6 netfilter support is under development, it may not be sta-
ble enough to rely on.
IPv6-Aware Applications
There are currently quite a few IPv6-aware applications that are also commonly in
use on the IPv4 networks. Among the more popular are the Apache web server and
OpenSSH. In this section, we’ll detail common configuration for enabling IPv6
within these applications.

This is the Title of the Book, eMatter Edition
Copyright © 2007 O’Reilly & Associates, Inc. All rights reserved.
IPv6 as a Solution |241
Apache web server
Although Apache v1.3 is commonly used due to its stability, it does not support IPv6
without source code modification. Should you absolutely need v1.3 and IPv6 sup-
port, IPv6 patches do exist, but they are unsupported and likely untested. There has
been a great deal of discussion about whether to include official IPv6 support in the
stable v1.3, and the general consensus has been to leave v1.3 alone and use v2.0 for
the continued support and development of Apache’s IPv6 support. The Apache web
server Versions 2.0 and higher support IPv6 without modification. Therefore, we will
focus on this version in this section.
Configuring Apache v2.0.x for IPv6 support
The configuration of Apache with IPv6 is fairly straightforward. The build process
requires no special options and can be installed from either source or RPM. One
option that can be set at compile time that may be of interest to IPv6 users is -enable-
v4-mapped tag. This is most often the default in pre built packages. It enables you to
have a line with a general Listen directive such as:
Listen 80
This will bind the web server process to all available IP addresses. Administrators of
IPv6 systems may find this behavior insecure and inefficient, as unnecessary sockets
will be opened for the large number of default IPv6 addresses. It is for this reason
that you can use -disable-v4-mapped when compiling and force explicit configura-
tion of listening interfaces. With this option disabled, you can still have interfaces lis-
ten on all ports, but you must specify to do so.
When the server is compiled and installed as you wish, a single change to the config-
uration file is required to enable a listener. This step is very similar to the IPv4 con-
figuration of Apache. To enable a web listener on vlager’s IPv6 IP, the following
change to the apache.conf file is required:
Listen [fec0:ffff::2]:80
Once Apache is started, it opens up a listener on port 80 on the specified IP. This can
be verified through the use of netstat:
vlager# netstat -aunt
Active Internet connections (servers and established)
Proto Recv-Q Send-Q Local Address Foreign Address State
tcp 0 0 10.10.0.4:22 0.0.0.0:* LISTEN
tcp 0 0 fec0:ffff::2:80 :::* LISTEN
vlager#
The second entry in the table is the IPv6 apache listener, and it is noted in exactly the
same format as the IPv4 addresses.

This is the Title of the Book, eMatter Edition
Copyright © 2007 O’Reilly & Associates, Inc. All rights reserved.
242 |Chapter 13: Configuring IPv6 Networks
If you would like to have your Apache server listen on all available IPv6 addresses, a
slightly different configuration option can be used:
Listen [::]:80
This is very similar to the 0.0.0.0 address used to accomplish the same thing in IPv4.
To enable listeners on ports other than 80, either replace the existing port number or
add additional Listen lines. For a more detailed discussion of Apache, please refer to
Chapter 14.
OpenSSH
The OpenSSH project has been compatible with IPv6 since its early days, and sup-
port within the program is now considered mature. It is also quite easy to configure.
No additional options need to be passed during compile time, so installing from
binary package will cause no problems.
This section assumes that you have OpenSSH operational under IPv4 and know
where your configuration files are installed. In our case, the configuration files are
installed in /etc/ssh. To add an IPv6 listener, we need to add a line to the sshd_config
file:
ListenAddress fec0:ffff::2
Port 1022
When OpenSSH is restarted with the -6 command-line option, it will now be listen-
ing on our IPv6 address at port 1022.
Accessing IPv6 hosts with the OpenSSH client is also quite easy. It is only necessary
to specify the -6 command-line option as follows:
othermachine$ ssh -6 fec0:ffff::2 -p 1022
bob@fec0:ffff::2's password:
bob@vlager $
That’s really all there is to configuring OpenSSH for IPv6 usage. At this point you
should have a server with an OpenSSH IPv6 listener and be able to use ssh to con-
nect to other machines on the IPv6 network. If not, please see the “Troubleshoot-
ing” section, next.
Troubleshooting
As IPv6 networking is often uncharted territory, it is not uncommon for things to go
wrong. One of the most common mistakes made when dealing with IPv6 initially
involves the address notation. The change from the period to the colon for subset
separation can cause errors, as most administrators’ hands are used to reaching for
the period. A second notation problem when writing out addresses comes with
shortening them. As discussed earlier in the section, when omitting series of zeroes, a
double colon is used. Should you forget the double colon, the machine will generate
an error informing you that you have entered an incomplete IP address. Here are
some examples of incorrect IPv6 notation:

This is the Title of the Book, eMatter Edition
Copyright © 2007 O’Reilly & Associates, Inc. All rights reserved.
IPv6 as a Solution |243
fe80.ffff.0207.3bfe.0ddd.bbfe.02
3ffe:0001:fefe:5
2001:fdff::0901::1
If the problem is more severe, and you’re not seeing the IPv6 stack at all, you should
review your kernel configuration. If you’ve compiled support for IPv6 directly into
the kernel, check your system log and see if you’re receiving any errors when it
attempts to load. A successful IPv6 installation will yield the following message at
boot time:
NET4: Linux TCP/IP 1.0 for NET4.0
IP Protocols: ICMP, UDP, TCP
IP: routing cache hash table of 4096 buckets, 32Kbytes
TCP: Hash tables configured (established 32768 bind 65536)
NET4 Unix domain sockets 1.0/SMP for Linux NET4.0.
IPv6 v0.8 for NET4.0
IPv6 over IPv4 tunneling driver
This section shows the network stack initialization, and the last two lines are spe-
cific to IPv6. If you don’t see these two lines, or see an error, you need to check your
kernel configuration file and perhaps consider building IPv6 as a module.
If you’ve built IPv6 support as a module, make sure you have it configured to load
automatically. There are as many ways to do this as there are Linux distributions, so
consult your distribution’s documentation for specific details.
When properly loaded, the module should appear when you enter the lsmod com-
mand.
vlager# lsmod |grep ipv6
Module Size Used by Not tainted
ipv6 162132 -1
When loading the module, you should also see the following lines in your system
log:
Jul 7 16:13:43 deathstar kernel: IPv6 v0.8 for NET4.0
Jul 7 16:13:43 deathstar kernel: IPv6 over IPv4 tunneling driver
If you are confident that your IPv6 stack has installed properly, and you are able to
send traffic on your local LAN but cannot send traffic through your IPv6 tunnel,
check your IPv4 connectivity. The first step in this process would be double-check-
ing the IPv4 tunnel addresses specified in the sit0 configuration. If the configuration
is accurate, test the remote IPv4 endpoint. The inability to send IPv4 traffic to the
tunnel endpoint IP will also prevent you from sending any IPv6 traffic.
Other connectivity issues could be the result of a misconfigured firewall. If you have
decided to use Netfilter for IPv6, make certain that your firewall rules are accurate by
attempting to send traffic both with and without your rules enabled. It is possible
that there may be problems within Netfilter for IPv6 that prevent certain configura-
tions from working properly.

This is the Title of the Book, eMatter Edition
Copyright © 2007 O’Reilly & Associates, Inc. All rights reserved.
244
Chapter 14
CHAPTER 14
ConfiguringtheApache
Web Server
One of the most widely used software packages under Linux currently is the Apache
web server. Starting in 1995 as small group of developers, the Apache Software foun-
dation incorporated in 1999 to develop and support the Apache HTTP server. With
a base of more than 25 million operational Internet web servers, Apache’s HTTP
server is known for its flexibility and performance benefits. In this section, we will
explore the basics of building and configuring an Apache HTTP server and examine
some options that will assist in the security and performance of its operation. In this
chapter, we’ll be looking at Apache v1.3, which is currently the most widely
deployed and supported version.
Apache HTTPD Server—An Introduction
Apache is in itself just a simple web server. It was designed with the goal of serving
web pages. Some commercial web servers have tried to pack many different features
into a web server product, but such combination products tend to be open to sub-
stantial numbers of security vulnerabilities. The simplicity and modular design of the
Apache HTTPD server brings a more secure product, and its track record especially
when compared to other web servers shows it to be a stable and robust product.
This is not to say that Apache servers are incapable of providing dynamic content to
users. There are many Apache modules that can be integrated to provide an almost
infinite number of new features. Add-on products, such as PHP and mod_perl, can
be used to create powerful web applications and generate dynamic web content. This
chapter, however, will concentrate on the configuration of Apache itself. Here, we
will discuss how to build and configure an Apache HTTPD web server and look at
the different options that can be used to build a stable and secure web server.
Configuring and Building Apache
If your Linux distribution does not currently have Apache, the easiest way to get it is
from one of the many Apache mirror sites. A list can be found at the main Apache

This is the Title of the Book, eMatter Edition
Copyright © 2007 O’Reilly & Associates, Inc. All rights reserved.
Configuring and Building Apache |245
Software Foundation site, http://www.apache.org. At present, there are two branches
of the Apache HTTPD version tree, 1.3 and 2.0. The new version tree, v2.0 offers
new features and is being actively developed, but is more likely to be susceptible to
bugs and vulnerabilities. In this chapter, we will be using the most recent version of
the 1.3 branch because of its proven reliability and stability. Many of the configura-
tion options, however, are similar in both versions.
Getting and Compiling the Software
You have the option of obtaining Apache in either source format or package format.
If you are installing from package, you will not have the same amount of initial con-
figuration flexibility as you would building from source. Packages generally come
with the most common options pre-built into the binaries. If you are looking for spe-
cific features or options or if you want to build a very minimal version of the server,
you should consider building from source.
Building Apache from source is similar to building other Linux source packages and
follows the “configure-make-make install” path. Apache has many options that need
to be set at source configuration time. Among these is the ability to select the mod-
ules which you would like to build or have disabled. Modules are a great way to add
or remove functionality to your web server and cover a wide range of functions—
from performance to authentication and security. Table 14-1 shows a sample list
taken from the Apache documentation of a number of the available modules.
Table 14-1. Apache modules
Type
Enabled or disabled
by default Function
Environment creation
mod_env Enabled Set environment variables for CGI/SSI scripts
mod_setenvif Enabled Set environment variables based on HTTP headers
mod_unique_id Disabled Generate unique identifiers for request
Content-type decisions
mod_mime Enabled Content type/encoding determination (configured)
mod_mime_magic Disabled Content type/encoding determination (automatic)
mod_negotiation Enabled Content selection based on the HTTP Accept* headers
URL mapping
mod_alias Enabled Simple URL translation and redirection
mod_rewrite Disabled Advanced URL translation and redirection
mod_userdir Enabled Selection of resource directories by username
mod_spelling Disabled Correction of misspelled URLs
Directory handling
mod_dir Enabled Directory and directory default file handling
mod_autoindex Enabled Automated directory index file generation

This is the Title of the Book, eMatter Edition
Copyright © 2007 O’Reilly & Associates, Inc. All rights reserved.
246 |Chapter 14: Configuring the Apache Web Server
When you have decided which options to use, you can add them to the configure
script as follows. To enable a module, use:
vlager# ./configure -enable-module=module_name
Access control
mod_access Enabled Access control (user, host, and network)
mod_auth Enabled HTTP basic authentication (user and password)
mod_auth_dbm Disabled HTTP basic authentication via UNIX NDBM files
mod_auth_db Disabled HTTP basic authentication via Berkeley DB files
mod_auth_anon Disabled HTTP basic authentication for anonymous-style users
mod_digest Disabled Digest authentication
HTTP response
mod_headers Disabled Arbitrary HTTP response headers (configured)
mod_cern_meta Disabled Arbitrary HTTP response headers (CERN-style files)
mod_expires Disabled Expires HTTP responses
mod_asis Enabled Raw HTTP responses
Scripting
mod_include Enabled Server Side Includes (SSI) support
mod_cgi Enabled Common Gateway Interface (CGI) support
mod_actions Enabled Map CGI scripts to act as internal “handlers”
Internal content handlers
mod_status Enabled Content handler for server runtime status
mod_info Disabled Content handler for configuration summary
Request logging
mod_log_config Enabled Customizable logging of requests
mod_log_agent Disabled Specialized HTTP User-Agent logging (deprecated)
mod_log_referer Disabled Specialized HTTP Referrer logging (deprecated
mod_usertrack Disabled Logging of user click-trails via HTTP cookies
Miscellaneous
mod_imap Enabled Server-side image map support
mod_proxy Disabled Caching proxy module (HTTP, HTTPS, FTP)
mod_so Disabled Dynamic Shard Object (DSO) bootstrapping
Experimental
mod_mmap_static Disabled Caching of frequently served pages via mmap()
Developmental
mod_example Disabled Apache API demonstration (developers only)
Table 14-1. Apache modules (continued)
Type
Enabled or disabled
by default Function

This is the Title of the Book, eMatter Edition
Copyright © 2007 O’Reilly & Associates, Inc. All rights reserved.
Configuration File Options |247
To disable a default module, you can use the following command:
vlager# ./configure -disable-module=module_name
If you choose to enable or disable any of the default modules, make sure you under-
stand exactly what that modules does. Enabling or disabling certain modules can
adversely affect performance or security. More information about the specific mod-
ules can be found on the Apache web site.
The next step after configuration is to compile the entire package. Like many other
Linux programs, this is accomplished by the make command. After you have com-
piled, make install will install Apache in the directory you specified via the -prefix=
option at configuration time.
Configuration File Options
When the Apache software has been installed in the directory you have selected, you
are ready to begin configuration of the server. Earlier versions of the Apache server
used multiple configuration files. However, now only the httpd.conf file is required. It
is still quite handy to have multiple configuration files (for example, to make version
upgrades easier). The include option will allow you to read additional configuration
files from the main httpd.conf file.
Apache comes with a default configuration file that has the most common options
set. If you are in a hurry to have your server running, this default configuration
should cover the requirements to launch Apache. While functional, this configura-
tion is not acceptable to many administrators. To begin fine-tuning the configura-
tion, the first option most administrators choose is selecting the IP address and port
information of the server.
Binding Addresses and Ports
Listen and BindAddress are the first two options that you may want to change.
# Listen: Allows you to bind Apache to specific IP addresses and/or
# ports, instead of the default. See also the <VirtualHost>
# directive.
#
#Listen 3000
Listen 172.16.0.4:80
This configuration change enables the Apache server to listen only on the specified
interface and port. You can also use the BindAddress option to specify the IP address
to which the server will bind. With this option, you are only specifying the IP
address, not the port as above.
# BindAddress: You can support virtual hosts with this option. This directive
# is used to tell the server which IP address to listen to. It can either
# contain "*", an IP address, or a fully qualified Internet domain name.

This is the Title of the Book, eMatter Edition
Copyright © 2007 O’Reilly & Associates, Inc. All rights reserved.
248 |Chapter 14: Configuring the Apache Web Server
# See also the <VirtualHost> and Listen directives.
#
BindAddress 172.16.0.4
Logging and Path Configuration Options
When building Apache, you may have specified the installation directory. If so, the
installation has automatically set the paths for your server root documents and all of
your logfiles. If you need to change this, the following options will be useful:
ServerRoot
The location of the server’s main configuration and logfiles
DocumentRoot
The location of your HTML documents, or other web content
By default, Apache will log to a path under its main server root path. If you have a
different place on your system where you collect logs and would like to change the
logfile paths, the following options will require changes:
CustomLog
The location of your access logfile
ErrorLog
The location of your error logfile
There are also some other useful options that can be set when configuring the log-
ging settings on Apache:
HostnameLookups
Tells Apache whether it should look up names for logged IP addresses. It is a
good idea to leave this setting turned off, since logging can be slowed if the
server is attempting to resolve all names.
LogLevel
This option tells Apache how much information it should save to the logfiles. By
default it is set at warn, but possible values are debug,info,notice,warn,error,
crit,alert, and emerg. Each increasing level logs less information.
LogFormat
With this option, administrators can choose which format the logs are written
in. Items such as date, time, and IP address can be rearranged to any format
desired. The default settings are usually not changed.
Server Identification Strings
By default, Apache is very friendly and will provide requesting users with a great deal
of information about itself, including version information, virtual hostname, admin-
istrator name, and so on. Security conscious administrators may wish to disable this
information, as it allows attackers a much quicker way of enumerating your server.

This is the Title of the Book, eMatter Edition
Copyright © 2007 O’Reilly & Associates, Inc. All rights reserved.
Configuration File Options |249
While it is not a foolproof method of protecting your site, it can slow down would-
be attackers who use automated scanning tools. The following two configuration
options can help you limit the amount of information your server discloses:
ServerSignature
With this option turned on, the server adds a line to server-generated pages that
includes all of its version information.
ServerTokens
Setting this option to Prod will prevent Apache from ever disclosing its version
number.
Performance Configuration
Sites will always have different performance requirements. For many sites, the
default settings provided with Apache will deliver all the required performance.
However, busier sites will need to make some changes to the configuration to
increase performance capabilities. The following options can be used in perfor-
mance tuning a server. More information on Apache performance tuning can be
found at the Apache Software Foundation’s web site.
Timeout
The number of seconds before Apache will timeout receive and send requests.
KeepAlive
Enable this option if you want persistent connections enabled. It can be set to
either on or off.
MaxKeepAliveRequests
Set this option to the number of keep-alive requests that you want the server to
allow in persistent connections. Having a higher value here may increase perfor-
mance.
KeepAliveTimeout
This is the number of seconds that Apache will wait for a new request from the
current connected session.
Min/MaxSpareServers
These options are used to create a pool of spare servers that Apache can use
when it is busy. Larger sites may wish to increase these numbers from their
defaults. However, for each spare server, more memory is required on the server.
StartServers
This option tells Apache how many servers to start when first launched.
MaxClients
This is the option an administrator can use to limit the number of client sessions
to a server. The Apache documentation warns about setting this option too low
because it can adversely affect availability.

This is the Title of the Book, eMatter Edition
Copyright © 2007 O’Reilly & Associates, Inc. All rights reserved.
250 |Chapter 14: Configuring the Apache Web Server
Starting and Stopping Apache with apachectl
If you are feeling confident that your server is configured, and you’re ready to run it,
you will need to use apachectl, a tool provided with Apache that allows for the safe
startup and shutdown of the server. The available options of apachectl are as follows:
start
Starts the standard HTTP server
startssl
Starts the SSL servers in addition to the regular server
stop
Shuts down the Apache server
restart
Sends a HUP signal to the running server
fullstatus
Prints out a full status of the web server, but requires mod_status
status
Displays a shorter version of the above status screen. Requires mod_status
graceful
Sends a SIGUSR1 to the Apache server
configtest
Inspects the configuration file for errors
While it’s not mandatory to start Apache with apachectl, it is the recommended and
easiest way to do so. apachectl makes shutting down the server processes quicker and
more efficient, as well.
VirtualHost Configuration Options
One of the more powerful features of Apache is the ability to run multiple web serv-
ers on one machine. This functionality is accomplished using the VirtualHost
functionality found within the httpd.conf file. There are two types of virtual hosts
that can be configured—named virtual hosts and IP virtual hosts. With named vir-
tual hosts, you can host multiple TLDs on a single IP, while with IP virtual hosting,
you can host only one virtual host per IP address. In this section, we will give exam-
ples of each, and list some common configuration options.
IP-Based Virtual Hosts
For those who have only one site to host or have multiple IPs for all sites they wish to
run, IP-based virtual hosting is the best configuration choice. Consider the following
example where the Virtual Brewery decides to host a web site for its Virtual

This is the Title of the Book, eMatter Edition
Copyright © 2007 O’Reilly & Associates, Inc. All rights reserved.
VirtualHost Configuration Options |251
Vineyard. The following is the minimum amount of configuration that would need
to be added to the httpd.conf file in order to create the new web site.
Listen www.virtualvineyard.com:80
.
.
<VirtualHost www.virtualvineyard.com>
ServerAdmin webmaster@vbrew.com
DocumentRoot /home/www/virtualvineyard.com
ServerName www.virtualvineyard.com
ErrorLog /var/www/logs/vvineyard.error_log
TransferLog /var/www/logs/vvineyard.access_log
</VirtualHost>
You would also want to make sure that www.virtualvinyard.com was added to your
/etc/hosts file. This is done because Apache will need to look up an IP address for
this domain when it starts. You can rely entirely on your DNS, but should your DNS
server be unavailable for some reason when the web server restarts, your web server
will fail. Alternately, you can hardcode the IP address of your server at the beginning
of the configuration in the <VirtualHost> tag. Doing so may seem more efficient,
however, should you wish to change your web server IP address, it will require
changing your Apache configuration file.
In addition to the configuration options listed in the example, any of the options dis-
cussed earlier in the chapter can be added to the VirtualHost groups. This provides
you with maximum flexibility for each of your separate web servers.
Name-Based Virtual Hosting
The configuration of name-based virtual hosting is very similar to the previous exam-
ple, with the exception that multiple domains can be hosted on a single IP address.
There are two caveats to this functionality. The first—perhaps the biggest draw-
back—is that SSL can be used only with a single IP address. This is not a problem
with Apache, but rather with SSL and the way certificates work. The second poten-
tial drawback is that some older web browsers, such as those without the HTTP 1.1
specification, will not work. This is because name-based virtual hosting relies on the
client to inform the server in the HTTP request header of the site they wish to visit.
Nearly any browser released within the past few years, however, will have HTTP 1.1
implemented, so this isn’t a problem for most administrators.
Proceeding to an example configuration, we will use the same example given earlier
in the chapter, except this time the Virtual Brewery has only one public IP address.
You will first need to inform Apache that you are using named virtual hosting, and
then provide the detail on your sites as is shown in this example.
NameVirtualHost 172.16.0.199
<VirtualHost 172.16.0.199>
ServerName www.vbrew.com
DocumentRoot /home/www/vbrew.com

This is the Title of the Book, eMatter Edition
Copyright © 2007 O’Reilly & Associates, Inc. All rights reserved.
252 |Chapter 14: Configuring the Apache Web Server
</VirtualHost>
<VirtualHost 172.16.0.199>
ServerName www.virtualvineyard.com
DocumentRoot /home/www/vvineyard.com
</VirtualHost>
For the sake of clarity, the additional options were omitted, but any of the previ-
ously discussed options can be added as necessary.
Apache and OpenSSL
After having configured and tested your Apache web server configuration, the next
thing you may wish to do is configure an SSL page. From protecting web-based email
clients, to providing secure e-commerce transactions, there are many reasons why
one would use SSL. Within the Apache realm there are two options for providing
SSL, Apache-SSL and mod_ssl. In this section, we’ll focus on the older and more
commonly used mod_ssl.
As with any SSL-based application, certificates are required. These provide the basis
on which the trust relationship between client and server is established. This being
said, if you are hosting a site for a business, you will likely want to get a certificate
signed by a third party, such as Verisign or Thawte. Since these certificates are some-
what costly, if you aren’t hosting a business, you also have the option of generating
your own certificate. The disadvantage of this method is that when clients access
your site, an error will be generated telling them that your certificate is not trusted
since it hasn’t been signed by a third party. This means that they will be required to
click through the error message and decide whether or not they want to trust your
certificate. In this chapter we will provide configuration examples for administrators
generating their own certificates. Alternately, the cacert.org organization offers free
certificates for individuals.
Generating an SSL Certificate
In order to enable an SSL session, you will first need to create a certificate. To do this,
you will need to make sure you have OpenSSL installed. It can be found at http://
www.openssl.org, in both source and binary package format. This package comes
installed with many Linux distributions, so you may not have to install it. Once you
have installed or verified the installation of OpenSSL, you can proceed to create the
required SSL certificate.
The first step in this process is to create a certificate signing request. You will need to
enter a temporary PEM pass phrase and some information about your site:
vlager# openssl req -config openssl.cnf -new -out vbrew.csr
Using configuration from openssl.cnf
Generating a 1024 bit RSA private key
...............................++++++

This is the Title of the Book, eMatter Edition
Copyright © 2007 O’Reilly & Associates, Inc. All rights reserved.
Apache and OpenSSL |253
....++++++
writing new private key to 'privkey.pem'
Enter PEM pass phrase:
Verifying password - Enter PEM pass phrase:
-----
You are about to be asked to enter information that will be incorporated
into your certificate request.
What you are about to enter is what is called a Distinguished Name or a DN.
There are quite a few fields but you can leave some blank
For some fields there will be a default value,
If you enter '.', the field will be left blank.
-----
Country Name (2 letter code) [AU]:US
State or Province Name (full name) [Some-State]:California
Locality Name (eg, city) [ ]:Berkeley
Organization Name (eg, company) [Internet Widgits Pty Ltd]:www.vbrew.com
Organizational Unit Name (eg, section) [ ]:
Common Name (eg, YOUR name) [ ]:www.vbrew.com
Email Address [ ]:webmaster@vbrew.com
Please enter the following 'extra' attributes
to be sent with your certificate request
A challenge password [ ]:
An optional company name [ ]:
The next step is to remove the private key PEM pass phrase from your certificate.
This will allow the server to restart without having to input the password. For para-
noid administrators, this step can be bypassed, but should your server fail at any
point, you will have to manually restart it.
vlager # openssl rsa -in privkey.pem -out vbrew.key
read RSA key
Enter PEM pass phrase:
writing RSA key
Having separated the pass phrase, you will now need to self-sign your certificate file.
This is accomplished using the x509 option with OpenSSL:
apache ssl # openssl x509 -in vbrew.csr -out vbrew.cert -req -signkey vbrew.key -days
365
Signature ok
subject=/C=US/ST=California/L=Berkeley/O=www.vbrew.com/CN=www.vbrew.com/
Email=webmaster@vbrew.com
Getting Private key
Once this has been completed, your certificate is ready for use. You should copy the
certificate files to your Apache directory so the web server can access them.
Compiling mod_ssl for Apache
If you compiled Apache from source as in the earlier example in the chapter, you will
need to patch the Apache source and recompile in order to use mod_ssl. If you
installed Apache from a binary package for your Linux distributions, then there’s a

This is the Title of the Book, eMatter Edition
Copyright © 2007 O’Reilly & Associates, Inc. All rights reserved.
254 |Chapter 14: Configuring the Apache Web Server
good chance that it is already compiled in. To see whether you need to recompile,
check which modules are built into Apache by using the following command:
vlager # /var/www/bin/httpd -l
Compiled-in modules:
http_core.c
mod_env.c
mod_log_config.c
mod_mime.c
mod_negotiation.c
mod_status.c
mod_include.c
mod_autoindex.c
mod_dir.c
mod_cgi.c
mod_asis.c
mod_imap.c
mod_actions.c
mod_userdir.c
mod_alias.c
mod_access.c
mod_auth.c
mod_setenvif.c
In this case, mod_ssl is not present, so we will have to download and compile it into
our Apache server. Fortunately, this isn’t as difficult as it might sound. The source
for mod_ssl can be found at http://www.modssl.org. You will need to unpack it along
with the source to OpenSSL. For ease, we have put all three source trees under the
same directory. When you have everything unpacked, you are ready to continue.
First, you will need to configure the build of mod_ssl:
vlager # ./configure --with-apache=../apache_1.3.28 --with-openssl=../openssl-0.9.6i
Configuring mod_ssl/2.8.15 for Apache/1.3.28
+ Apache location: ../apache_1.3.28 (Version 1.3.28)
+ Auxiliary patch tool: ./etc/patch/patch (local)
+ Applying packages to Apache source tree:
o Extended API (EAPI)
o Distribution Documents
o SSL Module Source
o SSL Support
o SSL Configuration Additions
o SSL Module Documentation
o Addons
Done: source extension and patches successfully applied.
Now, assuming that you built your OpenSSL from source and it is in line with your
Apache source directory, you can configure and build Apache as follows:
vlager # cd ../apache_1.3.28
vlager # SSL_BASE=../openssl-0.9.6i ./configure -prefix=/var/www --enable-module=ssl
Configuring for Apache, Version 1.3.28
+ using installation path layout: Apache (config.layout)
Creating Makefile
Creating Configuration.apaci in src

This is the Title of the Book, eMatter Edition
Copyright © 2007 O’Reilly & Associates, Inc. All rights reserved.
Apache and OpenSSL |255
Creating Makefile in src
+ configured for Linux platform
+ setting C pre-processor to gcc -E
+ using "tr [a-z] [A-Z]" to uppercase
+ checking for system header files
+ adding selected modules
o ssl_module uses ConfigStart/End
+ SSL interface: mod_ssl/2.8.15
+ SSL interface build type: OBJ
+ SSL interface compatibility: enabled
+ SSL interface experimental code: disabled
+ SSL interface conservative code: disabled
+ SSL interface vendor extensions: disabled
+ SSL interface plugin: Built-in SDBM
+ SSL library path: /root/openssl-0.9.6i
+ SSL library version: OpenSSL 0.9.6i Feb 19 2003
+ SSL library type: source tree only (stand-alone)
+ enabling Extended API (EAPI)
+ using system Expat
+ checking sizeof various data types
+ doing sanity check on compiler and options
Creating Makefile in src/support
Creating Makefile in src/regex
Creating Makefile in src/os/unix
Creating Makefile in src/ap
Creating Makefile in src/main
Creating Makefile in src/modules/standard
Creating Makefile in src/modules/ssl
When the source configuration has completed, you can now rebuild Apache with
make install. You can also repeat the httpd -l command used above to verify that
mod_ssl has been compiled into Apache.
Configuration File Changes
Only a few minor changes are required. The easiest way to enable SSL within Apache
is by using the Virtual Host directives discussed earlier. However, first, outside of the
Virtual Host section, at the end of your configuration file, you will need to add the
following SSL directives:
SSLRandomSeed startup builtin
SSLSessionCache None
Now you need to build your VirtualHost configuration to enable the SSL engine.
Again, in the httpd.conf file, add the following lines:
<VirtualHost www.vbrew.com:443>
SSLEngine On
SSLCipherSuite ALL:!ADH:!EXPORT56:RC4+RSA:+HIGH:+MEDIUM:!SSLv2:+EXP:+eNULL
SSLCertificateFile conf/ssl/vbrew.cert
SSLCertificateKeyFile conf/ssl/vbrew.key
</VirtualHost>

This is the Title of the Book, eMatter Edition
Copyright © 2007 O’Reilly & Associates, Inc. All rights reserved.
256 |Chapter 14: Configuring the Apache Web Server
This section enabled the SSLEngine and configured the cipher suites. You can select
which you would like to allow or disallow. The “!” is used for entries that are explic-
itly disallowed, and the “+” is for those that are allowed. If you have stored your cer-
tificates in any other directory, you will need to make the necessary changes to the
SSLCertificateFile and KeyFile entries. For more information about the options avail-
able with mod_ssl, consult the documentation found on the mod_ssl web site.
Troubleshooting
As complex as Apache configurations can be, it’s not unlikely that there will be prob-
lems. This section will address some common errors and resolutions to those prob-
lems.
Testing the Configuration File with apachectl
Fortunately for administrators, Apache comes with a configuration checker, which
will test changes made to the configuration before bringing down an operational
server. If it finds any errors, it will provide you with some diagnostic information.
Consider the following example:
vlager # ../bin/apachectl configtest
Syntax error on line 985 of /var/www/conf/httpd.conf:
Invalid command 'SSLEgine', perhaps mis-spelled or defined by a module not included
in the server configuration
The configuration testing tool has found an error on line 985, and it appears that the
SSLEngine directive was spelled incorrectly. This configuration checker will catch
any syntactical errors, which certainly helps. Administrators should always run this
before stopping and restarting their servers.
The configtest option won’t solve all of your problems, however. Transposed digits
in an IP, a misspelled domain name, or commented out requirements will all pass the
test, but cause problems for the operational server.
Page Not Found Errors
This is a very general error, and a variety of circumstances can cause it. This is
Apache’s way of telling you that it can’t find or read the page. If you are getting an
error of this nature, first check all of your paths. Remember with Apache, you are
operating within a virtual directory environment. If you have links to files outside of
this structure, it is likely that the server will not be able to server them. Additionally,
you should verify the permissions of the files and make sure that the user who owns
the web server process can read them. Files owned by root, or any other user, set to
mode 700 (read/write/execute user) may cause the server to fail, since it will be
unable to read them.

This is the Title of the Book, eMatter Edition
Copyright © 2007 O’Reilly & Associates, Inc. All rights reserved.
Troubleshooting |257
Pathnames, along with domain names, are often misspelled. While configtest may
catch some of them, it is unlikely that it will catch all of them. One typo can cause a
whole site to fail. Double-check everything if you are having a problem.
SSL problems
If your SSL server isn’t working, there are a number of things that could have gone
wrong. If your server isn’t delivering the pages, you should check the error_log file. It
will often provide you with a wealth of troubleshooting options. For example, our
example web server was not serving up SSL pages, but unencrypted pages were being
served without issue. Checking the error_log, we see:
[Wed Aug 6 14:11:33 2003] [error] [client 10.10.0.158] Invalid method in request
\x80L\x01\x03
This type of error is quite common. The invalid request is the client trying to negoti-
ate an SSL session, but for some reason the web server is serving only unencrypted
pages on the SSL port. We can even verify this by pointing the browser at port 443
and initiating a normal HTTP session. The reason why this is occurring is that the
server does not think it has been told to enable the SSLEngine, or doesn’t think it
has.
To fix this problem, you need to verify that you have the line in your httpd.conf file:
SSLEngine On
You should also check the Virtual Host entry that you created for the SSL server. If
there is an error with the IP address or DNS name on which it was told to create the
server, the server will create this kind of error. Consider the following excerpt of our
configuration file:
<VirtualHost www.vbrew.cmo:443>
SSLEngine On
SSLCipherSuite ALL:!ADH:!EXPORT56:RC4+RSA:+HIGH:+MEDIUM:+LOW:!SSLv2:+EXP:+eNULL
SSLCertificateFile conf/ssl/vbrew.cert
SSLCertificateKeyFile conf/ssl/vbrew.key
</VirtualHost>
A typo in the VirtualHost directive has caused the server to try to start for a name in
the .cmo rather than the .com top-level domain. Of course, Apache doesn’t realize
this is an error, and is doing exactly what you’ve asked it to do.
Other SSL-related problems are likely to center on key locations and permissions.
Make sure that your keys are in a location known to the server and that they can be
read by the necessary entities. Also, note that if you are using a self-signed key—
some clients may be configured not to accept the certificate, causing them to fail. If
this is the case, either reconfigure your client workstations or purchase a third-party
signed certificate.

This is the Title of the Book, eMatter Edition
Copyright © 2007 O’Reilly & Associates, Inc. All rights reserved.
258
Chapter 15
CHAPTER 15
IMAP
Internet Message Access Protocol (IMAP) was developed from a need for mobile email
access. Many workers read mail from a variety of locations (the office, home, hotel
rooms, and so on) and want such flexible features as the ability to download headers
first and then selectively download mail messages. The main mail delivery protocols
before IMAP, for the Internet, was POP, which offers more rudimentary mail deliv-
ery-only functionality
With IMAP, traveling users can access their email from anywhere and download it or
leave it on the server as desired. POP, on the other hand, does not work well when
users access email from many different machines; users end up with their email dis-
tributed across many different email clients. IMAP provides users with the ability to
remotely manage multiple email boxes, and store or search as well as archive old
messages.
IMAP—An Introduction
IMAP, fully documented in RFC 3501, was designed to provide a robust, mobile
mail delivery and access mechanism. For more detail on the protocol and how it
functions on the network layer, or for additional information on the numerous speci-
fication options, please consult the RFC documentation.
IMAP and POP
POP and IMAP tend to be grouped together or compared, which is a bit unfair since
they are dissimilar in many ways. POP was created as a simple mail delivery vehicle,
which it does very well. Users connect to the server and obtain their messages, which
are then, ideally, deleted from the server. IMAP takes an entirely different approach.
It acts as the keeper of the messages and provides a framework in which the users
can efficiently manipulate the stored messages. While administrators and users can
configure POP to store the messages on the server, it can quickly become inefficient

This is the Title of the Book, eMatter Edition
Copyright © 2007 O’Reilly & Associates, Inc. All rights reserved.
IMAP—An Introduction |259
since a POP client will download all old messages each time the mail is queried. This
can get messy quickly, if the user is receiving any quantity of email. For users who do
not need any kind of portability, or receive little email, POP is probably an accept-
able choice, but those seeking greater functionality will want to use IMAP.
Which IMAP to Choose?
Once you’ve decided that IMAP is for you, there are two primary options. The two
main flavors are Cyrus IMAP and the University of Washington IMAP server. Both
follow the RFC specification for IMAP and have their advantages and disadvantages.
They also use different mailbox formats and therefore cannot be mixed. One key dif-
ference between the two is found in Cyrus IMAP. It does not use /etc/passwd for its
mail account database, so the administrator does not have to specially add mail users
to the system password file. This is more secure option for system administrators,
because creating accounts on systems can be construed as a security risk. However,
the ease of configuration and installation of UW IMAP often makes it more appeal-
ing. In this chapter, we’ll primarily focus on the two most common IMAP servers:
UW IMAP, because of its popularity and ease of installation, and Cyrus IMAP,
because of its additional security features.
Getting an IMAP client
The UW IMAP, as its name suggests, can be found at the University of Washington.
Their web site, http://www.washington.edu/imap/, contains various documentation
and implementation suggestions, as well as the link to their software repository FTP
site. There are a number of different versions available in various forms. For simplic-
ity, the UW IMAP team offers a link a direct link to the most current version: ftp://
ftp.cac.washington.edu/mail/imap.tar.Z.
Installing UW-IMAP
Once the server software has been downloaded and decompressed, it can be
installed. However, because of UW-IMAP’s large portability database, it does not
support GNU automake, meaning that there isn’t a configure script. Instead, a Make-
file that relies on user-specified parameters is used. There are many supported oper-
ating systems, including a number of Linux distributions. Here’s a list of a few of the
supported Linuxes distributions:
# ldb Debian Linux
# lnx Linux with traditional passwords and crypt( ) in the C library
# (see lnp, sl4, sl5, and slx)
# lnp Linux with Pluggable Authentication Modules (PAM)
# lrh RedHat Linux 7.2
# lsu SuSE Linux
# sl4 Linux using -lshadow to get the crypt( ) function
# sl5 Linux with shadow passwords, no extra libraries
# slx Linux using -lcrypt to get the crypt( ) function

This is the Title of the Book, eMatter Edition
Copyright © 2007 O’Reilly & Associates, Inc. All rights reserved.
260 |Chapter 15: IMAP
The lrh version will probably work on newer Red Hat versions as well. If your distri-
bution isn’t listed, try one of the matching generic options. lnp is a good guess for
most modern versions of Linux.
If you don’t have OpenSSL installed, you will need to edit a part of the Makefile.
Find the section where SSL is being configured, and look for the following line:
SSLTYPE=nopwd
The nopwd option needs to be set to none in order to tell IMAP that you aren’t using
OpenSSL.
If you have OpenSSL installed but the installer is still failing, the cause is most likely
that it is looking for OpenSSL in the wrong place. By default, the Makefile searches a
predefined path based on your build selection at the beginning of the process. For
example, if you have used the lnp option to build IMAP, it is looking for SSL in the
/usr/ssl directory. But if you’re using Gentoo Linux, your SSL directory is /usr and
you will need to search for the SSLPATH option in the Makefile and correct the path.
The same process will need to be followed for the SSLCERTS option, which should
be in the same area of the Makefile.
Having successfully compiled the IMAP server, you should install it in your inetd.
conf file (or use xinetd, if appropriate). To use inetd.conf, you need to add the follow-
ing line:
imap stream tcp nowait root /path/to/imapd imapd
Note that you will need to change the actual path to reflect the location where you
installed your imapd binary.
Most modern Linux systems have a fairly complete /etc/services file, but you should
verify that IMAP is present by searching for or, if necessary, adding, the following
line:
imap 143/tcp
imaps 993/tcp
When these steps have been completed, the installation can be tested with the net-
stat. If you installation is successful, you will see a listener on TCP port 143.
vlager# netstat -aunt
Active Internet connections (servers and established)
Proto Recv-Q Send-Q Local Address Foreign Address State
tcp 0 0 0.0.0.0:143 0.0.0.0:* LISTEN
tcp 0 0 0.0.0.0:22 0.0.0.0:* LISTEN
As with any service, it may also be necessary to make adjustments to the firewall to
allow the new connections.

This is the Title of the Book, eMatter Edition
Copyright © 2007 O’Reilly & Associates, Inc. All rights reserved.
IMAP—An Introduction |261
IMAP configuration
One of the great joys of UW IMAP is that once it is installed, it is almost always fully
functional. The default options, including the use of standard /etc/passwd authentica-
tion and the Unix mailbox format, are considered acceptable by most administra-
tors. If you need more flexibility or features, UW IMAP offers extended
configuration options such as anonymous logins, IMAP alert messages, alternate
mailbox formats, and the possibility of shared mailboxes, which we’ll take a look at
in the next section.
Advanced UW IMAP configuration options
There are a number of additional options that can be added to a UW IMAP server,
based on your requirements. One feature that may be useful is the potential to allow
anonymous logins. This can be used as a way to provide information to users with-
out creating specific accounts for them. This has been used at universities as a
method of distributing information, or providing read-only access to discussion lists.
To enable this functionality, the only step required is to place a file in your /etc direc-
tory called anonymous.newsgroups. Once this has been completed, anonymous users
will have access to commonly shared mailboxes.
Another potentially useful feature is the ability to create an alert message for IMAP
users. When enabled, this feature will generate an alert message for any user logging
in to check their mail. As the message is displayed every time a user checks their
mail, it should be used only in emergency situations. It would not be a good place to
put a banner or disclaimer. To create the alert message, you need to create a file
called imapd.alert. The contents consist of your message.
Using alternate mailbox formats
The default mailbox format configured by UW IMAP was selected because it pro-
vides the greatest flexibility and compatibility. While these are two definite advan-
tages, they come at a cost of performance. The mbx format supported by UW IMAP
provides better capabilities for shared mailboxes, since it supports simultaneous
reading and writing.
Configuring IMAP to use OpenSSL
IMAP provides many useful conveniences required by users when dealing with their
email, but lacks one very important feature—encryption. For this reason, IMAP-SSL
was developed. When it is installed, an IMAP user with compatible client software
can enjoy all the functions of IMAP without worrying about eavesdropping. In order
to install IMAP with SSL support, you will first need to make sure that your IMAP
server is properly installed and functioning. You will also need a functional OpenSSL
installation. Most Linux distributions are shipped with OpenSSL, but if for some

This is the Title of the Book, eMatter Edition
Copyright © 2007 O’Reilly & Associates, Inc. All rights reserved.
262 |Chapter 15: IMAP
reason your distribution does not have it, please consult the Apache chapter in this
book for more information on building OpenSSL.
To begin the configuration process, create digital certificates for your IMAP server to
use. This can be done with the OpenSSL command-line utility. A sample certificate
can be created as follows:
vlager# cd /path/to/ssl/certs
vlager# openssl req -new -x509 -nodes -out imapd.pem -keyout imapd.pem -days 365
Using configuration from /etc/ssl/openssl.cnf
Generating a 1024 bit RSA private key
..............++++++
..................................................++++++
writing new private key to 'imapd.pem'
-----
You are about to be asked to enter information that will be incorporated
into your certificate request.
What you are about to enter is what is called a Distinguished Name or a DN.
There are quite a few fields but you can leave some blank
For some fields there will be a default value,
If you enter '.', the field will be left blank.
-----
Country Name (2 letter code) [AU]:
.
.
Common Name (eg, YOUR name) [ ]: mail.virtualbrewery.com
Email Address [ ]:
vlager # ls -l
total 4
-rw-r--r-- 1 root root 1925 Nov 17 19:08 imapd.pem
vlager #
When creating this certificate, make sure that you’ve entered the domain name of
your mail server in the common name field. If this is not set, or is set improperly, you
will at best get error messages when clients try to connect, and at worst have a bro-
ken server.
There is a good chance that your IMAP server will need to be recompiled and config-
ured to use OpenSSL. Fortunately, this is a fairly easy process. If you are using Red
Hat, SuSE, or any of the other mentioned distributions, substitute them in the com-
mand line; otherwise, the following command-line options will work for most other
Linux distributions:
vlager# make lnp PASSWDTYPE=pam SSLTYPE=nopwd
If you receive errors regarding OpenSSL, you may need to adjust the path settings.
You can do this by making changes to the SSLDIR,SSLLIB, and SSLINCLUDE path
options found in the Makefile. For most users, this will not be necessary.
After compiling the new IMAP server, copy it from the build directory to the loca-
tion on your system where your other daemon files are located. Since IMAP-SSL uses

This is the Title of the Book, eMatter Edition
Copyright © 2007 O’Reilly & Associates, Inc. All rights reserved.
Cyrus IMAP |263
a different port from the standard IMAP, you will need to make a change to your
inetd.conf file.
imaps stream tcp nowait root /path/to/imapd imapd
If you’re using xinetd, you will need to create a file in your /etc/xinetd.d directory,
which looks like this:
service imaps
{
socket_type = stream
wait = no
user = root
server = /path/to/imapd
log_on_success += DURATION USERID
log_on_failure += USERID
disable = no
}
It is also important, at this point, to make certain that you have an imaps entry in
your /etc/services file.
vlager # cat /etc/services |grep imaps
imaps 993/tcp # IMAP over SSL
imaps 993/udp # IMAP over SSL
vlager #
You can now test your server from any number of clients. Make certain that you’ve
specified in the client configuration that you will be using SSL. In a number of cli-
ents, upon connection, you will receive a message asking you if you wish to trust the
certificate. This message will appear only if you’ve generated your own certificate, as
we did in the above example. Some administrators, especially if the server is being
used for production use, will likely want to purchase a certificate to avoid this.
Cyrus IMAP
Another option IMAP administrators have is the product from CMU called Cyrus. It
is similar to UW IMAP as far as general functionality goes—from the user stand-
point, there will be little difference. The majority of the differences come on the
administrative side. This is also where its benefits can be seen.
Getting Cyrus IMAP
The Cyrus software can be obtained in a number of places, but the most reliable
choice, with the latest source releases, will be the central CMU Cyrus distribution
site, http://asg.web.cmu.edu/cyrus/download/. Here, both current and previous
releases can be downloaded. The availability of previous releases could be an advan-
tage for sites with polices against using the most recent versions of software.

This is the Title of the Book, eMatter Edition
Copyright © 2007 O’Reilly & Associates, Inc. All rights reserved.
264 |Chapter 15: IMAP
To begin the installation of the Cyrus server, download and decompress the latest
version. You will need to download both the IMAP and SASL packages.
SASL is the authentication mechanism used by Cyrus IMAP, and will need to be con-
figured and installed first. It is easily built using the standard “configure-make”
order.
vlager# cd cyrus-sasl-2.1.15
vlager# ./configure
loading cache ./config.cache
checking host system type... i686-pc-linux-gnu
.
creating saslauthd.h
Configuration Complete. Type 'make' to build.
vlager# make
make all-recursive
make[1]: Entering directory `/tmp/cyrus-sasl-2.1.15'
Assuming the compile is completed without failure and you’ve successfully executed
the make install, you can now proceed to configuring and installing the Cyrus IMAP
server itself.
After decompressing the Cyrus IMAP source, prepare the configuration using the fol-
lowing command:
vlager# ./configure --with-auth=unix
This will prepare Cyrus IMAP to use the Unix passwd/shadow files for user authenti-
cation. It is also possible to enable Kerberos for authentication at this point.
Next, you will need to create all of the dependency files, and then build and install
the package:
vlager# make depend
...
vlager# make all CFLAGS=-O
...
vlager# make install
...
With that successfully completed, your Cyrus IMAP server is now ready to be config-
ured.
Configuring Cyrus IMAP
You will need to create a user for the Cyrus server to use. It should be something that
you can easily relate to your Cyrus server, and it also needs to be a part of the mail
group.
Once the user is created, you can begin configuring your Cyrus server. The /etc/
imapd.conf file is the primary configuration file for the server. Verify that it looks
something like the example below. You may need to add some of these lines.

This is the Title of the Book, eMatter Edition
Copyright © 2007 O’Reilly & Associates, Inc. All rights reserved.
Cyrus IMAP |265
configdirectory: /var/imap
partition-default: /var/spool/imap
sievedir: /var/imap/sieve
# Don't use an everyday user as admin.
admins: cyrus root
hashimapspool: yes
allowanonymouslogin: no
allowplaintext: no
Troubleshooting Cyrus IMAP
Building Cyrus IMAP can be somewhat tricky, as it tends to be pickier about files
and locations. If the configure process is failing, take special note of what exactly is
causing the failure. For example, when building Cyrus-SASL, if the build fails with
an error complaining about undefined references in the berkeley_db section, it is
likely that you do not have BerkeleyDB installed, or you installed it in a place where
the configure script isn’t looking. The path to the installed BerkeleyDB can be set at
the command line when the configure script is run. This method of tracing the root
of the error, and remedying it can solve many problems.
Another common problem when building Cyrus IMAP involves the location of a file
called com_err.h. It is expected by Cyrus IMAP to be in the /usr/include directory.
However, it often tends to be found in the /usr/include/et directory. Therefore, it will
be necessary to copy this file to the /usr/include directory for the installation to pro-
ceed.

This is the Title of the Book, eMatter Edition
Copyright © 2007 O’Reilly & Associates, Inc. All rights reserved.
266
Chapter 16
CHAPTER 16
Samba
The presence of Microsoft Windows machines in the network environment is often
unavoidable for the Linux network administrator, and often interoperability is criti-
cal. Fortunately, a group of developers has been hard at work for the last 10 years,
and has created one of the most advanced Windows-to-UNIX interoperability pack-
ages—Samba. It has, in fact, become so successful and practical that system adminis-
trators can completely replace Windows servers with Samba servers, keeping all
functionality, while adding additional stability.
Samba—An Introduction
Samba, still actively developed in order to maintain feature compatibility with the
ever-changing Microsoft software, provides a framework to allow Linux machines to
access Windows network resources, such as shared drives and printers. Samba not
only lets Linux machines access these services, but also allows Linux to offer these
same services to Windows machines. With Samba, it’s possible to completely replace
a Windows-based file server, a Windows print server, and even, with advanced
options, replace the Primary Domain Controller (PDC). Recent versions of Samba
even allow Active Directory compatibility. The open-source flexibility of Samba
means that development will be able to continue, and new features will be intro-
duced when the Windows architecture changes. More information on Samba can be
found in Using Samba, Second Edition (O’Reilly), by Jay Ts, Robert Eckstein, and
David Collier-Brown.
SMB, CIFS, and Samba
The underlying technology used in Samba is based on Server Message Blocks (SMB),
which was originally developed in the early 80s by Dr. Barry Feigenbaum while he
was working at IBM. Initially, IBM was actively involved with the development, but
Microsoft soon took charge and heavily continued the development work. In later

This is the Title of the Book, eMatter Edition
Copyright © 2007 O’Reilly & Associates, Inc. All rights reserved.
Samba—An Introduction |267
years, Microsoft renamed the SMB protocol to Common Internet File System (CIFS),
by which it is now known. One sees the terms used interchangeably.
There is little accurate and official documentation about how CIFS functions. Unlike
most other network protocols, there is no official RFC documentation, though
Microsoft did submit specifications to the IETF in the 1990s that expired due to
numerous inaccuracies and inconsistencies. Newer documentation attempts by
Microsoft have not been as helpful to the Samba development group, due to the
licensing restrictions place upon it as well as a general lack of new information.
Obtaining Samba
There are a number of options available for obtaining Samba. Many distributions
now come with Samba as a part of their default installation. If this is the case with
your distribution, you will not necessarily need to build from source. Red Hat, Man-
drake, and SuSE users may install the package from RPM, available via a number of
Samba mirrors. Gentoo users need only use emerge samba to install the package, and
Debian users do the same with apt-get. Other users, or those who prefer to do so,
can install the Samba package from source. Often this provides the greatest amount
of flexibility because of the options available at compile time.
Building from source
In order to build from source, you will need to obtain the latest source tarball, found
at any of the Samba mirrors listed on the main http://www.samba.org site. Once the
tarball has downloaded, extract it to a directory and build the binaries using the pro-
vided configuration file.
vlager# tar xzvf samba-current.tgz
vlager# cd samba-3.0.0
vlager# cd source
vlager# ./configure
...
...
vlager# make
...
vlager# make install
Once the software has compiled and installed, you will need to choose how you wish
to have it run at startup. It can be run as an inetd service or as a daemon. Either way
is acceptable, but running Samba from inetd may require the update of your /etc/ser-
vices file. You will need to make sure that the following lines, which define the
Samba protocol, are inserted:
netbios-ns 137/tcp # NETBIOS Name Service
netbios-ns 137/udp
netbios-dgm 138/tcp # NETBIOS Datagram Service
netbios-dgm 138/udp
netbios-ssn 139/tcp # NETBIOS session service

This is the Title of the Book, eMatter Edition
Copyright © 2007 O’Reilly & Associates, Inc. All rights reserved.
268 |Chapter 16: Samba
netbios-ssn 139/udp
microsoft-ds 445/tcp Microsoft-DS
microsoft-ds 445/udp Microsoft-DS
After this has been added or confirmed, you are should add Samba to your inetd.conf
file, or to your xinetd configuration. You should also check to verify that your fire-
wall is configured to allow the necessary ports.
Alternately, if you’re planning to have Samba run as a daemon process, you will need
to add it to your rc startup scripts. This is different for each of the various Linux dis-
tributions, so if you’re unsure of how to do this, check your distribution’s documen-
tation.
Getting Started with Samba
Once you’ve compiled or installed Samba, you now have the potentially lengthy task
of configuration ahead of you. The enormous flexibility offered by Samba means that
there are a number of configuration options. Fortunately, for file server functional-
ity, the configuration is fairly straightforward. In this section, we’ll cover some of the
basic options and discuss how to create shared file directories. For additional infor-
mation, refer to Using Samba (O’Reilly).
Basic configuration options
The easiest way to get started configuring Samba is to start with the minimal config-
uration and add to it. So, to start, we’ll just create a workgroup, name our server,
and add a simple file share.
{global}
workgroup = Brewery
netbios name = vlager
[share]
path = /home/files
comment = Some HomeBrew recipes
You can test your Samba configurations with testparm. It will parse your configura-
tion files and point out any typos or incorrect options you’ve entered. At this point,
it’s not too likely that you’ll have any mistakes, but it’s still good to get to know how
to use the tool.
If everything works, you can start or restart your Samba server and attempt to view
your new file share. The smbclient program, which is a part of the Samba package,
can be used to view file shares. In this example, we’re going to look at the file shares
we’ve just created on vlager (10.10.0.5)
client# smbclient -L 10.10.0.5
Password:

This is the Title of the Book, eMatter Edition
Copyright © 2007 O’Reilly & Associates, Inc. All rights reserved.
Samba—An Introduction |269
Sharename Type Comment
--------- ---- -------
share Disk Some HomeBrew recipes
client#
After the successful completion of this step, we’re now ready to tackle some more
sophisticated configuration options, which will make Samba much more useful.
Configuring Samba user accounts
The above configuration is great if you’re only interested in having an open file share,
but you may have been wondering about access control. In the above example con-
figuration, anyone can connect to the file share. This is generally not a desirable con-
figuration on a network. It is for that reason that Samba does, in fact, have user
authorization functionality.
Staring with the previous configuration file, authentication can be added by adding
the following lines:
security = user
encrypt passwords = yes
smb passwd file = /etc/samba/private/smbpasswd
username map = /etc/samba/smbusers
The first line enables user security. This means that you will need to manage the
users file on the Samba server. The second line establishes that the Samba password
file will be encrypted. The third and fourth lines provide the path locations for the
password and user files. It isn’t necessary to have a separate users file, but it is possi-
ble with Linux.
When this has been configured, you will now be required to create users on your sys-
tem. The Samba suite provides smbpasswd to manage user accounts. This isn’t
required, because Samba can reference the users in your /etc/passwd file. However, if
there are users from Microsoft environments accessing files on your new Samba
server, you will need to have this file.
Creating users is pretty straightforward and is done with the smbpasswd utility.
vlager# smbpasswd -a larry
New SMB password:
Retype new SMB password:
vlager#
Once the user has been created, it can be tested with either a Windows machine or a
Linux machine using smbmount. After entering \\<server.ip> into the Explorer
address bar, the Windows user will be presented with a dialog box, as shown in
Figure 16-1.
For Linux, and other Unixes, smbmount is invoked as follows:
vlager# mount -t smbfs -o username=larry //server.ip /mnt/samba
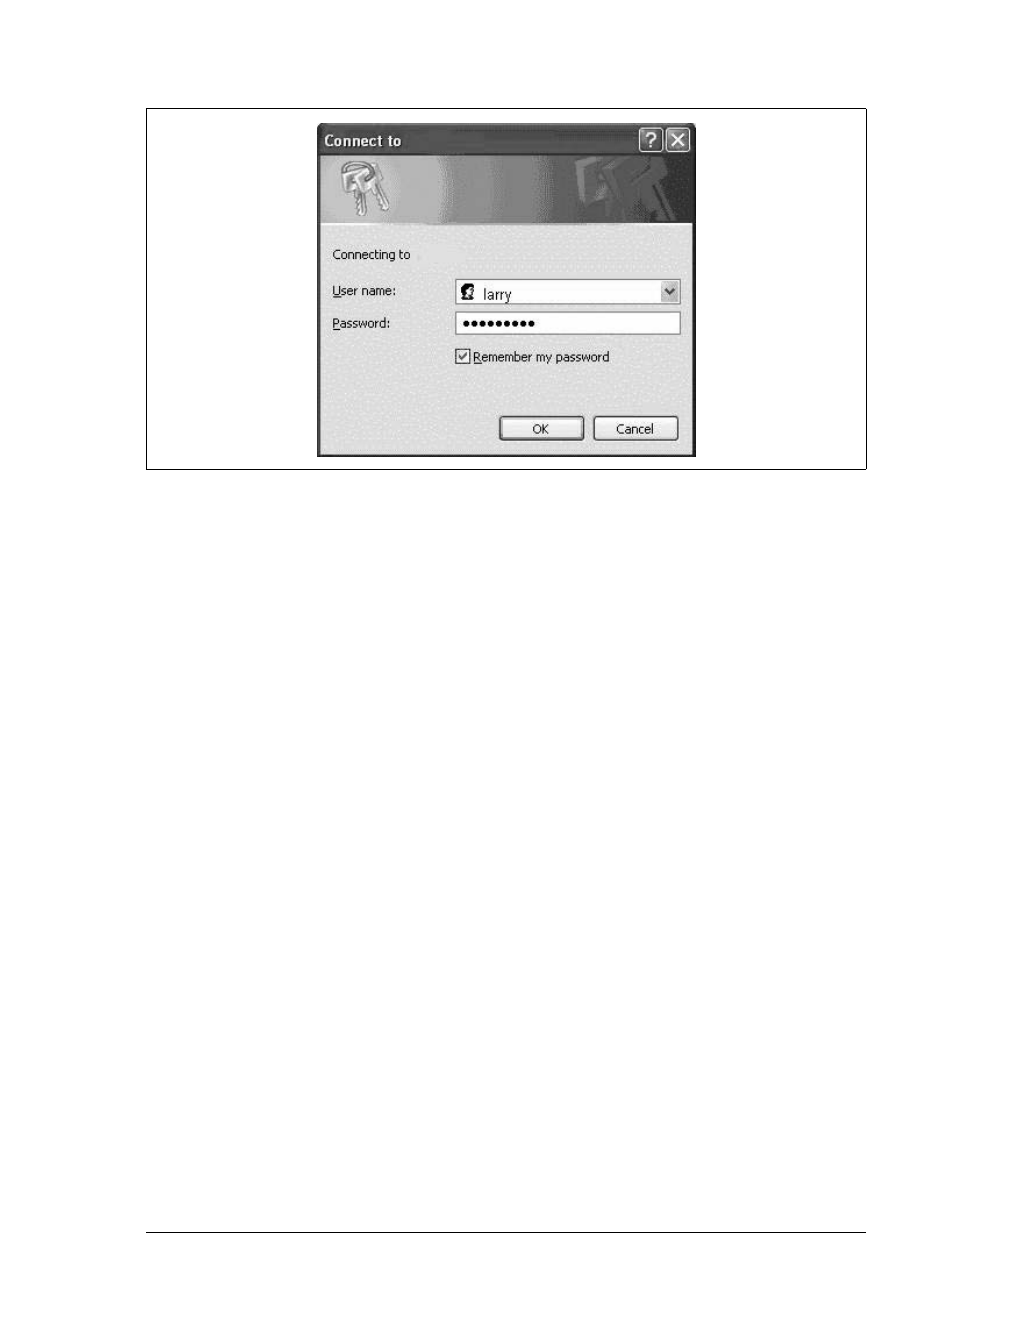
This is the Title of the Book, eMatter Edition
Copyright © 2007 O’Reilly & Associates, Inc. All rights reserved.
270 |Chapter 16: Samba
If everything has been successful, you will now be able to access the shared directory
at /mnt/samba.
Additional Samba Options
So far, we’ve discussed the bare minimum configuration of a Samba server. This is
great for those who just want to quickly get something on the network. In order to
get a little bit more out of Samba, we’ll now take a look at some additional options.
Access control
The Samba server offers some additional security, which can prove very useful in
large networks. IP-based access control is available with what are likely very familiar
commands:
hosts allow = 10.10.
hosts.deny = any
This will allow connections only from the 10.10 network. The Samba IP access con-
trol follows the same logic used by tcpwrappers. You can either explicitly allow or
deny IP addresses or ranges. This option is really convenient because it can be used
at the global or the share level, meaning that you can have a list of IP addresses that
are either allowed or banned from all of your server’s file shares, or you can break it
down so that only certain IP addresses have access to certain shared directories. This
type of granular access is not even offered by Windows itself!
The Samba server is also flexible as to which interface it will bind to. By default, it
will bind to all available interfaces, including loopback. To remove any unwanted
Figure 16-1. Windows network login request

This is the Title of the Book, eMatter Edition
Copyright © 2007 O’Reilly & Associates, Inc. All rights reserved.
Samba—An Introduction |271
access, such as binding Samba to the external interface of a dual-homed machine, the
bind interface can be specified.
bind interfaces only = True
interfaces = eth1 10.10.0.4
This will make sure that Samba listens only on the specified interface on the pro-
vided IP address. If you are concerned about security, it is best to restrict access at
the application level, rather than rely on a firewall to protect you.
Another type of access control offered by Samba is the ability to mark a shared direc-
tory as browsable. If it is browsable, it will be immediately visible and users will be
able to peruse its contents. The command to manipulate this feature is:
browsable = yes|no
If you would like to be able to give people access to certain files, perhaps by sending
them a URI pointing to a specific file, while not wanting them to be able to see all the
files in the directory, this option should be set to no. A URI of this kind should look
familiar; for example, \\vlager.vbrew.com\recipe\secret.txt would work for Windows
users, while for Unix users, one might use smb://vlager.vbrew.com/recipe/secret.txt.In
either case, the user would be allowed access to just the secret.txt file only. For most
purposes it is set to yes, as the Samba server tends to be more functional when users
can browse the filesystem.
Along the same lines, shared directories can be marked as to whether or not they’re
publicly available. If a folder is not public, even with a specific URI a user cannot
access a file. It is important to note, though, that anyone with a Samba account will
be able to view folders that are labeled public.
public = yes|no
Having granted viewing rights to a user, the Samba administrator can also choose
whether or not shared directories are writable. This is done with the writable com-
mand:
writable = yes|no
When this option is set to no, nothing can be written to the directory.
Should you wish to have a fairly open Samba server for something like an open,
browsable documentation server, you might wish to enable the Samba guest
account. This is easily done with the guest directive:
guest ok = yes|no
Finally, one of the most useful features of Samba is that it allows access to shared
directories to be controlled with user access lists. The easiest way to accomplish this
is by using the valid users option.
valid users = sharon paul charlie pat

This is the Title of the Book, eMatter Edition
Copyright © 2007 O’Reilly & Associates, Inc. All rights reserved.
272 |Chapter 16: Samba
You can also simplify this by using an already defined group from your /etc/group
file:
valid users = @brewers
The at sign (@) tells Samba that the brewers value is the group name. Having con-
trolled access to the point where you’re comfortable, you’re probably interested in
making sure that your configuration is working. One of the best ways to see what’s
happening with Samba is through its excellent logging capabilities.
Logging with Samba
Using the log functions with Samba is quite simple. There are a number of addi-
tional modifiers that can be added to expand on the logging capabilities. The most
basic logging can be accomplished with the following command:
log file = /var/log/samba.log
This will provide basic logging of all Samba transactions to the file specified. How-
ever, in some instances, these logfiles can be a bit unwieldy if many machines are
accessing the Samba server. To make the logging easier to sift through, Samba offers
the ability to log by each host that connects. Enabling this functionality requires only
the following addition:
log file = /var/log/samba.log.%m
As with most logging functions on Linux, the administrator has the ability to config-
ure how much logging occurs. In Samba, these log levels follow a 0 to 10 scale, start-
ing from light to intensive logging. For most uses, the Samba documentation
suggests using log level 2, which provides a good amount of information for debug-
ging, without overdoing it. Levels 3 and higher are designed for Samba programmers
and aren’t for normal usage. To specify the log level in your Samba configuration file,
add this line:
log level = 2
If you have a fairly busy server, it is likely that your logfiles will grow very quickly.
For this reason, Samba offers a maximum size logfile directive.
max log size = 75
This example sets the maximum logfile size to 75 KB. When the logfile reaches this
size, it is automatically renamed by adding .old to the file, and a new logfile is cre-
ated. When the new logfile reaches 75 KB, the previous .old file is overwritten. If you
have logfile retention requirements in your environment, make sure that you have a
script that automatically archives your Samba logs.
Logging with syslog
In addition to its own logging capabilities, Samba, when compiled with the --with-
syslog option, will also use the system logger. In situations when administrators

This is the Title of the Book, eMatter Edition
Copyright © 2007 O’Reilly & Associates, Inc. All rights reserved.
Samba—An Introduction |273
have automated log-watching tools, like swatch, this can be more useful. To have
Samba use syslog, just add the following line to your Samba configuration file:
syslog = 2
This will send all of Samba’s Level 2 logging detail to the syslogfile. If you’re happy
with this, and would like to use the syslog exclusively, specify the following in your
smb.conf:
syslog only = yes
Printing with Samba
Samba is fully functional as a Windows print server, enabling users to connect and
print, and even download relevant print drivers. According to the Samba team, this
was one of the biggest interoperability issues they faced because of complexities with
the Windows print job queuing system. There are a number of ways to configure
Samba for printing, but the two most common are the traditional BSD printing, and
more recent CUPS.
BSD Printing
The older, traditional method of printing is the BSD print system which is based
around the RFC 1179 framework. It uses commands such as lpr that most Unix
administrators are familiar with. Samba works well with this environment, and it is
easily configured. The basic configuration to enable BSD printing looks like this:
[global]
printing = bsd
load printers = yes
[printers]
path = /var/spool/samba
printable = yes
public = yes
writable = no
At this point, if you’re thinking that this seems really simplistic, it is! This is thanks
to the fact that Samba makes a great number of assumptions with its default configu-
ration. To see what the configuration really looks like, you can use the testparm pro-
gram:
ticktock samba # testparm -s -v |egrep "(lp|print|port|driver|spool|\[)"
Processing section "[printers]"
[global]
smb ports = 445 139
nt pipe support = Yes
nt status support = Yes
lpq cache time = 10
load printers = Yes
printcap name = /etc/printcap

This is the Title of the Book, eMatter Edition
Copyright © 2007 O’Reilly & Associates, Inc. All rights reserved.
274 |Chapter 16: Samba
disable spoolss = No
enumports command =
addprinter command =
deleteprinter command =
show add printer wizard = Yes
os2 driver map =
wins support = No
printer admin =
nt acl support = Yes
min print space = 0
max reported print jobs = 0
max print jobs = 1000
printable = No
printing = bsd
print command = lpr -r -P'%p' %s
lpq command = lpq -P'%p'
lprm command = lprm -P'%p' %j
lppause command =
lpresume command =
printer name =
use client driver = No
[printers]
path = /var/spool/samba
printable = Yes
This is the point at which you can readjust some of the default options that might
not be right for your system. One item to consider is whether the lp commands are in
your default path. You can also add anything to the lp command lines that you see
fit.
A sample /etc/printcap file is also included here. As all systems are different, this con-
figuration file may not work properly for you, but it is provided to give you an idea of
the configuration format. For more detailed information, check the printcap
manpages.
# /etc/printcap: printer capability database.
/lp|Generic dot-matrix printer entry
:lp=/dev/lp1
:sd=/var/spool/lpd/lp
:af=/var/log/lp-acct
:lf=/var/log/lp-errs
:pl#66
:pw#80
:pc#150
:mx#0
:sh
Printing with CUPS
The Common Unix Printing System (CUPS) is quickly replacing BSD-style printing in
most Linux distributions. There are numerous reasons why CUPS is displacing the

This is the Title of the Book, eMatter Edition
Copyright © 2007 O’Reilly & Associates, Inc. All rights reserved.
Samba—An Introduction |275
status quo, which we will leave for another discussion. However, no discussion of
printing in the Samba environment would be complete without now including a sec-
tion on CUPS printing.
To introduce printing with CUPS, let’s have a look at a simple CUPS configured smb.
conf file:
[global]
load printers = yes
printing = cups
printcap name = cups
[printers]
comment = Brewery Printers
path = /var/spool/samba
browsable = no
public = yes
guest ok = yes
writable = no
printable = yes
printer admin = root, @wheel
This is all that is required for basic configuration to make Samba work with CUPS,
provided that CUPS itself is functional on your system.
The global section establishes that the /etc/printcap file is enumerated with the load
printers option, which automatically parses the printcap and enables the printers
configured within. This feature can be both really helpful and a bit frightening for
some system administrators. While it makes configuration much easier, it does
somewhat reduce the administrators ability to control what is visible to users. If this
option turned off, you must individually create each printer share in the Samba con-
figuration files.
The printing option, which we had previously set to bsd, has been changed to cups.
We’ve also named the printcap cups for clarity.
The next section, printers, is also very similar to the previous example; however,
we’ve now configured a printer administration group. This is a basic option that will
allow the group specified to have administrative access to the CUPS aspects of the
printing.
While not necessary, there are a number of additional options that can be added to a
cups-based printer configuration to customize it based on need. For more detail and
advanced configuration with CUPS and Samba, check the Samba web site at http://
www.samba.org and the CUPS web site at http://www.cups.org.
Using SWAT
Samba Web Administration Tool (SWAT) is used to simplify administration and con-
figuration of Samba. For those who like to use a GUI, this is one of the best options

This is the Title of the Book, eMatter Edition
Copyright © 2007 O’Reilly & Associates, Inc. All rights reserved.
276 |Chapter 16: Samba
because it is written by the Samba team and contains all possible configuration
options. Other GUI frontend programs will work, but may not be as current.
Enabling SWAT
SWAT is basically a web server as well as an administration tool. In order to get it
working, you will need to add it to your inetd.conf or xinetd configurations. With
xinetd, your configuration for swat should look something like this:
service swat
{
port = 901
socket_type = stream
wait = no
user = root
server = /usr/sbin/swat
log_on_failure += USERID
disable = no
}
You will also need to add the SWAT port to your /etc/services file, if it’s not already
there.
swat 901/tcp # Samba configuration tool
After you restart your xinetd process, you are ready to use the service, which you
would do by pointing your web browser at your Samba server’s IP address on port
901.
SWAT and SSL
You may have noticed that SWAT doesn’t use SSL, which is probably OK if you are
using it from only localhost. If you are interested in using it over the network, how-
ever, encryption is a good idea. Though SWAT doesn’t support encryption, it can be
added using the popular SSL tunneling tool called stunnel.
The easiest method to configure this was developed by Markus Krieger. In order to
use this method, you will need to have both OpenSSL and stunnel installed. Docu-
mentation and source code for stunnel can be found at http://www.stunnel.org. Once
both are installed and operational, you will need to generate a private key, which can
be done like this:
vlager# /usr/bin/openssl req -new -x509 -days 730 -nodes -config /path/to/stunnel/
stunnel.cnf -out /etc/stunnel/stunnel.pem -keyout /etc/stunnel/stunnel.pem
Once you have created your keys, you need to make sure that you remove the origi-
nal SWAT from your inetd.conf file and send a SIGHUP signal to the daemon, if nec-
essary. You will no longer be calling the standard SWAT daemon through inetd,so
be sure that it has been removed.

This is the Title of the Book, eMatter Edition
Copyright © 2007 O’Reilly & Associates, Inc. All rights reserved.
Samba—An Introduction |277
stunnel can now be started. You can launch it from the command line or create a
small script to launch it automatically. To start stunnel, as root, type:
vlager# stunnel -p /etc/stunnel/stunnel.pem -d 901 -l /path/to/samba/bin/swat swat
Troubleshooting Samba
If you’ve built your Samba server and everything has worked perfectly the first time,
consider yourself a part of the lucky minority. For everyone else, we’ll now discuss a
few tips on how to track down and fix some common problems.
Configuration file woes
When troubleshooting Samba, one important issue to keep in mind is that the
default options always take priority. This means that if a default configuration option
is set, simply commenting it out does not change its value. For example, you can try
to disable the load printers option by simply commenting it out.
[printers]
path = /var/spool/samba
#load printers = yes
However, using testparm, you will see that the option is still set to yes.
ticktock samba # testparm -s -v |grep "load printers"
load printers = Yes
With Samba, you must always explicitly define the options you wish to have; com-
menting out will not necessarily guarantee success. If something isn’t working as
expected, check this first.
As basic as it sounds, you should also check to see whether the smbd and nmbd pro-
cesses exist. It is not uncommon for something to cause them to fail silently, and you
will not realize they are not running.
Account problems
One of the more common login problems with Samba occurs with the root, but can
happen with any user on the system. For each Samba user, it is important to remem-
ber that a separate Samba password must be created because Samba does not use the
Linux /etc/shadow hash. For example, if you try to access a Samba file share as root,
the system root password will fail, unless you’ve already created a Samba password
for the root account using the same root password (which is definitely not advised).
To correct this issue, a separate account must be created as follows:
vlager# smbpasswd -a root
New SMB password:
Retype new SMB password:
Added user root.

This is the Title of the Book, eMatter Edition
Copyright © 2007 O’Reilly & Associates, Inc. All rights reserved.
278
Chapter 17
CHAPTER 17
OpenLDAP
OpenLDAP is a freely available, open source LDAP solution designed to compile on
a number of different platforms. Under Linux, it is currently the most widely used
and best supported free LDAP product available. It offers the performance and
expected functionality of many commercial solutions, but offers additional flexibil-
ity because the source is available and customizable. In this section, we will discuss
possible uses for an OpenLDAP server as well as describe installation and configura-
tion.
Understanding LDAP
Before proceeding, a brief explanation of LDAP is required. Lightweight Directory
Access Protocol (LDAP) is a directory service that can be used to store almost any-
thing. In this way, it is very similar to a database. However, it is designed to store
only small amounts of data, and is optimized for quick searching of records. A per-
fect example of an application for which LDAP is suited is a PKI environment. This
type of environment stores only minimal amount of information and is designed to
be accessed quickly.
The easiest way to explain the structure of LDAP is to imagine it as a tree. Each
LDAP directory starts with a root entry. From this entry others branch out, and from
each of these branches are more branches, each with the ability to store a bit of infor-
mation. A sample LDAP tree is shown in Figure 17-1.
Another critical difference between LDAP and regular databases is that LDAP is
designed for interoperability. LDAP uses predefined schemas, or sets of data that
map out specific trees. The X.500 structure is outlined by RFC 2253 and contains the
following entries:
String X.500 AttributeType
------------------------------
CN commonName
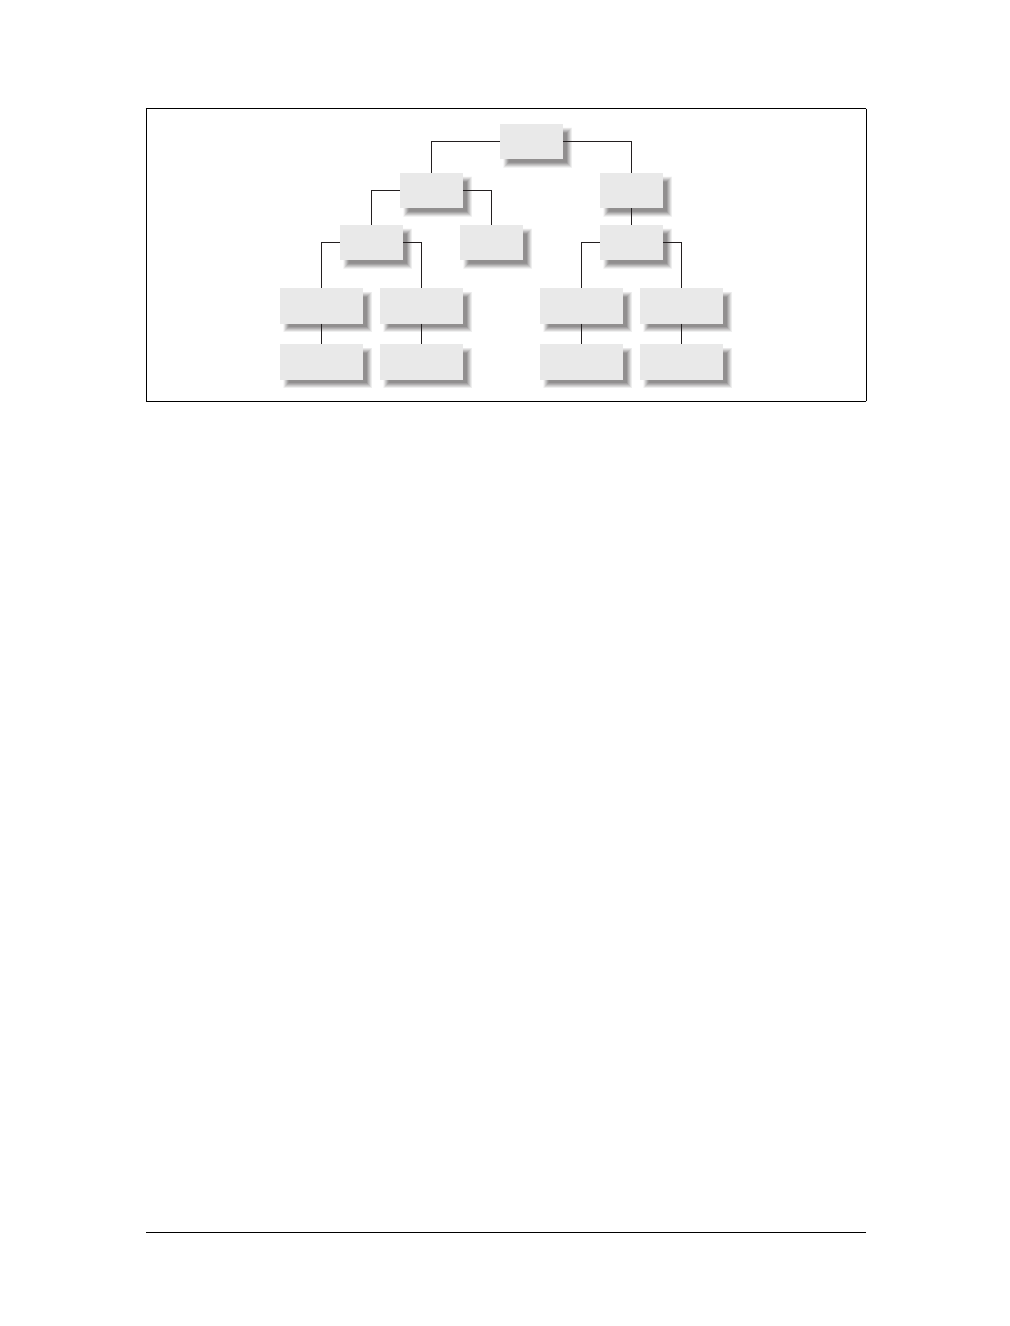
This is the Title of the Book, eMatter Edition
Copyright © 2007 O’Reilly & Associates, Inc. All rights reserved.
Understanding LDAP |279
L localityName
ST stateOrProvinceName
O organizationName
OU organizationalUnitName
C countryName
STREET streetAddress
DC domainComponent
UID userid
Another useful schema is inetOrgPerson. It is designed to represent people within an
organizational structure and contains values such as telephone numbers, addresses,
user IDs, and even employee photos.
Data Naming Conventions
LDAP entries are stored in the directory as Relative Distinguished Names (RDN), and
individual entries are referred to by their Distinguished Names (DN). For example,
the user Bob Jones might have an RDN of:
cn=BobJones
And his DN might look like this:
c=us,st=California,o=VirtualBrewery,ou=Engineering,cn=BobJones
While this section barely scratches the surface of the entirety of LDAP, it serves as
the necessary background to install and operate OpenLDAP. For a more detailed
look at LDAP, consult RFC 2251, “The Lightweight Directory Access Protocol (v3).”
Figure 17-1. Sample LDAP tree.
Root
C=CAC=US
O=VBrew O=VWine O=VBrew
ou=Sales ou=Marketing
cn=firstlast cn=firstlast
ou=Sales ou=Marketing
cn=firstlast cn=firstlast

This is the Title of the Book, eMatter Edition
Copyright © 2007 O’Reilly & Associates, Inc. All rights reserved.
280 |Chapter 17: OpenLDAP
Obtaining OpenLDAP
The current home of OpenLDAP is http://www.openldap.org. All current stable and
beta versions can be acquired from this site along with an “Issue Tracking” engine,
should you encounter any bugs that you wish to report.
While the temptation of downloading and using beta versions is always there,
because of the promise of increased functionality, unless you are installing the soft-
ware on a test server, it is best to use only known stable versions.
Having downloaded and extracted the source archive, it is generally a good idea to
briefly review any README files that may be contained within the archive. The five
minutes spent reading these files can save five times the initial time investment
should there be any problems during install.
Dependencies
Like many software packages, OpenLDAP is not without its dependencies. With
OpenLDAP, you will need to have the latest version of OpenSSL installed and con-
figured. If you do not yet have this package, it can be found at http://www.openssl.
org, along with installation instructions.
SASL from Cyrus is also required for OpenLDAP. As defined by its name, Simple
Authentication and Security Layer (SASL) provides an easy-to-use security frame-
work. Many Linux distributions have this package installed by default; however,
should you need to install this yourself, it can be found at http://asg.web.cmu.edu/
sasl/sasl-library.html or by using a package search engine such as RPMfind.
OpenLDAP supports Kerberos as an option rather than a requirement. If you are cur-
rently using Kerberos in your environment, you will want to make sure that you have
it installed on your OpenLDAP server machine. If you’re not currently using Ker-
beros, it may not be of great value to enable it especially for OpenLDAP. There is a
great deal of Kerberos information available on which you can base your decision as
to whether or not to enable it.
Another optional component is for the OpenLDAP backend database (BDB). In
order to use BDB, you will need something like the BerkeleyDB from Sleepycat Soft-
ware. This is a very commonly used package that is often installed by default on
many Linux distributions. If your system does not have this installed, you can find it
at http://www.sleepycat.com. Alternately, other BDBs exist; for example, MySQL may
be appropriate in your environment. It is important to note that this is a matter of
personal preference, and for most users the default OpenLDAP database is accept-
able.

This is the Title of the Book, eMatter Edition
Copyright © 2007 O’Reilly & Associates, Inc. All rights reserved.
Obtaining OpenLDAP |281
Compiling OpenLDAP
Building OpenLDAP is fairly straightforward once you have selected the options you
wish to have built into the software. A list of available options can be retrieved with
the configure program. One option that you may wish to enable is -with-tls. This will
enable SSL support in OpenLDAP, which we will discuss later in this chapter.
vlager# ./configure -with-tls
Copyright 1998-2003 The OpenLDAP Foundation, All Rights Reserved.
Restrictions apply, see COPYRIGHT and LICENSE files.
Configuring OpenLDAP 2.1.22-Release ...
checking host system type... i686-pc-linux-gnu
checking target system type... i686-pc-linux-gnu
checking build system type... i686-pc-linux-gnu
checking for a BSD compatible install... /bin/install -c
checking whether build environment is sane... yes
checking for mawk... no
checking for gawk... gawk
checking whether make sets ${MAKE}... yes
checking for working aclocal... found
checking for working autoconf... found
checking for working automake... found
checking for working autoheader... found
checking for working makeinfo... found
checking for gnutar... no
checking for gtar... no
.
.
vlager#
After configuring the makefile, the next step is to attempt to compile the package.
With most software, the next step is to run make. However, it is recommended when
building OpenLDAP to run a make depend first. The configure script will even
remind you of this, should you forget.
When the dependencies have been built, you can now safely issue the make com-
mand and wait for the software to build. Upon completion, you may wish to verify
that the build process has completed properly. Using make test will run a series of
checks and inform you of any problems with the build.
Assuming all has gone successfully, you can now become root and install the soft-
ware automatically by using the make install option. By default, OpenLDAP will
place its configuration files in /usr/local/etc/openldap. Users of some distributions will
choose to have these files placed in /etc/openldap for consistency. The option to do
this should be set in the ./configure command line.

This is the Title of the Book, eMatter Edition
Copyright © 2007 O’Reilly & Associates, Inc. All rights reserved.
282 |Chapter 17: OpenLDAP
Configuring the OpenLDAP Server
If you were watching the installation of the software, you may have noticed that it
created two programs, slapd and slurpd. These are the two daemons used with an
OpenLDAP installation.
The first step in understanding how to configure the OpenLDAP server is to look at
its configuration files. On our sample host, vlager, we have placed the configuration
scripts in the /usr/local/etc/openldap directory. Looking at the slapd.conf file, we see a
few places that must be customized. It will be necessary to update any of the follow-
ing values to make them consistent with your site:
include /usr/local/etc/openldap/schema/core.schema
include /usr/local/etc/openldap/schema/cosine.schema
include /usr/local/etc/openldap/schema/inetorgperson.schema
database ldbm
suffix "o=vbrew"
suffix "dc=ldap,dc=vbrew,dc=com"
rootdn "cn=JaneAdmin,o=vbrew"
rootpw secret
directory /usr/local/var/openldap-vbrew
defaultaccess read
schemacheck on
lastmod on
You should also change the rootpw from secret to something that makes sense to
you. This is the password you will need to use to make changes to your LDAP direc-
tory.
With these changes made, you are now ready to run the OpenLDAP server, which
we will discuss in the next section.
Running OpenLDAP
The standalone OpenLDAP server is called slapd and, if you have not changed any of
the default paths, it will have installed in /usr/local/libexec/. This program simply lis-
tens on the LDAP port (TCP 389) for incoming connections, and then processes the
requests accordingly. Since this process runs on a reserved port, you will need to
start it with root privileges. The quickest way to do this is as follows:
vlager# su root -c /usr/local/libexec/slapd
To verify that the service has started, you can use netstat to see that it is listening on
port 389:
vlager# netstat -aunt | grep 389
tcp 0 0 0.0.0.0:389 0.0.0.0:* LISTEN

This is the Title of the Book, eMatter Edition
Copyright © 2007 O’Reilly & Associates, Inc. All rights reserved.
Obtaining OpenLDAP |283
At this point, you should also verify that the service itself is working by issuing a
query to it using the ldapsearch command:
vlager# ldapsearch -x -b '' -s base '(objectclass=*)' namingContexts
version: 2
#
# filter: (objectclass=*)
# requesting: namingContexts
#
#
dn:
namingContexts: dc=vbrew,dc=com
# search result
search: 2
result: 0 Success
# numResponses: 2
# numEntries: 1
vlager#
This query is designed to do a wildcard search on your database; it should therefore
retrieve everything stored within. If your configuration was completed properly, you
will see your own domain name in the dc field.
Adding entries to your directory
Now that the LDAP server is operational, it makes sense to add some entries.
OpenLDAP comes with a utility called ldapadd, which inserts records into your
LDAP database. The program only accepts additions from LDAP Data Interchange
files (LDIF), so in order to add a record, you will need to create this file. More infor-
mation about the LDIF file format can be found in RFC 2849. Fortunately, creating
LDIF files is a very easy step—a sample file looks like:
# Organization for Virtual Brewery Corporation
dn: dc=vbrew,dc=com
objectClass: dcObject
objectClass: organization
dc: example
o: VirtualBrew Corporation
description: The Virtual Brewery Corporation
# Organizational Role for Directory Manager
dn: cn=Manager,dc=vbrew,dc=com
objectClass: organizationalRole
cn: Manager
description: Directory Manager
dn: dc=ldap,dc=vbrew,dc=com
objectClass: top

This is the Title of the Book, eMatter Edition
Copyright © 2007 O’Reilly & Associates, Inc. All rights reserved.
284 |Chapter 17: OpenLDAP
objectClass: dcObject
objectClass: orginization
dc: vbrew
o: vbrew
description: Virtual Brewing Company LDAP Domain
dn: o=vbrew
objectClass: top
objectClass: organization
o: vbrew
description: Virtual Brewery
dn: cn=JaneAdmin,o=vbrew
objectClass: organizationalRole
cn: JaneAdmin
description: Linux System Admin Guru
dn: ou=Marketing,o=vbrew
ou: Marketing
objectClass: top
objectClass: organizationalUnit
description: The Marketing Department
dn: ou=Engineering,o=vbrew
ou: Engineering
objectClass: top
objectClass: organizationalUnit
description: Engineering team
dn: ou=Brewers,o=vbrew
ou: Brewers
objectClass: top
objectClass: orginazationalUnit
description: Brewing team
dn: cn=Joe Slick,ou=Marketing,o=vbrew
cn: Joe Slick
objectClass: top
objectClass: person
objectClass: organizationalPerson
objectClass: inetOrgPerson
mail: jslick@vbrew.com
firstname: Joe
lasname: Slick
ou: Marketing
uid: 1001
postalAddress: 10 Westwood Lane
l: Chicago
st: IL
zipcode: 12394
phoneNumber: 312-555-1212
dn: cn=Mary Smith,ou=Engineering,o=vbrew
cn: Mary Smith

This is the Title of the Book, eMatter Edition
Copyright © 2007 O’Reilly & Associates, Inc. All rights reserved.
Obtaining OpenLDAP |285
objectClass: top
objectClass: person
objectClass: organizationalPerson
objectClass: inetOrgPerson
mail: msmith@vbrew.com
firstname: Mary
lasname: Smith
ou: Engineering
uid: 1002
postalAddress: 123 4th Street
l: San Francisco
st: CA
zipcode: 12312
phoneNumber: 415-555-1212
dn: cn=Bill Peris,ou=Brewing,o=vbrew
cn: Bill Peris
objectClass: top
objectClass: person
objectClass: organizationalPerson
objectClass: inetOrgPerson
mail: per@vbrew.com
firstname: Bill
lasname: Peris
ou: Brewing
uid: 1003
postalAddress: 8181 Binary Blvd
l: New York
st: NY
zipcode: 12344
phoneNumber: 212-555-1212
Once the LDIF file is ready, it is added to the LDAP directory using the following
command:
vlager# ldapadd -x -D "cn=Manager,dc=vbrew,dc=com" -W -f goo.ldif
Enter LDAP Password:
adding new entry "dc=vbrew,dc=com"
adding new entry "cn=Manager,dc=vbrew,dc=com"
vlager#
You can search for your new directory entries using the ldapsearch command
described earlier.
Using OpenLDAP
There are a number of uses for an LDAP server—too many to mention. However,
authentication is among the more useful to Linux network administrators. For an
administrator of many different machines, the task of managing the password and
authentication details for a large number of users can quickly become daunting. An

This is the Title of the Book, eMatter Edition
Copyright © 2007 O’Reilly & Associates, Inc. All rights reserved.
286 |Chapter 17: OpenLDAP
OpenLDAP directory can be used to centrally manage the user accounts for a group
of systems, making it possible for an administrator to enable or disable user accounts
quickly and efficiently—a process that, on multiple systems, can be a chore.
The first step in configuring this is to install the LDAP NSS and PAM libraries. Under
Linux, NSS and PAM handle authentication and tell the system where to look to ver-
ify users. It is necessary to install two packages, pam_ldap and nss_ldap, which can
be found at http://www.padl.com/OSS in the software subsection. Most distributions
have packages for these, and they are often combined and named libnss-ldap. If you
are installing from source, the building of this software is straightforward and can be
accomplished with the standard configure,make install method. Along with install-
ing this on your LDAP server, you will also need to install these libraries on your cli-
ent machines.
When these libraries have been installed, you can now start configuring your slapd
OpenLDAP process. You will need to make a few changes to your slapd.conf file,
similar to those which were covered earlier. The schema section as configured earlier
is sufficient; however, you will need to add some new definitions in the database sec-
tion.
#######################################################################
# ldbm database definitions
#######################################################################
database ldbm
suffix "o=vbrew,dc=com"
rootdn "uid=root,ou=Engineering,o=vbrew,dc=com"
rootpw secret
directory /usr/local/etc/openldap/data
# Indices to maintain
index objectClass,uid,uidNumber,gidNumber eq
index cn,mail,surname,givenname eq,subinitial
This section will create the directory definitions for the structure in which you will be
storing your user data.
Adding access control lists (ACLs)
As this type of directory should not be writable by any anonymous users, it is a good
idea to include some type of access list as well. Fortunately, OpenLDAP makes this
type of control quite easy.
# Access control listing - basic
#
access to dn=".*,ou=Engineering,o=vbrew,dc=com"
attr=userPassword
by self write
by dn="uid=root,ou=Engineering,o=vbrew,dc=com" write
by * auth

This is the Title of the Book, eMatter Edition
Copyright © 2007 O’Reilly & Associates, Inc. All rights reserved.
Obtaining OpenLDAP |287
access to dn=".*,o=vbrew,dc=com"
by self write
by dn="uid=root,ou=Engineering,o=vbrew,dc=com" write
by * read
access to dn=".*,o=vbrew,dc=com"
by * read
defaultaccess read
This list does some basic locking down of the directory and makes it more difficult
for anyone to write to the directory. Once this configuration has been completed,
you can now safely start (or restart) the OpenLDAP daemon.
Migrating to LDAP authentication
You now have your empty directory created awaiting input and queries. For adminis-
trators who have hundreds or thousands of user accounts across many machines, the
next step, migrating the authentication data into the directory, may sound like a
nightmare. Fortunately, there are tools created to assist with this potentially difficult
step. The OpenLDAP migration tools from http://www.padl.com/OSS make the task
of populating the LDAP database from existing /etc/passwd files simple. Each distri-
bution or package will likely place the files in the /usr/share directory, but check the
documentation in your package for specifics.
In order for these scripts to work properly, you will need to make a few minor
changes to one of them. The first one to update is migrage_common.ph. Search for
the following lines:
#Default DNS domain
$DEFAULT_MAIL_DOMAIN = "padl.com";
#Default base
$DEFAULT_BASE = "dc=padl,dc=com";
And replace them with the values that are correct for your environment. For our
example, this would be:
$DEFAULT_MAIL_DOMAIN = "vbrew.com";
$DEFAULT_BASE = "o=vbrew,dc=com";
Now, verify that your OpenLDAP server is listening and that you’ve saved the
changes to the migration configuration file. When all of this has been completed, you
are now ready to execute migrate_all_online.sh, which will begin the process of mov-
ing your /etc/passwd entries into your LDAP directory.
vlager# ./migrate_all_online.sh
Enter the Name of the X.500 naming context you wish to import into: [o=vbrew, dc=com]
Enter the name of your LDAP server [ldap]: vlager
Enter the manager DN: [cn=manager,o=vbrew,dc=com] cn=root,o=vbrew,dc=com
Enter the credentials to bind with: password
Importing into o=vbrew,dc=com...

This is the Title of the Book, eMatter Edition
Copyright © 2007 O’Reilly & Associates, Inc. All rights reserved.
288 |Chapter 17: OpenLDAP
Creating naming context entries...
Migrating aliases...
Migrating groups...
.
.
vlager#
At this point, you will now see that all of your /etc/passwd entries have been automat-
ically entered into your LDAP directory. You may wish to use the ldapsearch query
tool now to see some of your entries. With your directory service functional and now
populated with user entries, you now need to configure your clients to query the
LDAP server, which we will discuss in the next section.
Client LDAP configurations
Linux distributions come configured by default to look at the /etc/passwd file for
authentication. This default option is easily configurable once the nss-ldap and PAM
libraries are installed, as described earlier. The first of the configuration files that
need to be changed is the /etc/nsswitch.conf file. You simply need to tell the system to
query LDAP.
passwd: files ldap
group: files ldap
shadow: files ldap
You might be wondering why we’ve left the files entry in the configuration. It is
strongly recommended that it be left in so accounts such as root can still have access
should something happen to the LDAP server. If you delete this line, and the LDAP
server fails, you will be locked out of all of your systems! This is, of course, where
multiple servers come in handy. Replication between LDAP servers is possible and a
fairly straightforward exercise. For information on building backup OpenLDAP serv-
ers, check the OpenLDAP HOWTOs found on the Linux Documentation Project
web site.
Some Linux distributions (Debian, for example) have the client configuration in /etc/
openldap.conf. Be careful not to mistake this for the server configuration files found
in /etc/openldap.
The next file you need to modify is the openldap.conf file. Like the other configura-
tion files, the location of this will vary between the distributions. This file is very sim-
ple and has only a few configurable options. You need to update it to reflect the URI
of your LDAP server and your base LDAP information.
URI ldap://vlager.vbrew.com
BASE o=vbrew,dc=com
You should now attempt an LDAP query on one of your client machines.
client$ ldapsearch -x 'uid=bob'
version: 2

This is the Title of the Book, eMatter Edition
Copyright © 2007 O’Reilly & Associates, Inc. All rights reserved.
Obtaining OpenLDAP |289
#
# filter: uid=bob
# requesting: ALL
#
# bob,Engineering,vbrew,com
dn: uid=bob,ou=Engineering,o=vbrew,c=com
uid: bob
cn: bob
sn: bob
mail: bob@vbrew.com
objectClass: person
objectClass: organizationalPerson
objectClass: inetOrgPerson
objectClass: account
objectClass: posixAccount
objectClass: top
objectClass: shadowAccount
shadowMax: 99999
shadowWarning: 7
loginShell: /bin/bash
uidNumber: 1003
gidNumber: 1003
homeDirectory: /home/bob
gecos: bob
# search result
search: 2
result: 0 Success
# numResponses: 2
# numEntries: 1
client$
If your query resembled the above entry, you know that your queries are working.
Your OpenLDAP server is now fully populated, can be queried from client machines,
and is ready for real use.
Adding SSL to OpenLDAP
As LDAP was designed to be a secure and efficient method of serving up small
amounts of data, by default it runs in clear text. While this may be acceptable for
certain uses, at some point you may wish to add encryption to the data stream. This
will help preserve the confidentiality of your directory inquiries and make it more
difficult for attackers to gather information on your network. If you are using LDAP
for any kind of authentication, encryption is highly recommended.
If you configured your OpenLDAP at compile time using the -with-tls option, your
server is ready to use SSL. If not, you will need to rebuild OpenLDAP before continu-
ing.

This is the Title of the Book, eMatter Edition
Copyright © 2007 O’Reilly & Associates, Inc. All rights reserved.
290 |Chapter 17: OpenLDAP
Adding SSL to OpenLDAP requires only a few simple changes to the OpenLDAP
configuration file. You will need to tell OpenLDAP which SSL cipher to use and tell
it the locations of your SSL certificate and key files, which you will create later.
TLSCipherSuite HIGH:MEDIUM:+SSLv3
TLSCertificateFile /etc/ssl/certs/slapd.pem
TLSCertificateKeyFile /etc/ssl/certs/slapd.pem
In this case, we’ve specified that our OpenSSL certificates will be stored in the /etc/ssl
directory. This will vary between the distributions; however, you can choose to store
your SSL in certificates any place you like. We’ve also specified the type of cipher to
use. Note that there are a number of different choices available; you can choose
whichever you prefer. Since the server now expects to find certificate files when it is
restarted, we will need to create them. Information on how to do this is covered in
previous sections of this book or is available in the OpenSSL documentation.
It is important to realize that this creates a self-signed certificate, as opposed to one
that is purchased from one of the certificate providers. If an LDAP client were to
check the validity of your certificate, it would likely generate an error, just as a web
browser would when it detects a non-third-party signed certificate. However, most
LDAP clients do not check certificate validity, so this isn’t likely to create many
issues. If you would like to have a third party certificate, there are numerous vendors
who provide them.
Before you restart your server, you should also make sure that your certificates are
readable only by your LDAP server. They should not be accessible or writable by any
other user on the system. You should also clean up any temporary files, such as those
created in the previous step before continuing. When these steps have been taken,
you can safely restart your LDAP server.
Testing SSL availability
There are a couple of quick tests that can be done to see whether or not the SSL sup-
port has been enabled. The easiest way to test whether or not the server is listening is
to use netstat, as we did in the earlier example.
vlager# netstat -aunt | grep 636
tcp 0 0 0.0.0.0:636 0.0.0.0:* LISTEN
Seeing that the server is listening on the LDAP SSL port is a good start. This means
that the server understood the request to run SSL and is listening on the correct port.
Next, you can choose to see whether or not the process is actually working. An easy
way to do this is to request to see its digital certificates. The OpenSSL package comes
with a client that can be used to do this.
vlager# openssl s_client -connect vlager:636 -showcerts
The output of this command will display the full technical information about the
digital certificate that you created at the beginning of this section. If you aren’t seeing
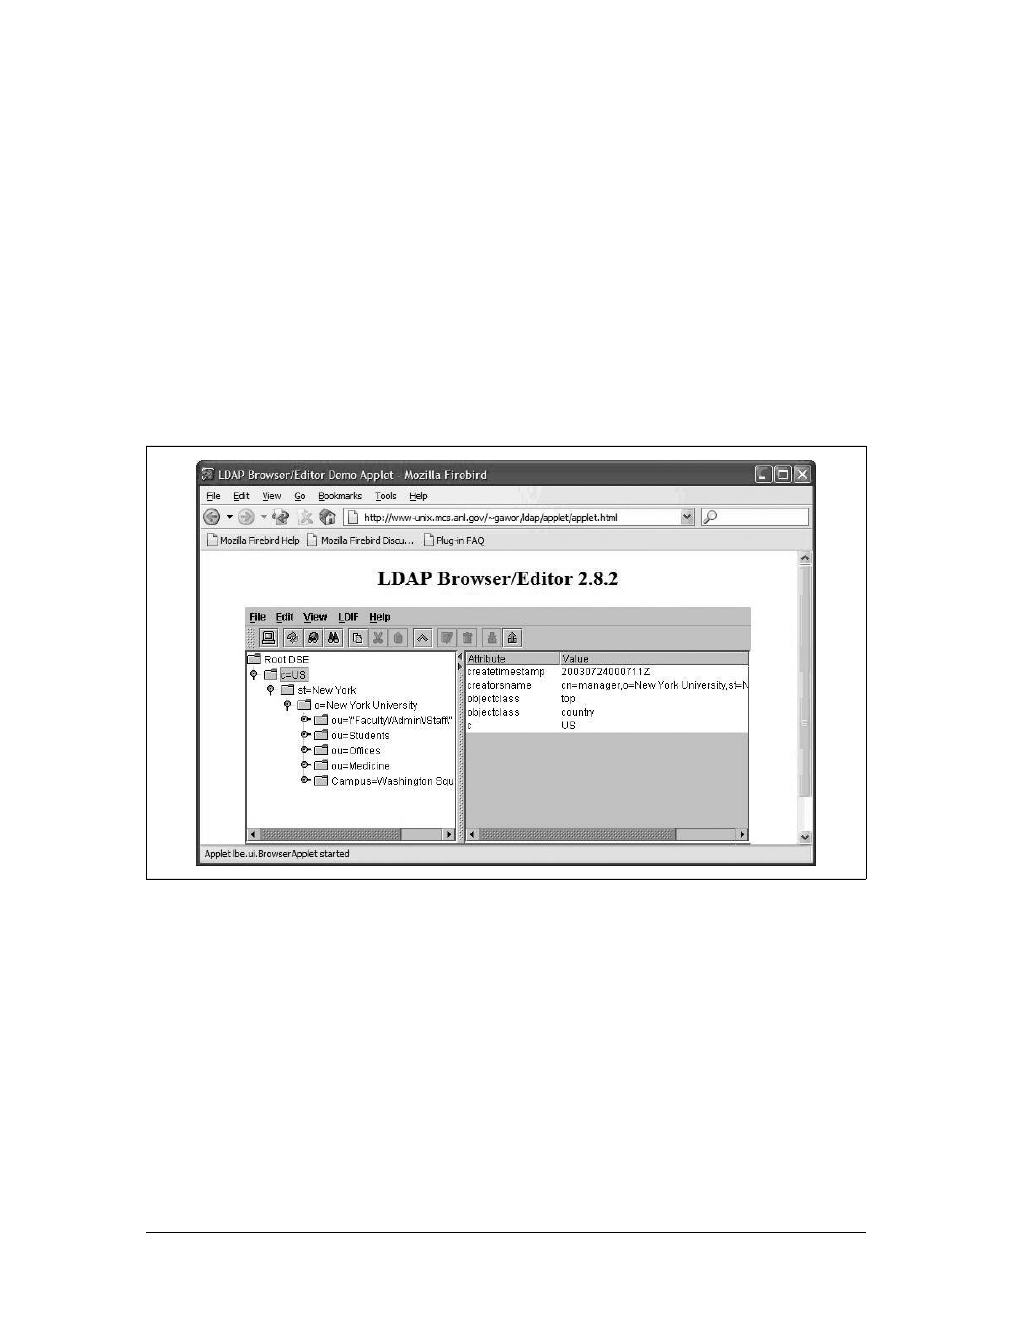
This is the Title of the Book, eMatter Edition
Copyright © 2007 O’Reilly & Associates, Inc. All rights reserved.
Obtaining OpenLDAP |291
any output from this command, verify that you’ve started the service and that some-
thing is listening on port 636. If you are still receiving no response, check the trou-
bleshooting section found later in this chapter.
LDAP GUI Browsers
For those administrators who prefer a GUI to a command line, there are a number of
LDAP browsers available for Linux. One of the more functional offerings is from
Argonne National Laboratory and is a Java applet available at http://www-unix.mcs.
anl.gov/~gawor/ldap/applet/applet.html. As seen in Figure 17-2, the GUI allows you to
easily browse your directories and modify entries. This software also has the advan-
tage of running from any platform, easily and without any installation hassles, pro-
vided that Java is available.
Another popular and very powerful LDAP frontend for Linux is GQ, illustrated in
Figure 17-3. It uses a GTK+-style interface and gives administrators full control over
their directories, allowing them to add, modify, and remove entries, build templates,
execute advanced searches and more. GQ can be found at http://www.biot.com/gq,
and requires a Linux GTK+-compatible interface.
Troubleshooting OpenLDAP
Installing and configuring OpenLDAP can be a tricky process, and there are a num-
ber of things that can go wrong. As with many Linux server processes, the best place
Figure 17-2. Java LDAP browser
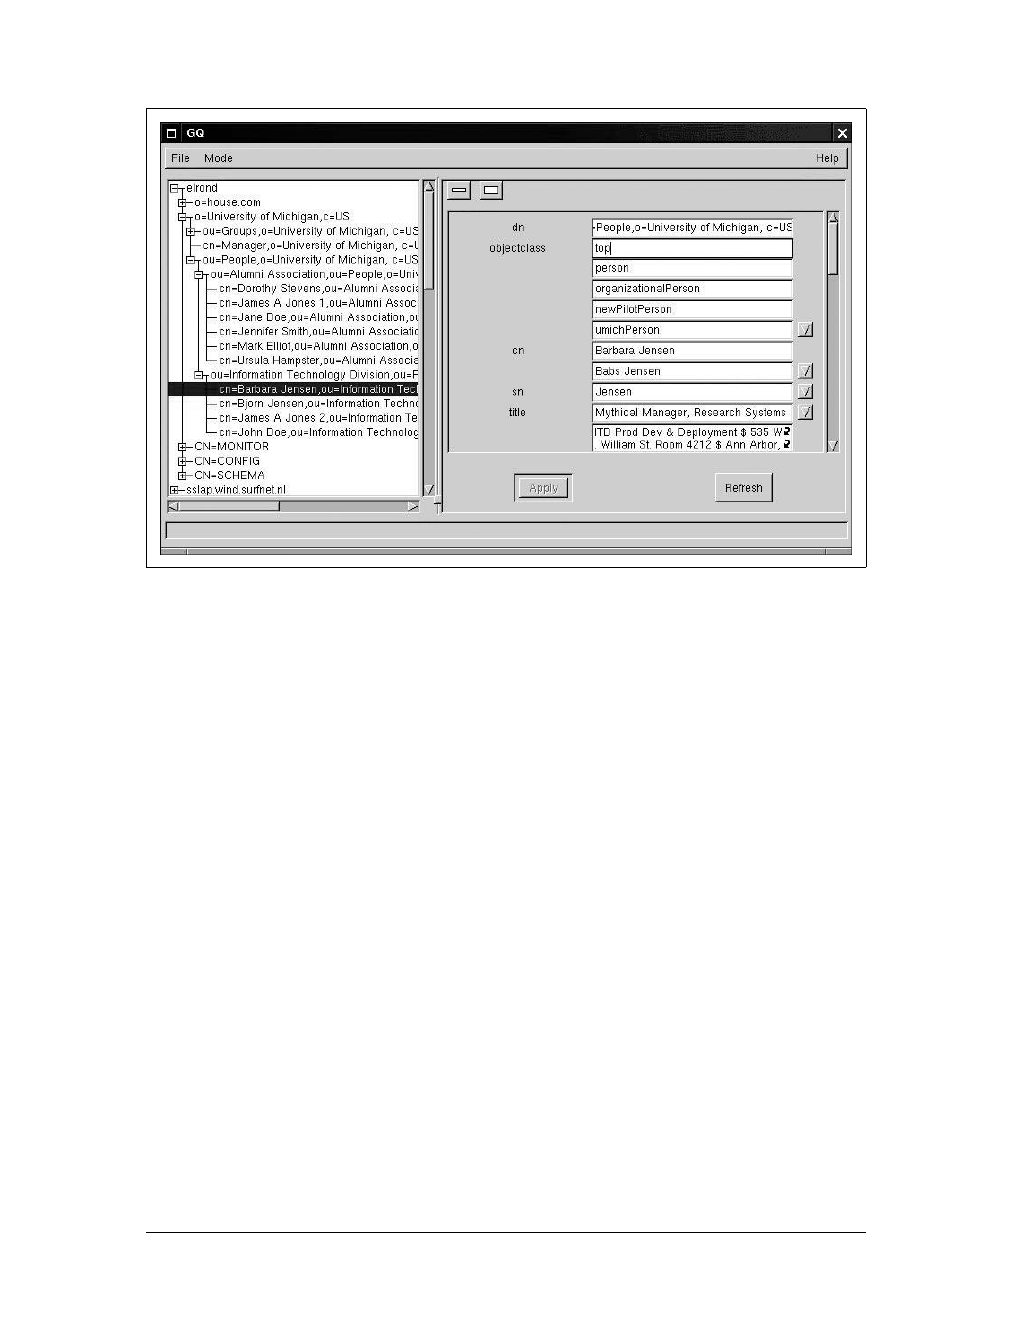
This is the Title of the Book, eMatter Edition
Copyright © 2007 O’Reilly & Associates, Inc. All rights reserved.
292 |Chapter 17: OpenLDAP
to start debugging is the system log. There, you should see a line somewhat similar to
this one, which should give you an indication as to whether your server has started
properly.
Jun 15 11:33:39 vlager slapd[1323]: slapd starting
If you make a typo in the slapd.conf file, the process is often smart enough to just
ignore the line and proceed. However, if you happen to make a critical error, as we
have in the following example, slapd will fail to start.
Jul 25 11:45:25 vlager slapd[10872]: /etc/openldap/slapd.conf: line 46: unknown
directive "odatabase" outside backend info and database definitions (ignored)
Jul 25 11:45:25 vlager slapd[10872]: /etc/openldap/slapd.conf: line 47: suffix line
must appear inside a database definition (ignored)
Jul 25 11:45:25 vlager slapd[10872]: /etc/openldap/slapd.conf: line 49: rootdn line
must appear inside a database definition (ignored)
Jul 25 11:45:25 vlager slapd[10872]: /etc/openldap/slapd.conf: line 54: rootpw line
must appear inside a database definition (ignored)
Jul 25 11:45:25 vlager slapd[10872]: /etc/openldap/slapd.conf: line 57: unknown
directive "directory" outside backend info and database definitions (ignored)
Jul 25 11:45:25 vlager slapd[10872]: /etc/openldap/slapd.conf: line 59: unknown
directive "index" outside backend info and database definitions (ignored)
Jul 25 11:45:25 vlager slapd[10873]: backend_startup: 0 databases to startup.
Jul 25 11:45:25 vlager slapd[10873]: slapd stopped.
Jul 25 11:45:25 vlager slapd[10873]: connections_destroy: nothing to destroy.
Figure 17-3. GQ in browsing mode

This is the Title of the Book, eMatter Edition
Copyright © 2007 O’Reilly & Associates, Inc. All rights reserved.
Obtaining OpenLDAP |293
In this example, we mistyped the word “database,” which is a critical option in the
configuration. As you can see, the server failed to start, but still provided us with
enough information to figure out what went wrong.
If you have verified that everything is running on the server, but clients are unable to
connect, you should verify that the LDAP ports 389 and 636 are not being blocked
by a firewall. If your server is running iptables with a default policy denying any
incoming connections, you will need to explicitly allow these two ports.
Other common issues are caused by missing or incomplete SSL certificates. An indi-
cation from the system log that something is wrong with the SSL functioning is:
Jul 25 12:02:15 vlager slapd[11135]: main: TLS init def ctx failed: 0
Jul 25 12:02:15 vlager slapd[11135]: slapd stopped.
Jul 25 12:02:15 vlager slapd[11135]: connections_destroy: nothing to destroy.
The error in this case is very terse; however, the fact that TSL is mentioned indicates
a problem with SSL. If you are receiving this error, you should check your certificate
paths and permissions. Often, the certificate files cannot be read by the LDAP server
because they are set to be readable only by the root account.

This is the Title of the Book, eMatter Edition
Copyright © 2007 O’Reilly & Associates, Inc. All rights reserved.
294
Chapter 18
CHAPTER 18
Wireless Networking
Wireless networking is a promising and increasingly popular technology, offering a
wide range of benefits compared to traditional wired technology. These advantages
range from increased convenience to users and decreased deployment cost to ease of
network installation. A new wireless deployment can save substantial amounts of
money since there is no need for additional cables, jacks, or network switches. Add-
ing new users to a network can be as easy as plugging in a wireless card and power-
ing up a machine. Wireless networking has also been used to deliver network access
to areas where there is little or no traditional network infrastructure.
Perhaps the biggest impact of wireless networking can be seen within its widespread
acceptance among consumers. The most obvious example of this popularity can be
seen with new laptop systems, where nearly every unit is shipped with integrated
802.11b or g. The practical benefits have consequently insured good sales, allowing
manufacturers to lower the equipment costs. At the time of this writing, the price of
client wireless cards is comparable to that of traditional Ethernet adapter cards.
These benefits, however, do not come without some disadvantages, the most severe
of these being the security issues.
History
Wireless LANs are based on spread spectrum technology, initially developed for mil-
itary communications by the U.S. Army during World War II. Military technicians
considered spread spectrum desirable because it was more resistant to jamming.
Other advances at this time allowed an increase in the radio data rate. After 1945,
commercial enterprises began to expand on this technology, realizing its potential
benefits to consumers.
Spread spectrum technology evolved into the beginnings of the modern wireless
LAN in 1971 with a University of Hawaii project called AlohNet. This project

This is the Title of the Book, eMatter Edition
Copyright © 2007 O’Reilly & Associates, Inc. All rights reserved.
The Standards |295
allowed seven computers around the various islands to communicate bidirectionally
with a central hub on Oahu.
The university research on AlohNet paved the way for the first generation of modern
wireless networking gear, which operated at the 901–928 MHz frequency range. Pri-
marily used by the military, this phase of wireless development saw only limited con-
sumer use, due to crowding within this frequency and the relatively low speed.
From this point, the 2.4 GHz frequency was defined for unlicensed use, so wireless
technology began to emerge in this range and the 802.11 specification was estab-
lished. This specification evolved into the widely accepted 802.11b standard, and
continues to evolve into faster, more secure implementations of the technology.
The Standards
The standards based around wireless networking for PCs are established by the
Institute of Electrical and Electronics Engineers (IEEE). LAN/MAN technology has
been broadly assigned number 802, which is then broken down into working groups.
Some of the most active wireless working groups include 802.15, designed for wire-
less personal area networks (Bluetooth), 802.16 which defines support for broad-
band wireless systems, and finally, 802.11, assigned to wireless LAN technology.
Within the 802.11 definition, there are more specific definitions that are assigned let-
ters. Here is a list of the most important 802.11 wireless LAN definitions:
802.11a
This definition provides wireless access on the 5 GHz band. It offers speeds of
up to 54 MBps, but has not caught on, perhaps due to relatively higher priced
equipment and short range.
802.11b
This is still the standard to which most people refer when talking about wireless
networking. It establishes 11 MBps speeds on the 2.4 GHz band, and can have a
range extending more than 500 meters.
802.11g
This standard has been established to provide higher data rates within the 2.4
GHz band and provides added security with the introduction of WiFi Protected
Access, or WPA. 802.11g devices are now being deployed in place of 802.11b
devices and have nearly reached mainstream acceptance.
802.11i
While still in the development phase, this standard seeks to resolve many of the
security issues that have plagued 802.11b and provide a more robust system of
authentication and encryption. At the time of this writing, the specification has
not been finalized.

This is the Title of the Book, eMatter Edition
Copyright © 2007 O’Reilly & Associates, Inc. All rights reserved.
296 |Chapter 18: Wireless Networking
802.11n
802.11n is being touted as the high-speed answer to current wireless network
speed shortcomings. With an operational speed of 100 Mbps, it will roughly
double existing wireless transfer speeds, while maintaining backward compati-
bility with b and g. At the time of this writing, the specification is not complete;
however, several vendors have released “pre-n” products, based on the early
drafts of the specification.
802.11b Security Concerns
When the IEEE created the 802.11b standard, they realized that the open nature of
wireless networking required some kind of data integrity and protection mechanism
and thus created Wired Equivalent Privacy (WEP). Promised by the standard to pro-
vide encryption at the 128-bit level, users were supposed to be able to enjoy the same
levels of privacy found on a traditional wired network.
Hopes for this kind of security, however, were quickly dashed. In a paper called
“Weaknesses in the Key Scheduling Algorithm of RC4” by Scott Fluhrer, Itsik Man-
tin, and Adi Shamir, the weaknesses in the key generation and implementation of
WEP were described in great detail. Although this development was a theoretical
attack when the paper was written, a student at Rice University, Adam Stubblefield,
brought it into reality and created the first WEP attack. Although he has never made
his tools public, there are now many similar tools for Linux that will allow attackers
to break WEP, making it an untrustworthy security tool.
Still, it should be acknowledged that staging a WEP attack requires a considerable
amount of time. The success of the attack relies upon the amount of encrypted data
the attacker has captured. Tools such as AirSnort require approximately 5 to 10 mil-
lion encrypted packets. A busy wireless LAN, which is constantly seeing the maxi-
mum amount of traffic, can still take as long as 10 hours to crack. Since most
networks do not run at capacity for this long, it can be expected that the attack
would take considerably longer, stretching out to a few days for smaller networks.
However, for true protection from malicious behavior and eavesdropping, a VPN
technology should be used, and wireless networks should never be directly con-
nected to internal, trusted networks.
Hardware
Different manufacturers use a slightly different architecture to provide 802.11b func-
tionality. There are two major chipset manufacturers, Hermes and Prism, and within
each, hardware manufacturers have made modifications to increase security or
speed. For example, the USRobotics equipment, based on the Prism chipset, now
offers 802.11b at 22 MBps, but it will not operate at these speeds without the DLink
802.11b 22 MBps hardware. However, they are interoperable at the 11 MBps speed.

This is the Title of the Book, eMatter Edition
Copyright © 2007 O’Reilly & Associates, Inc. All rights reserved.
802.11b Security Concerns |297
801.11g versus 802.11b on Linux
Due to new chipsets and manufacturer differences, 802.11g support on Linux has
been somewhat difficult. At the time of writing, support for 802.11g devices under
Linux was still emerging and was not yet as stable and robust as the 802.11b sup-
port. For this reason, this chapter focuses on 802.11b drivers and support. Main-
stream Linux support for g devices, however, is not far off. With the work of groups
such as Prism54.org, which is developing g drivers, and Intel’s announcement that it
will release drivers for its Centrino chipset, full support is less than a year away.
Chipsets
As mentioned, there are two main 802.11b chipsets, Hermes and Prism. While ini-
tially Hermes cards were predominant due to the popularity of Lucent WaveLAN
(Orinoco) cards, a majority of card makes today use Prism’s prism2 chipset. Some
well-known Prism cards are those from D-Link, Linksys, and USR. You’ll get roughly
the same performance with either card, and they are interoperable when operating
within the 802.11b standard, meaning that you can connect a Lucent wireless card to
a D-Link access point, and vice versa. A brief listing of major card manufacturers and
their chipsets follows. If your card is not listed, check your operation manual or the
vendor web site.
• Hermes chipset cards:
Lucent Orinoco Silver and Gold Cards
Gateway Solo
Buffalo Technologies
• Prism 2 Chipset cards:
Addtron
Belkin
Linksys
D-Link
ZoomMax
Client Configuration
802.11b networks can be configured to operate in several different modes. The two
main types you’re likely to encounter are infrastructure mode (sometimes referred to
as managed mode) and ad-hoc. Infrastructure mode is the most common and uses a
hub-and-spoke architecture in which multiple clients connect to a central access
point, as shown in Figure 18-1. The ad-hoc wireless network mode is a peer-to-peer
network, in which clients connect to each other directly, as shown in Figure 18-2.
Infrastructure mode deployments are an effective means to replace wires on a tradi-
tional network, making them ideal for office environments where wireless clients
need access to servers that are connected to the wired network. Ad-hoc networks are
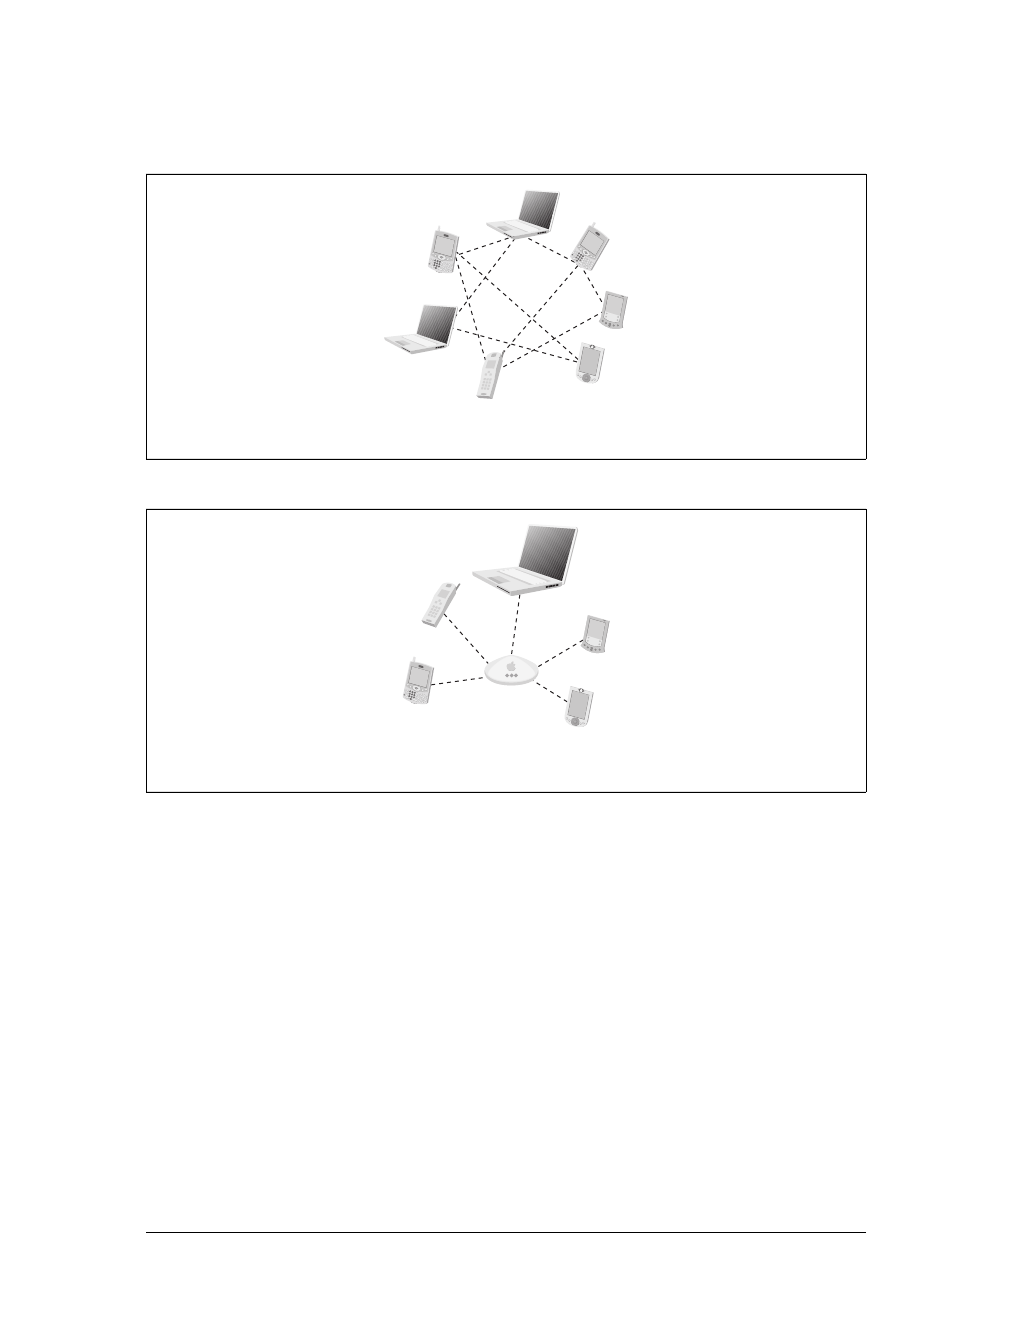
This is the Title of the Book, eMatter Edition
Copyright © 2007 O’Reilly & Associates, Inc. All rights reserved.
298 |Chapter 18: Wireless Networking
beneficial to those who simply wish to transfer files between PCs, or do not require
access to any servers outside of the wireless network.
802.11b networks operate on a predetermined set of frequencies known as a chan-
nel. The specification allows for 14 separate channels, though in North America
users are limited to the first 11 and in Europe, the first 13. Only Japanese users have
access to the full range of channels. In North America, the eleven channel span from
2400 to 2483 MHz, with each channel set to 22 MHz wide. Clearly there is some
overlap between the channels, so it is important to conduct a site survey before
selecting a channel to save future headaches by avoiding possible interference from
other wireless networks.
As it is the most commonly used mode, this section will focus primarily on the infra-
structure mode, which works on a hub-and-spoke model. The access point is the
hub, and the clients are the spokes. An access point can either be a packaged unit
bought from a store, or be built from a Linux machine running HostAP, which we’ll
discuss later.
Figure 18-1. Hub-and-spoke wireless network
Figure 18-2. Ad-hoc (peer-to-peer) wireless network
Hub-and-spoke
wireless network
Ad-hoc (peer-to-peer)
wireless network

This is the Title of the Book, eMatter Edition
Copyright © 2007 O’Reilly & Associates, Inc. All rights reserved.
802.11b Security Concerns |299
An 802.11b network utilizes an access point that transmits a signal known as a bea-
con. This is basically just a message from the access point informing any nearby cli-
ents that it is available for connections. The beacon contains a limited amount of
information that is necessary for the client to connect. The most important content
of the beacon is the ESSID, or the name of the access point. The client, on seeing an
access point, sends a request to associate. If the access point allows this, it grants an
associate frame to the client, and they attach. Other types of authentication can also
occur at this point. Some access points allow only clients with a prespecified MAC
address, and some require further authentication. Developers are working on the
standard 802.1x in an effort to establish a good authentication framework. Unfortu-
nately, however, this is unlikely to prove effective, as there are already known vulner-
abilities for it.
Drivers
A Linux wireless driver can either be built into your kernel when you compile, or
created as a loadable kernel module (LKM). It is recommended that you create a ker-
nel module, since drivers may require frequent updates. Building a new module is
much easier and less time consuming than rebuilding the entire kernel. Either way,
you need to enable the wireless extensions in the kernel configuration. Most distribu-
tions now come with this enabled; however, if you are upgrading from scratch, the
configuration looks like this:
# Loadable module support
#
CONFIG_MODULES=y
# CONFIG_MODVERSIONS is not set
CONFIG_KMOD=y
You may also notice that MODVERSIONS has been disabled. Having this option disabled
makes it easier to compile modules separate from the kernel module tree. While not
a requirement, this can save time when trying to patch and recompile kernel mod-
ules. Whichever chip architecture your card is using, if you’re using a PC card, or
even some PCI cards, pcmcia-cs, the Linux PCMCIA card manager, will be able to
detect your card and will have the appropriate driver installed for you. There are a
number of drivers available, but only two are currently and actively maintained.
The Orinico_cs drivers, written by David Gibson, are generally recognized as the
best for the Hermes cards. They are actively developed and patched, and work with
most wireless applications. The Orinoco_cs drivers have been included in the Linux
kernel since Version 2.4.3 and have been a part of the pcmcia-cs since version 3.1.30.
The driver included with your distribution may not be as current, so you may wish to
upgrade.
Confusingly enough, some prism2 cards are now supported in the Orninoco_cs driv-
ers. That number is increasing with each new release, so despite the name of the

This is the Title of the Book, eMatter Edition
Copyright © 2007 O’Reilly & Associates, Inc. All rights reserved.
300 |Chapter 18: Wireless Networking
driver, it is beginning to be a solid option for prism2 users, and may emerge as a
standard in the future.
However, should your card not be supported by the Orinoco_cs driver, Prism cards
are also supported by the linux-wlan-ng driver from Absolute Value Systems. This is
the best known and maintained client driver for this chipset at the moment. It is also
included with most Linux distributions and supports PCI, USB, and PCMCIA ver-
sions of Prism 2.x and 3.0 cards.
Once you have installed the driver of your choice and everything is working, you’ll
need to install the Linux Wireless Extension Tools, a collection of invaluable config-
uration tools written by Jean Tourrilhes, found at his site: http://www.hpl.hp.com/
personal/Jean_Tourrilhes/Linux/Tools.html.
Using the Linux Wireless Exension Tools
Linux Wireless Extension Tools are very useful for configuring every aspect of your
wireless networking devices. If you need to change any of the default wireless
options or want to easily configure ad-hoc networks, you will need to familiarize
yourself with these tools. They are also required for building a Linux access point,
which will be discussed later in the chapter.
The toolkit contains the following programs:
iwconfig
This is the primary configuration tool for wireless networking. It will allow you
to change all aspects of your configuration, such as the ESSID, channel, fre-
quency, and WEP keying.
iwlist
This program lists the available channels, frequencies, bit rates, and other infor-
mation for a given wireless interface.
iwspy
This program collects per node link quality information, and is useful when
debugging connections.
iwpriv
With this program, you can modify and manipulate parameters specific to your
driver. For example, if you are using a modified version of the Orinoco_cs
driver, iwpriv will allow you to place the driver into promiscuous mode.
Linux Access Point Configuration
A very useful tool in the Linux wireless arsenal is HostAP, a wireless driver written
by Jouni Malinen. It allows prism2 card users to turn their wireless cards and Linux
servers into access points. Since there are many inexpensive access points on the
market, you might be asking yourself why you’d ever want to turn a server into an

This is the Title of the Book, eMatter Edition
Copyright © 2007 O’Reilly & Associates, Inc. All rights reserved.
802.11b Security Concerns |301
access point. The answer is simply a matter of functionality. With most inexpensive
dedicated access points, there is little functionality other than simply serving up the
wireless network. There is little option for access control and firewalling. This is
where Linux provides immeasurable advantages. With a Linux-based access point,
you will be able to take advantage of Netfilter, RADIUS, MAC authentication, and
just about any other type of Linux-based software you may find useful.
Installing the HostAP driver
In order to install HostAP, your system must have the following:
• Linux Kernel v2.4.20 or higher (kernel patches for 2.4.19 are included)
• Wireless extensions toolkit
• Latest HostAP driver, found at http://hostap.epitest.fi/releases
Obtaining and building the HostAP driver
While RPM and .deb packages may be available, it’s likely that you will have to build
HostAP from scratch in order to have the most recent version of the driver. Untar the
source to a working directory. HostAP will also look for the Linux kernel source
code in /usr/src/linux. Some distributions, such as Red Hat, place kernel source in
/usr/src/linux-2.4. In that case, you should make a symbolic link called linux that
points at your kernel source directory. Preparing the source for installation is fairly
straightforward and looks like this:
[root@localhost root]# tar xzvf hostap-0.0.1.tar.gz
hostap-0.0.1/
hostap-0.0.1/COPYING
hostap-0.0.1/ChangeLog
hostap-0.0.1/FAQ
.
.
hostap-0.0.1/Makefile
hostap-0.0.1/README
hostap-0.0.1/utils/util.h
hostap-0.0.1/utils/wireless_copy.h
Unlike many packages, HostAP has no configuration script to run before building
the source. You do, however, need to choose which modules you would like to
build. HostAP can currently support PCMCIA, PLX, or PCI devices. USB devices are
not compatible, though support may be added in the future. For this example, we’ll
be building the PC Card version.
[root@localhost root]# make pccard
gcc -I/usr/src/linux/include -O2 -D__KERNEL__ -DMODULE -Wall -g -c -I/usr/src/
linux/arch/i386/mach-generic -I/usr/src/linux/include/asm/mach-default -fomit-frame-
pointer -o driver/modules/hostap_cs.o driver/modules/hostap_cs.c
gcc -I/usr/src/linux/include -O2 -D__KERNEL__ -DMODULE -Wall -g -c -I/usr/src/
linux/arch/i386/mach-generic -I/usr/src/linux/include/asm/mach-default -fomit-frame-
pointer -o driver/modules/hostap.o driver/modules/hostap.c

This is the Title of the Book, eMatter Edition
Copyright © 2007 O’Reilly & Associates, Inc. All rights reserved.
302 |Chapter 18: Wireless Networking
.
.
Run 'make install_pccard' as root to install hostap_cs.o
[root@localhost root]# make pccard_install
Installing hostap_crypt*.o to /lib/modules/2.4.20-8/net
mkdir -p /lib/modules/2.4.20-8/net
.
.
Installing /etc/pcmcia/hostap_cs.conf
[root@localhost hostap-0.0.1]#
After compiling, take note of the hostap_cs.conf file that’s now installed in /etc/
pcmcia. It is the module configuration file and tells the module to load when seeing a
matching card. The list comes with configurations for a number of popular cards,
but if yours isn’t listed, you will need to add it. This is an easy process, and entries
are generally only three lines long:
card "Compaq WL100 11Mb/s WLAN Card"
manfid 0x0138, 0x0002
bind "hostap_cs"
To determine the exact make of your card, this command can be used:
[root@localhost etc]# cardctl ident
Socket 0:
no product info available
Socket 1:
product info: "Lucent Technologies", "WaveLAN/IEEE", "Version 01.01", ""
manfid: 0x0156, 0x0002
function: 6 (network)
[root@localhost etc]#
After these steps, you can either use modprobe to install your device, or reboot, and it
will automatically load. You can check your syslog for the following message, or
something similarly reassuring, to confirm that it has been loaded properly:
hostap_crypt: registered algorithm 'NULL'
hostap_cs: hostap_cs.c 0.0.1 2002-10-12
(SSH Communications Security Corp, Jouni Malinen)
hostap_cs: (c) Jouni Malinen
PCI: Found IRQ 12 for device 00:0b.0
hostap_cs: Registered netdevice wlan0
prism2_hw_init( )
prism2_hw_config: initialized in 17775 iterations
wlan0: NIC: id=0x8013 v1.0.0
wlan0: PRI: id=0x15 v1.0.7
wlan0: STA: id=0x1f v1.3.5
wlan0: defaulting to host-based encryption as a workaround for
firmware bug in Host AP mode WEP
wlan0: LinkStatus=2 (Disconnected)
wlan0: Intersil Prism2.5 PCI: mem=0xe7000000, irq=12
wlan0: prism2_open
wlan0: LinkStatus=2 (Disconnected)

This is the Title of the Book, eMatter Edition
Copyright © 2007 O’Reilly & Associates, Inc. All rights reserved.
802.11b Security Concerns |303
Configuring HostAP
As discussed earlier, the iwconfig program is necessary to configure HostAP. First,
you have to tell HostAP that you wish to use it in infrastructure mode. This is done
with the following command:
vlager# iwconfig wlan0 mode Master
Next, the ESSID must be set. This will be the name of the access point, seen by all of
the clients. In this example, we’ll call ours “pub”:
vlager# iwconfig wlan0 essid pub
Then you should set the IP address as follows:
vlager# iwconfig wlan0 10.10.0.1
Selecting a channel is an important step, and as mentioned earlier, a site survey
should be conducted to find the least congested channel available:
vlager# iwconfig channel 1
Now, once this has been completed, you can check to make sure that it’s all been
entered properly. The following command will produce:
vlager# iwconfig wlan0
wlan0 IEEE 802.11-DS ESSID:"pub" Nickname:" "
Mode:Managed Frequency:2.457GHz Access Point:00:04:5A:0F:19:3D
Bit Rate=11Mb/s Tx-Power=15 dBm Sensitivity:1/3
Retry limit:4 RTS thr:off Fragment thr:off
Encryption key:off
Power Management:off
Link Quality:21/92 Signal level:-74 dBm Noise level:-95 dBm
Rx invalid nwid:0 Rx invalid crypt:0 Rx invalid frag:2960
Tx excessive retries:1 Invalid misc:0 Missed beacon:0
The configuration of HostAP is complete. You should now be able to configure cli-
ents to connect to your Linux server through the wireless network.
Additional options
As you get more comfortable with HostAP, you may wish to configure some addi-
tional options, such as MAC filtering and WEP configurations. It is a good idea to
implement one or both of these security measures, since the default configuration
results in an open access point that can be sniffed or used by anyone within range.
Using WEP will make sniffing more difficult but not impossible, and will also make
unauthorized use a more complex process. MAC address filtering provides another
good way to keep out unwanted guests. Again, it is important to note that because of
flaws in the 802.11b protocol, neither of these steps will guarantee a safe and secure
computing environment. In order to secure a wireless installation properly, tradi-
tional security methods, like VPNs, should be used. A VPN provides both confidenti-
ality and authentication, since after all, a client on a wireless LAN should be
classified in the same way as a client from the Internet—untrusted.

This is the Title of the Book, eMatter Edition
Copyright © 2007 O’Reilly & Associates, Inc. All rights reserved.
304 |Chapter 18: Wireless Networking
Enabling WEP is simple and accomplished through the iwconfig command. You can
choose whether you wish to use a 40-bit or 104-bit key. A 40-bit WEP key is config-
ured by using 10 hexadecimal digits:
#iwconfig wlan0 key 1234567890
A 104-bit WEP key is configured with 26 hexadecimal digits, grouped in four, sepa-
rated by a dash:
#iwconfig wlan0 key 1000-2000-3000-4000-5000-6000-70
Using the following command will confirm your key:
#iwconfig wlan0
It is also important to note that a WEP key can also be configured with an ASCII
string. There are a number of reasons why this method isn’t particularly good, but
perhaps the most important is that ASCII keys don’t always work when entered on
the client side. However, should you decide you’d like to try, ASCII key configura-
tion is accomplished by specifying s: followed by the key in the iwconfig command,
as follows:
For 40-bit keys, 5 characters, which equate to a 10-digit hexadecimal, are requred:
# iwconfig wlan0 key s:smile
For 104-bit keys, 13 characters, which equate to the 26 hexadecimal digits in the ear-
lier example, are required:
# iwconfig wlan0 key s:passwordtest3
If you wish to disable WEP, it can be done with:
# iwconfig wlan0 key off
HostAP also provides another useful feature that allows clients to be filtered by MAC
address. While this method is not a foolproof security mechanism, it will provide
you with a certain amount of protection from unauthorized users.
There are two basic ways to filter MAC addresses: you can either allow the clients in
your list, or you can deny the clients in your list. Both options are enabled with the
iwpriv command. The following command will enable MAC filtering, allowing the
clients in the MAC list:
# iwpriv wlan0 maccmd 1
The MAC filtering command maccmd offers the following options:
maccmd 0
Disables MAC filtering
maccmd 1
Enables MAC filtering and allows specified MAC addresses
maccmd 2
Enables MAC filtering and denies specified MAC addresses

This is the Title of the Book, eMatter Edition
Copyright © 2007 O’Reilly & Associates, Inc. All rights reserved.
802.11b Security Concerns |305
maccmd 3
Flushes the MAC filter table
To begin adding MAC addresses to your list, iwpriv is again used as follows:
#iwpriv wlan0 addmac 00:44:00:44:00:44
This command adds the client with the MAC address 00:44:00:44:00:44. Now this
user will be allowed to participate in our wireless network. However, should we
decide that we don’t want to allow this MAC at some point in future; it can be
removed with the following command:
#iwpriv wlan0 delmac 00:44:00:44:00:44
Now this MAC has been removed, and will no longer be able to associate. If you
have a large list of client MAC addresses and wish to remove them all, you can flush
the MAC access control list by invoking:
#iwpriv wlan0 maccmd 3
This clears the access control list, and you will need to either disable filtering or re-
enter the valid MAC addresses you wish to authorize.
Troubleshooting
Because of their wireless nature, 802.11b networks can be much more prone to prob-
lems than traditional wired networks. There are a number of issues you may face
when planning a wireless deployment.
The first is that of the signal strength. You want to make sure that your signal is
strong enough to reach all of your clients, and yet not so strong that you’re broad-
casting to the world. The signal strength can be controlled with an antenna, through
access point placement and some software controls. Experiment with different con-
figurations and placements to see what works the best in your environment.
Interference may also be an issue. Many other devices now share the same 2.4 GHz
frequency used by 802.11b. Cordless phones, baby monitor, and microwave ovens
may all cause certain amounts of interference with your network. Neighboring access
points operating on the same channel, or close to the channel you have selected, can
also interfere with your network. While it’s not likely that this particular issue will
cause an outage, there will certainly be performance degradation. It is recom-
mended, again, that experimentation be conducted prior to any major deployment.
Besides the physical issues, there are a number of software issues that are fairly com-
mon. Most issues are caused by driver or card incompatibility. The best way to avoid
these kinds of problems is to know precisely which hardware you’re using. Being
able to identify your chipset will make finding the correct driver much easier.
Card identification is accomplished with the cardctl command, or by looking at the
system log:

This is the Title of the Book, eMatter Edition
Copyright © 2007 O’Reilly & Associates, Inc. All rights reserved.
306 |Chapter 18: Wireless Networking
[root@localhost etc]# cardctl ident
Socket 0:
no product info available
Socket 1:
product info: "Lucent Technologies", "WaveLAN/IEEE", "Version 01.01", ""
manfid: 0x0156, 0x0002
function: 6 (network)
[root@localhost etc]#
In this example, we’re using the easily identifiable WaveLAN card. Of course, this
only works after successful configuration and module loading.
Bridging Your Networks
Once the HostAP software and drivers have been properly configured, a useful next
step is to grant the client’s access to your wired LAN. This is done via bridging,
which requires software located at http://bridge.sourceforge.net. Some distributions
have ready-to-install packages containing all necessary tools and kernel modifica-
tions. Red Hat RPMs contain both. Debian users can just enter apt-get install bridge-
utils. Check your distribution for specifics.
The bridging software is controlled with a program called brctl. It is the main config-
uration tool for the software and has quite a few options. We’ll be using only a few
of the available choices, but for a more comprehensive listing, check the brctl
manpages, which install with the software.
The first step in bridging is to create our virtual bridging interface by typing:
vlager# brctl addbr br0
This command creates an interface on the machine that is used to bridge the two
connections. You’ll see it when running ifconfig:
vlager# ifconfig br0
br0 Link encap:Ethernet HWaddr 00:00:00:00:00:00
BROADCAST MULTICAST MTU:1500 Metric:1
RX packets:0 errors:0 dropped:0 overruns:0 frame:0
TX packets:0 errors:0 dropped:0 overruns:0 carrier:0
collisions:0 txqueuelen:0
RX bytes:0 (0.0 b) TX bytes:0 (0.0 b)
Additionally, you can tell by looking at the system log whether the bridge has been
enabled:
Jan 22 13:17:54 vlager kernel: NET4: Ethernet Bridge 008 for NET4.0
The next step is to add the two interfaces that you wish to bridge. In this example,
we’ll be bridging wlan0, our wireless interface, and eth0, our wired Ethernet inter-
face. First, however, it is important to clear the IP addresses from your interfaces.
Since we’re bridging the networks at layer two, IP addresses are not required.
Vlager# ifconfig eth1 0.0.0.0 down
Vlager# ifconfig wlan0 0.0.0.0 down

This is the Title of the Book, eMatter Edition
Copyright © 2007 O’Reilly & Associates, Inc. All rights reserved.
802.11b Security Concerns |307
Once the IP addresses have been removed, the interfaces can be added to the bridge.
vlager# brctl addif br0 wlan0
vlager# brctl addif br0 eth1
The addif option adds interfaces that you’d like to have bridged. If you have another
wired or wireless interface to add to the bridge, do so now in the same way.
The final step in the bridging process is to bring up the interfaces. You can also
decide at this point whether you wish to assign an IP to your bridging interface. Hav-
ing an IP makes it possible to remotely manage your server; however, some would
argue that not having an IP makes the device more secure. For most purposes, how-
ever, it is helpful to have a management IP. To enable the bridge, you will need to
enable the bridge interface, as well as both hardware interfaces.
vlager# ifconfig br0 10.10.0.1 up
vlager# ifconfig wlan0 up
vlager# ifconfig eth0 up
With the successful completion of these commands, you will now be able to access
your bridge using the IP 10.10.0.1. Of course, this address must be one that is acces-
sible from either side of the bridge.
Now you may wish to configure all of this to load at startup. This is done in a differ-
ent way on just about every Linux distribution. Check the documentation specific to
your distribution regarding the modification and addition to startup scripts.

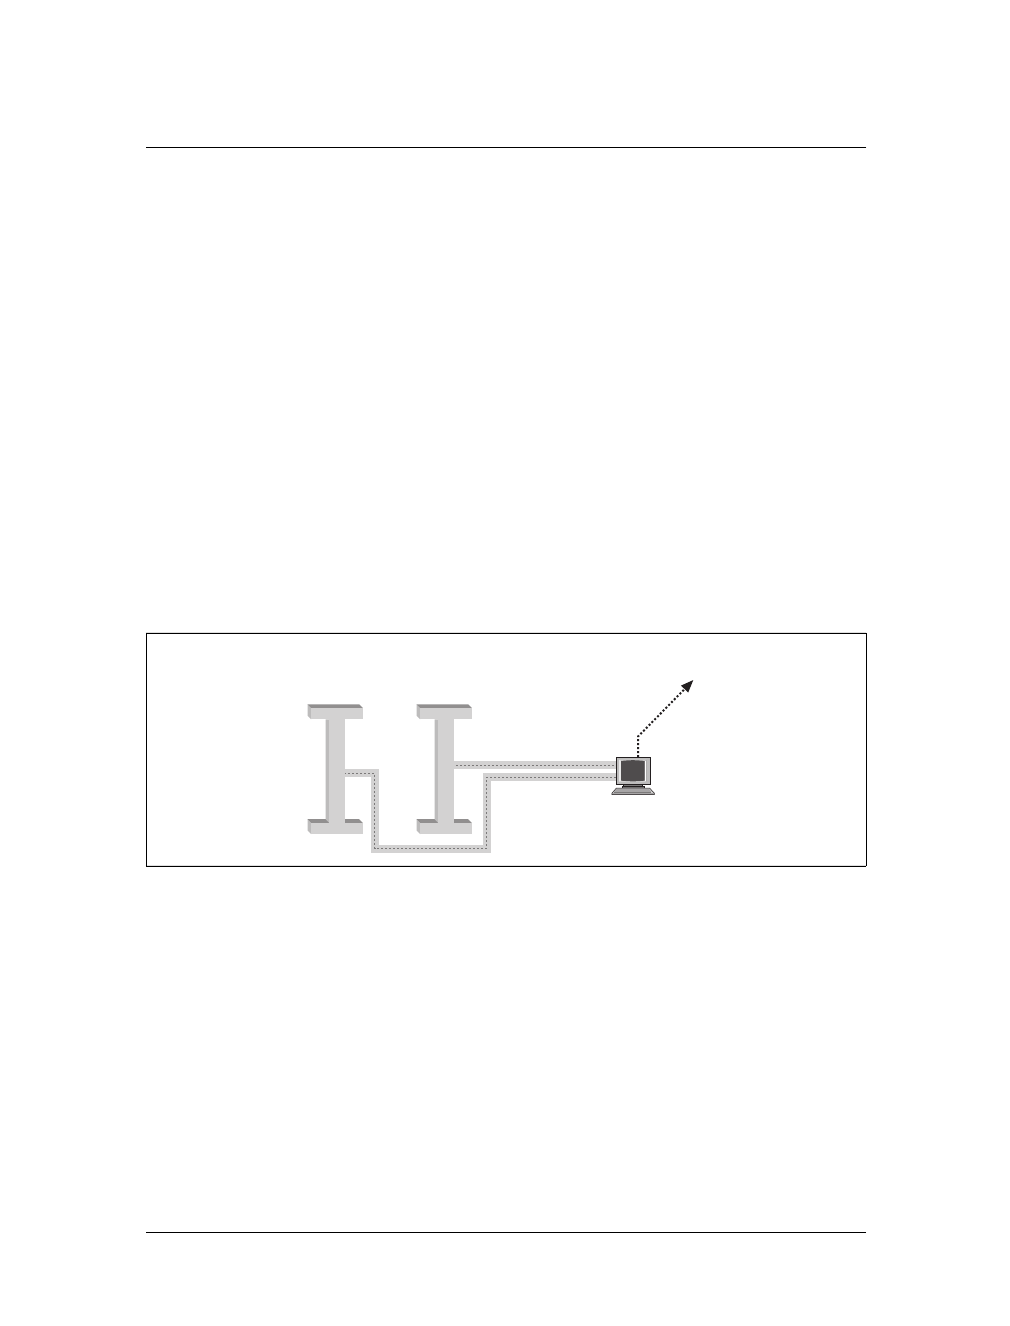
This is the Title of the Book, eMatter Edition
Copyright © 2007 O’Reilly & Associates, Inc. All rights reserved.
309
APPENDIX
Example Network:
The Virtual Brewery
Throughout this book we’ve used the following example that is a little less complex
than Groucho Marx University and may be closer to the tasks you will actually
encounter.
The Virtual Brewery is a small company that brews, as the name suggests, virtual
beer. To manage their business more efficiently, the virtual brewers want to network
their computers, which all happen to be PCs running the brightest and shiniest pro-
duction Linux kernel. Figure A-1 shows the network configuration.
On the same floor, just across the hall, there’s the Virtual Winery, which works
closely with the brewery. The vintners run an Ethernet of their own. Quite naturally,
the two companies want to link their networks once they are operational. As a first
step, they want to set up a gateway host that forwards datagrams between the two
subnets. Later, they also want to have a UUCP link to the outside world, through
which they exchange mail and news. In the long run, they also want to set up PPP
connections to connect to offsite locations and to the Internet.
The Virtual Brewery and the Virtual Winery each have a class C subnet of the Brew-
ery’s class B network, and gateway to each other via the host vlager, which also sup-
ports the UUCP connection. Figure A-2 shows the configuration.
Figure A-1. The Virtual Brewery and Virtual Winery subnets
vlager
Virtual Winery
172.16.2.0/
255.255.255.0
Virtual Brewery
172.16.1.0/
255.255.255.0
eth0
vlager—if1
(1.1)
eth1
vlager—if2
(2.1)
UUCP
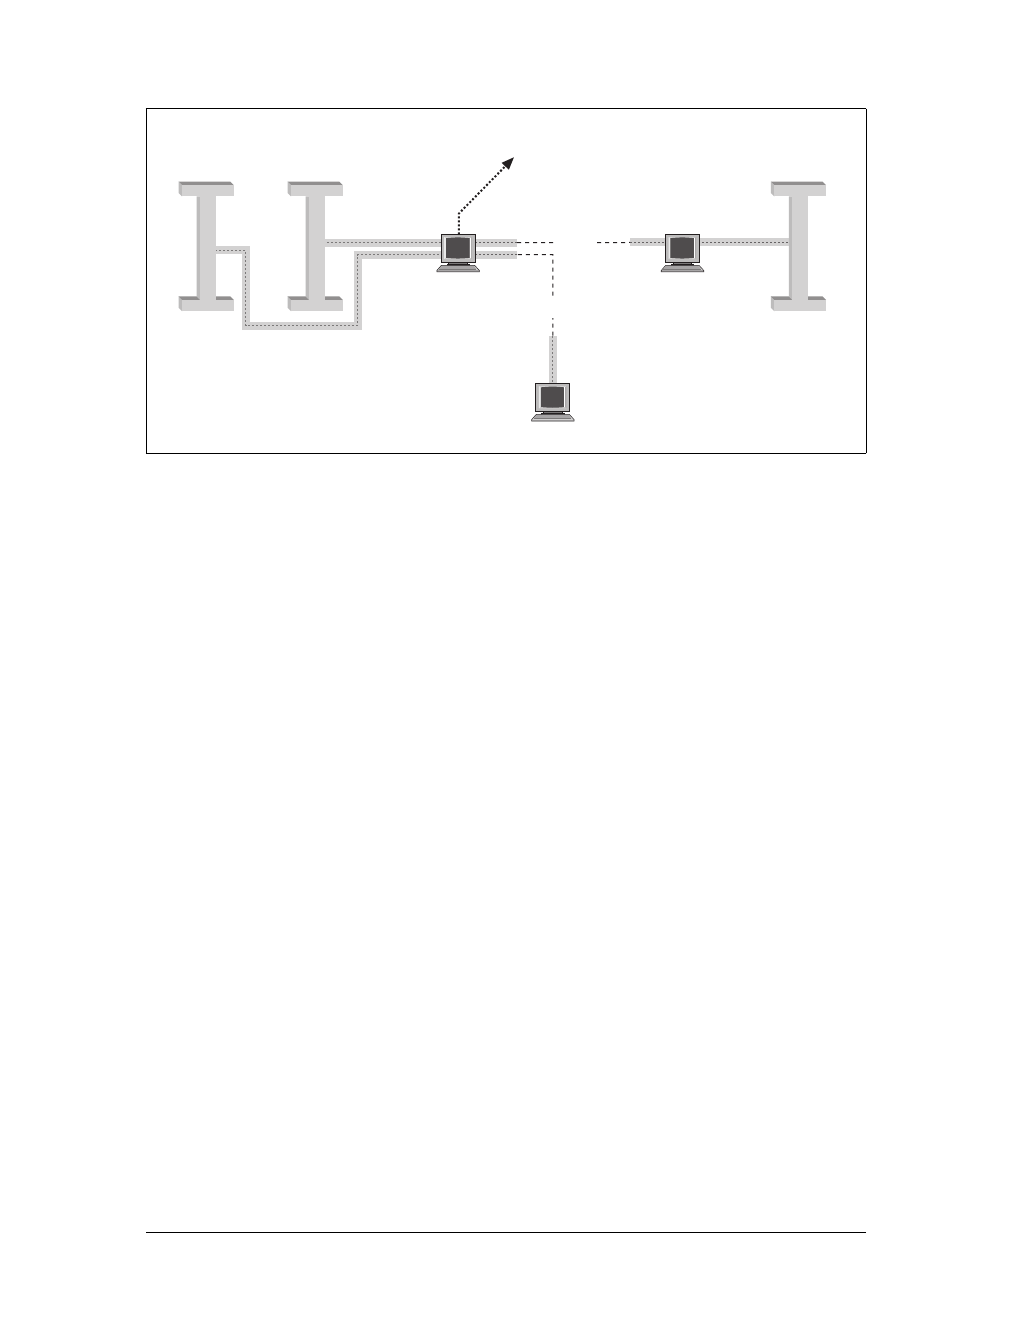
This is the Title of the Book, eMatter Edition
Copyright © 2007 O’Reilly & Associates, Inc. All rights reserved.
310 |Example Network: The Virtual Brewery
Connecting the Virtual Subsidiary Network
The Virtual Brewery grows and opens a branch in another city. The subsidiary runs
an Ethernet of its own using the IP network number 172.16.3.0, which is subnet 3 of
the Brewery’s class B network. The host vlager acts as the gateway for the Brewery
network and will support the PPP link; its peer at the new branch is called vbourbon
and has an IP address of 172.16.3.1. This network is illustrated in Figure A-2.
Figure A-2. The Virtual Brewery Network
UUCP
vlager
oneshot
vbourbon
Virtual Winery
172.16.2.0/
255.255.255.0
Virtual Brewery
172.16.1.0/
255.255.255.0
eth0
vlager—if1
(1.1)
eth1
vlager—if2
(2.1)
Virtual Subsidiary
172.16.3.0/
255.255.255.0
PPP link
ppp0
(1.1)
ppp1
(1.1)
ppp0
(3.1)
ppp0
Dynamic
eth1
(3.1)
vbourbon—if1
PPP link

This is the Title of the Book, eMatter Edition
Copyright © 2007 O’Reilly & Associates, Inc. All rights reserved.
311
We’d like to hear your suggestions for improving our indexes. Send email to index@oreilly.com.
Index
Symbols
* (asterisk), 61, 110
@ (at sign) (see at sign)
{} (braces), 79
[] (brackets), 68, 167
: (colon), 67, 184, 242
, (comma), 182
$ command (sendmail), 223
$= command (sendmail), 223
. (dot) (see dot)
:: (double-colon), 235, 242
= (equal sign), 94
! (exclamation point), 184, 256
! flag (netstat), 61
> (greater than) sign, 181, 202
- (hyphen), 102, 110
< (input redirection), 37
< (less than) sign (sendmail), 202
$# metasymbol, 201, 203
$* metasymbol, 200, 202
$+ metasymbol, 200
$- metasymbol, 200
$: metasymbol, 201, 203
$= metasymbol, 200
$@ metasymbol, 200, 201, 203
$~ metasymbol, 200
- (minus sign), 37, 58
+ (plus sign), 94, 256
# (pound sign) (see pound sign)
" (quotation marks) (ssh), 177
; (semicolon), 79
’ (single quotation mark), 194
⁄ (forward slash), 78, 164
Numbers
16450 UART chip, 34
16550 UART chip, 34
-6 option (OpenSSH), 242
802.11 standard, 295
802.11a standard, 4, 295
802.11b standard
client configuration, 297–300
hardware and, 296, 297
LANs and, 4
laptops and, 294
Linux access point
configuration, 300–305
overview, 295
troubleshooting, 305–306
802.11g standard
802.11b versus, 297
LANs and, 4
laptops and, 294
overview, 295
802.11i standard, 295
802.11n standard, 296
802.15 working group, 295
802.16 working group, 295
8250 UART chip, 34
A
A record
address resolution, 82
FQDNs and, 75
as glue record, 77
hostcvt tool and, 91
hostnames and, 81

This is the Title of the Book, eMatter Edition
Copyright © 2007 O’Reilly & Associates, Inc. All rights reserved.
312 | Index
A record (continued)
nslookup and, 89
purpose, 79
type option and, 80
-A subcommand option (iptables), 136
AAAA record, 81
ABORT keyword (chat), 102
absolute names, 79, 80
Absolute Value Systems, 300
ACCEPT target (iptables), 126, 131, 132
access control, 163, 164, 270–272
access control lists (ACLs), 286
access database, 208, 211, 217–219
access points (wireless networks), 298, 299,
300–305
access_db feature, 211, 217
ACLs (access control lists), 286
action items, 68
Active Directory, 266
active hubs, 4
active-filter option (pppd), 114
add argument (route), 50
add-alias command (djbdns), 94
add-host command (djbdns), 94
addif option (brctl), 307
add-ns command (djbdns), 94
address resolution
A records and, 82
BIND and, 66
defined, 8
of external machines, 94
overview, 19, 20
Address Resolution Protocol (see ARP)
addresses (see IP addresses; MAC addresses)
adduser utility, 112n
ad-hoc mode, 297
adsl-setup script, 116
adsl-start script, 117
advanced policy routing, 11
AF_ ROSE socket, 11
AF_ X25 socket, 11
AF_ATMPVC socket, 11
AF_ATMSVC socket, 11
AF_AX25 socket, 11
AF_INET socket, 11
AF_INET6 socket, 11
AF_IPX socket, 11
AF_NETROM socket, 11
AF_UNIX socket, 11
AirSnort tool, 296
Albitz, Paul, 66
alert messages, 261
aliases
canonical hostnames and, 82
CNAME records and, 79
configuring for interfaces, 57
email addresses and, 183
genericstable database and, 216, 217
hostcvt tool and, 91
hostnames and, 75
aliases database
genericstable database and, 216
overview, 211
sendmail and, 206, 212
aliases field (services), 168
ALL EXCEPT keyword, 164
ALL keyword, 164
Allman, Eric, 179, 186
ALLMULTI flag (ifconfig), 60
allmulti option (ifconfig), 60
allow-recursion option (named.conf), 78
allow-transfer option (named.conf), 78
AlohNet project, 294, 295
amateur radio, 6, 11, 19
anonymous users, 261, 286
anonymous.newsgroups directory, 261
Apache Software Foundation, 249
Apache web servers
background, 244
configuration file options, 247–250, 255
configuring and building, 244–247
IPv6 and, 240, 241
OpenSSL and, 252–256
overview, 244
security considerations, 15
troubleshooting, 256–257
VirtualHost functionality, 250–252
apache.conf file, 241
apachectl tool, 250, 256
Apache-SSL, 252
--append subcommand option
(iptables), 136
APPENDDEF macro (Build), 190
Appletalk, 11, 96
apt-get utility, 306
apt-get utility (Debian), 120, 306
Argonne National Laboratory, 291
ARP (Address Resolution Protocol)
ifconfig options and, 59
overview, 19, 20
proxy, 56, 64, 104
arp option (ifconfig), 59
ARP tables, 63, 65
arp tool, 20, 63, 64

This is the Title of the Book, eMatter Edition
Copyright © 2007 O’Reilly & Associates, Inc. All rights reserved.
Index | 313
ARPANET, 2, 180
ASCII characters, 105, 106, 304
asterisk (*), 61, 110
asynch map, 105, 106
asynchronous communications, 5, 6, 105
Asynchronous Control Character Map, 105
Asynchronous Transfer Mode (ATM), 6, 11
asyncmap option (pppd), 106
AT command set, 39
at sign (@)
dot and, 80
group names and, 272
Internet email address and, 202
origin and, 79
SOA record, 76
ATM (Asynchronous Transfer Mode), 6, 11
attacks
ifconfig option and, 60
inetd.conf file and, 162
man-in-the-middle, 172
methods of, 120–122
named.conf and, 78
system security and, 13
on WEP, 296
xinetd and, 164, 165
ATTEMPT suboption (xinetd), 166
ATZ command, 101
auth facility (syslog), 163
authentication
access points and, 301
chap-secrets file, 109
Cyrus IMAP and, 264
IMAP and, 261
LDAP and, 289
OpenLDAP and, 280, 285, 286
PAP and, 111
PPP and, 108–111, 113
pppd and, 99, 109
Samba and, 269
security considerations, 15, 60, 107
servers and, 96
ssh daemon and, 172
wireless networks and, 295, 299
authoritative nameservers, 75
authorization, 96, 269
authorized_keys file, 174, 178
autoconfig parameter (setserial), 35
auto_irq parameter (setserial), 35
automake configuration script, 46, 259
automatic dialing, 100–102
autonomous systems, 21
AX.25 protocol, 6, 11, 19
Aznar, Guylhem, 180
B
backend database (BDB), 280
bang path notation, 184
baseband modulation (base), 4
Bastille Linux, 14
Bcc: field (mail header), 182
-bd argument (sendmail), 228
BDB (backend database), 280
beacons, 299
Beale, Jay, 14
Berkeley Internet Name Domain service (see
BIND service)
Berkeley Socket Library, 10
BerkeleyDB, 265, 280
Bernstein, D.J., 66, 92
bestmx_is_local feature, 213
BGP (Border Gateway Protocol), 25
binary data, XON/XOFF handshake and, 33
BIND (Berkeley Internet Name Domain)
service
address resolution and, 66
alternatives to, 92–95
dig tool, 84, 87, 88
hostcvt tool, 91
named.conf file, 77–79
bind interface, 270
BindAddress option (Apache), 247
binding
addresses and ports, 247
Samba and, 270
Biro, Ross, 11
bitdomain database, 220
bitdomain feature, 220
BITNET networks, 220
biz top-level domain, 72
blacklist_recipient feature, 218
Bluetooth, 295
BNC connector, 3
BOOTP protocol, 20
Border Gateway Protocol (BGP), 25
bounced mail, 183
braces {}, 79
brackets [], 68, 167
brctl program, 306, 307
BREAK (carriage return), 102
Brewery, Virtual, 309
bridges/bridging
DSL modems and, 116
wireless networks, 306–307
broadband wireless systems, 295
broadcast address, 18
BROADCAST flag (ifconfig), 59

This is the Title of the Book, eMatter Edition
Copyright © 2007 O’Reilly & Associates, Inc. All rights reserved.
314 | Index
broadcast option (ifconfig), 59
broadcasting
defined, 19
eavesdropping and, 122
Ethernet and, 56, 60
browsable command (Samba), 271
-bs argument (sendmail), 228
BSD print system, 273
BSD remote services, 120, 121
BSD routed daemon, 25
buffers, UART chips and, 34
bug databases, 120
Bugtraq database, 120
Build utility, 190–191, 209
Burgiss, Hal, 116
BUSY message, 102
bytes_from field (mailstats), 230
bytes_to field (mailstats), 230
C
-c argument (Build), 191
.C command (sendmail), 223
C command (sendmail), 198, 199
-c option (iptables), 135
cable modems, 30
cacert.org organization, 252
cache option (named.conf), 79
caching-only servers, 75, 78, 83, 98
Callahan, Michael, 97
callout (cua) devices, 31
/canon command (sendmail), 223
canonical hostname
A record and, 81
aliases and, 82
defined, 75
SOA record and, 80
card identification, 305
cardctl command, 305
carriage return, 102
case sensitivity, 113, 193
Cc: field (mail header), 181
CCITT, 179
cellular phones, 233
certificates
OpenLDAP and, 290
OpenSSL and, 262
SSL and, 252, 253
troubleshooting, 293
chains
iptables and, 126, 130, 134
packets and, 131
policies for, 131
rules and, 149
Challenge Handshake Authentication
Protocol (see CHAP)
channels
defined, 298
HostAP and, 303
iwconfig tool and, 300
troubleshooting and, 305
CHAP (Challenge Handshake Authentication
Protocol)
authorization and, 96
chap-secrets file, 109, 111
mgetty program and, 113
PAP and, 108, 109
PPP and, 108, 113
pppd and, 97, 99
chap-secrets file, 109, 111
chargen internal service, 161
chat program, 97, 100–102
checksums, 15, 96, 129
chipsets, 296, 297
choke points, 122
CIDR (Classless Inter-Domain Routing)
address scarcity and, 233
block notation, 19
IP addresses and, 18
notation used, 138
overview, 234
CIFS (Common Internet File System), 266,
267
cipher, SSL, 290
Class A networks
address ranges, 18
IANA and, 45, 233, 234
nslookup and, 89
overview, 17
Class B networks
address ranges, 18
IANA and, 45, 234
overview, 17
subnetting and, 48
Class C networks
address ranges, 18
CIDR and, 234
IANA and, 45
overview, 17
subnetting and, 48
Class D networks, 17
Class E networks, 17
Class F networks, 17

This is the Title of the Book, eMatter Edition
Copyright © 2007 O’Reilly & Associates, Inc. All rights reserved.
Index | 315
class field (resource record) (DNS master
file), 79
Classless Inter-Domain Routing (see CIDR)
Clear to Send (CTS), 33
clients
802.11b standard and, 297–300
certificates and, 252
Ethernet addresses and, 20
listening for, 10
ports and, 10
PPPoE, 116–118
RPC and, 169
testing IMAP, 263
ucspi-tcp program, 92
clocal flag (stty), 38
cmdline field (inetd), 162
CNAME record
canonical hostname and, 75, 81
purpose, 79, 82
coaxial cable and, 3
Collier-Brown, David, 266
collisions, 4
colon (:), 67, 184, 242
com top-level domain, 72
Comer, Douglas R., 16
com_err.h file, 265
comma (,), 182
comments
DNS, 78
nsswitch.conf, 67
pppd, 99
r command, 171
sendmail.mc file, 192
Common Internet File System (CIFS), 266,
267
Common Unix Printing System (CUPS), 274,
275
Common Vulnerabilities and Exposures
(CVE) database, 120
communications software, 29, 30
Compressed SLIP (CSLIP), 8
confDONT_PROBE_INTERFACES variable
(m4), 213
confEBINDIR variable (m4), 205
confHOST_STATUS_DIRECTORY variable
(m4), 230
configtest option (apachectl), 250, 256
configuration files
Apache web servers, 247–250, 255
COPS program, 14
dhcpd.conf file, 47
djbdns resolver and, 93
mgetty program, 39, 40
named.conf, 77
OpenLDAP and, 281, 282, 288, 290
PPPoE clients, 117
printcap file, 274, 275
remote login and execution, 170–178
resolver functions and, 67
RPC and, 170
Samba and, 269, 277
sendmail, 179, 190, 191, 192–198
testing with apachectl, 256
troubleshooting, 257
xinetd and, 166, 167
configuration utilities, serial ports
and, 34–38
configure program (OpenLDAP), 281
confTRUSTED_USERS option
(FEATURE), 219
confUSERDB_SPEC option (define), 219
connect command, 114
CONNECT message (chat), 101
connect option (pppd), 100, 107
Connect: tag field (sendmail), 218
connection tracking, 150, 157
contact field (SOA RR) (DNS master file), 80
continue option (nsswitch.conf), 68
control characters, 106
converting binary to hexadecimal, 106
COPS program, 14
Costales, Bryan, 186
country codes, 73
Cox, Alan, 11
cp command, 177, 210
cps option (xinetd), 166
cron jobs, 13, 228
crontab file, 231
crtscts flag (stty), 36, 37
crtscts option (pppd), 98, 113
crtsdts flag (stty), 38
cs5 flag (stty), 38
cs6 flag (stty), 38
cs7 flag (stty), 38
cs8 flag (stty), 38
CSLIP (Compressed SLIP), 8
cstopb flag (stty), 38
CTS (Clear to Send), 33
cua (callout) devices, 31
CUPS (Common Unix Printing System), 274,
275
CustomLog option (Apache), 248
CVE (Common Vulnerabilities and
Exposures) database, 120

This is the Title of the Book, eMatter Edition
Copyright © 2007 O’Reilly & Associates, Inc. All rights reserved.
316 | Index
cyrus argument (MAILER macro), 196
Cyrus IMAP, 259, 263–265
D
-d built-in match (iptables), 137
.D command (sendmail), 223
D command (sendmail), 198, 199
-d command (sendmail), 223
-d option (arp), 64
-D subcommand option (iptables), 136
daemon facility (syslog), 101, 112
daemon wrapper, 163
daemons, 160, 162, 171
daemontools program, 92, 93
DARPA (Defense Advanced Research
Projects Agency), 2
Data Carrier Detect (DCD), 38, 101
data communications equipment, 5
data terminal equipment, 5
Data Terminal Ready (DTR), 40
databases
LDAP and, 278
sendmail, 210–222
datagrams
broadcasting, 19
congested networks and, 55
firewall packet logging and, 133n
hops for, 26
hosts and, 20, 21
netstat command and, 61
packets as, 2, 7
routing, 24–26
subnets and, 21
traceroute and, 63
UDP and, 9
Van Jacobson header compression, 97
data-only keyword (mgetty), 40
Date: field (mail header), 182
daytime internal service, 161
DCC (Direct Communications
Channels), 157
DCD (Data Carrier Detect), 38, 101
DDI (Device Driver Interface), 12
Debian, 120, 288, 306
debug keyword (mgetty), 40
debugging, PPP and, 112
DECnet, 196
default route, 18, 24, 25
default-lease-time option (DHCP), 47
defaultroute option (pppd), 99, 104
Defense Advanced Research Projects Agency
(DARPA), 2
define command (sendmail)
databases and, 219
lowercase and, 193
overview, 190, 195
sendmail.cf and, 198
sendmail.mc and, 192
setting maximum headers, 206
del argument (route), 50
--delete subcommand option (iptables), 136
--delete-chain subcommand option
(iptables), 136
delimiters, 200
demand dialing, 114, 115
demand option (pppd), 114
denial of service attacks, 121, 150
dependencies, OpenLDAP and, 280
--destination built-in match (iptables), 137
Destination NAT (DNAT), 121, 156, 159
--destination-port match option
(iptables), 140
-detach option (pppd), 101, 113
/dev directory, 30
device argument (ip-up), 105
Device Driver Interface (DDI), 12
device drivers, Net-4 and, 11
dgram sockets, 161
DHCP (Dynamic Host Configuration
Protocol), 44–48
dhcpcd program, 46
dhcpd.conf file, 47
diald command, 114
dial-up configuration
authorization and, 96
dumb terminals and, 38
IP addresses and, 103
nameservers and, 69
persistent dialing and, 115
proxy ARP and, 64
dig tool (BIND), 84, 87, 88
Direct Communications Channels
(DCC), 157
direct keyword (mgetty), 40
directory services, 278
disable configuration option (xinetd), 167
-disable-v4-mapped tag (IPv6), 241
DISCARD action (access rule), 218
discussion lists, 261
Distinguished Names (DN), 279
divert command (m4), 192, 193
djbdns resolver, 66, 92–93
DMZ (demilitarized zone) networks, 122
DN (Distinguished Names), 279

This is the Title of the Book, eMatter Edition
Copyright © 2007 O’Reilly & Associates, Inc. All rights reserved.
Index | 317
DNAT (Destination NAT), 121, 156, 159
DNAT target (iptables), 127, 159
dnl command (m4), 193
DNS database
master files and, 79–83
overview, 75–77
time to live, 75
tools used with, 91
DNS (Domain Name System)
BIND alternatives, 92–95
IP masquerade and, 158, 159
name lookups, 74–75
name resolution and, 28
named.conf file, 77–79, 83
nameservers, 75, 87, 88
newsgroups, 67
nslookup and, 88–91
overview, 71–73
spoofing, 176
useful tools, 91
writing master files, 84–87
dns option (nsswitch.conf), 67
dnsip tool, 95
dnswalk tool, 91
DocumentRoot option (Apache), 248
domain field (resource record), 79, 82
DOMAIN file, 194, 205–209
DOMAIN macro (sendmail), 194, 204
Domain Name System (see DNS)
domain names, 47, 202
domain option
pppd, 110
resolv.conf, 70
domainname command, 44
domain-name-servers command, 47
domains
access database and, 218
authoritative servers and, 75
country codes, 73
default, 70
defined, 71
hosting on single IP addresses, 251
hostnames in, 73
in-addr.arpa, 82
mail, 82, 183, 184
master files and, 79
relay-domains file and, 214
domaintable feature, 220
dot (.)
absolute names and, 79
at sign and, 80
domain names and, 202
local hostnames and, 164n
namespace and, 71
dotted decimal notation, 8
dotted quad notation
ARP tables and, 63
ifconfig command and, 58
IP addresses and, 8, 17, 110
iptables built-in matches and, 138
netstat command and, 61
pppd and, 103
route command and, 54
double-colon (::), 235, 242
down option (ifconfig), 58
--dport match option (iptables), 140
DROP target (iptables), 126, 131, 132
DSA keys, 172
DSL modems, 30, 116
dsmtp mailer (MAILER macro), 196, 197,
204, 220
--dst built-in match (iptables), 137
DTR (Data Terminal Ready), 40
DURATION suboption (xinetd), 166
Dynamic Host Configuration Protocol
(DHCP), 44–48
E
-E subcommand option (iptables), 136
eavesdropping, 122
ebtables (Ethernet Bridge Tables), 126
echo flag (stty), 38
Echo Reply message (ICMP), 150
Echo Request message (ICMP), 124, 150
Echo Request message (PPP), 107
Echo Response message (PPP), 107
Eckstein, Robert, 266
edu top-level domain, 72
EGP (External Gateway Protocol), 25
electronic mail
administration issues with, 179–185
IMAP and, 258
serial communications and, 29
testing, 222
elm mail reader, 181
email addresses
$: metasymbol and, 203
access database and, 218
genericstable database and, 216
genericstable feature and, 211
parts of, 183
relay_from_local feature and, 215
email (see electronic mail)
-enable-v4-mapped tag (IPv6), 241

This is the Title of the Book, eMatter Edition
Copyright © 2007 O’Reilly & Associates, Inc. All rights reserved.
318 | Index
encryption
802.11b standard and, 296
802.11i standard and, 295
eavesdropping and, 122
LDAP and, 289
remote login and, 171
Samba and, 269
ssh daemon and, 172
SWAT and, 276
troubleshooting, 257
wireless Ethernet and, 4
end points, TCP and, 9
envelope, 180, 218
equal sign (=), 94
ERROR action (access rule), 219
error messages
access rules and, 219
Apache web servers and, 256
bounced mail and, 183
certificates and, 252
ICMP and, 26
IPv6 notation and, 242
OpenSSL and, 262
error_log file, 257
ErrorLog option (Apache), 248
ertrn script, 229
escape characters, 105, 106
ESMTP (Extended SMTP), 197
esmtp mailer (MAILER macro), 196, 197,
203, 204, 220
ESSID, 299, 300, 303
Ethernet
ARP and, 20
broadcasting and, 19, 56, 60
IP addresses and, 44
IP masquerading and, 155
MAC addresses and, 132, 138
overview, 3–5
passive collection of accounting data, 152
PPP and, 98
prevalence of, 154
(see also PPPoE)
Ethernet interfaces, 16, 52–54
Ethernet snooping, 59
ETRN command (ESMTP), 197
Evolution mail reader, 181
--exact option (iptables), 135
exclamation point (!), 184, 256
expect strings, 100, 102
expire field (SOA RR), 81
EXPOSED_USER macro (generic.m4), 207
External Data Representation (XDR)
format, 169
External Gateway Protocol (EGP), 25
external routing protocols, 25
F
-f argument (Build), 190
-f built-in match (iptables), 137
F command (sendmail), 198, 199
-f option (chat), 101
-F subcommand option (iptables), 136, 152
Fannin, David, 116
fax argument (MAILER macro), 196
FDDI, 11, 16
FE8x addresses, 236, 238
FE9x addresses, 236
FEATURE macro (sendmail)
databases and, 219, 220
generic.m4 file and, 208
hostnames and, 207
mailers and, 205
overview, 195
pseudo-domains and, 206
usernames and, 199
FEAx addresses, 236
FEBx addresses, 236
Feigenbaum, Barry, 266
FHS (File Hierarchy Standard), xv
FidoNet, 184
FIFO buffer, 34
File Hierarchy Standard (FHS), xv
files option (nsswitch.conf), 67
files service (nsswitch.conf), 69
filter table (iptables)
chains for, 134
as default, 131
description, 131
null rule, 132
filtering
defined, 123
hosts and, 122
MAC addresses, 303, 304
spoofing and, 121
(see also IP filtering)
finger daemon, 163
finger service, 162, 164
fingerprints, 176, 188
firewall packet logging, 133n
firewalls
denial of service attacks and, 150
IP accounting and, 147
IP masquerade and, 156

This is the Title of the Book, eMatter Edition
Copyright © 2007 O’Reilly & Associates, Inc. All rights reserved.
Index | 319
kernel and, 123, 133, 134
Linux and, x
methods of attacks and, 120–122
NAT and, 125
Net-4 and, 11
overview, 122, 123
PPPoE and, 116
purpose of, 119
references, 144
Samba and, 268
sample configuration, 141–144
troubleshooting, 243, 293
fixed IP addresses, 47
fixed-address option (DHCP), 47
Fluhrer, Scott, 296
--flush subcommand option (iptables), 136
focus characters, 202
FORWARD hook point (iptables)
chains and, 127
DROP target and, 126
filter table and, 131, 134
functionality, 129
MAC match option, 139
mangle table and, 131
null rule, 132
forward slash (⁄), 78, 164
ForwardPath option (sendmail.cf), 206
fourport parameter (setserial), 35
Fox, Karl, 97
--fqdn argument (hostname), 44
FQDNs (fully qualified domain names)
adding hosts and, 94
DHCP servers and, 47
email addresses and, 183
hostnames and, 44, 203
NS record and, 77
FRAD (Frame Relay Access Device), 5
--fragments built-in match (iptables), 137
fragmentation, 149, 150
Frame Relay Access Device (FRAD), 5
Frame Relay protocol, 5, 11
frames (see packets)
Free Software Foundation, x
FreeBSD, 12
From: field (mail header), 181
From: tag field, 218
fs file, 67
FSSTND (Linux File System Standard
Group), xv
FTP, 148, 156
fullstatus option (apachectl), 250
fully qualified domain names (see FQDNs)
G
G flag (netstat), 61
gated
defined, 56
metric value and, 26
netstat options and, 61
RIP and, 26
gateways
configuring, 55
hops and, 26
hosts as, 7
IP and, 24–26
mail routing and, 184
netstat command and, 61
networks and, 22–24
proxy ARP and, 64
routing through, 54
generic-linux.mc file
generic.m4 file and, 205
modifying, 207
naming of, 204
purpose, 203
generic.m4 file, 205–209
GENERICS_DOMAIN macro, 215
generics_entire_domain feature, 215
genericstable database, 208, 211, 215–217
genericstable feature, 211, 215
Gentoo Linux, 260, 267
getdomainname( ) system call, 70
gethostbyaddr( ) function, 27, 67
gethostbyname( ) function, 27, 67
gethostname( ) function, 110
getty program, 38, 39
Gibson, David, 299
glibc library, 67
global Top-Level Domains (gTLD), 72
global unicast address, 236
glue records, 77, 82
GNU General Public License, x
Gnu Privacy Guard (gpg), 187, 188
GNU standard library, 67
gov top-level domain, 72
gpg (Gnu Privacy Guard), 187, 188
GQ, 291
graceful option (apachectl), 250
greater than (>) sign, 181, 202
group ID, sendmail and, 191
GTK+-style interface, 291
gTLD (global Top-Level Domains), 72
guest directive (Samba), 271
GUI, 275, 291

This is the Title of the Book, eMatter Edition
Copyright © 2007 O’Reilly & Associates, Inc. All rights reserved.
320 | Index
H
H command (sendmail), 198, 199
H flag (netstat), 61
-h option (iptables), 135
handshakes, 33, 36, 105
hardware, 802.11b standard and, 296
hardware Ethernet option (DHCP), 47
hardware field (HINFO RR), 83
hardware handshaking (see handshakes)
hash sign (see pound sign)
HDLC (High-Level Data Link Control), 96,
97, 112
help command (nslookup), 91
--help option (iptables), 135
Hermes chipsets, 296, 297, 299
Hesiod addresses, 75, 79
hexadecimal characters, 106, 304
High-Level Data Link Control (HDLC), 96,
97, 112
HINFO record, 83
holdoff option (pppd), 114, 115
hook points, 127, 129, 131
hops, 26, 26n
host field (MX RR), 82
host keys, 172, 175
host numbers, 17
-host option (route), 50
HOST suboption (xinetd), 166
host tool, 91
HostAP tool, 298, 300–303, 306
hostap_cs.conf file, 302
hostcvt tool (BIND), 91
hostlist, 164
hostname
A record and, 81
access database and, 218
canonical, 75, 80, 81, 82
chap-secrets file, 110
dot and, 164n
FEATURE macro and, 207
FQDNs and, 203
genericstable database and, 216
hostlist and, 164
IP addresses and, 67, 81, 103
IP masquerade and, 207
localhost, 51, 52
mapping, 79, 82
networks file and, 50n
scp program and, 177
setting, 44
uniqueness of, 73
xinetd and, 165
hostname command, 44
hostname option (nslookup), 89
hostname resolution
defined, 8
local nameservers and, 71
nsswitch.conf and, 67
overview, 27
pppd and, 98
TCP/IP networking and, 48–50
HostnameLookups option (Apache), 248
hosts
access database and, 218
adding, 93
broadcasting and, 19
communications and, 5
defined, 1
DHCP lease and, 47
eavesdropping and, 122
filtering and, 122
firewalls and, 122
as gateways, 7, 22
IP addresses and, 8, 20, 45
IP masquerade and, 156
MAC addresses, 48
mail and, 183, 184
names for, 70, 75
ports on, 9
relay-domains file and, 214
remote login to, 176
security and, 163
serial communications and, 29
sizes of, 17
spoofing and, 121
thin Ethernet and, 4
trusted, 163
updating files for, 27
zones and, 74
hosts database, 67
hosts: dns files, 71
hosts file
backup host table in, 71
configuring gateways and, 55
hostcvt tool and, 91
ifconfig and, 51
nameservers and, 69
writing, 48–50
hosts.allow file, 163
hosts.deny file, 163
hoststat command, 230, 231
HostStatusDirectory option, 230
HOSTS.TXT database, 27
HTTP, 123, 124, 148

This is the Title of the Book, eMatter Edition
Copyright © 2007 O’Reilly & Associates, Inc. All rights reserved.
Index | 321
httpd -l command, 255
httpd.conf file, 247, 250–252, 255
hub-and-spoke model, 298
hubs, active, 4
Hunt, Craig, 16, 199
hwaddr argument (arp), 64
HylaFAX software, 196
hyphen (-), 102, 110
I
-i built-in match (iptables), 138
-I subcommand option (iptables), 136
IANA (Internet Assigned Numbers
Authority), 45, 233, 234
IBM, 5, 220, 266
ICMP (Internet Control Message Protocol)
IP accounting and, 150, 151
IP filtering and, 124
iptables matches, 139
netstat options and, 61
TCP/IP and, 26–28
traceroute and, 63
--icmp-type match option (iptables), 139
identity file, 174, 175
identity.pub file, 174, 178
idle option (pppd), 115
IEEE (Institute of Electrical and Electronics
Engineers), 295, 296
IETF (Internet Engineering Task Force), 10,
267
if argument (route), 50
iface argument (ip-up), 105
ifconfig command
bridging interface and, 306
compatibility considerations, 52
Ethernet interfaces, 53
interface configuration and, 50
IPv6 and, 237
multicast support, 46
network devices and, 30
overview, 57–60
PPPoE clients and, 118
IMAP (Internet Message Access Protocol)
aliases and, 217
choosing, 259–263
Cyrus, 263–265
email and, 180
POP and, 258, 259
purpose, 258
imapd.alert file, 261
imapd.conf file, 264
in-addr.arpa domain, 82
include option (Apache), 247
indefinite tokens, 200
inetd daemon, 160–163, 227, 267
inetd.conf file
disabling r* commands, 171
finger daemon, 163
IMAP and, 260, 262
overview, 161–162
Samba in, 268
SWAT and, 276
inetOrgPerson schema, 279
info top-level domain, 72
infrastructure mode, 297, 298, 303
--in-interface built-in match (iptables), 138
init command, 40
inittab file, 40
INPUT hook point (iptables)
chains and, 127
filter table and, 131, 134
functionality, 129
MAC match option, 139
mangle table and, 131
input redirection (<), 37
--insert subcommand option (iptables), 136
install-cf command (Build), 210
installing
Apache considerations, 248
LDAP libraries, 286
sendmail, 186–192
ssh tools, 171–178
UW IMAP, 259–261
instances option (xinetd), 165
Institute of Electrical and Electronics
Engineers (IEEE), 295, 296
interfaces
bind, 270
bridging and, 306, 307
configuring aliases for, 57
defined, 16
displaying netstat statistics, 62
Ethernet, 16, 52–54
GTK+-style, 291
incompatible changes and, 169
IP and, 50n
IPv6 and, 237, 238
packets and, 18
packet-switching and, 26
PPP, 57
procmail argument (MAILER) and, 196
promiscuous mode, 59
Samba and, 270
(see also loopback interface; network
interfaces)

This is the Title of the Book, eMatter Edition
Copyright © 2007 O’Reilly & Associates, Inc. All rights reserved.
322 | Index
interference, 305
internal keyword (inetd.conf), 162
internal routing protocols, 25
internal services, 161
International Standards Organization
(ISO), 96
Internet
ARPANET and, 2
dangers of, 119
estimated users, 233
expense of connections, 154
growth of, 29
HOSTS.TXT database, 27
IP masquerade and, 155, 156, 157
Linux documentation available, xii
mail routing on, 184–185
PPP links, 98
prevalence of, ix
RFC 822 and, 179, 183
security considerations, 116
Internet Assigned Numbers Authority
(IANA), 45, 233, 234
Internet Control Message Protocol (see
ICMP)
Internet Daemon (see inetd daemon)
Internet Engineering Task Force (IETF), 10,
267
Internet Message Access Protocol (see IMAP)
Internet Protocol Control Protocol
(IPCP), 97, 98, 102
Internet Protocol (see IP)
internetworking, 7
interoperability, 278
(see also Samba)
interrupts, UART chips and, 34
intranets, 18
IP accounting, 11, 146–152
IP addresses
access database and, 218
ARP table and, 64
assigning, 8, 44, 45
binding, 247
bridging and, 307
choosing, 102, 104
clearing, 306
DHCP and, 45–48
DNS and, 75, 94
dotted quad notation, 8, 17, 110
DSL modems and, 116
end points and, 9
finding, 8
fixed, 47
HostAP driver and, 303
hostlist and, 164
hostnames and, 81
ifconfig and, 58
interfaces and, 16
IP accounting by, 147, 148
IP masquerading and, 155
IPv4 problems, 234
IPv6 and, 235, 236
looking up, 67
mapping, 27, 82
MTAs and, 184
NAT and, 159, 234
nslookup and, 89
pap-secrets file and, 111
Samba and, 276
scarcity of, 154, 233
TCP/IP and, 17–26
virtual hosting, 57
xinetd and, 165
IP Alias, 57
IP filtering
example, 126
IP masquerade and, 157
iptables and, 129, 130, 134
overview, 124–125
IP firewalling, 11, 125
IP forwarding, 55, 152n
IP (Internet Protocol)
choosing gateways, 24–26
configuration options, 102–105
Frame Relay and, 5
interfaces and, 50n
iptables matches, 137
networks, 20, 21
overview, 6–8
tunneling, 11
virtual hosting, 250, 251
IP masquerade
configuring, 157, 158
example, 126
hostnames and, 207
IP firewalling and, 125
kernel and, 157
nameserver lookups and, 158
NAT and, 154
Net-4 and, 11
overview, 156, 157
IP Multicast service, 17
ipchains command, 125, 134, 147
ipchains.o module, 134
ip_conntrack_ftp module, 157

This is the Title of the Book, eMatter Edition
Copyright © 2007 O’Reilly & Associates, Inc. All rights reserved.
Index | 323
IPCP (Internet Protocol Control
Protocol), 97, 98, 102
ipcp-accept-local option (pppd), 103n
ipcp-accept-remote option (pppd), 103n
ipfwadm interface, 125, 134
ipfwadm.o module, 134
ip_nat_ftp.o module, 157
IPSec, 236
iptables command
built-in matches, 137–141
concepts, 127–133
IP accounting and, 146, 147
IP accounting by service port, 148
IP masquerade and, 157, 158
netfilter and, 134
OpenLDAP and, 293
options for, 134
overview, 125–127
resetting counters, 151
rules and, 123, 152, 159
security and, 121
subcommands, 136, 137
using, 134–135
ip_tables.o module, 134
ip-up command, 104, 105, 114
iputils package, 237
IPv4 standard
addressing and, 8
match options, 137
OpenSSH and, 242
problems with, 233, 234
tunnel brokers and, 238
IPv6 standard
AAAA record and, 81
addresses with, 8, 235, 236
advantages, 236
applications and, 240–242
configuration, 236–238
troubleshooting, 242–243
tunnel brokers and, ??–240
xinetd and, 165
IPX, 11, 96
IPXCP, 97
irq option (ifconfig), 59
irq parameter (setserial), 35
ISDN, Net-4 and, 11
ISO (International Standards
Organization), 96
ISO-3166, 73
iwconfig tool, 300, 303, 304
iwlist program, 300
iwpriv program, 300, 304, 305
iwspy program, 300
ixon flag (stty), 38
J
-j MASQUERADE option (iptables), 157
-j option (iptables), 135, 147
-j SNAT option (iptables), 157
Java applets, 291
--jump option (iptables), 135
K
K command (sendmail), 198, 199
kdebug option (pppd), 112
KeepAlive option (Apache), 249
KeepAliveTimeout option (Apache), 249
Kerberos authentication, 60, 264, 280
kermit terminal program, 29
kernel
access control and, 31
ARP tables, 63, 65
debugging, 112
domainname command, 44
HostAP and, 301
ICMP and, 26
ifconfig command and, 50
initializing, 42
interfaces and, 16
IP accounting and, 146
IP firewall and, 123, 133, 134
IP forwarding and, 55
IP masquerade and, 157
IPv6 and, 236, 237, 243
loadable kernel module and, 299
location of source code, 301
MTU and, 106
netfilter and, 119
PPP and, 30, 97
/proc filesystem and, 43
serial ports and, 34
key ring, 187, 188, 189
KeyFile entry (httpd.conf), 256
keys (see private keys; public keys)
Kim, Gene, 15
klogd daemon, 112
known_hosts file, 174, 176
Krieger, Markus, 276
L
-l argument (ssh), 176
-L subcommand option (iptables), 136, 158

This is the Title of the Book, eMatter Edition
Copyright © 2007 O’Reilly & Associates, Inc. All rights reserved.
324 | Index
LANs (Local Area Networks)
IP masquerading and, 155
nameservers and, 71
prevalence of, 154
routing tables and, 25
wireless networking and, 295
LCP (Link Control Protocol)
overview, 105–107
PPP and, 96
pppd and, 98, 108
lcp-echo-failure option (pppd), 107
lcp-echo-interval option (pppd), 107
LDAP Data Interchange files
(LDIF), 283–285
LDAP (Lightweight Directory Access
Protocol)
GUI and, 291
overview, 278–279
sendmail and, 190
(see also OpenLDAP)
ldapadd utility, 283
ldapsearch command, 283, 285, 288
LDIF (LDAP Data Interchange
files), 283–285
less than (<) sign (sendmail), 202
libc library, 27, 67
Libes, Don, 100
Lightweight Directory Access Protocol (see
LDAP)
line discipline, 30
--line-numbers option (iptables), 135
Link Control Protocol (see LCP)
link-local address, 235, 238
Linux
documentation available, xii
getting the code, 12
mailing lists, xiii
obtaining, xiv
platforms supported, ix
Usenet newsgroups, xiii
user groups, xiv
Linux Documentation Project, xii
Linux File System Standard Group
(FSSTND), xv, 32
Linux Journal, xiii
Linux Magazine, xiii
Linux Standard Base, xv
Linux Systems Labs, xii
Linux Wireless Extension Tools, 300
linux.m4 file, 204
linux-wlan-ng driver, 300
--list subcommand option (iptables), 136
Listen option (Apache), 247
listening
IPv6 cautions, 240, 241
OpenLDAP and, 287
OpenSSH and, 242
ports and, 10
Samba and, 271
slapd program and, 282
testing, 290
Liu, Cricket, 67
LKM (loadable kernel module), 299
lnp option (IMAP), 260
load printers option (printcap), 275
loadable kernel module (LKM), 299
loadavg file, 43
Local Area Networks (see LANs)
local argument (MAILER macro), 196
LOCAL keyword, 164
local mailer (MAILER macro), 196, 204
local_addr option
ip-up, 105
pppd, 103
LOCAL_CONFIG macro (sendmail), 197,
198
LOCAL_DOMAIN macro (sendmail), 213
localhost hostname, 51, 52
local-host-names file, 207, 211, 212–214
LOCAL_NET_CONFIG macro
(sendmail), 197, 202
LOCAL_RULE_n macro (sendmail), 197
LOCAL_RULESET macro (sendmail), 197
lock files, 31, 32
lock keyword (pppd), 99
log file command (Samba), 272
log level command (Samba), 272
LogFormat option (Apache), 248
logins
anonymous, 261
PAP and, 108
pppd and, 100
remote, 170–178
serial devices and, 38–41
LogLevel option (Apache), 248
log_on_failure option (xinetd), 166
log_on_success option (xinetd), 166
log_type option (xinetd), 165
Longyear, Al, 97
loopback address, 18
loopback interface
defined, 18
example, 24
gated and, 26

This is the Title of the Book, eMatter Edition
Copyright © 2007 O’Reilly & Associates, Inc. All rights reserved.
Index | 325
IP address and, 44
overview, 51–52
Samba and, 270
lowercase, sendmail and, 193
lpr command (BSD), 273
lsmod command, 243
M
=M command (sendmail), 223
M command (sendmail), 198
M field (mailstats), 229
M flag (netstat), 61
-M option (iptables), 135
-m option (iptables), 132, 135
m4 macro processor program
Build utility and, 190
hoststat command and, 230
lowercase and, 193
purpose, 186
sendmail.cf file and, 192, 209
virtusertable feature and, 222
MAC (Media Access Controller) addresses
filtering, 303, 304
fixed IP addresses and, 47
HostAP and, 304, 305
iptables and, 132, 138
IPv6 and, 235, 238
wireless networks and, 299
maccmd command, 304, 305
Mackaras, Paul, 97
--mac-source match option (iptables), 139
mail body, 180
mail domains, 183
mail exchangers, 82, 179, 184
(see also electronic mail)
mail header
composition of, 181
defined, 180
sendmail and, 199
setting maximum length, 206
mail spool, 228
mail transfer agents (MTAs), 179
mail transport agents (MTAs), 182, 184
mail user agents (MUAs), 182
mail11 argument (MAILER macro), 196
mailboxes
alternate formats, 261
IMAP and, 261
transport and, 179, 181, 183
Mailer field (mailstats), 230
MAILER macro (sendmail)
mailers and, 204, 220
overview, 196
mailertable database, 220, 221
mailertable feature, 220
mailing lists
Linux, xiii
PPP and, 97
security and, 15
sendmail-announce, 186
mailq command, 228
mailstats command, 229, 230
make command, 209, 247, 281
make depend command, 281
make install command, 247, 255
make test command, 281
Makefile
OpenLDAP and, 281
path options for OpenSSL, 262
sendmail and, 209
UW-IMAP and, 259
makemap command, 216
Malinen, Jouni, 300
managed mode, 297
Mandrake, 267
mangle table (iptables), 131
mangling, 123, 157
man-in-the-middle attack, 172
Mantin, Itsik, 296
/map command (sendmail), 223
mapping
addresses, 159
genericstable database and, 217
hostnames, 27, 79
IP addresses, 19, 82
RPC and, 169, 170
MASQUERADE target (iptables), 157, 158
master files
domains and, 79
resource records and, 80–83
writing, 84–87
--match option (iptables), 132, 135
max log size directive (Samba), 272
MaxClients option (Apache), 249
MaxHeadersLength option
(sendmail.cf), 206
Maximum Receive Unit (MRU), 96, 105, 106
Maximum Transfer Unit (MTU), 16, 106,
149
Maximum Transmission Unit (MTU), 59

This is the Title of the Book, eMatter Edition
Copyright © 2007 O’Reilly & Associates, Inc. All rights reserved.
326 | Index
MaxKeepAliveRequests option
(Apache), 249
max-lease-time option (DHCP), 47
MaxSpareServers option (Apache), 249
Media Access Controller addresses (see MAC
addresses)
meminfo file, 43
mesg command, 113
Message-ID: field (mail header), 182
metasymbols, 200–202
metric option (ifconfig), 59
metric value, 26, 59
mgetty program, 39–41, 112, 113
Microsoft Windows, 266, 273
migrage_common.ph script, 287
migrate_all_online.sh script, 287
migration tools, 287
mil top-level domain, 72
MIME (Multipurpose Internet Mail
Extensions), 180
minicom program, 29, 99
minimum field (SOA RR), 81
MinSpareServers option (Apache), 249
minus sign (-), 37, 58
Mockaptris, Paul, 28
mod_access module (Apache), 246
mod_actions module (Apache), 246
mod_alias module (Apache), 245
mod_asis module (Apache), 246
mod_auth module (Apache), 246
mod_auth_anon module (Apache), 246
mod_auth_db module (Apache), 246
mod_auth_dbm module (Apache), 246
mod_autoindex module (Apache), 245
mod_cern_meta module (Apache), 246
mod_cgi module (Apache), 246
mod_digest module (Apache), 246
mod_dir module (Apache), 245
modem keyword (pppd), 101
modem option (pppd), 113
modems
abort messages, 102
ATZ command and, 101
demand dialing, 114, 115
getty program and, 38
mgetty program and, 112
PPP servers and, 114
pppd options and, 113
software for, 29–30
XOFF characters and, 105
mod_env module (Apache), 245
mod_example module (Apache), 246
mod_expires module (Apache), 246
mod_headers module (Apache), 246
mod_imap module (Apache), 246
mod_include module (Apache), 246
mod_info module (Apache), 246
mod_log_agent module (Apache), 246
mod_log_config module (Apache), 246
mod_log_referer module (Apache), 246
mod_mime module (Apache), 245
mod_mime_magic module (Apache), 245
mod_mmap_static module (Apache), 246
mod_negotiation module (Apache), 245
modprobe command, 134, 237, 302
--modprobe option (iptables), 135
mod_proxy module (Apache), 246
mod_rewrite module (Apache), 245
mod_setenvif module (Apache), 245
mod_so module (Apache), 246
mod_spelling module (Apache), 245
mod_ssl, 252–255
mod_status module (Apache), 246
mod_unique_id module (Apache), 245
mod_userdir module (Apache), 245
mod_usertrack module (Apache), 246
MODVERSIONS option (LKM), 299
MRU (Maximum Receive Unit), 96, 105, 106
mru option (pppd), 106
msgsdis field (mailstats), 230
msgsfr field (mailstats), 229
msgsreg field (mailstats), 230
msgsto field (mailstats), 230
--mss match option (iptables), 140
MTAs (mail transfer agents), 179
MTAs (mail transport agents), 182, 184
MTU (Maximum Transfer Unit), 16, 106,
149
MTU (Maximum Transmission Unit), 59
mtu option (ifconfig), 59
MUAs (mail user agents), 182
multicast addresses, 60
MULTICAST option (ifconfig), 47
Multipurpose Internet Mail Extensions
(MIME), 180
mutt MUA, 182
/mx command (sendmail), 223
MX record
bestmx_is_local feature and, 214
overview, 82
preferences and, 184
querying for, 90
sendmail test mode commands, 223
MySQL BDB, 280
MySQL service, 18

This is the Title of the Book, eMatter Edition
Copyright © 2007 O’Reilly & Associates, Inc. All rights reserved.
Index | 327
N
N flag (stty), 38
-N option
iptables, 136
ssh-keygen, 172
-n option (iptables), 135
name option
dig, 88
pppd, 111
name resolution, DNS and, 28, 74–75
name top-level domain, 72
named program, 66
named.conf file, 77–79, 83
nameserver option
dig, 87
resolv.conf, 69
nameservers
DNS and, 74, 75, 98
handling lookups, 158, 159
hosts file and, 69
LANs and, 71
nslookup and, 89
resolv.conf and, 69–71
root, 90
serial number and, 80
verifying setup of, 87, 88
namespace, 73, 77
naming conventions, LDAP and, 279
NAT (Network Address Translation)
address scarcity and, 233
defined, 123
IP addresses and, 45
IP firewalling and, 125
IP masquerade and, 154
iptables and, 121, 127, 134
netfilter and, 159
overview, 234, 235
spoofing and, 121
nat table (iptables), 131, 134
NCP (Network Control Protocol), 96
net directory, 43
-net option (route), 50, 53
net top-level domain, 72
Net-2, 11
Net-3, 11
Net-4, 11, 12
netfilter kernel module
access control and, 301
backwards compatibility with, 134
firewalls and, 243
IP masquerade and, 157
kernel and, 119
loading, 134
NAT and, 159
overview, 125–127
packet processing and, 123
netmask option (ifconfig), 58
netmasks, 21, 25, 164, 234
NetRom protocol, 6, 11
netstat command
Apache web server and, 241
checking interface configuration, 54
checking ports and, 120
IMAP and, 260
IPv6 and, 237
overview, 60–63
testing SSL availability, 290
net-tools package, 57, 237
Network Address Translation (see NAT)
Network Control Protocol (NCP), 96
Network File System (NFS), 169
Network Information Center (NIC), 17, 27,
73
network interface card (NIC), 4
network interfaces
configuring, 50n
gated and, 26
scripts and, 42
TCP/IP, 16
network layer
denial of service and, 122
ebtables command and, 126
IP filtering and, 124
protocols, 6, 45
network numbers, 17, 21, 45
networking
access database and, 218
broadcast, 56
choke points, 122
congested, 55
DHCP lease and, 45
email and, 179
gateways and, 22–24
global village and, ix
history, 1
IP masquerade and, 156
IPv6 and, 236
Linux, 12–13
perimeter, 122
system maintenance, 13–15
TCP/IP networks, 2–11
unauthorized access, 120
(see also wireless networks)
networks database, 67

This is the Title of the Book, eMatter Edition
Copyright © 2007 O’Reilly & Associates, Inc. All rights reserved.
328 | Index
networks file, 50, 53
newaliases command, 212
--new-chain subcommand option
(iptables), 136
newsgroups
DNS, 67
PPP and, 97
Usenet, xiii
NFS (Network File System), 169
NIC (Network Information Center), 17, 27,
73
NIC (network interface card), 4
nice configuration option (xinetd), 167
NIS domain, 44
nmbd process, 277
NO CARRIER message, 102
NOARP flag (ifconfig), 59
noauth option (pppd), 107
noipdefault option (pppd), 103
nopwd option (IMAP), 260
notfound option (nsswitch.conf), 68
Novell, 11, 12n, 96
Novell NCP (NetWare Core Protocol), 11
NS record
as glue record, 77
nslookup and, 90
purpose, 82
type option and, 80
nslint tool, 91
nslookup tool, 88–91
NSS library (LDAP), 286, 288
nss_ldap package, 286
nsswitch.conf file, 67–69, 288
NULL character (ASCII), 106
--numeric option (iptables), 135
O
-o built-in match (iptables), 138
O command (sendmail), 198
octets, 17, 59
OK action (access rule), 218
100-baseT, 4
1000-baseT, 4
only_from option (xinetd), 165
OpenBSD project, 171n
OpenLDAP
compiling, 281
configuring server, 282
dependencies with, 280
GUI browsers, 291
obtaining, 280
overview, 278
running, 282–285
SSL and, 289–291
troubleshooting, 291–293
using, 285–289
OpenLDAP BDB (backend database), 280
openldap.conf file, 288
OpenSSH project, 171, 240, 242
OpenSSL
Apache web servers and, 252–256
certificates and, 290
generating SSL certificates, 252, 253
IMAP and, 260, 261–263
OpenLDAP and, 280
security considerations, 15
SWAT and, 276
OperatorChars option (sendmail.cf), 200
option domain-name option (DHCP), 47
option domain-name-servers option
(DHCP), 47
option router command, 47
options file
auth option, 109
demand dialing and, 114
mgetty program and, 113
overview, 99
security considerations, 107
org top-level domain, 72
Organization: field (mail header), 182
origin, 79
origin field (SOA RR), 80
Orinico_cs drivers, 299, 300
OSTYPE command (generic-linux.mc), 204
OSTYPE file, 205
OSTYPE macro (sendmail), 194
--out-interface built-in match (iptables), 138
Outlook mail reader, 181
OUTPUT hook point (iptables)
chains and, 127
filter table and, 131
functionality, 129
iptables and, 134
mangle table and, 131
nat table and, 131
P
-p built-in match (iptables), 138
P command (sendmail), 198
-P subcommand option (iptables), 136
Packet Assembler Disassembler (PAD), 5
packet filtering (see IP filtering)
packet flooding, 150
packet mangling, 123, 157

This is the Title of the Book, eMatter Edition
Copyright © 2007 O’Reilly & Associates, Inc. All rights reserved.
Index | 329
packet radio, 6, 59
packet sniffing, 122
packets
chains and, 131
as datagrams, 2, 7
encapsulation of, 5
Ethernet and, 4
Ethernet maximum size, 53
firewall packet logging and, 133n
flow of, 127–129
fragmenting, 149, 150
ICMP, 150
interfaces and, 16, 18
IPv6 and, 236
netfilter subsystem and, 123
rules and, 132
packet-switching
gateways and, 22, 55
interfaces and, 26
protocols for, 2
support for, 5
PAD (Packet Assembler Disassembler), 5
PAM library (LDAP), 286, 288
pam_ldap package, 286
PAP (Password Authentication Protocol)
authorization and, 96
CHAP and, 108, 109
mgetty program and, 113
pap-secrets file, 111
PPP and, 108, 113
pppd and, 97, 99
pap-secrets file, 109, 111
PARANOID keyword, 164
parenb flag (stty), 38
parodd flag (stty), 38
/parse command (sendmail), 223
passphrases, 175, 252, 253
passwd command, 113
passwd file, 112, 113, 162
Password Authentication Protocol (see PAP)
passwords
chat script and, 101n
Cyrus IMAP and, 264
eavesdropping and, 122
login procedure and, 108
PPPoE client and, 118
remote login and, 171
Samba and, 269, 277
security and, 14
ssh command and, 176, 178
TFTP and, 162
patch lists, 120
PCI, 301
PCMCIA, 301
pcmcia-cs, 299
PDAs, 233
PDC (Primary Domain Controller), 266
PEM pass phrase, 252, 253
perimeter networks, 122
Perkins, Drew, 97
permissions, 256
persist option (pppd), 115
persistent dialing, 115
PGP keys (sendmail), 187
PGPKEYS file, 188, 189n
phquery argument (MAILER macro), 196
pid (process ID), 31
PID suboption (xinetd), 166
pine MUA, 181, 182
ping command, 51, 117
ping flooding, 150
ping6 tool, 237
PKI environment, 278
PLIP, 11, 56, 59
plipconfig tool, 57
plus sign (+), 94, 256
PLX, 301
pointopoint option (ifconfig), 59
point-to-point links, 56
Point-to-Point Protocol (see PPP)
policy, chains and, 131
--policy subcommand option (iptables), 136
pop argument (MAILER macro), 196
POP (Post Office Protocol)
aliases and, 217
IMAP and, 258, 259
MAILER macro and, 196
port field (services), 168
port parameter (setserial), 35
portmapper daemon, 52n, 170
ports
accounting services by, 148–150
binding, 247
daemons and, 160
ICMP and, 150
LDAP and, 282
netstat command and, 120
outgoing connections and, 63n
overview, 10
Samba and, 268, 276
services and, 167
TCP and, 9
troubleshooting, 293
Post Office Protocol (see POP)

This is the Title of the Book, eMatter Edition
Copyright © 2007 O’Reilly & Associates, Inc. All rights reserved.
330 | Index
POSTROUTING hook point (iptables)
chains and, 127
functionality, 129
mangle table and, 131
nat table and, 131, 134
pound sign (#), 67, 78, 99, 171, 192
PPP (Point-to-Point Protocol)
advanced configurations, 112–116
authentication with, 108–111
debugging and, 112
escape characters for, 105
interfaces, 57
interfaces and, 16
IP accounting by service port, 148
IP configuration options, 102–105
kernel and, 30
Linux and, x
Net-4 and, 11
overview, 96, 97
security considerations, 107, 108
serial communications and, 30
SLIP and, 8
pppd daemon
authentication and, 109
chap-secrets file and, 109, 110
chat and, 100–102
demand dialing, 114
IPCP options and, 102
LCP and, 108
options files, 99
pap-secrets file, 111
persistent dialing and, 115
purpose, 97
running, 98, 99
security considerations, 107
as server, 112, 114
ppp-log file, 112
PPPoE (PPP over Ethernet)
connections used, 30
DSL and, 96
options for, 116–118
preference field (MX RR), 82
-prefix= option (make install), 247
PREPENDDEF macro (Build), 190
PREROUTING hook point (iptables)
chains and, 127
functionality, 129
MAC match option, 139
mangle table and, 131
nat table and, 131, 134
Primary Domain Controller (PDC), 266
primary option (named.conf), 79
primary servers, 75, 82
printcap file, 274, 275
printing, Samba and, 273–275
Prism chipsets, 296, 297, 300
private keys
defined, 172
ssh clients and, 174
ssh-keygen command and, 175
SWAT and, 276
/proc filesystem (procfs)
ARP tables, 63, 65
assigning IP addresses, 44, 45
creating subnets, 48
DHCP and, 45–48
Ethernet interfaces, 52–54
gateways and, 54, 55
hostname resolution, 48–50
ifconfig command and, 57–60
installing tools, 43
interfaces and, 50n
IP Alias, 57
loopback interface, 51–52
netstat command, 60–63
PPP interface, 57
setting hostnames, 44
traceroute tool and, 63
process ID (pid), 31
procfs (see /proc filesystem)
procmail argument (MAILER macro), 196
prog mailer (MAILER macro), 196, 204
program numbers, 169
promisc option (ifconfig), 59, 60
promiscuous mode
eavesdropping and, 122
ifconfig and, 59, 152
iptables and, 129
iwpriv program and, 300
promiscuous_relay feature, 215
--protocol built-in match (iptables), 138
protocol field
inetd, 161
services, 168
protocols
for amateur radio, 6
defined, 1
encryption and, 4
IP accounting by, 151
serial, 8
(see also specific protocols)
protocols file, 167–169
proxy ARP, 56, 64, 65, 104
proxy servers, 121, 122, 124

This is the Title of the Book, eMatter Edition
Copyright © 2007 O’Reilly & Associates, Inc. All rights reserved.
Index | 331
proxyarp option (pppd), 104
ps command, 101
pseudo-domains, 206, 220
PTR record, 80, 82, 91
public command (Samba), 271
Public Key Cryptography, 171
public keys
authorized_keys file and, 178
defined, 172
fingerprints, 176
ssh clients and, 174, 176
ssh-keygen command and, 175
purgestat command, 231
Q
-q10m argument (sendmail), 228
QoS (Quality of Service), 6, 236
qpage argument (MAILER macro), 196
Quality of Service (QoS), 6, 236
querying
dig tool and, 88
DNS servers, 87
host tool and, 91
IP addresses, 19, 20, 89
LDAP server and, 283, 288, 289
nameservers and, 71, 98
recursive, 78
for root domain, 74
for root nameservers, 90
servers handling mail, 88
services, 68
QUEUE target (iptables), 133
QuickPage mailer, 196
/quit command (sendmail), 223
quotation marks (") (ssh), 177
R
R command (sendmail), 198, 199, 200
R configuration command (sendmail), 199
-R subcommand option (iptables), 136
random key generator, 172
RARP (Reverse Address Resolution
Protocol), 20
rc.inet1 script, 42
rc.inet2 script, 42
rcp command, 170
rc.serial script, 35, 36
rdata field (resource record), 80
RDN (Relative Distinguished Names), 279
Received: field (mail header), 182
Red Hat
bridging networks, 306
IMAP and, 260, 262
kernel source code and, 301
Samba and, 267
yum utility, 120
Redirect message (ICMP), 26, 27, 61
refresh field (SOA RR), 80
REJECT action (access rule), 218
REJECT target (iptables), 132
Relative Distinguished Names (RDN), 279
RELAY action (access rule), 218
relay mailer (MAILER macro), 196, 197,
204, 220
RELAY_DOMAIN command, 214
relay-domains database, 211
relay-domains file
access database and, 217
configuring, 208, 214
overview, 214, 215
relay_entire_domain feature, 215
relay_local_from feature, 215
remote login, 170–178
Remote Procedure Call (RPC), 169, 170
remote_addr option
ip-up, 105
pppd, 103
remotename keyword (pppd), 111
--rename-chain subcommand option
(iptables), 136
--replace subcommand option (iptables), 136
Reply-To: field (mail header), 182
Request to Send (RTS), 33
requested command, 172
reset command, 101
resolv.conf file
DHCP and, 46
dig tool and, 87
nameserver lookups using, 69–71
PPPoE clients, 117
resolver library, 27, 67–71
resolvers
djbdns, 66, 92–93
nsswitch.conf and, 68, 69
pppd and, 98
resolv.conf, 69–71
resolver library, 67
resource records and, 79
robustness of, 71
resource records (RRs), 75, 79–83
respawn option (mgetty), 40

This is the Title of the Book, eMatter Edition
Copyright © 2007 O’Reilly & Associates, Inc. All rights reserved.
332 | Index
restart option (apachectl), 250
retry field (SOA RR), 81
return option (nsswitch.conf), 68
RETURN target (iptables), 131, 133
Reverse Address Resolution Protocol
(RARP), 20
rewrite rules
example, 202, 203
left side, 200, 201
mailers and, 220
right side, 200, 202
sendmail and, 199
rexec command, 15, 171
rexec service (BSD), 120
RFC 821, 183, 185, 219
RFC 822
as common denominator, 180
FidoNet and, 184
header format, 180
Internet and, 179, 183
RFC 974, 185
RFC 1123, 185
RFC 1179, 273
RFC 1341, 180
RFC 1437, 179n
RFC 1591, 138
RFC 1700, 10
RFC 1893, 219
RFC 1912, 78
RFC 1918, 18, 45
RFC 2251, 279
RFC 2253, 278
RFC 2849, 283
RFC 3232, 139
RFC 3501, 258
RING message, 39
RIP (Routing Information Protocol), 25, 26
rlogin command, 15, 170, 171
rlogin service (BSD), 120, 121
Roaring Penguin, 116
root account
cron job output and, 13
LDAP server and, 288
ssh daemon and, 174
troubleshooting Samba, 277
root domain, 71, 74
root nameservers, 90
root.hint file, 84
rootpw option (slapd.conf), 282
Rose protocol, 6, 11
route command
building tables, 25
compatibility considerations, 52
displaying information, 25
Ethernet interfaces and, 53
interface configuration and, 50
PPP links and, 104, 105
routing
advanced policy, 11
defined, 7
DNAT and, 156
email and, 184–185
Ethernet interfaces and, 53
fragmentation and, 149
gateways and, 54
ICMP and, 27
IP addresses, 20–24
IPv6 traffic, 238
PPP links, 104–105
PPP servers and, 114
protocols for, 25
strictness of rules for, 154
TCP and, 9
Routing Information Protocol (RIP), 25, 26
routing tables
initializing, 50
metric value and, 26
netstat command and, 60, 61
overview, 24–26
TCP/IP networking and, 43
rpc file, 169, 170
RPC (Remote Procedure Call), 169, 170
RRs (resource records), 75, 79–83
RS-232 standard, 33, 34
RSA keys, 172
rsh command, 15, 170, 171
RTM Internet worm, 163
RTS (Request to Send), 33
rules
access database and, 218
IP accounting and, 150
IP masquerade and, 157
iptables and, 132, 149
mapping addresses, 159
matches for, 126, 131
sendmail and, 199, 200
(see also rewrite rules)
RUNNING flag (ifconfig), 58
runq command, 228, 229
Russell, Paul, 125
S
-s built-in match (iptables), 138
=S command (sendmail), 223

This is the Title of the Book, eMatter Edition
Copyright © 2007 O’Reilly & Associates, Inc. All rights reserved.
Index | 333
S command (sendmail), 198, 199, 200
-s option (arp), 64
Samba
access control, 270–272
CIFS and, 266, 267
configuring, 268–270
interoperability and, 11
logging with, 272
obtaining, 267, 268
printing with, 273–275
troubleshooting, 277
Samba Web Administration Tool
(SWAT), 276
SASL (Simple Authentication and Security
Layer) package, 264, 265, 280
scp program (ssh), 170, 174, 177
scripts
adsl-setup, 116
adsl-start, 117
chat, 100, 101
expect, 100
migrage_common.ph, 287
migrate_all_online.sh, 287
pppd and, 100
TCP/IP networking and, 42
search lists, 70
search option (resolv.conf), 70
secondary servers, 75, 82
secrets database, 108
Secure Shell (SSH), 120, 156
security
802.11b and, 296–307
access database and, 208
DNS cache and, 78
enabling relaying and, 215
finger service and, 162
host lookups and, 70
importance of, 119
Internet and, 116
IPv6 and, 236
mail accounts and, 259
passphrases and, 175
PPP and, 107, 108
relay-domains file and, 214
RTM Internet worm and, 163
Samba and, 269, 270
sendmail and, 186
ssh command and, 171, 176
system maintenance and, 13–15
wireless networking and, 4, 295
xinetd and, 166
semicolon (;), 79
send strings, 100, 102
sendmail
additional information, 231
configuration files, 192–198
creating a configuration, 203–210
databases used, 210–222
downloading source code, 187–190
installing, 186–192
overview, 179
running, 227
sendmail.cf, 198–203
signing key fingerprints, 188
testing configuration, 222–227
tips and tricks, 228–231
sendmail mail daemon, 163
sendmail-announce mailing list, 186
sendmail.cf file
building, 209, 210
configuration language, 198–203
define command and, 195
editing, 186
generic.m4 file and, 206
LOCAL macro and, 197
mailers and, 204
StatusFile option, 230
tuning, 192
sendmail.mc file
comments, 192
FEATURE macro and, 195
m4 program and, 192
sample, 203–204
typical commands, 193–198
serial field (SOA RR), 80
Serial Line IP (SLIP), 8, 11, 59
serial ports/devices
accessing, 30–34
configuration utilities, 34–38
login: prompt, 38–41
mgetty program and, 113
modem links, 29–30
PAD and, 5
PPP and, 97, 114
pppd and, 99
server configuration option (xinetd), 167
server field (inetd), 162
Server Message Blocks (SMB), 266, 267
server_args configuration option
(xinetd), 167
ServerRoot option (Apache), 248
servers
Apache configuration options, 248
authentication and, 96

This is the Title of the Book, eMatter Edition
Copyright © 2007 O’Reilly & Associates, Inc. All rights reserved.
334 | Index
servers (continued)
dynamic addresses and, 103
ports and, 10
PPP, 112–114
pppd as, 112
proxy, 121, 122, 124
RPC and, 169
secrets database and, 108
ucspi-tcp program, 92
WAN IP addresses and, 116
web, 156, 276
ServerSignature option (Apache), 249
ServerTokens option (Apache), 249
service field
inetd, 161
services, 168
servicelist, 164
services
accounting by ports, 148–150
action items, 68
denial of service attacks and, 121
exploiting weaknesses in, 123
finger, 162
internal, 161
port numbers and, 167
portmapper daemon and, 170
query order, 68
security and, 14
services file, 167–169, 276
set type command, 89
--set-counters option (iptables), 135
setserial command, 34–36
setuid program, 14, 107
seyon terminal program, 29
shadow file, 112
shadow passwords, 14, 162, 264
Shamir, Adi, 296
Shapiro, Greg, 204
shared directories, 271
shellcmd field (fingerd/tftpd), 164
SIGHUP signal, 276
signatures, 180n, 187, 189
silent option (pppd), 113
Simple Authentication and Security Layer
(SASL) package, 264, 265, 280
Simple Mail Transfer Protocol (see SMTP)
single quotation mark (’), 194
site configuration, 190
site.config.m4 file, 190
site.linux.m4 file, 190
site-local address, 236, 238
site.post.m4 file, 190
skip_test parameter (setserial), 35
slapd program, 282
slapd.conf file, 282, 286, 292
Sleepycat Software, 280
SLIP (Serial Line IP), 8, 11, 59
slogin program (ssh), 174
slurpd program, 282
SMB (Server Message Blocks), 266, 267
smbclient program, 268
smb.conf file, 273, 275
smbd process, 277
smbmount utility, 269
smbpasswd utility, 269
smmsp user/group, 191
smtp mailer (MAILER macro), 196, 204, 220
SMTP (Simple Mail Transfer Protocol)
Connect: tag field and, 218
firewalls and, 123
IP accounting by service port, 148
MAILER macro and, 196
remote delivery and, 183
sendmail and, 203, 224, 225
smtp8 mailer (MAILER macro), 196, 197,
204, 220
SNAT (Source NAT), 154, 157, 159
SNAT target (iptables), 157, 159
snooping, Ethernet, 59
SOA record
at sign in, 76
fields in, 80, 81
nslookup and, 89
purpose, 76
ttl and, 79
type option and, 80
socket library, 11
sockets, 62, 160, 161
socket_type configuration option
(xinetd), 167
software
Apache web servers, 245–247
bridging, 306
communications, 29, 30
security considerations, 14
testing networking, 18
troubleshooting wireless networks, 305
software field (HINFO RR), 83
--source built-in match (iptables), 138
Source NAT (SNAT), 154, 157, 159
--source-port match option (iptables), 140
spaces, 67, 79, 194
Spafford, Gene, 15
spd_hi parameter (setserial), 35

This is the Title of the Book, eMatter Edition
Copyright © 2007 O’Reilly & Associates, Inc. All rights reserved.
Index | 335
spd_normal parameter (setserial), 35
spd_vhi parameter (setserial), 35
Specialized Systems Consultants, Inc.
(SSC), xii, xiii
speed argument (ip-up), 105
spoofing, 121, 176
--sport match option (iptables), 140
Spurgeon, Charles, 5n
--src built-in match (iptables), 138
SSC (Specialized Systems Consultants,
Inc.), xii, xiii
ssh client, 172, 174–176
ssh command
localhost and, 52
remote hosts and, 170
security and, 171
using, 176–178
ssh daemon, 172–174
SSH protocol, 121, 172
ssh tools, 10, 15, 171–178
ssh_config file, 174
sshd_config file, 3, 242
ssh_host_key file, 172
ssh-keygen utility, 172, 175
SSL
Apache and, 252
certificates and, 252, 253
named virtual hosting and, 251
OpenLDAP and, 281, 289–291
SWAT and, 276
troubleshooting, 257, 293
SSLCertificateFile entry (httpd.conf), 256
SSLCERTS option (Makefile), 260
SSLDIR option (Makefile), 262
SSLEngine, 256
SSLINCLUDE option (Makefile), 262
SSLLIB option (Makefile), 262
SSLPATH option (Makefile), 260
start option (apachectl), 250
StartServers option (Apache), 249
startssl option (apachectl), 250
status option (apachectl), 250
StatusFile option (sendmail.cf), 230
stop option (apachectl), 250
stty command, 36–38, 113
Stubblefield, Adam, 296
stunnel tool, 276
subdomains, 71, 73
Subject: field (mail header), 182
submit.cf file, 210
subnet masks, 21, 234
subnetworks, 21, 22, 48
subscripts, 102
success option (nsswitch.conf), 68
Sun, Andrew, 96
Sun Microsystems, 169
super servers
inetd, 160–163
xinetd, 164–167
SuSE, 120, 262, 267
suucp mailer (MAILER macro), 196
svscan process, 93, 94
SWAT (Samba Web Administration
Tool), 276
swatch tool, 272
--syn match option (iptables), 140
synchronous serial ports, 5, 6
syslog.conf, 101n, 112, 163
syslogd daemon, 112
system administration, 13–15
system configuration, IPv6 and, 236, 237
system log (syslog)
bridging and, 306
card identification and, 305
HostAP driver and, 302
logging with, 272
Samba and, 273
troubleshooting and, 291, 293
T
T command (sendmail), 198
-t option
arp, 64
iptables, 135
tab character, 67, 79, 199
--table option (iptables), 135
tables
ARP, 63, 65
iptables and, 126, 127, 130, 131
mapping via, 27
tar command, 177
targets
chains and, 131
IP masquerade and, 158
iptables and, 126, 132, 133, 159
TCP (Transmission Control Protocol)
distinguishing connections, 10
inetd.conf and, 161
IP accounting and, 148, 151
IP filtering and, 124
iptables matches, 140
overview, 8, 9
ports and, 150
RPC and, 169, 170

This is the Title of the Book, eMatter Edition
Copyright © 2007 O’Reilly & Associates, Inc. All rights reserved.
336 | Index
TCP (Transmission Control Protocol)
(continued)
tcpd and, 163
ucspi-tcp program, 92
Van Jacobson header compression, 97
tcpd access control facility, 163, 164
tcpdump tool, 59, 114
--tcp-flags match option (iptables), 140
TCP/IP networking
ARP tables, 63, 65
creating subnets, 48
DHCP and, 45–48
Ethernet interfaces, 52–54
gateways and, 54, 55
hostname resolution, 48–50
ICMP and, 26–28
ifconfig command and, 57–60
installing tools, 43
interfaces and, 16, 50n
IP addresses, 17–26, 44, 45
IP Alias, 57
Linux and, x
loopback interface, 51–52
netstat command, 60–63
overview, 2–11
PPP interface, 57
setting hostnames, 44
SMTP and, 183
socket library for, 11
traceroute tool and, 63
Unix and, 2
--tcp-option match option (iptables), 140
tcpwrappers, 270
teletype devices (see tty devices)
telnet, 105, 124
10-base2, 4
10-base5, 4
10-baseT, 4
Terminal Node Controller, 6
terminal programs, 29
testparm program, 268, 273, 277
tftp daemon, 162
tftp service, 164
TFTP (Trivial File Transfer Protocol), 14,
162
Thawte, 252
thick Ethernet, 3, 4
thin Ethernet, 3, 4
time to live (see ttl)
Timeout option
Apache, 249
chat, 102
tkrat MUA, 182
TLDs (top-level domains), 72, 73, 250
To: field (mail header), 181
To: tag field, 218
toggle-dtr keyword (mgetty), 40
Token Ring, 5, 11
tokens, 200, 202
top-level domains (TLDs), 72, 73
Torvalds, Linus, x
Tourrilhes, Jean, 300
Toxen, Bob, 121
tracepath6 tool, 237
traceroute tool, 63
traceroute6 tool, 237
TRAFFIC suboption (xinetd), 166
Transmission Control Protocol (see TCP)
tree structure, 278
tripwire tool, 15
Trivial File Transfer Protocol (TFTP), 14,
162
troubleshooting
802.11b standard, 305–306
Apache web servers, 256–257
Cyrus IMAP, 265
IPv6 and, 242–243
OpenLDAP, 291–293
Samba, 277
trusted hosts, 163
/try command (sendmail), 223, 227
tryagain option (nsswitch.conf), 69
/tryflags command (sendmail), 223, 227
Ts, Jay, 266
ttl field (resource record), 79
ttl (time to live)
defined, 75
resource records and, 79, 81
SOA record and, 76
tty devices
defined, 30
opening, 31
PPP servers and, 112
stty command, 37
tunnels, 238–240, 276
twisted pair Ethernet, 3, 4
type field
inetd, 161
resource record, 80
type option (dig), 88

This is the Title of the Book, eMatter Edition
Copyright © 2007 O’Reilly & Associates, Inc. All rights reserved.
Index | 337
U
U flag (netstat), 61
UART chips, 34
uart parameter (setserial), 35
ucspi-tcp program, 92
UDP (User Datagram Protocol)
inetd.conf and, 161
IP accounting and, 148, 151
IP filtering and, 124
iptables matches, 139
overview, 9
ports and, 150
RPC and, 169, 170
tcpd and, 163
traceroute and, 63
unavail option (nsswitch.conf), 69
undefine command (m4), 195
Unix
Berkeley Socket Library, 10
counting and, 31
daemontools program, 92
init command, 40
kermit and, 29
lpr command and, 273
m4 program, 186
networks and, ix
sendmail and, 179
socket library for, 11
TCP/IP and, 2
tty devices and, 30
UNKNOWN keyword, 164
up option (ifconfig), 58
uppercase, 193
URIs, 271, 288
Urlichs, Matthias, 12
USB, 301
use_ct_file feature, 219
use_cw_file feature, 211, 212
usehostname option (pppd), 111
usenet argument (MAILER macro), 196
Usenet newsgroups, xiii, 196
user accounts, 269, 277, 285
user configuration option (xinetd), 167
user database, 219
User Datagram Protocol (see UDP)
user field (inetd), 161
user ID, 191
useradd utility, 112n
username
adding to classes, 207
eavesdropping and, 122
FEATURE macro and, 199
genericstable database and, 216
login procedure and, 108
PPP servers and, 113
PPPoE client and, 118
remote login and, 171
uucico program, 99
uucp argument (MAILER macro), 196
UUCP environment, 180, 184, 196, 220
uucpdomain database, 220
uucpdomain feature, 220
UW IMAP, 259–261
V
V command (sendmail), 198
-v option
chat, 101
iptables, 135
-V subcommand option (iptables), 136
valid users option (Samba), 271
vampire taps, 4
Van Jacobson header compression, 97, 106
van Kempen, Fred, 11
variables, 191, 195
/var/lock directory, 32
--verbose option (iptables), 135
Verisign, 252
--version subcommand option (iptables), 137
VERSIONID macro
generic-linux.mc, 204
generic.m4, 206, 208
linux.m4, 205
sendmail, 193
versions
OpenLDAP and, 280
RPC and, 169
Virtual Brewery, 309
virtual hosting, 57
virtual terminals, 30, 38, 100
VirtualHost functionality
(httpd.conf), 250–252, 255, 257
virtusertable database, 220, 221, 222
virtusertable feature, 221
VJ header compression (see Van Jacobson
header compression)
Voice over IP, 236
VPNs, 296, 303
vulnerabilities
BIND and, 92
RTM Internet worm, 163
security considerations and, 15

This is the Title of the Book, eMatter Edition
Copyright © 2007 O’Reilly & Associates, Inc. All rights reserved.
338 | Index
W
wait configuration option (xinetd), 167
wait field (inetd), 161
WANs, server addresses and, 116
WaveLAN cards, 297, 306
web browsers, 251, 291
web servers, 156, 276
(see also Apache web servers)
WEP (Wired Equivalent Privacy)
attacks on, 296
HostAP and, 303, 304
iwconfig tool and, 300
whitespace, 67
WiFi Protected Access (WPA), 295
wildcards, 110, 174, 283
Windows (Microsoft), 266, 273
WinModem, 34n
Wired Equivalent Privacy (see WEP)
wireless networks
802.11b security concerns, 296–305
acceptance of, 294
bridging, 306–307
history, 294, 295
Linux and, 4
standards, 295–296
troubleshooting, 305–306
--with-inet6 option (xinetd), 165
--with-syslog option (Samba), 272
-with-tls option (OpenLDAP), 281, 289
working groups, 295
World Wide Web, 124, 148, 211
(see also Internet)
WPA (WiFi Protected Access), 295
writable command (Samba), 271
X
X- field (mail header), 182
-x option (iptables), 135
-X subcommand option (iptables), 137
X terminals, 162
X.11, 29, 30
X.25 protocol, 5, 11, 96
X.400 standard, 179, 183, 184
x509 option (OpenSSL), 253
XDR (External Data Representation)
format, 169
xinetd super server, 164–167
xinetd.conf file, 165, 263, 268, 276
XON/XOFF handshaking, 33, 105
Y
YaST Online Update (YOU) utility, 120
YOU (YaST Online Update) utility, 120
yum utility (Red Hat), 120
Z
-Z subcommand option (iptables), 137
--zero subcommand option (iptables), 137
zeroes, double-colon and, 235, 242
zone option (named.conf), 78
zones
domains and, 73
nameservers and, 74
NS records and, 82
RFC 1912, 78
serial numbers and, 80
SOA records and, 80

About the Authors
Tony Bautts is an independent security consultant who has worked with Fortune
500 companies in the U.S. and Japan. He has spoken at security-related events for
The Information Systems Audit and Control Association (ISACA) and has spoken
and chaired events for the MIS Training Institute. Tony is the coauthor of Hack
Proofing Your Wireless Network,Nokia Network Solutions Handbook, and the Secu-
rity Certification Handbook and has, additionally, served as technical reviewer for
Implementing IPv6 on Cisco IOS. His specialties include wireless networking, secure
infrastructure design, and post-intrusion forensics.
Terry Dawson has 20 years of professional experience in telecommunications and
currently leads a team engaged in operational support system research in the Telstra
Research Laboratories.
Gregor N. Purdy is an engineering manager in the large account services group at
Amazon.com. Before joining Amazon.com in 2003, Gregor worked for 10 years as a
consultant in high-end data warehousing, system integration, and prior art research
in software and Internet patents. He has also contributed to a number of open source
projects, including Perl core and extension modules, the Perl shell, and the Parrot
virtual machine for Perl 6.
Colophon
Our look is the result of reader comments, our own experimentation, and feedback
from distribution channels. Distinctive covers complement our distinctive approach
to technical topics, breathing personality and life into potentially dry subjects.
The image on the cover of Linux Network Administrator’s Guide, Third Edition, is
adapted from a 19th-century engraving from Marvels of the New West: A Vivid
Portrayal of the Stupendous Marvels in the Vast Wonderland West of the Missouri
River, by William Thayer (The Henry Bill Publishing Co., Norwich, CT, 1888). The
cowboy has long been an American symbol of strength and rugged individualism,
but the first cowboys, known as vaqueros, were actually from Mexico. In the 1800s,
vaqueros drove their cattle north into America to graze. This practice gave ranchers
in Texas ideas of moving herds away from cold weather, toward water sources, and
eventually north to railheads so that their cattle could be shipped to eastern markets.
Cattle trails started from the southernmost tip of Texas and extended through Colo-
rado, Arkansas, and Wyoming. Cowboys were hired by ranchers to brand and drive
the cattle through dangerous countryside and deliver them safely to railheads. Cattle
were often scared by bad weather and started stampedes powerful enough to make
the ground vibrate. It was the cowboys’ responsibility to calm the herds and round
up any cows and steers that had wandered off. One well-known technique for
calming nervous cattle was singing to them.

American cowboys were a diverse crowd. African-Americans, Indians, Mexicans, and
former Confederate cavalrymen were about as common as the Hollywood, John
Wayne stereotype. Cowboys were usually medium-sized, wiry fellows, and on
average about twenty-four years old. They owned their saddles, but not the horses
they rode day and night. Cowboys were worked so hard and paid so little that most
of them made only one trail drive before finding another occupation.
Although cowboys had a large impact on American culture, they were only an
important part of the West for a short time. As more and more ranchers began using
barbed wire to fence cattle for branding, fewer cowboys were needed. Before long,
railroads covered the former Wild West, and cattle herding turned into an event seen
primarily at the rodeo.
Adam Witwer was the production editor and copyeditor for Linux Network Adminis-
trator’s Guide, Third Edition. Ann Schirmer proofread the text. Matt Hutchinson
and Claire Cloutier provided quality control. Lucie Haskins wrote the index.
Edie Freedman designed the cover of this book. Emma Colby produced the layout
with Adobe InDesign CS using Adobe’s ITC Garamond font.
David Futato designed the interior layout. The chapter opening images are from
Marvels of the New West: A Vivid Portrayal of the Stupendous Marvels in the Vast
Wonderland West of the Missouri River. This book was converted to FrameMaker
5.5.6 by Julie Hawks with a format conversion tool created by Erik Ray, Jason McIn-
tosh, Neil Walls, and Mike Sierra that uses Perl and XML technologies. The text font
is Linotype Birka; the heading font is Adobe Myriad Condensed; and the code font is
LucasFont’s TheSans Mono Condensed. The illustrations that appear in the book
were produced by Robert Romano and Jessamyn Read using Macromedia FreeHand
MX and Adobe Photoshop CS. The tip and warning icons were drawn by Christo-
pher Bing. This colophon was written by Lydia Onofrei.
