Linux Pocket Guide (2nd Edition) Daniel J Barrett O'Reilly
User Manual:
Open the PDF directly: View PDF ![]() .
.
Page Count: 228 [warning: Documents this large are best viewed by clicking the View PDF Link!]
- Table of Contents
- Linux Pocket Guide
- What’s in This Book?
- Getting Help
- Linux: A First View
- The Filesystem
- The Shell
- Basic File Operations
- Directory Operations
- File Viewing
- File Creation and Editing
- File Properties
- File Location
- File Text Manipulation
- File Compression and Packaging
- File Comparison
- Printing
- Spell Checking
- Disks and Filesystems
- Backups and Remote Storage
- Viewing Processes
- Controlling Processes
- Scheduling Jobs
- Logins, Logouts, and Shutdowns
- Users and Their Environment
- User Account Management
- Becoming the Superuser
- Group Management
- Host Information
- Host Location
- Network Connections
- Web Browsing
- Usenet News
- Instant Messaging
- Screen Output
- Math and Calculations
- Dates and Times
- Graphics and Screensavers
- Audio
- Video
- Installing Software
- Programming with Shell Scripts
- Final Words
- Index


SECOND EDITION
Linux
Pocket Guide
Daniel J. Barrett
Beijing
•
Cambridge
•
Farnham
•
Köln
•
Sebastopol
•
Tokyo
Linux Pocket Guide, Second Edition
by Daniel J. Barrett
Copyright © 2012 Daniel Barrett. All rights reserved.
Printed in the United States of America.
Published by O’Reilly Media, Inc., 1005 Gravenstein Highway North,
Sebastopol, CA 95472.
O’Reilly books may be purchased for educational, business, or sales promo-
tional use. Online editions are also available for most titles (http://my.safari
booksonline.com). For more information, contact our corporate/institutional
sales department: (800) 998-9938 or corporate@oreilly.com.
Editors: Mike Loukides and Andy Oram
Copyeditor: Rachel Monaghan
Production Editor: Melanie Yarbrough
Proofreader: Stacie Arellano
Indexer: Daniel Barrett
Cover Designer: Karen Montgomery
Interior Designer: David Futato
Illustrator: Robert Romano
February 2004: First Edition.
March 2012: Second Edition.
Revision History for the First Edition:
2012-03-07 First release
See http://oreilly.com/catalog/errata.csp?isbn=9781449316693 for release de-
tails.
Nutshell Handbook, the Nutshell Handbook logo, and the O’Reilly logo are
registered trademarks of O’Reilly Media, Inc. Linux Pocket Guide, Second
Edition, the cover image of a roper, and related trade dress are trademarks of
O’Reilly Media, Inc.
Many of the designations used by manufacturers and sellers to distinguish
their products are claimed as trademarks. Where those designations appear
in this book, and O’Reilly Media, Inc., was aware of a trademark claim, the
designations have been printed in caps or initial caps.
While every precaution has been taken in the preparation of this book, the
publisher and author assume no responsibility for errors or omissions, or for
damages resulting from the use of the information contained herein.
ISBN: 978-1-449-31669-3
[M]
1331140892

Contents
Linux Pocket Guide 1
What’s in This Book? 1
Getting Help 6
Linux: A First View 8
The Filesystem 13
The Shell 22
Basic File Operations 36
Directory Operations 41
File Viewing 44
File Creation and Editing 54
File Properties 59
File Location 70
File Text Manipulation 79
File Compression and Packaging 92
File Comparison 98
Printing 103
Spell Checking 105
Disks and Filesystems 106
Backups and Remote Storage 111
Viewing Processes 116
Controlling Processes 121
Scheduling Jobs 124
iii

Logins, Logouts, and Shutdowns 129
Users and Their Environment 130
User Account Management 135
Becoming the Superuser 138
Group Management 140
Host Information 142
Host Location 146
Network Connections 150
Email 154
Web Browsing 160
Usenet News 164
Instant Messaging 166
Screen Output 168
Math and Calculations 174
Dates and Times 177
Graphics and Screensavers 181
Audio 185
Video 188
Installing Software 190
Programming with Shell Scripts 195
Final Words 209
Index 211
iv | Table of Contents

Linux Pocket Guide
Welcome to Linux! If you’re a new user, this book can serve as
a quick introduction, as well as a guide to common and prac-
tical commands. If you have Linux experience, feel free to skip
the introductory material.
What’s in This Book?
This book is a short guide, not a comprehensive reference. We
cover important, useful aspects of Linux so you can work pro-
ductively. We do not, however, present every single command
and every last option (our apologies if your favorite was omit-
ted), nor delve into detail about operating system internals.
Short, sweet, and essential, that’s our motto.
We focus on commands, those pesky little words you type on
a command line to tell a Linux system what to do. Here’s an
example command that counts lines of text in a file, myfile:
wc -l myfile
We’ll cover the most important Linux commands for the aver-
age user, such as ls (list files), grep (search for text in a file),
amarok (play audio files), and df (measure free disk space). We
touch only briefly on graphical windowing environments like
GNOME and KDE, each of which could fill a Pocket Guide by
itself.
1

We’ve organized the material by function to provide a concise
learning path. For example, to help you view the contents of a
file, we introduce all file-viewing commands together: cat for
short text files, less for longer ones, od for binary files, acro
read for PDF files, and so on. Then we explain each command
in turn, briefly presenting its common uses and options.
We assume you have an account on a Linux system and know
how to log in with your username and password. If not, speak
with your system administrator, or if the system is your own,
use the account created when you installed Linux.
What’s Linux?
Linux is a popular, open source operating system that com-
petes with Microsoft Windows and the Apple Macintosh.
There are two ways to work with a Linux system:
• A graphical user interface with windows, icons, and
mouse control.
• A command-line interface, called the shell, for typing and
running commands like the preceding wc.
Windows and Mac OS computers can be operated by com-
mand line as well (Windows with its cmd and PowerShell com-
mand tools, and OS X with its Terminal application), but most
of their users can survive without typing commands. On Linux,
however, the shell is critical. If you use Linux without the shell,
you are missing out.
What’s a Distro?
Linux is extremely configurable and includes thousands of
programs. As a result, different varieties of Linux have arisen
to serve different needs and tastes. They all share certain core
components but may look different and include different pro-
grams and files. Each variety is called a distro (short for “dis-
tribution”). Popular distros include Ubuntu Linux, Red Hat
2 | Linux Pocket Guide

Enterprise Linux, Slackware, Mint, and more. This book cov-
ers core material that should apply to every distro.
What’s a Command?
A Linux command typically consists of a program name fol-
lowed by options and arguments, typed within a shell, like this:
$ wc -l myfile
The program name (wc, the “word count” program) refers to a
program somewhere on disk that the shell will locate and run.
Options, which usually begin with a dash, affect the behavior
of the program. In the preceding command, the -l option tells
wc to count lines rather than words. The argument myfile
specifies the file that wc should read and process. The leading
dollar sign ($) is a prompt from the shell, indicating that it is
waiting for your command.
Commands can have multiple options and arguments. Options
may be given individually:
$ wc -l -w myfile Two individual options
or combined behind a single dash:
$ wc -lw myfile Same as -l -w
though some programs are quirky and do not recognize com-
bined options. Multiple arguments are also OK:
$ wc -l myfile1 myfile2 Count lines in two files
Options are not standardized. The same option letter (say,
-l) may have different meanings to different programs: in
wc -l it means “lines of text,” but in ls -l it means “longer
output.” In the other direction, two programs might use dif-
ferent options to mean the same thing, such as -q for “run qui-
etly” versus -s for “run silently.”
Likewise, arguments are not standardized, unfortunately. They
usually represent filenames for input or output, but they can
be other things too, like directory names or regular
expressions.
What’s in This Book? | 3

Commands can be more complex and interesting than a single
program with options:
• Commands can run more than one program at a time,
either in sequence (one program after another) or in a
“pipeline” with the output of one command becoming the
input of the next. Linux experts use pipelines all the time.
• The Linux command-line user interface—the shell—has
a programming language built in. So instead of a com-
mand saying “run this program,” it might say, “if today is
Tuesday, run this program; otherwise, run another com-
mand six times for each file whose name ends in .txt.”
Reading This Book
We’ll describe many Linux commands in this book. Each de-
scription begins with a standard heading about the command;
Figure 1 shows one for the ls (list files) command. This heading
demonstrates the general usage in a simple format:
ls [options] [files]
which means you’d type “ls” followed, if you choose, by op-
tions and then filenames. You wouldn’t type the square brack-
ets “[” and “]”: they just indicate their contents are optional;
and words in italics mean you have to fill in your own specific
values, like names of actual files. If you see a vertical bar be-
tween options or arguments, perhaps grouped by parentheses:
(file | directory)
This indicates choice: you may supply either a filename or di-
rectory name as an argument.
The special heading also includes six properties of the com-
mand printed in black (supported) or gray (unsupported):
stdin
The command reads from standard input, i.e., your key-
board, by default. See “Input and Output” on page 12.
4 | Linux Pocket Guide

stdout
The command writes to standard output, i.e., your screen,
by default. See “Input and Output” on page 12.
- file
When given a dash (-) argument in place of an input file-
name, the command reads from standard input; and like-
wise, if the dash is supplied as an output filename, the
command writes to standard output. For example, the
following wc command line reads the files file1 and file2,
then standard input, then file3:
$ wc file1 file2 - file3
-- opt
If you supply the command-line option “--” it means “end
of options”: anything appearing later on the command
line is not an option. This is sometimes necessary to op-
erate on a file whose name begins with a dash, which
otherwise would be (mistakenly) treated as an option. For
example, if you have a file named -foo, the command wc
-foo will fail because -foo will be treated as an (invalid)
option. wc -- -foo works. If a command does not support
“--”, you can prepend the current directory path “./” to
the filename so the dash is no longer the first character:
$ wc ./-foo
--help
The option --help makes the command print a help mes-
sage explaining proper usage, then exit.
--version
The option --version makes the command print its ver-
sion information and exit.
Figure 1. Standard command heading
What’s in This Book? | 5

Shell prompts
Some commands in this book can be run successfully only by
the superuser, a special user with permission to do anything on
the system. In this case, we use a hash mark (#) as the shell
prompt:
# superuser command goes here
Otherwise, we will use the dollar sign prompt, indicating an
ordinary user:
$ ordinary command goes here
Keystrokes
Throughout the book, we use certain symbols to indicate key-
strokes. Like many other Linux documents, we use the ^ sym-
bol to mean “press and hold the Control (Ctrl) key,” so for
example, ^D (pronounced “control D”) means “press and hold
the Control key and type D.” We also write ESC to mean “press
the Escape key.” Keys like Enter and the space bar should be
self-explanatory.
Your friend, the echo command
In many of our examples, we’ll print information to the screen
with the echo command, which we’ll formally describe in
“Screen Output” on page 168. echo is one of the simplest
commands: it merely prints its arguments on standard output,
once those arguments have been processed by the shell.
$ echo My dog has fleas
My dog has fleas
$ echo My name is $USER Shell variable USER
My name is smith
Getting Help
If you need more information than this book provides, there
are several things you can do.
6 | Linux Pocket Guide

Run the man command
The man command displays an online manual page, or
manpage, for a given program. For example, to learn about
listing files with ls, run:
$ man ls
To search for manpages by keyword for a particular topic,
use the -k option followed by the keyword:
$ man -k database
Run the info command
The info command is an extended, hypertext help system
covering many Linux programs.
$ info ls
While info is running, some useful keystrokes are:
• To get help, type h
• To quit, type q
• To page forward and backward, use the space bar and
Backspace keys
• To jump between hyperlinks, press TAB
• To follow a hyperlink, press Enter
If info has no documentation on a given program, it dis-
plays the program’s manpage. For a listing of available
documentation, type info by itself. To learn how to nav-
igate the info system, type info info.
Use the --help option (if any)
Many Linux commands respond to the option --help by
printing a short help message. Try:
$ ls --help
If the output is longer than the screen, pipe it into the
less program to display it in pages (press q to quit):
$ ls --help | less
Getting Help | 7

Examine the directory /usr/share/doc
This directory contains supporting documents for many
programs, usually organized by program name and ver-
sion. For example, files for the text editor emacs, version
23, are likely found (depending on distro) in /usr/share/
doc/emacs23.
GNOME and KDE Help
For help with GNOME or KDE, visit http://www.gnome
.org or http://www.kde.org.
Distro-specific websites
Most Linux distros have an official site that includes doc-
umentation, discussion forums for questions and an-
swers, and other resources. Simply enter the distro name
(e.g., “Ubuntu”) into any popular search engine to find its
web site. You can also visit the web site for this book: http:
//shop.oreilly.com/product/0636920023029.do.
Linux help sites
Many web sites answer Linux questions, such as http://
www.linuxquestions.org, http://unix.stackexchange.com,
http://www.linuxhelp.net, and http://www.linuxforums
.org.
Web search
To decipher a specific Linux error message, enter the mes-
sage into a web search engine, word for word, and you
will likely find helpful results.
Linux: A First View
Linux has four major parts:
The kernel
The low-level operating system, handling files, disks, net-
working, and other necessities we take for granted. Most
users rarely notice the kernel.
Supplied programs
Thousands of programs for file manipulation, text editing,
mathematics, web browsing, audio, video, computer
8 | Linux Pocket Guide

programming, typesetting, encryption, DVD burning…
you name it.
The shell
A user interface for typing commands, executing them,
and displaying the results. Linux has various shells: the
Bourne shell, Korn shell, C shell, and others. This book
focuses on bash, the Bourne-Again Shell, which is often
the default for user accounts. However, all these shells
have similar basic functions.
X
A graphical system that provides windows, menus, icons,
mouse support, and other familiar GUI elements. More
complex graphical environments are built on X; the most
popular are KDE and GNOME. We’ll discuss a few pro-
grams that open X windows to run.
This book focuses on the second and third parts: supplied pro-
grams and the shell.
The Graphical Desktop
When you log into a Linux system, you’re likely to be greeted
by a graphical desktop1 like Figure 2, which contains:
• A main menu or taskbar. Depending on your distro and
system settings, this might be at the top, bottom, or side
of the screen.
• Desktop icons representing the computer, a folder repre-
senting your home directory for personal files, a trash can,
and more.
• Icons to run applications, such as the Firefox web browser
and the Thunderbird email program.
• Controls for opening and closing windows and running
multiple desktops at once.
1. Unless you’re logging in remotely over the network, in which case you’ll
see just a command prompt, waiting for you to type a command.
Linux: A First View | 9
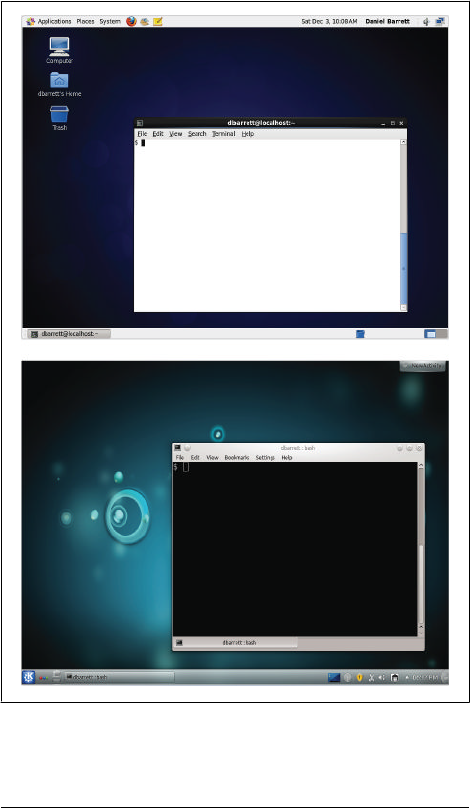
• A clock and other small, informational icons.
Figure 2. Graphical desktops (CentOS Linux with GNOME, Ubuntu
with KDE). Desktops can look wildly different, depending on your
distro and system settings.
10 | Linux Pocket Guide

Linux systems have several graphical interfaces, the most com-
mon being GNOME and KDE. Identify yours by clicking your
system’s equivalent of a main menu or start menu and looking
for the words GNOME, KDE, Kubuntu (KDE on Ubuntu Li-
nux), or similar.
Running a Shell
The icons and menus in GNOME and KDE are, for some users,
the primary way to work with Linux. This is fine for simple
tasks like reading email and browsing the Web. Nevertheless,
the true power of Linux lies beneath this graphical interface,
in the shell.
To get the most out of Linux, take the time to become profi-
cient with the shell. (That’s what this book is all about.) It
might initially be more difficult than icons and menus, but once
you’re used to it, the shell is quite easy to use and very powerful.
To run a shell within GNOME, KDE, or any other graphical
interface for Linux, you need to open a shell window: a window
with a shell running in it. Figure 2 shows two shell windows
with “$” shell prompts, awaiting your commands. Look
through your system menus for an application to do this. Typ-
ical menu items are Terminal, xterm, gnome-terminal, konsole,
and uxterm.
Don’t confuse the window program (like konsole) with the
shell running inside it. The window is just a container—
possibly with fancy features of its own—but the shell is what
prompts you for commands and runs them.
If you’re not running a graphical interface—say, you’re logging
in remotely over the network, or directly over an attached
terminal—a shell will run immediately when you log in. No
shell window is required.
This was just a quick introduction. We’ll discuss more details
in “The Shell” on page 22, and cover more powerful con-
structs in “Programming with Shell Scripts” on page 195.
Linux: A First View | 11

Input and Output
Most Linux commands accept input and produce output. In-
put can come from files or from standard input, which is usually
your keyboard. Likewise, output is written to files or to stan-
dard output, which is usually your shell window or screen. Er-
ror messages are treated specially and displayed on standard
error, which also is usually your screen but kept separate from
standard output.2 Later we’ll see how to redirect standard in-
put, output, and error to and from files or pipes. But let’s get
our vocabulary straight. When we say a command “reads,” we
mean from standard input unless we say otherwise. And when
a command “writes” or “prints,” we mean on standard output,
unless we’re talking about computer printers.
Users and Superusers
Linux is a multiuser operating system: multiple people can use
a single Linux computer at the same time. On a given com-
puter, each user is identified by a unique username, like
“smith” or “funkyguy,” and owns a (reasonably) private part
of the system for doing work. There is also a special user named
root—the superuser—who has the privileges to do anything at
all on the system. Ordinary users are restricted: though they
can run most programs, in general they can modify only the
files they own. The superuser, on the other hand, can create,
modify, or delete any file and run any program.
To become the superuser, you needn’t log out and log back in;
just run the su command (see “Becoming the Super-
user” on page 138) and provide the superuser password:
$ su -l
Password: *******
#
2. For example, you can capture standard output in a file and still have
standard error messages appear on screen.
12 | Linux Pocket Guide

The superuser prompt (#) indicates that you’re ready to run
superuser commands. Alternatively, run the sudo command (if
your system is configured to use it), which executes a single
command as the superuser, then returns control to the original
user:
$ sudo ls /private/secrets View a protected directory
Password: *******
secretfile1 secretfile2 It worked!
$
The Filesystem
To make use of any Linux system, you need to be comfortable
with Linux files and directories (a.k.a. folders). In a “windows
and icons” system, the files and directories are obvious on
screen. With a command-line system like the Linux shell, the
same files and directories are still present but are not constantly
visible, so at times you must remember which directory you
are “in” and how it relates to other directories. You’ll use shell
commands like cd and pwd to “move” between directories and
keep track of where you are.
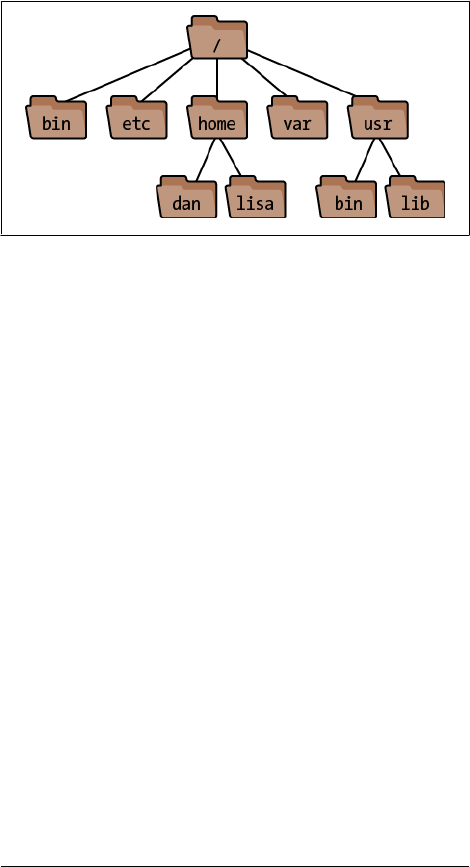
Let’s cover some terminology. As we’ve said, Linux files are
collected into directories. The directories form a hierarchy, or
tree, as in Figure 3: one directory may contain other directories,
called subdirectories, which may themselves contain other files
and subdirectories, and so on, into infinity. The topmost di-
rectory is called the root directory and is denoted by a slash (/).3
We refer to files and directories using a “names and slashes”
syntax called a path. For instance, this path:
/one/two/three/four
refers to the root directory /, which contains a directory called
one, which contains a directory two, which contains a directory
3. In Linux, all files and directories descend from the root. This is unlike
Windows or DOS, in which different devices are accessed by drive
letters.
The Filesystem | 13
three, which contains a final file or directory, four. If a path
begins with the root directory, it’s called an absolute path, and
if not, it’s a relative path. More on this in a moment.
Whenever you are running a shell, that shell is working “in”
some directory (in an abstract sense). More technically, your
shell has a current working directory, and when you run com-
mands in that shell, they operate relative (there’s that word
again) to the directory. More specifically, if you refer to a rel-
ative file path in that shell, it is relative to your current working
directory. For example, if your shell is “in” the directory /one/
two/three, and you run a command that refers to a file myfile,
then the file is really /one/two/three/myfile. Likewise, a relative
path a/b/c would imply the true path /one/two/three/a/b/c.
Two special directories are denoted . (a single period) and ..
(two periods in a row). The former means your current direc-
tory, and the latter means your parent directory, one level
above. So if your current directory is /one/two/three, then .
refers to this directory and .. refers to /one/two.
You “move” your shell from one directory to another using the
cd command:
$ cd /one/two/three
More technically, this command changes your shell’s current
working directory to be /one/two/three. This is an absolute
Figure 3. A Linux filesystem (partial). The root folder is at the top.
The “dan” folder’s full path is /home/dan.
14 | Linux Pocket Guide

change (since the directory begins with “/”); of course you can
make relative moves as well:
$ cd d Enter subdirectory d
$ cd ../mydir Go up to my parent, then into directory mydir
File and directory names may contain most characters you ex-
pect: capital and lowercase letters,4 numbers, periods, dashes,
underscores, and most symbols (but not “/”, which is reserved
for separating directories). For practical use, however, avoid
spaces, asterisks, parentheses, and other characters that have
special meaning to the shell. Otherwise, you’ll need to quote
or escape these characters all the time. (See “Quot-
ing” on page 29.)
Home Directories
Users’ personal files are often found in /home (for ordinary
users) or /root (for the superuser). Your home directory is typ-
ically /home/your-username: /home/smith, /home/jones, etc.
There are several ways to locate or refer to your home directory.
cd
With no arguments, the cd command returns you (i.e., sets
the shell’s working directory) to your home directory.
HOME variable
The environment variable HOME (see “Shell vari-
ables” on page 25) contains the name of your home
directory.
$ echo $HOME The echo command prints its arguments
/home/smith
˜
When used in place of a directory, a lone tilde is expanded
by the shell to the name of your home directory.
$ echo ˜
/home/smith
4. Linux filenames are case-sensitive, so capital and lowercase letters are
not equivalent.
The Filesystem | 15
When followed by a username (as in ~fred), the shell ex-
pands this string to be the user’s home directory:
$ cd ˜fred
$ pwd The “print working directory” command
/home/fred
System Directories
A typical Linux system has tens of thousands of system
directories. These directories contain operating system files,
applications, documentation, and just about everything ex-
cept personal user files (which typically live in /home).
Unless you’re a system administrator, you’ll rarely visit most
system directories—but with a little knowledge you can un-
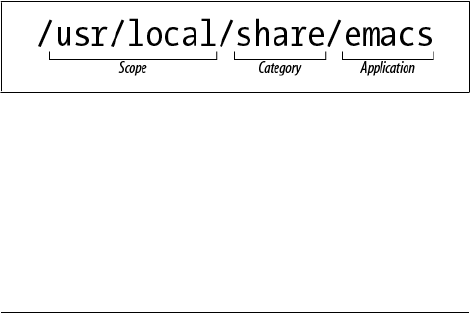
derstand or guess their purposes. Their names often contain
three parts, which we’ll call the scope, category, and applica-
tion. (These are not standard terms, but they’ll help you un-
derstand things.) For example, the directory /usr/local/share/
emacs, which contains local data for the emacs text editor, has
scope /usr/local (locally installed system files), category share
(program-specific data and documentation), and application
emacs (a text editor), shown in Figure 4. We’ll explain these
three parts, slightly out of order.
Figure 4. Directory scope, category, and application
Directory path part 1: category
A category tells you the types of files found in a directory. For
example, if the category is bin, you can be reasonably assured
that the directory contains programs. Common categories are:
16 | Linux Pocket Guide

Categories for programs
bin Programs (usually binary files)
sbin Programs (usually binary files) intended to be run by the superuser
lib Libraries of code used by programs
libexec Programs invoked by other programs, not usually by users; think “library
of executable programs”
Categories for documentation
doc Documentation
info Documentation files for emacs’s built-in help system
man Documentation files (manual pages) displayed by the man program; the
files are often compressed, or sprinkled with typesetting commands for
man to interpret
share Program-specific files, such as examples and installation instructions
Categories for configuration
etc Configuration files for the system (and other miscellaneous stuff)
init.d Configuration files for booting Linux
rc.d Configuration files for booting Linux; also rc1.d, rc2.d, ...
Categories for programming
include Header files for programming
src Source code for programs
Categories for web files
cgi-bin Scripts/programs that run on web pages
html Web pages
public_html Web pages, typically in users’ home directories
www Web pages
Categories for display
fonts Fonts (surprise!)
X11 X window system files
Categories for hardware
dev Device files for interfacing with disks and other hardware
The Filesystem | 17

media Mount points: directories that provide access to disks
mnt Mount points: directories that provide access to disks
misc Mount points: directories that provide access to disks
Categories for runtime files
var Files specific to this computer, created and updated as the computer runs
lock Lock files, created by programs to say, “I am running”; the existence of a
lock file may prevent another program, or another instance of the same
program, from running or performing an action
log Log files that track important system events, containing error, warning,
and informational messages
mail Mailboxes for incoming mail
run PID files, which contain the IDs of running processes; these files are often
consulted to track or kill particular processes
spool Files queued or in transit, such as outgoing email, print jobs, and scheduled
jobs
tmp Temporary storage for programs and/or people to use
proc Operating system state: see “Operating System Directories”
on page 19
Directory path part 2: scope
The scope of a directory path describes, at a high level, the pur-
pose of an entire directory hierarchy. Some common ones are:
/System files supplied with Linux (pronounced “root”)
/usr More system files supplied with Linux (pronounced “user”)
/usr/games Games (surprise!)
/usr/local System files developed “locally,” either for your organization or your
individual computer
/usr/X11R6 Files pertaining to the X window system
So for a category like lib (libraries), your Linux system might
have directories /lib, /usr/lib, /usr/local/lib, /usr/games/lib,
and /usr/X11R6/lib.
18 | Linux Pocket Guide

There isn’t a clear distinction between / and /usr in practice,
but there is a sense that / is “lower-level” and closer to the
operating system. So /bin contains fundamental programs like
ls and cat, /usr/bin contains a wide variety of applications sup-
plied with your Linux distribution, and /usr/local/bin contains
programs your system administrator chose to install. These are
not hard-and-fast rules but typical cases.
Directory path part 3: application
The application part of a directory path, if present, is usually
the name of a program. After the scope and category (say, /usr/
local/doc), a program may have its own subdirectory (say, /usr/
local/doc/myprogram) containing files it needs.
Operating System Directories
Some directories support the Linux kernel, the lowest-level
part of the Linux operating system.
/boot
Files for booting the system. This is where the kernel lives,
typically named /boot/vmlinuz.
/lost+found
Damaged files that were rescued by a disk recovery tool.
/proc
Describes currently running processes; for advanced
users.
The files in /proc provide views into the running kernel and
have special properties. They always appear to be zero sized,
read-only, and dated now:
$ ls -l /proc/version
-r--r--r-- 1 root root 0 Oct 3 22:55 /proc/version
However, their contents magically contain information about
the Linux kernel:
$ cat /proc/version
Linux version 2.6.32-71.el6.i686 ...
The Filesystem | 19

Files in /proc are used mostly by programs, but feel free to ex-
plore them. Here are some examples:
/proc/ioports A list of your computer’s input/output hardware.
/proc/version The operating system version. The uname command prints the same
information.
/proc/uptime System uptime, i.e., seconds elapsed since the system was last booted.
Run the uptime command for a more human-readable result.
/proc/nnn Where nnn is a positive integer, information about the Linux process
with process ID nnn.
/proc/self Information about the current process you’re running; a symbolic link
to a /proc/nnn file, automatically updated. Try ls -l /proc/
self several times in a row: you’ll see /proc/self changing where it
points.
File Protections
A Linux system may have many users with login accounts. To
maintain privacy and security, most users can access only
some files on the system, not all. This access control is embod-
ied in two questions:
Who has permission?
Every file and directory has an owner who has permission
to do anything with it. Typically the user who created a
file is its owner, but relationships can be more complex.
Additionally, a predefined group of users may have per-
mission to access a file. Groups are defined by the system
administrator and are covered in “Group Manage-
ment” on page 140.
Finally, a file or directory can be opened to all users with
login accounts on the system. You’ll also see this set of
users called the world or simply other.
What kind of permission is granted?
File owners, groups, and the world may each have per-
mission to read, write (modify), and execute (run) partic-
ular files. Permissions also extend to directories, which
20 | Linux Pocket Guide

users may read (access files within the directory), write
(create and delete files within the directory), and execute
(enter the directory with cd).
To see the ownership and permissions of a file, run:
$ ls -l myfile
-rw-r--r-- 1 smith smith 7384 Jan 04 22:40 myfile
To see the ownership and permissions of a directory, run:
$ ls -ld dirname
drwxr-x--- 3 smith smith 4096 Jan 08 15:02 dirname
In the output, the file permissions are the 10 leftmost charac-
ters, a string of r (read), w (write), x (execute), other letters, and
dashes. For example:
-rwxr-x---
Here’s what these letters and symbols mean.
Position Meaning
1 File type: - = file, d = directory, l = symbolic link, p = named pipe,
c = character device, b = block device
2–4 Read, write, and execute permissions for the file’s owner
5–7 Read, write, and execute permissions for the file’s group
8–10 Read, write, and execute permissions for all other users
So our example -rwxr-x--- means a file that can be read, writ-
ten, and executed by the owner, read and executed by the
group, and not accessed at all by the rest of the world. We
describe ls in more detail in “Basic File Opera-
tions” on page 36. To change the owner, group ownership,
or permissions of a file, use the chown, chgrp, and chmod com-
mands, respectively, as described in “File Proper-
ties” on page 59.
The Filesystem | 21

The Shell
In order to run commands on a Linux system, you’ll need
somewhere to type them. That “somewhere” is called the
shell, which is Linux’s command-line user interface: you type
a command and press Enter, and the shell runs whatever pro-
gram (or programs) you’ve requested. (See “Running a
Shell” on page 11 to learn how to open a shell window.)
For example, to see who’s logged in, you could execute this
command in a shell:
$ who
silver :0 Sep 23 20:44
byrnes pts/0 Sep 15 13:51
barrett pts/1 Sep 22 21:15
silver pts/2 Sep 22 21:18
(The dollar sign is the shell prompt, which means the shell is
ready to run a command.) A single command can also invoke
several programs at the same time, and even connect programs
together so they interact. Here’s a command that redirects the
output of the who program to become the input of the wc pro-
gram, which counts lines of text in a file; the result is the num-
ber of lines in the output of who:
$ who | wc -l
4
telling you how many users are logged in.5 The vertical bar,
called a pipe, makes the connection between who and wc.
A shell is actually a program itself, and Linux has several. We
focus on bash (the Bourne-Again Shell), located in /bin/bash,
which is usually the default in Linux distros.
5. Actually, how many interactive shells those users are running. If a user
has two shells running, like the user silver in our example, he’ll have
two lines of output from who.
22 | Linux Pocket Guide

The Shell Versus Programs
When you run a command, it might invoke a Linux program
(like who), or instead it might be a built-in command, a feature
of the shell itself. You can tell the difference with the type
command:
$ type who
who is /usr/bin/who
$ type cd
cd is a shell builtin
It is helpful to know what the shell provides versus what Linux
does. The next few sections describe features of the shell.
Selected Features of the bash Shell
A shell does much more than simply run commands. It also
has powerful features to make this task easier: wildcards for
matching filenames, a “command history” to recall previous
commands quickly, pipes for making the output of one com-
mand become the input of another, variables for storing values
for use by the shell, and more. Take the time to learn these
features, and you will become faster and more productive with
Linux. Let’s skim the surface and introduce you to these useful
tools. (For full documentation, run info bash.)
Wildcards
Wildcards are a shorthand for sets of files with similar names.
For example, a* means all files whose names begin with low-
ercase “a”. Wildcards are “expanded” by the shell into the ac-
tual set of filenames they match. So if you type:
$ ls a*
the shell first expands a* into the filenames that begin with “a”
in your current directory, as if you had typed:
$ ls aardvark adamantium apple
ls never knows you used a wildcard: it sees only the final list
of filenames after the shell expands the wildcard. Importantly,
The Shell | 23

this means every Linux command, regardless of its origin,
works with wildcards and other shell features.
Wildcards never match two characters: a leading period, and
the directory slash (/). These must be given literally, as
in .pro* to match .profile, or /etc/*conf to match all filenames
ending in conf in the /etc directory.
Dot Files
Filenames with a leading period, called dot files, are special in
Linux. When you name a file beginning with a period, it will
not be displayed by some programs:
•ls will omit the file from directory listings, unless you
provide the -a option
• Shell wildcards do not match a leading period
Effectively, dot files are hidden unless you explicitly ask to see
them. As a result, sometimes they are called “hidden files.”
Wildcard Meaning
* Zero or more consecutive characters
? Any single character
[set] Any single character in the given set, most commonly a sequence of
characters, like [aeiouAEIOU] for all vowels, or a range with a dash, like
[A-Z] for all capital letters
[^set] Any single character not in the given set (as in the earlier example)
[!set] Same as ^
When using character sets, if you want to include a literal dash
in the set, put it first or last. To include a literal closing square
bracket in the set, put it first. To include a ^ or ! symbol liter-
ally, don’t put it first.
24 | Linux Pocket Guide

Brace expansion
Similar to wildcards, expressions with curly braces also expand
to become multiple arguments to a command. The comma-
separated expression:
{X,YY,ZZZ}
expands first to X, then YY, and finally ZZZ within a command
line, like this:
$ echo sand{X,YY,ZZZ}wich
sandXwich sandYYwich sandZZZwich
Braces work with any strings, unlike wildcards, which are limi-
ted to filenames. The preceding example works regardless of
which files are in the current directory.
Shell variables
You can define variables and their values by assigning them:
$ MYVAR=3
To refer to a value, simply place a dollar sign in front of the
variable name:
$ echo $MYVAR
3
Some variables are standard and commonly defined by your
shell upon login.
Variable Meaning
DISPLAY The name of your X window display
HOME Your home directory, such as /home/smith
LOGNAME Your login name, such as smith
MAIL Your incoming mailbox, such as /var/spool/mail/smith
OLDPWD Your shell’s previous directory, prior to the last cd command
PATH Your shell search path: directories separated by colons
PWD Your shell’s current directory
SHELL The path to your shell, e.g., /bin/bash
The Shell | 25

Variable Meaning
TERM The type of your terminal, e.g., xterm or vt100
USER Your login name
To see a shell’s variables, run:
$ printenv
The scope of the variable (i.e., which programs know about it)
is, by default, the shell in which it’s defined. To make a variable
and its value available to other programs your shell invokes
(i.e., subshells), use the export command:
$ export MYVAR
or the shorthand:
$ export MYVAR=3
Your variable is now called an environment variable, since it’s
available to other programs in your shell’s “environment.” So
in the preceding example, the exported variable MYVAR is avail-
able to all programs run by that same shell (including shell
scripts: see “Variables” on page 196).
To make a variable value available to a specific program just
once, prepend variable=value to the command line:
$ echo $HOME
/home/smith
$ HOME=/home/sally echo "My home is $HOME"
My home is /home/sally
$ echo $HOME
/home/smith The original value is unaffected
Search path
Programs are scattered all over the Linux filesystem, in direc-
tories like /bin and /usr/bin. When you run a program via a shell
command, how does the shell find it? The critical variable
PATH tells the shell where to look. When you type any
command:
$ who
26 | Linux Pocket Guide

the shell has to find the who program by searching through Li-
nux directories. The shell consults the value of PATH, which is
a sequence of directories separated by colons:
$ echo $PATH
/usr/local/bin:/bin:/usr/bin:/home/smith/bin
and looks for the who command in each of these directories. If
it finds who (say, /usr/bin/who), it runs the command. Other-
wise, it reports:
bash: who: command not found
To add directories to your shell’s search path temporarily,
modify its PATH variable. For example, to append /usr/sbin to
your shell’s search path:
$ PATH=$PATH:/usr/sbin
$ echo $PATH
/usr/local/bin:/bin:/usr/bin:/home/smith/bin:/usr/sbin
This change affects only the current shell. To make it perma-
nent, modify the PATH variable in your startup file
~/.bash_profile, as explained in “Tailoring Shell Behav-
ior” on page 36. Then log out and log back in.
Aliases
The built-in command alias defines a convenient shorthand
for a longer command, to save typing. For example:
$ alias ll='ls -l'
defines a new command ll that runs ls -l:
$ ll
total 436
-rw-r--r-- 1 smith 3584 Oct 11 14:59 file1
-rwxr-xr-x 1 smith 72 Aug 6 23:04 file2
...
Define aliases in your ~/.bashrc file (see “Tailoring Shell Be-
havior” on page 36) to be available whenever you log in.6 To
list all your aliases, type alias. If aliases don’t seem powerful
6. Some setups use a separate file, ~/.bash_aliases, for this purpose.
The Shell | 27

enough for you (since they have no parameters or branching),
see “Programming with Shell Scripts” on page 195, run
info bash, and read up on “shell functions.”
Input/output redirection
The shell can redirect standard input, standard output, and
standard error to and from files. In other words, any command
that reads from standard input can have its input come from a
file instead with the shell’s < operator:
$ mycommand < infile
Likewise, any command that writes to standard output can
write to a file instead:
$ mycommand > outfile Create/overwrite outfile
$ mycommand >> outfile Append to outfile
A command that writes to standard error can have its output
redirected to a file as well, while standard output still goes to
the screen:
$ mycommand 2> errorfile
To redirect both standard output and standard error to files:
$ mycommand > outfile 2> errorfile Separate files
$ mycommand >& outfile Single file
Pipes
You can redirect the standard output of one command to be
the standard input of another, using the shell’s pipe (|) opera-
tor. For example:
$ who | sort
sends the output of who into the sort program, printing an al-
phabetically sorted list of logged-in users. Multiple pipes work
too. Here we sort the output of who again, extract the first col-
umn of information (using awk), and display the results one
page at a time (using less):
$ who | sort | awk '{print $1}' | less
28 | Linux Pocket Guide

Combining commands
To invoke several commands in sequence on a single command
line, separate them with semicolons:
$ command1 ; command2 ; command3
To run a sequence of commands as before, but stop execution
if any of them fails, separate them with && (“and”) symbols:
$ command1 && command2 && command3
To run a sequence of commands, stopping execution as soon
as one succeeds, separate them with || (“or”) symbols:
$ command1 || command2 || command3
Quoting
Normally, the shell treats whitespace simply as separating the
words on the command line. If you want a word to contain
whitespace (e.g., a filename with a space in it), surround it with
single or double quotes to make the shell treat it as a unit. Single
quotes treat their contents literally, while double quotes let
shell constructs be evaluated, such as variables:
$ echo 'The variable HOME has value $HOME'
The variable HOME has value $HOME
$ echo "The variable HOME has value $HOME"
The variable HOME has value /home/smith
Backquotes (“backticks”) cause their contents to be evaluated
as a shell command. The contents are then replaced by the
standard output of the command:
$ whoami Program that prints your username
smith
$ echo My name is `whoami`
My name is smith
Escaping
If a character has special meaning to the shell but you want it
used literally (e.g., * as a literal asterisk rather than a wildcard),
precede the character with the backward slash “\” character.
This is called escaping the special character:
The Shell | 29

$ echo a* As a wildcard, matching “a” filenames
aardvark agnostic apple
$ echo a\* As a literal asterisk
a*
$ echo "I live in $HOME" Dollar sign means a variable value
I live in /home/smith
$ echo "I live in \$HOME" A literal dollar sign
I live in $HOME
You can also escape control characters (tabs, newlines, ^D,
and so forth) to have them used literally on the command line,
if you precede them with ^V. This is particularly useful for tab
(^I) characters, which the shell would otherwise use for file-
name completion (see “Filename completion” on page 31).
$ echo "There is a tab between here^V^I and here"
There is a tab between here and here
Command-line editing
Bash lets you edit the command line you’re working on, using
keystrokes inspired by the text editors emacs and vi (see “File
Creation and Editing” on page 54). To enable command-line
editing with emacs keys, run this command (and place it in
your ~/.bash_profile to make it permanent):
$ set -o emacs
For vi keys:
$ set -o vi
emacs keystroke vi keystroke (after ESC) Meaning
^P or up arrow k Go to previous command
^N or down arrow j Go to next command
^F or right arrow l Go forward one character
^B or left arrow h Go backward one character
^A 0 Go to beginning of line
^E $ Go to end of line
^D x Delete next character
^U ^U Erase entire line
30 | Linux Pocket Guide

Command history
You can recall previous commands you’ve run—that is, the
shell’s history—and re-execute them. Some useful
history-related commands are listed below.
Command Meaning
history Print your history
history NPrint the most recent N commands in your history
history
-c
Clear (delete) your history
!! Re-run previous command
!NRe-run command number N in your history
!-NRe-run the command you typed N commands ago
!$ Represents the last parameter from the previous command; great for
checking that files are present before removing them:
$ ls a*
acorn.txt affidavit
$ rm !$
!* Represents all parameters from the previous command:
$ ls a b c
a b c
$ wc !*
103 252 2904 a
12 25 384 b
25473 65510 988215 c
25588 65787 991503 total
Filename completion
Press the TAB key while you are in the middle of typing a file-
name, and the shell will automatically complete (finish typing)
the filename for you. If several filenames match what you’ve
typed so far, the shell will beep, indicating the match is am-
biguous. Immediately press TAB again and the shell will
present the alternatives. Try this:
$ cd /usr/bin
$ ls un<TAB><TAB>
The Shell | 31

The shell will display all files in /usr/bin that begin with un,
such as uniq, units, and unzip. Type a few more characters to
disambiguate your choice and press TAB again.
Shell Job Control
jobs List your jobs.
&Run a job in the background.
^Z Suspend the current (foreground) job.
suspend Suspend a shell.
fg Unsuspend a job: bring it into the foreground.
bg Make a suspended job run in the background.
All Linux shells have job control: the ability to run programs in
the background (multitasking behind the scenes) and fore-
ground (running as the active process at your shell prompt). A
job is simply the shell’s unit of work. When you run a command
interactively, your current shell tracks it as a job. When the
command completes, the associated job disappears. Jobs are
at a higher level than Linux processes; the Linux operating
system knows nothing about them. They are merely constructs
of the shell. Some important vocabulary about job control is:
Foreground job
Running in a shell, occupying the shell prompt so you
cannot run another command
Background job
Running in a shell, but not occupying the shell prompt,
so you can run another command in the same shell
Suspend
To stop a foreground job temporarily
Resume
To cause a suspended job to start running again
32 | Linux Pocket Guide

jobs
The built-in command jobs lists the jobs running in your current
shell.
$ jobs
[1]- Running emacs myfile &
[2]+ Stopped su
The integer on the left is the job number, and the plus sign identifies
the default job affected by the fg (foreground) and bg (background)
commands.
&
Placed at the end of a command line, the ampersand causes the
given command to run as a background job.
$ emacs myfile &
[2] 28090
The shell’s response includes the job number (2) and the process
ID of the command (28090).
^Z
Typing ^Z in a shell, while a job is running in the foreground, will
suspend that job. It simply stops running, but its state is
remembered.
$ mybigprogram
^Z
[1]+ Stopped mybigprogram
$
Now you’re ready to type bg to put the command into the back-
ground, or fg to resume it in the foreground.
suspend
The built-in command suspend will suspend the current shell if
possible, as if you’d typed ^Z to the shell itself. For instance, if you’ve
run the su command and want to return to your original shell:
The Shell | 33

$ whoami
smith
$ su -l
Password: **************
# whoami
root
# suspend
[1]+ Stopped su
$ whoami
smith
bg
bg [%jobnumber]
The built-in command bg sends a suspended job to run in the
background. With no arguments, bg operates on the most recently
suspended job. To specify a particular job (shown by the jobs com-
mand), supply the job number preceded by a percent sign:
$ bg %2
Some types of interactive jobs cannot remain in the background—
for instance, if they are waiting for input. If you try, the shell will
suspend the job and display:
[2]+ Stopped command line here
You can now resume the job (with fg) and continue.
fg
fg [%jobnumber]
The built-in command fg brings a suspended or backgrounded job
into the foreground. With no arguments, it selects a job, usually the
most recently suspended or backgrounded one. To specify a par-
ticular job (as shown by the jobs command), supply the job number
preceded by a percent sign:
$ fg %2
34 | Linux Pocket Guide

Killing a Command in Progress
If you’ve launched a command from the shell running in the
foreground, and want to kill it immediately, type ^C. The shell
recognizes ^C as meaning, “terminate the current foreground
command right now.” So if you are displaying a very long file
(say, with the cat command) and want to stop, type ^C:
$ cat bigfile
This is a very long file with many lines. Blah blah blah
blah blah blah blahblahblah ^C
$
To kill a program running in the background, you can bring it
into the foreground with fg and then type ^C, or alternatively,
use the kill command (see “Controlling Pro-
cesses” on page 121).
Typing ^C is not a friendly way to end a program. If the program
has its own way to exit, use that when possible: see the sidebar
for details.
Surviving a Kill
Killing a foreground program with ^C may leave your shell in
an odd or unresponsive state, perhaps not displaying the key-
strokes you type. This happens because the killed program had
no opportunity to clean up after itself. If this happens to you:
1. Press ^J to get a shell prompt. This produces the same
character as the Enter key (a newline) but will work even
if Enter does not.
2. Type the shell command reset (even if the letters don’t
appear while you type) and press ^J again to run this
command. This should bring your shell back to normal.
^C works only with shells. It will likely have no effect if typed
in a window that is not a shell window. Additionally, some
programs are written to “catch” the ^C and ignore it: an exam-
ple is the text editor emacs.
The Shell | 35

Terminating a Shell
To terminate a shell, either run the exit command or type ^D.7
$ exit
Tailoring Shell Behavior
To configure all your shells to work in a particular way, edit
the files .bash_profile and .bashrc in your home directory.
These files execute each time you log in (~/.bash_profile) or
open a shell (~/.bashrc). They can set variables and aliases, run
programs, print your horoscope, or whatever you like.
These two files are examples of shell scripts: executable files
that contain shell commands. We’ll cover this feature in more
detail in “Programming with Shell Scripts” on page 195.
This concludes our basic overview of Linux and the shell. Now
we turn to Linux commands, listing and describing the most
useful commands for working with files, processes, users, net-
working, multimedia, and more.
Basic File Operations
ls List files in a directory.
cp Copy a file.
mv Rename (“move”) a file.
rm Delete (“remove”) a file.
ln Create links (alternative names) to a file.
One of the first things you’ll need to do on a Linux system is
manipulate files: copying, renaming, deleting, and so forth.
7. Control-D sends an “end of file” signal to any program reading from
standard input. In this case, the program is the shell itself, which
terminates.
36 | Linux Pocket Guide

ls stdin stdout - file -- opt --help --version
ls [options] [files]
The ls command (pronounced as it is spelled, ell ess) lists attributes
of files and directories. You can list files in the current directory:
$ ls
in given directories:
$ ls dir1 dir2 dir3
or individually:
$ ls file1 file2 file3
The most important options are -a, -l, and -d. By default, ls hides
files whose names begin with a dot, as explained in the sidebar
“Dot Files” on page 24. The -a option displays all files.
$ ls
myfile1 myfile2
$ ls -a
.hidden_file myfile1 myfile2
The -l option produces a long listing:
-rw-r--r-- 1 smith users 149 Oct 28 2011 my.data
that includes, from left to right: the file’s permissions (-rw-r--r--),
owner (smith), group (users), size (149 bytes), last modification
date (Oct 28 2011) and name. See “File Protections” on page 20 for
more information on permissions.
The -d option lists information about a directory itself, rather than
descending into the directory to list its files.
$ ls -ld my.dir
drwxr-xr-x 1 smith users 4096 Oct 29 2011 my.dir
Useful options
-a List all files, including those whose names begin with a dot.
-l Long listing, including file attributes. Add the -h option (human-readable) to print
file sizes in kilobytes, megabytes, and gigabytes, instead of bytes.
-F Decorate certain filenames with meaningful symbols, indicating their types. Ap-
pends “/” to directories, “*” to executables, “@” to symbolic links, “|” to named
Basic File Operations | 37

pipes, and “=” to sockets. These are just visual indicators for you, not part of the
filenames!
-i Prepend the inode numbers of the files.
-s Prepend the size of the file in blocks, useful for sorting files by their size:
$ ls -s | sort -n
-R If listing a directory, list its contents recursively.
-d If listing a directory, do not list its contents, just the directory itself.
cp stdin stdout - file -- opt --help --version
cp [options] files (file | directory)
The cp command normally copies a file:
$ cp file file2
or copies multiple files into a directory:
$ cp file1 file2 file3 file4 destination_directory
Using the -a option, you can also recursively copy directories.
Useful options
-p Copy not only the file contents, but also the file’s permissions, timestamps and, if
you have sufficient permission to do so, its owner and group. (Normally the copies
will be owned by you, timestamped now, with permissions set by applying your
umask to the original permissions.)
-a Copy a directory hierarchy recursively, preserving all file attributes and links.
-r Copy a directory hierarchy recursively. This option does not preserve the files’
attributes such as permissions and timestamps. It does preserve symbolic links.
-i Interactive mode. Ask before overwriting destination files.
-f Force the copy. If a destination file exists, overwrite it unconditionally.
mv stdin stdout - file -- opt --help --version
mv [options] source target
The mv (move) command can rename a file:
38 | Linux Pocket Guide

$ mv file1 file2
or move files and directories into a destination directory:
$ mv file1 file2 dir3 dir4 destination_directory
Useful options
-i Interactive mode. Ask before overwriting destination files.
-f Force the move. If a destination file exists, overwrite it unconditionally.
rm stdin stdout - file -- opt --help --version
rm [options] files | directories
The rm (remove) command can delete files:
$ rm file1 file2 file3
or recursively delete directories:
$ rm -r dir1 dir2
Useful options
-i Interactive mode. Ask before deleting each file.
-f Force the deletion, ignoring any errors or warnings.
-r Recursively remove a directory and its contents. Use with caution, especially if
combined with the -f option, as it can wipe out all your files.
ln stdin stdout - file -- opt --help --version
ln [options] source target
A link is a reference to another file, created by the ln command.
Intuitively, links give the same file multiple names, allowing it to
live in two (or more) locations at once.
There are two kinds of links. A symbolic link (also called a symlink
or soft link) refers to another file by its path, much like a Windows
“shortcut” or a Macintosh “alias.” To create a symbolic link, use
the -s option:
$ ln -s myfile mysoftlink
Basic File Operations | 39
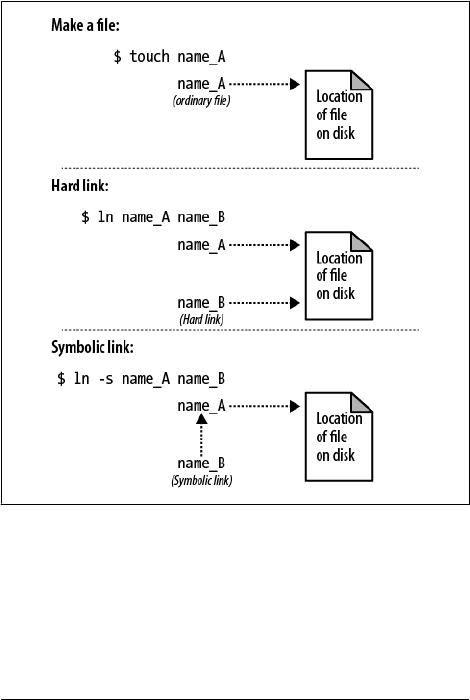
If you delete the original file, the now-dangling link will be invalid,
pointing to a nonexistent file path. A hard link, on the other hand,
is simply a second name for a physical file on disk (in tech talk, it
points to the same inode). If you delete the original file, the link still
works. Figure 5 illustrates the difference. To create a hard link, type:
$ ln myfile myhardlink
Figure 5. Hard link versus symbolic link
Symbolic links can point to files on other disk partitions, since they
are just references to file paths; hard links cannot, since an inode
on one disk has no meaning on another. Symbolic links can also
point to directories, whereas hard links cannot...unless you are the
superuser and use the -d option.
40 | Linux Pocket Guide

Useful options
-s Make a symbolic link. The default is a hard link.
-i Interactive mode. Ask before overwriting destination files.
-f Force the link. If a destination file exists, overwrite it unconditionally.
-d Create a hard link to a directory (superusers only).
It’s easy to find out where a symbolic link points with either of these
commands:
$ readlink linkname
$ ls -l linkname
Directory Operations
cd Change your current directory.
pwd Print the name of your current directory, i.e., “where you are now” in the
filesystem.
basename Print the final part of a file path.
dirname Print a file path without its final part.
mkdir Create (make) a directory.
rmdir Delete (remove) an empty directory.
rm -r Delete a nonempty directory and its contents.
We discussed the directory structure of Linux in “The Filesys-
tem” on page 13. Now we’ll cover commands that create,
modify, delete, and manipulate directories within that
structure.
cd stdin stdout - file -- opt --help --version
cd [directory]
The cd (change directory) command sets your current working
directory:
$ cd /usr/games
Directory Operations | 41

With no directory supplied, cd defaults to your home directory:
$ cd
pwd stdin stdout - file -- opt --help --version
pwd
The pwd command prints the absolute path of your current working
directory:
$ pwd
/users/smith/mydir
basename stdin stdout - file -- opt --help --version
basename path [suffix]
The basename command prints the final component in a file path:
$ basename /users/smith/finances/money.txt
money.txt
If you provide an optional suffix, it gets stripped from the result:
$ basename /users/smith/finances/money.txt .txt
money
dirname stdin stdout - file -- opt --help --version
dirname path
The dirname command prints a file path with its final component
removed:
$ dirname /users/smith/mydir
/users/smith
dirname does not change your current working directory. It simply
manipulates a string, just like basename does.
42 | Linux Pocket Guide

mkdir stdin stdout - file -- opt --help --version
mkdir [options] directories
mkdir creates one or more directories:
$ mkdir directory1 directory2 directory3
Useful options
-p Given a directory path (not just a simple directory name), create
any necessary parent directories automatically:
mkdir -p /one/two/three creates /one and /one/two if
they don’t already exist, then /one/two/three.
-m mode Create the directory with the given permissions:
$ mkdir -m 0755 mydir
By default, your shell’s umask controls the permissions. See the
chmod command in “File Properties” on page 59, and “File
Protections” on page 20.
rmdir stdin stdout - file -- opt --help --version
rmdir [options] directories
The rmdir (remove directory) command deletes one or more empty
directories you name:
$ rmdir /tmp/junk
Useful options
-p If you supply a directory path (not just a simple directory name), delete not only
the given directory, but the specified parent directories automatically, all of which
must be empty. So rmdir -p /one/two/three will delete not only /one/
two/three, but also /one/two and /one.
To delete a nonempty directory and its contents, use (carefully)
rm -r directory. Use rm -ri to delete interactively, or rm -rf to
annihilate without any error messages or confirmation.
Directory Operations | 43

File Viewing
cat View files in their entirety.
less View text files one page at a time.
head View the first lines of a text file.
tail View the last lines of a text file.
nl View text files with their lines numbered.
strings Display text that’s embedded in a binary file.
od View data in octal (or other formats).
xxd View data in hexadecimal.
acroread View PDF files.
gv View PostScript or PDF files.
xdvi View TeX DVI files.
In Linux, you’ll encounter various types of files to view: plain
text, PostScript, binary data, and more. Here we’ll explain how
to view them. Note that commands for viewing graphics files
are covered in “Graphics and Screensavers” on page 181, and
video files in “Video” on page 188.
cat stdin stdout - file -- opt --help --version
cat [options] [files]
The simplest viewer is cat, which just prints its files to standard
output, concatenating them (hence the name). Large files will likely
scroll off screen, so consider using less if you plan to read the out-
put. That being said, cat is particularly useful for sending a set of
files into a shell pipeline:
$ cat * | wc
cat can also manipulate its output in small ways, optionally dis-
playing nonprinting characters, prepending line numbers (though
nl is more powerful for this purpose), and eliminating whitespace.
44 | Linux Pocket Guide

Useful options
-T Print tabs as ^I.
-E Print newlines as $.
-v Print other nonprinting characters in a human-readable format.
-n Prepend line numbers to every line.
-b Prepend line numbers to nonblank lines.
-s Squeeze each sequence of blank lines into a single blank line.
less stdin stdout8 - file -- opt --help --version
less [options] [files]
Use less to view text one “page” at a time (i.e., one window or
screenful at a time). It’s great for text files, or as the final command
in a shell pipeline with lengthy output.
$ command1 | command2 | command3 | command4 | less
While running less, type h for a help message describing all its fea-
tures. Here are some useful keystrokes for paging through files.
Keystroke Meaning
h, H View a help page.
Space bar, f, ^V, ^F Move forward one screenful.
Enter Move forward one line.
b, ^B, ESC-b Move backward one screenful.
/Enter search mode. Follow it with a regular expression and
press Enter, and less will look for the first line matching
it.
?Same as /, but it searches backward in the file.
nRepeat your most recent search forward.
N Repeat your most recent search backward.
8. Although technically less can be plugged into the middle of a pipeline,
or its output redirected to a file, there isn’t much point to doing this.
File Viewing | 45

Keystroke Meaning
vEdit the current file with your default text editor (the value
of environment variable VISUAL, or if not defined,
EDITOR, or if not defined, vi).
< Jump to beginning of file.
> Jump to end of file.
:n Jump to next file.
:p Jump to previous file.
less has a mind-boggling number of features; we’re presenting only
the most common. (For instance, less will display the contents of
a compressed Zip file: try less myfile.zip.) The manpage is rec-
ommended reading.
Useful options
-c Clear the screen before displaying the next page. This avoids scrolling and may be
more comfortable on the eyes.
-m Print a more verbose prompt, displaying the percentage of the file displayed so far.
-N Display line numbers.
-r Display control characters literally; normally less converts them to a
human-readable format.
-s Squeeze multiple, adjacent blank lines into a single blank line.
-S Truncate long lines to the width of the screen, instead of wrapping.
head stdin stdout - file -- opt --help --version
head [options] [files]
The head command prints the first 10 lines of a file: great for pre-
viewing the contents.
$ head myfile
$ head * | less Preview all files in the current directory
46 | Linux Pocket Guide

It’s also good for previewing the first few lines of output from a
pipeline:
$ grep 'E' very-big-file | head
Useful options
-NPrint the first N lines instead of 10.
-n NPrint the first N lines instead of 10.
-c NPrint the first N bytes of the file.
-q Quiet mode: when processing more than one file, don’t print a banner above
each file. Normally, head prints a banner containing the filename.
tail stdin stdout - file -- opt --help --version
tail [options] [files]
The tail command prints the last 10 lines of a file, and does other
tricks as well.
$ tail myfile
The ultra-useful -f option causes tail to watch a file actively while
another program is writing to it, displaying new lines as they are
written to the file. This is invaluable for watching log files in active
use:
$ tail -f /var/log/messages
Useful options
-N Print the last N lines of the file instead of 10.
-n NPrint the last N lines of the file instead of 10.
+ NPrint all lines except the first N.
-c NPrint the last N bytes of the file.
-f Keep the file open, and whenever lines are appended to the file, print them. This
is extremely useful. Add the --retry option if the file doesn’t exist yet, but you
want to wait for it to exist.
-q Quiet mode: when processing more than one file, don’t print a banner above
each file. Normally tail prints a banner containing the filename.
File Viewing | 47

nl stdin stdout - file -- opt --help --version
nl [options] [files]
nl copies its files to standard output, prepending line numbers.
$ nl myfile
1 Once upon a time, there was
2 a little operating system named
3 Linux, which everybody loved.
It’s more flexible than cat with its -n and -b options, providing an
almost bizarre amount of control over the numbering. nl can be
used in two ways: on ordinary text files, and on specially marked-
up text files with predefined headers and footers.
Useful options
-b [a|t|n|p R ]Prepend numbers to all lines (a), nonblank lines (t), no lines (n),
or only lines that contain regular expression R. (Default=a)
-v NBegin numbering with integer N. (Default=1)
-i NIncrement the number by N for each line, so for example, you could
use odd numbers only (-i2) or even numbers only (-v2 -i2).
(Default=1)
-n [ln|rn|rz] Format numbers as left-justified (ln), right-justified (rn), or right-
justified with leading zeroes (rz). (Default=ln)
-w NForce the width of the number to be N columns. (Default=6)
-s SInsert string S between the line number and the text. (De-
fault=TAB)
Additionally, nl has the wacky ability to divide text files into virtual
pages, each with a header, body, and footer with different number-
ing schemes. For this to work, however, you must insert nl-specific
delimiter strings into the file, such as \:\:\: (start of header),
\:\: (start of body), and \: (start of footer). Each must appear on
a line by itself. Then you can use additional options (see the man-
page) to affect line numbering in the headers and footers of your
decorated file.
48 | Linux Pocket Guide

strings stdin stdout - file -- opt --help --version
strings [options] [files]
Binary files, such as executable programs and object files, usually
contain some readable text. The strings program extracts that text
and displays it on standard output. You can discover version infor-
mation, authors’ names, and other useful tidbits with strings.
$ strings /usr/bin/who
David MacKenzie
Copyright %s %d Free Software Foundation, Inc.
Report %s bugs to %s
...
Combine strings and grep to make your exploring more efficient.
Here we look for email addresses:
$ strings /usr/bin/who | grep '@'
bug-coreutils@gnu.org
Useful options
-n length Display only strings with length greater than length (the default is 4).
od stdin stdout - file -- opt --help --version
od [options] [files]
When you want to view a binary file, consider od (Octal Dump) for
the job. It copies one or more files to standard output, displaying
their data in ASCII, octal, decimal, hexadecimal, or floating point,
in various sizes (byte, short, long). For example, this command:
$ od -w8 /usr/bin/who
0000000 042577 043114 000401 000001
0000010 000000 000000 000000 000000
0000020 000002 000003 000001 000000
...
displays the bytes in binary file /usr/bin/who in octal, eight bytes per
line. The column on the left contains the file offset of each row,
again in octal.
File Viewing | 49

If your binary file also contains text, consider the -tc option, which
displays character data. For example, binary executables like who
contain the string “ELF” at the beginning:
$ od -tc -w8 /usr/bin/who | head -3
0000000 177 E L F 001 001 001 \0
0000010 \0 \0 \0 \0 \0 \0 \0 \0
0000020 002 \0 003 \0 001 \0 \0 \0
Useful options
-N BDisplay only the first B bytes of each file, specified in decimal,
hexadecimal (by prepending 0x or 0X), 512-byte blocks (by
appending b), kilobytes (by appending k), or megabytes (by ap-
pending m). (Default displays the entire file.)
-j BBegin the output at byte B +1 of each file; acceptable formats are
the same as for the -N option. (Default=0)
-w [ B ]Display B bytes per line; acceptable formats are the same as in the
-N option. Using -w by itself is equivalent to -w32. (Default=16)
-s [ B ]Group each row of bytes into sequences of B bytes, separated by
whitespace; acceptable formats are the same as in the -N option.
Using -s by itself is equivalent to -s3. (Default=2)
-A (d|o|x|n) Display file offsets in the leftmost column, in decimal (d), octal
(o), hexadecimal (h), or not at all (n). (Default=o)
-t (a|c)[z] Display output in a character format, with nonalphanumeric char-
acters printed as escape sequences (a) or by name (c). For z, see
below.
-t (d|o|u|x)
[SIZE[z]]
Display output in an integer format, including octal (o), signed
decimal (d), unsigned decimal (u), hexadecimal (x). (For binary
output, use xxd instead.) SIZE represents the number of bytes
per integer; it can be a positive integer or any of the values C, S, I,
or L, which stand for the size of a char, short, int, or long datatype,
respectively. For z, see below.
-t f[SIZE[z]] Display output in floating point. SIZE represents the number of
bytes per integer; it can be a positive integer or any of the values
F, D, or L, which stand for the size of a float, double, or long double
datatype, respectively. For z, see below. If -t is omitted, the
default is -to2.
50 | Linux Pocket Guide

Appending z to the -t option prints a new column on the right-hand
side of the output, displaying the printable characters on each line,
much like the default output of xxd.
xxd stdin stdout - file -- opt --help --version
xxd [options] [files]
Similar to od, xxd produces a hexadecimal or binary dump of a file
in several different formats. It can also do the reverse, converting
from its hex dump format back into the original data. For example,
here’s a hex dump of binary file /usr/bin/who:
$ xxd /usr/bin/who
0000000: 7f45 4c46 0101 0100 0000 ... 0000 .ELF............
0000010: 0200 0300 0100 0000 a08c ... 0000 ............4...
0000020: 6824 0000 0000 0000 3400 ... 2800 h$......4. ...(.
0000030: 1900 1800 0600 0000 3400 ... 0408 ........4...4...
...
The left column indicates the file offset of the row, the next eight
columns contain the data, and the final column displays the print-
able characters in the row, if any.
By default, xxd outputs three columns: file offsets, the data in hex,
and the data as text (printable characters only).
Useful options
-l NDisplay only the first N bytes. (Default displays the entire file,)
-s NSkip the first N bytes of the file.
-s -NBegin N bytes from the end of the file. (There is also a +N syntax for more
advanced skipping through standard input; see the manpage.)
-c NDisplay N bytes per row. (Default=16)
-g NGroup each row of bytes into sequences of N bytes, separated by whitespace,
like od -s. (Default=2)
-b Display the output in binary instead of hexadecimal.
-u Display the output in uppercase hexadecimal instead of lowercase.
-p Display the output as a plain hexdump, 60 contiguous bytes per line.
File Viewing | 51

-r The reverse operation: convert from an xxd hex dump back into the original
file format. Works with the default hexdump format and, if you add the -p
option, the plain hexdump format. If you’re bored, try either of these com-
mands to convert and unconvert a file in a pipeline, reproducing the original
file on standard output:
$ xxd myfile | xxd -r
$ xxd -p myfile | xxd -r -p
-i Display the output as a C programming language data structure. When reading
from a file, it produces an array of unsigned chars containing the data, and
an unsigned int containing the array length. When reading from standard
input, it produces only a comma-separated list of hex bytes.
acroread stdin stdout - file -- opt --help --version
acroread [options] file.pdf
acroread is the official PDF reader from Adobe. It’s easy to use and
similar to Adobe Reader on Windows. You can also view PDF files
with xpdf (http://www.foolabs.com/xpdf/) and gv.
gv stdin stdout - file -- opt --help --version
gv [options] file
GhostView displays an Adobe PostScript or PDF file in an X win-
dow. You can invoke it as gv or ghostview. Its basic operation is
simple: click the desired page number to jump to that page, and so
forth. A few minutes of playing around and you’ll have the hang
of it.
Useful options
-page PBegin on page P. (Default=1)
-monochrome Display in black and white.
-grayscale Display in grayscale.
-color Display in color.
-portrait Choose portrait orientation.
-landscape Choose landscape orientation.
52 | Linux Pocket Guide

-seascape Choose upside-down landscape orientation.
-upsidedown Choose upside-down portrait orientation.
-scale NZoom in or out. The integer N may be positive (make the image larger)
or negative (smaller).
-watch Automatically reload the PostScript file when it changes.
-nowatch Do not automatically reload the PostScript file when it changes.
xdvi stdin stdout - file -- opt --help --version
xdvi [options] file
The document processing system TeX produces binary output files
in a format called DVI, with suffix .dvi. The viewer xdvi displays a
DVI file in an X window. While displaying a file, xdvi has a column
of buttons down the right-hand side with obvious uses, such as Next
to move to the next page. (You can hide the buttons by invoking
xdvi with the -expert option.) You can also navigate the file by
keystroke.
Keystroke Meaning
qQuit.
nJump to next page. (Alternatively, press Space bar, Enter, or
Pagedown.) Precede it with a number N to jump by N pages.
pJump to previous page. (Alternatively, press Backspace, Delete, or
Pageup.) Precede it with a number N to jump by N pages.
<Jump to first page.
>Jump to last page.
^L Redisplay the page.
RReread the DVI file, say, after you’ve modified it.
Any mouse
button
Magnify a rectangular region under the mouse cursor.
xdvi has dozens of command-line options for tailoring its colors,
geometry, zoom, and overall behavior.
File Viewing | 53

If you prefer, convert a DVI file to PostScript via the dvips command
and then use GhostView (gv) to display it:
$ dvips -o myfile.ps myfile.dvi
$ gv myfile.ps
File Creation and Editing
Command Meaning
emacs Text editor from Free Software Foundation.
vim Text editor, extension of Unix vi.
soffice Office suite for editing Microsoft Word, Excel, and PowerPoint documents.
abiword Edit Microsoft Word documents.
gnumeric Edit Excel spreadsheets.
To get far with Linux, you must become proficient with one of
its text editors. The two major ones are emacs from the Free
Software Foundation, and vim, a successor to the Unix editor
vi. Teaching these editors fully is beyond the scope of this book,
but both have online tutorials, and we list common operations
in Table 1. To edit a file, run either:
$ emacs myfile
$ vim myfile
If myfile doesn’t exist, it is created automatically.
In case you share files with Microsoft Windows systems, we
will also cover Linux programs that edit Microsoft Word, Ex-
cel, and PowerPoint documents.
Creating a File Quickly
You can quickly create an empty file (for later editing) using
the touch command:
$ touch newfile
54 | Linux Pocket Guide

or the echo -n command (see “File Properties” on page 59):9
$ echo -n > newfile2
or write data into a new file by redirecting the output of a pro-
gram (see “Input/output redirection” on page 28):
$ echo anything at all > newfile
Your Default Editor
Various Linux programs will run an editor when necessary, and
by default the editor is vim. For example, your email program
may invoke an editor to compose a new message, and less
invokes an editor if you type “v”. But what if you don’t want
vim to be your default editor? Set the environment variables
VISUAL and EDITOR to your choice, for example:
$ EDITOR=emacs
$ VISUAL=emacs
$ export EDITOR VISUAL Optional
Both variables are necessary because different programs check
one variable or the other. Set EDITOR and VISUAL in your
~/.bash_profile startup file if you want your choices made per-
manent. Any program can be made your default editor as long
as it accepts a filename as an argument.
Regardless of how you set these variables, all system adminis-
trators should know at least basic vim and emacs commands
in case a system tool suddenly runs an editor on a critical file.
emacs stdin stdout - file -- opt --help --version
emacs [options] [files]
emacs is an extremely powerful editing environment with more
commands than you could possibly imagine, plus a complete
9. The -n option prevents a newline character from being written to the
file, making it truly empty.
File Creation and Editing | 55

programming language to define your own editing features. To in-
voke emacs in a new X window, run:
$ emacs
To run in a existing shell window:
$ emacs -nw
Now to invoke the built-in emacs tutorial, type ^h t.
Most emacs keystroke commands involve the control key (like ^F)
or the meta key, which is usually the Escape key or the Alt key.
emacs’s own documentation notates the meta key as M- (as in M-F
to mean “hold the meta key and type F”), so we will too. For basic
keystrokes, see Table 1.
vim stdin stdout - file -- opt --help --version
vim [options] [files]
vim is an enhanced version of the old standard Unix editor vi. To
invoke the editor in a new X window, run:
$ gvim
To run in a existing shell window:
$ vim
To run the vim tutorial, run:
$ vimtutor
vim is a mode-based editor. It operates in two modes, insert and
normal. Insert mode is for entering text in the usual manner, while
normal mode is for running commands like “delete a line” or copy/
paste. For basic keystrokes in normal mode, see Table 1.
56 | Linux Pocket Guide

Table 1. Basic keystrokes in emacs and vim
Task emacs vim
Type text Just type Type i, then any
text, and finally
ESC
Save and quit ^x^s then ^x^c :wq
Quit without saving ^x^c
Respond “no” when
asked to save buffers
:q!
Save ^x^s :w
Save As ^x^w :w filename
Undo ^/ or ^x u u
Suspend editor (not in X) ^z ^z
Switch to edit mode (N/A)ESC
Switch to command mode M-x :
Abort command in progress ^g ESC
Move forward ^f or right arrow l or right arrow
Move backward ^b or left arrow h or left arrow
Move up ^p or up arrow k or up arrow
Move down ^n or down arrow j or down arrow
Move to next word M-f w
Move to previous word M-b b
Move to beginning of line ^a 0
Move to end of line ^e $
Move down one screen ^v ^f
Move up one screen M-v ^b
Move to beginning of buffer M-< gg
Move to end of buffer M-> G
Delete next character ^d x
Delete previous character BACKSPACE X
File Creation and Editing | 57

Task emacs vim
Delete next word M-d de
Delete previous word M-BACKSPACE db
Delete current line ^a^k dd
Delete to end of line ^k d$
Define region (type this keystroke to
mark the beginning of the region, then
move the cursor to the end of the desired
region)
^ Space bar v
Cut region ^w d
Copy region M-w y
Paste region ^y p
Get help ^h :help
View the manual ^h i :help
soffice stdin stdout - file -- opt --help --version
soffice [files]
OpenOffice.org10 is a comprehensive, integrated office software
suite that can edit Microsoft Word, Excel, and PowerPoint files.
Simply run:
$ soffice
and you’re ready to work. The same program edits all three types
of files.11 It is a large program that requires plenty of memory and
disk space.
OpenOffice.org can also handle drawings (oodraw command),
databases (oobase), and mathematical formulas (oomath).
10. The “.org” is part of the software package’s name.
11. Under the hood, soffice comprises the separate programs Writer
(oowriter command) for word processing, Calc (oocalc) for
spreadsheets, and Impress (ooimpress) for presentations, which you can
run directly if desired.
58 | Linux Pocket Guide

OpenOffice.org has more information, or you can use the soffice
Help menu.
Some distros supply a different package, LibreOffice, a spin-off of
OpenOffice.org with the same commands. See http://www.libreof
fice.org/ for details.
abiword stdin stdout - file -- opt --help --version
abiword [options] [files]
abiword is another program for editing Microsoft Word documents.
It is smaller and quicker than soffice, though not as powerful, and
perfectly suitable for many editing tasks.
$ abiword myfile.doc
If you specify files on the command line, they must exist: abiword
won’t create them for you.
gnumeric stdin stdout - file -- opt --help --version
gnumeric [options] [files]
gnumeric is a spreadsheet program that can edit Microsoft Excel
documents. It is quite powerful and fast, and if you’ve used Excel
before, gnumeric will feel familiar.
$ gnumeric myfile.xls
If you specify files on the command line, they must exist:
gnumeric won’t create them for you.
File Properties
stat Display attributes of files and directories.
wc Count bytes, words, lines in a file.
du Measure disk usage of files and directories.
file Identify (guess) the type of a file.
touch Change timestamps of files and directories.
File Properties | 59

chown Change owner of files and directories.
chgrp Change group ownership of files and directories.
chmod Change protection mode of files and directories.
umask Set a default mode for new files and directories.
chattr Change extended attributes of files and directories.
lsattr List extended attributes of files and directories.
When examining a Linux file, keep in mind that the contents
are only half the story. Every file and directory also has at-
tributes that describe its owner, size, access permissions, and
other information. The ls -l command (see “Basic File Oper-
ations” on page 36) displays some of these attributes, but other
commands provide additional information.
stat stdin stdout - file -- opt --help --version
stat [options] files
The stat command lists important attributes of files (by default) or
filesystems (-f option). File information looks like:
$ stat myfile
File: "myfile"
Size: 1264 Blocks: 8 Regular File
Access: (0644/-rw-r--r--) Uid: (600/lisa) Gid: (620/users)
Device: 30a Inode: 99492 Links: 1
Access: Fri Aug 29 00:16:12 2003
Modify: Wed Jul 23 23:09:41 2003
Change: Wed Jul 23 23:11:48 2003
and includes the filename, size in bytes (1264), size in blocks (8),
file type (Regular File), permissions in octal (0644), permissions in
the format of “ls -l” (-rw-r--r--), owner’s user ID (600), owner’s
name (lisa), owner’s group ID (620), owner’s group name (users),
device type (30a), inode number (99492), number of hard links (1),
and timestamps of the file’s most recent access, modification, and
status change. Filesystem information looks like:
$ stat -f myfile
File: "myfile"
60 | Linux Pocket Guide

ID: bffff358 ffffffff Namelen: 255 Type: EXT2
Blocks: Total: 2016068 Free: 876122 Available:
773709 Size: 4096
Inodes: Total: 1026144 Free: 912372
and includes the filename (myfile), filesystem ID (bffff358 ffffffff),
maximum length of a filename for that filesystem (255 bytes), file-
system type (EXT2), the counts of total, free, and available blocks
in the filesystem (2016068, 876122, and 773709, respectively),
block size for the filesystem (4096), and the counts of total and free
inodes (1026144 and 912372, respectively).
The -t option presents the same data but on a single line, without
headings. This is handy for processing by shell scripts or other
programs:
$ stat -t myfile
myfile 1264 8 81a4 500 500 30a 99492 1 44 1e 1062130572
1059016181 1059016308
$ stat -tf myfile
myfile bffff358 ffffffff 255 ef53 2016068 875984 773571
4096 1026144 912372
Useful options
-L Follow symbolic links and report on the file they point to.
-f Report on the filesystem containing the file, not the file itself.
-t Terse mode: print information on a single line.
wc stdin stdout - file -- opt --help --version
wc [options] [files]
The wc (word count) program prints a count of bytes, words, and
lines in (presumably) a text file.
$ wc myfile
24 62 428 myfile
This file has 24 lines, 62 whitespace-delimited words, and 428
bytes.
File Properties | 61

Useful options
-l Print the line count only.
-w Print the word count only.
-c Print the byte (character) count only.
-L Locate the longest line in each file and print its length in bytes.
du stdin stdout - file -- opt --help --version
du [options] [files| directories]
The du (disk usage) command measures the disk space occupied by
files or directories. By default, it measures the current directory and
all its subdirectories, printing totals in blocks for each, with a grand
total at the bottom.
$ du
8 ./Notes
36 ./Mail
340 ./Files/mine
40 ./Files/bob
416 ./Files
216 ./PC
2404 .
It can also measure the size of files:
$ du myfile myfile2
4 ./myfile
16 ./myfile2
Useful options
-b Measure usage in bytes.
-k Measure usage in kilobytes.
-m Measure usage in megabytes.
-B NDisplay sizes in blocks that you define, where 1 block = N bytes. (Default = 1024)
-h -H Print in human-readable units. For example, if two directories are of size 1
gigabyte or 25 kilobytes, respectively, du -h prints 1G and 25K. The -h option
uses powers of 1024, whereas -H uses powers of 1000.
62 | Linux Pocket Guide

-c Print a total in the last line. This is the default behavior when measuring a
directory, but for measuring individual files, provide -c if you want a total.
-L Follow symbolic links and measure the files they point to.
-s Print only the total size.
file stdin stdout - file -- opt --help --version
file [options] files
The file command reports the type of a file:
$ file /etc/hosts /usr/bin/who letter.doc
/etc/hosts: ASCII text
/usr/bin/who: ELF 32-bit LSB executable, Intel 80386 ...
letter.doc: Microsoft Office Document
Unlike some other operating systems, Linux does not keep track of
file types, so the output is an educated guess based on the file con-
tent and other factors.
Useful options
-b Omit filenames (left column of output).
-i Print MIME types for the file, such as “text/plain” or “audio/mpeg”, instead
of the usual output.
-f
name_file
Read filenames, one per line, from the given name_file, and report
their types. Afterward, process filenames on the command line as usual.
-L Follow symbolic links, reporting the type of the destination file
instead of the link.
-z If a file is compressed (see “File Compression and Packaging” on page 92),
examine the uncompressed contents to decide the file type, instead of
reporting “compressed data.”
touch stdin stdout - file -- opt --help --version
touch [options] files
The touch command changes two timestamps associated with a file:
its modification time (when the file’s data was last changed) and its
File Properties | 63

access time (when the file was last read). To set both timestamps to
right now, run:
$ touch myfile
You can set these timestamps to arbitrary values, e.g.:
$ touch -d "November 18 1975" myfile
If a given file doesn’t exist, touch creates it, a handy way to create
empty files.
Useful options
-a Change the access time only.
-m Change the modification time only.
-c If the file doesn’t exist, don’t create it (normally, touch creates it).
-d timestamp Set the file’s timestamp(s). A tremendous number of timestamp
formats are acceptable, from “12/28/2001 3pm” to “28-May” (the
current year is assumed, and a time of midnight) to “next tuesday
13:59” to “0” (midnight today). Experiment and check your work
with stat. Full documentation is available from info touch.
-t timestamp A less intelligent way to set the file’s timestamp, using the
format [[CC]YY]MMDDhhmm [.ss], where CC is the two-digit cen-
tury, YY is the two-digit year, MM is the 2-digit month, DD is the
two-digit day, hh is the two-digit hour, mm is the two-digit minute,
and ss is the two-digit second. For example, -t
20030812150047 represents August 12, 2003, at 15:00:47.
chown stdin stdout - file -- opt --help --version
chown [options] user_spec files
The chown (change owner) command sets the ownership of files and
directories. To make user smith the owner of several files and a di-
rectory, run:
# chown smith myfile myfile2 mydir
The user_spec parameter may be any of these possibilities:
•A username (or numeric user ID), to set the owner: chown smith
myfile
64 | Linux Pocket Guide

•A username (or numeric user ID), optionally followed by a
colon and a group name (or numeric group ID), to set the
owner and group: chown smith:users myfile
•A username (or numeric user ID) followed by a colon, to set
the owner and to set the group to the invoking user’s login
group: chown smith: myfile
•A group name (or numeric group ID) preceded by a colon, to
set the group only: chown :users myfile
•--reference= file to set the same owner and group as another
given file
Useful options
--dereference Follow symbolic links and operate on the files they point to.
-R Recursively change the ownership within a directory hierarchy.
chgrp stdin stdout - file -- opt --help --version
chgrp [options] group_spec files
The chgrp (change group) command sets the group ownership of
files and directories.
$ chgrp smith myfile myfile2 mydir
The group_spec parameter may be any of these possibilities:
•A group name or numeric group ID
•--reference= file, to set the same group ownership as another
given file
See “Group Management” on page 140 for more information on
groups.
Useful options
--dereference Follow symbolic links and operate on the files they point to.
-R Recursively change the ownership within a directory hierarchy.
File Properties | 65

chmod stdin stdout - file -- opt --help --version
chmod [options] permissions files
The chmod (change mode) command protects files and directories
from unauthorized users on the same system, by setting access per-
missions. Typical permissions are read, write, and execute, and they
may be limited to the file owner, the file’s group owner, and/or other
users. The permissions argument can take three different forms:
•--reference= file, to set the same permissions as another
given file.
•An octal number, up to four digits long, that specifies the file’s
absolute permissions in bits, as in Figure 6. The leftmost digit
is special (described later) and the second, third, and fourth
represent the file’s owner, the file’s group, and all users.
•One or more strings specifying absolute or relative permissions
(i.e., relative to the file’s existing permissions). For example,
a+r makes a file readable by all users.
Figure 6. File permission bits explained
In the third form, each string consists of three parts: an optional
scope, a command, and permissions.
Scope (optional)
u for user, g for group, o for other users not in the group, a for
all users. The default is a.
66 | Linux Pocket Guide

Command
+ to add permissions; − to remove permissions; or = to set ab-
solute permissions, ignoring existing ones.
Permissions
r for read, w for write/modify, x for execute (for directories,
this is permission to cd into the directory), X for conditional
execute (explained later), u to duplicate the user permissions,
g to duplicate the group permissions, o to duplicate the “other
users” permissions, s for setuid or setgid, and t for the sticky
bit.
For example, ug+rw would add read and write permission for the
user and the group, a-x (or just -x) would remove execute permis-
sion for everyone, and u=r would first remove all existing permis-
sions and then make the file readable only by its owner. You can
combine these strings by separating them with commas, such as
ug+rw,a-x.
Conditional execute permission (X) means the same as x, except that
it succeeds only if the file is already executable, or if the file is a
directory. Otherwise, it has no effect.
Setuid and setgid apply to executable files (programs and scripts).
Suppose we have an executable file F owned by user “smith” and
the group “friends”. If file F has setuid (set user ID) enabled, then
anyone who runs F will “become” user smith, with all her rights
and privileges, for the duration of the program. Likewise, if F has
setgid (set group ID) enabled, anyone who executes F becomes a
member of the friends group for the duration of the program. As
you might imagine, setuid and setgid can impact system security,
so don’t use them unless you really know what you’re doing. One
misplaced chmod +s can leave your whole system vulnerable to
attack.
The sticky bit, most commonly used for /tmp directories, controls
removal of files in that directory. Normally, if you have write per-
mission in a directory, you can delete or move files within it, even
if you don’t have this access to the files themselves. Inside a direc-
tory with the sticky bit set, you need write permission on a file in
order to delete or move it.
File Properties | 67

Useful options
-R Recursively change the ownership within a directory hierarchy.
umask stdin stdout - file -- opt --help --version
umask [options] [mask]
The umask command sets or displays your default mode for creating
files and directories: whether they are readable, writable, and/or
executable by yourself, your group, and the world.
$ umask
0002
$ umask -S
u=rwx,g=rwx,o=rx
Let’s start with some technical talk and follow with common-sense
advice. A umask is a binary (base two) value, though it is commonly
presented in octal (base eight). It defines your default protection
mode by combining with the octal value 0666 for files and 0777 for
directories, using the binary operation NOT AND. For example, the
umask 0002 yields a default file mode of 0664:
0666 NOT AND 0002
= 000110110110 NOT AND 000000000010
= 000110110110 AND 111111111101
= 000110110100
= 0664
Similarly for directories, 0002 NOT AND 0777 yields a default mode of
0775.
If that explanation seems from outer space, here are some simple
recipes. Use mask 0022 to give yourself full privileges, and all others
read/execute privileges only:
$ umask 0022
$ touch newfile && mkdir dir
$ ls -ld newfile dir
-rw-r--r-- 1 smith smith 0 Nov 11 12:25 newfile
drwxr-xr-x 2 smith smith 4096 Nov 11 12:25 dir
Use mask 0002 to give yourself and your default group full privi-
leges, and read/execute to others:
68 | Linux Pocket Guide

$ umask 0002
$ touch newfile && mkdir dir
$ ls -ld newfile dir
-rw-rw-r-- 1 smith smith 0 Nov 11 12:26 newfile
drwxrwxr-x 2 smith smith 4096 Nov 11 12:26 dir
Use mask 0077 to give yourself full privileges with nothing for any-
one else:
$ umask 0077
$ touch newfile && mkdir dir
$ ls -ld newfile dir
-rw------- 1 smith smith 0 Nov 11 12:27 newfile
drwx------ 2 smith smith 4096 Nov 11 12:27 dir
chattr stdin stdout - file -- opt --help --version
chattr [options] [+ − =]attributes [files]
If you grew up with other Unix systems, you might be surprised that
Linux files can have additional attributes beyond their access per-
missions. If a file is on an “ext” filesystem (ext2, ext3, etc.), you can
set these extended attributes with the chattr (change attribute)
command and list them with lsattr.
As with chmod, attributes may be added (+) or removed (-) relatively,
or set absolutely (=). For example, to keep a file compressed and
nondumpable, run:
$ chattr +cd myfile
Attribute Meaning
aAppend-only: appends are permitted to this file, but it cannot otherwise be
edited. Root only.
AAccesses not timestamped: accesses to this file don’t update its access
timestamp (atime).
cCompressed: data is transparently compressed on writes and uncompressed
on reads.
dDon’t dump: tell the dump program to ignore this file when making backups
(see “Backups and Remote Storage” on page 111).
iImmutable: file cannot be changed or deleted (root only).
jJournaled data (ext3 filesystems only).
File Properties | 69

Attribute Meaning
sSecure deletion: if deleted, this file’s data is overwritten with zeroes.
SSynchronous update: changes are written to disk immediately, as if you had
typed sync after saving (see “Disks and Filesystems” on page 106).
uUndeletable: file cannot be deleted.
There are a few other attributes too, some of them obscure or ex-
perimental. See the manpage for details.
Useful options
-R Recursively process directories.
lsattr stdin stdout - file -- opt --help --version
lsattr [options] [files]
If you set extended attributes with chattr, you can view them with
lsattr (list attributes). The output uses the same letters as chattr;
for example, this file is immutable and undeletable:
$ lsattr myfile
-u--i--- myfile
With no files specified, lsattr prints the attributes of all files in the
current directory.
Useful options
-R Recursively process directories.
-a List all files, including those whose names begin with a dot.
-d If listing a directory, do not list its contents, just the directory itself.
File Location
find Locate files in a directory hierarchy.
xargs Process a list of located files (and much more).
locate Create an index of files, and search the index for string.
70 | Linux Pocket Guide

which Locate executables in your search path (command).
type Locate executables in your search path (bash built-in).
whereis Locate executables, documentation, and source files.
Linux systems can contain hundreds of thousands of files
easily. How can you find a particular file when you need to?
The first step is to organize your files logically into directories
in some thoughtful manner, but there are several other ways
to find files, depending on what you’re looking for.
For finding any file, find is a brute-force program that slogs
file-by-file through a directory hierarchy to locate a target.
locate is much faster, searching through a prebuilt index that
you generate as needed. (Some distros generate the index
nightly by default.)
For finding programs, the which and type commands check all
directories in your shell search path. type is built into the bash
shell (and therefore available only when you’re running bash),
while which is a program (normally /usr/bin/which); type is
faster and can detect shell aliases.12 In contrast, whereis ex-
amines a known set of directories, rather than your search path.
find stdin stdout - file -- opt --help --version
find [directories] [expression]
The find command searches one or more directories (and their
subdirectories recursively) for files matching certain criteria. It is
very powerful, with over 50 options and, unfortunately, a rather
unusual syntax. Here are some simple examples that search the en-
tire filesystem from the root directory:
Find a particular file named myfile:
$ find / -type f -name myfile -print
12. The tcsh shell performs some trickery to make which detect aliases.
File Location | 71

Print all directory names:
$ find / -type d -print
Print filenames ending in “.txt” (notice how the wildcard is escaped
so the shell ignores it):
$ find / -type f -name \*.txt -print
Useful options
-name pattern
-path pattern
-lname pattern
The name (-name), pathname (-path), or symbolic link
target (-lname) of the desired file must match this shell
pattern, which may include shell wildcards *, ?, and [].
(You must escape the wildcards, however, so they are
ignored by the shell and passed literally to find.) Paths
are relative to the directory tree being searched.
-iname pattern
-ipath pattern
-ilname pattern
The -iname, -ipath and -ilname options are the
same as -name, -path, and -lname, respectively, but
are case-insensitive.
-regex regexp The path (relative to the directory tree being searched)
must match the given regular expression.
-type tLocate only files of type t. This includes plain files (f),
directories (d), symbolic links (l), block devices (b), char-
acter devices (c), named pipes (p), and sockets (s).
-atime N
-ctime N
-mtime N
File was last accessed (-atime), last modified
(-mtime), or had a status change (-ctime) exactly N *24
hours ago. Use +N for “greater than N,” or -N for “less than
N.”
-amin N
-cmin N
-mmin N
File was last accessed (-amin), last modified (-mmin), or
had a status change (-cmin) exactly N minutes ago. Use
+N for “greater than N,”or -N for “less than N.”
-anewer other_file
-cnewer other_file
-newer other_file
File was accessed (-anewer), modified (-newer), or had
a status change (-cnewer) more recently than
other_file has.
-maxdepth N
-mindepth N
Consider files at least (-mindepth) or at most (-max
depth) N levels deep in the directory tree being searched.
72 | Linux Pocket Guide

-follow Dereference symbolic links.
-depth Proceed using depth-first search: completely search a
directory’s contents (recursively) before operating on the
directory itself.
-xdev Limit the search to a single filesystem, i.e., don’t cross
device boundaries.
-size N [bckw] Consider files of size N, which can be given in blocks (b),
one-byte characters (c), kilobytes (k), or two-byte words
(w). Use +N for “greater than N,” or -N for “less than N.”
-empty File has zero size, and is a regular file or directory.
-user name File is owned by the given user.
-group name File is owned by the given group.
-perm mode File has permissions equal to mode. Use - mode to check
that all of the given bits are set, or +mode to check that
any of the given bits are set.
You can group and negate parts of the expression with the following
operators:
expression1 -a expression2
And. (This is the default if two expressions appear side by side,
so the “-a” is optional.)
expression1 -o expression2
Or.
! expression
-not expression
Negate the expression.
( expression )
Precedence markers, just like in algebra class. Evaluate what’s
in parentheses first. You may need to escape these from the
shell with “\”.
expression1 , expression2
Same as the comma operator in the C programming language.
Evaluate both expressions and return the value of the second
one.
File Location | 73

Once you’ve specified the search criteria, you can tell find to per-
form these actions on files that match the criteria.
Useful options
-print Simply print the path to the file, relative to the search
directory.
-printf string Print the given string, which may have substitutions
applied to it in the manner of the C library function,
printf( ). See the manpage for the full list of outputs.
-print0 Like -print, but instead of separating each line of output
with a newline character, use a null (ASCII 0) character.
Use when piping the output of find to another program,
and your list of filenames may contain space characters.
Of course, the receiving program must be capable of read-
ing and parsing these null-separated lines—for example,
xargs −0.
-exec cmd ;Invoke the given shell command, cmd. Make sure to
escape any shell metacharacters, including the required,
final semicolon, so they are not immediately evaluated on
the command line. Also, the symbol “{}” (make sure to
quote or escape it) represents the path to the file found.
-ok cmd ;Same as -exec, but also prompts the user before invoking
each command.
-ls Perform the command ls -dils on the file.
xargs stdin stdout - file -- opt --help --version
xargs [options] [command]
xargs is one of the oddest yet most powerful commands available
to the shell. It reads lines of text from standard input, turns them
into commands, and executes them. This might not sound exciting,
but xargs has some unique uses, particularly for processing a list of
files you’ve located. Suppose you made a file named important that
lists important files, one per line:
$ cat important
/home/jsmith/mail/love-letters
/usr/local/lib/critical_stuff
74 | Linux Pocket Guide

/etc/passwd
...
With xargs, you can process each of these files easily with other
Linux commands. For instance, the following command runs the
ls -l command on all the listed files:
$ cat important | xargs ls -l
Similarly, you can view the files with less:
$ cat important | xargs less
and even delete them with rm:
$ cat important | xargs rm -f
Each of these pipelines reads the list of files from important and
produces and runs new Linux commands based on the list. The
power begins when the input list doesn’t come from a file, but from
another command writing to standard output. In particular, the
find command, which prints a list of files on standard output,
makes a great partner for xargs. For example, to search your current
directory hierarchy for files containing the word “myxomatosis”:
$ find . -print | xargs grep -l myxomatosis
This power comes with one warning: if any of the files located by
find contains whitespace in its name, this will confuse grep. If one
file is named (say) my stuff, then the grep command constructed is:
$ grep -l myxomatosis my stuff
which tells grep to process two files named my and stuff. Oops! Now
imagine if the program had been rm instead of grep. You’d be telling
rm to delete the wrong files! To avoid this problem, always use find
-print0 instead of -print, which separates lines with ASCII null
characters instead of newline characters, combined with xargs -0,
which expects ASCII nulls:
$ find . -print0 | xargs -0 grep -l myxomatosis
We have barely scratched the surface of the xargs command, so
please experiment! (With harmless commands like grep and ls at
first!)
File Location | 75

Useful options
-n kFeed k lines of input to the command being executed. A common scenario is to
use -n1, guaranteeing that each execution will process only one line of input.
Otherwise, xargs may pass multiple lines of input to a single command.
-0 Set the end-of-line character for input to be ASCII zero rather than whitespace,
and treat all characters literally. Use this when the input is coming from
find -print0.
xargs Versus Backquotes
If you remember “Quoting” on page 29, you might realize that
some xargs tricks can be accomplished with backquotes:
$ cat file_list | xargs rm -f with xargs
$ rm -f `cat file_list` with backquotes
While both commands do similar things, backquotes can fail
if the command line gets so long, after the quoted part is ex-
panded, that it exceeds the maximum length of a shell com-
mand line. xargs does not have this limitation, so it’s safer and
more suitable for large or risky operations.
locate stdin stdout - file -- opt --help --version
locate [options]
The locate command, with its partner updatedb, create an index
(database) of file locations that is quickly searchable.13 If you plan
to locate many files over time in a directory hierarchy that doesn’t
change much, locate is a good choice. For locating a single file or
performing more complex processing of found files, use find.
Some distros automatically index the entire filesystem on a regular
basis (e.g., once a day), so you can simply run locate and it will
13. Our locate command comes from a package called “mlocate.” Some
systems have an older package called “slocate” with slightly different
usage. If you have slocate, simply type slocate instead of updatedb in
our examples.
76 | Linux Pocket Guide

work. But if you ever need to create an index yourself of a directory
and all its subdirectories (say, storing it in /tmp/myindex), run:
$ updatedb -l0 -U directory -o /tmp/myindex
(Note that -l0 is a lowercase L followed by a zero, not the number
10.) Then to search for a string in the index:
$ locate -d /tmp/myindex string
locate has an interesting, optional security feature. You can create
an index that, when searched, will display only files that the user is
permitted to see. So if the superuser created an index of a protected
directory, a non-superuser could search it but not see the protected
files. This is done by omitting the -l0 option to updatedb and run-
ning it as root:
# updatedb -U directory -o /tmp/myindex
Indexing options for updatedb
-u Create index from the root directory downward.
-U directory Create index from directory downward.
-l (0|1) Turn security off (0) or on (1). The default is 1.
-e directories Exclude one or more directories from the index. Separate their
paths by commas.
-o outfile Write the index to file outfile.
Search options for locate
-d index Indicate which index to use (in our example, /tmp/myindex).
-i Case-insensitive search.
-r regexp Search for files matching the given regular expression.
which stdin stdout - file -- opt --help --version
which file
The which command locates an executable file in your shell’s search
path. If you’ve been invoking a program by typing its name:
$ who
File Location | 77

the which command tells you where this command is located:
$ which who
/usr/bin/who
You can even find the which program itself:
$ which which
/usr/bin/which
If several programs in your search path have the same name (for
example, /usr/bin/who and /usr/local/bin/who), which reports only
the first.
type stdin stdout - file -- opt --help --version
type [options] commands
The type command, like which, locates an executable file in your
shell’s search path:
$ type grep who
grep is /bin/grep
who is /usr/bin/who
However, type is built into the bash shell, whereas which is a pro-
gram on disk:
$ type which type rm if
which is /usr/bin/which
type is a shell builtin
rm is aliased to `/bin/rm -i'
if is a shell keyword
As a built-in command, type is faster than which; however, it’s
available only if you’re running bash.
whereis stdin stdout - file -- opt --help --version
whereis [options] files
The whereis command attempts to locate the given files by search-
ing a hardcoded list of directories. It can find executables, docu-
mentation, and source code. whereis is somewhat quirky because
its list of directories might not include the ones you need.
78 | Linux Pocket Guide

Useful options
-b
-m
-s
List only executables (-b), manpages (-m), or source code files (-s).
-B dirs... -f
-M dirs... -f
-S dirs... -f
Search for executables (-B), manpages (-M), or source code files
(-S) only in the given directories. You must follow the directory list
with the -f option before listing the files you seek.
File Text Manipulation
grep Find lines in a file that match a regular expression.
cut Extract columns from a file.
paste Append columns.
tr Translate characters into other characters.
sort Sort lines of text by various criteria.
uniq Locate identical lines in a file.
tee Copy a file and print it on standard output, simultaneously.
Perhaps Linux’s greatest strength is text manipulation: mas-
saging a text file (or standard input) into a desired form by
applying transformations, often in a pipeline. Any program
that reads standard input and writes standard output falls into
this category, but here we’ll present some of the most impor-
tant tools.
grep stdin stdout - file -- opt --help --version
grep [options] pattern [files]
The grep command is one of the most consistently useful and pow-
erful in the Linux arsenal. Its premise is simple: given one or more
files, print all lines in those files that match a particular regular ex-
pression pattern. For example, if a file contains these lines:
File Text Manipulation | 79

The quick brown fox jumped over the lazy dogs!
My very eager mother just served us nine pancakes.
Film at eleven.
and we search for all lines containing “pancake”, we get:
$ grep pancake myfile
My very eager mother just served us nine pancakes.
Now we use a regular expression to match lines ending in an ex-
clamation point:
$ grep '\!$' myfile
The quick brown fox jumped over the lazy dogs!
grep can use two different types of regular expressions, which it calls
basic and extended. They are equally powerful, just different, and
you may prefer one over the other based on your experience with
other grep implementations. The basic syntax is in Table 2.
Useful options
-v Print only lines that do not match the regular expression.
-l Print only the names of files that contain matching lines, not the
lines themselves.
-L Print only the names of files that do not contain matching lines.
-c Print only a count of matching lines.
-n In front of each line of matching output, print its original line
number.
-b In front of each line of matching output, print the byte offset of
the line in the input file.
-i Case-insensitive match.
-w Match only complete words (i.e., words that match the entire
regular expression).
-x Match only complete lines (i.e., lines that match the entire regular
expression). Overrides -w.
-A NAfter each matching line, print the next N lines from its file.
-B NBefore each matching line, print the previous N lines from its file.
-C NSame as -A N -B N: print N lines (from the original file) above
and below each matching line.
80 | Linux Pocket Guide

--color=always Highlight the matched text in color, for better readability.
-r Recursively search all files in a directory and its subdirectories.
-E Use extended regular expressions. See egrep.
-F Use lists of fixed strings instead of regular expressions. See
fgrep.
egrep stdin stdout - file -- opt --help --version
egrep [options] pattern [files]
The egrep command is just like grep, but uses a different (“exten-
ded”) language for regular expressions. It’s the same as grep -E.
Table 2. Regular expressions for grep and egrep
Regular expression
MeaningPlain Extended
.Any single character.
[...] Match any single character in this list.
[^...] Match any single character NOT in this list.
(...) Grouping.
\| | Or.
^Beginning of a line.
$End of a line.
\< Beginning of a word.
\> End of a word.
[:alnum:] Any alphanumeric character.
[:alpha:] Any alphabetic character.
[:cntrl:] Any control character.
[:digit:] Any digit.
[:graph:] Any graphic character.
[:lower:] Any lowercase letter.
[:print:] Any printable character.
File Text Manipulation | 81

Regular expression
MeaningPlain Extended
[:punct:] Any punctuation mark.
[:space:] Any whitespace character.
[:upper:] Any uppercase letter.
[:xdigit:] Any hexadecimal digit.
*Zero or more repetitions of a regular expression.
\+ + One or more repetitions of a regular expression.
\? ? Zero or one occurrence of a regular expression.
\{n \} {n }Exactly n repetitions of a regular expression.
\{ n ,\} {n ,} n or more repetitions of a regular expression.
\{ n , m \} { n , m }Between n and m (inclusive) repetitions of a regular expres-
sion, n < m.
\cThe character c literally, even if c is a special regular ex-
pression character. For example, use \* to match an asterisk
or \\ to match a backslash. Alternatively, put the literal
character inside square brackets, like [*] or [\].
grep and End-of-Line Characters
When you match the end of a line ($) with grep, text files cre-
ated on Microsoft Windows or Macintosh OS X systems may
produce odd results. The reason is that each operating system
has a different standard for ending a line. On Linux, each line
in a text file ends with a newline character (ASCII 10). On
Windows, text lines end with two characters: a carriage return
(ASCII 13) followed by a newline character. And on Macin-
tosh, a text file might end its lines with newlines or carriage
returns alone. If grep isn’t matching the ends of lines properly,
check for non-Linux end-of-line characters with cat -v, which
displays carriage returns as ^M:
$ cat -v dosfile
Uh-oh! This file seems to end its lines with^M
carriage returns before the newlines.^M
82 | Linux Pocket Guide

To remove the carriage returns, use the tr -d command:
$ tr -d '\r' < dosfile > newfile
$ cat -v newfile
Uh-oh! This file seems to end its lines with
carriage returns before the newlines.
fgrep stdin stdout - file -- opt --help --version
fgrep [options] [fixed_strings] [files]
The fgrep command is just like grep, but instead of accepting a
regular expression, it accepts a list of fixed strings, separated by
newlines. It’s the same as grep -F. For example, if you have a dic-
tionary file full of strings, one per line:
$ cat my_dictionary_file
aardvark
aback
abandon
...
you can conveniently search for those strings in a set of input files:
$ fgrep -f my_dictionary_file inputfile1 inputfile2
Normally, you’ll use the lowercase -f option to make fgrep read
the fixed strings from a file. You can also read the fixed strings on
the command line using quoting, but it’s a bit trickier. To search
for the strings one, two, and three in a file, you’d type:
$ fgrep 'one Note we are typing newline characters
two
three' myfile
fgrep is convenient when searching for nonalphanumeric charac-
ters like * and { because they are taken literally, not as regular ex-
pression characters.
File Text Manipulation | 83

cut stdin stdout - file -- opt --help --version
cut -(b|c|f)range [options] [files]
The cut command extracts columns of text from files. A “column”
is defined by character offsets (e.g., the nineteenth character of each
line):
$ cut -c19 myfile
or by byte offsets (which are often the same as characters, unless
you have multibyte characters in your language):
$ cut -b19 myfile
or by delimited fields (e.g., the fifth field in each line of a comma-
delimited file):
$ cut -f5 -d, myfile
You aren’t limited to printing a single column: you can provide a
range (3-16), a comma-separated sequence (3,4,5,6,8,16), or both
(3,4,8-16). For ranges, if you omit the first number (-16), a 1 is
assumed (1-16); if you omit the last number (5-), the end of line is
used.
Useful options
-d CUse character C as the input delimiter character be-
tween fields for the -f option. By default it’s a tab
character.
--output-delimiter=CUse character C as the output delimiter character
between fields for -f. By default it’s a tab character.
-s Suppress (don’t print) lines that don’t contain the
delimiter character.
paste stdin stdout - file -- opt --help --version
paste [options] [files]
The paste command is the opposite of cut: it treats several files as
vertical columns and combines them on standard output:
$ cat letters
A
84 | Linux Pocket Guide

B
C
$ cat numbers
1
2
3
4
5
$ paste numbers letters
1 A
2 B
3 C
4
5
$ paste letters numbers
A 1
B 2
C 3
4
5
Useful options
-d delimiters Use the given delimiters characters between columns; the
default is a tab character. Provide a single character (-d:) to be
used always, or a list of characters (-dxyz) to be applied in se-
quence on each line (the first delimiter is x, then y, then z, then x,
then y, ...).
-s Transpose the rows and columns of output:
$ paste -s letters numbers
A B C
1 2 3 4 5
tr stdin stdout - file -- opt --help --version
tr [options] charset1 [charset2]
The tr command performs some simple, useful translations of one
set of characters into another. For example, to capitalize everything
in a file:
$ cat myfile
This is a very wonderful file.
File Text Manipulation | 85

$ cat myfile | tr 'a-z' 'A-Z'
THIS IS A VERY WONDERFUL FILE.
or to change all vowels into asterisks:
$ cat myfile | tr aeiouAEIOU '*'
Th*s *s * v*ry w*nd*rf*l f*l*.
or to delete all vowels:
$ cat myfile | tr -d aeiouAEIOU
Ths s vry wndrfl fl.
As a very practical example, delete all carriage returns from a DOS
text file so it’s more compatible with Linux text utilities like grep:
$ tr -d '\r' < dosfile > newfile
tr translates the first character in charset1 into the first character
in charset2, the second into the second, the third into the third, etc.
If the length of charset1 is N, only the first N characters in charset2
are used. (If charset1 is longer than charset2, see the -t option.)
Character sets can have the following forms.
Form Meaning
ABCD The sequence of characters A, B, C, D.
A-B The range of characters from A to B.
[x*y] y repetitions of the character x.
[: class :] The same character classes ([:alnum:], [:digit:], etc.) accepted
by grep.
tr also understands the escape characters “\a” (^G = ring bell), “\b”
(^H = backspace), “\f” (^L = formfeed), “\n” (^J = newline), “\r”
(^M = return), “\t” (^I = tab), and “\v” (^K = vertical tab) accepted
by printf (see “Screen Output” on page 168), as well as the nota-
tion \nnn to mean the character with octal value nnn.
tr is great for quick and simple translations, but for more powerful
jobs consider sed, awk, or perl.
86 | Linux Pocket Guide

Useful options
-d Delete the characters in charset1 from the input.
-s Eliminate adjacent duplicates (found in charset1) from the input. For example,
tr -s aeiouAEIOU would squeeze adjacent, duplicate vowels to be single
vowels (reeeeeeally would become really).
-c Operate on all characters not found in charset1.
-t If charset1 is longer than charset2, make them the same length by truncating
charset1. If -t is not present, the last character of charset2 is (invisibly)
repeated until charset2 is the same length as charset1.
sort stdin stdout - file -- opt --help --version
sort [options] [files]
The sort command prints lines of text in alphabetical order, or sor-
ted by some other rule you specify. All provided files are concaten-
ated, and the result is sorted and printed.
$ cat myfile
def
xyz
abc
$ sort myfile
abc
def
xyz
Useful options
-f Case-insensitive sorting.
-n Sort numerically (i.e., 9 comes before 10) instead of alphabetically (10 comes
before 9 because it begins with a “1”).
-g Another numerical sorting method with a different algorithm that, among
other things, recognizes scientific notation (7.4e3 means “7.4 times ten to the
third power,” or 7400). Run info sort for full technical details.
-u Unique sort: ignore duplicate lines. (If used with -c for checking sorted files,
fail if any consecutive lines are identical.)
-c Don’t sort, just check if the input is already sorted. If it is, print nothing;
otherwise, print an error message.
File Text Manipulation | 87

-b Ignore leading whitespace in lines.
-r Reverse the output: sort from greatest to least.
-t XUse X as the field delimiter for the -k option.
-k key Choose sorting keys. (Combine with -t to choose a separator character be-
tween keys.)
A sorting key is a portion of a line that’s considered when sorting,
instead of considering the entire line. An example is “the fifth char-
acter of each line.” Normally, sort would consider these lines to be
in sorted order:
aaaaz
bbbby
but if your sorting key is “the fifth character of each line,” then the
lines are reversed because y comes before z. A more practical ex-
ample involves this file of names and addresses:
$ cat people
George Washington,123 Main Street,New York
Abraham Lincoln,54 First Avenue,San Francisco
John Adams,39 Tremont Street,Boston
An ordinary sort would display the “Abraham Lincoln” line first.
But if you consider each line as three comma-separated values, you
can sort on the second value with:
$ sort -k2 -t, people
George Washington,123 Main Street,New York
John Adams,39 Tremont Street,Boston
Abraham Lincoln,54 First Avenue,San Francisco
where “123 Main Street” is first alphabetically. Likewise, you can
sort on the city (third value) with:
$ sort -k3 -t, people
John Adams,39 Tremont Street,Boston
George Washington,123 Main Street,New York
Abraham Lincoln,54 First Avenue,San Francisco
and see that Boston comes up first alphabetically. The general syn-
tax -k F1[.C1][,F2[.C2]] means:
88 | Linux Pocket Guide

Item Meaning Default if not supplied
F1 Starting field Required
C1 Starting position within
field 1
1
F2 Ending field Last field
C2 Starting position within
ending field
1
So sort -k1.5 sorts based on the first field, beginning at its fifth
character; and sort -k2.8,5 means “from the eighth character of
the second field, to the first character of the fifth field.” The -t op-
tion changes the behavior of -k so it considers delimiter characters
such as commas rather than spaces.
You can repeat the -k option to define multiple keys, which will be
applied from first to last as found on the command line.
uniq stdin stdout - file -- opt --help --version
uniq [options] [files]
The uniq command operates on consecutive, duplicate lines of text.
For example, if you have a file myfile:
$ cat myfile
a
b
b
c
b
then uniq would detect and process (in whatever way you specify)
the two consecutive b’s, but not the third b.
$ uniq myfile
a
b
c
b
File Text Manipulation | 89

uniq is often used after sorting a file:
$ sort myfile | uniq
a
b
c
In this case, only a single b remains because all three were made
adjacent by sort, then collapsed to one by uniq. Also, you can count
duplicate lines instead of eliminating them:
$ sort myfile | uniq -c
1 a
3 b
1 c
Useful options
-c Count adjacent duplicate lines.
-i Case-insensitive operation.
-u Print unique lines only.
-d Print duplicate lines only.
-s NIgnore the first N characters on each line when detecting duplicates.
-f NIgnore the first N whitespace-separated fields on each line when detecting
duplicates.
-w NConsider only the first N characters on each line when detecting duplicates. If
used with -s or -f, sort will ignore the specified number of characters or fields
first, then consider the next N characters.
tee stdin stdout - file -- opt --help --version
tee [options] files
Like the cat command, the tee command copies standard input to
standard output unaltered. Simultaneously, however, it also copies
that same standard input to one or more files. tee is most often
found in the middle of pipelines, writing some intermediate data to
a file while also passing it to the next command in the pipeline:
$ who | tee original_who | sort
90 | Linux Pocket Guide

In this command line, tee writes the output of who to the file
original_who, and then passes along that same output to the rest of
the pipeline (sort), producing sorted output on screen.
Useful options
-a Append instead of overwriting files.
-i Ignore interrupt signals.
More Powerful Manipulations
We’ve just touched the tip of the iceberg for Linux text filtering.
Linux has hundreds of filters that produce ever more complex ma-
nipulations of the data. But with great power comes a great learning
curve, too much for a short book. Here are a few filters to get you
started.
awk
awk is a pattern-matching language. It matches data by regular ex-
pression and then performs actions based on the data. Here are a
few simple examples for processing a text file, myfile.
Print the second and fourth word on each line:
$ awk '{print $2, $4}' myfile
Print all lines that are shorter than 60 characters:
$ awk '{length($0) < 60}' myfile
sed
Like awk, sed is a pattern-matching engine that can perform ma-
nipulations on lines of text. Its syntax is closely related to that of
vim and the line editor ed. Here are some trivial examples.
Print the file with all occurrences of the string “red” changed to
“hat”:
$ sed 's/red/hat/g' myfile
Print the file with the first 10 lines removed:
$ sed '1,10d' myfile
File Text Manipulation | 91

m4
m4 is a macro-processing language and command. It locates key-
words within a file and substitutes values for them. For example,
given this file:
$ cat myfile
My name is NAME and I am AGE years old
ifelse(QUOTE,yes,No matter where you go... there you are)
see what m4 does with substitutions for NAME, AGE, and QUOTE:
$ m4 -DNAME=Sandy myfile
My name is Sandy and I am AGE years old
$ m4 -DNAME=Sandy -DAGE=25 myfile
My name is Sandy and I am 25 years old
$ m4 -DNAME=Sandy -DAGE=25 -DQUOTE=yes myfile
My name is Sandy and I am 25 years old
No matter where you go... there you are
Perl, PHP, Python
Perl, PHP, and Python are full-fledged scripting languages powerful
enough to build complete, robust applications. See “Beyond Shell
Scripting” on page 208 for references.
File Compression and Packaging
tar Package multiple files into a single file.
gzip Compress files with GNU Zip.
gunzip Uncompress GNU Zip files.
bzip2 Compress files in BZip format.
bunzip2 Uncompress BZip files.
bzcat Compress/uncompress BZip files via standard input/output.
compress Compress files with traditional Unix compression.
uncompress Uncompress files with traditional Unix compression.
zcat Compress/uncompress file via standard input/output (gzip or
compress).
zip Compress files in Windows Zip format.
92 | Linux Pocket Guide

unzip Uncompress Windows Zip files.
metamail Extract MIME data to files.
Linux can compress files into a variety of formats and uncom-
press them. The most popular formats are GNU Zip (gzip),
whose compressed files are named with the .gz suffix, and
BZip, which uses the .bz2 suffix. Other common formats in-
clude Zip files from Windows systems (.zip suffix) and occa-
sionally, classic Unix compression (.Z suffix).
A related technology involves converting binary files into tex-
tual formats, so they can (say) be transmitted within an email
message. Nowadays this is done automatically with attach-
ments and MIME tools, but we’ll cover the metamail program,
which can do this from the command line.
If you come across a format we don’t cover, such as Macintosh
sit files, Arc, Zoo, rar, and others, learn more at http://en.wiki
pedia.org/wiki/List_of_archive_formats.
tar stdin stdout - file -- opt --help --version
tar [options] [files]
The tar program was originally for backing up files onto a tape drive
(its name is short for “tape archive”). Although tape has lost its
popularity, tar is still the most common file-packaging format for
Linux. It can pack multiple files and directories into a single file for
transport, optionally compressed.
$ tar -czvf myarchive.tar.gz mydir Create
$ tar -tzvf myarchive.tar.gz List contents
$ tar -xzvf myarchive.tar.gz Extract
If you actually have a tape drive, simply specify the drive’s device
(such as /dev/tape) as the destination file:
$ tar -cf /dev/tape myfile1 myfile2
If you specify files on the command line, only those files are
processed:
$ tar -xvf myarchive.tar file1 file2 file3
File Compression and Packaging | 93

Otherwise, the entire archive is processed.
Useful options
-c Create an archive. You’ll have to list the input files and directories on the
command line.
-r Append files to an existing archive.
-u Append new/changed files to an existing archive.
-A Append one archive to the end of another: e.g., tar -A -f first.tar
second.tar appends the contents of second.tar to first.tar. Does not work
for compressed archives.
-t List the archive.
-x Extract files from the archive.
-f file Read the archive from, or write the archive to, the given file. This is usually
a tar file on disk (such as myarchive.tar) but can also be a tape drive (such
as /dev/tape).
-d Diff (compare) the archive against the filesystem.
-z Use gzip compression.
-j Use bzip2 compression.
-Z Use Unix compression.
-b NUse a block size of N * 512 bytes.
-v Verbose mode: print extra information.
-h Follow symbolic links rather than merely copying them.
-p When extracting files, restore their original permissions and ownership.
gzip stdin stdout - file -- opt --help --version
gzip [options] [files]
gzip and gunzip compress and uncompress files in GNU Zip format.
Compressed files have the suffix .gz.
Sample commands
gzip file Compress file to create file.gz.
Original file is deleted.
94 | Linux Pocket Guide

gzip -c file Produce compressed data on standard
output.
cat file | gzip Produce compressed data from a pipeline.
gunzip file.gz Uncompress file.gz to create file.
Original file.gz is deleted.
gunzip -c file.gz Uncompress the data on standard output.
cat file.gz | gunzip Uncompress the data from a pipeline.
zcat file.z Uncompress the data on standard output.
gzipped tar files: sample commands
tar -czf myfile.tar.gz dirname Pack directory dirname.
tar -tzf myfile.tar.gz List contents.
tar -xzf myfile.tar.gz Unpack.
Add the v option to tar to print filenames as they are processed.
bzip2 stdin stdout - file -- opt --help --version
bzip2 [options] [files]
bzip2 and bunzip2 compress and uncompress files in Burrows-
Wheeler format. Compressed files have the suffix .bz2.
Sample commands
bzip2 file Compress file to create file.bz2.
Original file is deleted.
bzip2 -c file Produce compressed data on standard
output.
cat file | bzip2 Produce compressed data on standard
output.
bunzip2 file.bz2 Uncompress file.bz2 to create file.
Original file.bz2 is deleted.
bunzip2 -c file.bz2 Uncompress the data on standard output.
File Compression and Packaging | 95

cat file.bz2 | bunzip2 Uncompress the data on standard output.
bzcat file.bz2 Uncompress the data on standard output.
bzipped tar files: sample commands
tar -cjf myfile.tar.bz2 dirname Pack.
tar -tjf -myfile.tar.bz2 List contents.
tar -xjf myfile.tar.bz2 Unpack.
Add the -v option to tar to print filenames as they are processed.
compress stdin stdout - file -- opt --help --version
compress [options] [files]
compress and uncompress compress and uncompress files in stan-
dard Unix compression format (Lempel Ziv). Compressed files have
the suffix .Z.
Sample commands
compress file Compress file to create file.Z.
Original file is deleted.
compress -c file Produce compressed data on standard
output.
cat file | compress Produce compressed data from a pipeline.
uncompress file.Z Uncompress file.Z to create file.
Original file.Z is deleted.
uncompress -c file.Z Uncompress the data on standard output.
cat file.Z | uncompress Uncompress the data from a pipeline.
zcat file.Z Uncompress the data on standard output.
Compressed tar files: sample commands
tar -cZf myfile.tar.Z dirname Pack directory dirname.
tar -tZf myfile.tar.Z List contents.
96 | Linux Pocket Guide

tar -xZf myfile.tar.Z Unpack.
Add the -v option to tar to print filenames as they are processed.
zip stdin stdout - file -- opt --help --version
zip [options] [files]
zip and unzip compress and uncompress files in Windows Zip for-
mat. Compressed files have the suffix .zip. Unlike most other Linux
compression commands, zip does not delete the original files.
zip myfile.zip file1 file2 file3 ... Pack.
zip -r myfile.zip dirname Pack recursively.
unzip -l myfile.zip List contents.
unzip myfile.zip Unpack.
metamail stdin stdout - file -- opt --help --version
metamail [options] mail_file
Modern email programs can send and receive attachments so easily
we rarely think about it, but this was not always the case. Programs
like metamail were created to work with attachments directly on the
command line, appending or extracting them to and from mail
messages. For example, if you have an email message in a file,
mymessage, and it contains a JPEG image as an attachment, meta
mail can extract the image:
$ metamail -w mymessage
Content-Description: coolcat.jpg
This message contains 'image/jpeg`-format data.
Please enter the name of a file to which the data should
be written (Default: coolcat.jpg) > hotdog.jpg
Wrote file hotdog.jpg
Here we extracted the attached JPEG file, coolcat.jpg, renaming it
as hotdog.jpg. The -w option tells metamail to write the data to a file;
otherwise, metamail would attempt to display the attachment with
an appropriate program, such as an image viewer:
File Compression and Packaging | 97

$ metamail mymessage
This message contains 'image/jpeg'-format data.
Do you want to view it using the 'xv' command (y/n) [y] y
---Executing: gthumb
File Comparison
diff Line-by-line comparison of two files or directories.
comm Line-by-line comparison of two sorted files.
cmp Byte-by-byte comparison of two files.
md5sum Compute a checksum of the given files (MD5).
There are three ways to compare Linux files:
• Line by line (diff, diff3, sdiff, comm), best suited to text
files
• Byte by byte (cmp), often used for binary files
• By comparing checksums (md5sum, sum, cksum)
These programs are all text-based. For a graphical
file-comparison tool, try xxdiff at http://furius.ca/xxdiff.
diff stdin stdout - file -- opt --help --version
diff [options] file1 file2
The diff command compares two files line-by-line, or two direc-
tories. When comparing text files, diff can produce detailed reports
of their differences. For binary files, diff merely reports whether
they differ or not. For all files, if there are no differences, diff pro-
duces no output.
The traditional output format looks like this:
Indication of line numbers and the type of change
< Corresponding section of file1, if any
---
> Corresponding section of file2, if any
For example, if we start with a file fileA:
98 | Linux Pocket Guide

Hello, this is a wonderful file.
The quick brown fox jumped over
the lazy dogs.
Goodbye for now.
Suppose we delete the first line, change “brown” to “blue” on the
second line, and add a final line, creating a file fileB:
The quick blue fox jumped over
the lazy dogs.
Goodbye for now.
Linux r00lz!
Then diff fileA fileB produces this output:
1,2c1 fileA lines 1-2 became fileB line 1
< Hello, this is a wonderful file. Lines 1-2 of fileA
< The quick brown fox jumped over
--- diff separator
> The quick blue fox jumped over Line 1 of fileB
4a4 Line 4 was added in fileB
> Linux r00lz! The added line
The leading symbols < and > are arrows indicating fileA and fileB,
respectively. This output format is the default: many others are
available, some of which can be fed directly to other tools. Try them
out to see what they look like.
Option Output format
-n RCS version control format, as produced by rcsdiff (man rcsdiff).
-c Context diff format, as used by the patch command (man patch).
-D macro C preprocessor format, using #ifdef macro ... #else ...
#endif.
-u Unified format, which merges the files and prepends “-” for deletion and
“+” for addition.
-y Side-by-side format; use -W to adjust the width of the output.
-e Create an ed script that would change fileA into fileB if run.
-q Don’t report changes, just say whether the files differ.
diff can also compare directories:
$ diff dir1 dir2
File Comparison | 99

which compares any same-named files in those directories, and lists
all files that appear in one directory but not the other. To compare
entire directory hierarchies recursively, use the -r option:
$ diff -r dir1 dir2
which produces a (potentially massive) report of all differences.
Useful options
-b Don’t consider whitespace.
-B Don’t consider blank lines.
-i Ignore case.
-r When comparing directories, recurse into subdirectories.
diff is just one member of a family of programs that operate on file
differences. Some others are diff3, which compares three files at a
time, and sdiff, which merges the differences between two files to
create a third file according to your instructions.
comm stdin stdout - file -- opt --help --version
comm [options] file1 file2
The comm command compares two sorted files and produces three
columns of output, separated by tabs:
1. All lines that appear in file1 but not in file2.
2. All lines that appear in file2 but not in file1.
3. All lines that appear in both files.
For example, if file1 and file2 contain these lines:
file1: file2:
apple baker
baker charlie
charlie dark
100 | Linux Pocket Guide

then comm produces this three-column output:
$ comm file1 file2
apple
baker
charlie
dark
Useful options
−1 Suppress column 1.
−2 Suppress column 2.
−3 Suppress column 3.
cmp stdin stdout - file -- opt --help --version
cmp [options] file1 file2 [offset1 [offset2]]
The cmp command compares two files. If their contents are the same,
cmp reports nothing; otherwise, it lists the location of the first dif-
ference:
$ cmp myfile yourfile
myfile yourfile differ: char 494, line 17
By default, cmp does not tell you what the difference is, only where
it is. It also is perfectly suitable for comparing binary files, as op-
posed to diff, which operates best on text files.
Normally, cmp starts its comparison at the beginning of each file,
but it will start elsewhere if you provide offsets:
$ cmp myfile yourfile 10 20
This begins the comparison at the tenth character of myfile and the
twentieth of yourfile.
Useful options
-l Long output: print all differences, byte by byte:
$ cmp -l myfile yourfile
494 164 172
This means at offset 494 (in decimal), myfile has “t” (octal 164) but yourfile has “z”
(octal 172).
File Comparison | 101

-s Silent output: don’t print anything, just exit with an appropriate return code; 0 if
the files match, 1 if they don’t. (Or other codes if the comparison fails for some
reason.)
md5sum stdin stdout - file -- opt --help --version
md5sum files | --check file
The md5sum command works with checksums to verify that files are
unchanged. The first form produces the 32-byte checksum of the
given files, using the MD5 algorithm:
$ md5sum myfile
dd63602df1cceb57966d085524c3980f myfile
while the second form tests whether a checksum matches its file,
using --check:
$ md5sum file1 file2 file3 > mysum
$ cat mysum
90a022707ca5b5fc8f465e7cbb954987 file1
86d19ef79d33c28cf0c9ba882f25cdb8 file2
d0dc53c9941e33a10e7f38ecc0de772f file3
$ md5sum --check mysum
file1: OK
file2: OK
file3: OK
$ echo "new data" > file2
$ md5sum --check mysum
file1: OK
file2: FAILED
file3: OK
md5sum: WARNING: 1 of 3 computed checksums did NOT match
Two different files are highly unlikely to have the same MD5 check-
sum, so comparing checksums is a reasonably reliable way to detect
if two files differ:
$ md5sum myfile1 | cut -c1-32 > sum1
$ md5sum myfile2 | cut -c1-32 > sum2
$ diff -q sum1 sum2
Files sum1 and sum2 differ
Some other programs similar to md5sum are sum and cksum, which use
different algorithms to compute their checksums. sum is compatible
102 | Linux Pocket Guide

with other Unix systems, specifically BSD Unix (the default) or Sys-
tem V Unix (-s option), and cksum produces a CRC checksum:
$ sum myfile
12410 3
$ sum -s myfile
47909 6 myfile
$ cksum myfile
1204834076 2863 myfile
The first integer is a checksum and the second is a block count. But
as you can see, these checksums are small numbers and therefore
unreliable, since files could have identical checksums by coinci-
dence. md5sum is by far the best. See http://www.faqs.org/rfcs/rfc1321
.html for the technical details.
Printing
lpr Print a file.
lpq View the print queue.
lprm Remove a print job from the queue.
Linux has two popular printing systems, called CUPS and
LPRng. Both systems use commands with the same names: lpr,
lpq, and lprm. However, these commands have different op-
tions depending whether you’re using CUPS or LPRng. To be
generally helpful, we will present common options that work
with both systems.
Installing a printer on Linux used to require editing a cryptic
configuration file, such as /etc/cups/printers.conf or /etc/print-
cap. Nowadays, both GNOME and KDE have printer config-
uration tools in their system settings that generate these files.
lpr stdin stdout - file -- opt --help --version
lpr [options] [files]
The lpr (line printer) command sends a file to a printer.
Printing | 103

$ lpr -P myprinter myfile
Useful options
-P printername Send the file to printer printername, which you have previously
set up.
-# NPrint N copies of the file.
-J name Set the job name that prints on the cover page (if your system is
set up to print cover pages).
lpq stdin stdout - file -- opt --help --version
lpq [options]
The lpq (line printer queue) command lists all print jobs waiting to
be printed.
Useful options
-P printername List the queue for printer printername.
-a List the queue for all printers.
-l Be verbose: display information in a longer format.
lprm stdin stdout - file -- opt --help --version
lprm [options] [job_IDs]
The lprm (line printer remove) command cancels one or more print
jobs. Use lpq to learn the ID of the desired print jobs (say, 61 and
78), then type:
$ lprm -P printername 61 78
If you don’t supply any job IDs, your current print job is canceled.
(Only the superuser can cancel other users’ jobs.) The -P option
specifies which print queue contains the job.
104 | Linux Pocket Guide

Spell Checking
look Look up the spelling of a word quickly.
aspell Interactive spelling checker.
spell Batch spelling checker.
Linux has several spellcheckers built in. If you’re accustomed
to graphical spellcheckers, you might find Linux’s text-based
ones fairly primitive, but they can be used in pipelines, which
is quite powerful.
look stdin stdout - file -- opt --help --version
look [options] prefix [dictionary_file]
The look command prints (on standard output) words that begin
with a given string prefix. The words are located in a dictionary file
(default /usr/share/dict/words). For instance, look bigg prints:
bigger
biggest
Biggs
If you supply your own dictionary file—any text file with alpha-
betically sorted lines—look will print all lines beginning with the
given prefix.
Useful options
-f Ignore case.
-t XMatch the prefix only up to and including the termination character X. For
instance, look -t i big prints all words beginning with “bi”.
aspell stdin stdout - file -- opt --help --version
aspell [options] file | command
aspell is a powerful spellchecker with dozens of options. A few
useful commands are:
Spell Checking | 105

aspell -c file
Interactively check, and optionally correct, the spelling of all
words in file.
aspell -l < file
Print a list of the misspelled words in file on standard output.
aspell dump master
Print aspell’s master dictionary on standard output.
aspell help
Print a concise help message. See http://aspell.net for more in-
formation.
spell stdin stdout -file --opt --help --version
spell [files]
The spell command prints all words in the given files that are mis-
spelled, according to its dictionary.
$ spell myfile
thier
naturaly
Linuxx
Disks and Filesystems
df Display available space on mounted filesystems.
mount Make a disk partition accessible.
umount Unmount a disk partition (make it inaccessible).
fsck Check a disk partition for errors.
sync Flush all disk caches to disk.
Linux systems can have multiple disks or disk partitions. In
casual conversation, these are variously called disks, partitions,
filesystems, volumes, even directories. We’ll try to be more
accurate.
106 | Linux Pocket Guide

A disk is a hardware device, which may be divided into parti-
tions that act as independent storage devices. Partitions are
represented on Linux systems as special files in (usually) the
directory /dev. For example, /dev/sda7 could be a partition on
your hard drive. Some common devices in /dev are:
hda First IDE bus, master device; partitions are hda1, hda2, ...
hdb First IDE bus, slave device; partitions are hdb1, hdb2, ...
hdc Second IDE bus, master device; partitions are hdc1, hdc2, ...
hdd Second IDE bus, slave device; partitions are hdd1, hdd2, ...
sda First block device, such as SCSI, SATA, USB, or Firewire hard drives; partitions are
sda1, sda2, ...
sdb Second block device; partitions are sdb1, sdb2, ... Likewise for sdc, sdd, ...
ht0 First IDE tape drive (then ht1, ht2, ...) with auto-rewind
nht0 First IDE tape drive (then nht1, nht2, ...) without auto-rewind
st0 First SCSI tape drive (then st1, st2, ...)
scd0 First SCSI CD-ROM drive (then scd1, scd2, ...)
fd0 First floppy drive (then fd1, fd2, ...), usually mounted on /mnt/floppy
Before a partition can hold files, it is “formatted” by a program
that writes a filesystem on it (see “Partitioning and Format-
ting” on page 108). A filesystem defines how files are repre-
sented; examples are ext3 (a Linux journaling filesystem) and
ntfs (Microsoft Windows NT filesystem). Formatting is gen-
erally done for you when you install Linux.
Once a filesystem is created, you can make it available for use
by mounting it on an empty directory. For example, if you
mount a Windows filesystem on a directory /mnt/win, it be-
comes part of your system’s directory tree, and you can create
and edit files like /mnt/win/myfile. Mounting is generally done
automatically at boot time. Filesystems can also be unmounted
to make them inaccessible via the filesystem, say, for
maintenance.
Disks and Filesystems | 107

Partitioning and Formatting
Disk-related operations like partitioning and formatting can
be complex on Linux systems. Here are pointers to the pro-
grams you may need (start with their manpages).
parted, fdisk, or sfdisk
Partition a hard drive. Any of these programs will do: they
simply have different user interfaces.
mkfs
Format a hard disk, i.e., create a new filesystem.
floppy
Format a floppy disk.
df stdin stdout - file -- opt --help --version
df [options] [disk devices | files | directories]
The df (disk free) program shows you the size, used space, and free
space on a given disk partition. If you supply a file or directory, df
describes the disk device on which that file or directory resides.
With no arguments, df reports on all mounted filesystems.
$ df
Filesystem 1k-blocks Used Available Use% Mounted on
/dev/sda 1011928 225464 735060 24% /
/dev/sda9 521748 249148 246096 51% /var
/dev/sda8 8064272 4088636 3565984 54% /usr
/dev/sda10 8064272 4586576 3068044 60% /home
Useful options
-k List sizes in kilobytes (the default).
-m List sizes in megabytes.
-B NDisplay sizes in blocks of N bytes. (Default = 1024)
-h
-H
Print human-readable output, and choose the most appropriate unit for each
size. For example, if your two disks have 1 gigabyte and 25 kilobytes free,
respectively, df -h prints 1G and 25K. The -h option uses powers of 1024,
whereas -H uses powers of 1000.
108 | Linux Pocket Guide

-l Display only local filesystems, not networked filesystems.
-T Include the filesystem type (ext3, vfat, etc.) in the output.
-t type Display only filesystems of the given type.
-x type Don’t display filesystems of the given type.
-i Inode mode. Display total, used, and free inodes for each filesystem, instead
of disk blocks.
mount stdin stdout - file -- opt --help --version
mount [options] device | directory
The mount command makes a partition accessible. Most commonly
it handles disk drives (say, /dev/sda1) and removal media (e.g., USB
keys), making them accessible via an existing directory (say, /mnt/
mydir):
# mkdir /mnt/mydir
# ls /mnt/mydir Notice it’s empty
# mount /dev/sda1 /mnt/mydir
# ls /mnt/mydir
file1 file2 file3 Files on the mounted partition
# df /mnt/mydir
Filesystem 1K-blocks Used Available Use% Mounted on
/dev/sda1 1011928 285744 674780 30% /mnt/mydir
mount has tons of options and uses; we will discuss only the most
basic.
In most common cases, mount reads the file /etc/fstab (filesystem
table) to learn how to mount a desired disk. For example, if you
type mount /usr, the mount command looks up “/usr” in /etc/fstab,
whose line might look like this:
/dev/sda8 /usr ext3 defaults 1 2
Here mount learns, among other things, that disk device /dev/sda8
should be mounted on /usr as a Linux ext3-formatted filesystem.
Now you can mount /dev/sda8 on /usr with either of these
commands:
# mount /dev/sda8 by device
# mount /usr by directory
Disks and Filesystems | 109

mount is run typically by the superuser, but common devices like
USB and CD-ROM drives often can be mounted and unmounted
by any user.
$ mount /media/cdrom
Useful options
-t type Specify the type of filesystem, such as ext3 or ntfs.
-l List all mounted filesystems; works with -t too.
-a Mount all filesystems listed in /etc/fstab. Ignores entries that include the
noauto option. Works well with -t too.
-r Mount the filesystem read-only (but see the manpage for some disclaimers).
umount stdin stdout - file -- opt --help --version
umount [options] [device | directory]
umount does the opposite of mount: it makes a disk partition un-
available via the filesystem. For instance, if you’ve mounted a
CD-ROM disc, you can’t eject it until it’s umounted:
$ umount /media/cdrom
Always unmount a removable medium before ejecting it or you risk
damage to its filesystem. To unmount all mounted devices:
# umount -a
Don’t unmount a filesystem that’s in use; in fact, the umount com-
mand will refuse to do so for safety reasons.
fsck stdin stdout - file -- opt --help --version
fsck [options] [devices]
The fsck (filesystem check) command validates a Linux disk
partition and, if requested, repairs errors found on it. fsck is run
automatically when your system boots; however, you can run it
manually if you like. In general, unmount a device before checking
it, so no other programs are operating on it at the same time:
110 | Linux Pocket Guide

# umount /dev/sda10
# fsck -f /dev/sda10
Pass 1: Checking inodes, blocks, and sizes
Pass 2: Checking directory structure
Pass 3: Checking directory connectivity
Pass 4: Checking reference counts
Pass 5: Checking group summary information
/home: 172/1281696 files (11.6% non-contiguous), ...
fsck is a frontend for a set of filesystem-checking programs found
in /sbin, with names beginning “fsck”. Only certain types of filesys-
tems are supported; you can list them with the command:
$ ls /sbin/fsck.* | cut -d. -f2
Useful options
-A Check all disks listed in /etc/fstab, in order.
-N Print a description of the checking that would be done, but exit without performing
any checking.
-r Fix errors interactively, prompting before each fix.
-a Fix errors automatically (use only if you really know what you’re doing; if not, you
can seriously mess up a filesystem).
sync stdin stdout - file -- opt --help --version
sync
The sync command flushes all disk caches to disk. The kernel usu-
ally buffers reads, writes, inode changes, and other disk-related ac-
tivity in memory. sync writes the changes to disk. Normally, you
don’t need to run this command, but if (say) you’re about to do
something risky that might crash your machine, running sync im-
mediately beforehand can’t hurt.
Backups and Remote Storage
dump Write a disk partition to a backup medium.
restore Restore the results of a dump.
cdrecord Burn a CD, DVD, or Blu-ray disc.
Backups and Remote Storage | 111

rsync Mirror a set of files onto another device or host.
mt Control a tape drive.
There are various way to back up your precious Linux files:
• Copy them to a backup medium, such as an external hard
drive.
• Burn them onto a writeable CD, DVD, or Blu-ray disc.
• Mirror them to a remote machine.
We aren’t presenting every available Linux command for back-
ups. Some users prefer cpio, and for low-level disk copies, dd
is invaluable. See the manpages for these programs if you are
interested in them.
dump stdin stdout - file -- opt --help --version
dump [options] partition_or_files
The dump command writes an entire disk partition, or selected files,
to a backup medium such as tape. It supports full and incremental
backups, automatically figuring out which files need to be backed
up (i.e., which have changed since the last backup). To restore files
from the backup medium, use the restore command.
To perform a full backup of a given filesystem (say, /usr) to your
backup device (say, /dev/tape), use the −0 (zero) and -u options:
# dump −0 -u -f /dev/tape /usr
This is called a level zero dump. The -u option writes a note to the
file /etc/dumpdates to say that the backup was performed.
Incremental backups may have levels 1 through 9: a level i backup
stores all new and changed files since the last level i-1 backup.
# dump −1 -u -f /dev/tape /usr
Don’t run dump on a “live” filesystem actively in use: unmount it
first when possible.
112 | Linux Pocket Guide

restore stdin stdout - file -- opt --help --version
restore [options] [files]
The restore command reads a backup created by dump. It can then
restore the files to disk, compare them against those on disk, and
other operations. The friendliest way to use restore is with the -i
flag for interactive operation, which lets you browse the dumped
contents just like a filesystem, selecting files and directories, and
finally restoring them.
# restore -i -f /dev/tape
restore then prompts you for commands like the ones listed below.
help Print a help message.
quit Exit the program without restoring any files.
cd dir Like the shell’s cd command, set your current working directory within
the dump for working with files.
ls Like the Linux ls command, view all files in the current working
directory within the dump.
pwd Like the shell’s pwd command, print the name of your current working
directory within the dump.
add Add files or directories to the “extraction list”: the list of files you’ll want
to restore. With no arguments, add adds the current directory and all
its files.
add file Add the file to the extraction list.
add dir Add the directory dir to the extraction list.
delete The opposite of add: remove files from the extraction list. If run with
no arguments, delete removes the current directory (and its
contents) from the extraction list.
delete
file
Remove the file from the extraction list.
delete dir Remove the directory dir from the extraction list.
extract Restore all the files you added to the extraction list. (Tip: if your backup
spans multiple tapes, start with the last tape and work backward.)
restore also works in other noninteractive modes:
Backups and Remote Storage | 113

restore -x Restore everything from the backup into an existing filesystem. (cd
into the root of the desired filesystem first.)
restore -r Restore everything from the backup into a freshly formatted disk
partition. (cd into the root of the desired filesystem first.)
restore -t List the contents of the dump.
restore -C Compare the dump against the original filesystem.
cdrecord stdin stdout - file -- opt --help --version
cdrecord [options] tracks
The cdrecord command burns a writable CD, DVD, or Blu-ray disc.
To burn the contents of a Linux directory onto a disc readable on
Linux, Windows, and Macintosh systems:14
1. Locate your disc writer’s device by running:
$ cdrecord --scanbus
...
0,0,0 0) *
0,1,0 1) *
0,2,0 2) *
0,3,0 3) 'YAMAHA ' 'CRW6416S ' '1.0d' CD-ROM
...
The device in this case is 0,3,0.
2. Find out your CD writer’s speed for writing CD-R or CD-RW
discs (whichever you’re using). Suppose it is a 6x writer of
CD-Rs, so the speed is 6.
3. Put the files you want to burn into a directory, say, dir. Arrange
them exactly as you’d like them on the CD. The directory dir
itself will not be copied to CD, just its contents.
4. Burn the CD:
$ DEVICE="0,3,0"
$ SPEED=6
$ mkisofs -R -l dir > mydisk.iso
$ cdrecord -v dev=${DEVICE} speed=${SPEED} mydisk.iso
14. Specifically, an ISO9660 CD with Rock Ridge extensions. mkisofs can
create other formats for cdrecord to burn: see man mkisofs.
114 | Linux Pocket Guide

or if your system is fast enough, you can do this with a single
pipeline:
$ mkisofs -R -l dir \
| cdrecord -v dev=${DEVICE} speed=${SPEED} -
cdrecord can burn music CDs as well, but you might want to use a
friendlier, graphical program like k3b instead (see “Au-
dio” on page 185), which is built on top of cdrecord.
rsync stdin stdout - file -- opt --help --version
rsync [options] source destination
The rsync command copies a set of files. It can make an exact copy,
including file permissions and other attributes (called mirroring),
or it can just copy the data. It can run over a network or on a single
machine. rsync has many uses and over 50 options; we’ll present
just a few common cases relating to backups.
To mirror the directory D1 and its contents into another directory
D2 on a single machine:
$ rsync -a D1 D2
In order to mirror directory D1 over the network to another host,
server.example.com, where you have an account with username
smith, secure the connection with SSH to prevent eavesdropping:
$ rsync -a -e ssh D1 smith@server.example.com:D2
Useful options
-o Copy the ownership of the files. (You might need superuser privileges on the
remote host.)
-g Copy the group ownership of the files. (You might need superuser privileges
on the remote host.)
-p Copy the file permissions.
-t Copy the file timestamps.
-r Copy directories recursively, i.e., including their contents.
-l Permit symbolic links to be copied (not the files they point to).
-D Permit devices to be copied. (Superuser only.)
Backups and Remote Storage | 115

-a Mirroring: copy all attributes of the original files. This implies all of the
options, -ogptrlDa.
-v Verbose mode: print information about what’s happening during the copy.
Add --progress to display a numeric progress meter while files are copied.
-e ssh Connect via ssh for more security. (Other remote shells are possible, but
ssh is the most common.)
mt stdin stdout - file -- opt --help --version
mt [-f device] command
The mt (magnetic tape) command performs simple operations on a
tape drive, such as rewinding, skipping forward and backward, and
retensioning. Some common operations are:
status Show the status of the drive.
rewind Rewind the tape.
retension Retension the tape.
erase Erase the tape.
offline Take the tape drive offline.
eod Move forward on the tape to the end of data.
For example:
$ mt -f /dev/tape rewind
You can also move through the tape, file by file or record by record,
but often you’ll use a tape reading/writing program for that, such
as tar or restore.
Viewing Processes
ps List process.
uptime View the system load.
wList active processes for all users.
top Monitor resource-intensive processes interactively.
116 | Linux Pocket Guide

gnome-system-monitor Monitor system load and processes graphically.
xload Simple, graphical monitor of system load.
free Display free memory.
A process is a unit of work on a Linux system. Each program
you run represents one or more processes, and Linux provides
commands for viewing and manipulating them. Every process
is identified by a numeric process ID, or PID.
Processes are different from jobs (see “Shell Job Con-
trol” on page 32): processes are part of the operating system,
whereas jobs are higher-level constructs known only to the
shell in which they’re running. A running program comprises
one or more processes; a job consists of one or more programs
executed as a shell command.
ps stdin stdout - file -- opt --help --version
ps [options]
The ps command displays information about your running pro-
cesses, and optionally the processes of other users.
$ ps
PID TTY TIME CMD
4706 pts/2 00:00:01 bash
15007 pts/2 00:00:00 emacs
16729 pts/2 00:00:00 ps
ps has at least 80 options; we’ll cover just a few useful combinations.
If the options seem arbitrary or inconsistent, it’s because the sup-
plied ps command (GNU ps) incorporates the features of several
other Unix ps commands, attempting to be compatible with all of
them.
To view your processes:
$ ps -ux
all of user smith’s processes:
$ ps -U smith
Viewing Processes | 117

all occurrences of a program:
$ ps -C program_name
processes on terminal N:
$ ps -tN
particular processes 1, 2, and 3505:
$ ps -p1,2,3505
all processes with command lines truncated to screen width:
$ ps -ef
all processes with full command lines:
$ ps -efww
and all processes in a threaded view, which indents child processes
below their parents:
$ ps -efH
Remember, you can extract information more finely from the out-
put of ps using grep and other filter programs:
$ ps -ux | grep myprogram
uptime stdin stdout - file -- opt --help --version
uptime
The uptime command tells you how long the system has been run-
ning since the last boot.
$ uptime
10:54pm up 8 days, 3:44, 3 users, load average: 0.89,
1.00, 2.15
This information is, from right to left: the current time (10:54pm),
system uptime (8 days, 3 hours, 44 minutes), number of users log-
ged in (3), and system load average for three time periods: one mi-
nute (0.89), five minutes (1.00), and fifteen minutes (2.15). The
load average is the average number of processes ready to run in that
time interval.
118 | Linux Pocket Guide

wstdin stdout - file -- opt --help --version
w [username]
The w command displays the current process running in each shell
for all logged-in users:
$ w
10:51pm up 8 days, 3:42, 8 users,
load average: 0.00, 0.00, 0.00
USER TTY FROM LOGIN@ IDLE JCPU PCPU WHAT
barrett pts/0 :0 Sat 2pm 27:13m 0.07s 0.07s emacs
jones pts/1 host1 6Sep03 2:33m 0.74s 0.21s bash
smith pts/2 host2 6Sep03 0.00s 13.35s 0.04s w
The top line is the same one printed by uptime. The columns indi-
cate the user’s terminal, originating host or X display (if applicable),
login time, idle time, two measures of the CPU time (run man w for
details), and the current process. Provide a username to see only
that user’s information.
For the briefest output, try w -hfs.
Useful options
-h Don’t print the header line.
-f Don’t print the FROM column.
-s Don’t print the JCPU and PCPU columns.
top stdin stdout - file -- opt --help --version
top [options]
The top command lets you monitor the most active processes, up-
dating the display at regular intervals (say, every second). It is a
screen-based program that updates the display in place,
interactively.
$ top
94 processes: 81 sleeping, 1 running, 0 zombie, 11 stopped
CPU states: 1.1% user, 0.5% system, 0.0% nice, 4.5% idle
Mem: 523812K av, 502328K used, 21484K free, 0K shrd, ...
Swap: 530104K av, 0K used, 530104K free 115300K cached
Viewing Processes | 119

PID USER PRI NI SIZE SHARE STAT %CPU %MEM TIME COMMAND
26265 smith 10 0 1092 840 R 4.7 0.2 0:00 top
1 root 0 0 540 472 S 0.0 0.1 0:07 init
2 root 0 0 0 0 SW 0.0 0.0 0:00 kflushd
...
While top is running, you can press keys to change its behavior,
such as setting the update speed (s), hiding idle processes (i), or
killing processes (k). Type h to see a complete list and q to quit.
Useful options
-nNPerform N updates, then quit.
-dNUpdate the display every N seconds.
-pN -pM ... Display only the processes with PID N, M, ..., up to 20 processes.
-c Display the command-line arguments of processes.
-b Print on standard output noninteractively, without playing screen
tricks. top -b -n1 > outfile saves a quick snapshot to a file.
gnome-system-monitor stdin stdout - file -- opt --help --version
gnome-system-monitor
gnome-system-monitor is a graphical tool that displays the system
load of each processor, a list of running processes, and information
on memory, filesystems, and more.
xload stdin stdout - file -- opt --help --version
xload
xload is a very simple monitoring tool that graphs processor load
(Y axis) over time (X axis). If your computer has multiple processors
or cores, xload does not provide separate views, and you’ll probably
prefer a more powerful tool like gnome-system-monitor.
Useful options
-update NUpdate the display every N seconds (default 10).
120 | Linux Pocket Guide

-scale NDivide the Y axis into N sections (default 1). xload may add more
divisions as the load goes up; N is the minimum visible at any time.
-hl color Use this color for the scale divider lines.
-label XPrint the text X above the graph (default = your hostname).
-nolabel Don’t print any text label above the graph.
-jumpscroll NWhen the graph reaches the right margin, scroll N pixels to the left
and keep drawing (default is half the window width).
free stdin stdout - file -- opt --help --version
free [options]
The free command displays memory usage in kilobytes:
$ free
total used free shared buffers cached
Mem: 523812 491944 31868 0 67856 199276
-/+ buffers/cache: 224812 299000
Swap: 530104 0 530104
The Linux kernel reserves as much memory as possible for caching
purposes, so your best estimate of free RAM in the preceding output
is in the buffers/cache row, free column (i.e., 299000K).
Useful options
-s NRun continuously and update the display every N seconds.
-b Display amounts in bytes.
-m Display amounts in megabytes.
-t Add a totals row at the bottom.
-o Don’t display the “buffers/cache” row.
Controlling Processes
kill Terminate a process (or send it a signal).
nice Invoke a program at a particular priority.
renice Change a process’s priority as it runs.
Controlling Processes | 121

Once processes are started, they can be stopped, restarted, kil-
led, and reprioritized. We discussed some of these operations
as handled by the shell in “Shell Job Control” on page 32. Now
we cover killing and reprioritizing.
kill stdin stdout - file -- opt --help --version
kill [options] [process_ids]
The kill command sends a signal to a process. This can terminate
a process (the default action), interrupt it, suspend it, crash it, and
so on. You must own the process, or be the superuser, to affect it.
To terminate process 13243, for example, run:
$ kill 13243
If this does not work—some programs catch this signal without
terminating—add the -KILL or (equivalently) -9 option:
$ kill -KILL 13243
which is virtually guaranteed to work. However, this is not a clean
exit for the program, which may leave resources allocated (or cause
other inconsistencies) upon its death.
If you don’t know the PID of a process, run ps and examine the
output:
$ ps -uax | grep emacs
or even better, try the pidof command, which looks up and prints
the PID of a process by its name:
$ pidof emacs
8374
Now you can kill a process knowing only its program name in a
single line, using shell backquotes to execute pidof:
$ kill `pidof emacs`
In addition to the kill program in the filesystem (usually /bin/kill),
most shells have built-in kill commands, but their syntax and be-
havior differ. However, they all support the following usage:
$ kill -N PID
$ kill -NAME PID
122 | Linux Pocket Guide

where N is a signal number, and NAME is a signal name without its
leading “SIG” (e.g., use -HUP to send the SIGHUP signal). To see a
complete list of signals transmitted by kill, run kill -l, though its
output differs depending on which kill you’re running. For de-
scriptions of the signals, run man 7 signal.
nice stdin stdout - file -- opt --help --version
nice [-level] command_line
When invoking a system-intensive program, you can be nice to the
other processes (and users) by lowering its priority. That’s what the
nice command is for: it sets a nice level (an amount of “niceness”)
for a process so it gets less attention from the Linux process sched-
uler.15 Here’s an example of setting a big job to run at nice level 7:
$ nice −7 sort VeryLargeFile > outfile
If you run nice without a level, 10 is used. Normal processes (run
without nice) run at level zero, which you can see by running
nice with no arguments:
$ nice
0
The superuser can also lower the nice level, increasing a process’s
priority:
# nice --10 myprogram
(Yes, that’s “dash negative 10”.) To see the nice levels of your jobs,
use ps and look at the “NI” column:
$ ps -o pid,user,args,nice
renice stdin stdout - file -- opt --help --version
renice [+-N] [options] PID
While the nice command can invoke a program at a given nice level,
renice changes the nice level of an already-running process. Here
15. This is called “nicing” the process. You’ll hear the term used as a verb:
“That process was niced to 12.”
Controlling Processes | 123

we increase the nice level (decrease the priority) of process 28734
by five:
$ renice +5 -p 28734
Ordinary users can increase the nice level of their own processes,
while the superuser can also decrease it (increasing the priority) and
can operate on any process. The valid range is −20 to +20, but avoid
high negative numbers or you might interfere with vital system
processes.
Useful options
-p pid Affect the given process ID. You can omit the -p and just provide a PID
(renice +5 28734).
-u username Affect all processes owned by the given user.
Scheduling Jobs
sleep Wait a set number of seconds, doing nothing.
watch Run a program at set intervals.
at Schedule a job for a single, future time.
crontab Schedule jobs for many future times.
If you need to launch programs at particular times or at regular
intervals, Linux provides several scheduling tools at various
degrees of complexity.
sleep stdin stdout - file -- opt --help --version
sleep time_specification
The sleep command simply waits a set amount of time. The given
time specification can be an integer (meaning seconds) or an integer
followed by the letter s (also seconds), m (minutes), h (hours), or d
(days).
$ sleep 5m Do nothing for 5 minutes
sleep is useful for delaying a command for a set amount of time:
124 | Linux Pocket Guide

$ sleep 10 && echo 'Ten seconds have passed.'
(10 seconds pass)
Ten seconds have passed.
watch stdin stdout - file -- opt --help --version
watch [options] command
The watch program executes a given command at regular intervals;
the default is every two seconds. The command is passed to the shell
(so be sure to quote or escape any special characters), and the results
are displayed in a full-screen mode, so you can observe the output
conveniently and see what has changed. For example, watch -n 60
date executes the date command once a minute, sort of a poor man’s
clock. Type ^C to exit.
Useful options
-n seconds Set the time between executions, in seconds.
-d Highlight differences in the output, to emphasize what has changed
from one execution to the next.
at stdin stdout - file -- opt --help --version
at [options] time_specification
The at command runs a shell command once at a specified time:
$ at 7am next sunday
at> echo Remember to go shopping | mail smith
at> lpr $HOME/shopping-list
at> ^D
<EOT>
job 559 at 2011-09-14 21:30
The time specifications understood by at are enormously flexible.
In general, you can specify:
•A time followed by a date (not a date followed by a time)
•Only a date (assumes the current clock time)
•Only a time (assumes the very next occurrence, whether today
or tomorrow)
Scheduling Jobs | 125

•A special word like now, midnight, or teatime (16:00)
•Any of the preceding followed by an offset, like “+ 3 days”
Dates are acceptable in many forms: december 25 2012, 25 december
2012, december 25, 25 december, 12/25/2012, 25.12.2012, 20121225,
today, thursday, next thursday, next month, next year, and more.
Month names can be abbreviated to three letters (jan, feb, mar, ...).
Times are also flexible: 8pm, 8 pm, 8:00pm, 8:00 pm, 20:00, and 2000
are equivalent. Offsets are a plus or minus sign followed by white-
space and an amount of time: + 3 seconds, + 2 weeks, - 1 hour, and
so on.16
If you don’t specify a part of the date or time, at copies the missing
information from the system date and time. So “next year” means
one year from right now, “thursday” means the upcoming Thursday
at the current clock time, “december 25” means the next upcoming
December 25, and “4:30pm” means the very next occurrence of
4:30 p.m. in the future.
The command you supply to at is not evaluated by the shell until
execution time, so wildcards, variables, and other shell constructs
are not expanded until then. Also, your current environment (see
printenv) is preserved within each job so it executes as if you were
logged in. Aliases, however, aren’t available to at jobs, so don’t
include them.
To list your at jobs, use atq (“at queue”):
$ atq
559 2011-09-14 07:00 a smith
To delete an at job, run atrm (“at remove”) with the job number:
$ atrm 559
Useful options
-f filename Read commands from the given file instead of standard input.
-c job_number Print the job commands to standard output.
16. Programmers can read the precise syntax in /usr/share/doc/at/timespec.
126 | Linux Pocket Guide

crontab stdin stdout - file -- opt --help --version
crontab [options] [file]
The crontab command, like at, schedules jobs for specific times.
However, crontab is for recurring jobs, such as “Run this command
at midnight on the second Tuesday of each month.” To make this
work, you edit and save a file (called your crontab file), which au-
tomatically gets installed in a system directory (/var/spool/cron).
Once a minute, a Linux process called cron wakes up, checks your
crontab file, and executes any jobs that are due.
$ crontab -e
Edit your crontab file in your default editor ($EDITOR)
$ crontab -l
Print your crontab file on standard output
$ crontab -r
Delete your crontab file
$ crontab myfile
Install the file myfile as your crontab file
The superuser can add the option -u username to work with other
users’ crontab files.
Crontab files contain one job per line. (Blank lines and comment
lines beginning with “#” are ignored.) Each line has six fields, sep-
arated by whitespace. The first five fields specify the time to run the
job, and the last is the job command itself.
Minutes of the hour
Integers between 0 and 59. This can be a single number (30),
a sequence of numbers separated by commas (0,15,30,45), a
range (20–30), a sequence of ranges (0-15,50-59), or an asterisk
to mean “all.” You can also specify “every nth time” with the
suffix /n; for instance, both */12 and 0-59/12 mean
0,12,24,36,48 (i.e., every 12 minutes).
Hours of the day
Same syntax as for minutes.
Scheduling Jobs | 127

Days of the month
Integers between 1 and 31; again, you may use sequences,
ranges, sequences of ranges, or an asterisk.
Months of the year
Integers between 1 and 12; again, you may use sequences,
ranges, sequences of ranges, or an asterisk. Additionally, you
may use three-letter abbreviations (jan, feb, mar, ...), but not
in ranges or sequences.
Days of the week
Integers between 0 (Sunday) and 6 (Saturday); again, you may
use sequences, ranges, sequences of ranges, or an asterisk. Ad-
ditionally, you may use three-letter abbreviations (sun, mon,
tue, ...), but not in ranges or sequences.
Command to execute
Any shell command, which will be executed in your login en-
vironment, so you can refer to environment variables like
$HOME and expect them to work. Use only absolute paths to
your commands (e.g., /usr/bin/who instead of who) as a general
rule.
Some example time specifications are:
* * * * * Every minute
45 * * * * 45 minutes after each hour (1:45, 2:45, etc.)
45 9 * * * Every day at 9:45 am
45 9 8 * * The eighth day of every month at 9:45 am
45 9 8 12 * Every December 8 at 9:45 am
45 9 8 dec * Every December 8 at 9:45 am
45 9 * * 6 Every Saturday at 9:45 am
45 9 * * sat Every Saturday at 9:45 am
45 9 * 12 6 Every Saturday in December, at 9:45 am
45 9 8 12 6 Every Saturday in December, plus December 8,
at 9:45 am
If the command produces any output upon execution, cron will
email it to you.
128 | Linux Pocket Guide

Logins, Logouts, and Shutdowns
We assume you know how to log into your Linux account. To
log out using GNOME or KDE, choose Logout from the main
menu. To log out from a remote shell, just close the shell (type
exit or logout).
Never simply turn off the power to a Linux system: it needs a
more graceful shutdown. To perform a shutdown from
GNOME or KDE, use the main menu. To perform a shutdown
from a shell, run the shutdown command as the superuser, as
follows.
shutdown stdin stdout - file -- opt --help --version
shutdown [options] time [message]
The shutdown command halts or reboots a Linux system; only the
superuser may run it. Here’s a command to halt the system in 10
minutes, broadcasting the message “scheduled maintenance” to all
users logged in:
# shutdown -h +10 "scheduled maintenance"
The time may be a number of minutes preceded by a plus sign, like
+10; an absolute time in hours and minutes, like 16:25; or the word
now to mean immediately.
With no options, shutdown puts the system into single-user mode,
a special maintenance mode in which only one person is logged in
(at the system console), and all nonessential services are off. To exit
single-user mode, either perform another shutdown to halt or reboot,
or type ^D to bring up the system in normal, multiuser mode.
Useful options
-r Reboot the system.
-h Halt the system.
-k Kidding: don’t really perform a shutdown, just broadcast warning messages to all
users as if the system were going down.
-c Cancel a shutdown in progress (omit the time argument).
Logins, Logouts, and Shutdowns | 129

-f On reboot, skip the usual filesystem check performed by the fsck program
(described in “Disks and Filesystems” on page 106).
-F On reboot, require the usual filesystem check.
For technical information about shutdowns, single-user mode, and
various system states, see the manpages for init and inittab.
Users and Their Environment
logname Print your login name.
whoami Print your current, effective username.
id Print the user ID and group membership of a user.
who List logged-in users, long output.
users List logged-in users, short output.
finger Print information about users.
last Determine when someone last logged in.
printenv Print your environment.
Who are you? Only the system knows for sure. This grab-bag
of programs tells you all about users: their names, login times,
and properties of their environment.
logname stdin stdout - file -- opt --help --version
logname
The logname command prints your login name. It might seem trivial,
but it’s useful in shell scripts.
$ logname
smith
130 | Linux Pocket Guide

whoami stdin stdout - file -- opt --help --version
whoami
The whoami command prints the name of the current, effective user.
This may differ from your login name (the output of logname) if
you’ve used the su command. This example distinguishes whoami
from logname:
$ logname
smith
$ whoami
smith
$ su
Password: ********
# logname
smith
# whoami
root
id stdin stdout - file -- opt --help --version
id [options] [username]
Every user has a unique, numeric user ID, and a default group with
a unique, numeric group ID. The id command prints these values
along with their associated user and group names:
$ id
uid=500(smith) gid=500(smith)
groups=500(smith),6(disk),490(src),501(cdwrite)
Useful options
-u Print the effective user ID and exit.
-g Print the effective group ID and exit.
-G Print the IDs of all other groups to which the user belongs.
-n Print names (for users and groups) rather than numeric IDs. Must be combined
with -u, -g, or -G. For example, id -Gn produces the same output as the
groups command.
-r Print login values instead of effective values. Must be combined with -u, -g, or
-G.
Users and Their Environment | 131

who stdin stdout - file -- opt --help --version
who [options] [filename]
The who command lists all logged-in users, one user shell per line:
$ who
smith pts/0 Sep 6 17:09 (:0)
barrett pts/1 Sep 6 17:10 (10.24.19.240)
jones pts/2 Sep 8 20:58 (192.168.13.7)
jones pts/4 Sep 3 05:11 (192.168.13.7)
Normally, who gets its data from the file /var/run/utmp. The file
name argument can specify a different data file, such as /var/log/
wtmp for past logins or /var/log/btmp for failed logins.17
Useful options
-H Print a row of headings as the first line.
--lookup For remotely logged-in users, print the hostnames of origin.
-u Also print each user’s idle time at his/her terminal.
-T Also indicate whether each user’s terminal is writable (see mesg in
“Instant Messaging” on page 166). A plus sign means yes, a minus sign
means no, and a question mark means unknown.
-m Display information only about yourself, i.e., the user associated with the
current terminal.
-q Quick display of usernames only, and a count of users. Much like the
users command, but it adds a count.
users stdin stdout - file -- opt --help --version
users [filename]
The users command prints a quick listing of users who have login
sessions. If a user is running multiple shells, she appears multiple
times.
$ users
barrett jones smith smith smith
17. If your system is configured to log this information.
132 | Linux Pocket Guide

Like the who command, users reads /var/log/utmp by default but can
read from another supplied file instead.
finger stdin stdout - file -- opt --help --version
finger [options] [user[@host]]
The finger command prints logged-in user information in a short
form:
$ finger
Login Name Tty Idle Login Time
smith Sandy Smith :0 Sep 6 17:09
barrett Daniel Barrett :pts/1 24 Sep 6 17:10
jones Jill Jones :pts/2 Sep 8 20:58
or a long form:
$ finger smith
Login: smith Name: Sandy Smith
Directory: /home/smith Shell: /bin/bash
On since Sat Sep 6 17:09 (EDT) on :0
Last login Mon Sep 8 21:07 (EDT) on pts/6 from localhost
No mail.
Project:
Enhance world peace
Plan:
Mistrust first impulses; they are always right.
The user argument can be a local username or a remote user in the
form user@host. Remote hosts will respond to finger requests only
if they are configured to do so.
Useful options
-l Print in long format.
-s Print in short format.
-p Don’t display the Project and Plan sections, which are ordinarily read from the
user’s ~/.project and ~/.plan files, respectively.
Users and Their Environment | 133

last stdin stdout - file -- opt --help --version
last [options] [users] [ttys]
The last command displays a history of logins, in reverse chrono-
logical order.
$ last
barrett pts/3 localhost Mon Sep 8 21:07 - 21:08 (00:01)
smith pts/6 :0 Mon Sep 8 20:25 - 20:56 (00:31)
barrett pts/4 myhost Sun Sep 7 22:19 still logged in
...
You may provide usernames or tty names to limit the output.
Useful options
-N Print only the latest N lines of output, where N is a positive integer.
-i Display IP addresses instead of hostnames.
-R Don’t display hostnames.
-x Also display system shutdowns and changes in system runlevel (e.g.,
from single-user mode into multiuser mode).
-f filename Read from some other data file than /var/run/wtmp; see the who
command for more details.
printenv stdin stdout - file -- opt --help --version
printenv [environment_variables]
The printenv command prints all environment variables known to
your shell and their values:
$ printenv
HOME=/home/smith
MAIL=/var/spool/mail/smith
NAME=Sandy Smith
SHELL=/bin/bash
...
or only specified variables:
$ printenv HOME SHELL
/home/smith
/bin/bash
134 | Linux Pocket Guide

User Account Management
useradd Create an account.
userdel Delete an account.
usermod Modify an account.
passwd Change a password.
chfn Change a user’s personal information.
chsh Change a user’s shell.
The installation process for your Linux distro undoubtedly
prompted you to create a superuser account (root), and pos-
sibly also an ordinary user account (presumably for yourself).
But you might want to create other accounts, too.
Creating users is an important job not to be taken lightly. Every
account is a potential avenue for an intruder to enter your sys-
tem, so every user should have a strong, hard-to-guess
password.
useradd stdin stdout - file -- opt --help --version
useradd [options] username
The useradd command lets the superuser create a user account.
# useradd smith
Its defaults are not very useful (run useradd -D to see them), so be
sure to supply all desired options. For example:
# useradd -d /home/smith -s /bin/bash -g users smith
Useful options
-d dir Set the user’s home directory to be dir.
-s shell Set the user’s login shell to be shell.
-u uid Set the user’s ID to be uid. Unless you know what you’re doing,
omit this option and accept the default.
-c string Set the user’s comment field (historically called the
User Account Management | 135

GECOS field). This is usually the user’s full name, but it can be any
string. The chfn command can also set this information.
-g group Set the user’s initial (default) group to group, which can either
be a numeric group ID or a group name, and which must already
exist.
-G
group1,group2,...
Make the user a member of the additional, existing groups
group1, group2, and so on.
-m Copy all files from your system skeleton direc-
tory, /etc/skel, into the newly created home directory. The skeleton
directory traditionally contains minimal (skeletal) versions of in-
itialization files, like ~/.bash_profile, to get new users started. If
you prefer to copy from a different directory, add the -k option
(-k dirname).
userdel stdin stdout - file -- opt --help --version
userdel [-r] username
The userdel command deletes an existing user.
# userdel smith
It does not delete the files in the user’s home directory unless you
supply the -r option. Think carefully before deleting a user; con-
sider deactivating the account instead (with usermod -L). And make
sure you have backups of all the user’s files before deleting them:
you might need them again someday.
usermod stdin stdout - file -- opt --help --version
usermod [options] username
The usermod command modifies the given user’s account in various
ways, such as changing a home directory:
# usermod -d /home/another smith
Useful options
-d dir Change the user’s home directory to dir.
136 | Linux Pocket Guide

-l username Change the user’s login name to username. Think care-
fully before doing this, in case anything on your system
depends on the original name. And change system ac-
counts (root, daemon, and so on) unless you really know
what you’re doing!
-s shell Change the user’s login shell to shell.
-g group Change the user’s initial (default) group to group, which
can either be a numeric group ID or a group name, and
which must already exist.
-G group1,group2,... Make the user a member only of the additional, existing
groups group1, group2, and so on. If the user previ-
ously belonged to other groups, but you don’t specify
them here, the user will no longer belong to them.
-L Disable (lock) the account so the user cannot log in.
-U Unlock the account after a lock (-L) operation.
passwd stdin stdout - file -- opt --help --version
passwd [options] [username]
The passwd command changes a login password, yours by default:
$ passwd
or another user’s password if run by the superuser:
# passwd smith
passwd does have options, most of them related to password expi-
ration. Use them only in the context of a well-thought-out security
policy.
chfn stdin stdout - file -- opt --help --version
chfn [options] [username]
The chfn (change finger) command updates a few pieces of personal
information maintained by the system: real name, home telephone,
office telephone, and office location, as displayed by the finger
command. Invoked without a username, chfn affects your account;
User Account Management | 137

invoked with a username (by root), it affects that user. With no
options, chfn will prompt you for the desired information.
$ chfn
Password: ********
Name [Shawn Smith]: Shawn E. Smith
Office [100 Barton Hall]:
Office Phone [212-555-1212]: 212-555-1234
Home Phone []:
Useful options
-f name Change the full name to name.
-h phone Change the home phone number to phone.
-p phone Change the office phone number to phone.
-o office Change the office location to office.
chsh stdin stdout - file -- opt --help --version
chsh [options] [username]
The chsh (change shell) command sets your login shell program.
Invoked without a username, chsh affects your account; invoked
with a username (by root), it affects that user. With no options,
chsh will prompt you for the desired information.
$ chsh
Changing shell for smith.
Password: *******
New shell [/bin/bash]: /bin/tcsh
The new shell must be listed in /etc/shells.
Useful options
-s shell Specify the new shell.
-l List all permissible shells.
Becoming the Superuser
Normal users, for the most part, can modify only the files they
own. One special user, called the superuser or root, has full
138 | Linux Pocket Guide

access to the machine and can do anything on it. To become
the superuser, log in as yourself and type:
$ su -l
Password: *******
#
You will be prompted for the superuser password (which we
presume you know, if it’s your computer). Your shell prompt
will change to a hash mark (#) to indicate you are the superuser.
When finished executing commands as the superuser, type
^D or run exit to end the superuser shell and become yourself
again.
If you provide a username to su:
$ su -l sophia
Password: ********
you can become that user (provided you know her password).
sudo
su is the simplest way to obtain superuser privileges. A more
complex program, sudo, runs one command at a time as the
superuser, using your own password, if your system is config-
ured to use it:
$ sudo rm protected_file
Password: ******** Your own password
sudo is superior for systems with multiple superusers, as it pro-
vides precise control over privileges (in the /etc/sudoers file) and
even logs the commands that get run. A full discussion is be-
yond the scope of this book: see man sudo and http://www.gra
tisoft.us/sudo/ for full details.
Becoming the Superuser | 139

Useful options
-l Run a login shell. You almost always want this option, so root’s proper
search path is set.
-m Preserve your current environment variables in the new shell.
-c command Run just this command (as the other user) and exit. If you need to do
this a lot, read the sudo manpage.
-s shell Run the given shell (e.g., /bin/bash).
Group Management
groups Print the group membership of a user.
groupadd Create a group.
groupdel Delete a group.
groupmod Modify a group.
A group is a set of accounts treated as a single entity. If you give
permission for a group to take some action (such as modify a
file), then all members of that group can take it. For example,
you can give full permissions for the group friends to read,
write, and execute the file /tmp/sample:
$ groups
users smith friends
$ chgrp friends /tmp/sample
$ chmod 770 /tmp/sample
$ ls -l /tmp/sample
-rwxrwx--- 1 smith friends 2874 Oct 20 22:35 /tmp/sample
To add users to a group, edit /etc/group as root.18 To change
the group ownership of a file, recall the chgrp commands from
“File Properties” on page 59.
18. Different systems may store the group member list in other ways.
140 | Linux Pocket Guide

groups stdin stdout - file -- opt --help --version
groups [usernames]
The groups command prints the Linux groups to which you belong,
or to which other users belong:
$ whoami
smith
$ groups
smith users
$ groups jones root
jones : jones users
root : root bin daemon sys adm disk wheel src
groupadd stdin stdout - file -- opt --help --version
groupadd [options] group
The groupadd command creates a group. In most cases, you should
use the -f option to prevent duplicate groups from being created:
# groupadd -f friends
Useful options
-g gid Specify your own numeric group ID instead of letting groupadd choose one.
-f If the specified group exists already, complain and exit.
groupdel stdin stdout - file -- opt --help --version
groupdel group
The groupdel command deletes an existing group.
# groupdel friends
Before doing this, it’s a good idea to identify all files that have their
group ID set to the given group, so you can deal with them later:
# find / -group friends -print
because groupdel does not change the group ownership of any files.
It simply removes the group name from the system’s records. If you
Group Management | 141

list such files, you’ll see a numeric group ID in place of a group
name.
groupmod stdin stdout - file -- opt --help --version
groupmod [options] group
The groupmod command modifies the given group, changing its
name or group ID.
# groupmod -n newname friends
groupmod does not affect any files owned by this group: it simply
changes the ID or name in the system’s records. Be careful when
changing the ID, or these files will have group ownership by a non-
existent group.
Useful options
-n name Change the group’s name to name (safe).
-g gid Change the group’s ID to gid (risky).
Host Information
uname Print basic system information.
hostname Print the system’s hostname.
dnsdomain
name
Same as hostname -d.
domainname Same as hostname -y.
nisdomain
name
Same as hostname -y.
ypdomainname Same as hostname -y.
ip Set and display network interface information.
ifconfig Older command to set and display network interface information.
142 | Linux Pocket Guide

Every Linux machine (or host) has a name, a network IP ad-
dress, and other properties. Here’s how to display this
information.
uname stdin stdout - file -- opt --help --version
uname [options]
The uname command prints fundamental information about your
computer:
$ uname -a
Linux server.example.com 2.6.32-35-generic-pae #78-Ubuntu
SMP Tue Oct 11 17:01:12 UTC 2011 i686 GNU/Linux
This includes the kernel name (Linux), hostname (server.exam-
ple.com), kernel release (2.6.32-35-generic-pae), kernel version
(#78-Ubuntu SMP Tue Oct 11 17:01:12 UTC 2011), hardware
name (i686), processor type (i686), and operating system name
(GNU/Linux). Each of these values can be printed individually us-
ing options.
Useful options
-a All information.
-s Only the kernel name (the default).
-n Only the hostname, as with the hostname command.
-r Only the kernel release.
-v Only the kernel version.
-m Only the hardware name.
-p Only the processor type.
-i Only the hardware platform.
-o Only the operating system name.
Host Information | 143

hostname stdin stdout - file -- opt --help --version
hostname [options] [name]
The hostname command prints the name of your computer. De-
pending on how you have things set up, this might be the fully
qualified hostname:
$ hostname
myhost.example.com
or your short hostname:
$ hostname
myhost
You can also set your hostname, as root:19
# hostname orange
However, hostnames and nameservers are complicated topics well
beyond the scope of this book. Don’t just blindly start setting
hostnames!
Useful options
-i Print your host’s IP address.
-a Print your host’s alias name.
-s Print your host’s short name.
-f Print your host’s fully qualified name.
-d Print your host’s DNS domain name.
-y Print your host’s NIS or YP domain name.
-F hostfile Set your hostname by reading the name from file hostfile.
ip stdin stdout - file -- opt --help --version
ip [options] object command...
19. This change might not survive a reboot. Some Linux distros require
additional steps, such as placing the hostname into a configuration file
that is read at boot time. Consult the documentation for your distro.
144 | Linux Pocket Guide

The ip command displays and sets various aspects of your com-
puter’s network interface. This topic is beyond the scope of the
book, but we’ll teach you a few tricks.
You can get information about the default network interface
(usually called eth0):
$ ip addr show eth0
2: eth0: <BROADCAST,MULTICAST,UP,LOWER_UP> mtu 1500 ...
link/ether 00:50:ba:48:4f:ba brd ff:ff:ff:ff:ff:ff
inet 192.168.0.21/24 brd 192.168.0.255 scope global eth0
inet6 fe80::21e:8cff:fe53:41e4/64 scope link
valid_lft forever preferred_lft forever
This includes your MAC address (00:50:ba:48:4f:ba), your IP ad-
dress (192.168.0.21), and various other information. To view all
loaded network interfaces, run:
$ ip addr show
Some other useful commands for displaying network information
include:
ip help
See usage information for all these commands
ip addr
Display IP addresses of your network devices
ip maddr
Display multicast addresses of your network devices
ip link
Display attributes of your network devices
ip route
Display your routing table
ip monitor
Begin monitoring your network devices; type ^C to stop
Each of these commands has various options: add help on the end
(e.g., ip link help) for usage. Additionally, ip can modify your
network: configuring your network devices, managing routing
tables and rules, creating tunnels, and more. It’s part of a suite of
tools called iproute2. You’ll need networking experience to
Host Information | 145

understand this complex command; see the ip manpage to get
started, or visit http://lartc.org.
ifconfig stdin stdout - file -- opt --help --version
ifconfig [options] interface
The ifconfig command is an ancestor of ip. It is still found on many
Linux systems but is less powerful (some would call it obsolete).
We’ll cover a few simple commands here, but you should be using
ip instead.
To display information about the default network interface (usually
called eth0):
$ ifconfig eth0
eth0 Link encap:Ethernet HWaddr 00:50:BA:48:4F:BA
inet addr:192.168.0.10 Bcast:192.168.0.255 ...
UP BROADCAST RUNNING MULTICAST MTU:1500 ...
RX packets:1955231 errors:0 dropped:0 overruns:0 ...
TX packets:1314765 errors:0 dropped:0 overruns:0 ...
collisions:0 txqueuelen:100
...
This includes your MAC address (00:50:BA:48:4F:BA), your IP ad-
dress (192.168.0.21), your netmask (255.255.255.0), and various
other information. To view all loaded network interfaces, run:
$ ifconfig -a
Host Location
host Look up hostnames, IP addresses, and DNS info.
whois Look up the registrants of Internet domains.
ping Check if a remote host is reachable.
traceroute View the network path to a remote host.
When dealing with remote computers, you might want to
know more about them. Who owns them? What are the IP
addresses? Where on the network are they located?
146 | Linux Pocket Guide

host stdin stdout - file -- opt --help --version
host [options] name [server]
The host command looks up the hostname or IP address of a remote
machine by querying DNS.
$ host www.ubuntu.org
www.ubuntu.com has address 91.189.90.41
$ host 91.189.90.41
41.90.189.91.in-addr.arpa domain name pointer
jujube.canonical.com.
It can also find out much more:
$ host -a www.ubuntu.org
Trying "www.ubuntu.org"
;; ->>HEADER<<- opcode: QUERY, status: NOERROR, id: 16652
;; flags: qr rd ra; QUERY: 1, ANSWER: 1, AUTHORITY: 0, ...
;; QUESTION SECTION:
;www.ubuntu.org. IN ANY
;; ANSWER SECTION:
www.ubuntu.org. 60 IN CNAME ubuntu.org.
though a full discussion of this output is beyond the scope of this
book. The final, optional “server” parameter specifies a particular
nameserver for the query:
$ host www.ubuntu.org ns2.dondominio.com
Using domain server:
Name: ns2.dondominio.com
Address: 93.93.67.2#53
Aliases:
www.ubuntu.org is an alias for ubuntu.org.
ubuntu.org has address 147.83.195.55
ubuntu.org mail is handled by 10 mx2.upc.es.
ubuntu.org mail is handled by 10 mx1.upc.es.
To see all options, type host by itself.
Useful options
-a Display all available information.
Host Location | 147

-t Choose the type of nameserver query: A, AXFR, CNAME, HINFO, KEY, MX, NS, PTR,
SIG, SOA, and so on.
Here’s an example of the -t option to locate MX records:
$ host -t MX redhat.com
redhat.com mail is handled by 5 mx1.redhat.com.
redhat.com mail is handled by 10 mx2.redhat.com.
If the host command doesn’t do what you want, try dig, another
powerful DNS lookup utility. You might also encounter the
nslookup command, mostly obsolete but still found on some Linux
and Unix systems.
whois stdin stdout - file -- opt --help --version
whois [options] domain_name
The whois command looks up the registration of an Internet
domain:
$ whois linuxmint.com
...
Domain name: LINUXMINT.COM
...
Administrative Contact:
Lefebvre, Clement
...
Technical Contact:
Hostmaster, Servage
...
Registrar of Record: TUCOWS, INC.
Record expires on 07-Jun-2012.
Record created on 07-Jun-2006.
...
plus a few screens full of legal disclaimers from the registrar.
Useful options
-h registrar Perform the lookup at the given registrar’s server. For example,
whois -h whois.networksolutions.com yahoo.com.
-p port Query the given the TCP port instead of the default, 43 (the whois
service).
148 | Linux Pocket Guide

ping stdin stdout - file -- opt --help --version
ping [options] host
The ping command tells you if a remote host is reachable. It sends
small packets (ICMP packets to be precise) to a remote host and
waits for responses.
$ ping google.com
PING google.com (74.125.226.144) from 192.168.0.10 :
56(84) bytes of data.
64 bytes from www.google.com (74.125.226.144): icmp_seq=0
ttl=49 time=32.390 msec
64 bytes from www.google.com (74.125.226.144): icmp_seq=1
ttl=49 time=24.208 msec
^C
--- google.com ping statistics ---
2 packets transmitted, 2 packets received, 0% packet loss
round-trip min/avg/max/mdev = 24.208/28.299/32.390/4.091 ms
Useful options
-c NPing at most N times.
-i NWait N seconds (default 1) between pings.
-n Print IP addresses in the output, rather than hostnames.
traceroute stdin stdout - file -- opt --help --version
traceroute [options] host [packet_length]
The traceroute command prints the network path from your local
host to a remote host, and the time it takes for packets to traverse
the path.
$ traceroute yahoo.com
1 server.example.com (192.168.0.20) 1.397 ms ...
2 10.221.16.1 (10.221.16.1) 15.397 ms ...
3 gbr2-p10.cb1ma.ip.att.net (12.123.40.190) 4.952 ms ...
...
...
16 p6.www.dcn.yahoo.com (216.109.118.69) * ...
Each host in the path is sent three “probes” and the return times
are reported. If five seconds pass with no response, traceroute
Host Location | 149

prints an asterisk. Also, traceroute may be blocked by firewalls or
unable to proceed for various reasons, in which case it prints a
symbol:
Symbol Meaning
!F Fragmentation needed.
!H Host unreachable.
!N Network unreachable.
!P Protocol unreachable.
!S Source route failed.
!X Communication administratively prohibited.
!NICMP unreachable code N.
The default packet size is 40 bytes, but you can change this with the
final, optional packet_length parameter (e.g., traceroute myhost
120).
Useful options
-n Numeric mode: print IP addresses instead of hostnames.
-w NChange the timeout from five seconds to N seconds.
Network Connections
ssh Securely log into a remote host, or run commands on it.
telnet Log into a remote host (insecure!).
scp Securely copy files to/from a remote host (batch).
sftp Securely copy files to/from a remote host (interactive).
ftp Copy files to/from a remote host (interactive, insecure!).
With Linux, it’s easy to establish network connections from
one machine to another for remote logins and file transfers.
Just make sure you do it securely.
150 | Linux Pocket Guide

ssh stdin stdout - file -- opt --help --version
ssh [options] host [command]
The ssh (Secure Shell) program securely logs you into a remote ma-
chine where you already have an account:
$ ssh remote.example.com
Alternatively, it can invoke a program on that remote machine
without logging you in:
$ ssh remote.example.com who
ssh encrypts all data that travels across its connection, including
your username and password (which you’ll need to access the re-
mote machine). The SSH protocol also supports other ways to au-
thenticate, such as public keys and host IDs. See man sshd for details.
Useful options
-l user Specify your remote username; otherwise, ssh assumes your local
username. You can also use the syntax username@host:
$ ssh smith@server.example.com
-p port Use a port number other than the default (22).
-t Allocate a tty on the remote system; useful when trying to run a remote
command with an interactive user interface, such as a text editor.
-v Produce verbose output, useful for debugging.
telnet stdin stdout - file -- opt --help --version
telnet [options] host [port]
The telnet program logs you into a remote machine where you
already have an account.
$ telnet remote.example.com
Avoid telnet for remote logins: most implementations are insecure
and send your password over the network in plain text for anyone
to steal. Use ssh instead, which protects your password and data
via encryption. There are two exceptions:
Network Connections | 151

•In a Kerberos environment, using enhanced (“kerberized”)
telnet software on both the client and server side). See http://
web.mit.edu/kerberos/ for more information.
•Connecting to a remote port when you aren’t sending any
sensitive information at all. For example, to check for the
presence of a web server (port 80) on a remote system:
$ telnet remote.example.com 80
Trying 192.168.55.21...
Connected to remote.example.com (192.168.55.21).
Escape character is '^]'.
xxx Type some junk and press Enter
<HTML><HEAD> Yep, it’s a web server
<TITLE>400 Bad Request</TITLE>
</HEAD><BODY>
<H1>Bad Request</H1>
Your browser sent a request that
this server could not understand.<P>
</BODY></HTML>
Connection closed by foreign host.
To discourage you further from using telnet, we aren’t even going
to describe its options.
scp stdin stdout - file -- opt --help --version
scp local_spec remote_spec
The scp (secure copy) command copies files and directories from
one computer to another in batch. (For an interactive user interface,
see sftp.) It encrypts all communication between the two machines.
As a simple example, scp can copy a local file to a remote machine:
$ scp myfile remote.example.com:newfile
recursively copy a directory to a remote machine:
$ scp -r mydir remote.example.com:
copy a remote file to your local machine:
$ scp remote.example.com:myfile .
or recursively copy a remote directory to your local machine:
$ scp -r remote.example.com:mydir .
152 | Linux Pocket Guide

To specify an alternate username on the remote system, use the
username@host syntax:
$ scp myfile smith@remote.example.com:
Useful options
-p Duplicate all file attributes (permissions, timestamps) when copying.
-r Recursively copy a directory and its contents.
-v Produce verbose output, useful for debugging.
sftp stdin stdout - file -- opt --help --version
sftp (host username@host)
The sftp program copies files interactively and securely between
two computers. (As opposed to scp, which copies files in batch.)
The user interface is much like that of ftp, but ftp is not secure.
$ sftp remote.example.com
Password: ********
sftp> cd MyFiles
sftp> ls
README
file1
file2
file3
sftp> get file2
Fetching /home/smith/MyFiles/file2 to file2
sftp> quit
If your username on the remote system is different from your local
one, use the username@host argument:
$ sftp smith@remote.example.com
Command Meaning
help View a list of available commands.
ls List the files in the current remote directory.
lls List the files in the current local directory.
pwd Print the remote working directory.
lpwd Print the local working directory.
Network Connections | 153

Command Meaning
cd dir Change your remote directory to be dir.
lcd dir Change your local directory to be dir.
get file1 [file2] Copy remote file1 to local machine, optionally
renamed as file2.
put file1 [file2] Copy local file1 to remote machine, optionally
renamed as file2.
mget file * Copy multiple remote files to the local machine using
wildcards * and ?.
mput file * Copy multiple local files to the remote machine using
wildcards * and ?.
quit Exit sftp.
ftp stdin stdout - file -- opt --help --version
ftp [options] host
The ftp (File Transfer Protocol) program copies files between com-
puters, but not in a secure manner: your username and password
travel over the network as plain text. Use sftp instead if your remote
server supports it.
The same commands we listed for sftp also work for ftp. (However,
the two programs support other, differing commands, too.)
Email
thunderbird Graphical mail client.
evolution Graphical mail client.
mutt Text-based mail client.
mail Minimal text-based mail client.
mailq View the outgoing mail queue on your system.
Linux includes a number of mail readers, some graphical and
some entirely text-based. We’ll look at several with different
154 | Linux Pocket Guide

purposes and strengths. Other Linux mailers include kmail,
alpine, and the RMAIL and vm applications built into emacs.
thunderbird stdin stdout - file -- opt --help --version
thunderbird
Thunderbird is one of the most popular graphical email programs,
available not only for Linux but also Windows and Macintosh. The
first time you run Thunderbird, you’ll be guided through a series of
dialogs to set up your mail account. Once this is complete, the main
Thunderbird window presents you with common email operations:
Inbox View your mail
Write Compose a new mail message
Get Mail Check for new messages on your mail server
Reply Reply to a message, only to the sender
Reply All Reply to a message, to all addresses in the To and CC lines
Forward Forward a message to a third party
Thunderbird is highly configurable. You can customize the entire
look and feel of the program (known as the “Theme”), install
add-ons to provide new features, and more. See http://www.getthun
derbird.com for details.
evolution stdin stdout - file -- opt --help --version
evolution
Evolution is another popular graphical email program. Run the
command evolution from the shell to get started. As with Thun-
derbird, the first time you run Evolution, you’ll be guided to set up
your mail account. Once this is complete, the main Evolution win-
dow offers you common email commands by point-and-click:
Inbox View your mail
New Compose a new mail message
Email | 155

Send/Receive Check for new messages on your mail server
Reply Reply to a message, only to the sender
Reply To All Reply to a message, to all addresses in the To and CC lines
Forward Forward a message to a third party
There are many more features, so experiment, and see http://projects
.gnome.org/evolution for more information.
mutt stdin stdout - file -- opt --help --version
mutt [options]
Mutt is a text-based mailer that runs in an ordinary terminal (or
terminal window), so it can be used both locally (e.g., in an X ter-
minal window) or remotely over an SSH connection. It is very pow-
erful, with many commands and options. To invoke it, type:
$ mutt
When the main screen appears, any messages in your mailbox are
listed briefly, one per line, and the following commands are
available:
Keystroke Meaning
Up arrow Move to the previous message.
Down arrow Move to the next message.
PageUp Scroll up one pageful of messages.
PageDown Scroll down one pageful of messages.
Home Move to the first message.
End Move to the last message.
mCompose a new mail message. This invokes your default text editor. After
editing the message and exiting the editor, type y to send the message
or q to postpone it.
rReply to current message. Works like m.
fForward the current message to a third party. Works like m.
iView the contents of your mailbox.
156 | Linux Pocket Guide

Keystroke Meaning
CCopy the current message to another mailbox.
dDelete the current message.
While writing a message, after you exit your text editor, the fol-
lowing commands are available:
Keystroke Meaning
aAttach a file (an attachment) to the message.
cSet the CC list.
bSet the BCC list.
eEdit the message again.
rEdit the Reply-To field.
sEdit the subject line.
ySend the message.
CCopy the message to a file.
qPostpone the message without sending it.
Additional commands are always available:
Keystroke Meaning
?See a list of all commands (press the SPACEBAR to scroll down, q to quit).
^G Cancel the command in progress.
qQuit.
The official Mutt site is http://www.mutt.org.
mail stdin stdout - file -- opt --help --version
mail [options] recipient
The mail program (equivalently, Mail)20 is a quick, simple email
client. Most people want a more powerful program for regular use,
Email | 157

but for quick messages from the command line or in scripts, mail is
really handy.
To send a quick message:
$ mail smith@example.com
Subject: my subject
I'm typing a message.
To end it, I type a period by itself on a line.
.
Cc: jones@example.com
$
To send a quick message using a single command, use a pipeline:
$ echo "Hello world" | mail -s "subject" smith@example.com
To mail a file using a single command, you can use redirection or a
pipeline:
$ mail -s "my subject" smith@example.com < filename
$ cat filename | mail -s "my subject" smith@example.com
Notice how easily you can send the output of a pipeline as an email
message; this is useful in scripts.
Useful options
-s subject Set the subject line of an outgoing message.
-v Verbose mode: print messages about mail delivery.
-c addresses CC the message to the given addresses, a comma-separated list.
-b addresses BCC the message to the given addresses, a comma-separated list.
mailq stdin stdout - file -- opt --help --version
mailq
The mailq command lists any outgoing email messages awaiting
delivery.
20. On older Unix systems, Mail and mail were rather different programs,
but on Linux they are the same: /usr/bin/Mail is a symbolic link to the
mail command.
158 | Linux Pocket Guide

$ mailq
Queue ID- --Size-- ----Arrival Time-- -Sender/Recipient---
46AAB43972* 333 Tue Jan 10 21:17:14 smith@example.com
jones@elsewhere.org
Sent mail messages are also recorded in a log file such as /var/log/
maillog; the name may differ from distro to distro.
Beyond Mail Readers
Email is more “transparent” on Linux than on other platforms that
merely display your mailbox and send and receive messages. The
ability to list outgoing email messages with mailq is just one exam-
ple. Here are some other options to whet your appetite and en-
courage you to explore.
•You can process your mailboxes with any command-line tools,
such as grep, because mail files are plain text.
•You can manually retrieve messages from your mail server at
the command line with the fetchmail command. Using a sim-
ple configuration file, this command can reach out to IMAP
and POP servers and download mail in batch. See man fetch
mail.
•Your system can run a mail server, such as postfix or send
mail, to handle the most complex mail delivery situations.
•You can control local mail delivery in sophisticated ways with
the procmail command, which filters arriving email messages
through any arbitrary program. See man procmail.
•Spam filtering is sophisticated on Linux: check out the
SpamAssassin suite of programs. You can run it personally on
your incoming email, or at the server level for large numbers
of users.
In short, email is not limited to the features of your mail-reading
program. Investigate and experiment!
Email | 159

Web Browsing
firefox Full-featured web browser.
lynx Text-only web browser.
wget Download web pages and files.
Linux offers several ways to explore the World Wide Web:
traditional browsers, text-based browsers, and page-retrieval
utilities.
firefox stdin stdout - file -- opt --help --version
firefox [options] [URL]
Firefox is one of the most popular web browsers for Linux and most
other operating systems. Start it in the background with:
$ firefox &
Some other web browsers for Linux include Google Chrome (http:
//www.google.com/chrome), Opera (http://www.opera.com), Kon-
queror for KDE (http://www.konqueror.org), and Epiphany for
GNOME (http://projects.gnome.org/epiphany).
lynx stdin stdout - file -- opt --help --version
lynx [options] [URL]
Lynx is a stripped-down, text-only web browser. It doesn’t display
pictures, play audio or video, or even respond to your mouse. But
it’s incredibly useful when you just want a quick look at a page, or
when the network is slow, or for downloading the HTML of a web-
site. It’s particularly good for checking out a suspicious URL, since
Lynx doesn’t run JavaScript and won’t even accept a cookie without
asking you first.
$ lynx http://www.yahoo.com
160 | Linux Pocket Guide

All browsing is done by keyboard. Many pages will not look quite
right, especially if they use tables or frames extensively, but usually
you can find your way around a site.
Keystroke Meaning
?Get help.
kList all keystrokes and their meanings.
^G Cancel a command in progress.
qQuit Lynx.
Enter “Click” the current link, or finish the current form field.
Left arrow Back to previous page.
Right arrow Forward to next page, or “click” the current link.
gGo to a URL (you’ll be prompted to enter it).
pSave, print, or mail the current page.
Space bar Scroll down.
bScroll up.
Down arrow Go to the next link or form field.
Up arrow Go to the previous link or form field.
^A Go to top of page.
^E Go to end of page.
mReturn to the main/home page.
/Search for text on the page.
aBookmark the current page.
vView your bookmark list.
rDelete a bookmark.
=Display properties of the current page and link.
\View HTML source (type again to return to normal view).
Lynx has over 100 command-line options, so the manpage is well
worth exploring.
Web Browsing | 161

Useful options
-dump Print the rendered page to standard output and exit. (Compare to
the -source option.)
-source Print the HTML source to standard output and exit. (Compare to
the wget command.)
-emacskeys Make Lynx obey keystrokes reminiscent of the emacs editor.
-vikeys Make Lynx obey keystrokes reminiscent of the vim (or vi) editor.
-homepage=URL Set your home page URL to be URL.
-color Turn colored text mode on.
-nocolor Turn colored text mode off.
wget stdin stdout - file -- opt --help --version
wget [options] URL
The wget command hits a URL and downloads the data to a file or
standard output. It’s great for capturing individual web pages,
downloading files, or duplicating entire web site hierarchies to ar-
bitrary depth. For example, let’s capture the Yahoo home page:
$ wget http://www.yahoo.com
23:19:51 (220.84 KB/s) - `index.html' saved [31434]
which is saved to a file index.html in the current directory. wget has
the added ability to resume a download if it gets interrupted in the
middle, say, due to a network failure: just run wget -c with the same
URL and it picks up where it left off.
Perhaps the most useful feature of wget is its ability to download
files without needing a web browser:
$ wget http://www.example.com/files/manual.pdf
This is great for large files like videos and ISO images. You can even
write shell scripts to download sets of files if you know their names:
$ for i in 1 2 3; do wget http://example.com/$i.mpeg; done
Another similar command is curl, which writes to standard output
by default—unlike wget, which duplicates the original page and file
names by default.
162 | Linux Pocket Guide

$ curl http://www.yahoo.com > mypage.html
wget has over 70 options, so we’ll cover just a few important ones.
(curl has a different set of options; see its manpage.)
Useful options
-i filename Read URLs from the given file and retrieve them in turn.
-O filename Write all the captured HTML to the given file, one page
appended after the other.
-c Continue mode: if a previous retrieval was interrupted,
leaving only a partial file as a result, pick up where wget
left off. That is, if wget had downloaded 100K of a 150K
file, the -c option says to retrieve only the remaining 50K
and append it to the existing file. wget can be fooled,
however, if the remote file has changed since the first
(partial) download, so use this option only if you know the
remote file hasn’t changed.
-t NTry N times before giving up. N =0 means try forever.
--progress=dot Print dots to show the download progress.
--progress=bar Print bars to show the download progress.
--spider Don’t download, just check existence of remote pages.
-nd Retrieve all files into the current directory, even if remotely
they are in a more complex directory tree. (By default,
wget duplicates the remote directory hierarchy.)
-r Retrieve a page hierarchy recursively, including subdirec-
tories.
-l NRetrieve files at most N levels deep (5 by default).
-k Inside retrieved files, modify URLs so the files can be viewed
locally in a web browser.
-p Download all necessary files to make a page display com-
pletely, such as stylesheets and images.
-L Follow relative links (within a page) but not absolute links.
-A pattern Accept mode: download only files whose names match a
given pattern. Patterns may contain the same wildcards
as the shell.
Web Browsing | 163

-R pattern Reject mode: download only files whose names do not
match a given pattern.
-I pattern Directory inclusion: download files only from directories
that match a given pattern.
-X pattern Directory exclusion: download files only from directories
that do not match a given pattern.
Usenet News
Usenet News is one of the oldest communities online today. It
consists of tens of thousands of newsgroups, discussion forums
in which people post (submit) messages and reply to them. One
common, text-based newsreader program is slrn, but there are
dozens more available on the Net (rn, trn, tin, and so on).
Usenet News can also be searched at Google Groups, http://
groups.google.com.
In order to access Usenet, you need to connect to a news server,
an Internet host that permits reading and posting of news ar-
ticles. Once you can connect to a news server (say, news.ex-
ample.com), a record of your subscribed newsgroups and
which articles you’ve read is kept in a file in your home direc-
tory automatically. Depending on your newsreader configura-
tion, the file is either ~/.newsrc or ~/.jnewsrc.
slrn stdin stdout - file -- opt --help --version
slrn [options]
slrn is a Usenet newsreader. Before using it, you must specify a news
server by setting your shell’s NNTPSERVER variable:
$ export NNTPSERVER=news.example.com
Then create a newsgroups file (only if you haven’t used slrn on this
computer before):
$ slrn --create
164 | Linux Pocket Guide

and start reading news:
$ slrn
When invoked, slrn displays the News Groups page with a list of
your subscribed newsgroups. Some useful commands are:
Keystroke Meaning
qQuit slrn.
Down Select next newsgroup.
Up Select previous newsgroup.
Enter Read the selected newsgroup.
pPost a new article in the selected newsgroup.
aAdd a new newsgroup (you must know the name).
uUnsubscribe from the selected newsgroup (it will be removed after you
quit). Type s to resubscribe.
When you press Enter to read a newsgroup, slrn displays a Group
page, containing the available discussions (or “threads”) in that
newsgroup. Some useful commands on this page are:
Keystroke Meaning
qQuit and go back to the News Groups page.
Down Select next thread.
Up Select previous thread.
Enter Begin reading the selected thread.
cMark all threads as read (“catch up”): type ESCAPE u to undo.
Commands while reading an article include:
Keystroke Meaning
qQuit reading and return to the Group page.
Space bar Go to next page of article.
bGo back to previous page of article.
rReply to the author by email.
fPost a followup article.
Usenet News | 165

Keystroke Meaning
PPost a new article.
oSave the article in a file.
nGo to next unread article.
pGo to previous unread article.
At any time you can type ? for the help page. slrn has a tremendous
number of commands and options, and can be configured via the
file ~/.slrnrc. We’ve covered only the basics; see /usr/share/doc/
slrn* and www.slrn.org for more information.
Instant Messaging
gaim Instant messaging and IRC client.
talk Linux/Unix chat program.
write Send messages to a terminal.
mesg Prohibit talk and write.
tty Print your terminal device name.
Linux provides various ways to send messages to other users
on the same machine or elsewhere on the Internet. These range
from the ancient programs talk and write, which work over
Linux terminal devices (ttys), to more modern instant messag-
ing clients like gaim.
gaim stdin stdout - file -- opt --help --version
gaim [options]
gaim is a instant messaging client that works with many different
protocols, including AOL, MSN, Yahoo, and more. It is also an IRC
(Internet Relay Chat) client. It runs in an X window:
$ gaim &
166 | Linux Pocket Guide

If you don’t already have an account with one of these IM services,
you’ll need to create one first; for example, visit www.aim.com to
create an AOL Instant Messenger account. Once this is done, simply
click the Accounts button to indicate your account to gaim, enter
your screen name and password in the login window, and you
should be connected.
Useful options
-u screenname Set your default account to be screenname.
-l Automatically log in when invoking gaim (assuming your pass-
word is stored).
-w [ message ]Set yourself to be away, with an optional away message.
talk stdin stdout - file -- opt --help --version
talk [user[@host]] [tty]
The talk program predates modern instant messaging by a few
decades: it connects two users, logged in on the same or different
hosts, for one-to-one communication. It runs in a shell window,
splitting it horizontally, so you can see your own typing and that of
your partner.
$ talk friend@example.com
If your partner is logged in multiple times, you can specify one of
his ttys for the talk connection.
write stdin stdout - file -- opt --help --version
write user [tty]
The write program is more primitive than talk: it sends lines of text
from one logged-in user to another on the same Linux machine.
$ write smith
Hi, how are you?
See you later.
^D
Instant Messaging | 167

^D ends the connection. write is also useful in pipelines for quick
one-off messages:
$ echo 'Howdy!' | write smith
mesg stdin stdout - file -- opt --help --version
mesg [y|n]
The mesg program controls whether talk and write connections can
reach your terminal. mesg y permits them, mesg n denies them, and
mesg prints the current status (y or n). The default is y. mesg has no
effect on modern instant messaging programs like gaim.
$ mesg
is y
$ mesg n
$ mesg
is n
tty stdin stdout - file -- opt --help --version
tty
The tty program prints the name of the terminal device associated
with the current shell.
$ tty
/dev/pts/4
Screen Output
echo Print simple text on standard output.
printf Print formatted text on standard output.
yes Print repeated text on standard output.
seq Print a sequence of numbers on standard output.
clear Clear the screen or window.
168 | Linux Pocket Guide

Linux provides several commands for printing messages on
standard output:
$ echo hello world
hello world
Each command has different strengths and intended purposes.
These commands are invaluable for learning about Linux,
debugging problems, writing shell scripts (see “Programming
with Shell Scripts” on page 195), or just talking to yourself.
echo stdin stdout - file -- opt --help --version
echo [options] strings
The echo command simply prints its arguments:
$ echo We are having fun
We are having fun
Unfortunately, there are several different echo commands with
slightly different behavior. There’s /bin/echo, but Linux shells typ-
ically override this with a built-in command called echo. To find out
which you’re using, run the command type echo.
Useful options
-n Don’t print a final newline character.
-e Recognize and interpret escape characters. For example, try echo 'hello\a'
and echo -e 'hello\a'. The first prints literally and the second makes a beep.
-E Don’t interpret escape characters: the opposite of -e.
Available escape characters are:
\a Alert (play a beep)
\b Backspace
\c Don’t print the final newline (same effect as -n)
\f Form feed
\n Line feed (newline)
\r Carriage return
Screen Output | 169

\t Horizontal tab
\v Vertical tab
\\ A backslash
\' Single quote
\" Double quote
\nnn The character whose ASCII value is nnn in octal
printf stdin stdout - file -- opt --help --version
printf format_string [arguments]
The printf command is an enhanced echo: it prints formatted
strings on standard output. It operates much like the C program-
ming language function printf( ), which applies a format string to
a sequence of arguments to create some specified output. For ex-
ample:
$ printf "User %s is %d years old.\n" sandy 29
User sandy is 29 years old.
The first argument is the format string, which in our example con-
tains two format specifications, %s and %d. The subsequent argu-
ments, sandy and 29, are substituted by printf into the format
string and then printed. Format specifications can get fancy with
floating-point numbers:
$ printf "That\'ll be $%0.2f, sir.\n" 3
That'll be $3.00, sir.
There are two printf commands available in Linux: one built into
the bash shell, and one in /usr/bin/printf. The two are identical ex-
cept for one format specification, %q, supported only by the bash
built-in: it prints escape symbols (“\”) so its output can be used as
shell input safely. Note the difference:
$ printf "This is a quote: %s\n" "\""
This is a quote: "
$ printf "This is a quote: %q\n" "\""
This is a quote: \"
It is your responsibility to make sure the number of format specifi-
cations (%) equals the number of arguments supplied to printf. If
170 | Linux Pocket Guide

you have too many arguments, the extras are ignored, and if you
have too few, printf assumes default values (0 for numeric formats,
an empty string for string formats). Nevertheless, you should treat
such mismatches as errors, even though printf is forgiving. If they
lurk in your shell scripts, they are bugs waiting to happen.
Format specifications are described in detail on the manpage for the
C function printf (see man 3 printf). Here are some useful ones.
%d Decimal integer
%ld Long decimal integer
%o Octal integer
%x Hexadecimal integer
%f Floating point
%lf Double-precision floating point
%c A single character
%s String
%q String with any shell metacharacters escaped
%% A percent sign by itself
Just after the leading percent sign, you can insert a numeric expres-
sion for the minimum width of the output. For example, “%5d”
means to print a decimal number in a five-character-wide field, and
“%6.2f” means a floating-point number in a six-character-wide
field with two digits after the decimal point. Some useful numeric
expressions are:
nMinimum width n.
0nMinimum width n, padded with leading zeroes.
n.m Minimum width n, with m digits after the decimal point.
printf also interprets escape characters like “\n” (print a newline
character) and “\a” (ring the bell). See the echo command for the
full list.
Screen Output | 171

yes stdin stdout - file -- opt --help --version
yes [string]
The yes command prints the given string (or “y” by default) forever,
one string per line.
$ yes again
again
again
again
...
Though it might seem useless at first glance, yes can be perfect for
turning interactive commands into batch commands. Want to get
rid of an annoying “Are you SURE you want to do that?” message?
Pipe the output of yes into the input of the command to answer all
those prompts:
$ yes | my_interactive_command
When my_interactive_command terminates, so will yes.
seq stdin stdout - file -- opt --help --version
seq [options] specification
The seq command prints a sequence of integers or real numbers,
suitable for piping to other programs. There are three kinds of spec-
ification arguments:
A single number: an upper limit
seq begins at 1 and counts up to the number.
$ seq 3
1
2
3
Two numbers: lower and upper limit
seq begins at the first number and counts as far as it can
without passing the second number.
$ seq 2 5
2
3
172 | Linux Pocket Guide

4
5
Three numbers: lower limit, increment, and upper limit
seq begins at the first number, increments by the second num-
ber, and stops at (or before) the third number.
$ seq 1 .3 2
1
1.3
1.6
1.9
You can also go backward with a negative increment:
$ seq 5 -1 2
5
4
3
2
Useful options
-w Print leading zeroes, as necessary, to give all lines the same width:
$ seq -w 8 10
08
09
10
-f format Format the output lines with a printf-like format string, which must
include either %g (the default), %e, or %f:
$ seq -f '**%g**' 3
**1**
**2**
**3**
-s string Use the given string as a separator between the numbers. By default, a
newline is printed (i.e., one number per line):
$ seq -s ':' 10
1:2:3:4:5:6:7:8:9:10
Screen Output | 173

clear stdin stdout - file -- opt --help --version
clear
This command simply clears your display or shell window.
Math and Calculations
xcalc Display a graphical calculator.
expr Evaluate simple math on the command line.
dc Text-based calculator.
Need a calculator? Linux provides not only a familiar graphical
calculator, but also some command-line programs to compute
mathematical truths for you.
xcalc stdin stdout - file -- opt --help --version
xcalc [options]
The xcalc command displays a simple, graphical calculator in an X
window. The default is a traditional calculator; if you prefer a
reverse-polish notation (RPN) calculator, supply the -rpn option.
expr stdin stdout - file -- opt --help --version
expr expression
The expr command does simple math (and other expression eval-
uation) on the command line:
$ expr 7 + 3
10
$ expr '(' 7 + 3 ')' '*' 14 Special shell characters are quoted
140
$ expr length ABCDEFG
7
$ expr 15 '>' 16
0 Meaning false
174 | Linux Pocket Guide

Each argument must be separated by whitespace. Notice that we
had to quote or escape any characters that have special meaning to
the shell. Parentheses (escaped) may be used for grouping. Opera-
tors for expr include:
Operator Numeric operation String operation
+Addition
-Subtraction
*Multiplication
/Integer division
%Remainder (modulo)
<Less than Earlier in dictionary.
<= Less than or equal Earlier in dictionary, or
equal.
>Greater than Later in dictionary.
>= Greater than or equal Later in dictionary, or equal.
=Equality Equality.
!= Inequality Inequality.
|Boolean “or” Boolean “or”.
&Boolean “and” Boolean “and”.
s : regexp Does the regular expression
regexp match string s?
substr s p n Print n characters of string
s, beginning at position p.
(p =1 is the first character.)
index s chars Return the index of the first
position in string s contain-
ing a character from string
chars. Return 0 if not
found. Same behavior as
the C function index( ).
For Boolean expressions, the number 0 and the empty string are
considered false; any other value is true. For Boolean results, 0 is
false and 1 is true.
Math and Calculations | 175

expr is not very efficient. For more complex needs, consider using
a language like Perl instead.
dc stdin stdout - file -- opt --help --version
dc [options] [files]
The dc (desk calculator) command is a reverse-polish notation
(RPN), stack-based calculator that reads expressions from standard
input and writes results to standard output. If you know how to use
a Hewlett-Packard RPN calculator, dc is pretty easy to use once you
understand its syntax. But if you’re used to traditional calculators,
dc may seem inscrutable. We’ll cover only some basic commands.
For stack and calculator operations:
qQuit dc.
fPrint the entire stack.
cDelete (clear) the entire stack.
pPrint the topmost value on the stack.
PPop (remove) the topmost value from the stack.
n kSet precision of future operations to be n decimal places (default is 0: integer
operations).
To pop the top two values from the stack, perform a requested op-
eration, and push the result:
+Addition.
−Subtraction.
*Multiplication.
/Division.
%Remainder.
^Exponentiation (second-to-top value is the base, top value is the exponent).
176 | Linux Pocket Guide

To pop the top value from the stack, perform a requested operation,
and push the result:
vSquare root.
Examples:
$ dc
4 5 + p Print the sum of 4 and 5
9
2 3 ^ p Raise 2 to the 3rd power and print the result
8
10 * p Multiply the stack top by 10 and print the result
80
f Print the stack
80
9
+p Pop the top two stack values and print their sum
89
Dates and Times
xclock Display a graphical clock.
cal Print a calendar.
date Print or set the date and time.
ntpdate Set the system time using a remote timeserver.
Need a date? How about a good time? Try these programs to
display and set dates and times on your system.
xclock stdin stdout - file -- opt --help --version
xclock [options]
The xclock command displays a simple, graphical clock in an X
window. If you prefer a different style, there are other clock pro-
grams included, such as oclock (round clock) and the taskbar clocks
displayed by GNOME and KDE.
Dates and Times | 177

Useful options
-analog An analog clock with hands.
-digital [-brief] A digital clock with full date and time; add -brief to show
only the time.
-update NUpdate the time display every N seconds.
cal stdin stdout - file -- opt --help --version
cal [options] [month [year]]
The cal command prints a calendar—by default, the current
month:
$ cal
December 2011
Su Mo Tu We Th Fr Sa
1 2 3
4 5 6 7 8 9 10
11 12 13 14 15 16 17
18 19 20 21 22 23 24
25 26 27 28 29 30 31
To print a different calendar, supply a month and four-digit year:
cal 8 2011. If you omit the month (cal 2011), the entire year is
printed.
Useful options
-y Print the current year’s calendar.
-3 Three-month view: print the previous and next month as well.
-j Number each day by its position in the year; in our example, September 1 would
be displayed as 244, September 2 as 245, and so on.
date stdin stdout - file -- opt --help --version
date [options] [format]
The date command prints dates and times. The results will depend
on your system’s locale settings (for your country and language). In
this section we assume an English, US-based locale.
178 | Linux Pocket Guide

By default, date prints the system date and time in the local time-
zone:
$ date
Sun Sep 28 21:01:31 EDT 2003
You can format the output differently by supplying a format string
beginning with a plus sign:
$ date '+%D'
09/28/03
$ date '+The time is %l:%M %p on a beautiful %A in %B'
The time is 9:01 PM on a beautiful Sunday in September
Here is a sampling of the date command’s many formats:
Format Meaning Example (US English)
Whole dates and times:
%c Full date and time, 12-hour clock Sun 28 Sep 2003,
09:01:25 PM EDT
%D Numeric date, 2-digit year 09/28/03
%x Numeric date, 4-digit year 09/28/2003
%T Time, 24-hour clock 21:01:25
%X Time, 12-hour clock 09:01:25 PM
Words:
%a Day of week (abbreviated) Sun
%A Day of week (complete) Sunday
%b Month name (abbreviated) Sep
%B Month name (complete) September
%Z Time zone EDT
%p AM or PM PM
Numbers:
%w Day of week (0–6, 0=Sunday) 0
%u Day of week (1–7, 1=Monday) 7
%d Day of month, leading zero 02
%e Day of month, leading blank 2
%j Day of year, leading zeroes 005
Dates and Times | 179

Format Meaning Example (US English)
%m Month number, leading zero 09
%y Year, 2 digits 03
%Y Year, 4 digits 2003
%M Minute, leading zero 09
%S Seconds, leading zero 05
%l Hour, 12-hour clock, leading blank 9
%I Hour, 12-hour clock, leading zero 09
%k Hour, 24-hour clock, leading blank 9
%H Hour, 24-hour clock, leading zero 09
%N Nanoseconds 737418000
%s Seconds since the beginning of Linux time: mid-
night January 1, 1970
1068583983
Other:
%n Newline character
%t Tab character
%% Percent sign %
Through its options, date can also display other dates and times.
Useful options
-d date_or_time_string Display the given date_or_time_string, for-
matted as you wish.
-r filename Display the last-modified timestamp of the given file,
formatted as you wish.
-s date_or_time_string Set the system date and/or time; only the superuser
can do this.
ntpdate stdin stdout - file -- opt --help --version
ntpdate timeserver
180 | Linux Pocket Guide

The ntpdate command sets the current system time by contacting
a timeserver machine on the network. You must be root to set the
system time.
# /usr/sbin/ntpdate timeserver.someplace.edu
7 Sep 21:01:25 ntpdate[2399]: step time server 178.99.1.8
offset 0.51 sec
To keep your system date in sync with a timeserver over long peri-
ods, use the daemon ntpd instead; see http://www.ntp.org. If you
don’t know a local timeserver, search Google for “public ntp time
server”.
Graphics and Screensavers
eog Display graphics files.
geeqie Display graphics files and slideshows.
ksnapshot Take a screenshot (screen capture).
gimp Edit graphics files.
dia Draw structured diagrams.
gnuplot Create graphs and plots.
xscreensaver Run a screensaver.
For viewing or editing graphics, Linux has handy tools with
tons of options. We won’t cover these programs in much detail,
just enough to pique your interest. Our goal is to make you
aware of the programs so you can explore further on your own.
eog stdin stdout - file -- opt --help --version
eog [options] [files]
The eog (Eye of Gnome) image viewer displays graphics files in a
variety of formats. If you invoke it for a single file, it displays the
file. Invoked on two or more files:
$ eog file1.jpg file2.gif file3.pbm
it displays each in a separate window.
Graphics and Screensavers | 181

Useful options
-f Display images in full-screen mode.
-s Display images in a slideshow.
geeqie stdin stdout - file -- opt --help --version
geeqie [options] [file]
The geeqie image viewer (the successor to gqview) displays graphics
files in a variety of formats, and can automatically switch from one
image to the next, like a slideshow. By default, it displays the names
of all graphics files in the current directory, and you can select
names to display the images. The onscreen menus are straightfor-
ward, so explore them and try things out. Type ^q to quit.
Useful options
-f Display images in full-screen mode. (Toggle between full-screen mode and
window mode by typing v.)
-s Display images in a slideshow. (Turn the slideshow on and off by typing s.)
ksnapshot stdin stdout - file -- opt --help --version
ksnapshot [options]
The ksnapshot command is a versatile screen-capture utility. Simply
run:
$ ksnapshot
and it takes a screenshot, displaying it in miniature. From there you
can save it to a graphics file or take another screenshot. The file
format will match whatever file extension you choose: .jpg to pro-
duce a JPEG file, .bmp for a Windows bitmap, .pbm for a portable
bitmap, .eps for encapsulated PostScript, .ico for a Windows icon,
and so forth. For a list of supported file formats, click the Save
Snapshot button and view the selections under Filter. For more in-
formation, click the Help button in the ksnapshot window, or run
ksnapshot --help-all from the shell.
182 | Linux Pocket Guide

gimp stdin stdout - file -- opt --help --version
gimp [options] [files]
The GIMP (GNU Image Manipulation Program) is a full-featured
image-editing package that rivals Adobe Photoshop in power and
scope. It is fairly complex to use, but the results can be stunning.
Visit http://www.gimp.org for full information. To run the program,
type:
$ gimp
To edit a particular file, type:
$ gimp filename
If the GIMP is more complicated than you need, download the xv
program for simpler edits, from http://www.trilon.com/xv. Simply
display the graphics file:
$ xv myfile.jpg
and click the right mouse button on the image. A menu of editing
tools appears.
dia stdin stdout - file -- opt --help --version
dia [options] [files]
The dia program creates structured drawings such as flowcharts,
schematics, entity-relation (ER) diagrams, and more. It’s like a mini
Microsoft Visio. Diagrams can be exported in popular formats like
JPEG, PDF, and PNG. See http://live.gnome.org/Dia for full details.
gnuplot stdin stdout - file -- opt --help --version
gnuplot [options] [files]
The gnuplot program creates graphs, plotting points and connect-
ing them with lines and curves, and saves them in a wide variety of
printer and plotter formats, such as PostScript. To use gnuplot, you
need to learn a small but powerful programming language. Here’s
an example of plotting the curve y = x2 from x = 1 to 10, which will
appear in an X window on your display:
Graphics and Screensavers | 183

$ gnuplot
gnuplot> plot [1:10] x**2
gnuplot> quit
To do the same, saving the results as a PostScript file:
$ cat myfile
set terminal postscript
plot [1:10] x**2
$ gnuplot < myfile > output.ps
See http://www.gnuplot.info for full details.
xscreensaver stdin stdout - file -- opt --help --version
xscreensaver
The xscreensaver system is a versatile screen saver with hundreds
of animations available. KDE and GNOME have their own screen-
savers and options, but if you prefer, you can run xscreensaver
manually.
xscreensaver runs in the background, and you can control it in var-
ious ways:
After a period of inactivity.
You can configure xscreensaver to run automatically after a
period of inactivity, such as five minutes.
As a screen locker.
xscreensaver can also lock your screen on request. Your dis-
play will remain locked until you enter your login password.
On the command line.
Run xscreensaver-demo to preview the many animations and
set things up the way you like. Then run xscreensaver-com
mand to control the program’s behavior:
$ xscreensaver-command -activate Blank now
$ xscreensaver-command -next Choose next animation
$ xscreensaver-command -prev Choose previous animation
$ xscreensaver-command -cycle Choose random animation
$ xscreensaver-command -lock Lock the screen now
$ xscreensaver-command -exit Quit
184 | Linux Pocket Guide

Audio
amarok, rhythmbox, xmms Audio file players (MP3, WAV, OGG).
grip CD player, ripper, and MP3 encoder.
cdparanoia Rip audio from CDs to WAV files.
lame Convert from WAV to MP3.
id3tag Edit ID3 tags.
audacity Edit audio files.
k3b CD burner with graphical interface.
Audio is alive and well on Linux systems. Most of the programs
we’ll cover have intuitive user interfaces, tons of features, and
reasonable documentation, so we won’t discuss them in detail.
Mainly, we want you to have a taste of what’s available and
possible. Visit http://linux-sound.org/ for a directory of Linux
audio and MIDI programs.
xmms stdin stdout - file -- opt --help --version
xmms [options] [files]
Linux has numerous audio file players, including xmms, amarok,
rhythmbox, and more. We’ll cover xmms, but your system probably
has several of these programs installed.
The easiest way to get started with xmms is to try it, either with no
arguments:
$ xmms
or providing audio files on the command line:
$ xmms file1.mp3 file2.wav file3.ogg ...
Here are some useful actions.
Action Meaning
Right-click on titlebar Display main menu
Click PL button Display playlist (click Add to add files)
Audio | 185

Action Meaning
Click EQ button Display graphic equalizer
Double-click track in
playlist
Play track
Right-click on playlist Display playlist menu
grip stdin stdout - file -- opt --help --version
grip [options]
grip is a CD player and an audio ripper: it can play CDs, extract
audio from CDs, save it in WAV files, and convert the files to MP3s.
It has extensive built-in help and fairly intuitive controls.
cdparanoia stdin stdout - file -- opt --help --version
cdparanoia [options] span [outfile]
The cdparanoia command reads (rips) audio data from a CD and
stores it in WAV files (or other formats: see the manpage). Common
uses are:
$ cdparanoia N
Rip track N to a file.
$ cdparanoia -B
Rip all tracks on the CD into separate files.
$ cdparanoia -B 2-4
Rip tracks 2, 3, and 4 into separate files.
$ cdparanoia 2-4
Rip tracks 2, 3, and 4 into a single file.
If you have difficulty accessing your drive, try running cdparanoia
-Qvs (“search for CD-ROM drives verbosely”) and look for clues.
186 | Linux Pocket Guide

lame stdin stdout - file -- opt --help --version
lame [options] file.wav
The lame command converts a WAV audio file (say, song.wav) into
an MP3 file:
$ lame song.wav song.mp3
It has over 100 options to control bit rate, convert other formats,
add ID3 tags, and much more.
id3tag stdin stdout - file -- opt --help --version
id3tag [options] files
The id3tag command adds or modifies ID3 tags in an MP3 file. For
example, to tag an MP3 file with a new title and artist, run:
$ id3tag -A "My Album" -a "Loud Linux Squad" song.mp3
Useful options
-A name Set the artist’s name
-a title Set the album title
-s title Set the song title
-y year Set the year
-t number Set the track number
-g number Set the genre number
audacity stdin stdout - file -- opt --help --version
audacity [files]
audacity is a graphical audio file editor for making changes to WAV,
MP3, and Ogg files. Once a file is loaded, you can view its waveform,
cut and paste audio data, apply filters and special effects to the
sound (echo, bass boost, reverse, etc.), and more. See http://audacity
.sourceforge.net/ for details.
Audio | 187

k3b stdin stdout - file -- opt --help --version
k3b [options]
k3b is a CD burning program with a graphical user interface. (For a
command-line interface, see cdrecord.) Run the program and when
the main window appears, visit the File menu. Browse to New
Project and select the type of disc you want to burn. A New Data
Project simply burns files and directories to the disc so it can be read
on other computers. New Music Project and New Video Project
should be self-explanatory. Once you’ve selected the type of
project, drag your desired files or folders from the top half of the
window (showing your filesystem) to the bottom half (listing what
will be burned). When done, click the Burn icon.
The Tools menu also has useful commands. These include copying
discs, working with ISO images, and ripping audio and video discs
to files.
Video
mplayer Video file playback.
gxine Simple DVD player.
kino Video editor.
HandBrake Video ripper.
Linux has some fine programs for common video operations,
such as playback, editing, and ripping. We’ll briefly survey a
few popular ones.
mplayer stdin stdout -file -- opt --help --version
mplayer [options] video_files...
The mplayer command plays video files in many formats: MPEG,
AVI, MOV, and more:
$ mplayer myfile.avi
188 | Linux Pocket Guide

While the video is playing, press the space bar to pause and resume,
the cursor keys to jump forward and backward in time, and Q to
quit. The program has dozens of options on its manpage, and you
can learn more at http://www.mplayerhq.hu.
Other popular video players for Linux include vlc (http://www.vid
eolan.org/vlc/), kaffeine (http://kaffeine.kde.org/), and xine (http://
sourceforge.net/projects/xine/).
gxine stdin stdout -file -- opt --help --version
gxine [options] [source]
The gxine command displays a graphical video player that supports
DVDs and video files. Just type gxine to get started with the graph-
ical user interface, or provide a video source such as a file:
$ gxine myfile.mpeg
or a Media Resource Locator (MRL):
$ gxine dvd://home/jsmith/myvideo.iso
kino stdin stdout -file -- opt --help --version
kino [file]
kino is a video editor that can split videos into parts and reassemble
them in another order. It can also capture video (if you have com-
patible hardware) and play it back. An overview of kino and video
editing is beyond the scope of this book, so visit http://kinodv.org/
for full details.
HandBrake stdin stdout -file -- opt --help --version
ghb [options]
HandBrakeCLI [options] -i device -o file
HandBrake is a video ripper (transcoder) that can copy video from
DVDs and Blu-ray discs to files, as long as the discs are not copy-
protected. It comes as a graphical program, ghb, and a
Video | 189

command-line program, HandBrakeCLI (note the capital letters, un-
usual for a Linux command). To get started, we recommend ghb.
Full details can be found at http://handbrake.fr.
Installing Software
You will probably want to add further software to your Linux
system from time to time. The method of installation varies,
however, because Linux has multiple standards for “packaged”
software. Your distro might do installations on the command
line, with one or more GUI tools, or both. The most common
package types are:
*.deb files
Debian packages, used by Debian, Ubuntu, and other dis-
tros. We’ll cover the package manager aptitude for in-
stalling software in this format.
*.rpm files
RPM Package Manager files are used by Red Hat, Fedora,
CentOS, and other distros. These are installed by the
package managers yum, rpm, and on older systems, up2date.
*.tar.gz files, *.tar.Z files, and *.tar.bz2 files
Compressed tar files. This kind of file isn’t an installable
“package” but a collection of files created by tar and com-
pressed with gzip (.gz), bzip2 (.bz2), or compress (.Z).
Whereas Debian and RPM packages can be installed with
a single command, compressed tar files usually require
multiple manual steps.
You must learn which package type is used by your Linux sys-
tem. In general, you cannot (or should not) mix package types
like Debian and RPM. Fortunately, modern Linux systems are
usually set up with a package manager when initially installed,
so all you need to do is use it.
Most new software must be installed by the superuser, so you’ll
need to run the su command (or equivalent) before installation.
For example:
190 | Linux Pocket Guide

$ su -l
Password: ********
# rpm -ivh mypackage.rpm
...etc...
or with sudo:
$ sudo rpm -ivh mypackage.rpm
Password: ********
To locate new software, run the “search” utility of your pack-
age manager, check your Linux DVDs or CD-ROMs, or visit
fine sites like these:
http://freecode.com/
http://freshrpms.net/
http://rpmfind.net/
http://sourceforge.net/
yum stdin stdout - file -- opt --help --version
yum [options] [packages]
yum is a popular package manager for RPM packages (.rpm files)
found on Red Hat Enterprise Linux, Fedora, CentOS, and other
distros. It is primarily a command-line tool, though you may en-
counter graphical front-ends for yum, such as PackageKit on Fedora
Linux.
The following table lists common operations with yum. For opera-
tions on local files, which yum does not provide, we use the rpm
command directly.
Action yum command
Search for a package that meets your needs
(supports wildcards * and ?).
yum search command_name
Check if a package is installed. yum list installed
package_name
Download a package but don’t install it. This
requires installing the downloadonly plu-
gin first by running:
yum install yum-downloadonly
yum --downloadonly install
package_name
Installing Software | 191

Action yum command
Download and install a package. yum install package_name
Install a package file. rpm -ivh package.rpm
Learn about a package. yum info package_name
List the contents of a package. rpm -ql package_name
Discover which package an installed file be-
longs to.
yum provides /path/to/file
Update an installed package. yum update package_name
Remove an installed package. yum remove package_name
List all packages installed on the system. yum list installed | less
Check for updates for all packages on the sys-
tem.
yum check-update
Update all packages on the system. yum update
rpm stdin stdout - file -- opt --help --version
rpm [options] [files]
If you prefer to download and install RPM packages by hand, use
rpm, the same package-management program that yum runs behind
the scenes. Unlike yum, rpm works locally on your computer: it does
not search software archives on the Internet for new packages.
rpm not only installs the software, but also makes sure your system
has all prerequisites. For example, if package superstuff requires
package otherstuff that you haven’t installed, rpm will not install
superstuff. If your system passes the test, however, rpm completely
installs the software.
RPM filenames typically have the form name-version.architec
ture.rpm. For example, emacs-23.1-17.i386.rpm indicates the
emacs package, version 23.1-17, for i386 (Intel 80386 and higher)
machines. Be aware that rpm sometimes requires a filename argu-
ment (like emacs-23.1-17.i386.rpm) and other times just the pack-
age name (like emacs).
192 | Linux Pocket Guide

Action rpm command
Check if a package is installed rpm -q package_name
Install a package file rpm -ivh package_file.rpm
Learn about a package rpm -qi package_name
List the contents of a package rpm -ql package_name
Discover which package an installed file belongs
to
rpm -qf /path/to/file
Update an installed package rpm -Uvh package_file.rpm
Remove an installed package rpm -e package_name
List all packages installed on the system rpm -qa | less
aptitude stdin stdout - file -- opt --help --version
aptitude [options] [packages]
aptitude is a package manager for the command line that manipu-
lates Debian (.deb) packages. Some older Debian package manag-
ers, including Advanced Packaging Tool (the apt-get command
suite) and dpkg, are also in wide use today. (In our table of com-
mands, we’ll use dpkg to work with local files, since aptitude does
not do this.) You’ll also encounter graphical package managers like
synaptic and Ubuntu’s update-manager.
Action yum command
Search for a package that meets
your needs
aptitude search package_name
Check if a package is installed
(examine the output for “State: not
installed” or “State: installed”)
aptitude show package_name
Download a package but don’t in-
stall it
aptitude download package_name
Download and install a package aptitude install package_name
Install a package file dpkg -i package_file.deb
Learn about a package aptitude show package_name
List the contents of a package dpkg -L package_name
Installing Software | 193

Action yum command
Discover which package an installed
file belongs to
dpkg -S /path/to/file
Update an installed package aptitude safe-upgrade package_name
Remove an installed package aptitude remove package_name
List all packages installed on the
system
aptitude search '~i' | less
Check for updates for all packages
on the system
aptitude --simulate full-upgrade
Update all packages on the system aptitude full-upgrade
tar.gz and tar.bz2 Files
Packaged software files with names ending .tar.gz and .tar.bz2 typ-
ically contain source code that you’ll need to compile (build) before
installation. Typical build instructions are:
1. List the package contents, one file per line. Assure yourself that
each file, when extracted, won’t overwrite something precious
on your system, either accidentally or maliciously:21
$ tar tvzf package.tar.gz | less For gzip files
$ tar tvjf package.tar.bz2 | less For bzip2 files
2. If satisfied, extract the files into a new directory. Run these
commands as yourself, not as root, for safety reasons:
$ mkdir newdir
$ cd newdir
$ tar xvzf <path> package.tar.gz For gzip files
$ tar xvjf <path> package.tar.bz2 For bzip2 files
3. Look for an extracted file named INSTALL or README. Read
it to learn how to build the software, for example:
$ cd newdir
$ less INSTALL
21. A maliciously designed tar file could include an absolute file path
like /etc/passwd designed to overwrite your system password file.
194 | Linux Pocket Guide

4. Usually the INSTALL or README file will tell you to run a
script called configure in the current directory, then run
make, then run make install. Examine the options you may
pass to the configure script:
$ ./configure --help
Then install the software:
$ ./configure options
$ make
$ su
Password: *******
# make install
Programming with Shell Scripts
Earlier when we covered the shell (bash), we said it had a pro-
gramming language built in. In fact, you can write programs,
or shell scripts, to accomplish tasks that a single command
cannot. Like any good programming language, the shell has
variables, conditionals (if-then-else), loops, input and output,
and more. Entire books have been written on shell scripting,
so we’ll be covering the bare minimum to get you started. For
full documentation, run info bash, search the Web, or pick up
a more in-depth O’Reilly book.
Whitespace and Linebreaks
bash shell scripts are very sensitive to whitespace and line-
breaks. Because the “keywords” of this programming language
are actually commands evaluated by the shell, you need to sep-
arate arguments with whitespace. Likewise, a linebreak in the
middle of a command will mislead the shell into thinking the
command is incomplete. Follow the conventions we present
here and you should be fine.
If you must break a long command into multiple lines, end each
line (except the last) with a single \ character, which means
“continued on next line”:
Programming with Shell Scripts | 195

$ grep abcdefghijklmnopqrstuvwxyz file1 file2 \
file3 file4
Variables
We described shell variables earlier:
$ MYVAR=6
$ echo $MYVAR
6
All values held in variables are strings, but if they are numeric,
the shell will treat them as numbers when appropriate.
$ NUMBER="10"
$ expr $NUMBER + 5
15
When you refer to a variable’s value in a shell script, it’s a good
idea to surround it with double quotes to prevent certain run-
time errors. An undefined variable, or a variable with spaces in
its value, will evaluate to something unexpected if not sur-
rounded by quotes, causing your script to malfunction.
$ FILENAME="My Document" Space in the name
$ ls $FILENAME Try to list it
ls: My: No such file or directory Oops! ls saw 2 arguments
ls: Document: No such file or directory
$ ls -l "$FILENAME" List it properly
My Document ls saw only 1 argument
If a variable name is evaluated adjacent to another string, sur-
round it with curly braces to prevent unexpected behavior:
$ HAT="fedora"
$ echo "The plural of $HAT is $HATs"
The plural of fedora is Oops! No variable "HATs"
$ echo "The plural of $HAT is ${HAT}s"
The plural of fedora is fedoras What we wanted
Input and Output
Script output is provided by the echo and printf commands,
which we described in “Screen Output” on page 168:
196 | Linux Pocket Guide

$ echo "Hello world"
Hello world
$ printf "I am %d years old\n" `expr 20 + 20`
I am 40 years old
Input is provided by the read command, which reads one line
from standard input and stores it in a variable:
$ read name
Sandy Smith <ENTER>
$ echo "I read the name $name"
I read the name Sandy Smith
Booleans and Return Codes
Before we can describe conditionals and loops, we need to ex-
plain the concept of a Boolean (true/false) test. To the shell,
the value 0 means true or success, and anything else means false
or failure. (Think of zero as “no error” and other values as error
codes.)
Additionally, every Linux command returns an integer value,
called a return code or exit status, to the shell when the com-
mand exits.
You can see this value in the special variable $?:
$ cat myfile
My name is Sandy Smith and
I really like Ubuntu Linux
$ grep Smith myfile
My name is Sandy Smith and A match was found...
$ echo $?
0 ...so return code is “success”
$ grep aardvark myfile
$ echo $? No match was found...
1 ...so return code is “failure”
The return codes of a command are usually documented on its
manpage.
Programming with Shell Scripts | 197

test and “[”
The test command (built into the shell) will evaluate simple
Boolean expressions involving numbers and strings, setting its
exit status to 0 (true) or 1 (false):
$ test 10 -lt 5 Is 10 less than 5?
$ echo $?
1 No, it isn’t
$ test -n "hello" Does the string “hello” have nonzero length?
$ echo $?
0 Yes, it does
Here are common test arguments for checking properties of
integers, strings, and files:
File tests
-d name File name is a directory
-f name File name is a regular file
-L name File name is a symbolic link
-r name File name exists and is readable
-w name File name exists and is writable
-x name File name exists and is executable
-s name File name exists and its size is nonzero
f1 -nt f2 File f1 is newer than file f2
f1 -ot f2 File f1 is older than file f2
String tests
s1 = s2 String s1 equals string s2
s1 != s2 String s1 does not equal string s2
-z s1 String s1 has zero length
-n s1 String s1 has nonzero length
Numeric tests
a -eq bIntegers a and b are equal
a -ne bIntegers a and b are not equal
a -gt bInteger a is greater than integer b
198 | Linux Pocket Guide

a -ge bInteger a is greater than or equal to integer b
a -lt bInteger a is less than integer b
a -le bInteger a is less than or equal to integer b
Combining and negating tests
t1 -a t2 And: Both tests t1 and t2 are true
t1 -o t2 Or: Either test t1 or t2 is true
! your_test Negate the test, i.e., your_test is false
\( your_test \) Parentheses are used for grouping, as in algebra
test has an unusual alias, “[” (left square bracket), as a short-
hand for use with conditionals and loops. If you use this short-
hand, you must supply a final argument of “]” (right square
bracket) to signify the end of the test. The following tests are
identical to the previous two:
$ [ 10 -lt 5 ]
$ echo $?
1
$ [ -n "hello" ]
$ echo $?
0
Remember that “[” is a command like any other, so it is fol-
lowed by individual arguments separated by whitespace. So if
you mistakenly forget some whitespace:
$ [ 5 -lt 4] No space between 4 and ]
bash: [: missing ']'
then test thinks the final argument is the string “4]” and com-
plains that the final bracket is missing.
true and false
bash has built-in commands true and false, which simply set
their exit status to 0 and 1, respectively.
$ true
$ echo $?
0
$ false
Programming with Shell Scripts | 199

$ echo $?
1
These will be useful when we discuss conditionals and loops.
Conditionals
The if statement chooses between alternatives, each of which
may have a complex test. The simplest form is the if-then
statement:
if command If exit status of command is 0
then
body
fi
For example:
if [ `whoami` = "root" ]
then
echo "You are the superuser"
fi
Next is the if-then-else statement:
if command
then
body1
else
body2
fi
For example:
if [ `whoami` = "root" ]
then
echo "You are the superuser"
else
echo "You are an ordinary dude"
fi
Finally, we have the form if-then-elif-else, which may have
as many tests as you like:
if command1
then
body1
elif command2
200 | Linux Pocket Guide

then
body2
elif ...
...
else
bodyN
fi
For example:
if [ `whoami` = "root" ]
then
echo "You are the superuser"
elif [ "$USER" = "root" ]
then
echo "You might be the superuser"
elif [ "$bribe" -gt 10000 ]
then
echo "You can pay to be the superuser"
else
echo "You are still an ordinary dude"
fi
The case statement evaluates a single value and branches to an
appropriate piece of code:
echo "What would you like to do?"
read answer
case "$answer" in
eat)
echo "OK, have a hamburger"
;;
sleep)
echo "Good night then"
;;
*)
echo "I'm not sure what you want to do"
echo "I guess I'll see you tomorrow"
;;
esac
The general form is:
case string in
expr1)
body1
;;
expr2)
Programming with Shell Scripts | 201

body2
;;
...
exprN)
bodyN
;;
*)
bodyelse
;;
esac
where string is any value, usually a variable value like
$myvar, and expr1 through exprN are patterns (run the com-
mand info bash reserved case for details), with the final * like
a final “else.” Each set of commands must be terminated
by ;; (as shown):
case $letter in
X)
echo "$letter is an X"
;;
[aeiou])
echo "$letter is a vowel"
;;
[0-9])
echo "$letter is a digit, silly"
;;
*)
echo "The letter '$letter' is not supported"
;;
esac
Loops
The while loop repeats a set of commands as long as a condition
is true.
while command While the exit status of command is 0
do
body
done
For example, if this is the script myscript:
i=0
while [ $i -lt 3 ]
202 | Linux Pocket Guide

do
echo "$i"
i=`expr $i + 1`
done
$ ./myscript
0
1
2
The until loop repeats until a condition becomes true:
until command While the exit status of command is nonzero
do
body
done
For example:
i=0
until [ $i -ge 3 ]
do
echo "$i"
i=`expr $i + 1`
done
$ ./myscript
0
1
2
The for loop iterates over values from a list:
for variable in list
do
body
done
For example:
for name in Tom Jack Harry
do
echo "$name is my friend"
done
$ ./myscript
Tom is my friend
Jack is my friend
Harry is my friend
Programming with Shell Scripts | 203

The for loop is particularly handy for processing lists of files;
for example, all files of a certain type in the current directory:
for file in *.doc *.docx
do
echo "$file is a stinky Microsoft Word file"
done
Be careful to avoid infinite loops, using while with the condi-
tion true, or until with the condition false:
while true Beware: infinite loop!
do
echo "forever"
done
until false Beware: infinite loop!
do
echo "forever again"
done
Use break or exit to terminate these loops based on some con-
dition inside their bodies.
Break and Continue
The break command jumps out of the nearest enclosing loop.
Consider this simple script called myscript:
for name in Tom Jack Harry
do
echo $name
echo "again"
done
echo "all done"
$ ./myscript
Tom
again
Jack
again
Harry
again
all done
204 | Linux Pocket Guide

Now with a break:
for name in Tom Jack Harry
do
echo $name
if [ "$name" = "Jack" ]
then
break
fi
echo "again"
done
echo "all done"
$ ./myscript
Tom
again
Jack The break occurs after this line
all done
The continue command forces a loop to jump to its next
iteration.
for name in Tom Jack Harry
do
echo $name
if [ "$name" = "Jack" ]
then
continue
fi
echo "again"
done
echo "all done"
$ ./myscript
Tom
again
Jack The continue occurs after this line
Harry
again
all done
break and continue also accept a numeric argument (break N,
continue N) to control multiple layers of loops (e.g., jump out
of N layers of loops), but this kind of scripting leads to spaghetti
code and we don’t recommend it.
Programming with Shell Scripts | 205

Creating and Running Shell Scripts
To create a shell script, simply put bash commands into a file
as you would type them. To run the script, you have three
choices:
Prepend #!/bin/bash and make the file executable
This is the most common way to run scripts. Add the line:
#!/bin/bash
to the very top of the script file. It must be the first line of
the file, left-justified. Then make the file executable:
$ chmod +x myscript
Optionally, move it into a directory in your search path.
Then run it like any other command:
$ myscript
If the script is in your current directory, but the current
directory “.” is not in your search path, you’ll need to pre-
pend “./” so the shell finds the script:
$ ./myscript
The current directory is generally not in your search path
for security reasons. (You wouldn’t want a local script
named (say) “ls” to override the real ls command.)
Pass to bash
bash will interpret its argument as the name of a script and
run it.
$ bash myscript
Run in current shell with “.” or source
The preceding methods run your script as an independent
entity that has no effect on your current shell.22 If you
want your script to make changes to your current shell
(setting variables, changing directory, and so on), it can
22. That’s because the script runs in a separate shell (a subshell or child
shell) that cannot alter the original shell.
206 | Linux Pocket Guide

be run in the current shell with the source or “.”
command:
$ . myscript
$ source myscript
Command-Line Arguments
Shell scripts can accept command-line arguments and options
just like other Linux commands. (In fact, some common Linux
commands are scripts.) Within your shell script, you can refer
to these arguments as $1, $2, $3, and so on.
$ cat myscript
#!/bin/bash
echo "My name is $1 and I come from $2"
$ ./myscript Johnson Wisconsin
My name is Johnson and I come from Wisconsin
$ ./myscript Bob
My name is Bob and I come from
Your script can test the number of arguments it received with
$#:
if [ $# -lt 2 ]
then
echo "$0 error: you must supply two arguments"
else
echo "My name is $1 and I come from $2"
fi
The special value $0 contains the name of the script, and is
handy for usage and error messages:
$ ./myscript Bob
./myscript error: you must supply two arguments
To iterate over all command-line arguments, use a for loop
with the special variable $@, which holds all arguments:
for arg in $@
do
echo "I found the argument $arg"
done
Programming with Shell Scripts | 207

Exiting with a Return Code
The exit command terminates your script and passes a given
return code to the shell. By tradition, scripts should return 0
for success and 1 (or other nonzero value) on failure. If your
script doesn’t call exit, the return code is automatically 0.
if [ $# -lt 2 ]
then
echo "$0 error: you must supply two arguments"
exit 1
else
echo "My name is $1 and I come from $2"
fi
exit 0
$ ./myscript Bob
./myscript error: you must supply two arguments
$ echo $?
1
Beyond Shell Scripting
Shell scripts are fine for many purposes, but Linux comes with
much more powerful scripting languages, as well as compiled
programming languages. Here are a few.
Language Program To get started...
C, C++ gcc, g++ man gcc
http://www.gnu.org/software/gcc/
.NET mono man mono
http://www.mono-project.com/
Java javac http://java.sun.com/
Perl perl man perl
http://www.perl.com/
PHP php man php
http://www.php.net/
Python python man python
208 | Linux Pocket Guide

Language Program To get started...
http://www.python.org/
Ruby ruby http://ruby-lang.org/
Final Words
Although we’ve covered many commands and capabilities of
Linux, we’ve just scratched the surface. Most distributions
come with thousands of other programs. We encourage you to
continue reading, exploring, and learning the capabilities of
your Linux systems. Good luck!
Acknowledgments
I am very grateful to the many readers who purchased the first
edition of this book, making the second edition possible. My
heartfelt thanks also go to my long-time editor Mike Loukides
and new editor Andy Oram, the O’Reilly production staff, the
technical review team (Stephen Figgins, Stephen Roylance, and
Ellen Siever), Chris Connors at Vistaprint, and as always, my
wonderful family, Lisa and Sophia.
Final Words | 209

Index
Symbols
! (shell command history), 31
& (ampersand), running
background jobs, 33
&& (two ampersands), logical
and, stopping execution of
combined commands, 29
- (dash), standard input/output,
5
-- (two dashes), end of options, 5
--help option, 7
. (period)
current directory, 14
dot files, 24
shell script execution, 207
.. (two periods), parent directory,
14
.NET, 208
/ (slash), root directory, 13
; (semicolon), combine
commands using, 29
[ (left square bracket), alias for test
command, 199
\ (backward slash)
escaping special characters,
29
line continuation, 195
^C command (killing programs),
35
^Z command (suspending jobs),
33
| (pipe operator), 28
|| (two pipes), logical or, stopping
execution of combined
commands, 29
˜ (tilde), denoting home
directories, 15
A
abiword command, 59
absolute path of current directory,
printing, 42
acroread viewer, 52
Adobe Photoshop, 183
Advanced Packaging Tool, 193
alias command, 27
alphabetical order, sorting text in,
87
alpine mail program, 155
amarok command, 185
ampersand (&), running
background jobs, 33
apt-get command, 193
aptitude command, 190, 193
We’d like to hear your suggestions for improving our indexes. Send email to
index@oreilly.com.
211

arguments for commands, 3
aspell command, 105
at command, 125
atq command, 126
atrm command, 126
attributes of files, 69
changing, 69
viewing, 70
audacity sound editor, 187
audio, 185
editing, 187
playback, 185
ripping, 186
awk command, 91
vs. tr command, 86
B
background jobs, running, 32
backing up Linux files, 112
backquotes on command line, 29,
122
vs. xargs, 76
backward slash (\)
escaping special characters,
29
line continuation, 195
basename command, 42
bash (Bourne-Again Shell), 9, 22
command-line editing, 30
printf command, 170
programming with shell
scripts, 195
type command, 71, 78
bg command, 34
jobs command and, 33
bin directory, 17
Booleans in shell scripts, 175,
197
/boot directory, 19
Bourne-Again Shell (see bash),
22
braces
expansion on command line,
25
grep regular expressions, 82
shell variables, 196
break command, 204
browsing the Web, 160
bunzip2 command, 95
burning CDs and DVDs, 114,
188
bzcat command, 96
bzip2 command, 95
tar –j command and, 94
C
C and C++ languages, 208
cal command, 178
Calc program (soffice), 58
calculator programs, 174
calendar printing, 178
carriage returns, 82
case statement, 201
cat command, 44
revealing end-of-line
characters, 82
tee command and, 90
CD burning programs, 114, 188
cd command, 13, 14, 42
home directories, locating, 15
CD ripping, 186
cdparanoia command, 186
cdrecord command, 114
k3b command and, 115
cgi-bin directory, 17
chattr command, 69
checksums, comparing, 103
chfn command, 138
with useradd, 136
chgrp command, 21, 65, 140
chmod command, 21, 66
chown command, 21, 64
chsh command, 138
cksum command, 98, 103
clear command, 174
clearing the screen, 174
clock programs, 177
cmp command, 98, 101
columns of text, extracting from
files, 84
212 | Index

combining commands, 29
comm command, 98, 100
command-line arguments in shell
scripts, 207
command-line editing with bash,
30
commands, 3
combining, 29
killing, 35, 122
previous, 31
comparing files, 98
completing filenames with TAB
key, 31
compress command, 96
software installation and, 190
tar –Z command and, 94
compressing/uncompressing
files, 93
conditionals in shell scripts, 200
configure script, 195
configuring the shell, 36
connecting to networks, 150
continue command, 205
controlling processes, 122
cp command, 38
cpio command, 112
cron process, 127
crontab command, 127
CUPS printing system, 103
curl command, 162
curly-brace expressions (see
braces)
cut command, 84
D
date command, 178
watch command and, 125
dates, displaying/setting, 177,
180
dc command, 176
dd command, 112
deb file, 190
Debian packages, 190, 193
default editor, setting, 55
desktop screen capture, 182
/dev directory, 17
df command, 108
dia command, 183
diff command, 98
diff3 command, 98, 100
dig command, 148
directories, Linux, 13
changing, using cd command,
42
creating, 43
deleting empty directories, 43
home directories, 15
operating system directories,
19
printing absolute path of, 42
system directories, 16
dirname command, 42
disk usage command (du), 62
disks and filesystems, 106
DISPLAY environment variable,
25
dnsdomainname command, 142
doc directory, 17
domain name service (DNS), 146
querying, 147
domainname command, 142
dot files, 24
downloading files, 162
dpkg command, 193
du command, 62
dump command, 112
chattr command and, 69
restore command and, 112
DVD burning, 188
DVD playback, 189
DVI files, 53
dvips command, 54
E
echo command, 6, 169
script output provided by,
196
ed line editor, 91
diff –e command, 99
Index | 213

EDITOR environment variable,
46
setting default editor, 55
egrep command, 81
else statement, 200
emacs text editor, 30
bash command-line editing,
30
creating/editing files, 54
email readers, 155
lynx –emacskeys command,
162
email, 155
directory, 18, 25
emacs as reader, 155
file format, 159
log file, 159
pipelines, 158
queue, 158
readers, 155
reading over SSH connection,
156
scripting, 158
environment variables, 26
DISPLAY, 25
EDITOR, 46, 55
HOME, 15, 25
LOGNAME, 25
MAIL, 25
NNTPSERVER, 164
OLDPWD, 25
PATH, 25
preserving, in new shell, 140
printing, 134
PWD, 25
SHELL, 25
TERM, 26
USER, 26
VISUAL, 46, 55
eog (Eye of Gnome) image viewer,
181
Epiphany web browser for
GNOME, 160
escaping special characters, 29
etc directory, 17
Evolution mail program, 155
Excel documents, 59
editing with gnumeric, 59
editing with soffice, 58
exclamation point (!) for shell
history, 31
exit command, 129
exiting with return codes,
208
terminating loops, 204
terminating shells, 36
exit status of Linux commands,
197
export command, 26
expr command, 174
ext3 filesystems, 107
chattr/lsattr commands, 69
Eye of Gnome (eog) image viewer,
181
F
false command, 199
infinite loops and, 204
fdisk command, 108
fetchmail command, 159
fg command, 34
jobs command and, 33
file command, 63
filename completion, 31
files
attributes of, 60
copying, using cp command,
38
counting words, 61
creating, 54, 64
deleting, using rm command,
39
disk space of, 62
editing, 54
group ownership, 65
linking, using ln command,
39
listing, using ls command, 37
locating, 71
moving, 38
ownership, 20, 37, 64, 65
214 | Index

permissions, 20, 37, 66
renaming, using mv
command, 38
timestamps, 64
transferring between
machines, 152, 154
viewing, 44
filesystem, 13, 107
find command, 71
with xargs, 75
finger command, 133, 138
Firefox web browser, 9, 160
floppy command, 108
fonts directory, 17
for loops, 203
command-line arguments
and, 207
foreground, bringing jobs into,
34
formatting disks, 107, 108
free command, 121
fsck command, 110
shutdown command and,
130
ftp (File Transfer Protocol)
program, 154
insecure, use sftp, 154
G
g++ command, 208
gaim command, 166
gcc command, 208
geeqie image viewer, 182
ghb command, 190
ghostview command, 52
DVI files and, 54
GIMP (GNU Image Manipulation
Program), 183
GNOME graphical environment,
9
Epiphany web browser, 160
getting help with, 8
xclock command, 177
xscreensaver program, 184
gnome-system-monitor
command, 120
GNU emacs (see emacs text
editor)
gnumeric command, 59
gnuplot command, 183
Google
Groups, 164
gqview (see geeqie image viewer)
graphical desktop, 9
graphics, viewing/editing, 181,
183
graphing data, 183
grep command, 79
egrep command and, 81
ps command and, 118
grip command, 186
group ownership of files, 65
groups, 140
groupadd command, 141
groupdel command, 141
groupmod command, 142
groups command, 141
id –Gn command and, 131
gunzip command, 94
gv command, 52
DVI files and, 54
gxine command, 189
gzip command, 94
software installation and, 190
tar –z command and, 94
H
HandBrake, 190
HandBrakeCLI command, 190
hard links, 40
hardware platform, 143
head command, 46
help and tutorials, 6
--help option, 5
hexadecimal dump of binary files,
51
history command, 31
home directories, 15
Index | 215

HOME environment variable, 15,
25
host command, 147
host information, 143, 146
hostname command, 143, 144
html directory, 17
I
ICMP packets, 149
id command, 131
ID3 tags, 187
id3tag command, 187
if statement, 200
ifconfig command, 146
images, viewing/editing, 181,
183
Impress program (soffice), 58
include directory, 17
index of file locations, creating,
76
info command, 7
init.d directory, 17
input in shell scripts, 197
input/output redirection, 28
installing software, 190
instant messaging on Linux, 166
Internet domains, looking up
registration of, 148
ip command, 145
ISO files, 114, 188
J
Java language, 208
javac command, 208
job control in Linux shells, 32
jobs command, 33
jobs, scheduling, 125, 127
K
k3b command, 115, 188
kaffeine video player, 189
KDE graphical environment, 9
getting help with, 8
Konqueror web browser, 160
running shells within, 11
xclock command, 177
xscreensaver program, 184
Kerberos, 152
kernel, 8
name, 143
version, 143
kill command, 35, 122
kino command, 189
kmail command, 155
konsole command, 11
ksnapshot command, 182
L
lame command, 187
last command, 134
less command, 45
cat command and, 44
lib directory, 17
libexec directory, 17
LibreOffice, 59
line continuation character, 195
linebreaks
grep, 82
in shell scripts, 195
Windows and Macintosh, 82
links, 39
hard vs. symbolic, 40
Linux, components of, 8
linuxforums.org, 8
linuxhelp.net, 8
linuxquestions.org, 8
ln command, 39
load average, 118, 120
locate command, 76
locating files, 76
lock directory, 18
log directory, 18
logging into remote machines,
151
logname command, 130
whoami and, 131
LOGNAME environment
variable, 25
logout command, 129
216 | Index

look command, 105
loops in shell scripts, 202
/lost+found directory, 19
lpq command, 104
lpr command, 103
lprm command, 104
LPRng printing system, 103
ls command, 4, 37
displaying file attributes, 60
file protections and, 21
lsattr command, 70
lynx web browser, 160
M
m4 macro-processing language,
92
magnetic tape command (mt),
116
mail (see email)
mail command, 158
mail directory, 18, 25
MAIL environment variable, 25
mailq command, 158
make command, 195
man command, 7, 17
man directory, 17
masks and protection modes, 68
math commands, 174
md5sum command, 98, 102, 103
/media directory, 18
memory usage, displaying, 121
mesg command, 132, 168
Microsoft Excel documents, 59
editing with gnumeric, 59
editing with soffice, 58
Microsoft Visio, 183
Microsoft Word documents, 59
editing with abiword, 59
editing with soffice, 58
MIDI, 185
misc directory, 18
mkdir command, 43
mkfs command, 108
mkisofs command, 114, 115
mlocate command, 76
/mnt directory, 18
mono command, 208
mount command, 109
movie playback, 189
Mozilla
Firefox, 160
Thunderbird, 155
MP3 files
create from WAV, 187
ID3 tags, 187
playback, 185
mplayer command, 188
mt command, 116
mv command, 38
N
nameserver (see domain name
service)
.NET, 208
network connections,
establishing, 150
network interface, displaying
information about, 145,
146
news, Usenet, 164
nice command, 123
nisdomainname command, 142
nl command, 48
cat command and, 44
NNTPSERVER environment
variable, 164
nslookup command, 148
ntfs filesystems, 107
ntp daemon, 181
ntpdate command, 181
O
oclock command, 177
octal dump (od) command, 49
od (octal dump) command, 49
OLDPWD environment variable,
25
oobase command, 59
oocalc command, 58
oodraw command, 59
Index | 217

ooimpress command, 58
oomath command, 59
oowriter command, 58
OpenOffice.org package, 58
Opera web browser, 160
operating system directories, 19
operating system name, 143
options for commands, 3
output in shell scripts, 196
ownership of files, 20, 37
P
package managers, 190
PackageKit, 191
parted command, 108
partitioning disks, 106, 108
passwd command, 137
paste command, 84
patch command, context diff, 99
PATH environment variable, 25
Perl language, 208
permissions, file, 20, 37, 66
photos, viewing/editing, 181,
183
Photoshop, 183
PHP language, 208
pidof command, 122
ping command, 149
pipe (|) operator, 28
plotting data, 183
postfix mail server, 159
print screen, 182
printenv command, 134
at command and, 126
printf command, 170
script output provided by,
196
-printf option (find command),
74
printing, 103
/proc directory, 18, 19
processes, 122
controlling, 122
shell jobs vs., 117
viewing, 117
processor type, 143
procmail command, 159
ps command, 117, 122
public_html directory, 17
pwd command, 13, 42
PWD environment variable, 25
Python language, 209
Q
quoting
in shell scripts, 196
on command line, 29
R
rc.d directory, 17
rcsdiff command, 99
read command, 197
readlink command, 41
redirecting input/output, 28
regular expressions
awk command, 91
egrep command, 81
find –regex command, 72
grep command, 79, 81
less command and, 45
locate –r command, 77
remote machines, 151
file transfers, 152, 153
hostname lookup, 147
logging in with ssh, 151
logging in with telnet, 151
sending ICMP packets to,
149
traceroute command, 149
renice command, 124
reset command, 35
restore command, 112, 113
mt command and, 116
resuming jobs with fg command,
34
return codes of Linux commands,
197, 208
rhythmbox command, 185
ripping CD tracks, 186
rm command, 39
218 | Index

RMAIL program, 155
rmdir command, 43
root directory (/), 13
/root home directory for
superuser, 15
root user, 12, 139
rpm command, 190, 192
RPM Package Manager files, 190,
191, 192
rsync command, 115
Ruby language, 209
run directory, 18
S
sbin directory, 17
scheduling jobs, 125, 127
scp command, 152
screen capture, 182
screensavers, 184
viewing/editing, 184
xscreensaver program, 184
screenshots, 182
sdiff command, 98, 100
secure copy (scp) command, 152
secure shell (ssh) program, 151
sed command, 91
vs. tr command, 86
semicolon (;), combine
commands using, 29
sendmail mail server, 159
seq command, 172
setting the date and time, 180
by timeserver, 181
sfdisk command, 108
sftp command, 153
share directory, 17
SHELL environment variable, 25
shell prompts, 3
for superuser commands, 6
shell scripts, 195
break and continue in, 204
command-line arguments in,
207
conditionals in, 200
creating, 206
exiting with return codes,
208
loops in, 202
programming with, 195
running, 206
shell windows, opening, 11
shells, 9, 22
(see also bash)
changing login shell program,
138
history-related commands,
31
job control, 32
running, 11
suspending, 33
terminating, 36
vs. programs, 23
shutdown command, 129
slash (/)
directory separator, 14
root directory, 13
sleep command, 124
slocate command, 76
slrn newsreader, 164
soffice command, 58
soft links, 39
software installation, 190
sort command, 87
sound (see audio)
source command, 207
spamassassin, 159
special characters, escaping, 29
spell command, 106
spelling checkers, 105
spool directory, 18
src directory, 17
ssh (secure shell) program, 151
stackexchange.com, 8
standard output, printing
messages on, 169
stat command, 60
su command, 12
becoming superuser, 139
software installation and, 190
whoami command and, 131
subdirectories, Linux, 13
Index | 219

sudo command, 13, 140, 191
sum command, 98, 103
superusers, 12
becoming, 139
suspend command, 33
symbolic links, 39
target file of, 41
symlink, 39
synaptic package manager, 193
sync command, 70, 111
system directories, 16
system load, 118
displaying graphically, 120
T
TAB key, completing filenames
with, 31
tail command, 47
talk command, 167
tape drives, copying files to, 93,
116
tar command, 93, 113
mt command and, 116
software installation and, 190
tar files, 190, 194
bzipped, 96
compressed, 96
gzipped, 95
tee command, 90
telnet command, 151
TERM environment variable, 26
Terminal program, 11
terminating shells, 36
test command, 199
text manipulation commands, 79
Thunderbird mail program, 9,
155
tilde (˜), denoting home
directories, 15
time, displaying/setting, 177
timestamps, 64
tmp directory, 18
top command, 119
touch command, 64
creating empty files, 55
tr command, 85
traceroute command, 149
translating characters, using tr
command, 85
true command, 199
infinite loops and, 204
tty command, 168
tutorials, 56
emacs, 56
Linux help, 6
mutt mailer, 157
vim editor, 56
type command, 71, 78
locating files, 78
types of files, reporting, 63
U
umask command, 68
umount command, 110
uname command, 20, 143
uncompress command, 96
uniq command, 89
until loops, 203
infinite loops and, 204
unzip command, 97
up2date command, 190
update-manager, 193
updatedb command, 76
uptime command, 20, 118, 119
Usenet news, 164
USER environment variable, 26
useradd command, 135
userdel command, 136
usermod command, 136
users, 135
creating new accounts, 135
deleting existing users, 136
finger command and, 133
listing logged-in users, 132
modifying accounts, 136
password changes, 137
printenv command and, 134
printing login names, 130
printing user IDs, 131
superusers and, 12
220 | Index

updating information, 138
users command, 132
/usr/share/doc directory, 7
uxterm command, 11
V
/var directory, 18
variables, 25
defining, 25
in shell scripts, 196
vi (see vim text editor)
video, 188
editing, 189
playback, 188, 189
ripping, 190
viewing
files, 44
processes, 116
vim text editor, 54, 56
bash command-line editing,
30
less command, 46
lynx –vikeys command, 162
sed and, 91
Visio, 183
VISUAL environment variable,
46
setting default editor, 55
vlc video player, 189
W
w command, 119
watch command, 125
wc command, 3, 61
web browsing, 160
automation, 162
retrieving pages via command
line, 162
text-based, 160
wget command, 162
whereis command, 71, 78
locating files, 78
which command, 77
locating files, 77
while loops, 202
infinite loops and, 204
whitespace, 195
linebreaks, 82
programming with shell
scripts, 195
quoting on command line, 29
who command, 132
tee command and, 91
whoami command, 131
logname and, 131
whois command, 148
wildcard characters and the shell,
23
(see also regular expressions)
windows (shell), opening, 11
Word documents, 59
editing with abiword, 59
editing with soffice, 58
write command, 167
Writer program (soffice), 58
www directory, 17
X
X11 directory, 17, 18
xargs command, 74
vs. backquotes, 76
with find command, 75
xcalc command, 174
xclock command, 177
xdvi command, 53
xine video player, 189
xload command, 120
xmms command, 185
xpdf viewer, 52
xscreensaver command, 184
xscreensaver-demo command,
184
xterm command, 11
xv command, alternative to
GIMP, 183
xxd command, 51
xxdiff command, 98
Y
yes command, 172
Index | 221