Lip Sync Startup Guide
User Manual:
Open the PDF directly: View PDF ![]() .
.
Page Count: 9
LipSync
STARTUP GUIDE
Version 1.3 / December 2018 www.MakersMakingChange.com

2
Table of Contents
About the LipSync ................................................................................................................................. 3
What Do You Get? 3
Getting Started...................................................................................................................................... 4
Mounting 4
External Power Bank 5
Plugging the LipSync 5
Device Compatibility 6
Supporting Applications 6
Using the LipSync ................................................................................................................................. 7
Functions 7
Speed Control 8
Cleaning the LipSync 8
Mouthpiece and Filter 8
Feedback .............................................................................................................................................. 9
Troubleshooting .................................................................................................................................... 9

3
About the LipSync
The LipSync is a mouth operated joystick that allows a person who has limited or no control of
their hands and arms to control a cursor on a mobile phone, tablet or computer using only head
movement. It is an open source assistive technology design hosted by Makers Making Change, a
movement that connects volunteer makers with people with disabilities to create more affordable
assistive technology.
Open source designs are freely released by their creators for people to make for themselves,
modify or incorporate in their own designs without charge. Join the online Makers Making Change
community on http://www.makersmakingchange.com
Need a build or a friend needs a build -- join us.
Want to make a build -- join us.
Want to fund a build for a person with a disability -- join us.
What Do You Get?
Your volunteer maker should be provided with the following parts in your kit:
Part A - LipSync
Part B – Mouthpieces and filters
Part C - Mounting arm
Part D - Mounting bracket
Part E - USB splitter cable to connect to a mobile phone or tablet

4
1 Getting Started
The LipSync requires the following items to get started:
• A LipSync
• Computing device (mobile phone, tablet, or laptop) which supports a USB mouse
• External power bank (optional but recommended)
• Mounting solution for securing the LipSync to a surface
Before plugging the LipSync, make sure of the following:
1. Computing device is fully charged and/or uses an external power source (e.g. power bank).
2. Computing device and LipSync are securely mounted to a stable surface.
3. LipSync USB, adapter cable and external power source are plugged together (see Plugging
the LipSync in this section)
Mounting
Wheelchair: Every wheelchair has different points available for mounting. Common mounting
points available on power wheelchairs are the headrest rail, back of wheelchair, armrest rail,
under chair cushion, chair rail, and footplate. Try out different areas and see what works best. If
you are not familiar with mounts, consult with a local assistive technology professional.
Desk: Find a clear space on the front edge of your desk or table. Orient the mount bracket toward
the user being careful not to move the LipSync. Secure the bracket and adjust the mounting arm
so the LipSync is within easy reach. Tighten the knob when the arm is in the desired position.
Checklist for after mounting:
Are the clamp and mount secure and do not move?
Is there clearance around the wheels, wires, and chair frame with the mount attached?
Does the wheelchair fit through doorways?
Is the driving view of the user clear with no obstructions?
Is the mobile device within viewing angle of the LipSync?
Can the user easily reach the LipSync to use it?
5
External Power Bank
The LipSync can be powered using an external power supply like power bank of at least 2700mAH
or higher. This prevents the LipSync from drawing battery from your mobile or tablet. The power
bank is only supplying power to the LipSync and the mobile or tablet will not be charged.
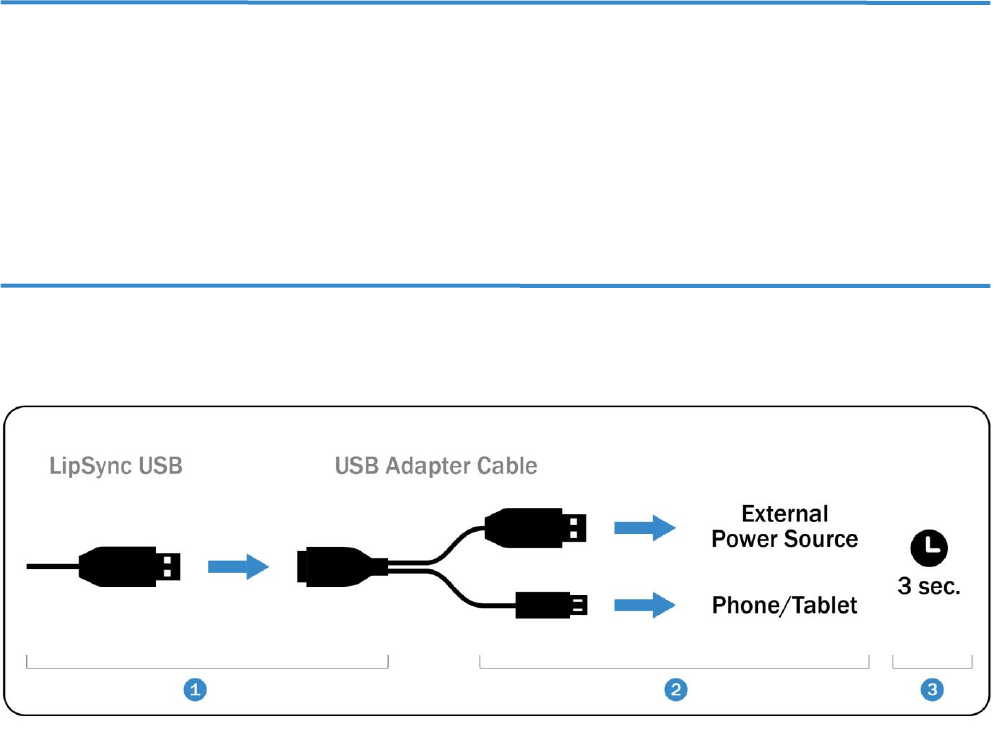
Plugging the LipSync
The order in which you connect the USB cables may affect how the LipSync functions. Plug the
cables in the following order:
1. Connect the LipSync USB to the USB adapter cable’s receptacle.
2. Connect the other end of the adapter into the computing device and external power source.
3. Wait 3 seconds for the LipSync to initialize. Initialization is complete when the LED blinks red
and green four times.
Note: If you are using a desktop or laptop the LipSync USB can be directly plugged into the
computer USB port.

6
Device Compatibility
Not all mobile phones and tablets support external
pointing devices like the LipSync or other mouse
replacements. Apple iOS does not support external
mice but an iOS compatible LipSync is currently
being developed. Only some Android mobile phones
and tablets support the LipSync. Check with the
manufacturer before purchasing. Look to see if your
device supports “USB OTG HID” or “Universal Serial
Bus On the Go Human Interface Device” profile.
Supporting Applications
Some Samsung mobile devices and tablets have an application called Assistant Menu, which puts
a small menu on the screen that allows quick access to important functions that cannot be
accessed without physically touching the device, such as the Home button, the Back button,
Zoom In and Out, Screen Capture, Volume, and Restart.
To turn on the Assistant Menu go the SETTING application → MY DEVICE → ACCESSIBILITY →
DEXTERITY AND INTERACTION → ASSISTANT MENU. A little square icon will appear
The icon will always appear on the screen and can be moved by clicking and dragging on it.
Not all phones will have Assistant Menu. If your device does not have it, applications like Assistive
Touch For Android, Back Button, Handy Soft Keys, Simple Control or Floating Toucher can be
downloaded from the Android Play Store. These applications provide access to at least the Home
and Back functions, which are important for accessing all features on the phone.
A swiping action is required on some mobile device to unlock it. This can be avoided by setting the
phone so that the SCREEN LOCK in the Settings Menu is set to NONE. Alternatively, an application
called Keep Screen On can be downloaded from the Android Play store. It will prevent the phone
from going to sleep so it does not require a swipe to unlock. However, this will drain the battery on
your phone faster.

7
2 Using the LipSync
.
IMPORTANT: Each time after plugging the LipSync to a computing device, wait 3
seconds for the LipSync to initialize before moving the mouthpiece (LED will blink red
and green 3 times). Moving it before the 3 seconds is complete will affect the usage.
Functions
FOR MOBILE DEVICES
Function
Action
Time (seconds)
Tap
Puff
1
Back button1
Sip
1
Toggle
Puff
3
Scrolling
Sip
3
Cursor drift reset
Puff
5
Home button1
Sip
5
1 The back/home functions may not work if the device uses on-screen icons. In this case, move the cursor over the icon to tap.
Useful function examples:
Toggle: unlocking pattern lock screen, keyboard swipe typing, scrolling a precise distance
Scrolling: panning through home screen pages, and scrollable apps
Cursor drift reset: resolving cursor drift issue
FOR WINDOWS PCs
Function
Action
Time (seconds)
Left click
Puff
1
Right click
Sip
1
Double-click
Puff
1 each
Toggle
Puff
3
Scrolling ( ↑ ↓ )
Sip
3
Cursor drift reset
Puff
5
Scrolling ( ↑ ↓ ← → )
Sip
5

8
Useful function examples:
Click and drag: rearrange icons on desktop, dragging files to trash bin, highlight text
Right click: open secondary menu for cut, paste, select all, etc.
Scrolling: mouse wheel scrolling instead of clicking and dragging scroll bar
Speed Control
The LipSync has 9 speed control levels with the default level set to 5 when first initialized.
To adjust the cursor sensitivity and speed, set the computing device’s cursor speed to its slowest
setting to start and then adjust the LipSync speed control buttons until you get a speed that is
comfortable for you.
Press the upward facing triangular button on the rear of the LipSync to increase the cursor
speed or the downward facing triangular button to decrease it. The red LED will blink the speed
level number (e.g. 5 blinks indicate the fifth speed level). The LED will rapidly flash red and green
10 times when the level is at the minimum or maximum speed level.
Cleaning the LipSync
The LipSync shell is 3D printed layer by layer in plastic. Due to this, tiny gaps are formed between
each layer, making the casing porous and not resistant to water. Wipe the casing with a non-
abrasive cloth lightly damped with water. Do not use any cleaning agents or soap to clean it.
Mouthpiece and Filter
Each user should have their own set of mouthpiece and filter for hygienic reasons. It has a life
cycle of 3-6 months depending on how often its used and how much saliva is trapped by the filter.
All mouthpieces and filters are new and clean, but not sterile. Please wipe with the units with the
provided Benzalkonium chloride antiseptic wipes before first use. Unused pieces should be kept
in a clean sealable bag away from the sun and used ones should be disposed of after each cycle.
Do not use wipes with alcohol content as it will destroy the plastic. Do not wash the filter.

9
3 Feedback
Your feedback is very important to us. It helps to support the engineers and designers of the
LipSync by learning what is working and what can be improved. It will help inform future
development of the LipSync. None of your feedback will be shared publicly without your consent.
Our feedback form can be found at the following link: https://tinyurl.com/yc57vkpr
Troubleshooting
Q: Why doesn’t the cursor appear on the screen when I plug in the LipSync?
Solution 1: Make a 5 second long puff to trigger the home position reset.
Solution 2: Wait 3 seconds for the LipSync to initialize. Moving the mouthpiece before the 3
seconds is complete will affect the calibration.
Solution 3: If the cursor does not appear after 3 seconds, disconnect the cable from the
computing device, reconnect again, and let the LipSync initialize for 3 seconds.
Q: Why does my cursor drift across the screen when I am not moving the LipSync?
Solution 1: Make a 5 second long puff to trigger the home position reset.
Solution 2: Wait 3 seconds for the LipSync to initialize. Moving the mouthpiece before the 3
seconds is complete will affect the calibration.
Solution 3: If the cursor does not appear after 3 seconds, disconnect the cable from the
computing device, reconnect again, and let the LipSync initialize for 3 seconds.
