CentreVu Supervisor V8 Installation And Getting Started PDF Lucent Centre Vu Install& Guide
CentreVu Supervisor Install& Getting Started Guide CentreVu Supervisor Install& Getting Started Guide
User Manual: PDF T E X T F I L E S
Open the PDF directly: View PDF ![]() .
.
Page Count: 306 [warning: Documents this large are best viewed by clicking the View PDF Link!]
- ===============
- MAIN MENU
- MASTER INDEX
- GLOSSARY
- ===============
- CentreVu® Supervisor V8 Installation and Getting Started
- Client Software License Agreement
- Table of Contents
- Preface
- 1 Introduction
- 2 Installing CentreVu Supervisor on a Local PC
- 3 Installing CentreVu Supervisor on a Shared Network Drive
- 4 Uninstalling CentreVu Supervisor
- 5 Getting Started with CentreVu Supervisor
- Overview
- Logging Into the CMS Server — First Time
- Logging Into CMS Server — After First Time
- Logging Off the CentreVu CMS Server
- Exiting Supervisor
- Changing Connection Settings
- Exploring the CentreVu Supervisor Controller
- Using the System Tray Icon
- Using Supervisor Menus
- Using Supervisor Selector Windows
- Completing Input Windows
- Completing Input Fields
- Using the Browse Button
- Using the History List
- Closing Supervisor Windows
- 6 Performing CMS Operations
- 7 Using CentreVu Supervisor Reports
- Overview
- Running a Report
- Selecting Report Run Dates
- Selecting Report Run Times
- Report Menu Bar
- Report Layouts
- Formatting Table Reports
- Formatting Chart Reports
- Minimizing Report Output Windows
- Right Mouse Button Pop-Up Menus
- Rotating a 3D Chart
- Exporting Report Data
- Copying Chart Reports
- Resizing Report Windows
- Changing Column Widths
- Selecting a Printer
- Using Page Setup
- Setting Report Threshold Highlights
- Report Options
- Exiting and Restarting Reports
- 8 Installing and Using CentreVu Terminal Emulator
- 9 Troubleshooting
- Overview
- Troubleshooting Tips
- Installation Error Messages
- Login Error Messages
- OCX and DLL Incompatibilities
- Windows Swap Files
- Installing CentreVu Supervisor
- Preserving CentreVu Supervisor User Profiles
- Resolving TCP/IP Host Name
- Proper Operation of Networking Software
- Problems with Serial/Modem Connections
- Using a Secondary System Password on the CMS Server
- A Saving as HTML
- Glossary
- Index

1
CentreVu® Supervisor
Version 8
Installation and Getting Started
585-210-928
Comcode 108502170
Issue 1
December 1999

Copyright© 1999 Lucent Technologies
All Rights Reserved
Printed in U.S.A.
Notice
Every effort was made to ensure that the information in this
document was complete and accurate at the time of printing.
However, information is subject to change.
Your Responsibility for Your System’s Security
Toll fraud is the unauthorized use of your telecommunications
system by an unauthorized party, for example, persons other
than your company’s employees, agents, subcontractors, or
persons working on your company’s behalf. Note that there may
be a risk of toll fraud associated with your telecommunications
system and, if toll fraud occurs, it can result in substantial
additional charges for your telecommunications services.
You and your system manager are responsible for the security
of your system, such as programming and configuring your
equipment to prevent unauthorized use. The system manager is
also responsible for reading all installation, instruction, and
system administration documents provided with this product in
order to fully understand the features that can introduce risk of
toll fraud and the steps that can be taken to reduce that risk.
Lucent Technologies does not warrant that this product is
immune from or will prevent unauthorized use of common-
carrier telecommunication services or facilities accessed
through or connected to it. Lucent Technologies will not be
responsible for any charges that result from such unauthorized
use.
Lucent Technologies Fraud Intervention
If you
suspect that you are being victimized
by toll fraud and you
need technical support or assistance, call Technical Service
Center Toll Fraud Intervention Hotline at 1-800-643-2353.
Trademarks
●CentreVu is a trademark of Lucent Technologies.
●DEFINITY is a registered trademark of Lucent Technologies.
●INFORMIX is a registered trademark of INFORMIX
Software, Inc.
●INTEL and Pentium are registered trademarks of Intel
Corporation.
●Microsoft, MS, Windows, and NT are registered trademarks
of Microsoft Corp.
●Sun and Solaris are registered trademarks of Sun
Microsystems, Inc.
●SPARCserver is a registered of SPARC International
licensed exclusively to Sun Microsystems, Inc.
All other product names mentioned herein are the trademarks of their
respective owners.
Ordering Information
Call: Lucent Technologies Publications Center
Voice: 1-800-457-1235
International Voice: +1-317-322-6416
Fax: 1-800-457-1764
International Fax: +1-317-322-6699
Write: Lucent Technologies BCS Publications Center
2855 N. Franklin Road
Indianapolis, IN 46219
U.S.A.
Order: CentreVu Supervisor Version 8
Installation and Getting Started guide
Document No.585-210-928
Comcode 108502170
Issue 1, December 1999
For additional documents, refer to the section entitled “Related
Documents” in the Preface.
You can be placed on a Standing Order list for this and other
documents you may need. Standing Order will enable you to
automatically receive updated versions of individual documents
or document sets, billed to account information that you provide.
For more information on Standing Orders, or to be put on a list
to receive future issues of this document, please contact the
Lucent Technologies Publications Center.
Lucent Technologies National Customer Care Center
Lucent Technologies provides a telephone number for you to
use to report problems or to ask questions about your call
center. The support telephone number is 1-800-242-2121.
Document Support Telephone Number
Lucent Technologies provides telephone numbers for you to
use to report errors or to ask questions about the information in
this document. The support telephone numbers are:
Voice: 1-888-584-6366 and
International Voice: +1-317-322-6848.
European Union Declaration of Conformity
Lucent Technologies Business Communications Systems
declares that the equipment specified in this document
conforms to the referenced European Union (EU) Directives
and Harmonized Standards listed below:
EMC Directive 89/336/EEC
Low Voltage Directive 73/23/EEC
The “CE” mark affixed to the equipment
means that it conforms to the above
Directives.
Disclaimer
Intellectual property related to this product (including
trademarks) and registered to AT&T Corporation has been
transferred to Lucent Technologies Incorporated.
Any references within this text to American Telephone and
Telegraph Corporation or AT&T should be interpreted as
references to Lucent Technologies Incorporated. The exception
is cross references to books published prior to December 31,
1996, which retain their original AT&T titles.
Heritage Statement
Lucent Technologies—formed as a result of AT&T’s planned
restructuring—designs, builds, and delivers a wide range of
public and private networks, communication systems and
software, consumer and business telephone systems, and
microelectronics components. The world-renowned Bell
Laboratories is the research and development arm for the
company.
Warranty
Lucent Technologies provides a limited warranty on this
product. Refer to the “Limited use Software License
Agreement” card provided with your package.
Client Software License Agreement
DEFINITIONS
l“Lucent” means Lucent Technologies Inc.
l“You”, “Your”, or “Licensee” means the person or business entity who purchased this License
to use this Client Software or for whom such License was purchased.
l“Client Software” means a software application that operates on a computer system that
provides resources to Client Software.
l“Documentation” means the manual and any other printed material provided by Lucent with
the Client Software.
l“License” means the License purchased and granted pursuant to this Agreement.
LICENSE AND PROTECTION
1. License Grant. Lucent grants to You, subject to the following terms and conditions, a
nonexclusive, nontransferable right to use the Client Software on multiple single user devices,
maximum simultaneous users of the Client Software being limited to the number Licensed and
authorized by Lucent. THE SERVER SOFTWARE AUTOMATICALLY PREVENTS
SIMULTANEOUS USE BY MORE THAN THE AUTHORIZED NUMBER OF USERS.
Lucent reserves all rights not expressly granted to You.
2. Protection of Software. You agree to take all reasonable steps to protect the Client Software
and Documentation from unauthorized copy or use. The Client Software source code
represents and embodies trade secrets of Lucent and/or its licensors. The source code and
embodied trade secrets are not licensed to You and any modification, addition, or deletion is
strictly prohibited. You agree not to disassemble, decompile, or otherwise reverse engineer the
Client Software in order to discover the source code and/or the trade secrets contained in the
source code or for any other reason.
To the extent that the Client Software is located in a Member State of the European
Community and You need information about the Client Software in order to achieve
interoperability of an independently created software program with the Client Software, You
shall first request such information from Lucent. Unless Lucent refuses to make such
information available, You shall not take any steps, such as reverse assembly or reverse
compilation, to derive a source code equivalent to the Client Software. Lucent may charge You
a reasonable fee for the provision of such information.
3. Copies. You may make multiple copies of the Client Software, provided You do not receive
any payment, commercial benefit, or other consideration for reproduction or use. You may not
copy Documentation unless it carries a statement that copying is permitted. All proprietary
rights notices must be faithfully reproduced and included on all copies.
4. Ownership. Ownership of, and title to, the Client Software and Documentation (including any
adaptations or copies) remains with Lucent and/or its licensors.
5. Restrictions. You agree not to rent, lease, sublicense, modify or time share the Client Software
or Documentation.
Introduction
6. Termination. This Agreement shall automatically terminate if You breach any of the terms or
conditions of this Agreement. You agree to destroy the original and all copies of the Client
Software and Documentation, or to return them to Lucent, upon Termination of this License.
LIMITED WARRANTY AND LIMITED LIABILITY
1. Compatibility. The Client Software is only compatible with certain computers and operating
systems. THE SOFTWARE IS NOT WARRANTED FOR NONCOMPATIBLE SYSTEMS.
2. Software. Lucent warrants that if the Client Software fails to substantially conform to the
specifications in the Documentations and if the Client Software is returned to the place from
which it was purchased within one (1) year from the date purchased, then Lucent will either
replace the Client Software or offer to refund the License Fee to You upon return of all copies
of the Client Software and Documentation to Lucent. In the event of a refund, the License shall
terminate.
3. DISCLAIMER OF WARRANTIES. Lucent makes NO WARRANTY, REPRESENTATION
OR PROMISE NOT EXPRESSLY SET FORTH IN THIS AGREEMENT. LUCENT
DISCLAIMS AND EXCLUDES ANY AND ALL IMPLIED WARRANTIES OF
MERCHANTABILITY OR FITNESS FOR A PARTICULAR PURPOSE. LUCENT DOES
NOT WARRANT THAT THE CLIENT SOFTWARE OR DOCUMENTATION WILL
SATISFY YOUR REQUIREMENTS OR THAT THE CLIENT SOFTWARE OR
DOCUMENTATION ARE WITHOUT DEFECT OR ERROR OR THAT THE OPERATION
OF THE SOFTWARE WILL BE UNINTERRUPTED. Some states or countries do not allow
the exclusion of implied warranties or limitations on how long an implied warranty lasts, so
the above limitation may not apply to You. This warranty gives You specific legal rights which
vary from state to state.
4. EXCLUSIVE REMEDY. EXCEPT FOR BODILY INJURY CAUSED BY LUCENT’S
NEGLIGENCE, LUCENT’S ENTIRE LIABILITY ARISING FROM OR RELATING TO
THIS AGREEMENT OR THE CLIENT SOFTWARE OR DOCUMENTATION AND YOUR
EXCLUSIVE REMEDY IS LIMITED TO DIRECT DAMAGES IN AN AMOUNT NOT TO
EXCEED $10,000. LUCENT SHALL NOT IN ANY CASE BE LIABLE FOR ANY
SPECIAL INCIDENTAL, CONSEQUENTIAL, INDIRECT OR PUNITIVE DAMAGES
EVEN IF LUCENT HAS BEEN ADVISED OF THE POSSIBILITY OF SUCH DAMAGES.
LUCENT IS NOT RESPONSIBLE FOR LOST PROFITS OR REVENUE, LOSS OF USE
OF THE CLIENT SOFTWARE, LOSS OF DATA, COSTS OF RECREATING LOST DATA,
THE COST OF ANY SUBSTITUTE EQUIPMENT OR PROGRAM, OR CLAIMS BY ANY
PARTY OTHER THAN YOU. Some states or countries do not allow the exclusion or
limitation of incidental or consequential damages, so the above limitation or exclusion may not
apply to You.
Introduction
GENERAL CONDITIONS.
1. Governing Law. This Agreement shall be governed by, and interpreted in accordance with,
the substantive laws of the State of New Jersey of the United States of America.
2. Entire Agreement. This Agreement sets forth the entire understanding and agreement
between You and Lucent and may be amended only in a writing or writings signed by You and
Lucent. NO VENDOR, DISTRIBUTOR, DEALER, RETAILER, SALES PERSON OR
OTHER PERSON IS AUTHORIZED TO MODIFY THIS AGREEMENT OR TO MAKE
ANY WARRANTY, REPRESENTATION OR PROMISE WHICH IS DIFFERENT THAN,
OR IN ADDITION TO, THE REPRESENTATIONS OR PROMISES OF THIS
AGREEMENT ABOUT THE SOFTWARE.
3. Export. Licensee hereby agrees that it will not knowingly, directly or indirectly, without prior
written consent, if required, of the Office of Export Licensing of the U.S. Department of
Commerce, Washington D.C. 20230, export or transmit any of the Products to any group Q, S,
W, Y, or Z country specified in the Export Administration Regulations issued by the U.S.
Department of Commerce or to any country which such transmission is restricted by
applicable regulations or statues.
4. U.S. Government Restricted Rights. Use, duplication, or disclosure by the United States
Government is subject to restrictions as set forth in FAR 52.227-14 (June 1987) Alternate III
(g)(3) (June 1987), FAR 52.227-19 (June 1987), or DFARS 52.227-7013 (c)(1)(ii) (June
1988), as applicable Contractor/Manufacturer is Lucent Technologies Inc. 11900 North Pecos
Street, Westminster, Colorado 80234.
5. Assignment. Lucent may without your consent or notice to You, assign this Agreement to an
entity to which it transfers ownership of the Client Software. Upon the effective date of such
assignment, You agree that Lucent shall be released and discharged from all obligations and
liabilities under this Agreement.
0
Introduction

Table of Contents
CentreVu
Supervisor Version 8 Installation and Getting Started
vii
CentreVu
Supervisor
Preface. . . . . . . . . . . . . . . . . . . . . . . . . . . . . . . . . . . . . . . . . . . . . . . . . . . . . . . . . . . . P-1
Overview . . . . . . . . . . . . . . . . . . . . . . . . . . . . . . . . . . . . . . . . . . . . . . . . . . . . . . P-1
Contents of This Document . . . . . . . . . . . . . . . . . . . . . . . . . . . . . . . . . . . . . . P-3
Conventions Used in This Document . . . . . . . . . . . . . . . . . . . . . . . . . . . . . . P-5
Related Documents . . . . . . . . . . . . . . . . . . . . . . . . . . . . . . . . . . . . . . . . . . . . . P-6
Introduction . . . . . . . . . . . . . . . . . . . . . . . . . . . . . . . . . . . . . . . . . . . . . . . . . . . . . . . 1-1
About CentreVu Supervisor . . . . . . . . . . . . . . . . . . . . . . . . . . . . . . . . . . . . . . 1-1
About CentreVu CMS . . . . . . . . . . . . . . . . . . . . . . . . . . . . . . . . . . . . . . . . . . . 1-4
Types of Installation . . . . . . . . . . . . . . . . . . . . . . . . . . . . . . . . . . . . . . . . . . . . . 1-5
Checking Package Contents . . . . . . . . . . . . . . . . . . . . . . . . . . . . . . . . . . . . . . 1-6
Installation Support . . . . . . . . . . . . . . . . . . . . . . . . . . . . . . . . . . . . . . . . . . . . . 1-7
Tips . . . . . . . . . . . . . . . . . . . . . . . . . . . . . . . . . . . . . . . . . . . . . . . . . . . . . . . 1-7
Online Help . . . . . . . . . . . . . . . . . . . . . . . . . . . . . . . . . . . . . . . . . . . . . . . . 1-8
Help Topics . . . . . . . . . . . . . . . . . . . . . . . . . . . . . . . . . . . . . . . . . . . . . . 1-8
Learning to Use Help. . . . . . . . . . . . . . . . . . . . . . . . . . . . . . . . . . . . . . 1-9
What You Need on Your PC . . . . . . . . . . . . . . . . . . . . . . . . . . . . . . . . . . . . . 1-10
Other Requirements . . . . . . . . . . . . . . . . . . . . . . . . . . . . . . . . . . . . . . . . 1-11
What You Need for Your CentreVu CMS Server . . . . . . . . . . . . . . . . . . . . 1-12
CMS System Capacities . . . . . . . . . . . . . . . . . . . . . . . . . . . . . . . . . . . . . . . . . 1-13
Number of Supervisor Windows Allowed . . . . . . . . . . . . . . . . . . . . . 1-13
Number of Simultaneous Instances Allowed . . . . . . . . . . . . . . . . . . . 1-13
Number of PCs Allowed to Run Supervisor. . . . . . . . . . . . . . . . . . . . 1-14
Performance . . . . . . . . . . . . . . . . . . . . . . . . . . . . . . . . . . . . . . . . . . . . . . . 1-14
Reliability/Availability. . . . . . . . . . . . . . . . . . . . . . . . . . . . . . . . . . . . . . 1-14
Security . . . . . . . . . . . . . . . . . . . . . . . . . . . . . . . . . . . . . . . . . . . . . . . . . . . 1-15
Installing CentreVu Supervisor on a Local PC. . . . . . . . . . . . . . . . . . . . . . . . . 2-1
Overview . . . . . . . . . . . . . . . . . . . . . . . . . . . . . . . . . . . . . . . . . . . . . . . . . . . . . . 2-1
Installation Procedures . . . . . . . . . . . . . . . . . . . . . . . . . . . . . . . . . . . . . . . . . . 2-2
Preparing the Network Folder . . . . . . . . . . . . . . . . . . . . . . . . . . . . . . . . 2-2
Setting Up the PC . . . . . . . . . . . . . . . . . . . . . . . . . . . . . . . . . . . . . . . . . . . 2-3
Installing CentreVu Supervisor on a Shared Network Drive . . . . . . . . . . . . 3-1
Overview . . . . . . . . . . . . . . . . . . . . . . . . . . . . . . . . . . . . . . . . . . . . . . . . . . . . . . 3-1
Installation Procedures . . . . . . . . . . . . . . . . . . . . . . . . . . . . . . . . . . . . . . . . . . 3-2
Network Setup. . . . . . . . . . . . . . . . . . . . . . . . . . . . . . . . . . . . . . . . . . . . . . 3-2
Client Setup . . . . . . . . . . . . . . . . . . . . . . . . . . . . . . . . . . . . . . . . . . . . . . . . 3-9

CentreVu
Supervisor Version 8 Installation and Getting Started
viii
Uninstalling CentreVu Supervisor . . . . . . . . . . . . . . . . . . . . . . . . . . . . . . . . . . . 4-1
Overview . . . . . . . . . . . . . . . . . . . . . . . . . . . . . . . . . . . . . . . . . . . . . . . . . . . . . . 4-1
Performing the Uninstall . . . . . . . . . . . . . . . . . . . . . . . . . . . . . . . . . . . . . . . . . 4-2
Getting Started with CentreVu Supervisor . . . . . . . . . . . . . . . . . . . . . . . . . . . . 5-1
Overview . . . . . . . . . . . . . . . . . . . . . . . . . . . . . . . . . . . . . . . . . . . . . . . . . . . . . . 5-1
Establishing CentreVu CMS Server Connection Settings . . . . . . . . . . 5-2
Opening the CentreVu Supervisor Application . . . . . . . . . . . . . . . . . . 5-3
Establishing the Connection. . . . . . . . . . . . . . . . . . . . . . . . . . . . . . . . . . . 5-4
Network . . . . . . . . . . . . . . . . . . . . . . . . . . . . . . . . . . . . . . . . . . . . . . . . . . . 5-5
Serial . . . . . . . . . . . . . . . . . . . . . . . . . . . . . . . . . . . . . . . . . . . . . . . . . . . . . . 5-7
Modem . . . . . . . . . . . . . . . . . . . . . . . . . . . . . . . . . . . . . . . . . . . . . . . . . . . . 5-8
Logging Into the CMS Server — First Time . . . . . . . . . . . . . . . . . . . . . . . . . 5-9
Logging Into CMS Server — After First Time . . . . . . . . . . . . . . . . . . . . . . 5-10
Automatic Login . . . . . . . . . . . . . . . . . . . . . . . . . . . . . . . . . . . . . . . . . . . 5-10
Manual Login . . . . . . . . . . . . . . . . . . . . . . . . . . . . . . . . . . . . . . . . . . . . . . 5-11
Logging Off the CentreVu CMS Server . . . . . . . . . . . . . . . . . . . . . . . . . . . . 5-14
Exiting Supervisor . . . . . . . . . . . . . . . . . . . . . . . . . . . . . . . . . . . . . . . . . . . . . 5-15
Changing Connection Settings . . . . . . . . . . . . . . . . . . . . . . . . . . . . . . . . . . . 5-16
Exploring the CentreVu Supervisor Controller . . . . . . . . . . . . . . . . . . . . . 5-18
Not Logged Into the CMS Server . . . . . . . . . . . . . . . . . . . . . . . . . . . . . 5-18
System Menu Box . . . . . . . . . . . . . . . . . . . . . . . . . . . . . . . . . . . . . . . . 5-18
Title Bar. . . . . . . . . . . . . . . . . . . . . . . . . . . . . . . . . . . . . . . . . . . . . . . . . 5-18
Toolbar . . . . . . . . . . . . . . . . . . . . . . . . . . . . . . . . . . . . . . . . . . . . . . . . . 5-19
Maximize, Minimize, and Close Buttons . . . . . . . . . . . . . . . . . . . . 5-19
Status Bar . . . . . . . . . . . . . . . . . . . . . . . . . . . . . . . . . . . . . . . . . . . . . . . 5-19
Menu Bar . . . . . . . . . . . . . . . . . . . . . . . . . . . . . . . . . . . . . . . . . . . . . . . 5-20
Tools . . . . . . . . . . . . . . . . . . . . . . . . . . . . . . . . . . . . . . . . . . . . . . . . . . . 5-21
Help. . . . . . . . . . . . . . . . . . . . . . . . . . . . . . . . . . . . . . . . . . . . . . . . . . . . 5-22
Logged Into the CMS Server . . . . . . . . . . . . . . . . . . . . . . . . . . . . . . . . . 5-23
Toolbar . . . . . . . . . . . . . . . . . . . . . . . . . . . . . . . . . . . . . . . . . . . . . . . . . 5-24
Status Bar . . . . . . . . . . . . . . . . . . . . . . . . . . . . . . . . . . . . . . . . . . . . . . . 5-26
Menu Bar . . . . . . . . . . . . . . . . . . . . . . . . . . . . . . . . . . . . . . . . . . . . . . . 5-27
Connect. . . . . . . . . . . . . . . . . . . . . . . . . . . . . . . . . . . . . . . . . . . . . . . . . 5-28
Commands. . . . . . . . . . . . . . . . . . . . . . . . . . . . . . . . . . . . . . . . . . . . . . 5-29
Tools . . . . . . . . . . . . . . . . . . . . . . . . . . . . . . . . . . . . . . . . . . . . . . . . . . . 5-32
Scripts . . . . . . . . . . . . . . . . . . . . . . . . . . . . . . . . . . . . . . . . . . . . . . . . . . 5-34
Help. . . . . . . . . . . . . . . . . . . . . . . . . . . . . . . . . . . . . . . . . . . . . . . . . . . . 5-35
Using the System Tray Icon . . . . . . . . . . . . . . . . . . . . . . . . . . . . . . . . . . . . . . 5-36
Using Supervisor Menus . . . . . . . . . . . . . . . . . . . . . . . . . . . . . . . . . . . . . . . . 5-37
Using Supervisor Selector Windows . . . . . . . . . . . . . . . . . . . . . . . . . . . . . . 5-38
Tab Folders . . . . . . . . . . . . . . . . . . . . . . . . . . . . . . . . . . . . . . . . . . . . . . . . 5-38
Available Windows . . . . . . . . . . . . . . . . . . . . . . . . . . . . . . . . . . . . . . . . . 5-39
Current ACD . . . . . . . . . . . . . . . . . . . . . . . . . . . . . . . . . . . . . . . . . . . . . . 5-39
Script... Button . . . . . . . . . . . . . . . . . . . . . . . . . . . . . . . . . . . . . . . . . . . . . 5-39
OK, Cancel, and Help Buttons. . . . . . . . . . . . . . . . . . . . . . . . . . . . . . . . 5-39

CentreVu
Supervisor Version 8 Installation and Getting Started
ix
Completing Input Windows . . . . . . . . . . . . . . . . . . . . . . . . . . . . . . . . . . . . . 5-40
Completing Input Fields . . . . . . . . . . . . . . . . . . . . . . . . . . . . . . . . . . . . . . . . 5-42
Using the Browse Button. . . . . . . . . . . . . . . . . . . . . . . . . . . . . . . . . . . . . . . . 5-43
Single Entity Input . . . . . . . . . . . . . . . . . . . . . . . . . . . . . . . . . . . . . . . . . 5-43
Multiple Entries Input . . . . . . . . . . . . . . . . . . . . . . . . . . . . . . . . . . . . . . 5-44
Using the History List . . . . . . . . . . . . . . . . . . . . . . . . . . . . . . . . . . . . . . . . . . 5-46
Closing Supervisor Windows. . . . . . . . . . . . . . . . . . . . . . . . . . . . . . . . . . . . 5-47
Performing CMS Operations . . . . . . . . . . . . . . . . . . . . . . . . . . . . . . . . . . . . . . . . 6-1
Overview . . . . . . . . . . . . . . . . . . . . . . . . . . . . . . . . . . . . . . . . . . . . . . . . . . . . . . 6-1
Running an Operation. . . . . . . . . . . . . . . . . . . . . . . . . . . . . . . . . . . . . . . . . . . 6-3
Operations Menus . . . . . . . . . . . . . . . . . . . . . . . . . . . . . . . . . . . . . . . . . . . . . . 6-6
Actions Menu. . . . . . . . . . . . . . . . . . . . . . . . . . . . . . . . . . . . . . . . . . . . . . . 6-6
Edit Menu. . . . . . . . . . . . . . . . . . . . . . . . . . . . . . . . . . . . . . . . . . . . . . . . . . 6-8
Adding Items to the CMS Database . . . . . . . . . . . . . . . . . . . . . . . . . . . . . . 6-10
Finding Items in the CMS Database . . . . . . . . . . . . . . . . . . . . . . . . . . . . . . 6-11
List All. . . . . . . . . . . . . . . . . . . . . . . . . . . . . . . . . . . . . . . . . . . . . . . . . . . . 6-11
Find one . . . . . . . . . . . . . . . . . . . . . . . . . . . . . . . . . . . . . . . . . . . . . . . . . . 6-12
Modifying Items in the CMS Database . . . . . . . . . . . . . . . . . . . . . . . . . . . . 6-13
Deleting Items from the CMS Database . . . . . . . . . . . . . . . . . . . . . . . . . . . 6-15
Using CentreVu Supervisor Reports . . . . . . . . . . . . . . . . . . . . . . . . . . . . . . . . . 7-1
Overview . . . . . . . . . . . . . . . . . . . . . . . . . . . . . . . . . . . . . . . . . . . . . . . . . . . . . . 7-1
Report Menus and Tabs . . . . . . . . . . . . . . . . . . . . . . . . . . . . . . . . . . . . . . 7-2
Running a Report . . . . . . . . . . . . . . . . . . . . . . . . . . . . . . . . . . . . . . . . . . . . . . . 7-3
Completing the Report Input Window . . . . . . . . . . . . . . . . . . . . . . . . . 7-5
Selecting Report Run Dates . . . . . . . . . . . . . . . . . . . . . . . . . . . . . . . . . . . . . . 7-7
Selecting Report Run Times . . . . . . . . . . . . . . . . . . . . . . . . . . . . . . . . . . . . . 7-10
Report Menu Bar . . . . . . . . . . . . . . . . . . . . . . . . . . . . . . . . . . . . . . . . . . . . . . 7-11
Report . . . . . . . . . . . . . . . . . . . . . . . . . . . . . . . . . . . . . . . . . . . . . . . . . . . . 7-12
Edit . . . . . . . . . . . . . . . . . . . . . . . . . . . . . . . . . . . . . . . . . . . . . . . . . . . . . . 7-15
Format. . . . . . . . . . . . . . . . . . . . . . . . . . . . . . . . . . . . . . . . . . . . . . . . . . . . 7-17
Tools . . . . . . . . . . . . . . . . . . . . . . . . . . . . . . . . . . . . . . . . . . . . . . . . . . . . . 7-18
Options . . . . . . . . . . . . . . . . . . . . . . . . . . . . . . . . . . . . . . . . . . . . . . . . . . . 7-20
Report Layouts . . . . . . . . . . . . . . . . . . . . . . . . . . . . . . . . . . . . . . . . . . . . . . . . 7-21
Tables. . . . . . . . . . . . . . . . . . . . . . . . . . . . . . . . . . . . . . . . . . . . . . . . . . . . . 7-22
Charts . . . . . . . . . . . . . . . . . . . . . . . . . . . . . . . . . . . . . . . . . . . . . . . . . . . . 7-23
Formatting Table Reports . . . . . . . . . . . . . . . . . . . . . . . . . . . . . . . . . . . . . . . 7-24
General Tab . . . . . . . . . . . . . . . . . . . . . . . . . . . . . . . . . . . . . . . . . . . . . . . 7-25
Sort Tab . . . . . . . . . . . . . . . . . . . . . . . . . . . . . . . . . . . . . . . . . . . . . . . . . . . 7-26
Formatting Chart Reports . . . . . . . . . . . . . . . . . . . . . . . . . . . . . . . . . . . . . . . 7-28
General Tab . . . . . . . . . . . . . . . . . . . . . . . . . . . . . . . . . . . . . . . . . . . . . . . 7-29
3D Effects Tab . . . . . . . . . . . . . . . . . . . . . . . . . . . . . . . . . . . . . . . . . . . . . 7-30
Axis Tab . . . . . . . . . . . . . . . . . . . . . . . . . . . . . . . . . . . . . . . . . . . . . . . . . . 7-32
Type Tab . . . . . . . . . . . . . . . . . . . . . . . . . . . . . . . . . . . . . . . . . . . . . . . . . . 7-33
Title Tab. . . . . . . . . . . . . . . . . . . . . . . . . . . . . . . . . . . . . . . . . . . . . . . . . . . 7-35
Legend Tab. . . . . . . . . . . . . . . . . . . . . . . . . . . . . . . . . . . . . . . . . . . . . . . . 7-36

CentreVu
Supervisor Version 8 Installation and Getting Started
x
Data Labels Tab . . . . . . . . . . . . . . . . . . . . . . . . . . . . . . . . . . . . . . . . . . . . 7-37
Minimizing Report Output Windows . . . . . . . . . . . . . . . . . . . . . . . . . . . . . 7-39
Minimized Report Thresholds. . . . . . . . . . . . . . . . . . . . . . . . . . . . . . . . 7-41
Right Mouse Button Pop-Up Menus . . . . . . . . . . . . . . . . . . . . . . . . . . . . . . 7-42
Rotating a 3D Chart . . . . . . . . . . . . . . . . . . . . . . . . . . . . . . . . . . . . . . . . . . . . 7-46
Exporting Report Data . . . . . . . . . . . . . . . . . . . . . . . . . . . . . . . . . . . . . . . . . . 7-47
Copying Chart Reports . . . . . . . . . . . . . . . . . . . . . . . . . . . . . . . . . . . . . . . . . 7-50
Resizing Report Windows . . . . . . . . . . . . . . . . . . . . . . . . . . . . . . . . . . . . . . . 7-51
Standard CMS Reports . . . . . . . . . . . . . . . . . . . . . . . . . . . . . . . . . . . . . . 7-51
Graphical Reports . . . . . . . . . . . . . . . . . . . . . . . . . . . . . . . . . . . . . . . . . . 7-51
Changing Column Widths. . . . . . . . . . . . . . . . . . . . . . . . . . . . . . . . . . . . . . . 7-52
Selecting a Printer . . . . . . . . . . . . . . . . . . . . . . . . . . . . . . . . . . . . . . . . . . . . . . 7-53
Using Page Setup . . . . . . . . . . . . . . . . . . . . . . . . . . . . . . . . . . . . . . . . . . . . . . 7-54
Setting Report Threshold Highlights . . . . . . . . . . . . . . . . . . . . . . . . . . . . . . 7-56
Tips for Setting Report Threshold Highlights . . . . . . . . . . . . . . . . . . . 7-60
Available Agent Threshold Settings . . . . . . . . . . . . . . . . . . . . . . . . . . . 7-62
Available Split/Skill Threshold Settings . . . . . . . . . . . . . . . . . . . . . . . 7-67
Available VDN Threshold Settings . . . . . . . . . . . . . . . . . . . . . . . . . . . . 7-70
Report Options . . . . . . . . . . . . . . . . . . . . . . . . . . . . . . . . . . . . . . . . . . . . . . . . 7-72
Options General Tab . . . . . . . . . . . . . . . . . . . . . . . . . . . . . . . . . . . . . . . . 7-73
Options Report Colors Tab . . . . . . . . . . . . . . . . . . . . . . . . . . . . . . . . . . . 7-75
Options Threshold Colors Tab . . . . . . . . . . . . . . . . . . . . . . . . . . . . . . . . 7-76
Options Name Format Tab . . . . . . . . . . . . . . . . . . . . . . . . . . . . . . . . . . . 7-77
Creating a New Report Color Scheme . . . . . . . . . . . . . . . . . . . . . . . . . 7-78
Creating a New Threshold Color Scheme . . . . . . . . . . . . . . . . . . . . . . 7-82
Creating a New Name Format. . . . . . . . . . . . . . . . . . . . . . . . . . . . . . . . 7-85
Exiting and Restarting Reports. . . . . . . . . . . . . . . . . . . . . . . . . . . . . . . . . . . 7-86
Installing and Using CentreVu Terminal Emulator. . . . . . . . . . . . . . . . . . . . . 8-1
Overview . . . . . . . . . . . . . . . . . . . . . . . . . . . . . . . . . . . . . . . . . . . . . . . . . . . . . . 8-1
Using Terminal with Supervisor. . . . . . . . . . . . . . . . . . . . . . . . . . . . . . . . . . . 8-3
Installing Terminal . . . . . . . . . . . . . . . . . . . . . . . . . . . . . . . . . . . . . . . . . . . . . . 8-4
Opening and Exiting Terminal and CMS . . . . . . . . . . . . . . . . . . . . . . . . . . . 8-5
Opening Terminal . . . . . . . . . . . . . . . . . . . . . . . . . . . . . . . . . . . . . . . . . . . 8-5
Logging into CMS . . . . . . . . . . . . . . . . . . . . . . . . . . . . . . . . . . . . . . . . . . . 8-6
Exiting Terminal. . . . . . . . . . . . . . . . . . . . . . . . . . . . . . . . . . . . . . . . . . . . . 8-8
Using Terminal . . . . . . . . . . . . . . . . . . . . . . . . . . . . . . . . . . . . . . . . . . . . . . . . . 8-9
Terminal Window . . . . . . . . . . . . . . . . . . . . . . . . . . . . . . . . . . . . . . . . . . . 8-9
Menu Bar . . . . . . . . . . . . . . . . . . . . . . . . . . . . . . . . . . . . . . . . . . . . . . . 8-10
Profile Menu . . . . . . . . . . . . . . . . . . . . . . . . . . . . . . . . . . . . . . . . . . 8-10
Edit Menu . . . . . . . . . . . . . . . . . . . . . . . . . . . . . . . . . . . . . . . . . . . . 8-12
Connection Menu. . . . . . . . . . . . . . . . . . . . . . . . . . . . . . . . . . . . . . 8-12
Reset Menu . . . . . . . . . . . . . . . . . . . . . . . . . . . . . . . . . . . . . . . . . . . 8-13
Help Menu . . . . . . . . . . . . . . . . . . . . . . . . . . . . . . . . . . . . . . . . . . . 8-13
Creating Profiles. . . . . . . . . . . . . . . . . . . . . . . . . . . . . . . . . . . . . . . . . . . . 8-14
Editing Profiles. . . . . . . . . . . . . . . . . . . . . . . . . . . . . . . . . . . . . . . . . . . . . 8-16
Setting Profile Options . . . . . . . . . . . . . . . . . . . . . . . . . . . . . . . . . . . . . . 8-17

CentreVu
Supervisor Version 8 Installation and Getting Started
xi
Communications Tab . . . . . . . . . . . . . . . . . . . . . . . . . . . . . . . . . . . . . 8-18
Network Connection Settings . . . . . . . . . . . . . . . . . . . . . . . . . . . 8-18
Serial and Modem Connection Settings . . . . . . . . . . . . . . . . . . . 8-19
Modem Tab . . . . . . . . . . . . . . . . . . . . . . . . . . . . . . . . . . . . . . . . . . . . . . . 8-20
Font Tab . . . . . . . . . . . . . . . . . . . . . . . . . . . . . . . . . . . . . . . . . . . . . . . . 8-21
Terminal Messages . . . . . . . . . . . . . . . . . . . . . . . . . . . . . . . . . . . . . . . . . . . . . 8-23
Error Messages . . . . . . . . . . . . . . . . . . . . . . . . . . . . . . . . . . . . . . . . . . . . 8-23
Unable to connect to the remote host. . . . . . . . . . . . . . . . . . . . . . . . 8-23
The connection to the remote host was lost.. . . . . . . . . . . . . . . . . . 8-23
The profile {name} does not exist. . . . . . . . . . . . . . . . . . . . . . . . . . . 8-23
Information Messages . . . . . . . . . . . . . . . . . . . . . . . . . . . . . . . . . . . . . . 8-24
The profile {name} exists, replace?. . . . . . . . . . . . . . . . . . . . . . . . . . 8-24
Save changes to {name}? . . . . . . . . . . . . . . . . . . . . . . . . . . . . . . . . . . 8-24
A connection is active, exit anyway?. . . . . . . . . . . . . . . . . . . . . . . . 8-24
Troubleshooting . . . . . . . . . . . . . . . . . . . . . . . . . . . . . . . . . . . . . . . . . . . . . . . . . . . 9-1
Overview . . . . . . . . . . . . . . . . . . . . . . . . . . . . . . . . . . . . . . . . . . . . . . . . . . . . . . 9-1
Troubleshooting Tips . . . . . . . . . . . . . . . . . . . . . . . . . . . . . . . . . . . . . . . . . . . . 9-2
Installation Error Messages. . . . . . . . . . . . . . . . . . . . . . . . . . . . . . . . . 9-2
Login Error Messages . . . . . . . . . . . . . . . . . . . . . . . . . . . . . . . . . . . . . 9-4
OCX and DLL Incompatibilities. . . . . . . . . . . . . . . . . . . . . . . . . . . . 9-11
Windows Swap Files . . . . . . . . . . . . . . . . . . . . . . . . . . . . . . . . . . . . . 9-11
Installing CentreVu Supervisor . . . . . . . . . . . . . . . . . . . . . . . . . . . . 9-11
Preserving CentreVu Supervisor User Profiles . . . . . . . . . . . . . . . 9-12
Resolving TCP/IP Host Name . . . . . . . . . . . . . . . . . . . . . . . . . . . . . 9-12
Proper Operation of Networking Software . . . . . . . . . . . . . . . . . . 9-13
Problems with Serial/Modem Connections. . . . . . . . . . . . . . . . . . 9-13
Using a Secondary System Password on the CMS Server . . . . . . 9-14
Saving as HTML . . . . . . . . . . . . . . . . . . . . . . . . . . . . . . . . . . . . . . . . . . . . . . . . . . . A-1
Overview . . . . . . . . . . . . . . . . . . . . . . . . . . . . . . . . . . . . . . . . . . . . . . . . . . . . . . A-1
Using Save as HTML . . . . . . . . . . . . . . . . . . . . . . . . . . . . . . . . . . . . . . . . A-2
Output Files. . . . . . . . . . . . . . . . . . . . . . . . . . . . . . . . . . . . . . . . . . . . . . A-4
Using Templates . . . . . . . . . . . . . . . . . . . . . . . . . . . . . . . . . . . . . . . . . . A-5
Not Using Templates . . . . . . . . . . . . . . . . . . . . . . . . . . . . . . . . . . . . . . A-5
Using Existing Templates . . . . . . . . . . . . . . . . . . . . . . . . . . . . . . . . . . A-6
Save as HTML Template Tags . . . . . . . . . . . . . . . . . . . . . . . . . . . . . . A-6
Fonts . . . . . . . . . . . . . . . . . . . . . . . . . . . . . . . . . . . . . . . . . . . . . . . . . . . . A-7
Glossary . . . . . . . . . . . . . . . . . . . . . . . . . . . . . . . . . . . . . . . . . . . . . . . . . . . . . . . . GL-1
Index . . . . . . . . . . . . . . . . . . . . . . . . . . . . . . . . . . . . . . . . . . . . . . . . . . . . . . . . . . . . IN-1

CentreVu
Supervisor Version 8 Installation and Getting Started
xii

CentreVu
Supervisor Version 8 Installation and Getting Started
Overview
P-1
CentreVu
Supervisor
Preface 0
Overview 1
The CentreVu® Supervisor Installation and Getting Started document includes
the following information:
●Instructions for installing CentreVu Supervisor (Supervisor) on a local PC
from a network server or CD-ROM
●Procedures for installing Supervisor to a Shared Network Drive
●Procedures for uninstalling Supervisor
●Instructions for using Supervisor
●Procedures for installing and using CentreVu Terminal Emulator
●Guidelines for responding to error messages that may be displayed while
installing Supervisor or logging into the CentreVu Call Mangement System
(CMS) server.
NOTE:
CentreVu Terminal must be separately installed; it is not automatically installed
by CentreVu Supervisor Version 8.

CentreVu
Supervisor Version 8 Installation and Getting Started
Overview
P-2
This document is intended for anyone who is installing the CentreVu Supervisor
software on the DEFINITY® Enterprise Communications Server (ECS). It
assumes that you are familiar with your PC and the Microsoft* Windows†95 or
98 or Windows NT‡4.0 operating systems, including standard Windows
conventions.
The following sections are included in this Preface:
●Contents of this Document
●Conventions Used in this Document
●Related Documents.
*Microsoft is a registered trademark of Microsoft Corp.
†Windows is a registered trademark of Microsoft Corp.
‡NT is a registered trademark of Microsoft Corp.

CentreVu
Supervisor Version 8 Installation and Getting Started
Contents of This Document
P-3
Contents of This Document 1
The document is organized into the following chapters:
Chapter 1 Introduction
This chapter introduces the CentreVu Supervisor
application. It provides information on the following:
●The two methods of installation
●The items provided in the CentreVu Supervisor
package
●The equipment required to run CentreVu
Supervisor
●The Helpline numbers.
Chapter 2 Installing
CentreVu
Supervisor on a Local PC
This chapter walks you through the process of installing
CentreVu Supervisor from a CD-ROM or the network
onto a PC that will not access Supervisor over the
network.
Chapter 3 Installing
CentreVu
Supervisor on a Shared
Network Drive
This chapter describes the steps required to install the
Supervisor application files (executables and default files)
to a shared read-only folder on the network server.
Chapter 4 Uninstalling
CentreVu
Supervisor
This chapter describes the steps required to uninstall the
CentreVu Supervisor Version 8 software.

CentreVu
Supervisor Version 8 Installation and Getting Started
Contents of This Document
P-4
Chapter 5 Getting Started with
CentreVu
Supervisor
This chapter walks you through the process of starting
Supervisor, logging into a CMS server, logging out of a
CMS server, and exiting Supervisor. It also teaches you
how to change your connection settings and gives you
information about getting help with the Supervisor
product.
Chapter 6 Performing CMS Operations
This chapter defines how to use windows that display as a
result of selecting an item from any Operations tab,
including detailed information on the Actions menu items
in Operations input windows.
Chapter 7 Using
CentreVu
Supervisor Reports
This chapter defines how reports are displayed in
Supervisor and teaches you how to format and print
reports, including selecting run dates and times. This
chapter also gives detailed information on the Actions
menu items available in report output windows and
teaches you how to export report information to another
Windows application.
Chapter 8 Installing and Using
CentreVu
Terminal
This chapter gives you general information about the
CentreVu Terminal application and explains how to install
the CentreVu Terminal application and how to set it up to
connect to the CMS server.
Chapter 9 Troubleshooting
This chapter gives you information on error messages that
you might receive while installing or using Supervisor and
outlines basic troubleshooting procedures for the error
messages.
CentreVu
Supervisor Version 8 Installation and Getting Started
Conventions Used in This Document
P-5
Conventions Used in This Document 1
The following conventions are used in this document:
*Whenever you are asked to click or double click the mouse button, click
button 1 (the left-most mouse button or primary button), unless button 2 (the
right-most button or secondary button) is specified.
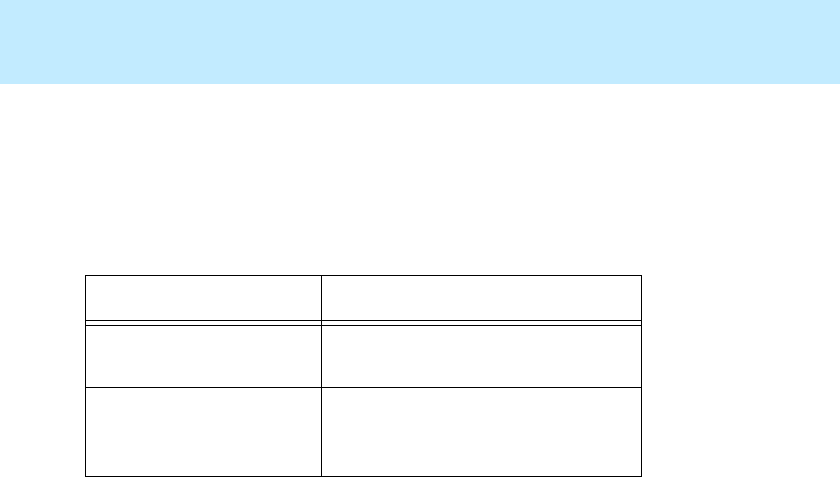
Convention Description
Bold Text Menu names, options, and icon names are shown in
bold text. For example: Choose Save from the File
menu.
Initial Capital
Letters Names of windows, dialog boxes, and keyboard keys.
For example: This field is in the Manual Login window.
Courier
Text
Text you are asked to enter and system commands. For
example: Enter this command.
< > Variable text is marked by less-than/greater-than signs.
For example: Couldn’t create <filename>.
KEY+KEY Key combinations for which you must press and hold
down one key and then press another. For example:
ALT+4.
Italic Text References to other documents, trademarks, and for
emphasis.
“ “ Sections and chapters that are referenced. For example:
See Chapter 1, “Introduction,” for an outline of the
information in this book.
Click and
Double click *Button 1 (left-most mouse button or primary button).
Microsoft Windows
or Windows These terms are used to refer to both Microsoft
Windows 95 or 98 and Microsoft Windows NT 4.0.

CentreVu
Supervisor Version 8 Installation and Getting Started
Related Documents
P-6
Related Documents 1
The following documents include additional information about the Call
Management System or Supervisor:
●CentreVu® Supervisor Version 5 User Guide (585-215-829)
●CentreVu® Call Management System Release 3 Version 8 Administration
(585-210-910)
●CentreVu® Supervisor Version 8 Reports (585-210-929)
●CentreVu® Call Management System Release 3 Version 8 Database Items
and Calculations (585-210-939)
●CentreVu® Call Management System Release 3 Version 5 Custom Reports
(585-215-822)
●Lucent Version 8 Call Center Change Description (585-210-925)
●CentreVu® Call Management System Release 3 Version 8 External Call
History Interface (585-210-912)
●CentreVu® Advocate User Guide (585-210-927)
●CentreVu® Call Management System Release 3 Version 8 Upgrades and
Migrations (585-210-913)
●CentreVu® Report Designer Version 8 User Guide (585-210-930)
●CentreVu® Call Management System Release 3 Version 8 Hardware
Maintenance and Troubleshooting (585-210-919)
●CentreVu® Call Management System Release 3 Version 6 Software
Installation and Maintenance (585-215-866)
●CentreVu® Call Management System Release 3 Version 8 Planning,
Configuration, and Implementation (585-210-920)
●Sun SPARCserver Hardware Installation documentation, connectivity
diagrams, and Maintenance and Troubleshooting documentation

CentreVu
Supervisor Version 8 Installation and Getting Started
Introduction
About CentreVu Supervisor
1-1
CentreVu
Supervisor
Introduction 1
About
CentreVu
Supervisor 1
The Lucent Technologies CentreVu® Supervisor (Supervisor) software is a
graphical user interface to the Lucent CentreVu Call Management System
Release 3 Version 8 (CentreVu CMS R3V8) or Call Management System
Release 3 Version 6 (CentreVu CMS R3V6) software.
The Supervisor software runs on an Intel* 486-compatible processor (a Pentium
processor is preferred) that is running one of the following Microsoft Windows
operating systems (see page 1-10 for more detailed requirements):
●Windows 95†
●Windows 98‡
●Windows NT** 4.0 with Service Pack 4.
* Intel is a registered trademark of Intel Corporation.
†Windows 95 is a trademark of Microsoft Corp.
‡Windows 98 is a trademark of Microsoft Corp.
**Windows NT is a trademark of Microsoft Corp.
CentreVu
Supervisor Version 8 Installation and Getting Started
Introduction
About CentreVu Supervisor
1-2
NOTE:
Supervisor is not supported for all languages of Windows operating systems.
For information about which versions of Supervisor are supported for which
Windows operating systems, see the table on the following page.
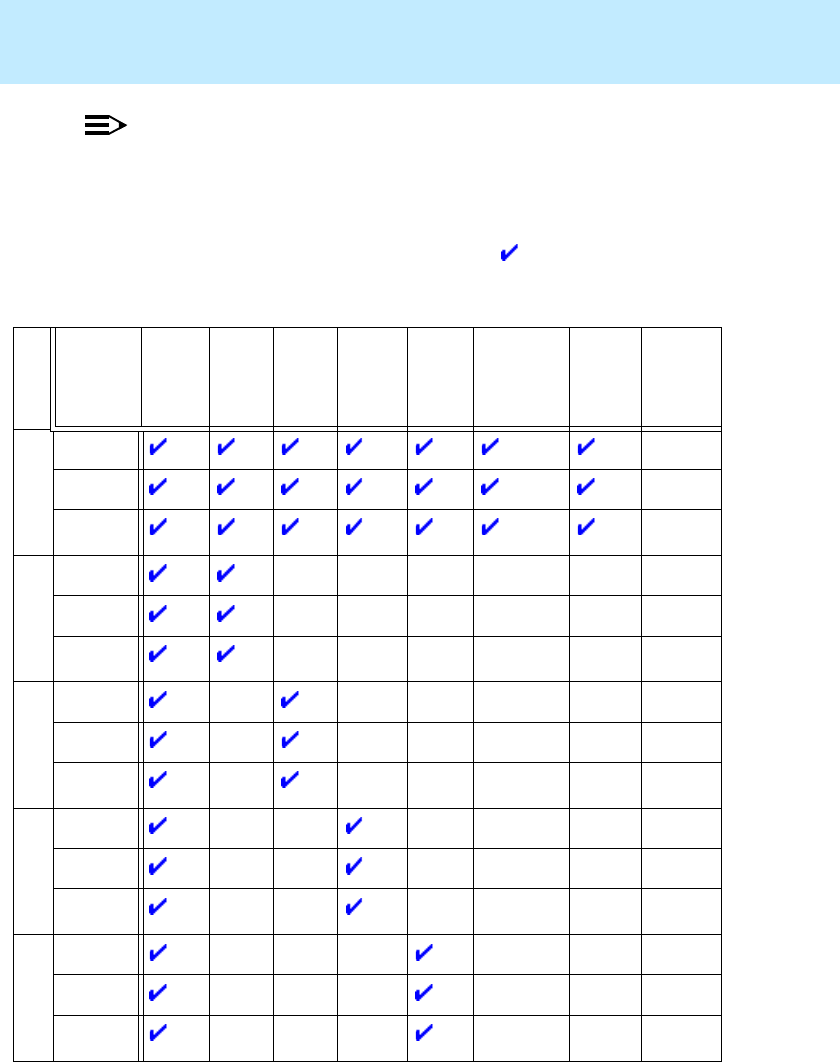
The following table shows which language-versions of Supervisor are
supported with which Windows operating systems ( indicates that the
operating system is supported).
Windows
OS
Language English Dutch French German Italian Portuguese Spanish Japanese
English
Windows 95
Windows 98
Windows
NT 4.0
Dutch
Windows 95
Windows 98
Windows
NT 4.0
French
Windows 95
Windows 98
Windows
NT 4.0
German
Windows 95
Windows 98
Windows
NT 4.0
Italian
Windows 95
Windows 98
Windows
NT 4.0
CentreVu
Supervisor Version 8 Installation and Getting Started
Introduction
About CentreVu Supervisor
1-3
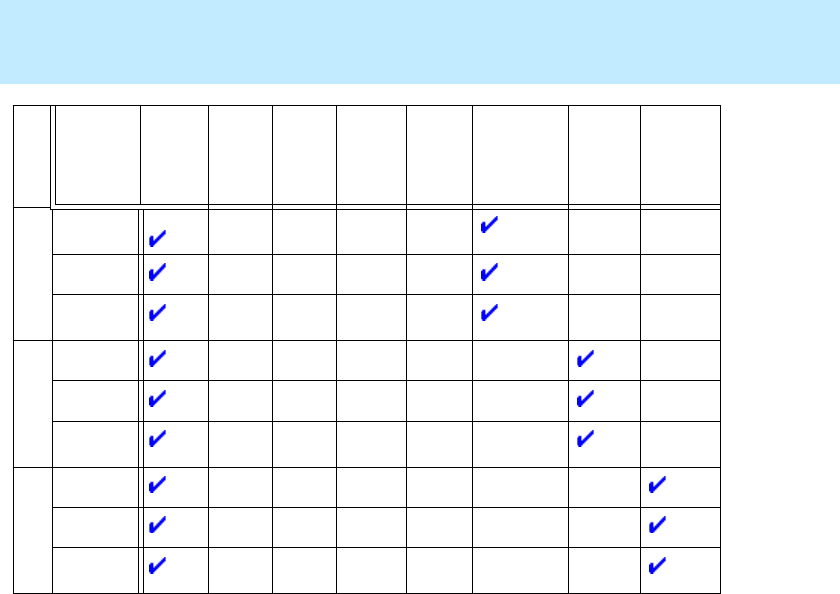
Portuguese
Windows 95
Windows 98
Windows
NT 4.0
Spanish
Windows 95
Windows 98
Windows
NT 4.0
Japanese
Windows 95
Windows 98
Windows
NT 4.0
Windows
OS
Language English Dutch French German Italian Portuguese Spanish Japanese

CentreVu
Supervisor Version 8 Installation and Getting Started
Introduction
About CentreVu CMS
1-4
About
CentreVu
CMS 1
CentreVu Call Management System (CMS) is a software product used by
customers who have the Lucent Technologies DEFINITY® Enterprise
Communications Server (ECS) or Lucent telecommunications switches and
receive a large volume of telephone calls that are processed through the
Automatic Call Distribution (ACD) feature of the switch. The CMS server
collects call-traffic data, formats management reports, and provides an
administrative interface to the ACD feature in the switch.

CentreVu
Supervisor Version 8 Installation and Getting Started
Introduction
Types of Installation
1-5
Types of Installation 1
There are several ways of installing the CentreVu Supervisor software. This
manual discusses the following methods:
●Local installation. With this type of installation, all of the Supervisor
software is installed locally on each PC from a CD-ROM or from a
network server. When installing from the network, the network
administrator first copies the Supervisor installation files to a shared
installation folder that resides on the network. Then, the user runs a client
setup from the installation folder to install Supervisor to disk space local to
the PC. See Chapter 2, “Installing CentreVu Supervisor on a Local PC,” for
details.
●Shared network installation. With this type of installation, the CentreVu
Supervisor application software is installed to a shared application folder
on the network server, but user-specific files and logs are stored in a
Supervisor folder on each user’s PC or on their own network drive. See
Chapter 3, “Installing CentreVu Supervisor on a Shared Network Drive,”
for details.
CentreVu
Supervisor Version 8 Installation and Getting Started
Introduction
Checking Package Contents
1-6
Checking Package Contents 1
The CentreVu Supervisor software package includes the items listed in
Table 1. Check the package contents to be sure all items are included.
If any of the items are missing or damaged, contact your Lucent Account Team.
International customers should contact their Lucent representative or
distributor.
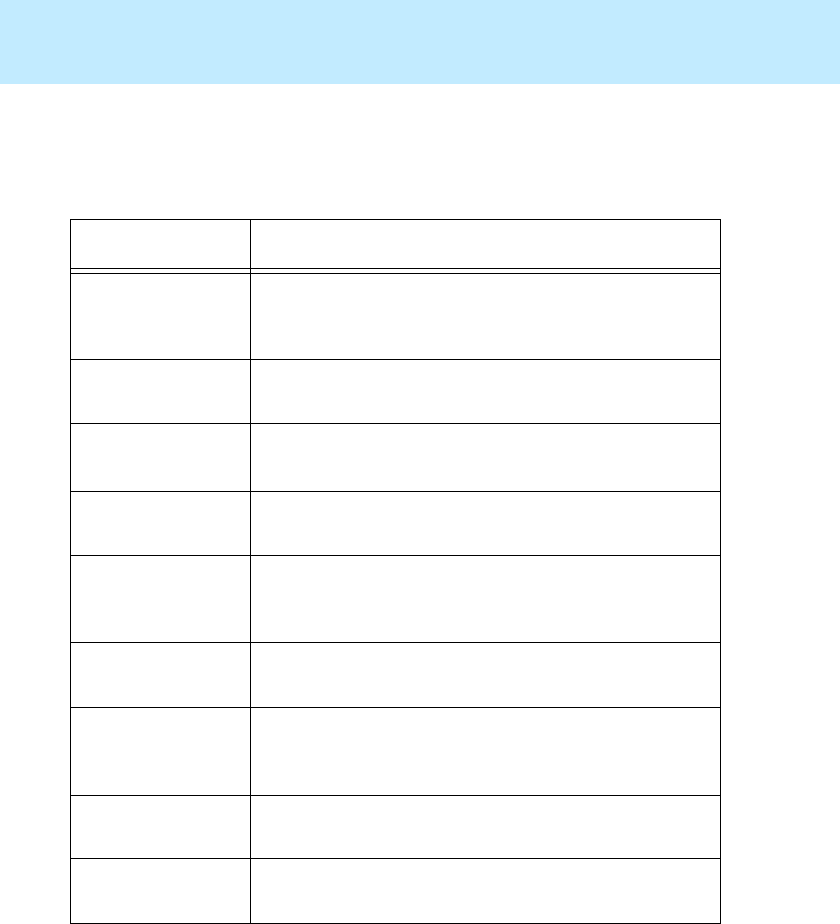
Table 1: CentreVu Supervisor Package Contents
Item Description
CentreVu Supervisor
Software CD-ROM
CentreVu® Supervisor
Installation and Getting
Started document
Document Number (585-210-928)

CentreVu
Supervisor Version 8 Installation and Getting Started
Introduction
Installation Support
1-7
Installation Support 1
If you have difficulty installing CentreVu Supervisor, refer to the following
sources:
●System requirements in “What You Need on Your PC” on page 1-10.
●The online Help option provided with the installation program. (See
“Online Help” on page 1-8.)
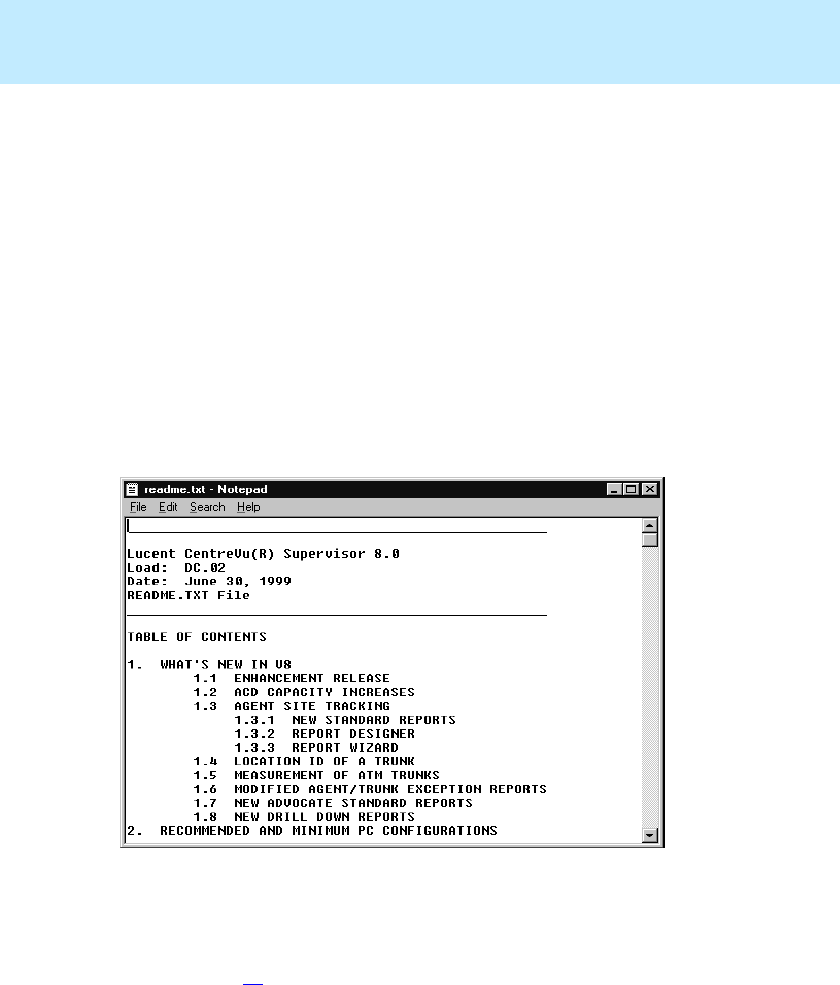
●The tips in the readme.txt file on the CD-ROM. Use an editor such as
Microsoft Windows Notepad to read the file.
●The Install Status dialog box will display a list of all files installed for
CentreVu Supervisor Release 8. Review this list to see that all files were
successfully installed.
●Chapter 9, “Troubleshooting.”
If you have further questions, contact the Lucent Technologies National
Customer Care Center on 1-800-242-2121. For international support, call your
Lucent representative or distributor for assistance.
Tips 1
The CD-ROM in your package includes a graphical installer to help you install
your copy of CentreVu Supervisor.
The CD-ROM also supports the Microsoft Windows AutoPlay feature. If
AutoPlay is enabled on the PC, insert the CD-ROM into the drive and the
CentreVu Supervisor Setup program starts automatically.
NOTE:
See your system administrator for information on how to enable or disable
AutoPlay on your PC.
You can cancel the installation of CentreVu Supervisor at any time by selecting
“Close” from the control menu, pressing Alt+F4, or pressing the F3 key. You
can also cancel the installation by selecting the Cancel button at the bottom of
the screen. The Supervisor installation program will exit installation and
remove any files that were built by the program.
CentreVu
Supervisor Version 8 Installation and Getting Started
Introduction
Installation Support
1-8
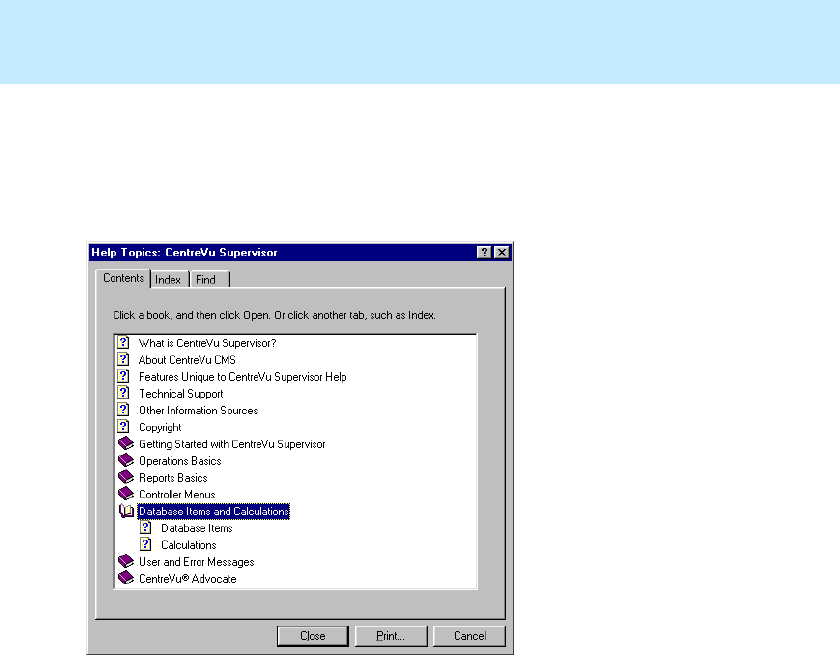
Online Help 1
CentreVu Supervisor provides online Help to assist you in installing and using
Supervisor. This Help is divided into main categories (books), as shown on the
Help Contents tab shown below:
Help Topics 1
Topics are the basic unit of a help project. Each Help book listed above contains
a list of topics. Double-click on the book name to list the related topics, which
are represented by a question mark, as shown above under Local Computer
Installation.
CentreVu
Supervisor Version 8 Installation and Getting Started
Introduction
Installation Support
1-9
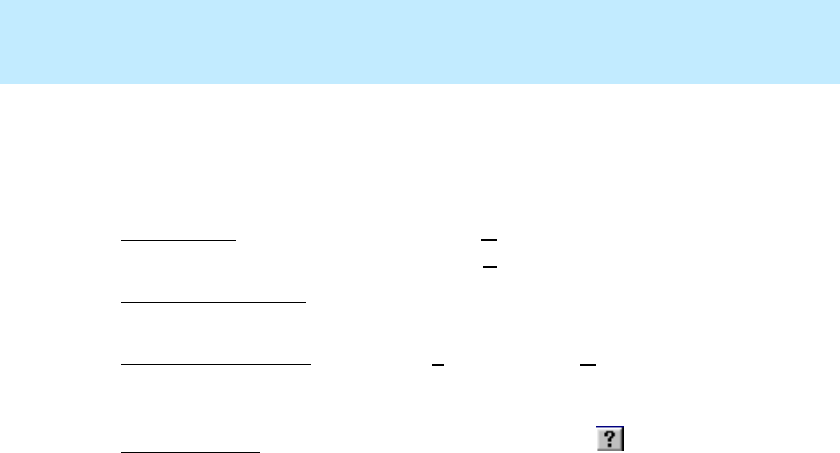
Learning to Use Help 1
You can get information from Supervisor Help in a number of ways. The
method you use often depends on the type of information you are searching for.
The following methods of accessing Help are available:
●Help Contents: Displayed by clicking on the Help menu from the
Supervisor Controller Window and selecting Contents.
●Help on open windows: With a window open, you can press the F1 key to
get help on that window.
●Help on a specific topic: Choosing the Find tab from the Help Topics
dialog box displays a window in which you can search for topics that
contain a specific term or phrase.
●What’s This Help: With a dialog box open that displays the icon in the
title bar, help topics are available for each area or individual item in the
dialog box. Click the icon, followed by the item or area on which you want
help. You can also right-click certain items and select “What’s This?”
The Supervisor Help system provides several other features such as bookmarks
for marking topics you refer to frequently. For more information on using Help,
see your Windows documentation.
CentreVu
Supervisor Version 8 Installation and Getting Started
Introduction
What You Need on Your PC
1-10
What You Need on Your PC 1
To install and run CentreVu Supervisor, you need the following recommended
configuration:
●A Pentium* 133 MHz processor.
NOTE:
The minimum supported PC configuration is an Intel 486-compatible 66
MHz processor. If you have this configuration, expect to experience slower
response time.
●A hard disk drive with 50 MB of free space. If you are installing Supervisor
in more than one language, you will need an additional 5 MB of disk space
for each language installed.
●A CD-ROM drive.
●Minimum of 32 MB RAM. If simultaneous Supervisor instances are
running in the background, additional memory may be required to maintain
acceptable performance.
●An SVGA monitor and adapter set to at least 800x600x256 colors graphics
resolution.
●Microsoft Windows 95 or 98 or Windows NT 4.0 operating system with
Service Pack 4.
NOTE:
If you are installing Supervisor on a Windows NT 4.0 operating system,
you must first install the Microsoft Service Pack 4 or later version.
●A mouse compatible with the supported Windows operating systems.
●For Network Connection
— WinSock 1.1 compliant TCP/IP stack
— Ethernet communications board.
* Pentium is a registered trademark of Intel Corporation.

CentreVu
Supervisor Version 8 Installation and Getting Started
Introduction
What You Need on Your PC
1-11
●For Serial Connection
— Serial cable correctly wired to support hardware flow control and a
16550A UART communications port
— Available COM port.
●For Modem Connection—at least a 19.2 Kbps modem and a 16550A
UART communications port. If the modem is external, then the cable must
be correctly wired to support hardware flow control.
Other Requirements 1
If you are upgrading from Supervisor 1.0 or 5.0 and you are running Windows
3.1, Windows for Workgroups 3.11, or Windows NT 3.51, you must upgrade
your PC operating system to Microsoft Windows 95 or 98 or Windows NT 4.0
before you can install CentreVu Supervisor R8.
If you are installing Supervisor on a Windows 95 or 98 operating system that
does not have Internet Explorer 4.0, you need to install Dcom95 before
installing CentreVu Supervisor. To install Dcom95, run the dcom95.exe
program located in the Dcom95 folder on your CentreVu Supervisor CD-ROM,
or in the Supervisor folder on the network server. Dcom95 requires you to
reboot your PC, so you need to close any open applications before running it.
If you are running Windows NT 4.0 and do not have Service Pack 4 installed,
you must install it before installing CentreVu Supervisor.
If you have Windows NT 4.0 with no Service Pack, Service Pack 1 or Service
Pack 2, you will need to install Service Pack 3 first, then Service Pack 4. If you
have Windows NT 4.0 with Service Pack 3, you will need to upgrade to Service
Pack 4.

CentreVu
Supervisor Version 8 Installation and Getting Started
Introduction
What You Need for Your CentreVu CMS Server
1-12
What You Need for Your
CentreVu
CMS Server1
To install and run CentreVu Supervisor, you need the following:
●Sun* SPARCserver† computer
●CentreVu Call Management System Release 3 Version 8 or Version 6
(CentreVu CMS R3V8 or R3V6).
NOTE:
If you are upgrading from Supervisor 1.0 or 5.0, you must upgrade your
CMS server before you upgrade Supervisor. When logging into CentreVu
CMS, you must have both Supervisor Version 8 and CentreVu CMS R3V8
or R3V6 or the login will fail, and an error message will appear.
CentreVu Supervisor R8 will run with CentreVu CMS R3V6. You will be
given the option to choose a version of CMS to use when logging into
CentreVu Supervisor.
*Sun is a registered trademark of Sun Microsystems, Inc.
†SPARCserver is a registered trademark of SPARC International licensed
exclusively to Sun Microsystems.

CentreVu
Supervisor Version 8 Installation and Getting Started
Introduction
CMS System Capacities
1-13
CMS System Capacities 1
The CMS system capacities are unchanged by the Supervisor software. If you
are putting your CentreVu Supervisor users on a LAN, then your network must
support the additional network traffic.
Number of Supervisor Windows Allowed 1
Supervisor allows users to open as many as 12 windows simultaneously. This
limit is set for each user by the CMS system administrator. Windows that do not
directly use CMS data, such as the color customization data, are not included in
this limit. Windows that have been opened for other applications also are not
included in this limit.
The Supervisor application can connect to a single CMS. Supervisor does not
provide the capability to combine data from more than one CMS.
Number of Simultaneous Instances Allowed 1
With the recommended configuration listed in “What You Need on Your PC”
on page 1-10, you can run as many as four simultaneous Supervisor instances.
With an Intel 486-compatible processor, you are limited to one instance of
Supervisor with one report.
With Windows 95, you are limited to one instance of Supervisor with six reports
running or four instances of Supervisor with one report each.
The ability to launch several instances and their performance depends upon the
memory and speed of the PC, and the other applications active on the PC. If
simultaneous Supervisor instances are running in the background, additional
memory may be required to maintain acceptable performance.

CentreVu
Supervisor Version 8 Installation and Getting Started
Introduction
CMS System Capacities
1-14
Number of PCs Allowed to Run Supervisor 1
The number of PCs running CentreVu Supervisor is limited by the number of
simultaneous users contracted for in the site-licensing agreement with Lucent.
The CMS software will count the number of active CentreVu Supervisor clients
that are logged in, and limit the number of simultaneous users to the number
purchased by the customer.
A client may be logged into a CMS server once per user ID on a single PC.
Performance 1
When you are using Supervisor you may experience slightly slower response
times for some actions. This could be for a variety of reasons. The following are
a few possible reasons for slower performance:
●The PC’s configuration, processor speed, Level 2 cache, hard disk speed,
and video RAM could affect the response time.
●If the Supervisor application is running simultaneously with other
applications, performance of the Supervisor application could be affected
by those other applications.
●Two or more Supervisor instances running simultaneously could result in
slightly slower than user response time.
●If Supervisor is running in a LAN environment, Supervisor will generate
additional network traffic. For example, if 250 Supervisor instances were
running two real-time reports each, then Supervisor could require
approximately 20% of the LAN’s capacity. Therefore, ensure that your
LAN has been engineered appropriately.
●In a LAN environment, network backups could cause congestion on the
network, adversely affecting its performance.
Reliability/Availability 1
If serial links or LAN connectivity drop, the Supervisor application will
automatically attempt to restore the connection if you logged in using the
Automatic Login capability.

CentreVu
Supervisor Version 8 Installation and Getting Started
Introduction
CMS System Capacities
1-15
Security 1
When Supervisor is connected to CMS, the same level of security is afforded to
you as with a dedicated CMS terminal. The existing CMS permissions structure
will be honored. When you are using Supervisor on a LAN, you will be able to
access only the information that is available in a direct-connect environment.

CentreVu
Supervisor Version 8 Installation and Getting Started
Introduction
CMS System Capacities
1-16

CentreVu
Supervisor Version 8 Installation and Getting Started
Installing CentreVu Supervisor on a Local PC
Overview
2-1
CentreVu
Supervisor
Installing CentreVu
Supervisor on a Local PC2
Overview 2
Local installation means that you install all of the files necessary to run
CentreVu® Supervisor on disk space within a PC. You can perform this
installation from either a CD-ROM or on a network server.
If you are installing Supervisor from the network, you must first copy the
Supervisor installation files from the CD-ROM onto the network. Then you
install Supervisor onto each client PC from the network.
You must have administrator privileges to install Supervisor on a PC running
Windows NT* 4.0.
This chapter includes the following sections:
●Installation Procedures
●Preparing the Network Folder
●Setting Up the PC.
*Windows NT is a trademark of Microsoft Corp.
CentreVu
Supervisor Version 8 Installation and Getting Started
Installing CentreVu Supervisor on a Local PC
Installation Procedures
2-2
Installation Procedures 2
Use these procedures to install CentreVu Supervisor on a PC that will run the
application from a local disk drive. If you are installing Supervisor on each PC
using the network, start with the “Preparing the Network Folder” section below.
If you are installing Supervisor on each PC using the CD-ROM, go to “Setting
Up the PC” on page 2-3.
NOTE:
For installation requirements, see “Other Requirements” on page 1-11.
Preparing the Network Folder 2
Installing CentreVu Supervisor over a network is a two-step process that
consists of preparing the installation folder and then installing Supervisor on
each PC.
To prepare the network folder, do the following:
1. At a PC that is connected to the network, insert the CentreVu Supervisor
CD-ROM into the CD-ROM drive.
2. If AutoPlay is enabled on the PC, the CentreVu Supervisor Setup program
will start automatically after you insert the CD-ROM into the drive.
Choose the Cancel button in the dialog box that displays, and then
continue with Step 3.
NOTE:
See your system administrator for information on how to enable or disable
AutoPlay on your PC.
3. Open Windows Explorer.
4. Create a folder on the network drive, and record the path to the folder for
later use.
5. Using the Copy command or drag-and-drop, copy the contents of the CD-
ROM to the folder you created in Step 4. Be sure to copy all of the files.
CentreVu
Supervisor Version 8 Installation and Getting Started
Installing CentreVu Supervisor on a Local PC
Installation Procedures
2-3
6. Verify that the network drive where you copied the contents of the
distribution medium is available to each PC that will be installing
Supervisor from the network.
7. Go to “Setting Up the PC” below.
Setting Up the PC 2
1. Before starting the installation, close all running programs on the PC.
2. On the Supervisor distribution medium (CD-ROM or installation folder),
locate and double-click on the Readme.txt file to view last minute
installation tips on CentreVu Supervisor.
The file will be displayed in Windows Notepad, as shown below:
3. To exit the readme file, close the Notepad application.
4. To begin the installation, select the appropriate following step:
a. If installing from CD-ROM and AutoPlay is enabled, insert the CD
go to Step 10.
CentreVu
Supervisor Version 8 Installation and Getting Started
Installing CentreVu Supervisor on a Local PC
Installation Procedures
2-4
b. If installing from CD-ROM and AutoPlay is not enabled, follow
Steps 5 and 6, insert the CD and then proceed with Step 10.
c. If installing from the network, go to Step 5, and then proceed with
Step 7.
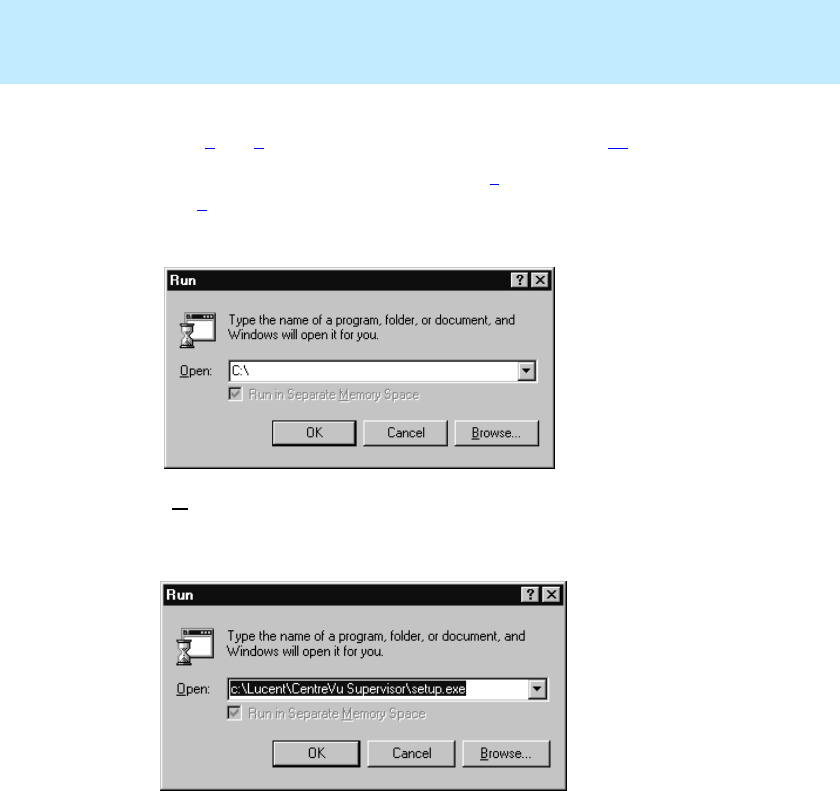
5. Click Start on the taskbar and select Run. The Run dialog box appears.
6. In the Open text box, enter the drive from which you are installing
CentreVu Supervisor, followed by setup, and then select OK. In the
following example, the “c:” drive is selected.
CentreVu
Supervisor Version 8 Installation and Getting Started
Installing CentreVu Supervisor on a Local PC
Installation Procedures
2-5
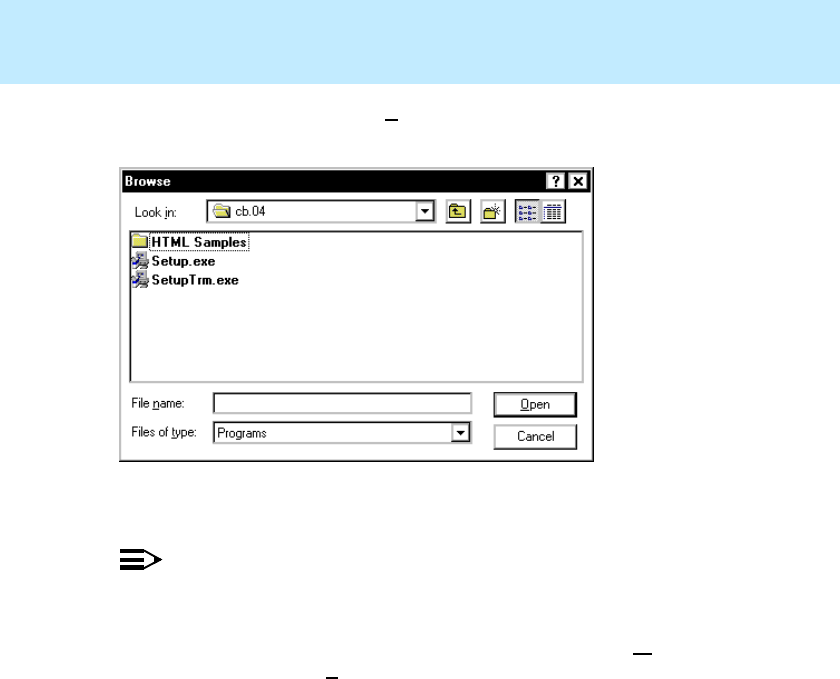
7. In the Run dialog box, select the Browse button. The Browse dialog box
appears.
8. In the Browse dialog box, navigate to the drive and directory containing the
CentreVu Supervisor files.
NOTE:
If the drive containing the Supervisor installation files is not mapped to the
PC, you need to map a drive letter to where Supervisor has been installed
on your network. To do this, open Windows Explorer and select Map
Network Drive from the Tools drop-down menu. Select any available
drive letter and enter the appropriate description in the path field; for
example, \my_server\folder_name.
9. Locate and double-click on the Setup.exe file to begin the installation.
CentreVu
Supervisor Version 8 Installation and Getting Started
Installing CentreVu Supervisor on a Local PC
Installation Procedures
2-6
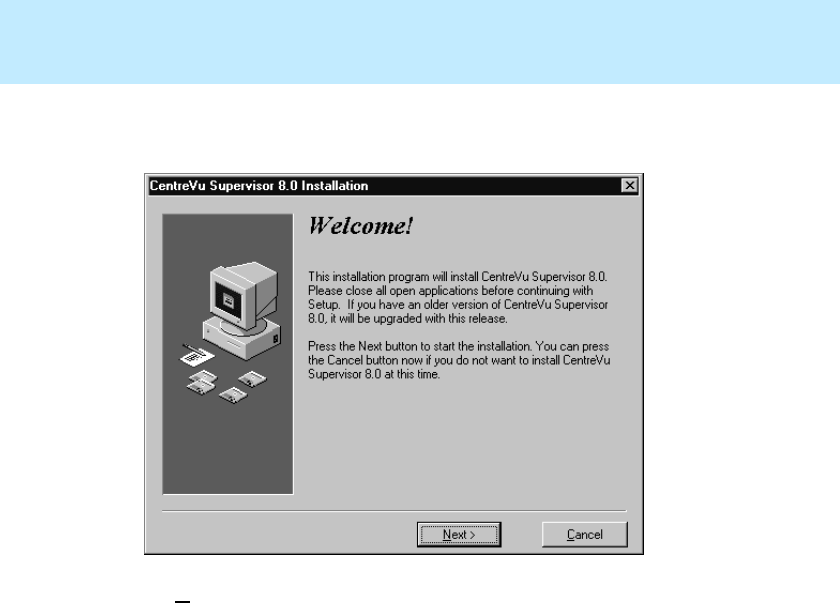
10. After a short wait, the CentreVu Supervisor 8.0 Installation Welcome
window appears.
11. Select Next. Setup begins searching for a previous installation of
Supervisor on your PC.
CentreVu
Supervisor Version 8 Installation and Getting Started
Installing CentreVu Supervisor on a Local PC
Installation Procedures
2-7
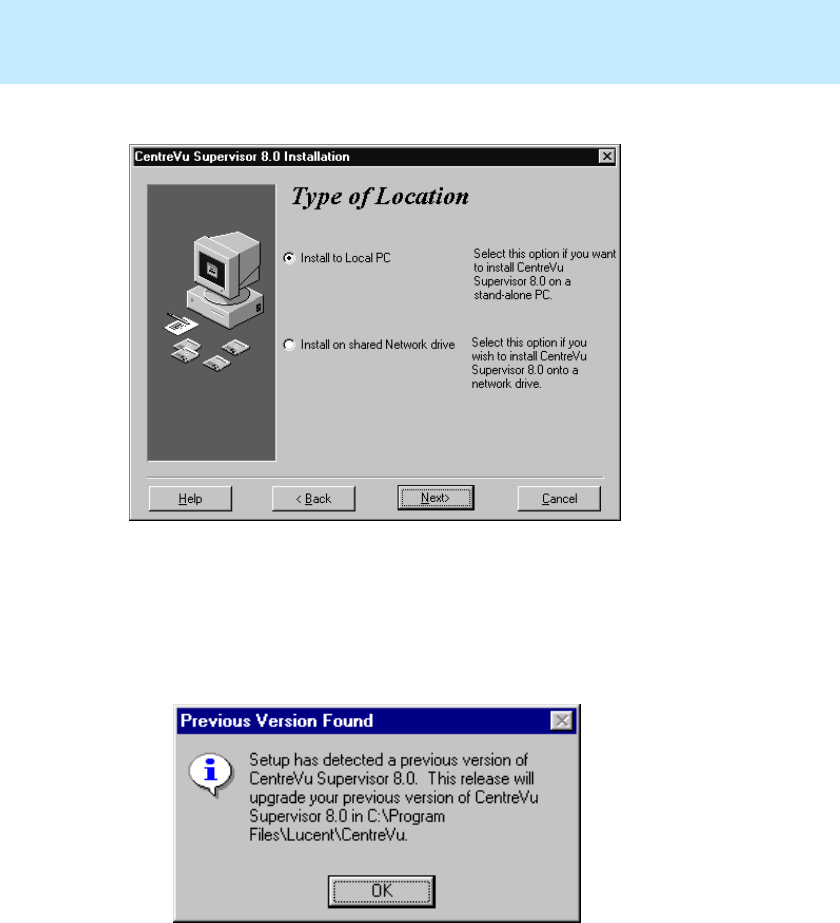
12. The Type of Location dialog box appears.
13. Select Install to Local PC to install CentreVu Supervisor to a stand-alone
client PC or on the client’s own Local Area Network (LAN) drive.
14. If the setup program finds a previous installation of Supervisor
Version 8 or Version 6, the Previous Version Found dialog box appears.
Click OK to continue with the installation.
CentreVu
Supervisor Version 8 Installation and Getting Started
Installing CentreVu Supervisor on a Local PC
Installation Procedures
2-8
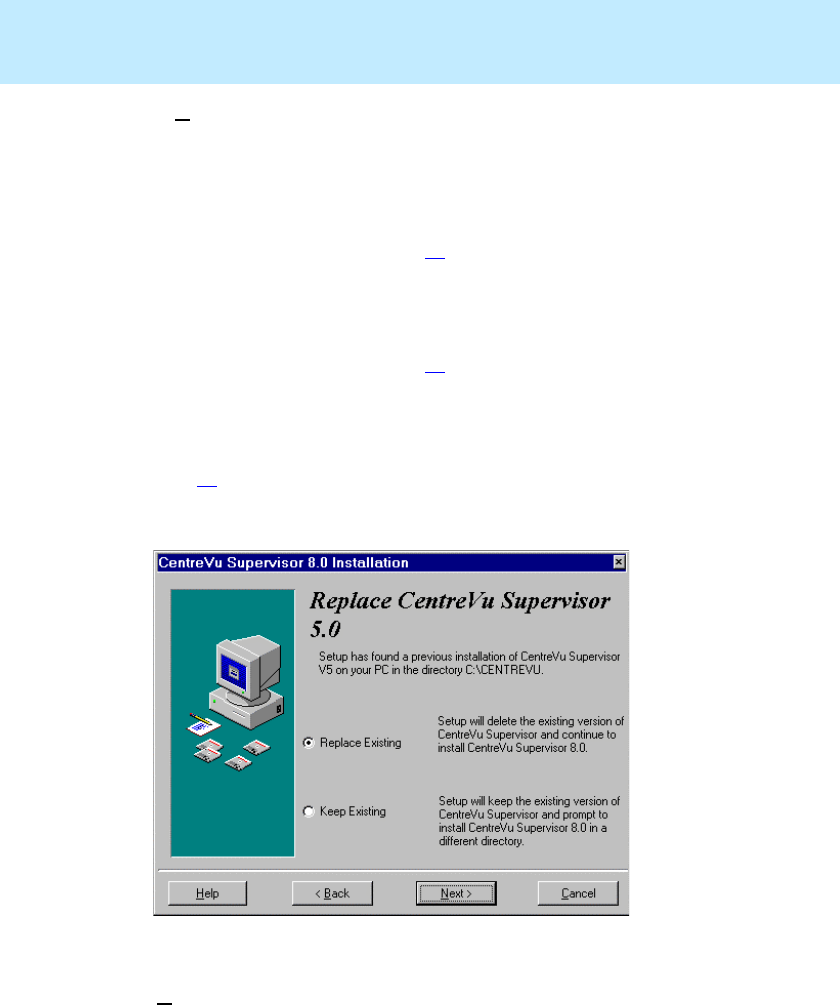
15. Select Next. Then select one of the following, depending on which dialog
appears:
●If the Replace CentreVu Supervisor 5.0 dialog box appears, it means
that the setup program did not find a previous installation of
Supervisor Version 8 or Version 6, but it found an installation of
Supervisor Version 5. Go to Step 16.
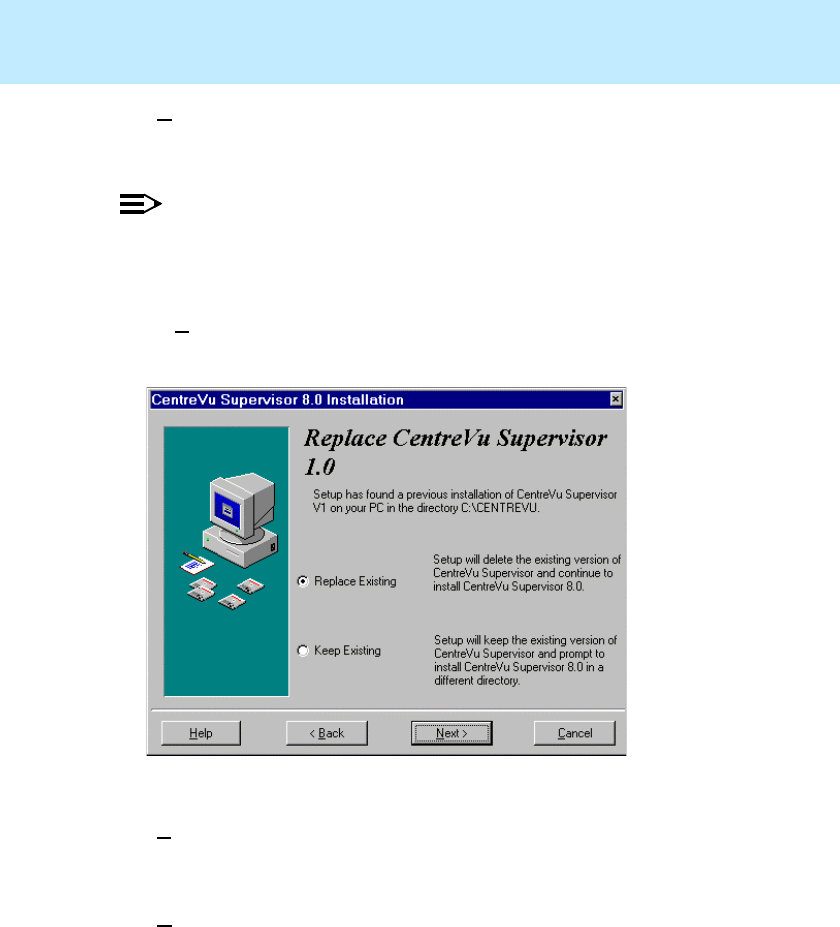
●If the Replace CentreVu Supervisor 1.0 dialog box appears, it means
that the setup program did not find a previous installation of
Supervisor Version 8 or Version 6, but it found an installation of
Supervisor Version 1. Go to Step 19. (Either Supervisor Version 5 or
Version 1 could exist, but not both.)
●If the Select Location dialog box appears, it means that the setup
program did not find any previous installation of Supervisor. Go to
Step 22.
16. The Replace CentreVu Supervisor 5.0 dialog box appears.
17. Select one of the following:
●Replace Existing—the setup program will delete the existing
installation of Supervisor Version 5 and install Supervisor Version 8 in
its place.
CentreVu
Supervisor Version 8 Installation and Getting Started
Installing CentreVu Supervisor on a Local PC
Installation Procedures
2-9
●Keep Existing—the setup program will keep the existing installation
of Supervisor and prompt to install Supervisor Version 8 in a different
folder.
NOTE:
If you decide to keep the previous installation of Supervisor
Version 5, you can uninstall it later using the uninstall executable file on
the Supervisor CD-ROM. This file is named removeV5.exe.
18. Select Next.
19. The Replace CentreVu Supervisor 1.0 dialog box appears.
20. Select one of the following:
●Replace Existing—the setup program will delete the existing
installation of Supervisor Version 1 and install Supervisor Version 8 in
its place.
●Keep Existing—the setup program will keep the existing installation
of Supervisor and prompt to install Supervisor Version 8 in a different
folder.
CentreVu
Supervisor Version 8 Installation and Getting Started
Installing CentreVu Supervisor on a Local PC
Installation Procedures
2-10
NOTE:
If you decide to keep the previous installation of Supervisor
Version 1, you can uninstall it later using the uninstall executable file on
the Supervisor CD-ROM. This file is named removeV1.exe.
21. Select Next.
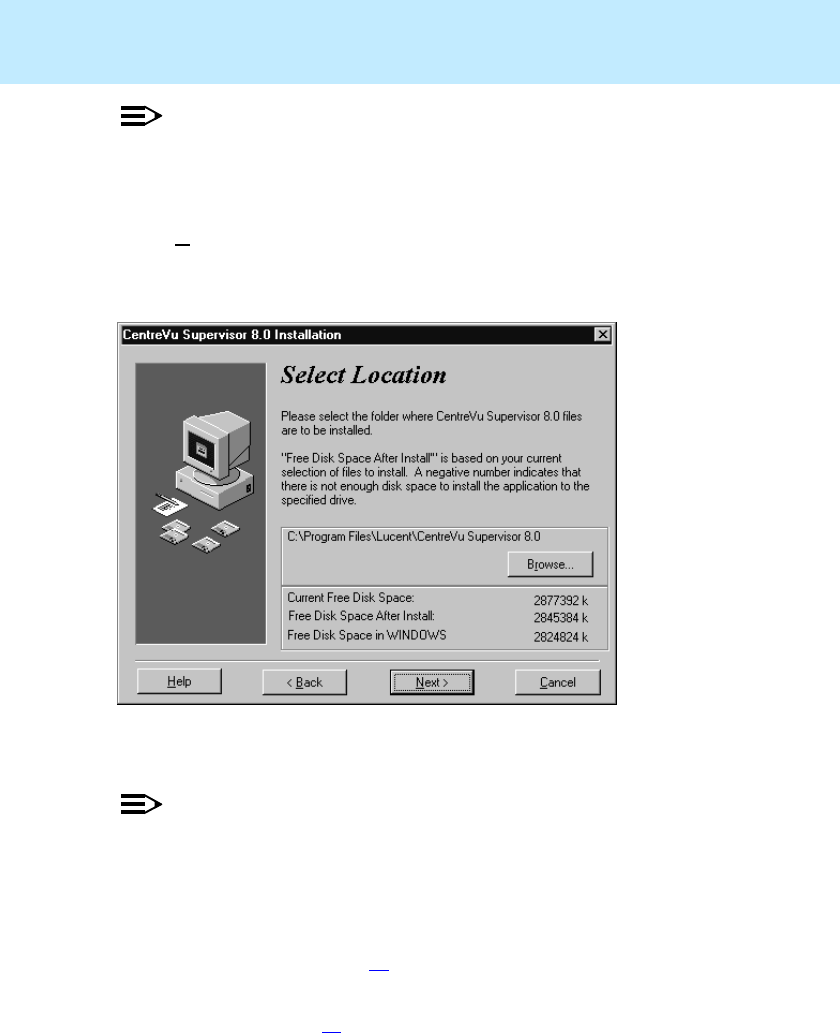
22. The Select Location dialog box appears. If you are replacing the existing
version of Supervisor, the Browse button will be disabled.
23. Assure that you have enough disk space to install the application to the
specified drive.
NOTE:
The information on the bottom of the dialog box indicates the Current Free
Disk Space and the Free Disk Space After Install.
24. Choose one of the following:
●If you want to install the Supervisor files in the default installation
path displayed, go to Step 28.
●If you want to install the CentreVu Supervisor files in a different drive
or folder, go to Step 25.
CentreVu
Supervisor Version 8 Installation and Getting Started
Installing CentreVu Supervisor on a Local PC
Installation Procedures
2-11
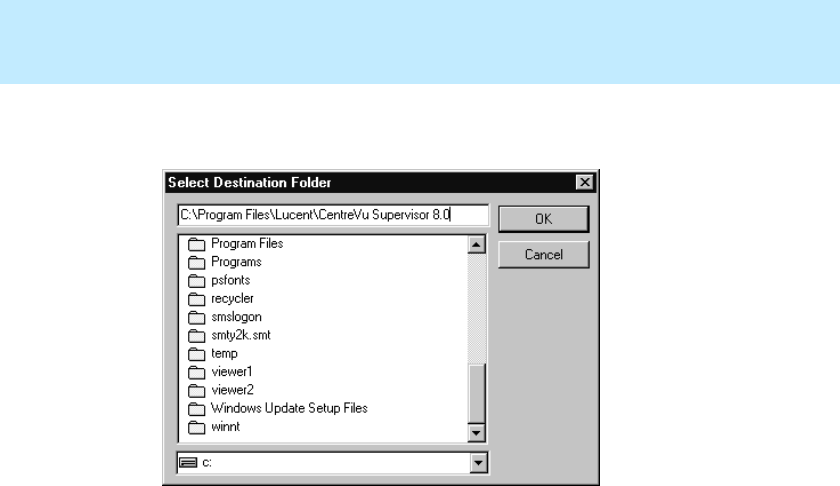
25. Use the Browse option to display the Select Destination Directory dialog
box.
26. In the Select Destination Folder dialog box, do one of the following:
●Navigate to the drive and folder where you want to install the files.
Double click on the folder to select it.
●Type the drive and folder where you want to install the files. If the
folder does not exist, the Setup program creates it.
27. When you have selected the location, click OK. The destination path you
chose displays in the Select Location dialog box.
CentreVu
Supervisor Version 8 Installation and Getting Started
Installing CentreVu Supervisor on a Local PC
Installation Procedures
2-12
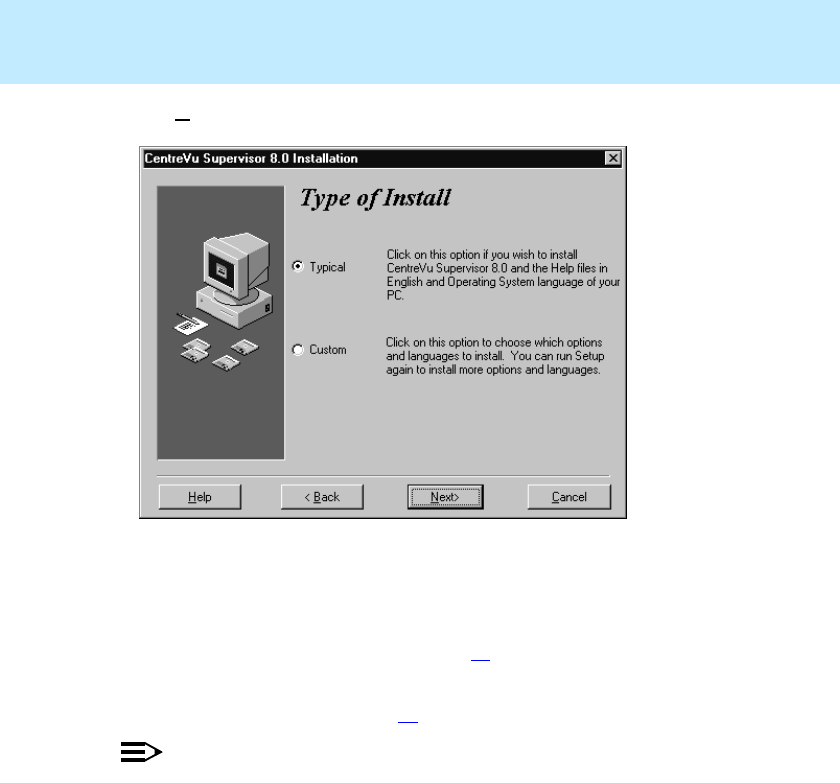
28. Select Next. The Type of Install dialog box appears.
29. In the Type of Install dialog box, select one of the following:
●Typical—this selection installs all of the basic options in English,
which is required, and all of the basic options in the language of your
Windows operating system. Go to Step 33.
●Custom—this selection lets you choose which options and language
versions to install. Go to Step 30.
NOTE:
If you are doing a Supervisor Version 8 upgrade, you must also install all of
the required languages. The Supervisor upgrade will not automatically
reinstall the required languages.
CentreVu
Supervisor Version 8 Installation and Getting Started
Installing CentreVu Supervisor on a Local PC
Installation Procedures
2-13
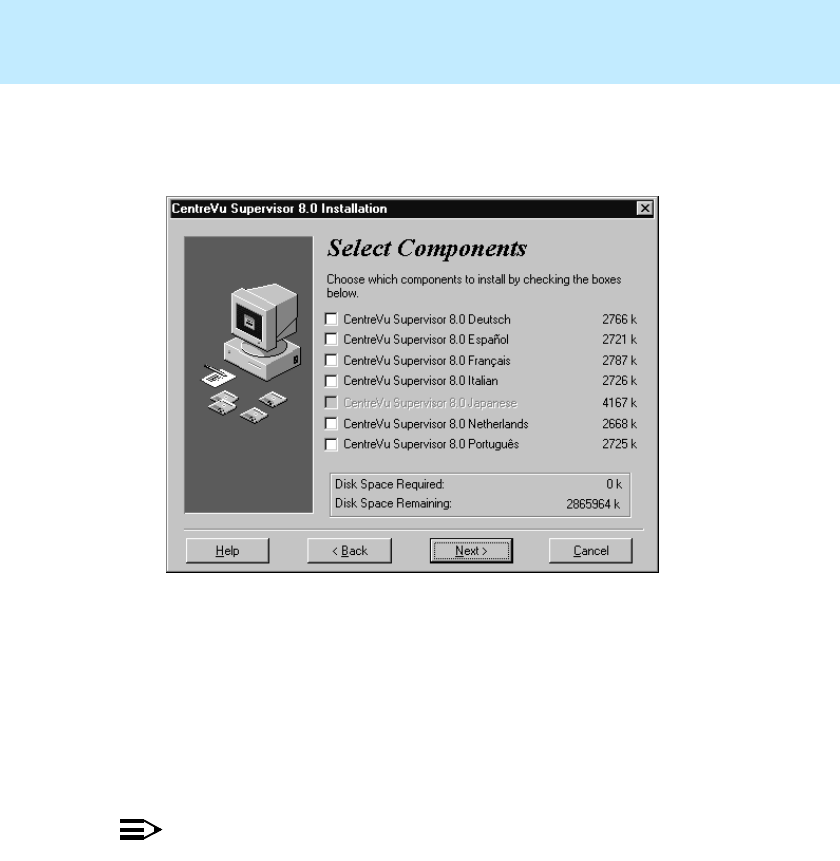
30. If you selected Custom, the Select Components dialog box appears. This
dialog box lets you select or deselect the components and language
versions you want to install.
31. Before making your selections, read the bottom half of the dialog box. It
provides you with the following information:
●The total space required to install the options you selected
●The total space available on the specified drive (both the destination
drive and the drive on which Windows exists).
32. Place a check mark in front of the components in the list box that you want
to install.
NOTE:
The English versions of Supervisor and on-line help are always installed.
If you are running a supported non-English version of Windows, Setup
will also install Supervisor and on-line help in the language that matches
your Windows System. See page 1-2 for a table showing supported
versions.
CentreVu
Supervisor Version 8 Installation and Getting Started
Installing CentreVu Supervisor on a Local PC
Installation Procedures
2-14
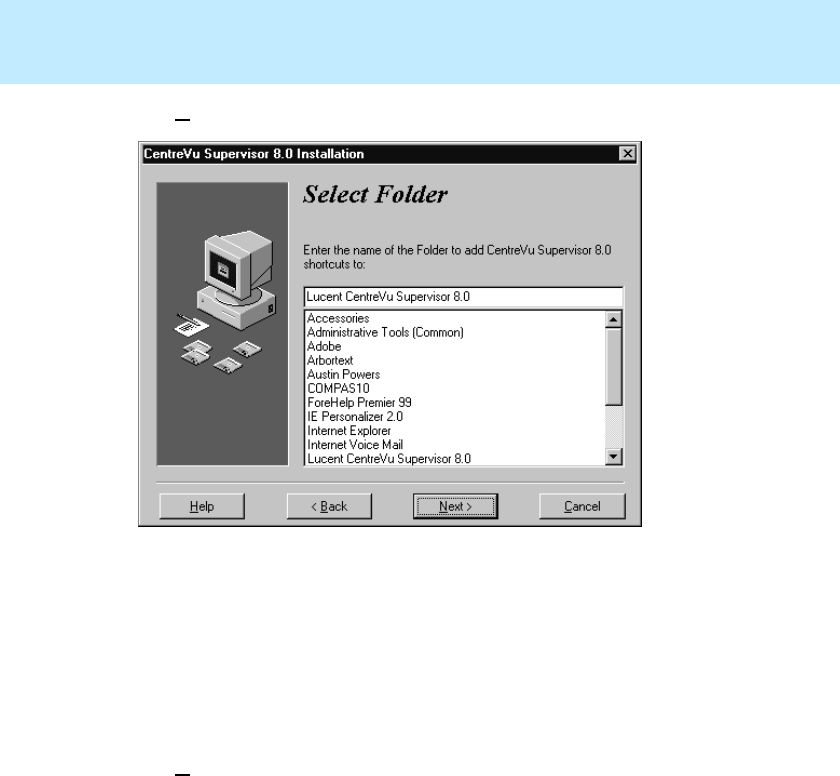
33. Select Next. The Select Folder dialog box appears.
34. The Select Folder dialog box lets you select a folder in which to put
CentreVu Supervisor shortcuts. Do one of the following:
●Choose the default folder displayed.
●Enter a different folder name in the text box. The Supervisor setup
program creates the folder.
●Select a folder name from the list of existing groups.
35. Select Next.
CentreVu
Supervisor Version 8 Installation and Getting Started
Installing CentreVu Supervisor on a Local PC
Installation Procedures
2-15
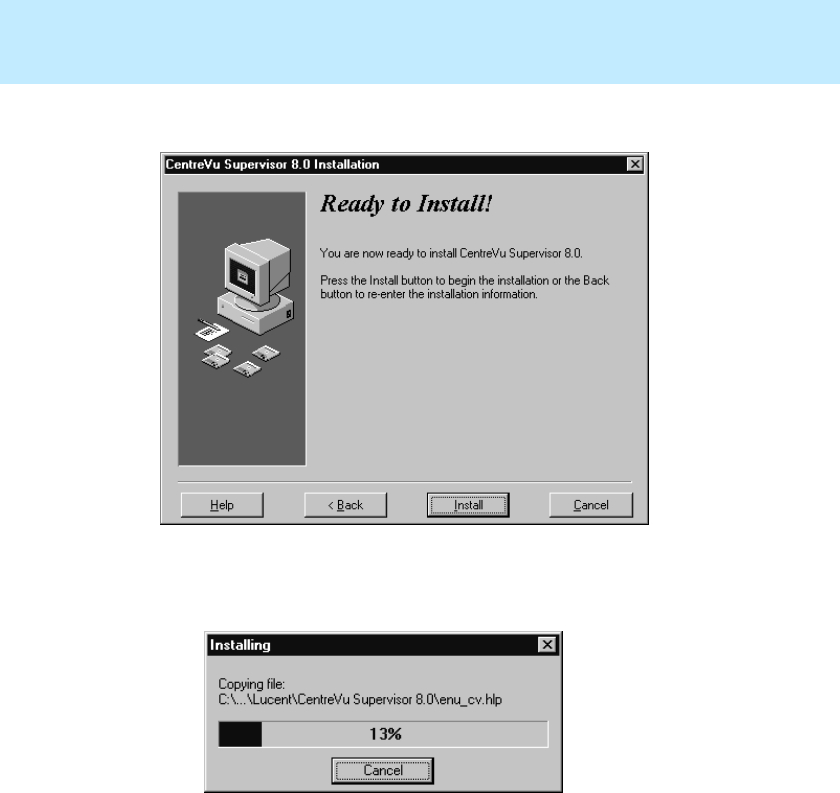
The Ready to Install dialog box appears.
36. Select Install to begin the installation. A progress indicator shows what
percentage of the files are being installed.
The Install Status dialog box will display a list of all files installed for CentreVu
Supervisor Release 8. Review this list as needed to see that all files were
successfully installed.
CentreVu
Supervisor Version 8 Installation and Getting Started
Installing CentreVu Supervisor on a Local PC
Installation Procedures
2-16
When the installation is complete, the Install Successful dialog box
appears.
37. Select Finish to return to your desktop.
38. CentreVu Supervisor installation is complete.

CentreVu
Supervisor Version 8 Installation and Getting Started
Installing CentreVu Supervisor on a Shared Network Drive
Overview
3-1
CentreVu
Supervisor
Installing CentreVu
Supervisor on a Shared
Network Drive 3
Overview 3
This chapter explains how to install the CentreVu® Supervisor application
software for use in a shared application folder configuration on the network
drive. With this type of installation, the Supervisor executable files reside on
the application server and are shared by multiple computers.
You must have administrator privileges to install Supervisor on a PC running
Windows NT* 4.0.
You must first do a network setup to install Supervisor onto the network. Then,
from each client workstation, you do a client setup to allow users to access
Supervisor from their workstations.
This chapter includes the following sections:
●Installation Procedures
●Network Setup
●Client Setup.
*Windows NT is a trademark of Microsoft Corp.

CentreVu
Supervisor Version 8 Installation and Getting Started
Installing CentreVu Supervisor on a Shared Network Drive
Installation Procedures
3-2
Installation Procedures 3
Installing CentreVu Supervisor to a shared application folder is a two-step
process that consists of the following:
●Performing the network setup
●Performing a client setup at each client PC.
The network setup expands all program files and all language options into the
network directory. In addition, this setup transfers a client setup program and its
associated files to the network directory. You can do this setup from either the
network installation folder or from a CD-ROM.
The client setup program allows clients to access Supervisor from the network
server. Client setup creates a folder on the client PC. The icons in the folder
point to the executable files on the application server. In addition, client setup
allows you to identify where you want to put the user-specific files (these files
can be located on the client’s local drive or on the network).
NOTE:
For installation requirements, see “Other Requirements” on page 1-11.
Network Setup 3
To perform a network setup, you must have administrative privileges on a
workstation that is running Windows. Then do the following:
1. Log on to the PC as a user with administrative privileges.
2. Before starting the installation, close all running programs on the PC.
3. Create a folder on the network drive to hold the Supervisor application
files, and make it read-only and shared.
4. Verify that the network drive containing the application folder is connected
to each client PC.
5. On the Supervisor distribution medium (CD-ROM or installation folder),
locate and double-click on the Readme.txt file to view last minute
installation tips on CentreVu Supervisor.
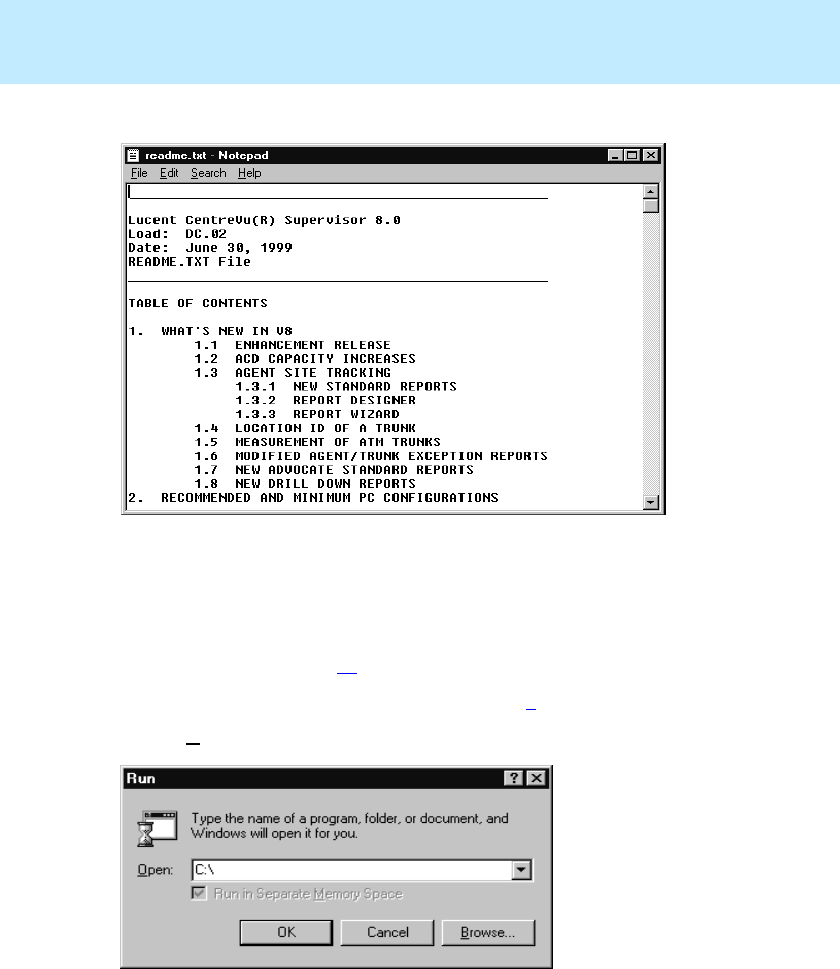
CentreVu
Supervisor Version 8 Installation and Getting Started
Installing CentreVu Supervisor on a Shared Network Drive
Installation Procedures
3-3
The file will be displayed in Windows Notepad, as shown below:
6. To exit the readme file, close the Notepad application.
7. Insert the CentreVu Supervisor CD-ROM into the CD-ROM drive. One of
the following will occur:
●If AutoPlay is enabled, setup starts automatically when you insert the
CD-ROM. Go to Step 10.
●If AutoPlay is not enabled, proceed with Step 8.
8. Choose Run from the Start menu. The Run dialog box appears.
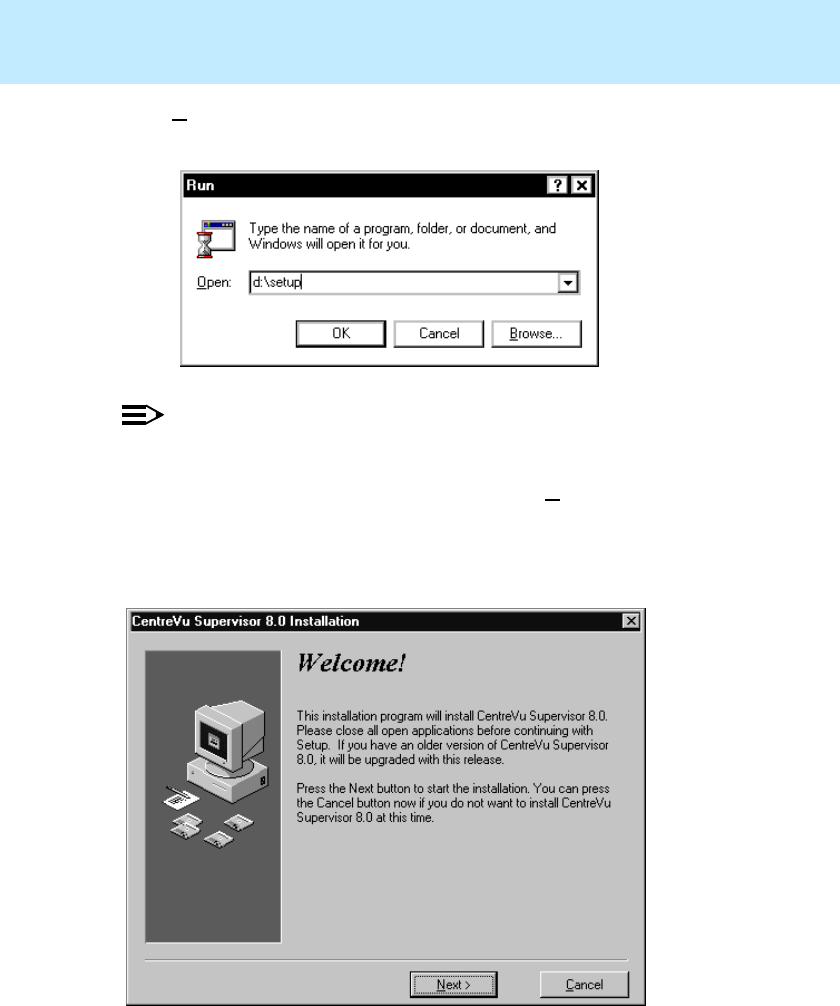
CentreVu
Supervisor Version 8 Installation and Getting Started
Installing CentreVu Supervisor on a Shared Network Drive
Installation Procedures
3-4
9. In the Open text box, enter your CD-ROM drive, followed by setup, and
then select OK. In the following example, the “d:” drive is selected.
NOTE:
You can also install Supervisor from an installation folder on the network
drive. If the drive containing the Supervisor installation files is not mapped
to your PC, you need to type the network path in the Open text box of the
Run dialog box to map it to your PC.
10. After a short wait, the CentreVu Supervisor 8.0 Installation Welcome
window appears.
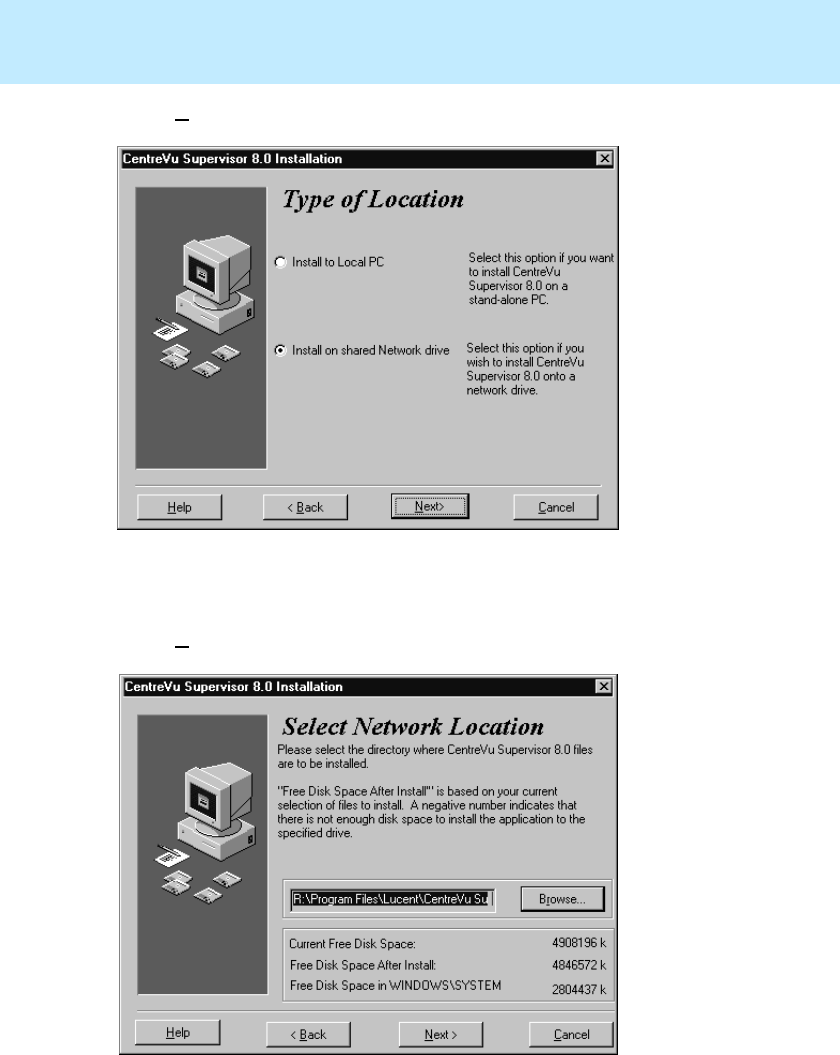
CentreVu
Supervisor Version 8 Installation and Getting Started
Installing CentreVu Supervisor on a Shared Network Drive
Installation Procedures
3-5
11. Select Next. The Type of Location dialog box appears.
12. Select Install on Shared Network Drive to install the CentreVu
Supervisor application files to a folder on a shared network server.
13. Select Next. The Select Network Location dialog box appears.

CentreVu
Supervisor Version 8 Installation and Getting Started
Installing CentreVu Supervisor on a Shared Network Drive
Installation Procedures
3-6
The setup program expands all program files and all language versions into
the network directory specified in the Select Network Location dialog box.
14. Check the Current Free Disk Space and the Free Disk Space After Install to
assure that you have enough disk space to install the application to the
specified drive.
15. Choose one of the following:
●If you want to install the Supervisor files in the default installation
path displayed, go to Step 19.
●If you want to install the CentreVu Supervisor files in a different drive
or folder, go to Step 16.
16. In the Select Network Location dialog box, use the Browse option to
display the Select Destination Folder dialog box.
17. Navigate to the drive containing the folder you created in Step 3, and
double-click on the folder to select it.
NOTE:
If performing a Supervisor upgrade, the upgrade must be installed in the
same folder containing the previous Supervisor Version 8 software. It is the
system administrator’s responsibility to make sure that the client’s PC is
mapped to the network drive and folder containing the Supervisor Version
8 software.
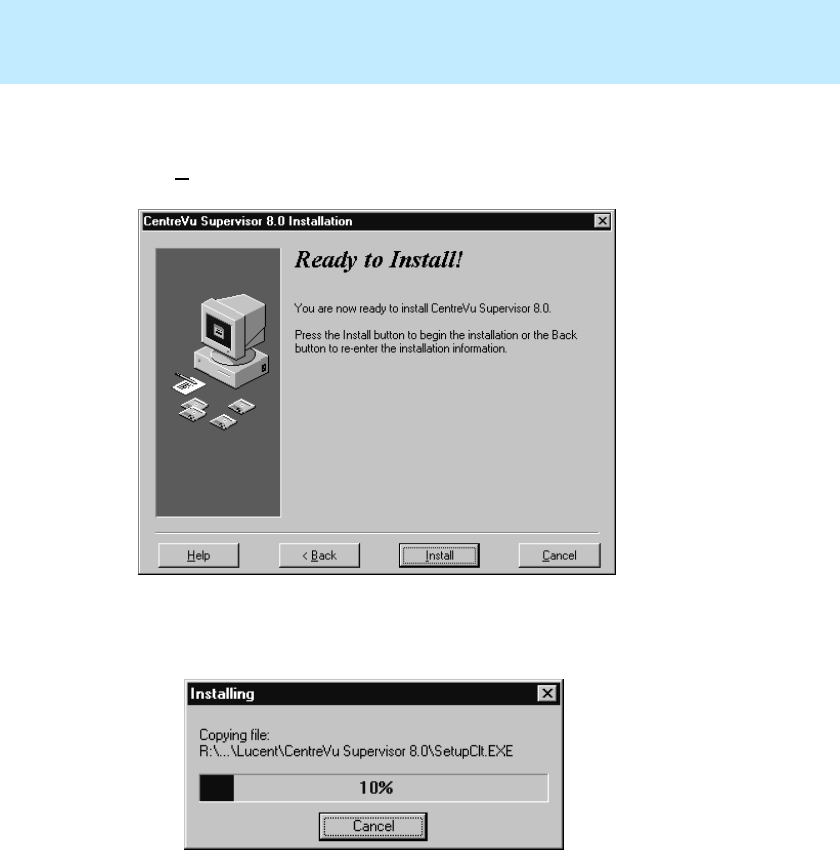
CentreVu
Supervisor Version 8 Installation and Getting Started
Installing CentreVu Supervisor on a Shared Network Drive
Installation Procedures
3-7
18. Select OK. The drive and folder where Supervisor will be installed appears
in the Select Network Location dialog box.
19. Select Next. The Ready to Install dialog box appears.
20. Select Install to begin the installation. A progress indicator shows what
percentage of the files have been installed.

CentreVu
Supervisor Version 8 Installation and Getting Started
Installing CentreVu Supervisor on a Shared Network Drive
Installation Procedures
3-8
When the installation is complete, the Install Successful dialog box
appears.
21. Select Finish to return to your desktop.
22. CentreVu Supervisor installation is complete. Go to Chapter 5, “Getting
Started with CentreVu Supervisor,” to learn how to establish a connection
to the CentreVu CMS server.
NOTE:
You may get a message that you need to restart your computer before
running Supervisor. Press OK to restart your computer.
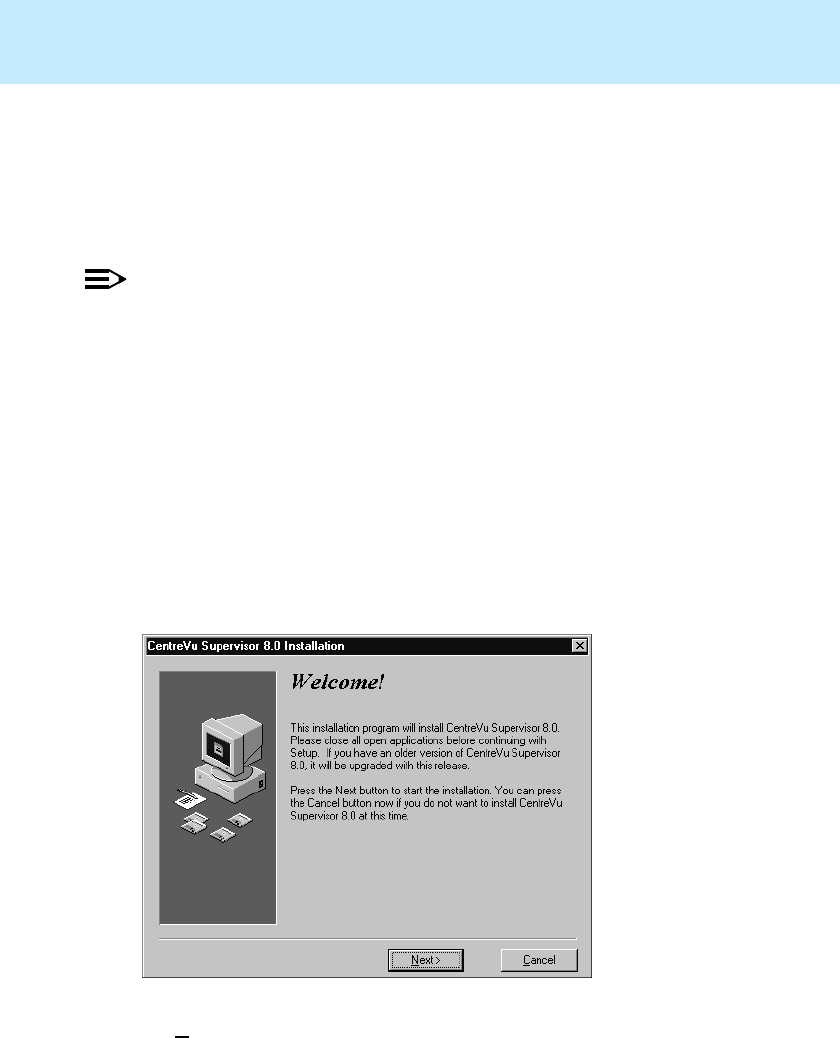
CentreVu
Supervisor Version 8 Installation and Getting Started
Installing CentreVu Supervisor on a Shared Network Drive
Installation Procedures
3-9
Client Setup 3
The client setup program sets up the client computer to access CentreVu
Supervisor from the network server. Supervisor setup installs the application
files on the network, while client setup installs on the client PC only the user-
specific files needed to run Supervisor.
NOTE:
You must run client setup from the physical PC that the client will use to access
Supervisor. If you simply log into the network as each user and then run client
setup, the program will not install properly.
To set up a client PC, do the following:
1. Before starting the installation, close all running programs on the PC.
2. In Windows Explorer or Network Neighborhood (Windows 95 or 98 or
Windows NT 4.0), navigate to the directory where CentreVu Supervisor is
installed.
3. Locate and then double-click on the setupclt.exe file.
4. After a short wait, the CentreVu Supervisor 8.0 Installation Welcome
window appears.
5. Select Next. Setup begins searching for a previous installation of
Supervisor on your PC.
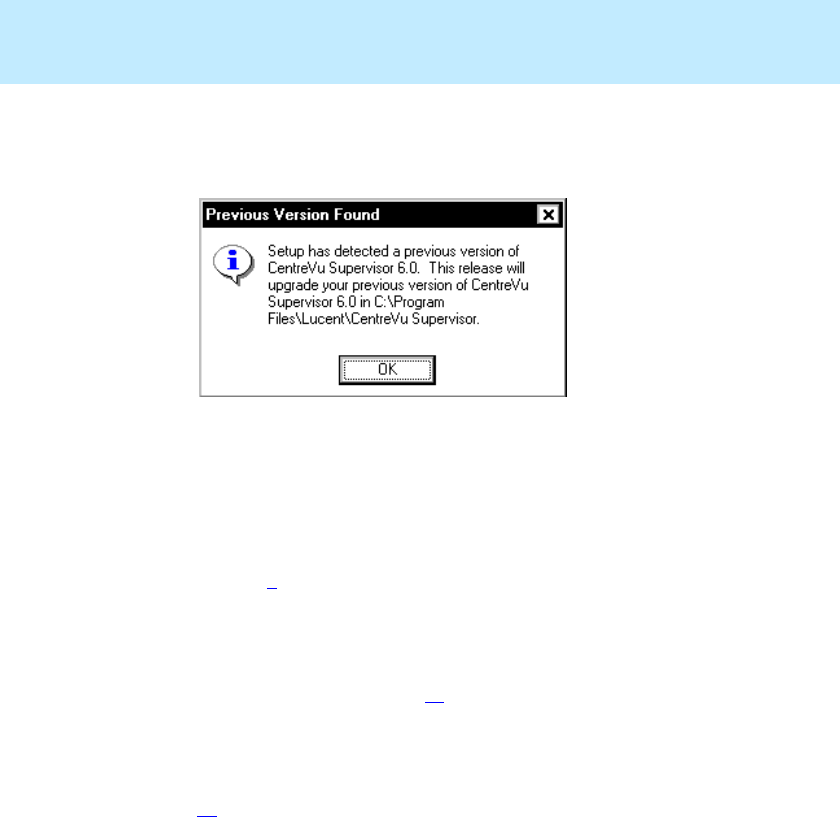
CentreVu
Supervisor Version 8 Installation and Getting Started
Installing CentreVu Supervisor on a Shared Network Drive
Installation Procedures
3-10
6. If the setup program finds a previous installation of Supervisor
Version 6 or Version 8, the Previous Version Found dialog box appears.
Select OK to continue with the installation.
7. If the setup program did not find a previous installation of Supervisor
Version 8, one of the following dialog boxes appears:
●If the Replace CentreVu Supervisor 5.0 dialog box appears, it means
that the setup program did not find a previous installation of
Supervisor Version 8, but it found an installation of Supervisor Version
5. Go to Step 8.
●If the Replace CentreVu Supervisor 1.0 dialog box appears, it means
that the setup program did not find a previous installation of
Supervisor Version 8 or Version 6, but it found an installation of
Supervisor Version 1. Go to Step 11. (Either Supervisor Version 5 or
Version 1 could exist, but not both.)
●If the Select Location dialog box appears, it means that the setup
program did not find an installation of Supervisor Version 5. Go to
Step 14.
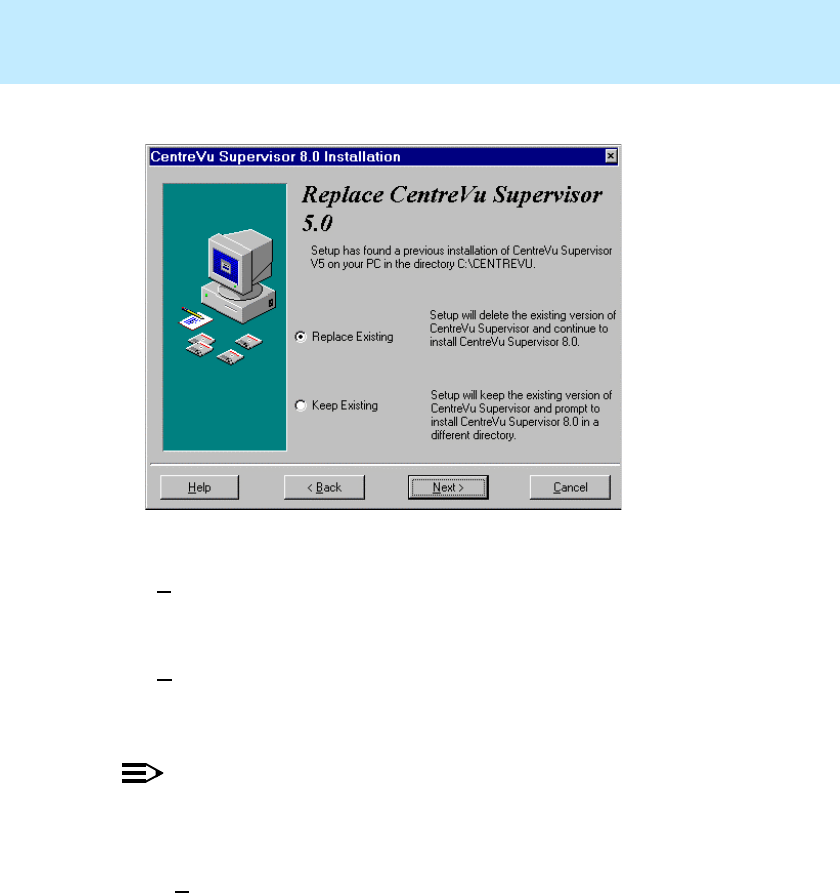
CentreVu
Supervisor Version 8 Installation and Getting Started
Installing CentreVu Supervisor on a Shared Network Drive
Installation Procedures
3-11
8. The Replace CentreVu Supervisor 5.0 dialog box appears.
9. Select one of the following:
●Replace Existing—the setup program will delete the existing
installation of Supervisor Version 5 and install Supervisor Version 8 in
its place.
●Keep Existing—the setup program will keep the existing installation
of Supervisor and prompt to install Supervisor Version 8 in a different
folder.
NOTE:
If you decide to keep the previous installation of Supervisor
Version 5, you can uninstall it later using the uninstall executable file on
the Supervisor CD-ROM. This file is named removeV5.exe.
10. Select Next.

CentreVu
Supervisor Version 8 Installation and Getting Started
Installing CentreVu Supervisor on a Shared Network Drive
Installation Procedures
3-12
11. The Replace CentreVu Supervisor 1.0 dialog box appears.
12. Select one of the following:
●Replace Existing—the setup program will delete the existing
installation of Supervisor Version 1 and install Supervisor Version 8 in
its place.
●Keep Existing—the setup program will keep the existing installation
of Supervisor and prompt to install Supervisor Version 8 in a different
folder.
NOTE:
If you decide to keep the previous installation of Supervisor
Version 1, you can uninstall it later using the uninstall executable file on
the Supervisor CD-ROM. This file is named removeV1.exe.
13. Select Next.
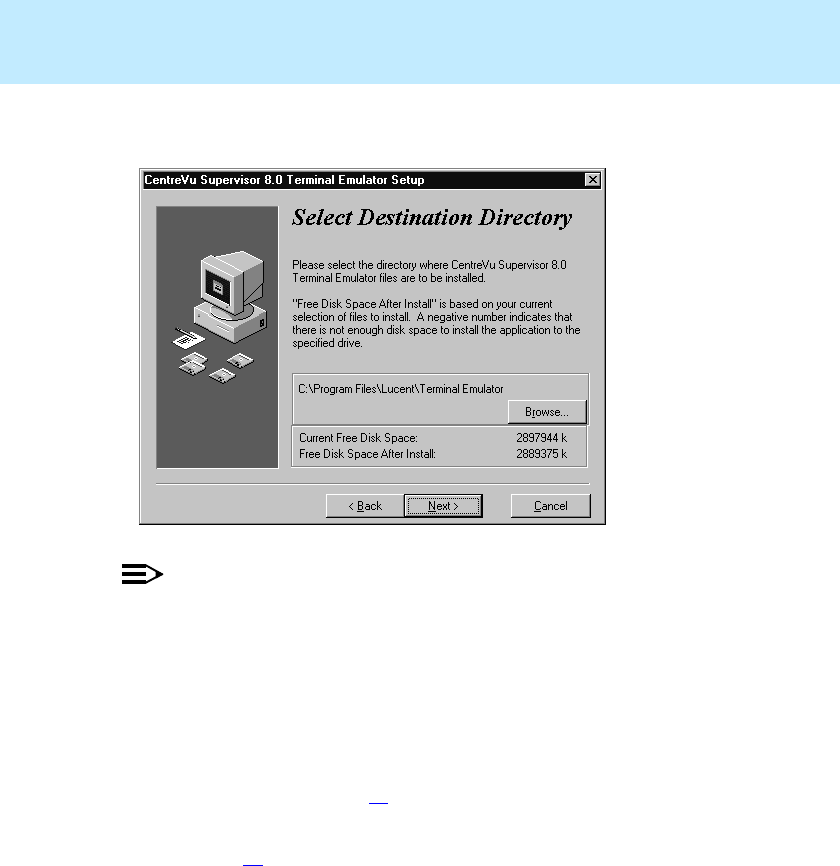
CentreVu
Supervisor Version 8 Installation and Getting Started
Installing CentreVu Supervisor on a Shared Network Drive
Installation Procedures
3-13
14. The Select Destination Directory dialog box appears. If you are replacing
the existing version of Supervisor, the Browse button will be disabled.
NOTE:
The Select Destination Directory dialog box lets you choose where you
want to install user-specific files. If a previous user file location is not
detected, the default location is c:\Lucent\CentreVu\Supervisor. If a
previous user file location is detected, the client setup displays the user file
path that was used for the previous installation.
15. Choose one of the following:
●If you want to install the Supervisor files in the default installation
path displayed, go to Step 19.
●If you want to install the Supervisor files in a different drive or folder,
go to Step 16.
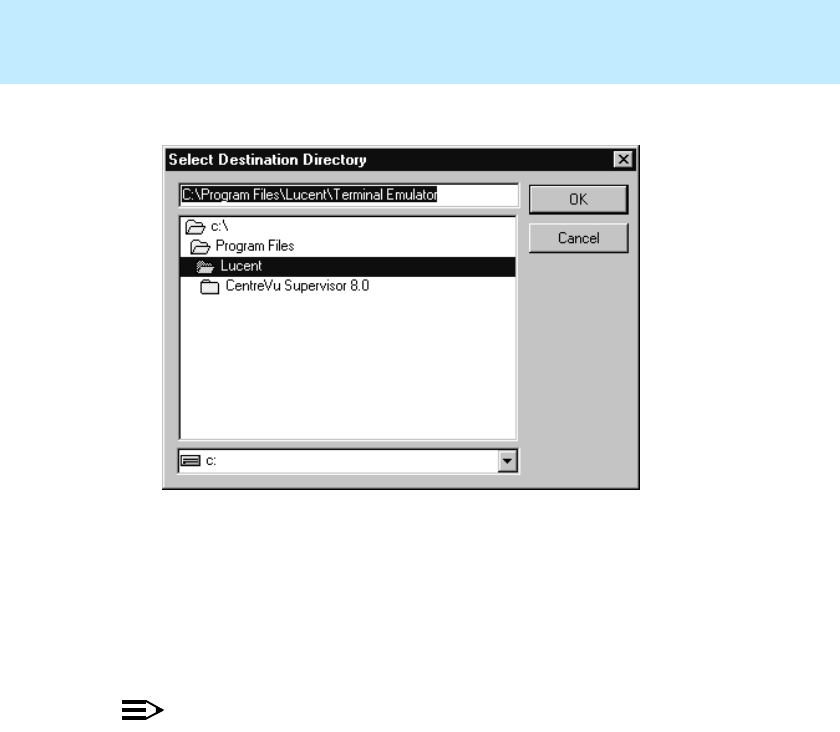
CentreVu
Supervisor Version 8 Installation and Getting Started
Installing CentreVu Supervisor on a Shared Network Drive
Installation Procedures
3-14
16. Use the Browse option to display the Select Destination Folder dialog box.
17. In the Select Destination Folder dialog box, do one of the following:
●Navigate to the drive and folder where you want to install the files.
Double click on the folder to select it.
●Type the drive and folder where you want to install the files. If the
folder does not exist, the Setup program creates it.
NOTE:
The user files can be located on the client’s local drive or on the network.
18. When you have selected the location, click OK. The destination path you
chose displays in the Select Location dialog box.
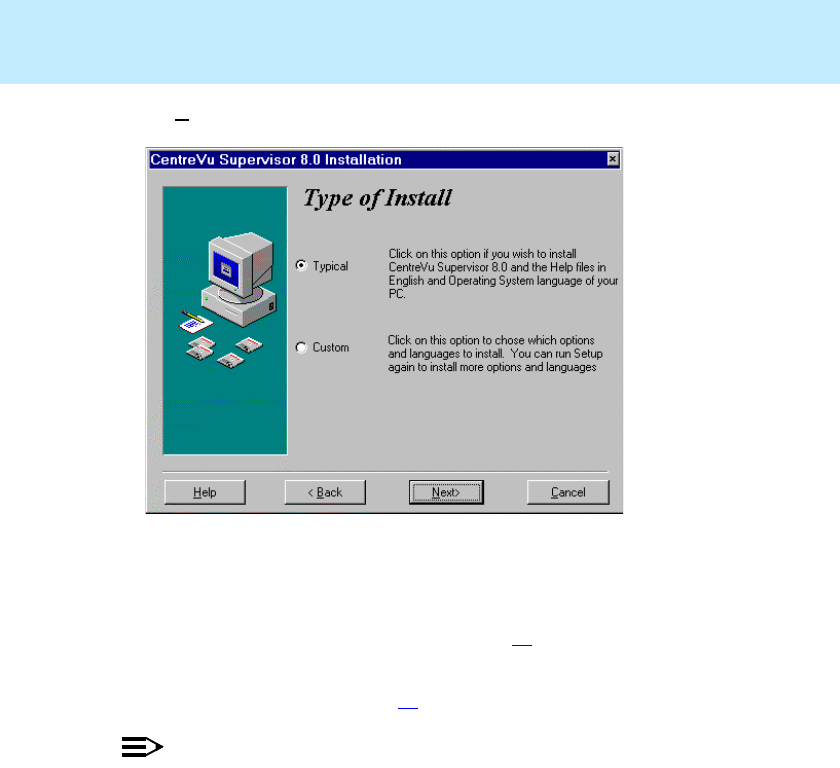
CentreVu
Supervisor Version 8 Installation and Getting Started
Installing CentreVu Supervisor on a Shared Network Drive
Installation Procedures
3-15
19. Select Next. The Type of Install dialog box appears.
20. In the Type of Install dialog box, select one of the following:
●Typical—this selection installs all of the basic options in English,
which is required, as well as all of the basic options in the language of
your Windows operating system. Go to Step 23.
●Custom—this selection lets you choose which options and language
versions to install. Go to Step 21.
NOTE:
If you are doing a Supervisor Version 8 upgrade, you must also install all of
the required languages. The Supervisor upgrade will not automatically
reinstall the required languages.
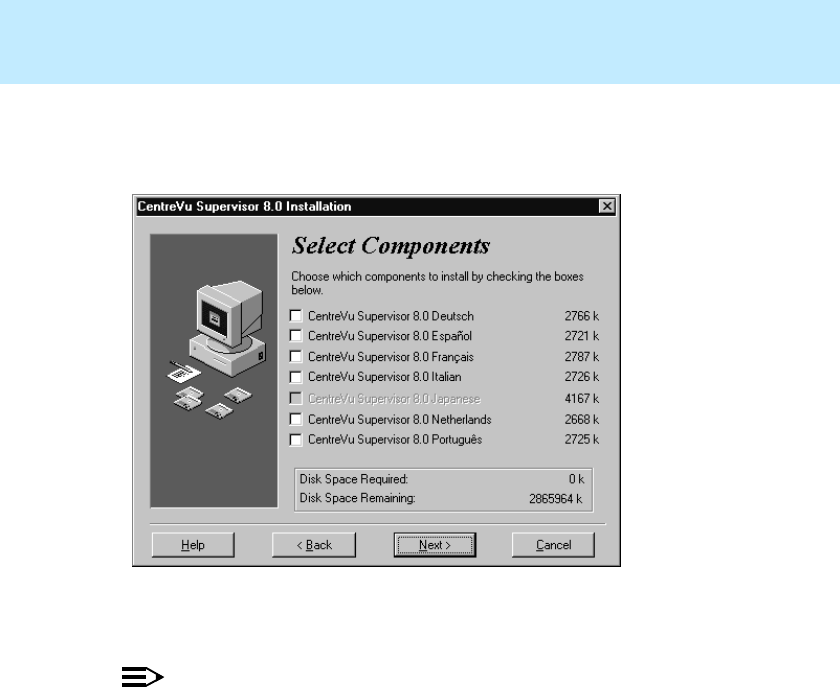
CentreVu
Supervisor Version 8 Installation and Getting Started
Installing CentreVu Supervisor on a Shared Network Drive
Installation Procedures
3-16
21. If you selected Custom, the Select Components dialog box appears. This
dialog box lets you select or deselect the components and language
versions you want to install.
22. Place a check mark in front of the components in the list box that you want
to install.
NOTE:
The English versions of Supervisor and on-line help are always installed. If
you are running a supported non-English version of Windows, Setup will
also install Supervisor and on-line help in the language that matches your
Windows System. See page 1-2 for a table listing supported versions.
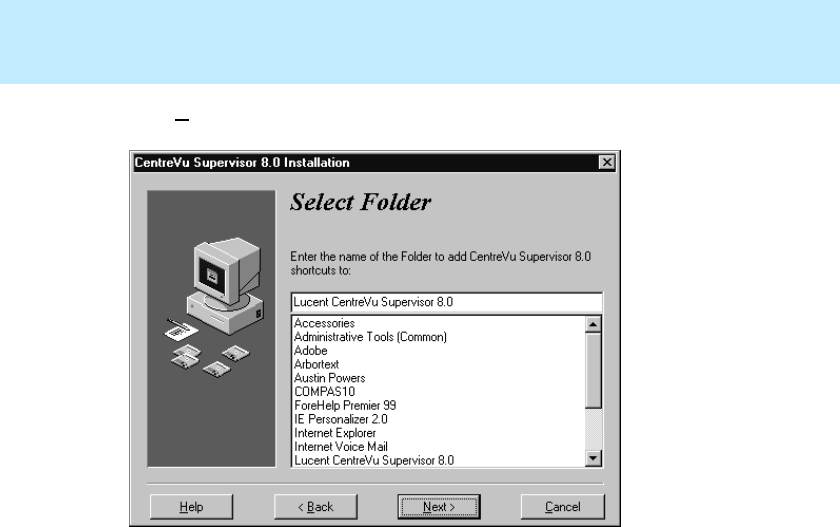
CentreVu
Supervisor Version 8 Installation and Getting Started
Installing CentreVu Supervisor on a Shared Network Drive
Installation Procedures
3-17
23. Select Next. The Select Folder dialog box appears.
24. The Select Folder dialog box lets you select a folder in which to put
CentreVu Supervisor shortcuts. Do one of the following:
●Choose the default folder displayed.
●Enter a different folder name in the text box. The Supervisor setup
program creates the folder.
●Select a folder name by from the list of existing groups.
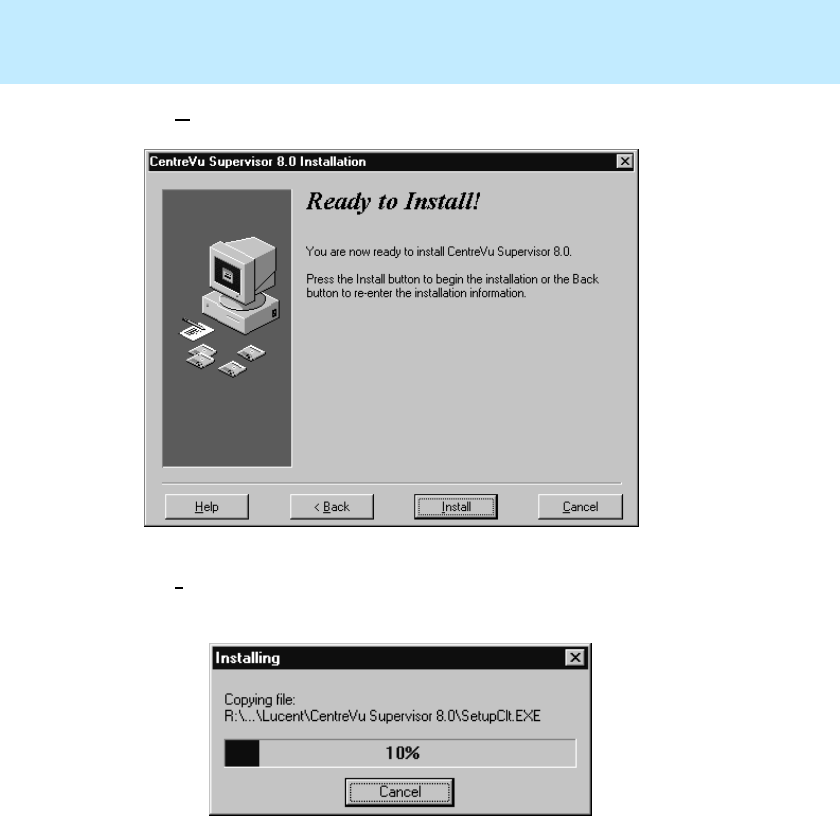
CentreVu
Supervisor Version 8 Installation and Getting Started
Installing CentreVu Supervisor on a Shared Network Drive
Installation Procedures
3-18
25. Select Next. The Ready to Install dialog box appears.
26. Select Install to begin the setup. A progress indicator shows what
percentage of the files are being installed.
The Install Status dialog box will display a list of all files installed for CentreVu
Supervisor Release 8. Review this list as needed to see that all files were
successfully installed.
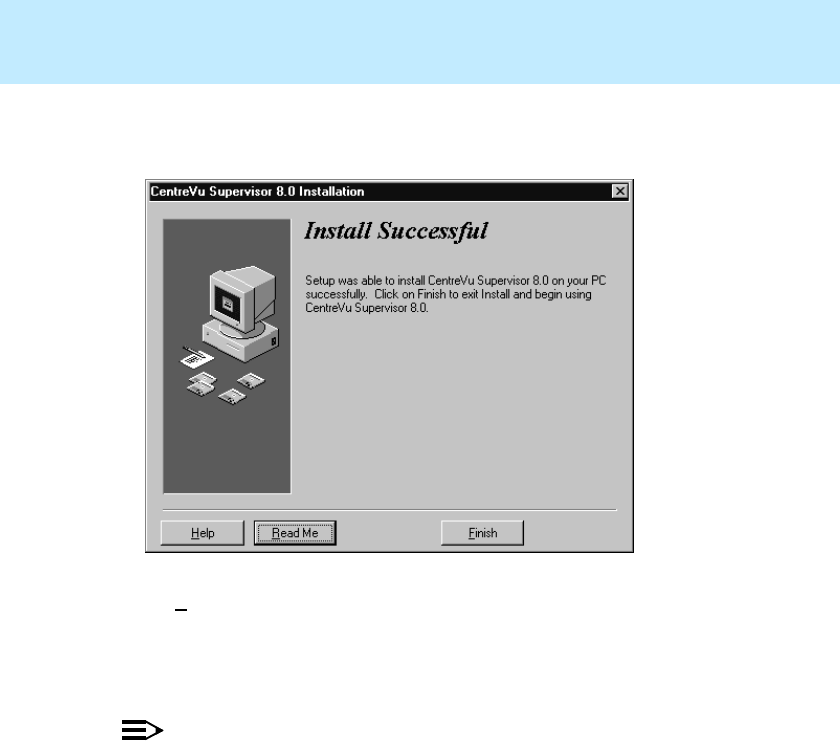
CentreVu
Supervisor Version 8 Installation and Getting Started
Installing CentreVu Supervisor on a Shared Network Drive
Installation Procedures
3-19
When the installation is complete, the Install Successful dialog box
appears.
27. Select Finish to return to your desktop.
28. CentreVu Supervisor installation is complete. Go to Chapter 5, “Getting
Started with CentreVu Supervisor,” to learn how to establish a connection
to the CentreVu CMS server.
NOTE:
You may get a message that you need to restart your computer before
running Supervisor. Press OK to restart your computer.

CentreVu
Supervisor Version 8 Installation and Getting Started
Installing CentreVu Supervisor on a Shared Network Drive
Installation Procedures
3-20

CentreVu
Supervisor Version 8 Installation and Getting Started
Uninstalling CentreVu Supervisor
Overview
4-1
CentreVu
Supervisor
Uninstalling CentreVu
Supervisor 4
Overview 4
You can easily uninstall the CentreVu® Supervisor Version 8 application using
the Microsoft Windows* Add/Remove Programs wizard. Uninstall removes the
Supervisor files and folders from the PC. Uninstall will not remove
components, registry entries, files that are being used by other applications, or a
folder that is not empty.
NOTE:
A registry is a Windows database that holds information about the system and
its applications, including system settings, client, and server information.
This chapter explains how to perform a CentreVu Supervisor Version 8
uninstall.
*Microsoft Windows is a trademark of Microsoft Corp.
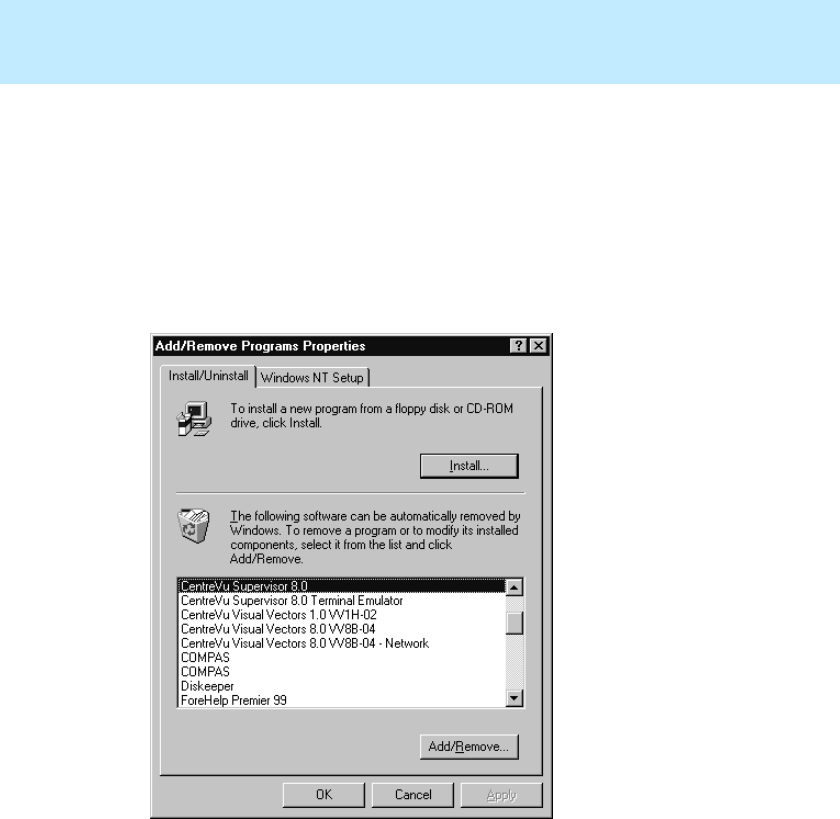
CentreVu
Supervisor Version 8 Installation and Getting Started
Uninstalling CentreVu Supervisor
Performing the Uninstall
4-2
Performing the Uninstall 4
To uninstall the CentreVu Supervisor application, do the following:
1. Close all running programs on the PC.
2. Select Settings and then Control Panel in the Windows Start menu.
3. Double click on the Add/Remove Programs icon. The Add/Remove
Programs Properties window opens.
4. Select the Install/Uninstall tab.
5. Highlight Lucent CentreVu Supervisor 8.0 in the list of installed software.
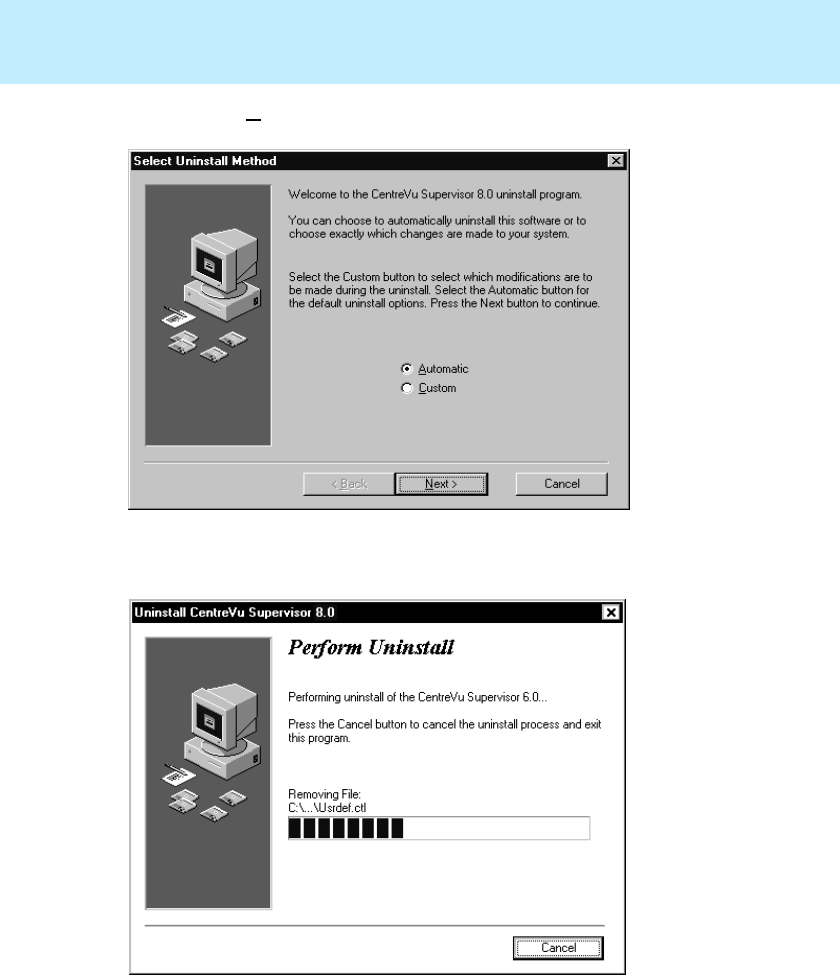
CentreVu
Supervisor Version 8 Installation and Getting Started
Uninstalling CentreVu Supervisor
Performing the Uninstall
4-3
6. Select the Add/Remove button. The following message displays:
7. Click Next. The Perform Uninstall window appears.

CentreVu
Supervisor Version 8 Installation and Getting Started
Uninstalling CentreVu Supervisor
Performing the Uninstall
4-4
A progress indicator indicates the percentage of the files that are being
removed.
NOTE:
If you press Cancel at this time, it will cancel the uninstall process, but
because some files will have been deleted, Supervisor will not run. Also, if
you try to uninstall Supervisor again after canceling the uninstall, you will
not be able to do it.
8. After the uninstall is complete, you are returned to your desktop.

CentreVu
Supervisor Version 8 Installation and Getting Started
Getting Started with CentreVu Supervisor
Overview
5-1
CentreVu
Supervisor
Getting Started with
CentreVu Supervisor 5
Overview 5
This section familiarizes you with the main components of the Supervisor
Controller window and teaches you a few basic skills you will use every time
you work with the application. You will learn how to do the following:
●Open the Supervisor application
●Log into the CMS server
●Log off the CMS server
●Get help.
You will also learn about the following components of Supervisor Controller:
●Menus
●Icons
●Status line
●Windows.
CentreVu
Supervisor Version 8 Installation and Getting Started
Getting Started with CentreVu Supervisor
Overview
5-2
Establishing
CentreVu
CMS Server Connection
Settings 5
You must establish connection settings in order to connect to the CMS server. If
you have already established connection settings, go to the following sections:
●“Logging Into the CMS Server — First Time” on page 5-9
●“Logging Into CMS Server — After First Time” on page 5-10.
There are three connection options:
●Network
●Serial
●Modem.
You can set these options to connect to the CMS server one of two ways:
●Automatic—used to login to the CMS server directly from Supervisor
●Manual—used to login to the CMS server by way of the server’s Solaris*
system. You would use manual login for the following reasons:
— You need to access cmssvc and cmsadm menus
— You are instructed to do so for troubleshooting purposes
— Your version of Supervisor resides in a different Solaris system than
the CMS server.
NOTE:
For more information about your Solaris system, see your Solaris system
administrator.
Now you are ready to open Supervisor and establish a connection to the CMS
server. See “Opening the CentreVu Supervisor Application” on page 5-3.
*Solaris is a registered trademark of Sun Microsystems.
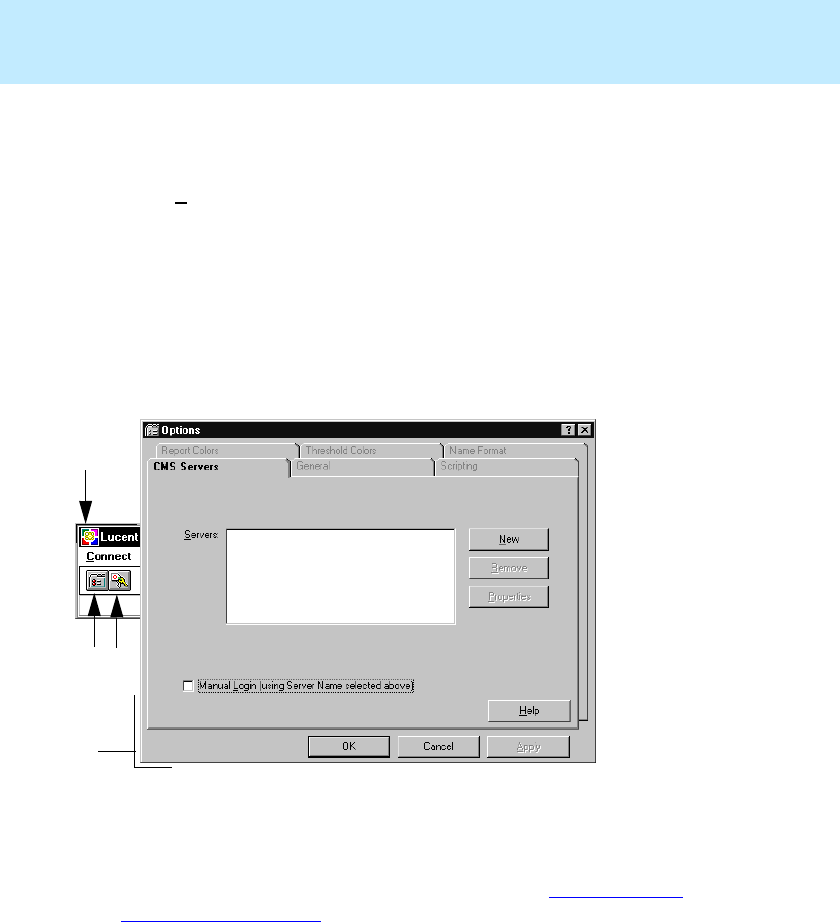
CentreVu
Supervisor Version 8 Installation and Getting Started
Getting Started with CentreVu Supervisor
Overview
5-3
Opening the
CentreVu
Supervisor Application 5
To open the Supervisor application, do the following:
1. Select Programs and then Lucent CentreVu Supervisor 8.0 from the
Windows Start menu.
2. In the Lucent CentreVu Supervisor menu, select CentreVu Supervisor-
English.
At this point, the Supervisor application is open, but you are not logged
into the CMS server. If you have not yet established connection settings to
a CMS server, the Supervisor Controller appears, along with an open
Options dialog box, as shown below.
3. Next, you need to establish connection settings. See “Establishing the
Connection” on page 5-4.
1. Supervisor Controller
2. Options icon
3. Login icon
4. Options window
4
23
1
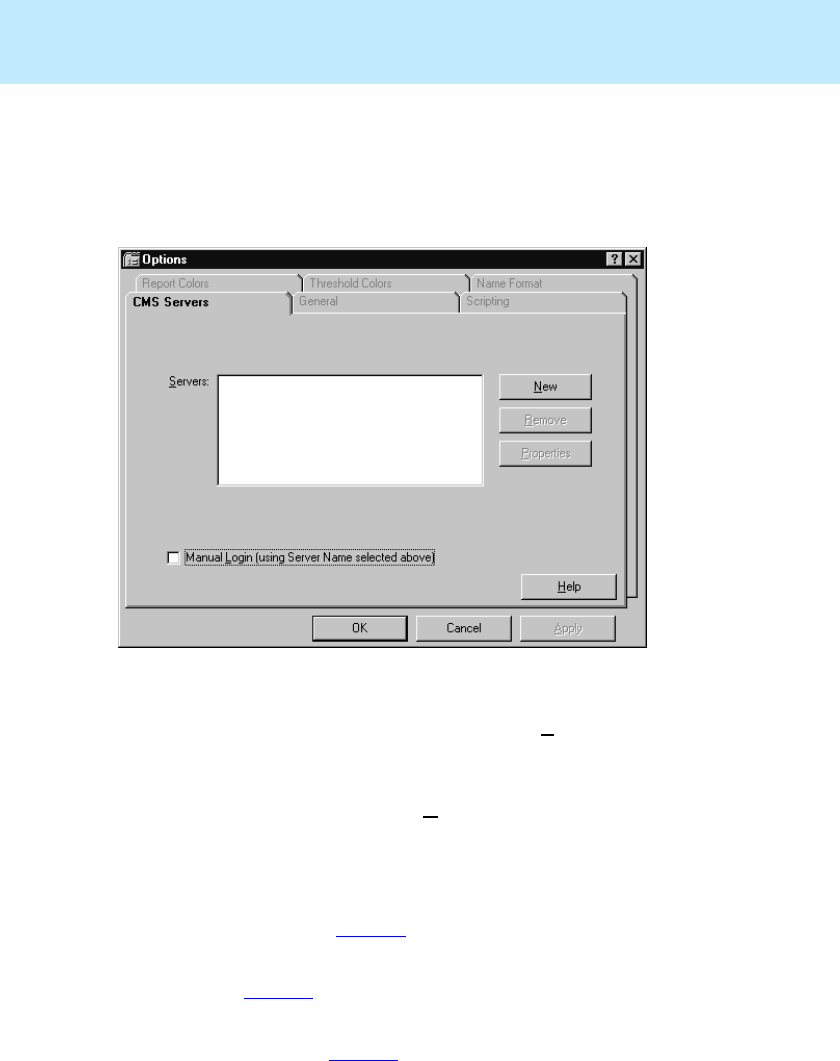
CentreVu
Supervisor Version 8 Installation and Getting Started
Getting Started with CentreVu Supervisor
Overview
5-4
Establishing the Connection 5
To establish connection settings to a CMS server, you must use the Options
dialog box. The Options dialog box displays with the CMS Servers tab active
(this is the only active tab).
To establish a connection, do the following:
1. If you want to connect manually, select the Manual Login check box. If
you want to connect automatically, do not select the Manual Login check
box.
2. Since this is a new connection, select New. The Server Properties window
appears.
3. Do one of the following:
●If you are going to have a Network connection, continue with the
“Network” section on page 5-5.
●If you are going to have a Serial connection, continue with the “Serial”
section on page 5-7.
●If you are going to have a Modem connection, continue with the
“Modem” section on page 5-8.
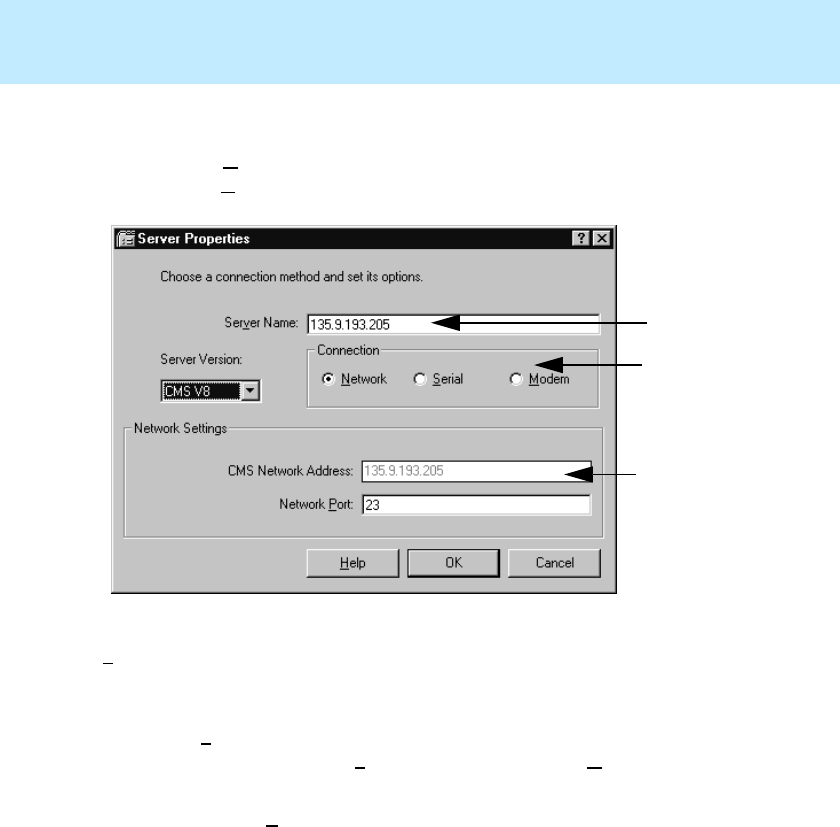
CentreVu
Supervisor Version 8 Installation and Getting Started
Getting Started with CentreVu Supervisor
Overview
5-5
Network 5
When you select New in the Options window, the Server Properties window
appears with the Network connection checked.
To establish a network connection, do the following:
1. In the Server Name text box, enter the name of the server that you will be
using. As you type it, the Server Name will appear in the CMS Network
Address text box.
2. Use the Network Port default of 23 unless otherwise instructed by your
system administrator.
3. Click on OK. The system brings you back to the CMS Servers tab folder.
1
2
3
2.Connection Box
3. CMS Network Address: text box
1. Server Name text box
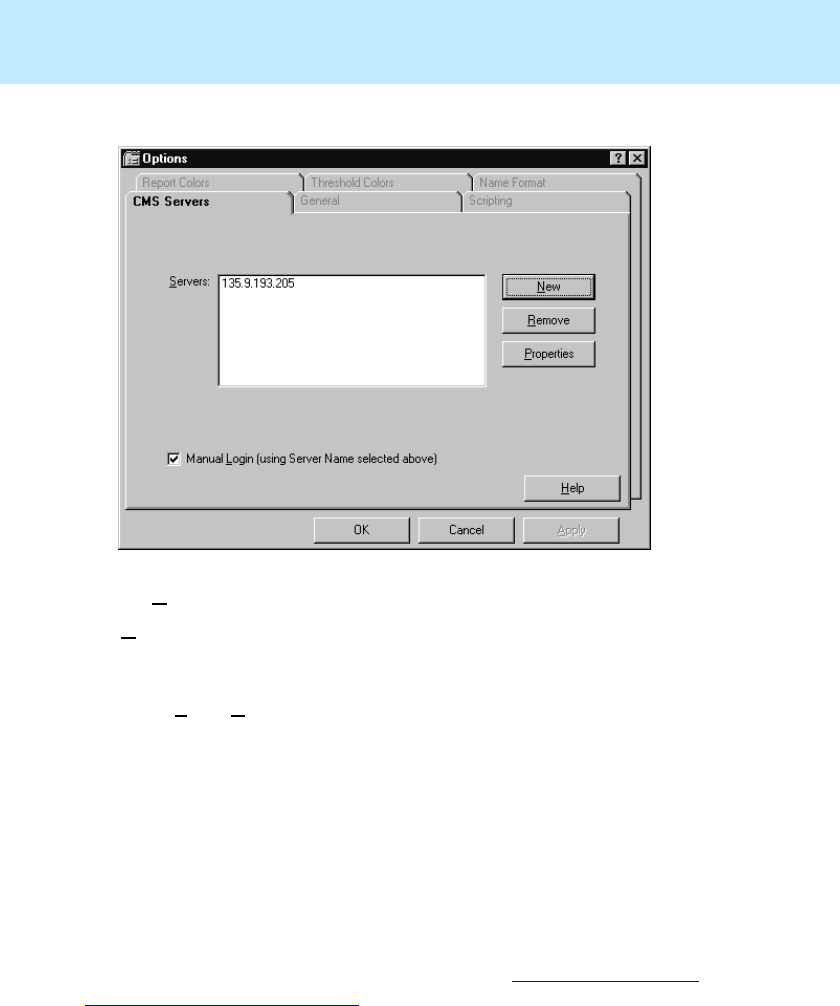
CentreVu
Supervisor Version 8 Installation and Getting Started
Getting Started with CentreVu Supervisor
Overview
5-6
The CMS Servers tab folder displays the options you chose.
Besides New, the other options in the CMS Servers tab are as follows:
●Remove—Highlight the name of the server and select this option to
remove the CMS server configuration that you entered previously. You will
get a message asking if are sure you want to delete the server configuration.
Select Yes or No.
●Properties—Highlight the name of the server and select this option to
display the Server Properties window, where you can view or change the
CMS server configuration properties.
Select OK to accept the Network settings. You have to select a server from the
list before you select OK.
The system brings you back to the Supervisor Controller window. At this point
you are still not logged into the CMS server, but you have established
connection settings to the CMS server.
Now you are ready to log into the CMS server. See “Logging Into the CMS
Server — First Time” on page 5-9.
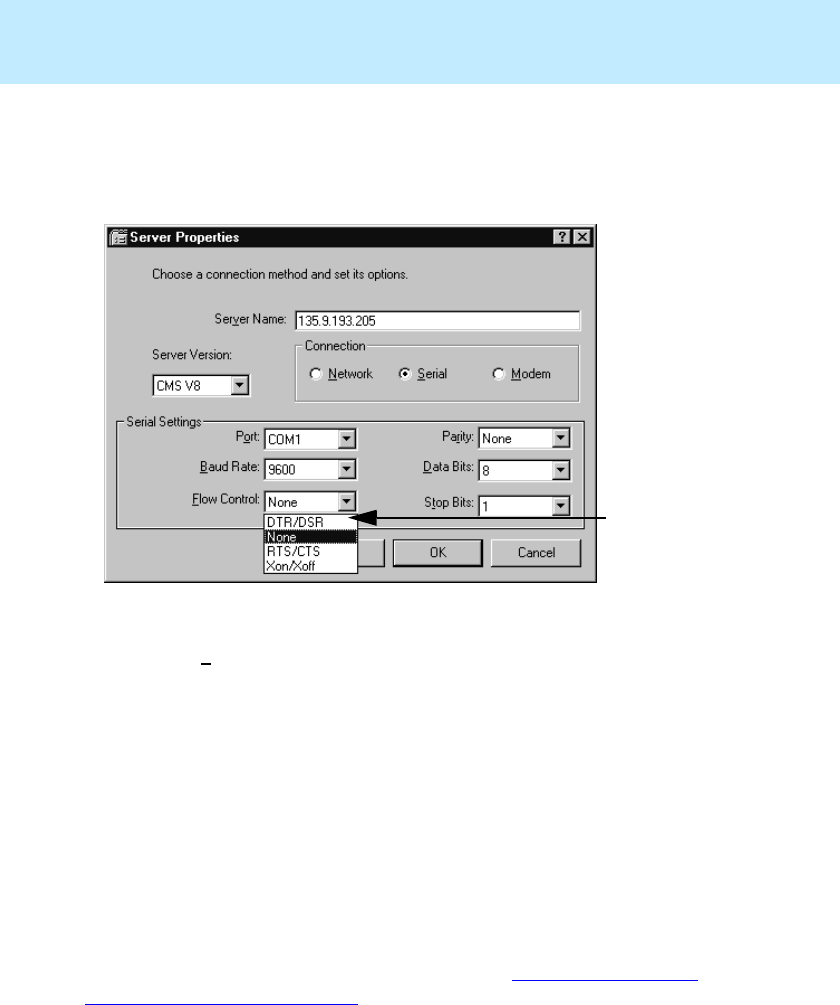
CentreVu
Supervisor Version 8 Installation and Getting Started
Getting Started with CentreVu Supervisor
Overview
5-7
Serial 5
If you selected the serial setting in the Connection box of the Server Properties
window, the Server Properties window is changed, as shown below:
In the Server Properties box, do the following:
1. In the Server Name text box, enter the name of the server that you will be
using.
2. In the Serial Settings box, enter all settings for the serial connection. Each
setting has a pull-down list with various options (see the example above).
See your CMS Administrator for serial settings.
3. When finished entering serial settings, click on OK. The CMS Servers tab
displays.
4. Select OK to accept the serial settings.
The system brings you back to the Supervisor Controller window. At this point
you are still not logged into the CMS server, but you have established
connection settings to the CMS server.
Now you are ready to log into the CMS server. See “Logging Into the CMS
Server — First Time” on page 5-9.
Pull-down list
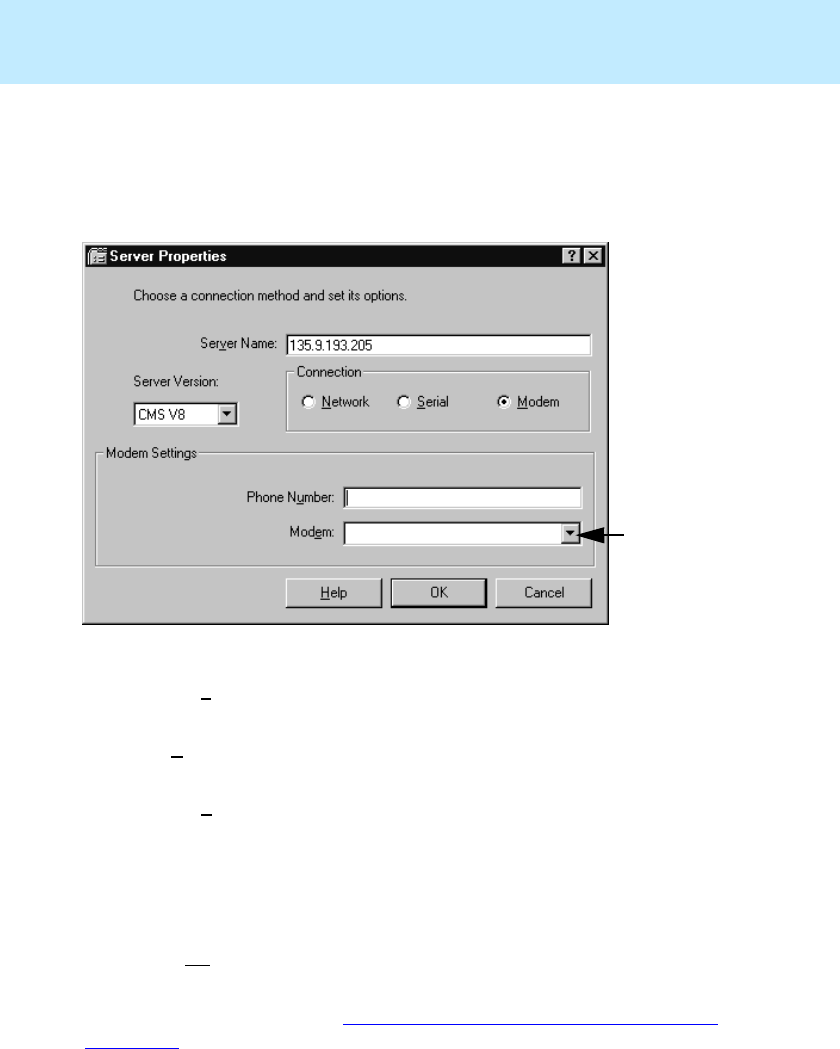
CentreVu
Supervisor Version 8 Installation and Getting Started
Getting Started with CentreVu Supervisor
Overview
5-8
Modem 5
If you selected the modem setting in the Connection box of the Server
Properties window, the Server Properties window displays the Modem Settings
box, as shown below:
In the Server Properties window, do the following:
1. In the Server Name text box, enter the name of the server that you will be
using.
2. In the Phone Number text box, enter the number to the CMS server. If you
do not know the phone number, contact your CMS System Administrator.
3. In the Modem box, select the modem from the pull-down list of modems
configured in Windows.
4. Select OK. The CMS Servers tab displays.
5. Select OK to accept the modem settings.
The system brings you back to the Supervisor Controller window. At this point
you are still not logged into the CMS server, but you have established
connection settings to the CMS server.
To log into the CMS server, see “Logging Into the CMS Server — First Time”
on page 5-9.
Pull-down list
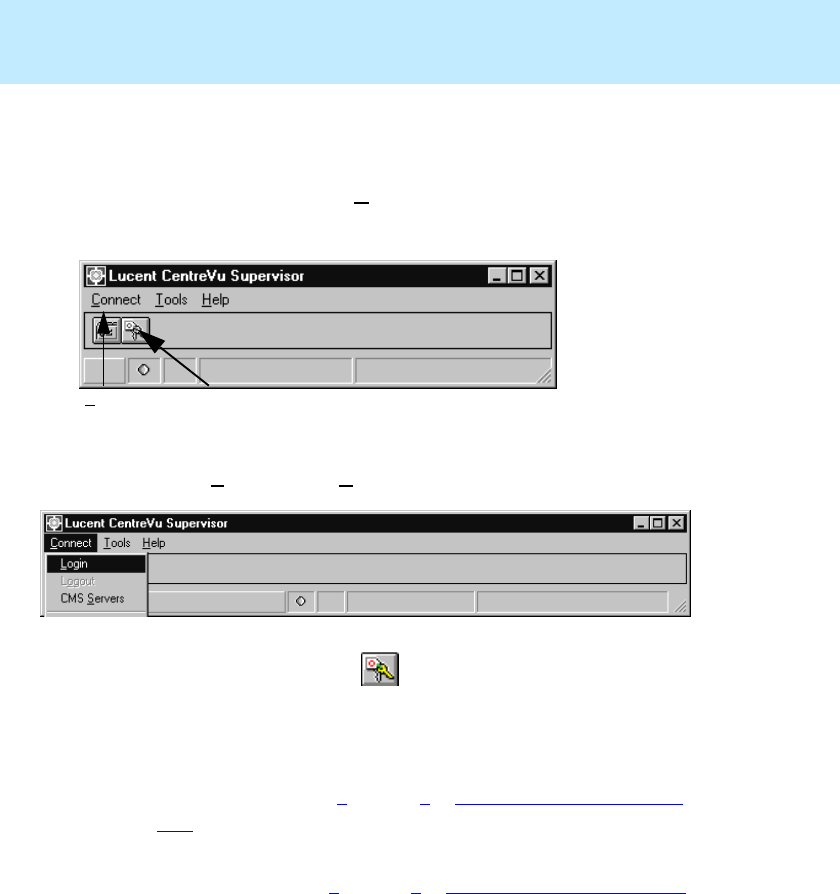
CentreVu
Supervisor Version 8 Installation and Getting Started
Getting Started with CentreVu Supervisor
Logging Into the CMS Server — First Time
5-9
Logging Into the CMS Server — First Time 5
After you have established connection settings to the CMS server, you can log
into the CMS server by using the Connect menu or using the Login icon (see
the graphic below).
1. To log into the CMS server for the first time, do one of the following:
●Select Login from the Connect menu.
●Click on the Login icon: .
●Depending on how you established connection settings to the CMS
server, one of two actions will occur:
●For an automatic login connection, the Login Information dialog box
appears. Follow Steps 4 through 7 in “Automatic Login” on page
5-10.
●For a manual login connection, the Manual Login dialog box will
appear. Follow Steps 2 through 6 in “Manual Login” on page 5-11.
Connect menu Login Icon
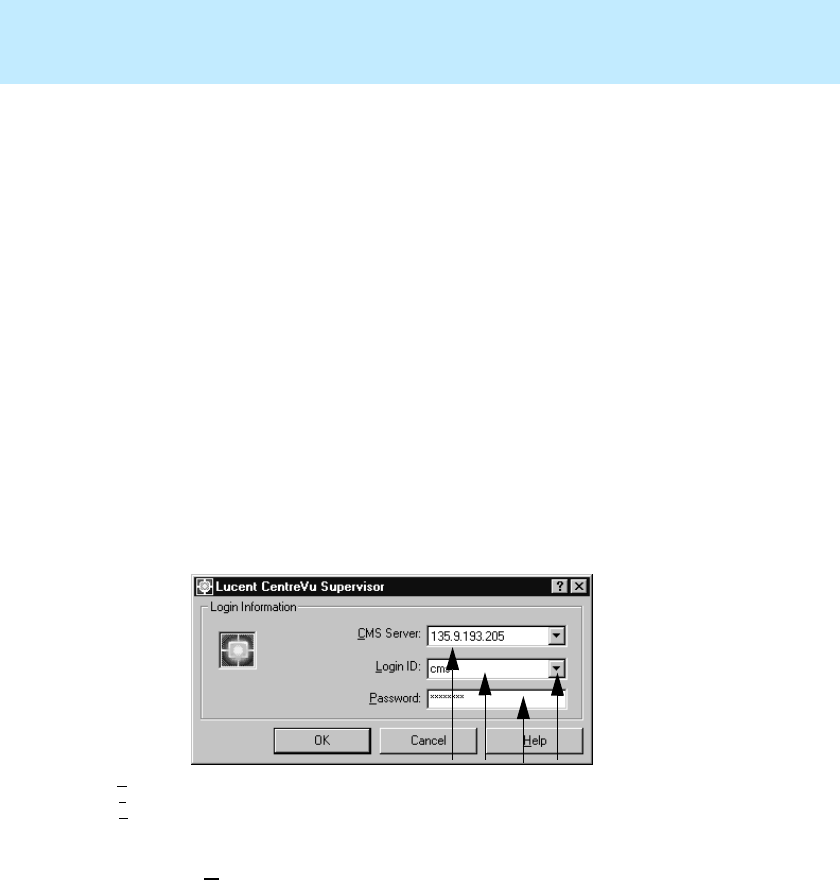
CentreVu
Supervisor Version 8 Installation and Getting Started
Getting Started with CentreVu Supervisor
Logging Into CMS Server — After First Time
5-10
Logging Into CMS Server — After First Time 5
After you have logged into Supervisor for the first time and established your
login ID and password, the login procedures change slightly. Follow the
procedures below for automatic and manual login.
Automatic Login 5
If the connection settings were established for automatic login, you will use the
Automatic Login dialog box. Now, each time you open the Supervisor
application, the Supervisor Controller window will appear, along with the
Login Information dialog box.
To log into the CMS server, do the following:
1. Double click on the Supervisor icon in its program group. The Supervisor
Controller window appears, along with the Login Information dialog box
in the forefront, as shown below:
2. Select the CMS Server from the pull-down list of servers.
3. Select the CMS Version from the pull-down list. Version 8 Supervisor is
compatible with either R3V6 CMS or R3V8 CMS. You must select the
version of CMS that is on the server you have selected. If you select the
wrong version of CMS, you will receive an error message. See Chapter 9,
“Troubleshooting,” for more information.
2. Login ID: Text Box
3. Password: Text Box
4. History list of Login IDs
123
1. CMS Server: Text Box 4
CentreVu
Supervisor Version 8 Installation and Getting Started
Getting Started with CentreVu Supervisor
Logging Into CMS Server — After First Time
5-11
NOTE:
If you select CMS R3V6, you will see both Generic 2 and Generic 3 ACDs
and their associated data. If you select R3V8 CMS, you will see only
Generic 3 ACDs and data, and Generic 2 ACD data. You will not be able to
access Generic 2 ACDs.
4. Type your CMS login ID in the Login ID: text box, or choose it from the
history list of IDs (if it has been entered previously).
5. Tab to the Password: text box.
6. Type your CMS password in the Password: text box.
7. Select OK.
A message box indicates that Supervisor is connecting to the CMS server.
Once you connect to the CMS server, the Supervisor Controller window
appears with CMS operations available on the toolbar. The status line is active
and two new menus (Commands and Scripts) appear in the menu bar.
Now you are ready to learn more about the Supervisor Controller window. See
“Exploring the CentreVu Supervisor Controller” on page 5-18.
Manual Login 5
If the connection settings were established for manual login, you will log into
the CMS server through the Manual Login dialog box. Now, each time you
open the Supervisor application, the Supervisor Controller window will appear,
along with the Manual Login dialog box.
NOTE:
The Manual Login window is not recommended for standard Solaris use (for
example, it should not be used for editing files). The Manual Login dialog box
is not a Terminal Emulator.
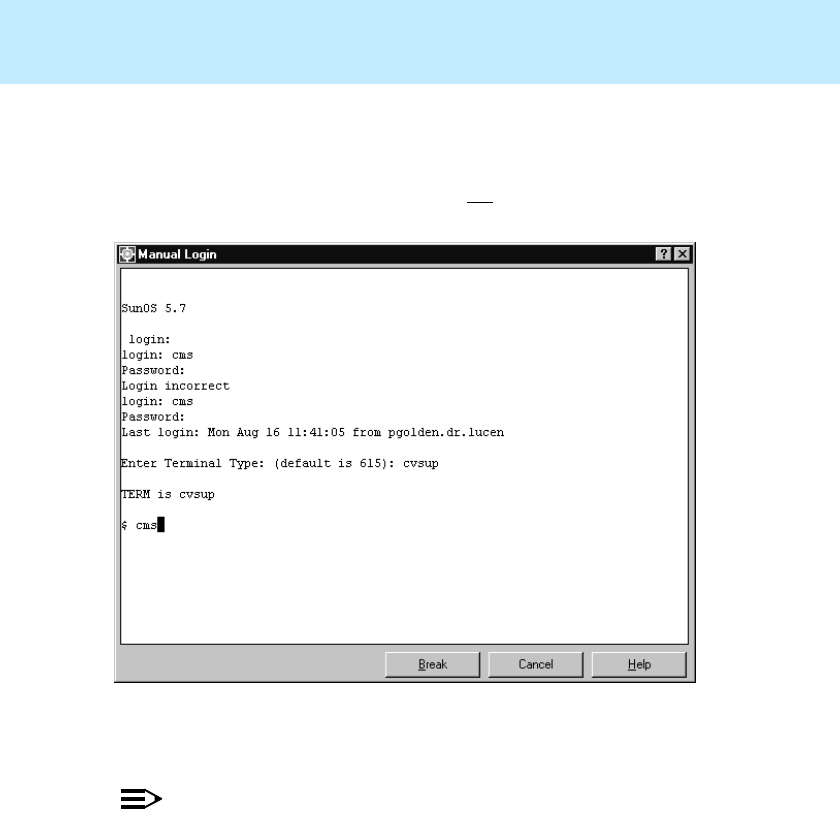
CentreVu
Supervisor Version 8 Installation and Getting Started
Getting Started with CentreVu Supervisor
Logging Into CMS Server — After First Time
5-12
To log into the CMS server using the manual login, do the following:
1. Double click on the Supervisor icon in its program group. The application
brings up the Supervisor Controller window and the Manual Login dialog
box (in the forefront). At this time, you are not logged into the CMS server.
2. In the Manual Login dialog box, at the login: prompt, enter your CMS
Login ID.
NOTE:
The prompts will appear only after you have entered information for the
previous prompt. All prompts are shown in the Manual Login dialog box
for convenience.
3. At the Password: prompt, enter your CMS password.
4. If the Enter Terminal Type: prompt displays, enter cvsup.
5. If the Solaris system prompt displays, enter cms.
6. At the Input terminal type: prompt, enter the terminal type
cvsup , or press Enter if the default listed is cvsup.
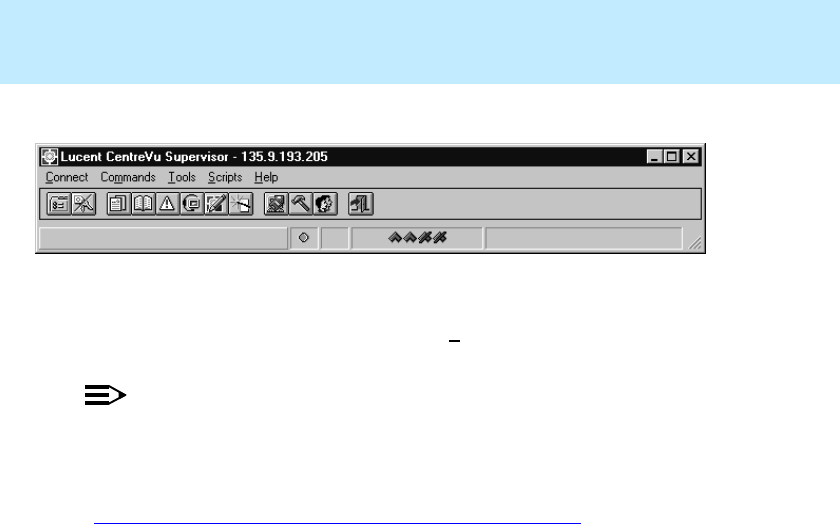
CentreVu
Supervisor Version 8 Installation and Getting Started
Getting Started with CentreVu Supervisor
Logging Into CMS Server — After First Time
5-13
The Supervisor Controller window appears.
The Controller window includes the Commands and Scripts menus and
additional items, which relate to CMS, in the Tools menu. Also, the status line
is now active.
NOTE:
For more information on the scripting feature, refer to Chapter 3, “Scripting,” in
the CentreVu® R3V8 CMS Administration (585-210-910) document.
Now you are ready to learn more about the Supervisor Controller window. See
“Exploring the CentreVu Supervisor Controller” on page 5-18.
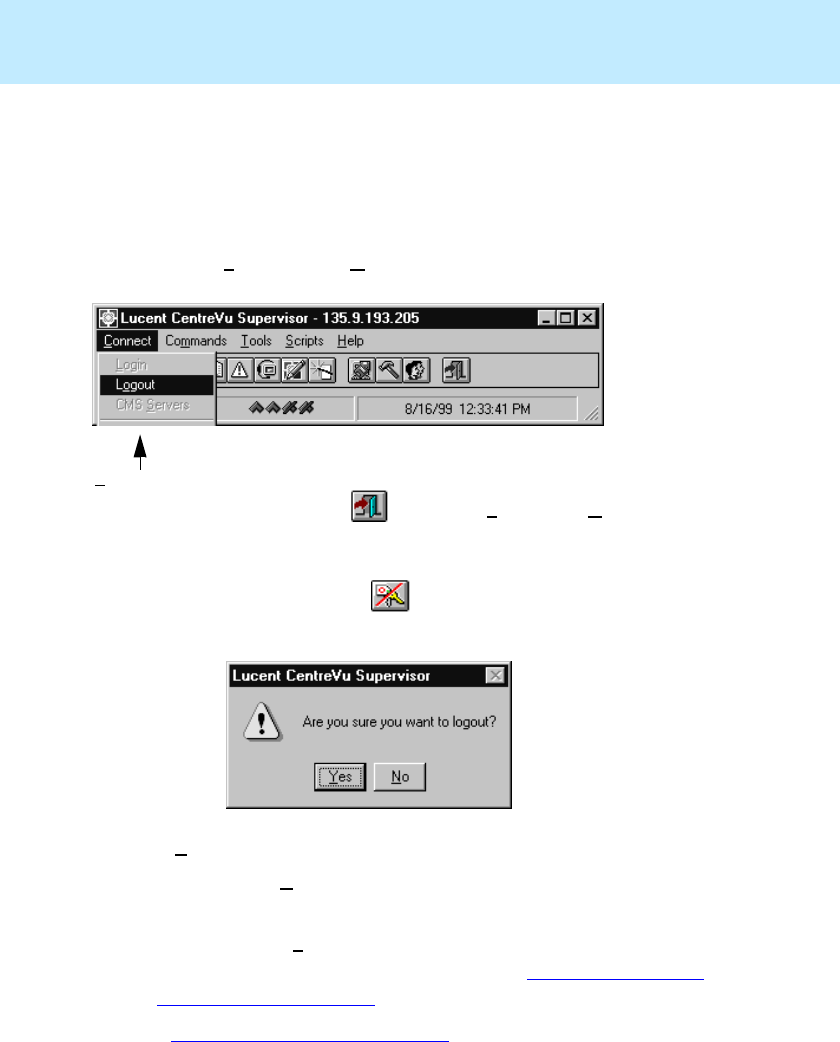
CentreVu
Supervisor Version 8 Installation and Getting Started
Getting Started with CentreVu Supervisor
Logging Off the CentreVu CMS Server
5-14
Logging Off the
CentreVu
CMS Server 5
You can log off the CMS server by using any of three options, which are
explained below.
1. To log off the CMS server, do one of the following:
●Select Logout from the Connect menu.
●Click on the Exit icon: , or select Exit from the Connect menu.
This logs you out of the CMS server as well as the CentreVu
Supervisor application.
●Click on the Logout icon: .
2. The application responds with the following question:
3. Select Yes to log off the CMS server. One of two things can happen:
●If you selected Exit, Supervisor logs you out and closes the
application.
●If you selected Logout, the Supervisor Controller window remains
open, but it is now in disconnected mode (see “Not Logged Into the
CMS Server” on page 5-18 for details).
4. Go to “Exiting Supervisor” on page 5-15.
Connect Menu
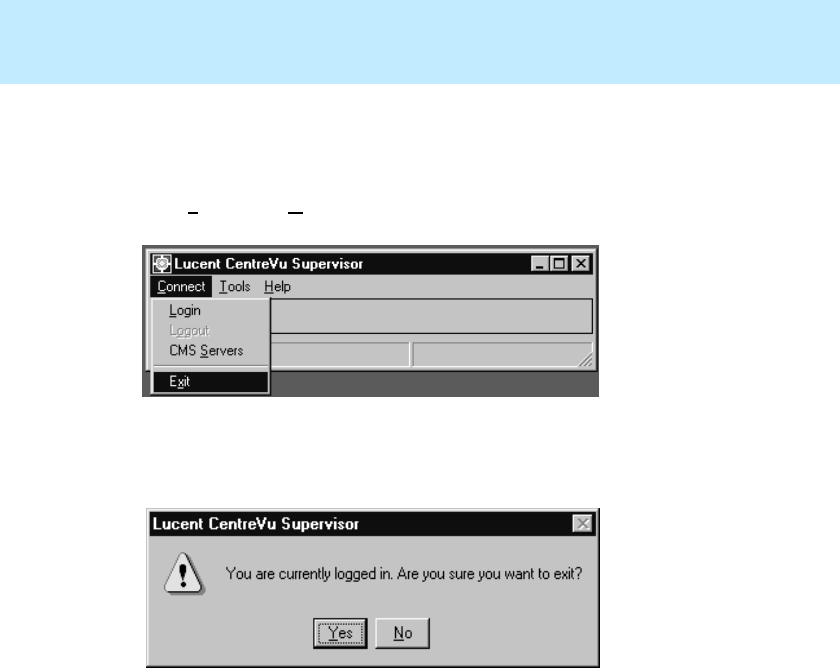
CentreVu
Supervisor Version 8 Installation and Getting Started
Getting Started with CentreVu Supervisor
Exiting Supervisor
5-15
Exiting Supervisor 5
To exit from the Supervisor application, do the following:
1. Select Exit from the Connect menu.
2. If you try to exit from the Supervisor application before logging off the
CMS server, the following message displays:
3. Select one of the following:
●Yes—Supervisor automatically logs you off of the CMS server and
then exits from the application.
●No—you are returned to the Controller and remain logged into the
CMS server.
CentreVu
Supervisor Version 8 Installation and Getting Started
Getting Started with CentreVu Supervisor
Changing Connection Settings
5-16
Changing Connection Settings 5
If you want to change connection settings to the CMS server, do the following:
NOTE:
You cannot be logged into a CMS server when you change connection settings.
1. Open the Supervisor application.
2. If your connection to the CMS server is set for automatic login, go to Step
3. If your connection to the CMS server is set for manual login, go to Step
4.
3. Select Cancel from the Login Information dialog box (this closes the
Login Information dialog box).
4. Select Cancel from the Manual Login dialog box (this closes the Manual
Login dialog box).
5. The system responds by returning to the Controller.
6. Open the Options dialog box by doing one of the following:
●Select Options... from the Tools menu.
●Click on the Options icon:
The Options dialog box appears with the CMS Servers tab folder open.
NOTE:
You can also open the Options dialog box by selecting CMS Servers from
the Connect menu.
7. In the CMS Servers tab folder, select Properties.
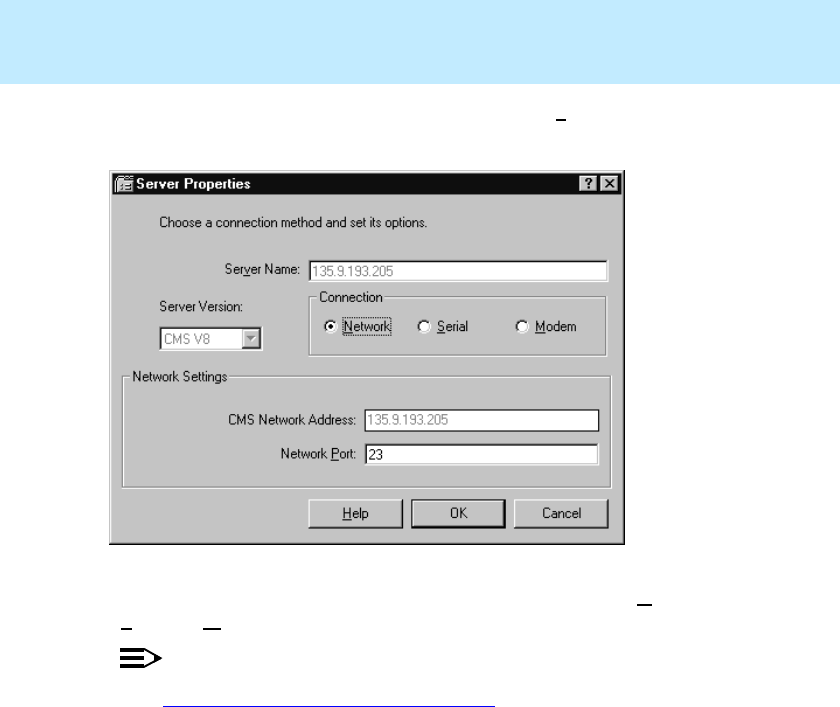
CentreVu
Supervisor Version 8 Installation and Getting Started
Getting Started with CentreVu Supervisor
Changing Connection Settings
5-17
The Server Properties window appears. Notice that the Server Name is
displayed and cannot be changed.
8. In the Connection box, click on the type of connection you want, Network,
Serial, or Modem.
NOTE:
See “Establishing the Connection” on page 5-4 for information on entering
serial and modem information.
9. Change any settings as needed.
10. Select OK to change the connection.
The CMS Servers tab folder appears.

CentreVu
Supervisor Version 8 Installation and Getting Started
Getting Started with CentreVu Supervisor
Exploring the CentreVu Supervisor Controller
5-18
Exploring the
CentreVu
Supervisor Controller 5
The following sections explain the different parts of the Controller window as it
appears when you are not logged into the CMS server and when you are logged
into the CMS Server.
Not Logged Into the CMS Server 5
This section details the Controller window as it appears when you are not
logged into the CMS server. The following graphic illustrates the basic
Controller window:
System Menu Box 5
The system menu box is a common Windows convention. It allows you to
perform common windows conventions, such as closing the current window or
application.
Title Bar 5
The title bar is a common Windows convention. It shows the name of the
application.
4
23
1
1. System Menu Box
2. Title Bar
3. Maximize/Minimize/Close Window Sizing Buttons
4. Status Bar
5. Toolbar
6. Menu Bar
7. Login Status Indicator
567
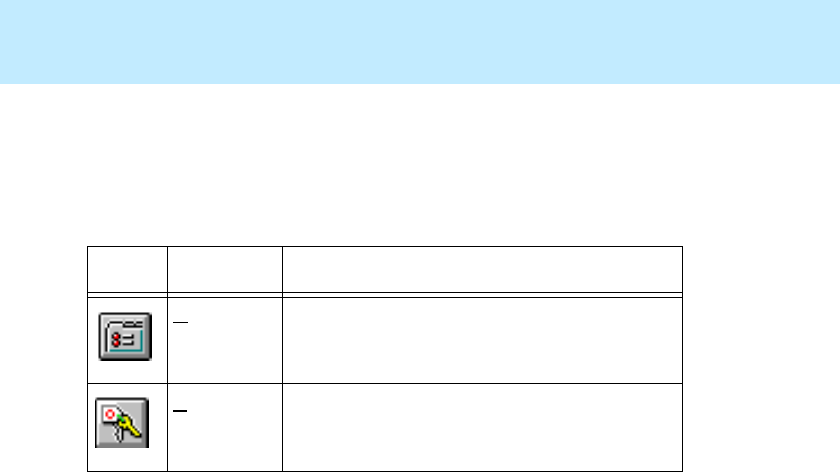
CentreVu
Supervisor Version 8 Installation and Getting Started
Getting Started with CentreVu Supervisor
Exploring the CentreVu Supervisor Controller
5-19
Toolbar 5
The toolbar contains buttons that are used for quick access to specific features
of the application. When you are not logged into the CMS server, the two
buttons available on the toolbar are as follows:
When you move your cursor over a toolbar button, a tooltip displays next to
your mouse pointer with a brief description of the command the button
performs. The status bar also displays a description of the command that
particular button performs.
Maximize, Minimize, and Close Buttons 5
The maximize, minimize, and close buttons are a common Windows
convention. They adjust the size of the window, or close the window.
Status Bar 5
The status bar is located at the bottom of the Controller window. It displays a
brief description of each of the toolbar buttons when the cursor is over the
button. The status bar also includes a Login Status Indicator, which shows a
green light if you are currently logged into the CMS server, or shows a gray
light if you are not logged into the CMS server.
Button Name Command
Options Accesses the window needed to change your
login options.
Login Initiates a connection to the CMS server.
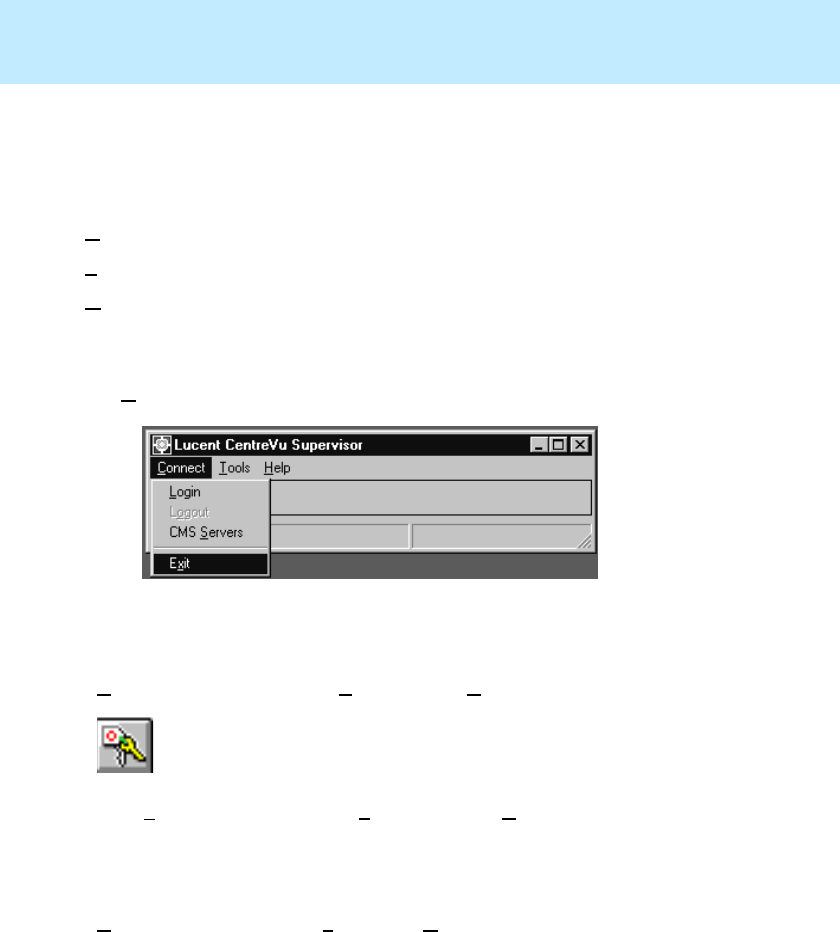
CentreVu
Supervisor Version 8 Installation and Getting Started
Getting Started with CentreVu Supervisor
Exploring the CentreVu Supervisor Controller
5-20
Menu Bar 5
A common Windows convention. The menu bar lists the available drop-down
menus. When you are not logged into the CMS server, the menu bar has the
following menus available:
Connect
Tools
Help.
The following sections outline the options available from each menu.
From this menu, you can initiate or discontinue a connection to the CMS server.
The Connect menu, shown below, has the following options:
Menu Item Action
Login Selecting the Login from the Connect menu displays the
Manual Login window if the Manual Login Option is set,
and displays items in the Automatic Login window if the
Manual Login Option is not set.
CMS Servers Selecting CMS Servers from the Connect menu opens the
CMS Service tab in the Options window. When you are not
logged into the CMS server, the CMS Service tab allows
you to select Network, Serial, and Modem settings.
Exit Selecting Exit from the Connect menu closes the
Supervisor application.
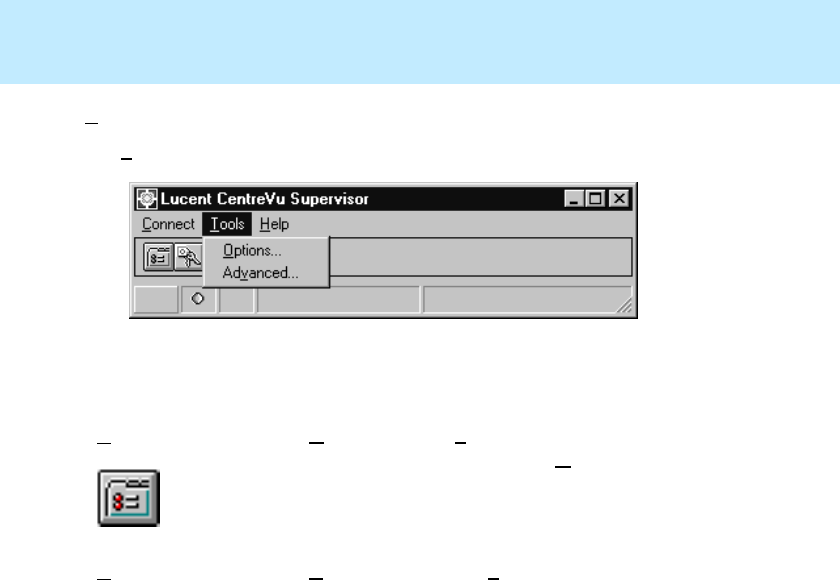
CentreVu
Supervisor Version 8 Installation and Getting Started
Getting Started with CentreVu Supervisor
Exploring the CentreVu Supervisor Controller
5-21
Tools 5
The Tools menu, shown below, has the following options:
Menu Item Action
Options... Selecting Options from the Tools menu or selecting the
Options button on the toolbar, opens the Options window.
When you are not logged into the CMS server, you can set
standard Supervisor communications options in the Options
window.
Advanced...
(No Icon)
Selecting Advanced... from the Tools menu opens the
Advanced window. This menu item is used for debugging
purposes. Do not change the settings on the Advanced
window unless you are instructed to do so by a Lucent
Technologies associate.

CentreVu
Supervisor Version 8 Installation and Getting Started
Getting Started with CentreVu Supervisor
Exploring the CentreVu Supervisor Controller
5-22
Help 5
You can access Supervisor on-line help from all windows by doing any of the
following steps:
●Pressing the F1 key—displays help specific to the current window.
●Selecting the Help button (if available)—displays help specific to the
current window.
●Selecting Help from the menu bar (shown below)—allows you to choose
from the following options:
Some windows also offer a style of help called “What’s This?” When
the icon on a title bar or the “What’s This?” item on a right mouse-button
popup menu is selected, a popup help topic displays information about the area
of the window to which the mouse cursor is pointing.
Menu Item Action
Contents Selecting Contents opens the Supervisor on-line
help table of contents.
Technical Support Selecting Technical Support opens a window that
provides Technical Support information.
About CentreVu
Supervisor Selecting About CentreVu Supervisor opens the
Supervisor Help About window, which shows the
software version number.
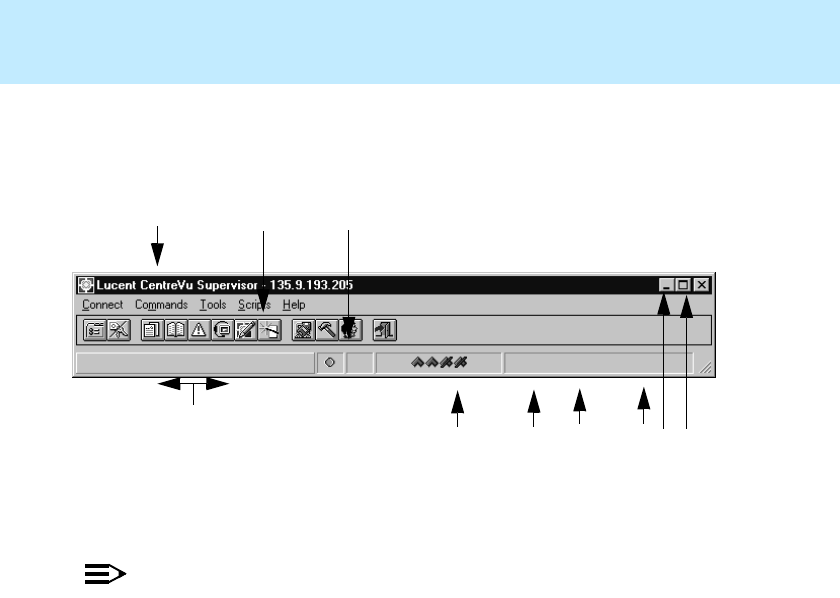
CentreVu
Supervisor Version 8 Installation and Getting Started
Getting Started with CentreVu Supervisor
Exploring the CentreVu Supervisor Controller
5-23
Logged Into the CMS Server 5
The Supervisor Controller window, when logged into the CMS server, consists
of the following components:
NOTE:
The System Menu Box, Title Bar, and Maximize/Minimize buttons are not
defined below because they work the same when you are logged into the CMS
server as they do when you are not logged into the server.
Depending on what your CMS user permissions are, some menu items and
toolbar buttons may not be accessible to you.
1. Title Bar
2. Menu Bar
3. Toolbar
4. Status Line
5. Login Status Indicator
6. Exception Count
7. ACD Status Indicator(s)
8. CMS Date and Time
9. Minimize Button
10. Maximize Button
13
4
78910
56
2
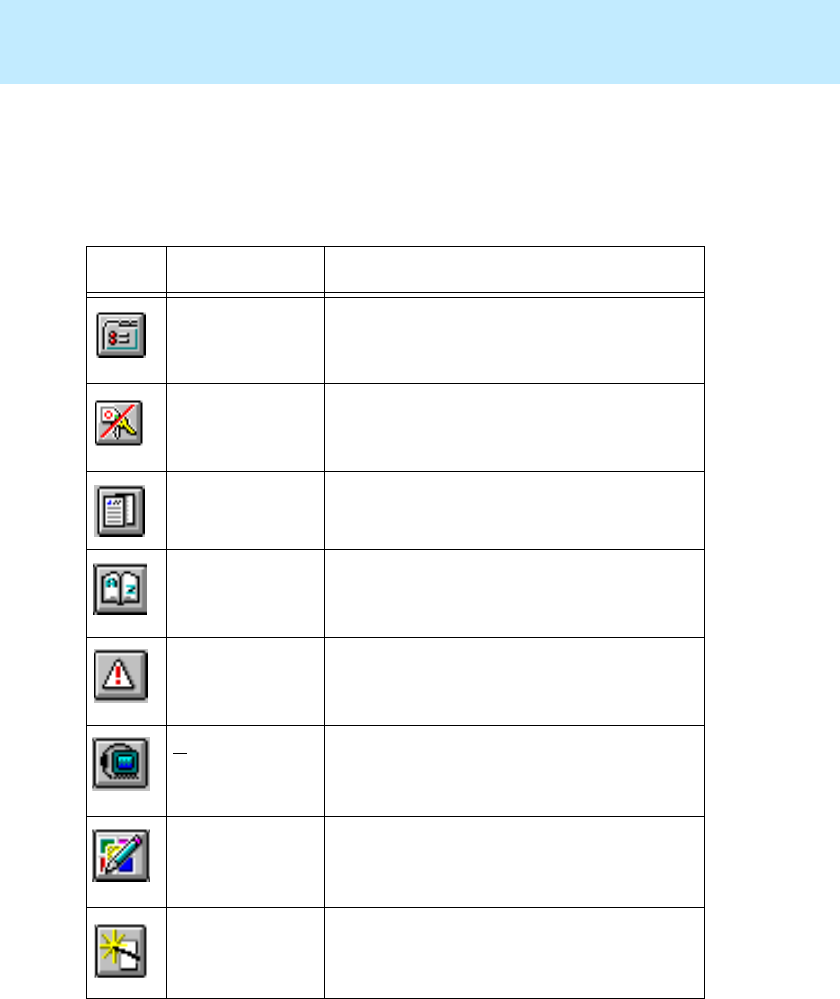
CentreVu
Supervisor Version 8 Installation and Getting Started
Getting Started with CentreVu Supervisor
Exploring the CentreVu Supervisor Controller
5-24
Toolbar 5
The toolbar contains buttons that are used for quick access to specific CMS
commands and tools. Based on your CMS user permissions, some or all of the
following buttons will appear on your toolbar when you are logged into CMS.
Button Name Command
Options Accesses the window needed to change your
environment options.
Logout Disconnects from the CMS server.
Reports Initiates the Reports command.
Dictionary Initiates the Dictionary command.
Exceptions Initiates the Exceptions command.
Agent
Administration Initiates the Agent Administration command.
Call Center
Administration Initiates the Call Center Administration
command.
Report Wizard Initiates the Report Wizard command.
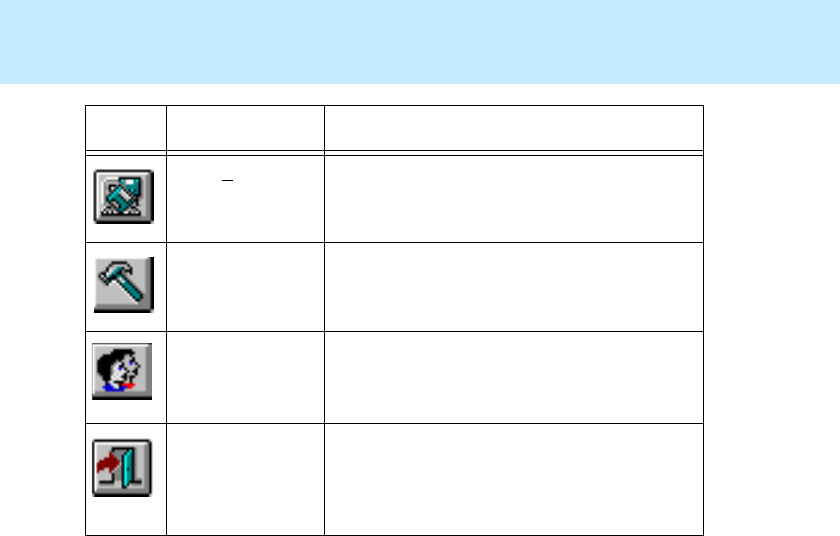
CentreVu
Supervisor Version 8 Installation and Getting Started
Getting Started with CentreVu Supervisor
Exploring the CentreVu Supervisor Controller
5-25
When you move your cursor over a toolbar button, the status bar gives a
description of what the toolbar button does.
CMS System
Setup Initiates the CMS System Setup tool.
Maintenance Initiates the Maintenance tool.
User
Permissions Initiates the User Permissions tool.
Exit Logs you out of CMS and closes the
Supervisor application. A message box
notifies you that you are logged in and asks if
you wish to continue the exit.
Button Name Command

CentreVu
Supervisor Version 8 Installation and Getting Started
Getting Started with CentreVu Supervisor
Exploring the CentreVu Supervisor Controller
5-26
Status Bar 5
The status bar is located at the bottom of the window and is used to display
CMS application status. It is also used to display a brief description of each of
the toolbar buttons when the mouse pointer is over the button.
●Login Status Indicator—shows a green light if you are connected to the
CMS server, or shows a gray light if you are disconnected from the CMS
server.
●Exception Count—gives you the current count of exceptions for all ACDs
for which you have exception permissions. The exceptions count is cleared
to zero at the beginning of the interval. For information on CMS
exceptions, refer to Chapter 7, “Exceptions,” in the CentreVu® CMS R3V8
Administration (585-210-910) document.
●ACD Status Indicators—shows which ACDs are active/inactive. There
can be up to eight ACD icons showing, depending on how many ACDs this
CMS supports. If you place your mouse over the ACD status indicator, the
current ACD displays in the status bar. There are two variations of ACD
status indicators, as follows:
— If the link to any one of the ACDs is down, the icon will be crossed
out.
— If there is a TCP/IP connection between the switch and CMS, the ACD
icon will contain a bar. This means that CMS and the switch are not
fully communicating at this time. This is a transitory state,
●Current Date and Time—shows the current date and time of the CMS
server you are logged into.

CentreVu
Supervisor Version 8 Installation and Getting Started
Getting Started with CentreVu Supervisor
Exploring the CentreVu Supervisor Controller
5-27
Menu Bar 5
The menu bar lists the available menus. When you are logged into the CMS
server, there are five menus available on the menu bar:
●Connect
●Commands
●Tools
●Scripts
●Help.
NOTE:
The Commands menu item is available only when you are logged into the
CMS server. All of the options in the Commands menu are
CMS-specific.
The test on the following pages describes the options available from each menu.

CentreVu
Supervisor Version 8 Installation and Getting Started
Getting Started with CentreVu Supervisor
Exploring the CentreVu Supervisor Controller
5-28
Connect 5
The Connect menu shown below has the following options:
Menu Item Action
Logout Selecting Logout from the Connect menu or the Logout
button on the toolbar allows you to log out of the CMS
server. When you select Logout, a message box confirming
the logout action displays. If you select OK, the logout
sequence begins. Once the logout is complete, Supervisor is
still open but you are not connected to the CMS server.
Exit Selecting Exit from the Connect menu closes the
Supervisor application. If you are logged into the CMS
server when you select Exit, a message box notifies you that
you are logged in and asks if you wish to continue the exit.
If you select Yes, you are automatically logged out of the
CMS server and Supervisor is closed. If you select No, the
exit is cancelled and you are returned to the Controller, still
logged into the CMS server.
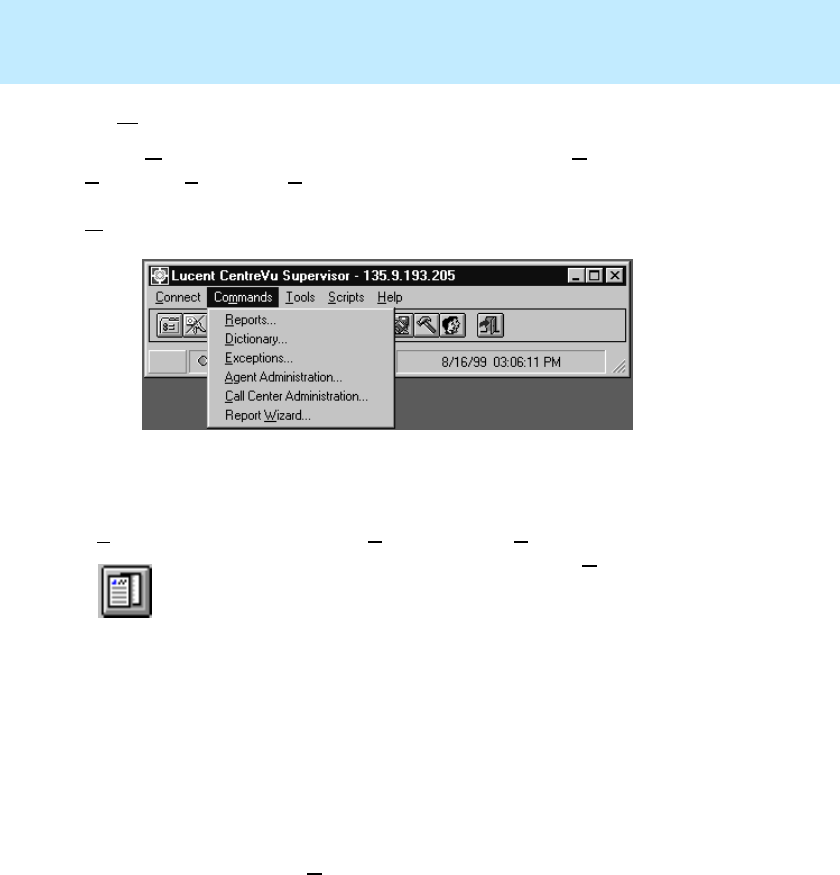
CentreVu
Supervisor Version 8 Installation and Getting Started
Getting Started with CentreVu Supervisor
Exploring the CentreVu Supervisor Controller
5-29
Commands 5
The Commands menu shown below gives you access to the Reports,
Dictionary, Exceptions, Agent Administration, and Call Center
Administration subsystems in CMS. It also gives you access to the Report
Wizard.
Menu Item Action
Reports When you select Reports from the Commands menu or
select the Reports button on the toolbar, the Reports
selector window opens. You will see the following tabs to
choose from:
●Real-Time
●Historical
●Integrated.
Any Custom Reports you have created are ported to
Supervisor. You can view and print the reports in
Supervisor. To edit the reports, or create new ones, use the
Terminal Emulator or a CMS terminal.
From the Reports command, you can view, print, and
export data from all of the standard CMS reports, Custom
CMS Reports, Supervisor Integrated and Graphical reports,
and Report Designer reports.
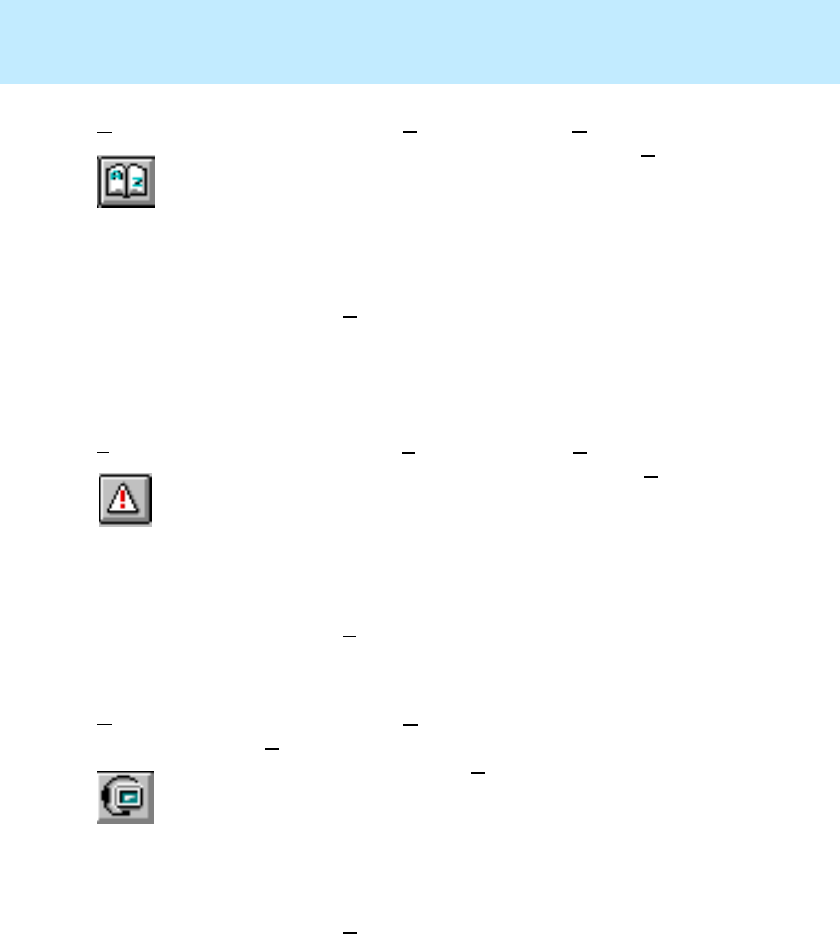
CentreVu
Supervisor Version 8 Installation and Getting Started
Getting Started with CentreVu Supervisor
Exploring the CentreVu Supervisor Controller
5-30
Dictionary When you select Dictionary from the Commands menu or
select the Dictionary button on the toolbar, the Dictionary
selector window opens. You will see the following tabs to
choose from:
●Operations
●Reports.
From the Dictionary command, you can assign names to
splits/skills, trunk groups, call work codes, reason codes,
ACDs, VDNs and vectors, enter and edit agent names and
agent groups, view and define CMS database items and
calculations, and modify split/skill and trunk string values.
Exceptions When you select Exceptions from the Commands menu or
select the Exceptions button on the toolbar, the Exceptions
selector window opens. You will see the following tabs to
choose from:
●Operations
●Reports.
From the Exceptions command, you can administer timing
or counting-based thresholds for exceptions and report on
those exceptions.
Agent
Administration When you select Agent Administration from the
Commands menu or select the Agent Administration
button on the toolbar, the Agent Administration
selector window opens. You will see the following tabs
to choose from:
●Operations
●Reports.
From the Agent Administration command, you can
view, add, delete, or modify Agent-related parameters
on the switch, such as Change Agent Skills.
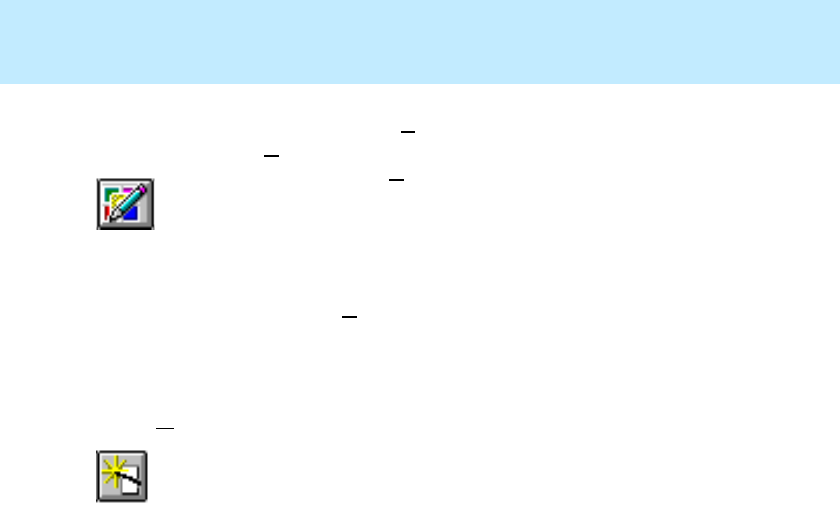
CentreVu
Supervisor Version 8 Installation and Getting Started
Getting Started with CentreVu Supervisor
Exploring the CentreVu Supervisor Controller
5-31
Call Center
Administration When you select Call Center Administration from the
Commands menu or select the Call Center button on
the toolbar, the Call Center selector window opens.
You will see the following tabs to choose from:
●Operations
●Reports
From the Call Center command, you can view, add,
delete, or modify call work codes, change VDN skill
preferences, setup split/skill and VDN call profiles, and
make trunk and VDN group assignments.
Report Wizard When you select Report Wizard form the Commands or
select the Report Wizard button, the CentreVu
Supervisor Report Wizard window appears. The wizard
provides instructional help that guides you through a
series of tasks that create a new customized report.
Report Wizard is a supplement to Report Designer.
For more information about the Report Designer, see
the CentreVu® Report Designer Version 8 User Guide
(585-210-930), or select Help in any Report Designer
or Report Wizard window.
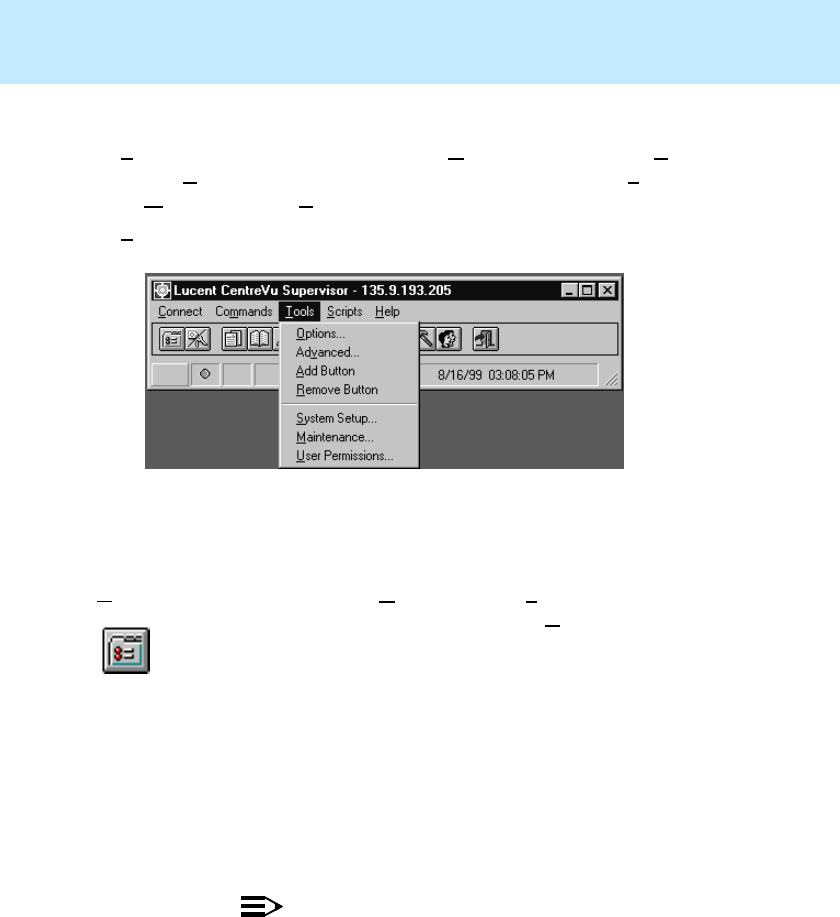
CentreVu
Supervisor Version 8 Installation and Getting Started
Getting Started with CentreVu Supervisor
Exploring the CentreVu Supervisor Controller
5-32
Tools 5
The Tools menu, in addition to accessing the Options window and the Add
Button and Remove Button wizards, gives you access to the CMS System
Setup, Maintenance, and User Permissions subsystems.
The Tools menu has the following options
Menu Item Action
Options... When you select Options from the Tools menu or select
the Options button on the toolbar, the Options window
opens. You can set standard Supervisor preferences in the
Options window. You will see the following tabs:
●General
●Report Colors
●Threshold Colors
●Name Format
●Scripting.
NOTE:
Selecting the Scripting tab in the Options window lets you
log script execution as minimum, normal, or maximum.
This window also lets you select a default script owner
(for automatic scripts). You can also specify a name for the
log file and view the contents of the log file.
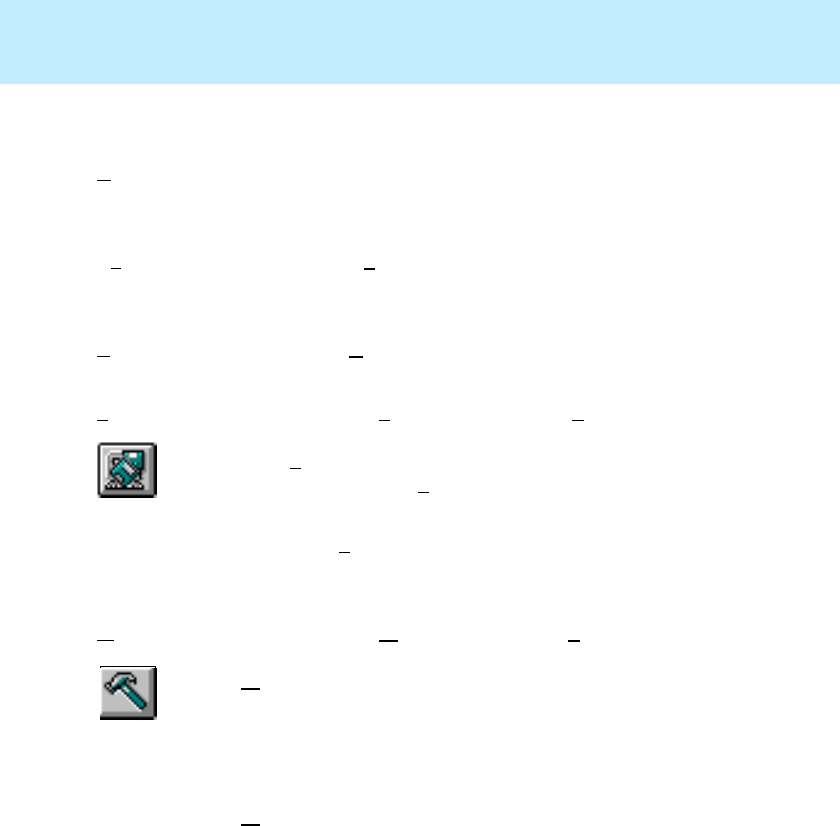
CentreVu
Supervisor Version 8 Installation and Getting Started
Getting Started with CentreVu Supervisor
Exploring the CentreVu Supervisor Controller
5-33
Advanced... This menu item is used for debugging purposes. Do not
change the settings on the Advanced window unless you
are instructed to do so by a Lucent Technologies associate.
Add Button Selecting the Add Button tool starts the Add Button
wizard, which steps you through the process of creating a
button and adding it to the toolbar.
Remove
Button... Selecting the Remove Button tool displays a window that
tells you how to remove a button from the toolbar.
System Setup When you select System Setup from the Tools menu or
select the CMS System Setup button on the toolbar, the
CMS System Setup selector window opens. The only
active tab in the CMS System Setup tool is the Operations
tab.
From CMS System Setup you can view and modify
information relevant to how the CMS and switch were
configured during installation.
Maintenance When you select Maintenance from the Tools menu or
select the Maintenance button on the toolbar, the
Maintenance selector window opens. You will see the
following tabs to choose from:
●Operations
●Reports.
Maintenance is where you perform routine maintenance
of the CMS, including backing up data, checking on the
status of the connection to the switch, and scanning the
error log.
Menu Item Action

CentreVu
Supervisor Version 8 Installation and Getting Started
Getting Started with CentreVu Supervisor
Exploring the CentreVu Supervisor Controller
5-34
Scripts 5
The Scripts menu gives you access to the Organize Scripts window which
displays all logged-in user’s scripts and script folders. The Scripts menu
appears as follows:
You will be able to perform the following functions in the Organize Scripts
window:
●List script names, or show details regarding list size, type, and date
modified
●Add a new folder
●Move a script
●Delete a script
●Rename the script.
NOTE:
Scripts are a replacement for Bookmarks. For more information, see Chapter 3,
“Scripting,” in the CentreVu CMS R3V8 Administration (585-210-910)
document.
User
Permissions When you select User Permissions from the Tools menu
or select the User Permissions button on the toolbar, the
User Permissions selector window opens. The only active
tab in the User Permissions tool is the Operations tab.
User Permissions is where the CMS Administrator
defines CMS user IDs and access capabilities each user
will have.
Menu Item Action
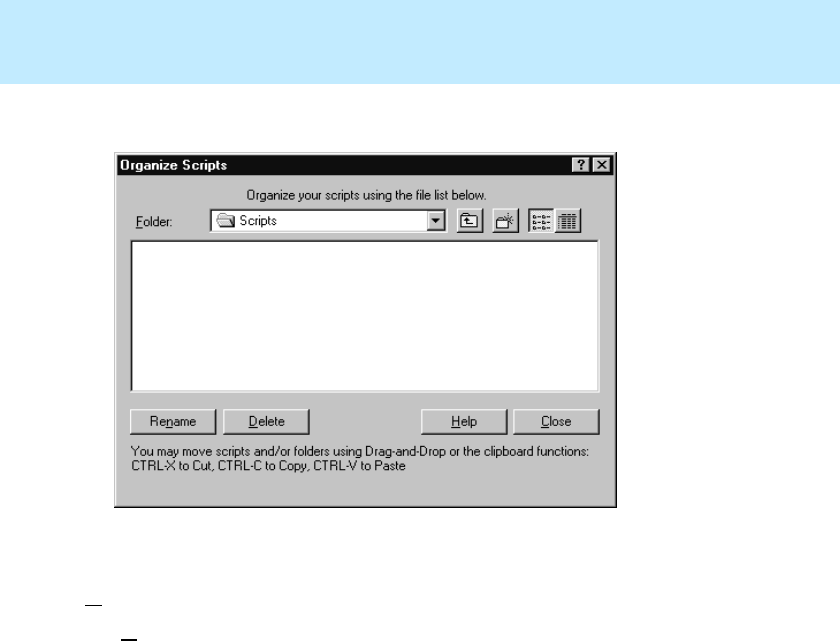
CentreVu
Supervisor Version 8 Installation and Getting Started
Getting Started with CentreVu Supervisor
Exploring the CentreVu Supervisor Controller
5-35
An example of the Organize Scripts window is shown below:
Help 5
The Help menu is the same when you are logged into the CMS as it is when
you are not connected.

CentreVu
Supervisor Version 8 Installation and Getting Started
Getting Started with CentreVu Supervisor
Using the System Tray Icon
5-36
Using the System Tray Icon 5
The Supervisor icon resides in the system tray while the application is
running.
You can use the system tray icon in the following ways:
●When a real-time report threshold highlight Caution or Warning condition
is met, the system tray icon will change to the Caution/Warning icon (as
appropriate).
●Select the system tray icon to display a list of all of the Supervisor
windows that you have open. You can then select a window from the list
to make it the current window.
If a report threshold highlight Caution or Warning condition has been met, the
Caution/Warning icon (as appropriate) is displayed next to the report(s)
affected by that condition.
Depending on the state shown for the system tray icon, one of the following
things happens when you double click on the icon:
●If the Supervisor icon is shown, the Controller becomes the current
window.
●If the Caution icon is shown, all reports that are currently running with a
caution condition are brought to the front.
●If the Warning icon is shown, all reports that are currently running with a
warning condition are brought to the front.
You can control the sort order of the system tray icon menu and turn the
feature on and off on the Tools | Options General tab. For more information,
see the CentreVu® CMS R3V8 Administration (585-210-910) document.

CentreVu
Supervisor Version 8 Installation and Getting Started
Getting Started with CentreVu Supervisor
Using Supervisor Menus
5-37
Using Supervisor Menus 5
Each Supervisor menu item can be selected by doing any of the following steps:
●Clicking on the item
●Using the arrow keys to highlight the item and then pressing Return
●Using the assigned Windows keyboard access characters or accelerator
keys (hold down the Alt or Ctrl key and press the letter that is underlined in
the word you want to select).
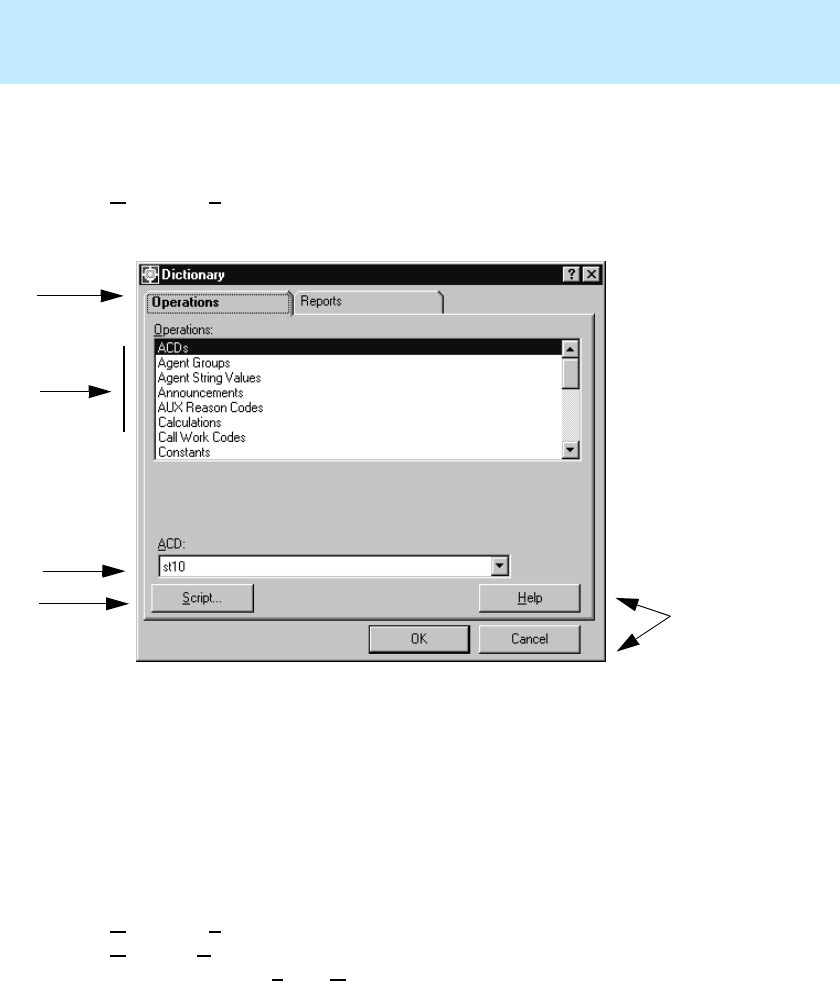
CentreVu
Supervisor Version 8 Installation and Getting Started
Getting Started with CentreVu Supervisor
Using Supervisor Selector Windows
5-38
Using Supervisor Selector Windows 5
A selector window is the window that displays after you select an item from the
Commands or Tools menu. An example (the Command| Exceptions
Operations tab selector window) is shown below.
Tab Folders 5
Typically, there are two tab folders, Operations and Reports, on any
Commands or Tools selector window. The exceptions to this are the
Commands | Reports selector window, which has Real-Time, Historical, and
Integrated tabs and the Tools | Options window, which has General, Report
Colors, Threshold Colors, Name Format, Controller, and Scripting tabs.
Select the appropriate tab to bring that folder to the front.
1
2
1. Tab Folders
2. Available Windows
3. Current ACD
4. Script... Button
5. OK, Cancel, Help (and Apply) Buttons
3
45

CentreVu
Supervisor Version 8 Installation and Getting Started
Getting Started with CentreVu Supervisor
Using Supervisor Selector Windows
5-39
Available Windows 5
Highlight an item from the list of available windows (usually operations or
reports) using your up and down arrow keys or the mouse, and then select OK
to open that window.
Current ACD 5
This box shows the ACD that is currently selected.
Script... Button 5
Scripts are tags you can use to easily access operations and reports you use
often. To create a script for a report or operation, do the following:
1. Highlight the item in the selector box.
2. Select the Script... button. The Save as Script dialog box appears.
For more information on using the Scripting feature, see Chapter 3, “Scripting,”
in the CentreVu® CMS R3V8 Administration (585-210-910) document.
OK, Cancel, and Help Buttons 5
The OK, Apply, Cancel, and Help buttons you see on Supervisor windows
perform standard Windows actions. When you select each button, the result is
the following:
●OK—accepts the current input and continues to the next window.
●Cancel—cancels the current input and returns you to the previous window.
●Help—opens the help topic specific to this window.
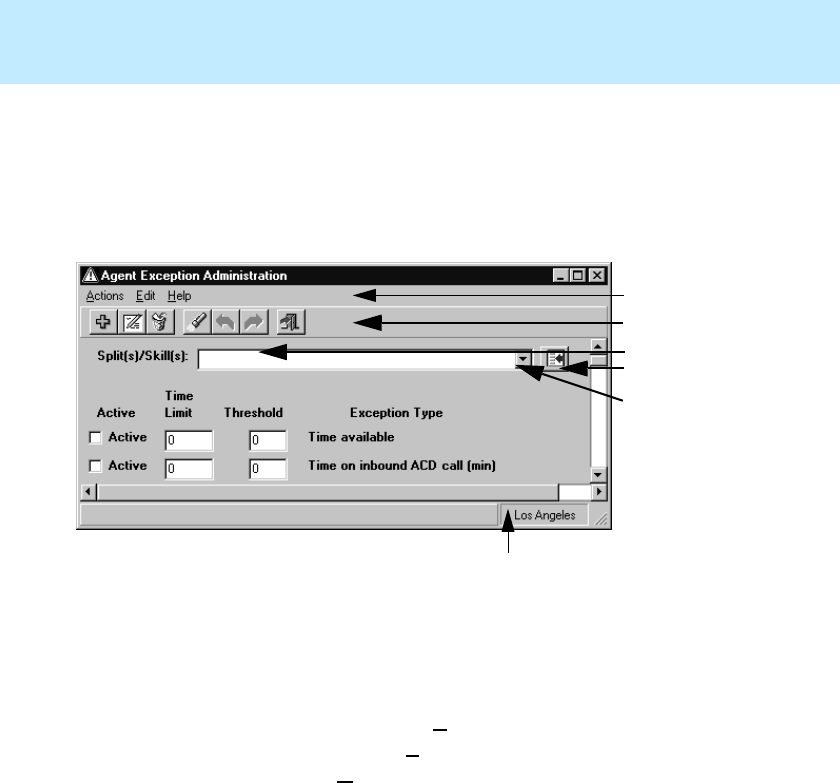
CentreVu
Supervisor Version 8 Installation and Getting Started
Getting Started with CentreVu Supervisor
Completing Input Windows
5-40
Completing Input Windows 5
Once you have selected an operation or report, an input window displays. The
information required on the input window depends on where you are in the
system. An example of an input window is shown below.
Input windows have all or some of the following items:
●Menu Bar—includes menus for CMS Actions (Add, Delete, Find One,
Next, Previous, List All, and Exit), Edit options (Cut, Copy, Paste, and
Clear All), and Supervisor Help.
●Toolbar Action Buttons—lets you perform CMS actions (Add, Delete,
Find One, Next, Previous, List All, and Exit) by clicking on a button. See
Chapter 6, “Performing CMS Operations,” for more information on the
action buttons.
●Input Fields—text boxes where you type in the information needed to
complete the CMS action.
●History List—displays a list of inputs you have previously used in the
input field.
tons
1. Menu Bar
2. Toolbar Action(s)
3. Input Field(s)
4. Browse Button
5. History List
6. Current ACD
1
2
3
4
5
6

CentreVu
Supervisor Version 8 Installation and Getting Started
Getting Started with CentreVu Supervisor
Completing Input Windows
5-41
●Browse Button—lets you browse through all possible items for the input
field. See “Using the Browse Button” on page 5-43 for more information.
Also see “Selecting Report Run Dates” and “Selecting Report Run Times”
in Chapter 7, “Using CentreVu Supervisor Reports.”
●Current ACD—displays the ACD on which you are working.
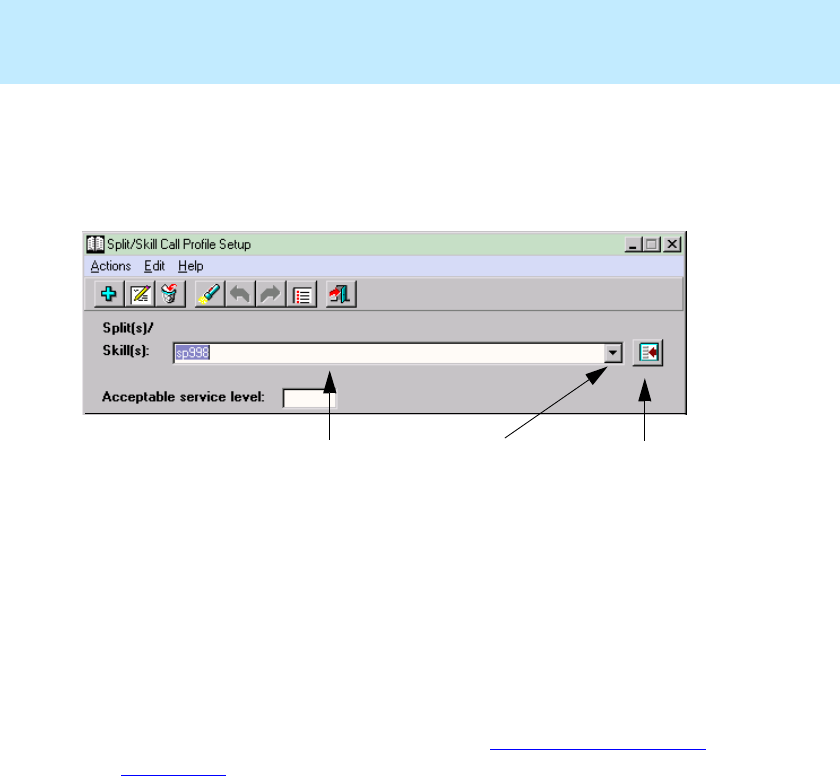
CentreVu
Supervisor Version 8 Installation and Getting Started
Getting Started with CentreVu Supervisor
Completing Input Fields
5-42
Completing Input Fields 5
Below is an example of an input window. The items related to completing input
windows are labeled.
To complete an input field, do one of the following:
●Type in the information requested.
●Select the information from the history list of previously used items.
During each CMS session, Supervisor recalls the items you have previously
selected for each input field. If an input field has an associated history list, you
can use the history list to select an item for the input field.
●Use the Browse button to view all available items for the input field, and
then select an item(s) for the input field. See “Using the Browse Button”
on page 5-43 for more information. Also see “Selecting Report Run
Dates” and “Selecting Report Run Times” in Chapter 7, “Using CentreVu
Supervisor Reports.”
13
2
1. Input Field(s)
2. History List
3. Browse Button
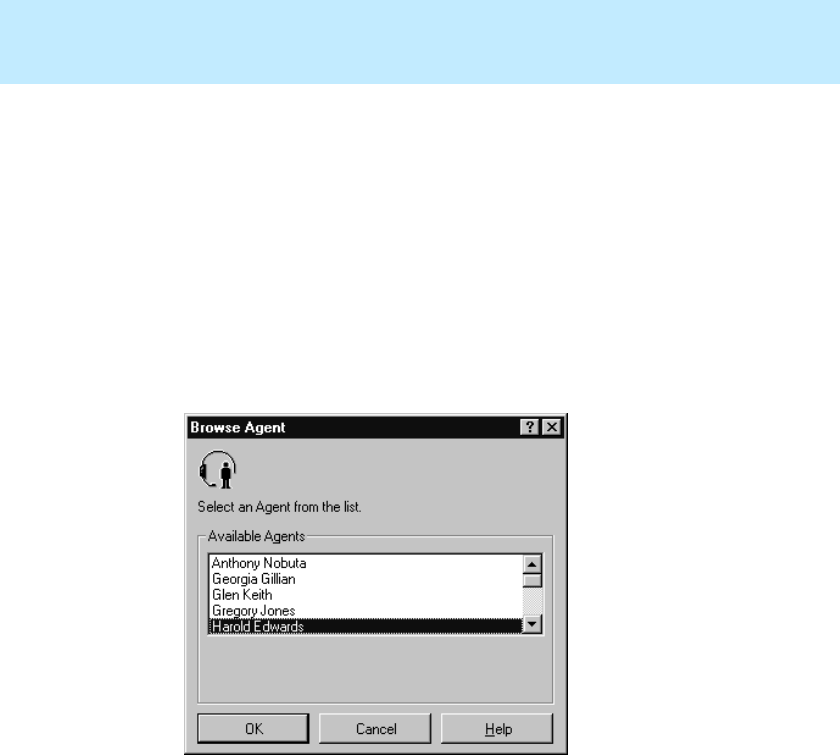
CentreVu
Supervisor Version 8 Installation and Getting Started
Getting Started with CentreVu Supervisor
Using the Browse Button
5-43
Using the Browse Button 5
When you select the Browse button, a window opens that lets you select items
for the input field. The browse selection window will differ depending on
whether the input is for a single entity or for multiple entries of the entity.
Single Entity Input 5
If the input is for a single entity (split/skill, vector, agent, VDN, trunk, or trunk
group), a browse selection window similar to the following example displays:
To use this window, do the following:
1. Click on the name/number of the entity that you want to work with.
2. Select OK.
The input window appears. The input field is populated with the
name/number of the entity that you selected in the Browse window.
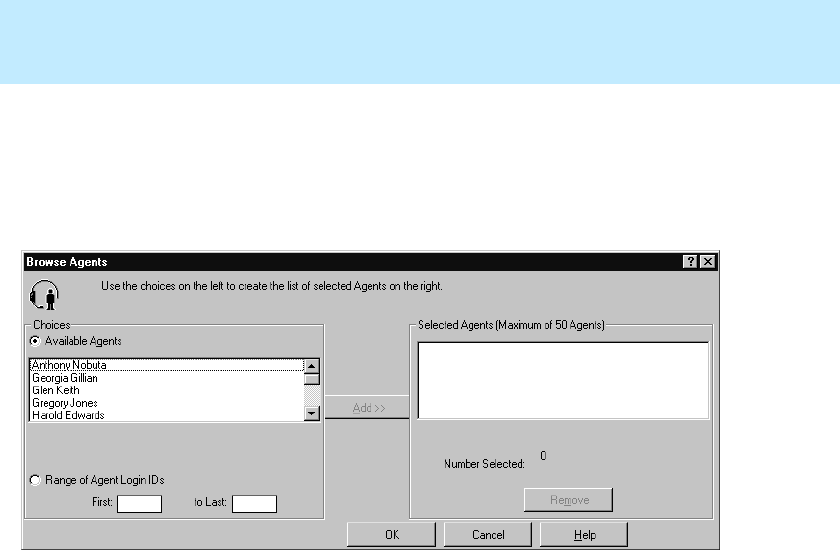
CentreVu
Supervisor Version 8 Installation and Getting Started
Getting Started with CentreVu Supervisor
Using the Browse Button
5-44
Multiple Entries Input 5
If the input allows for multiple entries of the entity (split/skill, vector, agent,
VDN, trunk, or trunk group), a browse selector window similar to the following
example displays:
To use this window, do the following:
1. In the Choices box, click on the entity names/numbers with which you
want to work.
You can select the entities individually from the Choices box or you can
select a range of entity numbers, or you can use a combination of the two.
To select a range, do the following:
a. Select the Range of... option.
b. In the First: input field, type the beginning entity number for the
range.
c. Tab to the to Last: input field.

CentreVu
Supervisor Version 8 Installation and Getting Started
Getting Started with CentreVu Supervisor
Using the Browse Button
5-45
d. In the to Last: input field, type the ending entity number for the
range.
NOTE:
For example, if your call center has skills 1, 2, 3, 4, and 5 and you want to
select all of them, you can type 1 in the First: input field and type 5 in the
to Last: input field.
2. Select Add>>. The entities that were highlighted in the Choices box are
now listed in the Selected ... box.
3. Select OK.
The input window displays and the input field is populated with the
name/number of the entities that you selected in the Browse window.
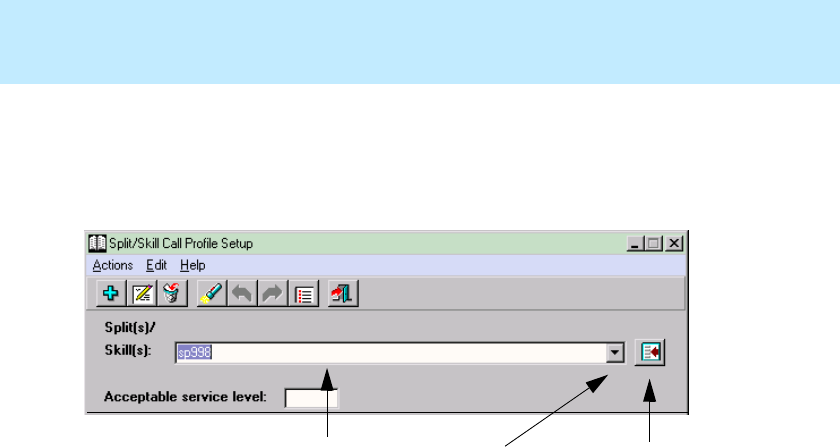
CentreVu
Supervisor Version 8 Installation and Getting Started
Getting Started with CentreVu Supervisor
Using the History List
5-46
Using the History List 5
There is a drop-down history list on the right of each entity input field. This
history list shows values you have previously entered in this field.
You can use the history list to select the entity that you would like to include
for the report/operation that you are running by doing the following steps:
1. Place the cursor in the input field.
2. Select the History List button.
3. Point and click the mouse cursor on the item that you would like to add to
the input field.
The history list closes and the item is added to the input field.
1 3
2
1. Input Field(s)
2. History List
3. Browse Button

CentreVu
Supervisor Version 8 Installation and Getting Started
Getting Started with CentreVu Supervisor
Closing Supervisor Windows
5-47
Closing Supervisor Windows 5
To close Supervisor windows, use any of the standard Windows methods or
select Exit from the Connect menu. Selecting Exit from the Connect menu
closes all windows and quits the application.
If the Controller is closing a window due to the CMS server shutting down or
changing to single-user mode, a warning message is issued and then any open
windows are closed.

CentreVu
Supervisor Version 8 Installation and Getting Started
Getting Started with CentreVu Supervisor
Closing Supervisor Windows
5-48

CentreVu
Supervisor Version 8 Installation and Getting Started
Performing CMS Operations
Overview
6-1
CentreVu
Supervisor
Performing CMS
Operations 6
Overview 6
The information in this chapter teaches you about the menus and inputs you will
find when performing CMS operations in Supervisor. This chapter includes the
following sections:
●Running an Operation
●Operations Menus
●Adding Items in an Operations Input Window
●Finding Items from an Operations Input Window (using Find one and List
all)
●Modifying Items in an Operations Input Window
●Deleting Items from an Operations Input Window.
CentreVu
Supervisor Version 8 Installation and Getting Started
Performing CMS Operations
Overview
6-2
This chapter gives you general information about how to use the windows you
access from the Supervisor Operations tabs. You will find Operations tabs
available under the following commands and tools:
●Commands | Dictionary
●Commands | Exceptions
●Commands | Agent Administration
●Commands | Call Center Administration
●Tools|System Setup
●Tools|Maintenance
●Tools|User Permissions.
No matter which command or tool you use to select an operation, how you
perform the operation is the same.
NOTE:
If information applies to a specific Operations tab (Dictionary, Exceptions,
Agent Administration, Call Center Administration, System Setup,
Maintenance, or User Permissions), then that information is in the appropriate
chapter in the CentreVu CMS R3V8 Administration (585-210-910) document.
For example, Agent Administration has several procedures specific to that
command, so those procedures are located in Chapter 6, “Agent
Administration,” in that document.
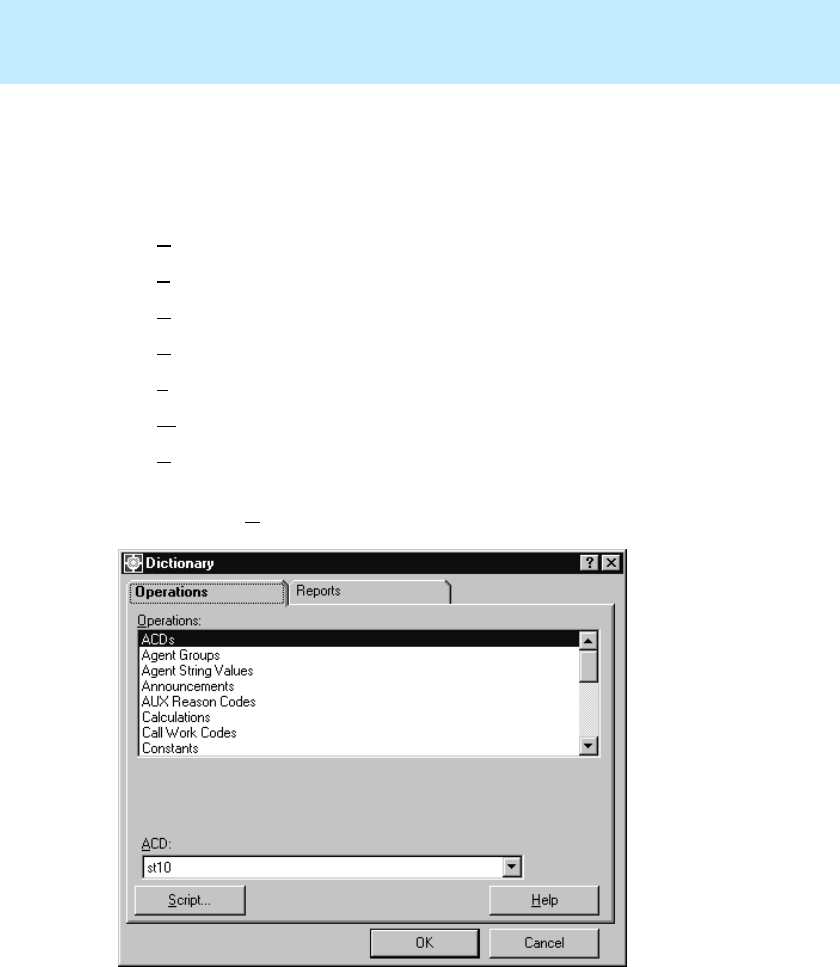
CentreVu
Supervisor Version 8 Installation and Getting Started
Performing CMS Operations
Running an Operation
6-3
Running an Operation 6
To run an operation, do the following:
1. Select one of the following options under Commands or Tools:
●Dictionary
●Exceptions
●Agent Administration
●Call Center Administration
●System Setup
●Maintenance
●User Permissions.
The Operations list box for the application you selected appears. In the
following example, Dictionary was selected.
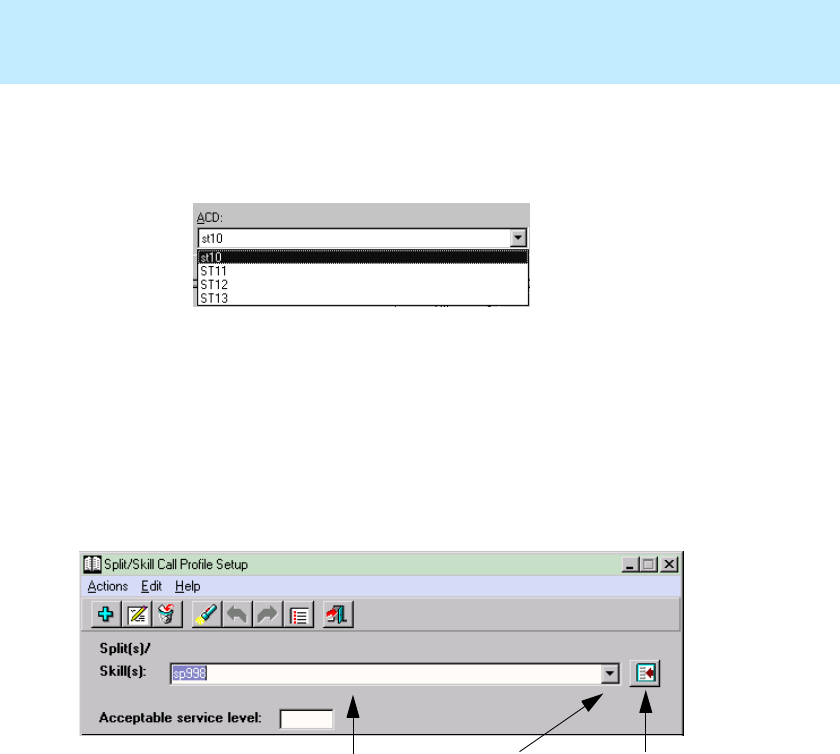
CentreVu
Supervisor Version 8 Installation and Getting Started
Performing CMS Operations
Running an Operation
6-4
1. Select an operation from the Operations list box.
2. From the ACD drop-down list, select the ACD for which you want to
perform the operation, as shown below:
3. Select OK in the Dictionary window.
4. The operation input window appears. The inputs required will vary,
depending on which operation you are running.
5. Complete the operation input window.
The following example (from the Commands |Call Center
Administration| Operations tab) shows the possible types of information
that might be required to complete an operation input window.
6. Fill in the input field(s). Input fields are where you specify the information
that you would like to view, add, modify, or delete. Use any of the
following methods:
●Type in the name or number of the input requested.
●Use the history list to select an input that you have previously used.
●Press the Browse button to view all of the available inputs.
1. Input Field(s)
2. History List
3. Browse Button
13
2

CentreVu
Supervisor Version 8 Installation and Getting Started
Performing CMS Operations
Running an Operation
6-5
7. Ensure that the correct ACD is selected. The current ACD (selected on the
Operations selector window) is displayed at the bottom of the input
window.
8. If you want to perform an operation for a different ACD than is currently
selected, do the following (if you are in an input window, select the Cancel
button to exit the input window):
a. Go to the selector window you chose in Step 1.
b. Change the ACD on the selector window.
c. Select the operation you want to perform.
d. Select OK.
The input window displays again and the input fields are populated with
any inputs that you may have previously entered. 6
9. Select OK.
The operation runs.
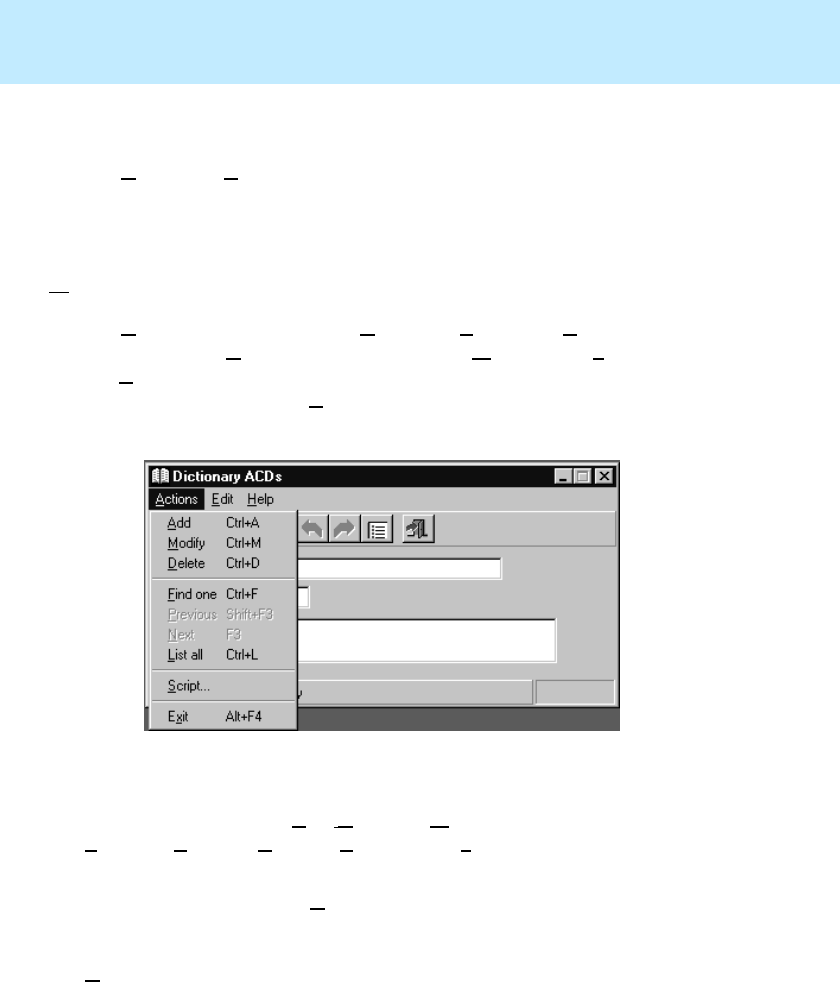
CentreVu
Supervisor Version 8 Installation and Getting Started
Performing CMS Operations
Operations Menus
6-6
Operations Menus 6
The Actions and Edit menu options are commonly found on windows that you
access from the Operations tab.
Actions Menu 6
The Actions menu is found in the Dictionary, Exceptions, Agent
Administration, Call Center Administration, Maintenance, System Setup,
and User Permission operations windows. Actions are used to perform CMS-
related functions. When the Actions menu item is available, the menu bar looks
like this:
This menu contains all of the CMS actions that are available in your current
window. The menu items and their associated buttons on the toolbar are in the
same order. For example, Add, Delete and Modify are grouped together, as are
Find One, Previous, Next, and List All. The Exit selection is always last in the
menu and the last button on the toolbar.
The following table lists the Actions menu items, their associated buttons, and a
definition of each action. Not all of the actions will be available to you all of the
time. If an action is not available in the current window, it is grayed-out on the
Actions menu list and does not appear on the toolbar.
CentreVu
Supervisor Version 8 Installation and Getting Started
Performing CMS Operations
Operations Menus
6-7
Action Button Description
Add Adds the data entered in your current window
to the database.
CancelCancels the operation that is in progress.
Copy Group/
Create Creates a new group from an existing one.
Delete Removes the entry on your current window
from the CMS database.
Exit Exits the window and other associated
windows.
Find one Searches the database for entries that match the
input values in your current window.
Get contents Provides access to the members of the agent
group.
List all Lists all the entries that matched the current
field values.
List Devices Lists all the devices which have been specified
in the Backup/Restore Devices window.
Modify Changes the database entry to reflect the new
values entered in your current window.
Next Once you have used the Find One function, the
Next button displays the next match found.
Otherwise, this button is disabled.
Previous Once you have used the Find One function, the
Previous button displays the previous match
found. Otherwise, this button is disabled.
CentreVu
Supervisor Version 8 Installation and Getting Started
Performing CMS Operations
Operations Menus
6-8
Edit Menu 6
The Edit menu is found on all Dictionary, Exceptions, Maintenance, System
Setup, and User Permissions operations windows. Edit options are used to
perform functions that are related to Microsoft Windows*. When the Edit menu
item is available, the menu bar (and Edit menu) looks like this:
Run/Start Starts the process for your current window.
Script... (No
Icon) Displays the Save as Script - Action dialog box.
This dialog box enables you to enter
information in the appropriate fields, then
select the Add, Modify, or Delete action, and
save it as a script. If Add, Modify, or Delete are
not present, the Save as Script menu item will
not be present.
Select tables Allows you to select specific tables to Back Up
or Restore.
*Microsoft Windows is a trademark of Microsoft Corp.
Action Button Description

CentreVu
Supervisor Version 8 Installation and Getting Started
Performing CMS Operations
Operations Menus
6-9
The Edit menu has the following options:
Menu Item Shortcut Action
Cut Ctrl + X A standard Windows feature that removes
selected text or graphics and places the item(s)
on the clipboard. Cut is available on windows
that have input fields and on List All windows.
Copy Ctrl + C A standard Windows feature that copies the
image of the currently selected chart, text, or
cell to the clipboard in Windows metafile
format. This allows you to paste the item into
any Windows application that supports Copy
and Paste, such as a word processor. This item
is available when text is selected in the
window or the cell is selected in a List All
window. You can also access Copy from the
right mouse button pop-up menu.
Paste Ctrl + V A standard Windows feature that inserts a copy
of the contents of the clipboard at the insertion
point or replaces the selection (if any) with the
text on the clipboard. This item is available
only on windows that have input fields and
when the clipboard is not empty.
Clear all Ctrl + E A feature that is available only on windows
that have input fields. This menu item clears
all of the values entered in the input fields.
Option buttons are reset to their default value.

CentreVu
Supervisor Version 8 Installation and Getting Started
Performing CMS Operations
Adding Items to the CMS Database
6-10
Adding Items to the CMS Database 6
After you select an operation, an input window displays. You may want to add
an item to the CentreVu CMS (such as an agent group, a CMS user ID, or agent
login IDs). To add items from an operations input window, do the following:
1. Fill in the information required in the input fields.
2. Select Add from the Actions menu, select the Add button on the
toolbar, or press Ctrl+A.
If the add is successful, the status bar at the bottom of the window reads
“Successful.” If you do not have the required write permissions to perform
the add you attempted, the status bar reads “Failed,” and an error message
displays.
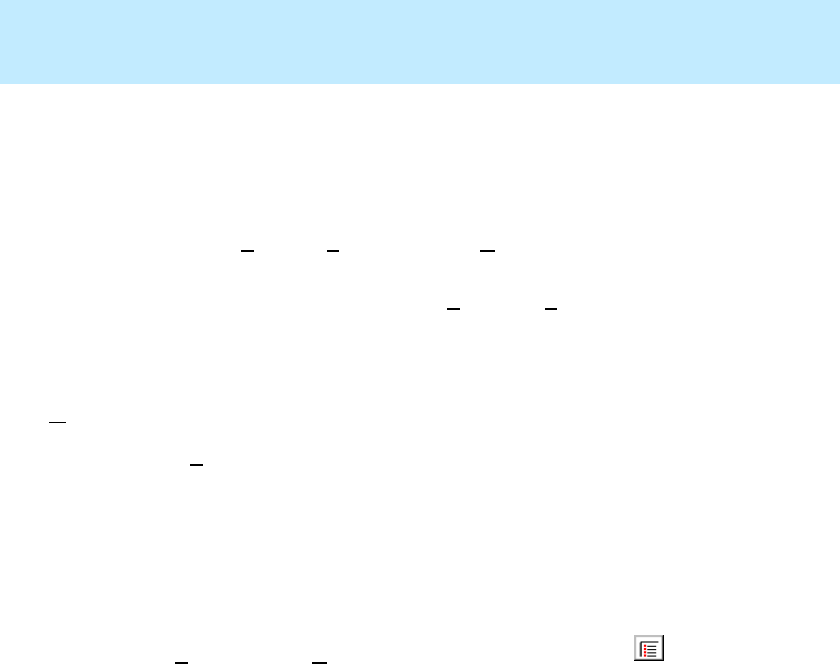
CentreVu
Supervisor Version 8 Installation and Getting Started
Performing CMS Operations
Finding Items in the CMS Database
6-11
Finding Items in the CMS Database 6
After you select an operation, an input window displays. You may want to work
with an item in the CMS (such as an agent group, a CMS user ID, or agent login
IDs), but do not recall how that entity is named or specific details about the
entity. You can use List all or Find one from the Actions menu to locate items
in the CMS.
The following sections teach you how to use List all and Find one in
Supervisor.
List All 6
You will use List all when you do not recall any of the specific information
about an entity, or when you want to list all of the entities of a specific type to
see if any already exist that meet your needs.
To list all of the items related to an operations window, do the following:
1. Leave the text boxes on the input window blank to list all of this type of
entity that exist on the CMS, or complete specific text boxes to refine the
list to a specific range of output.
2. Select List all from the Actions menu, select the List all button on
the toolbar, or press Ctrl+L.
A list of all of the items that match the criteria on the input window
displays.
CentreVu
Supervisor Version 8 Installation and Getting Started
Performing CMS Operations
Finding Items in the CMS Database
6-12
Find one 6
You will use Find one when you know some (or all) of the specific information
about an entity, or when you want to list all of the entities of a specific type,
one-by-one.
To find one entity at a time, do the following:
1. Complete all or some of the text boxes on the input window to try to find a
match, or leave the text boxes blank to list, one-by-one, all of this type of
entity that exist on the CMS.
This is your find criteria.
2. Select Find one from the Actions menu, select the Find one button on
the toolbar, or press Ctrl+F.
The text boxes are completed with information related to the first entity
that matches the find criteria for which you have permissions.
3. If there is more than one match, the status bar reads “xx matches found.”
You can scroll through the Find one matches by selecting Next and
Previous from the Actions menu, by selecting the Next button and
Previous button on the toolbar, or by pressing F3 for Next or Shift-F3
for Previous.
You can also search on partial strings (for example, ac) if the input field is
not labeled with an (s). For example, you cannot use the wild cards * or ? to
search for strings in any entity name input fields that are labeled with (s),
such as Split[s].
NOTE:
For more information on List all and Find one, refer to the CentreVu® CMS
R3V8 Administration (585-210-910) document.
CentreVu
Supervisor Version 8 Installation and Getting Started
Performing CMS Operations
Modifying Items in the CMS Database
6-13
Modifying Items in the CMS Database 6
After you select a category from the Operations tab, an input window displays.
You may want to modify the information for an item that already exists in the
CentreVu CMS database (such as an agent group, a CMS user ID, or agent login
IDs). To modify items from an Operations input window, begin with Step 1 or
Step 2, whichever is appropriate:
1. If you do know all or part of the specific information required for the input
text boxes, do the following:
a. Complete the text boxes for which you have information.
b. Select Find one from the Actions menu, select the Find one button
on the toolbar, or press Ctrl+F. The input window displays with
the appropriate information.
2. If you do not know the specific information required for the input text
boxes, do the following:
a. Select List all from the Actions menu, select the List all button
on the toolbar, or press Ctrl+L.
b. Locate the information for the entity that you want to modify and
note the relevant information.
c. Close the List all window. The input window displays.
d. Complete the text boxes for which you have information.
e. Select Find one from the Actions menu, select the Find one button
on the toolbar, or press Ctrl+F. The input window displays with
the appropriate information.
3. Update the information in the text boxes.
CentreVu
Supervisor Version 8 Installation and Getting Started
Performing CMS Operations
Modifying Items in the CMS Database
6-14
4. Select Modify from the Actions menu, select the Modify button on
the toolbar, or press Ctrl+M. If the Modify is successful, the status bar at
the bottom of the window reads “Successful.” If you do not have the
required write permissions to perform the Modify you attempted, the status
bar reads “Failed,” and an error message displays.
NOTE:
If you attempted to perform a Modify on a database entry that does not yet
exist, the status bar reads, “Does not exist,” and you need to choose Add
from the Actions menu to add the item to the database.
If you leave any fields blank and select Modify, any current data in the
blank fields is erased from the database.
CentreVu
Supervisor Version 8 Installation and Getting Started
Performing CMS Operations
Deleting Items from the CMS Database
6-15
Deleting Items from the CMS Database 6
After you select an operation from the Operations tab, an input window
displays. You may want to delete the information for an item that already
exists in the CMS (such as an agent group, a CMS user ID, or agent login IDs).
To delete items from an operations input window, begin with Step 1 or Step 2,
whichever is appropriate:
1. If you do know all or part of the specific information required for the
input text boxes:
a. Complete the text boxes for which you have information.
b. Select Find one from the Actions menu, select the Find one button
on the toolbar, or press Ctrl+F. The input window displays with
the appropriate information.
2. If you do not know the specific information required for the input text
boxes, do the following:
a. Select List all from the Actions menu, select the List all button
on the toolbar, or press Ctrl+L.
b. Locate the information for the entity that you want to delete and note
the relevant information.
c. Close the List all window. The input window displays.
d. Complete the text boxes for which you have information.
e. Select Find one from the Actions menu, select the Find one button
on the toolbar, or press Ctrl+F. The input window displays with
the appropriate information.
3. Select Delete from the Actions menu, select the Delete button on the
toolbar, or press Ctrl+D.
!WARNING:
No warning message will display when you select Delete. The item you
have specified for deletion from the CMS database will automatically be
deleted.
4. If the delete is successfully completed, “Successful” appears in the status
bar. If the database entry does not exist, “Does not exist” appears in the
status bar.

CentreVu
Supervisor Version 8 Installation and Getting Started
Performing CMS Operations
Deleting Items from the CMS Database
6-16

CentreVu
Supervisor Version 8 Installation and Getting Started
Using CentreVu Supervisor Reports
Overview
7-1
CentreVu
Supervisor
Using CentreVu
Supervisor Reports 7
Overview 7
CMS reports display, report, and summarize the performance of any measured
subset of the ACD, including agents, splits/skills, trunks/trunk groups, VDNs,
and vectors.
The information in this chapter teaches you how to use all Supervisor reports.
The sections are as follows:
●Using the Scripting Feature
●Running a Report
●Selecting Report Run Dates
●Selecting Report Run Times
●Report Menu Bar
●Report Layouts
●Formatting Table Reports
●Formatting Chart Reports
●Minimizing Report Output Windows
●Right Mouse Button Pop-Up Menus

CentreVu
Supervisor Version 8 Installation and Getting Started
Using CentreVu Supervisor Reports
Overview
7-2
●Rotating a 3D Chart
●Exporting Report Data
●Copying Chart Reports
●Resizing Report Windows
●Changing Column Widths
●Selecting a Printer
●Using Page Setup
●Setting Report Threshold Highlights
●Report Options
●Exiting and Restarting Reports.
Report Menus and Tabs 7
No matter where you run a report from, the way you select, run, edit, and view a
report is the same. You will find reports available under the following menus
and tabs:
●Commands | Reports | Real-Time, Historical, or Integrated tab
●Commands | Dictionary | Reports tab
●Commands | Exceptions | Reports tab
●Commands | Agent Administration | Reports tab
●Commands |Call Center Administration | Reports tab
●Commands |Report Wizard
●Tools | Maintenance | Reports tab.
NOTE:
Procedures that relate to specific Commands or Tools are located in the
appropriate chapters in the CentreVu® CMS R3V8 Administration (585-210-
910) document.
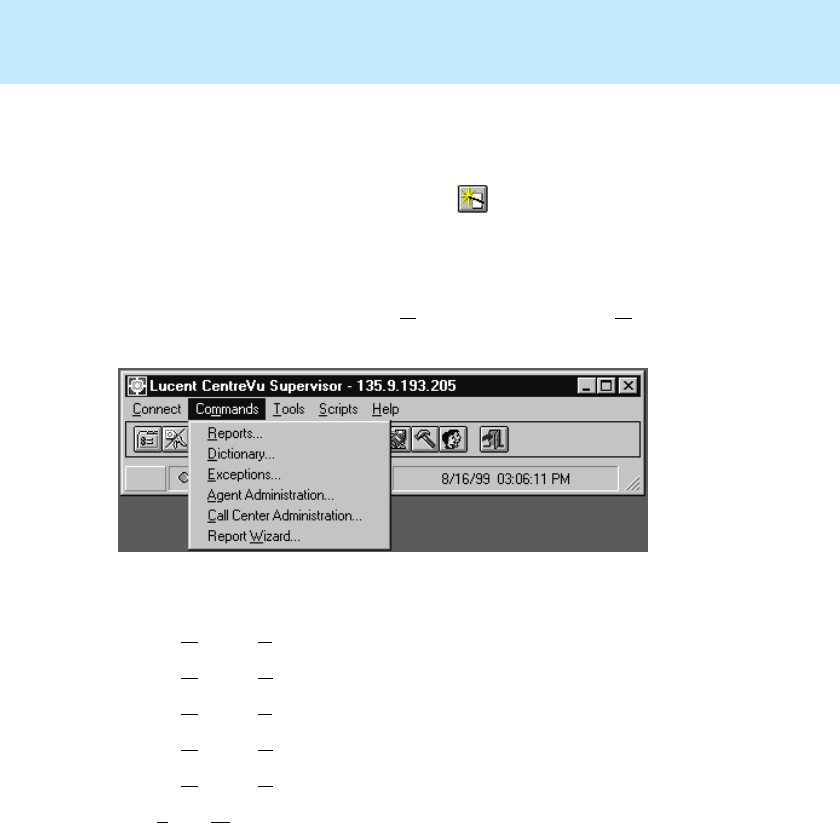
CentreVu
Supervisor Version 8 Installation and Getting Started
Using CentreVu Supervisor Reports
Running a Report
7-3
Running a Report 7
If you have Report Designer and want to quickly and easily generate a new
customized report, select the Report Wizard button in the Controller
toolbar. For more information about the Report Designer, see the CentreVu®
Report Designer Version 8 User Guide (585-210-930).
To run a CMS report, do the following:
1. In the Controller toolbar, select Commands to display the Commands
drop-down menu.
2. Select one of the following options:
●Commands|Reports |Real-Time, Historical, or Integrated tab
●Commands|Dictionary | Reports tab
●Commands|Exceptions | Reports tab
●Commands|Agent Administration | Reports tab
●Commands|Call Center Administration | Reports tab
●Tools |Maintenance | Reports tab.
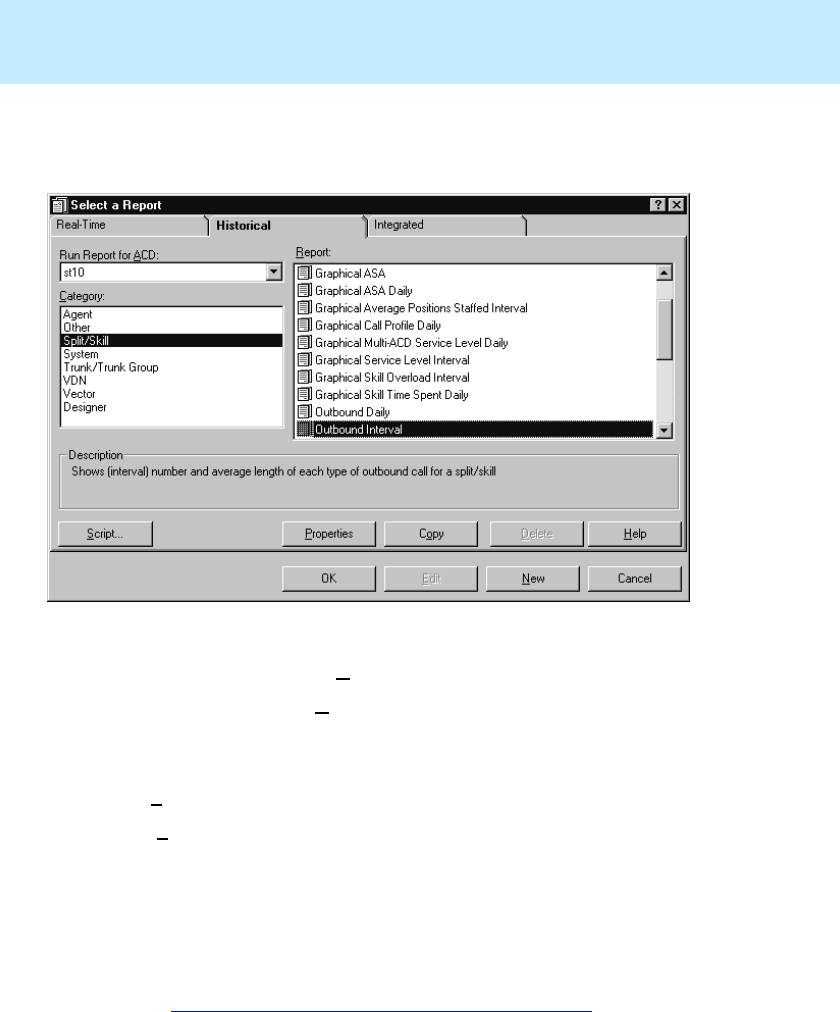
CentreVu
Supervisor Version 8 Installation and Getting Started
Using CentreVu Supervisor Reports
Running a Report
7-4
The Report Selector window appears. An example of the Report Selector
window is shown below. The tabs in this window may vary, depending on
which option you chose under Commands or Tools.
In the Report Selector window:
3. Select a category from the Category box.
4. Select a report from the Report list box.
5. Select the ACD for which you want to run the report.
6. If you want to schedule the selected report to run at a certain time, select
the Script button.
The Script button displays the Save as Script dialog box, which lets you
create a new script for the selected report, but does not run the report. The
script type is set to interactive and cannot be changed.
7. Select OK, or double-click on the report. The report input window
displays. The inputs required will vary, depending on which report you are
running.
8. Go to “Completing the Report Input Window” on page 7-5.
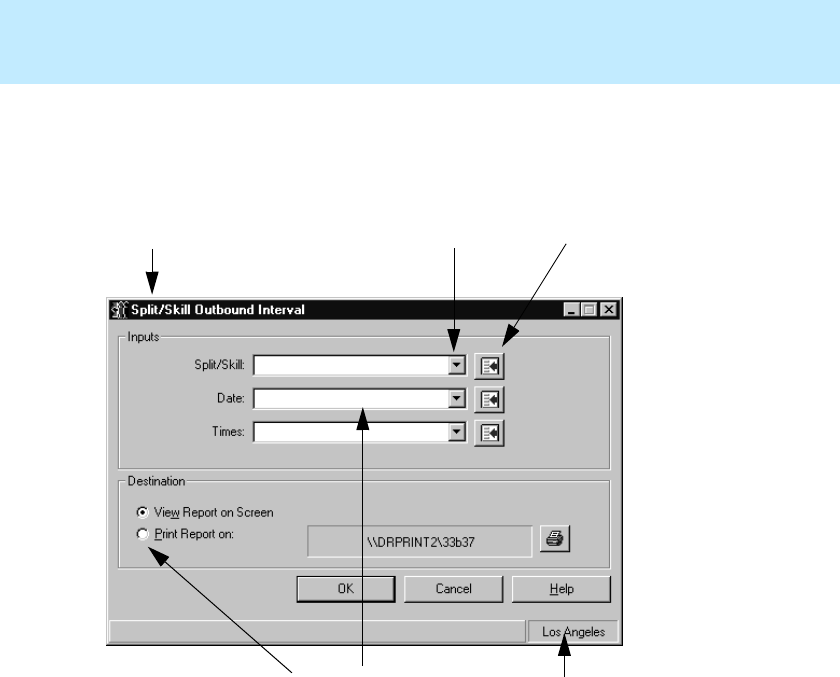
CentreVu
Supervisor Version 8 Installation and Getting Started
Using CentreVu Supervisor Reports
Running a Report
7-5
Completing the Report Input Window 7
The following example shows possible types of input that might be required to
run a report. The inputs required will vary, depending on which report you are
running.
To complete an input window, do the following:
1. Fill in the input field(s). Input fields are where you specify the information
for which you are running the report. Do one of the following:
●Type in the name or number of the input requested.
●Select the Browse button to view all of the available inputs.
●Use the history list to select an input that you have previously used.
1. Report Title
1
2. History List
3. Browse Button
4. Destination Selection
23
5. Input Field(s)
6. Current ACD
456

CentreVu
Supervisor Version 8 Installation and Getting Started
Using CentreVu Supervisor Reports
Running a Report
7-6
2. For all reports other than Commands | Reports Real-Time and Integrated
tabs, select the report destination. Reports can be viewed on screen or
printed to any printer to which your PC is connected.
3. To select the report destination, do one of the following:
●Select the View Report on Screen destination.
●Select the Print Report on: destination. If you want to print on a
printer other than the one displayed, click the button.
4. Ensure that the correct ACD is selected. The current ACD (selected on the
Report Selector window) is displayed at the bottom right of the input
window.
5. If you want to run a report for a different ACD than is selected, do the
following:
a. If you are in an input window, select Cancel to exit the report input
window.
e. Go to the selector window you chose in Step 1.
f. Change the ACD on the selector window.
g. Select the Report you want to run.
6. Select OK to run the report.
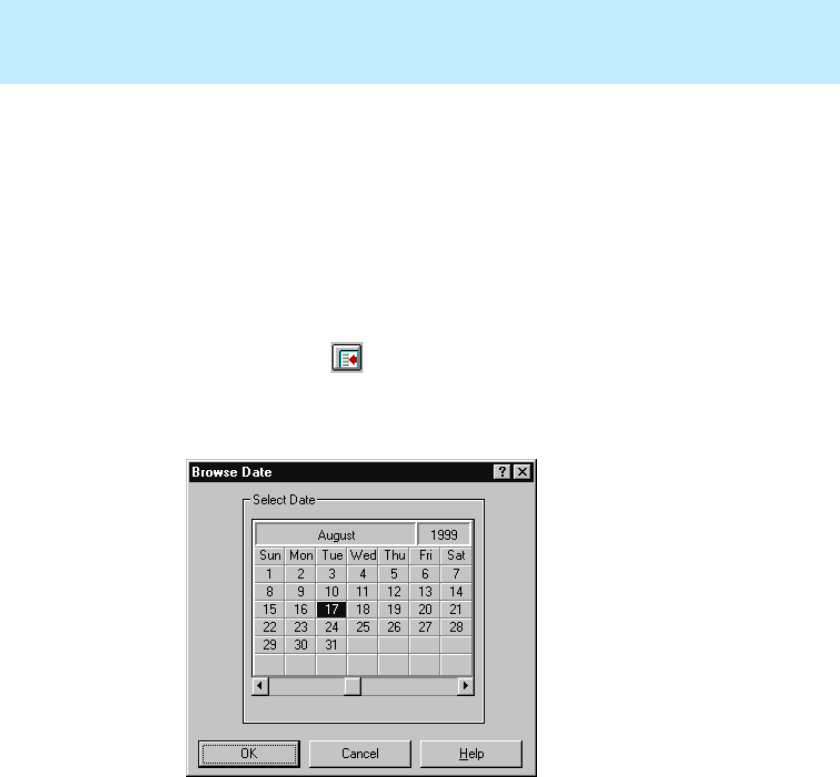
CentreVu
Supervisor Version 8 Installation and Getting Started
Using CentreVu Supervisor Reports
Selecting Report Run Dates
7-7
Selecting Report Run Dates 7
When you run historical reports, you need to select the date or dates for which
to run the report. To do this, you can do any of the following:
●Type the date or date range in the Date(s): input field.
●Type a relative date (for example, -2 for two days ago).
●Select the date(s) from the history list of previously used date(s) for this
report.
●Select the Browse button .
— If you select the Browse button and the input needed is a single date,
the following window displays:
To select a specific date, use your mouse to point at a day and click.
The day is highlighted.
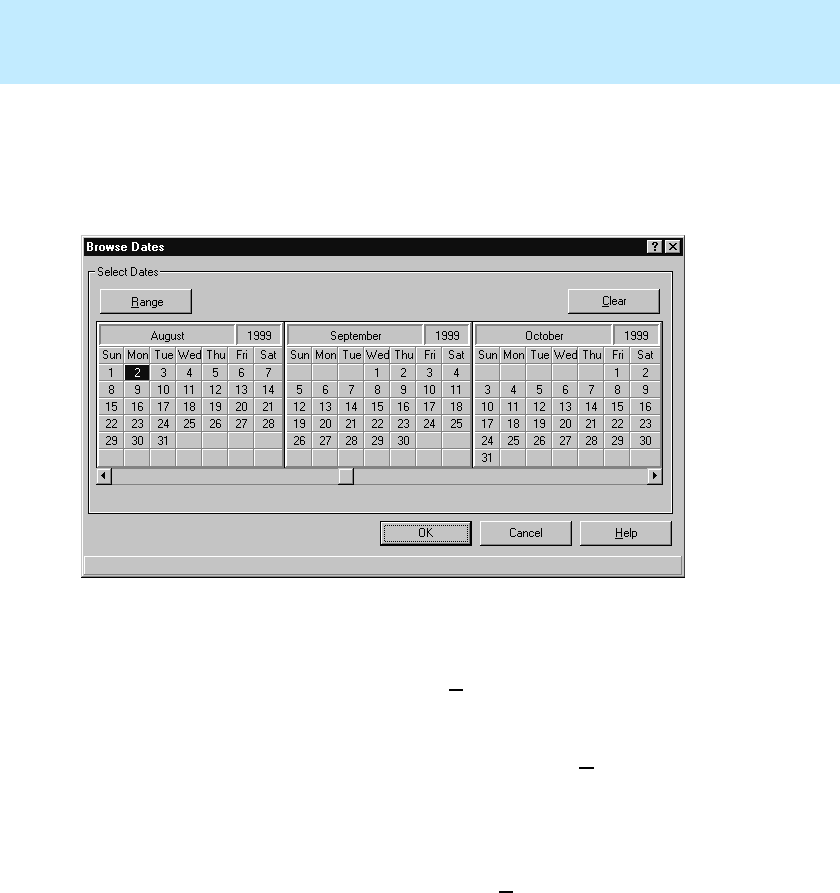
CentreVu
Supervisor Version 8 Installation and Getting Started
Using CentreVu Supervisor Reports
Selecting Report Run Dates
7-8
If you want to choose a date that is not in the current month, use the
arrow keys at the bottom of the window to scroll through the months.
— If the input needed is for more than one date, the following window
displays:
To select specific dates, use your mouse to point at a day and click.
The day highlights. You can select as many days as you want.
To select a range of dates, select the Range button, point-and-click on
the first day of the desired range, then point-and-click on the last day
of the desired range. The dates selected highlight. You can select as
many ranges as you want to, but you must select the Range button in
order to define each range.
If you want to choose a date that is not currently displayed, use the
arrow keys at the bottom of the window to scroll through the months.
To clear your current selections, select the Clear button.
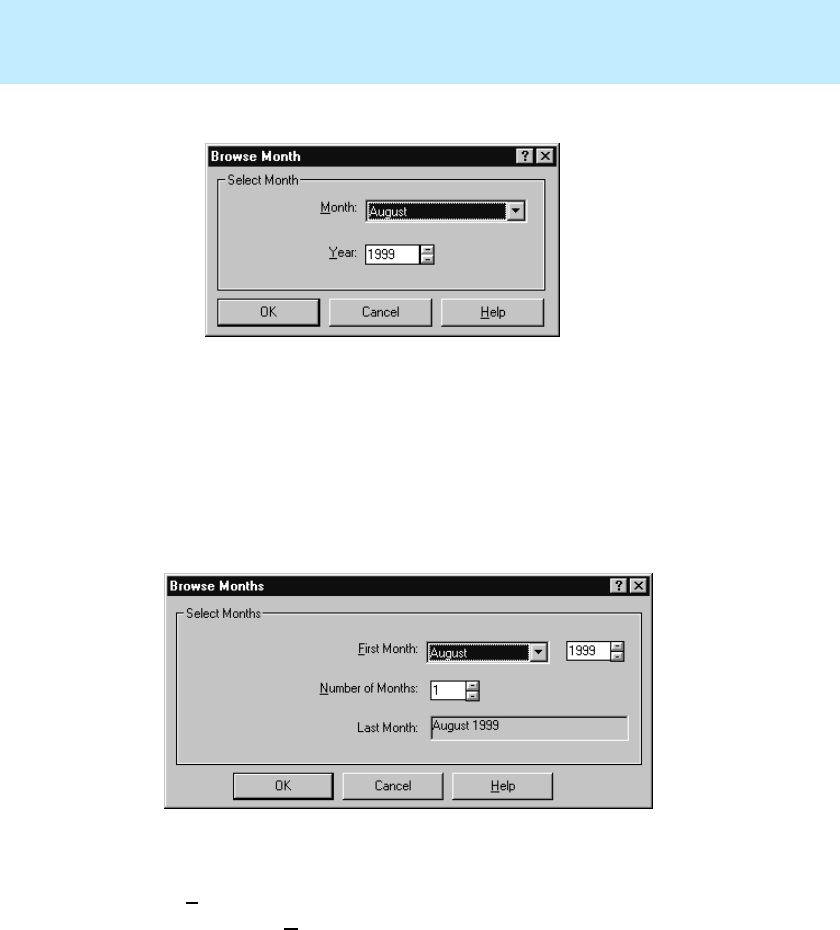
CentreVu
Supervisor Version 8 Installation and Getting Started
Using CentreVu Supervisor Reports
Selecting Report Run Dates
7-9
— If the input needed is for one month, the following window displays:
This window is used in monthly reports where the data is for a single
month. The form initially displays with the values in the input field or
to the month previous to the current month when the input field is
empty. Select a single month and year for the report. The minimum
date is January 1980, and the maximum date is December 2055.
— If the input needed is for more than one month, the following window
displays:
This window is available in monthly reports where the data is for one
or more months. The report runs, beginning with the month entered in
the First Month: field, and going through as many months as are
specified in the Number of Months: field.
The months are in calendar order in the drop-down box, with the
minimum date being January 1980, and the maximum date December
2055.
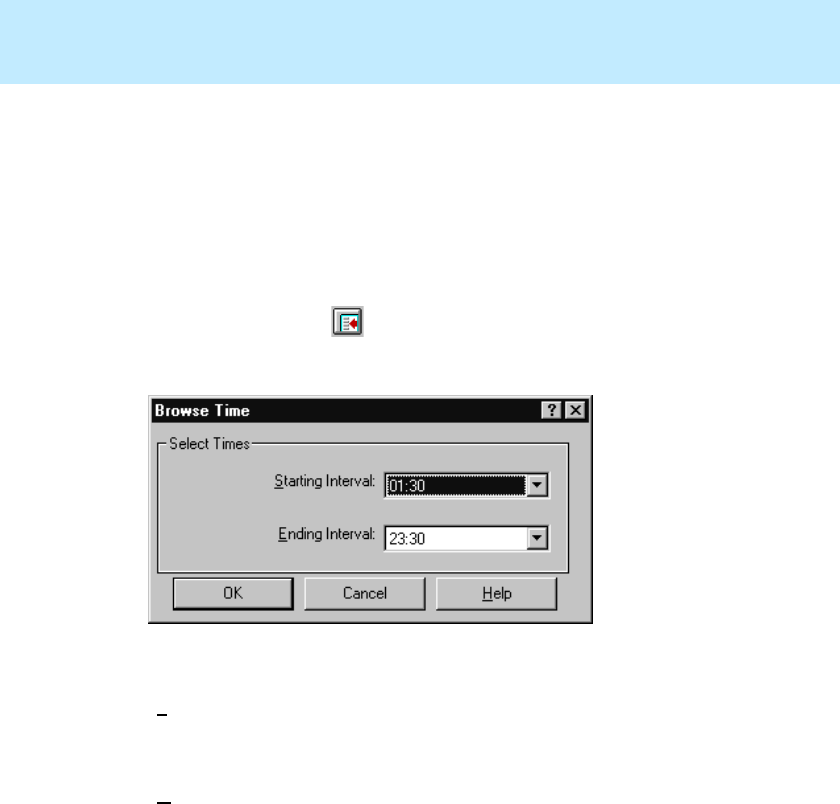
CentreVu
Supervisor Version 8 Installation and Getting Started
Using CentreVu Supervisor Reports
Selecting Report Run Times
7-10
Selecting Report Run Times 7
When you run interval historical reports, you need to select the time period for
which to run the report. In the report input window, do any of the following:
●Type the time range in the Times: input field.
●Select the times from the history list of previously used times for this
report.
●Select the Browse button next to the Times: field.
If you select the Browse button, the following window displays:
Complete the following fields:
—Starting Interval—select the time you want the report to begin with
from the drop-down list. The report data will begin with the interval
that begins immediately after the time you enter.
—Ending Interval—select the time you want the report to end with
from the drop-down list. The report data will go through the interval
that falls within the time you enter.

CentreVu
Supervisor Version 8 Installation and Getting Started
Using CentreVu Supervisor Reports
Report Menu Bar
7-11
Report Menu Bar 7
When you run a report, the menu bar at the top of the window has the following
options:
●Report
●Edit
●Format
●Tools
●Options
●Help
The following paragraphs detail the menu items that are available in each of
these menus.
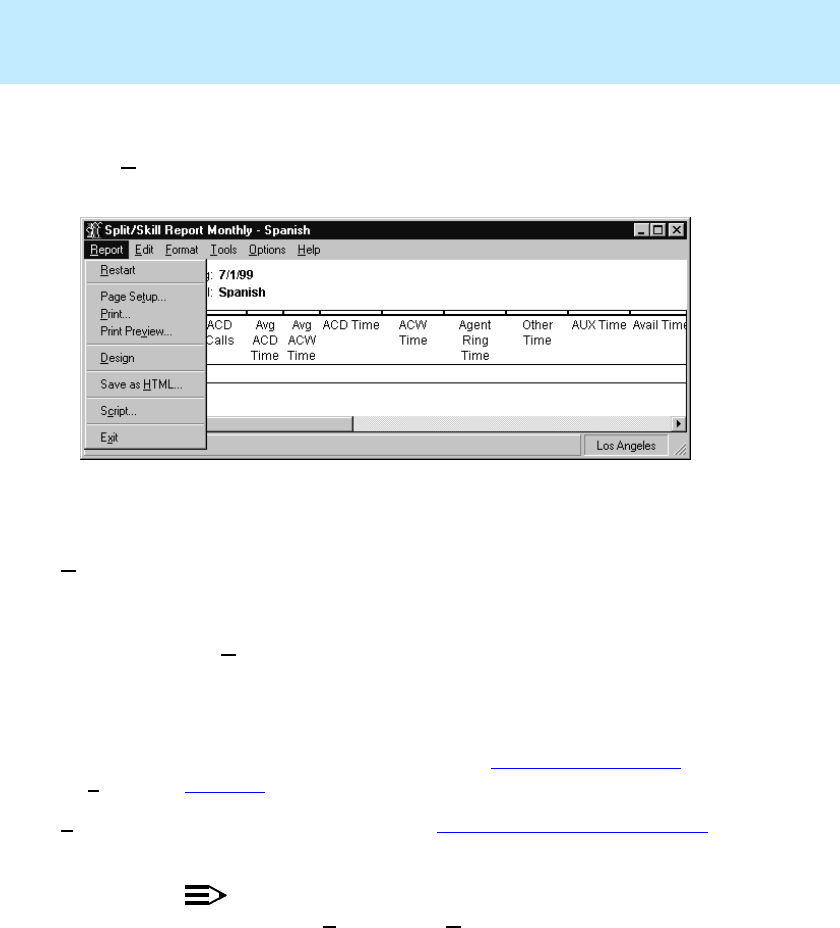
CentreVu
Supervisor Version 8 Installation and Getting Started
Using CentreVu Supervisor Reports
Report Menu Bar
7-12
Report 7
The Report menu has the following options that relate to the report you are
running.
Menu Item Action
Restart Closes the current report output window and displays the input
window for the current report. This allows you to run the same
report, changing inputs as needed.
The Restart menu item will be grayed out if you are currently
running a drill-down report. This is disabled for Drill-Down
reports and if the report is an unsaved report created using the
Report Wizard (this item is enabled when the report is saved).
Page
Setup... Displays the Page Setup window. See “Using Page Setup” on
page 7-54 for more information.
Print... Displays the Print window. See “Selecting a Printer” on page 7-53
for more information.
NOTE:
When you select Print from the Report menu, the report that is
active will be printed according to the options you choose in the
Print window. If the report is a real-time report, only one refresh
of the report will be printed.
Print
Preview... Displays the report so that you can see it before printing.
CentreVu
Supervisor Version 8 Installation and Getting Started
Using CentreVu Supervisor Reports
Report Menu Bar
7-13
Design If you have purchased the Report Designer software and your
CMS User ID is authorized to use the Report Designer, you can
access the Report Designer Design Mode window from any report
using this menu item.
When you select Design from the Report menu, the report that is
currently running remains visible, but you are placed in the
Design Mode, where you can edit the report.
The Design menu item will be grayed out if you are currently
running a drill-down report.
NOTE:
For more information on the Design Mode, see the CentreVu®
Report Designer Version 8 User Guide (585-210-930).
Save Saves the report that you edited.
Save AsSaves the report that you edited under a different file name.
Save as
HTML... Displays the Save as HTML window, which lets you save a
snapshot of the report output as an HTML file. Selecting the
Script button in this window displays the Save as Script dialog
box, which lets you create a script to run the specified report and
save the output as an HTML file.
NOTE:
For more information on the Save as HTML feature, see
Appendix A, “Saving as HTML.”
Menu Item Action

CentreVu
Supervisor Version 8 Installation and Getting Started
Using CentreVu Supervisor Reports
Report Menu Bar
7-14
Script... Displays the Save as Script dialog box, which enables you to
create a script to run a specified report on schedule and display it
on your PC. The script can be interactive or automatic, as follows:
●Interactive—the script runs in the current Supervisor session
and the actions display on the PC. You can input requested
information while the script is running.
●Automatic—the script launches a new Supervisor session that
logs into CMS and runs the requested tasks in the background.
Actions do not display on the PC.
The scripts will require a customer-provided scheduler to be run
at a later time.
Exit Closes the active report output window. The location of the report
output window is saved when the report is exited, and that is
where the report will display the next time you run it.
Menu Item Action
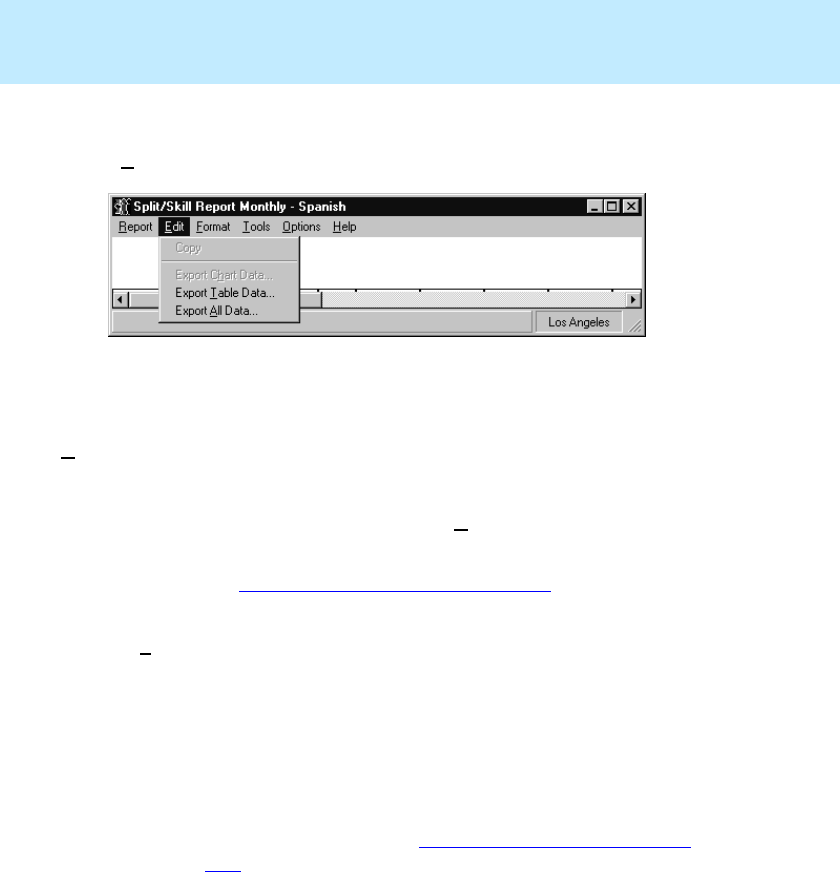
CentreVu
Supervisor Version 8 Installation and Getting Started
Using CentreVu Supervisor Reports
Report Menu Bar
7-15
Edit 7
The Edit menu has the following standard Microsoft Windows* editing options.
Menu Item Action
Copy The image of the currently selected chart is copied to the
clipboard in Windows metafile format. Then you can paste the
chart picture into most Windows applications, such as a word
processor. You can also access Copy from the right mouse
button pop-up menu.
See “Copying Chart Reports” on page 7-50 for more
information.
Export Chart
Data... The Data Export Options window allows you to export the data
in the currently selected chart. If the report is a real-time
report, only one refresh of the data is exported. If there is more
than one chart on this report, this option will be grayed out
until you select a chart.
You can also access the Data Export Options window from the
right mouse button pop-up menu.
For more information, see “Exporting Report Data” on page
7-47.

CentreVu
Supervisor Version 8 Installation and Getting Started
Using CentreVu Supervisor Reports
Report Menu Bar
7-16
*Microsoft Windows is a trademark of Microsoft Corp.
Export Table
Data... The Data Export Options window allows you to export the
table data in the report. If the report is a real-time report, only
one refresh of the data will be exported. If there is more than
one table on the report, this option will be grayed out until you
select a table.
You can also access the Data Export Options window from the
right mouse button pop-up menu.
For more information, see “Exporting Report Data” on page
7-47.
Export All
Data... The Data Export Options window allows you to export all data
in the report. You will also be allowed to include labels and
headers in the data that are exported. If the report is a real-time
report, only one refresh of the data will be exported.
You can also access the Data Export Options window from the
right mouse button pop-up menu.
For more information, see “Exporting Report Data” on page
7-47.
Menu Item Action
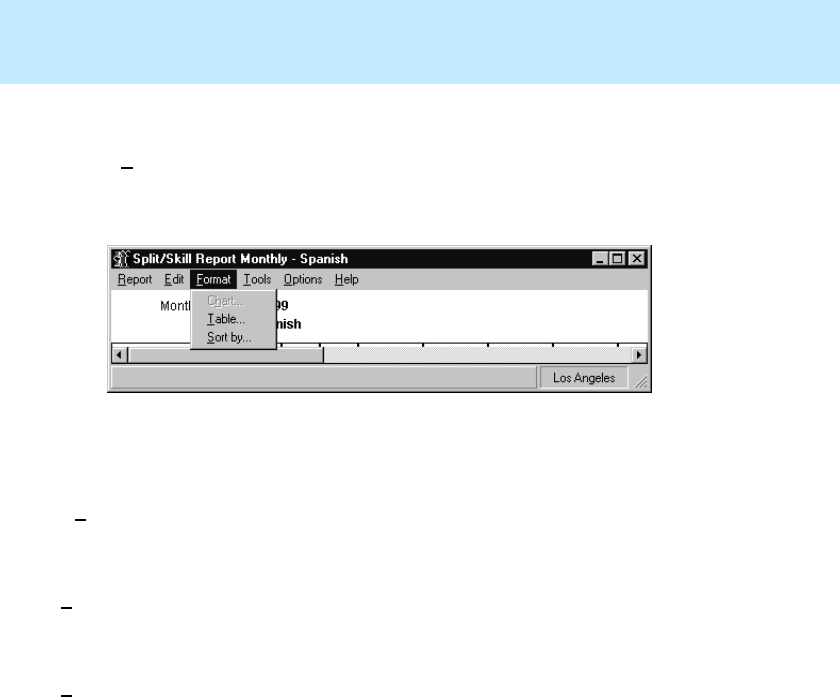
CentreVu
Supervisor Version 8 Installation and Getting Started
Using CentreVu Supervisor Reports
Report Menu Bar
7-17
Format 7
The Format menu contains the following actions for modifying the display
format of the currently selected object. If one (or more) of the actions does not
apply to the selected object, it will be grayed out.
Menu Item Action
Chart... Allows you to format a chart. You can also access the
Format Chart window from the right mouse button pop-up
menu.
Table... Allows you to format a table. You can also access the
Format Table window from the right mouse button pop-up
menu.
Sort by... Allows you to sort the table by several parameters specific
to the information in the selected table. You can also access
the Sort by window from the right mouse button pop-up
menu.
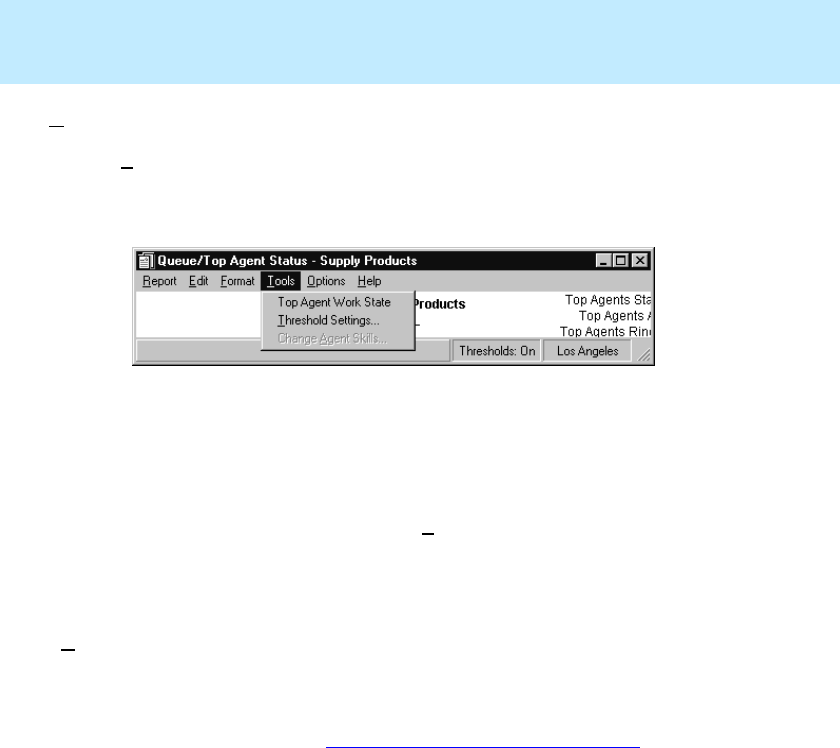
CentreVu
Supervisor Version 8 Installation and Getting Started
Using CentreVu Supervisor Reports
Report Menu Bar
7-18
Tools 7
The Tools menu contains the following additional actions that affect the
currently selected object. You can also access the Tools actions from the right
mouse button pop-up menu.
Menu Item Action
Available
Drill-Down
Reports
If you are running a report that allows you to access one or
more drill-down reports, the available drill-down reports
will be accessible from the Tools menu. For information on
drill-down reports, see the appropriate chapter in the
CentreVu® Supervisor Version 8 Reports (585-210-929)
document.
Threshold
Settings... Opens a window that allows you to view or modify
threshold highlight settings. Threshold highlight settings
apply only to some real-time data items in real-time and
integrated reports. For information on setting threshold
highlights, see “Setting Report Threshold Highlights” in
this chapter.

CentreVu
Supervisor Version 8 Installation and Getting Started
Using CentreVu Supervisor Reports
Report Menu Bar
7-19
Change
Agent
Splits/Skills
If the current ACD supports Expert Agent Selection (EAS),
this menu item reads Change Agent Skills; otherwise, it
reads Change Agent Splits.
This menu item is enabled only when the selected table cell
in a report is an agent name or agent login ID; otherwise, it
is disabled. If you do not have write permission for Agent
Administration, then this menu item is not shown.
This action opens the Change Agent Skills window (EAS)
or Change Agent Split Assignments window (non-EAS) for
the selected agent. You can then modify the split/skill
assignments for the agent.
For information on changing agent splits/skills, see the
appropriate chapter in the CentreVu® CMS R3V8
Administration (585-210-910) document.
Menu Item Action
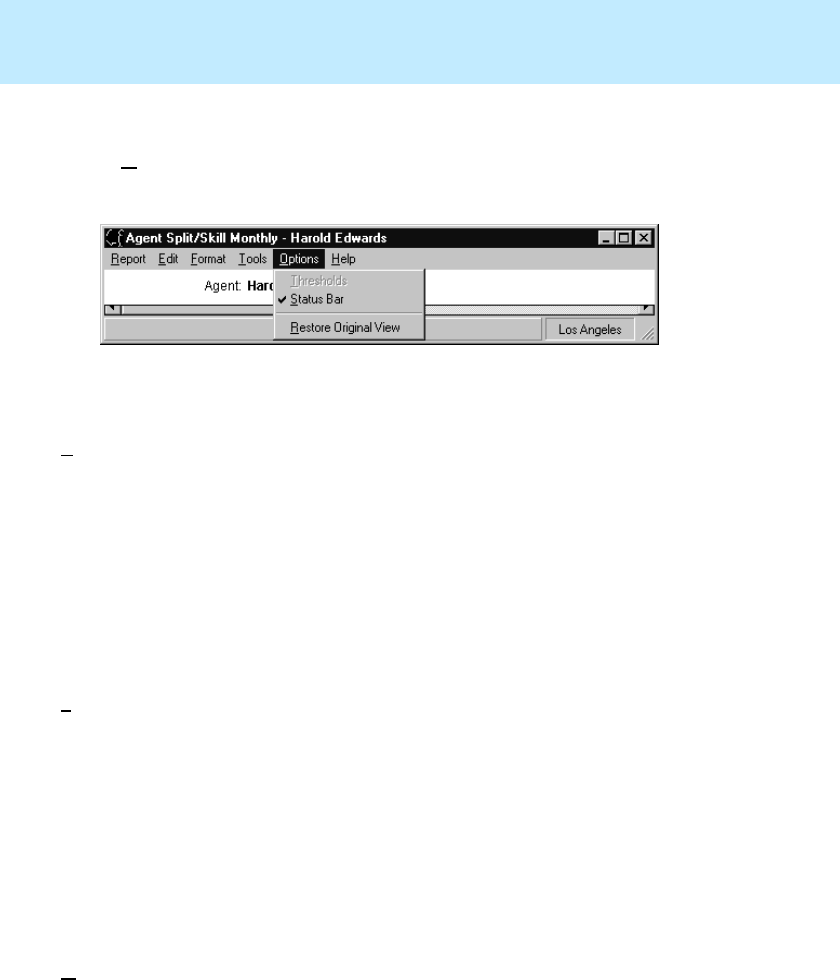
CentreVu
Supervisor Version 8 Installation and Getting Started
Using CentreVu Supervisor Reports
Report Menu Bar
7-20
Options 7
The Options menu contains the following actions that affect the basic display
of the report.
Menu Item Action
Thresholds Turns threshold highlighting on or off for this real-time
report.
When threshold highlighting is on (there is a check by the
menu item), the report shows the colors (icons if the
report is minimized) specified in the Threshold Settings
window.
When threshold highlighting is off (there is no check by
the menu item), the report shows none of the threshold
highlights (or icons if the report is minimized).
Status Bar Shows or hides the status bar.
When the status bar is hidden, the window remains the
same size but the contents are resized to fill the window.
You would choose this to get a larger viewing area for the
report.
When the status bar is made visible, the window remains
the same size but the contents are resized to fill the
smaller window area.
The status bar setting is saved in the report view.
Restore
Original View Restores the Report View to the original settings. All
changes made to the format of this report are discarded.

CentreVu
Supervisor Version 8 Installation and Getting Started
Using CentreVu Supervisor Reports
Report Layouts
7-21
Report Layouts 7
There are two types of report layouts in Supervisor:
●Tables—the Supervisor presentation of standard CMS reports
●Charts — the Supervisor presentation of graphical reports.
A report can consist of only a table/tables, only a chart/charts, or a combination
of tables and charts.
In addition to the tables and charts that make up the main body of reports,
reports can include text and field names that are followed by single data items.
Text and data fields are used on both table and chart reports.
The following sections describe each type of report layout.
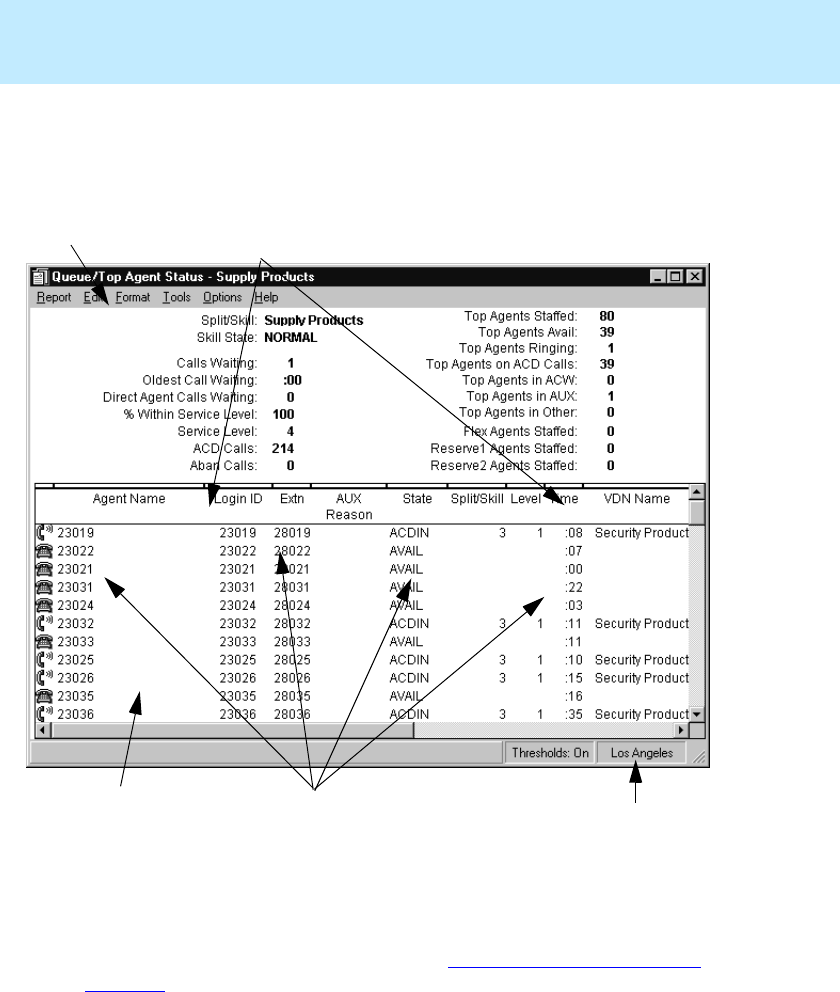
CentreVu
Supervisor Version 8 Installation and Getting Started
Using CentreVu Supervisor Reports
Report Layouts
7-22
Tables 7
Most standard CMS reports (reports that are not prefaced by “Graphical”) are
displayed in tables. The information on a standard report window is organized
as follows:
Standard real-time reports can be sorted. See “Formatting Table Reports” on
page 7-24 for more information.
4
1. Menu Bar
2. Headings
3. Table
4. Columns
5. Current ACD
2
35
1

CentreVu
Supervisor Version 8 Installation and Getting Started
Using CentreVu Supervisor Reports
Report Layouts
7-23
Charts 7
The graphical CentreVu Supervisor reports are displayed in charts. The
information on a chart report window is organized as follows:
There are several options for formatting the appearance of the charts (graphical
reports). For more information, see “Formatting Chart Reports” on page 7-28.
1. Bar Chart
2. Line Chart
3. Pie Chart
4. Legend
5. Current ACD
1
2
3
4
5
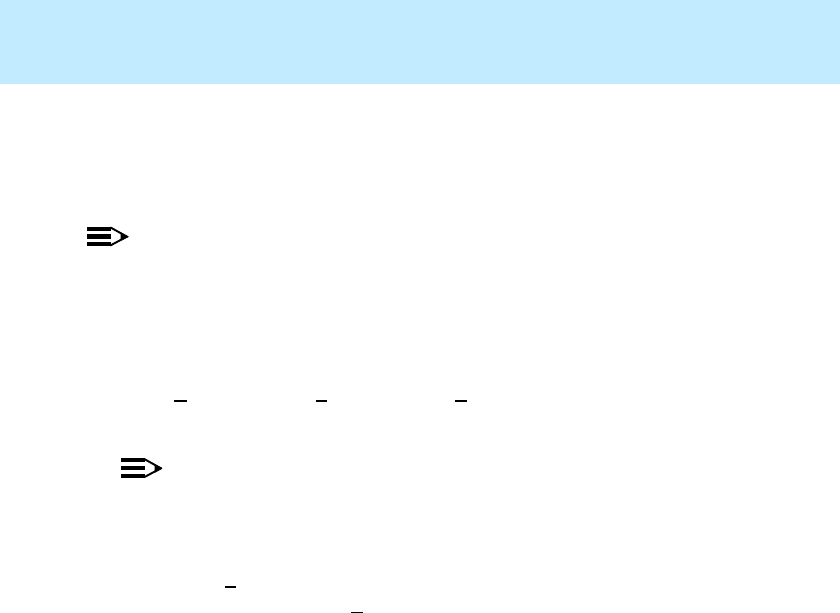
CentreVu
Supervisor Version 8 Installation and Getting Started
Using CentreVu Supervisor Reports
Formatting Table Reports
7-24
Formatting Table Reports 7
If you are in a report containing a table, you can format how the report is
displayed using the Table Format Options window.
NOTE:
The changes you make to a report’s format affect only your view of the report.
The changes do not affect how other CMS users see the report.
Use one of the following methods to access the Table Format Options window:
●Double click on a column heading in the report.
●Select Format Table or Sort by from the Format menu or the right mouse
button pop-up menu.
NOTE:
The Table Format Options window allows you to make layout changes to a
table. All changes you make are saved as part of the report view when the
report exits.
If you select Sort by, the Table Format Options window displays with the
Sort tab active. If you select Format Table, the Table Format Options
window displays with the General tab active.
The following sections describe the General and Sort tabs.
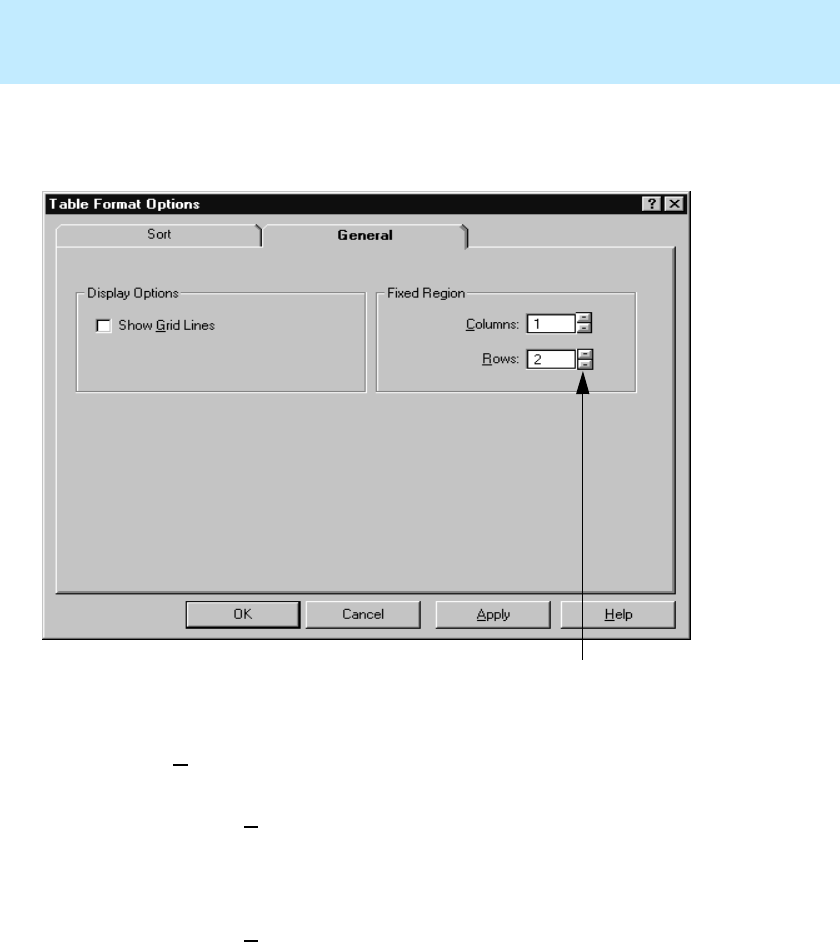
CentreVu
Supervisor Version 8 Installation and Getting Started
Using CentreVu Supervisor Reports
Formatting Table Reports
7-25
General Tab 7
The General tab allows you to make format changes to a table.
The following table parameters can be changed:
●Show Gridlines—specifies whether or not table lines are to be shown in
the table.
●Fixed Region, Columns—specifies the number of columns from the left
of the table that are fixed in place and do not scroll. Valid values are in the
range of 0 through 99. You can use the spin boxes to select a valid value or
type in the value.
●Fixed Region, Rows—specifies the number of rows from the top of the
table that are fixed in place and do not scroll. Valid values are in the range
of 0 through 99. You can use the spin boxes to select a valid value or type
in the value.
Spin Box

CentreVu
Supervisor Version 8 Installation and Getting Started
Using CentreVu Supervisor Reports
Formatting Table Reports
7-26
Sort Tab 7
The Sort tab allows you to specify the order in which the following information
on the real-time table report is displayed.
When you are setting up display order for a real-time report, specify the sort
column (Sort By) and the sort order (Ascending or Descending). The drop-
down list for the Sort By lists all of the database table and item names used in
the report.
1. Sort By Criteria Drop-Down Lists
2. Sort Order
2
1

CentreVu
Supervisor Version 8 Installation and Getting Started
Using CentreVu Supervisor Reports
Formatting Table Reports
7-27
Some examples of sorting follow:
●Viewing a list of agents alphabetically—select “Agent Name” from the
first Sort By drop-down list, select Ascending as the sort order, and leave
the other two Sort By boxes set to “(none).”
●Searching for agents who have been in a certain state for too long— select
“State” from the first Sort By drop-down list, then select “Time” from the
second Sort By drop-down list, and then select Descending as the sort order
for the second Sort By.
Sorting may cause report refreshes to take longer. If you wish to speed up the
refresh rate, turn off the sort options by selecting “(none)” for all of the Sort By
criteria.

CentreVu
Supervisor Version 8 Installation and Getting Started
Using CentreVu Supervisor Reports
Formatting Chart Reports
7-28
Formatting Chart Reports 7
Charts (found in graphical reports) provide a graphical representation of data.
Values or data points are displayed in formats such as bars, lines, filled areas,
and pie charts. These data points are grouped into series that are identified with
unique colors.
In many chart types, one data point from each series is grouped together by
category across an axis. Categories are plotted along the x-axis, while values
are plotted along the y-axis. A two-dimensional chart shows series next to each
other, while a three-dimensional chart plots series along the z-axis. A chart can
also have a title and a legend.
If you are in a graphical (chart) report, you can format how the report is
displayed. The changes you make to a report’s format affect only your view of
the report. The changes do not affect how other CMS users see the report.
To format a chart report, selecting Format Chart or Sort by from the Format
menu list or the right mouse button pop-up menu. The Chart Format Options
window appears.
The Chart Format Options window has seven tabs: General, 3D Effects, Axis,
Type, Title, Legend, and Data Labels. The following sections describe each of
the tabs.

CentreVu
Supervisor Version 8 Installation and Getting Started
Using CentreVu Supervisor Reports
Formatting Chart Reports
7-29
General Tab 7
The General tab allows you to specify several general options that apply to the
chart.
You can change the following chart parameters:
●Background Color—specifies whether the backdrop of the chart is a solid
color or whether it is displayed as a gradient, a smooth transition from one
color to another. The gradient transition can be one of the following:
Horizontal, Vertical, Rectangle, or Oval. The quality of the gradient
effect will vary depending on the video card installed in the PC, or the
capabilities of the printer for printed reports.
●Real-Time—if the chart is a rolling chart, you can specify the number of
data points to be displayed in the chart. Permitted values are 2 through 100,
with 10 being the default. A rolling chart is a line chart that is initially
displayed with no data points. For each refresh of the report, a data point is
added. As data points are added, the chart “rolls” from left to right. When
enough refreshes have occurred so that the chart is displaying the number
of specified data points, at the next refresh, the oldest data point is dropped
from the display and the newest data point is displayed.
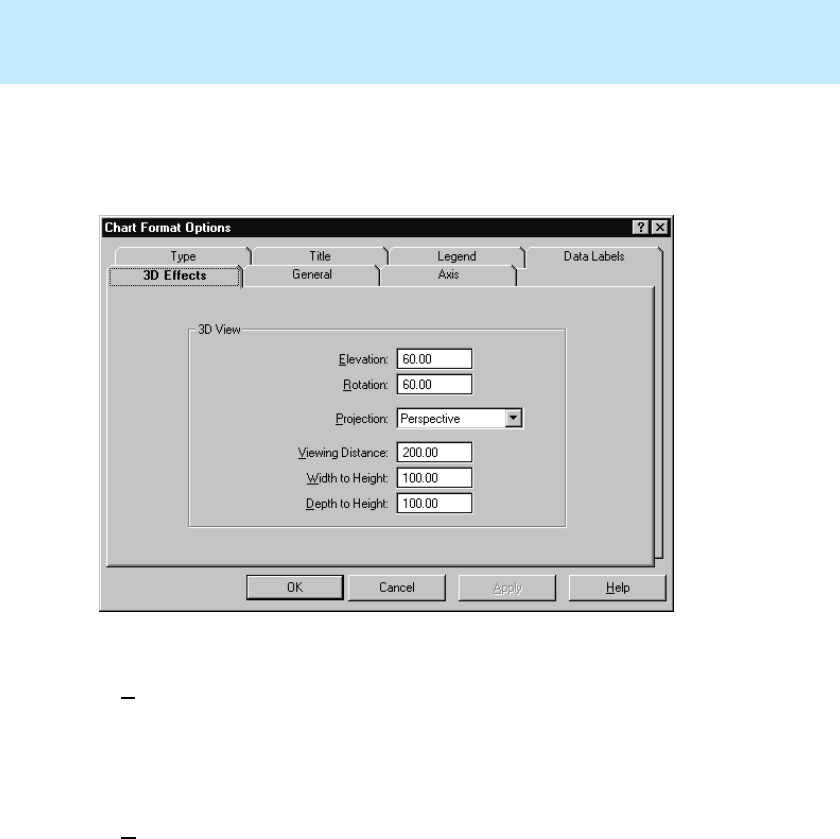
CentreVu
Supervisor Version 8 Installation and Getting Started
Using CentreVu Supervisor Reports
Formatting Chart Reports
7-30
3D Effects Tab 7
The 3D Effects tab allows you to control the 3D appearance of the chart. If the
current chart is a 2D chart, this tab is disabled.
The following chart parameters can be changed:
●Elevation—a number from 0 through 90 degrees that describes the relative
height from which a chart is viewed. An elevation of 90 looks directly
down on the top of the chart, while an elevation of 0 looks directly at the
side of the chart. The example charts throughout this document use an
elevation of 30 degrees.
●Rotation—a number from -360 through 360 degrees that specifies the
angle that the chart is turned relative to the viewing position. The example
charts throughout this document use a rotation of 60 degrees. Rotation does
not apply to 3D pie charts.

CentreVu
Supervisor Version 8 Installation and Getting Started
Using CentreVu Supervisor Reports
Formatting Chart Reports
7-31
●Projection—selects one of three mathematical algorithms used to give a
3D appearance on a 2D sheet of paper or computer screen. You can choose
the following values:
—Oblique: The chart has depth but the X-Y plane does not change when
the chart is rotated or elevated.
—Orthogonal: Perspective is not applied to the chart, resulting in less of
a 3D effect. The advantage of using this type of projection is that
vertical lines remain vertical, making some charts easier to read.
—Perspective: This provides the most realistic 3D appearance. Objects
farther away from you converge toward a vanishing point.
●Viewing Distance—a number from 50 through 1000 that represents the
distance from which the chart is viewed as a percentage of the depth of the
chart.
●Width to Height—a number from 5 through 2000 that represents the
percentage of the chart’s height that is used to draw the chart’s width.
●Depth to Height—a number from 5 through 2000 that represents the
percentage of the chart’s height that is used to draw the chart’s depth.
See “Rotating a 3D Chart” on page 7-46 for an easy way to change the elevation
and rotation of a chart using the mouse.

CentreVu
Supervisor Version 8 Installation and Getting Started
Using CentreVu Supervisor Reports
Formatting Chart Reports
7-32
Axis Tab 7
The Axis tab allows you to specify the title that will display on each axis of the
chart report.
The Axis Display chart parameter can be changed. The Axis Display parameter
makes each of the axes visible or invisible. The choices are X Axis, Y Axis, 2nd
Y Axis, and Z Axis.
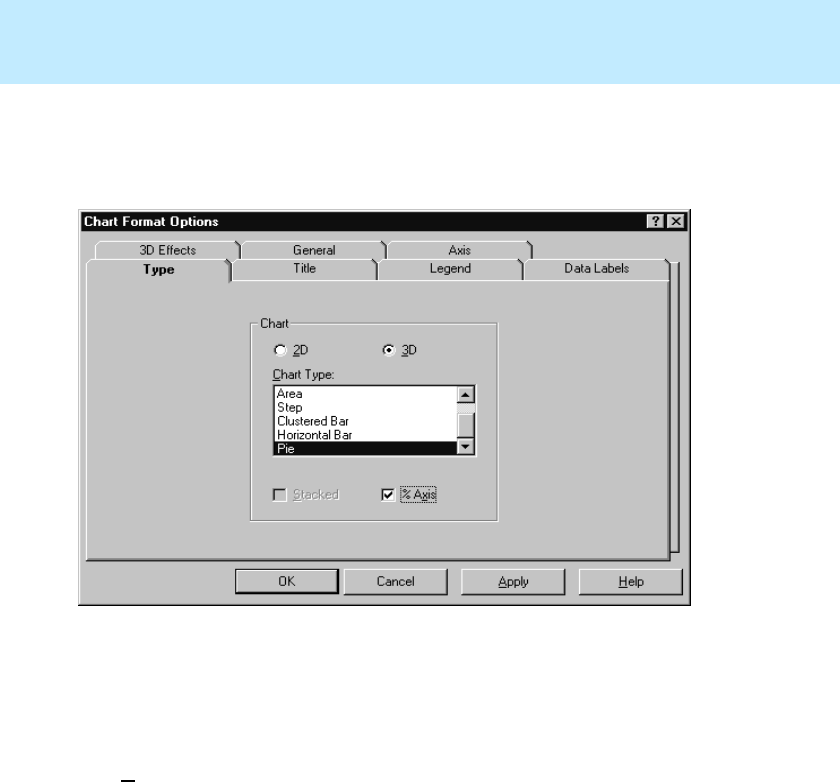
CentreVu
Supervisor Version 8 Installation and Getting Started
Using CentreVu Supervisor Reports
Formatting Chart Reports
7-33
Type Tab 7
The Type tab lets you change the chart type.
The available options on the Type tab are as follows:
●2D and 3D—changes the chart between 2-dimensional and 3-dimensional
views. 2D charts update faster than 3D charts, so if the drawing speed
seems too slow, you may want to display charts as 2D.
●Chart Type—specifies how the data is presented. You choose a chart type
from the list. The types of charts available vary slightly depending on
whether a 2D or 3D chart has been selected. All possible chart types are as
follows:
— Bar Chart (2D and 3D)
— Line Chart (2D and 3D)
— Area Chart (2D and 3D)
— Step Chart (2D and 3D)

CentreVu
Supervisor Version 8 Installation and Getting Started
Using CentreVu Supervisor Reports
Formatting Chart Reports
7-34
— Horizontal Bar Chart (2D and 3D)
— Clustered Bar Chart (3D only)
— Pie Chart (2D and 3D).
●Stacked check box—causes the data for all series to be stacked rather than
shown separately. This check box is disabled for pie charts.
●% Axis check box—causes the value axis (y-axis) to be displayed as
percentages rather than as actual data values. This can be combined with
the stacked check box to produce a percentage stacked chart.

CentreVu
Supervisor Version 8 Installation and Getting Started
Using CentreVu Supervisor Reports
Formatting Chart Reports
7-35
Title Tab 7
The Title tab allows you to control the location of the chart title.
The available options on the Title tab are as follows:
●Visible check box—allows you to display or not display report titles.
●Location of title—if you elect to have report titles visible, you can select
where the titles display. The available options are Top Left, Top (center),
Top Right, Left, Right, Bottom Left, Bottom (center), and Bottom
Right.
NOTE:
Since the title takes up space, the drawn chart will be smaller if you have
selected Visible. If you wish to increase the size of the chart, do not select the
Visible option.
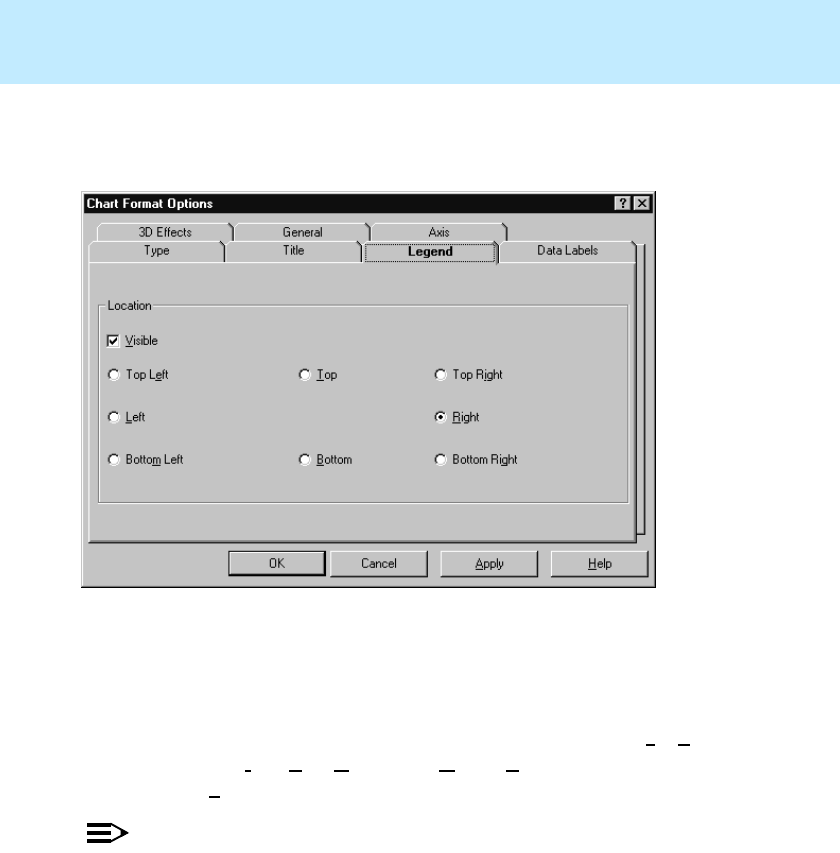
CentreVu
Supervisor Version 8 Installation and Getting Started
Using CentreVu Supervisor Reports
Formatting Chart Reports
7-36
Legend Tab 7
The Legend tab allows you to control the location of the chart legend.
The available options on the Legend tab are as follows:
●Visible check box—allows you to display or not display report legends.
●Location of legend—if you elect to have report legends visible, you can
select where the legend displays. The available options are Top Left, Top
(center), Top Right, Left, Right, Bottom Left, Bottom (center), and
Bottom Right.
NOTE:
Since legends take up space, the drawn chart will be smaller if you have
selected Visible. If you wish to increase the size of the chart, do not select the
Visible option.
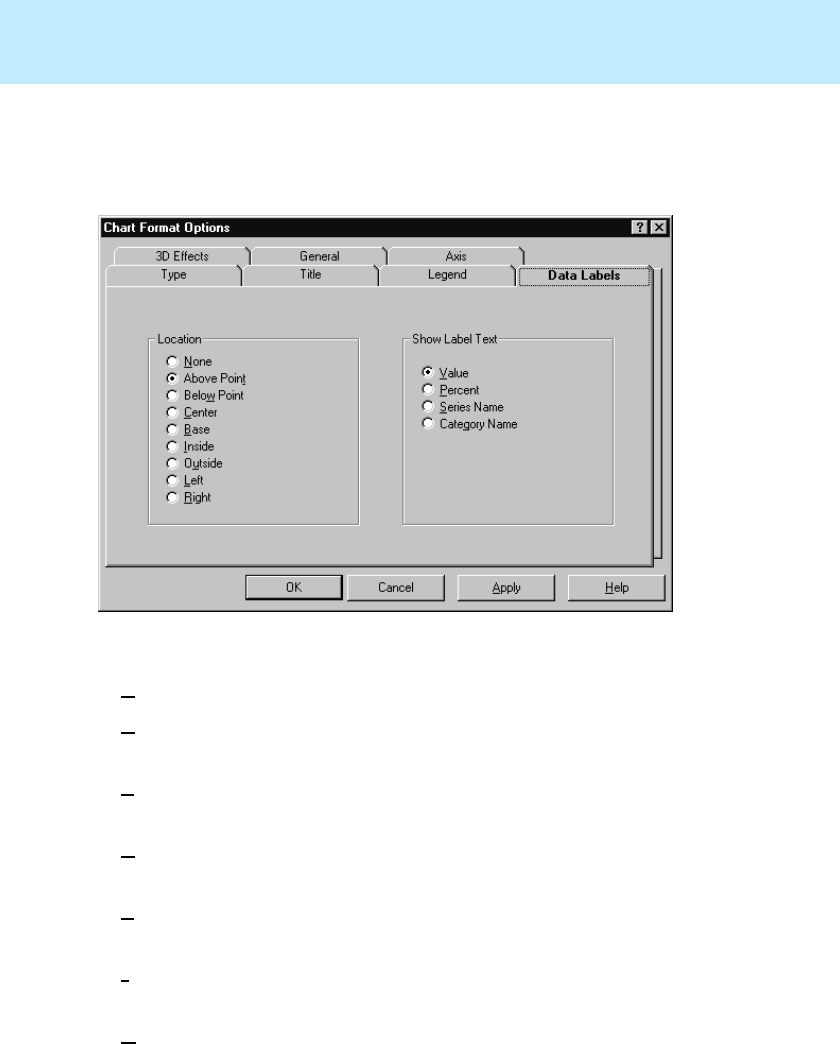
CentreVu
Supervisor Version 8 Installation and Getting Started
Using CentreVu Supervisor Reports
Formatting Chart Reports
7-37
Data Labels Tab 7
The Data Point Labels tab allows you to control the location of the data point
labels.
The following parameters can be specified:
●None—labels are not displayed.
●Above Point—displays the label above the data point. This location is
valid only for bar, line, area, and step charts.
●Below Point—displays the label below the data point. This location is
valid only for bar, line, area, and step charts.
●Center—displays the label centered on the data point. This location is
valid only for bar, line, area, and step charts.
●Base—displays the label along the category axis, directly beneath the data
point. This location is valid only for bar, line, area, and step charts.
●Inside—displays the label inside a pie slice. This location is valid only for
pie charts.
●Outside—displays the label outside a pie slice. This location is valid only
for pie charts.

CentreVu
Supervisor Version 8 Installation and Getting Started
Using CentreVu Supervisor Reports
Formatting Chart Reports
7-38
●Left—displays the label at the left of a pie slice. This location is valid only
for pie charts.
●Right—displays the label at the right of a pie slice. This location is valid
only for pie charts.
If data point labels are displayed, you can specify that they include one of the
following:
●Value—the value of the data point appears in the label.
●Percent—the value of the data point appears in the label as a percentage.
●Series Name—the series name is used to label the data point.
●Category Name—the category name is used to label the data point.
NOTE:
The position of data point labels can affect the readability of the chart. The label
text may overlap in some situations, making it difficult or impossible to read the
labels.
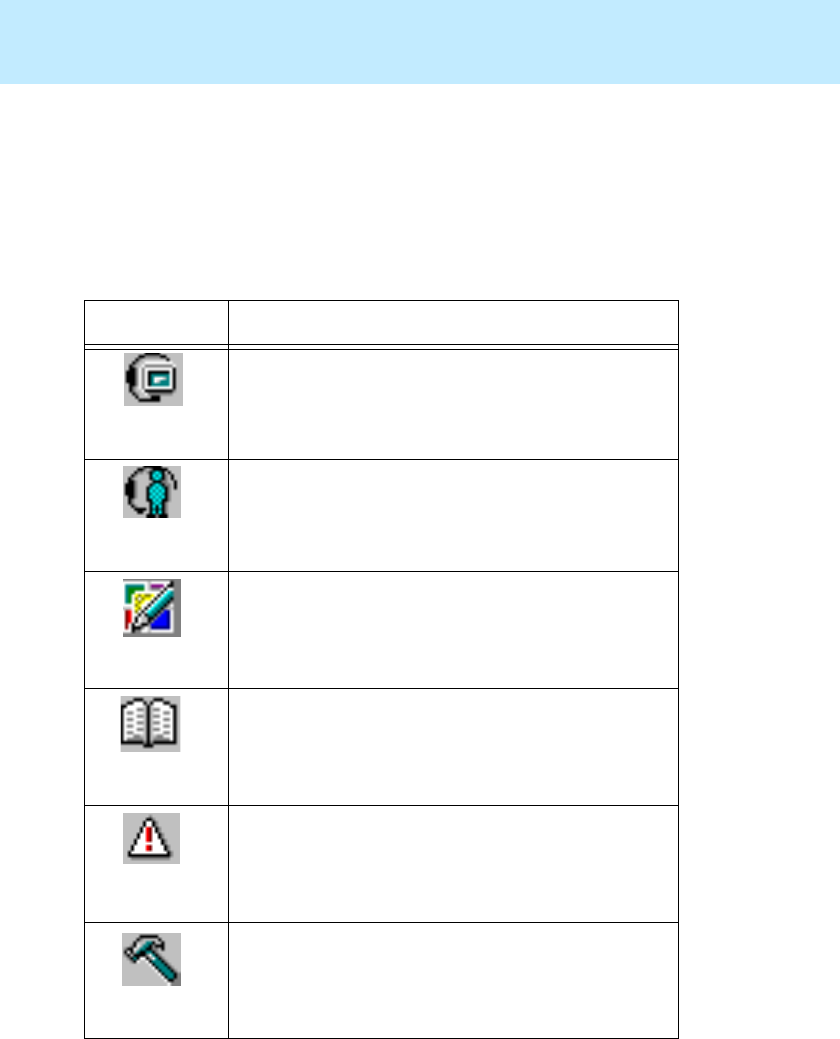
CentreVu
Supervisor Version 8 Installation and Getting Started
Using CentreVu Supervisor Reports
Minimizing Report Output Windows
7-39
Minimizing Report Output Windows 7
To minimize a report window, select the minimize button, which is located in
the upper right-hand corner of the window.
When a report output window is minimized, the report’s icon displays.
Depending on the category of the report, one of the following icons displays:
Icon Report Type
Agent Administration Reports
Agent Real-Time, Historical, and Integrated Reports
Call Center Administration Reports
Dictionary Reports
Exceptions Reports
Maintenance Reports
CentreVu
Supervisor Version 8 Installation and Getting Started
Using CentreVu Supervisor Reports
Minimizing Report Output Windows
7-40
Other, Queue/Agent, and Custom Real-Time and
Historical Reports
Split/Skill Real-Time, Historical, and Integrated
Reports
Trunk/Trunk Group Real-Time and Historical
Reports
VDN Real-Time, Historical, and Integrated Reports
Vector Real-Time and Historical Reports
Icon Report Type
CentreVu
Supervisor Version 8 Installation and Getting Started
Using CentreVu Supervisor Reports
Minimizing Report Output Windows
7-41
Minimized Report Thresholds 7
If Report Thresholds are enabled, real-time and integrated reports continue to
update while they are minimized. If no Caution or Warning threshold condition
is currently being met, the report’s normal icon, as shown on the previous table,
displays on the toolbar and in the system tray. If thresholds are being met, the
report’s icon on the toolbar remains the same, but the Caution or Warning
threshold icon appears in the system tray.
The threshold icons are as follows:
For more information on how the Supervisor icon in the system tray works, see
Chapter 5, “Getting Started with CentreVu Supervisor.”
Icon Threshold Type
Caution Threshold
Warning Threshold
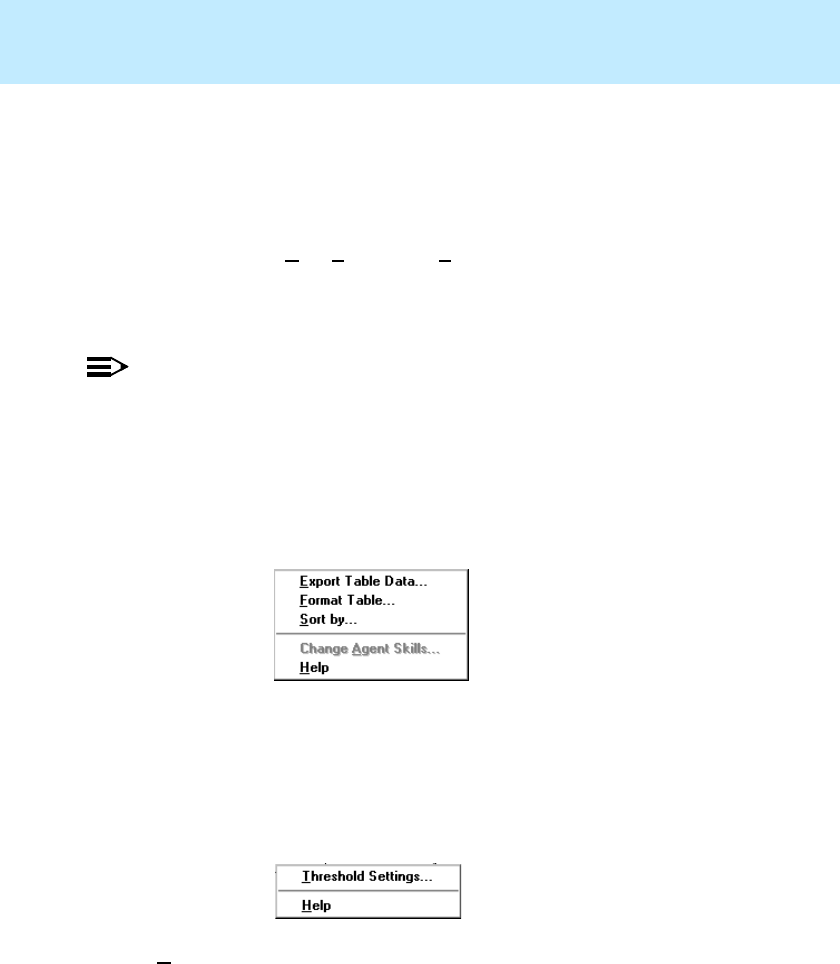
CentreVu
Supervisor Version 8 Installation and Getting Started
Using CentreVu Supervisor Reports
Right Mouse Button Pop-Up Menus
7-42
Right Mouse Button Pop-Up Menus 7
The right mouse button pop-up menu is available only when running reports.
When you click the right mouse button, a pop-up menu displays.
The menu that displays is dependent on the location of your cursor. It can
include options from the Edit, Format, and Tools menus on the Reports menu
bar. The applicable menu items for the input field are enabled. If a report object
is not selected, a menu is not displayed when you hold down the right mouse
button. To deselect a selected object, click anywhere else on the report.
NOTE:
See the CentreVu® Supervisor Version 8 Reports (585-210-929) document for
descriptions about these types of reports.
The right mouse button pop-up menu is available when you do any of the
following actions:
●Select a cell in a table and hold down the right mouse button —
a dotted border is drawn around the cell and the following menu displays:
If you select a cell that displays an agent name, agent number, or work
mode, the available drill-down reports for that cell display at the top of the
right mouse button menu. See examples of these later in this section.
●Select an output field or label and hold down the right mouse button—
a dotted border is drawn around the field and the following menu displays:
The Threshold Settings menu item is enabled if the highlighted field has
related threshold settings.
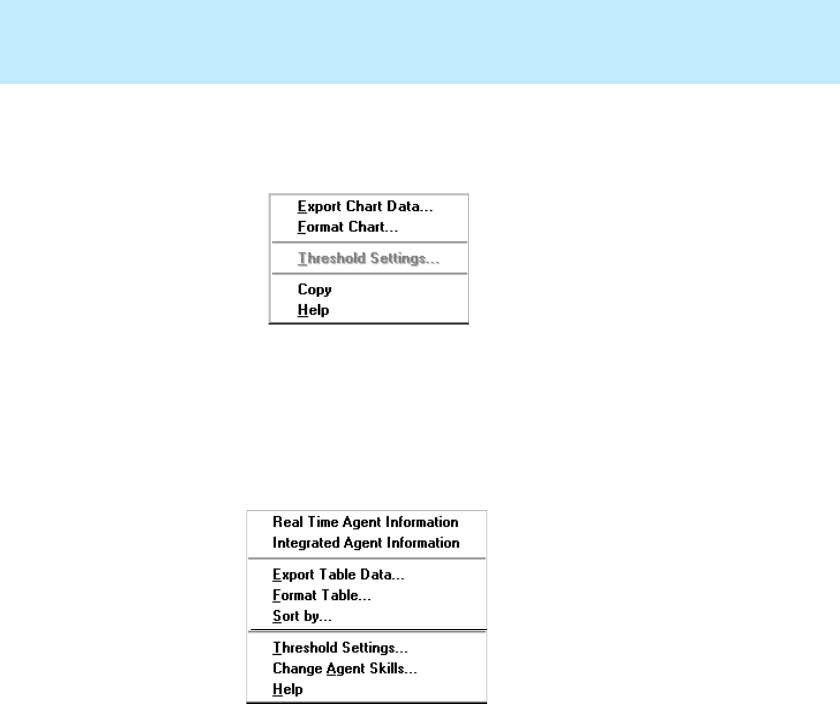
CentreVu
Supervisor Version 8 Installation and Getting Started
Using CentreVu Supervisor Reports
Right Mouse Button Pop-Up Menus
7-43
●Select a data point in a chart and hold down the right mouse button—
the data point is highlighted using selection handles (dots along the edges
of the data point) and the following menu displays:
If you select a data point that allows report threshold highlighting to be set,
the menu item will not be grayed out.
●Select an agent name or agent number in a table and hold down the
right mouse button—a dotted border is drawn around the agent name and
the following menu displays:
If you do not have the EAS feature on your Enterprise Communications
Server (ECS) or switch, the drill-down reports available will be the Real-
Time Agent Information report and the Integrated Agent Information
report.
From this menu, you can access either the Real-Time or the Integrated
Agent Graphical Information report. If you double click on the agent name
and you are running a real-time report, the default drill-down report is the
Real-Time Agent Graphical Information report. For descriptions of the
reports, see Chapter 3, “Real-Time Reports,” and Chapter 5, “Integrated
Reports.”
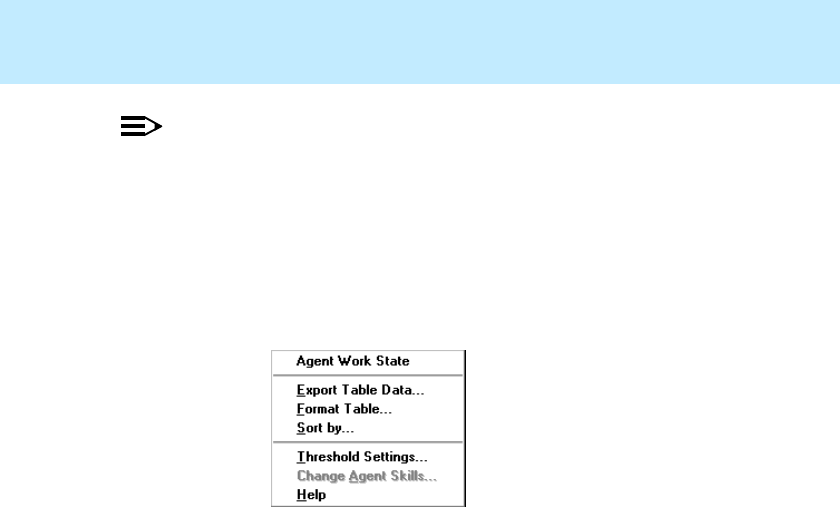
CentreVu
Supervisor Version 8 Installation and Getting Started
Using CentreVu Supervisor Reports
Right Mouse Button Pop-Up Menus
7-44
NOTE:
You can change an agent’s splits/skills while you are in a report using this
method of selection. See the appropriate chapter in the CentreVu® CMS
R3V8 Administration (585-210-910) document for more information.
●Select a cell on a table or a point on a chart that displays agent work
state information and hold down the right mouse button— the data
point is highlighted using selection handles (dots along the edges of the
data point) and the following menu displays:
If you have the ECS or a switch with the EAS feature, the Real-Time AUX
Agent drill-down report will also be available.
From this menu, you can access the Real-Time Split/Skill Work State
Report, which also displays when you double click on a work state in the
report.

CentreVu
Supervisor Version 8 Installation and Getting Started
Using CentreVu Supervisor Reports
Right Mouse Button Pop-Up Menus
7-45
●Select a cell on a table or a point on a chart that displays Top Agent
work state information and hold down the right mouse button — the
data point is highlighted using selection handles (dots along the edges of
the data point) and the following menu displays:
If you have the ECS or switch with the EAS feature, the Real-Time AUX
Agent drill-down report will also be available.
From this menu, you can access the Real-Time Split/Skill Top Agent Work
State Report, which also displays when you double click on the work state
in the report.

CentreVu
Supervisor Version 8 Installation and Getting Started
Using CentreVu Supervisor Reports
Rotating a 3D Chart
7-46
Rotating a 3D Chart 7
The rotation and elevation of any 3D chart can be changed interactively using
the mouse. This is easier than using the 3D Effects tab of the Chart Format
window (see “Formatting Chart Reports” on page 7-28 for information on using
the 3D Effects tab). To change the rotation and elevation of a 3D chart, do the
following:
1. Place the pointer over a 3D chart.
2. Press and hold the CTRL key. The pointer changes to indicate that the chart
can be rotated.
3. Click and hold the left mouse button. A dotted 3D outline appears around
the chart.
4. Move the pointer up and down to change the chart elevation, and left and
right to change the chart rotation. The dotted 3D outline shows the position
of the chart as you move the mouse.
5. When you find the rotation and elevation you want, release the mouse
button. The chart is redrawn in the new position.
The 3D rotation and elevation of each chart is saved as part of the report view.
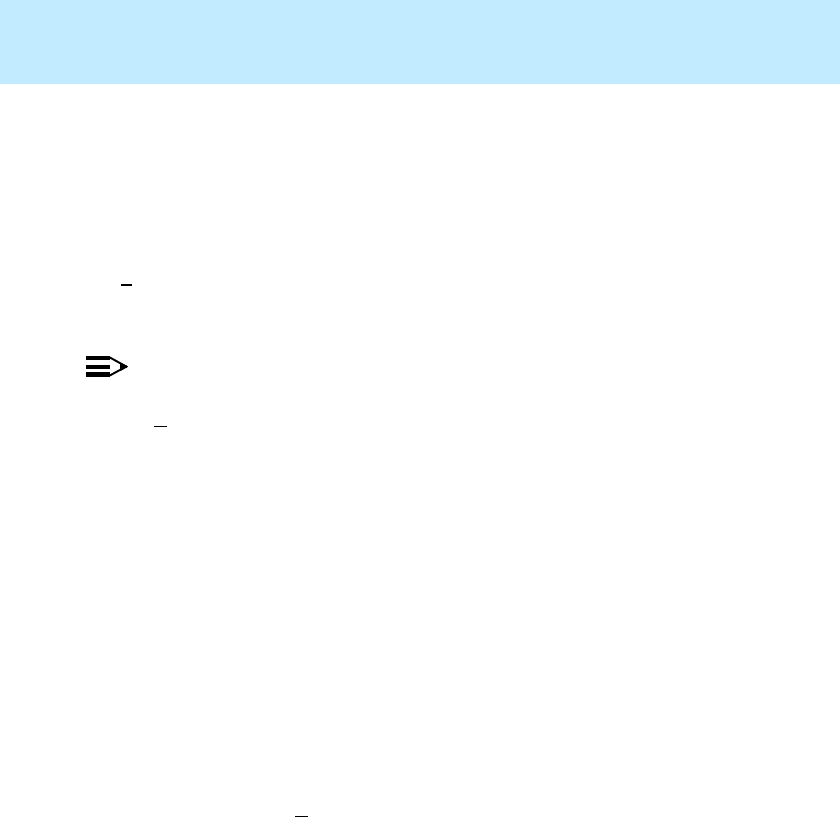
CentreVu
Supervisor Version 8 Installation and Getting Started
Using CentreVu Supervisor Reports
Exporting Report Data
7-47
Exporting Report Data 7
You can export the data from both standard (table) and graphical (chart) reports,
either to a file or to the Windows clipboard. Once you have exported report data,
you can copy the report information into another application (for instance, a
spreadsheet).
The Script button on the Data Export window displays the Save as Script
dialog box, which lets you create a new script to run the selected report and then
export it at a scheduled time.
NOTE:
By default, only the data from the chart or table is exported. You can select the
Include Labels and Headers check box on the Export Data window to include
that information in the export of data.
Reports are exported from CentreVu Supervisor in the following format:
●Data is exported as ASCII characters.
●For table reports, each row of data is written as one line, terminated by a
carriage return (ASCII value 13).
●The field separator character is written between fields.
●The field separator does not follow the last character in the line.
●Text strings are delineated according to the specified text delimiter.
To export the data from a report, do the following:
1. Click on the table or chart within a report.
2. Select Export Table Data or Export Chart Data or Export All Data, as
appropriate, from the Edit menu or the right mouse button pop-up menu.
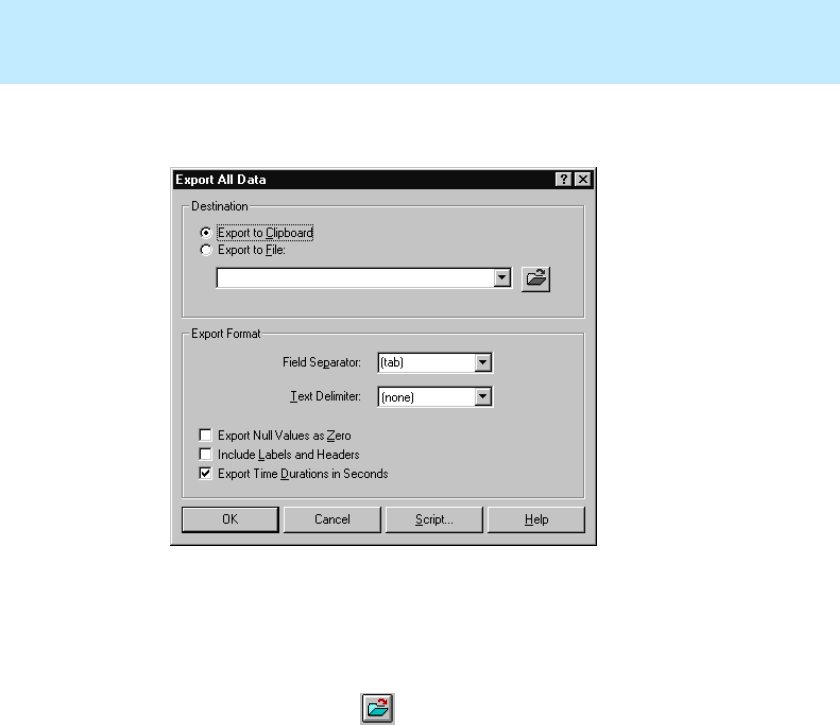
CentreVu
Supervisor Version 8 Installation and Getting Started
Using CentreVu Supervisor Reports
Exporting Report Data
7-48
3. The Export Data window appears. The Export Data window allows you to
copy the data from a report to the clipboard or a file.
4. Complete the following parts of the Export Data window:
●Destination selection box—choose to export the report to the
clipboard or to a file. If you are exporting the report to a file, you can:
—Type in a name for the file.
—Select the File button to browse the files on your PC.
—Use the history list to select a file you previously used.

CentreVu
Supervisor Version 8 Installation and Getting Started
Using CentreVu Supervisor Reports
Exporting Report Data
7-49
●Export Format selection box—define the export format of the report.
The character you choose from the drop-down list in the Field
Separator box is what will be placed between each field in the report.
The character you choose for the Text Delimiter determines what is
used around text strings in the exported file. If a text delimiter is
specified, no special checks are done to ensure that the data does not
contain that character, and the data is written unmodified.
If you want to export data to Microsoft Excel, choose “Tab” as the
field separator and “None” as the text delimiter.
●Export Null Values as Zero—select this check box to include data
that is null as a zero in the export of information. This is helpful if you
are exporting a table report because a null value that is not included in
the export of the data could disrupt the order of the rows/columns in
the data.
●Include Labels and Headers check box—select this check box to
include the text information (such as column headers in table reports)
in the export of the report’s data.
●Export Time Durations in Seconds—select this check box to include
the time duration in the export of information.
5. If you want to automatically export data at a scheduled time, select the
Script button to display the Save as Script dialog box, which lets you
create a script to export the data from the report and then exit the report.

CentreVu
Supervisor Version 8 Installation and Getting Started
Using CentreVu Supervisor Reports
Copying Chart Reports
7-50
Copying Chart Reports 7
You can copy chart reports to the Windows clipboard. The copy of the selected
chart report is copied to the clipboard in the Microsoft Windows metafile
(*.wmf) format. This allows you to paste the chart image into any Windows
application that can read the metafile format. For instance, you can copy chart
reports and import the files into word processing files to be used as viewgraphs.
To copy a chart report to the metafile format, do the following:
1. Run a chart (graphical) report.
2. Select the image that you want to copy by clicking on it.
3. Select Copy from the Edit menu, or use the right mouse button menu to
select Copy.
The chart you selected is copied to the clipboard.

CentreVu
Supervisor Version 8 Installation and Getting Started
Using CentreVu Supervisor Reports
Resizing Report Windows
7-51
Resizing Report Windows 7
You can resize report windows by moving the cursor to the edge of the window
and, when the resize arrow appears, holding down the left mouse button and
moving the mouse to size the window. When the window is the size you want,
release the mouse button.
You can also use the maximize and minimize buttons at the top of the window
to size the window.
When you resize a Supervisor report output window, the resulting effect
depends on the type of report (standard CMS or graphical) you are running. The
following paragraphs outline the effects of resizing each type of report window.
Standard CMS Reports 7
When you resize the window of a standard report, the contents of the window
do not change in size to reflect the new window size.
If you made the window smaller than the size of the report, scroll bars will
appear to allow you to view the entire contents of the report.
Graphical Reports 7
When you resize the window of a graphical report, the contents of the window
will change in size to reflect the new window size.
If a window is made too small, some elements may shrink in such a way to
become unreadable. If this happens, resize the window to a more appropriate
size. You may also choose to turn chart legends or data labels off to make more
room for the chart itself.
The window size is saved as part of the report view.

CentreVu
Supervisor Version 8 Installation and Getting Started
Using CentreVu Supervisor Reports
Changing Column Widths
7-52
Changing Column Widths 7
You can change the width of an individual table column in a table or chart
report by positioning the mouse pointer on the vertical line between the column
headers. The pointer will change to indicate that a resize is possible, and you
can then drag the mouse to change the column size.
CentreVu
Supervisor Version 8 Installation and Getting Started
Using CentreVu Supervisor Reports
Selecting a Printer
7-53
Selecting a Printer 7
The Print window is a standard Windows feature.
To access the Print window, do the following:
1. Select a report (from Reports, Dictionary, Exceptions, Call Center
Administration, or Maintenance).
2. On the report input window, select the Print button , or select Print
from the Report menu.
The Print window displays.
The default printer is listed in the Name field. To select another printer, click on
the down arrow after the field to display a drop-down list of installed printers.
You can choose any printer that has been installed in the Windows Control
Panel. Depending on what printers are installed, non-printer devices such as
files and fax may appear here. To print to a file, you must check the Print to file
box.
Other entries in this Printer box (Status, Type, Where, and Comment) will
vary depending on the chosen printer. The Windows system software
determines what is available here.
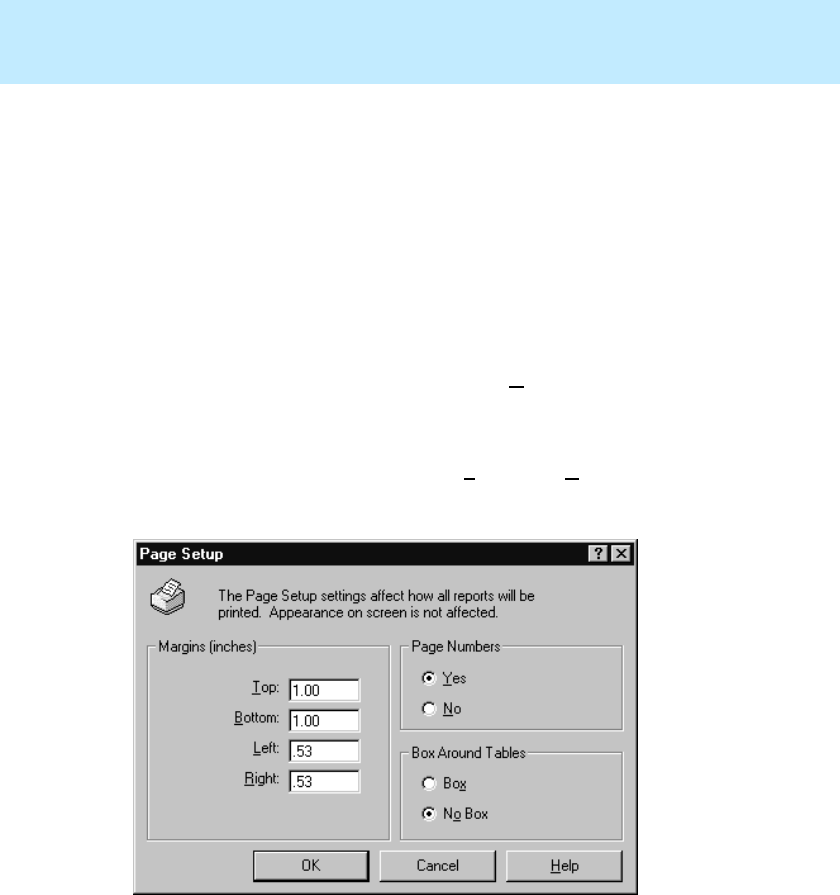
CentreVu
Supervisor Version 8 Installation and Getting Started
Using CentreVu Supervisor Reports
Using Page Setup
7-54
Using Page Setup 7
The Page Setup window allows you to specify how each page of a report is
positioned when printed. The changes you make in this window apply only to
printed reports and do not affect reports displayed on-screen.
The Page Setup window for printing options is a standard Windows feature.
To access the Page Setup window, do the following:
1. Select a report (from Reports, Dictionary, Exceptions, Call Center
Administration, or Maintenance).
2. Complete the report input window, selecting View Report On Screen as
the destination.
3. Select OK to run the report.
4. Once the report is running, select Page Setup from the Report menu.
The Page Setup window displays.

CentreVu
Supervisor Version 8 Installation and Getting Started
Using CentreVu Supervisor Reports
Using Page Setup
7-55
The following options are available in the Page Setup window:
●Margins—lets you define the spaces at the edges of the page where
nothing will be printed. The margin settings are defined as follows:
—Top—the margin is measured from the top of the page. The report is
offset by this amount at the top of each page.
—Bottom—the margin is measured from the bottom of the page. When a
printed table reaches the bottom of the page, it will continue printing at
the top of the next page, with the table titles repeated. If a chart would
overlap the bottom margin, it is scaled smaller so that it fits within the
margin. Text that reaches the bottom of the page is printed on the next
page.
—Left—the margin is measured from the left of the page. The report is
offset by this amount on the left of each page.
—Right—the margin is measured from the right of the page. Tables and
text that are too wide to fit on the printed page are truncated at the right
margin. Charts that would overlap the right margin are scaled smaller
to fit within the margin.
●Page Numbers—lets you choose whether or not to display page numbers.
The following settings are valid:
—Yes—page numbers will be displayed.
—No—page numbers will not be displayed. This is equivalent to the way
CMS currently prints reports.
●Box Around Tables—allows you to choose whether or not to display a
box around report tables when printed. The following settings are valid:
—Box—boxes will be displayed.
—No Box—boxes will not be displayed.

CentreVu
Supervisor Version 8 Installation and Getting Started
Using CentreVu Supervisor Reports
Setting Report Threshold Highlights
7-56
Setting Report Threshold Highlights 7
Report threshold highlights let you set visual flags to notify you when a real-
time data item is out of acceptable bounds. This feature enables you to run a
report minimized and be notified (through color/icon changes) when an item
has passed a specific threshold.
You can set threshold highlights for only real-time data items in real-time or
integrated reports. The threshold highlights you set will tell you when data for
an entity (split/skill, agent, agent group, or VDN) has reached a certain level
(threshold), as defined by you.
Threshold highlight settings apply to a single entity on a specific ACD. For
example, if you run a real-time split report for split 17 on ACD 1 and set the
threshold highlights, the threshold settings apply to split 17 on ACD 1 for all
reports you run for that split and ACD. Also, the threshold highlight settings are
saved on the PC you are currently using. So, if you move to another PC, you
need to set up the threshold highlights on that PC. If multiple users log into the
same PC, each user’s threshold highlight settings are saved individually.
By default, the thresholds for each report are turned on, but the threshold
highlight settings are empty and the sample size threshold is zero. Therefore, no
threshold highlights show on any reports until you create them using the
Threshold Settings window. You can turn thresholds on and off for each report
by selecting/deselecting the Thresholds Settings check box in the report input
window, or by selecting Threshold Settings from the Options menu in the
report output window.
An example of setting report threshold highlights is to set thresholds for Time
on ACD Calls in the skill named Sales. You might set the High Caution
threshold to 50 seconds and the High Warning threshold to 60 seconds. If an
agent spends more than 50 seconds, but less than 60 seconds, on an ACD call in
the Sales skill, the item on the report will highlight with the High Caution
threshold color. If the time exceeds 60 seconds, the item on the report will
highlight with the High Warning threshold color. However, if the agent spends
more than 50 seconds on an ACD call in any other skill (that does not have the
same thresholds), the item on the report will not display any threshold
highlighting.
CentreVu
Supervisor Version 8 Installation and Getting Started
Using CentreVu Supervisor Reports
Setting Report Threshold Highlights
7-57
NOTE:
Report threshold highlights are not the same as CMS Exceptions Thresholds.
The threshold highlighting you can do with this feature is available through the
Supervisor interface only.
To set report threshold highlights do the following steps:
1. Run a report that contains real-time data (a real-time or integrated report)
2. Select on a data item in the report for which you can set threshold
highlights
NOTE:
When a data item/items for which threshold highlights can be set is
selected, the Threshold Settings menu item is enabled. When the data item
that is selected does not allow thresholds, an error message will display.
See the tables later in this section for a list of the report outputs that allow
threshold highlighting.
3. Select Threshold Settings from the right mouse button or from the Tools
menu.
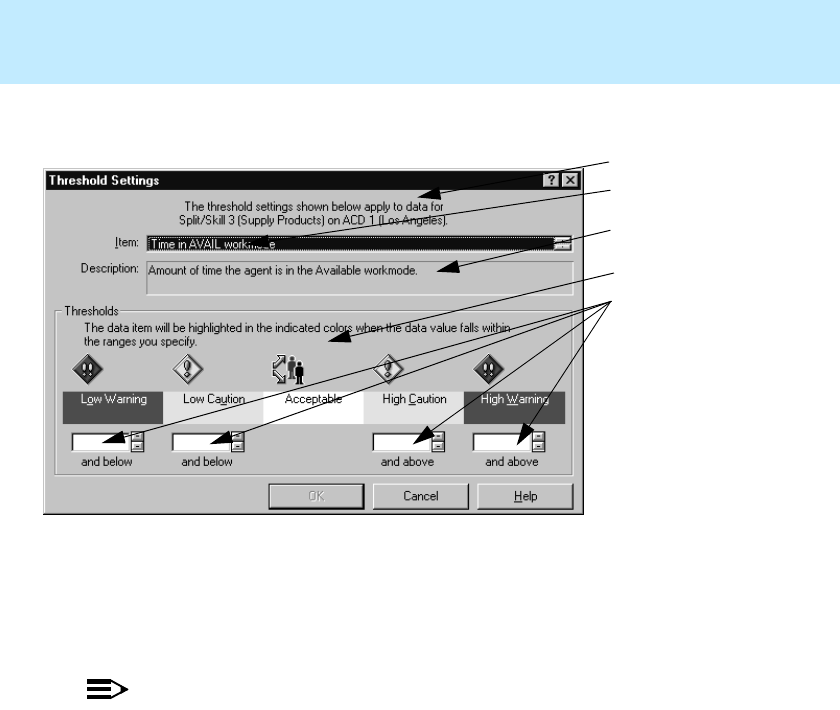
CentreVu
Supervisor Version 8 Installation and Getting Started
Using CentreVu Supervisor Reports
Setting Report Threshold Highlights
7-58
4. Complete the Threshold Settings window:
NOTE:
Depending on which data item you have selected, the Sample Size box at the
bottom of the Threshold Settings window may or may not be visible. If you
selected a data item that is a percentage or an average, the Sample Size box is
present.
The Threshold Settings window includes the following information and text
boxes:
●Item — shows the name of the report threshold that applies to the selected
data value. In most cases, this box contains a single entry. If the data value
is agent “Time in State” or “Time in Workmode,” or agent group “Time in
State” or “Time in Workmode,” then this list box contains multiple names,
one for each possible agent state or workmode. Threshold highlights can be
set for each individual state and workmode.
1.
2.
3.
4.
5.
1. Data Item Threshold Definition
2. Item
3. Description
4. Icons
5. Thresholds

CentreVu
Supervisor Version 8 Installation and Getting Started
Using CentreVu Supervisor Reports
Setting Report Threshold Highlights
7-59
●Description — shows a description of the threshold currently selected.
●Thresholds — shows the colors (as defined in the Options Threshold
Colors tab, accessed from the Tools menu), icons, and current numerical
settings for the threshold highlights of this item. For thresholds that are
time-related, the numbers you enter are in seconds. For example, if you are
entering a High Caution threshold for three minutes, type 180 (for 180
seconds) in the High Caution field.
—Low Warning — contains the current value for the Low Warning
threshold for the selected data item. If no value is defined, the field is
blank. You can set the value to any positive integer from 0 to
999,999,999 or leave it blank. If the field is blank, no threshold is set.
—Low Caution — contains the current value for the Low Caution
threshold for the selected data item. If no value is defined, the field is
blank. You can set the value to any positive integer from 0 to
999,999,999 or leave it blank. If the field is blank, no threshold is set.
—High Caution — contains the current value for the High Caution
threshold for the selected data item. If no value is defined, the field is
blank. You can set the value to any positive integer from 0 to
999,999,999 or leave it blank. If the field is blank, no threshold is set.
—High Warning — contains the current value for the High Warning
threshold for the selected data item. If no value is defined, the field is
blank. You can set the value to any positive integer from 0 to
999,999,999 or leave it blank. If the field is blank, no threshold is set.
●Sample Size — contains the current value for the Sufficient Sample Size
value. You can set this to any value from 0 to 999. When you set Sufficient
Sample Size value, you are defining a minimum number of items that must
be currently tracked before the threshold highlighting is enabled. You will
only see Sample Size if the data item you selected is a percentage or an
average.
5. Select OK.

CentreVu
Supervisor Version 8 Installation and Getting Started
Using CentreVu Supervisor Reports
Setting Report Threshold Highlights
7-60
Tips for Setting Report Threshold Highlights 7
Keep the following tips in mind when you are setting report threshold
highlights.
●Before you can administer threshold highlights for a data item, you must
first click on the data item in the report to select it. When a data item is
highlighted in a table (standard) report, it is outlined with a dotted line.
When a data item is highlighted in a chart (graphical) report, it has “pull-
bars” around the perimeter.
●See the “Available Agent Threshold Settings,” “Available Split/Skill
Threshold Settings,” and “Available VDN Threshold Settings” sections in
this chapter for more information on the real-time data items in reports for
which you can set threshold highlights.
●In standard reports, you can select items from the table or from the output
information at the top of the report.
●In chart reports, you can select items from the pie charts, bar charts,
graphical reports, or tables.
●When you set threshold highlights for an entity (split/skill, agent, agent
group, or VDN), that set of threshold highlights applies to every report that
is run specifically for that entity.
●The report threshold highlights are updated with each refresh of the report,
but not between report refreshes.
●The numbers you define for the threshold highlights must increase from
left to right (the number you use for Low Warning must be less than the
number you use for High Warning).
●You can set the label colors by choosing Options from the Tools menu on
the Controller. Depending on how you define the colors, the sample size
threshold can behave in the following ways:
— If you want to be alerted to the fact that a particular calculation is not
statistically significant, set the Insufficient color to a different color
than any other threshold condition. This causes data with insufficient
sample size to be highlighted in a special color.

CentreVu
Supervisor Version 8 Installation and Getting Started
Using CentreVu Supervisor Reports
Setting Report Threshold Highlights
7-61
— If you want to ignore values with insufficient sample sizes, set the
Insufficient color to be black text on a gray background. This causes
the value with insufficient sample size to not be highlighted.
●Setting report threshold highlights affects how report data is displayed in
the following ways:
— If the data calculation contains a non-zero Sample Size threshold, the
denominator of the specified calculation is compared to the Sample
Size threshold. If the denominator is less than the Sample Size
threshold, the value displays in the “Insufficient” color, indicating that
the sample size is insufficient for the value to be significant.
— If the sample size is sufficient or if there is no sample size associated
with the data, then the data value is compared to the Low Warning,
Low Caution, High Caution, and High Warning threshold values to
determine which band applies. The value is displayed in the color
associated with the appropriate threshold.
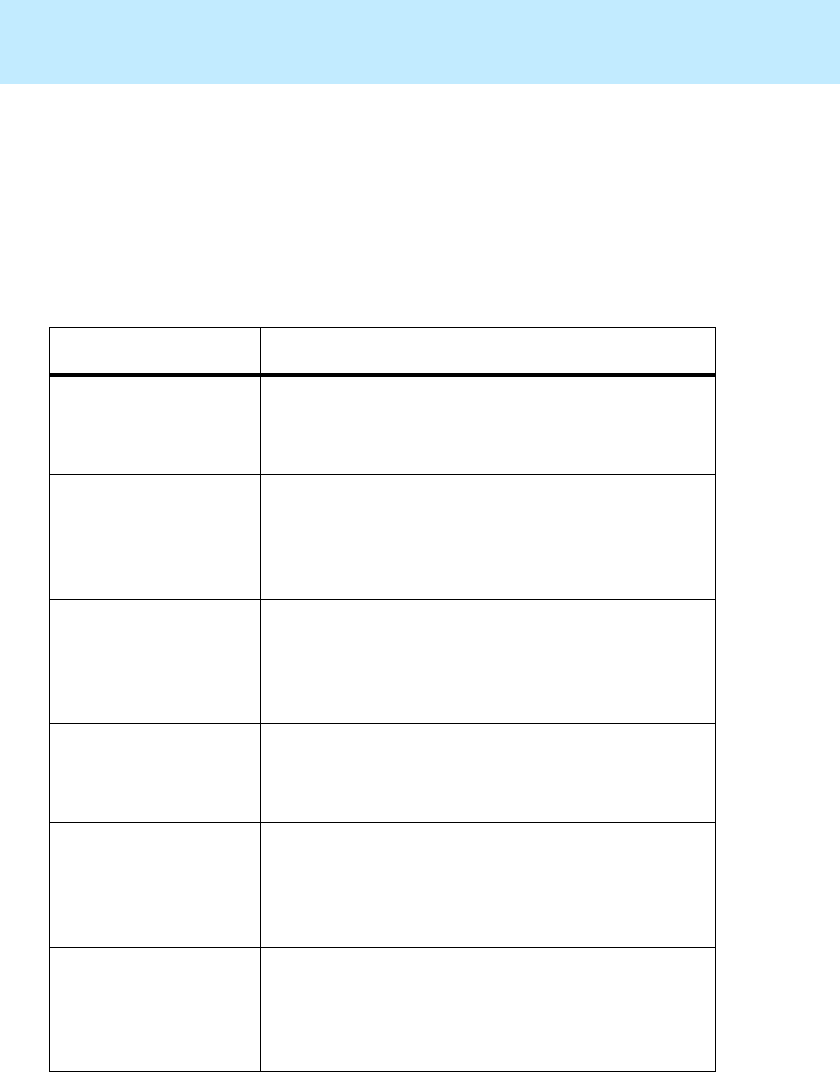
CentreVu
Supervisor Version 8 Installation and Getting Started
Using CentreVu Supervisor Reports
Setting Report Threshold Highlights
7-62
Available Agent Threshold Settings 7
All of the data that CentreVu Supervisor uses for agent threshold highlights are
retrieved from the cagent (current interval agent) database table. See the
CentreVu® CMS R3V8 Database Items and Calculations (585-210-939)
document for more information on the database tables. The agent threshold
highlights you can set are as follows:
Threshold Description/Database Item or Calculation
Time in AUX State Description — Amount of time the agent is in the
Auxiliary Work state.
Measures — DURATION while AGSTATE = AUX
Time in AUX-IN State Description — Amount of time the agent is on an
incoming call while in the Auxiliary Work state.
Measures — DURATION while AGSTATE =
AUX-IN
Time in AUX-OUT
State Description — Amount of time the agent is on an
outgoing call while in the Auxiliary Work state.
Measures — DURATION while AGSTATE =
AUX-OUT
Time in ACW State Description — Amount of time the agent is in the After
Call Work state.
Measures — DURATION while AGSTATE = ACW
Time in ACW-IN State Description — Amount of time the agent is on an
incoming call while in the After Call Work state.
Measures — DURATION while AGSTATE =
ACW-IN
Time in ACW-OUT
State Description — Amount of time the agent is on an
outgoing call while in the After Call Work state.
Measures — DURATION while AGSTATE =
ACW-OUT

CentreVu
Supervisor Version 8 Installation and Getting Started
Using CentreVu Supervisor Reports
Setting Report Threshold Highlights
7-63
Time in AVAIL State Description — Amount of time the agent is in the
AVAIL state.
Measures — DURATION while AGSTATE = AVAIL.
Time in ACD State Description — Amount of time the agent is in the ACD
state.
Measures — DURATION while AGSTATE = ACD
Time in ACD-IN State Description — Amount of time the agent is in the
ACD-IN state.
Measures — DURATION while AGSTATE =
ACD-IN
Time in ACD-OUT
State Description — Amount of time the agent is in the
ACD-OUT state.
Measures — DURATION while AGSTATE =
ACD-OUT
Time in DACD State Description — Amount of time the agent is in the
DACD state.
Measures — DURATION while AGSTATE = DACD
Time in DACD-IN
State Description — Amount of time the agent is in the
DACD-IN state.
Measures — DURATION while AGSTATE = DACD-
IN
Time in DACD-OUT
State Description — Amount of time the agent is in the
DACD-OUT state.
Measures — DURATION while AGSTATE = DACD-
OUT
Time in DACW State Description — Amount of time the agent is in the
DACW state.
Measures — DURATION while AGSTATE = DACW
Threshold Description/Database Item or Calculation
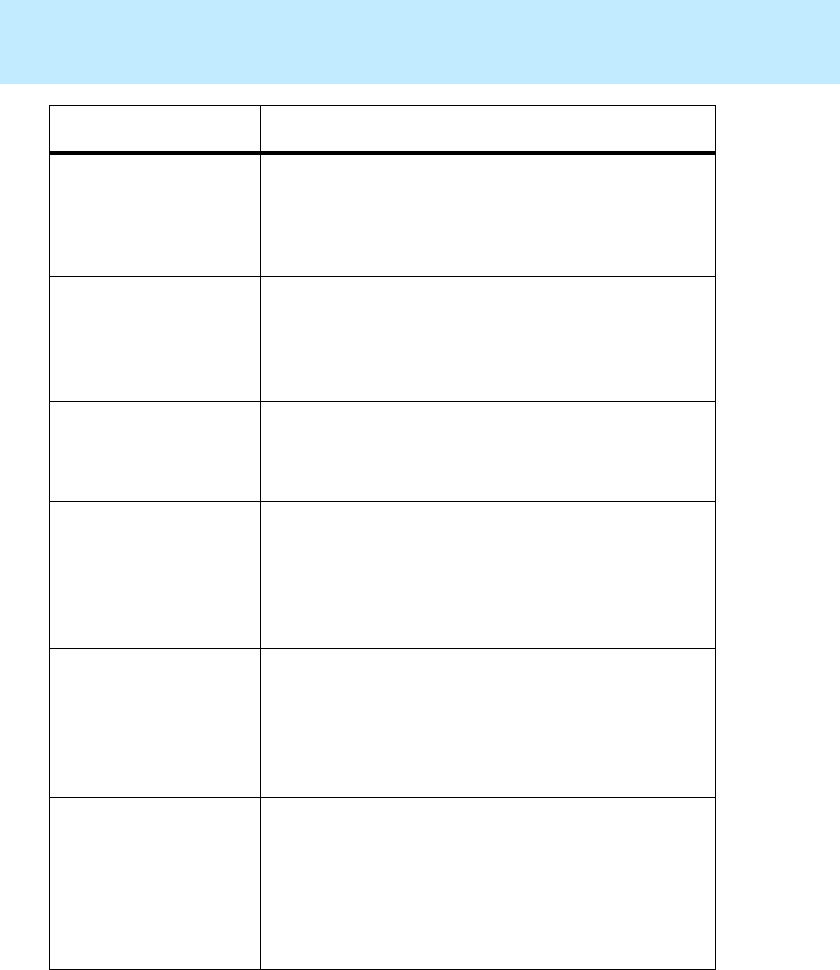
CentreVu
Supervisor Version 8 Installation and Getting Started
Using CentreVu Supervisor Reports
Setting Report Threshold Highlights
7-64
Time in DACW-IN
State Description — Amount of time the agent is in the
DACW-IN state.
Measures — DURATION while AGSTATE = DACW-
IN
Time in DACW-OUT
State Description — Amount of time the agent is in the
DACW-OUT state.
Measures — DURATION while AGSTATE = DACW-
OUT
Time in RING State Description — Amount of time the agent is in the
RING state.
Measures — DURATION while AGSTATE = RING
Time AUX Workmode Description — Amount of time the agent is in the AUX
workmode, including incoming and outgoing calls.
This time measures the time the agent remains in AUX,
regardless of any incoming or outgoing calls handled.
Measures — AGTIME while WORKMODE = AUX.
Time in ACD
Workmode Description — Amount of time the agent is in the ACD
workmode, including incoming and outgoing calls.
This time measures the time the agent remains in ACD,
regardless of any incoming or outgoing calls handled.
Measures — AGTIME while WORKMODE = ACD
Time in ACW
Workmode Description — Amount of time the agent is in the
ACW workmode, including incoming and outgoing
calls. This time measures the time the agent remains in
ACW, regardless of any incoming or outgoing calls
handled.
Measures — AGTIME while WORKMODE = ACW
Threshold Description/Database Item or Calculation

CentreVu
Supervisor Version 8 Installation and Getting Started
Using CentreVu Supervisor Reports
Setting Report Threshold Highlights
7-65
Time in AVAIL
Workmode Description — Amount of time the agent is in the
AVAIL workmode, including incoming and outgoing
calls. This time measures the time the agent remains in
AVAIL, regardless of any incoming or outgoing calls
handled.
Measures — AGTIME while WORKMODE = AVAIL
Time in DACD
Workmode Description — Amount of time the agent is in the
DACD workmode. This time measures the time the
agent remains in DACD, regardless of any incoming or
outgoing calls handled. (Applies only to Generic 3
switches.)
Measures — AGTIME while WORKMODE = DACD
Time in DACW
Workmode Description — Amount of time the agent is in the
DACW workmode, including incoming and outgoing
calls. This time measures the entire time the agent
remains in DACW, regardless of any incoming or
outgoing calls handled.
Measures — AGTIME while WORKMODE = DACW
Calls in Direct Agent
Queue Description — Number of Direct Agent calls that are
queued to the agent. DA_INQUEUE is the current
number of Direct Agent calls waiting in any split/skill
queue for a specific agent. (Applies only to Generic 3
switches.)
Measures — DA_INQUEUE
Time call waiting in
Direct Agent Queue Description — Amount of time the caller has waited in
the Direct Agent queue. DA_OLDESTCALL is the
length of time that the oldest Direct Agent call has
waited in any split/skill queue for this agent. (Applies
only to Generic 3 switches.)
Measures — DA_OLDESTCALL
Threshold Description/Database Item or Calculation
CentreVu
Supervisor Version 8 Installation and Getting Started
Using CentreVu Supervisor Reports
Setting Report Threshold Highlights
7-66
Average talk timeaDescription — Average length of time the agent spends
talking on ACD calls.
Measures — AVG_AGENT_TALK_TIME calculation.
a. Sample Size thresholds apply.
Threshold Description/Database Item or Calculation

CentreVu
Supervisor Version 8 Installation and Getting Started
Using CentreVu Supervisor Reports
Setting Report Threshold Highlights
7-67
Available Split/Skill Threshold Settings 7
All of the data that CentreVu Supervisor uses for split/skill threshold highlights
are retrieved from the csplit (current interval split) database table. See the
CentreVu® CMS R3V8 Database Items and Calculations (585-210-939)
document for more information on the database tables. The split/skill threshold
highlights you can set are as follows:
Threshold Description/Database Item or Calculation
Oldest Call Waiting Description — Amount of time the oldest call to this
split/skill has waited in queue. OLDESTCALL is the
number of seconds the oldest split/skill ACD call has
waited in queue or ringing.
Measures — OLDESTCALL
Number of Calls
Waiting in Queue Description — Number of calls queued to this
split/skill. The computation measures the number of
calls in queue or ringing at an agent position.
Measures — INQUEUE + INRING
Number of Calls
Abandoned Description — Number of calls that were queued to
this split/skill and then abandoned. ABNCALLS is the
number of calls offered to a split/queue which were
subsequently abandoned by the caller.
Measures — ABNCALLS
Average Speed of
Answera
Description — Number of seconds, on average, before
a call to this split/skill is answered. Average speed of
answer is the ANSTIME (time spent by callers in
queue or ringing before being answered) divided by
the ACDCALLS (number of calls queued to the
split/skill that were answered by an agent at this
split/skill).
Measures — AVG_ANSWER_SPEED

CentreVu
Supervisor Version 8 Installation and Getting Started
Using CentreVu Supervisor Reports
Setting Report Threshold Highlights
7-68
Average Talk TimeaDescription —Average length of time spent on ACD
calls to the split/skill.
Measures — AVG_ACD_TALK_TIME
Average Time to
Abandona
Description — Average length of time callers waited
before abandoning calls to the split/skill.
Measures — AVG_ABANDON_TIME
Full-Time Equivalent
Agents Staffed Description — Number of total full-time equivalent
agents currently staffed for the skill.
Measures — FTE_AGENTS
Number of Calls
Forced Busy Description — Number of calls to the split/skill that
were given a busy signal by the switch.
Measures — BUSYCALLS
Number of Calls
Disconnected Description — Number of calls to the split/skill that
were disconnected by the switch.
Measures — DISCCALLS
Percent of Calls
Answered in Service
Levela
Description — Percentage of ACD calls to the
split/skill that were answered within the service level.
Measures — PERCENT_SERV_LVL_SPL
Percent of Calls
Abandoneda
Description — Percentage of ACD calls to the
split/skill that were abandoned.
Measures — PERCENT_CALL_ABAN
Number of Agents
Staffed Description — Number of agents logged into the
split/skill.
Measures — STAFFED
Percent of Calls
Answered* Description — Percent of ACD calls offered to the
split/skill that were answered.
Measures — PERCENT_CALL_ANS
Threshold Description/Database Item or Calculation
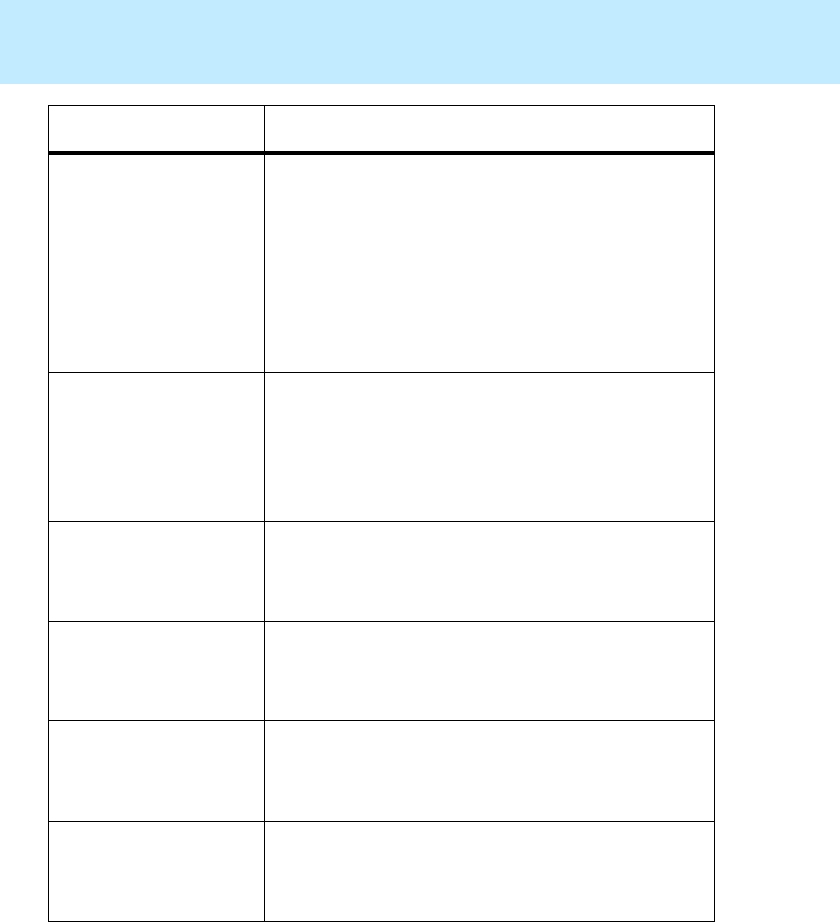
CentreVu
Supervisor Version 8 Installation and Getting Started
Using CentreVu Supervisor Reports
Setting Report Threshold Highlights
7-69
Call Profile Abandon
per Service Level
Increment
Description — Number of abandoned calls to the
split/skill for any service level increment. A single
report threshold applies to all of the values. If the
number of abandoned calls for the split/skill reaches
the threshold for any of the service level increments,
the value for that service level increment is
highlighted.
Measures — ABNCALLS1 through ABNCALLS10
Rolling Average Speed
of Answer Description — Switch-based Rolling Average Speed
of Answer for this split/skill. The Rolling Average
Speed of Answer is the average speed of answer across
intervals.
Measures — ASA
Expected Wait Time
(Low) Description — Expected Wait Time for a call queued
to this split/skill at a low priority level.
Measures — EWTLOW
Expected Wait Time
(Medium) Description — Expected Wait Time for a call queued
to this split/skill at medium priority level.
Measures — EWTMEDIUM
Expected Wait Time
(High) Description — Expected Wait Time for a call queued
to this split/skill at high priority level.
Measures — EWTHIGH
Expected Wait Time
(Top) Description — Expected Wait Time for a call queued
to this split/skill at top priority level.
Measures — EWTTOP
a. Sample Size thresholds apply.
Threshold Description/Database Item or Calculation
CentreVu
Supervisor Version 8 Installation and Getting Started
Using CentreVu Supervisor Reports
Setting Report Threshold Highlights
7-70
Available VDN Threshold Settings 7
All of the data that CentreVu Supervisor uses for VDN threshold highlights are
retrieved from the cvdn (current interval VDN) database table. See the
CentreVu® CMS R3V8 Database Items and Calculations (585-210-939)
document for more information on the database tables. The VDN threshold
highlights you can set are as follows:
Threshold Description/Database Item or Calculation
Number of Calls
Abandoned During the
Interval
Description — Number of calls that were queued to
this VDN and then abandoned.
Measures — ABNCALLS
Number of Calls
Forced Busy During the
Interval
Description — Number of calls to the VDN that were
given a busy signal by the switch.
Measures — BUSYCALLS
Number of Calls
Disconnected During
the Interval
Description — Number of calls to the VDN that were
disconnected by the switch via the vector “disconnect”
command.
Measures — DISCCALLS
Oldest Call Waiting Description — Number of seconds the oldest call has
waited in this VDN.
Measures — OLDESTCALL
Number of Calls
Waiting Description — Number of calls queued to this VDN
that have not been answered by an agent.
Measures — INPROGRESS - ATAGENT
Percent of Calls
Answered in Service
Levela
Description — Percentage of ACD calls to the VDN
that were answered within the service level.
Measures — 100*(ACCEPTABLE / INCALLS)
Percent of Calls
Abandoneda
Description — Percentage of ACD calls to the VDN
that were abandoned.
Measures — 100*(ABNCALLS / INCALLS)
CentreVu
Supervisor Version 8 Installation and Getting Started
Using CentreVu Supervisor Reports
Setting Report Threshold Highlights
7-71
Percent of Calls
Answereda
Description — Percentage of ACD calls offered to the
VDN that were answered.
Measures — 100a [(ACDCALLS +
CONNECTCALLS) / INCALLS]
Call Profile Abandon
per Service Level
Increment
Description — Number of abandoned calls to this
VDN for any service level increment. A single report
threshold applies to all of the values. If the number of
abandoned calls for the VDN reaches the threshold for
any of the service level increments, the value for that
service level increment is highlighted.
Measures — ABNCALLS1 through ABNCALLS10
Average Speed of
Answera
Description — Number of seconds, on average, before
a call to this VDN is answered. This value is the time
callers spent in queue or ringing before being
answered, divided by the number of calls queued to the
VDN that were answered by an agent at this VDN.
Measures — AVG_ANSWER_SPEED
Average Talk TimeaDescription — Average length of time spent on ACD
calls to the VDN.
Measures — AVG_ACD_TALK_TIME
Average Time to
Abandona
Description — Average length of time callers waited
before abandoning calls to the VDN.
Measures — AVG_ABANDON_TIME
Rolling Average Speed
of Answer Description — Switch-based Rolling Average Speed
of Answer for this VDN. The Rolling Average Speed
of Answer is the average speed of answer across
intervals.
Measures — ASA
a. Sample Size thresholds apply
Threshold Description/Database Item or Calculation

CentreVu
Supervisor Version 8 Installation and Getting Started
Using CentreVu Supervisor Reports
Report Options
7-72
Report Options 7
Use the Options tab to do the following actions:
●Set the ACD and other general options that Supervisor will default to when
you log in (General tab).
●Set up the colors that will be used in your graphical reports (Report Colors
tab).
●Set up the colors that will be used in reports to tell you when threshold
highlights (not exceptions thresholds) have been reached. See “Setting
Report Threshold Highlights” in this chapter for more information on
threshold highlights.
●Choose or create a name format using {name} for Dictionary Name,
{entity} for entity type, and {number} for entity number. The name format
determines how items will be displayed in reports. For instance, if you
select the name format of {entity}{number}, then all of the entities
(splits/skills, ACDs, VDNs, vectors, trunks, trunk groups, call work codes,
and AUX codes) that can be named in the Dictionary will display as the
entity type and number instead of the Dictionary name. If you selected
{name} as the name format, then the names that have been assigned to the
entities in the Dictionary will display.

CentreVu
Supervisor Version 8 Installation and Getting Started
Using CentreVu Supervisor Reports
Report Options
7-73
Options General Tab 7
NOTE:
The General tab is accessible when you are connected to a CMS server.
The following graphic shows the Options General tab (with default settings).
Use the General tab to set your first calendar day, default ACD, and other
general options. The options are described below.
●First Day of Week — this option affects only how the calendar displays; it
does not change the CMS Start of Week day for weekly data collection (the
CMS Start of Week day is set through the System Setup—Storage Intervals
window). For example, if you browse for a date, the calendar will start the
week based on the day that you choose.
Use the drop-down list to make your selection.
●Default ACD — when you select the ACD, this ACD will be the default
listed in the functions windows and drop-down list options.
Use the drop-down list to make your selection.
CentreVu
Supervisor Version 8 Installation and Getting Started
Using CentreVu Supervisor Reports
Report Options
7-74
●Synchronize PC and CMS Time at Login — activate the check box for
this selection to set the PC’s clock to read the same time as the CMS clock.
If you do not activate this selection, your PC clock and the CMS clock may
not read the same time. This does not affect the CMS clock.
●Use Sound — activate the check box for this selection to be alerted, by
sound, when the Exceptions Indicator box is updated. The Exceptions
Indicator box is on the Controller status bar. The sound you hear is the
sound you have chosen for the exclamation event associated with your PC.
NOTE:
Threshold Highlighting does not use sound. It uses color only as an
indicator of a threshold being met.
●Use Tooltips — activate the check box for selection to make tooltips
visible. For example, when you are working on the Controller window, you
may place your mouse cursor over a toolbar button and a yellow box will
appear with a brief description of that button.
●Use Taskbar Icon — activate the check box for this selection to use the
Supervisor system tray icon feature. See Chapter 2, “Supervisor Basics,”
for more information on using the Supervisor system tray icon.
●Window Menu Sort Order —if you activate the Use Tray Icon, you need
to determine how the items that display in the system tray icon menu will
be sorted.
—Start Order — select this radio button and the items in the system tray
icon menu will display in the order in which you started them from
Supervisor.
—Alphabetical — select this radio button and the items in the system
tray icon menu will display in alphabetical order, regardless of the
order in which you started them.

CentreVu
Supervisor Version 8 Installation and Getting Started
Using CentreVu Supervisor Reports
Report Options
7-75
Options Report Colors Tab 7
NOTE:
The Report Colors tab is accessible when you are connected to a CMS server.
The following graphic shows the Options Report Colors tab (with default
settings).
Use the Report Colors tab to set up the colors that will be used in your graphical
reports.
●Scheme — You can select the report color scheme that you want to use for
Supervisor reports in one of two ways:
— From a series of predefined color schemes, which are listed in the
Scheme: field. Use the drop-down list to select a different scheme
from the one that is currently displayed.
— By creating a new color scheme. See the “Creating a New Report
Color Scheme” section in this chapter for instructions on creating
report color schemes.
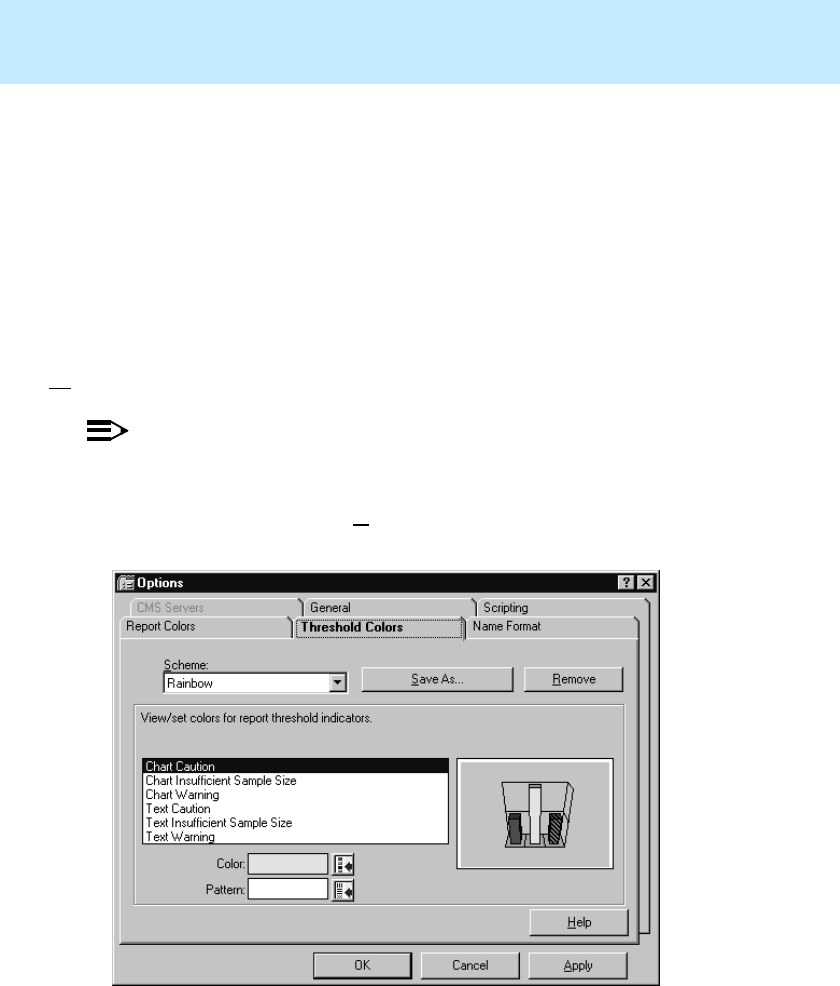
CentreVu
Supervisor Version 8 Installation and Getting Started
Using CentreVu Supervisor Reports
Report Options
7-76
●Background — Supervisor gives you two choices for the background
color of reports:
—White — Select this radio button to make the background of all
reports white.
—Automatic — Select this radio button to make the background of all
reports match the color that you have set up for your system in
Windows.
Options Threshold Colors Tab 7
NOTE:
The Threshold Colors tab is accessible when you are connected to a CMS
server.
The following graphic shows the Options Threshold Colors tab (with default
settings).
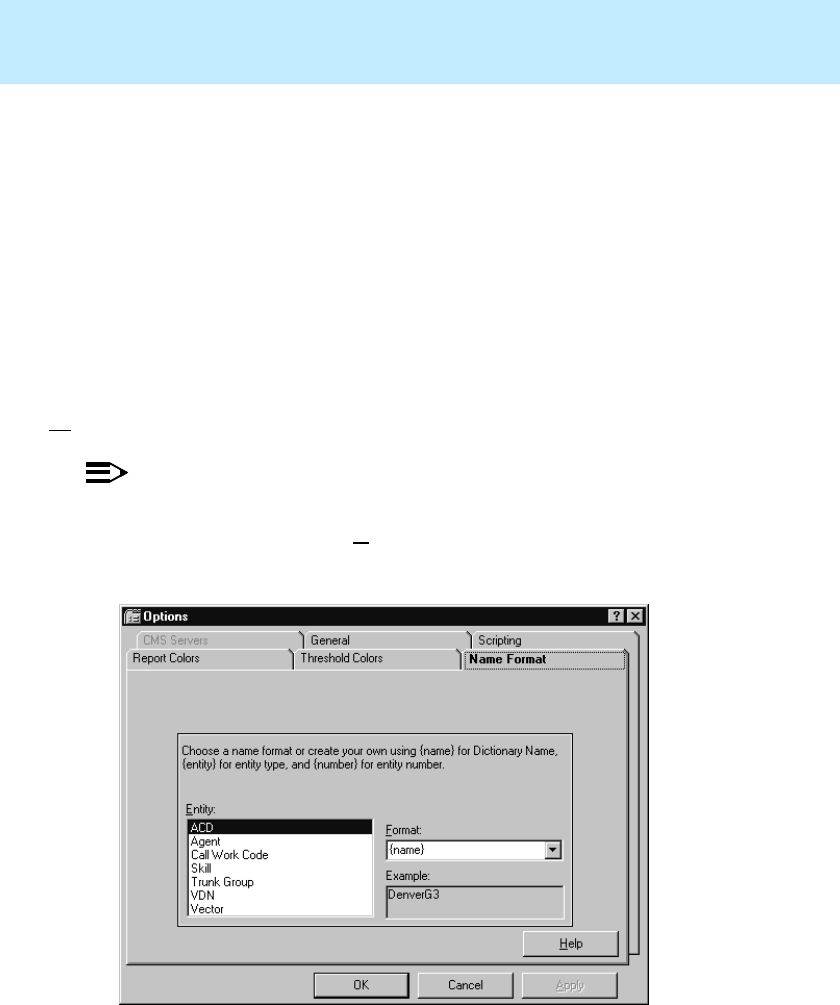
CentreVu
Supervisor Version 8 Installation and Getting Started
Using CentreVu Supervisor Reports
Report Options
7-77
Use the Threshold Colors tab to set up the colors that will be used in reports to
tell you when exceptions thresholds have been reached. You can select report
color schemes in the following ways:
●From a series of predefined color schemes, which are listed in the Scheme:
field. Use the drop-down list to select a different scheme from the one that is
currently displayed.
●By creating a new color scheme. See the “Creating a New Threshold Color
Scheme” section in this chapter for instructions on creating report color
schemes.
Options Name Format Tab 7
NOTE:
The Name Format tab is accessible when you are connected to a CMS server.
The following graphic shows the Options Name Format tab (with default
settings).

CentreVu
Supervisor Version 8 Installation and Getting Started
Using CentreVu Supervisor Reports
Report Options
7-78
Use the Name Format tab to choose or create formats for how CMS entities
(splits/skills, ACDs, VDNs, vectors, trunks, trunk groups, call work codes, and
AUX codes) will display in Supervisor. The display can be set to any one or a
combination of {name} for Dictionary Name, {entity} for entity type, and
{number} for entity number.
To define the name format for entities, do the following steps:
1. Select the item that you want to set formats for from the Entity box.
2. In the Format text box, you can do either of the following actions:
— Type the format that you want ({name}, {entity}, and/or {number}),
or
— Use the drop-down list to choose from a set of preformatted options.
For example, if you want to display agent names and extension
numbers on reports, enter {name} {number} in the Format box.
The Example box provides an example of what the format will look
like based on your current definition of the name format.
3. Select OK to save your changes. Select Cancel to clear your changes.
Creating a New Report Color Scheme 7
To create a new color scheme for reports, do the following steps:
1. Choose Options from the Tools menu, or select the Options button
on the toolbar.
2. Select the Report Colors tab.
3. Select the color scheme with which you want to begin from the Scheme:
drop-down list.
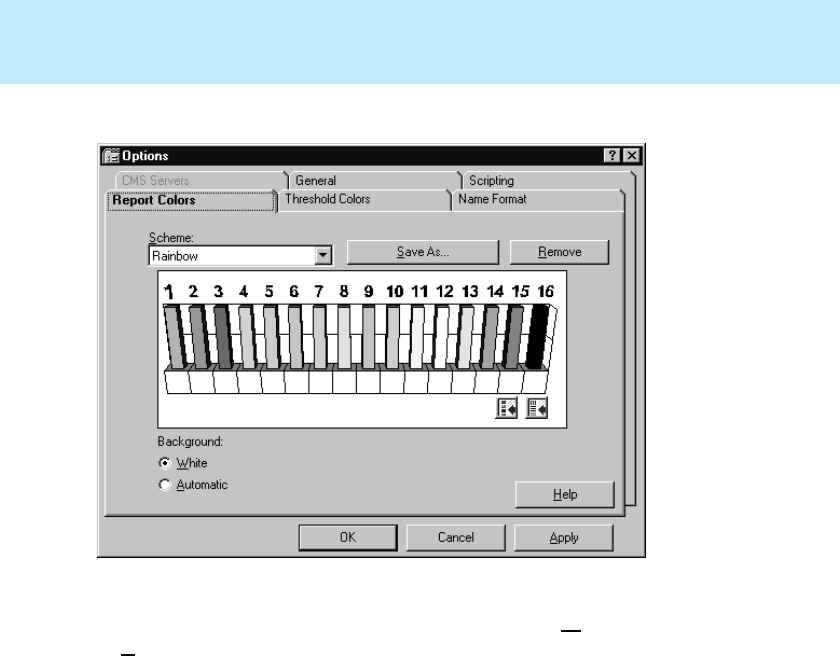
CentreVu
Supervisor Version 8 Installation and Getting Started
Using CentreVu Supervisor Reports
Report Options
7-79
The view of the scheme displays:
4. Choose the Background color for reports by selecting White or
Automatic.
5. Click on the color bar (1 through 16) you want to modify.
6. Select either the Color Selector or the Pattern Selector button.
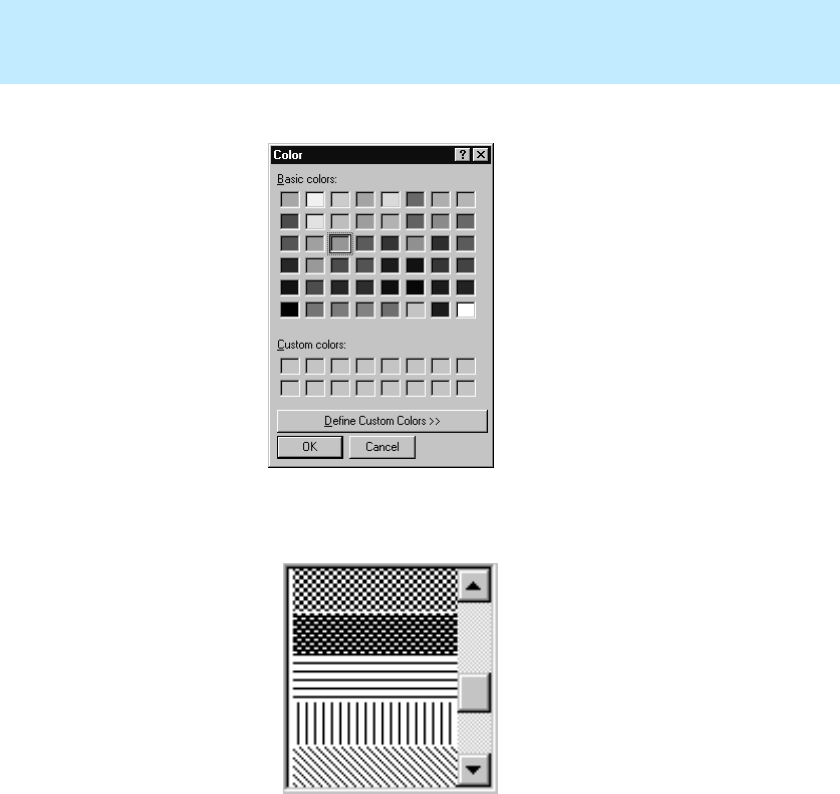
CentreVu
Supervisor Version 8 Installation and Getting Started
Using CentreVu Supervisor Reports
Report Options
7-80
If you select the Color Selector button, the following window displays:
If you select the Pattern Selector button, the following box displays:
7. To select a new color, choose from the Basic colors palette, or create a
custom color using standard Windows procedures.
To select a new pattern, click on the pattern you want to use.
8. Repeat steps 5 through 7 until you have updated all of the color bars that
you want to modify.
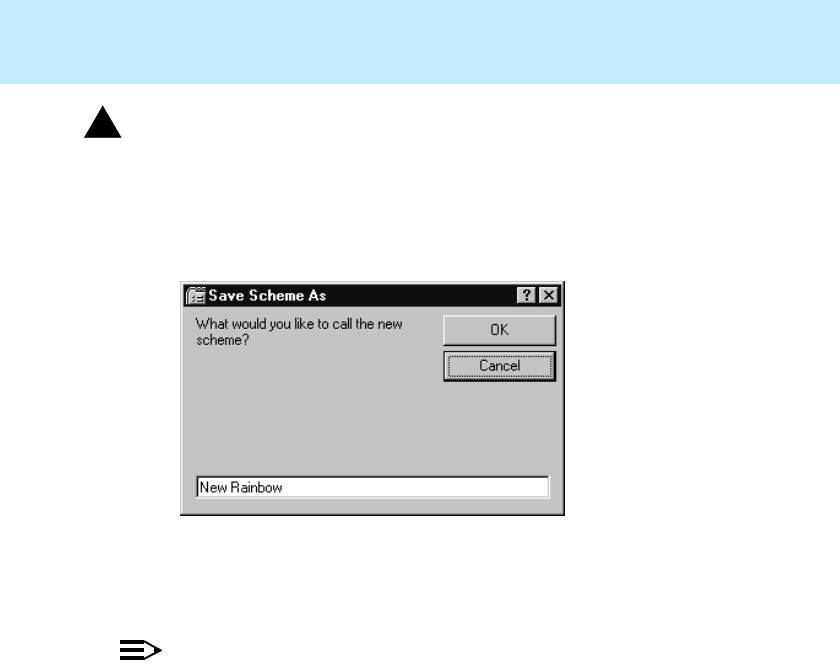
CentreVu
Supervisor Version 8 Installation and Getting Started
Using CentreVu Supervisor Reports
Report Options
7-81
!WARNING:
If you do not save the new color scheme using the Save As button, the changes
that you have made will overwrite the default color scheme that you modified.
9. When you are done modifying color bars, select Save As.
The following window displays:
10. Type the name of the report color scheme that you created in the text box.
11. Select OK to save the scheme and the scheme name.
NOTE:
You can view the changes that you made to a color scheme at any point in
the modification by selecting Apply. When you do this, the current color
scheme is applied to any reports that are running.
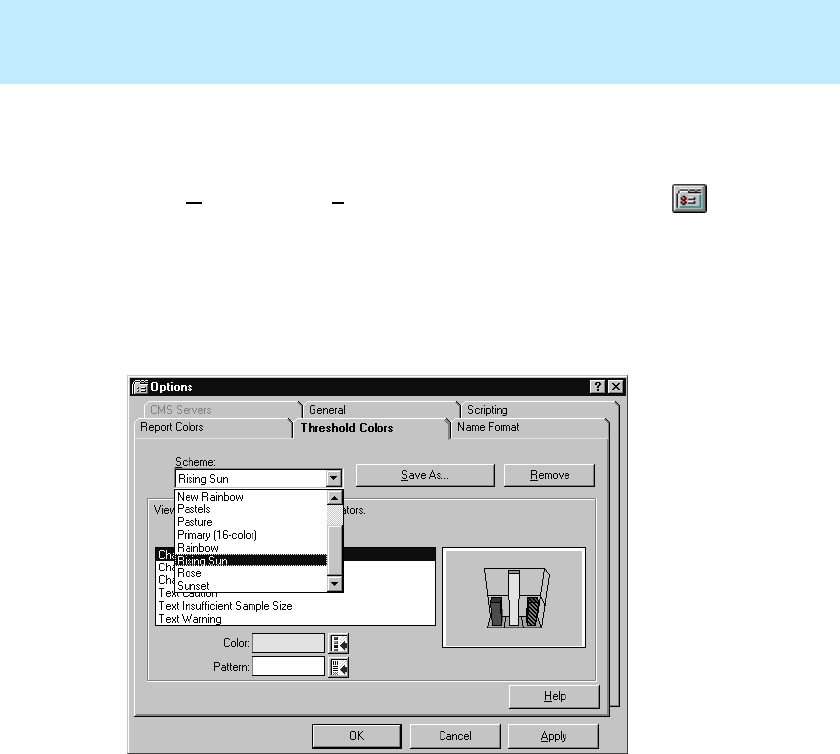
CentreVu
Supervisor Version 8 Installation and Getting Started
Using CentreVu Supervisor Reports
Report Options
7-82
Creating a New Threshold Color Scheme 7
To create a new threshold color scheme for reports, do the following steps:
1. Choose Options from the Tools menu, or select the Options button
on the toolbar.
2. Select the Threshold Colors tab.
3. Select the color scheme with which you want to begin from the Scheme:
drop-down list.
The view of the scheme displays:
4. Select the element of threshold highlighting that you want to modify colors
for from the list box (Text Warning, Text Caution, Text Insufficient Sample
Size, Chart Warning, Chart Caution, or Chart Insufficient Sample Size).
The current setting for the element displays to the right of the list box.
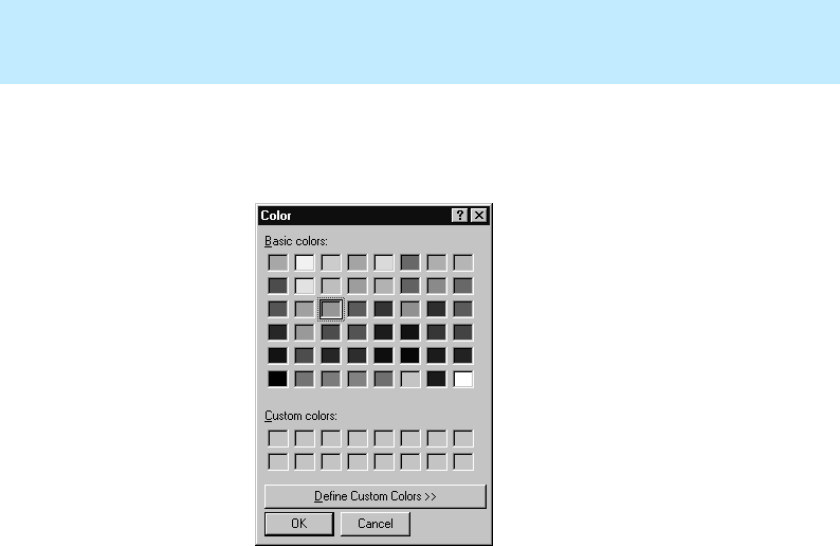
CentreVu
Supervisor Version 8 Installation and Getting Started
Using CentreVu Supervisor Reports
Report Options
7-83
5. Set the color that will be displayed as text:
a. Select the Color Selector button next to the Text display box. The
following window displays
b. Choose a color from the Basic colors palette, or create a custom color
using standard Windows procedures.
c. Select OK when you are done.
The Options window displays.
6. Set the color that will be displayed as the background on the threshold
element:
a. Select the Color Selector button next to the Background display box.
The Color palette displays.
b. Choose a color from the Basic colors palette or create a custom color
using standard Windows procedures.
c. Select OK when you are done.
d. The Options window displays.
7. Repeat steps 4 through 6 until you have updated all of the threshold
element colors that you want to modify.
8. When you are done modifying the threshold element colors, select
Save As.
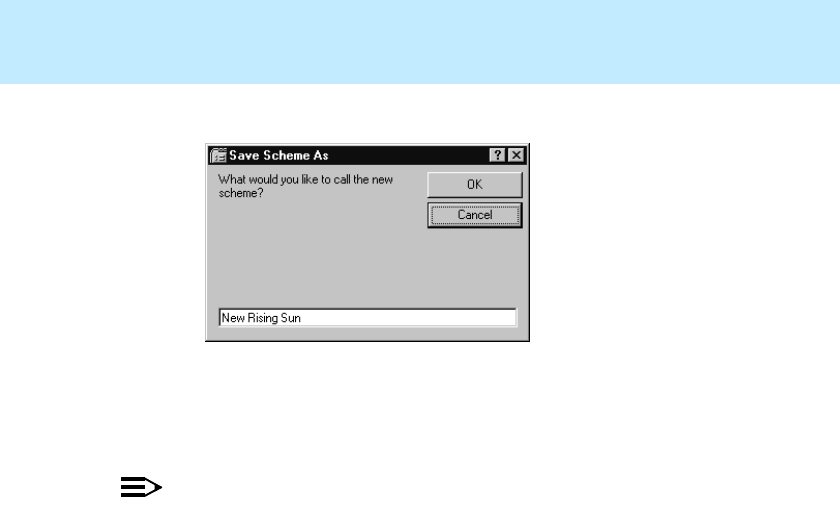
CentreVu
Supervisor Version 8 Installation and Getting Started
Using CentreVu Supervisor Reports
Report Options
7-84
The following window displays:
9. Type the name of the threshold color scheme that you created in the text
box.
10. Select OK to save the scheme and the scheme name.
NOTE:
You can view the changes that you made to a color scheme at any point in
the modification by selecting Apply. When you do this, the current color
scheme is applied to any threshold highlights that are displayed on running
reports.
CentreVu
Supervisor Version 8 Installation and Getting Started
Using CentreVu Supervisor Reports
Report Options
7-85
Creating a New Name Format 7
To create a new name format, do the following steps:
1. Choose Options from the Tools menu, or select the Options button
on the toolbar.
2. Select the Name Format tab.
3. Select the Entity for which you want to change the name format.
4. In the Format text box, use the drop-down list to select one of the standard
formats, or type in a name combination.
5. Select OK.
6. If you typed a nonstandard name format in Step 4, the format is not saved
in the Format list as a standard option.
7. To select another name format, go to the Name Format tab, select the
format, and then select OK.

CentreVu
Supervisor Version 8 Installation and Getting Started
Using CentreVu Supervisor Reports
Exiting and Restarting Reports
7-86
Exiting and Restarting Reports 7
To exit a report (return to the Controller), do one of the following:
●Double click the System button.
●Select Close from the System button menu.
●Select Exit from the Report menu.
NOTE:
If the system shuts down due to an error, any changes you have made to the
report(s) you are running are saved.
To restart a report (return to the report input window), select Restart from the
Report menu.
NOTE:
Work State drill-down reports and unsaved reports created in Report Wizard
cannot be restarted.

CentreVu
Supervisor Version 8 Installation and Getting Started
Installing and Using CentreVu Terminal Emulator
Overview
8-1
CentreVu
Supervisor
Installing and Using
CentreVu Terminal
Emulator 8
Overview 8
This chapter explains how to install the CentreVu® Terminal Emulator (referred
to as Terminal) application software and gives an overview of Terminal. In
addition, it teaches you how to set up profiles for using Terminal.
This chapter includes the following sections:
●About Terminal
●Using Terminal with Supervisor
●Installing Terminal
●Opening and Exiting Terminal and CMS
●Using Terminal
●CentreVu Terminal Messages
●Uninstalling Terminal.

CentreVu
Supervisor Version 8 Installation and Getting Started
Installing and Using CentreVu Terminal Emulator
Overview
8-2
About
CentreVu
Terminal
CentreVu Terminal is packaged with the CentreVu Supervisor application.
CentreVu Terminal is a software application that emulates a 615 Color (615C)
terminal. It is used to access the CentreVu CMS server from your PC running
Microsoft Windows*. You can use CentreVu Terminal with any CMS server that
supports 615 or 615C terminal types.
Terminal can only be purchased in conjunction with Supervisor.
NOTE:
CentreVu Terminal must be separately installed; it is not automatically installed
by CentreVu Supervisor Version 8.
*Microsoft Windows is a trademark of Microsoft Corp.

CentreVu
Supervisor Version 8 Installation and Getting Started
Installing and Using CentreVu Terminal Emulator
Using Terminal with Supervisor
8-3
Using Terminal with Supervisor 8
If you are using Supervisor and Terminal, you will use the CentreVu Terminal
application for the following CMS capabilities:
●ACD Administration — Vector Contents
●cmsadm and cmssvc command capabilities
●Solaris* system command capabilities
●INFORMIX† database commands
●Forecast
●Shortcuts
●Timetables
●Creating and Editing CMS Custom Reports
●Administering ACDs for Generic 2.2 switches with the Expert Agent
Selection (EAS) feature. For all of the other switches with EAS, you may
use Supervisor to perform ACD Administration operations (except for
Vector Contents) and run the applicable configuration reports.
* Solaris is a registered trademark of Sun Microsystems, Inc.
† INFORMIX is a registered trademark of Informix Software, Inc.
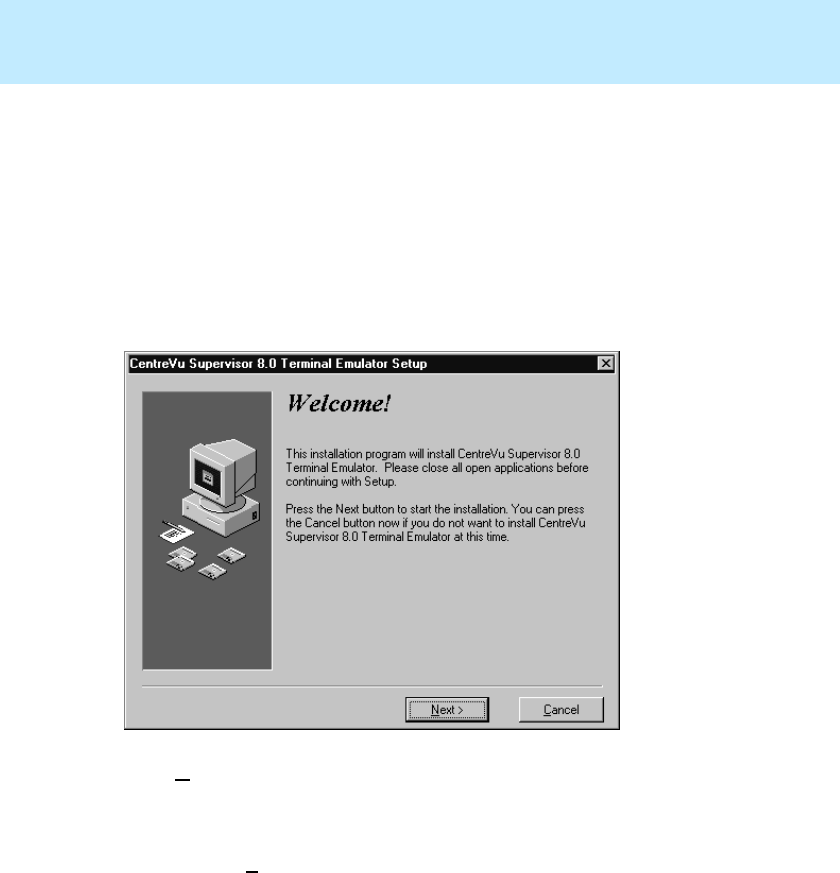
CentreVu
Supervisor Version 8 Installation and Getting Started
Installing and Using CentreVu Terminal Emulator
Installing Terminal
8-4
Installing Terminal 8
To install CentreVu Terminal, do the following:
1. In the directory containing the CentreVu Supervisor files, find the Terminal
setup file, SetupTrm.exe.
2. Double-click on the SetupTrm.exe file to begin the installation.
3. After a short wait, the CentreVu Terminal 8.0 Terminal Emulator Setup
Welcome window appears.
4. Select Next to proceed with the installation.
5. Follow the instructions on the dialog boxes to install CentreVu Terminal.
6. When the Installation is finished, the Installation Completed dialog
appears. Select Finish to return to your desktop.
You can now begin using Terminal.
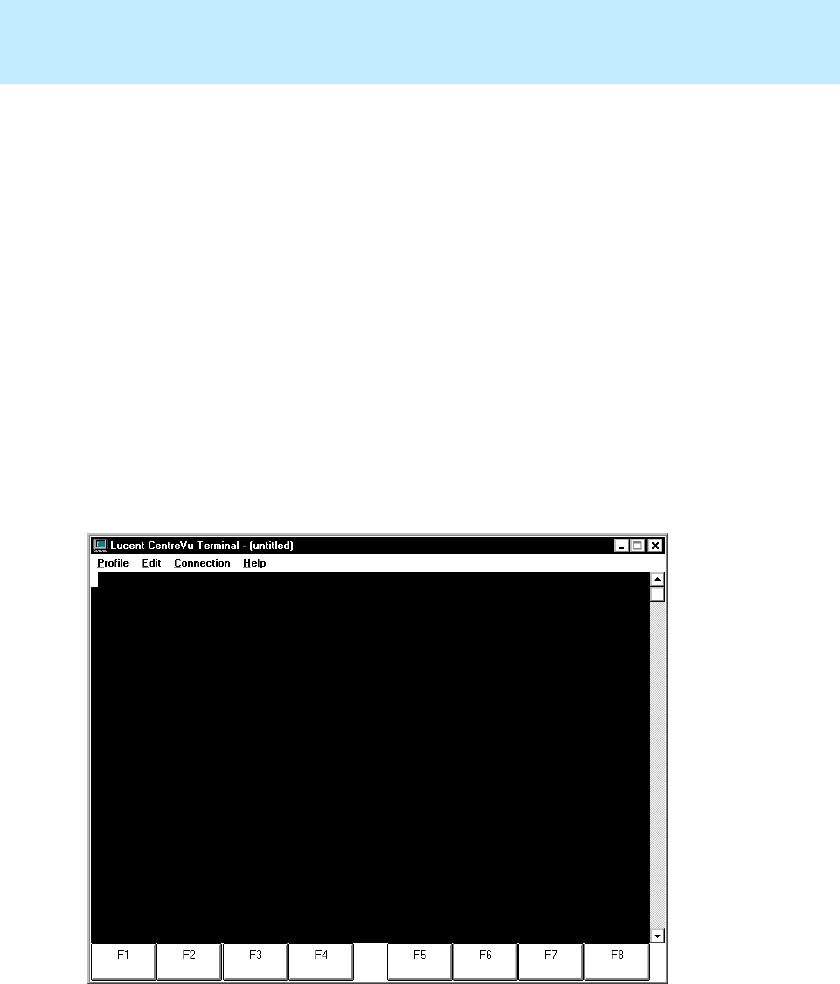
CentreVu
Supervisor Version 8 Installation and Getting Started
Installing and Using CentreVu Terminal Emulator
Opening and Exiting Terminal and CMS
8-5
Opening and Exiting Terminal and CMS 8
This section includes the following information:
●Opening Terminal
●Logging into CMS
●Exiting Terminal.
Opening Terminal 8
To open Terminal:
1. Select the CentreVu Terminal item in the Lucent CentreVu Supervisor sub-
menu under Programs from the Start Menu.
2. The Terminal window opens with no connection active:
The size of the application window is fixed at 24 rows by 80 columns, but the
window resizes based on font size.
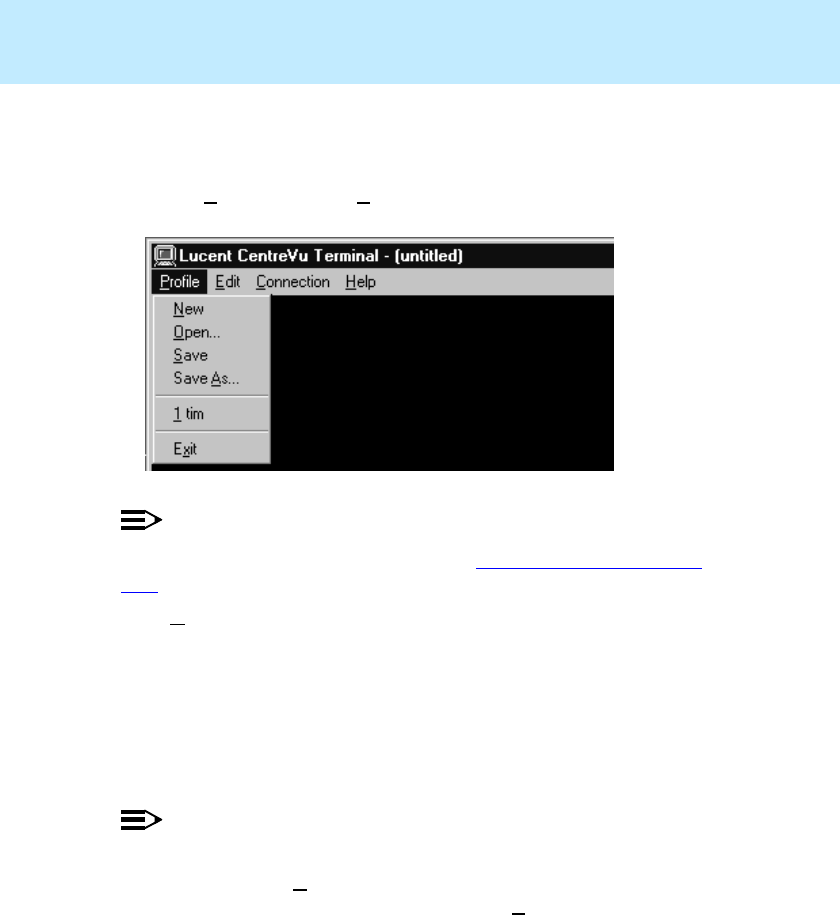
CentreVu
Supervisor Version 8 Installation and Getting Started
Installing and Using CentreVu Terminal Emulator
Opening and Exiting Terminal and CMS
8-6
Logging into CMS 8
Follow these steps when logging into CMS:
1. Select the Profile menu. The Profile menu items appear:
NOTE:
If you do not have a profile created, refer to “Creating Profiles” on page
8-14.
2. Click Open.
When you select a connection profile, a connection is initiated and a status
window appears. The status window automatically goes away when the
connection is established. If the connection is established through the
network or a dedicated serial line, you see the CMS login: prompt. If
the connection is established through a modem, the modem dials the
number of the remote host and then attempts to connect.
NOTE:
If you want to stop the login process, but keep Terminal running, select
Disconnect from the Connection menu. If you want to stop the login
process and close Terminal, select Exit from the Profile menu.
Once a connection has been established, log into the remote CMS host using
standard CMS login procedures.

CentreVu
Supervisor Version 8 Installation and Getting Started
Installing and Using CentreVu Terminal Emulator
Opening and Exiting Terminal and CMS
8-7
3. At the login: prompt, enter your CMS login ID, and press Enter.
4. At the Password: prompt, enter your CMS password (it does not
display on the screen), and press Enter.
5. At the Terminal type: prompt, type 615c or CVTERM, and press
Enter.
NOTE:
CentreVu Terminal does not use cvsup as the terminal type.
The CMS Main Menu displays.
NOTE:
If a system prompt, such as $ or #, displays instead of the terminal type
prompt or the CMS Main menu, type cms, and press Enter.

CentreVu
Supervisor Version 8 Installation and Getting Started
Installing and Using CentreVu Terminal Emulator
Opening and Exiting Terminal and CMS
8-8
Exiting Terminal 8
To exit Terminal, do the following:
1. Select Logout from the CMS Main Menu. You will see a window
indicating that the CMS connection has been dropped.
NOTE:
If a system prompt, such as $ or #, displays instead of the dropped
connection message, type exit, and press Enter.
2. Select OK or press Return in the message window.
3. Select Exit from the Profile menu.
NOTE:
If you select Exit or try to close the Terminal window while a connection is
active, a message is displayed informing you of this and asking if you want
to exit anyway. Select Yes to drop the CMS connection and exit Terminal;
select No to keep the connection active and ignore the Exit request.
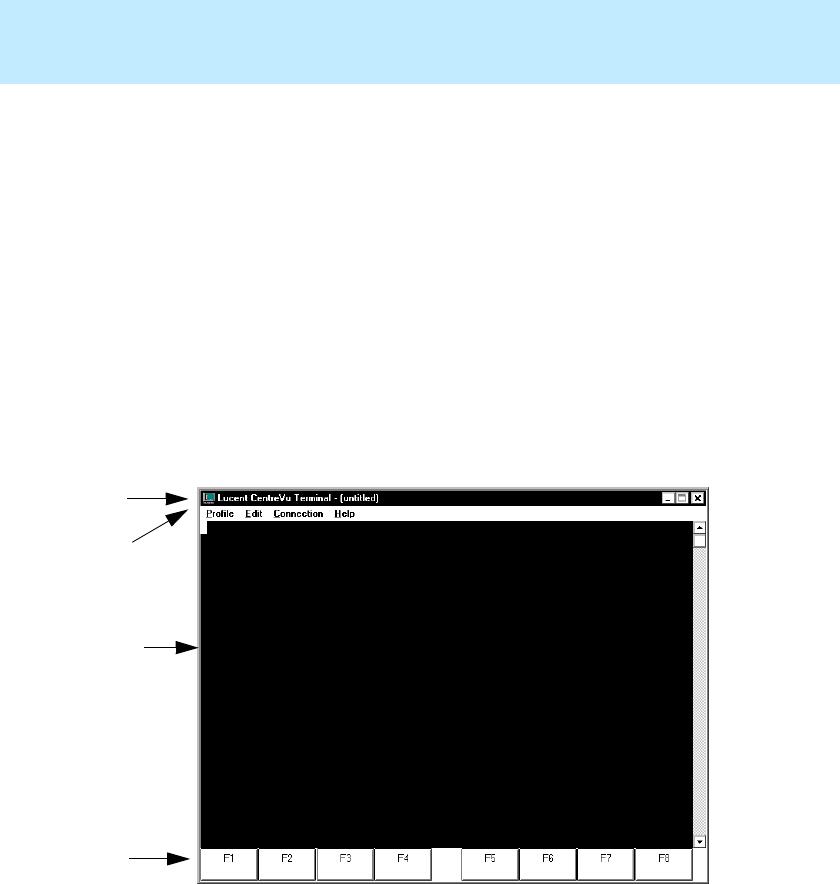
CentreVu
Supervisor Version 8 Installation and Getting Started
Installing and Using CentreVu Terminal Emulator
Using Terminal
8-9
Using Terminal 8
This section contains the following information:
●Terminal Window
●Creating Profiles
●Editing Profiles
●Setting Profile Options.
Terminal Window 8
A representation of the Terminal window is shown below:
Title Bar
Menu Bar
Application Window
Function Keys

CentreVu
Supervisor Version 8 Installation and Getting Started
Installing and Using CentreVu Terminal Emulator
Using Terminal
8-10
The Terminal window contains the following items:
●Title bar—displays “Lucent CentreVu Terminal” and the name of the
current connection profile. If no profile is currently selected, “untitled”
displays instead of the profile name.
●Menu bar—includes the Profile, Edit, Connection, Reset, and Help
options.
●Application window—the area of the screen where you log into CMS and
use CMS.
●Function keys—the keys at the bottom of the Terminal’s main window.
Initially, these keys are not visible. After you have logged into CMS, the
function keys are appropriately labeled and work the same as the standard
CMS Screen-Labeled Keys (SLKs).
See the CentreVu® CMS R3V8 Administration (585-210-910) document
for definitions of and instructions for using the function keys and their
associated menus.
Menu Bar 8
The following paragraphs describe the menus on the Terminal menu bar, each
menu item, and the action each menu item performs.
Profile Menu 8
From this menu you can create, open, and save a connection profile. You
can also exit Terminal from this menu. Profiles are used to store
information related to how a particular user connects to the remote host.
The following table lists the items on the Profile menu and describes the
action each item performs.

CentreVu
Supervisor Version 8 Installation and Getting Started
Installing and Using CentreVu Terminal Emulator
Using Terminal
8-11
Menu Item Action
New Creates a new connection profile. By default, this
connection profile is named “profile 1” until you save
it. This item is disabled if there is already a
connection active.
Open... Opens an existing connection profile. Selecting this
menu item brings up a window displaying the current
profiles. Once you select a profile to open, that
profile becomes the first profile in the list of recently
accessed profiles. This item is disabled if there is
already a connection active.
Save Saves the current connection profile.
Save As... Brings up a window that requests a name under
which to save the profile. Existing profile names are
listed in the Save Profile As window. You can select
one of these names or enter a new profile name in the
Profile Name text box. If you use an existing profile
name, a message box warns you that you are
overwriting the contents of an existing profile.
1...4 The four most-recently opened connection profiles
are displayed here. You can choose a numbered
profile for quick access. The most recently selected
profile you choose becomes profile number 1, with
the other items being renumbered accordingly. These
items are disabled if there is a connection already
active.
Exit Exits Terminal. If there is a profile that has been
modified but not saved, a warning message is
displayed.

CentreVu
Supervisor Version 8 Installation and Getting Started
Installing and Using CentreVu Terminal Emulator
Using Terminal
8-12
Edit Menu 8
From this menu you can copy selected text to the Microsoft Windows
Clipboard, paste the contents of the Clipboard to a remote host computer,
and clear the contents of the Clipboard. In this case, “pasting” means
sending the selected text to the screen as if it were typed by the user. The
capability to cut text is not supported by Terminal. The following table lists
the items on the Edit menu and a brief description of the action each item
performs. You can use the basic Microsoft Windows keyboard shortcuts.
Connection Menu 8
From this menu you can connect to, disconnect from, or send a break to a
remote host computer. You also use this menu to set up or change Terminal
options (communications, modem, and font). The following table lists the
items on the Connection menu and describes the action each item
performs.
Menu Item Action
Copy Copies the selected text to the Microsoft Windows
clipboard.
Paste Pastes (sends) the contents of the Microsoft
Windows clipboard to the location of your cursor on
your PC as if you had typed it in.
Clear Clears the contents of the Microsoft Windows
clipboard.
Menu Item Action
Connect Establishes a connection to a remote host computer
as specified in the active connection profile. If a
connection is already active, this menu item is
disabled.
Disconnect Disconnects the active connection. If there is no
active connection, this menu item is disabled.

CentreVu
Supervisor Version 8 Installation and Getting Started
Installing and Using CentreVu Terminal Emulator
Using Terminal
8-13
Reset Menu 8
From this menu, you can do a terminal reset for Terminal Emulator. This
provides a way to log into Audix and the switch.
Help Menu 8
From this menu, you can get on-line Help for Terminal. The following
table lists the items on the Help menu and describes the action each item
performs.
Send Break Sends a “break” sequence to a remote host
computer. A break is used to temporarily suspend
an operation or transmission. If your connection is
“hung up” and the host appears not to respond
when you press keys on your keyboard, try
sending a break.
Options... Brings up a window from which you can set up or
change Terminal options. Terminal options are
grouped under three tabs: Communications,
Modem, and Font.
Menu Item Action
Contents Displays a table of contents of help topics.
Technical Support Shows how to get Terminal technical support.
About... Opens the Terminal Help About window.
Menu Item Action
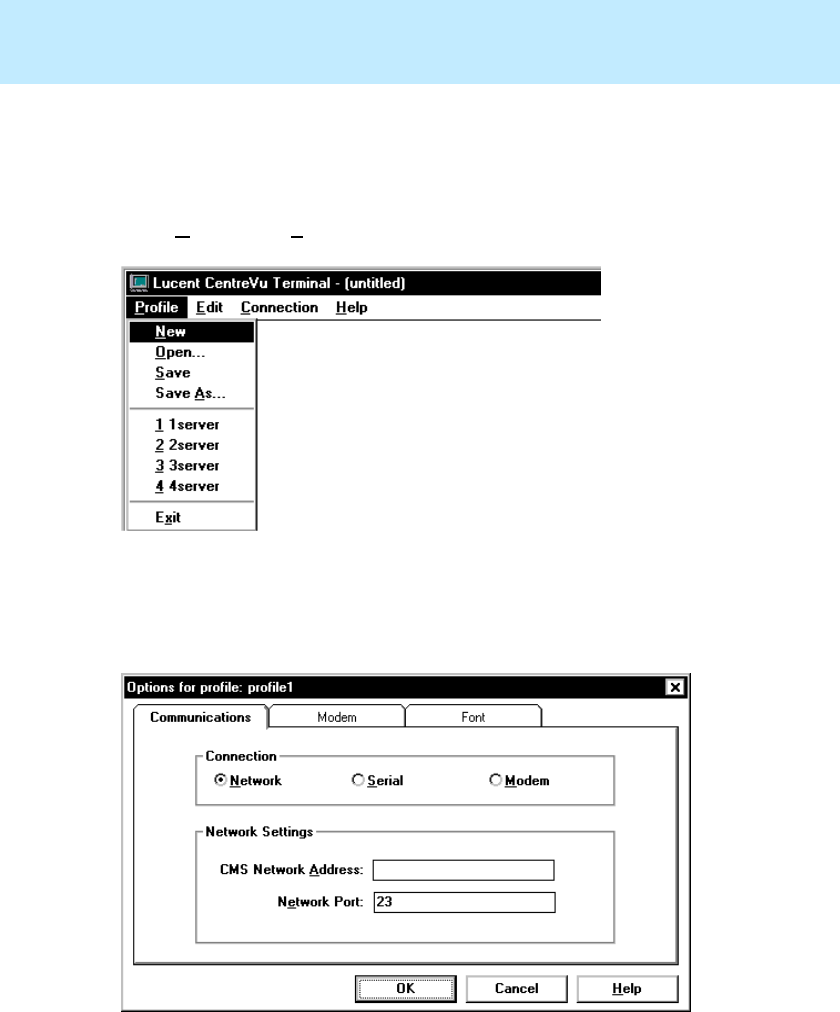
CentreVu
Supervisor Version 8 Installation and Getting Started
Installing and Using CentreVu Terminal Emulator
Using Terminal
8-14
Creating Profiles 8
To create a profile:
1. Open Terminal.
2. Select New from the Profile menu.
The Options window displays:

CentreVu
Supervisor Version 8 Installation and Getting Started
Installing and Using CentreVu Terminal Emulator
Using Terminal
8-15
3. Set the Terminal options.
NOTE:
The Terminal Options are grouped under three tabs: Communications,
Modem, and Font. See the section on each tab later in this chapter to learn
how to set the options in each tab.
4. Select Save As from the Profile menu.
5. The Save Profile As box displays:
6. Type the name of the profile in the text box and select OK.
NOTE:
If you want to overwrite an existing profile with one you have just created,
double click the name in the list box.

CentreVu
Supervisor Version 8 Installation and Getting Started
Installing and Using CentreVu Terminal Emulator
Using Terminal
8-16
Editing Profiles 8
To edit an existing profile:
1. Select Open from the Profile menu.
2. Choose the name of the profile you want to edit.
3. Click Open.
4. Select Options from the Connection menu.
5. Edit the profile.
6. Click OK.
7. Select Save from the Profile menu.
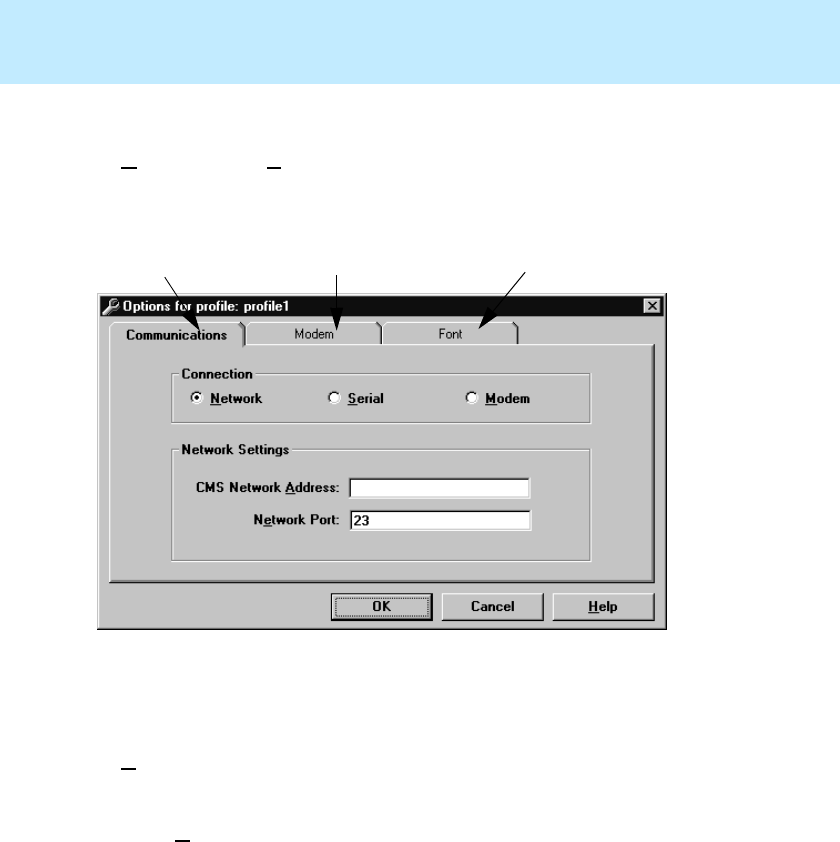
CentreVu
Supervisor Version 8 Installation and Getting Started
Installing and Using CentreVu Terminal Emulator
Using Terminal
8-17
Setting Profile Options 8
Use Options from the Connection menu to set up how you will connect to the
CMS host computer. The following paragraphs describe the options available to
you and give you illustrations of settings for standard Terminal profiles.
When you are working in any of the windows, the following conventions are
used:
●Click OK to set your current settings in the selected profile and close the
Options window.
●Select Cancel to close the window without accepting the current settings.
●Select Help to bring up a help window with help on the currently selected
folder tab.
Communications Tab Modem Tab Font Tab
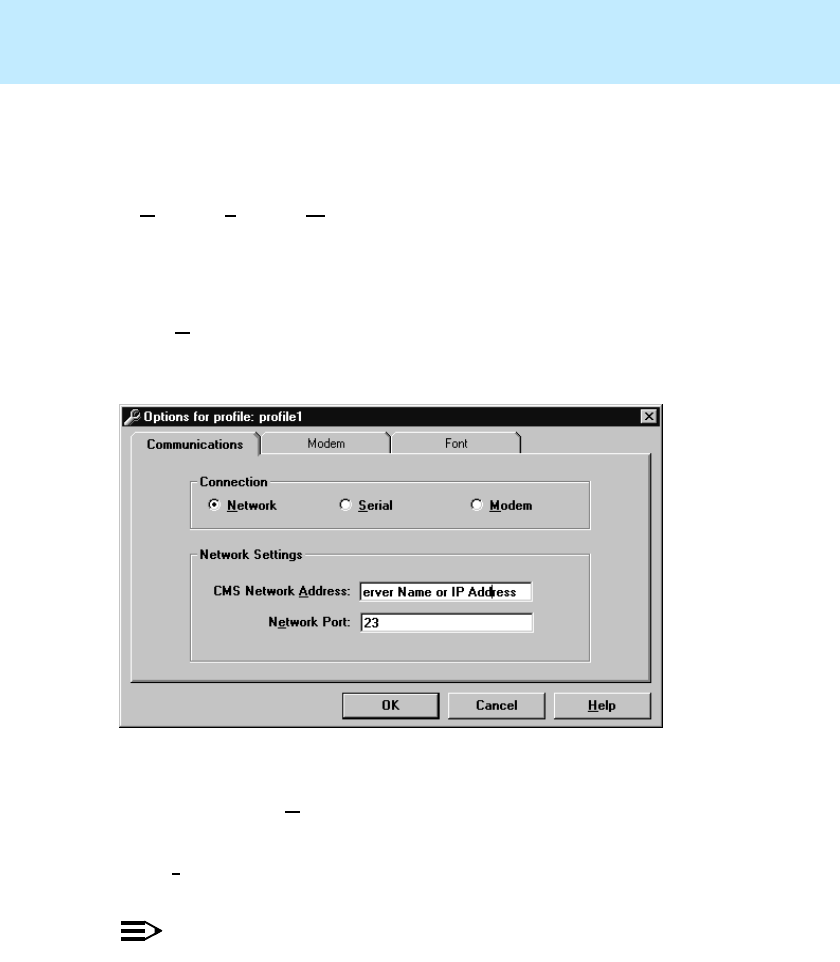
CentreVu
Supervisor Version 8 Installation and Getting Started
Installing and Using CentreVu Terminal Emulator
Using Terminal
8-18
Communications Tab 8
Select the Communications tab to display the window that lets you set up or
change the options for connecting to a remote host computer.
Select Network, Serial, or Modem from the Connection box. Below are
explanations and examples of the settings required for each type of connection.
Network Connection Settings 8
Select Network if you are connecting to the remote CMS through a
network. An example of standard settings for a network connection is
shown below:
Enter the following required information for this setting:
●CMS Network Address—enter the name or the Internet Protocol (IP)
address of the remote host. There is no default.
●Network Port—enter the network port that you wish to connect. The
default is 23, which is the network port reserved for Telnet.
NOTE:
Do not change these settings unless you are instructed to do so by your
Network Administrator.
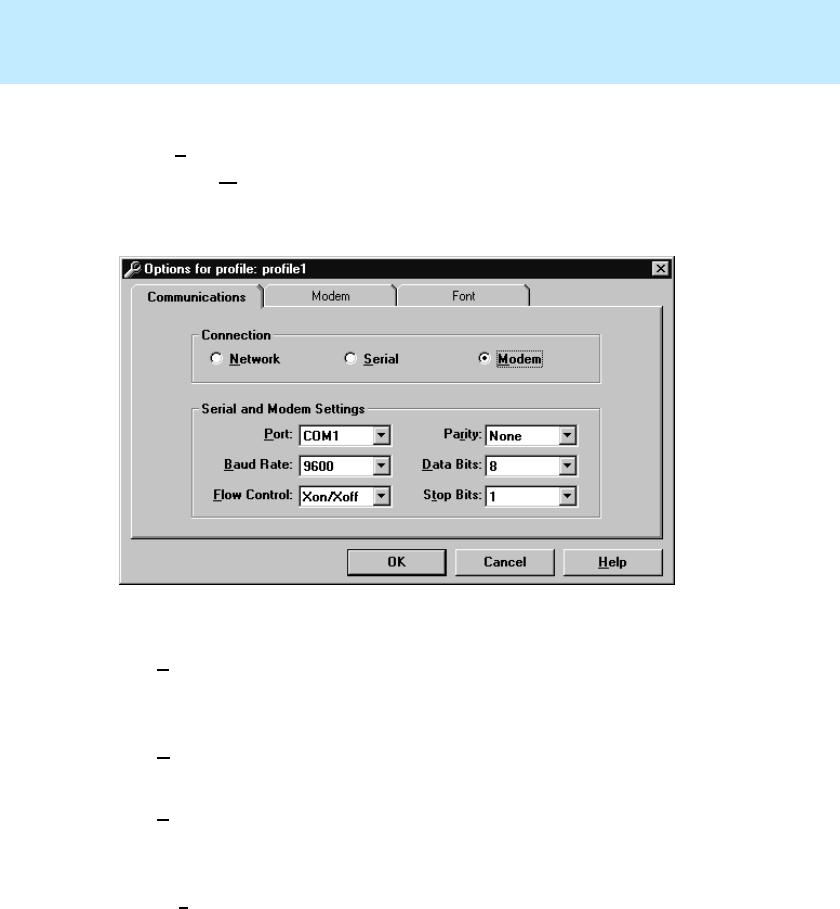
CentreVu
Supervisor Version 8 Installation and Getting Started
Installing and Using CentreVu Terminal Emulator
Using Terminal
8-19
Serial and Modem Connection Settings 8
Select Serial if you are connecting to the remote CMS through a serial
connection, Modem if you are connecting to the remote CMS through a
modem. An example of standard settings for a serial or modem connection
is shown below:
Enter the following required information for this setting:
●Port—choose from the pull-down list the communication (COM) port
you will use to connect to the CMS server. The options are COM1,
COM2, COM3, and COM4.
●Baud Rate—choose the baud rate from the pull-down list. The
options are 110, 300, 600, 1200, 2400, 4800, 9600, and 19.2K.
●Flow Control—choose the appropriate flow control from the pull-
down list. The options are None, Xon/Xoff (software), Rts/Cts
(hardware), or Both.
●Parity—choose the appropriate parity setting from the pull-down list.
The options are None, Odd, Even, Mark, and Space.
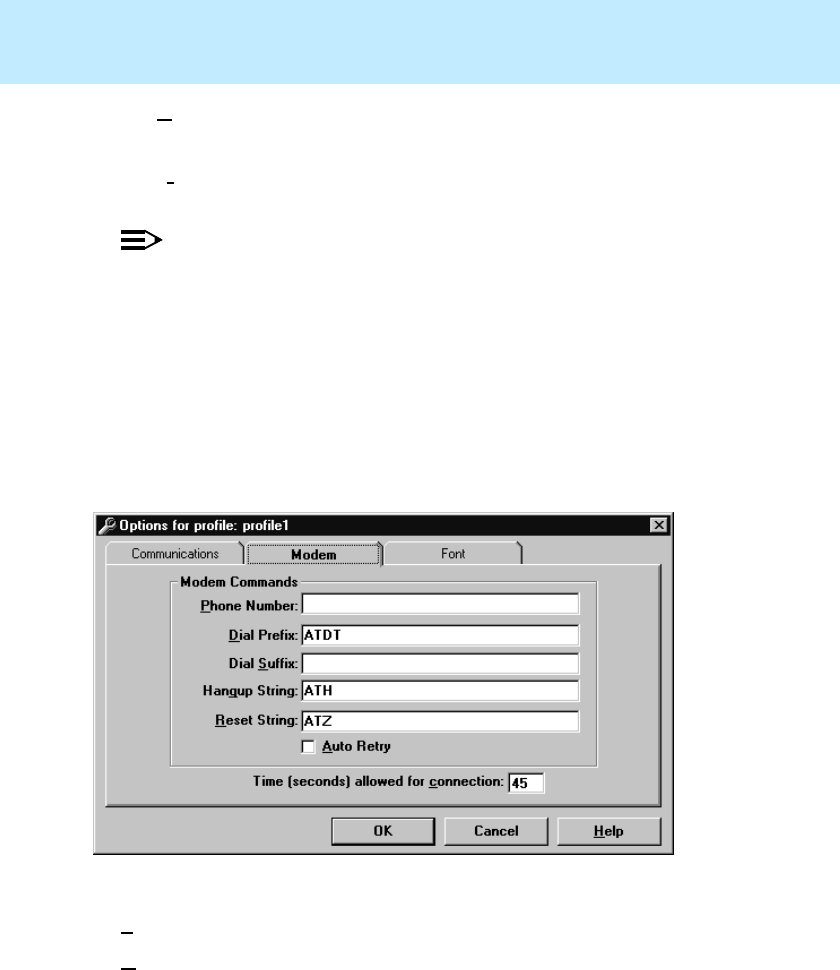
CentreVu
Supervisor Version 8 Installation and Getting Started
Installing and Using CentreVu Terminal Emulator
Using Terminal
8-20
●Data Bit—choose the number of data bits from the pull-down list.
The options are 5, 6, 7, and 8.
●Stop Bits—displays the number of stop bits from the pull-down list.
The options are 1, 1.5, and 2.
NOTE:
Do not change these settings unless you are instructed to do so by your
Network Administrator.
Modem Tab 8
Select the Modem tab to set up or change dial strings for connecting to the
remote CMS through a modem port. Below is an example of standard modem
settings for Terminal:
Use the following information to set up the modem connection:
●Phone Number—enter the phone number of the remote host.
●Dial Prefix—enter the characters to send to the modem before the Phone
Number of the remote host. For example, if a “9” must be dialed before the
telephone number, you can enter it after the phrase ATDT (ATDT9).
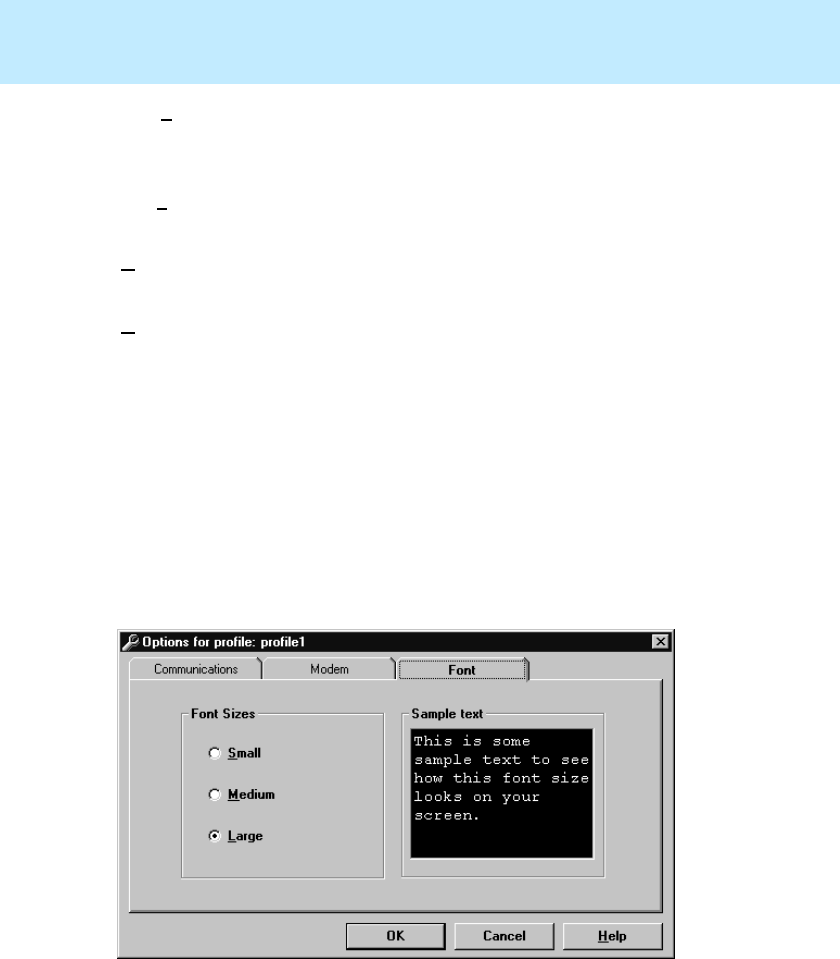
CentreVu
Supervisor Version 8 Installation and Getting Started
Installing and Using CentreVu Terminal Emulator
Using Terminal
8-21
●Dial Suffix—enter the characters to send to the modem after the Phone
Number of the remote host. For example, if an extension has to be dialed
after the telephone number of the remote host, enter it here.
●Hangup String—enter the characters to send to the modem to cause it to
hang up the connection. The default is ATH.
●Reset String—enter the characters to send to the modem to cause it to reset
itself. The default is ATZ.
●Auto Retry—turns the auto retry option on or off. If the check box is not
selected, the modem tries only once to establish a connection to the remote
host.
●Allow xx seconds for connection—enter the maximum time to wait for the
connection to be established. The valid values are 1 to 999 seconds. The
default value is 45 seconds.
Font Tab 8
Select the Font tab to change the font size used by the Terminal when you are
using CMS. Below is an illustration of the standard font settings for Terminal:

CentreVu
Supervisor Version 8 Installation and Getting Started
Installing and Using CentreVu Terminal Emulator
Using Terminal
8-22
Use the following information to set the font size:
●Small font is approximately 8 points and is appropriate for video displays
that have a resolution of 640 x 480 (VGA) or less.
●Medium font is approximately 9 points and is appropriate for video
displays that have a resolution of 800 x 600 or 1024 x 768. Medium is the
default font size.
●Large font is approximately 10 points and is appropriate for video displays
that have a resolution of 1024 x 768 or greater.
●Sample Text box shows what the selected font size looks like.

CentreVu
Supervisor Version 8 Installation and Getting Started
Installing and Using CentreVu Terminal Emulator
Terminal Messages
8-23
Terminal Messages 8
There are two types of messages you can receive when using Terminal:
●Error Messages
●Information Messages.
Error Messages 8
The following messages are displayed in a window with an OK button:
Unable to connect to the remote host. 8
Terminal failed to connect to the remote host. If the reason for failure can be
determined, Terminal displays one of the following messages:
●Busy, no answer.
●The remote host is not responding.
●The network is not responding.
The connection to the remote host was lost. 8
Some possible causes for this message are:
●The remote host has crashed.
●The network has dropped the connection.
●The modem has hung up the line.
The profile {name} does not exist. 8
This message appears if you try to open a profile named {name} and it does not
exist.

CentreVu
Supervisor Version 8 Installation and Getting Started
Installing and Using CentreVu Terminal Emulator
Terminal Messages
8-24
Information Messages 8
The following messages are displayed in a box with Yes and No buttons:
The profile {name} exists, replace? 8
This message appears if you try to save a profile named {name} and it already
exists.
Save changes to {name}? 8
This message appears if you try to exit the Terminal without saving changes to
the profile named {name}.
A connection is active, exit anyway? 8
This message appears if you try to exit the Terminal while a connection is
active.

CentreVu
Supervisor Version 8 Installation and Getting Started
Troubleshooting
Overview
9-1
CentreVu
Supervisor
Troubleshooting 9
Overview 9
If you are having trouble with any of the procedures mentioned in this
document, please read through this section before calling the National
Customer Care Center. The problem may be something simple that you can
quickly solve yourself.
If you have not solved the problem after reading through this section, contact
the National Customer Care Center at 1-800-242-2121 (Lucent Technologies
also offers fee-based installation consultation). Customers outside the United
States should contact their Lucent representative or distributor.
If you have received an error message(s) in the course of a failed installation,
then record the message(s) in order to assist National Customer Care Center
personnel in diagnosing your problem.
CentreVu
Supervisor Version 8 Installation and Getting Started
Troubleshooting
Troubleshooting Tips
9-2
Troubleshooting Tips 9
This section will help you with problems you may encounter when installing
CentreVu® Supervisor, logging into CentreVu Supervisor, or running CentreVu
Supervisor. It contains the following tables which describe error messages that
may appear in Supervisor:
Installation Error Messages 9
Use the following information to help you with error messages encountered
while installing CentreVu Supervisor on a network server or installing CentreVu
Supervisor on a PC. The following types of error messages can appear:
●Information — Indicates that the error will not affect the success of the
installation. Also indicates that you do not have privileges to perform the
installation.
●Warning — Indicates that the error may affect the success of the
installation.
●Severe — Indicates that the installation will fail, and that Setup will exit.
Error Message Corrective Action
Installing to the WINDOWS or
WINDOWS SYSTEM directories is
not permitted. Select another
directory.
WARNING
Select another directory.
Invalid directory name specified.
WARNING
Provide a valid directory name.
Invalid Location. You cannot install
CentreVu Supervisor 8.0 to a floppy
drive. Please select another location.
WARNING
Select another drive.
CentreVu
Supervisor Version 8 Installation and Getting Started
Troubleshooting
Troubleshooting Tips
9-3
Perform Rollback? This installation
did not complete. Would you like to
rollback the changes that were made
during the partial installation?
SEVERE
Select Yes to delete files installed
or reinstate files in the registry
that were changed during the
partial installation.
Setup has determined that CentreVu
Supervisor 8.0 was previously
unsuccessfully attempted to be
installed on this computer. Since the
PC configuration was changed, Setup
will attempt to restore the PC to its
original configuration (cleanup)
before continuing with Setup.
SEVERE
Select Next to continue with the
installation. It is important that
the PC is restored to its original
configuration, or Supervisor may
not install or run correctly.
The drive selected either does not
exist or has insufficient space
available.
Enter a different destination drive.
WARNING
Select another drive.
You do not have administrative
privileges. Please log on as
administrator and install Centre Vu
Supervisor 8.0.
INFORMATION
Contact your systems
administrator, or select a PC on
which you have administrative
privileges.
Error Message Corrective Action
CentreVu
Supervisor Version 8 Installation and Getting Started
Troubleshooting
Troubleshooting Tips
9-4
Login Error Messages 9
Use the following information to help you with problems you may encounter
when logging into the CMS server.
Error Message Corrective Action
A bad or invalid WINSOCK.DLL
was detected on the system. Please
correct this problem and try again.
Reinstall network stack.
An action cannot be completed
because a component (cvsServer) is
not responding. Choose “Switch
To” to activate the component and
correct the problem.
Select Switch To to correct the
problem. If the problem still exists,
install Dcom95 before attempting
to run CentreVu Supervisor again.
(See “Other Requirements” on page
1-12 for further information.)
Could not communicate with the
modem. Make sure that communication and
modem setting are correct. Use the
Communications and Modem tabs
in the Options dialog box.
Could not connect to the server Try again. If you still have trouble
after your third attempt, contact
your System Administrator to see if
the server is down.
Your CentreVu Supervisor
software is not compatible with
the CentreVu CMS server
software. The CentreVu CMS
server must be upgraded before
you can log in. Contact your
system administrator.
Contact your system
administrator.
CentreVu
Supervisor Version 8 Installation and Getting Started
Troubleshooting
Troubleshooting Tips
9-5
This version of CentreVu
Supervisor is not compatible with
the software on your CentreVu
CMS server. Please upgrade your
PC with the appropriate version of
CentreVu Supervisor. Contact
your CentreVu CMS system
administrator.
Select a different server that has
the CMS version you selected, or
select a different CMS version
(R3V6 or R3V8).
Contact your CentreVu CMS
system administrator.
Could not find the file
DALEAPP.EXE in the Lucent
CentreVu Supervisor directory.
Please re-install this file into the
Lucent CentreVu Supervisor
directory or contact technical
support.
Reinstall CentreVu Supervisor. If
you cannot solve this problem
yourself, contact the National
Customer Care Center.
Could not initialize
communications. Try again. If you still have trouble
after your second attempt, contact
the National Customer Care
Center.
Could not initialize
DALEAPP.EXE. Please try to
login again or contact technical
support
1. Exit Windows.
2. Open Windows.
3. Try to connect again.
4. If this does not work, reinstall
CentreVu Supervisor and try to
connect.
5. If this does not work, contact
the National Customer Care
Center.
Could not initiate a socket
connection. The network is not installed
properly. Use the Bravo Tool to
help you isolate the network
problem, or contact your System
Administrator.
Error Message Corrective Action
CentreVu
Supervisor Version 8 Installation and Getting Started
Troubleshooting
Troubleshooting Tips
9-6
Could not open the specified serial
port. Please check communications
settings, correct any problems, and
try again.
Check the settings under the
Communications tab in the Options
dialog box. Check to see if any
other device is connected to the
port, or if you have the correct port.
Could not resolve the hostname
’< user-entered server
name>‘. Please check
communications settings, correct
any problems, and try again
The hostname was not recognized
by the Domain Name Services
(DNS). Try the IP Address instead
of the hostname. If this does not
work, contact your System
Administrator.
The application could not be started
because system memory is low.
Please close some applications and
try again.
Close any open applications and try
again.
The application could not be started
because the executable file is
corrupt. Please reinstall CentreVu
Supervisor or call Technical
Support.
Remove CentreVu Supervisor and
reinstall it. If Supervisor still does
not start, call the National
Customer Care Center.
The application could not be started
because the executable was not
found. Please reinstall CentreVu
Supervisor or call Technical
Support.
Reinstalling CentreVu Supervisor
or call the National Customer Care
Center.
The application could not be started
because the path to the executable
was not found. Please reinstall
Lucent CentreVu Supervisor or call
Technical Support.
Reinstalling CentreVu Supervisor
or call the National Customer Care
Center.
Error Message Corrective Action
CentreVu
Supervisor Version 8 Installation and Getting Started
Troubleshooting
Troubleshooting Tips
9-7
The carrier detect signal was lost. This is a modem-related problem.
Try connecting again. If the
problem persists, contact your
System Administrator.
The connection to the server has
been lost, and CentreVu
Supervisor must exit. Please try to
connect again later.
This is a network-related problem.
A nonrecoverable break in the
network was received. Try to log
into the CMS server again. If the
problem persists, contact your
System Administrator.
The connection to the server was
lost. This is a network-related problem.
A nonrecoverable break in the
network was received. Try to log
into the CMS server again. If the
problem persists, contact your
System Administrator.
The file AOS.EXE is corrupt, so
CentreVu Supervisor must exit.
Please re-install this file into the
Lucent CentreVu Supervisor
directory or contact technical
support.
Reinstall CentreVu Supervisor
(during the install, make sure you
do not skip icon installation) or
call the National Customer Care
Center.
The file AOS.EXE is not in your
Lucent CentreVu Supervisor
directory, so CentreVu Supervisor
must exit. Please reinstall
CentreVu Supervisor.
Reinstall CentreVu Supervisor.
The file WINSOCK.DLL could
not be found. Please ensure that
this file is on your workstation’s
path.
Check for proper installation of
the network. Contact your System
Administrator for help.
Error Message Corrective Action
CentreVu
Supervisor Version 8 Installation and Getting Started
Troubleshooting
Troubleshooting Tips
9-8
The maximum number of CentreVu
Supervisor logins on the server has
been reached. Please try again later.
The number of users that have been
authorized to use CentreVu
Supervisor has been met. You will
be denied login until the number of
users fall below the authorized
number.
If you continue to have this
problem, you can order more user
licenses from the National
Customer Care Center.
The network connection to
’< user-entered server
name>‘ timed out.
CentreVu Supervisor was unable to
log into the server. This error
indicates that there may be a
problem on the server. Contact your
CMS Administrator.
The network connection was
broken. There is possibly a problem with
the network. Contact your System
Administrator.
The passwords you entered do not
match. Please retype the passwords
and try again.
Check to see if the Caps Lock key
is on, and if it is, turn it off. Then,
retype the password and try again.
The serial connection was broken. Try to log into the CMS server
again. If the problem persists,
contact your System Administrator.
The server did not recognize your
Login ID and/or Password. Please
try again.
Make sure that you entered the
correct login ID and password. If
you did, make sure that the Caps
Lock key is not on.
The server did not respond to the
login request. Try again? This type of error will occur when
the network is busy. Try again. If
the problem persists, contact your
System Administrator.
Error Message Corrective Action
CentreVu
Supervisor Version 8 Installation and Getting Started
Troubleshooting
Troubleshooting Tips
9-9
The server does not support this
version of CentreVu Supervisor.
Please contact your system
administrator.
There is an incompatibility
problem between the server and
CentreVu Supervisor. Upgrade the
CMS server or install an older
version of CentreVu Supervisor.
The server is currently in single-
user mode. Please try again later. You are logging into the CMS
server when it is in single-user
mode. Try again later.
The server is not set up to support
CentreVu Supervisor. Please
contact your system administrator.
CentreVu Supervisor is not
authorized on the server (either
the number of CentreVu
Supervisor users = 0 or the feature
is not authorized). Contact your
System Administrator.
The server refused the connection. Check the Network Port number
in the Options dialog box.
There was an unknown failure on
the server. Contact your CMS Administrator.
This version of CentreVu
Supervisor is not supported by the
server. Please contact your system
administrator.
There is an incompatibility
problem between the server and
CentreVu Supervisor. Upgrade the
CMS server or install an older
version of CentreVu Supervisor.
You are not recognized as a valid
server user. Please contact your
system administrator.
Your login ID is not administered
on the CMS server. Contact your
System Administrator.
Error Message Corrective Action
CentreVu
Supervisor Version 8 Installation and Getting Started
Troubleshooting
Troubleshooting Tips
9-10
Your new password must differ
from the old by at least three
character positions.
Choose another password. It must
have at least three different
character positions than your old
password. It also must have at
least two alphabetic characters, at
least one numeric or special
character, and must be six
characters in length.
Your password may not be the
same as or this similar to your
login ID
Choose another password. It must
have at least three different
character positions than your old
password. It also must have at
least two alphabetic characters, at
least one numeric or special
character, and must be six
characters in length.
Your password must be at least six
characters in length. Choose another password. Your
password must have at least two
alphabetic characters, and at least
one numeric or special character.
Your password must contain at
least two alphabetic characters,
and at least one numeric or special
character.
Choose another password. Your
password must also be at least six
characters in length.
Your UNIX shell is not set to
/usr/bin/cms, so Automatic Login
will not work properly. Please
select Manual Login in the
Options dialog box and try again.
On the CentreVu Supervisor
Controller, select Tools then
Options... From the Options
dialog box, select Manual Login
and try logging into the CMS
server manually. Call your System
Administrator to change your
shell.
Error Message Corrective Action

CentreVu
Supervisor Version 8 Installation and Getting Started
Troubleshooting
Troubleshooting Tips
9-11
OCX and DLL Incompatibilities 9
The CentreVu Supervisor application as well as other applications on your PC
use OCX and DLL files. Some of the OCXs and DLLs that Supervisor uses
may already exist on the PC because they are used by other applications.
Problems can occur when Supervisor uses existing OCXs and DLLs that are an
incompatible with what Supervisor needs. These problems may appear as
General Protection Faults (GPF), lockups, or other unexpected problems. To
determine if this type of problem exists, do the following steps:
1. Remove everything from your StartUp group, or hold down the Shift key
and press the L key while starting.
2. Restart Windows.
3. Run CentreVu Supervisor (make sure it is the only application running).
NOTE:
If the problem went away, it means that other software loaded on your PC
is using a OCX/DLL that is not compatible with CentreVu Supervisor.
4. Start running the software that was in the StartUp group.
If you still encounter problems, then you will not be able to run this software at
the same time as you run CentreVu Supervisor. Contact the National Customer
Care Center for assistance.
If you did not encounter problems, it is likely that this software is compatible
with the version of OCX/DLL that CentreVu Supervisor uses.
Windows
Swap Files 9
Systems should be running with permanent swap files. This increases
performance during swap file operations.
Installing
CentreVu
Supervisor 9
Before you install CentreVu Supervisor, make sure no other application is
running. This includes items that may be in the Windows StartUp group and
items specified via the WIN.INI file load= and run= parameters. Restart
Windows after temporarily moving items from the StartUp group to another
group and after “commenting out” the load= and run= lines of the
WIN.INI file.

CentreVu
Supervisor Version 8 Installation and Getting Started
Troubleshooting
Troubleshooting Tips
9-12
Preserving
CentreVu
Supervisor User Profiles 9
In the event that there is a failure during a new or upgrade Supervisor
installation, the old software can be reinstalled; however, if the user has any
preferences set, these will be lost. Use the following procedure to preserve user
preferences before a new installation or upgrade:
1. In the Windows* Explorer, locate the Lucent\CentreVu Supervisor folder
(generally under Program Files).
2. Open the folder and copy the Profiles file tree to another location.
3. Reinstall or upgrade CentreVu Supervisor.
4. Copy the saved profiles to the Profiles tree in the new CentreVu Supervisor
installation.
Resolving TCP/IP Host Name 9
In the event that initial configuration of the TCP/IP server for CentreVu
Supervisor has an error or other problem, use the following procedure to
resolve host name problems:
1. To ensure that this is the problem, open an MS-DOS prompt or command
prompt in Windows.
2. Ping the CMS host.
If the host cannot be found, contact your network administrator. If the host
is found, the reply will contain the host’s IP address.
3. Check that the CMS host entry on the Domain Name Server (DNS) is
correct. If it is wrong or missing, use the IP address returned to you to
correct or create the entry.
4. Edit the LMHOSTS file on the user PC to include a line for the CMS
server, which is:
server name <tab> IP address
*Windows is a registered trademark of Microsoft Corp.

CentreVu
Supervisor Version 8 Installation and Getting Started
Troubleshooting
Troubleshooting Tips
9-13
Proper Operation of Networking Software 9
To ensure that the PC networking software is loaded and functional, you should
test the networking connectivity to the target CMS server prior to running
CentreVu Supervisor. To test this functionality, use the network software’s own
ftp/telnet application. If this works, but Supervisor still cannot establish
connection, it is most likely a problem with the WINSOCK.DLL.
Problems with Serial/Modem Connections 9
If you have a bad serial or modem connection, you will encounter slow data
transfers and frequent loss of the serial connection. The CentreVu Supervisor
controller will report this as a “Serial Connection Broken” error message. If
automatic login was selected, Supervisor will attempt to connect again.
What to check for if you have serial or modem connection problems:
1. Make sure that the RTS/CTS flow control string is selected in the Options
dialog box.
2. Check to see if your serial connection to the CMS server or modem is
wired correctly for hardware flow control. For modem connections, make
sure you have the correct cable wiring between the modem and the CMS
server.
3. Your hardware flow control on the CMS server's serial ports must be on
and functioning properly. Refer to the CentreVu Call Management System
Release 3 Version 5 Sun SPARCserver Computers Installation and
Maintenance (585-215-827) or your SPARCserver documentation for
correct configuration of hardware flow control for your respective serial
communications.
4. 16550A UARTS must be in use on the PC running CentreVu Supervisor.
The following parameters in the [386Enh] section of the PC's
SYSTEM.INI file should be set to:
COMnFIFO=1
Where n is the communications port being used. This will ensure that the
FIFO buffer capability of the communications port will be used.
5. Some terminal server connections may require the addition of
EscAllCtrl=1 in the [LINK] section of the Centrevu.ini file.

CentreVu
Supervisor Version 8 Installation and Getting Started
Troubleshooting
Troubleshooting Tips
9-14
Using a Secondary System Password on the CMS
Server 9
If you use a secondary system password on your CMS server, set the
[CONTROL] SystemPasswordPrompt= section in the Centrevu.ini
file to a string that is the security password prompt of your CMS server.
For example:
[CONTROL]
SystemPasswordPrompt=External security:

CentreVu
Supervisor Version 8 Installation and Getting Started
Overview
A-1
CentreVu
Supervisor
Saving as HTML A
Overview 1
The Save as HTML function available with CentreVu Supervisor
Version 8 allows the user to export a snapshot of a report running in CentreVu
Supervisor and save it as an HTML file. Any report generated in CentreVu
Supervisor can be converted to an HTML file. This file can then be stored on a
Web server for viewing on the Internet or an Intranet.
To view the HTML file, your Internet browser must support tables and .gif
graphic files. For example, Netscape Navigator* 3.0 or Microsoft† Internet
Explorer 3.0, or later versions of either, support tables and .gif graphic files.
Here are some points to remember when using the Save as HTML function:
●Save as HTML does not automatically save the HTML file onto a Web
server. You must copy the HTML file and any associated graphics to the
Internet server you want to use.
●Save as HTML does not automatically update the HTML for real-time
reports.
*Netscape Navigator is a trademark of Netscape Communications Corporation.
†Microsoft Internet Explorer is a registered trademark of Microsoft Corp.
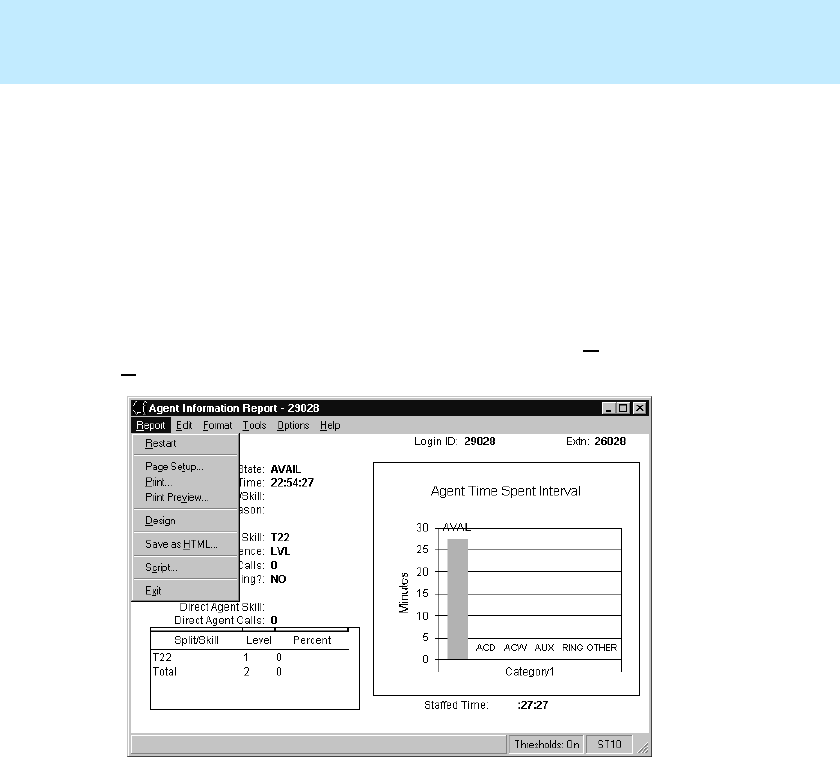
CentreVu
Supervisor Version 8 Installation and Getting Started
Overview
A-2
●Save as HTML is found in the pull-down report menu on an open report.
●Save as HTML does not support 32-bit color mode for graphics saved
using Save as HTML.
Using Save as HTML 1
To save a report as an HTML file, do the following:
1. While running the report you want to save, select Save as HTML from the
Report menu, as shown below:
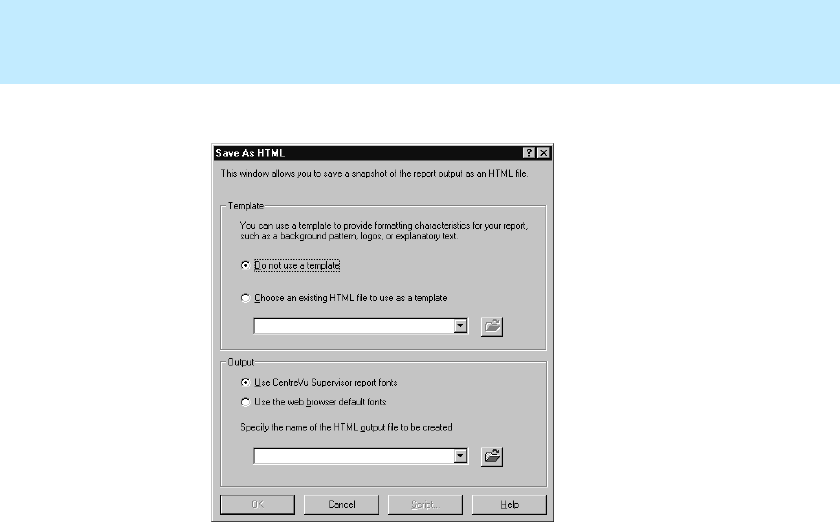
CentreVu
Supervisor Version 8 Installation and Getting Started
Overview
A-3
The Save as HTML dialog box appears:
2. In the Template section of the Save as HTML dialog box, do one of the
following:
●If you want to use a template, type the template file name in the
template field, select the template from the drop-down history lists, or
select the browse button and browse for a template.
●If you do not want to use a template, select the Do not use a template
radio button.
3. In the Output section, select one of the following:
●Select Use CentreVu Supervisor fonts to preserve the report fonts as
you see them in CentreVu Supervisor.
●Select Use Web Browser default fonts to display the output file
using Internet browser default fonts.
4. To specify the name of the HTML output file to be created, do one of the
following:
●Type the name of the output file in the file name field.
●Select the file name from the pull-down history list.
●Select the browse button and browse for a file name.

CentreVu
Supervisor Version 8 Installation and Getting Started
Overview
A-4
5. You can now do either of the following:
●If you want to schedule the creation of an HTML file, select the
Script button at the bottom of the dialog box. The Script button
displays the Save as Script dialog box, which lets you create a new
script for the selected report, run the report, and save it in HTML
format. The report will exit after the save is complete.
NOTE:
For more information on the Scripting feature, see Chapter 3, “Scripting,”
in the CentreVu® CMS R3V8 Administration (585-210-910) guide.
●Select the OK button to save the report in HTML file format.
The HTML file that has been generated can be modified to fit your
specific need using an HTML or text editor. The report can now be
viewed with an Internet browser.
Output Files 1
You must select a name for the HTML file you are creating. You must specify
the full file path (for example, c:\temp\myrpt.htm) to save the file in a directory
other than the current directory.
If there are charts associated with the file, they are converted into .gif files and
numbered in the order created. For example, c:\temp\myrpt1.gif and
c:\temp\myrpt2.gif.
The output file is created using the templates and fonts you have specified.
After the HTML is saved, you can move or copy it and all associated graphics
files to a Web server directory for viewing on the Internet or an Intranet.

CentreVu
Supervisor Version 8 Installation and Getting Started
Overview
A-5
Using Templates 1
Templates are HTML files that can be created or edited using an HTML or text
editor. A template can be used to provide company logos, background color,
specific fonts, or surrounding text to the HTML file. The templates are limited
by what your Web browser supports. Templates are installed with Save as
HTML.
NOTE:
If you do not select a template, the HTML file displays only the report.
Not Using Templates 1
If you choose not to use existing templates, Save as HTML does the following:
●Generates standard surround tags <HTML> and <BODY> in order for
your report to be converted to HTML
●Sets the background color white and font color to black
●Gives the page the same title as the report title.
CentreVu
Supervisor Version 8 Installation and Getting Started
Overview
A-6
Using Existing Templates 1
CentreVu Supervisor provides you with templates to use when saving a report
as an HTML file. Sample templates can be found in the samples directory of the
CentreVu Supervisor directory where the executable files were installed.
Save as HTML Template Tags 1
The following table describes the tags used by Save as HTML and which can be
used to create templates.
HTML Tag Description
<CVSUP_TITLE> This tag is replaced with the title of report in the
HTML file. If this tag is used within the
<TITLE> tags, the title of the report will be
used as heading to the page. Multiple uses of
this tag are allowed.
<CVSUP_BODY> This tag is replaced by the report body in the
HTML file. However, only the first occurrence
of this tag is replaced. If a template is used and
the <CVSUP_BODY> tag is not in the
template, an error occurs, and the Save as
HTML operation is aborted.

CentreVu
Supervisor Version 8 Installation and Getting Started
Overview
A-7
Fonts 1
If you choose to use the CentreVu Supervisor fonts, the font face and size are
preserved in the HTML file, as follows:
●The fonts used in CentreVu Supervisor are Arial, Courier New and Times
New Roman.
●In the event these fonts are not available on the computer viewing the
HTML file, backup fonts are used. The backup fonts are Helvetica for
Arial, Courier for Courier New, and Times for Times New Roman.
●If you choose to use the Web browser’s default fonts, the HTML file will
not specify any fonts, as follows:
— If you choose not to preserve the CentreVu Supervisor fonts, the
appearance of the report in the HTML file may change.
— If you choose to use a template, do not preserve the CentreVu
Supervisor fonts if the template specifies the fonts.

CentreVu
Supervisor Version 8 Installation and Getting Started
Overview
A-8

CentreVu
Supervisor Version 8 Installation and Getting Started
GL-1
CentreVu
Supervisor
Glossary 0
ACD See
Automatic Call Distribution
.
Actions Menu A menu in the upper-left corner of the
Supervisor Operations windows. The menu
lists the actions available for that particular
user window (for example, add, modify, and
delete). You select an action after entering the
necessary data in the user window.
Add A Supervisor action that adds the data
entered in the given window to the CMS
database.
Add/Remove
Programs
Wizard
A
Windows
feature that guides you through a
series of steps in order to remove programs
that have been installed on your computer.
The Add/Remove icon is found in the Control
Panel dialog box.

CentreVu
Supervisor Version 8 Installation and Getting Started
GL-2
Administrator
Privileges
Permissions assigned to a
Centrevu
Supervisor user in order to administer specific
elements, such as installing
CentreVu
Supervisor on a network. Access permissions
are specified as read or write permission.
Read permission means the user can access
and view only Supervisor data. Write
permission means the Supervisor user can
add, modify, or delete Supervisor data.
Agent A person who answers calls to an extension in
an ACD split/skill. The agent is known to CMS
by a login identification keyed into a voice
terminal.
Agent
Reports
A group of reports that give the status of
agents in an agent group, selected splits or
skills, or real-time information and statistics.
Agent Skill An attribute that is associated with an ACD
agent. Agent Skills can be thought of as the
ability for an agent with a particular set of
skills to handle a call that requires one of a set
of skills. An agent can be assigned up to four
skills.
Application
Folder
A folder on the network server that holds
CentreVu
Supervisor application software—
executables and components.

CentreVu
Supervisor Version 8 Installation and Getting Started
GL-3
Automatic
Call
Distribution
(ACD)
A switch feature using software that channels
high-volume incoming and outgoing call traffic
to agent groups (splits or skills).
Also an agent state where the extension is
engaged on an ACD call.
Automatic
Script
A Supervisor feature that launches a new
Supervisor session that logs into CMS and
runs the requested tasks in the background.
Actions do not display on the PC. See also
Interactive Script
and
Script
.
AutoPlay A
Windows
feature that causes an application
on a CD-ROM to run without any user
interaction as soon as the CD-ROM is
inserted into the drive.
Call
Management
System
(CMS)
A software product used by business customers that
have AT&T telecommunications switches and receive
a large volume of telephone calls that are processed
through the Automatic Call Distribution (ACD) feature
of the switch. The CMS collects call-traffic data,
formats management reports, and provides an
administrative interface to the ACD feature in the
switch.
CentreVu
Advocate
A collection of ECS features that provide new
flexibility in the way a call is selected for an agent in a
call surplus situation and in the way that an agent is
selected for a call.
Client A single PC that uses
CentreVu
Supervisor.

CentreVu
Supervisor Version 8 Installation and Getting Started
GL-4
CMS See
Call Management System
.
Controller A Supervisor feature that allows the user to
access CMS reports and operations. The
Controller includes a toolbar, a menu bar, a
status bar, tooltips, and indicators/
Custom
Reports
Real-time or historical reports that have been
customized from standard reports or created
from scratch.
Database A group of tables that store ACD data according to a
specific time frame: current and previous intrahour
real-time data and intrahour, daily, weekly, and
monthly historical data.
Database
Item
A name for a specific type of data stored in one of the
CMS databases. A database item may store ACD
identifiers (split numbers or names, login IDs, VDNs,
etc.) or statistical data on ACD performance (number
of ACD calls, wait time for calls in queue, current
states of individual agents, etc.).
Database
Table
CMS uses these tables to collect, store, and retrieve
ACD data. Standard CMS items (database items) are
names of columns in the CMS database tables.
Data Points Points of historical data. A data point should
include data for each interval of the working
day.
Delete A Supervisor action that removes the entry on
the window from the CMS database.

CentreVu
Supervisor Version 8 Installation and Getting Started
GL-5
Designer
Reports
Customized reports that can be created using
CentreVu
Supervisor’s Report Designer feature, and
which are run from
CentreVu
Supervisor.
Dialog Box A small on-screen window that conveys or
requests information from the user. This
window can contain list boxes, text boxes,
tabbed pages, and so forth.
Dictionary A CMS subsystem that can be used to assign names
to various call center elements such as login IDs,
splits/skills, trunk groups, VDNs and vectors. These
names appear on reports, making them easier to
interpret.
Edit Menu A menu on the Supervisor Operations
windows. The menu lists the actions available
for that particular user window (for example,
cut, copy, and paste).
Exception A type of activity on the ACD which falls
outside of the limits you have defined. An
exceptional condition is defined in the CMS
Exceptions subsystem, and usually indicates
abnormal or unacceptable performance on
the ACD (by agents, splits/skills, VDNs,
vectors, trunks, or trunk groups).
Exceptions
Reports
Display occurrences of unusual call-handling
events.
Find One A CMS action that searches the database for entries
thatch the input value.

CentreVu
Supervisor Version 8 Installation and Getting Started
GL-6
Graphics A CMS reporting option that allows you to view some
reports in bar graph format.
Grayed Out When you do not have access to a menu or action list
item, it will be grayed out (that is, dimmed or displayed
in a different color from the rest of the menu or action
list).
Historical
Reports
Display past ACD data for various agent, split/skill,
trunk, trunk group, vector, or VDN activities. A report
summary of call data into daily, weekly or monthly
totals
HTML See
HyperText Markup Language.
Hypertext A linkage between related text. For example,
if you select a word in a sentence, information
about that word is retrieved if it exists, or the
next occurrence of the word is found.
HyperText
Markup
Language
A standard for defining documents with
hypertext links. See also
Hypertext
.
Input Field An area on window where you specify
information that you would like to view, add,
modify, or delete.
Installation
Folder
A folder on the network that holds all of the
CentreVu
Supervisor files. Setup.exe is run
from this folder to install Supervisor on each
client computer.

CentreVu
Supervisor Version 8 Installation and Getting Started
GL-7
Integrated
Reports
Integrated reports compile call center
information from any starting point in the last
24 hours up to and including the current
interval.
Interactive
Script
A Supervisor feature that runs the requested
tasks in the current Supervisor session and
displays the actions on the PC. You can input
requested information while the script is
running. See also
Automatic Script
and
Script
.
Jump In Help, a command that moves you from the
currently displayed topic to another topic.
LAN See
Local Area Network
.
List All A CMS action that lists all the entries that matched the
current field values.
Local Area
Network
(LAN)
Two or more computers connected by cable
and using a suitable operating system and
application software so they can directly share
hard disks, printers, and other peripherals,
and files.
Local
Installation
With this type of installation, you install all of
the Supervisor software to disk space local to
each computer from a CD-ROM or from the
network.
Log A file that contains a record of computer
activity as well as backup and recovery data.

CentreVu
Supervisor Version 8 Installation and Getting Started
GL-8
Maintenance A CMS subsystem that is used for doing
routine maintenance of the
CentreVu
CMS,
such as backing up data, checking on the
status of the connection to the switch, and
scanning the error log.
Name Fields Fields in which you may enter a name (synonym) that
has been entered in the Dictionary subsystem (for
example, names of agents, splits/skills, agent groups,
trunk groups, vectors, VDNs).
Network
Server
A computer in a network shared by multiple users.
Pop-up A small window containing information that
displays over a Help window.
Queue/Agent
Reports
A group of reports that give the status of all
top agents in a skill and queue status, or skill
status for a selected skill.
Readme File A file that provides up-to-the-minute
information on a newly released product; in
this case,
CentreVu
Supervisor.
Read-Only A folder or file that can be read, but not
updated or erased.

CentreVu
Supervisor Version 8 Installation and Getting Started
GL-9
Real-Time
Reports
Display current ACD call activity on agents,
splits/skills, trunks, trunk groups, vectors, and
VDNs for the current or previous intrahour
interval. Current intrahour interval real-time
reports are constantly updated as data
changes during the interval. Previous
intrahour interval real-time reports show data
totals for activity that occurred in the previous
intrahour interval.
Registry The system-wide depository of information
supported by
Windows
. The registry contains
information about the system and its
applications, including clients and servers.
Report
Designer
A
CentreVu
Supervisor feature that enables
users to design their own reports.
Report
Wizard
A
CentreVu
Supervisor feature that delivers
user assistance, by way of a wizard, to quickly
and easily generate new customized reports.
The wizard provides instructional help that
guides the user through a series of tasks that
create a new customized report. Report
Wizard is a supplement to Report Designer.
Run A
Windows
command that lets you execute a
program, such as Supervisor installation.

CentreVu
Supervisor Version 8 Installation and Getting Started
GL-10
Scripting A CMS feature lets you automate actions
such as changing an agent’s skills, running
reports, exporting report data, and many other
CMS functions. For example, you can create
a script to run a specified report and export
the data on schedule.
Scroll To use the bar on the side of the report
window to move forward, backward, up, or
down within a window.
Setup
Program
A program that configures a system for a
particular environment; for example, it informs
the system of a new device or interface, such
as
CentreVu
Framework.
Shared
Installation
With this type of installation, the
CentreVu
Supervisor application software is installed to
a shared application folder on the network
server, but user-specific files and logs are
stored in a Supervisor folder on each user’s
PC or on their own network drive.
Shortcut An icon on your computer screen that enables
you to select and run an application (for
example,
CentreVu
Supervisor) quickly and
easily.
Skill An attribute that is assigned to an ACD Agent.
Agent Skills can be thought of as the ability for
an Agent with a particular set of skills to
handle a call which requires one of those
skills.

CentreVu
Supervisor Version 8 Installation and Getting Started
GL-11
Solaris
System
A multi-user operating system developed by sun
Microsystems. The operating system on which CMS
runs.
Split A group of extensions that receives special-purpose
calls in an efficient, cost-effective manner. Normally,
calls to a split arrive primarily over one or a few trunk
groups.
Standard
Reports
The set of reports that are delivered with the CMS or
CentreVu
Supervisor software.
Start Menu The menu that appears when you click on the
Start button in the
Windows
taskbar. This
menu contains programs and other
Windows
applications.
Taskbar The bar that appears by default at the bottom
of the
Windows
desktop. You can click
buttons that appear on this bar to switch
between running programs.
Terminal A combination of monitor (video display) and
keyboard used to communicate with a remote
computer to type and display information.
Terminal
Emulator
A Supervisor software application that
emulates a 615 Color (615C) terminal.
Toolbar A row of Controller buttons used to activate
various functions of the Supervisor
application.

CentreVu
Supervisor Version 8 Installation and Getting Started
GL-12
Tooltips Brief descriptions that display when the
mouse pointer is over a toolbar button.
Trunk Group
Report
Displays the status of each trunk in a selected
trunk group.
UNIX
System A multi-user operating system developed by
AT&T in 1969. The operating system on the
computer on which CMS runs.
User ID The login ID for a CMS user.
VDN See
Vector Directory Numbe
r.
VDN Reports A group of reports that show profiles of
current VDN performance, call handling
information for a specific VDN based on skill
preference, and how calls to specific VDNs
have been handled.
Vector A list of steps that process calls in a user-
defined manner. The steps in a vector can
send calls to splits, play announcements and
music, disconnect calls, give calls a busy
signal, or route calls to other destinations.

CentreVu
Supervisor Version 8 Installation and Getting Started
GL-13
Vector
Directory
Number
(VDN)
An extension number that enables calls to
connect to a vector for processing. A VDN is
not assigned an equipment location. It is
assigned to a vector. A VDN can connect calls
to a vector when the calls arrive over an
assigned automatic-in trunk group or when
calls arrive over a dial-repeating (DID) trunk
group and the final digits match the VDN.
Vector Report A report that lists the number of calls to
specific vectors.
Window A rectangular, on-screen frame through which
you can view a menu, data entry fields,
reports, or messages.

CentreVu
Supervisor Version 8 Installation and Getting Started
GL-14
CentreVu
Explorer
CentreVu
Supervisor Version 8 Installation and Getting Started
Index IN-1
IN
Index 1
Symbols
% Axis check box,7-34
Numerics
2-dimensional,7-33
3D Effects Tab,7-30
Depth to Height,7-31
Elevation,7-30
Projection,7-31
Rotation,7-30
Viewing Distance,7-31
Width to Height,7-31
3-dimensional,7-33
Rotating,7-46
A
About CentreVu Supervisor,1-1
Above Point, label parameter,7-37
ACD
Current,5-41, 7-6
Selecting,6-4, 7-6
Status Indicators,5-26
Action Buttons,5-40
Actions Menu,5-40, 6-6
Add,6-7, 6-10
Cancel,6-7
Copy,6-7
Create,6-7
Delete,6-7
Exit,6-7
Find one,6-7, 6-12, 6-13, 6-15
Get contents,6-7
List all,6-7, 6-11, 6-13, 6-15
List Devices,6-7

CentreVu
Supervisor Version 8 Installation and Getting Started
Index IN-2
Actions Menu, (continued)
Modify,6-7
Next,6-7, 6-12
Previous,6-7, 6-12
Run,6-8
Scripting,6-8
Select tables,6-8
Start,6-8
Add Button,6-7, 6-10
Add/Remove Button,4-3
Agent Administration Button,5-24, 5-30
Agent Administration icon,7-39
Agent Real-Time icon,7-39
Agent Thresholds,7-62
All Data, Exporting,7-16
Allow xx seconds,8-21
Application Window,8-10
Apply Button,5-39
Auto Retry,8-21
AutoPlay, Definition,1-7
Axis
Display,7-32
Tab,7-32
B
Background Color,7-29
Base, label parameter,7-37
Baud Rate Setting,8-19
Below Point, label parameter,7-37
Browse Button,5-41
Selecting Report Dates,7-7
Selecting Report Times,7-10
Using,5-42 to 5-45
Browse Selector Window
Multiple Entries Input,5-44
Single Entity Input,5-43
Buttons
Add,6-7, 6-10
Agent Administration,5-24
Apply,5-39
Browse,5-41, 5-42 to 5-45
Call Center Administration,5-24
Cancel,5-39, 6-7
Copy,6-7
Create,6-7
CentreVu
Supervisor Version 8 Installation and Getting Started
Index IN-3
Buttons, (continued)
Delete,6-7
Dictionary,5-24
Exceptions,5-24
Exit,6-7
Find one,6-7, 6-12, 6-13, 6-15
Get contents,6-7
Help,5-39
List all,6-7, 6-11, 6-13, 6-15
List Devices,6-7
Login,5-19
Logout,5-24
Maintenance,5-25
Modify,6-7
Next,6-7, 6-12
OK,5-39
Options,5-19, 5-21, 5-24
Previous,6-7, 6-12
Print Setup,7-53
Reports,5-24
Run,6-8
Script,5-39, 6-8, 7-49
Select tables,6-8
Start,6-8
System Setup,5-25
User Permissions,5-25
C
Call Center Administration Button,5-24, 5-31
Call Management System
Definition,1-4
Supervisor Requirements,1-13
System Capacities,1-13
Cancel Button,5-39, 6-7
Canceling Installation,1-7
Category Name, data point label,7-38
Caution Threshold icon,7-41
Center, label parameter,7-37
CentreVu Terminal Emulator
Creating profiles,8-14 to 8-15
Definition,8-2
Exiting,8-8, 8-11
Installing,8-4
Logging into CMS,8-6, 8-7

CentreVu
Supervisor Version 8 Installation and Getting Started
Index IN-4
CentreVu Terminal Emulator, (continued)
Messages
Error,8-23
Information,8-24
Profile menu,8-6
Using,8-3, 8-9
Window,8-9 to 8-10
Application,8-10
Function keys,8-10
Menu bar,8-10
Title bar,8-10
Change Agent Splits/Skills,7-19
Chart Format Options
3D Effects Tab,7-30
Axis Tab,7-32
Data Point Labels Tab,7-37
General Tab,7-29
Legend Tab,7-36
Title Tab,7-35
Type Tab,7-33
Chart Reports
Copying,7-50
Metafile format,7-50
Chart Type,7-33
Charts
Copying data,7-15, 7-50
Exporting Data,7-15
Formatting,7-17
Rotating a 3D,7-46
Choosing a profile,8-11
Clear All,6-9
Client Setup,3-9 to 3-19
Close Button,5-19
CMS (see also Call Management System),1-4
CMS Network Address,8-18
CMS Operations
Deleting Database Items,6-15
Finding database items,6-11
Input window,6-4
Menus
Actions,6-6
Edit,6-8
Modifying database items,6-13
Running,6-3 to 6-5

CentreVu
Supervisor Version 8 Installation and Getting Started
Index IN-5
CMS Server
Logging in,5-20, 8-7
Password prompt,8-7
Terminal type prompt,8-7
Logging out,8-8
CMS Server Requirements,1-12
CMS Servers,5-20
Color, Changing Threshold,7-60
Column Width, changing,7-52
Commands Menu,5-29
Agent Administration,5-30
Call Center Administration,5-31
Dictionary,5-30, 6-3
Exceptions,5-30
Reports,5-29
Communications Tab,7-73, 7-75, 7-76, 7-77, 8-18
Modem,8-19
Network,8-18
Serial,8-19
Connect Menu,5-20, 5-28
CMS Servers,5-20
Exit,5-28
Login,5-20
Logout,5-28
Connection Menu,8-12, 8-13
Connect,8-12
Disconnect,8-12
Options,8-13, 8-17
Send Break,8-13
Connection, establishing,8-6
Contents, Help,1-9
Conventions, writing,P-5
Copy,6-9
Copy Button,6-7
Create Button,6-7
Creating profiles,8-11, 8-14 to 8-15
Current ACD,5-41
Current Date and Time,5-26
Custom icon,7-40
Cut,6-9
CentreVu
Supervisor Version 8 Installation and Getting Started
Index IN-6
D
Data Bit Setting,8-20
Data Point Labels Tab,7-37
Above Point,7-37
Base,7-37
Below Point,7-37
Category Name,7-38
Center,7-37
Inside,7-37
None,7-37
Outside,7-37
Percent,7-38
Right,7-38
Series Name,7-38
Value,7-38
Dcom95 Installation,1-11
Default ACD,7-73
DEFINITY Enterprise Communications Server (ECS),1-4
Delete Button,6-7
Deleting Database Items,6-15
Depth to Height,7-31
Designing a report,7-13
DialPrefix,8-20
Strings,8-20
Suffix,8-21
Dictionary Button,5-24, 5-30
Dictionary Commands,6-3
Dictionary icon,7-39
DLL Incompatibilities,9-11
Drill-Down Reports,7-18
E
Edit Menu,5-40, 6-8, 7-15, 8-12
Clear,8-12
Clear all,6-9
Copy,6-9, 7-15, 8-12
Cut,6-9
Export All Data,7-16
Export Chart Data,7-15
Export Table Data,7-16
Paste,6-9, 8-12

CentreVu
Supervisor Version 8 Installation and Getting Started
Index IN-7
Editing Profiles,8-16
Elevation,7-30
Ending Interval,7-10
Error Messages,9-2 to 9-10
Installation,9-2 to 9-3
Login,9-4 to 9-10
Terminal,8-23
Exception Count,5-26
Exceptions
Button,5-24
Icon,7-39
Exceptions Button,5-30
Exit,6-7, 7-14
Reports,7-86
Supervisor,5-28
Exit Button,6-7
Exiting Terminal,8-8, 8-11
Export
All Data,7-47
Chart Data,7-47
Data window,7-48 to 7-49
Table Data,7-47
Exporting
Table Data,7-47
All Data,7-47
Chart Data,7-47
Report Data,7-47 to 7-49
Save as Script,7-49
F
Find one button,6-7, 6-12, 6-13, 6-15
Find Tab,1-9
First Day of Week,7-73
Fixed Columns,7-25
Fixed Rows,7-25
Flow Control Setting,8-19
Font Tab,8-21
Large,8-22
Medium,8-22
Sample Text,8-22
Small,8-22
CentreVu
Supervisor Version 8 Installation and Getting Started
Index IN-8
Format Menu,7-17
Chart,7-17
Sort by,7-17
Table,7-17
Formatting Chart Reports
3D Effects Tab,7-30
Axis Tab,7-32
Data Point Labels Tab,7-37
General Tab,7-29
Legend Tab,7-36
Title Tab,7-35
Type Tab,7-33
Formatting Table Reports
General Tab,7-25
Sort Tab,7-26
Function keys,8-10
G
General Tab,7-25, 7-29, 7-73
Axis Display,7-32
Background Color,7-29
First Day of Week,7-73
Fixed Columns,7-25
Fixed Rows,7-25
Real-Time,7-29
Show Gridlines,7-25
Get Contents Button,6-7
H
Hangup String,8-21
Help,1-8 to ??, 1-8, 1-9, ?? to 1-9, 5-22
About Help,5-22
Button,5-39
Contents,1-9, 5-22
Find Tab,1-9
Learning to use,1-9
Main Categories (books),1-8
On open windows,1-9
Technical Support,5-22
Topics,1-8

CentreVu
Supervisor Version 8 Installation and Getting Started
Index IN-9
Help Menu,8-13
About,8-13
Contents,8-13
Technical Support,8-13
Helpline,1-7, 9-1
History List,5-40
How to use,5-46
HTML, Saving as,7-13, A-1 to A-7
I
Icons
Agent Administration,7-39
Agent Real-Time,7-39
Caution Threshold,7-41
Custom,7-40
Dictionary,5-24, 7-39
Exceptions,5-24, 7-39
Logout,5-24
Maintenance,5-25, 7-39
Options,5-19, 5-24
Other,7-40
Previous,6-7, 6-12
Reports,5-24
Split/Skill,7-40
System Setup,5-25
Trunk,7-40
User Permissions,5-25
VDN,7-40
Vector,7-40
Warning Threshold,7-41
Information Messages, Terminal,8-24
Input Fields
Completing,5-42
Definition,5-40
Input Windows
Completing,5-40
Definition of fields,5-40
Inside, label parameter,7-37
Install/Uninstall Tab,4-2
Installation
Canceling,1-7
CentreVu Terminal Emulator,8-4
CMS Server
Requirements,1-12
Dcom95,1-11

CentreVu
Supervisor Version 8 Installation and Getting Started
Index IN-10
Installation, (continued)
Local,2-1 to ??
Other Requirements,1-11
PC Requirements
Network Connection,1-10
Serial Connection,1-10
Windows 95,1-11
Windows NT,1-11
Service Pack 3,1-11
Support,1-7
Tips,1-7
L
Language-version table,1-2
Large Font,8-22
Left, label parameter,7-38
Legend Tab,7-36
Location,7-36
Visible,7-36
List all button,6-11, 6-13, 6-15
List Devices button,6-7
Lists, History,5-40
Local Installation,1-5, 2-1 to ??
Network Folder, Preparing,2-2 to 2-3
Previous Version Found,2-7
Replace CentreVu Supervisor 5.0,2-8 to 2-9, 2-9 to 2-10, 3-12
Selecting Components,2-13
Selecting the Destination Folder,2-11
Selecting the Local Directory,2-10 to 2-11
Selecting the Shortcuts Folder,2-14
Selecting the Type of Installation,2-12
Setting Up the PC,2-3 to 2-16
Type of Location,2-7
Using Start/Run,2-3 to 2-5
Location
of Legend,7-36
of title,7-35
Logging into CMS,8-6, 8-7
Logging out of CMS,8-8
Login
Button,5-19, 5-20
Prompt,8-7
Login Status Indicator,5-26
Logout Button,5-24, 5-28

CentreVu
Supervisor Version 8 Installation and Getting Started
Index IN-11
M
Maintenance
Button,5-25, 5-33
Icon,7-39
Margins, defining page,7-55
Maximize/Minimize Buttons,5-19
Maximizing Report Output Windows,7-51
Medium Font,8-22
Menu Bar,5-40
About CentreVu Supervisor,5-22
Commands,5-29
Agent Administration,5-30
Call Center Administration,5-31
Dictionary,5-30
Exceptions,5-30
Reports,5-29
Connect,5-20, 5-28
CMS Servers,5-20
Exit,5-28
Login,5-20
Logout,5-28
Connected to CMS Server,5-27
Help,5-22
Help Contents,5-22
Not Connected to CMS Server,5-20
Report,7-11
Scripts,5-34
Technical Support,5-22
Terminal,8-10
Tools,5-21, 5-32
Add Button,5-33
Advanced,5-21, 5-33
Maintenance,5-33
Options,5-21, 5-32
Remove Button,5-33
System Setup,5-33
User Permissions,5-34
Menus
Pop-Up,7-42
Right Mouse Button,7-42
Minimizing Report Output Windows,7-51

CentreVu
Supervisor Version 8 Installation and Getting Started
Index IN-12
Modem Connection
Baud Rate,8-19
Data Bit,8-20
Flow Control,8-19
Parity,8-19
Port,8-19
Problems,9-13
Settings,8-19
Stop Bits,8-20
Modem Tab,8-20
Allow xx seconds,8-21
Auto Retry,8-21
Dial Prefix,8-20
Dial Suffix,8-21
Hangup String,8-21
Reset String,8-21
Modify button,6-7
Modifying Database Items,6-13
N
Name Format Tab,7-77
National Customer Care Center Phone Number,1-7, 9-1
Network Connection,1-10
Network Connection Settings,8-18
CMS Network Address,8-18
Network Port,8-18
Network Port,8-18
Network Setup,3-2 to 3-8
Network Software Operation,9-13
Next button,6-7, 6-12
None, label parameter,7-37
Numbers, displaying page,7-55
O
OCX Incompatibilities,9-11
OK Button,5-39
On a specific topic,1-9
Opening a profile,8-11
Opening Terminal,8-5
Operations
Actions menu,6-6
Edit menu,6-8
Input window,6-4
CentreVu
Supervisor Version 8 Installation and Getting Started
Index IN-13
Operations Window
Adding items,6-10
Modifying items,6-13
Options Button,5-19, 5-21, 5-24, 5-32
Options Menu,7-20
Restore Original View,7-20
Status Bar,7-20
Thresholds,7-20
Options Tab
Default ACD,7-73
Synchronize PC and CMS Time at Login,7-74
Use Tooltips,7-74
User Sound,7-74
Options...
Communications Tab,7-73, 7-75, 7-76, 7-77
General Tab,7-73
Name Format Tab,7-77
Report Colors Tab,7-75
Threshold Colors Tab,7-76
Organize Scripts window,5-34
Other icon,7-40
Outside, label parameter,7-37
P
Package Contents,1-6
Page
Margins, defining,7-55
Numbering,7-55
Setup,7-12, 7-54
Parity Setting,8-19
Password Prompt,8-7
Paste,6-9
Percent, data point label,7-38
Port Setting,8-19
Previewing a report,7-12
Previous Button,6-7, 6-12
Previous Version Found,2-7, 3-10
Print Setup,7-53
Printer selection,7-53
Printing a report,7-12
Profile Menu,8-6, 8-10 to 8-11
1...4, choosing a profile,8-11
Editing profiles,8-16
New,8-11
Open,8-6, 8-11
CentreVu
Supervisor Version 8 Installation and Getting Started
Index IN-14
Profile Menu, (continued)
Save,8-11
Save As,8-11
Save Profile As,8-15
Profile Options
Communications Tab,8-18
Font Tab,8-21
Modem Tab,8-20
Setting,8-15, 8-17
Window,8-14
Profiles, creating,8-14 to 8-15
Projection,7-31
R
Readme File
Accessing,2-3, 3-2
Where to Find,1-7
Real-Time,7-29
Related Documents,P-6
Replace CentreVu Supervisor 5.0,2-8 to 2-9, 2-9 to 2-10, 3-11, 3-12
Report
Dates,7-7
Destinations,7-6
Layouts
Chart,7-23
Table,7-22
Restoring view,7-20
Thresholds, Minimized,7-41
Times,7-10
Ending Interval,7-10
Starting Interval,7-10
Windows, Minimizing,7-39
Report Colors Tab,7-75
Report Designer,7-3
Report Menu,7-12
Design,7-13
Exit,7-14
Page Setup,7-12
Print,7-12
Print Preview,7-12
Restart,7-12
Save,7-13
Save As,7-13
Save as HTML,7-13
Script,7-14

CentreVu
Supervisor Version 8 Installation and Getting Started
Index IN-15
Report Menu Bar,7-11
Edit,7-15
Format,7-17
Options,7-20
Report,7-12
Tools,7-18
Report Selector Window,7-4
Reports
Change Agent Splits/Skills,7-19
Chart,7-23
Copying chart,7-50
Drill Down,7-18
Exiting,7-86
Formatting
Changing column widths,7-52
Chart,7-28
Table,7-24
Historical
Run Dates,7-7
Run Times,7-10
Printing,7-53
Report Selector Window,7-3
Resize,7-51
Resizing windows,7-51
Restarting,7-86
Running,7-3
Saving to File,7-15, 7-16
Setting Threshold Highlights,7-56
Specifying page setup,7-54
Status Bar,7-20
Table,7-22
Threshold Settings,7-18
Reports Button,5-24, 5-29
Reset String,8-21
Resizing Report Windows,7-51
Restarting a report,7-12, 7-86
Restore Original View,7-20
Right Mouse Button menu,7-42
Right, label parameter,7-38
Rotating a 3D Chart,7-46
Rotation,7-30
Run button,6-8

CentreVu
Supervisor Version 8 Installation and Getting Started
Index IN-16
S
Sample Text box,8-22
Save As,7-13
Save as HTML,7-13, A-1 to A-7
Dialog box,A-3
Selecting fonts,A-3, A-7
Using a template,A-3
Save Profile As dialog box,8-15
Saving a profile,8-11
Saving a report,7-13
Script
Automatic,7-14
Interactive,7-14
Report menu,7-14
Save as Script dialog,7-14
Script Button,5-39, 6-8
Scripting
Organizing Scripts,5-34
Scripts menu,5-34
Scripts Menu,5-34
Search for Help On,1-9
Secondary System Password, using,9-14
Select Components,2-13, 3-16
Select Destination Directory,3-14
Select Destination Folder,2-11, 3-6
Select Folder,2-14, 3-17
Select Local Directory,2-10 to 2-11
Select Location,2-10 to 2-11, 3-13 to 3-14
Select Network Location,3-5 to 3-7
Select tables button,6-8
Selector Windows,5-38 to 5-39
Apply button,5-39
Cancel button,5-39
Help Button,5-39
OK button,5-39
Script button,5-39
Tab folders,5-38
Serial Connection,1-10
Baud Rate,8-19
Data Bit,8-20
Parity,8-19
Port,8-19
Problems,9-13
Settings,8-19
Stop Bits,8-20

CentreVu
Supervisor Version 8 Installation and Getting Started
Index IN-17
Series Name, data point label,7-38
Service Pack 3 Installation,1-11
Setting Profile Options,8-17
Setting Report Threshold Highlights,7-56
Shared Network Installation,1-5
Client Setup,3-9 to 3-19
Previous Version Found,3-10
Replace CentreVu Supervisor 5.0,3-11
Selecting the Components,3-16
Selecting the Destination Directory,3-14
Selecting the Location,3-13 to 3-14
Selecting the Shortcuts Folder,3-17
Selecting the Type of Installation,3-15
Network Setup,3-2 to 3-8
Doing Administrative Tasks,3-2
Selecting the Destination Folder,3-6
Selecting the Network Location,3-5 to 3-7
Selecting Type of Location,3-5
Using Start/Run,3-3
Show Gridlines,7-25
Skill, Change Agent,7-19
Small Font,8-22
Sort Tab,7-26
Split, Change Agent,7-19
Split/Skill icon,7-40
Split/Skill Thresholds,7-67
Stacked check box,7-34
Start button,6-8
Starting Interval,7-10
Status Bar,7-20
ACD Status Indicators,5-26
Connected to CMS Server,5-26
Current Date and Time,5-26
Exception Count,5-26
Login
Status Indicator,5-26
Not Connected to CMS Server,5-19
Stop Bits Setting,8-20
Supervisor
Icon,5-36
Menus, using,5-37
Performance,1-14
Reliability/Availability,1-14
Security,1-14
Selector Windows,5-38 to 5-39
Upgrading,1-11
Synchronize PC and CMS Time at Login,7-74

CentreVu
Supervisor Version 8 Installation and Getting Started
Index IN-18
System Menu Box,5-18
System Setup,5-25
System Setup Button,5-33
System Tray Icon
Controlling the sort order,5-36
Turning on and off,5-36
Using,5-36
T
Tab Folders
Operations,5-38
Reports,5-38
Table
Exporting Data,7-16
Formatting,7-17
Sorting,7-17
Table Format Options
General Tab,7-25
Sort Tab,7-26
Technical Support,5-22
Terminal
Creating profiles,8-14 to 8-15
Definition,8-2
Exiting,8-8, 8-11
Installing,8-4
Logging into CMS,8-6, 8-7
Messages,8-23 to 8-24
Error,8-23
Information,8-24
Opening,8-5
Profile menu,8-6
Using,8-3, 8-9
Window,8-9 to 8-10
Application,8-10
Function keys,8-10
Menu bar,8-10
Title bar,8-10
Terminal Menu Bar
Connection Menu,8-12, 8-13
Edit Menu,8-12
Help Menu,8-13
Profile Menu,8-10 to 8-11
Terminal type prompt,8-7
Text Boxes, Completing,5-42

CentreVu
Supervisor Version 8 Installation and Getting Started
Index IN-19
Threshold Colors Tab,7-76
Threshold Highlights
Agent Thresholds,7-62
Caution Icon,5-36
Minimized,7-41
Setting,7-56
Settings, accessing,7-42
Split/Skill Thresholds,7-67
Supervisor icon,5-36
VDN Thresholds,7-70
Warning icon,5-36
Threshold Settings,7-18
Highlighting,7-20
Threshold, Color,7-60
Title Bar
Connected to CMS Server,5-23
Not Connected to CMS Server,5-18
Title Bar, Terminal,8-10
Title Tab,7-35
Location,7-35
Visible,7-35
Toolbar
Buttons,5-24 to 5-25
Connected to CMS Server,5-24 to 5-25
Not Connected to CMS Server,5-19
Toolbar Action buttons,5-40
Tools Menu,5-21, 5-32, 7-18
Add Button,5-33
Advanced,5-21, 5-33
Change Agent Splits/Skills,7-19
Drill-Down Reports,7-18
Maintenance,5-33
Options,5-21, 5-32
Remove Button,5-33
System Setup,5-33
Threshold Settings,7-18
User Permissions,5-34
Topics, Help,1-8
Troubleshooting,9-1 to ??
Installing CentreVu Supervisor,9-11
Networking Software Operation,9-13
OCX and DLL Incompatibilities,9-11
Preserving CentreVu Supervisor User Profiles,9-12
Resolving TCP/IP Host Name,9-12
Secondary System Password,9-14
Serial/Modem Connections Problems,9-13
Windows Swap Files,9-11
Trunk icon,7-40
CentreVu
Supervisor Version 8 Installation and Getting Started
Index IN-20
Type of Install,2-12, 3-15
Type of Location,2-7, 3-5
Type Tab,7-33
% Axis,7-34
2D vs. 3D,7-33
Chart Type,7-33
Stacked,7-34
U
Uninstalling CentreVu Supervisor,4-1 to 4-4
What is Removed,4-1
Upgrading Supervisor,1-11
Use Sound,7-74
Use Tooltips,7-74
User Permissions,5-25
User Permissions Button,5-34
V
Value, data point label,7-38
VDN icon,7-40
VDN Thresholds,7-70
Vector icon,7-40
Viewing Distance,7-31
Visible check box,7-35, 7-36
W
Warning Icon,5-36
Warning Threshold icons,7-41
Width to Height,7-31
Windows
Closing,5-47
Deleting items,6-15
Input definitions,5-40
maximizing,7-51
minimizing,7-51
Resize,7-51
Resizing,7-51
Windows Swap Files,9-11

How Are We Doing?
Document Title:
CentreVu
®
Supervisor Version 8
Installation and Getting Started
Document No.: 585-215-830 Date: December 1999
Lucent Technologies welcomes your feedback on this document. Your comments can be of great
value in helping us to improve our documentation.
1. Please rate the effectiveness of this document in the following areas:
2. Please check the ways you feel we could improve this document:
❒ Improve the overview/introduction ❒ Make it more concise/brief
❒ Improve the table of contents ❒ Add more step-by-step procedures/tutorials
❒ Improve the organization ❒ Add more troubleshooting information
❒ Include more figures ❒ Make it less technical
❒ Add more examples ❒ Add more/better quick reference aids
❒ Add more detail ❒ Improve the index
Please provide details for the suggested improvement. ___________________________________
_____________________________________________________________________
3.What did you like most about this document?
_____________________________________________________________________
_____________________________________________________________________
4.Feel free to write any comments below or on an attached sheet.
_____________________________________________________________________
_____________________________________________________________________
_____________________________________________________________________
_____________________________________________________________________
If we may contact you concerning your comments, please complete the following:
Name: ___________________________________ Telephone Number: (_____)______________
Company/Organization: _________________________________ Date: ____________________
Address: ______________________________________________________________________
When you have completed this form, please fold, tape, and return to address on back, or you can fax
the form to 303-538-2195.
Excellent Good Fair Poor Not Applicable
Ease of Use ///////////////////////
Clarity ///////////////////////
Completeness ///////////////////////
Accuracy ///////////////////////
Organization ///////////////////////
Appearance ///////////////////////
Examples ///////////////////////
Illustration ///////////////////////
Overall Satisfaction ///////////////////////
