SCBA VOL 1 Luxfer Inspection Guide
User Manual: Luxfer SCBA Inspection Guide
Open the PDF directly: View PDF ![]() .
.
Page Count: 75
LUXFER’S SCBA CYLINDER
VISUAL INSPECTION GUIDE
VOLUME ONE:
1972 - 1987
A Guide to the Visual Inspection of Luxfer SCBA Cylinders
Manufactured in the USA between 1972-1987

Copyright (c) 1998 By Luxfer Inc. All rights reserved.
Except as permitted under the U.S. Copyright Act of 1976,
no part of this book may be reproduced in any form without
the express written consent of Luxfer Inc.
Published in the USA by Luxfer Inc.
3016 Kansas Avenue
Riverside, CA 92507
USA
Tel: (1) (909)-684-5110
First Edition, June 1998.
L SCBA G1 1998

Table of Contents
Introduction........................................................1
Visual Inspection Procedures .............................7
1. Frequency of Inspection ............................7
2. Before Inspection Begins ...........................9
3. Preparing The Cylinder For Inspection....11
4. Preparing The Exterior.............................14
5. Threads.....................................................18
6. Interior .....................................................20
7. Miscellaneous ...........................................22
8. Repairs to Composite Materials ...............23
9. Cylinder Condition - The Decision...........24
10. Re-Installing Valves ...................................26
11. Filling the SCBA Cylinder.........................27
Notes.................................................................29
Appendices .......................................................43
Appendix A...............................................43
Appendix B ..............................................44
Appendix C ..............................................46
Appendix D..............................................47
Appendix E...............................................48
Appendix F...............................................49
Glossary/Appendix G........................................51
Figures/Photos ..................................................61


Luxfer SCBA Guide Volume One 1
Every day, emergency response team members use self-contained breathing apparatus
(SCBA) equipment in the performance of their job. It allows them to enter what
otherwise is an unsafe environment to save lives and protect property.
SCBA equipment throughout the world is used several million times every year and has
an excellent safety record. A major reason for that excellent record is the strict
regulation of SCBA equipment in the USA and many other parts of the world.
The Luxfer SCBA cylinder is only one part of that complex respiratory equipment and
the care and maintenance of the Luxfer SCBA cylinder is the only focus of this
Guide. From this point on, usage of the term “SCBA” refers primarily to the Luxfer SCBA
cylinder component.
It is also very important to point out that this Guide is not meant to cover all visual
inspections required or mandated by federal or other state or local authorities or your
SCBA manufacturer. This Guide covers only the technical, comprehensive external and
internal inspections carried out by qualified technicians as part of government-
mandated hydrotests or at times recommended by this Guide. Hereinafter these techni-
cal inspections are referred to as “visual inspections.”
SCBA cylinders are extremely tough and designed for the hard service they receive.
Nevertheless, like all SCBA equipment components, cylinders must be treated with
respect and be well maintained. Central to any prudent care and maintenance policy
should be the visual inspection as recommended in this Guide and in all applicable rules
and regulations.
This Guide is not intended to replace the need for professional training in how to carry
out a professional visual inspection. In fact, Luxfer strongly recommends such training,
and the Guide includes a resource list of known training agencies. This Guide will,
however, provide the trained inspector with the procedures and standards for visual
inspections and additional resources a technician will need to carry out a thorough,
professional visual inspection.
The professional staff at Luxfer who worked on developing this Guide want to
acknowledge the considerable assistance received from many members of the SCBA
community in making this Guide possible.
INTRODUCTION

21998 Edition
NOTES:
• In developing these procedures and standards, Luxfer has complied with all known US
DOT and other applicable governmental regulations and CGA standards applicable to
all-metal and hoop-wrapped composite cylinders in the USA.
• In jurisdictions outside the USA, refer to your local regulations which may override any
recommendations made in this Guide.
•Remember, this Guide applies to the visual inspection of Luxfer-manufactured
cylinders only.
HOW TO USE THIS GUIDE
This Guide provides you, the technician, with step-by-step instructions on how to carry
out a visual inspection of all types of Luxfer SCBA cylinders manufactured in the USA
between 1972 and 1987, inclusive. To identify the year of manufacture of your Luxfer
cylinder, look for a US DOT hydro stamp dated between 1972 and the end of 1987.
Before you begin any inspection, you should make yourself familiar with the
contents of this Guide.
Included in the Guide are the following sections:
•1.
Categorizing Your Cylinder: Before you begin your inspection, you must determine
what kind of cylinder you are about to inspect.
•2.
Frequency of Inspection: You must also decide how frequently you are going to
inspect your SCBA cylinders. This will depend partly upon the type of cylinder and
how it is used.
•3.
Before Inspection Begins: Everything you need to know to get ready for an
inspection.
• 4-10.The Inspection Process: In seven sections, everything you need to know to take
you through the inspection process.
• 11. Filling the SCBA cylinder.
• The NOTES: There is much information about the inspection procedures which, if
included in the Inspection Process, would make it unwieldy and difficult to read.
These NOTES are an important part of the Inspection Process and will help you
understand some of the reasons why a particular instruction was given, or may elabo-
rate on a particular point, or may explain how to do something.You must read and
understand the NOTES before you conduct visual inspections on an SCBA cylinder.
We recommend that you review the NOTES frequently.
• The APPENDICES: Useful lists and forms as well as sources for equipment,
accessories and further technical references. Each APPENDIX should be reviewed as
needed after its first reading. The Glossary of Terms is one of the Appendices.
• FIGURES and PHOTOS: To help you recognize things to look for during an inspection.
Review them all before and while you are reading the Inspection Process sections.

Luxfer SCBA Guide Volume One 3
WARNINGS:
• Before using this Guide for the first time, read through and become familiar
with all the sections, including the NOTES, APPENDICES, FIGURES and
PHOTOS. If any part is unclear, contact Luxfer before inspecting the first
cylinder. Remember, Luxfer recommends professional training for anyone
visually inspecting cylinders.
• This Guide applies to visual inspections of Luxfer SCBA cylinders made
between 1972 and 1987 only. This Guide is not intended for the inspection of
any other Luxfer cylinder; nor for inspecting SCBA cylinders, valves or other
SCBA components produced by another manufacturer. Contact the
relevant manufacturer for their inspection materials.
• This Guide only applies to Luxfer SCBA cylinders filled with air and used in a
'normal' environment (free of corrosive atmospheres and environments).
For other applications or product usage, please contact Luxfer.
• To eliminate the risk of fire and serious injury, never fill a Luxfer SCBA cylin-
der with pure oxygen or oxygen-enriched air mixture or any other special
gas. See NOTE 2 for additional information.
NOTE: This Guide includes the inspection procedures for short-duration (5 and
10 minute) air cylinders used for emergency escape and limited reliance
although not specifically referred to in the text.
To contact Luxfer Gas Cylinders, see NOTE 7 for information.
IMPORTANT
References to the NOTES,APPENDICES, FIGURES and PHOTOS in the following text
are shown by the use of superscript numbers or letters and numbers, as follows:
NOTES: Superscript number alone, such as Luxfer Gas Cylinders7(i.e. NOTE 7)
APPENDICES: Superscript letter alone, such as The FORMG(i.e.APPENDIX G)
FIGURES: Superscript F with number, such as F4 (i.e. FIGURE 4)
PHOTOS: Superscript P with number, such as P14 (i.e. PHOTO 14)
41998 Edition
CATEGORIZING THE CYLINDER
Luxfer SCBA cylinders come in a variety of models, sizes and features. There are two
basic categories: All-aluminum (also called all-metal) and composite. This Guide covers
the care and maintenance of all-aluminum cylinders and one type of composite,
hoop-wrapped cylinders.
ALL-ALUMINUM
These SCBA cylinders are made of aluminum. The US Department of Transportation
(DOT) regulates the visual inspection of aluminum cylinder surfaces (including the alu-
minum surfaces of composite cylinders). The applicable DOT regulations reference
Compressed Gas Association (CGA) Pamphlet C-6.1 as the required procedure to follow.
Every SCBA cylinder inspector in the USA, or other countries following DOT regulations,
must be familiar with and have the most current version of C-6.1 at hand.
COMPOSITE (HOOP-WRAPPED)
Luxfer hoop-wrapped composite cylinders are a combination of exposed aluminum
surfaces and composite materials where the composite material is only on the middle
cylindrical portion of the container. These cylinders consist of an all-aluminum inner
cylinder or “liner”Gthat is wrapped with resin and glass fiber materials (see GlossaryG
definition, of composite materials). All composite cylinders have a resin component
that holds in place the fibers wrapped around the aluminum liner.
The DOT regulates the visual inspection of composite surfaces. The applicable DOT
regulations reference CGA Pamphlet C-6.2 as the required procedure.FEvery SCBA
cylinder inspector in the USA, or in other countries conforming to DOT regulations,
must be familiar with and have the most current version of C-6.2 at hand.
To be able to inspect the composite materials on your cylinder, you will also need to
identify the cylinder category. All hoop-wrapped composite cylinders fall into one of
two categories: GROUPS A and B.
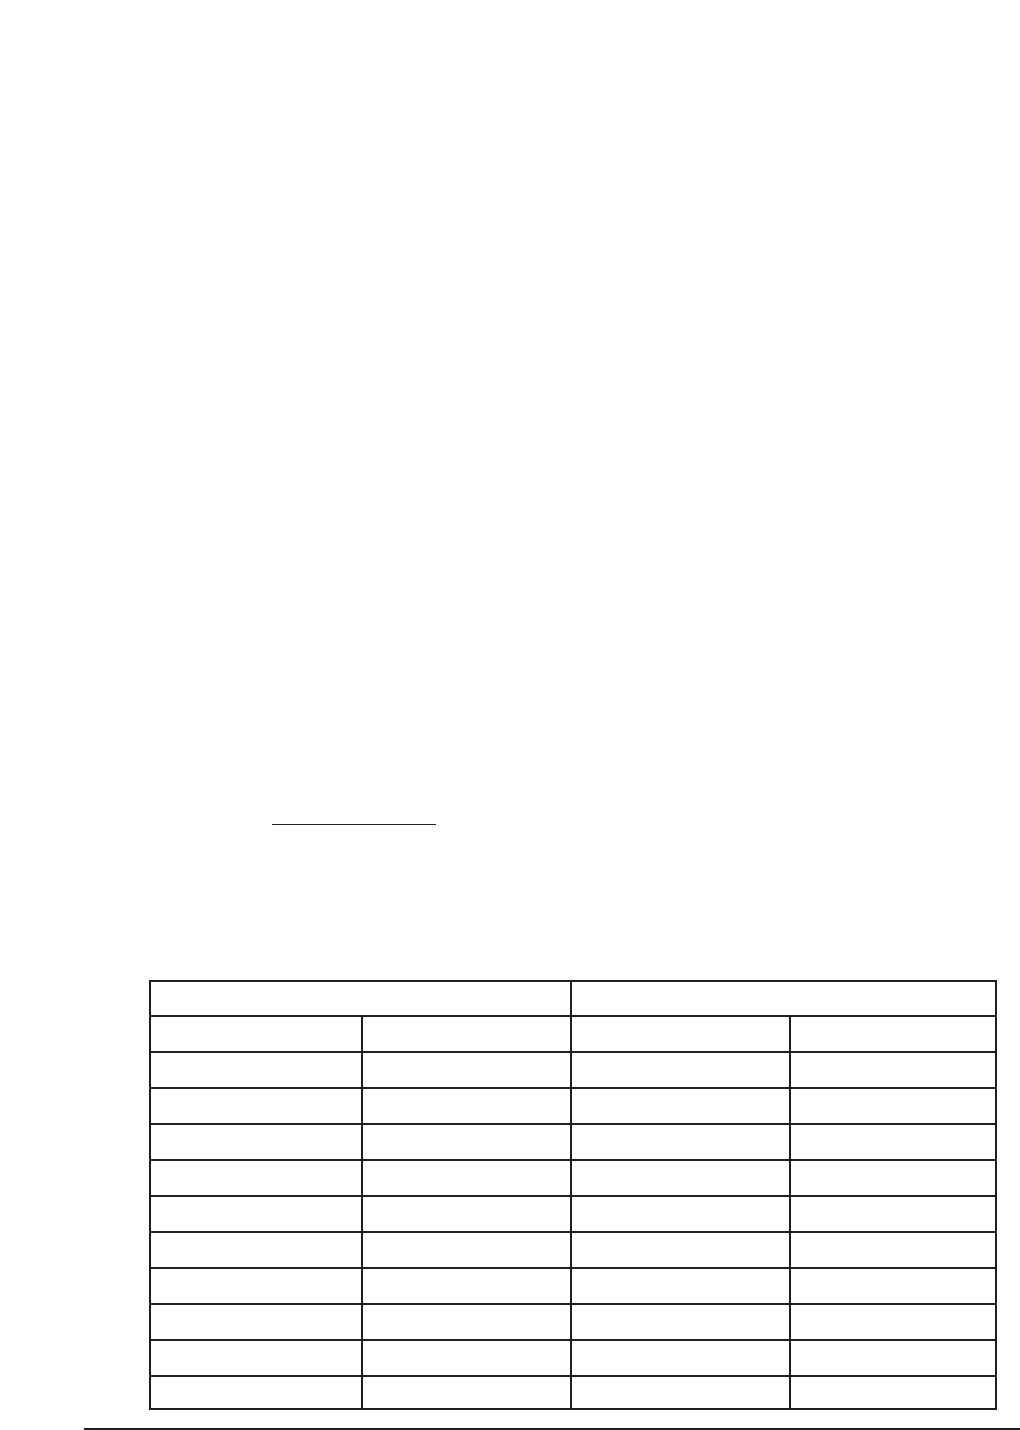
To identify your cylinder category, look on its label for its Part Number or Prefix code.
(For examples, see FIGURES 3 and 4.) Then, look at the chart below. Find the group con-
taining your cylinder identification and, where relevant in the inspection process, follow
the procedures for that group.
GROUP A GROUP B
PART NUMBER PART NUMBERPREFIX NUMBER PREFIX NUMBER
L08W
L13W
L15W
L17W
L17A
L18W
L23W
L24W
L45N
L62W
L45WRD
WG
TL
WH
WO
TH
WZ
WY
WK
WS
WF

Luxfer SCBA Guide Volume One 5
NOTE: Remember, these procedures are for the composite materials on your
cylinder. You must follow the aluminum inspection procedures for any and all
aluminum portions of every composite cylinder.
For your general guidance:
•Group A: Follow Group A inspection limits for the composite portion of the cylinder.
•Group B: Follow Group B inspection limits for the composite portion of the cylinder.
It is also important to know that physical damage (abrasion, dents, digs, scratches, cuts,
gouges, etc.) to composite surfaces is categorized into three levels in CGA C-6.2. There is
Level 1, Level 2 and Level 3 damage.
•Level 3 damage requires the condemnation of the cylinder.
•Level 2 damage may be repaired and the cylinder must then be hydrotested prior to
returning to service. If the owner of a composite container with Level 2 damage
chooses not to have the container repaired (or the regulatory authority doesn't allow
the cylinder to be repaired), the cylinder must be condemned.
•Level 1 damage is usually noted in the cylinder record/log or owner formDand the
cylinder is acceptable to return to service (providing it passes the rest of the visual
inspection and its regular hydrotest).
Remember, this damage categorization refers only to the composite portion of the SCBA
and refers to the physical conditions of the composite materials.

61998 Edition
This page is intentionally left blank.

Luxfer SCBA Guide Volume One 7
The frequency of inspection for an SCBA cylinder is determined by the type of cylinder,
how often it is used22 and the care4it has received.
Aluminum Cylinders and Hoop-Wrapped Composite Cylinders
Luxfer has identified three levels of service: Normal, Heavy and Unusual Treatment,
Accident or Condition (UTAC). They are defined as follows:
A. NORMAL SERVICE. These cylinders are well cared4for and maintained and are filled
or ‘topped off’ three or four times22 a week or less. Every SCBA cylinder in good con-
dition should be visually inspected no less than every 30 months for all-aluminum
and every 18 months for hoop-wrapped composite cylinders and at any opportune
time before that point.15
B. HEAVY SERVICE: “Heavy service” means any one or more of the following:
1. Cylinders being filled or ‘topped off’ five or more times per week; and/or
2. Cylinders used wherever damage is more likely than in normal use or where the
care and/or maintenance is below recommended care;4and/or
3. Normal Service Cylinders that have been repaired (defined below).
If the cylinder is used in Heavy Service, it should be inspected every twelve months.
C. UNUSUAL TREATMENT, ACCIDENT, OR CONDITION (UTAC) is defined as
including a situation where the cylinder:
1. Dropped, fell, was struck, or was in an accident;
2. Was stored improperly4or shows signs of damage;
3. Has obvious corrosion since the last visual inspection, or has been exposed to
chemicals or an extremely corrosive atmosphere/environment;
4. Has a gouge, dent, scrape, cut, dig, or in any way has been damaged since the last
visual inspection;
5. Was stored with water, material or matter inside the cylinder, or was stored in a
place where it was in chemicals or corrosive materials;
6. Shows signs of exposure to fire or high heat,20 including any one or more of the
following:
a. CharringP27 or blistering of the paint or protective coating;
b. Melting or charring of the metal;
c. Distortion of the cylinder and/or any cylinder accessory;
d. Melting of fuse plugs, valve handwheel, valve protector, and/or any other
valve component or cylinder accessory;
7. Has been partially or fully repainted or treated to hide suspected damage and/or
fire damage;
8. Is known or suspected to be leaking;
9. Is known or suspected of having a crack; or,
10. Was found empty (when it should have been full) and there is no known reason
for it to be empty.
INSPECTION
1 FREQUENCY OF INSPECTION

81998 Edition
WARNING: If a cylinder is known to have been subjected to any unusual treatment,
accident, or condition, it should be immediately taken out of service, depressurized and
visually inspected before it is returned to service or, if necessary, condemned.

Luxfer SCBA Guide Volume One 9
If there is any part of the following procedure that is unclear, please contact Luxfer7for
assistance.
A work station should be made ready to do visual inspections. Select an area and table
which will not cause damage to the cylinder or equipment. The table should be flat,
level, and padded (e.g., old carpet, carpet remnants, rugs, etc.). Lighting in the area
should be bright. The table should be equipped with a holder or blocks to keep a
cylinder on its side from rolling, without damaging the cylinder or valving.
The inspector should be alert, clear-headed, and observant. The visual inspection
depends upon the knowledge, experience and senses of the inspector.
Luxfer recommends that all inspectors responsible for visual inspections are trained and
accredited as visual cylinder inspectors. For a listing of inspection training agencies, see
APPENDIX A.
The inspection equipment and accessories should be gathered together. A list of
accessories can be found in APPENDIX B and a list of sources in APPENDIX C. All equip-
ment and accessory items should be inspected before use for defects or damage,
and all should be made fully operational.
Obtain a SCBA CYLINDER VISUAL INSPECTION FORM (otherwise referred to as THE
FORM) for each cylinder to be inspected, or use the sample in APPENDIX D.
A log may be used and kept by an inspector instead of using THE FORM, especially when
the cylinders are all owned by the inspecting group (e.g., the inspectors doing the
inspecting are employees of a fire station which owns and maintains the cylinders).
If the inspector is inspecting a third-party SCBA cylinder, an OWNER'S RELEASE FORM
should be completed prior to the inspection. An example of an Owner's Release Form
can be found in APPENDIX E.
Complete the cylinder ownership information on THE FORM prior to the inspection.
Leave no place blank on THE FORM and be descriptive in the fill-ins.
A completed copy of THE FORM is to be kept by the inspector/organization, and a copy
provided to the owner (if the owner is not the organization completing the inspection).
The inspection procedures that follow contain detailed instructions on what to do as you
proceed through the inspection. These instructions include the following actions:
RECORD, DO NOT RETURN TO SERVICE, REPAIR, CONDEMN, CONTACT and
RETURN TO SERVICE.
RECORD: As you carry out the inspection, make detailed notes of your observations on
THE FORM.
DO NOT RETURN TO SERVICE: The cylinder cannot return to service until some
action has been taken to correct an unacceptable situation.
2 BEFORE INSPECTION BEGINS

10 1998 Edition
REPAIR: Applies to composite cylinders only. Under certain conditions, the composite
portion of the composite SCBA may be repaired. Follow the instructions on how to carry
out repairs. After the repair is complete, the cylinder must be hydrostatically tested
before being put back into service.
CONDEMN: If a condemnable feature is found, the inspection stops at that point and
the cylinder is rendered unfit for further use.
CONTACT: There may be circumstances where it is advisable to contact the manufactur-
er's representative for more information before proceeding further. To contact Luxfer, see
NOTE 7.
RETURN TO SERVICE: The cylinder has passed its visual inspection and may go back
into service. You may or may not, depending upon industry usage, affix a label to the
cylinder indicating when and by whom it was inspected. At no time may a visual
inspector put any markingsGon a cylinder nor embed label(s)Gwith resin to the compos-
ite portion of a container to be returned to service.
See GLOSSARY for complete definitions of condemn and repair.
Before beginning the inspection, remove all SCBA accessories from the cylinder (i.e.,
backplate, harness, cover, boot, bands, straps, etc.). Only the cylinder itself is needed for
this inspection. If the cylinder is valved, the inspector should remove it prior to
inspection, as suggested below. Contact the SCBA or respirator manufacturer for the
proper inspection procedure of the valve.
The cylinder must be empty of pressurized air for inspection. Slowly discharge the
pressurized air from the valved cylinder according to recommendations by the SCBA or
respirator manufacturer. Record if any leak was detected (see section 5 A. below).
When the cylinder is empty, remove the valve. The valve should be removed according
to the SCBA or respirator manufacturer's recommendations so that the valve and
cylinder are not damaged.
CAUTION: If the valve is damaged or not functioning properly, the
inspector/operator may think that the cylinder is empty after opening the
valve and not hearing any gas released. All valved cylinders thought to be
empty should still be handled as if they are under pressure, and the valve
should be removed carefully, according to the respirator manufacturer's
guidelines.
If, for any reason, the valve is hard to remove, stop.
Check to see that the valve is functioning properly by adding a small amount of air to
the cylinder to prove that air goes in and out of the valve. Depressurize and then
proceed to remove the hard-to-remove valve, after this valve check shows that the valve
is working properly. Contact the SCBA manufacturer for further instructions if the valve
isn’t working.

Luxfer SCBA Guide Volume One 11
The visual inspection begins by:
• recording cylinder markings
• making general observations
• preparing the cylinder interior for inspection by removing any internal contaminants
(water, materials, debris or contents), and finally
• preparing the cylinder exterior for inspection.
Remove any loose paint or anything obstructing the reading of the stamped cylinder
information located on the crown of the all-metal and hoop-wrapped SCBA cylinder. See
FIGURES 1 and 2 for illustrations and NOTE 16. Do not attempt to remove resin, paint,
or fibers on the composite portion of the cylinder.
If the original labelGinformation is obscured on hoop-wrapped cylinders, please read
below.
RECORD all relevant cylinder information from the cylinder on the SCBA CYLINDER
VISUAL INSPECTION FORM or Cylinder LogD(Referred to as “THE FORM” below).
RECORD markingGand labelGinformation you see, including: Government specification,
service pressure, serial number, and hydrostatic test dates: original, all previous, and latest
hydrostatic test date. See FIGURES 1 through 4 for examples.
The first FIGURES, 1 and 2, depict examples of cylinder marking layout. A list of
“Markings” under each diagram shows the possible marking variations for each layout. In
other words, look at each FIGURE as an example of marking design. Then read the list of
MarkingsGbelow the diagram to learn what different markings could be in that design.
FIGURES 3 and 4 depict how original labelsGappear embedded at time of manufacture in
the composite material.
Original labelGdamage or illegibility can be cause for condemning a cylinder. If the serial
number is no longer legible, the cylinder must be condemned or Luxfer7contacted for
advice. An SCBA cylinder that is known to be a Luxfer cylinder, which still has a legible
serial number, can be returned to service only after all the other product information is
made legible. For instance, an illegible part of a composite SCBA cylinder label which
has the part identification on it can be corrected by putting that information back on the
cylinder, onlyif the serial number is still legible on the label. Contact Luxfer for further
advice.
RECORD the Category of the composite cylinder (according to CATEGORIZING THE
CYLINDER guidelines above). Also, RECORD the thread type on THE FORM.
RECORD if the cylinder was under pressure prior to the inspection, or empty.
WARNING: Luxfer SCBA cylinder marking does not include the plus sign (+). If a
plus sign is found on a Luxfer SCBA cylinder (stamped into the metal), contact
Luxfer7and do not return that cylinder to service.
3 PREPARING THE CYLINDER FOR INSPECTION
3A CYLINDER MARKINGS

12 1998 Edition
RECORD if you are aware the cylinder was repaired previously.
CONDEMN all cylinders with altered or unreadable serial numbers.F1-4
CONTACT LUXFER7if cylinder manufacturer labels or markings are illegible or missing
identification or other information.
DO NOT RETURN TO SERVICE any cylinder that has not been hydrostatically tested with-
in its required time.1
DO NOT RETURN TO SERVICE any composite cylinder that has been repaired, without
first hydrostatically testing it.
RECORD what you know or can see about the cylinder condition (signs of wear), mainte-
nance, exposure to unusual treatment or conditions, evidence or knowledge of exposure
to heavy service or extreme/hazardous service, (see Section 1 above and GlossaryGfor
definitions of the types of service).
RECORD if there is evidenceP27 or knowledge about cylinder exposure to heat and/or
fire. See Section 1D above for more information about unusual treatment, accident or
condition.
RECORD if fresh paint is found. If fresh paint is found, get information about how and
why it was painted and how the paint was cured and dried. RECORD this information
on THE FORM, as well.
RECORD if there is evidence or knowledge that the cylinder had previously been
repaired.
RECORD any information about the care4the cylinder has received.
CONDEMN all unattended cylinders left exposed or suspected of having been exposed
to temperatures in excess of 350°F (175°C) or unattended cylinders that have been
exposed to the direct action of fire. Special circumstances apply when the SCBA
cylinder is being worn and used by a firefighter exposed to excessive temperatures.
Read NOTE 20 which explains the reasons for this exception.
CONDEMN all cylinders which exhibit any arc or torch burns,P13 or fire damage.P27
CONDEMN all cylinders that were repainted and heated over 350°F (175°C) to dry or
cure the paint.
CONDEMN all composite cylinders if there is any noticeable lifting or peeling of the
composite materials.P25
CONDEMN all cylinders which may have been crushed (exhibit a non-round shape).
DO NOT RETURN TO SERVICE all cylinders with fresh paint until it passes a hydrostatic
retest, unless the inspector is sure the fresh paint doesn't hide an imperfection.GFresh
paint may also hide heat damage.
WARNING: Do not return to service any cylinder with hidden heat or
physical damage that cannot be visually inspected.
3B GENERAL OBSERVATIONS

Luxfer SCBA Guide Volume One 13
Pour out any contaminating material from the interior into a sufficiently strong and large
bowl or container.
RECORD on THE FORM any unusual odors.
Inspect any and all material or matter that was poured from the cylinder. Identify and/or
describe this material11 on THE FORM.
If at this time the cylinder has material ‘stuck’ in it, invert the cylinder over a white piece
of paper, holding it about one half inch (1/2 inch) (13mm) above the paper. Then allow
the cylinder to drop onto the paper, releasing any of the remaining contents of the cylin-
der onto the paper.
Bag all these materials in a plastic bag or seal in a jar to show the owner. RECORD
observations11 on THE FORM. RECORD the kind and source of contents.
DO NOT RETURN TO SERVICE any cylinder with gummy internal substances, oil and/or
debris, or which have an offensive odor. Hold for internal cleaning.17
DO NOT RETURN TO SERVICE any cylinder with an internal contaminate. After clean-
ing,17 the cylinder may then be reinspected (starting at the beginning of this
procedure).
NOTE: Train and educate all owners on the proper filling, care and
maintenance of SCBA cylinders4if water, debris, lubricants, oils, etc. are
found inside the cylinder. Ask them to adhere to the recommendations.
3C PREPARING THE INTERIOR

14 1998 Edition
The entire exterior of the cylinder must be exposed to the inspector and not concealed.
Do not remove paint unless it is lifting off.16 If decals and/or stickers hide damage or
suspected damage, then they should be removed. Signs of damage or suspected damage
include, but are by no means limited to, scraped labels, evidence of impact, bubbling up
or distortion of labels. Contact those who put on the decals or stickers for removal
procedures18 and authorization. If the source of the sticker or decal is unknown, lift off
enough of the label to inspect the cylinder surface below. Use only removal procedures
which do not harm aluminum or composite materials. (Make sure to replace any
cautionary stickers or labels after the inspection). Do not remove or attempt to remove
any labels embedded in the resin.
• There should be no cylinder equipment attached during the inspection process.
• There should be no external material or condition which prevents a visual inspection
of the surface.
• If there are external contaminants, refer to NOTE 16 for proper cleaning of the exterior.
Aluminum Cylinders
Check for bulges, bows (“banana”) and dents. Roll cylinder on padded table to find
bulges and bows; hold a straight edge against its sidewall in several places and the base,
to find dents and more bulges or bows. Check crown for dents. See PHOTOS 1 and 18
and FIGURES 10 and 11.
Determine the dent depth and diameter using a straight edge and ruler. RECORD this
information and the location of the dent on THE FORM. Read NOTE 6.
Look for a bow and bulges: If a straight edge rises from the cylinder sidewall and light is
clearly visible between the edge and cylinder surface, then a bulge or bow is indicated.
Further determine if the condition is a bow or bulge.
If the shape of the cylinder is a curveP18 then RECORD on THE FORM that the cylinder is
bowed.
If the rise is in a distinct area and is definitely visible (light is clearly seen between the
straight edge and the cylinder; the straight edge wobbles on bulge),F10 record on THE
FORM as a bulge. RECORD the bulge's location on THE FORM.6
• CONDEMN cylinders with dents 0.060 inch (1.53 mm) or greater in depth in the
aluminum.
• CONDEMN cylinders with dents measuring less than two inches in diameter in the
aluminum.
• CONDEMN cylinders with definite visible bulges in the aluminum.
• ACCEPT cylinders with bows.
• RETURN TO SERVICE aluminum bowed cylinders. If unsure whether it is a bow or bulge,
refer to FIGURES 10 and 11 and PHOTO 18. Contact Luxfer if you are still unsure.7
4A BULGES, BOW AND DENTS
4 PREPARING THE EXTERIOR

Composite Cylinders
Check for bows, bulges and dents as is outlined above in the aluminum section. A
composite material dent may appear as a frosty area rather than an indentation. Measure
and determine the area of any noted frosty area(s).
• CONDEMN cylinders with dents in the composite material which cause the breaking
or loosening of fibers, or when structural damage is apparent.
• CONDEMN cylinders with dents in the composite material which causes a ‘frosty’
appearance that is 1.0 square inch (6.45 cm2) or more in area.
• CONDEMN composite cylinders with bows and/or bulges.
Check for cuts, digs, gouges and scratches both in the metal and in the composite
material. See APPENDIX G for definitions, including the definition of transverse.G
See PHOTOS 2, 3, 21, 22, 23, 24, 25, and 26. The current CGA pamphlet C-6.2 defines lev-
els of types of damage to composite cylinders as: Level 1 (return to service), Level 2
(repairable damage), and Level 3 (condemn cylinder). The current CGA pamphlet C-6.1
defines inspection criteria for aluminum cylinders.
Aluminum Cylinders
Gently and carefully, with a file, smooth any upset metal (metal raised up from the
cylinder surface from the cut, dig, gouge, or scratch) without causing damage to the
cylinder or composite material. This is in order to get a true depth measurement of the
cut, dig, gouge or scratch in the metal.
Measure the length, depthP28 and location of all cylinder surface cuts, digs, gouges or
scratches. Note whether the cuts, digs, gouges or scratches in the composite material are
transverseGto the fiber direction.P23 Look for abrasionGon the composite materials. Read
NOTE 6. RECORD on The Form all information, findings, measurements and location(s)
of any damage.
• CONDEMN all cylinders with surface cuts, digs or gouges in the metal that are either
longer than six inches (152mm), or deeper than 0.030 (thirty thousandths) inch
(0.76 mm).
Composite Cylinders
RECORD on THE FORM all information, findings, measurements and location(s) of any
damage.
• CONDEMN composite cylinders with cuts, digs, scratches, abrasionGor gouges in the
composite material (transverse to the fiber direction) deeper than the depths given in
Table 1 and of any length (for the category of cylinder you are inspecting). See
PHOTO 26. Level 3 damage.
• CONDEMN composite cylinders with cuts, digs, scratches, abrasion or gouges in the
composite material in any direction which occurs in previously repaired
(see SECTION 8) areas. Level 3 damage.
• CONDEMN composite cylinders if the repaired area resin shows signs of poor
adhesion or is ‘lifting off’ the composite surface.
Luxfer SCBA Guide Volume One 15
4B CUTS, GOUGES, SCRATCHES, ABRASION
16 1998 Edition
• CONDEMN composite cylinders with cuts, digs, scratches, abrasion or gouges in the
composite material which are transverse and longer than one inch (25.4 mm) in length
and more than 0.005 inches (0.13 mm) deep. Level 3 damage.
• CONDEMN composite cylinder with abrasion damage of any depth which loosens or
breaks fiber(s) in the wrapping.P25
• REPAIR composite cylinders with cuts, digs, scratches, abrasion or gouges in the
composite material greater than 0.005 inches (0.13 mm) in depth, less than the depths
given in TABLE 1 and shorter than one inch (25.4 mm) long (for the category of
cylinder you are inspecting). Level 2 damage. Hydrostatic test cylinders after the repair
and reinspect before filling.
• Determine the Cylinder Category from the chart in CATEGORIZING THE CYLINDER.
No composite material may be repaired if the imperfection is longer than one
inch (25.4 mm).
Transverse damage with depths greater than those listed in TABLE 1 is Level 3 damage.
Transverse damage with depths greater than 0.005 inches (0.13 mm) and less than the
depths listed in TABLE 1 and shorter than 1 inch (25.4 mm) long, is Level 2 damage
(repairable). All damage less than 0.005 inches (0.13 mm) deep is Level 1 damage.
Abrasion damage under 1 square inch (645 mm2) in area (in any direction) may be
repaired if it is deeper than 0.005 inches (0.13 mm), but less than the depth listed in
TABLE 1. See PHOTO 26. If it is less than 0.005 inches deep, it doesn't need repair and
may be returned to service. If the abrasion covers an area great than 1 square inch and is
deeper than 0.005 inches, the cylinder must be condemned.
All repaired cylinders must be hydrotested and reinspected prior to filling and use.
Aluminum Cylinders
Check external metal surfaces for corrosion. Determine the type of corrosion and the
depth of what seems to be the deepest pit or deepest part of the broadspread corrosion.
See NOTES 5 and 6.
Record the location and whether the corrosion is an isolated pit corrosion, line, or broad-
spread corrosion on THE FORM. (For visual examples, see FIGURES 9 and PHOTOS 11
and 12.)
• CONDEMN all cylinders with one or more external corrosion pits over 0.060 inch
(1.53 mm) deep in the sidewall, crown, and/or base.
• CONDEMN all cylinders with external line or broadspread corrosion when one or
more pit, or the broadspread corrosion, is over 0.030 inch (0.76 mm) deep in the side-
wall or crown.
4C EXTERNAL SURFACE CORROSION
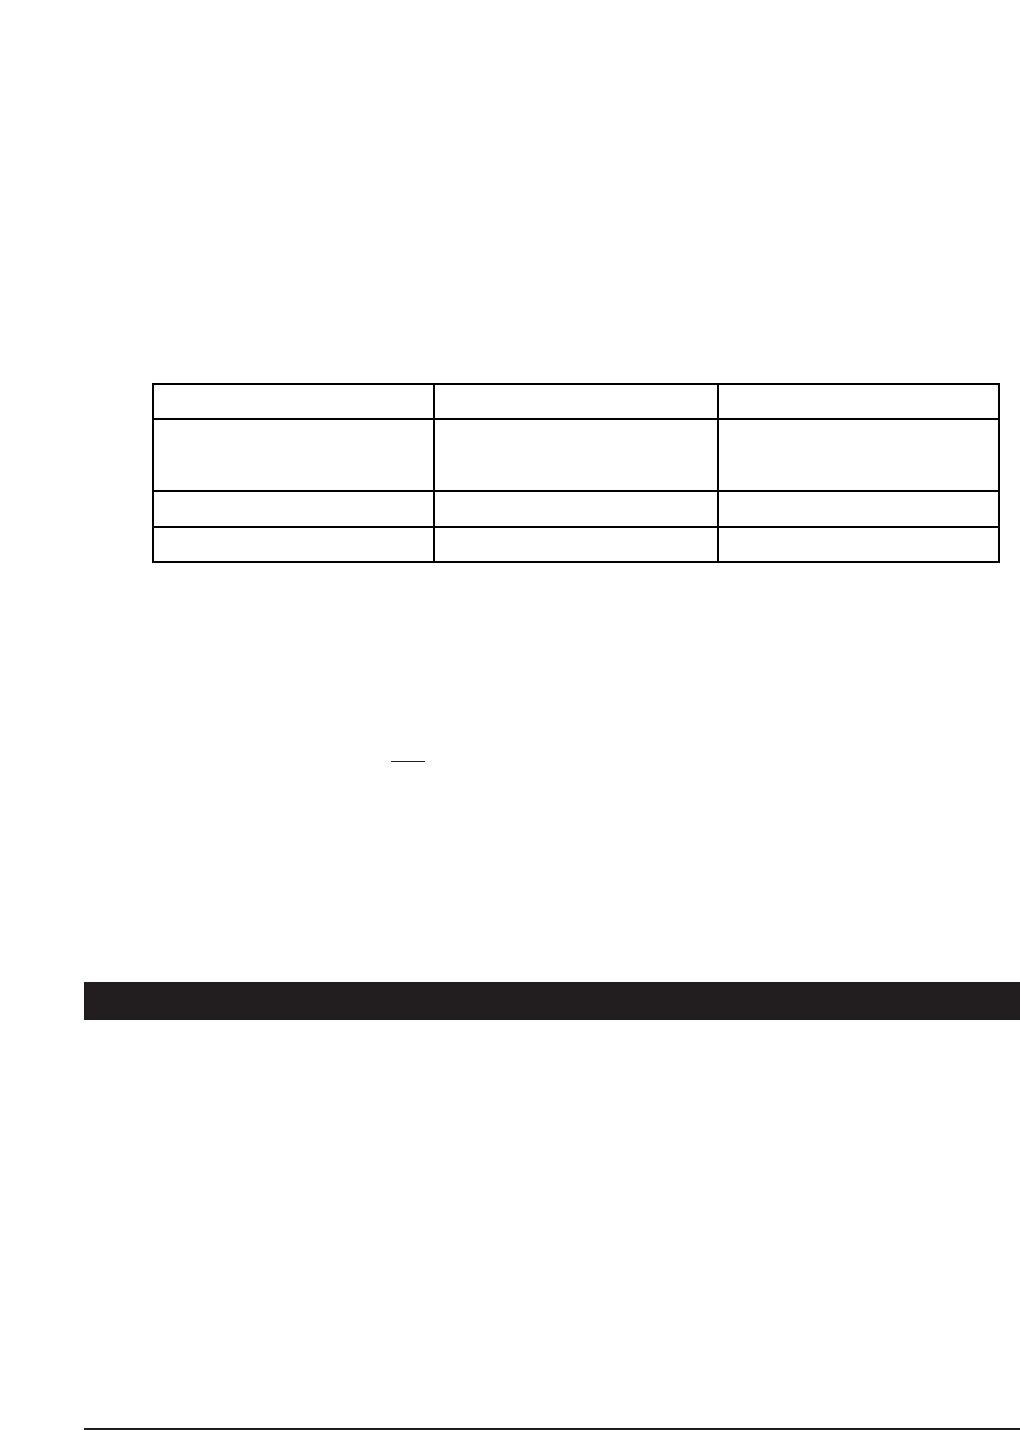
TABLE 1. Transverse Composite Damage
Cylinder Category
GROUP
Maximum Allowable Depth
of Damage on
Cylindrical Portion
Maximum Allowable Depth
of Damage on
Dome/Base Portion
A
B
0.02 inches (0.51 mm)
0.04 inches (1.02 mm)
0.01 inches (0.25 mm)
0.02 inches (0.51 mm)

Luxfer SCBA Guide Volume One 17
• CONDEMN all cylinders with external line corrosion over 6 inches (152 mm) long.
• CONDEMN all cylinders with broadspread corrosion covering more than 25 percent of
the area.
• If other pits are present, check a few more pit depths to be sure the cylinder is fit to
return to service.
Composite Cylinders
Composite materials can be attacked by chemicals19 and, in some cases, by treated water.
The external composite surfaces must be checked for any visible signs of such chemical
exposure.
• CONDEMN composite cylinders with unknown chemical residues on or in the
composite material.
• CONDEMN composite cylinders known to have been covered, splashed, or left
standing (soaked) in unknown chemical(s) such that the composite material came in
contact with the chemical(s).
• CONDEMN composite cylinders if the composite portion is discolored, blotchy, or the
paint and/or resin shows signs of chemical attack (e.g., paint or resin has softened,
smeared, bubbled, etc.).
• CONDEMN composite cylinders if the composite portion has come into contact with a
type of chemical that deteriorates or may deteriorate the composite material.19
• HOLD composite cylinders if the composite portion has come into contact with a type
of chemical that isn't listed19 and if you are unsure of its affects on the composite
material. Contact Luxfer7for advice.
18 1998 Edition
• Thread imperfections include metal loss, galling, corrosion, cracking and abuse.
• Abuse can appear as deep nicks, broken threads, cross threads,Gstripped threads, and
threads without well defined and sharp peaks.
• Careful inspection of threads is critical to the proper operation and safety of the Luxfer
SCBA cylinder.
• Be familiar with what is known as a tool stop mark. See NOTE 14, PHOTO 10, and see
the GlossaryGfor definitions of the various kinds of thread imperfections.
• Clean threads of any debris and lubricant9before proceeding.
WARNING: DOT E 7235 SCBA cylinders marked with a 4500 psig service
pressure must be equipped with a steel neck ring. If the steel neck ring is
not present, immediately withdraw from service and contact Luxfer.7
From information gathered while releasing any pressurized air, or from prior knowledge,
or from discovering an empty SCBA cylinder (that should have been full or partially full),
RECORD if you are aware that the cylinder has been leaking.
Determine the cause of the leakF6 (e.g., valve, O-ring, cylinder threads, cylinder, etc.).
CONDEMN all cylinders where the leak at the valve connection is caused by a damaged
cylinder, defective threads, or imperfections in the neck area.
WARNING: Immediately withdraw from service any DOT E 7235 SCBA cylinder
marked with a 4500 psig service pressure that does not have a neck ring. Contact
Luxfer.7
Inspect clean cylinder threads with and without a dental mirror and light. See NOTE 8
and PHOTOS 4 - 9. Inspect cylinder threads for any imperfections.GCheck for corrosion
on cylinder thread as well as valve thread, if valve is available.
RECORD on the form the location of all thread imperfections (damaged, missing, and
cross threads).
Count the number of continuous full threads, starting at the top, that do not have imper-
fections. RECORD this number of good threads on THE FORM.
Cylinders must have a specified minimum number of continuous full threads as required
in applicable thread standards. The overriding requirement is a minimum number of
threads so that a gas-tight seal can be obtained by reasonable valving methods.
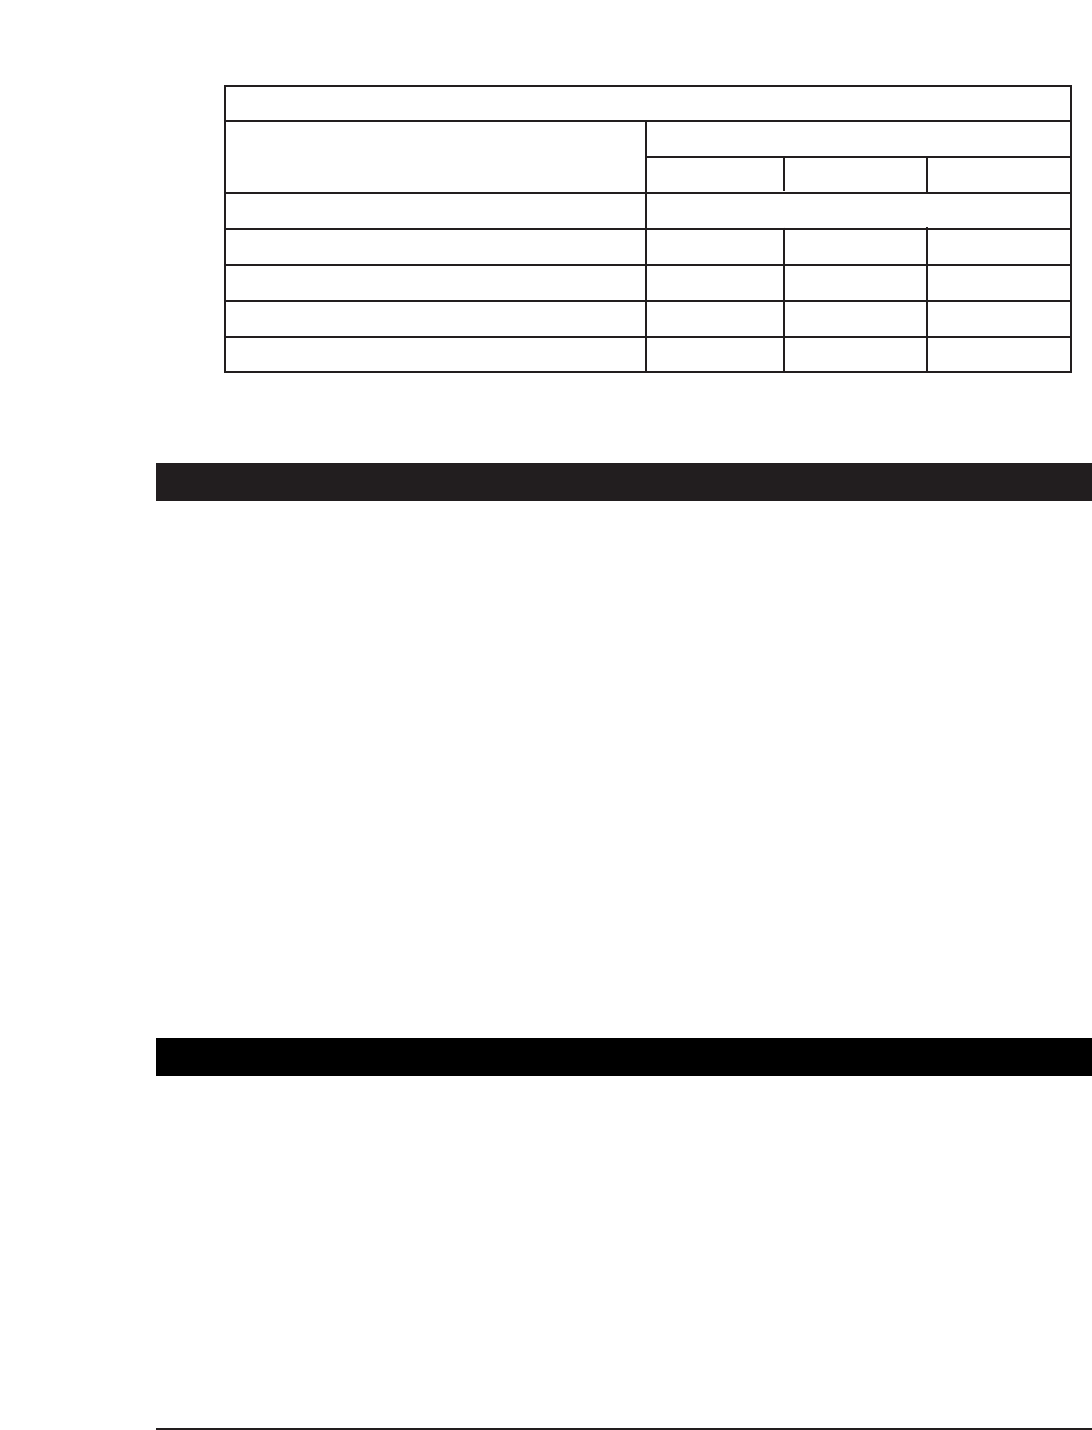
Know the cylinder’s (recorded) service pressure and then review Table 2. If you cannot
determine the thread type, contact Luxfer7for advice. Each Luxfer cylinder part
number has a specific thread type, and a Luxfer representative can provide you with
this information.
CONDEMN all cylinders that do not have the required minimum number of continuous
full threads without imperfection, counting from the top according to TABLE 2 criteria.
5 THREADS
5A LEAKS
5B THREAD IMPERFECTIONS
Luxfer SCBA Guide Volume One 19
CONDEMN all cylinders with corrosion in a thread that is a continuous full thread
required and defined above.
Inspect all cylinder threads for cracking with and without a dental mirror and light. See
PHOTOS 6 - 9. In addition to a visual inspection using the naked eye, the use of an Non-
destructive Testing (NDT)Gdevice, such as Visual PlusB&C is also recommended to detect
thread cracks.
Remove the O-ring. Inspect the O-ring gland and cylinder faceF5/6 for cracking. Follow
the SCBA or respirator manufacturer’s recommendation on when to replace the O-ring.
NOTE: SCBA components, like the O-ring, are certified by regulatory agencies in
the USA. DO NOT replace components without following the SCBA manufactur-
er’s instructions. Replace components with parts that are authorized by the
SCBA manufacturer.
CONDEMN all cylinders that show evidence of cracking in more than one continuous
full thread.GContact Luxfer7with this information and findings.
CONDEMN all cylinders with O-ring gland or face cracks. Contact Luxfer7with this
information and findings.
CONDEMN all cylinders with O-ring gland or face damage.
RETURN TO SERVICE all cylinders with tool stop marksP10 on otherwise acceptable
threads, with acceptable glands and faces.
Inspect cylinder threads near the bottom (closest to the inside of the cylinder) of the
threaded area, with a dental mirror and light8for folds and valleys that enter into the
thread area. For visual illustrations, see FIGURES 6 - 8 and PHOTOS 14 - 17.
RECORD the findings on THE FORM.
CONDEMN all cylinders with valleys that reduce the number of defect-free, continuous
full threads below the minimum (according to the limits defined in section 5B.),
counting from the top. Contact Luxfer7with this information and findings.
CONDEMN all cylinders with a fold which enters into more than one thread. Contact
Luxfer7with this information and findings.
TABLE 2. Thread Requirements
Thread Type Service Pressure (psig)
0.750-16UNF-2B
0.750-14NSPM-2B
0.875-14UNF-2B
1.125-12UNF-2B
2216
Minimum Required Threads
3000 4500
6
6
6
6
7
8
7
8
10
12
10
12
5C CRACKED CYLINDER THREADS
5D FOLDS AND VALLEYS IN THREADS

20 1998 Edition
Nothing must obscure the interior metal surface of the cylinder from visual inspection.
If the interior metal surface cannot be seen after removing loose contents and water
(because of such things as stains, deposits, heavy corrosion, material still clinging to the
inside, etc.), arrange to have the cylinder cleaned. See NOTE 17.
Proceed only if the interior surface is readily visible.
See NOTE 12 for further information on standard interior surface appearances in Luxfer
SCBA cylinders.
Inspect all cylinders with a dental mirror and light, just below the threads and inside the
cylinder crown area for any sign of cracks, folds and valleys. See NOTE 10. (See PHO-
TOS 14 - 17 and 20 and FIGURES 6 - 8).
Determine the location of any crack, fold, and valley. Measure the depth of any and all
folds.
RECORD all information on THE FORM.
CONDEMN all cylinders that show evidence of cracking.P20 Contact Luxfer7with this
information and findings.
CONDEMN all cylinders with one or more folds in the interior crown area deeper than
0.060 inches (1.53 mm). Contact Luxfer7with this information and findings.
RETURN TO SERVICE all cylinders with interior valleys in the crown area.10
Inspect cylinder interior with a light for any metal irregularities. Cylinders may show
interior irregularities that may have been caused by exterior impacts. These include,
but are not limited to, indentations or liner distortions (in composite cylinders).
RECORD the location and observations of all such irregularities on THE FORM.
Contact Luxfer7with any observations you question.
CONDEMN all cylinders that show any cracks in the interior sidewall, base, and/or
crown. Contact Luxfer7with this information and findings.
CONDEMN aluminum cylinders that show any interior sidewall or base metal
distortions. Contact Luxfer7with this information and findings.
CONDEMN composite cylinders that show interior liner indentations or distortions.
6 INTERIOR
6A INTERIOR THREAD AREA
6B METAL IRREGULARITIES

Luxfer SCBA Guide Volume One 21
The concern of corrosion is that it has the potential of reducing cylinder material, as has
been previously mentioned and covered in the Glossary: see material loss.
Before proceeding, the inspector must be sure which type of cylinder interior is being
inspected, and then apply only the appropriate criteria for that design.
Inspect interior sidewall, crown and base with a light for any corrosion or pitting.
Determine the type, depth, location and length (for line corrosion) of the corrosion. See
NOTES 5 and 6. For visual illustrations, see PHOTOS 11 and 12. RECORD location, type
and depth of corrosion on THE FORM.
Aluminum Cylinders
CONDEMN all cylinders with any interior isolated corrosion pit estimated to be over
0.060 inch (1.53 mm) deep.
CONDEMN all cylinders with interior sidewall line or broadspread corrosion when one
or more interior pits in the line corrosion is deeper than 0.030 inch (0.76 mm), and/or if
the interior broadspread corrosion is deeper than 0.030 inch (0.76 mm).
Composite/Hoop-Wrapped Cylinders
CONDEMN all hoop-wrapped cylinders with internal isolated corrosion pit(s) estimated
to be over 0.060 inches (1.53 mm) deep.
CONDEMN all hoop-wrapped cylinders with sidewall line or broadspread corrosion
when one or more interior pits in the line corrosion is deeper than 0.030 inch (0.76
mm), and/or if the interior broadspread corrosion is deeper than 0.030 inch (0.76 mm)
Aluminum and Composite
CONDEMN all cylinders with interior sidewall line corrosion that is over 6 inches (152
mm) long (any depth).
CONDEMN all cylinders with an interior surface that looks like it was blasted, ground,
sanded, cut or has lost metal.
HOLD the cylinder for internal cleaning17 if corrosion obstructs a clear view of the interi-
or's surface.
If other pits and/or corrosion are found, check them to determine if the cylinder is fit to
return to service.
Train and educate the owner on the proper care and maintenance of the cylinder if any
corrosion is found. See NOTE 4.
6C INTERIOR CORROSION AND PITING

22 1998 Edition
This procedure does not cover valve inspection or the inspection of any SCBA compo-
nent other than the SCBA cylinder. Check with the manufacturer of the SCBA for the
proper handling and inspection of the other components.
Especially check with the SCBA manufacturer on the inspection of any valve component
(rupture discs or pressure relief device, dip tube, valve threads, O-rings, etc.) and the
condition which requires their replacement.
CAUTION: SCBA components [like the valve and O-ring] are certified by
regulatory agencies in the USA. DO NOT replace components without following
the SCBA manufacturer's instructions. Replace components with parts that are
authorized by the SCBA manufacturer.
If the valve or valve component did not pass inspection, or if the valve was not
inspected at all, do not attach the valve to the cylinder. Instead, return each separately to
the owner, explaining the concern or problem or relaying that the valve was not
inspected.
The end of THE FORM is set aside to describe these and other concerns or problems
with accessories or the cylinder that were not covered above. RECORD specific and
clear comments.
7 MISCELLANEOUS
Under certain circumstances, composite cylinders may be repaired. The portion
permitted for repair is only the composite material itself (not metal portions, threads,
liners, or other places on the cylinder). Repair can only be done on the composite area
of the cylinder when the damage is qualified for repair (Level 2 damage) through the
above inspection criteria. These repairs are minor in nature and are meant to help
extend the safe life of the cylinder.
The suitable conditions, procedures and directions for making a repair to the composite
material are given in NOTE 13.
WARNING: All repaired composite cylinders must be hydrotested and
visually reinspected before being returned to service.
Luxfer SCBA Guide Volume One 23
8 REPAIRS TO COMPOSITE MATERIALS

24 1998 Edition
A. If there are no recorded conditions sufficient to condemn the cylinder then RECORD
on THE FORM the cylinder status as ACCEPTABLE. Proceed to section 9E.
B. If the composite portion of a composite cylinder has one or more repairable condi-
tions (Level 2 damage), then have the cylinder repaired.13 Have the cylinder
hydrotested prior to returning the cylinder to the owner and/or prior to filling the
cylinder. If it passes hydrotest, visually reinspect the cylinder and return the cylinder
to service. Proceed to section 9E.
C. If the cylinder has a feature or condition sufficient to condemn it, the inspection
stops, and the condemning feature is recorded on THE FORM. Before recording what
appears to be or may be a condemnable feature, we recommend that a qualified
second or third inspector who is familiar with the visual inspection procedure, is
consulted and asked to confirm the condition(s) which could condemn the cylinder.
When it is agreed that the cylinder should be condemned, be sure that a signed
Release FormFis on file from the cylinder owner. Proceed to section 9D.
D. Procedures for handling a condemned cylinder:
1. In the USA: Thoroughly review NOTE 7. After reviewing 9C. above, we
recommend that condemned cylinders in the USA are rendered unusable in one
of two ways:
a. If the cylinder is condemned during this inspection and is to be returned by
arrangement to Luxfer,7we recommend, in the USA, to strikeout the stamped
markings on the cylinder crown (all-metal cylinders), leaving the serial
number and hydrostatic test dates visible. If the cylinder is of a composite
type, put a large “CONDEMNED” label on the composite portion of the
cylinder (near to but not obscuring the original manufacturer's and other
labels) and, using the repair epoxy, coat the 'condemned' label and seal it to
the composite material. Do not destroy the threads.
Contact Luxfer7to make arrangements for returning the cylinder to Luxfer.
b. If the cylinder is condemned during an inspection in the USA and is not to be
returned to Luxfer,7we recommend that it (aluminum or composite) is
made unusable by destroying all the threads to the extent that no valve or
pressure fitting can be put into the cylinder opening (e.g., with a narrow
chisel/screwdriver and hammer).
2. Outside the USA: Cylinders used outside the USA should be condemned
according to the specifications set by that country. If allowed and in accordance
with the foreign specifications, do not damage threads on, nor drill holes in, those
cylinders to be returned to Luxfer7in the USA.
If a condition is found that would condemn the cylinder, then the inspection
stops. After rendering the cylinder unusable, return a copy of THE FORM to the
owner along with the condemned cylinder, any accessories, valve, etc. Do not
attach any components to the condemned cylinder.
3. Proceed to section 9F.
9 CYLINDER CONDITION - THE DECISION

Luxfer SCBA Guide Volume One 25
E. Cylinders to be returned to service should have an inspection sticker or labelG
attached to the exterior, where the label doesn't obscure markings, other labels, or
repairs:
1. We recommend that all ACCEPTABLE cylinders be returned to service with an
inspection sticker applied to the cylinder, indicating it has passed the inspection
and is a safe and usable cylinder.
2. We recommend that repaired cylinders returned to service with an inspection
sticker which specifically says “REPAIRED,” should be visually inspected more
frequently. (See Section 1, FREQUENCY, above).
3. We recommend that in both cases (1 and 2 above) the sticker includes
information regarding any damage or imperfection the inspector has reviewed
and/or any repair made by the inspector.
F. Date and sign THE FORM. Return the cylinder and any accessories received with
cylinder, and give the owner a copy of THE FORM and a copy of the Luxfer SCBA
cylinder care and maintenance instructions.4

26 1998 Edition
If the valve and valve components have passed inspection (from information obtained
from the SCBA manufacturer), and if the cylinder has passed inspection, then the valve
may be reinstalled as suggested below.
CAUTION: SCBA components [like the valve and O-ring] are certified by
regulatory agencies in the USA. DO NOT replace components without
following the SCBA manufacturer's instructions. Replace components with
parts that are authorized by the SCBA manufacturer.
10 RE-INSTALLING VALVES

Luxfer SCBA Guide Volume One 27
The Luxfer SCBA cylinder can be filled and re-used for many years. If the SCBA cylinder
is properly cared for and maintained and the recommendations in this Guide are fol-
lowed carefully, your Luxfer cylinder will provide long, safe and reliable service. Your
SCBA manufacturer will have provided you with instructions for the safe and proper fill-
ing of the SCBA cylinder. Carefully follow those instructions and the advice that follows.
In addition to your SCBA manufacturer’s instructions on how to properly and safely fill
your Luxfer SCBA cylinder, you must also be aware of and familiar with any and all filling
guidelines, regulations, requirements and laws of the appropriate local, county,
state/provincial and federal agencies. Many agencies, authorities and organizations have
made rules and/or standards on how to fill and use SCBA cylinders.
In the USA, some of these agencies include, but are not limited to: NIOSH, OSHA, NFPA
and DOT. Your state/province may have made rules for you to follow for the safe filling
of SCBA cylinders with air. One such state is New Jersey and its agency, PEOSH. Some
agencies (like PEOSH) regulate publicly owned/operated emergency response personnel
safety. Such agencies may have rules that cover not only how to fill, but also require-
ments for personnel qualifications, equipment, inspections and safeguards, as well as the
quality of the air to be used. You should always follow the rules and guidelines of the
authorities with jurisdiction over respirators and their usage.
Similarly, know and be aware of any applicable industry or professional guidelines. Many
organizations have issued guidance documents and standards covering the use and filling
of SCBA cylinders. Contact any organizations that represent users of SCBA cylinders
(e.g. firefighters) and obtain relevant guidelines.
WARNING: Luxfer does not recommend the fast filling (1,000 psig or higher) of SCBA
cylinders covered by this Guide (Volume One).
11 FILLING THE SCBA CYLINDER

28 1998 Edition
This page is intentionally left blank.

Luxfer SCBA Guide Volume One 29
1. At the time of printing, hydrostatic retesting and re-certification of SCBA cylinders is
required in the USA every three or five years of the service life of the cylinder in
interstate service. The USA Department of Transportation (DOT), through the Research
and Special Programs Administration (RSPA) agency, issues retester's identification
numbers to retest stations who may legally perform hydrostatic retesting. Only the
DOT has the authority to issue such numbers in the USA.
RSPA issues station numbers (sometimes referred to as 'retester ID, or identification,
numbers') based on the applicant meeting that agency's qualifications for same. Once
issued, the number is valid for five years, provided the retest station maintains its
equipment and personnel at the level required for the initial RSPA qualification. A third
party, independent inspection agency, is charged with performing the applicant
inspections.
A retest station must register with the DOT and obtain and hold a valid inspection
station number in order to legally perform the hydrostatic retest on SCBA cylinders.
When a retest date is stamped on the cylinder (marking), or affixed to a composite
cylinder (sealed with resin over it), the retest station is certifying that the cylinder
meets DOT hydrostatic retest standards, and that the retest station holds a valid
identification number, issued by DOT/RSPA. Every organization and cylinder owner
should verify that the station where cylinders are being retested in their area is a duly
qualified retest station holding a valid DOT/RSPA station number.
Information about hydrostatic testing and the retest program is found in the Code of
Federal Regulations,Title 49, Section 173.34(e). Other documents may outline this pro-
gram in more detail than found in this Guide. See APPENDIX F.
There are no specific testing and certification procedures outlined in 49 CFC for
composite cylinders. Therefore DOT developed special tests and certifications, known
as “exemptions.”
All Luxfer high-pressure composite cylinders sold and used in the USA have a DOT
exemption number. (Information on exemptions is found in paragraph 49 CFR
107.101). This is what is meant by "DOT authorized." Exemptions may vary according
to the cylinder model. Such DOT authorized exempted cylinders are retested
according to specific conditions and frequency written in the exemption. All DOT
retest facilities performing retests on Luxfer composite cylinders must have a current
copy of the cylinder's exemption and follow its instructions and conditions.
All DOT Luxfer exemptions specify that the retest be performed every three years on
the composite SCBA cylinder and every five years on the all-aluminum SCBA cylinder.
Both the cylinder owner and retest facility must know how often to have the retest
performed.
Also, DOT authorized composite SCBA cylinders have a service life indicated in the
exemption. If it has been fifteen years or more from the first hydro test date indicated
on the composite cylinder, the cylinder must be removed from service.
The above applies to the USA, Canada and other DOT-compliant facilities. Other
countries may have similar or different standards, requirements, and regulations
controlling the use, handling and transportation of SCBA cylinders. If you are
NOTES

30 1998 Edition
inspecting or operating outside the USA, you need to contact the authorities that
regulate SCBA cylinders to get: retesting, inspection and cylinder certification
requirements.
Briefly, the hydrostatic retest is a measure on how much a cylinder will expand when
a specified pressure is applied. In our opinion, the most common and safest method is
the water jacket method. We would recommend that only a hydrostatic retest station
using this method be allowed to test Luxfer SCBA cylinders.
The cylinder is placed inside of a water jacket or bath (containing water) which is
specially sealed. The cylinder is pressurized and the amount of water displaced in the
water jacket is measured by a precision method. This amount of water displaced
represents how much the cylinder expanded under pressure and how much of this
expansion is permanent after pressure is removed. Information is then gathered to
determine if the expansion and permanent expansion of the cylinder complies with
DOT regulations. If the cylinder passes, the retester marksGthe cylinder by stamping
into the metal the retester identification and the retest date or by resin-sealing a labelG
to the composite material. The cylinder is returned to service until the retest is
required again or a condition warrants a retest.
2. Some SCBA owners may try to have SCBA cylinders partially filled with pure oxygen,
then having them topped off with air or nitrogen (NITROX). This practice can cause
catastrophic failure and loss of life or serious injury. SCBA cylinders, valves and other
components are not specifically cleaned for oxygen use. Also, some lubricants used in
the industry are not compatible with pure oxygen, or oxygen enriched air. This could
result in a fire or rupture. Breathing air that contains more than 21 percent oxygen is
generally referred to as "oxygen-enriched air." For additional information, or for
guidance on the use of other gases, oxygen, and various air combinations, contact the
SCBA equipment manufacturer.
3. See your SCBA manufacturer for information about other available cylinder products.

Luxfer SCBA Guide Volume One 31
4. SCBA technicians should ensure that users of SCBA cylinders understand the following
general guidelines covering the care and maintenance of their Luxfer SCBA cylinder:
CARE AND MAINTENANCE OF A SCBA
ALWAYS:
• check for air leaks with each fill;
• keep the threads and cylinder interior dry and free from oil, dirt and other
contaminants;
• fill cylinders with proper breathable air;
• follow the inspection recommendations (see above);
• follow valve manufacturer's installation procedures and recommendations;
• maintain all accessory equipment to your cylinder according to manufacturer's
recommendations; and
NEVER:
• overfill cylinders;
• fill a cylinder if it leaks;
• fill a cylinder with a crack;
• ever completely discharge cylinder (except when you're planning to remove the valve)
as it can lead to moist air seeping into the cylinder;
• fill or partially fill a cylinder with oxygen;
• artificially heat your cylinder;
• use a cylinder past its required retest date;
• use a composite cylinder past its allowable life (according to exemption);
• use a cylinder that hasn't been visually inspected according to its condition of use (see
above);
• over-torque the valve;
• remove, obscure or alter manufacturer's labels or stamped markings; or
• use your cylinder in an extremely corrosive atmosphere or environment. If you do,
always have the cylinder thoroughly visually inspected for damage before returning it
to service.

Here are some additional guidelines for SCBA cylinder users:
Maintenance - After the use of an SCBA cylinder in an emergency or rescue opera-
tion, remove the harness assembly (backpack) and check for damage. Clean the cylin-
der and components. If water is used to clean, make sure all components are allowed
to dry. Don't reassemble until all components are thoroughly dried. Do not apply
heat over the temperature of steam (212°F/100°C) in order to dry a wet cylinder.
Storage - Short term (Less than six months): Tightly close the cylinder valve. Leave
some pressure in the cylinder (about 25 psi). Secure the cylinder and assembly from
rolling loose, tipping over or falling. Store at room temperature in a dry place, away
from chemicals, artificial heat sources and corrosive environments.
Long term: Prior to prolonged storage, the valve should be removed from the empty
cylinder. Wash the cylinder internally and externally with fresh tap water, then thor-
oughly dry (inside and out). Install the valve and O-ring according to SCBA manufac-
turer's recommendations. Replace the O-ring if the SCBA manufacturer recommends
it. Store the valved cylinder at room temperature in dry conditions either upright or
horizontal and properly protect the valve which could otherwise be damaged. Always
store with some positive pressure inside the cylinder valve assembly (about 25 psi).
Never store a cylinder near heat or in a place likely to get artificially hot.
Handling - Cylinders should never be dragged, dropped, or roughly handled. When
transporting cylinders, take steps to insure that the valve is protected and that the
cylinder is well secured. SCBA cylinders should never be allowed to roll around
loose, tip or fall during transport. Secure cylinders in a protected position.
Painting - Retouch damaged paint areas with air drying paint, but if damage has
been done to the cylinder metal or composite materials, have it visually inspect-
ed first by an authorized technician. Never allow the cylinder to be heated in order
to dry or cure paint. Never use corrosive, caustic, or acid paint strippers, burning
techniques, or solvents, in order to remove paints from aluminum or composite sur-
faces. Any chemical used to remove paint from, or to paint an aluminum portion of a
cylinder, should specifically say on the product label that it is safe and recommended
for use on aluminum surfaces. (Then, in addition, such chemicals must not be
allowed to come into contact with any composite portion of the composite cylin-
der.) If the entire cylinder is to be painted, contact Luxfer for recommendations.
Inspections - See earlier section on Frequency of Inspection (Section I).
5. There are several kinds of aluminum corrosion which differ by what caused the
corrosion, as well as the shape and depth of the corrosion. First, refer to the
GlossaryGfor the definition of ‘corrosion.’ Next, refer to the GlossaryGfor the vari-
ous corrosion-related words and phrases: ‘broadspread corrosion, galvanic cor-
rosion, line corrosion, pit corrosion.’
Corrosion is one of the causes of material loss. Material loss may lead to leaks and
ruptures of SCBA cylinders. As an inspector, you're asked to look at the cylinder, both
inside and out (for cylinders with external aluminum surfaces), for corrosion. When
you find corrosion, you are then asked to estimate the depth of the corrosion. In this
way, you get an estimate on the material loss being caused by the corrosion.
Broadspread corrosion, sometimes called general corrosion, may be widespread on
the cylinder surface, yet pose less of a concern than a corroded pit, which may go
deep into the metal. FIGURE 9 shows some of the ways in which pit corrosion may
32 1998 Edition

occur. Some types are clear, some pose a special problem for the inspector, since the
pit may not go straight down into the metal. The corrosion may proceed at angles
and in varying depths within the initial pit. Nonetheless, all types of corrosion must
be inspected for how deep it has gone into the metal. See also PHOTOS 11 and 12.
6. As indicated in NOTE 5, corrosion is one of the causes of material loss. Material loss
can also be caused by damage (cuts, dents, digs, gouges, scrapes, etc.) and some other
imperfections. (See GlossaryGfor the definition of these terms and for the definition
of ‘imperfection’). Once found, the location of the imperfection needs to be
identified. Then, its depth needs to be estimated in order to compare with the
acceptable limits.
Many of the acceptable limits are from the general limits established by the
Compressed Gas Association (CGA). Others are from Luxfer’s knowledge and experi-
ence with the Luxfer SCBA cylinder.
Location: Review FIGURES 1 - 4 to familiarize yourself with the various kinds of
cylinder crown markings or labels you're likely to encounter. Review definitions of
markings and labels in GLOSSARY.GSCBA cylinders manufactured by Luxfer have a
mark in the crown (metal) or have a resin-embedded label on the sidewall (compos-
ites). Aluminum Cylinders: All-metal cylinders usually have the mark “LUXFER.”
Looking from the top of the cylinder, down on the crown, put the “L” from the word
“LUXFER” at the 12 o’clock position of an imaginary clock. Composite Cylinders:
Use the right edge of the resin-embedded original label (when normally reading it) to
align at the 12 o’clock position of an imaginary clock.F3
All cylinder imperfections, damages, etc. can then be referenced by this location
system no matter where in the world a Luxfer cylinder is used. For instance, if an
external corrosion pit on an all-aluminum cylinder was located 90° from the “L” (to
the right) on the sidewall, then the pit location is described as being at “3 o'clock,
outside.” RECORD on THE FORM that the pit was located at “3, outside,” for an even
more abbreviated entry.
If an external wall gouge was found just left of the “L” marking, it could be recorded
as being at “11, outside.”
Unless otherwise recorded, imperfections are assumed to be in the sidewall. Thus,
other imperfections are recorded as located in the “crown”,“base”,“thread”,“gland” or
“face”. If an internal crack in the shoulderP20 of the crown was located at 270° from
the “L”, then its location is recorded as “9, inside crown.”
Older (early '70's) all-aluminum cylinders may have a stamped Alcan symbol on them.
Use it as the 12 o'clock position and record all imperfections and damage from this
position. Other older cylinders may have an arrow symbol on the crownF4 instead of
the word “LUXFER.” Use the arrow symbol for the 12 o’clock position.
Recording the position of all imperfections will help you to identify it later during
future visual inspections; help you to show it to the owner at a later time; help you to
show it to fellow inspectors and help you identify its location to Luxfer should it
become necessary to have a manufacturer's representative review it. As you inspect a
cylinder, take the few moments to identify the location of SCBA cylinder imperfec-
tions of concern and RECORD them on THE FORM.
Depth Estimates: It is important to next determine if the material loss located
makes the cylinder unsafe to return to service, or whether the cylinder should be
Luxfer SCBA Guide Volume One 33

inspected more frequently. To accomplish this, an estimate of the depth of the imper-
fection needs to be made.
Before proceeding, the cylinder surface (inside and outside) must be clean enough to
see all imperfections. If corrosion is heavy or interferes with the good visual
identification of pits, clean it away by one of the recommended cleaning procedures.
See more on cleaning, NOTES 16 and 17.
Also, for gouges and digs on the external surface, disturbed, raised or upset metal may
need to be filed even with a surrounding metal surface for good estimates of their
depth. (See GlossaryGand Section 4B above for the definition of ‘upset metal’.)
Internal pits are ‘measured’ in depth by use of equipment designed to estimate the
depth. External damage depth is best measured by the use of a depth gauge.
Estimating internal pit depths requires practice. Practice estimating the depths of
depressions, pits, etc. using your pick and the Master Pit Reference Plate from your
set of recommended inspection equipment,Bas suggested at the end of this note.
See FIGURE 9 for examples of the different kinds of pit shapes and forms. When you
probe inside of a corrosion pit, check it out carefully to be sure it doesn’t hide
deeper corrosion or corrosion at an angle. Let the pick slip into a pit or surface
depression on the outside or inside cylinder surface and estimate the depression's
depth. RECORD it on THE FORM.
When measuring the depth of broadspread corrosion, find the deepest pit within the
corrosion or, if no pits are apparent, estimate the deepest part of the corrosion below
where the normal cylinder surface would be.
RECORD all depth estimates with the corresponding location and the kind of
imperfection.
Practice with the Master Pit Reference Plate. Get a feel for how far the pick
enters a Plate depression and how that compares to the known depth of the
Reference Plate depression. Lay the Plate flat and run the pick end of the pick/end
probe along the surface around the depressions. Let the pick drop into one of the
known depth depressions in the Plate. Compare the ‘drop’ you feel with the known
depth of the Plate depression. Do this many times, with all the depressions in
the Plate.
Next, once the pick is in a Plate depression, try to pull it sideways, out of the
depression. Get a feel for how the different depths make it harder or easier to pull
the pick out sideways.
Lastly, hold the Plate at an angle so you can't see the depressions. Slip the pick into,
and pull the pick out sideways from, one of the Plate depressions that you can’t see.
Repeat this many times. Can you estimate the depth of the unseen Plate depression?
Now look at the Plate depression you were practicing on, and check your accuracy.
Practice estimating the depth again, changing the position of the Plate and sliding the
pick into another ‘unseen’ depression. Repeat this until you feel confident and your
accuracy is within one depression standard most of the time.
To restate the process you’ll use on a cylinder: The way to use the pick/end probe
for estimating the depth of pits, gouges, digs, etc. is to slide/push the pick over the
undisturbed metal surface and then to let it fall or slip into the depression. Move the
pick around in the depression, and then, by pulling and pushing the pick in and out
34 1998 Edition

of the depression, you can get a feel of the pit's depth compared to the undisturbed
metal surface around the pit. The deeper the pit, the harder it is to get the pick to
come out by pulling it sideways. The more shallow the pit, the easier it is to get the
pick to pull out sideways and the less noticeable the pick 'drops' into the pit when
pushing it in.
Use of the depth gauge for external damage requires some practice, too. You can see
by moving the depth gauge over the surface how positioning the gauge affects its
reading. Being consistent with the positioning of the gauge improves its usefulness.
For instance, when looking for the depth of a particular imperfection, first take read-
ings around the imperfection where the metal or composite material isn't damaged.
When you take readings around an imperfection with the depth gauge, hold the
gauge in the same orientation to the curvature of the cylinder. Then, when you mea-
sure the depth of the imperfection, hold the gauge in exactly that same orientation.
Depth gauge readings are not absolute. This means that the reading on the dial isn't
the depth of the imperfection. Instead, you must take several readings in the area
around the imperfection. Calculate the average reading you get in the 'good' areas.
Now take a gauge reading at the imperfection. Finally, subtract the gauge reading at
the imperfection from the average good reading. This difference gives you the depth
of the imperfection.
7. Luxfer offers complete customer support for its SCBA product line. Many questions
may be answered by visiting our web site at www.luxfercylinders.com. For other
concerns, questions, or problems, please contact the Customer Service Department
as follows:
Luxfer Gas Cylinders
3016 Kansas Avenue
Riverside, CA 92507
Telephone: (909) 684-5110
FAX: (909) 781-6598
www.luxfercylinders.com
Please be ready to identify any cylinder condition (damage, imperfections, folds,
cracks, etc.) on which advice is sought. Have ready the serial number, cylinder identi-
fication, and all hydro dates (first and each subsequent). In some cases, Luxfer will
request that condemned cylinders be returned for testing.
8. See FIGURE 6 for an example of a dental mirror and light. The dental mirror is com-
mon and standard whereas there are many different kinds of lights available. For use
with a dental mirror, a small, bright penlight works well. The mirror is held to reflect
the lit part of the threads or the inside of the crown of the cylinder. See PHOTOS 4
and 20 and FIGURE 6 for examples of mirror positioning.
These photos demonstrate how important the use of such a mirror is for the inspec-
tor. The mirror can ‘see’ areas the eye can't and, at the correct angle, may make a
hard-to-see imperfection easy to identify. Careful use of a dental mirror may help
determine the difference between a tool stop markP10 and a crack.P6
Almost all imperfectionsGrequire up-close observation that only a mirror and light
will allow. There is one important exception, however. Tool stop marks are usually
more readily seen from a distance. From a distance they appear as smudges or
Luxfer SCBA Guide Volume One 35

shadows—an unclear vertical line across the cylinder threads. As your eyes get
closer to the thread, a tool stop mark may get more difficult to see, or may even
seem to fade.
Looking deep inside long cylinders requires a Light Wand or a high–intensity bulb on
a long cord. See APPENDIX B for such equipment.
When an imperfection is found, see NOTE 6 for how to record its location and (if
required) its depth.
9. Threads of both the cylinder and valve can trap debris. After wiping loose debris
from the thread surface, wipe off as much of (if any is present) the lubricant as you
can with a clean soft cloth. Never grind or press hard when wiping the threads as
thread gallGmay occur. Use an old toothbrush, bottle brush or other medium-hard
bristled brush small enough to get inside the neck to clean the threads. Never use a
brush with metal bristles. Dip the bristle end of the brush in some fresh isopropyl
alcohol and brush the threads with this solution. Inspect the threads closely to be
sure there is no debris left. The threads should be readily visible, showing
imperfections clearly.
10. Finding a valley is a challenge. Finding a valley will require careful attention to detail.
Lightly run the pick tool over the inside surface of the crown to ‘feel’ for valleys and
depressions. They may be easier to feel than to see, so include this feeling technique
along with your visual inspection of the inside surface of the cylinder crown. If you
locate a valley, record its location first (see NOTE 6,“Location”), then continue. See
FIGURE 7 and PHOTOS 16 and 17. Since the depth of a valley isn't a criteria for
condemning a cylinder, the inspector doesn't have to estimate its depth, but be sure
to RECORD its location.
Valleys that enter into the threaded area of a cylinder are a concern when they
extend into the threads and reduce the number of continuous full threads below the
limits set in this Guide, section 5B.
11. A wide variety of things have been found in cylinders by inspectors, including but
not limited to: dead insects, dead animals, chemicals, fresh and salt water, corrosion,
sand, dirt, and oil. Whereas most of the above may be recognizable from your life
experience, there are materials found inside cylinders that you may not be familiar
with and these include:
Aluminum Corrosion: Corroding aluminum may be white or black, or any
combination of the two (e.g., gray). It is usually powdery after it falls away from the
aluminum surface or it may cling to the aluminum surface as a raised, crusty material.
With signs of corrosion on the surface, the powdery material of the correct color is
usually easily identified as aluminum corrosion. A surprising large quantity of this
material can accumulate, especially from cylinders not properly cared for and not
inspected frequently.
Aluminum Oxide: A superior corrosion-resistant internal surface coating formed on
Luxfer SCBA cylinders during the aluminum heat treatment process.
Hydroxides: This material often forms in aluminum cylinders stored with water
inside. If conditions are right (poor maintenance and care of the cylinder), a light
colored, whitish to gray aluminum oxide may be present which, when moist,
becomes gummy. It is an alkaline material (like a strong soap) which may burn
the skin.
36 1998 Edition

When contaminating material is found inside the SCBA cylinder, it should be
removed in order that the interior surface is visible for an accurate visual inspection.
(See NOTE 17 for general cylinder internal cleaning procedures). Save some of the
material to show the cylinder owner.
12. Through the decades that Luxfer has manufactured SCBA cylinders, there have been
process/manufacturing changes. The cleaning and preparation of the cylinder inside
surface processes have changed over the years, too. Some changes have occurred to
improve the product internal surface, some have occurred to make the manufactur-
ing more environmentally friendly. Whatever the reasons, the various manufacturing
processes cause different visual surface effects. These differences are apparent when
inspecting the interior of the cylinder.
Over the years, the interior of a just-manufactured Luxfer high-pressure aluminum
and aluminum-lined SCBA cylinder may have had one of the following appearances:
Bright shiny white/gray
Gray to dark gray (almost black)
Dark gray to brown
Aluminum gray
Aluminum gray with darker streaks
As the above surfaces are exposed to use, they may change in appearance. Most get
darker over time. The recommended cleaning/drying methods17 may make the
surface more aluminum gray.
In all cases, the above list of possible surface appearances is 'normal' for the Luxfer
SCBA cylinder.
13. Damaged composite materials can be repaired if the damage meets the criteria for
repair (Level 2 damage) specified in this Guide. Determine if repair of the damage is
allowed by following the criteria given in Section 4B. Measure the depthP28 and
length of the damage on the categorized cylinder (see CATEGORIZING THE
CYLINDER above), and compare it to Section 4B criteria and the limits listed in its
TABLE 1. In the case of abrasionGyou will need to measure the area of the abrasion,
then use the table and criteria in Section 4B above to determine if repair of the abra-
sion is allowed.
Equipment and Supplies: You'll need to have the following items in order to per-
form a repair, in addition to the empty damaged cylinder:
a. A two-part, room temperature curing (fast drying) epoxy resin (each part of the
resin system is in a separate tube or syringe-type dispenser) available from
hardware stores;
b. A stick (like a popsicle stick) or small stirring rod to mix the resin and help
spread it on and around the damaged area;
c. Mixing dish—a small shallow cup, cap or container to mix and hold a tablespoon
of the mixed resin;
d. Rag or old cloth for cleaning up; and
e. A clean, protected work surface (bench or table) to bring the damage up to a
convenient working height.
Luxfer SCBA Guide Volume One 37

Procedure: Review PHOTOS 29 through 33. Only work with a depressurized, empty
cylinder. Never attempt to repair a cylinder that is pressurized. Clean the cylinder
surface on and around the damaged composite material. (See NOTE 16 for cleaning
tips.) The surface must be dry and free of any chemicals, residues, oils, etc. Secure
the cylinder on its side from rolling or moving around, setting the damaged area at
the top.
Follow the repair resin mixing and preparation instructions on the package to make a
total of about one tablespoon of mixed resin. Follow the repair resin instructions as
to when the resin is ready to apply.
When the resin is ready, apply enough to the damaged surface to coat the area with-
out running or dripping excess mixed resin. Spread the mixed resin in an area about
one length or size of the damage beyond the damaged area. For example: If the
damage is 0.75 inches long (19 mm), then the mixed resin should extend about 0.75
inches beyond each end and sides of the damage.
Allow the resin to thoroughly dry and harden. Have the cylinder hydrotested and
reinspected prior to its next fill. Make sure to tell the hydrotester that it is a repaired
cylinder and that, if the hydrotester is testing according to DOT requirements, he/she
must use the criteria in the CGA pamphlet C-6.2 to accept or reject a repaired com-
posite SCBA cylinder.
14. Learning the difference between a crack, scratch, breaks, and a tool stop mark in the
threads is important in a visual inspection program. Study the photos for examples.
See PHOTO 10 for an example of a tool stop mark which is sometimes seen during
thread inspections. Contact Luxfer7for further help or answers to your questions.
Review the definitions of these terms in the Glossary.G
15. Occasions arise in a cylinder's life that provide good opportunities for visual inspec-
tions prior to the minimum-period recommendation. For example, have a complete
(internal and external) visual inspection done whenever the cylinder valve is
removed (for any reason) and whenever the cylinder has been completely emptied.
16. The outside surface of a cylinder is cleaned so that the surface is exposed to the
inspector's eyes. The surface finish on some Luxfer SCBA cylinders is a coating of
paint. This can also include a clear coating over a brushed all-aluminum cylinder, or a
clear coating over a wrapped composite cylinder. Luxfer may also supply SCBA
cylinders to distributors who apply their own coatings. Also, some owners have their
cylinder re-coated. Because of all these coating possibilities, there can be no
generalized statement concerning Luxfer SCBA cylinder external surfaces.
The inspector must be satisfied that the exterior of the cylinder is clean enough to
inspect the surface. Sometimes, this may mean removing dirt and oils. This can be
done with any clean fresh water source or tap water. You can also use a soap
solution made of one tablespoon of liquid dish detergent in one gallon of tap water,
followed by many clean rinses, to remove dirt and oil. A light solvent tar remover may
be used, followed by the soap solution and multiple fresh water rinses.
If, after cleaning the surface, the coating is seen to be raised or bumpy in places, then
it is necessary for the inspector to look below the coating to determine if there is
corrosion (metal) or chemical attack (composite). Some coatings may be removed in
a small area simply by lifting a chip of it away from the surface.
38 1998 Edition

Aluminum Cylinders
If the raised paint is due to corrosion on the metal surface, it will most often be easily
chipped off for an inspection. If corrosion is found on the exterior, under the coat-
ing, then the entire coating should be removed. Get permission from the owner
before removing large quantities of coatings. See NOTE 4 for paint touch-up sugges-
tions.
Any repainting of aluminum cylinders stripped of paint should be done with air-drying
paints. Never use heat to dry or cure paints. Heating a cylinder may require that it be
condemned and never used again. See NOTE 20.
Do not shot blast (other than sling type) the exterior of any Luxfer SCBA cylinder, or
use any abrasive cleaners or abrasive cleaning methods. Any method, which may
reduce the metal thickness or create metal loss, should not be used to clean Luxfer
SCBA cylinders.
Composite Cylinders
If the raised paint (that is, paint which is lifting off the composite surface) is due to
chemical action in or on the composite material, the cylinder is to be condemned.
No paint stripping or chemical removal of paint from composite surfaces is allowed.
Touch-up paints can be applied, but the retouch must not hide any repaired surface
areas.
17. Luxfer aluminum SCBA cylinders may never need an internal cleaning, provided they
are cared for and maintained according to manufacturer's recommendations.4
Occasionally, lubricants (which are all not recommended) may get into the cylinder
or organic materials may be trapped, causing odors. Under these circumstances,
when the cylinder has been contaminated, an internal cleaning is useful. This clean-
ing is a general cleaning guideline for removing offensive odors, lubricants, and light
grime from an otherwise empty cylinder:
Moisture and light grime: Steam clean and blow dry.
Oil, grease, lubricants, light corrosion: Clean with a mild soapy solution (one
tablespoon of hydro-carbon free liquid or solid hydro-carbon free detergent to one
gallon of tap water (use soft water if the tap water is hard)). Rinse several times
with tap water, rinse twice with soft water, steam clean and blow dry.
Odors: Rinse thoroughly with a solution of baking soda (one cup baking soda to
one gallon of tap water). Rinse with clean tap water. Then, rinse with a solution of
vinegar (one half (1/2) cup of household vinegar to one gallon of clean tap water).
Rinse several times with fresh tap water, rinse twice with soft water. Steam clean
and blow dry.
Do not shot blast (internally or externally) or use any abrasive or corrosive cleaners,
or abrasive cleaning methods on a Luxfer cylinder, other than the above recommend-
ed procedures.
18. Label removal from the coated surface (painted surface) of an aluminum Luxfer SCBA
cylinder should be done so as to not disturb or ruin the coating. A particularly good
physical label removing tool (the Super Scraper) is available from Motsenbocker. See
APPENDIX B for a definition and APPENDIX C for sources. We do not recommend the
use of chemical label removers. Do not attempt to remove a resin embedded label.
Luxfer SCBA Guide Volume One 39

19. Some chemicals are known to cause damage to composite materials. The list would
be too long to put in this Guide, however, we can list the types of chemicals that are
known to cause damage, attack, or harm composite surfaces.
Any cylinder composite material coming into prolonged (e.g. soaking) contact
with these types of chemicals and materials must be condemned:
Solvents: (paint thinners, kerosene, turpentine, paint solvents, paint
cleaners, all paint-like products, stoddard solvent, epoxy
solvents, resin removers, organic solvents, etc.);
Vehicle Fluids: (materials that contain benzene, glycol (anti-freeze), battery
acids/alkalis, window washer fluids, oils containing solvents,
flammable materials, organic volatile materials, gasoline and oil
additives, fuels (gasoline, gasohol, methanol, etc.);
Strong Bases: (materials that contain medium to high concentrations of: sodium
hydroxide, potassium (and/or other) hydroxides, materials that
contain strong soap solutions, cleaning (soap) solutions, etc.);
Acids: (materials that are or contain any concentration of acids
like hydrochloric, sulfuric, nitric, phosphoric, acetic acid
(vinegar), etc.);
Corrosives: (materials that contain corrosive components or that are corrosive
themselves, such as the chemicals mentioned above and: cleaners,
glass cleaners, metal cleaners, resin cleaners/removers, drain
openers/cleaners, glues, rubber and other chemical cements, and
atmospheres containing corrosive gases); and
Alcohols: (materials that are or that contain any type of alcohol).
Avoid cleaners, and do not allow composites to come into contact with cleaners that are
not specifically recommended for cleaning in this Guide. See NOTES 16 and 17.
20. As a general rule, aluminum cylinders exposed to temperatures in excess of 350°F
(175°C) must be condemned (see CGA C-6.1). This is because the properties of the
aluminum metal rapidly reduce when temperatures exceed 350°F (175°C), and the
longer the exposure, the greater the degradation of the metal. The higher the
temperature above 350°F (175°C), the faster and greater the degradation. It is a
combination of temperature and time that is critical.
But firefighters can wear aluminum and composite SCBA cylinders with complete
confidence even though they are frequently exposed to temperatures in excess of
350°F (175°C). A firefighter is never exposed long enough to excessive tempera-
tures to damage the cylinder's metal properties. Even wearing the typical firefighting
protective equipment, a firefighter will feel sufficient discomfort from life-threaten-
ing heat and pull back before his or her cylinder could be affected by the exposure
to that excessive temperature.
Luxfer's concern, and yours too, is over the SCBA cylinder left in a fire unattended.
Such cylinders must be condemned. For further information about heat exposure,
read Luxfer's Technical Bulletin on the subject. Contact Luxfer7for a copy.
40 1998 Edition

21. All references in this Guide to ‘inspection’ refer to the comprehensive internal and
external visual inspection outlined in this Guide. This ‘visual inspection’ must not be
confused with that of any regulatory authority. Quite often, a regulatory authority
will require the inspection of SCBA before and/or after each use or on a frequent
basis. For instance, OSHA in the USA requires frequent inspections of SCBA in CFR
29, Part 1910.134(f)(2). These types of inspections generally mean an external visual
inspection of the equipment and does not include the disassembly of the SCBA
cylinder for internal inspection. When 'inspection' is used in this Guide, it means
the 'thorough external and internal visual inspection' outlined and recommended in
this Guide, unless it is stated otherwise.
22. The frequency of cylinder use and type of service are estimated. No documented
data or cylinder record is needed for each cylinder so as to be able to estimate the
frequency of filling or topping off of an organization's SCBA cylinder inventory. An
experienced and knowledgeable member of the organization may estimate the
frequency of use and the type of service of their SCBA cylinders . This estimated
frequency will determine the frequency-of-use rate for all cylinders belonging to that
organization.G
Luxfer SCBA Guide Volume One 41

42 1998 Edition
This page is intentionally left blank.

Luxfer SCBA Guide Volume One 43
VISUAL CYLINDER INSPECTOR TRAINING WORKSHOPS
Luxfer recommends that anyone who wants to perform thorough external and internal
visual inspections on SCBA cylinders, obtain training and accreditation from a reputable
and knowledgeable source. The guidelines set forth in this document are not meant to
replace the experience and knowledge an inspector can obtain from an inspection train-
ing course. At this time, we are aware of the following independent source for such
training:
Professional Scuba Inspectors, Inc. (PSI)
6531 NE 198th St.
Seattle,WA 98155
(425) 486-2252
www.marinestudio.com/sunpacific/psi
e-mail: psicylinders@msn.com
There may be other training agencies offering visual inspection training courses and mate-
rials. We suggest you contact your SCBA manufacturer trade or industry association for
further information.
APPENDICES
APPENDIX A

44 1998 Edition
INSPECTION EQUIPMENT AND ACCESSORIES
Equipment, tools and accessories referred to in this document may be available from
multiple sources. This appendix identifies and lists recommended inspection equipment
tools and accessories.21 Purchase sources are given in parentheses at the end of each
product description. These sources are listed in APPENDIX C.
Pick/end probe: Extends inspector's eyes and fingers into cylinder to probe imperfec-
tions of the interior surface. Looks like a long–handled (30 inch) dental pick. Used to
estimate depths of corrosion pits and external damages (gouges, digs, scrapes, etc.). (1, 5)
Straight Probe: The long-handled (30 inch) probe extends the inspector's eyes and fingers far
into the cylinder to probe the inside base. This is a straight, pointed-end, thin, stiff metal rod. (1, 5)
Master Pit Reference Plate: A very useful reference disc. This round disc has ten or so
machined depressions in it of known depths. Depths should range from 0.01 inch to
greater depths, including the depths to use with this guide. More depths/pits on the ref-
erence plate are acceptable. With practice, this plate will give the inspector a sense for
estimating imperfection depths in cylinder surfaces. (See the end of NOTE 6 for recom-
mended use and see GlossaryGfor definition of 'imperfection'). (1, 5)
Dental Mirror: A typical high quality, half-inch diameter mirror, placed at the end of a
bent probe, commonly used in dental offices. Used here to inspect the thread and inter-
nal crown area of the cylinder. The preferred dental mirror is one which offers a 2X
magnification of the reflection, manufactured by Grobet File Company of America, part
29.386 (ask for the magnification mirror, same part number). Review the photos to see
how indispensable this tool is in viewing hard-to-see areas of the cylinder. See FIGURE 6
for a sample positioning of the mirror when looking for shoulder cracks, and PHOTOS 4
and 7 for thread inspection positioning. (1, 5, 6)
Inspection Light: A small, penlight-like light source (see FIGURE 6). The light is used in
conjunction with the mirror. Variations on this theme have proven useful, such as the
custom–altered Mighty Lite from source 1. (1, 5, 7)
Light Wand: For seeing deep into the cylinder, it is more useful to have a light source that
can enter the cylinder and go to the base of the cylinder. Consider investing in a wand or
inspector's lamp. This can be as simple as a string of white Christmas tree mini-lights on a
stiff rod or as elaborate as a high–intensity bulb at the end of a flexible cord. (1, 5, 10, 12)
Magna-Lite: Hand-held magnifier with light source. Useful for inspecting the outside
surface areas of the cylinder. See FIGURE 5. (5)
Visual Plus: A non-destructive testing (NDT) device made by Advanced Inspection
Technology to automatically detect shoulder and thread cracks. A sensitive device that,
when used properly, gives excellent and reliable determinations on whether or not
shoulder/thread cracks or other neck-area imperfections are present. (14)
Dow Corning 111: Lubricant of choice for installing valves to cylinder. A little goes a
long way. See Section 9. (1, 2)
Small Metal File: A fine metal file is used to remove raised portions of disturbed metal
on the exterior of the cylinder. (5)
Work Bench: A steady, well-lit table or bench to bring the cylinder to a comfortable
height for external inspection. Cylinder should be braced with blocks or a vise that
APPENDIX B

Luxfer SCBA Guide Volume One 45
doesn't damage the cylinder surface. Another station to inspect the interior of the cylin-
der is useful, at about knee level to the operator.
Inspection Stickers: The inspector's own design (or ones obtained from an outside
source) with a place for the date inspected and the inspector's initials/name. Sticker
should indicate “ACCEPTED” and where the inspection took place. (1, 5)
Old Tooth Brushes: You now have a use for those old toothbrushes you've been throw-
ing out. A medium-firm brush or bottle brush will do just as well when cleaning cylinder
threads. Never use brushes with metal bristles. (5)
Isopropyl Alcohol: Sometimes referred to as 'rubbing alcohol,' and is readily available.
Read the label carefully to make sure it is isopropyl alcohol. Used only to clean cylinder and
valve threads. See NOTE 9. Alcohols must not come into contact with composite materi-
als.19 (5)
Liquid Dish Soap: Used to clean the exterior16 and interior17 of dirty or contaminated
cylinders. Obtain and use a mild, non-ammonia soap that is hydro-carbon free.(5)
Air-Dry Paints: To touch up external surfaces opened for inspection (e.g., small area
paint removal where corrosion under the coating is suspected but found not to be dan-
gerous), or for touching up gouges, digs, etc. which have only removed or disturbed the
external coating. Paint must be labeled that it is recommended for aluminum and com-
posite surfaces. See NOTE 4 for more information about painting as it pertains to the
proper maintenance of the cylinder. Never paint over repairs (composite cylinders) or
any damaged areas (all types of cylinders) that affect material loss. Before repainting,
contact Luxfer7for a current technical bulletin on repainting cylinders.(5)
Bowls: Sturdy ones, used to catch water, debris and contaminants found inside cylinders.
Super Scraper: Remove labels physically by slipping this thin plastic wedge under the
label but on top of the coated/painted surface. Useful for removing labels from aluminum
surfaces which may hide external imperfectionsGon aluminum surfaces.(8)
Scotch-Brite Scrubbing Pads: A non-abrasive scrubber for removing stuck-on dirt and
debris from aluminum cylinder surfaces. (5, 9)
Documents: Customer Release for Cylinder Inspection Form.EA two-part FormDfor
recording inspection information. Previous inspection reports on the cylinder being
inspected if available, or from the inspector's files. (1, 5)
Filing System: Keep records of previous cylinder inspections and inspection reports.
Keep records of fillings, also. (5)
Straight Edge/Ruler: A reliable straight edge of metal or wood, together with a small ruler
with easy–to–read increments, is needed to measure cylinder imperfections and damage(s).
For inspectors who will likely be having to clean the interior and exterior cylinder sur-
faces of dirt and contaminants, a steam cleaner and dry, warm air source is recommended.
Depth Gauge: The depth gauge mentioned in this Guide refers to a homemade tool. It
is used to measure the relative depths of cuts, scratches, pits, and abrasions on composite
cylinder external surfaces. Purchase a dial depth gauge, mount it on a pair of small, nar-
row rails that are curved to fit the curvature of the composite cylinder. See PHOTO 28. A
commercially available type of depth gauge used to measure pits in piping is available
from reference 13. (3, 11, 13).
Items of general usefulness: Clean, dry soft rags, clip board, pens/pencils, and a hand-
held magnifying glass. (5)

46 1998 Edition
INSPECTION ACCESSORY SOURCES
These sources for the equipment and supplies listed in APPENDIX B are not meant to be
exclusive. Other suppliers may be closer to your facility and offer acceptable inspec-
tion21 aids.
1. PSI, 6531 NE 198th St., Seattle,WA 98155, (425) 486-2252. A good source of
inspection equipment and literature (publishers of Inspecting Cylinders by William
L. High). PSI specializes in inspection training and inspection equipment, and is refer-
enced many times in APPENDIX B.
2. Dow Corning 111 Lubricant may be found in your area by looking up BEARINGS in
your Yellow Pages/Phone Book. Contact bearing suppliers in your area to see if they
sell it. The lubricant is used in the bearing industry, so if it is not available from a
local bearing company, one may help you find it. Also available from source 1 above.
3. The depth gauge mentioned in APPENDIX B and NOTE 13 can be easily made.
Purchase components from source 11. Have a machine shop do the work if you are
not equipped to do it at your facility. A dial depth gauge is mounted on small,
narrow 'rails' to fit the curvature (arc) of the cylinder. See PHOTO YY. (5, 11)
4. Galiso Nuvac, 22 Ponderosa Dr., Montrose, CO 81402, (800) 854-3789.
5. General supply or manufacturing places (local and mail order), such as: hardware
store, grocery store, drug store, office supply, printer (stickers), laboratory supply
houses, scientific supply sources (e.g.,Van Waters & Rogers (800) 999-8974, Baxter
Diagnostics Inc. (800) 234-5227, etc.), and local machine shops (picks, probes,
'homemade' Master Pit Reference Plate, Light Wands, tumbler, etc.).
6. Ken's Tool & Supply, (909) 686-2542; Wherever you purchase the dental mirror, ask
for the half-inch, 2X mirror manufactured by Grobet File Company of America, part
number 29.386. The part number doesn't guarantee the magnification of the mirror.
You'll need to ask for the 2X mirror with that part number.
7. PB-2 Penlight, Mel's Industrial Supply, (909) 737-8143. Many office supply stores and
hardware stores have such lights.
8. Motsenbocker Super Scraper. Call (619) 581-0222 for your nearest supplier.
9. 3M Corporation product. Check sources listed in source 5 above.
10. Hydro-Test Products Inc., 1-800-225-9488.
11. Starrett (714) 879-6637 for engineering tools and supplies.
12. ZTC, Inc., 1-800-882-0708.
13. W. R.Thorpe & Co., P. O. Box 38, Ketchum, OK 74349, 918-782-2003. Ask for informa-
tion about “Pipe Pit Gages.”
14. Advanced Inspection Technology, 1220 E.Washington St., Suite 24, Colton, CA 92324-
6436, (909) 369-0945.
APPENDIX C

Luxfer SCBA Guide Volume One 47
SCBA CYLINDER VISUAL INSPECTION FORM
You may want to use the following sample form. Feel free to modify or copy this form.
Pre-printed forms are available from PSI and other sources (see APPENDICES B and C).
Ideally, you may want to print the guidelines for the care and maintenance of the cylin-
der (as set out in NOTE 4) on the back of THE FORM.
SCBA CYLINDER VISUAL INSPECTION FORM
Cylinder Owner:__________________________________________________________
Phone: ______________________________ Date: _______________________
Address: _______________________________________________________________
City: ________________________________ State: _______Zip: ___________________
I GENERAL
Receipt: With accessories: ___________________________________________________
Under pressure/any leaks? __________________________________________________
II CYLINDER INFO
Markings: Serial Number Thread: _______________ Service Pressure: ________________
Gov't. Specification/Identification: ______________ Category: _______________________
Original Hydro: ____ Last retest: _____
Visible conditions/reason for inspection? ________________________________________
Inside contaminants/materials found/odor: ______________________________________
III EXTERIOR
Any bulges or bows noted? _______________ Where? ____________________________
Any dents, cuts, digs, gouges, abrasion, scratches?________Where/depth/length: ________
Corrosion? _______________ Kind? __________________________________________
Where/depth/length: _______________________________________________________
IV THREADS
Gall? ________ Known leaks? ________ Good thread count, starting from top: ________
Good threads needed? ________O-Ring gland/face condition: ________ Cracks? _______
Where/describe: __________________________________Valleys into threads? ________
Where? __________________________________ Thread loss due to valley? _________
How many threads affected? ________General appearance: _________________________
V INTERIOR
Cleaning required? ________Type? ____________ Crown cracks/folds found? ________
Where? ________________________Corrosion?_______ Type? ___________________
Where/depth/length: _______________________________________________________
VI CYLINDER STATUS
Accept/Repair/Condemn: Explain: ______________________________________________
____________________________________________________________________________
Condemn how? ______________________________________________________________
Remarks: ____________________________________________________________________
Inspector's signature: ___________________________ Location: _____________________
Inspection Date: _____________________________________________________________
APPENDIX D

48 1998 Edition
OWNER RELEASE FOR CYLINDER INSPECTION FORM
You may want to consider using the following sample form. Feel free to modify or copy this
form. Pre-printed forms are available from PSI and other sources (see APPENDICES B and C).
OWNER RELEASE FOR CYLINDER INSPECTION FORM
To Our Valued Cylinder Owner and Customer:
Thank you for considering us for your high pressure SCBA cylinder visual safety inspec-
tion. The regular visual safety inspection of your SCBA cylinder is part of its routine care
and maintenance. With proper care, maintenance, regular visual inspections and hydro-
static retesting, your cylinder will provide you with a long, safe and satisfactory service.
Visual safety inspections need to be done on your Luxfer SCBA cylinder to assure its con-
tinued safe service. The frequency of these inspections depends upon the kind of use,
care and maintenance your cylinder gets. The more often it is used, the worse its care,
maintenance and handling, and the more frequently it should be inspected.
Your cylinder should also be inspected before further use whenever it is known to have
been exposed to temperatures over 350°F, in an accident, known or suspected to be
leaking, has been dropped, has fallen, has been struck, has obvious metal corrosion since
the last visual inspection, has composite material damage or chemical exposure, has a
gouge, dent, scrape, cut, dig or in any way has been damaged since the last visual inspec-
tion, or was stored with water, material or matter inside the cylinder.
Your cylinder should not be used if it is, or is suspected to be, leaking.
Your cylinder should be inspected once every thirty months, or more frequently in certain
cases. The visual inspector can help you decide how frequently your cylinder should be
inspected. If it is time or if you suspect or have any concern about the general condition
of your SCBA cylinder, a visual inspection by an experienced visual inspector is needed.
The visual inspection is a safety check on your cylinder, and the inspector performing it
wants to make sure that your SCBA cylinder is safe for continued service. If, during the
inspection, a cylinder condition exists which would make your SCBA cylinder unfit for
continued service, it will be necessary to condemn and to render your cylinder unusable.
The condemned cylinder, valve, and accessories will be returned to you with an explana-
tion of the condition found. By signing below, you agree to this process which may ren-
der your SCBA cylinder unusable in the future.
I, _____________________________ (print owner name or name of authorized owner
representative), have requested that the SCBA cylinder identified by the serial number:
_____________________________________ be visually inspected.
I agree, as a condition of having this visual inspection, that the cylinder may be disabled
and/or rendered unusable if it does not meet the accepted standards of quality estab-
lished by the manufacturer for continued service. I will receive a written report of any
and all conditions which caused the SCBA cylinder to fail the inspection and to be con-
demned. Also, I will have the condemned cylinder, accessories, components, and valve
returned to me.
Owner (or representative's) Signature: ________________________Date: __________
Witnessed by (inspector or station rep.): ______________________________________
APPENDIX E

Luxfer SCBA Guide Volume One 49
FURTHER REFERENCES AND INFORMATION
For further information and reading, we suggest reviewing the following documents.
CGA Pamphlets: C-6.1 (aluminum cylinders) and C-6.2 (composite cylinders) are required
reading.
CGA Pamphlet C-6.1;“Standards for Visual Inspection of High Pressure Aluminum
Compressed Gas Cylinders,”
CGA Pamphlet C-6.2;“Guidelines for the Visual Inspection and Requalification of Fiber
Reinforced High Pressure Cylinders,”
Other CGA Documents: C-1 (Hydrostatic Testing information); and
C-7 (Compressed Air information)
all published by Compressed Gas Association, Inc.:
1725 Jefferson Davis Hwy, Suite 1004
Arlington,VA 22202-4100
(703) 412-0900
Department of Transportation,Title 49 Code of Federal Regulations
(CFR) Parts 100-199, (obtain current publications) from:
U.S. Department of Transportation
Superintendent of Documents
U.S. Government Printing Office
Washington, DC 20402
Inspecting Cylinders, by William L. High.
Available from:
PSI, Inc.
6531 NE 198th St.
Seattle,WA 98155
(425) 486-2252
Luxfer SCBA Cylinder Exemptions:
DOT-E 7235
DOT-E 9894
DOT-E 10345
available from:
Associate Administrator for Hazardous Materials Safety
Research and Special Projects Administration
Department of Transportation
Washington, DC 20590
Attn.: DHM-31
APPENDIX F

50 1998 Edition
This page is intentionally left blank.

Luxfer SCBA Guide Volume One 51
GLOSSARY OF TERMS
These terms are defined and described as they relate to Luxfer high pressure SCBA
aluminum cylinders.
abrasion: When used to express a damage condition on composite materials, it means
the type of damage caused by wearing, grinding, rubbing away by friction, or scraping of
the composite material. These types of damage can be caused by sliding contact with a
rough surface. Inspection criteria for abrasion includes the depth and area of the region.
aluminum alloys: SCBA cylinders manufactured from aluminum are actually produced
from a variety of aluminum mixtures. These mixtures are called alloys. An alloy called 6351
was used by Luxfer up to and including 1987. Since 1988, Luxfer uses an alloy called 6061.
area: The inspector will need to be able to calculate the 'area' of damage to apply the
inspection criteria to abrasions and dents in composite materials. (See abrasion and
dent in this Glossary).
base: The bottom, flat portion of the aluminum cylinder. Also, the rounded end of a
composite cylinder that has no opening. See Figure 11.
bow: A cylinder exhibiting a curved feature. On one side, the cylinder may appear to be
raised, as in PHOTO 18. On the other side, the cylinder may appear to have a depression,
as in FIGURE 11. Such a cylinder usually has a peculiar, un-smooth pitch when it rolls on
a flat surface. Also known as “banana.”
broadspread corrosion: General corrosion, usually irregular, covering a relatively large
area and causing aluminum material loss. May or may not have random pitting and is
sometimes difficult to see when it is uniform. Also called general corrosion, or wide-
spread corrosion.
bulge: A swell or bend outward of metal or composite material. A protuberance which
is easy to see using a straight edge. See Figure 10.
composite material: Used in this Guide to mean the resin and wrapping fiber system
or systems applied to aluminum–lined SCBA containers. It is beyond the scope of this
Guide to describe the differing resins and fibers and systems employed to manufacture
the Luxfer composite SCBA cylinder. Unless otherwise written, the entire Luxfer Gas
Cylinder family of composite material cylinders used in the SCBA service and referred to
in this Guide are grouped into the 'composite cylinder' category.
condemn: To remove from service and make unfit for future use. The Luxfer SCBA
Visual Inspection Guide indicates when to condemn a cylinder and, in Section 9E., indi-
cates how to condemn a cylinder.
continuous full thread: Uninterrupted, unbroken thread with a sharp peak and with-
out imperfections. (See thread and imperfection).
corrosion: The simple oxidation or galvanic action of aluminum metal. Action of chem-
icals, salts, water, or sea water may produce corrosion if the cylinder isn't kept clean and
dry, or taken care of properly. Corrosion caused by galvanic action often comes from the
exposure of the cylinder to other metals. (See galvanic corrosion). Copper, brass and
stainless steel contacts are significant sources of galvanic corrosion of aluminum.
APPENDIX G

52 1998 Edition
Most valves are brass, plated with an inert metal (e.g., chromium or nickel), however, if the
plating is broken, incomplete or penetrated, the valve brass in contact with aluminum may
cause galvanic corroding of the aluminum. This type of galvanic corrosion occurs primarily
around the valve connection area, but may spread throughout the cylinder interior.
When stainless steel comes into contact with the aluminum cylinder or liner (for
instance, when steel accessories, straps, bands, etc. remain in contact with uncoated or
unprotected aluminum external surfaces), galvanic corrosion can occur.
Corrosion leading to material loss may cause cylinder leaks and ruptures.
Corrosion of aluminum will appear as a white-roughened or discolored area, with a loose
or crusty white deposit sometimes associated with the corrosion. Estimating the materi-
al loss due to the corrosion, and condemning cylinders with severe or unacceptable cor-
rosion is an important function of the inspection procedure. See broadspread corro-
sion,line corrosion, and pit corrosion. Proper care and maintenance will prevent
corrosion. See NOTE 4.
crack: A split or fracture (usually jagged) in the metal causing an open and often fine fis-
sure which may cause leaks if permitted to develop. Carefully inspecting for cracks is an
important function of the inspection procedure. Condemn all cylinders with cracks in
the aluminum before any leak or rupture can occur. See also thread cracks. For a dis-
cussion of 'crack' as it pertains to composites, see delamination.
cross threads: When the threaded area appears to have two different sets of threads.
This can be caused by installing the wrong valve (threads on valve don't match the threads
in the cylinder) or by installing a valve crookedly. When a valve is screwed in crookedly or
the wrong valve is forced into a cylinder, the valve threads can 'cut' a new set of threads in
the cylinder threading. The new set or partial set of threads are there, in addition to the
set of threads machined there by Luxfer. The visual effect is to make the threaded area
appear to have two sets of threads. A cylinder with cross threads must be condemned.
crown: The dome-shaped top portion of the cylinder which includes the distance
between the top facing down to where the sidewall begins. The aluminum in this area is
thicker than in the sidewall on all aluminum cylinders and hoop wrap cylinders and is
more tolerant of damage. But, in composites the crown/dome and base that is composite-
wrapped is less tolerant of damage. See FIGURE 5 and TABLE 1.
cut: An incision or gash associated with some loss of wall thickness in the aluminum, or
associated with some loss of strength in composites, usually made by a sharp object.
cylinder: For the purposes of this Guide: A single-piece tank made of aluminum alloy
material or a hoop-wrapped composite/aluminum container manufactured by Luxfer to
contain air under high pressures for use in a self-contained breathing apparatus (SCBA). The
cylinder is only the tank portion of the assembly and does not include any attachments.
depth gauge: A 'dial depth gauge' available from many engineering supply companies, is
mounted on a pair of small, curved rails to roughly match the curvature (arc) of the
cylinder and becomes a 'depth gauge.' This device is used to estimate the depth of
external damage done on composite materials. The dial should read in increments of at
least thousandths of an inch (0.001 inch -- 0.025 mm) to relatively measure the depth of
a cut or scratch on the composite material. See PHOTO 28.

Luxfer SCBA Guide Volume One 53
delamination: The separation of layers or strands of wrap/fiber materials from other
layers or strands. The effect is to appear like a crack along the direction of the wrapped
fibers. Closer inspection may show loose fiber strands. On the composite portion of a
cylinder with delamination, the strands may not be cut, but they could be loose and sepa-
rated from other strands.
When layers of fibers separate, they may appear 'frosty' under resin-coated composite
materials. Loose strands are cause for condemning. Small frosty areas under resin-coated
composites may be acceptable. Refer to inspection guidelines.
dent: Imperfection of the cylinder caused by a blunt object in such a manner that the
wall (aluminum or composites) suffers no material loss but shows an indentation or evi-
dence that the container was dented.
Dents up to one sixteenth of an inch deep in the aluminum can be tolerated when the
major diameter of the dent is two inches or more. The condemning criteria is thus:
Condemn cylinders with dents over one sixteenth of an inch in depth; condemn cylin-
ders with any depth dent if the dent diameter is under two inches. See PHOTO 1.
The dent criteria for exterior aluminum metal may seem confusing. Small diameter dents
create a greater damage to the metal than large diameter dents. This is because the small
diameter dent has actually deformed the metal at a greater 'angle' than if it were a large
diameter dent. It is this degree or severity of the deforming angle which renders the
metal potentially unreliable. Large diameter dents spread this angle over a larger surface
and thus, that degree of angle is small (the dent is less of a concern).
Dents in composite materials may cause delamination or separation of fiber layers from
one another. The appearance of this to the inspector is an area in the composites that is
'frosty' or opaque. Dents or frosty areas in composites may be cause to condemn the cylin-
der. The criteria for composite dents is based upon the area of the frosty region. See the
criteria, section 4A. Also, an aluminum–lined composite cylinder may show evidence of a
dent by looking at the liner from the thread opening. See interior inspection, Section 6B.
digs: An imperfection associated with some loss of wall thickness (material loss) usually
caused by a sharp object, leaving a gouge-like short, wide cut.
DOT: Department of Transportation. A federal agency regulating interstate trade within
the United States of America. Wherever references to the DOT are made, the inspector
and reader of this document should be aware that other countries may have similar or
differing regulations. If operating outside the USA, the inspector must be aware of regu-
lations in the country the cylinder is used, which govern cylinder safety, care, handling,
use, certification, inspection, and filling. See APPENDIX F.
exemption: The USA DOT issues exemptions for all Luxfer composite cylinders. The
exemption gives retest information as well as cylinder life. All retesters, cylinder owners
and inspectors should be aware of any and all exemption requirements pertaining to the
composite cylinder(s) they handle.
face: The topmost surface of the cylinder, parallel with the base, above the threads,
which may touch the bottom of an installed valve. See FIGURE 5.
fold: The place where two metal flows meet in such a manner as to create a sharp, visu-
al groove. The groove of the fold will always be along the length of the cylinder and usu-
ally in the crown area. See FIGURE 8 and PHOTOS 14 and 15.

54 1998 Edition
Form, The: The SCBA Visual Inspection Form (see APPENDIX D for an example) or any
form or cylinder log used to record cylinder information, owner information, the inspec-
tion date and results, and the inspector's name and findings. If the cylinder is inspected
by the owner (for example at the station that owns it), then it would be more practical
to maintain a cylinder log (electronic and/or hardcopy) for the life of the cylinder.
full thread: A sharp thread which is continuous for one complete turn (360°) around
the neck, without cracks, nicks, or distortions interrupting the thread.
gall: An imperfection in the metal's surface including a scratch, small gouge, or raised
metal areas. Gall in SCBA cylinders is a concern when located in the thread and/or
O-ring gland areas. See thread gall for more detailed information.
galvanic corrosion: Corrosive action caused by an electric current flow between met-
als, normally in a wet environment. An electric current is often formed between alu-
minum and copper (and copper alloys, like brass), and aluminum and stainless steel.
Brass valves must be properly and thoroughly plated with metals which are more inert
(e.g., chrome and nickel). Keep uncoated steel accessories (straps, bands, etc.) from
coming into contact with uncoated/unprotected aluminum. See corrosion.
gouge: An imperfection associated with some material loss usually caused by a sharp object
leaving a wide and usually deep trough in the metal or composite material. See PHOTO 2.
government specification: A government's requirements for a cylinder which is usual-
ly included in the cylinder marking or on a cylinder label. Each country may have their
own specification, or they may accept the USA DOT specification. Within the USA, the
government specification of an aluminum SCBA cylinder may be “DOT-3AL,” for example,
or “DOT-E9894.” See FIGURES 1 - 4 for USA examples. See labels and markings.
A government's requirements for a composite cylinder are often written in an exemp-
tion. All Luxfer composite cylinders in the USA are regulated by exemptions which
include information about the retest frequency and cylinder life. See exemption.
heat effects on aluminum cylinders: Metals (e.g., iron/steel and aluminum) change
properties when exposed to high temperatures. Aluminum cylinders exposed to fire, arc
welding, ovens, furnaces and other heat sources will become soft. Aluminum cylinders
known to have been left unattended and exposed to heat sources over 350° F (175°C)
are unsafe and must be condemned and removed from service. If you suspect an all-
metal cylinder has been left unattended for a day or more, and heated to temperatures
between 265°F (130°C) and 350°F (175°C) it must be hydrostatically retested before fur-
ther use. At no time should any cylinder be heated (except for an occasional steam
cleaning) in order to dry, cure or remove paint, or to dry a wet cylinder. See NOTE 20
and PHOTO 13 for important additional information.
heavy service conditions: Cylinders filled or topped off five or more times per week.
Also, cylinders used wherever damage is more likely to occur than in normal use or
where the care and/or maintenance is slightly below recommended care (see NOTE 4).
Then cylinders must be inspected once a year or more frequently.
hoop-wrapped: As used in this Guide, it is meant to describe the composite cylinder
design where the composite material is only put on the cylindrical portion of the con-
tainer. The crownF5 and base of the liner are left as unwrapped aluminum. See liner.
hydrostatic test: A pressure test of the cylinder using a water jacket. The U.S.
Department of Transportation (DOT) requires that this test (called a retest) be done on
every all-aluminum cylinder every five years by a hydrostatic retester duly authorized by

Luxfer SCBA Guide Volume One 55
the Research and Special Programs Administration. Similarly, under the exemption
requirements for composite cylinders, the DOT specifies this retest be done on compos-
ite cylinders every three years. See NOTE 1 and APPENDIX F.
hydrostatic retest date: A date, consisting of the month and year, when a hydrostatic
retest was performed after its manufacturer's hydrotest date. An all-aluminum cylinder
will have retest dates for every five years or less after the manufacturer's first hydro test
date. Exemptions specify how frequently a composite cylinder must be retested (usually
every three years). See NOTE 1 and APPENDIX F.
imperfection: Used in this Guide, it means any visual fault or weakness in the cylinder
(including thread, metal and composite areas). This includes, but isn't limited to: corro-
sion, damage (cuts, digs, gouges, scrapes, dents, etc.), cross threads, cracks, bulges, bow,
folds, valleys, tool stop marks, loose fibers, missing resin, etc. Not all imperfections are
material losses and may not pose a cylinder safety concern (e.g., tool stop marks). Each
imperfection that does pose a cylinder safety concern is discussed in the Guide, which
identifies acceptable limits that can be measured or estimated (e.g., pits), or con-
demnable features (e.g., a thread crack, fold, delamination, etc.).
inspection: See NOTE 22.
isolated pit corrosion: Pit corrosion, when the pit is alone or separated from other
corrosion pits. See pit corrosion. See PHOTOS 11 and 12.
labels: Composite cylinders are not generally 'marked' (see markings) but are, instead,
labeled. The exception may be hoop-wrapped cylinders, which may have retest informa-
tion stamped into the crown portion. Composite cylinders have their information print-
ed on labels that are then embedded in the composite material. Retest information for
composite cylinders is most often put on labels and then those labels are put on the
composite material of the cylinder and sealed with a coating of resin. However, hoop-
wrapped cylinders may have retest markings stamped in the metal dome area. The resin-
coated labels (and any stamped retest markings) must never be disturbed, removed or
covered. If the serial number becomes illegible or is for any reason unknown, the SCBA
cylinder must be condemned. If the first hydrotest date or manufacturer's or supplier's
name, product identification, etc. on the original embedded label is obscured or at any
time illegible, the cylinder must be taken out of service until the proper information is
put back on the cylinder. See FIGURE 3 and 4.
Level 1 damage: A damage severity scheme put forth in CGA Pamphlet C-6.2 (see
APPENDIX F). Level 1 damage includes that type of physical damage to composite mate-
rials which is minor and still makes the cylinder suitable for service.
Level 2 damage: A damage severity scheme put forth in CGA Pamphlet C-6.2 (see
APPENDIX F). Level 2 damage includes the type of physical damage to composite mate-
rials which is allowed to be repaired by the application of a two-part, room temperature
cure epoxy resin. Luxfer composites may be repaired if the damage (cuts, gouges,
scratches, etc.) is over 0.005 inches (0.13 mm) deep, one inch (25.4 mm) or shorter in
length, and is at or under the depths given in TABLE 1.
Level 3 damage: A damage severity scheme put forth in CGA Pamphlet C-6.2 (see
APPENDIX F). Level 3 damage is physical damage to the composite portion of a cylinder
which requires the cylinder to be condemned. Level 3 damage is any damage which
exceeds Level 2 damage.

56 1998 Edition
line corrosion: Pit corrosion occurring along a line in aluminum material. When pits
are so close that they merge, or from a short distance appear to be a single corrosion
along a narrow to broad line, the effect is called line corrosion. Cylinders left with
water inside and then stored on their side often show interior line corrosion where the
water's edge touches the cylinder wall. Line corrosion is sometimes seen where the
cylinder boot, harness or straps may trap moisture against the aluminum exterior. Line
corrosion is particularly detrimental to the safety of an aluminum cylinder. Follow con-
demning guidelines carefully. Proper care and maintenance will prevent line corrosion.
liner: The liner of a composite cylinder is very simply the material below the composite
material. The metal portion of a hoop-wrapped container can be thought of as a liner.
The liner is the form around which the composite material is wrapped around. Luxfer
Gas Cylinders manufactures aluminum liners for many of its composite cylinders.
markings: The words, letters, numbers and symbols stamped into the aluminum portion
of a cylinder. Manufacturing markings include cylinder information (date manufactured,
date first hydro tested, cylinder type, service pressure [in psig or bar or both], serial num-
ber, manufacturer (Luxfer), etc.). Other markings include the hydrostatic retest date(s)
and markings authorized to be added by the DOT. Composite hoop-wrapped cylinders
may have retest markings stamped into the metal dome portion. See FIGURES 1 and 2.
In composite cylinders, the manufacturing information appears on the label embedded in
the composite material. See labels above.
material loss: The removal of aluminum metal by corrosion or from physical abuse. The
loss of material (aluminum) from any part of the cylinder is one of the most important
concerns of cylinder safety. One of the reasons for regular and timely visual inspections,
as well as inspections following a known condition (see under FREQUENCY in Section
1D) is to condemn cylinders which suffer unacceptable material loss. Material loss can
also occur when owners (with good intention) try to sand a cylinder, or blast it with
material to make it shiny or to restore a luster to the aluminum cylinder surface. These
activities are not recommended, as surface treatments may result in sufficient material
loss to cause leaks and ruptures. See PHOTO 2.
Material loss in a composite cylinder can be the removal of resin, delamination, or any
removal of the wrapping fibers. Such 'loss' is generally considered a weakening of the
composite portion of the cylinder and may lead to leaks or ruptures. See PHOTO 25.
metal alloys: Over the years, different metal mixtures have been used to manufacture
SCBA cylinders. These metal mixtures are called alloys. Different alloys of steel and alu-
minum have been used by many different manufacturers. Generally, when one considers
an 'aluminum alloy,' the majority of the metal mixture is aluminum. See aluminum
alloys.
metal distortions: During the manufacturing process, some aluminum metal may not
flow smoothly, causing sections or areas to form ridges, valleys, folds, and misshaped devi-
ations from the normal smooth and uniform metal. These manufacturing imperfections
may generally be termed metal distortions. See PHOTOS 3, 14, 15, 16 and 17. See
fold, imperfection, and valley.
NDT: Non-destructive test(ing). A particularly useful means for quickly and accurately
determining whether or not there are thread cracks present—even the ones that are
very hard to see.

Luxfer SCBA Guide Volume One 57
neck: The top portion of the crown, containing the threads, face and O-ring gland. See
FIGURE 6.
neck ring: Luxfer DOT E 7235 cylinders with a 4500 psig service pressure require the
use of a steel ring around the threaded neck. This 'neck ring' reinforces and strengthens
the threaded area of this cylinder design and is required. Cylinders of this design were
'retrofitted' with a neck ring. Cylinders of this design must not be used unless they have a
neck ring. Contact Luxfer (see NOTE 7) if you have such a cylinder without a neck ring.
normal service: An SCBA cylinder in normal service under 'average' SCBA service con-
ditions is well cared for, handled, and maintained according to guidelines in NOTE 4.
These cylinders are not subject to frequent use (more than two fills per week), nor are
they subject to conditions likely to damage them (e.g., working in tight spaces where
damage to the cylinder is likely to occur). If in normal service, all-aluminum cylinders
covered by this Guide should be inspected every thirty months or less. Hoop-wrapped
composite cylinders covered by this Guide should be inspected every 18 months or less.
O-ring: The gasket placed between the cylinder neck and the valve, forming an air-tight
seal. Each valve manufacturer specifies the kind of O-ring to use with the valve as well
as its proper installation. Some manufacturers will recommend that the O-ring be
replaced whenever the valve is removed. Be sure to follow the valve manufacturer's sug-
gested procedures for O-ring replacement and installation.
O-ring gland: The top portion of the cylinder in the neck which is cut into the alu-
minum to fit the O-ring. Also referred to as a “seat.” Usually a depression in the metal
just below the face into which the O-ring fits. The installation of the valve squeezes the
O-ring to press against the bottom and side of the gland to make an air tight seal. If the
O-ring gland is damaged (gouge, cut, scrape, etc.) it may cause an air leak. See FIGURE 6.
Organization: The entity that provides the direct management and supervision for
emergency incident response personnel. Examples of such entities include, but are not
limited to, fire departments, police departments, rescue squads, EMS providers, HAZMAT
response teams and entities (such as hazardous material manufacturing facilities, facilities
with confined spaces, etc.) who keep and use SCBAs for private response teams.
pit: A hole or cavity in the metal or composite material of a cylinder. Usually caused by
corrosion (metal), chemicals, or a sharp object. The pit may or may not be 'straight.'
Other possibilities include the many types of corrosion paths outlined in this procedure
and the kinds of metal pit formations shown in FIGURE 9. Since not all corrosion pits
are identical in shape, the inspector should take a few moments to inspect or probe the
pit to get an idea of its overall shape and profile before estimating its depth.
pit corrosion: Corrosion which makes a pit. Pit corrosion is particularly detrimental to
the safety of an aluminum cylinder. Its depth and shape should be the primary concern of
a good inspection, since pits beyond certain depths may render the cylinder unsafe. See
PHOTOS 11 and 12. See FIGURE 9. Proper care and maintenance prevents pit corrosion.
psig: An acronym pressure parameter for a gas, standing for pounds per square inch
gauge of a gas. Some use “psi” which is “pounds per square inch” but in this Guide, since
all references are to gauge pressures, the more specific and accurate acronym,“psig” is
used. Sometimes written “p.s.i.g.,” the 'gauge' portion references the standard pressure
above the atmospheric pressure of 14.7 psi.

58 1998 Edition
repair: Under certain conditions, the composite portion of the composite SCBA may be
repaired. The procedure is given in NOTE 13. After the repair is complete, the cylinder
must be hydrostatically tested before being put back into service. The retester operating
in the USA and those retesters following DOT requirements must be notified that the
cylinder they are getting has been repaired. Repaired cylinders must pass a specific
retest visual inspection special to them, in accordance with CGA Pamphlet C-6.2 (see
APPENDIX F).
RSPA: Research and Special Programs Administration agency within the USA DOT. For
their function related to SCBA cylinders, see NOTE 1.
respiratory equipment: Used in this Guide to refer to the equipment making up the
basic SCBA. Similar to the definition of 'respiratory system' below, but not thought of as
a “certified set“ of equipment.
respiratory system: Used in this Guide to refer to the Luxfer SCBA cylinder and all the
other attachments and components to the respiratory equipment which is provided by a
respiratory manufacturer as a 'certified set.' The system is usually certified and approved
by a regulatory agency (in the USA) and its components cannot be changed or replaced
with parts not conforming to the system's certification. The parts are compulsory in the
sense that each part of the system is certified as a part of the SCBA. Respiratory system
(SCBA) manufacturers must be contacted to find out what part is approved to act as
replacement parts to their certified system.
retrofit: The Luxfer DOT E 7235 cylinder with a 4500 psig service pressure was original-
ly sold without a neck ring. Later, it was determined that the cylinder design required the
fitting of a neck ring around the outside of the threaded neck area. These cylinders were
fitted with a steel neck ring (see neck ring). The fitting is called 'retrofit.' Cylinders that
have been correctly retrofitted have a black and white sticker on the crown that says,
“Retrofitted.” Through service, following the retrofit, some retrofitted cylinders could exist
without a sticker and should not be removed from service because of this.
SCBA: Used in this Guide to mean the respiratory apparatus known as the self-contained
breathing apparatus. The 'apparatus' is a combination of equipment and components
which may or may not be certified and regulated in the country, state, province, or place
of use. When the SCBA is certified, then each component is specified for use in that res-
piratory system (SCBA system). In this Guide, unless otherwise specified, it is assumed
that “SCBA” means a certified set of respiratory equipment and components, which
makes a complete system for breathing air from a high pressure cylinder.
SCBA cylinder: SCBA cylinders manufactured by Luxfer Gas Cylinders to hold breath-
able air at pressures of 2216 psig or more.
scrape: To rub with something rough or sharp causing a scuff abrasion and/or scratches.
The Super Scraper by Motsenbocker, when used properly, slides along the aluminum sur-
face of the cylinder without causing any scrape damage to the cylinder surface (see
APPENDICES B and C).
shoulder: The top part of the cylinder from the sidewall to the neck. Most of the crown
portion, except for the threaded area. See FIGURE 5.
shoulder cracks: Splits or fractures in the metal, in the top part of the cylinder. See
PHOTO 20.

Luxfer SCBA Guide Volume One 59
sidewall: The straight smooth portion of a SCBA cylinder between the base and the
crown. The metal thickness is uniform in this region.
stamped markings: See markings. For examples of Luxfer stamped markings used
over the years, see FIGURES 1 - 4.
stripped thread: Threads which have been removed, or torn.
structural damage: Generally used to describe severe damage to composite containers.
Such damage may involve damage to the liner, sometimes only visible by doing an internal
inspection. Any composite container showing external indentations or that may have
been crushed or squeezed has suffered structural damage. If the composite cylinder does
not roll smoothly on the table top during the inspection test for dents and bows, then the
cylinder must be carefully inspected to determine if there has been structural damage.
Condemn all containers with structural damage or with suspected structural damage.
tap: A tool to machine threads into a metal. See tool stop mark.
thread: The top portion of the cylinder, in the neck, which contains a fine helical fila-
ment of metal which meshes with the same of a valve. See FIGURE 5, PHOTOS 4 - 10
and 19.
thread cracks: A split or fracture in the threaded portion of the cylinder. It is usually
jagged. See PHOTOS 6 - 9. Not to be mistaken for a “tool stop mark.”
thread gall: Imperfections in the threaded area caused by many possible physical abus-
es. Thread gall is usually caused when inappropriate (wrong size valves or wrong thread-
ed valves), unclean, deformed, or damaged threaded items (e.g., valves) are forced
(screwed) into the cylinder thread. When debris in the cylinder thread or debris on the
valve thread is ground into the cylinder thread, such as when the valve is installed, gall
will often occur. Threads too large, improperly sized, damaged or deformed, if forced into
a cylinder's thread may cause gall, if not ruining the cylinder's thread. See gall and cross
threads.
tool stop mark: When the tool (tap) is stopped, after machining threads in metal, there
is occasionally a faint, shadowy line left on the thread. Sometimes called a “tool mark” or
“tap stop”. The line is straight, passing down through most of the entire thread area. The
tool stop mark doesn't affect the quality, safety or performance of the cylinder or thread
area. Without accurate and careful inspection, the tool stop may appear to be a crack.
The visual inspector must learn the difference between a tool stop mark (something
which doesn't affect the safety or quality of the cylinder) and a crack (something which
may cause the cylinder to leak or rupture). See PHOTO 10.
torque wrench: A conventional-type wrench which will 'click' (make an audible sound)
or 'slip' when too much force is applied to it. The desired setting on the wrench is made
prior to its use. The recommended equipment for use when reinstalling cylinder valving.
transverse: A direction near right angles from the direction of the fiber wrapping.
Fibers are wrapped on the aluminum in a direction that can be determined by looking
closely at an area of the composite material. A 'transverse' direction to the fiber wrap-
ping will be in a direction that 'cuts' across the path of the fiber wrap. When a scratch,
cut, gouge, etc. is in a transverse direction, it may cut fibers if long and/or deep enough.

60 1998 Edition
upset metal: Metal which has been pushed or moved to rise above the regular surface
of the metal around it. When aluminum is gouged, scraped, etc. some of the metal, at the
edge of the damage, may be raised or set higher than the unaffected metal in the vicinity.
In general, the raised or upset metal may be filed and smoothed to the regular surface, so
an accurate depth measurement of the imperfection can be taken. Care must be taken
so as to not remove metal which is part of the wall thickness in the original design of
the cylinder. See material loss.
valley: The place between two metal flows which meet in such a manner as to create a
shallow and smooth elongated depression. The valley will always be along the length of
the cylinder and usually in the crown area. See FIGURE 7 and PHOTOS 16 and 17.
Compare this to fold.
valve: The control device installed into the threaded opening of a cylinder to restrain
and manage the compressed air. Various manufacturers make valves and accessories for
SCBA cylinders. Brass and/or copper alloy valves should not be used in aluminum
cylinders unless they have been thoroughly and properly plated with chrome or nickel
so that the brass and/or copper doesn't come into contact with the aluminum. See
corrosion and galvanic corrosion.
visual inspection procedure: A procedure primarily relying upon the sense of sight to
examine, investigate and observe the condition of a cylinder. See inspection.
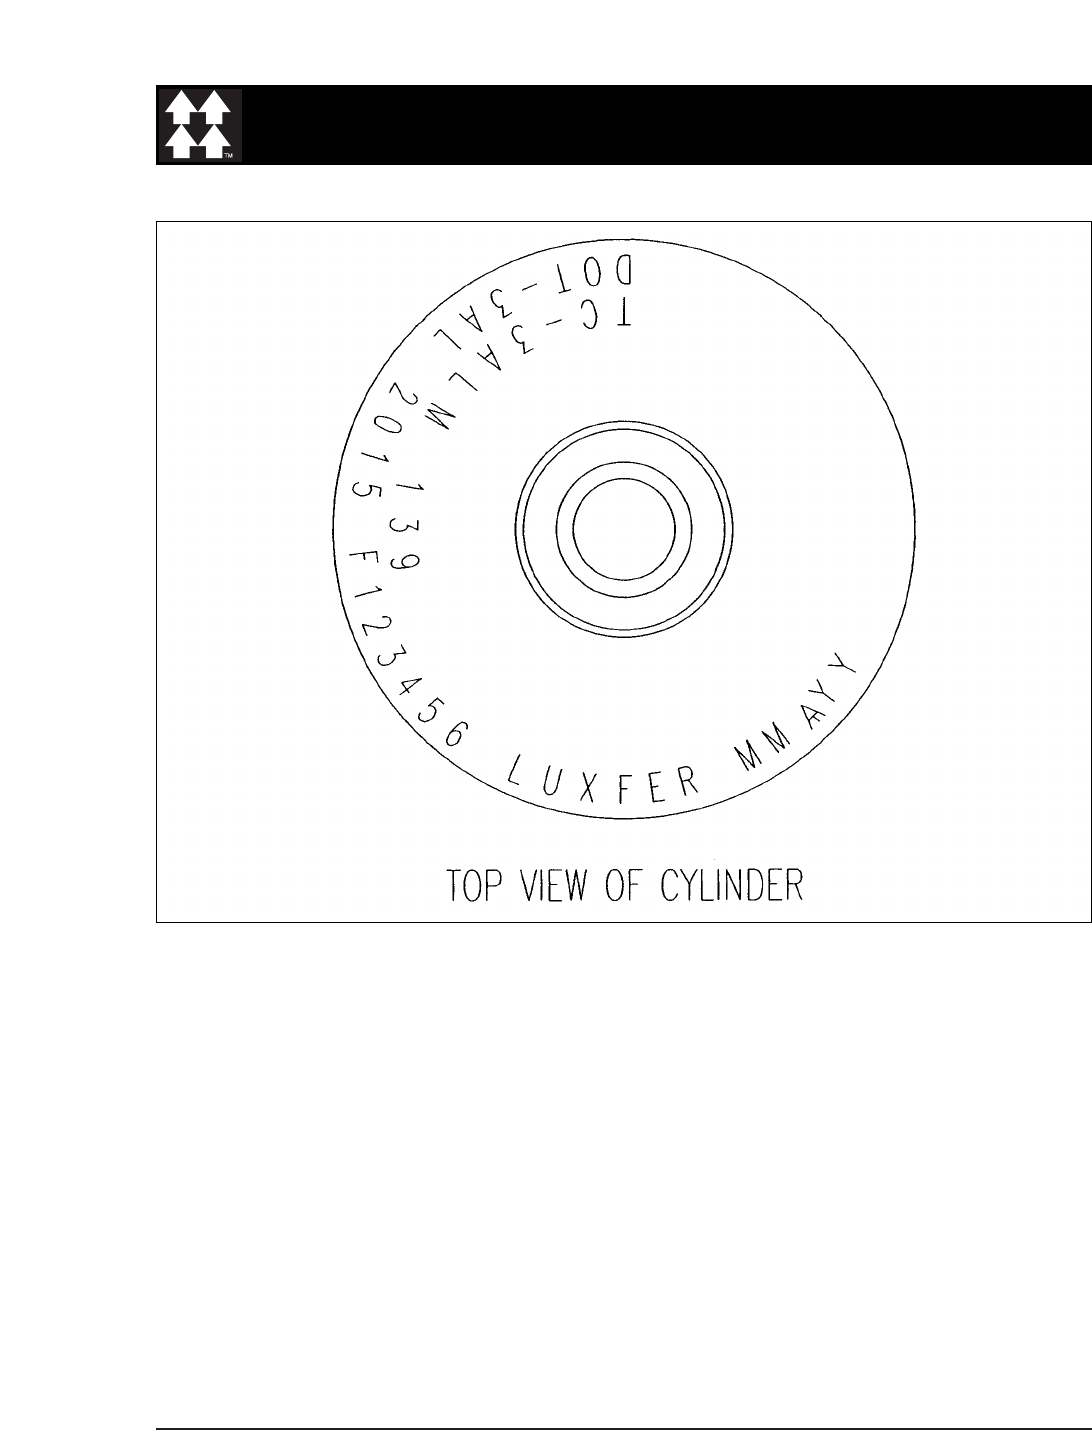
Luxfer SCBA Guide Volume One 61
FIGURE 1.
Interpretation Marking Example
Bottom Row
01. U.S.A. Governmental Specification: DOT-3AL
02. Service Pressure (p.s.i.g.): 2015
03. Serial Number: F123456
04. Manufacturer: LUXFER
05. Original Hydro Date with Testing Agency Stamp: MM YY
Top Row
01. Canadian Governmental Specification: TC-3ALM
02. Service Pressure (bar): 139
FIGURES
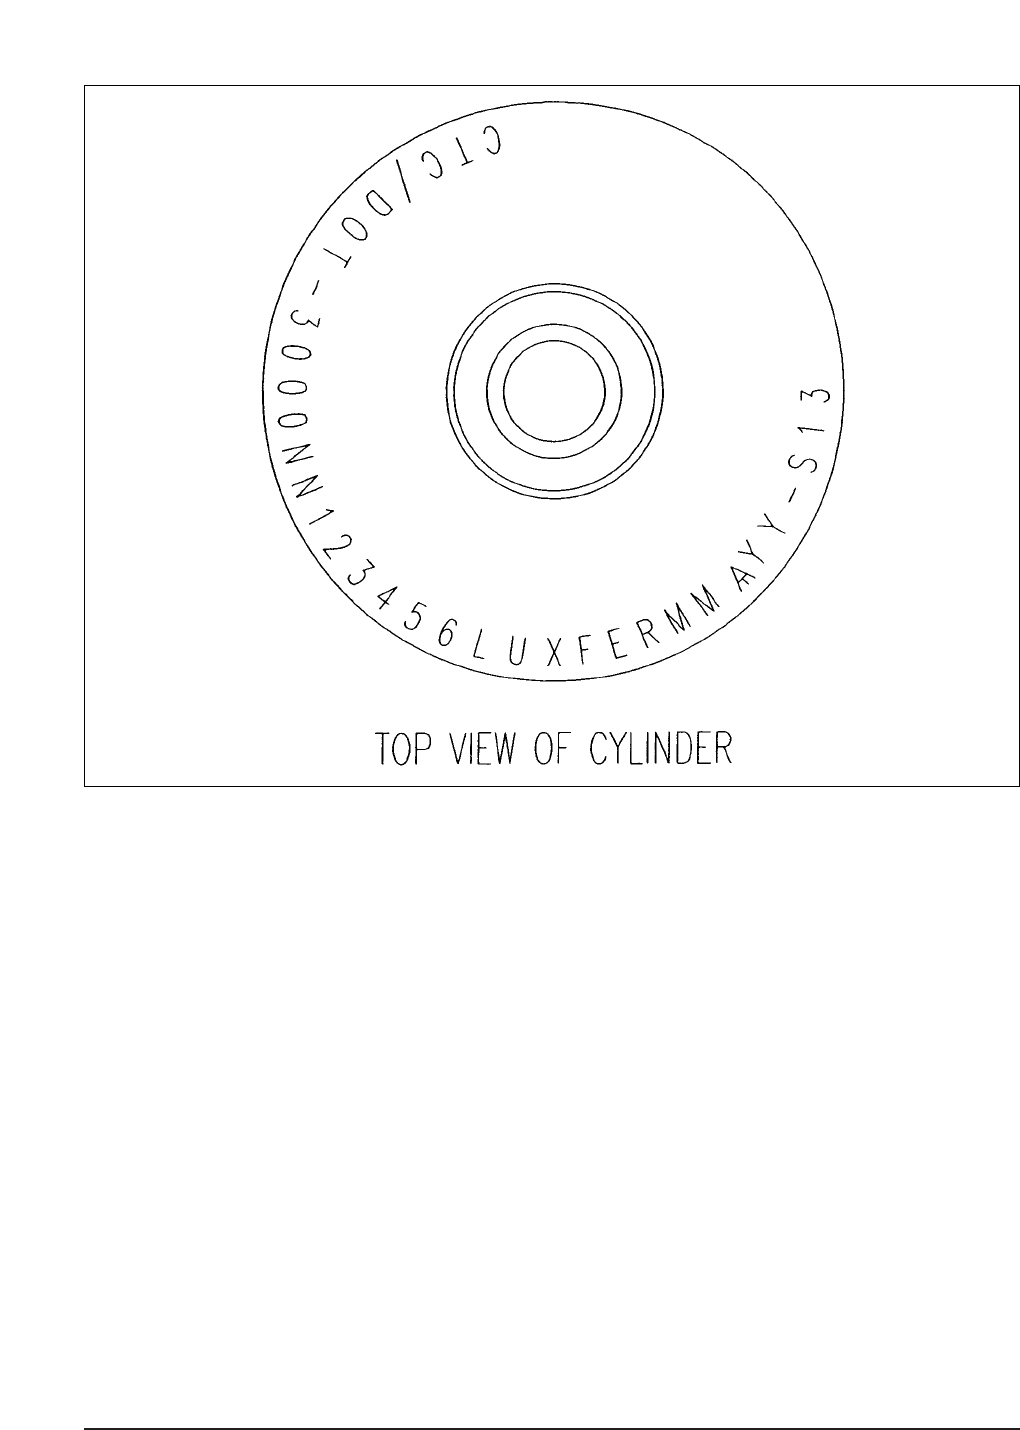
62 1998 Edition
FIGURE 2.
Interpretation Marking Examples
Bottom Row
01. U.S.A. and Canadian Governmental Specification: CTC/DOT-3AL
02. Service Pressure (p.s.i.g.): 3000
03. Serial Number: NN123456
04. Manufacturer: LUXFER
05. Original Hydro Date with Testing Agency Stamp: MM YY
06. Luxfer U.S.A. SCUBA cylider type: -S13

Luxfer SCBA Guide Volume One 63
FIGURE 3.
Marking Requirements Example
Canadian Governmental Specification TC-3HWM
Service Pressure (bar) 153
DOT Exemption Number DOT-E 7235
Service Pressure (psi) 2216
Serial Number EK 12345
Manufacturer LUXFER
Original Hydro Date with Testing Agency stamp MM YY
TC-3HWM 153
DOT-E 7235 2216
WK 12345 LUXFER 5 98
WARNING!! Do not fill if damage has caused strand unravelling.
ELASTIC EXPANSION RANGE 75-90 CC
MADE IN USA
Example of Label Embedded in Composite Wrap

64 1998 Edition
FIGURE 4.
Marking Requirements Example
DOT Exemption Number DOT-E 10915
Service Pressure (psi) 4500
Serial Number OK 12345
Manufacturer LUXFER
Original Hydro Date with Testing Agency Stamp MM YY
Rejection Elastic Expansion (cc) REE: 78
DOT-E 10915-4500
OK 12345 LUXFER
5 98 REE: 78
Luxfer Part Number: L45M
WARNING!! Do not fill if damage has caused strand unravelling.
MADE IN USA
Example of Label Embedded in Composite Wrap
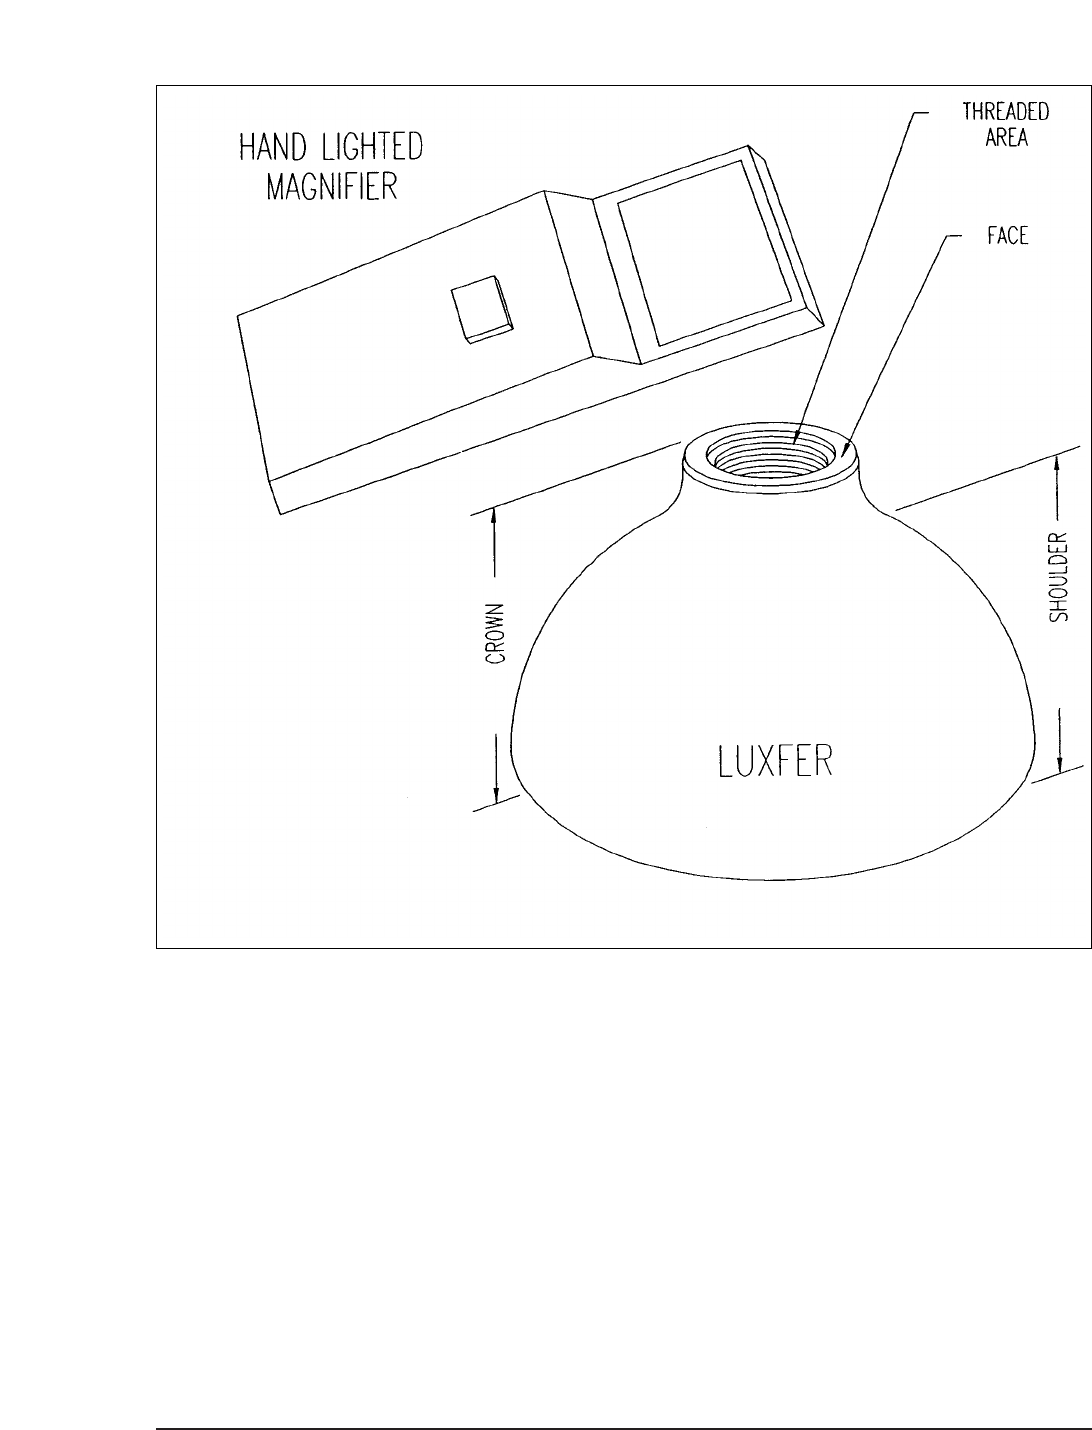
Luxfer SCBA Guide Volume One 65
FIGURE 5.
FIGURE 5 shows a MAGNA-LITE Model #1502, 3 power wide-angle, hand-lighted
magnifier and a Luxfer USA Limited crown section.
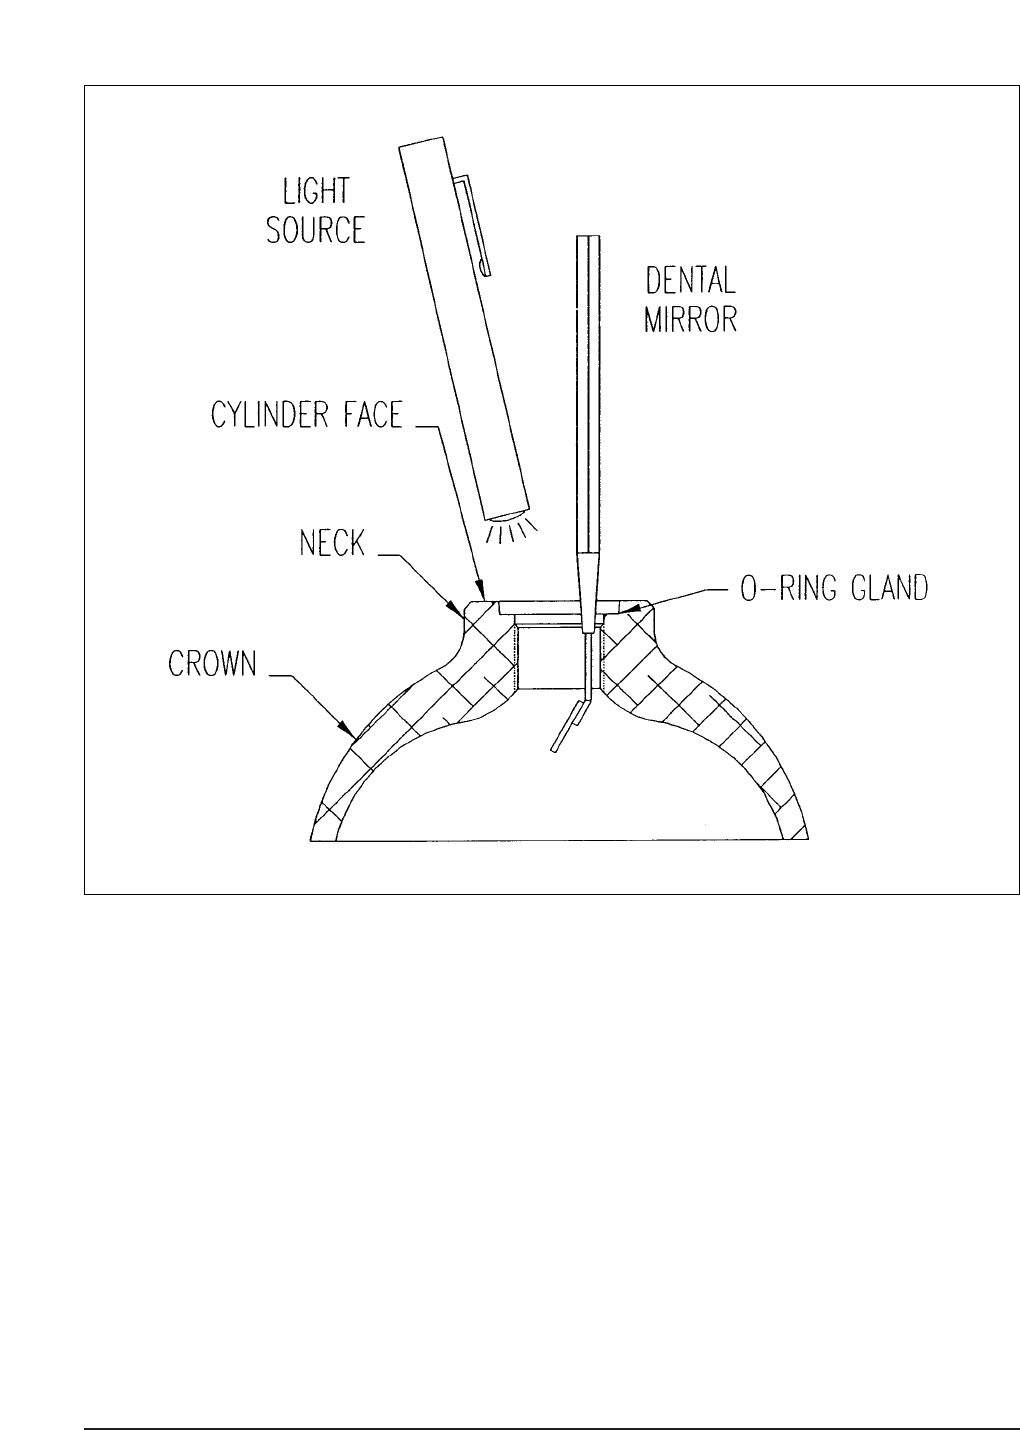
66 1998 Edition
FIGURE 6.
Dental mirror in position with a light source to adequately illuminate the interior
of the crown area of the cylinder which allows the user to perform a successful
inspection. See PHOTO 20.
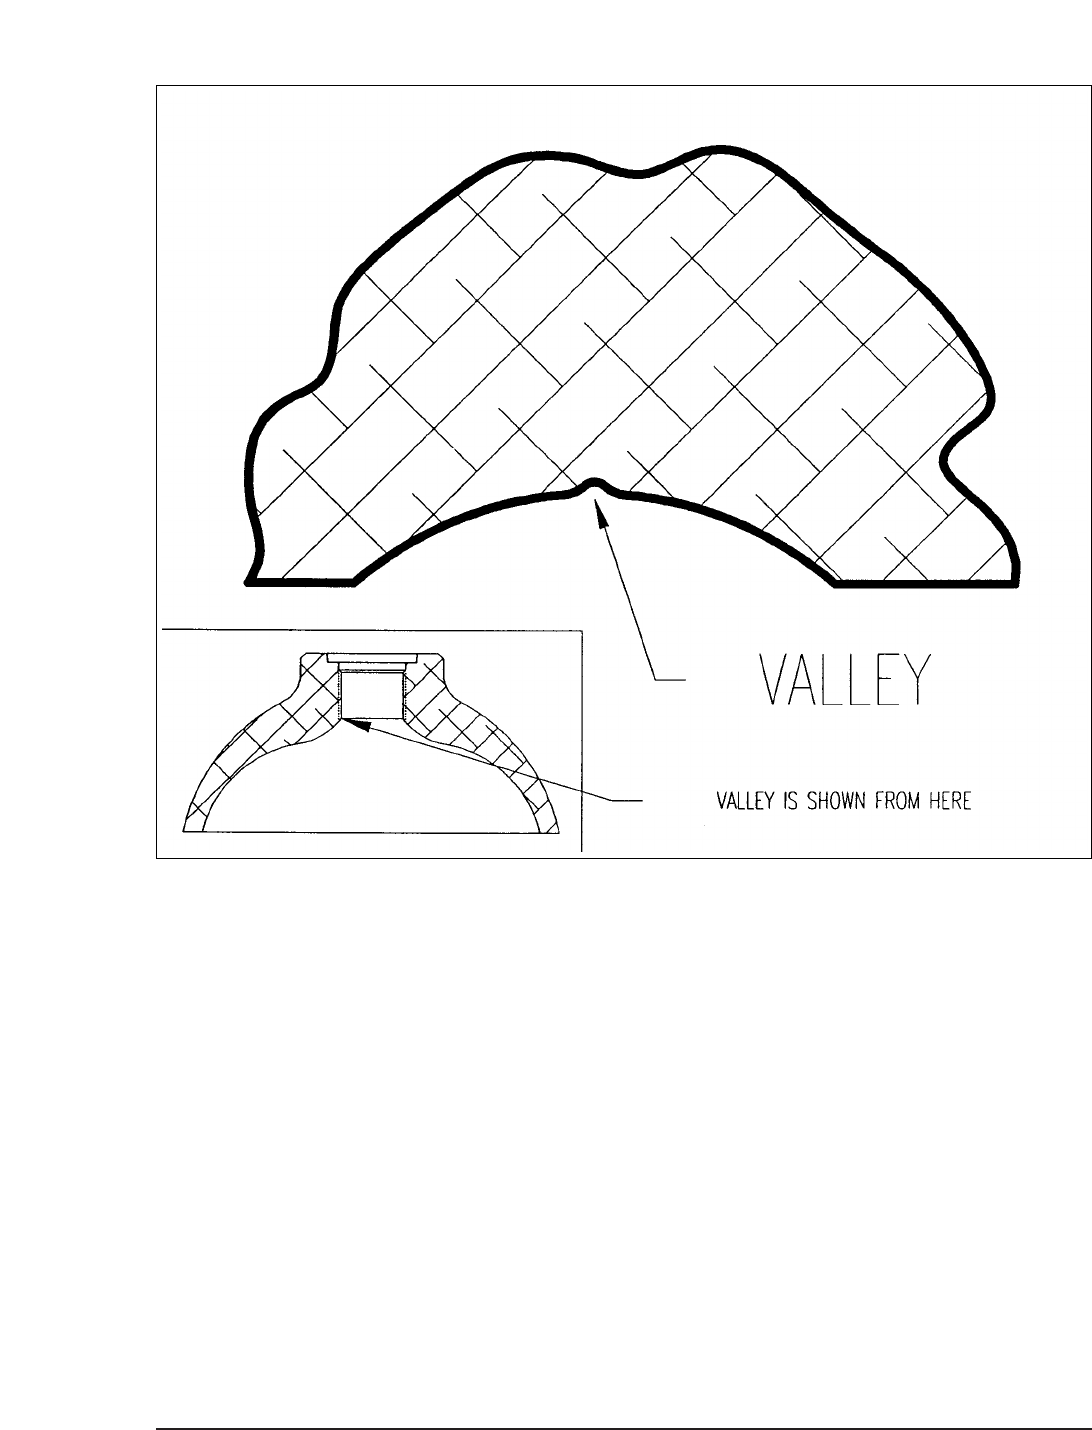
Luxfer SCBA Guide Volume One 67
FIGURE 7.
In FIGURE 7, the valley is shown from a cross sectional view of the bottom of the
threaded area.The valley has a rounded effect in the metal flow.See PHOTO 16 and
17.
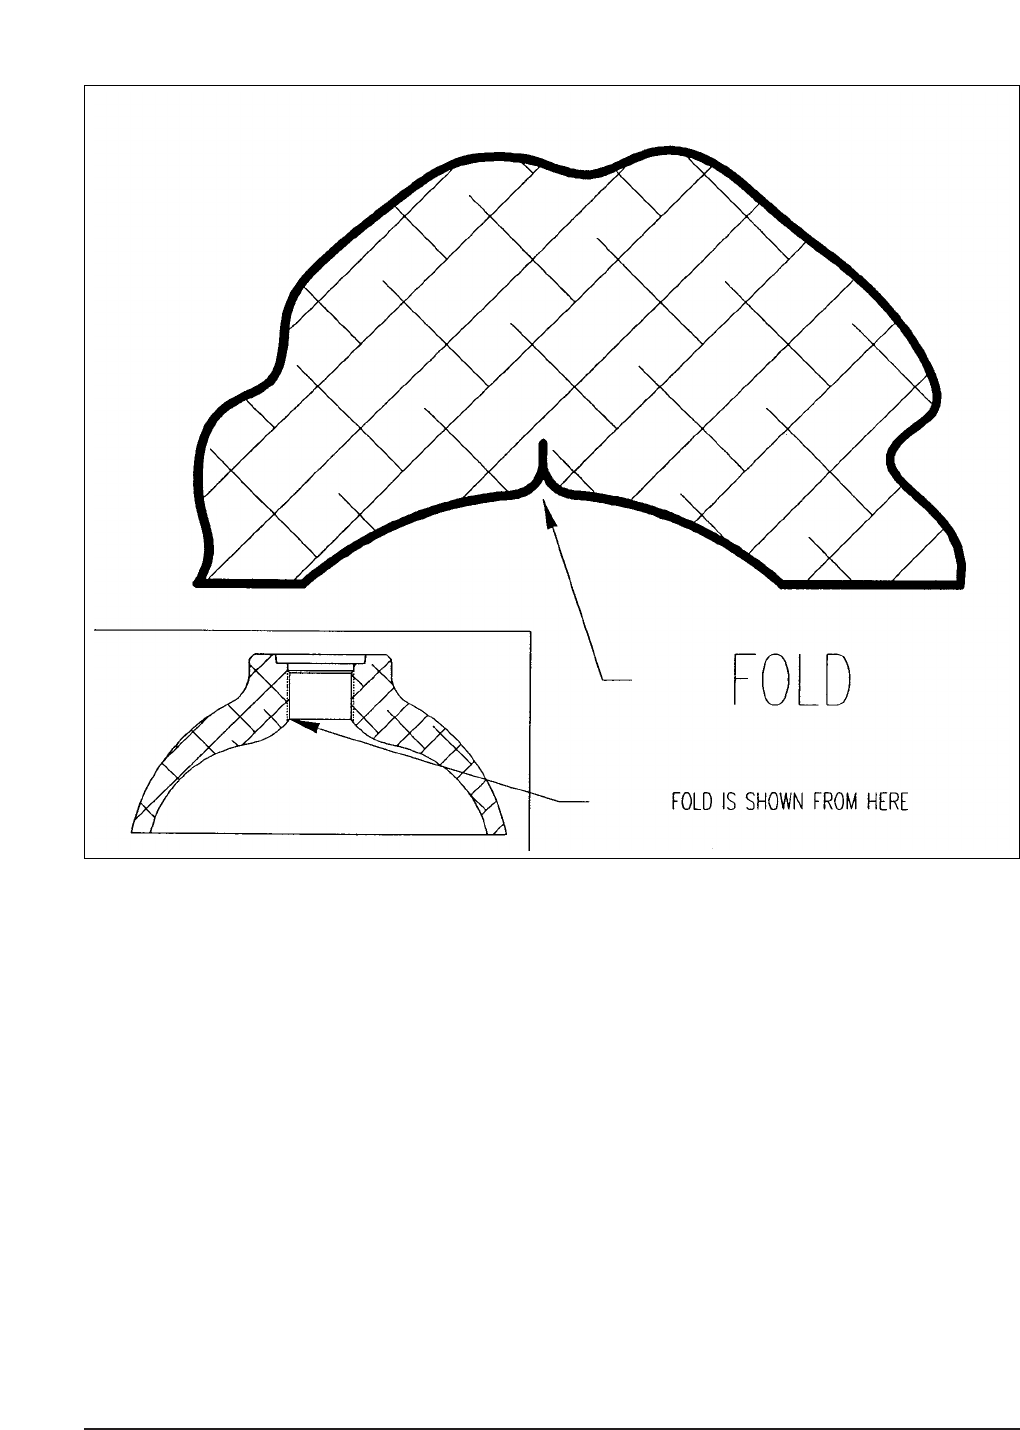
68 1998 Edition
FIGURE 8.
In FIGURE 8, the fold is shown from a cross sectional view of the bottom of the
threadedarea.The fold has a definite flow back into the shoulder. See PHOTO 14
and 15.
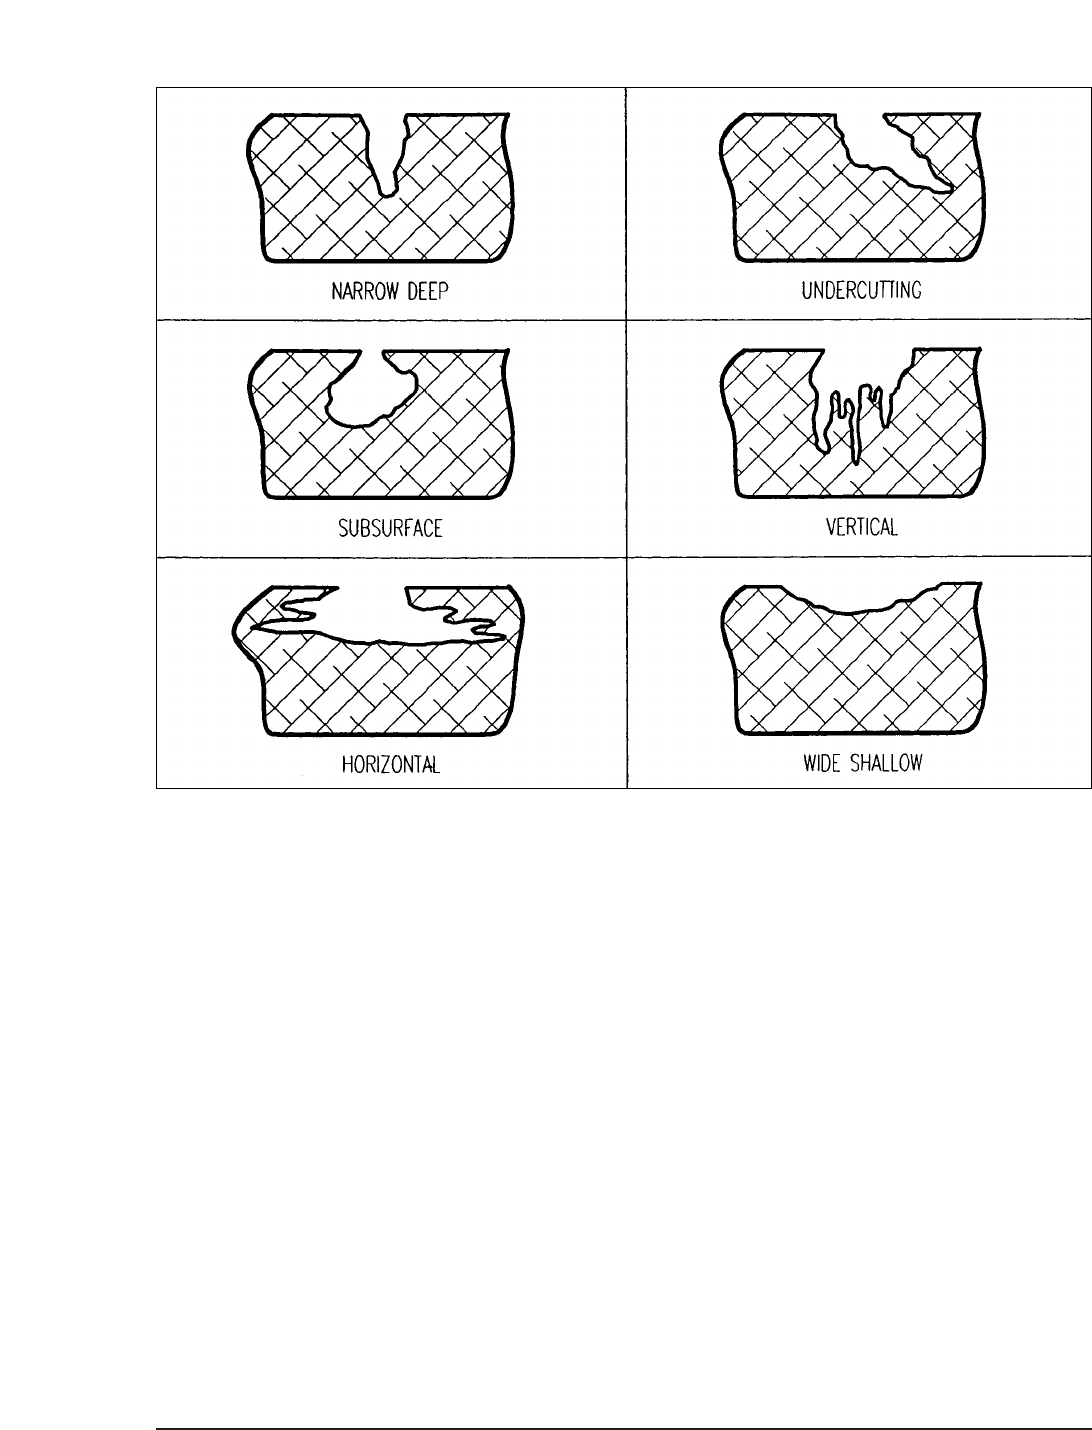
Luxfer SCBA Guide Volume One 69
FIGURE 9.
In FIGURE 9,the various shapes of pits are shown from a cross sectional view of the
sidewall,base or crown section of the cylinder.The gap section of the pits represents
where the sidewall, base or crown metal was,before pitting began.All cross sections
are greatly magnified.
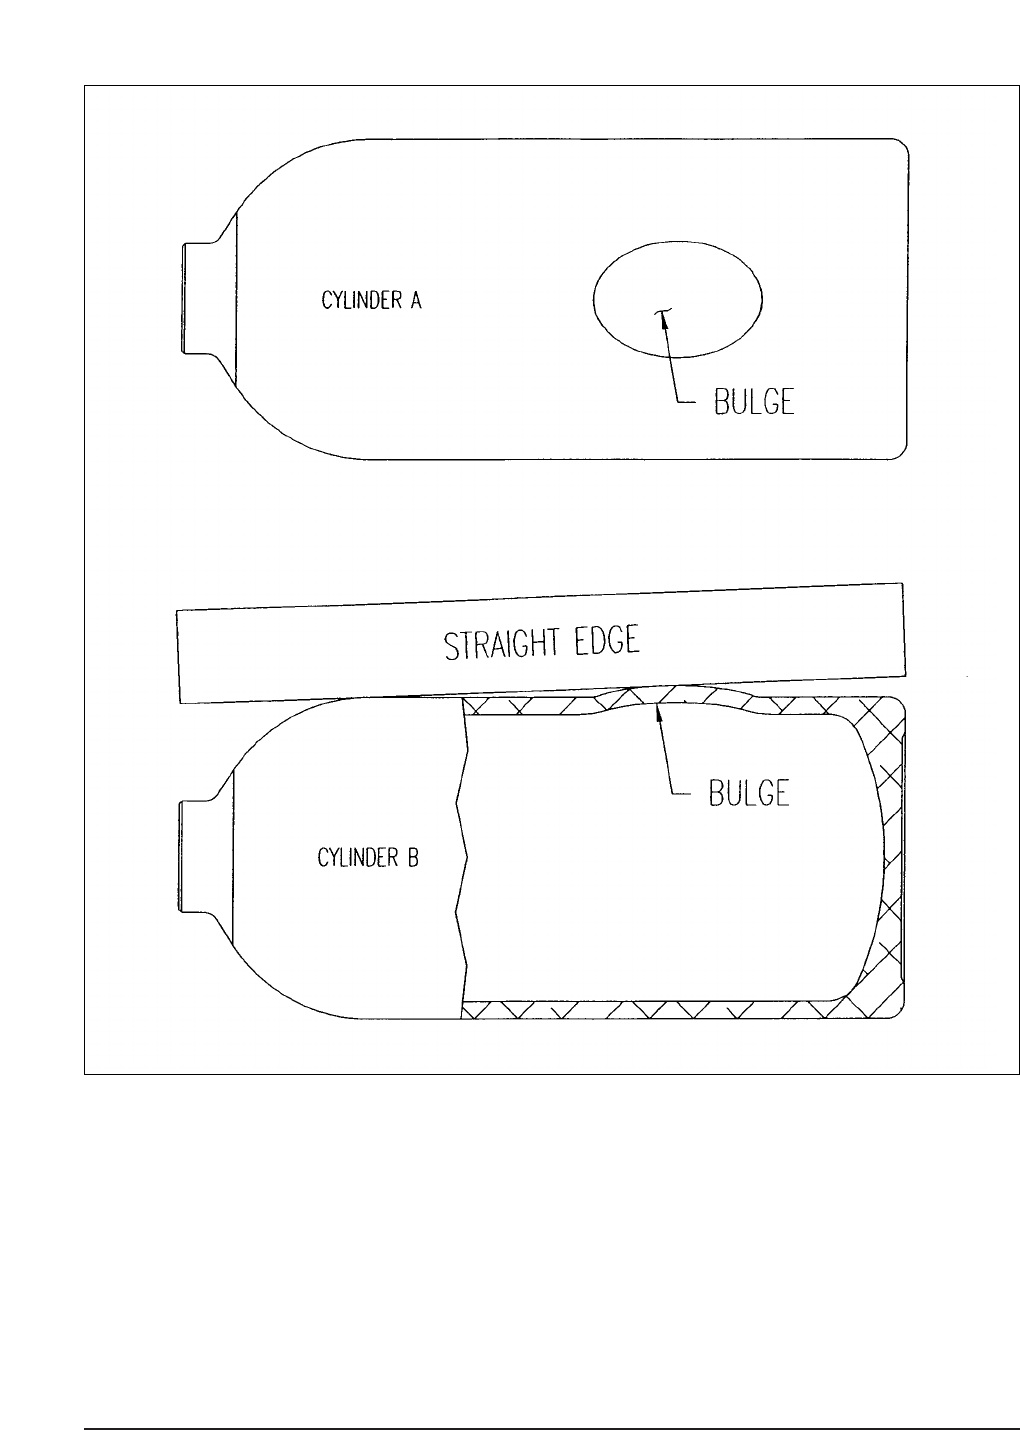
70 1998 Edition
FIGURE 10.
Cylinder (A) shows the bulge externally and cylinder (B) is a cutaway of cylinder
(A) and shows the same bulge internally.To find a bulge use any straight edge along
the sidewall of the cylinder.Any cylinder with a bulge is to be condemned.
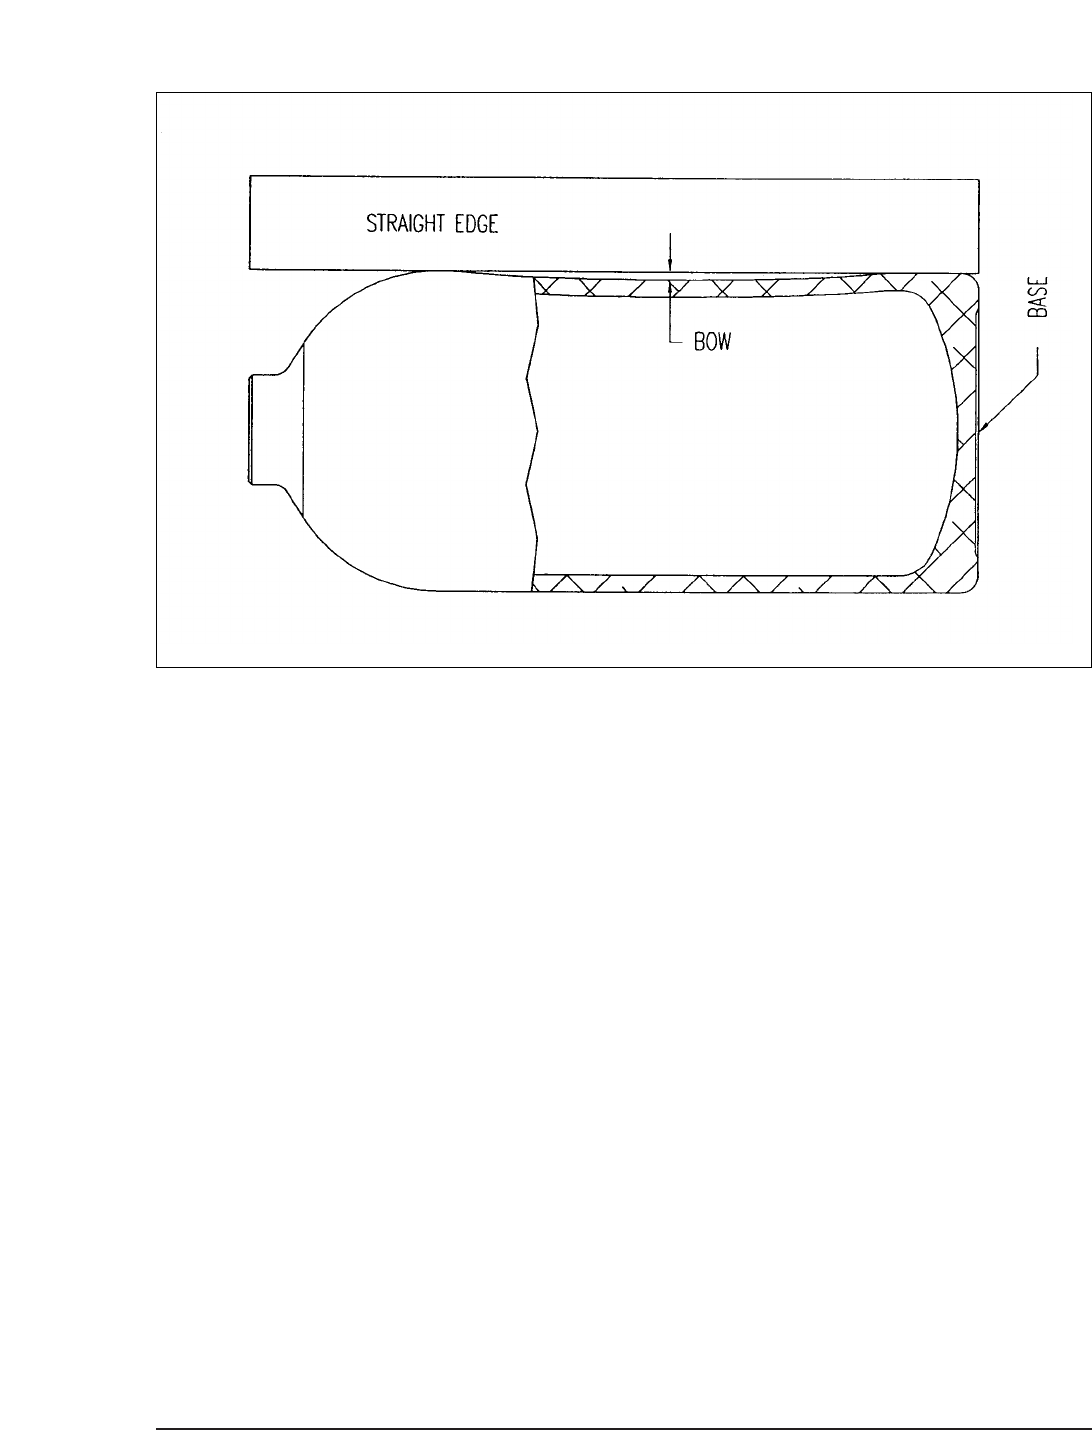
Luxfer SCBA Guide Volume One 71
FIGURE 11.
To find a bow, lay the cylinder on its side.With any straight edge set at the base and
on the spherical radius crown section, find the greatest gap between the straight
edge and the sidewall of the cylinder.