M7310 User Guide Meridian
User Manual: Meridian M7310
Open the PDF directly: View PDF ![]() .
.
Page Count: 90
- Telephone Overview
- Making Calls
- Answering Calls
- Call Controls
- Holding and Parking Calls
- Conference Calls
- Directory
- Call Log
- Voicemail
- Logging In/Out
- Redirecting Calls
- Phone Settings
- Button Programming
- Button Inspection
- Default Buttons
- Erasing a Button
- Auto Dial Button
- Internal Auto Dial (User Button)
- Function Button
- Feature Button
- Button Functions
- Account Code
- Automatic Intercom
- Call Forwarding All
- Call Log
- Call Park/Park & Page
- Conference
- Contrast
- Direct Pickup
- Directory
- Do Not Disturb
- Flash Hook
- Forward on Busy
- Forward on No Answer
- Group Listen
- Group Pickup
- Hunt Group Night Service
- Internal Auto Answer
- Last Number Redial
- Page Group
- Pickup
- Priority Call
- Ring Again
- Ringer Off
- Self-Admin
- Speed Dial
- Speed Dial [nnnn]
- Timer
- Time of Day
- Transfer
- Twinning
- User BLF
- Voicemail
- Glossary
- Abbreviated Ring
- Appearance Button
- Attention Ring
- Auto Hold
- Bridged Appearance Button
- Call Appearance Button
- Call Coverage Button
- Do Not Disturb
- Do Not Disturb Exceptions
- Follow Me
- Follow Me Here
- Follow Me To
- Forward on Busy
- Forward on No Answer
- Forward Unconditional
- Group
- Idle Line Preference
- Internal Twinning
- Line Appearance Button
- Logged Out
- Login Code
- Missed Call
- Missed Group Call
- Mobile Twinning
- Park Call
- Park Slot Number
- Ringing Line Preference
- Short Codes
- Small Community Network
- System Administrator
- System Phone User
- Twinning
- Document History

- Issue 02c - (13 March 2014)
M7310 Telephone User Guide
IP Office

M7310 Telephone User Guide Page 2
- Issue 02c (13 March 2014)IP Office
© 2014 AVAYA All Rights Reserved.
Notice
While reasonable efforts have been made to ensure that the information in this document is complete and accurate at the time of printing,
Avaya assumes no liability for any errors. Avaya reserves the right to make changes and corrections to the information in this document
without the obligation to notify any person or organization of such changes.
For full support, please see the complete document, Avaya Support Notices for Hardware Documentation, document number 03–600759.
For full support, please see the complete document, Avaya Support Notices for Software Documentation, document number 03–600758.
To locate this document on our website, simply go to http://www.avaya.com/support and search for the document number in the search box.
Documentation disclaimer
“Documentation” means information published by Avaya in varying mediums which may include product information, operating instructions and
performance specifications that Avaya generally makes available to users of its products. Documentation does not include marketing
materials. Avaya shall not be responsible for any modifications, additions, or deletions to the original published version of documentation
unless such modifications, additions, or deletions were performed by Avaya. End User agrees to indemnify and hold harmless Avaya, Avaya's
agents, servants and employees against all claims, lawsuits, demands and judgments arising out of, or in connection with, subsequent
modifications, additions or deletions to this documentation, to the extent made by End User.
Link disclaimer
Avaya is not responsible for the contents or reliability of any linked websites referenced within this site or documentation provided by Avaya.
Avaya is not responsible for the accuracy of any information, statement or content provided on these sites and does not necessarily endorse
the products, services, or information described or offered within them. Avaya does not guarantee that these links will work all the time and has
no control over the availability of the linked pages.
Warranty
Avaya provides a limited warranty on its hardware and Software (“Product(s)”). Refer to your sales agreement to establish the terms of the
limited warranty. In addition, Avaya’s standard warranty language, as well as information regarding support for this Product while under
warranty is available to Avaya customers and other parties through the Avaya Support website: http://support.avaya.com. Please note that if
you acquired the Product(s) from an authorized Avaya Channel Partner outside of the United States and Canada, the warranty is provided to
you by said Avaya Channel Partner and not by Avaya. “Software” means computer programs in object code, provided by Avaya or an Avaya
Channel Partner, whether as stand-alone products or pre-installed on hardware products, and any upgrades, updates, bug fixes, or modified
versions.
Licenses
THE SOFTWARE LICENSE TERMS AVAILABLE ON THE AVAYA WEBSITE, HTTP://SUPPORT.AVAYA.COM/LICENSEINFO ARE
APPLICABLE TO ANYONE WHO DOWNLOADS, USES AND/OR INSTALLS AVAYA SOFTWARE, PURCHASED FROM AVAYA INC., ANY
AVAYA AFFILIATE, OR AN AUTHORIZED AVAYA CHANNEL PARTNER (AS APPLICABLE) UNDER A COMMERCIAL AGREEMENT WITH
AVAYA OR AN AUTHORIZED AVAYA CHANNEL PARTNER. UNLESS OTHERWISE AGREED TO BY AVAYA IN WRITING, AVAYA DOES
NOT EXTEND THIS LICENSE IF THE SOFTWARE WAS OBTAINED FROM ANYONE OTHER THAN AVAYA, AN AVAYA AFFILIATE OR
AN AVAYA AUTHORIZED AVAYA CHANNEL PARTNER; AVAYA RESERVES THE RIGHT TO TAKE LEGAL ACTION AGAINST YOU AND
ANYONE ELSE USING OR SELLING THE SOFTWARE WITHOUT A LICENSE. BY INSTALLING, DOWNLOADING OR USING THE
SOFTWARE, OR AUTHORIZING OTHERS TO DO SO, YOU, ON BEHALF OF YOURSELF AND THE ENTITY FOR WHOM YOU ARE
INSTALLING, DOWNLOADING OR USING THE SOFTWARE (HEREINAFTER REFERRED TO INTERCHANGEABLY AS “YOU” AND “END
USER”), AGREE TO THESE TERMS AND CONDITIONS AND CREATE A BINDING CONTRACT BETWEEN YOU AND AVAYA INC. OR
THE APPLICABLE AVAYA AFFILIATE (“AVAYA”).
Avaya grants you a license within the scope of the license types described below, with the exception of Heritage Nortel Software, for which the
scope of the license is detailed below. Where the order documentation does not expressly identify a license type, the applicable license will be
a Designated System License. The applicable number of licenses and units of capacity for which the license is granted will be one (1), unless a
different number of licenses or units of capacity is specified in the documentation or other materials available to you. “Designated Processor”
means a single stand-alone computing device. “Server” means a Designated Processor that hosts a software application to be accessed by
multiple users.
License type(s)
Designated System(s) License (DS). End User may install and use each copy of the Software only on a number of Designated Processors up
to the number indicated in the order. Avaya may require the Designated Processor(s) to be identified in the order by type, serial number,
feature key, location or other specific designation, or to be provided by End User to Avaya through electronic means established by Avaya
specifically for this purpose.
Concurrent User License (CU). End User may install and use the Software on multiple Designated Processors or one or more Servers, so long
as only the licensed number of Units are accessing and using the Software at any given time. A “Unit” means the unit on which Avaya, at its
sole discretion, bases the pricing of its licenses and can be, without limitation, an agent, port or user, an e-mail or voice mail account in the
name of a person or corporate function (e.g., webmaster or helpdesk), or a directory entry in the administrative database utilized by the
Software that permits one user to interface with the Software. Units may be linked to a specific, identified Server.
Database License (DL). End User may install and use each copy of the Software on one Server or on multiple Servers provided that each of
the Servers on which the Software is installed communicates with no more than a single instance of the same database.
CPU License (CP). End User may install and use each copy of the Software on a number of Servers up to the number indicated in the order
provided that the performance capacity of the Server(s) does not exceed the performance capacity specified for the Software. End User may
not reinstall or operate the Software on Server(s) with a larger performance capacity without Avaya’s prior consent and payment of an upgrade
fee.

M7310 Telephone User Guide Page 3
- Issue 02c (13 March 2014)IP Office
Named User License (NU). You may: (i) install and use the Software on a single Designated Processor or Server per authorized Named User
(defined below); or (ii) install and use the Software on a Server so long as only authorized Named Users access and use the Software. “Named
User”, means a user or device that has been expressly authorized by Avaya to access and use the Software. At Avaya’s sole discretion, a
“Named User” may be, without limitation, designated by name, corporate function (e.g., webmaster or helpdesk), an e-mail or voice mail
account in the name of a person or corporate function, or a directory entry in the administrative database utilized by the Software that permits
one user to interface with the Software.
Shrinkwrap License (SR). You may install and use the Software in accordance with the terms and conditions of the applicable license
agreements, such as “shrinkwrap” or “clickthrough” license accompanying or applicable to the Software (“Shrinkwrap License”).
Heritage Nortel Software
“Heritage Nortel Software” means the software that was acquired by Avaya as part of its purchase of the Nortel Enterprise Solutions Business
in December 2009. The Heritage Nortel Software currently available for license from Avaya is the software contained within the list of Heritage
Nortel Products located at http://support.avaya.com/LicenseInfo under the link “Heritage Nortel Products”. For Heritage Nortel Software, Avaya
grants Customer a license to use Heritage Nortel Software provided hereunder solely to the extent of the authorized activation or authorized
usage level, solely for the purpose specified in the Documentation, and solely as embedded in, for execution on, or (in the event the applicable
Documentation permits installation on non-Avaya equipment) for communication with Avaya equipment. Charges for Heritage Nortel Software
may be based on extent of activation or use authorized as specified in an order or invoice.
Copyright
Except where expressly stated otherwise, no use should be made of materials on this site, the Documentation, Software, or hardware provided
by Avaya. All content on this site, the documentation and the Product provided by Avaya including the selection, arrangement and design of
the content is owned either by Avaya or its licensors and is protected by copyright and other intellectual property laws including the sui generis
rights relating to the protection of databases. You may not modify, copy, reproduce, republish, upload, post, transmit or distribute in any way
any content, in whole or in part, including any code and software unless expressly authorized by Avaya. Unauthorized reproduction,
transmission, dissemination, storage, and or use without the express written consent of Avaya can be a criminal, as well as a civil offense
under the applicable law.
Virtualization
Each vAppliance will have its own ordering code. Note that each instance of a vAppliance must be separately ordered. If the end user
customer or Avaya channel partner would like to install two of the same type of vAppliances, then two vAppliances of that type must be
ordered.
Each Product has its own ordering code. Note that each instance of a Product must be separately licensed and ordered. “Instance” means one
unique copy of the Software. For example, if the end user customer or Avaya channel partner would like to install two instances of the same
type of Products, then two Products of that type must be ordered.
Third Party Components
“Third Party Components” mean certain software programs or portions thereof included in the Software that may contain software (including
open source software) distributed under third party agreements (“Third Party Components”), which contain terms regarding the rights to use
certain portions of the Software (“Third Party Terms”). Information regarding distributed Linux OS source code (for those Products that have
distributed Linux OS source code) and identifying the copyright holders of the Third Party Components and the Third Party Terms that apply is
available in the Documentation or on Avaya’s website at: http://support.avaya.com/Copyright. You agree to the Third Party Terms for any such
Third Party Components.
Note to Service Provider
The Product may use Third Party Components that have Third Party Terms that do not allow hosting and may need to be independently
licensed for such purpose.
Preventing Toll Fraud
“Toll Fraud” is the unauthorized use of your telecommunications system by an unauthorized party (for example, a person who is not a
corporate employee, agent, subcontractor, or is not working on your company's behalf). Be aware that there can be a risk of Toll Fraud
associated with your system and that, if Toll Fraud occurs, it can result in substantial additional charges for your telecommunications services.
Avaya Toll Fraud intervention
If you suspect that you are being victimized by Toll Fraud and you need technical assistance or support, call Technical Service Center Toll
Fraud Intervention Hotline at +1-800-643-2353 for the United States and Canada. For additional support telephone numbers, see the Avaya
Support website: http://support.avaya.com. Suspected security vulnerabilities with Avaya products should be reported to Avaya by sending
mail to: securityalerts@avaya.com.
Trademarks
The trademarks, logos and service marks (“Marks”) displayed in this site, the Documentation and Product(s) provided by Avaya are the
registered or unregistered Marks of Avaya, its affiliates, or other third parties. Users are not permitted to use such Marks without prior written
consent from Avaya or such third party which may own the Mark. Nothing contained in this site, the Documentation and Product(s) should be
construed as granting, by implication, estoppel, or otherwise, any license or right in and to the Marks without the express written permission of
Avaya or the applicable third party.
Avaya is a registered trademark of Avaya Inc.
All non-Avaya trademarks are the property of their respective owners. Linux® is the registered trademark of Linus Torvalds in the U.S. and
other countries.

M7310 Telephone User Guide Page 4
- Issue 02c (13 March 2014)IP Office
Downloading Documentation
For the most current versions of Documentation, see the Avaya Support website: http://support.avaya.com.
Contact Avaya Support
See the Avaya Support website: http://support.avaya.com for product notices and articles, or to report a problem with your Avaya product. For
a list of support telephone numbers and contact addresses, go to the Avaya Support website: http://support.avaya.com, scroll to the bottom of
the page, and select Contact Avaya Support.

M7310 Telephone User Guide Page 5
- Issue 02c (13 March 2014)IP Office
Contents
Contents
Telephone Overview1.
..................................................................... 91.1 M7310 Telephone
..................................................................... 91.2 Which Telephone System?
..................................................................... 101.3 Button Functions
..................................................................... 111.4 Feature Codes
..................................................................... 131.5 Short Codes
..................................................................... 151.6 Status Letters
..................................................................... 151.7 Tones
..................................................................... 161.8 Key Lettering
..................................................................... 161.9 What's My Extension Number?
..................................................................... 161.10 Notes
Making Calls2.
..................................................................... 182.1 Setting a Callback
..................................................................... 182.2 Redial the Previous Number
..................................................................... 192.3 Making a Page Call
..................................................................... 192.4 Direct Voice Calls
..................................................................... 192.5 Making a Priority Call
..................................................................... 202.6 Pre-Dialing (Enbloc)
..................................................................... 212.7 Using Speed Dials
..................................................................... 222.8 Account Codes
..................................................................... 222.9 Calling from the Contacts List
..................................................................... 222.10 Calling from the Call Log
Answering Calls3.
..................................................................... 243.1 Divert a Call to Voicemail
..................................................................... 243.2 Ignore an Incoming Call
..................................................................... 243.3 Answering a Page Call
..................................................................... 253.4 Call Pickup
Call Controls4.
..................................................................... 284.1 Adjust the Call Volume
..................................................................... 284.2 Muting a Call
..................................................................... 284.3 Switching Between Calls
..................................................................... 294.4 Transferring Calls
..................................................................... 294.5 Transferring a Held Call
..................................................................... 294.6 Handsfree Speaker Operation
..................................................................... 304.7 Headset Operation
..................................................................... 304.8 Group Listen
..................................................................... 304.9 Ending Calls
..................................................................... 314.10 Groups
Holding and Parking Calls5.
..................................................................... 355.1 Parking Calls
............................................................................ 355.1.1 Traditional Park
............................................................................ 355.1.2 Park & Page
..................................................................... 365.2 Holding Calls
............................................................................ 365.2.1 Holding a Call
............................................................................ 365.2.2 Taking a Call Off Hold
............................................................................ 365.2.3 Switching Between Calls
............................................................................ 365.2.4 Transferring a Held Call
Conference Calls6.
..................................................................... 386.1 Starting a Conference
..................................................................... 386.2 Adding a Call to a Conference
..................................................................... 396.3 Viewing Conference Details
..................................................................... 396.4 Dropping Parties
..................................................................... 396.5 Holding a Conference Call
..................................................................... 396.6 Transferring Calls Using Conference
Directory7.
..................................................................... 427.1 Viewing Contacts Details
..................................................................... 437.2 Make a Call from the Directory
..................................................................... 437.3 Using the Directory for Other Functions
..................................................................... 447.4 Adding a New Contact
..................................................................... 447.5 Add a Contact from the Call Log
Call Log8.
..................................................................... 468.1 Accessing the Call Log
..................................................................... 478.2 Viewing Call Details
..................................................................... 488.3 Making a Call
..................................................................... 488.4 Deleting a Record
..................................................................... 488.5 Deleting All Records
..................................................................... 488.6 Adding a Record to Your Contacts
Voicemail9.
..................................................................... 509.1 Message Waiting Indication
..................................................................... 509.2 Checking Messages
..................................................................... 509.3 Send a Call to Voicemail
Logging In/Out10.
..................................................................... 5310.1 Logging In on a Phone Already in Use
..................................................................... 5310.2 Logging In on a Logged Out Phone
..................................................................... 5310.3 Logout
Redirecting Calls11.
..................................................................... 5711.1 Follow Me
..................................................................... 5811.2 Forwarding Calls
............................................................................ 5911.2.1 Forward Unconditional
............................................................................ 6011.2.2 Forward on Busy
............................................................................ 6111.2.3 Forward on No Answer
..................................................................... 6211.3 Do Not Disturb
..................................................................... 6311.4 Twinning
Phone Settings12.
..................................................................... 6612.1 Contrast
..................................................................... 6612.2 Ringer Sound
..................................................................... 6612.3 Ringer Volume
..................................................................... 6612.4 Enbloc Pre-Dialing
Button Programming13.
..................................................................... 6813.1 Button Inspection
..................................................................... 6913.2 Default Buttons
..................................................................... 6913.3 Erasing a Button
..................................................................... 7013.4 Auto Dial Button
..................................................................... 7013.5 Internal Auto Dial (User Button)
..................................................................... 7113.6 Function Button
..................................................................... 7113.7 Feature Button
..................................................................... 7213.8 Button Functions
............................................................................ 7213.8.1 Account Code
............................................................................ 7213.8.2 Automatic Intercom
............................................................................ 7213.8.3 Call Forwarding All
............................................................................ 7213.8.4 Call Log
............................................................................ 7213.8.5 Call Park/Park & Page
............................................................................ 7313.8.6 Conference

M7310 Telephone User Guide Page 6
- Issue 02c (13 March 2014)IP Office
............................................................................ 7313.8.7 Contrast
............................................................................ 7313.8.8 Direct Pickup
............................................................................ 7313.8.9 Directory
............................................................................ 7313.8.10 Do Not Disturb
............................................................................ 7313.8.11 Flash Hook
............................................................................ 7313.8.12 Forward on Busy
............................................................................ 7313.8.13 Forward on No Answer
............................................................................ 7413.8.14 Group Listen
............................................................................ 7413.8.15 Group Pickup
............................................................................ 7413.8.16 Hunt Group Night Service
............................................................................ 7413.8.17 Internal Auto Answer
............................................................................ 7413.8.18 Last Number Redial
............................................................................ 7413.8.19 Page Group
............................................................................ 7413.8.20 Pickup
............................................................................ 7413.8.21 Priority Call
............................................................................ 7513.8.22 Ring Again
............................................................................ 7513.8.23 Ringer Off
............................................................................ 7513.8.24 Self-Admin
............................................................................ 7513.8.25 Speed Dial
............................................................................ 7513.8.26 Speed Dial [nnnn]
............................................................................ 7513.8.27 Timer
............................................................................ 7513.8.28 Time of Day
............................................................................ 7513.8.29 Transfer
............................................................................ 7513.8.30 Twinning
............................................................................ 7613.8.31 User BLF
............................................................................ 7613.8.32 Voicemail
Glossary14.
..................................................................... 7814.1 Abbreviated Ring
..................................................................... 7814.2 Appearance Button
..................................................................... 7814.3 Attention Ring
..................................................................... 7814.4 Auto Hold
..................................................................... 7814.5 Bridged Appearance Button
..................................................................... 7814.6 Call Appearance Button
..................................................................... 7814.7 Call Coverage Button
..................................................................... 7814.8 Do Not Disturb
..................................................................... 7914.9 Do Not Disturb Exceptions
..................................................................... 7914.10 Follow Me
..................................................................... 7914.11 Follow Me Here
..................................................................... 7914.12 Follow Me To
..................................................................... 7914.13 Forward on Busy
..................................................................... 7914.14 Forward on No Answer
..................................................................... 7914.15 Forward Unconditional
..................................................................... 8014.16 Group
..................................................................... 8014.17 Idle Line Preference
..................................................................... 8014.18 Internal Twinning
..................................................................... 8014.19 Line Appearance Button
..................................................................... 8014.20 Logged Out
..................................................................... 8014.21 Login Code
..................................................................... 8014.22 Missed Call
..................................................................... 8114.23 Missed Group Call
..................................................................... 8114.24 Mobile Twinning
..................................................................... 8114.25 Park Call
..................................................................... 8114.26 Park Slot Number
..................................................................... 8114.27 Ringing Line Preference
..................................................................... 8114.28 Short Codes
..................................................................... 8114.29 Small Community Network
..................................................................... 8114.30 System Administrator
..................................................................... 8114.31 System Phone User
..................................................................... 8114.32 Twinning
Document History15.
...............................................................................85Index

M7310 Telephone User Guide Page 7
- Issue 02c (13 March 2014)IP Office
Telephone Overview
Chapter 1.

M7310 Telephone User Guide Page 9
- Issue 02c (13 March 2014)IP Office
Telephone Overview: M7310 Telephone
1. Telephone Overview
1.1 M7310 Telephone
On IP Office, the M7310 telephone is supported by IP500v2 IP Office systems running IP Office Release 7.0 and higher
software. This guide is for IP Office Standard Version mode, separate user guides exist for other IP Office operation
modes.
10/22
14/26
18/30
11/23
15/27
19/31
12/24
16/28
20/32
13/25
17/29
21/33
Shift
Display
Release
Feature
Hold
SK1
SK2
SK3
1
2
3
Do Not Disturb
09
04
Conference
4
5
6
Transfer
08
03
Last Number Redial
7
8
9
Call Forwarding All
07
02
Call
*
0
#
Group Pickup
06
01
Call
–
Volume
+
Page Group
05
Spk
An option BLF module can be attached to a M7310 phone. The module provides status lamp indication for buttons 10 to
33.
The bottom right button is fixed as a Handsfree speaker button. This can be used to answer calls handsfree on the
phone's speaker (or headset if the phone has a headset connected).
1.2 Which Telephone System?
The IP Office telephone system can operate in a number of modes. This guide is for a system operating in IP Office
Standard Version mode.
To check what system you are one, press Feature 9*80. If your system is a IP Office Standard Version system, you will
hear an error tone. The display will show Invalid. If otherwise, the display will show the software level of the non-IP
Office Standard Version mode system. Contact your system administrator to obtain the appropriate M7310 user guide.
73 73
75 74
72 78
74 78
74

M7310 Telephone User Guide Page 10
- Issue 02c (13 March 2014)IP Office
1.3 Button Functions
In addition to the standard buttons 0 to 9, * and # buttons for dialing, the phone also has the following additional keys
listed below. Some buttons may use either icons or words depending on your locale and the particular model of the
phone that you have.
· Hold
Put the current call on hold. The calls associated call appearance key flashes. Press that key to retrieve the call
from hold.
· Feature
This key is used to access a range of special functions by pressing the key and then dialing a feature code .
· Release
End (drop) the current call.
·Display Soft Keys
The three keys below the display are called soft keys. Their functions change while you use the phone. The current
function of each key is indicated by the text label in the display.
· Volume Controls
Increase or decrease the volume during a call.
·Handsfree Speaker
The bottom right button is fixed as a handsfree speaker button. You can press this button to answer or make a call
in handsfree speakerphone mode. You can also press it to switch from the handset to the speaker during a call.
The button is lit when the phone is on the speaker.
·Shift
The triangular Shift button is used with the adjacent set of programmable buttons; those without icons. They
represent both buttons 10 to 21 and buttons 22 to 33. The first set are the ones used by default when you press
any of the buttons. When you want to access or use the second set, press the Shift button and then press the
button. If the phone is idle, it will display Shifted to indicate that you are using the second set of buttons. Note
that the phone will usually revert to the first set of buttons following any use of the buttons.
The button layout is indicated below. The double-digits are the button numbers for programmable buttons . The
default function for those buttons is indicated. The function for each programmable button can be set by you or by your
system administrator.
10/22
14/26
18/30
11/23
15/27
19/31
12/24
16/28
20/32
13/25
17/29
21/33
Shift
Display
Release
Feature
Hold
SK1
SK2
SK3
1
2
3
Do Not Disturb
09
04
Conference
4
5
6
Transfer
08
03
Last Number Redial
7
8
9
Call Forwarding All
07
02
Call
*
0
#
Group Pickup
06
01
Call
–
Volume
+
Page Group
05
Spk
11
68
73 73
75 74
72 78
74 78
74

M7310 Telephone User Guide Page 11
- Issue 02c (13 March 2014)IP Office
Telephone Overview: Button Functions
1.4 Feature Codes
The phone can access a range of functions by pressing the phone's Feature key and dialing the required feature code.
·Speed Dial: Feature 0 <index>
Dial a stored number. Follow it with a 3-dight number system speed dial (000 to 999) or * and a 2-digit number
personal speed dial (00 to 99).
·Ring Again: Feature 2 (Set)/Feature #2 (Clear)
Set a ringback on the extension being called. When the target extension ends its current call,you are rung and
when you answer, a new call is made to the target.
·Conference: Feature 3
Turn the current call and any held call or calls into a conference call. The held call can be an existing conference to
which you want to add another call.
·Forward Unconditional On: Feature 4 <number> (On)/Feature #4 (Off)
Switch on and off immediate forwarding of calls to the number entered.
·Last Number Redial: Feature 5
Redial the last number dialed. This code can only be used when the phone is currently idle.
·Page: Feature 60 <number>
Make a page call to an extension or group. The target extension or group members must be free and must support
handsfree auto-answer in order to hear the page.
·Retrieve Messages: Feature 65 or Feature 981
Access your voicemail mailbox to collect messages.
·Dial Voice Call: Feature 66 <number>
Have a call automatically answered on speaker phone after 3 beeps. If the extension is not free when called, the
call is presented as a normal call.
·Priority Call: Feature 69
Allows you to call another user even if they are set to 'do not disturb'. A priority call will follow forward and follow
me settings but will not go to voicemail.
·Transfer: Feature 70 <number>
Put your current call on hold and make an transfer enquiry call to another number. Pressing Feature 70 again to
completes the transfer.
·Call Park/Park & Page: Feature 74
Park your current call. The additional functions and method for unparking calls depends on whether Park & Page is
configured on your system or not. See Parking Calls .
·Call Unpark: Feature #74 <park slot number>
Unpark a call. The code is followed by the park slot number used to park the call.
·Call Pickup Group: Feature 75
Answer a call ringing a group of which you are a member. You can use this function even if you group membership
is currently set to disabled.
·Directed Call Pickup: Feature 76
Answer a call ringing the user or hunt group extension number specified.
·Call Timer: Feature 77
Briefly display the current duration of the currently connected call. The final duration of a call is also automatically
shown after a call is ended.
·Time of Day: Feature 803
Briefly display the time and date during a connected call.
·Do Not Disturb On: Feature 85 (On)/Feature #85 (Off)
Switch do not disturb on or off. Do not disturb overrides all forwarding and follow me functions. Calls go to
voicemail if available, otherwise the caller receives busy.
·Group Listen On: Feature 802 (on)/Feature #802 (Off)
Group listen allows you to hear the caller on the phone speaker while you speak through the handset microphone.
The code must be dialed during the call. Group listen is automatically turned off at the end of a call.
·Call Log: Feature 812
Displays your call log. Use the * key to switch between all calls, missed calls, outgoing calls and incoming calls.
Use the volume keys to move through the calls in the currently displayed category. To make a return to the entry
displayed press #, to delete the entry press Hold.
Each of these feature codes above can be assigned to a programmable button . The feature can then be invoked using
a single button press.
35
71

M7310 Telephone User Guide Page 12
- Issue 02c (13 March 2014)IP Office
Administration Feature Codes
The following feature codes are used to edit phone settings. Some functions may request a security code after the
feature code is entered. When this occurs, enter your login code and press #.
·Button Inspect: Feature *0
After selecting this function, pressing any programmable button will display the function currently assigned to
that button.
·Auto Dial Button : Feature *1
This feature allows you to store a number against a programmable button. After entering the code, press the
button to be programmed and then enter the number that the button should dial.
·Internal Autodial (User Button) : Feature *2
This feature allow you to create a user button that matches another user's extension number. The button can then
be used to call the other user. The button can also be used to see the current state of the other user. The button's
icon will flash when the other user has a call alerting them. When that is the case, pressing the button answers
their call. When the icon is steady the user is busy.
·Button Program : Feature *3
This feature allows programming of a range of features onto programmable buttons.
·Store a Personal Speed Dial : Feature *4
This feature code allows you to configure personal directory entries for use as speed dials. After selecting this
function, dial the two digit number between 00 to 99 for the personal directory entry to be programmed. Note that
no warning is given if the entry is already programmed. Enter the number and press Hold. Then enter a name to
associate with the number. The volume buttons are used to move the cursor. When complete, press Hold again.
·Ringer Sound : Feature *6
Adjust the ringer sound type. When selected, the number keys 1 to 4 are used to select the required ringer. The
volume can also be adjusted using the volume controls.
·Contrast : Feature *7
Adjust the display contrast. When selected, the number keys are used to select the required contrast.
·Ring Volume : Feature *80
This feature code causes the phone's ringer to sound for a short period during which its volume can be adjusted
using the phone's volume controls.
·Enbloc Pre-Dialing On/Off : Feature *82
This feature code allows you to switch enbloc dialing on or off. When on, you can compose a number to dial
without the digits being dialed until the number is complete.
52
72
70
70
68
21
66
66
66
20

M7310 Telephone User Guide Page 13
- Issue 02c (13 March 2014)IP Office
Telephone Overview: Feature Codes
1.5 Short Codes
In addition to the Feature codes supported by the phone, you can also dial short codes provided by the telephone
system. These are useful as they can be dialed from any type of phone on the system.
Some short codes require you to enter additional information when you dial them, typically an extension number. That is
indicated by N in the short codes shown below.
The short codes below are default short codes that may be supported by your telephone system. Your system
administrator can add, remove or edit the short codes.
Park/Unpark
·Park Call: *37*N#
Parks the held call using the park slot number dialed in place of N. Works with both park methods but does not
display page options if Park & Page is configured.
·Unpark Call: *38*N#
Unpark the call parked in park slot number N.
Call Pickup
·Pickup Any Call: *30
Answer a call ringing on the telephone system.
·Pickup a Group Call: *31
Answer a call ringing a group of which you are a member. You can use this function even if your group
membership is set to disabled.
·Pickup a Users Call: *32*N#
Pickup a call ringing a user's extension number (N).
·Pickup a Group Members Call: *53*N#
Pickup a call ringing the members of a group (N). This does not necessarily have to be a group call.
Conference
·Conference Held Calls: *47
Start a conference between yourself and any calls that you have on hold.
Do Not Disturb
·Switch Do Not Disturb On: *08
Set your phone to do not disturb.
·Switch Do Not Disturb Off: *09
Switch off do not disturb.
·Add a Do Not Disturb Exception Number: *10*N#
Add a number (N) to your list of do not disturb exceptions.
·Delete a Do Not Disturb Exception Number: *11*N#
Remove a number (N) from your list of do not disturb exceptions.
·Cancel All Forwarding: *00
Switch off any forwarding. Includes forward unconditional, forward on busy, forward on no answer, follow me and
do not disturb.
Follow Me
·Follow Me Here: *12*N#
Dialed at the extension to which you want you calls redirected. Use your own extension number (N) when dialing
the short code.
·Follow Me Here Cancel: *13*N#
Dialed at the extension to which you want your calls were redirected. Use your own extension number (N) when
dialing the short code.
·Follow Me To: *14*N#
Dialed at your phone. Dial the extension number (N) to which you want your calls redirected. You can dial just
*14# to cancel follow me.
·Cancel All Forwarding: *00
Switch off any forwarding. Includes forward unconditional, forward on busy, forward on no answer, follow me and
do not disturb.
11
35

M7310 Telephone User Guide Page 14
- Issue 02c (13 March 2014)IP Office
Forwarding
·Cancel All Forwarding: *00
Switch off any forwarding. Includes forward unconditional, forward on busy, forward on no answer, follow me and
do not disturb.
·Set the Forward Unconditional Destination: *07*N#
Set the destination number (N) for forward unconditional when it is switched on.
·Switch Forward Unconditional On: *01
Switch on forward unconditional. A destination must have been set.
·Switch Forward Unconditional Off: *02
·Include Group Calls in Forward Unconditional: *50
·Exclude Group Calls from Forward Unconditional: *51
·Set the Forward On Busy/No Answer Destination: *57*N#
Set the destination number (N) for forward on busy and forward on no answer. If no number has been set, those
functions will use the forward unconditional number if set.
·Switch Forward On Busy On: *03
·Switch Forward On Busy Off: *04
·Switch Forward on No Answer On: *05
·Switch Forward on No Answer Off: *06
Group
·Night Service Status On: *20*N#
Set a group into night service status by entering its extension number (N).
·Night Service Status Off: *21*N#
Take a group out of night service status by entering its extension number (N).
Login
·Login: *35*N*L#
Login to a phone using your extension number (N) and login code (L).
·Log Out: *36
Log yourself out from the phone where you are currently logged in.
Voicemail
·Check Messages: *17
Access mailboxes to check for messages.
·Voicemail On: *18
Allow voicemail to be used to answer calls.
·Voicemail Off: *19
Stop voicemail being used to answer calls.
·Voicemail Ringback On: *48
Have voicemail ring your phone when you have any new messages. It will call when you use the phone.
·Voicemail Ringback Off: *49
Switch off ringback.

M7310 Telephone User Guide Page 15
- Issue 02c (13 March 2014)IP Office
Telephone Overview: Short Codes
1.6 Status Letters
When the phone is idle, it normally displays the date, time and extension number. It may also show any of the following
status letters at the bottom left of the display.
·B = Barred
A B is shown on your phone's display when the system administrator has set you to outgoing call barred status.
You will only be able to make internal calls while this is applied.
·D = Diverting (Forwarding) Calls
A D is shown on your phone's idle display when you have forward unconditional enabled.
·G = Group Member (In Group)
A G is shown on your phone's idle display when have been configured as a member of a group and your
membership is enabled. While this is the case, you may receive calls targeted to the group.
·N = No Calls (Do Not Disturb)
An N is shown on your phone's idle display when you have do not disturb enabled.
·O = Out of Service
An O is shown on your phone's display when any of the groups of which you are enabled as a member is set to
night service mode. While in that mode, any calls to that group are diverted to its fallback if set or otherwise to
voicemail if available.
·T = Twinned
A T is shown on the phone's idle display if it is internally twinned with your other phone extension. Calls to you will
alert on both phones and can be answered by you at either phone.
·S = System Alarm
If you are configured as a system phone user, an S in the phone's display indicates a system alarm.
1.7 Tones
In addition to ringing, you may hear the following tones:
·Page Call: Single Loud Beep
This tone indicates that your phone is receiving a page call . You do not need to take any action to hear the call
and you cannot be heard by the person doing the page. You can answer a page call, turning it into a normal call
by pressing the Answer soft key.
·Short Code Confirmation: 2 Loud Beeps
These tones are heard when using short codes . It is a confirmation that the short code function has been
completed.
·Direct Voice Call: 3 Loud Beeps
These tones are heard when receive a direct call which has been automatically answered by the phone. You can
hear the caller and then can hear you.
·Waiting: 4 Loud Beeps
These tones are heard if the phone has been waiting for you to complete dialing or the number you have dialed is
invalid. The tones are repeated until you hang up.
·Incompatible: Warble tone
This continuous high-low tone is heard if the number dialed is not valid for routing by the telephone system or any
system function. .
You may hear the following tones during calls:
·Conference Tones: Single Tone/Double Tone
During a call, a single tone indicates that someone else has joined the call. A double tone indicates that someone
has left the conference. The system administrator can replace these with a repeating single tone every 10
seconds.
·Held Tone: Double tone every 4 seconds.
If the system does not have music on hold configured, this repeated double tone is used to inform you that your
call has been put on hold by the other system user.
59
62
19
13
M7310 Telephone User Guide Page 16
- Issue 02c (13 March 2014)IP Office
1.8 Key Lettering
Some older phones have the Q and Z letters printed on the 0 key rather than on the 7 and 9 keys respectively. For
functions that use letter input, the latter standard keypad marking is assumed.
1.9 What's My Extension Number?
The label under the handset is normally used to record the extension number of the phone. This is normally a fixed
number. However, the telephone system supports users logging in to an extension when they want to us it, changing
its extension number to match their own when they do so.
The current extension number associated with the phone is displayed when the phone is idle.
1.10 Notes
This guide was written assuming that the telephone system and your phone are using their default settings. However, the
system has a wide range of controls and features that can be used to customize its operation and that of your phone.
Your system administrator will inform you if they change any settings that will affect you or the operation of your phone.
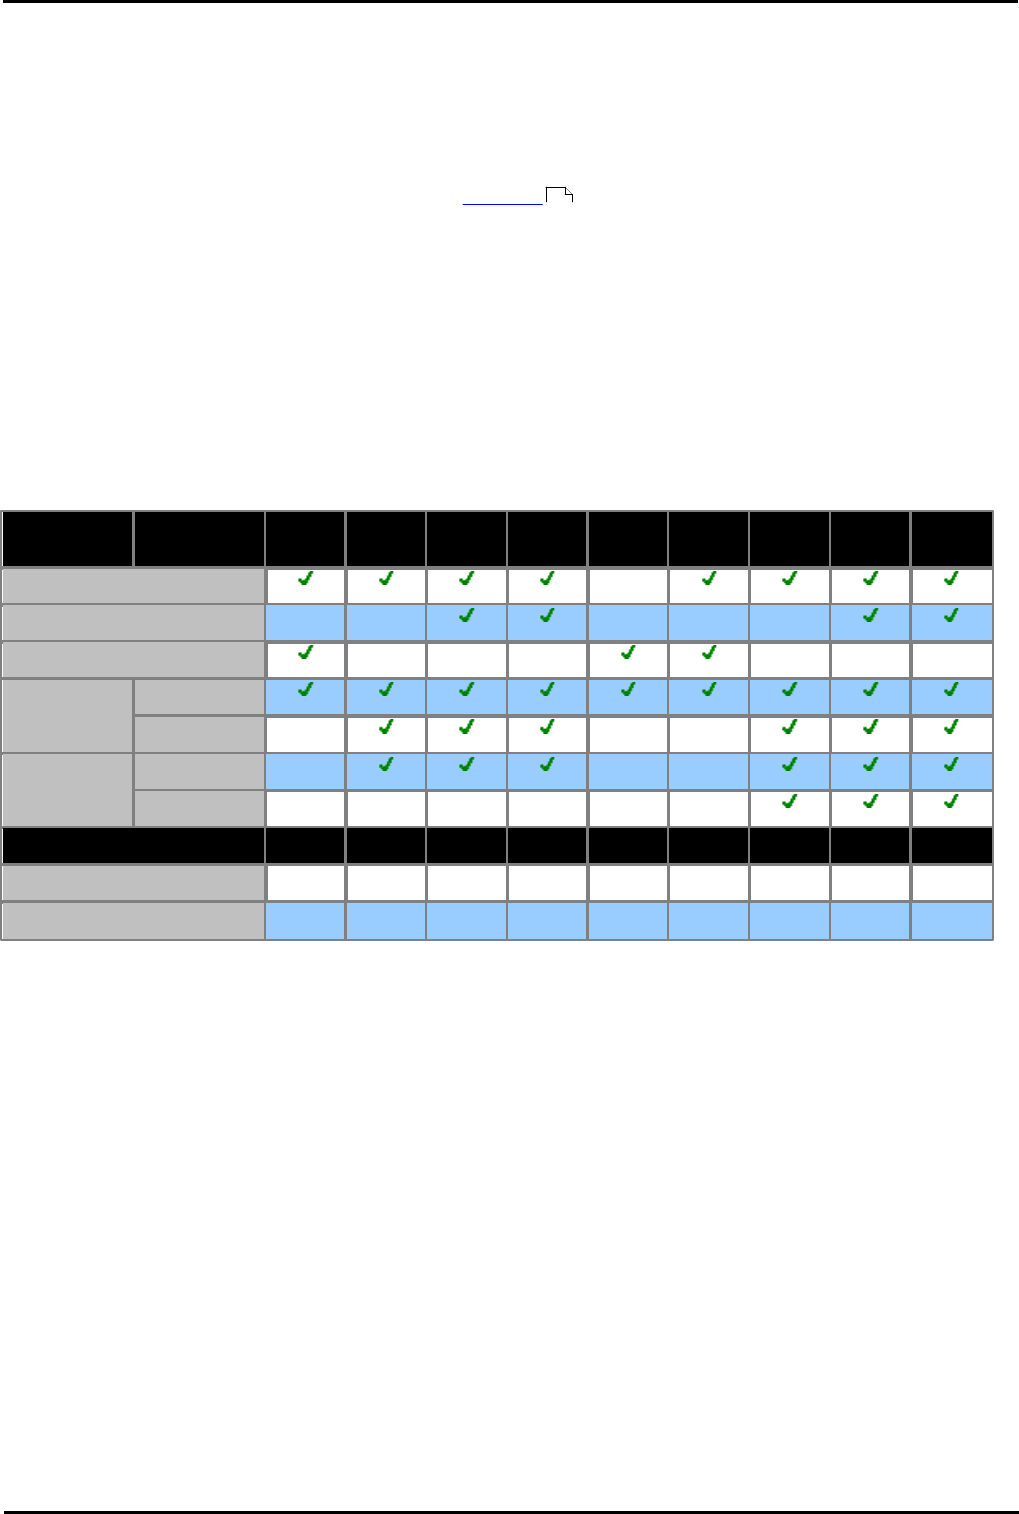
Other Phones
The M7310 is one of a range of similar phones that are supported by the telephone system. Most of the Feature codes
supported by the M7310 can also be used on these other phones.
M7100/
M7100N
M7208/
M7208N
M7310/
M7310N
M7324/
M7324N
T7000
T7100
T7208
T7316
T7316
Display
–
Display Soft Keys
–
–
–
–
–
Virtual Call Appearances
–
–
–
–
–
–
Handsfree
Operation
Speaker
Microphone
–
–
–
Headset
Operation
Socket
–
–
–
Button
–
–
–
–
–
–
Programmable Buttons...
1
7
33
23
4
1
7
15
16
... with icons
–
7
9
23
–
–
7
15
16
... without icons
1
–
24
–
4
1
–
–
–
52

M7310 Telephone User Guide Page 17
- Issue 02c (13 March 2014)IP Office
Making Calls
Chapter 2.

M7310 Telephone User Guide Page 18
- Issue 02c (13 March 2014)IP Office
2. Making Calls
If you are not already on a call, then you can just dial the number. The first available appearance button will be used for
the call. Alternatively, you can press a specific appearance button in order to make a call using that button.
The number of call appearance buttons on your phone controls the number of calls you can make and receive at the
same time. The normal number is 2 but this can be changed by your system administrator. They can also provide your
phone with other types of appearance buttons (line, bridged and call coverage) for making and answering additional
calls.
If the number you dial matches a user or group on the telephone system, the directory name of the user or group is
shown and the call starts alerting the target.
2.1 Setting a Callback
If you call another internal user and they do not answer, you can set a callback. When you have a callback set, the
system will call you when the other user next uses ends a call. When you answer the callback, the system will
automatically make another call to the user.
·This function can be assigned to a programmable button . This allows it to be accessed in a single key press. If
the button includes an indicator, it will indicate the status of the function (on or off).
To Set a Callback
1.While the call is still ringing or if you hear busy, press Feature 2 (or press the AutCB soft key).
2.End your call attempt.
To Clear a Callback
If you have a callback set, you can cancel it using the following process:
1.Press Feature #2.
2.2 Redial the Previous Number
You can redial the number of the last outgoing call that you made.
·This function can be assigned to a programmable button . This allows it to be accessed in a single key press. If
the button includes an indicator, it will indicate the status of the function (on or off).
1.To redial the last number called, press Feature 5.
71
71

M7310 Telephone User Guide Page 19
- Issue 02c (13 March 2014)IP Office
Making Calls: Redial the Previous Number
2.3 Making a Page Call
You can make a page call to another user or to the available members of a group. The users do not have to take any
action to hear the page.
The phones called must support handsfree auto-answer in order to hear the page. If they do not, they do not receive any
alerting call.
·This function can be assigned to a programmable button . This allows it to be accessed in a single key press. If
the button includes an indicator, it will indicate the status of the function (on or off).
1.Press Feature 60.
2.Dial the number of the user or group you want to page.
·If the destination is a user and they already have a call connected, they cannot be paged. If the destination is
a group which is not in service or has no available members, it cannot be paged.
2.4 Direct Voice Calls
This feature is also called dial voice call or direct voice call. It calls another extension and has the call automatically
answered on handsfree speaker after playing 3 beeps. If the called extension does not have a handsfree microphone, the
user must use the handset if they want to talk.
The called extension called must support a handsfree speaker. If the extension does not or if the extension is not free
when called, the call is alerts as a normal call.
·This function can be assigned to a programmable button . This allows it to be accessed in a single key press. If
the button includes an indicator, it will indicate the status of the function (on or off).
1.Press Feature 66.
2.Dial the target user extension number.
2.5 Making a Priority Call
A priority call allows you to call another user even if they have 'do not disturb' set. The call will follow any forwarding and
follow me settings they have in use but will not go to voicemail.
·This function can be assigned to a programmable button . This allows it to be accessed in a single key press. If
the button includes an indicator, it will indicate the status of the function (on or off).
1.Press Feature 69.
2.Dial the target user extension number.
71
71
71

M7310 Telephone User Guide Page 20
- Issue 02c (13 March 2014)IP Office
2.6 Pre-Dialing (Enbloc)
By default, when you start dialing a number, your phone immediately connects to the telephone system. It then starts
passing the digits you dial to the phone system as and when you dial them. However, in this traditional dialing mode, you
cannot correct the digits you have already dialed except by ending the call and starting again. Also if you pause dialing
for too long the phone system may think that you have finished dialing and will attempt to connect the call using only the
digits you have completed dialing so far.
Pre-dialing or enbloc dialing allows you to compose and edit the number to dial on your phone's display before you send
it to the phone system to be dialed.
Through the phone's menus you can select whether you want to use traditional or enbloc pre-dialing when you make
calls.
Dialing a Number Using En-Bloc Mode
1.Without going off-hook to hear dial tone, start dialing.
2.You can use the key (or the <<< soft key) to delete the previous digit dialed if you need to correct the
number.
3.When you have completed the number as required, you can select how you want to make the call.
·Lift the handset to start a call using the handset.
·Press one of your idle call appearance buttons to start a call handsfree using that appearance.
·Press the Speaker button to start the call on your phone's handsfree speaker.
Enabling/Disabling En-Bloc Dialing
You can enable or disable your enbloc pre-dialing using Feature 82. When on, you can compose a number to dial
without the digits being dialed until the number is complete.
·This function can be assigned to a programmable button . This allows it to be accessed in a single key press. If
the button includes an indicator, it will indicate the status of the function (on or off).
1.Press Feature *82.
2.The phone displays Enbloc dial and the current setting.
3.Press the on or off soft key to change the setting.
20
71

M7310 Telephone User Guide Page 21
- Issue 02c (13 March 2014)IP Office
Making Calls: Pre-Dialing (Enbloc)
2.7 Using Speed Dials
Speed dials are telephone numbers that are stored by the telephone system. There are two types of speed dial: personal
speed dials and system speed dials.
You or your system administrator can enter numbers that you want stored as personal speed dials. These are only
useable by you. Your system administrator can also store numbers as system speed dials. Those are useable by all users
on the system including you.
If you have any internal or external number that you dial frequently, you can store those as an auto dial button
rather than a speed dial.
Dialing a Speed Dial
This function can be assigned to a programmable button . This allows it to be accessed in a single key press.
1.Press Feature 0.
·To dial a personal speed dial:
Dial * followed by the 2-digit personal speed dial number between 00 to 99. Alternatively you can dial the 2-
digit personal speed dial number and then press #.
·To dial a system speed dial:
Dial the 3-digit system speed dial number between 000 to 999.
Using the Contacts Directory
You can also select the personal or system speed dial to use for a call using the Contacts Directory .
Entering a Personal Speed Dial
·! WARNING
Note that no warning is given if the entry is already programmed. It is simply overwritten.
1.Press Feature *4.
2.Dial the two digit number, between 00 to 99, for the personal directory entry to be programmed.
3.Enter the number to be dialed by the speed dial. Use the <<< soft key to delete the last digit entered.
4.When the number is completed press the OK soft key.
5.Enter a name to associate with the number.
1
1
2
ABC2abc
3
DEF3def
4
GHI4ghi
5
JKL5jkl
6
MNO6mno
7
PQRS7pqrs
8
TUV8tuv
9
WXYZ9wxyz
*
Backspace
0
.–0()
#
Space
·Use the # button button to advance the text entry cursor to enter the next character.
·Use the * button button to delete the current character.
6.When complete, press Hold again.
70
71
42

M7310 Telephone User Guide Page 22
- Issue 02c (13 March 2014)IP Office
2.8 Account Codes
The telephone system can store a set of account codes. Account codes can be used to keep track of calls in relation to
particular work, activities or clients. They can also be used to keep track of calls by particular users.
·When an account code is entered while making a call or during a call, that account code is included in the call
records output by the system.
·Accounts entered are checked against those stored by the telephone system. If an invalid code is entered, the
account code is requested again.
·The system administrator can configure certain numbers or types of numbers to require entry of an account code
before you can continue making a call to such a number.
·The system administrator can also configure you to have to enter an account code before making any external
call.
Forced Account Code Entry
If you are required to enter an account code, the phone will display ACCOUNT:_.
1.Enter an account code and press #.
2.If the account code is not valid, the phone will display AGAIN:_.
Voluntary Account Code Entry
You can choose to enter an account code before making a call or during a call. This is done using a programmable button
assigned with the Account Code function.
2.9 Calling from the Contacts List
You can use any directory contacts to make a call. You can also use the directory in many telephone functions where you
need to select the number for a destination, for example during transfers.
1.Access the contacts directory:
a. Press the programmable button to which the Directory function has been assigned (or, if displayed, press
the Dir soft key).
b. Dial the name or part of the name that you want to find. The list of contacts is filtered to show only matching
names.
c. Use the and buttons to scroll through the list of matching names (Note: If done during a call or while
alerting, this will also adjust the call or ring volume). To return to the full directory, press Back.
2.When the required entry is shown, press #
c. Press the programmable button to which the Directory function has been assigned (or, if displayed, press
the Dir soft key).
d. Dial the name or part of the name that you want to find. The list of contacts is filtered to show only matching
names.
d. Use the and buttons to scroll through the list of matching names (Note: If done during a call or while
alerting, this will also adjust the call or ring volume). To return to the full directory, press Back.
(or press the Call soft key).
2.10 Calling from the Call Log
You can use the call log to make calls to the number included in the currently selected call record.
1.Press Feature 812. The display will change to show your call log records.
·Use the * key to select which call log records you are viewing. The options are All, Mis (missed calls), Ans
(answered incoming calls) and Out (outgoing calls).
·Use the up and down buttons to scroll through the records.
2.When the required entry is shown, press # (or press the Call soft key).
71

M7310 Telephone User Guide Page 23
- Issue 02c (13 March 2014)IP Office
Answering Calls
Chapter 3.

M7310 Telephone User Guide Page 24
- Issue 02c (13 March 2014)IP Office
3. Answering Calls
While you still have a call appearance button available you can receive incoming calls. The button icon on the call
appearance button will show a slow flashing icon.
To Answer a Call when Idle
1.If your phone is idle or you only have parked or held calls, you can answer calls in a number of ways:
·Pickup the handset.
·To answer handsfree, press the call appearance button or the Handsfree button.
2.The button icon changes to a steady icon to show it is the call to which you are connected.
To Answer Another Call
If you already have a call in progress, you can still answer another call. Pressing the alerting call appearance button will
automatically put the current call on hold and answer the waiting call.
Switching Between Calls
You can switch between calls by pressing the call appearance button of the call to which you want to talk. The button
icons will show which call you are currently talking to.
·A slow flashing icon indicates a call waiting to be answered.
·A steady icon indicates the currently connected call.
·A fast flashing icon indicates a held call.
3.1 Divert a Call to Voicemail
You can redirect a call to voicemail without answering the call. This only applies for call to you, not calls to a group of
which you are a member.
1.Press the To VM soft key or if your phone is idle press the Release button.The call is redirected to voicemail.
3.2 Ignore an Incoming Call
You can quiet the ringer of a currently alerting call. The call will continue alerting visually but with no audible ring. You
can assign one of your phones programmable buttons as a Ringer Off button to turn the ringer on or off for all calls.
1.Press the Ignore soft key.
2.The call will continue alerting but with no audible ring.
3.3 Answering a Page Call
You can be paged if you have no call in progress or only held and or parked calls. After a single tone, the page is heard
through the phone's speaker. If you are currently on a call or set to do not disturb your phone is not paged.
To answer the page call, press the Answer soft key. The page call is turned into a normal call between just you and the
pager.
75

M7310 Telephone User Guide Page 25
- Issue 02c (13 March 2014)IP Office
Answering Calls: Answering a Page Call
3.4 Call Pickup
Pickup is used to answer a call ringing elsewhere on the phone system. There are a number of pickup options:
·Answer any ringing call on the telephone system.
·Answer a call ringing a particular user.
·Answer a call ringing a particular group.
·Answer a call, not necessarily a group call, ringing the members of a group.
Direct Call Pickup
Answer a call ringing the user or group extension number specified.
1.Press Feature 76.
2.Dial the extension or group number.
Group Call Pickup
You can answer a call ringing any group of which the you are a member even if the call is not currently alerting on your
phone. You can use this function even when your group membership is set to disabled.
1.Press Feature 75.
Default Short Codes
Short codes are numbers that you can dial from any types of phone on the telephone system. The following are
default short codes that may be available on your system.
·Pickup Any Call: *30
Answer a call ringing on the telephone system.
·Pickup a Group Call: *31
Answer a call ringing a group of which you are a member. You can use this function even if your group
membership is set to disabled.
·Pickup a Users Call: *32*N#
Pickup a call ringing a user's extension number (N).
·Pickup a Group Members Call: *53*N#
Pickup a call ringing the members of a group (N). This does not necessarily have to be a group call.
13

M7310 Telephone User Guide Page 27
- Issue 02c (13 March 2014)IP Office
Call Controls
Chapter 4.

M7310 Telephone User Guide Page 28
- Issue 02c (13 March 2014)IP Office
4. Call Controls
4.1 Adjust the Call Volume
While talking, you can adjust the volume of the incoming call. The volume is separately adjusted for whichever device
you are currently using (handset or speaker).
1.With the call connected, press the and keys to adjust the volume.
4.2 Muting a Call
Muting a call stops the caller from hearing you. However, you can still hear them.
·The button flashes when in use.
·Changing a call between handset or handsfree automatically re-enables the microphone.
·Switching between calls re-enables the microphone.
1.To activate mute, press the MUTE key. The button will be lit while mute is active.
2.To switch mute off, press the key again.
4.3 Switching Between Calls
You can switch between calls by pressing the call appearance button of the call to which you want to talk. The button
indicators will show which call you are currently talking to.
·A slow flashing icon indicates a call waiting to be answered.
·A steady icon indicates the currently connected call.
·A fast flashing icon indicates a held call.
Answering Another Call
If you have an idle call appearance, you can still receive and answer another call.
1.Press the call apperance button with a slow flashing icon. Your current call is automatically put on hold.
Making Another Call
If you have an idle call appearance, you can still make another call.
1.Press the idle call appearance. Your current call is automatically put on hold.
2.Make the call as normal.

M7310 Telephone User Guide Page 29
- Issue 02c (13 March 2014)IP Office
Call Controls: Switching Between Calls
4.4 Transferring Calls
To transfer a call, your phone must have an available call appearance button. If all your current call appearance buttons
are in use, you must either end or park one of your existing calls.
·Your system administrator can configure the system so that it will attempt to return unanswered transfers to
you.
1.Dial Feature 70. The current call is automatically put on hold.
2.Dial the number for the transfer destination. Alternatively, press the Dir soft key to select a destination from the
directory .
·To complete the transfer, press Feature 70 again (or press the Complete soft key). You can do this while
the call is still ringing or you can wait until it is answered.
·Transferring a call while it is still ringing is called an unsupervised or blind transfer.
·Transferring a call after ringing finishes is called a supervised or announced transfer.
·If the transfer destination does not answer or, after answering the call, does not want to accept the call:
·To try another number, replace the handset or press Release.
·To cancel the transfer attempt, press the call appearance button of the original held call (or press the
Cancel soft key).
4.5 Transferring a Held Call
When you already have a call on hold and a call connected, you can connect them by starting a conference. Press
Feature 3. Your current call and the held call will be connected. You can now drop yourself from the conference.
4.6 Handsfree Speaker Operation
Your phone has a handsfree speaker and microphone. These allow you to make and answer calls handsfree.
·You can make a handsfree call by simply dialing without lifting the handset. You can hear the call progress and when
answered, either continue handsfree or lift the handset.
·The speaker allows the phone to receive page calls . You can hear the page without needing to take any action. You
can answer the page by pressing the Answer soft key.
·The speaker allows the phone to auto answer direct voice calls. You can hear the caller and they can hear you
without you needing to take any action. The same applies for call from other users if you have internal auto-answer
set on the phone.
·Pressing the Handsfree button answers a call handsfree.
·The phone has a headset socket. If a headset is plugged into that socket, it is used for handsfree rather than the
phone's speaker and microphone.
·The key can also pressed to turn a call already answered using the handset into a handsfree call.
·If there are no currently connected call to which you are talking, a call answered by pressing its appearance button
is connected as handsfree.
·If you are not currently connected to a call:
·If the handset is off-hook, answering a call by pressing the alerting appearance button answers the call using
the handset.
·If the handset is on-hook, answering a call by pressing the alerting appearance button answers the call using
the speaker or headset if one is connected, depending on which of the two modes was last used on a call.
·If there is already a connected call to which you are talking handsfree, answering another call by pressing the
appearance button will answer that call handsfree.
Conference Phones
Your phone is not designed as a conference room speakerphone, it is a personal speakerphone. It is designed for use by
a speaker who is located directly in front of the phone with no obstructions between them and the microphone. Phones
designed to be used as conference speaker phones typically have multiple microphones and are able to handle sounds
coming from multiple directions. For details of conference speaker phones supported by your phone system, contact your
system administrator.
30 35
43
39
19
19
74

M7310 Telephone User Guide Page 30
- Issue 02c (13 March 2014)IP Office
4.7 Headset Operation
Your phone has a headset socket located under the phone. If you connect a headset, it overrides the phone's handsfree
speaker and microphone and is controlled by the Handsfree button (bottom right).
·To answer a call using the headset, press the Handsfree button or the button on which the call is alerting.
·Use the Handsfree button to switch between the headset and the handset.
4.8 Group Listen
Using group listen allows you to hear the caller through the phone's handsfree speaker but they only hear speech from
your phone's handset microphone rather than the handsfree microphone. Group listen is automatically turned off at the
end of a call.
·To Turn Group Listen On: Press Feature 802.
·To Turn Group Listen Off: Press Feature #802.
4.9 Ending Calls
The Release button ends the current call. If the call is connected on the phone's handset, replacing the handset
will end the call. The duration of a call is briefly shown on the display after a call is ended.

M7310 Telephone User Guide Page 31
- Issue 02c (13 March 2014)IP Office
Call Controls: Ending Calls
4.10 Groups
Your system administrator can include you as a member of a group or groups along with other users. Each group has its
own extension number which is used to call the group.
When a call is presented to a group, it is presented to the available group members, either one at a time or all at the
same time, until answered by one of the members.
How long a group call will ring at each group member's phone before being presented to the next member is controlled
by the group's own settings. Groups also use voicemail and have their own settings for when an unanswered call should
go to the group's mailbox. For group calls, the group's own voicemail settings are used rather than your settings.
·G = Group Member (In Group)
A G is shown on your phone's idle display when have been configured as a member of a group and your
membership is enabled. While this is the case, you may receive calls targeted to the group.
·O = Out of Service
An O is shown on your phone's display when any of the groups of which you are enabled as a member is set to
night service mode. While in that mode, any calls to that group are diverted to its fallback if set or otherwise to
voicemail if available.
Default Short Codes
Short codes are numbers that you can dial from any types of phone on the telephone system. The following are
default short codes that may be available on your system.
·Night Service Status On: *20*N#
Set a group into night service status by entering its extension number (N).
·Night Service Status Off: *21*N#
Take a group out of night service status by entering its extension number (N).
13

M7310 Telephone User Guide Page 32
- Issue 02c (13 March 2014)IP Office

M7310 Telephone User Guide Page 33
- Issue 02c (13 March 2014)IP Office
Holding and Parking Calls
Chapter 5.

M7310 Telephone User Guide Page 34
- Issue 02c (13 March 2014)IP Office
5. Holding and Parking Calls
Holding a call and parking a call are two similar actions. The table below summarizes the main differences between
parking a call or holding a call.
When a call is ...
Held
Parked
... the call occupies an appearance button.
Yes
No
... the caller hears music on hold or hold reminder tones.
Yes
Yes
... the call can be retrieved by other users.
No
Yes
... the call recalls to you automatically after a time.
Yes
Default 15
seconds
Yes
Default 5
minutes.
... the call can be used to start or add calls to a conference.
Yes
No
... the call is assigned a unique ID.
No
Yes

M7310 Telephone User Guide Page 35
- Issue 02c (13 March 2014)IP Office
Holding and Parking Calls:
5.1 Parking Calls
Parking a call is similar to holding a call. However, parked calls can be unparked by other users on the phone system.
Calls that you park recall to your phone (when idle) if they have been parked for too long. The default timeout is 5
minutes but can be changed by the system administrator. Recall calls ignore any forwarding or do not disturb settings
that you have set.
For IP Office Release 9.0 and higher, call park can operate in two different ways:
·Traditional Park
·Park & Page
Default Short Codes
Short codes are numbers that you can dial from any types of phone on the telephone system. The following are
default short codes that may be available on your system.
·Park Call: *37*N#
Parks the held call using the park slot number dialed in place of N. Works with both park methods but does not
display page options if Park & Page is configured.
·Unpark Call: *38*N#
Unpark the call parked in park slot number N.
5.1.1 Traditional Park
This method of parking calls is used if Park & Page is not configured on the telephone system. Your system
administration will confirm which way your system operates.
If you park a call without specifying a park slot number, the system automatically assigns a park number based on your
extension number plus a single digit. For example, for extension 201, the first parked call uses park slot number 2010 if
available. Otherwise, it uses park slot 2011 if available and so on up to 2019.
Call park buttons can be configured to match specific park slot numbers. A call parked using that button is given that
park slot number. All users with a call park button set to the same number can see when there is a parked call there and
can unpark that call using their button.
To Park a Call
1.Press Feature 74. The park slot number assigned to the parked call is briefly shown on the display. If there are
not slots available the call is not parked and you will still be connected to the caller.
To Unpark a Call
1.Press Feature #74.
2.The park slot ID of the longest waiting call parked is shown.
·Press the Done soft key or # to unpark the call.
·Otherwise, enter the park slot number assigned to the call that you want to unpark and press #.
5.1.2 Park & Page
This method of parking calls is used if Park & Page is configured on the telephone system. Your system administration will
confirm which way your system operates.
Park and page uses a set of pre-configured park slot numbers that act like extension numbers. When you parked a call in
one of those park slots, you or any other user on the system can dial that park slot number to unpark the call.
Your system administrator can also configure up to 3 hunt groups for paging. When you park a call, after displaying the
park slot number used, your phone displays options for paging.
To Park a Call
1.Press Feature 74. The call is parked and the parked slot number needed to unpark the call is displayed.
2.If you want to make a page announcement of the parked call, press Page. You can then select one of the
displayed hunt groups for your page or you can dial any extension number that want to page.
To Unpark a Call
1.Dial the park slot number that was assigned to the parked call.
35
35
13
35
35

M7310 Telephone User Guide Page 36
- Issue 02c (13 March 2014)IP Office
5.2 Holding Calls
You can hold as many calls as your phone can receive.
·The held call will still occupy the call appearance on which it was made or answered.
·While held, the caller will hear music on hold. If your system does not have music on hold available, the caller will
hear double beep tones every few seconds.
·If you have more than one call on your phone, either held or connected, you can start a conference between
yourself and the calls.
Calls that you have held will recall to your phone when it is idle if they have been on hold for too long. The default hold
timeout for the telephone system is 15 seconds but it can be changed by the system administrator. Hold recall calls
ignore any forwarding or do not disturb settings you have set.
Important - Holding Conference Calls
You can hold a conference call in the same way as holding a normal call. Holding the conference call does not affect the
other conference parties who can continue talking. You will also still be listed as a member of the conference call in the
conference details.
·! Warning
This only applies to conference calls hosted by your own telephone system. Holding your call to a conference
hosted on another telephone system will cause that conference to hear your system's music on hold.
5.2.1 Holding a Call
1.To put your current call on hold, press the Hold button or the call's appearance button.
2.The held call will be indicated by its appearance key changing to a fast flashing icon.
3.While held, the caller will hear music on hold. If your system does not have music on hold available, the caller will
instead hear double beep tones every few seconds.
5.2.2 Taking a Call Off Hold
If you have a currently connected call, that call will be automatically put on hold.
1.Press the appearance button with the fast flashing icon.
5.2.3 Switching Between Calls
You can switch between calls by pressing the call appearance button of the call to which you want to talk. The button
indicators will show which call you are currently talking to.
·A slow flashing icon indicates a call waiting to be answered.
·A steady icon indicates the currently connected call.
·A fast flashing icon indicates a held call.
5.2.4 Transferring a Held Call
When you already have a call on hold and a call connected, you can connect them by starting a conference. Press
Feature 3. Your current call and the held call will be connected. You can now drop yourself from the conference.
38
39

M7310 Telephone User Guide Page 37
- Issue 02c (13 March 2014)IP Office
Conference Calls
Chapter 6.

M7310 Telephone User Guide Page 38
- Issue 02c (13 March 2014)IP Office
6. Conference Calls
Multiple conference calls are supported, with parties addable to each conference call until the system's total conference
capacity (128) is reached. However, a maximum of 64 parties is supported in any particular conference call.
Conference resources are also used for call recording and other features, reducing the available conference capacity for
ordinary conference calls.
Note that some conference controls, for example dropping other parties, only apply for conferences started on the same
phone system as your extension.
Default Short Codes
Short codes are numbers that you can dial from any types of phone on the telephone system. The following are
default short codes that may be available on your system.
·Conference Held Calls: *47
Start a conference between yourself and any calls that you have on hold.
6.1 Starting a Conference
If you have a connected call and any held calls, pressing Feature 3 will start a conference between you and those calls.
If you do not already have a held call, you can use the process below to start a conference.
1.Make a call to the first party or answer a call.
2.Place the call on hold by pressing Hold or Feature 3.
3.Dial the party that you want to add to the conference.
4.If they answer and want to join the call, press Feature 3.
5.If they do not want to join the call or do not answer, replace the handset or press Release. Return to the
held call by pressing its call appearance (fast flashing icon).
6.2 Adding a Call to a Conference
You can add additional parties to an existing conference.
1.Press HOLD or Feature 3 to put the conference on hold. The appearance key for the conference call will
show a fast flashing icon.
2.This does not affect the other conference parties who can continue talking to each other.
3.Dial the party that you want to add to the conference.
4.If they answer and want to join the call, press Feature 3.
5.If they do not want to join the call or do not answer, replace the handset or press Release. Return to the
held call by pressing its call appearance (fast flashing icon).
Important - Holding Conference Calls
You can hold a conference call in the same way as holding a normal call. Holding the conference call does not affect the
other conference parties who can continue talking. You will also still be listed as a member of the conference call in the
conference details.
·! Warning
This only applies to conference calls hosted by your own telephone system. Holding your call to a conference
hosted on another telephone system will cause that conference to hear your system's music on hold.
13

M7310 Telephone User Guide Page 39
- Issue 02c (13 March 2014)IP Office
Conference Calls: Adding a Call to a Conference
6.3 Viewing Conference Details
You can display a list of the parties involved in a conference call.
1.Press Release (or press the Detail soft key).
2.The details of the parties in the conference are displayed. Your own details are always displayed first.
3.Press * (or the Next soft key) to cycle through the details of the conference parties.
4.Press Exit to return to the normal call display.
6.4 Dropping Parties
You can drop parties from a conference call, including yourself.
To Drop Yourself
1.Press Release. Your own details are displayed.
2.Press Release again.
To Drop Other Parties
1.Press Release (or press the Detail soft key).
2.The details of the parties in the conference are displayed. Your own details are always displayed first.
3.Press * (or the Next soft key) to cycle through the details of the conference parties.
4.When the party you want to drop is displayed # (or press Release).
5.Press Exit to return to the normal call display..
Note
1.If you are the only internal user in the conference, depending on your telephone systems configuration, dropping
yourself from the conference may end the conference. Consult your system administrator for details.
6.5 Holding a Conference Call
Using the Hold key you can put a conference call on hold in the same way as you can for a normal call. The
appearance key for the conference call will show a fast flashing icon.
To take the conference call off hold, press the appearance key.
Important - Holding Conference Calls
You can hold a conference call in the same way as holding a normal call. Holding the conference call does not affect the
other conference parties who can continue talking. You will also still be listed as a member of the conference call in the
conference details.
·! Warning
This only applies to conference calls hosted by your own telephone system. Holding your call to a conference
hosted on another telephone system will cause that conference to hear your system's music on hold.
6.6 Transferring Calls Using Conference
When you already have a call on hold and a call connected, you can connect them by starting a conference. Press
Feature 3. Your current call and the held call will be connected. You can now drop yourself from the conference.
39

M7310 Telephone User Guide Page 41
- Issue 02c (13 March 2014)IP Office
Directory
Chapter 7.

M7310 Telephone User Guide Page 42
- Issue 02c (13 March 2014)IP Office
7. Directory
This menu is accessed by pressing a button set to the Directory function. It is used to display names and numbers
that you can then use for making calls. In some dialing scenarios it can also be accessed using the Dir soft key when
displayed.
The contacts shown in the directory are sorted alphabetically by name but come from a number of sources.
·Personal Directory
These contacts are stored by the telephone system as part of your user settings. If you login at another 1400,
1600, 9400, 9500, 9600, M-Series, T-Series phone, your call log moves with you.
·If you hot desk to another phone, your personal contacts move with you.
·You can have up to 100 personal directory entries[1] which you can add or delete through the phone.
·The system administrator can also add, edit and delete your personal directory entries.
·Users
These contacts list all[2] telephone system users. If your system is part of a network of IP Office telephone
systems, it also includes users on the other systems.
·Groups
These contacts list all the groups on the telephone system. If your system is part of a network of IP Office
telephone systems, it includes those groups that the system administrator has configured to be advertised across
the network.
·External Contacts
These contacts are viewable and useable by all phone users. These are two types of external contacts:
·Some external contacts are entered into the telephone system configuration by the system administrator.[1]
·Other external contacts are those imported by the telephone system from other directory sources.
Notes
1.While you are allowed up to 100 personal directory entries, the total capacity of the telephone system may limit
the addition of further personal directory.
2.Your system administrator can set some users as Ex Directory. Those users are then not included in the
directory.
7.1 Viewing Contacts Details
1.Access the contacts directory:
a. Press the programmable button to which the Directory function has been assigned (or, if displayed, press
the Dir soft key).
b. Dial the name or part of the name that you want to find. The list of contacts is filtered to show only matching
names.
c. Use the and buttons to scroll through the list of matching names (Note: If done during a call or while
alerting, this will also adjust the call or ring volume). To return to the full directory, press Back.
2.When the required entry is highlighted, press Detail to display the name and number.
3.The range of soft keys available will depend on the type of directory entry:
·Call
Make a call to the stored number.
·Back
Return to the display of matching names.
73
52
43

M7310 Telephone User Guide Page 43
- Issue 02c (13 March 2014)IP Office
Directory: Viewing Contacts Details
7.2 Make a Call from the Directory
You can use any directory contacts to make a call. You can also use the directory in many telephone functions where you
need to select the number for a destination, for example during transfers.
1.Access the contacts directory:
a. Press the programmable button to which the Directory function has been assigned (or, if displayed, press
the Dir soft key).
b. Dial the name or part of the name that you want to find. The list of contacts is filtered to show only matching
names.
c. Use the and buttons to scroll through the list of matching names (Note: If done during a call or while
alerting, this will also adjust the call or ring volume). To return to the full directory, press Back.
2.When the required entry is shown, press #
c. Press the programmable button to which the Directory function has been assigned (or, if displayed, press
the Dir soft key).
d. Dial the name or part of the name that you want to find. The list of contacts is filtered to show only matching
names.
d. Use the and buttons to scroll through the list of matching names (Note: If done during a call or while
alerting, this will also adjust the call or ring volume). To return to the full directory, press Back.
(or press the Call soft key).
7.3 Using the Directory for Other Functions
Within other menus where entry of a number is required, it may be possible to use the directory to select an existing
number by name. If this option is available, it will be indicated by the presence of a Dir soft key in the menu.
When using the directory in this way, the names made available will depend on the type of function that is being
performed. For example, for some functions only group names will be displayed, for others only user names.
1.Press the Dir soft key.
2.When the required entry is shown, press Call.

M7310 Telephone User Guide Page 44
- Issue 02c (13 March 2014)IP Office
7.4 Adding a New Contact
So long as the telephone system capacity has not been reached, you can add up to 100 personal directory entries. This is
done using the same process as for adding personal speed dials.
·! WARNING
Note that no warning is given if the entry is already programmed. It is simply overwritten.
1.Press Feature *4.
2.Dial the two digit number, between 00 to 99, for the personal directory entry to be programmed.
3.Enter the number to be dialed by the speed dial. Use the <<< soft key to delete the last digit entered.
4.When the number is completed press the OK soft key.
5.Enter a name to associate with the number.
1
1
2
ABC2abc
3
DEF3def
4
GHI4ghi
5
JKL5jkl
6
MNO6mno
7
PQRS7pqrs
8
TUV8tuv
9
WXYZ9wxyz
*
Backspace
0
.–0()
#
Space
·Use the # button button to advance the text entry cursor to enter the next character.
·Use the * button button to delete the current character.
6.When complete, press Hold again.
7.5 Add a Contact from the Call Log
You can add a name and number shown in your call log to your personal contacts.
1.Press Feature 812. The display will change to show your call log records.
·Use the * key to select which call log records you are viewing. The options are All, Mis (missed calls), Ans
(answered incoming calls) and Out (outgoing calls).
·Use the up and down buttons to scroll through the records.
2.Press 0 (or press the Details soft key). The individual details of the currently selected call record are displayed.
3.Press 0 (or press the +Dir soft key).
·If you are configured as a system phone user, you can add a contact to either your own personal directory (
Personal...) or to the system's external directory (External...). Use the and key to select which.
4.Press # (or press the Selct soft key).

M7310 Telephone User Guide Page 45
- Issue 02c (13 March 2014)IP Office
Call Log
Chapter 8.

M7310 Telephone User Guide Page 46
- Issue 02c (13 March 2014)IP Office
8. Call Log
You can access your call log by pressing Feature 812. The call log you see is a call log stored on the telephone system.
If you login at another 1400, 1600, 9400, 9500, 9600, M-Series, T-Series phone, your call log moves with you.
Your call log contains your 10 most recent answered calls, 10 most recent calls you made and 10 most recent missed
calls. If configured by the system administrator, it can also include calls missed by groups of which you are a member.
Missed Calls
Missed calls are calls to you that you did not answer. Your system administrator can also configure if the log includes calls
presented to you but answered by someone else or by voicemail.
Missed Group Calls
If you are a member of any groups, the system administrator can configure whether your missed calls log should also
include missed group calls. The hunt group does not necessarily have to have rung your phone. It will be recorded as
missed if it was presented to the group and not answered by any of the members including you.
Note
1.Your centralized call log can be turned off by the system administrator . If they do that, your phone will display
Call Log Disabled when you try to access the call log.
8.1 Accessing the Call Log
1.Press Feature 812. The display will change to show your call log records.
·Use the * key to select which call log records you are viewing. The options are All, Mis (missed calls), Ans
(answered incoming calls) and Out (outgoing calls).
·Use the up and down buttons to scroll through the records.
2.Pressing # or lifting the handset will make a call to the number stored with the currently displayed record. You
can use the functions listed at the bottom of the display by pressing the soft key below the function name.
·Call
To make a call to the currently displayed name or number, press #.
·Detail
Display more details about the current call log record. You can then also add the caller details to your personal
directory if required.
·More
Switch between the different sets of available soft key functions.
·Del
Deletes the current displayed record.
·Del *
Delete all the call log records, not just the current types of records being shown.
3.To exit the call log, press the Feature button.
52
81
48
47
48
48
48

M7310 Telephone User Guide Page 47
- Issue 02c (13 March 2014)IP Office
Call Log: Accessing the Call Log
8.2 Viewing Call Details
You can view additional details about the currently shown call.
1.Press Feature 812. The display will change to show your call log records.
·Use the * key to select which call log records you are viewing. The options are All, Mis (missed calls), Ans
(answered incoming calls) and Out (outgoing calls).
·Use the up and down buttons to scroll through the records.
2.Press 0 (or press the Details soft key). The individual details of the currently selected call record are displayed.
3.The call details are displayed. Use the and keys to cycle through the values:
·Time and Date - The time of the call.
·Count - How many time a call of the same type, name and number has occurred. Only the details of the most
recent call are kept in your call log. However the count will indicate if the caller has rung or has been rung
several times.
·Call Type - The type of call record. The options are Mis (missed calls), Ans (answered incoming calls) and
Out (outgoing calls). .
·Number - The number of the caller if available.
·Name - The name of the caller if known.
·Duration - The length of the call.
4.While you are in the details of a call record, the following functions are available:
·Call the Number: Press # (or press the Call soft key).
·Add to Your Personal Directory: Press 0 (or press the +Dir soft key).
·Return to the Calls Display: Press * (or press the Back soft key).

M7310 Telephone User Guide Page 48
- Issue 02c (13 March 2014)IP Office
8.3 Making a Call
You can use the call log to make calls to the number included in the currently selected call record.
1.Press Feature 812. The display will change to show your call log records.
·Use the * key to select which call log records you are viewing. The options are All, Mis (missed calls), Ans
(answered incoming calls) and Out (outgoing calls).
·Use the up and down buttons to scroll through the records.
2.When the required entry is shown, press # (or press the Call soft key).
8.4 Deleting a Record
You can delete the currently displayed call record. If the record is a missed group call, the record is also deleted from the
call log of other users configured to see the same group's missed calls.
1.Press Feature 812. The display will change to show your call log records.
·Use the * key to select which call log records you are viewing. The options are All, Mis (missed calls), Ans
(answered incoming calls) and Out (outgoing calls).
·Use the up and down buttons to scroll through the records.
2.When the required record is highlight, press Hold (or press More and then press the Delete soft key).
8.5 Deleting All Records
You can delete all call records from your call log. This action deletes all call log record types (Incoming, Missed and
Outgoing), not just the type you are currently viewing. This action deletes your personal call records and any group call
records.
1.Press Feature 812. The display will change to show your call log records.
·Use the * key to select which call log records you are viewing. The options are All, Mis (missed calls), Ans
(answered incoming calls) and Out (outgoing calls).
·Use the up and down buttons to scroll through the records.
2.Press the More soft key.
3.Press the Del* soft key to delete all your call log records.
8.6 Adding a Record to Your Contacts
You can add a name and number shown in your call log to your personal contacts.
1.Press Feature 812. The display will change to show your call log records.
·Use the * key to select which call log records you are viewing. The options are All, Mis (missed calls), Ans
(answered incoming calls) and Out (outgoing calls).
·Use the up and down buttons to scroll through the records.
2.Press 0 (or press the Details soft key). The individual details of the currently selected call record are displayed.
3.Press 0 (or press the +Dir soft key).
·If you are configured as a system phone user, you can add a contact to either your own personal directory (
Personal...) or to the system's external directory (External...). Use the and key to select which.
4.Press # (or press the Selct soft key).

M7310 Telephone User Guide Page 49
- Issue 02c (13 March 2014)IP Office
Voicemail
Chapter 9.

M7310 Telephone User Guide Page 50
- Issue 02c (13 March 2014)IP Office
9. Voicemail
If enabled, voicemail is used to answer calls to you that have rung unanswered for your "no answer time", the default is
15 seconds. It is also used to answer calls when you have do not disturb enabled.
Default Short Codes
Short codes are numbers that you can dial from any types of phone on the telephone system. The following are
default short codes that may be available on your system.
·Check Messages: *17
Access mailboxes to check for messages.
·Voicemail On: *18
Allow voicemail to be used to answer calls.
·Voicemail Off: *19
Stop voicemail being used to answer calls.
·Voicemail Ringback On: *48
Have voicemail ring your phone when you have any new messages. It will call when you use the phone.
·Voicemail Ringback Off: *49
Switch off ringback.
9.1 Message Waiting Indication
The phone does not have a message waiting lamp. The icon of a programmable button programmed to Feature 65
will act as a message waiting indicator for new messages. That button can then also be used to access the mailbox.
9.2 Checking Messages
1.Press Feature 65 or Feature 981.
·Depending on how your voicemail system is configured, you may be asked to entered your voicemail code.
2.Follow the voice prompts provided by the system. For help press either 8 or *4.
Notes
1.Automatic Message Deletion
By default, messages are automatically deleted a set time after being played. The delay depends on the particular
voicemail server (24 hours for embedded voicemail, 30 days for Voicemail Pro). For voicemail messages on a
Voicemail Pro system, the system administrator can customize the delay and can also apply automatic deletion
times to new and saved messages.
9.3 Send a Call to Voicemail
You can redirect a call to voicemail without answering the call. This only applies for call to you, not calls to a group of
which you are a member.
1.Press the To VM soft key or if your phone is idle press the Release button.The call is redirected to voicemail.
13
71

M7310 Telephone User Guide Page 51
- Issue 02c (13 March 2014)IP Office
Logging In/Out
Chapter 10.

M7310 Telephone User Guide Page 52
- Issue 02c (13 March 2014)IP Office
10. Logging In/Out
You may always use the same phone in the same location. However, the telephone system provides features that allow
you to use any phone on the system to make and receive your calls. To do this your system administrator need to assign
you a login code.
·Log In
You can login on any phone that you want to use. When you login to a phone, you take control of that phone.
Incoming calls for you are redirected to that phone and your user information and settings are available[1]. Any
existing user on the phone is logged off when you login. Your contacts and call log are displayed by the phone.
·Any existing user of the phone is logged out while you are logged in.
·If you were logged in on another phone, you are logged out from that phone.
·If your phone system is in a Small Community Network of phone systems, it may be possible to login at
extensions located on other phone systems in the network. Your system administrator will advise you if you
can remote hot desk and what features will still be available to you when you do.
·Log Out
When you log out from a phone (or are logged out by another user logging in), the telephone system may apply
several actions:
·If you have a normal default extension and no one else is logged in there, you return to being logged in on
that phone.
·If you remain logged out, you are treated the same as being on do not disturb except that all calls to you go
to voicemail if available.
·If you have a mobile twinned number, the system administrator can configure the system so that calls are still
presented to your mobile twin while you are logged out.
·Default Extension
Each extension can be configured with a default user. If you are logged off from an extension, if you have a
default extension the system will automatically log you in at your default extension if it is not in use by another
user.
·Login Idle Period
Your system administrator can configure a timeout which will automatically log you out if you do not use the phone
in that time to make or answer a call.
Default Short Codes
Short codes are numbers that you can dial from any types of phone on the telephone system. The following are
default short codes that may be available on your system.
·Login: *35*N*L#
Login to a phone using your extension number (N) and login code (L).
·Log Out: *36
Log yourself out from the phone where you are currently logged in.
Note
1.User information stored by the telephone system, for example call log, contacts directory and speed dials, moves
with you when you login on different phones. However this only applies when moving between 1400, 1600, 9400,
9500, 9600, M-Series, T-Series phones. Other phone types store the information on the phone and that
information does not move with you when you login or out.
53
81
53
13

M7310 Telephone User Guide Page 53
- Issue 02c (13 March 2014)IP Office
Logging In/Out:
10.1 Logging In on a Phone Already in Use
If you have a login code, you can login at a phone that is already in use by another user. The existing user is logged out.
1.Dial the short code for logging in. The default is *35*N*L# where N is replaced by your extension number and L
by your login code.
10.2 Logging In on a Logged Out Phone
This method is used to login at an extension where the previous user has logged out and the phone has no current
user. You can recognize a phone in this state by Login and NoUser being shown on the display.
1.Press the Login soft key.
2.Enter your extension number and press #.
3.Enter your login code and press # again.
10.3 Logout
You can only log yourself out if you have been given a login code by your system administrator. Otherwise, the only way
to be logged out is if someone else logs in on your phone. When that happens, if you are not automatically logged back
in when they log off or if you want to login over them, you can login again using the login process with a blank
password .
If you have a login code, to logout dial *36.
53

M7310 Telephone User Guide Page 55
- Issue 02c (13 March 2014)IP Office
Redirecting Calls
Chapter 11.
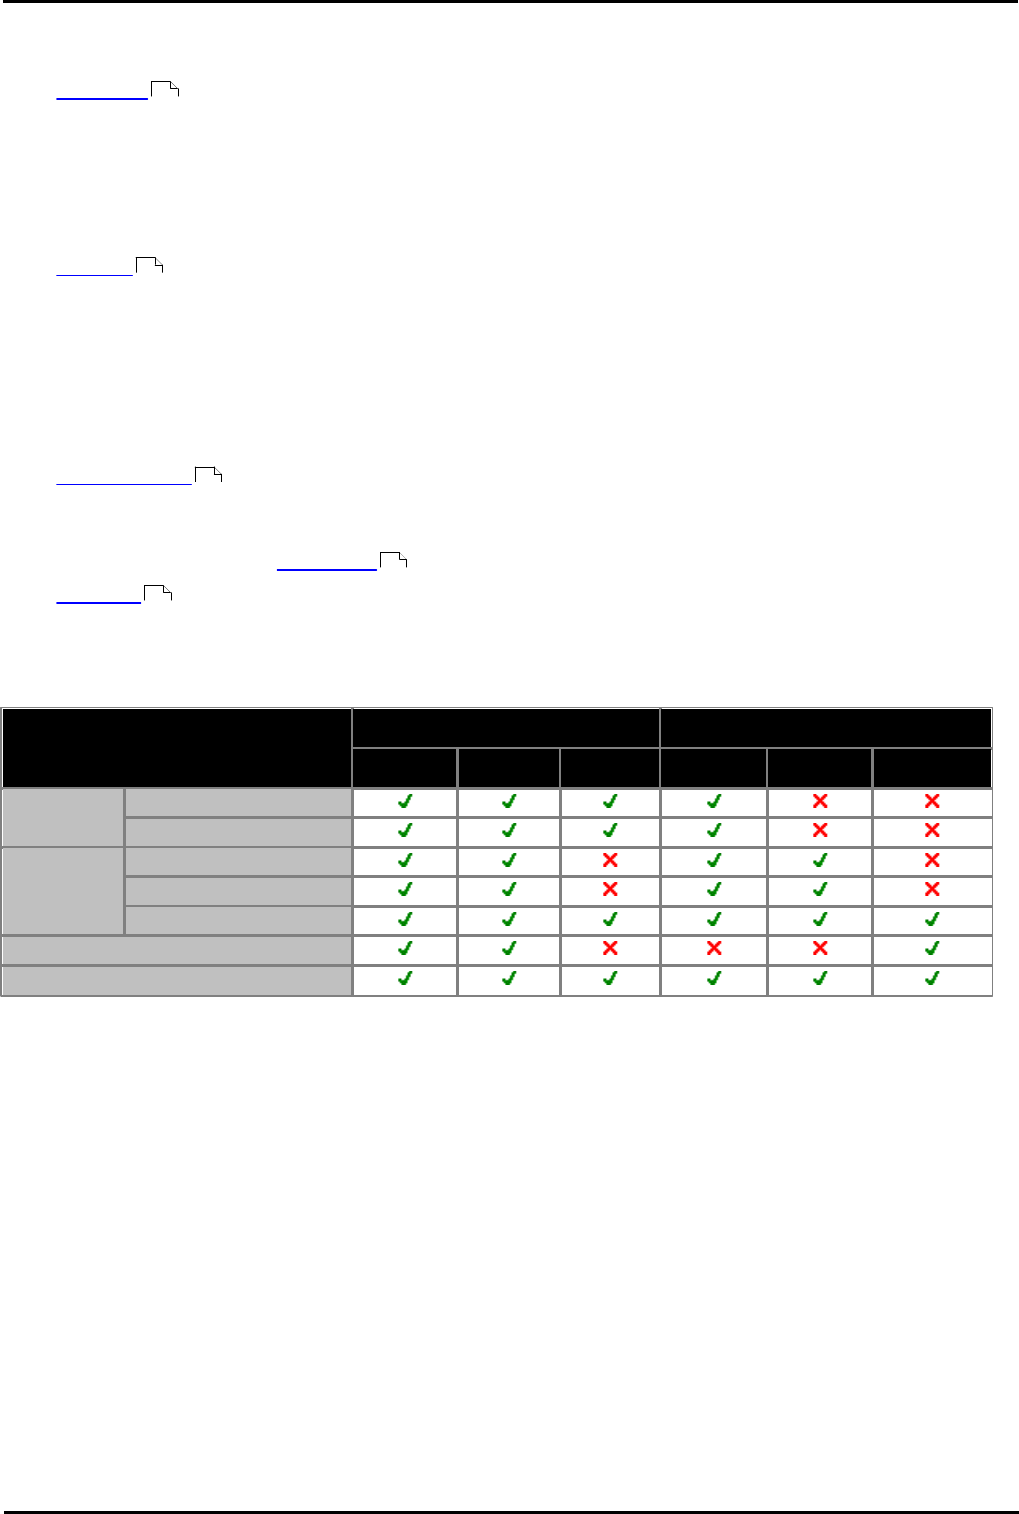
M7310 Telephone User Guide Page 56
- Issue 02c (13 March 2014)IP Office
11. Redirecting Calls
This section looks at the different ways that you can redirect your calls to another phone.
·Follow Me
Temporarily redirect all your calls to another phone that you will be sharing with that phone's normal user. This
function can be used in two ways:
·Follow Me To
Set the follow me destination from your own phone.
·Follow Me Here
Set the follow me from the phone that you want to share.
·Forward
Forward calls to an internal or external number.
·Forward on Busy
Forward calls when you have reached the limit of the number of calls that the phone can present to you.
·Forward on No Answer
Forward calls if they have rung unanswered at your phone.
·Forward Unconditional
Immediately forward calls. Forwarding to voicemail can be selected as an option.
·Do Not Disturb
Redirect all calls to voicemail if available or otherwise to busy tone.
·You can set do not disturb exception numbers for calls to which do not disturb if not applied.
·Other users can make priority calls to override your do not disturb.
·Twinning
Twinning is a process whereby you can have your calls ring at two different phones. You can answer calls at either
phone. There are two variants of twinning, internal twinning which uses two internal extensions and mobile
twinning which twins your internal extension with an external number.
Method
Calls Redirected
Destination
Internal
External
Group
Internal
External
Voicemail
Follow Me
Follow Me To
Follow Me Here
Forward
Forward on Busy
Forward on No Answer
Forward Unconditional
Do Not Disturb
Twinning
57
58
73
19
63

M7310 Telephone User Guide Page 57
- Issue 02c (13 March 2014)IP Office
Redirecting Calls:
11.1 Follow Me
Follow me to is used to redirect your calls to another extension where you will be working. The calls are presented with
your user name so that they can be distinguished from calls for the extensions normal user. This allows you to share
another person's phone without logging them off their phone.
The calls are still subject to all your user settings as if they were ringing at your phone. All calls are redirected.
Follow Me To
Follow me to is the function used to enable follow me from your own phone.
Follow Me Here
Follow here is used to enable follow me at the extension to which you want your calls redirected.
Default Short Codes
Short codes are numbers that you can dial from any types of phone on the telephone system. The following are
default short codes that may be available on your system.
·Follow Me Here: *12*N#
Dialed at the extension to which you want you calls redirected. Use your own extension number (N) when dialing
the short code.
·Follow Me Here Cancel: *13*N#
Dialed at the extension to which you want your calls were redirected. Use your own extension number (N) when
dialing the short code.
·Follow Me To: *14*N#
Dialed at your phone. Dial the extension number (N) to which you want your calls redirected. You can dial just
*14# to cancel follow me.
·Cancel All Forwarding: *00
Switch off any forwarding. Includes forward unconditional, forward on busy, forward on no answer, follow me and
do not disturb.
13

M7310 Telephone User Guide Page 58
- Issue 02c (13 March 2014)IP Office
11.2 Forwarding Calls
Forwarding is used to redirect calls to another extension or an external number. The system supports 3 different types of
forward.
·Forward Unconditional
This forward is used immediately when it is switched on.
·Forward on No Answer
This forward is used when a call alerts at your extension for too long without being answered. The normal default
is 15 seconds.
·Forward on Busy
This forward is used when you have no call appearances buttons available to on which to receive calls.
Default Short Codes
Short codes are numbers that you can dial from any types of phone on the telephone system. The following are
default short codes that may be available on your system.
·Cancel All Forwarding: *00
Switch off any forwarding. Includes forward unconditional, forward on busy, forward on no answer, follow me and
do not disturb.
·Set the Forward Unconditional Destination: *07*N#
Set the destination number (N) for forward unconditional when it is switched on.
·Switch Forward Unconditional On: *01
Switch on forward unconditional. A destination must have been set.
·Switch Forward Unconditional Off: *02
·Include Group Calls in Forward Unconditional: *50
·Exclude Group Calls from Forward Unconditional: *51
·Set the Forward On Busy/No Answer Destination: *57*N#
Set the destination number (N) for forward on busy and forward on no answer. If no number has been set, those
functions will use the forward unconditional number if set.
·Switch Forward On Busy On: *03
·Switch Forward On Busy Off: *04
·Switch Forward on No Answer On: *05
·Switch Forward on No Answer Off: *06
59
61
60
13

M7310 Telephone User Guide Page 59
- Issue 02c (13 March 2014)IP Office
Redirecting Calls: Forwarding Calls
11.2.1 Forward Unconditional
Forward unconditional is used to immediately redirect your calls.
·By default this function is only applied to incoming external calls to you. However, if required internal calls and or
group calls can also be selected.
·When enabled, all calls matching the settings are forwarded to the number set as the forward unconditional
destination. That number can be internal or external.
·You can still use the phone to make outgoing calls. When you go off-hook you will hear broken dial tone.
·The forward on busy and forward on no answer options both use the same separate destination number. However
if that number has not been set, they use the same destination as set for forward unconditional.
·If you have voicemail on, the telephone system will attempt to redirect forwarded calls to voicemail if they are still
unanswered after having rung for your no answer time (default 15 seconds). This is not always possible for calls
that have been forwarded to an external number.
·D = Diverting (Forwarding) Calls
A D is shown on your phone's idle display when you have forward unconditional enabled.
To Turn Forward Unconditional On
1.Press Feature 4.
2.The phone prompts you for the number to which you want calls forwarded. If you already had a number set
previously, that number is displayed.
3.Enter the number to which you want to forward the call. Press * to delete the previous digit.
4.If the number matches an internal extension, it is saved automatically. For other numbers, press Hold to
save the number when set as required.
To Change the Forwarding Number
Use the same process as above. You do not need to switch off forwarding in order to change the forwarding number.
To Turn Forward Unconditional Off
1.Press Feature #4.
Default Short Codes
Short codes are numbers that you can dial from any types of phone on the telephone system. The following are
default short codes that may be available on your system.
·Cancel All Forwarding: *00
Switch off any forwarding. Includes forward unconditional, forward on busy, forward on no answer, follow me and
do not disturb.
·Set the Forward Unconditional Destination: *07*N#
Set the destination number (N) for forward unconditional when it is switched on.
·Switch Forward Unconditional On: *01
Switch on forward unconditional. A destination must have been set.
·Switch Forward Unconditional Off: *02
·Include Group Calls in Forward Unconditional: *50
·Exclude Group Calls from Forward Unconditional: *51
59
13

M7310 Telephone User Guide Page 60
- Issue 02c (13 March 2014)IP Office
11.2.2 Forward on Busy
Forward on busy redirects your calls when your phone is not able to present you with any more alerting calls.
·By default this function is only applied to incoming external calls to you. However, if required internal calls can also
be selected.
·When enabled, all calls matching the settings are forwarded to the number set as the forward on busy/no answer
destination. That number can be internal or external.
·Busy is defined has having no available call appearance buttons on which further calls can be presented.
·Group calls are not presented when you are busy and so are not forwarded by this setting.
·The forward on busy and forward on no answer options both use the same separate destination number. However
if that number has not been set, they use the same destination as set for forward unconditional.
·If you have voicemail on, the telephone system will attempt to redirect forwarded calls to voicemail if they are still
unanswered after having rung for your no answer time (default 15 seconds). This is not always possible for calls
that have been forwarded to an external number.
Using a Programmable Button
·This function can be assigned to a programmable button . This allows it to be accessed in a single key press. If
the button includes an indicator, it will indicate the status of the function (on or off).
Default Short Codes
Short codes are numbers that you can dial from any types of phone on the telephone system. The following are
default short codes that may be available on your system.
·Cancel All Forwarding: *00
Switch off any forwarding. Includes forward unconditional, forward on busy, forward on no answer, follow me and
do not disturb.
·Set the Forward On Busy/No Answer Destination: *57*N#
Set the destination number (N) for forward on busy and forward on no answer. If no number has been set, those
functions will use the forward unconditional number if set.
·Switch Forward On Busy On: *03
·Switch Forward On Busy Off: *04
·Switch Forward on No Answer On: *05
·Switch Forward on No Answer Off: *06
71
13

M7310 Telephone User Guide Page 61
- Issue 02c (13 March 2014)IP Office
Redirecting Calls: Forwarding Calls
11.2.3 Forward on No Answer
Forward on no answer redirects calls that have alerted your phone but have not been answered for some reason.
·By default this function is only applied to incoming external calls to you. However if required internal calls can also
be selected.
·When enabled, all calls matching the settings are forwarded to the number set as the forward on busy/no answer
destination. That number can be internal or external.
·No answer is defined as having been presented to your phone for your no answer time (default 15 seconds).
·Group calls are not forwarded.
·The forward on busy and forward on no answer options both use the same separate destination number. However
if that number has not been set, they use the same destination as set for forward unconditional.
·If you have voicemail on, the telephone system will attempt to redirect forwarded calls to voicemail if they are still
unanswered after having rung for your no answer time (default 15 seconds). This is not always possible for calls
that have been forwarded to an external number.
Using a Programmable Button
·This function can be assigned to a programmable button . This allows it to be accessed in a single key press. If
the button includes an indicator, it will indicate the status of the function (on or off).
Default Short Codes
Short codes are numbers that you can dial from any types of phone on the telephone system. The following are
default short codes that may be available on your system.
·Cancel All Forwarding: *00
Switch off any forwarding. Includes forward unconditional, forward on busy, forward on no answer, follow me and
do not disturb.
·Set the Forward On Busy/No Answer Destination: *57*N#
Set the destination number (N) for forward on busy and forward on no answer. If no number has been set, those
functions will use the forward unconditional number if set.
·Switch Forward On Busy On: *03
·Switch Forward On Busy Off: *04
·Switch Forward on No Answer On: *05
·Switch Forward on No Answer Off: *06
71
13

M7310 Telephone User Guide Page 62
- Issue 02c (13 March 2014)IP Office
11.3 Do Not Disturb
·When you are in 'do not disturb', your callers are redirected to voicemail if available or otherwise hear busy tone.
·People who call from numbers in your do not disturb exceptions list can still call you. Forwarding is set is applied
to those calls.
·People who use a priority call function can also call you.
·Calls to any group of which you are a member are not presented to you (unless you are the last available member
of the group).
·Enabling do not disturb will not affect any calls already being presented to your phone.
·You can still use the phone to make outgoing calls. When you go off-hook you will hear broken dial tone.
·N = No Calls (Do Not Disturb)
An N is shown on your phone's idle display when you have do not disturb enabled.
To Turn On Do Not Disturb
1.Press Feature 85. The phone briefly displays Do Not Distrb.
To Turn Off Do Not Disturb
1.Press Feature #85. The phone briefly displays Allow Calls.
Default Short Codes
Short codes are numbers that you can dial from any types of phone on the telephone system. The following are
default short codes that may be available on your system.
·Switch Do Not Disturb On: *08
Set your phone to do not disturb.
·Switch Do Not Disturb Off: *09
Switch off do not disturb.
·Add a Do Not Disturb Exception Number: *10*N#
Add a number (N) to your list of do not disturb exceptions.
·Delete a Do Not Disturb Exception Number: *11*N#
Remove a number (N) from your list of do not disturb exceptions.
·Cancel All Forwarding: *00
Switch off any forwarding. Includes forward unconditional, forward on busy, forward on no answer, follow me and
do not disturb.
62
13

M7310 Telephone User Guide Page 63
- Issue 02c (13 March 2014)IP Office
Redirecting Calls: Do Not Disturb
11.4 Twinning
Twinning allow calls to you to ring at both your phone and at another number. The telephone system supports two types
of twinning; internal twinning and mobile twinning.
Internal Twinning
This method of twinning twins your phone (your primary phone) with another internal extension (your secondary phone).
Both phones are yours and share the same extension number. Your incoming calls will ring on both phones. You can
make your calls from either extension.
A typical example for internal twinning would be a user who uses both a normal desk phone and also needs a mobile
phone while moving around the building.
Your settings are applied to both phones. If the secondary is a 1400, 1600, 9400, 9500, 9600, M-Series, T-Series phone,
it will share the same call log and personal directory contacts as available on your primary. Similarly, message waiting
indication for your mailbox is show on both phones.
·T = Twinned
A T is shown on the phone's idle display if it is internally twinned with your other phone extension. Calls to you will
alert on both phones and can be answered by you at either phone.
Mobile Twinning
Mobile twinning is twinning where your calls ring at both your phone and at another number which can be an external
number.
You can assign a programmable button to turn twinning on or off and to set the number to which you are twinned.
75
71

M7310 Telephone User Guide Page 65
- Issue 02c (13 March 2014)IP Office
Phone Settings
Chapter 12.

M7310 Telephone User Guide Page 66
- Issue 02c (13 March 2014)IP Office
12. Phone Settings
12.1 Contrast
You can change the contrast on the phone display.
1.Press Feature *7.
2.Use the number keys to select the required contrast. Alternatively, use the and buttons to change the
contrast.
3.The function will automatically cancel after a 3 seconds.
12.2 Ringer Sound
You can change the ringer sound. This does not change the ring pattern which is controlled by the telephone system.
1.Press Feature *6.
2.Press 1 to 4 to select the required ringer sound.
·Whilst the function is active, you can also use the and buttons to change the ringer volume.
3.The function will automatically cancel after a 5 seconds.
12.3 Ringer Volume
You can change the ringer volume using the following process. You can also adjust the volume while a call is ringing your
phone.
1.Press Feature *80. The phone will start a continuous ring.
2.Use the soft and loud volume buttons to change the volume to the level required.
3.The function will automatically cancel after a 5 seconds.
12.4 Enbloc Pre-Dialing
You can enable or disable your enbloc pre-dialing using Feature 82. When on, you can compose a number to dial
without the digits being dialed until the number is complete.
·This function can be assigned to a programmable button . This allows it to be accessed in a single key press. If
the button includes an indicator, it will indicate the status of the function (on or off).
1.Press Feature *82.
2.The phone displays Enbloc dial and the current setting.
3.Press the on or off soft key to change the setting.
20
71

M7310 Telephone User Guide Page 67
- Issue 02c (13 March 2014)IP Office
Button Programming
Chapter 13.

M7310 Telephone User Guide Page 68
- Issue 02c (13 March 2014)IP Office
13. Button Programming
The programmable buttons on your phone can be assigned a range of functions. You cannot override the function of
buttons configured as appearance buttons for calls by your system administrator. Also your administrator can apply
templates to your phone which set the function of specific buttons.
There are a number of methods that you can use for button programming:
·Button Inspect : Feature *0
See the function currently set on a button.
·Auto Dial Button : Feature *1
Store a number to be dialed by the button when it is pressed.
·User Button (Internal Auto Dial) : Feature *2
Store another user's extension number to be dialed when the button is pressed. The button's icon will flash when
the other user has a call alerting them. When that is the case, pressing the button answers their call. When the
icon is steady the user is busy.
·Feature Button : Feature *3
Set a button to invoke a Feature code.
·Function Button : Feature *3*
Set a button to invoke a selected telephone system function.
·Default Buttons : Feature *3**
You can return the function of certain buttons back to their default for this type of phone.
·Erase a Button : Feature *1 Hold
You can use the auto dial programming process but with a number to erase the current programming of a button.
You system administrator can see and edit your button settings. They can also apply functions that you cannot program.
Note that button user templates can be applied which will lock the function of certain button even if you try to change
them.
13.1 Button Inspection
You can check the current function set on a programmable button.
1.Press Feature *0.
2.Press a button. The button's function , if any, is displayed.
68
70
70
71
71
69
69
72
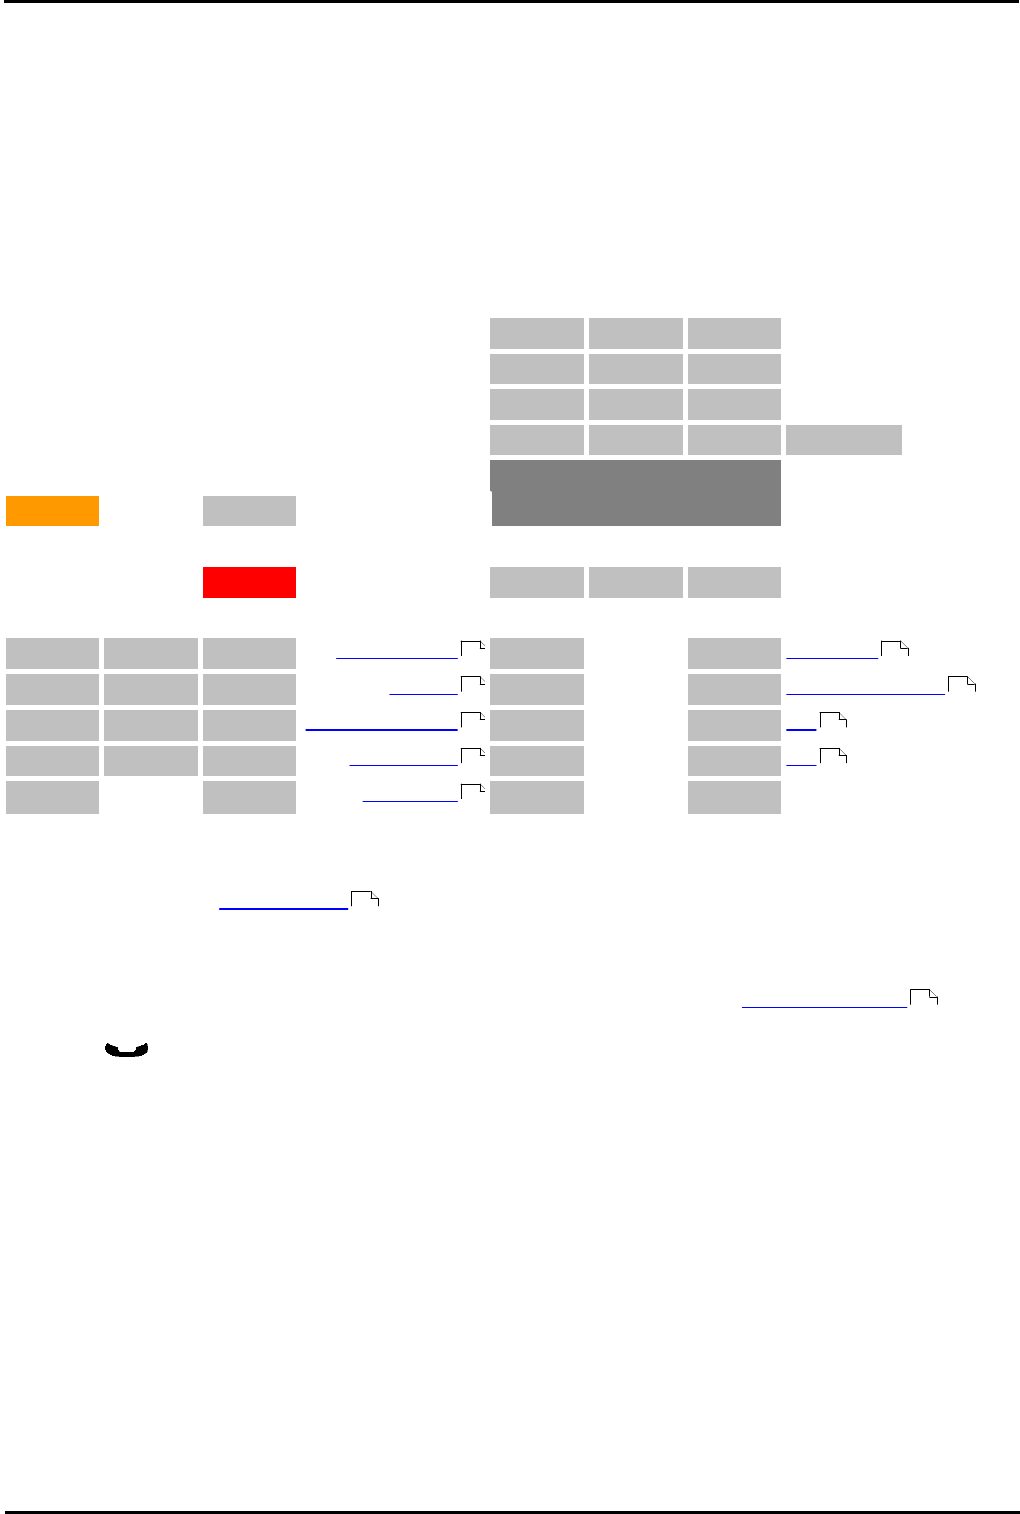
M7310 Telephone User Guide Page 69
- Issue 02c (13 March 2014)IP Office
Button Programming: Button Inspection
13.2 Default Buttons
You can use the following process to return those programmable buttons that have default functions back to those
functions. It does not affect the functions assigned to any buttons that do not have a default function.
1.Press Feature *3.
·If a security code is requested, enter your phone login code and press #.
2.Press * twice (or press the More soft key twice).
3.Press # (or press the Prog soft key).
The following are the default buttons for a M7310 telephone.
10/22
14/26
18/30
11/23
15/27
19/31
12/24
16/28
20/32
13/25
17/29
21/33
Shift
Display
Release
Feature
Hold
SK1
SK2
SK3
1
2
3
Do Not Disturb
09
04
Conference
4
5
6
Transfer
08
03
Last Number Redial
7
8
9
Call Forwarding All
07
02
Call
*
0
#
Group Pickup
06
01
Call
–
Volume
+
Page Group
05
Spk
13.3 Erasing a Button
The process for setting an auto dial button can also be used to erase any programming on a programmable button.
1.Press Feature *1.
·If a security code is requested, enter your phone login code and press #.
2.Press the button you want to erase. You cannot override any button configured to a appearance function by
your system administrator.
3.Press Hold.
73 73
75 74
72 78
74 78
74
70
78

M7310 Telephone User Guide Page 70
- Issue 02c (13 March 2014)IP Office
13.4 Auto Dial Button
A button set to this function dials a stored number. That number can be any number composed of the digits 0 to 9 plus *
and #. It can be an internal or an external number. It can be a partial number that you complete dialing after pressing
the button. It can also be a system short code for a telephone system feature. This button function is also known as
Auto Dial and External Auto Dial.
·! Warning
This process will overwrite the existing function of a programmable button without any warning.
1.Press Feature *1.
·If a security code is requested, enter your phone login code and press #.
2.Press the button to program.
·You cannot override the programming of any button configured to a call appearance function by your system
administrator.
·On buttons that you can program, any existing function is overwritten without warning. If in doubt, use
Feature *0 to inspect the button first.
3.Enter the number you want stored by the button. This can be a partial number which you will complete after
pressing the button.
·The button deletes the last digit entered. The <<< soft key can also be used. The Clear soft key deletes
the whole number entered.
4.When the number is complete, press Hold (or press the OK soft key).
13.5 Internal Auto Dial (User Button)
A button set to this function calls another user. The button can also be used to see the current state of the other user.
The button's icon will flash when the other user has a call alerting them. When that is the case, pressing the button
answers their call. When the icon is steady the user is busy.
·! Warning
This process will overwrite the existing function of a programmable button without any warning.
1.Press Feature *2.
·If a security code is requested, enter your phone login code and press #.
2.Press the button to program.
·You cannot override the programming of any button configured to a call appearance function by your system
administrator.
·On buttons that you can program, any existing function is overwritten without warning. If in doubt, use
Feature *0 to inspect the button first.
3.Enter the extension number of the user for who you want a button.
·The button deletes the last digit entered. The <<< soft key can also be used. The Clear soft key deletes
the whole number entered.
4.As soon as a valid number is entered, the value is saved and the button set.
13
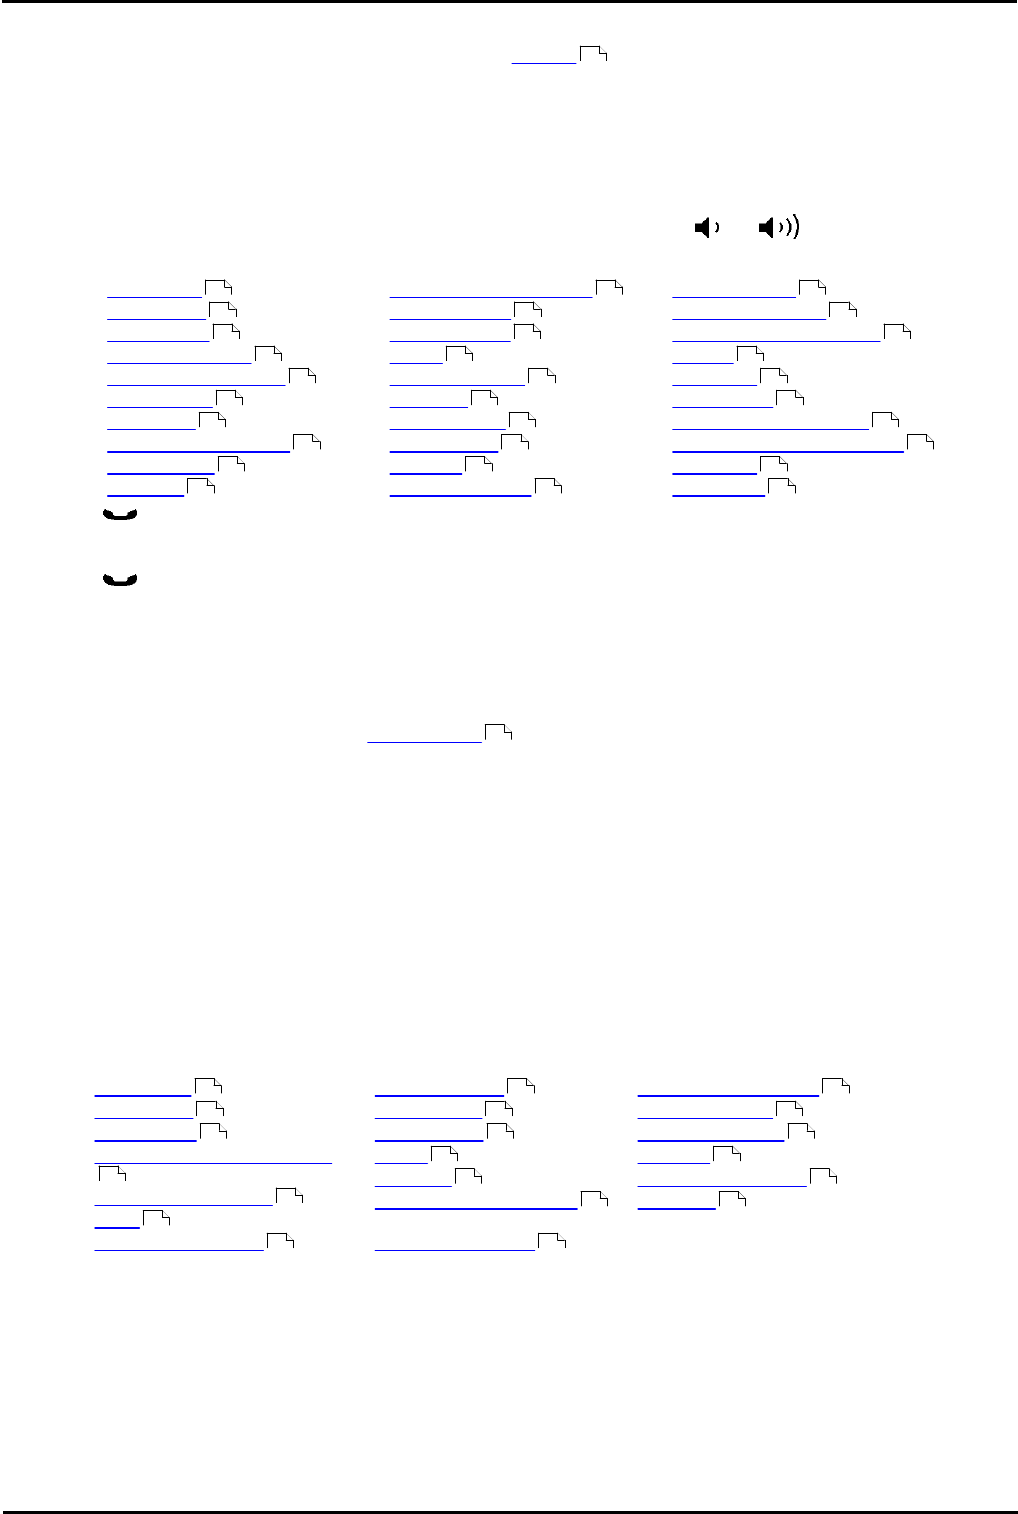
M7310 Telephone User Guide Page 71
- Issue 02c (13 March 2014)IP Office
Button Programming: Internal Auto Dial (User Button)
13.6 Function Button
This process allows you to assign a selected telephone system function to a programmable button. This is not the full
set of button functions available from the telephone system. The system administrator can assign other button functions
and will inform you what those functions are if they do that.
1.Press Feature *3.
·If a security code is requested, enter your phone login code and press #.
2.Press * (or More if displayed).
3.Enter the number for the feature required as listed below. Alternately use the and buttons to move
through the list of functions.
01. Speed dial
02. Ring Again
03. Conference
04. Call Forward All
05. Last Number Redial
06. Page Group
07. Voicemail
08. Automatic Intercom
09. Priority Call
10. Transfer
11. Call Park/Park & Page
12. Group Pickup
13. Direct Pickup
14. Timer
15. Do Not Disturb
16. Contrast
17. Group Listen
18. Time of Day
19. Call Log
20. Self-Administer
21. Account Code
22. Forward on Busy
23. Forward on No Answer
24. Pickup
25. Directory
26. Flash Hook
27. Internal Auto Answer
28. Hunt Group Night Service
29. Twinning
30. Ringer Off
4.Press Hold to select a currently displayed function (or press the Selct soft key).
5. If the button has an existing function it is displayed.
6.Press Hold to assign the function (or press the Repla soft key). Otherwise, press Feature to return to
function selection (or press the Back soft key).
7.Press Release to exit programming.
13.7 Feature Button
This process allows you to store some of the Feature codes that you can dial. You can then activate the feature using
a single button press.
·! Warning
This process will overwrite the existing function of a programmable button without any warning.
1.Press Feature *3.
·If a security code is requested, enter your phone login code and press #.
2.Press the button to program.
·You cannot override the programming of any button configured to a call appearance function by your system
administrator.
·On buttons that you can program, any existing function is overwritten without warning. If in doubt, use
Feature *0 to inspect the button first.
3.Enter the feature code of the function required.
·Speed Dial : 0
·Ring Again : 2
·Conference : 3
·Forward Unconditional On
: 4
·Last Number Redial : 5
·Page : 60
·Retrieve Messages : 65
·Dial Voice Call : 66
·Priority Call : 69
·Time of Day : 803
·Timer : 77
·Transfer : 70
·Call Park/Park & Page
: 74
·Call Pickup Group : 75
·Directed Call Pickup : 76
·Do Not Disturb : 85
·Group Listen On : 802
·Call Log : 812
·Retrieve Messages : 981
·Contrast : *7
72
75
75
73
72
74
74
76
72
74
75
72
74
73
75
73
73
74
75
72
75
72
73
73
74
73
73
74
74
75
75
11
75
75
73
72
74
74
76
72
74
75
75
75
72
74
73
73
74
72
76
73

M7310 Telephone User Guide Page 72
- Issue 02c (13 March 2014)IP Office
13.8 Button Functions
The following is a quick summary of the various telephone system functions that you can set on a programmable
button. This is not a comprehensive list of all button functions available, it only covers those that can be set by telephone
users. The system administrator can assign other button functions and will inform you what those functions are if they do
that.
Each function is listed by the name shown when you use button inspection.
You can check the current function set on a programmable button.
1.Press Feature *0.
2.Press a button. The button's function , if any, is displayed.
Some button function use the directory to allow number selection. When this is the case, the and volume
buttons are used to scroll through the list of matching names. If this is done during a call or while a call is alerting, this
will also adjust the call or ring volume.
13.8.1 Account Code
A button set to this function is used to enter an account code before making a call or during a call. The account code
entered is validated against those stored by the phone system and must be re-entered if not valid.
13.8.2 Automatic Intercom
A button set to this function makes an auto answered call to another extension.
This feature is also called dial voice call or direct voice call. It calls another extension and has the call automatically
answered on handsfree speaker after playing 3 beeps. If the called extension does not have a handsfree microphone, the
user must use the handset if they want to talk.
The called extension called must support a handsfree speaker. If the extension does not or if the extension is not free
when called, the call is alerts as a normal call.
13.8.3 Call Forwarding All
A button set to this function switches your forwarding unconditional setting on/off. The button's indicator is shown when
forwarding is enabled.
When pressed, your current forwarding number is displayed. You can change the number if required and then enable
forwarding.
13.8.4 Call Log
A button set to this function accesses your call log .
13.8.5 Call Park/Park & Page
A button set to this function parks and unpark calls. The button can be setup with or without a specific park slot number.
·When associated with a specific park slot number, the button will park and unpark calls from that park slot. If Park
& Page is configured on the system, calls are parked without displaying the additional page options.
·When not associated with a specific park slot number, the button's operation depends on whether Park & Page is
configured on the system:
·If Park & Page is configured:
·If pressed while you have a call connected, that call is parked into an available system park slot. See Park
& Page .
·If pressed while you have no call connected, the button performs no action.
·If Park & Page is not configured:
·If pressed while you have a call connected, that call is parked using a personal park slot number based on
your extension number.
·If pressed while you have no call connected, your phone displays details of your parked calls which you
can use to select a call to unpark. See Traditional Park .
71
72
22
46
35
35

M7310 Telephone User Guide Page 73
- Issue 02c (13 March 2014)IP Office
Button Programming: Button Functions
13.8.6 Conference
A button set to this function starts a conference between your current call and any calls you already have on hold.
13.8.7 Contrast
A button set to this function adjusts the phone's display contrast.
13.8.8 Direct Pickup
A button set to this function answers a call ringing the user or group extension number specified.
13.8.9 Directory
A button set to this function allows you to access the contacts directory .
13.8.10 Do Not Disturb
A button set to this function turns your do not disturb setting on or off.
·When you are in 'do not disturb', your callers are redirected to voicemail if available or otherwise hear busy tone.
·People who call from numbers in your do not disturb exceptions list can still call you. Forwarding is set is applied
to those calls.
·People who use a priority call function can also call you.
·Calls to any group of which you are a member are not presented to you (unless you are the last available member
of the group).
·Enabling do not disturb will not affect any calls already being presented to your phone.
·You can still use the phone to make outgoing calls. When you go off-hook you will hear broken dial tone.
·N = No Calls (Do Not Disturb)
An N is shown on your phone's idle display when you have do not disturb enabled.
13.8.11 Flash Hook
A button set to this function will send a hook flash signal to a currently connected analog line.
13.8.12 Forward on Busy
A button set to this function turns your forward on busy setting on or off.
Forward on busy redirects your calls when your phone is not able to present you with any more alerting calls.
·By default this function is only applied to incoming external calls to you. However, if required internal calls can also
be selected.
·When enabled, all calls matching the settings are forwarded to the number set as the forward on busy/no answer
destination. That number can be internal or external.
·Busy is defined has having no available call appearance buttons on which further calls can be presented.
·Group calls are not presented when you are busy and so are not forwarded by this setting.
·The forward on busy and forward on no answer options both use the same separate destination number. However
if that number has not been set, they use the same destination as set for forward unconditional.
·If you have voicemail on, the telephone system will attempt to redirect forwarded calls to voicemail if they are still
unanswered after having rung for your no answer time (default 15 seconds). This is not always possible for calls
that have been forwarded to an external number.
13.8.13 Forward on No Answer
A button set to this function turns your forward on no answer setting on or off.
Forward on no answer redirects calls that have alerted your phone but have not been answered for some reason.
·By default this function is only applied to incoming external calls to you. However if required internal calls can also
be selected.
42
62

M7310 Telephone User Guide Page 74
- Issue 02c (13 March 2014)IP Office
·When enabled, all calls matching the settings are forwarded to the number set as the forward on busy/no answer
destination. That number can be internal or external.
·No answer is defined as having been presented to your phone for your no answer time (default 15 seconds).
·Group calls are not forwarded.
·The forward on busy and forward on no answer options both use the same separate destination number. However
if that number has not been set, they use the same destination as set for forward unconditional.
·If you have voicemail on, the telephone system will attempt to redirect forwarded calls to voicemail if they are still
unanswered after having rung for your no answer time (default 15 seconds). This is not always possible for calls
that have been forwarded to an external number.
13.8.14 Group Listen
A button set to this function turns your group listen setting on or off. The button's icon is shown while the function is
switched on.
Using group listen allows you to hear the caller through the phone's handsfree speaker but they only hear speech from
your phone's handset microphone rather than the handsfree microphone. Group listen is automatically turned off at the
end of a call.
13.8.15 Group Pickup
A button set to this function answers the longest waiting call ringing any group of which the you are a member even if
the call is not currently alerting on your phone. You can use this function even when your group membership is set to
disabled.
13.8.16 Hunt Group Night Service
A button set to this function turns the night service status of all the groups of which you are a member on or off. The
button cannot be used to override a group automatically put into night service by a time profile on the telephone
system.
13.8.17 Internal Auto Answer
A button set to this function switches your internal auto-answer setting on or off. When on, if the phone is idle, any
internal call is automatically answered after three beeps. If the phone is in use, internal calls alert normally. The button's
icon is shown when internal auto answer is on.
13.8.18 Last Number Redial
A button set to this function can be press to redial the number of the last outgoing call that you made.
You can redial the number of the last outgoing call that you made.
13.8.19 Page Group
A button set to this function starts the process of making a page call. After pressing the button, enter the extension
number of the user or group that you want to page.
You can make a page call to another user or to the available members of a group. The users do not have to take any
action to hear the page.
The phones called must support handsfree auto-answer in order to hear the page. If they do not, they do not receive any
alerting call.
13.8.20 Pickup
A button set to this function will pickup the longest waiting ringing call on the system. This function is not recommended
for large systems where it will be difficult to predict which call will be answered.
13.8.21 Priority Call
A button set to this function starts the process of making a priority call. After pressing the button, enter the user
extension number that you want to call.
A priority call allows you to call another user even if they have 'do not disturb' set. The call will follow any forwarding and
follow me settings they have in use but will not go to voicemail.

M7310 Telephone User Guide Page 75
- Issue 02c (13 March 2014)IP Office
Button Programming: Button Functions
13.8.22 Ring Again
A button set to this function sets or clears a callback. The button's icon is shown when you have a callback set.
If you call another internal user and they do not answer, you can set a callback. When you have a callback set, the
system will call you when the other user next uses ends a call. When you answer the callback, the system will
automatically make another call to the user.
13.8.23 Ringer Off
A button set to this function turns your phone's ringer on or off. While the ringer is off, the button's icon is shown.
13.8.24 Self-Admin
A button set to this function starts button programming . It operates the same as dialing Feature *3.
13.8.25 Speed Dial
A button set to this function allows you to dial any of your personal speed dials or a system speed dial .
·To dial a system speed dial, press the button and then dial a 3-digit system speed dial number in the range 000 to
999.
·To dial a personal speed dial, press the button and then dial * followed by a 2-digit personal speed dial number in
the range 00 to 99.
13.8.26 Speed Dial [nnnn]
A button set to this function dials a stored number. That number can be any number composed of the digits 0 to 9
plus * and #. It can be an internal or an external number. It can be a partial number that you complete dialing after
pressing the button. It can also be a system short code for a telephone system feature. This button function is also
known as Auto Dial and External Auto Dial.
13.8.27 Timer
A button set to this function briefly displays the duration of a call when the button is pressed. Even without this button,
the duration of a call is briefly shown on the display after a call is ended.
13.8.28 Time of Day
A button set to this function briefly display the date and time during a call in place of the caller's name and number.
13.8.29 Transfer
A button set to this function operates the same as dialing Feature 70.
13.8.30 Twinning
A button set to this function lets you control your mobile twinning . It only applies if you have been configured as a
mobile twinning user by your system administrator.
·While your phone is idle, the button allows you to set and change the destination for your twinned calls and to
switch mobile twinning on/off. The button icon is shown when mobile twinning is on.
·When a call has been routed by the system to your twinned destination, pressing the Twinning button will
attempt to retrieve the call.
·When on a call on your primary extension, pressing the Twinning button will make an unassisted transfer to the
twinning destination. You can use this feature even if when you do not have mobile twinning switched on. Pressing
the Twinning button again will halt the transfer attempt and reconnect the call at your primary extension.
71
21 21
70
13
81

M7310 Telephone User Guide Page 76
- Issue 02c (13 March 2014)IP Office
13.8.31 User BLF
A button set to this function calls another user. The button is set to match another user's extension number, see Internal
Auto Dial .
The button can also be used to see the current state of the other user. The button's icon will flash when the other user
has a call alerting them. When that is the case, pressing the button answers their call. When the icon is steady the user is
busy.
13.8.32 Voicemail
A button set to this function accesses your voicemail mailbox. If the button has an icon, the icon is shown when you have
new messages in your mailbox.
70

M7310 Telephone User Guide Page 77
- Issue 02c (13 March 2014)IP Office
Glossary
Chapter 14.

M7310 Telephone User Guide Page 78
- Issue 02c (13 March 2014)IP Office
14. Glossary
14.1 Abbreviated Ring
A single non-repeated ring. By default this is the type of ring used when another call alerts you when you already have a
call in connected.
14.2 Appearance Button
Appearance buttons are used to represent calls made and received by you. They are configured by your system
administrator. Normally your first 2 buttons are call appearance buttons but additional buttons can be configured as
appearance buttons by the system administrator.
14.3 Attention Ring
Your system administrator can set what ringing should be used if another call alerts you when you already have a call
connected. The options are a single non-repeated ring (abbreviated ring) or no ring.
14.4 Auto Hold
By default, when you have a connected call in progress, if you press another appearance button, the connected call is
automatically put on hold. Without auto-hold, the connected call is ended when you press another appearance button.
14.5 Bridged Appearance Button
A bridged appearance button shows the state of one of another user's call appearance buttons. It can be used to
answer or join calls on that other user's call appearance button. It can also be used to make a call that the call
appearance user can then join or retrieve from hold.
·When the user's call appearance button alerts, your matching bridged appearance button also alerts. The bridged
appearance button can be used to answer the call on the call appearance button user's behalf.
·When the call appearance button user answers or makes a call using that call appearance, your matching bridged
appearance button show the status of that call, for example connected, on hold, etc. The bridged appearance
button can be used to retrieve the call if on hold or to join the call if active.
·Bridged appearance buttons are not supported between users on different systems in a Small Community Network
.
14.6 Call Appearance Button
Call appearance buttons are used to represent calls to and from your phone. By having several call appearance buttons,
you are able to answer and make several calls, switch between calls and perform other actions.
When all your call appearance buttons are in use, any further calls to your number follow your forward on busy setting if
set or otherwise go to voicemail if available.
14.7 Call Coverage Button
Each call coverage button is associated with another user on your telephone system. The button allows you to be alerted
when that user has an unanswered call still ringing. You can view the details of the call and answer it if required.
The settings of the user being covered control how long it rings at their phone before it also starts alerting on your call
coverage button for that user. Call coverage appearance buttons are not supported between users on different systems
in a Small Community Network.
14.8 Do Not Disturb
·When you are in 'do not disturb', your callers are redirected to voicemail if available or otherwise hear busy tone.
·People who call from numbers in your do not disturb exceptions list can still call you. Forwarding is set is applied
to those calls.
·People who use a priority call function can also call you.
·Calls to any group of which you are a member are not presented to you (unless you are the last available member
of the group).
·Enabling do not disturb will not affect any calls already being presented to your phone.
·You can still use the phone to make outgoing calls. When you go off-hook you will hear broken dial tone.
·N = No Calls (Do Not Disturb)
An N is shown on your phone's idle display when you have do not disturb enabled.
78
81
62

M7310 Telephone User Guide Page 79
- Issue 02c (13 March 2014)IP Office
Glossary: Do Not Disturb Exceptions
14.9 Do Not Disturb Exceptions
·These are numbers for caller's who can call you even when you are set to do not disturb. This only applies for calls
to you. It does not apply for calls to a group of which you are a member.
14.10 Follow Me
Follow me to is used to redirect your calls to another extension where you will be working. The calls are presented with
your user name so that they can be distinguished from calls for the extensions normal user. This allows you to share
another person's phone without logging them off their phone.
The calls are still subject to all your user settings as if they were ringing at your phone. All calls are redirected.
14.11 Follow Me Here
Follow here is used to enable follow me at the extension to which you want your calls redirected.
14.12 Follow Me To
Follow me to is the function used to enable follow me from your own phone.
14.13 Forward on Busy
Forward on busy redirects your calls when your phone is not able to present you with any more alerting calls.
·By default this function is only applied to incoming external calls to you. However, if required internal calls can also
be selected.
·When enabled, all calls matching the settings are forwarded to the number set as the forward on busy/no answer
destination. That number can be internal or external.
·Busy is defined has having no available call appearance buttons on which further calls can be presented.
·Group calls are not presented when you are busy and so are not forwarded by this setting.
·The forward on busy and forward on no answer options both use the same separate destination number. However
if that number has not been set, they use the same destination as set for forward unconditional.
·If you have voicemail on, the telephone system will attempt to redirect forwarded calls to voicemail if they are still
unanswered after having rung for your no answer time (default 15 seconds). This is not always possible for calls
that have been forwarded to an external number.
14.14 Forward on No Answer
Forward on no answer redirects calls that have alerted your phone but have not been answered for some reason.
·By default this function is only applied to incoming external calls to you. However if required internal calls can also
be selected.
·When enabled, all calls matching the settings are forwarded to the number set as the forward on busy/no answer
destination. That number can be internal or external.
·No answer is defined as having been presented to your phone for your no answer time (default 15 seconds).
·Group calls are not forwarded.
·The forward on busy and forward on no answer options both use the same separate destination number. However
if that number has not been set, they use the same destination as set for forward unconditional.
·If you have voicemail on, the telephone system will attempt to redirect forwarded calls to voicemail if they are still
unanswered after having rung for your no answer time (default 15 seconds). This is not always possible for calls
that have been forwarded to an external number.
14.15 Forward Unconditional
Forward unconditional is used to immediately redirect your calls.
·By default this function is only applied to incoming external calls to you. However, if required internal calls and or
group calls can also be selected.
·When enabled, all calls matching the settings are forwarded to the number set as the forward unconditional
destination. That number can be internal or external.
·You can still use the phone to make outgoing calls. When you go off-hook you will hear broken dial tone.
·The forward on busy and forward on no answer options both use the same separate destination number. However
if that number has not been set, they use the same destination as set for forward unconditional.

M7310 Telephone User Guide Page 80
- Issue 02c (13 March 2014)IP Office
·If you have voicemail on, the telephone system will attempt to redirect forwarded calls to voicemail if they are still
unanswered after having rung for your no answer time (default 15 seconds). This is not always possible for calls
that have been forwarded to an external number.
·D = Diverting (Forwarding) Calls
A D is shown on your phone's idle display when you have forward unconditional enabled.
14.16 Group
Your system administrator can include you as a member of a group or groups along with other users. Each group has its
own extension number which is used to call the group.
When a call is presented to a group, it is presented to the available group members, either one at a time or all at the
same time, until answered by one of the members.
How long a group call will ring at each group member's phone before being presented to the next member is controlled
by the group's own settings. Groups also use voicemail and have their own settings for when an unanswered call should
go to the group's mailbox. For group calls, the group's own voicemail settings are used rather than your settings.
14.17 Idle Line Preference
Having one of your phone's call or line appearance button set as the currently selected appearance button, means it will
be the appearance button used when you go off hook. If this was not the case, you would need to select an appearance
button before going off hook. Idle line preference automatically selects the first available call appearance or line
appearance as your currently selected button when you do not have a call connected.
14.18 Internal Twinning
This method of twinning twins your phone (your primary phone) with another internal extension (your secondary phone).
Both phones are yours and share the same extension number. Your incoming calls will ring on both phones. You can
make your calls from either extension.
A typical example for internal twinning would be a user who uses both a normal desk phone and also needs a mobile
phone while moving around the building.
Your settings are applied to both phones. If the secondary is a 1400, 1600, 9400, 9500, 9600, M-Series, T-Series phone,
it will share the same call log and personal directory contacts as available on your primary. Similarly, message waiting
indication for your mailbox is show on both phones.
14.19 Line Appearance Button
Line appearance buttons allow you to make and receive calls on a specific telephone line connected to your telephone
system. The button also allows you to see when the line is in use by other users.
For incoming calls, the telephone system still determines the destination for the call. That may be a user or group.
However, if you have a line appearance button for the line, you will see that there is a call alerting and can answer it if
required.
·Private Lines
Special behaviour is applied to calls where the user has both a line appearance for the line involved and is also the
Incoming Call Route destination of that call. Such calls will alert only on the Line Appearance button and not on
any other buttons. These calls will also not follow any forwarding.
14.20 Logged Out
If you are logged out from any phone, you are treated as being busy to receiving any calls. Callers follow your forwarding
settings if set or go to voicemail if available.
14.21 Login Code
You can use a login code to login at any phone on the telephone system and then use that phone as your own. It is also
used to prevent access to some of your settings.
14.22 Missed Call
Missed calls are calls that ring at your phone but are not answered by you. Your 10 most recent missed calls are included
in your call log.
The system administrator can configure whether missed calls should include calls that you did not answer but where
answered for you by another user. For example by a user with a call coverage button set for your calls. If this mode is
enabled, it will also include calls that were answered by your voicemail.
59

M7310 Telephone User Guide Page 81
- Issue 02c (13 March 2014)IP Office
Glossary: Missed Group Call
14.23 Missed Group Call
The system administrator can configure whether the telephone system should keep an internal log of missed group calls.
They can then also set which groups of which you are a member, should have their missed calls shown as part of your
missed calls call log. This does not require the group call to have been presented to you and missed.
14.24 Mobile Twinning
Mobile twinning is twinning where your calls ring at both your phone and at another number which can be an external
number.
14.25 Park Call
Parking a call is similar to holding a call. However parked calls can be retrieved by other users on the telephone system.
A call that you park and leave parked for too long will recall to your phone. The recall will ignore any do not disturb and
forwarding settings, recalling to the phone from which it was parked.
14.26 Park Slot Number
If you park a call without specifying a park slot number, the system automatically assigns a park number based on your
extension number plus a single digit. For example, for extension 201, the first parked call uses park slot number 2010 if
available. Otherwise, it uses park slot 2011 if available and so on up to 2019.
Call park buttons can be configured to match specific park slot numbers. A call parked using that button is given that
park slot number. All users with a call park button set to the same number can see when there is a parked call there and
can unpark that call using their button.
14.27 Ringing Line Preference
This setting is controlled by your system administrator and is normally on. When you are not connected to a call, if you
receive an incoming call, ringing line preference will make the alerting appearance button your selected appearance
button. You can answer the call by just lifting the handset without having to press the button to select it first.
Without ringing line preference, to answer the call on the alerting appearance button, you must press the appearance
button to select it manually.
14.28 Short Codes
Short codes are numbers that you can dial from any types of phone on the telephone system. The following are
default short codes that may be available on your system.
14.29 Small Community Network
Several IP Office telephone systems can be connected together to form a Small Community Network. You can then dial
the user on other systems in the same way as for internal calls on your own system. The remote users are listed in the
directory.
The system administrator can also configure which groups are accessible across the network. You may also be able to hot
desk to a phone located on another system in the network.
14.30 System Administrator
The system administrator is able to make or arrange changes to the telephone system configuration. They are able to see
and change most of your user settings.
14.31 System Phone User
Your system administrator can configure some user's as system phone users. They will be able to access a range of
additional functions such as adding and deleting system directory entries.
14.32 Twinning
Twinning is a process whereby your calls ring on two phones. Twinning is only available if configured by the system
administrator. There are two methods of twinning supported, internal twinning and mobile twinning .
75
13
80 81

M7310 Telephone User Guide Page 83
- Issue 02c (13 March 2014)IP Office
Document History
Chapter 15.


M7310 Telephone User Guide Page 85
- Issue 02c (13 March 2014)IP Office
Index
Index
A
Abbreviate Ring 78
Abbreviated Dial Button 75
Account Code
Button 72
Entry 22
Add
Contact 44, 48
to conference call 38
Administrator 81
All
Call Log 22, 44, 46, 47, 48
Contacts 22, 42, 43
Answered 22, 44, 46, 47, 48
Answered Calls
Log 46
Appearance Button
Call Coverage 78
Line Appearance 80
Appearance Buttons 78
Apperance Buttons
Bridged Appearance 78
Call Appearance 78
Auto Answer 19
Button 74
Auto Dial
Button program 70
Auto Dial Button 75
Auto Hold 78
Automatic Intercom 19
Button 72
B
B 15
Barred 15
Blind Transfer 29
Bridged Appearance 78
Broadcast 19, 74
Answer 24
broken dial tone 59, 62, 73, 78, 79
Button
Abbreviate Dial 75
Account Code 72
Auto Answer 74
Auto Dial 75
Automatic Intercom 72
Call Forwarding All 72
Call Log 72
Call Park 72
Callback 75
Conference 73
Contacts 73
Contrast 73
Default 69
Dial Voice 72
Direct Pickup 73
Directory 73
Do Not Disturb 73
Erase 69
Feature Codes 71
Flash Hook 73
Forward All 72
Forward on Busy 73
Forward on No Answer 73
Forward Unconditional 72
Functions 72
Group Listen 74
Group Page 74
Group Pickup 74
Hook Flash 73
Hunt Group Night Service 74
Inspect 68
Intercom 72
Internal Auto Answer 74
Last Number Redial 74
Log 72
Night Service 74
No Calls 73
Page 74
Park 72
Pickup 74
Priority Call 74
Program a feature 71
Program a function 71
Program Auto Dial 70
Redial 74
Ring Back 75
Ringer Off 75
Self-Administration 75
Speed Dial 75
Time of Day 75
Timer 75
Transfer 75
Twinning 75
User 76
Voicemail 76
C
Call
Account Code 22
Answer a Page 24
Auto Answer 19
Automatic Intercom 19
Broadcast 19, 74
Dial Direct 19
Direct Voice 19
Divert to voicemail 24, 50
Drop 30
End 30
from Call Log 22, 48
From the Call Log 48
From the Directory 22, 43
Handsfree 29
Headset 30
History 46
Hold a Conference 39
Ignore 24
Intercom Dial 19
Log 46
Page 19, 74
Page Direct 19
Park 35
Personal Speed Dial 21
Pickup 25
Pickup Button 74
Priority Call 19, 74
Release 30
Ride 35
Speed Dial 21
System Speed Dial 21
Transfer 29
Unpark 35

M7310 Telephone User Guide Page 86
- Issue 02c (13 March 2014)IP Office
Call
Volume 28
Call Appearance Button 78
Call Coverage Button 78
Call Log 22, 44, 46, 47, 48
Add to Directory 44, 48
Button 72
Call from 22, 48
Delete 48
Details 47
Menu 46
Missed Calls 80
Missed Group Calls 81
Redial 48
Call Park
Button 72
Call Park ID 35, 81
Call Pickup
Direct 25
Group 25
Short Cde 13, 25
Callback 18, 75
Button 75
When Free 72
When Next User 72
Caller
Details 47
Calls
Switch 28
Code 25, 31, 35, 38, 50, 52, 57, 58, 59, 60, 61, 62, 81
Conference
Add call 38
Button 73
Details 39
Drop 39
End automatically 39
Hold 36, 38, 39
Last internal user 39
Maximum Parties 38
Music on hold 36, 38, 39
Parties 39
Short Code 13, 38
Transfer a Call 39
Contact
Add 44, 48
Contacts 22, 42, 43
Button 73
Make a call 22, 43
Contrast 66
Button 73
Count 47
D
D 15, 59, 79
Default 69
Delete
Call Log 48
Details
Call Log 47
Dial Direct 19
Dial tone
Broken 59, 62, 73, 78, 79
Dial Voice
Button 72
Dialing Code 25, 31, 35, 38, 50, 52, 57, 58, 59, 60, 61, 62,
81
Direct Call Pickup 25
Direct Pickup
Button 73
Direct Voice 19
Directory 42
Add 44, 48
Add From Call Log 44, 48
Button 73
Make a call 22, 43
Display
B 15
Contrast 66
Contrast Button 73
D 15, 59, 79
G 15, 31
N 15, 62, 73, 78
O 15, 31
S 15
T 15, 63
Divert
All 59, 79
Busy 60, 73, 79
Divert All Button 73
Divert on Busy Button 73
No Answer 61, 73, 79
To voicemail 24, 50
Divert All
Button 72
Diverting 15, 59, 79
Do Not Disturb 15, 62, 73, 78
Button 73
Exceptions 79
Priority Call 19, 74
Short Code 13, 62
Drop
From Conference 39
Drop Call 30
E
En-bloc 20
En-Bloc Dialing 20, 66
End Call 30
Conference 39
Erase 69
External 22, 42, 43
External Directory 42
F
Feature Codes
Button 71
Flash Hook
Button 73
Follow Me
Here 57, 79
Short Codes 13, 57
To 57, 79
Forced Account Code 22
Forward
All 59, 79
Busy 60, 73, 79
Busy Short Code 13, 58, 60, 61
No Answer 61, 73, 79
No Answer Short Code 13, 58, 60, 61
Unconditional 59, 79
Forward on Busy
Button 73
Forward on No Answer
Button 73

M7310 Telephone User Guide Page 87
- Issue 02c (13 March 2014)IP Office
Index
Forward Unconditional
Button 72
Short Codes 13, 58, 59
Forwarding 15, 59, 79
G
G 15, 31
Group 31, 80
Call log 46
Directory 42
Missed 46
Missed Calls 81
Night Service Button 74
Page Button 74
Pickup Button 74
Short Code 13, 31
Group Call Pickup 25
Group Listen 30, 74
Group Member 15, 31
Group Pickup
Short Code 13, 25
Groups 22, 42, 43
H
Handset
Mute 28
Volume 28
Handsfree 29
Hangup 30
Headset 30
Held call
Transfer 29, 36, 39
History
Call Log 46
Hold
Auto Hold 78
Conference 36, 38, 39
Transfer 29, 36, 39
Hook Flash
Button 73
Hunt Group 31, 80
Call log 46
Missed 46
See Group 74
I
Idle Line Preference 80
Ignore 24
Inspect 68
Intercom
Button 72
Intercom Dial 19
Internal Auto Answer
Button 74
Internal twinning 81
K
Keys
Letters 16
L
Last Number Rdial 18, 74
Last Number Redial
Button 74
Letters
Key Top 16
Status 15
Line Appearance 80
Line Preference
Idle Line Preference 80
Ringing 81
Listen
Group Listen 74
Log
Button 72
Login
Short Code 13, 52
Login Code 80
Logout
Short Code 13, 52
M
Mailbox 76
Short Codes 13, 50
Make a call
From the Directory 22, 43
Make call
from Call Log 22, 48
Menu
Call log 46
Contacts 42
Microphoe
Mute 28
Missed 22, 44, 46, 47, 48
Missed Calls 80
Group 81
Hunt group calls 46
Log 46
Mobile twinning 63, 81
Button 75
More 46
Music on hold 36, 38, 39
Mute 28
N
N 15, 62, 73, 78
Network 81
New
Contact 44, 48
Night Service 74
No Answer
Forward 61, 73, 79
No Calls 15, 62, 73, 78
Button 73
Exceptions 79
Priority Call 19, 74
O
O 15, 31
Out of Service 15, 31
Outgoing 22, 44, 46, 47, 48
Outgoing Calls
Log 46
P
Page 19, 74
Answer 24
Button 74
Direct 19
Park 35
Button 72
Short Code 13, 35
Park Slot ID 35, 81
Personal 22, 42, 43
Personal Directory 42
Personal Speed Dials 42
Phone
Mute 28

M7310 Telephone User Guide Page 88
- Issue 02c (13 March 2014)IP Office
Pickup
Button 74
Direct 25
Direct Pickup Button 73
Group 25
Group Button 74
Short Code 13, 25
Priority Call 19, 74
Button 74
Program
Personal Speed Dial 21
Speed Dial 21
R
Reason 47
Redial 18, 74
Button 74
From the Call Log 48
Release 30
Ride 35
Ring
Abbreviated 78
Attention Ring 78
Ring Again 18, 72, 75
Ring Back 18, 72, 75
Button 75
Ring Time 47
Ringer
Ignore 24
Off Button 75
Quiet 24
Sound 66
Volume 66
Ringing Line Preference 81
S
S 15
SCN 81
Self-Administration
Button 75
Send All Calls 59, 79
Button 73
Settings
Default buttons 69
Display Contrast 66
En-Bloc Dialing 20, 66
Personal Speed Dial 21
Ringer Sound 66
Ringer Volume 66
Speed Dial 21
Short Code 25, 31, 35, 38, 50, 52, 57, 58, 59, 60, 61, 62,
81
Do Not Disturb 13, 62
Short Codes
Conference 13, 38
Follow Me 13, 57
Forward on Busy 13, 58, 60, 61
Forward on No Answer 13, 58, 60, 61
Forward Unconditional 13, 58, 59
Group 13, 31
Login 13, 52
Logout 13, 52
Mailbox 13, 50
Park 13, 35
Pickup 13, 25
Unpark 13, 35
Voicemail 13, 50
Slot Number 35, 81
Small Community Network 81
Sound 66
Speaker 29
Group Listen 30, 74
Mute 28
Volume 28
Speech
Mute 28
Volume 28
Speed Dial
Personal 21
Program 21
System 21
Speed Dial Button 75
Speed Dials
Directory 42
Status Letters 15
Supervised Transfer 29
Switch Calls 28
System
Administrator 81
System Phone 81
System Alarm 15
System Directory 42
System Short Code 25, 31, 35, 38, 50, 52, 57, 58, 59, 60,
61, 62, 81
System Speed Dials 42
T
T 15, 63
Time of Day 75
Timer 75
Transfer 29, 75
Held call 29, 36, 39
To voicemail 24, 50
Using a Conference 39
Twinned 15, 63
Twinning 81
Button 75
Internal Twinning 63, 80
Mobile Twinning 63, 81
U
Unpark 35
Short Code 13, 35
Unsupervised Transfer 29
User Button 76
Users 22, 42, 43
V
View
Conference Parties 39
Voicemail 76
Short Codes 13, 50
Transfer 24, 50
Volume
Call 28
Ringer 66

M7310 Telephone User Guide Page 89
- Issue 02c (13 March 2014)IP Office

M7310 Telephone User Guide Page 90
- Issue 02c (13 March 2014)IP Office
Performance figures and data quoted in this document are typical, and must be
specifically confirmed in writing by Avaya before they become applicable to any
particular order or contract. The company reserves the right to make alterations
or amendments to the detailed specifications at its discretion. The publication of
information in this document does not imply freedom from patent or other
protective rights of Avaya or others.
All trademarks identified by the ® or ™ are registered trademarks or trademarks,
respectively, of Avaya Inc. All other trademarks are the property of their
respective owners.
This document contains proprietary information of Avaya and is not to be
disclosed or used except in accordance with applicable agreements.
© 2014 Avaya Inc. All rights reserved.
Template: 29th August 2013
