A7595 0085 Rev T ARTWK MANUAL UL2 ULTRALIGHT2
User Manual: MANUAL ULTRALIGHT2 Rev T
Open the PDF directly: View PDF ![]() .
.
Page Count: 10

One World. One Smart Choice.
™
Owner’s Manual
ULTRALIGHT® 2
( UL-2 )
A7595-0085 Rev T
®
Approved Copy

TABLE OF CONTENTS
1 TO REMOVE HEAD MODULE
TO RE-ATTACH HEAD MODULE
TO REMOVE / REPLACE BULB
2 INTRODUCTION
OPERATING
IMPORTANT
3 1/4-20 STUD MOUNT APPLICATION
SHOE MOUNT APPLICATION
4 ACCESSORIES
UL2 Wedge
XL Wedge
Filters
5 UL-Soft Box
UltraDAYlight®
Ultralight® Dimmer
6 BULB SELECTION AND OPERATION
SPECIFICATION
SERVICE
7 LIMITED WARRANTY
Approved Copy
1
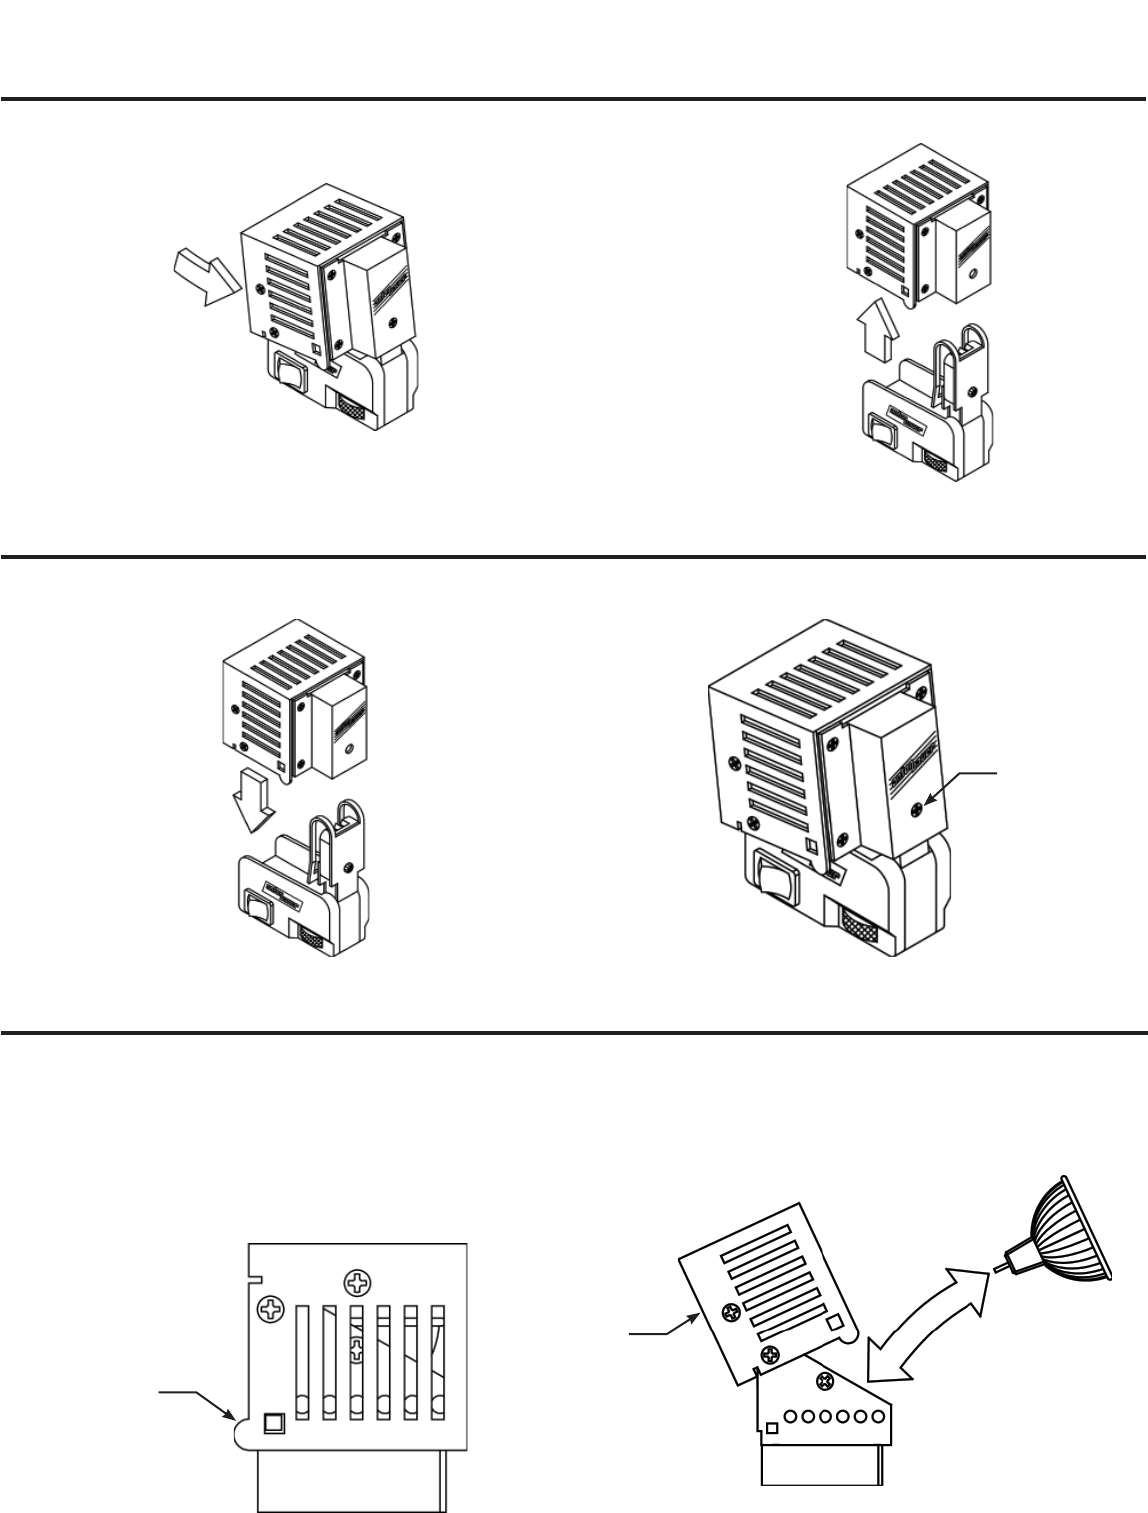
TO REMOVE HEAD MODULE
TO RE-ATTACH HEAD MODULE
TO REMOVE / REPLACE BULB
NOTE: Only MR-16 type bulbs should be used with the UL2.
1. Pull out on the Thumb Tabs of the Head Module.
2. Swing Hood open.
3. Remove and replace bulb as necessary.
4. Close Head Module, insuring that it “clicks” closed.
Push Head Module onto base, as shown, until Head Module engages over screw.
Thumb
Tabs
Hood
Screw
1. Push Head Module forward. 2. Lift Head Module and
remove it from the Base.
Approved Copy
INTRODUCTION
The Ultralight®2 (UL2) is an extremely compact, super lightweight version of the original Ultralight® system, designed specifi cally for on-camera
lighting applications.
The Ultralight 2 incorporates many unique features including:
• Included with a AB-60, wide angle bulb.
• A diffused glass for smoother beam patterns.
• Quick-change head module feature permits instant fi eld light source changes without direct bulb handling, adjusting to full or spot lighting
situations.
• The head module tilts for indirect lighting applications and can be easily fi tted with a swing away wide angle adapter (UL-WA), diffuser (UL-
DF), or dichroic fi lter (UL-DC).
• Compact size with the quick-change head module removed the Ultralight 2 is a mere 2¼” x 1½” x 1” and can be left on the camera at all
times without interfering with operation, fi tting easily into a camera case with little or no modifi cation to the case.
• A patented universal mounting system for ¼-20 stud or shoe type mounting is standard - eliminating the need for special studs or adapters.
• An Integral PowerTap® connector cable comes in lengths to dress neatly on any camera/camcorder-no secondary cables are required to
mate to any Gold Mount® camera bracket.
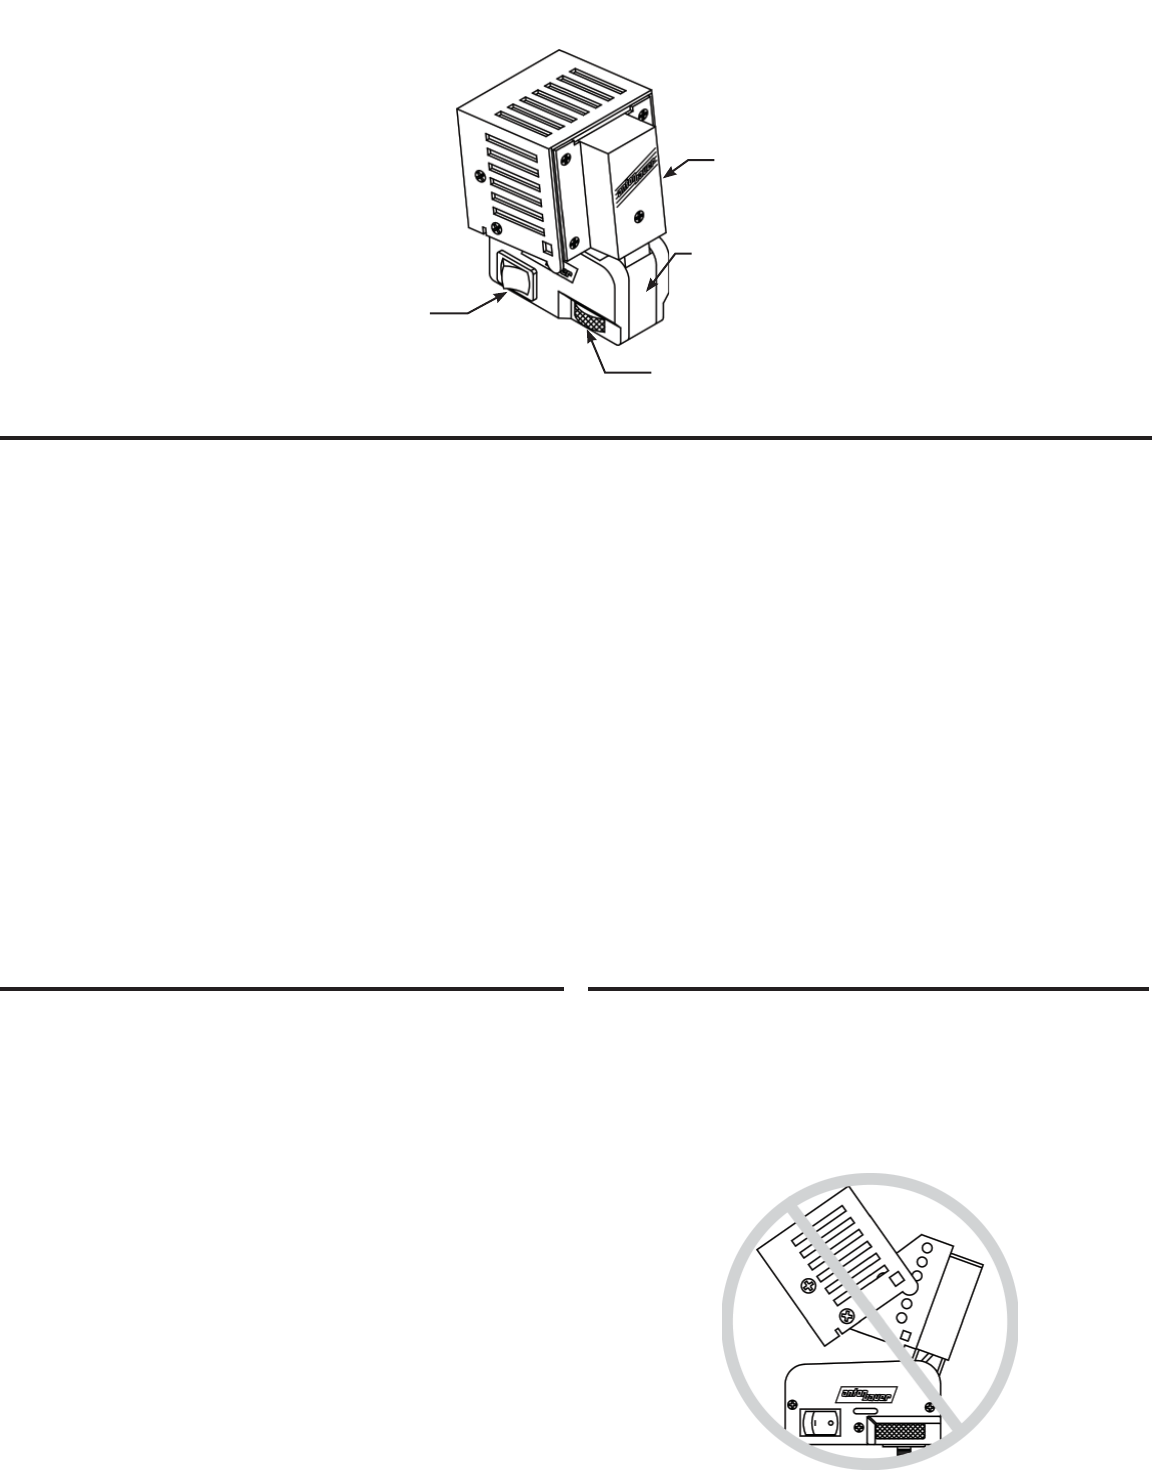
ON/OFF SWITCH
THUMBWHEEL
HEAD MODULE
BASE ASSEMBLY
OPERATING
When powering the Ultralight® 2 through the on-board camera battery
pack (integral PowerTap® connector cable), the UL2 should be turned
off and the battery pack charged as soon as the camera battery warning
light comes on in the viewfi nder. If the light is left on after this point,
the UL2 will continue to drain the battery which can cause permanent
damage to the cell pack. Greater caution is required if an external,
unmetered battery is used. In this case, suggested bulb run times
should be followed closely and the battery should be changed before
the light begins to grow noticeably dimmer. During battery operation
the light should never be left on when unattended.
To achieve the full versatility and benefi ts of the Ultralight® 2 system
several spare Head Modules should be employed with each light to
carry spare bulbs or a variety of bulb voltages, wattages and beam
angles. The Head Module is designed to be a compact and rugged
storage container allowing extra bulbs to be easily and safely carried
in the fi eld. Bulbs can then be quickly switched for different lighting
conditions or changes in power source. Carrying spare bulbs in fragile
cardboard packages defeats one of the main features of the Ultralight® 2.
IMPORTANT
HEAD MODULE MUST BE REMOVED FROM THE BASE PRIOR
TO CHANGING A BULB. NEVER ATTEMPT TO REMOVE A BULB
WHILE THE HEAD MODULE IS ATTACHED TO THE BASE.
2
Approved Copy
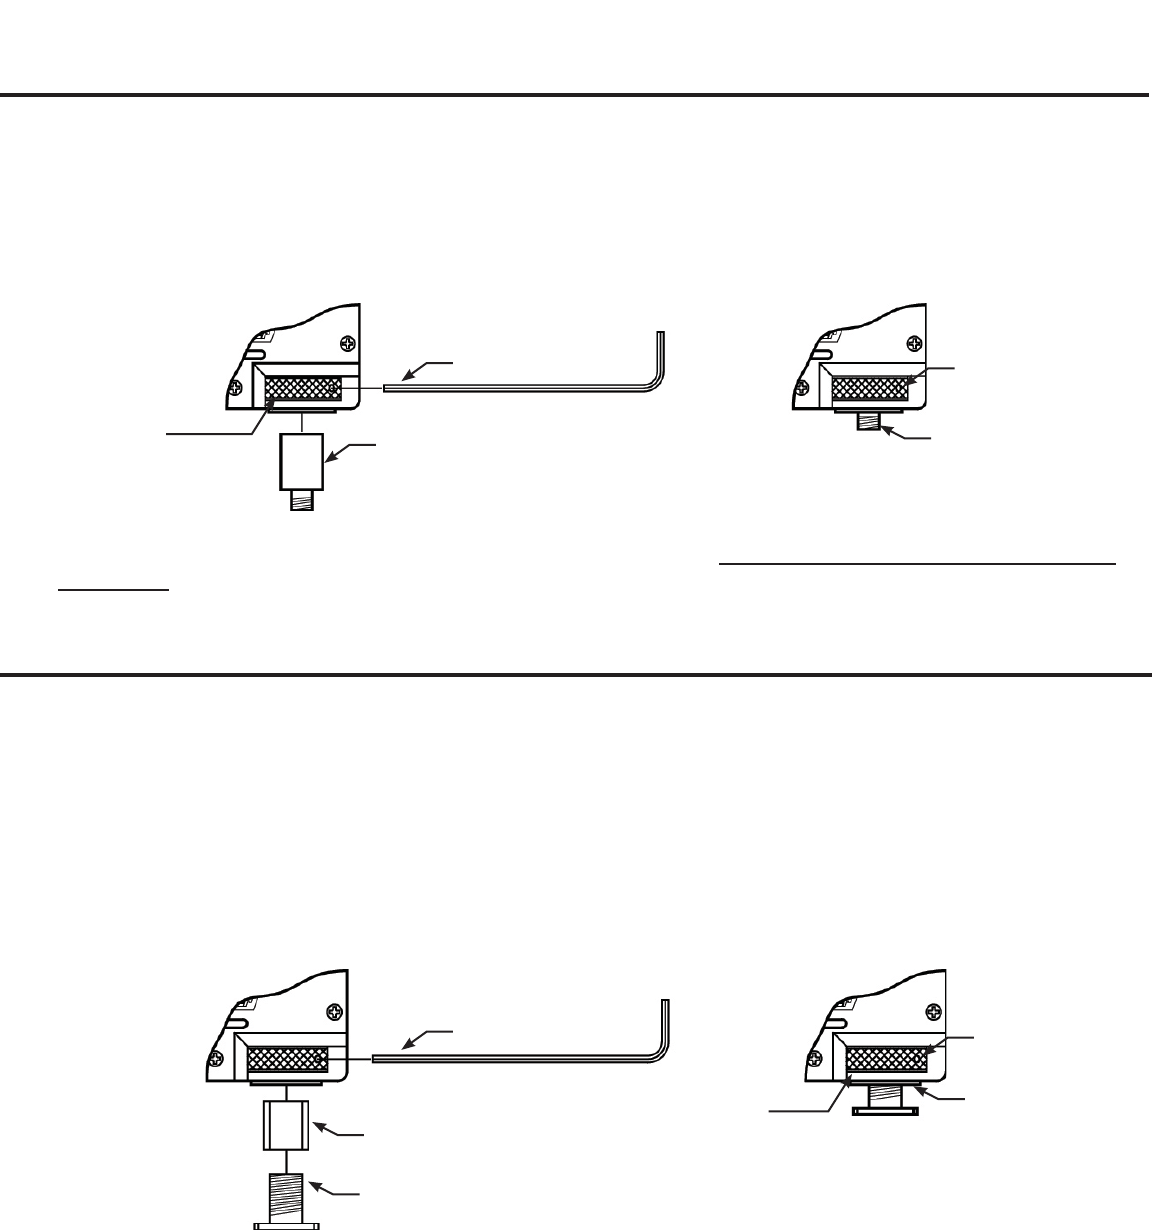
¼-20 STUD MOUNT APPLICATION
The Ultralight® 2 is shipped standard with ¼-20 Stud Mount for attaching to the camera handle. To remove/install a ¼-20 Stud Mount, follow
these instructions.
1. With the supplied 5/64 hex wrench, loosen the set screw located in the thumbwheel.
2. Install a ¼-20 Stud Mount into the bottom of the thumbwheel. (Insert stud as far into light as possible).
3. Tighten the set screw in the thumbwheel.
NOTE: In order for the ¼-20 Stud Mount to completely tighten down on the camera, the Stud Mount must be fully inserted into the
thumbwheel. Otherwise, the UL2 may swing back and forth.
SHOE MOUNT APPLICATION
Certain lighting applications need a “Shoe Mount” to secure the light to the camera. Most JVC and PANASONIC cameras will use this
Shoe Mount.
For installation of Shoe Mount:
1. Remove existing Stud Mount from the Ultralight 2 base. (See previous page)
2. Insert Shoe Sleeve int thumbwheel, pushing it as far into the thumbwheel as possible.
3. Using 5/64 Hex Wrench, tighten down the Shoe Sleeve.
4. Screw Shoe Mount into Shoe Sleeve about half way.
5. Slide the Shoe Mount onto the camera handle and then tighten down via the thumbwheel.
NOTE: In order for the Shoe Mount to completely tighten down on the camera, the Shoe Sleeve must be inserted as far into the thumb-
wheel as possible. Otherwise, the light may swing back and forth.
THUMBWHEEL
Thumbwheel
5/64 Hex Wrench
5/64 Hex Wrench
Stud Mount
Set Screw
Set Screw
Insert Stud Mount as far into
the light as possible.
Shoe Sleeve
Shoe Mount
Be sure the Shoe Sleeve
is completely inside the
light, otherwise the light
may swing back & forth.
3
Approved Copy
ACCESSORIES
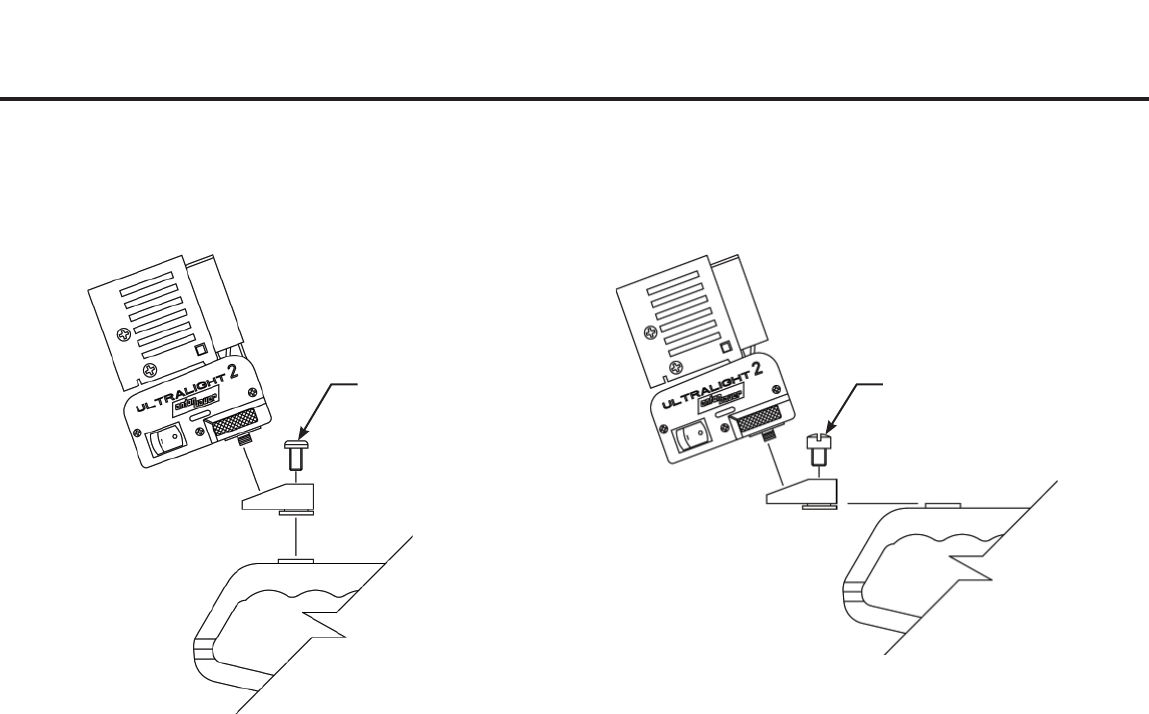
UL2 WEDGE
The UL2 Wedge is developed specifi cally for use with the Anton/Bauer® Ultralight® 2 on-camera light. The UL2 Wedge provides the Ultralight® 2
with an additional 20º of down angle lighting for shooting extreme close up camera shots (less than 3 feet).
A Universal mounting design allows quick adaptation to cameras using either ¼-20 Stud Mount or Shoe typing lighting mounts.
UL2 WEDGE STUD MOUNT APPLICATION
1. Position the base of the UL2 wedge directly over the camera’s ¼-20 Stud Mount.
2. Fasten the UL2 wedge to the camera mount using the supplied ¼-20 Phillips screw. (Do Not Overtighten)
3. Attach the Ultralight® 2 to the UL2 wedge by threading the UL2’s ¼-20 stud directly into the mating hole on the ramp of the UL2 wedge.
UL2 WEDGE SHOE MOUNT APPLICATION
4. Slide the base of the UL2 wedge into the camera Shoe Mount. (Insert at the front of camera - towards the lens.)
5. Fasten the UL2 wedge to the camera shoe using the supplied 5/16-24 slotted screw. (Do Not Overtighten as this will cause damage to the
camera mount)
6. Attach the Ultralight® 2 to the UL2 wedge by threading the UL2’s ¼-20 stud directly into the mating hole on the ramp of the UL2 wedge.
XL-WEDGE
Same as the UL2-Wedge except that it is 3 inches longer. Should be used to clear Shotgun Mics and Wide Angle Lens. Will also allow the UL2
to clear the shoulder strap without interference.
FILTERS
Adapter accessories are detachable pivoting fi lter/lenses allowing the user to fl ip the adapter in and out of the beam pattern. Adapters (Diffuser,
Wide Angle, Dichroic) are mounted in a holder, pivoted from a slotted tab. The adapter assembly is attached to the Head Module by sliding the
slotted tab into the space between the light head safety glass holder and the hood.
UL-WA. Ultralight® Wide Angle Adapter: Converts both spot bulbs and medium fl ood bulbs into full fl ood (36°) patterns. A very effi cient optical
device that provides an exceptionally smooth and even pattern and will cover the widest angle zoom lenses. The UL-WA fi lter can also be used
with fl ood bulbs to smooth out uneven bulb patterns.
UL-DF. Ultralight® #1 Diffuser: For use with spot bulbs. Lowers light output by approximately one “f” stop (50%) while softening the edges of the beam
pattern and increasing beam diameter approximately 50%.
Stud Mount Application Shoe Mount Application
5/16-24 Screw1/4-20 Screw
4
Approved Copy

UL-SOFT BOX
The UL-Soft Box mounts easily to any Ultralight® Head Module to soften
and diffuse light output. The UL-Soft Box is collapsible allowing easy
storage or can fold and swing away while remaining on the Ultralight®
until needed.
ULTRADAYLIGHT
The UltraDaylight® Head Module fi ts any Ultralight® base to instantly
deliver 5600°k at less than half the power required of tungsten/halogen
– without the need for dichroic adapters. Uniquely designed to share
power from camera battery using the PowerTap® on every camera Gold
Mount®.
Instantly change from daylight to tungsten
and back by simply swapping head
modules – no twisting, turning, or handling
bulbs. And since the rugged Ultralight®
Head Module house and protect the bulbs,
they can be stored in the head module
until the next use. The UltraDaylight® head
module is a unit – 25 watt bulb and ballast
all in one.
ULTRALIGHT DIMMER
This new Ultralight® accessory allows the adjustment of light output
from 0-100%. It’s microprocessor controlled PWM (Pulse-Width
Modulation) circuit minimizes power loss and is designed to be used
with any Ultralight® in the fi eld. With the push of a bottom, a low and
high output setting can be pre-programmed anywhere between 0-100%
With this feature, quick and exact light settings can be established
before the shot, allowing for quick light transitions without fumbling or
the need to “dial-it-in”. Fitting underneath the light, its innovative bevel
design provides for additional down angle of the light while moving the
light forward to avoid lens shadows. The UL Dimmer is fully compatible
with Automatique feature standard in most Gold Mounts® and has an
auto shut off in the case of a low voltage battery. Note: The UL Dimmer
is not for use with the UltraDay® Light Head.
UL-DC. Ultralight® Dichroic Filter: Converts output of bulbs to
match 5600°K daylight. The UL-DC fi lter must be used when using the
Ultralight® for daylight fi ll or cool white fl uorescent fi ll
When properly fi tted, the slot in the tab will align with a screw in the center
of the hood. The tab insertion requires a slight force. If the fi lter assembly
is too loose and does not stay in place, bend each side of the tab in
opposite directions as shown to provide suffi cient holding friction. The
friction on the fi lter pivot may be increased by tightening the pivot screw
which extends the length of the fi lter assembly.
MOUNTING A FILTER
Adapters may be attached to the top of the Head Module or to either
side and folded back against the Head Module when not in use. Two
adapters may be simultaneously attached to the lighthead (one on either
side). A UL-DC can be used in combination with either a UL-WA or a UL-
DF simultaneously.
When trying to accommodate two fi lters at the same time, it may be
necessary to obtain a new hinge for the fi lter, which will allow two to be
used simultaneously. The part number for this hinge is #5140-1051.
Please contact the Anton/Bauer Customer Service Department for more
details at (800) 541-1667, (203) 925-4991, or support@antonbauer.com.
PERMANENTLY MOUNTING A FILTER
First remove the screw and washer (between the hood and glass
frame) from any one of the Head Module’s three sides. Install the fi lter
as described before. Reinsert the screw and tighten fully. The washer
will no longer be necessary.
5
Approved Copy
BULB SELECTION AND OPERATION
Bulbs used by the Ultralight® 2 are Type MR16, tungsten-halogen bulbs. Spot or fl ood bulbs of any light distribution angle may be used.
The Ultralight® 2 offers the greatest versatility with the following low voltage bulbs. They can be powered from any 12-14.4 volt camera battery
with the Ultralight® 2 integral PowerTap® connector cable.
Triple Purpose Low Voltage Bulb - The ESX, EYR and EYF bulbs provide three beam/output options:
1. Spot (15º) - plain bulb.
2. Medium Spot (approximates 21º) - with Diffuser (UL-DF).
3. Flood (36º) - with Wide Angle adapter (UL-WA) which covers most zoom lenses in the extreme wide position.
Dual Purpose Low Voltage Bulb - The EXZ bulb provides two beam/output and is a good all around bulb:
1. Medium Food (24º) - plain bulb.
2. Full Flood (36º) - with Wide Angle Adapter (UL-WA).
Single Purpose Low Voltage Flood Only bulbs. The BAB, EYP, and EYC bulbs provide full fl ood (36º) - plain bulb.
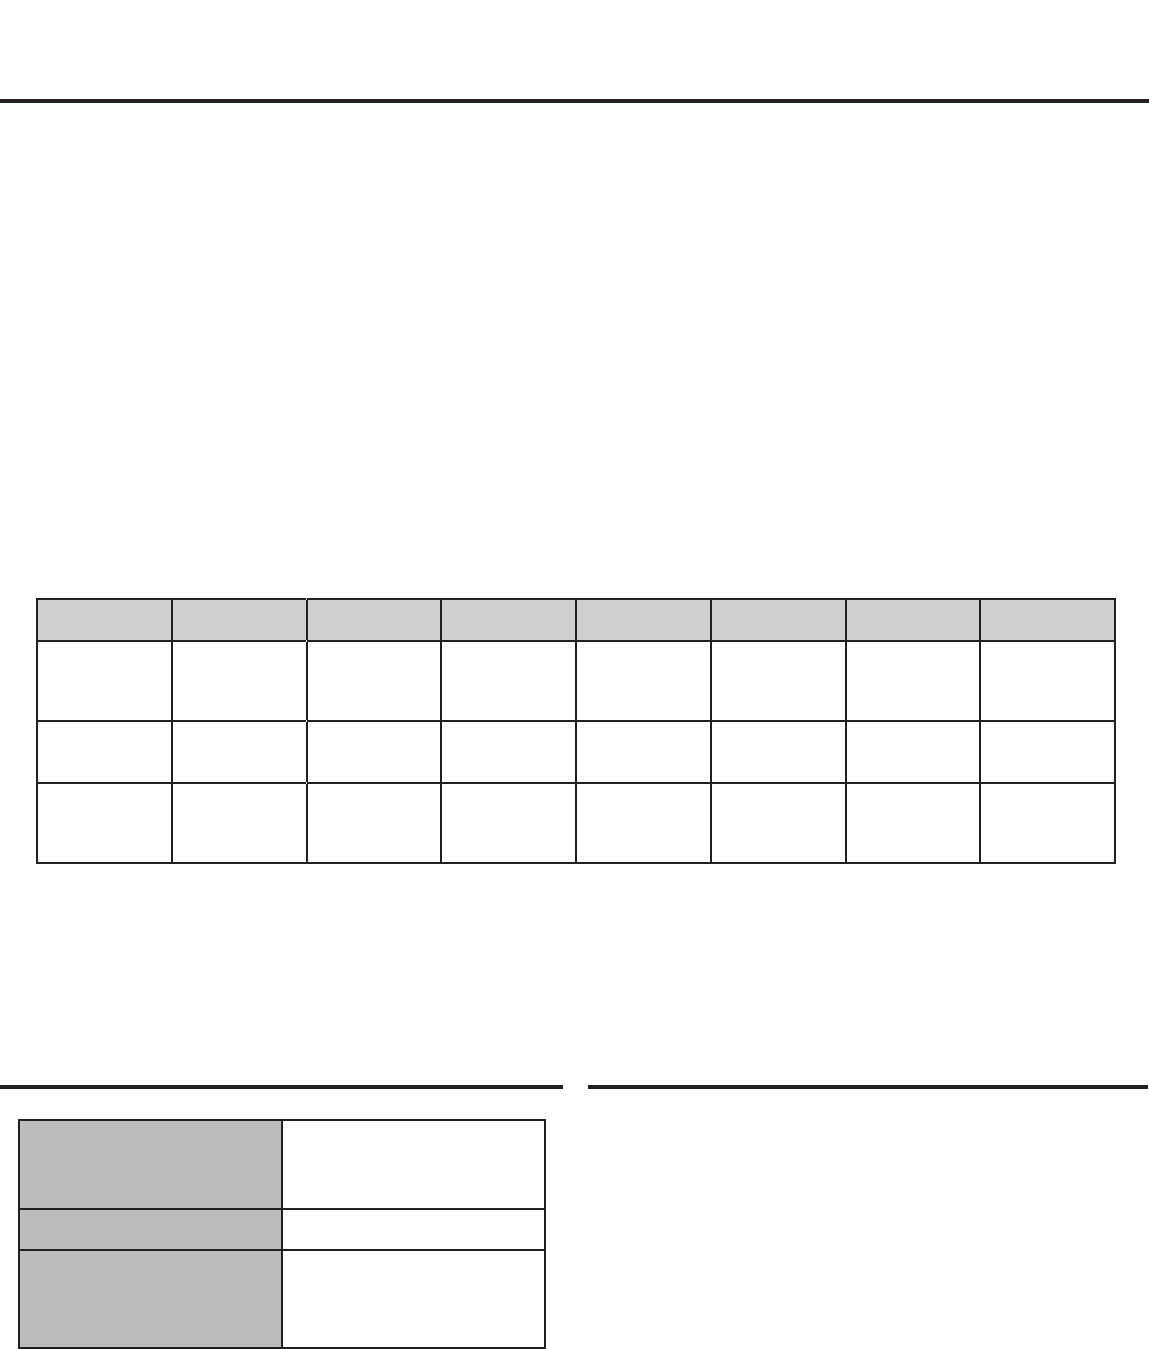
Purpose/Type Bulb Code Watts Spot Med Flood Amps RunTime w/4 AH
Battery
Triple Purpose:
Spot/Med Spot
Flood
ESX
EYR
EYF
25
50
75
200
400
700
85*
170*
300*
30**
60**
120**
1-2/3
3-3/4
6-1/4
120 min
60 min
35 min
Dual Purpose:
Med Flood/Flood
EXZ 60 - - - - - 175 70 4-1/2 45 min
Single Purpose:
Flood Only
BAB
EYP
EYC/FPB
25
50
75/85
- - - - -
- - - - -
- - - - -
- - - - -
- - - - -
- - - - -
35
65
125
1-1/3
3-3/4
6-1/4
120 min
60 min
35 min
NOTE: All above data measured at 14 volts. * with a Diffuser (UL-DF) ** with a Wide Angle Adapter (UL-WA)
SPECIAL NOTE: Extensive fi eld testing indicates that the ESX bulb, despite its minimal 25 watts, when used with the UL-WA Wide
Angle Adapter, or the plain BAB bulb, provides the most pleasing lighting condition for most indoor interviews in
the typical 3 ft. to 6 ft. range
SPECIFICATION
LAMPS Type MR-16 12-14 Volts, 25-85 Watts.
Higher wattage bulbs are not recom-
mended due to excessive heat gener-
ated by these bulbs.
WEIGHT Base unit with bulb: 12 oz.
SIZE Light Head Module:
2¼”W x 2¼”H x 2¾” DP
Base Unit w/Head Module:
2¼”W x 4¼”H x 3¾”DP
SERVICE
If you have any question about this or any Anton/Bauer product,
please contact our Customer Support Department at 1-800-541-1667
(USA Only) or 203- 925-4991.
6
Approved Copy

LIMITED WARRANTY
This one (1) year limited warranty for the product specifi ed in this
document (“Product”) is given by Anton/Bauer, Inc. (“Anton/Bauer”),
14 Progress Drive, Shelton, Connecticut 06484. If you (the purchaser
of the Product from Anton/Bauer, or the person for whom the Product
was purchased, if it was a gift) have any questions regarding Product
applications, Product specifi cation, or to obtain warranty service on
this or any Anton/Bauer product, contact the company at the address
above.
THIS PRODUCT MUST BE REGISTERED WITH ANTON/BAUER WITHIN
30 DAYS OF PURCHASE TO ASSURE WARRANTY COVERAGE. TO
REGISTER YOU MAY EITHER:
1. MAIL WARRANTY REGISTRATION CARD or
2. REGISTER ON LINE AT www.antonbauer.com
The liability of Anton/Bauer hereunder is expressly limited to a claim for
repair or replacement of the Product or as otherwise stated herein at
Anton/Bauer’s sole discretion. Notice of any claim under this warranty
shall be delivered to Anton/Bauer during the period of the warranty
and the Product shall be returned with its packaging promptly, at your
expense, to an Anton/Bauer Customer Support Center or to the address
above. Upon receipt of the Product and a record of your compliance
with the conditions of this warranty, Anton/Bauer will repair or replace
the Product and return it to you, or issue a credit, as applicable. You
are responsible for all shipping and handling charges to and from
authorized facility.
THIS WARRANTY DOES NOT APPLY TO AND IS VOID IN THE CASE OF
DEFECTS OR DAMAGE RESULTING FROM ACCIDENTS, DISASTER,
NEGLECT, MISUSE, IMPROPER INSTALLATION, IMPROPER OR
UNAUTHORIZED SERVICE OR MAINTENANCE, UNAUTHORIZED
REPLACEMENT PARTS OR ATTACHMENTS; OR DYSFUNCTION OR
MALFUNCTION OF, OR CAUSED BY, ANY OTHER PRODUCT OR
DEVICE. Misuse includes any use of the Product in other than its
intended application, including the use of this Product with any
charging device or accessory not manufactured by and/or specifi ed
by Anton/Bauer. This warranty does not cover, and Anton/Bauer
assumes no responsibility for, any equipment or devices used in
conjunction with the Product.
ANTON/BAUER DISCLAIMS ANY LIABILITY FOR INCIDENTAL OR
CONSEQUENTIAL DAMAGES FOR BREACH OF ANY WRITTEN
OR IMPLIED WARRANTY OF THE PRODUCT. UNDER NO
CIRCUMSTANCES WILL ANTON/BAUER BE RESPONSIBLE FOR
ANY SPECIAL, INCIDENTAL OR CONSEQUENTIAL DAMAGES.
This Warranty is to be construed and enforced in accordance with the
law of the State of Connecticut, including the provisions of the Uniform
Commercial Code as adopted and from time to time amended in the
State of Connecticut, and not the Convention for the International
Sale of Goods. This choice of Connecticut law is exclusive of any
Connecticut law that would require reliance on any law foreign to
Connecticut. Should any action of law or in equity be brought by any
person under this Warranty, such action shall be brought only in the
United States District Court for the District of Connecticut, or in any
Superior Court in Fairfi eld County, Connecticut, USA. Some states do
not allow limitations on how long a warranty lasts, so the time period
limitation herein may not apply to you. Some states do not allow the
exclusion or limitation of incidental or consequential damages, so the
above limitation or exclusion may not apply to you. This warranty gives
you specifi c legal rights and you may have other legal rights which may
vary from state to state.
Use of unauthorized equipment in conjunction with Anton/Bauer
products constitutes misuse under our warranties and may limit or
void those warranties. Anton/Bauer does not authorize, condone,
recommend, or otherwise assume any liability or responsibility resulting
from the use of any battery, charger, or accessory made by Anton/Bauer
with any battery, charger or accessory not manufactured, produced or
sold by Anton/Bauer. Anton/Bauer only authorizes the use of original
Anton/Bauer products with this Product. Use only original Anton/Bauer
equipment with this Product.
7
Approved Copy

7
Anton/Bauer
A Vitec Group brand
The following are trademarks of Anton/Bauer, Inc.:
Anton/Bauer, Anton/Bauer logo and parallelogram design, Aspekt, Automatique,
DataTap, DIONIC, Elipz, Egripz, Elightz, Essentialz, Gold Mount, HubZ, HyTRON, Impac,
Interactive and design, LifeSaver, Logic Series, Logic Series Logo, Maxx man logo design,
Nexus, PowerStrap, Proformer, Probe, ProPac, RealTime, Satellight, Snap-On, Stasis, Stasis
Flex, Tandem, TrimPac, Ultrakit, Ultralight, “One World. One Smart Choice”, “The power
behind the best cameras capturing the best images in the world.”, “The quality standard
of the video industry”, “The worldwide standard”, and “There should always be choices. It
makes it easier to recognize the best.”
Lexan is a registered trademark of G.E. Company Corp.
Cordura is a registered trademark of E.I. duPont de Nemours
Anton/Bauer, Inc.
World Headquarters
14 Progress Drive, Shelton, CT U.S.A.
Tel (203) 929-1100 or (800) 541-1667
Fax (203) 929-9935
support@antonbauer.com
Anton/Bauer Europe, B.V.
Eurode Business Center, Eurode - Park 1-2
6461KB Kerkrade, The Netherlands
Tel (+31) 45 5639220
Fax (+31) 45 5639222
eurosupport@antonbauer.com
www.antonbauer.com
Anton/Bauer, Inc. - Signapore Oce
6 New Industrial Road, # 02-02 Hoe
Huat Ind. Bld., Singapore 536199
Tel (+65) 62975784
Fax (+65) 62825235
asia@antonbauer.com
Approved Copy
