MEMO MINUTES Update Grand MA2 Via USB 120608 En
User Manual: MEMO MINUTES update grandMA2 via USB 120608 en
Open the PDF directly: View PDF ![]() .
.
Page Count: 4
MA Lighting International – An der Talle 24-28 – D-33102 Paderborn – Germany
Tel. +49 52 51/68 88 65-10 – Fax +49 52 51/68 88 65-88 – info@malighting.de
MEMO_MINUTES
Paderborn, 29/06/2012
Contact: tech.support@malighting.com
Updating grandMA2 via USB
This document is intended to help you upgrading your grandMA2 console, Replay Unit or NPU
(Network Processing Unit). Do not try to use any keys on the consoles surface when you are
involved in the update process, since when booting up from the USB stick these are not active at
that moment. When the command key ‘Please’ is used in this manual, do not use the key on the
consoles surface. Do only use the ‘Please’ key on the internal or the ‘Enter’ key on an external
keyboard. Whenever grandMA compatibility mode or grandMA2 mode is started, the ‘Please’ key
on the console surface works regularly.
Attention: Be aware that a fullinstall will completely format and empty your grandMA2 hard
disk. Make a copy of already done showfiles via FTP access to save already done showfiles or any
other user created data. If you only do a standard update the data-section will not be deleted.
Preparing the StickMAker program
You have to download two files to your Windows OS or MAC OS computer.
The files ‘StickMaker-x.x.x.x.exe’ and the console image file ‘gMA2Console_[x][x.x]_vxxxx.imgz’
are relevant for your update. Please use the latest version for updating.
First install the program StickMAker onto your PC. You can do this by double-clicking the
‘StickMAker….exe’-file. You will be automatically guided through the installation process.
After installing the StickMAker program make sure you always run the program in Administrator-
mode (more information later in this document)!
Now you are ready to create your first grandMA2 USB-Update-Stick.
Creating the USB Stick for grandMA2 Update
The recommended USB device must have a minimum memory of 2GB.
Before starting the program StickMAker….exe connect an empty USB stick to your PC and make
sure you always run the program in Administrator-mode (more information later in this
document). Make sure you have a backup of all data that is stored on you USB stick because the
StickMAker will completely erase all data of your storage device!

MA Lighting International – An der Talle 24-28 – D-33102 Paderborn – Germany
Tel. +49 52 51/68 88 65-10 – Fax +49 52 51/68 88 65-88 – info@malighting.de
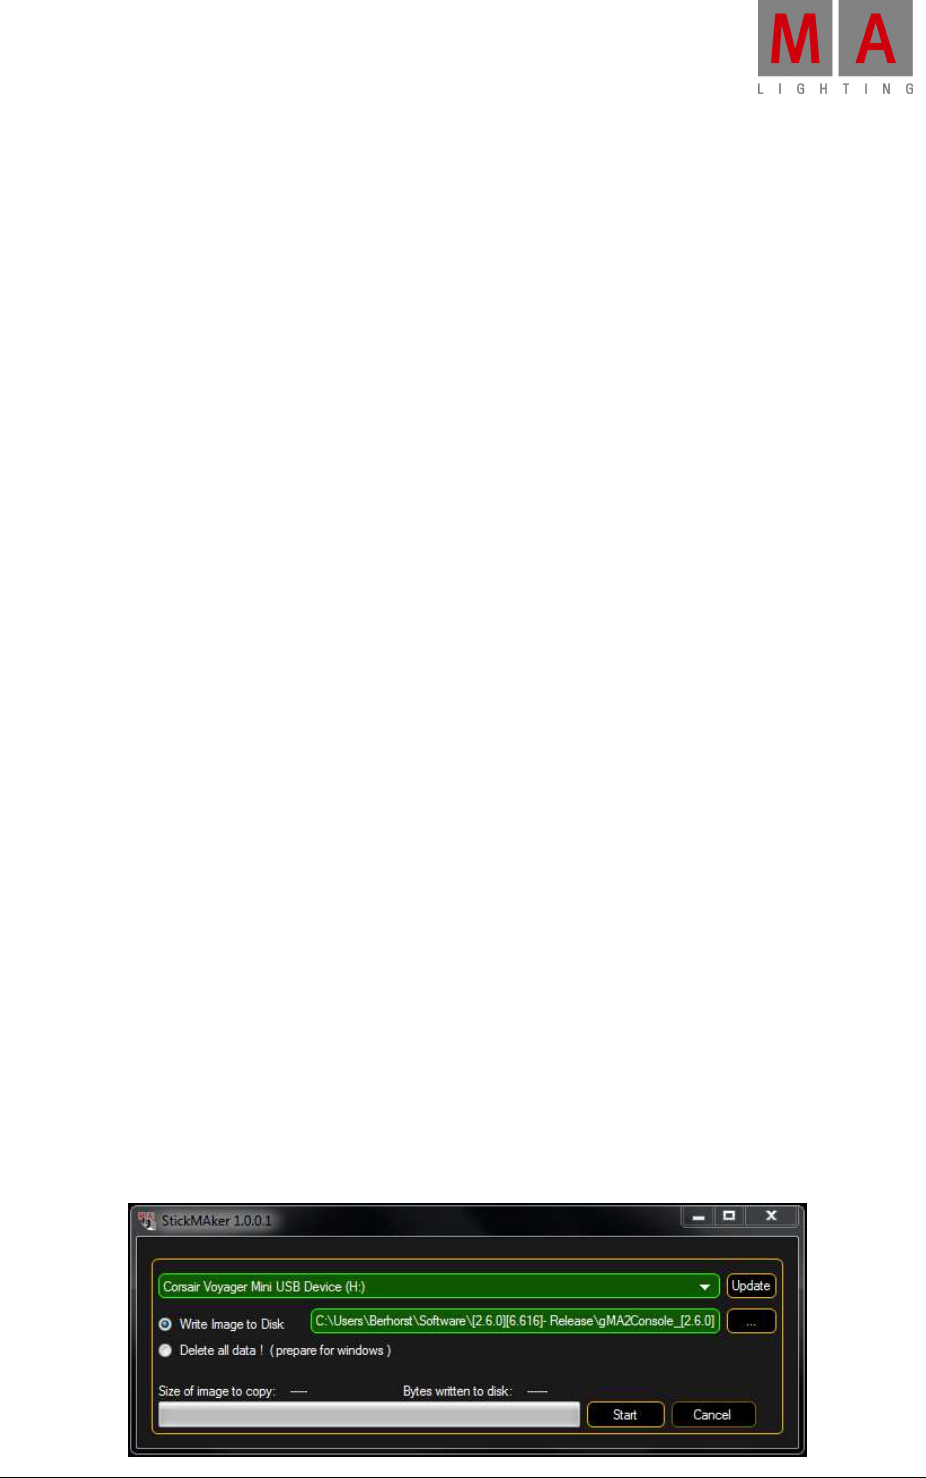
Setup the software to prepare your USB stick: Target Disk (your USB device). If the correct USB
device is not displayed automatically click on the little arrow on the right side and select it.
Select the option ‘Write Image to Disk’ (click on the button with 3 dots ‘…’ and select the file type
*.imgz. Then select the image file and open it).
Attention: The option ‘Delete all data!’ deletes all files on the USB device and erases any image
data written to it. It is intended to prepare your stick to work under Windows again. When you
have used this option and accepted with the ‘Start’ button in the StickMAker program, you can
format the stick in Windows or OSX with a FAT based file system to regain access for regular
applications again.
No matter which option you choose, you have to accept your settings and start the process with
the ‘Start’ button in the bottom right.
A popup window will ask you to confirm. Click on ‘Yes’ / ‘Ja’ to proceed.
It will take a minute or two until all data is transferred. A blue bar will indicate the progress. A
new popup will show when the operation is finished. You can now close the StickMAker program
and unplug the USB storage device.
Booting up the console to update the software
First insert your grandMA2 USB-Update-Stick into one of the USB ports of your console, RPU or
NPU. If you use an external keyboard make sure this one is connected as well before you power
up your console. After powering up the console check your screen. With the Welcome screen as
below you can press ‘TAB’ to see all single steps. The welcome screen tells you which button to
press to get to your boot-menu to choose a different device then your SSD.
The most common keys to update NPU, RPU and consoles so far: ‘F8’,‘F11’, ‘F12’, ‘ESC’
Tip:
Press the F-key a few times and you can be sure your console recognized your command. Due
to the static Welcome-screen you might miss the right time to press the F-key. If you press ‘TAB’
first you see the dynamic boot-up screen and exactly see the time to push the button but it is
more difficult to find out which F-key to press.
Where to find the right F-key on your console? With the grandMA2 full-size and light you can
use your built in keyboard. You have to push and hold the button ‘F-key’ and the correct F-key on
your console (above the armrest). If your correct key is ‘F11’ or ‘F12’ you need to push and hold
the ‘Fn’ key (right above the arrow keys on your console) and press ‘F11’ or ‘F12’ (above the
armrest and the same keys as F1 or F2).
If you like to update grandMA2 ultra-light, RPU or NPU you need an external keyboard! Please
plug in the USB-keyboard before you power up your console!
If you pressed the correct F-key a few times but the console keeps booting and ignores your
manual access your BIOS-settings might be wrong. In this case please contact your MA
Tech.Support.
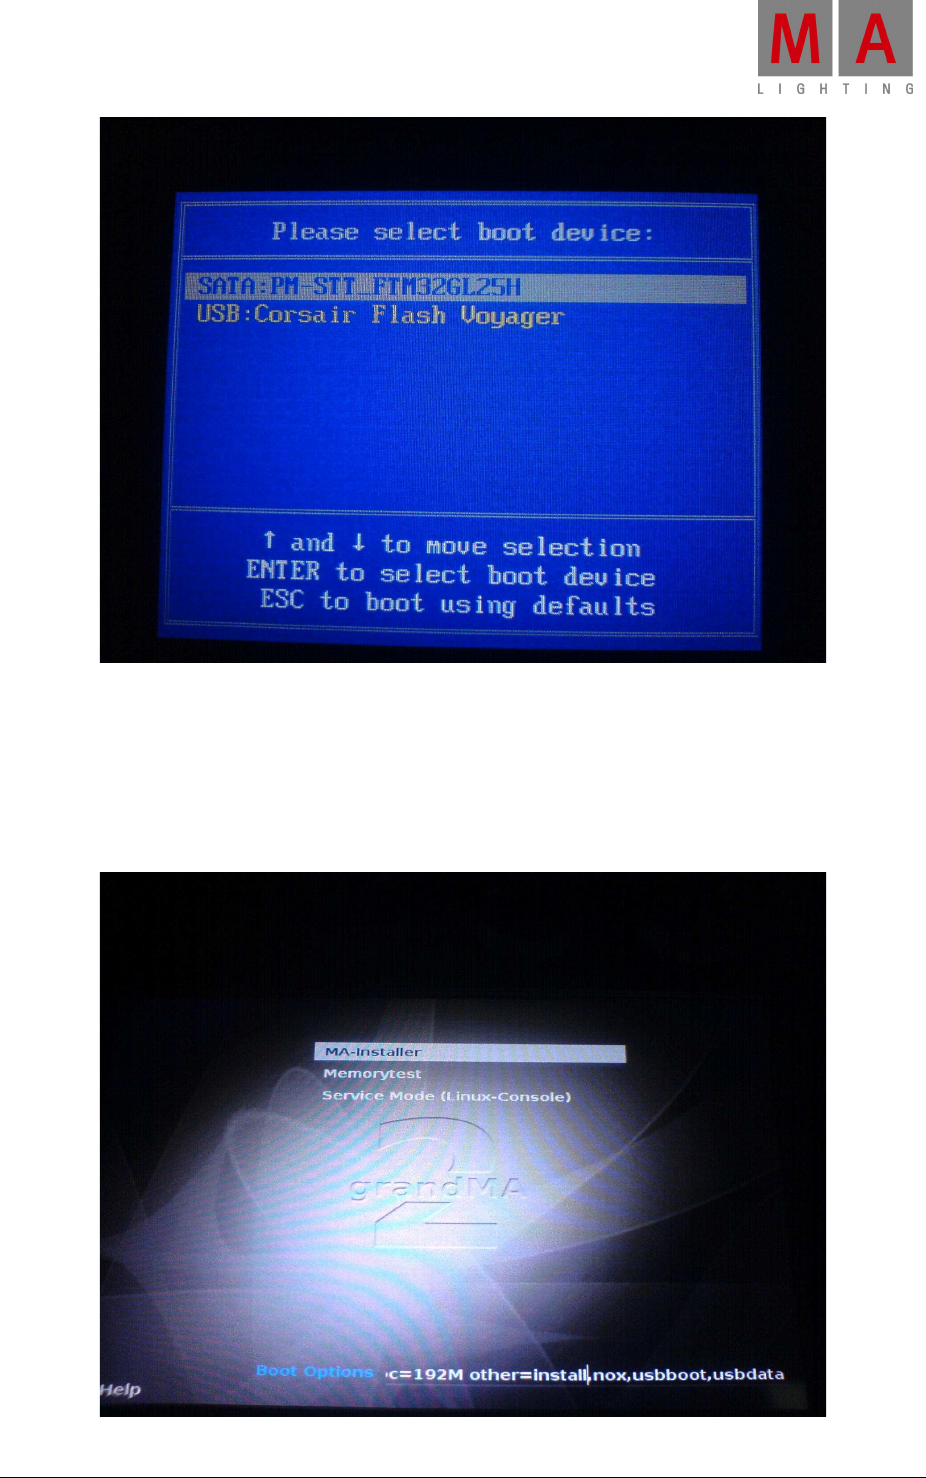
If you see the Boot-device screen (see below) you have to choose the external device. Sometimes
(depending on the BIOS used) you see a lot of devices but not your USB-Stick. Then there should
be a line named ‘HDD’ with a plus in front. Select this line and the next screen allows you to
choose your device.
MA Lighting International – An der Talle 24-28 – D-33102 Paderborn – Germany
Tel. +49 52 51/68 88 65-10 – Fax +49 52 51/68 88 65-88 – info@malighting.de
Installing the new Software
After selecting your USB-Stick as your boot device you will end up with the MA-Installer screen
(see below). Here you can choose your option!

MA Lighting International – An der Talle 24-28 – D-33102 Paderborn – Germany
Tel. +49 52 51/68 88 65-10 – Fax +49 52 51/68 88 65-88 – info@malighting.de
Memorytest and Service-Mode are not of interest in this moment.
In the bottom, you can see in written letters ‘Boot Options’ and an implemented command line.
Now you have to choose if you like to run a normal ‘install’ or the ‘full-install’!
Normal install:
Just quit the screen with the Please / Enter key. You will be guided through the update-routine
with on screen information. After this install all your showfiles as well as the older versions are
still available.
Fullinstall:
Use the left / right arrows to move the cursor in front of the word ‘install’ and add ‘full’ with your
keyboard. Make sure the ‘MA-Installer’ selection is highlighted and not one of the other options.
Press the ‘Please’ button to proceed in the configuration process. You will be prompted if you
want to format your hard disk. Proceed by pressing the ‘Please’ button. You will be guided though
the installation process with on screen information.
After a couple of seconds you will be prompted to remove the USB stick. Do so and press ‘Please’
to accept. Now the console reboots automatically into the just installed software version. If you
did run your console in mode 1 it will boot up into mode 1 – if you did run your console in mode
2 it will boot up into mode 2!
Attention: Be aware that a fullinstall will completely format and empty your grandMA2 hard
disk. Make a copy of already done showfiles via FTP access to save already done showfiles or any
other user created data. If you only do a standard update the data-section will not be deleted.
Administrator-Mode:
Please make sure that your application is started as Administrator all the time. You can right click
with the mouse on your application icon and go to properties. Depending on your OS version you
might need to change to another level of option, but nevertheless there will be a tick-box which
says “operate as administrator”. Please tick this box and save your changes.
