502W_602W Owners Manual MTX Blueprint 502W 602W
User Manual: MTX Blueprint 502W
Open the PDF directly: View PDF ![]() .
.
Page Count: 4

MODEL502W, MODEL 602W
IN-WALL LOUDSPEAKER
OWNERS MANUAL
FIRST
CLASS
STAMP
HERE
4545 E BASELINE RD
PHOENIX AZ 85040-6400
21A2676
Model502W_602W Owners Manual.qxd 10/14/2002 1:22 PM Page 1

CONGRATULATIONS
W e appreciate your choice of MTX In-Wall Loudspeakers. Properly installed
and operated, MTX In-Wall Loudspeakers should provide years of worry free
listening pleasure. It’ s important that you follow each step in this guide
carefully to insure proper installation. If you have any questions regarding
MTX In-Wall Loudspeakers, please call us at 1-800-223-5266.
SPECIFICATIONS
MODEL502W MODEL602W
Frequency Response 53-20kHz 43-20kHz
Impedance 8 Ohms 8 Ohms
Nom. Power Handling 45 Watts50 Watts
Peak Power Handling 140 W atts 160 W atts
Sensitivity 84dB@1W/1m 85dB@1W/1m
W oofer Diameter 5-1/4” 6-1/2”
T weeter 1/2”Polycarbonate 1/2”Polycarbonate
Balanced Dome Balanced Dome
Mounting Depth 2-1/2” 2 7/8”
PAINTING YOUR MTX IN-WALLS
MTX In-Walls are designed to accept all types of interior and exterior paints.
Spray or roller application should provide excellent results. A paint shield is
included with all Blueprint Series In-W alls to protect the speakers during the
painting process.
W ARRANTY
MTX Blueprint Series In-Wall Loudspeakers are guaranteed against
defects in parts and workmanship for a period of ten (10) years from the date
of purchase. Speakers found defective during that period will be repaired by
MTX without char ge for parts.
This warranty is void if it is determined that unauthorized parties have
attempted repairs or alterations of any nature. Before assuming that a defect is
present in the loudspeakers, be certain that all associated equipment is
operating properly .
If a defect is present, your authorized MTX dealer may be able to
ef fect repairs. If not, you are responsible for providing transportation to the
factory . Y our MTX dealer can recommend the safest method of transportation.
Proof of purchase is required when requesting service, so please retain your
sales slip.
Specifications subject to change without notice.
(Cut out on dotted line and mail to address on reverse side.)
W ARRANTYREGISTRATION
To r egister your pur chase and insur e your investment, please fill out and r eturn this car d.
NAME_______________________________AGE______________
ADDRESS______________________________________________
______________________________________________
MODELPURCHASED MODEL502W MODEL602W
D ATE PURCHASED____________________
DEALER NAME ________________________________________
PURPOSE: Main Music Listening Background V ideo/surround
Other__________________________________________
ROOM(S) INSTALLED _____________________________________
INSTALLED BY __________________________________________
H O W DID YOU FIRST LEARN OF MTX IN-WALLS?
Model502W_602W Owners Manual.qxd 10/14/2002 1:22 PM Page 2

LOUDSPEAKER PLACEMENT
Blueprint Series Loudspeakers are designed to work within any interior
decorating scheme. They can be installed in virtually any location where flush
mounting is possible. T o maximize their sound performance however certain
guidelines should be followed. For the best stereo reproduction the two
loudspeakers should be placed an equal distance from your listening position
and separated so that the angle between them, at the listening position, is
For best stereo imaging, we recommend that the units be placed so that the
tweeters are as close as possible to the ear level of a seated listener .
OTHER HOME AUDIO PRODUCTS FROM MTX
MTX offers a wide assortment of audio components. Ranging from in-ceiling
speakers to amplifiers to accessories. Each component is value engineered and
must meet strict quality control standards before it becomes part of the MTX
product line.
Listed below you will find a sampling of components available from your
authorized MTX dealer.
LPS-600
Speaker/Amplifier Selector
Accommodates up to 6 pair of speakers
Handles up to 250 watts/channel continuous (RMS)
Impedance Protection Circuitry
Accommodates up to 14 gauge wire
MODELMP42
Multi-Purpose Loudspeaker
T wo 4” W oofers, with 1/2” Balanced Dome Tweeter
50 W atts RMS/200 W atts T otal Power Handling
Magnetically shielded, weather resistant
Sleek, Euro-style design
A vailable in white or black
12.6” x 4.8” x 4.9”
PS15
15” Powered Subwoofer System
200 W att Class D Switching Power Amplifier
Infrared Remote Control for V olume Function
Magnetically Shielded, Downfiring Subwoofer in small enclosure
Signal Sensing Auto T urn On
Red LED Clipping Indicator
Model502W_602W Owners Manual.qxd 10/14/2002 1:22 PM Page 3
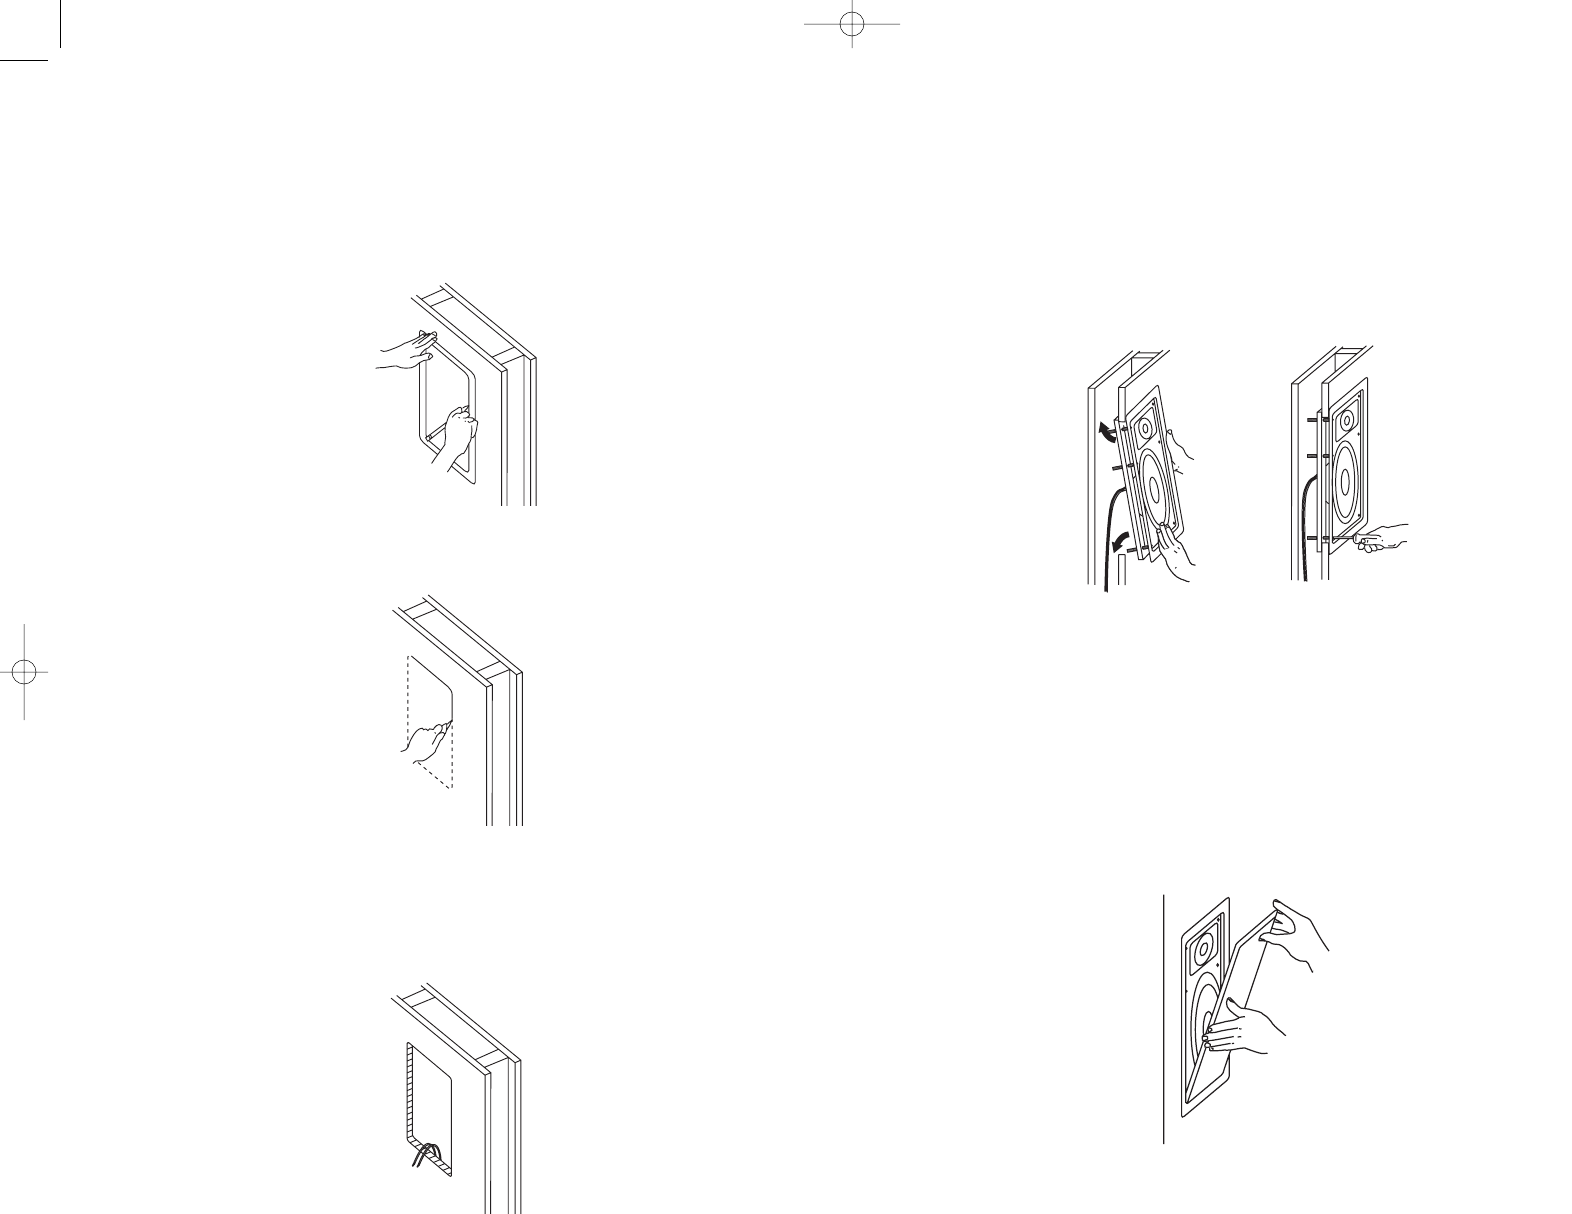
STEP 1
Using a stud finder (available at low cost at most hardware stores) or other
accurate method, locate center point between two studs and mark. Using
template provided, trace hole pattern on surface of wall. Placing a bubble level
on either the horizontal or vertical guidelines of template will assist you in
STEP 2
Using a sabre saw , keyhole saw or very sharp utility knife, cut hole in wall,
STEP 3
Run loudspeaker wires to sound source location. There are several methods you
can use to accomplish wiring, depending on the construction characteristics of
the room or house. Y ou can add a professional touch to your installation by
using a speaker terminal plate at the source location. Leave suf ficient amount
STEP 4
Attach loudspeakers wires to speaker terminals, observing correct polarity
(positive to positive and negative to negative), and position panel and frame
assembly to hole as shown. Insert top of mounting frame into hole at top. By
moving bottom of frame upwards, you should now be able to insert bottom of
frame into hole at bottom. Be careful not to pinch loudspeaker wires in the
process. T ighten long screws. Use a level during tightening to insure
STEP 5
After speaker panel is secured tightly , test for sound.
STEP 6
When you are satisfied the speaker is operational,af fix grill. As grill is designed
for a snug fit, you’ll need to position one edge into slot first, and press or
squeeze around perimeter of grill, while pushing leading edges into grill slot.
Model502W_602W Owners Manual.qxd 10/14/2002 1:22 PM Page 4
