Serviceo UM For Internal Use MSP User Manual
MSP_User_Manual
User Manual:
Open the PDF directly: View PDF ![]() .
.
Page Count: 88

SERVICEO-UM-
FOR INTERNAL USE

serviceo
Corporate Headquarter: 980 Mission Court, Fremont, CA 94539, USA. Phone: +(1) 408-895-8000, Fax: +(1) 408-943-8101
Copyright Information
Copyright © 2017-2018, Iron Systems Inc. All rights reserved.
The copyright in this work is vested in the Iron Systems Inc. and the document along with all enclosures
is issued in confidence for the purpose only for which these are produced. These must not be
reproduced in whole or in part, or stored in a system, or transmitted in any form or by any means
electronically or mechanically including photocopy and recording or otherwise for any purpose other
than under agreement or with the consent in writing of Iron Systems Inc.
All enquiries with respect to this document, in the first instance, be referred to:
Name
Role & Responsibility
Contact Details
Document Control
Document Change History
Version
Version Date
Author(s)
Amendments/Notes
V0.1
01/21/2018
Amit Singh
Initial draft
Approval/Signoff History
Version
Approver(s)
Date
Roles &
Responsibilities
Description

serviceo
Corporate Headquarter: 980 Mission Court, Fremont, CA 94539, USA. Phone: +(1) 408-895-8000, Fax: +(1) 408-943-8101
1 Introduction .......................................................................................................................................... 4
1.1 Purpose ............................................................................................................................................... 4
1.2 Intended Audience ............................................................................................................................. 4
2 Getting Started ...................................................................................................................................... 5
3 Orders .................................................................................................................................................... 7
3.1 Create Case (Dispatch FSE – Customer site) ....................................................................................... 9
4 Setup ................................................................................................................................................... 17
4.1 Jobsite Setup (PMS) .......................................................................................................................... 17
4.1.1 Viewing Jobsite List ........................................................................................................................... 18
4.1.2 Updating Existing Jobsite Location ................................................................................................... 20
4.1.3 Creating New Jobsite Location by Selecting Nearby Service Zone ................................................... 22
4.1.4 Creating New Jobsite Location by Uploading the Jobsite List .......................................................... 24
5 Service Configurator ............................................................................................................................ 25
5.1 Program Setup .................................................................................................................................. 25
5.1.1 Configuring Program Setup .............................................................................................................. 25
5.1.2 Creating New Program ..................................................................................................................... 33
5.2 Jobsite Setup..................................................................................................................................... 33
5.2.1 Viewing Jobsite List ........................................................................................................................... 34
5.3 Quote Setup ...................................................................................................................................... 35
5.3.1 Configuring Quote Setup .................................................................................................................. 36
5.4 Price Instruction Setup ..................................................................................................................... 42
6 Billing ................................................................................................................................................... 46
6.1 PMS Billing (Invoice) Dashboard ....................................................................................................... 46
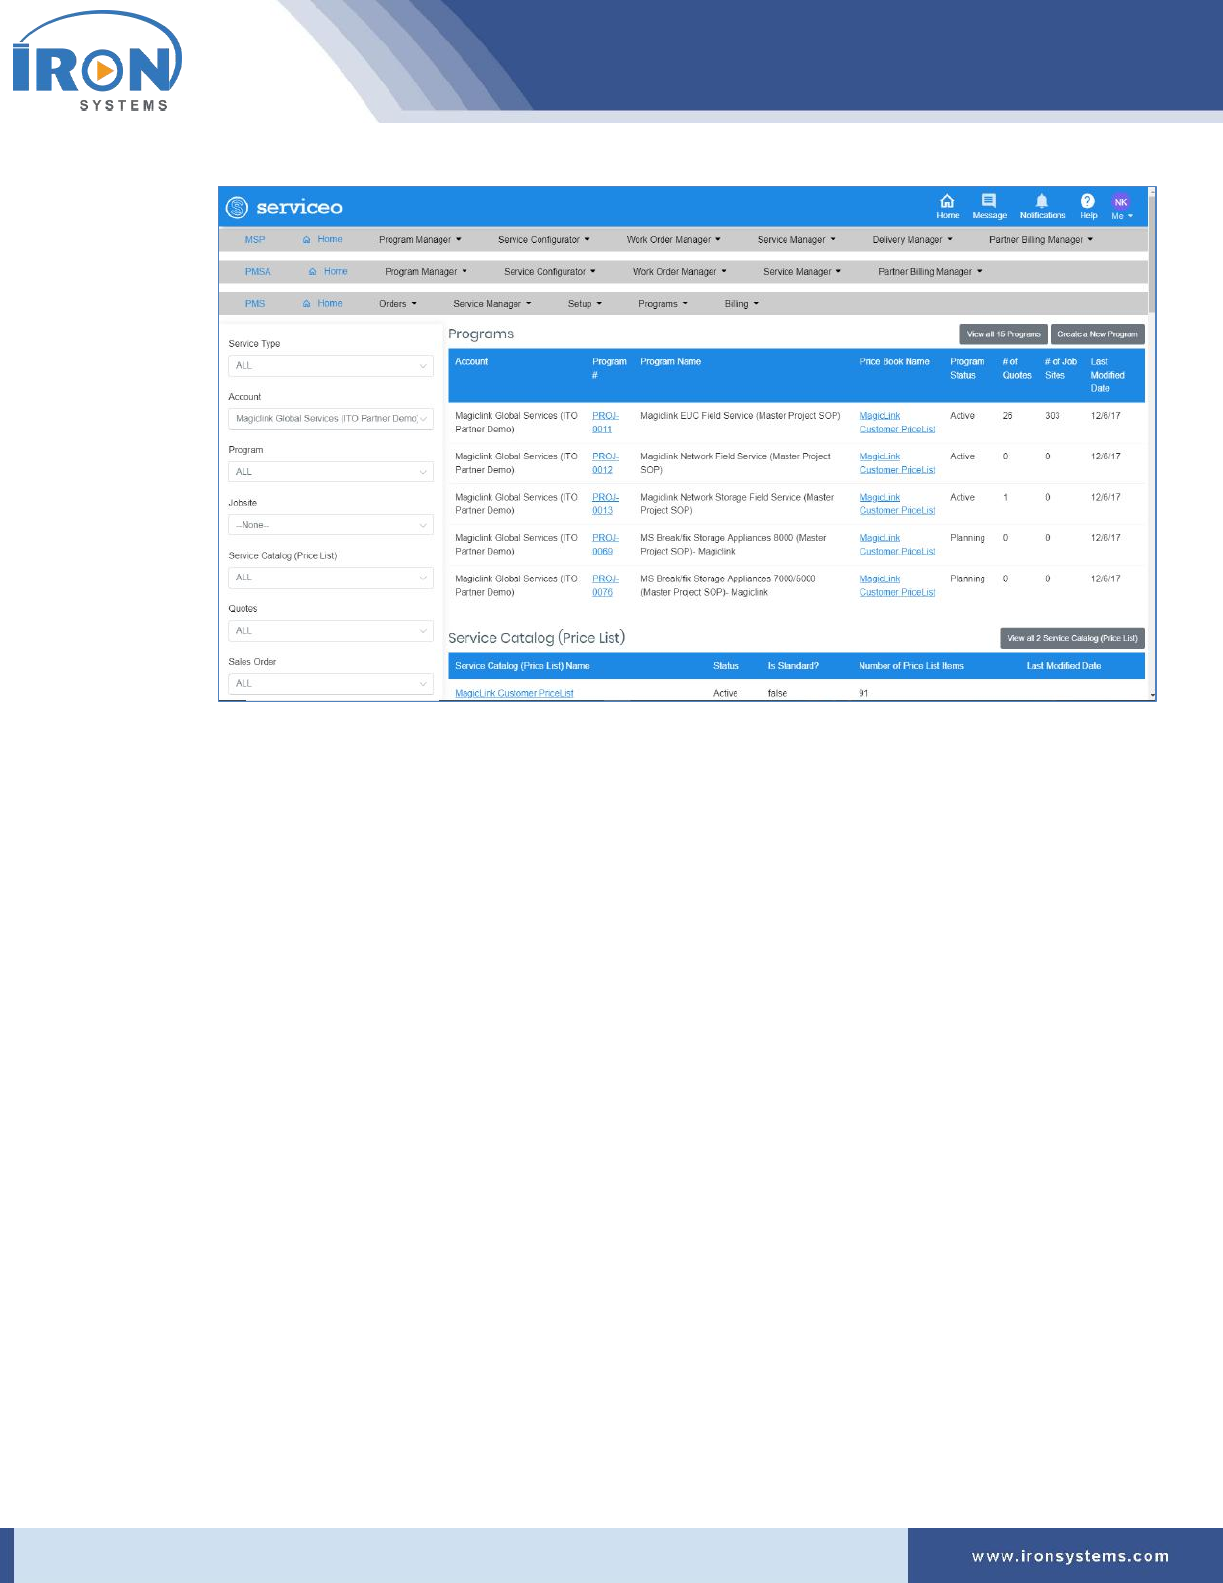
7 Programs ............................................................................................................................................. 49
7.1 Programs........................................................................................................................................... 49
7.2 Service Catalogue (Price List) (PMS) ................................................................................................. 52
7.3 Iron Global Service Locator (PMS) .................................................................................................... 55
8 Service Manager .................................................................................................................................. 60
8.1 Service Manager Console (PMS)....................................................................................................... 60
8.2 Activity Feed Console (PMS) ............................................................................................................. 63
8.3 Service Manager Dashboard (PMS) .................................................................................................. 67
9 Work Order Manager .......................................................................................................................... 72
9.1 Create Work Order ........................................................................................................................... 72
9.2 Create Case (Dispatch FSE – Customer Site) .................................................................................... 76

serviceo
Corporate Headquarter: 980 Mission Court, Fremont, CA 94539, USA. Phone: +(1) 408-895-8000, Fax: +(1) 408-943-8101
10 Program Manager ............................................................................................................................... 77
10.1 Program Profile ................................................................................................................................. 77
10.2 Service Catalog (Price List) ................................................................................................................ 80
10.3 Iron Service Locator .......................................................................................................................... 82
10.4 Iron Service Locator (FSL) ................................................................................................................. 86

serviceo
Corporate Headquarter: 980 Mission Court, Fremont, CA 94539, USA. Phone: +(1) 408-895-8000, Fax: +(1) 408-943-8101
1 Introduction
ServiceO is a web-based vendor Management System (VMS) designed to manage customer-specific
requirements. It combines best in class solutions providing you the ability to execute vendor
management strategies faster and more profitably, from strategic and tactical planning to execution. It
also provides a means for transferring data entered into the System across multiple stages of the supply
chain.
The System is capable of meeting customer-specific requirements for reliability, responsiveness, agility
and cost. It also features industry-specific functionality allowing you to identify and keep track of
customer assets throughout your network of global facilities.
1.1 Purpose
The purpose of this document is to explain the features of the ServiceO, the interface of the System,
what the System will do and the constraints under which it must operates. It also contains all available
instructions for each module.
This document contains the task-oriented sections describing all modules of the serviceo. It also has
informative notes and tips, which help you better understand the entire system.
1.2 Intended Audience
This document is primarily indented for the Internal Users who aim to……to be updated at later stage
with actual information.
The information contained in this manual is intended to be used only by the authorized members with
proper rights and privileges.

serviceo
Corporate Headquarter: 980 Mission Court, Fremont, CA 94539, USA. Phone: +(1) 408-895-8000, Fax: +(1) 408-943-8101
2 Getting Started
In this section, you will find instructions and other information useful for evaluating the ServiceO and
getting to know it when you are starting out.
This section also provides a general walkthrough of each module of the ServiceO from initiation through
exit.
To use ServiceO, you need to open serviceo web page (https://) and then enter your Email and password
at the login screen. This process only takes a few seconds and ensures the privacy and security of your
product information.
1. Log on to the ServiceO.
The login page is displayed as shown in Figure 2.1.
Figure 2.1: login page
Tip: Select the Remember me check box to store your credentials in the cookies and enables
you to sign back automatically if you close the site without logout. Click the Forgot password? to
reset your password. You will be taken to the Reset screen where you need to enter your Email
and then click Reset button. The instructions to reset password will be sent to the entered
Email.
2. Type your correct Email in the Email field.
3. Type your password in the Password field and then click the LOG IN button to access home
page.
serviceo
Corporate Headquarter: 980 Mission Court, Fremont, CA 94539, USA. Phone: +(1) 408-895-8000, Fax: +(1) 408-943-8101
The PMS home page is displayed as shown below:
serviceo
Corporate Headquarter: 980 Mission Court, Fremont, CA 94539, USA. Phone: +(1) 408-895-8000, Fax: +(1) 408-943-8101
3 Orders
Here, order represents work to be performed on customers’ products. This module allows you to create
an incident or work order-based case by selecting and typing appropriate values in the required fields.
The created orders can be used to efficiently track or manage different types of services.
To access the PMS menus, the user you log on as must have rights to run the module. If you want access
to the PMS and the System will not allow you to log on, contact your System Administrator to verify that
your user name has been granted appropriate rights.
Here, you can also view progress bar showing the different stages of order completed during the
process. The progress bar will run a colored bar showing the complete or incomplete stage. It also
provides lots of flexibility for order handling while providing visibility for users to better understand the
status.
This module provides key functionalities overview related to new case creation web form section and
fields.
More Information will be added in next version.
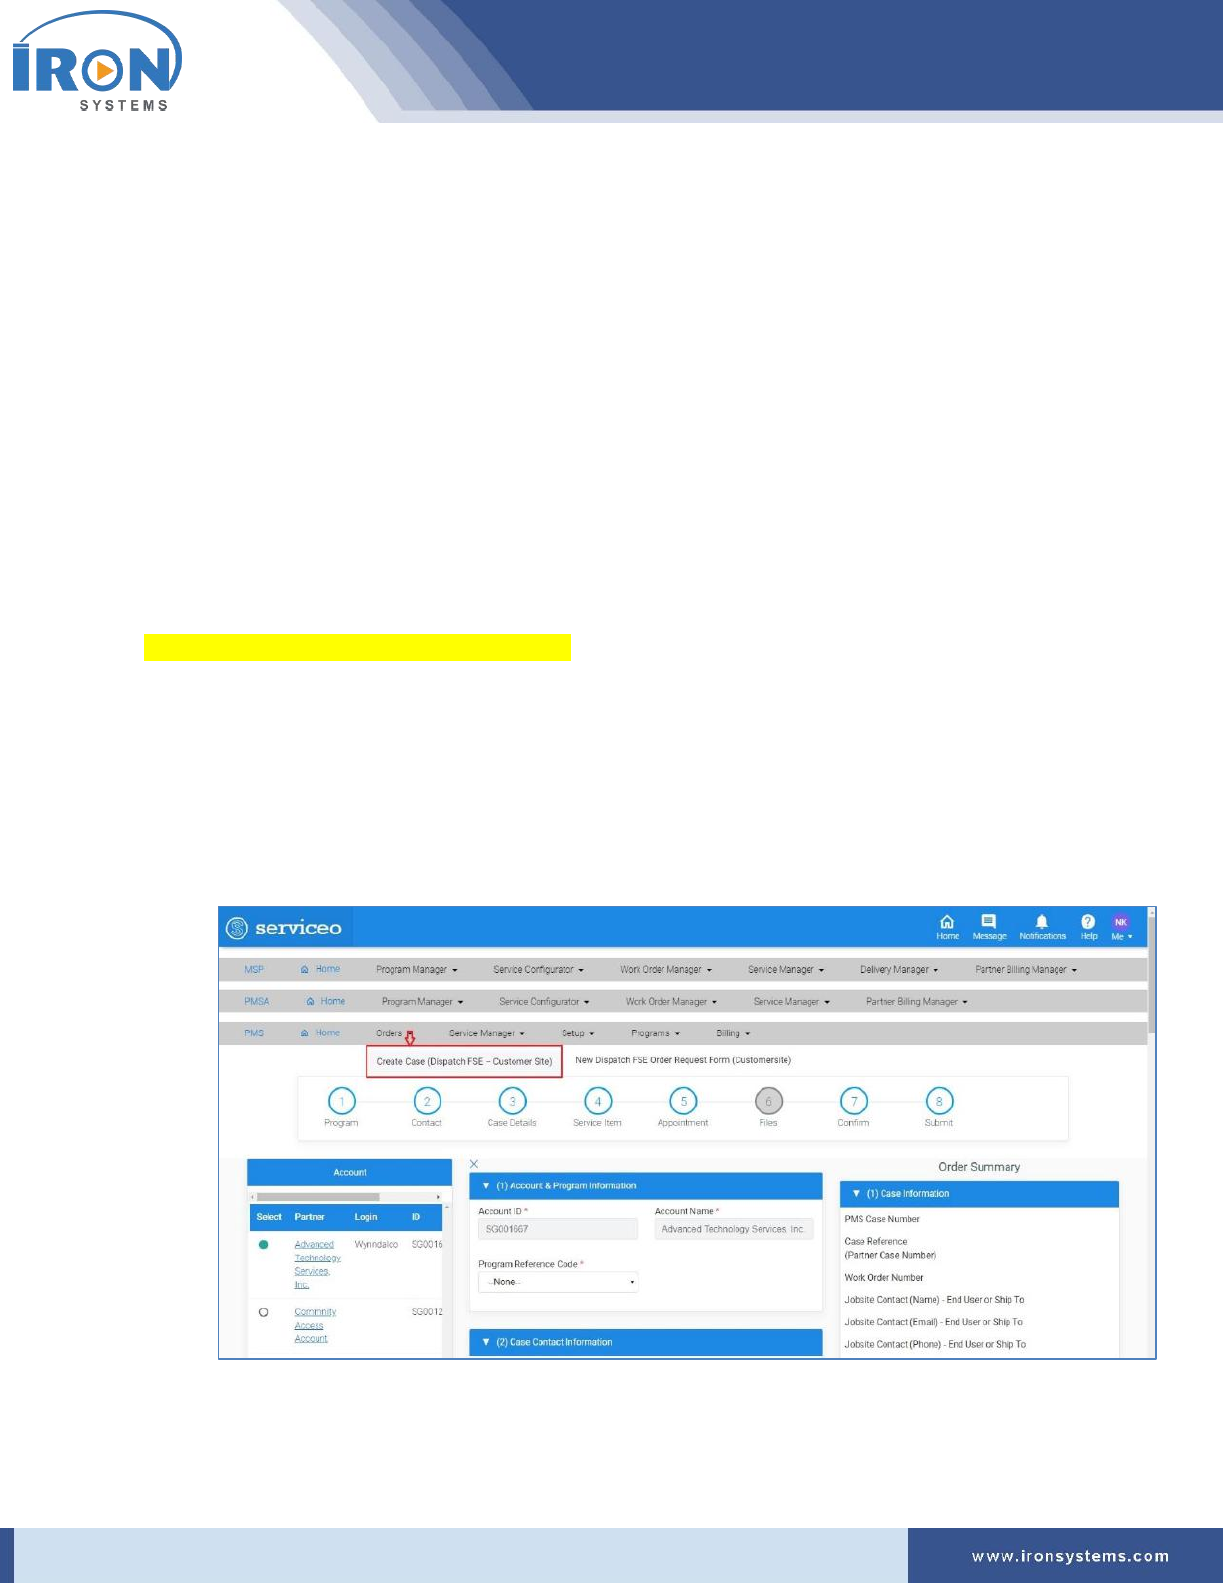
To access Create Case (Dispatch FSE – Customer site) screen, perform the following steps:
1. Click the Orders next to the PMS Home icon and then click the Create Case (Customer site)
option.
The Create Case screen displays as shown in Figure 3.1.
Figure 3.1: The Create screen

serviceo
Corporate Headquarter: 980 Mission Court, Fremont, CA 94539, USA. Phone: +(1) 408-895-8000, Fax: +(1) 408-943-8101
Note: The Create Case screen shows progress bar on the top, the Account section at the left and
the Order Summary section at the right side of the screen.
The Account section displays a list of partners including their Login, ID and other details.
The Order Summary section is composed of six tabs:
• The Case Information tab holds case related information.
• The Program Information tab displays program details.
• The Jobsite Information tab holds jobsite related details.
• The Standard Service Profile tab holds standard service profile details selected for case.
• The Global Program Instructions tab holds instructions for Service Deliverables.
• The Pricing: Service Catalog Item Selection tab holds price details.
• The IRON (Internal): Program Vendor Routing Summary tab holds the details of vendor
routing summary.
The partner, which was selected when user last logged, is selected by default in the Account
section.
Tip: Click the Tab Heading or down arrow on the tab to minimize or maximize the tab.
2. Click the Partner name link in the Account section to view account details.
An Account Detail pop-up displays as shown below:
serviceo
Corporate Headquarter: 980 Mission Court, Fremont, CA 94539, USA. Phone: +(1) 408-895-8000, Fax: +(1) 408-943-8101
Tip: Click the Close button or X (cross sign) to close this Account Details pop-up.
3.1 Create Case (Dispatch FSE – Customer site)
This option allows you to create case (Dispatch FSE – Customer Site) using appropriate values in the
required fields available in case creation web-form sections:
➢ Account & Program Information
a. Account Information
b. Program Information
➢ Case Contact Information
a. Jobsite Selection
b. Case Contact Information

serviceo
Corporate Headquarter: 980 Mission Court, Fremont, CA 94539, USA. Phone: +(1) 408-895-8000, Fax: +(1) 408-943-8101
➢ Case Details
a. Case Information
b. Case Additional Instructions (optional)
➢ Service Catalog Selection: Incident Options
a. Standard Incident Type
b. Customer Incident Type
➢ Appointment Setup
➢ File Upload
➢ Review/Confirm
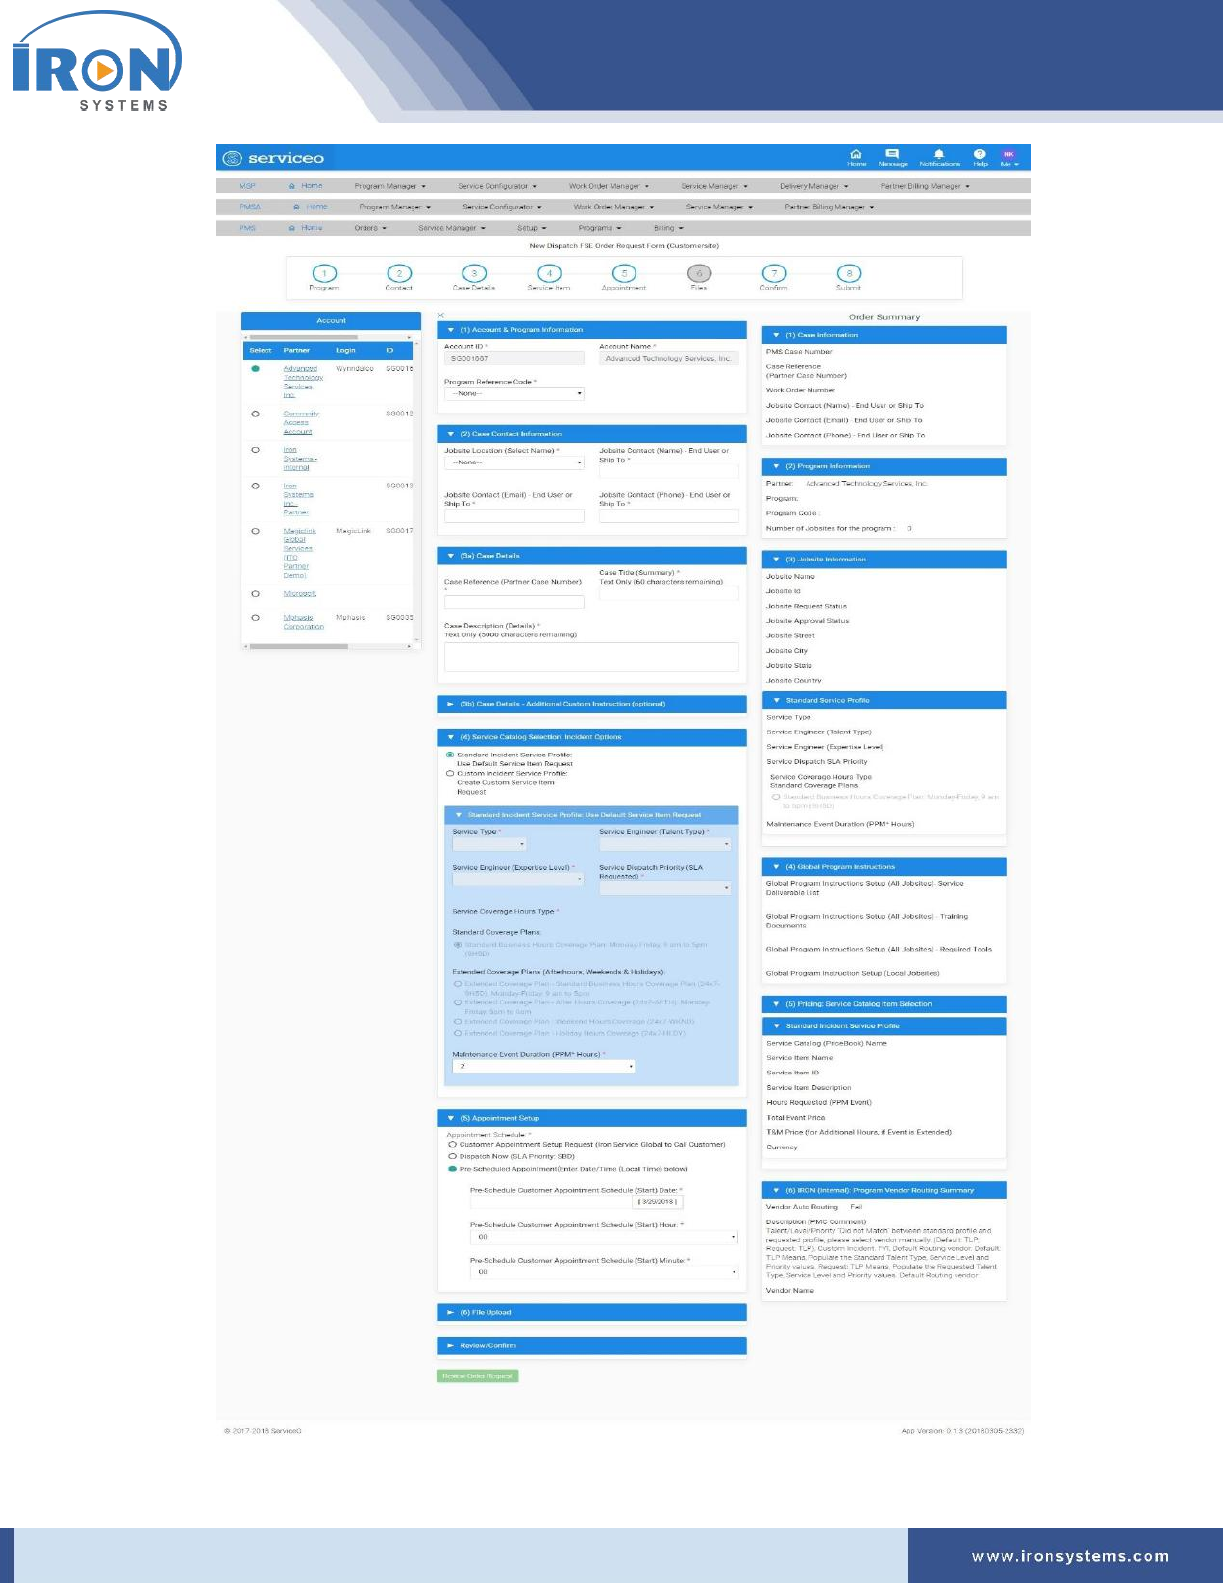
The Account ID and Account Name fields in the Account & Program Information tab are prepopulated.
To create case (customer site), perform the following steps:
1. Select the Partner name in the Account section. Refer Figure 3.1.
The Create Case screen is displayed with seven tabs as shown in the below figure:
serviceo
Corporate Headquarter: 980 Mission Court, Fremont, CA 94539, USA. Phone: +(1) 408-895-8000, Fax: +(1) 408-943-8101
serviceo
Corporate Headquarter: 980 Mission Court, Fremont, CA 94539, USA. Phone: +(1) 408-895-8000, Fax: +(1) 408-943-8101
Note: The Account ID and Account Name fields get updated as you select the Partner name.
As you start selecting or entering values in the fields under different tabs, fields in the Order
Summary section at the right side of the screen get updated based on selection.
Fields marked with an asterisk are mandatory.
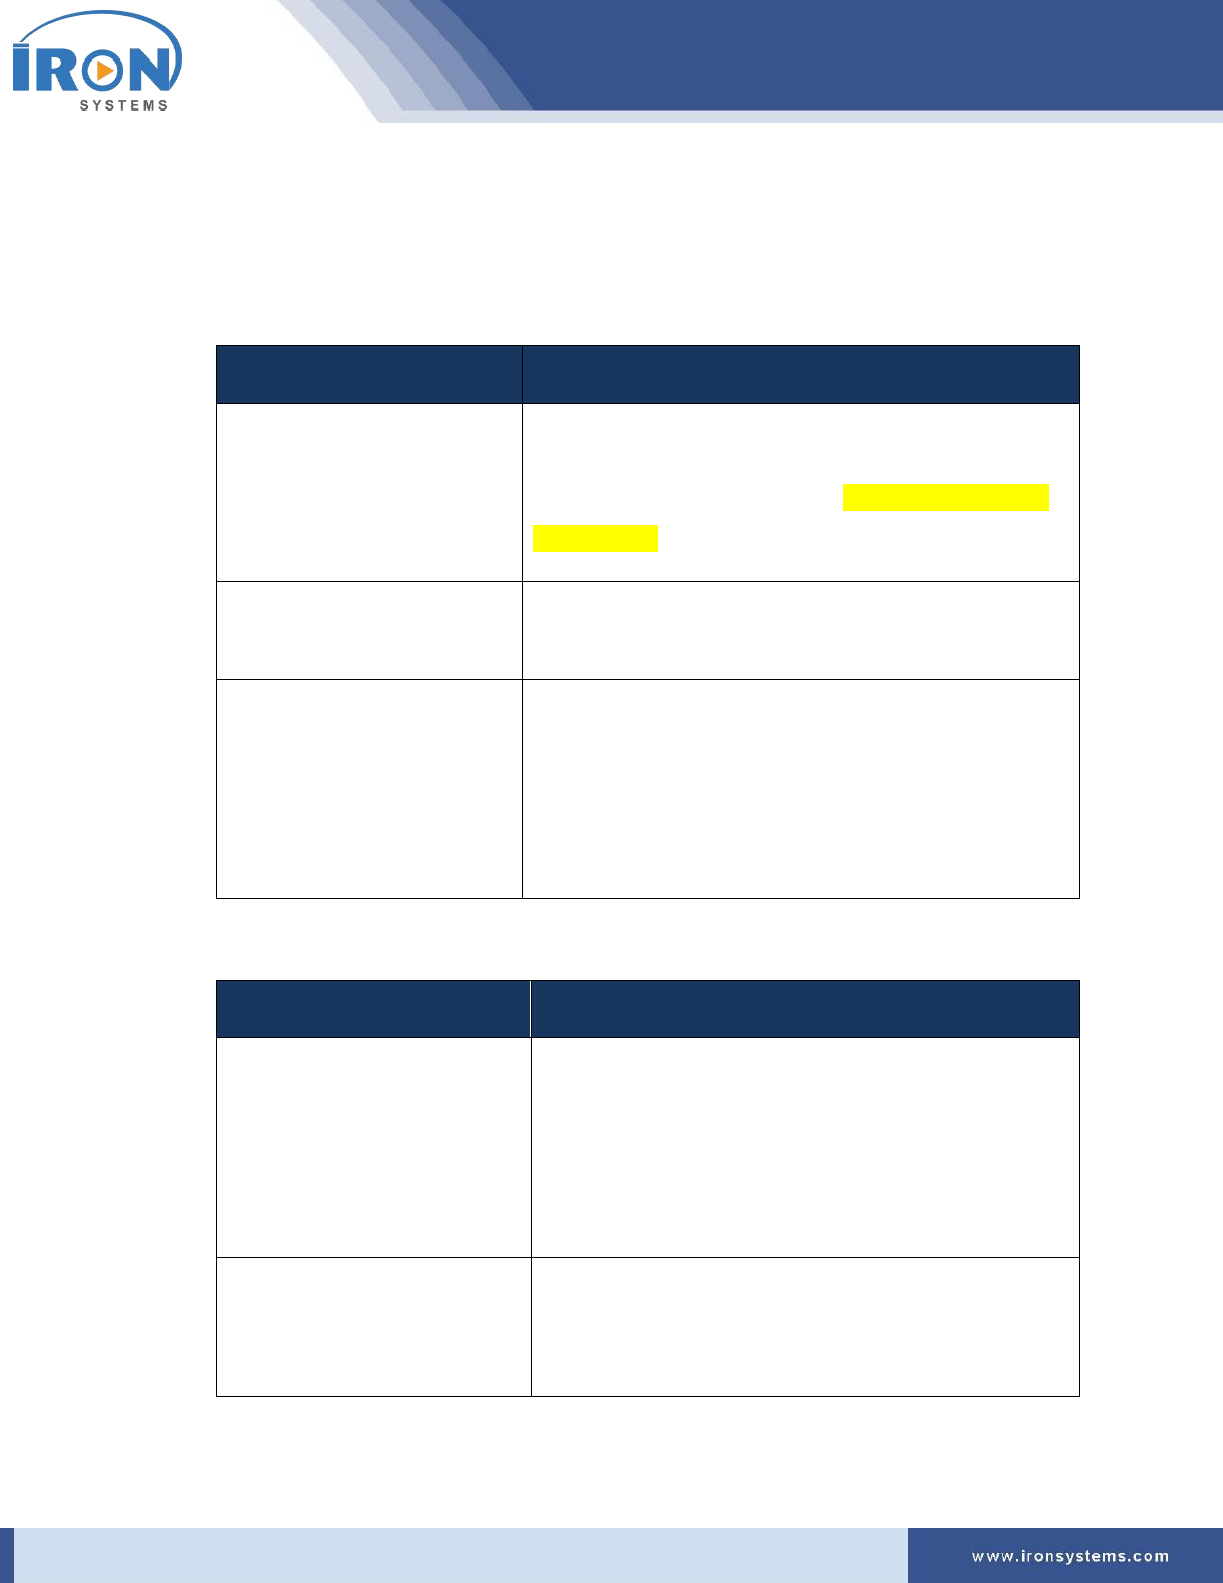
2. Complete the following fields in the (1) Account & Program Information tab:
Field
Instruction
Account ID
This field is prepopulated.
Note: This field displays the Account ID of the Partner. This
will remain same for all programs. This information needs
to be verified.
Account Name
This field is prepopulated.
Note: This field displays the partner name of the company.
Program Reference Code
• Select the appropriate program reference code in
the Program Reference Code drop-down list.
Note: This is a unique code that corresponds to a
specific Program as every Program has its own
unique Program Code.
3. Complete the fields in the (2) Case Contact Information tab:
Field
Instruction
Jobsite Location (Select Name)
• Select jobsite location name for dispatch in the
Jobsite Location (Select Name) drop-down list.
Note: Each Jobsite needs to be registered in the
Serviceo prior to creating a new case. The list of
registered Jobsites is available as a drop down.
Jobsite Contact (Name) - End
User or Ship To
• Type the name of End User or Ship-To in this field.
Note: This person will be first point of contact with
whom IRON Service Global will coordinate arrival.
serviceo
Corporate Headquarter: 980 Mission Court, Fremont, CA 94539, USA. Phone: +(1) 408-895-8000, Fax: +(1) 408-943-8101
Jobsite Contact (Email) - End
User or Ship To
• Type the E-Mail ID of End User of Ship-To in this
field.
Note: This E-Mail ID is used by IRON Service Global
to coordinate arrival.
Jobsite Contact (Phone) - End
User or Ship To
• Type phone number of End User or Ship-To in this
field.
Note: This phone number on which IRON Service
Global will reach out to coordinate arrival of
engineer.
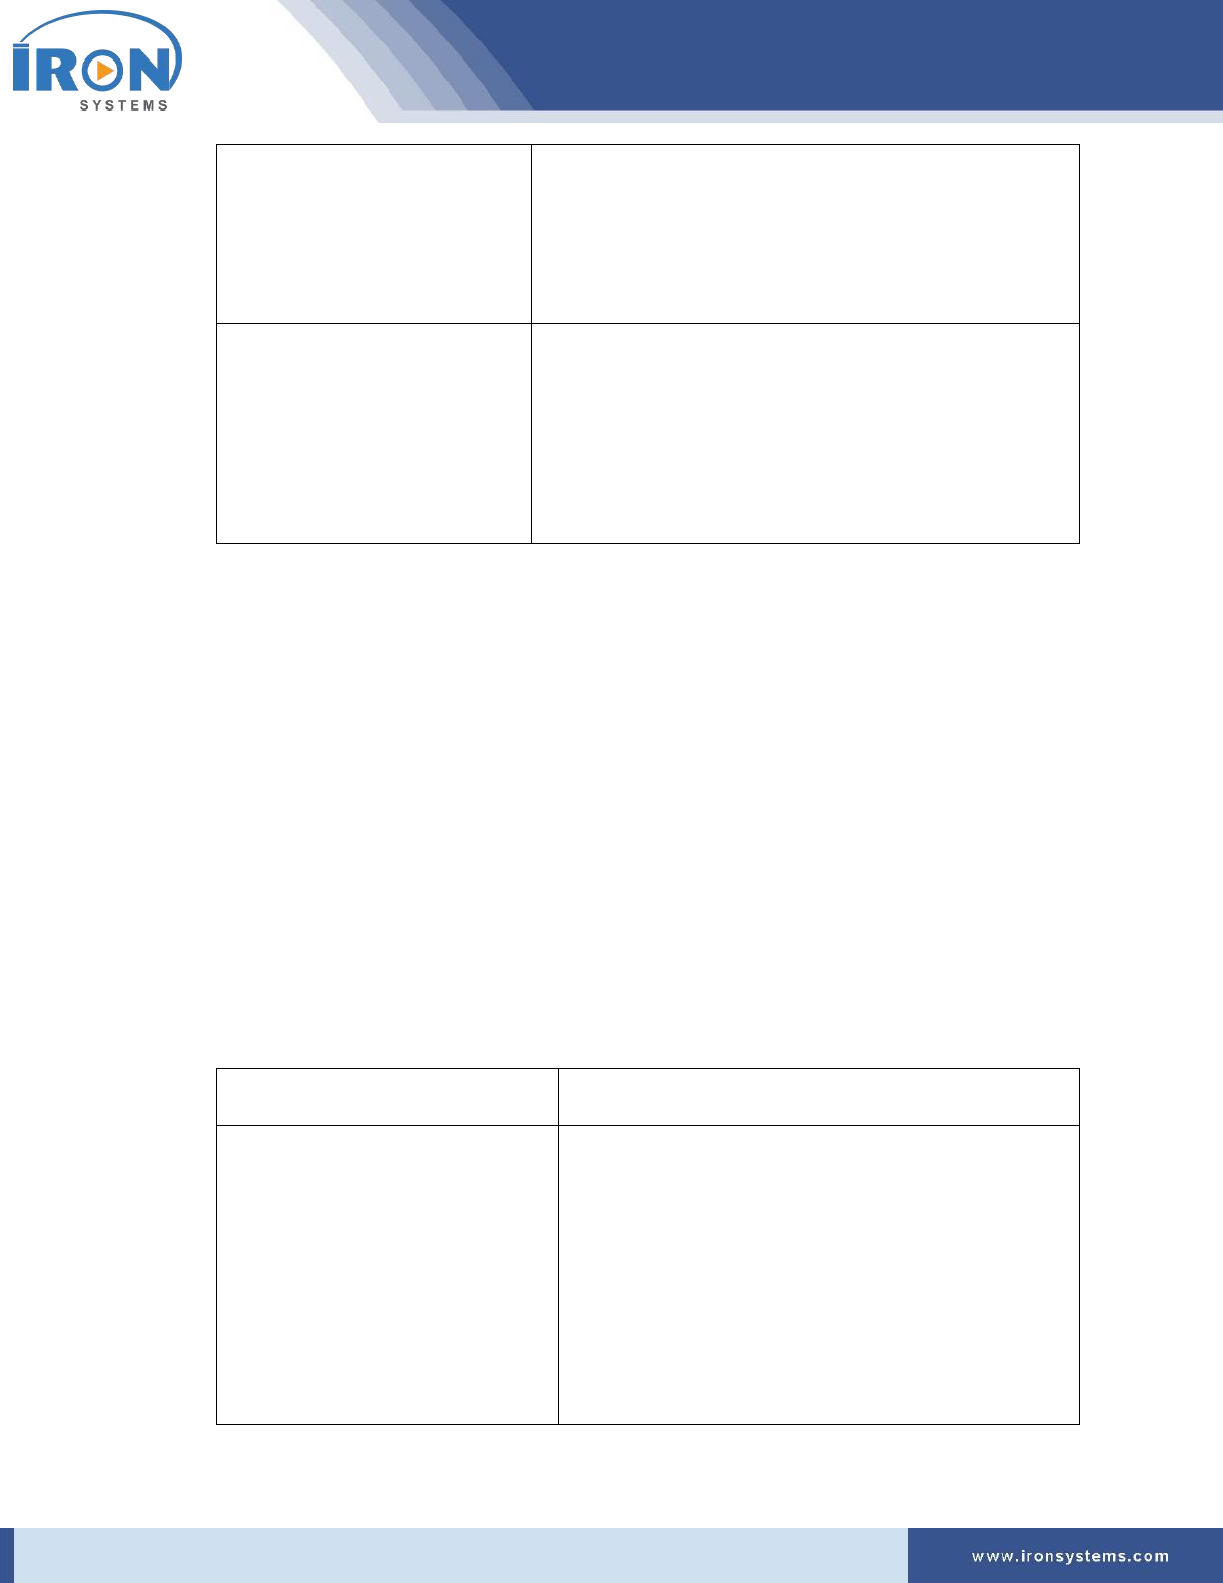
4. Enter reference case number (Client Case Number or Purchase Order Number) in the Case
Reference (Partner Case Number) field in the (3a) Case Details tab.
Note: This number will be used for reporting and billing references.
5. Type the short summary related to the case in the Case Title (Summary) field in the (3a) Case
Details tab.
6. Type the detailed case description in the Case Description (Details) text box in the (3a) Case
Details tab.
7. Type special instruction related to the case, if any, in the Special Instruction for Service
Engineer (Private Message) text box in the (3a) Case Details tab.
Note: Here, users can type instructions for “Field Service Engineer”, which are not part of
Custom Work Instructions.
8. Choose the next step:
If you want to…
Then…
Create Standard Service Profile
(Default)
1. Select the Create Default Incident: Standard
Service Profile option.
Note: When you select the Create Default
Incident: Standard Service Profile, the
standard service profile is selected against this
case. Stand Service Profile uses preset Program
Default.

serviceo
Corporate Headquarter: 980 Mission Court, Fremont, CA 94539, USA. Phone: +(1) 408-895-8000, Fax: +(1) 408-943-8101
Create Custom Service Profile
1. Select the Create Custom Incident: Custom
Service Profile Request option to create your
own “custom service profile” per incident.
The Create Case screen updates with Create
Custom Incident: Custom Service Profile
Request fields allowing you to select Talent
Type, Talent Level, and SLA Priority differing
from the Program’s Standard Incident Profile
and specific for this case.
2. Select the required service type in the Service
Type drop-down list.
Tip: You can any of the following type of
services:
• Desk-side Support
• IMAC
• Break/Fix Service
3. Select the relevant talent type in the Service
Engineer (Talent Type) drop-down list.
Tip: You can select following talent types,
subject to availability for a given jobsite
location:
• Field Services EUC Deskside Support
• Field Service Server/Storage HW B/F
Support
• FTE-FEEUC-TEC-MSFT
• Field Service Network Support
4. Select the appropriate expertise level of
engineer in the Service Engineer (Expertise
Level) drop-down list.
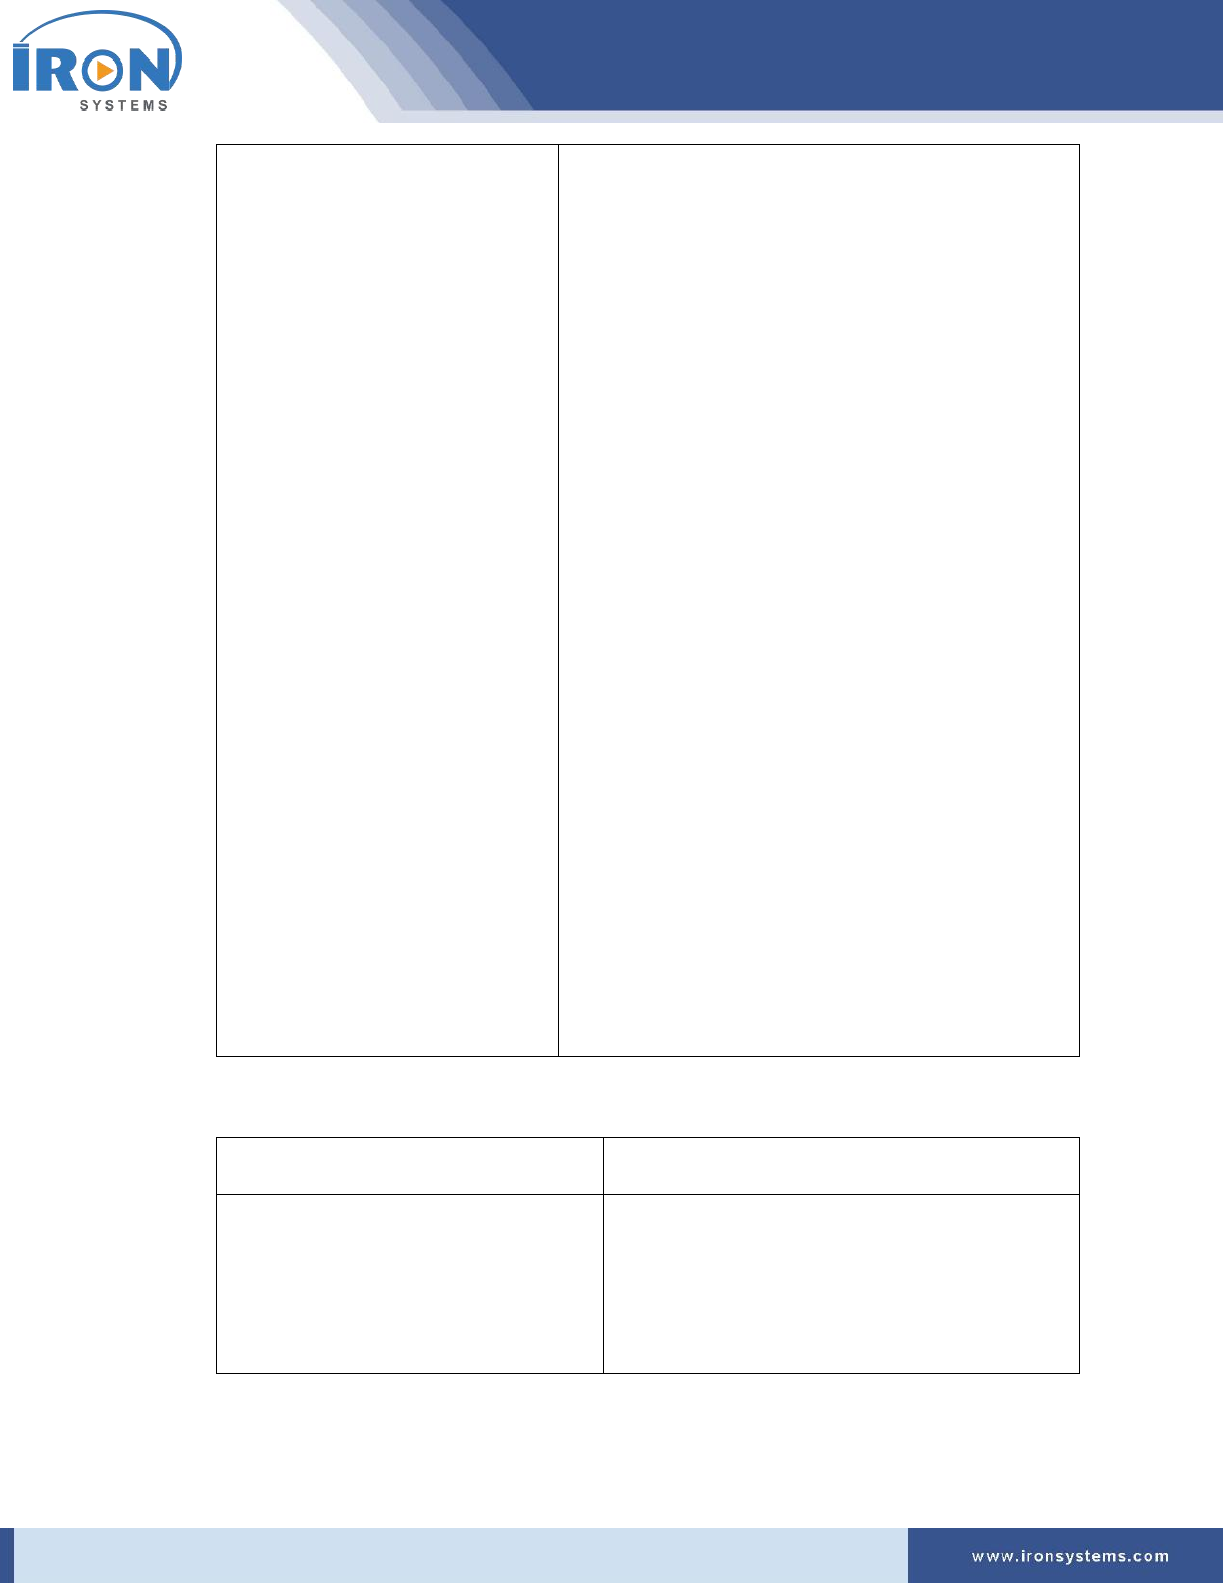
serviceo
Corporate Headquarter: 980 Mission Court, Fremont, CA 94539, USA. Phone: +(1) 408-895-8000, Fax: +(1) 408-943-8101
Tip: You can select the following levels of
technical expertise, subject to availability for a
given jobsite location:
• Level 1 (L1)
• Level 2 (L2)
5. Select the correct SLA in the Service Dispatch
Priority (SLA Requested) drop-down list.
Tip: You can select the following dispatch
priorities, subject to availability for a given
jobsite location:
• P1 (SBD4H), Same Business Day - 4
Hours
• P3 (NBD), Next Business Day
• P4 (2BD), 2 Business Days
• P5 (3BD), 3 Business Days
• P6 (5BD), 5 Business Days
6. Select the duration of event application for
maintenance in the Maintenance Event
Duration (PPM* Hours) drop-down list.
7. Select the required number of service
engineers in the Number of Service Engineers?
drop-down list.
9. Choose the next step:
If you want to…
Then…
Request for Customer Appointment
Setup (Call Customer)
Select the Customer Appointment Setup Request
(Iron Service Global to Call Customer) option.
Note: Here, a request is sent to Iron System to call
End-Customer and setup an appointment.
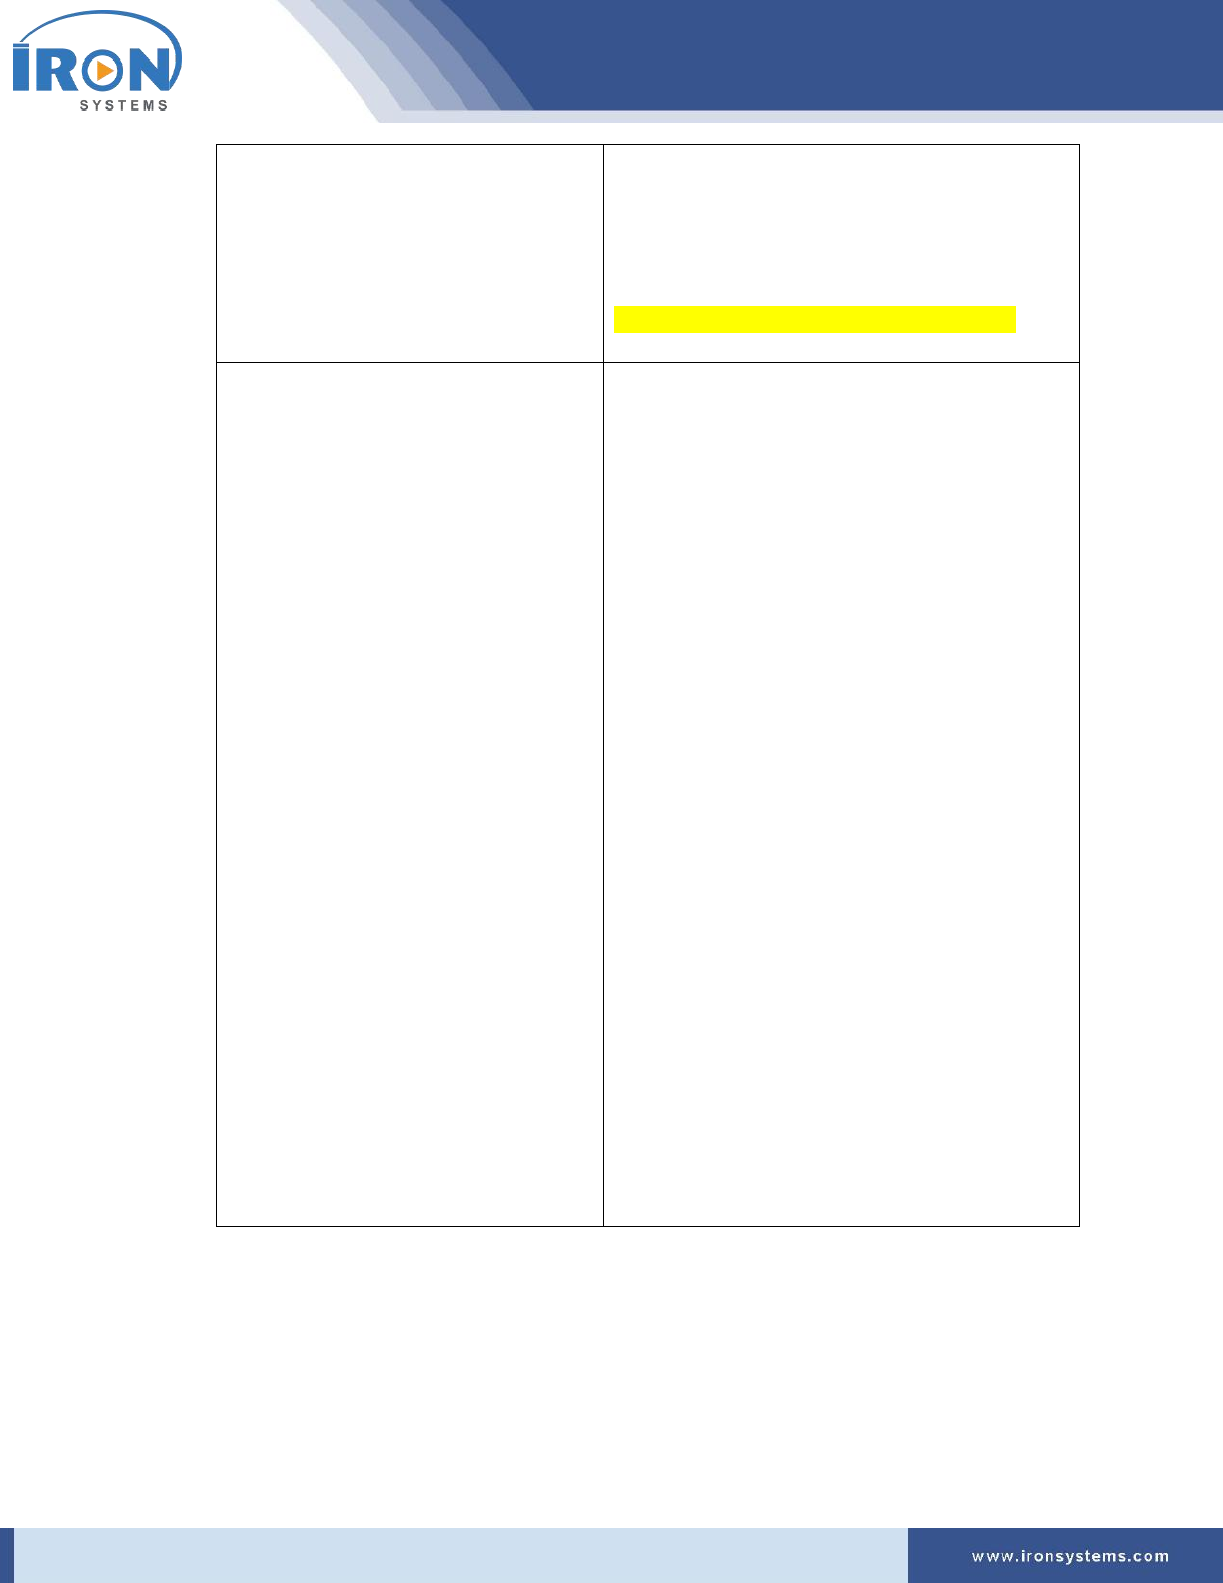
serviceo
Corporate Headquarter: 980 Mission Court, Fremont, CA 94539, USA. Phone: +(1) 408-895-8000, Fax: +(1) 408-943-8101
Request for SLA Priority: SBD
Select Dispatch Now (SLA Priority: SBD) option for
same business day dispatch. This is a Same
Business Day (SBD) premium service contract
option.
Note: Details will be updated in next version.
Pre-Schedule an Appointment
Select the Pre-Scheduled Appointment (Enter
Date/Time (Local Time Zone) below) option if
your Service Desk has already setup an
appointment with End-Customer.
To pre-schedule your appointment, follow the
below steps.
1. Type or select the Customer Appointment
Schedule (Start) Date in the Pre-Schedule
Customer Appointment Schedule (Start)
Date field.
Tip: Click anywhere in the field and then
select the date from the calendar that
displays.
2. Type or select Customer Appointment
Schedule Start Hour in the Pre-Schedule
Customer Appointment Schedule (Start)
Hour field.
3. Type or select Customer Appointment
Schedule Start Minute in the Pre-Schedule
Customer Appointment Schedule (Start)
Minute field.
10. Click the File Upload button in the File Upload tab to upload any relevant document required in
this case.
11. Click the Review & Confirm button to review and confirm the details before case creation.
It will take you to the Review Order Summary Screen for….

serviceo
Corporate Headquarter: 980 Mission Court, Fremont, CA 94539, USA. Phone: +(1) 408-895-8000, Fax: +(1) 408-943-8101
4 Setup
This module allows users to create new jobsite, update existing jobsite location, and view jobsite list.
Here, you can create new jobsite location by selecting nearby service zone or by uploading the jobsite
list.
Here, you can also view various stages involved to complete a Work Order. The progress bar will run a
colored bar showing the progress stage completed during the process.
This progress bar provides lots of flexibility for service handling and fulfilment while providing visibility
for users to better understand the status.
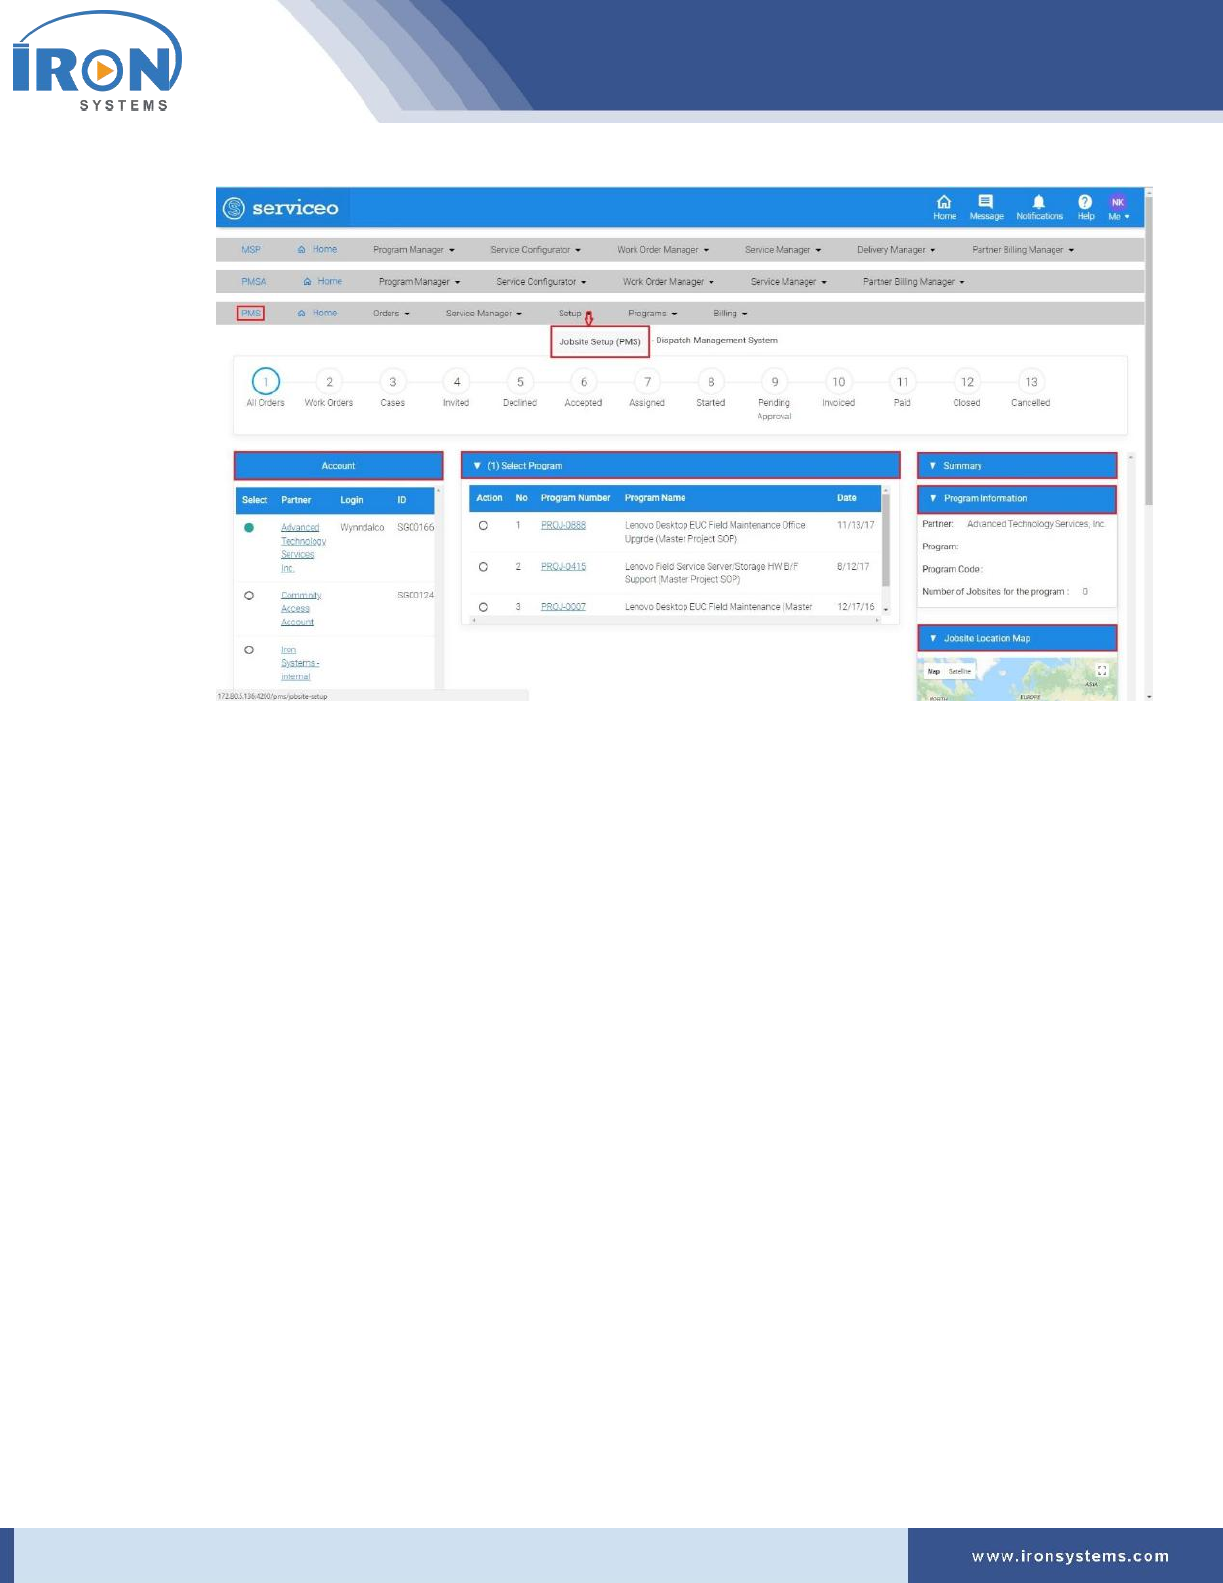
4.1 Jobsite Setup (PMS)
Here, you can configure Jobsite Setup, view existing Jobsite Locations, update a Jobsite Location, and
create a new Jobsite Location.
In the Serviceo, a new Jobsite can be added to Program location list through the following ways:
• Enter Address and Search for Nearby Service Zone
• Select a preferred Nearby Service Zone to Create a New Jobsite
Here, you can also view various stages involved to complete a Work Order. Each Work Order would have
predefined stages.
To access Jobsite Setup screen for PMS, perform the following steps:
1. Click the Setup next to the PMS Home icon and then click the Jobsite Location (PMS) option at
the top of the home page.
The Jobsite-setup screen appears as shown in Figure 4.1.
serviceo
Corporate Headquarter: 980 Mission Court, Fremont, CA 94539, USA. Phone: +(1) 408-895-8000, Fax: +(1) 408-943-8101
Figure 4.1: Jobsite-setup screen
Note: The Jobsite-setup screen shows progress bar at the top and the Account section at the left
side of the screen. In the right side of the Jobsite-setup screen, the Summary section is being
displayed that contains Program Information and Jobsite Location Map tabs.
The progress bar enables users to see stages of a specific process/task that are involved to
complete a work order.
The Account section displays a list of partners including their login, ID and other details. The
Summary section lists program information for the selected Partner along with its Jobsite
Location details on the Map.
Tip: Click the Account name next to the Select column in the Account section to view Account
Details. Click the Program Number next to Action column in the (1) Select Program tab to view
the program details.
4.1.1 Viewing Jobsite List
Here, you can view the list of Jobsite Locations associated with Program for the selected Partner in the
Account section.
To view a list of Jobsite Location, perform the following steps:
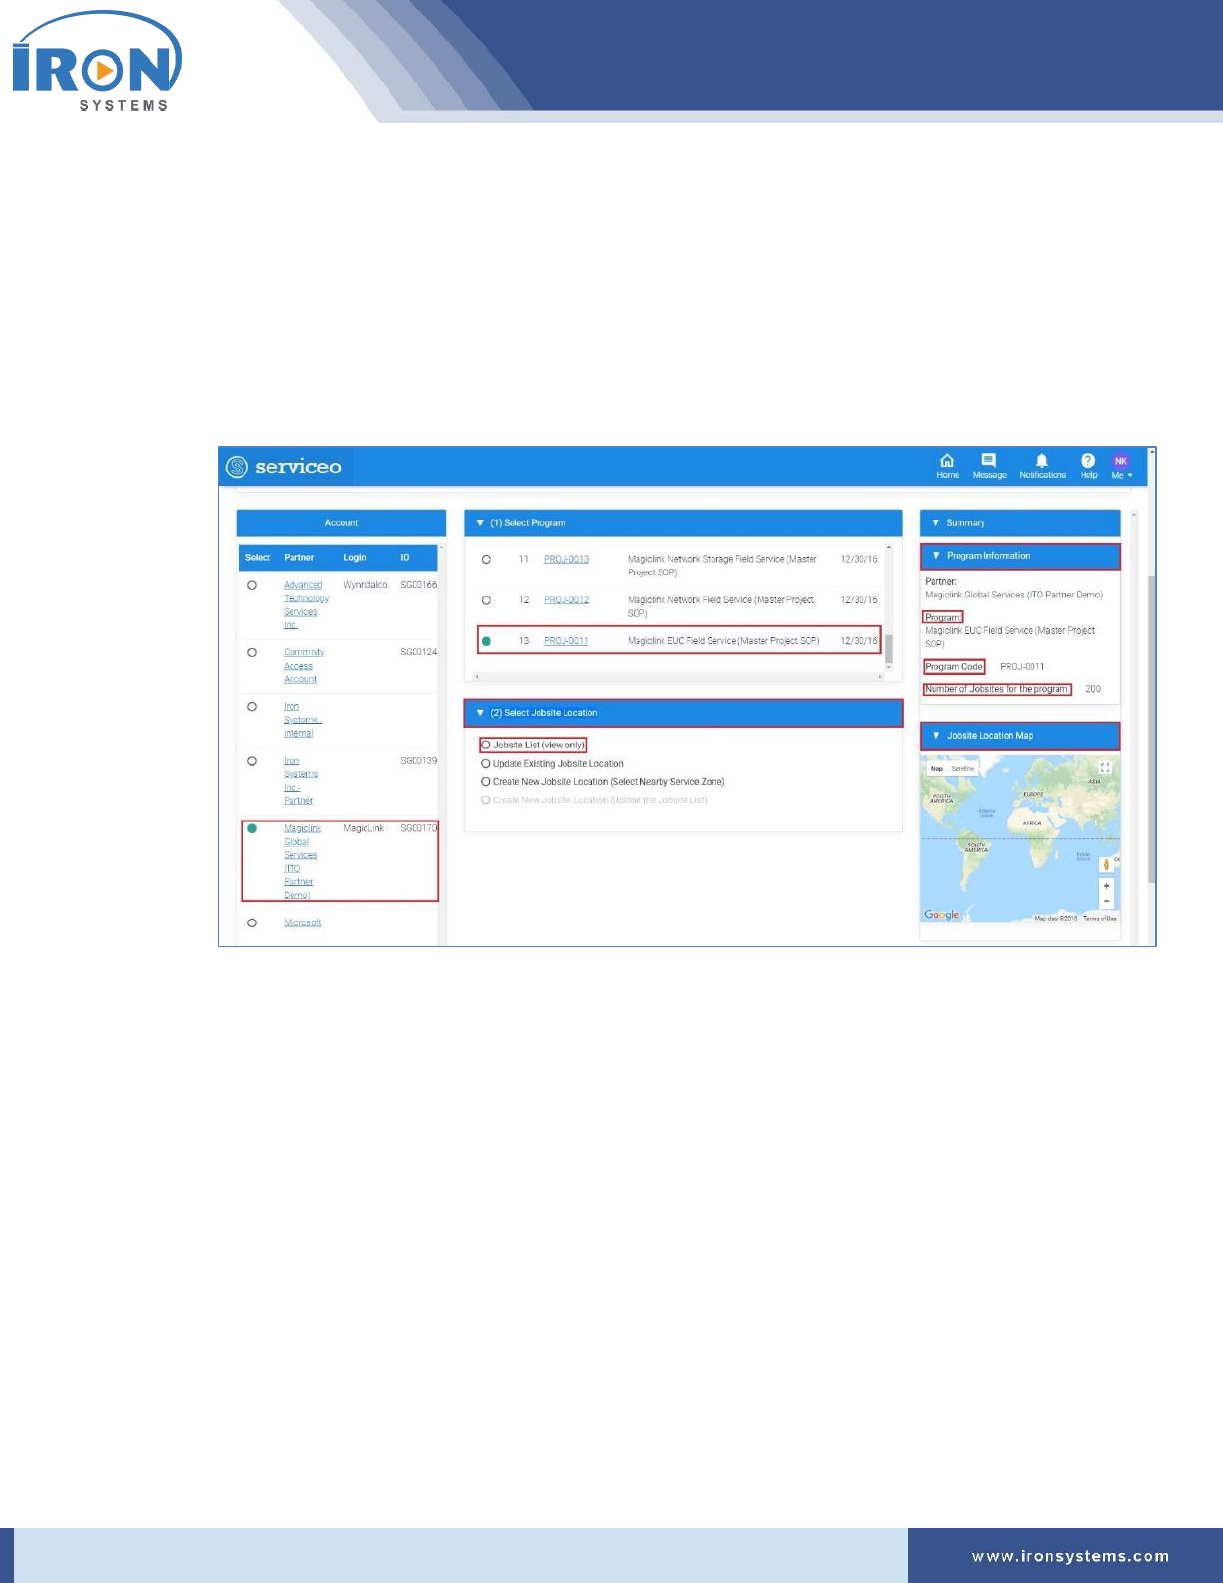
1. Select the partner in the Account section to view all listed programs. Refer Figure 4.1.
serviceo
Corporate Headquarter: 980 Mission Court, Fremont, CA 94539, USA. Phone: +(1) 408-895-8000, Fax: +(1) 408-943-8101
Tip: As you select Partner in the Account section, a list of Programs, which are associated with
the selected Partner, get displayed in the (1) Select Program tab. The program information of
the selected Partner is also displayed in the Program Information tab in the right side of the
Jobsite-setup screen.
2. Select the program in the (1) Select Program tab for which you want to view Jobsite Locations.
The Jobsite-setup screen updates with (2) Select Jobsite Location tab as shown in Figure 4.2.
Figure 4.2: Jobsite-setup screen - (1) Select Program
Tip: When you select the Program in the (1) Select Program tab, the program details, including
Program, Program Code, and Number of Jobsites for the program, get updated in the Program
Information tab as per Program selection.
The Jobsite Location Map also gets changed with the selection of Program in the (1) Select
Program tab.
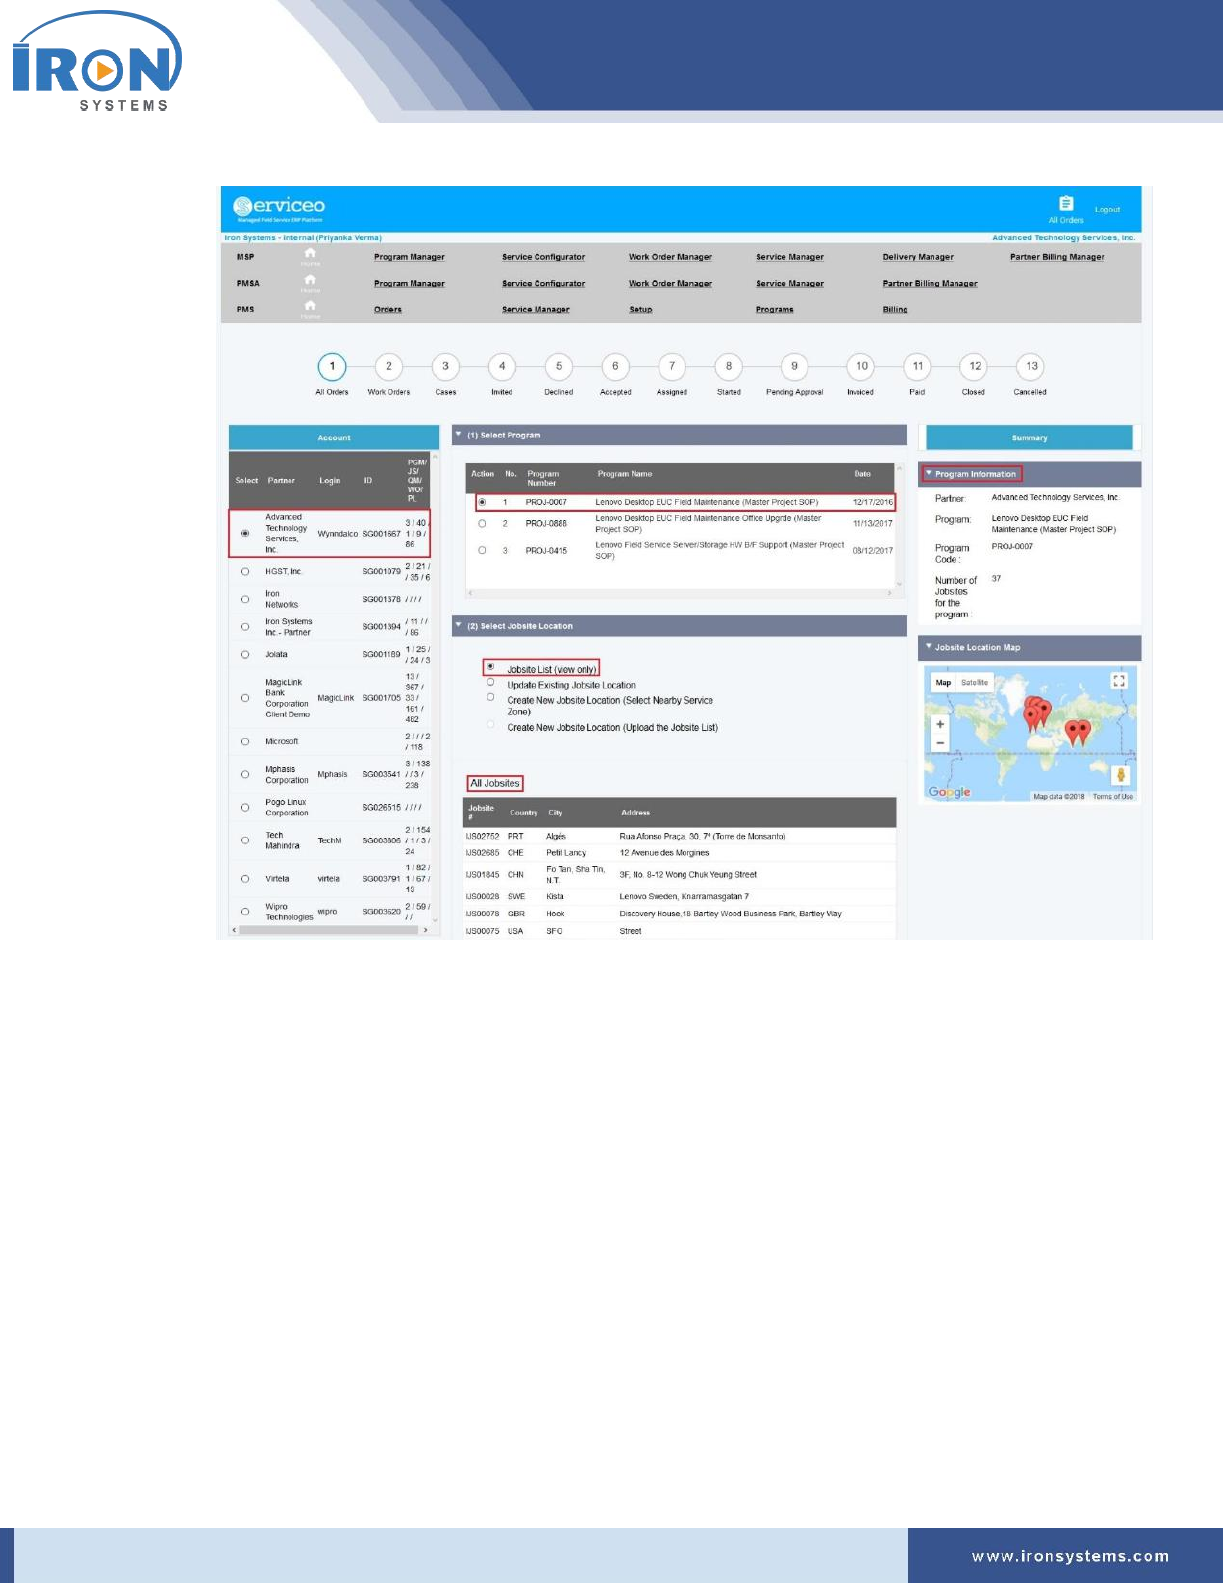
3. Select the Jobsite List (view only) in the (2) Select Jobsite Location tab. Refer Figure 4.2.
The Jobsite-setup screen updates with a list of all Jobsites which are linked with the selected
program for the Partner as shown in Figure 4.3.
serviceo
Corporate Headquarter: 980 Mission Court, Fremont, CA 94539, USA. Phone: +(1) 408-895-8000, Fax: +(1) 408-943-8101
Figure 4.3: Jobsite-setup screen - All Jobsites
Note: Here, you can view the list of all the jobsites that are linked to the selected program and
the detailed information about all the jobsites. The jobsite list includes the following fields:
a) Jobsite Code
b) Country
c) City
d) Address
4.1.2 Updating Existing Jobsite Location
Here, users can edit the Contact Information to keep Jobsite detail updated. You can also manage the
status of the Jobsite location by assigning Active/Passive/Archived status.
To update or edit existing Jobsite Location details, perform the following steps:
serviceo
Corporate Headquarter: 980 Mission Court, Fremont, CA 94539, USA. Phone: +(1) 408-895-8000, Fax: +(1) 408-943-8101
1. Select the program in the (1) Select Program tab whose jobsite location you want to update.
Refer Figure 4.3.
2. Select the Update Existing Jobsite Location option in the (2) Select Jobsite Location tab.
The Jobsite-setup screen updates with the Default Profile and List of all available Jobsites
sections as shown in Figure 4.4.
Figure 4.4: Jobsite-setup screen – Available Jobsites
Tip: The List of all available Jobsites section is composed of four tabs:
• The Active tab holds all available jobsites that are in Active state.
• The Passive tab holds all available jobsites that are in Passive state.
• The Archived tab contains all those jobsites that are less frequently used.
• The All tab displays all available jobsites irrespective of their states.
serviceo
Corporate Headquarter: 980 Mission Court, Fremont, CA 94539, USA. Phone: +(1) 408-895-8000, Fax: +(1) 408-943-8101
3. Click the Edit link of the Jobsite to update jobsite location details.
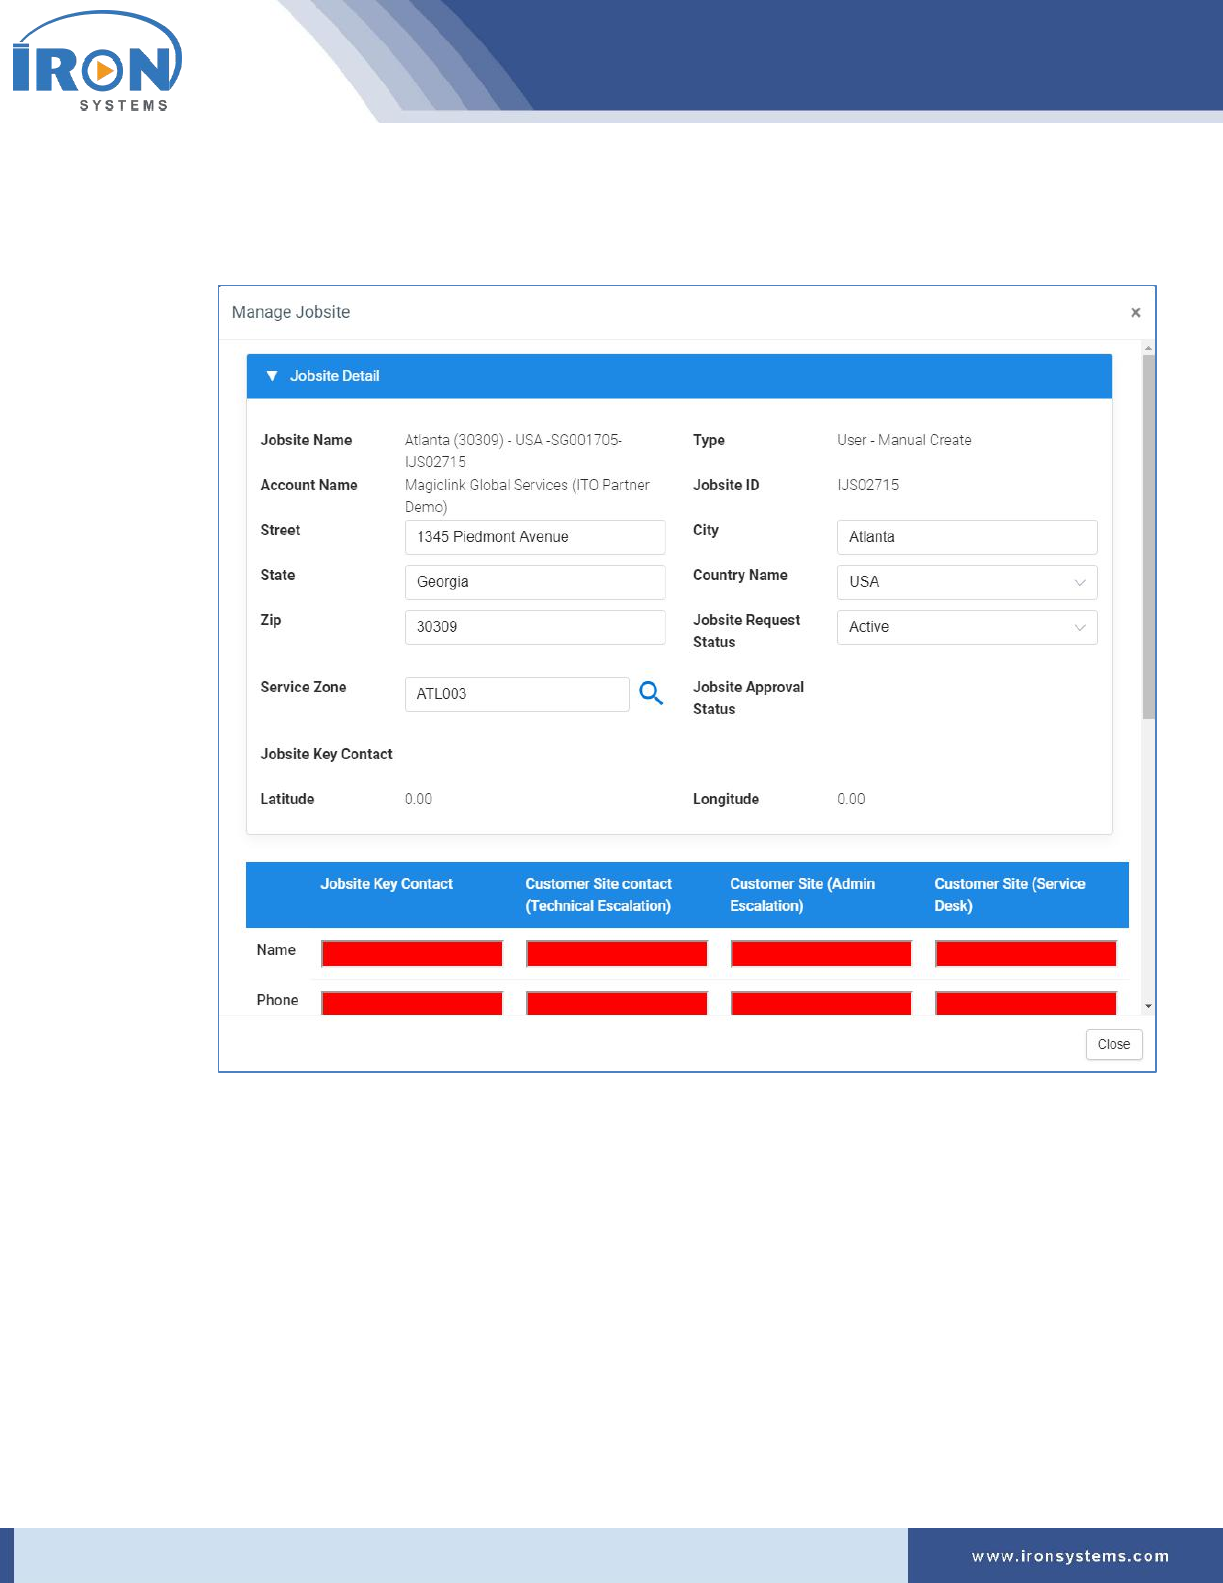
It will take you to the Manage Jobsite pop-up to make changes as shown in Figure 4.5.
Figure 4.5: Manage Jobsite pop-up
4. Make the relevant changes in the fields you want to make and then click Save button to update
the changes.
Tip: Click the Close button to discard the changes.
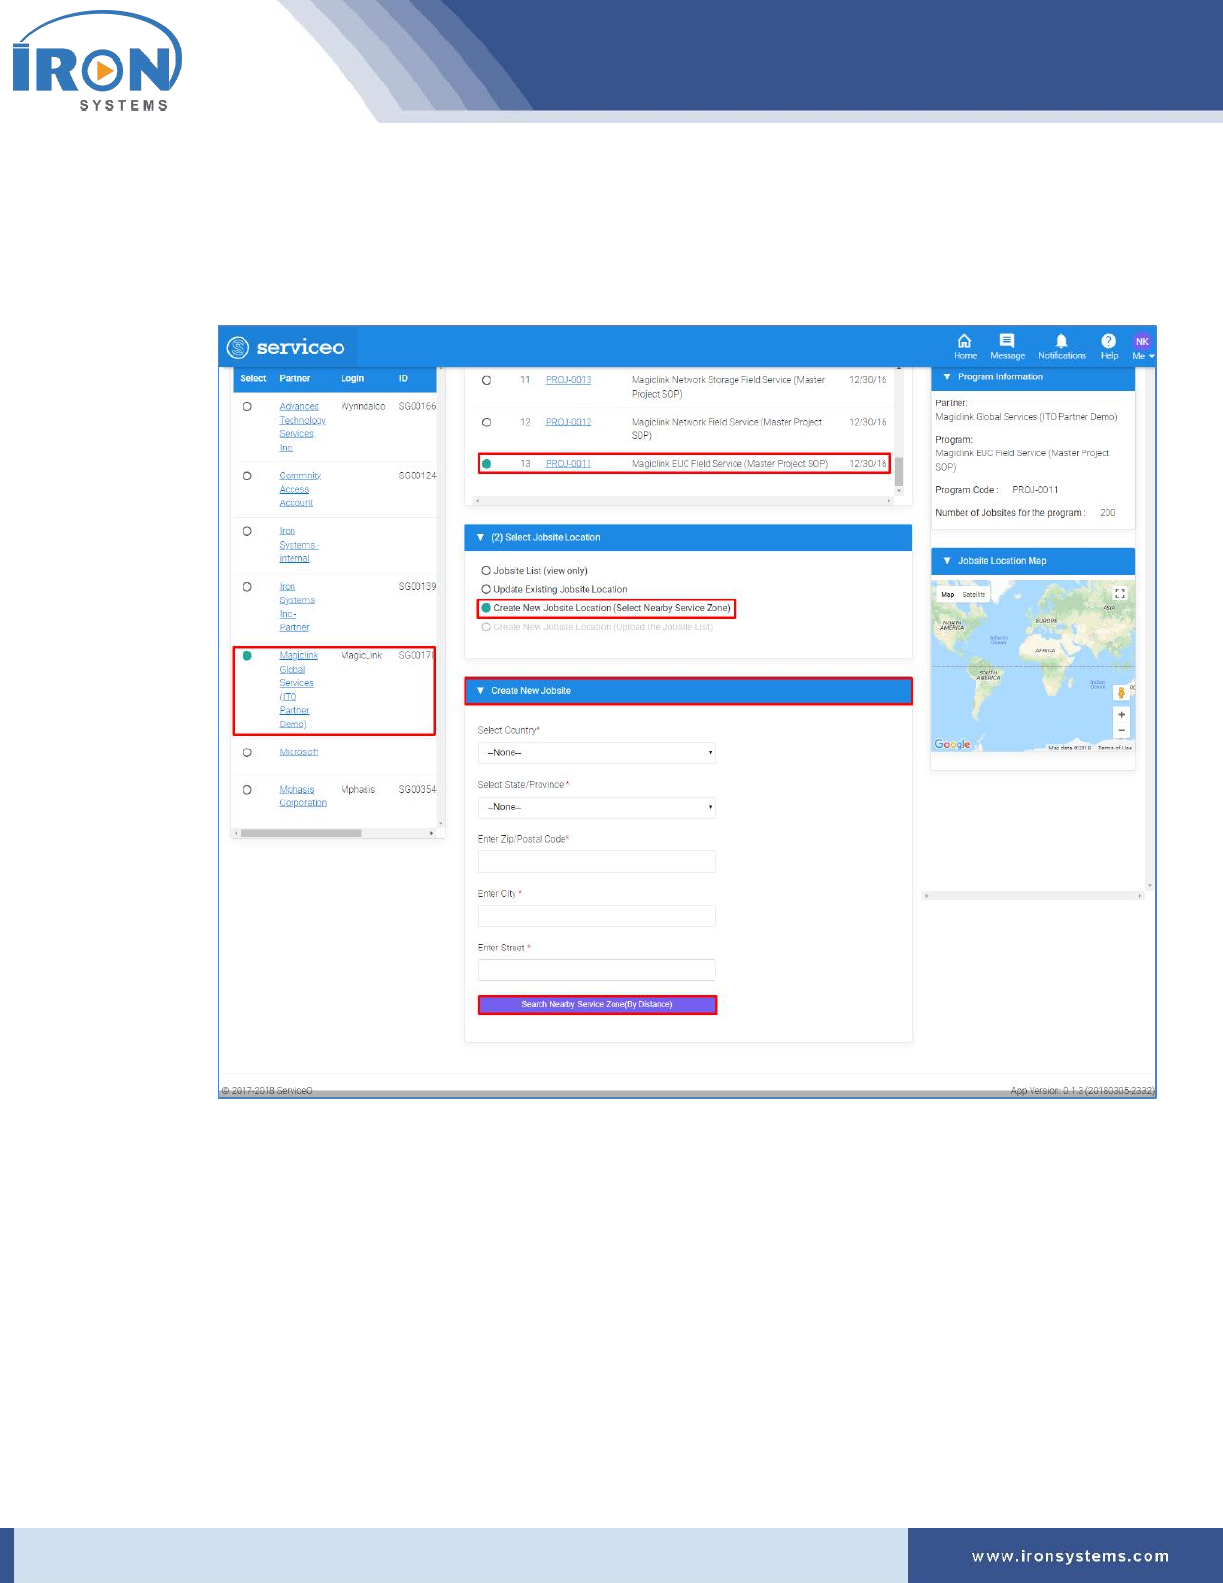
4.1.3 Creating New Jobsite Location by Selecting Nearby Service Zone
To create new jobsite location, perform the following steps:
1. Select the program in the (1) Select Program tab for which you want to create new jobsite
location by selecting nearby available service zone. Refer Figure 4.2.
serviceo
Corporate Headquarter: 980 Mission Court, Fremont, CA 94539, USA. Phone: +(1) 408-895-8000, Fax: +(1) 408-943-8101
2. Select the Create New Jobsite Location (Select Nearby Service Zone) option in the Select
Jobsite Location tab.
The Jobsite-setup screen updates with the Create New Jobsite tab as displayed in Figure 4.6.
Figure 4.6: Jobsite-setup screen - Create New Jobsite
Note: Fields marked with asterisk are mandatory.
3. Select the country name in the Country drop-down list.
4. Select the state or province in the State/Province drop-down list.
5. Type the postal code of the area in the Zip/Postal Code field.
6. Type the name of city in the City field.
7. Type the street name in the Street field.
8. Click the Search Nearby Service Zone (By Distance) button to search the nearest location.
serviceo
Corporate Headquarter: 980 Mission Court, Fremont, CA 94539, USA. Phone: +(1) 408-895-8000, Fax: +(1) 408-943-8101
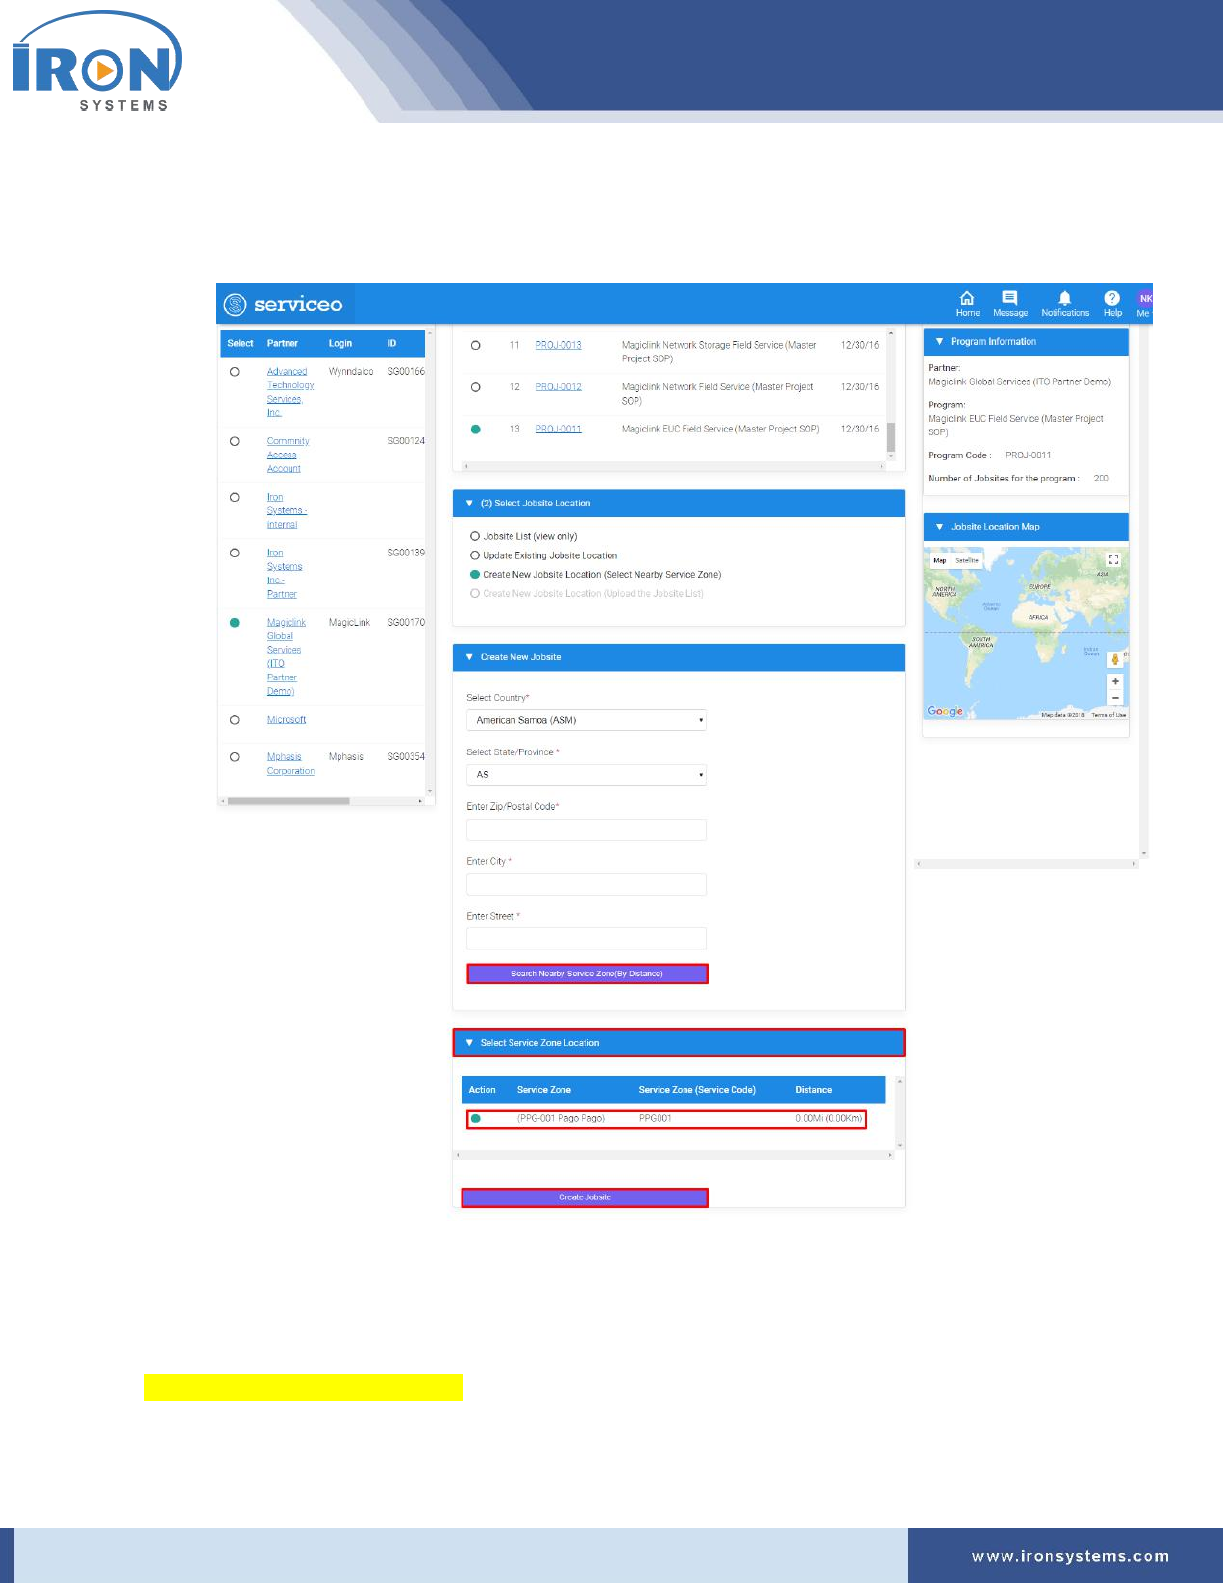
The Jobsite-setup screen updates with the Select Service Zone Location tab is displayed at the
bottom of the screen as displayed in Figure 4.7.
Figure 4.7: Jobsite-setup screen – Service Zone Location
9. Select the location which is nearest to the entered location in the Select Service Zone Location
tab and then click the Create Jobsite button to create new jobsite location for the program.
4.1.4 Creating New Jobsite Location by Uploading the Jobsite List
-------This option is not available-----

serviceo
Corporate Headquarter: 980 Mission Court, Fremont, CA 94539, USA. Phone: +(1) 408-895-8000, Fax: +(1) 408-943-8101
5 Service Configurator
The Service Configurator is where you can configure services based on your requirements. This unified
point of configuration makes it easier to configure services. It allows users to configure existing
programs, create new programs, update existing jobsite location and create new jobsite location.
Here, you can also manage Quote for the listed programs or create new quote for the program. You can
set process instructions for the listed programs.
To access the Service Configurator module, the user you log on as must have rights to run the module. If
you need access to the Service Configurator module and the program will not allow you to log on,
contact your System Administrator to verify that your user name has been granted appropriate rights.
5.1 Program Setup
This option allows users to create and manage programs associated with an Account. Here, you can use
existing program to configure Program Setup or can create new Program, if required.
5.1.1 Configuring Program Setup
Here, you can configure program setup that will be used as prerequisite for configuring pricing quote.
In order to successfully configure Program Setup, you need to select a program and the selected
program must meet the following prerequisites:
• The Program must have Jobsite Location.
• It also contains Jobsite Dispatch Service Profiles, and Provider details.
If there is no program available or associated with an Account, you need to create a new Program with
appropriate details.
A new program can be created/added through the following ways in the service:
➢ Using create new program option in the Serviceo.
➢ Through….
Using existing program option, you can configure Program Setup by selecting the prerequisites.
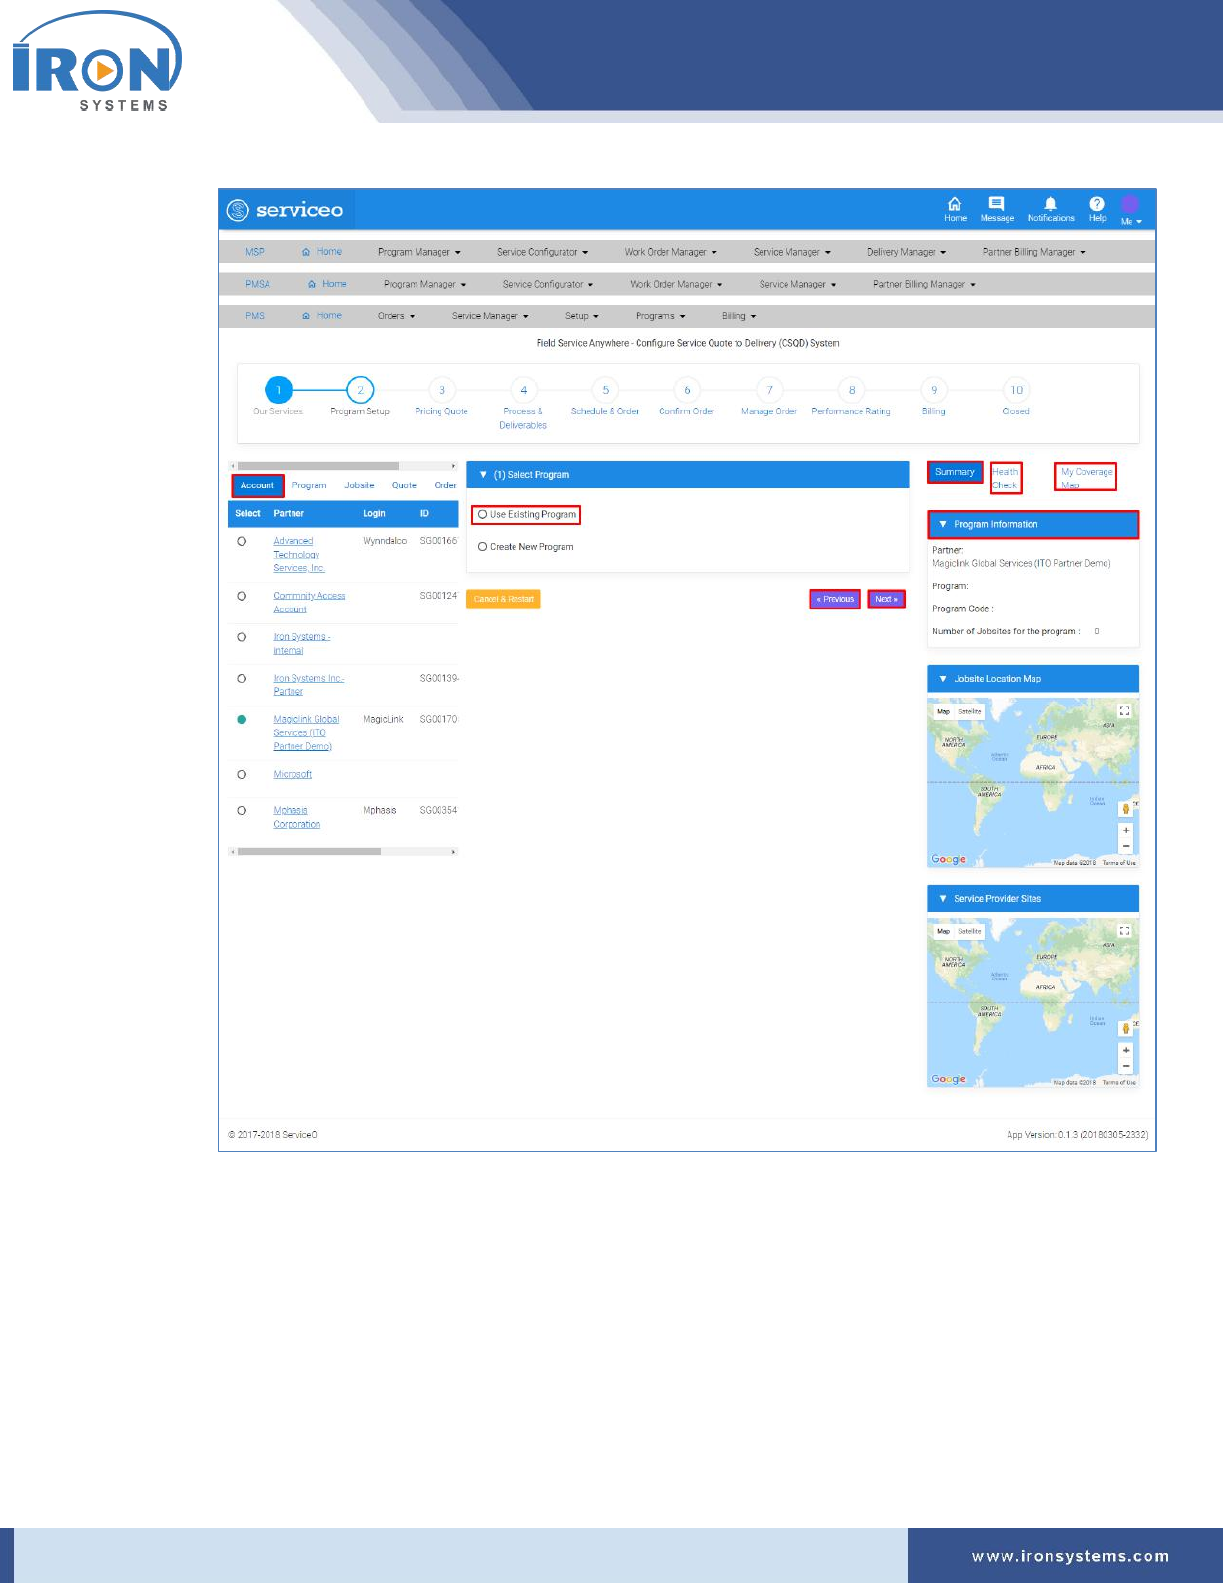
To configure Program Setup using existing Program, perform the following steps:
1. Click the Service Configurator next to the MSP Home icon and then click the Program Setup
option on the home page.
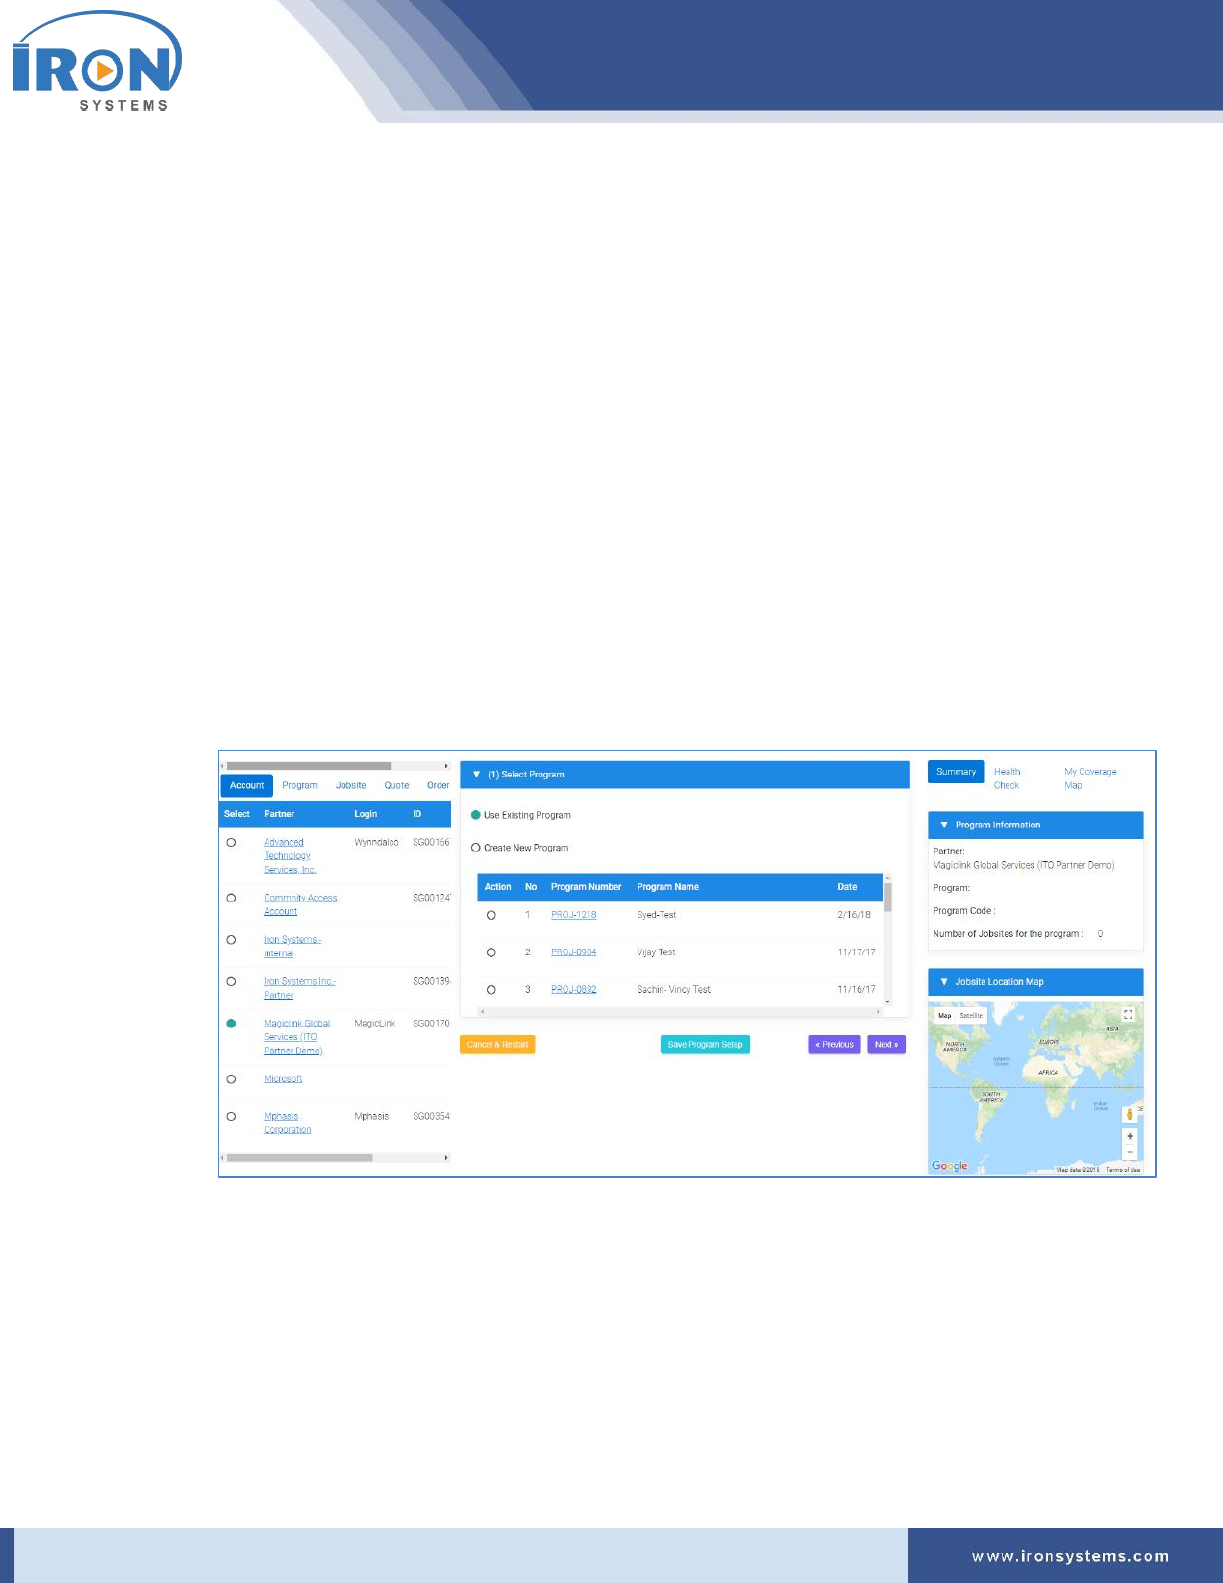
The Program screen appears as shown Figure 5.1.
serviceo
Corporate Headquarter: 980 Mission Court, Fremont, CA 94539, USA. Phone: +(1) 408-895-8000, Fax: +(1) 408-943-8101
Figure 5.1: Program screen
Note: The Program screen displays with the Account, Program, Jobsite, Quote, Order and Price
Book tabs in the left pane of the screen. The Account tab displays by default. In the right pane of
the Program screen, there are three tabs, namely Summary, Health Check, and My Coverage
Map tabs appear. Here, the Summary tab displays by default.
Here, you can also view various stages involved to complete a service configuration. The
progress bar will run a colored bar showing the progress stage completed during the process
serviceo
Corporate Headquarter: 980 Mission Court, Fremont, CA 94539, USA. Phone: +(1) 408-895-8000, Fax: +(1) 408-943-8101
This progress bar provides lots of flexibility for service handling while providing visibility for
users to better understand the status.
Tip: Click the Account Name next to the Select column in the Account tab to view Account
Details. Click the Program Number in the Program tab next to the Account tab to view the
program details. Click the Manage link in the Jobsite tab to view and edit jobsite details. Click
the Quote Number in the Quote tab to view Quote Manager details. Click the Work Order # in
the Order tab to view Work Order Details. Select the Program in the Price Book tab and then
click the View link to Price Book Details.
2. Select the account name in the Account tab for which you want to configure program setup.
Refer Figure 5.1.
Note: As you select the Account name in the Account tab, the records in the Summary, Health
Check, and My Coverage Map tabs in the right side of the screen get updated as per selection.
3. Select the Use Existing Program option in the (1) Select Program section. Refer Figure 5.1.
The Program screen updates with a list of existing programs associated with the selected
Account as shown in the below figure:
4. Select the program in the Action column to configure program setup.
The Program screen updates with the List of all available Jobsites, Jobsite Dispatch Service
Profiles, and Provider Option tabs for the corresponding “Program”, if the selected Program
contains all these details, if not, you will not be able to see any records.
serviceo
Corporate Headquarter: 980 Mission Court, Fremont, CA 94539, USA. Phone: +(1) 408-895-8000, Fax: +(1) 408-943-8101

serviceo
Corporate Headquarter: 980 Mission Court, Fremont, CA 94539, USA. Phone: +(1) 408-895-8000, Fax: +(1) 408-943-8101
Tip: Here, you can also add new jobsite to Program location list by:
• Selecting Create New Jobsite Location (Select Nearby Service Zone) option in the (2)
Select Jobsite Location tab if you want to create new jobsite location by selecting
nearby service zone.
• Selecting Create New Jobsite Location (Upload the Jobsite List) option in the (2) Select
Jobsite Location tab if you want to upload jobsite list.
5. Select the jobsite for which you want to configure program setup in the List of all available
Jobsites tab.
Note: The List of all available Jobsites tab lists all the jobsites pre-configured for a given
program.
Tip: Click Edit link next to the Select check box to edit Jobsite details. When you click the Edit
link, a Manage Jobsite pop-up appears where you can edit or modify jobsite details by typing or
selecting appropriate values in the respective fields.
You can also deselect the selected Jobsites which appears in the Selected Jobsites tab below the
List of all available Jobsites tab.
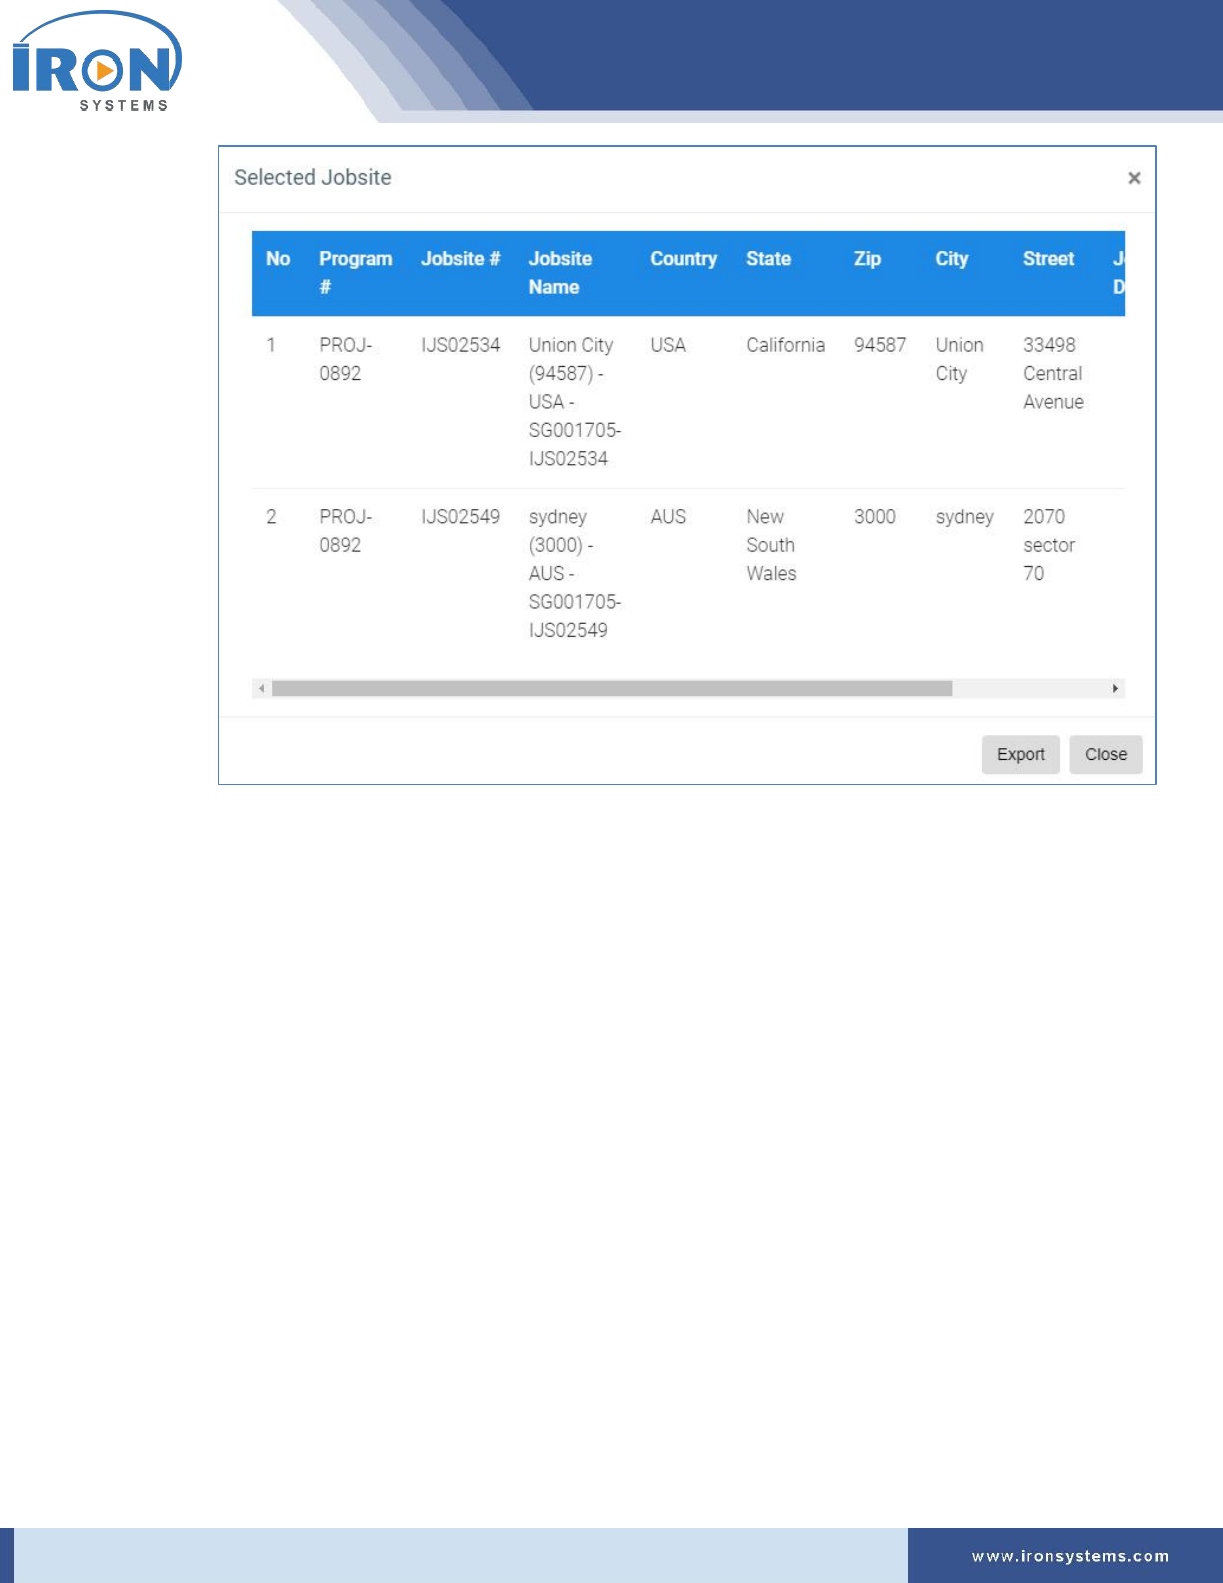
6. Select the Jobsite you want to deselect from the selected jobsite list in the Selected Jobsites tab.
Tip: Click the Expanded View in the upper-right corner of the section to view the selected
Jobsite Location in pop-up.
serviceo
Corporate Headquarter: 980 Mission Court, Fremont, CA 94539, USA. Phone: +(1) 408-895-8000, Fax: +(1) 408-943-8101
Tip: Click Export button to export Jobsite details in Excel format. Click Close button or X sign in
the upper-right corner to close the pop-up.
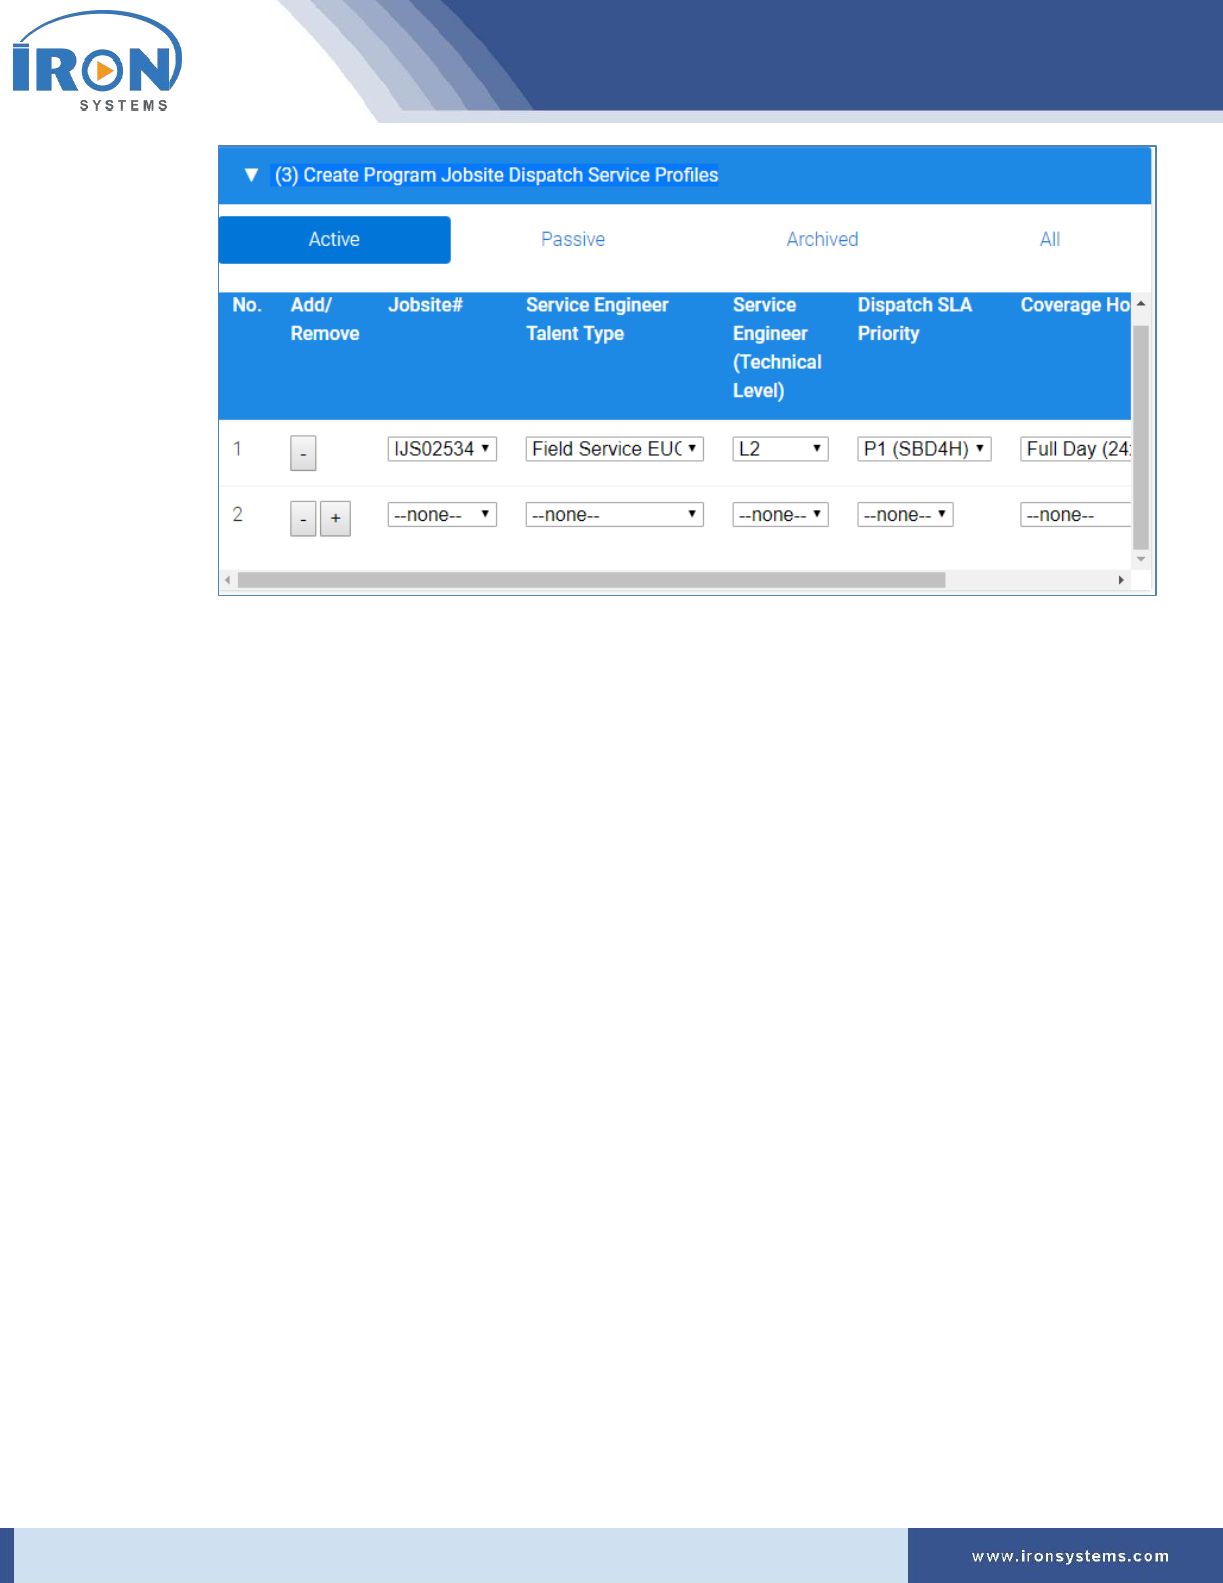
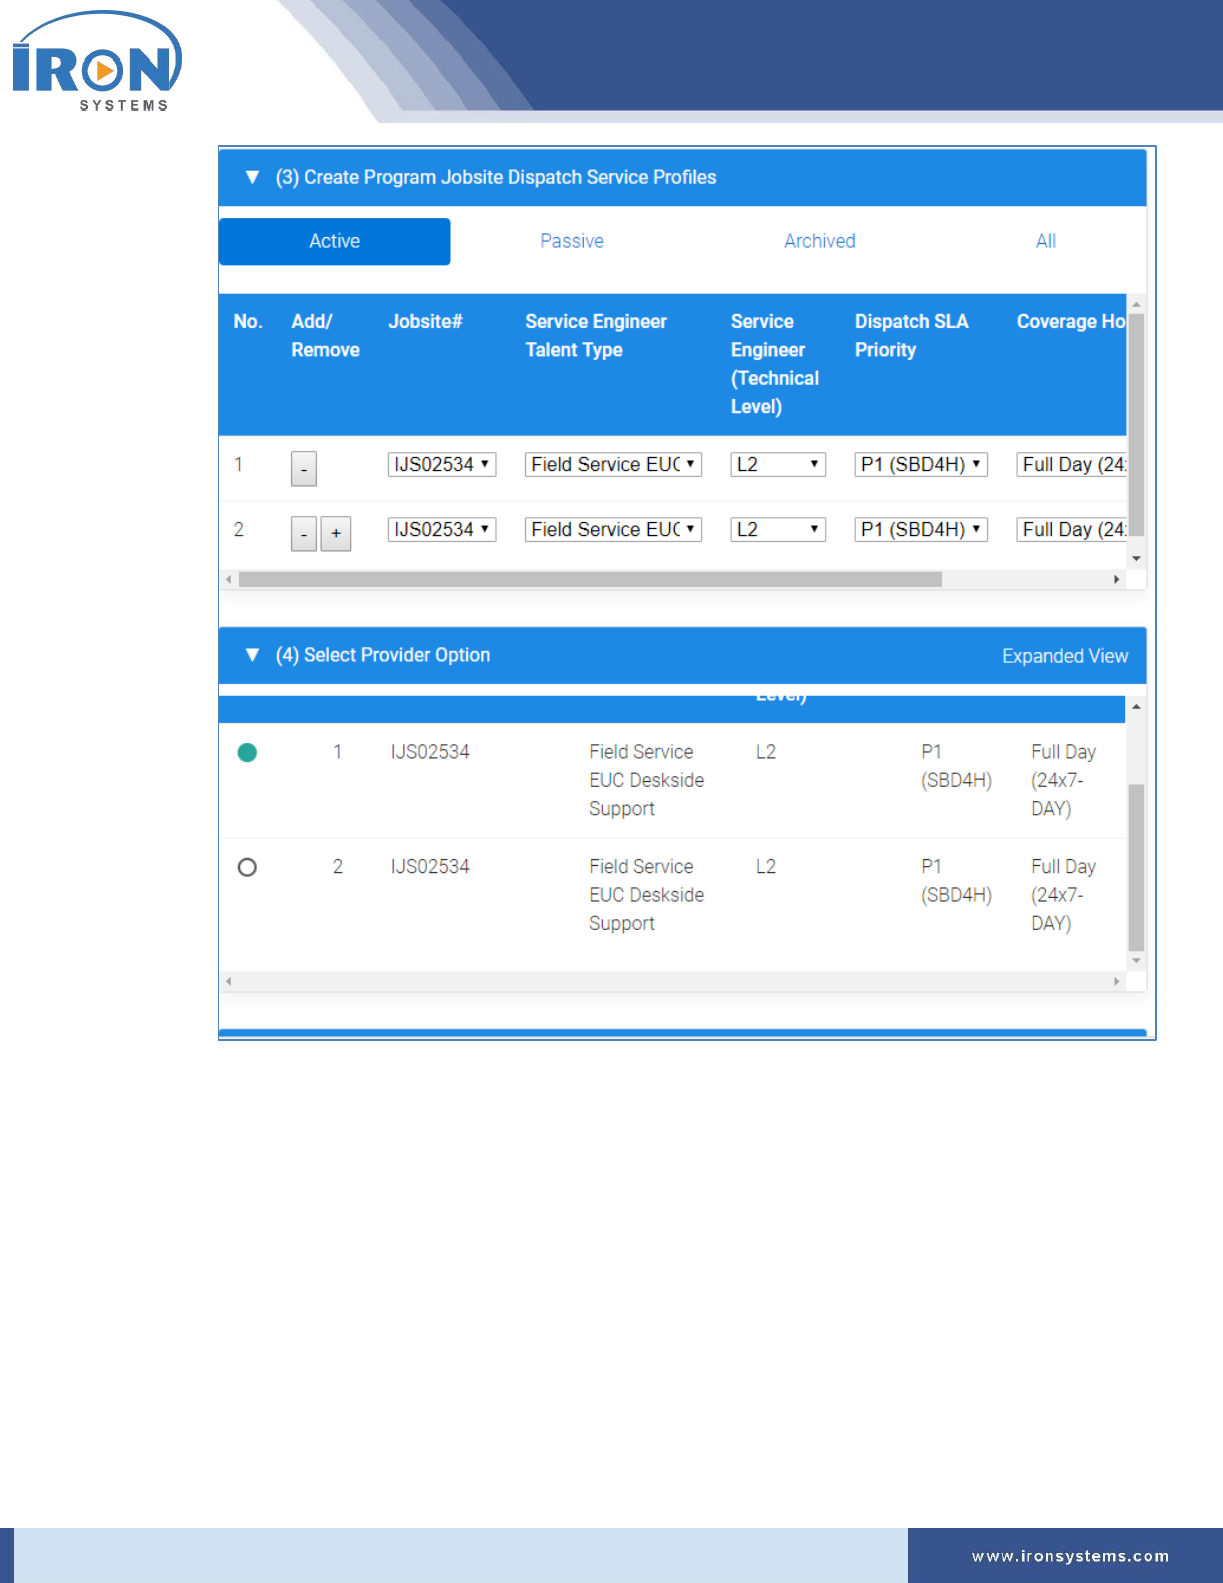
7. Select the program jobsite dispatch service profile in the (3) Create Program Jobsite Dispatch
Service Profiles tab.
Tip: Here, you can add or remove program jobsite dispatch service profile by clicking + sign.
8. Click the + (the plus sign) to add program jobsite dispatch service profile to the list.
The (3) Create Program Jobsite Dispatch Service Profiles tab updates with a new row as shown
below
serviceo
Corporate Headquarter: 980 Mission Court, Fremont, CA 94539, USA. Phone: +(1) 408-895-8000, Fax: +(1) 408-943-8101
9. Select the appropriate values in the available fields. The added Service Profile details are
displayed in the (4) Select Provider Option section. Refer the below figure:
serviceo
Corporate Headquarter: 980 Mission Court, Fremont, CA 94539, USA. Phone: +(1) 408-895-8000, Fax: +(1) 408-943-8101
10. Select the service provider in the (4) Select Provider Option section.
Note: The selected provider is displayed in the Option: B, Select Provider of your choice tab.
11. If you want to select the Iron as service provider in the Option: A, Select Iron Service Global
Auto Router Profile tab.
12. If you want to provider from the added list, select the provider of your choice in the Option: B,
Select Provider of your choice tab.
13. Click the Save Program Setup button to save the newly configured program setup.
Tip: Click Next button to move to next page and Previous button to go back to previous page.
serviceo
Corporate Headquarter: 980 Mission Court, Fremont, CA 94539, USA. Phone: +(1) 408-895-8000, Fax: +(1) 408-943-8101
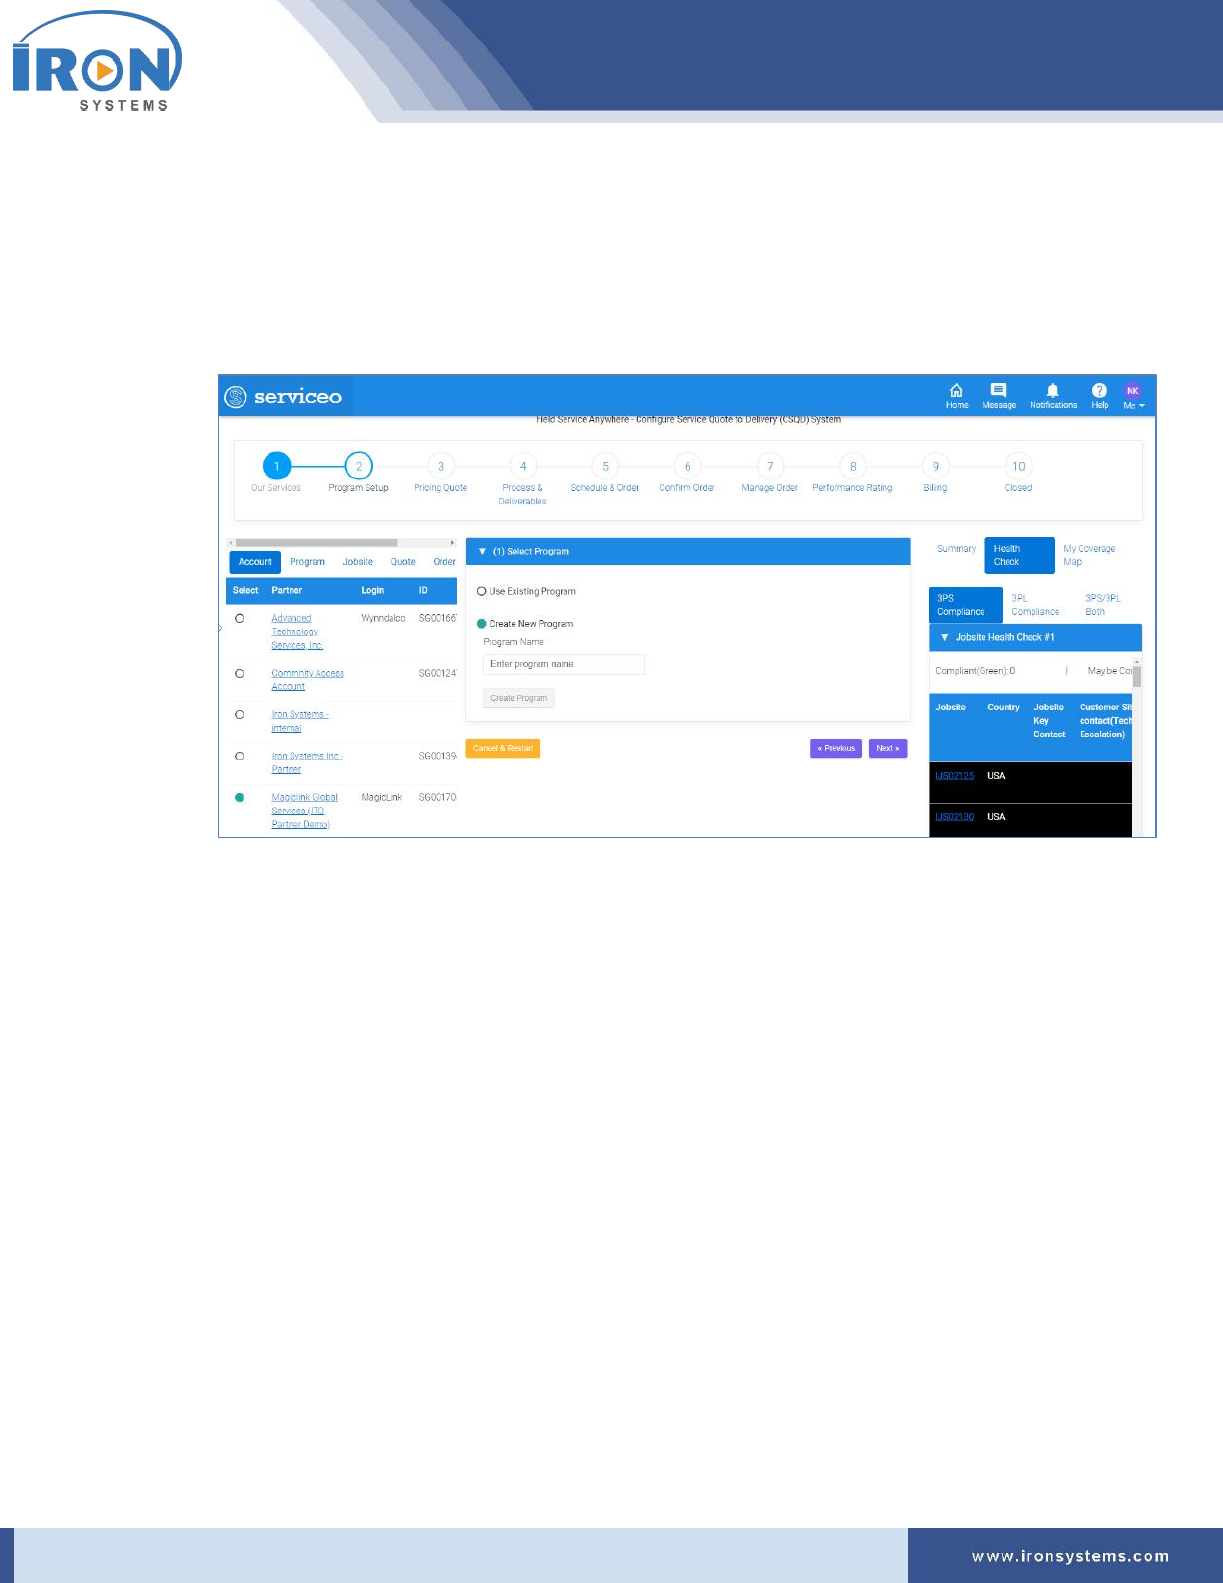
5.1.2 Creating New Program
To create new program, perform the following steps:
1. Select the Create New Program option in the (1) Select Program section. Refer Figure 5.1.
The Program screen updates with Program Name field as shown in Figure 5.2.
Figure 5.2: Program screen – Create New Program
2. Type the appropriate name in the Program Name field. Refer Figure 5.2.
3. Click the Create Program button to create save newly create program in the database.
Tip: Click Cancel & Restart button to cancel program creation. Click the Next button to move to
the next page and Previous button to go back to the previous page.
5.2 Jobsite Setup
Here, you can configure the jobsite setup, view jobsite location, update existing jobsite location, and
create new jobsite location
Here, you would be able to see various stages involved to complete a Work Order. These workflow
stages provide lots of flexibility for Work Order handling and fulfillment while providing visibility for
users to better understand the status of the Work Order.
To access Jobsite Setup screen for MSP, perform the following steps:
1. Click the Service Configurator next to the MSP Home icon and then click Jobsite Setup on the
home page.
The Jobsite-setup screen displays as shown in Figure 5.3.

serviceo
Corporate Headquarter: 980 Mission Court, Fremont, CA 94539, USA. Phone: +(1) 408-895-8000, Fax: +(1) 408-943-8101
Figure 5.3: Jobsite-setup screen
Note: The Jobsite-setup screen shows workflow status on the top and the Account section at the
left side of the screen. The partner, which was selected when user last logged, is selected by
default in the Account section. In the right side of the Jobsite-setup screen, the Summary section
is being displayed that contains Program Information and Jobsite Location Map tabs.
The progress bar enables users to see stages of a specific process/task that are involved to
complete to a work order.
The Account section displays a list of partners including their login, ID and other details. The
Summary section lists program information for the selected Partner along with its Jobsite
Location details on the Map.
5.2.1 Viewing Jobsite List
Here, you can view the list of Jobsite Locations associated with Program for the selected Partner in the
Account section.
For instruction on viewing, updating or creating Jobsite Locations, refer Section 4.1.1: Viewing Jobsite
List.
serviceo
Corporate Headquarter: 980 Mission Court, Fremont, CA 94539, USA. Phone: +(1) 408-895-8000, Fax: +(1) 408-943-8101
5.3 Quote Setup
The Quote Setup option enables you to configure the existing quote. Here, you would also be able to
manage jobsite details.
Generally, Pricing Catalogs are pre-loaded inside the system.
To access Pricing screen, perform the following steps:
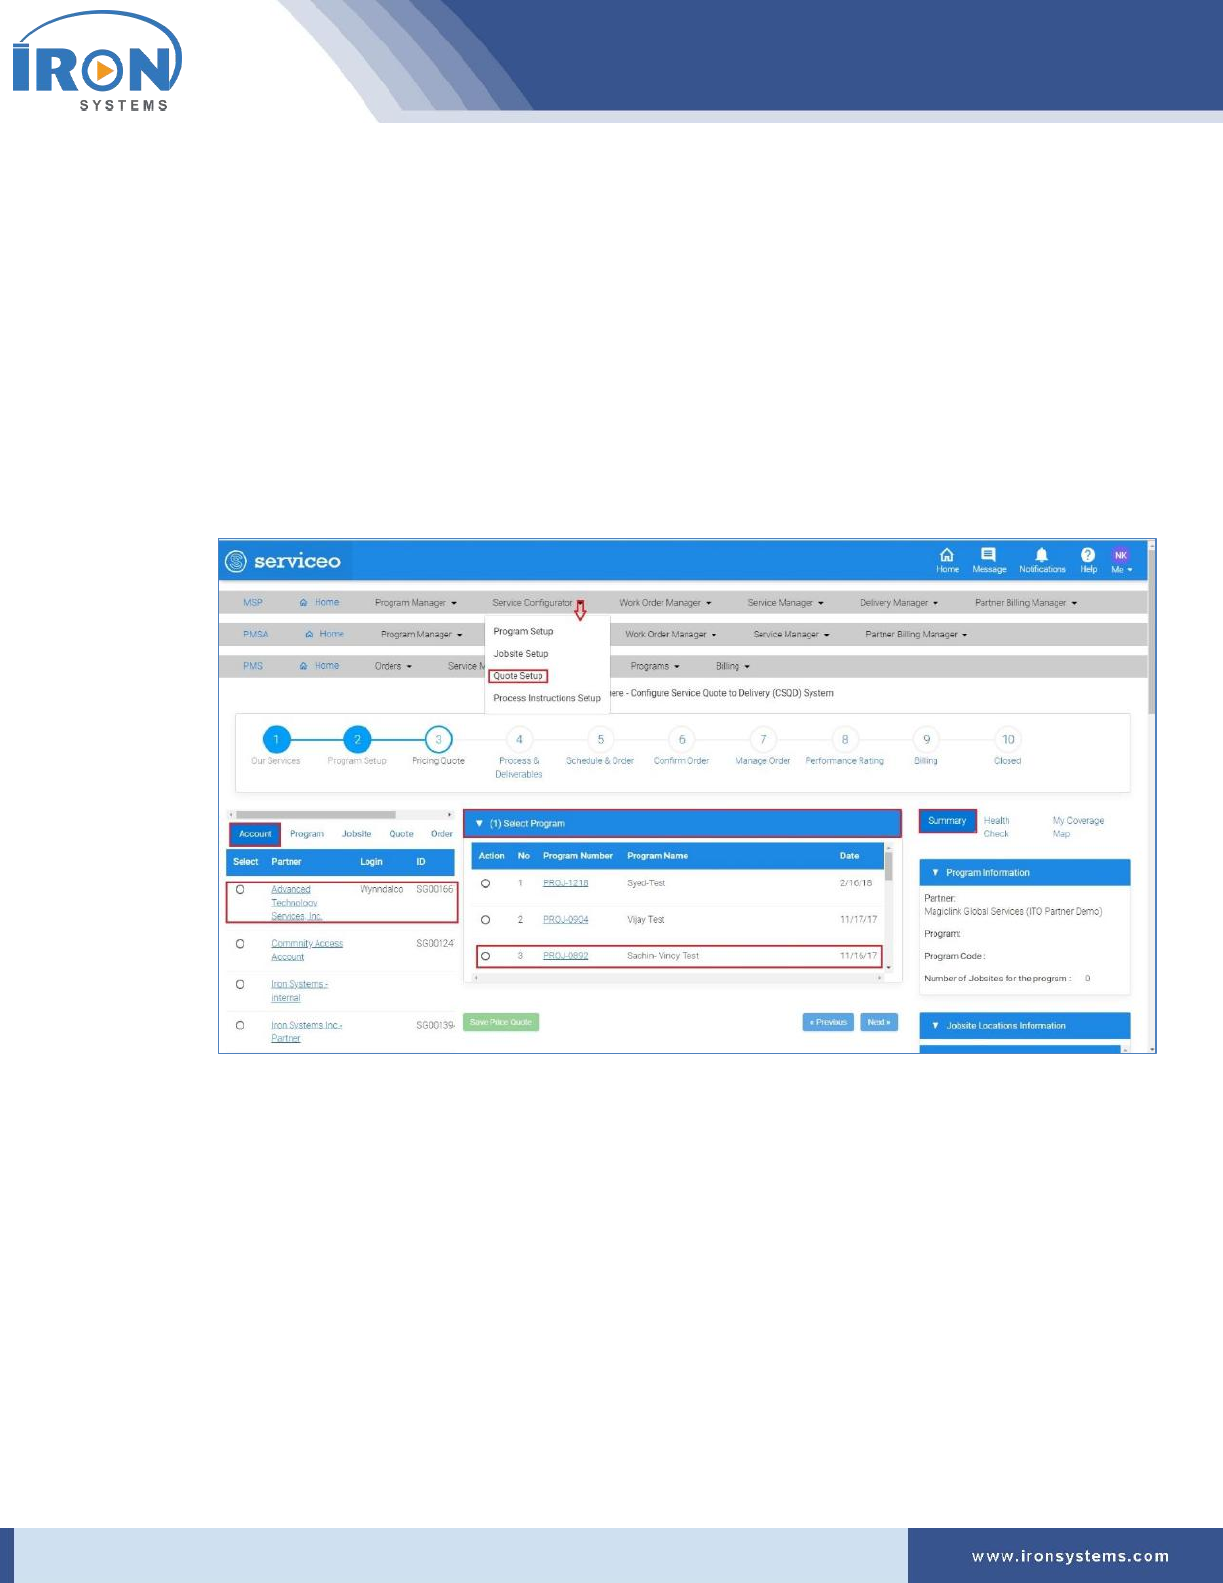
1. Click the Service Configurator next to the MSP Home icon and then click Quote Setup to access
Pricing screen.
The Pricing screen displays as shown in Figure 5.4.
Figure 5.4: Pricing screen
Note: The Pricing screen displays with the Account, Program, Jobsite, Quote, Order and Price
Book tabs in the left pane of the screen. The Account tab displays by default. In the right pane of
the Program screen, there are three tabs, namely Summary, Health Check, and My Coverage
Map tabs appear. Here, the Summary tab displays by default.
Here, you can also view various stages involved to complete a process. The progress bar will run
a colored bar showing the progress stage completed during the process This progress bar
provides lots of flexibility for service handling while providing visibility for users for better
understanding.

serviceo
Corporate Headquarter: 980 Mission Court, Fremont, CA 94539, USA. Phone: +(1) 408-895-8000, Fax: +(1) 408-943-8101
Tip: Click the Account name next to the Select column in the Account tab to view Account
Details. Click the Program Number in the Program tab next to the Account tab to view the
program details. Click the Manage link in the Jobsite tab to view and edit jobsite details. Click
the Quote Number in the Quote tab to view Quote Manager details. Click the Work Order # in
the Order tab to view Work Order Details. Select the Program in the Price Book tab and then
click the View link to Price Book Details.
5.3.1 Configuring Quote Setup
Here, you will find the complete steps to configure the quote setup.
Perform the following steps to configure pricing:
1. Select the account in the Account tab for which you want to configure quote. Refer Figure 5.4.
Note: As you select the Account name in the Account tab, the records in the (1) Select Program
tab get populated based on selection. The records in the Summary, Health Check, and My
Coverage Map tabs in the right side of the screen also get updated as per selection.
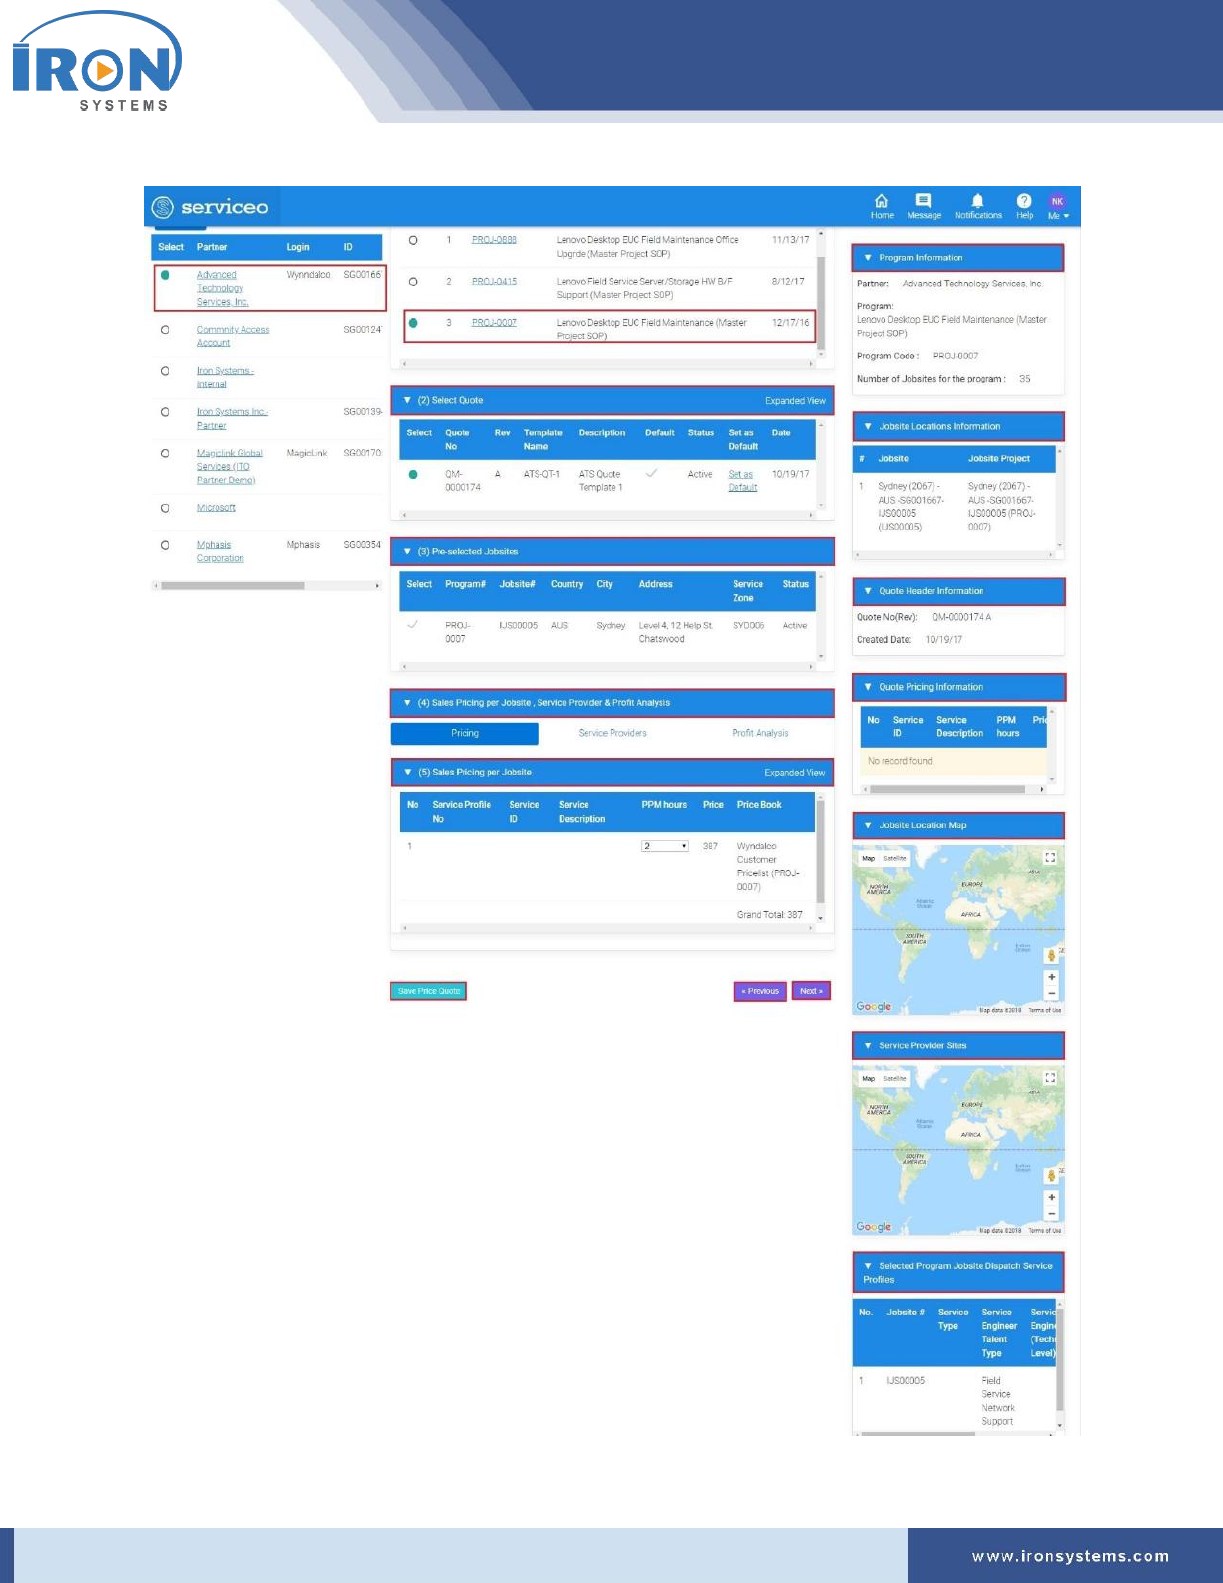
2. Select the relevant program in the (1) Select Program tab.
The Pricing screen updates with Quote and Jobsite details as shown in Figure 5.5.
serviceo
Corporate Headquarter: 980 Mission Court, Fremont, CA 94539, USA. Phone: +(1) 408-895-8000, Fax: +(1) 408-943-8101
Figure 5.5: Pricing screen – Quote

serviceo
Corporate Headquarter: 980 Mission Court, Fremont, CA 94539, USA. Phone: +(1) 408-895-8000, Fax: +(1) 408-943-8101
Note: As you select the Program in the (1) Select Program, the records in the (2) Select Quote,
(3) Pre-selected Jobsites, (4) Sales Pricing per Jobsite, Service Provider & Profit Analysis, (5)
Sales Pricing per Jobsite tabs auto-populate.
The (2) Select Quote tab displays the default quote selected.by default.
3. Select the quote number that you want to configure in the (2) Select Quote tab.
Note: All jobsites associated with the selected Programs are displayed in the (3) Pre-selected
Jobsites tab as checked/selected.
4. Select the total hours to complete a job in the PPM Hours drop-down list.
Tip: Click the Expanded View in the upper-right corner of the section to view the selected
Jobsite Location in pop-up.
A Sales pricing per Jobsite pop-up displays as shown below:
5. Click the Service Providers tab to select service provider from the list.
The Pricing screen updates with (6) Select Provider Option tab as shown in Figure 5.6.
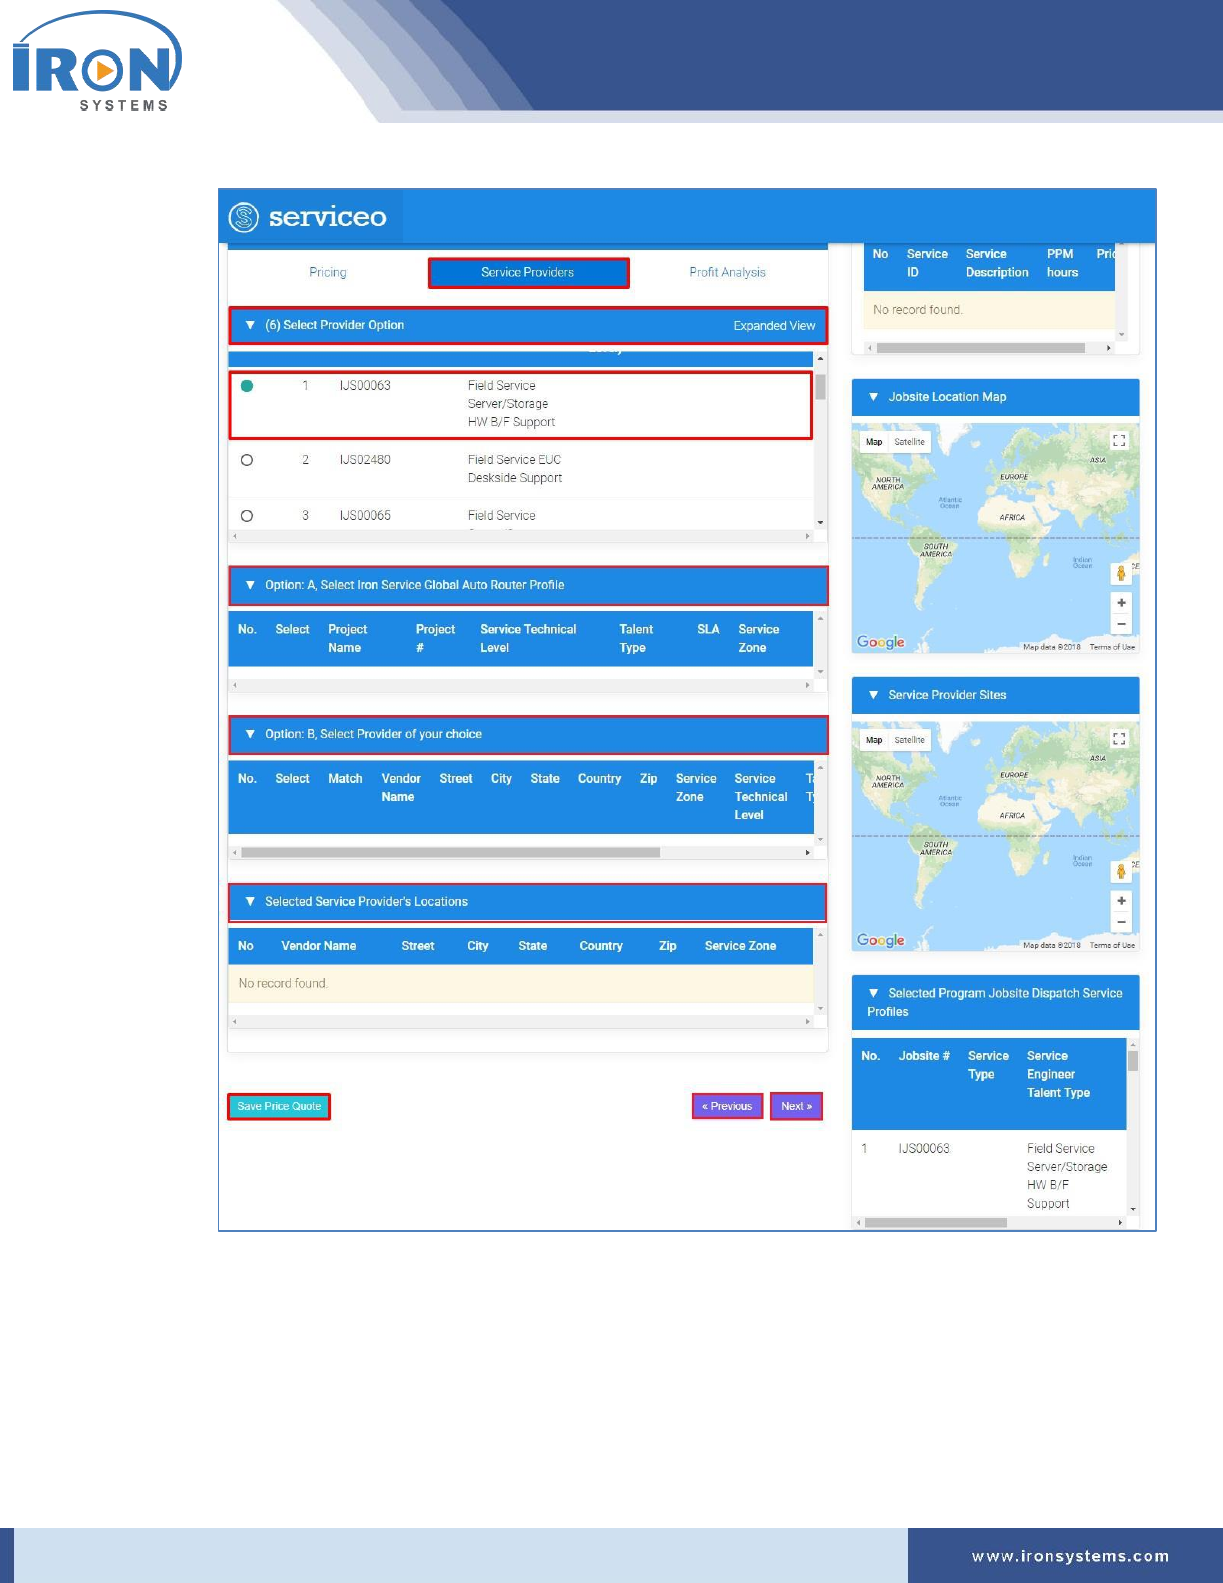
serviceo
Corporate Headquarter: 980 Mission Court, Fremont, CA 94539, USA. Phone: +(1) 408-895-8000, Fax: +(1) 408-943-8101
Figure 5.6: Pricing screen – Service Provider tab
Note: The Service Providers tabs is composed of four tabs:
• The (6) Select Provider Option tab holds the list of service providers.
• The Option: A, Select Iron Service Global Auto Router Profile tab
• The Option: B, Select Provider of your choice tab
• The Selected Service Provider's Locations tab holds
serviceo
Corporate Headquarter: 980 Mission Court, Fremont, CA 94539, USA. Phone: +(1) 408-895-8000, Fax: +(1) 408-943-8101
6. Select the relevant service provider in the (6) Select Provider Option tab.
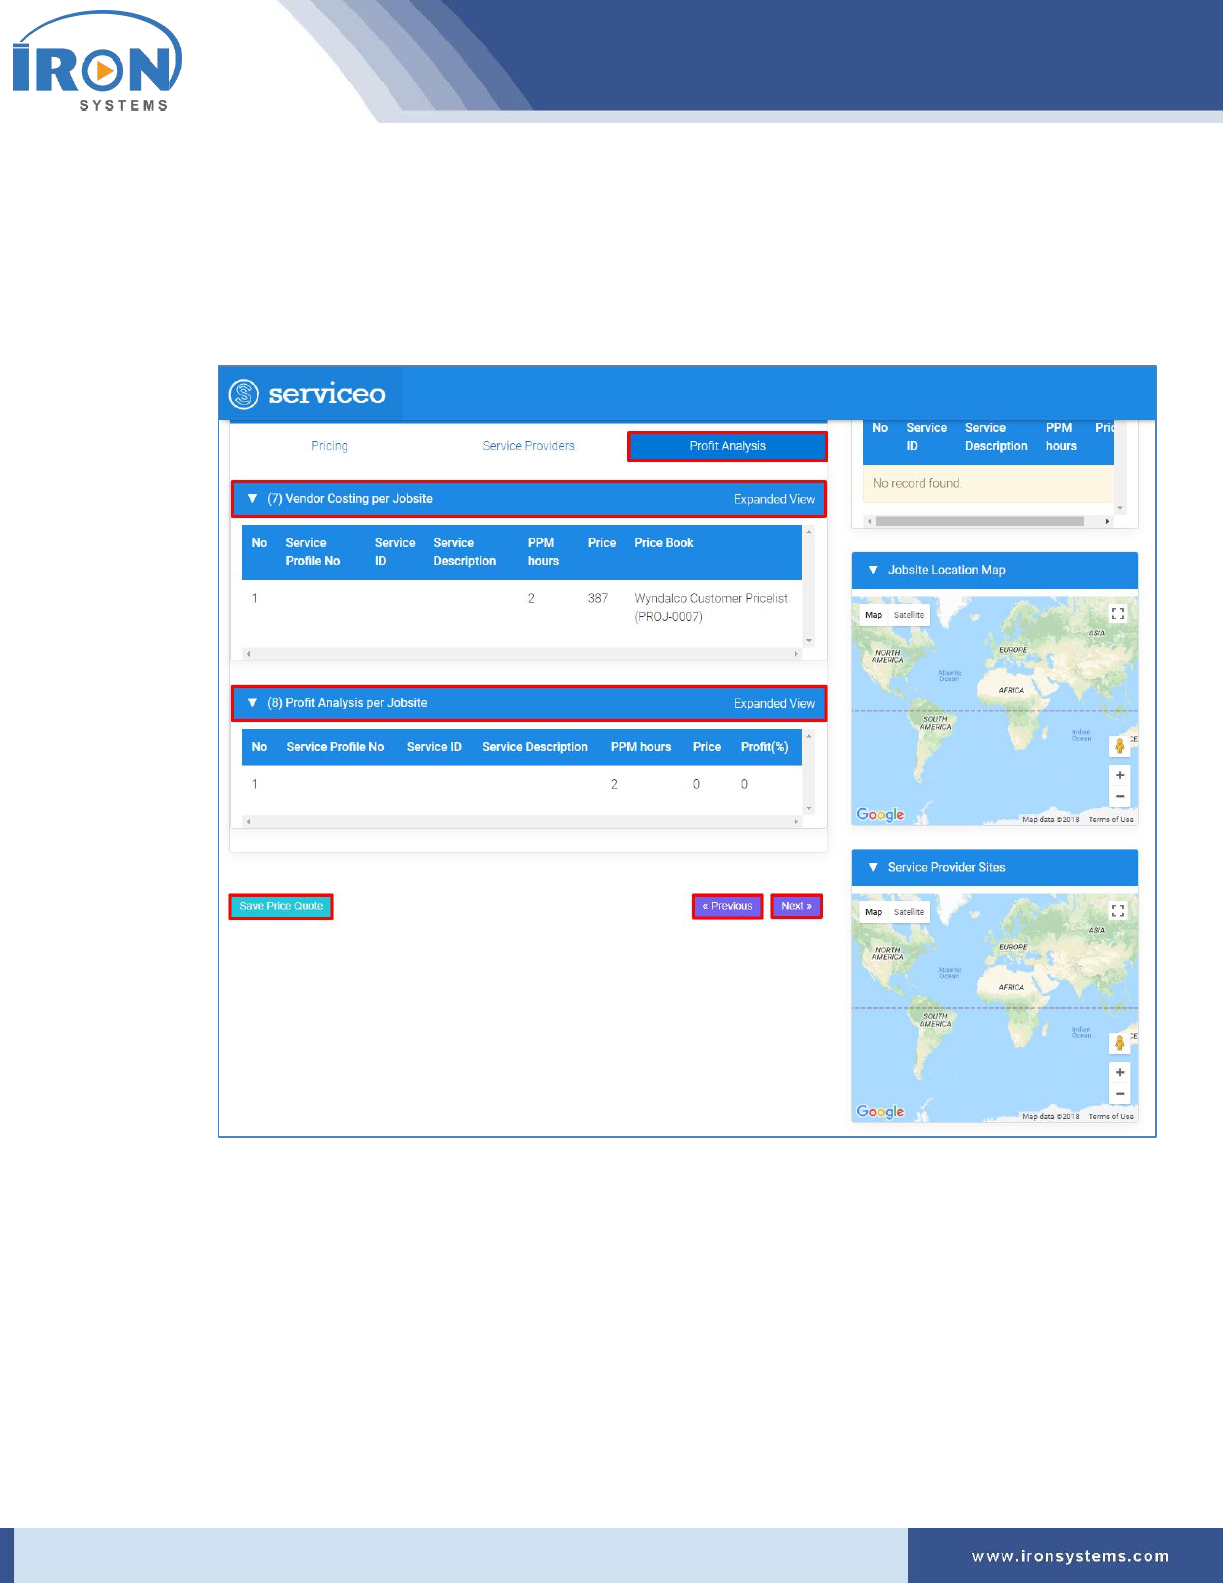
7. Click the Profit Analysis tab for cost benefit analysis.
The Pricing screen updates with the (7) Vendor Costing per Jobsite and (8) Profit Analysis per
Jobsite tabs as shown in Figure 5.7.
Figure 5.7: Pricing screen – Profit Analysis tab
8. Click the Expanded View in the upper right-corner on the (7) Vendor Costing per Jobsite tab to
view vendor costing per jobsite.
A Vendor costing per Jobsite pop-up displays as shown below:

serviceo
Corporate Headquarter: 980 Mission Court, Fremont, CA 94539, USA. Phone: +(1) 408-895-8000, Fax: +(1) 408-943-8101
Tip: Click Export button to export Vendor costing details in Excel format. Click Close button or X
sign in the upper-right corner to close the pop-up.
9. Click the Expanded View in the upper right-corner on the (8) Profit Analysis per Jobsite tab to
view the Profit Analysis per Jobsite.
A Profit Analysis per Jobsite pop-up displays as shown below:
Tip: Click Export button to export Profit Analysis per Jobsite details in Excel format. Click Close
button or X sign in the upper-right corner to close the pop-up.
10. Click the Save Price Quote button to save the new configured quote.
serviceo
Corporate Headquarter: 980 Mission Court, Fremont, CA 94539, USA. Phone: +(1) 408-895-8000, Fax: +(1) 408-943-8101
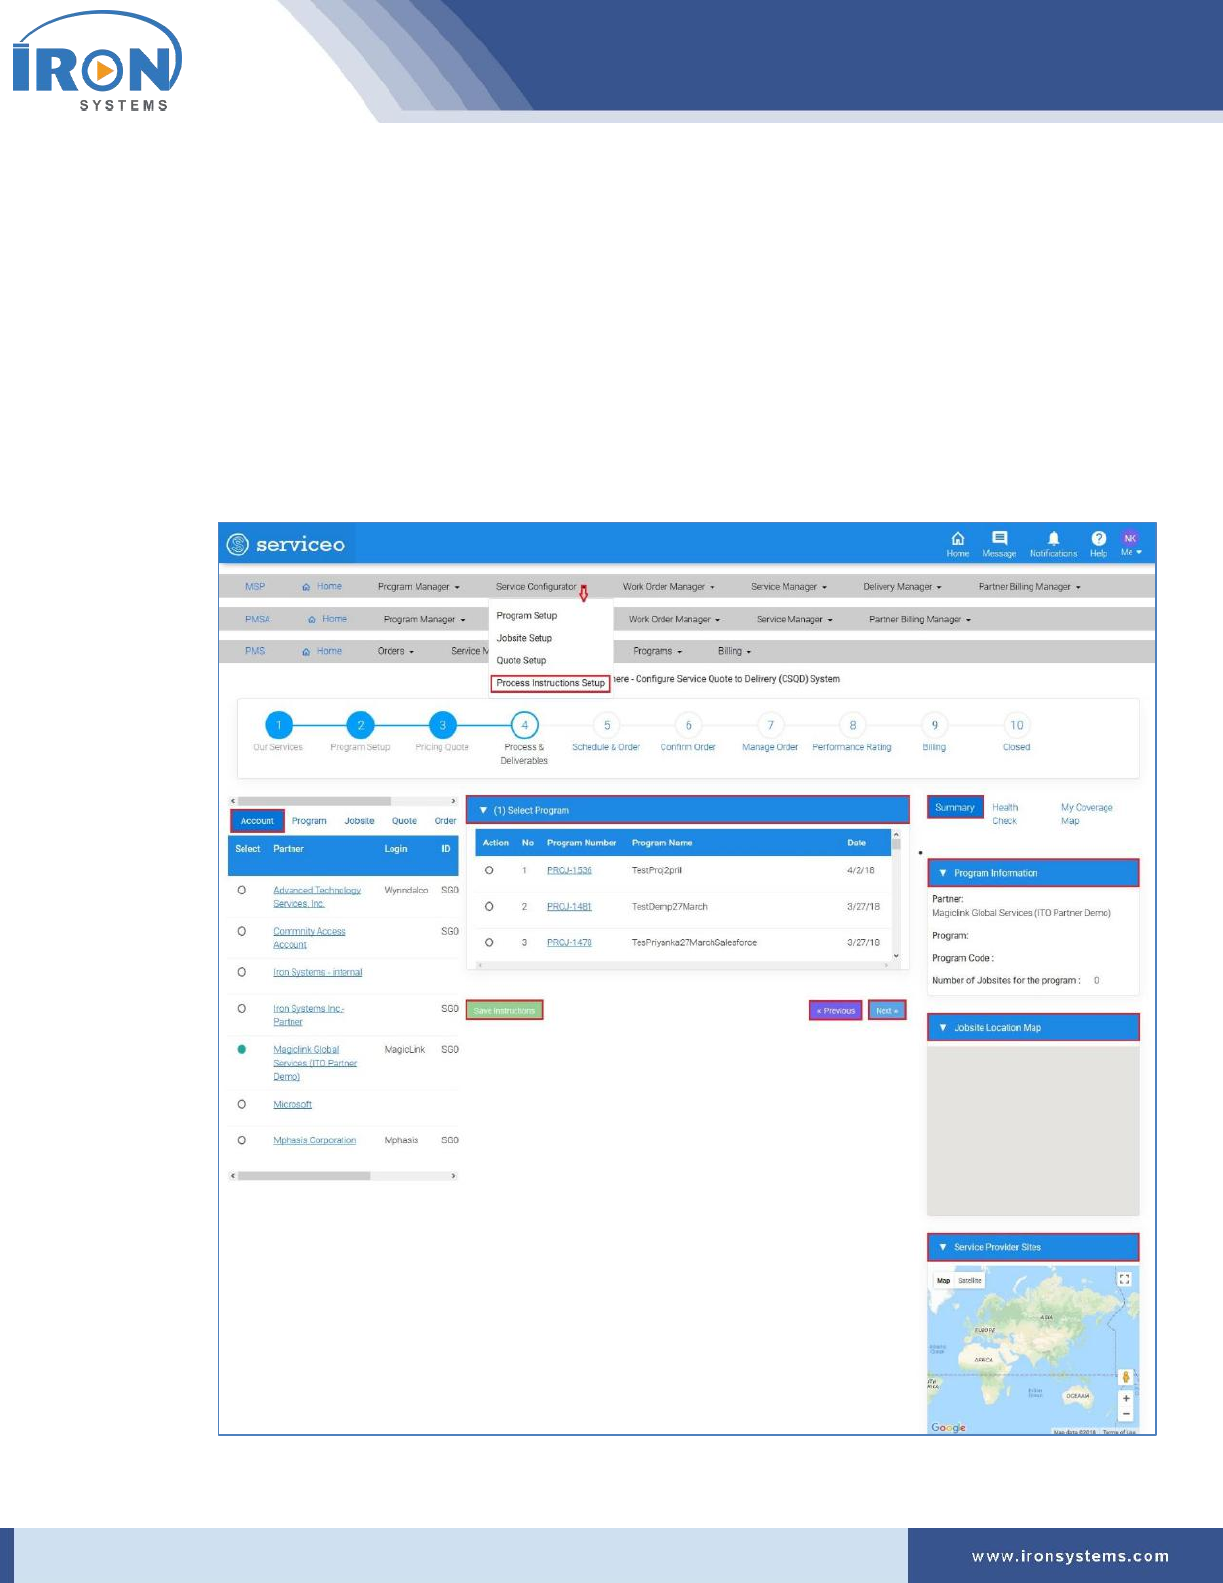
5.4 Price Instruction Setup
The Price Instruction Setup is the interface where you will configure the process instructions that include
detailed instruction to complete a job. Here you will see the list of all service deliverables, training
documents and the list of all required tools that are necessary to complete a task.
To configure Price Instruction Setup, perform the following steps:
1. Click the Service Configurator next to the MSP Home icon and then click Process Instruction
Setup option to access Instruction screen.
The Instruction screen appears as shown in Figure 5.8.
Figure 5.8: Instruction screen

serviceo
Corporate Headquarter: 980 Mission Court, Fremont, CA 94539, USA. Phone: +(1) 408-895-8000, Fax: +(1) 408-943-8101
Note: The Instruction screen displays with the Account, Program, Jobsite, Quote, Order and Price
Book tabs in the left pane of the screen. The Account tab displays by default. In the right pane of
the Program screen, there are three tabs, namely Summary, Health Check, and My Coverage
Map tabs appear. Here, the Summary tab displays by default.
Here, you can also view various stages involved to complete a service configuration. The
progress bar will run a colored bar showing the progress stage completed during the process
This progress bar provides lots of flexibility for service handling while providing visibility for
users to better understand the status.
Tip: Click the Account name next to the Select column in the Account tab to view Account
Details. Click the Program Number in the Program tab next to the Account tab to view the
program details. Click the Manage link in the Jobsite tab to view and edit jobsite details. Click
the Quote Number in the Quote tab to view Quote Manager details. Click the Work Order # in
the Order tab to view Work Order Details. Select the Program in the Price Book tab and then
click the View link to Price Book Details.
2. Select the account name in the Account tab for which you want to configure Process Instruction.
Note: As you select the Account name in the Account tab, the records in the Summary, Health
Check, and My Coverage Map tabs in the right side of the screen get updated as per selection.
3. Select the relevant program in the (1) Select Program tab.
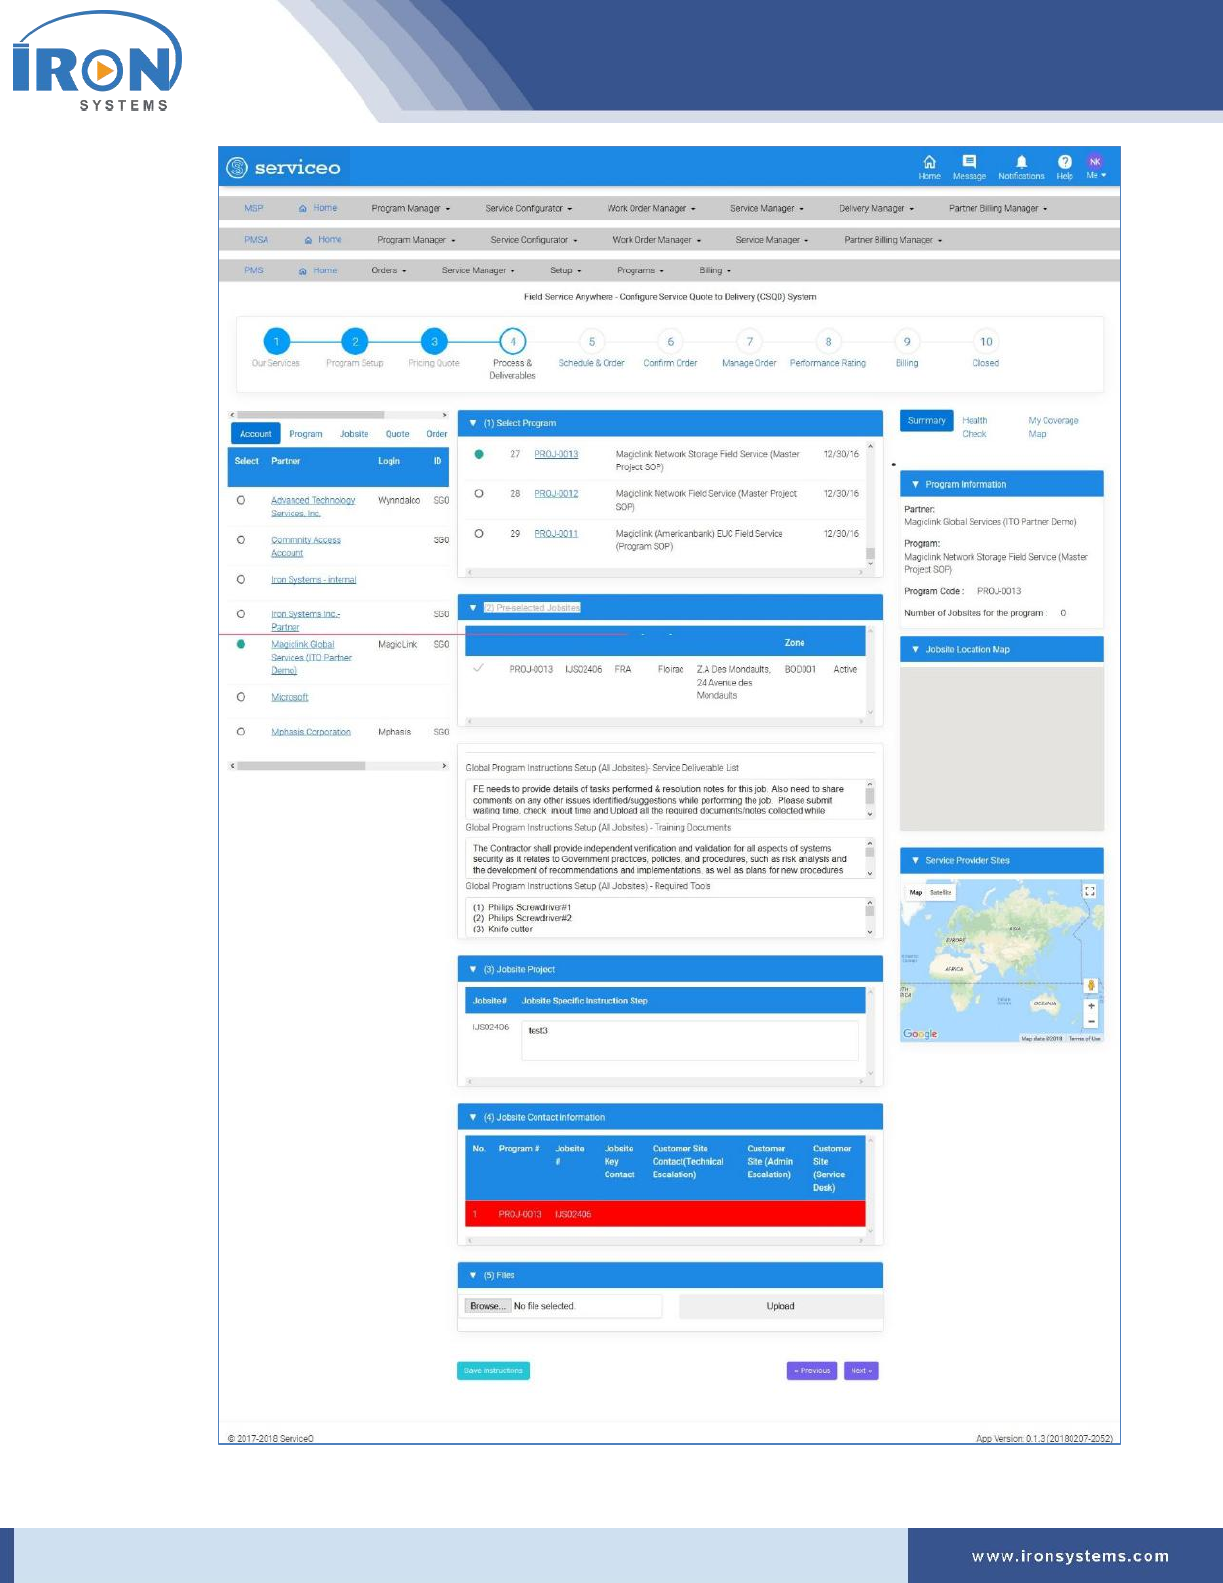
The Pricing screen updates with five tabs, namely (2) Pre-selected Jobsites, (3) Jobsite Project,
(4) Jobsite Contact information, and (5) Files as shown in the below figure:
serviceo
Corporate Headquarter: 980 Mission Court, Fremont, CA 94539, USA. Phone: +(1) 408-895-8000, Fax: +(1) 408-943-8101

serviceo
Corporate Headquarter: 980 Mission Court, Fremont, CA 94539, USA. Phone: +(1) 408-895-8000, Fax: +(1) 408-943-8101
The (2) Pre-selected Jobsites comprises of three process instructions for the selected jobsite:
• Global Program Instructions Setup (All Jobsites)- Service Deliverable List holds….
• Global Program Instructions Setup (All Jobsites) - Training Documents contains all
training documents.
• Global Program Instructions Setup (All Jobsites) - Required Tools contains details of all
tools to process a task.
4. Type the jobsite specific instruction steps in the Jobsite Specific Instruction Step text field next
to the Jobsite name.
5. Click the Browse button to select the file to be uploaded.
A File Upload dialog box appears where you need to provide the local path of the file and then
click Open button to upload the selected file.
Note: The dialog box may vary depending upon the user’s operating system.
6. Click the Upload button to upload the document.
7. Click the Save Instructions button to save the configured process instruction for the Jobsite.
Tip: Click the Previous button to go back to the previous page, and Next button to move to the
next page.

serviceo
Corporate Headquarter: 980 Mission Court, Fremont, CA 94539, USA. Phone: +(1) 408-895-8000, Fax: +(1) 408-943-8101
6 Billing
The Billing module contains billing related information entered by authorized users.
The Billing Dashboard allows you to view and analyze the cumulative data of detailed invoice. It also
displays Sales invoice in graphics on a single screen. It pulls relevant information in real time that helps
staff to view key information.
This capability allows you to make quick and the spot decision.
The Billing Dashboard also allows to select column name for which you want view data on the
dashboard.
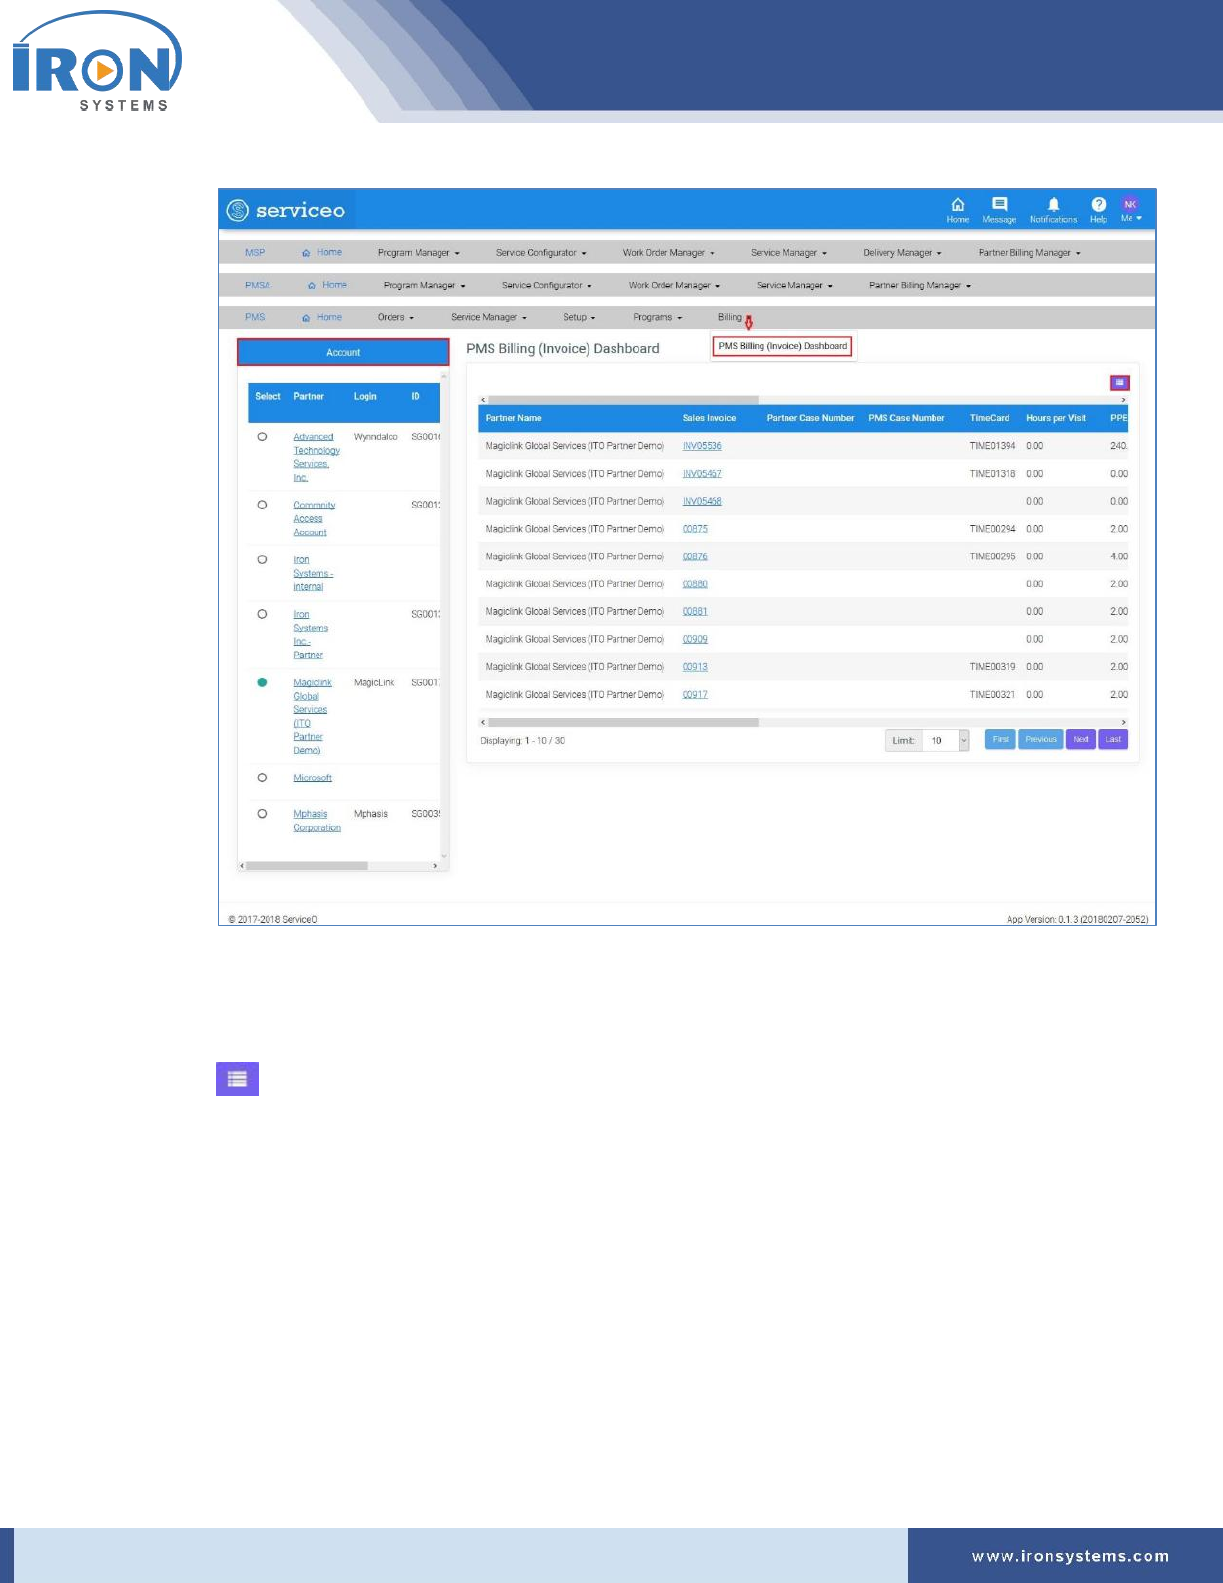
6.1 PMS Billing (Invoice) Dashboard
To access PMS Billing (Invoice) Dashboard, perform the following steps:
1. Click the Billing next to the PMS Home icon and then click the PMS Billing (Invoice) Dashboard.
The Billing-manager screen appears as shown in Figure 6.1.
serviceo
Corporate Headquarter: 980 Mission Court, Fremont, CA 94539, USA. Phone: +(1) 408-895-8000, Fax: +(1) 408-943-8101
Figure 6.1: Billing-manager screen
Note: The partner, which was selected when user last logged, is selected by default in the
Account section.
Tip: Click the Partner name link in the Account section to view the account details. Click the
icon in the upper right-corner to select or clear the Column Name check boxes as per
requirements.
2. Select the partner name in the Account section for which you want to view billing dashboard.
Note: As you select the Partner name in the Account section, the records in the PMS Billing
(Invoice) Dashboard updates as per selection.
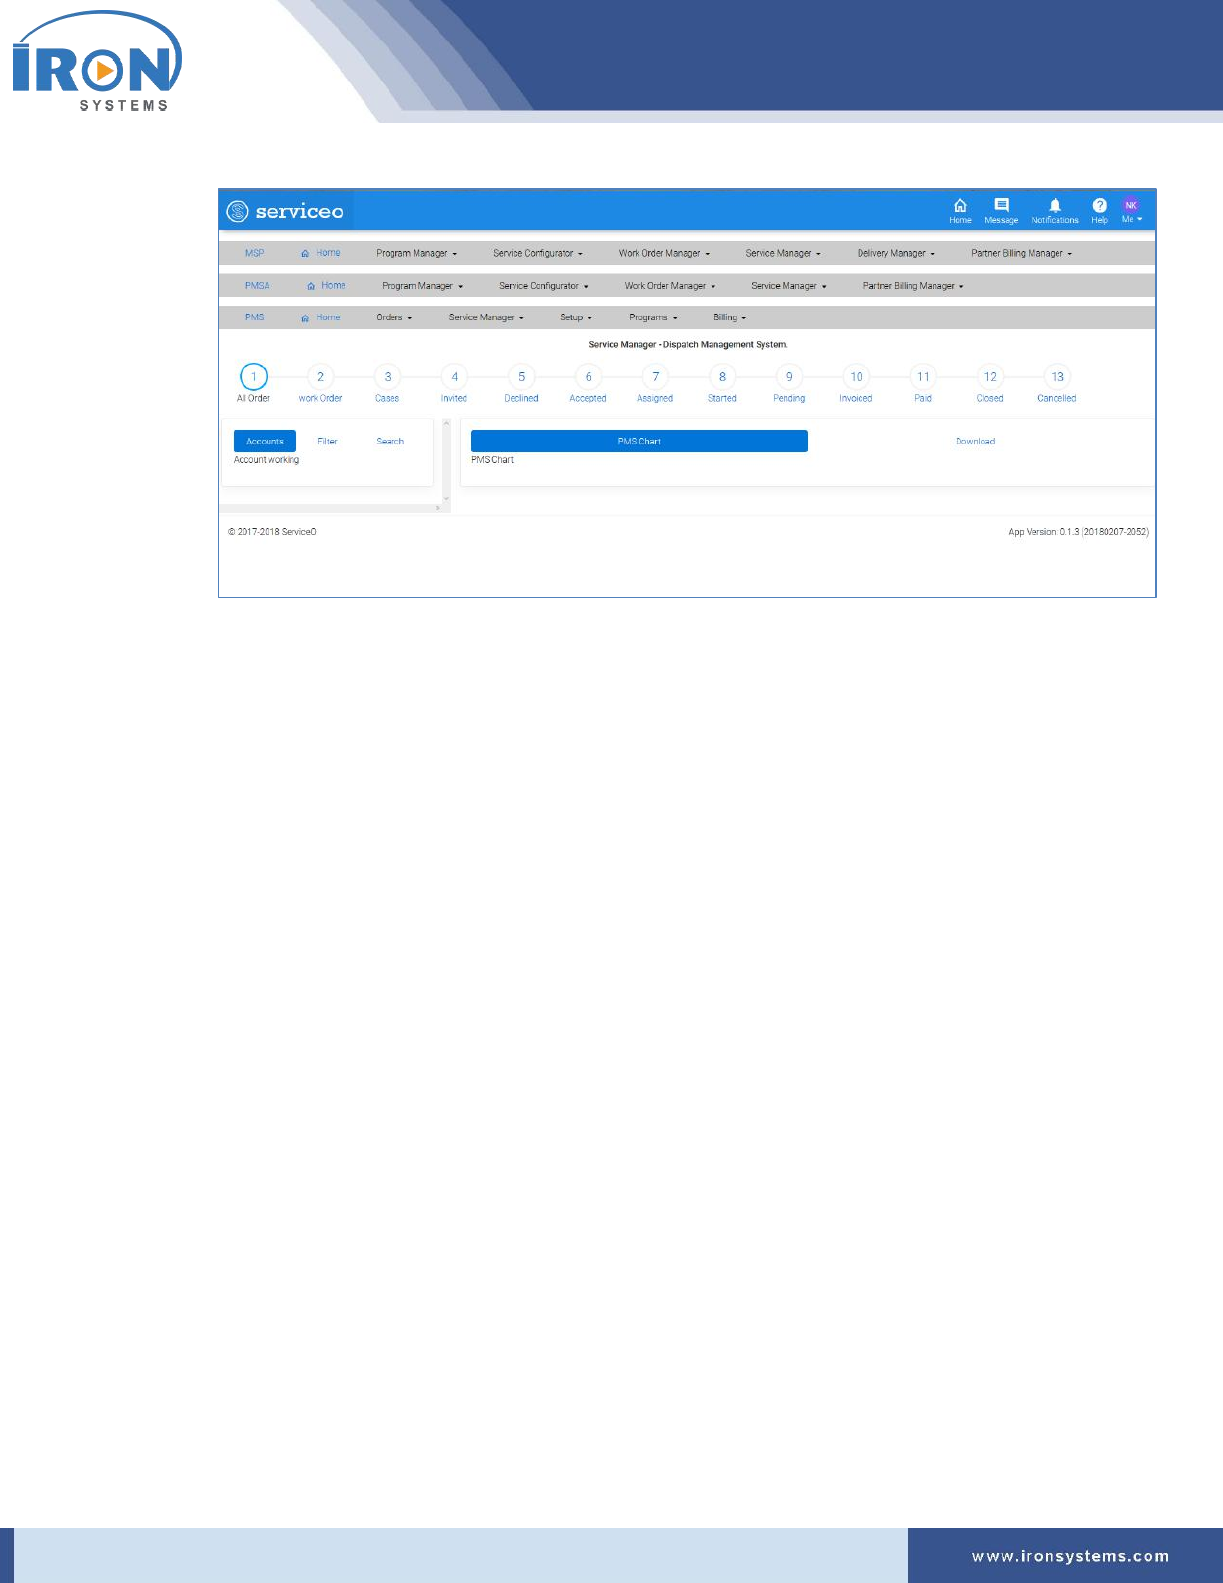
3. Click the Sales Invoice link next to the Partner Name to view invoice details in graphics.
It will take you to the Service-manager screen. The PMS Chart tab displays by default. Refer
Figure 6.2.
serviceo
Corporate Headquarter: 980 Mission Court, Fremont, CA 94539, USA. Phone: +(1) 408-895-8000, Fax: +(1) 408-943-8101
Figure 6.2: Service-manager screen
Note: Here, you can also view progress bar showing the different stages of order completed
during the process. The progress bar will run a colored bar showing the complete or incomplete
stage. It also provides lots of flexibility for order handling while providing visibility for users to
better understand the status.
Tip: The Service-manager screen displays three tabs, namely Accounts, Filter, and Search tabs in
the left side of the screen.
4. Click the Download tab to download the invoice.
5. Click the Filter tab in the left side of the Service-manager screen to apply filter to narrow down
your viewing options.
6. Click the Search tab to apply search criteria to get records as per requirements.

serviceo
Corporate Headquarter: 980 Mission Court, Fremont, CA 94539, USA. Phone: +(1) 408-895-8000, Fax: +(1) 408-943-8101
7 Programs
The Programs is the place where you will be able to access the detailed view of all listed programs
associated with an Account. Here you can also view approved project vendors and project workers.
It primarily provides access to the all listed Service Catalogue (Price List) that have already been
brought/stored in the Serviceo.
This module is not designed to enter any records but to only view the records which have been stored in
the System.
Here, you can also locate all service providers, which are listed with the Iron Systems.
The Programs module comprises three sub-modules, namely Programs, Service Catalog (Price List), and
Service Locator (PMS).
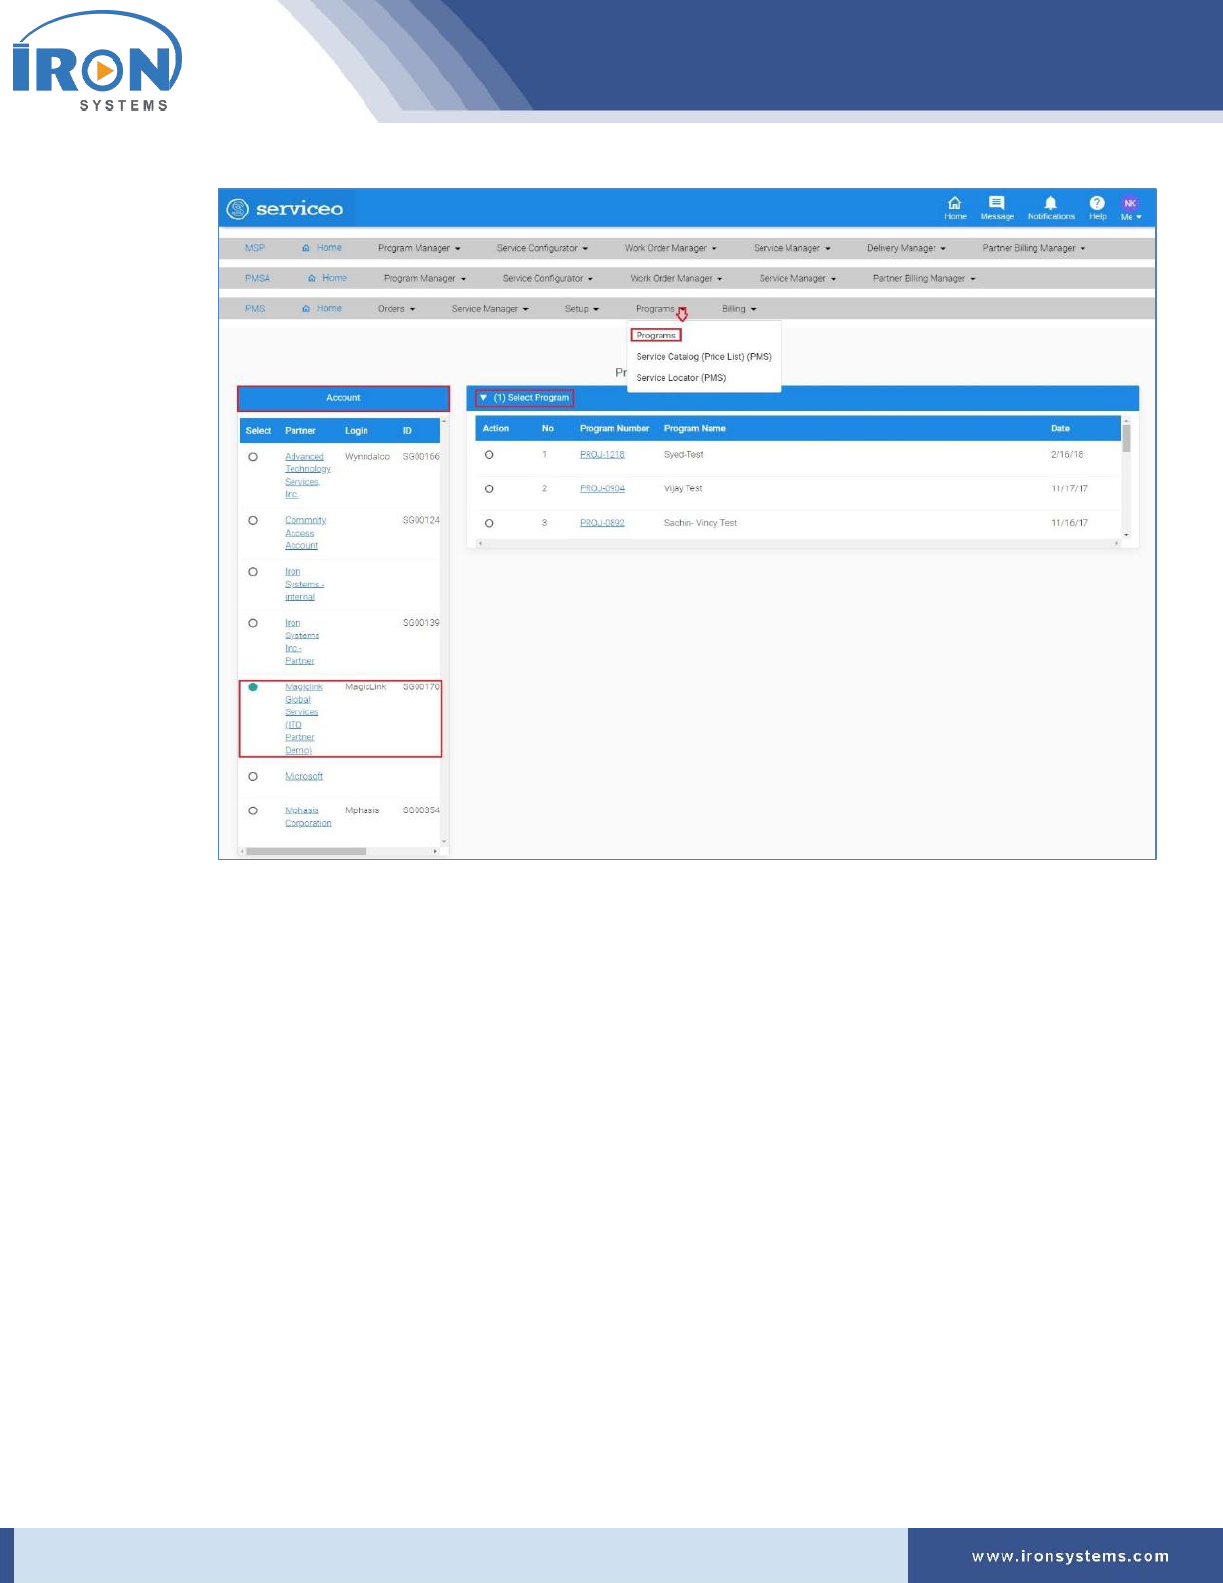
7.1 Programs
The Programs interface lists the details of Programs, Project Vendors, and Project Workers.
To access the Program Profile, perform the following steps:
1. Click the Programs next to the PMS Home icon and then click the Programs to access the
Program Profile.
The programs screen displays as shown in Figure 7.1.
serviceo
Corporate Headquarter: 980 Mission Court, Fremont, CA 94539, USA. Phone: +(1) 408-895-8000, Fax: +(1) 408-943-8101
Figure 7.1: programs screen
Tip: Click the Partner name link in the Account section to view the Account Details. Click the
Program Number link in the (1) Select Program tab to view Program Details.
2. Select the partner in the Account section for which you want to view program list associated
with it.
Note: As you select the Partner name in the Account section, the (1) Select Program tab
updates with the list of associated Programs. Refer Figure 7.1.
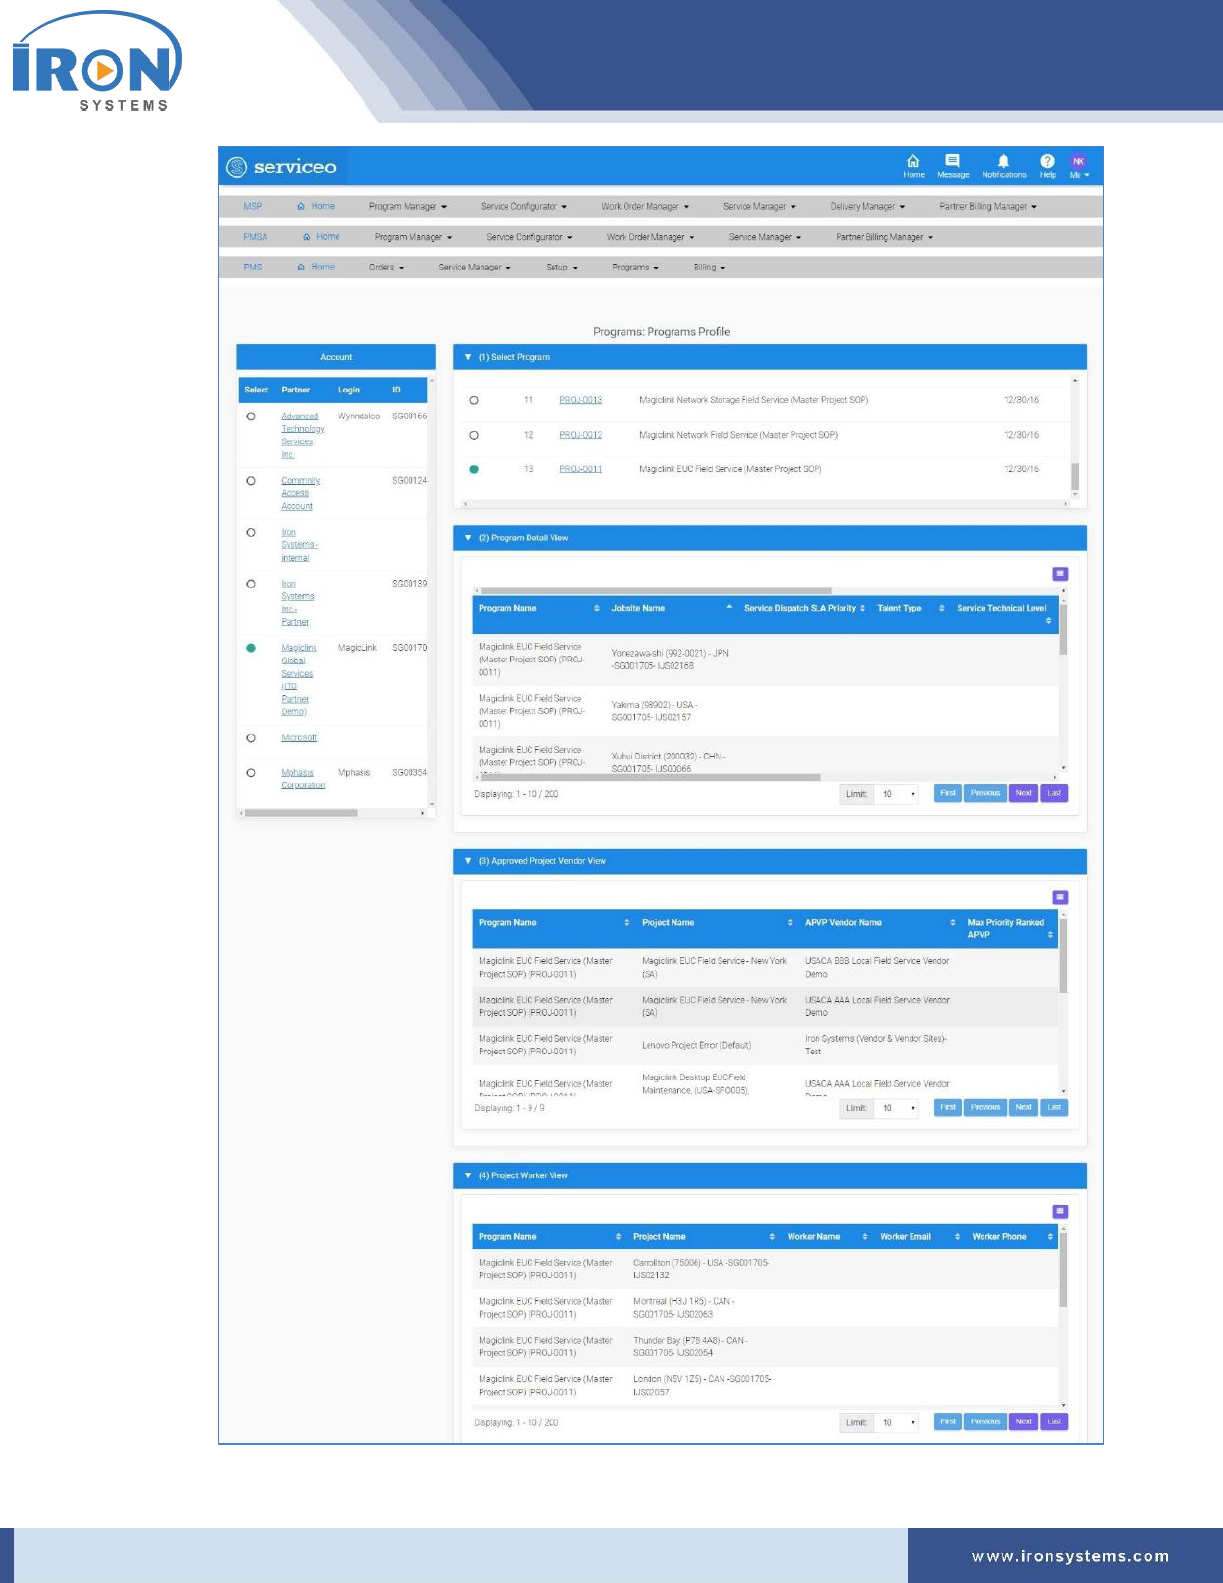
3. Select the Program number in the (1) Select Program tab to view detailed program profile.
The programs screen updates with tabs, (2) Program Detail View, (3) Approved Project Vendor
View, (4) Project Worker View for corresponding “Program” as shown in the below figure:
serviceo
Corporate Headquarter: 980 Mission Court, Fremont, CA 94539, USA. Phone: +(1) 408-895-8000, Fax: +(1) 408-943-8101

serviceo
Corporate Headquarter: 980 Mission Court, Fremont, CA 94539, USA. Phone: +(1) 408-895-8000, Fax: +(1) 408-943-8101
Tip: Click the icon in the upper right-corner of tabs and then select or clear the Column
Name check boxes from the list as per requirements.
Select the number you want to view in the Limit drop-down list.
Click the First button.to view records displayed on the first page, Previous button to view
previous records, Next button to move to the next page, and the Last button to go to the last
page.
7.2 Service Catalogue (Price List) (PMS)
This module allows you to view service catalogue and search the most complex service catalogue (price
list) with ease. Here, you will be able to search the price list of services by applying different search
criteria.
To view and search the Service Catalogue (Price List), perform the following steps:
1. Click the Programs next to the PMS Home icon and then click the Service Catalogue (Price List)
(PMS) option to access pricelist screen.
The Pricelist screen appears as shown in Figure 7.2.
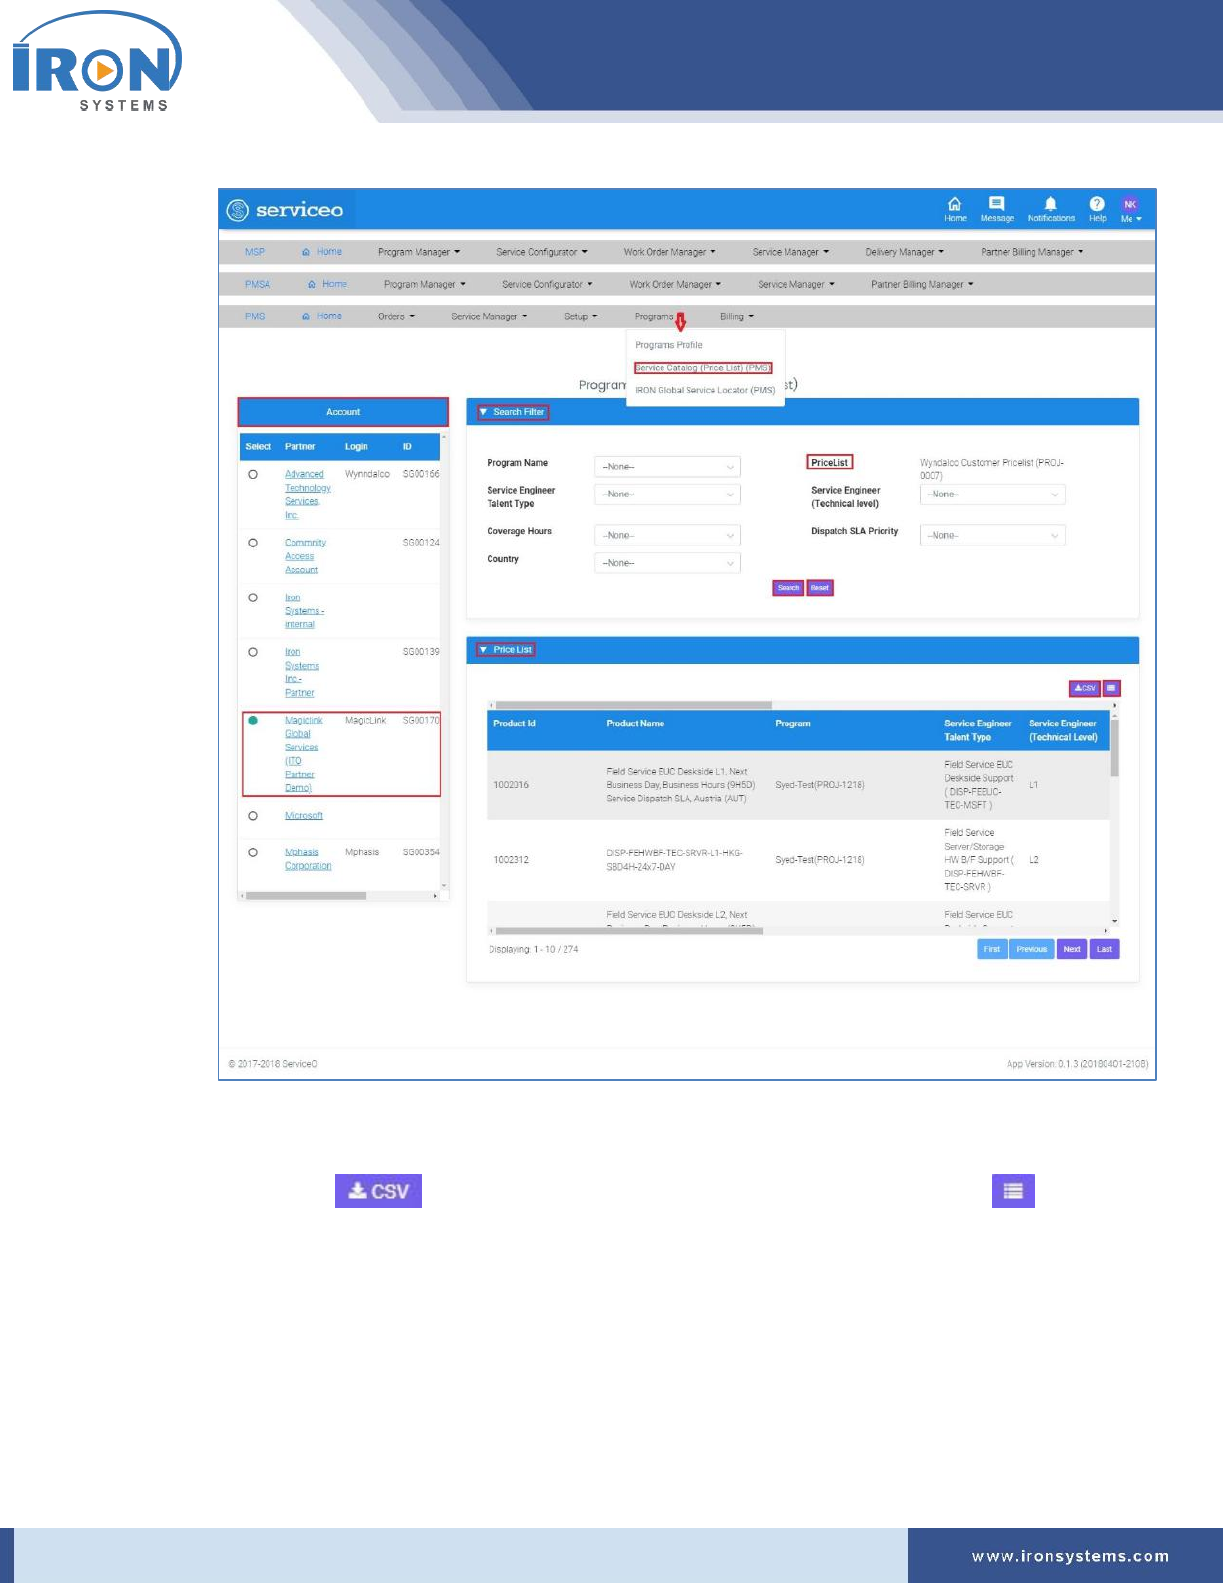
serviceo
Corporate Headquarter: 980 Mission Court, Fremont, CA 94539, USA. Phone: +(1) 408-895-8000, Fax: +(1) 408-943-8101
Figure 7.2: Pricelist screen
Note: The partner, which was selected when user last logged, is selected by default in the
Account section.
Tip: Click the button to download the Price List in the Excel format. Click the icon
in the upper right-corner of tabs and then select or clear the Column Name check boxes from
the list as per requirements.
Click the First button.to view records displayed on the first page, Previous button to view
previous records, Next button to move to the next page, and the Last button to go to the last
page.

serviceo
Corporate Headquarter: 980 Mission Court, Fremont, CA 94539, USA. Phone: +(1) 408-895-8000, Fax: +(1) 408-943-8101
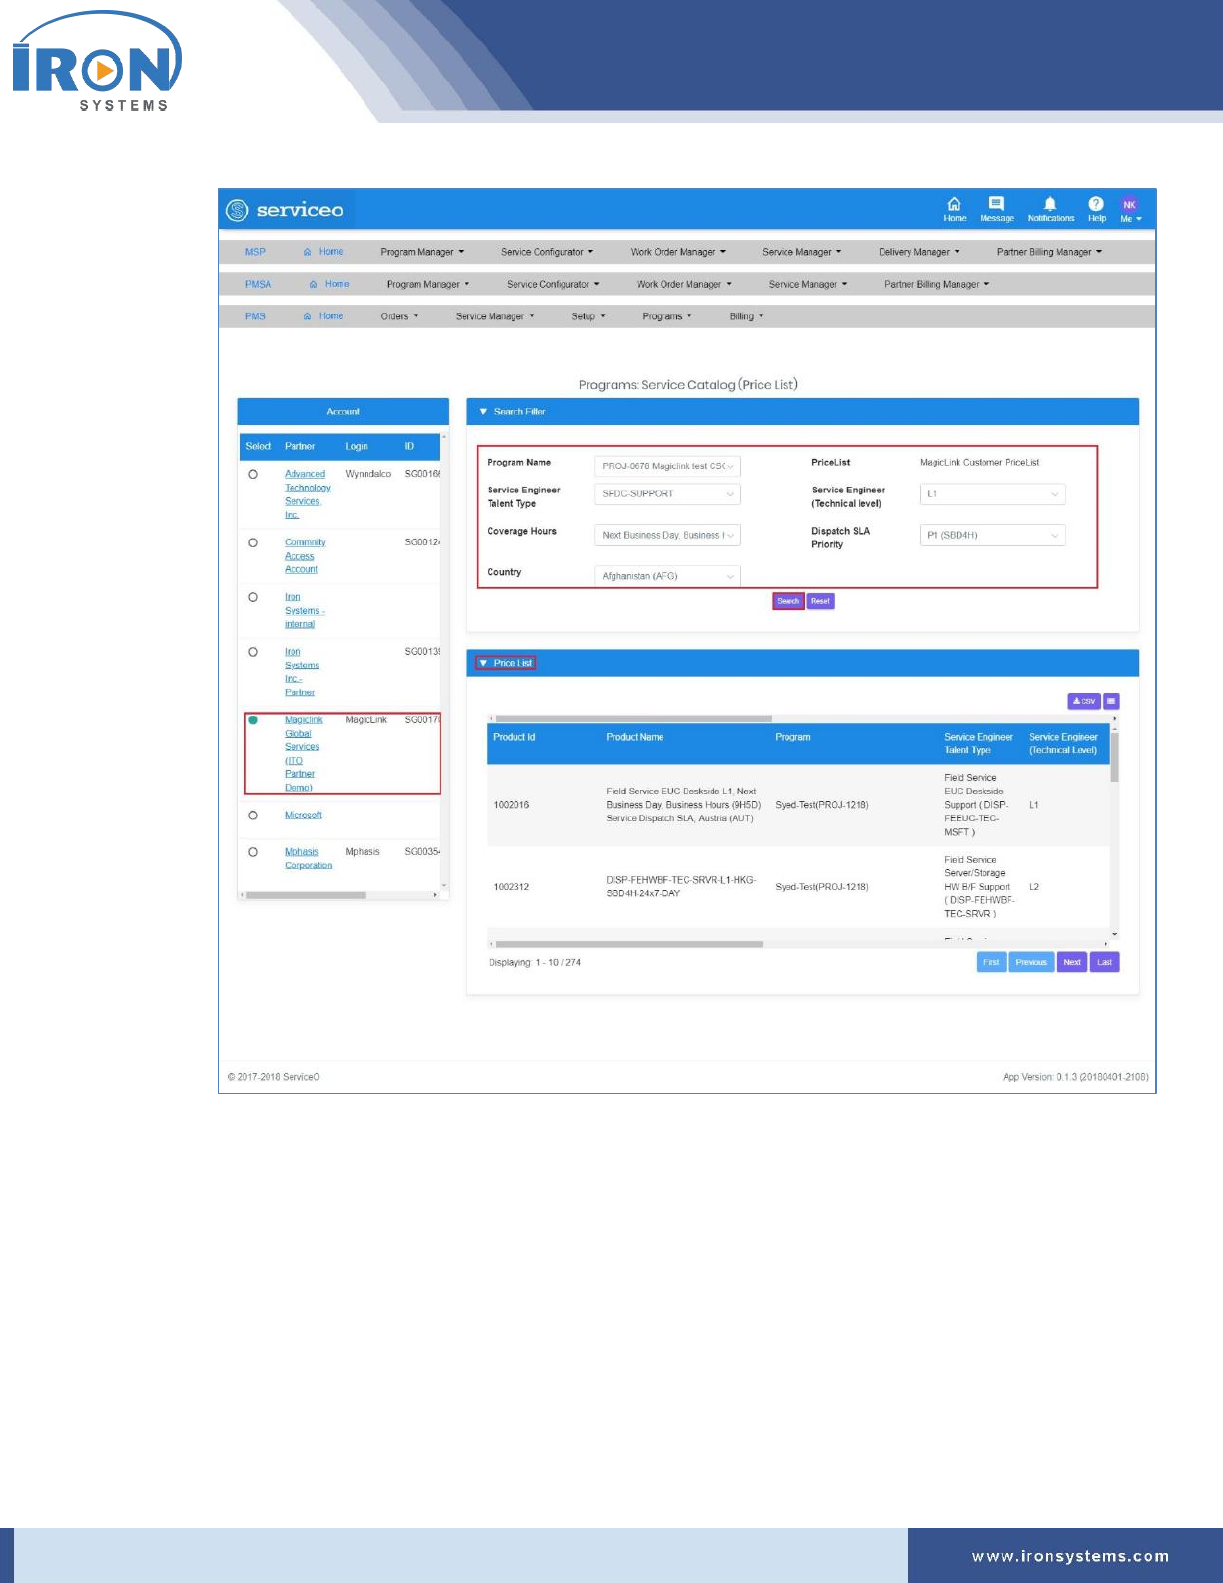
2. Select the Partner name in the Account section.
Note: As you select the partner name in the Account section, the PriceList field and other
records get updated as per selection in the Search Filter tab.
3. Select the program name for which you want to search price list in the Program Name drop-
down list in the Search Filter tab.
Note: As you select the Program Name in the Program Name drop-down select list, the PriceList
field gets updated.
4. Select the service engineer talent type in the Service Engineer Talent Type drop-down list.
5. Select the technical level of selected service engineer in the Service Engineer (Technical level)
drop-down select list.
6. Select the coverage hours in the Coverage Hours drop-down list.
7. Select the SLA priority in the Dispatch SLA Priority drop-down list.
8. Select the country in the Country drop-down select list.
9. Click the Search button to fetch the records based on selected search criteria.
The Price List tab on the pricelist screen updates with records as shown in Figure 7.3.
serviceo
Corporate Headquarter: 980 Mission Court, Fremont, CA 94539, USA. Phone: +(1) 408-895-8000, Fax: +(1) 408-943-8101
Figure 7.3: Pricelist screen – Price List tab
Tip: Click the Reset button in the Search Filter tab to reset the search criteria.
7.3 Iron Global Service Locator (PMS)
This module allows you to easily search, identify and connect all available active 3PS and 3PL service
providers in any region. You will also be able to detect service providers’ location, identify service
providers in the vicinity with markers on the map.
Iron Service Global serves various locations globally.
There are two types of service provider available in the serviceo.
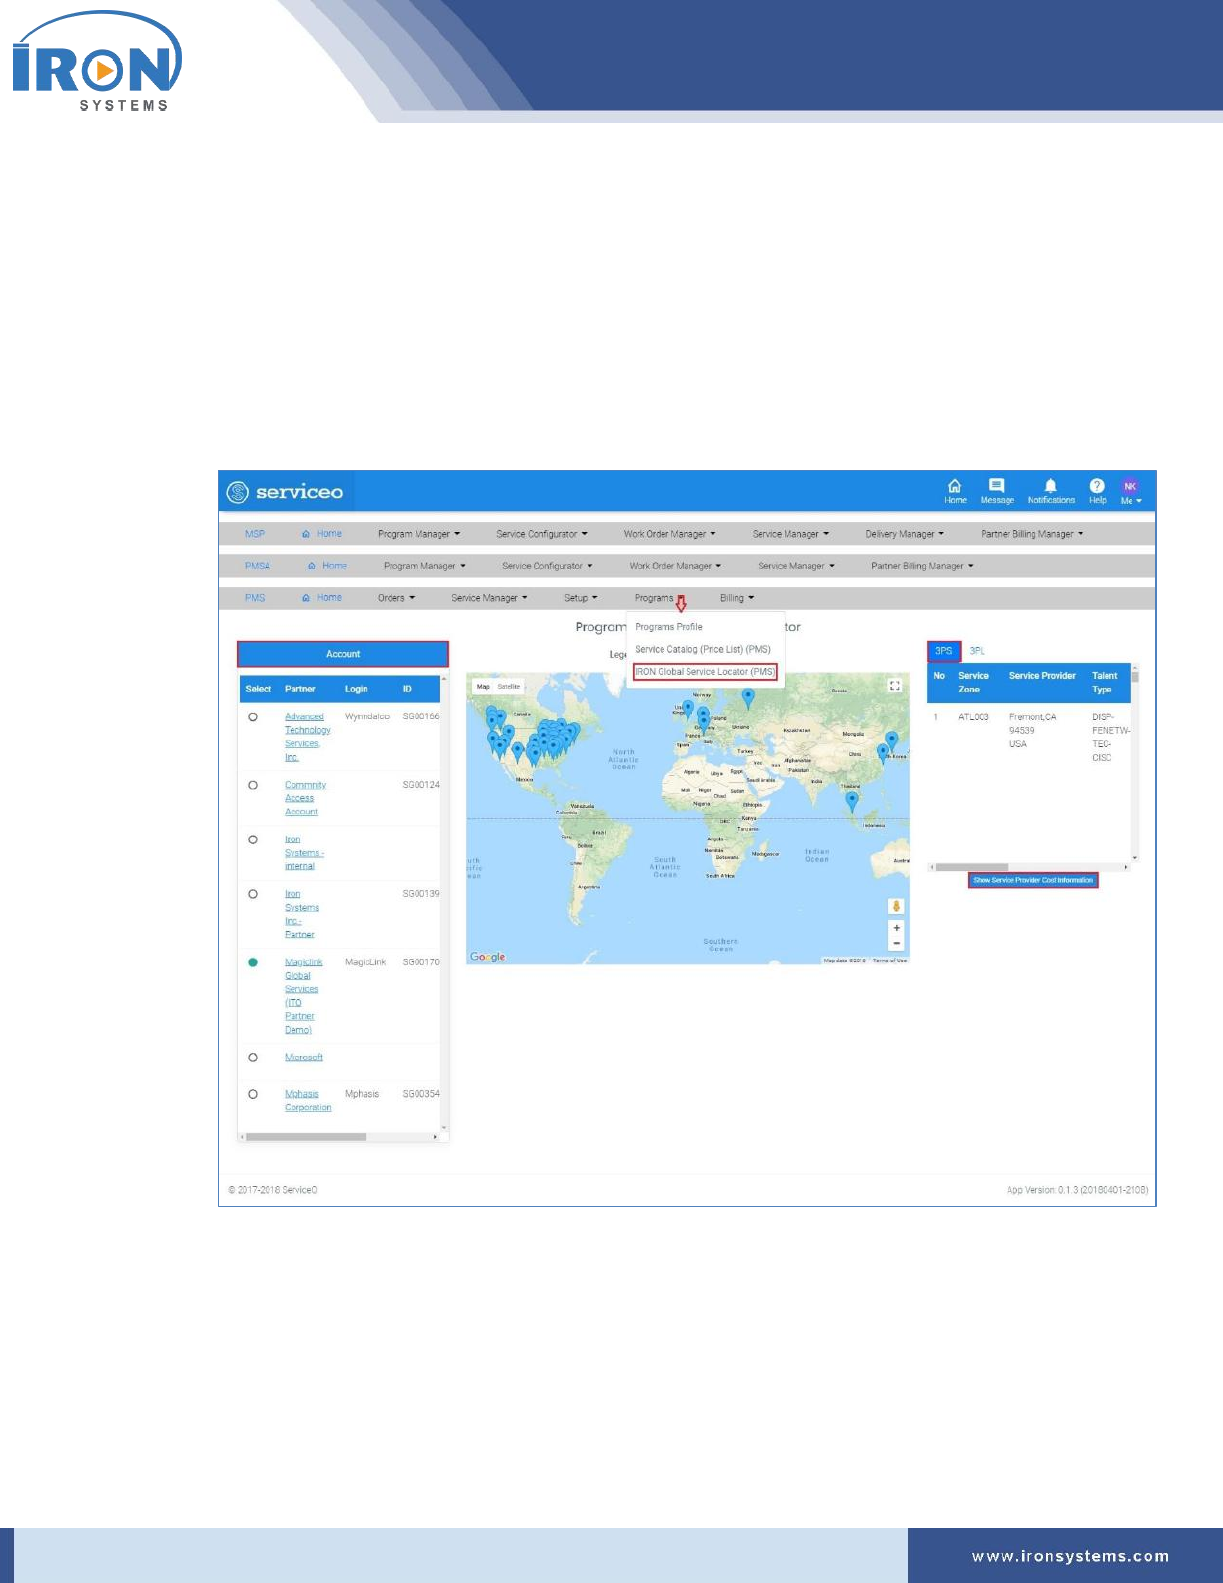
serviceo
Corporate Headquarter: 980 Mission Court, Fremont, CA 94539, USA. Phone: +(1) 408-895-8000, Fax: +(1) 408-943-8101
• 3PS –
• 3PL –
To locate global service providers, perform the following steps:
1. Click the Programs next to the PMS Home icon and then click the IRON Global Service Locator
(PMS) option to Coverage-map screen.
The Coverage-map screen appears as shown in Figure 7.4.
Figure 7.4: Coverage-map screen
Note: The Coverage-map screen displays Account section in the left side and 3PS and 3PL tabs in
the right side of the screen. The 3PS tab displays by default. Refer Figure 7.4.
The Account section displays a list of partners including their login, ID and other details.
The partner, which was selected when user last logged, is selected by default in the Account
section.

serviceo
Corporate Headquarter: 980 Mission Court, Fremont, CA 94539, USA. Phone: +(1) 408-895-8000, Fax: +(1) 408-943-8101
Placing the pointer over the icon on the map displays the location code and complete address of
the service providers.
2. Select the partner name in the Account section.
Note: As you select the partner name in the Account section, the locations on the map and
records in the 3PS and 3PL tabs get updated.
3. Click the Show Service Provider Cost Information button to view price details charged by the
Service Provider.
The Coverage-map screen updates with the Search Filter and Price List tabs as shown in Figure
7.5.
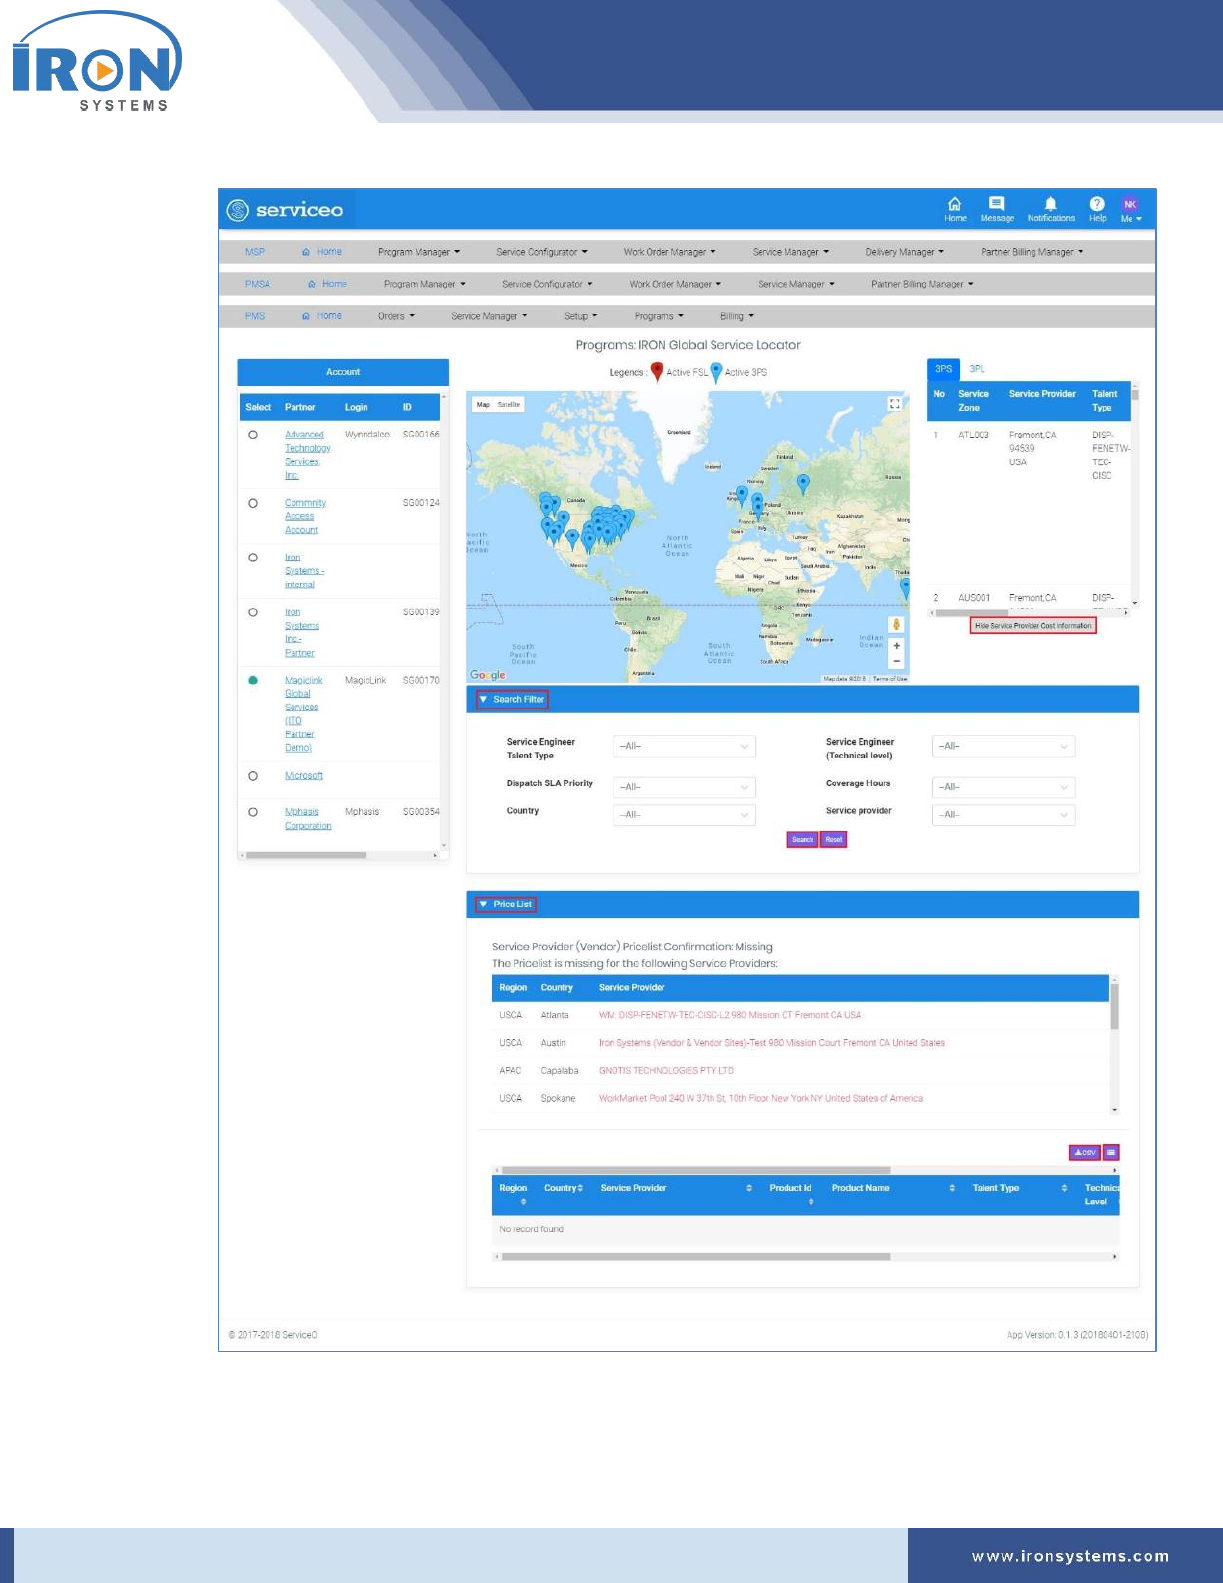
serviceo
Corporate Headquarter: 980 Mission Court, Fremont, CA 94539, USA. Phone: +(1) 408-895-8000, Fax: +(1) 408-943-8101
Figure 7.5: Coverage-map screen - Service Provider Cost Information
Tip: Click the Hide Service Provider Cost Information button to hide the price details (pricelist)
of the service provider.

serviceo
Corporate Headquarter: 980 Mission Court, Fremont, CA 94539, USA. Phone: +(1) 408-895-8000, Fax: +(1) 408-943-8101
4. Select the relevant service engineer type you want to view price in the Service Engineer Talent
Type drop-down select list.
5. Select the technical level of service engineer in the Service Engineer (Technical level) drop-
down list.
6. Select the appropriate SLA priority in the Dispatch SLA Priority drop-down list.
7. Select the coverage hours in the Coverage Hours drop-down list.
8. Select the country of the service provider in the Country drop-down select list.
9. Select the Service Provider you want to choose for the selected region in the Service Provider
drop-down list.
10. Click the Search button to fetch the records based on selected search criteria.
Tip: Click the Reset button to reset the selected search criteria.
The Coverage-map screen updates with records in the Price List tab as shown below:
Tip: Click the button to download the Price List details of the service provider in the
Excel format. Click the icon in the upper right-corner of tabs and then select or clear the
Column Name check boxes from the list as per requirements.
serviceo
Corporate Headquarter: 980 Mission Court, Fremont, CA 94539, USA. Phone: +(1) 408-895-8000, Fax: +(1) 408-943-8101
8 Service Manager
The purpose of Service Manager is to make the service management easier and efficient. This module of
the PMS……. More information will be added at a later stage.
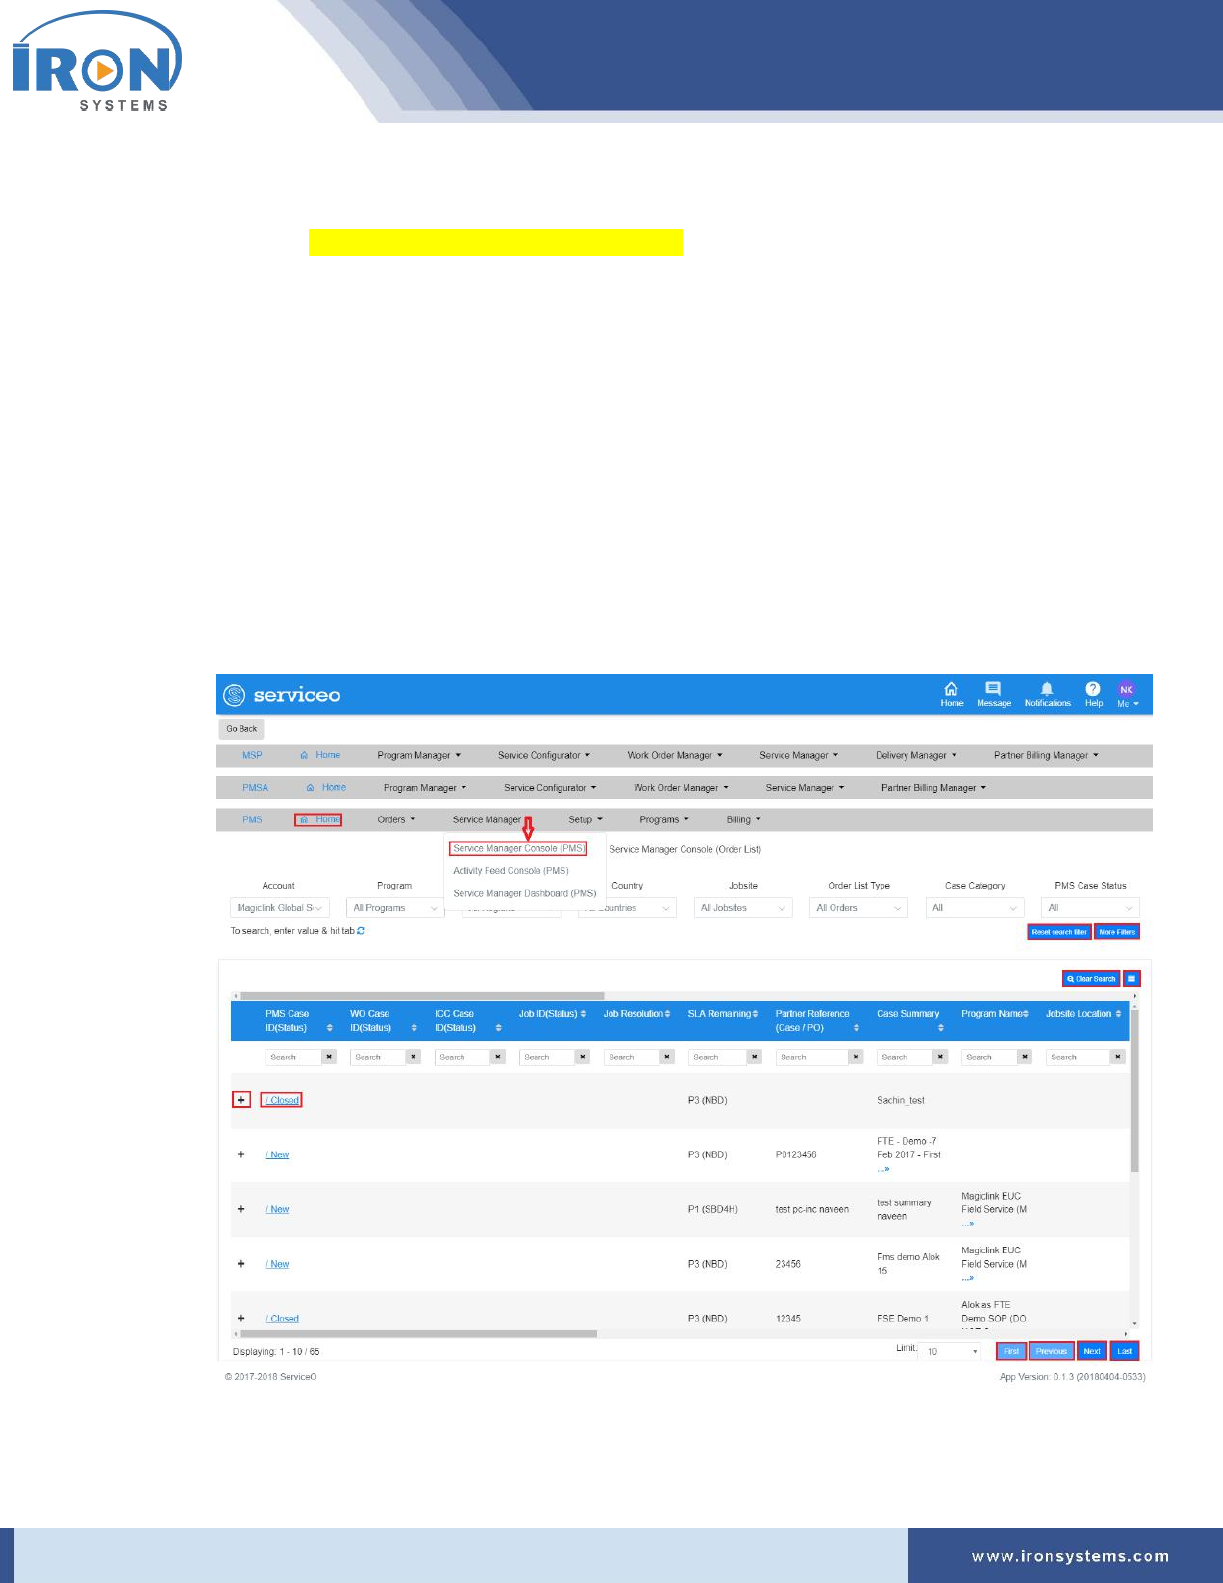
8.1 Service Manager Console (PMS)
The Service Manager Console logs the consolidated list of orders for all listed partner, which are entered
into the Serviceo system. It
To view the Order List (PMS), perform the following steps:
1. Click the Service Manager next to the PMS Home icon and then click the Service Manager
Console (PMS) to access the order list.
The Orders-list screen appears as shown in Figure 8.1.
Figure 8.1: Orders-list screen
serviceo
Corporate Headquarter: 980 Mission Court, Fremont, CA 94539, USA. Phone: +(1) 408-895-8000, Fax: +(1) 408-943-8101
Tip: Click the button in the upper-left corner of the Orders-list screen to return
to the page you were viewing before this current page. Click the icon to refresh the Orders-
list screen. Click the icon in the upper right-corner to select or clear the Column Name
check boxes as per requirements.
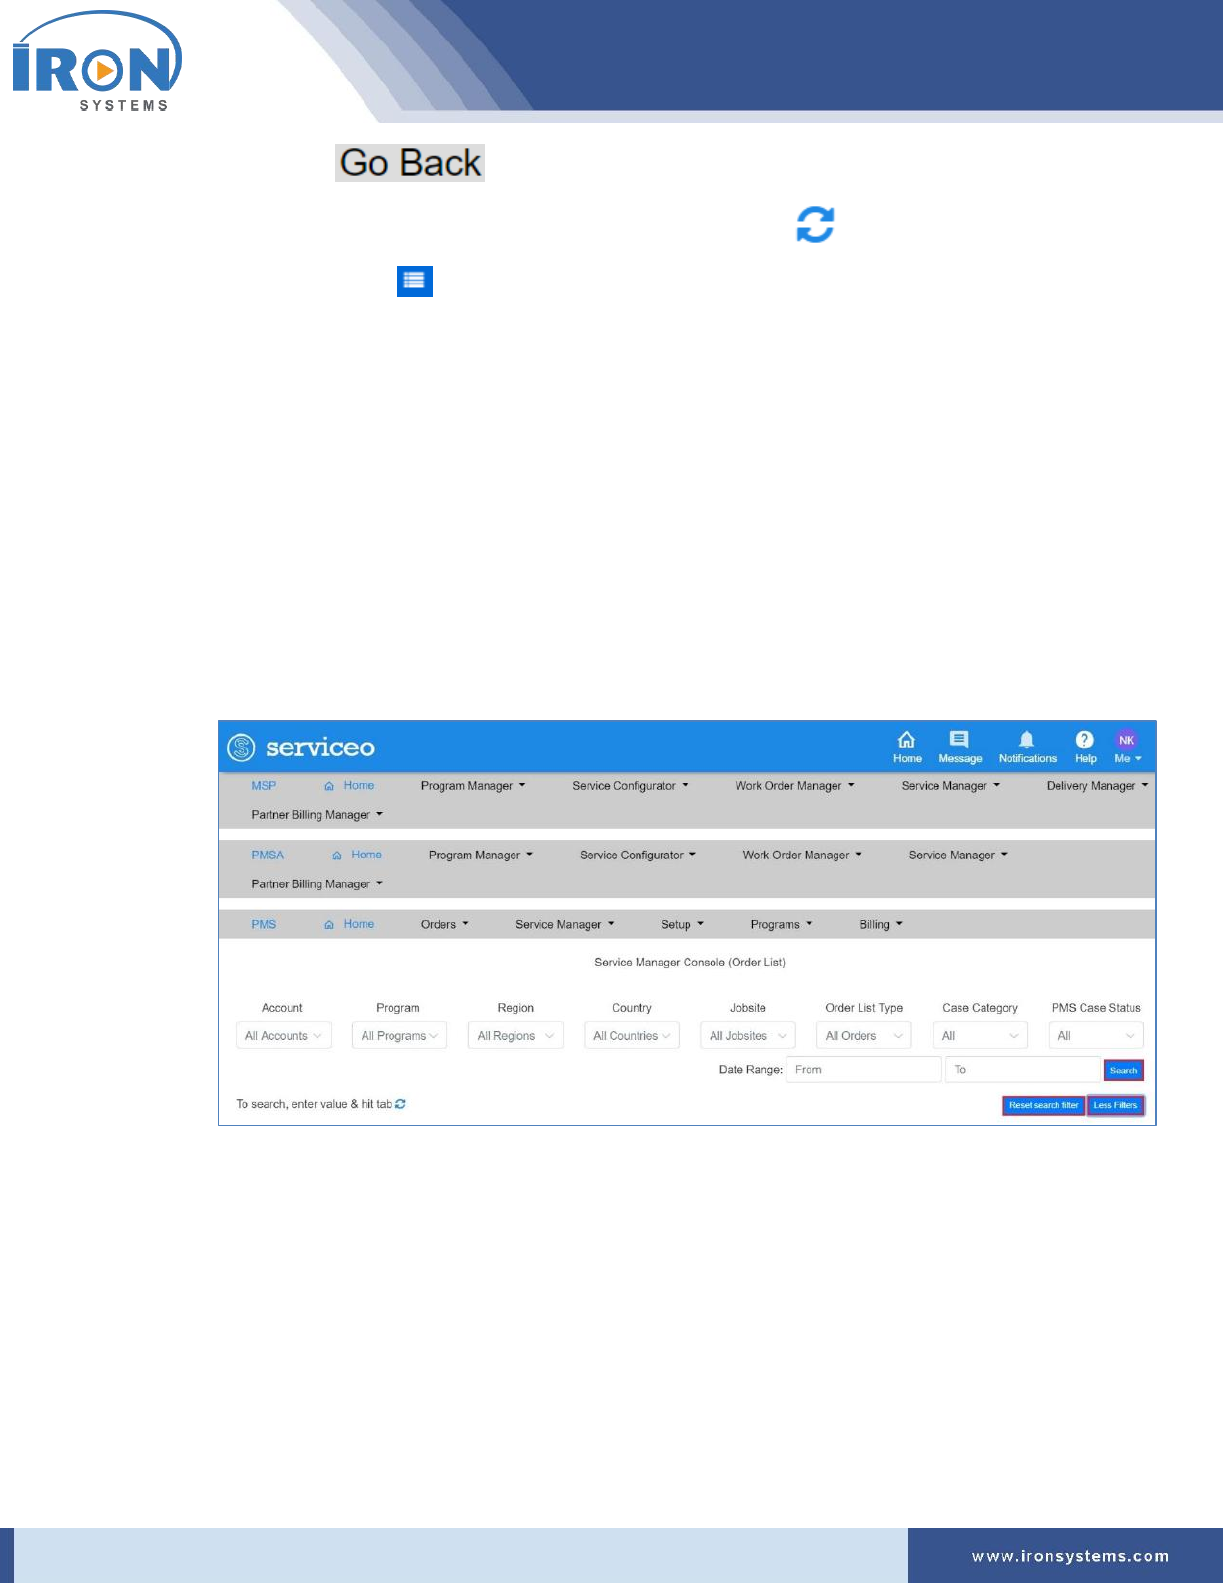
2. Select the Account name in the Account drop-down select list.
Tip: As you select the Account name in the Account drop-down list, the order list corresponding
to the selected Account gets updated on the page.
3. Select the relevant program in the Program drop-down list for which you want to view order list.
The Order List gets updated on the Orders-list screen for the corresponding “Program” if the
selected Program has orders.
4. Select the appropriate values in the different search fields to narrow down your search results.
5. To further narrow down your search results and viewing options, click the More Filters button.
The Orders-list screen updates with more search fields as shown in the below figure:
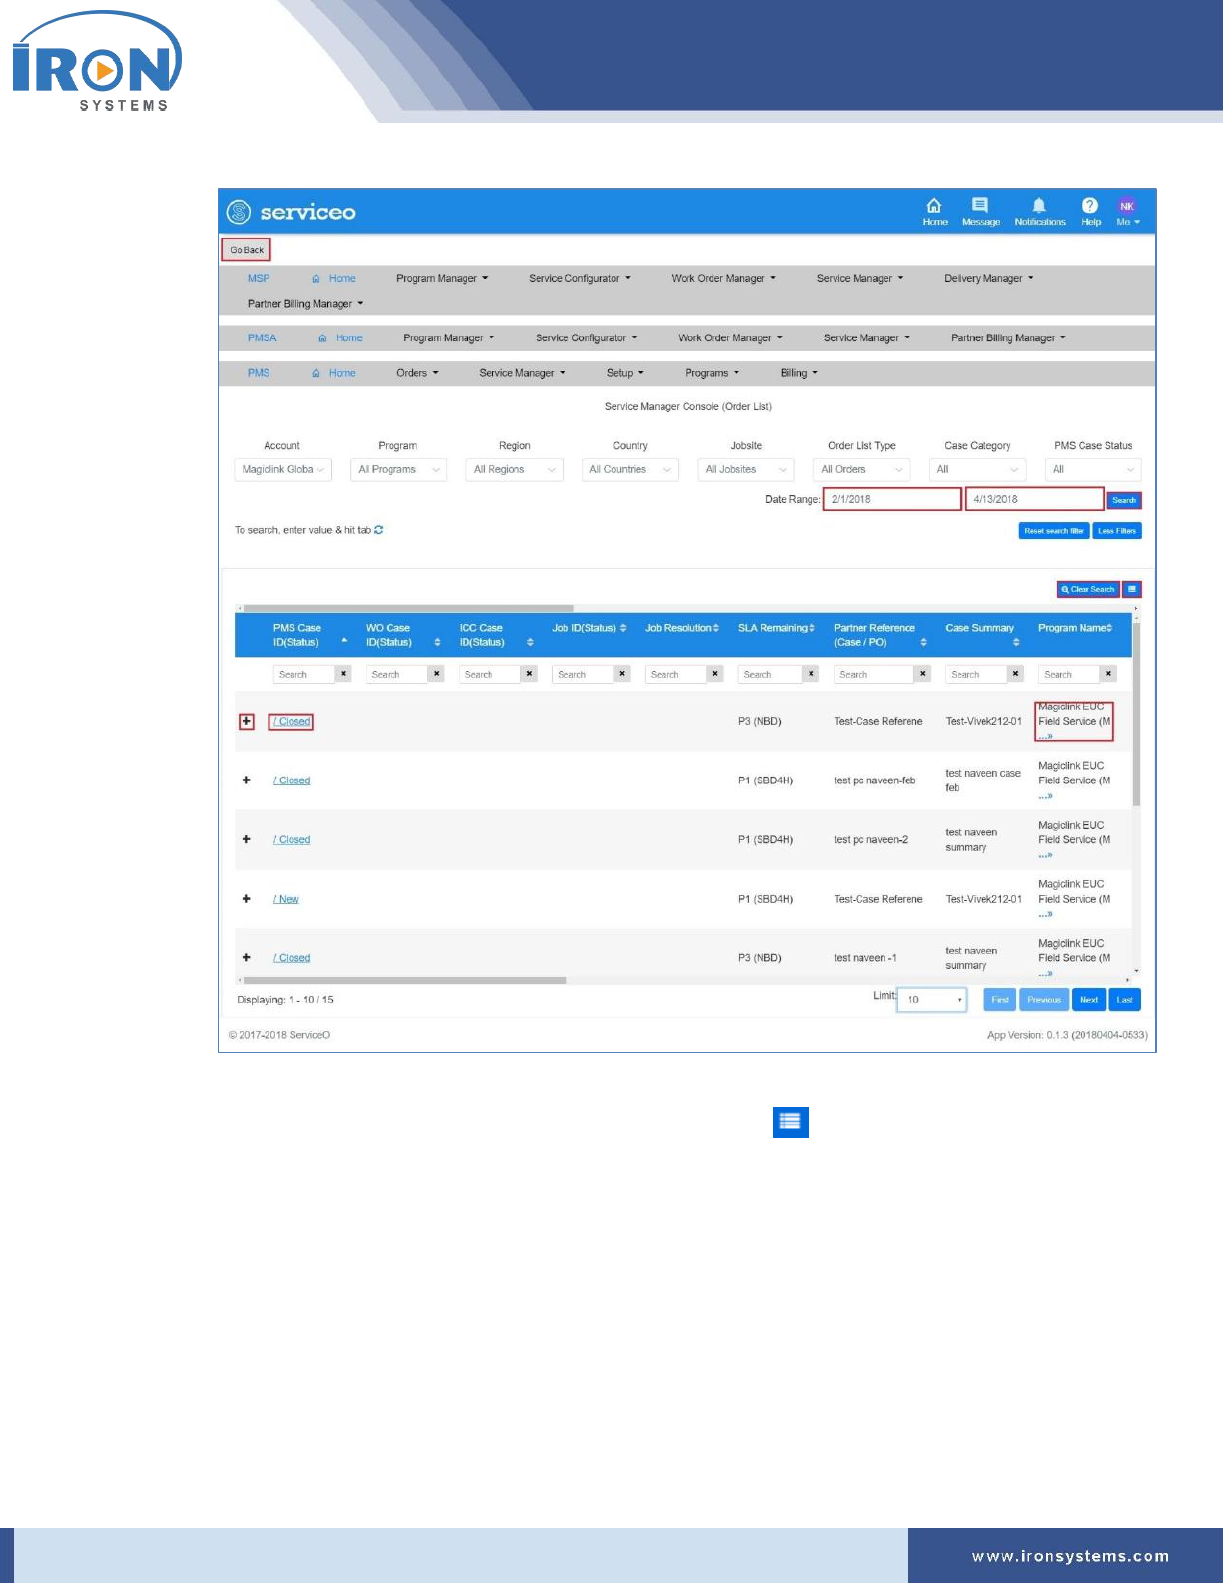
6. Select Date Range in the From and To Date fields and then click the Search button for viewing
orders within the purged date range.
Tip: Click anywhere in the From and To fields and then select date on the calendar that appears.
Click the Less Filters to hide extra fields that appear after clicking on the More Filters button. If
you want to reset search criteria, click the Reset Search Filter button.
The Orders-list screen updates with records as per selected date range as shown in Figure 8.2.
serviceo
Corporate Headquarter: 980 Mission Court, Fremont, CA 94539, USA. Phone: +(1) 408-895-8000, Fax: +(1) 408-943-8101
Figure 8.2: Orders-list screen – Search Results
Tip: You can search any specific order by typing the relevant values in the different search fields.
Click the Clear Search button to reset search criteria. Click the icon in the upper right-corner
to select or clear the Column Name check boxes as per requirements.
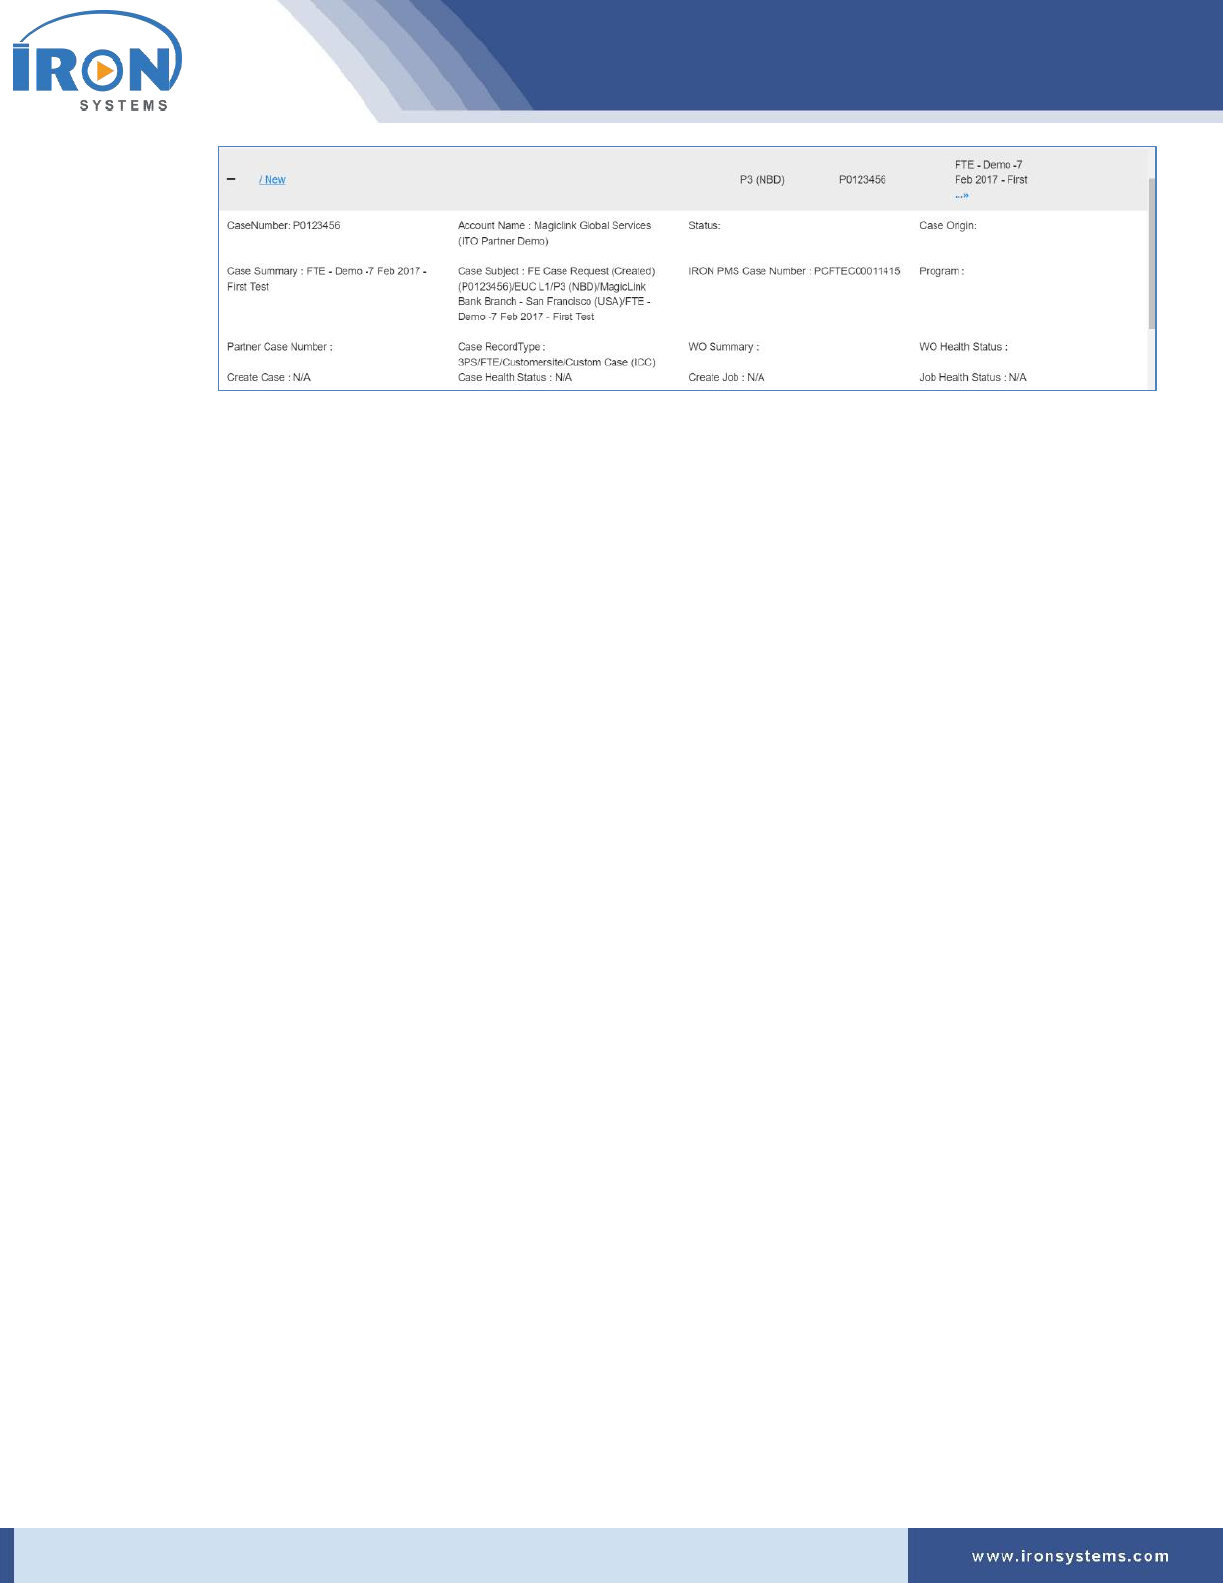
7. Click the + (plus sign) to view order details in expanded form.
The Order Details appears in expanded form as shown in the figure below:
serviceo
Corporate Headquarter: 980 Mission Court, Fremont, CA 94539, USA. Phone: +(1) 408-895-8000, Fax: +(1) 408-943-8101
Tip: Click the – (minus sign) to close the expanded form.
8. Click the PMS Case ID (Status) link next to the + (plus sign) to view
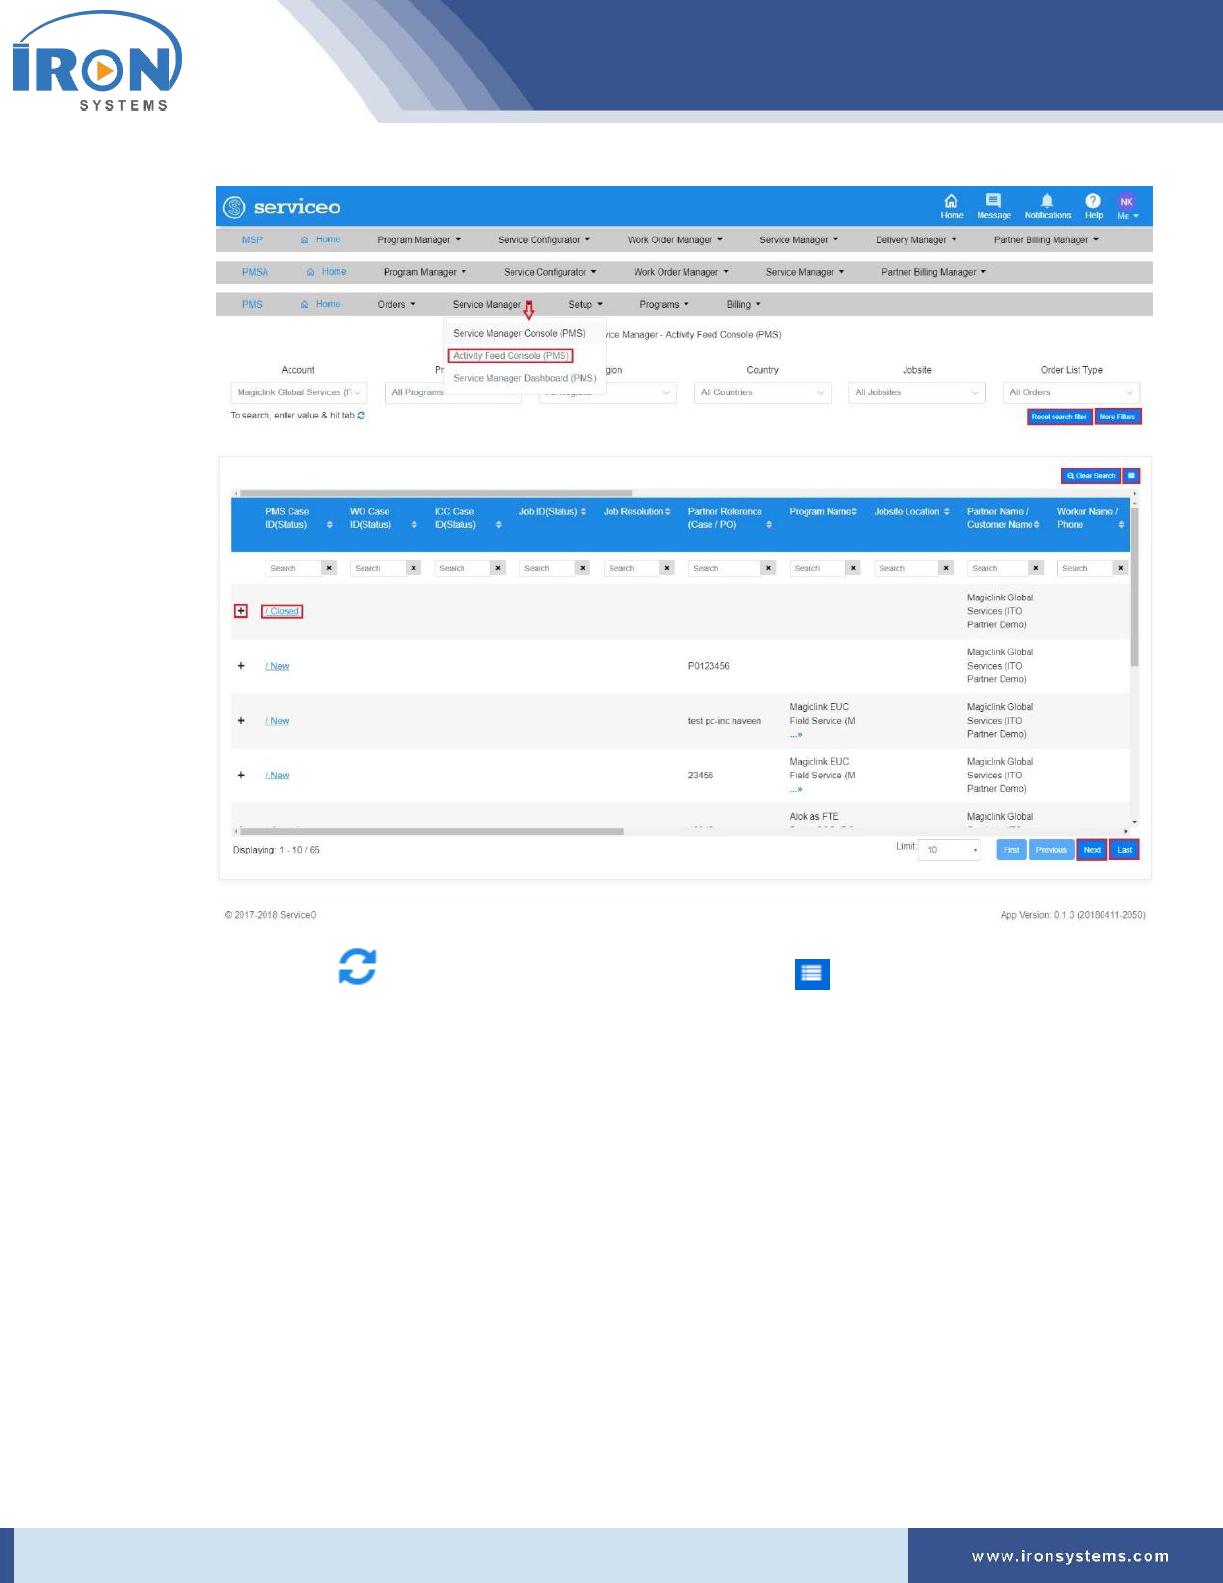
8.2 Activity Feed Console (PMS)
The Activity Feed Console logs the consolidated list of all activities/events. It provides centralized view of
all cases updates in the PMS System.
The list of activity includes any updates to PMS case status, case messages, appointment date, worker
Contact information.
To view the Activity Feed Console (PMS), perform the following steps:
1. Click the Service Manager next to the PMS Home icon and then click the Activity Feed Console
(PMS) option to access the Activity Feed.
The Feeds-list screen appears with auto-populated Account Name in the Account drop-down list
as shown in Figure 8.3.
serviceo
Corporate Headquarter: 980 Mission Court, Fremont, CA 94539, USA. Phone: +(1) 408-895-8000, Fax: +(1) 408-943-8101
Figure 8.3: Feeds-list screen
Tip: Click the icon to refresh the Feeds-list screen. Click the icon in the upper right-
corner to select or clear the Column Name check boxes as per requirements
2. Select the Account name in the Account drop-down select list.
Tip: As you select the Account name in the Account drop-down list, the Activity Feed
corresponding to the selected Account gets updated on the page.
3. Select the relevant program in the Program drop-down list for which you want to view Activity
Feed list.
The Activity Feed gets updated on the Orders-list screen for the corresponding “Program” if the
selected Program has orders.
4. Select the appropriate values in the different search fields to narrow down your search results.
5. To further narrow down your search results and viewing options, click the More Filters button.
The Feeds-list screen updates with more search fields as shown in the below figure:
serviceo
Corporate Headquarter: 980 Mission Court, Fremont, CA 94539, USA. Phone: +(1) 408-895-8000, Fax: +(1) 408-943-8101
6. Select Date Range in the From and To Date fields and then click the Search button for viewing
Activity within the purged date range.
Tip: Click anywhere in the From and To fields and then select date on the calendar that appears.
Click the Less Filters to hide extra fields that appear after clicking on the More Filters button. If
you want to reset search criteria, click the Reset Search Filter button.
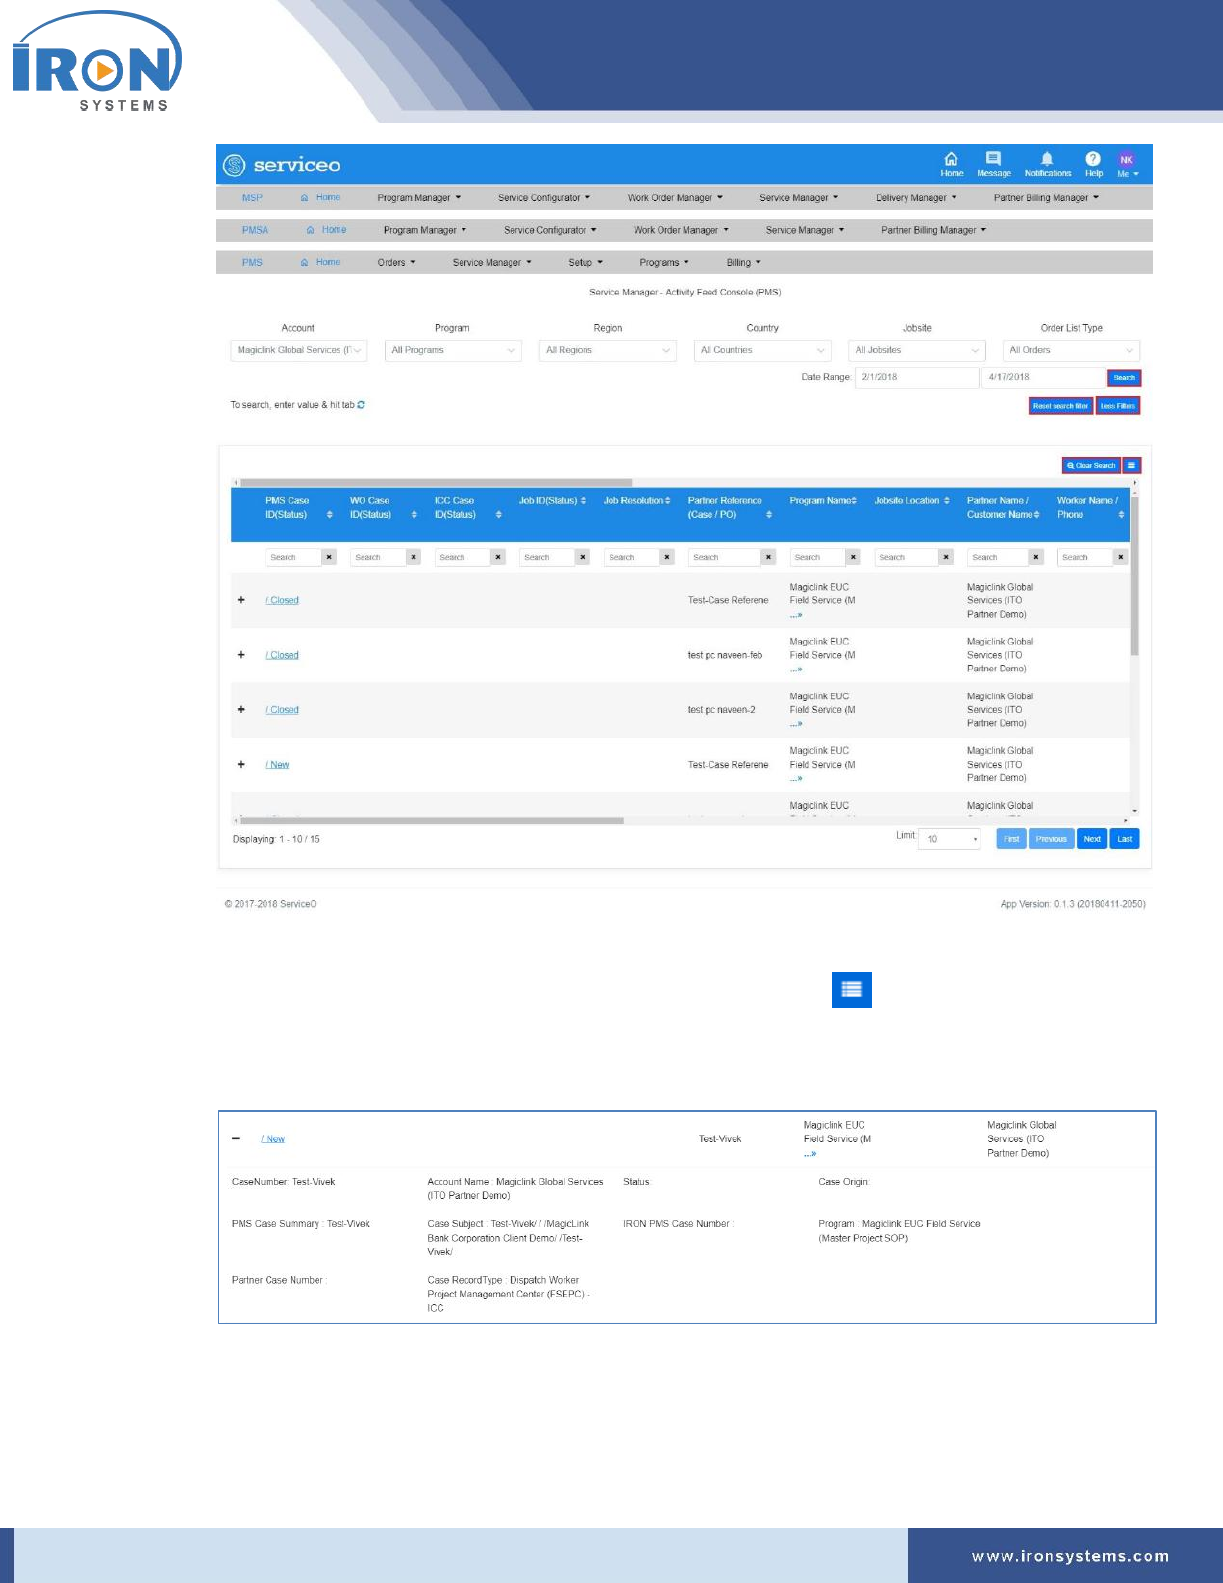
The Feeds-list screen updates with records as per selected date range as shown in the below
figure:
serviceo
Corporate Headquarter: 980 Mission Court, Fremont, CA 94539, USA. Phone: +(1) 408-895-8000, Fax: +(1) 408-943-8101
Tip: You can search any specific Activity by typing the relevant values in the different search
fields. Click the Clear Search button to reset search criteria. Click the icon in the upper
right-corner to select or clear the Column Name check boxes as per requirements.
7. Click. the + (plus sign) to view Activity details in expanded form.
Tip: Click the – (minus sign) to close the expanded form.
8. Click the PMS Case ID (Status) link next to the + (plus sign) to view.

serviceo
Corporate Headquarter: 980 Mission Court, Fremont, CA 94539, USA. Phone: +(1) 408-895-8000, Fax: +(1) 408-943-8101
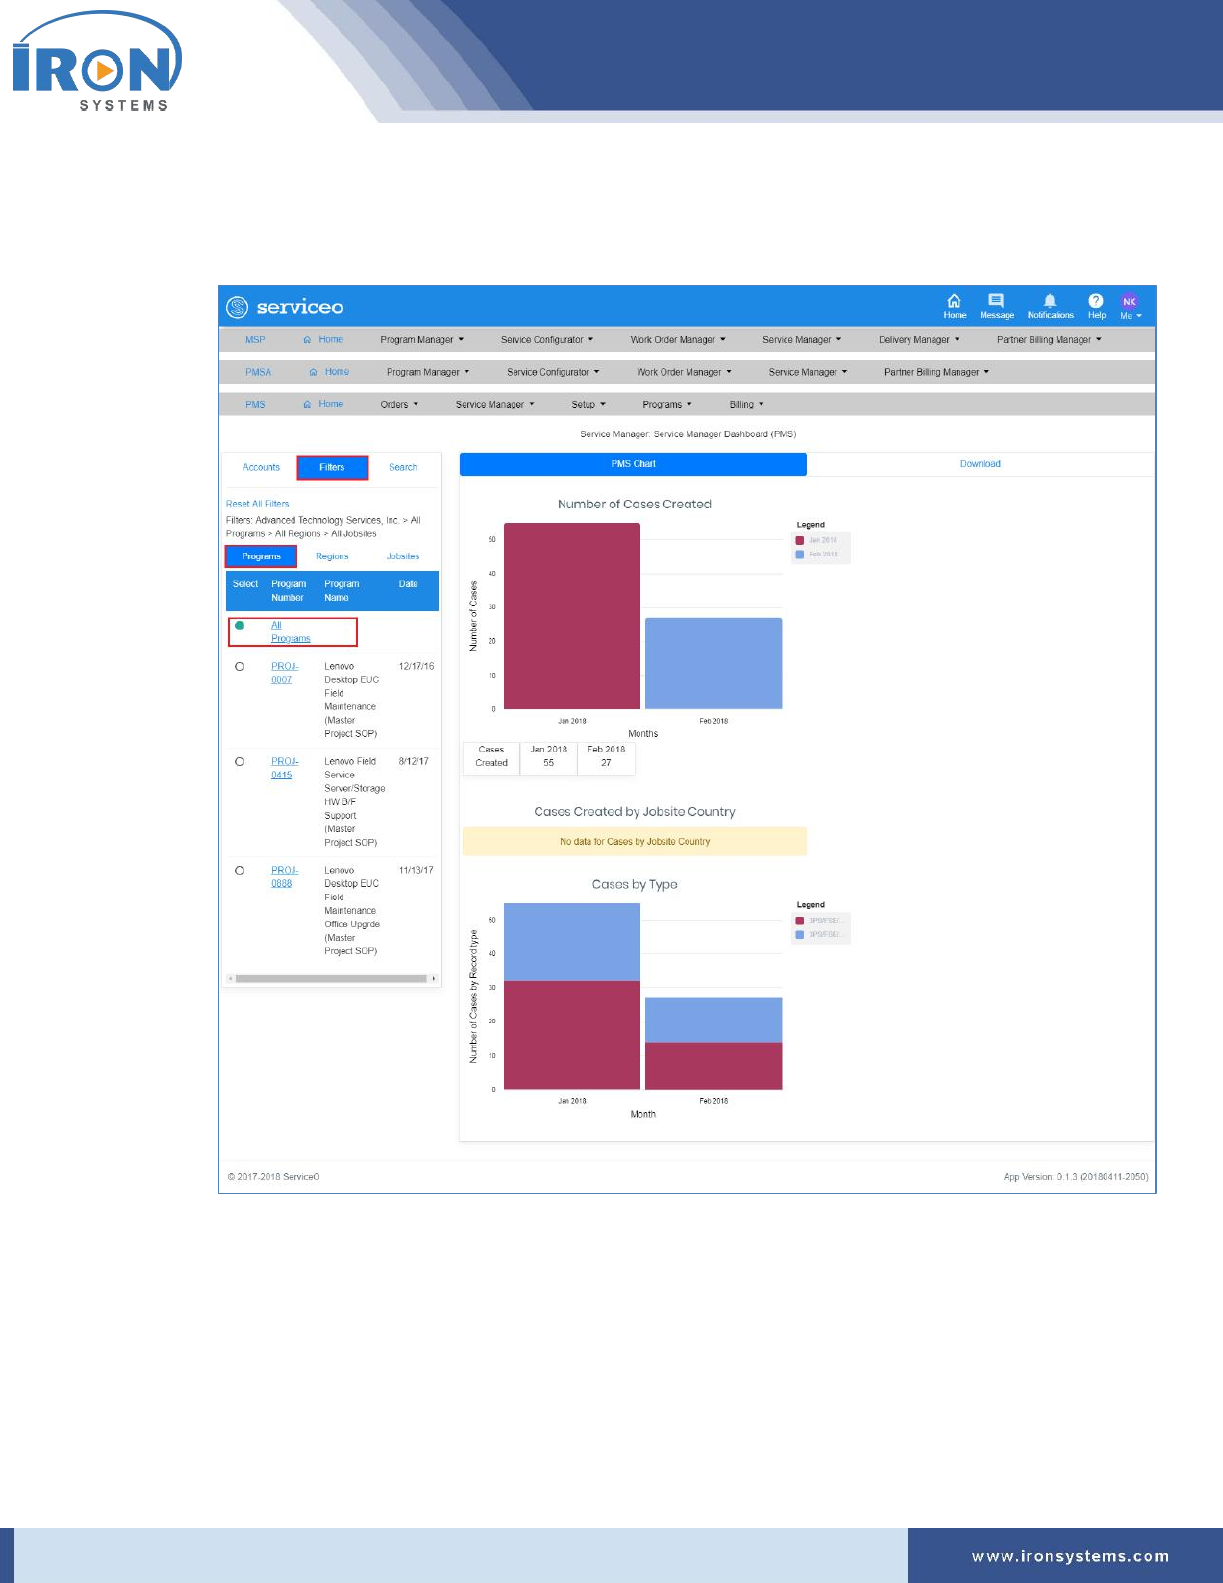
8.3 Service Manager Dashboard (PMS)
The Service Manager Dashboard (PMS) allows you to view and analyze the cumulative data that
provides the status of your Cases and other important details.
The Dashboard also displays status of cases in graphics on a single screen in real time environment. It
pulls relevant information in real time that helps you to view key information. This is the place where
you get real time status of cases as per Jobsite Country. This capability allows you to make quick
analysis.
This Dashboard also allows to use filters tab to narrow down your PMS Chart report and viewing option.
Here, you can also download entire data in the Excel format.
To access Service Manager Dashboard (PMS). Perform the following steps:
1. Click the Service Manager next to the PMS Home icon and then click the Service Manager
Dashboard (PMS) option to view the dashboard.
The Service-manager screen appears with the Accounts, Filters, and Search tabs in the left side
of the screen and the PMS Charts and Download tabs in the middle of the screen. Refer Figure
8.4.
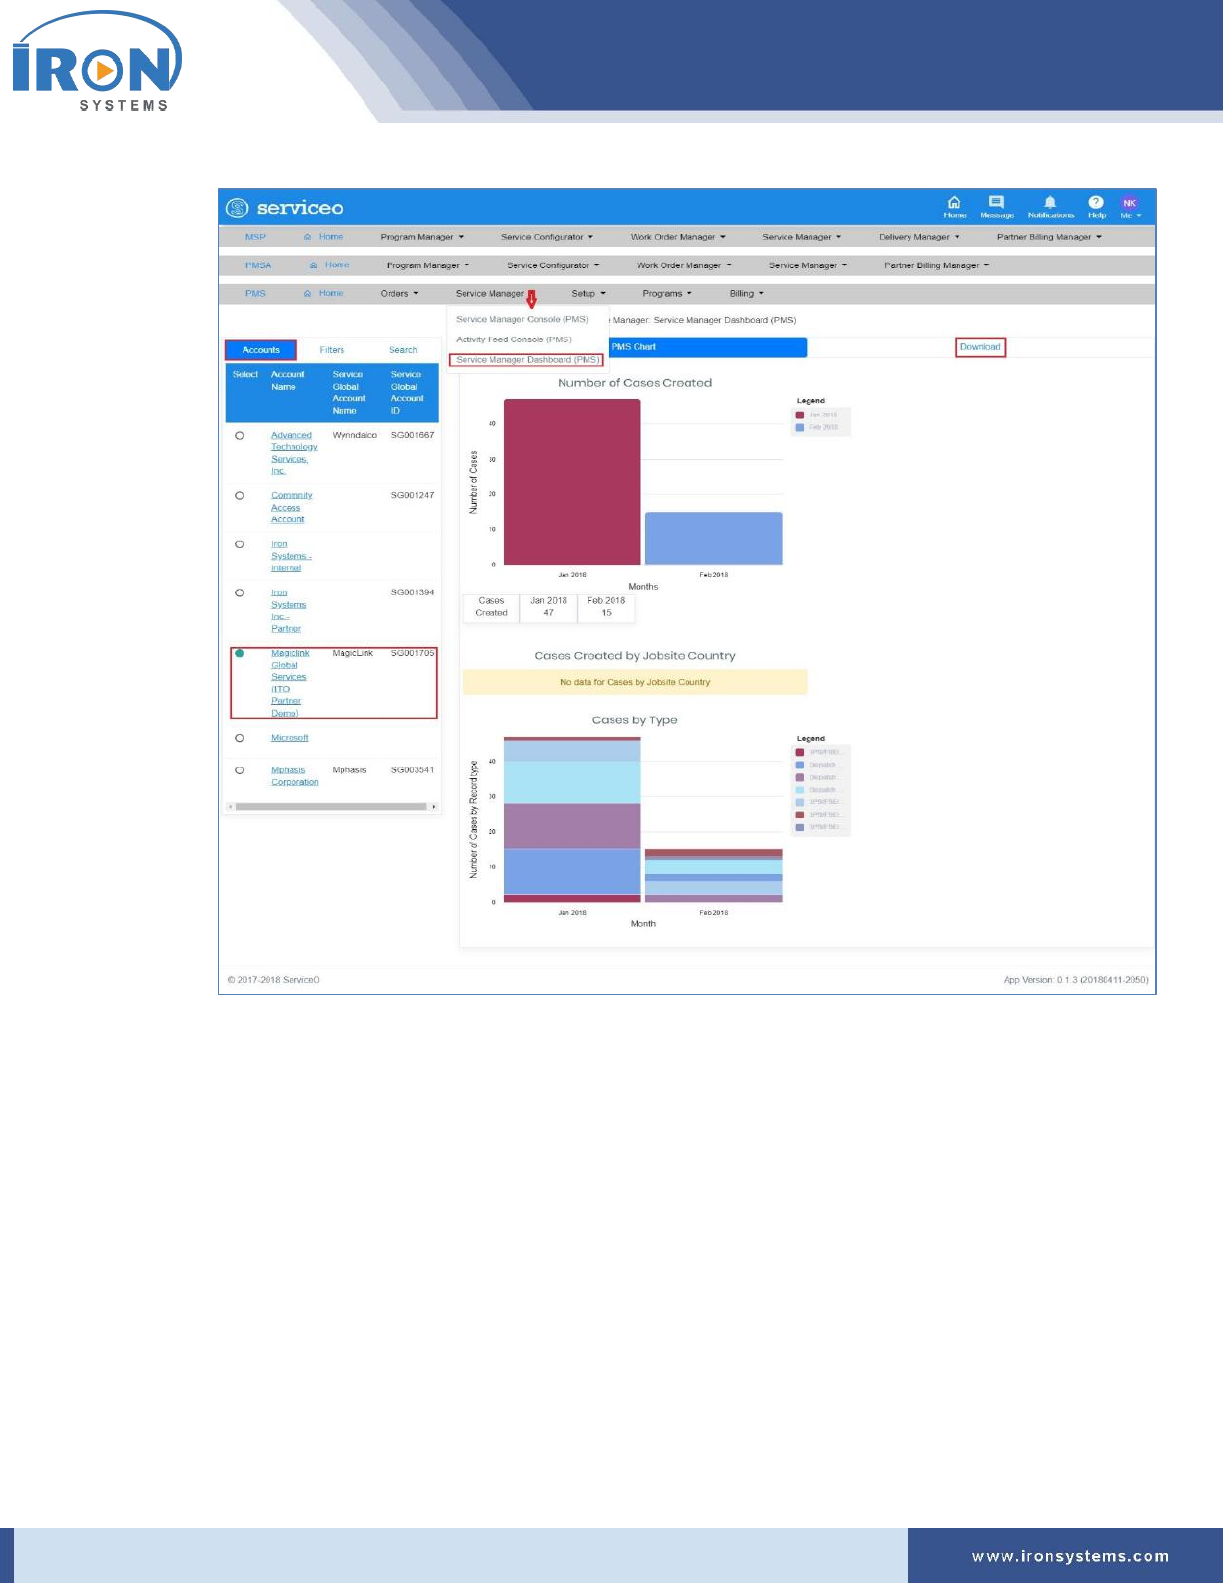
serviceo
Corporate Headquarter: 980 Mission Court, Fremont, CA 94539, USA. Phone: +(1) 408-895-8000, Fax: +(1) 408-943-8101
Figure 8.4: Service-manager screen
Note: The Service-manager screen displays the dashboard for the Account, which was selected
when user last logged.
The PMS Chart tab displays the total number of cases created in the Serviceo system in graphics.
It also displays the number of cases by their record type.
2. Select the Account Name in the Accounts tab to view all programs listed with the selected
Account.
Tip: As you select the Account Name in the Accounts tab, the PMS Chart tab updates with
records corresponding to the selected Account.
3. Click the Filters tab to narrow down your viewing option in the left side of the screen. Refer
Figure 8.4.
serviceo
Corporate Headquarter: 980 Mission Court, Fremont, CA 94539, USA. Phone: +(1) 408-895-8000, Fax: +(1) 408-943-8101
The Service-manager screen appears with Filters tab options containing the Programs, Regions,
and Jobsites tabs. The Programs tab displays by default. Refer Figure 8.5.
Figure 8.5: Service-manager screen – Filters tab
Tip: The Service-manager screen displays the PMS Chart for all programs, because in the
Programs tab, All Programs option is auto-selected when you click the Filters tab
4. Select the Program Number for which you want to view PMS Chart in the Filters tab.
Tip: As you select the Program Number in the Filters tab, the PMS Chart tab updates with
records of the selected Program Number.
serviceo
Corporate Headquarter: 980 Mission Court, Fremont, CA 94539, USA. Phone: +(1) 408-895-8000, Fax: +(1) 408-943-8101
5. Click the Regions tab and then select the Region for which you want to narrow down your
viewing option.
6. Click the Jobsites tab and then select the Jobsites for which you want to view the chart.
Tip: The Service-manager screen gets auto-refreshed with each selection.
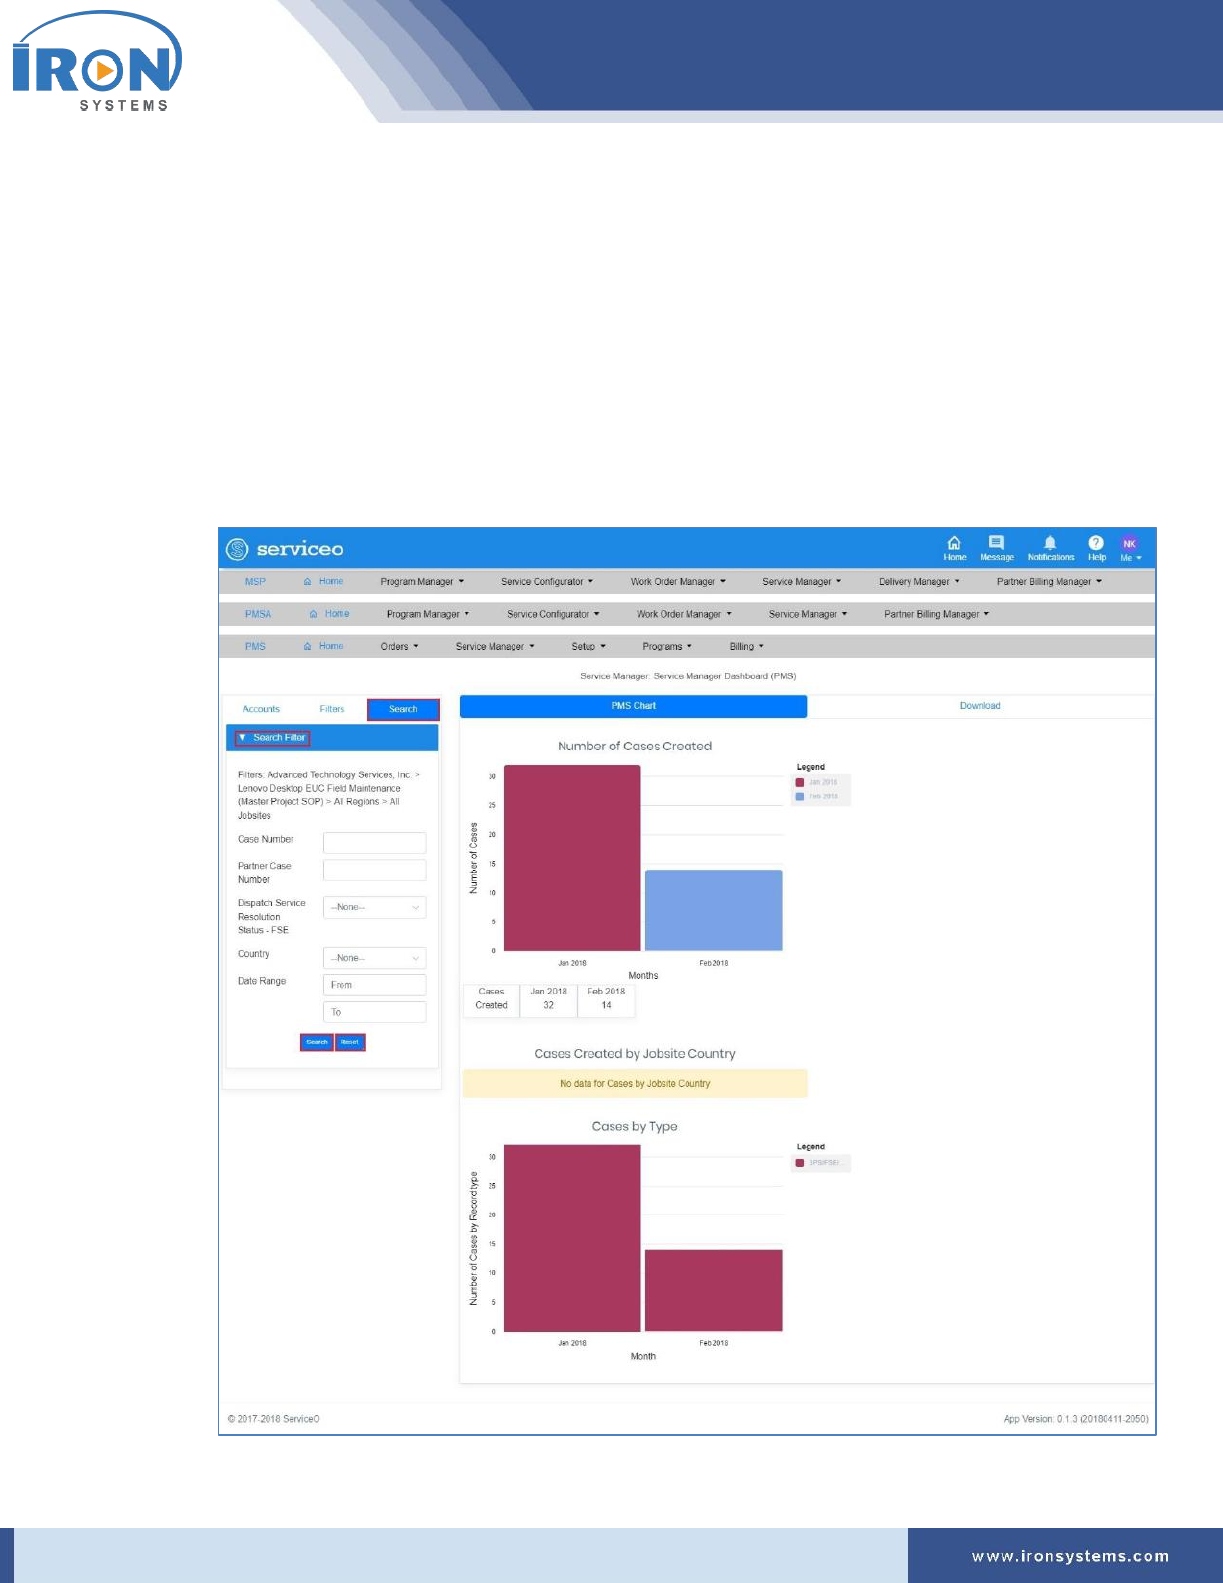
7. Click the Search tab in the left side of the Service-manager screen to view Case-specific PMS
Chart. Refer Figure 8.4.
The Service-manager screen updates with Search Filters tab in the left side of the screen as
shown Figure 8.6.
Figure 8.6: Service-manager screen – Search tab

serviceo
Corporate Headquarter: 980 Mission Court, Fremont, CA 94539, USA. Phone: +(1) 408-895-8000, Fax: +(1) 408-943-8101
8. Type the case number for which you want to view PMC Chart in the Case Number field.
9. Type the partner case number in the Partner Case Number field.
10. Select the relevant Service Resolution Status in the Dispatch Service Resolution Status – FSE
drop-down list.
Tip: There are four Dispatch Service Resolution Status states:
• New -
• In-Progress -
• Resolved -
• Closed -
11. Select the country in the Country drop-down list.
12. Select the date range in the From and To fields and then click the Search button to view records.
Tip: Click anywhere in the From and To fields and then select the dates on the calendar that
displays. Click the Reset button to reset the search criteria.
13. Click the Download tab to download entire data in the Excel format.

serviceo
Corporate Headquarter: 980 Mission Court, Fremont, CA 94539, USA. Phone: +(1) 408-895-8000, Fax: +(1) 408-943-8101
9 Work Order Manager
The Work Order Manager module provides key functionalities overview related to new work order
creation and new case creation web form section and fields.
The Create Case (Dispatch FSE - Customer Site) sub menu details web-form section and related fields to
create a “new case request order” for Field Service Engineer (FSE) Customer site dispatch.
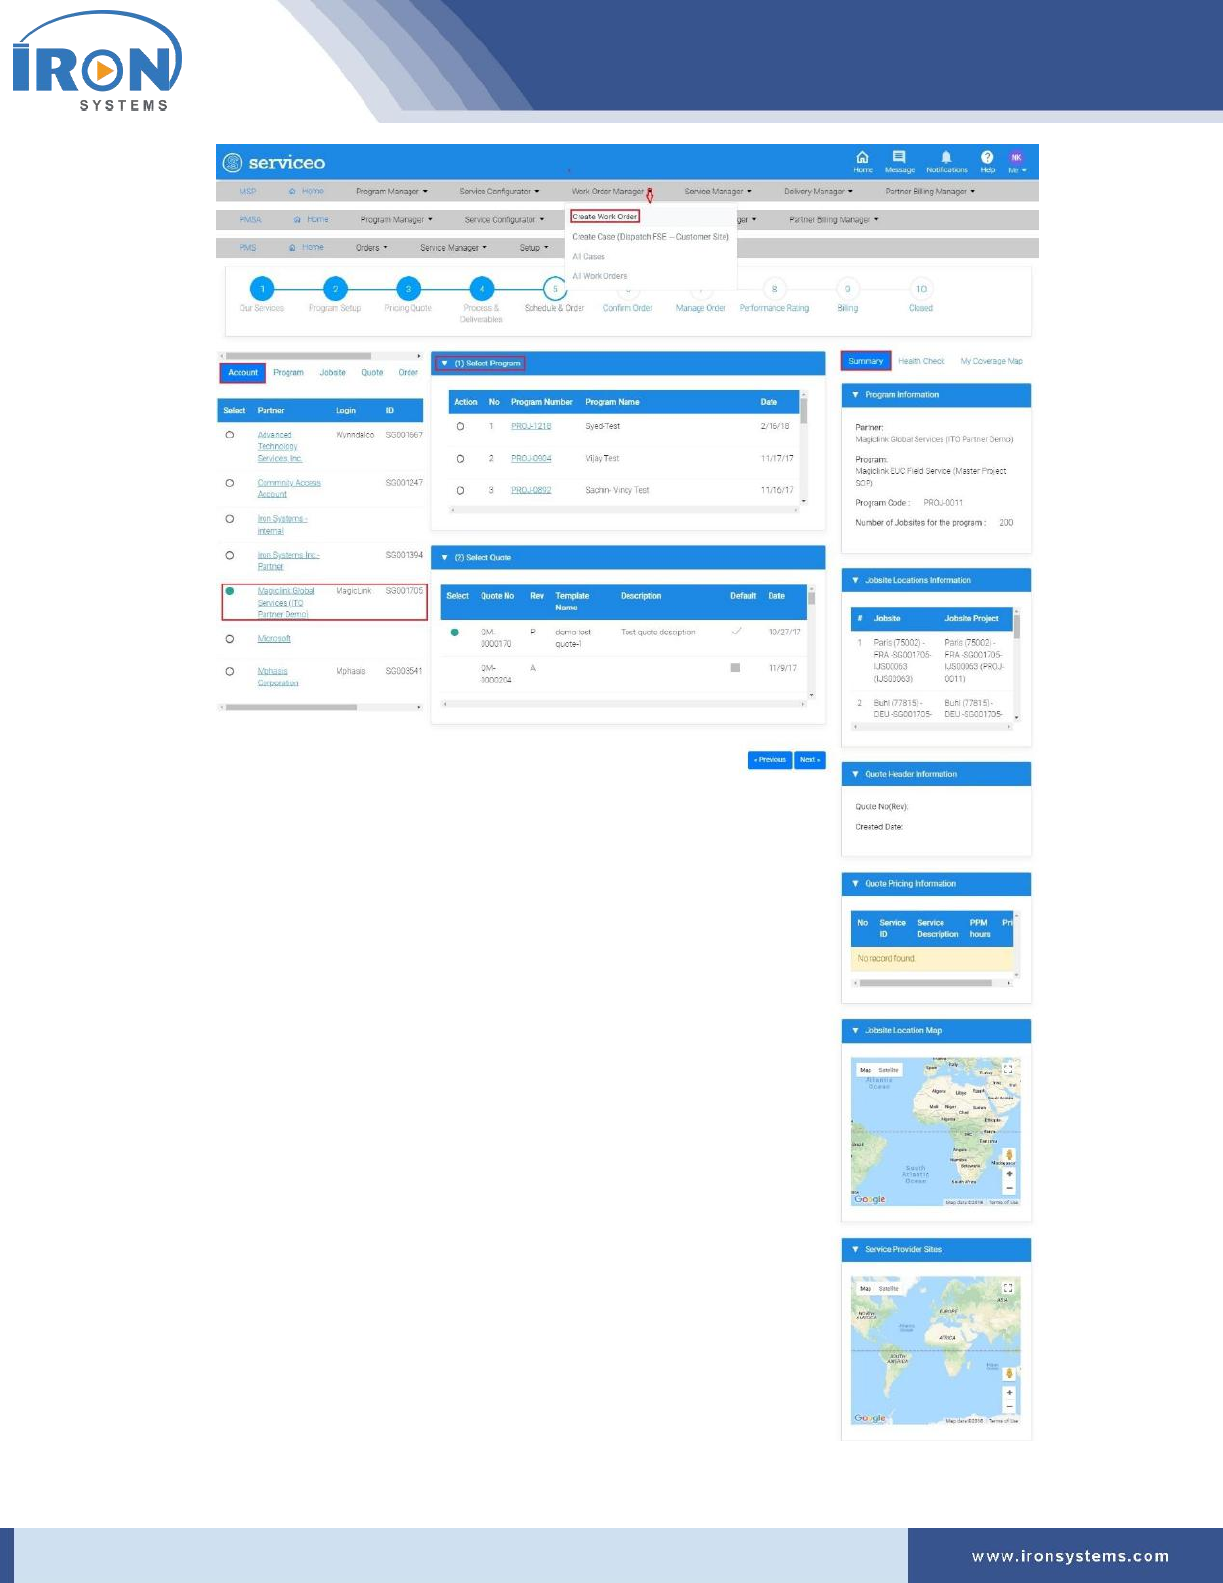
9.1 Create Work Order
The Create Work Order allows to create new work order. It provides web-form section and related fields
to create a “new work order”.
The below is the list of web-form sections to create new work order:
➢ Program Setup
a.
➢ Pricing Quote
➢ Process & Deliverables
➢ Schedule & Order
➢ Confirm Order
➢ Manager Order
➢ Performance Rating
➢ Billing
To create a work order request, perform the following steps:
1. Click the Work Order Manager next to the MSP home icon and then click the Create Work
Order option to access the Schedule screen.
The Schedule screen displays as shown in Figure 9.1.
Figure 9.1: Schedule screen
serviceo
Corporate Headquarter: 980 Mission Court, Fremont, CA 94539, USA. Phone: +(1) 408-895-8000, Fax: +(1) 408-943-8101

serviceo
Corporate Headquarter: 980 Mission Court, Fremont, CA 94539, USA. Phone: +(1) 408-895-8000, Fax: +(1) 408-943-8101
Note: The Schedule screen displays with the Account, Program, Jobsite, Quote, Order and Price
Book tabs in the left pane of the screen. The Account tab displays by default. In the right pane of
the Schedule screen, there are three tabs, namely Summary, Health Check, and My Coverage
Map tabs appear. Here, the Summary tab displays by default.
Here, you can also view various stages involved to create a work order request. The progress bar
will run a colored bar showing the progress stage completed during the process. This progress
bar provides lots of flexibility for service handling while providing visibility for users to better
understand the status.
Tip: Click the Partner Name next to the Select column in the Account tab to view Account
Details. Click the Program Number link in the Program tab next to the Account tab to view the
program details. Click the Manage link in the Jobsite tab to view and edit jobsite details. Click
the Quote Number in the Quote tab to view Quote Manager details. Click the Work Order # in
the Order tab to view Work Order Details. Select the Program in the Price Book tab and then
click the View link to Price Book Details.
2. Select the partner name in the Account tab to create work order request.
Tip: As you select partner in the Account tab, the (1) Select Program tab gets updated with
records (in this case, Program numbers) corresponding to the selected Partner.
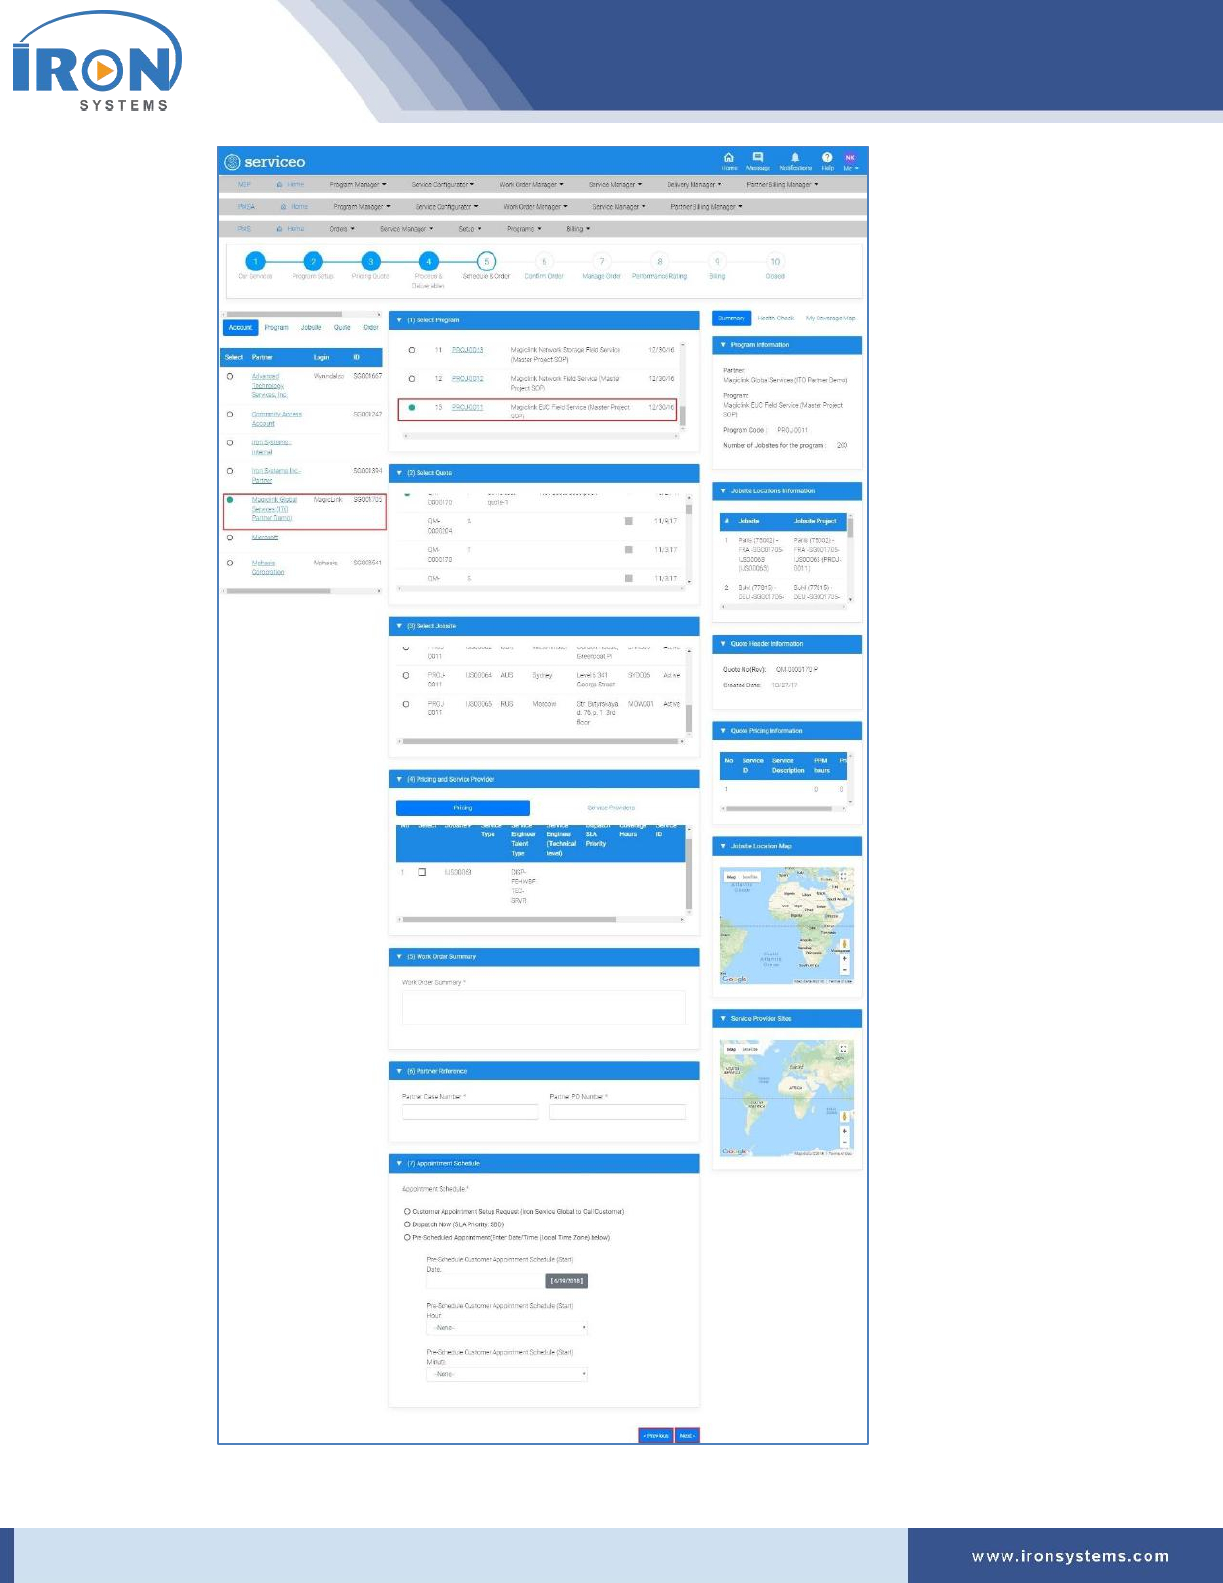
3. Select the program number in the (1) Select Program tab for which you want to create work
order request.
The Schedule screen updates with (2) Select Quote, (3) Select Jobsite, (4) Pricing and Service
Provider, (5) Work Order Summary, (6) Partner Reference, and (7) Appointment Schedule tabs as
shown below:
serviceo
Corporate Headquarter: 980 Mission Court, Fremont, CA 94539, USA. Phone: +(1) 408-895-8000, Fax: +(1) 408-943-8101

serviceo
Corporate Headquarter: 980 Mission Court, Fremont, CA 94539, USA. Phone: +(1) 408-895-8000, Fax: +(1) 408-943-8101
4. Select the relevant quote in the (2) Select Quote tab, if you want to modify or add new price
quote for the selected program.
Note: The (2) Select Quote tab lists all quotes pre-configured for a given program.
5. Select the jobsite location in the (3) Select Jobsite tab, if you want to modify or add new jobsite
location.
Note: The (3) Select Jobsite tab lists all jobsites pre-configured for a given program.
6. Select the relevant Service Catalog Item Pricing and Service Provider for the work order request
in the (4) Pricing and Service Provider tab.
Tip: Click the Service Providers tab to select service provider.
7. Type the appropriate summary related to the work order in the Work Order Summary text box
in the (5) Work Order Summary tab.
8. Type the partner case number in the Partner Case Number field and Partner PO Number in the
Partner PO Number field in the (6) Partner Reference tab.
9. For appointment scheduling, select the appropriate option as applicable in the (7) Appointment
Schedule tab.
Note: There are three available appointment scheduling options:
a) Customer Appointment Setup Request (IRON Service Global to Call Customer):
✓ IRON Service Global Service Desk is requested to call End-Customer and setup
an appointment.
b) Dispatch Now (SLA Priority: SBD):
✓ This is Same Business Day (SBD) premium service contract option.
✓ Field Service Engineer will arrive at Jobsite Location within SLA period.
✓ End-Customer will not be contacted to make an Appointment unless Partner
requests this service via “case comment”.
c) Pre-Scheduled Appointment:
✓ Here, Service Desk has already setup an appointment with End-Customer with
date and time.
10. Click the Next button to go to the stage (in this case, web-form).
Tip: Click the Previous button to go to the previous page.
9.2 Create Case (Dispatch FSE – Customer Site)
Refer Section 3.1: Create Case (Dispatch FSE – Customer site) for detailed steps for creating case for Field
Service Engineer (FSE) Customer site dispatch.
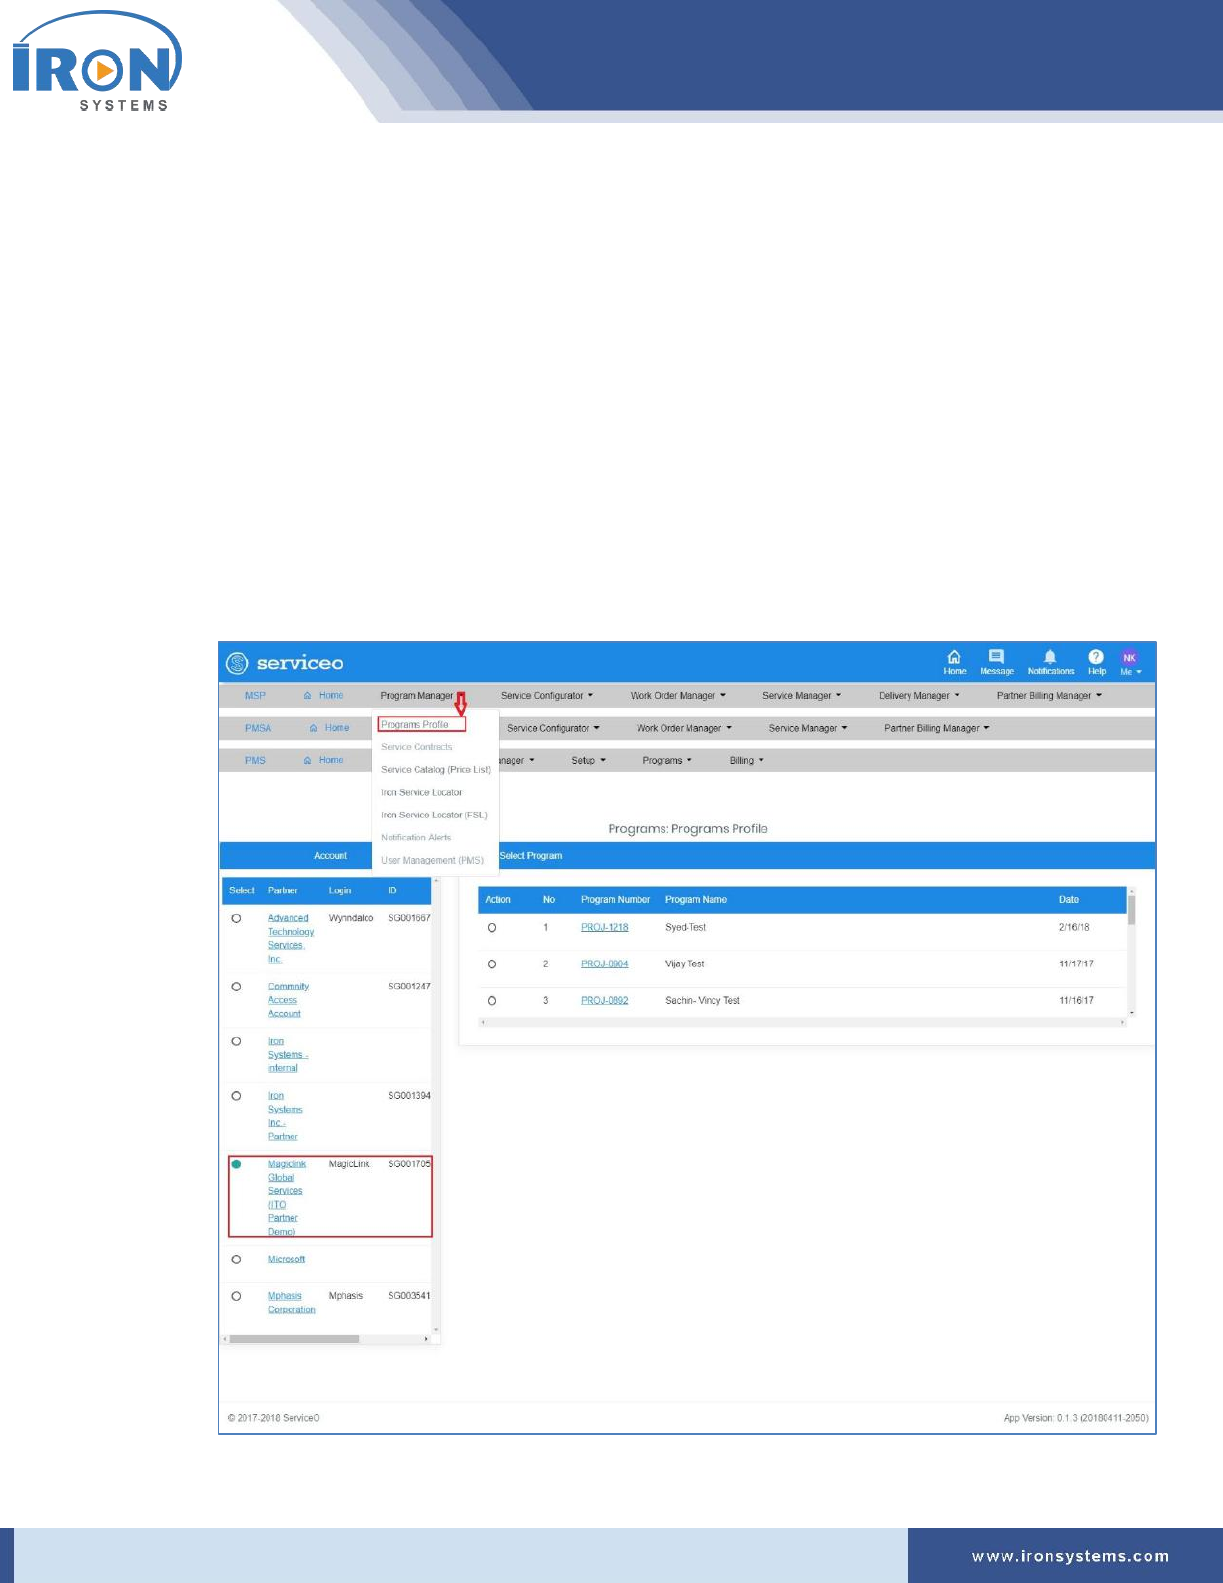
serviceo
Corporate Headquarter: 980 Mission Court, Fremont, CA 94539, USA. Phone: +(1) 408-895-8000, Fax: +(1) 408-943-8101
10 Program Manager
The program manager section provides key functionalities overview related to program
configuration/management, service contracts, service catalogue, service locator, notifications, and user
management.
10.1 Program Profile
Here, you will get detailed overview of service type, approved project vendor details and project worker
view for the listed programs.
To view program profile, perform the following steps:
1. Click the Program Manager next to the MSP Home icon and then click the Program Profile
option to access program profile page.
The Programs screen appears as shown in Figure 10.1.
Figure 10.1: Programs screen

serviceo
Corporate Headquarter: 980 Mission Court, Fremont, CA 94539, USA. Phone: +(1) 408-895-8000, Fax: +(1) 408-943-8101
Note: The Programs screen displays with Account section at the left and (1) Select Program tab
at the center of the screen.
The Account section displays a list of partners including their login, ID and other details. The (1)
Select Program tab allows you to select the program to view its detailed profile.
2. Select the partner name in the Account section to view its all listed programs.
Tip: As you select Partner in the Account section, a list of Programs, which are associated with
the selected Partner, get displayed in the (1) Select Program tab.
3. Select the program in the (1) Select Program tab to view its detailed profile.
The Programs screen updates with (2) Program Details: Jobsite Service Type, (3) Approved
Project Vendor View, and (4) Project Worker View tabs as shown below:
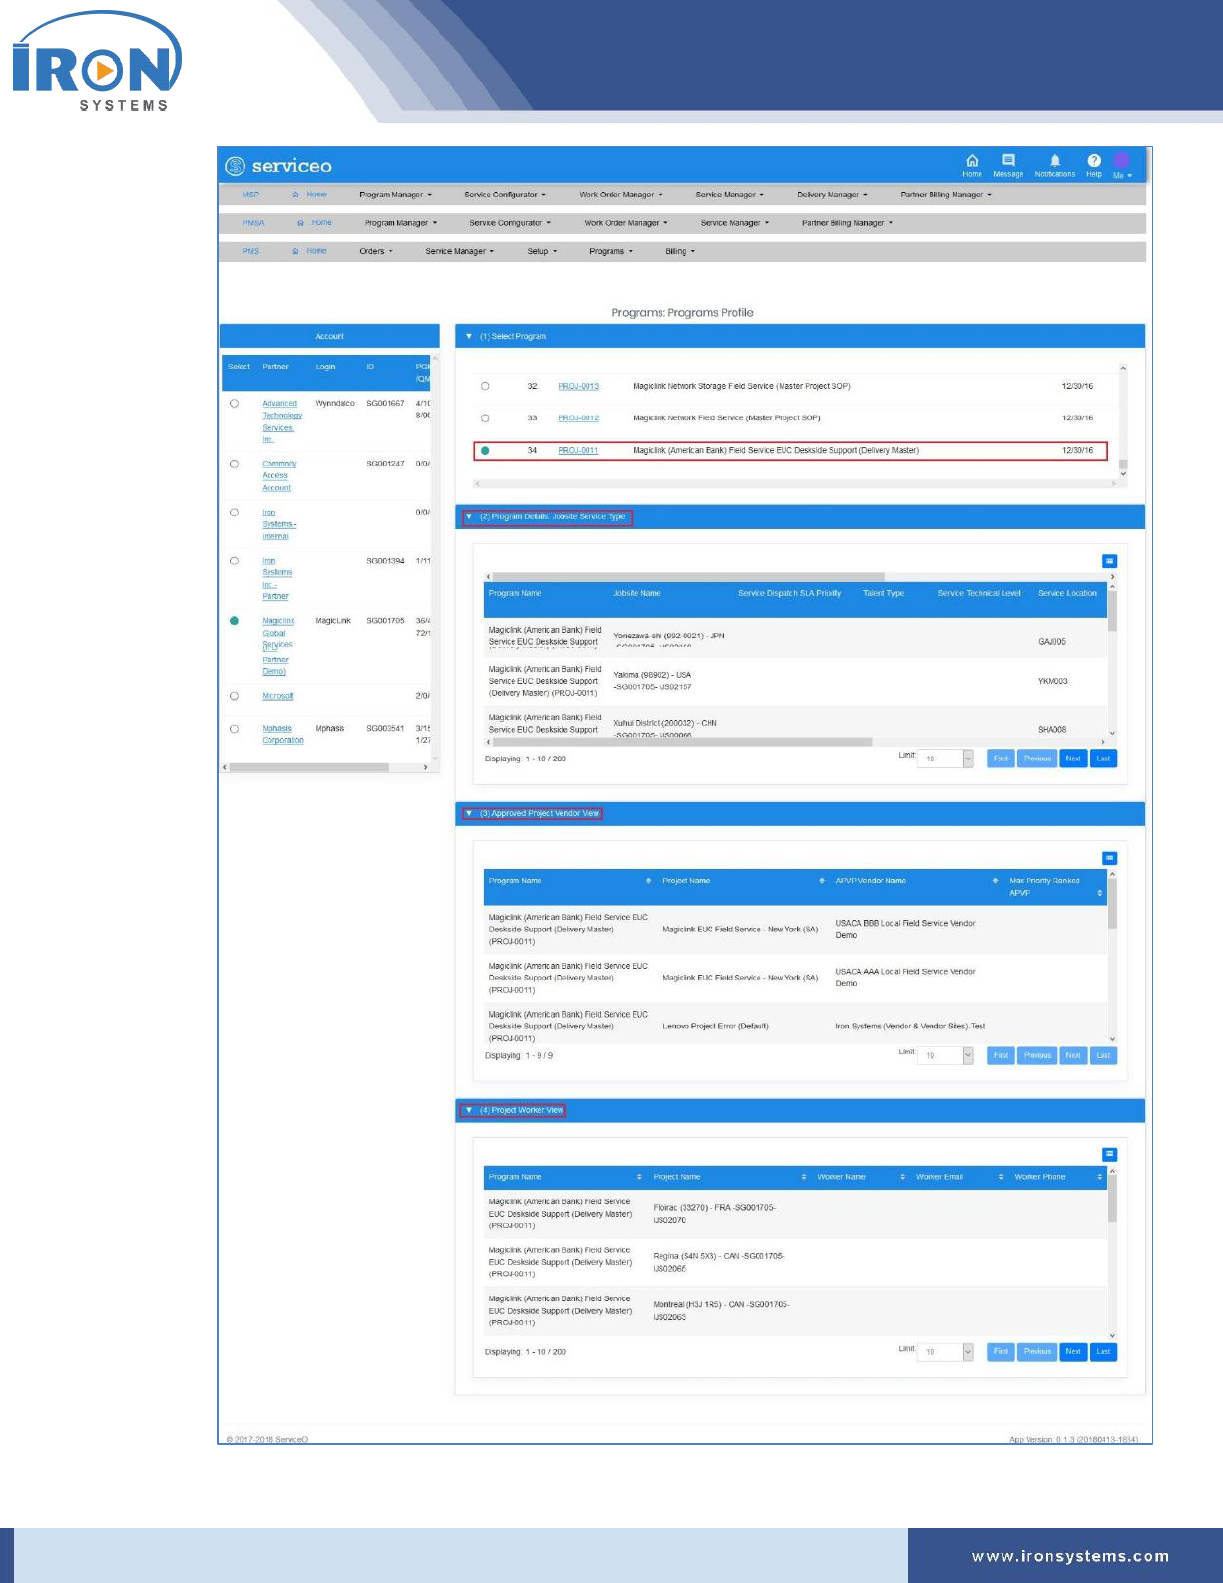
serviceo
Corporate Headquarter: 980 Mission Court, Fremont, CA 94539, USA. Phone: +(1) 408-895-8000, Fax: +(1) 408-943-8101
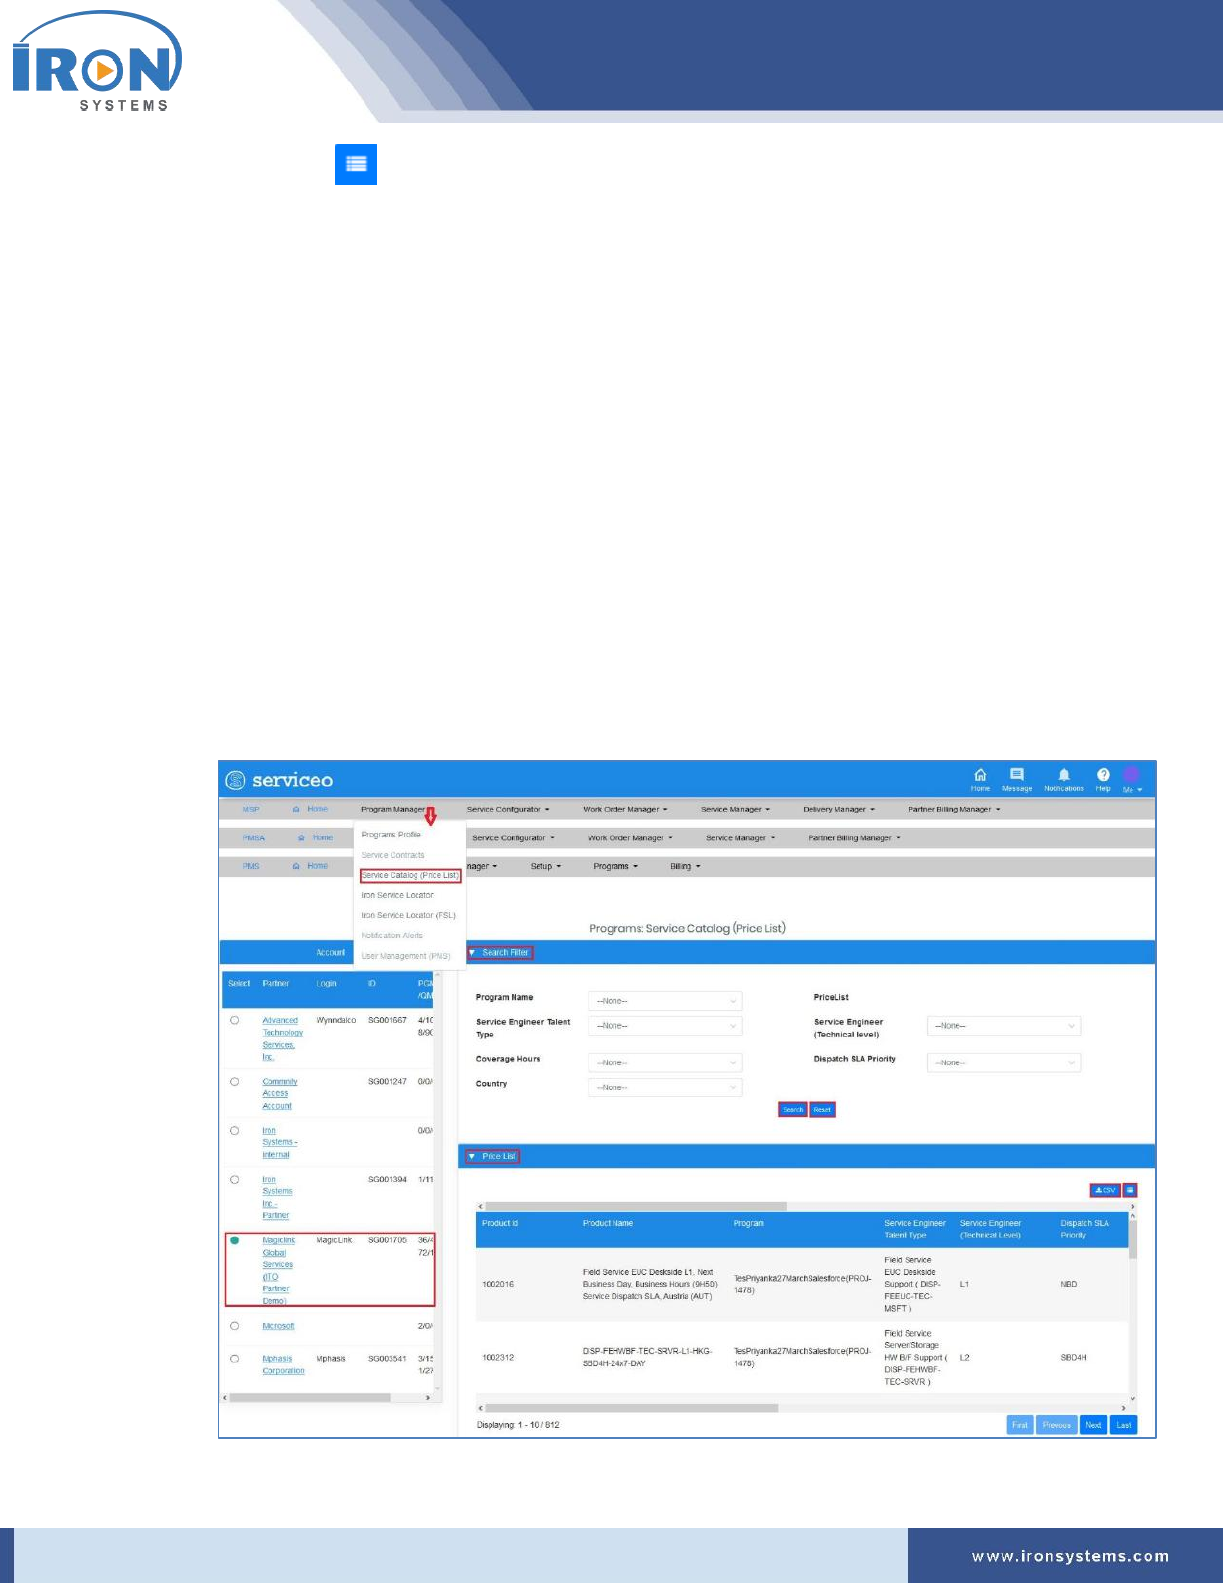
serviceo
Corporate Headquarter: 980 Mission Court, Fremont, CA 94539, USA. Phone: +(1) 408-895-8000, Fax: +(1) 408-943-8101
Tip: Click the icon in the upper right-corner of tabs and then select or clear the Column
Name check boxes from the list as per requirements.
Select the number you want to view in the Limit drop-down list.
Click the First button.to view records displayed on the first page, Previous button to view
previous records, Next button to move to the next page, and the Last button to go to the last
page.
10.2 Service Catalog (Price List)
The Service Catalog (Price List) enables users to view Program Price List Catalog, which is entered into
the Serviceo. The Program Price List Catalog is available as per Program Pricing term.
To view Service Catalog (Price List), perform the following steps:
1. Click the Program Manager next to the MSP Home icon and then click the Service Catalog (Price
List) option to access price list.
The Pricelist screen displays as shown in Figure 10.2.
Figure 10.2: Pricelist screen
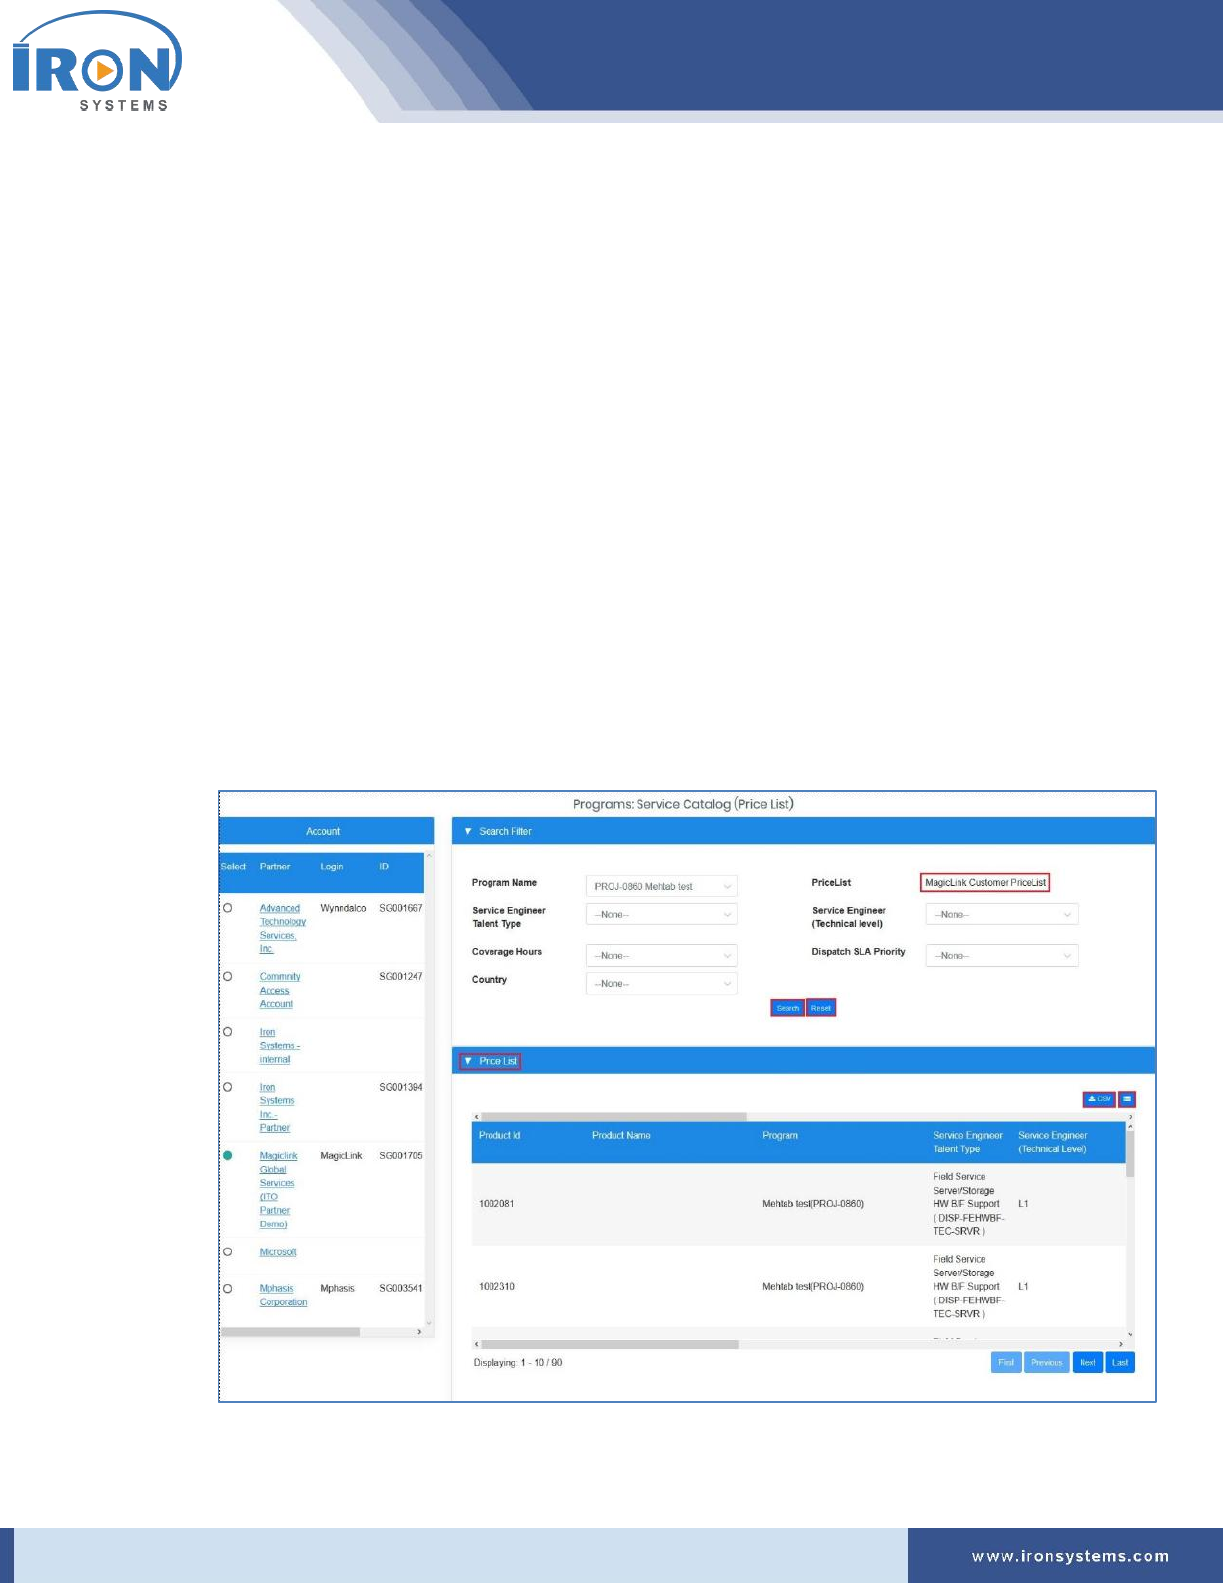
serviceo
Corporate Headquarter: 980 Mission Court, Fremont, CA 94539, USA. Phone: +(1) 408-895-8000, Fax: +(1) 408-943-8101
Note: The Programs screen displays with Account section at the left and the Search Filter and
Price List tabs at the center of the screen.
The Account section displays a list of partners including their login, ID and other details. The
Search Filter tab allows you to select the program to view price list.
2. Select the partner name in the Account section to view the price list.
Tip: As you select Partner in the Account section, a list of Programs, which are associated with
the selected Partner, get displayed in the Program Name drop-down list in the Search Filter tab.
3. Select the program name in the Program Name drop-down list.
Tip: As you select the program name, the Price List name auto-populates next to the PriceList.
4. Select the relevant talent type in the Service Engineer (Talent Type) drop-down list.
5. Select the relevant technical expertise in the Service Engineer (Technical level) drop-down list.
6. Select the coverage hours in the Coverage Hours drop-down list.
7. Select the service contract option in the Dispatch SLA Priority drop-down list.
8. Select the location of jobsite in the Country drop-down list and then click the Search button to
fetch the records based on selected search criteria.
The Pricelist screen updates with price details in the PriceList tab as shown below:

serviceo
Corporate Headquarter: 980 Mission Court, Fremont, CA 94539, USA. Phone: +(1) 408-895-8000, Fax: +(1) 408-943-8101
Tip: Click the Reset button to reset the search criteria.
Click the button to download the Price List in the Excel format. Click the icon in the
upper right-corner of tabs and then select or clear the Column Name check boxes from the list
as per requirements.
Click the First button.to view records displayed on the first page, Previous button to view
previous records, Next button to move to the next page, and the Last button to go to the last
page.
10.3 Iron Service Locator
This module allows you to easily search, identify and connect all available active 3PS and 3PL service
providers in any region. You will also be able to detect service providers’ location, identify service
providers in the vicinity with markers on the map.
Iron Service Global serves various locations globally.
There are two types of service provider available in the serviceo.
• 3PS –
• 3PL –
To access map for locating global service providers, perform the following steps:
1. Click the Program Manager next to the MSP Home icon and then click the Iron Service Locator
option to identify location.
The Coverage-map screen appears as shown in Figure 10.3.
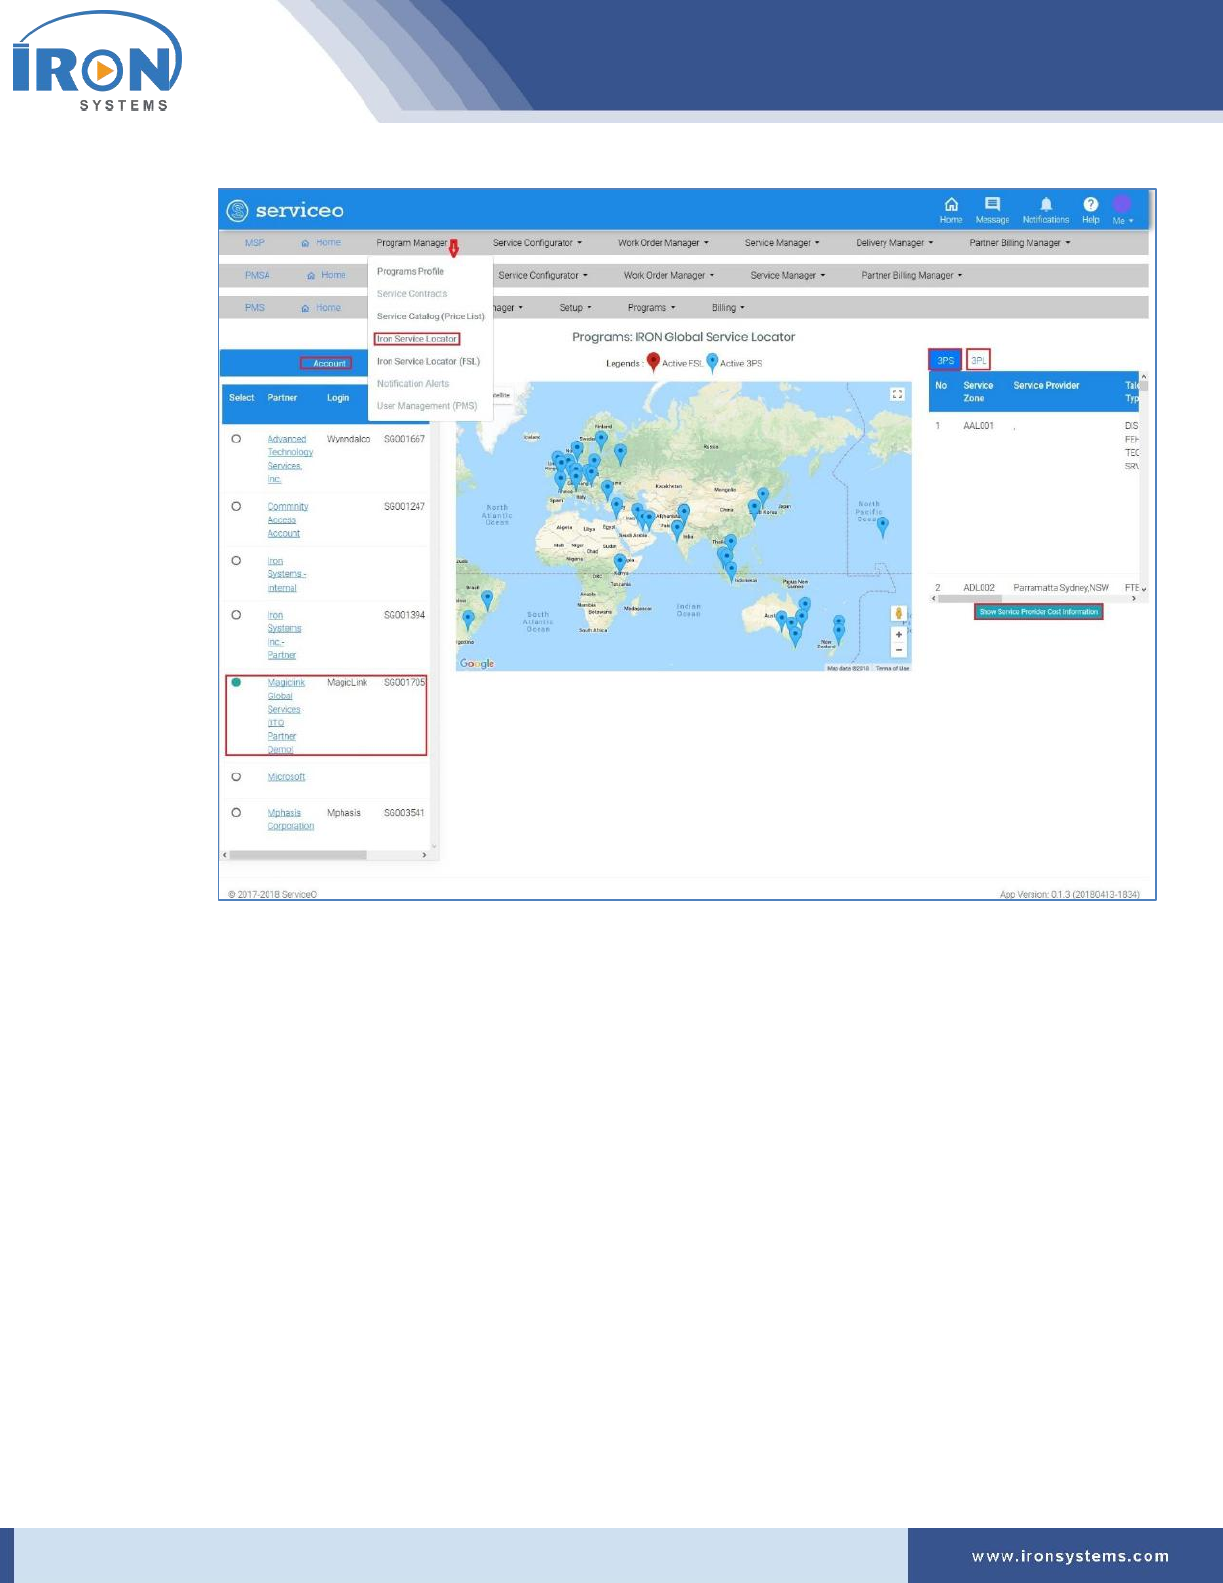
serviceo
Corporate Headquarter: 980 Mission Court, Fremont, CA 94539, USA. Phone: +(1) 408-895-8000, Fax: +(1) 408-943-8101
Figure 10.3: Coverage-map screen
Note: The Coverage-map screen displays Account section in the left side and 3PS and 3PL tabs in
the right side of the screen. The 3PS tab displays by default. Refer Figure 10.3.
The Account section displays a list of partners including their login, ID and other details.
The partner, which was selected when user last logged, is selected by default in the Account
section.
Placing the pointer over the icon on the map displays the location code and complete address of
the service providers.
2. Select the partner name in the Account section.
Note: As you select the partner name in the Account section, the locations on the map and
records in the 3PS and 3PL tabs get updated.
3. Click the Show Service Provider Cost Information button to view price details charged by the
Service Provider.
The Coverage-map screen updates with the Search Filter and Price List tabs as shown below:
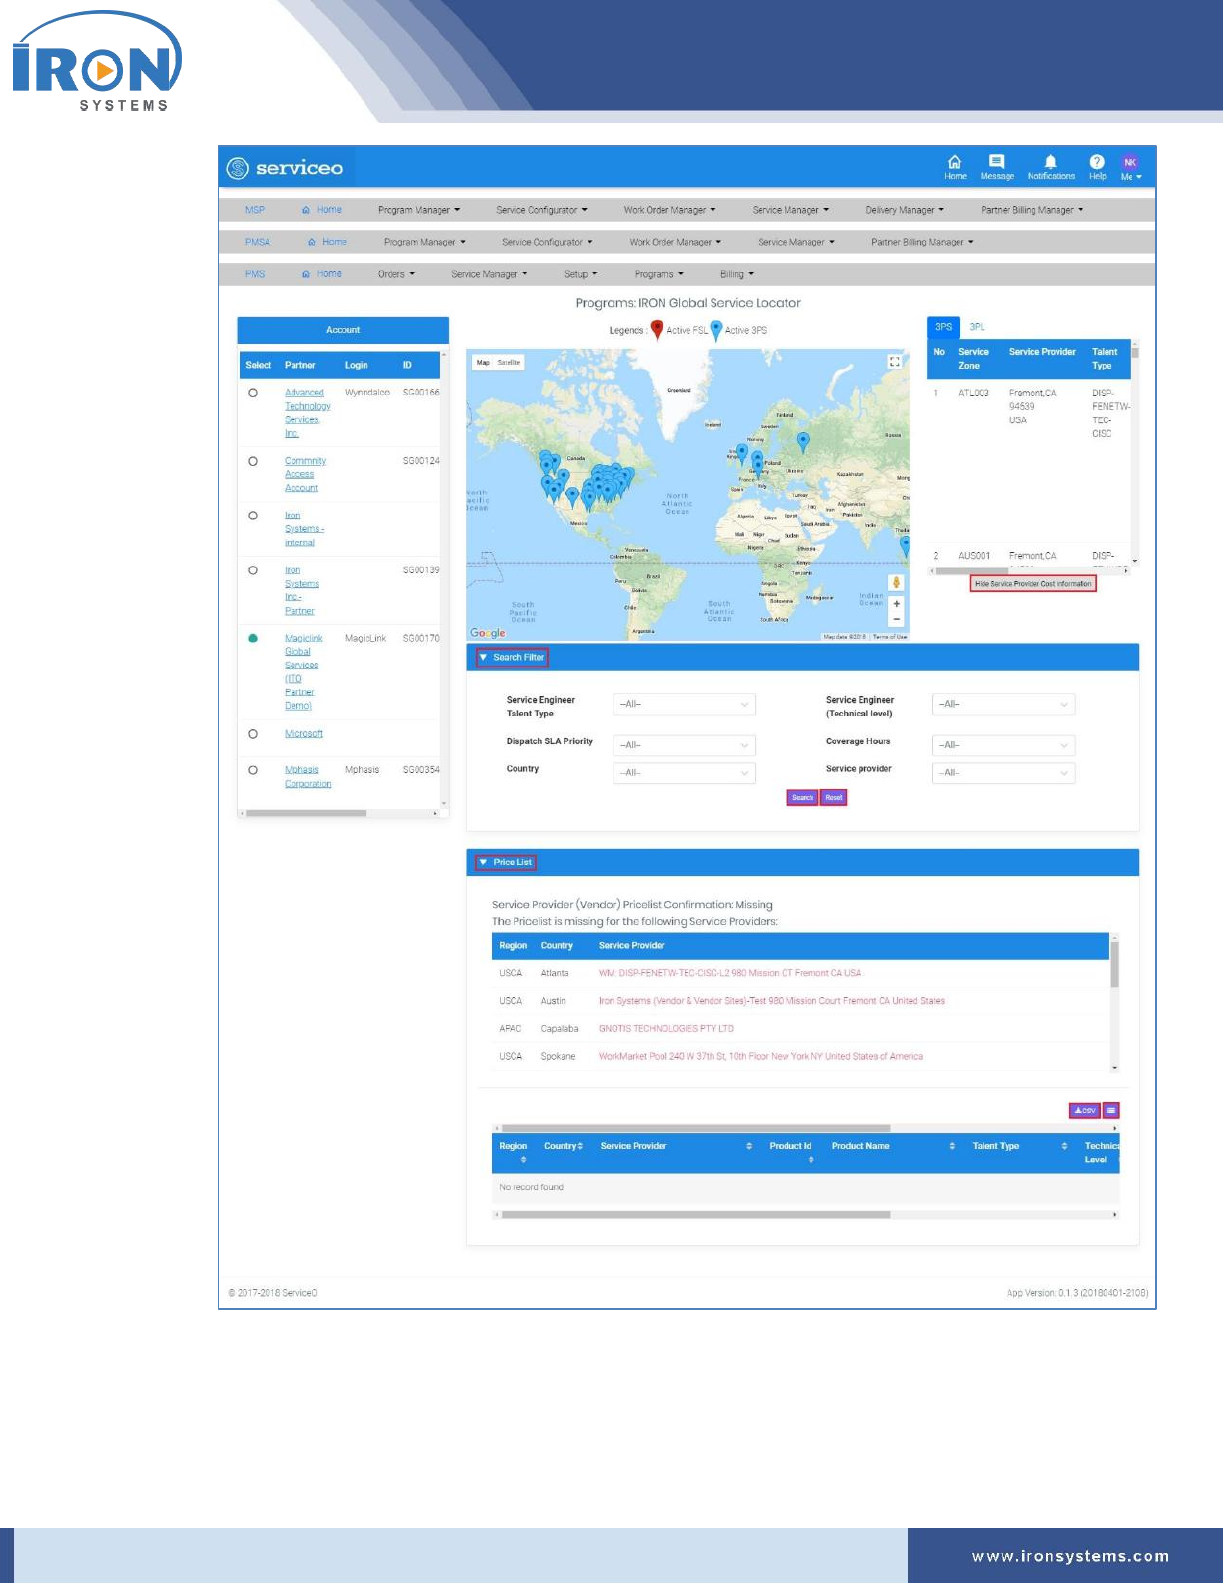
serviceo
Corporate Headquarter: 980 Mission Court, Fremont, CA 94539, USA. Phone: +(1) 408-895-8000, Fax: +(1) 408-943-8101
Tip: Click the Hide Service Provider Cost Information button to hide the price details (pricelist)
of the service provider.
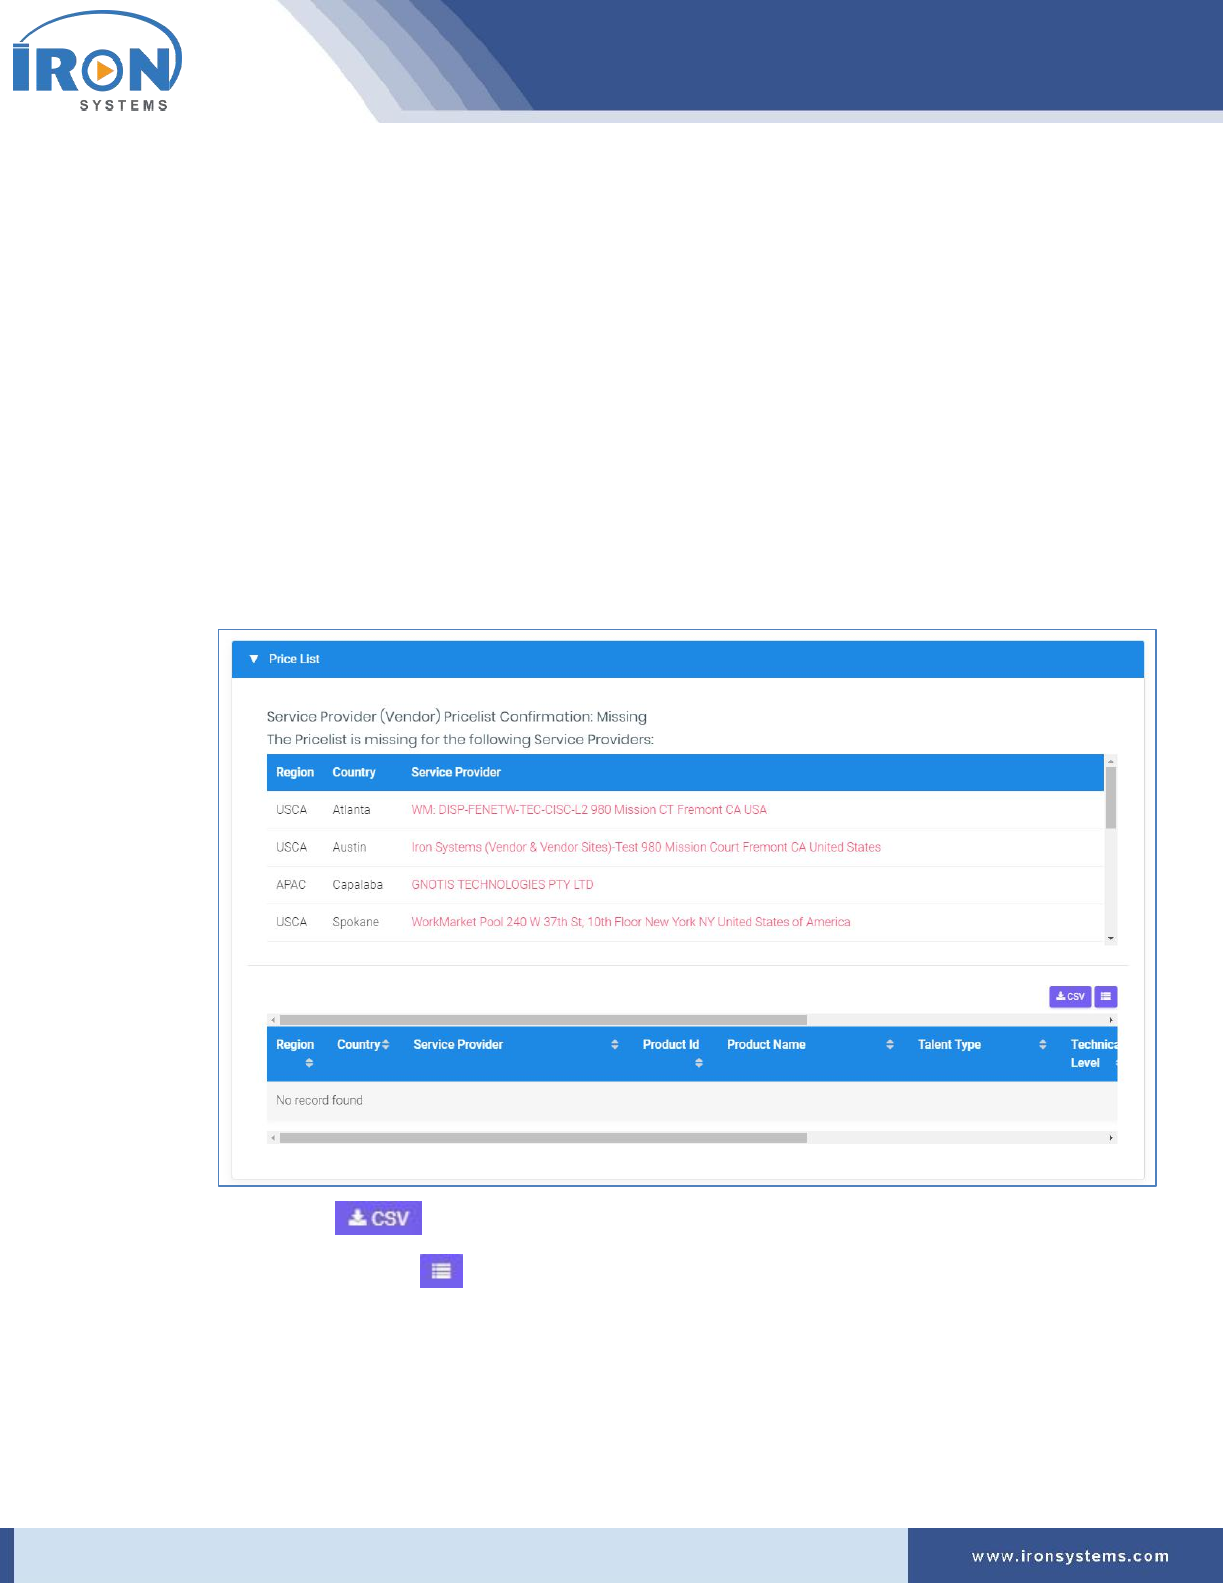
serviceo
Corporate Headquarter: 980 Mission Court, Fremont, CA 94539, USA. Phone: +(1) 408-895-8000, Fax: +(1) 408-943-8101
4. Select the relevant service engineer type you want to view price in the Service Engineer Talent
Type drop-down select list.
5. Select the technical level of service engineer in the Service Engineer (Technical level) drop-
down list.
6. Select the appropriate SLA priority in the Dispatch SLA Priority drop-down list.
7. Select the coverage hours in the Coverage Hours drop-down list.
8. Select the country of the service provider in the Country drop-down select list.
9. Select the Service Provider you want to choose for the selected region in the Service Provider
drop-down list.
10. Click the Search button to fetch the records based on selected search criteria.
Tip: Click the Reset button to reset the selected search criteria.
The Coverage-map screen updates with records in the Price List tab as shown below:
Tip: Click the button to download the Price List details of the service provider in the
Excel format. Click the icon in the upper right-corner of tabs and then select or clear the
Column Name check boxes from the list as per requirements.

serviceo
Corporate Headquarter: 980 Mission Court, Fremont, CA 94539, USA. Phone: +(1) 408-895-8000, Fax: +(1) 408-943-8101
10.4 Iron Service Locator (FSL)
This module allows you to easily search, identify and connect all available Forward Stocking Location
Depots (FSL) in any region. The Map provides Global locations reference of most popular Parts Depot
Warehouse Locations for Service Parts (FRUs) inventory stocking for Same Business Day (SBD) and Next
Business Day (NBD) service delivery options.
To access Map for locating FSL depots, perform the following steps:
1. Click the Program Manager next to the MSP Home icon and then click the Iron Service Locator
option to identify location.
The Iron Service Locator (FSL) screen displays as shown in Figure 10.4.
Figure 10.4: Iron Service Locator (FSL) screen
Note: The Coverage-map screen displays Account section in the left side. The Account section
displays a list of partners including their login, ID and other details.
The partner, which was selected when user last logged, is selected by default in the Account
section.

serviceo
Corporate Headquarter: 980 Mission Court, Fremont, CA 94539, USA. Phone: +(1) 408-895-8000, Fax: +(1) 408-943-8101
Placing the pointer over the icon on the map displays the location code and complete address of
the service providers.
2. Select the partner name in the Account section.
Note: As you select the partner name in the Account section, the locations on the map get
updated.
3. Type the name of any FSL depot location you want to search in the Search field.
4. Click either the In Miles or In KMs and then select the range in the Range drop-down list.
5. Select the Asset model in the All Asset Models drop-down list to search only those FSL deports,
which store the selected asset model.
6. Select the check boxes that fulfil your requirements.
Tip: There are three check boxes available for selection:
• Active – This option is selected for the FSL depots, which are “active” in state.
• Passive – This option is selected for the locations, which are not active.
• FSL Network (N/A) -
7. Click the Search button to fetch the records based on selected criteria.
8. Click the Global View button to view all available FSL locations across the globe.
Note: The Coverage-map screen updates with the records in the right side of the screen under
Search Results section.
