MT76x7 Flash Tool User's Guide Users
User Manual:
Open the PDF directly: View PDF ![]() .
.
Page Count: 15

MT76x7 Flash Tool User's Guide
Version: 1.3
Release date: 5 may 2017
© 2015 - 2018 Airoha Technology Corp.
This document contains information that is proprietary to Airoha Technology Corp. (“Airoha”) and/or its licensor(s). Airoha cannot grant you
permission for any material that is owned by third parties. You may only use or reproduce this document if you have agreed to and been
bound by the applicable license agreement with Airoha (“License Agreement”) and been granted explicit permission within the License
Agreement (“Permitted User”). If you are not a Permitted User, please cease any access or use of this document immediately. Any
unauthorized use, reproduction or disclosure of this document in whole or in part is strictly prohibited. THIS DOCUMENT IS PROVIDED ON AN
“AS-IS” BASIS ONLY. AIROHA EXPRESSLY DISCLAIMS ANY AND ALL WARRANTIES OF ANY KIND AND SHALL IN NO EVENT BE LIABLE FOR ANY
CLAIMS RELATING TO OR ARISING OUT OF THIS DOCUMENT OR ANY USE OR INABILITY TO USE THEREOF. Specifications contained herein are
subject to change without notice.

MT76x7 Flash Tool User's Guide
© 2015 – 2018 Airoha Technology Corp.
Page 1 of 14
This document contains information that is proprietary to Airoha Technology Corp. (“Airoha”) and/or its licensor(s).
Any unauthorized use, reproduction or disclosure of this document in whole or in part is strictly prohibited.
Document Revision History
Revision Date Description
1.0 1 April 2016 Initial version
1.1 30 June 2016 Refine the images and complement the information of using the
flash tool.
1.2 13 January 2017 Updated UI.
Added support in Linux OS.
1.3 5 May 2017 Updated UI.
Add new flash info configuration file.

MT76x7 Flash Tool User's Guide
© 2015 – 2018 Airoha Technology Corp.
Page 2 of 14
This document contains information that is proprietary to Airoha Technology Corp. (“Airoha”) and/or its licensor(s).
Any unauthorized use, reproduction or disclosure of this document in whole or in part is strictly prohibited.
Table of contents
1. Introduction ........................................................................................................................................... 4
2. MT76x7 Flash Tool Installation .............................................................................................................. 5
2.1. Environment ....................................................................................................................................... 5
2.2. Linux version of Airoha MT76x7 flash tool ......................................................................................... 5
2.3. Microsoft Windows version of Airoha MT76x7 flash tool .................................................................. 5
3. Supported Features ............................................................................................................................... 7
3.1. Configuring the Flash Tool .................................................................................................................. 7
3.2. Command execution sequence .......................................................................................................... 8
3.3. Formatting the storage ....................................................................................................................... 8
3.4. Downloading an image ....................................................................................................................... 9
3.5. Reading back an image ..................................................................................................................... 10
3.6. Cloning the image of a device ........................................................................................................... 10
3.7. eFuse operations .............................................................................................................................. 11
4. Adding New Flash Hardware ................................................................................................................. 14

MT76x7 Flash Tool User's Guide
© 2015 – 2018 Airoha Technology Corp.
Page 3 of 14
This document contains information that is proprietary to Airoha Technology Corp. (“Airoha”) and/or its licensor(s).
Any unauthorized use, reproduction or disclosure of this document in whole or in part is strictly prohibited.
Lists of tables and figures
Figure 1. The Flash Tool GUI ................................................................................................................................... 4
Figure 2. Executable file in the MT76x7 Flash Tool’s destination folder................................................................. 6
Figure 3. Setup the COM port and baud rate .......................................................................................................... 7
Figure 4. Command execution sequence and status .............................................................................................. 8
Figure 5. Download an image to the device storage............................................................................................... 9
Figure 6. Downloading the image is successfully complete ................................................................................... 9
Figure 7. Reading back the whole flash................................................................................................................. 10
Figure 8. Clone the image using Download Scatter File function ......................................................................... 11
Figure 9. eFuse operations .................................................................................................................................... 13

MT76x7 Flash Tool User's Guide
© 2015 – 2018 Airoha Technology Corp.
Page 4 of 14
This document contains information that is proprietary to Airoha Technology Corp. (“Airoha”) and/or its licensor(s).
Any unauthorized use, reproduction or disclosure of this document in whole or in part is strictly prohibited.
1. Introduction
MT76x7 Flash Tool is designed to support flexible device flashing on MT76x7 applications. It primarily supports
flashing the normal binary required for the LinkIt 7687 HDK operation based on MT76x7 chipset. It also supports
flashing the scrambled binary to hide the device data. Figure 1 shows the graphical user interface (GUI) of the Flash
Tool.
This document guides you through the following.
• Flashing the system on your development board.
• Reading the data from the development board.
• Cloning a system image from one device to another.
• Adjusting system properties using get or set operations on eFuse registers.
Figure 1. The Flash Tool GUI

MT76x7 Flash Tool User's Guide
© 2015 – 2018 Airoha Technology Corp.
Page 5 of 14
This document contains information that is proprietary to Airoha Technology Corp. (“Airoha”) and/or its licensor(s).
Any unauthorized use, reproduction or disclosure of this document in whole or in part is strictly prohibited.
2. MT76x7 Flash Tool Installation
This section provides an installation guide for the MT76x7 Flash Tool and covers the following items:
• The supported environment for installation.
• Installing the MT76x7 Flash Tool.
2.1. Environment
The Flash Tool can be used on Microsoft Windows XP, Vista, Win7, 8 and 10 with 32-bit and 64-bit operating
system, also can be used on Linux with 32-bit and 64-bit operating system (Ubuntu 14.04 or higher).
To install the tool:
Download the Airoha IOT SDK v4 package from here.
2.2. Linux version of Airoha MT76x7 flash tool
On Linux OS environment:
1) Extract the content of the SDK and navigate to the MT76x7 Flash Tool’s folder (./linux32bit or
./linux64bit). The tool is a setup free package.
2) Run the following command to establish the library environment and launch the Flash Tool:
source env-setup.sh
./mt76x7-flash-tool.exe
2.3. Microsoft Windows version of Airoha MT76x7 flash tool
On Microsoft Windows OS environment:
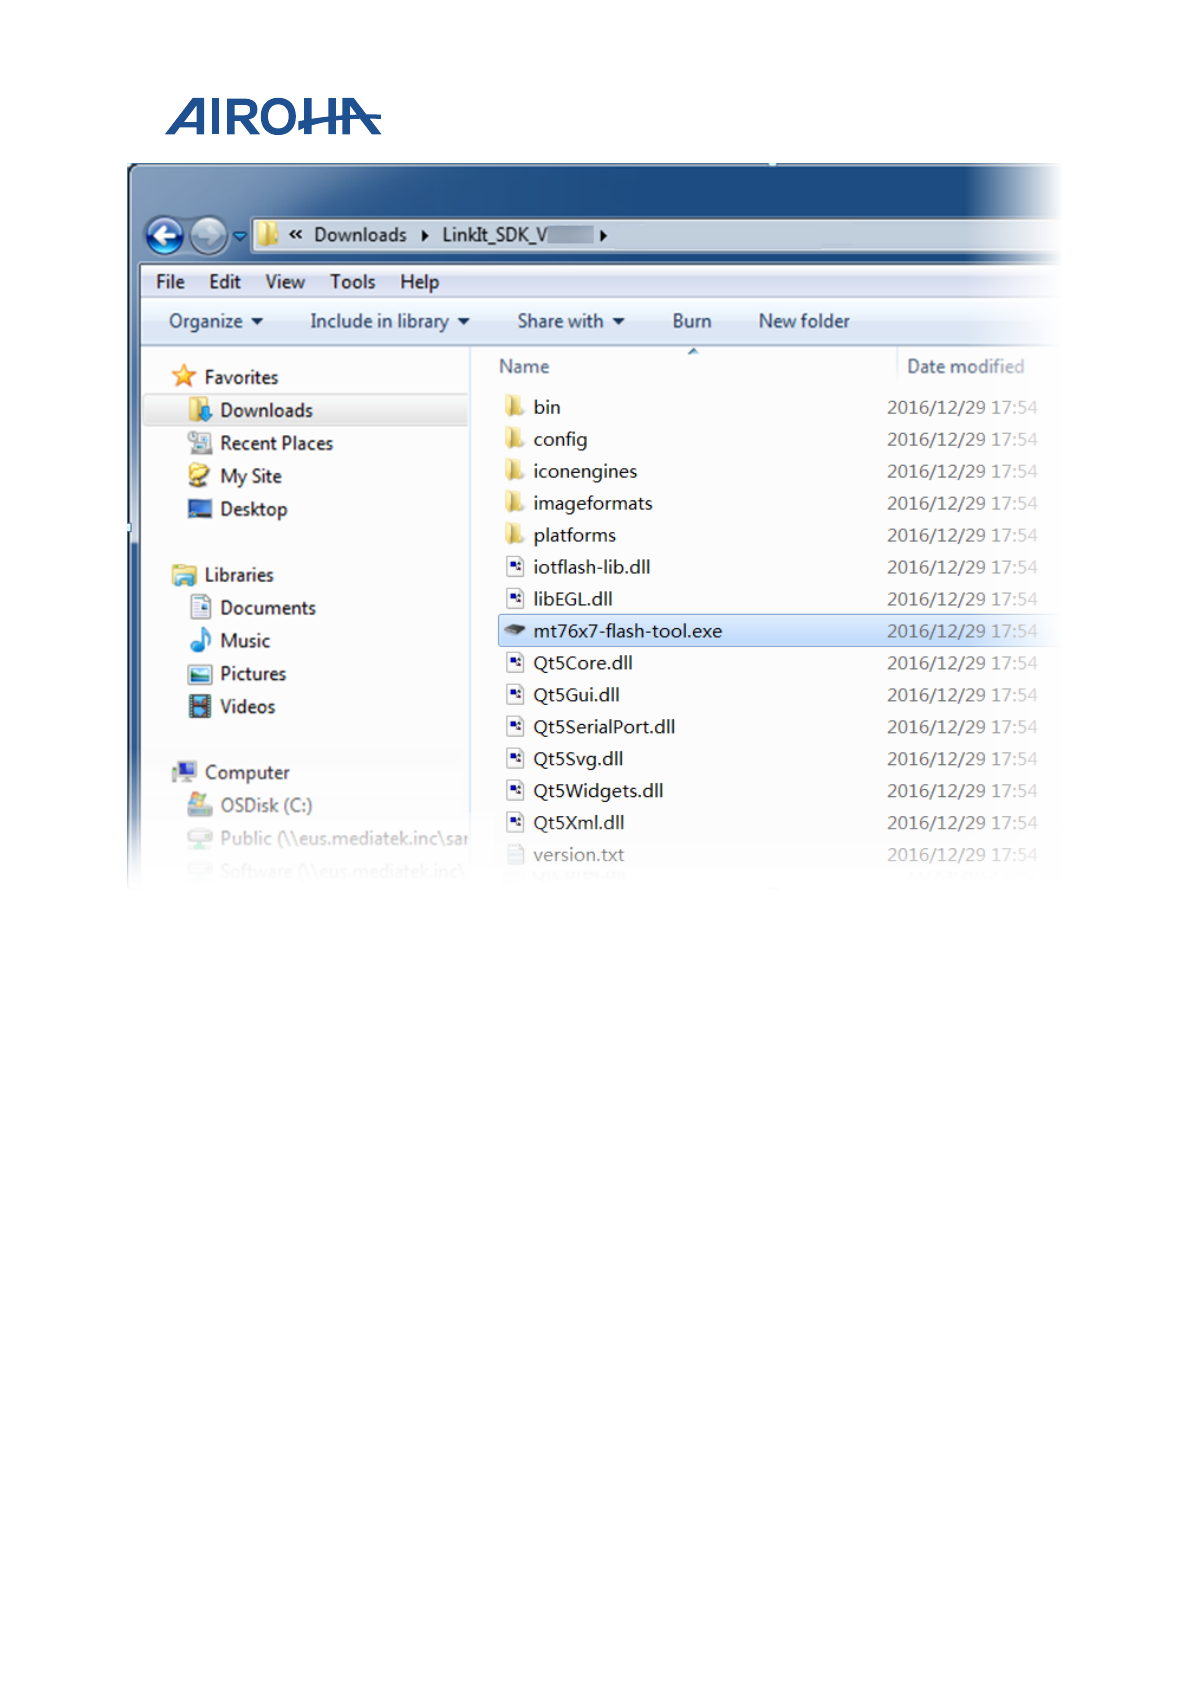
1) Extract the content of the SDK and navigate to the MT76x7 Flash Tool’s folder (./win). The tool is a setup
free package.
2) Execute the mt76x7-flash-tool.exe to launch the Flash Tool (see Figure 2).
MT76x7 Flash Tool User's Guide
© 2015 – 2018 Airoha Technology Corp.
Page 6 of 14
This document contains information that is proprietary to Airoha Technology Corp. (“Airoha”) and/or its licensor(s).
Any unauthorized use, reproduction or disclosure of this document in whole or in part is strictly prohibited.
Figure 2. Executable file in the MT76x7 Flash Tool’s destination folder
MT76x7 Flash Tool User's Guide
© 2015 – 2018 Airoha Technology Corp.
Page 7 of 14
This document contains information that is proprietary to Airoha Technology Corp. (“Airoha”) and/or its licensor(s).
Any unauthorized use, reproduction or disclosure of this document in whole or in part is strictly prohibited.
3. Supported Features
The Flash Tool supports the following five features:
• Formatting the storage, see section 3.3, “Formatting the storage”.
• Downloading the images, see section 3.4, “Downloading an image”.
• Reading back an image, see section 3.5, “Reading back an image”.
• Cloning the image of a device, see section 3.6, “Cloning the image of a device”.
• eFuse operations, see section 3.7, “eFuse operations”.
3.1. Configuring the Flash Tool
Configure the Flash Tool before commencing the first image download or storage formatting operations. Follow
the description in section 2.1, “Firmware update” of the LinkIt 76x7 HDK user’s guide to set the board to FLASH
Recovery mode before proceeding to the next section.
3.1.1. Configure the COM port and the baud rate
To configure the COM port and the baud rate:
1) Launch the MT76x7 Flash Tool and connect the device with a micro-USB cable.
2) Reset the development board or unplug and re-plug in the micro-USB cable.
3) Click Refresh and configure the correct COM port and the baud rate, as shown in Figure 3.
Figure 3. Setup the COM port and baud rate

MT76x7 Flash Tool User's Guide
© 2015 – 2018 Airoha Technology Corp.
Page 8 of 14
This document contains information that is proprietary to Airoha Technology Corp. (“Airoha”) and/or its licensor(s).
Any unauthorized use, reproduction or disclosure of this document in whole or in part is strictly prohibited.
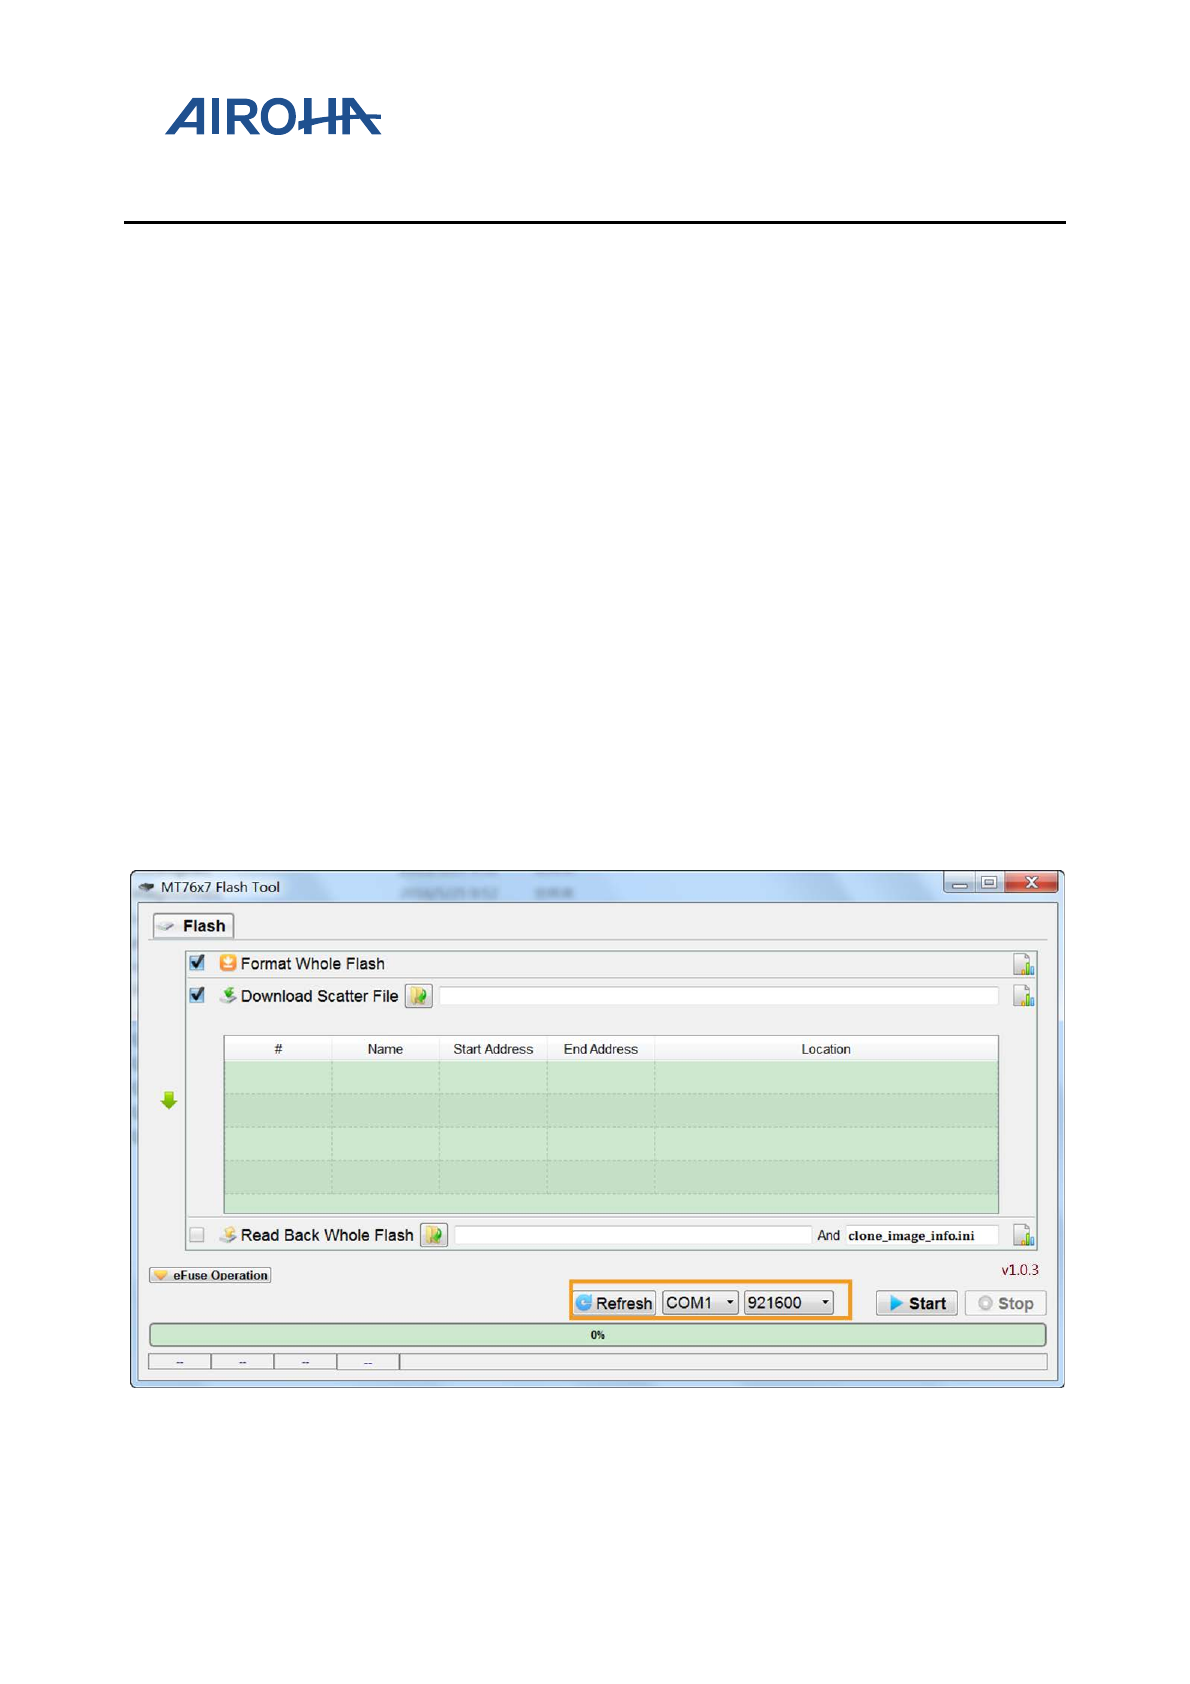
3.2. Command execution sequence
This tool provides all-in-one service, where format, download, read back and eFuse operations can be applied in a
single run. The command execution sequence is from the top to the bottom of the UI, as shown in Figure 4.
To execute the commands:
1) Select the checkbox to enable the operation.
2) Some functions need additional input for successful execution; such as Download Scatter File operation
requires the path to the scatter file. Once all the required information is provided, click Start to execute
the commands sequentially.
After the completion of the command execution, the corresponding icon changes to checkmark or crossmark to
indicate status of the result.
Figure 4. Command execution sequence and status
3.3. Formatting the storage
The Format function erases the available storage on the target device.
To apply formatting:
1) Enable Format Whole Flash checkbox.
2) Click Start to execute the command and check the final status.

MT76x7 Flash Tool User's Guide
© 2015 – 2018 Airoha Technology Corp.
Page 9 of 14
This document contains information that is proprietary to Airoha Technology Corp. (“Airoha”) and/or its licensor(s).
Any unauthorized use, reproduction or disclosure of this document in whole or in part is strictly prohibited.
3.4. Downloading an image
The Download feature flashes the image to the device. The image data can be scrambled if necessary. If
scrambled, the data read back cannot be decoded.
Follow these steps to execute commands.
1) Enable Download Scatter File checkbox.
2) Click open folder to provide the scatter file. It’s an Image Description File that contains the partition
layout of the device along with the project load. The detailed content including Name, Start Address, End
Address and the Location of the files are displayed in a table, as shown in Figure 5.
3) Click Start to execute the command. When downloading is complete, the result status is shown in Figure 6.
Figure 5. Download an image to the device storage
Figure 6. Downloading the image is successfully complete

MT76x7 Flash Tool User's Guide
© 2015 – 2018 Airoha Technology Corp.
Page 10 of 14
This document contains information that is proprietary to Airoha Technology Corp. (“Airoha”) and/or its licensor(s).
Any unauthorized use, reproduction or disclosure of this document in whole or in part is strictly prohibited.
The Scatter file, known as Image Description File (usually named as flash_download.ini), is located under the
project binary folder, where all other binary files reside. The binary files could be either Airoha released or
generated during build process. The Image Description File includes information about the file version, project
name, partition layout details, etc. More information about this file can be found in section “Building the project”
of the Airoha IOT Development Platform for RTOS Get Started Guide.
3.5. Reading back an image
The Read Back Whole Flash feature reads back the entire image from the device storage. The image is usually used
as an input file for cloning the device.
To execute the commands:
1) Enable Read Back Whole Flash checkbox.
2) Click the corresponding open folder to select the output file where the image needs to be stored.
3) Click Start to execute the command. After the command execution is complete, the corresponding image
description file named “clone_image_info.ini” will be generated in the same folder, as shown in Figure 7.
Figure 7. Reading back the whole flash
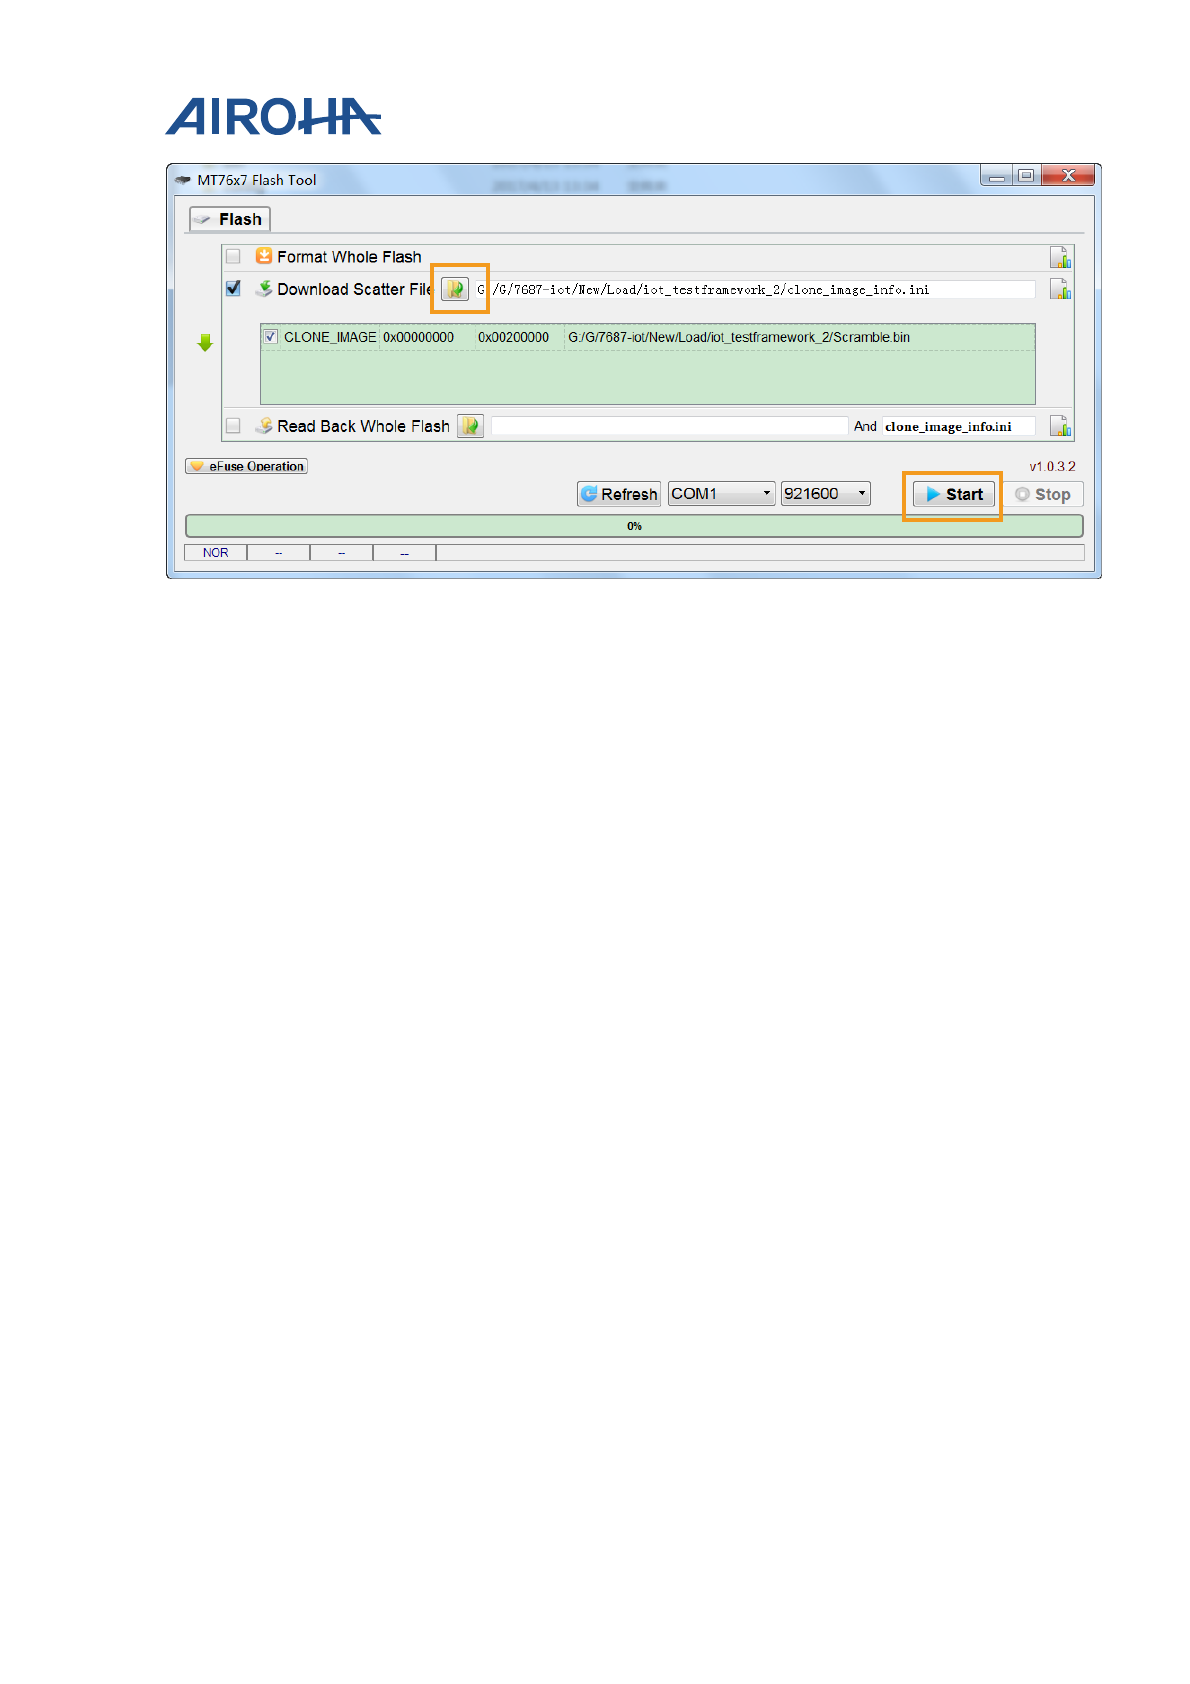
3.6. Cloning the image of a device
The Clone feature reads back the image of the device from one device and flashes it to another device.
To execute the commands:
1) Enable Download Scatter File checkbox.
2) Click open folder to select the image description file read out from a device. This file is usually generated
through the Read Back Whole Flash operation and named as “clone_image_info.ini”. See section 3.5,
“Reading back an image”.
3) Click Start to execute the command, as shown in Figure 8.
MT76x7 Flash Tool User's Guide
© 2015 – 2018 Airoha Technology Corp.
Page 11 of 14
This document contains information that is proprietary to Airoha Technology Corp. (“Airoha”) and/or its licensor(s).
Any unauthorized use, reproduction or disclosure of this document in whole or in part is strictly prohibited.
Figure 8. Clone the image using Download Scatter File function
3.7. eFuse operations
eFuse is a technology that enables dynamic real-time reprogramming of computer chips. Computer logic is
generally etched or hard-coded onto a chip and cannot be changed after the chip is manufactured. By utilizing a
set of eFuse operations, it is possible to change the circuit configuration on the chip during the runtime.
The eFuse operations of the SDK is an advanced feature that gets or sets the eFuse registers to adjust property
values on the device. Setting up eFuse with wrong values on the device will result in an unpredictable behavior.
The primary functions are:
• Save/Load full region of the eFuse.
• Get the device’s unique ID.
• Set/Get device license and WLAN MAC address.
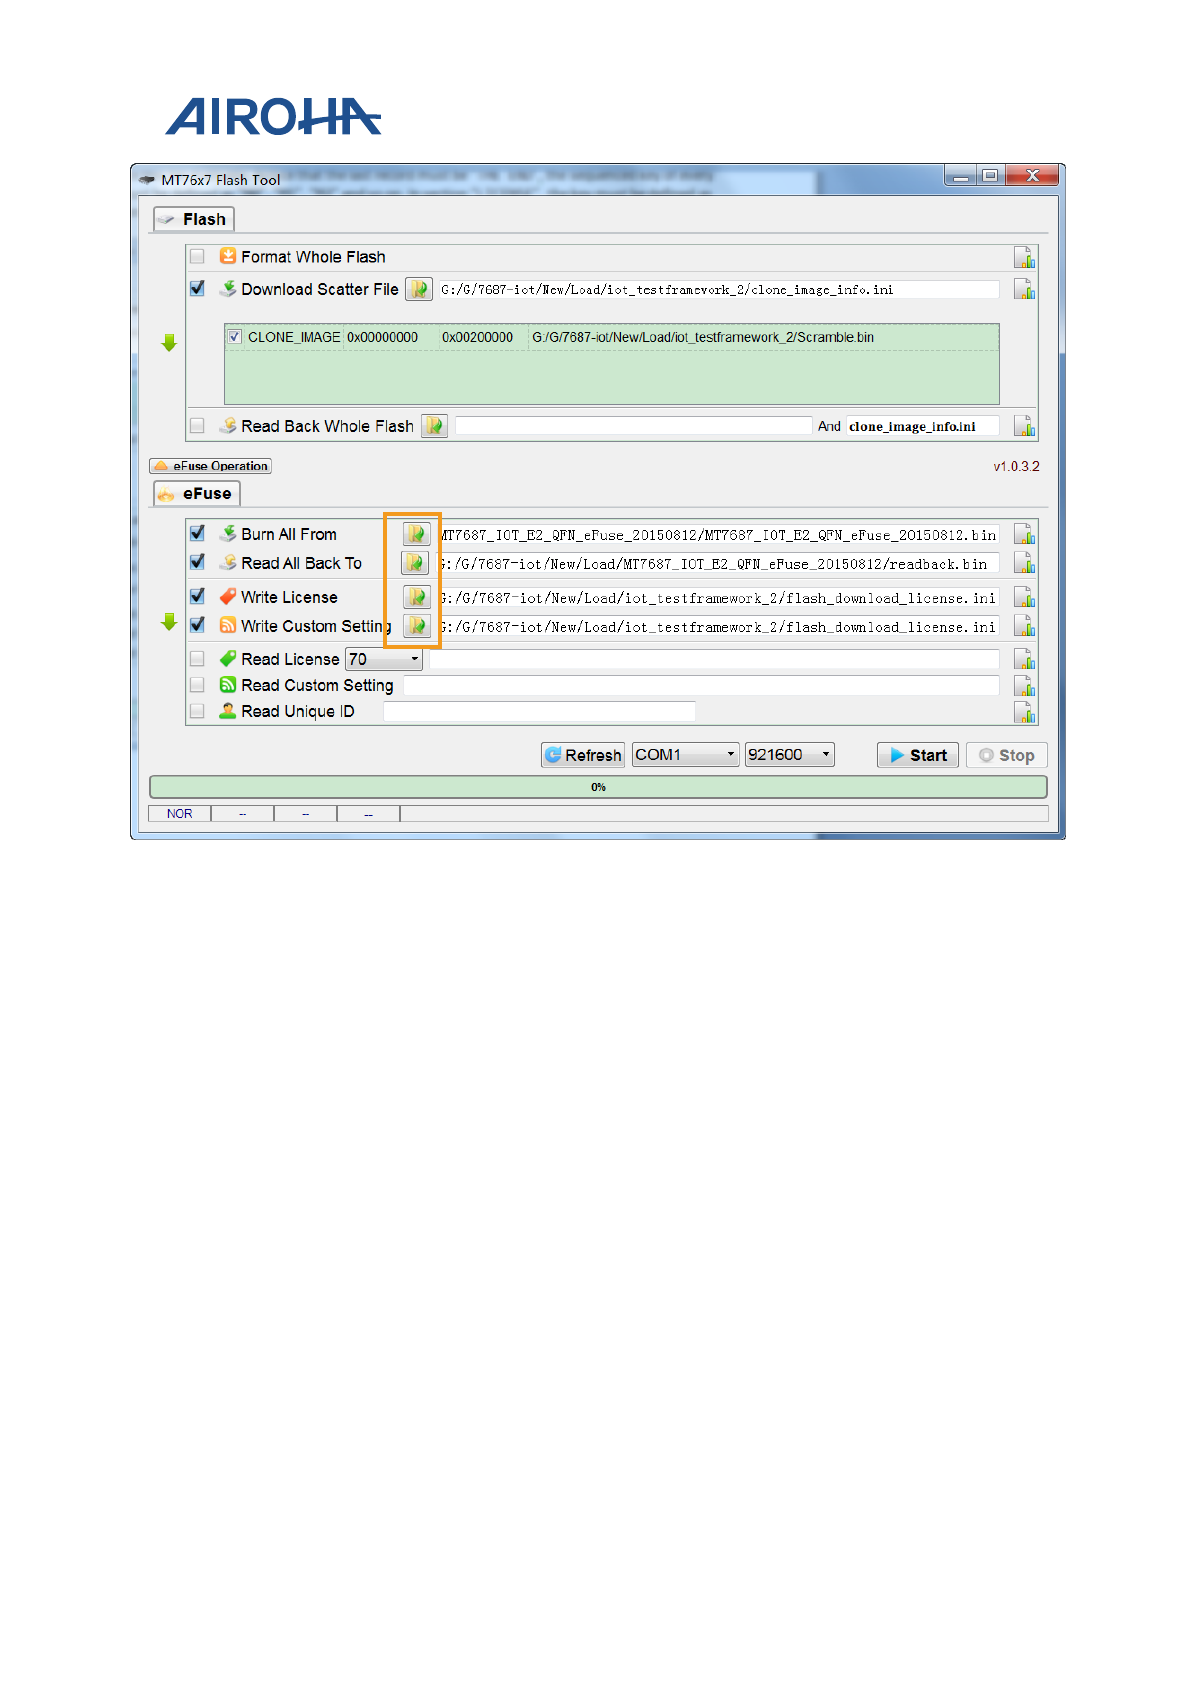
Perform eFuse operations in the following order (see Figure 9). Enable running one or more functions by selecting
the checkbox corresponding to the function on the GUI.
1) Click eFuse Operation to expand the eFuse Tab.
2) Enable Burn All From checkbox to write full region of the eFuse binary to the target device. Click open
folder to provide the file name of the eFuse data binary.
3) Enable Read All Back To checkbox to read back full region of the eFuse from the target device. Click open
folder to provide the file name to store the eFuse data.
4) Enable Write License checkbox to write the license data to the target device. Click open folder to provide
the file name that contains the license.
5) Enable Write Custom Setting checkbox to write the WLAN MAC or BT MAC data to the target device. Click
open folder to provide the file name that contains the data.
6) Enable Read Unique ID checkbox to read back the device ID. After the process is complete, the ID string
will be read back and displayed under Read Unique ID box.
7) Enable Read License checkbox to read back license of device. Select the license length under Length. After
the process is complete, the data will be read back and displayed under Read License box.
8) Enable the Read Custom Setting checkbox to read back the WLAN MAC and BT MAC of the device. After
the process is complete, the data will be read back and displayed under Read Custom Setting.

MT76x7 Flash Tool User's Guide
© 2015 – 2018 Airoha Technology Corp.
Page 12 of 14
This document contains information that is proprietary to Airoha Technology Corp. (“Airoha”) and/or its licensor(s).
Any unauthorized use, reproduction or disclosure of this document in whole or in part is strictly prohibited.
9) Click Start to execute the command.
The file type is *.ini and it contains the license, BT MAC and WLAN MAC similar to the script snippet and the
content format, as shown below.
[MAC]
M-ENABLED=FALSE
M0=00 00 00 00 00 00
M1=00 00 00 00 00 00
M7=THE END
[BT_MAC]
B-ENABLED=TRUE
B0=00 00 00 00 00 00
B1=00 00 00 00 00 00
B7=THE END
[LICENSE]
L-ENABLED=TRUE
L0=05 C2 69 43 57 12 F4 FF 05 C2 69 43 57 12 F4 FF 05 C2 69 43 57 12 F4 FF
05 C2 69 43 57 12 F4 FF 05 C2 69 43 57 12 F4 FF 05 C2 69 43 57 12 F4 FF 05
C2 69 43 57 12 F4 FF 05 C2 69 43 57 12 F4 FF
L1=05 C2 69 43 57 12 F4 FF 05 C2 69 43 57 12 F4 FF 05 C2 69 43 57 12 F4 FF
05 C2 69 43 57 12 F4 FF 05 C2 69 43 57 12 F4 FF 05 C2 69 43 57 12 F4 FF 05
C2 69 43 57 12 F4 FF 05 C2 69 43 57 12 F4 FF
L7=THE END
The user can create this file manually. Notice that the last record must be “THE END”, the sequenced key of every
record in “MAC” must be defined as “M0”, “M1”, “M2” and so on. In section “LICENSE”, the key must be defined as
“L0”, “L1”, “L2” and so on. In section “BT_MAC”, the key must be defined as “B0”, “B1”, “B2” and so on.
If the setting of “M-ENABLED” in section “MAC” is FALSE like ”M-ENABLED=FALSE”, then Write Custom Setting
will not write the WLAN MAC.
If the setting of “B-ENABLED” in section “BT_MAC” is FALSE like ”B-ENABLED=FALSE”, then Write Custom Setting
will not write the BT MAC.
MT76x7 Flash Tool User's Guide
© 2015 – 2018 Airoha Technology Corp.
Page 13 of 14
This document contains information that is proprietary to Airoha Technology Corp. (“Airoha”) and/or its licensor(s).
Any unauthorized use, reproduction or disclosure of this document in whole or in part is strictly prohibited.
Figure 9. eFuse operations

MT76x7 Flash Tool User's Guide
© 2015 – 2018 Airoha Technology Corp.
Page 14 of 14
This document contains information that is proprietary to Airoha Technology Corp. (“Airoha”) and/or its licensor(s).
Any unauthorized use, reproduction or disclosure of this document in whole or in part is strictly prohibited.
4. Adding New Flash Hardware
This section provides the method of adding new type of flash hardware supported by Flash Tool.
• The configure file named “flash-id-white-list.xml” in folder “config” and it contains the flash info like “Jedec id”,
“name” and “total flash size” similar to the script snippet and the content format, as shown below.
• If new flash is added, creating a new item in this configure file.
<?xml version="1.0" encoding="utf-8"?>
<white-list>
<list>
<!--item jedec_id="0x[Manufactory ID][Memory type][Memory
density][Reserved 00]" name="Flash Name" total_size="flash size"-->
<item jedec_id="0xEF401600" name="W25Q32JV"
total_size="0x400000"/>
<item jedec_id="0xEF401400" name="W25Q80DV"
total_size="0x400000"/>
<item jedec_id="0xEF401500" name="W25Q16DV_SPI"
total_size="0x400000"/>
<item jedec_id="0xEF601500" name="W25Q16DV_QPI"
total_size="0x400000"/>
</list>
</white-list>
