Getting Started With Transact SQL Labs MVA Setup Guide
User Manual:
Open the PDF directly: View PDF ![]() .
.
Page Count: 11

Querying with Transact-SQL
Getting Started
Overview
Transact-SQL is an essential skill for database professionals, developers, and data analysts working with
Microsoft SQL Server or Microsoft Azure SQL Database. This course combines online presentations with
hands-on labs that will give you practical experience and a chance to test and extend your Transact-SQL
programming skills.
To complete the labs in this course, you will need to set up a lab environment that includes the
AdventureWorksLT sample database. This document explains how to achieve this using Microsoft Azure
SQL Database, a cloud-based relational database service. This is the recommended environment for the
labs as it requires minimal software installation and configuration on your computer. However, if you
prefer, you can install a local instance of SQL Server Express and download and attach the sample
database – there are instructions at the end of this document for doing this.
Each module in this course consists of:
An online video presentation.
A hands-on lab.
The recommended approach for this course is to complete each module in turn; first watching the
online presentation, then completing the lab, and finally answering the review questions for that
module. Then, when you’re comfortable with what you’ve learned, move onto the next module and
repeat the process. You can complete the course as quickly or slowly as you want, though we
recommend pacing yourself to ensure that you absorb the lessons from each module before progressing
to the next one.
Each lab consists of a document that contains a number of progressively complex challenges, which you
should be able to complete by using the information that was presented in the online presentation as
well as the references to further information that are provided in the lab itself. Suggested solution
scripts are provided for each lab.
What You’ll Need
A web browser
A Microsoft account
A Microsoft Azure subscription
A Microsoft Windows* computer with either of the following tools installed:

o Microsoft SQL Server Management Studio
o Microsoft Visual Studio
* The labs were written and tested on Microsoft Windows. If you are using a non-Windows
computer, you can install a third-party SQL Server client application for your platform. Microsoft
provides no endorsement or support for non-Microsoft client tools, and you install and use them at
your own discretion. There are some suggestions for using SQL Server client tools on Linux and Mac
OS X at the end of this document.
Creating a Free Trial Azure Subscription
If you already have a Microsoft Azure subscription, you can skip this section. Otherwise, follow these steps
to create a free trial subscription, which includes enough free credit in your local currency to complete the
labs. You will need to provide a valid credit card number for verification, but
you will not be charged for Azure services – for more information, see the frequently asked questions in
the Azure sign-up page.
1. If you already have a Microsoft account that has not already been used to sign up for a free Azure
trial subscription, you’re ready to get started. If not, don’t worry, just create a new Microsoft
account at https://signup.live.com.
2. After you’ve created a Microsoft account, browse to http://aka.ms/mva-10530-az and click the
Free Trial link. Then follow the instructions to sign up for a free trial subscription to Microsoft
Azure. You’ll need to sign-in with your Microsoft account if you’re not already signed in. Then
you’ll need to:
a. Enter your cellphone number and have Microsoft send you a text message to verify your
identity.
b. Enter the code you have been sent to verify it.
c. Provide valid payment details – don’t worry, your credit card won’t be charged for any
services you use during the trial period, and the account is automatically deactivated at
the end of the trial period unless you explicitly decide to keep it active.
Create an Azure SQL Database
Now that you have an Azure subscription, you can create an Azure SQL Database instance to use in the
labs.
1. Browse to http://portal.azure.com. If you are prompted to sign in, do so with the Microsoft
account that is associated with your Azure subscription.
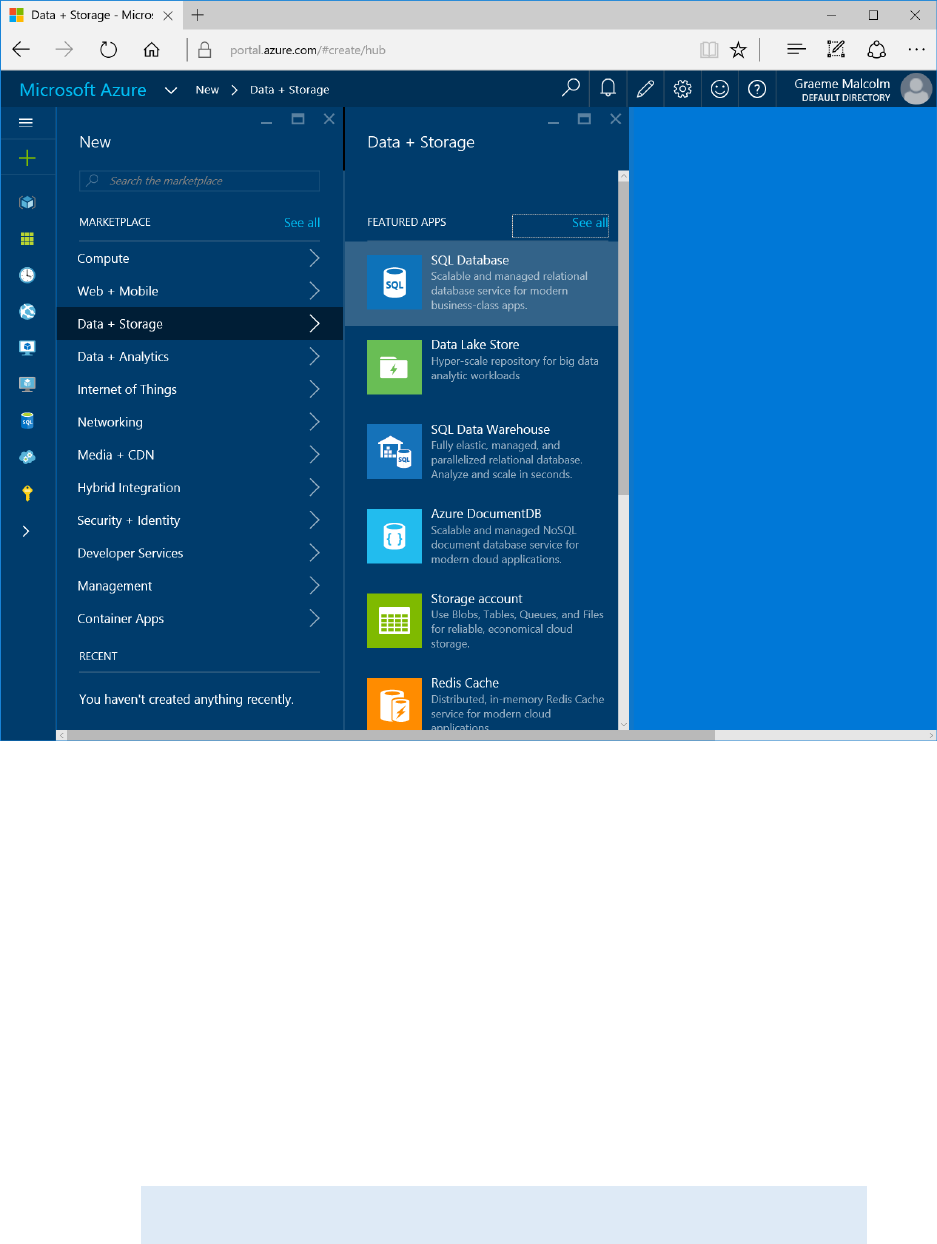
2. At the bottom of the Hub menu (the vertical bar on the left), click New (represented by a
symbol if the menu is minimized), and then in the New blade that appears, click Data and
Storage, and then click SQL Database.
3. In the SQL Database blade:
a. Enter the name AdventureWorksLT
b. Click Server. Then click Create a new server and enter the following details and click OK.
A unique name for your server (a pink exclamation mark will be displayed if the
name you have entered is invalid or already in use, otherwise a green tick is
shown)
A user name you want to assign to the server administrator. This can be your
name or some other name you’ll remember easily – however, you cannot use
“Administrator”.
A password for your server administrator account. This must meet the password
complexity rules for Azure SQL database, so for example it cannot be blank or
“password”.
The location where your server should be hosted. Choose the location nearest
to you.
Note: At the time of writing, the latest version of Azure SQL Database is V12. If
this version is available in your regions, select it.
Leave the option to allow Azure services to access the server selected (this
opens an internal firewall port in the Azure datacenter to allow other Azure
services to use the database).
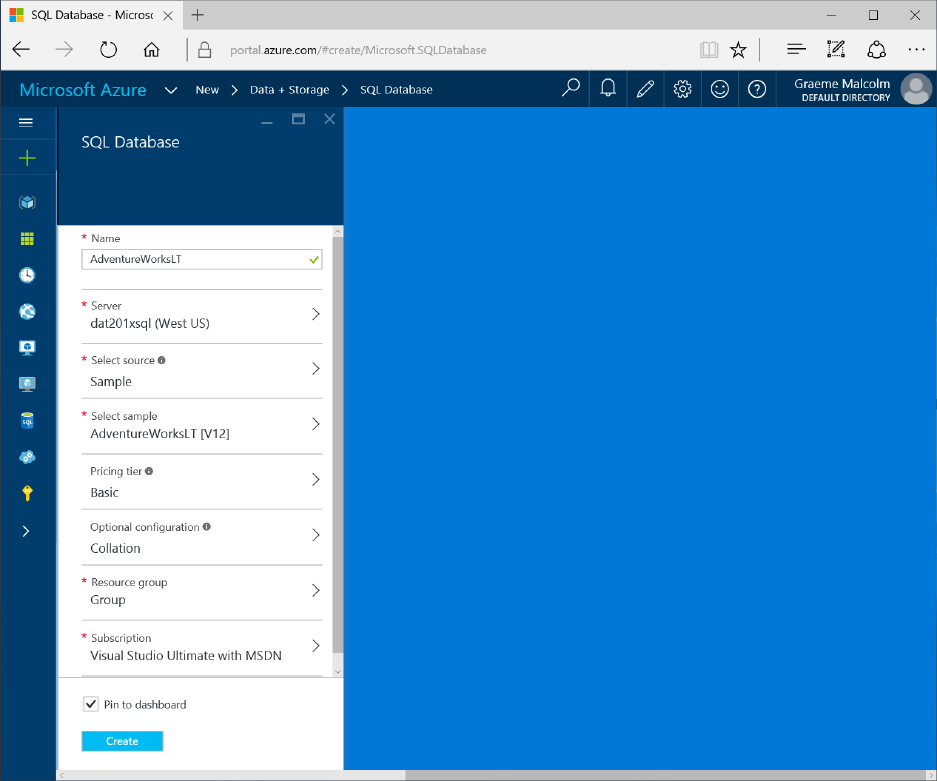
c. Click Select Source, and select Sample.
d. In the Select Sample section, ensure that AdventureWorksLT is selected. If you created
a V12 server, select the V12 version of the database)
e. In the Pricing Tier section, select Basic.
f. Ensure that your selections are similar to those below, and click Create.
4. After a short time, your SQL Database will be created and displayed on the dashboard, and the
blade for your AdventureWorksLT database should be opened (if not, click the
AdventureWorksLT SQL Database icon on the dashboard or browse to it from the Hub menu).
Configure Firewall Rules for your Azure SQL Database Server
1. In the AdventureWorksLT blade, under Essentials, click the server name for your database
server (which should be in the format server_name.database.windows.net).
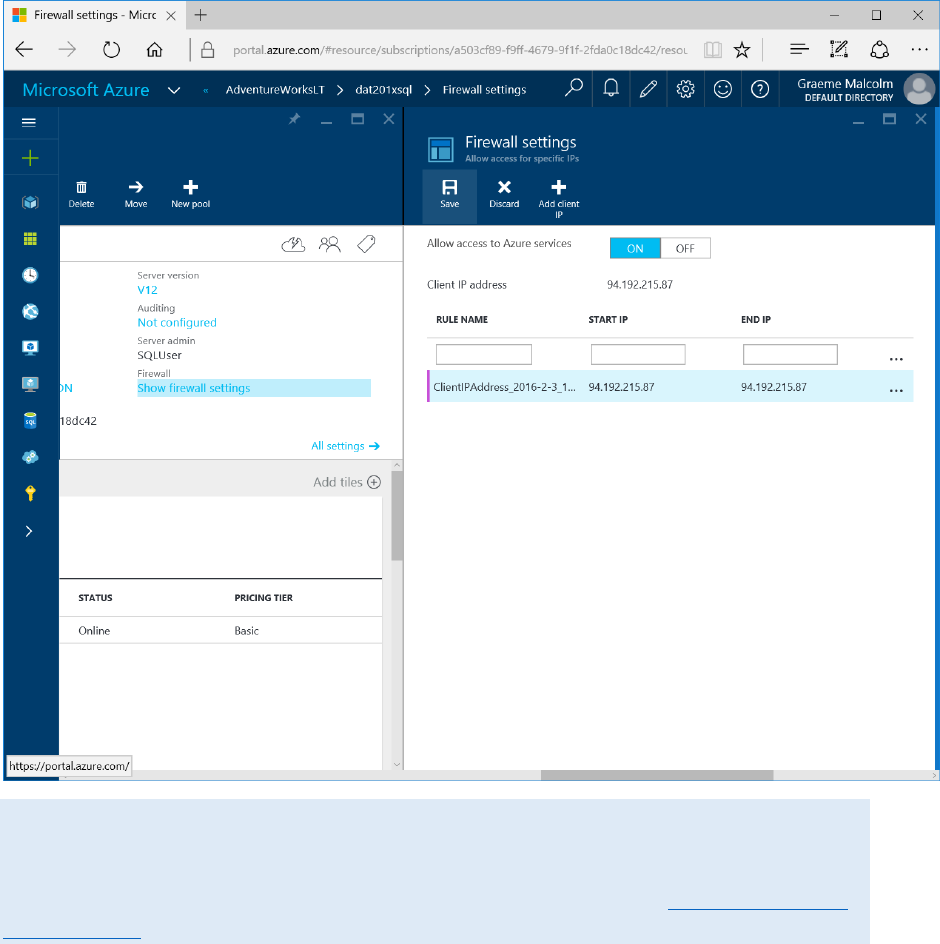
2. In the blade for your SQL server, under Essentials, click Show firewall settings.
3. In the Firewall settings blade, click the Add client IP icon to create a firewall rule for your client
computer, and then click Save.
Note: Azure SQL Database uses firewall rules to control access to your database. If your
computer’s public-facing IP address changes (or you want to use a different computer), you’ll
need to repeat this step to allow access. Alternatively, you can modify the firewall settings for
your Azure SQL Database server to allow a range of IP addresses – see the Azure SQL Database
documentation for details of how to do this.
Installing and Connecting from a Client Tool
You can use either of the following tools to develop your Transact-SQL queries.
Note: These tools are designed for Microsoft Windows. If you are using a non-Windows computer, you
can install a third-party SQL Server client application for your platform. See the notes at the end of this
document for more details.
Microsoft SQL Server Management Studio
SQL Server Management Studio is the primary management tool for Microsoft SQL Server, and you can
also use it to manage and query Azure SQL Database. If you do not already have SQL Server
Management Studio installed, you can download and install the free Express edition.
Before installing SQL Server Management Studio, use the Programs and Features app in Control Panel to
add the Microsoft .NET Framework 3.5 Windows feature to your Windows installation. You may need to
restart Windows after adding this feature.
After you have installed the .NET Framework, you can install SQL Server Management Studio from
http://aka.ms/mva-10530-sql. Just click Download and sign in using your Microsoft account if prompted,
then scroll down to the bottom of the list of downloads and select the MgmtStudio
32BIT\SQLManagementStudio_x86_ENU.exe download if you are using a 32-bit installation of
Windows, or MgmtStudio 64BIT\SQLManagementStudio_x64_ENU.exe if you are using a 64-bit
version. When the download is complete, run the executable file to extract the installation files to a
folder on your computer and start the setup wizard, then use the SQL Server installation center to
perform a new standalone installation of SQL server and install only the management tools.
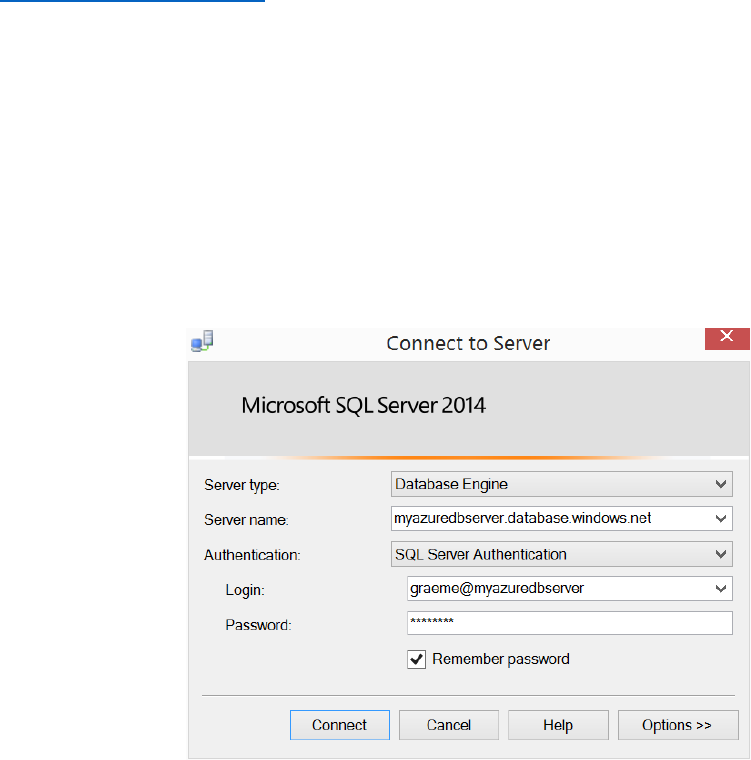
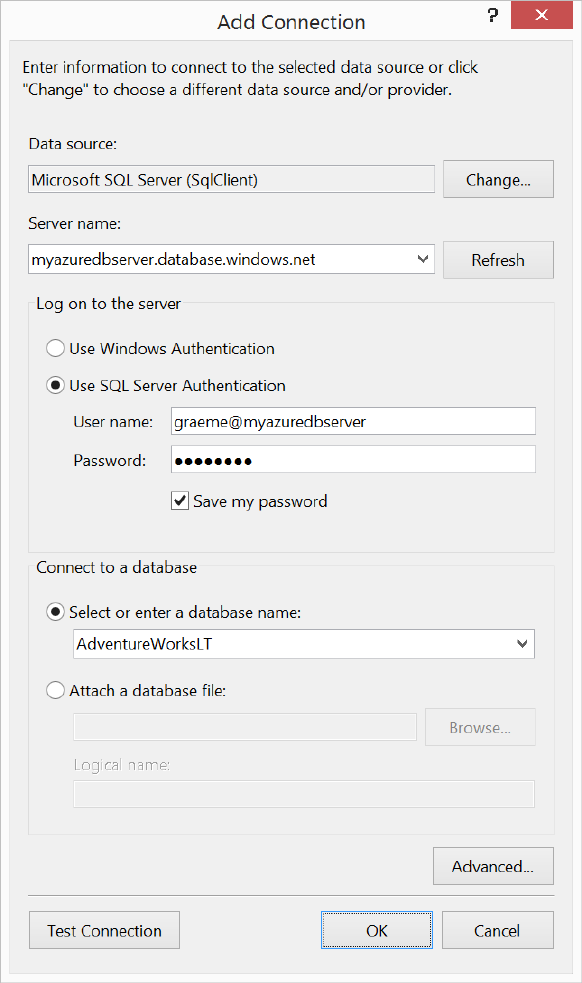
After installing SQL Server Management Studio, you can start it and connect to your Azure SQL Database
server by selecting the option to use SQL Server authentication, specifying the fully-qualified name of
your Azure SQL Database server (<your_server_name>.database.windows.net), and entering your user
name in the format <your_user_name>@<your_server_name> and password, as shown here:
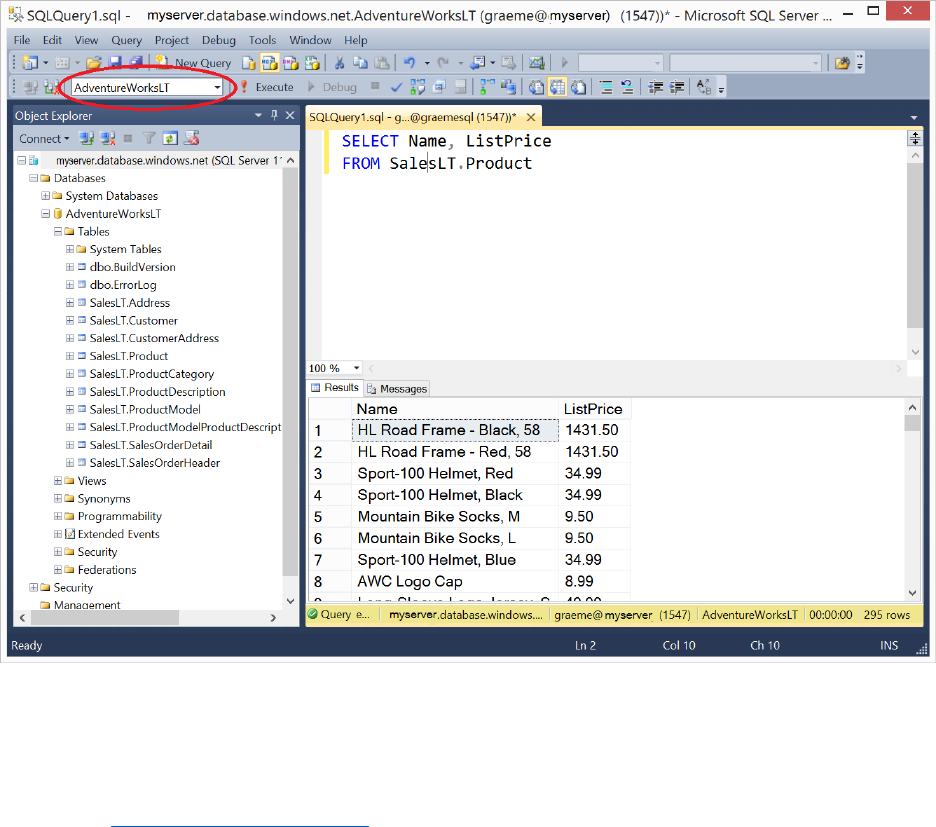
After connecting, you can create a new query and run it by clicking Execute, and you can save and open
Transact-SQL scripts. Be sure to select the AdventureWorksLT database when running your queries as
shown here:
Microsoft Visual Studio
If you are primarily a developer, you may prefer to use Visual Studio to create your Transact-SQL
queries. Visual Studio is a comprehensive software development environment for all kinds of software
projects, including database development. You can download the free Community edition of Visual
Studio from http://aka.ms/mva-10530-vs and install it on your Windows computer.
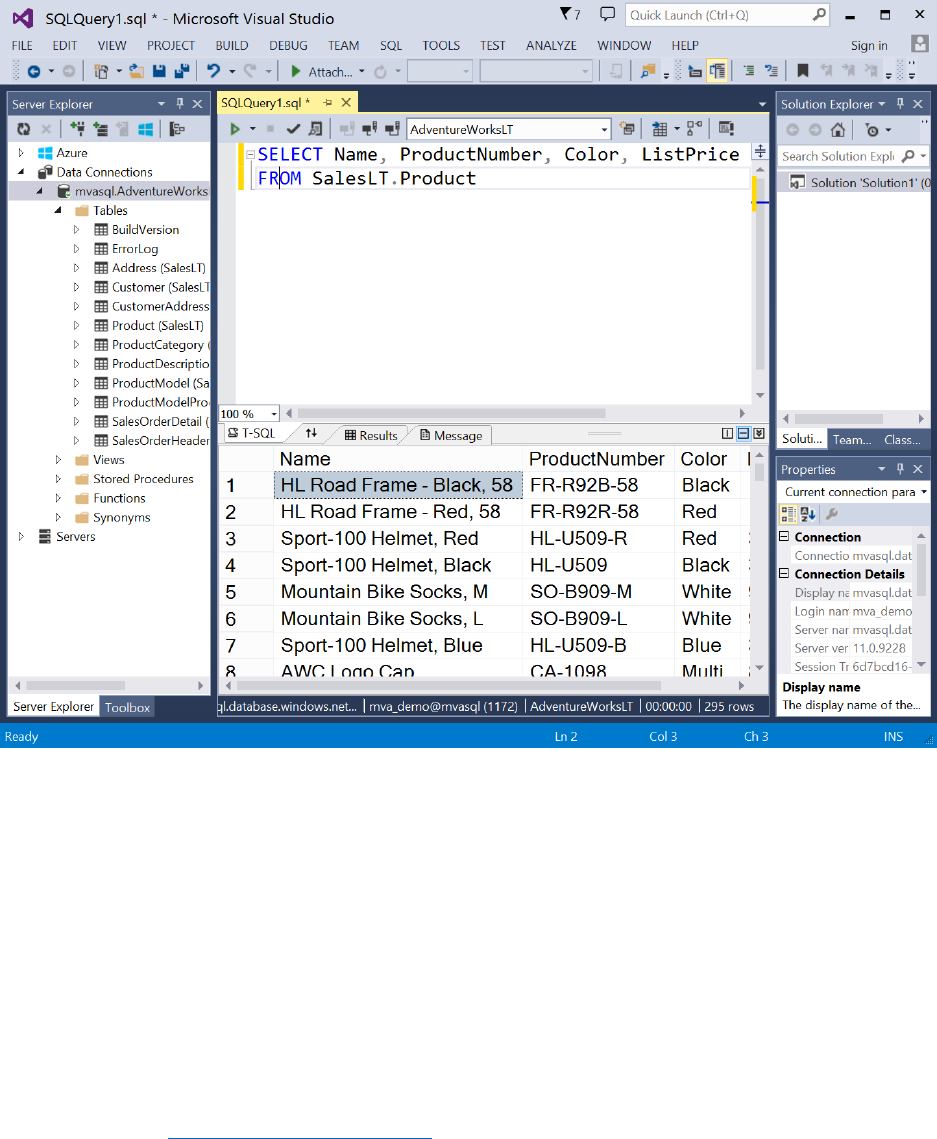
When you install Visual Studio, be sure to select the option to include the SQL Server Data Tools
optional component. Then, in the Server Explorer pane, you can create a data connection to your Azure
SQL database server using the Microsoft SQL Server (SqlClient) data source as shown here.
After you have created a data connection, you can view database objects in the Server Explorer window.
You can also create and save Transact-SQL scripts and run queries, as shown here.
Alternative Setup using SQL Server Express
The labs in this course are designed to work with Azure SQL Database. For the best experience, sign up
for a free Azure trial subscription and follow the instructions provided above. If you are unable to create
an Azure subscription, you can use the following instructions to install SQL Server Express on a Windows
computer, and deploy a sample database that is similar to the one used in the labs.
Note: These instructions assume you are familiar with Windows and comfortable installing software.
Install SQL Server 2014 Express
1. Use the Programs and Features app in Control Panel to add the Microsoft .NET Framework 3.5
Windows feature to your Windows installation. You may need to restart Windows after adding
this feature.
2. Browse to http://aka.ms/mva-10530-sql and click Download. If prompted, sign in with a
Microsoft account or create a new one.
3. Select the option for ExpressAndTools that is right for your Windows installation (32 Bit or 64
Bit. Then click Next.
4. Save SQLEXPRWT_xNN_ENU.exe (where NN is 32 or 64) to a temporary location and then run it
after it’s been downloaded.
5. When prompted, choose a folder to which the installation files will be extracted (by default,
they are extracted to a folder named SQLEXPRWT_xNN_ENU on the desktop.

6. If the SQL Server Installation Center window does not appear, in the folder where you extracted
the files, run Setup.exe. Then, in the SQL Server Installation Center window, on the Installation
page, click New SQL Server stand-alone installation or add features to an existing installation.
7. In the SQL Server 2014 Setup window; if there are any issues, resolve them by installing any
prerequisite software or making any required configuration changes. Then re-run setup.
8. On the License Terms page, accept the license terms and click Next.
9. On the Feature Selection page, select all features and ensure that the installation location has
sufficient disk space. Then click Next.
10. On the Instance Configuration page, select Default instance and click Next (note, if you wish,
you can install a named instance instead of a default instance – if you do this, when you connect
to your SQL Server instance you must specify the name (local)\instance_name.)
11. On the Server Configuration page, do not change the default selections (unless you are
comfortable configuring service accounts). Just click Next.
12. On the Database Engine Configuration page, select Mixed Mode (SQL Server authentication
and Windows authentication), enter a suitable password for the system administrator account
(and make a note of it!), and click Next.
13. When installation is complete. Click Close.
14. Close the SQL Server Installation center window.
15. If you are using Windows 8, on the Start screen, click the down arrow to view all apps, and then
right-click SQL Server 2014 Management Studio and click Pin to Taskbar – this will make it
easier to find when you want to use it.
Install the AdventureWorksLT Sample Database
1. Browse to http://msftdbprodsamples.codeplex.com/releases/view/55330, and click the link to
download AdventureWorksLT2012_Data (be careful to choose this download and not any of the
others!) Save the AdventureWorksLT2012_Data.mdf file to the Data folder for the SQL Server
Express instance you installed (by default, this is C:\Program Files\Microsoft SQL
Server\MSSQL12.MSSQLSERVER\MSSQL\DATA). Note, you may be prompted to confirm that
you want to grant your user account permission to access this location.
2. Start SQL Server Management Studio, and when prompted, enter or select the following options
and click Connect:
Server type: Database Engine
Server name: (local) (or (local)\instance_name if you installed a named instance)
Authentication: SQL Server Authentication
Login: sa
Password: The password you specified during installation
3. If the Object Explorer pane is not visible, on the View menu, click Object Explorer. Then in
Object Explorer, right-click Databases and click Attach.
4. In the Attach Databases dialog box, under the Databases to attach list, click Add. Then browse
to the folder where you downloaded AdventureWorksLT2012_Data.mdf, select it, and click OK.
5. In the Attach Databases dialog box, in the “AdventureWorksLT2012” database details area,
select AdventureWorksLT2012_log.ldf and click Remove. Then click OK.
6. In Object Explorer, expand the databases folder and verify that the AdventureWorksLT2012
database is listed.
7. On the toolbar, click New Query. Then in the Available Databases list, ensure that
AdventureWorksLT2012 is select and type the following query:

SELECT * FROM SalesLT.Product;
8. On the toolbar, click Execute, and verify that a table of product data is returned.
9. Close SQL Server Management Studio without saving any files.
Alternative Client Tools for Non-Windows Computers
If you are using a non-Windows computer, you will be unable to install SQL Server Management Studio
or Visual Studio. However, you can use the following options to perform the labs. Microsoft provides no
endorsement or support for non-Microsoft client tools, and you install and use them at your own
discretion.
If you are using a Mac OS X computer, you can:
Use virtualization software such as Parallels to install a virtualized instance of Windows on your
Mac, then install SQL Server Management Studio or Visual Studio and connect to Azure SQL
Database, or install SQL Server Express and the AdventureWorksLT2012 sample database as
described above.
Install a third party SQL Server client tool such as NaviCat for SQL Server
(http://www.navicat.com/download/navicat-for-sqlserver) or the command line cross-platform
sql-cli tool* (https://www.npmjs.com/package/sql-cli) and connect to Azure SQL Database.
If you are using Linux, you can install the command line cross-platform sql-cli tool*
(https://www.npmjs.com/package/sql-cli) and connect to Azure SQL Database.
*Note that the cross-platform sql-cli tool is a command-line interface, and does not support many of the
features in graphical tools such as SQL Server Management Studio. In particular, you may need to enter
Transact-SQL statements on a single line. To view help for the sql-cli tool, enter the command mssql -h.
