Note Pad Mac Secrets 5th Edit
Mac Secrets 5th Edit Mac Secrets 5th Edit
User Manual: Mac Secrets 5th Edit
Open the PDF directly: View PDF ![]() .
.
Page Count: 1285 [warning: Documents this large are best viewed by clicking the View PDF Link!]
- Contents
- Chapter 01
- Chapter 02
- Chapter 03
- Chapter 04
- Chapter 05
- Chapter 06
- Chapter 07
- Chapter 08
- Chapter 09
- Chapter 10
- Chapter 11
- Chapter 12
- Chapter 13
- Chapter 14
- Chapter 15
- Chapter 16
- Chapter 17
- Chapter 18
- Chapter 19
- Chapter 20
- Chapter 21
- Chapter 22
- Chapter 23
- Chapter 24
- Chapter 25
- Chapter 26
- Chapter 27
- Chapter 28
- Chapter 29
- Chapter 30
- Chapter 31
- Chapter 32
- Chapter 33
- Chapter 34
- Chapter 35
- Chapter 36
- Appendix
- License Agreement
Macworld®Mac®Secrets®
5th Edition
MACWORLD MAC SECRETS • 4040-8/5 • FM.F • Front Matter • FINAL • VB • 11/03/98 • p.i
MACWORLD MAC SECRETS • 4040-8/5 • FM.F • Front Matter • FINAL • VB • 11/03/98 • p.ii

Macworld®Mac®
Secrets®, 5th Edition
David Pogue and Joseph Schorr
MACWORLD MAC SECRETS • 4040-8/5 • FM.F • Front Matter • FINAL • VB • 11/03/98 • p.iii
IDG Books Worldwide, Inc.
An International Data Group Company
Foster City, CA ♦Chicago, IL ♦Indianapolis, IN ♦New York, NY

Macworld
®
Mac
®
Secrets
®
, 5th Edition
Published by
IDG Books Worldwide, Inc.
An International Data Group Company
919 E. Hillsdale Blvd., Suite 400
Foster City, CA 94404
www.idgbooks.com (IDG Books Worldwide Web site)
Copyright ©1998 IDG Books Worldwide, Inc. All rights reserved. No part of this book, including interior design, cover
design, and icons, may be reproduced or transmitted in any form, by any means (electronic, photocopying, recording, or
otherwise) without the prior written permission of the publisher.
Library of Congress Catalog Card Number: 98-071156
ISBN: 0-7645-4040-8
Printed in the United States of America
10 9 8 7 6 5 4 3 2 1
1B/QR/RS/ZY/FC
Distributed in the United States by IDG Books Worldwide, Inc.
Distributed by Macmillan Canada for Canada; by Transworld Publishers Limited in the United Kingdom; by IDG Norge Books
for Norway; by IDG Sweden Books for Sweden; by Woodslane Pty. Ltd. for Australia; by Woodslane (NZ) Ltd. for New Zealand;
by Addison Wesley Longman Singapore Pte Ltd. for Singapore, Malaysia, Thailand, Indonesia, and Korea; by Norma
Comunicaciones S.A. for Colombia; by Intersoft for South Africa; by International Thomson Publishing for Germany, Austria,
and Switzerland; by Toppan Company Ltd. for Japan; by Distribuidora Cuspide for Argentina; by Livraria Cultura for Brazil; by
Ediciencia S.A. for Ecuador; by Ediciones ZETA S.C.R. Ltda. for Peru; by WS Computer Publishing Corporation, Inc., for the
Philippines; by Unalis Corporation for Taiwan; by Contemporanea de Ediciones for Venezuela; by Computer Book & Magazine
Store for Puerto Rico; by Express Computer Distributors for the Caribbean and West Indies. Authorized Sales Agent: Anthony
Rudkin Associates for the Middle East and North Africa.
For general information on IDG Books Worldwide’s books in the U.S., please call our Consumer Customer Service
department at 800-762-2974. For reseller information, including discounts and premium sales, please call our Reseller
Customer Service department at 800-434-3422.
For information on where to purchase IDG Books Worldwide’s books outside the U.S., please contact our International
Sales department at 650-655-3200 or fax 650-655-3297.
For consumer information on foreign language translations, please contact our Customer Service department at
1-800-434-3422, fax 317-596-5692, or e-mail rights@idgbooks.com.
For information on licensing foreign or domestic rights, please phone +1-650-655-3109.
For sales inquiries and special prices for bulk quantities, please contact our Sales department at 650-655-3200 or write to
the address above.
For information on using IDG Books Worldwide’s books in the classroom or for ordering examination copies, please
contact our Educational Sales department at 800-434-2086 or fax 317-596-5499.
For press review copies, author interviews, or other publicity information, please contact our Public Relations
department at 650-655-3000 or fax 650-655-3299.
For authorization to photocopy items for corporate, personal, or educational use, please contact Copyright Clearance
Center, 222 Rosewood Drive, Danvers, MA 01923, or fax 978-750-4470.
LIMIT OF LIABILITY/DISCLAIMER OF W
ARRANTY: THE PUBLISHER AND AUTHORS HAVE USED THEIR BEST EFFORTS
IN PREPARING THIS BOOK. IDG BOOKS WORLDWIDE, INC., AND AUTHORS MAKE NO REPRESENTATIONS OR
WARRANTIES WITH RESPECT TO THE ACCURACY OR COMPLETENESS OF THE CONTENTS OF THIS BOOK AND
SPECIFICALLY DISCLAIM ANY IMPLIED WARRANTIES OF MERCHANTABILITY OR FITNESS FOR A PARTICULAR
PURPOSE. THERE ARE NO WARRANTIES WHICH EXTEND BEYOND THE DESCRIPTIONS CONTAINED IN THIS
PARAGRAPH. NO WARRANTY MAY BE CREATED OR EXTENDED BY SALES REPRESENTATIVES OR WRITTEN SALES
MATERIALS. THE ACCURACY AND COMPLETENESS OF THE INFORMATION PROVIDED HEREIN AND THE OPINIONS
STATED HEREIN ARE NOT GUARANTEED OR WARRANTED TO PRODUCE ANY PARTICULAR RESULTS, AND THE
ADVICE AND STRATEGIES CONTAINED HEREIN MAY NOT BE SUITABLE FOR EVERY INDIVIDUAL. NEITHER THE
PUBLISHER NOR AUTHORS SHALL BE LIABLE FOR ANY LOSS OF PROFIT OR ANY OTHER COMMERCIAL
DAMAGES, INCLUDING BUT NOT LIMITED TO SPECIAL, INCIDENTAL, CONSEQUENTIAL, OR OTHER DAMAGES.
FULFILLMENT OF EACH COUPON OFFER IS THE RESPONSIBILITY OF THE OFFEROR.
Trademarks: All brand names and product names used in this book are trade names, service marks, trademarks, or
registered trademarks of their respective owners. IDG Books Worldwide is not associated with any product or vendor
mentioned in this book.
is a trademark under exclusive
license to IDG Books Worldwide, Inc.,
from International Data Group, Inc.
MACWORLD MAC SECRETS • 4040-8/5 • FM.F • Front Matter • FINAL • VB • 11/03/98 • p.iv
MACWORLD MAC SECRETS • 4040-8/5 • FM.F • Front Matter • FINAL • VB • 11/03/98 • p.v
Eleventh Annual
Computer Press
Awards 1995
Tenth Annual
Computer Press
Awards 1994
Eighth Annual
Computer Press
Awards 1992 Ninth Annual
Computer Press
Awards 1993
IDG is the world’s leading IT media, research and exposition company. Founded, in 1964, IDG had 1997 revenues of $2.05
billion and has more than 9,000 employees worldwide. IDG offers the widest range of media options that reach IT buyers
in 75 countries representing 95% of worldwide IT spending. IDG’s diverse product and services portfolio spans six key areas
including print publishing, online publishing, expositions and conferences, market research, education and training, and
global marketing services. More than 90 million people read one or more of IDG’s 290 magazines and newspapers, including
IDG’s leading global brands — Computerworld, PC World, Network World, Macworld and the Channel World family of
publications. IDG Books Worldwide is one of the fastest-growing computer book publishers in the world, with more than
700 titles in 36 languages. The “...For Dummies®” series alone has more than 50 million copies in print. IDG offers online
users the largest network of technology-specific Web sites around the world through IDG.net (http://www.idg.net), which
comprises more than 225 targeted Web sites in 55 countries worldwide. International Data Corporation (IDC) is the world’s
largest provider of information technology data, analysis and consulting, with research centers in over 41 countries and more
than 400 research analysts worldwide. IDG World Expo is a leading producer of more than 168 globally branded conferences
and expositions in 35 countries including E3 (Electronic Entertainment Expo), Macworld Expo, ComNet, Windows World
Expo, ICE (Internet Commerce Expo), Agenda, DEMO, and Spotlight. IDG’s training subsidiary, ExecuTrain, is the world’s
largest computer training company, with more than 230 locations worldwide and 785 training courses. IDG Marketing
Services helps industry-leading IT companies build international brand recognition by developing global integrated marketing
programs via IDG’s print, online and exposition products worldwide. Further information about the company can be found
at www.idg.com. 10/8/98
Welcome to the world of IDG Books Worldwide.
IDG Books Worldwide, Inc., is a subsidiary of International Data Group, the world’s largest publisher of
computer-related information and the leading global provider of information services on information technology.
IDG was founded more than 30 years ago by Patrick J. McGovern and now employs more than 9,000 people
worldwide. IDG publishes more than 290 computer publications in over 75 countries. More than 90 million
people read one or more IDG publications each month.
Launched in 1990, IDG Books Worldwide is today the #1 publisher of best-selling computer books in the
United States. We are proud to have received eight awards from the Computer Press Association in recognition
of editorial excellence and three from Computer Currents’ First Annual Readers’ Choice Awards. Our best-
selling ...For Dummies® series has more than 50 million copies in print with translations in 31 languages. IDG
Books Worldwide, through a joint venture with IDG’s Hi-Tech Beijing, became the first U.S. publisher to
publish a computer book in the People’s Republic of China. In record time, IDG Books Worldwide has become
the first choice for millions of readers around the world who want to learn how to better manage their
businesses.
Our mission is simple: Every one of our books is designed to bring extra value and skill-building instructions
to the reader. Our books are written by experts who understand and care about our readers. The knowledge
base of our editorial staff comes from years of experience in publishing, education, and journalism —
experience we use to produce books to carry us into the new millennium. In short, we care about books, so
we attract the best people. We devote special attention to details such as audience, interior design, use of
icons, and illustrations. And because we use an efficient process of authoring, editing, and desktop publishing
our books electronically, we can spend more time ensuring superior content and less time on the technicalities
of making books.
You can count on our commitment to deliver high-quality books at competitive prices on topics you want
to read about. At IDG Books Worldwide, we continue in the IDG tradition of delivering quality for more than
30 years. You’ll find no better book on a subject than one from IDG Books Worldwide.
John Kilcullen Steven Berkowitz
Chairman and CEO President and Publisher
IDG Books Worldwide, Inc. IDG Books Worldwide, Inc.
Acquisitions Editor
Michael Roney
Development Editors
Katharine Dvorak
Steve Klett
Technical Editor
Dennis Cohen
Copy Editors
Tracy Brown
Eric Hahn
Christine Schultz-Touge
Project Coordinator
Ritchie Durdin
Graphics Technicians
Linda Marousek
Hector Mendoza
Graphics & Production Specialists
Mario Amador
Vincent F. Burns
Stephanie Hollier
Elizabeth Pauw
Chris Pimentel
Dina F Quan
Quality Control Specialists
Mike Arellano
Mark Schumann
Proofreader
York Production Services
Indexer
York Production Services
Credits
MACWORLD MAC SECRETS • 4040-8/5 • FM.F • Front Matter • FINAL • VB • 11/03/98 • p.vi
About the Authors
David Pogue graduated summa cum laude from Yale in 1985. After several
years conducting Broadway shows in New York, he began writing his back-
page column, “The Desktop Critic,” for Macworld magazine in 1991.
David is the author of Macs For Dummies, the #1 bestselling Macintosh book
since its publication in 1992 — in all of its 17 languages and six editions. In
addition to the previous editions of Macworld Mac Secrets, he has also
authored or co-authored Magic For Dummies, Opera For Dummies, Classical
Music For Dummies, The iMac For Dummies, and PalmPilot: The Ultimate
Guide. He’s been profiled in USA Today and the New York Times, and on CBS’
“48 Hours” and MSNBC’s “The Site.” You can reach David through his Web
page (www.davidpogue.com) or via email (david@pogueman.com).
Joseph Schorr is a journalist and playwright. He writes the monthly “Secrets”
column for Macworld magazine and his plays have been produced at Yale, Off-
Off Broadway, and at Wolf Trap. A 1985 Yale graduate, he spent seven years
as a reporter with The Oregonian newspaper, and is currently a software
product manager in Portland, Oregon.
Joe co-wrote the original Macworld Mac Secrets while living in an absurdly
remote town in the White Mountains of Arizona, where he communicated
with the outside world solely via modem (address: schorr@earthlink.net).
Preface
Who Should Read This Book
There’s no question that you’ll get some good out of this book no matter how
much of a Mac expert you are. Heck, even if you throw away the book, the
accompanying 600MB of spectacular software will make you mighty glad you
picked it up.
But we may as well admit that this book completely skips over the basics of
using a Macintosh. If you don’t already know how to point and click, open
windows, insert a disk, use a menu, and open a control panel, we’d like to
recommend Macs For Dummies, an outstanding beginner’s book from IDG
Books Worldwide. But because it was written by one of your present authors,
we won’t even mention it. That would be a conflict of interest.
As a matter of fact, here are the terms we’re going to be tossing around
without any definition:
Ô-key (command key), Apple menu, backup copy, click, control panel, cursor,
Delete key, desktop, double-click, File menu, floppy disk, folder, font, hard drive,
icon, K (kilobyte), keyboard, launch a program, MB (megabyte), menu, menu
command, monitor, mouse, numeric keypad, Option key, point, quit a program,
Return key, spacebar, scroll bar, System 7, title bar (of a window), Trash.
On the other hand, this book doesn’t go to the very technical ends of the Mac
universe, either. It doesn’t talk about programming in C language or using
DAL or hooking up to a mainframe. And we wouldn’t tell you what you can
accomplish by going inside your Mac with a soldering gun — even if we knew.
This book is for everybody in the middle — everybody who’s no longer
impressed by the way the Trash changes shape when something’s in it but
wouldn’t mind knowing how to change a file’s icon or beat Word 98 into
submission.
Secrets of This Book
The biggest secret to getting the most out of this book is understanding its
structure. Each topic is divided into halves. The first part is a general
discussion, like a miniarticle. It’s followed by the secrets: undocumented,
often never-before-published hints and tips for pushing your Mac to its max.
MACWORLD MAC SECRETS • 4040-8/5 • FM.F • Front Matter • FINAL • VB • 11/03/98 • p.vii

viii Macworld Mac Secrets, 5th Edition
■ ■
MACWORLD MAC SECRETS • 4040-8/5 • FM.F • Front Matter • FINAL • VB • 11/03/98 • p.viii
Part by Part
Here’s how the primary book sections are broken down:
Part I: System Software Revealed unearths insider information about the free
software that came with your Mac — namely, the System software that fills
that Apple System CD-ROM or that mound of white System disks. But we
won’t mention only the Finder (and aliases and labels and Trash and the
Desktop file), but also the important Installer, your control panels, your
Apple menu, and all those Apple Extras. And, best of all, this part identifies
all the System-folder clutter you can throw out.
Part II: Secrets of the Machine takes you into the actual mechanics of the Mac.
You won’t go so far in that you’ll need a degree in electrical engineering;
you’ll just learn enough of the inner workings to be useful. This part, for
example, actually gives a decent explanation of how to use virtual memory. It
includes a Disk Chapter, a Memory Chapter, special coverage of the Power
Macs and PowerBook laptops, and a new section on USB, the new gadget-
connection technology introduced with the iMac. Chapters 12 and 13 even
contain detailed Mac-by-Mac model descriptions so that you’ll know what
you bought, how it can be upgraded, and how much technology has marched
on since you bought your machine.
Part III: Application Secrets covers the programs you probably use in day-to-
day work: major players like AppleWorks (formerly ClarisWorks), Word,
Excel, and FileMaker, as well as software like ResEdit that can help make the
Mac more yours. This part is a whole book-within-a-book, with enough expert
insight to make you say “Wow” at least once per page.
Why We Wrote This Book
DP: Everybody who’s ever worked with a Mac
already knows that you discard a file by moving its
icon to the Trash can, that you select text by dragging
across it, and that you end the day by choosing Shut
Down from the Special menu. The world doesn’t need
another book to define scroll bar.
JS: So when we started writing this book, we worked
from one simple, overarching concept: Under no
circumstances would we define scroll bar.
DP: Instead, we decided to tell secrets: secrets
about how a Mac really works, secrets that software
programmers buried in programs but forgot to tell the
manual writer, secrets that answer some of the most
frequently asked (and seldom answered) questions
about Macintosh computing, secrets like how to
restore an ailing Mac to health.
JS: All those elusive, mystical Ô-Option-Shift-Tab-
Question Mark key sequences that are whispered at
little-known user groups... The little animated
surprises that lurk inside commercial programs...
DP: The trick to connecting two Macs together with
a piece of phone wire or getting your PowerBook
safely through the X-ray machine or making your
icons invisible to prying eyes...
JS: ...at last, it’s all been collected into one
substantial paperback written by a couple of former
college roommates.
DP: Is there anything else you think we should
mention?
JS: Do the words free software mean anything to you?
DP: Good point. We’ve included an incredible stash of
great programs on a CD-ROM at the end of the book.
JS: We were both sick of reading books that tell you
about some great software and then send you to your
local user group or store to find it. So we decided
from the outset that this book would be different. If
DIALOGUE

Preface ix
■ ■
MACWORLD MAC SECRETS • 4040-8/5 • FM.F • Front Matter • FINAL • VB • 11/03/98 • p.ix
we mention something you need, we included it with
the book.
DP: And not only shareware. We’ve also included
commercial software, from actual software companies
like Apple, Microsoft, Netscape, Berkeley Systems,
Extensis, MicroFrontier, DataViz, Westcode, Abbott
Systems, and Power On. And we’ve even thrown in a
couple of programs written especially for this book —
totally exclusive software. All of this adds up to a book
that delves into the inner workings of the machine, the
hardware behind the hardware, the raw code, the...
JS: Wait a minute, this isn’t going to be one of those
horribly dry, technical, IBM-style books that probes
the depths of programming and discusses things like
— like DIP switches, is it?
DP: DIP switches won’t even be mentioned.
JS: So then why is there a “DIP switch” entry in the
index?
DP: Because you just said DIP switches. Once you
say it, it goes in the index. Now it’s part of the book.
JS: Just because I said it.
DP: Yes! That’s how indexes work. So, anyway, we
think this book will show you how to get the most
from your Mac and increase the...
JS: So if I say “DOS,” suddenly DOS is in the index?
DP: Right, so quit saying stuff like that. I’m trying to
finish this obligatory introductory section...
JS: What about AUTOEXEC.BAT? And COM1? And
RS-422 port?
DP: Stop it! Stop it!
JS: Just checking.
DP: Shall we begin?
JS: Let’s.
DIALOGUE
Part IV: The World Online makes its debut in this edition. Now that the Internet
has become an integral part of using the Mac — and an integral part of its
software — we thought we’d better start demystifying that mother of all
networks, too. Here you’ll find chapters devoted to buying and understanding
modems; America Online; Netscape Navigator and Microsoft Internet Explorer;
writing your own Web pages; and dealing with e-mail (including junk e-mail).
Part V: Attachments is about everything you attach to your computer —
printers (and, therefore, fonts), scanners, digital cameras, CD-ROM and DVD-
ROM players, NuBus and PCI cards, and networks. At the end of this part is a
troubleshooting chapter that, among other things, contains our Rule of
Three: a troubleshooting trick that solves about 99% of typical mysterious
Mac crashes and odd behaviors.
Appendix: The Secrets Software describes the hundreds of programs that
come with this book.
Sidebars
Along the way, we intend to spice things up with special minitopics:
■Each Answer Man sidebar contains an actual question asked by an actual
imaginary Macintosh user, and our actual attempt to answer it.
■A Macintosh Secret has, we suppose, much in common with a regular Hint
or Trick or Tip. But to qualify for its own special sidebar, a Macintosh
Secret has to have particular juiciness, a surprising element, or special
pertinence to the discussion at hand.
■Case Histories are true stories from real life, reflecting the genuine agony
of trying to solve a computer problem as deadlines loom. Of course,
we’ve selected only stories with happy endings.
■True Facts, however, may not end happily. These are fun tidbits from the
world of high-powered Silicon Valley politics: tales of Apple intrigue or
Adobe warfare, and other trivia.
■As you can imagine, writing a tightly integrated book like this is difficult
for one person. We found that it may even be tougher for two; sometimes
we (JS and DP) simply couldn’t agree. In those instances, you’ll get both
sides of the story in the form of a Dialogue between your co-authors.
You’ll hear the conservative, careful view (usually Joe’s) versus the devil-
may-care, it’s-under-warranty-anyway stance (usually David’s).
Finding the Good Parts
Finally, you’ll find icons in the margin of this book. Here’s what they’re about:
Speed Tip icons are for people in such a hurry that they don’t even
have the time to scan our secrets for efficiency tips; these symbols
mark our time-saving tips.
CD icons let you know that, whatever the current discussion is about,
you don’t have to go out and buy some program to make it work. The
software you need is on a CD-ROM, right at the back of this book.
Strange But True icons indicate an oddity we bet you didn’t know.
Even though the Mac is the world’s most self-explanatory computer,
there’s a lot of weirdness going on behind that plastic.
Worth Learning icons mark a technique most people don’t bother
with. But we, as seasoned veterans, have found a tip marked by this
icon particularly worth making part of your work routine.
Contest Winner icons alert you to secrets submitted by readers — the
best 50, in fact. These lucky 50 readers each received a free copy of
this book, just as you’ll receive a copy of the Sixth Edition if we choose
your secret to publish (see the contest details later in this chapter).
Mac Basics icons debut with this edition. We’re particularly proud that
IDG Books is still a full-steam producer of Macintosh books, even as
some of the more spineless publishers buy into the Wall Street Journal’s
anti-Mac paranoia and abandon the market. The Mac Basics icon is
there as a welcome to new Mac Secrets readers — and to existing Mac
fans who may find surprising holes in their knowledge of what we
consider to be the fundamentals.
Mac OS 8 icons mark information specific to Mac OS 8 or later. So many
things changed in Mac OS 8 that we thought we’d point out these
dramatic changes.
OS
8
Mac Basics
Contest
Winner
Worth
Learning
Strange
But True
xMacworld Mac Secrets, 5th Edition
■ ■
MACWORLD MAC SECRETS • 4040-8/5 • FM.F • Front Matter • FINAL • VB • 11/03/98 • p.x

Mac OS 8.5 icons denote coverage of the OS version that debuted just as
this book did: Mac OS 8.5 (and its subsequent decimal-point upgrades).
That bizarre arrow notation
As you read this edition, you’ll notice frequent use of this notation: File➪
Open. That’s shorthand for “From the File menu, choose the Open command.”
This abbreviation style really pays off when you’re asked to choose submenus,
as in “Choose Insert ➪Autotext ➪Normal,” and when you’re supposed to open
a nested folder (“Open your System Folder ➪Apple Menu Items folder”).
Why’d we incorporate this shorthand? Because we’re all busy people, and
the book is long enough as it is.
What’s New in Secrets 5.0
As you know, computer years are like dog years — seven of them for one of
our years. This edition hit the shelves nearly two years after the previous
one; as a result, so many aspects of Macintosh life changed we had to
overhaul the thing — almost all 1,400 pages of it.
You’ll find changes on almost every page. We’re especially proud of our Mac
OS 8.5 (and later) coverage. You’ll find new discussions of Mac OS 8 and 8.1;
the HFS+ hard drive-formatting scheme; digital cameras; the iMac, G3 Power
Macs, and G3 PowerBooks; USB devices; Photoshop 5, America Online 4, and
Microsoft Office 98; Word macro viruses; Outlook Express and Claris Emailer;
Netscape Navigator 4.x and Microsoft Internet Explorer 4.x; Quark 4 and
PageMaker 6.5; G3 upgrade cards; AppleScript and MacsBug; and much more.
And we had to double-check every single secret to make sure it still works.
You might wonder what we cut to make way for all of this good new stuff.
The answer is: just about every remaining shred of System 7 and 7.1
information. If your Mac still runs those operating systems that exited the
scene in 1994, take joy from the fact that the cut material is still in the fourth
edition — which you’ve got on the CD-ROM that accompanies this book!
Finally, we overhauled the software that comes with this book. We’ve included
a delicious variety of commercial programs: OneClick, Action Files, You Don’t
Know Jack Lite, Color It, Extensis PhotoBevel, and MacLinkPlus are among
them — software you could purchase on your own for literally hundreds of
dollars. And we’ve included many times more hand-picked shareware and
freeware programs; you’ll never have to go scampering to the Web to find
some useful utility we describe in the text.
You’ll also find the complete text of this edition in electronic, searchable form
on the CD-ROM. You may find that Mac Secrets on a PowerBook is actually
easier to carry around than Mac Secrets itself. See the appendix for the
complete list and descriptions of the CD goodies.
OS
8.5
Preface xi
■ ■
MACWORLD MAC SECRETS • 4040-8/5 • FM.F • Front Matter • FINAL • VB • 11/03/98 • p.xi

You Asked For It
By far the most frequent suggestions we receive from readers are:
■“Give us an electronic, searchable edition!” You got it. The book in
your hands is also on the accompanying CD-ROM in an electronic,
searchable format. Now you can take Mac Secrets with you on your
PowerBook, too.
■“Keep the book updated!” That’s the purpose of our free online updates
(see “Free Electronic Updates,” below) — and our Web page
(http://www.idgbooks.com/idgbooksonline/macsecrets).
■“The book is too big! Sell it as separate volumes.” The publisher really
did consider this suggestion — for about 11 seconds. We were told that
this kind of packaging would jack up the cost of the book and prevent
bookstore browsers from checking the book out (because it would have
to be wrapped in plastic). Bummer.
And speaking of the feedback we get: send it on! (Our e-mail addresses are on
page vi.) Point out our mistakes, please, and send us the secrets you uncover,
and tell us how we could improve the next edition. We’re secure people;
we’re prepared to suffer the slings and arrows of reader feedback if it’ll
produce a better book the next time around.
Free Electronic Updates
This may be the fifth edition, but you have to check the copyright page (that
10 9 8 7. . . business) to see which printing you have. Every few months —
each time the publisher prints up a new batch — we update the material in
this book.
So we had a wacky thought: instead of just sending the updates to our editor,
why not post them on the Internet, where everybody can get at them? That’s
exactly what we’ve done. Each update document comes complete with page
numbers, so you can make your copy match the latest printings! To find these
free electronic updates, visit this book’s Web page at www.idgbooks.com/
idgbooksonline/macsecrets. This Web site lets you download our updates —
and much more: contest results, updated shareware programs, and more.
Get Your Next Edition Free, or Win $500
It’s the third annual Mac Secrets Mac secret contest!
This year’s contest
Send us the coolest undocumented features, buried treasures, power-user
shortcuts, authoritative corrections, ResEdit hacks, and secret About boxes.
If you send us one that hasn’t been published elsewhere, and we use it in the
xii Macworld Mac Secrets, 5th Edition
■ ■
MACWORLD MAC SECRETS • 4040-8/5 • FM.F • Front Matter • FINAL • VB • 11/03/98 • p.xii

next edition of this book, we’ll send you the sixth edition of Macworld Mac
Secrets at no charge when it’s published. We’ll award 50 free books this way
(and, of course, we’ll credit you in the book).
Furthermore, we’ll once again award $500 to the absolute coolest, most
amazing undocumented secret we receive.
Send your entries by e-mail to david@pogueman.com or schorr@earthlink.net,
or, if you must, by U.S. mail to:
Mac Secrets Contest
IDG Books Worldwide, Inc.
919 E. Hillsdale Blvd. #400
Foster City, CA 94404
Last year’s contest
No joke: fully 60 percent of the entries in the secrets contest for the edition
in your hands were secrets that already appeared in the book! Another 20
percent were duplicated, alas — we’ve awarded the free books to the first
submission we received.
Of the rest, some were too trivial, too technical, or based on software that is
too old or too uncommon to appeal to our wide audience. Lots of these
secrets were terrific things to know, but were already well documented in the
software manuals. And 50, of course, were winners.
Once again this year, we didn’t receive any single secret that was so amazing
it merited the big $500 grand prize. Therefore, we’ve sent $250 to each of two
lucky gentlemen: Lubomir Stroetmann, for his submission of 20 absolutely fresh
and useful tricks; and Swedish reader Göran Svegler, who went so far as to write
special software (the extremely cool Hi-Res Map) to include on our CD. Lubomir
is from Denmark and Göran is from Sweden, which we assume is either (a) pure
coincidence or (b) a secret Scandanavian plot to take over the world.
Where to Get Apple Software
As you read this book, you’ll encounter frequent references to Apple updates,
system patches, supplementary software, and so on. By far the simplest way
to get this free Apple software is to download it (see Chapter 25 to find out
how to get connected to the Internet or an online service).
■On America Online: Use keyword: AppleComputer.
■On the Internet: Download stuff from Apple’s software sites at
ftp.support.apple.com or ftp.info.apple.com.
Preface xiii
■ ■
MACWORLD MAC SECRETS • 4040-8/5 • FM.F • Front Matter • FINAL • VB • 11/03/98 • p.xiii
MACWORLD MAC SECRETS • 4040-8/5 • FM.F • Front Matter • FINAL • VB • 11/03/98 • p.xiv
Acknowledgments
The information in this book comes from many sources, the most important
of which is our army of loyal and articulate readers. Since the last edition
appeared, we received over 4,500 e-mail messages from readers around the
planet: tricks, tips, clarifications, news, and encouragement. We read and
replied to all of them — and used their input to shape the final product.
Over the years, various other knowledgeable, friendly Mac fans have left their
marks on the evolving book, too. Gene Steinberg and John Stroud contributed
several important chapters to the early editions. In this edition, you’ll find a
new chapter on tackling Mac-Windows compatibility issues — a chapter
written by genius John Rizzo, who maintains the mac-windows.com Web site.
New, too, is the chapter on creating Web sites, which had substantial input
from Ted Alspach, and a chapter on America Online, drafted by Erfert Fenton.
We were thrilled to learn that once again, Dennis Cohen would be the book’s
technical editor, which in this case involved not just catching our gaffes but
also contributing some astounding Mac secrets of his own. We’re also proud
to toast the various IDG Books editors who’ve shaped the book over the
years: Marta Partington (first edition), Andy Cummings (second), Jim Grey
and Joe Curran (third), Kevin Shafer (fourth), and Steve Klett and Katharine
Dvorak (this edition). Josh Bernstein and Stefan Anthony each made special
coverage possible — thanks dudes. Thanks, too, to IDG Books’ Mike Roney,
Walt Bruce, and John Kilcullen, who had the faith to keep producing great
Mac books at a time when wussier publishers were leaving the market.
Finally, our gratitude gushes to those we wanted to spend more time with,
but couldn’t, while we were immersed in this project: Allison, for her
constant support; Alexandria and Zachary; the lovely Dr. Pogue, son Kelly,
and his upcoming sibling; our editors and friends at Macworld magazine; and
Bullwinkle the Wonder Dog.
The Good Stuff on the CD-ROM
The CD-ROM that comes with this book includes over 100 outstanding, hand-
picked shareware and freeware programs. Our gratitude and admiration go to
the programmers who were (a) talented enough to write these programs, and
(b) nice enough to give us permission to include them.
The CD-ROM with this book also comes with a number of commercial
programs — an even more remarkable inclusion. After all, if you ran a
software company, would you have enough security and faith to give away
your company’s crown jewels with a book like this?
But that’s exactly what happened. The companies listed below have given us
actual, functioning, non-time-limited software to include on the CD with this
book. You get something great without having to pay for it. They hope you’ll
MACWORLD MAC SECRETS • 4040-8/5 • FM.F • Front Matter • FINAL • VB • 11/03/98 • p.xv

like the stuff so much, you’ll buy more of their software, or upgrade to the new
versions. (Discount coupons to further entice you are in the back of the book.)
Here are the names of our friendly contacts at the participating software
companies:
Abbott Systems: Ken Abbott
Aladdin Systems: Jonathan Kahn, Jennifer Lyng
Binary Software: Charles Haspel
DataViz: Scott Thomas
MicroFrontier: Ed Jones, Keith Woodard
Nova Development: Roger Bloxberg, Gary Gonzales
Olduvai Software: Gabriel Foux
Power On Software: Bob Leeds
WestCode Software: Rob Renstrom, Mark Brooks
xvi Macworld Mac Secrets, 5th Edition
■ ■
MACWORLD MAC SECRETS • 4040-8/5 • FM.F • Front Matter • FINAL • VB • 11/03/98 • p.xvi

Contents at a Glance
Preface ............................................................................................vii
Acknowledgments ..............................................................................xv
Part I: System Software Revealed .......................................1
Chapter 1: Your First Software: The Finder..............................................................................................3
Chapter 2: Finder Command Secrets ......................................................................................................59
Chapter 3: Desk-Accessory World...........................................................................................................93
Chapter 4: Control Panels and Extensions...........................................................................................137
Chapter 5: Enablers, Installers, and Apple Extras...............................................................................255
Chapter 6: The System Software Museum............................................................................................293
Part II: Secrets of the Machine .......................................327
Chapter 7: On, Off, and Everything in Between...................................................................................329
Chapter 8: The Disk Chapter..................................................................................................................355
Chapter 9: Memory..................................................................................................................................393
Chapter 10: Keyboards, Mice, and USB ................................................................................................417
Chapter 11: Monitors ..............................................................................................................................435
Chapter 12: From 120K to Quadra: Mac to Mac...................................................................................453
Chapter 13: The PowerPC Macs, Model by Model ..............................................................................503
Chapter 14: PowerBooks Exposed ........................................................................................................549
Part III: Application Secrets............................................587
Chapter 15: Mac Application Basics .....................................................................................................589
Chapter 16: Mac to PC and Back............................................................................................................623
Chapter 17: Word Processing.................................................................................................................645
Chapter 18: Page Design .........................................................................................................................701
Chapter 19: Number and Data Crunching ............................................................................................729
Chapter 20: Graphics and 3D .................................................................................................................763
Chapter 21: The ResEdit Chapter ..........................................................................................................797
Chapter 22: Utilities, Macros, and AppleScript....................................................................................837
Chapter 23: Speech, Movies, and Sound...............................................................................................869
MACWORLD MAC SECRETS • 4040-8/5 • FM.F • Front Matter • FINAL • VB • 11/03/98 • p.xvii

Part IV: The World Online ...............................................907
Chapter 24: Mysteries of the Modem....................................................................................................909
Chapter 25: The Web, the Net, and Everything Online.......................................................................925
Chapter 26: Getting the Most Out of America Online .........................................................................961
Chapter 27: Everything E-mail ...............................................................................................................975
Chapter 28: A Web Site –Making Crash Course....................................................................................997
Part V: Attachments ....................................................1013
Chapter 29: Inside Fonts.......................................................................................................................1015
Chapter 30: Printing Secrets.................................................................................................................1053
Chapter 31: Scanners and Digital Cameras ........................................................................................1101
Chapter 32: CD-ROM, DVD, and Other Such Words ..........................................................................1117
Chapter 33: The SCSI Chain, IDE, and FireWire..................................................................................1129
Chapter 34: NuBus, PCI, and Other Slots............................................................................................1145
Chapter 35: The Networking Chapter .................................................................................................1151
Chapter 36: Troubleshooting ...............................................................................................................1187
Appendix: The Secrets Software..........................................................................................................1217
Index........................................................................................................................................................1251
xviii Macworld Mac Secrets, 5th Edition
■ ■
MACWORLD MAC SECRETS • 4040-8/5 • FM.F • Front Matter • FINAL • VB • 11/03/98 • p.xviii

Contents
Preface ...........................................................................vii
Acknowledgments ............................................................xv
Part I: System Software Revealed .......................................1
Chapter 1: Your First Software: The Finder ............................................3
Finder: The Unknown Program .................................................................................................................3
A Few Words about Icons ..........................................................................................................................4
Selecting icons .......................................................................................................................................5
Icon Secrets .....................................................................................................................................7
Renaming icons ...................................................................................................................................12
Icon Renaming Secrets .................................................................................................................14
The Truth about Finder Windows ..........................................................................................................18
Anatomy of a window .........................................................................................................................19
Mac OS 8 window stunts ....................................................................................................................23
Pop-up Window Secrets ................................................................................................................25
Finder Window Secrets ................................................................................................................28
The Point of Views: Lists, Icons, and Buttons .......................................................................................33
List, Icon, and Button View Secrets ............................................................................................33
Copying Files .............................................................................................................................................41
File Copying Secrets .....................................................................................................................42
Your First Database: The Desktop File ...................................................................................................43
What’s in the Desktop file ..................................................................................................................43
Curing a troubled Desktop file ...........................................................................................................44
Desktop File Secrets .....................................................................................................................46
Secrets of the Trash .................................................................................................................................49
Trash Secrets ................................................................................................................................49
All about Aliases .......................................................................................................................................51
Making an alias ....................................................................................................................................53
Finding the original file .......................................................................................................................55
More alias notes ..................................................................................................................................56
Alias Secrets ..................................................................................................................................57
Drag-and-Dropping Icons .........................................................................................................................57
Macintosh Drag-and-Drop .......................................................................................................................57
Macintosh Drag-and-Drop Secrets ..............................................................................................57
Chapter 2: Finder Command Secrets ..................................................59
The Apple Menu ........................................................................................................................................59
Apple Menu Secrets ......................................................................................................................60
The File Menu ............................................................................................................................................64
Print ......................................................................................................................................................64
MACWORLD MAC SECRETS • 4040-8/5 • FM.F • Front Matter • FINAL • VB • 11/03/98 • p.xix

Move to Trash ......................................................................................................................................64
Get Info .................................................................................................................................................65
Label .....................................................................................................................................................67
Are labels useless? ..............................................................................................................................69
Sharing ..................................................................................................................................................70
Make Alias ............................................................................................................................................70
Add to Favorites ..................................................................................................................................70
Put Away ...............................................................................................................................................71
Find .......................................................................................................................................................71
The Edit Menu ...........................................................................................................................................72
Undo ......................................................................................................................................................72
Cut, Copy, Paste, Clear .......................................................................................................................72
Show Clipboard ...................................................................................................................................73
Preferences ..........................................................................................................................................73
The View Menu .........................................................................................................................................74
as Icons, as Buttons, as List ...............................................................................................................76
as Window, as Pop-up Window ..........................................................................................................76
Clean Up, Arrange (Mac OS 8.x) ........................................................................................................76
Reset Column Positions .....................................................................................................................77
View Options ........................................................................................................................................78
The Special Menu .....................................................................................................................................80
Eject Disk ..............................................................................................................................................80
Erase Disk .............................................................................................................................................80
Clean Up (System 7.x) ........................................................................................................................80
Clean Up Secrets (System 7.x) .....................................................................................................81
The Help Menu ..........................................................................................................................................82
Balloon Help .........................................................................................................................................82
Apple Guide .........................................................................................................................................83
Mac OS 8.5 Help ...................................................................................................................................85
The Keyboard/International Menu .........................................................................................................87
Contextual Menus .....................................................................................................................................88
The Application Menu ..............................................................................................................................90
Mac OS 8.5 Application Palette Secrets .....................................................................................91
Hidden System Commands .....................................................................................................................93
Hidden System Software Command Secrets ..............................................................................94
Chapter 3: Desk-Accessory World........................................................93
Welcome to the Desk Accessories ..........................................................................................................93
Apple System Profiler ..............................................................................................................................94
AppleCD Audio Player ..............................................................................................................................96
AppleCD Audio Player Secrets ....................................................................................................97
Automated Tasks ......................................................................................................................................98
Calculator ..................................................................................................................................................99
Calculator Secrets ......................................................................................................................100
Chooser ....................................................................................................................................................101
Chooser Secrets ..........................................................................................................................103
Control Panels .........................................................................................................................................104
Connect To… ...........................................................................................................................................104
Favorites ..................................................................................................................................................105
Find (Find File) ........................................................................................................................................106
Find basics .........................................................................................................................................107
Find by Content (Mac OS 8.5) ..........................................................................................................109
xx Macworld Mac Secrets, 5th Edition
■ ■
MACWORLD MAC SECRETS • 4040-8/5 • FM.F • Front Matter • FINAL • VB • 11/03/98 • p.xx

Search the Internet (Mac OS 8.5) ....................................................................................................111
Find File Secrets ..........................................................................................................................114
Graphing Calculator ...............................................................................................................................121
Graphing Calculator Secrets ....................................................................................................122
Internet Access .......................................................................................................................................123
Jigsaw Puzzle ...........................................................................................................................................124
Jigsaw Puzzle Secrets ................................................................................................................124
Key Caps ..................................................................................................................................................125
Key Caps Secrets .........................................................................................................................126
Network Browser ....................................................................................................................................126
Network Software Selector ....................................................................................................................128
Note Pad ..................................................................................................................................................128
Note Pad Secrets .........................................................................................................................129
Recent Applications, Documents, Servers ..........................................................................................130
Remote Access Status ............................................................................................................................130
Scrapbook ................................................................................................................................................131
Scrapbook Secrets ......................................................................................................................131
SimpleSound ............................................................................................................................................132
Stickies .....................................................................................................................................................134
Stickies Secrets ...........................................................................................................................136
Shut Down ...............................................................................................................................................139
Chapter 4: Control Panels and Extensions ..........................................137
The Control Panels .................................................................................................................................138
What’s a control panel, anyway? .....................................................................................................138
Appearance (Mac OS 8.0 and 8.1) ...................................................................................................139
Appearance Control Panel Secrets ..........................................................................................141
Appearance (Mac OS 8.5) .................................................................................................................142
Apple Menu Options .........................................................................................................................148
Apple Menu Options Secrets .....................................................................................................149
AppleTalk ...........................................................................................................................................149
AppleVision Setup .............................................................................................................................150
At Ease Setup .....................................................................................................................................150
At Ease Secrets ............................................................................................................................151
ATM .....................................................................................................................................................152
Auto Power On/Off ............................................................................................................................152
AutoRemounter .................................................................................................................................152
Button Disabler .................................................................................................................................153
CloseView ...........................................................................................................................................153
Color ...................................................................................................................................................154
Color Control Panel Secrets ......................................................................................................154
ColorSync or ColorSync System Profile .........................................................................................155
Control Strip ......................................................................................................................................155
Control Strip Secrets ..................................................................................................................158
Changing the Strip: before Mac OS 8.5 ...........................................................................................158
CPU Energy Saver ..............................................................................................................................160
Date & Time .......................................................................................................................................160
Date & Time Secrets ...................................................................................................................161
Desktop Patterns ...............................................................................................................................162
Desktop Patterns Secrets ...........................................................................................................164
Desktop Pictures ...............................................................................................................................166
Desktop Pictures Secrets ...........................................................................................................168
Contents xxi
■ ■
MACWORLD MAC SECRETS • 4040-8/5 • FM.F • Front Matter • FINAL • VB • 11/03/98 • p.xxi

Dial Assist ...........................................................................................................................................170
Easy Access ........................................................................................................................................170
Editor Setup ......................................................................................................................................172
Energy Saver 1.0 ................................................................................................................................172
Energy Saver 2.0 (and related files) ................................................................................................173
Energy Saver Secrets ..................................................................................................................174
Energy Saver and G3 PowerBooks ..................................................................................................175
Express Modem .................................................................................................................................176
Extensions Manager ..........................................................................................................................176
Extensions Manager Secrets .....................................................................................................178
File Exchange .....................................................................................................................................181
File Exchange Secrets .................................................................................................................182
File Sharing .........................................................................................................................................183
File Sharing Monitor .........................................................................................................................183
File Synchronization .........................................................................................................................184
General Controls (7.5 and later) ......................................................................................................184
General Controls (pre–System 7.5) .................................................................................................187
Infrared ...............................................................................................................................................188
Internet ...............................................................................................................................................189
Keyboard ............................................................................................................................................189
Labels ..................................................................................................................................................191
Launcher ............................................................................................................................................192
Launcher Control Panel Secrets ...............................................................................................193
Location Manager .............................................................................................................................195
Location Manager Secrets .........................................................................................................199
Mac OS Easy Open (Macintosh Easy Open) ..................................................................................200
MacLinkPlus Setup ............................................................................................................................202
MacTCP ..............................................................................................................................................202
MacTCP DNR ......................................................................................................................................203
Map .....................................................................................................................................................203
Map Secrets .................................................................................................................................206
Memory ..............................................................................................................................................209
Memory Control Panel Secrets ..................................................................................................210
Monitors .............................................................................................................................................211
Monitor Secrets ...........................................................................................................................211
Modem ................................................................................................................................................212
Modem control panel Secrets ....................................................................................................212
Monitors & Sound .............................................................................................................................213
Mouse .................................................................................................................................................217
Network ..............................................................................................................................................219
Numbers .............................................................................................................................................219
Password Security .............................................................................................................................220
PC Exchange ......................................................................................................................................221
PC Setup .............................................................................................................................................221
PC Setup Secrets .........................................................................................................................221
Performa .............................................................................................................................................222
Pointer Mode .....................................................................................................................................222
Power Macintosh Card .....................................................................................................................222
PowerBook .........................................................................................................................................222
PowerBook Display ...........................................................................................................................223
PowerBook SCSI Disk Mode .............................................................................................................224
PowerBook Setup ..............................................................................................................................224
PowerTalk Setup ................................................................................................................................225
xxii Macworld Mac Secrets, 5th Edition
■ ■
MACWORLD MAC SECRETS • 4040-8/5 • FM.F • Front Matter • FINAL • VB • 11/03/98 • p.xxii

PPP ......................................................................................................................................................225
QuickTime Settings ...........................................................................................................................225
Remote Access ..................................................................................................................................226
Screen .................................................................................................................................................226
Sharing Setup .....................................................................................................................................226
Sound ..................................................................................................................................................227
Sound Control Panel Secrets .....................................................................................................228
Sound & Displays ..............................................................................................................................228
Speech ................................................................................................................................................229
Speech Setup .....................................................................................................................................230
Startup Disk .......................................................................................................................................230
TCP/IP .................................................................................................................................................231
Text .....................................................................................................................................................232
Token Ring .........................................................................................................................................232
Trackpad ............................................................................................................................................232
Users & Groups .................................................................................................................................234
Video ...................................................................................................................................................234
Views ...................................................................................................................................................234
Web Sharing .......................................................................................................................................235
WindowShade ....................................................................................................................................236
Extensions One by One ..........................................................................................................................237
All about shared libraries ................................................................................................................237
The extensions themselves .............................................................................................................240
The Ultimate Extension-Linking Guide ................................................................................................254
Chapter 5: Enablers, Installers, and Apple Extras ................................255
The System Folder Folders ....................................................................................................................255
Appearance ........................................................................................................................................257
Apple Data Detectors ........................................................................................................................257
Apple Menu Items folder ..................................................................................................................258
Application Support ..........................................................................................................................258
ColorSync Profiles .............................................................................................................................259
Contextual Menu Items folder .........................................................................................................259
Control Panels folder ........................................................................................................................259
Control Panels (Disabled) ................................................................................................................259
Control Strip Modules folder ...........................................................................................................260
Desktop PrintMonitor documents ..................................................................................................260
Extensions folder ..............................................................................................................................260
Extensions (Disabled) folder ...........................................................................................................260
Favorites folder .................................................................................................................................260
Fonts folder ........................................................................................................................................261
Help folder .........................................................................................................................................261
Internet Search Sites .........................................................................................................................262
Launcher Items folder ......................................................................................................................263
Preferences folder .............................................................................................................................263
MS Preference Panels .......................................................................................................................264
PrintMonitor Documents folder ......................................................................................................264
Scripting Additions ...........................................................................................................................264
Scripts .................................................................................................................................................265
Shutdown Items folder .....................................................................................................................266
Shutdown Items (Disabled) .............................................................................................................266
Speakable Items folder .....................................................................................................................266
Contents xxiii
■ ■
MACWORLD MAC SECRETS • 4040-8/5 • FM.F • Front Matter • FINAL • VB • 11/03/98 • p.xxiii

Startup Items folder ..........................................................................................................................266
Startup Items (Disabled) ..................................................................................................................267
Loose in your System folder ............................................................................................................267
All About Enablers ..................................................................................................................................267
Why Enablers exist ...........................................................................................................................267
The enabler is born ...........................................................................................................................268
The System File Itself .............................................................................................................................268
Apple Extras and Apple Leftovers ........................................................................................................269
Apple Extras .......................................................................................................................................269
On your system CD ...........................................................................................................................270
Older system-software versions ......................................................................................................275
The System-Software Installer ..............................................................................................................278
Why use the Installer ........................................................................................................................279
Step 1: Start up from the CD ............................................................................................................279
Step 2: Run the Installer (Mac OS 8.x) ............................................................................................280
Step 2: Run the Installer (System 7.5–7.6) ......................................................................................282
What the components are ................................................................................................................284
System 7.0–7.1 notes .........................................................................................................................286
Installer Secrets ..........................................................................................................................286
Switching between System Versions ....................................................................................................290
Two different disks ............................................................................................................................290
Two different disks (occasional method) ......................................................................................290
One disk ..............................................................................................................................................291
The Great Invisible-File Collection .......................................................................................................291
Chapter 6: The System Software Museum..........................................293
The Jurassic Era: System 1.0–4.2 ..........................................................................................................293
System 1.0 ..........................................................................................................................................294
System 1.1 ..........................................................................................................................................295
System 2.0 ..........................................................................................................................................295
System 3.0 ..........................................................................................................................................297
System 3.1 ..........................................................................................................................................298
System 3.2 ..........................................................................................................................................298
System 3.3 ..........................................................................................................................................299
System 4.0 ..........................................................................................................................................299
System 4.1 ..........................................................................................................................................300
System 4.2 ..........................................................................................................................................300
The Victorian Age: System 6 .................................................................................................................300
System 6.0.2 .......................................................................................................................................301
System 6.0.3, 6.0.4, 6.0.5, 6.0.7 .........................................................................................................301
System 6.0.8 .......................................................................................................................................301
System 7.0 ................................................................................................................................................302
System 7.0.1 .......................................................................................................................................302
System 7.1 ..........................................................................................................................................303
System 7 Pro (System 7.1.1) .............................................................................................................304
System 7.1.2 .......................................................................................................................................304
System 7.1.2P .....................................................................................................................................305
System 7.1.3 .......................................................................................................................................305
System 7.5 ................................................................................................................................................305
System 7.5.1 (System 7.5 Update 1.0) .............................................................................................311
System 7.5.2 .......................................................................................................................................312
xxiv Macworld Mac Secrets, 5th Edition
■ ■
MACWORLD MAC SECRETS • 4040-8/5 • FM.F • Front Matter • FINAL • VB • 11/03/98 • p.xxiv

System 7.5.3 (System 7.5 Update 2.0) .............................................................................................315
System 7.5.3L .....................................................................................................................................316
System 7.5.3 Revision 2 ....................................................................................................................316
System 7.5.3 Revision 2.1 .................................................................................................................318
System 7.5.4 .......................................................................................................................................318
System 7.5.5 .......................................................................................................................................318
Copland: The OS That Wasn’t ...............................................................................................................319
System 7.6 ..........................................................................................................................................320
System 7.6.1 .......................................................................................................................................321
Mac OS 8 ..................................................................................................................................................322
Mac OS 8.1 ..........................................................................................................................................324
Mac OS 8.5 ..........................................................................................................................................326
Rhapsody and Next ................................................................................................................................327
Carbon and Mac OS X ............................................................................................................................328
Performa System-Software Annex ........................................................................................................330
Part II: Secrets of the Machine .......................................327
Chapter 7: On, Off, and Everything in Between....................................329
Power On .................................................................................................................................................329
The ADB Bus ...........................................................................................................................................329
How to turn on the Mac when there’s no keyboard .....................................................................330
The Startup Sequence ............................................................................................................................331
The startup chimes ...........................................................................................................................331
ROM: the hidden software ...............................................................................................................332
Why the Mac needs a System file ....................................................................................................333
The startup continues ......................................................................................................................333
The Chimes of Death ........................................................................................................................334
What else takes so long ....................................................................................................................335
The search for a good system .........................................................................................................336
The first programs to run: enablers ...............................................................................................337
More startup software: extensions and control panels ...............................................................338
Extensions and control panels: how they load .............................................................................338
Your personalized loading order .....................................................................................................339
Drivers: sometimes invisible, always vital .....................................................................................340
Icon row ..............................................................................................................................................340
The Ultimate Startup-Keys List .............................................................................................................341
Startup Secrets ...........................................................................................................................341
Beyond the Startup Sequence ...............................................................................................................348
Startup Items .....................................................................................................................................348
Shutting Down .........................................................................................................................................349
The cycle of last chances .................................................................................................................350
Shut Down Secrets ......................................................................................................................352
The Restart (Reset) Switch ...................................................................................................................353
Where is it? ........................................................................................................................................353
What is it? ...........................................................................................................................................354
Sleep Modes ............................................................................................................................................354
System sleep ......................................................................................................................................354
Hard drive sleep ................................................................................................................................354
Monitor sleep —and saving power .................................................................................................354
Contents xxv
■ ■
MACWORLD MAC SECRETS • 4040-8/5 • FM.F • Front Matter • FINAL • VB • 11/03/98 • p.xxv

Chapter 8: The Disk Chapter ............................................................355
Disk Basics ...............................................................................................................................................355
Sectors, tracks, and blocks ..............................................................................................................356
The great wasted-space conspiracy ...............................................................................................357
The changing-file-size syndrome .....................................................................................................358
What’s a volume? ..............................................................................................................................359
HFS+ (Mac OS Extended Format) .........................................................................................................359
Should you upgrade your drive to HFS+? ......................................................................................360
How to upgrade to HFS+ ...................................................................................................................360
Hard Disks ...............................................................................................................................................361
Two things you don’t want to think about — but should .............................................................362
The device driver ..............................................................................................................................362
All about IDE ......................................................................................................................................364
How to update your hard-disk driver .............................................................................................364
Interleave ...........................................................................................................................................365
The Secrets hard-drive maintenance schedule .............................................................................365
Hard Drive Secrets .....................................................................................................................368
File fragmentation .............................................................................................................................372
Defragmenting Secrets ...............................................................................................................373
Partitions .................................................................................................................................................374
Why partition? ...................................................................................................................................374
Why not to partition .........................................................................................................................376
How to partition a hard drive ..........................................................................................................376
Partitioning for smaller block sizes ................................................................................................379
Your hard drive’s secret partitions .................................................................................................380
Reformatting ......................................................................................................................................381
Floppy Disks ............................................................................................................................................382
How they work ..................................................................................................................................383
The obligatory “floppies-are-fragile” discussion? .........................................................................383
The end of the floppy drive? ............................................................................................................383
Floppy Disk Secrets ....................................................................................................................384
Removable Disks ....................................................................................................................................394
Removable-Disk Secrets .............................................................................................................396
Chapter 9: Memory..........................................................................393
RAM: the Chips .......................................................................................................................................393
Where your memory goes ................................................................................................................394
What to do about a RAM shortage ..................................................................................................395
How to buy SIMMs/DIMMs ...............................................................................................................395
Types of DIMMs .................................................................................................................................396
Installing memory .............................................................................................................................396
RAM: for Programs .................................................................................................................................397
The two out-of-memory messages ..................................................................................................400
Three different memory sizes per program ...................................................................................402
The Finder’s memory partition .......................................................................................................403
See where your memory’s going .....................................................................................................404
RAM Doubler to the rescue ..............................................................................................................406
RAM Doubler Secrets ..................................................................................................................407
A calm discussion of memory fragmentation ................................................................................409
Memory leaks — and shared libraries ............................................................................................410
The Disk Cache .......................................................................................................................................411
Setting the Disk Cache ......................................................................................................................411
xxvi Macworld Mac Secrets, 5th Edition
■ ■
MACWORLD MAC SECRETS • 4040-8/5 • FM.F • Front Matter • FINAL • VB • 11/03/98 • p.xxvi

The correct disk cache size .............................................................................................................412
RAM Disks: High-Speed Imaginary Drives ...........................................................................................413
What’s wrong with RAM disks .........................................................................................................413
Where a RAM disk comes from .......................................................................................................414
RAM Disk Secrets ........................................................................................................................415
Virtual Memory: Instant, Free RAM ......................................................................................................416
How it works ......................................................................................................................................416
How to turn on virtual memory ......................................................................................................416
Virtual Memory Secrets .............................................................................................................416
Chapter 10: Keyboards, Mice, and USB ............................................417
About the ADB Chain .............................................................................................................................417
What to plug in ..................................................................................................................................417
About the ADB power .......................................................................................................................418
USB Hits the Mac ....................................................................................................................................418
The Keyboard ..........................................................................................................................................420
A Few Odd Keys and What They Mean ................................................................................................421
The Option key ..................................................................................................................................423
The Power key ...................................................................................................................................423
A word or two about Caps Lock ......................................................................................................424
A guide to the strange keyboard symbols .....................................................................................425
Keyboard Secrets ........................................................................................................................427
The Mouse, Trackball, and Trackpad ..................................................................................................432
Journey to the interior .....................................................................................................................432
Cleaning the mouse or trackball .....................................................................................................433
Mouse alternatives ............................................................................................................................434
Ergonomics Basics .................................................................................................................................434
Chapter 11: Monitors ......................................................................435
Monitor Basics ........................................................................................................................................435
How a CRT works ..............................................................................................................................435
Flicker .................................................................................................................................................436
About VRAM ............................................................................................................................................436
Deeper colors, bigger screen: more VRAM needed ......................................................................437
How much VRAM do I need? ...........................................................................................................438
Switching modes ...............................................................................................................................440
Grayscale ............................................................................................................................................440
A Word About DPI ...................................................................................................................................441
How big is your monitor —really? ..................................................................................................441
Multisync (multiple-scan) monitors ...............................................................................................442
Multiple Monitors ...................................................................................................................................443
Arranging the monitors in space ....................................................................................................444
Which monitor is this? .....................................................................................................................446
Specifying the startup monitor .......................................................................................................446
Selecting the main monitor ..............................................................................................................447
Monitor Secrets ...........................................................................................................................448
Chapter 12: From 128K to Quadra: Mac to Mac..................................453
Coming to Terms ....................................................................................................................................454
More specs ..............................................................................................................................................456
More Secrets ............................................................................................................................................456
Contents xxvii
■ ■
MACWORLD MAC SECRETS • 4040-8/5 • FM.F • Front Matter • FINAL • VB • 11/03/98 • p.xxvii

Compact Macs ........................................................................................................................................457
SE/30 Secrets ...............................................................................................................................464
The Mac II Series .....................................................................................................................................468
A IIfx Secret .................................................................................................................................470
IIci Secrets ...................................................................................................................................472
The LC Series ..........................................................................................................................................474
The Centris/Quadra Line .......................................................................................................................481
Portable Macs .........................................................................................................................................491
The Only Upgrade Guide You’ll Ever Need ..........................................................................................507
Chapter 13: The PowerPC Macs, Model by Model ..............................503
The PowerPC Chip ..................................................................................................................................503
All about emulation ..........................................................................................................................504
Look and feel ......................................................................................................................................505
Get your chips straight .....................................................................................................................506
Power Macs, Model by Model ...............................................................................................................507
Laptop Power Macs ................................................................................................................................538
PowerPC Mac Secrets .................................................................................................................548
Macintosh Clones: Here and Gone .......................................................................................................548
The clones arrive ..............................................................................................................................548
Apple backs out .................................................................................................................................548
PowerPC and the Future ........................................................................................................................548
Chapter 14: PowerBooks Exposed ....................................................549
A Little History ........................................................................................................................................549
The Screen ...............................................................................................................................................550
Passive-matrix, dual-scan, and SFT screens ..................................................................................551
Active-matrix and TFT screens ........................................................................................................551
PowerBook Screen Secrets ........................................................................................................552
Working from a Wall Outlet ...................................................................................................................553
The battery gauge .............................................................................................................................553
Power-outlet Secrets ...................................................................................................................554
Tales of the Trackpad .......................................................................................................................555
Trackpad secrets ........................................................................................................................556
Working from a Battery ..........................................................................................................................557
Meet your battery .............................................................................................................................557
Charging batteries .............................................................................................................................557
The memory effect ............................................................................................................................558
Battery-swapping notes ...................................................................................................................560
Conserving battery power ...............................................................................................................560
Battery Secrets ............................................................................................................................561
The Four-Hour Charge (RAM-Disk) Trick ............................................................................................566
Choosing the right size for the RAM disk ......................................................................................567
Creating the RAM disk ......................................................................................................................568
Loading up the RAM disk .................................................................................................................569
Putting the RAM disk in charge .......................................................................................................571
Trashing your hard drive .................................................................................................................571
PowerBook RAM-Disk Secrets ....................................................................................................572
Sleep Mode ..............................................................................................................................................575
Sleep versus restart ..........................................................................................................................575
How much time you have ................................................................................................................575
xxviii Macworld Mac Secrets, 5th Edition
■ ■
MACWORLD MAC SECRETS • 4040-8/5 • FM.F • Front Matter • FINAL • VB • 11/03/98 • p.xxviii

Sleep Secrets ...............................................................................................................................576
Getting Info In and Out ...........................................................................................................................577
Of CD-ROMs, Zips, and floppies ......................................................................................................577
Transferring files from a PowerBook to another Mac ..................................................................577
Keeping track of which files are current ........................................................................................583
Making presentations .......................................................................................................................584
Using the fax/modem ........................................................................................................................586
A word or two about printing ..........................................................................................................589
PowerBook Printing Secrets ......................................................................................................589
Traveling with the PowerBook ..............................................................................................................590
In the Airport .....................................................................................................................................590
Security on the road .........................................................................................................................591
Inflight silliness ..................................................................................................................................592
Duo Notes —and Newton Stunts ..........................................................................................................593
Part III: Application Secrets............................................587
Chapter 15: Mac Application Basics ..................................................589
Types, Creators, and Double-Clicking ..................................................................................................589
Creator codes ....................................................................................................................................590
Type codes .........................................................................................................................................590
How type and creator codes affect you .........................................................................................590
Changing type and creator codes ...................................................................................................591
Type and Creator Code Secrets .................................................................................................592
Which Copy Will Launch? ......................................................................................................................594
Which copy on your system ............................................................................................................595
Which version of the program .........................................................................................................595
How the Mac Multitasks ........................................................................................................................596
Modern Multitasking .........................................................................................................................596
Hazards of Multitasking .........................................................................................................................597
Memory management .......................................................................................................................597
Not knowing which program is open ..............................................................................................598
Multitasking Secrets ...................................................................................................................599
Publish and Subscribe ...........................................................................................................................603
Why hasn’t it caught on? ..................................................................................................................603
The basics of Publish and Subscribe ..............................................................................................603
Publish and Subscribe step-by-step ...............................................................................................604
Editing the subscriber ......................................................................................................................606
Controlling when editions are updated ..........................................................................................607
Subscriber options ............................................................................................................................607
Multitasking Pro: OpenDoc ...................................................................................................................607
Save, Save As, Revert .............................................................................................................................608
Save and Revert .................................................................................................................................608
Save As ...............................................................................................................................................609
A visual tour of the Save box ...........................................................................................................609
Save/Open Dialog Box Secrets ..................................................................................................611
Save and Open File 2000: Navigation Services ....................................................................................615
New Open/Save Dialog Box Secrets .........................................................................................618
Stationery ................................................................................................................................................619
Ten Macintosh Application Basic Techniques ....................................................................................620
Contents xxix
■ ■
MACWORLD MAC SECRETS • 4040-8/5 • FM.F • Front Matter • FINAL • VB • 11/03/98 • p.xxix

Chapter 16: Mac to PC and Back ......................................................623
PC Disks ...................................................................................................................................................623
PC floppies .........................................................................................................................................624
PC CD-ROMs .......................................................................................................................................624
PC Disk Secrets ...........................................................................................................................624
Converting PC Files for the Mac ...........................................................................................................626
Category 1: No conversion necessary ............................................................................................626
Category 2: Let your application do the conversion ....................................................................626
Category 3: Convert the document yourself .................................................................................627
Category 4: Save as a simpler, intermediary format .....................................................................628
How to open a PC document ...........................................................................................................629
Cross-Platform File-Conversion Secrets ...................................................................................631
Exchanging Graphics with Windows Users .........................................................................................635
Cross-Platform Networking ...................................................................................................................637
A Protocol Primer .............................................................................................................................638
Putting PCs on a Mac Network ........................................................................................................639
Macs on PC networks .......................................................................................................................639
Connecting to Windows NT Server .................................................................................................640
Sharing files with AppleShare IP and Web Technology ................................................................640
Running Windows Programs on a Mac ................................................................................................641
Software PC Emulators .....................................................................................................................642
VirtualPC/SoftWindows Speed Secrets ....................................................................................643
Using PC Peripherals on the Mac .........................................................................................................644
Monitors .............................................................................................................................................644
Keyboards, Mice, and Joysticks ......................................................................................................645
USB Devices .......................................................................................................................................645
Scanners .............................................................................................................................................645
Printers ...............................................................................................................................................646
PCI Cards ............................................................................................................................................646
Chapter 17: Word Processing............................................................645
A Few Words About Word Processing ..................................................................................................645
Universal Word Processing Secrets ..........................................................................................645
Microsoft Word .......................................................................................................................................649
Customizing menus ...........................................................................................................................650
Adding keyboard shortcuts .............................................................................................................656
Customizing Word Toolbars ............................................................................................................657
Styles and style sheets .....................................................................................................................662
AutoCorrect, AutoText, and the Glossary ......................................................................................666
Templates and Settings files ............................................................................................................670
Microsoft Word Secrets ..............................................................................................................672
Word Macros: The Menu-Changer’s Workaround .........................................................................692
WordPerfect .............................................................................................................................................693
WordPerfect Secrets ...................................................................................................................694
Nisus, WriteNow, MacWrite Pro ............................................................................................................696
AppleWorks/ClarisWorks .......................................................................................................................697
AppleWorks/ClarisWorks Word Processor Secrets ................................................................697
SimpleText: The ReadMe Machine .......................................................................................................702
SimpleText Secrets ......................................................................................................................703
xxx Macworld Mac Secrets, 5th Edition
■ ■
MACWORLD MAC SECRETS • 4040-8/5 • FM.F • Front Matter • FINAL • VB • 11/03/98 • p.xxx

Chapter 18: Page Design..................................................................701
Page-Layout Principles ..........................................................................................................................702
Two font families, three at most ......................................................................................................702
Page grid .............................................................................................................................................704
In defense of the ragged-right margin .............................................................................................704
Break up the text ...............................................................................................................................705
Use rules .............................................................................................................................................705
Reverse type ......................................................................................................................................706
Widows and orphans ........................................................................................................................706
Indents ................................................................................................................................................707
How to start a paragraph .................................................................................................................708
Watch those line lengths ..................................................................................................................709
Keep your eyes open ........................................................................................................................710
PageMaker ...............................................................................................................................................710
PageMaker Secrets ......................................................................................................................710
QuarkXPress ............................................................................................................................................716
Measurements palette ......................................................................................................................717
Document palette ..............................................................................................................................718
QuarkXPress Secrets ..................................................................................................................719
Page Design and the World Wide Web .................................................................................................727
Chapter 19: Number and Data Crunching............................................729
Spreadsheet Basics ................................................................................................................................729
Excel Secrets (and ClarisWorks) ...............................................................................................730
Quicken ....................................................................................................................................................746
Quicken Secrets ..........................................................................................................................746
FileMaker and ClarisWorks ....................................................................................................................749
FileMaker/ClarisWorks Secrets ................................................................................................750
Chapter 20: Graphics and 3D ..........................................................763
File Formats .............................................................................................................................................763
PICT files ............................................................................................................................................764
TIFF files .............................................................................................................................................765
JPEG files ............................................................................................................................................766
EPS files ..............................................................................................................................................767
GIF files ...............................................................................................................................................768
Startup screens .................................................................................................................................769
PDF (Acrobat) files ............................................................................................................................770
Types of Graphics Programs .................................................................................................................770
Painting ...............................................................................................................................................770
Editing high-resolution bitmaps ......................................................................................................772
General Painting Secrets ............................................................................................................773
Adobe Photoshop (and Color It) .....................................................................................................774
Photoshop Secrets .......................................................................................................................779
Drawing ....................................................................................................................................................784
Drawing program advantages ..........................................................................................................784
Selecting and grouping multiple objects ........................................................................................785
Universal Drawing Program Secrets .........................................................................................786
PostScript Drawing Programs ...............................................................................................................788
Paths and wireframes .......................................................................................................................788
Faster, more reliable printing ..........................................................................................................789
Contents xxxi
■ ■
MACWORLD MAC SECRETS • 4040-8/5 • FM.F • Front Matter • FINAL • VB • 11/03/98 • p.xxxi

Universal PostScript Drawing Secrets ......................................................................................789
FreeHand Secrets.........................................................................................................................792
Illustrator Secrets .......................................................................................................................794
3D Graphics .............................................................................................................................................795
QuickDraw 3D ....................................................................................................................................795
Chapter 21: The ResEdit Chapter ......................................................797
What Is ResEdit? .....................................................................................................................................797
How to Use ResEdit ................................................................................................................................799
The Peril Factor .................................................................................................................................801
A primer in customizing menus ......................................................................................................801
Adding a keyboard equivalent in Finder 7 or 8 .............................................................................806
Customizing dialog boxes ................................................................................................................808
Editing individual dialog-box elements ..........................................................................................809
ResEdit Secrets ............................................................................................................................810
Top Ten ResEdit Pranks .........................................................................................................................838
Chapter 22: Utilities, Macros, and AppleScript ....................................837
Hard Disk Repair and Recovery Software ...........................................................................................838
Disk Utility Secrets .....................................................................................................................838
Virus Protection ......................................................................................................................................840
Where viruses live .............................................................................................................................840
Software protection ..........................................................................................................................841
The AutoStart Worm .........................................................................................................................841
Macro Software .......................................................................................................................................842
Macro Software Secrets .............................................................................................................844
The OneClick Crash Course ..................................................................................................................845
Recording the macro ........................................................................................................................846
Cleaning up the macro ......................................................................................................................847
Further info ........................................................................................................................................848
OneClick Secrets .........................................................................................................................848
The AppleScript Crash Course .............................................................................................................848
The AppleScript basics ....................................................................................................................849
Is it scriptable? ..................................................................................................................................850
Your first AppleScript .......................................................................................................................850
Debugging your script ......................................................................................................................852
How to trigger an AppleScript .........................................................................................................853
What to do with AppleScript ...........................................................................................................854
Screen Savers and Screen Grabbers ....................................................................................................854
Screen savers .....................................................................................................................................855
Screen grabbers ................................................................................................................................855
Compression Software ...........................................................................................................................856
Segmenting files .................................................................................................................................857
Disk Images, DiskCopy, and ShrinkWrap .............................................................................................857
ShrinkWrap/DiskCopy Secrets ..................................................................................................859
CanOpener: the Great Retriever ...........................................................................................................861
MacsBug: Weird Land of the Coder ......................................................................................................863
How to use MacsBug ........................................................................................................................863
MacsBug Secrets .........................................................................................................................865
Extension Managers ...............................................................................................................................866
Extension Manager Secrets .......................................................................................................867
xxxii Macworld Mac Secrets, 5th Edition
■ ■
MACWORLD MAC SECRETS • 4040-8/5 • FM.F • Front Matter • FINAL • VB • 11/03/98 • p.xxxii

Chapter 23: Speech, Movies, and Sound ............................................869
A Mac Digitized-Sound Primer ..............................................................................................................869
How to record sounds ......................................................................................................................870
What to do with sounds ...................................................................................................................873
Sound Secrets...............................................................................................................................875
Music with MIDI ......................................................................................................................................878
Sequencing .........................................................................................................................................878
What you need ...................................................................................................................................878
MIDI Secrets..................................................................................................................................880
QuickTime Movies ..................................................................................................................................881
How to record your own movies .....................................................................................................881
QuickTime Digitizing Secrets .....................................................................................................883
How to play back and edit movies ..................................................................................................885
What good is it? .................................................................................................................................886
QuickTime Secrets .......................................................................................................................887
QuickTime VR ....................................................................................................................................894
QuickTime VR Secrets .................................................................................................................895
Mac Meets TV .........................................................................................................................................896
Bringing TV to your Mac ..................................................................................................................896
Bringing your Mac to TV ..................................................................................................................897
Speech I: The Mac Talks ........................................................................................................................900
Text-to-Speech Secrets .................................................................................................................900
Speech II: The Mac Listens ....................................................................................................................902
What you can say to the Mac ..........................................................................................................904
Speech Secrets .............................................................................................................................904
Part IV: The World Online ...............................................907
Chapter 24: Mysteries of the Modem ................................................909
Hardware .................................................................................................................................................909
Modem speeds ..................................................................................................................................910
The truth about 56K Modems .........................................................................................................911
Other modem shopping tips ............................................................................................................912
Standards and protocols .......................................................................................................................912
Handshaking: two modems get acquainted ...................................................................................915
Beyond the modem: ISDN, Cable Modems, ASDL ...............................................................................915
Enter ISDN ..........................................................................................................................................915
ASDL, SDSL .........................................................................................................................................916
Cable modems ...................................................................................................................................916
The Software ...........................................................................................................................................917
Connecting to the Internet or online services ..............................................................................917
Going online without the Internet ...................................................................................................917
How your Mac talks to a modem ...................................................................................................918
The modem initialization string ......................................................................................................918
Telecom Secrets ...........................................................................................................................919
Mac as Fax ..............................................................................................................................................921
How to fax ..........................................................................................................................................921
Fax Modem Secrets .....................................................................................................................922
Contents xxxiii
■ ■
MACWORLD MAC SECRETS • 4040-8/5 • FM.F • Front Matter • FINAL • VB • 11/03/98 • p.xxxiii

Chapter 25: The Web, the Net, and Everything Online ..........................925
What’s on the Internet ......................................................................................................................926
Getting online I: Finding an Internet account ................................................................................927
The Internet via AOL ........................................................................................................................929
Getting online II: Preparing your Mac .............................................................................................929
Getting online III: Dialing ..................................................................................................................934
Getting offline: Hanging up ..............................................................................................................935
Internet Connection Secrets ......................................................................................................936
Getting Around: Internet Addresses and URLs ...................................................................................938
Where to Go on the Internet .................................................................................................................940
Newsgroups .......................................................................................................................................940
The World Wide Web ..............................................................................................................................944
A World Wide Web warning .............................................................................................................947
Web browsers ....................................................................................................................................948
Web Browser Secrets ..................................................................................................................950
Turn your bookmarks into your home page ..................................................................................956
Launch your browser without dialing ............................................................................................957
Bookmark secrets .............................................................................................................................958
The cheapskate’s bookmark manager: the Finder ........................................................................959
The Mac-wide bookmark manager: Mac OS 8.5 ............................................................................959
The mouse-click contextual menu ..................................................................................................960
Drag-and-drop multimedia ...............................................................................................................960
Internet Explorer Secrets ...........................................................................................................960
Netscape Secrets .........................................................................................................................960
Where to Go on the Web ........................................................................................................................960
Chapter 26: Getting the Most Out of America Online ..........................961
Mastering the Basics ..............................................................................................................................962
Making it past the busy signal .........................................................................................................962
Surf AOL via the Internet ..................................................................................................................963
Elevator buttons: Keywords ............................................................................................................963
The Favorite Places management guide ........................................................................................964
America Online Secrets .............................................................................................................966
Chapter 27: Everything E-mail ..........................................................975
Anatomy of an E-mail Message .............................................................................................................975
The Mac Secrets Guide to E-mail Etiquette ..........................................................................................977
E-mail programs ......................................................................................................................................981
E-mail Software Secrets .............................................................................................................982
The Attachment-Nightmare Guidebook ...............................................................................................989
Why you can’t open attachments ...................................................................................................989
How to fix It ........................................................................................................................................989
Attachment-Opening Secrets .....................................................................................................990
Spam and How to Nuke It ......................................................................................................................992
Filtering ..............................................................................................................................................992
Spam-Killing Secrets ...................................................................................................................995
Chapter 28: A Web Site–Making Crash Course ....................................997
Create Your Web Pages ..........................................................................................................................998
Welcome to HTML .............................................................................................................................998
xxxiv Macworld Mac Secrets, 5th Edition
■ ■
MACWORLD MAC SECRETS • 4040-8/5 • FM.F • Front Matter • FINAL • VB • 11/03/98 • p.xxxiv

WYSIWYG design programs .............................................................................................................999
Designing your Web page .................................................................................................................999
The Web-Page Building Cookbook ......................................................................................................1001
Creating a table ...............................................................................................................................1002
Create a link .....................................................................................................................................1002
Add a graphic ..................................................................................................................................1003
Add a color panel down the left side ............................................................................................1003
Bulleted lists ....................................................................................................................................1004
Adding a counter .............................................................................................................................1004
HTML Secrets .............................................................................................................................1005
Secure Web Space .................................................................................................................................1009
Send the Web Pages to Your Web Space ............................................................................................1010
Keep Your Pages Updated ...................................................................................................................1012
Part V: Attachments ....................................................1013
Chapter 29: Inside Fonts................................................................1015
The Evolution of Mac Fonts ................................................................................................................1016
Font format #1: bitmapped fonts ..................................................................................................1016
Font format #2: PostScript fonts ...................................................................................................1017
ATM ...................................................................................................................................................1020
ATM Secrets ...............................................................................................................................1022
Font format #3: TrueType ..............................................................................................................1023
Font format #4: GX fonts ................................................................................................................1024
Working with multiple font formats ...................................................................................................1024
Why screen fonts still exist even with ATM .................................................................................1025
Why screen fonts still exist even with TrueType ........................................................................1026
Which font version is that? ............................................................................................................1027
Installing, Removing, and Moving Fonts ............................................................................................1028
How to install a font ........................................................................................................................1028
How to remove a font .....................................................................................................................1029
How to copy a font to another disk ..............................................................................................1029
Font Secrets ...............................................................................................................................1029
Why Text Prints with Jaggies ..............................................................................................................1030
Style Variations .....................................................................................................................................1032
Style variations for bitmapped fonts ............................................................................................1032
Style variations for PostScript fonts .............................................................................................1032
How to apply bold and italic ..........................................................................................................1035
Other styles and Multiple Masters ...............................................................................................1036
Other derived styles .......................................................................................................................1037
The Non-Typographer’s Guide to Type .............................................................................................1039
Proportional fonts ...........................................................................................................................1039
Spaces between sentences ............................................................................................................1041
Don’t use underline style ...............................................................................................................1041
Use tabs, not spaces .......................................................................................................................1042
Em dashes ........................................................................................................................................1042
En dashes .........................................................................................................................................1043
Special spaces .................................................................................................................................1043
Leading .............................................................................................................................................1043
Tracking ............................................................................................................................................1045
Kerning .............................................................................................................................................1045
Contents xxxv
■ ■
MACWORLD MAC SECRETS • 4040-8/5 • FM.F • Front Matter • FINAL • VB • 11/03/98 • p.xxxv

Ligatures ...........................................................................................................................................1046
Hyphenation ....................................................................................................................................1047
Fractions ...........................................................................................................................................1048
Ellipses .............................................................................................................................................1049
Curly quotes ....................................................................................................................................1050
When to use dumb quotes .............................................................................................................1052
The Option-key character set ........................................................................................................1052
Option Key Secrets ....................................................................................................................1052
Font Futures ..........................................................................................................................................1052
Chapter 30: Printing Secrets ..........................................................1053
How Printing Works ..............................................................................................................................1053
Dot-matrix printers .........................................................................................................................1053
Inkjet printers ..................................................................................................................................1054
Laser printers ..................................................................................................................................1054
Color printers ..................................................................................................................................1056
Imagesetters ....................................................................................................................................1057
General Printing Secrets ..........................................................................................................1057
Canceling a printout .......................................................................................................................1059
QuickDraw Printing ..............................................................................................................................1060
QuickDraw versus PostScript ........................................................................................................1061
The StyleWriter series ....................................................................................................................1062
StyleWriter Secrets ...................................................................................................................1062
The Truth About PostScript ................................................................................................................1064
PostScript fundamentals ................................................................................................................1065
PostScript fonts ...............................................................................................................................1066
PostScript printing ..........................................................................................................................1066
The PostScript Printer Driver .............................................................................................................1067
LaserWriter 8: PostScript Level 2 ..................................................................................................1067
PostScript Level 3 ...........................................................................................................................1068
PostScript (LaserWriter 8) Printing Secrets ..........................................................................1075
Desktop Printing ..............................................................................................................................1081
Desktop Printing 2.0 Secrets ....................................................................................................1082
QuickDraw GX .......................................................................................................................................1084
PostScript Printer Guidebook .............................................................................................................1084
Background printing .......................................................................................................................1084
The messages you see during printing ........................................................................................1086
What a difference RAM makes .......................................................................................................1087
Desktop Printer Utility (Apple Printer Utility, LaserWriter Utility) ................................................1087
Naming the printer ..........................................................................................................................1088
Printing a PostScript file ................................................................................................................1088
Downloading a new font to the laser printer ...............................................................................1089
Remembering the font: the printer’s task ....................................................................................1090
Finding your printer’s fonts ...........................................................................................................1090
PrintMonitor/Desktop PrintMonitor ..................................................................................................1091
Color Separations .................................................................................................................................1092
Secrets of the Service Bureau .............................................................................................................1093
Service bureau checklist ................................................................................................................1093
PostScript files and PDFs ...............................................................................................................1094
Service Bureau Secrets ............................................................................................................1094
Printing Troubleshooting ....................................................................................................................1096
When the printout doesn’t match the screen .............................................................................1096
xxxvi Macworld Mac Secrets, 5th Edition
■ ■
MACWORLD MAC SECRETS • 4040-8/5 • FM.F • Front Matter • FINAL • VB • 11/03/98 • p.xxxvi
Font and graphics problems ..........................................................................................................1097
General printer errors ....................................................................................................................1098
Complex printing errors .................................................................................................................1099
Poor printout quality ......................................................................................................................1100
Chapter 31: Scanners and Digital Cameras ......................................1101
How It Works .........................................................................................................................................1102
Hooking Up Your Scanner ....................................................................................................................1102
Color Scanning ......................................................................................................................................1102
Which Scanner to Buy ..........................................................................................................................1103
Other kinds of scanners .................................................................................................................1103
Choosing a Resolution .........................................................................................................................1104
Scanning Secrets ......................................................................................................................1108
All About OCR .......................................................................................................................................1111
How OCR software works ...............................................................................................................1111
Faxes and OCR .................................................................................................................................1112
The end of spell-checking? .............................................................................................................1112
OCR Secrets ...............................................................................................................................1113
Digital Cameras .....................................................................................................................................1114
The good and bad of digital ...........................................................................................................1115
Buying a digicam .............................................................................................................................1115
Printing digital pictures ..................................................................................................................1116
Chapter 32: CD-ROM, DVD, and Other Such Words ..........................1119
CD-ROM Basics .....................................................................................................................................1119
The speed issue ...............................................................................................................................1119
The great “8X, 16X, 24X” myth .......................................................................................................1120
How a CD works ..............................................................................................................................1120
What to Do with 600MB .......................................................................................................................1121
Getting Your CD-ROM Up and Running ..............................................................................................1121
PhotoCD .................................................................................................................................................1122
Make Your Own CDs .............................................................................................................................1123
CD-R ..................................................................................................................................................1123
CD-RW ...............................................................................................................................................1124
The DVD .................................................................................................................................................1125
Playing DVD movies on your Mac .................................................................................................1126
CD-ROM Secrets .........................................................................................................................1126
Chapter 33: The SCSI Chain, IDE, and FireWire ................................1131
The Importance of Drivers ..................................................................................................................1132
The Three Rules of SCSI .......................................................................................................................1132
Rule #1: Termination .......................................................................................................................1132
Rule #2: SCSI addresses ..................................................................................................................1134
Rule #3: Cabling ...............................................................................................................................1136
The Great SCSI power-off myth .....................................................................................................1136
SCSI Secrets ...............................................................................................................................1138
SCSI Troubleshooting ...........................................................................................................................1139
Spotting the symptoms ..................................................................................................................1139
Solving the problems ......................................................................................................................1140
Beyond SCSI ..........................................................................................................................................1142
Fast, Wide, and Ultra .......................................................................................................................1142
MACWORLD MAC SECRETS • 4040-8/5 • FM.F • Front Matter • FINAL • VB • 11/03/98 • p.xxxvii

IDE: Cheaper, Sooner, and Less Flexible ............................................................................................1144
FireWire ..................................................................................................................................................1145
The digital video revolution ..........................................................................................................1146
Beyond video ...................................................................................................................................1146
Chapter 34: NuBus, PCI, and Other Slots ........................................1145
NuBus Cards ..........................................................................................................................................1145
The big idea .....................................................................................................................................1145
PDS Cards ..............................................................................................................................................1146
The PCI Revolution ...............................................................................................................................1146
Why PCI? ..........................................................................................................................................1147
PCI futures ........................................................................................................................................1147
How to Install a Card ............................................................................................................................1147
Losing charge ...................................................................................................................................1148
The board meeting ..........................................................................................................................1148
Removing the card ..........................................................................................................................1149
Chapter 35: The Networking Chapter ..............................................1151
The Wiring Setup ..................................................................................................................................1151
Wiring setup 1: LocalTalk ...............................................................................................................1152
Wiring setup 2: Ethernet .................................................................................................................1154
Wiring setup 3: Token Ring ............................................................................................................1156
File Sharing Basics ................................................................................................................................1157
The Software Setup: File sharing for one ...........................................................................................1157
Setting up the PowerBook ..............................................................................................................1158
Setting up the desktop Mac ...........................................................................................................1159
File synchronization .......................................................................................................................1160
The Software Setup: File Sharing for an Office ..................................................................................1161
Step 1: Set up the AppleTalk Control Panel .................................................................................1161
Step 2: Set up the File Sharing control panel ...............................................................................1161
Step 3: Set up Users & Groups .......................................................................................................1162
Step 4: Sharing specific folders .....................................................................................................1167
Sharing Command Secrets ......................................................................................................1170
Step 5: Logging on to Other Macs .................................................................................................1173
File-sharing Secrets ..................................................................................................................1174
When No One’s Home: Remote Access ..............................................................................................1175
Remote Access Secrets .............................................................................................................1175
Expanding the Net ................................................................................................................................1176
General Networking Secrets ....................................................................................................1177
What Else a Network is Good For .......................................................................................................1177
File servers .......................................................................................................................................1178
Print servers ....................................................................................................................................1178
E-mail ................................................................................................................................................1178
Net modems .....................................................................................................................................1179
Fax servers .......................................................................................................................................1179
Program linking ...............................................................................................................................1180
PowerTalk, R.I.P. ....................................................................................................................................1180
Open Transport Arrives .......................................................................................................................1181
Network Troubleshooting ...................................................................................................................1183
AppleTalk troubles ..........................................................................................................................1183
Other common problems and solutions ......................................................................................1184
xxxviii Macworld Mac Secrets, 5th Edition
■ ■
MACWORLD MAC SECRETS • 4040-8/5 • FM.F • Front Matter • FINAL • VB • 11/03/98 • p.xxxviii

Mac OS 8.5 and the Network Browser ...............................................................................................1186
Chapter 36: Troubleshooting ..........................................................1187
Principles of Troubleshooting ............................................................................................................1187
A word about troubleshooting ......................................................................................................1188
More troubleshooting .....................................................................................................................1188
The Secrets Rule of Three ...................................................................................................................1188
Step 1: Start up with the Shift key .................................................................................................1189
Step 2: A clean reinstall of the System .........................................................................................1189
Step 3: Unplug the SCSI chain ........................................................................................................1193
Other things to try ..........................................................................................................................1193
Avoiding Troubles in the First Place ..................................................................................................1199
The Mac Secrets Error-Message Table ...............................................................................................1199
DS Errors ..........................................................................................................................................1200
Negative Error Codes ......................................................................................................................1203
Details on the most common error messages .............................................................................1204
Oddities on the Screen .........................................................................................................................1208
Generic icons ...................................................................................................................................1208
Shimmering monitor .......................................................................................................................1208
Black menu ...................................................................................................................................1209
Finder changes don’t stick .............................................................................................................1209
No Mac icon on the System Folder ...............................................................................................1209
Startup Troubles ...................................................................................................................................1209
The Sad Mac icon ............................................................................................................................1210
Especially long startup times ........................................................................................................1211
The blinking question-mark icon at startup ................................................................................1211
Crashing on startup ........................................................................................................................1212
Twilight Zone theme, car crash, or four notes ............................................................................1212
Disk Troubles ........................................................................................................................................1212
Hard disk troubleshooting .............................................................................................................1212
All floppy disks show up locked ...................................................................................................1213
File, Desktop, and Icon Troubles ........................................................................................................1214
Can’t empty the Trash ....................................................................................................................1214
Keyboard Ailments ...............................................................................................................................1215
Dead key ...........................................................................................................................................1215
Crazy slow typing ............................................................................................................................1215
When All Else Fails ...............................................................................................................................1216
Appendix: The Secrets Software....................................1217
What You’ve Got Here ..........................................................................................................................1217
Disclaimer ........................................................................................................................................1217
How the CD-ROM Is Organized ......................................................................................................1218
The Secrets Software Described .........................................................................................................1219
Action Files 1.1P ..............................................................................................................................1219
Anagrams .........................................................................................................................................1220
Apeiron .............................................................................................................................................1220
AppDisk ............................................................................................................................................1220
Apple Spec Database ......................................................................................................................1221
AppleScript Utilities ........................................................................................................................1222
AppSizer ...........................................................................................................................................1222
Contents xxxix
■ ■
MACWORLD MAC SECRETS • 4040-8/5 • FM.F • Front Matter • FINAL • VB • 11/03/98 • p.xxxix

Avara .................................................................................................................................................1222
BeHierarchic ....................................................................................................................................1222
Big Picture ........................................................................................................................................1223
Biorhythms ......................................................................................................................................1223
Brian’s Sound Tool ..........................................................................................................................1223
Cache-22 ...........................................................................................................................................1224
CanOpener .......................................................................................................................................1224
Chiral ................................................................................................................................................1224
Clean Install Assistant ....................................................................................................................1224
Clip Jokes .........................................................................................................................................1225
Clockometer .....................................................................................................................................1225
Color It! .............................................................................................................................................1225
Conflict Catcher 8 Demo ................................................................................................................1226
Control Strip modules ....................................................................................................................1226
CoolViews .........................................................................................................................................1226
DemoGod ..........................................................................................................................................1227
DeskPicture ......................................................................................................................................1227
Desktop Patterns (Wraptures) ......................................................................................................1227
Desktop Picture Gallery .................................................................................................................1227
Disinfectant ......................................................................................................................................1228
DiskTracker ......................................................................................................................................1228
DragAnyWindow ..............................................................................................................................1229
DragClick ..........................................................................................................................................1229
DropStuff ..........................................................................................................................................1229
Dvorak Keyboard Layouts .............................................................................................................1230
eDOC .................................................................................................................................................1230
Escape Velocity ...............................................................................................................................1230
Extensis PhotoBevel .......................................................................................................................1231
EZNote ..............................................................................................................................................1231
FileTyper ..........................................................................................................................................1231
Finder View Settings .......................................................................................................................1231
FinderPop .........................................................................................................................................1232
Flash-It ..............................................................................................................................................1232
Font-O-Rama! ....................................................................................................................................1232
Fraction Fonts ..................................................................................................................................1233
FreePPP ............................................................................................................................................1233
GoMac ...............................................................................................................................................1233
Googol Eyes .....................................................................................................................................1234
GraphicConverter ...........................................................................................................................1234
GURU .................................................................................................................................................1234
Harry .................................................................................................................................................1234
Hi-Res Map .......................................................................................................................................1235
Holiday Lights ..................................................................................................................................1235
HTML Vocabulary ...........................................................................................................................1235
Icon, Sound, Clip Art Samplers ......................................................................................................1235
Internet Explorer .............................................................................................................................1236
Kaleidoscope ...................................................................................................................................1236
Label Secrets Pro .............................................................................................................................1237
Mac Libs ...........................................................................................................................................1237
Mac Secrets Ultimate Bookmark List ............................................................................................1238
Mac Secrets, Electronic Edition .....................................................................................................1238
xl Macworld Mac Secrets, 5th Edition
■ ■
MACWORLD MAC SECRETS • 4040-8/5 • FM.F • Front Matter • FINAL • VB • 11/03/98 • p.xl

Mac Start-up Sound Collection ......................................................................................................1238
MacLinkPlus .....................................................................................................................................1238
MacsBug ...........................................................................................................................................1239
Maelstrom ........................................................................................................................................1239
MIDI files for Chapter 23 .................................................................................................................1239
Mouse Jolt ........................................................................................................................................1239
Movie2Snd ........................................................................................................................................1239
Navigator Button editor .................................................................................................................1240
Netscape Navigator .........................................................................................................................1240
Olduvai Font Sampler .....................................................................................................................1240
OneClick ...........................................................................................................................................1240
OT/PPP Strip ....................................................................................................................................1241
Outlook Express ..............................................................................................................................1242
Pogue’s Song Spoofs .......................................................................................................................1242
PopChar Pro .....................................................................................................................................1242
PowerPC Check ...............................................................................................................................1242
Program Switcher ............................................................................................................................1243
QuickPop ..........................................................................................................................................1243
QuickTime 3 .....................................................................................................................................1243
QuickTime VR Movies ....................................................................................................................1243
Quiet Start ........................................................................................................................................1243
RAMometer ......................................................................................................................................1244
ResEdit Templates ..........................................................................................................................1244
ScrapIt Pro .......................................................................................................................................1244
SCSIProbe .........................................................................................................................................1244
ShareDraw ........................................................................................................................................1244
ShrinkWrap ......................................................................................................................................1245
SimpleText Color Menu ..................................................................................................................1245
Slot Info .............................................................................................................................................1245
SmartKeys ........................................................................................................................................1245
Snapz Pro .........................................................................................................................................1245
SndSampler ......................................................................................................................................1246
Square One Lite ...............................................................................................................................1246
Startup Doubler ...............................................................................................................................1246
Stuffit Expander ...............................................................................................................................1246
Swoop ...............................................................................................................................................1247
TechTool ...........................................................................................................................................1247
Tex-Edit Plus ....................................................................................................................................1247
TypeIt4Me ........................................................................................................................................1248
Ultra Recorder .................................................................................................................................1248
UnmountIt ........................................................................................................................................1248
WormScanner ..................................................................................................................................1248
X-Words Deluxe ...............................................................................................................................1249
You Don’t Know Jack Lite ...............................................................................................................1249
Zipit ...................................................................................................................................................1249
ZTerm ................................................................................................................................................1250
Index .........................................................................1251
Contents xli
■ ■
MACWORLD MAC SECRETS • 4040-8/5 • FM.F • Front Matter • FINAL • VB • 11/03/98 • p.xli
MACWORLD MAC SECRETS • 4040-8/5 • FM.F • Front Matter • FINAL • VB • 11/03/98 • p.xlii

MACWORLD MAC SECRETS • 4040-8/5 • ch01.F • Chapter 1 • FINAL • VB/EAP • 10/21/98 • p.3
MACWORLD MAC SECRETS • 4040-8/5 • ch01.1 • Chapter 1 • Proof 1 • SH • 10/01/98 • p.3
Chapter 1
Your First Software: The Finder
In This Chapter
©Icons: Moving, renaming, and making them invisible
©Window and list-view shortcuts, and undocumented features
©Mac OS 8 specialty features: Pop-up windows and spring-loaded folders
©The Desktop File: What it is, how to see it, and how to slim it down
©Aliases: What they are and how to use them
©Mastering the Trash
©Details on Macintosh drag-and-drop
Finder: The Unknown Program
Do you remember the first program you ever ran on the Macintosh? We do. It
was the Finder. The Finder is the program that displays your familiar startup
world: the Trash can, icons, folders, and the Desktop.
Most people don’t immediately think of the Finder as a program. After all, you
don’t double-click an icon to launch it, as you would with, say, Photoshop.
And there’s no Quit command in the Finder, as in other programs. The Finder
is just always there, waiting as your home base, whenever you exit your other
programs.
Nonetheless, the Finder is a program. Yes, it runs automatically when you
turn on the Mac, but you can quit the Finder — and launch it again. It even
shows up in the Application menu, along with any other programs you’re
running (see Figure 1-1).
4040-8/5 ch01.F 11/3/98 4:00 PM Page 3
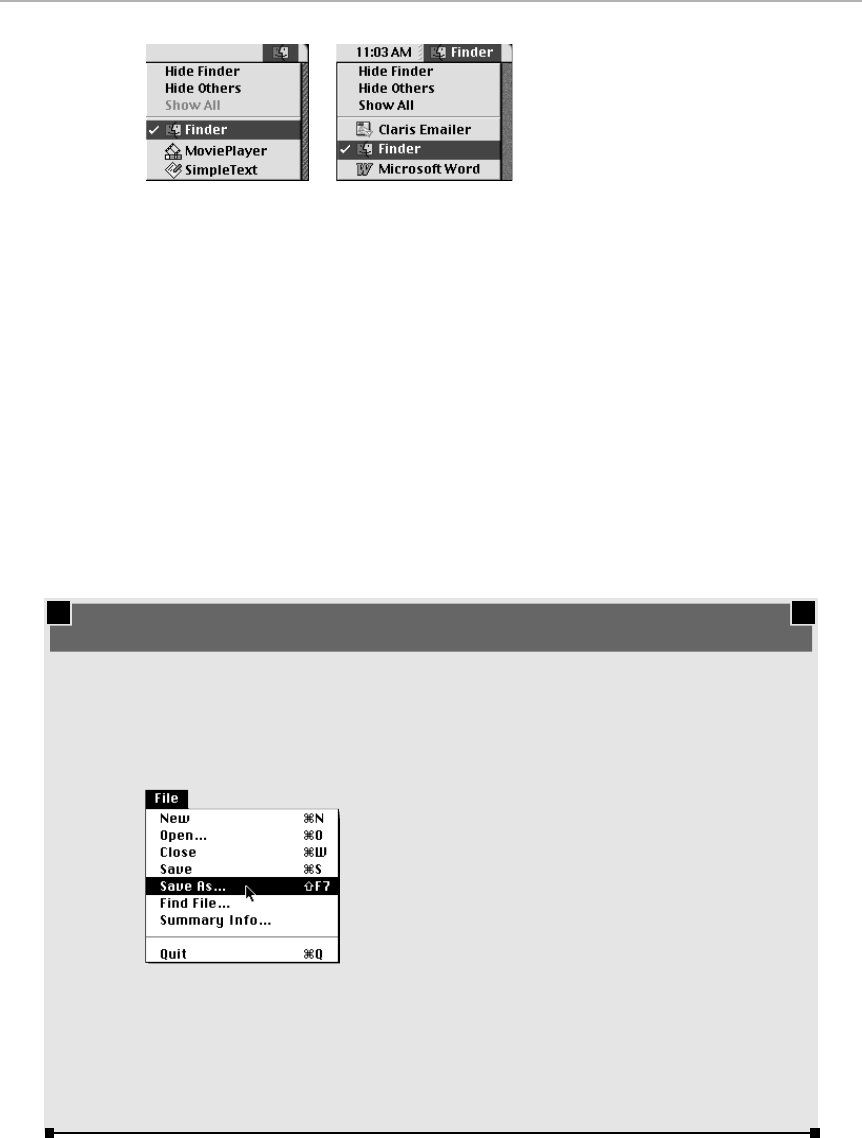
Figure 1-1: The Finder on the Application menu (at the right side of the menu bar), in Mac
OS 8 (left) and Mac OS 8.5 (right).
The Finder is pure utility software: You don’t actually do work there (in the
sense of earning a living). Its functions all relate to managing your stuff:
organizing, renaming, discarding, copying, and opening your documents,
disks, and programs.
A Few Words about Icons
Before the Finder can perform any of its tasks, you must indicate which files
you want to move (or rename, or discard, or whatever) by selecting their
icons. Selecting something by highlighting its icon is the cornerstone of the
entire Macintosh way of life. It’s the Macintosh interface.
4Part I: System Software Revealed
■■
MACWORLD MAC SECRETS • 4040-8/5 • ch01.F • Chapter 1 • FINAL • VB/EAP • 10/21/98 • p.4
MACWORLD MAC SECRETS • 4040-8/5 • ch01.1 • Chapter 1 • Proof 1 • SH • 10/01/98 • p.4
TRUE FACT
Interface? What interface?
Ever wonder what the three dots (the ellipsis . . . )
mean when you see them in a menu item?
Here’s what Apple’s own interface bible,
Macintosh Human Interface Guidelines
(Addison-Wesley, 1992), has to say:
“The ellipsis character (. . .) after a menu
item means that the command needs more
information from the user before the
operation executes. The ellipsis character
doesn’t simply mean that a dialog box or
window will appear. For example, in the
Finder File menu, the Get Info command
doesn’t have an ellipsis character and
shouldn’t. When you select a Finder object
and choose Get Info, a window appears
displaying information about the object.
The window appearing simply completes
the command.”
Oh, yeah? Then how come the About this
Computer command (or, on older Macs, About
This Macintosh) in the menu has an ellipsis?
All it does is bring up an info window, too!
Ah, well. Maybe they licensed that command
from Microsoft.
4040-8/5 ch01.F 11/3/98 4:00 PM Page 4

Selecting icons
In the days before System 7, there was only one way to highlight an icon: by
using the mouse. Today, you have a wealth of efficient keyboard shortcuts for
selecting specific items. (When we say “System 7” or “7.x” in this book, by the
way, we mean “7-point-anything.” When we say “System 7.5,” we mean
“System 7.5-point-anything-or-7.6-point-anything.” “Mac OS 8” generally
means “8.0 or 8.1,” and so on.)
Here’s an example of a typical maneuver that demonstrates the power of
ignoring your mouse. Suppose that yesterday you were working on a document
called Valentine’s Party Invite, but you don’t remember the folder in which you
put it. You press Ô-F (the shortcut for choosing Find from the File menu). The
Find dialog box appears. You type valen and press the Return key.
In a moment, you’re shown a list of every file on your hard drive whose name
contains those letters. By pressing the up-arrow or down-arrow keys, you
highlight the precise file for which you were looking. When your file is
selected, you press Ô-O to open the file for editing. During this entire process,
you never had to move your hands from the keyboard to use the mouse.
Similarly, in a messy folder full of icons, you can highlight a specific file icon
without even being able to spot it — just type the first few letters of the file’s
name. That’s especially handy when you want, for example, to add or remove
Fonts from your system. With the System Folder open, just type FO to
highlight the Fonts folder and then press Ô-O to open it. You’ve navigated
through the clutter and confusion of the System Folder with just a few
keystrokes.
Figure 1-2 shows some other keys you can press to select icons within a
single window.
Figure 1-2: The arrow keys highlight adjacent icons. The Tab key finds the next icon in
alphabetical order. You can press Shift-Tab to highlight the previous icon in the alphabet. If
you type a letter, you’ll jump to the icon whose name begins with that letter (or the next
letter alphabetically).
Tab
Shift-Tab
V (or Z)
Mac Basics
Chapter 1: Your First Software: The Finder 5
■ ■
MACWORLD MAC SECRETS • 4040-8/5 • ch01.F • Chapter 1 • FINAL • VB/EAP • 10/21/98 • p.5
MACWORLD MAC SECRETS • 4040-8/5 • ch01.1 • Chapter 1 • Proof 1 • SH • 10/01/98 • p.5
4040-8/5 ch01.F 11/3/98 4:01 PM Page 5

To select a group of icons, press Shift and click each one in succession. To
exclude a highlighted icon from a group, Shift-click it again. Of course, you
can also select groups of icons by drag-enclosing them (see Figure 1-3). You
can even select more than one icon in a window without using the mouse
(read about Easy Access in Chapter 3).
After you’ve drag-selected icons as shown in Figure 1-3, by the way, don’t
forget that you can select additional groups of icons (or deselect some of the
ones you already highlighted) within the same window by Shift-dragging or
Shift-clicking them. And for more far-flung selections, use the Find command
(see Chapter 3).
Figure 1-3: As you drag in a diagonal line, any icon even touched by the dotted-line selection
rectangle gets selected. (This procedure works in list views, too.)
After icons are selected, you can move all of them as a unit by dragging any
one of them.
So who cares about avoiding the mouse? Efficiency fans, primarily. Every
time you have to stop your work at the keyboard while one hand reaches for
the mouse, you stop your flow of thinking (and typing). As you become more
familiar with your Mac, you’ll use the mouse less and get your work done
more quickly.
But you can do much more with icons than just select them, as our first
batch of Macintosh secrets clearly explains.
Icon Secrets
■
Make icons jump neatly into position . . . or not
Mac OS 8 has a View ➪View Options command. (In case you missed this in our
Introduction to this book, that shorthand notation means “From the View menu,
choose View Options.”) That command is the successor to the Views control
panel in Systems 7 through 7.6.
OS
8
6Part I: System Software Revealed
■ ■
MACWORLD MAC SECRETS • 4040-8/5 • ch01.F • Chapter 1 • FINAL • VB/EAP • 10/21/98 • p.6
MACWORLD MAC SECRETS • 4040-8/5 • ch01.1 • Chapter 1 • Proof 1 • SH • 10/01/98 • p.6
4040-8/5 ch01.F 11/3/98 4:01 PM Page 6
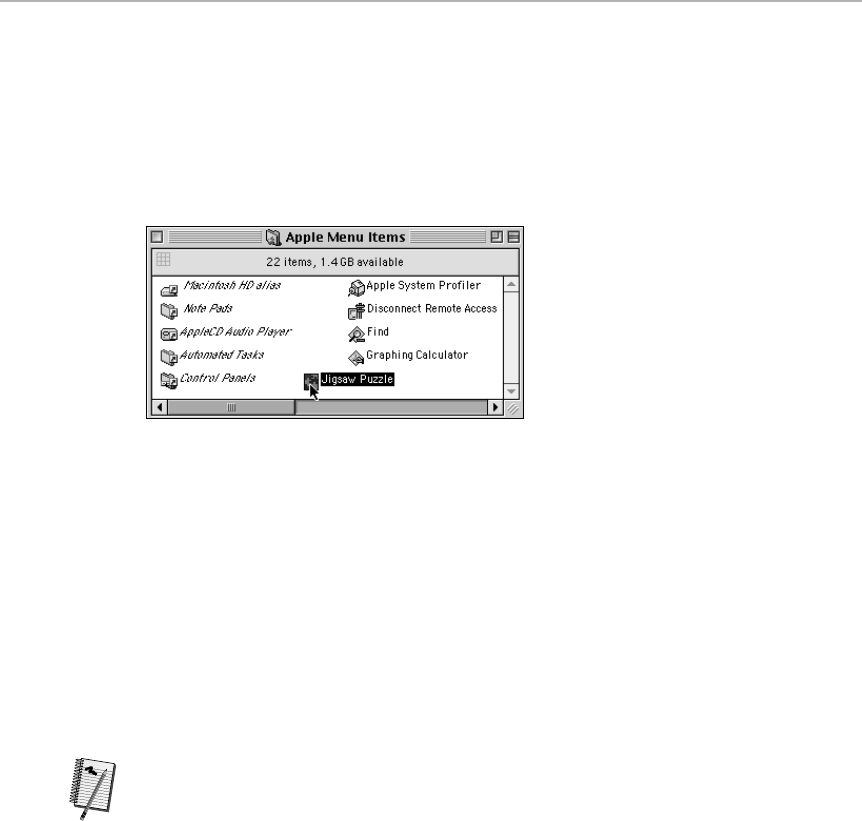
Anyway, as described in more detail in Chapter 2, this command (or control
panel) enables you to specify that all your Finder icons should fall into points on
a neat, invisible grid (see Figure 1-4). Here’s the tip: If you press the Ôkey
while you drag an icon, you can set the icon down anywhere, even if it’s not in a
grid-defined position. (Technically, the Mac only cares whether or not the Ôkey
is being pressed when you
release
the mouse. You don’t really have to press
the key all the time you’re dragging.)
Figure 1-4: Even in a Small Icon view like this, the Finder aligns the icons in a grid — or not.
It’s up to you.
If the grid option
isn’t
turned on, the Ôkey has the opposite effect. It makes
the icon you dragged jump
into
grid position.
If, like most people, you don’t have the Finder grid permanently turned on, keep
the Ôkey in mind when you want to put a couple of icons exactly side-by-side.
When you set each icon down while the Ôkey is pressed, they’ll jump into
perfect horizontal alignment.
Change windows but keep your icons highlighted
You probably think that when you select a bunch of icons, any click in another
window deselects them all. Even clicking in a window’s title bar deselects all
highlighted icons. Does that mean that you can never bring another window to
the front without losing your selection?
No, you can do it — if you’re running System 7-point-anything. Click the
scroll bar
or the
info strip
(where it says Name, Size, and so on) of the other window. Your
icons in the first window stay selected.
(Evidently Apple didn’t place a high value on this rarely-used feature; it got
scrapped in Mac OS 8.)
Worth
Learning
Chapter 1: Your First Software: The Finder 7
■ ■
MACWORLD MAC SECRETS • 4040-8/5 • ch01.F • Chapter 1 • FINAL • VB/EAP • 10/21/98 • p.7
MACWORLD MAC SECRETS • 4040-8/5 • ch01.1 • Chapter 1 • Proof 1 • SH • 10/01/98 • p.7
4040-8/5 ch01.F 11/3/98 4:01 PM Page 7
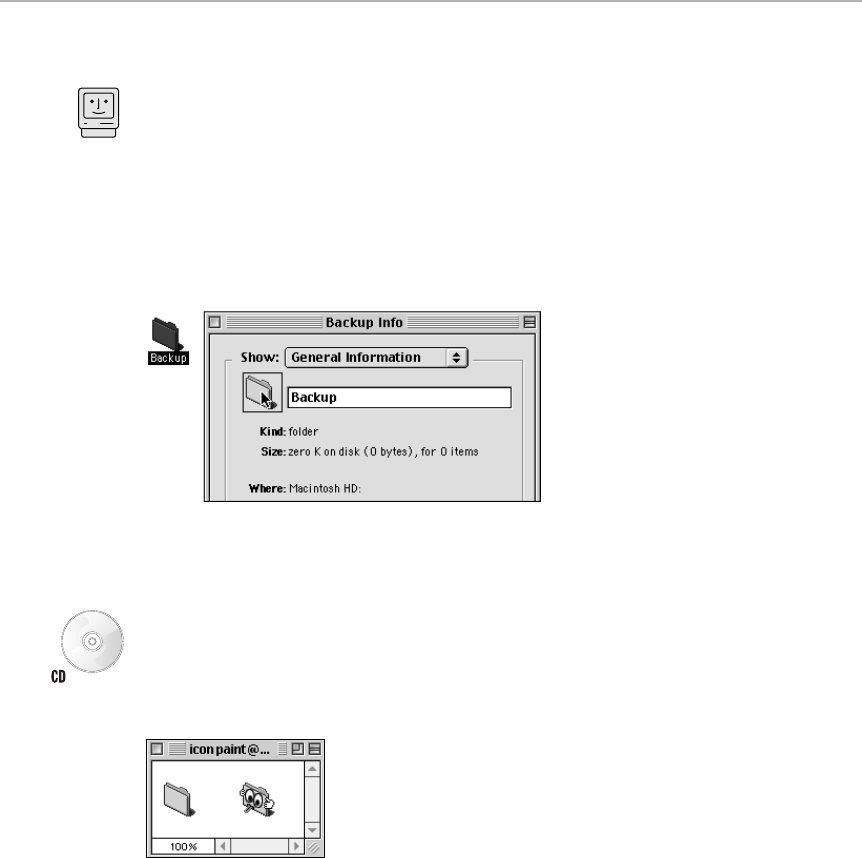
Replace an icon
Replacing an icon isn’t really much of a secret anymore, but it’s worth repeating in
case you missed it. The bottom line: you can create your own icons for any file,
folder, or disk. Imagine etching your initials onto a folder, reducing the size of the
icons for unimportant files, and making your hard drive icon look like Neil Diamond.
Here’s how to do it. First, highlight the icon you want to replace. Choose File ➪
Get Info. When the Get Info box appears, click the icon in the upper-left corner
(see Figure 1-5). Choose Copy from the Edit menu to copy this original icon to
the Clipboard.
Figure 1-5: The first steps to replacing an icon: First, select the icon (left); then choose Get
Info and click the icon in the dialog box that appears; then copy it.
To customize the icon, launch a painting program — Color It, included on the
Mac Secrets
CD-ROM, is a great choice.
Choose Paste from the Edit menu so that the original icon appears where you
can edit it (see Figure 1-6).
Figure 1-6: Paste the original icon into a painting program (left side of the window). Doctor it
up (right). Copy it again and paste it back into the Get Info window of your file, disk, or folder.
Now, using the painting tools, create a replacement icon. Doctor the original, or
just use the original as a size guideline and create something completely new.
Try not to paint an icon larger than the size of a real icon, which is 32 pixels
(screen dots) square. (If you create an image that’s too large, it’ll be squished
unartistically into a 32-by-32 space when it’s pasted as an icon.)
Mac Basics
8Part I: System Software Revealed
■ ■
MACWORLD MAC SECRETS • 4040-8/5 • ch01.F • Chapter 1 • FINAL • VB/EAP • 10/21/98 • p.8
MACWORLD MAC SECRETS • 4040-8/5 • ch01.1 • Chapter 1 • Proof 1 • SH • 10/01/98 • p.8
4040-8/5 ch01.F 11/3/98 4:01 PM Page 8

When you’re finished, copy the new icon. Go back to the original icon’s Get Info
box, click the icon, and paste the replacement. (If it’s too big, the Mac shrinks it
to fit the square box, sometimes with lousy results.) That’s it! You replaced the
original icon.
If you’re using color and you discover that the color leaks out of your new icon,
go back into the painting program. Enclose any
light-colored
part of the icon with
a dark outline. (Or just enclose the entire icon in a solid-outline square.)
Repaste this modified icon into the Get Info box.
If you’re not artistically inclined, instead of doing your own artwork, you could
simply copy one of the professionally drawn icons we’ve included on the
Mac
Secrets
CD-ROM. Copy the icon out of
its
Get Info box, then paste into the Get
Info box of your target file.
P.S. — The Mac won’t let you change certain icons using the Get Info method:
any open document icon; the special ones used for the System, Control Panels,
Apple Menu Items, Extensions, and Startup Items folders; and the Trash. You,
however, as the savvy owner of this book, can change these icons, using
ResEdit. Check Chapter 21 for details.
P.P.S. — Some programs — notably AppleWorks/ClarisWorks — restores a
document’s original icon every time you save the document. Rats.
Keyboard-only icon replacement
If you’re going to do a lot of icon-replacing — and we hope you do — try this little-
known secret. Open the Get Info box for the file whose icon you want to change.
Instead of actually clicking the existing icon, you can just press Tab. If you follow
this idea to its logical conclusion, you now see how it’s possible to copy an icon
onto a different file without ever touching the mouse: select an icon (by typing
letters), Get Info on it (Ô-I), select its icon (by tabbing — twice, if you’re in Mac
OS 8.5 or later), copy the icon (Ô-C), close the Get Info window (Ô-W), select
another icon (by typing letters), Get Info, tab, and paste (Ô-V) the icon into its
new location.
Electronic Post-it notes
Use the method described in the previous tip to replace a folder’s icon with a
plain white square
you copied from a graphics program. A floating piece of text
appears (the file’s name) with no icon attached.
You can use this idea for all kinds of interesting effects. For example, you can
use it to give a Desktop folder a two-name title (see Figure 1-7, top). Or, handier
still, you can duplicate this doctored folder endlessly. Just make sure that you
give each copy a new folder name, such as
Meet Jennifer at noon today.
Then
leave these notes strewn about your Desktop as little reminders (see Figure 1-7,
bottom) — a quicker, low-tech version of the Stickies program.
Chapter 1: Your First Software: The Finder 9
■ ■
MACWORLD MAC SECRETS • 4040-8/5 • ch01.F • Chapter 1 • FINAL • VB/EAP • 10/21/98 • p.9
MACWORLD MAC SECRETS • 4040-8/5 • ch01.1 • Chapter 1 • Proof 1 • SH • 10/01/98 • p.9
4040-8/5 ch01.F 11/3/98 4:01 PM Page 9
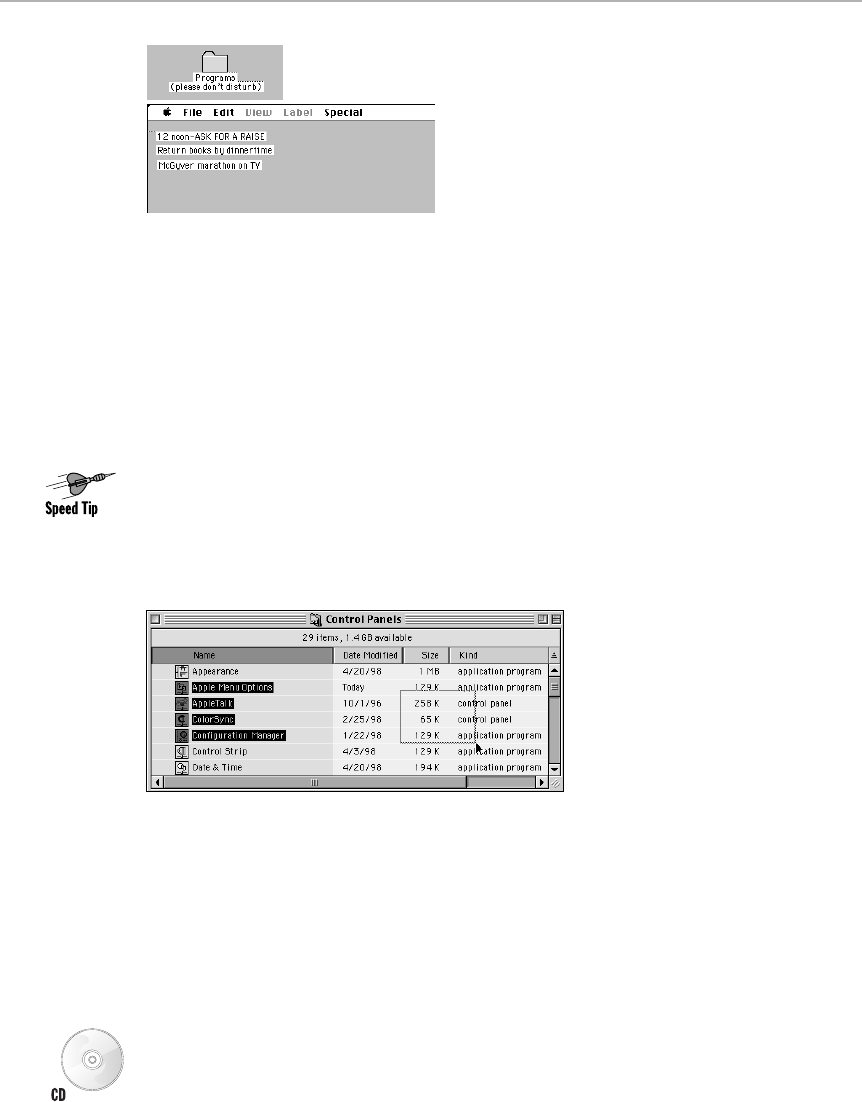
Figure 1-7: Using empty folders with invisible icons, you can make pieces of text seem to
float on your Desktop.
Select icons in a list view
Selecting a group of icons in a list view is easy. Drag the cursor in any direction,
starting anywhere. Each item in the list turns black as you move the cursor, and
you have ’em.
Here’s the oft-ignored secret: To select an icon in a list view, you don’t have to
click on its name or icon. You can click on
any
component of the listed
file info — the date, version number, size, whatever. Likewise, you can drag-
select over any portion of the listed information to grab a
group
of icons (see
Figure 1-8).
Figure 1-8: You can drag or select icons by any portion of their “rows” in a list view.
Make any file invisible
You can make any file — folder, document, or application —
completely
disappear
from your Desktop. (This procedure isn’t the same as making just its
icon
disappear, which you can do using the secret described earlier.)
There’s a good reason most people don’t hide their icons regularly: It takes special
tools. Fortunately, we’ve provided you with the ideal tool: FileTyper, included on the
CD-ROM with this book. Drag the file or folder you want to make invisible onto the
FileTyper icon. Click Invisible, and then Change. The deed is done.
10 Part I: System Software Revealed
■ ■
MACWORLD MAC SECRETS • 4040-8/5 • ch01.F • Chapter 1 • FINAL • VB/EAP • 10/21/98 • p.10
MACWORLD MAC SECRETS • 4040-8/5 • ch01.1 • Chapter 1 • Proof 1 • SH • 10/01/98 • p.10
4040-8/5 ch01.F 11/3/98 4:01 PM Page 10
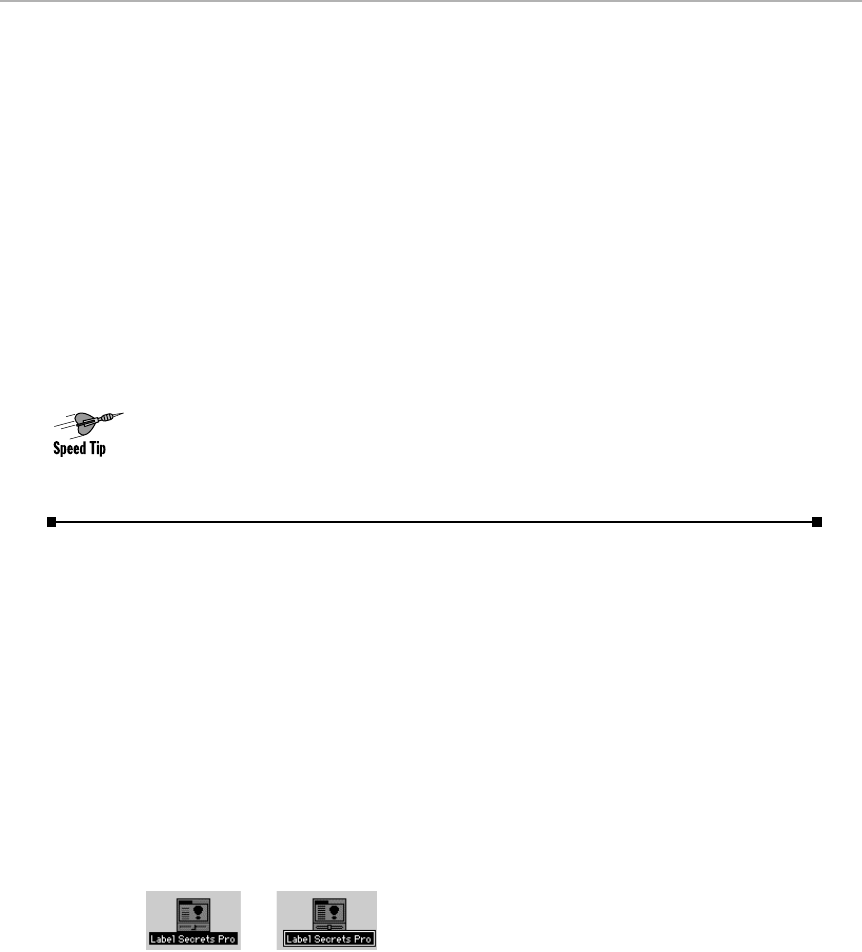
To reverse the procedure, launch FileTyper. Choose File ➪Get Info. All files and
folders, invisible or not, show up in the dialog box. Select and open the one you
want to make appear, turn off the Invisible checkbox, and click Change.
The nice thing about an invisible document is that you can still open it from
within a program. You can open an invisible Word file by using Word’s Open
command, for example; the invisible document shows up in the Open File list
box just fine.
To launch or not to launch a
program or document icon
You can use one of several ways to open a program or document icon that’s
staring you in the face in the Finder: Double-click it, select it, and press Ô-O,
and so on.
There’s only one way, however, to
stop
a document or program from opening
after you launch it: Press Ô-period.
Fast.
And repeatedly. If you press this
keystroke
just
after launching a document or program, you go right back to the
Finder as though you never opened a thing.
Renaming icons
In System 6 — maybe you’re too young to remember — renaming file icons
was too easy. When a file, folder, or disk was highlighted, anything you typed
replaced the icon’s name. All it took was a finger, a stack of papers, or a cable
pressing continuously on a key while an icon was highlighted, and you wound
up with an icon named QQQQQQQQ.
Apple engineers came up, therefore, with a new method of renaming icons
under System 7, in which it’s almost impossible to rename a file accidentally.
■If the icon is already selected, press Enter or Return to make the “renaming
rectangle” appear around the existing file name. Type the new name.
(Figure 1-9 shows an icon before and after the renaming rectangle appears.)
Figure 1-9: You can only rename a file when its “renaming rectangle” is visible, as shown on
the right. You don’t have to delete the old name first; just start typing.
■If the icon isn’t selected, click the file name itself. After a moment — the
moment of inactivity called the rename delay — the rectangle appears,
signaling you that it’s okay to type the new name.
Chapter 1: Your First Software: The Finder 11
■ ■
MACWORLD MAC SECRETS • 4040-8/5 • ch01.F • Chapter 1 • FINAL • VB/EAP • 10/21/98 • p.11
MACWORLD MAC SECRETS • 4040-8/5 • ch01.1 • Chapter 1 • Proof 1 • SH • 10/01/98 • p.11
4040-8/5 ch01.F 11/3/98 4:01 PM Page 11

Icon Renaming Secrets
■
Surviving the rename delay
First, here’s why the rename delay exists. Everyone knows that you double-click
an icon to launch it. But you may not realize that you can even double-click the
file’s
name
to open the icon. And that’s why there’s a pause between your first
click and the moment the renaming rectangle appears. The Mac is waiting to
make sure that you’re not going to click
again
. In other words, it makes sure
that you really meant to click just once (to edit the file’s name) and not twice (to
launch the file).
We suggest that you don’t bother waiting out the rename delay. If you’ve clicked
an icon’s name, you can make the renaming rectangle appear instantly just by
moving the mouse — even a little twitch — or by pressing Return. Then you can
begin typing the new name.
Worth
Learning
12 Part I: System Software Revealed
■ ■
MACWORLD MAC SECRETS • 4040-8/5 • ch01.F • Chapter 1 • FINAL • VB/EAP • 10/21/98 • p.12
MACWORLD MAC SECRETS • 4040-8/5 • ch01.1 • Chapter 1 • Proof 1 • SH • 10/01/98 • p.12
MACINTOSH SECRET
An Easter egg, of course, is a credits screen
hidden in software, buried by the programmers
in such a way that only the savvy (or the Mac
Secrets reader) knows how to trigger it.
Apple has been quietly removing some of the
best Easter eggs from its system software (see
Chapter 6 for a listing of some of the greats).
Why? Because (so the theory goes) the bosses
don’t know about (and can’t test) the Easter eggs,
Easter eggs are inherently destabilizing. That’s a
problem for a company that wants to make the
most stable operating system in the world.
One Easter egg, however, survives in the system
software — and we didn’t even know about it
until this edition, even though we had
unwittingly written about it three editions ago!
Our original write-up said:
You need a native-PowerPC-code, “thread-
manager savvy” application (the Thread
Manager is an extension that permits a
certain degree of true multitasking, such as
initializing a disk in the background).
Launch it while pressing the B and E keys
— and you’ll get a rolling list of credits.
Years passed. We forgot all about it — even
when we read that as of Mac OS 8, the Finder
itself was now thread-manager-savvy!
It took free book winner Patrick Thompson to
point out that our Easter egg secret of Mac
Secrets, 2nd Edition, was now available to
anyone with a Power Mac!
“I’m not claiming I discovered it,” he modestly
wrote us. “I’m just saying I know that native-
code, ‘thread-manager savvy’ applications aren’t
that widespread. The other day, while re-reading
this section, I got to thinking, “Hey . . . isn’t the
new OS 8 Finder threaded and native? Let’s see
. . . “ I gave it a shot, holding down the B and E
keys while my system booted — and, lo and
behold, a tiny box filled with scrolling credits
appeared on my screen! Neat little list of credits
and jokes, but you have to read fast.”
Sometimes we astonish even ourselves.
The Last Easter Egg
4040-8/5 ch01.F 11/3/98 4:01 PM Page 12
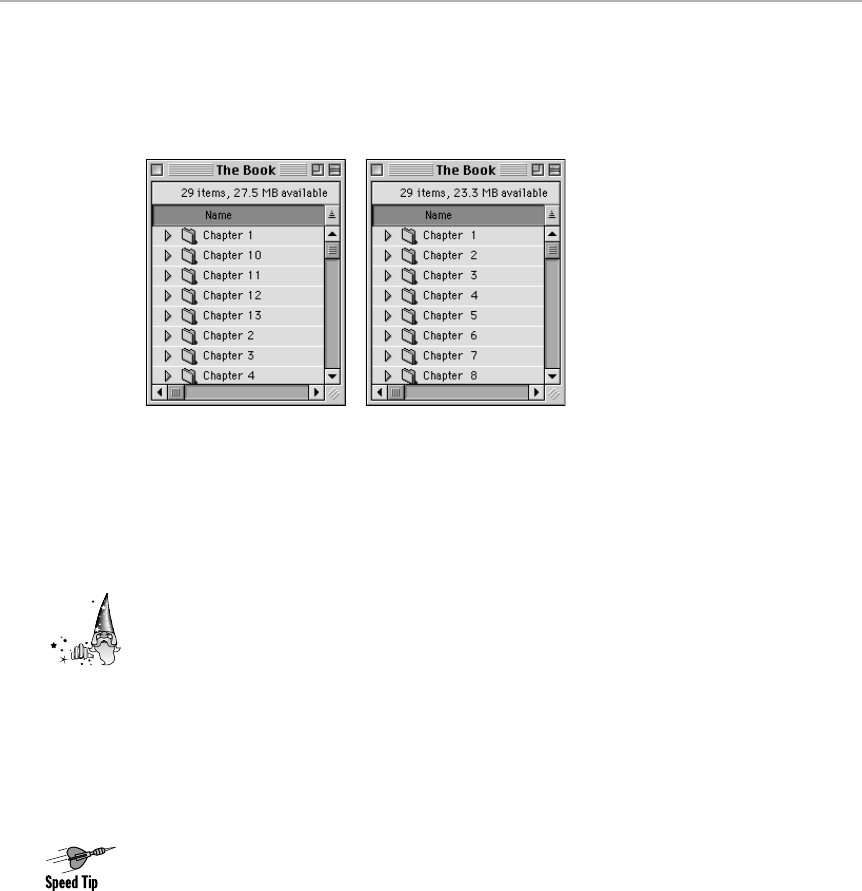
The Mac’s wacky alphabet scheme
The Mac alphabetizes things a little bit oddly, in that spaces and symbols come
before letter
A
. And 10, believe it or not, comes before 3 (see Figure 1-10).
Figure 1-10: The Mac, apparently, can’t count. As you can see at left, it believes that the
number 10 comes before 2 (left). Use this secret to solve the problem (right).
To make a file appear first in an alphabetical list (in a list-view window, for
example), type a space at the front of the name. To make the number 3 come
before the number 10, therefore, put a space before the 3.
Incidentally, one symbol the Mac absolutely does not let you use when you name
an icon is the colon (:). (That’s because the Mac treats the colon as a “where is
this file filed?” indicator. Use the Get Info command on a file on your hard drive
some day and you’ll see what we mean — the file, as far as the Mac is
concerned, is on “Macintosh HD:Backup:Recent Projects:.”)
When you’re in the Finder, if you type a colon as part of a file name, the Mac
substitutes a hyphen (-) without even so much as a by-your-leave.
Renaming is just like word processing
The Edit menu’s Cut, Copy, and Paste commands (and their keyboard equivalents)
work while you’re editing a file name. That’s useful when you’re naming a bunch of
files, for example, in a row “Koyaanisqatsi 1,” “Koyaanisqatsi 2,” “Koyaanisqatsi
3,
”
and so on. Just copy
Koyaanisqatsi
to the Clipboard. Then, each time a file’s
name is highlighted for renaming, press Ô-V to paste the word, and type the rest
of the file name (the digit, in this case).
Other typical Mac word-processing techniques work, too. You double-click a word
to select it (instead of dragging through it), and highlighted text gets instantly
replaced by anything you type (so that you don’t have to delete the old file name
before typing a new one).
Strange
But True
Chapter 1: Your First Software: The Finder 13
■ ■
MACWORLD MAC SECRETS • 4040-8/5 • ch01.F • Chapter 1 • FINAL • VB/EAP • 10/21/98 • p.13
MACWORLD MAC SECRETS • 4040-8/5 • ch01.1 • Chapter 1 • Proof 1 • SH • 10/01/98 • p.13
4040-8/5 ch01.F 11/3/98 4:01 PM Page 13

If you begin typing a new name and suddenly realize that you’re renaming the
wrong icon, just press Ô-Z, the Finder’s Undo command. The icon’s original
name reappears. Alternate method: If, while typing in the new name for a file,
you change your mind, press Delete until the entire name is gone. Then press
Return — the original name reappears.
The power-user’s arrow keys
Suppose you’ve just clicked an icon name. The renaming rectangle is ready; the
file name is highlighted.
Now suppose you just wanted to add a word to the
end
of that file’s name.
Instead of using your mouse and a microscope, painstakingly trying to plant the
cursor at the end of the rectangle, just press the right-arrow or down-arrow key.
You’ll deposit the insertion-point cursor at the very end of the file name. (The
left
-arrow or
up
-arrow key pops the cursor at the
beginning
of the file name.)
The down-arrow and up-arrow keys are particularly useful because they make your
insertion point leap to the end (or beginning) of the name, even if it’s in the
middle
of the existing file name — the name doesn’t have to be highlighted. (When the
insertion point’s in the middle of the name, on the other hand, the left-arrow and
right-arrow keys simply move it one character at a time, forward or backward.)
Deactivating the renaming rectangle
We’ve already told you how to activate a selected icon’s renaming rectangle:
Press Enter or Return. Now we’ll tell you how to
deactivate
it, so that your icon is
still selected, but you’re no longer in renaming mode: Press Return or Enter again.
And why would you want to do this? To select
another
icon without using the
mouse. (If you tried to select another icon from the keyboard with the renaming
rectangle active, you’d just end up renaming the currently selected icon.)
We should point out that there
is
one way to select another icon without first
deactivating the renaming rectangle: Press Tab. This key always moves you to
the next icon in alphabetical order, even if the current icon’s name is selected
for renaming.
A really amazing re-alphabetizing secret
Over and over again, in this book and others, you’ll be told to put spaces in front
of your icons’ names if you want them to rise to the top of an alphabetical list. For
example, a file called Zebra will come
before
one called Aardvark, as long as you
put a space in front of the
Z
. You can put that trick to particularly good use in your
Apple Menu Items folder, so that you can put your Amenu names in any order.
Trouble is, you can
see
those spaces. Your icons’ names look stranger and
stranger the more spaces you put in front of the actual names. Here’s a much
better way.
14 Part I: System Software Revealed
■ ■
MACWORLD MAC SECRETS • 4040-8/5 • ch01.F • Chapter 1 • FINAL • VB/EAP • 10/21/98 • p.14
MACWORLD MAC SECRETS • 4040-8/5 • ch01.1 • Chapter 1 • Proof 1 • SH • 10/01/98 • p.14
4040-8/5 ch01.F 11/3/98 4:01 PM Page 14

Open the Note Pad. Press Return, thus creating a blank line. Select the blank
line and copy it. Now click the name of the icon — the one you’d like to appear
first alphabetically — in readiness for renaming it. Press the left-arrow key to
move the cursor to the beginning of the file’s name.
Now paste that invisible Return character you copied. The existing name seems
to disappear; just press Enter, and it returns.
Incredibly, your renamed file now appears first in any alphabetical file list, but it
doesn’t
look
any different!
Furthermore, a file with
two
blank Returns at the beginning of its name comes
before one with only one Return; a file with three appears even before that . . .
and so on. April Fool’s Day stunt: Use the blank-Return technique to make all
the files in your System Folder appear in
reverse
alphabetical order. Amaze your
friends!
Caution: This trick befuddles programs that refer to linked files. For example, a
Quark or PageMaker document won’t print with graphics files whose names
you’ve doctored this way.
Renaming files en masse
You won’t find yourself in this predicament often, but you will find yourself there
someday: You’ve got a folder full of files that you’d like to rename in some
consistent way. For example, suppose you’ve just finished creating all 1,294
Web pages for your breathtaking site — but you discover that Windows people
need every file to end in
.htm
instead of
.html.
Don’t tell us you’re going to
delete the last letter individually 1,294 times!
Fortunately, you don’t have to. Plenty of shareware programs will do that job for
you — and even some commercial programs, such as OneClick (which is
included with this book). Using an add-on OneClick palette like File Tools (also
included), changing the names of huge scads of files in one stroke is a piece of
cake. (See Chapter 22 for instructions on using OneClick.)
The longest file name
Everyone knows that the longest Mac file name is 31 letters. But what’s the
longest file name measured
horizontally?
It’s 31 of the infinity symbol, which
you produce by pressing Option-5. It looks like this: ∞∞∞∞∞∞∞∞∞∞∞∞
∞∞∞∞∞∞∞∞∞∞∞∞∞∞∞∞∞∞∞. That’s a
very
long file name. Keep
that in mind the next time you’re trying to create special visual effects on your
Desktop . . . or making bar bets.
Strange
But True
Chapter 1: Your First Software: The Finder 15
■ ■
MACWORLD MAC SECRETS • 4040-8/5 • ch01.F • Chapter 1 • FINAL • VB/EAP • 10/21/98 • p.15
MACWORLD MAC SECRETS • 4040-8/5 • ch01.1 • Chapter 1 • Proof 1 • SH • 10/01/98 • p.15
4040-8/5 ch01.F 11/3/98 4:01 PM Page 15

16 Part I: System Software Revealed
■ ■
MACWORLD MAC SECRETS • 4040-8/5 • ch01.F • Chapter 1 • FINAL • VB/EAP • 10/21/98 • p.16
MACWORLD MAC SECRETS • 4040-8/5 • ch01.1 • Chapter 1 • Proof 1 • SH • 10/01/98 • p.16
The Truth about Finder Windows
Ah, windows. No aspect of any computer has been the subject of so much
attention — and so much litigation. Xerox, the developer of the concept of
movable, overlapping panes to display computer information, sued Apple for
ripping off the idea. And then Microsoft created Windows, and Apple sued
Microsoft.
But heck, that’d be like Kleenex suing Puffs. You just can’t keep a great idea
down, and now windows have cropped up on every computer from NeXT to
the Apple II.
CASE HISTORY
In previous editions of this book, we pointed out
with perverse pleasure the five-letter file name
that would trash your hard drive. And that name
was: .Sony.
We pointed out that the Mac’s operating system
believes files beginning with periods to be
drivers, those invisible programs that run your
disk drives, serial ports, and other jacks. If a file
name begins with a period, the Mac can
potentially get confused and treat that file as a
device driver instead of a plain old data file. As it
turns out, .Sony is the name of the driver that
controls your floppy drive! If you gave a file that
name, we said, the Mac may try to address it as
though it’s a floppy drive — and hard drive
corruption would result.
Well, chaos poured down on us. The nasty
e-mails began. “Your irresponsible journalism,”
went one, “has cost our school system
thousands of dollars in consultant fees. Because
you published the .Sony secret, our junior-high
students have named files on every hard drive
that way, and our entire System 7 network
crashes constantly. Next time, think before you
publish.”
Another: “I want you to know that your book
has caused tragedy and destruction in my
neighborhood. Somebody apparently uploaded a
file to my BBS named .Sony. And before I had a
chance to stop it, 352 people downloaded it.
Because of your ill-advised publishing of that
fact, hundreds of people in my area are now
experiencing system problems. I hope you’re
satisfied.”
But just as we were starting to feel worried, we
got one final message that made it all seem
worthwhile. Manny Vera of Sony Corporation
had spotted our secret. And according to Sony
engineers, we had been 100 percent accurate in
our report — except for one little detail. Apple
and Sony had patched that particular booby-trap
in System 7!
In other words, the system problems
experienced by those unhappy e-mail writers
had nothing to do with the .Sony secret. As
System 7 users, they were probably having
garden-variety extension conflicts.
We learned from that episode why this country
has more lawyers per capita than any other in
the world.
The saga of the deadliest file name
4040-8/5 ch01.F 11/3/98 4:01 PM Page 16
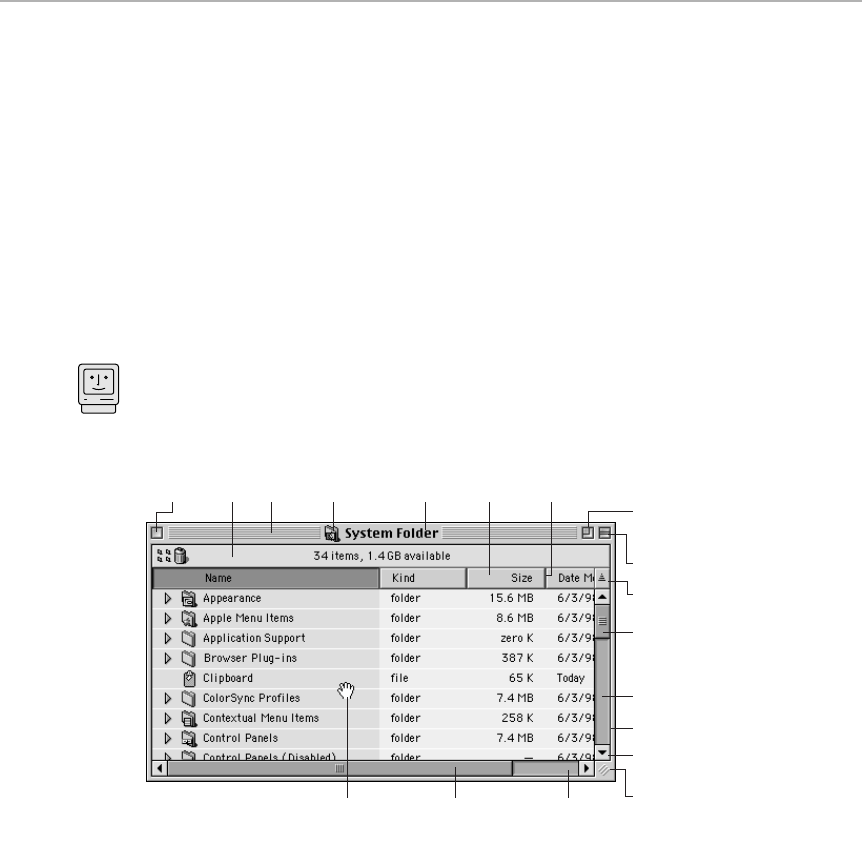
Window-manipulation skill is particularly necessary in the Finder, when the
mere act of opening your Extensions folder requires you to open three
windows (hard drive, System Folder, Extensions). If you’re not careful, your
screen will clutter up with so many windows you can’t get any work done.
Window management is becoming so important, in fact, that Apple has made
window-manipulation a key focus of each system-software upgrade since
System 6.x. The WindowShade feature first appeared in System 7.5, in which a
double-click on a window’s title bar “collapses” the window (see Chapter 4);
draggable window edges and pop-up window tabs debuted in Mac OS 8; and
title-bar icons first showed up in Mac OS 8.5.
Anatomy of a window
A schematic drawing is worth a thousand words — that’s what our mothers
always told us. Here in Figure 1-11, then, is the complete list of doodads and
places to click in a standard Macintosh window.
Figure 1-11: The complete list of places to click in a Mac OS 8.5 window.
■Close box — Click here (or press Ô-W) to close the window. Option-click
(or press Option-Ô-W) to close all Finder windows.
■Info strip — Shows how much space is left on your hard drive, the
number of items in this window, and so on. If there’s a tiny Trash icon at
the left end (Mac OS 8.x), you’re looking at a window whose folder is in
the Trash at the moment. (Obviously, Figure 1-11 is a fake — we only
rarely put our System folder in the Trash.)
Close
box
Info
strip
Title
bar
Title-bar
icon
Window
name
Column
header
Column
divider
Zoom box
Collapse box
Sort-order button
Vertical scroll bar
Vertical scroll box
Window edge
Scroll arrow
Ô-drag area Horizontal
scroll box
Horizontal
scroll bar
Resize box
Mac Basics
Chapter 1: Your First Software: The Finder 17
■ ■
MACWORLD MAC SECRETS • 4040-8/5 • ch01.F • Chapter 1 • FINAL • VB/EAP • 10/21/98 • p.17
MACWORLD MAC SECRETS • 4040-8/5 • ch01.1 • Chapter 1 • Proof 1 • SH • 10/01/98 • p.17
4040-8/5 ch01.F 11/3/98 4:01 PM Page 17

If four tiny squares appear at the left edge of the info strip (Mac OS 8.x),
meanwhile, you’ve turned on the Keep Arranged option for this window
(by choosing View ➪View Options). (Obviously, Figure 1-11 is an even
bigger fake — you can’t “Keep Arranged” a list view.)
■Title bar — Drag anywhere in this strip to move the entire window.
Double-click here to “windowshade” the window (hide all but its title
bar), or Option-double-click to windowshade all open Finder windows —
if you’ve turned on that feature in the Appearance control panel (Mac OS
8) or WindowShade control panel (System 7.x).
■Title-bar icon (Mac OS 8.5) — Dragging this icon is exactly like dragging
this window’s folder. In other words, you can drag a window to the Trash,
drag it to another disk for copying, drag it to another folder to re-file it,
and so on — all while the window is still open.
■Window name — This name identifies the folder you opened into the
window you’re now viewing. Ô-click to see a pop-up menu of folders that
this one is inside of, as described in the upcoming secrets.
■Column header — Click here to sort the contents of a list-view window
by this criterion: name, date, size, kind, and so on.
In Mac OS 8.5, in fact, you can drag this header sideways. If you drag it to
the far side of one of the other column headers, you succeed in actually
moving the entire column, thus rearranging the columns’ order.
■Column divider — In Mac OS 8.5 and later, this divider is a handle. Drag it
horizontally to make its corresponding column (the column to its left)
wider or narrower.
■Zoom box — Click to make the window exactly as large as it needs to be
in order to show you all of its contents. Option-click to make the window
fill the screen, obliterating anything else open on the Mac (in case of
emergency when your boss or spouse wanders by and shouldn’t know
what you’re working on, we guess). Reshrink the window to its previous
dimensions by clicking the Zoom box again.
■Collapse box (Mac OS 8.x) — This doodad rolls up (“windowshades”) the
window so that only its title bar is showing, giving you a better view to
whatever’s behind. Also known as the WindowShade box. Option-click to
roll up all open Finder windows — a hilarious and delightful effect you’ve
got to see for yourself. (And hear for yourself, if you’ve turned on the
sound effects for this feature.)
■Vertical scroll box — Drag up or down to shift your view, bringing more
icons into view. If you’re already seeing all icons, top to bottom, this box
doesn’t appear.
OS
8
OS
8.5
OS
8.5
OS
8
18 Part I: System Software Revealed
■ ■
MACWORLD MAC SECRETS • 4040-8/5 • ch01.F • Chapter 1 • FINAL • VB/EAP • 10/21/98 • p.18
MACWORLD MAC SECRETS • 4040-8/5 • ch01.1 • Chapter 1 • Proof 1 • SH • 10/01/98 • p.18
4040-8/5 ch01.F 11/3/98 4:01 PM Page 18

Chapter 1: Your First Software: The Finder 19
■ ■
MACWORLD MAC SECRETS • 4040-8/5 • ch01.F • Chapter 1 • FINAL • VB/EAP • 10/21/98 • p.19
MACWORLD MAC SECRETS • 4040-8/5 • ch01.1 • Chapter 1 • Proof 1 • SH • 10/01/98 • p.19
In Mac OS 8.5 and later, the Appearance control panel offers a “Smart
Scrolling” checkbox, which makes this box grow or shrink according to
how much of the window you’re seeing right now. If the scroll box is one-
third the height of the window, then two-thirds of the icons in the
window are out of sight.
■Vertical scroll bar — Click to scroll the window by a screenful at a time.
(Click above the scroll box to see the icons above your current view, and
below to see the icons below your current view.)
■Window edge (Mac OS 8.x) — Drag to move the window. Thanks to this
thin gray strip (which borders all four edges of the window), you can
now position windows nearly off the screen.
■Vertical scroll button — Click to scroll the window one “line” at a time in
the indicated direction. Click and hold for smooth scrolling.
■Resize box — Drag in any direction to change the window’s size or shape.
■Horizontal scroll bar, horizontal scroll box — Like the vertical ones, but
shifts your view from side to side.
■Ô-drag area (Mac OS 8.5): While pressing the Ôkey, drag anywhere
inside the window itself to scroll the contents. A great time saver,
because you can now scroll in two directions at once (instead of having
to use first one scroll bar, and then the other).
You can also Control-click in this area (Mac OS 8.x) to make a pop-up
menu appear at your cursor tip, offering an array of commands for
adjusting your window’s view — turning it into a list view, for example.
OS
8.5
OS
8
OS
8.5
CASE HISTORY
Free book winner (and ruthless proofreader)
Martin Fuhrer succinctly solved a Mac mystery
we’re frequently e-mailed about: why the free
space shown at the top of a disk’s window
doesn’t seem to agree with the amount of stuff
actually on the disk. Come along with us now as
we join Martin’s account already in progress:
I recently downloaded a shareware thing called
Flags of the World, which is nothing more than a
collection of hundreds of folders, each with a
different flag picture pasted in as a custom icon,
as explained in Chapter 1 of Mac Secrets, 4th
Edition.
When I copied these folders onto a freshly
formatted floppy, the size info strip in the
window claimed that 611K of space was being
taken up — by a collection of empty folders! The
Size column of the list view asserted that the
Flags of the World folder, which houses all the
other folders, was taking up — yikes — only 2K.
It appears that list views, then, do not calculate
the disk space taken up by custom icons. Mine
was an extreme example, but the moral of the
story: If in doubt, trust the size information strip
at the top of the window, and ignore whatever
the size column has to say.
Missing Kilobytes of the World
4040-8/5 ch01.F 11/3/98 4:01 PM Page 19

Mac OS 8 window stunts
Along with its newer look and snazzier features (see Chapter 6), Mac OS 8
introduced a few wild new ways to massage your windows. After conducting
extensive focus-group studies with Mac users, Apple’s designers concluded
that the average person needed help organizing icons — after all, who among
us doesn’t have a mess of icons sitting out on our desktops for easy access?
The solution to the problem came in two parts: pop-up windows and spring-
loaded folders.
Pop-up windows
Want easy access to your frequently used windows — but don’t want them
actually sitting out on your screen, taking up space?
Then turn them into pop-up windows, as shown in Figure 1-12. When a
window has been pop-upped, only its tab peeks out from the bottom of your
screen. Click the tab to make the window spring upward into view. The pop-
up window’s real value: when you click anywhere outside this window, or
when you double-click something inside it, the window snaps shut into a tab
automatically. You never have to clean up after yourself.
Figure 1-12: Click a pop-up window tab (left) to make the window’s contents jump up
(right).
You can turn an open window into a pop-up in either of two ways:
■Choose View ➪as Pop-up window.
■Drag a window (by its title bar) down, down, and down toward the
bottom of your screen — until you see the dotted outline change shape to
look like the tab it’s destined to become.
There’s only one difference between these two methods: When you let the
Mac create your pop-up windows, it places each newly created tab tightly
adjacent to the next one, left to right across your screen. When you make a
window, you can place its tab anywhere you feel like — just drag it directly
into position.
OS
8
20 Part I: System Software Revealed
■ ■
MACWORLD MAC SECRETS • 4040-8/5 • ch01.F • Chapter 1 • FINAL • VB/EAP • 10/21/98 • p.20
MACWORLD MAC SECRETS • 4040-8/5 • ch01.1 • Chapter 1 • Proof 1 • SH • 10/01/98 • p.20
4040-8/5 ch01.F 11/3/98 4:01 PM Page 20
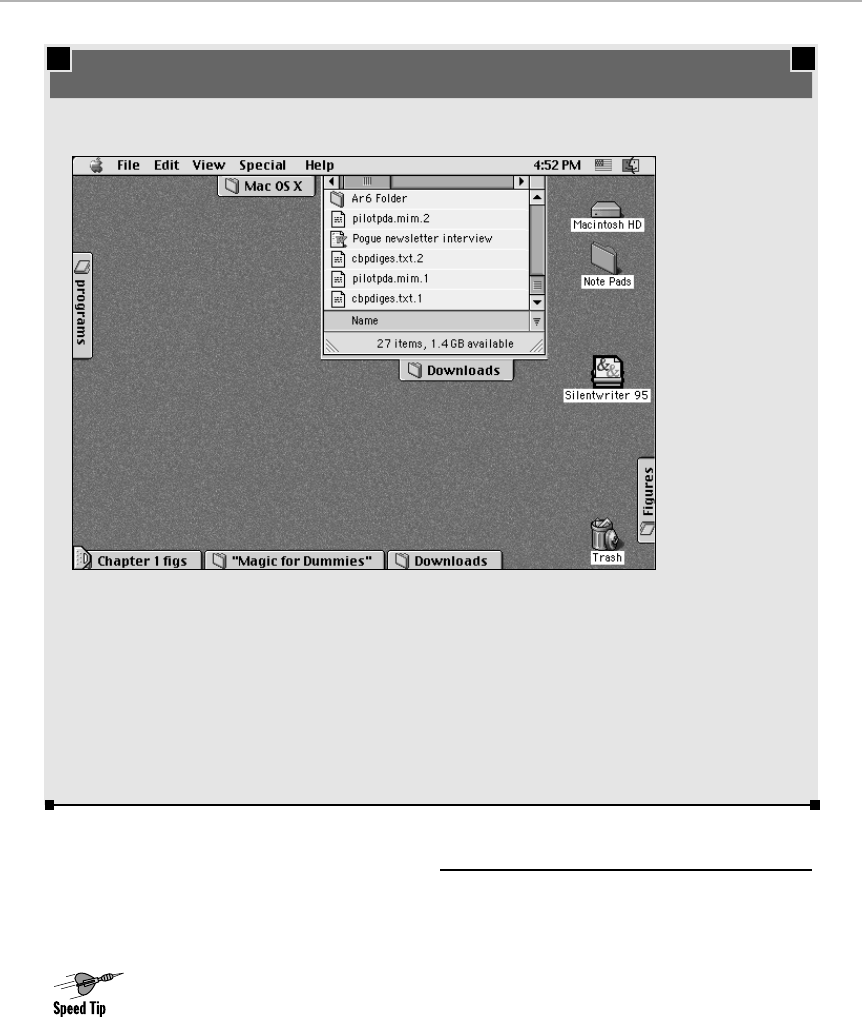
Pop-up Window Secrets
■
Drag to open
If you want to place an icon inside a pop-up window, there’s no need to expand
the window first. Just drag a file onto a pop-up window’s
tab
at the bottom of the
screen. The window pops open for you. As soon as you let go (to leave the icon
inside the window) — or as soon as you change your mind in mid-drag and move
the icon back out again — the window collapses back into its tabbed state.
Chapter 1: Your First Software: The Finder 21
■ ■
MACWORLD MAC SECRETS • 4040-8/5 • ch01.F • Chapter 1 • FINAL • VB/EAP • 10/21/98 • p.21
MACWORLD MAC SECRETS • 4040-8/5 • ch01.1 • Chapter 1 • Proof 1 • SH • 10/01/98 • p.21
TRUE FACT
Pop-down, pop-out, pop-up windows
As we’ve mentioned, the purpose of pop-up
windows is to give Mac users quick access to
frequently used stuff — without having to leave
icons out on the desktop.
We were surprised and delighted to learn, in
fact, that in the early, beta-test versions of Mac
OS 8, you could create these pop-up tab/
windows on any edge of the screen, as shown
above! They could spring out of the sides, the
top, the bottom — anywhere.
Subsequent focus-group members, alas, found
all that tabbing and popping too confusing;
eventually, Apple’s designers settled on bottom-
feeding pop-ups only. Too bad, we say; we
would have loved to have tabs everywhere we
want to be.
4040-8/5 ch01.F 11/3/98 4:01 PM Page 21
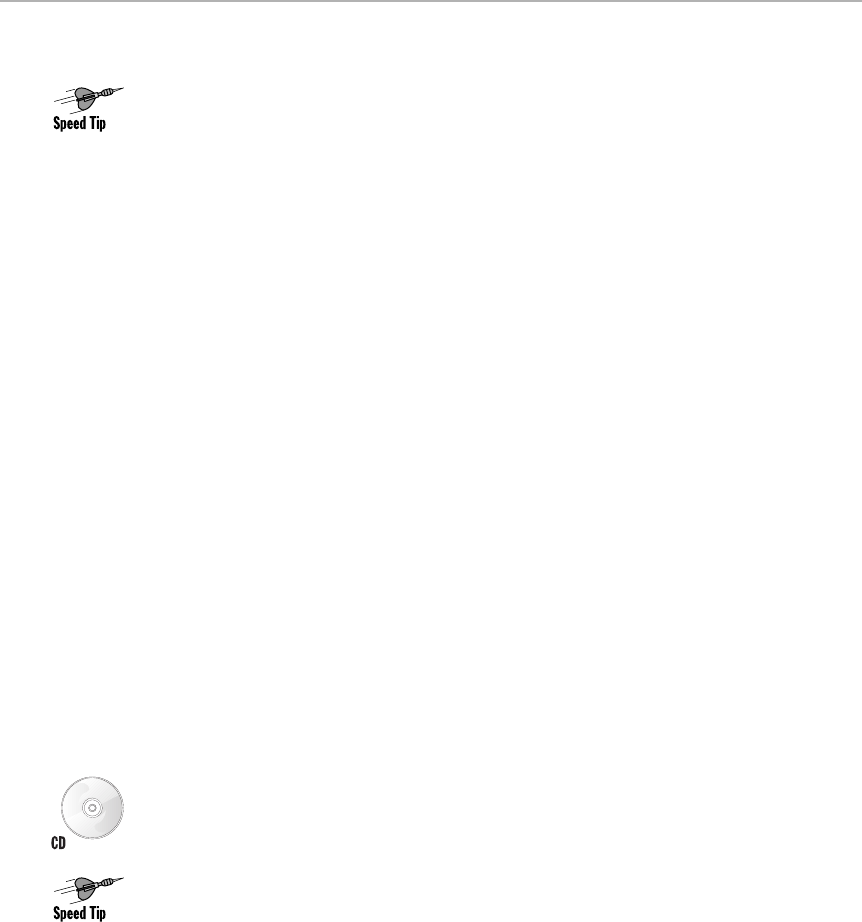
Close shortcut
When you’ve finished working with a pop-up window, you can snap it back down
to the bottom of the screen by pressing command-W — the same old keystroke
you use to close regular windows.
Of course, all that does is take your pop-up windows back down to the bottom
edge of the screen. If you want to get rid of them entirely, the magic keystroke is
Ô-Option-Shift-W. That one closes
all
windows of
every
kind, both traditional and
pop-up, leaving your screen clean, clear, and window-free.
Expand with a click
Don’t bother closing one pop-up window to make room for another. Expanding
one pop-up window (with a single click on its window tab) automatically
collapses the previous window, keeping things tidy.
To maximize the benefits of this one-click window switching, make your windows
tall and narrow
before
collapsing them the first time. Then position the window
tabs far enough apart so that you’ll be able to see (and click) the collapsed tabs
even when another pop-up window is expanded.
The program launcher
So what, exactly, can you do with pop-up windows? One of the best ideas is to
create a software launching bay. Stuff a window with aliases of all the programs
you use regularly. Put them in a list view. Make the window tall and skinny — and
then pop-up-ize it, as shown in Figure 1-12.
From now on, you’ll have instant access to your frequently used programs —
and, as with all pop-up windows, the “drawer” of programs slams shut after you
double-click one of the files inside it, leaving only the tidy tab behind.
This system works great when it comes to drag-and-dropping documents onto your
programs. For example, suppose you’ve got a
.sit
(StuffIt) file you downloaded
from the Internet. As you can read in Chapter 27, StuffIt Expander (included on
the CD-ROM with this book) is the ideal decoder for downloaded files.
In this case, then, just drag the downloaded file
onto the tab
of your
program-launcher window. It obediently pops up; continue your drag onto
the Expander icon; then let go. The file decompresses instantly, the window
slams shut into a tab, and you’ve got no folders or windows to clean up when
the deed is done.
22 Part I: System Software Revealed
■ ■
MACWORLD MAC SECRETS • 4040-8/5 • ch01.F • Chapter 1 • FINAL • VB/EAP • 10/21/98 • p.22
MACWORLD MAC SECRETS • 4040-8/5 • ch01.1 • Chapter 1 • Proof 1 • SH • 10/01/98 • p.22
4040-8/5 ch01.F 11/3/98 4:01 PM Page 22
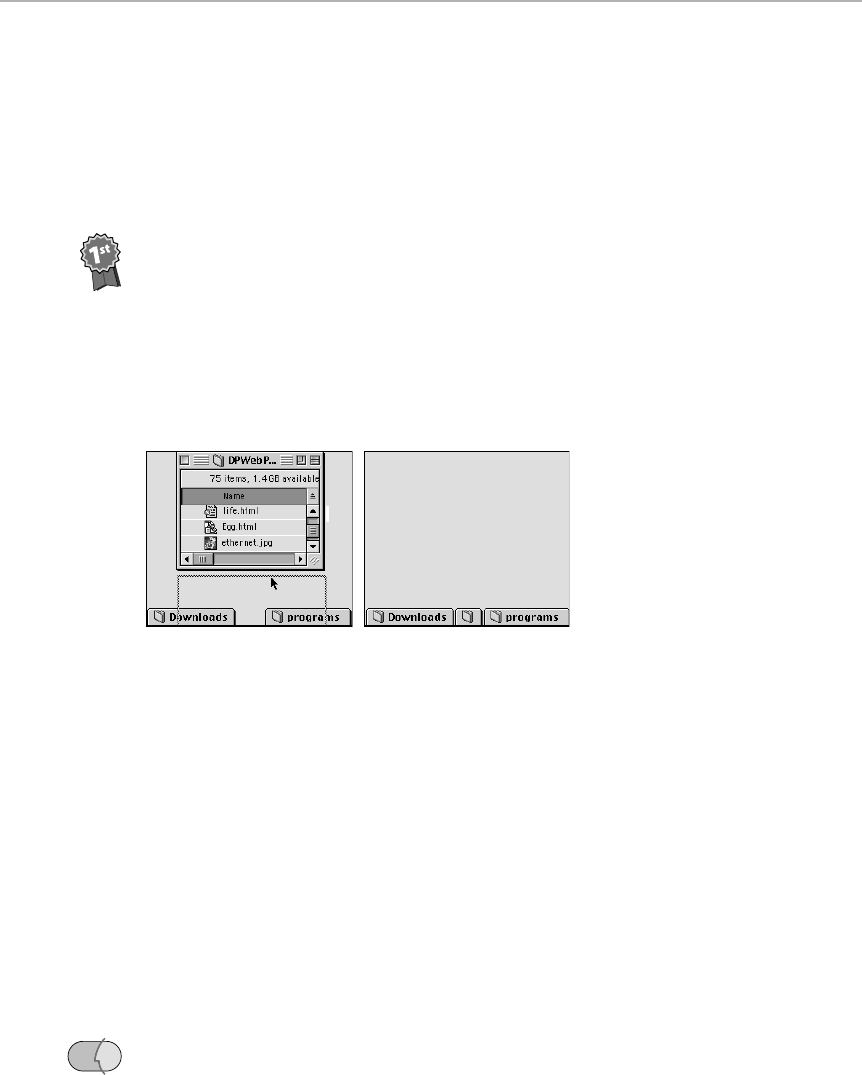
Chapter 1: Your First Software: The Finder 23
■ ■
MACWORLD MAC SECRETS • 4040-8/5 • ch01.F • Chapter 1 • FINAL • VB/EAP • 10/21/98 • p.23
MACWORLD MAC SECRETS • 4040-8/5 • ch01.1 • Chapter 1 • Proof 1 • SH • 10/01/98 • p.23
The skinniest pop-up tab
As we’ve noted, you can make a pop-up window either using the View menu’s
“as Pop-up window” command or by dragging a window to the bottom of the
screen. The latter method gives you control over where the tab goes — but
neither method gives you control over the
size
of the tab. You get a tab exactly
as long as the window’s name — no shorter. That’s too bad if you want to cram
more tabs across your screen than their names permit.
That’s where free book winner Steve Alper’s trick comes in. To make a super-
skinny pop-up window tab, first drag it high enough so that it turns back into a
normal window. Drag the remaining tabs about a half-inch apart.
Now drag your open window’s title bar down into that gap, as shown in Figure
1-13. Even though the dotted outline indicates that a big wide tab is about to be
born, let go of the mouse. Sure enough, the Mac creates a new mini-tab, only as
wide as the gap you left it. (If the tab is
really
narrow, “…” is all you get by way
of title). You can even drag that mini-tab around at this point — it stays small.
Figure 1-13: How skinny can you go? Make a narrow gap between tabs (left), and then drag
a new window into the gap. It fits (right).
One window, front and center!
Ever want to close all Finder windows except the one in which you’re working?
Here’s a quick way. Turn your current window into a pop-up window. Now Option-
click the close box of any other open window, which makes
all
normal Finder
windows close (as you’ll read later in this chapter). Finally, drag the pop-up
window back upward until it becomes a normal window once again — in this
case, the
only
open window, just as you desired.
Spring-loaded folders
The other Mac OS 8 window-management innovation was
spring-loaded
folders.
This feature lets you burrow deeply into nested folders — without having to open
a bunch of windows as you go — or close them all after you’re finished.
OS
8
Contest
Winner
4040-8/5 ch01.F 11/3/98 4:01 PM Page 23

There are two ways to use spring-loaded folders:
■Dragging a file. When you drag an icon on top of a disk or folder, and you
keep your finger pressed on the mouse button, the folder springs open into
a full window, enabling you to drop a file directly into a nested folder. Using
this technique, you can actually place an icon into a folder within a folder
within a folder — with a single drag. When you release the mouse, all the
windows you’ve opened (except the final one) snap shut again.
■The click-and-a-half. You can also burrow into multiple nested folders even
if you’re not dragging an icon — you might do so just to see what’s in some
nested folder, for example.
To do this, point to a disk or folder icon and do a
click-and-a-half
— that is,
push the mouse button down-up-down, and leave it down. The window
opens; now, keeping your finger down, move the cursor over a folder icon in
this window. And so on. You can continue opening window after window as
long as you keep your finger down on the mouse button. When you arrive at
the window you ultimately intended to reach, let go; all the windows except
this innermost one snaps shut behind you.
You control the speed of this feature (or turn it off entirely) by choosing Edit ➪
Preferences.
And here we have a conundrum. If you set the speed of the spring-loaded folders
too high, you’re likely to open all kinds of windows
accidentally —
that is, folder
A opens, and before you even know what’s happening, your still-hovering mouse
opens folder B (which it happens to be resting over). Yet if you set the speed to
medium or low, the feature takes too long to kick in when you
want
it to: you sit
there staring at the little magnifying-glass icon, just waiting for something to
happen.
Our sneaky little workaround: Set the slider (in Edit ➪Preferences) to its fastest
setting. And then, to avoid accidentally opening some subsequent window, get
into the habit of
shooting for the strip
— that is, jerk your mouse to the title bar
(or info strip) at the top of the window. Once there, you can pause, catch your
breath, and take a look around your newly opened window; up here, your cursor
can’t trigger any more window-openings.
Once you’ve got your bearings, dive back down into the list of folders — and
repeat the process.
Finder Window Secrets
■
Drag a window without bringing it forward
When two Finder windows overlap, you can bring the rear window forward (make
it active) by clicking any visible part of it. But you knew that.
Worth
Learning
24 Part I: System Software Revealed
■ ■
MACWORLD MAC SECRETS • 4040-8/5 • ch01.F • Chapter 1 • FINAL • VB/EAP • 10/21/98 • p.24
MACWORLD MAC SECRETS • 4040-8/5 • ch01.1 • Chapter 1 • Proof 1 • SH • 10/01/98 • p.24
4040-8/5 ch01.F 11/3/98 4:01 PM Page 24

If you want to move a rear window
without
bringing it to the front, press the Ô
key as you drag it. The window stays to the rear.
Reader Neil Thorne, in fact, discovered a logical extension of this trick in Mac
OS 8.x — you can also move a window (without bringing it to the front) by Ô-
dragging any of its
edges.
In many ways, that’s a much more useful trick than
the title-bar-moving trick; the grabbing possibilities for moving a window are
greatly multiplied.
The golden Option-key window trick: folders
There are several ways to open a folder. You can double-click, of course, or you
can use any of the keyboard shortcuts outlined here. No matter how you open a
folder, however, remember that the Option key is your anti-window-clutter power
tool — any time you press Option as you open a window, the
previous
window
closes itself.
This even works if you’re just
switching
to a window that’s
already
open — by
double-clicking an open-folder icon. In fact, in System 7.5.3 through 8.1, it even
works if you’re double-clicking something from the list of stuff found with a Find
File search; Option-click, and the Find File program quits itself.
The golden Option-key window trick: programs
Our automatic window-closing Option-key trick also works when you’re opening a
program
. Open its icon with the Option key down, and the window it’s in closes
automatically.
Worth
Learning
OS
8
Chapter 1: Your First Software: The Finder 25
■ ■
MACWORLD MAC SECRETS • 4040-8/5 • ch01.F • Chapter 1 • FINAL • VB/EAP • 10/21/98 • p.25
MACWORLD MAC SECRETS • 4040-8/5 • ch01.1 • Chapter 1 • Proof 1 • SH • 10/01/98 • p.25
CASE HISTORY
Some of the best discoveries about the Mac OS
come from Mac Secrets readers — whether
they’re hoping to get a free book out of the deal
or just interested in the betterment of mankind,
we can’t say.
But we were heartened by this observation from
free book winner Leigh Blankenship:
Just a few minutes ago, I was flying through my
drives and folders using that charming, spring-
loaded, click-and-a-half technique.
I put the magnifying glass cursor on a broken
alias (the alias of a folder that’s no longer on the
drive), and was stunned to see a help balloon
pop up. (Balloon help was not turned on.) It told
me that the folder alias couldn’t be opened
because the original couldn’t be found.
How smart! No error message, no OK button to
dismiss — just the help balloon. That’s good
interface design!
Free book winner Peter Fine, in fact, discovered
that a similar help balloon pops up if you’re
dragging something onto the alias of a folder
that came from a Zip, Jaz, or other disk that’s
not currently inserted.
Balloon help-and-a-half
4040-8/5 ch01.F 11/3/98 4:01 PM Page 25
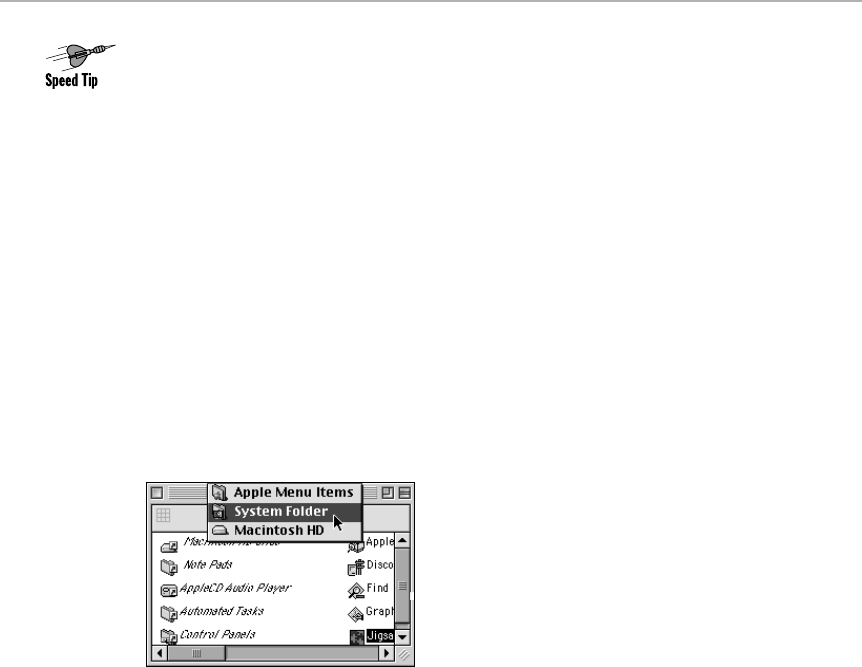
You can open a highlighted icon in any one of the following four ways:
■Press Ô-O
■Press Ô-down arrow
■Choose Open from the File menu
■Double-click the icon
The Option-key trick works in conjunction with any of those methods.
Backtrack to an outer window
Suppose you double-click the System Folder to open its window. Then you
double-click the Control Panels folder to open
it.
You can jump back to the
System Folder window (or any enclosing window) by pressing the Ôkey as you
click the current window’s title. If you keep the mouse button pressed, a pop-up
menu appears, from which you can choose the name of any folder you had to
open in reaching your current location (see Figure 1-14).
Figure 1-14: The hidden folder-backtracking menu.
Useful combo trick: Use this keyboard trick
with
the golden Option-key trick
described earlier — in other words, press
both
Option and Ôas you choose a
window name from the title bar pop-up menu. The result: You backtrack to an
outer window
and
close the window you were in.
Where is this folder?
You find yourself viewing the contents of a window called System Folder.
But you have two hard disks, each with a System Folder. Which System
Folder are you perusing?
The quick way to find out is to Ô-click the title of the window (and hold the
button down), exactly as described in the previous secret. In this case, of
course, you’re not trying to backtrack through windows; you just want to know
which disk contains the folder at which you’re looking. The disk name always
appears at the bottom of the pop-up menu.
26 Part I: System Software Revealed
■ ■
MACWORLD MAC SECRETS • 4040-8/5 • ch01.F • Chapter 1 • FINAL • VB/EAP • 10/21/98 • p.26
MACWORLD MAC SECRETS • 4040-8/5 • ch01.1 • Chapter 1 • Proof 1 • SH • 10/01/98 • p.26
4040-8/5 ch01.F 11/3/98 4:01 PM Page 26

Of course, if the mystery folder is on the
Desktop,
you’re out of luck. No secret
pop-up menu pops up if you Ô-click the title bar, because whatever’s on the
Desktop isn’t inside
any
other folder. In this case, you have only one hope of
determining what disk this folder belongs to: File ➪Get Info on it.
Close — and backtrack —
windows from the keyboard
We’re willing to bet that you’re not using this trick right now — but that once
you’ve tried it, you’ll use it all the time: If you burrow into several consecutive
nested folders, you can, of course, return to an outer folder using the hidden
title-bar pop-up menu as described in the previous secret. But you can do the
same thing from the keyboard by pressing Ô-up-arrow to return, one nested
folder at a time, to the outer window.
Or, once again, combine this trick with the golden Option-key trick described
previously; that is, press Option-Ô-up arrow to close the window you’re in
and
jump to the previous window.
Jump to the Desktop level from the keyboard
If a folder or disk window is open, you can select the Desktop level by pressing
Ô-Shift-Up arrow. (Why would you want to select the Desktop level? To select or
open an icon on the Desktop, such as a disk icon you want to eject, without
having to use the mouse.)
Combating the Mac OS 8 Window bug
If you’re running Mac OS 8, you’ve probably noticed this small but irritating bug.
Every now and then you open a folder full of files, only to find that the window is
empty
(or has some files missing). For a split second you panic — and then it
dawns on you that the window
isn’t
empty; you’re actually looking at the
bottom
of the window, below the end of the list of files. Scroll back up to the top, and
you find all your folders and files waiting exactly where they’re suppose to be.
The solution: When this happens, press the Home key. Your faulty window
obediently jumps to the very top of the window.
Quicker CD window opening
You’ll find out later in this chapter why some disc windows — especially large-
capacity ones filled with color icons, such as CD-ROM discs — seem to take so
long to appear on your screen when you insert them. The Mac must take
inventory of those discs’ invisible
Desktop files
, learning about the size, shape,
and colors of every single custom icon on board, before being able to proceed
with displaying them in the disc’s window.
OS
8
Strange
But True
Strange
But True
Chapter 1: Your First Software: The Finder 27
■ ■
MACWORLD MAC SECRETS • 4040-8/5 • ch01.F • Chapter 1 • FINAL • VB/EAP • 10/21/98 • p.27
MACWORLD MAC SECRETS • 4040-8/5 • ch01.1 • Chapter 1 • Proof 1 • SH • 10/01/98 • p.27
4040-8/5 ch01.F 11/3/98 4:01 PM Page 27
Of course, this delay is introduced because those windows have been
programmed to open automatically when you insert the CD. If you’re in a hurry,
keep the Option key pressed while inserting the CD. You’ve just prevented the
CD window from opening at all. (The same trick works for other kinds of
removable disks.)
Sure, that means you can’t see what’s
on
the CD — but we’re presuming you’re
intending to play some game, like Marathon 2 or You Don’t Know Jack, that
doesn’t
require
the CD window to be open (just that the CD be inserted).
Militarizing your open windows
This chapter makes abundantly clear that you can move or resize your windows
— with a lot of effort.
If you install OneClick, the macro/toolbar program that comes with this book,
however, you can reduce that effort to — well, one click. On the System Bar (the
Control Strip-like strip at the bottom of your screen after you install OneClick),
you’ll find a window-management tile. Its pop-up menu offers two useful
commands: Tile Windows (which neatly rearranges all open windows into equally
sized, evenly spaced pans) or Cascade Windows (which overlaps them in a
diagonal line). Either command beats manually lining them up any day. (See
Chapter 22 for more on OneClick.)
Notes on “windowshading”
Deep in its heart, Apple must really believe in the
windowshading
principle — the
notion that it’s often handy to “roll up” a window so that only its thin title bar
remains on the screen, thus revealing whatever’s beneath. This feature has
been kicked around from version to version of the system software — from a
WindowShade control panel in System 7.5, to the Appearance control panel of
Mac OS 8 through 8.5. Mac OS 8.x gives you two different ways to roll up a
window — you can click the “collapse box” in the upper-right corner, for example,
or double-click the title bar (if you’ve turned on that option in the Appearance
control panel).
But you know what? They’re on to something. We find ourselves windowshading
windows more and more frequently. For example, we often windowshade an
outgoing e-mail’s window in Eudora, Outlook Express, or Claris Emailer — so that
we can drag-and-drop a file from our desktop onto that windowshaded title bar
(to enclose the file as an e-mail attachment).
The Option key does something pretty wild in Mac OS 8 and later: If you’re
pressing it when you click the collapse box,
all
open Finder windows roll up (see
Figure 1-15). (If you’ve got the sound feature turned on, the resulting sound
effects —
whit, whit, whit, whit! —
makes this quite a display.)
OS
8
28 Part I: System Software Revealed
■ ■
MACWORLD MAC SECRETS • 4040-8/5 • ch01.F • Chapter 1 • FINAL • VB/EAP • 10/21/98 • p.28
MACWORLD MAC SECRETS • 4040-8/5 • ch01.1 • Chapter 1 • Proof 1 • SH • 10/01/98 • p.28
4040-8/5 ch01.F 11/3/98 4:01 PM Page 28
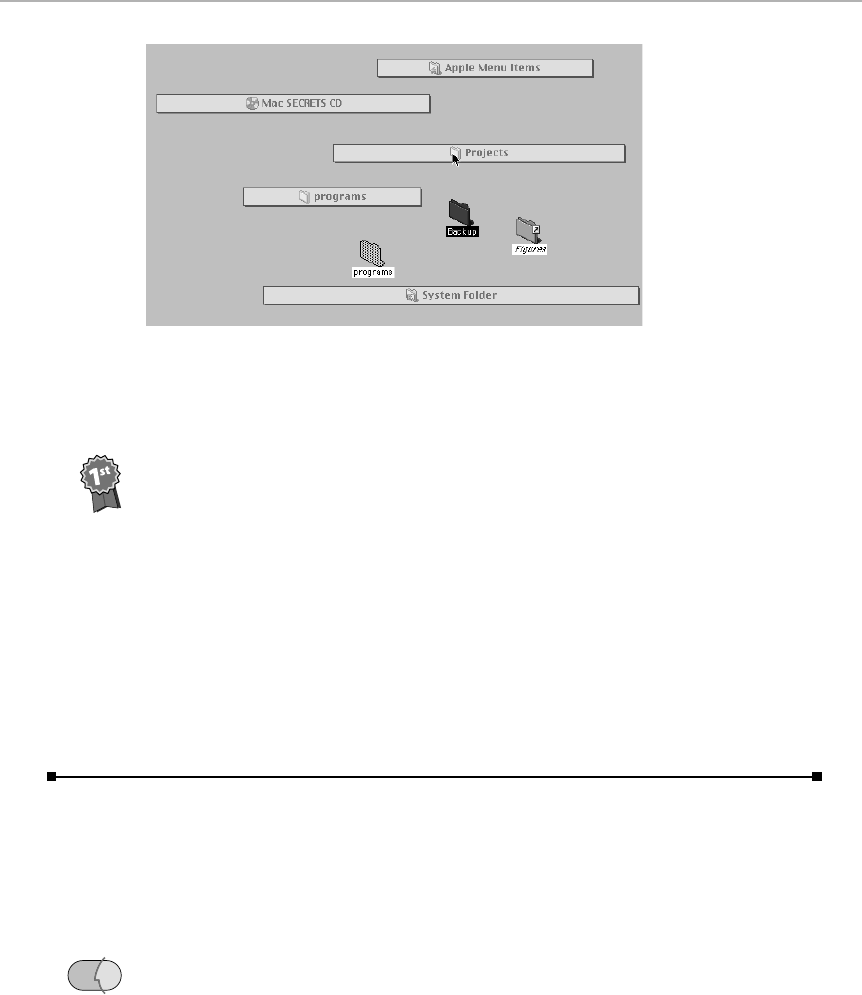
Figure 1-15: With a single click, you can “roll up” all your windows at once. You can even
drag icons onto windowshaded windows — such as moving the Backup folder into the
Projects window, as shown here.
Free book winner Rajan Munshi discovered, in fact, that you can actually drag
icons into a windowshaded folder by dragging icons onto the collapsed title bar!
(In Mac OS 8.5, the title-bar icon darkens to indicate that the Mac understands
what you’re doing.) That’s handy, he notes, because thanks to Murphy’s Law, it
seems as though the icon you want to put into a window seems always to be
behind
it.
On a roll, Rajan also pointed out that he’s gotten additional mileage out of our
“Drag a window without bringing it forward” secret (see “Finder Windows
Secrets,” earlier in this chapter). He discovered that he can windowshade an
inactive
window by Ô-double-clicking its dimmed title bar — without making it
active! (This works only if you’ve got the double-click-to-roll-up-a-window feature
turned on, in Mac OS 8.x’s Appearance control panel or System 7.5/7.6’s
WindowShade control panel.)
The Point of Views: Lists, Icons, and Buttons
Now that you know every conceivable way to manipulate windows, it’s time
to consider what’s in them. Files and folders, sure — but they may be
displayed in a nearly infinite variety of different ways.
For example, the default view on every new Mac is the icon view, with each
file represented by a double-clickable icon that can be freely dragged around
within a window or on the desktop. By switching to a list view, you can view
the contents of folders and disks in an organized, sortable table format. Mac
OS 8 introduced yet another view option — the button view, in which each file,
folder, and disk appears as a smoothly beveled, platinum-colored button that
requires only a single click to open.
OS
8
Contest
Winner
Chapter 1: Your First Software: The Finder 29
■ ■
MACWORLD MAC SECRETS • 4040-8/5 • ch01.F • Chapter 1 • FINAL • VB/EAP • 10/21/98 • p.29
MACWORLD MAC SECRETS • 4040-8/5 • ch01.1 • Chapter 1 • Proof 1 • SH • 10/01/98 • p.29
4040-8/5 ch01.F 11/3/98 4:01 PM Page 29
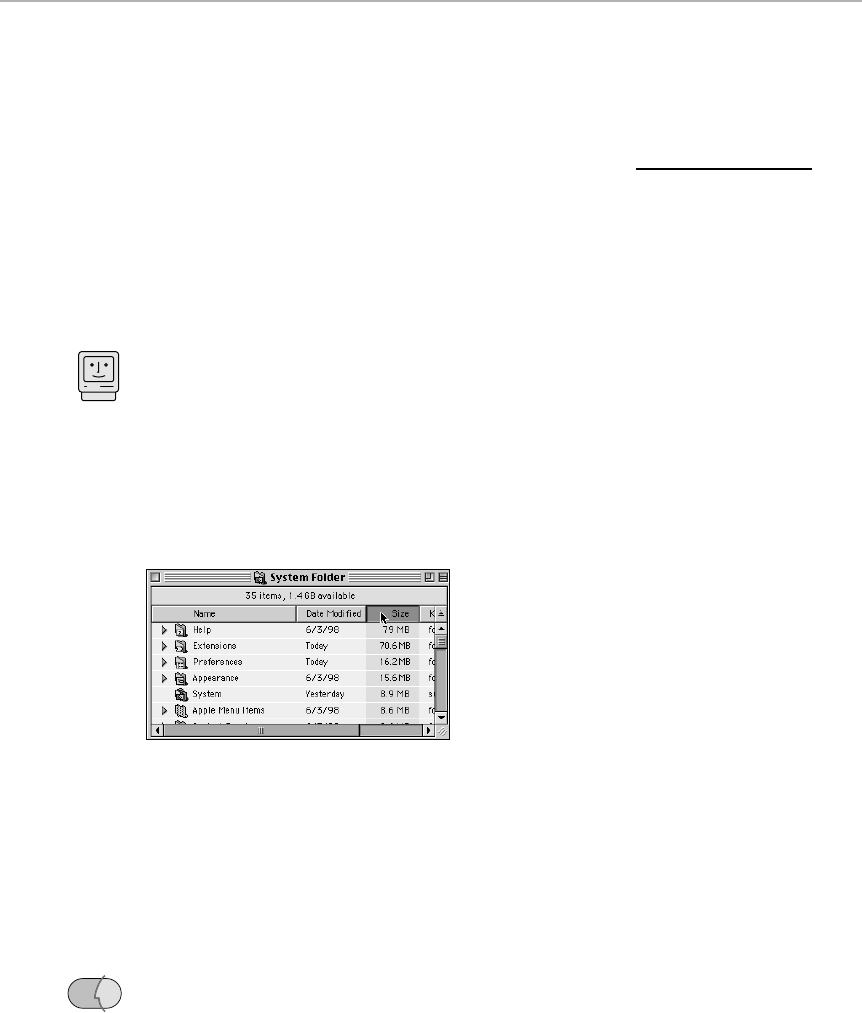
You can switch between these views using the Finder’s View menu or — even
better — by Control-clicking inside of a window, using Mac OS 8’s contextual
pop-up menus. (See Chapter 2 for all the details on these menus.)
List, Icon, and Button View Secrets
■
Viewing your icons as an outline
Icon views are pretty, but list views are generally more useful; in a list view
you can determine, at a glance, a file’s size, the date you last modified it, and
other details.
To switch to a list view, choose “as List” from the View menu. You can change
how the list is sorted — by file name, file size, and so on — by choosing the
appropriate command from the Sort List sub-menu. (In System 7.x, use any of
the bottom commands in the View menu — everything except “by Icon” and “by
Small Icon” — to display your icons as a sorted list.)
No need to return to the View menu every time you want to change the sort
order, however. It’s much quicker to click the appropriate
column heading
in the
window (see Figure 1-16).
Figure 1-16: A quicker way to re-sort files in a window. Click Size, for example, to see
largest files listed first.
Reversing the sort order
For years, the Finder only sorted list views in one direction — from biggest to
smallest, most recent to oldest, and so on. There was no way to reverse the
list, so that the smallest files (or oldest ones) were listed at the top of the list.
And that’s the way it was — until Mac OS 8.1. Under OS 8.1 and later, every
window has a tiny, subtle sort-order button located just above the top arrow on
the vertical scroll bar (see Figure 1-17). Clicking the button flips the “pyramid”
indicator upside-down — and reverses the sort order in any list view.
OS
8
Mac Basics
30 Part I: System Software Revealed
■ ■
MACWORLD MAC SECRETS • 4040-8/5 • ch01.F • Chapter 1 • FINAL • VB/EAP • 10/21/98 • p.30
MACWORLD MAC SECRETS • 4040-8/5 • ch01.1 • Chapter 1 • Proof 1 • SH • 10/01/98 • p.30
4040-8/5 ch01.F 11/3/98 4:01 PM Page 30
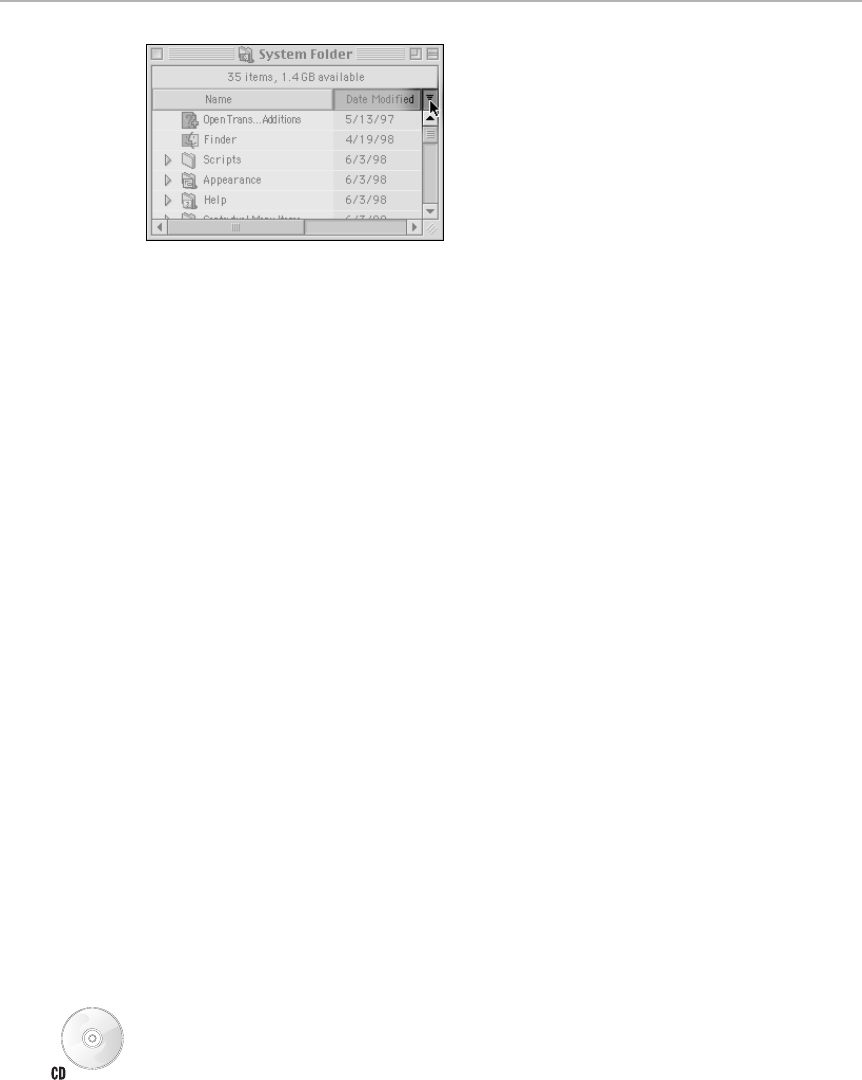
Chapter 1: Your First Software: The Finder 31
■ ■
MACWORLD MAC SECRETS • 4040-8/5 • ch01.F • Chapter 1 • FINAL • VB/EAP • 10/21/98 • p.31
MACWORLD MAC SECRETS • 4040-8/5 • ch01.1 • Chapter 1 • Proof 1 • SH • 10/01/98 • p.31
Figure 1-17: The Sort Order button, better known as the pyramid button, lets you reverse the
order of a list-view sort.
Hiding list-view columns
When you examine files in a list view, you’re probably used to seeing their
names, kinds, modification dates, and so on. Of course, the more columns of
information you see, the wider your windows are, and the more trouble it is to
see two full windows side by side.
That’s why we make it a point to hide columns of info we never use (the Labels
column comes to mind). To ditch unnecessary columns, choose Views ➪View
Options (Mac OS 8 and later) or open the Views control panel (System 7.x).
There you’ll discover checkboxes that control what columns of information
appear in your list views. Click to deselect a check box — and turn off the
corresponding list-view information.
Once you hide a column, you can no longer sort your files by that criterion; “by
Label” disappears from the Sort List submenu, for example, when you turn off
Labels in the Views Options dialog box. Still, it’s space you wanted, and it’s
space you get.
Columns: Skinnier, wider, or rearranged
For years, Mac fans have ached for a way to change the
widths
of the columns
in list views. A glance at Figure 1-17, for example, shows the problem: If the file
names are short, the window is much wider than necessary. We’ve also longed
for a way to
rearrange
the columns — putting the date column to the left of the
“Kind” column, for example. And then there’s the verbose date format:
“Saturday, September 23, 1998”—for goodness’ sake, you’d need a 35-inch
monitor just to see one of these windows with all the columns displayed!
Wouldn’t life be sweeter if we could just see the dates displayed like “9-23-98”?
Fortunately, a solution awaits if you’re using Mac OS 8 or later. The shareware
program CoolViews, included with this book, lets you adjust list views in all of
those ways and more (see Figure 1-18).
4040-8/5 ch01.F 11/3/98 4:01 PM Page 31

Of course, if you’ve got Mac OS 8.5, you don’t need CoolViews (at least, not as
direly). For the first time in Mac history, this OS lets you drag a column divider to
change the column’s width — and drag the
name
of the column — the column
header — to rearrange it completely.
Figure 1-18: Who can see the problem with waste space in the top window? Anybody?
Anybody? Fortunately, CoolViews or Mac OS 8.5 saves the day with adjustable columns and
shorter dates (bottom).
Short, shorter, and shortest date formats
“Ah,” but we can hear you protesting after having read the previous secret, “but
CoolViews lets us have short date formats, like 4/4/99 instead of April 4, 1999!
There’s no checkbox to do this, even in Mac OS 8.5! We love this feature!”
So does Apple. You’re right that there’s no checkbox for this option — but in Mac
OS 8.5, there’s something even better. The Mac
automatically
switches to the
short-date format — just as soon as you drag the Date column narrow enough to
demand the shorter format.
In fact, the Finder does CoolViews one better: if you
continue
to shrink the Date
column, your window adopts an even
more
concise date format — it lops off the
time, as shown at the bottom of Figure 1-18. Now
that’s
handy.
Tomorrow never comes
We’re fond of Mac OS 8 and later, in large part because of its grace notes of
intelligence and class. Example: your list views default to showing creation and
modification dates as “Today” and “Yesterday” (instead of showing whatever the
date is in written-out form).
But it doesn’t hit you just how hard Apple’s programmers worked until you try
this little stunt: Open your Date & Time control panel. Change the date to
tomorrow’s date. Create a new document or folder — and then change the Date
& Time control panel
back
to today’s date.
OS
8.5
OS
8.5
32 Part I: System Software Revealed
■ ■
MACWORLD MAC SECRETS • 4040-8/5 • ch01.F • Chapter 1 • FINAL • VB/EAP • 10/21/98 • p.32
MACWORLD MAC SECRETS • 4040-8/5 • ch01.1 • Chapter 1 • Proof 1 • SH • 10/01/98 • p.32
4040-8/5 ch01.F 11/3/98 4:01 PM Page 32
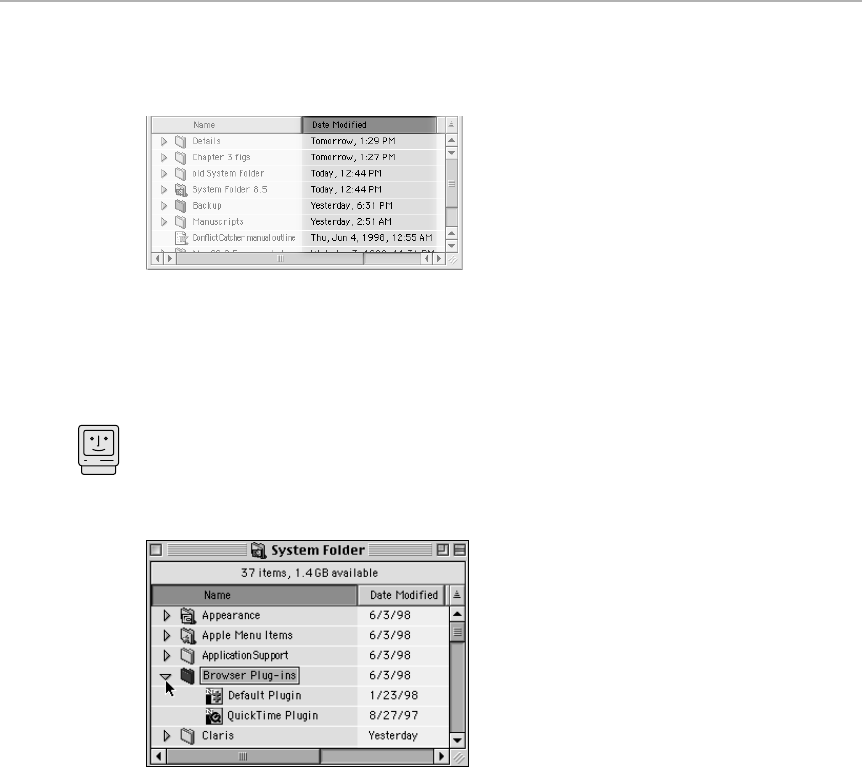
Incredibly enough, when you view your new folder or document in a list view,
you’ll see the sight shown in Figure 1-19 — it’s been date-stamped “Tomorrow!”
Figure 1-19: We’ve always known that Apple is a forward-thinking company — but this is
ridiculous.
The complete list-view keyboard navigation guide
You probably already know what happens when you click the little triangle —
known by Apple as a
disclosure triangle,
but by the programmers as a
flippy
triangle
— next to a folder name: It turns sideways, and the contents of its folder
are listed in an indented format, like an outline (see Figure 1-20).
Figure 1-20: Click the triangle to see the contents of a folder without having to open the
folder. You can also select the folder and press Ô-right arrow.
It’s more efficient to manipulate list-view folders by typing on the keyboard,
however. Here’s how:
■Type the first few letters of a file name to select it.
■Press the up-arrow or down-arrow keys to select icons higher and lower in
the list.
■Press Tab to highlight the next file alphabetically. (Shift-Tab takes you to the
previous
file alphabetically.)
■After a folder is highlighted, press Ô-right arrow to expand it (to see what’s
inside). Press Ô-left arrow to collapse it again.
Mac Basics
Chapter 1: Your First Software: The Finder 33
■ ■
MACWORLD MAC SECRETS • 4040-8/5 • ch01.F • Chapter 1 • FINAL • VB/EAP • 10/21/98 • p.33
MACWORLD MAC SECRETS • 4040-8/5 • ch01.1 • Chapter 1 • Proof 1 • SH • 10/01/98 • p.33
4040-8/5 ch01.F 11/3/98 4:02 PM Page 33
■Press Ô-Option-right arrow to expand a selected folder
and
all folders
nested inside it. Press Ô-Option-left arrow to collapse a selected folder and
all folders within it.
■Although this isn’t exactly a mouse-free technique, you can also collapse or
expand a folder
and
its subfolders by Option-clicking the triangle.
■Press the Page-Up or Page-Down keys (if you have an extended keyboard)
to scroll the list of files up or down by a windowful. Press Home to jump to
the top, or End to jump to the bottom.
■If you’re looking for a file at the end of the alphabet, it’s annoying that
typing its first letter makes the file appear at the
bottom
of the window, so
that you can’t see what comes after it alphabetically. The solution is to
press the End key and
then
type the first letter.
The all-at-once folder-collapsing trick
Combine the folder-expanding and -collapsing shortcuts described in the
previous secret with the Edit ➪Select All command, and you’ve got a powerful
tool for quickly cleaning up your list-view windows.
Suppose you have a window containing dozens of expanded folders nested
within expanded folders — a very, very long list view. Rather than scrolling
endlessly up and down through such a list to find an item, you can collapse the
whole thing down to a manageable size with just two keystrokes. First press Ô-A
to select all the files in the list. Then press Ô-Option-left-arrow to collapse every
selected folder simultaneously.
Now then: When you try this collapse-them-all-at-once maneuver, whatever you
do, don’t accidentally press Ô-Option-
down
-arrow instead of Ô-Option-left-arrow.
As it turns out, Ô-Option-down-arrow is the shortcut that
opens
folders and files.
If you have hundreds of files selected and use that keystroke, your Mac will
obediently attempt to open every selected program, folder, and document! You’ll
have no choice but to watch helplessly as document after document opens on
your screen — until the Mac runs out of memory and gives up on the whole thing.
Slow-opening folder syndrome
If you expand all the folders and nested folders in a window and then close the
window, you may find yourself waiting several seconds or longer the next time
you try to open that window. That’s because the Finder must mentally
reconstruct the entire visual “outline” of all those nested folders before opening
the window; you’re forced to sit there and wait until the display is ready.
In System 7-point-anything, here’s a great antidote: Press Shift
just after
double-
clicking the folder. Magically enough, the window opens—fast—with all its
folders collapsed. Alternatively, you can press Shift while choosing Open from
the File menu (or while pressing Ô-O).
Strange
But True
Worth
Learning
34 Part I: System Software Revealed
■ ■
MACWORLD MAC SECRETS • 4040-8/5 • ch01.F • Chapter 1 • FINAL • VB/EAP • 10/21/98 • p.34
MACWORLD MAC SECRETS • 4040-8/5 • ch01.1 • Chapter 1 • Proof 1 • SH • 10/01/98 • p.34
4040-8/5 ch01.F 11/3/98 4:02 PM Page 34

We’ve always loved this secret, but evidently Apple didn’t. The Shift-key trick
disappeared in Mac OS 8.
Showing free disk space in list views
Mac OS 8 always displays disk-space information in a strip at the top of each
window. The strip shows how many items are in the window and how much
space is left on the disk (see Figure 1-21).
Figure 1-21: Whether or not this strip of disk information appears is up to you.
In System 7.x, this extra little bit of disk info always appears in icon view, but
not in list views — unless you turn it on. Open your Views control panel and turn
on the “Show disk info in header” checkbox.
The default window-view scheme
In System 7.x, of course, certain aspects of window views — the icon sizes, the
“calculate folder sizes” setting, and other options — are universal, applying to
every folder on your entire hard drive. However, you
can
specify, on a window-by-
window basis, whether you see your icons as a list or as icons.
But what determines the list-view criteria for a new folder that’s never been
opened? How will its window appear? By icon? By name?
Answer: A new folder takes on the View-menu setting of the window in which it
was
created.
If you create a new folder in your main hard drive window, which is
viewed by small icon, the new folder’s window will also appear by small icon.
In Mac OS 8, Apple changed things quite a bit: Thanks to the View ➪View
Options command, you can now set up different view options (including icon
size, “calculate folder sizes” option, and so on) independently for
every window
on your hard drive.
Some people love this flexibility; others resent the requirement to set up their
favorite settings independently for each window. But the same rule holds true:
Any new folder takes on all the Mac OS 8 view settings of the window in which
you created it.
Still, there are ways to change all your windows (in Mac OS 8 and 8.1) to some
standard set of settings. You can use CoolViews or Finder View Settings, for
example, both of which are included on the CD-ROM with this book.
OS
8
Worth
Learning
Chapter 1: Your First Software: The Finder 35
■ ■
MACWORLD MAC SECRETS • 4040-8/5 • ch01.F • Chapter 1 • FINAL • VB/EAP • 10/21/98 • p.35
MACWORLD MAC SECRETS • 4040-8/5 • ch01.1 • Chapter 1 • Proof 1 • SH • 10/01/98 • p.35
4040-8/5 ch01.F 11/3/98 4:02 PM Page 35
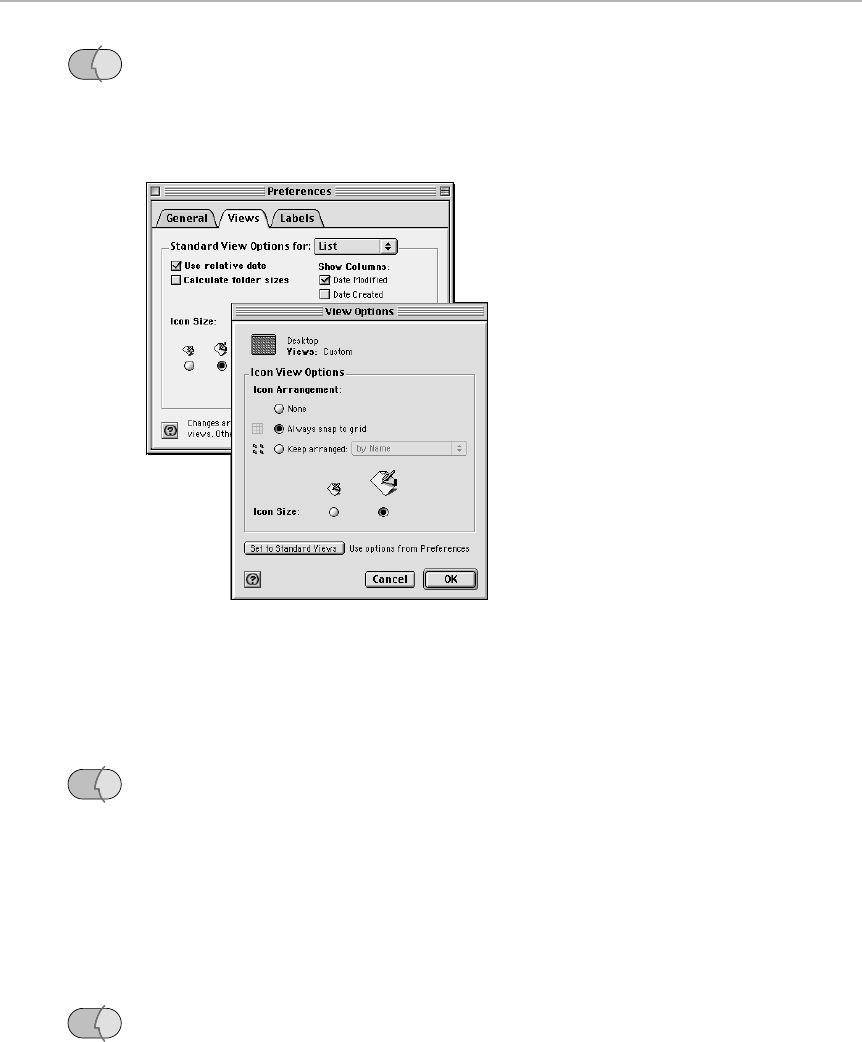
36 Part I: System Software Revealed
■ ■
MACWORLD MAC SECRETS • 4040-8/5 • ch01.F • Chapter 1 • FINAL • VB/EAP • 10/21/98 • p.36
MACWORLD MAC SECRETS • 4040-8/5 • ch01.1 • Chapter 1 • Proof 1 • SH • 10/01/98 • p.36
Fortunately, Apple finally got the hint in Mac OS 8.5. Now you can set up your
preferred window-view settings by choosing Edit ➪Preferences ➪Views tab.
Thereafter, you can open any folder, choose Views ➪View Options, and click the
Set to Standard Views button (see Figure 1-22). Doing so applies your preferred
standard settings to that window (and any new ones you create).
Figure 1-22: In Mac OS 8.5 and later, you can establish your favorite views settings in the
Edit ➪Preferences box (left). Later, you can choose to “synchronize” any window with those
standard views (by opening the window’s View Options box, right).
Small icons and buttons on the Desktop
In the old days of System 7, it was impossible to view the icons on your Desktop
in anything other than full-size icon view. Not so with Mac OS 8. Now you can
display desktop icons in small icon view (by choosing View ➪View Options and
selecting the smallest-sized icon) — a sight you’ve probably never seen before.
(You still can’t make a
list view
out of the icons on your Desktop, although you
can come close — use the smallest-icon view and — while you’re still in the View
Options dialog box — turn on one of the Keep Arranged options.)
Button view secrets
The
button view
debuted in Mac OS 8. Choose View ➪as Buttons, and every icon
in the active window (or the desktop) turns into big, E-Z launch jumbo buttons —in
which a single click, not a double-click, opens the corresponding file, folder, or disk.
All of this is great for the very young, very inexperienced, or easily overwhelmed.
Everybody’s happy now except for one niggling detail:
How do you move a button
OS
8
OS
8
OS
8.5
4040-8/5 ch01.F 11/3/98 4:02 PM Page 36
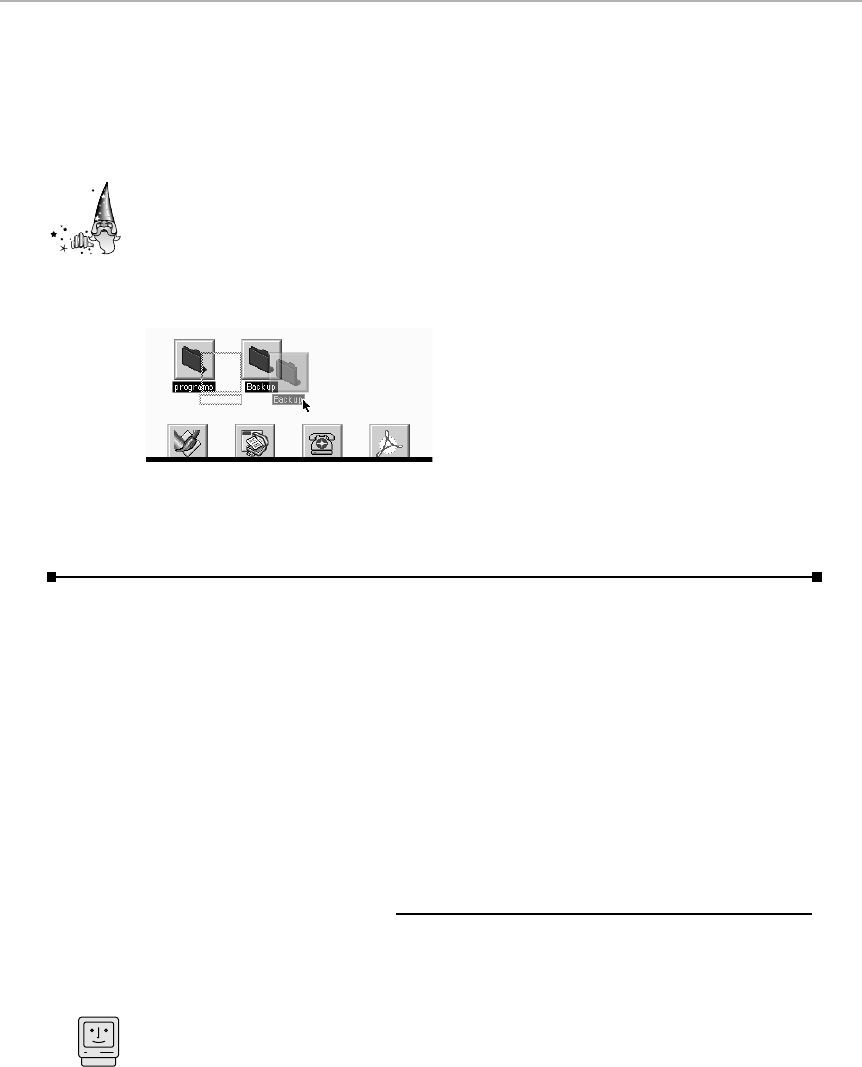
Chapter 1: Your First Software: The Finder 37
■ ■
MACWORLD MAC SECRETS • 4040-8/5 • ch01.F • Chapter 1 • FINAL • VB/EAP • 10/21/98 • p.37
MACWORLD MAC SECRETS • 4040-8/5 • ch01.1 • Chapter 1 • Proof 1 • SH • 10/01/98 • p.37
icon?
After all, you can’t drag a button — the moment you click it, you launch it.
Does this mean you can never file, move, or trash anything in button view?
Not if you know our little secret. Turns out you can select or drag a button-view
icon
by its name,
as shown in Figure 1-23. In fact, you can even Shift-click the
names of several buttons, thus making it possible to move them en masse.
At our Macworld Expo seminars, in fact, we’ve befuddled more than one
audience member by showing a line of button icons at the bottom edge of our
screen, also as shown in Figure 1-23 — so low that the icon names don’t even
appear. And now you know how we did it: By selecting those icons, plus another
one higher on the screen, whose file name we used as a handle to move the
whole group down below the screen’s edge!
Figure 1-23: The mystery of the movable buttons: Drag by the file name (top). Bottom: Our
hidden-name launching bay at the bottom of the screen . . . how’d we do that?
Copying Files
Has it ever struck you as odd that there’s no command for copying a file?
After all, making a copy of a file is one of the Finder’s primary duties, and yet
the method for copying a file to another disk by dragging it is something you
just have to know. By scanning the menus, you’d never discover the secret.
Apple has improved copying speeds with each successive version of its system
software. For example, Mac OS 8 introduced one of the biggest improvements in
years: the ability to start multiple copying jobs at once — and then, while they
churn away in the background, to get on with your work in other programs.
File Copying Secrets
■
Copying a file to another folder
You already know how to copy a file onto a different disk: Just drag its icon to
the other disk’s icon or window. But dragging an icon from one place to another
on the
same
disk doesn’t copy the file — it only moves the file.
If you want to
copy
a file on the same disk, press Option while you drag.
Mac Basics
Strange
But True
4040-8/5 ch01.F 11/3/98 4:02 PM Page 37
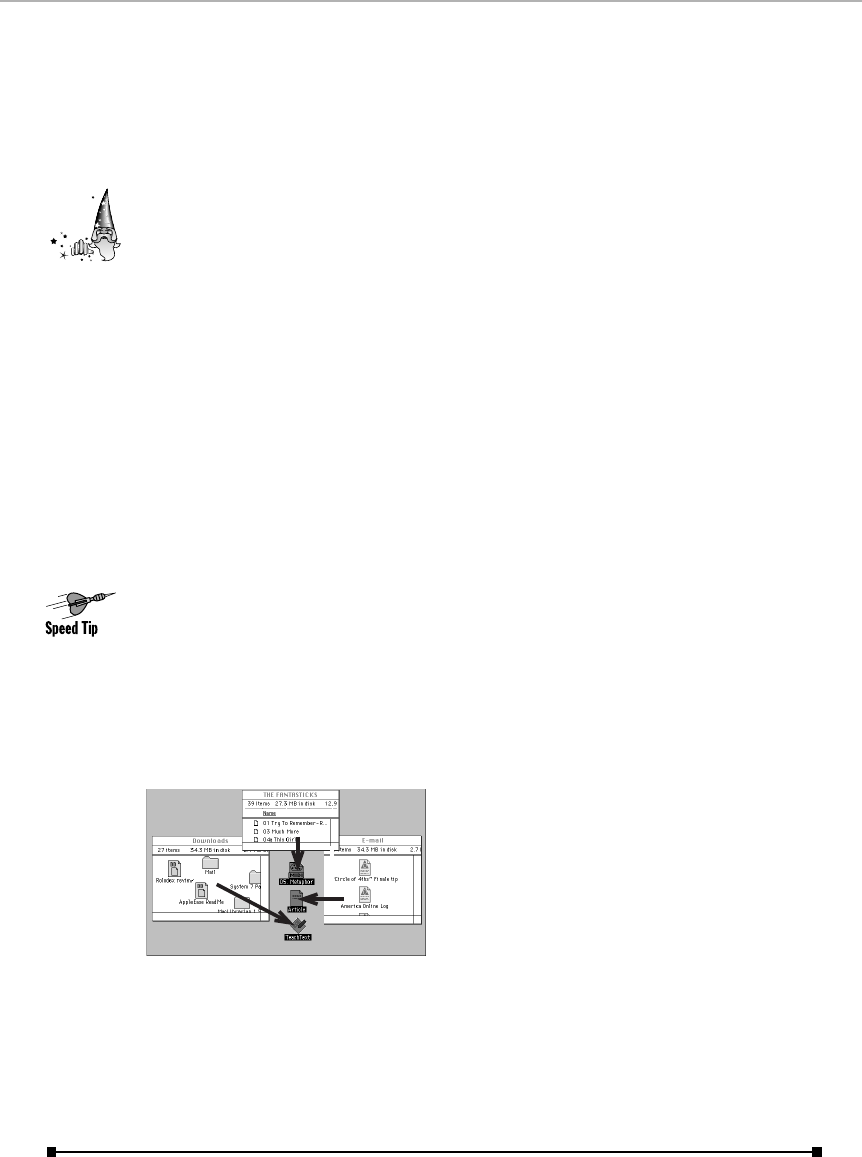
Copying from a disk onto the desktop
Suppose you want to copy a file or folder from a Zip disk (or floppy, or Jaz, or
whatever) onto your hard drive. If you’re like thousands of Mac users before you,
your instinct might be to drag it out of the Zip disk’s window directly onto the
desktop.
But as reader Simon Kornblith points out, doing so doesn’t make a copy at all!
You’ve merely placed the file’s icon onto the desktop — of the
Zip disk.
When
you eject the disk, the icon vanishes from your desktop!
The trick, then, is to
Option-drag
an icon from the Zip as you drag onto your
desktop. That makes a new copy — on your
hard drive’s
desktop.
Changing the “copying files” message
While the Finder is copying files, you see a dialog box that says “Items
remaining to copy: 2.” If you’re feeling particularly grumpy one day, you can
change this message to say something different (“All I ever do is copy,” for
example). You can do this with ResEdit, as described in Chapter 21.
Manipulating icons from different
windows at once
If you think about it, you can’t really select icons from different windows at once.
As soon as you click an icon in one window, you deselect any highlighted icons
in other windows.
There’s a simple solution: Drag the icons to the Desktop first, even if the icons
come from different disks (see Figure 1-24). From there, you can select all at
once. After they are selected, you can drag them to the Trash, open them all (by
pressing Ô-O), or make a backup by dragging them all to a different disk.
Figure 1-24: You can manipulate many icons at once, even if they come from different disks;
just deposit them on the Desktop first.
When you’re finished, you don’t have to drag the icons painstakingly back to their
original folder locations. Just select all the icons, then choose Put Away (Ô-Y)
from the File menu.
Strange
But True
38 Part I: System Software Revealed
■ ■
MACWORLD MAC SECRETS • 4040-8/5 • ch01.F • Chapter 1 • FINAL • VB/EAP • 10/21/98 • p.38
MACWORLD MAC SECRETS • 4040-8/5 • ch01.1 • Chapter 1 • Proof 1 • SH • 10/01/98 • p.38
4040-8/5 ch01.F 11/3/98 4:02 PM Page 38

Your First Database: The Desktop File
A database, of course, is an organized collection of repetitive information: a
phone book, a set of flash cards, or FileMaker Pro, for example. Your Mac
comes with a free database called the Desktop.
There’s a Desktop database file on every single disk: floppy or hard,
removable or fixed. But normally, the Desktop file is invisible; you, the user,
aren’t meant to interact with it. In theory, the Desktop database is used
exclusively by the computer itself.
What’s in the Desktop file
The Desktop file stores information about the icons in your Finder universe:
what their icon pictures look like; which file icons were created by which
programs; what comments you typed into their Get Info boxes (the window
that appears when you select an icon and choose Get Info from the File
menu); what shape and position your windows are in; and how icons are
displayed in each window (by name, by icon, and so on). Each time you
insert a disk, the computer takes a moment to study the icons on it and
record their vital statistics in your invisible Desktop database.
The presence of the Desktop database accounts for a number of mystifying
events that may occur in your computing career:
■You’ve never in your life seen a completely empty disk. Even a brand-
new, freshly-initialized floppy disk starts out with 1K in disk. At last you
know what’s taking up that room: your invisible Desktop database.
■You view a disk using a program — such as FileTyper (included on the
CD-ROM with this book), Find File (see Chapter 3), ResEdit, or even Word
— that can “see” all files on your disk, including invisible files. And you
see files called Desktop DB and Desktop DF.
Contrary to popular Mac-industry myth, DB doesn’t stand for Database. It
actually stands for Desktop BNDL. (BNDL is the four-letter code for bundle,
which is what they call the relationship between a certain program or
document and its icon. If you start getting blank generic icons on your
Desktop one day, you know something’s happened to your bundles — and,
thus, something’s corrupted in your invisible Desktop DB database.)
DF stands for Desktop Files. This is the database that records what files
you have and where they are (in whatever folders).
Hereafter, though, we’ll refer to this pair of files collectively as the
Desktop file.
■When you put a floppy, Zip disk, or CD into your disk drive, its icon never
pops up onto the screen immediately. It always takes a few seconds.
That’s the time the Finder needs to consult the new disk’s Desktop file to
find out what the disk’s icons should look like.
Mac Basics
Chapter 1: Your First Software: The Finder 39
■ ■
MACWORLD MAC SECRETS • 4040-8/5 • ch01.F • Chapter 1 • FINAL • VB/EAP • 10/21/98 • p.39
MACWORLD MAC SECRETS • 4040-8/5 • ch01.1 • Chapter 1 • Proof 1 • SH • 10/01/98 • p.39
4040-8/5 ch01.F 11/3/98 4:02 PM Page 39

■Every Mac book, manual, and magazine urges you never to turn off the
Mac simply by flipping off the power switch. Instead, you’re exhorted to
use the Shut Down command in the Special menu, or press the on/off key
on the keyboard, which always makes you wait several seconds before
the screen goes dark.
Now you know the reason: The Mac must take a moment to update its
database, reflecting any changes you made to the status of your files.
Curing a troubled Desktop file
Each time you insert a floppy disk or introduce new files onto your hard
drive, your Desktop files store the pictures of any icons they’ve never seen
before. File icons aren’t insignificant in terms of disk space. A typical Mac
program has not one, but nine different icons. They come in three sizes —
corresponding to the three possible icon sizes in the Finder (see
Chapter 2) — and in three degrees of colorfulness, depending on your
monitor setting.
As all these icons are memorized (along with the Get Info comments you add
to them and other information), the Desktop files grow. Over the months,
they take up more and more space on your hard drive, and the potential for
corruption (getting information mixed up) increases. After a while, several
unpleasant symptoms may interfere with your work:
■The icons for certain files may appear as generic, featureless pictures
(see Figure 1-25). In this case, your Desktop database has lost track of
which icon pictures belong with which icons.
Figure 1-25: When the Desktop file gets confused, a file that once had a pretty picture icon
(left, before) may turn into a generic icon (right, after).
■Windows take longer to open, files take longer to launch, and your
system seems decidedly slower than it used to be. At this point, your
Desktop files have to wade through so much superfluous information
that you’re actually having to wait for them.
■When you start up the computer, the Finder seems to take a long time to
appear. Once again, the Desktop files are having to struggle to produce
the information needed to display your windows and icons correctly.
In these instances, the solution to overgrown Desktop files is simple: Force
the Mac to reinspect the current status of icons and windows and create a
new, slimmer Desktop database that’s free of obsolete information. This
process is called rebuilding the Desktop. Here’s the best-known method:
40 Part I: System Software Revealed
■ ■
MACWORLD MAC SECRETS • 4040-8/5 • ch01.F • Chapter 1 • FINAL • VB/EAP • 10/21/98 • p.40
MACWORLD MAC SECRETS • 4040-8/5 • ch01.1 • Chapter 1 • Proof 1 • SH • 10/01/98 • p.40
4040-8/5 ch01.F 11/3/98 4:02 PM Page 40

Restart the Mac. (For added safety, Apple suggests doing so with the Shift key
down, although we have yet to see any evidence that turning your extensions
off makes any difference.)
As it’s starting up, press the Ôand Option keys down until you’re finally
asked if you want to rebuild the Desktop on the disk in question. If you have
more than one disk — for example, a hard drive and a floppy in the disk drive
— you’ll be asked separately about each one.
Desktop File Secrets
■
Better rebuilding I: Use TechTool
When you rebuild the Desktop, you do great things for your Mac’s overall health.
There’s only one circumstance under which rebuilding (using the Ô-Option
keystroke) doesn’t work wonders: when the file itself is corrupted. Because Ô-
Option simply updates your existing Desktop database, your rebuilt file will
maintain whatever corruption already existed.
Better idea: Completely
delete
the Desktop files instead of just patching over
them. That’s a particular skill of TechTool, an important utility included with this
book, as well as Conflict Catcher 8 (see the appendix). The next time the Mac
starts up, these utilities generate a clean, virginal Desktop file, corruption-free.
(They can even preserve your Get Info comments while they do the deed!)
Better rebuilding II: Use Find File
If you want to trash your outgoing Desktop file completely, as described in the
previous secret, but you’re stranded somewhere without your
Secrets
CD and
TechTool, try this trick.
Mac Basics
Chapter 1: Your First Software: The Finder 41
■ ■
MACWORLD MAC SECRETS • 4040-8/5 • ch01.F • Chapter 1 • FINAL • VB/EAP • 10/21/98 • p.41
MACWORLD MAC SECRETS • 4040-8/5 • ch01.1 • Chapter 1 • Proof 1 • SH • 10/01/98 • p.41
MACINTOSH SECRET
We always thought the most relaxing way to
rebuild the Desktop file was to hit Ôand Option,
click OK, then go away for vacation. But reader
Yinche Tanada rebuilds his Desktop to the
strains of Carly Simon. He writes:
I always have been a “rebuild the Desktop file”
fan. But I get bored waiting for it to get done.
Here’s how I conquer my boredom.
First, I open the Apple CD Audio Player desk
accessory. Next I switch to the Finder and
“force quit” the Finder by pressing Ô-Option-
Esc. As the Finder is quitting, I press Ô-Option
to rebuild the Desktop. I click OK.
Finally, I click the Apple CD Audio Player window,
click Play, and sit back to enjoy the music. Voila:
it’s a pleasure to rebuild the Desktop.
A more relaxing way to rebuild the Desktop
4040-8/5 ch01.F 11/3/98 4:02 PM Page 41

Launch your Find File program (from the Amenu, for example; see Chapter 3
for more on the Find program). While pressing Option, choose Visibility from the
lower-left pop-up menu. From the pop-up menu, choose Invisible, as shown in
Figure 1-26.
Figure 1-26: You can nuke your own Desktop files by searching for them, even though
they’re invisible.
In the resulting list of found files, you’ll get an enlightening surprise: look at all
the files that lurk, invisible, on your hard drive! Among them are your friends, the
Desktop DB and DF files. Drag them directly to the Trash, acknowledging the
peculiar error message that appears (“You must restart your Macintosh and
immediately empty the Trash” — and look at your weird button selections: OK
and No!).
When your Mac restarts, a new, virgin, smaller, more svelte Desktop file will be
created. All you lose is your corruptions — and, by the way, the Get Info comments
of your files (if any). (See Chapter 2 for details on Get Info and comments.)
The Mac OS Easy Open myth
In 1995, everyone from Apple to your favorite Mac magazines began some
revisionist doctoring of the “rebuild the Desktop” procedure. The official method
now follows:
■Restart the Mac with the space bar down, so that Extensions Manager’s
window appears. (See Chapter 4 for details on Extensions Manager.)
■Turn off all your extensions except Mac OS Easy Open.
■Close Extensions Manager’s window. As the restart proceeds, press Ôand
Option until you’re asked if you want the Desktop file rebuilt. Click OK.
■Restart the Mac with the spacebar down. Turn all your extensions back on.
The reason for these shenanigans: if Mac OS Easy Open is turned off —
ever
—
during a startup (whether with the Shift key or any other method), it forces
another
Desktop rebuild the
next
time you start up. (For the rationale, see Chapter 4.)
But by leaving
only
Mac OS Easy Open on, you supposedly gain the safety of
having extensions off, yet avoid the inconvenience of another rebuild.
42 Part I: System Software Revealed
■ ■
MACWORLD MAC SECRETS • 4040-8/5 • ch01.F • Chapter 1 • FINAL • VB/EAP • 10/21/98 • p.42
MACWORLD MAC SECRETS • 4040-8/5 • ch01.1 • Chapter 1 • Proof 1 • SH • 10/01/98 • p.42
4040-8/5 ch01.F 11/3/98 4:02 PM Page 42
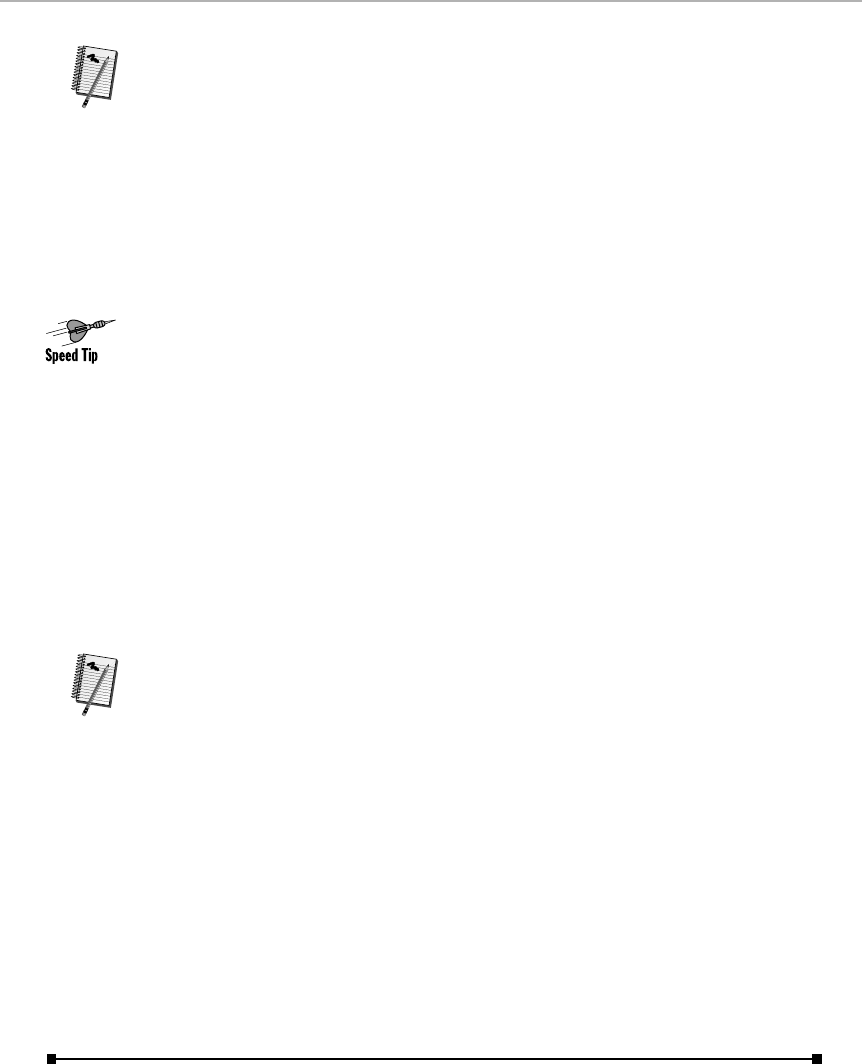
Chapter 1: Your First Software: The Finder 43
■ ■
MACWORLD MAC SECRETS • 4040-8/5 • ch01.F • Chapter 1 • FINAL • VB/EAP • 10/21/98 • p.43
MACWORLD MAC SECRETS • 4040-8/5 • ch01.1 • Chapter 1 • Proof 1 • SH • 10/01/98 • p.43
Our feeling: Mac OS Easy Open is perfectly useful for people who frequently open
text or graphics files whose parent programs they can’t identify (see Chapters 4
and 16 for details). If you don’t find it playing a role in your daily computing
activities, however, consider the benefits of turning it off for good: your Mac
loads faster, you have more RAM available to your machine, and — best of all —
you never have to mess with this ridiculous rebuild-the-Desktop procedure.
Rebuild without restarting
It’s common knowledge, as described previously, that you have to restart the
Mac to rebuild the Desktop file.
Not so. For this time-saving stunt, quit any programs you’re running — except the
Finder. Then press Ô-Option-Esc. Your Mac asks if you’re sure you want to
force
quit
the Finder.
Yes, you’re sure. Click Force Quit and then immediately press the rebuild-the-
Desktop keys, Ôand Option. The Finder relaunches itself and, because you’re
pressing those magic keys, it asks if you want to rebuild the Desktop. You do.
Similarly, if you use At Ease (the desktop-hiding Apple utility designed for
schools or families with kids), you can’t rebuild your Desktop normally as the
Mac is starting up. Instead, choose Go To Finder from the File menu;
now
press
Ô-Option as usual.
De-bloat a removable
To de-bloat a floppy disk (or
any
removable media — Zip, SyQuest, whatever),
you don’t have to restart the computer. Just hold down Ôand Option
as you
insert the disk.
You’ll get the “Rebuild?” dialog box right away.
Generic icons even after rebuilding
If your purpose in rebuilding the Desktop is to restore the color icons to
documents that are appearing with generic blank ones, you’ll probably be
surprised when, time after time, they still show up blank.
Remember, though, that one of the Desktop file’s functions is to associate
documents with the applications that created them. If the parent application —
which is, by the way, where those icons are stored to begin with — is no longer
on your hard drive, rebuilding the Desktop does exactly what it’s supposed to
do. It successfully
strips away
icon images for programs that are no longer
around, resulting in faster, more streamlined Finder behavior. Re-install the
parent program, rebuild the Desktop, and the document icons will reappear.
Worth
Learning
Worth
Learning
4040-8/5 ch01.F 11/3/98 4:02 PM Page 43

44 Part I: System Software Revealed
■ ■
MACWORLD MAC SECRETS • 4040-8/5 • ch01.F • Chapter 1 • FINAL • VB/EAP • 10/21/98 • p.44
MACWORLD MAC SECRETS • 4040-8/5 • ch01.1 • Chapter 1 • Proof 1 • SH • 10/01/98 • p.44
Secrets of the Trash
As everyone knows, you delete a file by dragging its icon to the Trash can (or
by using one of the equivalent commands or keystrokes). The Trash can icon
bulges or overflows to show that something’s inside. As long as the bulge is
there, you can retrieve the file by double-clicking the Trash and dragging the
icon out of the Trash window.
Behind the scenes, though, the Trash resembles a regular folder more than a
trash chute. Any file you drag into the Trash can stay there forever, or until
you choose Special ➪Empty Trash. (Your cheerful authors have met more
than one beginner whose hard drive had mysteriously filled up, even though
they had been diligently discarding old files. They had no clue that every file
they’d ever dragged to the Trash was still sitting there, taking up hard-drive
space, waiting for the Empty Trash command.)
And no wonder: The Trash is a folder — an invisible one. If you need
convincing, look at the contents of your hard drive over a network (while
seated at a different Mac). You’ll see a folder on your disk called Trash. Every
disk has a Trash folder, invisible or not.
Here are several clever tips for customizing the behavior of the Trash.
Trash Secrets
■
How to empty the Trash when files are locked
If you try to empty the Trash while locked files are inside, you’ll get a message
like the one in Figure 1-27. The solution is spelled out for you in the message:
Press the Option key as you choose Special ➪Empty Trash. The Trash, locked
files and all, will be emptied.
ANSWER MAN
Q: I’m trying to empty the Trash, but I get a
message that says “One or more items cannot
be deleted because they are in use.” What’s
going on?
A: It’s telling the truth. You’re no doubt running
more than one program, and you’re trying to
throw away a file that’s open by one of the
programs you’re running. Close the document, or
even quit the program. Then you’ll probably be
able to empty the Trash with no problem. (If not,
see Chapter 36.)
Oh, by the way: holding the Option key while
choosing Empty Trash often succeeds in “letting
go” of the stubborn, “untrashable” item.
That stubborn Trash thing
4040-8/5 ch01.F 11/3/98 4:02 PM Page 44
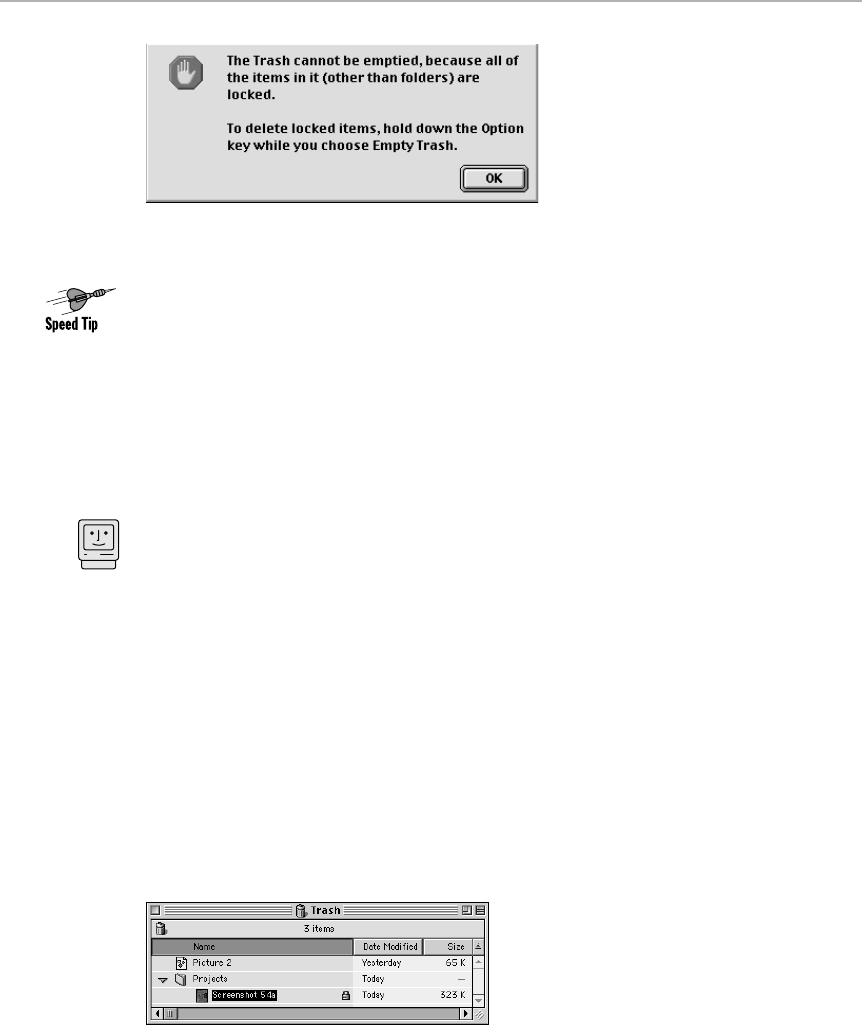
Figure 1-27: What you see when you try to empty the Trash if some of its contents are locked.
But if you
know
that something in the Trash is locked, why even bother with that
error message? Save time by pressing Option the first time; you won’t encounter
any error message at all.
The silence of the Trash
Whenever you choose Empty Trash from the Special menu, the Mac asks you to
confirm your action. “The Trash contains 3 items, which use 542K of space. Are
you sure you want to remove these items permanently?” says the dialog box.
If you prefer not to be bothered with this message each time you empty the Trash,
select the Trash can and choose File➪Get Info. Click the “Warn before emptying”
checkbox so that it’s no longer selected. From now on, no confirmation message.
If you
usually
like the confirmation message, but you want to shut it up
just this
time,
press your Option key while you choose Special ➪Empty Trash.
How to find out which files are locked
When you get a “locked files” message emptying the Trash, you may not always
want to blast your locked files into oblivion by pressing Option. Sometimes you
may want to see what you’re about to delete.
To do so, double-click the Trash can to open it. As shown in Figure 1-28, look for
the tiny padlock icon on the far right of the widened Trash window (System 7.x)
or just after the file’s name (Mac OS 8.x).
Figure 1-28: Find out which files aren’t letting the Trash empty by looking for their padlock icons.
To unlock the file, click one of the locked icons, choose File ➪Get Info, and then
click the Locked check box.
Mac Basics
Chapter 1: Your First Software: The Finder 45
■ ■
MACWORLD MAC SECRETS • 4040-8/5 • ch01.F • Chapter 1 • FINAL • VB/EAP • 10/21/98 • p.45
MACWORLD MAC SECRETS • 4040-8/5 • ch01.1 • Chapter 1 • Proof 1 • SH • 10/01/98 • p.45
4040-8/5 ch01.F 11/3/98 4:02 PM Page 45
Rename, or redraw, the Trash
You may have noticed that the Mac won’t let you rename the Trash can. Nor will
it let you paste in a new icon, as you can for any other file or folder — at least
not in the usual way.
This secret is only a referral to Chapter 21 (ResEdit). There you’ll find the secret
solution to renaming or replacing the Trash icon.
Although you can’t replace the Trash’s icon using the Finder alone, you
can
copy
it — although not from the Trash’s Get Info window, as you’d expect. Instead,
make an alias of the Trash — and File➪Get Info on
that.
You’ll have no problem
copying the alias’s icon.
All about Aliases
Authors of Mac books and manuals have described aliases as remote
controls, beepers, signposts, stand-ins — the metaphors are almost endless.
The point is that although aliases may appear to be duplicates of existing
files, they’re not. They’re just look-alike icons that provide a shortcut back to
the original file they represent. If you make an alias of a folder, for example,
double-clicking the alias opens the original folder — not a copy of it.
That’s why aliases are frequently referred to as pointers. When you double-
click an alias, the alias simply tells the Finder which file, folder, or disk you
want to open and points the way back to the original item, wherever it may
be (see Figure 1-29). That pointer-like quality may be why, in Mac OS 8.5,
Apple differentiates an alias’s icon from its original file’s icon with the
addition of a tiny arrow, as shown in Figure 1-29. (If the little arrow looks
suspiciously like the little arrow on shortcuts, the Windows 95 equivalent of
aliases, you’re right. Was Bill Gates behind this?)
Strange
But True
46 Part I: System Software Revealed
■ ■
MACWORLD MAC SECRETS • 4040-8/5 • ch01.F • Chapter 1 • FINAL • VB/EAP • 10/21/98 • p.46
MACWORLD MAC SECRETS • 4040-8/5 • ch01.1 • Chapter 1 • Proof 1 • SH • 10/01/98 • p.46
ANSWER MAN
Q: Hey, what’s the deal? I’ve got a completely
empty Zip disk. I’m trying to copy a 12MB file
onto it from my hard drive, and the darned thing
tells me there’s not enough room! What gives?
A: Your Zip disk is full. So how come it says 0
items? Because the items on the disk are in the
Trash, which is an invisible folder on the disk.
All you have to do is choose Special ➪Empty
Trash, and everything in the Trash — regardless
of what disks they came from — will be erased.
Your disk will now be truly empty.
Why the Zip’s still not empty
4040-8/5 ch01.F 11/3/98 4:02 PM Page 46
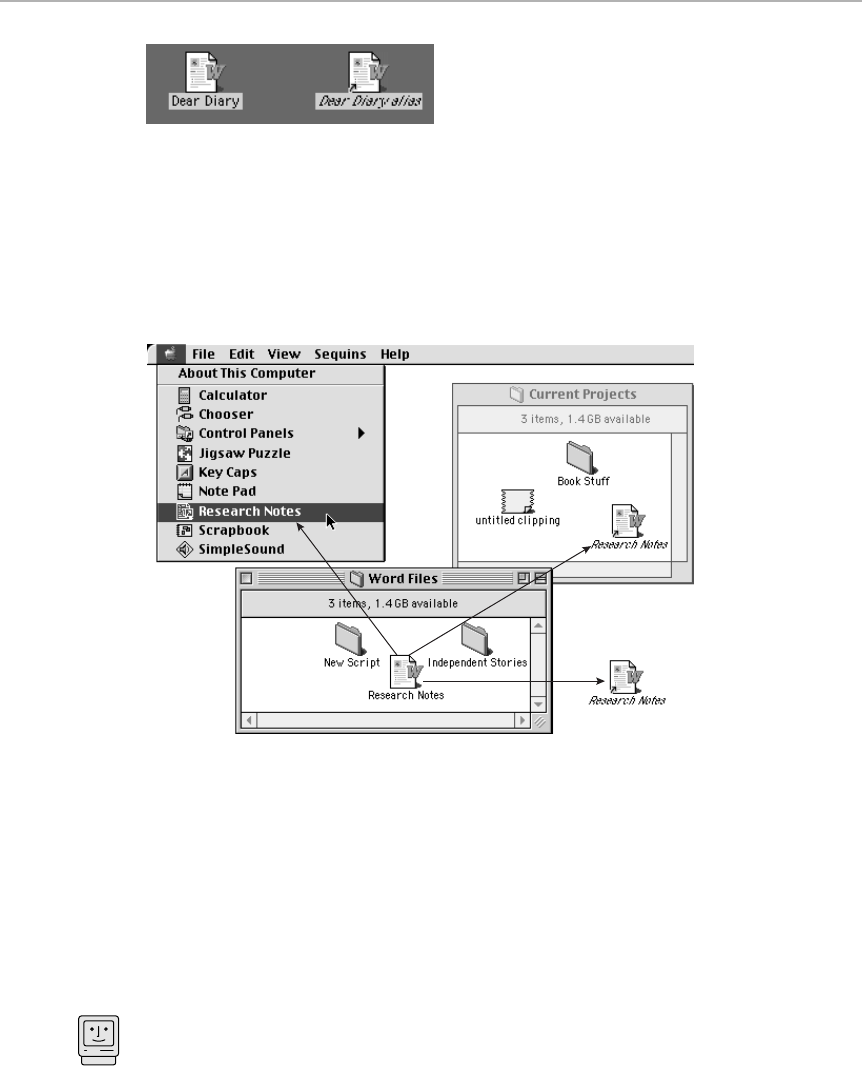
Chapter 1: Your First Software: The Finder 47
■ ■
MACWORLD MAC SECRETS • 4040-8/5 • ch01.F • Chapter 1 • FINAL • VB/EAP • 10/21/98 • p.47
MACWORLD MAC SECRETS • 4040-8/5 • ch01.1 • Chapter 1 • Proof 1 • SH • 10/01/98 • p.47
Figure 1-29: No matter where it is located or how it is renamed, an alias always points the
Finder back to the file from which it was created.
In other words, you can stash a file in several places at once without having
to make multiple copies of the file. You can keep a document or application
neatly tucked away in one folder and place aliases of it in as many different
locations as you like (see Figure 1-30).
Figure 1-30: A Word file with multiple aliases placed in three convenient spots: the Desktop,
the Amenu, and a folder for current projects.
Making an alias
Here’s how you make an alias: Select a disk, file, or folder in the Finder, and
then choose File ➪Make Alias. In Mac OS 8.x, you can also Ô-Option-drag an
icon. Either way, you now see what looks like an exact copy of the original
item, overlapping slightly with the selected icon.
The alias looks identical to the original icon in every way — except that its
name appears in italics, has a little arrow superimposed on it (in Mac OS 8.5
and later), and may have the word “alias” appended to it (unless you made it
by Ô-Option-dragging to a different window). After you create the alias, you
can rename it just like any other icon and drag it wherever you’d like, even to
another disk drive.
Mac Basics
4040-8/5 ch01.F 11/3/98 4:02 PM Page 47

Here are some of the best ways to use aliases to streamline your work:
■An all-time favorite: Add aliases of frequently used applications and
documents to the Amenu. To do this, put the aliases in the Apple Menu
Items folder (located within the System Folder). Because the Amenu is
always available, you have continuous access to the files you use the most.
■Place aliases of files and folders you open frequently right on the Desktop.
■Make aliases of the control panels you use the most and put them in the
Amenu, on the Desktop, on the Launcher (see Chapter 4), or in other
convenient spots. Making an alias of a specific control panel saves you
the step of choosing something from the A➪Control Panels menu.
(It could have been worse. The Control Panels folder listed in your A
menu is itself an alias. If it weren’t there, you’d really have to do some
digging to get to a control panel.)
■Put aliases of the Trash in as many folders as you’d like (see Figure 1-31).
Whenever you have to trash a file, you can just drop it in the nearest
Trash can.
48 Part I: System Software Revealed
■ ■
MACWORLD MAC SECRETS • 4040-8/5 • ch01.F • Chapter 1 • FINAL • VB/EAP • 10/21/98 • p.48
MACWORLD MAC SECRETS • 4040-8/5 • ch01.1 • Chapter 1 • Proof 1 • SH • 10/01/98 • p.48
ANSWER MAN
Q: I made several aliases of one document, but
then unthinkingly changed the name of the
original document. Will my aliases still work?
A: Remarkably, yes. An alias can always find the
original file from which it was created — even
when the original is renamed or moved to
another folder. (In this way, aliases are not like
“shortcuts” in Windows 95, which stop working
if you move the original.) Unbeknownst to you,
the Mac’s system software assigns every file a
unique ID number. Even duplicate copies of the
same file get different ID numbers.
When an alias is created, it’s programmed to
open a file with a prescribed ID number. The
name of the file doesn’t matter. In fact, if you
create a new document and give it exactly the
same name as the original file from which you
made an alias, the alias will ignore the new
document and still find the original.
Here’s where things get interesting. Suppose
that you drag the new, identically named file into
the same folder as the one to which the alias
refers. The Mac asks if you want to replace the
original file. If you say OK, then the alias will
point to the new file instead of the old! And in
Mac OS 8.5 or later, double-clicking a “broken”
alias (whose original file has been deleted)
prompts the OS to invite you to attach this alias
to a different “parent” file. (You can also do so
manually by using the File ➪Get Info command,
and then clicking Select New Original.)
Smart little computer, isn’t it?
Breaking the alias chain
4040-8/5 ch01.F 11/3/98 4:02 PM Page 48
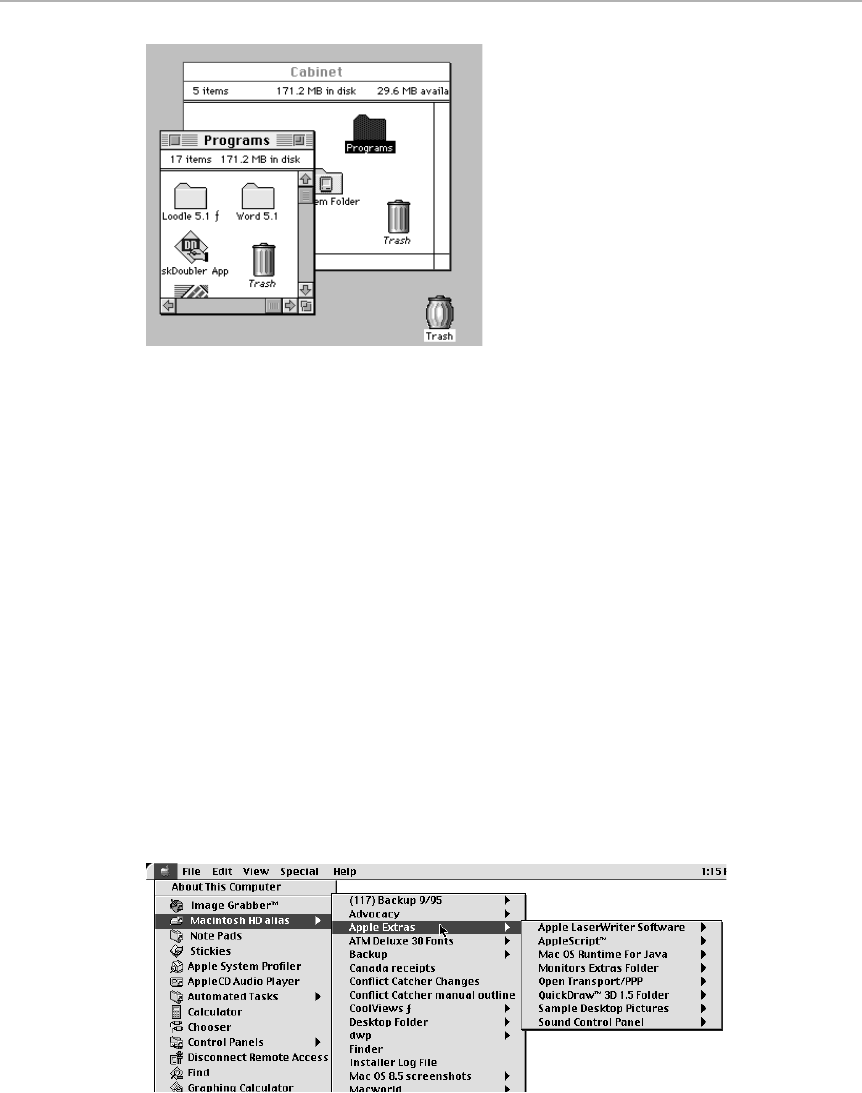
Figure 1-31: How many Trash cans? Multiple Trash cans are especially handy on big
monitors. (Only the real thing bulges when it has contents, though.)
■Aliases can greatly simplify setting up file sharing for users connected to
a network. Here’s how. When you’re on a network and you’ve brought
another Mac’s hard disk onto your Desktop (see Chapter 35), make an
alias of any shared program, document, or folder. When you’re off-line
and you’d like to reconnect, just double-click the alias. Your Mac
automatically looks for the original item, locates it on the other Mac on
the network, and pops it onto the screen. (If a password is required,
you’ll be asked for it first.)
■Get this: the previous secret works even if you’re thousands of miles
away. That’s right: if you made an alias of your office servers while you’re
connected to them using Apple Remote Access (ARA), then double-
clicking that alias (presumably on your PowerBook) will automatically
dial and tap into your office network.
■Make an alias of your hard disk icon and put it into the Apple Menu
Items folder. By sliding from submenu to submenu of your Amenu, you
can choose and open any file or folder on your entire hard drive (see
Figure 1-32).
Figure 1-32: Submenu redux. You can access any folder or file on your hard disk without ever
having to double-click an icon.
Chapter 1: Your First Software: The Finder 49
■ ■
MACWORLD MAC SECRETS • 4040-8/5 • ch01.F • Chapter 1 • FINAL • VB/EAP • 10/21/98 • p.49
MACWORLD MAC SECRETS • 4040-8/5 • ch01.1 • Chapter 1 • Proof 1 • SH • 10/01/98 • p.49
4040-8/5 ch01.F 11/3/98 4:02 PM Page 49
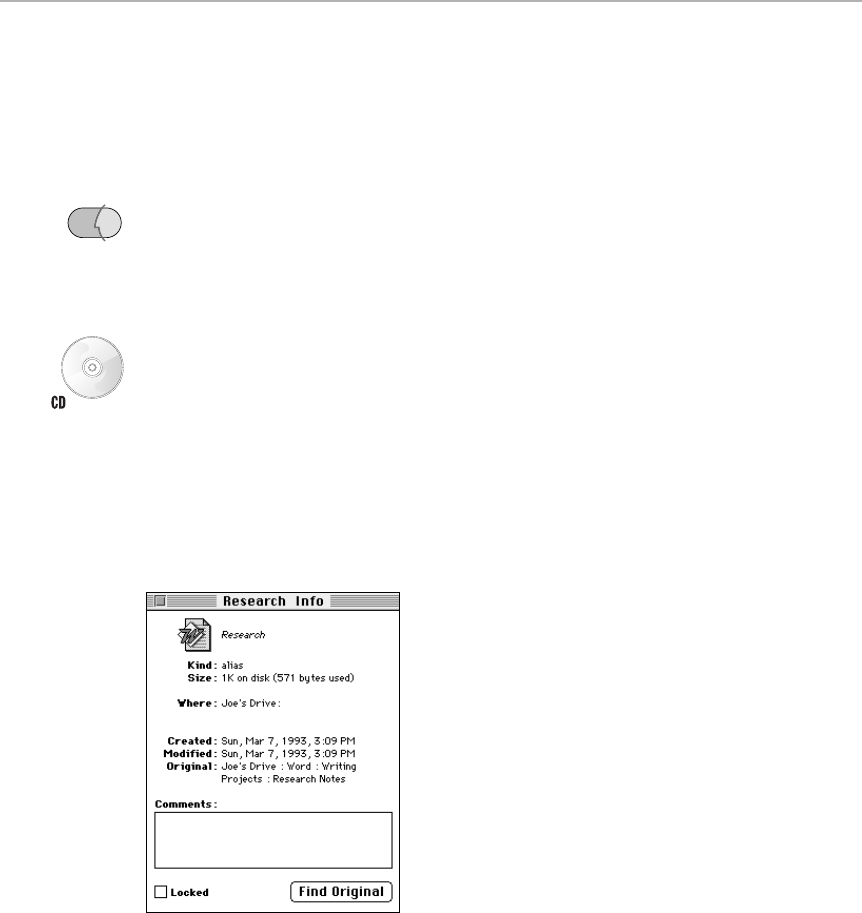
Finding the original file
Of course, at some point, you may actually need to find an original file and
not its alias. If you want to copy a file to a removable disk, for example, you
can’t just drag the alias to the disk — you need the actual file.
If you forget where the original file is located, you can easily find it.
■Mac OS 8 and later: Highlight the alias. Choose File ➪Show Original.
■System 7.5: Your Amenu contains a useful command called Useful
Scripts. Among them is Find Original, which (of course) finds the original
for a highlighted alias. See Chapter 22 for more on AppleScript, the
technology behind the Useful Scripts.
Alternatively, you can install Hidden Finder Features, included on the
CD-ROM with this book. It lets you find the original by clicking the alias
and pressing Ô-R.
■Systems before 7.5: Select the alias and choose File ➪Get Info. Just above
the Comments box, a boldface heading says Original, followed by a
hierarchical list pointing the way back to the original file. If the listing is
Macintosh HD: Word: Writing Projects: Research Notes, for example, it
means that the original file from which the alias was made is called
Research Notes, and it’s in the Writing Projects folder, within the Word
folder, on the drive named Macintosh HD (see Figure 1-33).
Figure 1-33: The Get Info box for an alias shows you where the original file is located and
contains a Find Original button to take you there.
To access the original file, click the Find Original button at the lower-
right corner of the Get Info box. The Finder opens the appropriate
window and highlights the original item.
OS
8
50 Part I: System Software Revealed
■ ■
MACWORLD MAC SECRETS • 4040-8/5 • ch01.F • Chapter 1 • FINAL • VB/EAP • 10/21/98 • p.50
MACWORLD MAC SECRETS • 4040-8/5 • ch01.1 • Chapter 1 • Proof 1 • SH • 10/01/98 • p.50
4040-8/5 ch01.F 11/3/98 4:02 PM Page 50
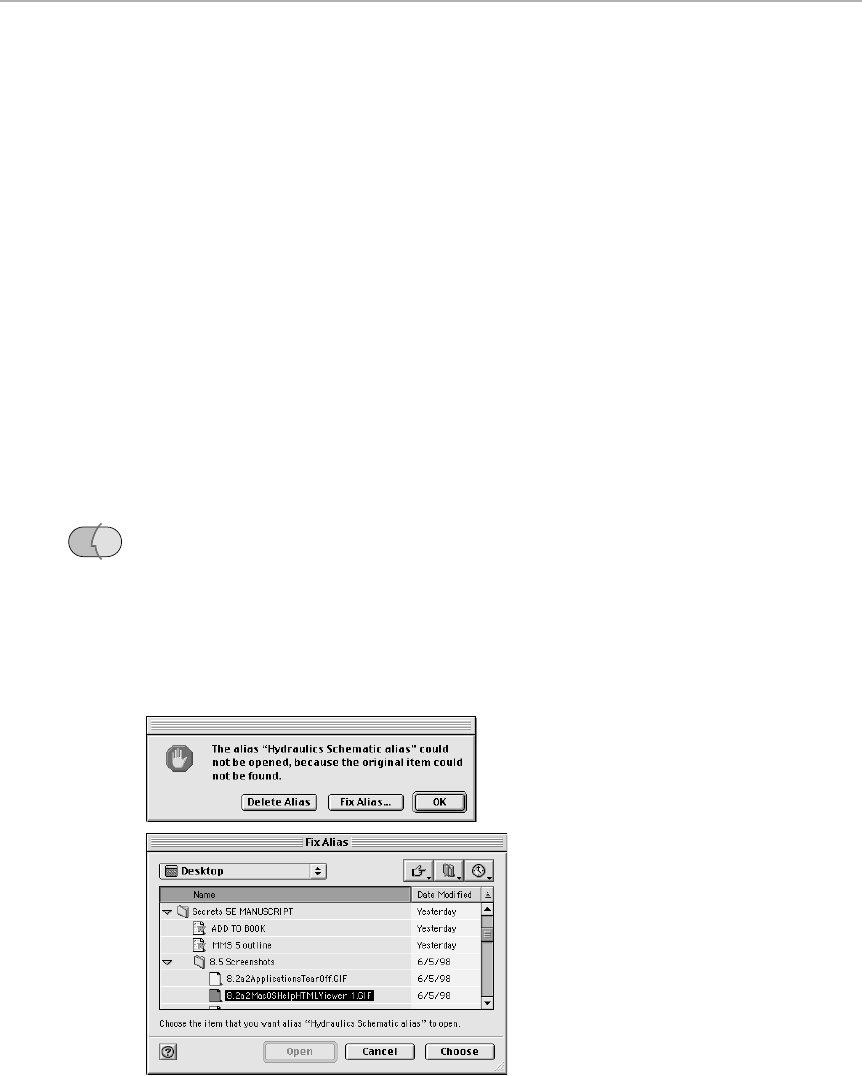
More alias notes
Some other points to keep in mind when working with aliases:
■You can create an alias of virtually any disk, document, application, or
folder. You can make aliases of your whole hard drive, a control panel,
the System Folder — any item you’d like to be able to grab and open
easily and quickly.
■Aliases take up very little room — generally a few kilobytes each — so
you can make as many as you’d like without crowding your hard drive.
Even an alias representing a document several megabytes in size will take
up no more than a few kilobytes. (The larger the hard drive, the larger
the alias; for the rationale, see Chapter 8.)
■A single item can have as many aliases as you’d like. So if having 15
aliases of a single item is going to save you a lot of opening and closing of
folders and windows, go ahead and make them.
Avoid making aliases of aliases, though. You can certainly do it, but you
increase the risk that, by accidentally throwing one of them away, you’ll
“break the chain” that points from alias to alias all the way back to the
genuine file.
■Talk about smart: When you double-click an alias whose original item has
gone off to that great Trash can in the sky, the Mac (starting in Mac OS
8.5) actually offers to take care of the problem for you, as shown in
Figure 1-34. Click Delete Alias to delete the orphaned alias; click Fix Alias
to select a different file — a file to which you’d like this alias to point now.
Either way, we’re grateful — we always prefer a dialog box that offers us
action than one that just says, “You’re dead in the water.”
Figure 1-34: Mac OS 8.5 is smart enough to offer a way out when your alias is broken (top),
enabling you to click Fix Alias and select a different file (bottom) to serve as the “original.”
OS
8.5
Chapter 1: Your First Software: The Finder 51
■ ■
MACWORLD MAC SECRETS • 4040-8/5 • ch01.F • Chapter 1 • FINAL • VB/EAP • 10/21/98 • p.51
MACWORLD MAC SECRETS • 4040-8/5 • ch01.1 • Chapter 1 • Proof 1 • SH • 10/01/98 • p.51
4040-8/5 ch01.F 11/3/98 4:02 PM Page 51

Alias Secrets
■
Instant alias, without the “alias” suffix
If you’re like millions of other Mac fans, you can’t
stand
the way the word
alias
gets tacked onto the end of a new alias’s name. Of
course
it’s an alias — any
fool can see that, thanks to the italicized name.
Our brains are seething with ways to get rid of that “alias” suffix. You could use
Mac OS 8 and create your aliases by Ô-Option-dragging the original items out of
their original windows; that method doesn’t tack the word
suffix
onto the end. If
you don’t have Mac OS 8 or later, you can achieve the same effect by installing
Hidden Finder Features, included with this book. It lets you make an alias of
something just by Control-dragging it — without the word
alias
at the end.
You could even use ResEdit to change the Mac’s default suffix to something else
— such as a small, nearly invisible space. (See Chapter 21 for instructions.)
El cheapo disk archiving
Here’s how you can have all your floppy-disk, Zip, Jaz, and SyQuest files stored
on your hard disk — and yet not.
Make sure that your disks and cartridges all have distinct names and label
them. Make aliases of all their contents and copy the aliases to your hard drive.
(You should probably keep the aliases all in one folder.) Next time you need one
of these files, double-click its alias on the hard drive. The Mac shrewdly calls for
the appropriate disk or cartridge by name.
Your basic Startup Items trick
Make an alias of anything — a sound file, a program, a document, a control
panel — and put it into the Startup Items folder inside your System Folder. Next
time (and every time) you turn on the Mac, the original of that file or program
behaves exactly as though you just double-clicked it. (Ditto, of course, for the
Shutdown Items folder.)
Drag-and-Dropping Icons
Beginning with System 7, Mac fans have enjoyed a curious and useful option:
you can drop a document icon onto an application icon to launch the former
with the latter, no double-clicking required.
Your cheerful authors normally applaud features wherever they may occur.
However, on this occasion, we must point out that, frankly, if a document icon
is handy enough that you can drag it over to an application icon, why not
OS
8
52 Part I: System Software Revealed
■ ■
MACWORLD MAC SECRETS • 4040-8/5 • ch01.F • Chapter 1 • FINAL • VB/EAP • 10/21/98 • p.52
MACWORLD MAC SECRETS • 4040-8/5 • ch01.1 • Chapter 1 • Proof 1 • SH • 10/01/98 • p.52
4040-8/5 ch01.F 11/3/98 4:02 PM Page 52

simply double-click the document icon to begin with? Is this the Emperor’s
new feature?
Nope. The point here is that you can drag a document icon onto the icon of a
program that didn’t create it, as shown in Figure 1-35. The classic example is
dragging a Read Me text file onto the AppleWorks/ClarisWorks program icon;
in so doing, you open the document in that program. Or you can drag an alien
downloaded Internet file onto the StuffIt Expander icon (see Chapter 27) to
decode and expand it. Or you can open some generic TIFF, PICT, or GIF file
you downloaded from the Web (created by God knows what graphics
program) using a graphics program you do have, such as Color It, just by
dropping the TIFF or GIF file onto Color It’s icon.
Figure 1-35: Drag-and-drop’s more useful use: Open a document with a program that didn’t
create it.
In all of these drag-and-drop moments, you get immediate visual feedback as to
whether your dropping action is going to accomplish anything: The program’s
icon gets highlighted. You can’t, for example, open a Word document with
Photoshop. If you try to drop the Word document’s icon on the Photoshop
icon, the latter won’t turn black, so you know your attempt is a failure.
Finally, soothe your psyche on this fact: When a drag-and-drop is in progress,
the document’s icon always snaps back to its original window location. Even
if you drag an icon out of its window in order to drop it on a distant program
icon, you haven’t really disturbed the document’s position.
Macintosh Drag-and-Drop
These days, however, when people talk about drag-and-drop on the
Macintosh, they most often refer to Macintosh drag-and-drop — the official,
Apple-capitalized version. This glorious feature, which debuted in System 7.5,
lets you drag selected data — usually graphics or text — from one place to
another instead of copying and pasting.
You can drag stuff from one spot to another within the same document. You
can drag it from one window to another within the same program. You can
even drag material from one program’s window into another program. All of
this happens seamlessly, quickly, and intuitively. And it all feels like a
perfectly natural extension of the Mac interface.
Mac Basics
Mac Basics
Chapter 1: Your First Software: The Finder 53
■ ■
MACWORLD MAC SECRETS • 4040-8/5 • ch01.F • Chapter 1 • FINAL • VB/EAP • 10/21/98 • p.53
MACWORLD MAC SECRETS • 4040-8/5 • ch01.1 • Chapter 1 • Proof 1 • SH • 10/01/98 • p.53
4040-8/5 ch01.F 11/3/98 4:02 PM Page 53
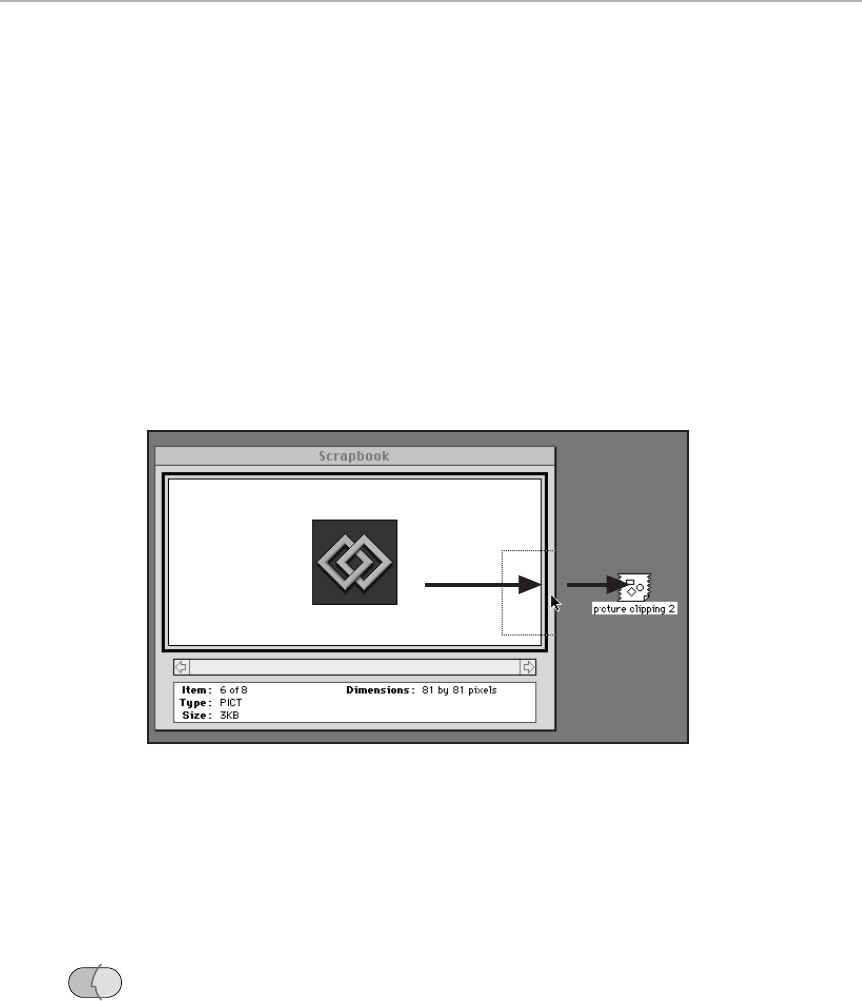
There’s only one drawback to Macintosh drag-and-drop: Not every program
on earth offers it. Fortunately, the number of programs that do is rapidly
expanding: for example, nearly every word processor (including AppleWorks/
ClarisWorks and Word 98), e-mail reader (including Claris Emailer), and
Internet program (including America Online) supports drag-and-drop.
Many Apple-supplied programs offer this kind of drag-and-drop, too. The
Scrapbook, Stickies, SimpleText, the Note Pad, the Finder, Desktop Pictures,
Appearances, and the Jigsaw Puzzle (incoming only) are all D&D-savvy. Here
are some handy examples:
■Slide something — a picture from Mac OS 8’s Desktop Pictures or Mac OS
8.5’s Appearance control panel, text from the Note Pad, or a sound from
the Scrapbook — onto the Desktop. It becomes an icon called text
clipping, sound clipping, or picture clipping (see Figure 1-36). Clippings
(picture, sound, or text) are double-clickable on the Desktop; they open
to show (or play) their contents.
Figure 1-36: System 7.5 takes dragging and dropping to a new level — you can slide text or
graphics right out of the Scrapbook and onto the Desktop, or vice versa.
■Drag a block of text from an America Online e-mail into a FileMaker
database or Word 98 document.
■Drag a picture out of the Scrapbook and into Desktop Pictures/Appearance
to create a new Desktop backdrop.
■Drag some text out of any drag-and-drop-savvy program to the desktop. If
that blob of text is an Internet address (such as http://www.davidpogue.com
or frank@universe.com), it instantly turns into a Mac OS 8.5 Internet
Location Document (see Chapter 25). When double-clicked, this document
launches the appropriate program (Web browser, e-mail program,
newsgroup reader), dials the Internet, and connects to that address.
OS
8.5
54 Part I: System Software Revealed
■ ■
MACWORLD MAC SECRETS • 4040-8/5 • ch01.F • Chapter 1 • FINAL • VB/EAP • 10/21/98 • p.54
MACWORLD MAC SECRETS • 4040-8/5 • ch01.1 • Chapter 1 • Proof 1 • SH • 10/01/98 • p.54
4040-8/5 ch01.F 11/3/98 4:02 PM Page 54
Chapter 1: Your First Software: The Finder 55
■ ■
MACWORLD MAC SECRETS • 4040-8/5 • ch01.F • Chapter 1 • FINAL • VB/EAP • 10/21/98 • p.55
MACWORLD MAC SECRETS • 4040-8/5 • ch01.1 • Chapter 1 • Proof 1 • SH • 10/01/98 • p.55
■Drag text around within AppleWorks/ClarisWorks — or between two of its
document windows — as a quick, simple way to reorder a list (or the
paragraphs of a memo).
By the way, what Microsoft Word 6 does — letting you drag text between
windows within Word — is not Macintosh drag-and-drop. Neither is the
interaction between Now Up-to-Date and Now Contact, where you can drag a
name from one Now program to the other. If you can’t drag stuff from a
program into any other drag-and-drop-savvy program, it isn’t real D&D. Quick
test: If you drag text onto the Desktop, does it turn into a clipping file? If not,
it doesn’t count.
Macintosh Drag-and-Drop Secrets
■
Quick e-mail reader
Get into the habit of saving your important e-mails as text files. (For example,
when you save an America Online e-mail, you’re offered a choice of two formats
— text and Read Mail.) Then, whenever you want to review one, don’t bother
launching America Online or a word processor. Just whip up to your Amenu,
open the Note Pad, and drag the e-mail’s icon into the window. It appears there
in full, ready for reading.
Quick graphics viewer
Much as in the previous secret, you can use Apple’s seemingly trivial Jigsaw
Puzzle to accomplish some very handy tasks. Specifically, you can drag any PICT
file right off the Desktop and into its window to get a quick glimpse of its
contents — without waiting 35 minutes for Photoshop to load. (You may have to
give the program more memory first. Highlight the Jigsaw Puzzle’s icon in the
Apple Menu Items folder [in your System Folder], choose File ➪Get Info, and add
about 100 to the lower text box in the Info window.)
Actually, the Scrapbook probably makes a better graphics viewer, because its
window is resizable. We just love showing people, however, how the homely little
Jigsaw Puzzle can actually be useful.
Making the non-savvy program D&D-savvy
As we’ve noted, not every program has been rewritten to support Drag-and-Drop,
much to the disappointment of its fans.
We can help. We’ve included the ingenious DragClick extension that magically
makes
every
program drag-and-drop-aware on this book’s CD-ROM. Suddenly
Word 5, America Online 2.7, QuickDex, and any other text-based program
behaves correctly when you drag text into another Drag-and-Drop program or to
the Desktop. See the appendix for instructions.
4040-8/5 ch01.F 11/3/98 4:02 PM Page 55

Duplicating text with the Option key
In any real D&D-savvy program, such as the Note Pad or SimpleText, you can
duplicate a piece of highlighted text exactly as you would a graphic object in,
say, Photoshop or an icon in the Finder: Press the Option key while dragging it.
The duplicate appears wherever you release the mouse.
Your advance notice of D&D success
One of Apple’s most thoughtful interface touches is the highlighting that
appears when you drag and drop something: The material you’re moving
displays an outline, and the destination window displays a purple “you mean
here?
” border. Use this fact to your advantage — it should help you recognize
immediately that you’re dealing with genuine D&D-savvy programs.
The collected works of clipping files
If you make assorted text clippings as you go about your daily routine, at some
point you’ll probably want to turn your folderful of individual clippings into a
single document. To do so, select all the clipping files in the Finder and drag
them en masse into a Drag-and-Drop-aware word-processing document.
In fact, you can even determine the
order
in which the clippings will appear in
the new document. Here’s the secret: Select the individual clipping files one by
one (by Shift-clicking), in the exact order you want them to appear. When you
drag the files to the document, they’ll be imported in the same order in which
you clicked them.
The navigational keystrokes — PowerBooks, too
Suppose you’re as much of a text-clipping nut as we are. Your desktop is strewn
with useful clippings containing Web articles, e-mail messages, top-10 lists,
jokes, troubleshooting techniques, and so on.
In that case, you’ll welcome free book winner Leigh Blankenship’s discovery that
the Page Up and Page Down keys scroll you a screen at a time through longer
clippings. And if you’re using a PowerBook that doesn’t have those keys? Or if
you’re a touch-typer and don’t want your hands to leave their home-row positions?
Easy —substitute Control-K and Control-L, respectively.
She notes, by the way, that the same secret keystrokes have the same secret
functions in America Online (e-mail messages and other text) and the Note Pad,
too. (Logic? Who said anything about logic?)
Contest
Winner
Strange
But True
Worth
Learning
56 Part I: System Software Revealed
■ ■
MACWORLD MAC SECRETS • 4040-8/5 • ch01.F • Chapter 1 • FINAL • VB/EAP • 10/21/98 • p.56
MACWORLD MAC SECRETS • 4040-8/5 • ch01.1 • Chapter 1 • Proof 1 • SH • 10/01/98 • p.56
4040-8/5 ch01.F 11/3/98 4:02 PM Page 56

Chapter 1: Your First Software: The Finder 57
■ ■
MACWORLD MAC SECRETS • 4040-8/5 • ch01.F • Chapter 1 • FINAL • VB/EAP • 10/21/98 • p.57
MACWORLD MAC SECRETS • 4040-8/5 • ch01.1 • Chapter 1 • Proof 1 • SH • 10/01/98 • p.57
Clippings with style
Text clippings can contain two different kinds of text: plain or styled. When you
drag text that’s been formatted with specific font, size, or style attributes —from
ClarisWorks, Word 98, America Online, and so on —to the Finder to create a new
clipping, the attributes are preserved within the clipping. (Try it —most people
aren’t accustomed to seeing fonts and styles show up in a Text Clipping window.)
Unstyled text, on the other hand, such as text from the Note Pad or Claris Emailer,
always appears in a default clipping font.
It may appear that you can’t change this font; after all, there’s no Font menu in
a clipping file. But you can change the default font used to display text clipping;
it turns out that the default clipping font is the same font you’re using for all text
in Finder views! To change it in System 7.5 through 7.6, use the Views control
panel; in Mac OS 8, choose Edit ➪Preferences.
In Mac OS 8.5, the text-clipping font is also the Views Font. (Choose A➪
Control Panels ➪Appearance ➪Fonts; there you’ll see the Views Font
pop-up menu.)
OS
8.5
TRUE FACT
Don’t ever let any PC bigot tell you that the
Macintosh is going away. When you survey the
following list of famous Mac users, you’ll realize
that virtually everybody in Hollywood, pop music,
literature, and theatre uses Macs. If Apple were
ever in real trouble, we feel confident that the
groups below would band together and cut a hit
music video to benefit the cause — “We are the
Mac World,” perhaps.
Madonna, Prince, Steven Spielberg, Dustin
Hoffman, Sandra Bullock, Harry Connick Jr., Kevin
Costner, Tom Cruise, Geena Davis, Danny DeVito,
Clint Eastwood, Sally Field, Whoopi Goldberg,
Harrison Ford, Jodie Foster, Mel Gibson, Tom
Hanks, Jerry Seinfeld, Douglas Adams, Tom
Clancy, William Gibson, Mario Puzo, William
Goldman, Michael Crichton, Herbie Hancock,
Eddie Van Halen, Aerosmith, Beastie Boys, U2,
Ice T, Rolling Stones, Seal, Tori Amos, B.B. King,
Hans Zimmer, Roger Clinton (Bill’s brother),
Thomas Dolby, Peter Gabriel, Jan Hammer, Ben
Heppner, Michael Jackson, Quincy Jones, Cyndi
Lauper, Courtney Love, John Tesh, Mannheim
Steamroller, Lou Rawls, Dabney Coleman, Todd
Rundgren, Enya, Danny Elfman, Gloria Estefan,
George Michael, Sting, Carly Simon, Tommy Lee,
Metallica, Kenny G, Gay Talese, Valerie Bertinelli,
Tim Allen, Drew Carey, Rush Limbaugh, Conan
O’Brien, Maury Povich, Norm Abram, Roger
Ebert, Don Novello (Father Guido Sarducci), Dan
Aykroyd, Mariel Hemingway, Natasha Richardson,
Vanessa Redgrave, Lauren Bacall, Phoebe Cates,
Kevin Kline, Christian Slater, Lawrence Fishburne,
Emilio Estevez, Dolly Parton, Henry Winkler,
Timothy Burton, Samuel L. Jackson, Nicole
Kidman, Wesley Snipes, Sylvester Stallone,
Sharon Stone, James Woods, Robin Williams,
Paul Reubens (Pee Wee Herman), Gary Oldman,
and Mia Farrow.
Macs of the Rich and Famous
4040-8/5 ch01.F 11/3/98 4:02 PM Page 57
MACWORLD MAC SECRETS • 4040-8/5 • ch01.F • Chapter 1 • FINAL • VB/EAP • 10/21/98 • p.58
MACWORLD MAC SECRETS • 4040-8/5 • ch01.1 • Chapter 1 • Proof 1 • SH • 10/01/98 • p.58
4040-8/5 ch01.F 11/3/98 4:02 PM Page 58

MAC SECRETS • 4040-8/5 • ch.02.F • Chapter 2 • FINAL • VB • 10/22/98 • p.59
MAC SECRETS • 4040-8/5 • ch.02.2 • Chapter 2 • Proof 2 • EAP • 10/15/98 • p.59
Chapter 2
Finder Command Secrets
In This Chapter
©Highlights of the File, Edit, View, Label, Special, Help, and Application menus
©Three hidden Finder commands
©Buried menu treasures
©Getting more mileage out of the Find command
©Four ways to clean up icons
The Finder has over 40 commands. Scary, when you consider that this is
supposed to be the most user-friendly computer on earth.
We’re going to assume that you can manage without a book to tell you about
commands like New Folder, Open, Close Window, Get Info, and Duplicate. And
we’ll get deep into the About This Computer command in Chapter 9.
However, you’ll find some goodies locked away behind some of the other
commands.
The Apple Menu
The menu, strictly speaking, isn’t just a Finder menu. But you create and
manage the menu’s contents in the Finder. The menu is used for launching
files and programs, just as the Finder — and its first command, About This
Computer (or About this Macintosh, as it said on earlier Macs) — provides a
wealth of fundamental information that seems right at home in the Finder.
In the ancient days of System 6, the menu was good for exactly one thing:
listing desk accessories (see Chapter 3). But ever since System 7, the menu
has become a powerhouse. It can list disks, files, folders, the Trash, the System
Folder, control panels, remote file servers, Web browser bookmarks — anything
with an icon in the Finder.
See Chapter 3 for a blow-by-blow account of what’s in the menu (that you
didn’t put there yourself). For now, here are our secrets of the menu in its
role as a menu.
4040-8/5 ch02.F 11/3/98 3:46 PM Page 59

Apple Menu Secrets
■
Quick access to the
menu
(conventional methods)
As you probably know, anything you place in the Apple Menu Items folder (in the
System Folder) is instantly listed in your menu, whether it’s a file, a folder, a
program, or the alias of a disk. Trouble is, the Apple Menu Items folder itself
isn’t very convenient, nested as it is inside the System Folder. (That’s why Apple
created the Favorites folder that debuted with Mac OS 8.5, as described in an
upcoming secret.)
If you’re using System 7.5 through Mac OS 8.1, Apple has provided a quick and
easy way to install items in the menu — the ➪Automated Tasks ➪Add Alias
to Apple Menu command.
Actually, Add Alias to Apple Menu isn’t a command; it’s a
script
— a set of
instructions — written in AppleScript, a programming language that can be used
to automate tasks in most Mac programs — including the Finder (see Chapter
22 for more on AppleScript). This script is really a tiny self-contained mini-
program that has just one purpose in life — to put things in the menu for you.
Just select a file or folder, then launch this AppleScript. It makes an alias of the
selected item, lops off the word “alias” (see “All About Aliases” in Chapter 1),
and then drops it into the menu for you.
Even this method isn’t terribly automatic, though. And there’s no AppleScript for
removing
an item from the Apple Menu, which you must still do manually.
That’s why we’re still fans of this time-tested low-tech approach to menu
management: Just make an alias of the Apple Menu Items
folder
and leave it
out on the desktop.
To add something to your menu, just drop it on top of this folder alias. To remove
something, double-click the folder alias and drag the item out of the window.
Quick access to the
menu (discreet method)
The Apple Menu Items folder alias trick described in the previous secret works
wonderfully, but it also leaves a big clunky folder out on your Desktop. Here’s a
less obtrusive technique.
Follow the steps in the previous trick. But instead of leaving the image of
the folder alias out on your Desktop, make the icon itself invisible (see the
“Electronic Post-it Notes” Secret in Chapter 1). You can also replace the name
of the folder alias with a few blank spaces.
OS
8
Mac Basics
60 Part I: System Software Revealed
■ ■
MAC SECRETS • 4040-8/5 • ch.02.F • Chapter 2 • FINAL • VB • 10/22/98 • p.60
MAC SECRETS • 4040-8/5 • ch.02.2 • Chapter 2 • Proof 2 • EAP • 10/15/98 • p.60
4040-8/5 ch02.F 11/3/98 3:46 PM Page 60
The result is an iconless folder with no name — all you see on the Desktop is a
white rectangular slot. Click the rectangle and drag it just under your menu
(see Figure 2-1).
Figure 2-1: Nuke the icon of the Apple Menu Items folder alias and change its
name to blanks. Now you’ve got a drop-slot for your menu.
Then, whenever you want to add an item to the menu, just drag it over and
pop it in the slot (the white rectangle). Anything you slip into it instantly
disappears from the Desktop and reappears as an item in the menu.
When you want to remove or rename something in the menu, double-click the
little slot itself. The Apple Menu Items folder opens.
Master your favorites
You can read about the Favorites folder — one of the items listed in the menu
beginning with Mac OS 8.5 — in Chapter 3.
For now, it’s worth noting that you can add items to it (actually aliases, but
we won’t tell) by highlighting an icon and choosing File ➪Add to Favorites. It’s
perfectly OK to highlight
folders
in this way, too; they’ll show up in your menu’s
Favorites command as submenus, so that you can choose the names of any
items
inside
those folders — even items within folders
within
folders.
To remove something from the Favorites folder, just choose the Favorites command
itself from the menu. (That’s one of the handy differences between the Mac and
Windows, where you can’t choose a command that has a submenu — you
must
choose a submenu item.)
The Favorites folder (which is in your System Folder) pops open. Just trash the
icons whose names you no longer want in your Favorites command.
Rearranging the
menu
The Mac normally alphabetizes the items listed in your menu. To force these
items into a different order, you can install an Apple-menu managing program,
such as BeHierarchic (included on the CD-ROM with this book).
But if you’re a do-it-yourselfer, try this. Open your Apple Menu Items folder. Bearing
in mind that a space comes alphabetically before any letter, rename the items in
the folder. You can make Zither come before Armadillo, for example, if you type a
space before the
Z
. Figure 2-2 shows an Apple Menu Items folder that’s been
realphabetized by using spaces. (For better cosmetic results, you can also use a
pasted return character, as described in Chapter 1’s “Icon-renaming Secrets.”)
OS
8.5
Chapter 2: Finder Command Secrets 61
■ ■
MAC SECRETS • 4040-8/5 • ch.02.F • Chapter 2 • FINAL • VB • 10/22/98 • p.61
MAC SECRETS • 4040-8/5 • ch.02.2 • Chapter 2 • Proof 2 • EAP • 10/15/98 • p.61
4040-8/5 ch02.F 11/3/98 3:46 PM Page 61

Figure 2-2: A judicious use of spaces and nameless folders in your Apple Menu Items folder
(left) customizes the order and look of the menu (right).
As a final flourish, you can create separator lines to group your menu items
(programs and documents, for example). To do so, make a new empty folder.
Change its name to a bunch of underlines or dashes — preceded, of course,
by the correct number of spaces (or pasted Returns) so that the folder will
fall, alphabetically, in the right place among the other items. Finally, use the
Electronic Post-it Notes tip in Chapter 1 to make the separator folder’s icon
invisible.
Kill the Recent Servers
If you’re using System 7.5 or later, you may have noticed the addition of three
weird commands in your menu: Recent Applications, Recent Documents, and
Recent Servers. The control panel responsible for creating these items is Apple
Menu Options (see Chapter 4 for details).
You can make
all
of these folders go away by turning off the “Remember
recently used items” check box in that control panel. But you can also turn them
off selectively — to get rid of only Recent Servers, for example. Simply open
the Apple Menu Options control panel and type 0(zero) into the text box that
corresponds to the item you want to disappear (Recent Ser vers, or whatever).
Visit scenic Silicon Valley
The first item in the Finder’s menu normally says About This Computer. When
you choose this command, you see a useful miniwindow that reveals your Mac’s
memory capacity, current memor y usage, and System version. (See Chapter 9
to find out how to interpret this information.)
62 Part I: System Software Revealed
■ ■
MAC SECRETS • 4040-8/5 • ch.02.F • Chapter 2 • FINAL • VB • 10/22/98 • p.62
MAC SECRETS • 4040-8/5 • ch.02.2 • Chapter 2 • Proof 2 • EAP • 10/15/98 • p.62
4040-8/5 ch02.F 11/3/98 3:46 PM Page 62
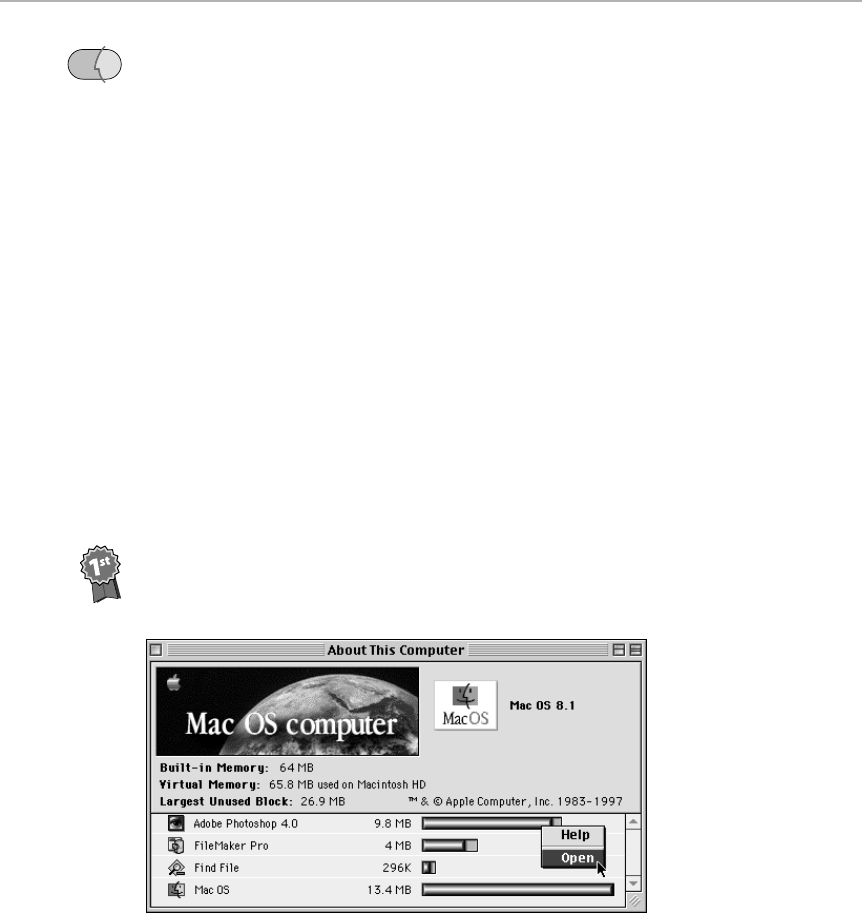
But if you press Option as you choose the first command in the menu, the
wording changes to say About the Finder, and you see a beautifully rendered
landscape of a verdant green valley — presumably the “silicon” one in which
Apple’s headquarters sits. After a moment, a scrolling list of credits appears —
the programmers who developed the Finder, grouped by version, all the way back
to the Lisa computer (the Mac’s predecessor).
(Incidentally: Reader Hugh McGuigan points out that the sixth name listed under
Quality in the scrolling credits is somebody named — sure enough —
Lunatic E’Sex.
We know that some colorful characters work at Apple, but this is ridiculous.)
The same trick works if you’re running System 7.x, although the landscape isn’t
quite as colorful. Instead, you see a flat, black-and-white rendering of the valley
that harkens back to the days of MacPaint, the very first Mac graphics program.
If you believe the old-timers, this same valley scene is what choosing About the
Finder
always
displayed on the very first versions of the Finder.
If you’re a System 7 holdout, you can try this one: Press Ô
and
Option as you
choose About the Finder — you get both a scenic moonlit scene
and
a cursor
with an attitude.
The undocumented program switcher
Free book winner Ronald Leroux discovered something astounding about Mac
OS 8.x’s About This Computer command. You know the memory graphs? (See
Figure 2-3 if you need a reminder.)
Figure 2-3: Control-click any bar of the About This Computer window, and then choose Open
to bring that program forward.
You may suppose that they merely indicate which programs are running and how
much memory they’re using. But there’s more — much more. Control-click one
of these bars to produce a contextual menu, as described later in this chapter.
One of them, impressively enough, is Open — you can switch to open programs
directly from within this dialog box!
Contest
Winner
OS
8
Chapter 2: Finder Command Secrets 63
■ ■
MAC SECRETS • 4040-8/5 • ch.02.F • Chapter 2 • FINAL • VB • 10/22/98 • p.63
MAC SECRETS • 4040-8/5 • ch.02.2 • Chapter 2 • Proof 2 • EAP • 10/15/98 • p.63
4040-8/5 ch02.F 11/3/98 3:46 PM Page 63
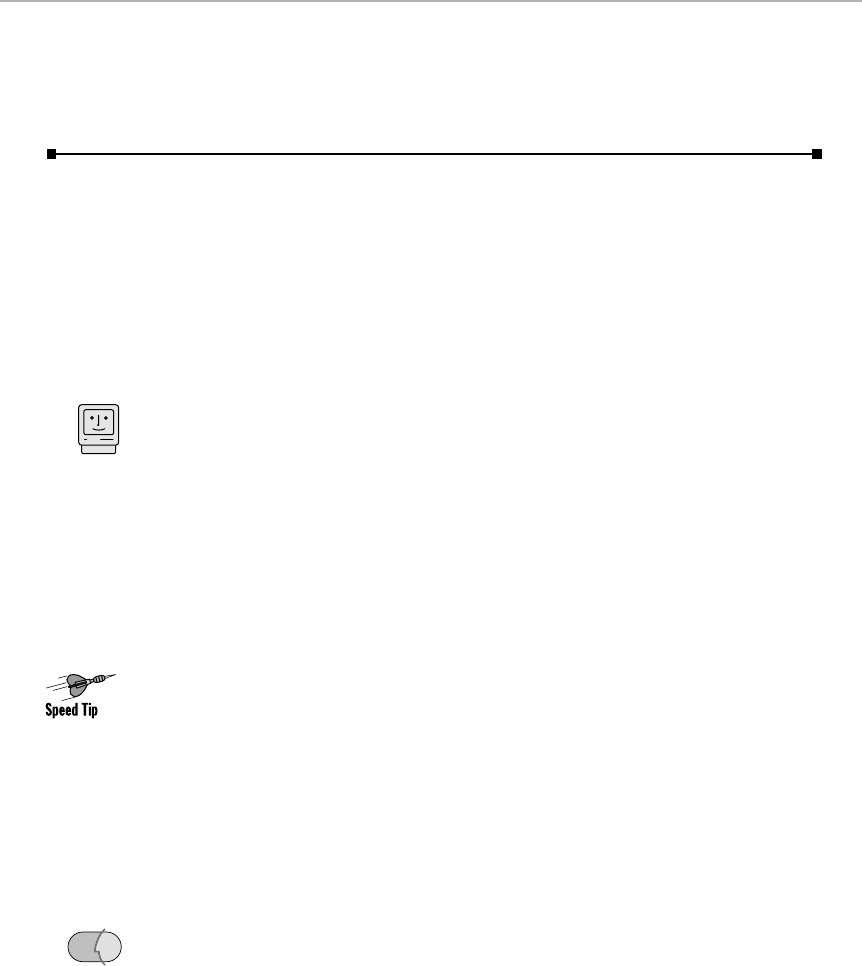
That can be handy when, having studied your memory-usage chart, you realize
that the reason you can’t launch BeeKeeper Pro is because Microsoft Guilt 7.3
is using up 23MB of RAM — and you’d like to switch to it so that you can quit it
and free up its memory.
The File Menu
Did you ever wonder about the parts of speech used in menus? Originally, they
were all supposed to be verbs. File is a verb here. So is Edit, Label, View, and (in
Mac OS 8) Help. (The theory breaks down when you get to Special, of course.)
Print
The Finder actually has two Print commands. The one at the top of the File
menu is available only if you select one or more document icons. It prints
those documents by launching whichever program created them, printing,
and then quitting that program. (You can even select document icons created
by different programs. The Finder launches each, as necessary, to do its
printing.)
The other Print command, at the bottom of the menu, is Print Window. It
prints a picture of whichever window is open. If no window is open, or if you
select the Desktop by clicking it, the command changes to say Print Desktop,
which prints the Finder icons on the Desktop, using as many pieces of paper
as are required to print the entire screen.
The Print Window command is especially handy when you’re testing or
troubleshooting a printer; it lets you print something without having to
launch an application.
It also comes in handy, weirdly enough, when you’re trying to check the
Mac’s sound (the volume, an external speaker, and so on). Why? Because
Print Window makes a dialog box appear — and clicking outside any dialog
box makes the Mac beep!
Move to Trash
For years, there was only one way to put items in the Trash — drag them
there yourself. Intuitive? Yes — but not always convenient, especially on large
monitors or when you’re doing a lot of cleaning up. Finally, in Mac OS 8, the
Move to Trash command was born, giving us a way to zap files without a
mouse journey across the screen.
The real beauty of the Move to Trash command is its keyboard shortcut,
Ô-Delete. Select a file (or multiple files), press Ô-Delete, and watch them
OS
8
Mac Basics
64 Part I: System Software Revealed
■ ■
MAC SECRETS • 4040-8/5 • ch.02.F • Chapter 2 • FINAL • VB • 10/22/98 • p.64
MAC SECRETS • 4040-8/5 • ch.02.2 • Chapter 2 • Proof 2 • EAP • 10/15/98 • p.64
4040-8/5 ch02.F 11/3/98 3:46 PM Page 64

zip into the Trash. (Plus — isn’t this smart? — Ô-Delete works only if the
highlighted icons are in the active window, thus ensuring that you’ll never
accidentally delete files without knowing it.) We love this command.
If you’re not running Mac OS 8, you won’t find a Move to Trash command in
the File menu, but there’s no reason to feel left out. Just install Hidden Finder
Features, which is on this book’s CD-ROM. Among other system
enhancements, it adds a Move to Trash keystroke to System 7.
Get Info
You click an icon; you choose File ➪Get Info; you read all about it. See
Chapter 8 for details on the File Sizes reported here, and Chapter 9 for details
on the Memory boxes (that appear when you Get Info on a program).
For now, note that the Where: line in the Get Info box gives you some insight
into how the Mac tracks your files — by listing a string of smaller and smaller
locations. It may say Hard Drive:System Folder:Control Panels:, for example.
(If it shows only the name of your hard drive, nothing more, then the icon in
question is on the Desktop.) At last you know why the colon (:) is the only
character you’re not allowed to use when you name a file. Can you imagine
how confused the Mac would become?
The Get Info box, too, is the home of the Comments field. After a decade of
avoiding this handy note-recording spot (because rebuilding the desktop
erased all such comments), Mac fans slowly began making some use of this
box when the erasing problem went away in System 7.5.3. These days, the
most widespread use of this box is by Netscape Navigator, which — when
you save a file or page from the World Wide Web onto your hard drive —
thoughtfully records the original URL (Web address) in this box.
If you choose Get Info after selecting a disk under Mac OS 8.1 or later, by the
way, a line called Format appears in the Get Info window. This tells you if
the selected disk was formatted using Apple’s old Hierarchical File System
(Mac OS Standard format) or the newer, more space-efficient HFS+ (Mac OS
Extended Format). See Chapter 8 for an explanation of these disk formats
and how they affect you.
A reworked Get Info window debuted with Mac OS 8.5. For the first time, a
pop-up menu now appears that lets you select one, two, or three different
panels of information (see Figure 2-4).
■The General Information screen is the Get Info window we’ve always
known and loved — except now it lets you change the icon’s name and
label color, right in this dialog box. This panel is the only panel available
for document icons (as opposed to application or folder/disk icons).
OS
8.5
OS
8
Chapter 2: Finder Command Secrets 65
■ ■
MAC SECRETS • 4040-8/5 • ch.02.F • Chapter 2 • FINAL • VB • 10/22/98 • p.65
MAC SECRETS • 4040-8/5 • ch.02.2 • Chapter 2 • Proof 2 • EAP • 10/15/98 • p.65
4040-8/5 ch02.F 11/3/98 3:46 PM Page 65
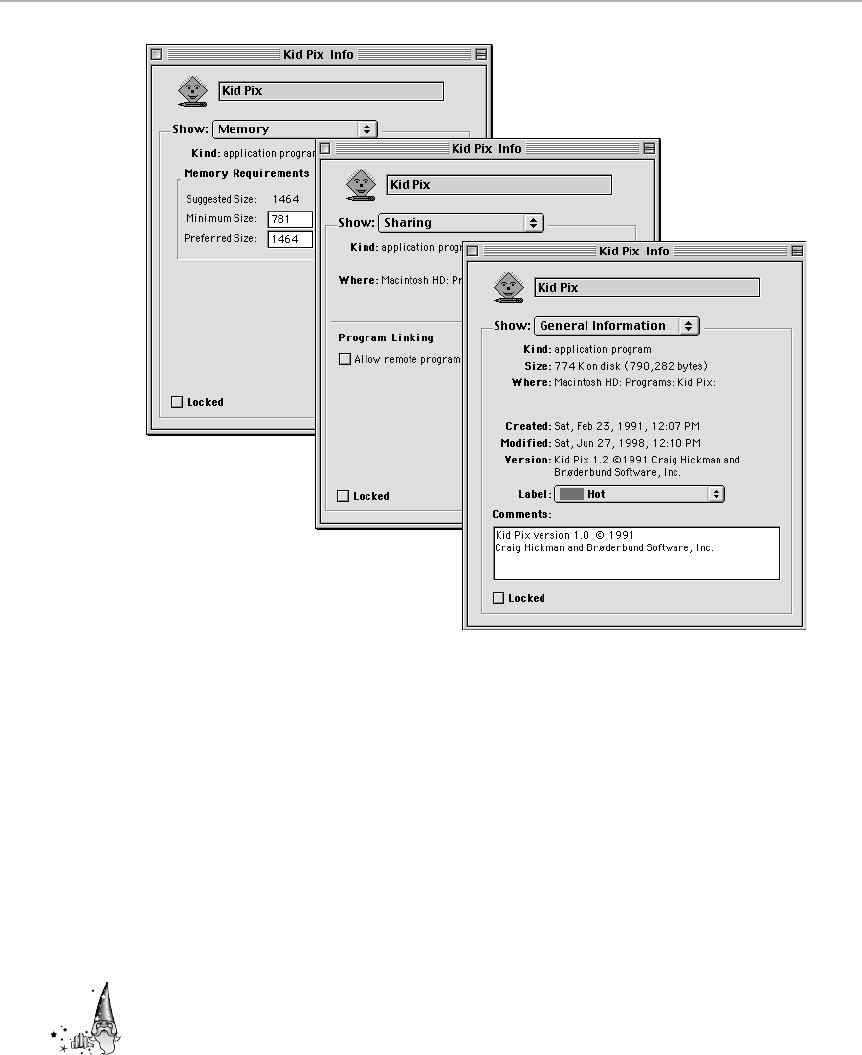
Figure 2-4: The Get Info window, as it appears in Mac OS 8.5. The pop-up menu at the top lets
you switch among three different views: General, Sharing, and (for applications) Memory.
■The Sharing panel is the equivalent of the dialog box that came up, in
previous system software versions, when you highlighted a disk or folder
icon and chose File ➪Sharing. This choice appears only when you’re
getting info for folders, disks, and applications. See Chapter 35 for more
on setting up file-sharing preferences for each folder. That chapter, too,
explains the utter uselessness of Program Linking (see Figure 2-4) — the
sole choice here if you’ve used the Get Info command on an application.
■The Memory panel is available only for applications. It contains nothing
but the three memory-size boxes described in Chapter 9, where you can
adjust how much RAM this program uses when it launches.
It’s interesting to note, by the way, that most of the File menu’s commands
are still available when the Get Info box is open. That is, with the Get Info box
on the screen, you can still move the icon in question to the Trash, give it a
new label, duplicate it, add it to your Favorites folder, and so on.
Strange
But True
66 Part I: System Software Revealed
■ ■
MAC SECRETS • 4040-8/5 • ch.02.F • Chapter 2 • FINAL • VB • 10/22/98 • p.66
MAC SECRETS • 4040-8/5 • ch.02.2 • Chapter 2 • Proof 2 • EAP • 10/15/98 • p.66
4040-8/5 ch02.F 11/3/98 3:46 PM Page 66

Label
The Finder’s Label menu keeps being demoted. In System 7.6 and earlier,
Label was its own menu, sitting proudly on the Finder’s menu bar between
the View and Special menus. But under Mac OS 8, Label is a just a humble
submenu down in the File menu. And the software used to change the colors
and names of your labels, which used to merit its own control panel (called
Labels, of course), became first a mere Edit ➪Preferences setting (in Mac
OS 8) and then just a tab of that box (in Mac OS 8.5).
But Labels’ functions haven’t changed. You still use labels to classify your
folders, files, and disks by color-coding their icons and tagging them with text
labels of up to 31 characters each. (Text labels show up only in list views.)
Seven label categories already are set for you when you install your system
software — the classic Essential, Hot, In Progress, and so on. You redefine
these categories by choosing Edit ➪Preferences (Mac OS 8) or via the Labels
control panel (System 7.x), as shown in Figure 2-5.
Figure 2-5: Choose Edit ➪Preferences (or, on earlier systems, open the Labels control panel)
to define your seven labels, which will then appear in the Label submenu.
To apply a label, select its icon (or a whole group of them), and then choose
one of the labels from the Labels menu (System 7.x) or the File ➪Label
command (Mac OS 8.x).
Finding and sorting by label
After you’ve applied labels to your icons, you can use the labels to sort file
lists and search for items:
OS
8
Chapter 2: Finder Command Secrets 67
■ ■
MAC SECRETS • 4040-8/5 • ch.02.F • Chapter 2 • FINAL • VB • 10/22/98 • p.67
MAC SECRETS • 4040-8/5 • ch.02.2 • Chapter 2 • Proof 2 • EAP • 10/15/98 • p.67
4040-8/5 ch02.F 11/3/98 3:46 PM Page 67
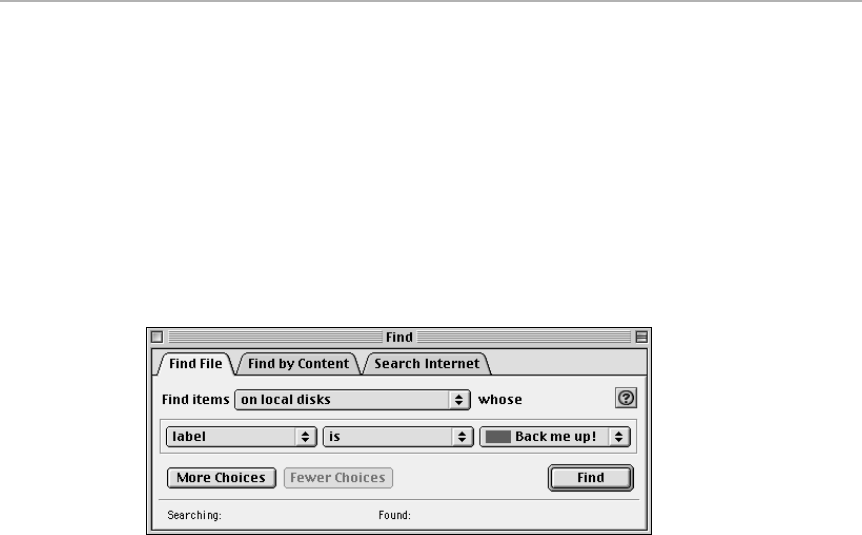
■To sort a list of files by label: If you’re in any list view, just click the word
Label at the top of the window; the files rearrange themselves by label.
The Mac “alphabetizes” the files according to the order in which their
labels appear in the Label menu. And if you don’t see the word Label at
the top of the window, choose View ➪View Options (or open your
System 7.x Views control panel) and turn the Labels column back on.
■To search for a file by label: Choose File ➪Find. Choose “label” from the
first pop-up menu. (If you have a system older than 7.5, click the More
Choices button.) When you search by label, the field to the far right
becomes a pop-up menu that lets you choose from among the seven label
categories (see Figure 2-6).
Figure 2-6: You can search for files by labels using the Find command.
More on labels
A few more Label points:
■Even though you can’t see text labels when you’re viewing a window’s
contents by icon, you can still apply them to the files and folders.
■If you still have a black-and-white monitor (the three of you know who
you are), and you’re in Icon view, you may think that there’s no way to
know what label you’ve given a certain icon (because you can see neither
color nor its text label). Actually, it’s easy. Select the icon and pull down
the Label menu — a check mark appears next to the icon’s label.
■Ever wonder what the Label menu would show if you highlighted two
icons that have different labels? Would there be two check marks in the
Label menu? Would there be no check marks?
Turns out that if the selected icons have different labels, you get little
hyphens in the Label menu (next to all the appropriate items).
■When you make an alias of a labeled item, the alias inherits the original’s
label. However, you can remove or change the label of one without
affecting the other.
68 Part I: System Software Revealed
■ ■
MAC SECRETS • 4040-8/5 • ch.02.F • Chapter 2 • FINAL • VB • 10/22/98 • p.68
MAC SECRETS • 4040-8/5 • ch.02.2 • Chapter 2 • Proof 2 • EAP • 10/15/98 • p.68
4040-8/5 ch02.F 11/3/98 3:46 PM Page 68

Are labels useless?
If the Label menu seems like a useless appendage hanging over your Desktop,
we have a few suggestions:
■Use Labels as an aid to backing up your work. Make a label called
Backup. As you go through your workweek, apply this label to each new
document you create or each file you modify. At the end of the week, use
your Find File command to round up all the files with the label, and back
them en masse.
■Use the Label menu in conjunction with the world’s best troubleshooting
trick, the clean reinstall (described in Chapter 36). Immediately after
installing a fresh System folder, assign a certain label to everything in
your System folder.
For the keystroke nut, here’s the sequence: Ô-A (to highlight all items in
the System folder window), Ô-Option-right-arrow key (to expand all the
“flippy folder triangles”), Ô-A (to highlight all of the newly revealed
contents of the expanded flippy-triangle folders). Then apply the label
you want. Finally, press Ô-Option-right-arrow to collapse all the
expanded folders.
Thereafter, a quick glance into those folders immediately tells you which
junk originally came with the system, and which has been deposited
there by, for example, little shareware doodads you downloaded from the
Net. (The latter, of course, will have no label at all.)
This procedure has two benefits. First, it makes cleaning up easy — at a
glance, you can see all the leftover detritus that should be removed from
your System folder. Second, when you do another clean reinstall later,
you can spot at a glance all the stuff you’ve added (control panels,
extensions, and so on) that you do want to retain.
If you adopt this secret, consider this final spin: open your Labels control
panel and change the label you’re giving your freshly installed
components. Make the new name “Clean install 3/99,” or something
equally informative, so you’ll know when those components were added.
For added purity, change the color of this label to white, so you don’t tint
Apple’s beautifully designed icons in the process.
■Dennis Cohen, our technical editor, reports that one of his former
coworkers uses Labels as part of a clever backup and workflow strategy.
This fellow drags folders of documents in progress onto an AppleScript
applet’s icon (see Chapter 22) that changes the label of anything
modified that day to red (after backing it up). Another applet later
transmits all the “red” documents to the next person in the company
who needs to deal with them.
Best idea of all! Install Label Secrets Pro, the handy control panel written
exclusively for this book. Drop it into your System Folder. Every day, when
you turn on the Mac, the Label menu shows you a new Macintosh Secret. It’s
like a word-a-day calendar — but much more useful! (See Figure 2-7, and see
Appendix A for instructions on how to use Label Secrets Pro.)
Chapter 2: Finder Command Secrets 69
■ ■
MAC SECRETS • 4040-8/5 • ch.02.F • Chapter 2 • FINAL • VB • 10/22/98 • p.69
MAC SECRETS • 4040-8/5 • ch.02.2 • Chapter 2 • Proof 2 • EAP • 10/15/98 • p.69
4040-8/5 ch02.F 11/3/98 3:46 PM Page 69

Figure 2-7: Label Secrets Pro is a year’s worth of handy tricks and tips for the Mac. And it’s
yours free!
Sharing
We’ve got an entire chapter devoted to this little gem — Chapter 35.
Make Alias
We have quite a bit to say on this topic, too, but it’s in Chapter 1.
Add to Favorites
Here it is: the Mac OS 8.5-and-later command that quickly and efficiently
creates aliases of any highlighted icons; stashes the aliases in a System Folder
folder called Favorites; and therefore makes those icons’ names appear in the
menu’s Favorites command, described earlier in this chapter. You can also
access your favorites from within the new Open File and Save File dialog
boxes (see Chapter 15), and in the Network Browser (see Chapter 3).
At first, this mechanism seems a tad redundant — we’ve already got the
menu and the Launcher; how many more ways do we need to choose favorite
icons? And yet the Favorites scheme is much quicker than the menu
method (quicker to add icons, quicker to remove them), and much less
obtrusive than the Launcher (which some Mac users feel is too kid-oriented).
Frankly, we’re also rather nuts about the elegance of the setup. The Favorites
folder itself is loose in your System Folder, not buried within some other
folder. So how can it show up in your menu? Easy — there’s an alias of the
Favorites folder in your Apple Menu Items folder (in the System Folder)!
OS
8.5
70 Part I: System Software Revealed
■ ■
MAC SECRETS • 4040-8/5 • ch.02.F • Chapter 2 • FINAL • VB • 10/22/98 • p.70
MAC SECRETS • 4040-8/5 • ch.02.2 • Chapter 2 • Proof 2 • EAP • 10/15/98 • p.70
4040-8/5 ch02.F 11/3/98 3:46 PM Page 70

Put Away
We love this command. We use it on everything! Disks, files, trash — the Put
Away command works housekeeping magic.
Put Away neatly refiles any icon that’s sitting out on your Desktop into the
original folder from whence it came, no matter how deeply buried. Put Away is,
therefore, a great trick to use after you’ve put a bunch of icons on the Desktop
that live on different disks (for copying or trashing all at once, for example). Put
Away makes them leap back into their original disk and folder locations.
Put Away is also great to use on icons that you tried to copy by dragging to
another disk icon — and just missed, leaving the icon sitting there on the
Desktop right next to the disk icon (or the Trash icon). It’s also great if you
succeeded in dragging an icon to the Trash, something you’d now like to
recover. Open the Trash window, select the icons you put there, and choose
Put Away. They hurl themselves back into their original folders.
If you’re running System 7.x, the best part of Put Away is that its keyboard
shortcut, Ô-Y, is the only way to eject a floppy disk without touching the
mouse. (And don’t talk to us about the Special ➪Eject Disk command — sure,
it pops the disk out, but the disk’s ghost icon remains on the screen. Eject
Disk simply ejects the disk; Put Away actually unmounts it, to use the
technical terminology.)
In fact, the only downside to Put Away is that it doesn’t know what to do with
icons it thinks were created on the Desktop. (These icons could be files that you
saved onto the Desktop from within a program, for example.) The Put Away
command gives you a message saying that they were “created on the Desktop.”
Find
Despite its name, the Finder hasn’t always been very good at finding things.
In System 6, you got a mere desk accessory in the menu that could only tell
you (not show you) the location of your missing file. In System 7, there was a
Find command in the File menu. And in System 7.5 and later, the Find
command launches a Find program.
If you have System 7.5 or later (especially Mac OS 8.5 or later), see the “Find
File” section in Chapter 3 for an amazing array of searching secrets. If you
have some flavor of System 7 or 7.1, though, see our “System 7.0–7.1 Find
Command Secrets.” They’re in Chapter 2 of the electronic Macworld Mac
Secrets, 4th Edition (on the CD-ROM that came with this book).
The Edit Menu
What is there to edit in the Finder, you ask? Plenty, as it turns out.
Mac Basics
Chapter 2: Finder Command Secrets 71
■ ■
MAC SECRETS • 4040-8/5 • ch.02.F • Chapter 2 • FINAL • VB • 10/22/98 • p.71
MAC SECRETS • 4040-8/5 • ch.02.2 • Chapter 2 • Proof 2 • EAP • 10/15/98 • p.71
4040-8/5 ch02.F 11/3/98 3:46 PM Page 71

Undo
Interestingly, Undo almost never does anything useful in the Finder. It doesn’t
work after you move an icon, empty the Trash, rename an icon, change a
setting, apply a label, or enlarge a window. And it certainly doesn’t work after
you eject a disk.
What’s especially strange is that Undo rarely works even when you cut, copy,
clear, or paste things (to or from the Scrapbook, for example), even though
(a) the command isn’t dimmed, as it’s supposed to be when unavailable, and
(b) it should work to undo Edit menu commands. Well, no one ever accused
Apple of being consistent.
Anyway, the Undo command in the Finder exists today for just one reason: to
help you when you’re editing a file’s name. The Undo command can take back
your last text editing.
Cut, Copy, Paste, Clear
It may not occur to you to use the Cut, Copy, Paste, and Clear commands in
the Finder, where there’s no text or graphics, really, with which to work. But
these commands do work in a surprising number of different Finder contexts.
■Click an icon. The Copy command grabs the icon’s name and puts it on
the Clipboard. If you press Return so that the icon’s renaming rectangle
appears, the other Edit commands work, too.
■Select a group of icons. The Copy command, believe it or not, grabs all
the icons’ names (limited to 255 characters before Mac OS 8). Here’s a
handy trick: Open a word processor and paste. You’ve just made yourself
a list of a folder’s contents.
■In the Get Info box for an icon, click the icon. The Cut, Copy, Paste, and
Clear commands now apply to the icon graphic.
■Open the Scrapbook. The Edit commands work to transfer pictures,
sounds, QuickTime movie clips, or text in or out.
■Open the Puzzle or Jigsaw Puzzle desk accessory. The Edit commands
copy and paste graphics into the puzzle itself (see Chapter 3). The same
thing works with the Map control panel.
■Open a text clipping or picture clipping, as described in Chapter 1. The
Copy command works on the entire graphic or text blob; switch to
another program to paste it.
Show Clipboard
Show Clipboard opens a window that displays whatever text, sound, or
graphics you most recently copied from any program. For example, if you
Show Clipboard after copying a sound from the Scrapbook, you see a solitary
button that says Play Sound, which does what you’d think.
Strange
But True
72 Part I: System Software Revealed
■ ■
MAC SECRETS • 4040-8/5 • ch.02.F • Chapter 2 • FINAL • VB • 10/22/98 • p.72
MAC SECRETS • 4040-8/5 • ch.02.2 • Chapter 2 • Proof 2 • EAP • 10/15/98 • p.72
4040-8/5 ch02.F 11/3/98 3:46 PM Page 72

The Clipboard isn’t terribly bright about QuickTime movie clips, however. It
shows only the first image of the movie (and identifies that Scrapbook item
as a “picture”). Still, if there is a movie on the Clipboard, it’s still genuinely a
movie, and you can paste it anywhere fine movies are pasted — into a Word
document, Scrapbook, Movie Player (see Chapter 23), or whatever.
Preferences
No Preferences command appeared in the Finder until Mac OS 8 — but to us,
it makes a lot of sense. This is the command center for adjusting a few global
Finder settings (see Figure 2-8):
■Font for views: It’s the feature on a quest for home! In System 7.x, the
Views control panel lets you specify a font for all your icon names and
list-view information. (See “Views” in Chapter 4.) In Mac OS 8, it’s here. In
Mac OS 8.5, it’s in the Appearance control panel.
Whatever. We think you could probably count on one hand the people
who use anything other than Geneva.
■Simple Finder: This option offers simplicity for the novice or the very
young. It eliminates many of the commands and features in the Finder you’d
need a book like this one to explain: aliases, labels, Move to Trash, printing
commands, clean-up and arranging commands, view options, sleep and
restart, and erase disk (thank goodness!). It also eliminates all keyboard
shortcuts — that’s right, even Ô-W to close a window. Set your windows
to button view, switch to Simple Finder, and you’ve practically got yourself
Apple’s At Ease program without actually having to buy or install it.
Your cheerful authors would go quietly mad trying to work in this view.
But many’s the time we ached for exactly such a setup on behalf of one of
our clients, parents, or offspring.
■Spring-loaded folders: See “Spring-loaded folders” in Chapter 1 for
details — and for our advice on adjusting this responsiveness slider.
■Grid spacing: In the next section, and elsewhere in this book, you’ll read
a lot about the imaginary grid that lurks invisibly behind the icons in any
Finder window. Use this command to adjust its spacing. (Hint: You want it
set to Tight. Really you do.)
■Labels: See “The File menu” in Chapter 1.
The Preferences command was such a hit that it grew. In Mac OS 8.5, in fact,
the Preferences dialog box has multiple tabs that open multiple panes. The
General and Labels panes contain the options we’ve just described. The new
central tab, Views (see Figure 2-8), lets you set up default options for each
kind of window view: icon, button, and list — a response to the Mac fans who
cried foul when Apple made these options window-specific instead of global.
From now on, whenever you create a new folder, it will automatically take on
the view characteristics you specify in this Preferences dialog box.
OS
8.5
OS
8
Chapter 2: Finder Command Secrets 73
■ ■
MAC SECRETS • 4040-8/5 • ch.02.F • Chapter 2 • FINAL • VB • 10/22/98 • p.73
MAC SECRETS • 4040-8/5 • ch.02.2 • Chapter 2 • Proof 2 • EAP • 10/15/98 • p.73
4040-8/5 ch02.F 11/3/98 3:46 PM Page 73

Figure 2-8: In Mac OS 8.5, the Preferences dialog box has three panes. Use the middle one
(right) to specify global list-, button-, or icon-view settings for all new windows to come.
The View Menu
The commands in the View menu control how your files and folders are
listed — as icons, in a list, as buttons, how they’re sorted, and so on. The
only truly befuddling characteristic of these options is the way they changed
between System 7.x and Mac OS 8.
Before Mac OS 8, there were two different categories of View menu options —
window-specific ones and global ones. For example, even in System 7, you
can decide whether you want your icons listed as normal icons, small icons,
or in a tidy list. But certain other options, such as the status of the “Calculate
folder sizes” setting, which info columns you want in list views, and the size
of the icons you want to see in list views, are global in System 7.x.
Mac OS 8 changed the whole ballgame. Now all of those characteristics can
be set on individual, window-by-window basis. Some people appreciate the
flexibility of being able to set these aspects of every window independently —
especially those of us who couldn’t stand the way System 7.x’s “Calculate
folder sizes” slows down the entire Macintosh, even when we only wanted to
see how big the folders were in one window.
Other people, however, were frustrated by Mac OS 8, assuming that the only
way to change make all windows display the same way was to set them up one
at a time, window by window. (Obviously, they hadn’t read our secrets in
Chapter 1 about setting the options for groups of windows simultaneously— or
upgraded to Mac OS 8.5, which lets you set up your preferred characteristics
for each of the three primary window views: icons, lists, and buttons.)
OS
8.5
OS
8
74 Part I: System Software Revealed
■ ■
MAC SECRETS • 4040-8/5 • ch.02.F • Chapter 2 • FINAL • VB • 10/22/98 • p.74
MAC SECRETS • 4040-8/5 • ch.02.2 • Chapter 2 • Proof 2 • EAP • 10/15/98 • p.74
4040-8/5 ch02.F 11/3/98 3:46 PM Page 74

as Icons, as Buttons, as List
These three commands have always been window-specific (although the
button view made its debut in Mac OS 8; see “The Point of Views: Lists, Icons,
and Buttons” in Chapter 1). Keep in mind that in Mac OS 8.x, you don’t
necessarily have to use the View menu to switch from one of these views to
another — just Control-click anywhere inside a window, and use the resulting
contextual menu to specify a different view.
Chapter 2: Finder Command Secrets 75
■ ■
MAC SECRETS • 4040-8/5 • ch.02.F • Chapter 2 • FINAL • VB • 10/22/98 • p.75
MAC SECRETS • 4040-8/5 • ch.02.2 • Chapter 2 • Proof 2 • EAP • 10/15/98 • p.75
MACINTOSH SECRET
As we mentioned in Chapter 1, in a quest for
operating-system stability, Apple decreed that
there were to be no more unauthorized Easter
eggs; only fully tested and debugged ones.
This new policy explains why so many of the
Easter eggs described in previous editions of
Mac Secrets no longer work in Mac OS 8. Still,
this newer operating system has a few officially
approved tricks of its own. Most of them, for
some reason, revolve around the Color Picker —
the dialog box that appears when you choose
Edit ➪Preferences ➪Label, and click a label
color. (But first a warning: These Easter eggs
disappeared in Mac OS 8.1 and later, lost to that
great Easter egg carton in the sky.)
The icons at the left side of the Color Picker let
you choose from among several different color-
selection schemes. If you click the Crayon Picker,
you see a picture of a box of Crayolas. You can
click each crayon to see its color name: “Chalk,”
“Tangerine,” “Warm Marble,” and so on. (Some
interior decorator in Cupertino had a field day
naming these crayons.) In fact, you can even
Option-click things, inside or outside of the dialog
box, to choose the color you want. Each time,
you’ll be told Apple’s name for the color you just
clicked, even when it gets ridiculous: “Melon-ish”
and “Cactus-ish” made us giggle, for example.
And now — on to the Easter egg, a discovery of
free book winner Dave Gammage. Click a
different icon on the left side of the window, and
now Shift-click the Crayon Picker icon again.
You get the box of crayons, all right. But this
time, if you click the various crayon tips, you’ll
see the programmers’ names, one per crayon.
Some of the crayons just say “Color Picker 2.1”
(or whatever the version number is); but others
offer more intriguing anagrammatic labels, such
as “Yes, I Surf Ohio” and “Night Thigh Desire.”
But there’s more. Look closely at the black crayon.
Look at the tips of the other crayons. Incredible as
it may seem, beginning January 2, 1998, a funny
thing started happening to the crayons in the
Crayon Picker: their tips started wearing down!
The scary thing is that as time goes by, more and
more crayons wear down. If you zoom the clock
ahead, to, say, 2004, nearly every other crayon is
worn down. Zoom ahead 10 more years, and
hey, it’s time for a fresh box of crayons.
Or a new computer, anyway.
Secrets of the Mac OS 8 Color Picker
4040-8/5 ch02.F 11/3/98 3:46 PM Page 75
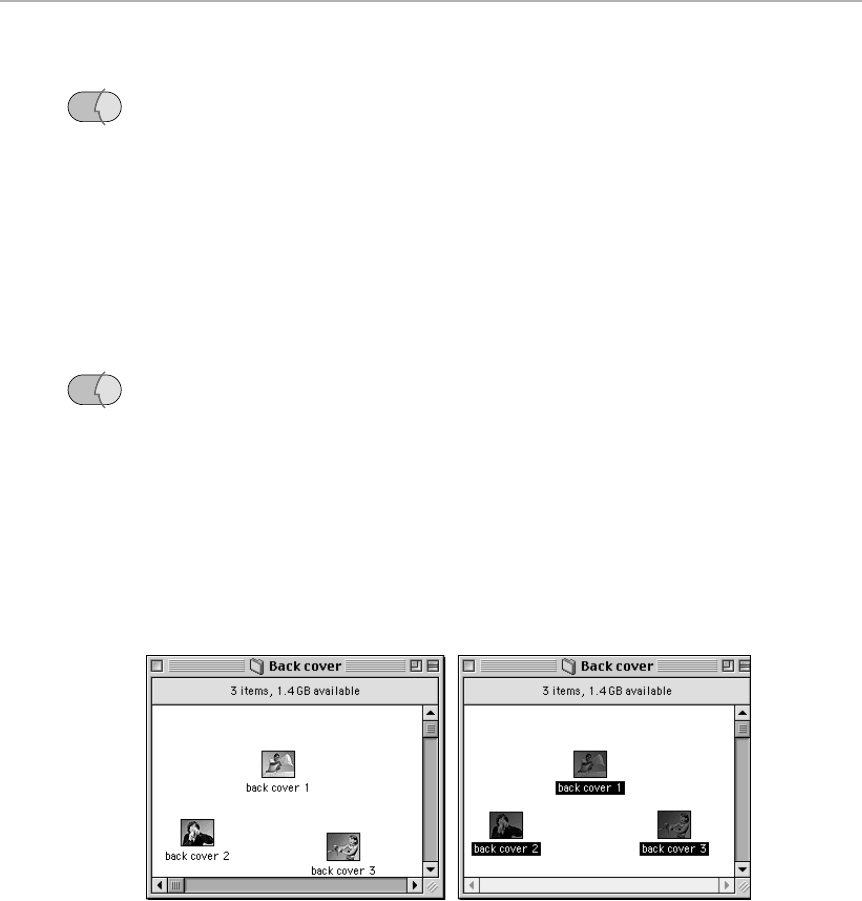
as Window, as Pop-up Window
The View menu grew longer by two commands when Mac OS 8 debuted.
Apple needed to create a way for us to switch between the traditional
window view — in which the window is a rectangle, floating detached in the
middle of the screen — and the new pop-up window format, in which the
window is a tab hugging the bottom edge of the screen (see “Mac OS 8
window stunts” in Chapter 1). These two commands are the result. Once
again, though, you don’t necessarily need the View menu to change a window
between these options — a Control-click inside the window itself brings up a
pop-up menu containing these same commands.
Clean Up, Arrange (Mac OS 8.x)
Frankly, we were delighted to see the Clean Up command move to the View
menu in Mac OS 8, where it should have been all along. After all, it clearly
pertains to the arrangement of icons within a window, just like the rest of the
View menu. Whenever possessed Apple to put it in the Special menu
originally, we can’t say. (See “The Special Menu” later in this chapter for
tricks involving that older Clean Up command.)
Anyway, Clean Up affects only the highlighted icons in an icon-view window.
It nudges each into alignment with the invisible icon grid that underlies every
icon-view window. Unfortunately, it does little more than move every icon to
the closest available grid position; if there are enormous gaps between icons,
the enormous gaps remain (see Figure 2-9).
Figure 2-9: Some messy icons before (left) and after (right) the Clean Up command. Ooh, big
improvement, right?
If genuine cleanup is your goal, eschew the Clean Up command altogether.
Instead, use the Arrange command. Its various subcommands (by name, by
date, and so on) not only make your icons snap to the invisible grid, but also
sort them and close up gaps between them (see Figure 2-10).
OS
8
OS
8
76 Part I: System Software Revealed
■ ■
MAC SECRETS • 4040-8/5 • ch.02.F • Chapter 2 • FINAL • VB • 10/22/98 • p.76
MAC SECRETS • 4040-8/5 • ch.02.2 • Chapter 2 • Proof 2 • EAP • 10/15/98 • p.76
4040-8/5 ch02.F 11/3/98 3:46 PM Page 76
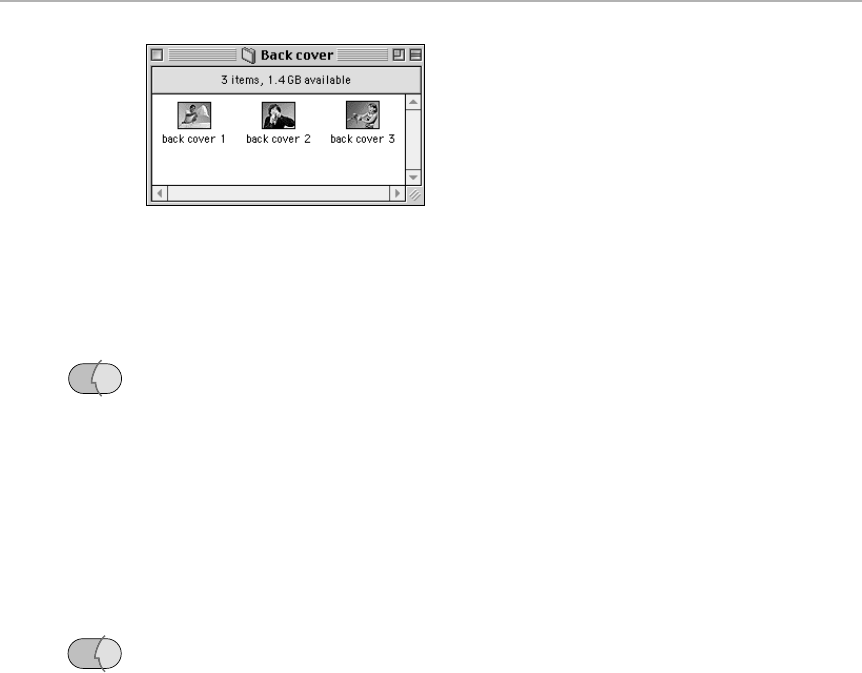
Figure 2-10: The same window (from Figure 2-9), but this time arranged with the Arrange
command.
Reset Column Positions
One delightful new feature in Mac OS 8.5 is the ability to rearrange the columns
in list views (see “Columns: Skinnier, wider, or rearranged” in Chapter 1). You
can also adjust the columns’ widths — independently in every window — just by
dragging the column dividers. In general, you can only improve your Mac’s use
of space and clarity of display by making these adjustments to suit your taste.
In the event you screw up your columns beyond recognition, however, just
choose View ➪Reset Column Positions. Your list view snaps back to its
original, Apple factory-fresh condition.
View Options
This command, new to Mac OS 8, brings up a dialog box that lets you
establish settings for whatever window is open at the moment. And if no
window is open, the View Options affects the desktop itself.
The key to understanding the View Options dialog box is that it comes in
three different flavors, depending on the view (icon, list, or button) you’ve
selected for this window, folder, or desktop. Figure 2-11 shows the dialog
boxes that may appear.
The options are as follows:
■Icon arrangement: Three choices await you here. “None” is what you’re
used to: icons lie where they lie, and you can drag them anywhere you
like. “Always snap to grid” means that every icon, when dragged, jumps
into the closest available underlying grid position (unless you press the
Ôkey as you drag). And if you’re a real neat freak, you can specify “Keep
arranged” — the Mac will align your icons in a grid, sort them, and keep
them that way even if you add or remove icons to the window (or resize
the window). Think of this option as a “clean up continuously” command.
OS
8
OS
8.5
Chapter 2: Finder Command Secrets 77
■ ■
MAC SECRETS • 4040-8/5 • ch.02.F • Chapter 2 • FINAL • VB • 10/22/98 • p.77
MAC SECRETS • 4040-8/5 • ch.02.2 • Chapter 2 • Proof 2 • EAP • 10/15/98 • p.77
4040-8/5 ch02.F 11/3/98 3:46 PM Page 77
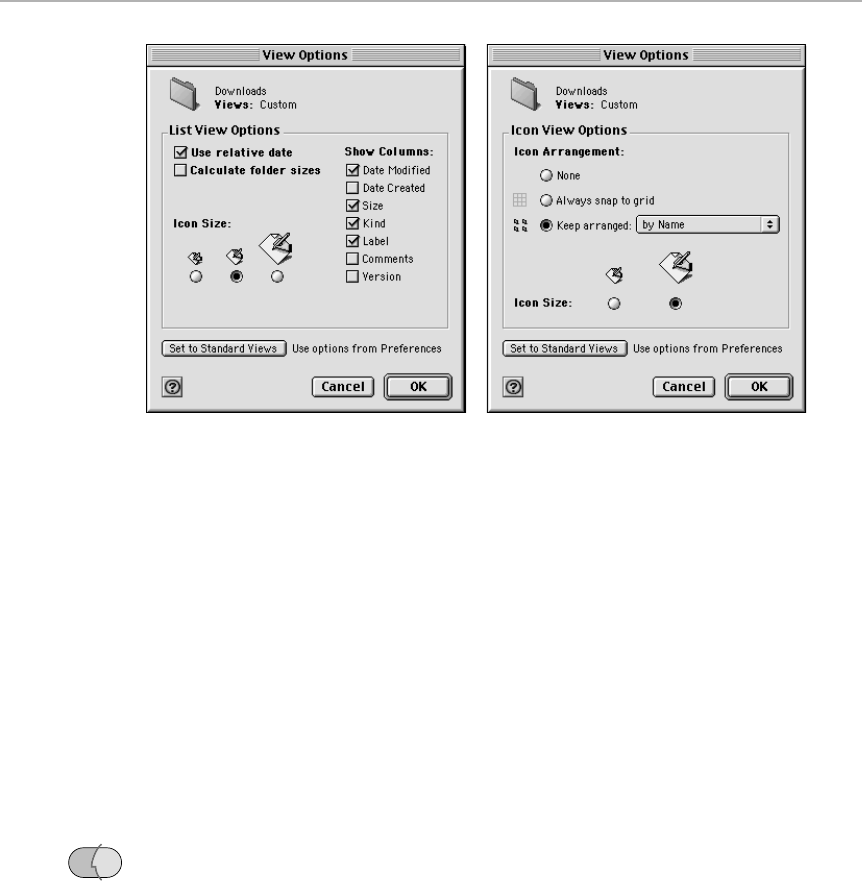
Figure 2-11: The Button and Icon view options are identical (right); the List view options are
very different.
■Use relative date: No, this doesn’t mean you’re going out with one of
your parents. It means that in list views, if a file’s modification date was
today, yesterday, or even tomorrow (see “List, Icon, and Button View
Secrets” in Chapter 1), you won’t see a date listed — you’ll see instead
the word Today, Yesterday, or Tomorrow. Like all of these options, this
one applies only to the window that was open at the moment you chose
View ➪View Options.
■Calculate folder sizes: See “Views” in Chapter 4, but ignore our warning
that this option slows down the Macintosh. In Mac OS 8 and later, this
option affects only the specific window you had open — not the entire
Macintosh.
■Show columns: Turn on the checkboxes of the information columns you’d
like to see in this window’s list view. Again, see “Views” in Chapter 4.
■Set Standard Views: The Edit ➪Preferences command lets you set up
default view options for each of the three view types — icon, button, and
list. If the Set Standard Views button here is dimmed, your current window’s
options match that default. (You can confirm this by looking at the top of
the window, where it says either “Views: Standard” or “Views: Custom.”)
But if the button is available, then you’ve changed this window’s settings.
Click Set Standard Views to make it match the preferences you’ve set up
with the Edit ➪Preferences command.
The Special Menu
Here it is: the only non-verb Finder menu title. Special, in this case, means
miscellaneous.
OS
8.5
78 Part I: System Software Revealed
■ ■
MAC SECRETS • 4040-8/5 • ch.02.F • Chapter 2 • FINAL • VB • 10/22/98 • p.78
MAC SECRETS • 4040-8/5 • ch.02.2 • Chapter 2 • Proof 2 • EAP • 10/15/98 • p.78
4040-8/5 ch02.F 11/3/98 3:46 PM Page 78

Eject Disk
It took 14 years for Apple to get this command right. As of Mac OS 8, this
command (or its equivalent, Ô-E) ejects a highlighted disk or CD icon, no
questions asked.
In systems before Mac OS 8, though, this command ejects your disk but leaves
its image on the screen. Therefore, the Mac believes the disk is still around.
At the least provocation — clicking the ghosted icon, for example — the
computer asks you to give the disk back. This, need we add, is a royal pain if
you’ve already put the disk back in its box on a shelf somewhere. The solution
is to use instead the File menu’s Put Away command (Ô-Y) to eject disks.
Why on earth did Eject Disk work that way for so many years? It was
designed in the era of Macs that had no hard drives. The Eject Disk command
was the only way to copy files from one floppy to another — you’d drag the
contents of one floppy onto the ghost of another, and then you’d swap the
disks in and out as the Mac requested them.
Even today, there’s one occasion when it’s useful to use the ghost-eject
method (which, by the way, is still available in Mac OS 8 and later — hold
down the Option key as you choose Special ➪Eject and Leave Behind). If you
insert a floppy disk that you discover was locked, and you need to copy stuff
onto it, use the ghost-eject command. When the disk pops out, unlock it and
stick it right back in. This routine is faster than using the Put Away command
(or the Mac OS 8 Eject Disk command) and reinserting the disk.
Erase Disk
We have a couple of little-known morsels concerning this command; see
Chapter 8.
Clean Up (System 7.x)
As we noted earlier in the chapter, the Clean Up command, as of Mac OS 8,
has moved to new digs (in the View menu). If yours is in the Special menu,
you’ve got System 7 — and you’ve got about a thousand variants from which
to choose. Here’s the complete list.
Clean Up Secrets (System 7.x)
■
Clean up only selected icons
When you view icons in a window, the command says Clean Up Window. It
adjusts the position of
all
icons so that they’re aligned to the nearest spot on an
invisible grid.
OS
8
Chapter 2: Finder Command Secrets 79
■ ■
MAC SECRETS • 4040-8/5 • ch.02.F • Chapter 2 • FINAL • VB • 10/22/98 • p.79
MAC SECRETS • 4040-8/5 • ch.02.2 • Chapter 2 • Proof 2 • EAP • 10/15/98 • p.79
4040-8/5 ch02.F 11/3/98 3:46 PM Page 79

If you press Shift, however, the command says Clean Up Selection. It makes
only the
highlighted
icons snap to the invisible grid (see Figure 2-12).
Figure 2-12: The Clean Up command is a many-splendored thing. Press Shift to make it
affect only the highlighted icons.
Sort and neaten simultaneously
This is a
really
useful secret. If you press Option, the command says Clean Up by
Name (or Size, or Date, and so on). Get this: The sorting method is determined by
the sort method you used the last time the window was displayed in a
list view
.
The command makes icons snap to a grid, just as the normal Clean Up
command does. However, instead of moving each icon to the
nearest
grid
position (and leaving gaps), this command places them neatly, one after
another, in sequential rows at the upper-left corner of the window. If you’re
viewing by Small Icon view, your files fall neatly into
columns.
Here’s an example. Suppose that you want the icons in a window arranged in
size order, largest files first. Choose “by Size” from the View menu, and then
choose “by Icon” from the same menu. Hold down Option and choose Special ➪
Clean Up by Size — the deed is done.
Hint: Because this special version of Clean Up puts icons side by side in rows (or
small icons in columns) so that they precisely fill up the window they’re in, be sure
to adjust the window
before
using this command so that it’s the shape you want.
Clean up icons on the Desktop
Oft-neglected factoid: You can also clean up your
Desktop
icons. First, select
the Desktop, either by clicking there or by pressing Ô-Shift-up arrow. Then, while
pressing Option, choose Special ➪Clean Up All. The Finder instantly arranges all
those loose Desktop icons along the right side of your screen.
Worth
Learning
80 Part I: System Software Revealed
■ ■
MAC SECRETS • 4040-8/5 • ch.02.F • Chapter 2 • FINAL • VB • 10/22/98 • p.80
MAC SECRETS • 4040-8/5 • ch.02.2 • Chapter 2 • Proof 2 • EAP • 10/15/98 • p.80
4040-8/5 ch02.F 11/3/98 3:46 PM Page 80
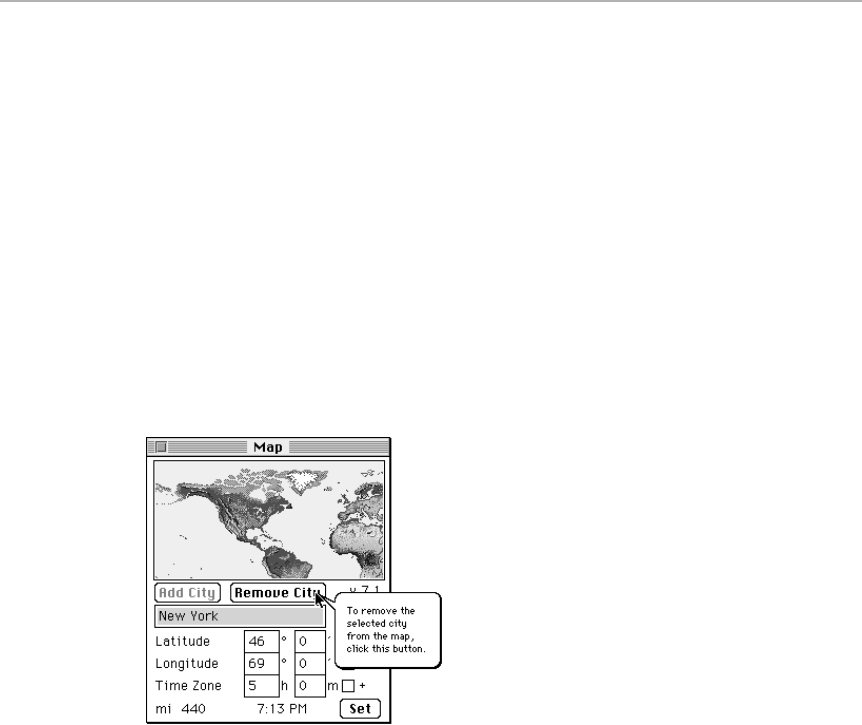
The Help Menu
The Help menu (sometimes known as the Guide menu), of course, is the little
question-mark icon near the top right of the screen. (In System 7.5, people
said: “It’s a question mark!” “It’s a light bulb!” “It’s a question mark and a
light bulb!” In Mac OS 8, Apple ended the confusion by replacing the light
bulb/question-mark icon with the unmistakable word Help.)
This menu either has zero or three functions, depending on which program
and system software you’re using: Balloon Help, Macintosh Guide, Mac OS
Help, and generic Help for that program.
Balloon Help
You probably already know how Balloon Help works; if not, Figure 2-13
should explain all.
Figure 2-13: Choose Show Balloons from the Help menu. Balloons appear wherever you
point. You can find some pretty hilarious secret messages if you poke around your System
folder long enough with Balloon Help on. For the complete list of Balloon-Help Easter eggs,
see David Pogue’s The Great Macintosh Easter Egg Hunt (Berkley Books, 1997). For now,
however, try pointing to the QuickTime extension; CloseView control panel; the QuarkXPress
icon; MacsBug; and the Speech Setup control panel’s version number.
We’ve heard conflicting reactions to Balloon Help. Some people think it’s the
dumbest thing alive. Others think it’s genuinely helpful. Your cheerful authors
kind of like it, having been seriously helped out by using it in a couple of
user-hostile programs.
In any case, whether or not balloons appear when you try Balloon Help
depends entirely on what program you’re using — and whether or not its
software company bothered to write all the little pop-up messages. You
always get balloons that identify standard Macintosh elements (such as
Chapter 2: Finder Command Secrets 81
■ ■
MAC SECRETS • 4040-8/5 • ch.02.F • Chapter 2 • FINAL • VB • 10/22/98 • p.81
MAC SECRETS • 4040-8/5 • ch.02.2 • Chapter 2 • Proof 2 • EAP • 10/15/98 • p.81
4040-8/5 ch02.F 11/3/98 3:46 PM Page 81
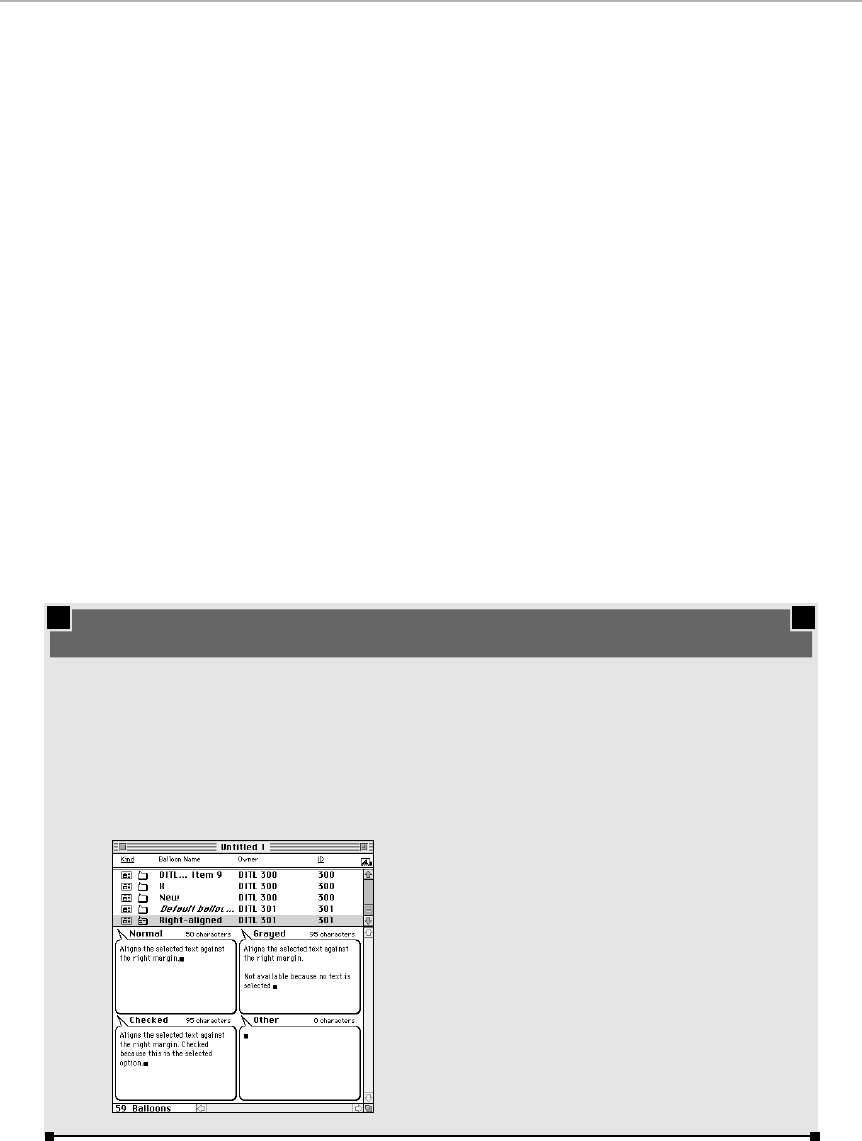
scroll bars, zoom boxes, icons, and so on). Apple did that much for you.
(Likewise, Apple created balloons for most of the system software: the desk
accessories, control panels, SimpleText, the Finder, and so on.)
Anyway, you can certainly live a rich and rewarding life even if you leave
Balloon Help off all the time.
Apple Guide
If programmers thought writing Balloon Help was tedious, they couldn’t have
imagined what Apple had in store next: Apple Guide (also called Macintosh
Guide), which made its debut in System 7.5.
Imagine choosing from an index of tasks that you may want to accomplish:
changing the Desktop pattern, let’s say. Now imagine that the computer
shows you how to do what you’ve requested, step by step, using a ghostly
red magic-marker pen to circle where you should click next. (The animated
magic marker creates what Apple calls coach marks, named after the
annotations football coaches make on the locker-room blackboard.)
That’s Apple Guide. It requires enormous support files to lie in your System
Folder. But for the beginner who’s lucky enough to find the desired task in the
list — and who’s smart enough to think of choosing Apple Guide from the
menu when stumped — it’s made in heaven (see Figure 2-14).
82 Part I: System Software Revealed
■ ■
MAC SECRETS • 4040-8/5 • ch.02.F • Chapter 2 • FINAL • VB • 10/22/98 • p.82
MAC SECRETS • 4040-8/5 • ch.02.2 • Chapter 2 • Proof 2 • EAP • 10/15/98 • p.82
CASE HISTORY
One of your cheerful authors was once contracted
to write Balloon Help for a program. He’d like to
share with you one of the reasons some
programmers opt not to write Balloon Help for
their programs. Take a look at the following figure:
This is BalloonWriter: a very, very buggy
program, at one time distributed by Apple for
programmers to write Balloon Help.
As you can see, you can’t just write one balloon
for each menu command or dialog box item. As
shown in the figure, you actually have to write
up to four balloons for each item! The text is
supposed to change, depending on whether a
menu command (for example) is checked,
dimmed, or both. As you can imagine, this
means that some poor slob has to compose up
to four balloons for every knob, slider, and
button in a program. It’s work.
How
many balloons?
4040-8/5 ch02.F 11/3/98 3:46 PM Page 82

Figure 2-14: Apple Guide is like an intelligent manual. First, you choose Macintosh Guide
from the new, enhanced Guide menu. You choose from a list of “How do I . . .?” questions.
Next, you read the step-by-step instructions in the Help window that appears. The bright red,
fat magic-markerish, ghost-drawn pen (called the Coach) draws your eye to the interface
element being described.
Once again, though, the trouble with Apple Guide is its limited acceptance by
the world of software companies. Few bothered to write the screens and draw
the graphics that would drive Apple Guide for their programs. (Quicken,
WordPerfect, and BBEdit are some exceptions.) Even most Apple and Claris
programs don’t have Guide files, although sometimes you’ll see a program’s
regularly scheduled Help feature listed in the Guide menu.
Mac OS 8.5 Help
After the Apple Guide debacle — a case of Apple being unable to persuade
software companies to write help files in the special (and Macintosh-only)
Apple Guide format — Apple revisited the help mechanism yet again with
Mac OS 8.5 (see Figure 2-15).
This time, we feel confident that more software companies will take the
bait — because the new OS’s file format is Web-page format, or HTML (see
Chapter 28). In other words, it’s a piece of cake for the companies that write
Mac software to adapt their existing paper manual or even Windows help
files into Mac OS 8.5 format — they essentially create a bunch of Web pages
using any of the dozens of Web-page-making programs on the market.
Using the HTML format is a helpful help-file format for several other reasons,
too. It can incorporate illustrations, links to other topics, movies, and sounds.
It’s easy to update. And if you, the Mac fan, know where the HTML files are
stashed (hint: inside the System Folder in a folder called Help), you can open
them with any Web browser, instead of using the Help Viewer that comes with
the OS. (Why would you want to do that? In case you wanted to copy some of
the help text, for example, which you can’t do with the Apple Help Viewer.)
Chapter 2: Finder Command Secrets 83
■ ■
MAC SECRETS • 4040-8/5 • ch.02.F • Chapter 2 • FINAL • VB • 10/22/98 • p.83
MAC SECRETS • 4040-8/5 • ch.02.2 • Chapter 2 • Proof 2 • EAP • 10/15/98 • p.83
4040-8/5 ch02.F 11/3/98 3:46 PM Page 83
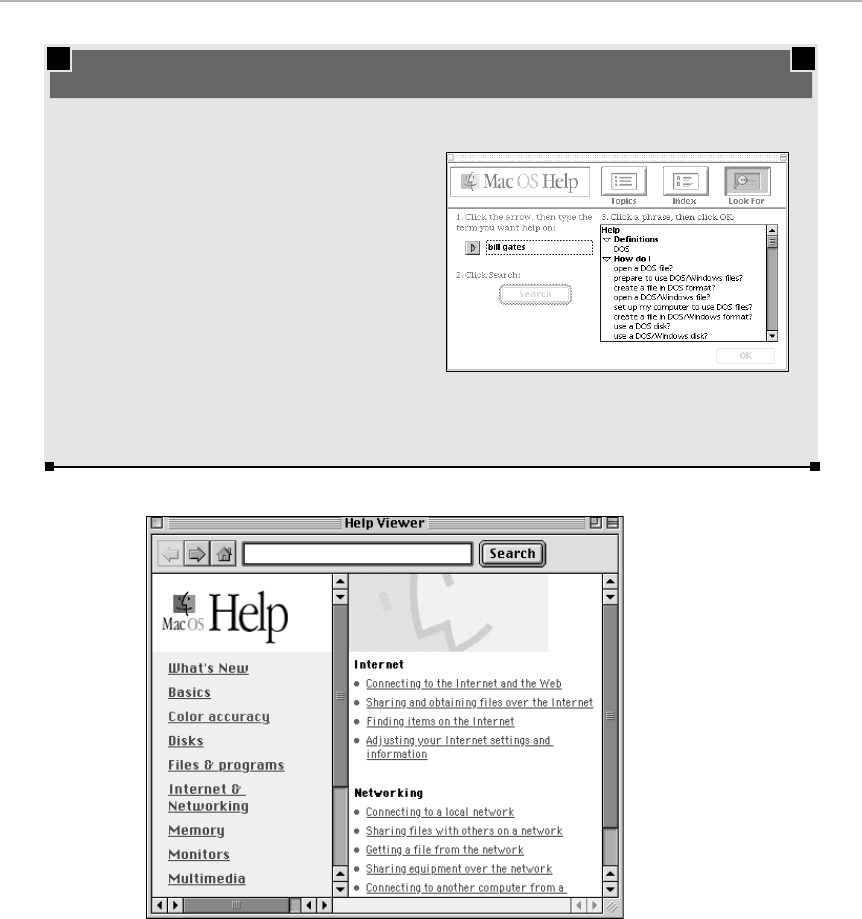
Figure 2-15: Starting in Mac OS 8.5, you read your software’s help in a miniature Web browser.
Time will tell, but we’d be willing to bet plenty of software companies will
embrace this new help mechanism. And that, in turn, will be a big help.
84 Part I: System Software Revealed
■ ■
MAC SECRETS • 4040-8/5 • ch.02.F • Chapter 2 • FINAL • VB • 10/22/98 • p.84
MAC SECRETS • 4040-8/5 • ch.02.2 • Chapter 2 • Proof 2 • EAP • 10/15/98 • p.84
MACINTOSH SECRET
Apple Guide has plenty of topics for which to
search. But sometimes the cross-references are
the darnedest things.
For example, open Macintosh Guide. Click the
Look For icon, as shown at right. And then
search for — get this — Bill Gates.
Apple Guide does the best it can at showing you
the list of Bill Gates–related topics it knows
about: DOS, Windows disks, and so on.
We’re guessing that searching for Steve Jobs on
a Windows machine doesn’t yield anything
nearly as fruitful.
Nobody really has to search for Bill
4040-8/5 ch02.F 11/3/98 3:46 PM Page 84
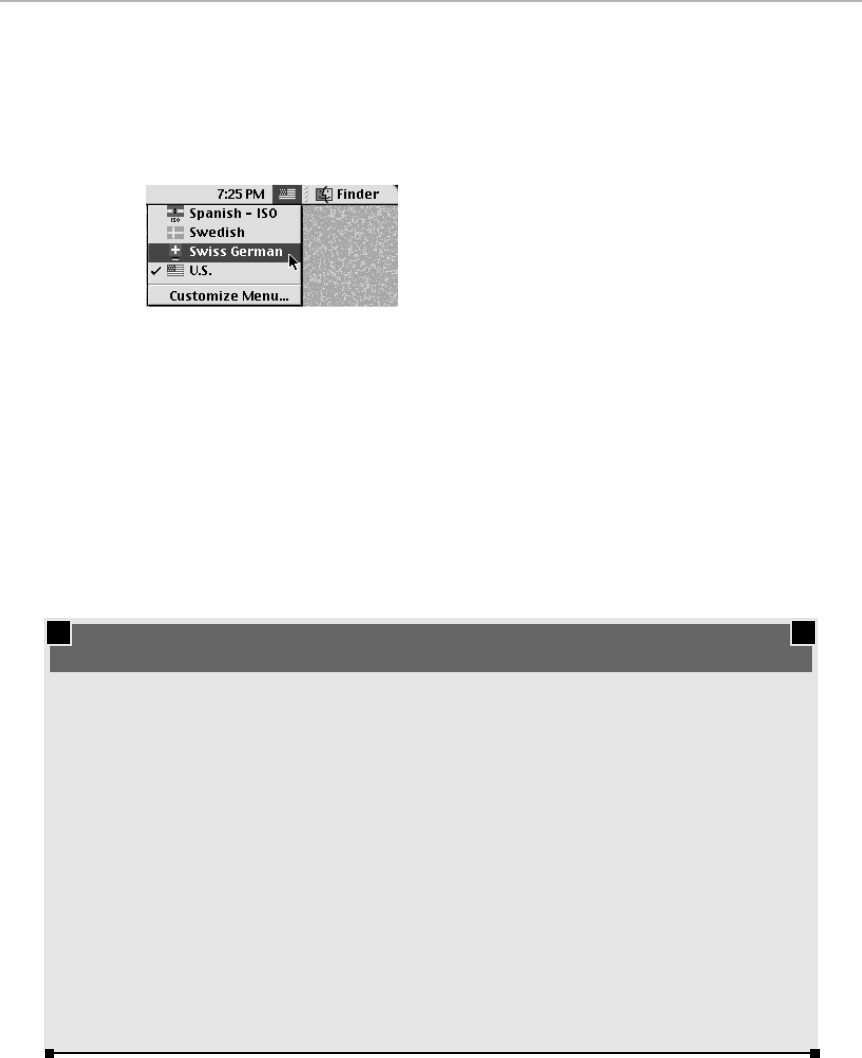
The Keyboard/International Menu
We doubt that you’ve been wondering about this menu, because you
probably have never even seen it. When it does appear, it’s at the right side of
your menu bar, just to the left of the Application menu (see Figure 2-16).
Figure 2-16: The menu no one knows.
The idea is that this menu lists several different keyboard script systems or
keyboard layouts. A script system is a set of files, purchased as a WorldScript
kit, that describes how a particular language should work on the Mac: Does
the typing appear right-to-left? What do the letters look like? And so on. A
keyboard layout specifies what character appears on the screen when you
press a certain key — a relationship that varies by language.
By choosing a command from this menu, you switch your entire keyboard to
a different language system or keyboard layout.
Chapter 2: Finder Command Secrets 85
■ ■
MAC SECRETS • 4040-8/5 • ch.02.F • Chapter 2 • FINAL • VB • 10/22/98 • p.85
MAC SECRETS • 4040-8/5 • ch.02.2 • Chapter 2 • Proof 2 • EAP • 10/15/98 • p.85
TRUE FACT
If you’re a Mac OS 8 fan, you may have
wondered why Apple (a) changed the Guide
logo (the question-mark) to the word Help, and
(b) moved it from the rightmost end of the menu
bar to the right end of the other menus.
The answer: In conducting focus-group studies,
Apple noticed that nobody ever bothered using
the online help — because nobody knew it was
there. “What about this thing here?” the
coordinator would say. “What about it?” the
testers would shrug. “Isn’t that part of the clock?”
With horror, Apple’s designers realized that
since the Guide logo was immediately to the left
of the menu-bar clock, Mac novices thought it
was some kind of graphic icon associated with
the time display!
In the beta version of Mac OS 8, then, Apple got
smart. They changed the menu from an icon to a
word — the word Help. Back they went to the
focus groups.
Unfortunately, the testers still didn’t use it. Now
they thought that command would get them
help with the clock.
That’s when Apple decided to move the Help
menu all the way to the left.
The homeless Help menu
4040-8/5 ch02.F 11/3/98 3:47 PM Page 85
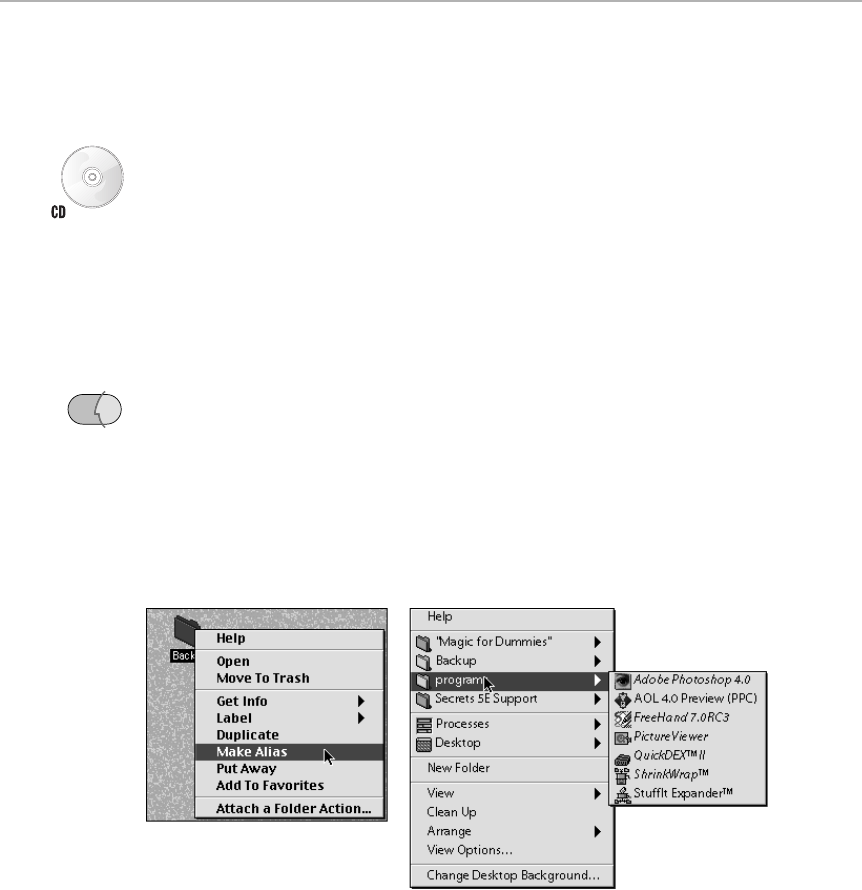
So how do you make this elusive menu appear? Easy: Open the Keyboard
control panel (see “Keyboard” in Chapter 4). Turn on the checkboxes of more
than one keyboard layout, and voila — your keyboard menu has appeared.
(The menu also appears if you install a WorldScript kit.)
As you’ll learn in Chapter 21, by using ResEdit, it’s simple to design your own
keyboard layouts. That’s of great consequence if you decide to try the
famous Dvorak keyboard layout (included on the CD-ROM with this book) —
an arrangement of keys that’s far more logically and efficiently designed (for
fast, efficient, error-free typing) than the standard “QWERTY” layout. Drop
the Dvorak layout onto your System Folder to install it; and use the Keyboard
menu to switch between the old and new layouts whenever you wish.
Contextual Menus
Mac OS 8 introduced a great feature and found a use for the previously
irrelevant Control key, all in one fell swoop. The feature: pop-up, contextual,
Control-key menus.
To trigger one, hold down the Control key. While it’s down, point to something
— an icon, folder, disk, Trash — or nothing (the desktop, the inside of a window)
and hold down the mouse button. At the tip of your cursor, a pop-up menu
appears, listing commands that pertain only to the object you’re clicking.
(That’s what contextual means.) Figure 2-17 shows a few of the possibilities.
Figure 2-17: The commands in the pop-up menu vary depending on what you’re clicking
(left). If you’re inspired, you can even get free programs like FinderPop that add even more
useful commands (right).
Apple didn’t invent this handy time-saver, but it did implement it beautifully —
and popularize it. Nowadays, you can Control-click to get cursor-tip menus
in dozens of programs, such as Netscape Navigator, Internet Explorer,
Photoshop, Emailer, America Online 4, and — especially — Word 98.
OS
8
86 Part I: System Software Revealed
■ ■
MAC SECRETS • 4040-8/5 • ch.02.F • Chapter 2 • FINAL • VB • 10/22/98 • p.86
MAC SECRETS • 4040-8/5 • ch.02.2 • Chapter 2 • Proof 2 • EAP • 10/15/98 • p.86
4040-8/5 ch02.F 11/3/98 3:47 PM Page 86

And because Apple designed this feature to be expandable, the Mac OS 8.x
System folder contains a Contextual Menu Items folder, into which you can
put add-on modules designed by, for example, shareware programmers.
Figure 2-17 shows some of the usual commands added by FinderPop, for
example, which is included with this book’s CD-ROM. Among other things,
FinderPop lets you:
■see what’s inside a folder by Control-clicking it
■change the font used for contextual menus everywhere
■switch to another program without having to use the Application menu
■hide or show all programs with a single click
■see a list of all open Finder windows, letting you switch directly
■create a list of frequently used programs, documents, or disks — and
open them from anywhere
Despite the fact that we adore FinderPop (especially because it’s free), there
are many other useful add-ons for contextual menus. Visit www.control-
click.com for a breathtaking array.
There’s not much to know about contextual menus except remembering to
try them! You may be surprised at some of the options you’re offered, some
of which may not be available in the real menus of the program you’re using.
In Mac OS 8.5, for example, the Attach Folder Action command lets you specify
an AppleScript that gets triggered every time an item is moved into the folder
you’re Control-clicking. You could make your Trash auto-empty this way, for
example, or make new arrivals in your Downloads folder self-unstuff — or have
documents in the Finished Chapters folder auto-email themselves to your
editors! And this command is available exclusively via contextual menu.
The Application Menu
The Application menu (Figure 2-18) is one of the most frequently used menus
on the Macintosh. And yet, if you mention it to the average Mac user, you’ll
probably get little more than a blank stare. Although we use the Application
menu every day, most people aren’t even aware that it has a name. As of Mac
OS 8, in fact, the Application menu and the menu are the only standard
Macintosh menus that aren’t represented on the screen by their names.
Whether or not you know what it’s called, the Application menu is the tiny
icon at the very upper-right corner of your screen. Here’s how you use the
Application menu:
■As a menu to switch from one program to another. Click the Application
menu icon, in other words, to see a list of all currently running programs;
choose the one you want. If you hold down the Option key as you choose
a new program’s name, all windows of the program you were using get
hidden.
Strange
But True
OS
8.5
Chapter 2: Finder Command Secrets 87
■ ■
MAC SECRETS • 4040-8/5 • ch.02.F • Chapter 2 • FINAL • VB • 10/22/98 • p.87
MAC SECRETS • 4040-8/5 • ch.02.2 • Chapter 2 • Proof 2 • EAP • 10/15/98 • p.87
4040-8/5 ch02.F 11/3/98 3:47 PM Page 87
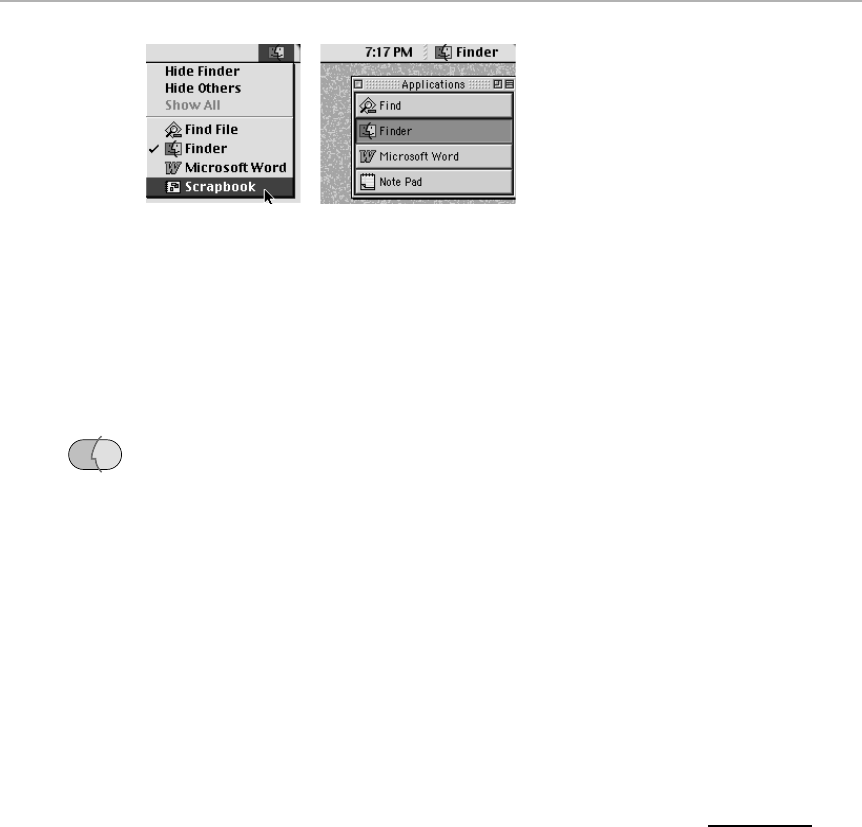
Figure 2-18: The original Application menu (left) lets you switch programs. The Mac OS 8.5
variety (right) can be torn off into a program-switching palette. Click the tiny square in its
upper-right corner to hide the program names, leaving only their icons.
■As an indicator of what program you’re currently in (even if no windows
are open). Of course, you may not always recognize the microscopic icon
in the upper-right corner of your screen, especially if it isn’t a program
you use every day.
In Mac OS 8.5, praise be, the name of the program you’re using
accompanies its icon as part of the menu title itself, as shown in Figure
2-18; in previous versions of the system software, the little icon is all you
have to go on.
■As a program-switching bay (in Mac OS 8.5 and later). If you drag your
cursor straight down off the bottom of the Application menu, the entire
menu rips off and turns into a floating palette. Click a program to switch
to it; option-click a program to switch to it and hide the one you were
using; click the tiny collapse box to make the application palette fold up
so that only the icons are showing. If there’s a sweeter, less obtrusive
application-switcher, we’ve yet to see it.
■As an application hider. If you Option-click an icon in the Mac OS 8.5-style
application palette (shown at right in Figure 2-18), the windows of the
program you were in are hidden.
Mac OS 8.5 Application Palette Secrets
■
Change the look, size, orientation, and position
Before you pass judgment on the Mac OS 8.5 application palette (the one that
appears when you tear off the Application menu), however, consider Figure 2-19.
It shows some of the many variations of this palette that are available to you.
Here’s how you create these delicious alternative palettes:
■To create the icon-only palette (no application names, as shown at top left
in Figure 2-19), click the zoom box in the tiny title strip at the top of the
palette. (The zoom box is second from right.)
OS
8.5
88 Part I: System Software Revealed
■ ■
MAC SECRETS • 4040-8/5 • ch.02.F • Chapter 2 • FINAL • VB • 10/22/98 • p.88
MAC SECRETS • 4040-8/5 • ch.02.2 • Chapter 2 • Proof 2 • EAP • 10/15/98 • p.88
4040-8/5 ch02.F 11/3/98 3:47 PM Page 88
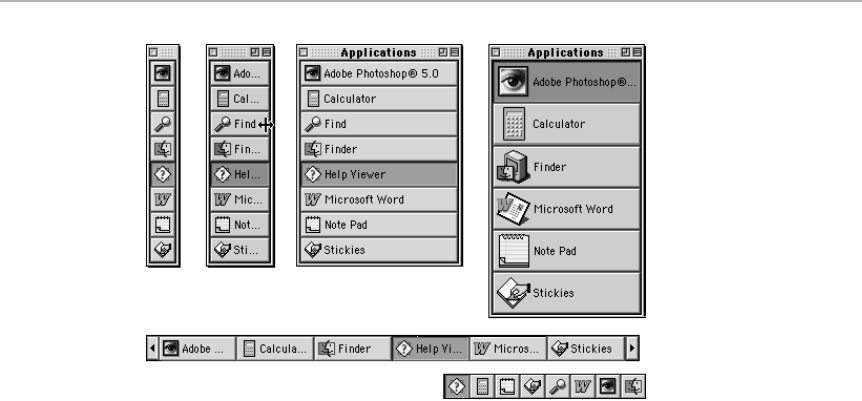
Figure 2-19: The Mac OS 8.5 application palette is a celebration of variety.
■To adjust the
width
of the tiles (in
any
of the variations described here),
position your cursor just inside the right edge of any application tile. Find the
spot where it changes to the cursor shown in Figure 2-19, second from left.
Now drag horizontally to make all of the tiles wider or narrower.
■To get full-sized icons (as shown at top right in Figure 2-19), Option-click the
tiny zoom box. Option-click again to restore the small-icon view.
■Option-Shift-click the zoom box to make the palette horizontal instead of
vertical. (Do it again to restore the palette to its vertical orientation.)
■Several other incarnations of the application palette await if you know how
to write AppleScripts (see Chapter 22) — or use the Mac OS 8.5 help.
For example, if you choose Help ➪Mac OS Help, search for
application
switcher,
click the topic called “Switching between open programs,” and
scroll down, you’ll see several blue underlined text phrases that can
completely reconfigure the application palette. One of them makes the
application palette hug the bottom-left edge of your screen (second from
bottom in Figure 2-19), complete with scroll arrows; another gives you an
icons-only switcher against the lower-
right
corner of your screen (shown at
bottom in Figure 2-19); and a third restores the application palette to its
original configuration.
Moving the palette
Normally, you reposition the application palette by dragging its tiny “title bar” (the
textured gray handle at the top or left edge). But what if this bar is hidden?
Simple: whether the drag bar is hidden or not, you can move the palette by
Ô-dragging anywhere on it.
Chapter 2: Finder Command Secrets 89
■ ■
MAC SECRETS • 4040-8/5 • ch.02.F • Chapter 2 • FINAL • VB • 10/22/98 • p.89
MAC SECRETS • 4040-8/5 • ch.02.2 • Chapter 2 • Proof 2 • EAP • 10/15/98 • p.89
4040-8/5 ch02.F 11/3/98 3:47 PM Page 89

Switching programs from the keyboard
The application palette is brought to you by an extension called Application
Switcher. (It’s in the Mac OS 8.5 Extensions folder.) Because it’s an extension,
this handy bit of code can actually do more than just show a program’s palette; it
also offers a way to switch programs from the keyboard, for the first time in Mac
history (without having to install third-party add-ons, that is).
Just press Ô-Tab. You jump to the next running program, in alphabetical order,
just as the icons appear on the application palette. Shift-Ô-Tab takes you
backward
alphabetically through your open programs.
Application palette drag-and-drop
The application palette tiles aren’t just for clicking. They’re also for
dragging onto.
In other words, when you want to drag-and-drop a document icon onto a
program icon (as described near the end of Chapter 1), treat these tile icons
exactly as though they’re the original program icons. You can drag-and-drop
right on top of them.
Hidden System Commands
Your Mac has more than menu commands. A good number of other useful
ones don’t appear in any menu; they’re activated purely by keystrokes.
Technically speaking, these aren’t really Finder commands at all; they’ll
work no matter what program you’re using.
90 Part I: System Software Revealed
■ ■
MAC SECRETS • 4040-8/5 • ch.02.F • Chapter 2 • FINAL • VB • 10/22/98 • p.90
MAC SECRETS • 4040-8/5 • ch.02.2 • Chapter 2 • Proof 2 • EAP • 10/15/98 • p.90
MACINTOSH SECRET
We’re nuts about the Mac OS 8.5-style
Application menu. But we’re fairly confident that
somebody, somewhere, will object to the
appearance of the current application’s name
appearing instead of just the icon, as was the
case in all previous system software versions.
But, as almost always, Apple has engineered its
redesign carefully, offering a way back to the old
way of doing things. If you examine Figure 2-18,
you’ll see a tiny textured handle just to the left of
the Application menu. Click there to hide the
program name altogether. Or drag to the right if
you’d like to allot less horizontal space to the
name, but still see part of it. (If you’re using a
program with a lot of menus, in fact, the Mac OS
8.5-style Application menu automatically shrinks
as necessary, until only the icon is visible.)
To restore the Application menu to its default look,
click that divider bar again (or drag it to the left).
The Application menu for nostalgia lovers
4040-8/5 ch02.F 11/3/98 3:47 PM Page 90

Hidden System Software
■
Command Secrets
Take a picture of the screen
Ever wonder how we poor-slob computer-book authors illustrate our work?
We take
screenshots
or
screen captures.
That is, we use special software to
capture the screen image, turning it into a TIFF or PICT file we can send to
our publisher.
For years, the Mac has offered
built-in
screen-capture software. Just press
Ô-Shift-3; you’ll hear a satisfying camera-click sound. The Mac creates a graphic
file, a PICT file on your hard disk, called Picture 1. If you take additional screen
shots, they’ll be named Picture 2, Picture 3, and so on.
That feature is fine, but it’s got its limitations. For starters, it captures the
entire screen, leaving it up to you to edit or crop the results down to just the
area you really wanted. And the fact that it creates PICT files could be improved,
too — wouldn’t it be nicer if the image went straight to your Clipboard, ready for
pasting into Photoshop or your Web page software?
That’s where our
Mac Secrets
exclusives come in. Who knew, in System 7.6 and
later, these additional screen-grabbing keystrokes awaited?
■Ô-Shift-4 — Turns the cursor into a tiny crosshair. Now you can drag
across any rectangular area of the screen, capturing only that much into
your PICT file.
■Caps Lock-Ô-Shift-4 — Our favorite by far. Turns the cursor into the little-
seen
bullseye
cursor. Now you can click any window, dialog box, or error
message — and capture a neat picture of it, pre-cropped.
But wait — it gets better. If you add the Control key to
any
of those keystrokes,
you put the resulting screen image directly onto your Clipboard instead of
making a PICT file!
All of that is certainly worth e-mailing home about. But even Apple’s built-in
keystrokes leave out one feature: the ability to capture open menus! That’s why
you, as a
Mac Secrets
owner, possess Flash-It! (on the CD-ROM with this book).
It can capture menus, pop-up menus . . . just about anything.
How to eject a disk by using only the keyboard
Ô-Shift-1 ejects a disk from the Mac’s built-in disk drive.
Ô-Shift-2 ejects a disk from the external disk drive (or the second drive if you
have a Mac with two built-in floppies).
Chapter 2: Finder Command Secrets 91
■ ■
MAC SECRETS • 4040-8/5 • ch.02.F • Chapter 2 • FINAL • VB • 10/22/98 • p.91
MAC SECRETS • 4040-8/5 • ch.02.2 • Chapter 2 • Proof 2 • EAP • 10/15/98 • p.91
4040-8/5 ch02.F 11/3/98 3:47 PM Page 91

Ô-Shift-0 ejects a disk from a
third
disk drive if there is one. (Some Macs have
two built-in drives plus an external.)
Keep in mind that all these commands eject the disk
without
removing its
image from the screen, so you run the risk of getting the “Please insert the
disk:” message over and over again. (You can try pressing Ô-period several
times. As we’ll discuss in Chapter 8, this strategy
sometimes
makes the
message go away.)
These are extremely useful keystrokes to know when you can’t eject a disk in
the usual way — for example, when you’re installing a program and it’s asking
for Disk 2 but hasn’t ejected Disk 1!
92 Part I: System Software Revealed
■ ■
MAC SECRETS • 4040-8/5 • ch.02.F • Chapter 2 • FINAL • VB • 10/22/98 • p.92
MAC SECRETS • 4040-8/5 • ch.02.2 • Chapter 2 • Proof 2 • EAP • 10/15/98 • p.92
4040-8/5 ch02.F 11/3/98 3:47 PM Page 92

MACWORLD MAC SECRETS • 4040-8/X • Chapter 03 • Proof f • SH/EAP • 10/21/98 • p.93
MACWORLD MAC SECRETS • 4040-8/X • Chapter 03 • Proof 1 • SH • 10/02/98 • p.93
Chapter 3
Desk-Accessory World
In This Chapter
©Secrets of the desk accessories: Chooser, Key Caps, Network Browser,
and more
©The profoundly useful additions in Mac OS 8.5
©Find File: The Ultimate Guide
You thought that the System 7’s standard 4MB System Folder was bad?
Get a load of Mac OS 8.5 — a full installation scarfs down a cool 330
megabytes of your hard drive.
Obviously, that huge swath of your primary drive is creaking with files and
features that most people never use. In this chapter and the next, you’ll find
out about every single piece of System Folder junk. In the process, you’ll find
out which stuff is safe to trash, saving yourself memory and disk space. You’ll
also learn a few surprising features of the desk accessories and control
panels that you’ve always taken for granted.
Welcome to the Desk Accessories
Look good and hard at Figure 3-1. You’re seeing the last of a dying breed —
true desk accessories, the ones that came with every Mac for ten years. (If
you’re a youngish whippersnapper, you may not even know what we’re
talking about when we use the term desk accessories.)
These days, the Úcontains mostly aliases or bigger, more powerful programs
— yes, actual applications — that mimic desk accessories by showing up in
your Úmenu. The original desk accessories are gradually disappearing; lost
forever are the Alarm Clock, Battery, and Puzzle, for example. (You can still
read about them in Chapter 3 of the electronic Macworld Mac Secrets, 4th
Edition, which is on this book’s CD-ROM.)
4040-8/5 ch03.F 11/3/98 3:23 PM Page 93

Figure 3-1: The original Apple desk accessories.
Apple System Profiler
This handy little program became a standard part of the OS with System 7.6.
It analyzes your Mac’s System folder and hardware, producing a neat little
printable report. Perhaps more important, it lets the novice Mac user answer
specific important troubleshooting questions when they call Apple’s tech-
support hotline. (One of your cheerful authors once spent a day at Apple’s
800-SOS-APPL tech center, listening in on Mac users’ calls to Apple’s agents.
Trust us on this: in the war against novice flounderings, Apple’s staff needs
every tool it can get.)
The Mac OS 8 through 8.1 version offers the following info screens:
■A general hardware overview screen that reveals the exact Mac model
you have, how much disk space and RAM it has, and its processor speed.
(Keyboard shortcut: Ô-1)
■A network/communication screen that identifies what kind of network
your Mac is on (see Chapter 35) and which printer is selected. (Keyboard
shortcut: Ô-2)
■A Volume Information panel that shows every disk (and every partition —
see Chapter 8) attached to your Mac: hard drive, CD-ROM, and so on,
along with its SCSI address (see Chapter 33), size, and other specs.
(Keyboard shortcut: Ô-3)
■A Device screen, very similar to the Volume Information display. Once
again, this information concerns disks attached to your Mac, but with a
heavier emphasis on the devices (Zip, Jaz, and so on) than on the actual
volumes (such as partitions). (Keyboard shortcut: Ô-4)
■A Control Panels list. Click one in the list to see exactly where it’s
located. Buttons let you change the list so that it shows all control
panels, only Apple’s, or only ones that aren’t from Apple. In times of
troubleshooting, that last item is handy, because the culprit is most often
something that didn’t come with your Mac (see Chapter 36). (Keyboard
shortcut: Ô-5)
OS
8
94 Part I: System Software Revealed
■ ■
MACWORLD MAC SECRETS • 4040-8/X • Chapter 03 • Proof f • SH/EAP • 10/21/98 • p.94
MACWORLD MAC SECRETS • 4040-8/X • Chapter 03 • Proof 1 • SH • 10/02/98 • p.94
4040-8/5 ch03.F 11/3/98 3:23 PM Page 94
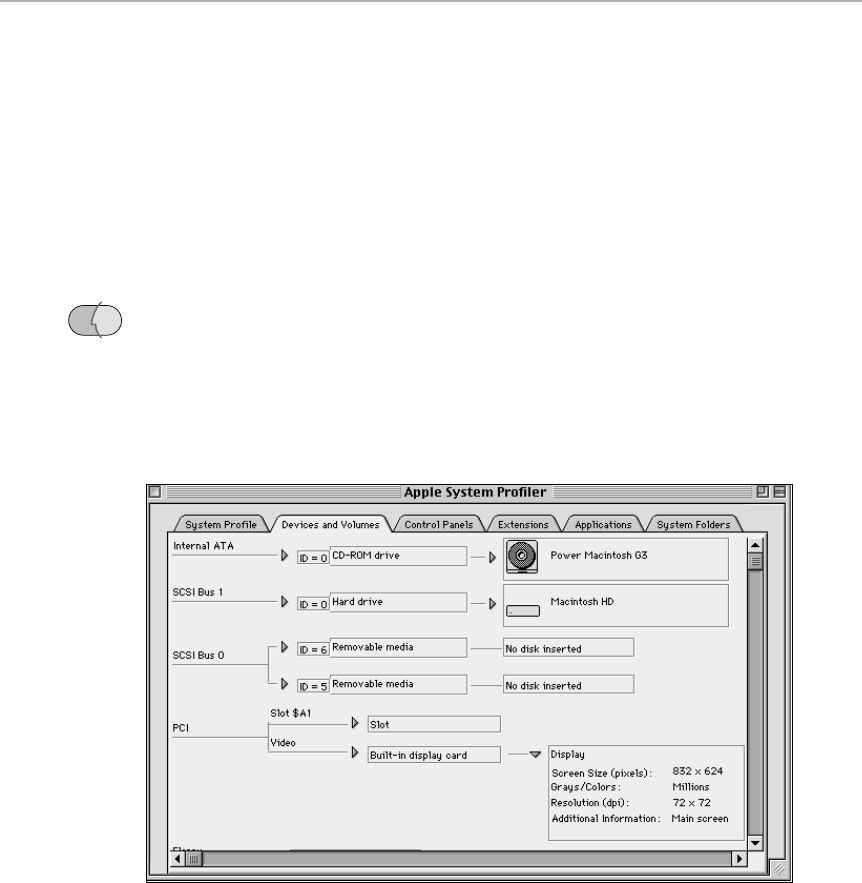
■An Extensions list. Same as the Control Panels list, but it shows
extensions only (see Chapter 4). (Keyboard shortcut: Ô-6)
■The System folder list is pretty sparse. It’s used exclusively to detect
duplicate System folders (see Chapter 5). (Keyboard shortcut: Ô-7)
■The applications screen, believe it or not, shows you a list of every
double-clickable program on your system, sorted alphabetically, with
version information in parentheses. It wouldn’t be a bad idea for you to
run this one right now, if only to spot some of the duplicates that are
probably cluttering your hard drive at this very moment. (Keyboard
shortcut: Ô-8)
In Mac OS 8.5, Apple enhanced the Profiler further still (see Figure 3-2).
Thanks to a tabbed interface, the various screens are all available
simultaneously. And the displays of information are terrific; we especially
like the map of your Mac’s various SCSI chains (if, like the tower-style Macs,
it has more than one). Despite showing more information, this version of the
program offers fewer different panels (combining the volumes and disks onto
a single pane, for example).
Figure 3-2: The key to understanding the Mac OS 8.5 version of Apple System Profiler is the
flippy triangles. Click one, for example, to see more information about that device, as shown
here by the monitor listing.
OS
8.5
Chapter 3: Desk-Accessory World 95
■ ■
MACWORLD MAC SECRETS • 4040-8/X • Chapter 03 • Proof f • SH/EAP • 10/21/98 • p.95
MACWORLD MAC SECRETS • 4040-8/X • Chapter 03 • Proof 1 • SH • 10/02/98 • p.95
4040-8/5 ch03.F 11/3/98 3:23 PM Page 95
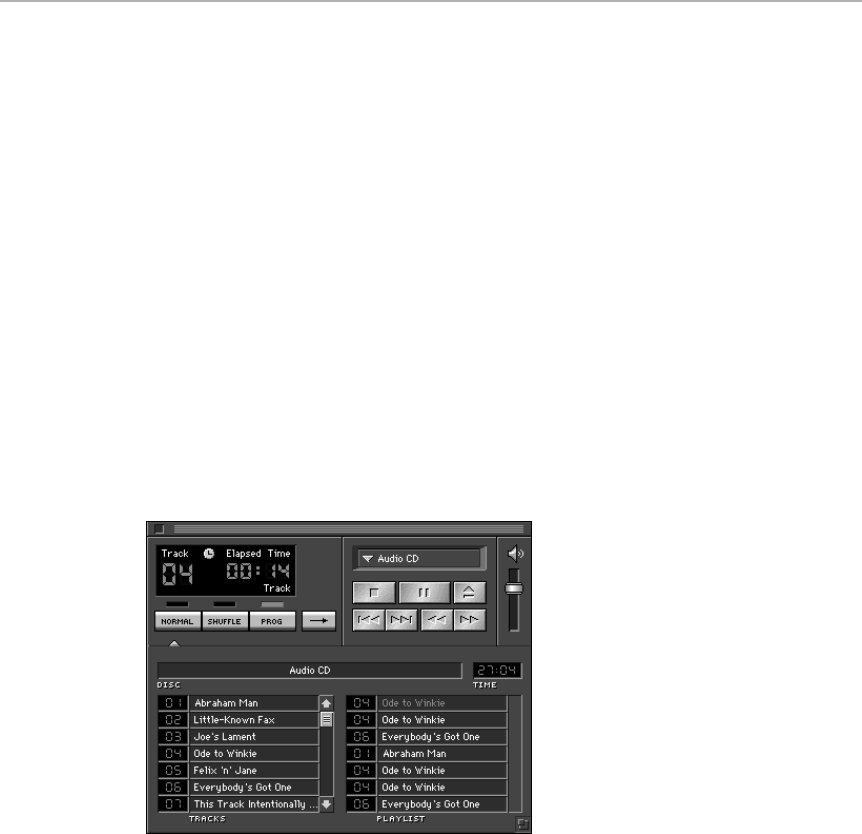
AppleCD Audio Player
One of the nice aspects of having a CD-ROM drive is that it can double as a
music CD player. You can crunch numbers to the strains of Carly Simon, for
example. AppleCD Audio Player is the “front panel” of your virtual CD player.
(It won’t even open if you don’t, in fact, have a CD-ROM drive.)
Now, if you have QuickTime 2.5 or later, you don’t technically need this
program to play audio CDs; if your QuickTime Settings control panel is so
configured, music CDs begin playing automatically when you insert them.
You can even control the playback of music CDs using your Control Strip, as
described in the next chapter.
But the controls for the AppleCD Audio Player are a lot like those on a
standard audio CD player: basic programming and repeat functions, the
ability to scan through the tracks of a disc, and even shuffle play, which
means that the player plays songs in its own random order. When you
expand the window, you can see a listing of each track on the disc, along with
its playing time. A pop-up menu allows you to jump directly to any track by
selecting its number (where it says Audio CD at the upper-right quadrant of
Figure 3-3).
Figure 3-3: AppleCD Audio Player desk accessory, which you use to play your favorite audio
CDs on your CD-ROM player, shown here in Program mode. Drag from the left list into the
right to build a playlist. This guy really likes that Winkie song.
You should recognize most of the buttons from standard CD or tape players.
The only buttons you might wonder about are:
■Normal: Plays the CD from beginning to end.
■Shuffle: Plays the tracks on the CD in a random order.
■Prog: Plays the tracks on the CD in an order that you’ve specified (see
the following Audio Player secrets).
96 Part I: System Software Revealed
■ ■
MACWORLD MAC SECRETS • 4040-8/X • Chapter 03 • Proof f • SH/EAP • 10/21/98 • p.96
MACWORLD MAC SECRETS • 4040-8/X • Chapter 03 • Proof 1 • SH • 10/02/98 • p.96
4040-8/5 ch03.F 11/3/98 3:23 PM Page 96
Next to the Prog button, by the way, is the Repeat button (marked by an
arrow). When you see the long arrow, the CD plays once and stops; if you
click the button, you get a looped arrow, which means that the disc will play
continuously until you either (a) click Stop or (b) go quietly mad.
AppleCD Audio Player Secrets
■
Use your keyboard, pal
This program is filled with keyboard shortcuts. You can start and stop the music
by pressing the spacebar or the Enter key. (Press Delete or Esc to stop the
music.)
Press the up-arrow and down-arrow keys to control the volume slider; press the
right- and left-arrow keys to “click” the Previous and Next Track buttons. You can
“click” the Eject Disc button by pressing Ô-E.
Instant Desktop access to your songs
The AppleCD Audio Player isn’t your only interface to your music discs. You can
also double-click songs as icons — that is, when you insert an audio CD, its
contents show up in the Finder as individual icons. (If not, reinstall your Foreign
File Access and Audio CD Access extensions.) Double-click a track’s icon to
open it in AppleCD Audio Player, ready to play.
Name those tunes
You’re not condemned to listen to your CD’s songs in the same old
unimaginative sequence every time. Audio Player actually allows you to
rearrange the tracks, repeat songs, or leave the irritating songs out of your
listening order.
To do so, click the tiny triangle to expand the panel into the full-height window
shown in Figure 3-3. If the songs aren’t already named, click the first track name
and begin typing the song titles. Press Return (or Tab) after each title to move
down to the next blank, or Shift-Return (or Shift-Tab) to move upward. While
you’re at it, click the words
Audio CD
(just above the track list) and type the
name of the disc, too.
After you do all this, the Player automatically remembers the album and song
titles the next time you insert the disc. Now
that
is cool. (They’re saved into a
secret file called CD Remote Programs in your Preferences folder.)
Finally, click the Prog button. Now you can drag any title on the left side to
any slot on the right side, as shown in Figure 3-3. (Drag it back to the left if
you change your mind.) You also can drag titles up or down on the right side.
Worth
Learning
Chapter 3: Desk-Accessory World 97
■ ■
MACWORLD MAC SECRETS • 4040-8/X • Chapter 03 • Proof f • SH/EAP • 10/21/98 • p.97
MACWORLD MAC SECRETS • 4040-8/X • Chapter 03 • Proof 1 • SH • 10/02/98 • p.97
4040-8/5 ch03.F 11/3/98 3:23 PM Page 97

Feel free to drag the same song twice — or leave songs out of the playlist on
the right side completely.
Tweak to your satisfaction
When the Audio Player is open, don’t disregard the Options menu. This menu
lets you change the color scheme of the Player panel. (We’ve come up with
some
very
cool combinations.)
Please note, too, the resize box in the lower-right corner. There’s no reason not
to drag this box and make room to display your CD’s entire track list.
Of time and music
Note that when you’re creating a playlist, as described in the previous secret,
the TIME display automatically adds up the lengths of the songs you’ve
selected. Use it as your guide to figuring out how many songs will fit onto one
side of a cassette tape, for example.
Speaking of that little time readout: Click it to toggle the display between
showing the elapsed time or the time remaining (on each track or on the entire
CD).
Automated Tasks
As with the Control Panels item described later in this chapter, Automated
Tasks isn’t a program at all. It’s merely an alias, dropped by Apple into your
Úmenu for convenience (in System 7.5 and later). Inside this folder are
several handy AppleScripts — miniprograms, each of which performs one
simple time-saving step when opened. (When you’ve hung around the Mac
long enough, you may be tempted to write your own AppleScripts; see
Chapter 22.)
Here, for example, are the basic AppleScripts that come with Mac OS 8:
■Add Alias to Apple Menu puts an alias of the selected icon into the
Apple Menu Items folder, and, therefore, into your Úmenu. Savings:
fussing with your Apple Menu Items folder and taking the word alias off
the alias.
■Share a Folder creates a folder named Drop Folder at the top level of the
startup disk (if there isn’t one already). It then turns on File Sharing and
gives Guests permission to access the Drop Folder over the network (see
Chapter 35). Savings: futzing around with several control panels.
■Start File Sharing turns file sharing on; Stop File Sharing turns it off.
Savings: a trip to the File Sharing control panel.
OS
8
98 Part I: System Software Revealed
■ ■
MACWORLD MAC SECRETS • 4040-8/X • Chapter 03 • Proof f • SH/EAP • 10/21/98 • p.98
MACWORLD MAC SECRETS • 4040-8/X • Chapter 03 • Proof 1 • SH • 10/02/98 • p.98
4040-8/5 ch03.F 11/3/98 3:23 PM Page 98

■Turn Sound On sets your Mac’s volume level to 5 (out of 7). Turn Sound
Off sets the volume to 0 (the menu bar will blink instead). Savings: a trip
to the Monitors & Sound control panel.
If you examine your Apple Extras folder, you’ll discover (in the AppleScripts
folder) another set of AppleScripts called More Automated Tasks. They
perform the following more advanced functions:
■Alert When Folder Changes tells you when somebody has dropped a
new file into a particular folder (via File Sharing over a network). To make
this script work, first drag a folder onto this AppleScript’s icon (in the
More Automated Tasks folder). The script runs in the background while
you work on your Mac. If anybody drops anything into your special
folder, a message will let you know. Weird, huh?
■Hide/Show Folder Sizes turns on or off the “Calculate folders sizes”
checkbox in the Views control panel (System 7.x). As you’ll learn in
Chapter 4, this option can be useful when trying to figure out what’s
taking up so much space on your hard drive— but it slows down the Mac
like crazy. This shortcut makes the on/off business much less painful.
■Synchronize Folders compares the contents of two folders and makes
their contents match. For example, if a file called Document 1 is in folder
A, and Document 2 is in folder B, the script copies each document into
the other folder so that both folders contain both files. If two files have
the same name, the more recently updated one winds up in both folders.
(Are you paying attention, PowerBook road warriors?)
Calculator
With the four-function Calculator (Figure 3-4), you can add, subtract,
multiply, and divide numbers of up to 13 digits. You can enter numbers by
typing them on the keyboard— notice that your numeric keypad precisely
matches the on-screen arrangement of number buttons— or by clicking the
Calculator buttons.
Chapter 3: Desk-Accessory World 99
■ ■
MACWORLD MAC SECRETS • 4040-8/X • Chapter 03 • Proof f • SH/EAP • 10/21/98 • p.99
MACWORLD MAC SECRETS • 4040-8/X • Chapter 03 • Proof 1 • SH • 10/02/98 • p.99
TRUE FACT
We’ve all heard about the Pentium chip’s
famous 1995 math bug, in which the most
heavily advertised computer chip in history
turned out not to be so great at simple math.
Well, we don’t want to cause any hysteria here
— but the Mac’s own Calculator isn’t always so
hot at math, either. (Neither is the Graphic
Calculator, for that matter.) Free book winner
Jason Darvick grew alarmed when the
Calculator couldn’t even correctly perform this
simple subtraction problem:
1 - .9 - .1 =
The answer is never zero, as you might expect.
We take some comfort in the fact that no
computer-based calculator gets this problem
right, Mac, Windows, or whatever.
The Calculator’s very new math
4040-8/5 ch03.F 11/3/98 3:23 PM Page 99
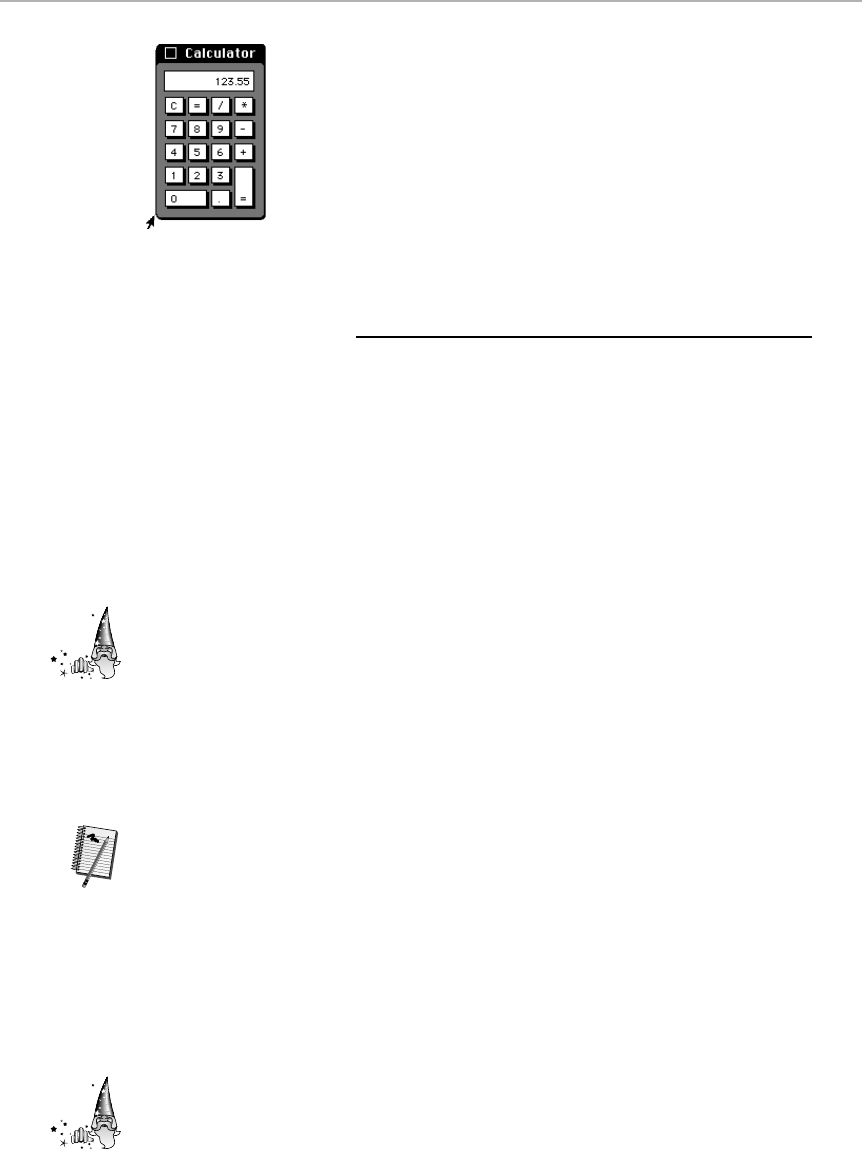
Figure 3-4: The arrow indicates one of the hidden pixel handles.
Calculator Secrets
■
The all-at-once calculation trick
The Cut, Copy, and Paste commands all work with the Calculator. You can paste
numbers from a word processor or spreadsheet. After you calculate
the answer, you can copy and paste it back into the document. You also can
paste an entire equation (such as 123-44*16/2=) into the Calculator. (In
computerese, * means
times
, and / means
divided by
.) The on-screen keys
flash madly, as though they’re being punched by a ghost, and the Calculator
instantly computes the answer.
By the way, notice the difference between the Calculator’s math and your
spreadsheet’s math. The Calculator solves what you paste in
written
order: in
other words, 123-44*16/2 gives you 632. A spreadsheet, on the other hand,
does multiplication and division
first
(as sub-equations); in that case, the
answer to 123-44*16/2 would be –229. That’s worth noting before you
calculate the next Space Shuttle’s trajectory on this thing.
How to correct errors in long calculations
The Calculator’s worst feature is that, unlike most real calculators, it has no CE
button to clear only the last entry. If you inadvertently enter a wrong number, you
have no choice but to click the Clear button, which erases the entire equation,
and then begin the entire calculation anew.
For this reason, whenever you have a lengthy string of numbers to crunch, we
recommend
always
typing your equation in the Note Pad desk accessory first
and then pasting the equation into the Calculator.
Secret scientific-notation keystroke
Press the E key when using the Calculator, and your calculations appear in
scientific notation! Now the Calculator can work with bigger numbers.
Strange
But True
Worth
Learning
Strange
But True
100 Part I: System Software Revealed
■ ■
MACWORLD MAC SECRETS • 4040-8/X • Chapter 03 • Proof f • SH/EAP • 10/21/98 • p.100
MACWORLD MAC SECRETS • 4040-8/X • Chapter 03 • Proof 1 • SH • 10/02/98 • p.100
4040-8/5 ch03.F 11/3/98 3:23 PM Page 100

Actually, it gets stranger. How’d you like to see your old trusty calculator start
displaying
words
instead of numbers? It will. Type E, then 9999, and then press
the equal sign. The answer, of course, is “infinity.”
And you know what E9999/E9999 is, don’t you? Right. “Not a number.”
The Calculator’s secret grip strips
The Calculator has a pair of secret handles. Because they’re at the bottom
of the Calculator, they’re ideal for dragging the Calculator back into the window if
it’s accidentally moved off the top of the monitor.
These dual grip strips are the black portions of the lower corners (see
Figure 3-4). These black pixels are the only spots on the Calculator that are
draggable (other than the title bar). Amaze your friends by showing them that
you’ve dragged the Calculator clear up off the screen!
Technically, of course,
any
Macintosh window of this type — black title bar,
rounded edges — offers these secret handles. But how many examples of this
ancient window type do you see these days?
(If you enjoy being on the cutting edge, by the way, don’t miss our awesome
keyless-calculator trick, featured in Chapter 21.)
Chooser
The Chooser is the most significant desk accessory. It’s a necessity if you
plan to print anything, fax anything, or connect your Mac to a network of
any kind.
The Chooser is the Mac’s Ellis Island; it acknowledges, administers, and
translates for the arrival of any Mac attachment whose cable goes into the
Mac’s modem or printer ports. (Printers, networks, and fax/modems are the
primary examples.) For the Mac to communicate with any such external
device, the Chooser must be able to locate a piece of software in your
Extensions folder called a driver (a translator between the Mac and this
outside device). You use the Chooser to tell the Mac which driver to use for a
given task.
If your network has more than one printer and your usual one is tied up, you
can use the Chooser to select an alternate. You also can use the Chooser to
turn AppleTalk on and off (although using the Control Strip, featured in
Chapter 4, is far more convenient). You don’t have to close the Chooser or
restart the computer to make its changes take effect. When you first attach a
new printer, open the Chooser and click the appropriate driver. The instant
you plug the cable into your new printer, the printer’s name appears in the
list on the right side of the Chooser (see Figure 3-5). For more information on
this fascinating window of opportunity, see Chapter 24.
Mac Basics
Chapter 3: Desk-Accessory World 101
■ ■
MACWORLD MAC SECRETS • 4040-8/X • Chapter 03 • Proof f • SH/EAP • 10/21/98 • p.101
MACWORLD MAC SECRETS • 4040-8/X • Chapter 03 • Proof 1 • SH • 10/02/98 • p.101
4040-8/5 ch03.F 11/3/98 3:23 PM Page 101
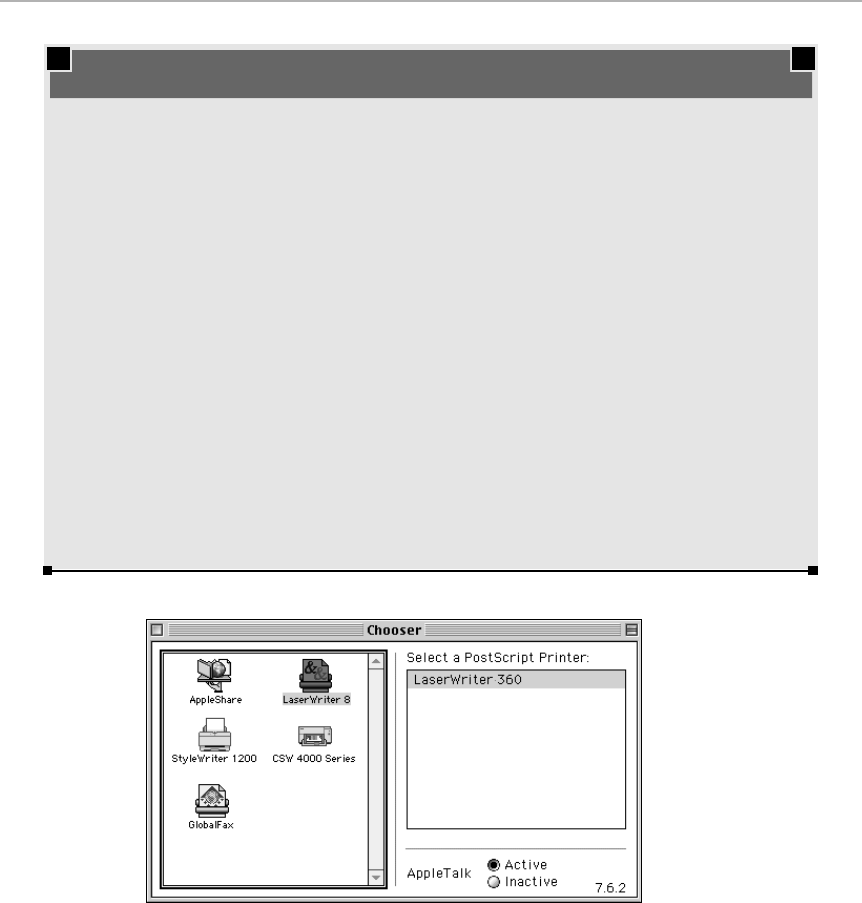
Figure 3-5: The Chooser is the control center for any equipment plugged into the serial ports
(modem and printer jacks).
102 Part I: System Software Revealed
■ ■
MACWORLD MAC SECRETS • 4040-8/X • Chapter 03 • Proof f • SH/EAP • 10/21/98 • p.102
MACWORLD MAC SECRETS • 4040-8/X • Chapter 03 • Proof 1 • SH • 10/02/98 • p.102
CASE HISTORY
As we discovered after writing the first couple
editions of this book, “best-sellerdom” has its
drawbacks. Imagine our sense of anguish, for
example, each time we see one of our exclusive
secrets pop up in another publication — without
acknowledging this book as the source. We’ve
seen many a trick from this book published in,
say, MacUser or even Macworld, as a $25
reader-submission winner.
Of course, there’s always that nagging doubt:
Maybe, just maybe, someone else stumbled
onto the same secret independently. We needed
a way to earmark one of our secrets before
releasing it into the world, much the way a
scientist might tag a bird’s leg to track its
migration.
So we did. We tagged our “Calculator’s secret
grip strips” trick: for a couple of editions, we
deliberately published it incorrectly. Well, not
incorrectly, but incompletely. In fact, it isn’t a
one-pixel handle (as we wrote then) at all; you
can grab anywhere along either of the bottom
two corners to move the Calculator — anywhere
on the rounded black area. And anyone who
genuinely discovered this trick would know that.
Sure enough, our delightful undocumented “one-
pixel” Calculator trick has proven popular in just
about every Mac magazine, book, and news-
letter. It has been reprinted, exactly as it was in
previous Secrets editions, always without
acknowledgment, and always without the
complete story.
Fie on them, we say. Go dig up your own tricks!
Revenge of the
Secrets
authors
4040-8/5 ch03.F 11/3/98 3:23 PM Page 102
Chooser Secrets
■
Type-select, and go home sooner
You can operate the Chooser entirely mouselessly, if you so desire. The Tab key
highlights the different areas in turn — the zone list (if you have one, at lower
left); the list of attached printers or networked Macs (right side); and the panel
full of icons (upper left).
Furthermore, you can type to highlight names
within
each of these areas, too;
type the letter
L
to highlight the LaserWriter among the printer icons, for
example. If your Mac is a network, and you’re bringing someone else’s Mac onto
your Desktop, you can hit Ô-G or Ô-R, respectively, to “click” the Guest or
Registered User buttons.
Why the Chooser never
remembers your settings
Many a novice — and not-so-novice — grumbles about the inconvenience of
having to open the Chooser and make a printer selection before
each
print job.
When asked why they bother, they demonstrate: When they open up the
Chooser, their printer of choice—LaserWriter or StyleWriter, for example—is no
longer highlighted.
True enough: The Chooser
never
opens up with an icon already highlighted, no
matter how hard you clicked one of its icons the last time. That’s because the
Chooser administers more than just printers — networks and fax/modems, too,
for example — and, thus, it always opens as a blank slate, requiring you to click
the kind of icon with which you intend to work. That doesn’t mean, however, that
it has
forgotten
the selections you made during your last trip to the Chooser.
Indeed, unless your Mac’s battery is dying or its PRAM needs clearing (see
Chapter 32), the Chooser always will remember whatever you clicked last.
End of the Chooser’s networking reign
It took 14 years, but Apple finally hit upon a better way to represent Macintosh
networks than the Chooser. In Mac OS 8.5, Apple introduced the Network
Browser, described later in this chapter.
Control Panels
Why isn’t this item called Control Panel, as it was in System 6? Because it’s
merely an alias of the Control Panels folder in the System Folder. Apple puts it
in your Úmenu purely as a convenience. See Chapter 4 for details.
OS
8.5
Mac Basics
Chapter 3: Desk-Accessory World 103
■ ■
MACWORLD MAC SECRETS • 4040-8/X • Chapter 03 • Proof f • SH/EAP • 10/21/98 • p.103
MACWORLD MAC SECRETS • 4040-8/X • Chapter 03 • Proof 1 • SH • 10/02/98 • p.103
4040-8/5 ch03.F 11/3/98 3:23 PM Page 103

Connect To . . .
In Mac OS 8 and 8.1, this tiny applet was Apple’s first attempt at integrating
the Internet with the Mac OS. Choose this command to bring up a simple
dialog box in which you can type an Internet or Web address. When you click
Connect, your Mac dials and connects to that address, launching your
preferred e-mail program or Web browser in the process. (See Chapter 25 for
more on Internet connections.)
And what, you may ask, if you don’t want Apple’s Web site to be the default
address every time you open this little dialog box? Then change it! Here’s the
cheat-sheet version:
1. Open your System folder, then the Apple Menu Items folder, then (in Mac
OS 8.5 only) the Internet folder. There you’ll see the Connect To applet.
2.Change its invisible type code to APPL, using FileTyper (included on the
CD-ROM with this book), as described in Chapter 15.
3. Now open the Connect To program with Script Editor, the AppleScript-
editing program described in Chapter 22. Scan the lines of AppleScript
code until you spot this line: set default URL to “http://www.apple.com.”
Just change the address between the quotes to a home page you prefer;
save changes; change the Connect To applet’s file type back to APPD; and
you’re done. (You lose Apple’s custom icon in the process, but hey—
that’s what the icon-pasting trick in Chapter 1 is all about.)
By the way, this little applet is still around in Mac OS 8.5— it’s just been
moved to the Internet folder, also in the Úmenu.
Favorites
The modern Mac OS 8.5-or-later Úmenu offers yet a third variation on the
theme pioneered by the Úmenu itself, the Launcher, and other schemes to
keep frequently used files, folders, and disks easily accessible.
In some ways, though, the Favorites mechanism is the most successful yet,
requiring neither the hassle of the Úmenu nor the screen real estate of the
Launcher.
Here’s how it works: as described in Chapter 2, highlight any icon (or icons).
Choose File ➪Add to Favorites. (That command places aliases of the
highlighted items into a folder called Favorites, which is in your System
Folder.)
Now check out your Úmenu’s Favorites command — the icons you
favoritized are instantly available, as shown in Figure 3-6. (They’re available
from within the newer-style Open and Save dialog boxes, too, as described in
Chapter 15, as well as in the Network Browser, described later in this
chapter.)
OS
8.5
OS
8.5
OS
8
104 Part I: System Software Revealed
■ ■
MACWORLD MAC SECRETS • 4040-8/X • Chapter 03 • Proof f • SH/EAP • 10/21/98 • p.104
MACWORLD MAC SECRETS • 4040-8/X • Chapter 03 • Proof 1 • SH • 10/02/98 • p.104
4040-8/5 ch03.F 11/3/98 3:23 PM Page 104
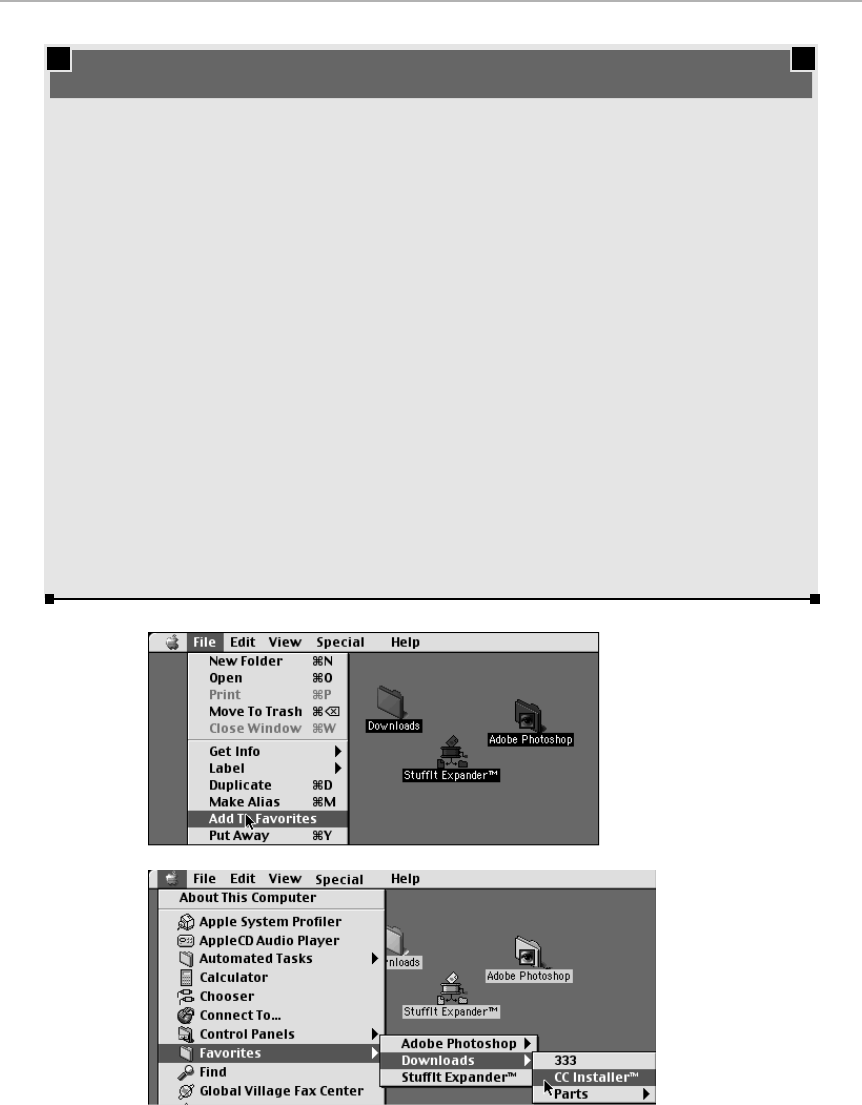
Chapter 3: Desk-Accessory World 105
■ ■
MACWORLD MAC SECRETS • 4040-8/X • Chapter 03 • Proof f • SH/EAP • 10/21/98 • p.105
MACWORLD MAC SECRETS • 4040-8/X • Chapter 03 • Proof 1 • SH • 10/02/98 • p.105
ANSWER MAN
Q: Hey, I put an alias of my hard drive into my
Apple Menu Items folder. That way, I can access
anything on my hard drive from within any
program, just by choosing it from the Úmenu.
A: What a great idea! We do that, too. You can
access any file up to five folders deep that way.
Q: But I also want to put an alias of my Desktop
folder there, so I can access things sitting on my
Desktop.
A: Why bother? The hard drive trick you already
mentioned gives you access to the stuff on your
Desktop. It’s all listed in the Desktop sub-folder.
Q: Just humor me, OK? It’s hard enough being a
nonexistent reader feeding you guys the
questions you want to answer.
A: All right. If you really want to add the invisible
Desktop folder directly into your Úmenu, you’ll
have to do a little work. (You can’t make the
Desktop folder visible, as you can with other
invisible items — see Chapter 2.)
Your options are: (a) Bring your Mac’s hard drive
onto the screen of another Mac, via a network
(see Chapter 35). Now the Desktop folder
shows up as a real folder, and you can make an
alias of it to stick into your Úmenu. (In the Get
Info window, lock that alias, though, or it’ll go
invisible on you.)
(b) Use a program like DiskTop (www.
prairiesoft.com). It can make an alias of the
Desktop folder without requiring the network
thing.
(c) Use the shareware program BeHierarchic,
included on the CD-ROM with this book.
The hard drive in the Úmenu — and the Desktop folder
Figure 3-6: To place something into the Favorites command in your Úmenu as
shown at bottom, use the Finder’s Add to Favorites command (top).
4040-8/5 ch03.F 11/3/98 3:23 PM Page 105

To remove something from your Favorites menu, simply choose the Favorites
command from your Úmenu. (You don’t even have to burrow into your
System Folder, as you would to change what’s on your Launcher or in your Ú
menu.) The Favorites folder opens instantly; drag the corresponding aliases
to the Trash.
Find (Find File)
As you’re about to find out, this amazing program has more secrets per
square inch than anything else on your Mac. And the Mac OS 8.5 version
represents one of that system’s most important improvements. We came this
close to renaming this book Macworld Find File Secrets.
When you choose the Find or Find File command (from either the Úmenu or
the File menu of System 7.5 and later), you launch a full-fledged program.
After it searches your Mac, it lists the files, folders, or disks you’re looking
for in a new window, called Items Found. If you click a file’s name in the top
half of that window, you can see (in the bottom half) where it’s filed (see
Figure 3-7).
This program is useful for finding a program or file you’ve lost; for rounding
up all files you’ve created today, for backup purposes; and, in Mac OS 8.5 and
later, for searching the Internet and even analyzing your documents for
relevance to a particular topic.
Find basics
This Items Found window shows a list view of “live” icons. From here, the fun
begins! Refer to Figure 3-7 and look at all you can do at this point:
A. Click an item to reveal where it is (as shown by the folder hierarchy in
the bottom part of the window.) Double-click an item in this top list to
launch it. Ô-Option-drag it out of the window to create an alias. Option-
drag an item out of the window to create a duplicate of it.
Another handy tip: Once you’ve highlighted an item in this list, you can
choose Open Enclosing Folder (Ô-E) from the File menu (or double-click
the item’s folder in the bottom window) to open the selected icon’s
window, wherever it may be, and highlight the icon.
In System 7.5 through 7.6, and in Mac OS 8.5 and later, you can also select
multiple items — and drag them all at once. Shift-click to select more than
one. (In Mac OS 8.5, Shift-click to select several items listed consecutively
in the list; Ô-click to select — or deselect — items that aren’t listed
consecutively.)
B. Click this flippy triangle (Mac OS 8.5 and later) to collapse (hide) the
bottom half of the window entirely. After all, in many cases, you really
don’t care where something is; you just want to open it and get on with
your life.
OS
8.5
OS
8.5
106 Part I: System Software Revealed
■ ■
MACWORLD MAC SECRETS • 4040-8/X • Chapter 03 • Proof f • SH/EAP • 10/21/98 • p.106
MACWORLD MAC SECRETS • 4040-8/X • Chapter 03 • Proof 1 • SH • 10/02/98 • p.106
4040-8/5 ch03.F 11/3/98 3:23 PM Page 106
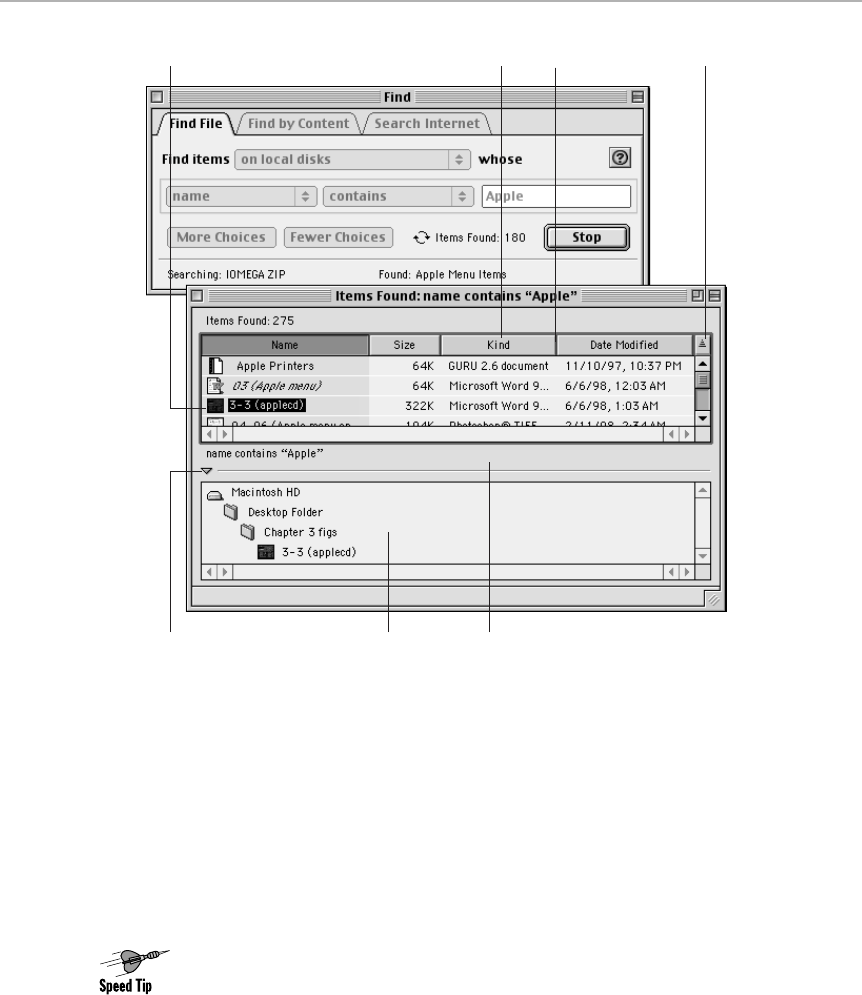
Figure 3-7: At top: The Find File dialog box (Mac OS 8.5 version), showing the three tabs
that let you search for a file’s name, search for text inside a file, or consult the major Web
search engines. At bottom: The Items Found window, showing all the files that match your
search request.
C. This half of the window shows where the selected item is. The disk is
always listed at the top; then you see a list of folders, each indented,
showing how deep you have to burrow to find the clicked file. (If you see
Desktop, as in this illustration, that means your file isn’t in any window —
it’s sitting out on the Desktop.) You can double-click any folder shown
here to open that folder into its usual Finder window.
If you’re a keyboard freak, forget about the double-clicking business.
Just press Tab to “shift the focus” to the lower window. Now you can
select any folder by typing the first couple of letters of its name — or by
pressing the up- or down-arrow keys. Once the desired folder or disk is
selected, press Ô-O to open it.
D. Drag in this horizontal strip to adjust the relative sizes of the top and
bottom parts of the window.
A
B
E
C D
F G
Chapter 3: Desk-Accessory World 107
■ ■
MACWORLD MAC SECRETS • 4040-8/X • Chapter 03 • Proof f • SH/EAP • 10/21/98 • p.107
MACWORLD MAC SECRETS • 4040-8/X • Chapter 03 • Proof 1 • SH • 10/02/98 • p.107
4040-8/5 ch03.F 11/3/98 3:23 PM Page 107

E. Click here to change the sorting order of the find results. For example,
you can see them listed alphabetically, in size order, or (usually the most
useful of all) by date.
F. Drag one of these column dividers (Mac OS 8.5 and later) to change the
column widths of the display.
G. Click this little square to reverse the sorting order (oldest to newest
instead of newest to oldest, for example).
Why did Apple list the Find command in both the Úand File menus? For
convenience: If you’re working in a program — ClarisWorks, say — and you
need to find a lost document, it’s too much trouble to switch back to the
Finder just to invoke the Find command. With the words Find File or Sherlock
always available in the Úmenu, you can do quick searches no matter what
program you’re using.
Find by Content (Mac OS 8.5)
The good work done on Copland, Apple’s abandoned 1996 super-OS project,
didn’t all go to waste when that mega-system was canceled. Find 2.0, which
made its debut in Mac OS 8.5, is a classic case. It was known as V-twin
technology in its Copland days; these days, we just call it V good.
The point is that until Mac OS 8.5, the Find File program was primarily limited
to searching for the names of your files (with one exception, covered in our
upcoming Find File secrets). But Sherlock can also search for the words inside
your files — with incredible speed.
But before you can use this “find by content” feature (see Figure 3-8), the Find
program must be allowed to create its own private card-catalog of your disks.
This process is called indexing your drives — spending a few minutes
analyzing every single document on them, compiling a tightly compressed
word-by-word index into an invisible, multimegabyte directory file. (That
invisible file is called, clearly enough, TheFindByContentIndex!)
The indexing process is slow. To start it going, click the Find By Content tab,
click Index Volumes, click the drive you want to index (hard drive, Zip, Jaz,
or whatever), and click Create Index. (You can’t index a CD, however. The
Sherlock program stores its index file on the disk you’re indexing; because you
can’t store anything on a CD-ROM, you can’t index it, either. You can create
an index for a hard drive on the network, but only at that Mac, not remotely
while seated at your own Mac.)
OS
8.5
OS
8.5
108 Part I: System Software Revealed
■ ■
MACWORLD MAC SECRETS • 4040-8/5 • ch03.F • Chapter 3 • FINAL • VB • 11/04/98 • p.108
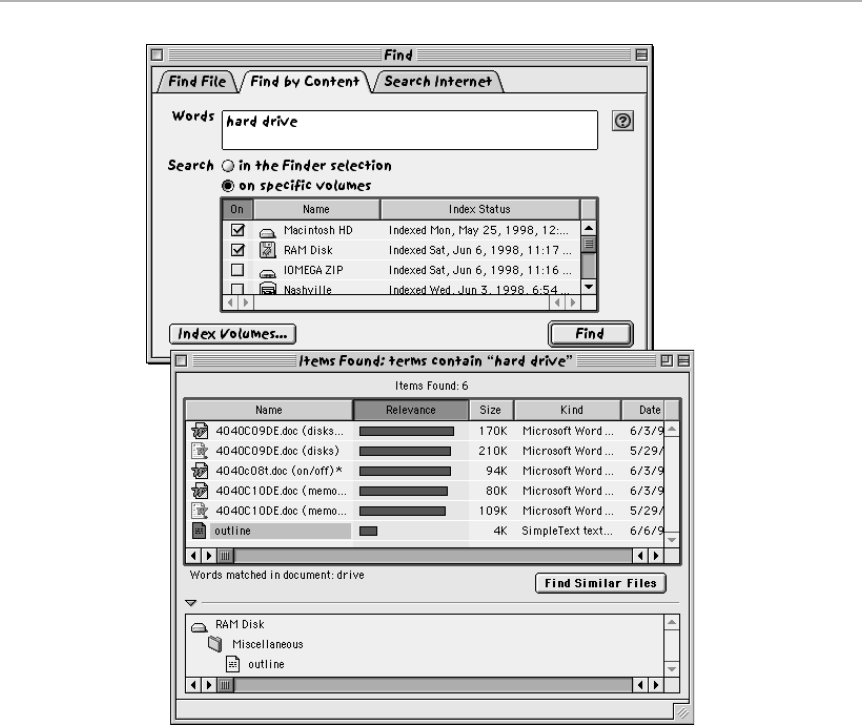
Figure 3-8: The Find by Content feature lets you locate text that’s inside your files —
regardless of the files’ names. The results window (bottom) ranks the found files by
relevance.
If sitting around watching progress bars isn’t your idea of a fun way to spend
the afternoon, by the way, you have two options:
■Click the Schedule button. As shown in Figure 3-9, you can tell the Mac to
do its indexing in the middle of the night, while you’re sweetly sleeping,
ready for a full day of content-searching the next morning.
■Make the Sherlock program do its indexing in the background, while you
work in other programs. Unfortunately, the indexing makes the Mac slow
to a crawl — unless you choose Edit ➪Preferences and drag the slider to
the “more responsive” position.
Chapter 3: Desk-Accessory World 109
■ ■
MACWORLD MAC SECRETS • 4040-8/5 • ch03.F • Chapter 3 • FINAL • VB • 11/04/98 • p.109
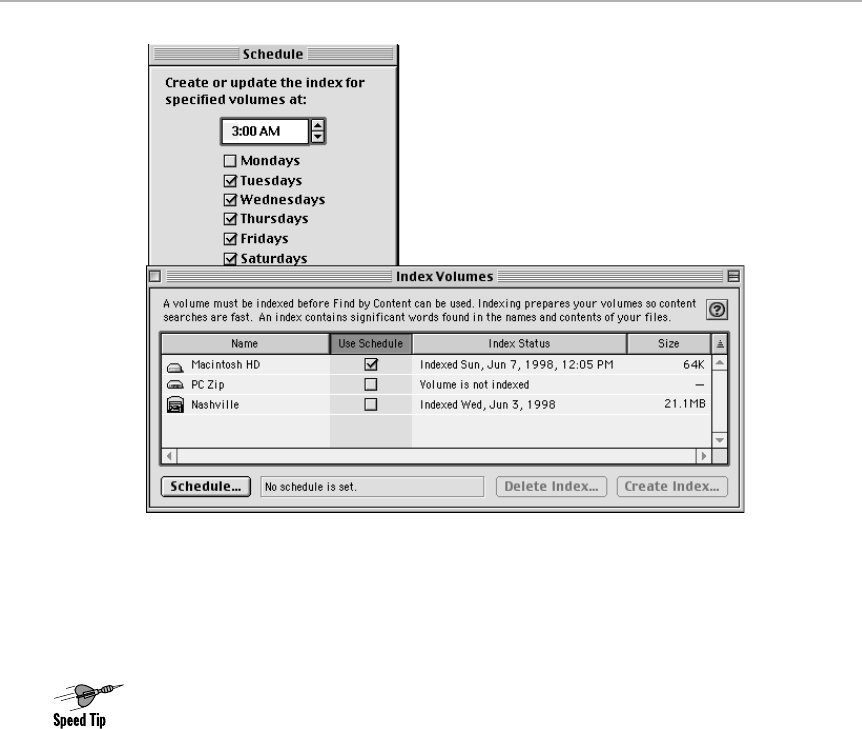
Figure 3-9: The Find by Content feature works best if you’ve indexed your disks. To do so,
click a disk and then click Create Index. (If you’ve already indexed this disk, click Update
Index instead to teach the Mac about any files you’ve created or edited since your last
indexing.) Click the Schedule button to specify automatic indexing when you’re not there to
be bored by it (top).
Once the Mac has created this index, it can search an entire, multigigabyte
drive in seconds, showing you a complete list of documents that contain the
words you searched for. Try it: Open Sherlock, click the Find By Content tab,
and type the words you’re looking for — that’s right, the words, even if you
don’t remember what the document was called. Specify which drive(s) to
search by clicking their checkboxes at the left edge of the window.
The technology is fuzzy and smart: the search phrase doesn’t have to be
an exact match. For example, you can type “the rain forest problem in
Burma”; you’ll be shown all documents containing any of those words. The
documents that contain all of those words, and many repetitions of them,
will show up at the top of the Items Found list. (That’s what Sherlock means
by relevance.)
110 Part I: System Software Revealed
■ ■
MACWORLD MAC SECRETS • 4040-8/5 • ch03.F • Chapter 3 • FINAL • VB • 11/04/98 • p.110

Search the Internet (Mac OS 8.5)
As though the Find By Content feature of Sherlock weren’t enough, the same
program can now be your window to the entire Internet. As long as you have
an Internet account (see Chapter 25), you can search the entire Net —
including encyclopedias, Apple’s tech-support database, and all the major
Web-search engines — with a single mouse click. This, dear reader, is a great
feature.
To make it work, just click Sherlock’s Search Internet tab. As shown in
Figure 3-10, you get a most intriguing screen — and the opportunity to click
exactly the search mechanisms you want. Some of the starter search sites
are Apple’s Tech Info Library (crawling with answers to Mac hardware
and OS questions), Encyclopedia.com (a Web-based free encyclopedia),
AltaVista, HotBot, Infoseek, Lycos (Web-page search engines, as described
in Chapter 25), and so on.
If you’re not online when you click the Search button, your modem dials (if
your Internet software is set up correctly, as described in Chapter 25). After a
minute or so, the Items Found window appears. But instead of listing files on
your hard drive, as in pre-Mac OS 8.5 systems, you’re now shown a list of Web
sites that contain the text for which you were searching! (See Figure 3-10.)
Figure 3-10: The Find command introduced in Mac OS 8.5 lets you search the Internet itself.
OS
8.5
Chapter 3: Desk-Accessory World 111
■ ■
MACWORLD MAC SECRETS • 4040-8/5 • ch03.F • Chapter 3 • FINAL • VB • 11/04/98 • p.111
So what can you do at this point? Let us count the ways:
■Click one of the site names in upper part of the window. You’re instantly
shown (in the lower part of the window) the first paragraph of text that
appears on that Web page — without having to actually go to that Web
page. (Unfortunately, you’re also shown a tacky Web-page ad. But there’s
no free lunch, we guess.)
■Double-click any Web page (in either pane of the window) to launch your
preferred Web browser (see Chapter 25) and view the full page in all its
glory, wherever it came from on the Internet.
■Drag the name of a Web site into the open window of your browser
window.
■Drag a Web page’s name out of the Items Found window to your desktop.
There it becomes a bizarre new kind of alias called a web page location —
an icon you can double-click at any time to launch your browser, dial the
Net, and visit the site it represents. (You can organize these web-page
location files in any convenient way. Organizing them in a folder in your
Apple Menu Items folder comes to mind, for example, so you’ll be able to
jump to your favorite Web pages by choosing their names from your Ú
menu. More in Internet Location Documents in Chapter 25.)
In any case, as we said, the Find File program is absolutely crawling with
juicy hidden secrets and features. Here they are.
Find File (and Sherlock) Secrets
■
The four secret searches — even inside files
If you’re using System 7.5 through 8.1, you may be looking longingly at the
enhanced Find of Mac OS 8.5. You may wish that you, too, could search for
Strange
But True
112 Part I: System Software Revealed
■ ■
MACWORLD MAC SECRETS • 4040-8/5 • ch03.F • Chapter 3 • FINAL • VB • 11/04/98 • p.112
MACHINOSH SECRET
We’ve mentioned that Sherlock, part of Mac OS
8.5 and later, uses some smart, fuzzy logic when
it goes hunting for the text inside your files.
Want to see just how smart?
Do a Find by Content, as described in this
section. Then Control-click one of the
documents turned up by the Find command.
There, in the contextual menu that appears, is
the enticing Summarize File to Clipboard
command. After using that command, switch to
your favorite word processor and paste — for a
concise, computer-edited capsule summary of
the file you clicked.
Sometimes the results are better than others —
but when we’re at the receiving end of wordy
writing, we’ll use any help we can get.
Insta-Summary

text
inside
your word processor files, for those days when you remember
nothing
about a file except what it was
about.
You can. Open the Find File window. Press Option as you pull down the left-hand
pop-up menu to reveal a set of four secret search options! Chief among these,
of course, is “contents” — this option does indeed mean that the Mac will
read
your files,
seeking the particular bit of text or numbers that you remember
having typed.
The “contents” search is incredibly slow — but, when you’re desperate,
incredibly useful. Three facts make the search more tolerable: First, your search
can crank away in the background as you work in another program. Second, you
can speed up the search considerably if you
Option
-click the Find button; this
makes the program search only for actual English words and skip any computer-
code gibberish it encounters.
Finally, fortunately, when you search by content, Find File doesn’t examine
every
file on your hard drive. It ignores 20 types of files, including applications and
system software, so that strings of programming code and text from dialog
boxes, menus, and help files don’t show up in the results of your searches.
The other three secret search attributes are less useful, but still good to know
(and still in Mac OS 8.5).
Name/icon lock
refers to files whose names and
icons, obviously, have been locked by the system software. Less obviously, this
refers to system icons: the Trash, the special System Folder icons (Control
Panels, Extensions, and so on), At Ease and its support files, and so on.
Custom icon
lets you find icons on which you’ve used our “Replace an icon”
secret in Chapter 1. And
visibility
lets you search for invisible icons. Try this one
right now; you’ll be shocked at how many secret files lurk, unseen, on your hard
drive!
Mac OS 8.5: Multiple search windows
In Find programs before Mac OS 8.5, the Items Found window was wiped empty
each time you performed another search.
But no longer. In Mac OS 8.5, each time you press Ô-F to initiate a new search
(without quitting the Find program), the previous Items Found window remains
open. As you perform successive searches, these windows remain open. For the
first time, you can compare the results of multiple searches, or round up
documents using several different approaches, with all the windows still hanging
around.
Mac OS 8.5: Index only a folder or two
Is Mac OS 8.5’s indexing process getting you down? Desperately want to search
only
one folder
on a Zip disk by content, without having to index the entire disk?
OS
8.5
Worth
Learning
Strange
But True
Chapter 3: Desk-Accessory World 113
■ ■
MACWORLD MAC SECRETS • 4040-8/5 • ch03.F • Chapter 3 • FINAL • VB • 11/04/98 • p.113

Then don’t miss Sherlock’s easily-overlooked Edit ➪Preferences command. It
lets you tag certain folders or files with a
label
(see Chapter 2) — which then get
ignored by the indexing process. Apply that label to
everything
on a disk except
your Documents folder, for example, and you’ll find that the indexing process is
fast and painless.
Mac OS 8.5: Save and reload your searches
Once you’ve used the Find command and set up its search criteria, check out
the File ➪Save Search Criteria command. It generates a tiny
search document
on your hard drive.
Now comes the fun part. When you double-click that search document later, the
Mac instantly reopens the Sherlock program, fills in the blanks, and per forms
the same kind of search — automatically, no matter how complicated your
original criteria were.
At first, you might wonder who’d bother with all this. But when you consider the
other Sherlock options, such as searching for text inside files or searching the
Internet, distinct possibilities come to mind.
For example, you could save a search that rounds up all documents with the
label Back Me Up. You could save a Web search for a particular topic —
complete with the search engines you prefer — and run it each day, checking
for news on a certain topic. (When you double-click a saved Internet search
document, you not only launch the Sherlock program — you also dial the
Internet.) And if you’re on a network, you could create a standard search
document that patrols certain folders for the arrival of new documents being
turned in by your coworkers.
More, more, and more choices
Find File introduces a unique twist to Apple’s standard inter face behavior:
the More Choices button. You can click this button over and over again,
expanding the dialog box more and more, until you see
twelve
search criteria, if
your screen is big enough (see Figure 3-11). You can also press Ô-M to expand
the window, and Ô-L (in Mac OS 8.5) or Ô-R (in System 7.5 through 8.0) to
collapse it. (In Mac OS 8.5, add Option to the Ô-L keystroke — or to a click of
the Fewer Choices button — to collapse
all
rows at once.)
With this knowledge, it doesn’t take a rocket scientist to figure out how you’d
search for all Excel files you created between August and September of last
year, even if you can’t remember the name of the specific file for which you’re
looking.
Which brings us to another important Find File attribute: those criterion pop-up
menus allow you to type four-letter Type and Creator codes, as described in
Chapter 15. For the techno-savvy, that’s a handy way to search for specific kinds
of files (say, Word-generated text files).
OS
8.5
114 Part I: System Software Revealed
■ ■
MACWORLD MAC SECRETS • 4040-8/5 • ch03.F • Chapter 3 • FINAL • VB • 11/04/98 • p.114
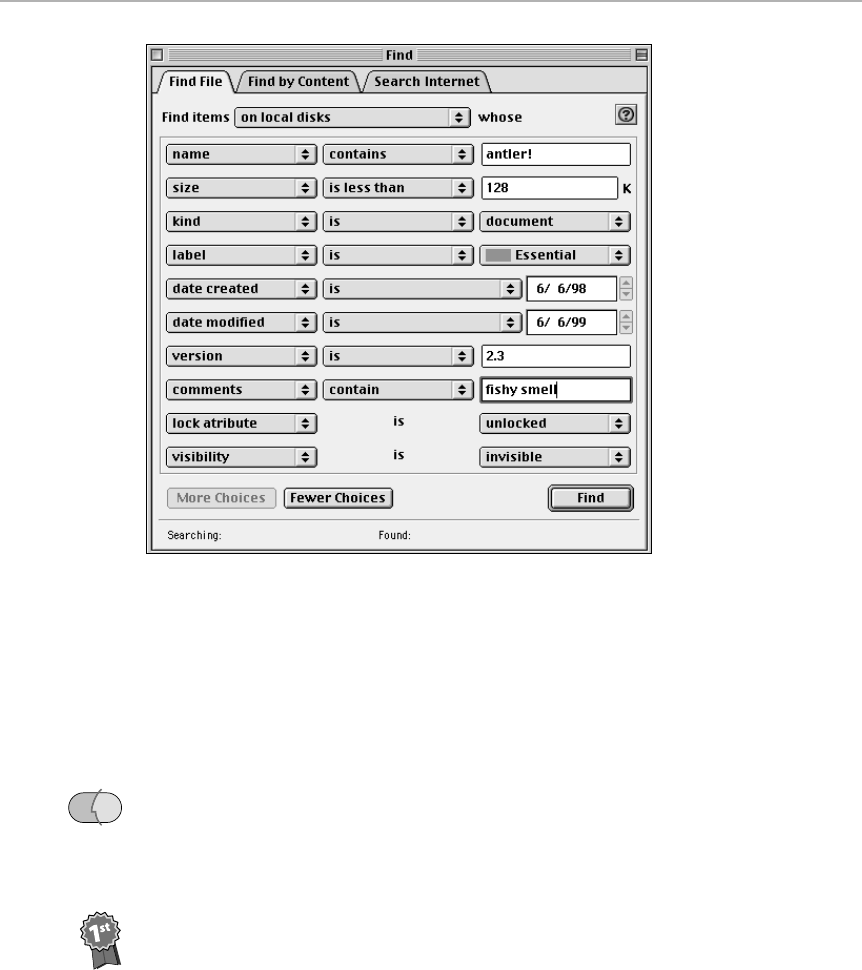
Figure 3-11: If you can’t describe the file you’re looking for with twelve descriptive phrases,
you probably don’t know what you’re looking for.
The multiple-item, drag-and-drop conundrum
Once the Items Found window appears, you can do several useful things with
the icons it displays. As shown in Figure 3-7, you can drag, Ô-Option-drag,
Option-drag, click, or double-click them with varying results.
As fans of Mac OS 8 and 8.1 discovered to their alarm, however, there’s one
thing you
can’t
do: drag
multiple
items out of the Items Found window. You could
do it in System 7.5 and 7.6, and you can do it in Mac OS 8.5 and later. But in
Mac OS 8 and 8.1, it’s one item at a time, pal. Too bad if you want to drag a
bunch of found items to the Trash or into a different window!
As free book winner George Cowie discovered, however, you
can
drag multiple
files out of the Found window onto an
alias.
Weird, we know, but useful. Now you
know why the desktops of the Mac OS 8-savvy sport an
alias
of the Trash right
next to the actual Trash!
Contest
Winner
OS
8.5
Chapter 3: Desk-Accessory World 115
■ ■
MACWORLD MAC SECRETS • 4040-8/X • Chapter 03 • Proof f • SH/EAP • 10/21/98 • p.115
MACWORLD MAC SECRETS • 4040-8/X • Chapter 03 • Proof 1 • SH • 10/02/98 • p.115
4040-8/5 ch03.F 11/3/98 3:24 PM Page 115
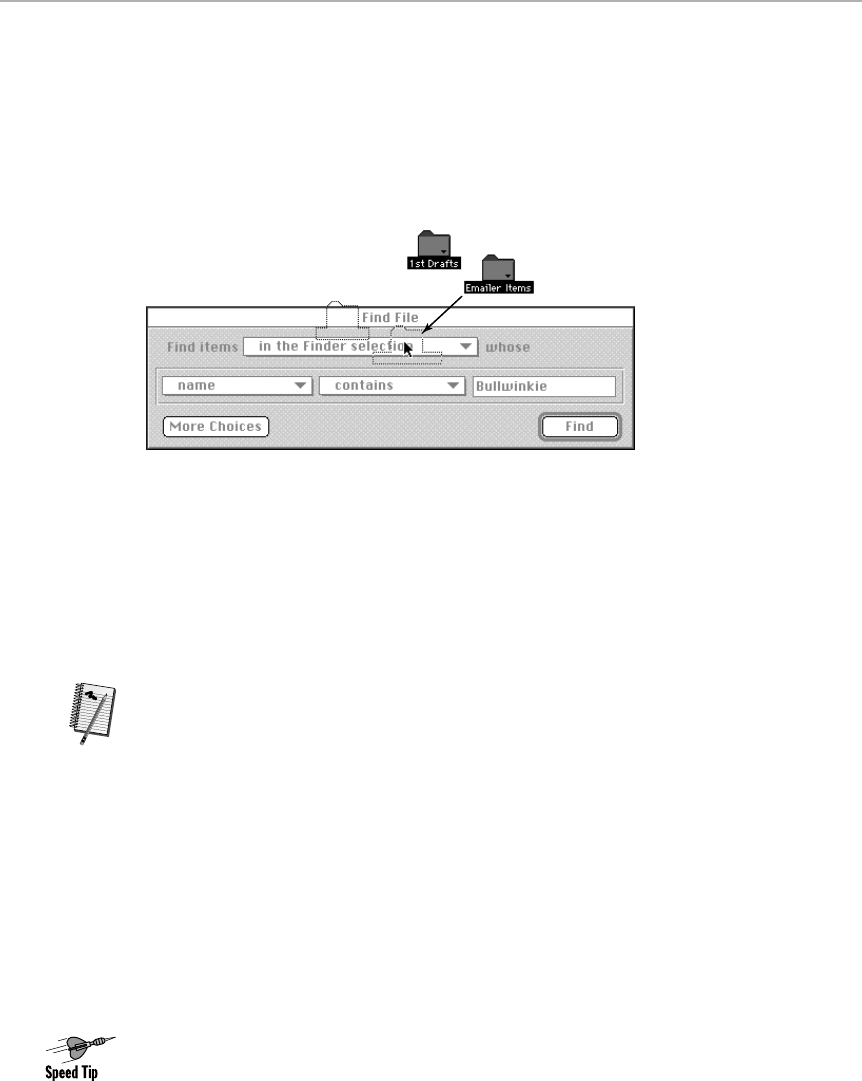
The best Drag and Drop ever
From Chapter 1, you know about the slick replacement for Copy and Paste
known as Drag and Drop. Check out
this
undocumented variation on the theme,
though: You can actually drag icons
from the Desktop
into the Find File window’s
blanks — or even onto its pop-up menus — to specify what, or where, you’re
seeking. See Figure 3-12 for a great example.
Figure 3-12: To search only inside of two particular folders, highlight them, then drag the
whole bunch onto the “Find items” pop-up menu. It changes instantly to say “in the Finder
selection,” meaning the folders you highlighted.
Get into the habit, therefore, of using Find File
not
for finding a file — but instead
for finding
information
about a file. To find out when a document was modified,
for example, change the criterion pop-up menu to say “modified,” and drop your
file onto the blank. Instantly, you’re shown that file’s modification date.
For added fun, keep clicking the More Choices button until you’re seeing all
kinds of criteria. Now drag an icon from your Desktop onto any
one
of the
blanks. Instantly, they
all
fill themselves in with info about the icon you dragged
and dropped — its size, date, type, and so on.
Yes, we realize that the Get Info command also gives you file info. However,
dragging a file onto a Find File blank has two advantages: (1) It provides
more
information (such as type and creator codes) than Get Info, and (2) it’s certainly
more fun.
Another way to say where
If you have several disks on your Desktop — for example, your hard drive plus a
Zip disk — press Ô-1, 2, 3, and so on; they make each disk’s name, in turn,
appear in the “find where” pop-up menu.
On the other hand, if there’s a removable disk you don’t want searched, such as
a CD-ROM disc, Shift-click the Find button. The program will search only hard
drives.
Worth
Learning
116 Part I: System Software Revealed
■ ■
MACWORLD MAC SECRETS • 4040-8/X • Chapter 03 • Proof f • SH/EAP • 10/21/98 • p.116
MACWORLD MAC SECRETS • 4040-8/X • Chapter 03 • Proof 1 • SH • 10/02/98 • p.116
4040-8/5 ch03.F 11/3/98 3:24 PM Page 116

Searching multiple CD-ROMs or Zip disks
Here’s an easy way to search multiple removable disks, such as CDs, Zip or Jaz
disks, SyQuest cartridges, or even floppies (in systems before Mac OS 8.5).
After Find File has finished searching the first disk, Option-click the disk’s name
(in the “Find items on” pop-up menu at the top of the window) — and rip it clear
out of the window and into the Trash!
The Mac ejects the disk. When you insert the next disk, its name will appear in
the “Find items” pop-up menu, ready for your next search.
Three instant database reports
Once your Find File has found files, it can produce any of three different
typed-up lists of its findings. All three produce a complete listing, unlike the
time-honored highlight-files-in-a-Finder-window-and-Copy method, which (until
recent OS versions) can paste only the first 256 characters you copy.
For a straight-ahead list, use Ô-A to select all the found files that appear in the
Items Found window; then copy and paste the selection into a word processor
document or even a Stickies note.
For a more detailed list, select the icons in the Items Found window and
drag
them into a Stickies note, or into any Drag-and-Drop word processor
(ClarisWorks, SimpleText, WordPerfect, and so on). You’ll get a tab-delimited
report listing each file’s name, size, kind and modification date and time (except
in Mac OS 8.5, where this trick, and the next, inexplicably stopped working).
Finally, if you
Option-
drag, you get an even more detailed list — one that reveals
everything
about the file you dragged, including its secret Type and Creator
codes, its label name, creation and modification dates, and so on.
Take note: this is the one and only way to produce a complete list of the files in
a particular folder! Confine your search to that folder (see the “The best Drag
and Drop ever” secret, earlier in this chapter), and set the criterion to something
all-inclusive (such as “date created is before 1999”); then hit Ô-A to select all
found items before dragging them into your word processor.
Where is that file — exactly?
Here’s a sneaky trick (for Mac OS 8.5 and later) along the same lines as the
files’-names copying technique provided in the previous secret. Suppose you’ve
used the Find program, and you’d like to write down, print out, or e-mail to
somebody the exact
path name
of a found file — you want to help them
understand the exact location of that file.
To do so, click the item in the top half of the Items Found list. Press the Tab key
to highlight the bottom half of the window, which now shows a graphic display of
your file’s location. Choose Edit ➪Copy. When you paste into a word processor,
you’ll find that the entire location of the file is provided in standard Mac
programmerese, like this:
Macintosh HD: System Folder:Apple Menu
Items:Calculator.
OS
8.5
Worth
Learning
Chapter 3: Desk-Accessory World 117
■ ■
MACWORLD MAC SECRETS • 4040-8/X • Chapter 03 • Proof f • SH/EAP • 10/21/98 • p.117
MACWORLD MAC SECRETS • 4040-8/X • Chapter 03 • Proof 1 • SH • 10/02/98 • p.117
4040-8/5 ch03.F 11/3/98 3:24 PM Page 117

A more revealing search
Generally, Find File just blasts away while searching, completely ignoring you
until it’s finished. If you Ô-click the Find button to initiate the search (in pre-Mac
OS 8.5 systems), however, a new information strip magically appears at the
bottom of the window. This secret status bar identifies the disk that the program
is currently searching, and even flashes the names of files it’s finding as they
whip by.
This latter piece of info is especially useful — it gives you a hint as to how on-
track your search setup was. Suppose, for example, you’re searching for a file
containing the word
cache
in its name. If you Ô-click Find, you might suddenly
discover that the search is wasting its time riffling through 500,000 Netscape
Navigator cache files, and you could abort the search in order to set up the
criteria more carefully.
As noted above, the secret Ô-click shortcut was removed from Mac OS 8.5. So
what’s a data-hunter to do? Easy — choose Edit ➪Preferences. In the resulting
dialog box, you’ll see the checkbox called Show Current Search Status for Find
File. It’s the same feature — it’s just not hidden any more.
Reverse sorting
You can sort files in the Items Found window by name, size, kind, or date by
clicking the category header, just as in Finder windows. But
Option
-clicking any
of these headers sorts the items in reverse order — before Mac OS 8.5. (In Mac
OS 8.5, of course, you can click the little upper-right doodad marked G in Figure
3-7.)
Too many files?
If your searching efforts turn up hundreds of files, you’ll probably get a message
midway through a search saying that Find File doesn’t have enough memory to
find any more items. In that case, try increasing the program’s memory
allocation by 500K or more. (To do this, select the Find or Find File icon in the
Apple Menu Items folder, choose Get Info from the File menu, and type the new
memory allocation into the Preferred size field.) Now the program will be able to
find, sort, and display hundreds of more items in each search.
Option-key secrets (pre-Mac OS 8.5)
Turns out the creators of Find File are just as much in love with the Option key
as the creators of the Mac itself. Consider these clever uses (which no longer
work in Mac OS 8.5) of that adorable little key:
OS
8.5
118 Part I: System Software Revealed
■ ■
MACWORLD MAC SECRETS • 4040-8/X • Chapter 03 • Proof f • SH/EAP • 10/21/98 • p.118
MACWORLD MAC SECRETS • 4040-8/X • Chapter 03 • Proof 1 • SH • 10/02/98 • p.118
4040-8/5 ch03.F 11/3/98 3:24 PM Page 118
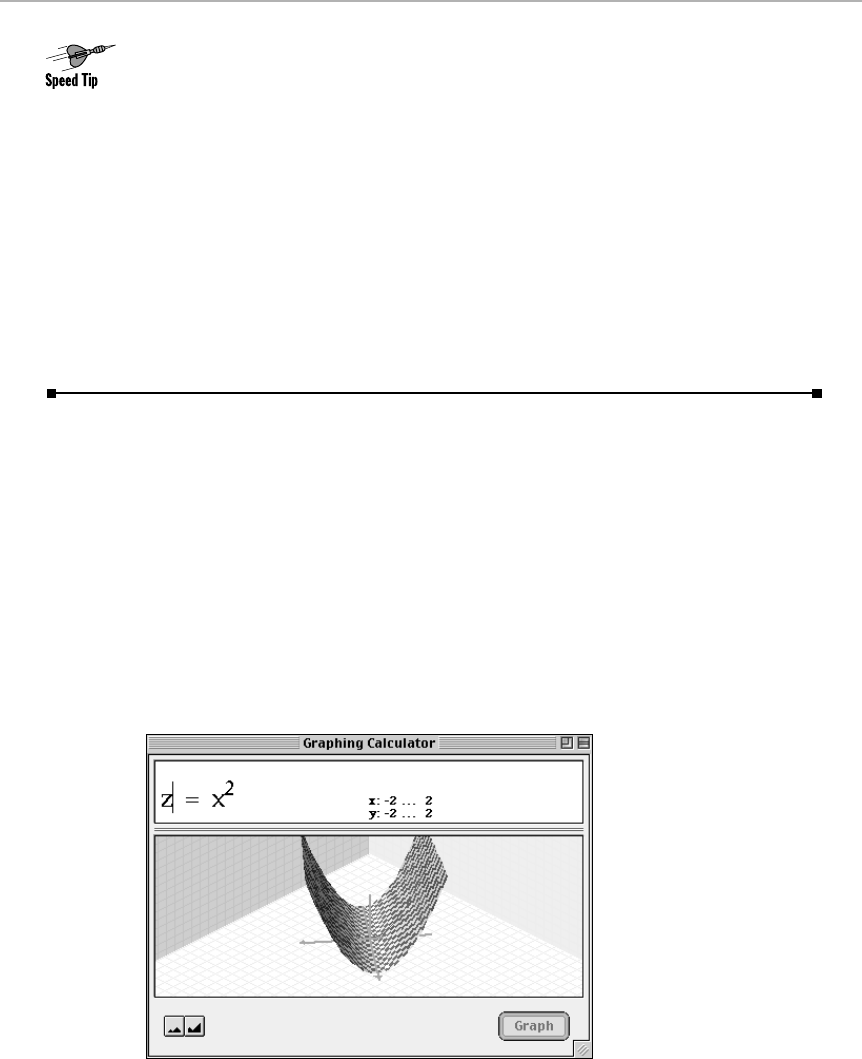
■Generally, after finding something with Find File, the first thing you want to do
is launch it. Therefore, wouldn’t it be nice if Find File would quit itself, freeing
memory and cleaning up your screen, whenever you launch something from its
Items Found window? It does exactly that if you press
Option
as you double-
click. (Find File also quits itself if you press Option while choosing Get Info,
Open Enclosing Item, or Sharing from its File menu.)
■The Option key also determines where the Find File window itself appears on
your monitor, oddly enough. If you’re pressing Option when you invoke the
program, the Find File window will appear dead center on your screen.
Likewise, if you’re pressing Option at the moment you click the Find button,
the
Items Found
window will open right in the middle of your screen.
■Exactly as with regular Finder windows, the Option key is the key to closing
windows. That is, Option-click any window’s close box to make the entire
Find File program quit itself.
Graphing Calculator
If there’s any “desk accessory” that’s used less than the Jigsaw Puzzle, it’s
the awesome but misunderstood Graphing Calculator. This program was an
early piece of showoff-ware, designed to highlight the speed of the early
Power Macs.
The concept of the Graphic Calculator is simple: type an equation that begins
with y = or z =. (Graphable ones, such as those involving a relationship
between X and Y, work best. Try y = 3x, for example, or y2= x.) When you
press Return or click Graph, the Graphing Calculator shows you the graph of
the equation you entered (see Figure 3-13).
Figure 3-13: The Graphing Calculator: made in heaven for algebra students everywhere. Feel
like playing with time and space? Then enter this equation and Option-drag back and forth in
the graph area.
Chapter 3: Desk-Accessory World 119
■ ■
MACWORLD MAC SECRETS • 4040-8/X • Chapter 03 • Proof f • SH/EAP • 10/21/98 • p.119
MACWORLD MAC SECRETS • 4040-8/X • Chapter 03 • Proof 1 • SH • 10/02/98 • p.119
4040-8/5 ch03.F 11/3/98 3:24 PM Page 119

Once you’ve got a nice graph, you can drag around in the display area to shift
the graph; Ô-click anywhere on the graph to view the exact coordinates of
your click; or click the tiny, lower-left “mountain” buttons to zoom in or zoom
out.
We puny literary types fail miserably at attempting to scale the heights of the
Graphing Calc’s greatness — y = x+3 is about the fanciest equation we could
imagine. But for a glimpse at some of the possibilities, try the different
commands in the Demos menu. Some of these graphs are not only 3-D, but
animated!
Graphing Calculator Secrets
■
Ballooning surprises
Turn on Balloon Help and you’ll discover some surprises. For example, point to
the csc and hyperbolic cosine buttons on the large keypad, the program icon
itself, and all the credits pages. (Hint: Ernest Rutherford was one of the great
pioneers in nuclear physics, having discovered radioactivity.)
Drag-and-drop ho!
The Graphing Calculator is profoundly drag-and-drop-savvy; for example, you can
drag graphs right onto the desktop, where they become PICT files. What’s really
neat is that they carry their equations with them behind the scenes; dragging a
graph
back
into the calculator restores its equation!
Secret benchmark mode
Comparing Macs? Try the secret benchmark mode in the Graphing Calculator.
Enter a graphable equation with an
n
in it, such as
r<n
. Control-click the Play
button (which looks like a triangle pointing to the right); the calculator times a
cycle of the slider and reports the number of seconds required to graph the
cycle! (The time appears just below the equation.)
The “standard” test for timing a Power Mac using the Calculator is to use the
last equation in the Inequalities demo. (Choose Demo ➪Inequalities, and then
press the Tab key repeatedly to advance through various graphs — and click the
Stop button when an inequality containing an
n
appears.) For the standard
benchmark to test a machine’s speed, delete the Calculator preferences file,
run the calculator on a Mac with a 640-by-480 screen, display or type in that
final inequality, and Control-click the slider Play button.
Strange
But True
120 Part I: System Software Revealed
■ ■
MACWORLD MAC SECRETS • 4040-8/X • Chapter 03 • Proof f • SH/EAP • 10/21/98 • p.120
MACWORLD MAC SECRETS • 4040-8/X • Chapter 03 • Proof 1 • SH • 10/02/98 • p.120
4040-8/5 ch03.F 11/3/98 3:24 PM Page 120

Real-time graphing mode
The Graphing Calculator’s “on-screen graphing mode” lets you watch it draw the
graphs step by step. To activate it, press the Space bar to erase any displayed
graph, and then Control-click the Graph button. (Programmer Greg Robbins notes
that 3-D surfaces are especially fun to watch being drawn.) Better yet, when this
on-screen drawing mode is activated,
copying
a graph copies it as a drawing —
not as a bitmap — so it can be printed at full resolution.
The interactive, cross-software grapher
The Calculator can be used as an equation editor with standard word
processors. Just paste an equation picture into one of many word processors
(ClarisWorks, WordPerfect, MacWrite Pro, and so on), either double-click
or double-click the equation, and the calculator will be launched and the
equation entered for editing. When the calculator window is closed, the
edited equation is automatically returned to the word processor!
Internet Access
This folder of handy Net-related applications was added to the Úmenu in
Mac OS 8.5. Its submenu lists these useful commands:
■Browse the Internet — This command launches your preferred Web
browser, as selected in the Internet control panel (see Chapter 4). And
it opens to your preferred home page, also determined in that control
panel.
■Connect To —See “Connect To,” earlier in this chapter.
■Disconnect — Yet another method to close your PPP connection and
hang up your modem’s phone line (see “Remote Access Disconnect,”
later in this chapter).
■Internet Setup Assistant — Walk through this series of screens while
your Internet access company’s tech-help agent is on the phone with
you, and you’ll save yourself a lot of grief in establishing an Internet
account for the first time. See Chapter 25 for details.
■Mail — This command launches your preferred e-mail program. (You
specify your favorite e-mail program using the Internet control panel,
as described in Chapter 4.)
OS
8.5
Chapter 3: Desk-Accessory World 121
■ ■
MACWORLD MAC SECRETS • 4040-8/X • Chapter 03 • Proof f • SH/EAP • 10/21/98 • p.121
MACWORLD MAC SECRETS • 4040-8/X • Chapter 03 • Proof 1 • SH • 10/02/98 • p.121
4040-8/5 ch03.F 11/3/98 3:24 PM Page 121

Jigsaw Puzzle
This desk accessory, which debuted in System 7.5, replaced the aging and
silly Puzzle that preceded it. At first glance, it’s equally silly — until you learn
about its secrets.
Once you open the program, begin by choosing Start New Puzzle from the
Options menu. You’re offered a choice of puzzle-piece sizes.
After making your choice, drag the jigsaw pieces with the mouse; as you
place hunks in the proper positions, they latch onto the adjacent pieces.
(They latch even when they’re not in the right place, but adjacent to the right
pieces.) You can move these increasingly larger hunks around by dragging
until you complete the entire picture. The sound you hear as a reward is a
little xylophone riff — but you can, of course, substitute any sound you wish,
using our ResEdit secrets in Chapter 21.
Jigsaw Puzzle Secrets
■
A FREE!! graphics viewer
Pasting isn’t the only way to get new graphics into the Jigsaw Puzzle; you can
also choose Open from the File menu to import any PICT graphics file on your
disk. Therefore, you can use the Jigsaw Puzzle as an especially handy, Ú
menu–based graphics viewer (when you need a quick glance at a screen shot
you took, for example).
Keep in mind, too, that the Jigsaw Puzzle works with Drag and Drop (see
Chapter 1). In other words, you can
drag
any graphic (from the Scrapbook, the
Desktop, or any other Drag-and-Drop–savvy program) directly into the Puzzle
“frame” to en-puzzle it without even copying and pasting. When you want to
check out some graphics file someone sent you — a QuickCam portrait, say, or a
downloaded scan — the lowly Jigsaw Puzzle makes a much quicker, easier
viewer than a lumbering behemoth such as, for example, Photoshop.
Make your own puzzle
Of course, you’re not condemned to piecing together the world map (or whatever
image appears in your Jigsaw Puzzle) forever. Any image you
paste — or Drag-and-Drop — into the picture window becomes the new
puzzle to solve.
If you paste a very large image, you may have to allot more memory to the
Jigsaw Puzzle program first, as described in Chapter 8.
122 Part I: System Software Revealed
■ ■
MACWORLD MAC SECRETS • 4040-8/X • Chapter 03 • Proof f • SH/EAP • 10/21/98 • p.122
MACWORLD MAC SECRETS • 4040-8/X • Chapter 03 • Proof 1 • SH • 10/02/98 • p.122
4040-8/5 ch03.F 11/3/98 3:24 PM Page 122
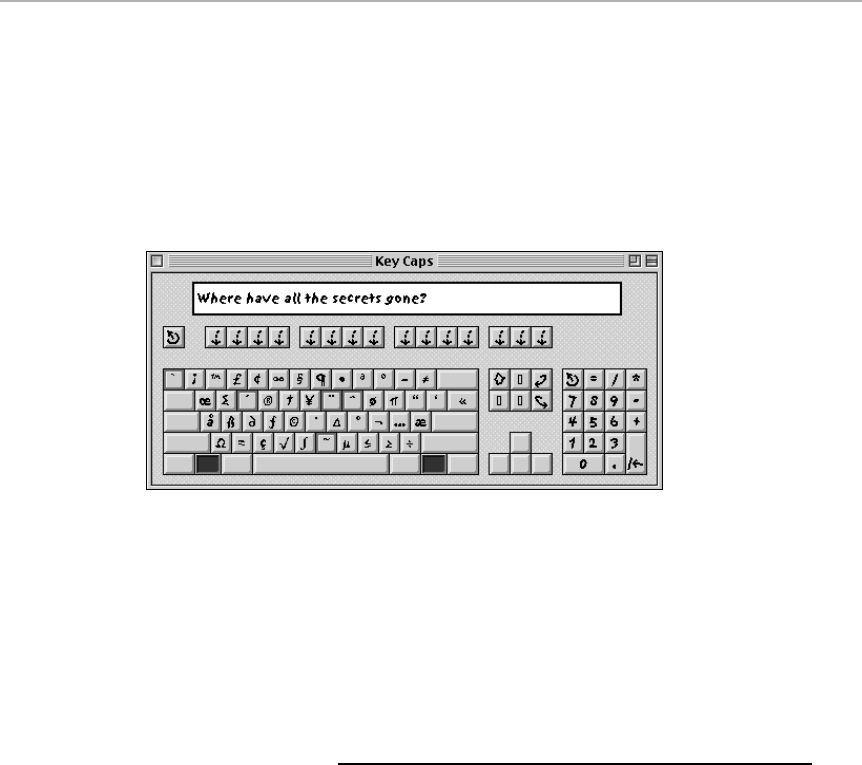
Key Caps
The Key Caps window looks like a minikeyboard. By holding down various
modifier keys (such as Ô, Option, Shift, or Control) while Key Caps is open,
you see which keys produce which characters. This feature is useful for
figuring out which keys to press to produce special symbols or non-English
characters, such as © or ¢ in certain fonts. You can type a sample sentence to
see what you’re getting, too (see Figure 3-14).
Figure 3-14: The Key Caps window reveals which keys produce which characters in every
font available. In this example, the Option key is being held down, and the resulting display
shows where the fancy symbols live.
Incidentally, you’re not limited to viewing the Charcoal font. Whenever Key
Caps is open, you see a new menu on-screen: the Key Caps menu, which lists
all the fonts in your System. Choose options from this menu to change fonts.
(You are limited to viewing characters in 12-point size, however.)
Key Caps Secrets
■
Copy & paste: the keyless keyboard
The fact that you can type a sample sentence in the Key Caps window can
be a life-saver when something goes wrong with your keyboard. If the E key
breaks when you’re within a few pages of finishing your doctoral dissertation, for
example, you
can
type an E in a crippled sort of way. Open Key Caps,
click
the E
key on-screen, and then
copy
the E you typed from the Key Caps text display to
your word processing document wherever you need an E.
In fact, Key Caps works in a crisis when you have
no
keyboard attached to
a Mac (take it from consultants like us: it happens). You can actually rename a
file or a folder using nothing but the mouse, Key Caps, and the Copy and Paste
commands. (Unfortunately, you’ll be limited to typing letters and using the
menus — you can’t use any Ô-key combinations without an actual keyboard, as
you’ll quickly discover.)
Chapter 3: Desk-Accessory World 123
■ ■
MACWORLD MAC SECRETS • 4040-8/X • Chapter 03 • Proof f • SH/EAP • 10/21/98 • p.123
MACWORLD MAC SECRETS • 4040-8/X • Chapter 03 • Proof 1 • SH • 10/02/98 • p.123
4040-8/5 ch03.F 11/3/98 3:24 PM Page 123

Dead keys, diacritical markings
When you press Option while the Key Caps window is open, you see little dark
outlines around certain keys, as shown in Figure 3-14. These rectangles identify
the
dead keys —
keys that, when pressed once, type
nothing
on-screen.
However, when you type
another
key — a normal letter, for example — it appears
with the dead key’s displayed marking
over
it. So, to produce the ñ in
niño,
you
press Option-N and
then
type an N.
Avoid painfully slow typing
Key Caps does its duty (displaying any symbol you type) even if it’s not the front
window. If you ever discover that typing in your word processor has become as
slow as rubber cement, check to make sure that Key Caps isn’t open
somewhere, intercepting every keypress and bogging down the works.
Network Browser
For over a decade, the Chooser has been Grand Central Station for
networking. As you can read in Chapter 35, the Chooser is where you click
the AppleShare icon, which summons the icons of the other machines on
your network to the screen. From there, you can click your way to the shared
files on any other hard drive.
But the Chooser’s role as networker is fading, thanks to the dawn of Mac OS
8.5’s Network Browser (see Figure 3-15). For the first time, navigating even
complex networks — those with multiple machines in multiple zones — is as
easy as using the “flippy triangle” folder buttons in a Finder list-view window.
Figure 3-15: The Network Browser looks uncannily like the new Open and Save dialog boxes,
discussed at length in Chapter 15.
OS
8.5
124 Part I: System Software Revealed
■ ■
MACWORLD MAC SECRETS • 4040-8/X • Chapter 03 • Proof f • SH/EAP • 10/21/98 • p.124
MACWORLD MAC SECRETS • 4040-8/X • Chapter 03 • Proof 1 • SH • 10/02/98 • p.124
4040-8/5 ch03.F 11/3/98 3:24 PM Page 124
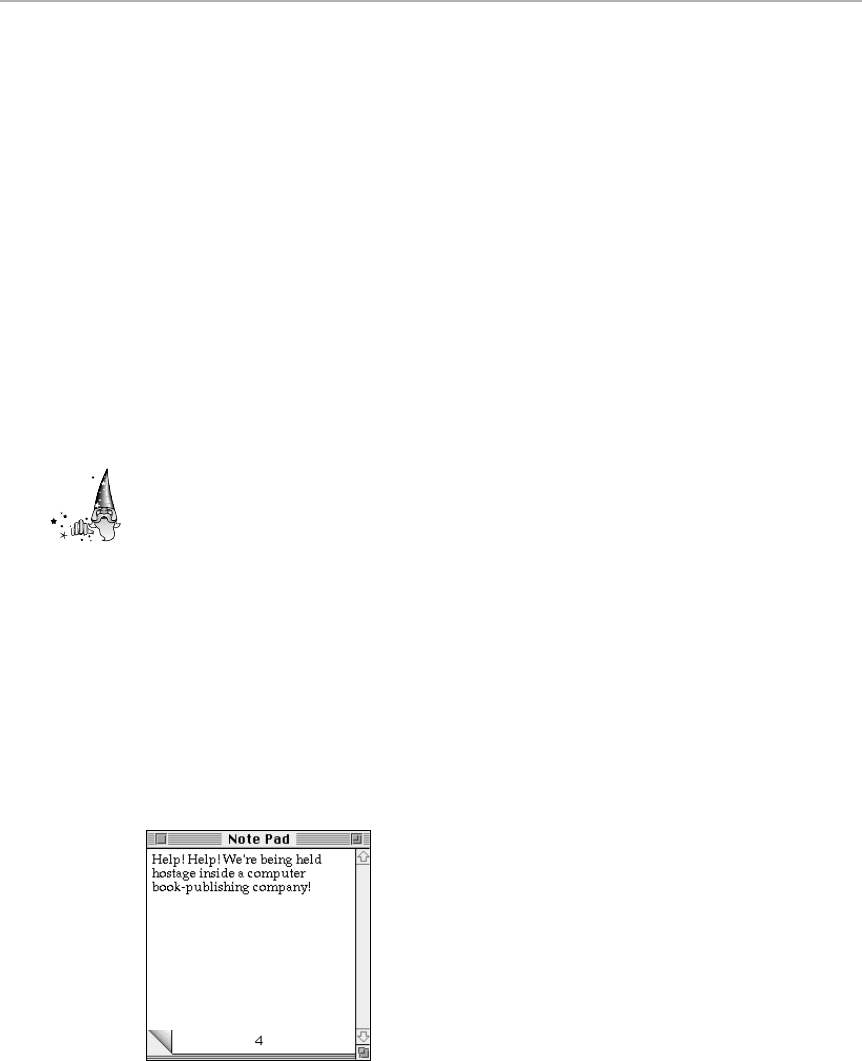
To bring a distant networked Mac’s hard drive onto the screen, double-click
its icon in this list. To make an alias of that hard drive, drag its icon to the
desktop (or use File ➪Make Alias). To revisit the last server you had open,
use the Back and Forward arrow buttons at the upper-right corner of the
screen.
The Network Browser offers plenty of other activities for your organizational
pleasure—but they’re virtually identical to the shortcuts in the Mac OS 8.5
Open and Save dialog boxes, described in Chapter 15 (see “Save and Open
File 2000: Navigation Services” in that chapter). For example, the three
picture buttons at the top are pop-up menus listing disks, favorite items, and
recently used items, respectively; all of these work as well here, referring to
networked hard drives, as they do when working with your own files and
folders.
(See Chapter 35 for much more detail on setting up and using networks.)
Network Software Selector
For 6100, 7100, and 8100-series Macs only. This little pre-Mac OS 8 program
is the on/off switch for Open Transport, the networking software described
in Chapter 35. Strange but true: when you switch to Classic AppleTalk, this
program makes the MacTCP control panel invisible—and revisifies it (but
hides the TCP/IP control panel) when you turn Open Transport on!
Note Pad
You type short notes and memos into the Note Pad (see Figure 3-16). No
graphics, no formatting — just 32K of typed text per scrollable, resizable,
searchable (choose Edit➪Find) page. Use Edit ➪Preferences to choose
whatever font and size you want. Our favorite aspects of the Note Pad: the
little page-turning sound and the fact that it’s drag-and-drop savvy (see
Chapter 1).
Figure 3-16: The new Note Pad: An eight-page repository for brief notes and memos.
Strange
But True
Chapter 3: Desk-Accessory World 125
■ ■
MACWORLD MAC SECRETS • 4040-8/X • Chapter 03 • Proof f • SH/EAP • 10/21/98 • p.125
MACWORLD MAC SECRETS • 4040-8/X • Chapter 03 • Proof 1 • SH • 10/02/98 • p.125
4040-8/5 ch03.F 11/3/98 3:24 PM Page 125
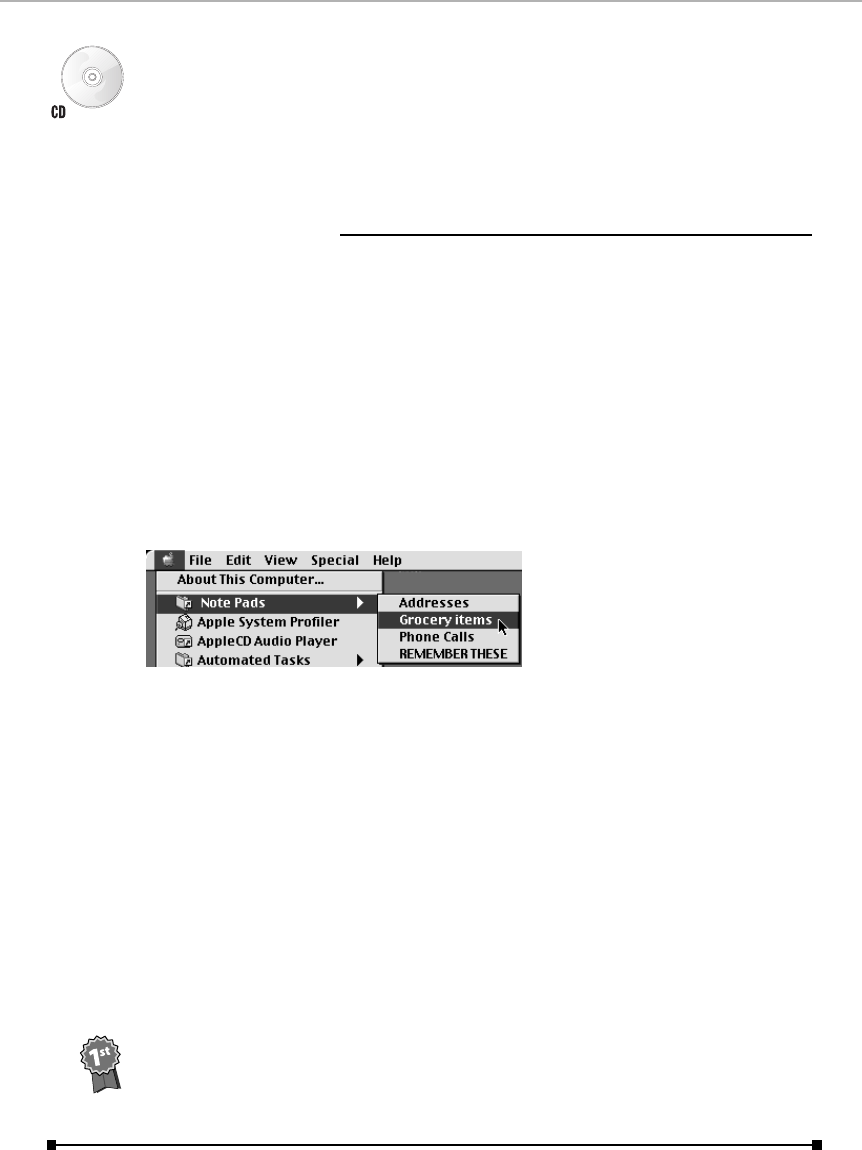
Don’t be fooled by the new Note Pad’s eight-page default allotment. Use the
New Note command in the File menu to create as many additional pages as
you want. (By the way: If you’re still using the old Note Pad, the pre-System
7.5 one, be sure to see Chapter 3 of the electronic Macworld Mac Secrets, 4th
Edition, on the CD-ROM that came with this book, for an assortment of
additional secrets.)
Note Pad Secrets
■
Multiple Note Pads
Today’s Note Pad is actually an application, not a desk accessory. That little
quirk gives the new Note Pad a particularly slick feature: multiple files. Each can
have its own type style, name, and contents, and each can reside anywhere you
want on your hard drive.
Just open your System Folder and duplicate the Note Pad file as many times as
you want. Rename them as you see fit. (One possibility: Keep them all in a Note-
Pad Files folder in your Apple Menu Items folder, for quick access, as shown in
Figure 3-17.)
Figure 3-17: The multiple-Note Pad trick in action.
From now on, when you double-click any Note Pad file (or choose one from your
Úmenu) the Note Pad program launches and opens the file on your screen.
What’s especially impressive is that, if one Note Pad file is open, double-clicking
the next one doesn’t give you an error message. Instead, the new file opens in
place of the first one — you can “hot swap” Note Pads.
Quick jumping to a page
Click the page number at the bottom of a new Note Pad (System 7.5 or later)
page. You get a handy dialog box that (a) tells you the total number of pages,
and (b) lets you jump directly to a specified page.
And while we’re at it: Free book winner François Brahic stumbled onto the Note
Pad’s secret navigation keystrokes. Ô-up and -down arrow makes
your insertion point jump to the top or bottom of the window — and
Ô-left and -right arrow turns the pages!
Contest
Winner
126 Part I: System Software Revealed
■ ■
MACWORLD MAC SECRETS • 4040-8/X • Chapter 03 • Proof f • SH/EAP • 10/21/98 • p.126
MACWORLD MAC SECRETS • 4040-8/X • Chapter 03 • Proof 1 • SH • 10/02/98 • p.126
4040-8/5 ch03.F 11/3/98 3:24 PM Page 126

Recent Applications, Documents, Servers
The presence of these three items in your Úmenu — Recent Applications,
Recent Documents, and Recent Servers — is a telltale sign that you’re using
the Apple Menu Options control panel. These items, introduced with System
7.5, marked the debut of submenus to official Apple System software. You can
get rid of these commands, if you want; see “Apple Menu Options,” in
Chapter 4.
Remote Access Status
This handy Mac OS 8.5 miniprogram (see Figure 3-18) isn’t quite as compact
as its Control Strip companion when it comes to getting online, monitoring
your progress, and hanging up your PPP connection. (All of these activities
are described in Chapter 25.) And the exact same information is available in
the Remote Access control panel, described in the next chapter.
Still, Remote Access Status is yet another noble attempt on Apple’s part to
educate its customers about the one weirdness of going onto the Internet:
that even when you quit the program you’re using (Web browser or e-mail
program, for example), your connection to the Net remains alive, tying up
your phone line. Remote Access Status, the Remote Access Control Strip
module, and the Remote Access control panel all offer Connect and
Disconnect buttons to help you master your online destiny in this regard.
OS
8.5
Chapter 3: Desk-Accessory World 127
■ ■
MACWORLD MAC SECRETS • 4040-8/X • Chapter 03 • Proof f • SH/EAP • 10/21/98 • p.127
MACWORLD MAC SECRETS • 4040-8/X • Chapter 03 • Proof 1 • SH • 10/02/98 • p.127
TRUE FACT
In general, Apple Computer is a leading
advocate of superior interface design. Classic
example: When, in a dialog box, several buttons
await your choosing, the button most likely to
get your click is usually outlined with a thick
black border — your clue that pressing Return or
Enter suffices to “click” it. For example,
whenever you risk deleting data, the Cancel
button is generally outlined so that, in your
haste, you don’t slap the Enter key and
inadvertently wipe out important work.
However, Singapore reader Martin Lim dis-
covered a frightening lapse in Apple’s usually
careful design — and it’s in the Note Pad.
Choose Delete Note from the File menu, and a
confirmation dialog box appears — with the
Delete button outlined! This dangerous setup is
all the more surprising because, as the dialog
box itself warns, there’s no Undo for deleting a
page of your Note Pad.
Well, OK. Maybe Apple figured that because
you’ve gone to the trouble to choose the Delete
Note command, you must know what you’re
doing — the programmers are just trying to save
you time.
Which brings us to the second interface
violation: pressing Return or Enter “clicks” the
Cancel button — not the one with the thick
black border!
Can you say “longstanding bug”?
Apple’s double interface violation
4040-8/5 ch03.F 11/3/98 3:24 PM Page 127

Figure 3-18: The Remote Access Status miniprogram shows you what kind of speeds you’re
getting while online.
Scrapbook
The Scrapbook is a holding tank for graphics, passages of text, sounds, movie
clips, or QuickDraw 3-D models that you’d like to keep on hand for future use.
Items stored in the Scrapbook are retained in a special Scrapbook File in the
System Folder.
You probably already know how to copy and paste (or drag-and-drop) items
to and from the Scrapbook, but here are a few lesser-known Scrapbook
tidbits.
Scrapbook Secrets
■
Sound storage
Consult Chapter 23 for details on creating, extracting, and manipulating sound
files on the Mac. Our purpose here is to suggest a great place to store them: in
the Scrapbook. Just drag-and-drop standard Mac sound files off the desktop and
directly into the Scrapbook, where they show up with a special sound icon (see
Figure 3-19).
Multiple Scrapbooks
As with the Note Pad, described earlier, today’s Scrapbook is actually an
application, not a desk accessory. The Scrapbook, too, therefore lets you easily
work with multiple Scrapbook files — one each for your various projects, for
example, each with its own name, contents, and folder location.
Just open your System Folder and duplicate the Scrapbook File file as many
times as you want. Rename and relocate them as you wish. From now on,
whichever one you double-click (or choose by name from your Úmenu, if
you put them there) will launch the Scrapbook program and appear on your
screen.
As with the Note Pad, you don’t even have to close one Scrapbook file before
opening the next; the Mac “hot swaps” the files on the fly.
128 Part I: System Software Revealed
■ ■
MACWORLD MAC SECRETS • 4040-8/X • Chapter 03 • Proof f • SH/EAP • 10/21/98 • p.128
MACWORLD MAC SECRETS • 4040-8/X • Chapter 03 • Proof 1 • SH • 10/02/98 • p.128
4040-8/5 ch03.F 11/3/98 3:24 PM Page 128
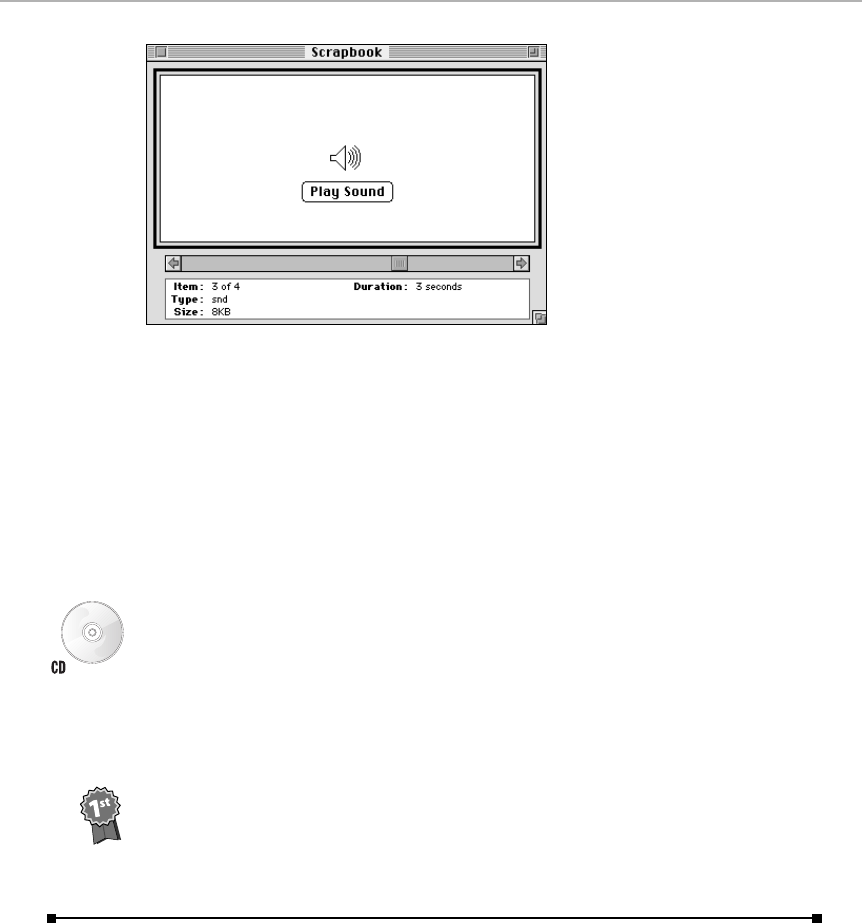
Figure 3-19: When you paste a recorded sound into the Scrapbook, a Play Sound button
appears.
Because Scrapbook files are, in fact, documents created by the Scrapbook
program, you can freely distribute them to other Macs that use System 7.5
or later. They’ll easily open with a double-click, serving as handy multimedia
envelopes for transporting groups of graphics, sounds, or text chunks intact to
other people.
The new, improved Scrapbook Pro
Miss having a table-of-contents view to your scrapbook? Then install ScrapIt Pro,
included on the CD-ROM with this book. See the appendix for details.
The impossible shrinking Scrapbook
Try to make the Scrapbook really small. Go ahead, try it. Shrink it right down to
postage-stamp size. Can’t do it, can you?
That’s because you don’t know Swedish reader Jagat Pati’s sly trick: Press Ôas
you drag the resize box. Now you can make the Scrapbook so small it nearly
disappears — great for those occasions when you’re trying to drag one graphic
after another out of the Scrapbook and into a window that’s filling up most of
the screen.
SimpleSound
When Apple’s designers first merged the Monitors control panel and the
Sound control panel into a single entity called Monitors & Sound (described in
the next chapter), they forgot about one little feature in the process: recording
new sounds. There was no Record button or Add button in the Monitors &
Sound control panel, as there had been in the Sound control panel.
Contest
Winner
Chapter 3: Desk-Accessory World 129
■ ■
MACWORLD MAC SECRETS • 4040-8/X • Chapter 03 • Proof f • SH/EAP • 10/21/98 • p.129
MACWORLD MAC SECRETS • 4040-8/X • Chapter 03 • Proof 1 • SH • 10/02/98 • p.129
4040-8/5 ch03.F 11/3/98 3:24 PM Page 129

It took a couple more system-software releases before the Add button
showed up back in the control panel where it belongs. But in the interim,
Apple threw this strange little desk accessory into the Úmenu. When
opened, it does nothing more but provide access to that temporarily lost
feature: the Add button that lets you record another alert beep. (See Figure
3-20.) See “Monitors & Sound” in the next chapter for instructions.
Figure 3-20: SimpleSound restores the add and remove features to your collection of error
beeps, yes (right). But it’s so much more! You can use the File menu’s commands to open
sounds and QuickTime movies, like the one shown here (middle), and use the Play and Stop
commands to listen to the sounds therein.
Using this miniprogram’s Open command, you can open sound files and even
QuickTime movies; the Play command lets you listen to them. Of course,
because this is SimpleSound, you won’t get to watch the QuickTime movie—
just listen to its soundtrack. (If such things interest you, consider putting an
alias of SimpleSound into your QuickTime movies folder. Whenever you want
to hear a movie, find out its length, or learn what its recording-quality level
was, just drag-and-drop it onto SimpleSound’s alias.)
To be honest, we’d always dismissed SimpleSound; we were deceived by its
simplicity and the fact that it was born as a temporary gap-filling system-
software doodad. But free book winner Steve Godun pointed out some cool
SimpleSound traits that we’ve since come to use fairly often:
■If you double-click a sound file in the Finder, you can’t do anything until
the sound is played out. But if you use SimpleSound to play the sound,
you can throw SimpleSound into the background and continue to work in
other programs while the sound plays!
■SimpleSound streams its sound data directly from the disk, instead of
having to load it all into memory before beginning to play (as the Finder
does). Even on a lowly Classic or SE with 4MB of RAM, you can play, say,
a 10MB sound file.
■SimpleSound can play multiple sounds on top of each other! Just open
several and then click their Play buttons one after another. (Ever want to
hear yourself singing harmony?)
Contest
Winner
130 Part I: System Software Revealed
■ ■
MACWORLD MAC SECRETS • 4040-8/X • Chapter 03 • Proof f • SH/EAP • 10/21/98 • p.130
MACWORLD MAC SECRETS • 4040-8/X • Chapter 03 • Proof 1 • SH • 10/02/98 • p.130
4040-8/5 ch03.F 11/3/98 3:24 PM Page 130
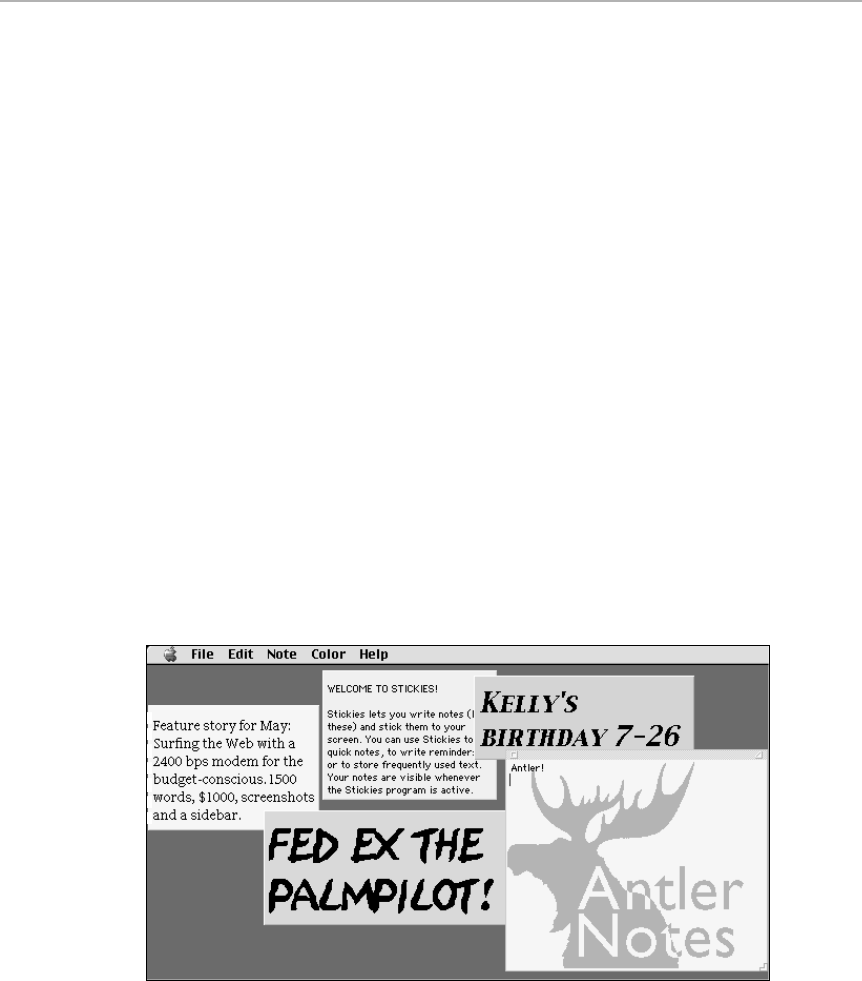
■SimpleSound can record extremely long sounds — much longer than the
pathetic 10-second snippets that Monitors & Sound can record. When
you’re fooling around with your PowerBook or your Mac microphone to
record the baby’s first words, or the great-uncle’s last, this is the program
you want to record into—not Monitors & Sound.
To make matters even more pleasant, SimpleSound offers its own quaint
Easter egg: Choose Ú➪About SimpleSound, and then click the icon in the
dialog box to view the author’s name.
Stickies
This ingenious little program does just what you’d think: allows you to jot
notes to yourself and stick them on your monitor, as Mac fans have done with
real Post-it notes for years (see Figure 3-21).
Each little note has a miniature title bar (so you can move the note around),
a zoom box in the upper-right corner (so you can make the note snap to its
original size), and a resize box in the lower-right corner (so you can resize
the note). To make a new note, just choose New Note from the File menu.
We want to call to your attention the supreme usefulness of the Preferences
command. Among its options is “Launch at system startup.” That simply
means that your Stickies will be on-screen waiting for you when you turn on
the computer each morning — a terrifically useful and convenient reminder
system.
Figure 3-21: Each Sticky can have its own size, color, and type style (use the Note and
Color menus). Play your cards right, read our secrets, and you may even get a graphic out
of the deal.
Chapter 3: Desk-Accessory World 131
■ ■
MACWORLD MAC SECRETS • 4040-8/X • Chapter 03 • Proof f • SH/EAP • 10/21/98 • p.131
MACWORLD MAC SECRETS • 4040-8/X • Chapter 03 • Proof 1 • SH • 10/02/98 • p.131
4040-8/5 ch03.F 11/3/98 3:24 PM Page 131
Stickies Secrets
The cleverest hidden credits in the
Ú
menu
Type
Antler!
into a new Sticky note and press Return. (Capitalization counts.)
Who said graphics can’t appear in Stickies? (See Figure 3-21 if you don’t know
what we’re talking about.)
(On a less frivolous note: This hidden credit reminds us that some of the
Mac OS’s pieces were not, in fact, written by Apple. Poke around Apple Menu
Options, Date & Time, Jigsaw Puzzle, Desktop Patterns, Find File, and other
included programs, and you’ll discover that all this software has been licensed
from independent programmers. And why not? It’s good stuff!)
The miracle of Stickies Stationery
If you’re like us, it didn’t take you long to grow weary of having to select a color,
size, and font style for each new Sticky you make. Here’s the brilliant, time-
saving solution.
Create a blank Sticky. Use the Color and Note menus to format it the way you
like. Drag the lower-right corner to change the note’s size and shape. If you want
a default title (such as
Today’s To-do’s
), type that, followed by a Return or two.
Now choose Close from the File menu. Stickies asks if you want to save this
note before closing it. (If it doesn’t ask, it’s because you turned off “Confirm
window-closing” in the Preferences dialog box. Choose Preferences from the
Note menu and turn it back on.)
Click Save. In the next dialog box, type a name for this
kind
of Sticky (such as
“Phone Message” or “To-Do’s”), click the
Stationery
box, click the Desktop
button, and click Save. When you quit Stickies, you’ll see a new icon on your
Desktop you’ve never seen before: It’s Stickies Stationery!
From now on, whenever you double-click this icon, you’ll launch Stickies (if
it isn’t already running) and open a new, blank note identical to the one you
originally created.
This is only half the setup, however. Using this technique, create a
folderful
of
preformatted Stickies. Drag the folder into your Apple Menu Items folder (in the
System Folder). From now on, your Úmenu provides quick access to your entire
arsenal of different, preformatted Sticky types.
The saga of closing, saving, and not saving
Free book winner Arlen Britton discovered something bizarre and amazing about
Stickies: when you close a new Sticky note, you’re generally asked whether or
not you want to
save
that note so that it’ll appear next time you launch the
Contest
Winner
132 Part I: System Software Revealed
■ ■
MACWORLD MAC SECRETS • 4040-8/X • Chapter 03 • Proof f • SH/EAP • 10/21/98 • p.132
MACWORLD MAC SECRETS • 4040-8/X • Chapter 03 • Proof 1 • SH • 10/02/98 • p.132
4040-8/5 ch03.F 11/3/98 3:24 PM Page 132

program (
if
this option is checked in the Stickies Preferences menu). If you
don’t want to save that note, you can click Don’t Save or press Ô-D.
But if you
Control-
click the close box of a Sticky, your note is simply deleted. “No
questions asked, and no way to get it back,” says Arlen. “Use with caution!”
Ah, not so fast, Arlen! Even as you were e-mailing us with that secret, 13-year-
old free book winner Lubomir Stroetmann from Germany was sending us
this
revelation: If you close a Sticky without saving it, a simple glance at the Edit
menu will reveal your safety net. It says Undo Close! In other words, even after
closing a Sticky, you can get it back again.
All the note that always fits
Under normal circumstances, a Sticky opens to a default size and shape. If your
typing extends beyond the bottom of the Sticky, the note automatically grows
vertically to accommodate all your typing. But if your typing fills up
less
than
the predefined note size, you’re stuck with all that wasteful empty space at the
bottom of your typing.
Chapter 3: Desk-Accessory World 133
■ ■
MACWORLD MAC SECRETS • 4040-8/X • Chapter 03 • Proof f • SH/EAP • 10/21/98 • p.133
MACWORLD MAC SECRETS • 4040-8/X • Chapter 03 • Proof 1 • SH • 10/02/98 • p.133
MACINTOSH SECRET
This write-up from free book winner Mark
Cannata says it all:
I use Stickies as a Web address manager. I’m
constantly switching between browsers, and
almost always want to visit a site that I have
bookmarked in another browser. I am too cheap
to buy a real URL manager, so I use Stickies.
I open the Bookmark or Favorites folders of my
browsers and drag-and-drop the sites I visit
most onto a Sticky. Most sites are recognizable
by the URL (the Web address), but if not, I leave
a few spaces and type a description after the
URL (such as “www.macintouch.com news
about the Mac”).
When I want to use one of these addresses, I
just highlight a URL (minus the description) and
drag and drop it into the window of any
browser. I’ve tried this with Cyberdog, Netscape
Navigator, Microsoft Internet Explorer, and even
AOL’s browser. Better yet — if you’ve got the
IceTe extension installed (part of Internet Config,
described in Chapter 4), you can just Ô-click a
URL on your Sticky note to open that Web page
in your browser.
While I’m surfing, I always have Stickies open
so I can copy and paste the URL of interesting
sites onto a Sticky. I even have one Sticky note
just for “Sites to Visit,” where I paste URLs that
I come across while reading a newsgroup or
e-mail.
Every once in a while, I have to take some time
to reorganize my bookmarks. But if you have
more time than money, it’s a great system.
Mark’s revelation
4040-8/5 ch03.F 11/3/98 3:24 PM Page 133

If this aesthetically unpleasant gulf bothers you as much as it does us, try this.
Create a piece of Stickies stationery, as described in the previous secret — but
save it in its
collapsed
state (by Option-clicking the tiny “collapse” triangle in the
upper-right corner before saving the stationery). Whenever you open this Stickies
stationery, a new note window appears in its collapsed condition. However, as
you begin typing, it automatically opens and grows, always remaining at the
perfect size to accommodate your text.
Change the colors!
You’re not locked forever into the original Stickies color scheme of pale pastels.
Using Stickies Color Editor (included on the CD-ROM with this book), you can
quickly and easily change the default color choices to a more interesting
rainbow.
And while we’re talking Sticky colors: See Chapter 21 for instructions on adding
Ô-key shortcuts to your Color menu.
Stickies: The tiniest word processor
Stickies? A word processor? OK, it’s not Word 98, but Stickies does have a
surprising number of hidden word processor-like features for quick-and-dirty text-
editing. For example:
■You can import any plain text file directly into a Sticky using the Import Text
command — or drag a text document onto the Stickies icon. In either case,
the text file opens in a new note window, in the font and style you’ve
defined as your default note style. This is a handy way to read e-mail
messages you’ve saved from America Online or the Internet.
■You can drag and drop selected text within and between notes. Dragging
text moves it, while Option-dragging
copies
the selected text to the new
location. (Simple Text, by contrast, doesn’t let you
move
text from window
to window; it
always
copies it.)
■You can press Ô-L or Ô-R to go to the beginning or end of a line of text in a
note. (Left and Right, get it?)
■Sticky notes have no scroll bars, but there are plenty of ways to navigate
through lengthy notes. The arrow keys work, of course. The Home and End
keys on extended keyboards scroll to the beginning and end of a note.
More useful, though, is Ô-down arrow, which both scrolls to the end of a
note
and
plants your cursor there.
■Option-clicking a note’s zoom box collapses it to a single line. In Mac
OS 8.5, Stickies even sweetly shows you the first line of text (in Geneva
9-point type) within the little collapsed strip, so you can tell the collapsed
notes apart. And if you’re using the Mac’s WindowShade feature (see
Chapter 4), you don’t even have to mess with the zoom box; you can
collapse a note by double-clicking anywhere on its top strip.
134 Part I: System Software Revealed
■ ■
MACWORLD MAC SECRETS • 4040-8/X • Chapter 03 • Proof f • SH/EAP • 10/21/98 • p.134
MACWORLD MAC SECRETS • 4040-8/X • Chapter 03 • Proof 1 • SH • 10/02/98 • p.134
4040-8/5 ch03.F 11/3/98 3:24 PM Page 134

■When resizing a note, you can constrain the resizing to one direction by
holding down the Shift key as you drag.
■When you close an unsaved note, the Mac asks if you want to save it.
You can close the note without saving by pressing Ô-D.
■A note can hold a maximum of 8,000 characters, which is about four
pages of text.
Shut Down
This little System 7.5/7.6 command simply shuts down the Mac. Because it’s
in the Úmenu, you don’t have to return to the Finder to quit for the day. (Its
name has the bullet [•] so that it appears at the very bottom of the Úmenu,
below all other letters of the alphabet.)
Why did • Shut Down disappear from Mac OS 8 and later? We guess it’s
because all Macs made today can be turned on and off from the keyboard—
no menu command necessary. But if you like the sound of • Shut Down, visit
Chapter 21, where we teach you how to make an even better version using
AppleScript.
Chapter 3: Desk-Accessory World 135
■ ■
MACWORLD MAC SECRETS • 4040-8/X • Chapter 03 • Proof f • SH/EAP • 10/21/98 • p.135
MACWORLD MAC SECRETS • 4040-8/X • Chapter 03 • Proof 1 • SH • 10/02/98 • p.135
MACINTOSH SECRET
Technically, • Shut Down is an actual program.
Open your Apple Menu Items folder, inside the
System Folder, and see for yourself. You can
double-click it to shut down your Mac.
This quirk, of course, opens a realm of cruel
April-Fools possibilities. One favorite: Place an
alias of • Shut Down into your victim’s Startup
Items folder (inside the System folder)! The
unlucky object of your attention will turn on the
Mac, sit through the extension-loading process,
wait for the Desktop to appear — and then
watch in horror as the Mac instantly shuts itself
off again.
Short of using another start-up disk, there’s only
one way to escape this evil cycle: press the
Shift key through the startup process. (Shift
prevents any Startup Items from running.) Then
remove the accursed alias from the Startup
Items folder.
About the only prank more sinister is the one we
recently saw perpetrated on an unsuspecting
coworker. On April Fool’s Day, a merry prankster
put a copy of the • Shut Down program on the
victim’s Desktop, renamed it Macintosh HD and
adorned with a new, pasted-in icon — the icon
of the real hard drive. (The actual hard drive’s
icon was renamed and moved into a crowded
area of the Desktop where it couldn’t be
spotted.) Sure enough, each time the unlucky
victim tried to open his “hard drive,” his Mac
responded by shutting down.
We would have loved to hear the gentlefolk at
800-SOS-APPL troubleshoot that one.
The cruelest practical joke of them all
4040-8/5 ch03.F 11/3/98 3:24 PM Page 135
MACWORLD MAC SECRETS • 4040-8/X • Chapter 03 • Proof f • SH/EAP • 10/21/98 • p.136
MACWORLD MAC SECRETS • 4040-8/X • Chapter 03 • Proof 1 • SH • 10/02/98 • p.136
4040-8/5 ch03.F 11/3/98 3:24 PM Page 136

MAC SECRETS • 4040-8/5 • ch.04.F • Chapter 4 • FINAL • VB • 10/22/98 • p.137
MAC SECRETS • 4040-8/5 • ch.04.1 • Chapter 4 • Proof 1 • VB • 09/16/98 • p.137
Chapter 4
Control Panels and Extensions
In This Chapter
©Secrets of the standard control panels
©Secrets of the standard extensions
©Which System Folder junk you can throw away
©Secrets of the shared libraries
This chapter, perhaps more than any other, is an exercise in futility. Apple
may churn out Macintosh models faster than anyone can track, but that’s
nothing compared to the control panels and extensions they write! All we can
hope to accomplish is to review what’s in the typical System Folder at the
time of this writing.
Even that, however, is enlightening. The modern-day System Folder is a
mishmash of added-on features, bug fixes, and system updates. Patches
patch patches; new extensions swallow functions previously performed by
others. Some icons in the Control Panels folder are actually extensions or full-
blown applications; some icons in the Extensions folder aren’t extensions at
all. It’s about time someone tried to make sense of it all.
Many extensions and control panels take up memory; make your Mac take
longer to start up; and create the potential for conflicts and crashes. In fact,
it’s safe to say that the most stable Mac is an extension-free Mac. Of course,
you probably wouldn’t have much fun on a machine with no extensions, but
this chapter should help you get rid of the components you’ll never need.
(And if you are having a strange crash, bomb, or freeze, see Chapter 36
immediately for instructions on turning off and testing your extensions.)
Incidentally, even though we became exhausted preparing this list, we have a
sinking feeling that the list isn’t exhaustive. We’re sure there’s probably some
patch or extension floating around that we haven’t snagged, tagged, and
cataloged — a modern Power Mac’s Extensions folder contains 125 icons! If
so, we hope you’ll let us know by e-mail; we’ll continue to expand the chapter
in subsequent printings of the book. We’ll also post the new information on
our Web page: http://www.idgbooks.com/idgbooksonline/macsecrets.
4040-8/5 ch04.F 11/3/98 3:12 PM Page 137
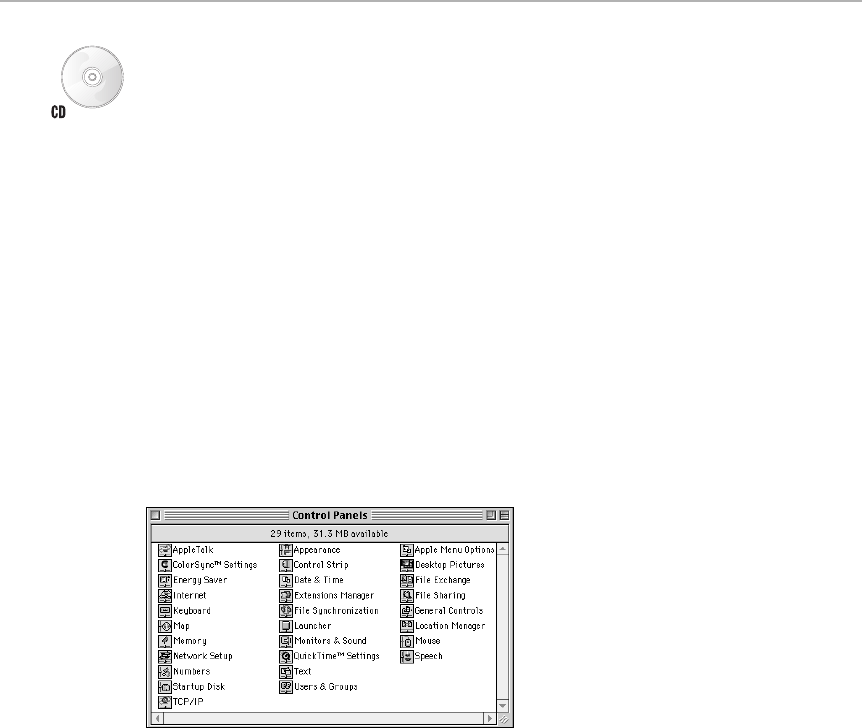
We’ve also taken the liberty of retiring the write-ups of some older items that
are useful only on particular Mac models. Their memory is preserved,
however, in the electronic version of Macworld Mac Secrets, 4th Edition on the
CD-ROM.
The Control Panels
You’re probably too young to remember the Control Panel on the original
Macintosh. It was a single window with several buttons, each controlling one
Mac function. Today, however, over 35 control panels come nestled in the
Control Panels folder, each panel a tiny double-clickable program unto itself.
The overall look of the Finder and Desktop, the feel of the mouse, the time,
date, and speaker volume settings — all these elements are managed by
control panels.
Usually, you access these little self-contained programs by choosing Control
Panels (actually an alias of the Control Panels folder) from the menu. The
Control Panels window opens, or the submenu pops to the right, so that you
can get at the specific control panel you need (see Figure 4-1).
Figure 4-1: Meet the standard control panels — a few of them, anyway. Stand back!
What’s a control panel, anyway?
These days, there’s no easy answer to the question: “What exactly is a
control panel?” Apple deposits full-blown application programs into our
Control Panels folders—Appearance, Keyboard, Desktop Patterns,
QuickTime Settings, Monitors & Sound, and Energy Saver, for example — that
don’t have the control panel file format at all.
Even among traditional control panels, the definition is a little blurry. It turns
out there are two different kinds of control panels: those that need to be in
your System Folder when the Mac starts up and those that don’t.
138 Part I: System Software Revealed
■■
MAC SECRETS • 4040-8/5 • ch.04.F • Chapter 4 • FINAL • VB • 10/22/98 • p.138
MAC SECRETS • 4040-8/5 • ch.04.1 • Chapter 4 • Proof 1 • VB • 09/16/98 • p.138
4040-8/5 ch04.F 11/3/98 3:12 PM Page 138

Those that do are said to contain init code; they’re essentially extensions with
a few settings that you can change. Apple Menu Options, AppleTalk (Network
Setup), File Sharing, Macintosh Easy Open, PC Exchange, Sharing Setup, and
fax software are some examples—like extensions, they’re useless unless they
were in your System Folder when the Mac started up.
Many other control panels, however, work properly even if they weren’t
installed in the System folder at startup. They behave like little miniprograms:
You launch one when you want to change your preferences. The preferences
are stored in your Mac’s PRAM (a tiny piece of memory permanently
sustained by your Mac’s built-in lithium battery), not in the control panel
itself. After you pick a Desktop pattern, choose a color for highlighted text,
pick an alert sound, or whatever, you won’t need those control panels again
until you want to change that setting.
In theory, you could actually get some mileage out of that fact if disk space or
security is at a premium for you. You could back up those control panels and
then throw away the ones in your System Folder, so that unauthorized
marauders couldn’t change your settings. To change any of your preferences
later, you could always insert the backup disk and open the appropriate
control panel—there’s no need to install it, copy it to your hard drive, or
restart the machine.
Perhaps more practically, the existence of these non-init control panels
means that even if they had been turned off using Conflict Catcher,
Extensions Manager, or a similar program, you can still launch them
whenever you want. That is, such control panels work regardless of whether
they’re in the actual Control Panels folder, the Control Panels (Disabled)
folder, or whatever.
Here’s a guide to all the little goodies in the Control Panels folder — and those
that you can ditch to save space.
Appearance (Mac OS 8.0 and 8.1)
This application, born in Mac OS 8.0, is designed to be the central interior-
decoration center for the look of your Mac’s interface. Use it to change the
color scheme, system font, and other aspects of the desktop. (Appearance
incorporates the functions of the old Color and WindowShade control panels.)
At the left side of the Appearance screen are rectangular buttons that let you
specify what Macintosh element you want to change. For example, in Mac OS
8.0 and 8.1, you have two choices: Color and Options.
The Color screen lets you specify an accent color, which shows up in three
places: the scroll bar “thumb” (the little box that marks your place in a scroll
bar); the progress bar (when you’re copying or deleting files); and the
window-interior highlighting (which appears when you drag an icon into an
open window). (You’re to be forgiven if the sheer excitement of this feature
doesn’t make you upgrade to Mac OS 8.)
OS
8
Strange
But True
Chapter 4: Control Panels and Extensions 139
■ ■
MAC SECRETS • 4040-8/5 • ch.04.F • Chapter 4 • FINAL • VB • 10/22/98 • p.139
MAC SECRETS • 4040-8/5 • ch.04.1 • Chapter 4 • Proof 1 • VB • 09/16/98 • p.139
4040-8/5 ch04.F 11/3/98 3:12 PM Page 139
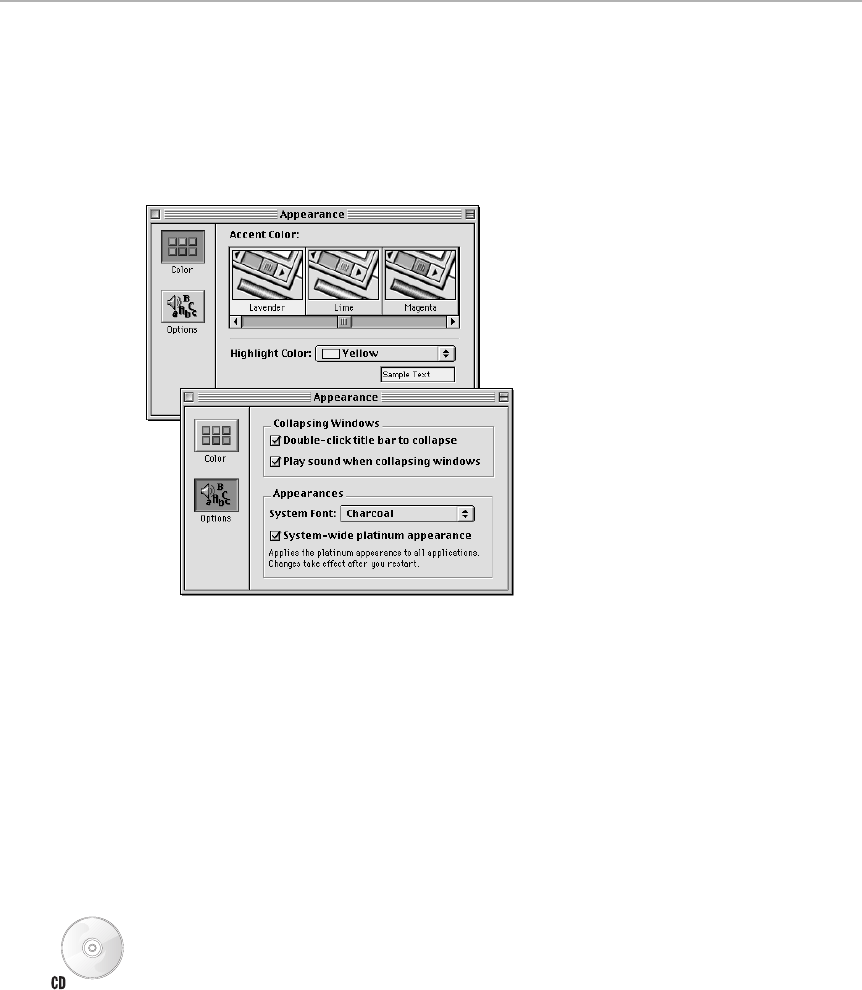
The Color screen also offers a pop-up menu listing of ten highlight colors — that
is, the color of the shading that appears when you drag across text. If none of
the standard highlighter-pen colors pleases you, choose Other from the menu
to open the standard Macintosh Color Picker. Click a new color and then click
OK (see Figure 4-2). You can set the highlight to almost any color, but dark,
heavily saturated colors make it hard to see the highlighted characters.
Figure 4-2: The Mac OS 8.0/8.1 Appearance control panel has two panels — one for color
accents (top) and the other for fonts and sounds (bottom).
The second option, Options, offers a motley assortment of miscellaneous
options. At the top, you’re offered “Double-click title bar to collapse
windows,” which is familiar to Mac vets as the WindowShade feature: when
you double-click the top stripes of a window, the window “rolls up” into that
title bar, revealing whatever’s underneath. A second double-click “pulls
down” the window again. Of course, in Mac OS 8 and later, every window has
a WindowShade button in the upper-right, as shown in Chapter 1 — but this
option gives you a bigger target. (The “Play sound” checkbox adds a terrific
whishp! sound to the windowshade animation.)
The Options panel also offers you a choice of system font. By that, Apple
means the typeface used in your menus and in the title bars of windows. If
you loathe Mac OS 8’s new default font, Charcoal, you’re welcome to switch
back to the old 1984 standby, Chicago. You can even use one of several
shareware replacement-Charcoal fonts, such as Virtue or any of the fonts that
come with the Kaleidoscope shareware control panel (which is included on
the CD-ROM with this book); see the appendix for installation instructions. Or
just install Mac OS 8.5, which offers a much larger array of system fonts.
140 Part I: System Software Revealed
■ ■
MAC SECRETS • 4040-8/5 • ch.04.F • Chapter 4 • FINAL • VB • 10/22/98 • p.140
MAC SECRETS • 4040-8/5 • ch.04.1 • Chapter 4 • Proof 1 • VB • 09/16/98 • p.140
4040-8/5 ch04.F 11/3/98 3:12 PM Page 140

Finally, the Options panel contains the bizarrely worded “System-wide
platinum appearance.” You wouldn’t be alone in wondering what the heck
that’s supposed to mean.
Turns out the “platinum appearance” means “gray look,” the overhauled Mac
OS 8 design scheme that includes these elements:
■Newly designed checkboxes. Little checkmarks appear when one of these
checkboxes is selected (instead of an X, as in systems before Mac OS 8).
■Newly designed buttons, such as OK and Cancel. In Mac OS 8 and later,
they’re light gray and slightly bulgy, as though they’re 3D. Radio buttons
(see Chapter 15), too, are more three-dimensional.
■Richer-looking title bars and scroll bars. In Mac OS 8, these elements
have once again been 3-D-ized and modernized.
■Gray menus. Before Mac OS 8, menus and menu bars were black text
against a white background; now the background is light gray.
So who on earth could object to these subtle visual enhancements? You
might, if you find the old black-on-white easier to read than black-on-gray.
Your software might, too, if it’s old and not terrifically well written.
It’s important to understand, by the way, that if you turn off the “System-wide
platinum appearance” checkbox, you won’t see the change until you restart,
and you won’t see the change in the Finder! This option only affects other
programs, such as ClarisWorks or Word or Navigator — not the Finder. In
other words, you’ll be able to compare the new look with the old just by
switching between the desktop and one of your programs.
Appearance Control Panel Secrets
■
Highlighting colors: How Bizarre
We’ve discovered some interesting quirks when it comes to choosing a text-
highlighting color. If you choose pure white (the spot at the center of the color
wheel), you’ll end up with solid
black
highlighting! (Apple obviously hopes to
protect you from yourself; if you truly chose white as the highlight color, you’d
never be able to tell when something was highlighted.)
If you choose a color that is very close to white, but not white itself, the results
are even stranger. You’ll see black highlighting on
black
text, obliterating
whatever you select. To view this effect in Mac OS 8 (shown in Figure 4-3), try
clicking the CMYK Picker (within the Color Picker dialog box). Drag all sliders to 0
except Cyan, which you can drag to 4%.
Strange
But True
Chapter 4: Control Panels and Extensions 141
■ ■
MAC SECRETS • 4040-8/5 • ch.04.F • Chapter 4 • FINAL • VB • 10/22/98 • p.141
MAC SECRETS • 4040-8/5 • ch.04.1 • Chapter 4 • Proof 1 • VB • 09/16/98 • p.141
4040-8/5 ch04.F 11/3/98 3:12 PM Page 141

Figure 4-3: What happens when you get zany in choosing your highlight color for text.
Insta-font change
Under normal circumstances, you have to restart the Mac in order to see any
system-font changes you’ve made in the Appearance control panel. That’s quite
a drag if, say, the Charcoal font bores you after an hour or two.
But if you press Option as you choose a new font from the pop-up menu, your
menus and dialog boxes change instantly to reflect the new system font.
Life’s too short for unnecessary restarts, we always say.
Appearance (Mac OS 8.5)
The Appearance control panel was more than updated in Mac OS 8.5—it was
positively reinvented. With this application (see Figure 4-4), you can do far
more than meekly change the font used in your menu; now you can change
the look and color of the scroll bar boxes and progress bars; choose any of
several different system fonts; add sound to your computing experience; view
smoother, more polished-looking text on the screen (in any program); and so on.
OS
8.5
142 Part I: System Software Revealed
■ ■
MAC SECRETS • 4040-8/5 • ch.04.F • Chapter 4 • FINAL • VB • 10/22/98 • p.142
MAC SECRETS • 4040-8/5 • ch.04.1 • Chapter 4 • Proof 1 • VB • 09/16/98 • p.142
ANSWER MAN
Q: How come the Appearance control panel
doesn’t let me choose any old font I want to use
in my menus? How come it’s either Chicago or
Charcoal?
A: Thousands of existing programs are
programmed to expect the Chicago font in your
menus. Unless each letter of the alphabet (of
your replacement font) is precisely the same
width as in Chicago, an overlapping or widely-
spaced mishmash in your menu bar will result.
Therefore, the Appearance control panel only
offers you a choice of fonts, such as Charcoal,
that share the precise letter widths as the
original Chicago font.
Why not any font I want?
4040-8/5 ch04.F 11/3/98 3:12 PM Page 142

Figure 4-4: The Appearance control panel (top) in Mac OS 8.5 is your interior-design
command center. It can accommodate shocking, interface-overhauling Theme files, such as
Hi-Tech (bottom), although Apple doesn’t provide any with the Mac OS 8.5 release.
Although Mac OS 8 introduced the concept of multiple panes in the
Appearance control panel, its pane-switching mechanism was buttons down
the left side of the program. In 8.5, tabs across the top offer numerous
customization options:
■Themes —A Theme, in Apple jargon, is a complete set of Appearance
control panel settings: your preferred choice of fonts, sounds, desktop
pattern, scroll-bar preferences, and all other settings you’ll read about in
the paragraphs to come. All of these settings, lumped together, constitute
a Theme that you can name and jump to whenever you feel the need for a
change of scene.
The Appearance control panel comes with several pre-defined Themes to
show you the idea, but you can create as many of your own as you like.
To do so, open the control panel. Click the Appearance, Fonts, Desktop,
Sounds, and Options tabs one at a time, and make any changes you like.
Then return to the Themes tab, where you’ll see a new entry called
Current Settings. Click the Save Themes button, give your new Theme a
name, and call it a day.
Chapter 4: Control Panels and Extensions 143
■ ■
MAC SECRETS • 4040-8/5 • ch.04.F • Chapter 4 • FINAL • VB • 10/22/98 • p.143
MAC SECRETS • 4040-8/5 • ch.04.1 • Chapter 4 • Proof 1 • VB • 09/16/98 • p.143
4040-8/5 ch04.F 11/3/98 3:12 PM Page 143

■Appearance — This panel contains three pop-up menus. The first, we’re
fascinated to note, is the Appearance pop-up menu on the Appearance tab
of the Appearance control panel. If you’re mystified by the fact that this pop-
up menu does not, in fact, offer any choices at all, see the sidebar “Death of
the Appearance Feature.” For now, you’re stuck with the menu’s sole
option, Apple Platinum, the standard look for the Mac OS since Mac OS 8.
The second pop-up menu on this panel is the latest resting place for the
abandoned Color control panel (of System 7.x). It lets you specify a
highlighting-pen color for text you select in, for example, a word
processor. (See “Color,” later in this chapter, for details.)
The third pop-up menu, Variation, lets you choose an accent color for the
Mac OS. This color shows up in subtle interface touches like the scroll-
bar box, progress bars, the color of a menu name when you pull down
the menu, the highlighting rectangle that lines a window when you drag
an icon into it, and so on.
■Fonts — This delightful panel lets you choose any of several typefaces for
use everywhere the Mac OS needs fonts (see Figure 4-5). The first pop-up
menu lets you choose a font for your menu bar and menus. (Yes, you had
a choice of system fonts in Mac OS 8’s Appearance control panel, too —
but now you have a longer list of fonts; Chicago and Charcoal are no
longer your only choices.)
The second font pop-up menu lets you choose a font for use by the
explanatory text in dialog boxes (a new feature). (To see an example of
this secondary system font in use, examine the Appearance program
itself.) The final pop-up menu lets you choose a font for your icons in the
Finder (which was once part of the Views control panel, then moved to
Mac OS 8’s Preferences command, and is now home at last).
Most useful of all is the “Smooth all fonts on screen” checkbox. When you
turn it on, the edges of your onscreen type gets softer and smoother (or
antialiased, as the geeks would say), making your entire computer look
as though it’s an elegantly designed Web page. (This is exactly what ATM
Deluxe can do for PostScript fonts — but now you save $100 and get
smooth TrueType fonts, too.) Because antialiasing works best as the type
size increases, you can use the Size control to set a minimum font size for
this feature; unfortunately, Apple decided that 12-point is the smallest
type size worthy of Font Smoothing.
Figure 4-5: Mac OS 8.5’s Appearance control panel offers the font-smoothing feature, shown
here before (left) and after (right).
144 Part I: System Software Revealed
■ ■
MAC SECRETS • 4040-8/5 • ch.04.F • Chapter 4 • FINAL • VB • 10/22/98 • p.144
MAC SECRETS • 4040-8/5 • ch.04.1 • Chapter 4 • Proof 1 • VB • 09/16/98 • p.144
4040-8/5 ch04.F 11/3/98 3:12 PM Page 144

■Desktop — This tab serves the same purpose as the Desktop Pictures
control panel of Mac OS 8, described elsewhere in this chapter. In this
case, however, you create new tiled patterns by dragging a graphics file
onto the scrolling list of patterns; you create a new, non-repeating
desktop picture by dragging a graphics file into the mini-desktop display
window. (Of course, you can also create a repeating pattern by dragging a
smallish picture file onto the mini-desktop screen and then choosing Tile
on Screen from the pop-up menu.)
You can still drag an entire folder onto the miniature screen here — in
case you want a randomized picture each time you turn on your Mac—
but you can no longer Option-click the Place Picture button to achieve
the same effect.
Chapter 4: Control Panels and Extensions 145
■ ■
MAC SECRETS • 4040-8/5 • ch.04.F • Chapter 4 • FINAL • VB • 10/22/98 • p.145
MAC SECRETS • 4040-8/5 • ch.04.1 • Chapter 4 • Proof 1 • VB • 09/16/98 • p.145
CASE HISTORY
The Appearance pop-up menu on the Appearance
panel of the Mac OS 8.5-and-later Appearance
program may strike you as singularly redundant.
It’s a pop-up menu that offers no choices at all—
it always says Apple Platinum!
As originally conceived, this pop-up menu was
supposed to let you switch from one Appearance
file to another — overall design schemes for your
menus, icons, windows, checkboxes, and so on.
Appearance files could change the look of title
bars, scroll bars, window shapes, menu-bar
colors, and more. We’re talking big design
overhauls, with squiggly scroll bars, jet-black
menu bars, and chrome type. (See the bottom
illustration in Figure 4-4 for an example.)
The beta versions of Mac OS 8.5 came with two
Appearance files—called Hi-Tech and Gizmo,
which included accompanying sound-set files —
that you could install by dropping onto your
System Folder. They showed up instantly as new
options in the Appearance pop-up menu. (For
those scoring at home: these files went into your
System Folder in a folder called Appearance.
There you’ll find three folders: one that stores
graphics files to be used as desktop pictures; one
that houses sets of sound files to be used for the
various sounds; and one that holds Appearance,
also called Theme, files.) We were delighted with
the concept of Appearance files, confident that
the world of shareware and commercial software
authors would rise to the challenge of creating
many more Theme and Sound Set files.
As the date for Mac OS 8.5’s release
approached, however, the designers at Apple
got cold feet about making such radical changes
to the trademark Mac look. They removed all
Appearance files from the final version,
announced that they had “no plans” to make
them part of the OS, and refused even to publish
the guidelines for creating Appearance files.
In other words, Mac OS 8.5 is Appearance-ready;
works great with Hi-Tech and Gizmo; and will work
automatically with any new Appearance files the
hacker world comes up with. But for millions of
Mac OS 8.5 users, the only sign that wacky, alien-
looking Mac OS overhauls were ever possible is
that bizarre, orphaned, redundant Appearance pop-
up menu in the Appearance control panel.
We look forward to the moment when the clever
members of the Mac programming community
crack Apple’s code and start releasing their own
OS 8.5 Appearance and sound files. (Hint: When
they do become available, just drop them onto
the System Folder to install them.)
Death of the Appearance Feature
4040-8/5 ch04.F 11/3/98 3:12 PM Page 145
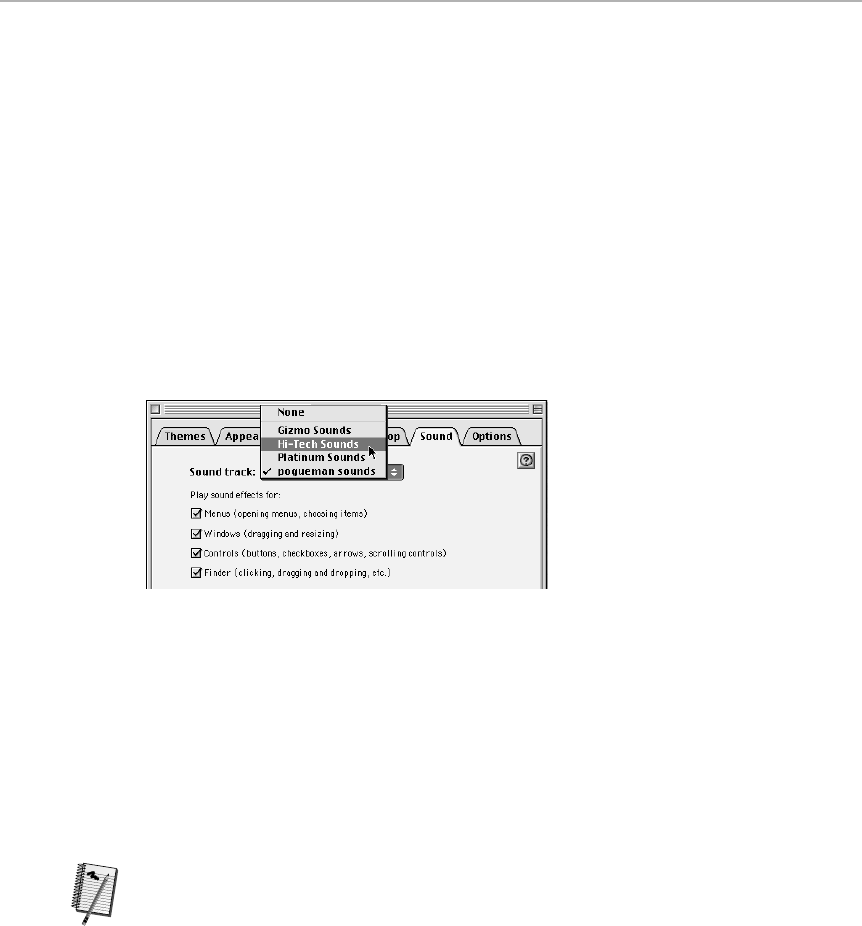
■Sounds — If any single feature gives Mac OS 8.5 the feeling of being a new
computing experience, this one’s it: sound effects. Whenever you use
scroll bars, menus, icons, the Trash, windows, disks, or almost anything
else that requires mouse manipulation, a tiny, cheerful sound
accompanies you. (A total of 89 different actions produce sounds.)
We’re certain that sounds will become an instantly polarizing option,
with those who find that it perks up using a Mac at loggerheads with
those who find the sounds insufferable. We gently remind the latter,
however, that the sounds can be easily switched off.
As originally conceived, Mac OS 8.5 was to offer a selection of different
“sound tracks.” (You can still see the orphaned, residual, pointless Sound
Tracks pop-up menu in Figure 4-6.) Unfortunately, when Apple killed the
entire idea of different Appearance files (see the sidebar “Death of the
Appearance Feature,”), it also eliminated your choices of sound sets.
Figure 4-6: If you use our sneaky ResEdit secret, you can create your own “sound tracks.”
As with other components of Mac OS 8.5’s new makeover tools, sounds
were to have come in prepackaged, audiophonically coordinated bundles
called Sound Set files. Only one comes with Mac OS 8.5 — the Platinum
sounds; you’ll find it in your System Folder, in the Appearance folder, in
the Sound Sets folder. Double-clicking a Sound Set file gains you nothing
but an error message. But opening a Sound Set with ResEdit, as
described in Chapter 21, gains you access to all of these sounds, suitable
for copying and pasting into other programs.
We hasten to point out, too, that even though Apple chose not to
distribute any sound sets except one, you can easily create your own.
Duplicate and rename the Apple Platinum file that’s already in your
Sound Sets folder (in the Appearance folder, in the System Folder). Open
that file with ResEdit and double-click the snd icon (see Chapter 21 for
details). To replace one of the Platinum sounds, carefully note its ID
number and name — and then delete it. Paste in a replacement sound,
and — using the Resource➪Get Resource Info command — change your
pasted-in replacement’s ID and name to exactly match the one you
deleted. Save the file.
Lather, rinse, repeat.
Worth
Learning
146 Part I: System Software Revealed
■ ■
MAC SECRETS • 4040-8/5 • ch.04.F • Chapter 4 • FINAL • VB • 10/22/98 • p.146
MAC SECRETS • 4040-8/5 • ch.04.1 • Chapter 4 • Proof 1 • VB • 09/16/98 • p.146
4040-8/5 ch04.F 11/3/98 3:12 PM Page 146
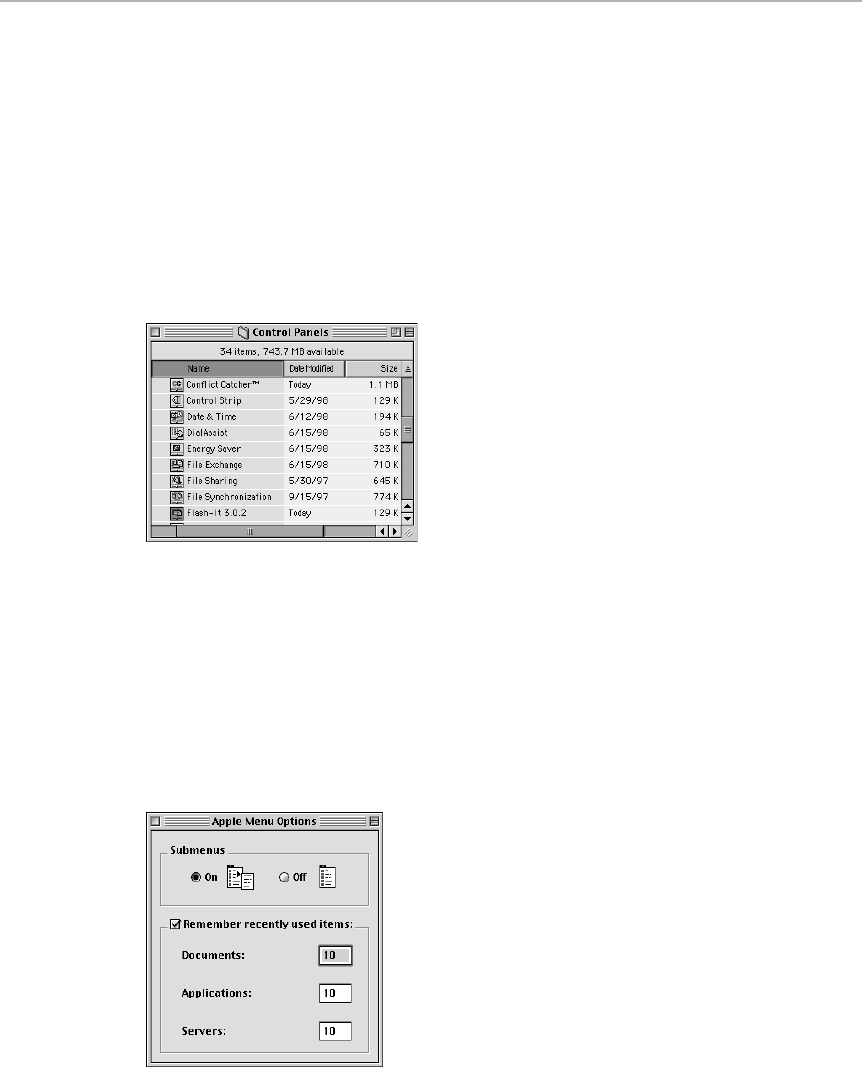
■Options — Apple has a fine tradition of observing which shareware
doodads Mac fans download and install — and then incorporating those
functions into the operating system. The scroll-bar option on the Options
panel is no exception; it places both the up- and down-scroll arrows in
the lower-right corner of your scrollbars, which can be handy for big-
monitor owners (see Figure 4-7).
This option also makes the scroll box (the square handle you drag) larger
or smaller to reflect the amount of the document that’s currently visible
in the window. That is, if the scroll bar handle is one-third the height of
the scroll bar, you’re seeing one-third of the document in your document
window (see Figure 4-7).
Figure 4-7: The new scrollbar option makes possible these double-arrowed, proportionally-
sized scroll bars.
Apple Menu Options
Apple Menu Options adds two extremely useful functions to the menu.
First, it adds a submenu to any folder listed in the menu (such as Control
Panels), listing that folder’s contents (see Figure 4-8). Choose a submenu item
to open it.
Figure 4-8: You are now the master of your own menu’s submenus.
Chapter 4: Control Panels and Extensions 147
■ ■
MAC SECRETS • 4040-8/5 • ch.04.F • Chapter 4 • FINAL • VB • 10/22/98 • p.147
MAC SECRETS • 4040-8/5 • ch.04.1 • Chapter 4 • Proof 1 • VB • 09/16/98 • p.147
4040-8/5 ch04.F 11/3/98 3:12 PM Page 147

Second, the Recent Items control adds three new folders to the menu:
Recent Applications, Recent Documents, and Recent Servers (that is,
networked disks). The control panel keeps track of the last few items you
worked on and lists them in these submenus. (You use the control panel to
specify how many of the most recent items you want it to track. In Mac OS 8.5
and later, these numbers also determine how many recent items show up in
the new Open and Save dialog boxes, described in Chapter 15.)
The Recent Items feature works by putting an alias of each item you open
into the Recent Documents folder (or other appropriate Recent folder). We
mention this fact so that when you fear that the boss might be walking by
your desk soon, you can open your System Folder, open the Apple Menu
Options folder, open your Recent Applications folder, and throw away the
Super Mario Tetris Plus! Pro alias. No one will suspect what you’ve really been
doing…recently.
Apple Menu Options Secrets
■
Turn off those recent items
So you’re not
on
a network. Are you forced to put up with a pointless Recent
Servers command in your menu?
No. Open the Apple Menu Options control panel. Change the number of Recent
Servers to zero; that item will no longer appear in your menu. If you’re not the
kind of person who uses the Recent Documents and Recent Applications
feature, by the way, turn those off, too. You’ll get a small but measurable speed
boost when you open and close programs and documents.
Add your own submenus
When you first install it, Apple Menu Options makes a submenu spring out of
four menu commands: Control Panels, plus those three Recent items. But
any
folder you put into the Apple Menu Items folder (inside your System Folder) will
automatically sprout submenus. And any folders inside
those
folders will sprout
submenus, too…and so on, up to five nested folders deep.
In other words, your menu can become a powerful navigation tool. Stick an alias
of your
hard drive
into your Apple Menu Items folder, for example, and suddenly you
can open any item in any folder on your drive, up to four nested folders deep. If
you’re on a network, make aliases of the hard drives you frequently log onto; put
them into a Frequently Used Servers folder in your Apple Menu Items folder. From
then on, mounting one of those disks is only an -menu choice away.
Worth
Learning
OS
8.5
148 Part I: System Software Revealed
■ ■
MAC SECRETS • 4040-8/5 • ch.04.F • Chapter 4 • FINAL • VB • 10/22/98 • p.148
MAC SECRETS • 4040-8/5 • ch.04.1 • Chapter 4 • Proof 1 • VB • 09/16/98 • p.148
4040-8/5 ch04.F 11/3/98 3:12 PM Page 148
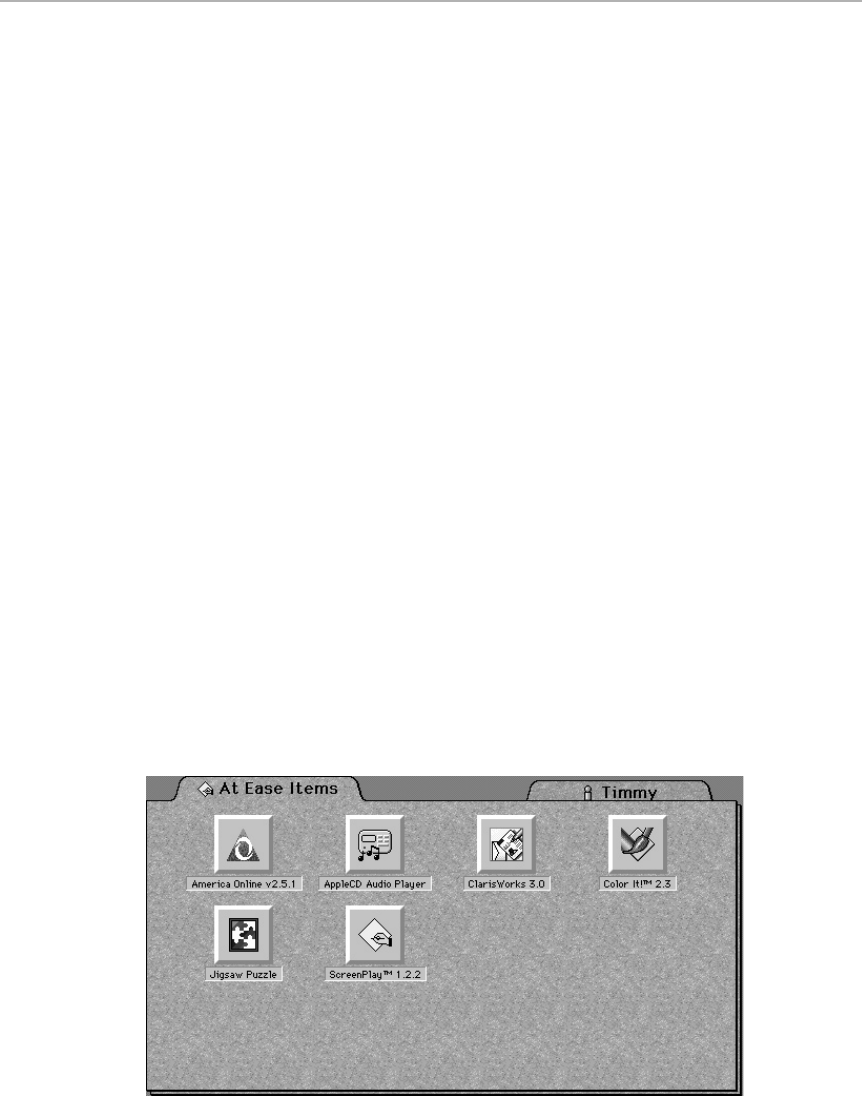
AppleTalk
The AppleTalk control panel is the Open Transport-era replacement for the
old Network control panel. You use AppleTalk’s simple pop-up menu to
choose the networking method you prefer: LocalTalk, Ethernet, and so on —
a crucial step when you’re trying to connect one Mac to another. See “Open
Transport (and related files)” later in this chapter, and see Chapter 35 for
step-by-step instructions.
AppleVision Setup
This application offers settings, obviously, for the AppleVision monitor series—
made obsolete by the Monitors & Sound control panel (described later).
At Ease Setup
At Ease is a Finder-hiding gadget designed for those in control (a parent, a
teacher, a service-bureau owner); it’s designed to protect the Mac from those
who are out of control (a kid, a student, a customer). It comes with the At Ease
Startup extension.
At Ease came free with the Performa series; you can also buy it from Apple or
a mail-order place. It has certain aspects in common with the Launcher or
Mac OS 8’s Button View, in that it creates a palette of jumbo icons that one
click, not two, will open. But At Ease fills up the entire screen—Control
Panels, the Trash can, and your disk icons are all hidden from view, making it
impossible for accidental renaming, deleting, or setting changes to occur
without the grown-up’s knowledge.
In its place, you see something like Figure 4-9. When you launch a program, the
At Ease window itself disappears, only to reappear when you quit that program.
Figure 4-9: What you see instead of the Finder when you’re in At Ease.
Chapter 4: Control Panels and Extensions 149
■ ■
MAC SECRETS • 4040-8/5 • ch.04.F • Chapter 4 • FINAL • VB • 10/22/98 • p.149
MAC SECRETS • 4040-8/5 • ch.04.1 • Chapter 4 • Proof 1 • VB • 09/16/98 • p.149
4040-8/5 ch04.F 11/3/98 3:12 PM Page 149

Each student/child/customer can have his/her own selection of icons
installed on these screens. When the Mac starts up, it presents a list of all
such setups (Timmy, Mom, Dad, Sissie, and so on), and you double-click to
tell the program which configuration to use.
You can even set up a “restricted Finder” environment for certain users, in
which the regular world of movable icons, folders, and menus is available—
but only designated ones. You, the administrator, decide which folders and
files are visible and usable, using the At Ease Setup program.
At Ease Secrets
■
At Ease and the death of your hard drive
The manual tells you that before removing At Ease, you must open the At Ease
control panel and
click the Off button
. It specifically warns you
not
to drag the At
Ease files to the Trash. The manual doesn’t, however, specify exactly what will
happen if you
don’t
remove At Ease in the officially sanctioned manner:
Basically, you
trash your hard drive.
At Ease does something rather un-kosher when it installs itself — it modifies the
boot blocks of your hard drive (the very first instructions that get processed
when the Mac is turned on) to ignore the Finder and launch At Ease instead. Of
course, if you’ve thrown away At Ease, the Mac goes on a wild-goose chase, and
throws up its electronic hands in frustration. It gives you a flickering system-
bomb icon in an empty dialog box — and, after a while, the blinking
question-mark Icon of Doom.
Sometimes, running the Disk Tools program can repair the damage. Other times,
doing a clean system reinstall (see Chapter 36) does the trick.
Much better, though, to avoid the problem in the first place: Turn off At Ease
before removing any of its components, or remove it using its original Installer
program’s Remove option.
The forgotten-At-Ease-password trick
It could happen to you: You forget your own At Ease password. Holding down the
Shift key at startup, of course, doesn’t bypass At Ease. How can you get back to
your Finder?
Restart the Mac from your Disk Tools disk or your system software CD-ROM. Now
just open your hard drive’s System Folder, open the Preferences folder, and throw
away At Ease Preferences. Now At Ease can’t remember your password, either!
Restart the Mac and you’re back in business.
150 Part I: System Software Revealed
■ ■
MAC SECRETS • 4040-8/5 • ch.04.F • Chapter 4 • FINAL • VB • 10/22/98 • p.150
MAC SECRETS • 4040-8/5 • ch.04.1 • Chapter 4 • Proof 1 • VB • 09/16/98 • p.150
4040-8/5 ch04.F 11/3/98 3:12 PM Page 150

Roll credits!
With At Ease running, hold down the Option key while choosing About At Ease
from the menu; you’ll uncover a picture of the At Ease programmers.
But those secret Easter egg credits are only an omelet compared to Part II: Click
to get rid of the About At Ease screen. Now choose At Ease from the menu —
this time,
without
holding down any keys.
The regular At Ease About box appears, without scrolling credits. Carefully point
the tip of your cursor at the head of the upper-middle Weeble head.
Watch in amazement as the little cartoon head changes into the
real
,
photographic head of the main programmer. Double your fun by pointing to the
lower
middle Weeble, too, and marvel as Scott Marcy’s head pops into sight.
ATM
ATM is Adobe Type Manager, which makes PostScript fonts look smooth on
the screen and in inkjet printouts (see Chapter 29). You may have any of
several versions. One gets installed when you install Adobe Acrobat Reader
(which is included on the CD-ROM with this book). Another, called ATM GX,
is installed if you’re one of the eight people who’ve installed QuickDraw GX.
Yet another control panel is the heart of ATM Deluxe, sold by Adobe just for
managing fonts.
Auto Power On/Off
This ancient control panel lets you specify times at which you want your Mac
to turn itself on or off. For details, see “Energy Saver 2.0 (and related files),”
later in this chapter.
AutoRemounter
Suppose you’re using your PowerBook. (Let’s assume it’s a PowerBook that
came before 1998’s PowerBook G3 series. AutoRemounter disappeared with
the debut of these PowerBooks; its functions became part of the Energy
Saver control panel, described later in this chapter.)
Using your office’s network (see Chapter 35), you bring the hard drive of
some other Mac (or two) to your PowerBook Desktop so that you can
transfer files. AutoRemounter’s job is to bring the other Macs’ icons back to
your PowerBook’s screen after it’s been off or asleep.
If you have a desktop Mac, forget it; networked disks stay on your screen
when a desktop Mac goes to sleep, so AutoRemounter serves no purpose.
Chapter 4: Control Panels and Extensions 151
■ ■
MAC SECRETS • 4040-8/5 • ch.04.F • Chapter 4 • FINAL • VB • 10/22/98 • p.151
MAC SECRETS • 4040-8/5 • ch.04.1 • Chapter 4 • Proof 1 • VB • 09/16/98 • p.151
4040-8/5 ch04.F 11/3/98 3:12 PM Page 151
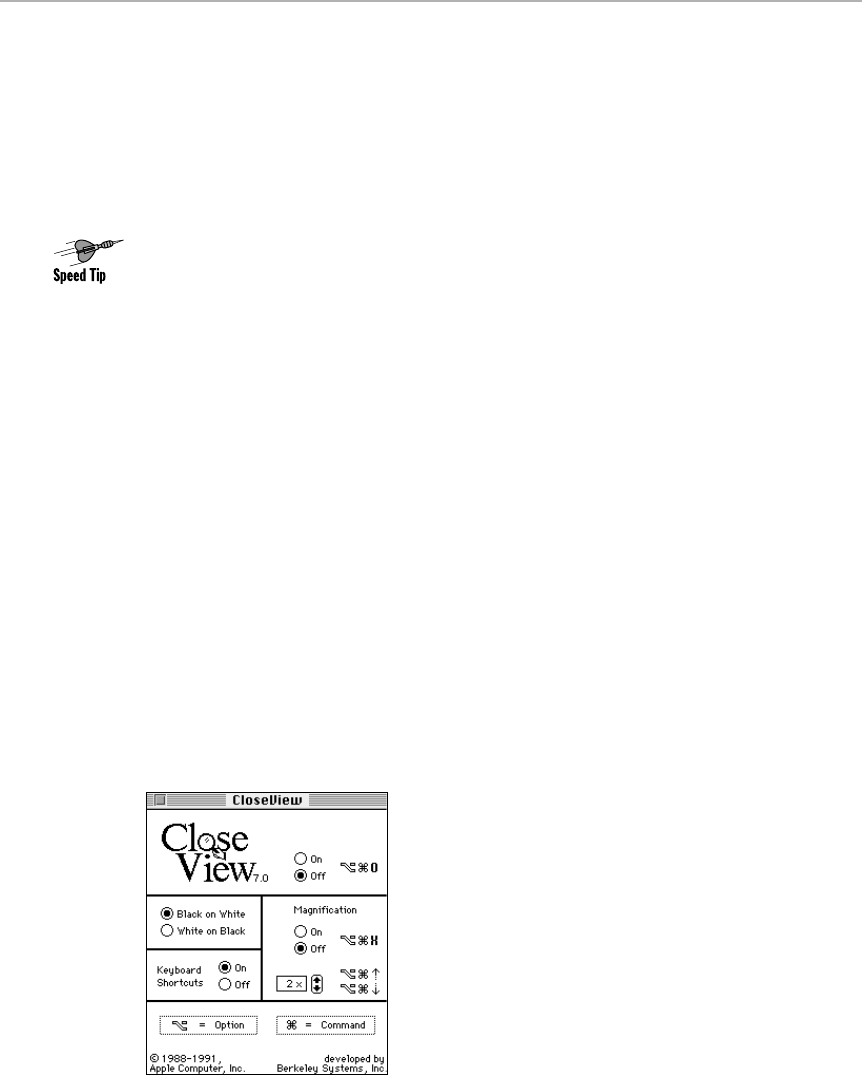
If you do have a pre-1998 PowerBook, however, AutoRemounter has another
handy side effect: It lets you put the laptop to sleep without encountering that
annoying “You’re about to lose network services” alert message, which
appears whenever you put a PowerBook to sleep when AppleTalk is turned on.
If you’re not on a network, though, we recommend trashing this control panel.
Button Disabler
Only for LC or Performa 500, 5000, or 6000 models running System 7.5 (and
later). This doodad disables the volume and brightness buttons on the front
panels of those models (to prevent tampering in school situations).
CloseView
CloseView is designed to help the visually impaired. It magnifies a portion of
the screen, making the screen image 2 to 16 times larger. CloseView isn’t
installed automatically these days; you generally have to install it with the
system installer’s Custom option (see Chapter 5) or by looking in your
system-software CD’s Universal Access folder (in the CD Extras folder).
Once CloseView is installed, you can switch it on and off by pressing Ô-Option-O
(before System 7.5.3) or Ô-Option-K (System 7.5.3 and later). (See Figure 4-10.)
To increase or decrease the degree of magnification, while holding down Ô
and Option, press the up- or down-arrow key (before System 7.5.3), or the
plus and minus keys (System 7.5.3 and later). The enlarged screen view
follows the insertion point — an arrangement that takes some getting used to.
CloseView also lets you reverse your monitor’s display black-for-white. Some
people find this inverted-video setup easier on the eyes for long-term Mac
work. (On color monitors, all the colors are inverted, making the screen
appear drugged-out.)
Figure 4-10: Zoom in close and invert screen colors with the CloseView control panel.
152 Part I: System Software Revealed
■ ■
MAC SECRETS • 4040-8/5 • ch.04.F • Chapter 4 • FINAL • VB • 10/22/98 • p.152
MAC SECRETS • 4040-8/5 • ch.04.1 • Chapter 4 • Proof 1 • VB • 09/16/98 • p.152
4040-8/5 ch04.F 11/3/98 3:12 PM Page 152

Color
With this pre-Mac OS 8 control panel, you can change the color of text
highlighting and the tint of windows in the Finder. The first pop-up menu lets
you choose what color text turns when you drag across it, and the second
affects the shading of window title bars, scroll arrows, and scroll sliders. See
“Appearance,” earlier in this chapter, for some fascinating details about
color-picking on the Mac.
Color Control Panel Secrets
■
Roll credits!
Click the words
Sample Text
, and the text is replaced with the words
by Dean
Yu
. Click again, and you see the name of Dean’s collaborator, Vincent Lo.
But that’s only the start. Keep clicking. At click #16 (keep your mouse button
pressed), a surprising new name appears: Don Louv, the mysterious third
programmer.
And if you click 26 more times, at click #42, a startling new expression appears
in the little sample-text box:
doodle doodle dee.
But the fun still isn’t over! This is a full five-minute Easter egg. If you click
42
more times, at click #84, you get the final surprise of the evening: the words
wubba wubba wubba
. Do you suppose the programmers were getting just a
little
slap-happy?
Strange
But True
Chapter 4: Control Panels and Extensions 153
■ ■
MAC SECRETS • 4040-8/5 • ch.04.F • Chapter 4 • FINAL • VB • 10/22/98 • p.153
MAC SECRETS • 4040-8/5 • ch.04.1 • Chapter 4 • Proof 1 • VB • 09/16/98 • p.153
MACINTOSH SECRET
“If you click 42 more times,” we wrote, “at click
#84, you get the final surprise of the evening:
the words wubba wubba wubba. Do you
suppose the programmers were getting just a
little slap-happy?”
And for two editions of this book, that’s where
our secret stood: a mystery of nonsense
syllables. The beauty of publication, though, is
that if enough readers join the quest, the truth
eventually emerges.
“By a quirk of fate,” wrote reader Scott Maxwell,
“I happened to be watching ‘The History of Rock
‘n Roll’ on The Learning Channel, when they
began talking about MTV. They ran one of the
very first ads for MTV, which was two phrases
on the screen, one at a time, and a deadpan
voice reading them. The phrases were, of
course, ‘Doodle Doodle Dee’ and ‘Wubba Wubba
Wubba.’ Then they threw up the MTV logo. (As
far as I know, ‘Wubba wubba wubba’ was a
catch-phrase that Downtown Julie Brown used
to say when she hosted Club MTV.”
Glad somebody’s paying attention.
The secret of the Color control panel secret
4040-8/5 ch04.F 11/3/98 3:12 PM Page 153

ColorSync or ColorSync System Profile
ColorSync is Apple’s solution to the age-old problem of printed colors that
don’t match the colors on-screen—and for graphics pros, such color
consistency is an important advantage of the Mac over Windows. Each piece
of color equipment — scanner, monitor, printer — is supposed to have its own
ColorSync Profile file that identifies its peculiar color quirks. (The profile
documents, by the way, get stored inside the ColorSync Profiles folder, which
lives within the Preferences folder in the System Folder.)
You use this control panel’s pop-up menu to select the kind of monitor you’re
using — Apple 16-inch, Performa Color Display, and so on — so that the
behind-the-scenes software will know how to keep colors consistent on other
color units. (The ColorSync extension, described later in this chapter, is
required for this control panel to work.)
ColorSync is absolutely useless unless you have exactly the right profiles
installed for your specific monitor and printer. If you have a Radius 20-inch
monitor, don’t use the profile for the Apple 20-inch monitor. (Unfortunately,
profiles for non-Apple equipment may be hard to find.) In fact, if you use the
wrong profile, your color matching might even get worse with ColorSync.
If you don’t do any color scanning or printing, trash ColorSync, the ColorSync
extension (which this control panel requires), and related files.
Control Strip
The Control Strip is one of the most important and useful features ever added
to the Mac. Over the course of your computing career, it can save you
thousands of trips to your control panels to change everyday settings. If
you’re not using the Control Strip, today’s the day.
The Control Strip was originally designed for PowerBooks, but it was such a
hit that it became part of System 7.5.3 and later. In Mac OS 8 and later, for
example, the Control Strip is automatically installed (you don’t have to do a
custom install, as you did for earlier OS versions).
It’s a rack of control tiles, as shown in Figure 4-11, that floats in a handy strip
above whatever other windows are open. Each tile actually is a tiny pop-up
menu. Hold the mouse button down steadily on a tile, and then slide up or
down to the command you want. Most of the tiles are affiliated with (and
save you a trip to) a particular control panel, as indicated in the following
descriptions.
Mac Basics
154 Part I: System Software Revealed
■ ■
MAC SECRETS • 4040-8/5 • ch.04.F • Chapter 4 • FINAL • VB • 10/22/98 • p.154
MAC SECRETS • 4040-8/5 • ch.04.1 • Chapter 4 • Proof 1 • VB • 09/16/98 • p.154
4040-8/5 ch04.F 11/3/98 3:12 PM Page 154
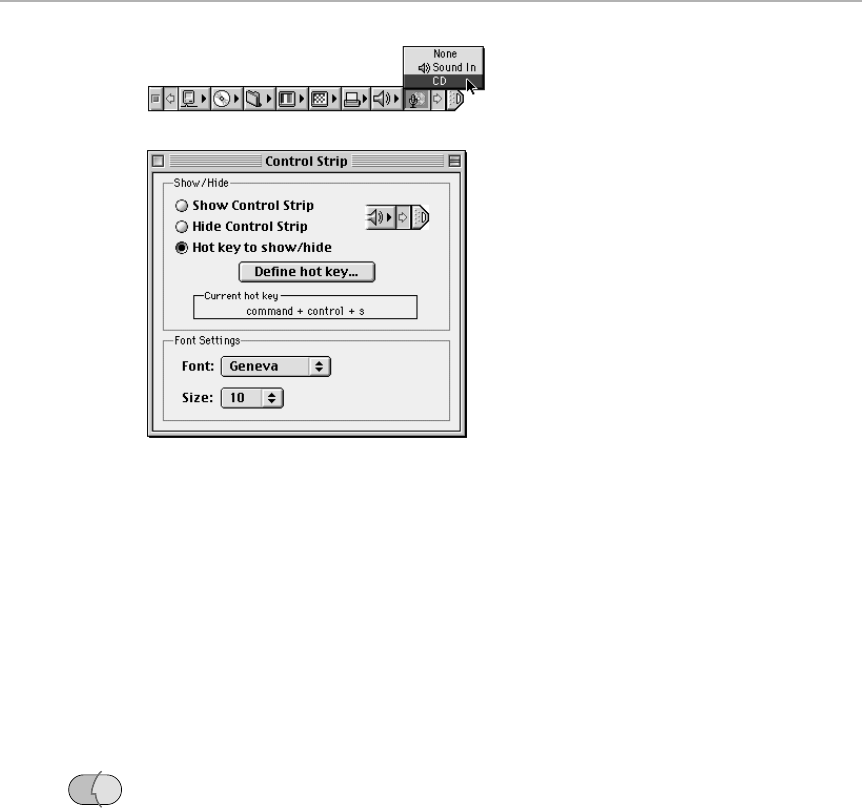
Figure 4-11: The awesomely handy PowerBook Control Strip, as shown on a desktop Mac
(top), and the control panel that controls it (bottom).
The original tiles provided by Apple include:
■AppleTalk Switch —Turns AppleTalk on or off. Trip saved to: the Chooser.
■Battery Monitor — A PowerBook battery/recharging gauge. The pop-up
menu allows you to hide the power graph.
■CDStrip — For Macs with CD-ROM drives: lets you control music CDs. The
pop-up menu has controls for Play, Stop, Eject, AutoPlay (starts playing a
music CD immediately upon insertion), and so on. Trip saved to: AppleCD
Audio Player desk accessory.
■Energy Settings — Debuting in Mac OS 8.5, this module gives you quick
access to your Mac’s (and monitor’s) auto-shutdown or auto-sleep
features. On a PowerBook, it also controls overall battery conservation
settings. Trip saved to: Energy Saver control panel.
■File Sharing Strip — A File Sharing on/off switch (and indicator), for
when you’re working on a network. See Chapter 35. Trip saved to: File
Sharing (or, before Mac OS 8, Sharing Setup) control panel.
■HD Spin Down — A power-conserving command, for PowerBooks only, to
make your internal hard drive stop spinning (and a spinning/not spinning
indicator).
■Location Manager Controls — Offers a choice of locations (New York,
Washington, Seattle, etc.) that you’ve previously set up using the
Location Manager control panel (described later in this chapter). Each
“location” stores the local Internet phone number, your file sharing and
printer selections, a speaker-volume level, and so on. Lets you switch
conveniently among them. Trip saved to: Location Manager control panel.
OS
8.5
Chapter 4: Control Panels and Extensions 155
■ ■
MAC SECRETS • 4040-8/5 • ch.04.F • Chapter 4 • FINAL • VB • 10/22/98 • p.155
MAC SECRETS • 4040-8/5 • ch.04.1 • Chapter 4 • Proof 1 • VB • 09/16/98 • p.155
4040-8/5 ch04.F 11/3/98 3:12 PM Page 155

■Media Bay — Another fresh face that debuted in Mac OS 8.5; for
PowerBooks only (such as the G3 Series). Tells you at a glance if anything
(a battery, a CD drive, a floppy or Zip drive) is inserted in each of the
laptop’s side compartments. A tiny red X even tells you when it’s safe to
remove whatever’s there at the moment.
■Monitor BitDepth — The pop-up menu lists “256 Colors,” “Thousands of
Colors,” and so on, which change the number of colors displayed on your
monitor. (See Chapter 11 for more on color depths.) Trip saved to:
Monitors & Sound control panel.
■Monitor Resolution — Lets you change the resolution (the magnification
level) of your screen. For certain PowerBook owners, a crucial
undocumented feature lurks: If you Control-click this tile, the pop-up
menu lists many more resolution settings. Among them, you’ll find one
called simulscan. This is the setting you must use when you want to
display a recent PowerBook’s image on an external monitor! Trip saved
to: Monitors & Sound control panel.
■Power Settings — For pre-Mac OS 8.5 PowerBooks only. A tile for
adjusting the overall power conservation/speed balance of your laptop’s
screen, disk, and system sleep functions. Trip saved to: PowerBook
control panel.
■Printer Selector — If you’re connected to more than one printer, and
you’re using the Desktop Printing extension (see Chapter 30), this pop-up
menu lets you choose a printer as the destination for your printouts. Trip
saved to: the Chooser desk accessory.
■Remote Access Control Strip — A long-overdue, profoundly useful tile
that controls your Internet connection. See an illustration and
description in Chapter 25. Trip saved to: Mac OS 8.5’s Remote Access
control panel.
■Sleep Now — For PowerBooks only. A tile with an instant-sleep command.
Trip saved to: the Finder’s Special menu. (In Mac OS 8.5 and later, this
command has been incorporated into the Energy Settings tile.)
■SoundSource Strip — Debuting in Mac OS 8.1, this control panel lets you
choose which source you want your Mac to “listen” to for recording new
sounds (or just listening). Trip saved to: Monitors & Sound control panel.
■Sound Volume — A sound-level slider that changes the Mac’s built-in
speaker volume. Trip saved to: Monitors & Sound control panel.
■TV Mirroring — For Macs with TV output jacks (RCA or S-VHS video
outs), such as the PowerBook G3 Series. Lets you turn TV mirroring
(showing the same thing on the Mac’s screen and the attached TV) on
and off in either the standard USA (NTSC) or European (PAL) format.
■Video Mirroring — Appears only when an external monitor is attached to
your desktop Mac or your pre-1997 PowerBook. Lets you control whether
or not video mirroring is on — that is, whether or not the external
monitor should display the same thing that’s on the primary monitor.
OS
8.5
Strange
But True
OS
8.5
156 Part I: System Software Revealed
■ ■
MAC SECRETS • 4040-8/5 • ch.04.F • Chapter 4 • FINAL • VB • 10/22/98 • p.156
MAC SECRETS • 4040-8/5 • ch.04.1 • Chapter 4 • Proof 1 • VB • 09/16/98 • p.156
4040-8/5 ch04.F 11/3/98 3:12 PM Page 156
■Web Sharing CS — Lets you turn on and off Mac OS 8-and-later’s Web
sharing feature, in which you make certain folders on your hard drive
available to anyone on the Internet (or on your corporate network). See
Chapter 28 for details on Web Sharing.
Control Strip Secrets
■
Changing the Strip: before Mac OS 8.5
If a particular Control Strip tile is of no use to you, by all means get rid of it. To
do so, open your System Folder; open your Control Strip Modules folder; and
throw away (or file away) any module you don’t use. You can always restore one
by putting it back into the Control Strip Modules folder and restarting the
Macintosh. (Conflict Catcher can also turn them on and off, sparing you the
trouble of moving Control Strip icons manually.)
You can also
add
new tiles to the Control Strip, thanks to its modular
construction. Install new modules as they’re written by shareware (or
commercial-ware) authors simply by adding them to the Control Strip Modules
folder (in the System Folder) and restarting.
Some of our favorites are Control Strip Terminator (lets you quickly quit all your
programs, or just the background ones, or even the Finder); OT/PPP Strip
(described in Chapter 25); and Bunch-O-Apps (serves as a quick launching list
for your favorite programs). You’ll find them on the CD-ROM that comes with this
book.
For dozens more, of every possible description, point your Web browser to
www2.gol.com/users/sytsma/csm, better known as Control Strip Haven.
Changing the Strip: Mac OS 8.5 and later
Control Strip 2.0, which debuted in Mac OS 8.5, makes adding and removing
tiles much easier than before. To install a Control Strip module, simply drag it
onto the expanded strip; you don’t even have to restart the Mac.
To remove a tile, Option-drag it off the strip and directly to the Trash. Sound
familiar, Launcher fans?
Move it, baby
The Control Strip is much more flexible than it looks. For example, you can
shrink it to any length by tugging its little end tab. If you simply
click
the tab, in
fact, the Strip collapses so that
only
the tab appears, at the very edge of your
screen — waiting for another click to expand again.
OS
8.5
Chapter 4: Control Panels and Extensions 157
■ ■
MAC SECRETS • 4040-8/5 • ch.04.F • Chapter 4 • FINAL • VB • 10/22/98 • p.157
MAC SECRETS • 4040-8/5 • ch.04.1 • Chapter 4 • Proof 1 • VB • 09/16/98 • p.157
4040-8/5 ch04.F 11/3/98 3:13 PM Page 157

Furthermore, if you press Option, you can drag the entire strip up or down the
side of your screen — or sideways, to the opposite edge. You can’t drag the Strip
to the middle of the screen, however — it must hug the right or left side.
Can’t find a place to put it where that darned tab isn’t in your way? Then hide it
completely until you want it again. Open up the Control Strip control panel,
select “Hot key to show/hide,” click in the keystroke box, and specify a key
combination that you’d like to be the on/off switch for the Control Strip’s
presence on your screen.
Permanently rearrange, add, or remove tiles
The Option key has another handy effect on the Control Strip: If you drag one of
the little tiles while pressing Option, you can slide the tile horizontally to a new
position. (Combine this feature with the drag-to-stretch feature in the preceding
secret, and you can customize the Strip to show only the tiles that you find
useful.)
Roll credits!
The author of this glorious tool is Steve Christensen, who wrote the classic
SuperClock control panel (which
also
was adopted by Apple and made part of
System 7.5). How do we know these things? Easy: Reader Lubomir Stroetmann
told us to turn on the “Hot key to show/hide” button. With the Option key
pressed, hold the mouse button down in the box where the keystroke shows up
— and examine the title bar of the window. (Older versions: Option-click the
version number instead.)
CPU Energy Saver
This control panel is one of the five control panels that have represented
Apple’s effort to conserve electricity — and to qualify its Macs for the
Environmental Protection Agency’s Energy Star seal of approval. See “Energy
Saver 2.0 (and related files),” later in this chapter, for the complete rundown.
Date & Time
This control panel (see Figure 4-12), which debuted with System 7.1, lets you
set the Mac’s clock. To do so, click in the time or date blanks and then type
numbers (or click the up-arrow or down-arrow buttons). Be sure you also
click Set Time Zone and select a city in your time zone; if you don’t, your
e-mail and other documents may wind up stamped with wacky times.
Worth
Learning
Mac Basics
158 Part I: System Software Revealed
■ ■
MAC SECRETS • 4040-8/5 • ch.04.F • Chapter 4 • FINAL • VB • 10/22/98 • p.158
MAC SECRETS • 4040-8/5 • ch.04.1 • Chapter 4 • Proof 1 • VB • 09/16/98 • p.158
4040-8/5 ch04.F 11/3/98 3:13 PM Page 158
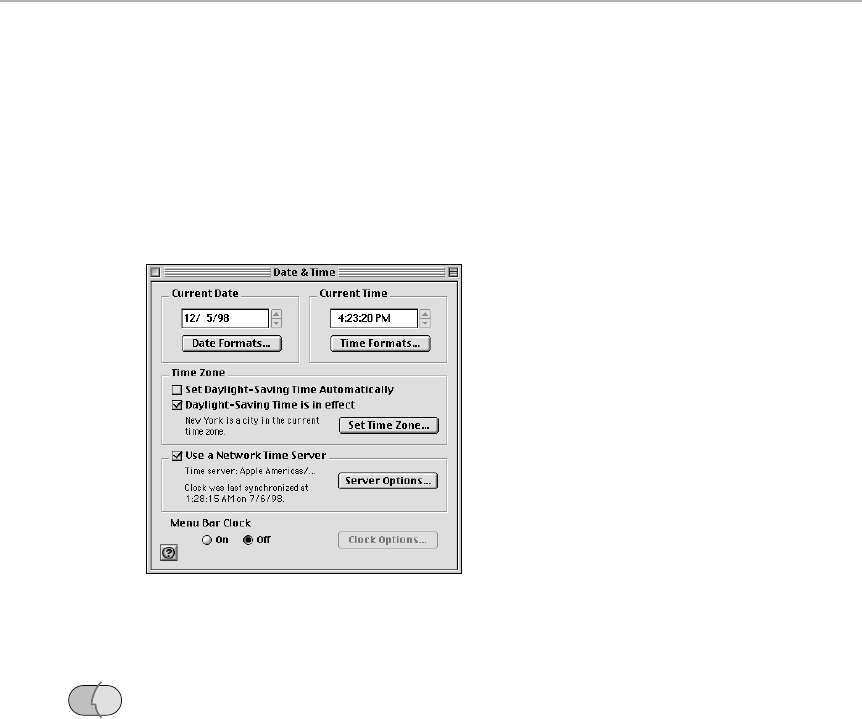
Date & Time also lets you change the way times and dates are displayed (in
Finder-window list views, for example). The usual value is the default one —
American — but you can make dates appear in European format (day of
month first) or in any zany order you can think up.
Finally, Date & Time controls the handy menu-bar clock that for years was
known in the shareware world as SuperClock. Click the Clock Options button
for a wealth of choices about the font, display, chimes, and other
characteristics of the menu-bar clock at the top of every Mac’s screen.
Figure 4-12: The Date & Time control panel. Hint: click the time display in your menu bar to
see the date.
In Mac OS 8.5, by the way, Date & Time got a huge syringe full of intelligence
juice. For the first time, it got smart enough to:
■Adjust for Daylight Savings Time automatically. (Click the Set Time Zone
button to indicate where in the world you are, and then turn on the Set
Daylight-Saving Time Automatically checkbox.)
■Set itself — to the second — by consulting a master clock on the Internet.
Click the Server Options button to display the dialog box shown in Figure
4-13; as you can see, it lets you specify when you want this clock-setting
to take place, such as every few weeks — or right now (by clicking the Set
Time Now box). Of course, you have to have an Internet account to make
this work. (You also need the Time Synchronizer extension in your
Extensions folder.)
Note, by the way, that this Date & Time control panel does its thing by
consulting Apple’s own time server (Web page clock). If you’d prefer to
set your Mac’s clock against a time server run by a company with a
better track record for time management, visit www.eecis.udel.edu/~ntp
with your Web browser. There you’ll find a list of other Web-based time
servers. Use the pop-up menu shown at top in Figure 4-13 to type in the
Web address of the time server you prefer.
OS
8.5
Chapter 4: Control Panels and Extensions 159
■ ■
MAC SECRETS • 4040-8/5 • ch.04.F • Chapter 4 • FINAL • VB • 10/22/98 • p.159
MAC SECRETS • 4040-8/5 • ch.04.1 • Chapter 4 • Proof 1 • VB • 09/16/98 • p.159
4040-8/5 ch04.F 11/3/98 3:13 PM Page 159
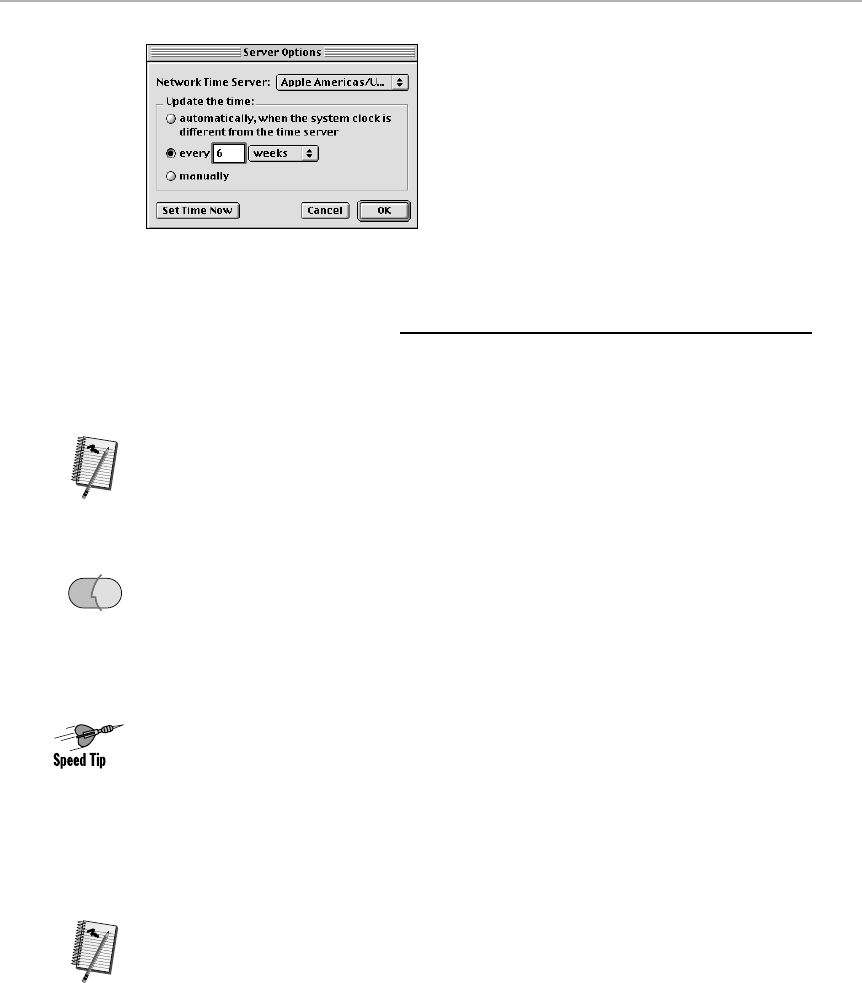
Figure 4-13: In Mac OS 8.5, let your Mac set its own clock.
Date & Time Secrets
■
How time flies
Considering the increasing number of today’s programs that put their own little
iconic menus in your menu bar, it would be nice if you could hide the Date &
Time’s clock display without having to restart the computer.
You can. If you’re running system software before Mac OS 8.5, Option-click the
clock to make it disappear — and Option-click again to make it return.
If you have Mac OS 8.5 or later, open the Date & Time control panel and turn off
the clock; you no longer have to restart the Mac. (You can no longer Option-click
the clock to hide it, however.)
Insta-sleep for PowerBooks
Another holdover from this control panel’s original incarnation as the freeware
SuperClock program: If you Control-click the battery icon (which appears
automatically when you’re using a PowerBook), you put your PowerBook to
sleep. (This feature, too, was removed from Mac OS 8.5, although there’s no
shortage of alternate ways to sleep your laptop, as Chapter 14 makes clear.)
Set your clock, or live in peril
Don’t underestimate the importance of keeping your clock set correctly, including
setting your time zone with the Set Time Zone button (and even the Daylight
Savings Time checkbox, if you don’t have Mac OS 8.5 or later). It’s not particularly
important that your Mac
shows
the correct time. But it
is
important that your Mac
stamps your files
with the correct times. Many Mac users —even experts — have
suffered grief because their files were incorrectly time-stamped, and there’s
nothing weirder than sending people e-mail that appears to
arrive
before it was
sent
. See “Map,” later in this chapter, for the rationale.
Worth
Learning
OS
8.5
Worth
Learning
160 Part I: System Software Revealed
■ ■
MAC SECRETS • 4040-8/5 • ch.04.F • Chapter 4 • FINAL • VB • 10/22/98 • p.160
MAC SECRETS • 4040-8/5 • ch.04.1 • Chapter 4 • Proof 1 • VB • 09/16/98 • p.160
4040-8/5 ch04.F 11/3/98 3:13 PM Page 160
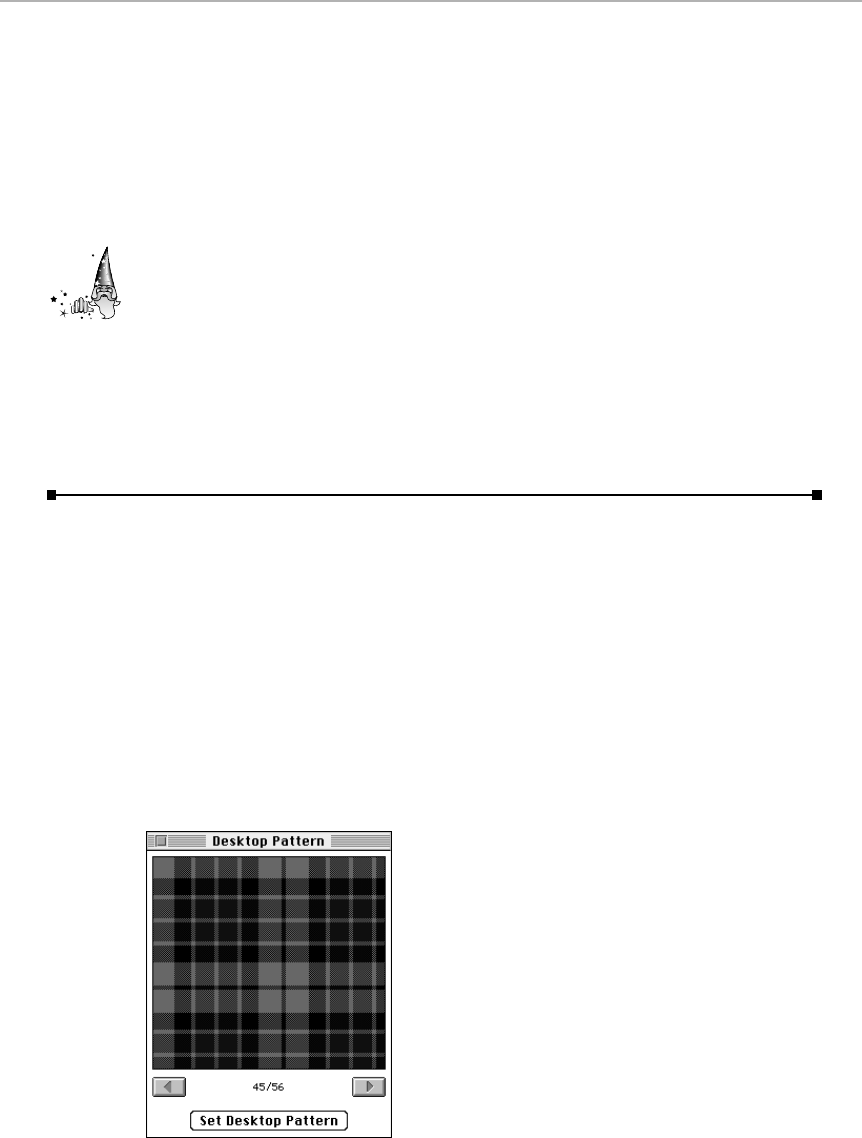
The mystery of Lower Burrell
Even we are confounded by the presence of Lower Burrell, PA — population
13,200 — in the databases of both the Map and the Date & Time control panels
(in systems before Mac OS 8.5). Yes, Lower Burrell…but
not
Pittsburgh!
Even stranger: Lower Burrell’s time zone seems to be an hour earlier than
anywhere else in Pennsylvania. We suspect that it’s a programmer’s hometown…
but we’d love some knowledgeable reader to fill us in on the details.
And while you’re doing research: find out who’s from Lake Nebagamon, WI. This
geographical puzzler is, like Lower Burrell, an entry in the databases of both the
Map and the Date & Time control panels.
Finally, there’s Steubenville. As reader Tom Bartholomew discovered, the small
town of Steubenville is the only city listed in Ohio. No Cleveland, Columbus,
Cincinnati — just Steubenville.
(“It’s possible that this is the hometown of one of the programmers,” Tom wrote
us, “but it is also the birthplace of porn ‘actress’ Traci Lords. Maybe one of the
programmers is a fan?”)
Desktop Patterns
For the Mac’s first seven years, the General Controls panel included a tiny
painting square, in which you could draw your own Desktop background
patterns (see “General Controls [pre-System 7.5]”). Apple’s studies indicated that
too many people had trouble figuring out how to work that mini-pattern editor.
System 7.5 through 7.6, therefore, came with a control panel called Desktop
Patterns, which lets you scroll through 64 ready-to-use patterns (see Figure
4-14). When you see the one you like, double-click it, or click the Set Desktop
Pattern button. If you absolutely despise a pattern, you can get rid of it by
choosing Cut or Clear from the Edit menu.
Figure 4-14: The Desktop Pattern control panel isn’t
really a control panel — it’s actually an application
residing in the Control Panels folder. You can move from
pattern to pattern by clicking the arrow buttons, or by
pressing the arrow keys on your keyboard.
Strange
But True
Chapter 4: Control Panels and Extensions 161
■ ■
MAC SECRETS • 4040-8/5 • ch.04.F • Chapter 4 • FINAL • VB • 10/22/98 • p.161
MAC SECRETS • 4040-8/5 • ch.04.1 • Chapter 4 • Proof 1 • VB • 09/16/98 • p.161
4040-8/5 ch04.F 11/3/98 3:13 PM Page 161

On the one hand, you can’t edit these patterns directly (unless you use
ResEdit; see Chapter 21). On the other hand, these patterns are bigger and
nicer-looking than anything Apple had provided before.
Desktop Patterns Secrets
■
Make your own patterns
You can’t edit the Desktop Patterns directly in the control panel. But you can do
much better: You can whip up your own in a graphics program like Color It,
included on the CD-ROM with this book (see the appendix). Simply copy your
custom pattern and then paste it into the Desktop Patterns window.
If you’re not artistically inclined, you can still try the following trick. Desktop
Patterns works with Macintosh drag-and-drop. In other words, you can open your
Scrapbook or your Jigsaw Puzzle and drag a graphic directly into the Desktop
Patterns window, where it appears like magic.
Because this program works with Drag-and-Drop, we discovered something
terrific: You can turn Desktop patterns into picture clippings files on your
Desktop! We’ve included an even better collection on the CD-ROM with this
book. Simply drag one into the Desktop Patterns “control panel” window to
install it there.
The classic interior-decoration trick
If you press the Option key, the button in the Desktop Patterns window changes
to say “Set Utilities Pattern.” If you click this special button, you won’t notice
anything different at first (except a strange alert message, which you must OK).
But now open some of your menu programs, such as the Calculator, Find File,
Jigsaw Puzzle, Key Caps, and Scrapbook. Sure enough, you’ve changed their
window interiors to match the pattern you chose! (To our dismay, this delightful
feature is missing from Mac OS 8 and later.)
The secret of Desktop Patterns Prefs
Inquiring minds want to know: Where are all those patterns stored? You can
poke around the Desktop Patterns program with ResEdit all you want, but you
won’t find them.
Cooperative authors answer: in the Desktop Patterns Prefs file, in the
Preferences folder (in the System Folder). It contains all 64 of the default
patterns.
Strange
But True
162 Part I: System Software Revealed
■ ■
MAC SECRETS • 4040-8/5 • ch.04.F • Chapter 4 • FINAL • VB • 10/22/98 • p.162
MAC SECRETS • 4040-8/5 • ch.04.1 • Chapter 4 • Proof 1 • VB • 09/16/98 • p.162
4040-8/5 ch04.F 11/3/98 3:13 PM Page 162

This revelation has several repercussions. First, if you take that Prefs file out of
the Preferences folder, the Mac will generate a new one the next time you run
Desktop Patterns. By selectively placing Desktop Patterns Prefs files back into the
Preferences folder, therefore, you can easily swap among several different sets of
patterns you’ve created. (Each Prefs file can hold 226 patterns.)
There’s another good reason to remember this secret, too. Believe it or not, when
you delete a pattern from Desktop Patterns, it isn’t
actually
deleted; it’s only
hidden. It remains in your Prefs file, inaccessible but taking up disk space! After a
lot of cuts and pastes, therefore, your Prefs file can get enormous. By removing it
— and forcing Desktop Patterns to generate a fresh default Prefs file —you start
over with a relatively compact default set of patterns.
The full-height Desktop pattern secret
The question is: exactly how big is one tile of a Desktop pattern? Most people
answer: “128 pixels square.”
That may
usually
be the answer. But
one
Desktop pattern provided by Apple is
much taller — tall enough, in fact, to stretch from the top to the bottom of a
standard 14-inch monitor. Here’s how you can make use of it.
Open Desktop Patterns. Scroll to pattern #62 — it looks like a soft purple solid
color. But if you apply it to your Desktop, you’ll discover that it’s actually shaded,
blending softly from the top of the screen to the bottom. Choose Copy from the
Edit menu.
Now launch a graphics program, such as Color It (included on the CD-ROM with
this book) or Photoshop. Paste the Desktop pattern into a window exactly 32
pixels wide and 512 tall (the original pattern’s dimensions). Now dress up this
special pattern slice in any way you want: paint over it, paste in your own photo,
and so on. Once you’ve finished, copy and paste the doctored 32 x 512 image
back into Desktop Patterns. Apply it to your Desktop — and be amazed (see
Figure 4-15).
But wait, there’s more! Free book winner Jason Darvick poked around long
enough to discover that there’s nothing magical about pixel dimensions of 128 x
128 or even 32 x 512. In fact,
any
dimensions work that, when multiplied, come
out to 16,384.
Your choices are 1 x 16,384 (now
that’s
useful!); 2 x 8,192; 4 x 4096; 8 x 2048;
16 x 1024; 32 x 512; 64 x 256; and 128 x 128. Using this heretofore
unpublished info, your creative impulses should no longer feel fettered by the
Desktop Patterns’ typical square shape.
Contest
Winner
Strange
But True
Chapter 4: Control Panels and Extensions 163
■ ■
MAC SECRETS • 4040-8/5 • ch.04.F • Chapter 4 • FINAL • VB • 10/22/98 • p.163
MAC SECRETS • 4040-8/5 • ch.04.1 • Chapter 4 • Proof 1 • VB • 09/16/98 • p.163
4040-8/5 ch04.F 11/3/98 3:13 PM Page 163
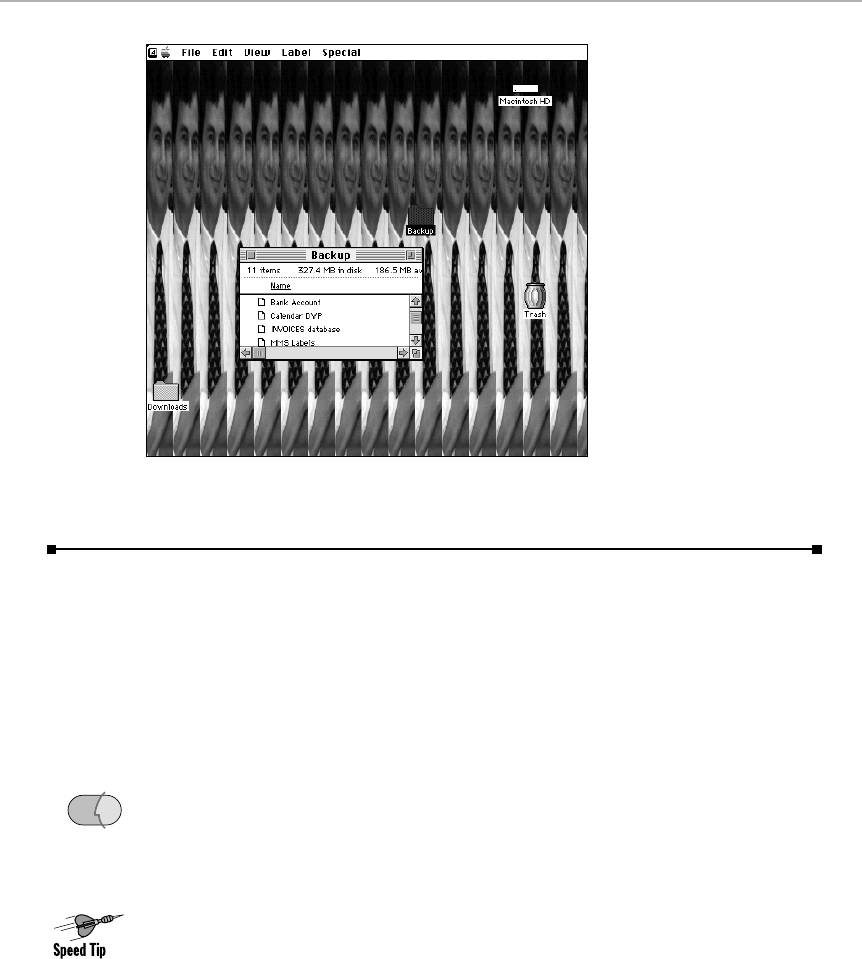
Figure 4-15 A full-height Desktop pattern? Impossible! Amaze your friends!
Desktop Pictures
For several editions of this book, we prided ourselves on providing our
readers with the software needed to plaster one big photo onto your desktop.
Not some measly repeating tile (see “Desktop Patterns” in this chapter), but a
single image to gloriously span your backdrop. Few aspects of the Mac are so
endearing and personal as this simple cosmetic option; you are what you
hang on your desktop.
Beginning in Mac OS 8, Apple took the wind out of our sails. The new Desktop
Pictures program lets you choose almost any kind of graphic image—PICT,
GIF, JPEG, even native Photoshop — and slap it up behind your windows and
icons. (The QuickTime extension, of all things, is the file-format interpreter.
Any graphics file it can understand, Desktop Pictures can understand.)
To open Desktop Pictures, you can choose its name from your Control Panels
folder, of course. But it’s faster to Control-click the desktop and choose
Change Desktop Background from the contextual pop-up menu that results.
Now you see two buttons on the left side of the Desktop Pictures window.
Click Pattern to enter, in effect, the Desktop Patterns program of system
software versions gone by—in other words, do this if you prefer a repeating,
tiled, smaller image or texture, such as the denim or grassy lawn that Apple
provides. Press the right or left arrow keys (or use the scroll bar) to navigate
OS
8
164 Part I: System Software Revealed
■ ■
MAC SECRETS • 4040-8/5 • ch.04.F • Chapter 4 • FINAL • VB • 10/22/98 • p.164
MAC SECRETS • 4040-8/5 • ch.04.1 • Chapter 4 • Proof 1 • VB • 09/16/98 • p.164
4040-8/5 ch04.F 11/3/98 3:13 PM Page 164
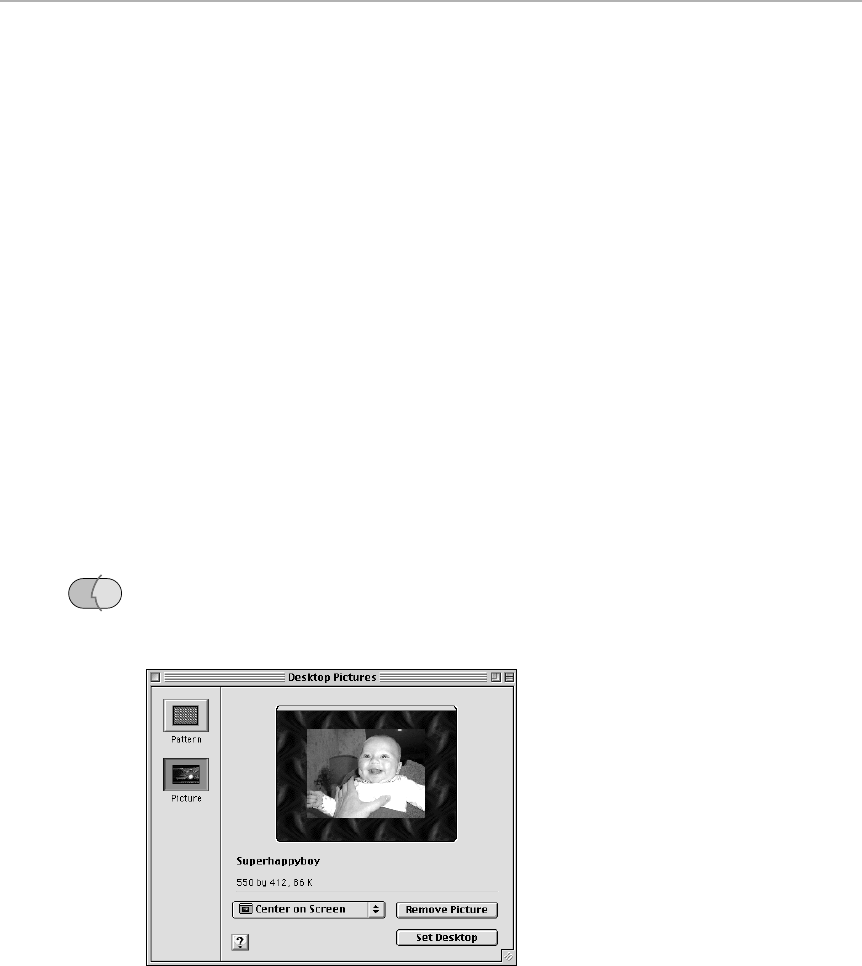
through the 48 sweetly named textures, such as Neon Blue, Sidewalk, and It’s
Purple. (You can also paste a graphic into this window, or drag-and-drop one
from the desktop, although wacky resizing and distortion may result.) When
you see a backdrop pattern you like, double-click it (or click Set Desktop) to
apply it to your actual screen.
Click the Picture button, however, to enable the full-screen-photo feature.
Now you can specify the picture you want in any of three ways. First, you can
drag a graphics file’s icon from the desktop directly into the Desktop Pictures
window, as shown in Figure 4-16. Second, you can click Select Picture and
choose a graphics file by navigating the Open File box that appears. Finally,
you can paste a previously copied image directly into the window.
Similarly, there are three ways to remove a desktop picture: drag it from the
mini-desktop to the Trash; click Remove; or Control-click on the mini-desktop
and choose the Remove Picture command. You don’t have to remove a
picture, however, if you simply want to replace it with another; instead, just
drag or paste a new picture into the control panel. The previous picture
vanishes automatically.
Before we start unloading our basket of Desktop Pictures secrets, note the
two following important tidbits:
■All of this program’s drag-and-drop smarts (such as dragging a picture
file into the mini-desktop) require the AppleScript extension.
■A few of the following secrets work equally well in Mac OS 8.5—but the
Desktop Pictures program no longer exists. Instead, open the
Appearance control panel and click the Desktop tab.
Figure 4-16: In Mac OS 8 and 8.1, turn your own family pix into desktop pinups, thanks to
Desktop Pictures.
OS
8.5
Chapter 4: Control Panels and Extensions 165
■ ■
MAC SECRETS • 4040-8/5 • ch.04.F • Chapter 4 • FINAL • VB • 10/22/98 • p.165
MAC SECRETS • 4040-8/5 • ch.04.1 • Chapter 4 • Proof 1 • VB • 09/16/98 • p.165
4040-8/5 ch04.F 11/3/98 3:13 PM Page 165

Desktop Pictures Secrets
■
Of graphic sizes, proportions, and monitors
To avoid having Desktop Pictures distort your chosen image, choose an image
that’s the right size to begin with: 640 by 480 pixels for a 14-inch monitor, for
example.
If your picture isn’t exactly the right size for your monitor, the pop-up menu in
Desktop Pictures offers several options for resizing it. “Tile on the Screen”
repeats your too-small picture, side-by-side and top-to-bottom, until the screen is
completely filled. (You might think of this option as a Pattern feature that has no
upper limit on the size of the repeated tile.) “Center on the Screen” puts the
picture in the middle of your desktop — and fills the leftover margin with
whatever desktop
pattern
you’ve chosen.
“Scale to Screen” enlarges or reduces your picture enough to fill the monitor,
but preserves its relative height and width proportions. (Because this option
preserves the picture’s aspect ratio, you may see some desktop pattern around
the top or side edges.) Although distortion can result, the result won’t be as bad
as with the “Fill Screen” option; this one may stretch the picture horizontally
and
vertically, by different amounts — whatever’s necessary to blanket the screen
area. The “Position Automatically” choice uses either “Scale to Screen” or “Fill
Screen,” whichever results in the least distortion.
When you use any of the options that leave desktop area visible around the
margins of your photo (such as the Center or Scale options, as shown in Figure
4-14), press the right- or left-arrow keys on your keyboard to cycle through the
various desktop patterns
behind
your picture! Hold down an arrow key
continuously for a truly psychedelic flashback effect.
The unknown positioning keystrokes
The pop-up menu controls the
sizing
of your image, but offers no control over its
positioning.
If your chosen picture is smaller than your monitor, you can slam
your image against the top, bottom, left, or right side of the monitor — a total of
nine different positions — by pressing the arrow keys while holding down the
Option key! For example, if you choose the pop-up menu’s Centered option,
press Option-up arrow to align your picture with the top of the desktop (against
the menu bar). Pressing Option-left arrow shifts the picture to the screen’s far-
left edge, and so on.
And with the Tile On Screen option selected, you can use the same keystrokes
to determine the starting point for tiling a picture.
Alas, none of these features work in Mac OS 8.5’s Appearance control panel.
166 Part I: System Software Revealed
■ ■
MAC SECRETS • 4040-8/5 • ch.04.F • Chapter 4 • FINAL • VB • 10/22/98 • p.166
MAC SECRETS • 4040-8/5 • ch.04.1 • Chapter 4 • Proof 1 • VB • 09/16/98 • p.166
4040-8/5 ch04.F 11/3/98 3:13 PM Page 166

The hidden contextual menu
Once you’ve installed a desktop picture, the Control key continues its
usefulness. Control-click the mini-desktop, where your picture is being shown in
miniature, to view yet another contextual pop-up menu. It lists the various
centering and scaling options discussed in the previous secret (at least in
systems before Mac OS 8.5).
Where’d this picture come from?
The secret contextual menu described in the previous secret offers a command
called Find Picture File. This fascinating option locates the
original icon
of the
graphic now displayed in the mini-desktop, wherever it may be on your hard
drive, in whatever folder it may be buried. The corresponding window opens
automatically, and the original graphic file is highlighted. (You can also press Ô-
F, or choose Show Picture File in Finder from the Edit menu, to accomplish the
same thing.)
Random pictures at each startup
If you’re tiring of looking at the same baby picture/mountain vista/gorgeous
Hollywood star week in and week out, try the Desktop Pictures’ undocumented
randomizing feature. Once you’ve set this up, the Mac will show a
different
picture on your desktop each time you turn it on.
Start by putting all the photo files in a folder. Drag that folder onto the Desktop
Pictures mini-desktop. (Alternatively,
Option-click
the Select Picture button. In the
resulting Open File dialog box, click the folder containing the graphics files you
want.)
That’s it; click Set Desktop, quit the program, and look forward to tomorrow’s
startup. (You can drag-and-drop a folder of pictures onto the Desktop tab of Mac
OS 8.5’s Appearance control panel, too, although the Option-clicking part
doesn’t work.)
Our favorite Mac prank ever
April 1 rolling around? Had enough attitude from the coworker with the 400-
megahertz G3 machine?
Take a snapshot of the desktop by pressing Ô-shift-3. Install the resulting picture
file (which appears on your hard disk as Picture 1)
as
your desktop picture.
The wild result: all your desktop icons appear directly on top of
exact replicas of
themselves.
Windows aren’t windows, the Trash isn’t the trash, and you can’t
open one of your two hard drive icons. Your hapless victim will become very, very
confused, suspect some hideous SCSI conflict — and come begging you for help.
Strange
But True
Worth
Learning
Chapter 4: Control Panels and Extensions 167
■ ■
MAC SECRETS • 4040-8/5 • ch.04.F • Chapter 4 • FINAL • VB • 10/22/98 • p.167
MAC SECRETS • 4040-8/5 • ch.04.1 • Chapter 4 • Proof 1 • VB • 09/16/98 • p.167
4040-8/5 ch04.F 11/3/98 3:13 PM Page 167
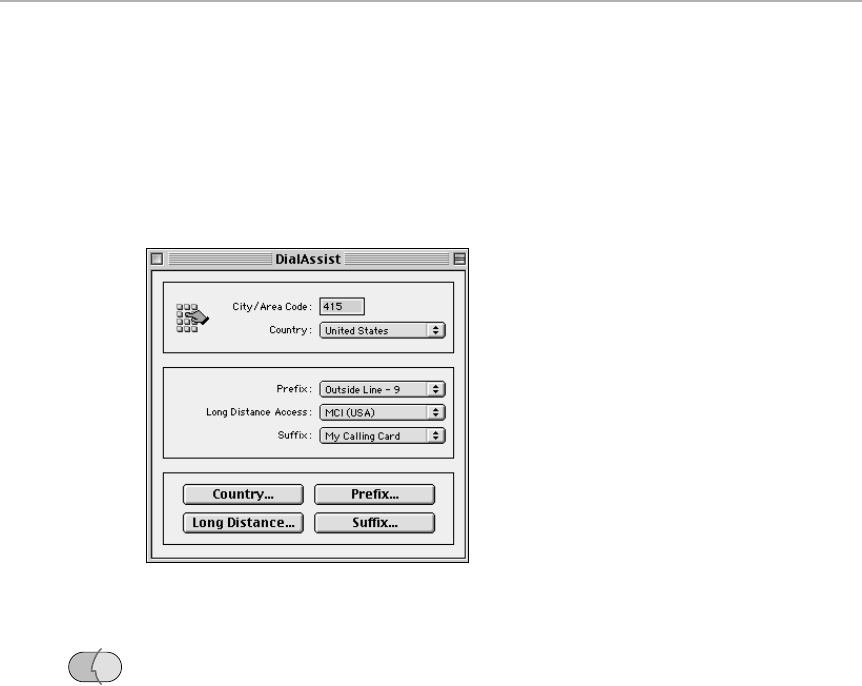
Dial Assist
The Dial Assist control panel has been available for years as part of Apple
Remote Access (ARA), a software kit that lets you dial into one Mac from
another. Its function is to let you create and store complicated dialing
instructions for making the call. As you can see by Figure 4-17, this control
panel lets you specify your calling-card numbers, dial-out prefix (such as 9),
area code, and so on.
Figure 4-17: Dial Assist gives you a central place to store your complex dialing strings.
In Mac OS 8.5, however, Remote Access and PPP (Internet dialing) are no
longer two different things. As a result, Dial Assist is part of the standard
system software—a handy benefit to anyone who travels.
Of course, this benefit won’t materialize until your programs are updated to
take advantage of the dialing digits you’ve specified in this control panel. At
this writing, only one program offers a “Use Dial Assist” checkbox— the
Remote Access Client program that you actually use to dial into another Mac.
Easy Access
Easy Access makes using the keyboard easier for people who type with one
hand or find it difficult to use a mouse — or, as you’ll read later, for graphic
artists who might appreciate the fine precision control Easy Access provides.
(If you don’t find Easy Access in your Control Panels folder, and you’d like to,
use the Custom Install option of your system-software Installer, or look in the
CD Extras folder of your system-software CD, where you’ll find a Universal
Access folder containing this control panel.)
OS
8.5
168 Part I: System Software Revealed
■ ■
MAC SECRETS • 4040-8/5 • ch.04.F • Chapter 4 • FINAL • VB • 10/22/98 • p.168
MAC SECRETS • 4040-8/5 • ch.04.1 • Chapter 4 • Proof 1 • VB • 09/16/98 • p.168
4040-8/5 ch04.F 11/3/98 3:13 PM Page 168

■Mouse Keys — Turning on Mouse Keys allows you to use the numeric
keypad, instead of the mouse, to control the pointer. The 5 key becomes
the mouse button; the number keys surrounding it move the pointer up,
down, diagonally, and so on. You can change the speed of the pointer
(Maximum Speed) and the length of the delay before the pointer starts
moving (Initial Delay). (See Figure 4-18.)
Figure 4-18: You can make your keyboard slow, sticky, or mouselike with Easy Access.
To turn on Mouse Keys mode, press Ô-Shift-Clear (the Clear key is on
your number pad). At this point, you can press the arrow keys to move
the cursor. If you’re a graphic artist, try the 0 key, which is a mouse-
button lock feature— a real help in precise graphic tasks.
■Sticky Keys — With Sticky Keys, you type keyboard shortcuts by pressing
the key combinations successively rather than simultaneously. For
example, the keyboard shortcut for turning on the Mouse Keys feature is
Ô-Shift-Clear. With Sticky Keys on, you press the keys one at a time: first
the Ôkey, then the Shift key, and finally the Clear key (see Figure 4-19).
Figure 4-19: When Sticky Keys is on, a little indicator appears at the far right side of the
menu (topmost figure). When you press a modifier key (Shift, Option, or Ô) once, a little
arrow appears (middle). That’s a signal that Sticky Keys is waiting for a nonmodifier key
(such as a letter) to complete the keystroke. If you press a modifier key twice, you lock it
down. As you type letter keys now, the Mac acts as though the modifier key is being held
down continuously (bottom).
Chapter 4: Control Panels and Extensions 169
■ ■
MAC SECRETS • 4040-8/5 • ch.04.F • Chapter 4 • FINAL • VB • 10/22/98 • p.169
MAC SECRETS • 4040-8/5 • ch.04.1 • Chapter 4 • Proof 1 • VB • 09/16/98 • p.169
4040-8/5 ch04.F 11/3/98 3:13 PM Page 169

You can turn on Sticky Keys from the keyboard by pressing the Shift key five
times in a row. The five keystrokes can be separated by several seconds,
or even several minutes, as long as the mouse doesn’t move between key
presses. You hear a neat little starting-up chirp as confirmation that Sticky
Keys is on. (If we had a dollar for every reader who’s written us in confusion,
wondering what that little chirping sound is ...)
To turn Sticky Keys off, press the Shift key five times again, or press any
two modifier keys simultaneously.
■Slow Keys — Slow Keys delays the acceptance of each keystroke. At its
highest setting, the Mac won’t acknowledge a keystroke unless you hold
the key down for at least a second and a half. This feature helps screen
out inadvertent keystrokes.
Editor Setup
See “OpenDoc Libraries,” later in this chapter.
Energy Saver 1.0
There have actually been two Energy Saver control panels. This one, a
monitor-only version, shuts off certain Mac monitors after a defined period of
inactivity — the ultimate screen saver. (To wake up a monitor that’s been put
to sleep in this way, click the mouse or press a key. After about 20 seconds of
beeping — there’s no way to adjust the volume — the monitor wakes up.)
This control panel works only with “Energy Star–compliant” monitors, such
as all Apple Multiple Scan and AppleVision monitors. It does indeed black out
all other kinds of monitors, but you don’t save any electricity that way.
Energy Saver 2.0 (and related files)
If you’ve read this much of the chapter, you’re probably by now totally
confused about all these energy-saving control panels. Each seems to be only
a partial solution to the turn-off-the-Mac-when-it’s-idle problem; each seems
to work only with certain models.
In an effort to clear up the confusion, Apple finally combined all of its earlier
energy-saving efforts — Auto Power On/Off, CPU Energy Saver, and Energy
Saver 1.0 (which shuts off monitors only) — into a single new application in
the Control Panels folder: Energy Saver 2.0 (Figure 4-20). As promised, it
controls the automatic on/off management of both the Mac and the monitors.
It works only on Power Macs (but not the 6100, 7100, or 8100).
Strange
But True
170 Part I: System Software Revealed
■ ■
MAC SECRETS • 4040-8/5 • ch.04.F • Chapter 4 • FINAL • VB • 10/22/98 • p.170
MAC SECRETS • 4040-8/5 • ch.04.1 • Chapter 4 • Proof 1 • VB • 09/16/98 • p.170
4040-8/5 ch04.F 11/3/98 3:13 PM Page 170
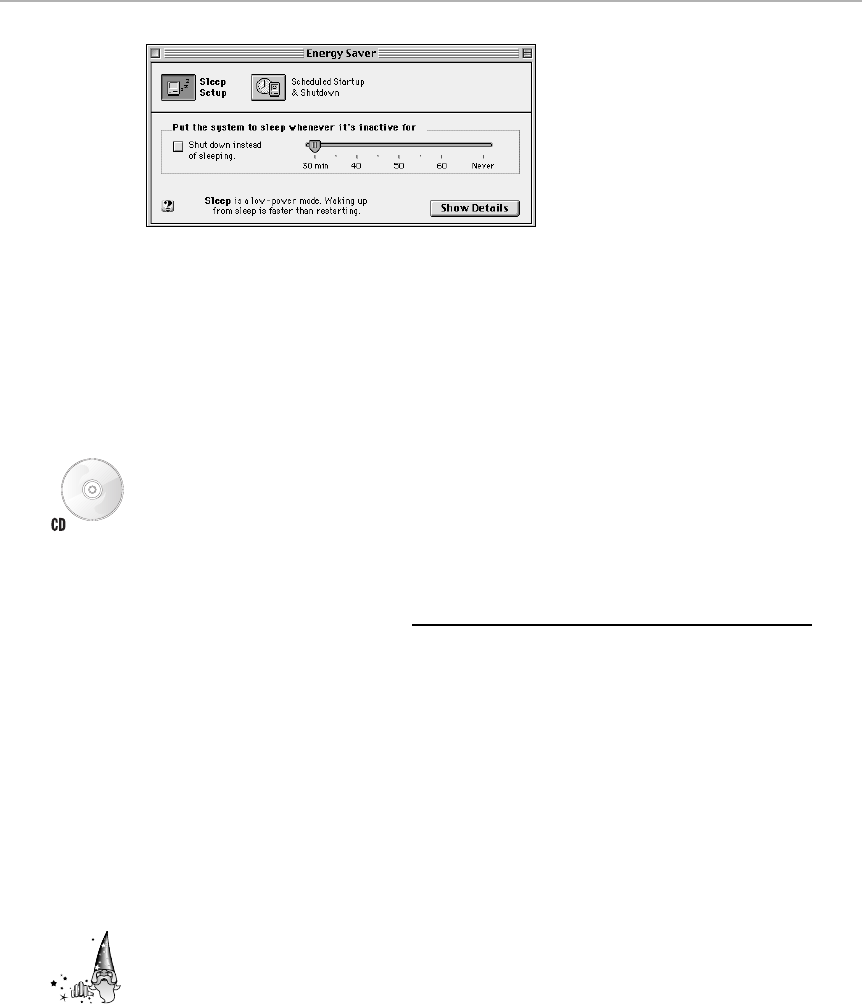
Figure 4-20: The modern Energy Saver control panel can put your Mac to sleep (or shut it
down) either after a period of inactivity or at specified times of day.
This “control panel” lets you specify intervals before the monitor, the hard
drive, and the computer itself go to sleep. (See Chapter 7 for more on
desktop Macs going to sleep.) And, since it incorporates the functions of
Auto Power On/Off, you can click the Scheduled Startup & Shutdown button
to see the timing controls for powering your Mac on and off unattended.
The rule then, is simple: If you have a PCI Power Mac or a recent PowerBook,
use Energy Saver 2.0 or later. If you have an older Mac, and you really care
about which Apple control panel to use for energy savings, consult the table
in Chapter 4 of Macworld Mac Secrets, 4th Edition (on the CD that came with
this book).
Energy Saver Secrets
■
The mystery of the new-Mac Energy Saver alert
Have you ever installed new system software on your Mac — or bought a new
Mac — and discovered that it wouldn’t let you start working until you’d set up
your Energy Saver settings? That’s right — the urgent dialog box encouraging you
to do so is among the very first things you see on a newly installed Mac.
We can explain. The Energy Saver sleep settings are stored in the Energy Saver
Preferences file (in the Preferences folder within the System Folder). If you move
or throw away that preferences file and restart the Mac, the Energy Saver
control panel snaps back to its default sleep time of 30 minutes.
But when the Macintosh restarts, if it can’t find the Energy Saver preferences
file, the control panel creates an alias of itself in your Startup Items folder.
Thereafter, each time you power on your Macintosh, the Energy Saver welcome
screen appears, begging you to set up your preferred settings. After you comply
— by opening the control panel and changing the settings — the alias is
removed from the Startup Items folder and a preference file is created.
Strange
But True
Chapter 4: Control Panels and Extensions 171
■ ■
MAC SECRETS • 4040-8/5 • ch.04.F • Chapter 4 • FINAL • VB • 10/22/98 • p.171
MAC SECRETS • 4040-8/5 • ch.04.1 • Chapter 4 • Proof 1 • VB • 09/16/98 • p.171
4040-8/5 ch04.F 11/3/98 3:13 PM Page 171

The 15-minute self-protection delay
If you’re using Energy Saver to schedule a shutdown time, the shutdown time
must be at least 15 minutes away. When you’re fooling around, therefore, don’t
bother setting it for two minutes away just to see your Mac shut down by itself.
You’ll get to see nada.
The secret duality of sleep modes
Believe it or not, although there’s not a word about it in the online help, the
Energy Saver control panel can put your monitor to sleep in two different ways.
There’s screen-saver (light) sleep, which saves no energy, but pops back to life
at the touch of a key. And then there’s deep sleep, which saves electricity but
requires you to press a key to wake up the machine.
For details and instructions on choosing the option you prefer, see the end of
Chapter 7.
Energy Saver and G3 PowerBooks
If you’re running the Energy Saver program on a 1998-or-later PowerBook,
such as the PowerBook G3 series, a raft of additional controls await your
perusal. For one thing, you’ve got a pop-up menu that lets you switch
between Battery and Power Adapter — that is, you can control Energy Saver’s
entire behavior (including automatic sleep and wakeup) independently,
depending on whether or not your laptop is plugged in.
But if you click the Advanced Settings button, things really get strange.
Suddenly you’re looking at options like “Reconnect to servers when waking”
— which you may distinctly remember as being part of the AutoRemounter
control panel (described earlier in this chapter)— and Reduce Processor
Speed, formerly part of the PowerBook control panel (described later in this
chapter).
Sure enough, it dawned on Apple that all of these settings could be combined
into a single control panel. See the individual entries for those other control
panels to see what these features do; for now, it’s enough to note these two
oddities:
■Turn off power to inactive PC cards. PC cards (formerly known as
PCMCIA cards) are those credit-card-sized things you insert to add a
modem or video-output features to your laptop. This checkbox cuts all
power to PC cards, many of which draw power even when they’re not in
use. (Not all cards respond to this command.)
■Wake up when the modem detects a ring. This option could conceivably
be useful if you’re using your PowerBook as a fax machine. Unfortunately,
this option is permanently disabled on the PowerBook G3 Series laptops.
What a tease!
Strange
But True
172 Part I: System Software Revealed
■ ■
MAC SECRETS • 4040-8/5 • ch.04.F • Chapter 4 • FINAL • VB • 10/22/98 • p.172
MAC SECRETS • 4040-8/5 • ch.04.1 • Chapter 4 • Proof 1 • VB • 09/16/98 • p.172
4040-8/5 ch04.F 11/3/98 3:13 PM Page 172

Express Modem
This control panel is confusing; you may need it even if you don’t have an
Express Modem (for many years, Apple’s internal PowerBook modem). In
fact, it’s more likely that you’ll use this control panel because you have a
GeoPort Telecom Adapter on your Power Mac or AV Mac; the same software
is used for both. (See Chapter 24 to read about the GeoPort.)
In any case, this control panel allows you to choose Express Modem or
External Modem. These controls were originally provided for the PowerBook
so that you could choose between its built-in modem and (if you had one
attached) an external modem.
But when you’re using a GeoPort, a paradox arises: Is the modem an Express
Modem, because it uses the Express Modem software, or is it External,
because the Telecom Adapter dangles off the back of the Mac?
Answer: Use the Express Modem setting.
Extensions Manager
When Apple added 60 control panels and extensions to System 7.5, someone
decided that it might be nice to provide you, the humble user, with some
means of controlling them all. After all, if you’re settling in for a nice
afternoon of word processing, you might not need the 24 PowerTalk
Chapter 4: Control Panels and Extensions 173
■ ■
MAC SECRETS • 4040-8/5 • ch.04.F • Chapter 4 • FINAL • VB • 10/22/98 • p.173
MAC SECRETS • 4040-8/5 • ch.04.1 • Chapter 4 • Proof 1 • VB • 09/16/98 • p.173
ANSWER MAN
Q: My Energy Saver control panel has a
checkbox called Document Auto-Save. I’d love
my documents to save automatically — how do I
turn on this feature?
A: Alas, you’re misinterpreting the whole thing.
Suppose you’ve set Energy Saver to shut down
your Mac at 8:00 p.m. every night. But what if
you’ve got unsaved documents on the screen?
The purpose of this feature is to quit all open
programs, automatically saving changes to any
open documents in each application. In fact, if
you had documents that you had never saved,
and therefore had no titles yet, the Mac gives
them generic names and puts them into folders
on the Desktop named for the date and time the
Mac shuts down.
There’s even an option to auto-reopen, at the
next startup, whatever documents the Mac
closed. It’s all pretty thoughtful, really.
Unfortunately, Apple discovered that this feature
didn’t always work—there are simply too many
different programs written too many different
ways. Therefore, in current versions of Energy
Saver, there’s no auto-save option at all. If you
schedule an automatic shutdown for your Mac,
and there are unsaved documents on the
screen, tough patooties; the Mac simply doesn’t
shut down.
Energy Saver Auto-Save
4040-8/5 ch04.F 11/3/98 3:13 PM Page 173
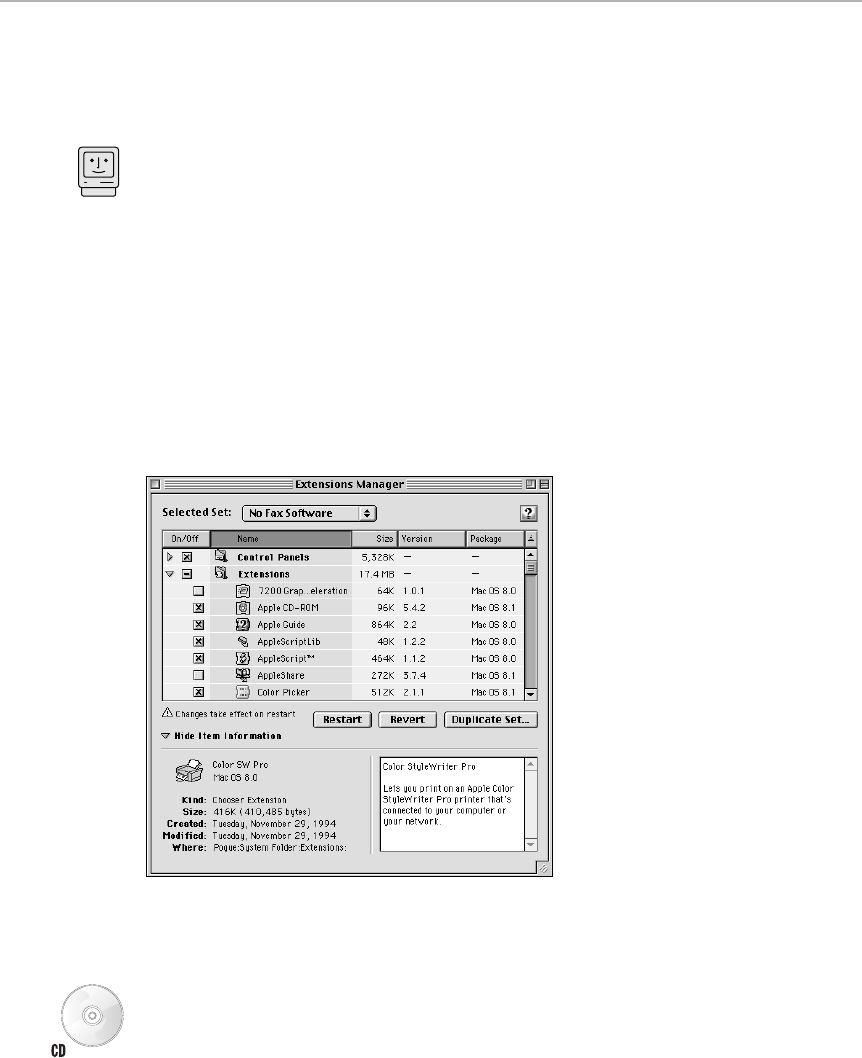
extensions, the 36 Open Transport extensions, and the 53 QuickDraw GX
extensions. And when trying to track down conflicting extensions, the world
needed an easier way to turn sets of extensions on and off than manually
dragging them out of the System Folder (see Chapter 36).
Extensions Manager is very simple. When you turn on your Mac, hold down
the space bar. After a moment, you see a list of your control panels and
extensions, and you can click to turn off the ones that you won’t be needing
(see Figure 4-21). For every item that you turn off, you’ll have fewer conflicts,
more memory, and a faster start-up sequence. (You can also open Extensions
Manager by opening the control panel—but then you must restart the Mac
to make your new extension selection take effect.)
Behind the scenes, Extensions Manager works by moving files from the
Extensions folder into a folder called Extensions (Disabled), where the Mac
ignores them. Control panels you turn off get moved into a folder called
Control Panels (Disabled). Knowing about these folders is a troubleshooting
advantage; you can restore an extension by moving it back into the
Extensions or Control Panels folder, even if Extensions Manager isn’t around.
Figure 4-21: Extensions Manager, as shown with the “Show Item Information” flippy triangle
turned down.
Versions 4.0 (which debuted with System 7.6) and later offer a well-organized
mountain of information about your extensions and control panels. For the
first time, you can click the Show Item Information triangle to view an
information panel that explains the function of each item you select (well,
attempts to explain). New columns show information about the size, version,
and original installation source (“package”) of each item. And what Apple
Mac Basics
174 Part I: System Software Revealed
■ ■
MAC SECRETS • 4040-8/5 • ch.04.F • Chapter 4 • FINAL • VB • 10/22/98 • p.174
MAC SECRETS • 4040-8/5 • ch.04.1 • Chapter 4 • Proof 1 • VB • 09/16/98 • p.174
4040-8/5 ch04.F 11/3/98 3:13 PM Page 174

programmers affectionately call “flippy triangles” let you collapse or expand
various startup-file categories, such as Control Panels and Extensions. These
features, plus the new, semi-3D look, make this latest incarnation of
Extensions Manager a vastly more useful tool. (We look forward to the day
Apple’s descriptions of the 30 million startup-file crumbs in your System
folder are complete enough to make this chapter unnecessary.)
Extensions Manager Secrets
■
What Extensions Manager sees
When you install Conflict Catcher, a commercial, much smarter extensions
manager from Casady & Greene (or the demo version included on the CD-ROM
with this book), you may be startled to discover
dozens
of extensions you didn’t
know you had — icons listed in Conflict Catcher that Extensions Manager never
showed you.
That’s because Extensions Manager has a very narrow definition of an
extension: something that’s (a) in your Extensions or Control Panels folder that
(b) has code that loads into memory when the Mac starts up. Among other
things,
shared libraries,
of which there are dozens (including many from
Microsoft), don’t necessarily load their code at startup, so they don’t show up in
Extensions Manager.
As a result of the extensions that Extensions Manager “misses,” don’t use
Extensions Manger’s All Off command (in the Selected Set pop-up menu) when
you want to start the Mac with a clean, extension-free, minimal system. To do
that
, press the Shift key during startup.
How to make new sets
Extensions Manager can’t create
links
between related extensions — subsets
that switch on or off together when you click any
one
of them — as Conflict
Catcher does. But it does let you create predefined sets of
all
extensions, which
you can switch at each startup.
The usual method of working on the Mac is: First you do some work, and then
you save the document. In Extensions Manager, the process is backward: here,
you
start
by saving the set (by clicking the Duplicate Set button and then naming
the new set). After naming the set,
then
you can go about selecting which
extensions you want included. From now on, your newly named set shows up in
the Selected Set pop-up menu; choose its name to enable or disable the
corresponding extensions.
Chapter 4: Control Panels and Extensions 175
■ ■
MAC SECRETS • 4040-8/5 • ch.04.F • Chapter 4 • FINAL • VB • 10/22/98 • p.175
MAC SECRETS • 4040-8/5 • ch.04.1 • Chapter 4 • Proof 1 • VB • 09/16/98 • p.175
4040-8/5 ch04.F 11/3/98 3:13 PM Page 175

If you think you’ll never need this Sets feature, you’re wrong. At the very least,
create a set called CD-ROM Only that contains only the extensions for your
CD-ROM drive — usually Apple CD-ROM and Foreign File Access. Switch to this
CD-ROM set before installing new software from a CD-ROM! (Before installing
software that’s
not
on a CD-ROM, turn off
all
extensions.) After the installation,
switch back to your regularly scheduled set of extensions. You’ll find that your
Mac is much stabler and more trouble-free in the long term.
And what about those two pre-existing sets called Mac OS 8.5 Base and Mac
OS 8.5 All (named for whatever system-software version you’re using)? They’re
useful in troubleshooting; they automatically shut off any extensions
you’ve
added, retaining only the extensions the Mac came with. (There’s not much
difference between Base and All, by the way; Base leaves on 114 extensions
and control panels, whereas All leaves on 130.)
Customized to the hilt
Extensions Manager 4.0 and later is filled with features that let you customize
the way it shows your extension information. For example, you can drag the
dividers between column names (Name, Size, Version, etc.) to resize the
columns. You can click the tiny pyramid button just above the scroll bar to
change the order in which your extensions are
sorted
(from A to Z or in reverse).
You can also control what the extensions are sorted
by —
name, version, size,
and so on — by clicking the name at the top of a column.
Extensions Manager also has a menu bar offering still more options —but most
people have never seen it. That’s because you see this menu only when you open
Extensions Manager
in the Finder
(from the Control Panels folder)
.
If you open the
program during startup (by pressing the space bar), you
don’t
see the menu.
The menu offers some useful options, however. For example, the View menu’s
commands can cluster your extensions by Folder (Control Panels, Extensions,
and so on) or by Package (that is, grouped according to the software that
installed these extensions, such as Microsoft Office or RAM Doubler). The File
menu offers commands for deleting or renaming sets; finally, you can change
the default name “My Settings” to something less kindergarten-ish. And the
Preferences command lets you add two new columns to the Extensions Manager
display — Type and Creator — that reveal the usually invisible four-letter codes
associated with every icon on your Mac (see Chapter 15).
Keyboard power in Extensions Manager
Regardless of how you’re viewing your extensions in Extensions Manager (by
Item, by Package, or by Folder), you don’t have to scroll to locate a particular
item. Instead, you can press the up- or down-arrow keys, or the Page Up and
Page Down keys — or you can type the first letter or two of the extension’s
name. The window scrolls automatically to the nearest match.
Worth
Learning
176 Part I: System Software Revealed
■ ■
MAC SECRETS • 4040-8/5 • ch.04.F • Chapter 4 • FINAL • VB • 10/22/98 • p.176
MAC SECRETS • 4040-8/5 • ch.04.1 • Chapter 4 • Proof 1 • VB • 09/16/98 • p.176
4040-8/5 ch04.F 11/3/98 3:13 PM Page 176

Locking your extension sets
You may have noticed that Extensions Manager comes with two predefined sets
of extensions: “Mac OS 8.5 base” and “Mac OS 8.5 All,” for example. A small
padlock icon appears beside each one’s name, indicating that you can’t add to,
or delete extensions from, these sets.
Ordinarily, any new extensions you install are automatically added to sets
you
make (such as My Settings). That’s usually what you want: after all, if you’ve
just paid $900 for a new digital camera, of
course
you want its extension added
to your sets — otherwise, you can’t use the camera.
On the other hand, once you get your Mac stabilized and working, you may find it
useful to lock one of
your
sets. Doing so simply involves changing the settings
file’s four-letter
type code
(see Chapter 15).
To do so, open your hard drive; open your System folder; open Preferences; open
Extensions Manager Preferences. Inside, you’ll see an icon for each set you’ve
saved (such as My Settings). Drag this icon onto the icon of FileTyper, which is
included on the CD-ROM with this book. Change the type code for the file you
opened from
ESET
(a changeable settings file) to
RSET
(a locked settings file).
Capitals count. Click Change, and you’re done —now your My Settings set (or
whatever you’ve edited) shows up with a padlock icon, just like Apple’s sets.
It doesn’t take much imagination to see how you might modify Apple’s canned
sets in the same way—just change the type code to ESET using this technique.
Chapter 4: Control Panels and Extensions 177
■ ■
MAC SECRETS • 4040-8/5 • ch.04.F • Chapter 4 • FINAL • VB • 10/22/98 • p.177
MAC SECRETS • 4040-8/5 • ch.04.1 • Chapter 4 • Proof 1 • VB • 09/16/98 • p.177
ANSWER MAN
Q: Every so often, when I try to open Extensions
Manager, it gives me some utterly incomprehen-
sible message like, “The selected set doesn’t
match your System folder.” It offers me three
buttons: Update, Revert, or Create New Set. Or
sometimes it says Cancel or Create Report.
What the hell is it talking about?
A: You moved something behind Extensions
Manager’s back! That is, since EM was last
open, you dragged something from the
Extensions (Disabled) folder into the regular
Extensions folder, or vice versa. EM has noticed
that something went on while it wasn’t looking
— has discovered a discrepancy between
what’s there and what’s supposed to be there —
and wants to know how you want to handle it.
If you click Revert, EM puts whatever icons you
manually moved back where they came from —
a disturbing thought, since you can’t see what’s
being moved.
And if you click Create New Set (or press
Return), EM automatically creates a newly
named set of extensions (called, for example,
My Settings 2) that reflects the actual contents
of your Extensions folders. Now it’s up to you to
sort out the mess.
The button you’ll most want to click, therefore,
is Update or Cancel (even though that’s not the
default button). The Update or Cancel button
means, “I have it like I want it. Shut up.”
The Extensions Manager Protest Message
4040-8/5 ch04.F 11/3/98 3:13 PM Page 177
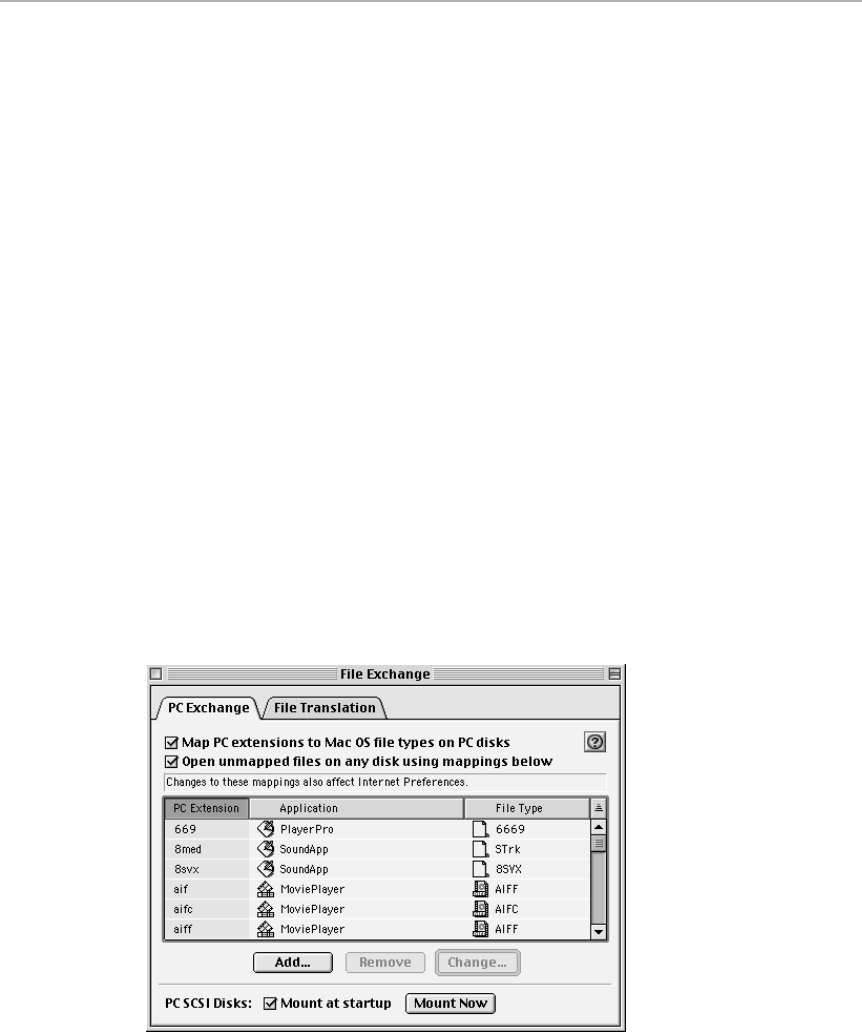
File Exchange
This control panel is Mac OS 8.5’s renamed version of PC Exchange, which
has come with Macs since System 7.5. (This discussion applies to both File
Exchange and PC Exchange.) File Exchange’s File Translation tab even
incorporates the functions of the old Mac OS Easy Open control panel,
described later in this chapter.
Its purpose is to break down the barriers between Macs and IBM-
compatibles. With File Exchange installed, you can insert a DOS or Windows
disk into your Mac and see its icon on the Desktop, just like a Mac disk. And
not just floppies — File Exchange also lets Windows-formatted SyQuests, Zip
disks, and other removables appear on your Desktop. The Mac OS 8.5
version, File Exchange, even has a new tab called File Translation, where you
can specify conversions that can take place automatically.
To make matters better, File Exchange also affects the dialog box that appears
when you erase a floppy. It adds choice for DOS (making the disk readable by
Windows computers) and ProDOS (for Apple II computers). In other words,
you can turn a Mac disk into a Windows disk, if you’re willing to erase it in the
process. (File Exchange doesn’t let you format Zip or other removable
cartridges for Windows, however — only floppies. See Chapter 8 for details.)
The control panel itself is designed to let you map various kinds of DOS or
Windows files to appropriate Macintosh programs that know how to open
them (see Figure 4-22). After you’ve established these assignments, you can
double-click a Word for Windows document on that PC disk you inserted, and
the document will open smoothly in your Mac version of Word.
Figure 4-22: A tool for trafficking with disks from the Dark Side.
178 Part I: System Software Revealed
■ ■
MAC SECRETS • 4040-8/5 • ch.04.F • Chapter 4 • FINAL • VB • 10/22/98 • p.178
MAC SECRETS • 4040-8/5 • ch.04.1 • Chapter 4 • Proof 1 • VB • 09/16/98 • p.178
4040-8/5 ch04.F 11/3/98 3:13 PM Page 178
File Exchange Secrets
■
What about Jaz? What about long file names?
For most of PC Exchange’s life, it was disappointing in two important respects.
First, it couldn’t handle
large
removable disks, such as Jaz disks, that had
been formatted on Windows 95. Second, even though both Windows 95 and
the Macintosh can handle file names longer than eight letters, PC Exchange,
firmly buried in a DOS mentality, automatically chopped off file names at eight
letters long.
The solution to both problems is to get the latest version of PC Exchange (Mac
OS 8.1) or File Exchange (Mac OS 8.5). It fixes both problems, and adds a host
of other compatibility enhancements.
Why you don’t want to use PC disks all the time
File Exchange works so well that we’ve actually met people who have been using
PC floppy disks — which they bought by mistake — for months without even
noticing it. Since the Mac treats them
exactly
like Mac floppies, there’s no way
those people would know.
Well, almost. PC disks, mounted on your Desktop via File Exchange, are even
slower than they usually are.
Much
slower. If this sounds like you, reformat your
PC disks as Mac disks and enjoy the newfound speed.
A view of your SCSI situation
Behind the Options button of the PC Exchange control panel (but not the newer
File Exchange) lurks some fascinating information about the SCSI appliances
(scanner, Zip drive, CD-ROM, and so on) attached to your Mac. This little window
provides immediate feedback on whether or not the Mac is “seeing” all of your
gadgets — an invaluable troubleshooting aid.
Alas, there’s not much more you can do here except read about your SCSI chain
and check the ID numbers assigned to each. To actually “mount” them onto the
Desktop, you need SCSIProbe, included on the CD-ROM with this book. But if
SCSIProbe isn’t handy, PC Exchange gives a useful hint as to what’s going on
with your SCSI setup.
Chapter 4: Control Panels and Extensions 179
■ ■
MAC SECRETS • 4040-8/5 • ch.04.F • Chapter 4 • FINAL • VB • 10/22/98 • p.179
MAC SECRETS • 4040-8/5 • ch.04.1 • Chapter 4 • Proof 1 • VB • 09/16/98 • p.179
4040-8/5 ch04.F 11/3/98 3:13 PM Page 179

File Sharing
As its name denotes, this Mac OS 8-and-later control panel (see Figure 4-23) is
the central control for file sharing (making your Mac’s hard-drive contents
available to other people on your office’s network). It’s the master on/off
switch for file sharing; it’s where you indicate what your Mac’s name is (as
viewed by others on the network); and it’s where you specify your own
password (for when you want to get at your Mac while seated elsewhere on the
network). For complete instructions in using this control panel, see Chapter 35.
A second tab within this control panel shows you file sharing activity going
on at the moment. Click the tab to see who, if anyone, has logged onto your
hard drive, and which folders you’ve given them access to. If it’s somebody
you’re angry at, you can click the Disconnect button.
By the way: you can’t open this control panel unless AppleTalk is active. For
more information, see “AppleShare (and related files)” later in this chapter.
Also, by the way: this single Mac OS 8 control panel incorporates two control
panels in previous system versions—File Sharing Monitor and Sharing Setup.
Figure 4-23: The File Sharing control panel has two different screens, depending on which
tab you click.
File Sharing Monitor
This pre-Mac OS 8 control panel provides an overview of your file-sharing
activity at the moment. It displays a list of all your shared files, folders, and
disks and allows you to keep track of which network users are currently
connected to your Mac. For details, see Chapter 35. (In Mac OS 8, this control
panel has been incorporated into the File Sharing control panel, discussed
above.)
OS
8
180 Part I: System Software Revealed
■ ■
MAC SECRETS • 4040-8/5 • ch.04.F • Chapter 4 • FINAL • VB • 10/22/98 • p.180
MAC SECRETS • 4040-8/5 • ch.04.1 • Chapter 4 • Proof 1 • VB • 09/16/98 • p.180
4040-8/5 ch04.F 11/3/98 3:13 PM Page 180
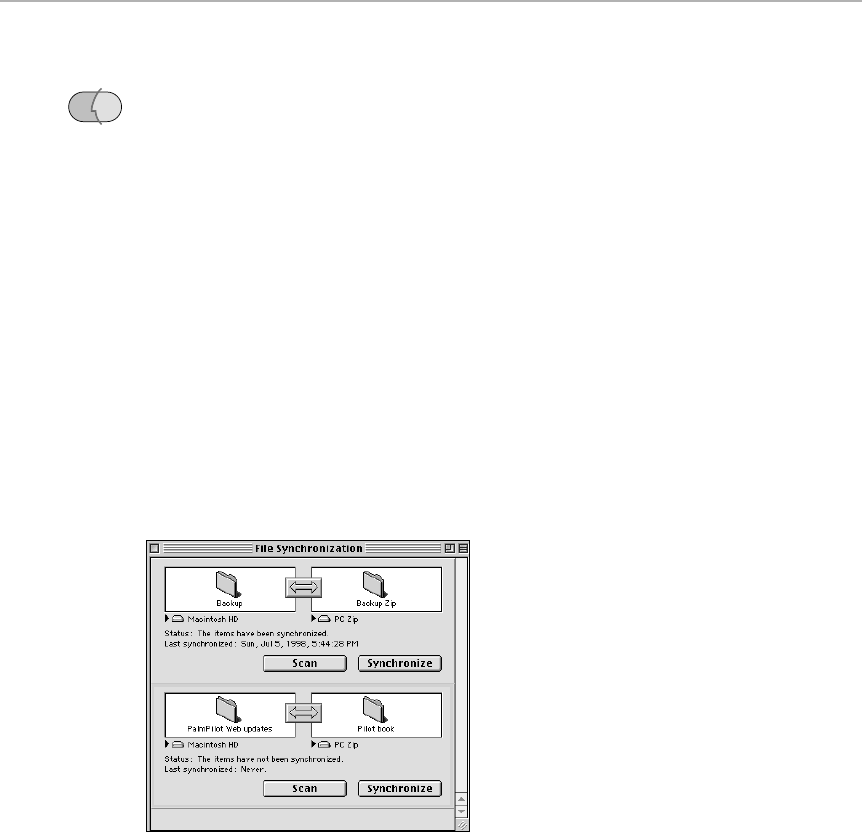
File Synchronization
It took until Mac OS 8.5 for Apple to include a backup program as part of the
built-in system software—but better late than never, we say. This program,
closely modeled on the file-synchronization program included with
PowerBooks for several years, lets you set up pairs of folders that you want
to keep updated with each other. You indicate the two folders you’d like kept
up-to-date with each other by simply dragging them, one at a time, directly
onto the pictures of folders (shown in Figure 4-24) in the File Synchronization
program’s window.
The obvious use for this program is to pair your Documents folder with a
matching folder on your backup disk. Whenever you open this control panel
and click Synchronize, the Mac analyzes the contents of each folder and
copies the most recent documents to each. If you have a PowerBook, you
might set up File Synchronization to bring key folders up to date with your
laptop before a trip, and then to bring the main Mac’s folders up to date after
the trip.
Take special note, by the way, of the program’s menus, which control (for
example) whether the file updating goes in two directions or only one (and
which way).
Figure 4-24: Mac OS 8.5’s File Synchronization control panel backs up chosen folders to
corresponding folders on your backup drive.
General Controls (7.5 and later)
The General Controls panel, shown in Figure 4-25, governs several
miscellaneous elements in the Macintosh work environment.
OS
8.5
Chapter 4: Control Panels and Extensions 181
■ ■
MAC SECRETS • 4040-8/5 • ch.04.F • Chapter 4 • FINAL • VB • 10/22/98 • p.181
MAC SECRETS • 4040-8/5 • ch.04.1 • Chapter 4 • Proof 1 • VB • 09/16/98 • p.181
4040-8/5 ch04.F 11/3/98 3:13 PM Page 181
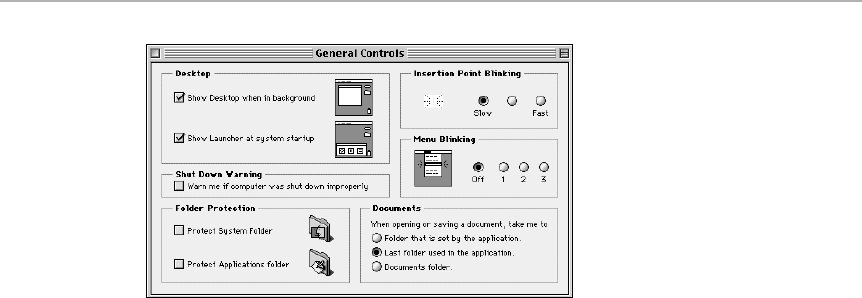
Figure 4-25: A better name for General Controls would have been Miscellaneous Controls.
Show Desktop when in background: This option is normally on. If you turn it
off, then every time you launch a program, the world of Finder icons and
windows disappears. You’re now protected from inadvertently switching to
the Finder when you accidentally click outside your document window. (Turn
this checkbox off for beginners!)
Show Launcher at system startup: The Launcher control panel provides easy
one-click access to your favorite programs, folders, and files (see “Launcher,”
later in this chapter). This option simply controls whether or not your
Launcher window appears automatically when you turn on the Mac. (How
does it work? The method isn’t very mysterious: If you turn this checkbox on,
the Mac just puts an alias of the Launcher control panel into your System
folder’s Startup Items folder!)
Protect System Folder: This checkbox is designed to prevent little hands (or
mischievous ones) from dragging icons out of the System Folder’s main
window (its root level), which could disable the Mac completely.
But few options have gotten adults into more trouble! When this feature is
turned on, you can’t drag anything out of, or even into, the System Folder.
(You can move things into, or out of, folders within the System Folder, such
as Control Panels or Apple Menu Items.) If you try, an error message appears.
In Mac OS 8 and later, the message is fairly helpful: “To move this item, first
turn off System Folder Protection in the General Controls panel.” But in
previous systems, the message is bewildering and frustrating: “You do not
have enough access privileges” — scarcely a comforting message to an adult
who’s just paid $3,000 for a computer!
A warning: the Mac’s Protect System Folder (and Protect Applications Folder)
options are mutually incompatible with File Sharing. If you’ve got File Sharing
turned on (see Chapter 35), these two Protect checkboxes are dimmed and
unavailable.
182 Part I: System Software Revealed
■ ■
MAC SECRETS • 4040-8/5 • ch.04.F • Chapter 4 • FINAL • VB • 10/22/98 • p.182
MAC SECRETS • 4040-8/5 • ch.04.1 • Chapter 4 • Proof 1 • VB • 09/16/98 • p.182
4040-8/5 ch04.F 11/3/98 3:13 PM Page 182

Another warning: The Protect System Folder checkbox can interfere with
certain software installations. It’s better to have this turned off when
installing new programs, which sometimes involves moving items into and
out of the System Folder.
Protect Applications Folder: This option works just like the Protect System
Folder checkbox — except that it applies to the Applications folder, if you
have one, in your main hard drive window.
Warn me if computer was shut down improperly: Speaking of warnings you
may prefer to do without: After a few repetitions of the “This Macintosh was
not shut down properly” message when you turn on the Mac following a
system crash, you may want to turn off this checkbox, too. It simply tells you,
as though you didn’t know, that you didn’t shut down the Mac using the Shut
Down command (or the Shut Down button in a dialog box). What’s annoying
is that this option defaults to being on; after you restart following a crash,
therefore, the startup process is interrupted by a warning message (“The
Macintosh was not shut down properly”). You must OK that box, in person,
before the startup finishes.
Beginning with Mac OS 8.5, however, this option becomes far more useful.
Now when your Mac starts up after a crash, it automatically starts running the
Disk First Aid utility (see Chapter 8) to inspect your hard drive for damage.
Since system crashes are indeed a leading cause of incipient corruption, this
preemptive strike nips many future problems in the bud, and is well worth
waiting for. (At least you don’t have to start up from a different startup disk in
order to run Disk First Aid, as you did in all systems before Mac OS 8.5.)
Insertion Point Blinking: Hey, check it out: you can change the rate at which
the insertion point blinks (the insertion point is the I-beam cursor that
appears whenever you’re editing text). The Slow setting produces 30 blinks
per minute; the Fast setting goes at a hyperactive 100 bpm. The middle
setting is roughly 50 times per minute. (Did somebody ask for this?)
Incredibly, this setting also affects the speed at which you must type when
type-selecting icons in the Finder (see Chapter 1). That is, if you set a slow
blinking rate, you can type more slowly to highlight a file in a window. If you
set the rate to the fastest setting, the Mac is more likely to think that, as you
type the second letter, you’re actually starting over with a new typed word.
Menu Blinking: When you release the mouse button after choosing a
command from a menu, the command blinks: black-white-black. You may never
even have noticed it. This setting specifies how many times it should blink.
Why should a menu command blink at all? About the only reason we’ve ever
heard is that it gives you a split second to confirm what you just did. Frankly,
we don’t get that logic. The menu blinks after you let go of the menu — when
it’s too late to change your mind!
Strange
But True
OS
8.5
Chapter 4: Control Panels and Extensions 183
■ ■
MAC SECRETS • 4040-8/5 • ch.04.F • Chapter 4 • FINAL • VB • 10/22/98 • p.183
MAC SECRETS • 4040-8/5 • ch.04.1 • Chapter 4 • Proof 1 • VB • 09/16/98 • p.183
4040-8/5 ch04.F 11/3/98 3:13 PM Page 183

Furthermore, suppose that it takes one second for a command to blink three
times. If you use, say, ten menu commands an hour, that means that if you
work a typical work week, in ten years you’ll have wasted two and a half days
— full 24-hour periods — doing nothing but sitting in front of your Mac
waiting for menus to blink.
We can think of many other things that we’d rather do with a free weekend.
The best choice for this setting is Off.
When opening or saving a document, take me to: The era of “Where did I file
that darned document?” cries ended with this option. This setting specifies
what folder’s contents you see whenever you choose Save As or Open from a
program’s File menu. Novices will appreciate the “Documents folder” choice,
which makes all new documents fall into a central Documents folder on the
Desktop. Most others prefer the “Last folder used in the application” choice,
which is good for keeping all related project documents together in their
appointed folders.
Both the grammar and the function of the third option were lousy before
System 7.5.3. It used to say, “Folder which contains the application,” and it
meant that any new files got saved into whatever folder the program’s in, no
matter how many nested folders deep, no matter how useless this function.
This option was mercifully corrected in System 7.5.3—it now says “Folder
that is set by the application.” It refers to the times when you launch a
program by double-clicking a document. In that case, all new documents will
get dumped into the same folder that contained that original document.
General Controls (pre–System 7.5)
The original General Controls panel, circa 1984 to 1994, looked quite different
from today’s General Controls. Most of its elements were the same, but a few
were different:
Setting the date and time: This control panel was used to set the Mac’s clock.
(Click a number to edit it by typing, or click the up- and down-arrows that
appear whenever numeric text is selected.)
Changing the Desktop pattern: Before the era of Desktop Pictures and
Desktop Patterns, the General Controls panel let you choose, apply, and even
draw your own backdrop patterns for your desktop. Click the little triangles
(or click just outside them) at the top of the mini-desktop to cycle through
the dozen or so Desktop patterns that come stored in the Mac. Click the mini-
desktop (below the little triangles) to apply the selected pattern to your
actual Desktop. The real fun, of course, comes from creating your own
Desktop patterns, as shown in Figure 4-26.
The point to remember when you create new Desktop patterns is that single-
clicking the mini-desktop applies the selected pattern to your Finder
background, but double-clicking saves the new pattern permanently. If you
don’t save your current Desktop pattern, it disappears the next time you
change patterns.
184 Part I: System Software Revealed
■ ■
MAC SECRETS • 4040-8/5 • ch.04.F • Chapter 4 • FINAL • VB • 10/22/98 • p.184
MAC SECRETS • 4040-8/5 • ch.04.1 • Chapter 4 • Proof 1 • VB • 09/16/98 • p.184
4040-8/5 ch04.F 11/3/98 3:13 PM Page 184
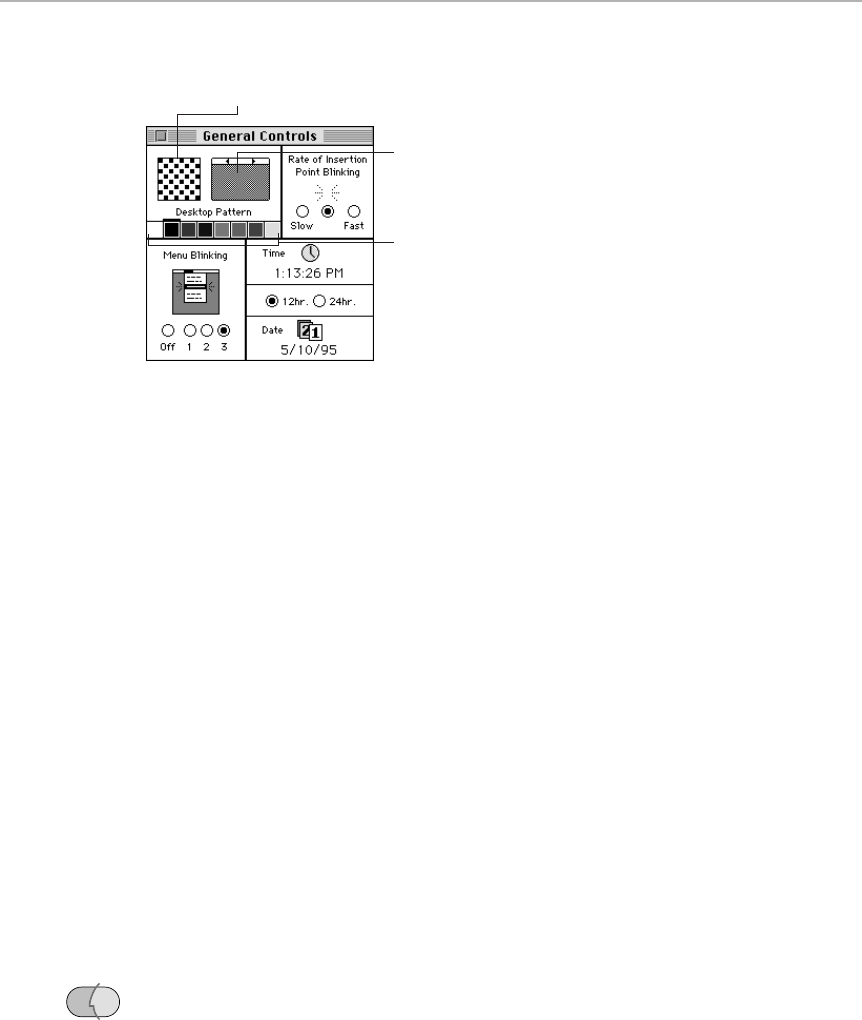
Figure 4-26: Getting down to basics with the General Controls.
Performa note: The specially designed General Controls panel was one of the
few differences between the system software for the Performa line and
mainstream Macs. The option to edit your own Desktop patterns was gone; in
its place was a pop-up menu of pre-made patterns.
Infrared
As you can read in Chapter 14, the infrared capability of today’s PowerBooks
is one of their cooler attributes. Aim the backs of two PowerBooks at each
other, and you’ve got yourself an invisible, through-the-air network, over
which you can shunt files back and forth between the two machines.
As you can also read in that chapter, there are two different infrared
“languages” your PowerBook can speak: IRTalk, is a Macintosh-only language,
and IrDA, a faster, more universal networking scheme. This control panel
serves as a status panel, letting you know when it perceives any other infrared
Macs within shooting distance — and, when you click the Options button, you
can switch between the two infrared protocols. (You can’t even open this
control panel unless you also have the IrDALib and IrLanScannerPPC files in
your Extensions folder.)
Internet
Aren’t you tired of typing your name, address, e-mail address, SMTP codes,
and other Internet junk into each of your Internet programs? That’s what
Internet Config is for (see “Internet Config Extension” later in this chapter).
But beginning in Mac OS 8.5, Apple reinvented the wheel and made it official:
the Internet control panel (see Figure 4-27) lets you type in every shred of
information about you and your Internet connection— right down to the
signature at the bottom of your e-mails—so that Internet software will already
know the key information.
OS
8.5
Click the mini Desktop to
apply this pattern to your
entire desktop.
Click the individual dots
in this enlarged view
to change the pattern.
This is your color palette.
Click a square to change
your "pencil's" color.
Chapter 4: Control Panels and Extensions 185
■ ■
MAC SECRETS • 4040-8/5 • ch.04.F • Chapter 4 • FINAL • VB • 10/22/98 • p.185
MAC SECRETS • 4040-8/5 • ch.04.1 • Chapter 4 • Proof 1 • VB • 09/16/98 • p.185
4040-8/5 ch04.F 11/3/98 3:13 PM Page 185
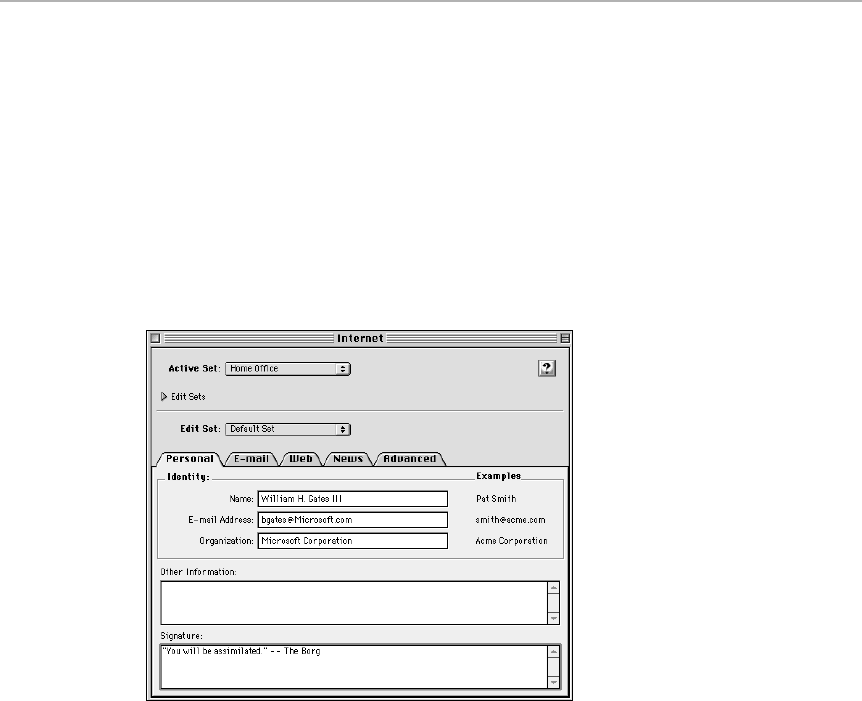
Of course, this presumes that you’re using Internet programs that know
about Mac OS 8.5’s Internet control panel. Fortunately, almost every Internet-
related program we could find offers an option to “Use Internet Config”
settings — which means, in the case of Mac OS 8.5 and later, the settings
you’ve entered into the Internet control panel.
For example, in Claris Emailer, choose Setup ➪Accounts; in the dialog box
that appears, double-click one of your e-mail accounts. You’ll see the option
to use Internet Config (i.e., the Internet control panel) settings. In Netscape
Navigator, choose Edit ➪Preferences and click Identity to see the “Use
Internet Config” checkbox. In every case, you’ll see your Internet
configuration information automatically slapped into the correct blanks.
Figure 4-27: Type in all those geeky Internet codes just once in this central space.
Keyboard
The Keyboard control panel (see Figure 4-28) lets you switch from one
keyboard layout to another. A keyboard layout is a little file placed in your
System file that defines what key the Mac understands when you press each
key on your keyboard.
186 Part I: System Software Revealed
■ ■
MAC SECRETS • 4040-8/5 • ch.04.F • Chapter 4 • FINAL • VB • 10/22/98 • p.186
MAC SECRETS • 4040-8/5 • ch.04.1 • Chapter 4 • Proof 1 • VB • 09/16/98 • p.186
4040-8/5 ch04.F 11/3/98 3:13 PM Page 186

Figure 4-28: The Keyboard control panel awaits your command.
What good are keyboard layouts? Here are a few tricks you can pull off with
them:
■Replace your current layout (called U.S.) with the famous Dvorak layout
(an arrangement of keys scientifically designed to be easier and more
efficient to use). Using Dvorak requires that you to spend a couple of
weeks adjusting, which isn’t made any easier by the fact that your
keyboard keys are still labeled the old way. But many people who have
made the switch swear that the Dvorak layout (included on the CD-ROM
with this book) is faster, more comfortable, and less conducive to typos.
(See “Dvorak keyboard layouts” in Appendix A for details.)
■Replace only two symbols of the keyboard: < and >. They’re what come
out if you type a period or comma while the Shift key is down, and that
usually leads people to type things like P>O> Box 234 by accident. If you
replace the < and > symbols with another comma and period, you won’t
have that trouble.
■For PowerBook users only, equip your keyboard with a numeric keypad.
That is, create a keyboard layout in which pressing a certain key — Ctrl,
say — turns the letter keys on the right half of your keyboard into a
numeric keypad: K is 5, L is 6, and so on. (PowerBook G3 series owners
already have something similiar.)
■Switch between the System 6 and System 7 keyboard layouts. Believe it
or not, Apple switched the locations of a few obscure symbols.
■For non-American Mac users, if you buy System 7.1’s WorldScript
software, you can use the Keyboard control panel to switch between an
American key set and yours.
Chapter 4: Control Panels and Extensions 187
■ ■
MAC SECRETS • 4040-8/5 • ch.04.F • Chapter 4 • FINAL • VB • 10/22/98 • p.187
MAC SECRETS • 4040-8/5 • ch.04.1 • Chapter 4 • Proof 1 • VB • 09/16/98 • p.187
4040-8/5 ch04.F 11/3/98 3:13 PM Page 187

OK, we admit it: 95 percent of Americans will never use any layout except the
one that came with the Mac. Open your System folder, double-click the
System suitcase, and trash any keyboard layouts you don’t intend to use
(German, Norwegian, and so on).
Key Repeat Rate: The Keyboard control panel also controls two minor
functions involving repeating keys. The Key Repeat Rate setting controls the
rate at which characters repeat when you hold down a key. At the slowest
setting, characters repeat once every two seconds — an utterly pointless
choice. It’s much faster to just press the key repeatedly.
Delay Until Repeat: The Delay Until Repeat setting controls how long you
have to hold a key down before it starts repeating the character. At the
slowest setting, the delay is less than one second; at the fastest setting,
repeats begin almost instantly. You can disable repeating keys by choosing
Off in the control panel—an excellent choice for beginners who are used to
nonrepeating typewriters.
Honestly, though, after you make these settings, you probably won’t ever need
to adjust them. Most people can afford to disable or trash this control panel.
Labels
As described in Chapter 1, the Mac’s Label feature (born System 7, died System
7.6.1) enables you to apply text and/or color labels to your files and folders. You
use the Labels control panel to set up the label categories and pick the color
associated with each label, exactly as in Mac OS 8’s Preferences command. See
Chapter 2 for instructions on editing your Mac’s label names and colors.
We have only one Label control panel secret. It takes a little more work than
most, but it’s weird. Select and delete all seven label names in the control
panel so that all the fields are blank; then restart your Mac and check out the
Labels menu. Read vertically, the labels spell out the names alan and jef —
the two programmers.
Of course, there’s a much more creative use of your Labels menu awaiting
you with this book — Label Secrets Pro. See the appendix for details.
188 Part I: System Software Revealed
■ ■
MAC SECRETS • 4040-8/5 • ch.04.F • Chapter 4 • FINAL • VB • 10/22/98 • p.188
MAC SECRETS • 4040-8/5 • ch.04.1 • Chapter 4 • Proof 1 • VB • 09/16/98 • p.188
CASE HISTORY
We once saw a certain international best-selling
novelist — a beginning Mac user — fill ten
pages of his word processing document with
spaces when he inadvertently leaned a book on
his spacebar. If the Delay Until Repeat setting in
the Keyboard control panel had been Off, this
accident would have produced only a single
space on-screen.
How to lose a manuscript
4040-8/5 ch04.F 11/3/98 3:13 PM Page 188

Launcher
The Launcher isn’t like any other control panel; it has no options to set, no
controls to adjust. Instead, when you double-click the Launcher icon, you get
the Launcher window, as shown in Figure 4-29—a launching pad filled with
one-click buttons for your favorite files and folders.
Actually, there have been three Launchers over time. The original Launcher
control panel gave the Performa its user-friendly features, such as the
Documents folder and automatic Finder-hiding. Then there was the Launcher
introduced with System 7.5 (and with some pre-7.5 PowerBooks and
Performa models).
Finally, when Apple introduced System 7.5.1 (see Chapter 6), it overhauled
the Launcher yet again, this time endowing it with a host of user-friendly
conveniences — such as drag-and-drop icon installation. The modern-day
Launcher window offers separate “pages,” each listing a different array of
jumbo icons.
Figure 4-29: To change the names of the big Launcher topic buttons (top), change the names
of the bulleted folders in the Launcher Items folder (bottom).
Here’s how it works. In the System Folder is a folder called Launcher Items.
Anything you put in this folder — or anything you drag onto the Launcher
window — instantly appears in the Launcher window as a jumbo icon (see
Figure 4-29). (In many ways, this process resembles adding items to the
menu.) One click in the Launcher window suffices to open that icon.
(Apparently focus groups found that double-clicking was too hard to
remember.)
Chapter 4: Control Panels and Extensions 189
■ ■
MAC SECRETS • 4040-8/5 • ch.04.F • Chapter 4 • FINAL • VB • 10/22/98 • p.189
MAC SECRETS • 4040-8/5 • ch.04.1 • Chapter 4 • Proof 1 • VB • 09/16/98 • p.189
4040-8/5 ch04.F 11/3/98 3:13 PM Page 189

Here, for example, are some ideas for stuff to stick onto your Launcher:
■Drag frequently accessed folders to the Launcher to create one-click
shortcuts. This is especially useful if you root around in deeply-buried
folders on a number of different file servers over a network; you’ll have
access to all of them from one central location.
■Make a Launcher “page” called Control Panels, adding buttons to the
Launcher for all the control panels you use the most.
■Create Stickies stationery documents (see “Stickies” in Chapter 3) and
drag them to the Launcher to generate ready-to-use Post-It notes.
■If you use AppleScripts to automate tasks on your Mac, drag the applets
to the Launcher as a command center for all your automated tasks.
■Create category buttons for projects you’re working on, and then group
all related documents and applications under the appropriate categories.
Even in the era of Mac OS 8, when any folder can be turned into a Launcher-
style window with one-click jumbo buttons, we find the Launcher worth
trying out. (Of course, if you wind up liking the Launcher, you’ll probably like
the infinitely more flexible, powerful, customizable OneClick better— it’s
included on the CD-ROM with this book. See Chapter 22.)
Launcher Control Panel Secrets
■
Make your own topic buttons
If you poke around a little, you’ll find out how Apple makes those big topic
buttons appear at the top of the Launcher window. In your System Folder, in the
Launcher Items folder, are
sub
folders. The name of each subfolder is preceded
by a bullet (•).
Any
folder name bulleted this way shows up in the Launcher
window itself as a big button name — and the folder’s contents “page” appears
when you click the folder’s name. Figure 4-29 should make this relationship
clear.
Add as many topic buttons (bulleted folders) as you want; the Launcher window
will display up to eight of them — the ones that come alphabetically first. (You
create the bullet symbol by pressing Option-8.) You can even resize or reshape
the Launcher window, and the topic buttons, like Silly Putty, will stretch and
reconfigure — becoming stacked vertically, for example — to accommodate your
nutty design impulses.
Especially cool: drag an icon, not into the Launcher window, but directly onto one
of its topic buttons to install that icon onto the corresponding Launcher “page.”
Strange
But True
190 Part I: System Software Revealed
■ ■
MAC SECRETS • 4040-8/5 • ch.04.F • Chapter 4 • FINAL • VB • 10/22/98 • p.190
MAC SECRETS • 4040-8/5 • ch.04.1 • Chapter 4 • Proof 1 • VB • 09/16/98 • p.190
4040-8/5 ch04.F 11/3/98 3:13 PM Page 190

Easy-install, easy-remove icons
Ever since System 7.5.1, installing a new button onto the Launcher has been
pitifully easy: simply drag an icon onto the Launcher window. That’s it — it jumps
alphabetically into place.
Removing a button is equally simple: Just Option-drag it to the Trash. Or, if you’d
like an alias of it, Option-drag it to your Desktop or into another window.
Better still, why not combine this trick with the previous one? That’s right:
Option-drag an already installed Launcher icon to a
different
topic button. Presto
— you’ve just reassigned that Launcher icon to a different page!
Change the icon-button size
The Launcher includes a little-known feature: a choice of button sizes! Press the
Ôkey and hold down the mouse button inside the Launcher window. You get a
pop-up menu listing three icon-button sizes, as shown in Figure 4-27. The smallest
size is particularly useful and makes the Launcher look a lot less kid-oriented.
Quick access to Launcher Items
As you customize your Launcher setup, you may find it an increasing hassle to
burrow your way into the System Folder, into the Launcher Items folder, and from
there into your individual topic folders.
Fortunately, there’s a speedy shortcut:
Option-click
any topic button. (As you
press Option, your cursor turns into a tiny folder to let you know that you’re
doing the right thing.) You’ll be teleported directly into that topic folder within
Launcher Items.
Change the Applications topic button
You may have discovered that there’s no bulleted folder for the first topic button,
called Applications. Any icon that’s
loose
in the Launcher Items folder appears
on the Applications screen of Launcher-window icons.
You can eliminate the Applications topic button, and its corresponding color-
coded page, easily enough: Just put
all
icons into bulleted folders of your own
(in the Launcher Items folder). If there are no loose icons, the Applications
button won’t appear.
(You
can
change the Applications button’s name, by the way, if you’re so inclined.
Launch ResEdit, as described in Chapter 21. Open the Launcher control panel
inside your System Folder. Double-click the icon called STR#. In the list of numbers,
double-click –4033. Scroll down until you see the item called Applications. Change
this word to whatever you wish your programs folder to be called.)
Worth
Learning
Mac Basics
Chapter 4: Control Panels and Extensions 191
■ ■
MAC SECRETS • 4040-8/5 • ch.04.F • Chapter 4 • FINAL • VB • 10/22/98 • p.191
MAC SECRETS • 4040-8/5 • ch.04.1 • Chapter 4 • Proof 1 • VB • 09/16/98 • p.191
4040-8/5 ch04.F 11/3/98 3:13 PM Page 191

Interior-decorate the Launcher
You’re not stuck with nine-point Geneva type and boring background patterns in
your Launcher escapades. See Chapter 21 for instructions on changing these
elements using ResEdit.
Roll credits
Hold down Ôand Option-click over the gray area of the Launcher window (the
thin margins around the folder buttons) to see the secret About box.
Location Manager
This clever but complex program was originally designed for PowerBooks. It
was inspired by a breakthrough concept: that laptops are likely to be moved
around. Using this control panel (and its corresponding Control Strip
module), you can change a slew of parameters — the time zone, local Internet
access phone number, networking method, speaker volume, and so on — with
a single click of the mouse.
The idea of switching easily from one set of settings to another was such a hit
that, starting in Mac OS 8.1, the Location Manager became available for
desktop Macs, too. OK, you probably won’t be needing to change the time
zone or Internet phone number much on your desktop Mac. However, the
network-switching features of the Location Manager are quite useful on a
desktop Mac. You might want, for example, to switch instantly from America
Online 3.0 to an Internet account — without having to restart; switch from
Ethernet to direct modem dialing; turn AppleTalk completely off without
getting the “port is in use” message (see Chapter 36 for more on this
anomaly); and so on. In the following discussion, we’ll assume you’re using a
PowerBook, but keep in mind that some of these instant-switching features
are equally useful on stationary Macs.
The key to using Location Manager is understanding its snapshot premise.
That is, you’re supposed to get all the various control panel settings the way
you want them — and then open the Location Manager control panel, which
captures the current settings for later.
Having opened Location Manager (see Figure 4-30), start by choosing New
Location. Name it for one of the places you plan to be (or one of the network
configurations you’ll be using). Eventually, of course, you’ll want to create
two or more such “locations” — after all, if you’re never going to switch,
what’s the point of this exercise? The following steps take you through
setting up one such location, which we’ll call NY Office.
OS
8
192 Part I: System Software Revealed
■ ■
MAC SECRETS • 4040-8/5 • ch.04.F • Chapter 4 • FINAL • VB • 10/22/98 • p.192
MAC SECRETS • 4040-8/5 • ch.04.1 • Chapter 4 • Proof 1 • VB • 09/16/98 • p.192
4040-8/5 ch04.F 11/3/98 3:13 PM Page 192
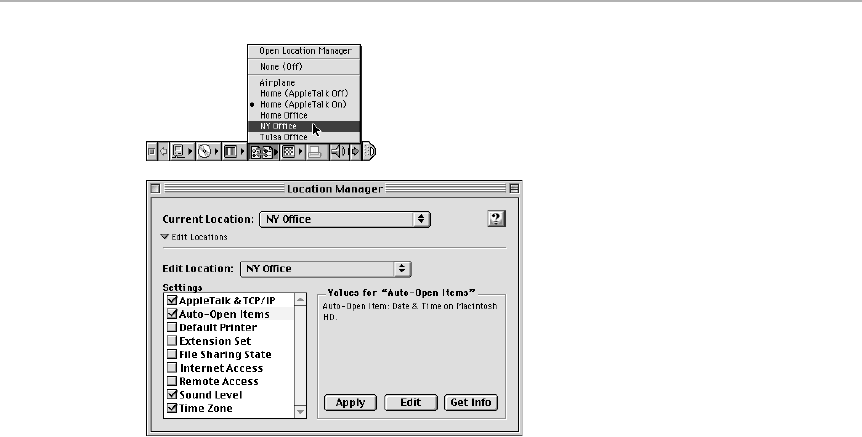
Figure 4-30: With the flick of a Control Strip tile (top), you can change a slew of settings at
once on your Mac, thanks to the Location Manager (bottom). The older Location Manager
control panel is similar, but instead of turning on checkboxes, as you do in 2.0, you double-
click items to “slide” them into a second list on the right side of the window.
Now choose which settings you want to capture. Be warned, however: some
of the settings can’t be captured until you’ve gone through some careful
preparation. (Note that the names and quantity of these options are slightly
different in versions 1 and 2 of Location Manager.) Here are the settings you
can make:
■Networking or AppleTalk & TCP: The following instructions (which
require Open Transport, described in Chapter 35) may seem ridiculously
convoluted, but trust us: you’ll go through it only once, and the payoff is
worth it.
Open your AppleTalk control panel. From the File menu, choose
Configurations. If you’re like most people, your current setup is named
Default — but Location Manager refuses to honor configurations called
Default, and forces you to come up with a more distinctive name. Click
Duplicate, therefore, and name your configuration (such as “Ethernet
connection”). Click Make Active; on the main AppleTalk panel, make sure
the Connect Via pop-up menu specifies the kind of network you want to
connect to: Printer Port, Infrared, Ethernet, PC card (for PowerBooks), or
whatever. Close the control panel, saving your changes.
Now open the TCP/IP control panel and repeat the steps: choose
Configurations, click Duplicate, name your setup (such as “EarthLink
account”), and click Make Active. On the main panel, set up the Connect
Via and Configure pop-up menus. (As you’ll learn in Chapter 35, the
terminology used in this dialog box is pretty much hopeless to anyone but
Chapter 4: Control Panels and Extensions 193
■ ■
MAC SECRETS • 4040-8/5 • ch.04.F • Chapter 4 • FINAL • VB • 10/22/98 • p.193
MAC SECRETS • 4040-8/5 • ch.04.1 • Chapter 4 • Proof 1 • VB • 09/16/98 • p.193
4040-8/5 ch04.F 11/3/98 3:13 PM Page 193

Internet geeks and network gurus; consult one of them for advice. On the
other hand, if you’re just setting this up for Location Manager’s benefit,
and you already had a working Internet or network connection, you don’t
need to change anything.) Close the control panel and save your changes.
Now, in the Location Manager control panel, select “Networking” or
“AppleTalk & TCP/IP.” Click the Apply button. That’s it! Your
Ethernet/EarthLink network setup has been memorized and associated
with the NY Office.
■Auto-Open Items: This feature lets you specify certain programs or files
to open automatically when you turn on the computer. Suppose you’ve
created two Locations in this control panel—NY Office and Airplane. You
might specify Microsoft Office to launch automatically when you’re in the
office (and plugged into a power outlet), but ClarisWorks when you’re in
the air (for battery savings).
To select startup items in this way, click the Auto-Open Items checkbox.
The standard Open File dialog box appears; double-click each file or
program you’d like to open. When you’re finished choosing icons, click
Apply.
■Default Printer: If you move between two offices with your PowerBook,
this setting can be a great time-saver, sparing you a slog to the Chooser
each time you arrive. It requires, however, the Desktop Printing
extensions (see Chapter 30).
To make this work, open your Chooser. Select the printer you prefer to
use at the NY Office. When you close the Chooser, you’ll see an icon for
that printer on your desktop (if it wasn’t there already). Click the icon
once and choose Set Default Printer from the Printing menu.
Now, in the Location Manager control panel, simply turn on the Default
Printer option. From now on, your PowerBook will automatically connect
to this printer when in the NY Office.
■Extensions Manager or Extension Set: Open your Extensions Manager
control panel (as described earlier in this chapter). Create and save the
set of extensions you’d like to use when you’re safely at the NY Office.
(You may want to choose a much sparer set for your Airplane “location,”
of course.)
In Location Manager, turn on the Extension Set option. Whatever set of
extensions you last chose in Extensions Manager is now memorized for
startups in your NY Office.
If you use Conflict Catcher 8 instead of Extensions Manager, you’re still in
luck. Not only can you use Location Manager to change Conflict Catcher
sets automatically, but you can also do the reverse—a Conflict Catcher
set can change your selected Location Manager setting at startup.
■File Sharing State: Open your File Sharing control panel (called Sharing
Setup before Mac OS 8). Turn File Sharing on or off as desired. When you
choose the File Sharing option in Location Manager, the current status
(on or off) will be associated with, of course, your NY Office.
194 Part I: System Software Revealed
■ ■
MAC SECRETS • 4040-8/5 • ch.04.F • Chapter 4 • FINAL • VB • 10/22/98 • p.194
MAC SECRETS • 4040-8/5 • ch.04.1 • Chapter 4 • Proof 1 • VB • 09/16/98 • p.194
4040-8/5 ch04.F 11/3/98 3:13 PM Page 194

■Internet Access: This option duplicates the functions of the “AppleTalk &
TCP/IP” settings described a few paragraphs ago and “Remote Access,”
described next. It’s for use only by people who connect to the Internet
using Apple’s Internet Connection Kit.
■Remote Access: There are four control panels involved in establishing an
Internet connection: AppleTalk, TCP/IP, Modem, and Remote Access
(called PPP before Mac OS 8.5). “AppleTalk & TCP/IP” (described above)
handles the first two; this option covers the remaining pair.
Once again, you must begin by creating and naming a configuration in
each control panel; follow the steps in “AppleTalk & TCP/IP,” above. The
beauty of using this option, by the way, is that it lets you store a different
Internet access number (as a different configuration in the PPP or
Remote Access control panel) for each of your locations.
Or, if you use Apple Remote Access to dial into another Mac, set up your
Remote Access Setup program correctly—and then use this item to
memorize its condition.
■Sound Level: Wow, is this one easy. Just select it in the Location
Manager; your current speaker volume level is instantly memorized.
■Time Zone: Another easy one! Open the Date & Time control panel. Click
Set Time Zone, and select a city in your time zone. Click OK. When you
return to Location Manager and select this setting, your NY Office’s time
zone is automatically memorized.
You’re not required to set all — or even some — of these, for each location
you create. Plenty of people use only one of the settings — the Internet
Access one, for example. They merely find it handy to be able to switch four
control panels’ configurations at once, simply by choosing from the Control
Strip (see Figure 4-30).
All right then: you’ve spent a rainy Saturday hooking up all of these settings.
Now the fun begins. Open your Control Strip; from the tile shown in Figure
4-30, switch to a different location. A weird gray message appears, asking you
to wait while the Mac scurries around, making control panel changes; when
it’s over, you’re ready to begin your workday.
Location Manager Secrets
■
The AppleTalk On/Off godsend
How many times in life do we wish it were easier to turn AppleTalk on or off?
Every time we plug our digital camera into the printer port. Every time we take
the PowerBook on the road and don’t want to lose 30 minutes’ worth of battery
juice to AppleTalk. Every time we hook up our color inkjet instead of our laser
printer.
Chapter 4: Control Panels and Extensions 195
■ ■
MAC SECRETS • 4040-8/5 • ch.04.F • Chapter 4 • FINAL • VB • 10/22/98 • p.195
MAC SECRETS • 4040-8/5 • ch.04.1 • Chapter 4 • Proof 1 • VB • 09/16/98 • p.195
4040-8/5 ch04.F 11/3/98 3:14 PM Page 195

Location Manger makes doing such things
much
easier than visiting the Chooser
— and more reliable, too, as anyone who’s ever gotten the Chooser’s “can’t
disable AppleTalk” message can attest. Here’s how (note that this process
requires Open Transport).
Open your AppleTalk control panel; choose Configurations from the File menu;
duplicate the currently selected configuration and name it AppleTalk Off (or
something equally memorable). Click Make Active to return to the main control
panel.
Now, from the Edit menu, choose User Mode; click Advanced; click OK; click
Options; click Inactive; and click OK. Close the control panel and save changes.
Finally, repeat all of these steps — but name this configuration AppleTalk On,
and choose Active (instead of Inactive) in the final rush of clicks. Now, when
setting up your Location Manager locations, you can use your two new AppleTalk
settings as part of an “AppleTalk & TCP/IP” location setting.
As Figure 4-28 illustrates, the result is a handy on/off mechanism that sure
beats Chooser-choosing. And as Chapter 36 makes clear, the result is an
AppleTalk that’s
really
turned off and won’t give you the “Port is in use,”
“Please make AppleTalk inactive,” or “Cannot find printer” messages.
Changing at startup
Because a few of the settings governed by Location Manager require restarting
the Mac, it sometimes makes sense to change your chosen location at startup.
But you won’t be offered that opportunity unless you ask for it. Choose
Preferences from Location Manager’s Edit menu. In the ensuing dialog box, you
can specify that you want to be asked for a location change at
every
startup —
or only when you hold down a special key. (In version 1.0, the key is the space
bar; in 2.0, you can choose any key combo you like.)
More settings, more fun!
The various settings you’re allowed to make in Location Manager are actually
represented by
modules
sitting in a folder called (can you guess it?) Location
Manager Modules. It’s in your Extensions folder. You can throw out any of these
modules that you never use, and they’ll disappear from the Location Manager
“control panel.”
You can also
add
modules, however, by putting them into this Location Manager
Modules folder. Apple plans to develop new modules as time goes on; you’ll find
them at http://www.powerbook.apple.com
.
196 Part I: System Software Revealed
■ ■
MAC SECRETS • 4040-8/5 • ch.04.F • Chapter 4 • FINAL • VB • 10/22/98 • p.196
MAC SECRETS • 4040-8/5 • ch.04.1 • Chapter 4 • Proof 1 • VB • 09/16/98 • p.196
4040-8/5 ch04.F 11/3/98 3:14 PM Page 196
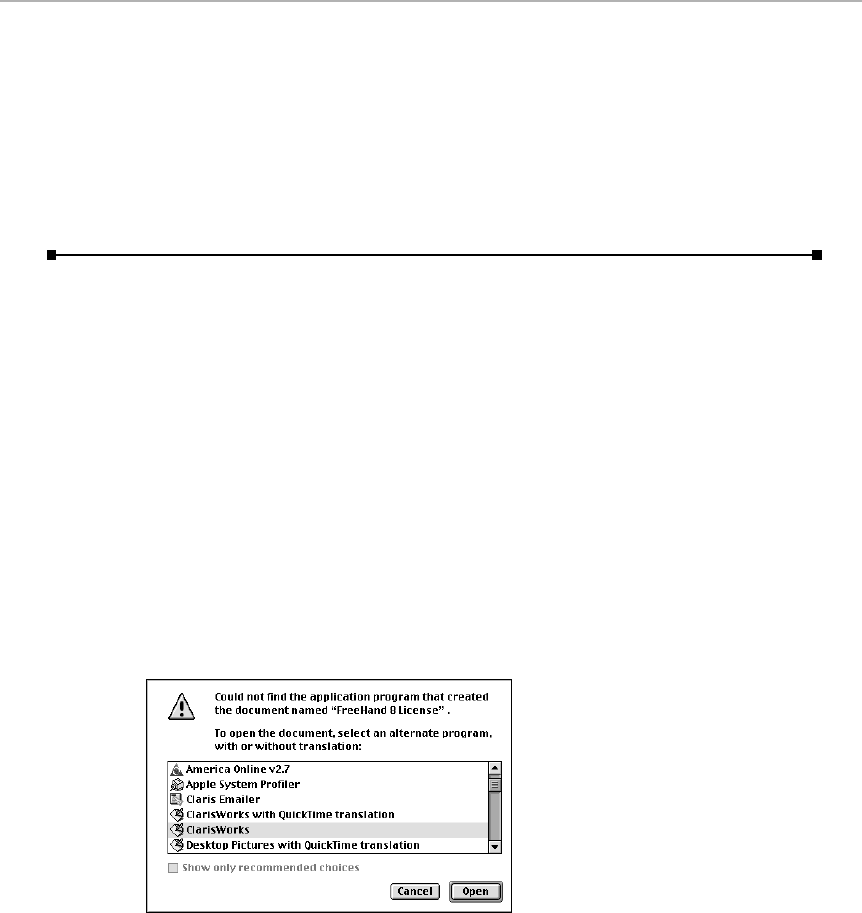
Roll credits!
With the Location Manager control panel open and the Option key pressed,
choose About Location Manager from the menu. The usual About box (those
are dance steps, by the way) — but this time, a scrolling list of inside-jokey
credits roll by.
They’re worth sitting through — if only for the sound of “Eric’s former cat”
Tabitha, who meows at the end of the sequence.
Mac OS Easy Open (Macintosh Easy Open)
If there’s one thing that frustrates novices and old Mac salts alike, it’s seeing
that infernal “Application not found” message when you double-click an icon.
Apple has made a couple of attempts to rectify the situation: allowing you to
drag a file onto a program’s icon, for example, or displaying messages that
offer to open text, movie, or PICT files in SimpleText. Unfortunately, these
solutions assume that you know what kinds of programs can read the
mysterious icon you’re trying to open.
That’s why Apple, beginning with System 7.5, gives us Mac OS Easy Open. (In
systems before 7.6, it’s called Macintosh Easy Open. And in Mac OS 8.5, it was
merged into the new File Exchange control panel, described earlier in this
chapter. With this control panel installed, when you double-click an icon, you
don’t get an error message— you get a dialog box that lists the programs you
own that can open the mystery file (see Figure 4-31).
Figure 4-31: Mac OS Easy Open intervenes when the “Application not found” box otherwise
would appear.
Chapter 4: Control Panels and Extensions 197
■ ■
MAC SECRETS • 4040-8/5 • ch.04.F • Chapter 4 • FINAL • VB • 10/22/98 • p.197
MAC SECRETS • 4040-8/5 • ch.04.1 • Chapter 4 • Proof 1 • VB • 09/16/98 • p.197
4040-8/5 ch04.F 11/3/98 3:14 PM Page 197

Today’s MEO control panel offers several checkboxes:
■Always show dialog box: Suppose you download a strange graphics file.
You double-click it. MEO doesn’t know what program the file came from,
and so its dialog box appears, listing the graphics programs you do have:
Photoshop and Color It. You choose Photoshop.
From now on, whenever you double-click that kind of graphics file, MEO
will automatically open it with Photoshop. But if you turn on “Always
show dialog box,” you’ll be offered the list of graphics programs every
time you double-click a mystery file — even if MEO already knows which
program you prefer.
■Include applications on servers: Turn on this checkbox if you want MEO
to search for available programs (to open the mystery file) not just on
your hard drive, but on other peoples’ hard drives if they’re connected
via network. As you can imagine, this searching-over-the-network
business makes the search take much longer.
■Auto pick if only 1 choice: If you double-click a mystery file and you
have only one program that could open it, this checkbox makes MEO
launch that program without even showing you its list dialog box.
■Translate TEXT documents: Turn this on if you want MEO to search for a
program that can open ordinary text files. If the text file is simply, well, a
text file, you’ve just made the process take longer. If the text file is
actually a word processor file from some program you don’t own,
however, you may appreciate being offered a translation choice.
198 Part I: System Software Revealed
■ ■
MAC SECRETS • 4040-8/5 • ch.04.F • Chapter 4 • FINAL • VB • 10/22/98 • p.198
MAC SECRETS • 4040-8/5 • ch.04.1 • Chapter 4 • Proof 1 • VB • 09/16/98 • p.198
ANSWER MAN
Q: What the heck is going on? My Mac sometimes
rebuilds its own Desktop, unbidden. I’m not
pressing any keys; I’m not doing anything —
except waiting and waiting for it to finish. What’s
going on?
A: Calm down. You’ve got Mac OS Easy Open,
right?
Q: How’d you know?
A: Mac OS Easy Open’s job is to suggest
programs to open the mystery document you’re
double-clicking, right? As a result, it has to know
what programs you have. It learns what
programs you have whenever you rebuild the
Desktop. (See Chapter 2 for details on rebuilding
the Desktop file.)
The trouble occurs when you rebuild the
Desktop with the Shift key down, thus turning
off all extensions, including Easy Open. The next
time you start up, Easy Open realizes that it
wasn’t around during the most recent Desktop-
rebuild, and so its catalog is out of date. It
therefore insists on rescanning your disk — by
rebuilding the Desktop — to make sure that its
index of your programs is current.
Desktop under permanent construction
4040-8/5 ch04.F 11/3/98 3:14 PM Page 198

In past versions, MEO could create a headache if you chose the wrong program
to open a mystery file —MEO, trying to do you a favor, would automatically
launch that same program every time you double-click any future document of
the same type. The only way to make MEO “unlearn” its association with that
wrong program was to delete its preferences file in your Preferences folder.
That’s why there’s a Delete Preferences button—but the “Always show
dialog box” checkbox is a superior method of re-teaching MEO.
Alas, MEO has its drawbacks. One problem is that it requires, at all times, an
up-to-date index of every program you own (so that its list of alternative
programs will be accurate). That requirement leads to a lot of extra Desktop-
rebuilding, as explained in the “Desktop under permanent construction”
sidebar. Another, related, problem is the hassle of rebuilding the Desktop when
you want to; see “The Mac OS Easy Open myth” secret in Chapter 1. As noted
there, we think these inconveniences outweigh Easy Open’s rare usefulness.
MacLinkPlus Setup
MacLinkPlus, a commercial utility included with System 7.5 through Mac OS
8.1, is designed to open DOS or Windows files when you double-click them,
translating them automatically into a Macintosh format. You use this control
panel to configure MacLinkPlus’s translators.
If you have Mac OS 8.5, you didn’t get MacLinkPlus. But don’t despair; we’ve
included it with this book! See the appendix for details.
MacTCP
This control panel is the pre-Open Transport component that configures your
Mac for connections to the Internet and other networks. If you’re not on a
network and don’t use the Internet, throw this out. See Chapter 25 for more
on the Internet. If you’re using Open Transport (see Chapter 35), this control
panel is replaced and made invisible by one called TCP/IP, described later in
this chapter.
MacTCP DNR
Talk about weird. According to the Finder, this little item is indeed a “control
panel” — and yet it isn’t in the Control Panels folder (it’s loose in the System
Folder) and can’t be opened!
DNR stands for “domain name resolver”; this phony control panel contains
information required by certain Internet (TCP/IP) programs. In theory, the file
should be obsolete in this era of Open Transport. It’s still around only to
accommodate Internet programs that aren’t compatible with Open
Transport. If you aren’t using Open Transport, and you have an Internet
account, don’t even bother trying to throw this file away; the next time you
sign on, the MacTCP control panel will create it anew.
Strange
But True
Chapter 4: Control Panels and Extensions 199
■ ■
MAC SECRETS • 4040-8/5 • ch.04.F • Chapter 4 • FINAL • VB • 10/22/98 • p.199
MAC SECRETS • 4040-8/5 • ch.04.1 • Chapter 4 • Proof 1 • VB • 09/16/98 • p.199
4040-8/5 ch04.F 11/3/98 3:14 PM Page 199
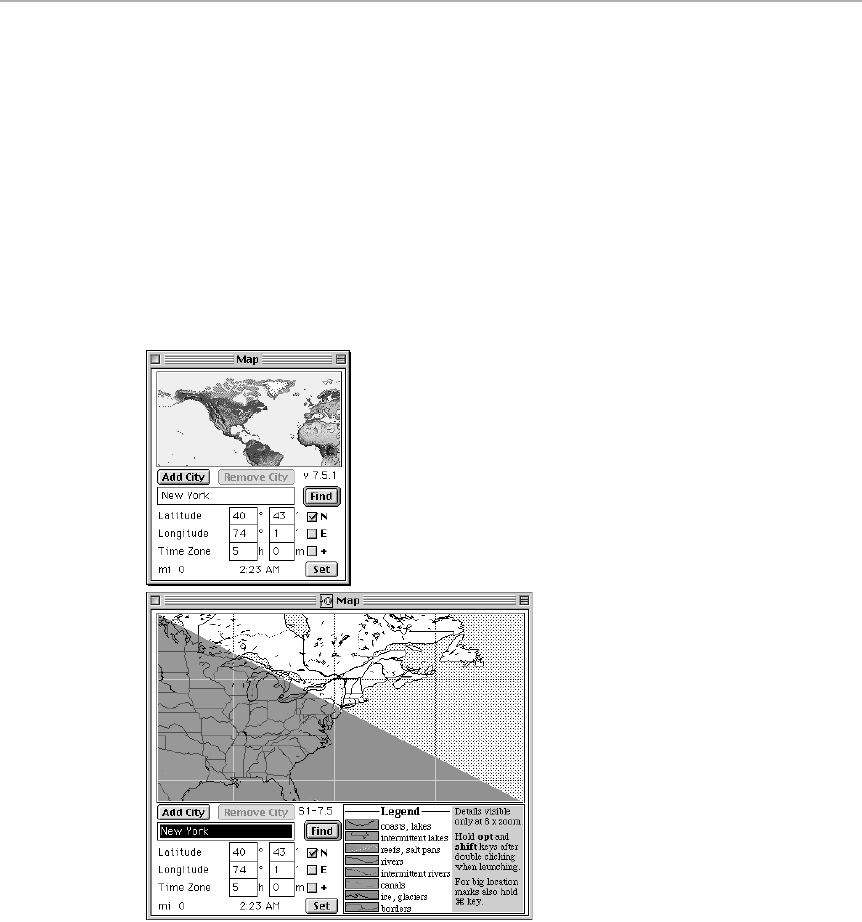
Map
If you need to know the exact time in Ulan Bator (the capital of Mongolia), or
if you’re called upon to calculate the mileage from there to your office, the
Map control panel is indispensable. Generations of Mac fans have disparaged
the Map — but it’s probably far more important than you suspect, as we’ll
discuss shortly. (In Mac OS 8.5 and later, you’ll have to hunt through the
Apple Extras folder on your hard drive to find the Map.)
Click any spot on the world map, and the Map displays the current time at
that locale, along with its precise longitude and latitude (see Figure 4-32). You
can scroll around the world by dragging the pointer to the edges of the Map
window.
Figure 4-32: Top: What your map looks like. Bottom: What ours looks like, after the
installation of Hi-Res Map, a Mac Secrets exclusive.
The Find feature can locate specific cities, islands, and other points on the
Map; just type the name of the city you want to locate and then click the Find
button (or press Return). The Map already knows about most major cities, as
well as Mount Everest and the Middle of Nowhere (a spot in the South
Atlantic Ocean — try it by typing MID and pressing Return).
200 Part I: System Software Revealed
■ ■
MAC SECRETS • 4040-8/5 • ch.04.F • Chapter 4 • FINAL • VB • 10/22/98 • p.200
MAC SECRETS • 4040-8/5 • ch.04.1 • Chapter 4 • Proof 1 • VB • 09/16/98 • p.200
4040-8/5 ch04.F 11/3/98 3:14 PM Page 200

If you’re not sure that a city is listed or don’t know how to spell it, type just the
first letter or letters and then click Find. The Map jumps to the nearest match.
To make practical use of the Map, you must set your home city, which
becomes the reference point from which all distances and times are
measured. To do this, locate your city on the Map, using the Find command,
and then click the Set button. Your city now becomes mile zero and displays
the current time. The Map calculates all distances and time differences based
on your home city’s location and time.
If your home isn’t among the cities listed in the Map, use an atlas to determine
the exact latitude and longitude of your home. (Or if you’re not fussy, just
click the approximate spot.) Use this information to add your city to the map:
Type the name of the city, along with its coordinates, and then click Add City.
Map Secrets
■
Around the world in 80 Returns
To see all the locations that the Map already knows about, hold down the Option
key while repeatedly clicking Find (or pressing Return). This trick cycles through
all the cities that the Map is programmed to find by name.
The importance of setting your home town
Here’s solid proof that the Map can have a profound impact on your work:
A magazine company in Oregon was struggling to keep its important QuarkXPress
files up to date. An editor would open a nearly-completed magazine layout— only to
get a warning from QuarkXPress that nearly all the imported graphics in the Quark
file had been modified and needed updating. Yet the editor knew perfectly well that
the graphics had
not
been updated since the file was last saved. Still, not wanting
to take chances, the editor would laboriously update each file. An hour later,
though, the same thing would happen. It was driving the staff crazy. Why did Quark
keep saying the pictures in the files had been modified when they weren’t?
Incredibly, the Map was responsible. One of the designers had unwittingly set
his Map’s home city to Ouagadougou — the capital of Burkina Faso in West
Africa. Even though his clock was set correctly, the Map was telling his Mac that
it was really eight hours earlier in Oregon. Therefore, each file he saved was
date-stamped with a time that was, by Oregon time,
eight hours ahead
of its
actual save time. When the file was opened and saved on
another
Mac set to
the correct time zone, Quark became hopelessly confused as to when the files
had
really
been modified last. (Fact is, this same Quark problem can arise even
when the Mac clocks on a network are out of sync by just an hour or two.) At any
rate, simply resetting the Map brought all the Macs on the network back into
sync and the problem vanished.
And
that’s
why you shouldn’t ignore your lowly Map.
Strange
But True
Chapter 4: Control Panels and Extensions 201
■ ■
MAC SECRETS • 4040-8/5 • ch.04.F • Chapter 4 • FINAL • VB • 10/22/98 • p.201
MAC SECRETS • 4040-8/5 • ch.04.1 • Chapter 4 • Proof 1 • VB • 09/16/98 • p.201
4040-8/5 ch04.F 11/3/98 3:14 PM Page 201

Instant intercity distance readout
You can use the Map to quickly ascertain the distance between any two spots on
Earth. Suppose that you live in Chicago but need to know the distance between
Miami and Budapest. Easy: Type Miami in the location field, click Find (or press
Return), and then click Set. As far as the Map is concerned, you just changed your
home city. Next, type Budapest in the location field and press Return. The Map
jumps to Budapest, and you’ll have your answer: 5,330 miles.
Miles-to-kilometers-to-degrees calculator
The Map control panel contains an undocumented feature for converting miles to
kilometers and vice versa. The distance between two map points is displayed in
the lower-left corner of the Map window. If the distance is displayed in miles, click
mi
, and that number is instantly converted from miles to kilometers. Click the
km
text and the distance again is converted, this time to degrees.
Interestingly, you can click a third time to see how many
degrees
the selected
city is from your home city. (The degrees number is a compass heading relative
to your home city, which is considered 360.) Click one last time to convert the
figure back to miles.
Map zooming
You can view the map at three levels of magnification: normal size, twice normal
size, and four times normal size.
Magnify the map by 200 percent by pressing the Shift key while opening the
Map control panel. To do this, you must first double-click the Map icon and
then
press the Shift key (an icon won’t open if you hold down the Shift key
while
double-clicking).
To magnify the map by 400 percent, hold down the Option key while opening the
control panel. For an even more magnified view, try opening the Map while
pressing both the Option
and
Shift keys. (Again, you must press Shift right
after
you double-click.)
Unfortunately, the resulting blown-up map is spectacularly blotchy and distorted.
Wouldn’t it be nice if the enlargement were every bit as clear as the original —
or clearer?
Thanks to the efforts of Map-obsessed Göran Svegle, it shall be so (see Figure
4-32). Install HiRes Map, a Mac Secrets exclusive; it’s included on the CD-ROM
with this book. Instructions are in the appendix.
A better Map
You can replace the uninspiring black-and-white map in the pre-System 7.6 Map
control panel with the splendid color world map stored in the Scrapbook. To
make the switch, copy the color map from the Scrapbook. Open the Map control
Contest
Winner
202 Part I: System Software Revealed
■ ■
MAC SECRETS • 4040-8/5 • ch.04.F • Chapter 4 • FINAL • VB • 10/22/98 • p.202
MAC SECRETS • 4040-8/5 • ch.04.1 • Chapter 4 • Proof 1 • VB • 09/16/98 • p.202
4040-8/5 ch04.F 11/3/98 3:14 PM Page 202
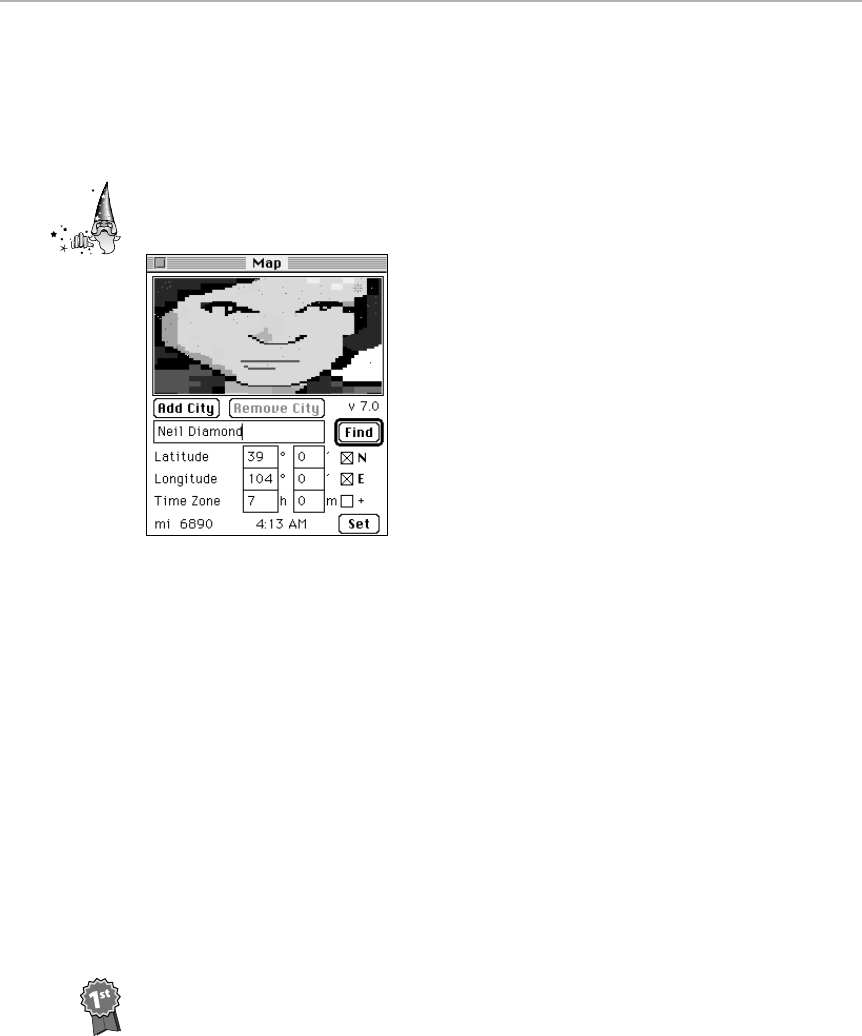
panel, click the map picture, and choose the Paste command. (System 7.6 and
later has this color map pre-installed.)
You also can copy the map graphic
from
the Map control panel. Click anywhere
on the map, and choose Copy. You now have a neat little world map that you can
paste into any other program.
Actually, you can paste any graphic into the Map, although few choices other
than a world map make any sense (see Figure 4-33).
Figure 4-33: You can replace the Map with a picture of Neil Diamond — but why?
What time is it in London?
You can find out the difference between any spot in the world and your own time
zone. First, click somewhere on the map (or type the city name, such as Paris,
and click Find). Then click the words
Time Zone
. The Time Differ. box now shows
the time difference between the cities. (The tiny + or - symbol at the right
indicates whether you’re ahead or behind.)
But you don’t have to do the addition yourself, of course; the exact time in the
other city is shown at the bottom of the window.
Fix that typo!
You can freely edit any cities
you’ve
added to the Map’s database. But the 230
cities already
in
the database are locked. You can’t edit their information.
That bugged Map specialist Göran Svegle, because he discovered that the
coordinates for Havana, Cuba, are incorrect! He didn’t rest until he devised a way to
edit a locked city. Two ways, actually —but one of them requires ResEdit.
The much easier way: Type in the locked city’s name and click Find. Add a letter
to the city name, making it, for example, “Havana2.” Click Add City and then
Remove City.
Contest
Winner
Strange
But True
Chapter 4: Control Panels and Extensions 203
■ ■
MAC SECRETS • 4040-8/5 • ch.04.F • Chapter 4 • FINAL • VB • 10/22/98 • p.203
MAC SECRETS • 4040-8/5 • ch.04.1 • Chapter 4 • Proof 1 • VB • 09/16/98 • p.203
4040-8/5 ch04.F 11/3/98 3:14 PM Page 203

Now
delete
the extra character you added to the city’s name. Now Havana is
removable, and therefore changeable. Click Remove City; type in the corrected
coordinates (23 degrees 0' N, 82 degrees 30' W); and finally, click Add City one
more time. The deed is done!
Roll credits!
Click (and hold) on the version number at the right side of the control panel, and
the words
v7.x, by Mark Davis
are inserted into the city-name field. Thanks,
Mark!
Memory
The Memory control panel (see Figure 4-34) manages several important
memory-related functions: the disk cache, virtual memory, RAM disks, Modern
Memory Manager, and 32-bit addressing. For explanations of the real-world
uses for these functions, see Chapter 9.
204 Part I: System Software Revealed
■ ■
MAC SECRETS • 4040-8/5 • ch.04.F • Chapter 4 • FINAL • VB • 10/22/98 • p.204
MAC SECRETS • 4040-8/5 • ch.04.1 • Chapter 4 • Proof 1 • VB • 09/16/98 • p.204
TRUE FACT
As we’ve noted, having the correct settings in
the Map control panel can make a big difference
to the way files are dated on your Mac. But the
weirdness doesn’t stop there, as free 4th Edition
winner Rajan Munshi observes.
I believe I have found a bug in the Map control
panel. When the Map control panel is open, the
time zone is displayed relative to Greenwich
Mean Time (GMT) in England. I am currently in
Jackson, MS (U.S. Central Time), which is six
hours behind GMT.
However, during Daylight Savings Time, the
“Time Zone” should now be five hours behind
GMT. Fair enough. Yet if you turn on “ Daylight
Savings Time” in the Date & Time control panel,
absolutely nothing happens in the Map; its
display of the current time and the difference
from GMT don’t change! Oddly enough, if you
click the Set button, the times in the Map will
immediately correct themselves — until the next
time you open the Map, whereupon the time
and time zone will both be wrong again.
The only way to solve this problem permanently
is to avoid the Daylight Savings Time option (in
the Date & Time control panel).
Or upgrade to Mac OS 8.5, we might add, which
finally makes the Map observe Daylight Savings
Time — and even resets your Mac’s clock
automatically when DST begins or ends.
Rajan’s Dilemma
4040-8/5 ch04.F 11/3/98 3:14 PM Page 204
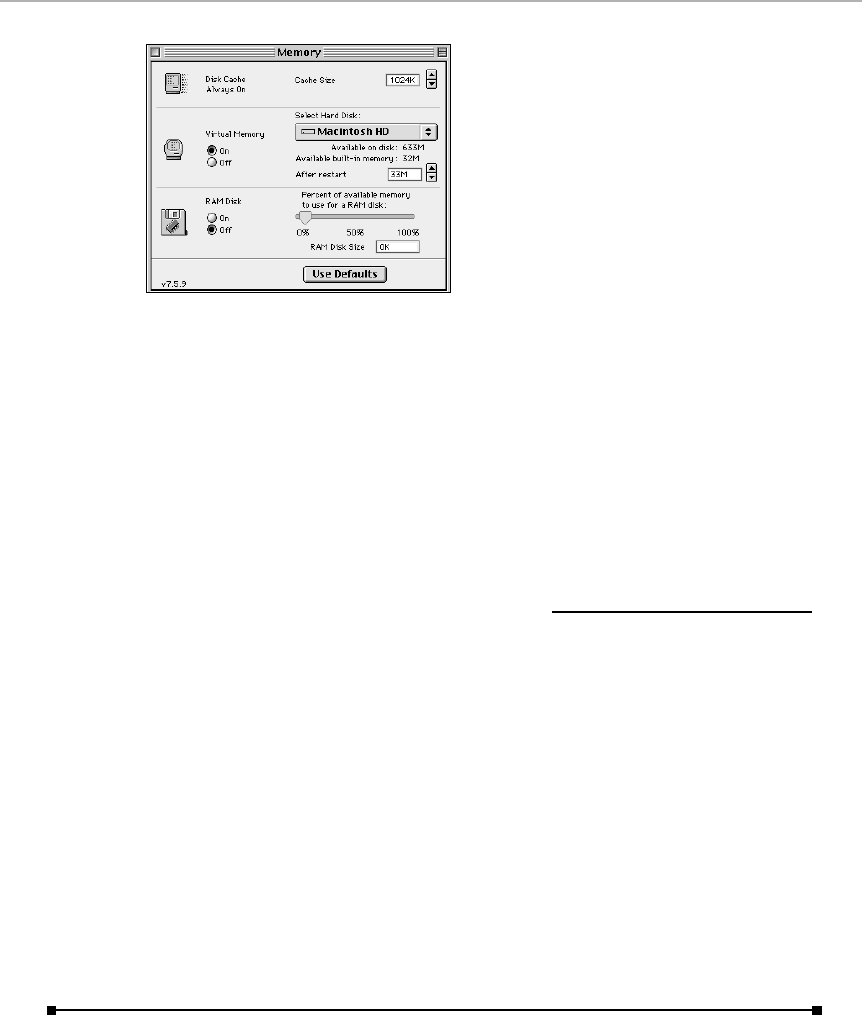
Figure 4-34: The many panels of Memory.
The Memory control panel automatically hides or shows controls, depending
on your Mac model. For example, the original Mac LC doesn’t work with
virtual memory, so no virtual-memory options appear. And only Power
Macintosh models (before Mac OS 8) offer the Modern Memory Manager
choice — an internal memory-management option that speeds up PowerPC-
specialized programs by about 25 percent. (The Off button is there in the rare
event of some ancient game program that doesn’t work with the Power Mac’s
new memory scheme.)
Memory Control Panel Secrets
■
Roll credits!
For this one, you need a Mac that works with virtual memory —and System 7.x.
First, turn on Virtual Memory. Hold down the Option key while clicking the pop-up
menu used to choose a hard drive. Instead of a list of available drives, you see
a hierarchical menu containing the names of the programmers. The submenus
contain the hilarious nicknames of each of the programmers.
Turn off virtual memory at startup
We’re not sure how often you’ll use this, but here it is: If you press the Ôkey
while your Mac starts up, you’ll turn off virtual memory for that computing
session.
Chapter 4: Control Panels and Extensions 205
■ ■
MAC SECRETS • 4040-8/5 • ch.04.F • Chapter 4 • FINAL • VB • 10/22/98 • p.205
MAC SECRETS • 4040-8/5 • ch.04.1 • Chapter 4 • Proof 1 • VB • 09/16/98 • p.205
4040-8/5 ch04.F 11/3/98 3:14 PM Page 205

Monitors
Use the Monitors control panel, if you have it, to change the number of colors
your monitor displays; manage multiple-monitor setups; and adjust the
gamma (overall monitor tone) and resolution of your screen. For more on
these topics, see “Monitors & Sound,” described next.
Monitor Secrets
■
What’s behind the Options button
As described in the sidebar “What’s the gamma?” your monitor’s
gamma
setting
is its overall hue. Most Mac monitors let you choose from among two or three
gamma settings, which can have a huge effect on the brightness or muddiness
of photographic images.
To view the secret dialog box containing these controls, Option-click the Options
button. Only now do you see the list of gamma settings (if your monitor supports
them).
No Option key is needed, by the way, when clicking the Options button, if you
want to change the
resolution
of your screen — that is, to choose larger or
smaller dimensions, thus enlarging or reducing the amount of area that fits on
your screen. (See Chapter 11 for details on screen resolution.)
Roll credits!
In the upper-right corner of the control-panel window, click the version number
(such as 7.1.3). You see a pop-up list showing the names of the six
programmers.
The fun isn’t over yet. Keep holding down the mouse button (so that the list
stays visible), and press the Option key. The tiny face next to Jim Straus’s name
sticks out its tongue each time you press the Option key. Press the Option key
11 times; the first and last names in the list begin to rearrange themselves and
get replaced with the words
Blue
and
Meanies
. (The Blue Meanies were the
System 7 test-and-cleanup SWAT team.)
Modem
Beginning with the dawn of Open Transport (see Chapter 35), Apple created a
central place for specifying what kind of modem you have. It’s this control
panel, whose central feature is a pop-up menu of different modem brands.
Other controls let you specify which jack your modem is plugged into
206 Part I: System Software Revealed
■ ■
MAC SECRETS • 4040-8/5 • ch.04.F • Chapter 4 • FINAL • VB • 10/22/98 • p.206
MAC SECRETS • 4040-8/5 • ch.04.1 • Chapter 4 • Proof 1 • VB • 09/16/98 • p.206
4040-8/5 ch04.F 11/3/98 3:14 PM Page 206

(modem, printer, PC card, and so on); whether or not you want the modem
speaker turned on; whether or not you want touch-tone dialing; and so on.
Most people don’t notice the menu bar that appears when you open the
Modem control panel. Its File menu features the important Configurations
command, which lets you create multiple modem setups — complete with
independent port assignments, speaker volumes, and so on — and switch
easily among them. As noted in Chapter 35, you can use the Location
Manager Control Strip icon to flip conveniently among different setups,
without even opening this control panel.
Modem control panel Secrets
■
Trash modems you don’t own
The list of modems you see in the Modem control panel corresponds to the
icons in the Modem Scripts folder (which is inside your System folder, inside the
Extensions folder). Mac OS 8.x comes with 44 of these mini-preference files,
which, for most people, is about 43 too many.
Open the Modem Scripts folder and throw away all of the modem names and
brands you don’t own. You’ll save disk space, make configuring the Modem
control panel easier, and sleep well at night. If you ever switch to a different
modem, heck, you can always reinstall the scripts.
Add your modem to the list
If you don’t see your modem’s name listed in the Modem control panel’s pop-up
menu, don’t even think about trying to get online. Choosing the wrong modem
type is a chronic cause of difficulty when trying to get onto the Internet.
(Choosing a modem name that sounds
similar,
such as Global Village Platinum
when what you actually have is a Global Village 56K, isn’t good enough.)
Instead, you have two options: Either ask for the necessary modem script from the
modem’s maker (or investigate the company’s Web page, where they’ve probably
posted the necessary scripts), or use Apple’s Modem Script Generator program.
You can download it from Apple’s Web page at www.info.apple.com/swupdates
(it’s filed under Macintosh, in the Unsupported folder).
Monitors & Sound
The Monitors & Sound application is the Mac’s audio/visual control center.
With the help of its required extension, SystemAV, Monitors & Sound lets you
change the settings for your monitor, speaker, and microphone. (Monitors &
Sound replaces two previous control panels—Monitors and Sound, of course.)
Chapter 4: Control Panels and Extensions 207
■ ■
MAC SECRETS • 4040-8/5 • ch.04.F • Chapter 4 • FINAL • VB • 10/22/98 • p.207
MAC SECRETS • 4040-8/5 • ch.04.1 • Chapter 4 • Proof 1 • VB • 09/16/98 • p.207
4040-8/5 ch04.F 11/3/98 3:14 PM Page 207

Several buttons at the top of the window let you switch its panels (see
Figure 4-35).
Monitors: When you click the Monitors button, you can specify the number
of colors your monitor displays (for example, to switch from color to
grayscale, or 256 colors to Thousands). The range of options depends on
your Mac’s video capability; the more video RAM (or VRAM) you have
installed, the more colors your Mac can display. (Details on VRAM appear in
Chapter 11.) The long rectangle at the bottom of the control panel displays
the full spectrum of colors you selected.
Figure 4-35: The three main Monitors & Sound panels. Your options may vary.
Why not always display the maximum number of colors possible? As a general
rule, the lower the color setting in the Monitors control panel (16 colors, 256,
and so on), the faster your screen gets repainted. On the other hand, the
slowdown is imperceptible on modern Power Macs; maybe that’s why they
can’t be set to black-and-white. (There are other ways to switch your color
setting without opening Monitors & Sound, by the way. You can save time,
effort, and RAM by using the Control Strip, described earlier in this chapter.)
208 Part I: System Software Revealed
■ ■
MAC SECRETS • 4040-8/5 • ch.04.F • Chapter 4 • FINAL • VB • 10/22/98 • p.208
MAC SECRETS • 4040-8/5 • ch.04.1 • Chapter 4 • Proof 1 • VB • 09/16/98 • p.208
4040-8/5 ch04.F 11/3/98 3:14 PM Page 208

If you’re lucky enough to own a multisync monitor (one whose image can be
enlarged or reduced), the Resolution panel is one way to switch from one
zoom setting (“resolution”) to another. (Once again, however, it’s faster to
use the Control Strip.)
You also use the Monitors control panel to set up multiple-monitor
configurations when more than one monitor is attached to your Mac.
Chapter 11’s juicy exploration of multiple-monitors secrets includes
instructions for specifying which monitor should be the “main” one, how
to figure out which monitor is which, and more.
Sound: The options on the Monitors & Sound application’s Sound panel differ
according to your Mac model and your system version. (See Chapter 23 for
much more on sound.) Most people, however, are offered sliders such as:
■Sound Out Level and Sound Out Balance: These sliders control the
volume and right-to-left stereo balance of your external speakers, if any.
■Computer Speaker Volume: This is the one you’ll probably use most
often: the volume of your Mac’s built-in speaker.
■Computer Speaker Balance: If you have stereo built-in speakers, such as
those built into the AppleVision monitors, this slider controls the right-
to-left balance between them.
■Sound Output: This pop-up menu lets you direct the sound coming out of
your Mac — to external speakers (if any), the built-in speaker, and so on.
■Sound Recording Input: Choose, from this pop-up menu, what sound
source you want to record (when you record; see Chapter 23). Your
choices depend on the equipment your Mac has, but the list may include
Internal Mic (the built-in microphone on PowerBooks, for example); Line
In (the microphone jack on the back of your Mac); Expansion Bay— PC
Card (the card slot on PowerBooks, in the event somebody invents a PC
card that contains a microphone); Internal CD (you can record from, or
listen to, music CDs); Zoom Video (for PowerBooks 3400 and later with a
Zoom Video PC card, as described in Chapter 14); and so on.
■Listen: This checkbox, known in the older Sound control panel as
Playthrough, lets you decide whether or not you want the incoming sound
passed through the Mac and played through its speakers. You’d definitely
want this turned on if you’re trying to listen to a music CD. You’d probably
want this off if you’re trying to record with your Mac microphone (to avoid
feedback). See Chapter 23 for more on recording sounds.
(Mac OS 8.1 fans may have been alarmed that this checkbox is no longer
available; the “playthrough” option is always on. Unless, of course, you
install the Control Strip module called Sound Input Strip, available from
www.csun.edu/~hbcsc224/SOFTWARE.HTML, and included with Mac OS 8.5
and later.)
OS
8.5
Chapter 4: Control Panels and Extensions 209
■ ■
MAC SECRETS • 4040-8/5 • ch.04.F • Chapter 4 • FINAL • VB • 10/22/98 • p.209
MAC SECRETS • 4040-8/5 • ch.04.1 • Chapter 4 • Proof 1 • VB • 09/16/98 • p.209
4040-8/5 ch04.F 11/3/98 3:14 PM Page 209

■Sound Output Quality: This pop-up menu lets you choose the quality of
sound playback; higher numbers are better quality. Actually, we can’t
think of any reason not to leave this control at its highest setting.
Alerts: This panel of the Monitors & Sound program lets you choose a sound
you’d like your Mac to use as its error beep — the quack, beep, or droplet
sound it makes when you’re clicking somewhere you shouldn’t be, for example.
To play a sound, click its name in the list. Whichever sound is selected when
you close the control panel becomes the standard alert sound. That’s an
important fact to remember if you have long sounds in your arsenal, which
are utterly annoying as error beeps; the Mac is incapacitated until the sound
finishes playing.
Note that this control, too, has a volume slider; it lets you set a volume level
for your error beeps independently from the other Mac’s sounds (which are
set using the Computer Speaker Volume, described earlier). In other words,
you can have your games playing full blast, while not embarrassing yourself
when the Mac notifies your coworkers that you’ve just made a mistake.
In recent versions of Monitors & Sound, the list of Alert Sounds also offers
Add and Delete buttons. If your Mac has a microphone, in other words, you
can record new error beeps of your own.
To do so, click Add, which opens a panel with tape recorder-like controls.
Click Record to begin recording your sound. Be ready to click Stop promptly
when you finish, so that you don’t record a block of dead air at the end of
your sound. To save what you recorded, click Save and assign the sound a
name. It now appears in your list of available alert sounds. (To remove a
sound, click its name and then click Delete.) See Chapter 23 to find out what
else you can do with your recorded sounds.
210 Part I: System Software Revealed
■ ■
MAC SECRETS • 4040-8/5 • ch.04.F • Chapter 4 • FINAL • VB • 10/22/98 • p.210
MAC SECRETS • 4040-8/5 • ch.04.1 • Chapter 4 • Proof 1 • VB • 09/16/98 • p.210
MACINTOSH SECRET
You make subtle adjustments to the color balance
on your monitor by using the Gamma controls at
the bottom of the Monitors & Sound window. (If
you have the older Monitors control panel, Option-
click the Options button to see these controls.)
Apple monitors are manufactured by Sony. Apple
found the overall image a little bit dim, however,
and decided to adjust the gamma settings to
create a brighter, whiter picture. Apple calls its
preferred setting Standard Gamma. Uncorrected
gamma, on the other hand, is the original,
unmodified Sony Trinitron setting. (Some Apple
monitors offer additional gamma settings.)
The Gamma selection you use can have a huge
effect on photos and other graphics; if you edit
your images with your monitor set to Standard
Gamma, you’ll cry out at the dismal, dark,
muddy image that results when you print your
photos or post them on the Web. Work with
photos with your monitor set to Uncorrected
Gamma. (Better yet, use a custom gamma
setting set just for your monitor. Use
Photoshop’s Monitor Setup command, in the File
menu’s Preferences submenu, to set this up.)
What’s the gamma?
4040-8/5 ch04.F 11/3/98 3:14 PM Page 210
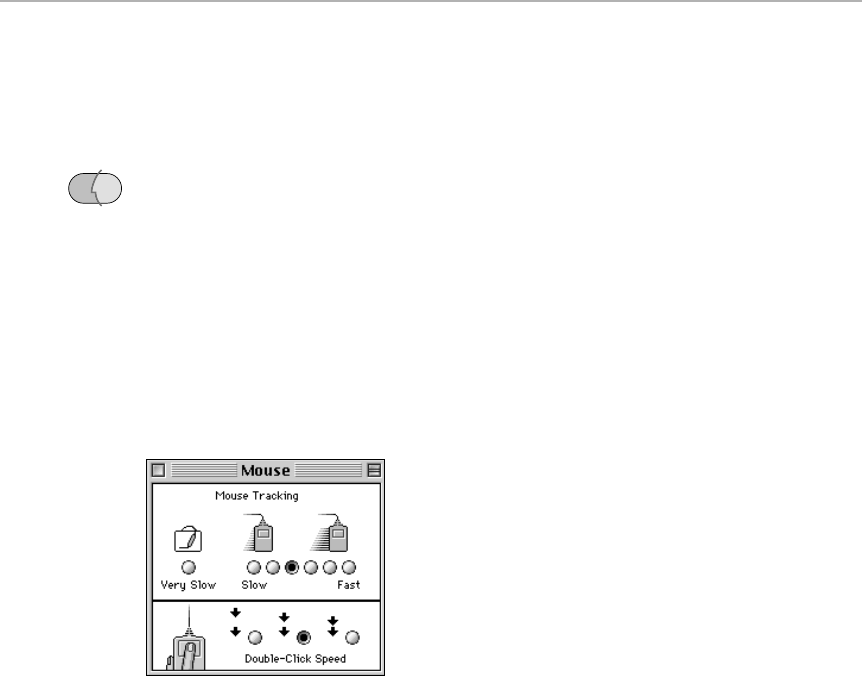
If your Monitors & Sound control panel doesn’t have an Add button, you must
use the SimpleSound desk accessory (described in Chapter 3) to record new
sounds. (In their zeal to create the original version of Monitors & Sound,
Apple’s programmers left out the ability to add new sounds — a feature the
older Sound control panel had had for years.)
Color: New in Mac OS 8.5, this button (and corresponding panel) offers a
simple list of monitors. They correspond to the list of ColorSync profiles in
your System Folder (which you should feel free to clean out, discarding the
icons for all monitors you don’t actually use). Its purpose is to tell the Mac
what kind of monitor you’re using for accurate color matching using
ColorSync, described earlier in this chapter.
Mouse
This control panel provides access to two vital mouse controls: tracking and
double-click speed (see Figure 4-36).
Figure 4-36: Fine-tune your mouse with the Mouse control panel. If you have a PowerBook
and version 7.2 or later of this panel, you also have an option for thickening your cursor.
Mouse tracking is the ratio between the physical movement of the mouse on
your desk and the movement of the pointer on your monitor. The higher the
setting, the less you have to slide the mouse to move the pointer. In other
words, at the fastest of the seven available settings, a tiny one-inch
movement of the mouse on your desk may move the cursor three inches
across the screen—or even more. The exaggeration of the cursor’s
movement is associated with how fast you move the mouse.
Even at the fastest tracking setting, however, when you move the mouse very
slowly, the cursor on the screen moves exactly that much—one inch per
inch of desk space. (That makes life easier when you’re doing fine editing in a
graphics program.) Yet, if you move the mouse that same inch very quickly,
the cursor on the screen may jump most of the way across your monitor.
OS
8.5
Chapter 4: Control Panels and Extensions 211
■ ■
MAC SECRETS • 4040-8/5 • ch.04.F • Chapter 4 • FINAL • VB • 10/22/98 • p.211
MAC SECRETS • 4040-8/5 • ch.04.1 • Chapter 4 • Proof 1 • VB • 09/16/98 • p.211
4040-8/5 ch04.F 11/3/98 3:14 PM Page 211

(Your cheerful authors once were privy to a thick Apple document — a bound
dissertation on mouse-acceleration research, believe it or not — in which the
pros and cons of various cursor-speed logarithmic scales were discussed and
tested at length.)
The higher settings are best for most applications. You’re less likely to run
out of mouse-pad (and desk space), and you can zip the pointer from one end
of the monitor to the other with the flick of a wrist. We’ve heard it argued that
the slower settings are good for graphics work, because a slow-moving
pointer provides better control. Yet, as we said, even at the Fast setting, a
slow-moving mouse gives you a slow-moving cursor. (You can make the
mouse even faster using ResEdit; see Chapter 21.)
How does the Mac know the difference between a double-click and two single
clicks? Using the Mouse control panel’s Double-Click Speed setting, you tell
the Mac how fast the two clicks must occur to qualify as a double-click. When
adjusting this setting, watch the little picture of the mouse. The mouse
button flashes to indicate the new minimum double-click rate.
In Mac OS 8 and later, this setting affects, of all things, the menu-drop hold-
down delay (for want of a better term). It determines the maximum amount of
time you can hold your cursor down on a menu title and still make the menu
drop down when you release. In other words, if you click quickly, the menu
drops down; if you keep the button pressed for a period longer than this
double-click speed setting, as though you’re just reading the menu instead of
using it, the menu snaps back up when you let go of the button.
Network
With the dawn of Open Transport (see Chapter 35), this control panel is no
more, having been replaced by the more attractive AppleTalk control panel.
The idea, however, is the same. The Mac, in its wondrous multilingual way,
can talk to several different kinds of networks. It can talk to LocalTalk (the
built-in networking system). It can talk to the faster, more expensive Ethernet
or Token Ring. It can beam information from PowerBook to PowerBook. The
Mac even can communicate with such a thing as a remote network, which is
what you become when you use Apple Remote Access to dial in. (See Chapter
35 for details on networks.)
You must use this control panel to direct the Mac’s attention to the correct
kind of network. For example, if your Mac is hooked up to a laser printer by
Ethernet, and you now want to connect your PowerBook 180 (which doesn’t
have Ethernet) to transfer some files, you’ll have to switch the Mac to
LocalTalk by opening Network and clicking the corresponding icon.
Strange
But True
212 Part I: System Software Revealed
■ ■
MAC SECRETS • 4040-8/5 • ch.04.F • Chapter 4 • FINAL • VB • 10/22/98 • p.212
MAC SECRETS • 4040-8/5 • ch.04.1 • Chapter 4 • Proof 1 • VB • 09/16/98 • p.212
4040-8/5 ch04.F 11/3/98 3:14 PM Page 212

Numbers
This control panel determines where the commas and periods appear in big
numbers. (In France, for example, periods are used instead of commas to
separate the thousands, as in “you owe me a grand — yeah, 1.000 bucks.”) Use
the little pop-up menus to change the punctuation to serve as the decimal
point and the thousands separator (see Figure 4-37), or simply type the
punctuation mark in the box. The right side of the control panel controls the
way money amounts are displayed (such as what currency symbol appears).
Figure 4-37: The Numbers control panel makes your digits world-ready.
Changing the Separators affects numbers in the Finder; a file that says
“1,233K” will say “1.233K” after you restart the Mac. The only other place
where the Numbers setting has any effect is in your spreadsheet programs.
For example, in Excel, even if you type “3.14159,” what appears in the cell is
“3,14159” — with a comma. Similarly, if you apply the Currency number
format to some numbers in Excel, the punctuation (and even currency unit,
such as ¥ or £) changes to your Numbers control panel’s setting.
In any case, you probably can see where we’re headed with this: After you
check out this control panel, throw it away.
Password Security
This control panel is a terrific idea. It protects PowerBooks from
unauthorized snooping by requiring a password each time you turn on (or,
optionally, wake up) the laptop.
The good news: even pressing the Shift key during startup doesn’t prevent
this control panel from requesting the password. Starting up from another
disk, such as Disk Tools, won’t work either. Moreover, when you type your
password, you see only bullets (•••••) appearing in the Password blank, so
that the guy in the next airplane seat can’t learn your password by looking
over your shoulder.
Chapter 4: Control Panels and Extensions 213
■ ■
MAC SECRETS • 4040-8/5 • ch.04.F • Chapter 4 • FINAL • VB • 10/22/98 • p.213
MAC SECRETS • 4040-8/5 • ch.04.1 • Chapter 4 • Proof 1 • VB • 09/16/98 • p.213
4040-8/5 ch04.F 11/3/98 3:14 PM Page 213

In other words, if you forget your password, you’re out of luck. Your only
option is to take your PowerBook, complete with original purchase receipt, to
an authorized Apple service center, where they have the special tools needed
to bypass the security. (The 800-SOS-APPL staff can’t help you here.)
Before you call, however, test your Password control panel to see if it has the
most amusing Apple bug of all time. Instead of typing the correct password to
get in, try typing the bullets themselves (•••••) by pressing Option-8 several
times — in several incarnations of this control panel, a string of bullets was
accepted as the correct password!
PC Exchange
See “File Exchange,” earlier in this chapter.
PC Setup
This control panel is strictly for Macs with DOS Compatibility cards installed,
such as those with the words “/DOS Compatible” in the model name. It’s
designed to let you map your Mac’s actual modem and printer ports to COM
ports on your “virtual PC,” and to let you specify a “virtual drive” for your
DOS partition.
PC Setup Secrets
■
Roll credits!
Turn on Balloon Help and point to the control panel’s version number. Your
reward: “This is the version number. Nothing more, nothing less.” How helpful!
The phony DOS prompt
Free book winner Dan Vanderkam unearthed this bit of silliness (which you can
try out even if you don’t actually have a DOS card installed): Ô-click the version
number in the PC Setup control panel. The panel goes black… and is replaced
by — a DOS prompt, complete with bootup noises! (To be perfectly accurate, it’s
called RP-DOS — a very obscure version, we’re guessing.)
It’s fully functional (if you know DOS, and we hope you don’t). At the C:\> prompt,
for example, you can type
help
to see a list of all available DOS commands. You
can also access folders showing the names of the programmers and their roles
(type
cd
to see a list of these folders, or
cd\
to move backward out of them).
Contest
Winner
214 Part I: System Software Revealed
■ ■
MAC SECRETS • 4040-8/5 • ch.04.F • Chapter 4 • FINAL • VB • 10/22/98 • p.214
MAC SECRETS • 4040-8/5 • ch.04.1 • Chapter 4 • Proof 1 • VB • 09/16/98 • p.214
4040-8/5 ch04.F 11/3/98 3:14 PM Page 214

Performa
This control panel existed only during the three years when Performas and
regular Macs used different system software. It was responsible for adding
the three “Performa features”: a self-hiding desktop, a Documents folder, and
System Folder protection (see “General Controls” in this chapter).
Pointer Mode
Because of some mysterious bug in System 7.5.3/7.5.5 , the cursor itself isn’t
captured in the Picture 1 file you get when, on 7200, 7300, 7600, and 8600
models, you press Ô-Shift-3 (or make QuickTime movies of screen activity
with a program like CameraMan). This control panel puts the cursor back
into the picture.
You know what? It’s harder to make the “Macintosh is superior” argument at
cocktail parties when Apple has to come up with hacks like this one.
Power Macintosh Card
Apple offered two ways to turn a standard Mac into a Power Macintosh:
Install a small PDS circuit board, or get a complete motherboard
replacement. The big advantage of the smaller upgrade card was that you
could turn it off, restoring your Mac to its pre-Power Mac state. You might
want to do that if, for example, you have a Quadra 800 and want to run Excel
4.0 (which, as a non-“PowerPC native” program, runs faster on the Quadra
than on the Power Macintosh chip).
This control panel is a simple on/off switch for the upgrade card. (You must
shut down completely after switching the card on or off.)
This control panel, by the way, contains great hidden credits. Open the control
panel while pressing the Option key: You get a picture of the programmers.
Now, if you turn on Balloon Help, you can point to each person’s mouth to get
an introduction, and a witty remark, from each. (“Hi, I’m Erica. Do you want to
buy any Girl Scout cookies?”)
PowerBook
The PowerBook control panel’s purpose in life is to save battery power at the
expense of speed. (It’s for pre-1998 PowerBooks. On today’s laptops, the
revamped Energy Saver control panel assumes the PowerBook control
panel’s functions; see “Energy Saver 2.0” earlier in this chapter.)
Chapter 4: Control Panels and Extensions 215
■ ■
MAC SECRETS • 4040-8/5 • ch.04.F • Chapter 4 • FINAL • VB • 10/22/98 • p.215
MAC SECRETS • 4040-8/5 • ch.04.1 • Chapter 4 • Proof 1 • VB • 09/16/98 • p.215
4040-8/5 ch04.F 11/3/98 3:14 PM Page 215
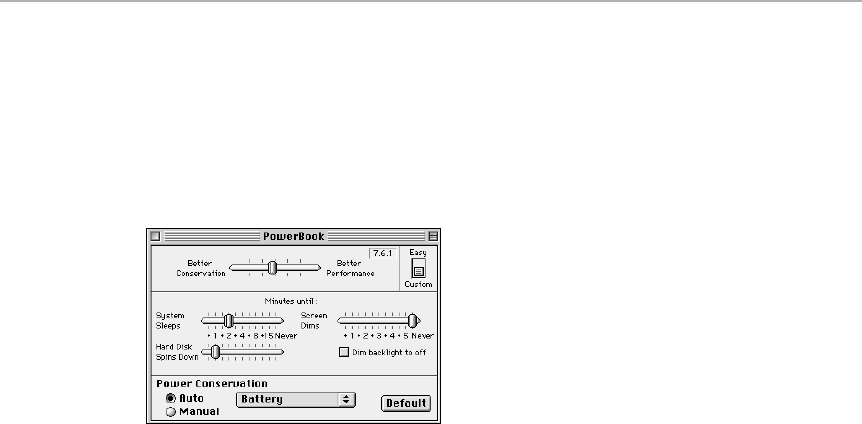
When you drag the little switch (see Figure 4-38) into the Custom position,
the dialog box expands to display three individual controls: System (how
quickly the Mac goes to sleep after you stop using it), Screen Dims (how
quickly the backlighting turns off), and Hard Disk Spins Down (how quickly
the internal hard drive stops spinning). The farther to the left you place these
sliders, the more battery power you’ll save — and the more irritating it will be
to try to get real work done.
Figure 4-38: The PowerBook control panel solves the problem of your PowerBook going to
sleep at inconvenient times. Solving the same problem for your spouse is up to you.
Handy feature: you can save one set of settings (quick-to-sleep) for battery
use and another (maximum speed) for when the Mac is plugged in. Choose
options from the pop-up menu at the bottom of the dialog box as appropriate.
PowerBook Display
On many PowerBook models, you can plug an external monitor or projector
into the video port, and your audience can watch the monitor while you
watch your PowerBook screen. This control panel, included with PowerBooks
in the 160, 180, Duo, and 500 lines, simply allows you to turn mirroring on or
off (although using the Control Strip is much more convenient). When your
two monitors are mirrored, the same image appears on both screens; you and
your audience see the same thing. This explains why the image on the
PowerBook 5300ce’s extra-large 800 by 600-pixel screen gets smaller when
mirroring is on (a big black border appears)—the external monitor is always
640 by 480 pixels, maximum. Conversely, that’s why the image on the external
monitor gets smaller when connected to, say, a PowerBook 180 — because
those older PowerBook screens are 640 by 400, so the external monitor’s
image seems to be foreshortened. In both cases, the images match exactly.
When mirroring is off, though, you have two independent monitors. Your
audience can be watching slides on the external screen while you’re privately
reading your notes on the PowerBook screen. It’s pretty great. (On modern
PowerBooks, such as the 2400, 3400, and G3 lines, mirroring can’t be turned
off. The external monitor always shows the same thing as the built-in
PowerBook screen.)
216 Part I: System Software Revealed
■ ■
MAC SECRETS • 4040-8/5 • ch.04.F • Chapter 4 • FINAL • VB • 10/22/98 • p.216
MAC SECRETS • 4040-8/5 • ch.04.1 • Chapter 4 • Proof 1 • VB • 09/16/98 • p.216
4040-8/5 ch04.F 11/3/98 3:14 PM Page 216
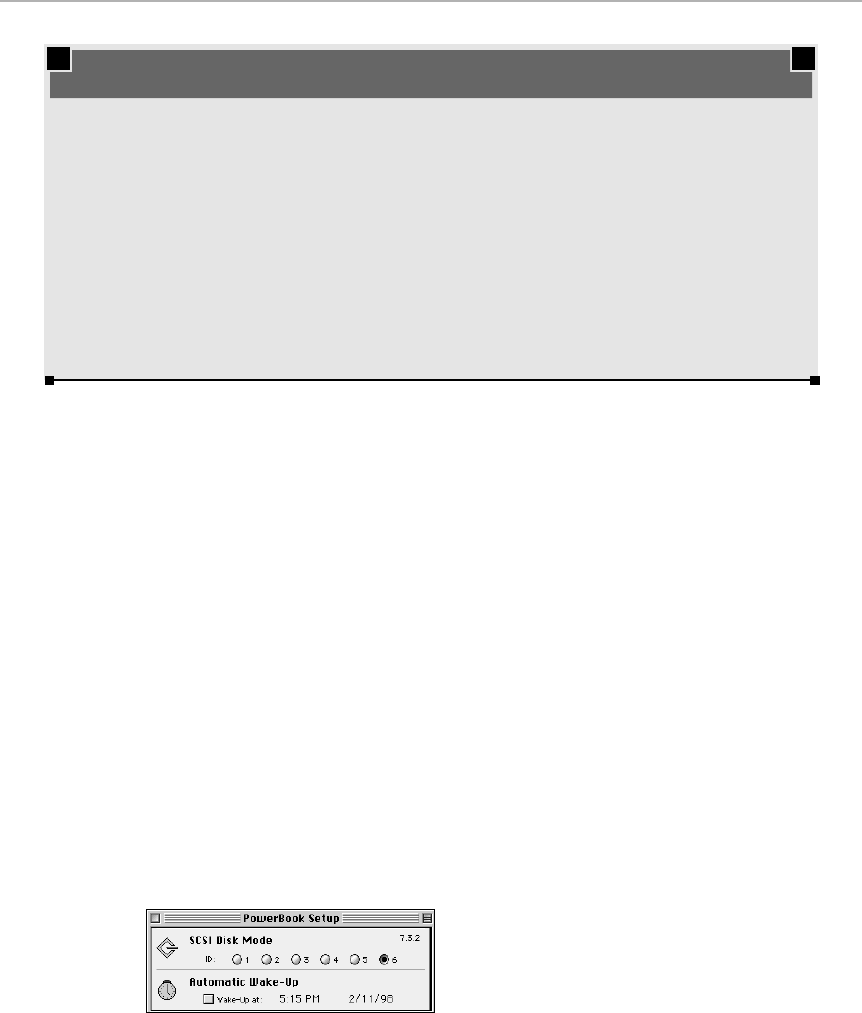
PowerBook SCSI Disk Mode
When designing 1998’s PowerBook models, Apple did away with the
PowerBook Setup control panel (described next). Apple tucked the
Automatic Wake-Up feature into the Energy Saver control panel, where it
seemed to fit better. But that left one PowerBook feature flapping around
without a control panel to call home: the one that lets you choose a SCSI ID
for your PowerBook when using it in SCSI Disk Mode (see Chapter 14).
The PowerBook SCSI Disk Mode control panel is the result: a special program
developed expressly for that purpose.
PowerBook Setup
This panel contains SCSI Disk Mode settings for more flexibility when you’re
using SCSI Disk Mode (see Chapter 14) and Automatic Wake-Up (see Figure
4-39). There’s not a word about this Wake-Up thing in the PowerBook manual,
so we’re not exactly sure what it’s for. We’ll just murmur something about
letting this feature wake the PowerBook at a specified time in the middle of
the night to receive a fax from Japan, and leave it at that.
Figure 4-39: PowerBook Setup, where Apple stashed two miscellaneous settings.
Chapter 4: Control Panels and Extensions 217
■ ■
MAC SECRETS • 4040-8/5 • ch.04.F • Chapter 4 • FINAL • VB • 10/22/98 • p.217
MAC SECRETS • 4040-8/5 • ch.04.1 • Chapter 4 • Proof 1 • VB • 09/16/98 • p.217
MACINTOSH SECRET
On some PowerBooks (such as 68030-based
models), two checkboxes eke out a few more
dribbles of battery power by allowing your
Mac’s processor chip to rest between bursts of
activity (“Allow processor cycling”) or by
slowing it (“Reduced processor speed”).
If your PowerBook uses an ‘040 chip or a
PowerPC 603 chip (see Chapters 13 and 14),
you don’t have a “Reduced processor speed”
option because your mile-a-minute chip can’t
slow down, as ‘030 chips can.
You do have processor cycling, though — it’s
just hidden. To access it, flip the control panel’s
upper-right switch to the Easy position (if it’s not
already in that position). Then, while pressing
Option, slide the switch to Custom. When the
panel opens next time, you’ll see the processor-
cycling checkbox, awaiting your command.
Slow down, save juice
4040-8/5 ch04.F 11/3/98 3:14 PM Page 217

PowerTalk Setup
PowerTalk, an optional feature of System 7.5 through 7.6, is described more
fully in Chapter 35. This control panel is the master on/off switch.
PPP
See “Remote Access,” later in this chapter.
QuickTime Settings
You can read all about QuickTime itself in the “Extensions” section to follow.
For now, suffice it to say that, beginning with QuickTime 2.5, QuickTime has a
front end— this application. There are various “pages” of settings you can
make here, which you can select from the pop-up menu. As of QuickTime 3,
these panels include:
■AutoPlay: These options govern whether or not CDs begin playing
immediately upon insertion into your CD-ROM drive. (Works well with
music CD’s; actual CD-ROMs, however, don’t auto-play unless they’ve
been specifically programmed to do so. The CD-ROM AutoPlay option is
worth leaving turned off anyway, since it leaves you vulnerable to the
AutoStart virus described in Chapter 22.)
■Connection Speed: One of QuickTime 3’s most useful features is its ability
to show you digital movies embedded right in certain Web pages. For
better quality, choose the kind of Internet connection you have on this
panel. (If you have a 56K modem, don’t leave the default 28.8K setting!)
■Media Keys: In theory, someday you’ll be able to unlock special
QuickTime features or files by paying for a password. This is where
you’ll enter the password.
■Music: QuickTime comes with a built-in set of amazing-sounding musical
instruments. Unfortunately, they’re not easy to access unless you own
such MIDI music software as Performer, Finale, or Vision. Still, if you have
Mac OS 8.5, open Mac OS Help, read about QuickTime, and click the “Play
an audio QuickTime movie for me” option.
Again in theory, someday you’ll be able to install additional sets of
instrument sounds; this is where you’ll choose which set you want.
■QuickTime Exchange: This panel offers a single checkbox that’s well
worth leaving turned on — it means that you’ll be able to open Windows
file formats, such as AVI (movies), AIFF and WAV (sound files), and BMP
(graphics) files using any QuickTime-compatible program (such as
MoviePlayer).
218 Part I: System Software Revealed
■ ■
MAC SECRETS • 4040-8/5 • ch.04.F • Chapter 4 • FINAL • VB • 10/22/98 • p.218
MAC SECRETS • 4040-8/5 • ch.04.1 • Chapter 4 • Proof 1 • VB • 09/16/98 • p.218
4040-8/5 ch04.F 11/3/98 3:14 PM Page 218

Remote Access
Mac OS 8.5 introduced this control panel’s name, but not its function; in
previous OS versions, it was called the PPP control panel.
In any case, this control panel (part of the Open Transport software suite) is
crucial for anyone hoping to connect to the Internet. It’s where you enter
your name, password, and local phone number for dialing the Net. By
choosing File ➪Configurations, in fact, you can create and switch among
multiple connection setups — one for each city you visit with your
PowerBook, for example. (See “Location Manager,” earlier in this chapter, to
find out how you can then switch among these different Internet
configurations by choosing from a pop-up menu on your Control Strip.)
For more on using this control panel to set up an Internet account, see
Chapter 25.
Screen
This little panel works only on specific models with built-in color monitors
(such as the LC 500 series, Color Classic, and Mac TV). These monitors have
no knobs to adjust. Therefore, you use this control panel to tweak the
brightness, contrast, and automatic dimming. If you have any other model,
toss this item.
Sharing Setup
The Sharing Setup control panel lets you assign your Mac a unique network
name and to identify yourself as its owner (and, therefore, the one who
determines which items on your Mac are shared and which aren’t). Mostly,
however, you use this control panel to turn File Sharing on and off in systems
before Mac OS 8. (The Mac OS 8 control panel called File Sharing replaces
this one.) For details on File Sharing, networking, and this control panel, see
Chapter 35.
Sound
With the Sound control panel (see Figure 4-40), you can change your Mac’s
alert sound, add sounds to and delete sounds from its repertoire, and adjust
the overall volume of your Mac speaker. You also can record and play from
your Mac’s CD-ROM drive, if you have one.
On modern Macs, these features have been moved to the newer Monitors &
Sound control panel, described earlier in this chapter. However, most Macs still
come with the Sound control panel—tucked away in your Apple Extras folder.
OS
8.5
Chapter 4: Control Panels and Extensions 219
■ ■
MAC SECRETS • 4040-8/5 • ch.04.F • Chapter 4 • FINAL • VB • 10/22/98 • p.219
MAC SECRETS • 4040-8/5 • ch.04.1 • Chapter 4 • Proof 1 • VB • 09/16/98 • p.219
4040-8/5 ch04.F 11/3/98 3:14 PM Page 219
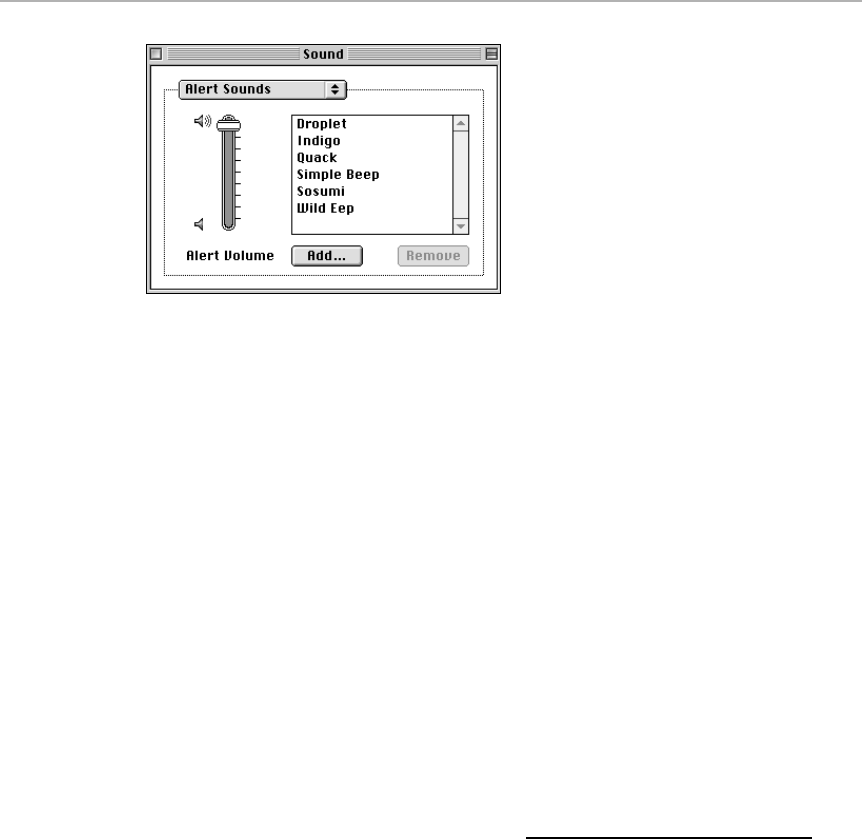
Figure 4-40: The Sound control panel (retired).
The standard Sound control panel takes a multiple-panel approach. When the
pop-up menu is set to Alert Sounds (the only setting for the original Sound
control panel), you see the Mac’s small set of alert sounds: a quack, the Wild
Eep, a droplet, and so on. To play a sound (and select it as your error beep),
click its name in the list.
You can record a new beep of your own, up to 10 seconds long, by clicking
Add. (See “Monitors & Sound” earlier in this chapter for additional tips, and
see Chapter 3 to realize that the SimpleSound desk accessory is far better for
recording sounds.)
And to remove a sound, click its name and then do one of the following:
■Click Remove, and confirm the deletion in the next dialog box. (You never
can remove the Simple Beep.)
■Choose Cut from the Edit menu, or press Ô-X. If you use this method, you
don’t get the warning dialog box. (After you cut the sound, you can paste
it into your Scrapbook for long-term storage.)
■Press the Clear key on the numeric keypad.
Sound Control Panel Secrets
■
How to rename a sound
You may think that there’s no way to rename a sound after you record it. Not
so — here’s how.
In the Sound control panel, select the sound that you want to rename. Remove it
from the list, using the Cut command (Edit menu). Next, use the Paste command
(or press Ô-V) to paste the sound
back
into your list. When you do so, you’re
asked to give the sound a name. Type a new name, and click OK.
220 Part I: System Software Revealed
■ ■
MAC SECRETS • 4040-8/5 • ch.04.F • Chapter 4 • FINAL • VB • 10/22/98 • p.220
MAC SECRETS • 4040-8/5 • ch.04.1 • Chapter 4 • Proof 1 • VB • 09/16/98 • p.220
4040-8/5 ch04.F 11/3/98 3:14 PM Page 220

Roll credits!
Press Option as you make a selection from the Sound pop-up menu. You’re
treated to an utterance by a very drugged-out programmer — or somebody acting
like one — and a quote from Jung.
Sound & Displays
For a brief, unhappy moment, Apple computer released this horribly
confusing control panel as a replacement for what had been two control
panels: Monitors and Sound. Only the first-release 7200, 7500, and 8500 Power
Mac models carried this control panel.
The interface has four panes that correspond to video (input and output) and
sound (input and output). You have to double-click an item in one of the four
directories to open a window containing the options you actually want to
change. For example, if you double-click the Display field, you get what looks
like the older Monitors control panel. To change your error beep, you click
the System Sound button; another window opens, containing what used to be
in the Sound control panel.
Chapter 4: Control Panels and Extensions 221
■ ■
MAC SECRETS • 4040-8/5 • ch.04.F • Chapter 4 • FINAL • VB • 10/22/98 • p.221
MAC SECRETS • 4040-8/5 • ch.04.1 • Chapter 4 • Proof 1 • VB • 09/16/98 • p.221
TRUE FACT
Ever wonder about the names of the sounds that
come with System 7? For the most part, they’re
onomatopoetic, spelled like they sound: “Wild
Eep,” “Quack,” and so on. But what about that
staccato, E-flat, diminished triad called “Sosumi”?
Early in Apple’s career as a computer-making
superstar, there was a little legal trouble.
(Apple’s always in legal trouble somewhere in
the world.) And that trouble was with, believe it
or not, the Beatles. The Beatles’ private record
label was called Apple Records. The Beatles’
lawyers claimed that Apple, in making a
computer with sound capabilities, was trying to
get into the recording industry, causing
confusion in consumers’ minds. After all, these
two companies had the same names and were
doing the same things, right?
So, Apple sighed and promised Apple Records,
in writing, that it would never get into the
recording industry. Apple Records backed off,
and Macintosh went forth into the world.
A couple of years ago, however, Apple started
including a microphone with most Mac models.
And guess what you’re supposed to do with that
mike? Yup—make recordings! It certainly would
take a hypersensitive record company to interpret
giving away a free microphone as “entering the
recording industry.” But you never know. A wily
Apple engineer, recognizing the potential
litigation, gave the alert sound a name that serves
as a subtle tribute to Apple Records: Sosumi!
Why it’s called Sosumi
4040-8/5 ch04.F 11/3/98 3:14 PM Page 221
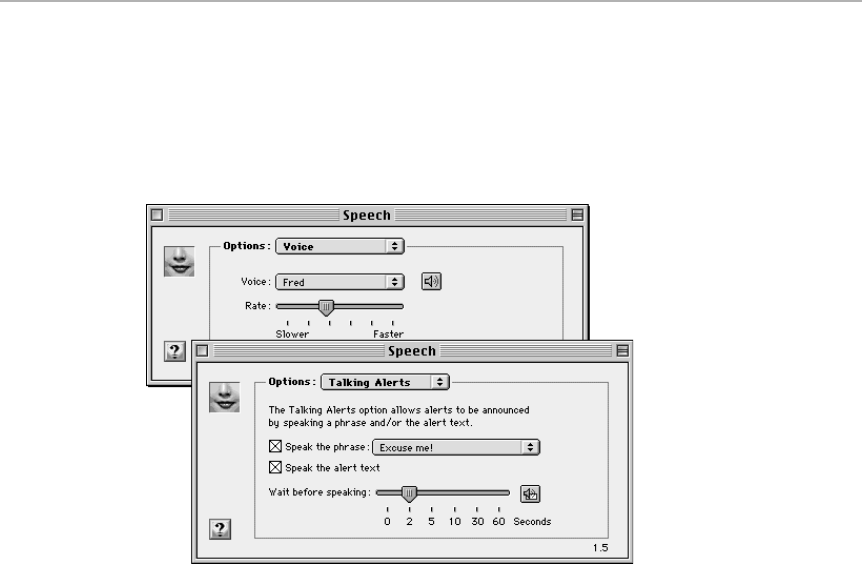
Speech
This thoroughly enjoyable control panel, shown in Figure 4-41, lets your Mac
read out loud. It’s the command center for the Mac’s text-to-speech feature, in
which the Mac speaks whatever you’ve typed into SimpleText (or other
compatible programs). See Chapter 23 for the full Speech scoop.
Figure 4-41: This control panel helps talking Macs (such as Power Macs) talk more naturally.
In System 7.6 and later, it also can make the Mac speak error messages out loud to you,
complete with an attention-getting phrase like “Oops!”
Meanwhile, this control panel lets you choose a default voice and rate of
speaking. Best of all, if you click the speaker icon, you hear each voice tested,
saying something hilariously in character. For example, the Good News voice
sings, to the tune of “Pomp and Circumstance,” “Congratulations! You’ve just
won the sweepstakes, and you don’t have to pay income tax again.” Zarvox
says, in its alien monotone, “That looks like a peaceful planet…” And
Deranged says, voice shaking, “I-I need to go on a really long va-a-cation…”
Sometimes we think it must be really fun to work at Apple.
Speech Setup
You need this control panel only if you have an AV Mac or a Power Mac and
you want to talk to it — or, rather, talk to it and have it respond. We’re
referring, of course, to Apple’s PlainTalk speech recognition feature,
discussed in detail (along with this control panel) in Chapter 23.
Oh, yeah — there’s a hidden credit in here. Turn on Balloon Help, and point to
the version number. Wowww.
222 Part I: System Software Revealed
■ ■
MAC SECRETS • 4040-8/5 • ch.04.F • Chapter 4 • FINAL • VB • 10/22/98 • p.222
MAC SECRETS • 4040-8/5 • ch.04.1 • Chapter 4 • Proof 1 • VB • 09/16/98 • p.222
4040-8/5 ch04.F 11/3/98 3:14 PM Page 222

Startup Disk
Startup Disk tells your Mac which disk to use as the System disk at the next
startup. Interestingly, even disks without working System Folders appear in
the control panel (see Figure 4-42).
Figure 4-42: Pick a disk to get things started with the Startup Disk control panel.
If you have more than one hard drive, or if you have a hard drive and a cartridge
system (Zip or SyQuest, for example), it’s sometimes handy to have two system
versions available—one System Folder on each drive. You use this control
panel, in this case, to specify which System you want to be in control the next
time the Mac starts. Beginning with System 7.5.3, Startup Disk can even
distinguish among different partitions of a disk—provided they were formatted
with System 7.5.3’s Apple hard drive formatting software; see Chapter 8.
If you open this control panel and click in the blank white area around your
disk icons, so that no icon is highlighted, the Mac will start up using the disk
with the highest SCSI address number (see Chapter 33).
If you have only one hard drive, and never plan to get a Zip drive (or
equivalent), you can safely pull this one out of your System Folder. And if you
regularly switch startup drives, consider getting Conflict Catcher 8 (see
Chapter 22), which lets you choose startup disks — or even different System
Folders — from a handy menu, which saves several steps.
TCP/IP
This control panel lets your Mac connect to the Internet or other TCP/IP
networks. It’s where you store the strings of DNS numbers that identify your
Internet access company, such as 207.155.184.72. As with the other control
panels that make up the Open Transport suite, you can also choose File ➪
Configurations to create and switch among multiple sets of such information.
See Chapter 35 for details on Open Transport.
Chapter 4: Control Panels and Extensions 223
■ ■
MAC SECRETS • 4040-8/5 • ch.04.F • Chapter 4 • FINAL • VB • 10/22/98 • p.223
MAC SECRETS • 4040-8/5 • ch.04.1 • Chapter 4 • Proof 1 • VB • 09/16/98 • p.223
4040-8/5 ch04.F 11/3/98 3:14 PM Page 223

Text
This control panel, introduced in System 7.5, works in conjunction with
WorldScript foreign-language systems. It allows you to specify (if you’ve
purchased any foreign-language kits) which kind of writing system (Roman,
Kanji, and so on) to use, and in which direction text should proceed across
the page. We guess that this is a good one to throw away.
Token Ring
Another obscure one, useful only if you are that rare individual whose
company has a Token Ring network.
Trackpad
This control panel (see Figure 4-43) is, of course, useful only on PowerBooks
that have a touch pad (instead of a trackball, as found on early PowerBooks).
The Trackpad panel’s top two controls are exactly the same as those in the
Mouse control panel (see “Mouse” earlier in this chapter).
So why keep Trackpad and Mouse? Because you may want to use your
PowerBook at home with a real mouse plugged into it, and yet use the
trackpad when you’re on the plane. By giving you two separate control
panels, Apple makes it easy to set up separate degrees of responsiveness for
each device.
224 Part I: System Software Revealed
■ ■
MAC SECRETS • 4040-8/5 • ch.04.F • Chapter 4 • FINAL • VB • 10/22/98 • p.224
MAC SECRETS • 4040-8/5 • ch.04.1 • Chapter 4 • Proof 1 • VB • 09/16/98 • p.224
MACINTOSH SECRET
The TCP/IP control panel, of all things, is the
solution to the frustration of America Online 3.0
users who also have an Internet account. These
poor souls have traditionally been forced to use
only one service at a time. To use your Internet
account after having used America Online, for
example, you’re generally forced to launch
America Online; open its Preferences dialog box;
click AOL Link; indicate that you’d like to switch
back to your ISP (Internet service provider)
account; and then restart the Mac. If you ask us,
life’s just too doggone short. (AOL 4.0 is much
improved in this regard.)
Fortunately, our method is much simpler. After
you’ve confirmed that both methods of reaching
cyberspace are working properly on your Mac,
open the TCP/IP control panel. By choosing File
➪Configurations and double-clicking either
“AOL Link” (for America Online) or “Mindspring”
(or whatever the name of your ISP configuration
is), you can switch between them without
having to restart the Mac or launch the AOL
program. (Adding those two setups to the
Location Manager tile of your Control Strip
makes switching even easier; see “Location
Manager,” earlier in this chapter.)
Switch from Internet to AOL without restarting
4040-8/5 ch04.F 11/3/98 3:14 PM Page 224

Figure 4-43: The Trackpad allows you to set up independent drag and click sensitivity for
your PowerBook.
If you’re lucky enough to own a 1996-or-later PowerBook model, your
Trackpad control panel offers a third set of settings. Whereas other
PowerBooks’ trackpads let you only move the cursor (you use the separate
thumb button for clicking and dragging), these newer models let you do your
clicking and dragging directly on the pad itself. Because the techniques take
some getting used to, these features are turned off when you first buy the
machine. Here in the Trackpad control panel, you can turn them on — and
see a quick animated demonstration of how you’re supposed to work them.
Details on these techniques in Chapter 14.
Users & Groups
You use the Users & Groups control panel to determine which network users
(or groups of users) have access to the shared items on your Mac, and the
degree of access each user is granted. Look for full details in Chapter 35.
Video
The control panel for AppleVision 14-inch monitors; obsolete in System 7.5.
Views
The Views control panel (see Figure 4-44) can change the font for all text in
Finder windows. It also allows you to specify the information included in list
views. (This control panel exited the earth with the debut of Mac OS 8; its
functions were moved into the Edit menu’s Preferences command and — in
the case of list views — individual View Options commands for every window
on your Mac. See Chapter 1.)
Chapter 4: Control Panels and Extensions 225
■ ■
MAC SECRETS • 4040-8/5 • ch.04.F • Chapter 4 • FINAL • VB • 10/22/98 • p.225
MAC SECRETS • 4040-8/5 • ch.04.1 • Chapter 4 • Proof 1 • VB • 09/16/98 • p.225
4040-8/5 ch04.F 11/3/98 3:14 PM Page 225

In the Icon Views portion of the control panel, you can specify how you want
icons to be displayed: along a straight or a staggered invisible grid. Select the
“Always snap to grid” checkbox if you want icons to snap in line with an
invisible grid when you drag them in Finder windows. (As mentioned in
Chapter 1, you can always override the setting you make here—press the Ô
key as you drag the icon.)
Figure 4-44: The Views control panel.
You choose the font from the pop-up menu near the top of the control panel.
Smaller fonts work best, but you can choose any size up to 36 points.
Although the pop-up menu lists only fonts up to 24 points, you can type
larger point sizes directly in the size box. (Hint:select a font that’s built into
the Mac, such as Geneva, Chicago, or Monaco; ATM-ready fonts take the Mac
longer to display.)
For list views, you also can specify the size of the icons that are displayed
next to each file’s name. The largest of these views produces icons as big as
the full-size icons.
The checkboxes in the bottom portion of the control panel allow you to
select the information you want to see in list views, exactly as described in
Chapter 1 under “The Edit menu.” List views look much better if you
eliminate categories that you don’t use.
There are two other list-view options to consider. Check “Calculate folder sizes”
if you want list views to include the size (in kilobytes) of folders as well as files.
(If this option isn’t selected, you simply see a dash for each folder’s size in a
Finder window.) Do so only temporarily, however; when “Calculate folder sizes”
is on, your Mac becomes sporadically sluggish as it attempts to add up the sizes
of all your files in the background. (This problem went away in Mac OS 8, where
you can turn on “Calculate folder sizes” only for specific windows.)
Check “Show disk info in header” if you want the amounts of available and
used disk space to be displayed at the top of each Finder window — a useful
indicator.
226 Part I: System Software Revealed
■ ■
MAC SECRETS • 4040-8/5 • ch.04.F • Chapter 4 • FINAL • VB • 10/22/98 • p.226
MAC SECRETS • 4040-8/5 • ch.04.1 • Chapter 4 • Proof 1 • VB • 09/16/98 • p.226
4040-8/5 ch04.F 11/3/98 3:14 PM Page 226

Web Sharing
This control panel, which debuted in Mac OS 8, brings a peculiar new feature
to the Mac: the ability to make a folder full of HTML (Web-page) documents
available to anyone on your company’s TCP/IP network. Think of the File
Sharing feature (described at length in Chapter 35), and you’ll have the idea.
The name of this feature implies that you can share files over the entire
Internet, but in fact, that’s not the point. (For one thing, your Mac would have
to remain connected to the Internet 24 hours a day; for another, Apple doesn’t
recommend using Web Sharing over a modem, for speed reasons.) Web Sharing
is actually for use on intranets — networks contained within companies.
Anyway, put any HTML documents you’d like to publish into your Web Pages
folder (or click the Select button in the Web Sharing control panel to choose the
folder you’d like to make public). Use the lower Select button to indicate which
HTML document you want to be your home page — the first page visitors see
when they sign onto your Mac’s shared folder. Then click the Start button to
turn on Web sharing. (If you’re not already connected to an office network that
runs the TCP/IP protocol, you’ll get nothing but an error message.)
Once things are up and running, use the Edit➪Copy My Address command
to copy your Web folder’s intranet address, which you can now paste into an
e-mail and distribute to anyone on the network. If your company is the kind
of place where this feature can be useful, you’re in for a pleasant ride; the
Web Sharing feature makes it incredibly easy to share files, post updates,
auto-compress files, and so on. Read the HTML documents in the Web Pages
folder itself for much more detail.
OS
8
Chapter 4: Control Panels and Extensions 227
■ ■
MAC SECRETS • 4040-8/5 • ch.04.F • Chapter 4 • FINAL • VB • 10/22/98 • p.227
MAC SECRETS • 4040-8/5 • ch.04.1 • Chapter 4 • Proof 1 • VB • 09/16/98 • p.227
ANSWER MAN
Q: I’ve got a bizarre problem. When I double-
click my hard disk icon — wow, it takes forever
to open into a window…like two whole minutes.
What’s going on?
A: You’ve fallen victim to a unique circumstance:
You’re viewing your hard drive’s contents in size
order (you chose, from the View menu in the
Finder, “by Size”); and you turned on “Calculate
folder sizes” in the Views control panel.
You see, to display your hard disk contents in a
list sorted by size, largest first, the Mac has to
calculate the sizes of all the folders in it before it
can open the window. That’s what causes the
delay.
If you were to turn “Calculate folder sizes” off,
you wouldn’t experience the delay, but all the
folders would appear clumped at the bottom of
your hard disk window, not sorted by size.
Likewise, if you choose any other sorting
method from the View menu — by Name, for
example — you wouldn’t experience such a
slowdown. And if you’d upgrade to Mac OS 8,
which has no global window settings (each
window has its own settings), you’d also avoid
this strange little glitch.
The sedated hard-disk window syndrome
4040-8/5 ch04.F 11/3/98 3:14 PM Page 227
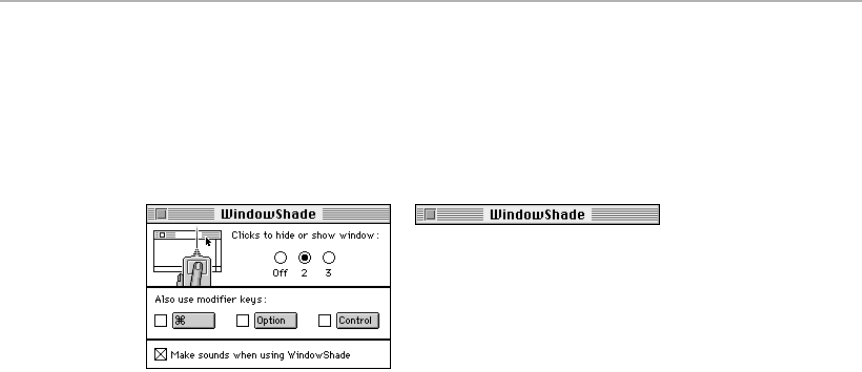
WindowShade
WindowShade, a control panel in System 7.5 through 7.6.1, lets you collapse
any open window into nothing but a title bar, as shown in Figure 4-45. (In Mac
OS 8.x, this feature is built into the Appearance control panel, as described
earlier in this chapter.)
Figure 4-43: A before-and-after example, showing the WindowShade window itself in its
normal and collapsed states.
To take this anticlutter step, double-click the title bar of the window. With a
neat little whoosh, the main portion of the window disappears, leaving only
the title bar floating on the screen. (Note, however, that both the whooshing
and the collapsing features default to being off when you first install your
system software. You must open this control panel and switch them on first.)
Unfortunately, some programs have their own ideas of what a title-bar
double-click means (in Excel and Word before version 98, it means “expand
this window to fill the monitor”). Therefore, WindowShade allows you to
change the number of clicks required to collapse a window. You can even
specify that you must hold down a key (such as Option or Ctrl) while clicking
for the collapsing to work.
There’s only one secret here — a very small one. To see the hidden credit,
click the picture of the mouse button in the control-panel window.
Extensions One by One
An extension a system-software add-on that blesses your Mac with some new
feature or another. They’re background programs that load into memory
when you turn on the Mac and stay there until you turn it off, like control
panels without a panel (with no settings for you to change).
To confuse the issue, however, extensions aren’t the only things you’ll find in
your Extensions folder. You’ll also find drivers, for one thing — those essential
software tidbits that teach your Mac to communicate with some external
appliance, such as a printer or a modem. The Extensions folder may also
contain translators, modem files, printer drivers, bug-fix patches, and so on.
228 Part I: System Software Revealed
■ ■
MAC SECRETS • 4040-8/5 • ch.04.F • Chapter 4 • FINAL • VB • 10/22/98 • p.228
MAC SECRETS • 4040-8/5 • ch.04.1 • Chapter 4 • Proof 1 • VB • 09/16/98 • p.228
4040-8/5 ch04.F 11/3/98 3:14 PM Page 228

Extensions generally reside in your Extensions folder, although they can also
be loose in your System Folder (or even in the Control Panels folder).
Extensions are notable—and confusing to beginners—because they exist
purely for the benefit and reference of the computer, not you. That is, if you
double-click an extension, you just get an error message; the extension has
no controls that you, the user, are meant to play with. Just put extensions in
the Extensions folder and forget them.
Apple has, fortunately, been cleaning up its extensions act. Printer files,
modem files, Location Manager modules, AppleScript add-ons, speech voice
files, and other supplementary items are now in their own sub-folders (such
as Printer Descriptions and Modem Descriptions) instead of cluttering up the
Extensions folder.
But don’t stop now, Apple! Put those 35 “communications tools” and
“Chooser drivers” into one folder each! Put the six CD-ROM drivers, eleven
Open Transport files, and 384 Microsoft Office libraries into a folder by
themselves! Let’s see some organization in the next system rev, OK?
All about shared libraries
In recent years, the population of shared libraries in your Extensions folder
has risen dramatically, too — chunks of computer instructions that don’t
necessarily do anything at startup, but instead are called into memory by
your various programs when needed. The idea is to create shared libraries
out of code that more than one program may need, thus saving disk space,
RAM, and programming time overall. Apple and Microsoft are among the
most aggressive creators of shared libraries.
Shared libraries don’t drop out of your RAM when you quit the program that
originally summoned them, either; many Mac fans, watching in quiet horror
as their available RAM slowly diminishes throughout the day, think that
something’s severely wrong with their Macs. See “Memory leaks — and
shared libraries” in Chapter 9 for details.
There’s one other funny aspect of shared libraries worth knowing about, too.
In many cases, the code that was once called a Lib or Library has subsequently
been incorporated into another extension. Yet internally, your applications still
look for —and usually find— the “Lib” or “Library” file they require. But if they
don’t, you may get an error message asking for some file in your Extensions
folder you’ve never even heard of. Graphic Converter, for example, may
complain that it “Can’t find QuickTimeLib”—but what it really can’t find is the
extension called QuickTime PowerPlug. Similarly, “Can’t find SpeechLib” means
your Speech Manger extension is missing; “Can’t find SoundLib” means your
Sound Manager extension is missing; and “Can’t find OLEWhateverLib” means
you need to reinstall Word 6.
P.S. — We hope, now that you’ve been educated, you never again look at the
file called OpenTransportLib and pronounce it “Open Transport Libb,” as in
“Women’s Lib.” It’s “lybe,” short for library.
Worth
Learning
Mac Basics
Chapter 4: Control Panels and Extensions 229
■ ■
MAC SECRETS • 4040-8/5 • ch.04.F • Chapter 4 • FINAL • VB • 10/22/98 • p.229
MAC SECRETS • 4040-8/5 • ch.04.1 • Chapter 4 • Proof 1 • VB • 09/16/98 • p.229
4040-8/5 ch04.F 11/3/98 3:14 PM Page 229

230 Part I: System Software Revealed
■ ■
MAC SECRETS • 4040-8/5 • ch.04.F • Chapter 4 • FINAL • VB • 10/22/98 • p.230
MAC SECRETS • 4040-8/5 • ch.04.1 • Chapter 4 • Proof 1 • VB • 09/16/98 • p.230
MACINTOSH SECRET
So many Apple extensions have been bug fixes
and patches for specific issues on specific models
that we could dedicate a 1,200-page Mac Secrets
supplement just to covering them. For now, we’ll
just provide the following list, assure you that
they’re of interest only if your model number is
part of the extension’s name, confess that most of
these were made obsolete by Mac OS 8 anyway,
and direct you to Apple’s Tech Info Library
(described in Chapter 36) or the 4th Edition of this
very book (available on the CD that accompanies
this one) if you really want the details.
!PowerAV Update
!TYC (for Power Mac AV models)
040 VM Update (for 575 and 630 models)
54xx/64xx L2 Cache Reset
54xx/64xx Update
5500/6500 ATA Update
5500/6500 L2 Cache Disable
5500/6500 Video Input Update
5xxx/6xxx Floppy Fix
630 SCSI Update
6360/64xx/54xx Update
7.5.2 Printing Fix
7200 Graphics Acceleration
7200 Graphics Driver
950 Color Addition
9600 Graphics Accelerator
Audio Volume Extension
AudioTuneUp
AudioVision Extension
AV Serial Extension
AV/PPC Serial Extension
Basic Color Monitor
CFM Update
Color Classic Update
DAL
Display Enabler
Drive Firmware Update Extension
Duo Battery Patch
EM (Express Modem) Sound Update
ENET Compatibility
External CD Sound
Fax Terminal 7.5 Compatibility
Finder Update
Hardware System Updates
Indeo Video, Intel Raw Video
Intelligent Battery Update
Internal Modem Sound
N-Up Printing
PB (PowerBook) 1400 PMU Update
PowerBook (1400) VM Tuner
PowerBook 1400 ATA Flash Extension
PowerBook 1400 Floppy Update
PowerBook 1400 PMU Updater
PowerBook 150 Update
PowerBook 3400
PowerPC Finder Update
Processor Info Extension
(for 5200, 5300, and 6200 series)
Record Button Extension
Sound Input Amplification
Startup Tuner
Type III Battery
The bug-fix collection
4040-8/5 ch04.F 11/3/98 3:14 PM Page 230

The extensions themselves
A/ROSE
Although the name may smell as sweet, A/ROSE by its other name is Apple
Real-time Operating System Extension. This extension is required only for
certain old Apple NuBus networking cards: Apple’s short Ethernet card,
Token Ring 4.16 NB card, Serial NB card, and Coax/TwinAx NB card. See
Chapter 35 for details on networking.
3Com Impact Analog 14.4, Apple/GV 56K...
As described under “Modem,” earlier in this chapter, an increasing number of
today’s telecommunications programs rely on a software structure called
Apple’s Communications Toolbox (CT), which is described in Chapter 24. One
of the convenient features of CT-aware programs is that you can select your
modem’s model, by name, from a pop-up list instead of having to enter its
technical parameters (in a Setup dialog box, for example). In the pre-Open
Transport Extensions folder, you may find, therefore, hundreds of icons that
correspond to individual modem brands. Throw away all these modem-
specific documents except the one that you own. (Other examples of these
CT modem documents: anything beginning with the words Zoom, Prometheus,
Hayes, Global Village, Practical Peripherals, and so on.)
Fortunately, thanks to Open Transport (see Chapter 35), these modem
scripts are, these days, filed away into a Modem Scripts folder. You should
still throw away the ones you don’t need, however.
About Apple Guide
See “Apple Guide (and related files).”
AMMS MPEG Decoder
The extension (the driver) for the Apple MPEG Media System Card, which
lets certain Mac models create high-quality, specially compressed QuickTime
movies.
AOL Link
Provided with America Online 3.0 and later, this little doodad is responsible
for one of AOL’s greatest features: the ability to use your choice of Web
browser, such as Netscape Navigator or Microsoft Internet Explorer, while
connected to America Online. (See Chapter 26 for details on this trick.) If you
connect to America Online via an Internet account (also as described in
Chapter 26), on the other hand, you don’t need this baby.
Appearance Extension
The single most important extension of all. A Mac OS 8 or 8.1 machine can’t
even start up without this one. Its job is to communicate with the Appearance
OS
8
Chapter 4: Control Panels and Extensions 231
■ ■
MAC SECRETS • 4040-8/5 • ch.04.F • Chapter 4 • FINAL • VB • 10/22/98 • p.231
MAC SECRETS • 4040-8/5 • ch.04.1 • Chapter 4 • Proof 1 • VB • 09/16/98 • p.231
4040-8/5 ch04.F 11/3/98 3:14 PM Page 231

control panel as to what your Mac’s interface should look like (as determined
by you, in the Appearance control panel). (Unnecessary in Mac OS 8.5 and
later.)
Apple Built-In Ethernet or Apple Enet
Lets your Mac connect to Ethernet networks. See “Open Transport (and
related files).”
Apple CD/DVD Driver or Apple CD-ROM
(and related files)
This extension’s name changed in Mac OS 8.5 (and late versions of Mac OS
8.1) to reflect the fact that some Macs come with DVD-ROM drives (see
Chapter 32) instead of CD-ROMs.
Whatever it’s called, this extension is the cornerstone of Apple’s sprawling
constellation of CD-ROM extensions. It’s the driver that permits your Mac to
talk to any Apple CD-ROM drive, internal or external. (See Chapter 32 for
more on CD-ROMs.)
The Apple CD-ROM suite also includes a special translator extension called
Foreign File Access. It lets your Mac play non-Mac CDs, such as PhotoCD,
music-only, and DOS-format discs, provided that you have the proper
translation extension installed. Your Mac comes with four such foreign-file
translators: Apple Photo Access (lets your Mac read Kodak PhotoCD discs);
Audio CD Access (lets your Mac play regular, non-computer music compact
discs); High Sierra File Access (lets your Mac use non-Mac CD-ROMs, such
as those designed for PCs); and ISO 9660 File Access (lets your Mac read
another format of non-Mac CD-ROM discs). You can trash any of these four
extensions if you never plan to use discs of the corresponding type.
Apple DVD-ROM
In systems before Mac OS 8.5, this is the driver necessary to run DVD-ROM
drives (see Chapter 32). Unnecessary if (a) you don’t have a DVD drive or (b)
you have the Apple CD/DVD Driver, described in the previous entry.
Apple Color SW Pro CMM
See “LaserWriter (and related files),” later in this chapter.
Apple Ethernet (LC, NB, or CS)
Exclusively for Mac LC’s or other Macs with NuBus or Com slots;
accommodates Apple’s Ethernet expansion card. See Chapter 35 for more
on Ethernet.
OS
8.5
232 Part I: System Software Revealed
■ ■
MAC SECRETS • 4040-8/5 • ch.04.F • Chapter 4 • FINAL • VB • 10/22/98 • p.232
MAC SECRETS • 4040-8/5 • ch.04.1 • Chapter 4 • Proof 1 • VB • 09/16/98 • p.232
4040-8/5 ch04.F 11/3/98 3:14 PM Page 232

Apple Guide (and related files)
Balloon Help, introduced in System 7, was supposed to change the world and
put book authors like us out of business. Yet few people use Balloon Help. It’s
slow; it doesn’t work in many programs; and perhaps above all, it doesn’t
show you what to do next if you’re trying to accomplish something specific.
Enter Apple Guide, introduced in System 7.5. When you choose this
command from the Help/Guide/question-mark menu, you get on-screen index
cards that walk you through specific tasks, one step at a time. See Chapter 2
for details. This file is the master switch for the Apple Guide feature.
In order to provide information about a certain program, Apple Guide must
see a Guide document — which stores all the text and graphics for the help
screens. The Finder, Quicken, BBEdit, WordPerfect, and SimpleText are
among the programs that come with Guide documents.
Apple itself has developed dozens of different Guide documents. Among
those you may find in your Extensions folder are: About Apple Guide (gives
information about Apple Guide itself); Shortcuts (keyboard shortcut
summary); Macintosh or Apple Guide (contains instructions for basic Finder,
printing, and control panel functions); PowerBook Guide Additions (laptop-
related instructions); Speech Guide Additions (info on using
speech-recognition features of Power Macs and AV models); and Video Guide
Additions (about using video features of AV models).
Chapter 4: Control Panels and Extensions 233
■ ■
MAC SECRETS • 4040-8/5 • ch.04.F • Chapter 4 • FINAL • VB • 10/22/98 • p.233
MAC SECRETS • 4040-8/5 • ch.04.1 • Chapter 4 • Proof 1 • VB • 09/16/98 • p.233
CASE HISTORY
An actual transcript from Apple’s Assistance
Center, based in Austin, TX, which you can
reach by dialing 800-SOS-APPL.
Caller: Let’s say, just hypothetically, that I
wanted to buy a new computer case from you.
Could I do that?
Tech: Just the case? No internal components?
Caller: Yeah. Just the plastics.
Tech: Well, it depends. What kind of computer?
Caller: Well, let’s say, hypothetically, Quadra 630.
Tech: Exactly what parts are we talking about?
Caller: Well, let’s say, hypothetically, the sides
and the top.
Tech: Did this hypothetical machine come
without plastic?
Caller: No, this would be in the event of, well,
let’s say, on the off chance that a small child
painted the top and sides of the computer.
Tech: Did this hypothetical child use watercolors?
Caller: Would it be covered under warranty if
she didn’t?
Tech: Hypothetically, no. You could always buy
more paint and paint a more pleasing design
over it, though.
That’s 800-SOS-APPL
4040-8/5 ch04.F 11/3/98 3:14 PM Page 233

Incidentally, don’t trash Apple Guide just because you’ve discovered Mac OS
8.5’s vastly improved help system. The extension called Apple Guide is still
required for the new, Web-like help system to function.
Apple IX3D Graphics Accelerator (and related files)
Power Macs of the 1997/1998 era included an accelerated graphics card.
These files, which include Apple IX3D Video Memory Manager and Apple
IX3D RAVE Engine, are the required software.
Apple Modem Tool (and related files)
It may seem a distressing waste to find, in your Extensions folder, a vast array
of seemingly useless files named things like Apple Modem Tool, AppleTalk
ADSP Tool, MP Telnet Tool, Serial Tool, Link Tool Manager, and Modem
LinkTool Personal. In fact, these “connection tools,” as the Finder calls them,
make life a lot easier; they ensure that whenever you install a new modem
program— America Online, Netscape Navigator, Remote Access, whatever —
you’ll encounter the exact same screen when you set up the software (see
Chapter 24). Whether you realize it or not, you’re face to face with the
Communications Toolbox, a standard set of software-meets-modem tools
that make it easy for programmers to create these Setup dialog boxes. (Also
part of the Comm Toolbox: about 4,000 “File Transfer Tools” (that let your
Mac send and receive files according to certain protocols) such as XModem,
Kermit, and ZModem, and “Terminal Tools” that let your Mac communicate
with certain other computers, such as TTY and VT102.
Apple Photo Access
See “Apple CD-ROM (and related files).”
Apple QD3D HW Driver
See “QuickDraw 3D (and related files).”
AppleScript (and related files)
This extension, provided with System 7.5 and later, is — as programming
languages go — a fairly easy system for “scripting” your Mac (making macros
to perform repetitive tasks). For details on AppleScript, see Chapter 22.
AppleScript is the extension itself. Accompanying it in your System Folder
may be such files as AppleScript Lib (for Power Macs only; a shared library
that translates between versions of AppleScript that aren’t PowerPC-native,
and programs that are); Finder Scripting Extension (gives the Find File
program its special drag-and-drop features, as described in the previous
chapter; built into Mac OS 8 and later); InLineFilter (lets you control your
Mac by voice command on certain Macs, which, behind the scenes, relies on
AppleScript); and Scripting Additions (a folder of modules that provide
additional features to the AppleScript language). See “Automated Tasks” in
Chapter 3 for some examples of AppleScript in action.
OS
8.5
234 Part I: System Software Revealed
■ ■
MAC SECRETS • 4040-8/5 • ch.04.F • Chapter 4 • FINAL • VB • 10/22/98 • p.234
MAC SECRETS • 4040-8/5 • ch.04.1 • Chapter 4 • Proof 1 • VB • 09/16/98 • p.234
4040-8/5 ch04.F 11/3/98 3:14 PM Page 234

AppleShare (and related files)
The AppleShare extension teaches your Mac how to make its disks available
to other Macs over a network. Details in Chapter 35.
To accomplish all of this, your Mac comes with another typical Apple rat’s
nest of extensions and control panels. They include File Sharing or Sharing
Setup, Users & Groups, the File Sharing Extension and File Sharing Library,
and File Sharing Monitor (all described earlier in this chapter).
Of course, you can’t share files unless you’ve set up a network in the first place.
If you’re using Open Transport (see Chapter 35), you need the AppleTalk and
TCP/IP control panels. If you’re not, you’ve got MacTCP and Network control
panels instead (and the Network extension). Also part of this collection are the
individual network-type extensions, which let your Mac speak to various kinds
of networks: EtherTalk Phase 2, Mac TCP Token Ring, TokenTalk Phase 2 (for
the Token Ring card), and TokenTalk Prep (the driver).
If you’re not on a network, don’t go online, and have no desire to transfer files
between two Macs, you can safely trash all of this stuff.
AppleVision
The driver that lets the Mac communicate with AppleVision monitors.
Application Switcher
This extension is responsible for the Amazing Tear-Off Applications Palette of
Mac OS 8.5 and later, as described in Chapter 2. It also lets you switch from
one open program to the next by pressing Ô-Tab. Try it — you’ll love it!
Assistant Toolbox
This extension is only for PowerBooks; it came with System 7.5 through 7.5.5,
but is built into 7.6 and later. Assistant Toolbox offers a random collection of
useful portable-computing features, such as:
■As you’ll discover in Chapter 9, a RAM disk’s contents are perfectly safe
unless you shut the machine down. Enter Assistant Toolbox, which can
copy your RAM disk contents back to the hard drive when you shut down
— and re-establish the RAM disk, with contents, the next time you start
up again.
■Assistant Toolbox also lets you control certain functions from the
keyboard: Ô-Shift-zero puts your laptop to sleep, and Ô-Shift-Control-zero
makes your hard drive stop spinning.
■In deference to those who use their PowerBooks on the plane or in the
cab, Assistant Toolbox adds deferred printing and deferred e-mail sending
features—your printouts and e-mails are held in limbo until you
reconnect to a network, whereupon they’re sent automatically.
Worth
Learning
OS
8.5
Chapter 4: Control Panels and Extensions 235
■ ■
MAC SECRETS • 4040-8/5 • ch.04.F • Chapter 4 • FINAL • VB • 10/22/98 • p.235
MAC SECRETS • 4040-8/5 • ch.04.1 • Chapter 4 • Proof 1 • VB • 09/16/98 • p.235
4040-8/5 ch04.F 11/3/98 3:14 PM Page 235

■Finally, as per its name, this extension works with the PowerBook File
Assistant file-syncing program, provided with System 7.5 and later. File
Assistant’s purpose is to keep the contents of certain folders — one set
on your PowerBook and a corresponding set on your desktop Mac—
identical, no matter which set you have updated in your travels.
At Ease Startup
See “At Ease Setup” earlier in this chapter.
ATI 3D Accelerator (and related files)
The software that drives certain ATI graphics boards (included with many
Power Macs) also includes the extensions called ATI Video Accelerator, ATI
Driver Update, ATI Graphics Accelerator, and ATI Video Memory Manager.
Audio CD Access
See “Apple CD/DVD Driver, Apple CD-ROM (and related files).”
Caps Lock
The traditional typewriter’s Caps Lock key doesn’t merely lock you into ALL-
CAPITALS typing; the key itself locks in a depressed position until you press it
a second time to release it.
But PowerBook keyboards’ Caps Lock keys don’t stay down. And on the
PowerBook 100 through 180c, there’s not even a light to signal you that
you’re about to start typing in caps. For this reason, Apple created the Caps
Lock extension. When your Caps Lock key is “engaged,” this extension draws
a fat, hollow arrow symbol at the upper-right end of your menu bar.
CFM-68K Runtime Enabler
Figuring out the name of this thing is hard enough — now try figuring out
whether or not you need it: This extension is for non-Power Macs (but not on
the Mac Plus or earlier models). It requires System 7.1 or later, but is
unnecessary in Mac OS 8. You must have 32-Bit Addressing turned on in your
Memory control panel. But don’t install versions of this extension before 4.0,
or you risk “crashing and data loss,” says Apple. Yikes.
This innocent-looking doodad is installed by the latest LaserWriter, Desktop
Printing, OpenDoc, and America Online software, among other programs. Its
purpose is to let non-PowerPC Macs use shared libraries, just as Power Macs
do (see Chapter 9 for more on shared libraries), thus saving the programmers
of PowerPC-native software the hassle of duplicating their efforts for non-
PowerPC Macs.
Clipping Extension
This little guy lets you drag a selected picture, sound, or paragraph out of a
program and onto your Desktop, where it turns into a Clipping file (using
System 7.5’s Drag and Drop — see Chapter 1 for details). Without this
236 Part I: System Software Revealed
■ ■
MAC SECRETS • 4040-8/5 • ch.04.F • Chapter 4 • FINAL • VB • 10/22/98 • p.236
MAC SECRETS • 4040-8/5 • ch.04.1 • Chapter 4 • Proof 1 • VB • 09/16/98 • p.236
4040-8/5 ch04.F 11/3/98 3:14 PM Page 236

extension, you can still drag text, sounds, and graphics between Drag-and-
Drop— savvy programs — you just can’t drag them back and forth to your
Desktop. (Unnecessary in Mac OS 8 and later.)
Color Picker
The Color Picker is that dialog box that shows a big color wheel, allowing you
to choose a particular color. It appears, for example, when you’re in the
Preferences dialog box (Mac OS 8 and later) or the Labels control panel
(previous systems) and you click a label color to change it.
This extension adds a More Choices button to that dialog box, allowing you
to choose from between two technical color-representation schemes: HSL
(for Hue, Saturation, Luminosity) and RGB (for Red, Green, Blue). In Mac OS 8
and 8.1, it also adds the amazing Crayon Picker, complete with its arsenal of
secret Easter eggs (see Chapter 2).
Color SW 2000 Series CMM
ColorSync software for color StyleWriter 2400. See “ColorSync System Profile,”
earlier in this chapter. (SW = StyleWriter, CMM = Color-Matching Module.)
ColorSync or ColorSync Extension
This extension is the actual guts of ColorSync, Apple’s color-matching system
(see “ColorSync or ColorSync System Profile,” earlier in this chapter). If you
don’t have ColorSync Profiles in your System Folder for each scanner,
monitor, and color printer you plan to use, you may as well toss this.
Contextual Menu Enabler, Contextual Menu
Extension
These innocent-looking files are responsible for the glorious Control-key
menu feature of Mac OS 8 and later. (See Chapter 2 for details.)
Control Strip Extension
Control Strip Extension? Don’t you distinctly remember reading about the
Control Strip in the Control Panels section of this chapter?
True enough. But starting in Mac OS 8.5, the Control Strip has far greater
powers, such as letting you drag-and-drop new modules directly onto the
strip — hence this extension, which permits the Control Strip to be “on the
alert” for such modifications.
Default Calibrator
Beginning in Mac OS 8.5, Apple monitors are even better suited to
professional graphics people; now these monitors can be calibrated (set to
exactly correct color settings, neatly compensating for heat, temperature,
ambient light, manufacturing variances, and so on) using Mac OS 8.5’s
DigitalColor Meter program. This extension adjusts your monitor at startup
to ensure that it’s colorifically perfect.
OS
8.5
OS
8.5
OS
8
Chapter 4: Control Panels and Extensions 237
■ ■
MAC SECRETS • 4040-8/5 • ch.04.F • Chapter 4 • FINAL • VB • 10/22/98 • p.237
MAC SECRETS • 4040-8/5 • ch.04.1 • Chapter 4 • Proof 1 • VB • 09/16/98 • p.237
4040-8/5 ch04.F 11/3/98 3:14 PM Page 237

Demo click&drag (and related files)
Only PowerBooks come with these three files, which are, believe it or not,
QuickTime movies. You can open and play them like normal QuickTime
movies (see Chapter 23), but they’re not what you’d call Spielberg material.
Instead, they’re designed to be used exclusively by, of all things, the Apple
Guide system.
Want to watch these fine animated films? Choose Help or Mac OS Guide from
your Help menu in the Finder; click Index; select the letter T; click Trackpad;
double-click “How do I use my PowerBook trackpad?”; select “learn how to
use the trackpad to click and drag”; follow along with the first few screens of
instructions; and, when prompted, double-click the big gray box to see the
movies.
Desktop Printer Spooler (and related files)
If you’re the proud owner (or user) of more than one printer, desktop printing,
as you’ll find out in Chapter 30, is actually a handy concept. It means that you
don’t have to go to the Chooser every time you want to switch from one to
another. Instead, Desktop printing puts an icon onto your Desktop — one for
each printer (or fax modem). This way, you can simply drag your document
icons onto the different printer icons to specify which printer you want to
use for each.
You can install this new technology by using the Custom Install option of
System 7.5.3; it’s part of the LaserWriter 8 software. You may also find, in
your Extensions folder, Desktop PrintMonitor, Desktop Printer Menu, and
Desktop Printer Extension (although this last has been incorporated into
Mac OS 8). The whole affair is charmingly described in Chapter 30.
DNSPlugin
Apple helpfully describes this little doodad, which first appeared in Mac OS
8.5, as an extension that “allows your computer to receive listings of network
objects from DNS directory services.”
In fact, the DNSPlugin (and its sister, the SLPPlugin) are part of a new Apple
technology called NSL (network service location). This underlying
technology lets software companies write into their programs an Internet-
resource browsing feature, such that you can view and select the various
machines on your corporate network, just as you can over an AppleTalk
network today. Unfortunately, at this writing, no software takes advantage of
this high-end feature; unless you have a system administrator who directs
you otherwise, we recommend disabling these extensions.
Drag and Drop
For System 7.1 variants only. Gives you the Macintosh Drag & Drop feature
described in Chapter 1; unnecessary in System 7.5 or later.
OS
8.5
238 Part I: System Software Revealed
■ ■
MAC SECRETS • 4040-8/5 • ch.04.F • Chapter 4 • FINAL • VB • 10/22/98 • p.238
MAC SECRETS • 4040-8/5 • ch.04.1 • Chapter 4 • Proof 1 • VB • 09/16/98 • p.238
4040-8/5 ch04.F 11/3/98 3:14 PM Page 238

EM Extension
This extension is a component of Extensions Manager (see “Extensions
Manager,” earlier in this chapter). As a control panel, Extensions Manager
actually loads after the very extensions it’s supposed to manage. Therefore,
you also have this extension, which loads before all other extensions. It gives
you the chance, by pressing the space bar during startup, to bring up the
Extensions Manager control-panel screen, so that you can choose which
extensions you want to load.
Energy Saver extension
Does the actual starting up and shutting down you’ve specified in the Energy
Saver control panel (see “Energy Saver 2.0 (and related files),” earlier in this
chapter).
Ethernet (Built-In)
See “Open Transport (and related files),” later in this chapter.
EtherTalk Phase 2, EtherTalkPrep
See “AppleShare (and related files),” earlier in this chapter.
Fax Extension
See “GeoPort Extension (and related files),” later in this chapter.
FBC Indexing Scheduler
This extension is responsible for the auto-pilot indexing feature of Mac OS
8.5’s Find By Content (FBC) tab, described in Chapter 3. In other words, this
is the monitor that watches the clock until midnight (or whatever time you’ve
specified), at which time the Mac indexes your hard drives (makes an
updated catalog of their contents for quicker searching).
File Sharing Extension, File Sharing Library
See “AppleShare (and related files),” earlier in this chapter.
File Sync Extension
This extension is required for the File Synchronizaton control panel,
described earlier in this chapter.
Find, FindByContent
To make the awesome new Find command (which debuted in Mac OS 8.5)
work, the FindByContent extension requires the data, and the Find by
Content Indexing program, stored in the Find folder. (Indexing is the process
of analyzing and cataloging all the text on your hard drive, as described in
Chapter 3.)
OS
8
OS
8
OS
8.5
Chapter 4: Control Panels and Extensions 239
■ ■
MAC SECRETS • 4040-8/5 • ch.04.F • Chapter 4 • FINAL • VB • 10/22/98 • p.239
MAC SECRETS • 4040-8/5 • ch.04.1 • Chapter 4 • Proof 1 • VB • 09/16/98 • p.239
4040-8/5 ch04.F 11/3/98 3:14 PM Page 239

Find File Extension
This extension simply launches the Find File program (of System 7.5 through
7.6.1) when you choose Find File (or press Ô-F). If it weren’t for this little guy,
you’d get the old Find box instead. And even without this extension, you can
still call up the new Find File — by choosing its name from your menu.
Finder Scripting Extension
See “AppleScript (and related files),” earlier in this chapter. Actually, this
AppleScript component is more important than most — it lets you drag things
into and out of the Find File program, as described in Chapter 3. It’s
unnecessary in Mac OS 8.5 and later.
Folder Actions
This extension lets AppleScript monitor your folders, in case you’ve created
an AppleScript that you want triggered whenever somebody opens or drops
something into a folder. For details on AppleScript, see Chapter 22.
Foreign File Access
See “Apple CD-ROM (and related files),” earlier in this chapter.
GeoPort Extension (and related files)
This extension is the driver for a GeoPort Telecom Adapter, a $100 fax/modem
simulator once sold by Apple for Power Mac or AV-model Macs. See Chapter 24
for details.
You’ll find other files in your System Folder, too, all pertaining to your GeoPort,
such as the Fax Extension (lets you send and receive faxes with the GeoPort
Adapter); the Express Modem control panel (described earlier), Fax Terminal
7.5 Compatibility (lets your GeoPort software work with System 7.5); and, in
some cases, anything with the word MegaPhone in it (another set of extensions
and control panels that lets your Mac act as a telephone answering machine).
240 Part I: System Software Revealed
■ ■
MAC SECRETS • 4040-8/5 • ch.04.F • Chapter 4 • FINAL • VB • 10/22/98 • p.240
MAC SECRETS • 4040-8/5 • ch.04.1 • Chapter 4 • Proof 1 • VB • 09/16/98 • p.240
CASE HISTORY
An actual transcript of a call to a Macintosh
software company.
Tech: Hello, Tech Support.
Caller: Yeah, I’ve got version 3.1 of your
program and it won’t run on my Macintosh 7500.
Tech: Yes, sir, that’s right. 3.1 is not compatible
with the new PCI Power Macs. You need version
5.0 or later.
Caller: Yeah, well, I’ve got that version 5, too.
Works fine.
Tech: That’s great, sir. So you have the
upgrade, then. So what’s the problem?
Caller: Well, I just want to know when you’re
gonna make the 3.1 version run on Power Mac.
We’ve been using the 3.1 version years more
than the 5.0, and we like it just fine.
The Upgrade paradox
4040-8/5 ch04.F 11/3/98 3:14 PM Page 240

Global Guide Files
This folder, which debuted in System 7.6, is a refreshing effort by Apple to
consolidate its Extensions folder junk. It’s a central location for your Apple
Guide files; see “Apple Guide (and related files),” earlier in this chapter.
Graphics Accelerator
This one is another file exclusively for PCI Macs Power Macs that have an ATI
video-acceleration PCI card installed. This is the software your Mac needs to
give you that video speed boost.
High Sierra File Access
See “Apple CD-ROM (and related files),” earlier in this chapter.
ICeTEe
If you use the Internet, this little gizmo is worth having. It’s installed by
Internet Config, a free Internet utility that comes with the Mac (before Mac OS
8.5’s Internet control panel replaced it). This particular extension adds to all
your programs the ability to Ô-click any Web-page address, wherever it
shows up — to open that Web page in your chosen Web browser. Similarly,
you can Ô-click an e-mail address to open a new, blank, pre-addressed e-mail
in your favorite e-mail program. (The name comes from the initials of Internet
Config and TextEdit, the Mac’s built-in text-processing routines.)
If a Ô-click doesn’t work, by the way, try enclosing the Internet address
exactly (no brackets or other extraneous characters). And if that doesn’t work,
your program may not use TextEdit behind the scenes. You’re out of luck.
Indeo Video, Intel Raw Video
If you use Microsoft Internet Explorer, these extensions got dumped into your
System folder. They let your Mac see QuickTime movies (which, presumably,
you find on the Web) that have been prepared in Windows format (AVI).
Installer Cleanup
This extension, if you can glimpse it at all, appears just after you install new
Apple software. During the startup immediately following a software
installation, Installer Cleanup takes care of a few technical loose ends—and
then deletes itself!
Internet Access
If you have Mac OS 8/8.1 or the Apple Internet Connection Kit, you need this
shared library to dial into the Internet.
Internet Config Extension
This isn’t Apple’s software, although Apple provides it with Mac OS 8 and
later. It’s the System Folder representative of Internet Config (or Mac OS 8.5’s
Internet control panel).
OS
8
Chapter 4: Control Panels and Extensions 241
■ ■
MAC SECRETS • 4040-8/5 • ch.04.F • Chapter 4 • FINAL • VB • 10/22/98 • p.241
MAC SECRETS • 4040-8/5 • ch.04.1 • Chapter 4 • Proof 1 • VB • 09/16/98 • p.241
4040-8/5 ch04.F 11/3/98 3:14 PM Page 241

Internet Config and the Internet control panel let you type in all your Internet
setup information (e-mail address, SMTP codes, and other stuff described in
Chapter 25) once — so that you won’t have to re-enter all of that information
over and over again into each of your other Internet programs. (See
“Internet” earlier in this chapter for details.)
Iomega Driver
In theory, you have this extension only if you have a Zip or Jaz drive; it’s the
driver software that lets your Mac talk to such a drive.
IrDALib, IrLanScannerPPC
See “IR Talk (and related files),” next.
IR Talk (and related files)
Every PowerBook since the 500 series, plus the iMac or any desktop Mac
with a Netopia AirDock, has an infrared transmitter/receiver. It looks like a
little red plastic taillight, and it permits wire-free networking between
similarly equipped machines. This extension, which in later system versions
takes the form of IrDALib and IRLanScannerPPC, makes it all possible. See
Chapters 14 and 35 for details.
ISO 9660 File Access
See “Apple CD/DVD Driver, Apple CD-ROM (and related files).”
jgdw.ppc
We know that this is an extension. We know it’s installed by Microsoft
Internet Explorer. We haven’t the faintest idea what it does. Something to do
with Java, no doubt.
Kodak Precision CP1 (and related files)
This extension isn’t part of the standard Apple software per se, but it’s
dumped into your System folder during the installation of so many digital
cameras, scanners, and graphics programs that it’s practically universal. CP
stands for color palette; these extensions, ColorSync-like, help maintain color
consistency among different color gadgets. Also includes Kodak Precision
CP2 and Kodak Precision ProfileAPI.
LaserWriter (and related files)
These extensions are printer drivers — they teach your Mac to communicate
with specific printer models. Obviously, you need only the one (or ones) that
matches your printer (or printers). Without the driver, you can’t print. Throw
all the others away. Other printer drivers that probably got dumped into your
Extensions folder are various StyleWriter, LaserWriter Select, ImageWriter
drivers, and so on.
242 Part I: System Software Revealed
■ ■
MAC SECRETS • 4040-8/5 • ch.04.F • Chapter 4 • FINAL • VB • 10/22/98 • p.242
MAC SECRETS • 4040-8/5 • ch.04.1 • Chapter 4 • Proof 1 • VB • 09/16/98 • p.242
4040-8/5 ch04.F 11/3/98 3:14 PM Page 242

LocalTalk PCI
This extension was inspired by a praiseworthy notion: to make LocalTalk, the
networking software used by many a LaserWriter and Mac (see Chapter 35),
PowerPC-native (that is, faster on Power Macs).
(The initial, Mac OS 8.1 version of LocalTalk PCI, alas, had a small problem—
on many machines, it made the Mac unable to “see” the laser printer at all.
Version 1.1 and later solve the problem.)
Location Manager Extension,
Location Manager Modules
Location Manager, described earlier in this chapter, is the clever PowerBook
control panel that, with the flick of a menu command, switches numerous
parameters that may change when you travel from place to place: your
default printer, extension set, speaker volume, local time, and so on. This
extension makes it work, and the Modules folder stores the individual
extensions that control, understand, and switch those parameters.
Macintalk (2, 3, or Pro)
Included with System 7.5 and later: lets your Mac speak text you’ve typed into
SimpleText. Requires the Speech Manager control panel and the Voices folder
in your Extensions folder, too. See Chapter 23 for details.
Macintalk 2 is for 68020 Macs and Macs running System 6; Macintalk 3 is for
68030, 68040, and PowerPC Macs; and Macintalk Pro requires a 68040 or
PowerPC chip.
Macintosh Guide
See “Apple Guide (and related files),” earlier in this chapter.
MacLinkPlus for Easy Open
File-format translators; see “Mac OS Easy Open (Macintosh Easy Open),”
earlier in this chapter.
MacTCP DNR
See “AppleShare (and related files),” earlier in this chapter.
MacTCP Token Ring
See “AppleShare (and related files),” earlier in this chapter.
Modem Scripts
See “Modem,” earlier in this chapter.
OS
8
Chapter 4: Control Panels and Extensions 243
■ ■
MAC SECRETS • 4040-8/5 • ch.04.F • Chapter 4 • FINAL • VB • 10/22/98 • p.243
MAC SECRETS • 4040-8/5 • ch.04.1 • Chapter 4 • Proof 1 • VB • 09/16/98 • p.243
4040-8/5 ch04.F 11/3/98 3:14 PM Page 243

Mount IDE Drive
For Macs with IDE-style hard drives only (such as most PowerBooks and 630-
series machines), this extension is designed to mount (bring onto the screen)
your internal hard drive’s icon if you’re starting up from some other disk.
MRJ Libraries
This folder (which stands for Macintosh Runtime for Java) contains the
software necessary for your Mac to run Java instructions (see Chapter 25).
Multiprocessing
A folder containing shared libraries (see Chapter 9) in System 7.6 and later.
On the one hand, this software is required only by Macs that have multiple
processors. On the other hand, Apple claims that more and more programs
will require these files, even on single-processor Macs; since these are only
shared libraries, and thus don’t load at startup, take up RAM, or cause
conflicts, you may as well leave them.
Network Extension
See “AppleShare (and related files),” earlier in this chapter. This extension
disappears when Open Transport is installed (see Chapter 35).
Network Setup Extension
Required for Mac OS 8.5’s networking features.
ObjectSupportLib
For Power Macintosh only; lets several running programs exchange Apple
Event messages regarding shared libraries. Unnecessary in Mac OS 8 and later.
OS
8.5
244 Part I: System Software Revealed
■ ■
MAC SECRETS • 4040-8/5 • ch.04.F • Chapter 4 • FINAL • VB • 10/22/98 • p.244
MAC SECRETS • 4040-8/5 • ch.04.1 • Chapter 4 • Proof 1 • VB • 09/16/98 • p.244
CASE HISTORY
Another actual, true transcript of a call to
Apple’s Austin, TX, 800-SOS-APPL help line.
While troubleshooting for printer problems with
a customer, the Apple agent noticed that simple
tasks were taking an inordinately long time.
Caller: This COMPUTER makes me SO mad!
EVERY TIME I need to use the mouse I have to
move my DESK back from the wall, UNPLUG the
keyboard and connect the MOUSE. HOW
FRUSTRATING!!
Agent: Ma’am, the mouse plugs into the keyboard.
Caller: You’re kidding — you’ve GOT to be
KIDDING. Oh, my God, I just knew there was
something wrong. I’ve been using it this way for
over a month!
A better mouse trap
4040-8/5 ch04.F 11/3/98 3:14 PM Page 244

OpenDoc Libraries
This folder, together with the helpfully named SOMobjects for Mac OS and
the Editor Setup control panel, let your Mac work with OpenDoc parts. See
Chapter 15 for the full explanation.
Open OT
The America Online installer blesses you with this little item. It’s needed
only on Macs where AppleTalk is not turned on (for example, if your printer
is an inkjet).
Open Transport (and related files)
Open Transport, the 1995 universal networking software from Apple,
introduces a bunch of clutter to your System Folder. You get four new control
panels: AppleTalk, Modem, Remote Access (or PPP in systems before Mac
OS 8.5), and TCP/IP. You also get numerous files in your Extensions folder:
Open Transport Library, OpenTpt Modem, OpenTpt Remote Access,
OpenTpt Serial Arbitrator, OpenTptAppleTalkLib, OpenTptInternetLib, and
OpenTransportLib, among others.
See Chapters 25 and 35 to find out what good all this does you; for now, note
that you need all of this Open Transport software if you hope to use the
Internet or an in-office network.
PC Card Extension, PC Card Modem Extension,
PC Card Multifunction Update
These drivers let PowerBooks recognize PC cards (those little credit-card size
things like modems and Internet cards), as described in Chapter 14.
PC Clipboard Translator
Suppose your Mac has a DOS Compatibility Card installed (see Chapter 16).
If you copy some text from a Windows program, and then switch to a
Macintosh program, you’ll want your Clipboard contents to survive the
switch. This extension makes it possible.
PlainTalk Speech Recognition
See “Speech Recognition (and related files),” later in this chapter.
PowerBook 3400 Ethernet,
PowerBook 3400 Modem
These extensions, known on the first PowerBook G3 as PowerBook 3400/G3
Ethernet and PowerBook 3400/G3 Modem, let the PowerBook 3400 and G3
models talk to their own built-in networking/modem card.
Chapter 4: Control Panels and Extensions 245
■ ■
MAC SECRETS • 4040-8/5 • ch.04.F • Chapter 4 • FINAL • VB • 10/22/98 • p.245
MAC SECRETS • 4040-8/5 • ch.04.1 • Chapter 4 • Proof 1 • VB • 09/16/98 • p.245
4040-8/5 ch04.F 11/3/98 3:14 PM Page 245

PowerBook Monitors Extension
See “Quadra Monitors Extension (and related files),” later in this chapter.
PowerBook ZoomedVideo
On PowerBooks that can accommodate a zoomed video card (a PC card that
lets you watch live video via cable), such as the 3400 and G3, this extension is
the driver software.
PowerPC Monitors Extension
See “Quadra Monitors Extension (and related files),” later in this chapter.
PowerTalk Extension (and related files)
PowerTalk is a complex, very technical set of interrelated software
components for use in office networks, officially abandoned by Apple as of
Mac OS 8. It’s described more fully in Chapter 35.
Some of the PowerTalk components you’ll find in your System Folder after
installation are: Catalogs Extension (lets you create and manage icons full of
addressee data called catalogs); Mailbox Extension (creates the Mailbox icon
on your Desktop to store incoming e-mails, faxes, and so on); PowerTalk
Manager (manages the Mailbox and other services); Serial Tool (lets your
PowerTalk software dial the modem to retrieve e-mail); and others.
PowerTalk Guide
See “Apple Guide (and related files),” earlier in this chapter.
Printer Descriptions
This folder contains PPDs (PostScript Printer Descriptions) for individual printer
models. It’s used only by the LaserWriter 8 printer driver (see Chapter 30). Feel
free to open this folder and discard the icons for any printers you don’t use.
Printer Share
This extension lets you share one StyleWriter (see Chapter 30) among several
networked Macs.
Printing Lib
Yet another shared library, as described at the beginning of this section; this
one’s needed only for laser printing.
PrintMonitor
PrintMonitor handles background printing if you don’t use the Desktop
Printing feature. See Chapter 30 for details on both.
QTVR, QTVR Components
See “QuickTime VR,” later in this chapter.
246 Part I: System Software Revealed
■ ■
MAC SECRETS • 4040-8/5 • ch.04.F • Chapter 4 • FINAL • VB • 10/22/98 • p.246
MAC SECRETS • 4040-8/5 • ch.04.1 • Chapter 4 • Proof 1 • VB • 09/16/98 • p.246
4040-8/5 ch04.F 11/3/98 3:14 PM Page 246

Quadra Monitors Extension (and related files)
This optional extension provides your Monitors control panel with specific
information about your model’s video features. The only way you can see its
effect is by opening the Monitors control panel and clicking the Options
button. There you may see some additional choices—such as the ability to
change the gamma settings (see “Monitors,” earlier in this chapter), which are
specific to your Mac model’s family.
Other model-specific Monitors Extensions include PowerBook Monitors
Extension, Quadra AV Monitors Extension, PowerPC Monitors Extension,
and so on.
Queue Monitor, Queue Watcher
On PowerBook 3400 and G3 models, these are components of the Fax STF
software used to control faxing on your built-in fax modem.
QuickDraw 3D
QD3D stands for QuickDraw 3-D, as you’ll find out in Chapter 20. These
extensions, which include Apple QD3D HW Plug-in, Apple QD3D HW Driver,
QuickDraw 3D, QuickDraw 3D IR, QuickDraw 3D RAVE, and QuickDraw 3D
Viewer, provide the underlying software for programs that let your Mac show,
create, and (on special circuit boards) accelerate 3D graphics, as described in
Chapter 20. (Frankly, most people can throw all of these out.)
QuickDraw GX (and related files)
The cornerstone of the vast, discontinued, Mac OS 8-incompatible,
QuickDraw GX fonts-and-printing empire (including ATM GX, Letterhead,
N-Up Printing, the QuickDraw GX extension, and much more), provided
with System 7.5 and later. See Chapter 30 for details.
For now, note that when you install QuickDraw GX, you may notice a curious
change to the icons in your Chooser: They all have the letters GX added to
their names. The QuickDraw GX extension hides the icons of all your normal
printer drivers.
If you want your original drivers to return to the Chooser—for example, if
your laser printer or software doesn’t work with the GX drivers—the fix is
simple. Just restart your Mac with the QuickDraw GX extension turned off.
Your normal icons return, and it will be the GX drivers’ turn to vanish.
QuickTime (and related files)
When you add the QuickTime extension to your System Folder, your Mac can
run programs that record, edit, and play digital movies—QuickTime movies.
It also helps graphics programs open certain kinds of compressed graphics
formats (such as JPEG) and even lets your Mac play MIDI music files. Chapter
23 provides details on the Mac’s most famous multimedia technology.
The QuickTime Power Plug adds PowerPC-native programming for
QuickTime movies to Power Macs. It doesn’t help playback, but dramatically
Chapter 4: Control Panels and Extensions 247
■ ■
MAC SECRETS • 4040-8/5 • ch.04.F • Chapter 4 • FINAL • VB • 10/22/98 • p.247
MAC SECRETS • 4040-8/5 • ch.04.1 • Chapter 4 • Proof 1 • VB • 09/16/98 • p.247
4040-8/5 ch04.F 11/3/98 3:14 PM Page 247

shortens the time it takes to create (compile and save) QuickTime movies of
your own. The QuickTime MPEG Extension lets your Mac play a specially
compressed type of QuickTime movies called MPEG. You won’t see MPEG
files often (except possibly on the Web and on DVD discs) — but when you
do, you’ll be ready.
QuickTime Musical Instruments, meanwhile, contains the realistic sounds of 30
musical instruments. In conjunction with the QuickTime extension — and a
program like Movie Player— it lets you open standard MIDI music files and play
them using the Mac as a synthesizer. For the first time, the Mac is free from its
age-old four-notes-simultaneously chord limit. See Chapter 23 for details.
(Check out the Balloon Help for this item: “Music n. 1: the science or art of
incorporating intelligible combinations of tones into a composition having
structure and continuity, 2: an agreeable sound, euphony, 3: punishment for a
misdeed.” As free book winner Leigh Blankenship points out, “Number 3
covers the Spice Girls phenomenon pretty well, I think.”)
QuickTime VR
This QuickTime plug-in lets your Mac play QuickTime VR movies — “virtual
reality” photos, as described in Chapter 23. If you have this extension,
remove its predecessors, QTVR and QTVR Components.
Scanner
The driver (translator) that lets your Mac talk to an Apple scanner.
Scripting Additions
See “AppleScript (and related files),” earlier in this chapter.
SCSI Manager 4.3
This extension is the software that lets AV and Power Mac models take
advantage of their faster SCSI circuitry, resulting in faster data transfer
between SCSI devices. Unnecessary in System 7.5.3 and later.
Serial (Built-In)
A shared library that helps your programs talk to the Mac’s modem and
printer jacks.
Serial Port Arbitrator
This extension is installed with Apple Remote Access (see Chapter 31). If
you’ve set up your Mac to answer the phone, this extension lets other
programs use your modem port in the mean time (so you can surf the Web,
for example, without having to turn off ARA).
Serial Tool
See “PowerTalk Extension (and related files),” earlier in this chapter.
Contest
Winner
248 Part I: System Software Revealed
■ ■
MAC SECRETS • 4040-8/5 • ch.04.F • Chapter 4 • FINAL • VB • 10/22/98 • p.248
MAC SECRETS • 4040-8/5 • ch.04.1 • Chapter 4 • Proof 1 • VB • 09/16/98 • p.248
4040-8/5 ch04.F 11/3/98 3:14 PM Page 248

SerialDMA
Some pretty sophisticated software is required to manage all the high-speed
data that gets shoved in and out of your modem port —particularly modem and
MIDI transmissions. This extension is it. Unnecessary in System 7.5.3 and later.
Shared Library Manager, Shared Library
Manager PPC
These two extensions control the loading and unloading of shared libraries,
which are discussed in this chapter (see the introduction of this section—
“Extensions: One by One”) and in Chapter 9. Required for Open Transport,
Microsoft programs, QuickTime, and other programs that rely on shared
libraries. (If you have a PowerPC-based Mac, you need both of these.)
Shortcuts
See “Apple Guide (and related files),” earlier in this chapter.
Slow SCSI Extension
For PowerBook 5300, 190, and 1400 models. This extension is designed to
solve a crashing problem when transferring data from these PowerBook’s
slowish IDE drives and equally slow other SCSI devices (such as single-speed
CD-ROM drives, Zip drives, and other PowerBooks). It works by slowing
down all of your SCSI transfers — so if you’re not crashing, and you’re not
using slow SCSI devices, turn this extension off.
SLPPlugin
See “DNSPLugin,” earlier in this chapter.
SOMobjects for Mac OS
Yet another shared library, as discussed at the beginning of this section. This
one, although it originally appeared as part of OpenDoc (see Chapter 15), is
required to make Mac OS 8’s contextual menus work (see Chapter 2). (SOM
stands for System Object Model, if you must know.)
Sound Input Amplification
Apple’s PlainTalk microphone generates an electrical signal that’s strong
enough to make the Mac’s sound-recording software happy (“line-level”
signal). Other microphones, however, are too weak. This extension, shipped
only with 7200 models, adds a “Microphone amplification” option to your
Sound control panel.
Sound Manager
There have been various versions of this sound-management software, each
designed to make recording and playing back sounds better and more
flexible. Unnecessary in System 7.6 or later.
Chapter 4: Control Panels and Extensions 249
■ ■
MAC SECRETS • 4040-8/5 • ch.04.F • Chapter 4 • FINAL • VB • 10/22/98 • p.249
MAC SECRETS • 4040-8/5 • ch.04.1 • Chapter 4 • Proof 1 • VB • 09/16/98 • p.249
4040-8/5 ch04.F 11/3/98 3:14 PM Page 249

Speech Guide Additions
See “Apple Guide (and related files).”
Speech Manager
See “Speech Recognition (and related files).”
Speech Recognition (and related files)
The Power Mac and AV lines, among other features, offer speech recognition:
You speak into your Mac’s microphone, issuing orders, and the Mac obeys. A
separate set of programs provides text-to-speech features — which can run on
any recent Mac—in which the Mac reads out loud, in a pseudo-human voice,
what you’ve typed into SimpleText. See Chapter 23 for details on both features.
These speech features add all kinds of junk to your Extensions folder: several
TTS Voice files (the voices used for text-to-speech); SR North American
English (dictionary for recognized terms); SR Monitor (listens to the mike);
System Speech Rules (teaches the Mac how English works); PlainTalk Text-
To-Speech or Speech Manager (the heart of the text-to-speech feature); My
Speech Macros (new spoken commands you’ve created, using the Speech
Macro Editor program, for the Mac to understand); and so on.
StyleWriter
See “LaserWriter (and related files),” earlier in this chapter.
System Speech Rules
See “Speech Recognition (and related files),” earlier in this chapter.
SystemAV
Tells the Monitors & Sound control panel what sound and video features your
particular Mac model has. Required by the Monitors & Sound control panel,
described earlier in this chapter.
Telephone Manager
Here’s the software your Mac needs to answer the phone — if you’ve installed
Apple’s Telecom Software, MegaPhone, or the like.
Text Encoding Converter
Probably unbeknownst to you, each kind of computer has a different way of
referring to typed letters. Sure, all computers understand A through Z, but
the wackier symbols (such as curly quotes, foreign diacritical markings, and
so on) are internally summoned differently on each computer type. Ever get
an e-mail in which all the apostrophes appear as capital U’s? Or in which all
the quote marks have turned to weird boxes? Now you know the problem.
The Text Encoding Converter is a shared library that’s designed to translate
other computers’ wacky alphabet references into the Mac’s system, so that
fewer nutty boxes and U’s show up in your e-mail.
250 Part I: System Software Revealed
■ ■
MAC SECRETS • 4040-8/5 • ch.04.F • Chapter 4 • FINAL • VB • 10/22/98 • p.250
MAC SECRETS • 4040-8/5 • ch.04.1 • Chapter 4 • Proof 1 • VB • 09/16/98 • p.250
4040-8/5 ch04.F 11/3/98 3:14 PM Page 250

Text Preview
When you’re examining files in the Open File dialog box (see Chapter 15),
there’s a little Preview area in certain programs, notably ClarisWorks. This
extension lets you see a few words of text files you’re browsing—right there
in the little Preview area—without actually having to open those files.
Thread Manager
A pre-System 7.5 extension that opens the way for certain programs (of
which very few exist) to perform one task — like initializing a floppy disk —
while you continue to work on something else.
Time Synchronizer
If you’re using Mac OS 8.5’s Date & Time control panel, you’ve noticed that it
can set your Mac’s clock automatically by dialing into the Internet, even
compensating for Daylight Savings Time (if you observe it). This extension is
the bridge between Date & Time and your Mac’s dialing software.
TokenTalk Phase 2
See “AppleShare (and related files),” earlier in this chapter.
TokenTalk Prep
See “AppleShare (and related files),” earlier in this chapter.
Trackpad Climate Control
For three PowerBooks—the 190, 1400, and 2300. This extension reduces the
likelihood of cursor jerkiness when you’re using the trackpad with moist or
sweaty palms. (Trust us: A Post-It note over the trackpad works better.)
UDF Volume Access
New for Mac OS 8.5: a driver that lets your Mac talk to DVD discs, as described in
Chapter 32. (“Volume,” in this case, doesn’t mean “loudness”; it refers to a disk.)
Video Guide Additions
See “Apple Guide (and related files),” earlier in this chapter.
Video Startup
As you’ll read in Chapter 23, some Macs—the 7600, 8600, and minitower G3,
for example — let you create digital QuickTime movies simply by hooking
your camcorder up to a jack on the back. This extension is required by Apple
Video Player, the program Apple gives you to capture the incoming footage.
Voices
This folder contains the voice files for Macintalk, the extension that lets the
Mac talk to you. See Chapter 23 for more on Macintalk.
OS
8.5
OS
8.5
Chapter 4: Control Panels and Extensions 251
■ ■
MAC SECRETS • 4040-8/5 • ch.04.F • Chapter 4 • FINAL • VB • 10/22/98 • p.251
MAC SECRETS • 4040-8/5 • ch.04.1 • Chapter 4 • Proof 1 • VB • 09/16/98 • p.251
4040-8/5 ch04.F 11/3/98 3:14 PM Page 251

Web Sharing Extension
Required by the Web Sharing control panel, described earlier in this chapter.
WorldScript Power Adapter
You may suspect that extension has something to do with WorldScript
Language Kits (if you’ve bought any). In fact, it’s far more useful; it actually
speeds up text processing (by patching over non-native code) on Macs with
PowerPC chips.
The Ultimate Extension-Linking Guide
Just about everyone in America now has some kind of program for managing
all of these extensions — either Extensions Manager, which comes with the
Mac, or its more powerful rival, Conflict Catcher.
Conflict Catcher lets you link various clumps of extensions, so that turning
one of them on turns the entire group on. For example, an Apple CD-ROM
drive comes with no fewer than six extensions, and a horrifying nine are
required for Open Transport. To save you time and effort, here’s a list that
shows what extensions should be turned on together. Even if you don’t use
an extension-management program, this list should help you better
understand the purpose of all those seemingly random files that clutter your
System folder.
Note, first, though: (1) You may not have all of these components; our
purpose here is to help you figure out which software suite something in your
System folder came from. (2) Not all of these elements even show up in your
extensions-management program. Some have no startup code to manage, and
are simply support files, or are otherwise invisible to such programs.
Apple CD-ROM or DVD
Apple CD-ROM
Apple CD/DVD Driver
Audio CD Access
Apple Photo Access
Foreign File Access
High Sierra File Access
ISO 9660 File Access
UDF Volume Access
Apple Remote Access
Apple Remote Access Client
Dial Assist (application)
Link Tool Manager
Modem Link Tool Personal
Remote Access Aliases
Remote Access Setup (control panel)
Remote Only
Serial Port Arbitrator
Apple Telecom Software
AddressBookLib.ppc
AddressBookLib.68K
Apple Fax Gateway
Apple Phone Extension
Fax Extension
Fax Sender
Fax Sender GX
Log Extension (shared library)
252 Part I: System Software Revealed
■ ■
MAC SECRETS • 4040-8/5 • ch.04.F • Chapter 4 • FINAL • VB • 10/22/98 • p.252
MAC SECRETS • 4040-8/5 • ch.04.1 • Chapter 4 • Proof 1 • VB • 09/16/98 • p.252
4040-8/5 ch04.F 11/3/98 3:14 PM Page 252

At Ease
At Ease 7.5 Layer Patch
At Ease Items
At Ease Setup
At Ease Startup
File Sharing
AppleShare
File Sharing Library
File Sharing Extension
Network Extension
Users & Groups
File Sharing or Sharing Setup
Microsoft Word 6/Excel 5
Microsoft Dialog Library
Microsoft Find File Library
Microsoft Mail Library
Microsoft OLE Automation
Microsoft OLE Extension
Microsoft OLE Library
Microsoft Office Manager (control panel)
Microsoft Tool Editor Library
Microsoft Office 98
Microsoft Dialog Library
Microsoft Find File Library
Microsoft Mail Library
Microsoft OLE Automation
Microsoft OLE Extension
Microsoft OLE Library
Microsoft Office Manager (control panel)
Microsoft Tool Editor Library
Open Transport (networking/Internet)
Network Software Selector
Open Tpt AppleTalk Library
Open Tpt Internet Library
Open Transport Guide Additions
Open Transport Library
OpenTpt Modem
OpenTpt Remote Access
OpenTpt Serial Arbitrator
OpenTptAppleTalkLib
OpenTptInternetLib
AppleTalk (control panel)
TCP/IP (control panel)
PPP or Remote Access (control panel)
Modem (control panel)
Apple Built-In Ethernet or Ethernet (Built-In)
QuickDraw 3D
QuickDraw 3D
QuickDraw 3D Accelerator
QuickDraw 3D RAVE
QuickDraw 3D Viewer
QuickDraw GX
EPSExtension
ATM GX
Letterhead,
QuickDraw GX
LaserWriter GX, etc.
QuickTime
QuickTime
QuickTime MPEG Extension
QuickTime Musical Instruments
QuickTime™ VR
QuickTime Musical Instruments
QuickTime Power Plug
QuickTime Settings (control panel)
PowerTalk
Apple Fax Gateway
AppleTalk Service
DigiSign
Mailbox Extension
PowerTalk Catalogs
PowerTalk Extension
PowerTalk Manager
PowerTalk Guide
PowerTalk Setup
Speech
Macintalk
My Speech Macros
Speakable Items (folder)
Speech (control panel)
Speech Manager
Speech Recognition
SR Monitor
System Speech Rules
InLine Filter
Voices folder
Chapter 4: Control Panels and Extensions 253
■ ■
MAC SECRETS • 4040-8/5 • ch.04.F • Chapter 4 • FINAL • VB • 10/22/98 • p.253
MAC SECRETS • 4040-8/5 • ch.04.1 • Chapter 4 • Proof 1 • VB • 09/16/98 • p.253
4040-8/5 ch04.F 11/3/98 3:14 PM Page 253

254 Part I: System Software Revealed
■ ■
MAC SECRETS • 4040-8/5 • ch.04.F • Chapter 4 • FINAL • VB • 10/22/98 • p.254
MAC SECRETS • 4040-8/5 • ch.04.1 • Chapter 4 • Proof 1 • VB • 09/16/98 • p.254
MACINTOSH SECRET
Plenty of people use Macs: programmers,
network geeks, NASA scientists, third graders.
Out of the box, the Mac tries to be all things to
all people — and it’s up to you to customize the
thing so it works right for normal people.
Here are the steps we reflexively take when we
take a new Mac out of the box—or sit down at
somebody else’s machine:
1. Open the General Controls control panel.
Turn off menu blinking. Life’s too short. While
we’re at it, turn off “Warn me if computer was
shut down improperly” (in systems before Mac
OS 8.5). If we had a system crash, we don’t
need our noses rubbed in it.
2. Open the Views control panel, if it’s a pre-Mac
OS 8 Mac. Turn on “Show disk info in header.”
There’s no downside, and the info is useful.
3. Open the Memory control panel. Make sure
virtual memory is turned on slightly; crank the
Disk Cache to 32K per meg — or more, if we
can spare it.
4. Open the Apple Menu Options control
panel. Set Recent Servers to zero, and Recent
Applications to 25.
5. Open Extensions Manager and turn off all the
junk normal people don’t need. When at home,
we’re not on a network and we don’t need the Mac
to talk. Therefore, in the Control Panels, we turn off
AutoRemounter; File Sharing; Mac OS Easy Open;
Numbers; QuickTime Settings; Speech; Text; and
Users & Groups. In the Extensions, we turn off all
of the Color SW files; Desktop Printing (useful only
if you have multiple printers); File Sharing
Extension; File Sharing Library; MacinTalk; Printer
Share; QuickTime MPEG; QuickTime VR; all the
QuickDraw 3D extensions; Speech Manager; and
UDF Volume Access.
6. Clean out the printers, modems, and
monitors. Open the Extensions folder and throw
away the Chooser icons for all the printers we
don’t own: ImageWriter, LaserWriter 300, and
so on. Then open the Printer Descriptions and
throw away all the files except the one printer
we own. In the Extensions folder, open Modem
Scripts and throw out all the icons except the
one for our modem. Wrap up by opening Mac
OS 8.5’s ColorSync Profiles folder and tossing all
the files except the monitors we use.
7. Clean out the Apple menu. Open the System
folder; open Apple Menu Items folder; and
move, into the Apple Extras (or some other out-
of-the-way) folder, everything we don’t need in
daily work: Apple System Profiler; Graphing
Calculator; Jigsaw Puzzle.
8. Change the look. In Mac OS 8, we change
the desktop to a solid, soothing color. (The Mac
OS logo is too commercial, and photos take up a
lot of memory.) In Mac OS 8.5, we then go to
Edit ➪Preferences and set up our preferred view
options for each kind of Finder window, as
described in Chapter 2.
9. Change the behavior. In Mac OS 8 and later,
we then visit the Edit ➪Preferences dialog box,
change the grid spacing to Tight and the Spring-
Loaded Folders feature to Faster, as described in
Chapter 1.
10. Clean up after Apple. Finally, we throw
away the stuff Apple’s Mac OS 8.x installer
leaves on the desktop: Mail, Browse the Web,
Register with Apple, and so on—and then we
open the Startup Items folder and throw away
the various assistants. You know — ‘cause
we’re power users.
Dave ’n’ Joe’s Ten-Step Mac Setup Guide
4040-8/5 ch04.F 11/3/98 3:14 PM Page 254

MACWORLD MAC SECRETS • 4040-8/X • Chapter 5 • Proof f • SH/EAP • 10/21/98 • p.255
MACWORLD MAC SECRETS • 4040-8/X • Chapter 5 • Proof 1 • SH • 10/06/98 • p.255
Chapter 5
Enablers, Installers, and
Apple Extras
In This Chapter
©The other crud in your System Folder
©Details on the automatic System Folder subfolders
©A few words about the System file
©Apple Extras
©All the invisible files
©The Installer nobody knows
That handful of control panels, extensions, and DAs described in the
preceding two chapters doesn’t completely explain why a Mac OS 8.5
System Folder can consume 330MB of your hard drive. Your Mac comes with
a lot of other fascinating software, too—and the flood doesn’t stop: Every
few months, Apple releases some Updater or other, which you’re supposed to
know about, get, and install. Your Mac even comes with some software the
Installer doesn’t install; those additional programs get left behind on the
original System CD, or dumped into an unexplained folder on your hard drive
called Apple Extras. All of it is worth knowing.
The System Folder Folders
Back in the dark days of System 6, your System folder, if you can believe it,
was even more chaotic and cluttered than it is today—it had no subfolders
to help organize your fonts, desk accessories, and so on. But with each new
system-software version, more subfolders have appeared to help organize
the crud:
■System 7 introduced folders for Extensions (INITs), Control Panels,
Preferences, Apple Menu Items,PrintMonitor Documents, and Startup
Items.
■When System 7.1 came along, we got the Fonts folder, too.
4040-8/5 ch05.F 11/3/98 2:24 PM Page 255
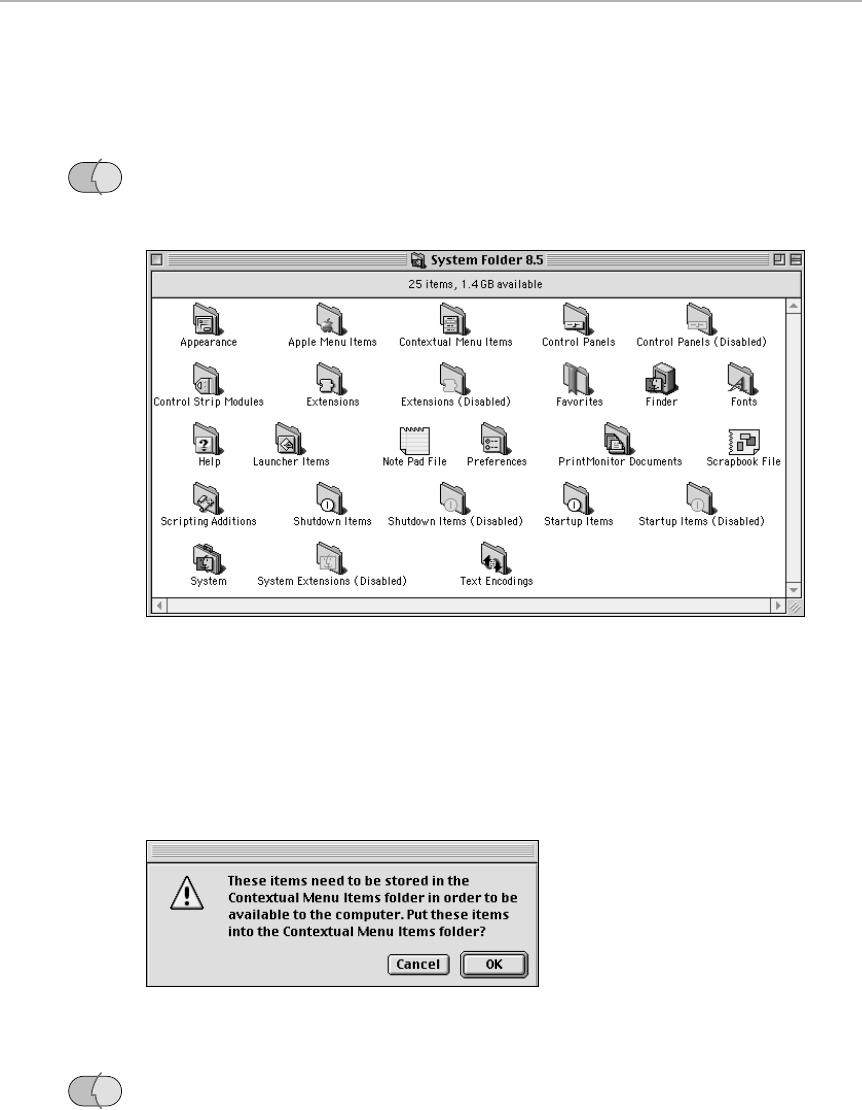
■Shutdown Items,Control Strip Modules, and Launcher Items made their
debut in System 7.5. There was also Speakable Items, for those Macs
with Macintalk text-to-speech software installed (see Chapter 23).
■The Contextual Menu Items folder debuted with Mac OS 8.
■Mac OS 8.5 (see Figure 5-1) brought us such additional folders as
Application Support, ColorSync Profiles,Favorites,Help,Internet
Search Sites,and Scripts.
Figure 5-1: All the system folders…where do they all belong?
As you probably know, you’re not expected to place each System Folder-
bound icon into the appropriate subfolder manually. When you drop a font,
sound, control panel, desk accessory, keyboard layout, or extension icon on
top of the System Folder icon, the Mac automatically dumps it into the
correct subfolder (and it tells you so, as shown in Figure 5-2).
Figure 5-2: The System Folder has some drag-and-drop brains.
In Mac OS 8.5, in fact, even more kinds of files find their way into the System
folder automatically: preference files (into the Preferences folder), shared
OS
8.5
OS
8.5
256 Part I: System Software Revealed
■ ■
MACWORLD MAC SECRETS • 4040-8/X • Chapter 5 • Proof f • SH/EAP • 10/21/98 • p.256
MACWORLD MAC SECRETS • 4040-8/X • Chapter 5 • Proof 1 • SH • 10/06/98 • p.256
4040-8/5 ch05.F 11/3/98 2:24 PM Page 256

libraries (into Extensions), data-fork fonts (the Fonts folder), Open Font
Architecture plug-ins (Extensions), and AppleTalk extensions (Extensions).
It makes no difference whether the System Folder window is open or closed,
just so you drop the stuff on the icon.
In fact, you can even drop a whole group of System Folder items of mixed
types — even a folder containing them — onto the System Folder. All of the
items still get stashed where they belong.
In any of the System Folder’s placement proposals, you’re welcome to decline
the suggestion shown in Figure 5-2 by clicking Cancel. If you want to place the
item somewhere other than the proposed folder, however, you can’t do it by
dropping it onto the System Folder icon. First, you must open the System
Folder into a window and then drag the icon into place.
Here, then, folder by folder, are the System Folder folders.
Appearance
Beginning with Mac OS 8.5, keeping up Appearances has a whole new meaning
for Mac fans. Thanks to the jaw-dropping possibilities of the Appearance
program in the Control Panels folder, you can now make your Mac’s menu
bar, scroll bars, windows, fonts, desktop backdrop, and other elements look
and even sound like anything you want. In fact, using the Themes feature, you
can switch among canned, color/sound-coordinated sets of these schemes
with a single click. See Chapter 4 for details on these transformations.
This folder contains three subfolders that house the components of a Theme:
Desktop Pictures (graphic images to serve as the backdrop of your desktop),
Sound Sets (sounds that the Mac plays when you open a window, drag a
scroll bar, and so on), and Theme Files (desktop picture/accent color combos
that show up as Themes choices in your Appearance control panel). When
Apple finally institutes real Themes in early 1999 — we’re talking wild, menu-
color-changing, Coplandesque Themes (see “Appearance” in Chapter 4) —
this folder will house those more dramatic cosmetic overhaul files.
Mac OS 8.5 itself comes with only a few of each of these items — but the
shareware and commercial software world offers dozens more, broadening
the choices in your Appearance control panel until you barely recognize
your Mac.
Apple Data Detectors
This folder appears only if you’ve installed Apple’s Internet Address
Detectors (IAD), a free software add-on that lets the Mac recognize Internet
addresses in any blob of text, in any program. Control-click any highlighted
text block to see a pop-up menu of useful commands pertaining to that
Internet address: Open in Netscape Navigator, Add to Claris Emailer Address
Book, and so on. See Chapter 27 for more on IAD.
OS
8.5
Chapter 5: Enablers, Installers, and Apple Extras 257
■ ■
MACWORLD MAC SECRETS • 4040-8/X • Chapter 5 • Proof f • SH/EAP • 10/21/98 • p.257
MACWORLD MAC SECRETS • 4040-8/X • Chapter 5 • Proof 1 • SH • 10/06/98 • p.257
4040-8/5 ch05.F 11/3/98 2:24 PM Page 257
Apple Menu Items folder
Beginning in System 7, Apple programmers hit upon the clever idea of using
a menu that’s been on your screen for years — the Apple (Ú) menu—as an
ever-present file launcher. You can put anything into this Úmenu — not just
documents and programs, but folders, disks, the Trash . . . literally anything
in the entire Mac universe that can be represented by an icon.
To change what’s listed in the Úmenu, you simply add icons to (or remove
them from) the Apple Menu Items folder. (More often, actually, you put an
alias of the original file there. And in System 7.5 and later, you don’t even
have to do that — just highlight the original icon and choose Úmenu ➪
Automated Tasks ➪Add Alias to Apple Menu.)
After you know about the relationship between this special folder and your
Úmenu, you’ll discover that the Úmenu is one of the operating system’s
most useful and well-designed features. See Chapter 3 for more on Apple
Menu Items and desk accessories.
Application Support
The Application Support folder debuted in Mac OS 8.5. The intent is obvious:
To provide a place for individual software companies’ support files to get
dumped, thus relieving us of the need to stare at Claris, Adobe, and Microsoft
folders (for example) every time we open the System folder.
Will software companies take the bait and rewrite their programs to take
advantage of these folders? It’s not quite as easy as it sounds, because those
same programs must also work on all older systems — the ones that don’t
even have an Application Support folder. We look forward to finding out.
OS
8.5
Mac Basics
258 Part I: System Software Revealed
■ ■
MACWORLD MAC SECRETS • 4040-8/X • Chapter 5 • Proof f • SH/EAP • 10/21/98 • p.258
MACWORLD MAC SECRETS • 4040-8/X • Chapter 5 • Proof 1 • SH • 10/06/98 • p.258
TRUE FACT
“A fully loaded System Folder can easily weigh
in at 200K, which doesn’t leave much room for
application programs and documents on disk . . .
It is ironic that, for the time being, making the
Mac an efficient computing tool means
eliminating portions of the system that add
convenience and appeal.”
— Macworld, April 1985
Say . . . would it help to throw out ISO 9660 File
Access?
Quote from history
4040-8/5 ch05.F 11/3/98 2:24 PM Page 258

ColorSync Profiles
This folder, yet another one that debuted with Mac OS 8.5, represents Apple’s
continuing focus on helping us keep consistent colors from scanner to
monitor to color printer.
Chapter 4 describes ColorSync in more detail. For now, simply note that this
folder is where the profiles — the little files that store color characteristics for
every conceivable scanner, printer, and monitor — are stored. By all means
throw away all of the profiles that don’t correspond to equipment you
actually use.
Contextual Menu Items folder
Mac OS 8 introduced the delight of contextual menus — the pop-up menus
that appear at your cursor whenever you Control-click an object (or no
object) in the Finder and some other programs, as described in Chapter 2.
But both shareware programmers and Apple programmers were quick to
realize untapped potential. Suppose you could add more commands to that
pop-up menu? Suppose, in other words, these pop-up menus were extensible,
just the way the Úmenu and the Control Strip are?
To pave the way for this delightful possibility, the Contextual Menu Items
folder was born. This is where new contextual menu plug-ins, such as
FinderPop (included with this book), get installed.
Control Panels folder
Today’s control panels, as noted in Chapter 4, are increasingly more like
individual, double-clickable programs than mere tiles of a central control
panel, as they were in the bygone days of System 6.
Actually, as mentioned in Chapter 4, most control panels don’t even have to
be on your computer — they can live perfectly comfortably on some backup
disk, or in another folder of your choosing, until you want to change one of
your settings. You can open a control panel just like a double-clickable
program, no matter where it is. Chapter 4 contains more information about
control panels than you’ll ever want to know.
Control Panels (Disabled)
See “Extensions (Disabled) folder” below.
Strange
But True
OS
8
OS
8.5
Chapter 5: Enablers, Installers, and Apple Extras 259
■ ■
MACWORLD MAC SECRETS • 4040-8/X • Chapter 5 • Proof f • SH/EAP • 10/21/98 • p.259
MACWORLD MAC SECRETS • 4040-8/X • Chapter 5 • Proof 1 • SH • 10/06/98 • p.259
4040-8/5 ch05.F 11/3/98 2:24 PM Page 259

Control Strip Modules folder
This folder is required for the glorious Control Strip found in System 7.5.3 or
later. You can read about the Control Strip in Chapter 4; for now, note that
any “tile” on your Control Strip is represented by a plug-in in this folder. Drag
a Control Strip-module icon out of this folder, and that tile vanishes from your
Control Strip; add one to this folder, and it appears on your Control Strip.
Desktop PrintMonitor documents
See “PrintMonitor documents” later in this chapter.
Extensions folder
If you read Chapter 4, you know about all the different things—extensions,
shared libraries, Chooser icons, and so on— that are housed in the
Extensions folder. Extensions also work fine loose in the System Folder or
even in the Control Panels folder, but the Extensions folder is their official
home.
Extensions (Disabled) folder
In the very old days, if you didn’t want some extension (INIT) to load when
you turned on the Mac, you’d have to drag the extension’s icon out of the
System Folder.
Fortunately, with the debut of Extension Manager (included with System 7.5
and later) and third-party programs like Conflict Catcher, a much easier
method of turning off extensions came to pass. These “startup manager”
programs simply move the extensions you want to turn off into a folder
called Extensions (Disabled). When the Mac is then restarted, it ignores any
extensions in that (Disabled) folder, thus carrying out your instruction to
“turn them off.” (And if, for some reason, Extensions Manager or Conflict
Catcher isn’t working or isn’t available, you turn an extension back on simply
by dragging its icon back into the Extensions folder manually.)
You’ll also see Control Panels (Disabled),Startup Items (Disabled),
Shutdown Items (Disabled), and, sometimes, System Folder (Disabled)
folders. They, too, are created by Extensions Manager (see Chapter 4) and
Conflict Catcher (see Chapter 22), this time to turn off control panels, startup
items, shutdown items, and loose-in-the-System-Folder items, respectively.
Favorites folder
Yet another of Mac OS 8.5’s special System subfolders, the Favorites folder is
used to store the icons of files, folders, or disks you use frequently. Once
you’ve turned something into a favorite, it appears both as a submenu of
OS
8.5
260 Part I: System Software Revealed
■ ■
MACWORLD MAC SECRETS • 4040-8/X • Chapter 5 • Proof f • SH/EAP • 10/21/98 • p.260
MACWORLD MAC SECRETS • 4040-8/X • Chapter 5 • Proof 1 • SH • 10/06/98 • p.260
4040-8/5 ch05.F 11/3/98 2:24 PM Page 260

your Favorites command (in the Úmenu) as well as in the Network Browser
(see Chapter 3) and the new Open and Save dialog boxes (see Chapter 15).
As we mentioned in Chapter 2, it’s a piece of cake to add an alias of any icon
to this folder — just choose Add to Favorites from the File menu. Or,
alternatively, Control-click any item and choose Add to Favorites from the
pop-up menu. When you do so, the Mac places an alias of the selected icon
into this folder.
(Does all of this sound vaguely familiar? It should — it’s exactly the scheme
used by Netscape Navigator and Microsoft Internet Explorer for creating
bookmarks of Web sites you visit frequently.)
Fonts folder
Before the Fonts folder debuted in System 7.1, you installed fonts into the
System file itself (into the little suitcase icon inside the System folder). That
method had a few problems:
■Installing a font was time-consuming.
■You could install a font only if no programs were running.
■Having a lot of fonts inside the System-file suitcase bloated it like crazy —
never a healthy situation.
■If your System file somehow got damaged, all your fonts got nuked.
By keeping all your fonts — not just TrueType fonts, but also screen (suitcase
icon) and printer files for PostScript fonts — safely in one folder, you
circumvent all of those hassles.
The maximum number of font files that can be in the Fonts folder is 128.
This doesn’t mean 128 fonts, however — it’s 128 font files (suitcases). Each
suitcase, in turn, can contain as many as 128 different individual fonts. Even
so, big-time desktop publishers and font zealots still find a font-management
program, such as Suitcase, to be a necessary and handy add-on. (Much more
on these topics in Chapter 29.)
A last note on font files: You can double-click a screen font file (or a TrueType
font file) to see what the font looks like (see Figure 5-3). We smile at Apple’s
never-ending zaniness as the sample sentence is rewritten with each
successive version of the OS software.
Help folder
The decision to add a Help folder to the System folder has been kicking
around at Apple since 1991; as readers of previous editions of this book may
remember, it was originally slated for System 7 — and then ripped out at the
last minute amid heated programmer debate.
Mac Basics
Chapter 5: Enablers, Installers, and Apple Extras 261
■ ■
MACWORLD MAC SECRETS • 4040-8/X • Chapter 5 • Proof f • SH/EAP • 10/21/98 • p.261
MACWORLD MAC SECRETS • 4040-8/X • Chapter 5 • Proof 1 • SH • 10/06/98 • p.261
4040-8/5 ch05.F 11/3/98 2:24 PM Page 261

Figure 5-3: Double-click a TrueType font file, or a regular PostScript screen-font file, to see
what the font actually looks like. Cute sentence, huh? It uses all the letters, but it’s not quite
as plausible as “The quick brown fox jumps over the lazy dog.” Then again, as the owner of
this book, you can change the sentence to say anything you want! See Chapter 21 for
instructions.
It’s finally here, as of Mac OS 8.5. The Help folder is a central place for help
files: the innumerable Apple Guide files, balloon-help files, plus Mac OS 8.5’s
Apple Help Viewer (a Web-browser-like help-reading program).
Other software companies are welcome to program their products to use this
Help folder as a handy storage place; but even if no software companies rise to
the occasion, at least Apple’s own help-file clutter now has a final resting place.
Internet Search Sites
In Chapter 3, you can read about the powerful new Find command that
debuted in Mac OS 8.5. This command can do more than search for files
by name; it can even search for the text inside of files. And more: the
Find window’s third tab lets you search the Internet, also as described in
Chapter 3.
In fact, this Internet-search window offers a list of several Web sites worth
searching: Apple’s tech-support database, for example, plus such standard
Web-search pages as InfoSeek, Excite, AltaVista, and Lycos. This Internet-
searching feature is extensible; this folder, Internet Search Sites, contains a
module for each of those available search mechanisms. Each module is
known to the system software as an Internet search site document, and its
name ends with the unusual suffix .src.
As more Web pages offer Mac OS 8.5 Find-compatible modules, you can
install them just by dropping them into this folder. (Conversely, if you never
plan to search one of the included Web pages — for example, if your Mac runs
perfectly all the time and you conclude you’ll never need to search Apple’s
tech database — you can pull modules out of this folder. They’ll obediently
disappear from the Find window’s list of options.)
OS
8.5
OS
8.5
262 Part I: System Software Revealed
■ ■
MACWORLD MAC SECRETS • 4040-8/X • Chapter 5 • Proof f • SH/EAP • 10/21/98 • p.262
MACWORLD MAC SECRETS • 4040-8/X • Chapter 5 • Proof 1 • SH • 10/06/98 • p.262
4040-8/5 ch05.F 11/3/98 2:24 PM Page 262

Launcher Items folder
The Launcher, of course, is the handy one-click icon-launching window
described in Chapter 4. You have it on any System 7.5-or-later Macintosh.
The Launcher Items folder works exactly like the Apple Menu Items folder
described earlier. In this case, any icon (or alias) you place into the folder
shows up immediately in the Launcher window. For the full scoop, plus some
Launcher Items folder secrets, see “Launcher” in Chapter 4.
Preferences folder
A Prefs file (or Preferences file) is a storage bin for a program’s settings.
Every time you tell PageMaker that you prefer to work in picas instead of
inches . . . or you change the font used for icon names in the Finder . . . or you
select a new “scratch disk” for Photoshop . . . or you store your name and
password into some Internet program . . . the program in question records
your settings in a Prefs file.
In the early days of the Mac, a program might record such options settings in
the body of its own code. But self-modifying programs are considered a
programming no-no. Programs that modify themselves trigger anti-virus
programs, they can’t be run from a CD-ROM (because nothing on a CD-ROM
can be changed), and they can’t be shared from a network server (see
Chapter 35). Therefore, well-behaved programs today never modify
themselves; your settings changes are recorded in a Prefs file.
The Preferences folder exists for the benefit of your programs. There’s
virtually nothing you can accomplish by messing with Prefs files, except to
read an error message that tells you so.
These files do, however, represent cumulative hours of work over many
months. As such, they should be backed up with great reverence and
transferred carefully whenever you perform a clean system install, as
described in Chapter 36.
We also believe that this folder gets gunked up rather quickly with Prefs files
from programs you no longer use. Every little shareware program you try,
and every program you delete from your hard drive, leaves behind that little
piece of itself in your Preferences folder. Review the contents of your
Preferences folder every couple of months, and throw away the Prefs files of
programs you don’t actually use. (This process is much quicker if you use the
trick described in Chapter 2, in which you use your Labels menu to tag all the
official Apple preference files. Then, when it comes time to clean out all the
irrelevant reference gunk you’ve accumulated, you can see at a glance which
icons to throw away.)
On a related topic: A corrupted Preferences file is one of the most common
causes of computer-induced insanity. You try everything — zap the PRAM,
rebuild the Desktop, reinstall the software—and some phantom glitch
remains, much to your exasperation. The problem is likely to be a corrupted
Preferences file. More on this topic in Chapter 36; for now, simply remember
Worth
Learning
Mac Basics
Chapter 5: Enablers, Installers, and Apple Extras 263
■ ■
MACWORLD MAC SECRETS • 4040-8/X • Chapter 5 • Proof f • SH/EAP • 10/21/98 • p.263
MACWORLD MAC SECRETS • 4040-8/X • Chapter 5 • Proof 1 • SH • 10/06/98 • p.263
4040-8/5 ch05.F 11/3/98 2:24 PM Page 263

that if you throw away a Preferences file, the program to which it belongs will
automatically generate a fresh, clean new one the next time it runs.
MS Preference Panels
If you’ve installed any Microsoft software lately, you’ve got this folder. It’s
part of the Configuration Manager, a little program (described in Chapter 4)
that serves as a central clearinghouse for Internet-related preferences: Your
e-mail name, signature, home page, and so on. Microsoft Internet Explorer
and Outlook Express can then share this information without making you
reinput it. (If this notion of rounding up all your Internet settings into a
central program sounds suspiciously like Internet Config, Mac OS 8.5’s
Internet control panel, and so on, well, you’re right.)
You can actually double-click one of these Preference panels to launch the
Configuration Manager program, prescrolled to the “panel” of information
you double-clicked, such as Security or User Passwords.
PrintMonitor Documents folder
When you use the Background Printing or Desktop Printing features,
described in Chapter 30, an interesting thing happens each time you choose
Print from a program’s File menu. Instead of sending the printing information
to your printer, the Mac sends it to a file on your hard disk. Then, as you
continue to work on your Mac, these saved-up print files get fed, little by
little, to your printer.
While they’re waiting to be printed, your files’ waiting room is the
PrintMonitor Documents folder. (Or, if you’re using Desktop Printing [see
Chapter 30], this folder is called Desktop PrintMonitor Documents.) Under
normal circumstances, you’ll never need to interact with this folder’s
contents. But in times of troubleshooting, or when you’re being particularly
clever with one of the techniques described in Chapter 30, it’s useful to
remember that this is where your printouts-to-be live.
Scripting Additions
This folder and its contents will be pretty much meaningless unless you’re
into AppleScript, the built-in Mac OS automation software described in loving
detail in Chapter 22. Turns out that this technology is extensible; by dropping
modules into this folder, you can add powers to the basic AppleScript
software. One of these add-ons makes your Monitors & Sound control panel
scriptable, so that you can control it with your macros. Another makes Open
Transport scriptable (in Mac OS 8.5 and later) so that an AppleScript, for
example, could control when your Mac signs onto, and off of, the Internet.
And so on.
264 Part I: System Software Revealed
■ ■
MACWORLD MAC SECRETS • 4040-8/X • Chapter 5 • Proof f • SH/EAP • 10/21/98 • p.264
MACWORLD MAC SECRETS • 4040-8/X • Chapter 5 • Proof 1 • SH • 10/06/98 • p.264
4040-8/5 ch05.F 11/3/98 2:24 PM Page 264

Scripts
Mac OS 8.5 brought us another AppleScript System folder add-on— the
Scripts folder. As AppleScript (see Chapter 22) becomes increasingly
important to Apple, its corporate customers, and the legions of publishing
companies who rely on AppleScript to automate their publishing and printing
tasks, Apple realized that it needed a central place to put all the scripts being
created. This folder is it. Instead of storing your finished AppleScripts in the
Úmenu or in the Shutdown Items folder (like the tutorial AppleScript in
Chapter 22), you finally have a good place to keep your finished work.
Chief among the contents of this folder is the Folder Actions folder, which
represents one of Mac OS 8.5’s most interesting AppleScript developments.
Folder Actions are scripts that get triggered automatically when you open,
close, move, or resize a specific folder, offering a useful scheme for
OS
8.5
Chapter 5: Enablers, Installers, and Apple Extras 265
■ ■
MACWORLD MAC SECRETS • 4040-8/X • Chapter 5 • Proof f • SH/EAP • 10/21/98 • p.265
MACWORLD MAC SECRETS • 4040-8/X • Chapter 5 • Proof 1 • SH • 10/06/98 • p.265
CASE HISTORY
Judy is the wife of an extremely famous
director. (This is a true story.) She fell in love
with her first Mac immediately. She played with
it for three days. And then she moved to a
different state and didn’t have a chance to use
the Mac for two weeks.
When she arrived at her new home, she set up
the Mac and printer. Then she turned on the
Mac — and it immediately started printing the
same ten-page document over and over and
over again! She panicked and turned off the
Mac. She waited patiently for 15 minutes while
it “cooled itself off” (as she described it later).
But when she turned the Mac on again, the
same thing happened! Pages spewed out of the
printer like crazy.
Here’s how it happened, and what she could
have done about it.
At the end of one day, she tried to print her ten-
page document. She chose Print from the File
menu. Nothing happened.
She had Background Printing turned on, so
instead of printing, she was actually creating a
disk-based file in the PrintMonitor Documents
folder in her System Folder. Of course, she didn’t
know any of this. She just knew that no printing
was going on.
So what did she do? She tried to print the
document again. It didn’t work again, so she
tried to print it again. Little did she know that
she was creating one PrintMonitor document
after another, all piling up in her PrintMonitor
Documents folder, waiting to be printed. When
no printing had started in those 30 seconds, she
gave up and shut down the Mac.
Of course, the next time she started up, good
old reliable PrintMonitor took up from where it
had left off and sanguinely began to print all of
those ten-page documents, one after another.
Judy could have solved this problem by calling
up PrintMonitor and deleting the items from the
list, as described in Chapter 30. But perhaps a
simpler method would have been to open the
PrintMonitor Documents folder and physically
trash all the little icons therein.
The laser printer from Hell
4040-8/5 ch05.F 11/3/98 2:24 PM Page 265

automating workflow (automatic backups, forwarding, notification,
processing, and so on). For complete instructions on the use of Folder
Actions, look up AppleScript in Mac OS 8.5’s Mac OS Help.
Shutdown Items folder
Any icon you put into Shutdown Items gets magically “double-clicked” by the
Mac’s ghost when you shut down the computer. Whereas the self-launching
items in the Startup Items run just after the Mac starts up, anything in
Shutdown Items — need we say — runs just before the Mac actually cuts off
its own power.
And what possible purpose could that serve? We can think of a couple,
offhand. First, you could put a sound file there—maybe Porky Pig saying
“Th-th-that’s all, folks!” — so that your Mac can bid you adieu at the end of a
hard day’s work. Second, you could put in a backup program’s alias, or the
alias of an AppleScript (like the one you can create in Chapter 22), so that it
runs automatically before shutting the computer down for the day.
Shutdown Items (Disabled)
See “Extensions (Disabled) folder” previously in this chapter.
Speakable Items folder
As you’ll find out in Chapter 23, most Power Macs can actually recognize
speech — if you’ve installed the necessary PlainTalk software and rounded up
a PlainTalk microphone. Even so, those Macs actually have a pretty limited
vocabulary. In fact, you can see a list of the phrases they understand — just
open your Speakable Items folder.
In other words, anything you put in this folder (almost always aliases) gets
added to the Mac’s vocabulary (almost always files and folders). If you have
been working on a spreadsheet called “Fourth Quarter” a great deal lately,
put its alias into Speakable Items; from now on, the Mac will understand you
when you command: “open Fourth Quarter.” See Chapter 23 for details.
Startup Items folder
Anything you put into this folder gets automatically double-clicked when you
turn on the Mac. Normally, you might place a program (a word processor, say,
or its alias) in the Startup Items folder, so that you can start working on it
immediately when you turn on the computer. You can also put a particular
document (or set of documents) in this folder to ensure that your Mac will be
ready for you to start work immediately. If you put several items in here, they
launch in alphabetical order— two alphabetical-order cycles, really: first all
the “real” icons, then any aliases.
266 Part I: System Software Revealed
■ ■
MACWORLD MAC SECRETS • 4040-8/X • Chapter 5 • Proof f • SH/EAP • 10/21/98 • p.266
MACWORLD MAC SECRETS • 4040-8/X • Chapter 5 • Proof 1 • SH • 10/06/98 • p.266
4040-8/5 ch05.F 11/3/98 2:24 PM Page 266

Just remember that whatever icons you put into this folder will behave as
though you double-clicked them. You may get unexpected results if you put
something you’re not supposed to interact with (such as a Preferences file)
into the Startup Items folder.
For details on the Mac’s startup process, see Chapter 7.
Startup Items (Disabled)
See “Extensions (Disabled)” previously in this chapter.
Loose in your System folder
Every System folder contains several other files that aren’t stored in one of
the subfolders described in the chapter thus far, such as the Clipboard file,
Scrapbook file, and Note Pad file.
The Clipboard file stores whatever you have most recently cut or copied. It’s
wiped clean whenever you shut down the Mac. It exists as a file primarily so
that you can double-click it to remind yourself of what’s on the Clipboard at
the moment.
The Scrapbook and Note Pad files, of course, store the information you’ve
typed or pasted using those desk accessories. See Chapter 3 for a delightful
discussion of the tricks you can perform with these files.
All About Enablers
An enabler is, we suppose, a relative of the extension. It, too, is installed into
your System Folder for the benefit of the Mac itself and has no settings that
you can make. An enabler, however, is supposed to be stored loose in your
System Folder and not in the Extensions folder.
Why Enablers exist
In days gone by, Apple unleashed a new, improved (and newly numbered)
System software version about every six months. There was System 6.03,
then 6.04, then 6.05, and so on. What necessitated each new version of the
System was the introduction of a new model of Macintosh. Each had slightly
different circuitry, requiring a slightly modified version of the System.
Unfortunately, keeping up with Apple was no easy feat. With each new
version of the System, power users lurched into action, getting their hands
on the new System by hook or by crook (which usually meant downloading it
from America Online). The rest of us slogged along in quiet obsolescence, or
got so much anxiety over having somehow been left in the dust that we
finally got the new System from an Apple dealer.
Chapter 5: Enablers, Installers, and Apple Extras 267
■ ■
MACWORLD MAC SECRETS • 4040-8/X • Chapter 5 • Proof f • SH/EAP • 10/21/98 • p.267
MACWORLD MAC SECRETS • 4040-8/X • Chapter 5 • Proof 1 • SH • 10/06/98 • p.267
4040-8/5 ch05.F 11/3/98 2:24 PM Page 267

The enabler is born
So Apple did what they hoped was a clever thing: They left a convenient
software outlet in the basic operating system. Into this socket could be
plugged a little file that explained a specific Mac’s circuitry to the System. As
each new model of Mac came out, Apple wouldn’t have to rewrite (and
rerelease) the entire System Folder; instead, Apple could just make available
the appropriate plug-in file, now called an enabler.
Sure enough, beginning in 1992, every new Mac model came equipped with
an enabler. The enabler is important; without it, those models can’t even run.
And each enabler only works with one specific Mac model (or model family
— there was only one enabler for the original three Power Macintosh models,
for example).
Periodically — with System 7.5 and Mac OS 8, for example — Apple resets the
counter by incorporating the computer instructions contained in currently
distributed enablers. But it’s not long, of course, before new models (and new
enablers) appear once again.
The System File Itself
Mac users almost never think about the System file — that little suitcase icon
inside the System folder. And why would they? The System file’s primary duty
is to serve the machine, not you. It’s supposed to lurk behind the scenes,
working with the machine’s ROM chips (see Chapter 7) to manage windows,
fonts, and menus.
Mac Basics
268 Part I: System Software Revealed
■ ■
MACWORLD MAC SECRETS • 4040-8/X • Chapter 5 • Proof f • SH/EAP • 10/21/98 • p.268
MACWORLD MAC SECRETS • 4040-8/X • Chapter 5 • Proof 1 • SH • 10/06/98 • p.268
TRUE FACT
As the Mac gets more complex, Apple’s
challenge — adding new features that work with
all the existing features and models — becomes
more and more difficult. As such, Apple
programmers are spending more and more of
their time fixing (“patching”) their own system-
software code.
They sometimes release these fixes in the form
of System Updates — collections of debugged
control panels or extensions, new enablers,
faster printer drivers, and so on.Unfortunately,
there’s no logic to these updates’ names, their
timing, or their distribution. Your only hope is to
stay alert — subscribe to a Mac magazine, visit
www.macintouch.com regularly, or join a user
group.
Some of the best-known, relatively recent
updates were System 7.5 Update 1.0 (a four-
disk set that turns any System 7.5 System
folder into System 7.5.1; see Chapter 6) and
System 7.5 Update 2.0 (turns any flavor of
System 7.5 into System 7.5.3, described in
detail in Chapter 6). The massive installer that
turned Mac OS 8 into Mac OS 8.1 was also a
system update, even though Apple didn’t call it
that. (Consistency in naming schemes has never
been Apple’s strong suit.)
For details on some of the older system
updates, see Chapter 5 in the electronic edition
of Mac Secrets, 4th Edition (on the CD-ROM that
comes with this book).
The System Update Series
4040-8/5 ch05.F 11/3/98 2:24 PM Page 268

But as savvy Mac users know, you can indeed interact with the System file.
You can drag-and-drop keyboard layouts or sound icons on top of it (or onto
the System Folder icon), instantly installing them. Similarly, you can double-
click the System file icon to open it into a window, where you can see all the
keyboard layouts and sounds you’ve installed.
(For more on keyboard layouts, see Chapters 8 and 20.)
Apple Extras and Apple Leftovers
Even if you install the full System using the Installer onto a hard disk, there’s
a lot of System software left over on that system CD-ROM that came with
your Mac. Every new Mac also comes with a folder called Apple Extras on the
hard drive.
Apple Extras
The contents of the Apple Extras folder evolves with each system-software
release. The Mac OS 8/8.5-era Apple Extras folder, for example, may contain
such miscellany as:
■Register with Apple. If you have a correctly configured Internet account,
this little applet launches your Web browser and visits a special Web
page. There you’re expected to provide your name, address, and other
information to register your new Mac and get on some exciting new junk-
mail lists.
■Apple LaserWriter Software includes the Desktop Printer Utility
program, which, like its ancestors LaserWriter Utility (LU) and Apple
Printer Utility, is a collection of miscellaneous PostScript laser printer-
management features. You’ll find our potent Desktop Printer Utility
secrets in Chapter 30, where they rightfully belong. For now, we’ll
just point out that the Desktop Printer Utility is the key to making your
laser printer quit spewing the wasteful start-up page every time you
switch it on.
■AppleScript is a programming language that lets you automate certain
tasks on your Mac. See Chapter 22 for a crash course.
This folder doesn’t just contain Script Editor, the program you need to
write your own little programs (called scripts); it also contains several
ready-to-run scripts. To run one of these little programs, you either
double-click it or drop one of your own icons onto it. For example, the
program called Add Alias to Apple Menu is one of the latter kind: Drop a
regular icon onto it, and—presto — after a moment, an alias of that icon
appears in your Úmenu.
■Mac OS Runtime For Java. Java, as you may have heard, is a
programming language that’s required to appreciate certain Web pages
fully — those with animations or games, for example. See Chapter 25 for
the scoop on Java — and MRJ (the initials for this little program). The
Mac Basics
Chapter 5: Enablers, Installers, and Apple Extras 269
■ ■
MACWORLD MAC SECRETS • 4040-8/X • Chapter 5 • Proof f • SH/EAP • 10/21/98 • p.269
MACWORLD MAC SECRETS • 4040-8/X • Chapter 5 • Proof 1 • SH • 10/06/98 • p.269
4040-8/5 ch05.F 11/3/98 2:24 PM Page 269

bottom line: if you do your Web surfing with Netscape Navigator or
Internet Explorer, you probably don’t need this.
■FireWire. See Chapter 33 if you want to get inspired reading about
FireWire, Apple’s ingenious replacement for the nightmarish old SCSI
technology. This folder contains the FireWire Support extension, which
lets your Mac talk to whatever FireWire card you install.
■Iomega. The software for Zip and Jaz drives, such as the one that you
may have had built into your Mac.
■Monitors Extras Folder. In here, you’ll find a bunch of monitor-related
software, such as DigitalColor Meter, a clever calibration program that
walks you through the process of correctly adjusting AppleVision
monitors.
■Although your Macintosh probably already has this software installed,
the Open Transport/PPP suite is what your Mac needs to dial the
Internet, as described in Chapter 25.
■Sample Desktop Pictures. As you can read in Chapter 4, Desktop
Pictures is the Mac OS 8/8.1 “control panel” that lets you slap a
photograph across your desktop. This folder contains a handful of
gorgeous nature shots to get you started. (In Mac OS 8.5, such pictures
are stored in the System folder➪Appearance folder ➪Desktop Pictures
folder.)
■Don’t forget, by the way, that an equally stunning raft of additional
desktop pictures came on your system CD, as described in a moment,
and even more come with this book’s CD.
■QuickDraw 3D. See Chapter 20 for details on this neat, but nichey, 3-D
modeling technology.
■Map Control Panel, Sound Control Panel. Chapter 4 describes these two
control panels, which have been superseded or laid to rest by the march
of new system-software versions.
On your system CD
Depending on your version of the system software, the following programs
may be on the startup CD that came with your Macintosh (the Mac OS 8.1 CD,
for example):
Adobe Software
As of the Mac OS 8.1 CD, this folder contains two programs. First, there’s
Acrobat Reader, a free program that lets you read PDF files — electronic
manuals, complete with fonts, graphics, and text in their original layouts.
As you can read in Chapter 20, the Acrobat format has several attractive
features, such as Find, Copy, and Zoom In/Out commands and Windows
exchangeability. (Get used to it; Apple has announced that PDF will be the
official graphics file format of Mac OS X, as described in Chapter 6).
270 Part I: System Software Revealed
■ ■
MACWORLD MAC SECRETS • 4040-8/X • Chapter 5 • Proof f • SH/EAP • 10/21/98 • p.270
MACWORLD MAC SECRETS • 4040-8/X • Chapter 5 • Proof 1 • SH • 10/06/98 • p.270
4040-8/5 ch05.F 11/3/98 2:24 PM Page 270

Mac OS 8.1 and later also includes Adobe Type Manager (ATM), as described
in Chapter 29.
America Online
Just when you thought you didn’t have enough copies of the America Online
starter software (see Chapter 26) coming to you in the mail, here’s a spare.
CD Extras
This folder contains a host of handy add-ons, such as:
■Additional Desktop Pictures: More gorgeous photos you can drag-and-
drop into your Desktop Pictures control panel (Mac OS 8 through 8.1)
or your Appearance control panel (Mac OS 8.5). See Chapter 4 for
discussions of these control panels.
■Additional Modem Scripts: A modem script is a tiny text document that
explains the particular features of your modem brand to your Macintosh
software. You need one specific to your modem model if you hope to get
onto the Internet, as described in Chapters 24 and 25. If your Modem
control panel doesn’t list your particular modem brand, look through
this folder to see if your modem model is among them. If so, drag it into
your System folder ➪Extensions ➪Modem Scripts folder.
■AppleCD Player: We can’t guess why Apple insists on giving us a
duplicate copy of this program that’s already in your Úmenu, but there
you have it.
■At Ease Updaters: For users of At Ease, Apple’s front-end software that
replaces the Finder with an extremely simple jumbo-icon, protected
interface for the young and the clueless. These updaters bring your
already purchased copy of At Ease up to date so it’ll be compatible with
the new OS you’re about to install. For details on At Ease, see Chapter 14
in the electronic version of Macworld Mac Secrets, 4th Edition (on the
CD-ROM that came with this book).
■Eric’s Solitaire Sampler: Windows users aren’t the only ones who can
waste their time mindlessly playing Solitaire!
In fact, depending on your Mac model, you may find any of several games
on the hard drive (or on the system CD): Eric’s Solitaire Sampler, Spin
Doctor, or Super Maze Wars, for example. We won’t take up precious
pages describing them — if you have time for games, you have time to
figure these out for yourself—but we are happy that Apple has begun to
realize that games sell computers.
■HyperCard Updates: Brings already purchased copies of HyperCard,
Apple’s “software construction kit” with a cult following, into compliance
with the latest system software.
■Iomega Tools: For Macs with built-in Zip or Jaz drives. These programs
let you format new cartridges, duplicate cartridges with a minimum of
swapping, reinstall the Iomega control panel or extension, and so on.
Chapter 5: Enablers, Installers, and Apple Extras 271
■ ■
MACWORLD MAC SECRETS • 4040-8/X • Chapter 5 • Proof f • SH/EAP • 10/21/98 • p.271
MACWORLD MAC SECRETS • 4040-8/X • Chapter 5 • Proof 1 • SH • 10/06/98 • p.271
4040-8/5 ch05.F 11/3/98 2:24 PM Page 271

■MoviePlayer Extras: MoviePlayer is the movie-playing program
described in Chapter 23. This folder contains some classical-music files
(in QuickTime format), animation, and graphics files to play with in
MoviePlayer 2.5. It also houses a couple of plug-ins that give MoviePlayer
2.5 more features, as described in the accompanying Read Me file.
(But read Chapter 23 to find out why all this may be obsolete with
QuickTime 3 — or maybe not.)
■Pointer Mode Control: See “Pointer Mode” in Chapter 4.
■QuickDraw 3D Extras: Read Chapter 20 to find out more about
QuickDraw 3D. This folder contains some sample 3-D images, texture files
you can drag-and-drop onto them, and the classic 3-D arcade adventure,
Gerbils!
■QuickTime Sample: A four-minute rock video QuickTime movie. Clearly,
the producers hadn’t read our Chapter 23, or they’d realize that their
oddball frame size (400 pixels wide, 200 tall) is just asking for jerky
playback.
■Spanish Text-to-Speech: Installs two new Macintalk speech voices—
Carlos and Catalina — that know how to read Spanish and pronounce it
correctly as it reads aloud. Read more about Macintalk and PlainTalk in
Chapter 23.
■Third-Party PC Card Drivers: For PowerBooks. Contains the software
needed to access modem PC cards from Global Village, Dayna, and
Farallon/Netopia.
■Universal Access: Contains two control panels described in Chapter 4:
CloseView and Easy Access, which make using the Mac easier for the
disabled.
272 Part I: System Software Revealed
■ ■
MACWORLD MAC SECRETS • 4040-8/X • Chapter 5 • Proof f • SH/EAP • 10/21/98 • p.272
MACWORLD MAC SECRETS • 4040-8/X • Chapter 5 • Proof 1 • SH • 10/06/98 • p.272
MACINTOSH SECRET
You can’t go through life claiming to be a true
Mac user until you’ve tried Gerbils! It may be
the most useful thing the average non-3-D-
model building person may ever do with
QuickDraw 3D (see Chapter 20).
Gerbils! is a game found on most system-
software CDs, although it doesn’t get installed
by default. Drag its folder from your CD Extras
folder onto the hard drive, make sure QuickDraw
3D’s extensions are installed, and away you go!
As shown on the next page, Gerbils! offers you
two different windows. The one on the left is the
track-construction window; drag-and-drop the
various track sections (loops, twists, humps,
and so on) onto the master layout to change the
terrain. The right window is where the action is:
cute little 3-D gerbils zoom around your track,
saying “bye-bye!” in cute little gerbil voices
when they’re bumped by other gerbils (and
plunge to their deaths), all accompanied by a
thudding rock soundtrack. Change your point of
view with the Camera menu, whose commands
(Gerbil Cam, Bird of Prey Cam, and Food Cam)
need little introduction.
Gerbils!
4040-8/5 ch05.F 11/3/98 2:24 PM Page 272
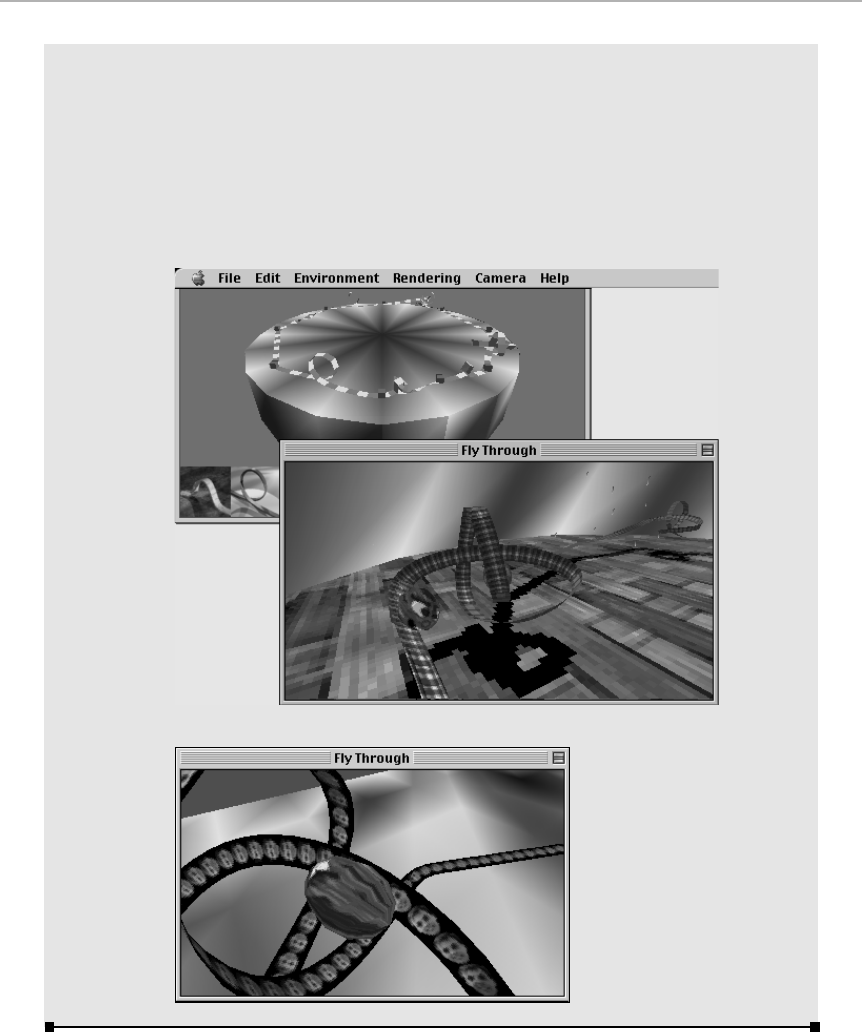
Chapter 5: Enablers, Installers, and Apple Extras 273
■ ■
MACWORLD MAC SECRETS • 4040-8/X • Chapter 5 • Proof f • SH/EAP • 10/21/98 • p.273
MACWORLD MAC SECRETS • 4040-8/X • Chapter 5 • Proof 1 • SH • 10/06/98 • p.273
Gerbils! even offers an Easter egg or two. For
example, hold down Option while choosing
Rendering ➪Textured Track. There, among the
other track-texturing options, you’ll now see
two surprising track surfaces: BRIAN’S HEAD
and DAN’S HEAD. Choose one to make your
track paved with endless repetitions of the
programmers’ faces.
Actually, it gets better: Using ResEdit (see
Chapter 21), you can paste your own photo into
the PICT resource, ID 145 or 146.
Then tell your friends how it feels to have 3-D
rodents running over your face all day.
4040-8/5 ch05.F 11/3/98 2:24 PM Page 273

Disk Tools Images
Chapter 23 explains the wonders of disk image files. In this case, Apple has
given you disk images that create Disk Tools floppy disks that can start up
your Mac when everything else — even the CD drive — is dead.
Full Install Pieces
The Mac OS 8/8.1 Installer (described later in this chapter) is a strange
hybrid. As the software installation proceeds, you get the distinct impression
that, in fact, the Mac is simply launching one installer after another (instead
of being guided by one mother-ship Installer).
In fact, you’re right. Open Full Install Pieces➪Software Installers, and you’ll
discover folders and installers for each individual piece of software that make
up a Mac OS 8/8.1 installation. (The Mac OS 8.5 installer, by contrast, is much
better integrated.)
Why is this trivia useful? For the times when you want to reinstall only one
component of your system folder, not the whole thing. Your choices may
include:
■ARA Client Install: The dialing-out portion of the Remote Access
software, as described in Chapter 35.
■English Text-to-Speech: The software that lets your Mac read text (in
SimpleText, America Online, Word 98, WordPerfect, ClarisWorks, and so
on). See Chapter 23.
■Info Center: A weird little Web-browser-based series of information
screens about Mac OS 8.x.
■Internet Access: The suite of control panels and extensions needed to
dial up the Internet.
■Internet Explorer: Microsoft’s browser. See Chapter 25.
■Location Manager Install: See Chapter 4 for a description of Location
Manager.
■Mac OS Runtime for Java: See “Apple Extras,” earlier in this chapter.
■MacLink Plus, Open Transport/PPP, OpenDoc: These control panels are
described in Chapter 4.
■Personal Web Sharing: You can “publish” the contents of any folder on
your hard drive— to the entire Internet. See Chapter 28 for details.
■QuickDraw 3D, QuickDraw GX: See Chapters 20 and 29, respectively.
■System Software: This is it — the actual system software installer.
Important Extra System Software
This folder contains extensions required by certain add-on equipment you
may have bought with your Mac, such as video or networking cards.
OS
8
274 Part I: System Software Revealed
■ ■
MACWORLD MAC SECRETS • 4040-8/X • Chapter 5 • Proof f • SH/EAP • 10/21/98 • p.274
MACWORLD MAC SECRETS • 4040-8/X • Chapter 5 • Proof 1 • SH • 10/06/98 • p.274
4040-8/5 ch05.F 11/3/98 2:24 PM Page 274

Internet Extras
This folder may contain Macromedia Plug-ins (read Chapter 25 to find out
about plug-ins) and The PointCast Network, a Mac program that puts a
“ticker” of continually updated Web-page info, such as stock prices or news,
on your screen (assuming you’re willing to remain connected to the Internet
all day long).
Mac OS Read Me Files
This collection of SimpleText documents is Apple’s timid attempt to explain
what the heck all those files are in your Extensions and Control Panels folder.
Not nearly as complete, needless to say, as our own Chapter 4.
Netscape Navigator
The Web browser for people who’d rather not use the default browser,
Microsoft Internet Explorer (see Chapter 25).
Restore Installed Software
This strange little program restores your hard drive to the way it was when
you bought the machine — including erasing all of your files and restoring the
original stuff that came on the hard drive.
Utilities
This folder contains three very important disk-related programs: Drive Setup
(see Chapter 8), Disk First Aid (Chapter 8), and Disk Copy (Chapter 22).
Older system-software versions
Depending on your Mac model and system-software CD that came with it, you
may also find these goodies:
Apple Video Player
If your Mac model has a Video In RCA jack on the back panel, it’s capable of
converting footage from your VCR or camcorder into a QuickTime movie. The
software responsible for this digitizing is Apple Video Player. For complete
instructions, see Chapter 23.
For PowerBooks Only
Today’s Mac laptops come with a couple of special software bundles
preinstalled on the hard drive (probably in, once again, the Apple Extras
folder). You get an assortment of useful information and utility programs like
these:
■PowerBook File Assistant — This program is useful if you have two
Macs — a PowerBook and a desktop machine at home, for example.
Chapter 5: Enablers, Installers, and Apple Extras 275
■ ■
MACWORLD MAC SECRETS • 4040-8/X • Chapter 5 • Proof f • SH/EAP • 10/21/98 • p.275
MACWORLD MAC SECRETS • 4040-8/X • Chapter 5 • Proof 1 • SH • 10/06/98 • p.275
4040-8/5 ch05.F 11/3/98 2:24 PM Page 275

File Assistant solves the age-old problem of updating the appropriate
machine’s documents before and after you leave on a trip. In other
words, it can synchronize a folder (or set of folders) on each machine,
making sure that the most-recent files from each Mac exist on both Macs.
(This program is the predecessor of Mac OS 8.5’s File Synchronization
control panel, described in the previous chapter.)
■Battery Recondition — Use this program to fight the memory effect of
NiCad batteries, the type used in most PowerBooks (and camcorders, by
the way). The memory effect is a problem that develops if you repeatedly
use up a battery only partway — and then recharge it. Eventually, the
battery may come to believe that that halfway-discharged point is its
fully discharged point. In other words, your battery now holds only half a
charge.
Clearly, the solution is (whenever possible) to use your battery until it’s
empty, and only then recharge it. Battery Recondition is a little program
that does exactly that, automatically — it uses up the remaining juice in
your battery, then recharges it completely.
■Apple IR File Exchange — Lucky, lucky PowerBook (and iMac) owners:
your models contain a tiny red plastic transmitter. It’s for wireless
infrared networking. You can transfer files, or play games, between two
thus-equipped Macs without connecting any cables between them. This
software, IR File Exchange, is the program you launch when you want to
begin such a transfer. (You can also equip a desktop Mac with wireless
networking if you purchase for it a Farallon AirDock.) For details, see
“Infrared Beaming” in Chapter 14.
■Remote Access Client — Remote Access is the Apple software that lets
you dial into one Mac from another one anywhere in the world—
provided both are equipped with modems. This free software, called
Remote Access Client, is what you use to dial in; Apple makes you buy
the software for the receiving end. (It’s called Remote Access Personal
Server.) For details, see Chapter 35.
■PC Card Modem Files — Recent PowerBooks let you install a modem
simply by inserting a metal card — a PC card —about the size of your
Visa card. This folder contains the extensions you need to install to make
your PowerBook recognize such a modem.
Network Software Selector
This tiny application is useful only on Power Macintosh 6100, 7100, and 8100
models onto which you’ve installed Open Transport — the networking
software described in Chapters 25 and 35. It simply lets you switch your Mac
between the older networking software—known as AppleTalk—and the
newer one, Open Transport.
(Talk about Strange But True! Choosing the Open Transport option in this
little program actually makes your MacTCP control panel invisible! And when
you switch back to AppleTalk, it makes your TCP/IP control panel invisible!
Well, that’s one way to prevent you from getting confused — make control
panels disappear before your eyes.)
Strange
But True
276 Part I: System Software Revealed
■ ■
MACWORLD MAC SECRETS • 4040-8/X • Chapter 5 • Proof f • SH/EAP • 10/21/98 • p.276
MACWORLD MAC SECRETS • 4040-8/X • Chapter 5 • Proof 1 • SH • 10/06/98 • p.276
4040-8/5 ch05.F 11/3/98 2:24 PM Page 276

Text-to-Speech, English Speech Recognition
If you have a PowerPC-based Mac model or a Quadra AV model, your Mac
can respond to spoken commands; the software is called English Speech
Recognition. And if you have System 7.5 or later, your Mac — any model —
can read text back to you; the software is called Text To Speech. Together,
the speech technologies are known as PlainTalk.
PlainTalk software, however, doesn’t get automatically installed. You have to
use this separate Installer to do the deed. See Chapter 23 for more on speech
features.
The System-Software Installer
The Installer is the program that gives birth to a System Folder — an
extremely important program, in other words. It loads your Mac with all the
system software described in the previous chapters. The Installer figures out
Chapter 5: Enablers, Installers, and Apple Extras 277
■ ■
MACWORLD MAC SECRETS • 4040-8/X • Chapter 5 • Proof f • SH/EAP • 10/21/98 • p.277
MACWORLD MAC SECRETS • 4040-8/X • Chapter 5 • Proof 1 • SH • 10/06/98 • p.277
CASE HISTORY
Shutting down certain older Mac models, as you
may know, involves two steps. First, you choose
Shut Down; after a moment, when the computer
says “It’s safe to shut down the computer now,”
you flip off the power switch. But that’s not how
TV sets and light switches work, so some
confusion is inevitable, as this Mac fan
discovered:
The whole family was astonished at how
powerful our new Power Mac was. We had
been taking turns using it all evening, and at
around 10 P.M., everyone started turning in.
Except for Mom, that is. She used the computer
for a couple more hours. Then, just before she
got up to go to bed, a problem arose. She called
Apple’s help line.
Mom: Could somebody there please tell me
how in the world to shut down my
computer!? I’ve been trying to shut
down for the past three hours!
Tech: You just press the button.
Mom: I’ve been doing that, and the computer
keeps restarting!
Tech: Tell me what you are doing.
Mom: I go to the “Special” menu, I go to
“Shut Down,” and I release the mouse
button. But it doesn’t shut down! It
just gives me a message that says, “It
is now safe to shut down your
computer,” with only one button that
says “restart,” and when I press it, my
computer restarts. How do I get it to
shut down? It has been restarting for
the past three hours!
Tech: No... not that button. The little white
button in front of the computer. You
know, the one you use to turn it on.
Mom: Ohhhhhhh, that one!
Mom was very embarrassed. In fact, ever since,
whenever she needs any assistance from Apple,
she has me call them; she thinks that when she
gives them her name, they’ve got the word
“idiot” next to her name on their database
screen.
Crossing the Restarting Line
4040-8/5 ch05.F 11/3/98 2:24 PM Page 277

which pieces of software are required to operate your particular Macintosh
model, and places each required file where it belongs. Every Mac comes with
this Installer.
If you’re like most people, you bought your Mac with the system software in
place. Therefore, you may not have had to mess with the Installer. But
everyone encounters the Installer at some point. You may use it for one of
the following reasons:
■To eliminate problems in your current System Folder by replacing it with
a fresh one (see Chapter 35)
■To install system software onto a backup cartridge or hard drive
■To replace your current system software with a newer version
■To create a leaner System Folder to conserve dwindling hard drive space
and memory
As a matter of fact, we run the Installer every few months as a disk-health
measure, replacing our older (and possibly corrupted) System files with
fresh, clean, untarnished versions.
Every Mac comes with a copy of this Installer — on the system-software
CD-ROM that came with your Mac. (On pre-CD Macs, it’s on a white floppy
disk called Install or Install Me First.) In general, the master system-software
installer is an icon (usually an alias) in the exact center of the CD window.
Why use the Installer
In the olden days, you could install the system just by dragging the files you
need from the floppy disks onto your hard drive. But using the Installer is
better and safer for the following reasons:
■The Mac looks for the various pieces of system software in specific
locations within the System Folder. The Installer ensures that everything
will wind up where it belongs (control panels in the Control Panels folder,
and so on).
■Not every Mac model requires every piece of system software. The
Installer copies only the files needed for your machine.
■If you’re upgrading from one System version to another, the Installer can
intelligently build a new System Folder around your old one, preserving
whichever fonts, control panels, sounds, and extensions you added
(although we don’t recommend this technique, as we’ll explain later).
■The Installer these days does much more than simply copy files from the
CD. It also performs several important troubleshooting tasks, such as
updating your hard drive’s invisible driver software, checking it for
problems, and making it ready to receive Apple’s latest blessings.
■With the Installer, you can customize an installation to create a system
perfectly suited to your needs. If you don’t have a laser printer, for
example, you can certainly live without the LaserWriter printer driver
Mac Basics
278 Part I: System Software Revealed
■ ■
MACWORLD MAC SECRETS • 4040-8/X • Chapter 5 • Proof f • SH/EAP • 10/21/98 • p.278
MACWORLD MAC SECRETS • 4040-8/X • Chapter 5 • Proof 1 • SH • 10/06/98 • p.278
4040-8/5 ch05.F 11/3/98 2:25 PM Page 278
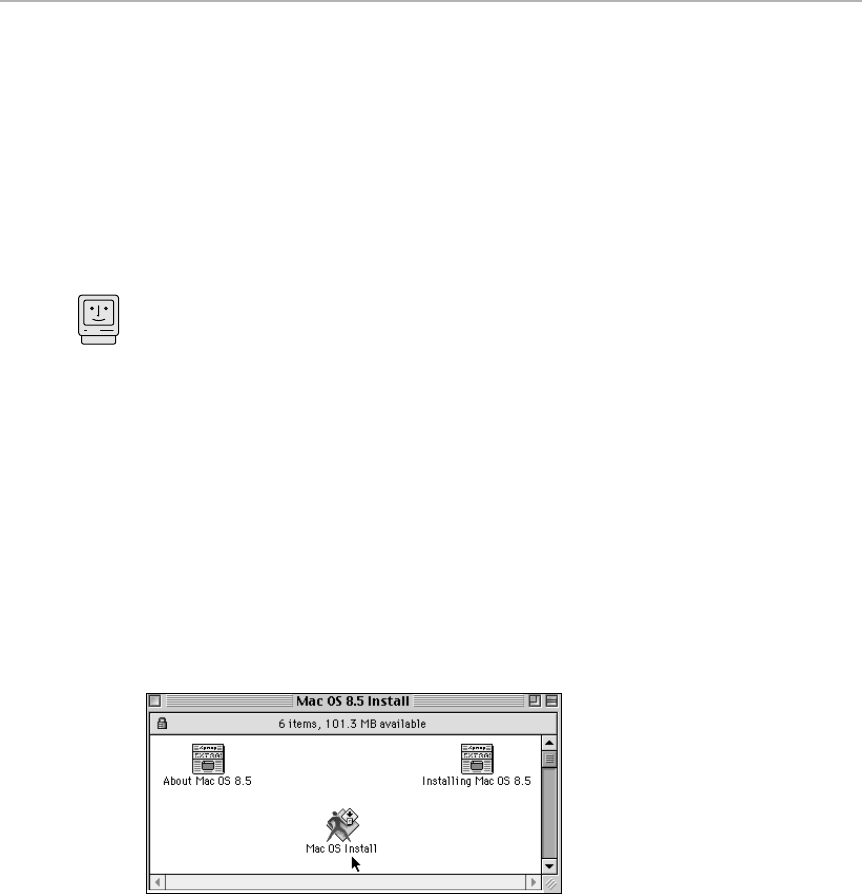
taking up 900K of your hard disk. The Installer lets you choose which
optional items get placed into your System Folder.
■The software to be installed has generally been compressed to save disk
space. The Installer automatically decompresses whatever you’re
installing, sometimes even rejoining pieces that had to be split apart.
After reading all of the reasons above, it turns out you couldn’t drag the
system-software pieces to your hard drive even if you tried!
Step 1: Start up from the CD
If you’re doing a clean install, as described in our upcoming Installer Secrets,
you don’t have to start the Mac up from the system-software CD. In most
other cases, though, doing so is the safest way to install system software.
(Among other things, booting off the CD allows Disk First Aid to repair any
problems with your hard drive before installing; until Mac OS 8.5, Disk First
Aid couldn’t operate on the startup disk.)
■Insert your System CD-ROM, restart the Mac, and hold down the letter C
key while the startup process is under way. (The Ckey makes the Mac
start up from the CD instead of its own hard drive.)
■If you arrive at the desktop and the icon of the hard drive, not the CD, is
in the upper-right corner of the screen, you must have the rare Mac
model that doesn’t offer the “C-key” trick. In that case, open your Startup
Disk control panel, select the system CD, and restart.
In any case, you should now see an icon in the CD window called something
like Install Mac OS 8.1 or Mac OS Installer. Double-click it (see Figure 5-4).
Figure 5-4: The Installer, as it may appear on the Installer disk.
Step 2: Run the Installer (Mac OS 8.x)
In all modern installers (Mac OS 8 and later), you’re forced to wade through a
sequence of silly screens before even initiating the installation process. They
include:
Mac Basics
Chapter 5: Enablers, Installers, and Apple Extras 279
■ ■
MACWORLD MAC SECRETS • 4040-8/X • Chapter 5 • Proof f • SH/EAP • 10/21/98 • p.279
MACWORLD MAC SECRETS • 4040-8/X • Chapter 5 • Proof 1 • SH • 10/06/98 • p.279
4040-8/5 ch05.F 11/3/98 2:25 PM Page 279

■The Installer’s title screen. In the Mac OS 8 through 8.5 installers, this
screen explains the basic four steps of installation. Click OK or Continue.
■Next screen: Now you must specify onto to which disk you want to install
a System Folder (see Figure 5-5). As you choose different disks from the
pop-up menu (if you have more than one drive), you’re shown how much
space is available (and how much the installation requires).
This screen offers the Perform Clean Install checkbox (in Mac OS 8 or
8.1) — or an Options button that makes that checkbox appear (in Mac
OS 8.5). See the upcoming Installer Secrets for our diatribe on the
importance of this option in times of troubleshooting.
When you’re finished with this screen, click Select.
■Next screen: the Read Me file. Read it if you like, and then click Continue.
■Next screen: A time-wasting annoyance, courtesy of Apple’s lawyers—
the software license agreement (which has, in the history of software,
never been invoked). It says absolutely nothing meaningful. Click
Continue — and then, in the annoying pop-up message that you can’t
dismiss with a tap of the Enter key, unlike all the dialog boxes so far, click
Accept.
■Next screen: Click Start to install yourself a full operating system,
complete with everything Apple thinks you ought to have. Or click
Customize to view a list of all the stuff the Installer plans to give you (see
Figure 5-6); feel free to turn off the stuff you won’t be needing. You’ll save
yourself disk space, memory, and installation time.
Figure 5-5: In Mac OS 8 and 8.1, the second screen you see lets you specify an installation
disk — and whether or not you want to do a clean reinstall.
At this point, you can also specify exactly which components you want
installed by clicking the Customize button. Doing so in Mac OS 8.5, for
example, brings up the dialog box shown in Figure 5-6. Here you can not only
specify which major chunks of the OS you’d like installed, but also which
OS
8.5
280 Part I: System Software Revealed
■ ■
MACWORLD MAC SECRETS • 4040-8/X • Chapter 5 • Proof f • SH/EAP • 10/21/98 • p.280
MACWORLD MAC SECRETS • 4040-8/X • Chapter 5 • Proof 1 • SH • 10/06/98 • p.280
4040-8/5 ch05.F 11/3/98 2:25 PM Page 280
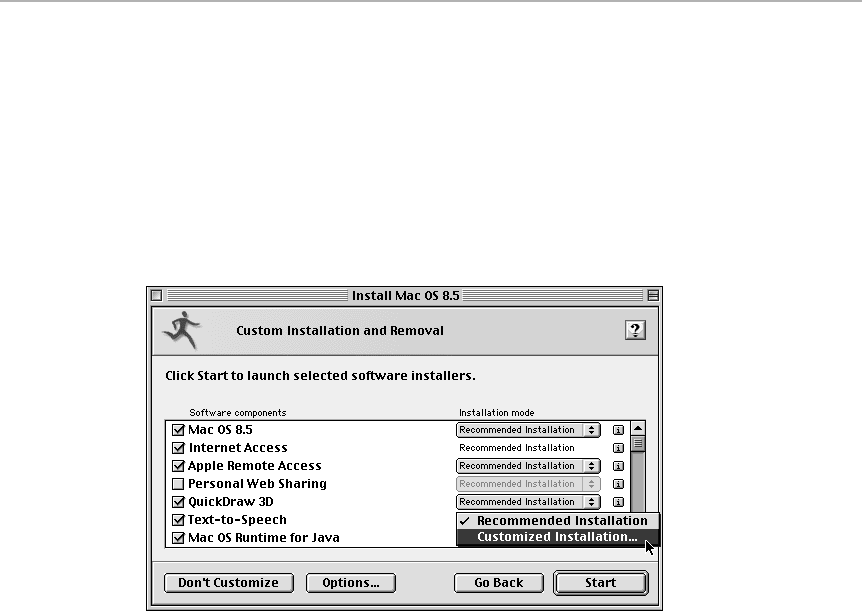
chunks of those chunks (by using the tiny pop-up menu to the right of each
chunk name, as shown in Figure 5-6). You also see how much space it’ll take
up on your hard drive. For example, the Apple Remote Access option reveals
that it’ll install not just the software necessary to dial up another Mac
network, but also 50,000 modem scripts. (Fortunately, this is your
opportunity to turn off the installation of the 49,999 of them that don’t match
your modem brand.)
Finally, click Start — and prepare to make phone calls, sort the mail, or read a
magazine. The installation process isn’t quick.
Figure 5-6: The Customize screen shows you all the little chunks of software the Installer is
prepared to give you.
Step 2: Run the Installer (System 7.5–7.6)
The System 7.5/System 7.6 installers offer a slightly different sequence of
events. In System 7.6, for example, the screen shown in Figure 5-7 encourages
you to think “Safety First!” You’re walked through the process of updating
your hard-disk driver, checking your hard drive for damage, and reading the
Read Me file before you can proceed with the installation.
The next box is the welcome screen; click OK or Continue. Now you arrive at
the “Switch Disk” screen, where you click the Switch Disk button until the
desired target disk is named in the middle left side of the dialog box (if, in
fact, you have more than one drive).
Now you’re faced with a decision (see Figure 5-7): You can perform the Easy
Install or choose Custom Install to configure your own installation.
Clicking the Install button (or simply hitting Return) starts the Easy Install.
Again, our advice is: Don’t do it. The Easy Install copies onto your hard drive
a huge assortment of software, much of which you don’t need.
Chapter 5: Enablers, Installers, and Apple Extras 281
■ ■
MACWORLD MAC SECRETS • 4040-8/X • Chapter 5 • Proof f • SH/EAP • 10/21/98 • p.281
MACWORLD MAC SECRETS • 4040-8/X • Chapter 5 • Proof 1 • SH • 10/06/98 • p.281
4040-8/5 ch05.F 11/3/98 2:25 PM Page 281

Figure 5-7: Click Install to begin Apple’s Easy Install. If you want to install only certain items,
choose Custom Install from the upper-left pop-up menu. If you have the older-style Installer,
click the Customize button instead.
Your cheerful authors recommend, therefore, that you generally opt for the
Custom installation. You’re now allowed to choose only the items that do you
any good (see Figure 5-8), using the following discussion as your guide. You
can save plenty of installation time and clutter on your disk by selecting only
what you need.
Figure 5-8: Fun aplenty in the System 7.5/7.6 Installer. You can resize the window; switch
back to the Finder without quitting (to make more room on your hard drive, for example);
click the little ibutton to get a description of something; and control what gets installed,
even down to the individual control panel, because of the Finder-style triangle buttons.
282 Part I: System Software Revealed
■ ■
MACWORLD MAC SECRETS • 4040-8/X • Chapter 5 • Proof f • SH/EAP • 10/21/98 • p.282
MACWORLD MAC SECRETS • 4040-8/X • Chapter 5 • Proof 1 • SH • 10/06/98 • p.282
4040-8/5 ch05.F 11/3/98 2:25 PM Page 282

What the components are
Once you’ve clicked Customize, you’re offered a bewildering array of
software modules to install. You can click the tiny i button to the right of
each item for a terse and nerdy description. But we think plain English works
better. Here’s the rundown on the modules you’ll be offered:
■Mac OS 8.x or System Software. This is the actual System folder you’re
trying to install. Unless you’re just adding on to an existing System folder,
you’ll generally want this option turned on.
■Internet Access. This item gives you all the extensions and control
panels needed to dialup the Internet and connect. We vote: leave it on.
■Apple Remote Access. Leave it off unless you regularly tap into a distant
Mac network back at your office (see Chapter 35 for details).
■Personal Web Sharing. Why this item defaults to being on, we can’t
possibly imagine. As described in Chapter 28, this software lets you make
folders on your hard drive available to in-house corporate intranets. Turn
it off.
■QuickDraw 3D. Turn it off unless you’re doing three-dimensional
modeling and have purchased software programs that require this
feature.
■OpenDoc and CyberDog. It blows the mind, but the installation checkbox
of these unpopular “modular software” schemes defaults to being on in
systems as late as Mac OS 8.1. Read about OpenDoc in Chapter 15, and
Cyberdog in Chapter 27, of Macworld Mac Secrets, 4th Edition (on the
CD-ROM that came with this book) if you must — but don’t install them.
■MacLinkPlus. See Chapter 4.
■Apple Location Manager. See Chapter 4.
■Text-to-Speech. As described in Chapter 23, this is the PlainTalk software
that lets your Mac read typed text out loud.
■Mac OS Runtime for Java. See “Apple Extras,” earlier in this chapter.
■ColorSync. If you scan, retouch, and print color photos, install this.
Otherwise, don’t.
■QuickDraw GX. Don’t install it. (See Chapter 29.)
■English Speech Recognition. The speech-recognition half of the
PlainTalk suite, as described in Chapter 23. Try it if you like, but you’ll
probably wind up leaving it off.
Chapter 5: Enablers, Installers, and Apple Extras 283
■ ■
MACWORLD MAC SECRETS • 4040-8/X • Chapter 5 • Proof f • SH/EAP • 10/21/98 • p.283
MACWORLD MAC SECRETS • 4040-8/X • Chapter 5 • Proof 1 • SH • 10/06/98 • p.283
4040-8/5 ch05.F 11/3/98 2:25 PM Page 283

■Worldwide Text Access or International Support. Leave this off unless
you’ve purchased a WorldScript language kit for your Mac (so that you
can display, for example, Japanese text on your screen).
The following items are offered only in System 7.5 through 7.6:
■Printing: Printer drivers for Apple printers. Click the triangle next to this
item’s name, and select only the names of the printers you’ll actually use.
(You can always run the Installer again later if you want to connect to an
additional printer.)
■Multimedia Software: The QuickTime movie extension and related files.
Install them (unless you’ve updated to a newer version, such as the 3.0
version described in Chapter 23).
■Networking Software: For File Sharing (Chapter 35) and Internet access.
■Utility Software: This includes nonessential items such as the Apple
Guide, AppleScript, and ColorSync. You should install AppleScript; many
programs rely on it to automate certain tasks. Apple Guide is
dispensable, though, if you don’t think you’ll need online coaching. And
you can forgo ColorSync if you don’t require monitor-to-printer color
matching.
■Fonts: The basic set of True Type fonts that come with every Mac. If
you’re upgrading your system and you’ve purchased and installed your
own fonts, you may not want to install these.
■Apple Menu Items: Installs the full complement of items that appear by
default under the Úmenu, but you can pick and choose among the
available items. Here’s your chance to eliminate the Jigsaw Puzzle before
it gets installed on your Mac.
■Control Panels: The standard set of control panels.
■Apple Telecom Software: Megaphone, the answering-machine software,
software for Apple fax modems, and so on.
The System 7.5 disks also offer separate Installers for PowerTalk and
QuickDraw GX, both of which you should avoid.
System 7.0–7.1 notes
For advice in installing these older systems, consult Chapter 5 of Macworld
Mac Secrets, 4th Edition (on the CD that came with this book). Sorry, kids —
technology marches on, and these pages aren’t getting any taller.
284 Part I: System Software Revealed
■ ■
MACWORLD MAC SECRETS • 4040-8/X • Chapter 5 • Proof f • SH/EAP • 10/21/98 • p.284
MACWORLD MAC SECRETS • 4040-8/X • Chapter 5 • Proof 1 • SH • 10/06/98 • p.284
4040-8/5 ch05.F 11/3/98 2:25 PM Page 284

Installer Secrets
■
The golden troubleshooting rule: A clean install
Here’s one of the most important secrets in this whole book: There’s a
difference between installing System software and per forming a
clean install.
When you run the Installer under normal circumstances, it actually
updates
whichever System you already have on your disk. This is a great feature;
suppose that you’re using System 8.1 and you customize it to the hilt with desk
accessories, control panels, and so on. When you upgrade to System 8.5, the
Installer thoughtfully preserves all of your customizations: fonts, sounds, DAs,
extensions, and so on. (Even if you reinstall the
same
version of the System,
this same process takes place.)
A potential problem with this technique lurks, however. If there’s some dormant
corruption or problem with the existing System file, it’s still there when the file
is upgraded to the new version of the System. (That’s why you sometimes hear
of people who have reinstalled the System for the purpose of eliminating some
mysterious crash they’ve been having — and it
doesn’t work.
They’re just
building one System file onto an existing bad one.)
To get around this, you can force the Installer to place a
completely new
System
Folder onto your disk. It won’t just update the existing System; it creates a
completely clean, untarnished, factor y-fresh one. This process is called “doing a
clean reinstall.”
In Mac OS 8.0 and 8.1, it’s incredibly easy to do a clean install. On the welcome
screen of the Installer, the checkbox that says “Perform a clean install” stares
you in the face. Turn it on. (To do a clean install of previous versions of the
System folder, see Chapter 36.) The important thing to understand is that when
the installation is over, you’ll have
two
System folders: your old, corrupted one
(called Previous System Folder) and your new, perfect, un-customized one
(called System folder).
Your Mac should hum along delightfully at this point. Unfortunately, all your
customized fonts, preferences, desk accessories, and so on are stranded back
in your
old
System folder. But that’s easy enough to solve; again, Chapter 36
offers step-by-step instructions. (Or you can use Conflict Catcher 8, whose
Clean-Install Merge feature makes copying those useful items into the new
System Folder as easy as clicking checkboxes.)
A clean reinstall of System software is almost guaranteed to improve the
performance and reliability of your Mac.
Worth
Learning
Mac Basics
Chapter 5: Enablers, Installers, and Apple Extras 285
■ ■
MACWORLD MAC SECRETS • 4040-8/X • Chapter 5 • Proof f • SH/EAP • 10/21/98 • p.285
MACWORLD MAC SECRETS • 4040-8/X • Chapter 5 • Proof 1 • SH • 10/06/98 • p.285
4040-8/5 ch05.F 11/3/98 2:25 PM Page 285

The Un-Installer
You can use the Installer to
remove
printing and networking software from your
current system if you no longer need it.
Mac OS 8.x Installer: Run the installer. On the screen where you choose a hard
drive, select the same hard drive you’ve previously installed onto. When you
click Select, the box shown in Figure 5-7 appears. Click Add/Remove. You’re
now shown a list of software components you can un-install!
System 7.5/7.6 Installer: Choose Custom Remove from the upper-left pop-up
menu.
Pre-System 7.5 Installer: First click the Customize button to open the
Customize window. Then hold down the Option key; the Install button turns into
a Remove button.
With the Option key still depressed, scroll through the configuration options.
Items that can’t be removed are dimmed. Select what you’d like to remove from
among the undimmed items and click the Remove button. The selected items
will be deleted from your System.
Don’t restart until you’re good and ready
It’s a creepily annoying fact of life: Every time you install almost anything these
days, the Mac makes you restart after the installation.
But free book winner Ubence wanted to install a series of software-module
updates: the Mac OS 8.1 updater; a new version of Open Transport; PlainTalk;
and so on. He realized he’d go quietly mad if he had to restart after each
installation. He became determined to find a way around the Mac’s insistence
at restarting after ever y newly-installed module.
His solution was to copy all the installers to his hard drive; start up the Mac
from his system CD; and
then
install the software. Amazingly enough, he didn’t
have to restart a single time.
The lesson: If you start up from a
different disk,
you can freely install
software onto your regular internal hard drive without having to restar t —
until
you
want.
How to prevent a component
from being installed
It’ll happen to you. If not today, tomorrow. If not tomorrow, then someday.
But it’ll happen: You run a software installer (not necessarily from Apple). And
the stupid thing tries to give you an
older
version of something — QuickTime, the
Chooser, AppleScript, whatever — than the version you’ve already got, wiping it
out in the process.
Contest
Winner
286 Part I: System Software Revealed
■ ■
MACWORLD MAC SECRETS • 4040-8/X • Chapter 5 • Proof f • SH/EAP • 10/21/98 • p.286
MACWORLD MAC SECRETS • 4040-8/X • Chapter 5 • Proof 1 • SH • 10/06/98 • p.286
4040-8/5 ch05.F 11/3/98 2:25 PM Page 286

Or this: An installer tries to give you a
newer
version of some component
you’ve already got, but you
want
the older version. (That was the situation, for
example, for many Radius MotoDV owners in 1998 who had been producing
full-screen, seamless video with QuickTime 2.5 — but got blotchy graininess
when they upgraded to QuickTime 3.0.) What’s a Mac fan to do?
Simple: Put a
folder
of the same name into the target location. That is, put a
folder called QuickTime into the Extensions folder; or a folder called Chooser
into the Apple Menu Items folder; and so on. (Beforehand, of course, put the
actual
QuickTime or Chooser file out on the Desktop for the moment.)
Now run your software installer. It won’t replace the folder — because the Mac
OS won’t
let
you replace a folder with a file of the same name! Thwarted, your
installer will proceed with its placement of other components; when the
installation is complete, trash your temporarily named folder and restore the
component you hoped to keep.
Chapter 5: Enablers, Installers, and Apple Extras 287
■ ■
MACWORLD MAC SECRETS • 4040-8/X • Chapter 5 • Proof f • SH/EAP • 10/21/98 • p.287
MACWORLD MAC SECRETS • 4040-8/X • Chapter 5 • Proof 1 • SH • 10/06/98 • p.287
TRUE FACT
Nobody doubts that Apple’s renowned system-
software programmers have a sense of humor.
But here’s how you can prove it to yourself.
Launch Microsoft Word. While pressing the
Shift key, choose Open from the File menu.
Navigate to your System Folder and open the
System file itself.
If you’re using System 6, there’s a copyright
notice and only one other intelligible sentence:
“Help! Help! We’re being held prisoner in a
system software factory!”
The joke was good enough to live on. If you
open the System file for System 7.0 through 7.1
this way, the sentence says, “Help! Help! We’re
still being held prisoner in a system software
factory!” And in System 7.5, it changed again,
to “Help! Help! He’s STILL being held prisoner in
a system software factory!”
Interestingly, if you try this trick in System 7.5,
you can scroll down into the document for an
extremely interesting set of additional credits.
(We’d give almost anything to know precisely
what services were provided by Domestic
Partner Amy, the Underpaid Process Dude, or
The Flake.)
The saga finally ended in System 7.6:
“Mercenaries hit the software factory and freed
the prisoners.” (And the programmers’ names
are categorized into two lists: “On contract:” and
“Freed, armed, and dangerous:”. Alas, the
legions of fans following the action-movie-
inside-the-OS were disappointed to find out that
that was truly the end of the adventure; Mac OS
8 and later make no reference to hostages or
mercenaries of any kind whatsoever.
The secret message in the System file
4040-8/5 ch05.F 11/3/98 2:25 PM Page 287

Switching between System Versions
Whenever you switch major System versions — from 8.1 to 8.5, for example—
compatibility is an issue. Older programs (especially games, ATM, fax/modem
software, Suitcase, and After Dark) may not run until you get upgraded
versions.
You can eat your cake and have it, too. As long as your Mac doesn’t require
the very latest system, you can install both Systems and switch between them
as needed. Here are several methods.
Two different disks
The easiest way to set up a two-System environment is to install one system
on each of two drives (your hard drive and a SyQuest or Zip disk, for
example).
To switch from one to the other, do this:
1. Open the Startup Disk control panel.
2. Click the icon for the disk that contains the System to which you want to
switch.
3. Restart the Mac.
Two different disks (occasional method)
Suppose you almost always use Mac OS 8.1, but occasionally want to run Mac
OS 8.5 (or vice-versa). If you have two hard disks (or an external Zip, Jaz, or
similar device), try this. Install 8.1 on the hard drive built into your Mac.
Install 8.5 on the external drive.
288 Part I: System Software Revealed
■ ■
MACWORLD MAC SECRETS • 4040-8/X • Chapter 5 • Proof f • SH/EAP • 10/21/98 • p.288
MACWORLD MAC SECRETS • 4040-8/X • Chapter 5 • Proof 1 • SH • 10/06/98 • p.288
TRUE FACT
If you do much switching between system
disks, the routine of opening the Control Panels
folder, opening Startup Disk, closing Startup
Disk, and restarting the Mac gets tired fast.
If you have Conflict Catcher, however, an easier
solution awaits. Once it’s installed, you can hold
down the space bar during startup; when the
Conflict Catcher window appears, choose a disk
from the Startup Disk pop-up menu. Your Mac
will automatically restart with the new start-up
disk you specified. (If your Conflict Catcher
screen doesn’t show the start-up-disk menu,
choose Edit ➪Preferences ➪General, and then
turn on the option called “Show Startup Disk
Menu.”)
Startup-disk switching on the fly
4040-8/5 ch05.F 11/3/98 2:25 PM Page 288

On the day you want to start up with Mac OS 8.1, switch on the computer.
Press the Ô, Option, Shift, and Delete keys continuously. The Mac ignores the
internal hard drive, Mac OS 8.1 and all. In fact, the drive’s icon won’t even
show up on the Desktop. Instead, the Mac will boot from the first System
Folder it finds — in this case, Mac OS 8.5 on the external drive. (You can then
bring your primary hard drive back onto the screen using SCSIProbe, the
control panel included on the CD-ROM with this book.)
Or get this: If you hold down Ô, Option, Shift, Delete, and a number key —
corresponding to the SCSI ID of the disk you want to start up from — your
Mac starts up from that corresponding device!
You read it here first, kids.
One disk
Conventional wisdom has it that you should never put two System Folders
onto a single hard disk, or you’re certain to get crashes.
Actually, doing so is utterly safe. Go ahead and keep two System Folders on
one disk. Only one of them at a time can display the telltale Macintosh icon
on its folder (and all the special folder icons inside). The other System Folder
will be officially disabled.
The one functional System Folder is, in programmer parlance, the blessed
folder — the one that will be in charge the next time you start up the Mac.
So how do you switch?
The easy way
Get Conflict Catcher 8. Simply choose the System Folder you want from its
Startup menu, and then restart the Mac.
The cheap way
1. Remove the Finder from one of the System folders. (Put it on the desktop,
for example.)
2. Open and close the other one.
The second System folder is now “blessed.”
3. Restart the Mac.
To restore the first System folder, put its Finder back in (click it and use File ➪
Put Away, for example) — and then repeat the two steps above.
The Great Invisible-File Collection
The Mac, in its efforts to be user-friendly, hides all kinds of technical goings-
on from you. If you use the Find File program’s “find invisible” option (see
Chapter 3), however, you can view an appallingly long list of all the files the
Worth
Learning
Chapter 5: Enablers, Installers, and Apple Extras 289
■ ■
MACWORLD MAC SECRETS • 4040-8/X • Chapter 5 • Proof f • SH/EAP • 10/21/98 • p.289
MACWORLD MAC SECRETS • 4040-8/X • Chapter 5 • Proof 1 • SH • 10/06/98 • p.289
4040-8/5 ch05.F 11/3/98 2:25 PM Page 289

Mac chooses to make invisible. You’ll also spy these folders if you examine
your own hard drive via network, while seated at another Mac.
■Shutdown Check: You’ve undoubtedly seen the “Your Macintosh was
shut down improperly” message when you restart after a crash. (Then
again, if you take our advice and turn off the “warn me” checkbox in the
General Controls control panel, you never saw that message again.)
Anyway, when the shutdown doesn’t go as planned — that is, when the
computer crashes — the Mac doesn’t get a chance to delete this little
invisible file as it usually does during a proper shutdown. The next time
you start up, the presence of the Shutdown Check file triggers the “shut
down improperly” dialog box on the next startup — and, in Mac OS 8.5,
launches Disk First Aid on a quest to repair any hard drive damage that
occurred during the crash.
■VM Swap File: Virtual memory, as you can read in Chapter 9, works by
setting aside a large chunk of hard drive space to use as temporary
memory. The chunk of space is actually a file — called a swap file. This is
it. It goes away if you turn off virtual memory.
■Desktop DB: The Desktop BNDL file. It’s where the Mac stores the
bundles — the relationship between a certain program or document and
its icon. See Chapter 1 for details.
■Desktop DF: Stands for Desktop Files. This is the database that records
what files you’ve got and what the icons look like.
■Move&Rename: You’ll see this mysterious invisible folder only if your
Mac has ever been networked (connected to other Macs). It’s used by the
Mac’s File Sharing feature to prepare for the moment when somebody at
a remote Mac tries to move or rename a file on your disk.
■Icon: As we mentioned in Chapter 1, you can paste a new graphic onto
any file, folder, or disk to serve as a custom icon. Well, the Mac must
store that pasted-in icon graphic somewhere.
When you paste a new icon onto a file, your custom graphic is stored in
the Desktop file. But if you replace the icon of a disk or folder, the Mac
creates the Icon file. (Caution: If you trash this invisible file, your disk or
folder’s icon will be in an iconic no-man’s land, having neither its original
nor its replacement icon . . . so it’s best to leave this, and all invisible
icons, alone.)
■Trash: The Trash in System 7 and later doesn’t just act like a folder — it is
one. That’s why you can drop things onto it, double-click it to view it as a
window, and so on.
■Desktop: The Desktop folder holds any icons that, under System 7 and
later, have been placed out on the Desktop outside of any window. Keep
this in mind when you try to access your Mac over a network — the very
icons you put out on the Desktop so they’d be easy to find are, when
viewed over the network, hidden away in the Desktop folder.
OS
8.5
290 Part I: System Software Revealed
■ ■
MACWORLD MAC SECRETS • 4040-8/X • Chapter 5 • Proof f • SH/EAP • 10/21/98 • p.290
MACWORLD MAC SECRETS • 4040-8/X • Chapter 5 • Proof 1 • SH • 10/06/98 • p.290
4040-8/5 ch05.F 11/3/98 2:25 PM Page 290
■ATM.temp, Brand.BRD, Aladdin Transaction Info: In the beginning,
software didn’t require serial numbers. But software pirates ate into the
software companies’ profits, so serial numbers were born to thwart
illegal copying.
But eventually, the software pirates realized that the passwords were
being stored in the software’s Preferences files, which could be easily
copied or e-mailed to friends. And that’s when software companies began
storing your passwords as invisible files.
TheFindByContentFolder, TheFindByContentIndex: These two invisible
files are the indexes created by Mac OS 8.5’s Find command. As explained
in Chapter 3, this Find program can search an enormous hard drive
instantaneously — even if you’re looking for text inside documents —
as long as you’ve taken the time to create an index of everything on
that drive.
TheFindByContentFolder is the invisible folder that stores the indexes
for a drive; TheFindByContentIndex is the actual invisible index file,
which can be many megabytes in size.
■Temporary Items: The Temporary Items folder is a locked, invisible
folder that lives permanently at the root level of your hard drive.
Applications are allowed to use this hidden folder for any purpose;
generally, programmers instruct applications to use the Temporary
Items folder to store scratch files or other temporary data. QuarkXPress,
for example, drops an XPress Temp file in this folder whenever you
have a Quark document open. Microsoft Word also uses this folder as
a temporary dumping ground. In the days of Word 5, these files were
called WordTemp-1, WordTemp-2, and so on; Word 6 tags them with
bizarre names such as <<dftmpAIBDBENKkkkkkk>. (Our theory behind
the name: This is the sound Word 6 users make when they first encounter
the program’s bloated interface.)
Incidentally, you are absolutely forbidden to name a folder Temporary
Items. No matter where you create a new folder—on the Desktop, on
the root level of your hard drive, or anywhere else—you can’t name it
Temporary Items. If you try, a dialog box asks you to choose another
name. (Some programs create a Temporary Items folder inside the
Preferences folder, but it’s not really called Temporary Items. Look
closely — there’s an extra space at the end of the name; that’s the only
way the Mac will accept it.)
Strange
But True
OS
8.5
Chapter 5: Enablers, Installers, and Apple Extras 291
■ ■
MACWORLD MAC SECRETS • 4040-8/X • Chapter 5 • Proof f • SH/EAP • 10/21/98 • p.291
MACWORLD MAC SECRETS • 4040-8/X • Chapter 5 • Proof 1 • SH • 10/06/98 • p.291
4040-8/5 ch05.F 11/3/98 2:25 PM Page 291

292 Part I: System Software Revealed
■ ■
MACWORLD MAC SECRETS • 4040-8/X • Chapter 5 • Proof f • SH/EAP • 10/21/98 • p.292
MACWORLD MAC SECRETS • 4040-8/X • Chapter 5 • Proof 1 • SH • 10/06/98 • p.292
ANSWER MAN
Ever wonder about the strange Rescued Items
folder that periodically appears in the Trash?
Usually this folder shows up when you restart
your Mac after a crash or freeze. It contains,
believe it or not, all the files that were in the
invisible Temporary Items folder when you
crashed.
When you finish using a program and use the
Quit command, the program is supposed to
neatly purge the Temporary Items folder. But if
your system crashes, the program never gets a
chance to empty the Temporary Items folder.
Then, when you restart and your Mac notices
that you still have files left over in the Temporary
Items folder, the System automatically creates a
new Rescued Items folder in the Trash and
moves the files there; it’s the Mac’s last-ditch
effort to salvage your unsaved work. Every now
and then, you can actually recover some of your
work by poking into the rescued temp files.
Return of the Rescued Items
4040-8/5 ch05.F 11/3/98 2:25 PM Page 292

MACWORLD MAC SECRETS • 4040-8/X • Chapter 6 • Proof f • SH • 10/20/98 • p.293
MAC SECRETS • 4040-8/5 • ch.06.1 • Chapter 6 • Proof 1 • VB • 09/15/98 • p.293
Chapter 6
The System Software Museum
In This Chapter
©Every system version Apple ever released
©The differences between 7.5, 7.5.1, 7.5.2, 7.5.3, 7.5.5, and so on
©Mac OS 8, 8.1, and 8.5 in a nutshell
©The Secrets time line
©Rhapsody, Next, and Mac OS X
In a little more than a decade, Apple has served up no fewer than 37
different versions of the Mac operating system. We will attempt in this
chapter to guide you on a never-before-attempted journey: We will describe
every permutation of the Mac’s system software, from the short-lived System
1.0 to the sprawling, sophisticated System Mac OS 8.5. Beyond that, we’ll
show you exactly what to expect from Apple’s as-yet-unreleased system
updates and the still-evolving Mac OS X.
The Jurassic Era: System 1.0–4.2
Why create a museum of the Mac’s system software? For one thing, exploring
the nitty-gritty of system compatibility may prove valuable to Mac
troubleshooters. It can be handy to know, for example, that in a pinch, you
can run an LC II with System 6.0.8, but not 6.0.7. Or that a Quadra 630 can run
System 7.1.2P, but not the nearly identical System 7.1.2. Furthermore, the
rash of System 7 varieties has boggled even us. Quick, without looking:
What’s the difference between Versions 7.1.1, 7.1.2, 7.1.3, and 7.5? And what
on earth was System 7.5.3 Revision 2.1?
On a more philosophical level, this retrospective provides a stunning
overview of just how far the Mac has come since its introduction. As we dug
up this information, we were continually surprised to learn how many of the
basic Mac interface features that we take for granted weren’t around when we
bought our first Macs.
4040-8/5 ch06.F 11/3/98 4:12 PM Page 293
For example, did you know that in the original Finder, you couldn’t drag a
disk into the Trash to eject it? That folders were nonexistent in Open and
Save dialog boxes? That the original Calculator buttons were in a completely
different order?
Join us now as we stroll down the corridors of the System Software Museum.
Watch as the Mac operating system evolves before your very eyes.
System 1.0
The original Mac operating system was tiny by today’s standards — a total of
about 216K, including the Finder (46K) and a solitary printer driver, the
Imagewriter file. (Note the lowercase w. The ImageWriter designation came
along later.) Desk accessories, such as the Alarm Clock and Calculator, were
installed in the System file, which was a whopping 142K, with fonts
accounting for about 86K.
If you opened the System Folder on an original Mac 128K, you saw only six
files — all with identical Finderlike Mac icons (see Figure 6-1).
Figure 6-1: The entire contents of the System Folder— all 216K of it —as it appeared in 1984.
The original system also included a separate tutorial disk, called Mousing
Around, to help new users get acquainted with using the mouse. Remember,
the whole concept of a mouse as a pointing device was new to the general
public in 1984. Mousing Around let you play connect-the-dots and plunk out
tunes on a tiny on-screen keyboard to hone your mousing skills (see
Figure 6-2). We have one dark secret to tell you about Mousing Around,
though — it was incompatible with the Finder! Apple actually had to ship a
different version of the System and Finder on the Mousing Around disk. If
you tried to use your Mac using that copy of the System, your Mac crashed!
294 Part I: System Software Revealed
■■
MACWORLD MAC SECRETS • 4040-8/X • Chapter 6 • Proof f • SH • 10/20/98 • p.294
MAC SECRETS • 4040-8/5 • ch.06.1 • Chapter 6 • Proof 1 • VB • 09/15/98 • p.294
4040-8/5 ch06.F 11/3/98 4:12 PM Page 294

Figure 6-2: Hey, remember this? Mousing Around was mouse training at its most basic —
and it came with all the early Macs.
System 1.1
It took less than four months for Apple to release its first system upgrade for
the Mac. System/Finder 1.1 was introduced on May 5, 1984, the same week
Apple announced that it had already sold 70,000 Macs.
The big selling point of 1.1 was disk-copying speed. Apple increased the size
of the Finder’s memory buffer, significantly reducing the number of swaps it
took to copy a disk on Macs with a single floppy drive. Improved system code
also reduced the length of the system startup by about 20 percent and sped
up returning to the Finder after quitting an application.
Finder 1.1 also included, for the first time, a Set Startup command in the
Special menu, so you could designate a specific application to launch
automatically when starting the Mac.
Still, there was no New Folder command; there was always an empty folder
on each disk, no matter how many times you tried to delete it. If you renamed
the empty folder (to use it for something), another empty folder appeared
instantly. And there was no Shut Down command!
System 2.0
Nearly a year went by without the release of a new system. Then, in April 1985,
Apple engineers unveiled System 2.0. Evidently, they had done most of their
tinkering in the Finder; its version number jumped from 1.1 to 4.1. (And for the
next three years, these two primary components of the operating system —the
System and Finder—continued to have different version numbers.)
Chapter 6: The System Software Museum 295
■ ■
MACWORLD MAC SECRETS • 4040-8/X • Chapter 6 • Proof f • SH • 10/20/98 • p.295
MAC SECRETS • 4040-8/5 • ch.06.1 • Chapter 6 • Proof 1 • VB • 09/15/98 • p.295
4040-8/5 ch06.F 11/3/98 4:12 PM Page 295

296 Part I: System Software Revealed
■ ■
MACWORLD MAC SECRETS • 4040-8/X • Chapter 6 • Proof f • SH • 10/20/98 • p.296
MAC SECRETS • 4040-8/5 • ch.06.1 • Chapter 6 • Proof 1 • VB • 09/15/98 • p.296
Finder 4.1 was not only faster, it was packed with new features. Some
commands (such as Put Back and Close All) were removed forever. For the
first time, list views displayed tiny icons next to file names. A new desk
accessory, Choose Printer, was introduced — the forerunner of the Chooser.
The Empty Folder command was replaced with the New Folder command.
Another new command, Print Catalog, appeared in the File menu; it let you
print a listing of a disk’s or folder’s contents. The Special menu sported two
new commands: Shut Down and Use MiniFinder.
The MiniFinder was an embryonic version of what would someday be At
Ease. Here’s how it worked. You selected the icons of the applications you
wanted and then chose Special ➪Use MiniFinder. A dialog box appeared,
asking whether you wanted to install the selected applications in the
MiniFinder. After that, whenever you quit an application, the MiniFinder
dialog box would open, showing the icons of all the programs you had
installed. You then could launch an application by double-clicking its icon.
Surprisingly, it wasn’t until Finder 4.1 that dragging a disk icon into the Trash
resulted in ejecting the disk and removing its icon from the Desktop. In
Versions 1.0 and 1.1, you had no choice but to use the Eject Disk command —
and only then could you drag the icon to the Trash to remove it from the
Desktop.
All these changes made for a much more sophisticated and polished
operating system. But, of course, even these enhancements weren’t enough
for some people. Mac gurus were already searching for ways to optimize Mac
performance. In early 1986, one Mac magazine suggested rebuilding the
Desktop. Doing so, an article pointed out, would trim “15K worth of System-
slowing stuff” from your Mac.
TRUE FACT
1976
The Official SECRETS Macintosh Time Line
MAY
David Pogue and Joseph Schorr, in
OH and NY, respectively, graduate
from seventh grade.
APRIL
Steve Wozniak and Steve Jobs, age
21 and 26, finish work on a
preassembled computer circuit
board. It has no keyboard, case,
sound, or graphics. They call it the
Apple I. On April Fool's Day, they
form the Apple Computer Company.
JULY
The Apple I board goes
on sale to hobbyists for
$666.66.
JANUARY
The Macintosh 128K is introduced
with System 1.0. Price: $2,500.
1984
FEBRUARY
Navy Captain Bruce
McCandless and Army Lt.
Colonel Robert Stewart
become the first humans
to fly free of a spacecraft
during a Space Shuttle
mission.
MAY
System 1.1 is released.
Strange
But True
4040-8/5 ch06.F 11/3/98 4:12 PM Page 296

Chapter 6: The System Software Museum 297
■ ■
MACWORLD MAC SECRETS • 4040-8/X • Chapter 6 • Proof f • SH • 10/20/98 • p.297
MAC SECRETS • 4040-8/5 • ch.06.1 • Chapter 6 • Proof 1 • VB • 09/15/98 • p.297
Interestingly, rebuilding the Desktop didn’t just erase Get Info comments
back then: It removed all your folders, leaving all your icons naked and
shivering on the Desktop.
System 3.0
The Mac Plus appeared in January 1986, equipped with a hot new Mac
operating system — System 3.0 and Finder 5.0.
1984 1985
JANUARY
The Space Shuttle Challenger explodes.
The Mac Plus debuts. The Hierarchical
Filing System (HFS), earlier introduced
with Apple's first hard drive (a non-SCSI,
20-megger) wins InfoWorld magazine's
1986 Readers Choice Award for OS
product of the year.
SEPTEMBER
The Mac 512K is introduced with a
list price of $3,200. At the same
time, the price of the Mac 128K
drops to $2,200.
NOVEMBER
Ronald Reagan is elected to a
second term as President of the
United States.
JANUARY
Apple announces the first
LaserWriter printer. Price: $7,000.
MARCH
Construction of the MX missile is
approved by Congress.
APRIL
Finder 4.1 is released.
The Empty Folder
command is replaced
by the New Folder
command.
1986
Evolution of the folder
Many elements of the Mac operating system
have remained constant as newer versions of the
system have been developed, but most have
gone through at least a few little refinements.
Folder icons are a good example. Sure, there
were folder icons in System 1.0— but the
original folders were different: They had four
widely rounded corners and tabs that were one
pixel shorter than today’s folders; the System 7-
era design (right) featured three sharp, pointy
corners and a slightly rounded upper-right corner
(look closely—a one-pixel chunk is missing,
creating a slightly softer edge). And, of course,
with Mac OS 8, the folder got yet another— and
much more dramatic—makeover.
The Trash also received a tiny cosmetic change.
In the older versions of the system software, the
lines indicating the ribbing on the body of the
can were drawn with edges leading off to the
right. In Finder 5.0, the Trash can design was
inexplicably flipped around, with the lines
trailing off to the left, and it stayed that way
right up until the arrival of Mac OS 8’s 3-D-style
icons. Now that’s progress.
4040-8/5 ch06.F 11/3/98 4:12 PM Page 297

This upgrade brought some of the biggest changes in the Macintosh
operating system to date. It featured a faster and more efficient Finder. It
introduced the RAM cache— a small portion of superfast memory that
speeds up Mac performance by storing frequently used instructions during a
work session (today called Disk Cache). This was also the first version of the
system that came with an Installer.
The most significant change was, without question, the mainstream
introduction of the Hierarchical File System (HFS), replacing the old
Macintosh File System (MFS). The old MFS system, you may recall, was
nonhierarchical. In other words, you couldn’t nest one folder within another.
Oh, you could put files into a folder, but as far as the Mac’s brain was
concerned, all the files were on one level—the only level. When you used an
Open or Save dialog box, the folders disappeared and all your files appeared
in one gigantic list. (HFS had first appeared as a patch to accompany the
HD20, Apple’s 20MB hard disk, which hooked up to the floppy connector on
the back of the Mac and which could have a floppy drive daisy-chained to it!)
System 3.1
You don’t hear much about this version. It was released just one month after
System 3.0 and was paired with an upgraded Finder—Version 5.2. Evidently,
it had serious bugs; this is one system that Mac gurus of the day urged users
to avoid.
System 3.2
Apple released System 3.2 in June 1986 (along with Finder 5.3) to fix about 30
bugs. Among other things, this release featured a redesigned Calculator. The
old Calculator, frankly, drove a lot of people crazy; its buttons didn’t match
the layout of the numeric keypad — the division, multiplication, and equal
buttons along the top row were in the wrong order (see Figure 6-3). The new
Calculator had (and still has) a layout that exactly matches the numeric
keypad on Apple keyboards.
1986 1987
FEBRUARY
Mac gurus suggest speeding up
your Mac's performance by
rebuilding the Desktop, thereby
reducing system clutter by 15K.
Swedish Premier Olaf Palme is
assassinated in Stockholm.
JUNE
Apple releases System
3.2 and Finder 5.3.
FEBRUARY
Disk First Aid is born.The Tower
report finds that President Reagan
was "confused and uninformed"
about the Iran-Contra affair.
1988
APRIL
AppleShare 1.1 is introduced.
OCTOBER
The stock market crashes.
JANUARY
Apple introduces the first
CD-ROM drive, the
AppleCD SC, for $1,200.
298 Part I: System Software Revealed
■ ■
MACWORLD MAC SECRETS • 4040-8/X • Chapter 6 • Proof f • SH • 10/20/98 • p.298
MAC SECRETS • 4040-8/5 • ch.06.1 • Chapter 6 • Proof 1 • VB • 09/15/98 • p.298
4040-8/5 ch06.F 11/3/98 4:12 PM Page 298
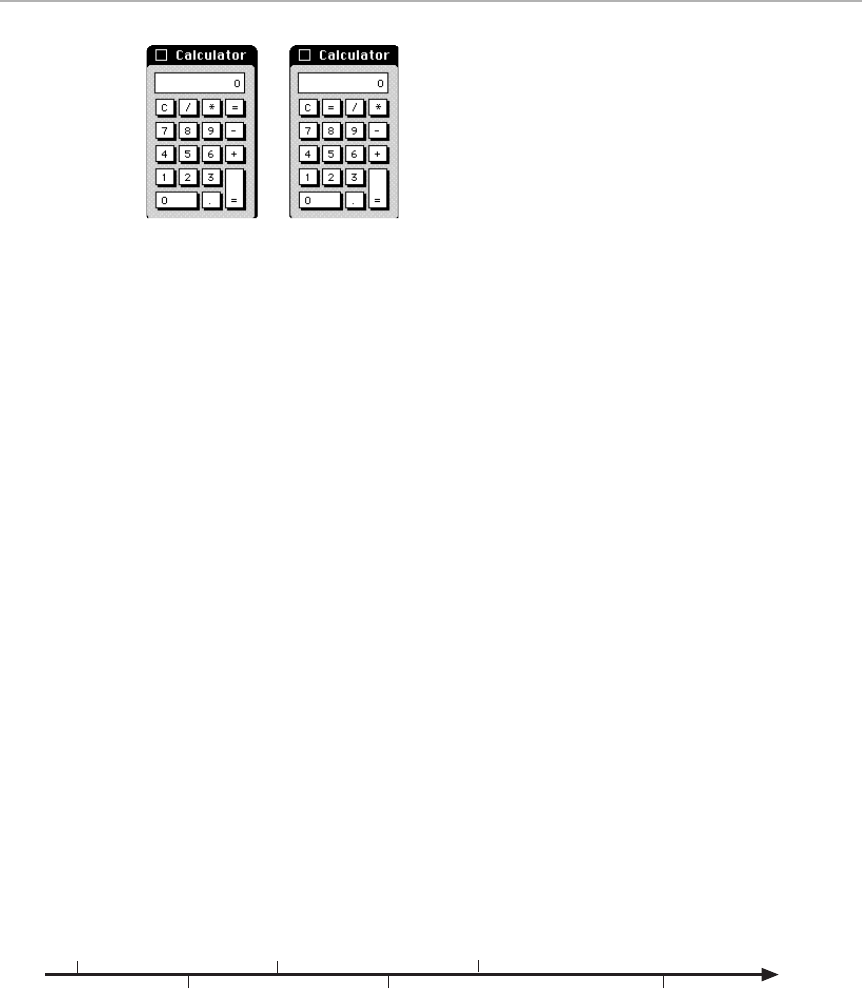
Figure 6-3: The layout of the old Calculator (left) didn’t match the numeric keypad.
The current layout (right) was introduced with System 3.2.
This update also fixed problems with the Chooser. It patched up a problem
that was causing italicized fonts to get mysteriously chopped off when
printed, and it also fixed bugs involving lost files and system crashes.
System 3.3
This incarnation of the system was paired with Finder 5.4. It debuted in
January 1987 and was a slight upgrade from 3.2. It was designed to
accommodate networked Macs that used AppleShare.
System 4.0
In March 1987, Apple released System 4.0. This time, the Finder didn’t get
upgraded; the current version (5.4) remained. Apple recommended this
system for all Macs with at least 512K of RAM. In other words, this was the
first system that could not be run with the original Mac 128K. Mainly, System
4.0 fixed bugs that were still floating around in Versions 3.2 and 3.3.
1988 1989
FEBRUARY
Panamanian ruler Gen. Manuel
Noriega is indicted in federal court
for assisting the Medellin drug cartel.
JUNE
Apple releases System 6.0, the first
version of the OS to include the
MacroMaker, CloseView, and Map
utilities. The price is $49.
NOVEMBER
George Bush is elected President.
APRIL
Apple announces the FDHD External
Floppy Drive for a price of $629.
Takeover rumors swirl.
AUGUST
System 6.0.3 is released
with the SE/30.
SEPTEMBER
Apple introduces the Macintosh
Portable.
Chapter 6: The System Software Museum 299
■ ■
MACWORLD MAC SECRETS • 4040-8/X • Chapter 6 • Proof f • SH • 10/20/98 • p.299
MAC SECRETS • 4040-8/5 • ch.06.1 • Chapter 6 • Proof 1 • VB • 09/15/98 • p.299
4040-8/5 ch06.F 11/3/98 4:12 PM Page 299

Cosmetic changes took place, too. Mac Pluses and ImageWriter IIs rolling off the
assembly line were no longer beige. They were clothed in Apple’s official new
color: platinum, a gray color that would remain untouched on desktop Macs for
11 years. Not until the radical iMac design would Mac fans get a break from gray.
System 4.1
This upgrade was released in April 1987 along with Finder 5.5. The new
system came with AppleShare 1.1, which was required for networking the
Mac II. Apple recommended this version of the system for the Mac Plus and
higher. Among other things, System 4.1 improved performance of large
capacity hard drives— meaning, of course, any drive over 32MB!
System 4.2
This update was released in October 1988. It became available to current
Macintosh users as part of the Apple System Software Update 5.0, which
included System 4.2 and Finder 6.0. This update introduced the first version
of MultiFinder — the pre-System 7 answer to multitasking. MultiFinder (code-
named Juggler) let you run two or more applications simultaneously and
switch between them by clicking an application icon in the menu bar. (Andy
Hertzfeld’s rival multitasking technology, called Servant, was never officially
adopted by Apple.)
The Victorian Age: System 6
The System 6 era began in August 1989 with the release of System 6.0.2. (This
also began the era of three-digit system numbers; a change in the third digit,
after the second decimal point, indicates an even more minor upgrade than a
change in the second digit.)
1989 1990
OCTOBER
In the wake of a major earthquake,
the San Francisco Chronicle and the
San Francisco Examiner are
published on October 18 using
Macintosh computers connected to
generators.
MARCH
Apple introduces the IIfx, the fastest
Mac to date. Suggested price is
$9,870.
JANUARY
The Persian Gulf war begins.
MAY
System 7.0 is introduced. Pope John
Paul II issues an encyclical, "Centesimus
Annus," urging a peaceful resolution to
world conflicts.
SEPTEMBER
System 7.0.1 is completed.
OCTOBER
NASA reports that the ozone level
in the stratosphere has dropped to
the lowest level on record.
1991
300 Part I: System Software Revealed
■ ■
MACWORLD MAC SECRETS • 4040-8/X • Chapter 6 • Proof f • SH • 10/20/98 • p.300
MAC SECRETS • 4040-8/5 • ch.06.1 • Chapter 6 • Proof 1 • VB • 09/15/98 • p.300
4040-8/5 ch06.F 11/3/98 4:12 PM Page 300

System 6.0.2
Savvy Mac fans noticed a single visual change in System 6.0.2 that
immediately signaled the presence of System 6: a single black pixel. This
extra screen dot appeared at the left edge of any Finder window, where the
double line beneath the disk information joined the left wall of the window.
(And by the way: What happened to System 6.0 and 6.0.1? The former was so
buggy that it was immediately replaced— and the latter was so buggy that it
was never even released.)
By this point, the system disks had grown into a four-disk set. Small upgrades
and enhancements followed over the next two years, many of which simply
accommodated the needs of specific new Mac models and printers.
System 6.0.3, 6.0.4, 6.0.5, 6.0.7
System 6.0.3 made its debut with the SE/30. Apple recommended 6.0.3 for all
recent models. System 6.0.4 is the oldest version of System 6 that can run on
a IIci. For a IIfx, you need at least System 6.0.5, whereas 6.0.7 is required to
run a Classic, IIsi, or the LC under System 6. (The LC II, however, requires at
least 6.0.8, whereas the LC III requires System 7.0.)
System 6.0.8
Apple’s code name for System 6.0.8 was Terminator — a fitting name, as this
was indeed the last version of System 6, released just months before System
7 was unveiled. According to Apple, this is the only version of System 6
software that can run an LC II. It supports Macs as early as the Mac Plus. In
essence, this system was 6.0.7 with improved printer drivers.
As the sun set on System 6, the Mac’s System and Finder, weighing in at about
610K, had more than tripled in size since the days of System 1.0.
1992
MAY
IBM, Motorola, and Apple
announce a collaboration to
develop the PowerPC family of
RISC microprocessors
AUGUST
System 7.1 debuts.
NOVEMBER
Bill Clinton is elected President.
FEBRUARY
Apple ships the ten millionth
Macintosh computer.
MAY
The cult of zealot David Koresh ends
in a fiery standoff with federal
authorities.
AUGUST
Apple introduces the Newton
handheld computer.
1993 1994
Chapter 6: The System Software Museum 301
■ ■
MACWORLD MAC SECRETS • 4040-8/X • Chapter 6 • Proof f • SH • 10/20/98 • p.301
MAC SECRETS • 4040-8/5 • ch.06.1 • Chapter 6 • Proof 1 • VB • 09/15/98 • p.301
4040-8/5 ch06.F 11/3/98 4:12 PM Page 301

System 7.0
System 7 was Apple’s quantum leap forward. Much hyped and heavily
criticized, System 7 — code-named Big Bang — was rolled out in May 1991.
Upgrading to System 7, for many, was something of a pain. You had to have a
hard drive. You had to have 2MB of memory or more. And upgrading all your
existing programs to versions that ran under System 7 cost good money.
But System 7 made life a great deal easier. Several bugs had been fixed, a lot
of poor interface elements had been improved, and a lot of thought went into
making System 7 as effortless and elegant as possible. The completely
refurbished operating system introduced dozens of new features. Among the
most significant: 32-bit addressing (which finally allowed Macs to access
more than 8MB of RAM); aliases; an menu that could contain not just desk
accessories, but also applications, folders, documents, and so on; the
Application menu; Balloon Help; colorized 3-D windows; faster printer
drivers; built-in File Sharing; the ever-useful Put Away command; the Startup
Items folder; stationery pads; the Views control panel; and QuickTime.
In fact, System 7 introduced many of the basic Mac interface features that
we’ve now come to take for granted: hierarchical list views that let you
expand and collapse the contents of nested folders; shortcuts that let you
select icons, open and close windows, and collapse and expand folders from
the keyboard; the “renaming” rectangle that appears when you click an icon’s
name; the capability to paste custom icons onto files; and a Trash can that
doesn’t automatically purge its contents every time you shut down.
System 7.0.1
Users had only a few months to enjoy the fresh, clean, hearty feeling of
having an operating system with a big, round integer before Apple followed
System 7 with System 7.0.1, adding not one but two irritating decimal points.
At Apple’s headquarters in Cupertino, the new system version was known by
two code names: Road Warrior and Beta Cheese.
1994
MARCH
Apple introduces the Power
Macintosh. Takeover rumors
swirl.
JUNE
O. J. Simpson's white Ford Bronco
is pursued by police in a slow-speed
chase across the highways of
Southern California.
NOVEMBER
The PowerBook Duo 230 is
discontinued. Tonya Harding is
stripped of her U. S. figure skating
championship.
SEPTEMBER
The first PowerPC-based
Performa, the 6110, makes its
debut. Takeover rumors swirl.
NOVEMBER
System 7.5 is released.
DECEMBER
Robert Duvall, Raisa Gorbachev, and
Diane Keaton turn 65, 64, and 50,
respectively.
1995
302 Part I: System Software Revealed
■ ■
MACWORLD MAC SECRETS • 4040-8/X • Chapter 6 • Proof f • SH • 10/20/98 • p.302
MAC SECRETS • 4040-8/5 • ch.06.1 • Chapter 6 • Proof 1 • VB • 09/15/98 • p.302
4040-8/5 ch06.F 11/3/98 4:12 PM Page 302

The new version was mainly about bug fixes — especially an insidious
disappearing icons-problem— and accommodations for the then-new
PowerBook and Quadra families. For example, the old Portable and
Brightness control panels (left over from the Mac Portable) were updated,
and the Caps Lock extension made its debut. The Cache Switch control panel,
along with internal system file-tweaks, was introduced for the 68040 Macs.
And the software governing RAM disks and sound management were touched
up for the new machines.
System 7.1
After the harrowing experience of cranking out System 7.0.1 solely to support
a couple of new Mac lines, Apple hit upon the enabler scheme described in
Chapter 5 and rolled it out in System 7.1, which was destined to be a solid
“reference release” for several years.
System 7.1 was remarkable for another reason, too: It was the first system-
software update Apple didn’t give away. You had to buy it, much to the fury of
user groups and online services that had gotten used to making each new
system release available to everybody. Backing down in the face of the
protests, Apple eventually offered the System 7.1 upgrade kit to user-group
and online service members for less than $30. But the writing was on the wall:
Apple was jealous of Microsoft, system-software superstore to the world.
Many wondered if the upgrade was even worth it. System 7.1 incorporated a
huge number of changes, but the vast majority were deep-seated, core-level
rewrites that added no usefulness to standard American Mac users. For
example, System 7.1 enabled (but didn’t provide) foreign-language translations,
using a technology called WorldScript. Along with that change came new
control panels for “internationalizing” your Mac: Numbers, Date & Time, and
so on.
1995
JANUARY
Apple replaces the PowerPC
chips in its first three Power Mac
models with faster versions.
MARCH
Eleven people die and more than
5,000 are injured in a nerve gas
attack on the Tokyo subway by the
Aum Shinri Kyo religious sect.
APRIL
The first authorized Macintosh clone,
the Power 100, is sold by Power
Computing.
MAY
A car bomb devastates a federal
building in Oklahoma City, killing
at least 167 people.
AUGUST
The second generation of Power
Macs is released — the first Macs
to contain PCI slots instead of
NuBus. Takeover rumors swirl.
OCTOBER
O.J. Simpson is acquitted. Apple releases the
Performa 6300 — the 45th Performa model
released since October 1992. That’s one new
Performa model every 3.5 weeks for three years.
Chapter 6: The System Software Museum 303
■ ■
MACWORLD MAC SECRETS • 4040-8/X • Chapter 6 • Proof f • SH • 10/20/98 • p.303
MAC SECRETS • 4040-8/5 • ch.06.1 • Chapter 6 • Proof 1 • VB • 09/15/98 • p.303
4040-8/5 ch06.F 11/3/98 4:12 PM Page 303

Except for the QuickTime extension (see Chapter 23), the sole practical new
feature of 7.1 was the Fonts folder. For the first time, all your fonts could be
stored sensibly in one Fonts folder in the System Folder—instead of being
buried in the System file or, in the case of printer-font files, scattered to the
winds of your System Folder.
System 7 Pro (System 7.1.1)
System 7 Pro formalized Apple’s practice of throwing existing software
programs into the System 7 box and calling it a new operating system. This
October 1993 release, aimed at networked offices, was nothing more than
System 7.1 with the addition of the utterly incomprehensible and prematurely
hatched PowerTalk (see Chapter 35). It also included AppleScript and
QuickTime (see Chapters 22 and 23, respectively).
Overall, the $150 System 7 Pro was the least exciting upgrade— as far as the
individual Mac user was concerned — in memory.
System 7.1.2
This minor upgrade accompanied the first-generation Power Macintosh models.
Despite what you may expect, it was not substantially rewritten in “native”
code to add a speed boost. In fact, only about 10 or 15 percent of the system
was native — according to Apple, the parts that are used most frequently.
The physical signs of change were primarily in the new Memory control
panel — that weird Modern Memory Manager setting — and its effects. For
example, turning on virtual memory now let you lower your programs’ Get
Info memory sizes, as you’ll see in Chapter 9.
Otherwise, 7.1.2 includes only subtle internal tweaks and remains, for all
practical purposes, another spin on System 7.1.
1995
DECEMBER
The U.S. government "shuts
down" over budgetary deadlock
in Congress.
JANUARY
Apple releases System 7.5.3. Takeover rumors still
swirl. Apple's quarterly report includes a $700 million
loss, triggering a year-long wave of negative publicity,
and the hiring of a new CEO, Gil Amelio.
FEBRUARY
The Tokyo Macworld Expo draws
170,000 attendees, and Apple's
market share in Japan reaches 25
percent.
JULY
TWA Flight 800 crashes off the coast of Long
Island. Power Computing unveils the 225 MHz
PowerTower Pro — the fastest personal
computer in history. Apple releases the first
minitower Performa.
1996
SEPTEMBER
System 7.5.4 is yanked from
distribution hours before its release
and replaced the next day with System
7.5.5. Four companies are now
manufacturing Macintosh clones.
304 Part I: System Software Revealed
■ ■
MACWORLD MAC SECRETS • 4040-8/X • Chapter 6 • Proof f • SH • 10/20/98 • p.304
MAC SECRETS • 4040-8/5 • ch.06.1 • Chapter 6 • Proof 1 • VB • 09/15/98 • p.304
4040-8/5 ch06.F 11/3/98 4:12 PM Page 304

System 7.1.2P
Don’t confuse this subtle variation on System 7.1.2 with System 7.1P2. The
former is a special version of 7.1.2 that was released with the Quadra (and LC
and Performa) 630 models. It’s a standard Macintosh operating system,
essentially the same as System 7.1.2, but included on all 630-series machines,
regardless of their designation as LCs or Performas. On the other hand,
System 7.1P2 was a Performa-only version of System 7.1. See “Performa
System-Software Annex,” later in this chapter, for details.
System 7.1.3
This system debuted with the PowerBook 500 series and merited the new
number only in that it included some improved software—notably the
Control Strip (see Chapter 4).
Here’s a little-known fact, however: A PowerBook 500 comes with the
equivalent of System 7 Pro. It’s bundled with PowerTalk, QuickTime, and all
of Apple’s usual goodies. We shudder to wonder if, having purchased a
PowerBook 540c, anyone then went out and purchased System 7 Pro to use
on it.
System 7.5
There wasn’t much surprise about the contents of System 7.5 by the time
Apple released it in late 1994. The new “reference release” included dozens of
truly useful new features, but most had been available in other forms before
being incorporated into System 7.5. In fact, the only truly new, significant
features from Apple were Macintosh Drag & Drop (see Chapter 1), QuickDraw
GX (the new font and printing software—see Chapters 29 and 30), and Apple
Guide (see Chapter 2).
MACINTOSH SECRET
OCTOBER
After three quarterly losses,
Apple's finances seem to
stabilize with a $25 million
quarterly profit.
NOVEMBER
Bill Clinton is re-elected President.
JANUARY
Apple releases System 7.6, the first
version of the System folder to
require a 68030 chip or
Apple records a net loss of
$120 million for the quarter.
MARCH
Thirty-nine members of the Heaven's Gate cult
commit suicide in a Rancho Santa Fe mansion.
NBC sportscaster Marv Albert is indicted on
charges of assault and sodomy.
1996
APRIL
Microsoft reports third quarter earnings
of $1.04 billion, a 45 percent increase
in revenue.
1997
JULY
Mac OS 8 is released.
Apple posts a loss of $56
million for the quarter.
better.
Chapter 6: The System Software Museum 305
■ ■
MACWORLD MAC SECRETS • 4040-8/X • Chapter 6 • Proof f • SH • 10/20/98 • p.305
MAC SECRETS • 4040-8/5 • ch.06.1 • Chapter 6 • Proof 1 • VB • 09/15/98 • p.305
4040-8/5 ch06.F 11/3/98 4:12 PM Page 305
The most surprising new inclusions were shareware. Apple licensed a handful
of popular shareware programs and adopted them as official system
software. This must have come as a pleasant and remunerative surprise to
their authors — the one-man operations who wrote MenuChoice,
WindowShade, and SuperClock!, for example.
AUGUST
Amelio is out, Steve Jobs is in (on an
“interim CEO” basis). Jobs and Bill Gates
join forces at Macworld Expo to announce
an alliance, with Microsoft to invest $150
million in Apple and develop Mac software
for at least the next three years.
OCTOBER
John Denver is dead
at 53 after his private
plane plunges into
the Pacific Ocean.
NOVEMBER
Jury selection begins in the trial of accused
Unabomber Theodore Kacszynski. "Titanic" is
released, the most expensive (and most
profitable) movie in history.
1997
JANUARY
Apple releases Mac OS 8.1. Bill Clinton
is accused of having a sexual affair
with White House aide Monica
Lewinsky.
1998
SEPTEMBER
Apple pays $100 million to purchase
Power Computing Corp, the top
seller of Macintosh clones, putting
an end to the Mac clone era.
306 Part I: System Software Revealed
■ ■
MACWORLD MAC SECRETS • 4040-8/X • Chapter 6 • Proof f • SH • 10/20/98 • p.306
MAC SECRETS • 4040-8/5 • ch.06.1 • Chapter 6 • Proof 1 • VB • 09/15/98 • p.306
Apple’s best secret About box yet
In System 7.5, open any Drag-and-Drop-savvy
program, such as the Note Pad or SimpleText.
Type secret about box. Select the phrase. Drag
it onto the Desktop, creating a Clipping file. The
Note Pad disappears and is replaced by a game
of Breakout!
Move the mouse to control your paddle; try to
make the bouncing ball break through all the
“bricks” containing System 7.5’s authors’
names. Click the mouse to return to your life
already in progress.
To everyone’s horror, Apple removed this
awesome secret About box in System 7.5.1 —
but replaced it with something equally delicious
in System 7.5.2.
4040-8/5 ch06.F 11/3/98 4:12 PM Page 306

Added value
Apple also tossed in some utility programs that it had previously sold
separately: PowerTalk network software, formerly available only with System
7 Pro; PC Exchange, the IBM disk-reading software (see Chapter 4); Macintosh
Easy Open, which suggests applications capable of opening an orphaned
document (Chapter 4). For PowerBooks, System 7.5 made the Control Strip
available (which had originally been included only with the 500 series) to all
PowerBook models. System 7.5 included enhanced desk accessories, too: a
new Note Pad, Scrapbook, Puzzle, and Find File command, for example.
The new General Controls panel offered several features that had debuted on
the Performa line: a Documents folder that automatically collected new
documents; System Folder contents protection; self-hiding Finder windows;
and the Launcher one-click icon-launching pad. (See Chapter 4 for some
Launcher tricks and tips.)
Meanwhile, the Desktop pattern-editing features of the old General Controls
panel were relegated to a stand-alone program called Desktop Patterns. (See
Chapter 4 for details.) Another example: 7.5’s Disk Cache (see Chapter 9) was
rewritten to eliminate all the silly rules about maximum and optimum
settings. In System 7.5, the higher you set the Disk Cache, the more speed
your Mac gains.
Deep-seated changes
Apple also made some substantive changes to the body of the system itself.
For example, Apple incorporated into System 7.5 the purple window
highlighting you see when, while dragging an icon from one window to
another, your cursor moves inside the destination window (a nice touch
introduced with System 7.1.3 with the PowerBook 500 series).
Other than GX and Apple Guide, the only brand-new software feature added
to System 7.5 was Macintosh Drag and Drop, a fantastically useful new core
Macintosh feature. Under this scheme, you can drag selected chunks of text
or graphics among Macintosh windows, even if they belong to different
programs, without copying and pasting (see Chapter 1 for details).
APRIL
Apple announces its second straight
quarterly profit, $55 million. Steve Jobs
announces the one-piece, two-toned,
translucent, inexpensive, fast iMac.
1998
AUGUST
The iMac debuts — a wild success,
selling several hundred thousand units
within hours of going on sale. Its impact
is large enough to boost Apple’s market
share, Mac software, and even Apple’s
other Mac models.
1999
MAY
The final episode of "Seinfeld" airs. Steve Jobs announces
Apple's latest OS plan, the development of a new system,
Mac OS X, for 1999, fusing portions of the existing Mac
OS 8.5 with the core elements of Rhapsody.
OCTOBER
Clinton-scandal hysteria continues. Mac
OS 8.5 ships. Apple reports its fourth
straight profitable quarter; its stock price
has nearly quadrupled since January.
DECEMBER
Macworld Mac
Secrets, 5th Edition,
ships.
Chapter 6: The System Software Museum 307
■ ■
MACWORLD MAC SECRETS • 4040-8/X • Chapter 6 • Proof f • SH • 10/20/98 • p.307
MAC SECRETS • 4040-8/5 • ch.06.1 • Chapter 6 • Proof 1 • VB • 09/15/98 • p.307
4040-8/5 ch06.F 11/3/98 4:12 PM Page 307

System 7.5, overall, didn’t change much of the behind-the-scenes operating
system at all; it was System 7.1 with fine-tuning. (Faster file copying and
Trash emptying were among the subtle tweaks.) But the enhancements Apple
did choose to include showed a great deal of thought and were beautifully
done. As a result of this conservative approach, you didn’t have much
software-upgrading to do. Anything that worked with 7.1 generally worked
well with 7.5, eliminating worries of another compatibility nightmare (a la
System 7’s introduction).
System 7.5, in fact, was probably disappointing to only two groups of people.
Power Mac owners had hoped that Apple would rewrite the operating system
to incorporate more “PowerPC-native” code (see Chapter 13). That crucial
speed enhancement, Apple hinted, would not appear until the release of Mac
OS 8. The upgrade was also disappointing to those users running short of
disk space or memory. System 7.5, particularly QuickDraw GX, consumed
substantially more RAM and hard drive than any system before it.
System 7.5.1 (System 7.5 Update 1.0)
Shortly after System 7.5 was released, Apple discovered more than a few nasty
bugs that were in desperate need of patching. In the months that followed,
Apple released a series of updated system components that fixed specific
problems— EM Sound Update, PowerBook 150 Update, and Mount IDE Drive,
to name a few. However, by March 1995, these patches started mounting up.
To avoid more confusion, Apple’s development team decided to roll the
patches together, throw in a generous bundle of system enhancements as a
bonus, and release the whole thing under one new name —the System 7.5
Update. (This later came to be known as System 7.5 Update 1.0.)
System 7.5 Update 1.0 was a four floppy-disk affair that dumped all kinds of
updated components into your System Folder, swallowed up the chunks that
were obsolete and, most significantly, officially upgraded your operating
system to 7.5.1.
System 7.5.1 improved memory stability and fixed potential crash problems
when pasting large blocks of data. It cleared up a weird problem in which
double-clicking an alias on the Desktop opened the wrong original file. The
update also cared for a number of model-specific issues.
The update also introduced new and improved versions of many system
components. File Sharing Version 7.6.1, for example, eliminated the need to
turn off file sharing in order to eject a removable disk or CD-ROM. Launcher
Version 2.7 added drag-and-drop support and a number of other slick
Launcher features (described in detail in Chapter 4). There were also new
versions of Apple Guide (rewritten in native PowerPC code), SCSI Manager,
Speech Manager, PowerTalk Mailbox, General Controls, Apple Menu Options,
Keyboard, WindowShade, MacTCP, Macintosh Easy Open, SimpleText, Find
308 Part I: System Software Revealed
■ ■
MACWORLD MAC SECRETS • 4040-8/X • Chapter 6 • Proof f • SH • 10/20/98 • p.308
MAC SECRETS • 4040-8/5 • ch.06.1 • Chapter 6 • Proof 1 • VB • 09/15/98 • p.308
4040-8/5 ch06.F 11/3/98 4:12 PM Page 308

File, Stickies, PowerTalk Catalogs Extension, and the LaserWriter printer
driver (updated to Version 8.2). The update also gave most Macs the ability
to be turned off with a press of the Power key.
What System 7.5.1 didn’t offer, once again, was a significant rewrite of the
operating system to PowerPC-native code. As of System 7.5.1, only three
components of the operating system had been rewritten to take advantage of
the speed of the PowerPC chip — QuickDraw, Modern Memory Manager, and
Apple Guide.
Nevertheless, 7.5.1 was a substantial upgrade — a must-have for every user of
System 7.5.
System 7.5.2
Five months after the System 7.5 Update appeared, Apple released the first
Power Macs with PCI slots (see Chapter 34) and a new fleet of PowerBooks.
Yet another update was needed to address the new hardware features on
these models. The result: System 7.5.2. The only Macs capable of even running
this operating system are the Power Mac 7200, 7500, 8500, and 9500 — and the
PowerBook 5300 line (or 500-series PowerBooks with a PowerPC upgrade).
Chapter 6: The System Software Museum 309
■ ■
MACWORLD MAC SECRETS • 4040-8/X • Chapter 6 • Proof f • SH • 10/20/98 • p.309
MAC SECRETS • 4040-8/5 • ch.06.1 • Chapter 6 • Proof 1 • VB • 09/15/98 • p.309
TRUE FACT
Mac fans who installed System 7.5 and then
chose About This Macintosh from the menu
were in for a rude shock. Unlike in all previous
system-software versions, this dialog box no
longer specified one prominent fact About This
Macintosh — your Mac model. Instead, it just
identifies the general class, such as Macintosh,
Power Macintosh, or Macintosh PowerBook.
Apple wrote System 7.5 to hide the model
information because of changing times. For
example, your About This Macintosh window
used to extract the model information from a
chip on your Mac’s motherboard. But today,
Apple builds the identical logic board into several
different Mac models — for example, the
Performa 6115 and the Power Mac 6100, or all of
the first-generation G3 machines. Furthermore,
Apple’s logic boards became available in other
companies’ Mac clones. In both cases, logic
boards could no longer be trusted to accurately
identify the model they once defined.
Of course, to find out your Mac’s model name,
you could just read what’s painted on the front
panel.
But then we’re forced to ask: What about the
fact that the command says About This
Computer? Sure, Apple did that for awhile,
during the Macintosh clone era, because only
Apple’s machines were allowed to be called
Macs. Apple didn’t want the word Macintosh to
show up on clones from other companies.
Well, fine. But when Apple killed off the clone
program in 1997, only Macs were left. So why
didn’t the command return to About This
Macintosh with Mac OS 8.1?
The world may never know.
Not About This Macintosh
4040-8/5 ch06.F 11/3/98 4:12 PM Page 309
310 Part I: System Software Revealed
■ ■
MACWORLD MAC SECRETS • 4040-8/X • Chapter 6 • Proof f • SH • 10/20/98 • p.310
MAC SECRETS • 4040-8/5 • ch.06.1 • Chapter 6 • Proof 1 • VB • 09/15/98 • p.310
The release of 7.5.2 caused a lot of confusion. Hordes of Mac owners heard
about 7.5.2 and scrambled to get what appeared to be another essential
upgrade — the vital System 7.5 Update, which had converted System 7.5 to
7.5.1, evidently was still fresh on everyone’s mind — only to discover that
this version of the System had absolutely nothing to offer most Mac owners.
MACINTOSH SECRET
When it really counts, Apple listens to its
customers.
For example, when System 7.5.1 appeared
without the famous System 7.5 secret game of
Breakout (or Pong), as described in an earlier
sidebar, Mac aficionados screamed bloody
murder. Fortunately, in System 7.5.2, Apple
came to its senses and put some fun back into
the secret architecture.
Once again, the trick is to type the words secret
about box into any Drag-and-Drop text program
(such as SimpleText or the Note Pad), highlight
those words, and drag them onto the Desktop.
The secret picture now revealed is that of
Apple’s Cupertino headquarters. The QuickTime
movie flag in the foreground reads, “iguana
iguana powersurgius.” (Power Surge was the
code name for the PCI-slot Mac models; the
secret movie is actually part of the ROMs in PCI
Macs and was included in the System 7.5.2
software on PowerBook 2300s and 5300s.)
By moving the mouse, you can change the
direction of the waving flag (move the mouse
downward to draw the flag “toward” you, up for
“away,” and left or right). In fact, you can make it
break off entirely, fluttering toward the ground
and off the screen. (Whip the flag right and left or
toward you and away; at just the right level of
violence, the flag will break off.) Even when the
flag is adrift, you can control its direction with the
mouse. Meanwhile, various inside jokes scroll by.
As though to prove themselves totally
apologetic for having interfered with our good,
clean secret-About-box fun of System 7.5,
Apple’s programmers even added secrets within
the secret About box. By pressing certain keys just
after you begin dragging the words secret about
box to your Desktop, you can make all kinds of
strange things happen in your little hidden world:
Press letter Pto see a picture of the design team,
with an iguana, on the flag. (With System 7.5.3
and later, pressing Pputs a picture of the Mac OS
logo on the flag.) Press letter Qto see a pink flag,
blank background, and a message that QuickTime
must be installed. Press letter Wfor a dialog box
that displays the current coordinates of the mouse.
Press letter Tfor a dialog box that identifies your
QuickTime frame rate (of the waving flag). Try
pressing P, Q, W, and Tin combination, too.
Despite the fact that this secret About box
couldn’t possibly remain a secret at Apple, the
Powers That Be were good enough to let this
gem remain — at least for a while. The great
Cupertino Iguana flag flapped proudly all the way
through System 7.6.1.
Apple’s second-best secret About box
4040-8/5 ch06.F 11/3/98 4:12 PM Page 310

Worse, the PowerBook and the PCI-Mac versions of 7.5.2 weren’t the same! To
the horrified bewilderment of everyone everywhere, it became apparent that
Apple had released two different, mutually incompatible operating systems
with the same name. The world held its breath until the universalized 7.5.3
made its debut.
System 7.5.2 also got some bad press because of the number of bugs and
quirks reported by users shortly after its release. Many users reported
problems establishing PPP or SLIP access to the Internet using 7.5.2’s Open
Transport networking scheme. Apple hastily churned out successive Open
Transport patches — Versions 1.0.6, 1.0.7, and 1.0.8—to deal with the problem.
Oddly enough, this specialized system also required a new model-specific
enabler and, in keeping with Apple’s well-established tradition of giving
enablers names that bear absolutely no relation to the Macs on which they
are required, this new file was dubbed System Enabler 701. (It gets worse; the
7200 and 9500 require Version 1.1 of System Enabler 701 version, while the
7500 and 8500 call for Version 1.2.)
Probably the best news about System 7.5.2 was that it increased the
maximum size of a volume that can be mounted on Mac from 4 gigabytes to 2
terabytes (the equivalent of 2,048 gigabytes), thus providing support for even
more massive storage devices.
System 7.5.3 (System 7.5 Update 2.0)
After the disastrous confusion caused by its preceding System 7.5-point-
something updates, Apple attempted to set the record straight in early 1996
with System 7.5.3. This was Apple’s effort to reset the counter and establish a
standard system supported by all current Mac models — no enablers needed.
System 7.5.3 incorporated all existing enablers and system-software updates
into a single package. Once again, several dozen little system bugs were fixed
and a number of system components were replaced with new versions. A new
QuickDraw 3D-capable version of SimpleText (1.3.1) appeared, and Monitors
& Sound replaced the Sound & Displays control panel on PCI Power Macs.
Apple took advantage of this update as an opportunity to clean up its
increasingly sloppy, sprawling, extension-ridden System Folder. The
numerous little patches and updates Apple had been cranking out to fix
specific problems in the months prior to the release of 7.5.3 were all merged
into the System 7.5.2 Update file or the System file itself. Files such as 7.5.2
Printing Fix, 040 VM Update, 630 SCSI Update, CFM Updater, EM Sound
Update, and Serial Update 406 were all eliminated. SCSI Manager 4.3 also was
incorporated into the System file and terminated as a standalone extension.
The Apple Multimedia Tuner became part of QuickTime 2.1.
But the new system was more than just a patch-up job; it introduced some
fascinating refinements to the Mac operating system. For example, on a
Power Mac running 7.5.3, when you drag an icon, it no longer turns into a
Strange
But True
Chapter 6: The System Software Museum 311
■ ■
MACWORLD MAC SECRETS • 4040-8/X • Chapter 6 • Proof f • SH • 10/20/98 • p.311
MAC SECRETS • 4040-8/5 • ch.06.1 • Chapter 6 • Proof 1 • VB • 09/15/98 • p.311
4040-8/5 ch06.F 11/3/98 4:12 PM Page 311

simple outline as you drag it. Now a translucent, ghosted version of the icon
remains visible as it is dragged across the screen—a fundamental change in
the Finder’s behavior. The Name field in the Finder’s list views got wider,
permitting you to read more of your long-titled files’ names.
System Update 2.0 also introduced Open Transport 1.1, Apple’s revamped
networking system software intended to replace the aging AppleTalk
networking scheme. This version of Open Transport worked with all 68030
and 68040 Macs, as well as with all the Power Macs except, oddly enough, the
5200, 5300, 6200, and 6300 series.
Realizing that this new networking software was likely to be incompatible
with plenty of existing programs, Apple tossed another odd little application
into 7.5.3 — the Network Software Selector. This tiny program served one
purpose — on non-PCI Macs, it let you choose between Open Transport and
classic AppleTalk. (See Chapter 5 for more on this peculiar little doodad.)
Another noteworthy change: Under 7.5.3, for the first time in Mac history, you
could rebuild the Desktop file without destroying any comments typed into a
file’s Get Info box. The new system also sped up Finder copying (eliminating
some of the advantage of copy-acceleration programs such as CopyDoubler).
The Memory control panel got smarter, too, automatically adjusting the
default value for the Mac’s disk cache based on the amount of physical RAM
installed. (The default is 32K for each meg of RAM, up to 4,096K.)
Finally, the new system introduced more components written in native PowerPC
code to speed up Power Mac models. The Resource Manager was rewritten in
native code, as was the software that controls the serial ports. Desktop Printing
software also was released in completely native PowerPC form.
Other 7.5.3 improvements included a new, faster version of Apple Guide
(Version 2.0); an improved, more reliable Apple Menu Options control panel;
and, at last, a version of the Control Strip for all Macs, not just PowerBooks.
System 7.5.3L
Virtually identical to System 7.5.3, this variation was created specifically for
Macintosh clones. Mac-compatibles from companies such as Power
Computing, UMAX, and Daystar all shipped with 7.5.3L systems.
System 7.5.3 Revision 2
In the months following the release of System 7.5.3, Apple released a couple of
minor patches and updates—items so minor they didn’t even earn a version
number. Within a short time, however, the bug reports came pouring in and it
became obvious that some larger updates were necessary to address problems
that were cropping up on PCI Power Macs and PowerPC-based PowerBooks.
312 Part I: System Software Revealed
■ ■
MACWORLD MAC SECRETS • 4040-8/X • Chapter 6 • Proof f • SH • 10/20/98 • p.312
MAC SECRETS • 4040-8/5 • ch.06.1 • Chapter 6 • Proof 1 • VB • 09/15/98 • p.312
4040-8/5 ch06.F 11/3/98 4:12 PM Page 312

Thus was born System 7.5.3. Revision 2 — the first of what Apple dubbed its
“rapid response updates” to address problems discovered between major
system releases. (The “2” was chosen, by the way, to reflect the fact that
earlier patches of 7.5.3 did exist, though there was never a Revision 1.)
Revision 2 was a two-disk upgrade released to fix a few select problems on
specific models — the PowerBook 5300 and Duo 2300 systems; any
PowerBooks (PowerPC or otherwise) running Connectix RAM Doubler; any
PowerBook 200 or 500 models that had been upgraded to PowerPC; and all
7200, 7500, 7600, 8500, and 9500 systems. Revision 2 didn’t do a thing on any
other models, except change the name of the operating system to “System
7.5.3 Updated to Revision 2” — yes, that’s the name of the system that
appears in the About This Macintosh box.
Apple distributed the update for free via the Internet. You could also buy the
update on floppy disks or CD-ROM direct from Apple for $13.
Unfortunately, this update resulted in even more confusion among thousands
of Mac users, who understandably mixed up System 7.5 Update 2.0 (which
installed System 7.5.3) with System 7.5.3 Revision 2. Macintosh experts and
columnists (such as your cheerful authors) had to refer to cheat-sheets to
claw their way through comprehending Apple’s system-software version
stew, praying that Apple would come to its senses and start getting its
version act together.
Still, Revision 2 did, at the very least, re-establish a standard system for
all Macs.
Chapter 6: The System Software Museum 313
■ ■
MACWORLD MAC SECRETS • 4040-8/X • Chapter 6 • Proof f • SH • 10/20/98 • p.313
MAC SECRETS • 4040-8/5 • ch.06.1 • Chapter 6 • Proof 1 • VB • 09/15/98 • p.313
ANSWER MAN
Q. What’s the difference between System 7.5.3
and System 7.5 Version 7.5.3?
A. Congratulations. You’ve just discovered that
Apple had two different names for exactly the
same system. Try to follow the logic here:
System 7.5 Version 7.5.3 is the name of the
software Apple sold to people who wanted to
upgrade to System 7.5.3 from a version of the
system prior to System 7.5. On the other hand,
System 7.5.3 is what actually appeared in the
About This Macintosh window of desktop Macs
that shipped with System 7.5.3.
Q. OK, so then how come, on my Mac, the
About This Macintosh window says I’m running
System 7.5.3 Revision 2. But on my friend’s
Mac, the About This Macintosh window says
he’s running System 7.5.3 Updated to Revision
2. Who’s got the newer system?
A. Again, they’re identical. The only difference:
Your Mac came with the revised version of
System 7.5.3 preinstalled, while your friend
upgraded his copy of System 7.5.3 using the
System 7.5.3 Revision 2 updater.
The many faces of System 7.5.3
4040-8/5 ch06.F 11/3/98 4:12 PM Page 313

System 7.5.3 Revision 2.1
Just when it seemed that Apple had again unified the operating system and
come up with a version that worked on all Macs, along came the Performa
6400 — a 200 MHz, PowerPC 603e-based minitower. The 6400 required a new
version of LocalTalk DMA in order to transfer files across a network properly,
and a video driver patch to fix a problem that occurred—get this—when the
computer went into sleep mode while connected to a 15-inch monitor. Apple
had no choice at this point but to release a revision of the revision of the
update to accommodate these tiny changes.
At any rate, the obscure System 7.5.3 Revision 2.1 was only for the Performa
6400/200 and 6400/180 — no other models were affected.
System 7.5.4
Apple planned to release System 7.5.4 in September 1996. Once again, the
objective was to create a standard, universal system that would work with
any Macintosh. Primarily, the new system was supposed to make PowerPC-
based PowerBooks and PCI Power Macs more stable and reliable. It was also
supposed to improve memory management and boost performance when
using virtual memory.
However, just after limited, prerelease distribution of System 7.5.4 began—
and literally just hours before the moment of the system’s official release — a
glaring bug was discovered that created problems with the 5400 and 6400
models. Apple frantically pulled System 7.5.4 from distribution and canceled
its release.
System 7.5.5
The day after System 7.5.4 was canned, Apple patched it up and released it
with a shiny new version number — 7.5.5. Apple recommended this update
for all System 7.5.3 users, but it didn’t contain any new features or interface
changes.
System 7.5.5 was largely about improving the stability of Power Macs and
PowerPC-based PowerBooks. For example, it eliminated one of the problems
that was causing newer Power Macs to lock up when accessing a hard disk. It
also improved the reliability of the higher performance Power Macs—those
with 604 or 604e chips that run at 180 MHz or faster — particularly when
formatting floppy disks.
For all models, System 7.5.5 made virtual memory work better, speeding up
the time it takes to launch big programs, switch between programs, and
switch between large documents within a program. (It also made virtual
memory more reliable when used over an Ethernet network.) On Power Macs,
the update improved memory management and supposedly eliminated at
least one cause of Type 11 errors.
314 Part I: System Software Revealed
■ ■
MACWORLD MAC SECRETS • 4040-8/X • Chapter 6 • Proof f • SH • 10/20/98 • p.314
MAC SECRETS • 4040-8/5 • ch.06.1 • Chapter 6 • Proof 1 • VB • 09/15/98 • p.314
4040-8/5 ch06.F 11/3/98 4:12 PM Page 314

The biggest news about 7.5.5 was that it allowed you to create a universal
System Folder — one that can start up any Mac, from the Mac Plus to the
latest model, which at that time was a Performa 6400.
This system represented a watershed of sorts for older models, too. It was
the last system Apple ever released that can run on Macs without built-in
32-bit addressing (see Chapter 9): the Mac Plus, SE, Classic, Portable,
PowerBook 100, original SE, SE/30, LC, II, IIx, and IIcx.
If you’re running any earlier version of System 7.5, the upgrade to System
7.5.5 is free. You can download the updater from Apple’s Web site.
Copland: The OS That Wasn’t
Even as System 7.5 began shipping in 1994, Apple was promising its
customers something better — much better. Within a year, Apple intended to
release its biggest and most dramatic rewrite of the Mac OS in history. Code-
named Copland, this version of the Mac’s system software would be designed
exclusively for the Power Macintosh, with almost every key component
written in native PowerPC code. Copland was to take a new approach to
memory management and multitasking that would let your Mac perform
several functions simultaneously without running into memory problems.
However, it soon became obvious that Apple’s engineers had bitten off more
than they could chew. Copland’s release date was repeatedly pushed back,
first to the end of 1995, then to the middle of 1996, then to the end of 1996,
and eventually to the end of 1997. In the meantime, Apple started calling this
still-nonexistent operating system by its official name — Mac OS 8 (no
relation to what you think of as Mac OS 8—read on).
With millions of customers growing impatient for the benefits of a more
modern operating system, Apple finally got radical: it canceled the Copland
project. Instead, Apple decided to purchase an existing OS—the Next OS, as
you’ll find out later in this chapter — and refashion it into an all-new
operating system called Rhapsody.
Chapter 6: The System Software Museum 315
■ ■
MACWORLD MAC SECRETS • 4040-8/X • Chapter 6 • Proof f • SH • 10/20/98 • p.315
MAC SECRETS • 4040-8/5 • ch.06.1 • Chapter 6 • Proof 1 • VB • 09/15/98 • p.315
TRUE FACT
By the time you read this, Apple will undoubtedly
have released system upgrades, updates,
patches, and revisions that aren’t listed here. If
you want to get your hands on the latest system
software updates — or any of the older operating
systems, patches, and updates described in this
chapter — you can get them for free over the
Internet at http://www.support.apple.com
or http://www.info.apple.com. (See
Chapter 25 for more about downloading software
over the Internet.)
Reach out and upgrade someone
4040-8/5 ch06.F 11/3/98 4:12 PM Page 315

In the meantime, however, Apple promised to continue developing the System
7 family in a series of incremental upgrades, six months apart, each with a few
of the features originally promised to arrive in Copland. These semi-annual OS
revisions were code-named Harmony (now System 7.6), Tempo (now Mac OS
8), Bride of Buster (now Mac OS 8.1), and Allegro (now Mac OS 8.5). At least
one more as-yet-unnamed upgrade is scheduled for 1999.
System 7.6
The first of these incremental releases, code-named Harmony, finally arrived
in January 1997 — officially called System 7.6. To the disappointment of many,
this release didn’t include any Copland-derived features. However, System 7.6
did offer a dramatic leap forward in speed and stability—which are big
features indeed, in our book (and it is our book). System 7.6 Macs start up
much faster than Macs running previous system versions—extension
startup icons seem to fly by — and programs launch more quickly, too.
More than anything else, System 7.6 was an enormous multi-megabyte
compilation of previously released software, including the latest LaserWriter
8.4 drivers, America Online 3, QuickTime 2.5, QuickDraw 3D, Open Transport
1.2.1, Open Doc 1.1, Cyberdog, Apple Telecom 3.0 software, PlainTalk 1.5,
Text-to-Speech 1.4.1, Apple Remote Access 2.1 Client, and PC Compatibility
Setup 1.5 (for Macs with DOS cards).
In addition, System 7.6 offers behind-the-scenes OS support for
multiprocessor Mac models, such as the “MP” models from Apple, Daystar,
UMAX, and others.
But we’re not saying this OS version offered no new features; just no dramatic
ones. For example, this OS version came with a newer, more sophisticated
Extensions Manager (see Chapter 4) and a smarter Installer that walks you
through the safety checks you were previously told about only in Read Me
files: running Disk First Aid, updating your hard drive driver, and so on. You
also got a new Speech 1.5 control panel that you can configure to speak the
messages displayed in dialog boxes after a moment or two — in case you’ve
dozed off, we suppose. You can have it preface the contents of the error
message with any of several hilarious attention-getting utterances, like
“Yeow!” or “Blast!” or, our personal favorite, “It’s not my fault!”
Our one and only System 7.6 secret: In previous System versions, you could
press Ô-Shift-3 to take a full-screen snapshot, producing a PICT graphics file.
Beginning in this OS version, however, you can press any of the other screen-
grabbing keystrokes (such as Ô-Shift-4) listed at the end of Chapter 2.
System 7.6.1
This little update came along just a few months after System 7.6, to squash
bugs and replace a couple of components that needed updating to maintain
compatibility with current hardware. The 7.6.1 Update fixed some embarrassing
316 Part I: System Software Revealed
■ ■
MACWORLD MAC SECRETS • 4040-8/X • Chapter 6 • Proof f • SH • 10/20/98 • p.316
MAC SECRETS • 4040-8/5 • ch.06.1 • Chapter 6 • Proof 1 • VB • 09/15/98 • p.316
4040-8/5 ch06.F 11/3/98 4:12 PM Page 316

little glitches, such as the fact that on a PowerBook 1400, the brightness and
contrast controls somehow ended up working in reverse under System 7.6
(pushing the + button made the screen darker). The update also improved some
error handling, improved reliability when playing back large QuickTime movies,
fixed infrared problems on PowerBook 1400s and 3400s, sped up printing on
5400- and 6400-series desktop models, and tossed in new versions of Apple
System Profiler, AppleVision monitor software, and the Apple Video Player.
Among other things, the 7.6.1 Update eliminated the need for a host of
obscure patch files Apple had distributed as temporary remedies for 7.6-
related incompatibilities. Gone from the System folder were 54xx/64xx
Update, 7.5.5 SCSI Server, Assistant Toolbox, PCI Network Legacy, PowerBook
1400 ATA, PowerBook 1400 PMU Updater, PowerBook VM Tuner for OS 7.6,
PowerMac Format Patch, and PowerPC Interrupt Extension.
Overall, the 7.6.1 wasn’t big news, but it did indeed provide greater stability
on some newer PowerBooks and desktop Macs.
Chapter 6: The System Software Museum 317
■ ■
MACWORLD MAC SECRETS • 4040-8/X • Chapter 6 • Proof f • SH • 10/20/98 • p.317
MAC SECRETS • 4040-8/5 • ch.06.1 • Chapter 6 • Proof 1 • VB • 09/15/98 • p.317
MACINTOSH SECRET
System 7.6 was a stable, solid upgrade that
didn’t pack many surprises—except for one that
certainly ranks as one of the most mysterious
hidden Mac OS oddities of all time. It’s not
dramatic, it’s not profound — it’s just weird.
Here’s how it works: A Mac running System 7.6
crashes. During restart, without warning, the
Mac displays the following cryptic message
instead of the usual Mac OS splash screen:
“Bluets and Granola Bars.” Desperate, you look
up bluets. You learn that they’re a kind of
mountain wildflowers. Now what?
The message is stored away deep inside the
System file’s DSAT 0 resource (which you can
peek at using ResEdit—see Chapter 21) along
with a second line: “make a chewy snack.”
The whole thing is sort of cute — until you realize
that your Mac won’t start up successfully once
the Granola Bars have made their appearance!
Of course, these little messages were probably
intended to be part of an Easter egg — a
surprise feature that only manifests itself when
certain keys are pressed or certain spots on the
screen are clicked.
But the so-called “bluets and granola bars” Easter
egg has proved particularly elusive, however.
Nobody really knows how to make it appear. In
fact, you can’t make it happen at all. It simply
shows up, unexpectedly and unannounced, at the
oddest times, as if by accident. Is this an Easter
egg that never got fully hooked up, or is it just so
subtle and elusive that no one’s been able to
figure out what exactly triggers it?
At any rate, it’s not hard to fix a Mac that’s
been corrupted by the bluets-and-granola-bar
phenomenon. Just start up from another disk
(such as the Disk Tools disk or System Software
CD that came with your Mac) and perform a
clean install (see Chapter 36). Or upgrade to
Mac OS 8 or later.
If you happen to witness this elusive secret,
consider yourself lucky (once you get your Mac
running again, that is) to be among the privileged
few who actually saw it with your own eyes.
Bluets, granola, and System 7.6
4040-8/5 ch06.F 11/3/98 4:12 PM Page 317

Mac OS 8
The first real Copland goodies to hit Mac fans’ hard drives were postponed
until the summer of 1997, in the biannual OS update called Mac OS 8. (This
version was code-named Tempo; was originally going to be called System 7.7;
and was finally renamed Mac OS 8, to the confusion of Apple-watchers who
thought that Copland was going to be OS 8.)
Mac OS 8 was big news. Not since the introduction of System 7 more than six
years earlier had the Mac’s system software been given such a substantial
overhaul. Indeed, recent system updates such as 7.5.5, 7.6, and 7.6.1 had been
disappointing to Mac users who had been waiting for years to see a new OS
that offered more than just a handful of upgraded system components or
some subtle speedups.
Mac OS 8, finally, delivered. First, this $99 system upgrade introduced a whole
new Macintosh look, filled with 3-D surfaces, a new font to replace Chicago,
and a new standard folder icon. Giving the Mac a new visual look was a
shrewd move on Apple’s part; if you ask us, the geeks can talk about multi-
threading and multi-whatever until they’re blue in the face, but the press and
the public will be more impressed by a snazzy exterior any day. (Overall, of
course, this look had been available to Mac fans for over a year, via the
shareware program called Aaron. Still, it’s modern, clean-looking, and built-in.)
Found: new Finder
But possibly the best feature of Mac OS 8 was the new Finder (Version 8.0),
which was completely written in native PowerPC code. Finally, with all that
old non-native code stripped out, the Finder could run like a real PowerPC
program instead of slogging behind at Quadra speeds.
Finder 8 was not only extremely fast, but also multi-threaded — it could
really, truly do two things at once. You could get several things copying
simultaneously (farewell, Speed Copy and CopyDoubler!) — and then launch
a program as the copy continues, without any loss in speed. And while the
multiple copying was going on, the Finder gave you something to read:
details about how fast the copy is proceeding, time remaining, file names
being copied, and so on.
U-Design-It
Mac OS 8 also took the concept of customizing your Mac’s look far beyond
creating your own Desktop pattern. Using the new Appearance control panel,
you could choose a color for the interface “accents” — scroll-bar “elevator”
boxes and the progress bar you see when you copy files. The Appearance
control panel also let you change, for the first time in Mac history, the font
used for menus and dialog boxes; goodbye, Chicago, goodbye. This control
panel also incorporated the old WindowShade control panel. The new
OS
8
Strange
But True
318 Part I: System Software Revealed
■ ■
MACWORLD MAC SECRETS • 4040-8/X • Chapter 6 • Proof f • SH • 10/20/98 • p.318
MAC SECRETS • 4040-8/5 • ch.06.1 • Chapter 6 • Proof 1 • VB • 09/15/98 • p.318
4040-8/5 ch06.F 11/3/98 4:12 PM Page 318

Desktop Pictures control panel let you fill your desktop with not just a
repeating pattern, but even a full-screen PICT or JPEG file if you wish.
Apple’s overhaul of the Finder went beyond pure looks. Spring-loaded folders,
which pop open automatically when you drag a folder on top of them, made
their debut, as did the new Finder Preferences command in the View. Other
major changes that arrived with Mac OS 8 included menus that stay open
when you click them; sortable icon views that can stay sorted, even if you add
or remove icons from the window; collapsible “pop-up” windows that can be
dragged to the bottom of the screen, where they become small button-like
tabs; and contextual pop-up menus that you can invoke by Control-clicking
icons or the desktop. (See Chapters 1 and 2 for much more on all this.)
Other refinements showed up in the Finder menu. The question-mark menu
in the upper-right corner of the screen, also known as the Guide menu, also
known as the Balloon Help menu, was finally given a name, to the relief of
telephone tech-support personnel everywhere. Starting with Mac OS 8, it was
called the Help menu, and it was moved just to the right of the Special menu.
Even the subtler changes of Mac OS 8 were smart and elegant. This was also
the first Mac OS to offer “live” scrolling in Finder windows, so that when you
drag the little square “elevator box” of the scroll bars, the window’s contents
shift in real time, smoothly and responsively. Mac OS 8 also brought faster
desktop rebuilding; a new Color Picker; a single, revamped File Sharing
control panel (to replace Sharing Setup and File Sharing Monitor control
panels); two new File menu commands: Move to Trash and Reveal Original
(for use with aliases and preference files), each with a keyboard equivalent;
and a faster, more powerful Apple Guide.
Evidently, Mac enthusiasts were hungrier for a faster, sleeker, more elegant
operating system than Apple realized; Mac OS 8 turned out to be one of
Apple’s most successful system releases ever, breaking all sales projections,
with more than 1.2 million copies sold in the first two weeks of its release.
Mac OS 8.1
The next incremental Mac OS upgrade—free to owners of Mac OS 8.0 — came
along at the beginning of 1998. Mac OS 8.1, code-named Bride of Buster, wasn’t
nearly such a dramatic makeover as Mac OS 8. It left the Mac interface mostly
unchanged, but it did fix a load of bugs, and introduced updated versions of a
number of important system components, including new printing software
(LaserWriter 8.5.1) and more reliable networking software (Open Transport 1.3).
The biggest news about Mac OS 8.1 was its optional new Macintosh disk format
called HFS+, or the Mac OS Extended Format. For the full Mac OS Extended
scoop, see Chapter 8. For now, it’s enough to say the this new disk format uses
an improved filing system that makes far more efficient use of disk space,
dramatically increasing the number of files that can fit on your hard drive.
Chapter 6: The System Software Museum 319
■ ■
MACWORLD MAC SECRETS • 4040-8/X • Chapter 6 • Proof f • SH • 10/20/98 • p.319
MAC SECRETS • 4040-8/5 • ch.06.1 • Chapter 6 • Proof 1 • VB • 09/15/98 • p.319
4040-8/5 ch06.F 11/3/98 4:12 PM Page 319

320 Part I: System Software Revealed
■ ■
MACWORLD MAC SECRETS • 4040-8/X • Chapter 6 • Proof f • SH • 10/20/98 • p.320
MAC SECRETS • 4040-8/5 • ch.06.1 • Chapter 6 • Proof 1 • VB • 09/15/98 • p.320
MACINTOSH SECRET
As you probably know, buying a program is
more like subscribing to something than owning
it; every year, you get some brochure in the mail
cheerfully pointing out that the version you
bought is now obsolete. Upgrading Macintosh
software is an art unto itself — not nearly the
all-weekend nightmare it is on other computers,
but still a project.
Most companies, including Apple, label their
software updates according to this scheme:
Double-decimal-point upgrades: The Double-
Decimal-Point Upgrade is when a company
updates the software in such a minor way that the
program’s number changes from, say, Version
1.5.1 to Version 1.5.2. (Don’t ask us why the
second decimal point is even necessary.) Such a
tiny tweak in the number generally signifies that
the new version offers no new features. Instead,
it’s only a cleaned-up (less bug-ridden) version, or
it’s just been updated to be compatible with some
new Mac model or new System-software update.
Certain kinds of software are especially
susceptible to frequent tiny updates of this kind:
fax software (especially Global Village), screen-
saver software (especially After Dark), virus
software, and other enhancements (especially
ATM, RAM Doubler, and Speed Doubler).
Fortunately, a Double-Decimal Upgrade is almost
always free. In fact, it’s almost always available
for free electronically — you can download a
little updater program from America Online or the
Internet. After this updater whirs and clanks for a
moment, you wind up with a single, updated
version of the program in question. Documents
you’ve created (for example, ClarisWorks files)
aren’t affected by a Double-Decimal Upgrade.
The software companies, unfortunately,
generally don’t tell you when they release these
tiny upgrades. They might not even change the
version number. For example, ClarisWorks 4.0
was silently updated several times — “4.0v2,”
“4.0v3,” and so on — and the only way you’d
know that a newer version exists would be by
calling the company. Microsoft, Intuit, and other
companies operate similarly.
Therefore, your sources of info are Mac
magazines and newsletters, user groups, and
online gossip.
Major upgrades: Then there are the meatier
upgrades, where the number immediately to the
left or right of the decimal point changes (from
3.3 to 3.4, for example, or from 3.0 to 4.0). You
generally have to pay for these, and the
program’s document format may change.
Unfortunately, “downgrades” are becoming
increasingly common; the new versions of some
programs are so huge, bloated, and sluggish
that they’re not worth getting (see Word 6, for
example).
System-software upgrades: In many ways,
upgrading your Mac’s System Folder is much
like upgrading any other software. As with other
software, finding out that such updates are
available isn’t necessarily easy, although Mac
magazines always have articles about this kind
of thing.
Apple’s system updates generally give your Mac
better speed, fewer crashes, and a couple of juicy
new features. Unfortunately, these updates
sometimes also mean that all your other
programs may need updating to work with the
new System software. The software you need to
worry about mostly are the extensions and
control panels: RAM Doubler, Speed Doubler, fax
software, After Dark, ATM, virus checkers, printer
drivers (Chooser icons), and programs of their ilk.
The ultimate guide to upgrading software
4040-8/5 ch06.F 11/3/98 4:12 PM Page 320

Other changes in Mac OS 8.1 included an improved version of PC Exchange
that supports Windows 95’s long file names and both Zip and Jaz disks
formatted for PCs; support for the Universal Disk Format used on some DVD-
ROMs (see Chapter 32); better virtual memory and memory caching; and a
bunch of updated system components. 8.1 also introduced the tiny “pyramid”
button above the vertical scroll bar in each Finder list-view window. Clicking
it lets you reverse the sorting order of what’s in that window.
Mac OS 8.5
Another monumental upgrade, Mac OS 8.5 (code-named Allegro) arrived in
the fall of 1998. While retaining the overall look and structure of Mac OS 8.0,
this new system offered dozens of new features, including PowerPC-native
QuickDraw and AppleScript for much better speed. The enhancements rolled
into Mac OS 8.5 were numerous—and are detailed throughout this book,
especially in the first three chapters.
Good looks, good speed
Aesthetically speaking, Mac OS 8.5 brought further refinements, with system-
wide antialiased text; new, graduated-fill icons; translucent icon names; and
an improved fit and finish that Windows users have to envy. List views are
totally customizable, letting you rearrange and resize columns. The enhanced
Appearance control panel lets you change the look, fonts, and sounds of
Finder windows, icons, and menus.
Other changes that made their appearance in Mac OS 8.5: Faster file copying
and improved networking; a much better, tear-offable Application menu (see
Chapter 2) that makes it easier to tell which programs you’re running and
switch between them; a super-charged Find command that lets you quickly
search files on your hard drive by content, or even extend a search to the
Internet (Chapter 3); centralized Internet setup through a new Internet
control panel (Chapter 4); a new Disk First Aid that lets you repair a disk even
if it’s your start-up volume (Chapter 8); a new Date & Time control panel that
automatically adjusts for Daylight Savings Time (and can dial the Internet to
learn the exact correct time); and a new Control Strip that lets you install
modules by dragging them right to the strip itself (Chapter 4).
Apple also overhauled its Apple Guide help mechanism, switching to an
HTML-based system that makes it easier for software companies to write
online help systems.
Mac OS 8.5 is pretty much good news all around—but not for users of older,
68K Macs. This is the first system upgrade in Apple history that requires, at a
minimum, a Mac with a PowerPC chip. Otherwise, though, 8.5 is an
impressive reworking of the Mac OS that shows Apple is pressing forward
with the process of metamorphosing the aging Mac OS into a powerful,
modern operating system.
OS
8.5
Chapter 6: The System Software Museum 321
■ ■
MACWORLD MAC SECRETS • 4040-8/X • Chapter 6 • Proof f • SH • 10/20/98 • p.321
MAC SECRETS • 4040-8/5 • ch.06.1 • Chapter 6 • Proof 1 • VB • 09/15/98 • p.321
4040-8/5 ch06.F 11/3/98 4:13 PM Page 321

Rhapsody and Next
Even as Apple continued to update and refine Mac OS 8, engineers were
feverishly working behind the scenes on a completely new operating system—
one that would eventually deliver the key features originally promised as a part
of Copland. Rather than build such an operating system from scratch, Apple
eventually decided to buy one. After rejecting one possible candidate, the Be
OS, as fledgling, incomplete “demoware” (as one Apple buddy of ours called it),
Apple paid $400 million in December 1996 to acquire NeXT Software. NeXT
happened to be owned by Apple’s founder and former chairman, Steve Jobs
(who began serving as Apple’s acting CEO several months after the acquisition).
Apple originally announced that the next major Mac OS — code-named
Rhapsody — would arrive in 1998, based on NeXT’s highly stable OpenStep
operating system. What made OpenStep so appealing was that it offered some
vital technologies that everyone had been waiting for years to see in Copland:
■Protected memory: The OS allows each program to access and
manipulate only the specific chunk of RAM allocated to it; any other
available memory — the RAM being used by the system itself, for
example — is protected. By strictly protecting each program’s memory
allocation, the OS makes it less likely that the crash of one program will
bring down the entire system.
322 Part I: System Software Revealed
■ ■
MACWORLD MAC SECRETS • 4040-8/X • Chapter 6 • Proof f • SH • 10/20/98 • p.322
MAC SECRETS • 4040-8/5 • ch.06.1 • Chapter 6 • Proof 1 • VB • 09/15/98 • p.322
MACINTOSH SECRET
It’s not your imagination — the Mac OS and
Windows 98 are looking more and more alike.
But it’s no longer because Microsoft is
desperately trying to imitate the Mac’s polished,
graphical interface. More and more, Apple’s
designers are adopting the look, feel — and
even the terminology — of Windows. It’s the
Microsoftization of Apple — and it’s got die-hard
Mac fans spooked.
Is this what Steve Jobs and Bill Gates had in
mind in August 1997 when they announced a
“technology development agreement” between
Apple and Microsoft? Consider some of the
clearly Microsoft-derived components that
showed up in Mac OS 8.5:
Alias icons now sport a tiny, curly arrow logo, just
like Windows’ “shortcuts.” The Network Browser
(see Chapter 3) bears a striking resemblance to
Windows’ Network Neighborhood. The Finder
now has a folder called Favorites and a command
called Add to Favorites— both borrowed directly
from Windows.
Meanwhile, Internet Explorer is the default Web
browser; QuickTime movies are configured to
open in Explorer; and the default e-mail program
isn’t Apple’s own home-grown Emailer (inherited
from Claris) but Microsoft Outlook Express.
Mac vs. Windows? In a few more years, it may
be hard to tell which is which.
The Microsoft Invasion
4040-8/5 ch06.F 11/3/98 4:13 PM Page 322

■Preemptive multitasking: Suppose you have several programs running
on your Mac simultaneously. Ordinarily, each program tries to grab
whatever CPU processing cycles and memory it can to carry out its
tasks. The resulting conflicts are generally what cause those “application
unexpectedly quit” messages. The new system architecture prohibits
programs from competing with each other for resources, however, by
preempting the requests of each individual program. It systematically
controls the switching between tasks that require attention and stands
between applications that would otherwise be grabbing for the same
resources at the same time.
There was only one catch: The version of OpenStep that Apple purchased didn’t
run on the PowerPC chip, and it was going to take a year or more to complete a
PowerPC-compatible operating system based on OpenStep. That’s why Apple
decided to continue upgrading its current OS every six months while
simultaneously developing Rhapsody—to satisfy the Mac faithful’s hunger for a
new OS for a couple of years until Rhapsody was ready for prime time.
Apple pushed ahead with this dual-OS development plan for a while, unveiling
Developer Release 1 of Rhapsody in October 1997 and Developer Release 2 in
May 1998. But then, once again, Apple announced a shift in its OS plans.
Suddenly, Rhapsody was not going to be the all-new OS that would universally
replace the outdated Mac operating system. Instead, Rhapsody would be
developed only as a specialized OS to be used on file servers and in high-end
publishing and media production environments. Apple announced that its fall
1998 Rhapsody 1.0 version would be the end of the line for that OS.
Why this dramatic switch? Most Mac software companies weren’t thrilled
about the Rhapsody plan. The problem was that to tap into all the benefits of
the Rhapsody OS, developers would have to rewrite their programs from
scratch — not an enticing proposition. With few developers willing to jump on
the Rhapsody bandwagon, it became clear that Apple had to adopt a new
approach—one that would allow for a modern new Mac OS, but wouldn’t
alienate developers who had already poured millions of dollars into creating
standard Mac OS software.
Carbon and Mac OS X
Steve Jobs announced the solution in May 1998 — a completely new system
that will fuse together portions of the existing Mac OS with the core elements
of Rhapsody. The new system will be called Mac OS X (pronounce it “Mac OS
ten,” not “Mac OS ex”).
By updating some of the existing Mac OS code and then adding a new
software architecture (called Carbon) that allows developers to plug easily
into the OS’s new Rhapsody-based features, Apple will at last be able to offer
an operating system that supports most existing Mac software, while also
delivering the modern OS features that made Rhapsody attractive. Carbon—
a cleaned-up version of the Macintosh Toolbox routines familiar to
Chapter 6: The System Software Museum 323
■ ■
MACWORLD MAC SECRETS • 4040-8/X • Chapter 6 • Proof f • SH • 10/20/98 • p.323
MAC SECRETS • 4040-8/5 • ch.06.1 • Chapter 6 • Proof 1 • VB • 09/15/98 • p.323
4040-8/5 ch06.F 11/3/98 4:13 PM Page 323

programmers— provides a set of application programming interfaces (APIs)
that make it easy for engineers to adapt current Mac programs to run under
both Mac OS 8.x and Mac OS X. That’s the theory, anyway.
Software companies still have to rewrite their Mac software to benefit from
Mac OS X’s advanced features — just not completely. Apple has estimated
that most Mac programs are 90 percent compatible with the Carbon-based
architecture that will be used in Mac OS X. In other words, with just a
minimal amount of recoding, software companies will be able to release Mac
OS X versions of their programs.
The bottom line: by the year 2000, your Mac situation may fall into one of
three categories:
■You’re running (new) Mac OS X programs in (old) Mac OS 8. With the
installation of a Carbon compatibility extension, you’ll supposedly be
able to run both the programs you’re running today and programs that
have been rewritten for Mac OS X. Of course, you won’t get any of the
speed or features of Mac OS X (such as protected memory).
■You’re running (old) Mac OS 8 programs in (new) Mac OS X. Apple says
that if you can run a program today under Mac OS 8-point-whatever,
you’ll be able to run it under Mac OS X — but, again, without the benefits
of Mac OS X. When one of these older programs crashes, all your older
programs will crash— but if you’re also running newer Mac OS X
programs at that moment, they’ll remain alive. And because the OS itself
is a Mac OS X program, you won’t have to restart the Mac.
■You’re running (new) Mac OS X programs in (new) Mac OS X. The best
of all possible Mac worlds. Programs run fast and launch fast, because all
of the old bottlenecks have been stripped out of the system software.
When a program crashes, the dialog box says: “The application has quit.
You do not need to restart the computer.”
Mac OS X will look and feel like Mac OS 8.5, and it will be written in native
PowerPC code, optimized to run on G3 and later PowerPC chips. With
protected memory, preemptive multitasking, a more sophisticated, self-
adjusting virtual memory system, and, of course, blazing speed, Mac OS X
should represent a huge step forward in the evolution of the Mac OS.
All of this isn’t going to happen overnight. Programmers won’t get their first
hands-on opportunity to work with Mac OS X until early 1999, and the
operating system probably won’t be available to the public until the dawn of
2000. In the meantime, Apple will forge ahead with at least two more updates
of the existing Mac OS, culminating with the release of Mac OS 9 (code-named
Sonata) at about the same time Mac OS X nears completion.
Our take on all this: It was confusing for awhile, but now Apple seems to be
on a solid track. The OS updates have been on time and a joy to use, and the
early prototypes of Rhapsody indicate even more exciting things to come as
its key features are rolled into the Mac OS itself. We have no doubt whatever
that if Apple can finally stick to an OS strategy, the final release of Mac OS X
will make Windows 98 look like System 6—even more than it does today.
324 Part I: System Software Revealed
■ ■
MACWORLD MAC SECRETS • 4040-8/X • Chapter 6 • Proof f • SH • 10/20/98 • p.324
MAC SECRETS • 4040-8/5 • ch.06.1 • Chapter 6 • Proof 1 • VB • 09/15/98 • p.324
4040-8/5 ch06.F 11/3/98 4:13 PM Page 324

Performa System-Software Annex
The Performa line of Macs, discontinued in 1997, differed from their
mainstream counterparts primarily in their system software. There was
never as much black magic to these special “P” system versions as most
people thought — the “P” versions ran on mainstream Macs, just as non-P
versions run on Performas.
Today, of course, there’s no longer any differentiation between Performa
system software and mainstream Mac System Folders. That’s why we’ve
removed our comprehensive Performa System Software Annex from this
chapter; there’s simply no such thing as a Performa operating system anymore.
If, for some reason, you still need to know the difference between System 7.1P3
and System 7.1P4, consult Chapter 6 in the electronic edition of Macworld Mac
Secrets, 4th Edition (on the CD-ROM that comes with this book).
Chapter 6: The System Software Museum 325
■ ■
MACWORLD MAC SECRETS • 4040-8/X • Chapter 6 • Proof f • SH • 10/20/98 • p.325
MAC SECRETS • 4040-8/5 • ch.06.1 • Chapter 6 • Proof 1 • VB • 09/15/98 • p.325
4040-8/5 ch06.F 11/3/98 4:13 PM Page 325
MACWORLD MAC SECRETS • 4040-8/X • Chapter 6 • Proof f • SH • 10/20/98 • p.326
MAC SECRETS • 4040-8/5 • ch.06.1 • Chapter 6 • Proof 1 • VB • 09/15/98 • p.326
4040-8/5 ch06.F 11/3/98 4:13 PM Page 326

Macworld MAC SECRETS, 5th edition • 4040-8/5 • ch07.F • Chapter 7 • Final • CP/EAP • 10/15/98 • p.329
Macworld MAC SECRETS, 5th edition • 4040-8/5 • ch07.1 • Chapter 7 • Proof 1 • VB • 08/18/98 • p.329
Chapter 7
On, Off, and Everything
in Between
In This Chapter
©What happens when you press the power key
©The startup sequence: the ROMs, the System file, loading extensions
©The complete list of startup keystrokes and what they do
©What happens when you shut down
©The inside story on the Reset and Interrupt switches
©Sleep modes
Power On
Hundreds of design elements are consistent from one Mac model to the
next — but the method of turning them on isn’t one of them. Your Mac’s
power switch may be (a) a rocker switch on the back panel (as on one-piece
Macs and LCs); (b) a round nubby button on the front panel (as on 610- and
6100-shaped models); or (c) a half-inch long, capsule-shaped button on the
top surface (as on a PowerBook Duo). Fortunately, all Macs manufactured
these days turn on and off with option (d), the power key at the upper-right
corner of the keyboard.
The ADB Bus
The term bus, as it applies to the Mac, makes much more sense if you imagine
the stream of electricity that courses through the computer’s veins. It
streams along specific pathways — wires and circuits — much like, well, a bus
route in a very congested city. Along the way, this stream of electricity makes
regularly scheduled stops, checking to see if there’s any new information to
pick up (see Figure 7-1).
4040-8/5 ch07.F 11/3/98 4:06 PM Page 329
Figure 7-1: A bus map for your computer, showing all regularly scheduled stops to pick up
and discharge messages: the keyboard jack (have you typed anything?), the mouse plug (are
you clicking?), and, eventually, the Grand Central Station of the Mac — the Motorola central
processor chip (CPU) that serves as your computer’s actual brain.
The term Apple Desktop Bus (ADB) or Universal Serial Bus (USB) is the official
name for one particular loop of the bus route: the one that includes the
keyboard and mouse. You can read about these loops of circuitry in Chapter
10; for now, note that it’s this circuit that’s constantly on the alert for a press
of your power key to turn on the Mac.
How to turn on the Mac
when there’s no keyboard
If you turn on your computer by pressing your keyboard’s power-on key, it’s
useful to know about the alternative method (for when you have a broken or
missing keyboard, for example). On most Mac models, the alternate power
switch is the small, round, slotted button in back of the computer. It’s about
the size of a pea, usually in the lower-left corner of the back panel as you look
at it. On some models (such as the tower-style Quadras, the 630-series, and
early Power Macs), it’s at the top left — and on recent Power Macs and
clones, it’s on the front panel. On PowerBooks, there’s usually a bizarre-
looking plastic button that looks like a dash ( — ) on the back panel.
In a pinch, such as when the system has crashed, you can turn the Mac off
using this button.
Mac Basics
ROM chips
Memory (RAM) sockets
Printer and modem ports
PCI or NuBus slots
Disk drive
Keyboard and mouse
CPU
330 Part II: Secrets of the Machine
■■
Macworld MAC SECRETS, 5th edition • 4040-8/5 • ch07.F • Chapter 7 • Final • CP/EAP • 10/15/98 • p.330
Macworld MAC SECRETS, 5th edition • 4040-8/5 • ch07.1 • Chapter 7 • Proof 1 • VB • 08/18/98 • p.330
4040-8/5 ch07.F 11/3/98 4:06 PM Page 330
The Startup Sequence
All right, juice is flowing. You hear the startup chime (see Figure 7-2).
Figure 7-2: From left to right: The Quadras and PowerBooks play the breathy C-chord sound.
The Mac II startup sound is an open fifth: F and C. The AV Macs start up with a majestic G
chord. Interestingly, these three startup chords, played in sequence, form the harmonies for
“La Bamba.”
The startup chimes
Over the years, Apple has waged various internal wars over the sound of the
startup chime. (You can hear all of them — we’ve included them on the
CD-ROM with this book.) Join us now for a countdown of the greatest startup
hits through the years...
■The one-note ding — In the beginning, there was the single ding (a D,
a ninth above middle C). This was the welcome to the original Mac, the
Mac 512K, the Plus, SE, and Classic. Not much oomph, but unmistakably
different from what had come before.
■The hollow fifth — Then came the Portable, SE/30, Classic II, and
Macintosh II family, accompanied by a two-note “chord” — an open fifth,
F and C. Still rather hollow sounding, but at least it’s harmony.
■The breathy chiff — The second-inversion C chord played by a breathy
synthesizer was a big hit; Apple used it to start up the Color Classic, IIvx,
IIvi, LC family, most Quadras, and most three-digit PowerBook models.
■The grand G triad — With the Quadra AV series, Apple’s sound
technicians unveiled what would become the most important startup
chime of all: a rather grand-sounding, root-position G triad played on a
synthesizer. This sound may also be heard on all post-1996 PowerBook
models, plus all Power Macs (7200, 75/7600, 85/8600, 9600, and so on)
after the original three models. Most of Power Computing’s clones use
this sound; Apple’s G3 models use an F-major variant.
■The fancy guitar chord — Apple wanted its Power Macintosh series
(the 6100, 7100, and 8100 models) to make a statement. Giddy with the
musical possibilities, Apple went wild with the complex E V11 chord,
strummed as a harmonic on a jazz guitar.
Chapter 7: On, Off, and Everything in Between 331
■ ■
Macworld MAC SECRETS, 5th edition • 4040-8/5 • ch07.F • Chapter 7 • Final • CP/EAP • 10/15/98 • p.331
Macworld MAC SECRETS, 5th edition • 4040-8/5 • ch07.1 • Chapter 7 • Proof 1 • VB • 08/18/98 • p.331
4040-8/5 ch07.F 11/3/98 4:06 PM Page 331

■The grizzly D fifth — Only two models came with this quickly-abandoned,
mournful-sounding open fifth — D and A: the 6200 and 6300 Performas
(plus the Power Macintosh upgrade card).
■The grand F triad — 1998’s PowerBook G3 Series introduced this lower-
pitched variation of the classic grand G chord. Let’s get this straight: it’s
called the PowerBook G3 — but its startup chime is an F triad? Where’s
the logic?
ROM: the hidden software
In any case, you may have wondered: What the heck takes so long for the
computer to come to life?
The answer is that the Mac is busily running programs without your even
knowing about it. These programs are normal Mac software, but they’re not
sold in any store, and they don’t come on any disks. They come “hardwired”
into the permanent silicon memory of your Mac — the ROM chips.
ROM stands for read-only memory; the implication is that you, O user, may
not store (write) anything in this kind of memory. It’s read-only.
Every Mac has ROM chips. (The iMac is a special case — see Chapter 13.)
Indeed, the ROM chips are what make a Mac a Mac. Some of the “programs”
(more accurately, code libraries) stored on the ROM chips are QuickDraw, the
software that draws lines and colors on your screen; the Window Manager,
responsible for drawing and manipulating the familiar Macintosh windows;
and the Menu Manager, which creates the menus at the top of your screen.
Because these programs are built into the Mac, people who write Mac
programs are spared the time and headache of writing lines of menu-handling
code, or window-handling code, and so on. They just write references
(“calls”) to the Mac’s ROM, which takes it from there. No wonder most Mac
programs work alike — they all rely on the same chunks of interface code.
Mac Basics
332 Part II: Secrets of the Machine
■ ■
Macworld MAC SECRETS, 5th edition • 4040-8/5 • ch07.F • Chapter 7 • Final • CP/EAP • 10/15/98 • p.332
Macworld MAC SECRETS, 5th edition • 4040-8/5 • ch07.1 • Chapter 7 • Proof 1 • VB • 08/18/98 • p.332
ANSWER MAN
Q: How can I turn off my Mac’s startup chime? I
don’t want to wake my spouse when I go online
for my 4 AM download sessions.
A: You can’t. You could insert the end of a pair of
Walkman headphones into the Mac’s speaker
jack, but that silences all sounds.
If you have a fairly recent model, you can also
try Quiet Start, a free extension that’s included
on the CD-ROM with this book. It sneakily turns
your Mac’s volume to zero when you shut
down — and then back to its previous speaker
level at the next startup (after the chime).
Unfortunately, early Macs’ ROMs don’t bother to
check the speaker-volume level before chiming,
which makes even Quiet Start useless.
The silence of the RAMs
4040-8/5 ch07.F 11/3/98 4:06 PM Page 332

Why the Mac needs a System file
So if the Mac operating system is stored in ROM, why do you need a System
Folder?
Actually, the System file and the ROM work together to create an operating
system. The System either adds to or replaces parts of the ROM. Apple, for
example, improves or enhances its system software at least twice a year — and
sometimes more often than that. (In a period of three years, Apple managed
to release System 7.5, 7.5.1, 7.5.2, 7.5.3, 7.5.5, 7.6, 7.6.1, 8.0, and 8.1.) You can
imagine what a mess you’d have if Apple had to replace your Mac’s ROM chips
twice each year! As it is, the company just creates a new software-only System
Folder with programming that supersedes or adds onto what’s in ROM.
The second reason for a System file: As in any software, the code in the ROM
chips is sometimes buggy. What do programmers do when their code has
been permanently etched into silicon and they discover a mistake? Simple:
Write a fix for the bug in the System file (the part that comes on a disk),
which forms a computer-code detour around the problem in ROM.
The startup continues
Back to our story in progress. The electricity sparks the ROM chips’ programs
into life. These startup programs are instructed, first of all, to check out the
machine. The computer sends electronic feelers into its own circuitry, making
sure that everything is as it should be. The Mac inspects the chips that control
the keyboard jack, the SCSI port, and so on, restoring them to their “ready-for-
action” settings.
One familiar example is the memory (RAM) checkup: The ROM programs test
the health of your RAM chips every time you turn on the computer. That’s
why the more memory your Mac has, the longer it takes to start up — because
there are more RAM chips to inspect. You particularly notice the longer delay
after you install more memory.
Chapter 7: On, Off, and Everything in Between 333
■ ■
Macworld MAC SECRETS, 5th edition • 4040-8/5 • ch07.F • Chapter 7 • Final • CP/EAP • 10/15/98 • p.333
Macworld MAC SECRETS, 5th edition • 4040-8/5 • ch07.1 • Chapter 7 • Proof 1 • VB • 08/18/98 • p.333
TRUE FACT
The Mac’s ROM chips are growing.
As each successive Mac model becomes more
complicated, more and more of the computer’s
Notes to Itself must be crammed onto its chips.
The original Macintosh, for example, fit all of its
identity into 64K of silicon. When the faster Mac
Plus came along, the ROM chips grew to 128K.
Color-processing instructions bloated the Mac
II’s ROMs to 256K; the complex 68030 CPU chip
used in the IIci and most of the II series required
512K ROMs.
Today, the Power Macintosh G3 calls for 4MB of
ROM instructions — that’s 32 times more ROM
than the first Mac had RAM!
How big is your ROM?
4040-8/5 ch07.F 11/3/98 4:06 PM Page 333

If even one pin of a memory board (each has dozens of pins) isn’t solidly
seated in its slot, the ROM program reports the bad news to you. Instead of
playing the usual chime, it plays a Chime of Death.
The Chimes of Death
Like the startup chimes, Apple’s Chimes of Death sounds have evolved
over the years; the one constant trait is a grisly sense of black humor. (We’ve
provided all of these sounds on the Mac Secrets CD-ROM, so you can listen for
yourself.) When you consider that this sound is meant to denote a problem
serious enough to require a technician’s attention, the following choices
seem particularly grim/funny:
■The cartoony breakdown — Only the Quadra AV models (see Chapter
12) featured this funny, sputtering-into-decay recording.
■The happy arpeggio — On the SE/30, Classic II, and Macintosh II series,
you get the four single arpeggiated notes of an A major chord. The worse
the problem is, the happier the music. Gruesome.
■The chilling movie music — The Performa 6200 and 6300 (along with the
Power Macintosh upgrade card) get their own special death chime: a
sinister, three-note, synthesized-brass fanfare that makes you expect
Dracula to show up, laughing, “MUAH-ha-ha-ha-haaaaaaa!”
■The “Twilight Zone” theme — Not content with playing only the cheery
four-note chord of the Mac II line, Apple’s wisecracking engineers tacked
the first four notes of the “Twilight Zone” theme to the end of it. The
resulting chime lifts your spirits when your LC, Quadra 600-series, or
PowerBook Duo dies.
■The car crash — Most Power Macintosh models, plus the Radius 81/110
and Power Computing clones, play the digitized recording of a horrific
car accident, complete with shattering-windshield sounds.
In addition to the cheerful audio cue, if something is drastically wrong inside,
you may also see the “sad Mac” icon on a dark screen. See Chapter 36 for
details and troubleshooting tips.
What else takes so long
Quadras and PowerPC-based Macs, by the way, occasionally take especially
long to start up — for your own protection. If the Mac wasn’t shut down
properly last time — for example, if you had a system freeze and had to
restart — the Power Mac ROMs perform an additional test, a scan of the
hard-drive to confirm the integrity of the disk file structures, during the
appearance of the happy Mac icon. And if you’ve got Mac OS 8.5 or later,
you’ll really wait around after a system crash — the Mac launches Disk First
Aid to make sure the hard drive survived the crash in perfect health.
OS
8.5
334 Part II: Secrets of the Machine
■ ■
Macworld MAC SECRETS, 5th edition • 4040-8/5 • ch07.F • Chapter 7 • Final • CP/EAP • 10/15/98 • p.334
Macworld MAC SECRETS, 5th edition • 4040-8/5 • ch07.1 • Chapter 7 • Proof 1 • VB • 08/18/98 • p.334
4040-8/5 ch07.F 11/3/98 4:07 PM Page 334

Chapter 7: On, Off, and Everything in Between 335
■ ■
Macworld MAC SECRETS, 5th edition • 4040-8/5 • ch07.F • Chapter 7 • Final • CP/EAP • 10/15/98 • p.335
Macworld MAC SECRETS, 5th edition • 4040-8/5 • ch07.1 • Chapter 7 • Proof 1 • VB • 08/18/98 • p.335
MACINTOSH SECRET
Conflict Catcher, a demo of which is included on
the CD-ROM with this book, does much more
than catch conflicts. We stumbled onto a little-
known feature that made us gasp in enlightened
amazement.
With the control panel open, choose “by Load
Time” from the right-hand pop-up menu. You’ll
be shown exactly how long each extension and
control panel takes to load as your Mac starts
up! Some of this information will shock you:
you’ve been waiting for four seconds every
single morning for Apple Guide to load into
memory? It scarcely seems worth it.
This exercise may convince you that some of
your extensions aren’t worth leaving installed for
everyday use. Cumulatively, over the many
startups of your Mac, the time you’ll save could
be substantial.
You haven’t got time for the pain
How does the Mac know that you crashed the last time? During a normal
shutdown, the Finder clears vulnerable file-directory information out of RAM
first and then resets a system flag — a tiny invisible software “switch” —
signaling that all is OK on your hard drive. (Want to see this little flag file for
yourself? Use your Find File program to search the hard drive for invisible files,
as described in Chapter 3. At the “root level” — that is, not inside any folder —
of your hard drive, thar she blows: a tiny file called Shutdown Check.)
When you shut down after a crash, however, without using the Shut Down
command, the Shutdown Check flag never gets reset. When the Mac restarts,
the ROM encounters the “file system dirty” flag and assumes the Finder didn’t
safely clear all the file info out of RAM the last time you shut down. That’s
what triggers it to (a) spend a little extra time checking the drive’s data to
make sure they survived the abrupt shutdown, and (b) bring up the “This
Mac wasn’t shut down properly” message (if that option is turned on in the
General control panel; see Chapter 4).
The larger your hard drive — and the more files stored on it — the longer this
extra integrity test takes.
The search for a good system
When the hardware checks out as OK, the ROM hands off to your System
file — or tries to. It seeks a System Folder in the following order:
■On the floppy disk in the main floppy drive
■On the floppy disk in an external drive (if any)
■On the hard disk you selected (if any) using the Startup Disk control panel
■On the internal hard drive (whose SCSI ID number is always 0; see
Chapter 33 for a discussion of SCSI ID numbers)
■On an external hard drive with ID number 6, and then 5, and then 4, and
so on
Strange
But True
4040-8/5 ch07.F 11/3/98 4:07 PM Page 335

It’s well worth remembering that you can override this search. For example,
suppose your hard drive’s System folder is corrupted; every time you start
up, and the Mac tries to load the Finder, you crash. How can you force the
Mac to start up from your backup Zip drive instead?
By holding down Ô-Shift-Option-Delete key during the startup process. As
you’ll read in our upcoming “Startup Secrets,” this keystroke makes the Mac
ignore its own internal hard drive — and start up instead from whatever the
next gadget is in its hunt for a good System folder.
And if you’ve got several bootable drives attached to your Mac — a Zip,
a Jaz, and a CD-ROM, for example — you can start up from a specific one
by pressing (during startup) a keystroke we’d never even heard of before:
Ô-Option-Shift-Delete-number key, corresponding to the SCSI ID number of
the disk you want. You may need to invite some friends over to help you hold
down all those keys, but as free book winner Denise Conner notes, you’ll still
save time and gain control in times of troubleshooting or experimentation.
If, after doing all that checking, the Mac doesn’t find a startup disk (a disk with a
System Folder), it checks the internal hard drive again, and then waits for you
to insert a floppy disk with a System Folder on it. (That’s when the blinking
question mark appears.) In that event, go find your system disks or startup
CD-ROM. Insert Disk Tools if you want to find out if anything’s wrong with your
hard disk, or insert your system CD if you want to reinstall the System Folder.
The first programs to run: enablers
The Mac is now turned on. It’s passed its own checkup, and it’s found a
working System Folder. If it’s a System 7.1 (or later) Mac, the first programs to
run are the enablers, if any. (As described in Chapter 5, an enabler is a file
that updates or enhances the regular Mac System software.)
If the enabler is missing from the System Folder on your designated startup
drive, that’s the end of the startup sequence — even if there’s a perfectly
good System Folder on another disk. The Mac displays an erroneous error
message (“This model Macintosh requires a newer version of the System
software”) and sits there until you turn it off or the warranty expires.
Get out your original system startup CD and get busy reinstalling the System
software.
More startup software: extensions
and control panels
After owning a Mac for a while, most people begin to tailor its startup
sequence to their specific needs. You do this by adding extensions and
control panels to your System Folder (see Chapter 4). Your Mac runs these
programs after the enablers, but before it gets to the Finder.
Contest
Winner
Worth
Learning
336 Part II: Secrets of the Machine
■ ■
Macworld MAC SECRETS, 5th edition • 4040-8/5 • ch07.F • Chapter 7 • Final • CP/EAP • 10/15/98 • p.336
Macworld MAC SECRETS, 5th edition • 4040-8/5 • ch07.1 • Chapter 7 • Proof 1 • VB • 08/18/98 • p.336
4040-8/5 ch07.F 11/3/98 4:07 PM Page 336

Chapter 7: On, Off, and Everything in Between 337
■ ■
Macworld MAC SECRETS, 5th edition • 4040-8/5 • ch07.F • Chapter 7 • Final • CP/EAP • 10/15/98 • p.337
Macworld MAC SECRETS, 5th edition • 4040-8/5 • ch07.1 • Chapter 7 • Proof 1 • VB • 08/18/98 • p.337
MACINTOSH SECRET
The Shift key plays a critical role in the startup
process. If you press and hold Shift before the
“Welcome to Macintosh” message appears on
the screen, you prevent your extensions, control
panels, and startup items from loading. This, of
course, is one of the most important tools in the
arsenal of anyone trying to solve a mysterious
system-crash problem.
The Shift key also reduces your Disk Cache
setting to a bare-bones minimum (see Chapter
9) and turns off virtual memory. Interestingly,
though, these changes don’t show up in the
Memory control panel; if you look there, your
settings appear to be unchanged. The Mac’s
lying, though — virtual memory and your Disk
Cache really have been changed.
The Shift key, however, doesn’t prevent all
extensions from loading. It certainly doesn’t
block an enabler that your Mac requires to run,
for example. Nor does it turn off any printer
drivers that you need to print.
A single, very sound principle governs Apple’s
programming in every case: The Shift key turns
off all software that isn’t required for the Mac to
start up with its basic functions intact.
Remember that the Shift key is designed for
helping you troubleshoot. It’s designed to assist
in your process of elimination as you attempt to
rule out extraneous software influences on your
Mac’s behavior.
The power of Shift
Normal programs run (get loaded into memory) only when summoned with a
double-click. Extensions and some control panels, on the other hand, load at
startup. Then they lurk, doing their preprogrammed magic, in the Mac’s
memory for as long as the computer is turned on. For this reason, they’re
ideal for — and designed for — customizing the Mac’s overall behavior.
America’s favorite add-on control panels include screen savers (After Dark,
for example), Adobe Type Manager, fax software, and so on.
Extensions and control panels: how they load
Extensions and control panels load separately according to the folder they’re
in, in the following order:
■System file: Few people realize it, but some extensions are actually
installed into the System file itself, just like a sound or a keyboard layout.
You can’t put one there — only certain Apple extensions (invisible to
you) are stored there.
■The contents of the Extensions folder, in alphabetical order. (Overseas
Mac fans, beware: What’s “alphabetical” varies depending on the
international version of the System folder you’re using.)
■The contents of the Control Panels folder, in alphabetical order. In
other words, an extension in the Extensions folder called Zipper actually
loads before one in the Control Panels folder called Alpha. It’s okay to
Mac Basics
4040-8/5 ch07.F 11/3/98 4:07 PM Page 337

put extensions in the Control Panels folder and vice versa, by the way.
These folder names are just for convenience; technically, you don’t have
to put anything particular in one or the other.
■The contents of the System Folder’s main level, in alphabetical order. Yes,
it’s fine to put extensions and control panels loose in the System Folder.
Your personalized loading order
Armed with this information, you have complete control over the loading
order of your extensions and control panels. That’s good, because some
extensions (such as hard disk drivers, virus checkers, and extension
managers) only work if loaded first. Loading order is also important when
you’re trying to troubleshoot a recurrent system crash or freeze, since the
order in which extensions load is often responsible. (More about solving
extension conflicts in Chapter 36.)
Here are some examples of things you can do:
■Make one control panel load before all the others by putting its alias into
the Extensions folder. (But leave the original in the Control Panels folder
so it’ll be there when you need to change its settings.)
■Take an extension that’s supposed to load before all the others and put a
space in front of its name. Leave it in the Extensions folder. It loads first
because it’s first alphabetically and in the first folder the Mac looks at.
■Use Conflict Catcher (or the demo included on the CD-ROM with this
book) to simply drag startup files into the order you want.
■Take an extension that’s supposed to load after all other extensions and
control panels. Put a Z at the beginning of its name and then put it loose
in the System Folder.
Drivers: sometimes invisible, always vital
Among your now-loading extensions, by the way, are the drivers for your
equipment. A driver is a piece of software that teaches the Mac all it needs
to know about a piece of peripheral equipment. No Mac add-on gadget —
printer, CD-ROM drive, Zip or SyQuest drive, modem — will work without a
corresponding driver in your System Folder.
Many of these drivers are invisible to you, built into the system software
(like the mouse, keyboard, and monitor drivers). Be grateful; on Windows
machines, these drivers are not only visible, but must be maintained and
regularly updated.
Most critical of all, of course, is your hard disk driver. (This particular set
of software is on its own invisible partition; see Chapter 8.) It’s important
338 Part II: Secrets of the Machine
■ ■
Macworld MAC SECRETS, 5th edition • 4040-8/5 • ch07.F • Chapter 7 • Final • CP/EAP • 10/15/98 • p.338
Macworld MAC SECRETS, 5th edition • 4040-8/5 • ch07.1 • Chapter 7 • Proof 1 • VB • 08/18/98 • p.338
4040-8/5 ch07.F 11/3/98 4:07 PM Page 338

because you use your hard disk more than any Mac add-on — constantly, in
fact. Now you know why Apple’s system-software installers make such a big
production out of checking your hard drive and its drivers before allowing
you to proceed (see Chapter 5).
On most recent Macs, the driver for the built-in Apple CD-ROM drive is built
into the Mac’s ROM chips. That explains how you’re able to start up from a
CD in times of crisis — even though the “CD-ROM extensions” haven’t,
technically speaking, been loaded.
Icon row
As each extension and control panel is loaded, its icon usually appears on the
bottom of your screen. We say usually, because many control panels have a
check box that lets you eliminate the appearance of the startup icon — and
some Apple extensions are programmed not to display a startup icon at all.
(Control-freak notice: You can use Conflict Catcher to force them to appear;
see the appendix.)
The icons appear one-by-one in a horizontal row. Depending on whether or
not there’s a tiny piece of “wrap the icons!” code in any of the extensions,
these icons may even wrap upward to start a second row above the first —
and a third, and a fourth, and so on. (One extension freak boasts that he
regularly runs 120 system extensions without crashing. We’d like to see it.)
This is worth mentioning, only because it can be a clue when you’re in
extension-conflict hell. If you’re suffering from startup-crash blues and having
trouble figuring out which extension is crashing your Mac, watch those icons
as they appear. Often one particular icon pops up just before the crash, each
time you restart. That icon may represent either the extension that’s causing
the crash or the one just after it. (For much more on extension conflicts and
how to solve them, see Chapter 36.)
Chapter 7: On, Off, and Everything in Between 339
■ ■
Macworld MAC SECRETS, 5th edition • 4040-8/5 • ch07.F • Chapter 7 • Final • CP/EAP • 10/15/98 • p.339
Macworld MAC SECRETS, 5th edition • 4040-8/5 • ch07.1 • Chapter 7 • Proof 1 • VB • 08/18/98 • p.339
CASE HISTORY
The owner of Atlantic Computer Systems, a
wonderful Mac dealer in New Jersey, told us
about one Mac widow who took things into her
own hands. (A Mac widow, of course, is a
woman whose husband spends more time with
his computer than with his spouse. We know a
Mac widower or two, too.)
Anyway, this particular woman took a low-tech
approach to solving a high-tech problem. She
grabbed a hammer and smashed in her
husband’s Apple 14-inch color monitor.
No report on whether that New Jersey couple
now spends more time together.
The New Jersey computer widow
4040-8/5 ch07.F 11/3/98 4:07 PM Page 339

The Ultimate Startup-Keys List
Mac lore is filled with tales of little-known stunts your computer performs if
you press certain mysterious key combinations while the computer is starting
up. Here, together at last, are all the different startup key combos. We threw in
a couple of other miscellaneous startup Secrets while we were at it.
Startup Secrets
■
The Shift key (no extensions)
Hold down your Shift key, beginning no later than the appearance of the smiling-
Macintosh icon. Release it when you see the words “Extensions off.” You’ve
just started up the Mac without any extensions or control panels. You also
prevented anything in the Startup Items and Shutdown Items folders from
launching, prevented File Sharing from turning on, turned off virtual memory,
and reset the Disk Cache to its default setting. (As noted earlier, when you
actually
look
at the Memory control panel, all settings seem to be where they
normally are. That’s because the Mac treats its special Shift-key settings as
temporary, and your regularly-scheduled settings are restored the next time you
start up the Mac.)
The Shift key (no Startup Items)
If you wait to press Shift until
after
your extension icons have finished appearing
on the screen — but
before
the Desktop appears — then you prevent the
contents of your System Folder’s Startup Items folder from loading without
turning off your extensions.
Option (all windows closed)
There’s no end to the secret key combinations that do things when you start up
the machine. Press Option, for example, if you want to be greeted by a clean,
neat Desktop, with no windows or folders open. (Normally, the Mac always
reopens whichever windows were open when you last shut down.)
Technically, you only need to press Option at the end of the startup
process — from the end of the extension-loading phase to the appearance of
the Trash can, for example.
Ô
-Option (rebuild the invisible Desktop file)
As you read in Chapter 1, there’s an invisible Desktop file on every disk.
Over time, the Desktop file becomes bloated with icons belonging to files
and programs you’ve long since taken off your disk.
340 Part II: Secrets of the Machine
■ ■
Macworld MAC SECRETS, 5th edition • 4040-8/5 • ch07.F • Chapter 7 • Final • CP/EAP • 10/15/98 • p.340
Macworld MAC SECRETS, 5th edition • 4040-8/5 • ch07.1 • Chapter 7 • Proof 1 • VB • 08/18/98 • p.340
4040-8/5 ch07.F 11/3/98 4:07 PM Page 340

To make the Mac “forget” all superfluous icons from your current Desktop
file, press and hold the Ôand Option keys when the Mac is starting up. You
don’t need to press them right away — the critical moment is just after your
extensions have all loaded. You can let go of the keys when the Mac asks you
specifically if you want to rebuild the Desktop file (see Figure 7-3).
Figure 7-3: The Mac asks if you’re sure you want to wipe out your old, invisible Desktop file.
If you click OK, the Mac takes a minute or so to cleanse its Desktop file,
resulting in a slimmer, quicker, invisible database (see Figure 7-4). You get a
separate message for each disk that’s attached to the Mac. (In software
versions before System 7.5.3, rebuilding the desktop also erases any
comments you’ve typed into the Get Info windows for your files.)
Figure 7-4: The Mac rebuilds the Desktop file. If you grow impatient, click Stop; no harm
done. If your icons show up generic, you can always rebuild again later to complete the job.
We should point out that Apple’s official recommendation is that you rebuild
the Desktop only
after
you’ve turned off all your extensions and control panels.
Frankly, though, we’ve rebuilt the Desktop plenty of times without turning off
other extensions without a hitch. See “Desktop File Secrets” in Chapter 2 for
more on this debate.
Ô
key (turn off virtual memory)
If you press the Ôkey during startup, the Mac turns virtual memory off (if it had
been on). The Memory control panel still says it’s on, but it’s showing you what
will happen the
next
time you turn on the Mac.
You
know that virtual memory is
off by checking out the free space on your hard drive — which has suddenly
increased by dozens of megs, thanks to the absence of the virtual memor y
swap file
. (See Chapter 9 for details on virtual memory.)
Chapter 7: On, Off, and Everything in Between 341
■ ■
Macworld MAC SECRETS, 5th edition • 4040-8/5 • ch07.F • Chapter 7 • Final • CP/EAP • 10/15/98 • p.341
Macworld MAC SECRETS, 5th edition • 4040-8/5 • ch07.1 • Chapter 7 • Proof 1 • VB • 08/18/98 • p.341
4040-8/5 ch07.F 11/3/98 4:07 PM Page 341

C to start up from Power Mac CD-ROM
When you start a Power Mac or most modern PowerBooks with a startup
CD-ROM in the drive, hold down the C key to force the Mac to load from
the CD-ROM’s System Folder instead of your hard drive — a very handy
troubleshooting tip. (This trick also works with some CD-equipped
non
-Power
Mac models, such as the Performa 630/640 series.)
If the C key doesn’t force your Mac to start up from the CD, your model doesn’t
accommodate that trick. Read the next secret for the solution.
Ô
-Option-Shift-Delete (ignore internal drive)
If, just after you turn on the Mac, you hold down Ô, Option, Shift, and the
Delete key, your Mac ignores its internal hard drive. This is a good way to force
your Mac to use a different startup disk, such as an external hard drive that you
loaded with a different System version. (This is also a good way to sprain your
hand.)
If you have a PowerBook 1400 or another machine that doesn’t support the
C-key trick described in the previous secret, this keystroke is your ticket to
booting off your system CD-ROM in times of crisis.
Ô
-Option-Shift-Delete-number
(specify startup drive)
Take that previous secret and add a number key, 1 through 6, and you’ve
just instructed the Mac to start up from a
specific
startup drive (instead of the
built-in hard drive).
Ô
-Option-P-R (zap the PRAM)
Your Mac has a tiny chunk of memory called parameter RAM or PRAM
(pronounced
pea
-ram). This smidgen of memory is where the Mac stores
settings it’s supposed to retain even when the computer is turned off — like the
settings you make using the Control Panels (mouse speed, keyboard settings,
monitor color setting, Desktop pattern, choice of star tup disk, choice of printer,
network setup, and so on).
In times of trouble, you may need to flush this bit of RAM and start over. To do
this, you use another hidden key combination at startup: Ô, Option, letter P, and
letter R keys. Keep them pressed until you hear a second startup chime. (On a
Mac with PCI slots, you can’t zap the PRAM with a restart; you have to turn the
computer completely off, press the keys, and then turn the computer on.)
Then use your control panels to reset your settings.
Mac Basics
342 Part II: Secrets of the Machine
■ ■
Macworld MAC SECRETS, 5th edition • 4040-8/5 • ch07.F • Chapter 7 • Final • CP/EAP • 10/15/98 • p.342
Macworld MAC SECRETS, 5th edition • 4040-8/5 • ch07.1 • Chapter 7 • Proof 1 • VB • 08/18/98 • p.342
4040-8/5 ch07.F 11/3/98 4:07 PM Page 342

Ô
-Option-T-V (use the TV for a monitor)
Hold down Ô-Option–T-V during startup to make an AV-style Quadra use an
attached TV as a monitor. (See Chapter 23.)
Ô
-Option-O-F (iMac copyright notice)
As you can read in Chapter 13, the iMac is revolutionary in more than its
futuristic design. It’s also the first Macintosh to have its ROM (underlying
computer code) stored on disk instead of on ROM chips, using a new
technology called Open Firmware.
Why should you care? Because now you can understand the significance of the
iMac keystroke Ô-Option-O-F. If you hold down these keys at the very beginning
of the startup process (before the screen has even lit up), you trigger the secret
Open Firmware Easter egg: a white screen with a little copyright notice and
version number.
We suppose it’d be the right thing to do to tell you how to
escape
this box once
you’ve summoned it. Believe it or not, you type
bye
and press Return!
Space bar (open Extensions Manager)
As described in Chapter 4, press the Space bar during startup to open the
Extensions Manager or Conflict Catcher window (whichever you have installed).
In this window, you can choose which extensions and control panels will be
turned on for the coming computing session.
And while we’re at it: Conflict Catcher offers a slew of other useful keys to hold
down at startup. Press the Tab key to halt the extension loading so that you can
look over the icons that have loaded so far; Ô-period (.) stops loading extensions
and jumps directly to the desktop (only the extensions that have appeared to that
point are loaded); R restarts the computer. You can set up any alphabet key to
correspond to a particular set of extensions, too, and (in version 8) you can click
any loading icon to pop up an information panel about that extension. More on
Conflict Catcher in Chapter 22.
Interrupt switch (to hear the Chimes of Death)
On 1994 through 1996 Power Macs, you can hear the “Chimes of Death” car-
crash sound whenever you want (see “The Chimes of Death,” earlier in this
chapter).
Just
after you turn on the Mac — while the monitor is still black —
press the Interrupt switch (see “The Interrupt Switch” sidebar later in this
chapter). Yikes, what a grisly sound!
Strange
But True
Chapter 7: On, Off, and Everything in Between 343
■ ■
Macworld MAC SECRETS, 5th edition • 4040-8/5 • ch07.F • Chapter 7 • Final • CP/EAP • 10/15/98 • p.343
Macworld MAC SECRETS, 5th edition • 4040-8/5 • ch07.1 • Chapter 7 • Proof 1 • VB • 08/18/98 • p.343
4040-8/5 ch07.F 11/3/98 4:07 PM Page 343

Mouse down (eject a floppy)
Suppose that you accidentally left a floppy disk in your disk drive. No problem:
when you turn the Mac on, the disk will pop out.
But if the floppy has a
System folder
on it, you might think you’re condemned to
waiting for the very slow floppy-disk startup sequence to finish, so that you can
eject the disk and restart from your hard drive.
You don’t have to. As soon as you realize your mistake (or sooner, since this
has to happen
before
the floppy’s System displays the smiling Mac), press and
hold down the mouse button. The floppy ejects itself, and the startup process
begins with the hard drive’s System Folder.
Startup screens
You can display a picture of your choice when the Mac starts up in place of
the usual “Welcome to Macintosh” screen. See Chapter 21 for instructions on
creating your own.
Startup movies
If you have the QuickTime extension installed (see Chapter 23), there’s a special
treat in store. You can designate a par ticular QuickTime movie to play in the
middle of your screen when you star t up the Mac!
To do this, rename the movie
Startup Movie
.Put it loose in your System Folder.
Then restart the Mac and watch the fun. (Of course, your movie won’t start
playing back until the QuickTime extension itself loads. And once it does star t
playing, the remainder of your Mac’s star tup sequence gets put on hold until the
movie ends. You can interrupt the flick, though, by pressing the spacebar.)
You can even combine a movie with a still picture, creating a theatrical “stage”
for your movie. Create a startup
screen
, as described in the previous Secret.
Create it, though, so that it has a nice central hole in which your movie can play
(see Figure 7-5). When you restart, the still picture appears first, and then the
movie plays in the center of it! Handily, the star tup movie always stops on its
last frame, where it stays until the Mac is finished star ting up.
Startup at a specified time
Your Mac gets along perfectly well without you — or at least it can turn itself on
without you.
The Energy Saver control panel (described in Chapter 4) can turn on any recent
Mac at a specified time — one day, or every day.
344 Part II: Secrets of the Machine
■ ■
Macworld MAC SECRETS, 5th edition • 4040-8/5 • ch07.F • Chapter 7 • Final • CP/EAP • 10/15/98 • p.344
Macworld MAC SECRETS, 5th edition • 4040-8/5 • ch07.1 • Chapter 7 • Proof 1 • VB • 08/18/98 • p.344
4040-8/5 ch07.F 11/3/98 4:07 PM Page 344
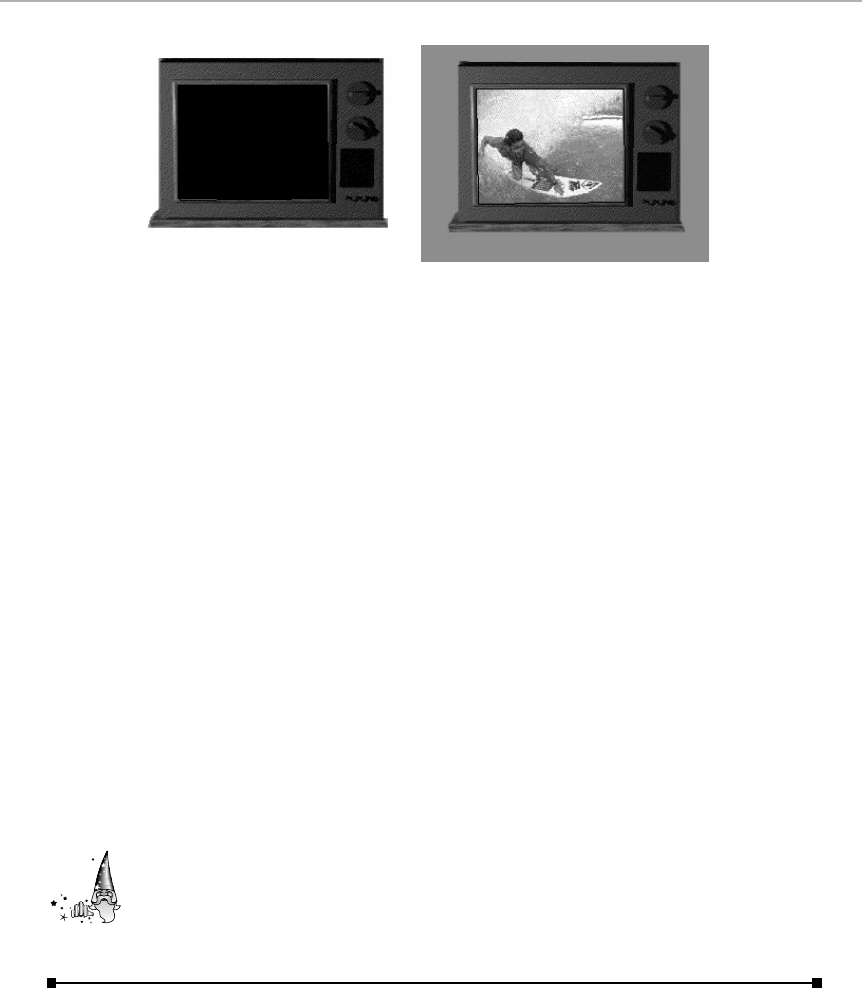
Figure 7-5: Create a startup screen/frame (left). When the startup movie plays, it neatly fills
the hollow part of the frame, if you’ve set it up right (right).
Most PowerBooks can do this, too. It’s an option in the PowerBook control panel
that lets the computer wake itself up at a specified time.
If you have any other Mac, buy a PowerKey (Sophisticated Circuits,
206-485-7979). It’s a surge-protected power strip that turns on all your Mac
gear with a touch on the keyboard power key (even compact and LC Macs). It
comes with a little software doodad that lets you schedule the Mac’s turning
itself on and off unattended. The PowerKey Pro version even lets you
call
your
Mac by phone — and press certain touch-tones to turn on selected components!
Startup Items to the background
Many people stick an alias of their word processor into the Startup Items folder,
so that a blank word-processing screen awaits them shortly after they turn on
the Mac. Nothing wrong with that.
Sometimes, however, the program in your Startup Items folder is designed to be
a
background
program. Speech-recognition software (such as PowerSecretary),
answering-machine programs (such as MegaPhone), and many screen-saver
programs fall into this category. Unfortunately, these programs wind up being the
frontmost application when the startup process is complete.
Not, however, if you put an alias of your
hard drive
into the Startup Items folder,
too. Doing so brings the Finder to the front (at the end of the startup process)
and open its window automatically. Just make sure that the item you want to
end up in front is the last in alphabetical order (begin its name with a Z, for
example).
Strange
But True
Chapter 7: On, Off, and Everything in Between 345
■ ■
Macworld MAC SECRETS, 5th edition • 4040-8/5 • ch07.F • Chapter 7 • Final • CP/EAP • 10/15/98 • p.345
Macworld MAC SECRETS, 5th edition • 4040-8/5 • ch07.1 • Chapter 7 • Proof 1 • VB • 08/18/98 • p.345
4040-8/5 ch07.F 11/3/98 4:07 PM Page 345

Beyond the Startup Sequence
Now you know why starting up the Mac takes so long — between checking
the hardware and loading the software, some Macs take several minutes to
get ready for action. (Want to speed up the startup sequence? Install Startup
Doubler, an extension that “memorizes” your standard set of extensions and
control panels. All subsequent startups fly by in a fraction of the time it
would have taken to load all your startup files individually.)
The Mac’s next step is to launch the Finder program. Your Finder menu bar
(File, Edit, View, Special, Help) appears. Then the computer consults an
important, though invisible, file on each disk: the Desktop file. As described
in Chapter 1, the Desktop file stores all kinds of information about your disks,
folders, files, and their icons. When the Mac knows (from the Desktop file)
which icons you have and where they should appear, they start popping onto
the screen. Then the Mac looks for disks (such as your hard drive), whose
icons it now draws in the upper-right corner of your screen.
In Mac OS 8 and later, only then is the menu built. That’s why the menu
appears empty if you click on it before all your desktop icons have appeared!
Startup Items
Inside the System Folder is a folder called Startup Items. Just after the
Desktop appears, the Mac opens anything you’ve put into this folder, as
described in Chapter 5.
The Mac launches the items in the Startup Items folder in this order:
applications, documents, and then aliases — and alphabetically among each
category. You can use this fact to your advantage; by renaming the items in
this folder, you control which programs load first for the day. As you’ll find
out in Chapter 9, controlling the loading order of multiple programs is one
weapon you have against memory fragmentation.
OS
8
346 Part II: Secrets of the Machine
■ ■
Macworld MAC SECRETS, 5th edition • 4040-8/5 • ch07.F • Chapter 7 • Final • CP/EAP • 10/15/98 • p.346
Macworld MAC SECRETS, 5th edition • 4040-8/5 • ch07.1 • Chapter 7 • Proof 1 • VB • 08/18/98 • p.346
CASE HISTORY
In our work as roving Mac tutors and observers,
we sometimes think we’ve seen it all. But then
there was the call from a hysterical, new Mac
owner. He claimed that “all hell” kept breaking
loose every time he turned on his Mac.
A little visit solved the mystery. As a perfectly
logical human being, he had filled his Startup
Items folder with, yes, startup items — namely,
all his control panels and extensions. (Of course,
they actually belong in the Control Panels and
Extensions folders.) So each day when he
turned on the Mac, he got a screen full of error
messages (as the Mac “double-clicked” each
extension) and control panel windows (as they
opened by themselves).
We doubt he was the first.
Startup items, right?
4040-8/5 ch07.F 11/3/98 4:07 PM Page 346
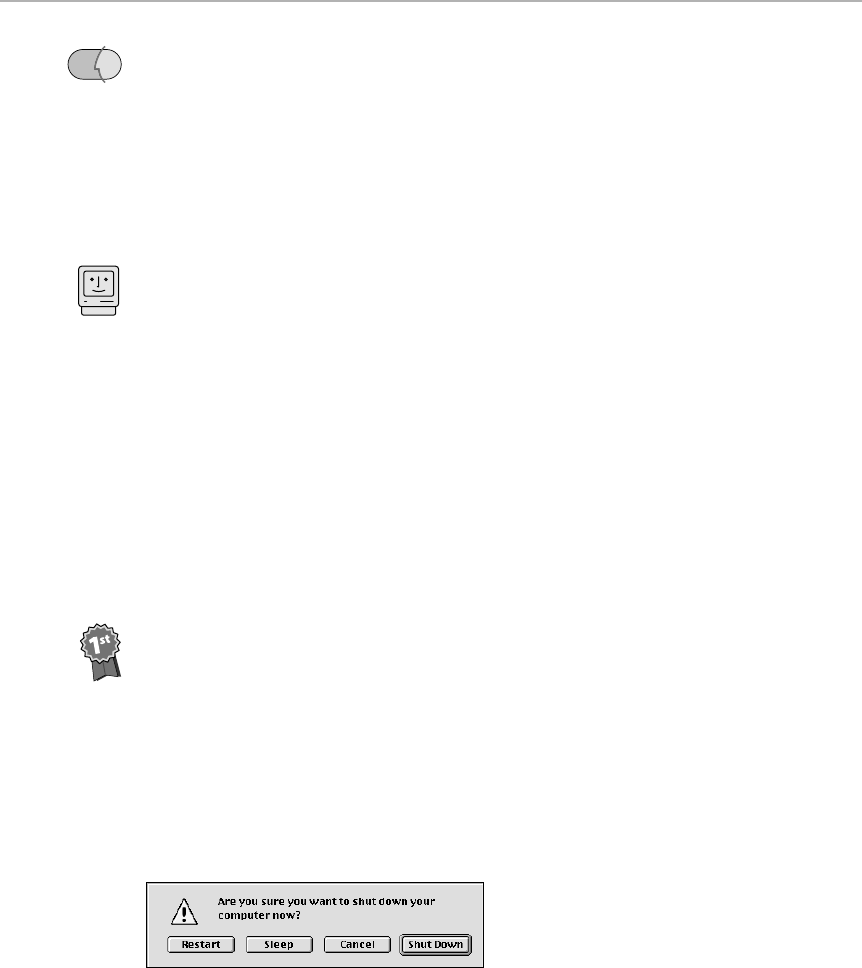
Here’s a nice trick for the Startup Items folder: Make an alias of it. Put the
alias at the lower-left corner of your screen. At the end of each workday, drag
an alias of the document you’re working on into the Startup Items folder
alias. (That’s especially easy to do in Mac OS 8 — just Ô-Option-drag the
document’s icon.) Next morning, you’ll turn on your Mac and be immersed
in exactly the same documents, ready to go.
Shutting Down
Apple strenuously suggests that you never turn your Mac off by cutting off
power using the switch on your power strip — or the power switch on the
back of the Mac. Instead, you’re always supposed to use one of the officially
endorsed Shut Down methods:
■Switch to the Finder (or quit all your programs). Choose Shut Down from
the Special menu.
■On most Macs since 1995, press the power key on your keyboard. You’re
shown the dialog box in Figure 7-6 that offers three options: Restart,
Cancel, or Shut Down. Click Shut Down — or hit the Return key — to
complete the shutdown process. (On most Power Macs, you get a fourth
option — Sleep. Clicking the Sleep button leaves your computer on, but
cuts the video signal to the monitor, causing the screen to go black. See
“Sleep Modes” later in this chapter.)
You can also press the R key to restart, or the S key to sleep.
■As free book winner Justin Crompton discovered, you can press the
little-known Shut Down keystroke: Control-Option-power key. Your
savings: one dialog box and one mouse click.
■In System 7.5 through 7.6, choose Shut Down in the menu, saving you a
trip to the Finder to get at it.
■If you have a remote control for your Mac (5400 owners, you know who
you are), press the Off button on your remote. And don’t let your
coolness go to your head.
■Let the Energy Saver control panel shut down your Mac (see Chapter 4).
Figure 7-6: Press the power key on any modern Mac to get this dialog box. You can save a
mouse click by typing R for restart, S for sleep, C for cancel, or Return for Shut Down.
Contest
Winner
Mac Basics
OS
8
Chapter 7: On, Off, and Everything in Between 347
■ ■
Macworld MAC SECRETS, 5th edition • 4040-8/5 • ch07.F • Chapter 7 • Final • CP/EAP • 10/15/98 • p.347
Macworld MAC SECRETS, 5th edition • 4040-8/5 • ch07.1 • Chapter 7 • Proof 1 • VB • 08/18/98 • p.347
4040-8/5 ch07.F 11/3/98 4:07 PM Page 347

Why does Apple care how you shut down? The rationale is that the Mac
needs to do some “housekeeping” before turning off the machine; cutting off
power deprives the Mac of the chance to take care of these tasks. The
checklist includes:
■Updating your invisible Desktop file with your current icon and window
positions
■Offering you the chance to save your work in any documents still open
■Correctly quitting any open programs, deleting any “temp files” in the
process
■Ejecting any floppy disks
We can think of plenty of times when you can’t get to the Shut Down
command, however. Imagine a system crash or a freeze, for example. In those
instances, you have no choice but to cut power to the computer.
We suggest that you use one of the official Shut Down methods as
recommended by Apple. We do not, however, endorse the wide-eyed,
paranoiac approach of many books and magazines; we say, cut the power
when you have to. Particularly in Mac OS 8.5 and later, Apple recognizes that
stuff happens — including crashes. That’s why, when the Mac next restarts, it
does a self-check and, if it finds problems, a self-repair. All you pay is the
extra time.
The cycle of last chances
The Mac follows a specific series of steps when you’ve chosen the Shut Down
command.
If any programs are open, the Mac quits them automatically, first offering you
the chance to save your work in any unsaved documents. If you’re connected
to a network and other Macs are sharing some of your files, you’re warned
that you’re about to slam the door in their faces (see Figure 7-7). If you click
Cancel in any of the dialog boxes that appear during the shutdown process,
the entire shutdown cycle is derailed; the Mac stays on.
Figure 7-7: If you’re on a network, and another Mac has “logged onto” your hard drive, the
Mac warns you politely. Grammatically, too; Mac OS 8 finally corrects the run-on sentence
that’s plagued this dialog box since System 7.
OS
8.5
348 Part II: Secrets of the Machine
■ ■
Macworld MAC SECRETS, 5th edition • 4040-8/5 • ch07.F • Chapter 7 • Final • CP/EAP • 10/15/98 • p.348
Macworld MAC SECRETS, 5th edition • 4040-8/5 • ch07.1 • Chapter 7 • Proof 1 • VB • 08/18/98 • p.348
4040-8/5 ch07.F 11/3/98 4:07 PM Page 348

Shut Down Secrets
■
Automatic shutdown at midnight
Suppose you’re downloading some huge file from America Online. Your Mac tells
you that it’s going to keep downloading until, say, 3 a.m. You want to go to bed,
but you don’t want to leave your system on all night.
Recent Macs let you use the Energy Saver control panel (described in Chapter 4)
to turn off your Mac automatically — at a certain time, or after a specified
amount of idle time. (A dialog box appears five minutes before shutdown,
offering you the chance to postpone the shutdown for another hour — or to
cancel the shutdown entirely. And if you’re actually using the Mac at the time
of scheduled shutdown — even downloading — the five-minute shutdown gets
perpetually postponed until the Mac is idle.)
If you’d prefer your entire system to shut down — printers, CD-ROM drives,
everything — then you need a PowerKey from Sophisticated Circuits. Its four or six
grounded outlets all cut off at the same time whenever the Mac shuts down.
Canceling a Shut Down or Restart command
Suppose you choose the Shut Down command, only to realize three
nanoseconds later that you forgot to copy a batch of important files to your
backup disk. Any chance you can stop your Mac from shutting down once it
begins the process of closing up shop?
Yes! The moment you realize you don’t really want to shut down, quickly launch
another application — SimpleText, the Calculator, anything! Simply launching a
program forces the Mac to abort its shutdown. (Our suggestion: use OneClick,
Speed Doubler, or another file-launching macro program. At moments like these,
you can simply slap the key corresponding to some “launch a program” macro.)
And if you have a screen saver, you can activate
that
to bail out of the
shutdown, too.
The Restart (Reset) Switch
What it’s called is the Reset switch. But what it does is restart the Mac.
Every Mac model has a pair of these funny little switches. One of them, the
Interrupt switch, is fairly useless unless you’re a programmer. But its twin,
Reset, is wonderfully useful.
Worth
Learning
Chapter 7: On, Off, and Everything in Between 349
■ ■
Macworld MAC SECRETS, 5th edition • 4040-8/5 • ch07.F • Chapter 7 • Final • CP/EAP • 10/15/98 • p.349
Macworld MAC SECRETS, 5th edition • 4040-8/5 • ch07.1 • Chapter 7 • Proof 1 • VB • 08/18/98 • p.349
4040-8/5 ch07.F 11/3/98 4:07 PM Page 349

Where is it?
Before we tell you how handy they are, we’ll help you figure out where your
switches are. On any SE or Mac II-series machine, you got a connected pair
of plastic buttons that you were supposed to install by snapping onto the
Mac’s case.
The next generation of desktop Macs have special buttons for the Interrupt
and Reset functions; there’s nothing to install. They’re located on the front of
the 7100, 8100, most Quadras, most Power Computing clones, and the Centris
(Quadra) 650 — and on the back of the Centris (Quadra) 610 and 6100 (on the
right as you look at the back).
If you have a PowerBook 140 through 180, your Interrupt and Reset switches
are two tiny holes on the right as you look at the back. You’re supposed to
“push the button” by inserting a straightened paper clip.
Virtually all other Macs have hidden Reset and Interrupt switches. Or, to be
perfectly accurate, they don’t have switches at all. Instead, you’re supposed
to press Ô, Control, and the power key all at the same time. (That’s to
restart. For the Interrupt function, it’s Ô-power key.)
If your model has an actual button, switch, or hole (for a straightened paper
clip), please note: The Interrupt switch is usually marked by a circle. The
Reset switch — the one we want you to notice — has a left-pointing triangle. It
matches the left-pointing triangle on the power key on your keyboard. Both
have to do with starting the computer, get it?
350 Part II: Secrets of the Machine
■ ■
Macworld MAC SECRETS, 5th edition • 4040-8/5 • ch07.F • Chapter 7 • Final • CP/EAP • 10/15/98 • p.350
Macworld MAC SECRETS, 5th edition • 4040-8/5 • ch07.1 • Chapter 7 • Proof 1 • VB • 08/18/98 • p.350
Leaving your Mac
on all the time
DP: JS, exactly why do we require an entire topic
for Shutting Down in our outline?
JS: What do you mean? It’s something you do
every day. It’s worth a topic.
DP: Well, I know plenty of people who don’t.
JS: What?
DP: Sure. Lots of people never shut their Macs
down.
JS: What? They leave their Macs on all the time?
DP: Don’t go ballistic. Everybody knows it’s better
for your Mac’s internal circuitry not to be turned on
and off all the time. Every time you switch on the
power, it’s like sending a solid brick wall of electrons
smashing through your computer’s fragile veins. If
you turn your machine on and off all the time, you’re
going to shorten its life.
JS: That is the biggest old wives’ tale! Have you
ever in your life heard of somebody’s Mac going in
for repairs, where the repair person announces that
you did your computer in by turning it on too much?
DP: Well, no.
JS: It’s a myth fabricated by the electric companies.
They want you to leave it on all the time so that you
run up your utility bills.
DP: Talk about old wives’ tales!
JS: It’s not! Look, do the math. I called up the
electric company —
DIALOGUE
4040-8/5 ch07.F 11/3/98 4:07 PM Page 350

Chapter 7: On, Off, and Everything in Between 351
■ ■
Macworld MAC SECRETS, 5th edition • 4040-8/5 • ch07.F • Chapter 7 • Final • CP/EAP • 10/15/98 • p.351
Macworld MAC SECRETS, 5th edition • 4040-8/5 • ch07.1 • Chapter 7 • Proof 1 • VB • 08/18/98 • p.351
TRUE FACT
We don’t often use the Interrupt switch — the
virtual switch you “press” by pressing Ô-power
key. (On older Macs, it’s an actual plastic button
on the computer’s case — marked by a dot). But
we’re told that it can occasionally get you out of
a system crash.
When the system crashes, press the Interrupt
switch. A special empty dialog box appears on the
screen, containing nothing but a > symbol. (This
dialog box is the mini-debugger; compare with the
real debugger, MacsBug, described in Chapter 22.)
Here are the various things you can type at this
point, and what they’re supposed to do.
G FINDER or G F (then press Return) is supposed
to get you back to the Finder safely.
SM0A9F4 (then press Return) PCFA700 (Return,
again) G (Return, again) is another Return-to-
Finder sequence. Those are zeros, by the way,
not letter “Os.”
SM A78 3F3C 0002 A895 (press Return, then)
G A78 (and another Return) shuts your Mac
down.
Honestly, we’ve found that these codes rarely
work. On the other hand, when the system
crashes and we’ve got important unsaved work
on the screen, we’d jump up and down and say
“gigabyte” ten times backward if we thought it
would help.
The Interrupt switch
DP: You called up your electric company!?
JS: Hey, I happen to care about the environment.
Anyway, you look at your electric bill to see what a
kilowatt-hour of juice costs. Mine says 13 cents.
Then you figure out how much power your Mac
uses — to do that, you multiply Amps by Volts. So,
a Power Mac 8500 is 9 amps, 110 volts; monitor is
1.0 amps. That’s 1,100 watts an hour. You’re paying
about 14 cents an hour to leave your Mac on.
DP: Yeah, yeah, so what’s the bottom line?
JS: In a year, that’s $1,226 down the sewer.
Whereas, if I turned the thing off at night (and I
work eight-hour days), I only pay $324 a year.
DP: But the wall of electrons . . .
JS: Furthermore, do you realize that the production
of electricity in this country is responsible for 35
percent of the carbon dioxide in the atmosphere? Do
you understand that New York City is going to be
underwater in 150 years?
DP: Under —
JS: From global warming.
DP: New York is . . . ?
JS: Common knowledge.
DP: I stand enlightened.
JS: You see?
DP: From now on, I’ll turn off the monitor at night.
ANSWER MAN
4040-8/5 ch07.F 11/3/98 4:07 PM Page 351

What is it?
We really want to impress upon you the convenience and simplicity of the
Reset switch. If you’re not using it whenever you have a system bomb or your
cursor freezes on the screen, you’re missing a great thing.
Obviously, you shouldn’t use the Reset switch as part of your daily shutdown
routine — use it only when your Mac is frozen. Cutting power in this way can
occasionally damage open documents (although usually only if such
documents are right in the middle of being saved).
Sleep Modes
In the name of conserving electricity, Apple seems to enjoy defining new
variations of On and Off. There’s the Sleep mode on PowerBooks, for example
(see Chapter 14). All Power Macs except the original three models (6100,
7100, 8100) offer an even more radical concept: desktop sleep.
In fact, today’s Macs take the sleep concept a step further, providing
independent controls for the sleep behavior of the Mac, the hard drive, and
the monitor (in fact, two different monitor sleep modes, as you’ll read in a
moment). In other words, you might choose to have the monitor blink off
after 30 minutes, but make the hard drive wait a full hour before spinning
down into low-power mode.
So how do you make your Mac sleep? Let us count the ways:
■In the Finder, choose Special ➪Sleep.
■Press the power key. In the dialog box that appears, click Sleep (or strike
the S key). (This method works on most modern Mac models.)
■Talk about little known: You can press Ô-Option-Power key to put your
Mac to sleep, thus bypassing a dialog box.
352 Part II: Secrets of the Machine
■ ■
Macworld MAC SECRETS, 5th edition • 4040-8/5 • ch07.F • Chapter 7 • Final • CP/EAP • 10/15/98 • p.352
Macworld MAC SECRETS, 5th edition • 4040-8/5 • ch07.1 • Chapter 7 • Proof 1 • VB • 08/18/98 • p.352
ANSWER MAN
Q: Hey! I followed your book’s instructions to
restart my locked-up iMac. I pressed Ô-Control-
power key like you said. The machine is still
locked up.
A: Ah, that’s because the iMac doesn’t use the
usual ADB (mouse/keyboard) circuitry. Remember,
the iMac uses new USB wiring (see Chapter 10).
As a result, the Ô-Control-power keystroke
doesn’t work in the case of severe crashes.
You have no choice but to push the iMac’s
physical reset button. Open the plastic cover on
the side of the machine. The reset hole is a tiny
hole between the Ethernet and modem jacks,
marked by a small triangle. Insert an unfolded
paper clip and push gently into the hole to make
the iMac restart.
And if even that doesn’t work, unplug the iMac,
wait 30 seconds, plug it in again and turn it on.
The iMac’s broken restart sequence
4040-8/5 ch07.F 11/3/98 4:07 PM Page 352
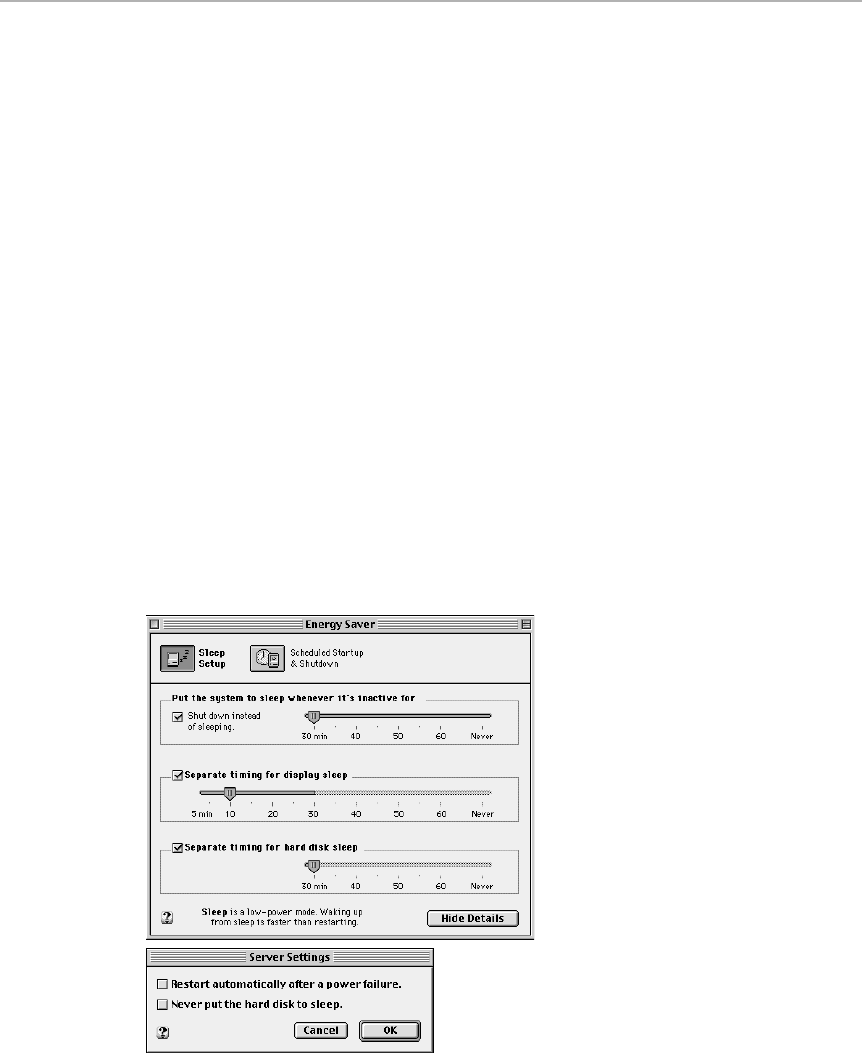
■You can set your Mac to go to sleep automatically, using the Energy Saver
program described next.
To wake up any sleeping Mac, press a key or click the mouse.
System sleep
The command center for making laptops and Power Macs go to sleep is
the Energy Saver program (see Chapter 4). As you can see in Figure 7-8, this
application-in-your-Control-Panels-folder gives you independent control over
each aspect of the Mac: hard drive, system, and monitor. To view these
added controls, click the Show Details button.
You’ll quickly discover that you can’t set the monitor or hard drive to stay
awake after the Mac itself has dozed off; in other words, if the Mac sleeps, the
whole thing sleeps. (If you examine the “grayed-out” ends of the lower two
sliders in Figure 7-8, you’ll see what we mean; you can’t drag the slider
handles farther to the right than the Mac’s own slider.)
And one other thing: If there’s a dialog box on the screen, such as “Save this
document?”, the Mac won’t go to sleep at all. (Apple once tried an auto-save
option, which it implemented in earlier versions of Energy Saver. It put a
folder on your desktop containing any documents that were open and
unsaved at the time the Mac shut off, stamped with the date and time of
the shutoff. Novices couldn’t deal. The feature went away.)
Figure 7-8: Click the Show Details button to expand your Energy Saver “control panel” into
its three-panel expanded state, shown here. At bottom: The Server preferences panel.
Chapter 7: On, Off, and Everything in Between 353
■ ■
Macworld MAC SECRETS, 5th edition • 4040-8/5 • ch07.F • Chapter 7 • Final • CP/EAP • 10/15/98 • p.353
Macworld MAC SECRETS, 5th edition • 4040-8/5 • ch07.1 • Chapter 7 • Proof 1 • VB • 08/18/98 • p.353
4040-8/5 ch07.F 11/3/98 4:07 PM Page 353

Hard drive sleep
The spinning of your hard drive is one of the Mac’s bigger power consumers.
Although making the hard drive sleep is a sure way to make your Mac take
longer to wake up again — because getting the hard drive up to its precise
normal speed requires considerable effort on the Mac’s part — it’s also a sure
way to save power when you’re not using the Mac.
There’s one circumstance, however, when you might want the hard drive not
to sleep when the rest of the Mac nods off: when you’re on a network and File
Sharing is turned on. (See Chapter 35 for more on networking.) If your hard
drive is asleep when someone else on the network tries to get at your Mac’s
files, they’ll wait almost forever before getting satisfaction.
That’s why you should make the hard drive stay awake full-time if you’re
networking. To do so, open the Energy Saver “control panel.” Choose
Preferences ➪Server to make the dialog box shown at the bottom of Figure
7-8 appear. Turn on the “Never put the hard disk to sleep” checkbox. (If
you’re on a serious office network, especially one that people dial into using
Remote Access, you might also want to turn on the “Restart automatically”
option while you’re at it.)
Monitor sleep — and saving power
Although there’s not a word about it in the manual, online help, or Energy
Saver dialog boxes, your Mac can actually make its monitor sleep in two
different ways.
■Screen-saver (light) sleep: The screen simply goes black; you’ve got
yourself a built-in screen-saver. The monitor, however, is still using
almost full power. When you touch a key or click the mouse, the picture
returns immediately.
■Power-saving (deep) sleep: This is the mode you probably think of when
we say “monitor sleep”: The monitor goes black and it draws only a tiny
trickle of power. You save money, energy, and the environment — but you
wait longer for the screen to light up again when you wake the thing up.
(This is also what you get when, in the Finder, you choose Special ➪Sleep.)
So how can you control what your monitor does? Simple: By default, the Mac
uses power-saving sleep.
To set up light sleep (which doesn’t save power), make sure you’ve expanded
the Energy Saver dialog box (as shown in Figure 7-8) by clicking the Show
Details button. Turn on the “Separate timing for display sleep” checkbox,
and drag the slider to a shorter time than you’ve got set for the top slider.
That’s it: After the interval you’ve just specified, your screen will go dark, but
it’s not fully asleep.
It will, however, shift into true, power-saving, deep sleep after the amount of
time you’ve specified using the system (top) slider. At this point, you’ll have
to press a key (not just click the mouse) to wake up the whole system.
354 Part II: Secrets of the Machine
■ ■
Macworld MAC SECRETS, 5th edition • 4040-8/5 • ch07.F • Chapter 7 • Final • CP/EAP • 10/15/98 • p.354
Macworld MAC SECRETS, 5th edition • 4040-8/5 • ch07.1 • Chapter 7 • Proof 1 • VB • 08/18/98 • p.354
4040-8/5 ch07.F 11/3/98 4:07 PM Page 354

MAC SECRETS • 4040-8/X • ch.08.F • Chapter 8 • FINAL • VB/EAP • 10/23/98 • p.355
MAC SECRETS • 4040-8/X • ch.08.1 • Chapter 8 • Proof 1 • ma • 09/2/98 • p.355
Chapter 8
The Disk Chapter
In This Chapter
©Of volumes, floppies, and hard drives
©The invisible driver software
©Disk First Aid, Apple Drive Setup, and their ilk
©Defragmenting, partitioning, reformatting
©HFS+ and its gift of 200MB
©SyQuest, Zip, Jaz, and Orb drives, SuperDisks, and other removables
©Other disk technologies
The moment you shut down your Mac, everything in its memory vanishes
into oblivion. Every application you launched, every document you
created, every file you modified during a work session — they all evaporate
into nonexistence as soon as you turn off the juice. This happens because
memory chips hold data only when electricity is running through them.
That’s why you need disks. Floppy disks, hard disks, and other storage media
provide a stable format that can permanently record the data you manipulate
in your Mac’s memory.
In this chapter, we’ll confront all the disk-related technoid terms you
hear flogged about in Mac user-group meetings: initializing and formatting,
interleave, defragmenting, optimizing, and partitioning. Impressively, you can
do a number of these stunts to your hard drive without spending a penny. You
can use Drive Setup or, if you have an older Mac, Apple HD SC Setup — two
vastly underpublicized free hard-drive utility programs. We’ll show you how.
Disk Basics
The Mac “writes” data to a disk, whether hard or floppy, by sending out a
stream of positive and negative electrical signals that correspond to the
series of bits (1s and 0s) that make up the data currently in the computer’s
memory. Based on those signals, an electromagnet in the disk drive’s
read/write head (a moving arm, like the needle of a record player) creates a
4040-8/5 ch08.F 11/3/98 3:49 PM Page 355
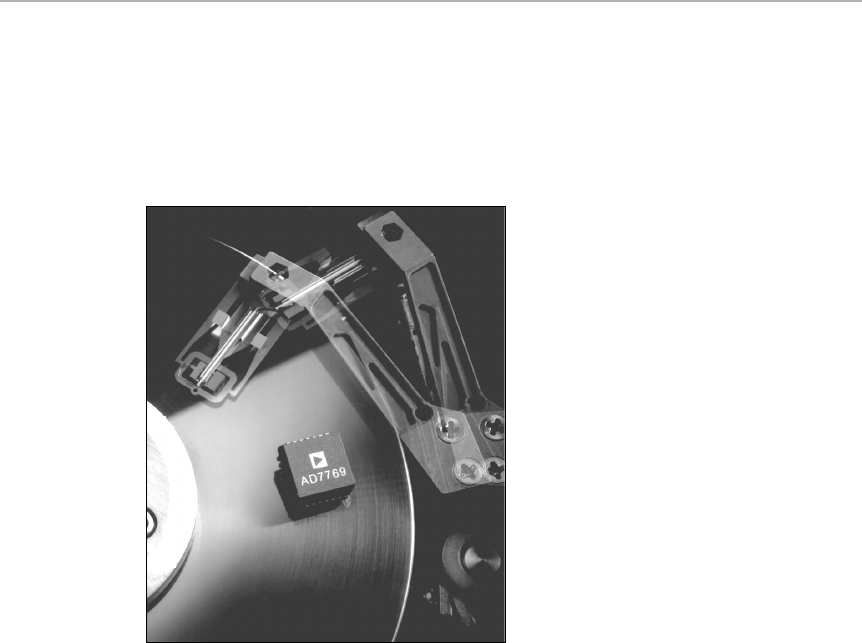
pattern of tiny magnetic bands along the surface of the disk as it spins
(see Figure 8-1). Because the disk is coated with metallic particles that are
extremely sensitive to magnetic charges, the patterns created by the drive
remain intact indefinitely. The area taken up by each magnetic charge is so
microscopically tiny that a single high-density floppy disk can store more
than 11.5 million bits of data.
Figure 8-1: The magnetic read/write head moves across the disk surface like the needle of a
record player. On a disk, however, it doesn’t start at the outside and move in; it jumps all over
the disk surface as needed.
Data is read back into the Mac through a reverse process in which the
read/write head reacts to the magnetic fields on the disk. Then it transfers
the positive and negative signals back to the Mac’s memory.
With millions of bits of data scattered over the surface of a disk, how does
the Mac find a particular string of recorded data?
Sectors, tracks, and blocks
Simply put, it follows a map. The surface of each disk is mapped out into a
series of concentric circles called tracks. Each track is, in turn, partitioned
into smaller segments called sectors. The Mac relies on these dividers as
guideposts. It keeps track of which bits of data get stuffed into which sectors
(or groups of sectors, called blocks), so that it can find them again when
needed. In essence, the surface of a Mac’s hard disk has been divided into
thousands of little numbered parking spaces for information.
356 Part II: Secrets of the Machine
■■
MAC SECRETS • 4040-8/X • ch.08.F • Chapter 8 • FINAL • VB/EAP • 10/23/98 • p.356
MAC SECRETS • 4040-8/X • ch.08.1 • Chapter 8 • Proof 1 • ma • 09/2/98 • p.356
4040-8/5 ch08.F 11/3/98 3:49 PM Page 356
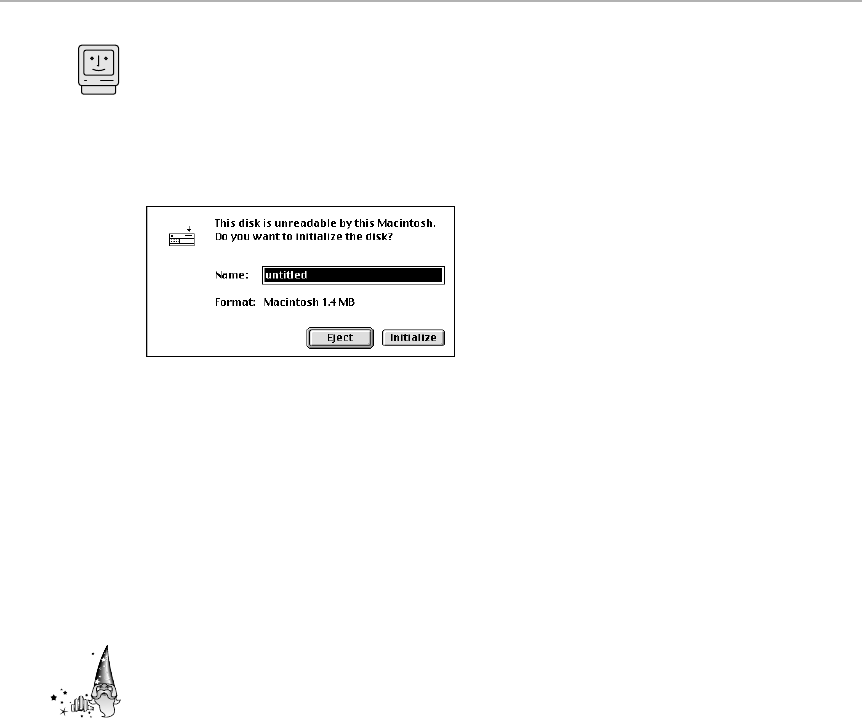
When you pop a new, unformatted floppy disk into your Mac, the Mac must
initialize the floppy disk before using it (see Figure 8-2). Here’s the reason: A
blank disk fresh out of the box hasn’t been mapped out with tracks, sectors,
and blocks. During initialization, the Mac inserts those reference points,
creating the map it will later use to navigate around the disk, storing and
retrieving specific pieces of data.
Figure 8-2: You can’t use a floppy disk until it’s been initialized with the guideposts the Mac
needs to find its way around.
The great wasted-space conspiracy
Apple’s standard Hierarchical File System (HFS) divides up every disk —
floppy, Zip, hard drive, CD-ROM, whatever— into a fixed number of blocks —
65,000, maximum. On a floppy disk, each block is about 1K — there are
nowhere close to 65,000 blocks. On a 1-gigabyte hard drive, though, the
65,000-block ceiling kicks in, meaning that each block is 32K. On a four-gig
drive, each block is 65K. And so on.
Now comes the strange part: no matter how small a file is, the minimum
amount of disk space it can take up is one block. You read that right—even a
completely empty SimpleText file takes up 65K on a four-gig drive. Try it
yourself — you’ll see.
Therefore, some space almost always gets wasted, especially with little
files — the Mac rounds up the amount of space taken up by a file to the
nearest block. Suppose you’ve got a four-gig drive. If a file is 70K, the Mac
must reserve 130 kilobytes for it. The file won’t fit completely in one block
(65K), and so a second block gets used up, even though it’s mostly empty.
Bottom line: the Mac can’t subdivide a block.
(Techie note: The situation can be even worse if the file in question has both
a data fork and a resource fork, the two separate chunks of code that can
constitute a Mac file. These chunks can’t coexist on a block — so that 70K
Mac file, if it contained 66K of data and 4K of resources, could consume 195K
of space — two blocks for data and one for resources.)
Want to see this bizarre wastefulness in action? Click a small file’s icon and
choose Get Info from the File menu. You’ll see not one, but two different sizes
for it. You’ll see something like “65K on disk (9,112 bytes used).” Now you
know: the file is actually about 9K in size — but it’s using up 65K on the disk
(most of which is empty).
Strange
But True
Mac Basics
Chapter 8: The Disk Chapter 357
■ ■
MAC SECRETS • 4040-8/X • ch.08.F • Chapter 8 • FINAL • VB/EAP • 10/23/98 • p.357
MAC SECRETS • 4040-8/X • ch.08.1 • Chapter 8 • Proof 1 • ma • 09/2/98 • p.357
4040-8/5 ch08.F 11/3/98 3:49 PM Page 357

Multiply this wasted-space scenario times the thousands of tiny files on your
hard drive— think of those hundreds of Web cache files, for example — and
you’d almost be tempted to suspect collusion between Apple and the hard-
drive manufacturers.
Only one thing calms our Oliver Stone-esque conspiracy theories — the fact
that Apple finally eliminated the wasted-space problem. Mac OS 8.1 and later
offers an optional hard-drive formatting scheme called HFS+, or Mac OS
Extended Format, that makes the wasted-block-space syndrome a thing of
the past. We’ll discuss this new formatting system later in this chapter.
So why did Apple devise a filing system that wastes so much space? This
system was developed in the days when a 20MB hard drive was considered
absurdly huge. The tiny amount of space wasted by a 20MB hard drive’s
partially-filled blocks is, indeed, negligible. But today, where a typical hard
drive is 200 times that size, the blocks are proportionally larger — and the
wasted space mounts up.
The changing-file-size syndrome
The different-block-size-for-each-disk phenomenon explains another quirk of
the Mac universe: the changing-file-size syndrome. For example, on a floppy,
an alias is only 1K — but drag it to a 4GB hard drive, and the very same alias
balloons to 65K! Similarly, you might drag your important 64K speech onto a
floppy and see it shrink before your eyes to 8K. There’s nothing bad going on;
you’re merely seeing these small files occupy a single block on each disk.
Want to make an impression at Silicon Valley cocktail parties? Let this
terminology fly: The number of blocks used up is the physical file size. The
actual size of the file, which is always smaller, is called the logical file size.
The two numbers you see in the Get Info box are the physical and logical
sizes of the file. The first number, the physical file size, is always expressed
in K; the second number, the logical file size, is always given in bytes.
There’s only one more strange aspect of file sizes. We just said that the
physical file size (the first number in the Get Info box) is always larger than
the second number because it reflects a certain amount of wasted space. But
if you look at Figure 8-3, you’ll see an apparent contradiction! The example
there says “314K in disk (319,065 bytes used)”—the first number is smaller
than the second! Right?
Figure 8-3: When is 314 not 314? When it’s 319. Which, believe it or not, is smaller than 903.
OS
8
358 Part II: Secrets of the Machine
■ ■
MAC SECRETS • 4040-8/X • ch.08.F • Chapter 8 • FINAL • VB/EAP • 10/23/98 • p.358
MAC SECRETS • 4040-8/X • ch.08.1 • Chapter 8 • Proof 1 • ma • 09/2/98 • p.358
4040-8/5 ch08.F 11/3/98 3:49 PM Page 358

Wrong! Don’t forget that there are not 1,000 bytes in a kilobyte, despite your
lessons in Greek prefixes. Because a computer can count only in powers of
two, there are actually 1024 bytes in a kilobyte! Therefore, the sentence
“903K in disk (319,065 bytes used)” is perfectly logical. If you do the math,
you’ll discover that the Get Info box is really saying 314K in disk, 311K used!
And, as we said, the first Get Info number is truly larger than the second
number. Always.
What’s a volume?
In the olden days, a disk was a disk. Then there were cartridges. Then there
were CD-ROMs, tape cassettes, and Zip disks. The world needed a generic term
to cover any kind of individual storage unit/disk/disc/cartridge/cassette— you
know, something that shows up on your Desktop with its own name and icon.
The term they came up with is volume.
HFS+ (Mac OS Extended Format)
This new disk format, supported by Mac OS 8.1 and higher, is a modern
alternative to the aging Hierarchical File System (HFS) which Apple now
refers to as Mac OS Standard Format. Under Mac OS Extended format, the
maximum number of blocks allowed on a drive swells from 65,536 to 4.29
billion — so the blocks can be much, much smaller, thus wasting much, much
less space.
The bottom line: HFS+ is like a gift of a free hard drive to every Mac owner in
the world. It can return to you hundreds of megabytes of free storage. When
you reformat your current hard drive as an Extended Format disk, your files
simply take up less disk space.
Just how much space you reclaim depends on the size of your disk—the
larger the disk, the more space you stand to gain — and the sort of files you
keep on it. You’ll see the biggest impact if you have a large number of small
files, rather than just a few enormous files. It’s not unusual to gain back 200
megabytes on a drive that holds 2G or more.
Should you upgrade your drive to HFS+?
Converting your existing hard drive to an HFS+ disk can save you a lot of
storage space. But if you’re not careful, you can end up with plenty of hard
drive space for your files — and no way to access them. Before proceeding,
learn well the following Rules of HFS+:
■Rule 1: First of all, you can access HFS+ disks only from Macs running
Mac OS 8.1.
OS
8
Mac Basics
Chapter 8: The Disk Chapter 359
■ ■
MAC SECRETS • 4040-8/X • ch.08.F • Chapter 8 • FINAL • VB/EAP • 10/23/98 • p.359
MAC SECRETS • 4040-8/X • ch.08.1 • Chapter 8 • Proof 1 • ma • 09/2/98 • p.359
4040-8/5 ch08.F 11/3/98 3:49 PM Page 359

Suppose, for example, that you format a Zip disk with HFS+. You take it to
a friend’s house, where the Mac is running System 7.6. Insert that Zip
disk, and you’ll find it empty — except for a Read Me document file called
Where_have_all_my_files_gone? The file explains that your files are still
present—but visible only on a Mac OS 8.1-or-later Macintosh.
(However, Macs running earlier system versions can access files on
HFS+ disk contents over a network, as long as the server is running OS
8.1 or later.)
■Rule 2: Furthermore, you can’t use an HFS+-formatted drive as the startup
drive disk in any non-PowerPC Mac. In other words, don’t try to format
the internal hard drive of Quadras, Mac II-series, or desktop Macs with
three-digit model numbers with HFS+. Only PowerPC-based Macs can
start up from an HFS+ disk. Nor can hard drives formatted with HFS+ be
selected as virtual memory disks (in the Memory control panel) on non-
PowerPC Macs.
■Rule 3: Also, it’s not worth upgrading if your Mac has a smallish hard
drive. You can format an 80MB drive using HFS+, but you might only gain
a few extra megabytes. Generally speaking, drives smaller than 1GB
aren’t worth converting; you’ll regain very little space.
How to upgrade to HFS+
Converting a disk to HFS+ means completely reinitializing it, which involves
erasing all the data on it. So the first step in the conversion process is to back
up your entire hard drive. When you’re done re-initializing your hard drive,
you’ll have to copy all your files back.
Start up from a Mac OS 8.1 disk (not, obviously, the one you’re trying to
erase) — the Apple Mac OS 8.1 (or later) startup CD-ROM is a good choice.
So is an external hard drive, a Zip, Jaz, or similar volume. You can also create
a Mac OS 8.1 (or later) startup floppy disk, thanks to the Disk Tools disk
image provided on the Mac OS 8.x CD-ROM. (See Chapter 22 for details on
using disk images.)
To initialize your hard drive, select it in the Finder and choose the Erase Disk
command from the Special menu. (Obviously, the disk you’re re-initializing
can’t be your current startup disk.) In the Erase Disk window, choose Mac OS
Extended from the Format pop-up menu.
Alternately, you can use Apple’s Drive Setup utility (version 1.4 or later). First
click Initialize, then click Custom Setup and choose Mac OS Extended from
the Type pop-up menu (see Figure 8-4).
If you’re willing to spend a little cash, there’s at least one way to convert to
HFS+ without reinitializing your hard drive. You can use PlusMaker, a $20
utility from AlSoft. PlusMaker converts a drive to HFS+ without reformatting
it, leaving all your data intact. It also runs faster than Drive Setup and can
create smaller-sized allocation blocks, for even greater space savings.
Strange
But True
360 Part II: Secrets of the Machine
■ ■
MAC SECRETS • 4040-8/X • ch.08.F • Chapter 8 • FINAL • VB/EAP • 10/23/98 • p.360
MAC SECRETS • 4040-8/X • ch.08.1 • Chapter 8 • Proof 1 • ma • 09/2/98 • p.360
4040-8/5 ch08.F 11/3/98 3:49 PM Page 360

Figure 8-4: Use either Drive Setup or the Finder’s Erase Disk command to reformat a drive as
an HFS+disk.
One other warning: If you do opt to reformat your drive with HFS+, make sure
any hard disk utilities you use (such as Hard Disk Toolkit, TechTool Pro, or
Norton Utilities) are HFS+-compatible. Only the most current versions of
these programs can rescue files properly with HFS+ volumes.
Hard Disks
Crack open any hard drive (don’t do it — we’re just being hypothetical), and
you’ll find not one disk, but a series of metal or glass platters. Each is coated
with a magnetically sensitive material. These disks spin at 5,400 rotations or
more per minute, passing within 10 millionths of an inch of the read/write
heads that transfer data to and from the disks.
A hard drive’s speed, however, is dependent on more than sheer rotations-
per-minute. In the next few pages, we’ll cover some of the other factors that
determine how well a hard drive does its job.
Two things you don’t want to
think about — but should
We don’t mean to be depressing, but before we get into the nitty-gritty of the
hard disk discussion, we feel morally obligated to mention a couple of
unpleasant realities.
Chapter 8: The Disk Chapter 361
■ ■
MAC SECRETS • 4040-8/X • ch.08.F • Chapter 8 • FINAL • VB/EAP • 10/23/98 • p.361
MAC SECRETS • 4040-8/X • ch.08.1 • Chapter 8 • Proof 1 • ma • 09/2/98 • p.361
4040-8/5 ch08.F 11/3/98 3:49 PM Page 361

First, disks and disk drives are among your Mac’s few mechanical
components. They have motors, gears, levers — parts that actually move,
parts that can be scratched, get sticky, rattle loose, or require lubrication.
Disks and disk drives are much more vulnerable to problems than most other
parts of your computer system.
At the same time, disks are among the most important devices you use each
day, because they are the repositories of virtually all the work you do on your
Mac. For this reason, we suggest that you take especially good care of disks
and disk drives. They should be handled with care, maintained using the
techniques we’ll give you, and not taken for granted.
Which brings us to Depressing Reality No. 2: The day will come when your
hard drive grinds to a halt. It will die. This is not a remote possibility; it is
your unchangeable destiny. When you lift a brand new hard drive out of its
foam packing crate for the first time and proudly place it on your desk, the
manufacturer already has labeled that drive with an MTBF—a Mean Time
Between Failures rating. This rating represents the number of hours the
manufacturer estimates the drive will operate before it fails because of one
problem or another. Some drives have an MTBF of just a few years. Others
are rated to last a dozen or more years. But they all are expected to fail at
some point.
When this happens — and it will if you use your Mac long enough — you will
probably panic. You will want to tear your hair out in frustration. So plan
ahead. Always make backups of irreplaceable work and heed this chapter’s
tips on keeping your hard drive in good working order.
The device driver
Nestled away in its own little corner of your hard drive is a little piece of
software called its driver — yet another program that works behind the
scenes. Every time you store data on your drive or retrieve data from it, the
driver software is called upon to manage the operation. (The driver is also
the file that stores your hard drive’s icon as it appears on the Desktop.)
Most new Mac hard drives come preformatted with driver software included
on the drive. Even though you never see driver software, you need to think
about it if you’re interested in coaxing the best possible performance out of
your hard drive. Some new non-Apple drivers are faster than others. Some
drivers are configured for use with specific drives and Mac models. To get
the fastest and most reliable performance, you need an up-to-date driver that
is fully compatible with your drive.
That’s especially true when you’re upgrading system-software versions.
Hundreds of Mac fans complained bitterly when they tried to install System
7.5.3, for example, and fell into a troubleshooting nightmare. Had they
updated their drivers first, all would have been well. (That’s why every Apple
system-installer since has forced you to update the drivers before proceeding
with the installation.)
Mac Basics
362 Part II: Secrets of the Machine
■ ■
MAC SECRETS • 4040-8/X • ch.08.F • Chapter 8 • FINAL • VB/EAP • 10/23/98 • p.362
MAC SECRETS • 4040-8/X • ch.08.1 • Chapter 8 • Proof 1 • ma • 09/2/98 • p.362
4040-8/5 ch08.F 11/3/98 3:49 PM Page 362
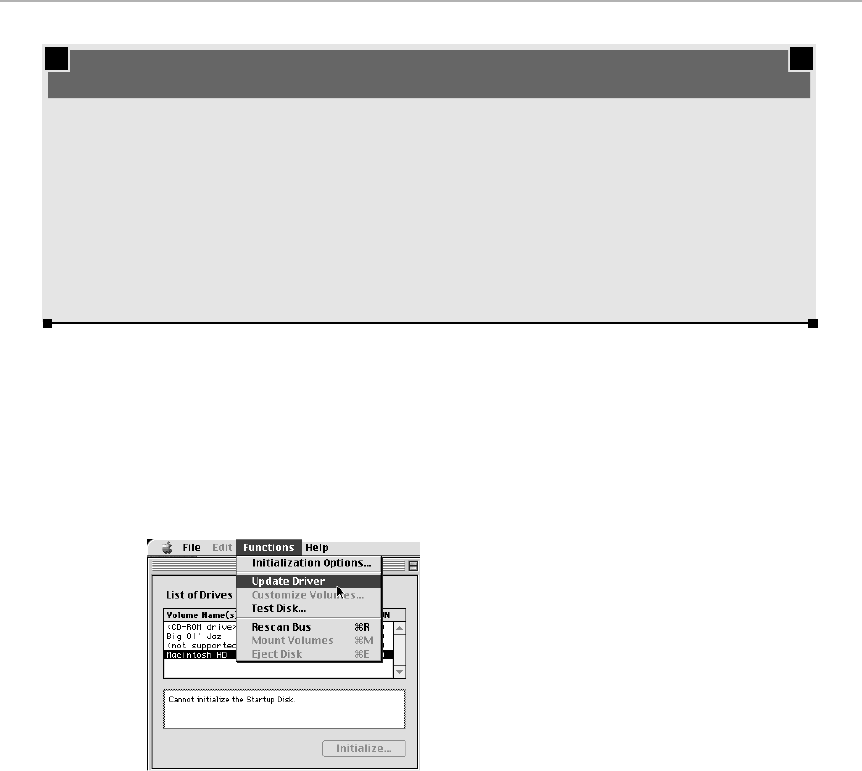
If you have an Apple hard drive, you can update the driver using the latest
version of the drive formatting utility that came with your Mac — Drive Setup.
(Older Macs came with Apple HD SC Setup or Internal HD Format; see Figure
8-5.) At least one of these programs is on your system software’s Disk Tools
disk or system CD-ROM; newer versions can be downloaded from
www.apple.com or America Online.
Figure 8-5: Drive Setup, Apple’s latest drive formatting utility, lets you update your hard
drive’s driver.
All about IDE
As you’ll learn in Chapter 33, some PowerBooks and lower-cost desktop Mac
models these days don’t have a typical SCSI hard drive inside (see the “The
IDE Macs” sidebar later in this chapter). Instead, they come with a hard drive
style known as IDE (Intelligent Drive Electronics), popular in the world of IBM
PC and clones. On one hand, IDE drives cost less than SCSI equipment and —
because you can’t connect more than two in a chain—you don’t have to
worry about address conflicts, cabling, or termination. On the other hand,
IDE drives are generally slower and less versatile than SCSI drives.
Chapter 8: The Disk Chapter 363
■ ■
MAC SECRETS • 4040-8/X • ch.08.F • Chapter 8 • FINAL • VB/EAP • 10/23/98 • p.363
MAC SECRETS • 4040-8/X • ch.08.1 • Chapter 8 • Proof 1 • ma • 09/2/98 • p.363
TRUE FACT
“The whole notion of computing takes a quantum
leap when you discover that information can be
stored in one place rather than scattered over
hundreds of little disks. Average users can store
all their programs as well as a year’s worth of
files on a 10MB hard disk — and theoretically
never have to look at a floppy again.”
We thought you might enjoy this fanciful,
forward-looking editorial. It was in the very first
issue of Macworld in 1985.
Three pages earlier, there’s an ad for exactly such
a device: a 10MB hard drive. List price: $1,495.
What a difference a decade makes
4040-8/5 ch08.F 11/3/98 3:49 PM Page 363

What does the presence of an IDE hard drive mean to your life? In general,
nothing; it’s a purely internal component. You still get the standard SCSI jack
on the back of your computer, into which you can plug the usual scanners,
CD-ROM drives, and so on; they work completely independent of the internal
IDE hard drive.
How to update your hard-disk driver
Updating your driver doesn’t reformat, initialize, or erase a disk. When you
update a driver, your data stays intact. Only the software that controls the
drive’s operation is changed.
Furthermore, you’ll rarely need to update your hard-disk driver manually. As
we noted earlier, Apple’s own system-software installers generally do this
whether you like it or not.
If you’d feel better knowing that you have the latest drivers, though, get the
newest version of the Apple drive formatting software that came with your
Mac. Current Macs come with, and can be updated with, Drive Setup. Pre-
1997 Macs came with either Apple HD SC Setup (for SCSI hard drives) or,
again, Drive Setup (for IDE drives). Do an online search to make sure you
have the very latest. (On America Online, it’s keyword: AppleComputer. On
the Web, start at www.apple.com.)
Once you’ve got the latest updating program, do the following:
■Apple hard drives, Drive Setup: Launch the program, and then choose
Update Driver from the Functions menu.
■Apple hard drives, Apple HD SC Setup: Launch the program. Click the
Update button.
■Non-Apple hard drive: The Apple programs (Drive Setup and HD SC
Setup) don’t work unless your hard drive is an Apple drive. In general, if
you have a Macintosh clone such as one from Umax or Power Computing,
you were provided with a third-party driver updater, such as SilverLining
(LaCie) or Hard Disk Toolkit (FWB). Unfortunately, you’ve just hit one of
the downsides of owning a Mac clone: Whenever Apple releases a new
system update (such as Mac OS 8.5), you’ll have to hunt down (and
possibly pay for) updated versions of those third-party hard drive
updaters. The Apple formatting programs, by contrast, are always free
and always posted on Apple’s Web site.
Interleave
Interleave is a term that’s obsolete today. It describes a scheme used to slow
down the arrival of data on very slow hard drives, such as those in the Mac
Classic, Plus, and PowerBook 100. For details, see Chapter 8 of the electronic
version of Macworld Mac Secrets, 4th Edition (on the CD-ROM that came with
this book).
364 Part II: Secrets of the Machine
■ ■
MAC SECRETS • 4040-8/X • ch.08.F • Chapter 8 • FINAL • VB/EAP • 10/23/98 • p.364
MAC SECRETS • 4040-8/X • ch.08.1 • Chapter 8 • Proof 1 • ma • 09/2/98 • p.364
4040-8/5 ch08.F 11/3/98 3:49 PM Page 364

The
Secrets
hard-drive
maintenance schedule
Your hard drive is filled with hidden goings-on and invisible files. Every time
you save, copy, or delete a file, all kinds of stressful activities take place: the
hard drive must update its internal table of contents (the invisible Desktop
DF file), log any new icons or icon positions (the invisible Desktop DB file),
and keep track of how the file is fragmented (in the invisible extents and
B-tree files).
We mentioned backups, formatting, and rebuilding the Desktop. But when
do you do all this stuff? Here, for the careful Mac user, is our recommended
schedule for hard-drive maintenance. Photocopy, clip, and save.
When you get the drive
Your hard drive came pre-formatted. The only decision to make before you
start loading it up is whether or not you want to partition it. (See “Partitions,”
later in this chapter.)
When you change System software versions
Before installing the new System, start up from a different disk (such as the
CD-ROM that came with your computer). Run Disk First Aid (on that same
CD-ROM) to make sure that the disk’s software structures are healthy. Then get
the latest version of Drive Setup (or Apple HD SC Setup) and update the driver.
(Fortunately, the installers for Mac OS 8 and later do all of that for you.)
Chapter 8: The Disk Chapter 365
■ ■
MAC SECRETS • 4040-8/X • ch.08.F • Chapter 8 • FINAL • VB/EAP • 10/23/98 • p.365
MAC SECRETS • 4040-8/X • ch.08.1 • Chapter 8 • Proof 1 • ma • 09/2/98 • p.365
TRUE FACT
Is your Mac’s internal hard disk a traditional
SCSI drive or one of the PC-style IDE drives that
Apple’s been popping into selected models? If
you have one of these models, you can’t use
Apple HD SC Setup to format or partition your
drive; you need either Internal HD Format or
Drive Setup:
Performa or LC 575, 580
LC, Quadra, or Performa 630 series
Power Macintosh 4400
LC or Performa 5000 series
Power Macintosh 7220
20th Anniversary Macintosh
Performa/Power Mac 6000 series (except 6100)
Power Macintosh G3 (except high-end models)
PowerBook 150, 190
PowerBook 1400, 3400, 2400, 5300, G3
iMac
The IDE Macs
4040-8/5 ch08.F 11/3/98 3:49 PM Page 365

Every day
Back up whatever files you worked on during the day. If it’s important work,
make two backups — on two different disks—and back up more than once a
day. (See “Making pain-free backups,” later in this chapter, for tips.)
Once a month
Rebuild the Desktop (press Ô-Option as the Mac is starting up). See Chapter 1
for unbelievable detail.
Every six months (or whenever flakiness arises)
Reinstall a fresh copy of the System software. Do a “clean install,” as
described in Chapter 5. (This eliminates any corruption that may have crept
into your System file during day-to-day use.)
Defragment your drive if it’s more than 80 percent full.
Every two years
Back up your entire drive and reformat it. Among other things, reformatting
locks out bad sectors on your disk, so you won’t try writing data to portions
of the disk that have developed tiny flaws and may not be reliable. Beyond
that, we just like the feeling of wiping out any lurking problems that may have
wiggled into existence.
Hard Drive Secrets
■
All the terminology that’s fit to print
Disk storage and RAM are measured in the same units, spelling confusion for
anyone who’s already having trouble telling them apart.
A
bit
is the smallest piece of information. It’s one single binary signal — on or
off — for the computer’s billions of electronic switches. (
Bit
is a contraction of
binary digit,
actually, but nobody writes it “b’it,” except maybe Klingons.)
On a disk, these two possible conditions correspond to the two possible
charges a particle on the disk surface may have: positive or negative.
Eight bits make a
byte.
(Everything in the computer world is a power of two, and
things seem to increase in multiples of eight.) A byte is enough information for
the computer to specify one character — a W, for example, or a comma. (If an
alphabet, as in Asian and Middle Eastern languages, has too many symbols to
be specified by a single byte, then
two
bytes are required to specify one letter.
That’s where the term
double-byte language system
comes from. System 7.1
was the first Mac system software that could handle double-byte language
systems — with the installation of a language kit.)
Mac Basics
366 Part II: Secrets of the Machine
■ ■
MAC SECRETS • 4040-8/X • ch.08.F • Chapter 8 • FINAL • VB/EAP • 10/23/98 • p.366
MAC SECRETS • 4040-8/X • ch.08.1 • Chapter 8 • Proof 1 • ma • 09/2/98 • p.366
4040-8/5 ch08.F 11/3/98 3:49 PM Page 366
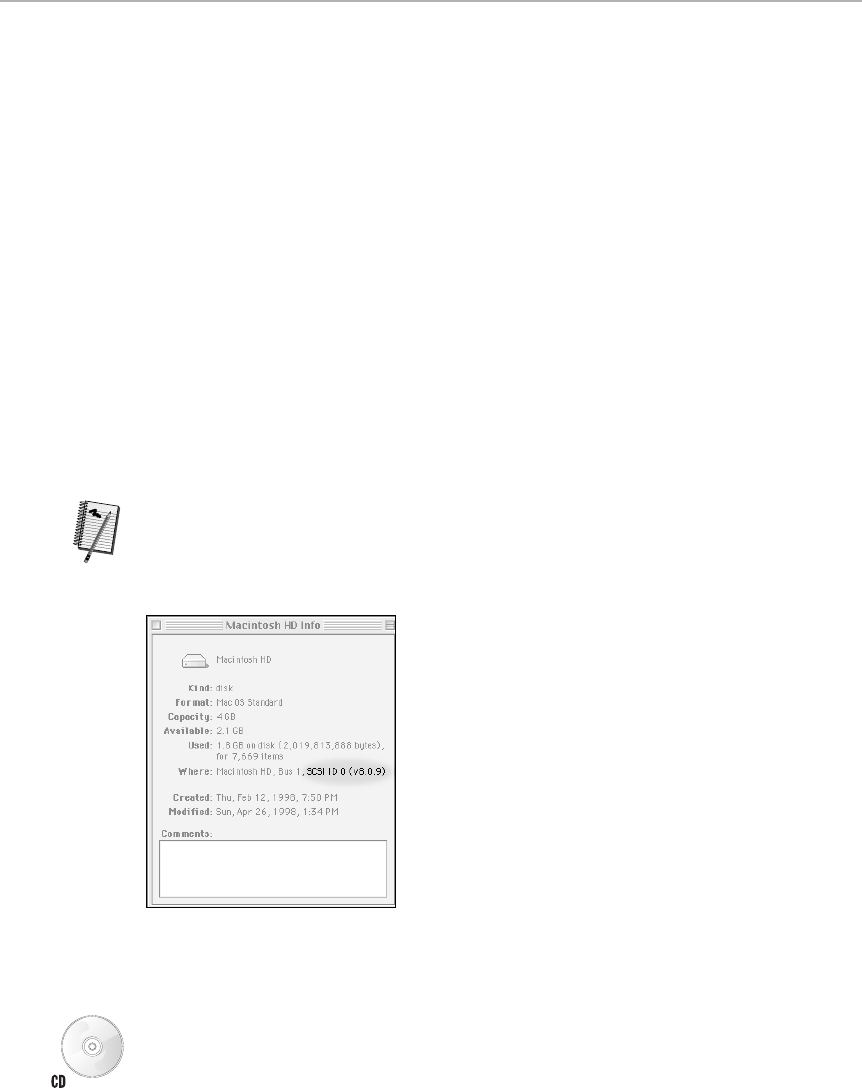
Take 1,024 bytes — that’s the closest a power-of-two machine can come to
1000 — and you have a
kilobyte,
or K. Take 1,024 of
those
and you have a
megabyte,
or MB.
And 1,024 of
those
is a
gigabyte,
or GB.
And 1,024 of
those
is a
terabyte.
And 1,024 of
those
is a
petabyte.
And 1,024 of
those
is one
huge
hard drive.
Finding a disk’s SCSI ID
Every hard drive must have its own personal ID number on your SCSI chain (see
Chapter 33 for details on SCSI). If two hard drives have the same ID number,
you’re asking for crashes and oddball behavior.
But it’s no picnic figuring out what a disk’s SCSI number
is.
Sometimes the
SCSI number is set by the positions of tiny DIP switches underneath the unit.
Sometimes there
is
no indication.
We discovered, however, that you can find any disk’s SCSI address much more
easily: Simply select its icon and choose Get Info from the File menu (see Figure
8-6). The resulting box shows not only the hard drive’s SCSI address, but its
driver-software version, too.
Figure 8-6: The Get Info box for a hard drive gives a wealth of secret information, including
its SCSI address. This hard drive, like all original internal hard drives, is at ID zero.
Of course, there’s an even easier way to find a disk’s SCSI ID number. Just use
SCSIProbe, which is included on the CD-ROM that comes with this book. Or, if
you have Mac OS 8 or later, you can launch the Apple System Profiler utility from
the Úmenu. Then press Ô-4 (or choose Device Information from the Select
Worth
Learning
Chapter 8: The Disk Chapter 367
■ ■
MAC SECRETS • 4040-8/X • ch.08.F • Chapter 8 • FINAL • VB/EAP • 10/23/98 • p.367
MAC SECRETS • 4040-8/X • ch.08.1 • Chapter 8 • Proof 1 • ma • 09/2/98 • p.367
4040-8/5 ch08.F 11/3/98 3:49 PM Page 367

menu) to view even more detailed information about each device attached to
your Mac — including its SCSI ID number, manufacturer, capacity, and the
number of partitions it contains.
Who makes your drive?
The company who sold you your drive didn’t make it.
In fact, very few companies actually
make
the hard-drive mechanism: Quantum,
Seagate, IBM, and a couple of others. The 100 companies who
sell
hard drives
to you, the customer, buy up these mechanisms. They install the drive into a
plastic or metal housing, paint their brand name on the front, throw in a manual
and some formatting software, and mark up the price.
The result is that 100 different companies may compete, but they’re actually
marketing identical equipment. (The term for that handful of companies who
make the internal guts of the drive is
OEM,
for Original Equipment
Manufacturer.)
Want to know who made your drive? If you have Mac OS 8, use the Apple
System Profiler, as described in the previous secret, and you’ll find out.
Making pain-free backups
Because every hard drive is destined to fail one day, your only hedge against
disaster is backing up your work. If you’re a corporate- or office-type person, we’re
sure that you’ve heard the usual advice: Keep
multiple
sets of backup files, made
on different days of the week. Keep a copy of the most-important files in a
different building. If possible, choose a building located in a different
city
.
If you’re working on a home computer, you may not need to be quite as
paranoid. For example, you generally don’t need to back up your System folder;
you’ve got that permanently backed up on your startup CD-ROM. Nor do you
need to regularly back up your
programs,
which you’ve presumably got on
their
original installation disks, too. Back up your documents, however, and possibly
your Preferences folder (inside the System folder).
To make the process easier, here are some tips:
First, you can simply gather up the documents you worked on each day and copy
them to a different disk. The Find File command makes this especially easy: At
the end of the day, launch Find File, and search for all documents modified on
the current date. (Or make a habit of flagging your document or project folders
with labels, as explained in Chapter 2 — and then use Find File to round up
those
folders.
)
When the list of found files appears in the Items Found window, press Ô-A to
select all the files, and then drag the icons to another disk (a SyQuest, Zip or
Jaz drive, a second hard drive, or multiple floppies if necessary) for backup.
OS
8
368 Part II: Secrets of the Machine
■ ■
MAC SECRETS • 4040-8/X • ch.08.F • Chapter 8 • FINAL • VB/EAP • 10/23/98 • p.368
MAC SECRETS • 4040-8/X • ch.08.1 • Chapter 8 • Proof 1 • ma • 09/2/98 • p.368
4040-8/5 ch08.F 11/3/98 3:49 PM Page 368

(Mac OS 8 and 8.1 note: As noted in Chapter 3, you can’t drag a group of items
out of the Items Found window except to an
alias.
Until you get Mac OS 8.5,
you’ll have to make an alias of your backup disk before dragging your items to
be backed up.)
But a much less painful strategy is to use a genuine backup program that
automates the backup process. They automatically hunt down the files that have
been changed since the last backup, instruct you to put in floppies, and do the
copying for you. Fastback, Retrospect, and Retrospect Express are some
popular backup programs. You might also consider writing an AppleScript to
backup all the folders that contain your documents (see instructions in Chapter
22) before the Mac shuts down each day.
Dealing with a hard disk crisis
If your hard drive suddenly won’t mount, comes up as “unreadable,” or starts
behaving erratically, with files appearing and disappearing at random, it might
need some minor repairs. Don’t worry — these repairs usually are
not
the kind
that require a clean room, special microscopic wrenches and a $70-per-hour
technician — they’re the kind you can do yourself.
First of all, the problem may not be the disk. There are all sorts of little glitches
that can make your Mac
think
there’s a problem with the hard drive when it’s
actually just fine. The real problem might be the cable connecting your scanner
to your Mac, or a corrupted file in the System Folder, or a conflict between two
system extensions, for example. Check out our troubleshooting guide in Chapter
36 to learn how to track down such problems.
If it turns out the disk really is the cause of the problem, take heart: Unreadable
disks usually contain readable files; its just the disk’s directory information
that’s become scrambled. In other words, the map that the Mac uses to locate
specific files on the disk is gone or mangled. Without a directory map, your Mac
loses track of what files are on the disk and decides that it’s unreadable.
Your first line of attack should be to run Disk First Aid, the free repair utility
that came with your Mac (it’s on your system software CD). Disk First Aid isn’t
as powerful as other commercial disk-repair programs, but it can repair many
directory glitches. In fact, Disk First Aid has improved quite a bit over the last
few years and has become a pretty decent tool for fixing disk problems. The
version of Disk First Aid that comes with Mac OS 8.5 and later, in fact,
launches
itself
after a system crash, thus nipping many hard drive problems
in the bud.
Except in Mac OS 8.5, a disk-repair program can’t fix the disk that contains files
that are
open
. So if the problem is on the startup drive, you generally have to
start up from another disk (that contains Disk First Aid). This can be an external
drive, a Jaz or Zip disk, a Disk Tools floppy, or — most conveniently — the Mac
system software CD-ROM. Once you’ve restarted from another disk, launch Disk
OS
8.5
Mac Basics
OS
8
Chapter 8: The Disk Chapter 369
■ ■
MAC SECRETS • 4040-8/X • ch.08.F • Chapter 8 • FINAL • VB/EAP • 10/23/98 • p.369
MAC SECRETS • 4040-8/X • ch.08.1 • Chapter 8 • Proof 1 • ma • 09/2/98 • p.369
4040-8/5 ch08.F 11/3/98 3:49 PM Page 369

First Aid, select your hard disk’s icon in the window and click the Verify button. If
the program finds a problem, it will let you know and offer to fix it if it can.
(Fortunately, Mac OS 8.5’s version of Disk First Aid is smart enough to bypass
those shenanigans. It can analyze the disk it’s on — even if it’s the startup disk.)
To fix major glitches, you might need a heftier program, such as Norton Utilities
or TechTool Pro, which can fix disks beset with even major problems. (These
programs can also retrieve files from disks that are so mangled that they can’t
be fixed.)
One bit of advice: You may think that if you have Norton Utilities, you don’t
need Disk First Aid. The fact is, Disk First Aid can catch glitches that Norton
misses — and vice versa. Your best bet is to run
both
utilities when a big disk
problem strikes to make sure you’ve caught all the problems.
File fragmentation
When you copy files to an empty hard drive, the data is written to contiguous
(adjacent) sectors on each disk; think of playing cards being laid end to end.
This makes it easy for the Mac to retrieve the information later, because
every piece of data is grouped with the data that’s supposed to come next.
That’s why a brand-new drive is the fastest drive.
But things don’t usually stay that way. Over time, drive space gets used up.
Small files get deleted, leaving little pockets of available space here and there.
File fragmentation occurs when, after extended use, the only storage space
available on your disk is in various unconnected sectors, scattered in various
locations. At that point, the Macintosh begins to save files in pieces, wherever
empty sectors are available.
The Mac can still access such fragmented files. However, reading fragmented
files takes longer, because the hard drive’s read/write heads must physically
move around to find all the pieces.
You can regain the tiny bit of speed lost through file fragmentation by
defragmenting your hard drive. Defragmenting also increases the chance that
you’ll be able to recover files after a crash using a repair utility; your files will
be in solid chunks and not scattered across the drive in tiny segments.
To defragment a hard drive, you can either buy a disk-defragmenting
program or simply reinitialize your disk. Both methods are outlined in the
secrets that follow.
Keep in mind, though, that a hard drive must be nearly full— and remain that
way for weeks or months — before defragmenting makes any measurable
speed difference. Most Mac users never defragment their hard drives and
never notice any appreciable speed loss.
Mac Basics
Worth
Learning
OS
8.5
370 Part II: Secrets of the Machine
■ ■
MAC SECRETS • 4040-8/X • ch.08.F • Chapter 8 • FINAL • VB/EAP • 10/23/98 • p.370
MAC SECRETS • 4040-8/X • ch.08.1 • Chapter 8 • Proof 1 • ma • 09/2/98 • p.370
4040-8/5 ch08.F 11/3/98 3:49 PM Page 370

On the other hand, if you record and play QuickTime movies, file fragmentation
can make a big difference. When it comes to digital video, every nanosecond
counts. A video clip containing 15 to 30 individual frames per second may
stutter and jerk when played back if your Mac must retrieve the movie frames in
small chunks scattered all over a hard drive. It’s best to record digital video on a
freshly defragmented hard drive that can store video data in large solid chunks.
You’ll also sometimes hear the term optimizing a drive. A disk optimizer
program not only defragments the files on the drive— it even tries to figure out
where to put them, in their reassembled conditions, so that defragmenting is
less likely to occur again. The optimizer may put your applications, which aren’t
very likely to be modified, at the outside edges of the drive surface, for example.
Defragmenting Secrets
■
Defragmenting the inexpensive way
You don’t need a special hard-drive utility program to defragment files and
optimize your drive. You can accomplish the same thing by erasing your drive
and starting over.
Granted, this isn’t the easiest way to defragment a disk, but it gets the job done.
To do this you must (a) back up everything on your drive — either to a stack of
floppies or some other drive; (b) reinitialize the drive by using either the Erase
Disk command in the Finder or the Drive Setup’s Initialize command; and (c) copy
all your files back to the reinitialized disk. The files will be written to contiguous
sectors of the now-empty disk, on which almost every sector is available.
Chapter 8: The Disk Chapter 371
■ ■
MAC SECRETS • 4040-8/X • ch.08.F • Chapter 8 • FINAL • VB/EAP • 10/23/98 • p.371
MAC SECRETS • 4040-8/X • ch.08.1 • Chapter 8 • Proof 1 • ma • 09/2/98 • p.371
ANSWER MAN
Q. The custom icon for my hard drive has
disappeared! Instead of a colorful, smiling
Ferengi from “Deep Space Nine,” I now have
only a generic document icon! I’ve tried to paste
on a new icon, but I got some weird message
about “it” not being found. I also tried rebuilding
the Desktop, reinstalling my hard disk driver, and
correcting the problem with ResEdit, but I’m still
stuck with the generic icon. Can you help me?
A. Custom icons are stored in invisible icon files
that live on your hard disk. Your hard drive is
showing up with a generic icon because the
Ferengi icon file is evidently missing. The problem
is, your disk’s custom icon flag is still set —in
other words, the disk still thinks that it has to look
for a custom icon and, when it can’t find one
anywhere, it has no choice but to display the
generic icon instead.
To reset the custom icon, use Disk Rejuvenator,
a free program from Aladdin that fixes this
problem. Once you’ve used it (it’s included with
this book) to turn the custom icon flag off, your
hard drive’s original icon will reappear. Then you
can paste on a new custom icon — Ferengi or
otherwise — without any trouble.
Custom icon beams out
4040-8/5 ch08.F 11/3/98 3:49 PM Page 371

Defragmenting made easy
You save yourself a great deal of the hassle involved with the previous
suggestion by using a hard disk optimizer program; some examples are Speed
Disk (part of Symantec’s Norton Utilities) and DiskExpress (AlSoft).
Optimizer programs defragment files without requiring you to reinitialize the disk.
How? They read large chunks of files into RAM, erase the section of the disk
where they lay, and then rewrite the data in a new location on the disk. An
optimizer tries to store the data in contiguous blocks, beginning with the first
blocks available on the disk.
One warning: Because some optimizer programs temporarily store files in RAM,
you risk losing data if there’s a power failure — or if you accidentally unplug your
computer — while the optimizer is running. For this reason, back up valuable
files before you optimize — just in case.
Partitions
Hard drives and removable cartridges can be partitioned into smaller
minivolumes with the help of a utility program. For example, you can
partition a 2 GB hard drive into two distinct volumes of 1 GB each. On the
Mac’s Desktop, that one hard drive will appear as two volumes, each with its
own name and icon. In essence, partitioning fools the Mac into thinking that
you have two (or more) drives connected instead of one.
Why partition?
We can think of several reasons why you may want to partition a drive in
this way:
372 Part II: Secrets of the Machine
■ ■
MAC SECRETS • 4040-8/X • ch.08.F • Chapter 8 • FINAL • VB/EAP • 10/23/98 • p.372
MAC SECRETS • 4040-8/X • ch.08.1 • Chapter 8 • Proof 1 • ma • 09/2/98 • p.372
Defragmenting
JS: I’m sorry to poke my nose into the middle of a
chapter, but after rereading our section on file
fragmentation and optimizing, I’m more than a little
concerned.
DP: Is there a problem?
JS: Well, yes. It almost leaves you with the
impression that you should actually go ahead and
defragment your hard drive.
DP: And — shouldn’t you? Isn’t that the whole point?
JS: Surely you’re joking.
DP: Why? Everyone knows that defragmenting gives
you improved hard-drive performance and speed gains.
JS: Speed gains? Look, consider this sobering bit of
reality: Last week, I decided to defragment my hard
drive so that I could experience this euphoric speed
gain everyone’s always talking about. Well, to be safe,
I first had to back up my entire 2 GB hard drive to a
stack of 20 Zip disks. That took an hour or so. Some
speed gain!
DP: Well, if you had a Jaz drive, you’d —
JS: Let me finish...
DP: Besides, you should back up anyway.
DIALOGUE
4040-8/5 ch08.F 11/3/98 3:49 PM Page 372

Chapter 8: The Disk Chapter 373
■ ■
MAC SECRETS • 4040-8/X • ch.08.F • Chapter 8 • FINAL • VB/EAP • 10/23/98 • p.373
MAC SECRETS • 4040-8/X • ch.08.1 • Chapter 8 • Proof 1 • ma • 09/2/98 • p.373
JS: Then I spent another few minutes launching my
drive-formatting software and scanning my drive to
see how badly fragmented my files were. That ate up
another six minutes. Turns out that after six months of
heavy hard drive use, about 4.6 percent of my files
were fragmented. So, I clicked the Optimize button.
DP: And. . . ?
JS: It took nearly nine minutes for the files to be
defragmented. Nine minutes. And some optimizing
utilities take even longer..
DP: So? Weren’t you thrilled by how much faster you
were able to open and save files once your disk was
fully optimized?
JS: Hardly. After all that work, I now save maybe a
fraction of a second each time I open a file.
DP: See that? You’re already gaining time back.
JS: The speed gain is an illusion. I mean, it’s so slight
that, at this rate, it will take months to make up the
time I spent just doing the defragmenting to begin
with. Now that I think about it, it may even take years.
DP: Okay, but at least at that point your optimization
will finally begin to pay off.
JS: Right — and by then it’ll be time to optimize
again, and I’ll be back in the hole.
■By subdividing a large disk into two smaller volumes, you reduce the
size of its blocks — the tiny spaces mapped out on the disk’s surface to
store chunks of data. In the long run, smaller block sizes mean more
efficient storage and less wasted disk space. For the rationale behind
this trick, see “Partitioning for smaller block sizes,” later in this chapter.
And note that this reason to partition evaporates if you’re using HFS+,
described earlier in this chapter.
■If you share your Macintosh with other people, you can partition your
hard drive into a number of smaller volumes, one for each person. The
volumes can be individually password-protected so that users have
access only to their own data.
■You can set up one partition as a vault for old files. Later, if you need to
search for an archived file, you won’t have to waste time searching your
whole hard drive for the document in question. You can search only the
archive partition. (Of course, even on an unpartitioned hard drive, you
can still restrict your search to a single folder, as described in Chapter 3.)
■It can confuse your Mac to have two versions of the same application on
a disk. By partitioning, you can create a separate volume containing an
older version of a program that you need to read some older files.
■You may find it handy to have both System 7.6 and Mac OS 8 (for example)
available for your work. With partitioning, you can create two volumes on
a single drive, one with a System 7.6 folder and another with a Mac OS 8
folder. (On the other hand, there’s nothing wrong with keeping both
systems on an unpartitioned hard drive, as described in Chapter 1.)
Why not to partition
There are also some good reasons not to partition your hard drive. As
noted above, some of the reasons for partitioning have evaporated with the
introduction of HFS+ and other technologies. Partitioning takes time and
4040-8/5 ch08.F 11/3/98 3:49 PM Page 373

effort — all that backing up and resetting-up — and can actually reduce the
likelihood of recovering files in the event of a hard drive disaster.
Lots of people claim that partitioning speeds up your Mac, too, but that’s not
necessarily true. In theory, partitioning a big hard drive into three smaller
volumes should produce a noticeable speed gain. The Mac ought to be able
to retrieve information about your files and their icons faster, because the
Finder’s Desktop file for each individual volume is smaller.
However, if you access a number of different volumes as you work,
partitioning can actually slow you down. Suppose you have QuarkXPress on
one volume, but the open document on another. The hard drive’s read/write
heads have to keep jumping to different parts of the disk surface, fetching
pieces of information from one partition and then another. The more a hard
drive has to play seek-and-ye-shall-find, the slower it seems. (And we’re not
even counting the hassle partitions present to you. Every time you’re looking
at the Open File dialog box, you now have several “disks” to choose from,
switch between, and remember the contents of.)
If you must partition, try to avoid making your hard drive’s heads jump back
and forth frequently between partitions. Try to organize your work so that
almost everything you need during a work session is within the same partition.
How to partition a hard drive
Changing partition sizes or adding new partitions almost always means
reinitializing—that is, erasing all your files. If you want to partition a drive
you’re already using, you must copy all your data to another drive, set up the
partitions, and then copy everything back again.
To perform the actual partitioning, you can use either Drive Setup or Apple
HD SC Setup, the utilities that came with your Mac. If you’re using Apple HD
SC Setup, make sure that you have at least version 7.3.5; earlier versions
don’t let you create multiple Macintosh partitions.
Using Drive Setup
Launch Drive Setup and choose the name of the drive you want to partition
from the list in the main window. Click Initialize, then choose Customize
Volumes from the Function menu.
In the Custom Setup window, use the Partitioning Scheme pop-up menu to
select the number of partitions you want to make on the drive, as shown in
Figure 8-7. The menu lets you create up to eight Mac partitions on a single
drive. (The “HFS” that appears next to the partition numbers refers to the
Hierarchical File System— the filing scheme used by the Mac OS. The last
two options on the menu are for splitting a drive between a Mac partition
and one or two ProDOS partitions, the filing system used by the old Apple II
computers.)
374 Part II: Secrets of the Machine
■ ■
MAC SECRETS • 4040-8/X • ch.08.F • Chapter 8 • FINAL • VB/EAP • 10/23/98 • p.374
MAC SECRETS • 4040-8/X • ch.08.1 • Chapter 8 • Proof 1 • ma • 09/2/98 • p.374
4040-8/5 ch08.F 11/3/98 3:49 PM Page 374
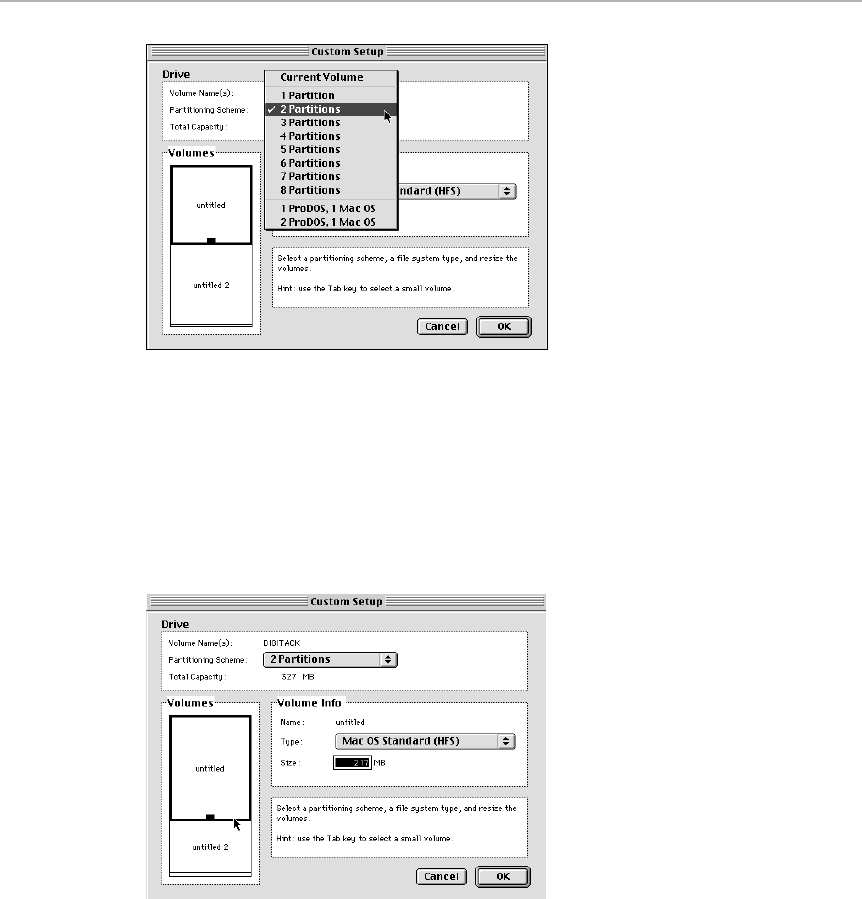
Figure 8-7: Partition a drive into as many as eight separate
Macintosh volumes with Drive Setup.
Once you’ve chosen the number of partitions you want to create, a map of
your subdivided drive appears in the Volumes box in the lower-left portion of
the Custom Setup window. You can then drag each partition on the map to
change its size (see Figure 8-8). When you’re finished, click OK and initialize
the drive.
Figure 8-8: Drag the resize handles to change the size of each partition.
Using Apple HD SC Setup
If you have Apple HD SC Setup — the forerunner of Drive Setup— the
partitioning process isn’t quite as straightforward. Click the Drive button to
select the hard drive you want to partition, and then click Partition. The
Chapter 8: The Disk Chapter 375
■ ■
MAC SECRETS • 4040-8/X • ch.08.F • Chapter 8 • FINAL • VB/EAP • 10/23/98 • p.375
MAC SECRETS • 4040-8/X • ch.08.1 • Chapter 8 • Proof 1 • ma • 09/2/98 • p.375
4040-8/5 ch08.F 11/3/98 3:49 PM Page 375
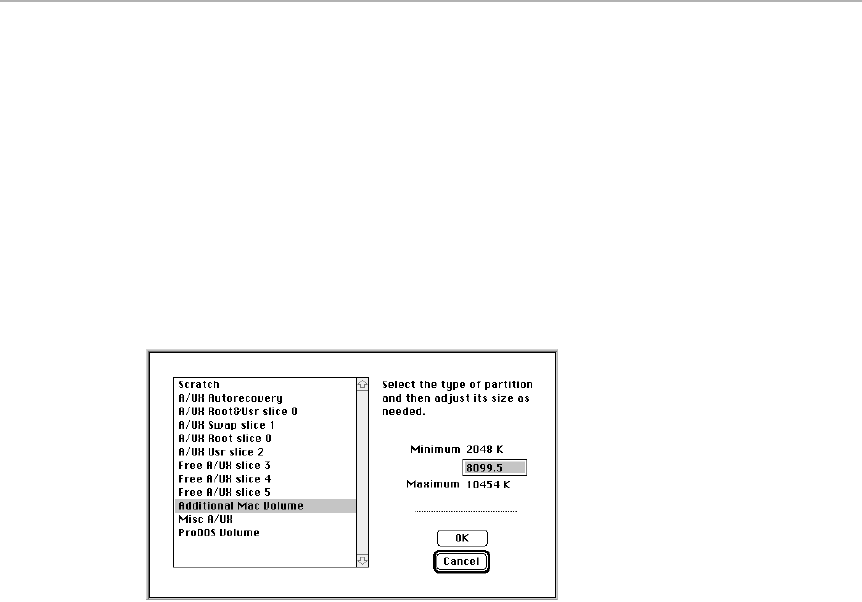
partition dialog box opens, displaying a map of all the partitions on your
drive, including the one reserved for the driver software. Select and delete
the other existing partitions using the Remove button. Then drag out a new
partition on the map at the size you want. The gray space on the map
represents the disk space available for partitioning. When you’ve dragged out
your new partition, the window shown in Figure 8-9 opens, allowing you to
select the type of partition you want to create.
At this point, you’ll notice that most of the options are utterly useless; they
create partition types such as A/UX Root&Usr slice 0 or Free A/UX slice 3 —
formats that appear to have originated on other planets. Ignore these alien
terms and instead select Additional Mac Volume from the list. Follow the
same steps to create as many other partitions on the drive as you like.
Figure 8-9: Choose Additional Mac Volume from this list of options in HD SC Setup to
subdivide your hard drive into multiple Macintosh volumes.
Of course, you can also partition your disks using commercial programs like
Hard Disk Toolkit (FWB), or SilverLining (LaCie). In addition to letting you
create multiple partitions on a disk, these programs also allow you to assign
each volume its own custom icon and password protection.
Partitioning for smaller block sizes
Despite the doubt concerning speed increases, there’s one indisputable
advantage to partitioning a big hard drive —if you’re running any system
prior to Mac OS 8.1 and can’t use the new HFS+ format.
Earlier in this chapter, we pointed out that files on your disk actually waste
space if their sizes don’t exactly fill up the blocks on which they’re stored.
Remember, under the Mac’s old Hierarchical File System, every drive, no
matter what its size, is divided up into a maximum of 65,536 uniformly-sized
blocks — and therefore, on larger drives, the standard block sizes escalate.
376 Part II: Secrets of the Machine
■ ■
MAC SECRETS • 4040-8/X • ch.08.F • Chapter 8 • FINAL • VB/EAP • 10/23/98 • p.376
MAC SECRETS • 4040-8/X • ch.08.1 • Chapter 8 • Proof 1 • ma • 09/2/98 • p.376
4040-8/5 ch08.F 11/3/98 3:50 PM Page 376

Therefore, the smallest any file can be on any disk is one block. A 9K
SimpleText file on a four-gig drive takes up one block — 65K — and wastes
56K! When you multiply that space by the thousands of files on your drive,
you can see that you wind up wasting a considerable chunk of disk space.
(There’s only one way to squeeze multiple files into a single block to reclaim
unused space — compress them into a single file using a program like StuffIt,
described in Chapter 22.)
It stands to reason, then, that the smaller the blocks on your disk, the less of
it is wasted. If you partition a hard drive into two smaller drives, you double
the total number of blocks — and they’re half the size they used to be.
Therefore, less space gets wasted if you have a lot of little files. (See “HFS+
[Mac OS Extended Format],” earlier in this chapter, for more on this
phenomenon — including why that reason for partitioning went away with
the release of Mac OS 8.1 and later.)
Your hard drive’s secret partitions
Even if you don’t partition your hard drive into multiple volumes, the one
Macintosh volume you do have can never equal the total storage capacity of
the drive. That’s because drive formatters create secret partitions on your
drive without you knowing it. These partitions don’t show up on your
Desktop, but they’re critical to the operation of the drive.
Chapter 8: The Disk Chapter 377
■ ■
MAC SECRETS • 4040-8/X • ch.08.F • Chapter 8 • FINAL • VB/EAP • 10/23/98 • p.377
MAC SECRETS • 4040-8/X • ch.08.1 • Chapter 8 • Proof 1 • ma • 09/2/98 • p.377
ANSWER MAN
Q. Wait a minute! It sounds to me like Apple HD
SC Setup, Internal HD Format, and Drive Setup
all do exactly the same thing — format, initialize,
and partition hard disks!
A. Ah, yes. You noticed.
Q. So, what’s the deal...?
A. All three do the same job — but on different
types of hard drives. Apple HD SC Setup is for
SCSI drives only, and came with all but the most
recent SCSI drive-equipped Macs. Internal HD
Format, on the other hand, works only with a
few specific Macs with internal IDE drives.
The newest member of the trio, Drive Setup,
comes with all current Macs, offers a few more
initializing options, and works on both SCSI and
IDE drives.
Naturally, there are a few bizarre exceptions to
the rule. Some later versions of the Performa
5200 and 6200, for example, can’t run Internal
HD Format, even though they have IDE drives;
they require Drive Setup. And, oddly enough, the
PowerBook 150, which also has an IDE drive,
can’t run Drive Setup; it requires the older
Internal HD Format.
The Partition Family
4040-8/5 ch08.F 11/3/98 3:50 PM Page 377
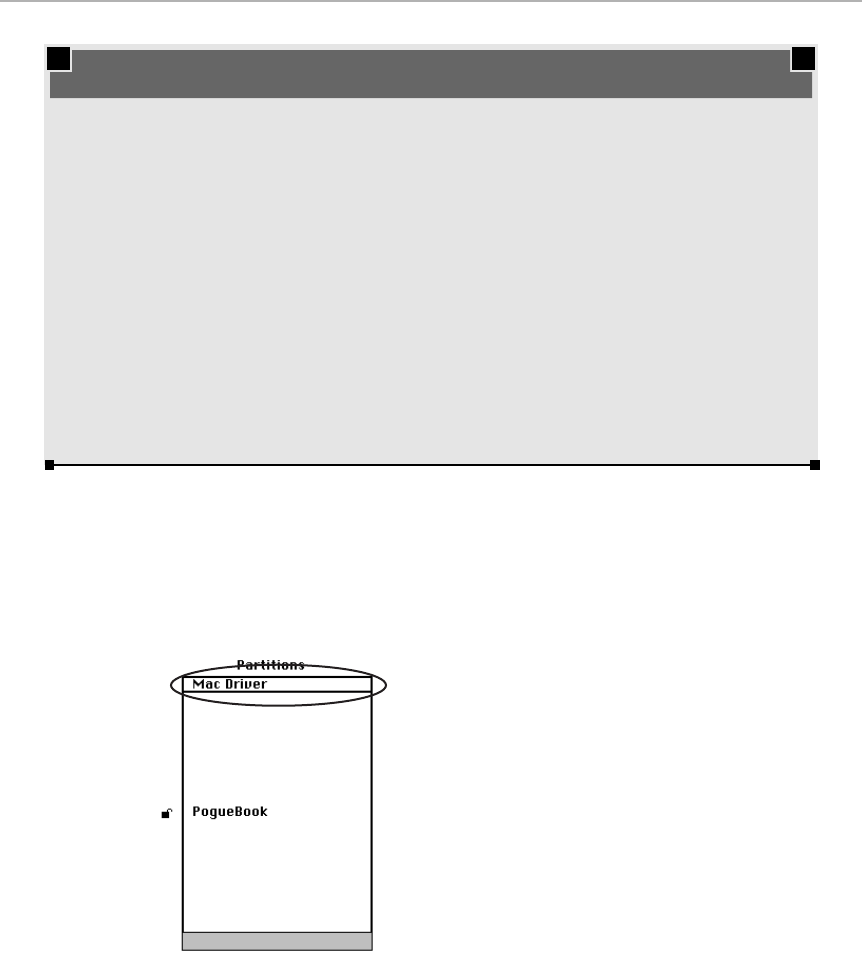
378 Part II: Secrets of the Machine
■ ■
MAC SECRETS • 4040-8/X • ch.08.F • Chapter 8 • FINAL • VB/EAP • 10/23/98 • p.378
MAC SECRETS • 4040-8/X • ch.08.1 • Chapter 8 • Proof 1 • ma • 09/2/98 • p.378
MACINTOSH SECRET
When you format your hard drive using Apple’s
Drive Setup utility, you get two options that
weren’t available in the older Apple HD SC Setup
utility — low-level format and zero all data.
Unfortunately, Apple provides almost no
information about why you might choose either
of these options. Here’s an explanation.
Ordinarily, initializing a disk doesn’t erase data; it
simply zaps the disk’s directories, so that the
location of existing data is forgotten and can be
overwritten. The low-level format option takes
this one step further, obliterating all the directory
structures and erasing all the data. Apple
doesn’t recommend performing a low-level
format unless you’re formatting a pre-System 7
disk more than five years old.
When you choose the “zero all data” option, the
data on your hard drive is actually replaced by a
string of zeros. This is a security measure; it
makes it impossible to retrieve data from a
reformatted disk, even using a disk-recovery
program.
You can also perform an initialization with either of
these options. The process will take much longer,
but you’ll end up with one clean hard drive.
Deep clean your hard drive
One of the secret partitions contains a partition map, a directory of all the
storage spaces on the disk. This map tells your Mac which blocks are empty
and which are occupied by data. Another secret partition (see Figure 8-10) is
occupied by the hard-disk driver itself (the software that controls all the
Mac-to-drive communications).
Figure 8-10: One of your drive’s secret partitions rears
its head in the custom partitions window of Apple HD
SC Setup. This partition containing the drive driver
shouldn’t be resized or deleted; it holds the instructions
the drive needs to operate properly.
Reformatting
Reformatting your hard drive erases every last kilobyte on it. This means
that you have to back up all your data before reformatting—and then copy
everything back to the disk when you’re done. With so much hassle
involved, why even consider doing it?
4040-8/5 ch08.F 11/3/98 3:50 PM Page 378

Here’s one important reason: Over a period of time, a hard drive inevitably
develops a few bad sectors — sections of the disk surface that are no longer
reliable for storing data. A portion of a disk may get slightly damaged through
contact with a read/write head or may be marred by a microscopic speck of
dirt. Reformatting software is smart enough to watch for these bad spots and,
in its private map of the hard-disk surface, denote these bad sectors as “off
limits” — they can no longer be accessed by the drive. After bad sectors have
been mapped out of a disk, data no longer will be stored in any of the
potential danger spots.
By the way, if your driver software does map out a few bad blocks, thereby
reducing the amount of space you have available for data, don’t feel cheated.
Most manufacturers intentionally make drives with a disk capacity slightly
larger than advertised so that bad blocks can be mapped out without
depriving you of the advertised storage space.
There’s no particular reason to reformat your drive, except as a last resort,
when your drive is acting up and you’ve tried everything else in our
Troubleshooting chapter, Chapter 36.
Floppy Disks
The original Mac’s disk drive could read only 400K disks. Eventually, Apple
adopted a drive that could read both 400K and 800K disks, maintaining that
critical backward-compatibility. By 1989, every Mac was built with a
SuperDrive, a fancy way of saying that they can read 1,440K high-density
disks (and 800K disks and 400K disks). We suppose that they call it a
SuperDrive because — thanks to the PC Exchange control panel— the disk
drive can read same-size disks from IBM computers and clones.
Chapter 8: The Disk Chapter 379
■ ■
MAC SECRETS • 4040-8/X • ch.08.F • Chapter 8 • FINAL • VB/EAP • 10/23/98 • p.379
MAC SECRETS • 4040-8/X • ch.08.1 • Chapter 8 • Proof 1 • ma • 09/2/98 • p.379
TRUE FACT
In 1984, the largest single volume you could
mount on a Macintosh was 400K — the total
capacity of a solitary floppy disk. Today it’s not
uncommon to see Macs equipped with hard
drives of several gigabytes. Is there any limit to
how large a single Mac volume can be?
Yes. Until System 7.5, the Mac organized data
using a 32-bit (32-digit) number to identify each
byte on a volume. This allows the Mac to specify
a total of 2,147,483,648 different bytes— that’s
two gigabytes. That’s as large as a single volume
could be before System 7.5.
Time and technology march on, however.
System 7.5, in recognition of the increasing
number of jumbo-disks on the market, introduced
a new scheme that boosted the maximum-size
limit to 4 gigabytes. System 7.5.2 pushed the
upward limit even more — to 2 terabytes (that’s
2,048 gigabytes). The introduction of HFS+
paved the way for even larger future increases in
drive capacity.
How big is too big?
4040-8/5 ch08.F 11/3/98 3:50 PM Page 379

As you probably noticed, no disk ever holds the amount of information it says
it does. A 400K floppy may only hold 388K of data, for example. The rest of
the space is filled with invisible files, such as the disk driver and directory
map (on hard drives) and the Desktop file we discuss in Chapter 1 (both hard
and floppy disks).
How they work
Floppy disks operate on the same magnetic storage principles as hard disks.
But the disk inside a floppy is made of an extremely thin, floppy sheet of
Mylar instead of glass or plastic. Floppies don’t spin as fast as hard disks,
and consequently provide slower access to data.
Floppies are also a lot less reliable than rigid disks. They go bad all the time.
If you need to transport an important file to, say, an important presentation,
copy the same file to different floppies and take them all. Your cheerful
authors swear by this one.
The obligatory “floppies-are-fragile”
discussion?
This would be the appropriate paragraph in which to expound on the fragility
of floppies. Every manual and Mac book does, after all. We’re supposed to
say that dropping a floppy is bad for it, and that you have to watch out for
deadly invisible magnetism, like that emitted from telephones. We’re
supposed to raise the dire specter of disk failure if you slide open the shutter
on a floppy disk.
Truth is, we’ve never seen a floppy disk die from any of these harsh
treatments. David drops his floppies all the time. And Joe snaps the shutter
open and closed while he’s on the phone. Both of us regularly carry floppies
through airport metal detectors. None of these floppies have ever become
unreadable as a result.
We’re not suggesting that floppies don’t go bad. We’re just pointing out that to
suppose that we, as mere mortals, have some control over the destiny of our
floppies is utter arrogance. In truth, floppies go bad when they’re ready to go
bad. Some microscopic piece of pollen lands on the disk surface, heat warps
the Mylar, a cosmic ray shoots completely through the disk in a fraction of a
nanosecond, and it’s gone. It’s the little, invisible things that kill a disk — not
the grosser effects of human handling.
On the other hand, we don’t actually encourage touching the brown shiny
disc inside the floppy’s shutter, which computer techno-dweebs (definitely
not us) refer to as “the cookie.”
380 Part II: Secrets of the Machine
■ ■
MAC SECRETS • 4040-8/X • ch.08.F • Chapter 8 • FINAL • VB/EAP • 10/23/98 • p.380
MAC SECRETS • 4040-8/X • ch.08.1 • Chapter 8 • Proof 1 • ma • 09/2/98 • p.380
4040-8/5 ch08.F 11/3/98 3:50 PM Page 380

The end of the floppy drive?
You read that right: Despite the fact that floppies are a very part of the
definition of “personal computer” to many people, they’ve actually become
increasingly irrelevant in recent years. Few software programs come on
floppy anymore—heck, it’s actually cheaper for a software company to mail
you a CD! Few people back up onto floppies these days, now that you can get
a Zip drive for well below $100. And as for shuttling data between computers
— well, only a handful of documents fit on a single floppy anyway; e-mail,
networking, and infrared beaming are used far more frequently for
transferring data.
Seeing the writing on the wall — and hoping to save some dollars — Apple
caused a searing controversy in 1998 by releasing the first desktop PC in 10
years to ship without a floppy-disk drive: the futuristic-looking iMac (see
Chapter 13). Of course, you can buy an external floppy drive for it. But our
guess is that the rest of the industry will follow Apple’s lead, gradually
making a floppy drive an added-cost option — and finally, five or ten years
from now, eliminating them altogether.
Floppy Disk Secrets
■
Locking a floppy
Locking a floppy disk prevents you or anyone else from accidentally (or
intentionally) modifying or trashing the files stored on it. When a floppy is
locked, you can still read its contents. You can open folders, rearrange icons,
launch applications, open documents, and even copy files
from
the locked disk
to another drive — but when you eject the disk, all will be as it was before you
started. A locked floppy disk can’t be renamed, either. Come to think of it, a
locked floppy behaves exactly like a CD-ROM.
To lock a floppy, turn it over so that the disk’s circular hub is facing you. In the
upper-left corner of this disk you see a little black tab; push it upward, opening a
tiny rectangular window, as shown in Figure 8-11. That’s it; the disk is locked.
This is the same principle as that plastic tab on the top edge of audio
cassettes, which audio fans for years have learned to break off in order to
prevent the cassette from being rerecorded. The nice thing about floppies,
though, is that you don’t need a piece of Scotch tape to paste over the hole to
unlock it again afterward, as you do with a cassette.
It’s smart to lock floppies that contain important files. The contents of a locked
disk can’t be trashed, changed, or infected by a virus.
Mac Basics
Chapter 8: The Disk Chapter 381
■ ■
MAC SECRETS • 4040-8/X • ch.08.F • Chapter 8 • FINAL • VB/EAP • 10/23/98 • p.381
MAC SECRETS • 4040-8/X • ch.08.1 • Chapter 8 • Proof 1 • ma • 09/2/98 • p.381
4040-8/5 ch08.F 11/3/98 3:50 PM Page 381
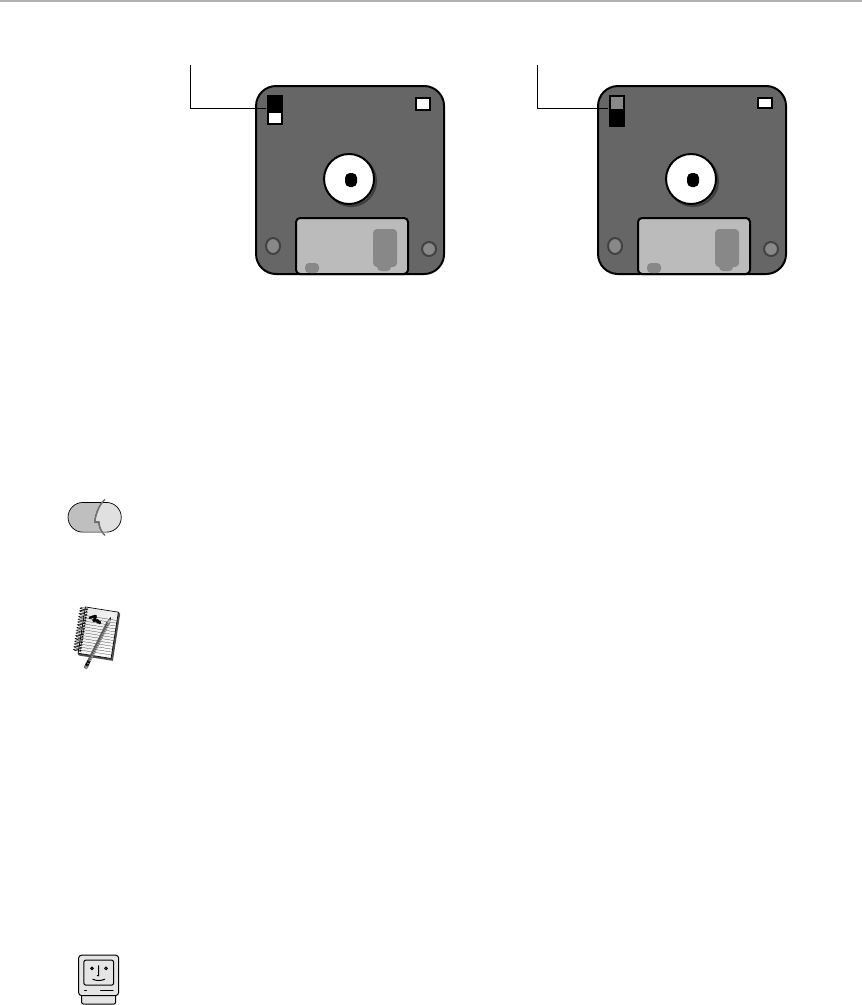
Figure 8-11: Lock a floppy by sliding the little black plastic tab up to open the tiny rectangular
window at the corner of the disk. Don’t confuse this window with the other rectangular hole—
on the right side—which simply identifies the floppy as a high-density disk.
Ejecting a disk
In Mac OS 8 or later, you eject a floppy (or CD, Zip, Jaz, SyQuest, and so on) by
selecting its icon and then choosing Special ➪Eject Disk. (Pressing Ô-E is the
equivalent.) The disk pops out of the drive, and its icon vanishes from the
desktop.
If you’re running any variant of System 7, however, we discourage using the
Eject Disk command. Doing so leaves a ghosted image of the disk on the
desktop. Worse, any of the disk’s open windows remain on the screen even
after the disk is gone. If you try to drag the phantom icon into the Trash, you
may be asked to
reinsert
the disk you just ejected! It’s better to avoid these
problems by using one of the following alternatives (which work in Mac OS 8
and later, too):
■Drag the disk icon straight into the Trash. The disk pops out of the drive
and its icon disappears.
■Select the disk icon. Use the File menu’s Put Away command or the Ô-Y
keyboard shortcut. Again, the disk ejects and the icon disappears.
Eliminating ghosted icons and windows
If you
do
eject a disk using the Eject Disk command or Ô-E under System 7,
how do you get rid of that annoying ghosted icon? Just drag the disk icon to the
Trash. You see a message asking you to reinsert the disk.
Don’t do it.
Instead,
press Ô-period. This dialog box goes away. The icon vanishes from the Desktop
and so do any of its windows that are open on the Desktop.
Mac Basics
Worth
Learning
OS
8
Locked floppy Unlocked floppy
Tab up/slot open Tab down/slot closed
382 Part II: Secrets of the Machine
■ ■
MAC SECRETS • 4040-8/X • ch.08.F • Chapter 8 • FINAL • VB/EAP • 10/23/98 • p.382
MAC SECRETS • 4040-8/X • ch.08.1 • Chapter 8 • Proof 1 • ma • 09/2/98 • p.382
4040-8/5 ch08.F 11/3/98 3:50 PM Page 382

Creating ghosted icons and windows
We mentioned earlier that Apple finally fixed the Eject Disk command in Mac OS 8,
so that it no longer leaves behind a ghosted icon whenever you eject a disk.
But what if you
want
the ghosted icon? You can do it. Just hold down the Option
key as you choose Eject Disk from the Special menu. The menu command
changes to say “Eject and Leave Behind” (see Figure 8-12). Using this
command, ejected disks of any kind — not just floppies — leave phantom icons
remaining on the desktop.
Figure 8-12: Mac OS 8 finally got rid of the ghosted icon problem, but you can bring it back
by holding down the Option key as you eject a disk, evoking the hidden Eject and Leave
Behind command.
The big question, of course, is
why
you’d ever want to do this. We admit there
aren’t many good reasons. But a
Mac Secrets
reader found at least one,
involving the use of multi-CD game playing. Check out “CD-ROM Secrets” in
Chapter 32 for details.
Ejecting shortcuts
Apple has built in three other keyboard shortcuts that let you eject a disk,
whether or not it has been selected.
■Ô-Shift-1 ejects a floppy disk from an internal drive. (The floppy drive
connected to a PowerBook 100, Duo, iMac, or PowerBook 2400 counts as
the internal drive, oddly enough.)
■Ô-Shift-2 ejects a floppy disk from an external drive (or the second drive if
your Mac has two built-in floppy drives). Obviously, we’re referring here to
the eight people still merrily using their Mac Pluses and SEs.
■Ô-Shift-0 ejects a floppy disk from a
third
drive if you have one connected.
(Now we’re addressing a
really
small group.)
Even though these commands save you the trouble of selecting a disk icon
before ejecting, they also leave ghosted icons on the screen under System
7-point-anything. But we’ve seen more than one case in which Ô-Shift-1
managed to eject a disk that otherwise refused to come out. So while it’s still
best to select the disk you want and use Ô-E (Mac OS 8) or Ô-Y (System 7),
keep these little-known alternatives in mind for when all else fails.
Strange
But True
Chapter 8: The Disk Chapter 383
■ ■
MAC SECRETS • 4040-8/X • ch.08.F • Chapter 8 • FINAL • VB/EAP • 10/23/98 • p.383
MAC SECRETS • 4040-8/X • ch.08.1 • Chapter 8 • Proof 1 • ma • 09/2/98 • p.383
4040-8/5 ch08.F 11/3/98 3:50 PM Page 383

Where are the comments?
The
comments
box (where you can record such tidbits as “Downloaded from
www.shareware.com on April 3”) appears when you highlight a file, folder, or disk
and choose Get Info from the File menu.
When you try to type anything into the comments box for a floppy disk, or any
file or folder it contains, however, you may be alarmed to discover that the
Comments box is inaccessible. It’s there, all right, but nothing happens when
you click inside — and it most definitely doesn’t accept anything you type.
384 Part II: Secrets of the Machine
■ ■
MAC SECRETS • 4040-8/X • ch.08.F • Chapter 8 • FINAL • VB/EAP • 10/23/98 • p.384
MAC SECRETS • 4040-8/X • ch.08.1 • Chapter 8 • Proof 1 • ma • 09/2/98 • p.384
MACINTOSH SECRET
You’ve probably heard it a thousand times:
Absolutely never, under any circumstances, put
floppy disks near a telephone or any other item
that generates a magnetic field. This can
obliterate your data.
To this we respectfully respond: Baloney.
We took several of our floppy disks—some
containing chapters of this book, as a matter of
fact — and put them directly on a ringing
telephone. We stuck the disks under the phone,
next to the phone, between the handset and the
phone unit. We waved the handset to and fro,
millimeters away from the disk. We rubbed a
disk against the phone. We tried a few different
telephones. No matter what we attempted, it
didn’t result in the destruction of a single file or
even a bit of data.
Our curiosity aroused, we kept experimenting.
We waved a few kitchen magnets across the
surface of a disk. We fastened a floppy disk to
David’s refrigerator using a magnet — all day!
Still, no problems.
Our conclusion: Yes, a strong enough magnetic
field probably can mess up the information on a
floppy disk. But we’re not talking about
refrigerator magnets here; more like the kind
they stick on the end of a 75-foot crane to pick
up scrap automobiles, or those bulk tape erasers
they use to erase audio- and videotapes.
One of our tech editors insists that he’s seen
floppies go bad that were left on the front left
corner of an ImageWriter I, where a magnet
lurks. All we know is that we couldn’t make it
happen, no matter what we tried.
P.S.: We feel vindicated by the following e-mail
from reader Thom Fries concerning this sidebar:
I have a Ph.D. in physics. My area of research
dealt with the effects of high magnetic fields on
certain types of semiconductors. Part of my
research was done at the Francis Bitter National
Magnet Lab at the M.I.T. Until very recently, the
strongest magnetic fields in the world were
generated there.
All the data acquisition is computerized. In the
areas around the magnets, nobody can use color
monitors because they become unreadable at
high fields. The colors all blend into one, and the
image on the screen begins to rotate away from
vertical.
We were very careless with our floppies. They
were routinely sitting on the monitors, or the
metal cases of the PCs. Other than actually
putting the floppies on the magnets themselves,
we made no attempt to protect the floppies.
Turns out the floppy-failure rate was no higher
for lab disks than for any other floppy ever used.
Thought you might want to know.
Floppy lies
4040-8/5 ch08.F 11/3/98 3:50 PM Page 384
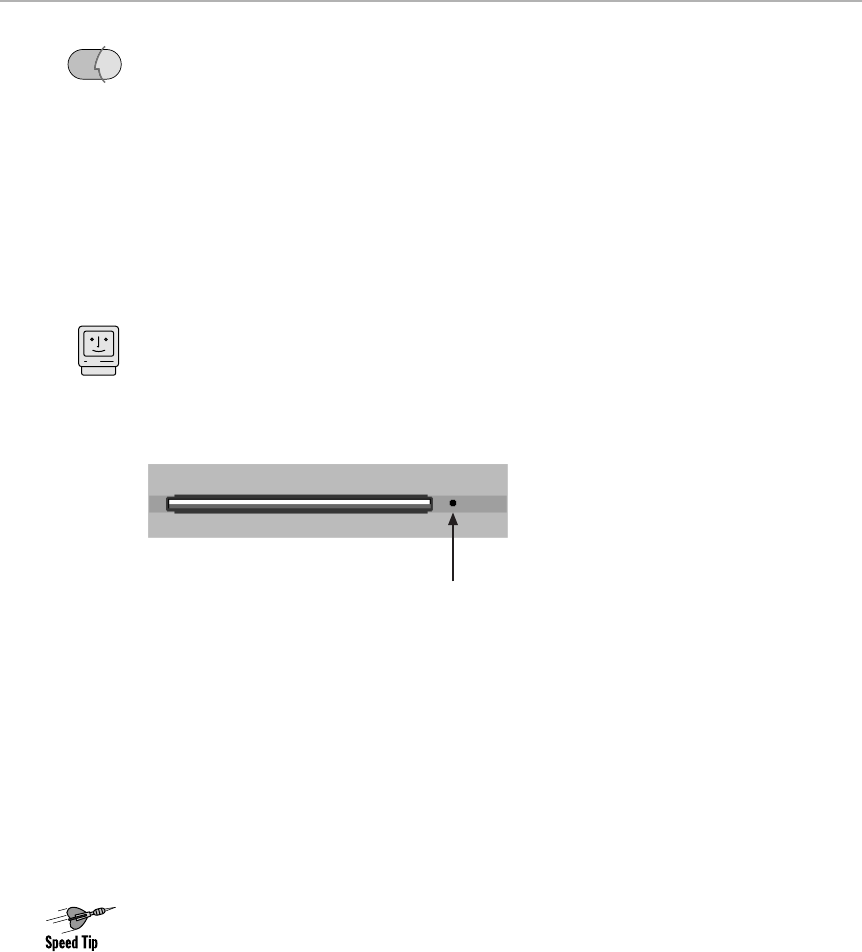
Explanation: You’re using Mac OS 8 or later. Given the tiny amount of under-the-
hood storage space on a floppy disk, Apple programmers were running out of
places to store such information as how windows are arranged and which icon
view you’ve selected. An executive decision was made: comments on floppies
have to go.
It’s not your imagination, then: In Mac OS 8 and later, you can’t store comments
for the icons on 1.4-meg floppies. And on 400K and 800K floppies, you can’t
store comments for the floppy’s icon
or
for any of the files on it!
Resorting to the paper clip
No discussion of disk ejection would be complete without at least mentioning
the paper-clip trick. If a floppy disk, Zip, Jaz, or CD simply refuses to be ejected
after you’ve tried all of the aforementioned eject commands, you can force it out
manually. Poke a straightened paper clip, slowly and firmly, into the tiny hole on
the front panel of the drive (see Figure 8-13) until the disk pops out.
Figure 8-13: A time-honored solution to jammed disks: Poke a straightened paper clip into
the tiny hole beside the disk drive slot until the disk is forced out.
If a floppy disk is physically jammed inside the drive, the shutter may be bent, or
the sticky disk label may have unpeeled and grabbed something inside the drive.
In both cases, forcing the disk may damage the drive unless you first free the
obstruction. Try sliding an index card in on top of the caught label or shutter,
then pulling them slowly out together. You should also try pushing the disk back
into the drive a little bit, then gently try to pull it out again.
Automatic disk erasing
Here’s a little-known shortcut for erasing floppy disks: If you hold down
Ô-Option-Tab while inserting a disk into the floppy drive, the dialog box asking if
you’d like to erase the disk pops up as soon as the disk mounts, saving you the
trouble of choosing the Erase Disk command from the Special menu.
Turning Mac disks into PC disks
Here’s a feature Mac users tend to take for granted, but that constantly amazes
PC users: You can create Windows-ready floppy disks right on your Mac, without
leaving the Finder — no special software or utilities required.
Mac Basics
OS
8
Chapter 8: The Disk Chapter 385
■ ■
MAC SECRETS • 4040-8/X • ch.08.F • Chapter 8 • FINAL • VB/EAP • 10/23/98 • p.385
MAC SECRETS • 4040-8/X • ch.08.1 • Chapter 8 • Proof 1 • ma • 09/2/98 • p.385
4040-8/5 ch08.F 11/3/98 3:50 PM Page 385

To do this, you must have the File Exchange control panel (see Chapter 4).
Select a floppy disk icon in the Finder and choose Erase Disk from the Special
window. From the Format pop-up window, choose DOS 1.4 MB, then click OK
(see Figure 8-14).
A minute or so later, you’ll have a blank PC disk mounted on your desktop.
(If you have Mac OS 8.1 or later, in fact, the files you see even have their
Windows 95-savvy long file names instead of the pathetic LTR2MOM.DOC-type
names of bygone versions.)
Figure 8-14: Transform a Mac disk into a PC disk using the Erase Disk command.
This is an important tip to remember when it comes to sharing files with PC
users — because while any Mac can read PC disks, any PC can’t read Mac
disks. If you want to pass a file on floppy disk to a friend with a PC, it’s not
enough to simply save the file in a PC-compatible format; you also have to put
the file on a PC floppy. (See Chapter 16 for more about sharing files between
Macs and PCs.)
Turning 400K disks into 800K
double-sided disks
Today’s youth — how carefree, how innocent! “400K disk? What’s that?”
We agree. Nobody’s seen 400K or 800K floppies for years, and even high-density
floppies are becoming scarcer (having been replaced by CD-ROMs and Zips).
Although we have much to say about converting 400K floppies to 800K ones,
800K ones to 1.4MB ones, and 1.4MB ones back to 800K ones, we won’t bore
you with it here. You can read these discussions in Chapter 8 of the electronic
edition of
Mac Secrets
,
4th Edition
(on the CD-ROM that comes with this book).
Fixing good disks gone bad
It happens to everybody sooner or later: You insert a floppy disk, and you get
the “This disk is unreadable” message.
Three times in ten, the floppy works if you (1) try inserting it again; (2) try
inserting it into another Mac; (3) remove the disk, manually turn the silver hub
with your fingernail, shake the disk around a little, and put it back in. Restart
the Mac, thus clearing the floppy drive port — the Mac equivalent of blowing your
OS
8
386 Part II: Secrets of the Machine
■ ■
MAC SECRETS • 4040-8/X • ch.08.F • Chapter 8 • FINAL • VB/EAP • 10/23/98 • p.386
MAC SECRETS • 4040-8/X • ch.08.1 • Chapter 8 • Proof 1 • ma • 09/2/98 • p.386
4040-8/5 ch08.F 11/3/98 3:50 PM Page 386
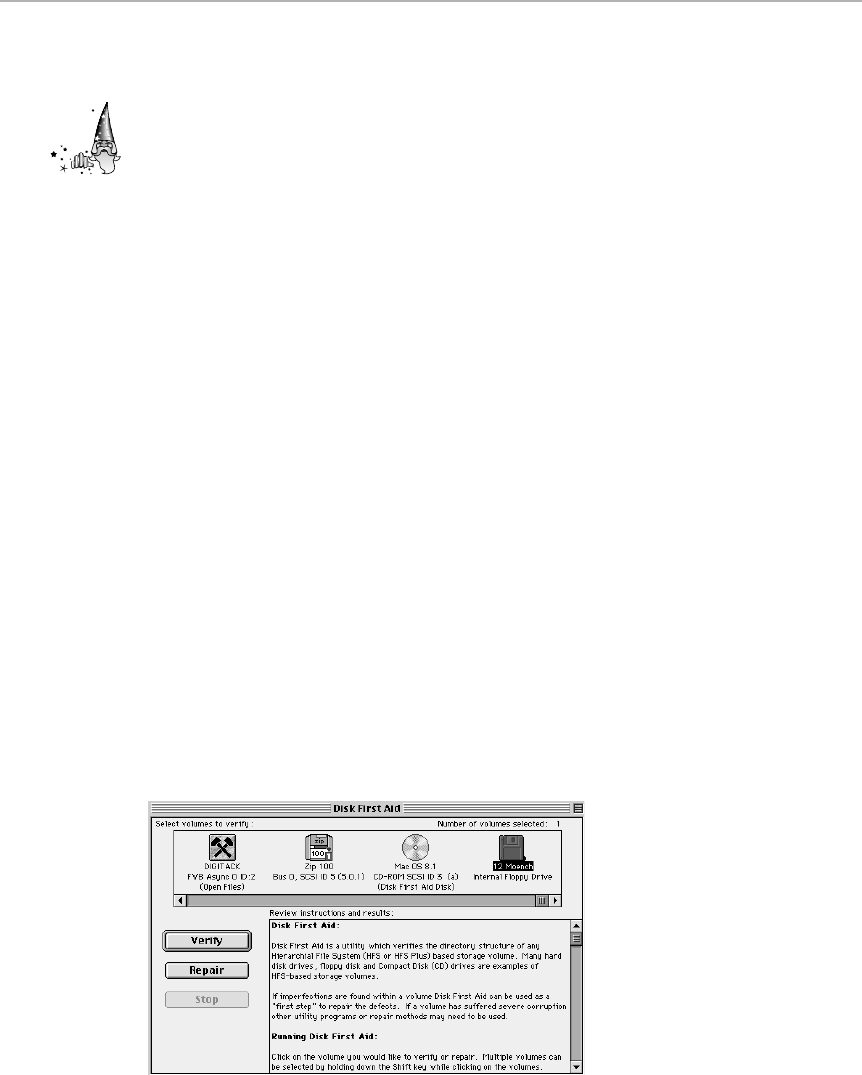
nose. (Item 2 has a very high success rate with PowerBook disk drives, which
are somewhat more finicky than regular drives.)
If the problem with the disk appears to be that the protective metal shutter is
jammed, bent, or broken, try this radical-but-effective trick: Carefully pull the
entire shutter off the disk; it can be broken off quite easily. Be careful not to
touch the Mylar disk material. Immediately insert the bare disk into the drive.
Your Mac will have no trouble reading the disk, despite the missing shutter.
Obviously, this technique ruins the floppy disk, but it might enable you to access
files from a broken disk that otherwise could not be inserted into a drive.
Fixing good disks that have really gone bad
If you tried the steps in the previous secret with no success, and you’re sure
that the disk has really gone bad, all hope is not lost.
There are ways to recover files from a damaged disk. Most often, in fact, your
files have not been damaged; the problem lies with the disk’s
catalog
of your
files. In other words, your precious files are still intact, but the Mac’s
instructions for
finding
them have gotten mangled.
Your Mac comes with a repair program called Disk First Aid. It’s on the Disk
Tools disk (or on the System CD-ROM) that came with your Mac. Disk First Aid
can scan a disk, check for problems and then offer to make the needed repairs.
If necessary, it rebuilds the disk’s catalog file, which may be all that’s needed to
make your files readable again.
To recover a bad floppy, first eject the floppy disk and launch Disk First Aid. Then
pop the fussy floppy back into the disk drive. Select the floppy’s icon in the Disk
First Aid and — here’s the important part —
don’t
click Repair. Instead, click Verify
(see Figure 8-15). In a minute or two, after scanning the floppy, Disk First Aid will
probably report the disk needs repairs — as if you didn’t know.
Then
click Repair;
if all goes well, you’ll end up with a working disk.
Figure 8-15: Disk First Aid, Apple’s free disk-fixing utility, doesn’t always work, but it’s worth
a try when a floppy comes up unreadable.
Strange
But True
Chapter 8: The Disk Chapter 387
■ ■
MAC SECRETS • 4040-8/X • ch.08.F • Chapter 8 • FINAL • VB/EAP • 10/23/98 • p.387
MAC SECRETS • 4040-8/X • ch.08.1 • Chapter 8 • Proof 1 • ma • 09/2/98 • p.387
4040-8/5 ch08.F 11/3/98 3:50 PM Page 387

For some reason, if you
don’t
run the Verify function first, Disk First Aid has a
much lower success rate.
Recovering files from damaged floppies
If you insert a floppy disk and get a message that says the disk is unreadable,
and the previous secrets don’t work, you still may be able to recover the files on
it. Leave the disk in the drive and open the
application
in which the files were
created. Use the Open command from within the application to open the file,
and then resave the file to a new disk.
If this doesn’t work and the disk is truly ruined, there’s still a glimmer of hope. A
file-recovery program such as Norton Utilities may be able to locate the file —
even on a fairly mangled disk — and allow you to copy it to another location. As
a last resort, a little program called RescueText by Abbott Systems lets you
search for text strings on a disk block by block. The process may take a while,
but if you’re trying to hunt down a precious bit of data that you can’t live
without, the search may be worthwhile.
388 Part II: Secrets of the Machine
■ ■
MAC SECRETS • 4040-8/X • ch.08.F • Chapter 8 • FINAL • VB/EAP • 10/23/98 • p.388
MAC SECRETS • 4040-8/X • ch.08.1 • Chapter 8 • Proof 1 • ma • 09/2/98 • p.388
CASE HISTORY
When a disk comes up as “damaged” or
“unreadable” you might assume the problem is
the result of some deep, dark technical mishap—
corruption of the catalog b-tree, or some such
error. In fact, you may be the victim of a far more
mundane —and easier-to-fix—sort of problem.
Reader George Waugh, for example, wrote us
describing a floppy drive nightmare in which his
Mac reported that every disk inserted into the
drive was damaged — even brand new ones
and commercial software disks he knew were
OK. He finally resigned himself to the fact that
his drive was dead; he’d have to buy a new one.
Then, in a final, crazed, desperate effort, he tried
something that we in no way recommend: He
sprayed WD-40 directly into the floppy drive.
When he again inserted a disk, it came out
dripping with the oily lubricant. So he dried it off
and put it back in, ejected it and dried it off
again. Still no success.
But after a few more rounds of insertion and
ejection, he noticed an oily, crumpled,
discolored shred of paper peeking out from the
drive slot. At once he realized what had
happened: A floppy disk he had inserted days
earlier had lost its label inside the drive and had
been jammed in there ever since. The WD-40,
however, had made the label sticky enough to
cling to another inserted disk so it could be
fished out. Once the old label was removed, the
floppy drive worked perfectly.
Obviously, spraying WD-40 into your Mac isn’t a
great idea. We relate this account to remind you
to be on the watch for little things — like a
peeled-off label — that can lead to big problems.
When all else fails — WD-40?
4040-8/5 ch08.F 11/3/98 3:50 PM Page 388

Removable Disks
Hard drives and floppy drives are by far the most frequently used storage
devices. But other storage options offer unique advantages over hard drives
and floppies.
Most of the following drives take removable disks that act like giant, super-
reliable floppy disks. As with floppies and hard drives, data is recorded on
spinning platters — but each of these disks can hold megabytes or gigabytes
of data, sealed into a cartridge that can be ejected from the drive.
With removables, you don’t have to start shopping for another drive every
time you need additional storage space; you just buy another cartridge (they
run about $12 to $150 each, depending on type and capacity) and pop it into
the drive. For a relatively low price, you get virtually unlimited storage.
■SyQuest drives: These older cartridge systems, available in 5.25-inch
and 3.5-inch versions, are usually formatted to hold 44, 88, 200, or 270
megabytes each. They were the first removables to reach critical mass; in
the eighties, every service bureau on earth had SyQuest drives to accept
clients’ files to be printed. By today’s standards, these old drives are
slow, low-capacity, and expensive.
■Zip drives: These sleek, slender disk systems from Iomega were
introduced in 1995 and became immensely popular. It’s not hard to figure
out why. Zip disks look like extra-thick floppies, but hold about 100MB
each. The Zip disks offer quiet, super-reliable performance at nearly the
speed of a hard disk. Best of all, they’re incredibly economical. The Zip
drive itself costs only about $90 — or you can get one built into many Mac
models — and disks run about $12 apiece. If you’re looking for a cheap,
reliable way to transport lots of data or make backups, you just can’t
beat a Zip drive and a stack of disks. (Thanks to the VST Zip 100, even
PowerBook fans can now have built-in Zip drives, providing a quick way
to transfer a week’s worth of work from your desktop Mac.)
■SyQuest EZ Drive: These miniature SyQuest cartridges are SyQuest’s
answer to the Zip disk — they’re similarly priced and sized. In fact, the
cartridges hold slightly more (135MB) than Zip disks, and are slightly
faster. Unfortunately, the awkwardness of loading and ejecting these
disks — and the fact that the Zip drives had a huge head start in the
market — put the EZ Drive at a distinct disadvantage.
■Jaz drives: Also from Iomega, and also wildly popular, these high-
capacity removables are a multimedia glutton’s dream. The original Jaz
drive itself costs about $400 and holds 1.2 gigabytes on each 3.5-inch,
$100 cartridge. In 1997, Iomega introduced a second-generation Jaz drive
that runs even faster and uses 2 gigabyte disks, which cost about $150
each. The beauty of the $600 Jaz 2G drive is that it’s backward-
compatible with the original cartridges.
Chapter 8: The Disk Chapter 389
■ ■
MAC SECRETS • 4040-8/X • ch.08.F • Chapter 8 • FINAL • VB/EAP • 10/23/98 • p.389
MAC SECRETS • 4040-8/X • ch.08.1 • Chapter 8 • Proof 1 • ma • 09/2/98 • p.389
4040-8/5 ch08.F 11/3/98 3:50 PM Page 389

Jaz drives aren’t just capacious, they’re fast—as fast as hard drives,
and, therefore perfectly suited for QuickTime movies and other speed-
intensive tasks. Despite a discouraging reputation for unreliability—both
the drives and some cartridge batches — they quickly became a standard
for storage among graphics and multimedia professionals.
■SyJet: Once again, SyQuest has tried to imitate Iomega’s success, this
time by developing a Jaz-drive wannabe. The $300 SyJet drive holds $80
cartridges that contain 1.5 gigs apiece — better specs than the Jaz. But
once again, the SyJet runs a distant second in popularity; whereas your
local service bureau, for example, is sure to have a Zip or Jaz drive to
accommodate your files, the odds of finding a SyJet drive are slim indeed.
■Orb: Castlewood Systems’ 1998 creation, the Orb drive, promises to send
Iomega and SyQuest, Inc. scrambling back to their board rooms. The Orb
is along the same lines as the Jaz 2G drive — but faster (they transfer 12
megs per second), more capacious, and much cheaper. At $200 for the
drive and only $30 for the cartridge, the Orb makes Jaz and SyJets look
like luxuries for the rich.
■SuperDisks: Imation’s $130 SuperDisk drive accepts both normal
floppies and its own Zip-like 120MB disks, making it ideal for such
floppyless machines as the iMac. Saving onto these disks is slow, but the
two-for-one nature of this translucent plastic doodad makes it especially
appealing.
■CD-R and CD-RW: Stand for CD recordable and CD rewritable. Unlike
traditional CD-ROMs, which are read-only, CD-Rs and RWs are compact
discs on which you can record your own data. For details, see Chapter
32. For now, we’ll just point out that a Jaz drive holds twice as much, is
erasable, and is many times faster. Although blank Jaz cartridges cost
more, we suspect CD-R’s time on Earth is limited — especially with
recordable versions of DVD compact discs, which can hold up to 26
times as much, on the drawing boards (see Chapter 32).
■Magneto-optical (MO) drives: These are rewritable optical disks that
come in cartridge form. The smaller cartridges, which resemble
standard-size floppy disks, can hold up to 256MB. The larger, 5.25-inch
square cartridges contain up to 1.3 gigabytes of data; a finely-focused
laser records your data onto a double-sided spinning disk. Magneto-
optical disks aren’t as popular as SyQuests, but they’ve been catching on,
especially with graphic artists; PowerBook owners can buy snap-in MO
drives when they want to transport and archive hundreds of megabytes
at a time. Magneto-opticals are slower than removables, and the drives
themselves are more expensive, but they’re economical for large-capacity
storage. Blank 1.3 gigabyte optical disks cost about $70, — about on par
with the Jaz drive.
■Tape drives: These are designed primarily as backup devices, because
they don’t provide random access. In order to find a specific block of
data, you have to fast forward or rewind through tape, which takes time.
All that winding and rewinding takes its toll on the tape’s life expectancy,
too; some tapes stretch and wear out if accessed more than a few dozen
390 Part II: Secrets of the Machine
■ ■
MAC SECRETS • 4040-8/X • ch.08.F • Chapter 8 • FINAL • VB/EAP • 10/23/98 • p.390
MAC SECRETS • 4040-8/X • ch.08.1 • Chapter 8 • Proof 1 • ma • 09/2/98 • p.390
4040-8/5 ch08.F 11/3/98 3:50 PM Page 390

times. Really, tape backups aren’t meant for repeated use. The idea is to
store the backup tape in a vault or a safe-deposit box. If an earthquake
swallows your house, or a satellite falls on your office building and wipes
out your network, you can restore your data from the tapes and carry on
with your life. Some tape drives record data on the same 8mm tape
cassettes used in video recorders. Others write the data to DAT (digital
audiotape). Tape drives are great for large-network backup because they
can archive a huge amount of data— as much as 16 gigabytes on a single
tape! They’re also the least expensive form of mass storage. A tape
cassette capable of holding 16 gigabytes of data costs under $30.
■Worm drives: Worm stands for Write Once, Read Many, but forget it:
These you-can-only-record-on-it-once CDs are already technological
dinosaurs. We’ve never even seen one.
Removable-Disk Secrets
■
Why can’t I eject my cartridge?
There’s a famous bug involving removable cartridges and file sharing prior to
System 7.5.1. You can’t remove a removable — a Zip, Jaz, CD, or SyQuest — if it
was in the drive when file sharing started up.
Solutions:
■Wait to insert the cartridge until after file sharing has started up.
■Turn file sharing off while you eject the disk (with the Control Strip, for
example; see Chapter 4).
Use the shareware program UnmountIt, which quickly turns File Sharing off and
on again when you eject a cartridge. It is included on the CD-ROM with this book.
My cartridge doesn’t show up
On certain Macs, with certain SCSI-chain setups, on certain days of the week,
you may insert a SyQuest, Zip, or Jaz cartridge (after the Mac is already on) and
discover that its icon doesn’t appear on the Desktop.
The solution is simple: restart your Mac with the cartridge or disk already
inserted into the drive. The Mac will pull it onto the Desktop even if the
necessary extension wasn’t installed at startup!
Don’t feel like restarting? Install SCSIProbe, included on the CD-ROM with this
book. Then, whenever you’re nipped by this won’t-mount problem, just press Ô-
space. SCSIProbe wakes up and forcibly brings your cartridge onto the Desktop.
(You can change this keystroke in the SCSIProbe control panel.)
Mac Basics
Chapter 8: The Disk Chapter 391
■ ■
MAC SECRETS • 4040-8/X • ch.08.F • Chapter 8 • FINAL • VB/EAP • 10/23/98 • p.391
MAC SECRETS • 4040-8/X • ch.08.1 • Chapter 8 • Proof 1 • ma • 09/2/98 • p.391
4040-8/5 ch08.F 11/3/98 3:50 PM Page 391

If you’re using a Zip or Jaz drive, of course, the solution is even easier; run the
little Iomega Guest program included with your drive. No extension needed.
The Surgeon General’s warning
Smoking is bad for your lungs, and it also can spell disaster for removables.
If even the tiniest bit of tobacco smoke manages to worm its way into a Zip, Jaz,
or SyQuest cartridge, a microscopic smoke particle can damage the disk
surface and cause the drive to crash. Maintaining a smoke-free office will help
keep your data safe — and probably prolong
your
life, too.
Using a Zip or Jaz on a PC
Want an inexpensive way to transfer larger-than-a-floppy batches of data to a
Windows machine? Don’t feel like spending hundreds of dollars for a network
between them?
Your Mac can read PC-formatted Zip and Jaz cartridges, just as it can read
PC-formatted floppies. As long as you’ve got the PC Exchange control panel
installed, those PC-originated cartridges show up on your desktop just as though
they’re regular Mac disks.
That’s how you
read
PC-formatted Zips and Jaz disks. But how do you
create
them? How do you turn a Mac-formatted Zip or Jaz drive into a Windows-
readable one? By using the Iomega Tools program that came with the drive.
(The Mac’s own Erase Disk command doesn’t offer a choice of Mac/PC
formats, as it does for floppies.)
Cash in on those disk guarantees
What’s the first thing you should do when you unwrap a fresh Zip, Jaz, or
SyQuest disk? Write down the date — preferably right on the disk label! Many
of these disks carry a reliability guarantee of three, four, or five years (the same
is true of many hard drives). If, at any time within the warranty period, a disk
becomes unusable, you can return it to the manufacturer for a
free
replacement.
The key is to have the purchase date and receipt available. Make it a point to
keep such records on file. We’ve seen companies return cartridge after cartridge
for free replacement, even when the disks were damaged by a faulty drive.
Worth
Learning
392 Part II: Secrets of the Machine
■ ■
MAC SECRETS • 4040-8/X • ch.08.F • Chapter 8 • FINAL • VB/EAP • 10/23/98 • p.392
MAC SECRETS • 4040-8/X • ch.08.1 • Chapter 8 • Proof 1 • ma • 09/2/98 • p.392
4040-8/5 ch08.F 11/3/98 3:50 PM Page 392

MAC SECRETS • 4040-8/5 • ch.09.F • Chapter 9 • FINAL • VB/mark • 10/23/98 • p.393
MAC SECRETS • 4040-8/5 • ch.09.1 • Chapter 9 • Proof 1 • ma • 09/03/98 • p.393
Chapter 9
Memory
In This Chapter
©What memory is and where it goes
©32-bit addressing and all that
©Allotting memory to programs
©The Disk Cache, RAM disks, RAM Doubler, and virtual memory
When you double-click a document or a program icon, your hard drive
spins furiously at up to 7,200 rotations per minute. Like an audio CD
player, the Mac reads the information contained in your file off the disk. The
Mac doesn’t send this data to a speaker, however — it copies the information
into memory. (By the way, we don’t belong to the “disks are memory” school.
Disks are disks. Memory is memory. There’s no such thing as “disk memory.”)
By the time your memo (for example) appears on the screen, you have two
copies of it — one copy on the disk and another in memory (RAM) on the
screen before you. (For a discussion of what happens next, see Chapter 15.)
Keep this distinction between disk storage and RAM in mind, and much of
computing becomes clearer.
RAM: the Chips
RAM comes on tiny circuit boards called SIMMs (for single in-line memory
modules) or, on most Power Macs, DIMMs (for dual in-line memory modules).
A SIMM is a bunch of memory chips (memory modules) carefully fastened, in
a neat row (in-line), to a small epoxy board. With your permission, from now
on, we’re just going to use DIMMs when we mean “SIMMs or DIMMs,
depending on your Macintosh model.”
If you’ve ever held a DIMM in your hand, you know that RAM looks pretty
unimpressive. RAM stands for random-access memory; random-access
implies that the computer can jump directly into any part of it to fetch a
piece of information. Contrast this random-access device with, say, a VCR,
which is a sequential-access device; you can only get to a certain spot in the
movie by waiting while it fast-forwards or rewinds to the appropriate spot.
4040-8/5 ch09.F 11/3/98 3:36 PM Page 393

Despite its humble appearance, memory is about 1,000 times faster than a disk
at sending information to the Mac’s brain. This critical fact accounts for
almost everything you’re about to read, because programmers deliberately
put something into RAM whenever speed is an issue. When you’re editing
your memo, of course, you don’t want to have to pause for ten seconds each
time you scroll to a new paragraph, which is what would happen if your
memo wasn’t in memory. As owners of the PowerBook 5300 can tell you, the
Mac can be slow enough as it is.
If you examine a DIMM, you’ll note that the little black memory modules are
connected to the board with tiny legs. The board portion is constructed of
impossibly thin layers of epoxy resin. In between layers, computers and acid
have arranged and etched circuitry. The legs of the memory pods make
contacts with this internal circuitry with extreme precision and specific depths.
These minicircuit boards (the DIMMs) can be snapped, with some difficulty,
into corresponding receptacles inside every Macintosh model. Various models
have various numbers of DIMM slots, usually in multiples of two or four.
The number of DIMM slots doesn’t necessarily affect how much memory
your Mac can have installed, however. The DIMMs themselves come in
different capacities, from 1/4 MB to 128MB or more on a single DIMM! Needless
to say, the technology required to cram 128MB of RAM on a three-inch piece
of board makes them expensive — at the moment. Like all high-tech products,
however, prices of memory chips will forever plummet. (Were you around
during the Great RAM Price Crash of 1996? Ah, it was a great time to be alive.)
We’ve figured out precisely how much memory your particular Mac model can
accept. Rather than bore you by listing it all here, we’ll direct you to Chapters
12 and 13, where you can read about your model and ignore the others. You
may also wish to spend some quality time with GURU, the amazing storehouse
of model-by-model RAM information included on the CD-ROM with this book.
Where your memory goes
We once heard an Apple engineer discussing the design of the very first Mac.
It seems that, in the early ’80s, Apple decided to break the bounds of
personal computers. Costs be damned, Apple was going to absolutely pack
memory into its flagship machine: a whopping 64K!
Of course, even in the time it took the Mac to reach market, 64K began to
look paltry; the first Mac actually contained 128K of RAM.
The Fundamental Law of Software Glut dictates, however, that the amount of
memory considered the crudest minimum doubles about once per year; at
this writing, a Mac OS 8 Power Mac feels memory-cramped unless it has at
least 32MB of memory. Some of the latest Macs can handle a hearty 768MB.
(Even paradise has its inconvenience, though: the more RAM your Mac has,
the longer it takes to start up.)
Mac Basics
394 Part II: Secrets of the Machine
■■
MAC SECRETS • 4040-8/5 • ch.09.F • Chapter 9 • FINAL • VB/mark • 10/23/98 • p.394
MAC SECRETS • 4040-8/5 • ch.09.1 • Chapter 9 • Proof 1 • ma • 09/03/98 • p.394
4040-8/5 ch09.F 11/3/98 3:36 PM Page 394

Where does it all go? Here’s how the math goes on a typical 32MB Power
Macintosh. Remember that one megabyte of anything isn’t 1,000 kilobytes —
it’s 1,024 kilobytes. So our 32MB machine has 32,768 kilobytes of RAM.
In our tests, a Mac OS 8 system with all extensions removed from the System
folder (not just turned off) takes up 6.5 megs of RAM right off the top. Set
your Disk Cache (we’ll get to this) to the recommended setting for a 32MB
machine, and you’re out another meg.
Furthermore, every single feature of your Mac saps away a little more
memory. Internet extensions ... CD-ROM extensions ... AppleTalk, virtual
memory, speech — each sucks away more RAM all the time your Mac is on
(unlike programs, which you can quit when you want to). The CD-ROM
extension grabs 225K, AppleTalk wants 107, File Sharing takes 484, QuickTime
wolfs down 768, and so on.
In other words, turn the basic Mac OS 8 extensions on, and you’re out
another 1.7MB. Add a few extensions of your own, and you rob even more
memory: QuicKeys (530K), a Global Village modem (318K), and StuffIt Deluxe
(768K) — and we won’t even begin to talk about RAM gobblers like ATM and
Apple’s speech software.
The bottom line: on a typical 32-meg Mac with a moderate number of
extensions, you lose 12 megs of RAM — 38 percent of your machine’s
memory — just by turning on the computer!
No wonder the standard RAM allotment doubles every year.
What to do about a RAM shortage
If you’re running short of RAM, you have three choices.
■Run fewer programs simultaneously. That is, quit Photoshop before
launching Netscape Navigator. It won’t kill you, but you won’t be getting
as much out of your Mac as you can.
■Use virtual memory or RAM Doubler. We’ll cover both of these shortly.
■Buy more memory. Upgrading that 32MB machine to 64MB costs about
$60 (at this writing, anyway). Go this route for maximum speed and
minimum hassle.
If you do decide to install more RAM, the following section provides some
pointers.
How to buy SIMMs/DIMMs
Memory upgrades come from three sources. First, you can take your machine
into a computer store. They will provide the memory, install it, and test it.
Having a dealer do the job certainly provides peace of mind, but it costs you
much more than what it would cost to do the job yourself. You’ll also have to
do without your Mac while it’s in the shop (depending on how friendly your
dealer is).
Chapter 9: Memory 395
■ ■
MAC SECRETS • 4040-8/5 • ch.09.F • Chapter 9 • FINAL • VB/mark • 10/23/98 • p.395
MAC SECRETS • 4040-8/5 • ch.09.1 • Chapter 9 • Proof 1 • ma • 09/03/98 • p.395
4040-8/5 ch09.F 11/3/98 3:36 PM Page 395

The second possibility is to buy the RAM from a general Mac-merchandise
mail-order company, such as Mac Connection, and install it yourself. We like
this option because your purchase, if not your Mac, is well protected. Mac
Connection (or another of the major Mac mail-order companies) guarantees
everything, frets over your satisfaction, may include a how-to-install video
(or at least a good manual), and ships overnight for $5. The drawback is that
each chip costs close to 50 percent more (say, $45 instead of $30 each) than
it would if you bought it from a chip company.
The third option entails ordering your DIMMs directly from a chip company
(like The Chip Merchant, 800-808-CHIP). This, too, is mail order, and it’s the
cheapest way to get RAM. You pay more for shipping; you may not get
instructions; and you may not be able to pay by credit card.
Both of the mail-order sources we mentioned carry ads each month in the
back of each issue of the Mac magazines (Macworld, MacAddict, Mac Home
Journal ). They all have toll-free numbers for advice and information.
Types of DIMMs
You’ll hear a few different terms bandied about in your efforts to buy memory.
First, there’s speed. Typical speeds are 70, 80, and 90 nanoseconds (ns). Getting
a faster speed chip than your Mac needs doesn’t speed up your Mac. However,
getting a chip that’s too slow for your Mac can cause trouble. See Chapters 12
and 13 (or the program on this book’s CD-ROM called GURU) for model-by-
model listings of the memory speeds required in each Mac. As a general rule,
though, the slowest Macs use 150 ns chips; the fastest need 60 ns.
Each model family requires a different kind of RAM board. For example, you
can’t use memory from your old Mac IIci in a Power Mac; nor does
PowerBook memory work in a desktop model.
Again, this information is listed in Chapters 12 and 13; the point is to mention
your Mac model when ordering memory upgrades.
Installing memory
If the thought of installing memory makes you a little queasy, you can have
either a dealer or some local guru do it. Do not upgrade a PowerBook with a
three-digit model number yourself. If you have a Plus, SE, or black-and-white
Classic, you need an $8 set of special tools, including a long-shafted Torx
screwdriver, to open the case. And to upgrade some tower-style Macs (such
as the 800 and 8100 series), you must practically dismantle the machine to
get at the RAM slots. For these models, once again you may want to go the
local-guru route.
For the remaining models, installing RAM isn’t difficult. (In fact, on the tower-
style Macs that unfold like a Hostess Ho-Ho unrolling — the G3 towers, for
example — getting at the RAM slots is child’s play.) But because different
models require chips in different multiples (two or four, for example), and
because every model’s slots are in a different place, we won’t attempt to walk
Mac Basics
396 Part II: Secrets of the Machine
■ ■
MAC SECRETS • 4040-8/5 • ch.09.F • Chapter 9 • FINAL • VB/mark • 10/23/98 • p.396
MAC SECRETS • 4040-8/5 • ch.09.1 • Chapter 9 • Proof 1 • ma • 09/03/98 • p.396
4040-8/5 ch09.F 11/3/98 3:36 PM Page 396
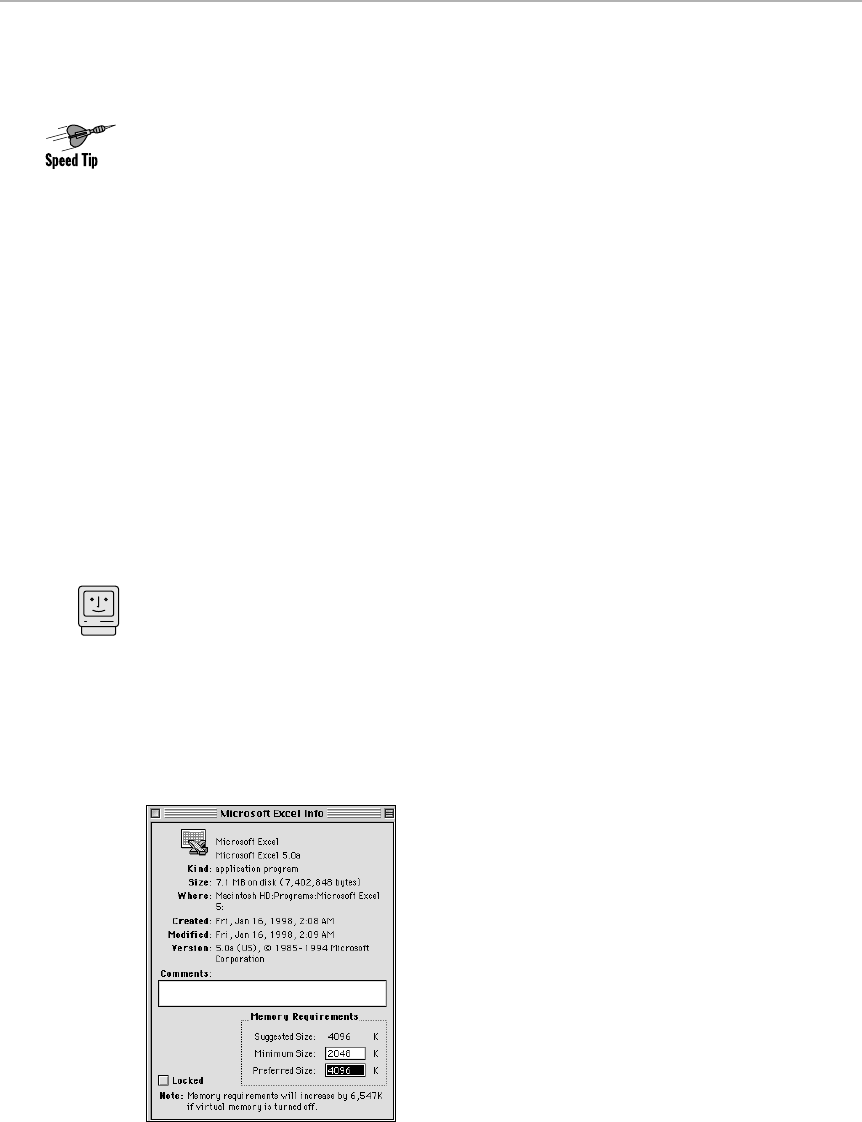
you through the process. The video or manual provided by some mail-order
companies does an excellent job of explaining the task, as does Apple’s
manual for most models.
When you’re finished with the installation, here’s a tip: Don’t bother hooking
everything up again. Leave the Mac opened up, and try turning it on. If all
went well, you’ll hear the usual start-up ding or chime; wait a moment to
make sure that the Mac has completely finished starting up — even if the
monitor isn’t connected — and then turn it off manually.
If, on the other hand, you hear the Chimes of Death (four single notes, the
Twilight Zone theme, a flute or drum solo, or a car-crash sound — depending
on your model), then one of the DIMMs is faulty or, more likely, not seated
right. All of its contacts aren’t correctly mating with the leads in its slot.
Don’t freak out; this happens fairly frequently, and it’s easy to fix. Remove
the DIMMs you just put in and start over.
Finally, when everything starts up okay, turn off the Mac and put it all back
together.
RAM: for Programs
The Mac uses RAM for all kinds of things before you even run a single program.
But, sooner or later, you’re going to use your RAM for running applications.
The most important thing we can convey is that you control how much memory
appetite a particular program has. If you’re working on an especially large
ClarisWorks file, for example, you may want to give ClarisWorks more memory.
Or if you’re working on a PowerBook with limited RAM, and you’re just writing
memos, you may want to give WordPerfect a smaller memory allotment.
To change the program’s memory allotment — its memory partition — go to
the Finder. (The program can’t be running yet.) Highlight its icon and then
choose Get Info from the File menu (see Figure 9-1).
Figure 9-1: Change a program’s memory appetite using the Preferred box.
Mac Basics
Chapter 9: Memory 397
■ ■
MAC SECRETS • 4040-8/5 • ch.09.F • Chapter 9 • FINAL • VB/mark • 10/23/98 • p.397
MAC SECRETS • 4040-8/5 • ch.09.1 • Chapter 9 • Proof 1 • ma • 09/03/98 • p.397
4040-8/5 ch09.F 11/3/98 3:36 PM Page 397

398 Part II: Secrets of the Machine
■ ■
MAC SECRETS • 4040-8/5 • ch.09.F • Chapter 9 • FINAL • VB/mark • 10/23/98 • p.398
MAC SECRETS • 4040-8/5 • ch.09.1 • Chapter 9 • Proof 1 • ma • 09/03/98 • p.398
TRUE FACT
A Mac can’t use more than 8MB of memory
without 32-bit addressing. Fortunately, this
technical feature is automatically, and
permanently, turned on in all Mac models since
about 1993. Look in your Memory control panel.
Do you see a switch for 32-Bit Addressing? If not,
you’ve got 32-Bit Addressing turned on forever.
But many owners of older Macs — the LC or Mac
II-series models, for example — get zapped by
the 32-bit addressing problem when they upgrade
their Macs from, say, 8MB to 20MB of memory.
When it’s all over, the About This Macintosh
command reveals that, sure enough, 20MB are
installed — but the System is using 12 of them!
Making the Mac aware of its new memory is
easy. Open the Memory control panel and turn
on 32-bit addressing (you must have System 7
or later). Then restart the Mac.
Why is this feature called 32-bit Addressing?
Deep down, a computer’s primary job is to
shuffle around zillions of tiny pieces of
information into zillions of corresponding
pigeonholes. Each little data mailbox is
numbered, so that the Mac will be able to find
the information again later. The programmers
call the data location’s number its address.
As you can imagine, the computer needs a very
long number to express a certain address if
there are millions of possible locations.
(Especially because the computer counts in
base two instead of base ten, like us.) In fact, to
put this in an understandable context — it takes
a number 24 digits long to be able to pinpoint
every memory address in 8MB of RAM. Some
letter “W” you’ve typed, for example, might be
stored at RAM address 10010110101101000
1101010.
But now we’re asking the Mac to store
information in more than 8MB of memory! It’s
exactly the same problem the phone company
had as the U.S. population grew. Simply put, Ma
Bell was running out of phone numbers. Pretty
soon, seven digits just weren’t enough for every
citizen to have a different phone number! Area
codes were born. Suddenly, every phone
number was ten digits long instead of seven.
In the same way, Apple Computer had to give
the Mac some extra digits to play with, starting
in System 7. Because it has more memory and
more places to stick information, the Mac can
use 32 digits in its addresses. Hey — it’s 32-bit
addressing, get it?
With 32-bit addressing on, your Mac can address
huge amounts of memory: up to four gigabytes
(4,096MB) of RAM, although there’s no Mac yet
made with enough slots to hold that many DIMMs!
Now then: Suppose you have a program that
was written when Macs had a maximum
address length of 24 bits. Suppose that the
programmers didn’t leave room for potential
expansion. Any time the Mac tries to look for a
RAM location whose address is higher than the
24-bit maximum, a system error will result. A
program that properly handles 32-bit addressing
is called 32-bit clean; otherwise, it’s 32-bit dirty.
How can you tell if a program is 32-bit dirty?
There’s no easy way. If it crashes when you turn
on 32-bit addressing, that’s one good sign.
Combine that information with the program’s
age, and you’ll have a pretty good idea.
Funny thing is, some machines weren’t written
to Apple’s guidelines, either — the Macintosh II,
IIx, IIcx, and SE/30 models. Their internal
circuitry prevents them from ever using more
than 8MB of memory. Go figure.
Fortunately, two extensions — Mode32, from
Connectix, and Apple’s own 32-Bit Enabler —
make these models 32-bit clean. If you have a
Macintosh II, IIx, IIcx, or SE/30 model and want
to upgrade the RAM beyond 8MB, install one of
these free extensions; Mode32 is the only one
that works with System 7.5 and later.
32-Bit Addressing: More than you wanted to know
4040-8/5 ch09.F 11/3/98 3:36 PM Page 398
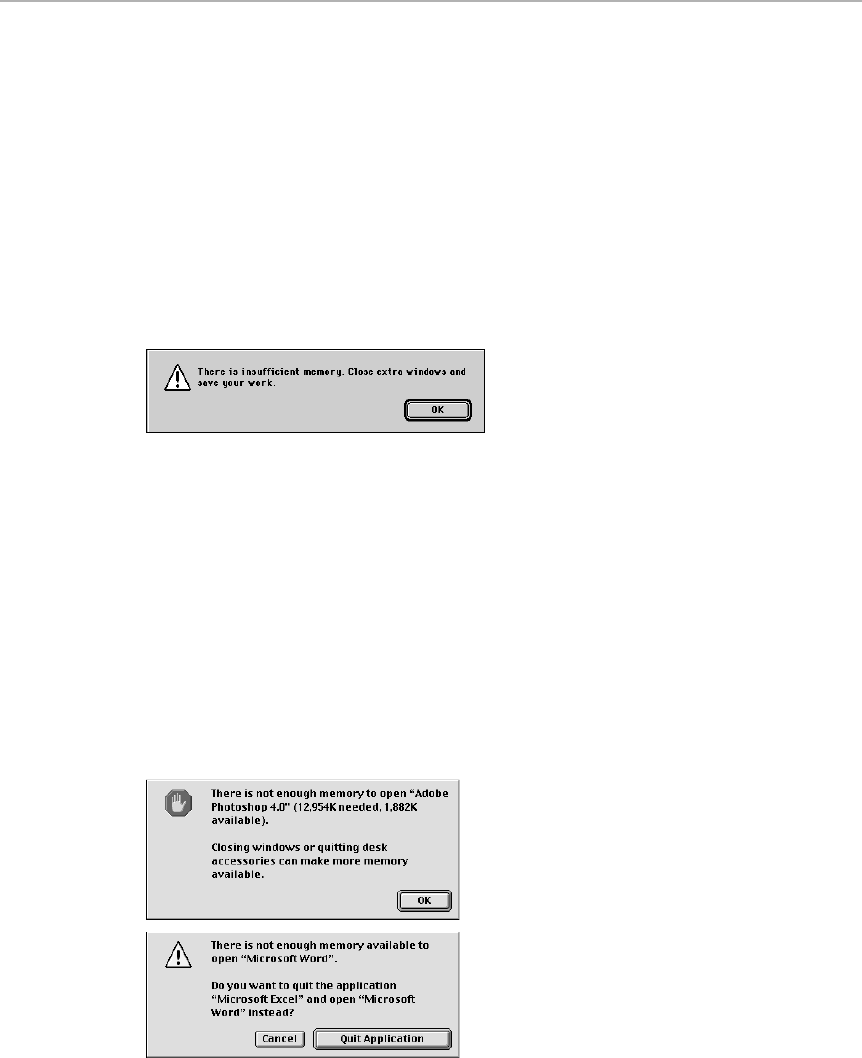
Finally, change the number in the lower-right corner of the Get Info box. If
you set this number below the program’s suggested or minimum size, the
Mac will notify you that you’re inviting System crashes.
The two out-of-memory messages
Your Mac may show you either of two different “not enough memory”
messages. Ironically, the one you see most often doesn’t mean what you think.
When a program you’re running gives you an “out of memory” message, it’s
not because your Mac doesn’t have enough memory! Even a Mac with 768MB
of RAM may give you the message shown in Figure 9-2.
Figure 9-2: You see this message when the program you’re using hasn’t been assigned
enough memory. Give it some breathing room!
This message appears because you haven’t permitted the program to use
enough of the Mac’s memory. Your program is gasping for RAM within the puny
amount you’ve given it. Use the Get Info method just described to increase the
program’s memory partition. Those out-of-memory messages will go away.
If, on the other hand, you get one of the messages shown in Figure 9-3 as
you’re launching a program, then it is your Mac that’s short on memory.
(Actually, your Mac is short on contiguous memory, as described later in “See
where your memory’s going.”) Quit some of the programs you’re running and
try launching the new program again.
Figure 9-3: These messages mean that your Mac simply doesn’t have a large enough block
of unused memory to launch the new program you’re opening. If the Mac sees that quitting
one of the open programs would free up enough memory to complete your launch, it even
offers to do so (bottom).
Chapter 9: Memory 399
■ ■
MAC SECRETS • 4040-8/5 • ch.09.F • Chapter 9 • FINAL • VB/mark • 10/23/98 • p.399
MAC SECRETS • 4040-8/5 • ch.09.1 • Chapter 9 • Proof 1 • ma • 09/03/98 • p.399
4040-8/5 ch09.F 11/3/98 3:36 PM Page 399

Three different memory sizes per program
The Get Info box has three different boxes showing memory sizes (see Figure
9-1). The Minimum size is the programmer’s opinion of the least RAM the
program needs to run at all. If you set this number below its factory-set
number, you’ll be warned that “this program may crash.” And if you set the
Preferred number (described below) to the Minimum number, the program
will open, but it will run slowly.
The Suggested size is the amount the software company thinks the program
needs to run comfortably and at full speed. And the Preferred size is the
number that you’re allowed to change. We like to think of it as actual size; it’s
the amount that will be set aside for the program — if that much RAM is
available. If not, the Mac will launch the program, using up a RAM chunk as
close to that size as possible (provided, of course, that the available RAM is
higher than the Minimum number).
The Preferred box is very important. Many programs’ pre-set Preferred size is
unrealistically low, reflecting the input of marketing directors who want their
company’s products to appear to have a modest RAM appetite. As a result,
boosting this number by 20 percent or more frequently makes a program run
faster and stabler. If you’re having trouble with cranky behavior in one
specific program, one of your first troubleshooting thoughts should be to
bump up its Preferred memory size.
By the way: As you’ll read in the sidebar “Why Power Mac programs are RAM
hogs,” on any PowerPC Mac, you can cut a program’s Preferred and Suggested
memory appetite by as much as 50 percent by turning on virtual memory or
RAM Doubler.
The Finder’s memory partition
In Chapter 1, we insisted that the Finder itself is a program. Like any program,
the Finder has a specific amount of memory allotted to it. And like any
program, the Finder can run out of memory in its partition. The more
windows you have open, or the more icons displayed on the screen, the more
RAM the Finder needs. Sometimes it says, “There is not enough memory to
keep this window open” or “...to open that control panel right now.” That’s a
clue that the Finder is gasping for RAM.
In theory, the Finder is supposed to be self-adjusting — but we still get out-of-
memory messages from it. Yet you can’t change its memory allotment using
the same Get-Info-while-it’s-not-running method described previously; the
Finder’s Get Info box has no memory-size boxes in the lower-right corner.
Fortunately, you can use ResEdit to achieve the same result. See Chapter 21
for details.
Worth
Learning
400 Part II: Secrets of the Machine
■ ■
MAC SECRETS • 4040-8/5 • ch.09.F • Chapter 9 • FINAL • VB/mark • 10/23/98 • p.400
MAC SECRETS • 4040-8/5 • ch.09.1 • Chapter 9 • Proof 1 • ma • 09/03/98 • p.400
4040-8/5 ch09.F 11/3/98 3:36 PM Page 400

Chapter 9: Memory 401
■ ■
MAC SECRETS • 4040-8/5 • ch.09.F • Chapter 9 • FINAL • VB/mark • 10/23/98 • p.401
MAC SECRETS • 4040-8/5 • ch.09.1 • Chapter 9 • Proof 1 • ma • 09/03/98 • p.401
ANSWER MAN
Q: Why do Power Mac programs need so much
more memory than their non-Power Mac
equivalents?
A: To follow this discussion, recall the basics of
how a program runs. When you double-click a
program’s icon, the hard drive spins, and your
Mac reads the program’s code — the computer
instructions that constitute a program — into
memory.
The Power Mac processor — the PowerPC chip
— is completely different from the chips in non-
Power Mac (680x0) models, and software
tailored to run on it (“native” PowerPC
programs) is completely different from 680x0
programs. A 680x0 program reads pieces of its
code from the hard disk, and gets rid of that
code, as necessary. For example, when you
print, your program reads the printing code on
the hard disk and loads it into RAM; when the
printing is finished, those instructions are
dumped out of memory. This swapping process
is known by the geeks as file mapping.
“Native” PowerPC programs, on the other hand,
don’t have the luxury of being able to read and
dump code fragments as necessary. Their code
is stored on the disk as one giant chunk.
Therefore, a PowerPC program requires much
more memory than its 680x0 counterpart; it
must load all of the program code into RAM
when you launch it. As you can imagine, this
also means that a PowerPC program takes
longer to load.
Fortunately, there is a quick and easy solution to
this problem — a simple mouse click that
permits a Power Mac to use file mapping, just
like non-native programs. Just open your
Memory control panel and turn on Virtual
Memory. Adjust the setting so that the amount
is only about one or two megabytes more than
your actual installed memory. (This option was
turned on when you bought your Mac. It should
still be on, unless you’ve turned it off.) You’ll find
a complete discussion of virtual memory later in
this chapter.
Because virtual memory, at heart, is simply a
method of rapidly swapping information
between the hard drive and RAM, it works
beautifully on a Power Mac. Microsoft Excel 5,
for example, requires 6,500K less memory when
virtual memory is turned on! FreeHand requires
7 megs of RAM on a Power Mac — but only 3
megs when virtual memory is turned on. In fact,
it’s easy to find out how much memory savings
you’ll get: Highlight a program’s icon and choose
Get Info from the File menu. As you can see in
the message at the bottom of Figure 9-1, the
savings are easy to spot.
In other words, when it comes to a Power Mac,
turning on virtual memory not only doesn’t slow
down your machine — it actually speeds it up.
RAM Doubler, as you’ll hear us mention several
times in this chapter, is a particularly sweet
blessing on PowerPC-based Macs. In addition to
its namesake stunt (letting you launch two or
three times as many programs as before), it also
lets you turn on file mapping for PowerPC-native
programs, exactly as virtual memory does.
(Figure 9-5 shows this option in the RAM
Doubler control panel.) Unlike virtual memory,
however, RAM Doubler doesn’t use up any hard
drive space.
Why Power Mac programs are RAM hogs
4040-8/5 ch09.F 11/3/98 3:36 PM Page 401
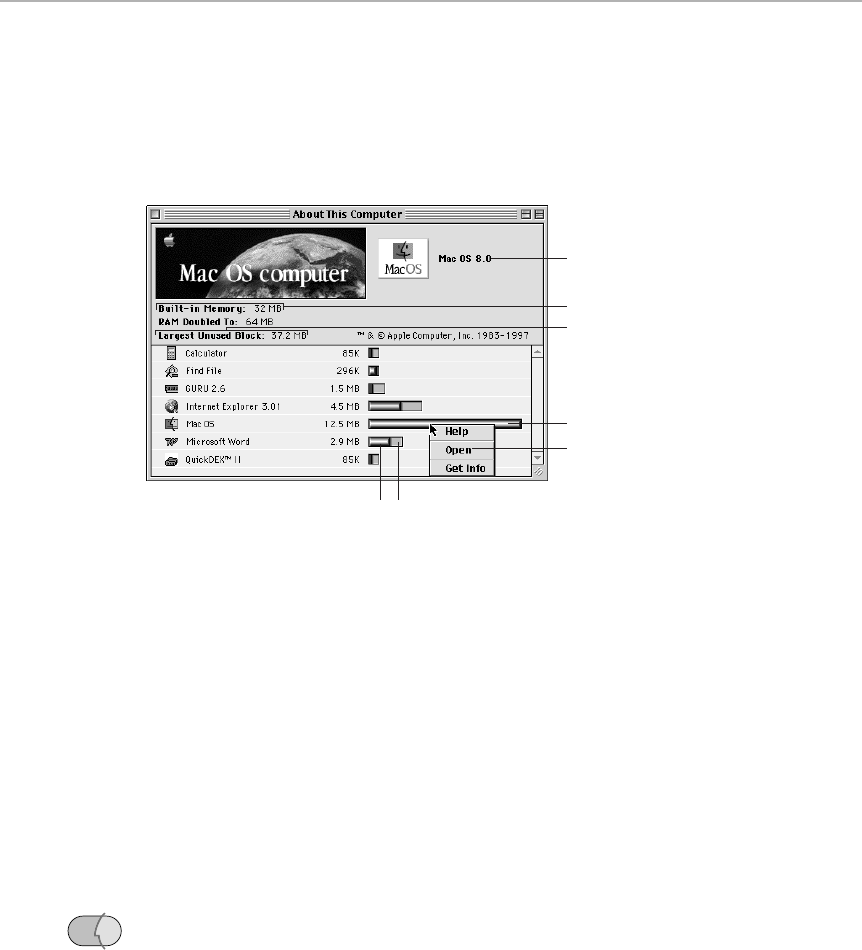
See where your memory’s going
Memory Central is the About This Computer command in the Úmenu.
(Depending on your system-software version, it may also be called About
This Macintosh or even About the Finder.) Choose this command at any time
to get some great statistics on how your memory is working (see Figure 9-4).
Figure 9-4: Your memory-usage resource.
The About This Computer box lists all the programs you’re currently running,
including the System and Finder. Here’s how it breaks down.
AHere’s where you find out what system-software version you’re using.
(See Chapter 6 for details on various system-software versions.)
BThis indicator shows how much real memory is installed in your Mac —
not “fake” memory like virtual memory or RAM Doubler memory, but
actual chips.
If you’re using virtual memory, your About This Computer box shows
both the Built-In Memory, which is how much actual RAM you have, and
the Total Memory. That’s how much memory you have, including the
disk-based virtual memory. (For details on virtual memory, see the
remainder of this chapter.)
If you have RAM Doubler installed, the number shown here is twice or three
times your actual installed RAM (even though, as we’ll discuss shortly,
that’s not really what RAM Doubler gives you). In Mac OS 8 and later, this
box is a little smarter — it shows a second line that says “Ram Doubled to”
(the new, artificially doubled or tripled amount), as shown in Figure 9-4.
CThis is a biggie. The Largest Unused Block isn’t how much memory you
have free in the Mac. Instead, it’s the largest block of unused memory — but
there may be several others. If the Largest Unused Block is 1,200K, then you
may have other free blocks of 1,000K and 400K: a total of 2,600K free!
OS
8
A
B
C
D
E
FG
402 Part II: Secrets of the Machine
■ ■
MAC SECRETS • 4040-8/5 • ch.09.F • Chapter 9 • FINAL • VB/mark • 10/23/98 • p.402
MAC SECRETS • 4040-8/5 • ch.09.1 • Chapter 9 • Proof 1 • ma • 09/03/98 • p.402
4040-8/5 ch09.F 11/3/98 3:36 PM Page 402
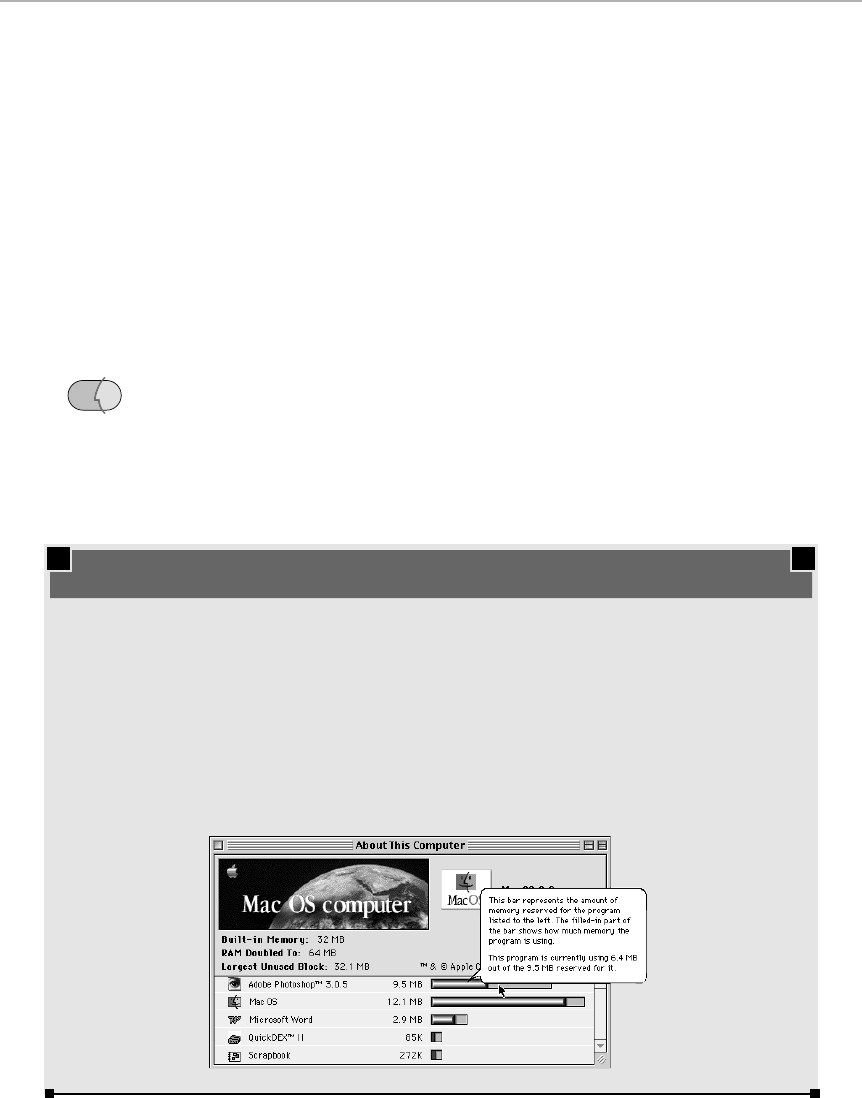
Why does the Mac track this statistic? Because whenever you open a
program, it can’t open unless there’s a block of contiguous, unbroken
memory (see “A calm discussion of memory fragmentation,” later in this
chapter, for details). This gauge helps you figure out why your 2,500K
program won’t open, even though your own personal math says there
should be a total of 2,500K free.
DEver wonder why this bar of the graph — the one for System Software —
is often the longest?
The System Software bar of the graph represents that 6,000K (or
whatever) that the System actually requires, plus every extension and
control panel you have installed. That includes big chunks of memory
required by the Disk Cache, a RAM disk (see Chapter 14), Speed Doubler,
QuickTime, QuicKeys, networking and CD-ROM software, and so on. It all
gets tallied in this bar of the graph.
EMac OS 8 and later lets you turn this memory-statistic dialog box into a
handy program-launching bay. Control-click any bar of the graph to view
the pop-up menu shown here. Choose Open from this pop-up menu, and
you bring that program to the front, no matter how deeply it’s buried in
your nest of open programs.
OS
8
Chapter 9: Memory 403
■ ■
MAC SECRETS • 4040-8/5 • ch.09.F • Chapter 9 • FINAL • VB/mark • 10/23/98 • p.403
MAC SECRETS • 4040-8/5 • ch.09.1 • Chapter 9 • Proof 1 • ma • 09/03/98 • p.403
MACINTOSH SECRET
Most people think of Balloon Help as a crutch for
beginners. In this instance, however, it can be a
sophisticated tool for the power user who’s
trying to do some memory sleuthing.
As you know, the About This Computer command
shows you how much of your memory is being
used by which programs. But only Balloon Help
shows you how much each program is using of
its allotted total RAM. Just turn on Balloon Help
and point to each bar of the graph, as shown
here, and you’ll see what we mean.
Getting the detailed memory specs
4040-8/5 ch09.F 11/3/98 3:36 PM Page 403

FIn the previous section, we mentioned that you can set the amount of
memory a particular program uses when launched. That’s the amount of
memory that program grabs; that’s also the amount shown by this graph,
including the lighter-colored end portion.
GHowever, a program may not actually need as much memory as you give
it. If we change ClarisWorks’ memory allotment to 12,000K, it still only
really needs the 1,400K the programmers designed it to use. The dark
part of this memory bar indicates how much of a program’s memory
partition it’s actually using.
If the light-colored portion of this bar is consistently large, the Mac is
signaling you that you’re wasting your RAM by allotting too much to that
program.
RAM Doubler to the rescue
RAM Doubler is an incredible idea that’s been executed extremely well. It’s
software — an extension sold by Connectix. You drop it into your System
Folder (’030, ’040, and PowerPC Macs only), and it apparently doubles or
triples the amount of memory installed in your Mac.
RAM Doubler uses some clever schemes to achieve this feat. For example, iif
you’re running three programs simultaneously, it compresses all but the
frontmost program, just as, say, StuffIt might do. But StuffIt compresses a file
on the disk into a smaller file on the disk. RAM Doubler, on the other hand,
compresses something in memory into a smaller amount of memory; as a
result, RAM Doubler’s compression takes place nearly instantaneously. If
there’s not enough RAM left to perform this quick compressing, RAM Doubler
may also store some of the background programs on the hard drive, just as
the Mac’s virtual memory feature does.
Current versions of RAM Doubler are mostly immune, in our experience, to
the slowdowns and extension conflicts associated with the earliest versions.
However, RAM Doubler isn’t magic. It doesn’t actually double or triple your
RAM; instead, it doubles or triples the number of programs you can open
simultaneously. In other words, RAM Doubler is for opening more small
programs, not for giving a single big program more memory. Each individual
program you want to open must fit into your genuine installed RAM.
Bottom line: If you can’t open that RAM-hungry program now, you won’t be
able to open it with RAM Doubler installed. If you want to run three programs
simultaneously instead of just one, however, RAM Doubler is an inexpensive,
pain-free solution. Furthermore, RAM Doubler offers special advantages for
PowerPC-based Macs, as discussed earlier in this chapter (see “Why Power
Mac programs are RAM hogs,” earlier in this chapter).
404 Part II: Secrets of the Machine
■ ■
MAC SECRETS • 4040-8/5 • ch.09.F • Chapter 9 • FINAL • VB/mark • 10/23/98 • p.404
MAC SECRETS • 4040-8/5 • ch.09.1 • Chapter 9 • Proof 1 • ma • 09/03/98 • p.404
4040-8/5 ch09.F 11/3/98 3:36 PM Page 404
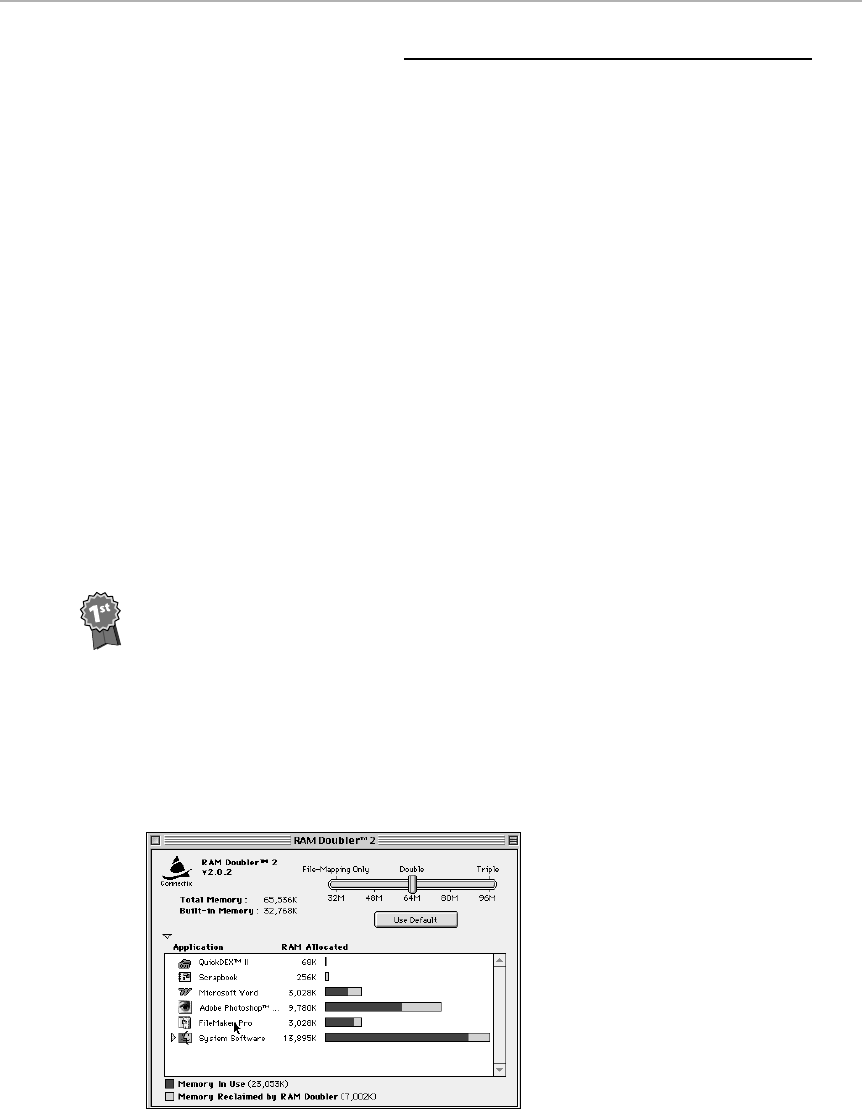
RAM Doubler Secrets
■
RAM Doubler versus Photoshop
Few topics generate so many questions as the Photoshop versus RAM Doubler
issue. Photoshop, of course, is an amazing program that gets more amazing the
more RAM it has. RAM Doubler would seem a natural for it. However, as we’ve
said, RAM Doubler can’t give any one program more RAM than you’ve actually
got installed, as chips, in your Mac.
Therefore, use the Get Info method described in this chapter to give Photoshop
as much real memory as you can — don’t include any of the “RAM Doubler”
memory. In other words, choose About This Computer from your Úmenu.
Subtract the amount of RAM your system is using (for example, 8 megs) from the
“built-in memory” amount (for example, 24 megs). That leaves 16 megs of real
RAM, which you can allot to Photoshop. It makes no difference that RAM Doubler
has made your “total memory” figure, say, 48 megs, 72 megs, or whatever.
If you get greedy, and you allot to Photoshop more RAM than you physically have
available (anything above 16 in this example), you’ll pay the price — system
crashes and unbelievably slow performance.
The RAM Doubler launching pad
RAM Doubler 2 and later takes the form of a control panel. In many ways, it
resembles the Get Info box shown previously in Figure 9-1. As free book winner
and Connectix employee John Malm points out, however, the bars shown in this
dialog box are more than a pretty inter face (see Figure 9-5). They’re a launching
bay for your running programs. Just double-click a program’s name to make it
the active program. (Alas, RAM Doubler 8 lacks this feature.)
(Is it fair that an employee of Connectix wins a free book by submitting an
undocumented secret about his
own product?
You better believe it. Let’s have
more
Secrets
contest submissions from software-company employees!)
Figure 9-5: RAM Doubler 2’s control
panel features double-clickable bars
for quick application launching.
Contest
Winner
Chapter 9: Memory 405
■ ■
MAC SECRETS • 4040-8/5 • ch.09.F • Chapter 9 • FINAL • VB/mark • 10/23/98 • p.405
MAC SECRETS • 4040-8/5 • ch.09.1 • Chapter 9 • Proof 1 • ma • 09/03/98 • p.405
4040-8/5 ch09.F 11/3/98 3:36 PM Page 405

Extensions no, RAM Doubler yes
You’re pressed against the wall. You need every last shred of memory you can
eke from your Mac. Your natural inclination, of course, is to turn off your
extensions — all those RAM-hungry, gluttonous extensions — by pressing the
Shift key as the Mac starts up. Yet you’d be silly, under these circumstances, to
turn off RAM Doubler itself, right?
Right. So hold down the Ô
and
Shift keys during startup; you’ll turn on RAM
Doubler even though all your other extensions are off.
Extensions yes, RAM Doubler no
Interestingly, you can do the opposite of the previous Secret, too: you can start
up the Mac without RAM Doubler, yet permit all your other extensions to load.
The trick is to hold down the ~ or Esc key (usually in the upper left corner of your
keyboard) while the Mac is starting up.
This technique has a distinct advantage over turning RAM Doubler off with an
extensions manager like Conflict Catcher or Extensions Manager, by the way: the
next time you restart the Mac, RAM Doubler will be on again. Turning RAM
Doubler off with an extensions manager generally requires restarting the Mac
twice
afterward to make RAM Doubler happy.
A calm discussion of memory fragmentation
Imagine that you’re trying to park in Manhattan. Your car is 10 feet long. You
come upon a city block where there actually is 10 feet of curb space left for
your car, but some jerk has parked so that the 10 feet is broken into two
pieces. There’s 5 feet of empty curb on either side of his car. Obviously,
you can’t park unless he moves his car.
The guy we’re talking about has fragmented the parking space.
Programs using your RAM are as much like cars on a curb as this analogy will
allow. When you launch a program, it seeks empty RAM not being used by
programs you’ve already opened. But if your free RAM has been broken up
by the presence of other programs, that new program can’t open at all.
So, what fragments RAM? Here’s the scenario. Your Mac has 32MB of
memory, let’s say. At noon, you start the Mac. Your memory usage looks
like the map at the top of Figure 9-6.
At 12:05, you open America Online. For this example, let’s say that its
memory requirement is 4MB. When you then launch Navigator, your Mac’s
memory map looks like the second map in Figure 9-6.
406 Part II: Secrets of the Machine
■ ■
MAC SECRETS • 4040-8/5 • ch.09.F • Chapter 9 • FINAL • VB/mark • 10/23/98 • p.406
MAC SECRETS • 4040-8/5 • ch.09.1 • Chapter 9 • Proof 1 • ma • 09/03/98 • p.406
4040-8/5 ch09.F 11/3/98 3:36 PM Page 406

Figure 9-6: Your memory usage when you start out (top); after launching two programs
(middle); and after quitting AOL (bottom).
At 12:15, you quit America Online. Your memory map now looks like the
bottom map in Figure 9-6; technically, you have 8MB of unused RAM at this
moment. And yet, if you look at this last drawing, you’ll see that you can’t
launch Claris Home Page now (it needs 6.5MB) — there aren’t 6.5MB of
contiguous memory left! Because of the sequence, you’ve fragged your RAM.
The only way to defragment your RAM is to quit all your programs, so that
only the Finder is running. When you relaunch them, in sequence, they’ll use
up consecutive chunks of RAM, and they’ll all fit.
Actually, there’s a good way to prevent memory fragmentation, if you’re that
much of a careful planner. Launch the programs you’ll want to leave open all
day first. Launch programs you think you’ll be quitting last.
Memory leaks — and shared libraries
Our e-mail brings this question nearly once a month: “Help! During the day, my
memory seems to disappear! My available RAM creeps invisibly away the more
I use my Macintosh. Even when I quit all my programs, the Largest Unused
Block never returns to the huge number it should be. What’s going on?”
There is such a thing as a memory leak, which results from buggy software.
Such programs munch down more RAM the longer they’re in use — RAM that
they don’t give back to the Mac’s pool of available memory when they quit.
Total Memory: 32 Megs
System (8MB) free (4)Netscape (16MB)
Total Memory: 32 Megs
System (8MB) Netscape (16MB)
Total Memory: 32 Megs
System (8MB) free memory
free (4)
AOL (4) free (4)
Chapter 9: Memory 407
■ ■
MAC SECRETS • 4040-8/5 • ch.09.F • Chapter 9 • FINAL • VB/mark • 10/23/98 • p.407
MAC SECRETS • 4040-8/5 • ch.09.1 • Chapter 9 • Proof 1 • ma • 09/03/98 • p.407
4040-8/5 ch09.F 11/3/98 3:36 PM Page 407

Much more often, however, the “creeping memory loss” syndrome results
from a much more benign source: shared libraries.
You may have read about shared libraries in Chapter 4. They’re small hunks
of program code that may be shared among several different programs.
Microsoft is one of the foremost users of shared libraries — after all, most of
its customers use some combination of Word, Excel, PowerPoint, and Internet
Explorer. Why should Microsoft clutter your hard drive with four copies of
the computer instructions for printing, font management, Internet
connectivity, and so on? Microsoft programs are big enough already!
Microsoft solves the problem by breaking these chunks of your applications
off and dumping them into your System folder. There they sit, with names like
Microsoft Component Library, Microsoft Dialog Library, and Microsoft OLE
Library: re-usable chunks of computer code that may be shared among the
various Microsoft applications. (Apple has written a number of shared
libraries of its own; scan your Extensions folder for files whose names end in
Lib or Library, and you’ll see what we mean.)
So how do shared libraries contribute to “memory leaks?” When you launch
Microsoft Word, it copies all of Microsoft’s shared libraries into memory.
But when you quit Word, you don’t “quit” these libraries! They remain in
memory — the theory is that if you subsequently launch Word again, or
launch any other Microsoft program, these pieces of common code will be
there waiting, ready to use. (That’s one reason launching a Microsoft
program a second time is much quicker than the first.)
In other words, the Macintosh thinks it’s doing you a favor by keeping these
chunks of program hanging, invisibly, in memory. The only way to release the
shared libraries from memory is to restart the Macintosh.
The Disk Cache
Cache, pronounced cash, is French for hide. When a computer caches some
information, it tucks it away into a protected, private part of its head,
separate from the rest of its memory and circuitry.
The Disk Cache is a feature that speeds up your Mac. And we can all use that
kind of feature.
Setting the Disk Cache
You access this feature by opening the Memory control panel, as shown in
Figure 9-7. To adjust the amount of memory you’re willing to dedicate to
the cache, click the up/down arrow buttons and then restart the machine.
(If you’re using Mac OS 8.5 or later, you must click the Custom Settings
button — and acknowledge the warning that you’re better off using the
default setting — in order to make the arrow buttons appear.)
OS
8.5
Worth
Learning
408 Part II: Secrets of the Machine
■ ■
MAC SECRETS • 4040-8/5 • ch.09.F • Chapter 9 • FINAL • VB/mark • 10/23/98 • p.408
MAC SECRETS • 4040-8/5 • ch.09.1 • Chapter 9 • Proof 1 • ma • 09/03/98 • p.408
4040-8/5 ch09.F 11/3/98 3:36 PM Page 408
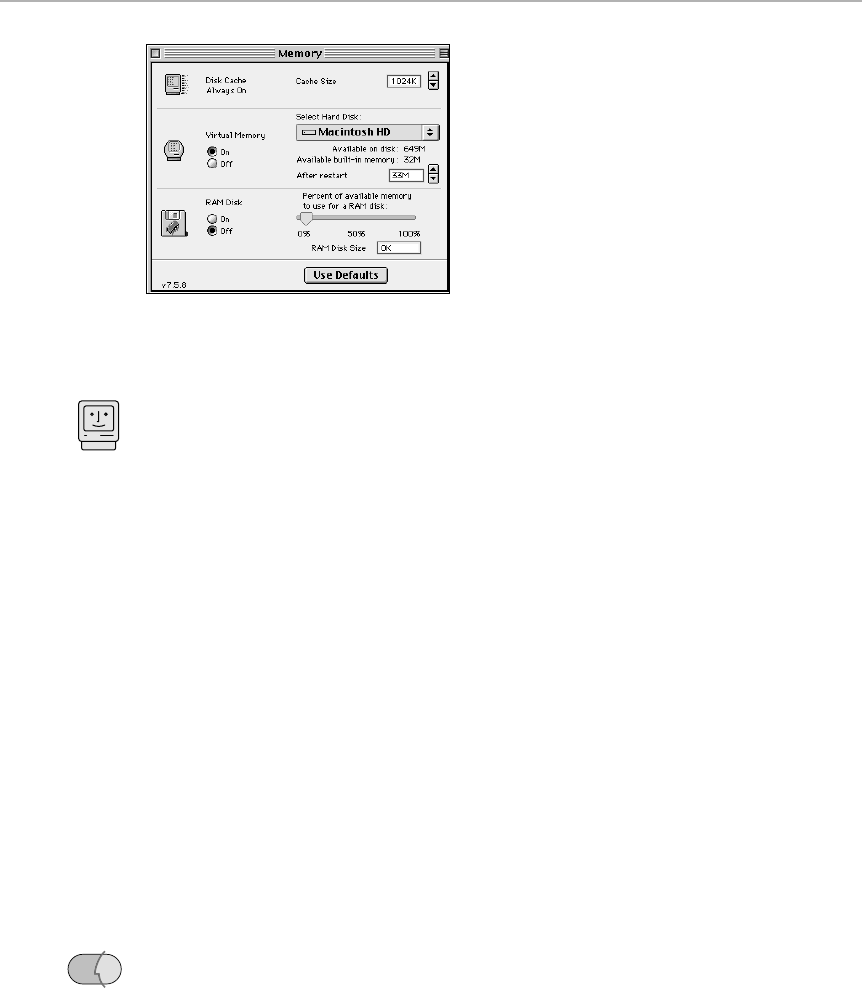
Figure 9-7: The Disk Cache, the Mac’s built-in speed feature (shown at the top of the control
panel), eats up a percentage of your RAM but gives you a nice speed boost.
The disk cache attempts to sock away frequently used information from the
hard drive into RAM. The Mac thereafter can grab this important data from
memory, instead of having to find it on the hard drive — and the overall effect
is a jump in your Mac’s speed. When you switch to Palatino font in your word
processor, when you open a folder in the Finder, when you launch a program
— the necessary program code for each of these tasks is crammed into your
disk-cache memory (new information pushes out the oldest). The next time
you perform that action, the Mac is ready (and avoids “hitting the disk” to
retrieve the necessary information).
Try it yourself: Double-click your System Folder and see how long it takes to
open. When you try this a second time, you should see it really fly open.
The correct disk cache size
So what’s the right setting? The basic rule: Set the Disk Cache to 32K for each
megabyte of RAM in your machine.
In systems before 7.5, don’t set it higher than 512K. Because of the Disk
Cache anomaly, a glitch in the pre-System 7.5 Memory control panel makes
the Mac’s performance get worse if you set the cache higher than 512K.
In System 7.5, Apple reworked the Disk Cache to make much better use of the
memory you give it. In this case, the more RAM you can afford to surrender
to the Disk Cache, the faster your Mac will go.
Setting your disk cache properly is especially important in Mac OS 8, by the
way. Did you notice that Finder operations (such as opening windows)
seemed slower after you installed Mac OS 8? Crank up your disk cache and
restart to alleviate the problem.
(An improved disk cache is one of the components in Connectix Speed
Doubler, by the way; using more-sophisticated algorithms, it ekes a few
additional percentage points of speed from your day-to-day Mac operations.)
OS
8
Mac Basics
Chapter 9: Memory 409
■ ■
MAC SECRETS • 4040-8/5 • ch.09.F • Chapter 9 • FINAL • VB/mark • 10/23/98 • p.409
MAC SECRETS • 4040-8/5 • ch.09.1 • Chapter 9 • Proof 1 • ma • 09/03/98 • p.409
4040-8/5 ch09.F 11/3/98 3:36 PM Page 409

RAM Disks: High-Speed Imaginary Drives
A RAM disk is yet another fun way to use memory. In this scenario, you use a
sophisticated program that sets aside a block of RAM and convinces the Mac
that it’s a disk. The RAM disk even shows up on your Desktop as an icon, as
shown in Figure 9-8.
Figure 9-8: The phantom of the disk drive — a RAM disk.
A RAM disk is a wonderful and underused invention. Think how much time
Mac users spend in the quest for speed: They shop and compare hard drives
and CD-ROM drives, trying to identify the fastest one; they try shareware
speed-testing programs; and so on. Imagine having a drive with almost zero
milliseconds access time!
Why set up a RAM disk? Consider these amazing tricks:
■Any program copied to this disk launches almost instantly when double-
clicked. And why not? It’s already in memory. Saving huge, complex
PageMaker files takes only a fraction of a second. QuickTime movies play
with effortless smoothness.
■Web browsing gets a huge speed boost if you direct the Mac to store its
cache files on a RAM disk instead of your hard drive (see our secrets in
Chapters 22 and 26).
■Starting up from a RAM disk takes only seconds (instead of two minutes).
Furthermore, you may recall from Chapter 8 that if something goes
wrong with your hard drive, you must start up from a different disk in
order to run Norton Disk Doctor. Starting up from a RAM disk is a quick,
convenient way to do so.
What’s wrong with RAM disks
Of course, the RAM disk subtracts its size from the amount of RAM you have
available for programs — as always, it’s a trade-off.
The more serious concern used to be that a RAM disk was a dangerous place
for your data. If a file is on a RAM disk, it disappears forever when you turn
off the Mac. There are three reasons why this doesn’t bother us anymore:
■You can do very well just copying your System Folder and programs onto
a RAM disk. These items are easily replaceable. If your power goes out,
you’ve got the originals safely on your hard disk.
410 Part II: Secrets of the Machine
■ ■
MAC SECRETS • 4040-8/5 • ch.09.F • Chapter 9 • FINAL • VB/mark • 10/23/98 • p.410
MAC SECRETS • 4040-8/5 • ch.09.1 • Chapter 9 • Proof 1 • ma • 09/03/98 • p.410
4040-8/5 ch09.F 11/3/98 3:36 PM Page 410

■Even if you do put your data files onto the RAM disk, you can just copy
them back to a real disk, like your hard drive. (Some of the RAM disk
programs discussed below actually do this for you.) If you do this at
regular intervals, you still get the speed gain of the RAM disk without
losing the safety of having your data files on a disk.
■On most Macs manufactured after 1992, the contents of a RAM disk don’t
disappear when you restart the Mac. They vanish if you turn the Mac off,
but not when you restart.
So even if you have a system crash, you can just hit the reset switch on
your Mac’s case (as described in Chapter 7), and your Mac restarts —
with the RAM disk intact. (G3 desktop machines are the exception, as
noted in the sidebar “G3 Macs: The silence of the RAMs.”)
Where a RAM disk comes from
A RAM disk is created by a RAM-disk program. We italicize this because the
terminology can be confusing. Someone may say to you, “Hey, I got a great
shareware RAM disk.” What they mean is a RAM-disk program; a RAM disk
exists only on a single machine (the one whose memory it’s using), and it
can’t be handed to friends.
Anyway, all recent Mac models, both desktop and laptop, come with a built-in
RAM disk program; you’ll find the On/Off switch in the Memory control panel.
(The inclusion of a RAM-disk program on the PowerBook may strike you as
odd, because PowerBooks are traditionally strapped for memory, not blessed
with it. As you’ll find out in Chapter 14, however, you can use a RAM disk to
very clever advantage in doubling the life of a battery charge.)
Chapter 9: Memory 411
■ ■
MAC SECRETS • 4040-8/5 • ch.09.F • Chapter 9 • FINAL • VB/mark • 10/23/98 • p.411
MAC SECRETS • 4040-8/5 • ch.09.1 • Chapter 9 • Proof 1 • ma • 09/03/98 • p.411
ANSWER MAN
Some Mac models are advertised as having an
optional “onboard cache,” “Level 2 cache,” or
“L2 cache.”
This special kind of cache is a cousin to the disk
cache. But instead of being a set-aside chunk of
your Mac’s main memory, like the disk cache, a
Level 2 cache is a special RAM chip on your
Mac’s main circuit board. And instead of storing
data from the hard disk that the Mac may
be needing again shortly, it stores information
from the Mac’s main RAM. (The cache card has
its own private RAM chips in which to do this
storing — usually between 512K and 1MB worth.)
What exactly is the point of storing RAM in
RAM? The cache card’s RAM is extremely high-
speed RAM. It’s so fast that, by storing frequently
used information in the fast cache-card RAM
instead of regular RAM, your Mac’s overall speed
increases between 10 and 20 percent.
And speaking of cache cards, several readers
have asked us, after installing a Level 2 cache
DIMM into a Power Mac, if there’s any way to
check to see if it’s working properly. According
to Apple, no. According to us, yes, you can just
run Cache-22, included on the CD-ROM with this
book. It tells you promptly whether or not your
cache card is being acknowledged by the Mac.
What’s an L2 cache?
4040-8/5 ch09.F 11/3/98 3:36 PM Page 411

But the Memory control panel isn’t the only game in town. The RAM disk
alternatives described in the following secrets have a great advantage over
Apple’s built-in RAM disk: you can launch, resize, or quit them without
having to restart the Mac. Their one disadvantage is that, because they’re
applications, you can’t start up the Mac from the RAM disks they create. (On
the other hand, if you have a G3 Mac that can’t start up from any RAM disk,
you’ve got nothing to lose.)
RAM Disk Secrets
■
How to destroy an Apple RAM disk
Creating a RAM disk is easy. Just open your Memory control panel. Turn on the
RAM disk option, set the slider, and restart the computer. (See Figure 9-7.)
Getting
rid
of the RAM disk is more difficult. None of the obvious ideas — dragging
the disk to the Trash, using the Erase Disk command — work. (Apple set this up
so that you can’t accidentally turn off your RAM disk, thus losing everything on it.)
The key is that you must first get
everything
off of it. Throw it all into the Trash
and then empty the Trash. (Or use the Erase Disk command in your Special
menu — wow, is erasing fast when the disk is made of RAM!) Only then can you
open the control panel and turn the RAM disk off or resize it.
Better RAM disks
Wouldn’t it be nice if you could create, resize, save, and delete RAM disks
without having to restart? You can, thanks to a great program not usually
associated with RAM diskage: Aladdin’s ShrinkWrap (included on this book’s
CD-ROM).
Strange
But True
412 Part II: Secrets of the Machine
■ ■
MAC SECRETS • 4040-8/5 • ch.09.F • Chapter 9 • FINAL • VB/mark • 10/23/98 • p.412
MAC SECRETS • 4040-8/5 • ch.09.1 • Chapter 9 • Proof 1 • ma • 09/03/98 • p.412
ANSWER MAN
Q: Hey! I tried starting up my G3 Power Mac from
a RAM disk like you said. But instead of starting
up from it, the darned thing erased my RAM disk!
A: It’s true. Here’s Apple’s explanation:
These systems make use of faster, industry-
standard memory called synchronous dynamic
random access memory (SDRAM), which adds
to both their economy and their availability. The
Power Macintosh G3 incorporates a new
memory controller called “Grackle” that can
support both extended data out (EDO) and
SDRAM which have different refresh cycles.
Here’s our translation: Somebody at Apple
screwed up. The G3 Macs take longer to
initialize their RAM chips than a RAM disk can
sustain its contents without power. Tests
showed that desktop G3 machines could
sometimes scramble the contents of your RAM
disk — so the engineers turned off the boot-
from-a-RAM-disk feature entirely, much to the
dismay of RAM disk and speed fans.
G3 Macs: The silence of the RAMs
4040-8/5 ch09.F 11/3/98 3:36 PM Page 412

These programs are normally associated with opening
disk-image files,
such as
the Disk Tools.img file that comes on every Mac OS 8-or-later CD. But as you
can read in greater detail in Chapter 22, where these two programs get their
own section, they’re also terrific RAM-disk programs. You can create or delete
your RAM disk on the fly, save and even compress its contents between
shutdowns, create multiple RAM disks simultaneously, and so on.
Free book winner Ken Rothman first brought these programs’ RAM-disk features to
our attention. He notes that although ShrinkWrap has more features, Apple’s own
DiskCopy, version 6.1.3 or later, is free (from www.apple.com
,
or this book’s CD).
To create a RAM disk using DiskCopy, start by creating a folder that contains
whatever you’ll want automatically copied to the RAM disk. (If you simply want
an empty RAM disk, create an empty folder.)
Launch Disk Copy. Choose Image ➪Mount Image From Folder. An Open File dialog
box appears; select the folder you created. In the next dialog box, you’re allowed
to name your RAM disk and select its size. Choose Read/Write from the first pop-
up menu and then click OK. Now check out your desktop: there’s your RAM disk!
(For similar instructions using ShrinkWrap, see Chapter 22.)
Interference by TrashBack
If you use Norton Utilities’ TrashBack feature, you’ll have a hard time getting rid
of your RAM disk. That control panel is designed to let you recover files you’ve
trashed — when you choose Empty Trash, TrashBack simply
hides
your Trash-
bound files instead of actually deleting them.
Because you must completely empty your RAM disk before you can resize or
remove it, you can see the problem: Because TrashBack doesn’t let you truly
erase your RAM disk, you won’t be able to remove or resize your RAM disk until
you turn off TrashBack.
Virtual Memory: Instant, Free RAM
A RAM disk is when a Mac gets fooled into treating a hunk of memory as a
disk. Virtual memory is the opposite — it’s when the Mac gets fooled into
thinking that a hunk of disk is memory.
At first glance, this doesn’t seem to make sense. Haven’t we been spending
this entire chapter figuring out how to get more data off the disk and into
memory (to gain speed)? Why would we consider storing stuff on the disk
that rightly belongs in memory? Wouldn’t virtual memory slow things down
instead of speeding them up?
There are two reasons virtual memory is becoming increasingly important.
First, virtual memory offers yet another speed-for-money tradeoff. In a
pinch, virtual memory lets you run more programs at once than you could
Contest
Winner
Chapter 9: Memory 413
■ ■
MAC SECRETS • 4040-8/5 • ch.09.F • Chapter 9 • FINAL • VB/mark • 10/23/98 • p.413
MAC SECRETS • 4040-8/5 • ch.09.1 • Chapter 9 • Proof 1 • ma • 09/03/98 • p.413
4040-8/5 ch09.F 11/3/98 3:36 PM Page 413
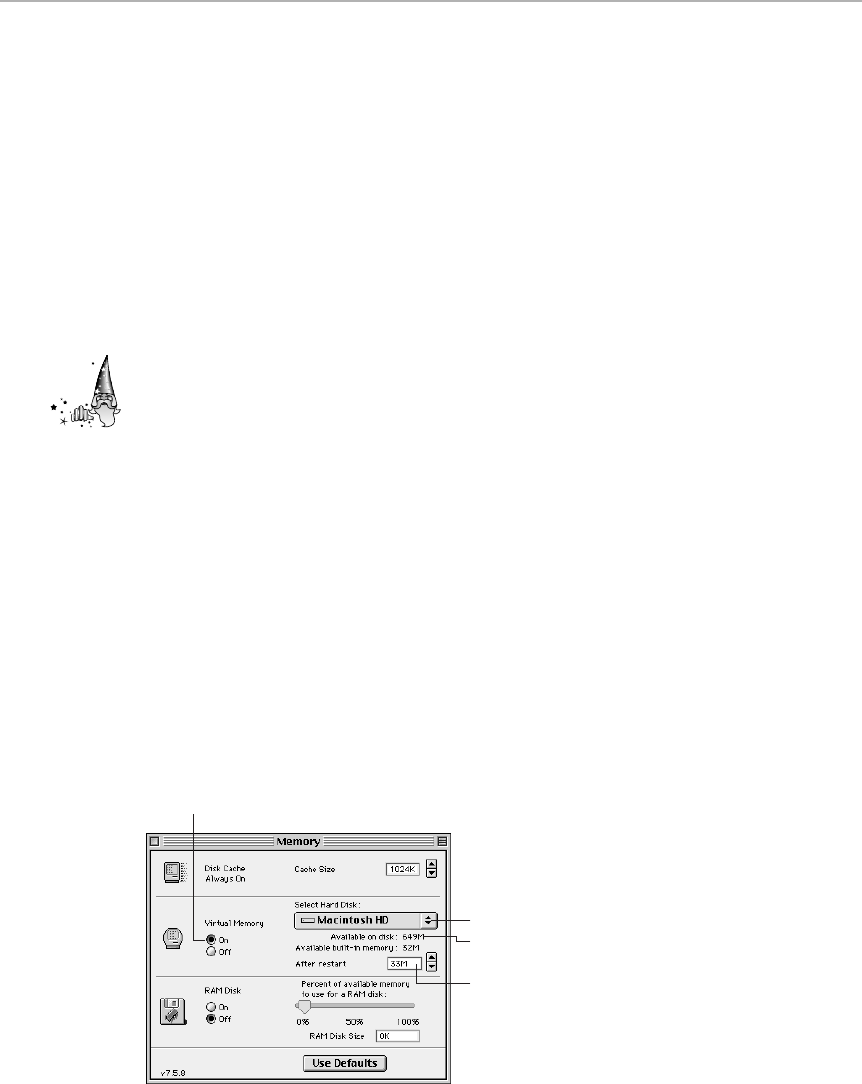
with your Mac’s real RAM alone. Second, on Macs with PowerPC chips,
virtual memory turns on the file-mapping feature described earlier in this
chapter, whereby PowerPC-native programs can run in as little as half the
RAM they’d need otherwise.
(Virtual memory requires System 7 and later and an ’030 processor or better.
That rules out the Plus, SE, original Classic, original Mac II, and original LC.)
How it works
When you turn on virtual memory, the Mac sets aside a chunk of hard-disk
space. (If your hard drive is full, forget about virtual memory.) This area — an
invisible file, actually — is called the swap file.
Strangely enough, the Mac sets aside a swap file of a size equal to both your
built-in RAM plus the amount of extra virtual memory you want. If you’ve got
16MB of real RAM, and you want 32MB total, you can’t just create a 16MB
swap file. Your Mac will suck away a full 32MB of hard drive space.
No program on Earth can run from the hard disk. Every program must be
copied into RAM before it can run. Virtual memory works by rapidly shuffling
data between the disk and RAM. This shuffling — and the corresponding delay
— occurs mainly when you switch from one program to another. While you’re
working in a specific program, however, you’ll notice very little slowdown. (As
with RAM Doubler, however, this doesn’t mean you can get greedy. You’re still
essentially limited to running programs that you have enough real memory to
run — don’t expect to run Microsoft Office on a 4-meg Mac, even with virtual
memory on.)
How to turn on virtual memory
Open the Memory control panel (see Figure 9-9).
Figure 9-9: These are the controls you need to turn virtual memory on and off.
A
B
C
D
Strange
But True
414 Part II: Secrets of the Machine
■ ■
MAC SECRETS • 4040-8/5 • ch.09.F • Chapter 9 • FINAL • VB/mark • 10/23/98 • p.414
MAC SECRETS • 4040-8/5 • ch.09.1 • Chapter 9 • Proof 1 • ma • 09/03/98 • p.414
4040-8/5 ch09.F 11/3/98 3:36 PM Page 414

Click On (that’s A in the illustration). If you have more than one disk large
enough to store the virtual memory swap file, select the one that you want to
use from the pop-up menu (B). All your hard drives are listed here; the Mac
tells you, as you select each, whether or not there’s room for a swap file. If
there is, you’ll be shown how much room there is (C). In general, the Mac
doesn’t let you put the swap file onto a removable disk. (The exception: If
you have Mac OS 8.5 and the latest Iomega driver, you can use Zip or Jaz
disks for virtual storage.)
Finally, based on that figure, set the amount of total memory, real + virtual —
you’ll want (D). Restart the Mac.
Remember that the higher you set this number, the more virtual memory
slows things down. The crunch gets critical if you set the Mac’s total memory
to more than twice the amount of real RAM it has.
Virtual Memory Secrets
■
Virtual memory and PowerPC PowerBooks
If you read that all-important sidebar called “Why Power Mac programs are RAM
hogs” earlier in this chapter, you’ll remember that native Power Mac programs
require much more memory than their pre-Power Mac counterparts — unless you
turn on virtual memor y. If you are the owner of a PowerPC-based PowerBook, such
as a 5300, 2400, 3400, or G3, you probably winced. “Ooh, turn virtual memory
on — on a PowerBook? What, and run through my battery charge in 15 minutes?”
That’s a legitimate concern; after all, virtual memory relies on the hard drive,
and the hard drive is an enormous batter y drainer. That’s why RAM Doubler is a
natural for a PowerPC-based PowerBook; it achieves the same effect — making
PowerPC-native programs require half as much memory — without touching your
hard drive.
(Much as you might suspect that we’re being paid by the RAM Doubler company,
by the way, we’re not. We’re merely recommending the least expensive of the
three options facing a PowerPC PowerBook owner — use non-native [slow]
programs; buy more RAM; or use virtual memory and carr y extra batteries.)
Speed up virtual memory
Remember that virtual memory works by shuffling data between the hard drive
and RAM. It shuffles a lot. It stands to reason, then, that the faster your hard
drive is, the better virtual memory works. And that’s why some people argue
that you can speed up virtual memory by regularly defragmenting your hard
drive. (See Chapter 8 for more on this topic.)
Chapter 9: Memory 415
■ ■
MAC SECRETS • 4040-8/5 • ch.09.F • Chapter 9 • FINAL • VB/mark • 10/23/98 • p.415
MAC SECRETS • 4040-8/5 • ch.09.1 • Chapter 9 • Proof 1 • ma • 09/03/98 • p.415
4040-8/5 ch09.F 11/3/98 3:36 PM Page 415

But frankly, we believe that members of the Defragment-for-Speed movement are
somewhat deluded. Unless you’ve been working with a totally full disk for weeks,
defragmenting your hard drive doesn’t produce any perceptible speed increase
in your virtual memory at all.
416 Part II: Secrets of the Machine
■ ■
MAC SECRETS • 4040-8/5 • ch.09.F • Chapter 9 • FINAL • VB/mark • 10/23/98 • p.416
MAC SECRETS • 4040-8/5 • ch.09.1 • Chapter 9 • Proof 1 • ma • 09/03/98 • p.416
ANSWER MAN
Q: You said, “While you’re working in a specific
program, you’ll probably notice very little slow-
down.” I’m using Photoshop, and I have virtual
memory turned on, and my Mac has the speed
of an anesthetized turtle. Are you guys lying?
A: Not per se. We haven’t, however, mentioned
the exceptions to our statement.
First, we’re correct that you won’t notice much
slowdown when you’re in a program — if it’s a
program that would have run within your real
RAM anyway. That is, if your Mac has 16MB of
RAM, and you run a program that requires 5MB
of RAM, you’ll encounter no slowdown
whatsoever. But if you use virtual memory to
run scanning/OCR software that requires 16MB
to run at full speed, you’re in for some waiting.
That’s because of all the massive copying of
information back and forth from the hard drive
the Mac is forced to do.
The other exception: programs such as
Photoshop, which are equipped with their own
proprietary virtual-memory schemes. Photoshop
creates its own private, huge, temporary file on
your hard drive. If you compound all the disk-
thrashing that that entails by using virtual
memory and its disk-thrashing, you’re in for a
seriously slow-working setup.
Virtual memory is dragging me down
4040-8/5 ch09.F 11/3/98 3:37 PM Page 416

MAC SECRETS • 4040-8/5 • ch.10.F • Chapter 10 • FINAL • VB/mark • 10/26/98 • p.417
MAC SECRETS • 4040-8/5 • ch.10.1 • Chapter 10 • Proof 1 • VB • 09/03/98 • p.417
Chapter 10
Keyboards, Mice, and USB
In This Chapter
©ADB and USB — chains for the rest of us
©The extended keyboard: What all those keys do
©Making the dead keys come alive
©A few mouse tricks
©Ergonomics basics
Keyboards and mice are known by geeks as input devices — they’re the
mechanical gadgets by which you communicate with your machine.
Apple has designed some weird ones in its day. It has redesigned the mouse
at least four times — not including the iMac’s confusingly circular mouse.
Apple has put two different trackballs and two different touch pads on
PowerBooks — plus the Mac Portable’s trackball, which you could put on
either side of the keyboard. The keyboard on the PowerBook Duos is slightly
bowed upward into a subtle curve. The wonderful, strange, discontinued
Apple Adjustable keyboard breaks in half right down the middle of the keys,
and its space bar isn’t a bar — it’s a pad.
About the ADB Chain
As we mentioned in Chapter 7, the Apple Desktop Bus (ADB) is designed to
be a chain of equipment, just like the SCSI chain. You can plug one ADB
device into the next, as many as 16 in all — and you don’t even need a
terminator at the far end!
What to plug in
This scenario presents some interesting possibilities. Some Mac keyboards
have two ADB jacks, for example, letting you plug your mouse into either side.
Others, such as the delightful AppleDesign keyboard, have a permanently
attached ADB cable in the middle; that’s where the mouse jack is, too.
4040-8/5 ch10.F 11/3/98 3:52 PM Page 417

The ADB jack accommodates more than just mice, by the way; we’ve seen
ADB-based modems, remote-controlled mice, and other kinds of substitute
mice. Nor are keyboards, mice, and Macs the only ADB-equipped gadgets;
many Apple monitors, such as the AppleDesign series, have ADB jacks and
cables, too. You plug your mouse and keyboard into the monitor, and then
plug the monitor into the Mac’s ADB jack.
About the ADB power
Actually, the ADB jack is more than just a connector; it’s also a power outlet.
Your keyboard and mouse get their juice from the feeble drool of electricity it
provides. In fact, some modem-port devices — digitizing tablets, headset
microphones, and so on—have a secondary, “pass-through” connector that’s
supposed to plug into your ADB jack just for this power. (You’re then supposed
to plug your keyboard cable into the back end of your gadget’s ADB connector.)
At least one modem we know of — the SupraExpress FAX modem — uses only
the ADB jack’s power; you don’t plug it into the wall at all.
The fact that electricity runs through your keyboard jack explains a couple
of interesting Mac phenomena. First, have you ever noticed your mouse
suddenly becoming incredibly sluggish—but been unable to fix the problem
by fiddling with your Mouse control panel? What actually happened was that
your mouse became unplugged and then plugged again (either by you or by a
barely noticeable jiggle). In the process, the electricity flow was interrupted,
and the Mac no longer remembers what control panel setting was established
at startup.
You can restore normal mouse behavior by restarting your Mac, of course,
but as free book winner Jeff Bates points out, it’s much easier to use
shareware programs such as Mouse Jolt 1.0 (included on the CD-ROM with
this book). Either of these utilities can reset the ADB chain without a restart.
Another side effect of the ADB power stream is our fervent advice: Turn off
the Mac before plugging or unplugging any ADB device. We mean it this time.
When you, an imperfect human, unplug the mouse, you’re not detaching all of
the pins at the same instant. The damage is done in the split second when the
juice is flowing through some pins but not others as you do the unplugging.
We have actually seen ADB ports fried because mice were attached or
removed while the Mac stayed on.
This risk is one of the reasons we’re delighted about the arrival of USB on
the Mac, described next — you can hot-swap those devices (plug and unplug
without turning the Mac off) all you like.
USB Hits the Mac
As far as Apple is concerned, the 14-year-old ADB technology is on its way
out. Beginning with 1998’s iMac model, the standard keyboard-and-mouse
circuitry is a thing of the past. It’s replaced by a new, industry-standard
technology called Universal Serial Bus (USB).
Contest
Winner
Strange
But True
418 Part II: Secrets of the Machine
■■
MAC SECRETS • 4040-8/5 • ch.10.F • Chapter 10 • FINAL • VB/mark • 10/26/98 • p.418
MAC SECRETS • 4040-8/5 • ch.10.1 • Chapter 10 • Proof 1 • VB • 09/03/98 • p.418
4040-8/5 ch10.F 11/3/98 3:52 PM Page 418

The only visible difference between USB and the keyboards and mice you’ve
always known is the jack — instead of the round plug we’re used to, the USB
connector is rectangular (see Figure 10-1). But the invisible advantages are
numerous:
■If you buy a hub box, you can connect up to 127 USB devices to a single
Mac — with no need for SCSI-style ID numbers or termination plugs. (The
iMac itself is a USB hub, and so is its keyboard, offering a total of two free
jacks into which you can plug other USB doodads.) Hubs offer various
numbers of free jacks—and can be plugged into each other, letting you
multiply your free jacks. For example, at this writing, ADS Technologies,
Inside Out Networks, Macally, and Philips each sell four- to seven-port
hubs from $80 to $200.
■You can hot-swap USB devices, safely plugging and unplugging them
while the Mac is still on.
■USB can accommodate lots of different kinds of “moderate-speed”
doodads: printers, floppy drives, modems, joysticks, scanners, speakers,
digital cameras, and, of course, keyboards and mice.
■As with the ADB chain, USB chains can draw power from the Mac’s USB
connector, sparing you the ugliness and hassle of plugging those external
devices into the wall outlet.
■Unlike ADB, the USB technology is cross-platform (translation: available
to Windows machines too). As a result, there are hundreds of USB
devices already available—although most don’t work with the Mac until
the manufacturer writes a Mac software driver to go with its products.
Chapter 10: Keyboards, Mice, and USB 419
■ ■
MAC SECRETS • 4040-8/5 • ch.10.F • Chapter 10 • FINAL • VB/mark • 10/26/98 • p.419
MAC SECRETS • 4040-8/5 • ch.10.1 • Chapter 10 • Proof 1 • VB • 09/03/98 • p.419
TRUE FACT
If you’re an Apple designer, what symbol do you
choose to mean command?
According to one of the Mac’s original designers,
the Mac’s space bar-nestling key originally had a
hollow apple graphic on it, as the Apple III and
Lisa computer keyboards had had. But as the
Mac was readied for release, some people at
Apple felt that using the corporate logo on a key
was somehow trivializing the logo — using it for
something it wasn’t designed for.
At the last minute, Mac graphic artists Susan
Kare and Barbara Koalkin were asked to come
up with a new symbol for this special key. The
symbol had to be small, easily represented in a
screen font, and unique. Oh — and it had to
mean “command.”
The artists pored through books and sources
until they found the familiar cloverleaf (or
propeller, or flower, or freeway) symbol. It came,
of all things, from a book of Swedish
campground and trail markers.
It meant “remarkable feature.”
Ironically, when Apple started selling the same
keyboards for both Mac and Apple II, it had to
put the hollow apple symbol back onto the
keyboard with the Csymbol, defeating its
entire original purpose.
Where did the Csymbol come from?
4040-8/5 ch10.F 11/3/98 3:52 PM Page 419

Dozens of companies have already done so. A partial list of USB Mac-ready
products includes the Logitech QuickCam, the Iomega Zip drive, the
SyQuest SparQ, some Umax scanner models, the Imation SuperDisk floppy
(which accepts both floppies and 120-meg SuperDisk disks), trackballs
from Macally and Itac Systems, joysticks from Advanced Gravis and
ThrustMaster, keyboards from Cherry and Macally, and mice from Macally.
Figure 10-1: The newest gadget connector to hit the Macintosh: USB.
We must admit: USB sounds pretty sweet. Not only is the technology vastly
superior to ADB in convenience and flexibility, but we look forward to the day
when it solves our not-enough-jacks problem. (If you’ve ever had to try
sharing your one modem port between a PalmPilot, modem, and MIDI
synthesizer, you know what we’re talking about.)
So what about the Mac owner who’s got older-style keyboards, digital
cameras, or other pre-USB gadgets—and wants to buy an iMac (or another
model that has only USB jacks)? And what about the jealous 1997-era Power
Mac owner who wants to use one of the new USB gadgets, like the USB
PalmPilot cradle or the USB Zip drive?
No big deal; adapters are available that go both directions. For example,
Griffin Technology sells a $30 adapter that lets you plug ADB-style gadgets
(mice, keyboards, and so on) into the iMac’s USB jack. Newer, Momentum,
and Inside Out make adapters that let you plug modem-port gadgets (like
modems, PalmPilots, or digital cameras) into a USB jack. And if you have an
older Mac, you can buy a PCI card (from Keyspan, ADS, and others) that adds
two or more USB jacks to your pre-USB Mac.
Your printers should be in good shape, too; Epson, HP, and Alps all have
adapters that let you use their older printers with USB Macs, and Farallon
and Asanté both make adapters that let you use USB-based Macs with
LocalTalk printers (usually laser printers).
The Keyboard
Apple’s smaller “standard”-style keyboards have 81 keys. The “extended”
keyboards have 105 keys, including a numeric keypad, a bank of page-control
keys (Home, End, and so on), and a row of function keys at the top. Only 62
keys actually type something; the remaining 40 percent of the keys are used
either to modify what those 62 keys do, or to control the computer itself.
420 Part II: Secrets of the Machine
■ ■
MAC SECRETS • 4040-8/5 • ch.10.F • Chapter 10 • FINAL • VB/mark • 10/26/98 • p.420
MAC SECRETS • 4040-8/5 • ch.10.1 • Chapter 10 • Proof 1 • VB • 09/03/98 • p.420
4040-8/5 ch10.F 11/3/98 3:52 PM Page 420

Apple was forced to come up with the extended keyboard in order to be
taken seriously by the DOS-dominated corporate world, where keyboards of
this layout were the norm. The silly thing was, however, that the Mac didn’t
need these specialized keys; then and now, most of these extra keys do
absolutely nothing.
Today, the F-keys — F1, F2, and so on — still do nothing in most Mac
programs. And it wasn’t until Mac OS 8 that the Control key was put to any
good use (see Chapter 2).
Fortunately, most Mac programs nowadays respond to the navigation keys like
PageUp and PageDown. And beginning in System 7.5.1, the F1, F2, F3, and F4
keys automatically “choose” Undo, Cut, Copy, and Paste from the Edit menu in
most programs (including the Finder). Beyond these simple examples, however,
only a few applications—notably Microsoft products— make use of the full
suite of keys.
However, you can do something with these keys if you have a macro program,
such as OneClick, QuicKeys, or KeyQuencer. The glory of macro software is
that you can make these keys do things — in fact, anything you want. Make F1
type out today’s date; F2 can type your name and return address; F3 can shut
down the Mac; and so on. We’ve included OneClick on the CD-ROM with this
book so that you can see what we mean.
We recommend using the Control key as the basis for your own custom
macro combinations. The Control key is a safe choice for triggering macros
because almost no programs come with preprogrammed keyboard shortcuts
involving it. Make Control-C open your Calculator; Control-E empty the Trash,
and so on. See instructions for OneClick in Chapter 22.
A Few Odd Keys and What They Mean
In the programs that do respond to presses on the bank of six page-control
keys, here’s what they’re supposed to do:
■Help: Brings up the on-line help for your software, if there is any.
■Home, End: Scrolls the document to the very first or very last sentence
in your document.
■Page Up, Page Down: Actually scrolls you a screen up or down.
■Del: Deletes the letter to the right of the insertion point. (The regular
Delete key nukes the letter to the left.)
Fortunately, those navigation keys work in a refreshing number of today’s
programs— including the Mac’s own dialog boxes, Finder windows, Claris
programs, and so on.
Chapter 10: Keyboards, Mice, and USB 421
■ ■
MAC SECRETS • 4040-8/5 • ch.10.F • Chapter 10 • FINAL • VB/mark • 10/26/98 • p.421
MAC SECRETS • 4040-8/5 • ch.10.1 • Chapter 10 • Proof 1 • VB • 09/03/98 • p.421
4040-8/5 ch10.F 11/3/98 3:52 PM Page 421
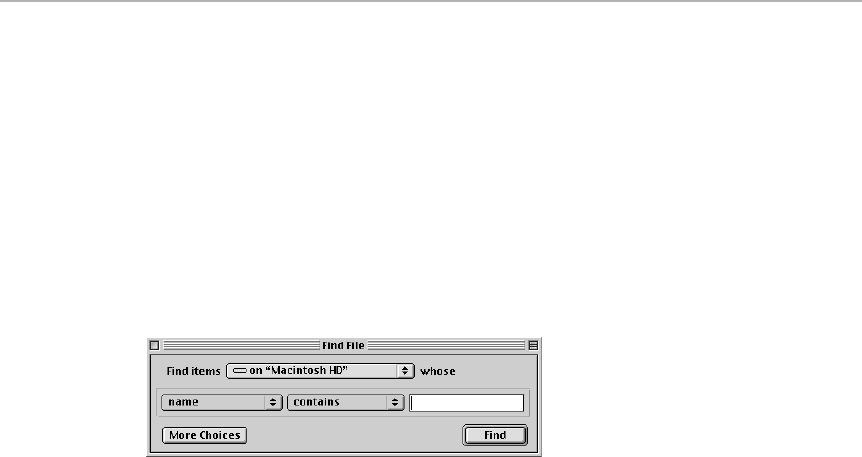
We’re sure that you know these others, too, but here they are for the sake of
completeness:
■Return and Enter: In years gone by, these keys served identical functions
in most programs. Today, an increasing number of programs distinguish
between the two. For example, in Excel, FileMaker, and many word
processors, Return and Enter don’t do precisely the same thing. (In
FileMaker, for example, Return begins a new paragraph within a record,
and Enter deselects all fields.)
In general, though, both keys can end a paragraph in a word processing
program, and pressing them is the same as clicking the heavily outlined
button in any dialog box, as shown in Figure 10-2.
Figure 10-2: Whenever you spot a heavily-outlined button in a dialog box, dispense with the
mouse and just press Return or Enter.
■Esc: This means Escape, which really means Cancel. This key, too,
originally did absolutely nothing and was included solely to soothe the
psyches of IBM lovers and telecommunications nuts who were making the
switch to Mac. However, today a number of programs let you press Esc
instead of clicking on-screen Cancel buttons with the mouse. All Microsoft
and Apple software works this way, including the System software.
■Command (C): This is, of course, the most frequently used modifier key
of them all. It’s the one most listed in menus to indicate keyboard
shortcuts for menu items.
When the Mac first appeared, and even today, the glorious simplicity and
mnemonics of its keyboard shortcuts made us rejoice. What can be more
natural than C-P for Print, C-O for Open, C-C for Copy?
We even forgave Apple for making Paste be C-V, Cut be C-X, and Undo be
C-Z, because of the natural adjacency of the Z, X, C, and V keys on the
keyboard. And you can justify X for Cut (sort of like crossing it out, or a
pair of scissors). C-Z is okay, too, because it is directly next to the Ckey
itself. And C-V is obviously necessary for Paste, because C-P is already
used for Print.
Anyway, compared to the complex and arbitrary keyboard command
sequences in the IBM world, we love this stuff.
422 Part II: Secrets of the Machine
■ ■
MAC SECRETS • 4040-8/5 • ch.10.F • Chapter 10 • FINAL • VB/mark • 10/26/98 • p.422
MAC SECRETS • 4040-8/5 • ch.10.1 • Chapter 10 • Proof 1 • VB • 09/03/98 • p.422
4040-8/5 ch10.F 11/3/98 3:52 PM Page 422

The Option key
The Option key is sometimes used as just another modifier key, pressed in
conjunction with the Shift or Ckey. When it’s used in conjunction with the
mouse, however, it consistently does one of three things. In the Finder, it’s
almost always used to close windows; see Chapter 1 for the Golden Option-
key Trick.
In graphics programs, Option changes the function of a drawing or painting
tool. It might change the magnifying glass’s effect, for example, to “zoom out”
instead of “zoom in.”
But the Option key’s most famous function is to turn the entire keyboard into
a symbol generator for creating symbols like the ones shown here:
To get this . . . Press Option and type this
©g
™2
çc
¢4
¡1
£3
•8
®r
†t
It’s nice to know that you have a complete built-in cheat sheet that shows the
locations of these characters on the keyboard: the Key Caps desk accessory,
as described in Chapter 3. For more on hidden Option-key characters, see
Chapter 29.
The Power key
For years, this key — at the top of the keyboard, with a left-pointing arrow—
was the Mac world’s biggest mystery. It did nothing at all. To this day, it’s a
useless appendage on computers like the Classic, the original LC series, and
even the Power Mac 6100.
In such cases, we highly recommend the Sophisticated Circuits PowerKey.
Not only does it make your power key actually work — on any Mac model that
has a power key — but it makes it work twice as well, switching on all your
equipment (monitor, printer, modem, and so on) instead of just the Mac.
Chapter 10: Keyboards, Mice, and USB 423
■ ■
MAC SECRETS • 4040-8/5 • ch.10.F • Chapter 10 • FINAL • VB/mark • 10/26/98 • p.423
MAC SECRETS • 4040-8/5 • ch.10.1 • Chapter 10 • Proof 1 • VB • 09/03/98 • p.423
4040-8/5 ch10.F 11/3/98 3:52 PM Page 423

A word or two about Caps Lock
Any self-respecting Caps Lock key gets locked down in its depressed
position when you press it, just as the Caps Lock has for decades on
typewriters. However, when locked down, the Mac’s Caps Lock key doesn’t
really work the same as when you hold down the Shift key. The letter keys
produce capital letters, but the number keys still produce numbers.
In any case, the Caps Lock key on most PowerBooks doesn’t lock down. The
only indication you have that you’ve engaged the key is that a hollow up-
arrow symbol appears on your menu bar, if the Caps Lock extension was
installed when you installed your PowerBook System Folder (see Chapter 4).
On Duos and modern PowerBooks, the situation is slightly better. The Caps
Lock key still never stays down, but at least a little light comes on within the
key itself. This way, at least, if you tend to look at your hands while you type,
you won’t inadvertently fill your screen with all-capital typing.
A guide to the strange keyboard symbols
We all know and love the Ckey. You’re never in doubt as to which key it is—
it’s painted right onto your keyboard, for heaven’s sake.
All too often, however, in program manuals and menus, they’ve started using
symbols to represent other keys, too. But these symbols, unlike the Csymbol,
give no hint as to which corresponding key they refer to on your keyboard.
There’s even some disagreement among software developers and manual
424 Part II: Secrets of the Machine
■ ■
MAC SECRETS • 4040-8/5 • ch.10.F • Chapter 10 • FINAL • VB/mark • 10/26/98 • p.424
MAC SECRETS • 4040-8/5 • ch.10.1 • Chapter 10 • Proof 1 • VB • 09/03/98 • p.424
TRUE FACT
One of the best parts about writing a bestseller in
the computer world is getting feedback from our
readers. What are we to make of this comment,
for example, which reader Stephen Randall
Carnefix e-mailed to us about this chapter?
“A correction: the tilde key is not a tilde key.
Unless the keystroke is altered by a superscript
option with an overstrike, the
˜
symbol means
‘circa’ (chronology) or an ‘approximately’
(mathematics) — it prints and displays in the
middle of the text line. A tilde is a phonetic
modifier that appears over the letter N in
Spanish to change an ‘enay’ (n) to an ‘enyay’ (n
with a tilde over it).”
Well, Stephen, you’re absolutely correct on
every point. Heck, you could have gone even
further, pointing out that to produce an actual
tilde, you press Option-N — a key with nothing
to do with the “tilde key.”
Problem is, everyone calls that key (usually the
upper-left key on the keyboard) the tilde key, not
just us. Every book, every article, even Apple
itself. Hey, if it were up to us, we’d call it the
“circa key” or the “approximately key” . . . but
the rest of the world wouldn’t know what we
were talking about.
The circa-or-approximately key
4040-8/5 ch10.F 11/3/98 3:52 PM Page 424

writers as to which symbol should properly represent which key, and some
manuals blatantly contradict each other. To clear up the confusion, here’s the
actual list, with the best mnemonic suggestions we can come up with.
SThis is the Shift key. Mnemonic: It makes capital letters. Taller letters, so
there’s an up arrow, see?
OHere’s the Option key. It looks like a side view of a key being pressed. Of
course, this doesn’t exactly specify which key it is, which is why we have
trouble remembering this one. Mnemonic: Maybe you can tell yourself it
looks like one key being held down while another is about to be pressed,
which is how you make those special symbols like ¢ and ©, as we
discussed earlier.
cBoth of these symbols represent the Control key, believe it or not.
or Mnemonic: It actually has a pretty good mnemonic, if you’re a modem
^junkie. In the olden days of IBM-ish telecommunication programs, this
caret symbol meant break — as in, “Listen, you remote mainframe
computer, stop.” (Something like the Mac’s C-period keystroke.)
Anyway, this was called a control character.
tThis is the Tab key. Mnemonic: Pressing it jumps the cursor to the right
until it hits the next stop.
rIf you need a mnemonic to help you figure out why this is the Return key,
you’ve never used a word processor.
dThis one’s pretty easy; it’s the Delete key. Don’t confuse it with the
rarely-used del key, which, in most programs, deletes characters to the
right of the insertion point. Mnemonic: The “X” stands for delete, and the
arrow points to the direction the key pushes your cursor.
sWeird, huh? It means the Space bar. Mnemonic: It looks like a bar that’s
being pressed below its usual level.
Chapter 10: Keyboards, Mice, and USB 425
■ ■
MAC SECRETS • 4040-8/5 • ch.10.F • Chapter 10 • FINAL • VB/mark • 10/26/98 • p.425
MAC SECRETS • 4040-8/5 • ch.10.1 • Chapter 10 • Proof 1 • VB • 09/03/98 • p.425
MACINTOSH SECRET
It happens. You hit Caps Lock by accident,
continue to type, and notice three minutes later
that all your text is capitalized, looking like a
Western Union telegram.
There’s an easy way to fix what you’ve typed
without having to retype anything. Launch
Microsoft Word. Open the file, highlight the
problem text, choose Change Case from the
Format menu, and select Sentence case.
(WordPerfect, and various shareware text
processors have similar features — including Tex-
Edit, included on the CD-ROM with this book.)
After you convert the text, you’ll have one
additional task. You’ll have to change each
occurrence of the word I, as well as any proper
nouns and acronyms, back to capitals. That’s
because Word and its ilk automatically
lowercase any word that’s not at the beginning
of a sentence.
How to fix three pages of accidental ALL CAPS TYPING
4040-8/5 ch10.F 11/3/98 3:52 PM Page 425

xHere’s one you almost never see. It’s the Esc (Escape) key found in the
upper left corner of the keyboard. As we mentioned earlier, more and more
Mac programs are starting to employ the use of this mostly-for-Windows
key. Mnemonic: The arrow is escaping from the confines of the circle.
Incidentally, you can type these and other symbols into your very own
documents. Use the Chicago font (the TrueType version that comes with
System 7 and later) or the Charcoal font that comes with Mac OS 8. In some
cases, you might have to type these characters using Key Caps and then copy
and paste them into your document.
To get these symbols Press these keys
qControl-Q
gControl-G
dControl-D
bControl-B
wControl-W
fControl-F
eControl-E
xControl-Esc
kOption-Shift-K
Keyboard Secrets
■
Copilots of the same Mac
Our little trick about stringing multiple ADB devices together can be handy when
you’re training somebody, when you’re collaborating two-on-a-Mac, or when
you’re playing a two-person game.
The secret is that you can plug
two
keyboards and a mouse into the same Mac.
And all of it works! (One person can type the vowels, or something.)
On a Mac model with two ADB jacks in the back (a IIcx or IIci, for example), you
can have two complete ADB chains — that is, a keyboard and mouse. On a Mac
with only one ADB jack, you can only have one ADB chain. Because the mouse
has no ADB jack, you’ll discover that you can have two keyboards, but only one
mouse in such a setup. The mouse must always end the ADB chain. Or must it?
Actually, you
can
have two mice, if you get an ADB cable with a Y-jack. And they
do make such a cable; Sophisticated Circuits sells one, for example.
426 Part II: Secrets of the Machine
■ ■
MAC SECRETS • 4040-8/5 • ch.10.F • Chapter 10 • FINAL • VB/mark • 10/26/98 • p.426
MAC SECRETS • 4040-8/5 • ch.10.1 • Chapter 10 • Proof 1 • VB • 09/03/98 • p.426
4040-8/5 ch10.F 11/3/98 3:52 PM Page 426

Extend your ADB
Feel the need to lean back a little farther from your desk? Then you may need
an extra-long keyboard cable. You can buy one from Kensington, of course. Or,
you can go to a Radio Shack store and buy an
S-video cable
.
It’s designed to hook up expensive VCRs, but, amazingly, it works as a keyboard
cable!
Chapter 10: Keyboards, Mice, and USB 427
■ ■
MAC SECRETS • 4040-8/5 • ch.10.F • Chapter 10 • FINAL • VB/mark • 10/26/98 • p.427
MAC SECRETS • 4040-8/5 • ch.10.1 • Chapter 10 • Proof 1 • VB • 09/03/98 • p.427
ANSWER MAN
Q: I have a weird green light on my keyboard
labeled Num Lock. Sometimes this light stays
dark and sometimes it flashes on, but it doesn’t
seem to mean anything. What’s going on?
A: Actually, most extended Mac keyboards have
three odd little LEDs — Num Lock, Scroll Lock,
and Caps Lock. The Caps Lock indicator, of
course, simply tells you when you’ve engaged
the Caps Lock key. If you have, the light turns on
to remind you.
Num Lock is more mysterious. How many Mac
Secrets readers have written us over the years,
frustrated and tormented by this key’s apparent
pointlessness? After all, this key does nothing in
any program — and yet it’s important enough
that it has a corresponding light on the keyboard
that comes on — sometimes — when the Num
Lock key is pressed.
The precedent was set in the hostile world of
DOS, when there was no such thing as a mouse.
When the Num Lock light (and mode) was on,
the number keys on the keypad typed numbers,
just as you’d expect. But when Num Lock mode
was off, the numeric keypad numbers
functioned as cursor keys, so that you could
move the insertion point up, down, right, or left
in your text without a mouse.
WordPerfect and Microsoft programs are among
the few we could find in which the Num Lock key
still does its thing, toggling the numeric keypad
between its two personalities. In Word 5.1, just
press Num Lock to switch from number-typing to
cursor-moving modes. In Word 6, Excel 5, and
later versions, you must press Shift-Num Lock (or
Shift-Clear, if your keypad has Clear instead of
Num Lock) to toggle these two modes.
Furthermore, if you run a PC emulation program
such as Virtual PC or SoftWindows, the Num
Lock light flashes to life, because some DOS and
Windows programs might require you to turn
Num Lock off.
Then there’s the Scroll Lock key (on the F14
function key), another carryover from the DOS
world. It’s even more vestigial than Num Lock; it
harkens back to the days when data from a
mainframe computer would scroll down the
screen of a terminal in one continuous stream.
Hitting Scroll Lock let you pause the relentless
scrolling so you could digest the information one
screen at a time.
Few current Mac programs use Scroll Lock for
anything. The one notable exception is Microsoft
Excel: there, pressing F14 jumps you into Scroll
Lock mode (and lights up the Scroll Lock
indicator). In this mode, you can use the arrow
keys to scroll the window without losing your
current cell selection. (Contrast with Num Lock
mode, which actually changes which cell is
selected.)
The Num Lock Mystery
4040-8/5 ch10.F 11/3/98 3:52 PM Page 427

Shave 25 percent off your typing efforts
If you could see how much of this book we actually typed ourselves, it would be
so skinny you’d demand a refund.
In reality, we made extensive use of TypeIt4Me, a terrific
typing-expander
program. You teach it to recognize certain typed abbreviations —
kb
for
keyboard
, for example. Thereafter, whenever you type one of your abbreviations,
in any program, TypeIt4Me instantly expands it to its full form.
Y can see th in ts sentence, fex, we let h mc do h work!
(You can see that in this sentence, for example, we let the Macintosh do the work!)
If you do much writing at all, we encourage you to try TypeIt4Me and see if you
love it as much as we do. We’ve made it easy for you; it’s included on the
CD-ROM with this book. (For full instructions, see the appendix.)
Type ahead
You may have noticed that the Mac is especially forgiving about premature
typists. That is, you can type on several keys before there’s anyplace to type.
The Mac will store this typing in a piece of memory called the
keyboard buffer
,
and deliver it to the screen when the time comes.
Here are some examples: Choose Print from the File menu. If you’re sure you
don’t want to change any of the Print dialog box settings, press the Return key
before the Print dialog box even appears. You’ll see the dialog box — or, rather,
its empty
outline
— blink onto the screen for an instant and then disappear as
your previously-typed Return message hits it. In some programs, you can carry
this technique to extremes: If you’ve arrived at one dialog box by clicking some
button in another, you can close both dialog boxes and return to your document
by pressing Return twice in rapid succession.
Or try launching your word processor. You can actually begin to type during the
latter half of its launching phase. When a document finally appears on the
screen, the typing you’ve done will suddenly tumble into place.
(This magical phenomenon breaks down if you have something happening in a
background program — downloading or printing, for example. In those cases, you
might see only a random
few
of the letters you typed appear.)
How to avoid typing “Made in the U>S>A>”
We hope you know what we mean by that title: You’re trying to type capital
letters, and there’s a period in the phrase, but you don’t think to lift your pinky
off the Shift key for each letter. Unfortunately, you wind up creating > symbols
(Shift-period) in place of periods.
428 Part II: Secrets of the Machine
■ ■
MAC SECRETS • 4040-8/5 • ch.10.F • Chapter 10 • FINAL • VB/mark • 10/26/98 • p.428
MAC SECRETS • 4040-8/5 • ch.10.1 • Chapter 10 • Proof 1 • VB • 09/03/98 • p.428
4040-8/5 ch10.F 11/3/98 3:52 PM Page 428

This is incredibly easy to fix; here are a couple of methods. First, you can
use ResEdit to edit your keyboard layout. (Instructions are in Chapter 21.)
Second, you can use the glorious SmartKeys, a program included on the
CD-ROM with this book, to turn them off. (SmartKeys can also join double
hyphens into the more correct long dashes, prevent you from typing a double
space after a period, and automatically curl your straight quotes. See Chapter
37 for details.)
The dead keys and how to make them alive
Certain Option-key strokes are
dead keys:
When you press them, nothing appears
on the screen. The Mac waits for you to type a
second
letter, which will appear
beneath the first. With this method you can create symbols such as ü and ñ.
However, there
is
a way to create the symbol by itself without requiring a letter
below it: Press Shift, too. To create the ˜ or ´ or ¨ symbol by itself, press Shift-
Option N, E, or U. (Alternate: Type the dead key followed by a space.)
Dead keys that aren’t supposed to be dead
You don’t realize how much you take a fully operational keyboard for granted
until that moment when a key suddenly stops working. If the deceased key is
fairly insignificant (such as the bracket or backslash key), you might be able to
limp along — but try writing a report without a W or an A key. Or try doing
anything
with a nonfunctioning Return key.
There are a few ways to get around such a dilemma. You could, of course, simply
copy the dead letter from an existing document and paste it ever y time you need
it. You could use a stand-in character like a % or # and then, later, use your word
processor’s Find/Replace function to paste in the actual letter.
Here’s the best solution: Use ResEdit to remap your keyboard. Assign a
working
key to type the broken letter. For example, if the Return key dies, remap the
keyboard so that pressing the backslash key (located directly above the Return
key) generates a Return character instead of a backslash. (For complete
instructions on how to do this, see Chapter 21.) This arrangement will tide you
over until you can have the keyboard repaired (as we’ve discovered through
painful experience).
The tale of the Dvorak layout
You may have heard this story: The arrangement of the keys on today’s keyboard
was never designed for efficient, accurate typing. Quite the opposite: According to
legend, typewriter maker Charles Sholes designed the layout to be as
inefficient
as possible, because fast typing made the keys of his prototype machine jam. (For
the benefit of his sales staff’s demonstrations, he also put all the letters
necessary for the word
typewriter
in the top row.)
Chapter 10: Keyboards, Mice, and USB 429
■ ■
MAC SECRETS • 4040-8/5 • ch.10.F • Chapter 10 • FINAL • VB/mark • 10/26/98 • p.429
MAC SECRETS • 4040-8/5 • ch.10.1 • Chapter 10 • Proof 1 • VB • 09/03/98 • p.429
4040-8/5 ch10.F 11/3/98 3:52 PM Page 429
August Dvorak, decades later, designed a better layout, in which the most
commonly typed keys are all directly beneath your fingers on the “home row.”
Your fingers travel only a fraction of the distance during the course of a day;
Dvorak-layout converts swear that they type faster, more accurately, and with
less fatigue than they do on standard (“QWERTY”) keyboards.
If you’d like to try the Dvorak layout, the Mac makes it simple to do so. Just
drop the Dvorak keyboard layout, included on the CD-ROM with this book, onto
your System Folder to install it. From now on, whenever you want to switch from
your old QWERTY layout to the new one, use the Keyboard control panel (as
described in Chapter 4) or the Keyboard menu (see Chapter 2). And, to see
where the keys are, consult your Key Caps desk accessory (or print out a copy
of its screen). Relearning your keyboard takes about two weeks; let us know
how you fare.
The unknown “Crash Lock” indicator
Has all activity ceased on your screen? That could mean one of two things:
either (a) your Mac has frozen, or (b) your Mac is taking forever to do something.
Free book winner Harold Tessmann III has come up with a quick way to test
whether his Mac has truly crashed: He taps the Caps Lock key. Because the little
Lock lights on Apple’s keyboard are software-activated, they won’t come on if the
computer has hung. They will light up, however, if the computer is just lagging.
The Mouse, Trackball, and Trackpad
The mouse — and its practically identical upside-down successor, the
trackball — are neat. Grab yours right now and follow along.
Contest
Winner
430 Part II: Secrets of the Machine
■ ■
MAC SECRETS • 4040-8/5 • ch.10.F • Chapter 10 • FINAL • VB/mark • 10/26/98 • p.430
MAC SECRETS • 4040-8/5 • ch.10.1 • Chapter 10 • Proof 1 • VB • 09/03/98 • p.430
ANSWER MAN
Q: How does the keyboard work?
A: Incredibly, the keyboard is practically its own
minicomputer. It’s got a processor and even
memory! The keyboard’s processor inspects
each key periodically (once every 3 milli-
seconds) to find out whether or not you’re
pressing it. Then it checks the suite of modified
keys — Shift, Option, C, Control, and Caps
Lock. Based on what it finds out, it transmits a
keyboard code to your Mac.
The keyboard driver (yes, even your keyboard
has a driver) consults its table of codes and
letters, and then informs the Mac what the
appropriate character should be. Finally, the
typing appears on your screen.
How the keyboard works
4040-8/5 ch10.F 11/3/98 3:52 PM Page 430

Journey to the interior
This is perfectly, 100 percent safe, and you don’t void any part of any
warranty by doing it. Turn the mouse upside-down in your hand. First, check
out the strip of waxy stuff at the front end of the mouse and on the retaining
ring. Know what it is? Sure you do— you cook on it every day. It’s Teflon.
With your other hand, push counterclockwise on the round ring, through
whose center you see the mouse ball peeping out. It should rotate a quarter-
turn or so and then stop. If your mouse’s retaining ring doesn’t rotate, then
it’s the newer style that just slides away from the mouse cable. (Opening a
PowerBook trackball is exactly the same.)
Turn the mouse right-side up, dumping the retaining ring and the mouse ball
into your waiting palm. Look at the mouse ball first. Its color varies,
depending on the Apple manufacturing plant that created it.
Chapter 10: Keyboards, Mice, and USB 431
■ ■
MAC SECRETS • 4040-8/5 • ch.10.F • Chapter 10 • FINAL • VB/mark • 10/26/98 • p.431
MAC SECRETS • 4040-8/5 • ch.10.1 • Chapter 10 • Proof 1 • VB • 09/03/98 • p.431
TRUE FACT
For slow typists, repetitive-strain sufferers, and
bad spellers, the day has finally arrived: The
Mac can take dictation.
All you need is a $400 program from Dragon
Systems called PowerSecretary. Once installed,
you can actually speak into a headset microphone
(which comes with the software) and your words
are transcribed onto the screen — in any program
where you can type. Yes, it really works.
There are all kinds of caveats, though. The
program needs 13MB of RAM all to itself. You —
must — talk — like — this, with a tiny pause
after each word. The program never does
improve much at discerning homonyms (too
versus two, for example). Actually, it’s not very
accurate discerning any words when you first
start using it; only if you correct its errors (by
voice), word by word, over the weeks, does
PowerSecretary’s accuracy and speed improve.
But improve it does. If you keep at it, after a few
weeks, PowerSecretary starts to seem like
science fiction. One of your cheerful authors, a
tendinitis sufferer, has had to use nothing but
PowerSecretary for two years (including while
working on this book). He gets about 55 words
per minute (and would get more if he didn’t stop
to correct errors). Since the program has solid
connections with QuicKeys and AppleScript, you
can easily control your Mac’s functions by voice
(“Edit: Cut,” “Style: Italic,” “Launch Excel,” and
so on). (Cheaper versions, which only type into
a specific word processor or database program
and don’t actually control your Mac, are
available for about $200.)
In the Windows world, you can get continuous-
speech recognition programs called things like Via
Voice and Naturally Speaking. These programs
purport to let you speak continuously into the
mike (not with gaps like PowerSecretary) and
transcribe what you’re writing. However, these
programs make many errors per paragraph; we’re
not convinced that the resulting speed is
dramatically better than the slower, but less error-
prone, word-by-word method.
Still, a Mac version may one day become
available; both Apple and some former
PowerSecretary programmers are hard at work
on a continuous-speech Mac dictation program.
Meanwhile, speech recognition is still an infant
technology — and the prices keep dropping.
Twenty years from now, maybe keyboards will
be the most expensive optional equipment.
When the Mac takes dictation
4040-8/5 ch10.F 11/3/98 3:52 PM Page 431

Set the ball and ring aside. Then peer into the cavity of the mouse. You’re
about to see why the movement of this thing on your desk controls the
pointer on your screen. See the three little wheels that make contact with the
mouse ball? (On most newer mice, these are made of white plastic.) As you
roll the mouse across the desk (or spin your trackball), the ball makes these
wheels turn.
One of the wheels is spring-loaded; it’s just a shock absorber. The other two,
however, usually at the 9:00 and 12:00 positions, are on shafts connected to
other wheels inside the mouse’s body. These hidden wheels have spokes.
Incredibly, your mouse/trackball has tiny lights inside shining through these
spokes. An optical sensor on the other side of each little wheel measures the
rate of flashing from the little lamp. By comparing the light-flashing rates from
the two perpendicular rollers, the Mac calculates how fast your mouse is
moving in each direction. That’s how it moves the cursor across the screen.
Cleaning the mouse or trackball
Any time your cursor’s movement becomes sticky, chances are high that
the mouse or trackball is dirty. After all, you spend all day dragging the
mouse through invisible dust and paper crumbs, or handling your
PowerBook trackball with oily fingers. If you’ve got a pet, forget it — that
angora cat hair just loves to cuddle up and wrap itself around the roller
shafts inside the mouse.
Open the mouse or trackball, as described above. Take out the ball. Run it
under the faucet for a few seconds. Shake off the excess water and blow it
dry. You’ve just solved half the sticky-cursor problem.
The other source of trouble is the rollers and the shafts. Gunk tends to
accumulate in a sickening stripe right down the center of your rollers. Tiny
threads and strands of hair get wound around the shafts, too. We’ve seen
mice so clogged up with debris that they’d stopped working completely.
You can scrape stuff off the rollers with a fingernail, toothpick, or a Q-tip
dipped in alcohol. Or, try pressing an inside-out ring of Scotch tape against
the stuff to pull it away. Take care, though, not to let the detritus fall
anywhere but directly into the center of the cavity, so that you’ll be able to
tap it out of the mouse/trackball completely when you’re done.
To reassemble the mouse or trackball, just drop the ball inside and replace
the ring. Anyway, now you know why Apple switched to touchpads for all its
PowerBooks; that cleaning-the-trackball routine was just too much of a drag.
Mouse alternatives
About a million mouse replacements flow across the desks of reviewers every
year. There are trackballs, joystick-like deals, touch screens, and even head
mice and foot-pedal controlled mice (so you can move the cursor without
using your hands at all).
Mac Basics
432 Part II: Secrets of the Machine
■ ■
MAC SECRETS • 4040-8/5 • ch.10.F • Chapter 10 • FINAL • VB/mark • 10/26/98 • p.432
MAC SECRETS • 4040-8/5 • ch.10.1 • Chapter 10 • Proof 1 • VB • 09/03/98 • p.432
4040-8/5 ch10.F 11/3/98 3:52 PM Page 432

Few of them are as good as the good old Apple mouse. Many graphic designers
have embraced digitizing tablets, such as the popular Wacom line, which work
beautifully with programs like Photoshop— but most use the regular mouse
for regular mousing. A few people prefer trackballs to mice, since a trackball
takes up less desk space. Most trackballs today come with two, three, or even
four programmable mouse buttons, which you can set to perform specific
actions that would normally require more than a mouse click. On the popular
Kensington TurboMouse, for example, you can program one button to double-
click. Another can be set to do a click-and-a-half (down-up-down), so that you
can take advantage of Mac OS 8’s spring-loaded folders with a single click.
Still, we bet the total number of people using those other wacky mouse
replacements don’t amount to one percent of America’s Mac-using
population. (The one really valuable mouse replacement/enhancement is the
digitizing tablet, such as those from Wacom, which are beloved by graphic
designers everywhere. These electronic pen-and-pad arrangements become
more like their real-world equivalents every year, even offering an “eraser tip”
on the opposite end of the stylus.)
By the way, we couldn’t think of any mouse secrets. For some trackpad
secrets, see Chapter 14. As for the mouse, you already know how to control
the rate of movement across the screen (Mouse control panel, Chapter 4) and
that you can do without the mouse completely (Easy Access, Chapter 4,
again). And now you know how to clean it.
At this point, there’s nothing left but to reflect gratefully on the fact that you
don’t live in the age when the only way to control the cursor was by pressing
arrow keys.
Ergonomics Basics
In the interest of fending off lawsuits from carpal-tunnel sufferers, Apple now
includes in every Mac manual extensive instructions for creating a
comfortable ergonomic computer setup. To recap: Feet flat on floor; knees
higher than seat of chair; shoulders relaxed; minimize glare; occasionally
focus on distant objects; blink often (no joke, this is what it says); take
frequent short breaks; and consult a physician if chronic arm pain develops.
To this we’d like to add the following secrets, which we’ve developed through
painful experience:
■Spend money on your chair. If you work in an office that’s already sprung
for a nice ergonomic full-back-support chair, no problem. But otherwise,
heed this advice, for your short-, medium-, and long-term comfort. Really
decent, well-designed desk chairs cost $300 or more. Trust us, it’s worth it.
■Don’t put the monitor in front of a window. It turns out that if bright light
is coming in from behind your monitor, your pupils contract, adjusting to
the light. Trouble is, what you’re trying to focus on is the screen, which is
relatively dim. The result, by the end of the day, is a burning, painful eye
strain. Put your monitor at right angles to the light source, on the other
hand, and you’ll be much happier.
Chapter 10: Keyboards, Mice, and USB 433
■ ■
MAC SECRETS • 4040-8/5 • ch.10.F • Chapter 10 • FINAL • VB/mark • 10/26/98 • p.433
MAC SECRETS • 4040-8/5 • ch.10.1 • Chapter 10 • Proof 1 • VB • 09/03/98 • p.433
4040-8/5 ch10.F 11/3/98 3:53 PM Page 433

■In terms of height and position, you’ll read all kinds of wild
measurements and statistics. As far as we’re concerned, though, there’s
only one big rule: Your elbows can’t be lower than your wrists! If they
are, then the angle of your wrists, cocked down to grab the mouse, is a
surefire repetitive-strain inducer.
One final ergonomic thought — on typing. Avoid joining the surprisingly well-
populated ranks of repetitive-strain injury sufferers (carpal-tunnel syndrome,
tenosynovitis, and so on) by using some common sense when you type.
Specifically: (1) Take breaks. Never just keep typing madly all day. (2) Don’t
rest your wrists on a wrist pad (or even the PowerBook wrist rests), except
when you’re resting. If you put them there when you’re typing, you bend your
wrists back at an unnatural angle and invite problems.
434 Part II: Secrets of the Machine
■ ■
MAC SECRETS • 4040-8/5 • ch.10.F • Chapter 10 • FINAL • VB/mark • 10/26/98 • p.434
MAC SECRETS • 4040-8/5 • ch.10.1 • Chapter 10 • Proof 1 • VB • 09/03/98 • p.434
4040-8/5 ch10.F 11/3/98 3:53 PM Page 434

MAC SECRETS • 4040-8/5 • ch.11.F • Chapter 11 • FINAL • VB/mark • 10/26/98 • p.435
MAC SECRETS • 4040-8/5 • ch.11.1 • Chapter 11 • Proof 1 • ma • 09/04/98 • p.435
Chapter 11
Monitors
In This Chapter
©How a CRT picture tube works
©What VRAM is and how it affects your display
©The importance of monitor resolution
©Tricks and shortcuts for multiple-monitor setups
©The PowerBook screen: How it works
Monitor Basics
In terms of our attempt to explain monitors, the good news is that a
computer screen works essentially like a TV screen. The bad news is that
even a TV screen is hard to explain.
How a CRT works
The CRT (cathode-ray tube) is your normal desktop monitor. TV sets use
something called a cathode (electron gun) to spew streams of electrons from
the back of the set. That’s why standard TVs and computer screens have to
be so deep; the gunner has to be back far enough to be able to hit the entire
screen surface.
The screen itself is coated, on the inside, with phosphors. When phosphors
are excited by those electrons, they light up. (Remember the glow-in-the-dark
Crunchberry stickers from boxes of Cap’n Crunch? Same idea.)
Of course, if the electron gun were left on its own, it would continuously fire
into the center of the glass screen, giving you nothing but a very bright dot,
making it exceptionally difficult to do large spreadsheets. To counteract
this drawback, the electron beam is surrounded by electromagnets. These
magnets, with incredible precision, turn on and off exceptionally fast, bending
the electron stream in this direction and that. If you saw a map of the beam’s
path, you would see that it was a zigzag pattern, starting at the top of the
screen, painting each row down to the bottom.
Mac Basics
4040-8/5 ch11.F 11/3/98 3:38 PM Page 435

The electron stream actually illuminates only one screen dot (pixel, short
for picture element) at a time. But it fires so quickly — painting the screen 60
times per second — and each pixel takes so long to fade after being struck,
that you perceive a continuous, solid image. (Usually that’s what happens. If
you want to prove our zigzag, phosphor-painting theory to yourself, chew a
Lifesaver while watching the screen from 15 feet away. Because the vibrations
make your skull move out of its stationary position, you’ll see, for the first
time, a decided flicker in your screen. The image breaks up a little, as you
catch only parts of each beam’s journey down your screen.)
Flicker
The larger a monitor is, the longer it takes the electron gun to paint the inside
of the glass. (The speed of this painting process is called the refresh rate.) If
the gun paints the screen 60 times per second, the techies would say, “The
refresh rate is 60 hertz.” In general, the larger the monitor, the more expensive
the electronics needed to maintain a high refresh rate, which is desirable.
Unfortunately, typical room lighting, especially fluorescent, interacts with
a typical monitor’s refreshing process, and the result is what we know as
flicker. If you want less flicker — not to be confused with the entire picture
shaking, which is often caused by another appliance on the same circuit —
turn out the lights.
About VRAM
We’re especially proud to discuss VRAM in this book because we hear about
it all the time, and it’s actually very important. However, no one ever seems
to define it or explain it.
VRAM stands for “video RAM.” It refers to the memory that stores the
current screen picture at any given moment. Every Mac must have VRAM,
or it wouldn’t have any screen picture at all. Every single pixel on your
screen has a corresponding bit of memory that stores its color.
What gets tricky, though, is that each Mac model stores its VRAM in different
places. VRAM may be hidden in the following three places:
■Scenario 1: The Mac’s VRAM can be a chunk of regular memory (your
system RAM) that’s earmarked for video.
■Scenario 2: The VRAM can be a separate bunch of memory chips built
into the Mac circuitry and devoted exclusively to the screen picture.
■Scenario 3: The VRAM can come aboard a video card (a NuBus or PCI
card into which you can plug a monitor), in the form of specialized
memory chips.
In a few older models (IIci, IIsi), the VRAM was just a chunk of regular system
memory (Scenario 1). While they don’t require a video card (Scenario 3),
these Macs didn’t draw the screen as efficiently as Scenario 2 Macs — those
436 Part II: Secrets of the Machine
■ ■
MAC SECRETS • 4040-8/5 • ch.11.F • Chapter 11 • FINAL • VB/mark • 10/26/98 • p.436
MAC SECRETS • 4040-8/5 • ch.11.1 • Chapter 11 • Proof 1 • ma • 09/04/98 • p.436
4040-8/5 ch11.F 11/3/98 3:38 PM Page 436

with built-in, separate video memory, which almost all subsequent models
have (Quadras, LCs, most Power Macs, and so on).
On the other hand, many old Mac models (such as the II, IIx, IIcx, and IIfx)
came with no video RAM, either as dedicated chips or as system memory.
Even one recent model, the tower-of-power Power Mac 9500, comes with no
VRAM at all. Instead, these Macs require a video card (Scenario 3), which is
an extra purchase.
And then there are the Power Macs that have two monitor jacks (the non-AV
7100 and 8100, for example). One jack is a high-speed version of the Scenario
1, in which some of the Mac’s regular system RAM is used as VRAM. The
other jack is driven by a little video card.
Deeper colors, bigger screen:
more VRAM needed
We said that for each pixel on the screen, there must be 1 bit of VRAM. That’s
true for the black-and-white monitors of your ancestors’ day: The 1 bit of
memory has to say either “on” or “off.” (Remember, a bit, the computer’s
basic thinking unit, is an on/off switch. Therefore, 1 bit can adequately
describe the condition of a screen pixel: either black or white.)
However, if each pixel can be one of four colors, then it requires 2bits of
memory (each of which can be either on or off, for a total of four possible
combinations).
A palette of four different colors for your whole screen isn’t exactly what
you’d call photorealistic color, however. That’s what led to the invention of
8-bit color; for several years, this was the most common Mac video setup.
If you count up all the possible combinations of on/off that those 8 bits
of VRAM can be, you find out that there are 256 possible combinations.
Therefore, in 8-bit color, there can be 256 different colors displayed on
the screen at the same time.
Then there’s 16-bit color, provided with all Mac models today, and ideal for
showing QuickTime movies. In the professional world, 24-bit color is the norm
for photo retouching, scanning, and so on. Grab the calculator, and you find
out that if each screen dot’s color is determined by the precise status of 24 bits,
then it can be one of 16,777,216 different colors. This may seem silly, since the
average 15-inch color monitor only has 480,000 pixels. True, in 24-bit color,
you can’t even see all the different colors at once on the screen. But because
each pixel can be any one of 16 million colors, the result is a very, very
realistic picture.
We read in a recent magazine that the really fussy video and photo
professionals are pushing for the Mac to support 48-bit color, which would
mean an extremely realistic color picture. We doubt the naked eye could tell
the difference between 24- and 48-bit color, however.
Chapter 11: Monitors 437
■ ■
MAC SECRETS • 4040-8/5 • ch.11.F • Chapter 11 • FINAL • VB/mark • 10/26/98 • p.437
MAC SECRETS • 4040-8/5 • ch.11.1 • Chapter 11 • Proof 1 • ma • 09/04/98 • p.437
4040-8/5 ch11.F 11/3/98 3:38 PM Page 437
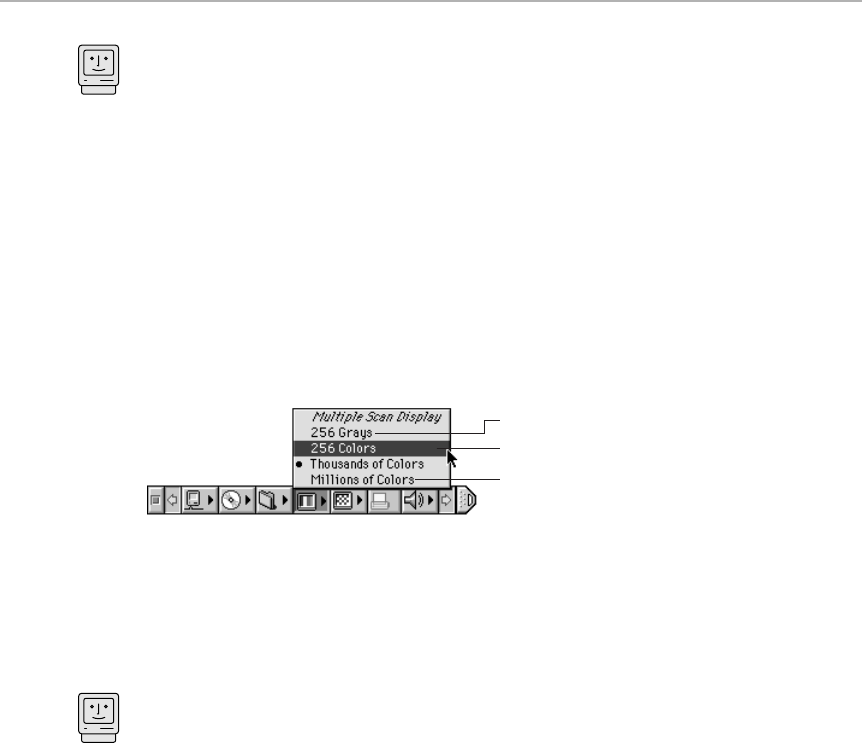
At this point, we’re talking about a sizable amount of RAM for each pixel.
We’re also talking about a sizable delay while the Mac computes the correct
color for each dot on the screen. The more colors on the screen, the slower the
screen picture is updated.
Each of these memory arrangements (1-bit, 8-bit, 24-bit, and so on) is called
a color depth. You change color depths (to change from black-and-white to
color, for example) by using the Control Strip (System 7.5.3 or later) or a
control panel like Monitors & Sound.
Incidentally, the Control Strip, Monitors control panel, and Monitors & Sound
control panel do not use the bit terminology that we (and Mac magazines)
use. Instead, the Monitors control panel shows only the result — the total
number of colors that the Mac can show at once (see Figure 11-1). Beyond
256 colors or grays, it doesn’t give the exact number; it just says
“Thousands” (for 16-bit color) or “Millions” (for 24-bit).
Figure 11-1: The Monitor Bit Depth control strip module, like the Monitors & Sound control
panel, shows only the result of each color depth. More often, however, you’ll hear the terms
listed on the right when people talk or write about the Macintosh.
How much VRAM do I need?
How much VRAM do you need? Well, you can pretty much do the math
yourself. Just remember these three golden rules. (1) The more pixels there
are on your monitor, the more VRAM will be needed to remember their
colors. (2) The greater the number of potential colors a pixel can be, the
more VRAM it requires. (3) Today’s monitors may be switched (zoomed in or
out) among different “sizes” (such as 640 by 480 pixels), as you’ll read later in
this chapter. While one monitor may work with a Mac that’s low on VRAM,
you might never be able to switch it all the way up to its largest screen-area
setting (such as 1600 by 1200).
Here are some examples of what VRAM can do for you:
■256K — Early PowerBooks had only this much VRAM, just enough to
handle 8-bit color (256 colors) on a 13- or 14-inch Apple monitor. (As
you’ll find out in a moment, 13-inch and 14-inch are the same thing.)
■512K — Such models as the LC III use this much VRAM to display 256
colors on a 16-inch Apple monitor. Interestingly, some Mac models can
also consolidate this 512K of VRAM into displaying 16-bit color on part
of a 14-inch display. That is, the bottom 80 pixels are just blank, but you
get much more realistic color on the remaining part of the screen. It’s a
perfect example of the trade-off between screen size and color depth.
(See the Macintosh secret in the following section.)
Mac Basics
Grayscale
8-bit
24-bit
Mac Basics
438 Part II: Secrets of the Machine
■ ■
MAC SECRETS • 4040-8/5 • ch.11.F • Chapter 11 • FINAL • VB/mark • 10/26/98 • p.438
MAC SECRETS • 4040-8/5 • ch.11.1 • Chapter 11 • Proof 1 • ma • 09/04/98 • p.438
4040-8/5 ch11.F 11/3/98 3:38 PM Page 438

■1MB — At the dawn of the 1990s, 1MB of VRAM was considered enviable. It
can fill a standard 14-inch monitor (640 by 480 pixels) at the “Thousands of
colors” setting (or lower). However, 1MB is not enough to show color at all
on larger monitors, such as a 15-incher set to 800 by 600.
■2MB — Two megs of VRAM can fill a monitor all the way up to 832 by 624
pixels at the top-of-the-line, Photoshop-happy “Millions of colors” (24-bit)
setting. Only at jumbo monitor sizes, such as 1024 by 768, does this VRAM
run out of steam (16-bit, or “thousands”). And at 1280 by 1024, which is
the absolute max for a 17-inch monitor, you get only 256 colors.
■4MB — If you’ve got a monitor the size of a Cineplex Odeon looming over
your living room, this is a decent VRAM quantity. Even at 1024 by 768
pixels, you’re still getting 24-bit color (“millions”). You drop to 16-bit
color (“thousands”) if your monitor is any bigger.
■6MB — Some Power Macintosh G3 models actually come with six megs
of VRAM, which let you coast all the way to 1280 by 1024 pixels at the
“millions of colors” setting. God help the legs on your desk.
■8MB — You don’t often hear of Macs with 8MB of VRAM. But a few
models, such as the highest-end clones from the now-defunct Power
Computing, actually came with a video card packed with this much
VRAM. Trust us: there’s no monitor big enough to exhaust the “millions
of colors” capacity of this much VRAM. Even at 1920 by 1020 pixels (and
we’ve never yet met a monitor that could show that many pixels), you’re
in photorealistic nirvana.
Chapter 11: Monitors 439
■ ■
MAC SECRETS • 4040-8/5 • ch.11.F • Chapter 11 • FINAL • VB/mark • 10/26/98 • p.439
MAC SECRETS • 4040-8/5 • ch.11.1 • Chapter 11 • Proof 1 • ma • 09/04/98 • p.439
ANSWER MAN
Q: All I do with my Macintosh is design black-and-
white flyers. Where can I buy a black-and-white
monitor to save money?
A: Black-and-white monitors, when they were
available, were clearer, crisper, and easier to
read than color monitors. The reason is that a
black-and-white monitor has only one color per
pixel to think about. A color monitor, on the
other hand, has three dots — red, green, and
blue, arranged in a triangle — that constitute a
single pixel. It’s no wonder that color is a little
bit blurrier.
Color is also slower than black-and-white.
We’ve seen Mac users turn their color monitors
to black-and-white mode for the first time and
positively shout about the speed increase. Their
Mac seems to be twice as responsive — and no
wonder; instead of having to compute and
display three dots for every screen pixel, it only
has to manage one.
But the demand for black-and-white dropped off
to nothing, just as it did in the TV-set racket.
Today, about the only black-and-white monitors
you can buy are used ones.
If this weren’t the ’90s, we’d simply advise you
to get a cheapo color monitor and set it to black-
and-white, using your Monitors control panel.
Unfortunately, you can’t change modern Mac
models to black-and-white. “256 colors” is the
lowest setting available on both PowerBooks
and Power Macs these days.
We guess you’re going to have to get used to
living in a colorful world.
Color versus Black-and-White
4040-8/5 ch11.F 11/3/98 3:38 PM Page 439

Remember, too, that your Mac’s VRAM endowment doesn’t merely control
the color depth it can display; it also controls what size monitor it can drive.
It’s perfectly possible to buy a brand new cheapo Mac and a $2,000, 21-inch
monitor, only to discover that the monitor won’t work with the Mac. (Or,
more likely, that all you get is a hugely magnified 640 by 480-pixel image on
the monitor.)
Switching modes
Because fewer colors translates to faster screen display, our advice is to
switch color depths regularly, depending on what you’re doing. Work in 256
colors (or whatever your lowest setting is) for word processing. Switch to a
higher color setting for Photoshop work or visiting Web pages that feature
color photos.
Grayscale
When you use the “256 Grays” setting in your Monitors control panel or your
Control Strip module, the color vanishes from your screen. You’re not in
black-and-white, actually; you’re now viewing shades of gray, like a “black-
and-white” TV set. (All the pictures in this book are grayscale. No need to
thank us for the $50 you saved in color printing costs.)
Interestingly, there’s no such setting as “thousands of grays” or “millions of
grays” on a Macintosh; 256 different shades is, apparently, enough to depict
any image.
Strange
But True
440 Part II: Secrets of the Machine
■ ■
MAC SECRETS • 4040-8/5 • ch.11.F • Chapter 11 • FINAL • VB/mark • 10/26/98 • p.440
MAC SECRETS • 4040-8/5 • ch.11.1 • Chapter 11 • Proof 1 • ma • 09/04/98 • p.440
MACINTOSH SECRET
The LC III came with 512K of video memory.
That’s enough RAM to handle 8-bit color on
most Apple monitors.
Like such other Macs as the Duo 270c, 280c,
and the PowerBook 540c, however, this model
(along with its equivalent, the Performa 450) has
a unique feature: It can also dedicate that same
VRAM to giving you more realistic color at the
expense of screen size. That means that you can
have 16-bit color — approaching photo-realistic
— if you’re willing to work with a smaller
picture-tube area.
Here’s how you do it. Open your Monitors
control panel and click Options. You’ll see two
choices: Macintosh Hi-Res Display and 640 by
400 Hi-Res. Select the second option and restart
the Mac.
When you restart, the picture is shorter from top
to bottom. Your screen area, instead of being
640 by 480 (standard 14-inch monitor size), is
now 640 by 400 pixels. The colors are much
more vivid and realistic, as you’ll notice if you
try to play a QuickTime movie or look at a
scanned photo.
Unfortunately, several readers have alerted us to
the fact that this secret seemed to stop working
in System 7.5.3.
16-bit color, for free
4040-8/5 ch11.F 11/3/98 3:38 PM Page 440

As with black-and-white, grayscale-only monitors have gone the way of the
dodo bird. But don’t forget that any color monitor is also a grayscale monitor.
The Monitors control panel (or equivalent) lets you switch between color
and grayscale.
A Word About DPI
You’ve probably heard the term dpi, meaning dots per inch, used primarily in
conjunction with printer quality. That’s because, for years, the Mac’s monitor
resolution (the number of pixels per inch) was always the same: 72. In other
words, every Mac monitor had 72 screen dots per inch.
And 72 was a clever choice — not only did it ensure crisp, readable text, but
there are 72 points to an inch. A point is a unit of typographical measurement.
In other words, Mac fonts could be designed so that each increase in point
size corresponded perfectly to the addition of one pixel to the character
shape. Furthermore, text on the screen would always be actual size.
Today, however, resolutions of monitors vary, even among Apple monitors.
The Apple 21-inch color monitor packs in 79 dpi, whereas the discontinued
12-inch color monitor had only 64 gigantic dots per inch.
How big is your monitor — really?
Inches-versus-dpi isn’t the only thing that’s confusing about monitor sizes.
For one thing, the Apple 13-inch and 14-inch color monitors are actually the
same size! For years, computer companies tried to fudge with the facts to
make their monitors seem larger than they actually were. IBM, for example,
would measure from corner to corner of the glass of the monitor instead of
the image area, which is always smaller.
Apple, for years, tried to do the right thing. They measured their monitors
(and advertised them) from corner to corner of the actual image area. Of
course, that meant that the marketing people had to listen to customers say:
“$300 for a 13-inch monitor? Why, by golly, when I used to own an IBM, I
could get a 14-incher for that money!”
As long as no one was giving Apple any credit for their more truthful
approach, Apple said: “The heck with it.” From that day on, Apple marketed
its monitors the same way its rivals do — by measuring diagonally across the
glass. Thus, the Apple 13-inch and 14-inch screens are identical in size, but
come from two different marketing policies.
Ironically, thanks to a recent lawsuit, all computer companies have made a
return to truth in advertisement. Today, monitors are advertised with phrases
like, “Avanti 15-inch monitor, 12.7 inches diagonal.”
Even so, inches aren’t everything. In fact, they can be downright misleading.
Here are two examples:
Chapter 11: Monitors 441
■ ■
MAC SECRETS • 4040-8/5 • ch.11.F • Chapter 11 • FINAL • VB/mark • 10/26/98 • p.441
MAC SECRETS • 4040-8/5 • ch.11.1 • Chapter 11 • Proof 1 • ma • 09/04/98 • p.441
4040-8/5 ch11.F 11/3/98 3:38 PM Page 441

■Consider Apple’s sole dud monitor, the 12-inch color. From the name, it
sounds as though it’s larger than the Mac Classic screen, which is only 9
inches diagonally.
Surprise! The 12-inch color monitor has about the same number of pixels
as the screen on a Mac Classic. Both have 512 pixels across; the 12-inch
color measures 384 pixels vertically, and the Classic has 342.
■The PowerBook 2400’s screen, measured with a ruler, is over an inch
smaller than the PowerBook G3’s screen. Yet you can see every bit as
much of a page on a 2400 as you can on the G3. It has the same number of
dots (800 across, 600 down) as the “larger” PowerBook screens — they’re
just closer together (see Figures 11-2 and 11-3).
Figure 11-2: Which PowerBook screen is bigger? It’s not an easy question.
Figure 11-3: Actually, both PowerBook screens are the same size. Each shows the same
slice of a page. The PowerBook 2400’s screen (on the left) packs its dots closer together so
that the image is smaller than actual size. But it’s showing the same number of pixels.
The bottom line on resolution: The higher the dots-per-inch rating, the
smaller but sharper the image will be. It’s the same syndrome when you
reduce something on a copying machine — the picture and text get smaller
but crisper because the dots are compressed into a smaller space.
When you reach very high dpi ratings, though (some monitors go as high as,
say, 94 dpi), normal-sized text becomes so small that it’s hard to read. Your
cursor and menus also get smaller. (If that effect bothers you, there’s plenty
of shareware available to help out. Greg’s Buttons can enlarge your menus,
for example.)
Multisync (multiple-scan) monitors
One of the most interesting developments in monitor technology is the
multisync, also called multiple-scan or multiple-resolution, monitor. These
monitors — virtually all monitors sold today — let you switch from one
resolution to another. You can kick into 92-dpi mode if you need to do page
layout and don’t need to read the text, but just want to get an overview of
as much graphic image as possible. When you need to edit, you can pop
into 70-dpi mode, where text is large and legible.
442 Part II: Secrets of the Machine
■ ■
MAC SECRETS • 4040-8/5 • ch.11.F • Chapter 11 • FINAL • VB/mark • 10/26/98 • p.442
MAC SECRETS • 4040-8/5 • ch.11.1 • Chapter 11 • Proof 1 • ma • 09/04/98 • p.442
4040-8/5 ch11.F 11/3/98 3:38 PM Page 442
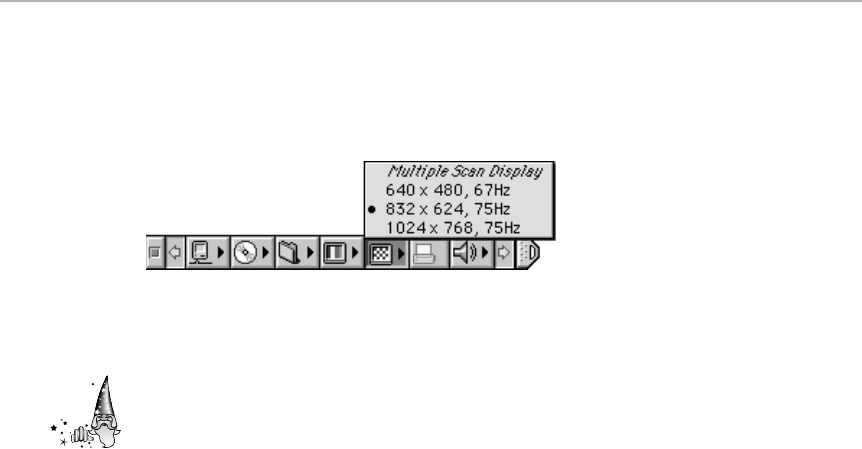
For example, using the Monitors & Sound control panel or the Control Strip
(see Figure 11-4), you can switch Apple’s 17-inch ColorSync monitor between
different modes, ranging from 640 by 480 gigantic pixels to 1,280 by 1,024
tiny pixels, which easily shows you two entire pages.
Figure 11-4: If your monitor can be switched among different resolutions (magnification
levels), use the Control Strip to do it.
Depending on your Mac model’s VRAM and video circuitry, you may even be
allowed to choose, in the Options dialog box, pixel dimensions larger than
the monitor itself. In such a case, the Mac — such as the 8500 — actually
creates a virtual screen; roll the cursor against the edge of the display, and
the entire picture slides in the opposite direction, as though your monitor’s
glass were merely a window onto a much larger desktop beneath.
The monitors in Apple’s multiple-scan series do more than change resolutions,
though. They come with a raft of other smart-screen technologies. For example,
they have front-panel controls that let you fiddle with the dimensions and
positioning of the image on the glass. And, in conjunction with most recent
Macs, they can shut themselves off after a period of inactivity (using included
control panels, such as Energy Saver; see Chapter 4).
Multiple Monitors
Windows users had to wait until 1998 to gain access to a multiple-monitors-
at-once setup; Macs have offered this feature for years, even on laptops. Here
are four ways to get a multiple-monitor setup going:
■Get a Power Macintosh 7100 or any AV Power Mac. These models all have
two video jacks on the back.
■Get any Mac with slots. Use its built-in video jack for the first monitor.
Install a video card into one of your Mac’s slots. Plug the second monitor
into the jack provided by the video card.
■Use an older PowerBook, such as a high-numbered 100 series machine or
a 500-series model, that has a video jack and lets you show a different
image on the second monitor. Plug an external monitor into the video
port. Your built-in PowerBook screen acts as one screen, and the external
monitor acts as the other. (You can hook up an external monitor to a
modern PowerBook, such as the 1400, 2400, 3400, or G3, but you can’t
use the external monitor as additional screen area — only as a mirror of
the built-in screen.)
Strange
But True
Chapter 11: Monitors 443
■ ■
MAC SECRETS • 4040-8/5 • ch.11.F • Chapter 11 • FINAL • VB/mark • 10/26/98 • p.443
MAC SECRETS • 4040-8/5 • ch.11.1 • Chapter 11 • Proof 1 • ma • 09/04/98 • p.443
4040-8/5 ch11.F 11/3/98 3:38 PM Page 443
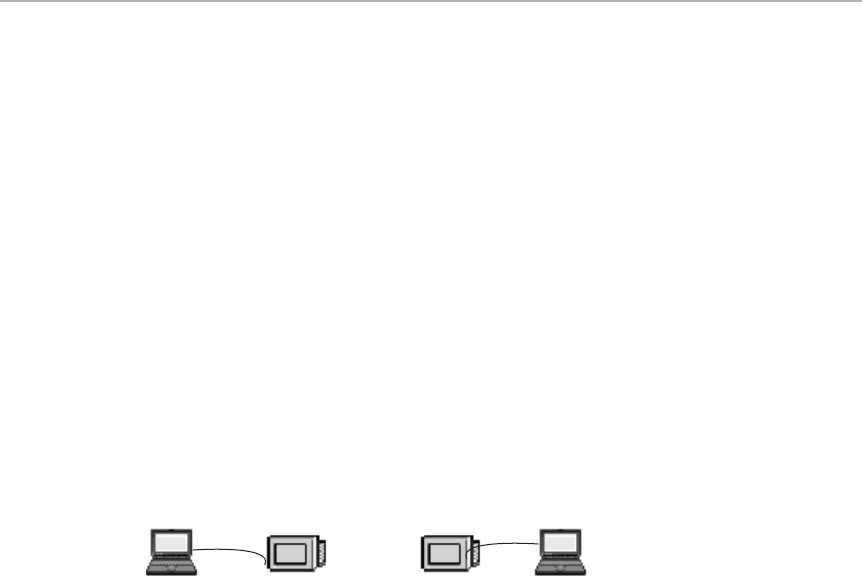
You can even have more than two monitors (up to six). You can theoretically
install more than one video card into your Mac’s slots, each with a separate
monitor attached.
Arranging the monitors in space
After you’ve hooked up all these monitors, you can control their behavior in
a number of impressive ways — using the Monitors & Sound control panel.
(On a few Power Macs, it’s called the Sound & Displays control panel; on
older Macs, it’s just the Monitors control panel.)
You can specify, for example, how the Mac will think the screens are ordered
from left to right. For instance, you can specify that your PowerBook be the
monitor on the left. When you move your cursor off the right edge of the
screen, only then will the cursor appear on the external monitor.
Note, of course, that the external monitor may be physically placed to the left
of the PowerBook. Even so, if the Monitors control panel thinks that it’s to
the right, the cursor will appear at the external monitor’s left edge as soon as
it leaves the primary monitor’s right side (see Figure 11-5).
Figure 11-5: Suppose you indicate, using the Monitors & Sound control panel, that the
external monitor is on the right (first example in the figure). From now on, the Mac will
always treat the external monitor as an extension to the right of the PowerBook screen. You
can move the actual monitor to the left (at right in the figure), and the Mac will still treat the
external monitor as being on the right.
Now that we’ve given you the warning, here’s how you specify the
positioning: Click the Arrange icon that magically appears in the Monitors &
Sound control panel (if you have it); then, regardless of which control panel
you have, simply drag the images of the respective screens within the
Monitors control panel (see Figure 11-6).
As you set up your monitors, keep in mind that the cursor can only cross
from one monitor to another where their little screen icons are touching.
Otherwise, there are no limitations. Screen 2 can appear anywhere relative to
screen 1: above it, below it, to the left or right, northwest of it, and so on. If
you want the cursor to appear on the external monitor when you move it (the
cursor) off the bottom of the main screen, for example, just drag screen icon
2 underneath icon 1. You can even nudge a selected screen icon in any
direction, one pixel at a time, by pressing the arrow keys.
ABC ABC
DEF DEF
444 Part II: Secrets of the Machine
■ ■
MAC SECRETS • 4040-8/5 • ch.11.F • Chapter 11 • FINAL • VB/mark • 10/26/98 • p.444
MAC SECRETS • 4040-8/5 • ch.11.1 • Chapter 11 • Proof 1 • ma • 09/04/98 • p.444
4040-8/5 ch11.F 11/3/98 3:38 PM Page 444
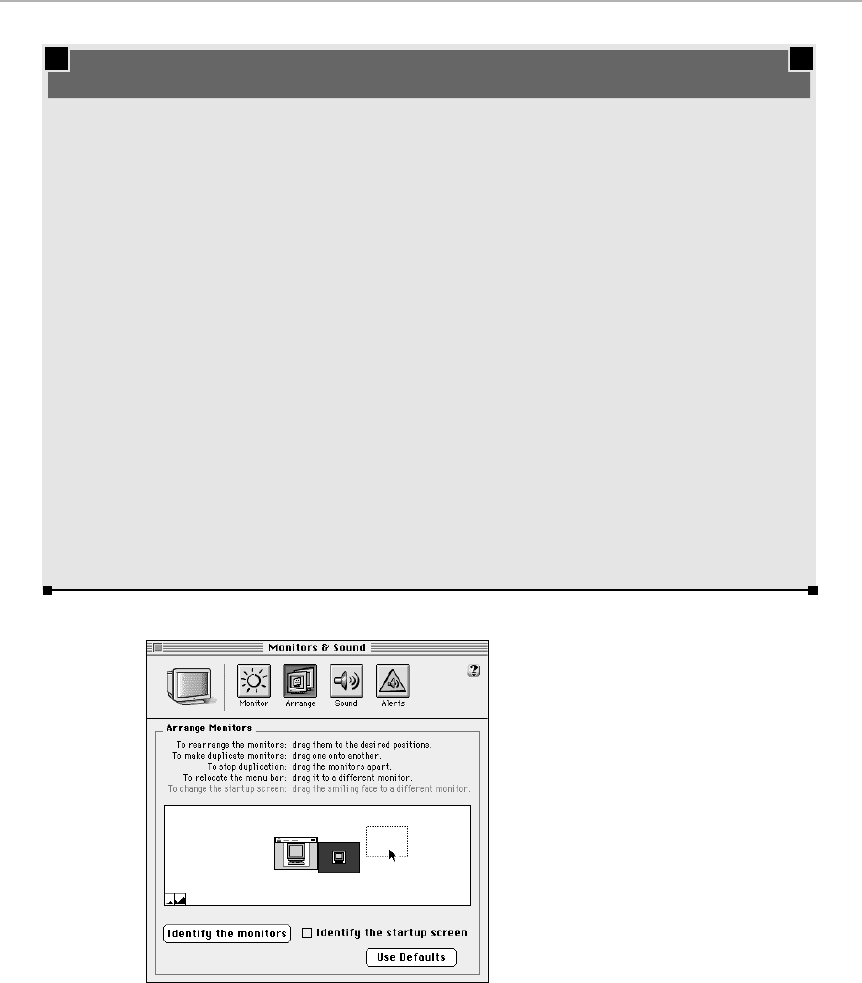
Figure 11-6: Drag either screen to change the Mac’s idea of its spatial relationship. The
Monitors & Sound control panel is shown, but the monitor-icons effect is the same on the
older Monitors control panel, as you can see in Figure 11-7.
Chapter 11: Monitors 445
■ ■
MAC SECRETS • 4040-8/5 • ch.11.F • Chapter 11 • FINAL • VB/mark • 10/26/98 • p.445
MAC SECRETS • 4040-8/5 • ch.11.1 • Chapter 11 • Proof 1 • ma • 09/04/98 • p.445
TRUE FACT
No, we’re not talking about built-in video
support here, but actual physical support — as
in weight-bearing capability.
Most people probably don’t give a second
thought to plunking a monitor on top of their Mac
— but think about it: A typical 21-inch monitor
weighs 80 pounds. Keeping such a unit stacked
on your computer is like having a healthy sixth-
grader standing on your Mac, all day, every day.
Is your Mac really meant to bear all that weight?
Maybe not, according to Apple. For example,
Apple says the IIsi, Quadra 605, Performa 475
and 476, and Macintosh LC 475 can support
displays of up to 35 pounds — but no more.
The other Macs in the LC series are a bit more
stable; they can carry loads of up to 50
pounds — but Apple doesn’t recommend
sticking a 16-inch monitor on the back of an
LC, anyway. The weight’s fine, they say, but
the configuration is a little top-heavy and
could be unstable.
The same holds true for the other desktop (non-
tower) Mac models, such as those in the G3,
6000 desktop, and 7000 series. The cases of
these Macs are strong enough to support a 16-
inch monitor weighing 47 pounds, but Apple
cautions that the setup might not be stable.
On the other hand, the Mac II, IIx, and IIfx were
constructed with special supporting posts in the
chassis that enable them to support a hefty two-
page monitor of more than 50 pounds.
To be honest, we’re not sure how important all
of this is. Fact is, we’ve been to plenty of offices
that break all the rules, with heavy large-size
monitors stacked on top of IIsi’s, and we’ve
never seen any signs of damage as a result.
Which monitors can your Mac support?
4040-8/5 ch11.F 11/3/98 3:38 PM Page 445

In fact, if you have the Monitors & Sound control panel, you can even drag
Screen 2’s icon squarely onto screen 1’s; the result is just what you would
imagine — both monitors will show exactly the same picture, and you’ll have
no additional screen space at all!
Which monitor is this?
As you drag your little multiple-monitor icons around in the control panel, it’s
possible to get confused as to which little screen icon corresponds to which
actual monitor on your desk. That’s the function of the Identify button (see
Figures 11-6 and 11-7), which comes in especially handy when you have four
or five monitors connected.
Figure 11-7: When you click Identify, a number appears on each screen icon in the control
panel. A corresponding number flashes onto the physical screens of your monitors.
Specifying the startup monitor
The startup monitor is the screen across which the icons of your startup
files (control panels and extensions) parade when you first turn on your Mac.
It’s also the monitor that displays your startup screen, if you’ve made one
(see Chapter 7). We can’t really figure out how this is useful (except to
programmers, who can use this trick to specify which monitor is displaying
the debugger, such as MacsBug), but there you are.
Anyway, you specify the startup monitor in the Monitors control panel by
pressing the Option key. A tiny smiling Mac appears (see Figure 11-8). Drag
this smiling Mac onto the icon of another screen, and you’ve done it. If you
have the newer Monitors & Sound control panel, this feature isn’t nearly so
hidden; in fact, a checkbox called “Identify the startup screen” is staring you
right in the face, as shown in Figure 11-6.
Strange
But True
446 Part II: Secrets of the Machine
■ ■
MAC SECRETS • 4040-8/5 • ch.11.F • Chapter 11 • FINAL • VB/mark • 10/26/98 • p.446
MAC SECRETS • 4040-8/5 • ch.11.1 • Chapter 11 • Proof 1 • ma • 09/04/98 • p.446
4040-8/5 ch11.F 11/3/98 3:38 PM Page 446
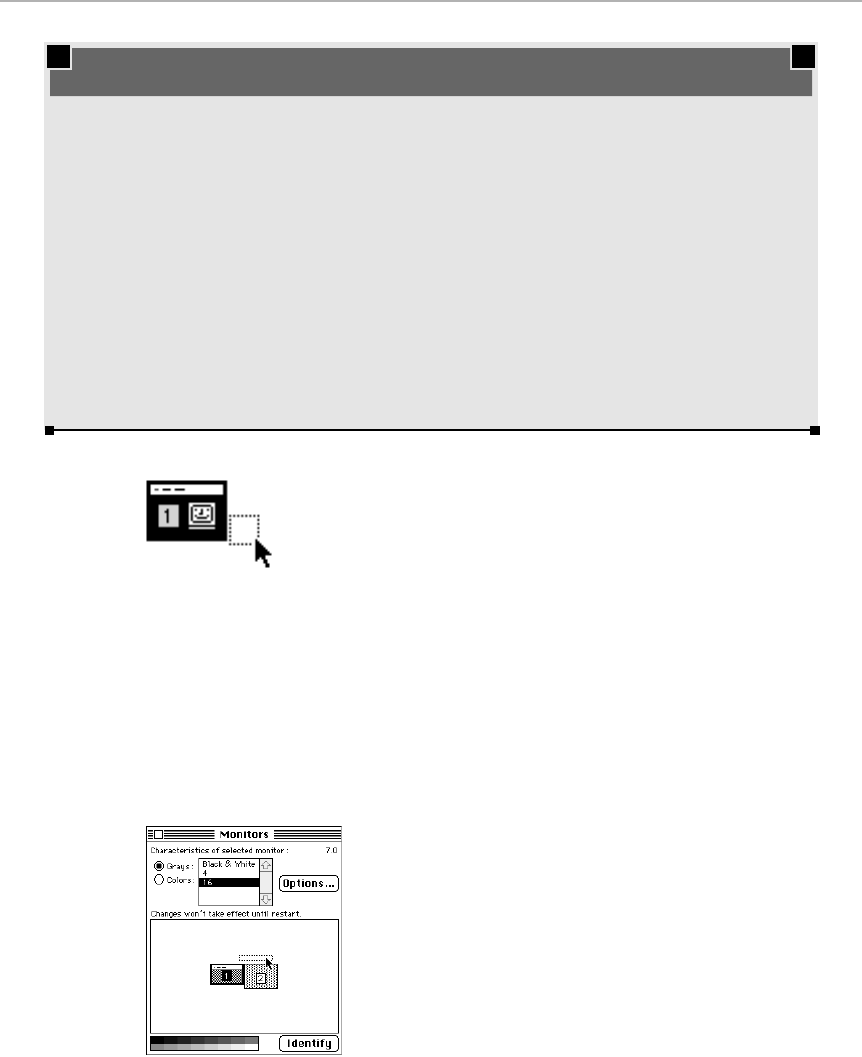
Figure 11-8: Specify the startup monitor — good only for the startup icon parade — by
dragging the microscopic happy Mac.
Selecting the main monitor
The main monitor is the one with the menu bar and the Úmenu. You can
specify which monitor is the main one by dragging the little menu bar in the
control panel from one monitor to another, as shown in Figure 11-9. (You can
do this in either the Monitors or Monitors & Sound control panel.)
Figure 11-9: Drag the tiny title bar to control which actual monitor will house the Desktop.
Then restart the Mac.
Chapter 11: Monitors 447
■ ■
MAC SECRETS • 4040-8/5 • ch.11.F • Chapter 11 • FINAL • VB/mark • 10/26/98 • p.447
MAC SECRETS • 4040-8/5 • ch.11.1 • Chapter 11 • Proof 1 • ma • 09/04/98 • p.447
MACINTOSH SECRET
Here’s a bombshell to throw out at the next
cocktail party gathering of Macintosh nerds.
“Hey, I got one. When you’ve got multiple
monitors connected, what’s the one window you
can’t ever slide from one screen to another?”
After the conversation dies and everyone stares
at you for a minute, you can cleverly reveal the
answer. “Why, the Monitors & Sound window
itself, of course!” You can then go on to explain
that when using this program with multiple
monitors, a version of its dialog box appears on
every screen. The purpose of this behavior, of
course, is to make it simple for you to customize
the color depth, resolution (zoom level), and
gamma setting for each screen independently
(because each now has its own private
Monitors & Sound window).
This means, of course, that you can’t drag any
one of these Monitors & Sound windows onto
any other screen; they’re locked forever within
their own monitors.
No need to thank us.
The one window you can’t move
4040-8/5 ch11.F 11/3/98 3:38 PM Page 447
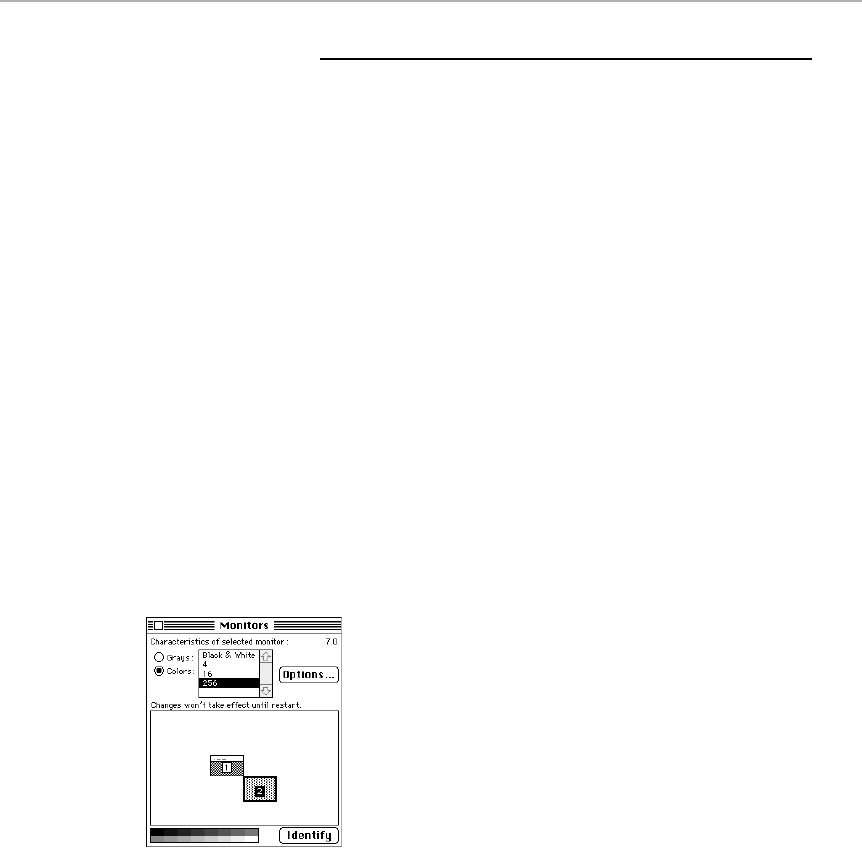
Monitor Secrets
■
The Mac’s built-in screen saver
As we explain in Chapter 22, we consider screen-saver software among the
biggest boondoggles ever to be foisted upon unsuspecting consumers. Instead of
saving
your screen by blackening it, such software accelerates your screen’s
wearout by keeping it brightly lit when you’re not using it.
Your Mac has a built-in screen saver, though — a real one, one that turns the
screen
off
after a few minutes of inactivity on your part. It’s the Energy Saver
program in your Control Panels folder. Instructions for setting up its two screen-
saver modes — “light sleep” and “deep sleep” — appear at the end of Chapter 7.
Multiple monitors: preventing cursor flyover
When you’re just beginning to work with two monitors, you’re still used to the
cursor stopping when it hits the boundary of your main screen’s display area. It
can be annoying, at first, when the cursor slips off your main monitor.
We’ve got a clever solution. When you’re using two monitors, the pointer can
cross over from one monitor to the next only where the
monitor icons
(in the
Monitors & Sound or Monitors control panel)
touch.
Position screen 2 so that
only its
corner
touches screen 1, as shown in Figure 11-10.
Figure 11-10: Position the icons like this to prevent accidental cursor flyover.
Then it’s
impossible
to move the cursor onto screen 2, unless you decisively roll
it through the imaginary “gateway” at the lower-right corner of screen 1.
Or suppose that you
like
the ability to move your cursor conveniently to the other
screen — you just hate
accidental
flyover, as when you’re going for your Úmenu
or Application menu.
In that case, open your Monitors & Sound control panel, and position the second
monitor’s icon just
a few pixels
lower than the primary monitor’s. This way, your
cursor can’t cross over at the corner — yet when you move the cursor in the
middle
of the first monitor’s boundary, it slips easily across to the second.
448 Part II: Secrets of the Machine
■ ■
MAC SECRETS • 4040-8/5 • ch.11.F • Chapter 11 • FINAL • VB/mark • 10/26/98 • p.448
MAC SECRETS • 4040-8/5 • ch.11.1 • Chapter 11 • Proof 1 • ma • 09/04/98 • p.448
4040-8/5 ch11.F 11/3/98 3:38 PM Page 448

Multiple monitors, multiple color settings
One fascinating aspect of the Monitors control panel is that you can set the
“color depth” (the setting: 256 colors, grayscale, and so on) and resolution (640
by 480, 800 by 600, etc.) independently for
each
monitor.
Monitors control panel:
Click the icon, in the control panel, of the monitor whose
color depth you want to change,
then
change the setting.
Monitors & Sound:
Each monitor appears with its own private copy of the
Monitors & Sound window, complete with Color Depth, Resolution, Gamma, and
Pointer Visibility settings.
Using this information, you can easily set up your multiple monitors to have
different
color depths. For example, you might display a color image in a
Photoshop window that spans both monitors (or you could have two windows of
the same image, one on each screen). One monitor could display the image in
24-bit color, and the other could appear in, say, 256 colors, so you’ll know
exactly what this image will look like when appearing on somebody else’s Mac.
Chapter 11: Monitors 449
■ ■
MAC SECRETS • 4040-8/5 • ch.11.F • Chapter 11 • FINAL • VB/mark • 10/26/98 • p.449
MAC SECRETS • 4040-8/5 • ch.11.1 • Chapter 11 • Proof 1 • ma • 09/04/98 • p.449
CASE HISTORY
We were fortunate enough to witness a near-
disaster recently. This took place at a seminar in
a New York City hotel ballroom. The incident
involved a PowerBook 540c attached to a
projector that the presenter had rented for the
occasion.
With 25 minutes to go before the presentation,
this presenter (who we’ll call Gary — because
that’s his name) hooked up the projector to his
PowerBook’s video port. It was an LCD
projection pad that he’d been guaranteed would
work with his Mac.
Yet when Gary turned everything on, nothing
came on. The projection pad showed a solid
black. The PowerBook screen was completely
gray: no icons, no menus, no cursor, nothing!
Gary began to panic. He could hear the
PowerBook’s hard drive churning away, exactly
as though it was starting up normally.
With five minutes to go before the speech, he
finally realized what was happening. First, he
saw nothing on the PowerBook screen because
it wasn’t selected as the main monitor in the
Monitors control panel! The external monitor,
number 2, was selected. Therefore, the
PowerBook was considering its own screen to
be an extended area of the external monitor.
What is off to the right of any Mac main
monitor? Plain, blank, gray infinity. That’s what
showed up on the PowerBook.
So why didn’t Gary see all his icons and
windows on the LCD projector? As it turned out,
he would have seen them, except the Contrast
control on the LCD was turned all the way up.
(This often happens when these pads are
shipped or handled.) As soon as he tweaked the
Contrast knob, the projector came into sharp
focus, complete with his usual Desktop.
This combination of two mishaps gave Gary
quite a scare. Eventually, he opened the
Monitors control panel, dragged the menu bar
back onto the screen 1 icon (his PowerBook’s
built-in screen), and restarted the Mac. Then the
projector acted as the extended area of the
Mac, just as he’d intended.
Help! Both my monitors are gray!
4040-8/5 ch11.F 11/3/98 3:38 PM Page 449

Multiple monitors, one big screenshot
It’s no big secret these days that pressing Ô-Shift-3 produces the sound of a
camera shutter — and a file on your hard drive called Picture 1. (See Chapter 2
for additional variants of this keystroke.) That file is a graphic that depicts
whatever was on your screen at the moment you pressed the keys.
But this powerful built-in screenshot function actually handles multiple monitors
beautifully. The resulting PICT file includes the images — correctly positioned
relative to each other — of all monitors attached to the Mac, no matter how big
the PICT file, therefore, must be.
Multiple monitors: the programmer’s head
As Easter eggs go, this is one of the eeriest — and funniest. Unlike most
secret credits screens, this one doesn’t reveal the programmer’s name; it
reveals his
head.
To view this one, you need a multiple-monitor setup. Open Monitors & Sound.
Click the Arrange button. If you now click the Identify Startup Screen button, a
tiny smiling Mac icon appears on the miniature screen representing the startup
screen, as described earlier in this chapter.
But if you
Option-
click the Identify Startup Screen button, you don’t see the little
smiling Mac icon. Instead, you see the little smiling
programmer’s head.
Correcting gamma?
Gamma
relates to the balance of the middle colors displayed on the Mac.
Gamma correction helps keep colors from looking washed out.
If your monitor offers gamma settings (most Apple monitors do), you’ll see the
controls at the left side of the Monitors & Sound program (see Figure 11-11).
If you have the older Monitors control panel, click the Options button while
pressing the Option key. Then you’ll see the Special Gamma options.
For example, most Apple monitors offer three gamma settings:
Uncorrected,
which means “as it was when Sony manufactured it” and creates a slightly
darker picture;
Page White,
which actually makes white images appear slightly
yellowish; and
Mac Standard,
which makes whites a crisp white, which is
Apple’s preferred setting.
We have one solemn word of advice:
use uncorrected gamma to view photos.
We’ve been devastated more than once by color-printing projects that looked
fabulous in Photoshop but — because we’d had Mac Standard gamma selected
while editing — looked dark and muddy when they came back from the local
printing shop.
Worth
Learning
Strange
But True
450 Part II: Secrets of the Machine
■ ■
MAC SECRETS • 4040-8/5 • ch.11.F • Chapter 11 • FINAL • VB/mark • 10/26/98 • p.450
MAC SECRETS • 4040-8/5 • ch.11.1 • Chapter 11 • Proof 1 • ma • 09/04/98 • p.450
4040-8/5 ch11.F 11/3/98 3:38 PM Page 450

Figure 11-11: The Gamma nobody knows.
Cleaning the screen
As an electronically charged device, the glass sur face of your monitor draws
dust and grime like moths to a porch light.
This is another one of those are-you-conservative-or-liberal arguments. We’ve
read in plenty of Mac magazines that you’re never supposed to use glass cleaner
on the monitor. This puzzles us because (a) it
is
glass, and (b) it’s not
even
glass
— it’s glass covered by a plastic bonded sealant. As a matter of fact, we’ve used
Fantastik for years to clean the monitor glass, and it works great. (We use paper
towels, but a clean rag would probably be better.)
Chapter 11: Monitors 451
■ ■
MAC SECRETS • 4040-8/5 • ch.11.F • Chapter 11 • FINAL • VB/mark • 10/26/98 • p.451
MAC SECRETS • 4040-8/5 • ch.11.1 • Chapter 11 • Proof 1 • ma • 09/04/98 • p.451
MACINTOSH SECRET
You wouldn’t think there’s much to hooking up your
monitor. After all: you plug one cord into a power
outlet and another into the Macintosh, right?
Not so fast. First, many a beginner is stymied
trying to plug the monitor’s power cord into the
wall — it won’t go. Its prongs are surrounded by
a tall plastic shield that prevents them from
entering the wall socket.
This walled-in prong apparatus is, of course,
designed to plug into the Mac, not the wall.
Most Mac models offer an “inside-out” power
outlet that accommodates this special monitor
cord. Plug the monitor into the Mac, the thinking
goes, and the monitor will shut off automatically
when you turn the Mac off.
Many of Apple’s latest monitors also have jacks
or wires that fit to your Mac’s sound,
microphone, and keyboard jacks. Our advice: do
it! For example, any Apple monitor that has
built-in stereo speakers won’t work at all unless
you’ve plugged a cable from it into your Mac’s
speaker jack on the back panel.
Or, as free book winner Eolake Stobblehouse put
it: “I owned an Apple 1710 (AV) monitor for a
year before anyone cared to inform me that I had
not plugged it in correctly. The keyboard goes into
the monitor, and the monitor has a plug that goes
into the ADB port. Doing this nearly doubled the
possible resolution for the screen, and made it
possible to tune the screen from the computer.”
Connecting-the-monitor basics
4040-8/5 ch11.F 11/3/98 3:38 PM Page 451

They
do
make special cleaning fluid for these screens. But we’d bet $100 that if
you did a chemical breakdown, you’d find out that it’s basically Fantastik.
Explaining the shadow line
The Apple 13-inch and 14-inch color monitors have a dark thin line that runs
horizontally across the screen about two inches from the bottom. Don’t bother
returning your monitor — it’s supposed to be there. The larger Apple monitors
have
two
lines.
Turns out that these monitors are actually Sony Trinitron picture tubes. The
design includes a wire inside the picture tube to stabilize the
colormask grid
(an
array of vertical wires that helps the electron beam strike only the correct spots
on the phosphor). Despite this shade effect, says Apple, there’s no better
monitor technology.
Simulating a smaller screen
Having a huge monitor is glorious — don’t get us wrong. But suppose you’re
designing a document that’s going to be used on many different Macs: a Web
page, say, a FileMaker data-entry screen, a dialog box, or a startup screen.
You’ll want to make sure your creation fits on the lowest-common-denominator
screen, 640 by 480 pixels.
Now that Mac OS 8 lets you use any image as your desktop backdrop, the solution
is at hand. In Photoshop or Color It (included with this book), create a 640 by 480-
pixel colored or white box. Using the Desktop Pictures or Appearance control panel
(see Chapter 4), install this image as a desktop picture.
Then, as you create your database/Web page/startup screen, just position it to
fit the background box. You’ve just saved yourself 50 annoying trips to the
Monitors control panel or control strip to switch back and forth from
your
favorite resolution to your future customers’.
Videotaping your monitor
You can’t. See the end of Chapter 23 for details on this frustrating topic.
PowerBook monitors
For the scoop on this mutant screen technology, see Chapter 14.
Strange
But True
452 Part II: Secrets of the Machine
■ ■
MAC SECRETS • 4040-8/5 • ch.11.F • Chapter 11 • FINAL • VB/mark • 10/26/98 • p.452
MAC SECRETS • 4040-8/5 • ch.11.1 • Chapter 11 • Proof 1 • ma • 09/04/98 • p.452
4040-8/5 ch11.F 11/3/98 3:38 PM Page 452

MACWORLD MAC SECRETS • 4040-8/5 • Chapter 12 • FINAL • VB/EAP • 10/26/98 • p.453
MACWORLD MAC SECRETS • 4040-8/5 • Chapter 12 • Proof 2 • SH • 10/19/98 • p.453
Chapter 12
From 128K to Quadra: Mac to Mac
In This Chapter
©What the specs mean
©The specs for every Mac model ever made
©Secrets of the pre-PowerPC Mac models
©Just how much your Mac has devalued
Yes, we’ve already been told that we’re nuts to attempt the next two
chapters of this book. Since 1984, Apple has created over 150 different
Mac models —including 38 PowerBooks and 53 Performas! To make matters
more complex, during the two-year era of Macintosh clones, Power Computing,
Motorola, UMAX, and other companies added 75 more models to the dizzying
parade. And despite Apple’s recent financial woes, the company still manages
to come up with another dozen or so new models each year. By the time you
finish reading this page, another Power Mac probably will have been born.
Attempting to describe every model that existed, therefore, is an exercise in
futility.
But we’re going to try it anyway. This chapter tracks the speeds, specs, and
life cycles of every non-Power Mac model, from the birth of the original
Macintosh 128K to the PowerBook 190, the last Mac to contain Motorola’s
68000-series processor chip. When you’re finished reading this chapter, you
will be one of the few people on Earth who actually know the difference
between a Performa 550, 560, 575, 577, 578, 580, and 588.
Chapter 13 covers every Apple Power Mac — or, more accurately, every
PowerPC-based machine — from the first ones released in 1994 to the models
released just minutes before this book was printed. In other words, what
separates the models in this chapter from those in the next is the microchip.
(For details on the PowerPC chip, see Chapter 13.)
Despite the seemingly pointless array of nearly identical models, Apple’s
lineup actually has some logic. Over the years, there have been exactly four
classes of Macs. Educational customers alone were usually offered the LC or
Power Mac 5000 series. In the home market, there were the Performas and the
Power Mac 6300 through 6500 lines. For business use, there were the Quadras
and now their potent replacements, the Power Macs. And, of course, for the
portable person, there are PowerBooks. On the other hand, Apple is never
4040-8/5 ch12.F 11/3/98 3:20 PM Page 453

completely consistent in its marketing distinctions; the first LCs, for example,
were not restricted to educational buyers and the Performa designation
disappeared in 1997—but across the model lines, there’s considerable
duplication. At any rate, keep the education/home/business/laptop distinction
in mind as you read. (All photos are courtesy of Apple Computer, Inc.)
Coming to Terms
We really don’t like using technical terms— we cringe every time we find
ourselves saying things like, “That microchip lacks a PMMU.” But when
comparing various Mac models, you must understand what some of the
technical specifications really mean. Here’s a guide to the terms we’ll be using.
Processor chip: Sometimes called the CPU, this chip is the absolute guts of
the computer, a collection of microscopic transistors etched in a single
square silicon chip. This microchip does the actual data processing. Until the
Power Macintosh, all Macs were built around one of four microprocessor
chips manufactured by Motorola: the 68000, 68020, 68030, and 68040. The
higher the number, the more powerful the processor. (The Power Macintosh
uses a PowerPC chip — the 601, 603, or 604, for example — as you’ll find
out in the next chapter.) These computers — the ones described in this
chapter — are often called 680x0 (pronounced “68 thousand”) machines.
Clock speed: This number is the most important speed statistic for a Mac. It
refers to the speed at which data moves through the Mac’s circuits, as
measured in megahertz, or millions of cycles per second. The earliest Macs
ran at 8 MHz; the newest Power Mac models run at 350 MHz or higher. (Pre-
G3 Power Macs’ names hint at their speeds; the 7200/75 model, for example,
runs at 75 MHz.) Two Mac models may use the same microprocessor yet run
at different speeds—because one has a lower clock speed.
Note well, however: A faster clock speed doesn’t necessarily mean a faster
computer. The computer’s processing speed is determined by the particular
processor chip and the speed at which it’s set to run. For example, a Power
Mac 8600 running at 200 MHz is faster than a PowerBook 3400 running at 240
MHz — because the Power Mac’s 604 chip is inherently faster than the
PowerBook’s 603e chip. As a rule, you can’t compare MHz across processor
chips. (Keep that startling fact in mind the next time somebody brags about
the speeds in the PC world. “My Pentium runs at 300 MHz for the price of a
275 MHz Mac,” you’ll be misleadingly told.)
Bus speed: It’s all well and good to have a Ferrari engine under the hood, but
you won’t go very fast if you have to drive through a wheat field. Similarly,
the second most important statistic in measuring a Mac’s speed is the bus
speed — the speed of the circuitry that connects your main processor to the
other components. Many a Mac model features a chip with dazzling clock
speed — that runs dog slow, thanks to a slow bus speed that feeds data to the
processor in miserable little dribbles. Likewise, many’s the Mac — especially
the G3 series — that runs much faster than its chip’s clock speed suggests,
Mac Basics
Mac Basics
454 Part II: Secrets of the Machine
■■
MACWORLD MAC SECRETS • 4040-8/5 • Chapter 12 • FINAL • VB/EAP • 10/26/98 • p.454
MACWORLD MAC SECRETS • 4040-8/5 • Chapter 12 • Proof 2 • SH • 10/19/98 • p.454
4040-8/5 ch12.F 11/3/98 3:20 PM Page 454

thanks to a beautifully engineered, blistering fast bus speed. Early Macs had
bus speeds as pokey as 16 MHz; the buses in today’s G3 machines cook along
at 150 MHz or more.
Data path: The wider the data path, the larger the chunk of data that a
microprocessor can push through the Mac’s circuits at one time. (Most
manuals and articles prompt you, at this point, to imagine lanes on a
highway.) The wider the data path, the faster the Mac. Macs with a 16-bit data
path are notably slower than those with a 32-bit data path. The PowerPC chip
uses a 64-bit data path, which is one clue to its speed.
Processor-Direct Slot (PDS): This connector inside some Macs lets you plug
an expansion card (such as an accelerator, digitizer, or video card) directly
into the computer’s main processor. Each Mac can have only one PDS — and,
alas, cards for one Mac model’s PDS might not fit a later model’s. See Chapter
34 for more on PDS slots.
NuBus slot: Like a PDS, this is a thin rectangular connector into which
expansion cards can be plugged. A Mac can control several NuBus cards
simultaneously. A IIvx, for example, has three NuBus slots; the II, IIx, and IIfx
had six (the most ever). For eight years, most desktop Macs included this
kind of slot. (Again, see Chapter 34 for more on NuBus.)
PCI: You’ll see this term mostly in the next chapter, which covers Power
Macs. PCI stands for Peripheral Component Interconnect, and it’s Apple’s new
design for expansion slots, replacing the NuBus slot. PCI cards mean lower
prices and faster speeds than NuBus cards. (Again, see Chapter 34 for more.)
PMMU: This acronym stands for Paged Memory Management Unit. It’s a
coprocessor (a second “brain” designed to take some of the load off the main
one) specifically designed to handle memory-related tasks. PMMUs are
significant for only one reason: They allow a Mac to use virtual memory (see
Chapter 9). In the following discussions, we won’t specifically identify models
with PMMUs; but any Mac based on a 68030, 68040, or PowerPC processor
has the PMMU (and virtual memory). (A PMMU was optional on a few 68020-
chip Macs.)
FPU: This stands for floating-point unit, the math coprocessor chip included in
some Macs to handle certain mathematical computations, such as
trigonometric and logarithmic calculations. Read this twice: For most
everyday tasks — word processing, database, or even fairly complex business
spreadsheet work—an FPU makes no difference to the speed of a Mac. Only if
you get into heavy-duty math applications, high-end drafting, a few
Photoshop filters, or 3D rendering does an FPU speed things up. The FPUs
used in Macs are Motorola 68881 or 68882 chips, or they’re built into the ’040
processor. (Power Macs have a powerful, redesigned FPU — so different that
non-PowerPC software can’t use it.)
SIMM speed, SIMM type: SIMMs (Single Inline Memory Modules) are the little
circuit cards you plug into a Mac to increase the amount of RAM available.
(See Chapter 9 for details.) Some types of SIMMs take longer to produce a
Chapter 12: From 128K to Quadra: Mac to Mac 455
■ ■
MACWORLD MAC SECRETS • 4040-8/5 • Chapter 12 • FINAL • VB/EAP • 10/26/98 • p.455
MACWORLD MAC SECRETS • 4040-8/5 • Chapter 12 • Proof 2 • SH • 10/19/98 • p.455
4040-8/5 ch12.F 11/3/98 3:20 PM Page 455

requested piece of information for delivery to the main processor. This speed
is measured in nanoseconds (ns) — billionths of a second. Some Macs require
faster SIMMs to take advantage of their microprocessor’s speed.
Each new generation of Macs tends to require a different type of SIMM, too—
chips of different sizes and numbers of pins, for example. The newest Power
Macs use DIMMs (Dual Inline Memory Modules), yet another permutation of
the memory chip. We include this information in the following discussions so
you’ll know that, for example, the 20MB of extra RAM you bought for your old
Quadra won’t work in your new Power Macintosh.
VRAM: In Mac models that include built-in video support (those that don’t
require the purchase of a video card), monitor display tasks are handled by
separate VRAM, or video RAM. As we discussed in Chapter 11, VRAM consists
of memory chips mounted on the main logic board. Generally, you can
expand your Mac’s VRAM if you want to increase the number of colors a Mac
can display, or if you need more VRAM for a larger monitor.
Price then/price now: Of course, our figures here are rough, and they’re
likely to change by the time you finish reading this book—or even this
sentence. Still, we think it’s fun to see what happens to your investment over
a very short period of time.
More specs
If we published every spec of every Mac, this chapter would be 1,400 pages
all by itself. We’ve included with this book’s CD-ROM, therefore, the
astounding mini-program called GURU.
The acronym stands, sort of, for GUide to Ram Upgrades, but the program
actually lists much more information about every Mac model. Run this program
and look up your model to learn such geeky specs as its power consumption;
cache sizes; SCSI connector style; which kind of replacement internal battery
you need; amount of VRAM (and VRAM expandability); and (the program’s
specialty) a list of every possible RAM upgrade configuration for your model,
including SIMM type and speed, number of RAM slots, and so on.
More Secrets
We’ve got a charming collection of Easter eggs, secret features, and subtle
performance quirks about each of the 79 Macs described in this chapter. The
odds of your having one of these Macs on your desk at this moment,
however, are diminishing monthly. And new models are clamoring for space
in the same number of Mac Secrets pages.
We hope you’ll forgive us, therefore, if we refer you to Chapter 12 of the
electronic edition of Macworld Mac Secrets, 4th Edition (on the CD-ROM that
came with this book), where all of these older models’ secrets are still intact.
On paper, we’ve left only the most interesting and useful tricks and tips of
these aging models.
456 Part II: Secrets of the Machine
■ ■
MACWORLD MAC SECRETS • 4040-8/5 • Chapter 12 • FINAL • VB/EAP • 10/26/98 • p.456
MACWORLD MAC SECRETS • 4040-8/5 • Chapter 12 • Proof 2 • SH • 10/19/98 • p.456
4040-8/5 ch12.F 11/3/98 3:20 PM Page 456

Compact Macs
Macintosh 128K
There it was: a beige one-piece computer with no fan, no expansion slots, and
a $2,500 price tag. Steve Jobs’s brainchild, a direct descendant of the neato,
but grossly overpriced, Lisa, was born January 24, 1984, out of his passion,
his rages, and his vision of a computer as commonplace as the telephone.
Jobs borrowed aspects of the Mac’s revolutionary point-and-click interface
from prototypes that he saw running at Xerox’s Palo Alto Research Center. He
packed in a whopping 128K of memory, twice as much as the popular
Commodore 64. And, at the last minute, Steve Jobs grudgingly agreed to
make the square, 3.5-inch, 400K disks part of the Mac — and only because the
disks he preferred, the 143K 51⁄4-inch floppies then used on the Apple II,
couldn’t even hold a System and a Finder. (We shouldn’t make fun of Steve,
though. We shouldn’t make fun of anyone who had $200 million in the bank
by age 25.)
Some people laughed at the Mac. Some called it a toy. It had no SCSI port, no
ADB jack, no slots of any kind (see Figure 12-1). In retrospect, it seems
astonishing that the little machine caught on at all, having been introduced
when virtually no software or peripherals were available.
Yet, if you were among those who first drew in MacPaint in 1984, you may
remember the simple irresistibility of the computer, which was the most
user-friendly ever built.
Price: $2,500 then, $0 now
On the market for: 22 months
Processor and speed: 68000 at 8 MHz
Soldered memory: 128K, not expandable (150-ns chips required)
Equipment: Built-in, black-and-white, 9" screen; no slots; no FPU
Chapter 12: From 128K to Quadra: Mac to Mac 457
■ ■
MACWORLD MAC SECRETS • 4040-8/5 • Chapter 12 • FINAL • VB/EAP • 10/26/98 • p.457
MACWORLD MAC SECRETS • 4040-8/5 • Chapter 12 • Proof 2 • SH • 10/19/98 • p.457
MACINTOSH SECRET
Apple’s first Macintosh television commercial
made its historic debut during the 1984 Super
Bowl, right?
Wrong. The famous “1984” ad, directed by film
director Ridley Scott (Alien, Blade Runner),
actually was run for the very first time by a local
station in Twin Falls, Idaho. It aired at 1 a.m. on
December 15, 1983.
Apple broadcast the ad in December so that it
would qualify for the 1984 Clio Awards. (It won,
by the way.)
The Mac’s big debut
4040-8/5 ch12.F 11/3/98 3:20 PM Page 457
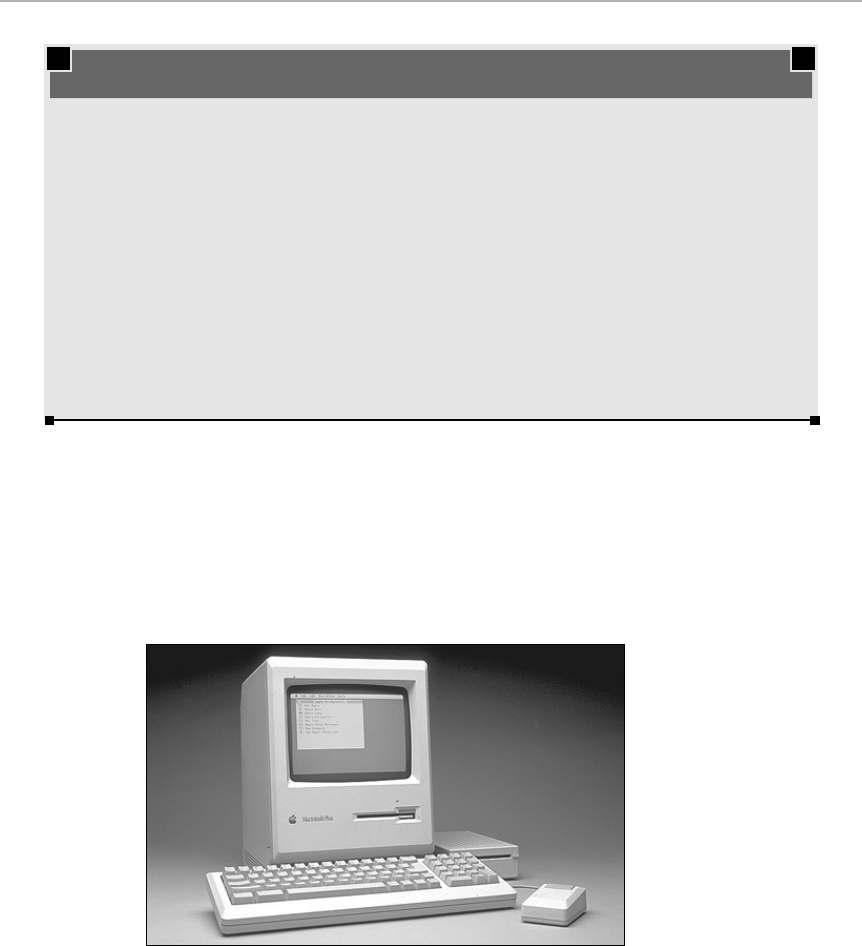
Macintosh 512K
The Macintosh 512K — the “Fat Mac” — was introduced September 10, 1984.
An Apple press release described it as a “powerful business computer” that
allowed users to “take advantage of larger documents and models, faster
response time, and the more than 40 business productivity software packages
now shipping.” (See Figure 12-1.)
Figure 12-1: The original Macintosh case design. This one-piece, compact, essentially
sealed-shut enclosure was the chassis for the Mac 128, the Mac 512K, and the Plus.
The 512K is simply the original Mac with four times as much RAM. Its debut was
accompanied by two Apple marketing announcements that set the pattern for
future Mac generations. First, the price of the original Mac 128K dropped (by
$300); second, Apple offered an upgrade from the earlier model to this latest one.
458 Part II: Secrets of the Machine
■ ■
MACWORLD MAC SECRETS • 4040-8/5 • Chapter 12 • FINAL • VB/EAP • 10/26/98 • p.458
MACWORLD MAC SECRETS • 4040-8/5 • Chapter 12 • Proof 2 • SH • 10/19/98 • p.458
TRUE FACT
You won’t believe how much the original Macs,
the ones people paid thousands of dollars to
own in 1984, are worth today.
Absolutely nothing.
The United Computer Exchange, an organization
that tracks the resale value of personal
computers, has officially listed the real market
value of a used Macintosh 128K as zero. The
same is true of the Macintosh 512K and the
512Ke, which originally sold for over $3,000. If
you’re looking for a little spare cash, about the
oldest Mac that you can sell these days is the
Mac SE, which may bring you 50 bucks.
Still, we’re not encouraging you to fling your old
128K Mac into a landfill. From a historical point
of view, the original Macintosh is still worth
plenty. Furthermore, we’re certain that the
pendulum will swing back — the day will come
when the Mac 128K will be considered a
valuable relic of a bygone era.
The Macintosh 128K: Officially worthless
4040-8/5 ch12.F 11/3/98 3:20 PM Page 458

The Macintosh 512Ke, for enhanced, appeared in April 1986, sporting an 800K
floppy-disk drive.
Price: $3,200 then, $0 now
Apple code name: Fat Mac
On the market for: 18 months (512K), 17 months (512Ke)
Processor and speed: 68000 at 8 MHz
Soldered memory: 512K, not expandable (150-ns chips required)
Equipment: Built-in, black-and-white, 9" screen; no slots; no FPU
Chapter 12: From 128K to Quadra: Mac to Mac 459
■ ■
MACWORLD MAC SECRETS • 4040-8/5 • Chapter 12 • FINAL • VB/EAP • 10/26/98 • p.459
MACWORLD MAC SECRETS • 4040-8/5 • Chapter 12 • Proof 2 • SH • 10/19/98 • p.459
TRUE FACT
If you’re thinking of buying a new Mac,
remember the golden rule of Mac obsolescence.
Before you go salivating over the hottest new
PowerBook and emptying your bank account,
keep the following realities in mind:
■Apple introduces more new computer
models, and retires old models, faster than
ever before. Some models, like the Quadra
900, were on the market for only 90 days
before being canned. Furthermore, newer
models are always much less expensive
and much more powerful than previous
models. (This is true, of course, of any
personal-electronics gadget.)
■However, this will always be the case. Your
holding off on buying a Mac in the hope
that one day the market will settle down
simply means that you’ll go longer without
having any computer at all. If you wait
forever, you will get an incredible deal, but
you’ll never get any work done.
■Therefore, do your best to anticipate what
new models Apple has in the pipeline (by
reading the Macintosh-area America Online
messages or www.macintouch.com, for
example), make a decision, and then buy
something. Plan, from the start, to feel
cheated and deceived as prices continue to
drop. Expect the Power Mac you buy in
February to cost $300 less in May. Don’t be
shocked. It will happen.
■Just because a computer has been
discontinued by Apple doesn’t mean it’s
obsolete. It still does your word processing,
doesn’t it? It still does what you bought it
for. By definition, then, it’s still a good
computer. Don’t fall prey to LAGS (latest-
and-greatest syndrome). At least don’t fall
prey to it as much as we do.
■In fact, the relentless parade of newer,
faster Mac models can actually work in
your favor when it comes to finding a good
deal on a computer. We know plenty of
savvy shoppers who actually wait for the
particular Mac they want to be
discontinued — then they buy it, just after
Apple slashes the price of the model by
$500 to clear it out and make room for the
hot, new machines. Smart buyers know
that a model’s being discontinued hardly
makes it obsolete. They realize that every
Mac, no matter how well designed or
enthusiastically received, will probably be
discontinued within a year. So why pay a
premium for a currently shipping model?
Mac Obsolescence
4040-8/5 ch12.F 11/3/98 3:20 PM Page 459

Macintosh Plus
“One Full Megabyte of Memory.” With these words, Apple proudly announced
the release of the Mac Plus in January 1986.
Compared with previous Macs, the Mac Plus was a major step forward. “With
one full megabyte of RAM available, the Macintosh Plus can accommodate
memory-intensive application programs,” boasted Apple in one press release.
And storage? The sky was the limit — 800K on each double-sided floppy disk.
That wasn’t all the good news for storage addicts, either. The Mac Plus was
the first model with a built-in SCSI port on the back, to which you could
attach a (very expensive) hard drive.
The Plus remained part of Apple’s product line for nearly five years, longer than
any other model, before or since. But today, the Plus is barely recognizable. It
doesn’t have an internal hard drive, uses the older-style keyboard that predates
the Apple Desktop Bus, and can’t be expanded beyond 4MB of RAM without the
use of third-party expansion kits. Nevertheless, thousands of Pluses are still
around and still being used effectively. We know of at least one semiweekly
newspaper that’s written almost entirely on dusty old Mac Pluses. Incredibly,
the Mac Plus cost the same as a Power Macintosh G3 today.
Price: $2,600 then, $0 now
Apple code name: Mr. T
On the market for: 4 years, 10 months
Processor and speed: 68000 at 8 MHz
Memory: 1MB, expandable to 4MB (150-ns, 30-pin DRAM chips required)
Equipment: Built-in, black-and-white, 9" screen; no slots; no FPU
System software notes: Requires System 3.2 through 7.5.5
Macintosh SE
The SE, released in March 1987, was originally billed as Apple’s mainstream
business computer (see Figure 12-2). The SE shares the Plus’s compact design
and 68000 microprocessor, although it runs 15 to 20 percent faster than the
Plus. New SE users who had owned previous Mac models probably were
shocked the first time they powered up an SE; it made noise! This was the first
Mac equipped with a cooling fan, ending an era of silent Mac computing.
The SE marked several other firsts: It was the first Corporate Gray Mac (its
predecessors were beige), it had the very first expansion slot and ADB
keyboard jack, and a built-in hard drive was optional. (If you didn’t opt for
the hard drive, you could get an SE with two floppy-disk drives.)
Price: $3,700 then, $50 now
Apple code names: Aladdin, Chablis
On the market for: 2 years, 5 months
Processor and speed: 68000 at 8 MHz
Memory: 1MB, expandable to 4MB (150-ns, 30-pin DRAM chips required)
460 Part II: Secrets of the Machine
■ ■
MACWORLD MAC SECRETS • 4040-8/5 • Chapter 12 • FINAL • VB/EAP • 10/26/98 • p.460
MACWORLD MAC SECRETS • 4040-8/5 • Chapter 12 • Proof 2 • SH • 10/19/98 • p.460
4040-8/5 ch12.F 11/3/98 3:20 PM Page 460

Equipment: Built-in, black-and-white, 9" screen; 1 Processor Direct Slot; no
FPU
Special note: Some later models (bearing the FDHD logo on the front) were
produced with SuperDrives capable of reading high-density
1.4MB disks
System software notes: Requires System 4.1 through 7.5.5
Figure 12-2: The light gray, slotted case design of the SE series.
Macintosh SE/30
Four times faster than an SE, the Macintosh SE/30 was released in January
1989 and was an extremely popular workhorse.
The SE/30 was another machine of firsts: the first compact Mac to be based
on the 32-bit Motorola 68030 microprocessor; the first with an FPU to speed
up complex math functions; the first with an internal SuperDrive to read high-
density floppy disks and provide MS-DOS disk compatibility; and the first to
include color QuickDraw, enabling you to add a video card to the SE/30’s
processor-direct slot and connect it to a color monitor.
Price: $4,900 then, $100 now
Apple code name: Green Jade
On the market for: 2 years, 9 months
Processor and speed: 68030 at 16 MHz
Memory: 1MB, expandable to 128MB (120-ns, 30-pin DRAM chips
required)
Equipment: Built-in, black-and-white, 9" screen; 1 Processor Direct Slot;
FPU
System software note: Requires System 6.0.3 through 7.5.5
Chapter 12: From 128K to Quadra: Mac to Mac 461
■ ■
MACWORLD MAC SECRETS • 4040-8/5 • Chapter 12 • FINAL • VB/EAP • 10/26/98 • p.461
MACWORLD MAC SECRETS • 4040-8/5 • Chapter 12 • Proof 2 • SH • 10/19/98 • p.461
4040-8/5 ch12.F 11/3/98 3:20 PM Page 461

SE/30 Secrets
■
Making the SE/30 32-bit clean
The ROMs of older Macs, such as the SE/30, II, IIx, and IIcx, are not
32-bit
clean.
As we discussed in Chapter 9, these models use only 24 bits instead of
32 to reference individual memory locations in RAM. Such machines are,
therefore, limited to
using
8MB of memory, no matter how much you install.
You can make these machines 32-bit clean with a free extension from Apple
called the 32-Bit Enabler. This extension (for System 7.1 or later) allows the Mac
to address up to 128MB of RAM. (See Chapter 9 for more information on 32-Bit
Enabler and Mode32.)
The SE/30’s secret attitude
Press the Interrupt switch on your SE/30. When the message box appears, type
dm 4082E853 20 and press Return. There on your screen, spelled out in plain-
text letters, are the words “
WHAT ARE YOU STARING AT?”.
Macintosh Classic
After releasing increasingly faster and more powerful computers for several
years, Apple released a cheaper, more basic compact Classic model, based on
the slower 68000 microprocessor, in October 1990 (see Figure 12-3). Why this
step backward? Apple was attempting to create a truly competitively priced
computer, one that would be especially attractive to new users. The stripped-
down Classic without a hard drive listed for about $1,000— a new low in
complete-Mac-system pricing that would stand unchallenged for nearly a
decade.
462 Part II: Secrets of the Machine
■ ■
MACWORLD MAC SECRETS • 4040-8/5 • Chapter 12 • FINAL • VB/EAP • 10/26/98 • p.462
MACWORLD MAC SECRETS • 4040-8/5 • Chapter 12 • Proof 2 • SH • 10/19/98 • p.462
MACINTOSH SECRET
By now, you’ve probably learned that if you poke
around the Mac’s System software long enough,
you’ll eventually find the name of a Mac
programmer or two hidden in some unlikely
spot. It usually takes some obscure Option-
mouse click combination to uncover these
hidden credits.
But the ultimate hidden-credits trick dates back
to the very first Macintosh model (and persisted
through the SE models). Crack open the case of
an original 128K or 512K Macintosh, and you’ll
find the signatures of the first 47 Mac team
members etched (in raised handwritten lettering)
in the rear part of the plastic casing.
The very first Mac surprise
4040-8/5 ch12.F 11/3/98 3:20 PM Page 462
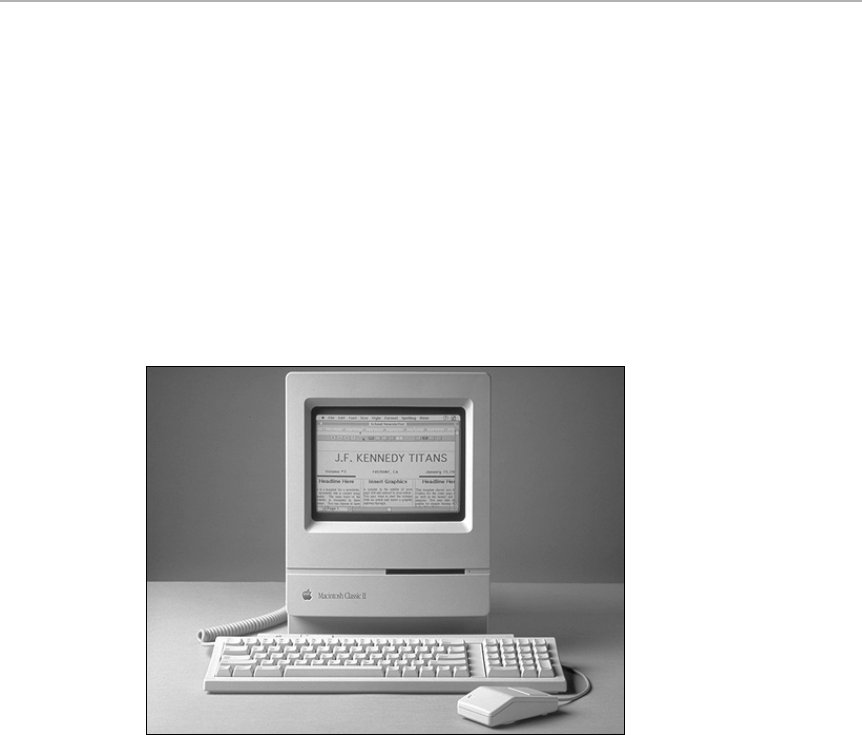
The modest price also meant modest equipment. The Classic was only 25
percent faster than the Mac Plus released more than four years earlier. The
limited processing power outdated the Classic quickly; it was discontinued
less than two years later and replaced by the more powerful Classic II.
Price: $1,500 then, $60 now
Apple code name: XO
On the market for: 1 year, 11 months
Processor and speed: 68000 at 8 MHz
Memory: 1MB, expandable to 4MB (requires a RAM card); 120-ns,
30-pin DRAM chips required
Equipment: Built-in, black-and-white, 9" screen; no slots; no FPU
System software notes: Requires System 6.0.6 through 7.5.5
Figure 12-3: Lose the grooves of the SE, and you’ve got the case design for the Classic and
Classic II.
Macintosh Classic II (Performa 200)
The Classic II, also marketed as the Performa 200, was the last of the original
compact Macs. It runs twice as fast as the Classic and includes a connector
for an optional math coprocessor. Unlike the Classic, the Classic II has a
microphone jack for sound input.
The Classic II is newer than the SE/30, which it replaced in October 1991. To
the chagrin of Mac users who loved the SE/30, however, the Classic II handles
most processing jobs about 30 percent slower, even though it’s equipped with
the same microprocessor. What accounts for the difference? The data path.
The Classic II is equipped with only a 16-bit data path between the ’030
processor and the RAM chips, whereas the SE/30 provides a 32-bit data path.
In other words, the Classic II can move only half as much data at one time
between the computer’s memory and central processor as the SE/30.
Chapter 12: From 128K to Quadra: Mac to Mac 463
■ ■
MACWORLD MAC SECRETS • 4040-8/5 • Chapter 12 • FINAL • VB/EAP • 10/26/98 • p.463
MACWORLD MAC SECRETS • 4040-8/5 • Chapter 12 • Proof 2 • SH • 10/19/98 • p.463
4040-8/5 ch12.F 11/3/98 3:20 PM Page 463

When the Classic II was released, it cost about $1,000 less than an SE/30
(which at the time was selling for more than $3,000), making it a good deal
despite the slower speed.
Price: $1,900 then, $75 now
Apple code name: Montana
On the market for: 1 year, 11 months
Processor and speed: 68030 at 16 MHz
Memory: 2MB, expandable to 10MB (100-ns, 30-pin DRAM chips
required)
Equipment: Built-in, black-and-white, 9" screen; no slots; FPU optional
System software notes: Requires System 7.0.1 through 7.6
464 Part II: Secrets of the Machine
■ ■
MACWORLD MAC SECRETS • 4040-8/5 • Chapter 12 • FINAL • VB/EAP • 10/26/98 • p.464
MACWORLD MAC SECRETS • 4040-8/5 • Chapter 12 • Proof 2 • SH • 10/19/98 • p.464
MACINTOSH SECRET
The Classic was and is the only Mac model with
a secret internal ROM disk (a disk whose
contents are permanently etched into the
computer’s ROM chips and whose icon shows
up on the Desktop like any other disk).
Hold down four keys while starting the Mac: Ô,
Option, letter O, and letter X. Wait. In a moment,
a new disk appears on your Desktop, containing
System 6.0.3. (Don’t leave your fingers on the
keys too long, however, or the Mac will think
that you’re trying to rebuild the ROM disk’s
Desktop. You’ll probably get a system crash.)
If you have ResEdit, open the ROM disk’s
System Folder and look at the invisible folders
therein. You’ll see the names of the engineers.
The hidden Mac Classic ROM disk
TRUE FACT
The first Macintosh owner’s manual provided
detailed instructions about how to use the Mac’s
Alternate Disk. This was an imaginary disk
whose icon was supposed to have appeared on
the Mac’s Desktop; its purpose was to help you
copy one disk onto another (because the original
Mac only had one disk drive).
The Alternate Disk wasn’t actually a disk; in
fact, it was a RAM disk, like the ones described
in Chapter 9. The idea was that you first would
copy files to the Alternate Disk icon, and then
eject the floppy disk, insert a destination disk,
and copy the files from the Alternate Disk to the
new floppy disk.
As it turned out, the Macintosh programmers at
the last minute figured out a more intuitive way
to accomplish disk copying. They eliminated the
Alternate Disk just before shipping the first
Macs. So the Alternate Disk didn’t appear in the
first version of the System software, but it did
show up in the owner’s manuals and the original
Macintosh Guided Tour disks.
The Alternate Disk?
4040-8/5 ch12.F 11/3/98 3:20 PM Page 464
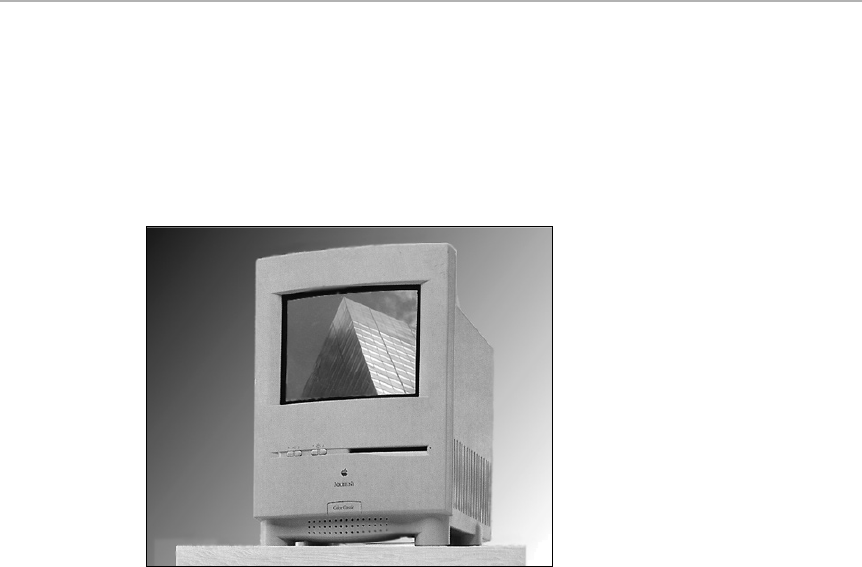
Macintosh Color Classic (Performa 250)
and Color Classic II
The squat/tall, strange/wonderful-looking Color Classic was the first compact
Mac with a built-in color screen. It was released in February 1993 and
discontinued 15 months later. Electronically speaking, the Color Classic is an
LC II in a compact case (see Figure 12-4).
Figure 12-4: The weirdest case shape yet: that of the Color Classic and Color Classic II.
The Color Classic also was the first compact equipped with an easily
accessible logic board (main circuit board). You can slide the entire board out
the back of the Mac simply by unlatching two clasps at the rear. This makes
adding RAM or expansion cards much easier than in previous compact models,
for which special tools were required. The Color Classic also was the first
desktop Mac with a tiny electret microphone built into the front of the case,
making it easy to record voice annotations or other sounds. The unusual front-
panel sound-volume control buttons make playing with sound even easier.
Although it’s built around the same chip and runs at the same clock speed as
its black-and-white counterpart, the Color Classic is slightly slower overall
than a Classic II. (The Color Classic II, on the other hand, zips along at a
goosed-up 33 MHz and can handle up to 36MB of memory — but, alas, was
sold only in Asia.)
The Color Classic was briefly marketed as the all-but-forgotten Performa 250.
It was also the noble ancestor, by the way, of the LC 520 (described later in
this chapter) and the entire line of inexpensive, color, educational-targeted,
easily upgradable machines.
Price (Color Classic): $1,390 then, $300 now
Apple code name: Slice
On the market for: 1 year, 3 months
Chapter 12: From 128K to Quadra: Mac to Mac 465
■ ■
MACWORLD MAC SECRETS • 4040-8/5 • Chapter 12 • FINAL • VB/EAP • 10/26/98 • p.465
MACWORLD MAC SECRETS • 4040-8/5 • Chapter 12 • Proof 2 • SH • 10/19/98 • p.465
4040-8/5 ch12.F 11/3/98 3:20 PM Page 465
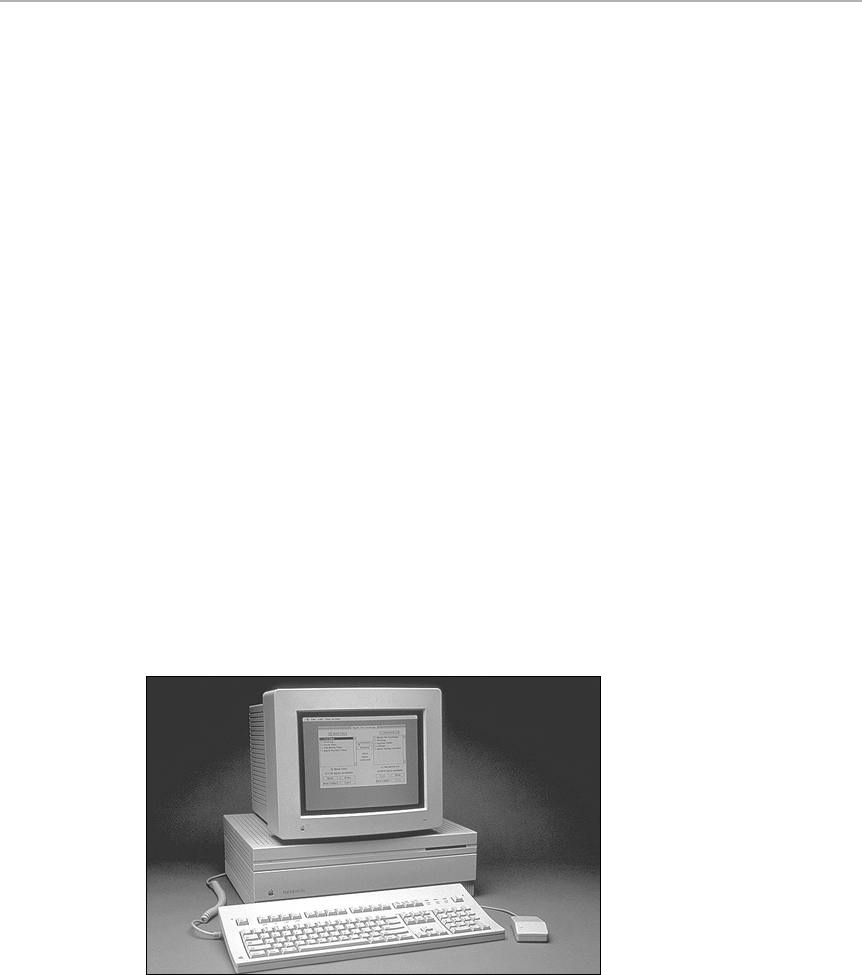
Processor and speed: 68030 at 16 MHz
Memory: 4MB, expandable to 10MB (100-ns, 30-pin DRAM chips required)
Equipment: Built-in 512-by-384-pixel Trinitron color display with 76 dpi;
256K VRAM (can be upgraded to 512K); 1 LC-style PDS slot;
FPU optional
System software notes: Requires System 7.1 (with Enabler 401) through 7.6
The Mac II Series
The era of modular Macs — those designed with separate, detachable
monitors — began in 1987 with the Mac II.
Compact Macs are endearing (and they’re making a comeback, led by the
futuristic iMac). Still, the two-piece design of modular Macs offers practical
advantages. A modular Mac is easy to expand, for example, because you can
open it easily. There’s plenty of room in the case for multiple expansion cards
and additional storage devices. Also, with a modular Mac, you can shop for
any size and type of monitor you prefer. Finally, the modular design allows
you to place a large, bulky CPU on the floor instead of on your desktop,
leaving more room on the desk for large monitors and other peripherals.
Macintosh II
The Macintosh II (March 1987 to January 1990; see Figure 12-5) was the first
Mac built around the 68020 microprocessor. It also has a 32-bit data path,
allowing it to operate roughly four times faster than a Plus. (The only other
Mac with the ’020 chip is the LC, introduced three years later.)
Figure 12-5: The Mac II’s big, boxy chassis is the same as that of the IIx and IIfx.
The II had a major emphasis on expandability. You could add RAM up to an
unprecedented 68MB. Furthermore, the six NuBus slots (and the pop-off lid)
made installing add-ons particularly easy. Except for the IIx and IIfx, no other
Mac model (even the Quadras) ever offered six NuBus slots.
466 Part II: Secrets of the Machine
■ ■
MACWORLD MAC SECRETS • 4040-8/5 • Chapter 12 • FINAL • VB/EAP • 10/26/98 • p.466
MACWORLD MAC SECRETS • 4040-8/5 • Chapter 12 • Proof 2 • SH • 10/19/98 • p.466
4040-8/5 ch12.F 11/3/98 3:20 PM Page 466

Like most of the early modular Macs, the Mac II has no built-in video
capability. To connect a monitor to it, you must install a video card.
Price: $6,500 then, $15 now
Apple code names: Jonathon, Milwaukee
On the market for: 2 years, 10 months
Processor and speed: 68020 at 16 MHz
Memory: 1MB, expandable to 68MB (special 120-ns, 30-pin PAL chips
and 32-Bit Enabler required)
Equipment: Video card required; 6 NuBus slots; FPU
System software notes: Requires System 4.1 through 7.5.5
Macintosh IIx
Released in September 1988, the IIx (see Figure 12-5) was the first modular
Mac equipped with a 68030 microprocessor and an FPU. The use of the ’030
instead of the ’020 chip makes the IIx about 15 percent faster than the Mac II.
On the IIx, a SuperDrive was standard (instead of an option, as on the Mac II).
The IIx also offers better memory-expansion possibilities than the II; RAM can
be boosted to 128MB instead of 68MB.
Price: $9,300 then, $75 now
Apple code name: Spock
On the market for: 2 years, 1 month
Processor and speed: 68030 at 16 MHz
Memory: 1MB, expandable to 128MB (120-ns, 30-pin DRAM chips
required)
Equipment: Video card required; 6 NuBus slots; FPU
System software notes: Requires System 6.0.0 through 7.5.5
Macintosh IIfx
The IIfx debuted in March 1990. Dubbed “wicked fast” by Apple, it reigned as
the top-of-the-line speed-demon Mac until the introduction of the Quadra in
1991. The IIfx is housed in the same larger-size case as the original Mac II (see
Figure 12-5).
Though it employs the same 68030 microprocessor used in previous models,
the IIfx runs at a faster clock speed — 40 MHz. That made the IIfx the first
great choice for high-end applications: scientific data analysis, commercial
publishing, multimedia production, 3-D animation, and so on. Also
contributing to the IIfx’s speed is its built-in 32K static RAM cache, which
stores the processor’s most frequently used instructions.
The IIfx is notable to us, by the way, because it’s one of many dramatic
examples of price deflation; a Mac IIfx bought in 1990 is today worth less than
one percent of its original $10,000 price!
Price: $10,000 then, $35 now
Apple code names: F-16, Stealth, Blackbird
Chapter 12: From 128K to Quadra: Mac to Mac 467
■ ■
MACWORLD MAC SECRETS • 4040-8/5 • Chapter 12 • FINAL • VB/EAP • 10/26/98 • p.467
MACWORLD MAC SECRETS • 4040-8/5 • Chapter 12 • Proof 2 • SH • 10/19/98 • p.467
4040-8/5 ch12.F 11/3/98 3:20 PM Page 467
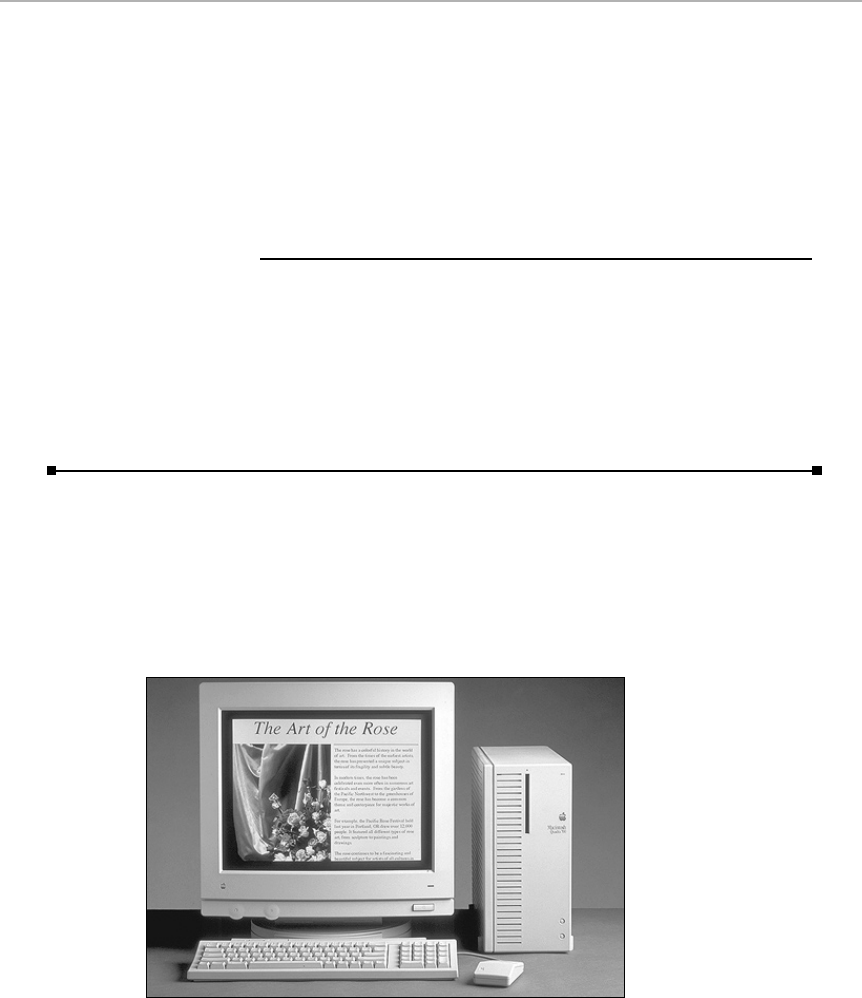
On the market for: 2 years, 1 month
Processor and speed: 68030 at 40 MHz
Memory: 1MB, expandable to 128MB (80-ns, nonstandard notched
64-pin DRAM chips required)
Equipment: Requires video card; 6 NuBus slots, 1 Processor Direct Slot;
FPU; SCSI chain requires special, 200-ohm black terminator
System software notes: Requires System 6.0.5 through 7.6
A IIfx Secret
■
Brought to you by…
A digitized color picture of the IIfx’s design team awaits your discovery. To see
the picture, set the Mac’s internal clock to 3/19/90, and set the monitor to
256 colors. Then restart your computer. As it restarts, hold down four keys: Ô,
Option, and the letters F and X.
Macintosh IIcx
Six months after the release of the IIx, Apple introduced the IIcx. The two
machines are very similar, but the IIcx has a quieter fan and a smaller, more
compact design. (It’s one of the few models that can be set either vertically
or horizontally on a desk, as shown in Figure 12-6.) The IIcx offers three
NuBus expansion slots instead of the IIx’s six.
Figure 12-6: The compact desktop case of the Quadra 700 (the IIcx and IIci design is very similar).
The IIcx was widely hailed as a breakthrough computer because it was
designed for manufacture — that is, for the first time, components were
designed with ease of factory assembly in mind. Its parts snap easily into the
468 Part II: Secrets of the Machine
■ ■
MACWORLD MAC SECRETS • 4040-8/5 • Chapter 12 • FINAL • VB/EAP • 10/26/98 • p.468
MACWORLD MAC SECRETS • 4040-8/5 • Chapter 12 • Proof 2 • SH • 10/19/98 • p.468
4040-8/5 ch12.F 11/3/98 3:20 PM Page 468

IIcx case without screws or solder. (In a famous demonstration, Apple Vice
President Jean-Louis Gassée assembled a IIcx in about a minute in front of a
huge crowd at a Macworld Expo.) As a result, the IIcx was less expensive to
build and easier to repair.
Apple was rewarded for its thoughtfulness by great enthusiasm from the Mac
community, many members of which thought that the IIcx was one of the
best-designed Macs ever. Great gnashing of teeth followed when the IIcx was
discontinued at the height of its popularity.
Price: $5,300 then, $20 now
Apple code name: Aurora
On the market for: 2 years
Processor and speed: 68030 at 16 MHz
Memory: 1MB, expandable to 128MB (120-ns, 30-pin DRAM chips
required)
Equipment: Video card required; 3 NuBus slots; FPU
System software notes: Requires System 6.0.3 through 7.5.5
Note: Requires 32-Bit Enabler to use more than 8MB of RAM
Macintosh IIci
When it was released in September 1989, the IIci was the fastest Macintosh
ever made. Physically, the IIci looks exactly like the other three-slotted
modular Mac, the IIcx (see Figure 12-6). But the IIci’s processor runs at 25 MHz
instead of 16, giving it enough horsepower for more demanding kinds of work.
A 25 MHz processor might seem laughably slow in this age of 300 MHz
PowerPC chips, but the IIci handled the color graphics and QuickTime
movies of its day with ease.
Rumor was that the iin the name stood for integrated video — it was the first
Macintosh that didn’t require you to buy a $400 video card to make a monitor
work. Instead, the IIci has video circuitry built right in, resulting in a new port
on the back panel into which you can plug a monitor directly.
The IIci can hold a cache card (described in the next section) that increases
the machine’s speed by up to 20 percent. At first, the cache card was a $300
add-on. Two years later, Apple offered a free cache card for a limited time. In
the end, Apple’s promotion never did wrap up; the cache card came free with
every IIci until the day this model was discontinued in 1993.
Price: $8,800 then, $35 now
Apple code names: Aurora II, Pacific
On the market for: 3 years, 5 months
Processor and speed: 68030 at 25 MHz
Memory: 1MB, expandable to 128MB (80-ns, 30-pin DRAM chips
required)
Equipment: Built-in color video support; 3 NuBus slots; FPU
System software notes: Requires System 6.0.4 through 7.6
Chapter 12: From 128K to Quadra: Mac to Mac 469
■ ■
MACWORLD MAC SECRETS • 4040-8/5 • Chapter 12 • FINAL • VB/EAP • 10/26/98 • p.469
MACWORLD MAC SECRETS • 4040-8/5 • Chapter 12 • Proof 2 • SH • 10/19/98 • p.469
4040-8/5 ch12.F 11/3/98 3:20 PM Page 469
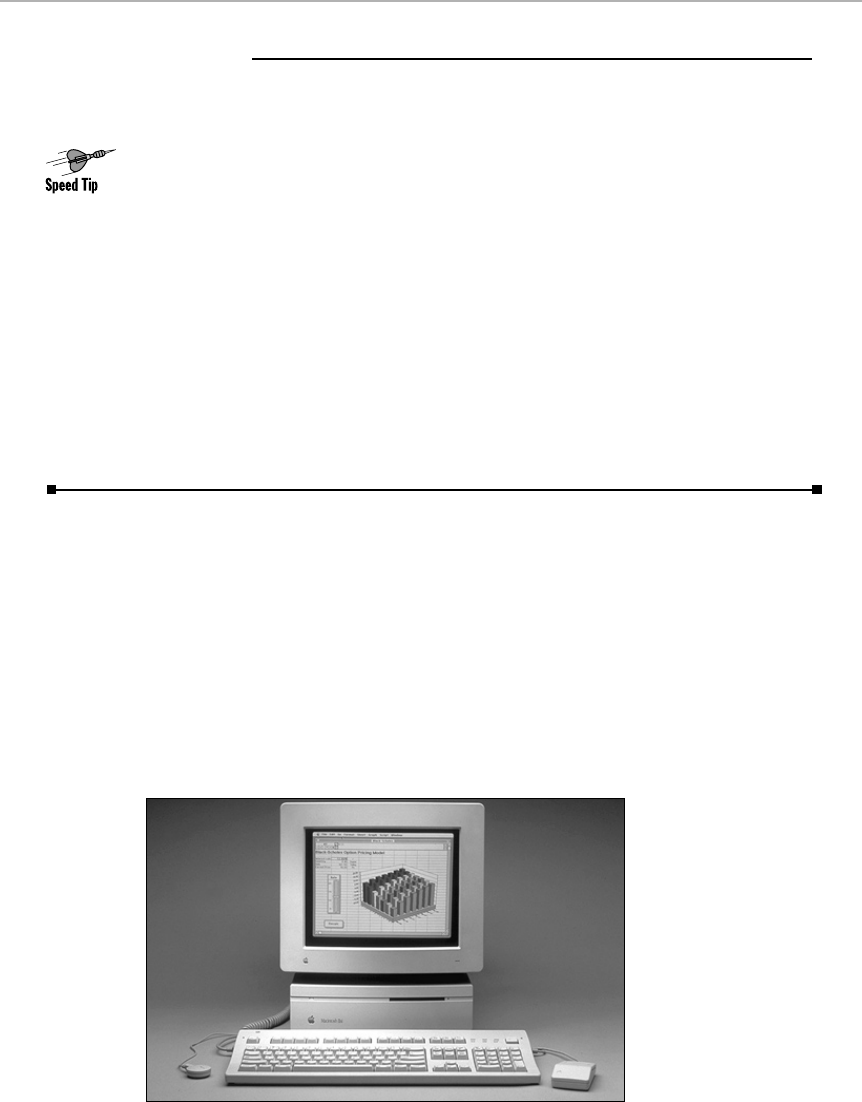
IIci Secrets
■
Maximizing the IIci’s memory
To an extent, you can crank a speed boost out of your IIci exactly as you can
with a IIsi (see the “Speeding up the IIsi” secret later in this chapter). The
speed boost won’t be as great, however, and the trick works only if your IIci
has 5MB of RAM.
As with the IIsi, if you crank up your Disk Cache to 768K, you may see some
improvement in the machine’s speed. The fastest option of all, of course, is to
use a video card instead of the built-in video option.
See the IIci design team
To see a full-color picture of the IIci’s design team, change the date on the
Mac’s internal clock to 9/20/89 and set your monitor to 8-bit (256) color.
Restart the Mac while pressing four keys: Ô, Option, letter C, and letter I.
Macintosh IIsi
The inexpensive IIsi (born in November 1990) was based on a 68030 chip
running at 20 MHz. This machine was the first in the II-series to have at least
1MB of RAM soldered onto the main logic board. And it was the first Mac—
along with the LC — to include built-in circuitry for recording your own
sounds. You can plug the included microphone into the sound input port.
As with most subsequent models, you don’t have to install a separate video
card to hook a monitor to the IIsi. All these features fit into the slimmest,
most elegant gray plastic case ever — a low-standing shape that Apple called
the “pizza-box” design (see Figure 12-7).
Figure 12-7: The slimline IIsi case design, ancestor of Macs like the Quadra 630.
470 Part II: Secrets of the Machine
■ ■
MACWORLD MAC SECRETS • 4040-8/5 • Chapter 12 • FINAL • VB/EAP • 10/26/98 • p.470
MACWORLD MAC SECRETS • 4040-8/5 • Chapter 12 • Proof 2 • SH • 10/19/98 • p.470
4040-8/5 ch12.F 11/3/98 3:21 PM Page 470
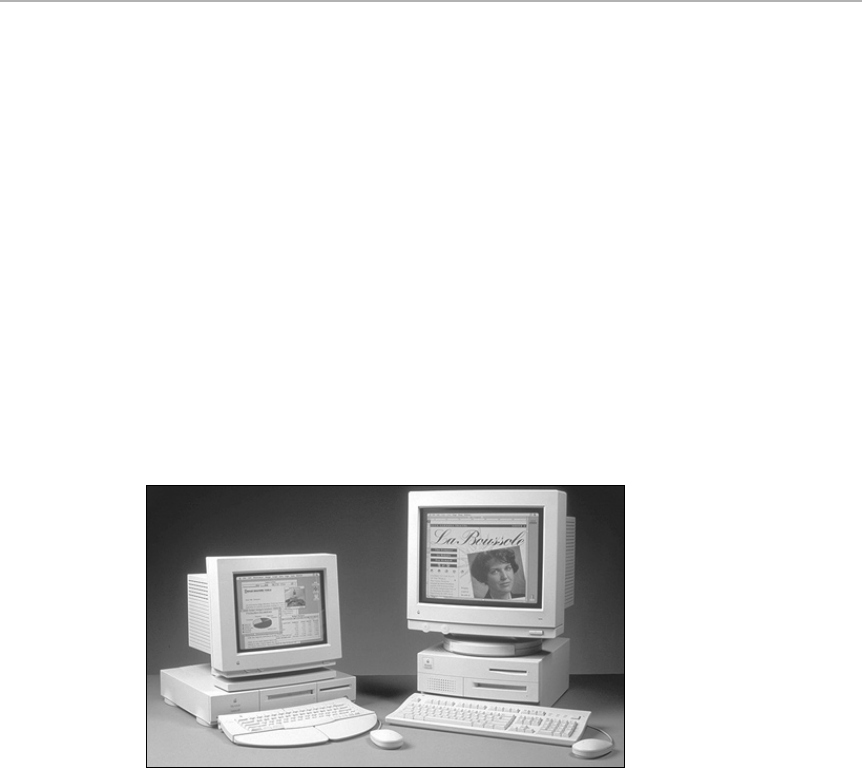
Price: $3,800 then, $20 now
Apple code names: Ericson, Raffica, Oceanic, Ray Ban
On the market for: 2 years, 5 months
Processor and speed: 68030 at 20 MHz
Memory: 1MB, expandable to 65MB (100-ns, 30-pin DRAM chips
required)
Equipment: Built-in 256-color support, using System memory; 1 slot (with
adapter, can hold NuBus or 030 Direct cards); FPU optional
System software notes: Requires System 6.0.6 through 7.6
Macintosh IIvx (Performa 600), IIvi
The IIvx, released in October 1992, was the last member of the Mac II series.
Its price was similar to that of the discontinued IIci; interestingly, so was its
speed, despite the fact that the IIvx’s processor runs at 32 MHz and the IIci’s
runs at 25 MHz. The IIvx loses its speed advantage because of the system bus
speed: The IIvx pushes information through the processor at only 16 MHz,
compared with the IIci’s 25 MHz. (See Figure 12-8.)
Figure 12-8: The IIvx case (right) was the harbinger of the ventilation-hole look, also used for
such Macs as the IIvi, Centris 650, and Power Macintosh 7100. At left: the big, low-slung case
of the “6” series — the Quadra/Centris 610, Power Mac 6100, Performa 6115, and so on.
The IIvx’s new twist: It was the first Mac to come with a built-in CD-ROM-drive
option. Like the IIfx, the IIvx was equipped with 32K of cache memory to give
its performance an extra boost. A lower-speed IIvx — without the cache or
math coprocessor— was sold as the Performa 600.
After getting rave reviews in the Macintosh trade press, the IIvx—outpriced
and outperformed by the Centris machines — was discontinued by Apple less
than a year later. Thousands of buyers felt burned, despite the fact that the
IIvx was (and is) a solid, flexible performer.
The IIvi, a IIvx that runs at half the clock speed, was never sold in the United
States.
Chapter 12: From 128K to Quadra: Mac to Mac 471
■ ■
MACWORLD MAC SECRETS • 4040-8/5 • Chapter 12 • FINAL • VB/EAP • 10/26/98 • p.471
MACWORLD MAC SECRETS • 4040-8/5 • Chapter 12 • Proof 2 • SH • 10/19/98 • p.471
4040-8/5 ch12.F 11/3/98 3:21 PM Page 471

Price: $2,950 then, $50 now
Apple code name: Brazil
On the market for: 11 months
Processor and speed: 68030 at 32 MHz
Memory: 4MB, expandable to 68MB (80-ns, 30-pin DRAM chips required)
Equipment: Built-in video (512K VRAM, expandable to 1MB); 3 NuBus
slots; cache slot; FPU
System software notes: Requires System 7.1 (with Enabler 001) through 7.6
The LC Series
LC originally stood for low-cost color. It wasn’t exactly a powerhouse, but it
was dirt cheap, and that’s all that mattered to the thousands who snapped up
this slim machine to make it one of Apple’s biggest hits.
Over time, LC came to represent the educational line of Macs, sold only through
schools and universities. Still, the line became more and more powerful, finally
offering Quadra and then PowerPC power at the same low LC prices.
Macintosh LC
The LC was introduced in October 1990 as the lowest-cost color-capable
Macintosh. Apple intentionally scaled back some features that were present
in the II-series — eliminating all but one expansion slot, for example — to keep
the size and cost down and to attract buyers who wanted color capability on
a modest budget. The strategy worked. The LC quickly become one of
Apple’s best-selling computers; more than 500,000 were sold in the first year.
The LC, like the Mac II, is built around the 68020 microprocessor. That makes
it about twice as fast as an SE or Classic but slower than most other Macs. (It
also means no virtual memory.) The LC was discontinued in 1992, having
been replaced by the LC II and III.
Price: $2,500 then, $25 now
Apple code name: Elsie
On the market for: 1 year, 5 months
Processor and speed: 68020 at 16 MHz
Memory: 2MB, expandable to 10MB (100-ns, 30-pin DRAM chips
required)
Equipment: Built-in video (256K VRAM, expandable to 512K); 1 Processor
Direct Slot; FPU optional
System software notes: Requires System 6.0.6 through 7.5.5
Macintosh LC II (Performa 400 – 430)
The LC II, introduced in March 1992, was destined to be a short-lived Mac
model (see Figure 12-9). Apple replaced the LC’s 68020 microprocessor with
the faster 68030. But Apple retained the 16-bit data bus, limiting the
computer’s capability to take advantage of the extra processing power. The
result: an upgraded computer with almost no improvement in speed.
472 Part II: Secrets of the Machine
■ ■
MACWORLD MAC SECRETS • 4040-8/5 • Chapter 12 • FINAL • VB/EAP • 10/26/98 • p.472
MACWORLD MAC SECRETS • 4040-8/5 • Chapter 12 • Proof 2 • SH • 10/19/98 • p.472
4040-8/5 ch12.F 11/3/98 3:21 PM Page 472
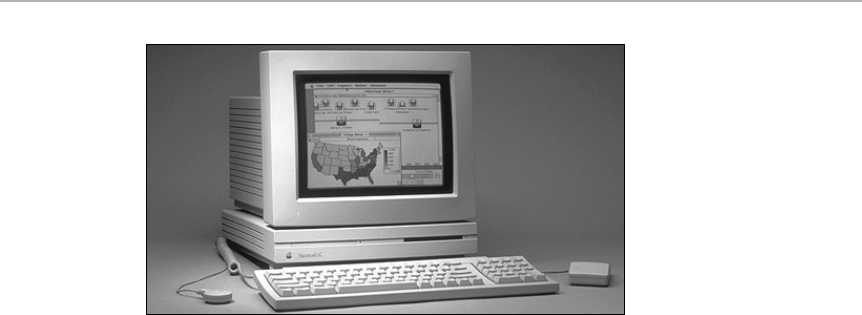
Figure 12-9: The original pizza-box LC I, II, and III, later inherited by the Performa 400
through 467.
The only practical difference between the LC and LC II is that the latter can
use virtual memory (because it includes a PMMU on the ’030 chip). The LC
II’s memory, however, still is expandable only to 10MB. The LC II lasted on the
market only about a year before being displaced by the LC III.
The LC II also was sold as the Performa 400. With a built-in modem,
preinstalled software, and monitor, it was called the Performa 405, 410, or
430, depending on the hard-drive size.
Price: $1,240 then, $50 now
Apple code name: Foster Farms
On the market for: 1 year
Processor and speed: 68030 at 16 MHz
Memory: 4MB, expandable to 10MB by installing 12MB and wasting 2
(100-ns, 30-pin DRAM chips required)
Equipment: Built-in video (256K VRAM, expandable to 512K); 1 Processor
Direct Slot; FPU
System software notes: Requires System 6.0.8 through 7.6
Macintosh LC III (Performa 450, 460, 466, 467)
Introduced in February 1993, the LC III (Performa 450) is what the LC II
should have been: a significant improvement from the LC. The LC III’s ’030
chip runs at 25 MHz, making this model twice as fast as the LC or LC II. The
LC III also came with more video RAM (512K) to support larger color
monitors without additional memory. Its price and expandability made it a
perfect entry-level Mac. (On the other hand, its requirement for a new kind of
RAM chip — the 72-pin style, popular on IBM clones — irritated some owners
of previous Macs, who couldn’t use their previously purchased SIMMs.)
The Performa 460, 466, and 467 are identical to the LC III (see Figure 12-9)—
same slim shape, same video possibilities — except that they’re faster. They
run at 33 MHz instead of 25.
Chapter 12: From 128K to Quadra: Mac to Mac 473
■ ■
MACWORLD MAC SECRETS • 4040-8/5 • Chapter 12 • FINAL • VB/EAP • 10/26/98 • p.473
MACWORLD MAC SECRETS • 4040-8/5 • Chapter 12 • Proof 2 • SH • 10/19/98 • p.473
4040-8/5 ch12.F 11/3/98 3:21 PM Page 473

Price: $750 then, $75 now
Apple code name: Vail, Elsie III
On the market for: 1 year
Processor and speed: 68030 at 25 MHz
Memory: 4MB, expandable to 36MB (80-ns, 72-pin DRAM chips required)
Equipment: Built-in video (256K VRAM, expandable to 768K); 1 Processor
Direct Slot; FPU optional
System software notes: Requires System 7.1 (with Enabler 003) through 7.6
Macintosh LC 475 (Performa 475 and 476)
See “Macintosh Quadra 605 (LC 475, Performa 475 – 476),” later in this
chapter. Same Mac, different names.
Macintosh LC 520
In June 1993, with this strange-looking, one-piece hybrid of the LC III and
Color Classic, Apple introduced a peculiar new shape for its Macs (see Figure
12-10). It’s nearly as big as (and contains the same electronics as) an LC III
with a 14-inch monitor, but it’s constructed as a one-piece unit, complete with
juicy multimedia features like a built-in CD-ROM drive, microphone built into
the monitor, and — unlike any Mac before it — stereo phase-shift speakers.
Like all LC models, the 520 wasn’t available through computer or electronics
stores; it was offered exclusively to schools. The new package proved to be
such a hit that Apple replaced the 520 with faster, but identical-looking
models, only seven months later.
Figure 12-10: The case for the “5” series: the LC 520, 550, 575, 580; Performas 550 through
588; and so on. Picture it jet black, and you’ll have the short-lived Macintosh TV.
474 Part II: Secrets of the Machine
■ ■
MACWORLD MAC SECRETS • 4040-8/5 • Chapter 12 • FINAL • VB/EAP • 10/26/98 • p.474
MACWORLD MAC SECRETS • 4040-8/5 • Chapter 12 • Proof 2 • SH • 10/19/98 • p.474
4040-8/5 ch12.F 11/3/98 3:21 PM Page 474

Price: $2,000 then, $275 now
On the market for: 7 months
Processor and speed: 68030 at 25 MHz
Memory: 5MB, expandable to 36MB (80-ns, 72-pin DRAM chips required)
Equipment: Built-in, 14" Trinitron color monitor; 1 Processor Direct Slot;
no FPU
System software notes: Requires System 7.1 (with Enabler 403) through 7.6
Macintosh LC 550 and 575 (Performa 550 – 578)
The popularity of the 520 — a result of its low cost and multimedia prowess
— led Apple to follow it up with two speedier sequels. In February 1994, these
one-piece, stereo-speakered, 14-inch-Trinitronned, built-in-CD-ROMmed Macs
made their debut (see Figure 12-10).
The only difference between the LC 550 and the LC 575 is the speed; the latter
offers a potent 68LC040 chip (the same chip used in the Performa 630 series)
instead of ’030. These relatively inexpensive machines proved once and for
all that the LC designation doesn’t mean underpowered. Both machines were
enthusiastically received by Mac fans, who appreciated their crisp color
screens, speedy performance, rich sound, and upgradability to Power Macs
down the line.
Apple ensured wider access to a good thing by selling these same computers
as Performa models, bundled with CD-ROMs, software, and keyboard. The
Performa 550 is identical to the LC 550. The 560 was the “Money magazine
edition” of the 550 and came bundled with financial-management software; the
577 and 578 were simply the LC 575 with additional RAM and hard drive space.
All 575 family members have a special internal connector that Apple calls the
communications slot. It’s designed to accept either of two cards from Apple:
a $100 Ethernet card or a high-speed fax/modem card.
LC 550
Price: $1,200 then, $325 now
Apple code name: Hook
Processor and speed: 68030 at 33 MHz
LC 575
Price: $1,700 then, $400 now
Apple code name: Optimus
Processor and speed: 68LC040 at 33 MHz
Both
Memory: 4MB, expandable to 36MB (80-ns, 72-pin DRAM chips required)
Equipment: Built-in, 14" Trinitron color monitor (512K VRAM, expandable to
1MB); 1 Processor Direct Slot; no FPU
System software notes: Requires System 7.1 (with Enabler 065) through 7.6. (The 575
can also handle Mac OS 8.)
Chapter 12: From 128K to Quadra: Mac to Mac 475
■ ■
MACWORLD MAC SECRETS • 4040-8/5 • Chapter 12 • FINAL • VB/EAP • 10/26/98 • p.475
MACWORLD MAC SECRETS • 4040-8/5 • Chapter 12 • Proof 2 • SH • 10/19/98 • p.475
4040-8/5 ch12.F 11/3/98 3:21 PM Page 475

Macintosh LC 580 (Performa 580, 588)
Take the all-in-one design of an LC 578 (see Figure 12-10): install System 7.5;
replace the SCSI hard drive with an IDE drive (see Chapter 8) that holds half a
gigabyte; add TV input and output jacks (the output jack operates in “mirror
mode” only, so that the monitor and the external TV show the same thing) —
and you have the LC 580. The Performa 580, of course, is the same computer
with the usual home-computer software bundle and modem.
Price: $1,200, $475 now
Processor and speed: 68LC040 at 33 MHz
Memory: 8MB, expandable to 52MB
Equipment: 500MB IDE hard drive, communications slot, built-in microphone
LC 630
See “Macintosh Quadra 630 (LC 630, Performa 630 – 638),” later in this
chapter. These Macs are identical.
LC 630 DOS Compatible (Performa 640)
One of many spin-offs from the Quadra 630, described later, this model was
introduced in May 1995 (see Figure 12-12). It’s equipped just like a 631CD,
but its PDS expansion slot has been fitted with an Apple DOS Compatibility
Card containing a 66-MHz 486DX2 microprocessor. With this setup, you can
switch between the Macintosh operating system and Windows (or DOS).
Of course, having the PDS filled means you can’t install any other options
that would require plugging into the PDS (such as an accelerated video card).
The Performa 640 version comes with a 15-inch monitor, modem, and the
usual software bundle.
476 Part II: Secrets of the Machine
■ ■
MACWORLD MAC SECRETS • 4040-8/5 • Chapter 12 • FINAL • VB/EAP • 10/26/98 • p.476
MACWORLD MAC SECRETS • 4040-8/5 • Chapter 12 • Proof 2 • SH • 10/19/98 • p.476
MACINTOSH SECRET
If Apple’s programmers, in creating the Performa
series, were aiming to make idiotproof
computers, they were serious about it. The
Performa 550 is an amazing case in point. When
you run the Apple Backup program included
with these Performa models, you get a little
surprise that you didn’t count on: a hidden
partition on your hard drive!
This invisible chunk of hard drive space contains
a miniature, invisible System Folder. Apple’s
internal memo explains it this way:
“When a system problem (one that prevents the
Performa from booting) is detected, a [dialog
box] informs the user of a system problem. The
user can choose to fix the problem manually or
to reinstall software from the backup partition’s
Mini System Folder.”
If you choose to reinstall your System software,
you get the wristwatch cursor for a moment
while the miniature System Folder is silently
copied to your main hard-drive partition. The
Performa restarts from the restored hard drive,
and the invisible system partition disappears
once again.
Who knows what goodness lurks in the hearts
of men?
The LC 550’s secret partition
4040-8/5 ch12.F 11/3/98 3:21 PM Page 476

Price: $2,200, $325 now
Processor and speed: 68LC040 at 33 MHz and 66-MHz 486DX2 on PDS card
Memory: 8MB, expandable to 36MB (80-ns, 72-pin DRAM chips required)
Equipment: Built-in video (nonexpandable 1MB VRAM); 1 LC-style PDS
slot; 1 Apple Video System slot; 1 communications slot; built-in
CD-ROM
Macintosh TV
This jet-black, weird-looking, one-piece hybrid machine is…a computer! It’s a
CD player! It’s a television?
All of the above. (It resembles the LC 500-series enough that we included it
here in our LC descriptions; see Figure 12-10.) Everything’s black: the TV, the
mouse, the keyboard, and the remote control. With a video source plugged
into the back of the machine (be it a VCR, cable, or camcorder), this Mac
suddenly becomes a 14-inch stereo TV. The remote control handles both
channel-changing and the CD player. You press a key on the keyboard to
switch the Mac between showing your work and showing the TV signal.
You can capture single frames (from whatever you’re watching) as PICT
graphics files. You can’t, alas, watch TV in one little window as you work on a
spreadsheet in another (although you can hear the TV sound while you
work). Nor can you capture incoming TV as a QuickTime movie. Yet this Mac
was an interesting and, in many ways, practical 40-pound piece of electronics.
Perhaps because of its limited availability (250 stores, plus college-campus
bookstores) and limited expansion options, the Mac TV was quietly
discontinued only a few months after its October 1993 introduction.
Price: $2,000 (including keyboard) then, $75 now
Apple code name: LD50
On the market for: 5 months
Processor and speed: 68030 at 32MHz
Memory: 5MB, expandable to 8MB (80-ns, 72-pin DRAM chips required)
Equipment: Built-in, 14", 69-dpi monitor (8-bit Mac, 16-bit TV); 1 Processor
Direct Slot; FPU optional
System software notes: Requires System 7.1 (with Enabler 404) through 7.6
The Centris/Quadra Line
Apple’s early-’90s, mainstream business Macs were built around two
variations of the Motorola 68040 processor: the regular ’040 and the 68LC040,
a less expensive chip that lacks an FPU chip. (We like to think that the LC
stands for lacking chip.)
Macintosh Quadra 605 (LC 475, Performa 475 – 476)
Apple’s October 1993 shakeup introduced one new Mac with four different
names: Quadra 605, LC 475, and Performa 475 or 476 (see Figure 12-11). To
many people, this was a revolutionary Mac. Inside its neat, slim case is a very
Chapter 12: From 128K to Quadra: Mac to Mac 477
■ ■
MACWORLD MAC SECRETS • 4040-8/5 • Chapter 12 • FINAL • VB/EAP • 10/26/98 • p.477
MACWORLD MAC SECRETS • 4040-8/5 • Chapter 12 • Proof 2 • SH • 10/19/98 • p.477
4040-8/5 ch12.F 11/3/98 3:21 PM Page 477
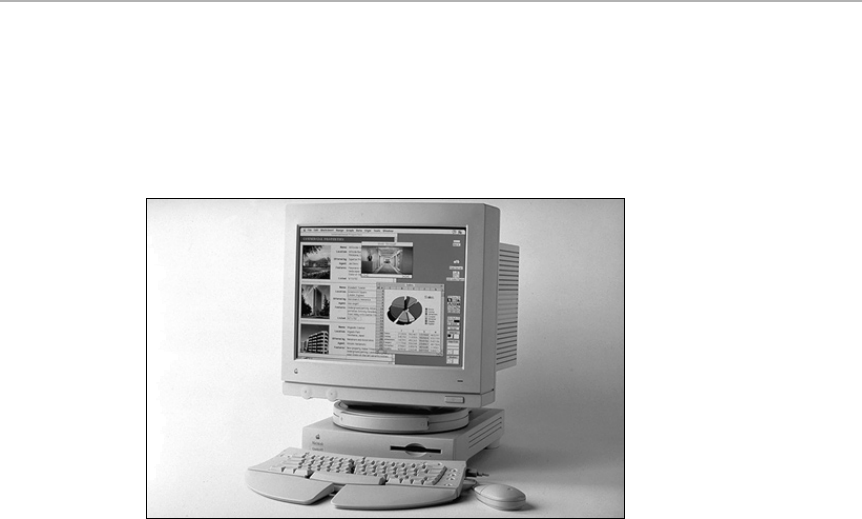
fast processor, the likes of which would have cost $10,000 three years earlier.
Unbelievably, this Mac cost less than $1,000 (without a monitor).
The chip inside is the 68LC040. With its single, LC III-style Processor Direct
Slot (PDS), which accepts boards designed for all LC models, the 9-pound 605
is like an ’040-based LCIII: sleek, fast, and pretty.
Figure 12-11: Take one LC case, lose the horizontal front-panel groove, and you get the sleek
case of the Quadra 605 (also known as the LC 475 and the Performas 475/476).
Price: $900 then, $175 now
Apple code name: Aladdin, Primus
Processor and speed: 68LC040 at 25 MHz
Memory: 4MB, expandable to 36MB (80-ns, 72-pin DRAM chips required)
Equipment: Built-in video (512K VRAM, expandable to 1MB); 1 Processor
Direct Slot; FPU optional
System software notes: Requires System 7.1 (with Enabler 065) or later
Macintosh Quadra 610 (Centris 610)
The Centris 610 was introduced in February 1993. It introduced the broad,
low-slung, CD-ROM-ready case that became a staple of the Macintosh model
line (see Figure 12-8). It also introduced one heckuva strange power button.
Instead of turning the machine on with the keyboard or a back-panel switch,
owners of this design (and all subsequent Macs based on it) must use a
protruding button/nub on the front panel to turn the machine on and off.
The Centris 610 was built around the 68LC040 (no FPU). In October 1993, this
model was renamed the Quadra 610 and (except for the 8/160 model) blessed
with a faster 25 MHz processor with the FPU. Neither 610 can take memory
chips in sizes less than 4MB each.
The 610 doesn’t have a ready-to-use NuBus slot; by adding a $100 adapter,
you can install either one 7-inch NuBus board or one PDS board. The Centris
478 Part II: Secrets of the Machine
■ ■
MACWORLD MAC SECRETS • 4040-8/5 • Chapter 12 • FINAL • VB/EAP • 10/26/98 • p.478
MACWORLD MAC SECRETS • 4040-8/5 • Chapter 12 • Proof 2 • SH • 10/19/98 • p.478
4040-8/5 ch12.F 11/3/98 3:21 PM Page 478

610 can use up to 68MB of RAM. Because the Centris models were expected
to find homes in corporate offices, high-speed Ethernet circuitry is available.
Price: $1,700 then, $175 now (Quadra)
Apple code name: Speedbump 610
On the market for: 8 months
Processor and speed: 68040 at 25 MHz (Centris: 68LC040 at 20 MHz)
Memory: 4MB, expandable to 68MB (80-ns, 72-pin DRAM chips required)
Equipment: Built-in video (512K VRAM, expandable to 1MB); with adapter;
slot can hold a 7-inch NuBus board or PDS board; FPU
System software notes: Requires System 7.1 (with Enabler 040) or later
Macintosh Quadra 610 DOS Compatible
In February 1994, Apple released a special edition of the Quadra 610. From
the outside, it looks exactly the same as previous 610s (see Figure 12-8)—
except for the intriguing words DOS Compatible painted on the nameplate.
Indeed, this model has Intel inside, a PDS card containing IBM-clone circuitry.
By pressing Ô-Return, you make the Mac screen fade smoothly to black;
fading in is the hostile world of DOS, right there on your Mac screen. You
even can run Windows at respectable speeds.
Chapter 12: From 128K to Quadra: Mac to Mac 479
■ ■
MACWORLD MAC SECRETS • 4040-8/5 • Chapter 12 • FINAL • VB/EAP • 10/26/98 • p.479
MACWORLD MAC SECRETS • 4040-8/5 • Chapter 12 • Proof 2 • SH • 10/19/98 • p.479
MACINTOSH SECRET
Apple released no fewer than eight different
Performa and LC variations on the standard 630
model. Apple’s naming conventions for these
models are so wildly inconsistent that it’s
almost impossible to distinguish which Per-
formas do what.
The seemingly random numbering system is so
confusing that Apple’s own specification
documents are sometimes wrong about how
each model is equipped. It would be nice if there
was a consistent rule — for example, the higher
the model number, the bigger the hard drive, or
something.
Abandon all such hope; it’s much, much
stranger than that.
The 631CD came with 8MB of RAM, a 500MB
hard drive, and a 14,400 bps fax modem, whereas
the 635CD had only 4MB of RAM, a 250MB hard
drive, and a 9600 bps fax modem—but it came
with a 15-inch monitor. The 636 is identical to the
635, but it came with a 14-inch monitor, and, oh
yes, was available only to the higher-education
market. The 636CD, however, was available to the
general public and, of course, it has 8MB of RAM.
Then there’s the 637CD, which is exactly the
same as the 635CD, except that it’s the Money
magazine edition, which includes financial
software such as Personal Record Keeper, Will
Maker, Wealth Builder, and MacInTax/Tax Planner.
So what’s the 638CD? Obviously, it’s a 635CD —
with Apple’s Video/TV Tuner card pre-installed.
Unfortunately, the one piece of logic to all of
these naming conventions is driven by crass
commercialism. Apple gave each consumer-
electronics chain (Circuit City, The Wiz, and so
on) the exclusive right to one particular model.
And what’s the point of that? The stores can
now honestly promise to beat any other store’s
price on that model. Not so tough — when
they’re the only ones carrying it!
Name that Performa
4040-8/5 ch12.F 11/3/98 3:21 PM Page 479

For those who have to coexist in offices with IBM compatibles, the DOS
Compatible was a clever, inexpensive solution (except that it doesn’t work,
obviously, with IBM add-on cards). The 25,000 of these machines that Apple
manufactured were snapped up quickly, making everybody wonder what the
company was thinking when it announced, two months later, that no more
would be manufactured. That gives this model the dubious honor of being
the shortest-lived Mac model in Apple history. (The specs are the same as
those listed for the Quadra 610, except for a higher original price tag and an
additional 25 MHz Intel 486 processor.)
Macintosh Quadra 630 (LC 630,
Performa 630 – 638)
Released in August 1994, this small, attractive desktop Mac represented new
highs in speed and multimedia flexibility — and new lows in pricing. Shortly
after it was released, it became one of Apple’s top-selling Macs (see Figure 12-12).
The 630 has a 33 MHz ’040 processor— surprisingly enough, as fast as the old
Quadra 950 — and was sold as part of the Performa, Quadra, and LC families.
This replacement for the Quadra 610, 650, and 660AV had three slots, each of
a different type: (1) an LC-style PDS; (2) a communications slot like that found
on the LC 575 (for an Ethernet card or— as bundled with the Performa
models — a fax/modem card); (3) a video slot for either the $150 Apple Video
System card (which lets you record video as a quarter-screen, 10-frames-per-
second, 16-bit-color QuickTime movie), or a $250 Apple TV/Video System
card (which offers a TV tuner and cable hookup for watching TV in a
resizable window, as well as QuickTime recording). You can also hook up the
630 to the $300 Apple Presentation System, a converter card that can send
the Mac’s image to a TV or VCR.
Figure 12-12: The blockbuster 630 case design. This same plastic box housed Mac models
ranging from the Quadra 630 to the LC 630 to the Performa 630 through 638, as well as the
PowerPC-based 6200 and 6300 lines.
480 Part II: Secrets of the Machine
■ ■
MACWORLD MAC SECRETS • 4040-8/5 • Chapter 12 • FINAL • VB/EAP • 10/26/98 • p.480
MACWORLD MAC SECRETS • 4040-8/5 • Chapter 12 • Proof 2 • SH • 10/19/98 • p.480
4040-8/5 ch12.F 11/3/98 3:21 PM Page 480

All this for $1,200? Some of the cost-cutting strategies were apparent. There’s
only one SIMM socket for memory; only one keyboard/mouse jack (as with all
subsequent models); you can’t expand the 1MB of video RAM; the 630 can
only play back, not record, stereo sound; and the internal hard drive
introduced the cheaper IDE format, as described in Chapter 8.
Nonetheless, the 630’s slide-out motherboard, high speed/price ratio, easy
upgradability to PowerPC, and distinctive front panel (which has volume
buttons, a headphone connector, and a tiny receiver panel for the TV tuner’s
remote control)— added up to a remarkable, and remarkably popular, machine.
The Quadra and Performa versions of these machines aren’t exact equivalents,
by the way. The original Quadra 630 has a full 68040 chip, whereas all the
Performa models are equipped with the 68LC040, without an FPU. The letters
CD at the end of a model number mean it’s equipped with an internal double-
speed CD-ROM drive.
Price: $1,280 then, $200 now. (Performa with CD-ROM and monitor:
$2,250 then, $250 now)
Apple code name: Crusader
Processor and speed: 68LC040 at 33 MHz (Quadra: full 68040)
Memory: 4MB, expandable to 36MB (80-ns, 72-pin DRAM chips required)
Equipment: Built-in video (nonexpandable 1MB VRAM); 1 LC-style PDS
slot; FPU (in Quadra model); 1 Apple Video System slot; 1
communications slot; optional built-in CD-ROM
System software notes: Requires System 7.1 (with Enabler) or later
Macintosh Quadra 650 (Centris 650)
The Centris 650 (born in February 1993), like the IIvx, is a IIcx-size, tallish
gray box with a bizarre set of perforations on the lower front panel (see
Figure 12-8).
Chapter 12: From 128K to Quadra: Mac to Mac 481
■ ■
MACWORLD MAC SECRETS • 4040-8/5 • Chapter 12 • FINAL • VB/EAP • 10/26/98 • p.481
MACWORLD MAC SECRETS • 4040-8/5 • Chapter 12 • Proof 2 • SH • 10/19/98 • p.481
MACINTOSH SECRET
If you bought the TV/Video System card for your
630 Mac, you also got a tiny remote-control
unit. It can turn the Mac on or off, mute the
sound, change TV channels, change the video
display size, and control the CD-ROM drive (play,
stop, eject, pause, fast-forward, and reverse on
audio discs).
This remote control is a Sony (model RMC-A1,
as it happens). Therefore, if you have a Sony TV
in the same room as your Mac, you may run into
problems — turning off the TV, for example, will
also turn off your Mac!
You have no choice except to (a) disable the
Apple remote, or (b) move the TV.
Just be grateful the thing doesn’t operate your
garage-door opener.
The 630’s remote control: It’s a Sony
4040-8/5 ch12.F 11/3/98 3:21 PM Page 481

It’s bigger than the 610, yes, but also more expandable, thanks to its three
NuBus slots. The 650 is faster, too, built on a quicker ’040 chip, giving it a
natural niche at the high end of Apple’s 1993 product line. All but the base-
model 650s include a math coprocessor (missing on the 610). The 650 offers
roughly the same speed as the discontinued Quadra 700; the Quadra 650,
which it was dubbed in October 1993, is faster still, thanks to its 33 MHz chip.
Like the 610, the 650 has an internal compartment that can hold an optional
CD-ROM player, hard drive, or other storage device. All but the base-model
650s include Ethernet capability.
Price: $2,700 then, $240 now
Apple code name: Speedbump 650
On the market for: 1 year
Processor and speed: 68040 at 33 MHz (Centris = 25MHz)
Memory: 4MB, expandable to 136MB (80-ns, 72-pin DRAM chips required)
Equipment: Built-in video (512K VRAM, expandable to 1MB); 3 NuBus
slots; 1 Processor Direct Slot (adding a PDS board, however,
covers one of the NuBus slots); FPU
System software notes: Requires System 7.1 (with Enabler 040) or later
Macintosh Quadra 700
The Quadra 700, released in October 1991, was the first Macintosh built
around the 68040 chip— and, with the Quadra 900, was the first to displace
the IIfx as the top-of-the-line Mac. Both the Quadra 700 and 900 run about 20
percent faster than a IIfx. The Quadras were the first Macs with built-in
support for Ethernet networking.
The original Quadras look different from other modular Macs; they were the
first to feature a tower-style case. The 700, however, is the size of a IIcx (see
Figure 12-6). Therefore, it’s small enough to be placed on the desk, and can be
used in a horizontal orientation.
Price: $6,000 then, $150 now
Apple code names: Shadow, IIce
On the market for: 1 year, 5 months
Processor and speed: 68040 at 25 MHz
Memory: 4MB, expandable to 20MB — or, with sometimes-problematic
16MB chips, to 64MB (80-ns, 30-pin DRAM chips required)
Equipment: Built-in 256-color video support (512K, expandable to 2MB);
2 NuBus slots; one Processor Direct Slot; FPU
System software notes: Requires System 7.0.1 or later
Macintosh Quadra 800
The 800, released in February 1993 and discontinued 13 months later, was a
terrific machine for the age (see Figure 12-13). It’s less expandable than the 950,
but it also is faster, lighter, more compact, and less expensive. Interestingly,
482 Part II: Secrets of the Machine
■ ■
MACWORLD MAC SECRETS • 4040-8/5 • Chapter 12 • FINAL • VB/EAP • 10/26/98 • p.482
MACWORLD MAC SECRETS • 4040-8/5 • Chapter 12 • Proof 2 • SH • 10/19/98 • p.482
4040-8/5 ch12.F 11/3/98 3:21 PM Page 482

this model can’t produce 24-bit color (the “millions of colors” setting) on any
monitor, no matter how much VRAM or what video card you buy for it—Apple
deliberately crippled this machine to enhance the attractiveness of the Quadra
900 and 950 models!
Figure 12-13: The Quadra 800 minitower design was also used for such Macs as the 840AV
and the Power Macintosh 8100 and 8500.
The 800 also offers memory interleaving, whereby the Mac can access two
SIMMs of the same size and speed at the same time. (Memory interleaving
also is a feature of the Centris 650.) And like other tower Macs, the 800 has
two extra storage bays. Only one of the two extra spaces is big enough for a
51⁄4-inch device, such as a SyQuest or CD-ROM. The other bay can hold a
smaller appliance, such as a hard drive.
Price: $4,700 then, $240 now
On the market for: 13 months
Processor and speed: 68040 at 33MHz
Memory: 8MB, expandable to 146MB (60-ns, 72-pin DRAM chips required)
SIMM slots: Four slots that accept 72-pin SIMMs
Equipment: Built-in video support (512K VRAM, expandable to 1MB);
3 NuBus slots; 1 Processor Direct Slot; FPU; Ethernet
System software notes: Requires System 7.1 (with Enabler 040) or later
Macintosh Quadra 900
The huge, tower-design Quadra 900 (see Figure 12-14) was released
simultaneously with the Quadra 700 at the beginning of 1992. Like most of
the Quadras, it has built-in Ethernet and video support. The 900 had the
most expandable memory of any Macintosh before it; you can boost it to
256MB by plugging SIMMs of 16MB each into each of the 16 slots. It also has
room for up to four internal hard drives (or other storage devices).
Chapter 12: From 128K to Quadra: Mac to Mac 483
■ ■
MACWORLD MAC SECRETS • 4040-8/5 • Chapter 12 • FINAL • VB/EAP • 10/26/98 • p.483
MACWORLD MAC SECRETS • 4040-8/5 • Chapter 12 • Proof 2 • SH • 10/19/98 • p.483
4040-8/5 ch12.F 11/3/98 3:21 PM Page 483
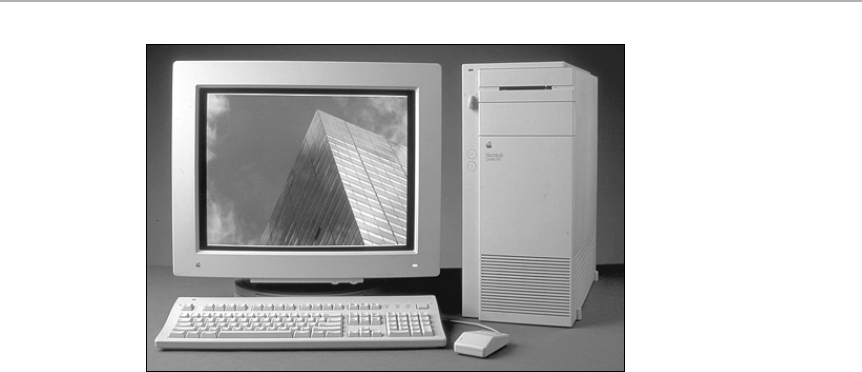
Figure 12-14: The full-size tower of the Quadra 900 was also the enclosure for other
“9-” series Macs: the 950, Power Macintosh 9500, and so on.
Along with the usual mouse and keyboard, the 900 came with one piece of
equipment alien to all previous Macs: a key. The key-lock control can be set
to Off, On, and Secure. When the key-lock is set to Off, the machine can’t be
powered up. In Secure mode, the ADB port (and, thus, the mouse and
keyboard) and the floppy disk drive are disabled, presumably for use when
the Quadra is doing duty as a dedicated file server.
Price: $8,500 then, $150 now
Apple code names: Darwin, IIex
On the market for: 6 months
Processor and speed: 68040 at 25 MHz
Memory: 4MB, expandable to 256MB (80-ns, 30-pin DRAM chips required)
Equipment: Built-in video (1MB VRAM, expandable to 2MB); 5 NuBus
slots; 1 Processor Direct Slot; FPU; Ethernet
System software notes: Requires System 7.0.1 or later
Macintosh Quadra 950
The hulking Quadra 950, which replaced the identical-looking 900 after only
six months, weighs more than 36 pounds without a monitor (see Figure 12-14).
Running at 33 MHz, it runs applications 30 percent faster than the Quadra
700, and it can display 16-bit color on monitors of up to 19 inches. The 950
offered a faster hard-drive data-transfer rate than any Macintosh before it:
3,800K per second.
Price: $6,100 then, $200 now
Apple code name: Amazon
Processor and speed: 68040 at 33 MHz
Memory: 8MB, expandable to 256MB (80-ns, 30-pin DRAM chips required)
484 Part II: Secrets of the Machine
■ ■
MACWORLD MAC SECRETS • 4040-8/5 • Chapter 12 • FINAL • VB/EAP • 10/26/98 • p.484
MACWORLD MAC SECRETS • 4040-8/5 • Chapter 12 • Proof 2 • SH • 10/19/98 • p.484
4040-8/5 ch12.F 11/3/98 3:21 PM Page 484

Equipment: Built-in video (1MB VRAM, expandable to 2MB); 5 NuBus
slots; 1 Processor Direct Slot; FPU; Ethernet
System software notes: Requires System 7.0.1 or later
Macintosh Quadra (Centris) 660av, 840av
The original audiovisual duo of July 1993, the 660av and 840av, are based on
the ’040 chip running at 25 MHz and 40 MHz, respectively. The Quadra 660av,
originally called the Centris 660av, resembles the Centris 610 in its low-slung
case (see Figure 12-8). The Quadra 840av has the same towerlike case as the
Quadra 800 (see Figure 12-13) and will forever rest secure in its place as the
fastest non-PowerPC Macintosh ever built.
Both models introduced several redesigned components, including a new 32-
bit data path that gives all internal components direct access to the memory
chips (meaning that 32-bit addressing is on all the time; see Chapter 9); an
improved input/output subsystem for faster access to attached disks and
storage devices; built-in 24-bit (840av) or 16-bit (660av) video for more lifelike
colors; and TV input and output, which allows you to watch the Mac’s video
picture on a TV, or record it directly to videotape, in a variety of TV-signal
outputs (NTSC, PAL [the European standard], and S-video).
Most impressive of all, however, was the new AT&T DSP (digital signal
processor) chip in both Macs. This special chip can process huge streams of
sound and video information. It debuted a number of amazing options on
these models:
■Speech recognition. You speak into the microphone, and the Mac
understands you. We’re not talking about a Mac that takes dictation. The
AV Macs recognize only certain sets of commands that have to do with
using the Mac — menu commands, for example.
Alas, subsequent (and superior) versions of the PlainTalk software were
incompatible with these guinea-pig AV models; see Chapter 23 for details.
■Talking. These Macs don’t just listen; they also speak words over your
speaker. (Once again, see Chapter 23 for more info.)
■Sound digitizing. Like other models, these Macs can digitize (record to
disk) sounds. Because of the DSP chip, however, these models and the
Power Macs can record in 16-bit sound — the same fidelity as that used by
audio compact discs.
■GeoPort. This serial-port connector is akin to the modem port found on
older Macs. Previous Macs’ serial ports handled only one task at a time.
But the GeoPort’s speed is so great that it can, in theory, print, send a fax
over the phone lines, and remain connected to a network—all from a
single port. Most people, however, use the GeoPort jack only to connect
the GeoPort Adapter ($100), which can impersonate a modem’s chirps
and squawks.
To further complement this multimedia mogul machine, Apple introduced its
first AudioVision monitor (today known as AppleVision), with stereo
speakers and a built-in microphone.
Chapter 12: From 128K to Quadra: Mac to Mac 485
■ ■
MACWORLD MAC SECRETS • 4040-8/5 • Chapter 12 • FINAL • VB/EAP • 10/26/98 • p.485
MACWORLD MAC SECRETS • 4040-8/5 • Chapter 12 • Proof 2 • SH • 10/19/98 • p.485
4040-8/5 ch12.F 11/3/98 3:21 PM Page 485

All this miraculous technology carried, for some, a steep price in compat-
ibility. Programs like Suitcase, ATM, After Dark, and most fax/modem
software needed upgrades to be compatible. Perhaps worse for many people
was the “sync on green” problem—the AV Macs didn’t work with many
standard Mac monitors. For some monitors, you could get a special cable
that works with the AV (call the monitor company and find out); others
couldn’t be made to work at all.
Quadra 660av
Price: $2,000 then, $200 now
Apple code name: Tempest
On the market for: 14 months
Processor and speed: 68040 at 25 MHz
Memory: 8MB, expandable to 68MB (70-ns, 72-pin DRAM chips required)
Equipment: Built-in 16-bit video support; 1 7" NuBus slot (requires
adapter); FPU
System software notes: Requires System 7.1 (with Enabler 088) or later
Quadra 840av
Price: $4,100 then, $330 now
Apple code name: Cyclone
On the market for: 9 months
Processor and speed: 68040 at 40 MHz
Memory: 8MB, expandable to 128MB (60-ns, 72-pin DRAM chips required)
Equipment: Built-in 32-bit video; 3 enhanced NuBus slots; FPU; Ethernet
System software notes: Requires System 7.1 (with Enabler 088) or later
Portable Macs
When it comes to shrinking the Macintosh to laptop size, the world took awhile
to get it right. Even before the anvil-like Macintosh Portable (described in a
moment), for example, there was the Outback, made from the cannibalized
chips out of a Macintosh SE by a Colorado company. Instead of a trackball or
trackpad, it had—well, how do we describe this — a three-inch piece of
drinking straw that you could slide horizontally with your thumb, roll toward
you or away, or push down to register a click.
We’ll take a PowerBook G3 any day.
Macintosh Portable
The Mac Portable, born in late 1989, was Apple’s first attempt at a laptop. It
failed miserably, mainly because of its weight. Though it has a laptop-style fold-
down design, the Mac Portable weighs 16 pounds —as much as a compact Mac!
Its excessive weight and high price—almost $7,000 —made it very unpopular.
Nevertheless, the Portable has an active-matrix LCD screen (see Chapter 14)
that provides a sharp, clear image, free of ghosting. And the Portable was the
486 Part II: Secrets of the Machine
■ ■
MACWORLD MAC SECRETS • 4040-8/5 • Chapter 12 • FINAL • VB/EAP • 10/26/98 • p.486
MACWORLD MAC SECRETS • 4040-8/5 • Chapter 12 • Proof 2 • SH • 10/19/98 • p.486
4040-8/5 ch12.F 11/3/98 3:21 PM Page 486

forerunner of the PowerBook 100, which inherited much of the Portable’s
internal design.
Price: $6,500 then, $10 now
Apple code names: Esprit, Laguna, Malibu
On the market for: 1 year, 5 months
Processor and speed: 68000 at 16 MHz
Memory: 1MB, expandable to 9MB (special 30-ns static RAM card
required)
Equipment: Built-in, 10", black-and-white, active-matrix 640-by-400-pixel
LCD screen (backlighted on later models); video-output jack for
external monitor; 1 nonstandard 120-pin PDS slot; no FPU
System software notes: Requires System 6.0.4 through 7.5.5
Battery: Lead-acid; lasts about 5 hours
Weight: 16 pounds
PowerBook 100
The PowerBook 100, born with the PowerBooks 140 and 170 in October 1991,
was the low-end, budget version of the PowerBook. It’s equipped with the
same slower 68000 microprocessor found in the Mac Classic.
The 100 is lighter than the other early PowerBooks because it’s missing a lot
of features; as with Apple’s subsequent ultralight PowerBooks (such as the
2000 series), it has no internal floppy disk drive, only a 20MB hard drive, and
no sound-recording capabilities. (You could buy a $200 floppy drive that
attached to the back of the PowerBook.) The case is made of lightweight
plastic instead of the polycarbonate used for the other PowerBooks. The 100’s
sealed lead-acid battery lasts two to four hours before requiring a recharge.
Probably because of the missing components, the PowerBook 100 didn’t sell
well. Apple shrugged and decided to sell off as many remaining 100s as
possible. It slashed the price; PowerBook 100s were selling for $900 on the
West Coast and $700 on the East Coast. Suddenly the 100 was the hottest Mac
ever. Soon, as Apple had hoped, the inventory was gone.
Price: $2,500 then, $90 now
Apple code names: Derringer, Rosebud
On the market for: 10 months
Processor and speed: 68000 at 16 MHz
Memory: 2MB, expandable to 8MB (100-ns pseudostatic RAM card
required)
Equipment: Built-in, 9", black-and-white, passive-matrix 640-by-400-pixel
LCD screen; no slots; no FPU; no video-output jack
System software notes: Requires System 7.0.1 through 7.5.5 — officially; 6.0.7 also
runs
Battery: Lead-acid; lasts about 2 hours
Weight: 5.1 pounds
Chapter 12: From 128K to Quadra: Mac to Mac 487
■ ■
MACWORLD MAC SECRETS • 4040-8/5 • Chapter 12 • FINAL • VB/EAP • 10/26/98 • p.487
MACWORLD MAC SECRETS • 4040-8/5 • Chapter 12 • Proof 2 • SH • 10/19/98 • p.487
4040-8/5 ch12.F 11/3/98 3:21 PM Page 487
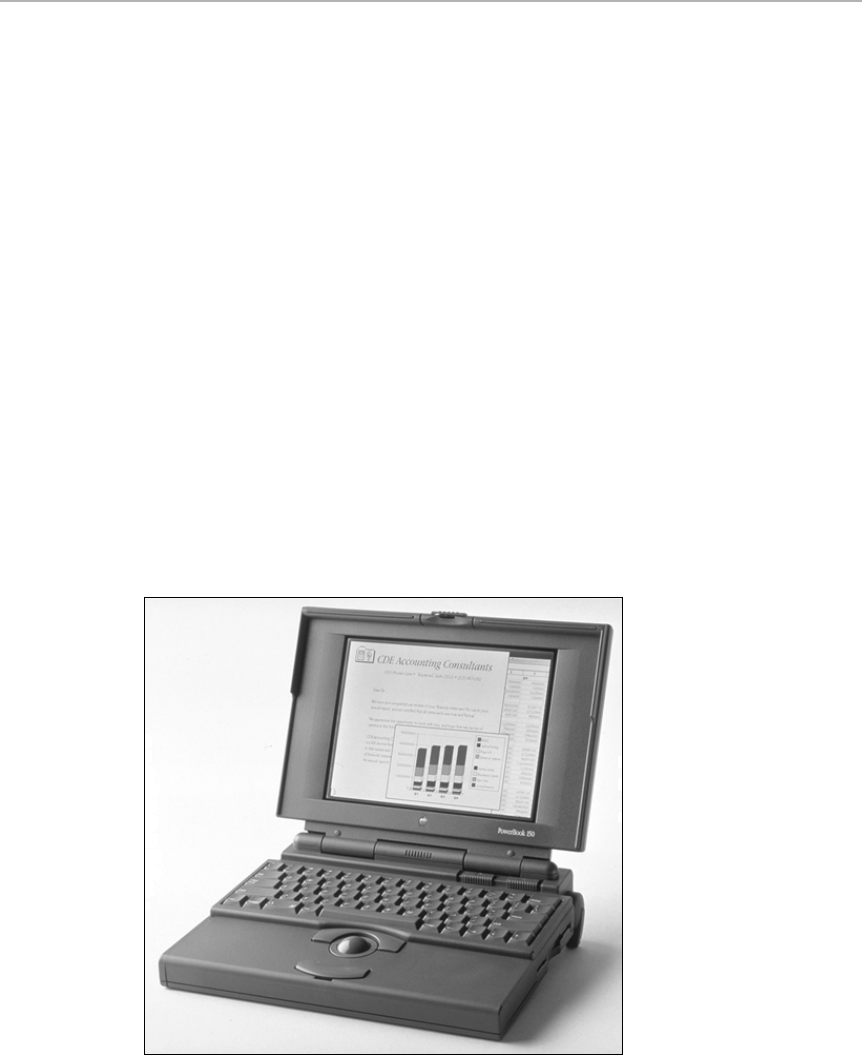
PowerBook 140
Heavier and more powerful than the 100, the 140 is the middle of the original
three PowerBook models. It’s equipped with a passive-matrix screen similar
to that of the 100, but the 140’s screen is larger, and its dots are less dense on
the screen. As a result, text is easier to read (see Figure 12-15).
Instead of a lead-acid battery, the 140 uses a NiCad battery that provides
between 90 minutes and two hours of power. The 140 also has a larger
trackball than the PowerBook 100 (30mm instead of 25mm), making it easier
to control. Finally, the 140 can record sound (and comes with a microphone),
unlike the PowerBook 100.
Price: $3,000 then, $140 now
Apple code name: TIM Lite
On the market for: 10 months
Processor and speed: 68030 at 16 MHz
Memory: 2MB, expandable to 8MB (100-ns, pseudostatic RAM card
required)
Equipment: Built-in, 10", black-and-white, passive-matrix LCD, 640-by-400-
pixel screen; no slots; no FPU; no video-output jack
System software notes: Requires System 7.0.1 through 7.6
Battery: NiCad; lasts about 2 hours
Weight: 6.8 pounds
Figure 12-15: The PowerBook 100-series case, used in such Macs as the PowerBook 140,
145, 150, 160, 165, 165c, 170, and 180.
488 Part II: Secrets of the Machine
■ ■
MACWORLD MAC SECRETS • 4040-8/5 • Chapter 12 • FINAL • VB/EAP • 10/26/98 • p.488
MACWORLD MAC SECRETS • 4040-8/5 • Chapter 12 • Proof 2 • SH • 10/19/98 • p.488
4040-8/5 ch12.F 11/3/98 3:21 PM Page 488

PowerBook 145
The 145 is a faster (and less expensive) version of the 140, which it replaced
at the end of 1992. The sole noticeable difference is that the 145’s chip runs
at 25 MHz instead of 16 MHz.
Price: $2,150 then, $200 now
On the market for: 10 months
Processor and speed: 68030 at 25 MHz
Memory: 2MB, expandable to 8MB (100-ns, pseudostatic RAM card
required)
Equipment: Built-in, 10", black-and-white, passive-matrix LCD, 640-by-400-
pixel screen; no slots; no FPU; no video-output jack
System software notes: Requires System 7.0.1 through 7.6
Battery: NiCad; lasts about 2 hours
Weight: 6.8 pounds
PowerBook 145b
Whenever Apple lowers its prices, it’s rewarded by a huge groundswell of
new purchasers. That phenomenon clearly is what Apple had in mind for this
PowerBook model, which debuted in June 1993.
The specs of the 145b are identical to those of the PowerBook 145 except for
the original price: about $1,300 for the 40MB-hard drive model. (The price
has dropped to about $200 now.) What you lose in the bargain (compared
with a PowerBook 145) is the microphone and a set of System disks. The
145b’s low price, and the fact that the low price doesn’t mean less computing
power, put all the necessary nails into the 145’s coffin.
PowerBook 150
In the never-ending series of replacements for replacements, the 150 is the next
heir in the 140-145-145b lineage. Its $1,300 price tag appealed to the budget-
minded. But “inexpensive” no longer meant “slow”; the 150’s 33 MHz 68030
processor is the same as the one that drives, for example, the LC 550. Also of
note: The 150 was the first PowerBook to use a less-expensive IDE internal hard
drive instead of a SCSI drive. (See Chapter 8 for more details about IDE drives.)
Chapter 12: From 128K to Quadra: Mac to Mac 489
■ ■
MACWORLD MAC SECRETS • 4040-8/5 • Chapter 12 • FINAL • VB/EAP • 10/26/98 • p.489
MACWORLD MAC SECRETS • 4040-8/5 • Chapter 12 • Proof 2 • SH • 10/19/98 • p.489
MACINTOSH SECRET
What do the PowerBook 100 and the overweight
Macintosh Portable have in common?
A lot. Sony, the company contracted by Apple to
build the 100, started with the original Mac
Portable and simply miniaturized its components
to create the 100. That’s why the design of the
100 is fundamentally different from that of the
140 and 170; it’s really just a shrunk-down Mac
Portable. The Portable and the 100 share the
same overall design and even the same ROM.
The Macintosh Portable and the PowerBook 100
4040-8/5 ch12.F 11/3/98 3:21 PM Page 489

The most startling aspect of the 150 was the appearance of some PowerBook
Duo technology. For example, the 150 uses Duo-style memory SIMMs, and it
preserves the contents of RAM while you change batteries, just like the Duos.
Unfortunately, the paucity of jacks also matches the Duos — the 150
introduced the solitary serial (modem/printer) jack that persists even on
today’s PowerBook models, and it lacks the Ethernet and monitor jacks of its
PowerBook contemporaries.
But members of the student-and-starving-artist class said, “Ports, schmorts!”
This model’s speed, low price, and unusually low weight (1.3 pounds less
than other full-size PowerBooks) gave it definite appeal. The 150 was
discontinued in August 1995.
Price: $1,300 then, $220 now
Apple code name: Jedi
Processor and speed: 68030 at 33 MHz
Memory: 4MB, expandable to 40MB (70ns Duo DRAM card required)
Equipment: Built-in, 9.5-inch, 4-level grayscale, passive-matrix LCD, 640-
by-400 pixel screen; no slots; no FPU; no video-output jack
System software notes: Requires System 7.0.1 through 7.6
Battery: NiCad; lasts about 2.5 hours
Weight: 5.5 lbs.
PowerBook 160
Released in September 1992 and dropped 11 months later, the PowerBook
160 is similar to the 145 — same weight, dimensions, processing speed (see
Figure 12-15). But the 160 also offered five important improvements:
■The 160’s LCD screen offers 16 levels of gray instead of just black and white.
■The 160 has a video-out port so that you can connect it to an external
monitor easily. The 160 can fill the external monitor with up to 256 colors.
■The 160 can hold an internal hard drive of up to 120MB, whereas
previous models could be expanded only to 80MB.
490 Part II: Secrets of the Machine
■ ■
MACWORLD MAC SECRETS • 4040-8/5 • Chapter 12 • FINAL • VB/EAP • 10/26/98 • p.490
MACWORLD MAC SECRETS • 4040-8/5 • Chapter 12 • Proof 2 • SH • 10/19/98 • p.490
MACINTOSH SECRET
PowerBooks were routinely advertised by Apple
as having a “full-size screen,” but that’s not
quite true on the original line. All PowerBooks
before the 180c have 640-by-400-pixel screens
— which means that they display 51,200 fewer
pixels (about an inch in height) than standard
640-by-480 desktop monitors (the Apple 14”
displays, for example).
You probably won’t notice the more limited
view in most cases. But if you try to view
graphics or multimedia presentations designed
to fill a standard-size screen, those 100-series
PowerBooks can’t display the whole picture.
They simply chop off the bottom 80 pixels of
the images.
Getting the whole picture
4040-8/5 ch12.F 11/3/98 3:21 PM Page 490

■The 160 was the first PowerBook since the original PowerBook 100 that
could be used in SCSI Disk Mode (in which it’s connected to your desktop
Mac just as though it were an external hard drive) for super-fast data
transfers. (See Chapter 14 for details.)
■Finally, the 160 was the first PowerBook on which memory could be
expanded beyond 8MB. You can boost it to 14MB.
All these features came at a price of only about $300 more than the
PowerBook 145, making the 160 an exceptionally flexible, functional Mac.
Price: $2,430 then, $250 now
On the market for: 11 months
Processor and speed: 68030 at 25 MHz
Memory: 4MB, expandable to 14MB (85-ns, pseudostatic RAM card
required)
Equipment: Built-in, 10", 16-level grayscale, passive-matrix LCD, 640-by-
400-pixel screen; no slots; no FPU; video-output jack
System software notes: Requires System 7.1 (with Enabler 131) through 7.6
Battery: NiCad; lasts about 2.5 hours
Weight: 6.8 pounds
PowerBook 165
See the preceding section. The 165 (born in August 1993) is identical to the
PowerBook 160 in every possible way, except that it runs at 33 MHz instead
of 25 MHz. Yet it was even less expensive than the model it replaced; it
debuted at about $1,300 (and goes for $250 used these days).
PowerBook 165c
The PowerBook 165c, released in February 1993, was the first color
PowerBook. The 165c’s passive-matrix LCD display is smaller than that of
most other PowerBook models — only 9 inches instead of 10 — but it can
display 256 colors.
The 165c, like the PowerBook 180 on which it’s based, is a fast and powerful
machine, with a 33 MHz 68030 microprocessor and an FPU chip. But many
Mac fans didn’t find its color screen (manufactured for Apple by Sharp) very
impressive. The passive-matrix technology is slow, it lacks brightness, and
it’s tough to read in bright sunlight. Another negative involves the 165c’s
NiCad battery life. A charge lasts only about an hour, thanks to the juice
required by the dual backlights.
Price: $3,400 then, $270 now
Apple code name: Monet
On the market for: 10 months
Processor and speed: 68030 at 33 MHz
Memory: 4MB, expandable to 14MB (85-ns, special notched chips
required)
Chapter 12: From 128K to Quadra: Mac to Mac 491
■ ■
MACWORLD MAC SECRETS • 4040-8/5 • Chapter 12 • FINAL • VB/EAP • 10/26/98 • p.491
MACWORLD MAC SECRETS • 4040-8/5 • Chapter 12 • Proof 2 • SH • 10/19/98 • p.491
4040-8/5 ch12.F 11/3/98 3:21 PM Page 491

Equipment: Built-in, 9", 256-color, passive-matrix LCD, 640-by-400-pixel
screen; no slots; FPU; video-output jack
System software notes: Requires System 7.1 (with Enabler 131) through 7.6
Battery: NiCad; lasts about 1 hour
Weight: 7 pounds
PowerBook 170
The PowerBook 170 was the top-of-the-line PowerBook in 1991 — one of the
original three models (see Figure 12-15). It was eventually replaced by the
faster, cheaper, sharper-screened PowerBook 180.
Overall, the 170 runs about 50 percent faster than the PowerBook 140. The
key differences between the 170 and the 140: The 170 has a clock speed of 25
MHz (instead of 16 MHz); it’s equipped with a math coprocessor; and it came
with an optional, troublesome, built-in fax/modem.
This model was the first PowerBook to offer an active-matrix display (see
Chapter 14), which produces a much brighter, crisper image with less ghosting
and sluggishness than the passive-matrix display used on other PowerBooks.
Price: $4,600 then, $270 now
Apple code name: TIM, Road Warrior
On the market for: 1 year
Processor and speed: 68030 at 25 MHz
Memory: 2MB, expandable to 8MB (100-ns, pseudostatic RAM card
required)
Equipment: Built-in, 10", black-and-white, active-matrix LCD, 640-by-400-
pixel screen; no slots; FPU; no video-output jack
System software notes: Requires System 7.0.1 through 7.6
Battery: NiCad; lasts about 2 hours
Weight: 6.8 pounds
PowerBook 180
The PowerBook 180, which debuted in October 1992, was by far the most
sought-after PowerBook to date. Months after its introduction, Apple still
couldn’t manufacture it fast enough for its customers. In frustration, dealers
took orders, pleaded with Apple, and waited for a few precious machines to
come their way — a pattern to be repeated with many subsequent Mac
models well into the 1990s.
The 33-MHz 180 is a faster version of the 170, with enough processing power
for even heavy-duty business tasks. The 180 also was the first PowerBook
with a 16-shade active-matrix grayscale screen, the clarity and beauty of
which was primarily responsible for this Mac’s popularity. This grayscale
screen makes the Desktop look richer and more attractive, and it makes
possible some QuickTime and graphics work.
492 Part II: Secrets of the Machine
■ ■
MACWORLD MAC SECRETS • 4040-8/5 • Chapter 12 • FINAL • VB/EAP • 10/26/98 • p.492
MACWORLD MAC SECRETS • 4040-8/5 • Chapter 12 • Proof 2 • SH • 10/19/98 • p.492
4040-8/5 ch12.F 11/3/98 3:21 PM Page 492

Like the 160, this model has a video-out port so that you can connect it to
an external monitor. The 180 was the first PowerBook to sport a built-in
microphone. Like the 160, the 180 can be connected to another Macintosh
as a SCSI device. A fax/modem is optional.
Price: $4,110 then, $300 now
On the market for: 1 year, 7 months
Processor and speed: 68030 at 33 MHz
Memory: 4MB, expandable to 14MB (85-ns chips required)
Equipment: Built-in, 10", 16-level grayscale, active-matrix LCD, 640-by-
400-pixel screen; no slots; FPU; video-output jack
System software notes: Requires System 7.1 (with Enabler 131) through 7.6
Battery: NiCad; lasts about 2.5 hours
Weight: 6.8 pounds
PowerBook 180c
This was the screen that PowerBook fans had been waiting for: for the first
time, an active-matrix color screen. Introduced in June 1993, the 180c offers a
glorious display that is not only vibrant, but also big — not in inches, but in
image area. That is, the 180c’s screen was the first on a PowerBook to match,
pixel-for-pixel, the dimensions of a standard Apple 14-inch monitor. But
because the screen resolution is 94 dots per inch, the dots are densely
packed, and the physical dimensions of the screen are smaller than on a
traditional PowerBook.
As usual, you paid a price for the active-matrix screen, both in battery power
and (dramatically) in dollars. Nonetheless, the 180c was the hot model for
quite a while — at least until the active-matrix color screen came to other
PowerBook models.
Price: $4,160 then, $385 now
On the market for: 8 months
Processor and speed: 68030 at 33 MHz
Memory: 4MB, expandable to 14MB (85-ns chips required)
Equipment: Built-in, 10", 256-color, active-matrix LCD, 640-by-480-pixel
screen; no slots; FPU; video-output jack
System software notes: Requires System 7.1 (with Enabler 131) through 7.6
Battery: NiCad; lasts about 1 hour
Weight: 7.1 pounds
PowerBook 190, PowerBook 190cs
Released in August 1995, the PowerBook 190 and 190cs were the last of
Apple’s non-PowerPC portable Macs. Like the 500-series PowerBooks
(described later), these models are based on the 33 MHz Motorola 68LC040
processor— the same chip used in the Performa 630 series.
Chapter 12: From 128K to Quadra: Mac to Mac 493
■ ■
MACWORLD MAC SECRETS • 4040-8/5 • Chapter 12 • FINAL • VB/EAP • 10/26/98 • p.493
MACWORLD MAC SECRETS • 4040-8/5 • Chapter 12 • Proof 2 • SH • 10/19/98 • p.493
4040-8/5 ch12.F 11/3/98 3:21 PM Page 493
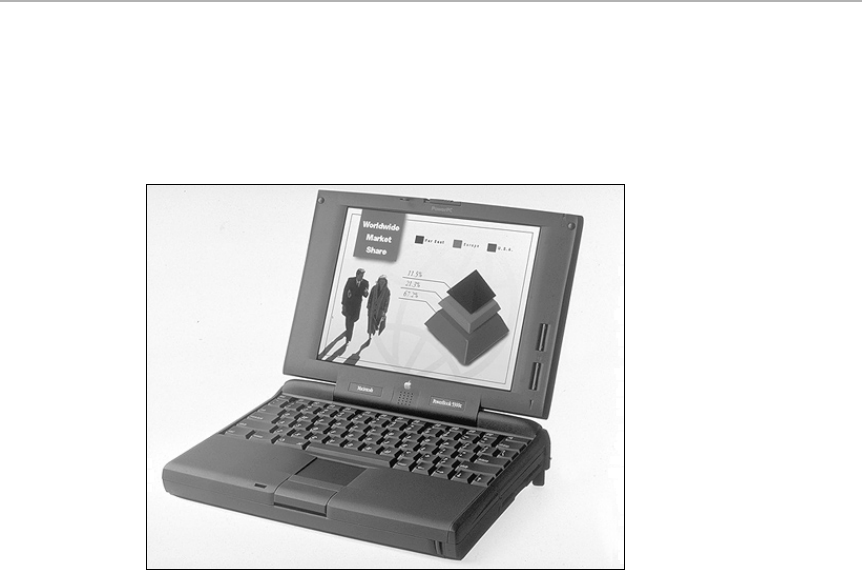
The 190 has essentially the same solid-black design as the PowerPC-based
PowerBook 5300 laptops (see Figure 12-16). It offers many of the same state-
of-the-art PowerBook features: built-in PC Card slots; a removable floppy
drive; and a trackpad that lets you double-click by tapping on the pad instead
of clicking a button (see Chapter 14 for a full description of these features).
Figure 12-16: The 1995 PowerBook line’s case. PowerBook 190 series and 5300 series look
like this.
Apple’s idea in releasing the 190 was to provide a low-budget model that was
nevertheless equipped with some of the more-advanced PowerBook features.
What it doesn’t have (that the 5300 series does) is the PowerPC chip, a video-
output jack, an infrared transceiver, and a sound input jack; you can add all
but the sound-input jack as added-cost upgrades. The 190’s passive-matrix
screen and its lack of a PowerPC chip made it about half the price of its
PowerPC counterparts.
The only real difference between the 190 and 190cs is the screen quality. The
190 has a grayscale screen, while the 190cs has a slightly larger, dual-scan
color display. Apple discontinued the 190 series in September 1996.
190
Price: $1,900 then, $410 now
Equipment: Built-in, 9.5" passive matrix grayscale; optional video-out port;
16-bit stereo output
Weight: 5.9 pounds
494 Part II: Secrets of the Machine
■ ■
MACWORLD MAC SECRETS • 4040-8/5 • Chapter 12 • FINAL • VB/EAP • 10/26/98 • p.494
MACWORLD MAC SECRETS • 4040-8/5 • Chapter 12 • Proof 2 • SH • 10/19/98 • p.494
4040-8/5 ch12.F 11/3/98 3:21 PM Page 494

190cs
Price: $2,300 then, $550 now
Equipment: Built-in, 10.4", dual-scan color passive-matrix LCD; optional
video-out port; 16-bit stereo output
Weight: 6.4 pounds
Both
On the market for: 1 year, 1 month
Apple code name: Omega
Processor and speed: 68LC040 at 33 MHz
System software notes: Requires System 7.5.3 or later
Memory: 8MB, expandable to 40MB
Battery: NiMH; lasts about 2 hours
PowerBook Duo 210 and 230
The PowerBook Duos, introduced in October 1992, are super-lightweight
portables. The name stems from the fact that a Duo can function either as a
stand-alone notebook computer or, when inserted into a docking station
(called a Duo Dock) or attached to a connector strip (the Mini Dock), as a
desktop system. See Chapter 14 for details.
The first Duo models — 210 and 230 — look the same (see Figure 12-17).
Built around a light-but-sturdy magnesium frame, they weigh just 4.2 pounds
each — nearly 3 pounds lighter than the other PowerBook models. The Duos
are only 1.4 inches tall.
Figure 12-17: The slimline Duo is the lightest-weight Macintosh ever created. This design
housed the 210, 230, 250, 280, and (in slightly thicker incarnations) the 270c and 280c.
Chapter 12: From 128K to Quadra: Mac to Mac 495
■ ■
MACWORLD MAC SECRETS • 4040-8/5 • Chapter 12 • FINAL • VB/EAP • 10/26/98 • p.495
MACWORLD MAC SECRETS • 4040-8/5 • Chapter 12 • Proof 2 • SH • 10/19/98 • p.495
4040-8/5 ch12.F 11/3/98 3:21 PM Page 495

Of course, many features were shrunk or eliminated to compress the Duos
into such a compact package. There’s no built-in floppy drive; a separate disk
drive is optional. The screen is an inch narrower than previous PowerBook
screens, although it has the same number of pixels (they’re just packed in
more closely). And the trackball is more than a centimeter smaller than other
PowerBook trackballs. There are only three connectors on the back of either
Duo: a modem/printer port, a power adapter jack, and the 152-pin connector
for attaching the computer to a Duo Dock or Mini Dock.
The Duo nickel-metal-hydride battery recharges faster than the NiCad
batteries used with most PowerBooks. There have been three generations of
Duo batteries, known as Type I (shipped with the Duo 210 and 230), Type II
(Duo 250 and 270), and Type III (the 280s). Each type lasts longer than the
preceding type, ranging from about two hours of power (Type I) to three
hours (Type III). All three types work in all Duos.
Despite their size, the Duos have powerful features. The 210 and 230 are built
around the 68030 microchip and can be upgraded to 24MB of RAM. The
displays can show 16 levels of grayscale. The 210 is the slower of the two
machines, running at 25 MHz.
Duo 210
Price: $2,250 then, $150 now
On the market for: 1 year
Processor and speed: 68030 at 25 MHz
Duo 230
Price: $2,610 then, $180 now
On the market for: 1 year, 8 months
Processor and speed: 68030 at 33 MHz
Both
Apple code names: DBLite, BOB W, Cinnamon
Memory: 4MB, expandable to 24MB (70-ns DRAM card required)
Equipment: Built-in, 9", 16-level grayscale, passive-matrix LCD, 640-by-
400-pixel screen; 2 NuBus slots (in Duo Dock only); FPU (in
Duo Dock II only); video output (with full or mini Dock)
System software notes: Requires System 7.1 (and PowerBook Duo Enabler) through 7.6
Battery: NiMH; Type I lasts about 2 hours
Weight: 4.2 pounds
PowerBook Duo 250
The second generation of Duos, the 250 and 270c, rescued the Duo line’s
flagging reputation in the computer press. First, the active-matrix LCD
screens on these new models, introduced in October 1993, are glorious to
look at. Second, these models came with the improved Type II Duo battery,
which meant that a Duo can hold a charge much longer than before —
perhaps just under three hours with normal use.
496 Part II: Secrets of the Machine
■ ■
MACWORLD MAC SECRETS • 4040-8/5 • Chapter 12 • FINAL • VB/EAP • 10/26/98 • p.496
MACWORLD MAC SECRETS • 4040-8/5 • Chapter 12 • Proof 2 • SH • 10/19/98 • p.496
4040-8/5 ch12.F 11/3/98 3:21 PM Page 496

The 250 is simply a 230 except that it has an active-matrix grayscale screen
instead of a passive one.
Price: $2,500 then, $250 now
Apple code name: Ansel
On the market for: 7 months
Processor and speed: 68030 at 33 MHz
Memory: 4MB, expandable to 24MB (70-ns DRAM card required)
Equipment: Built-in, 9", 16-level grayscale, active-matrix LCD, 640-by-400-
pixel screen; 2 NuBus slots (in Duo Dock only); FPU (in Duo
Dock II only); video output (with full or mini Dock)
System software notes: Requires System 7.1 (and PowerBook Duo Enabler) through 7.6
Battery: NiMH; Type II lasts about 2.5 hours
Weight: 4.2 pounds
PowerBook Duo 270c
Something had to give when Apple designed its first color Duo — size, weight,
and battery-charge length. The Duo 270c is almost a half-pound heavier than
other Duos. It’s also a quarter-inch taller, making it slightly too big to fit into a
Duo Dock. (You had to buy a replacement top half of the Duo Dock from
Apple to accommodate the 270c, or else use a Duo Dock II.)
Still, this model offers a fast processor, a stunning screen that offers a complete
640-by-480 display area, and an FPU. It even has a remarkable color-display
feature in common with the LC III (see “An LC III [Performa 450] Secret” earlier
in this chapter). It may not weigh much, but the 270c is no lightweight.
Price: $3,100 then, $275 now
Apple code name: Escher
On the market for: 7 months
Processor and speed: 68030 at 33 MHz
Memory: 4MB, expandable to 32MB (70-ns DRAM card required)
Equipment: Built-in, 8.4", color active-matrix LCD, 640-by-480-pixel screen
(or, in 16-bit color, 640 by 400); 2 NuBus slots (in Duo Dock
only); FPU chip; video output (with full or mini Dock)
System software notes: Requires System 7.1 (and PowerBook Duo Enabler) through 7.6
Battery: NiMH; Type II lasts about 2 hours
Weight: 4.8 pounds
PowerBook Duo 280 and 280c
Apple’s May 1994 Duos further refined its subnotebook genre by adding a
critical ingredient: speed. The 280 (active-matrix grayscale screen) and 280c
(active-matrix color screen) are identical to the 250 and 270c, except that
they include a 33 MHz 68LC040 processor—in other words, Quadra power in
a four-pound package. Apple sweetened the deal by including the longer-
lasting Type III batteries with these Duos, along with the promise that these
models would be easily upgradable to the PowerPC-based Duo models.
Chapter 12: From 128K to Quadra: Mac to Mac 497
■ ■
MACWORLD MAC SECRETS • 4040-8/5 • Chapter 12 • FINAL • VB/EAP • 10/26/98 • p.497
MACWORLD MAC SECRETS • 4040-8/5 • Chapter 12 • Proof 2 • SH • 10/19/98 • p.497
4040-8/5 ch12.F 11/3/98 3:21 PM Page 497

Duo 280
Price: $2,550 then; $270 now
Equipment: Built-in, 9", grayscale active-matrix LCD, 640-by-400-pixel
screen; 2 NuBus slots (in Duo Dock only); FPU (in Duo Dock II
only); video output (with full or mini Dock)
Duo 280c
Price: $3,000 then; $320 now
Equipment: Built-in, 8.4", color active-matrix LCD, 640-by-480-pixel screen
(or, in 16-bit color, 640 by 400); 2 NuBus slots (in Duo Dock
only); internal FPU; video output (with full or mini Dock)
Both
Processor and speed: 68LC040 at 33 MHz
Memory: 4MB, expandable to 24MB (70-ns DRAM card required)
System software notes: Requires System 7.1 (and PowerBook Duo Enabler 2.0) or later
Battery: NiMH; Type III lasts about 3 hours
Weight: 4.2 pounds (280c = 4.8 pounds)
PowerBook 520, 520c, 540, and 540c
Apple’s May 1994 crop of PowerBooks, code-named Blackbird, introduced
several dramatic improvements to the PowerBook line:
■They were the first full-size Mac laptops to contain a speedy ’040 processor
chip, just like a Quadra. (The 520s run at 25 MHz; the 540s go at 33 MHz.)
■They can be upgraded to Apple’s PowerPC-based PowerBook models.
■These sleek models offered, for the first time on a PowerBook, a full-size
keyboard that even includes a row of function keys. (A 100-series
PowerBook keyboard is, overall, 1⁄2-inch narrower than a desktop keyboard.)
■The trackball was replaced by a small trackpad that you operate by
dragging your finger. (There’s only one mouse button now, below the
trackpad.)
■Small stereo speakers adorn the upper corners of the screens.
■New battery technology gives these Macs longer life per charge.
Finally, most remarkably, a 500-series PowerBook introduced the PowerBook
module bay (see Figure 12-18), into which you can insert a second battery for
a total of about four hours of color-screen working time. A few other
companies manufacture additional modules for this bay—such goodies as
PC cards (credit card-size expansion cards, popular on IBM clones), cellular
modems, and so on. You can leave the bay empty for lighter weight.
The stereo speakers, larger (and higher-quality) screens, and quick
performance made these the first serious multimedia PowerBooks.
Despite the sleek feel of the 500s’ rounded, Duo-esque, two-tone gray cases,
they’re actually slightly larger and heavier than the 100-series PowerBooks.
Most PowerBook fans consider the 500’s among the most successful
PowerBooks ever.
498 Part II: Secrets of the Machine
■ ■
MACWORLD MAC SECRETS • 4040-8/5 • Chapter 12 • FINAL • VB/EAP • 10/26/98 • p.498
MACWORLD MAC SECRETS • 4040-8/5 • Chapter 12 • Proof 2 • SH • 10/19/98 • p.498
4040-8/5 ch12.F 11/3/98 3:21 PM Page 498
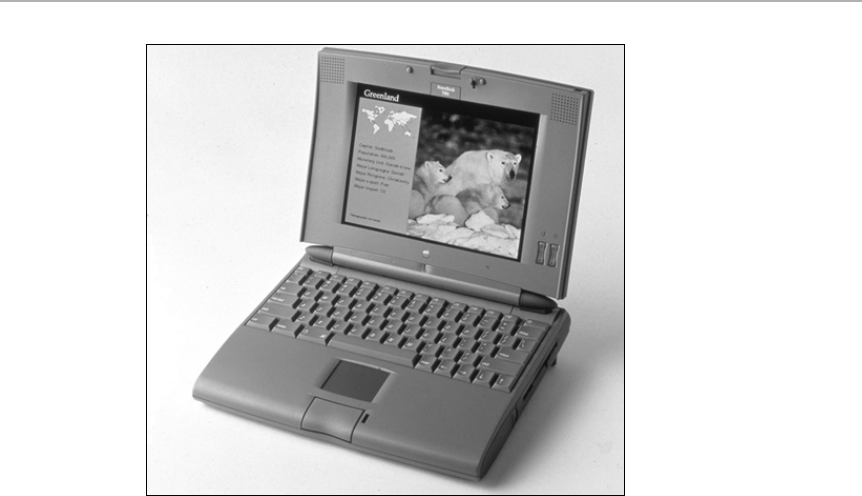
Chapter 12: From 128K to Quadra: Mac to Mac 499
■ ■
MACWORLD MAC SECRETS • 4040-8/5 • Chapter 12 • FINAL • VB/EAP • 10/26/98 • p.499
MACWORLD MAC SECRETS • 4040-8/5 • Chapter 12 • Proof 2 • SH • 10/19/98 • p.499
Figure 12-18: The two-tone 1994 PowerBook case design housed the 520 and 540 series
(and their color incarnations).
PowerBook 520
Price: $2,270 then, $410now
Processor and speed: 68LC040 at 25 MHz
Equipment: Built-in, 9.5", grayscale passive-matrix LCD, 640-by-480-pixel
screen; video-output jack
PowerBook 520c
Price: $2,900 then, $430 now
Processor and speed: 68LC040 at 25 MHz
Equipment: Built-in, 9.5", color dual-scan passive-matrix LCD, 640-by-480-
pixel screen (dual-scan’s quality is halfway between that of
previous passive- and active-matrix color screens); video-
output jack
PowerBook 540
Price: $3,160 then, $440 now
On the market for: 5 months
Processor and speed: 68LC040 at 33 MHz
Equipment: Built-in, 9", grayscale, active-matrix LCD, 640-by-480-pixel
grayscale screen; video-output jack
PowerBook 540c
Price: $4,840 then, $500 now
Processor and speed: 68LC040 at 33 MHz
Equipment: Built-in, 9", color active-matrix LCD, 640-by-480-pixel screen
(or, in 16-bit color, 640 by 400); video-output jack
4040-8/5 ch12.F 11/3/98 3:21 PM Page 499

500 Part II: Secrets of the Machine
■ ■
MACWORLD MAC SECRETS • 4040-8/5 • Chapter 12 • FINAL • VB/EAP • 10/26/98 • p.500
MACWORLD MAC SECRETS • 4040-8/5 • Chapter 12 • Proof 2 • SH • 10/19/98 • p.500
All four
Memory: 4MB, expandable to 36MB (70-ns DRAM card required)
Battery: PowerBook Intelligent Battery; lasts about 2.5 hours (two may
be used simultaneously)
System software notes: Requires System 7.1.1 (and PowerBook 500 Enabler) or later
Weight: 7.1 pounds
The Only Upgrade Guide You’ll Ever Need
All of us fall victim, now and then, to latest-and-greatest syndrome. Every
time Apple comes out with new Mac models that are much faster than the
ones we already own, we get Megahertz Envy, and we start to seek advice on
upgrading our own aging machines.
ANSWER MAN
Q: How does Apple come up with these model
names — by drawing numbers out of a hat?
A: Sarcasm duly noted.
Truth is, though, you’re right: Apple’s model-
numbering scheme has never seemed to have
much consistency. Why is the 7600 way faster
than the 8100? Why is the PowerBook 3400 much
more desirable than the higher-numbered 5300?
Apple’s naming conventions have come in
several multi-year spasms. At the beginning, of
course, each Mac had a two-letter name: the SE.
The LC. The FX, CX, CI, SI, VX, and so on. The
rumor was that the first letter usually represented
the size of the case (Compact, Slim) and the
second letter stood for the video system— either
Integrated or EXternal (on a video card).
Later came the three-digit era. We had the 475,
580, 650, and so on. In this system, the first
digit of the model number consistently referred
to the shape of the case: the 5, 6, 7, 8, and 9
families are, respectively, the one-piece built-in
monitor models (LC 550 and 580, for example);
the thin “pizza-box” shape (Quadra 630, Power
Mac 6100); the thicker desktop models tall
enough to accommodate NuBus or PCI cards
(Quadra 700, Power Mac 7600); the mini-towers
(Quadra 800, Power Mac 8500); and the full-
height towers (Quadra 900, Power Mac 9500).
This system occasionally broke down, alas; the
Quadra 650 actually has the same case shape
as the 7-something family, for example, and the
Performa 6400 is a full-size tower like the 9-
something models. But it was something. And
when the Power Macintosh debuted, we had
seven digits to contend with: the four digits of
the model, plus the three after the slash that
indicated the processor speed.
When Steve Jobs returned to the fold, he did
away with all those complicated naming
conventions. There were Power Mac G3s and
PowerBook G3s. Never mind that these names
say nothing about speed or case size. Never
mind that there was already a PowerBook model
called the G3 that had nothing to do with the G3
Series PowerBooks released in 1998.
At least nobody can claim to be confused by the
model line now — only by which computer they
actually own!
Where the model numbers come from
4040-8/5 ch12.F 11/3/98 3:21 PM Page 500

Chapter 12: From 128K to Quadra: Mac to Mac 501
■ ■
MACWORLD MAC SECRETS • 4040-8/5 • Chapter 12 • FINAL • VB/EAP • 10/26/98 • p.501
MACWORLD MAC SECRETS • 4040-8/5 • Chapter 12 • Proof 2 • SH • 10/19/98 • p.501
We have only one piece of advice about upgrading your Mac: Do the math.
The new models Apple releases every Wednesday aren’t just faster; they’re
also continually less expensive. For years, it made much more sense,
financially speaking, to sell your old Mac and apply the proceeds to the latest
model from Apple. (Advertise in the library, grocery store, user-group
newsletter, newspaper, or at the worldwide used-Mac Web page,
www.uce.com.) In the process, you get more speed, a new one-year warranty,
the latest operating system, a new system CD, and a more up-to-date model.
Upgrades from Apple, in particular, usually don’t make economic sense.
There are two whopping exceptions to our general “think twice before
upgrading” policy. First, upgrading your RAM makes plenty of sense, especially
given the dramatic drop in RAM prices in recent years. DIMMs aren’t a huge
investment, and they can give your existing system a lot more power.
Second, upgrading a Power Macintosh model by adding a G3 upgrade card,
such as those from Newer Technologies G3, is a no-brainer. These upgrades
are so popular, cost-worthy, and speed-inducing that many savvy Mac fans
now go out of their way to buy older machines, such as Power Mac 6100s and
PowerBook 1400s — just because, after the G3 upgrade card, they’ll have
spent less money overall than if they’d bought new G3 machines.
Worth
Learning
4040-8/5 ch12.F 11/3/98 3:21 PM Page 501
MACWORLD MAC SECRETS • 4040-8/5 • Chapter 12 • FINAL • VB/EAP • 10/26/98 • p.502
MACWORLD MAC SECRETS • 4040-8/5 • Chapter 12 • Proof 2 • SH • 10/19/98 • p.502
4040-8/5 ch12.F 11/3/98 3:21 PM Page 502

MACWORLD MAC SECRETS • 4040-8/X • Chapter 13 • FINAL • VB/dfq • 11/02/98 • p.503
MACWORLD MAC SECRETS • 4040-8/X • Chapter 13 • Proof 2 • SH • 10/20/98 • p.503
Chapter 13
The PowerPC Macs,
Model by Model
In This Chapter
©The PowerPC chip
©The specs for every desktop and portable PowerPC model
©What the model numbers mean
©The G3 Revolution
In March 1994, Apple introduced a completely new breed of Mac — the
Power Macintosh. After more than a decade of building Macs around the
Motorola 68000, 68020, 68030, and 68040 chips, Apple shifted to a much
faster, more powerful microprocessor — the PowerPC chip.
When the Power Macs were first released, Apple promised that all future
Mac models would be based on the PowerPC chip. Although that didn’t
immediately prove to be the case — the PowerBook 500 series, the
PowerBook 190, and the Quadra 630 series were among the 68040-based
machines released after the Power Macs — by the fall of 1996, Macs with four-
digit model numbers (PowerPC-based Power Macs, LCs, PowerBooks, and
Performas) were the only computers still in production. In less than four
years, the Power Mac line has grown to over 65 models.
One more note: We’ve included the most important specs for each model in
this chapter. For the real nitty-gritty, however — detailed information about
jacks, RAM slots, VRAM, and so on — see the Apple Specs database on the
CD-ROM that came with this book.
The PowerPC Chip
Remember, the PowerPC isn’t a computer. It’s just a processor chip that can
form the basis of a computer, whether it is a Macintosh, Windows NT machine,
or automobile transmission. This much-hyped RISC chip, which began shipping
in September 1993, is the result of joint development by the two former
archenemies — Apple and IBM — and Motorola. (For your cocktail-conversation
pleasure: Yes, the PowerPC chip is faster, cheaper, cooler, and less energy-
demanding than the corresponding Pentium chips found in high-end
4040-8/5 ch13.F 11/3/98 2:28 PM Page 503

DOS-based PCs. Furthermore, the PowerPC is a new architecture with plenty of
room for growth, as the G3 and G4 models demonstrate. The Pentium chip, by
contrast, is already reaching its limits; Intel can’t make them faster without
adding more circuitry, which explains their incredible heat. Now you know why
the guy with the Pentium laptop on the commuter train has charred thighs.)
RISC, by the way, stands for reduced instruction set computer. This reduced
instruction set is one of the things that makes the chip so fast; the RISC chip
uses a more concise, less-convoluted vocabulary of instructions. Therefore, it
can handle more tasks in less time than earlier chips could. Furthermore, the
RISC chip not only can process instruction data in larger chunks (32 bits
instead of 16 on 68040-based Macs), but also handle more than one set of
instructions at the same time. Even the slowest Power Mac can theoretically
run programs six times faster than, say, a Quadra 800.
The original Power Mac models — the 6100, 7100, and 8100 — used the first-
generation 601 PowerPC chip and ran at clock speeds of 60, 66, and 80 MHz,
respectively. Since then, many new versions of the PowerPC chip have been
released: the 603, 603e, 604, 604e, the G3 family, and so on. See “Get your
chips straight,” later in this chapter, for details.
All about emulation
To experience the exhilarating speed of a Power Mac in all its glory, you must
run software specially written for the PowerPC chip. This special software is
called native-mode PowerPC software. (That term is often shortened to “native,”
even though the term native actually means “written specifically for this chip,”
whether it’s a PowerPC chip or not.) As far as the Power Mac is concerned,
every program sold before March 1994 was written in a foreign language.
Obviously, Apple couldn’t release a Mac that didn’t run existing Mac software.
So, to ensure compatibility with existing Mac programs, Apple included an
emulator program in the Power Mac’s ROM. This emulator works behind the
scenes, automatically translating the normal Mac code (in which your
programs were written) into a format that the PowerPC chip understands.
So, despite the fast processor speed, these older programs don’t run any
faster in Mac emulation mode on the original Power Macs than they would
on, say, a Quadra 700.
Fortunately, the emulation picture got brighter quickly. With each generation
of Power Macs, Apple improves its emulation. Even in emulation mode, for
example, a 300-MHz Power Mac G3 is much faster than the fastest Quadra
ever made. (For first-generation Power Mac owners, the Connectix program
called Speed Doubler provides an emulation speed-up that ties or even beats
Apple’s mechanism.)
The emulated OS
Ironically, Apple’s own software is largely non-native. In its rush to get the
Power Macintosh to market, Apple had time to rework only a small
percentage of the Mac’s behind-the-scenes Toolbox (the set of computer
504 Part II: Secrets of the Machine
■■
MACWORLD MAC SECRETS • 4040-8/X • Chapter 13 • FINAL • VB/dfq • 11/02/98 • p.504
MACWORLD MAC SECRETS • 4040-8/X • Chapter 13 • Proof 2 • SH • 10/20/98 • p.504
4040-8/5 ch13.F 11/3/98 2:28 PM Page 504

instructions upon which all commercial programs rely and which handles
such basic Mac tasks as creating windows and menus) in System 7.1.2.
With each system update, Apple has added a few more nuggets of native
PowerPC code to the operating system. By the time System 7.5.3 rolled out in
1996, key components such as QuickDraw, Modern Memory Manager,
Desktop Printing, and the Resource Manager were all rewritten in native
code. And when Mac OS 8 was finally released in 1997, it included a fully
native version of the Finder.
Of course, every Power Mac owner’s fantasy would be a completely native-
PowerPC operating system; with each new system-software release, Apple
brings us closer to that goal. (See Chapter 6.). Mac OS x, Apple’s next-
generation operating system, is PowerPC-native from top to bottom.
In any case, when you run native-PowerPC software on a Power Macintosh,
no emulation is required. These programs leave even the fastest Quadra in
the dust. Fortunately, the installers for most of today’s Mac programs offer a
choice of PowerPC version, 68000, or fat binary — a single program version
that includes both PowerPC and non-PowerPC code, making it take up lots of
disk space, but ensuring its compatibility on any Mac.
Look and feel
On the outside, Power Macs look no different from their predecessors, and
most existing Mac appliances — printers, modems, CD-ROM drives, and so
on — work fine with Power Macs.
However, as new Power Macs have continued to roll off the assembly line,
driven by even faster versions of the PowerPC chip, some fundamental changes
have taken place. Although the first PowerPC models used the same 72-pin
SIMMs used in other recent Mac models, newer Power Macs require 168-pin
DIMMs, which transfer data at 64 bits at a time instead of 32. Also, the newest
Power Macs are equipped with PCI (Peripheral Component Interconnect)
expansion slots — instead of the standard NuBus slots found on most earlier
Macs — for items such as video digitizer cards, graphics accelerators, and
networking hardware. So although your old laser printer will work just fine with
a new Power Mac, the graphics card that came with your 1991 monitor will
probably have to be replaced. (See Chapter 34 for more about PCI slots.)
Every Power Macintosh offers audiovisual features previously associated only
with the AV Macs (see Chapter 23). These features include speech recognition,
CD-quality stereo recording and playback, and, in certain models, an input
jack for video (so you can make your own QuickTime movies).
Get your chips straight
Every Power Mac described in this chapter is based on one of six different
PowerPC chips — the 601, 603, 603e, 604, 604e, or the 750 (G3). But what’s the
difference between a 601 and a 603? And what makes the 604 different than a
604e? Here’s the rundown:
Chapter 13: The PowerPC Macs, Model by Model 505
■ ■
MACWORLD MAC SECRETS • 4040-8/X • Chapter 13 • FINAL • VB/dfq • 11/02/98 • p.505
MACWORLD MAC SECRETS • 4040-8/X • Chapter 13 • Proof 2 • SH • 10/20/98 • p.505
4040-8/5 ch13.F 11/3/98 2:28 PM Page 505

■The 601 was the first PowerPC chip, used in the earliest Power Macs. The
first 601s ran at 60 to 80 MHz. Later versions were accelerated to 120
MHz, but that’s about as fast as you can reliably speed up a 601 chip.
■Despite its higher number, the next-generation chip, the 603, isn’t faster
than the 601. It’s slower because it has a less efficient cache design.
(Cache is an added sidecar chip of superfast memory that stores, for
fractions of a second, information that may be needed again by the main
processor.) For this reason, a 603 running at 75 MHz offers about the
same speed as a 601 running at just 66 MHz. On the other hand, the 603 is
smaller, less expensive, and more energy efficient. Apple used the 603 in
the Performa/LC 5200-series and the early 6200-series models.
■Next comes the 603e, an update of the 603, with a larger chunk of cache
memory (32K instead of 16K). This cache makes the 603e a bit faster.
Because the 603e is smaller and runs cooler than any of the other
PowerPC chips, it’s the one found in all the PowerPC-based PowerBooks
until late 1997. Apple also uses the 603e in its lower-end desktop Macs,
including most 5000- and 6000-series Performas. With its power-efficient
design, the 603e can be accelerated more dramatically than the 601, with
speeds beyond 200 MHz.
■The 604 chip, found in the first 7600, 8500 and 9500 models, is considerably
faster than the 601 and 603 chips. To illustrate: A 604 running at 150 MHz
is faster than a 603e running at 200 MHz. The 604 has the same size
internal cache as the 601, but with a more efficient structure — the 32K
cache is divided into two sections, one for instructions and another for
data. A 604 chip can run at clock speeds of up to 166 MHz.
■Then there’s the 604e, a revision of the 604. The 604e is actually a much
more sophisticated chip. It has twice as much internal cache memory as
the 604 and can execute four computer instructions per clock cycle (that
is, per tick of the processor’s pulsing heart) — twice that of the 603e. It’s
also smaller than the 604 (and, therefore, it uses less power), squeezing
5.6 million circuits into 148 square millimeters.
■Finally, there’s the incredibly fast 750 chip, which Apple calls the G3 (for
“Generation 3”). The G3 is inside Power Macs and PowerBooks that bear
its name, although the processor in some PowerBooks, equipped with a
less powerful cache circuitry, is known as the 740. The G3 is even smaller
and more energy-efficient than the 604e chip, meaning that it can be used
in both portables and desktop Macs. The G3 is optimized to handle the
type of calculations most frequently used in graphics and business
applications at blazing speeds.
All of this emphasizes a point we’ve made repeatedly in this book: You can’t
compare the speed of Power Macs (or any computers) based solely on clock
speed. A Power Mac 8500/180 and Performa 6400/180 both run at 180 MHz —
but the 8500 is up to 50 percent faster, because the 604e chip is inherently
faster than the 603e. The same principle applies when comparing Macs and
PCs. Next time your neighbor brags about the speed of his 300-MHz Pentium
II, remind him that a G3 chip is 45 percent faster than the Pentium II chip at
any given megahertz.
Mac Basics
506 Part II: Secrets of the Machine
■ ■
MACWORLD MAC SECRETS • 4040-8/X • Chapter 13 • FINAL • VB/dfq • 11/02/98 • p.506
MACWORLD MAC SECRETS • 4040-8/X • Chapter 13 • Proof 2 • SH • 10/20/98 • p.506
4040-8/5 ch13.F 11/3/98 2:28 PM Page 506

Chapter 13: The PowerPC Macs, Model by Model 507
■ ■
MACWORLD MAC SECRETS • 4040-8/X • Chapter 13 • FINAL • VB/dfq • 11/02/98 • p.507
MACWORLD MAC SECRETS • 4040-8/X • Chapter 13 • Proof 2 • SH • 10/20/98 • p.507
(A note about this chapter: From the dawning of the Power Mac era until the
introduction of the G3 Macs, you could tell how fast a Mac’s processor chip
ran just by looking at the Mac’s name; the number after the slash mark
always indicated the Power Mac’s clock speed. The official name for the first
9500, therefore, was 9500/132. But Apple tends to release “speed bump” Macs,
identical in every respect to their predecessors, but with a marginally faster
PowerPC chip. For example, the Power Macintosh 7200/90 was replaced by
the 7200/120. For simplicity’s sake, we’ll leave off the chip-speed designations
in most of our model-by-model discussions.
Apple dropped the “slashed” naming convention when its G3 models debuted.
If you want to know how fast your Power Mac G3 is — well, consult your sales
receipt.)
Power Macs, Model by Model
Power Macintosh 4400
The 4400, introduced in April 1997, was Apple’s attempt to offer a no-nonsense,
low-frills computer targeted at the small-business market. Don’t look for cool
multimedia features on this machine; you won’t find a stereo subwoofer, video
capture jacks, or 3-D graphics acceleration. Instead, you get built-in Ethernet,
3 DIMM slots that let you expand memory to 160MB, and speed.
The 4400 contains the same 603e chip found in the 5400-, 5500-, 6400-, and
6500-series machines. All the 4400 models run at 200 MHz, except for one 160
MHz version that was sold only in Europe (and which also lacks the L2 cache
and Ethernet).
Apple billed the 4400 as the Mac for doing payroll reports, not homework.
It even looks more serious and businesslike than other models; the boring,
boxy case lacks the gently sculpted, bulging curves of most newer Macs
(see Figure 13-1). The machine’s simplified design — inside and out — allowed
Apple to sell this machine at what the time was a great price for a 200 MHz
computer — about $1,700.
The uninspiring 4400 wasn’t a great success. As the prices of much faster —
and better-looking — models dropped in late 1997 and early 1998, the
minimalist 4400 became a less and less appealing option.
Price: $1,700 then, $550 now
Processor and speed: PowerPC 603e at 200 MHz
Memory: 16MB, expandable to 160MB
Equipment: 1.2GB or 2GB IDE hard drive; 8X or 12X CD-ROM drive; 256K
level 2 cache; built-in 2-D graphics acceleration; 10Base-T
Ethernet port; 16-bit stereo audio input and output; 2 PCI slots
System software notes: Ships with 7.5.3; doesn’t support System 7.5.5. or 7.6; can be
upgraded to 7.6.1 and up
4040-8/5 ch13.F 11/3/98 2:28 PM Page 507
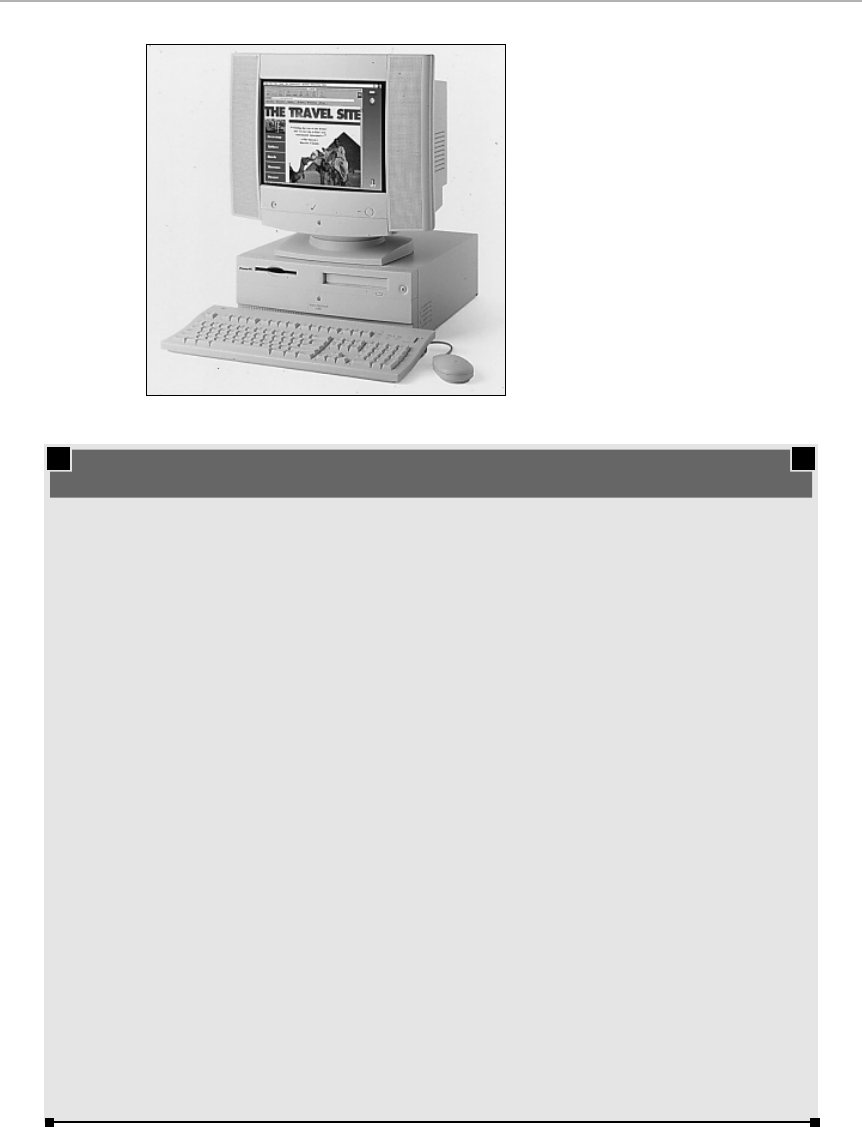
508 Part II: Secrets of the Machine
■ ■
MACWORLD MAC SECRETS • 4040-8/X • Chapter 13 • FINAL • VB/dfq • 11/02/98 • p.508
MACWORLD MAC SECRETS • 4040-8/X • Chapter 13 • Proof 2 • SH • 10/20/98 • p.508
Figure 13-1: The uninspiring look of the
strictly-for-business Power Mac 4400.
CASE HISTORY
David Schargel, former president of Aladdin
Systems, has a pretty good idea why even the
Macintosh isn’t easy for everyone.
Years ago, he says, he got a phone call from a
frustrated elderly woman who was trying to turn
off her Macintosh. David did what he could to
talk her through the process, much as the air-
traffic tower may try to talk down a novice pilot.
But things weren’t going well. Over and over
again, Schargel calmly attempted to teach her
how to use the Shut Down command (in the
Special menu). “OK, Mrs. Speck,” he’d say, “do
you see the word Special at the top of the
screen?”
“Yes,” she’d say.
“OK,” David would reply. “Now just point to that
word, Special, and press down on the button.”
“All right, I’m doing that,” Mrs. Speck would say.
David wiped his brow. “All right. So, now do you
see the list of commands? Including the one that
says Shut Down?”
“No,” she’d say. “All I see is that word Special
and the gray screen.”
So David would go through it all again. “You’re
pointing right at the word Special? And you’re
holding down the button?”
“Yes,” she’d say.
Finally, after 20 minutes of this, Mrs. Speck
interrupted the cycle. She asked him, “When you
say ‘the button,’ you mean the big button, right?”
David’s blood ran cold. “Um . . . what . . . what
do you mean, ‘the big button’?”
She told him, “I’m pressing the big button. With
one hand. And with the other, I’m pointing at the
word Special. Right?”
From there, it was only another five minutes
before David realized what she’d been doing. For
the entire call, she’d been pointing to the Special
menu — with her finger.
And she had indeed been pressing the button.
Not the mouse button — the big button.
The spacebar.
Tales from the Tech Line, Part I
4040-8/5 ch13.F 11/3/98 2:28 PM Page 508
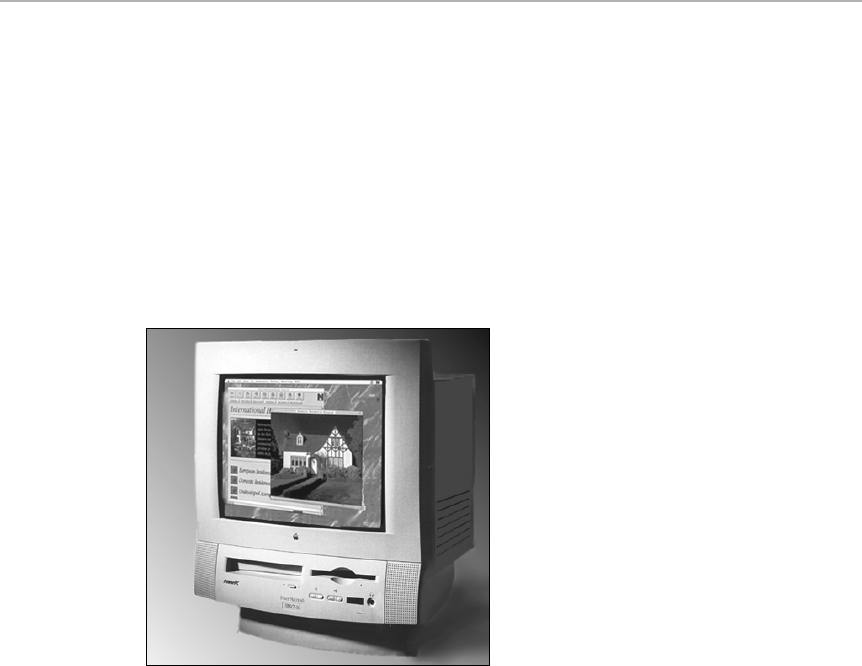
Power Macintosh 5200 LC, Power Macintosh
5260, Performa 5200–5270
The 5200, released in April 1995, occupies a unique position in Mac history —
it was the first Mac to contain a PowerPC 603 chip.
At first glance, the 5200 looks like a large monitor; it’s about the same size as
a standard 15-inch screen. But when you look closer, you notice the floppy-
disk drive, CD-ROM drive slot, and stereo speakers nestled in along the
bottom edge of the machine. Apple fused a variant of the 15-inch Multiscan
Display with the CPU case itself, creating one sleek-looking unit that can tilt
and swivel (see Figure 13-2).
Figure 13-2: The monitor-as-CPU concept. Looks like a monitor, but houses the entire
computer! This case design was used for the LC or Performa 5000 lines.
The 5200 models with the LC designation were available only to schools,
while the Performa models were sold to the general public. Once again, Apple
altered its naming conventions with this model, tacking the LC designation on
to the end of the model name instead of the beginning.
And speaking of naming conventions: Shouldn’t a Mac that’s newer than a
6100 have a number that’s higher than 6100? No, because Apple had fallen
into the practice of using the number 5 (at the beginning of a desktop model
number) to indicate a one-piece design (Performa 575, 580, 5200, and so on)
instead of a two-piece design.
The 5200 was a popular choice with schools because of its low price and compact
design. It’s also easily expandable. Like the old Color Classic, the 5200 has a
pull-out tray for access to its expansion slots, which are very similar to those
in the Quadra 630. There’s a communications slot for an Ethernet card, a video-
in slot for the Apple Video System, a connector for Apple’s optional TV tuner,
and a single LC-style PDS slot. Into this final slot you can plug the MPEG Media
System, a card that allows you to play back full-motion video with CD-quality
Chapter 13: The PowerPC Macs, Model by Model 509
■ ■
MACWORLD MAC SECRETS • 4040-8/X • Chapter 13 • FINAL • VB/dfq • 11/02/98 • p.509
MACWORLD MAC SECRETS • 4040-8/X • Chapter 13 • Proof 2 • SH • 10/20/98 • p.509
4040-8/5 ch13.F 11/3/98 2:28 PM Page 509

sound. The 5260 also includes a slot for a 256K cache card. (On the 5200, 256K
of level 2 cache memory is soldered on the logic board and can’t be upgraded.)
There were four versions of the basic 5200: The 5210 and 5220 were sold
outside the U.S., while the 5215 is a 5200 with a 1GB hard drive.
The 5200 is a perfect example of how higher MHz numbers don’t necessarily
mean better speed. You might think that one of these 75-MHz Macs would be
faster than a 60-MHz Mac (such as the Power Mac 6100). Not true; actually, a
5200 runs slower than a Power Mac 6100/60. That’s because the 603e chip has
a less efficient cache design; it has only half the Level 1 cache of the 6100
(16K instead of 32K). So even though the microchip at the heart of the 5200 is
running faster in sheer megahertz, the machine as a whole doesn’t process
data any faster. (As we pointed out in Chapter 12, MHz ratings are useful only
for comparisons between identical chips — you can’t compare the MHz
ratings between a 601 and a 603e PowerPC chip, and you can’t compare the
MHz ratings between a PowerPC and a Pentium.)
After one year, Apple replaced the 5200 with the Power Macintosh 5260
(without the LC designation), a revved-up model running on a 100-MHz 603e
chip. The 5260, like the original 5200 LC, was sold only to educational
institutions. (The 5270 was an identical model sold only overseas.)
Price: $2,000 then, $500 now
On the market for: 1 year (5200 LC version)
Processor and speed: 5200: PowerPC 603 at 75 MHz; 5260: 603e at 100 MHz
Memory: 8MB or 16MB, expandable to 64MB
Equipment: IDE hard drive; built-in video; 15” tilt-and-swivel display;
internal 4X CD-ROM drive; front-mounted speakers; internal
14.4 Kbps data/fax/voice modem; one PDS slot
Power Macintosh 5300 LC, Performa 5300, 5320
On the outside, the 5300 is exactly the same as the 5200 (see Figure 13-2).
The sole difference: It’s powered by the 603e chip instead of the 603, and it
chugs away at 100 MHz instead of 75. This means, of course, that the 5300 is
virtually the same as the 5260, but with more RAM (16MB instead of 8MB).
(The 5320 is the same model sold outside of the U.S.)
Price: $2,400 then, $600 now
Processor and speed: PowerPC 603e at 100 MHz
Memory: 16MB expandable to 64MB (80-ns, 72-pin DRAM chips
required)
Equipment: Built-in video with 1MB of DRAM; includes Apple Multiple
Scan 15"; 4X CD-ROM drive; 28.8 Kbps fax modem
Power Macintosh 5400–5420
Another in Apple’s series of for-schools-only computers, the 5400 looks
identical to all the other one-piece 5200- and 5300-series models (see Figure
13-2). Inside the case, however, it’s a whole new Mac. In developing the 5400,
Apple finally scrapped the logic board architecture that had been used in the
510 Part II: Secrets of the Machine
■ ■
MACWORLD MAC SECRETS • 4040-8/X • Chapter 13 • FINAL • VB/dfq • 11/02/98 • p.510
MACWORLD MAC SECRETS • 4040-8/X • Chapter 13 • Proof 2 • SH • 10/20/98 • p.510
4040-8/5 ch13.F 11/3/98 2:28 PM Page 510

Quadra 630 and Performa 5200, 6200 and 6300 models, and replaced it with a
new logic board based on the PCI architecture used in higher-end Power
Macs. The 5400 logic board includes one PCI slot, 8MB of soldered-on RAM,
and 64-bit RAM slots that hold 168-pin DIMMs. (This design is also the basis
for the tower-style Performa 6400, discussed later in this chapter.)
With this new design came new speed, with a 603e chip running at 120 MHz.
In fact, with a level 2 cache card installed (a $100 option), the 5400 is even
faster than a Power Mac 7200/120.
At the same time, the 5400 has the easy expansion options and slick
multimedia features found in the earlier 5000-series models: digital video
input and output; stereo sound; a bay for a TV tuner; a video converter for
output to a television; and a 15-inch monitor that can switch between three
different zoom levels. This is a very slick, compact classroom Mac. Apple
eventually bumped up the speed of the 5400 to 180 MHz, and sold two
spinoffs — the Performa 5410 and 5420 — outside of the U.S. only.
Price: $2,300 then, $850 now
Processor and speed: PowerPC 603e at 120 MHz
Memory: 16MB expandable to 136MB (70-ns, 168-pin DIMM chips
required)
System software notes: Requires System 7.5.3 Revision 2
Equipment: Built-in 15-inch multiple scan tilt-and-swivel color display;
1.6GB IDE hard drive; 4X CD-ROM drive; 10BaseT Ethernet
connector; NTSC video converter; two GeoPort-capable serial
ports; SRS 3-D sound enhancement; communications slot; TV
tuner slot; video input and output jacks
Power Macintosh 5500
At the end of 1997, Apple introduced another one-piece machine, the Power
Mac 5500. (The “LC” designation associated with Apple’s educational line of
computers was dropped in 1997. Today, all desktop models — whether
intended for school, home, or business — are simply called Power Macs.) The
5500 is essentially a souped-up 5400 (see Figure 13-2). It comes with a larger
2GB hard drive, a 12X CD-ROM drive, and a revved-up, 225-MHz 603ev chip.
The 5500 also is equipped with 3-D hardware acceleration and more VRAM.
Oddly enough, the 5500’s memory is less expandable than its predecessor,
with a 128MB maximum, instead of 136MB in the 5400.
Price: $1,899 then, $1,300 now
Processor and speed: PowerPC 603ev at 225 MHz
Memory: 32MB expandable to 128MB (64-bit-wide, 168-pin, EDO
DIMMs required)
System software notes: Supports System 7.5.5 or later
Equipment: Built-in 15-inch multiple scan tilt-and-swivel color display; 2.0
GB IDE hard drive; 12X CD-ROM drive; 2-D and 3-D hardware
graphics acceleration; 256K level 2 cache; two GeoPort-capable
serial ports; 16-bit sound with SRS 3-D sound enhancement;
communications slot; TV tuner slot; video input jack
Chapter 13: The PowerPC Macs, Model by Model 511
■ ■
MACWORLD MAC SECRETS • 4040-8/X • Chapter 13 • FINAL • VB/dfq • 11/02/98 • p.511
MACWORLD MAC SECRETS • 4040-8/X • Chapter 13 • Proof 2 • SH • 10/20/98 • p.511
4040-8/5 ch13.F 11/3/98 2:28 PM Page 511

Power Macintosh 6100, Performa 6110–6118
Introduced in March 1994, the 6100/60 was the cheapest of the very first
Power Macs. Its wide, low-slung case looks exactly like that of a Quadra 610
(see Figure 12-8 in the previous chapter). It’s equipped with the 601 PowerPC
chip running at a 60 MHz or 66 MHz.
Like the 610, the 6100 offers a PDS slot, which (with a $99 adapter, which may
no longer be available) can accommodate a NuBus card. (Buyer, beware:
The special circuit board on the AV model fills the PDS slot, so the 6100/60 AV
can’t accept any additional cards.) Also like the 610, you turn the machine on
by pushing a front-panel button, not by using the keyboard. The original
price of the 6100, around $1,600, was an incredible value at the time. With the
optional $300 cache card, this Mac blazed even faster than the original 7100.
Six months after the 6100 made its debut, it started showing up in department
stores under the Performa designation — the very first of the PowerPC-based
Performas. As always, the Performa versions of the 6100 (the 6110, 6112, 6115,
6116, 6117, 6118) included monitor, modem, CD-ROM drive, and pre-installed
software.
512 Part II: Secrets of the Machine
■ ■
MACWORLD MAC SECRETS • 4040-8/X • Chapter 13 • FINAL • VB/dfq • 11/02/98 • p.512
MACWORLD MAC SECRETS • 4040-8/X • Chapter 13 • Proof 2 • SH • 10/20/98 • p.512
CASE HISTORY
As consultants and troubleshooters, we’ve seen
it all. We’ve taken the calls from people whose
printer simply wouldn’t work (it wasn’t plugged
in); people who couldn’t manage to stick a
floppy disk into the drive (a disk was already in
the drive); and people whose work disappeared
suddenly and without a trace (they had clicked
the Desktop, sending their word-processor
window to the background).
But that’s small potatoes compared to some of
the stories we read in the Wall Street Journal
recently. A technician at Compaq Computers
told of a frantic call he received on the help line.
It was from a woman whose new computer
simply wouldn’t work. She said she’d taken the
computer out of the box, plugged it in, and sat
there for 20 minutes waiting for something to
happen. The tech guy asked her what happened
when she pressed the power switch. The lady
replied, “What power switch?”
In the Mac world, we’re used to pressing Return
or Enter to dismiss a dialog box. In the PC world,
however, it’s common for the screen to say,
“Press any key to continue.” Incredibly, literally
hundreds of people wind up calling the
computer makers to complain that they can’t
find the “Any” key on the keyboard. Compaq is
actually considering changing the instruction to
“Press the Return key.”
Then there’s the immortal tale of the help-line
technician who asked the caller to send him a
copy of the disk that was giving her trouble.
Sure enough, several days later, the technician
received a photocopy of the disk. (It was a two-
page enclosure, of course, because the disk was
double-sided.)
Our credulity is stretched nearly to the breaking
point, however, by the following story told by a
Dell computer technician. As the Wall Street
Journal put it: “A customer called to say he
couldn’t get his computer to fax anything. After
40 minutes of troubleshooting, the technician
discovered the man was trying to fax a piece of
paper by holding it in front of the monitor screen
and hitting the Send key.”
Tales from the Tech Line, Part II
4040-8/5 ch13.F 11/3/98 2:28 PM Page 512

The 6100/60 was replaced in January 1995 by the 6100/66, a nearly identical
computer with — as its name indicates — a faster clock speed.
Price: $1,700 then, $425 now (with AV option: $2,400 then, $500
now)
Apple code name: PDM
On the market for: 9 months (non-Performa version)
Processor and speed: PowerPC 601 at 60 or 66 MHz
Memory: 8MB, expandable to 72MB (80-ns, 72-pin DRAM chips, in
pairs, required)
Equipment: Built-in video (uses System RAM); with adapter, slot can hold a
7" NuBus board or PDS board (except on the AV model, whose
slot is already filled); optional AV model includes TV
input/output, additional video jack; optional cache card
provides 15 percent speed-up; Ethernet; 2 GeoPort jacks;
records and plays 16-bit CD-quality stereo sound
System software notes: Requires System 7.1.2 (with PowerPC Enabler) or later
Power Macintosh 6200, Performa 6200–6230
The July 1995-born 6200-series models — six Performas and one Power Mac
— were conceived as low-cost computers with a heavy-duty multimedia slant.
Each Performa has a 1GB hard drive, 8MB or 16MB of RAM, a 15-inch screen
and an internal 4X CD-ROM drive. Come to think of it, a 6200 is nothing more
than a 5200 split into two pieces — a monitor and a CPU box — which
resemble the Quadra 630 (see Figure 12-12 in the previous chapter).
As usual, distinguishing between the various Performa models is confusing at
best. The only difference between a Performa 6200 and a 6205 is the speed of
the modem (a 6200 has a 14.4 Kbps modem, while the 6205’s modem runs at
28.8 Kbps). The next model up isn’t called the 6210 or 6215 — it’s the 6216.
Why? Because it comes with one additional piece of software — Expresso, a
calendar/address book. After that comes the 6218, with 16MB of RAM instead
of 8 (and, oddly enough, a 14.4 Kbps modem). The 6220 came with a TV tuner
and the Apple Video System, which lets you digitize video from a VCR or
camcorder. And the Performa 6230CD came with Apple’s $300 MPEG Media
System preinstalled, a card that compresses and decompresses full-motion
video and 16-bit CD-quality sound.
Like the Quadra 630 series, the Performa 6200 (and the 5200 series, described
earlier) have IDE hard drives instead of the usual SCSI hard drive. See
Chapters 8 and 33 for IDE details.
Price: 6200: $2,000 then, $550 now; 6230: $3,000 then, $550 now
On the market for: 8 months
Processor and speed: PowerPC 603 at 75 MHz
Memory: 8MB or 16MB expandable to 64MB (80-ns, 72-pin DRAM chips
required)
Equipment: IDE hard drive; built-in video with 1MB of DRAM; includes
Apple Multiple Scan 15"; 4X CD-ROM drive; fax modem
Chapter 13: The PowerPC Macs, Model by Model 513
■ ■
MACWORLD MAC SECRETS • 4040-8/X • Chapter 13 • FINAL • VB/dfq • 11/02/98 • p.513
MACWORLD MAC SECRETS • 4040-8/X • Chapter 13 • Proof 2 • SH • 10/20/98 • p.513
4040-8/5 ch13.F 11/3/98 2:28 PM Page 513

Performa 6260CD, 6290CD
While seemingly identical to other models in the 6200 series (see Figure 12-12
in the previous chapter), the Performa 6290, introduced in January 1996, is
actually a faster and more powerful computer, built around a 603e chip running
at 100 MHz. The 6290 package comes with a 1.2GB hard drive, 28.8 Kbps internal
fax modem and a 14-inch monitor (instead of the 15-inch monitor that came
with the earlier 6200-series machines). The 6260, released six months later, is
identical, sold only overseas.
Price: $2,200 then, $575 now
On the market for: 9 months
Processor and speed: PowerPC 603e at 100 MHz
Memory: 8MB expandable to 64MB
Equipment: Built-in video with 1MB of DRAM; includes Apple Multiple
Scan 14"; 4X CD-ROM drive; 28.8 Kbps fax modem
Performa 6300–6360
The Performa 6300, introduced in November 1995, is a Performa 6290 with
more RAM, a 15-inch monitor, and three additional software programs thrown
into the Performa bundle (see Figure 12-12 in the previous chapter). (You can,
in fact, turn your 6200 into a 6300 with a $700 logic-board upgrade from Apple.
The upgrade — if it’s still available — also fits 5200-series and 630-series Macs.)
514 Part II: Secrets of the Machine
■ ■
MACWORLD MAC SECRETS • 4040-8/X • Chapter 13 • FINAL • VB/dfq • 11/02/98 • p.514
MACWORLD MAC SECRETS • 4040-8/X • Chapter 13 • Proof 2 • SH • 10/20/98 • p.514
MACINTOSH SECRET
Every desktop Mac comes with two standard
serial ports in the back — a modem port and a
printer port, right?
Not quite. Inspect the back of any Performa with
a built-in modem, such as the Performa 6200 or
5200, and you’ll see something unprecedented
in Mac history — instead of a modem port,
there’s a little plastic cap with a label that says,
“Do not remove.” If you pry off the cap and try
plugging something into this port anyway,
nothing happens. The port is dead.
What’s going on here? Believe it or not, the
internal Global Village IIv fax modem that comes
installed in the communications slot on those
models disables the external modem port.
That’s why Apple politely covers the port on
those models with a plastic cap.
Apple’s thinking on this was: “Who needs a
modem port? You’ve got an internal modem.”
The problem is, of course, modem ports aren’t
just for modems; they link all kinds of serial
devices to your Mac — MIDI keyboards, digital
cameras, QuickCams, PalmPilots, and so on.
(Then there’s the issue of upgrading that modem
to a 56K model.)
So what if you need to use that dead modem
port on your 6200? There is a solution: You can
remove the internal modem card from the
communications slot. As soon as the
communications slot is empty, your modem port
springs back to life. (Of course, Apple is quick to
point out that any damage caused by the removal
of the modem is not covered under warranty.)
The modem port scandal of '95
4040-8/5 ch13.F 11/3/98 2:28 PM Page 514
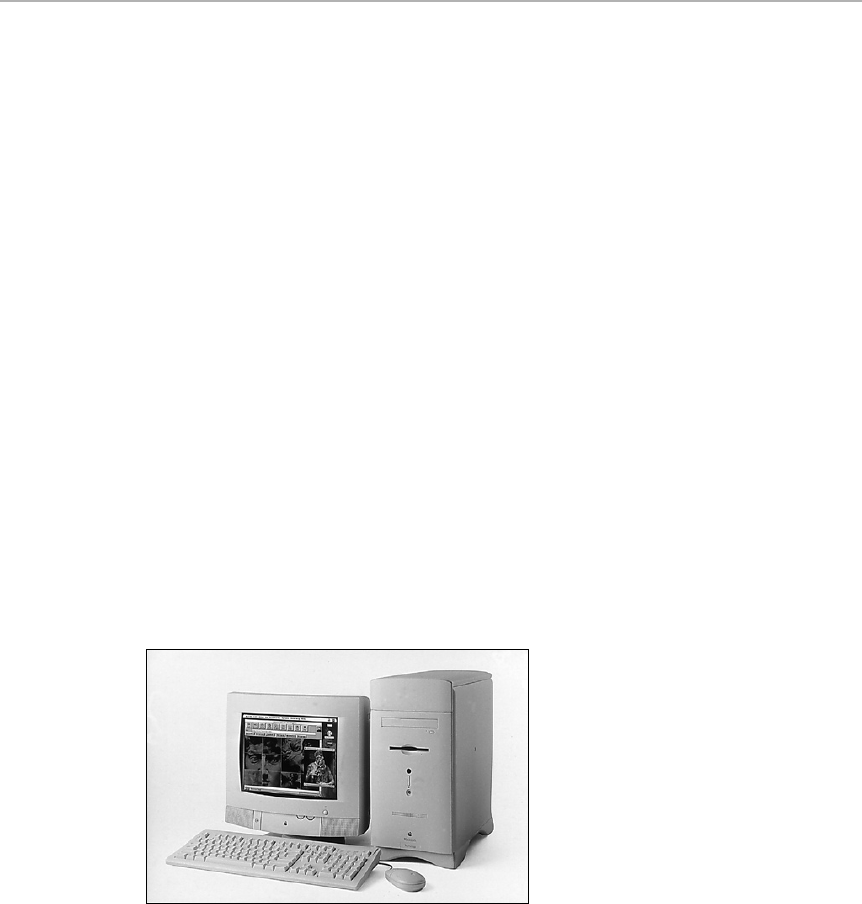
The Performa 6320, rolled out six months after the original 6300, is a souped-
up version of the 6300, running at 120 MHz. However, Apple canned the
6320 in September 1996, just seven months after its release, making it one
of the shortest-lived Mac models in history. Then, a month later, the 6360
debuted — a 160 MHz machine that, with its 16MB RAM, 1.2GB hard drive,
28.8 modem, and 8X CD-ROM for $1,500, actually made Windows computers
look expensive by comparison.
Price: 6300: $2,800 then, $650 now; 6360: $1,500 then, $700 now
Apple code name: Crusader
On the market for: 6300: 1 year, 1 month; 6320: 7 months; 6360: 1 year
Processor and speed: 6300: PowerPC 603e at 100 MHz; 6360: PowerPC 603e at
160 MHz
Memory: 16MB expandable to 64MB (80-ns, 72-pin DRAM chips
required)
Equipment: Built-in video with 1MB of DRAM; includes Apple Multiple
Scan 15" display; 4X CD-ROM drive; 28.8 Kbps fax modem
Performa 6400
When the Performa 6400 was introduced in August 1996, it forever shattered
the concept of the Performa as a low-end, beginners-only Macintosh. These
hefty, tower-style Macs were high-powered machines at the time, with 603e
chips running at 180 MHz or 200 MHz. The minitower case resembles a
puffed-up 8500, but with softer edges, a rounded, bulging top, and a
headphone jack mounted smack in the front panel (see Figure 13-3).
Figure 13-3: Apple’s first minitower Performas: tall, sleek, powerful.
Of course, the 200-MHz Performa 6400 isn’t as fast as, say, the 200-MHz Power
Mac 9500, which runs on a 604e chip. But it is as fast as a 150-MHz Power Mac
9500 — and that’s still one very fast Performa.
The 6400 doesn’t just run faster than earlier Performas — it sounds better,
too. Its sound system includes SRS surround-sound and a subwoofer speaker.
Plug Apple’s TV/FM Radio System into the special expansion bay provided on
Chapter 13: The PowerPC Macs, Model by Model 515
■ ■
MACWORLD MAC SECRETS • 4040-8/X • Chapter 13 • FINAL • VB/dfq • 11/02/98 • p.515
MACWORLD MAC SECRETS • 4040-8/X • Chapter 13 • Proof 2 • SH • 10/20/98 • p.515
4040-8/5 ch13.F 11/3/98 2:28 PM Page 515

the 6400, and you can listen to your favorite radio stations (or watch TV) in
full, rich stereo.
The 6400 is also one of the first Performas that’s easily expandable. It’s got two
PCI slots plus a variety of specialized communications and video slots. The
Performa 6400 Video Editing Edition, released in October 1996, added an Avid
Cinema software suite to Apple’s Video System digitizing card, making it easy
for camcorder or VCR owners to produce QuickTime movies on the family Mac.
The 6400, by the way, was the last Performa. Apple decided that the term
“Performa” was confusing the public, and that customers associated it with
the company’s older, less-powerful computers. The 6400’s successor, the
6500, was called a Power Mac — as are all new models, regardless of the
market for which they are intended.
Price: 6400/180: $2,400 then, $800 now; 6400/200: $2,800 then,
$900 now; 6400/200 Video Edition: $950
On the market for: 1 year, 1 month
Apple code name: Instatower
Processor and speed: PowerPC 603e at 180 or 200 MHz
Memory: 16MB (or 32MB in the Video Edition) expandable to 136MB
(70-ns, 168-pin DIMM chips required)
Equipment: Eight-speed CD-ROM drive; 1.6GB or 2.4GB IDE hard drive;
256K level 2 cache (with 200 MHz model); two PCI expansion
slots, communications slot, input slot for Apple Video System,
expansion bay for Apple TV/FM Radio System; 1MB of VRAM;
includes Apple Multiple Scan 15"; 4X CD-ROM drive; 28.8 Kbps
fax modem
Power Macintosh 6500
The 6500 is a faster, more powerful version of the Performa 6400 (see Figure
13-3). Four variants of the 6500 were introduced in April 1997 — each built
around a 603ev chip cranked up to 225 MHz, 250 MHz, 275 MHz, or 300 MHz.
Those speeds may have sounded dizzying, but remember that the 603 chip
was the slowest PowerPC chip in history. A 6500/300 runs slower than a
Power Mac 7300/200 (because the 7300 has a 604e chip).
Beyond the speed bumps, though, the 6500 is also equipped with a faster
CD-ROM drive (12X or 24X) than the 6400, twice the VRAM, 2-D and 3-D graphics
acceleration hardware (which the 6400 lacks), and a larger hard drive. Also, all
of the faster 6500 models came with a built-in Zip drive — a first for Apple.
Because the 6500 doesn’t have any RAM soldered on its logic board, it can be
expanded to 128MB of RAM, rather than the 136MB supported by the 6400.
Like the 6400, the 6500 was designed to be a multimedia machine, with
surround sound enhancement and slots for a TV or radio tuner. The “Creative
Studio” edition of the 6500 included video-capture hardware and software.
Price: 6500/225: $2,000 then, $1,100 now; 6500/300: $3,300 then,
$1,500 now
Processor and speed: PowerPC 603ev at 225, 250, 275, or 300 MHz
516 Part II: Secrets of the Machine
■ ■
MACWORLD MAC SECRETS • 4040-8/X • Chapter 13 • FINAL • VB/dfq • 11/02/98 • p.516
MACWORLD MAC SECRETS • 4040-8/X • Chapter 13 • Proof 2 • SH • 10/20/98 • p.516
4040-8/5 ch13.F 11/3/98 2:28 PM Page 516

Memory: 32, 48, or 64MB expandable to 128MB (64-bit-wide, 168-pin,
EDO DIMMs required)
System software notes: Supports System 7.5.5 or later
Equipment: 2, 3, 4, or 6GB IDE hard drive; 12X or 24X CD-ROM drive; 2-D
and 3-D hardware graphics acceleration; 256K level 2 cache;
2MB VRAM; two GeoPort-capable serial ports; 16-bit sound
with SRS 3-D sound enhancement; communications slot; TV
tuner slot
Power Macintosh 7100, 7100AV
This Mac was the middle-priced, midrange model of the original Power
Macintosh trio that debuted in March 1994. The 7100 looks like a Quadra 650
(see Figure 12-8 in the previous chapter) and runs at 66 or 80 MHz. It has three
NuBus slots and room for a PDS card. As on the 6100, the optional cache card
grants you another 15 percent speed increase — a worthy purchase.
This Mac has four RAM slots; as with the other original Power Macs, you
must fill those slots with pairs of identical SIMMs. The 7100, like the 6100,
was an impressive amount of computer for the money.
The 7100/66 models were replaced in January 1995 by the 7100/80 and
7100/80AV. In addition to providing more speed, the 7100/80 fixed a fairly
major problem with the 7100/66 — a glitch that caused slower NuBus
performance. Although this slowdown wasn’t noticeable with many types of
NuBus cards, it was very noticeable to those who plugged a video compression
card (such as the Radius Spigot Power AV) into one of the slots. The
7100/66’s NuBus slot wasn’t transferring data fast enough to keep up with the
video-capture hardware. The 7100/80’s NuBus slots can transfer data three to
four times faster than the 7100/66.
Price: $2,900 then, $475 now (AV model: $3,900 then, $600 now)
Apple code names: Carl Sagan, BHA
On the market for: 9 months
Processor and speed: PowerPC 601 at 66 or 80 MHz
Memory: 8MB, expandable to 136MB (80-ns, 72-pin DRAM SIMMs,
installed in pairs, required)
Equipment: Built-in video (uses System RAM) plus PDS video on non-AV
model (1MB, expandable to 2MB); three NuBus slots; AV
model includes TV input/output and additional video jack (2MB
VRAM); optional cache card provides 15 percent speed-up;
Ethernet; 2 GeoPort jacks; records and plays 16-bit CD-quality
stereo sound
System software notes: Requires System 7.1.2 (with PowerPC Enabler) or later
Power Macintosh 7200, 7215, 7220
In August 1995, the 7200/75 became the new low-end Power Mac, replacing both
the 6100 and 7100 series. Although it’s built around the same PowerPC 601 chip
found in the earlier Macs, the 7200’s faster clock speed makes it noticeably
Chapter 13: The PowerPC Macs, Model by Model 517
■ ■
MACWORLD MAC SECRETS • 4040-8/X • Chapter 13 • FINAL • VB/dfq • 11/02/98 • p.517
MACWORLD MAC SECRETS • 4040-8/X • Chapter 13 • Proof 2 • SH • 10/20/98 • p.517
4040-8/5 ch13.F 11/3/98 2:28 PM Page 517

faster than its predecessors. The first 7200s ran at 75 or 90 MHz. In 1996, a
“speed-bumped” version of the 7200 revved its CPU up to 120 MHz. Its bulged-
out version of the Power Mac 7100 case design is shown in Figure 13-4.
Figure 13-4: The Power Macintosh 7200 case design also houses such Macs as the 7300,
7500, 7600, and the G3 desktop series.
The 7200 may have been at the bottom of the heap among the second-
generation Power Macs, but its features rivaled or outshone those of the
high-end Macs of even a year or two earlier. Even the basic 7200 included a
4X CD-ROM drive, 500MB hard disk, Ethernet, and three PCI expansion slots
(see Chapter 34 for the significance of PCI). The 120 MHz version of the 7200
came with an 8X CD-ROM drive and a 1.2GB hard drive. There was also a DOS-
compatible version of the 7200, a 7200/120 with a 100 MHz Pentium processor
card pre-installed in one of the PCI slots.
The 7200, along with the other second-generation Power Macs, was one of the
first desktop Macs that could be put into sleep mode — just like a PowerBook
— to conserve energy. When you put a 7200 to sleep, the computer cuts the
video signal going to the monitor, which blacks out the screen. The hard drive
keeps spinning, however, and the CPU keeps drawing power.
A special version of the 7200/90 with 16MB of RAM was released in January
1996 and sold overseas as the Power Macintosh 7215/90. As for the more
recent Power Mac 7220/200 (another overseas-only machine, released in
February 1997), it’s hardly a member of the 7200 family at all. It’s built around
the 603e chip (instead of 601) running at 200 MHz, and — get this — it has the
same case as a Power Mac 4400 (see Figure 13-1). In fact, feature for feature, it
is a 4400 — yet another aberration in Apple’s wacky model-naming scheme.
Here’s an even stranger one: What do you get if you take a 7200/120 and pack
it into a Quadra 800-style minitower? A Power Mac 8200, of course! The 8200,
released in April 1996, was never sold in the U.S. It’s a 7200 in a tower.
518 Part II: Secrets of the Machine
■ ■
MACWORLD MAC SECRETS • 4040-8/X • Chapter 13 • FINAL • VB/dfq • 11/02/98 • p.518
MACWORLD MAC SECRETS • 4040-8/X • Chapter 13 • Proof 2 • SH • 10/20/98 • p.518
4040-8/5 ch13.F 11/3/98 2:28 PM Page 518

Chapter 13: The PowerPC Macs, Model by Model 519
■ ■
MACWORLD MAC SECRETS • 4040-8/X • Chapter 13 • FINAL • VB/dfq • 11/02/98 • p.519
MACWORLD MAC SECRETS • 4040-8/X • Chapter 13 • Proof 2 • SH • 10/20/98 • p.519
Price: 7200/75: $1,700 then, $400 now; 7200/90: $1,900 then, $430
now; 7200/120: $1,900 then, $500 now
Apple code name: Catalyst
Processor and speed: PowerPC 601 at 75, 90, or 120 MHz
Memory: 8MB, expandable to 256MB via four DIMM slots (16MB
standard on 120 MHz version)
Equipment: 16-bit stereo input and output; Internal AppleCD 600i
quadruple-speed CD-ROM drive (eight-speed CD on 120 MHz
models); 3 PCI slots; 1MB of VRAM, expandable to 2MB; level
2 cache slot for optional 256K or 512K L2 cache (256K
included with 120 MHz model)
System software notes: Requires System 7.5.2 (with System Enabler 701) or later;
7200/120 requires System 7.5.3 or later.
Power Macintosh 7300
The 7300, released in early 1997, was Apple’s replacement for the
inexpensive 7200 models, which the 7300 resembles. The three 7300 models,
all PowerPC 604e-based, have speeds of 166, 180, and 200 MHz, respectively
(the 166-MHz model was sold only in Asian markets). Like the 7200, the 7300
lacks video inputs. But like all current Macs, the 7300s come ready for
business — 32MB of RAM, a 2GB hard drive, a level 2 cache for added speed,
12X CD-ROM, and built-in Ethernet.
Price: 7300/180: $2,300 then, $800 now; 7300/200: $2,700 then,
$900 now
Processor and speed: PowerPC 604e at 180 or 200 MHz
Memory: 32 MB, expandable to 512MB via eight DIMM slots
Equipment: 16-bit stereo output; internal 12X CD-ROM drive; 3 PCI slots;
2MB of VRAM, expandable to 4MB; 256K level 2 cache; built-
in Ethernet
System software notes: Requires System 7.5.5 (with System Enabler 702) or later; can
run 7.6.1, but not 7.6
CASE HISTORY
The Dumb User stories we mentioned in a
previous sidebar are sad indeed, but we’ve
heard tales on our own that we think match the
Wall Street Journal’s.
For example, a Microsoft friend told us about a
guy who wanted to insert one of the old-style
51⁄4-inch floppy disks into his 31⁄2-inch drive.
Frustrated, he simply folded the disk in half —
and then called tech support in disbelief when
the drive would not read his mutilated diskettes.
Or this, from Aldus: A woman called the
company, irate and screaming, when she learned
that PageMaker had no keyboard shortcut that
would translate her newsletter into French.
Hmm . . . Ô-F, maybe?
Tales from the Tech Line, Part III
4040-8/5 ch13.F 11/3/98 2:28 PM Page 519

Power Macintosh 7500
The Power Mac 7500 looks identical to the 7200; it shares the same case
design (see Figure 13-4). But within that case, the 7500’s PowerPC 601 chip
runs at a faster 100 MHz. The 7500 is also faster because it has a faster system
bus — the internal circuitry — which runs at 50 MHz. Thanks in part to the
improved system bus, the 7500/100 fitted with a 256K cache card (optional) is
actually faster than an 8100/110 at most tasks.
520 Part II: Secrets of the Machine
■ ■
MACWORLD MAC SECRETS • 4040-8/X • Chapter 13 • FINAL • VB/dfq • 11/02/98 • p.520
MACWORLD MAC SECRETS • 4040-8/X • Chapter 13 • Proof 2 • SH • 10/20/98 • p.520
ANSWER MAN
Q. I’ve noticed that some Power Macs come
with level 2 cache and some don’t. What the
heck is level 2 cache? For that matter, what’s
level 1cache?
A. Both terms refer to tiny super-fast memory
circuitry that does nothing but feed frequently-
used data and instructions to your Mac’s
PowerPC chip. The larger the cache size, the
faster your computer will run.
Level 1 cache is a tiny piece of memory that’s
built right into the processor chip itself. The size of
the level 1 cache depends on the type of PowerPC
chip; the 603s has a 16K cache, while the 604e
and 750 chips have 64K. At any rate, level 1
cache is etched into the chip; you can’t upgrade it.
Level 2 cache is a different story. It’s yet
another piece of ultra-high-speed memory that
retains and feeds data into the PowerPC chip,
but this cache isn’t a part of the processor chip.
It exists in the form of a memory module that
plugs into the logic board or, in the case of the
newer G3 Power Macs, directly to the CPU card.
On most Power Macs, you can upgrade the level
2 cache simply by installing a cache SIMM or
DIMM in the appropriate slot. (The SIMM and
DIMM chips used in cache slots are not the
same as the chips you use to upgrade your
RAM — they’re a special design.) Most Macs
can handle up to 256K of level 2 cache, but
some can be upgraded to 512K or 1MB.
Power Macs based on the PowerPC 750 (G3) chip
use a much more efficient caching scheme called
backside cache. With backside cache, the cache
module is attached directly to the CPU module,
bypassing the system bus and providing a much
more direct (and faster) route between the cache
and PowerPC chip itself. (In fact, backside cache
is one of the main reasons the G3 Power Macs are
so fast.) You can’t upgrade backside cache.
The bottom line is that this extra cache memory
can dramatically speed up your Power Mac,
especially if you’re running PowerPC-native
software. As the PowerPC chip speeds through its
clock cycles, it looks for instructions to execute.
The extra bits of memory in the two caches keep
the pipeline full, feeding a continuous flow of data
to the CPU for processing. With each clock cycle,
the microprocessing chip first checks its internal
cache (level 1) for instructions, then checks the
external cache (level 2). Finally, it checks your
Mac’s RAM to grab the next instruction. But
cache memory is much faster than standard RAM.
And on G3 Power Macs, the journey from the
backside cache to the CPU is faster and more
direct than the route from your RAM chips through
the system bus. So the more cache, the steadier
the flow of data to the microprocessor.
Our advice: If your Power Mac supports level 2
cache memory and you don’t have any installed,
add it; a 256K cache chip costs less than $100
and will speed up your machine by 10 to 15
percent. (On the other hand, upgrading from
256K to 512K doesn’t produce nearly as much of
a performance gain.)
The cache story
4040-8/5 ch13.F 11/3/98 2:28 PM Page 520

Chapter 13: The PowerPC Macs, Model by Model 521
■ ■
MACWORLD MAC SECRETS • 4040-8/X • Chapter 13 • FINAL • VB/dfq • 11/02/98 • p.521
MACWORLD MAC SECRETS • 4040-8/X • Chapter 13 • Proof 2 • SH • 10/20/98 • p.521
The 7500’s most distinguishing characteristics, however, are its AV features.
This second-generation Power Mac, released in August 1995, has sound and
video options previously available only in Apple’s special AV models. For
example, the 7500 has RCA-style plugs for line-level stereo input and output,
which provide much better audio quality than the standard Mac miniplug-
style audio jacks. The 7500 also has RCA phono jacks for video input from a
typical VCR or camcorder, as well as an S-video input connector for the
higher-quality video signal from Hi-8 and S-VHS recorders.
The 7500’s video features allow full-screen (640-by-480 pixel) video capture at
15 frames per second. And, like the earlier Power Mac AV models, the 7500
has an internal DAV — a digital audio/video connector — for adding fancier
QuickTime compression/decompression cards. (But see Chapter 34 for
details on the rarity of DAV cards.)
Despite a winning combination of features, the 7500 was quickly eclipsed by
the even faster Power Mac 7600, which replaced it just eight months later.
Price: $2,700 then, $510 now
Apple code name: TNT
Processor and speed: PowerPC 601 at 100 MHz
Memory: 16MB of RAM, expandable to 512MB via 8 DIMM slots;
Requires 64-bit-wide, 168-pin, 70-ns DIMMs
Equipment: Internal 600i 4X CD-ROM drive; 2MB of VRAM, expandable to
4MB; GeoPort fax and telephony software; 3 PCI slots; 10Base-
T and AAUI-15 Ethernet connectors; internal Fast SCSI bus;
RCA phono jacks for 16-bit stereo audio input and output;
minijacks for 16-bit stereo audio input and output; RCA phono
jacks for composite video input; S-video input connector;
digital audio/video (DAV) connector for video
compression/decompression cards
System software notes: Requires System 7.5.2 (with System Enabler 701) or later
ANSWER MAN
Q: Didn’t I read somewhere that the second-
generation Power Macs have a removable
processor chip? That I can replace my processor
with a faster one next year?
A: Absolutely correct. In certain Power Mac
models (such as the 7300, 7500, 7600, 8500,
8600, 9500, and 9600) the PowerPC chip is
fastened to a removable circuit board —
technically known as a daughterboard. When
your budget and technology have reached high
enough levels, you can pop out the original
daughterboard and replace it with one
containing a faster PowerPC chip. (This easy
upgradability is also a feature of the higher-end
Power Computing and UMAX clones.)
As of this writing, inexpensive 604e upgrade
cards are available in 180, 200, and 233 MHz
flavors — and even G3 daughterboards — from
Newer Technology and others.
Upgradable processor chips
4040-8/5 ch13.F 11/3/98 2:28 PM Page 521

522 Part II: Secrets of the Machine
■ ■
MACWORLD MAC SECRETS • 4040-8/X • Chapter 13 • FINAL • VB/dfq • 11/02/98 • p.522
MACWORLD MAC SECRETS • 4040-8/X • Chapter 13 • Proof 2 • SH • 10/20/98 • p.522
Power Macintosh 7600
In April 1996, Apple swapped the 7500’s PowerPC 601 chip for the faster 604
chip, boosted its speed to 120 MHz, replaced the 4X CD-ROM drive with an
eight-speed drive, added a slightly larger hard drive, and rechristened it the
7600. (A 132-MHz version was released four months later.) In every other
respect, the 7600 is identical to the 7500. Like the 7200 and 7300, it was
available in a DOS-compatible configuration, with a 100-MHz Pentium
processor card pre-installed in one of the PCI slots.
In February 1997, the 7600 got the usual speed-bump overhaul. It gained a
faster chip (604e at 200 MHz), faster CD-ROM drive (12X), more RAM in its
basic configuration (32MB), and larger hard drive (2GB).
Price: 7600/120: $3,000 then, $650 now; 7600/132: $3,000 then,
$700 now
Processor and speed: PowerPC 604 at 120 or 132 MHz, or PowerPC 604e at 200 MHz
Memory: 16MB of RAM, expandable to 512MB via 8 DIMM slots;
requires 64-bit-wide, 168-pin, 70-ns DIMMs
Equipment: Internal 4X (120-MHz model), 8X, or 12X CD-ROM drive; 2MB
of VRAM, expandable to 4MB; 256K level 2 cache; GeoPort fax
and telephony software; 3 PCI slots; 10Base-T and AAUI-15
Ethernet connectors; internal Fast SCSI bus; RCA phono jacks
for 16-bit stereo audio input and output; minijacks for 16-bit
stereo audio input and output; RCA phono jacks for composite
video input; S-video input connector; digital audio/video (DAV)
connector for video compression/decompression cards
System software notes: Requires System 7.5.3; 200-MHz model requires System 7.5.5
(with System Enabler 702) or later; can run 7.6.1 but not 7.6
Power Macintosh 8100, 8100AV, 8115
At its introduction in March 1994, the 8100 was the fastest personal computer
ever made, running native software at an unheard-of 80 MHz and equipped
with a 256K cache for even more speed.
On the outside, the minitower 8100 looks like a Quadra 800 (see Figure 12-13
in the previous chapter). Its roomy case houses the same three NuBus slots
and room for extra internal storage devices, such as additional hard drives,
CD-ROM players, or SyQuest drives. The 8100 with the AV option (a PDS card
that adds television inputs and outputs) was the first Mac in several years to
cost more than $5,000.
The 8100/100 and the 8100/110 were built on faster-still 601 chips. The only
thing more impressive than its speed was its scarcity; virtually no one could
find one to buy. (Overseas, the fastest of the 8100-series models was sold as
the Power Macintosh 8115/110.)
Apple pulled the plug on the 8100/80 models in January 1995 and discontinued
the faster versions nine months later.
Price: 8100/80: $4,250 then, $400 now; 8100/80AV: $5,660 then,
$500 now
4040-8/5 ch13.F 11/3/98 2:28 PM Page 522

Chapter 13: The PowerPC Macs, Model by Model 523
■ ■
MACWORLD MAC SECRETS • 4040-8/X • Chapter 13 • FINAL • VB/dfq • 11/02/98 • p.523
MACWORLD MAC SECRETS • 4040-8/X • Chapter 13 • Proof 2 • SH • 10/20/98 • p.523
Apple code name: Cold Fusion
On the market for: 9 months
Processor and speed: PowerPC 601 at 80, 100, or 110 MHz
Memory: 8MB, expandable to 264MB (80-ns, 72-pin DRAM chips required)
Equipment: Built-in video (uses System RAM) plus PDS video on non-AV
model (2MB, expandable to 4MB); three NuBus slots; optional
AV model includes TV input/output, additional video jack (2MB
VRAM); 256K cache card; Ethernet; 2 GeoPort jacks; records
and plays 16-bit CD-quality stereo sound
System software notes: Requires System 7.1.2 (with PowerPC Enabler) or later; 100-
MHz and 110-MHz models require at least System 7.5 (with
PowerPC Enabler 1.1.1)
TRUE FACT
Early in the spring of 1996, Apple officials were
horrified to discover several serious problems in the
ROM and cache components used in the 5200 and
5300 LC Power Macs, as well as the Performa
5200, 5300, 6200, and 6300 models. The faulty
components were causing frequent system freezes
on some models and sudden, random color shifts
on the monitors of others. At the same time, a
series of distressing hardware-related problems
were emerging on the 5300 PowerBook family:
Video screen bezels were separating at the seams,
AC power connectors were failing, and
PowerBooks were dropping off LocalTalk networks.
These weren’t the kind of problems that could be
fixed with a software update or yet another system
enabler. Apple realized it had only one choice: Notify
the tens of thousands of customers who had bought
the affected models —and fix the problems for free.
Thus was born the euphemistically-named Repair
Extension Program for the Apple Power Macintosh
and Performa 5200, 5300, 6200, and 6300 and the
Apple PowerBook Repair Extension Program.
Company officials cautiously avoided referring to
either of these programs as recalls. In fact, in an
official press release, Apple helpfully explained, “This
is a repair extension program, not a product recall.”
Recall, repair, whatever — the point is that if you
have one of these Macs, you’re eligible for a free
repair if your model suffers from the aforementioned
problems. The affected desktop models are: 5200/75
LC, 5300/100 LC, Performa 5200, 5215, 5300, 6200,
6205, 6214, 6216, 6218, 6220, 6230, 6290, or 6300.
(The problem was fixed in the 5260 and 6320
models before they were released.) Before calling
800-SOS-APPL to schedule a repair, however,
download the free program called 5xxx-6xxx Tester
from America Online or Apple’s Web page
(www.info.apple.com/swupdates). This program
tells you whether or not your model has the
hardware problem, so you don’t wind up schlepping
your Mac away only to find out that you had a
simple extension conflict. (That diagnostic software
tests the desktop models, not the PowerBooks.)
Local Apple dealers handle the repairs.
The eligible PowerBooks include the 5300, 5300c,
5300ce, and 5300cs; and the 190 and 190cs. To
get the free repairs, call 800-801-6024. Apple will
send you a freight-paid shipping box so you can
send in your PowerBook without charge. (If your
PowerBook’s serial number has the letters AA at
the end of its serial number, it was manufactured
since the problems in the construction process
were corrected. You have nothing to worry about.)
Apple plans to continue the free repair programs
for each desktop and portable model until seven
years after it is discontinued. If only that free
seven-year warranty applied to our Macs for any
problem that might arise . . .
“Cupertino, we have a problem…”
4040-8/5 ch13.F 11/3/98 2:28 PM Page 523

Power Macintosh 8200
This tower-style Mac was sold only overseas and is, in essence, a Power Mac
7200 in a different case. See “Power Macintosh 7200” earlier in this chapter
for details.
Power Macintosh 8500, 8515
Toward the end of 1995, this was the Power Macintosh everyone wanted — a
screaming-fast machine with a stunning range of standard AV features, three
PCI slots for expansion, and, at its heart, a PowerPC 604 chip running at 120
MHz. The 8500 thereafter received three speed bumps. In April 1996, two
versions running at 132 and 150 MHz were introduced. Then, four months
later, Apple replaced the 604 chip with a 604e and again upped the speed, this
time to 180 MHz.
The 8500 has the same audio features as the 7500 — RCA-style plugs for 16-bit
sound — and can also record video signals via composite and S-video jacks.
However, the 8500 goes a step further, offering built-in video output
capabilities, too, so you can show your QuickTime movies on a TV or record
them on your VCR in 24-bit color. (Previous AV Macs were limited to 16-bit
color for video output; see Chapter 11 for definitions of these terms.) If you
upgrade the 8500’s VRAM to 4MB (the maximum), you can display images on
your computer screen and a TV at the same time.
Thanks to its speed, the 8500 is a QuickTime moviemaking monster. It can
capture full-motion video — 30 frames per second — at 320-by-240 pixel size
without requiring a compression card or other hardware.
Like its predecessor, the 8100, the 8500 is housed in a tower-style case (see
Figure 12-13 in the previous chapter) with three slots (PCI) and a bay for an
additional internal drive. As with most of the recent Power Macs, Apple
released an overseas-only version of the 8500, too, called the 8515.
Price: 8500/120: $4,000 then, $800 now; 8500/150: $3,600 then,
$850 now; 8500/180: $4,500 then, $925 now
Apple code name: Nitro
Processor and speed: PowerPC 604 at 120, 132, or 150 MHz; or PowerPC 604e at
180 MHz
Memory: 16MB or 32MB of RAM, expandable to 512MB via 8 DIMM
slots; requires 64-bit-wide, 168-pin, 70-ns DIMMs
Equipment: Internal AppleCD 600i 4X or 8X CD-ROM drive; 2MB of VRAM,
expandable to 4MB; GeoPort fax and telephony software; 3 PCI
slots; 512K cache card; 10Base-T and AAUI-15 Ethernet
connectors; internal Fast SCSI bus; RCA phono jacks for 16-bit
stereo audio input and output; minijacks for 16-bit stereo audio
input and output; RCA phono jacks for composite video input
and 24-bit video output; S-video input/output connector; digital
audio/video (DAV) connector for video
compression/decompression cards
System software notes: 120-MHz version requires System 7.5.2 (with System Enabler
701) or later; faster versions require System 7.5.3 or later.
524 Part II: Secrets of the Machine
■ ■
MACWORLD MAC SECRETS • 4040-8/X • Chapter 13 • FINAL • VB/dfq • 11/02/98 • p.524
MACWORLD MAC SECRETS • 4040-8/X • Chapter 13 • Proof 2 • SH • 10/20/98 • p.524
4040-8/5 ch13.F 11/3/98 2:28 PM Page 524
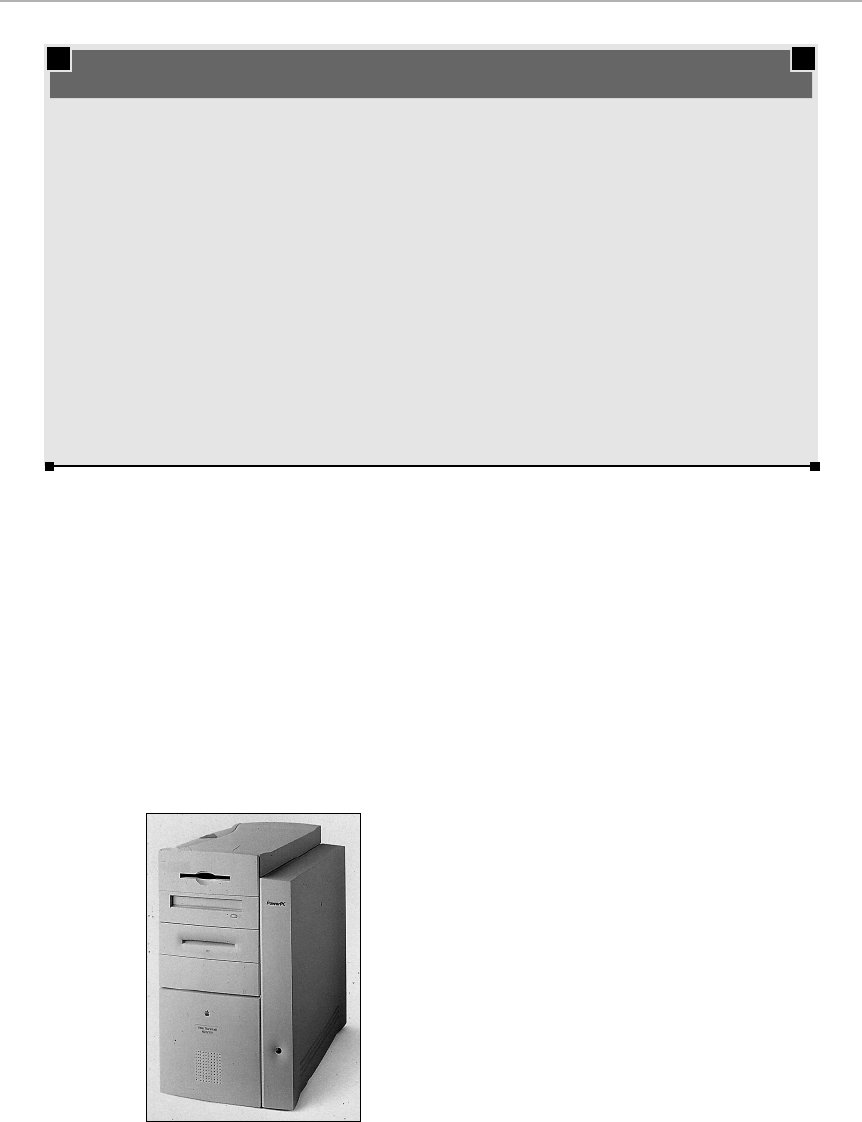
Chapter 13: The PowerPC Macs, Model by Model 525
■ ■
MACWORLD MAC SECRETS • 4040-8/X • Chapter 13 • FINAL • VB/dfq • 11/02/98 • p.525
MACWORLD MAC SECRETS • 4040-8/X • Chapter 13 • Proof 2 • SH • 10/20/98 • p.525
Power Macintosh 8600
Despite the 8500’s slick multimedia appeal, it has one feature everyone hates: A
crowded, convoluted case design that makes adding memory chips or installing
PCI cards a major headache. Adding RAM to a 8500 is a nightmarish process of
unscrewing the back panel, detaching a tangle of ribbon cables, removing all the
PCI cards, and then unscrewing the panel that holds the motherboard in place.
Relief came in February 1997, when Apple re-packed the 8500 into a new easy-
open case. Its side panel is a door that pops off; a drive bay inside swings
open to give unobstructed access to the expansion slots (see Figure 13-5).
Along with the new case design, Apple cranked up the speed to 200 MHz. A
new Mac model was born — the 8600.
Figure 13-5: The unfold-able case of the 8600 and similar machines.
MACINTOSH SECRET
Most PCI-based Power Macs (7500, 7600,
8500, and 9500, for example), as well as some
high-end clones, offer a unique trick called
memory interleaving to get more speed.(To find
out if your model is among the chosen, consult
the program called GURU — it’s included with
this book’s CD-ROM.)
If you examine the DIMM slots inside your
machine, you’ll discover that they’re arranged in
two separate clusters, called banks. (See
Chapter 9 for details on installing RAM.) When
you upgrade your RAM, buy your DIMMs in
identical pairs, and install them in identical
positions in the two banks. For example, buy
two 16MB DIMMs, and install them into the
rightmost slot (slot 1) in both banks (banks A
and B). Your Mac will automatically gulp down
data from the two parallel chips as though it’s a
single entity, resulting in a speed gain of about
10 percent for some processes.
If you have an odd number of DIMMs to install,
data accessed from the single DIMM will be at
the normal, noninterlaced speed; all DIMMs that
have been installed in matched pairs, however,
will still benefit from memory interleaving.
Play your RAM cards right for better speed
4040-8/5 ch13.F 11/3/98 2:28 PM Page 525

526 Part II: Secrets of the Machine
■ ■
MACWORLD MAC SECRETS • 4040-8/X • Chapter 13 • FINAL • VB/dfq • 11/02/98 • p.526
MACWORLD MAC SECRETS • 4040-8/X • Chapter 13 • Proof 2 • SH • 10/20/98 • p.526
Feature for feature, the 8600 and 8500 are otherwise the same, except that the
8600 has a larger hard drive, faster CD-ROM drive, and an optional internal
Zip drive. In August 1997, Apple released two even faster versions of the 8600,
running at 250 MHz and 300 MHz.
Price: 8600/200: $3,200 then, $1,120 now; 8600/250: $3,199 then,
$1,150 now; 8600/300: $3,700 then, $1,250 now.
Processor and speed: PowerPC 604e at 200, 250, or 300 MHz
Memory: 32MB of RAM, expandable to 512MB via 8 DIMM slots;
requires 64-bit-wide, 168-pin, 70-ns DIMMs
Equipment: Internal 12X CD-ROM drive; 2MB of VRAM, expandable to
4MB; GeoPort fax and telephony software; 3 PCI slots; 512K
cache card; 10Base-T and AAUI-15 Ethernet connectors;
internal Fast SCSI bus; RCA phono jacks for 16-bit stereo audio
input and output; minijacks for 16-bit stereo audio input and
output; RCA phono jacks for composite video input and 24-bit
video output; S-video input/output connector; digital
audio/video (DAV) connector for video compression/
decompression cards
System software notes: 200-MHz version requires System 7.5.5 (with System Enabler
702) or later; faster versions require System 7.6.1 or later.
Power Macintosh 9500, 9500/180MP, 9515
This June 1995 top-of-the-line Power Mac was, weirdly enough, the first of the
second-generation Power Macs; it preceded the 7200, 7500, and 8500 by two
months. It was, therefore, the first Mac to be built around the PowerPC 604
chip and the first Mac with PCI slots instead of NuBus slots.
Originally, there were two versions of the 9500 — 120 MHz and 132 MHz.
Subsequently, Apple released a 150-MHz version (in April 1996) and two
versions based on the 604e chip (August 1996), one running at 180 MHz and
one at 200 MHz. The 604 models were immediately discontinued with the
release of these faster machines.
Unlike the other second-generation Power Macs (notably the 7500 and 8500),
the 9500 wasn’t designed to be a multimedia powerhouse. It has neither RCA-
style audio jacks nor video input/output jacks. In fact, it has no built-in video
at all. You have to buy the Apple Accelerated Graphics Card or a third-party
graphics card just to hook the 9500 up to a monitor.
What the 9500 does offer, pure and simple, is speed and room to expand; it has
six PCI slots and can hold up to 768MB of RAM (see Figure 12-14 in the previous
chapter). This machine was intended for high-end users who need the 9500’s
sheer processing muscle for color publishing or multimedia production.
And speaking of sheer processing muscle, the 180-MHz model, officially called
the 9500/180MP, was a landmark release — the first computer in Apple’s history
to offer multiprocessing. It came with two 604e chips, which work simultaneously
to process data. (The MP in the name stands for multiprocessing.) One
processor handles the Mac OS and controls the stream of information
pouring in and out of the computer, handing off other tasks to the second
4040-8/5 ch13.F 11/3/98 2:28 PM Page 526

Chapter 13: The PowerPC Macs, Model by Model 527
■ ■
MACWORLD MAC SECRETS • 4040-8/X • Chapter 13 • FINAL • VB/dfq • 11/02/98 • p.527
MACWORLD MAC SECRETS • 4040-8/X • Chapter 13 • Proof 2 • SH • 10/20/98 • p.527
chip for processing. Obviously, a pair of 604e chips working in tandem in this
way can chug through graphics and video data very fast, but software has to
be specially rewritten to take advantage of this multiprocessing scheme.
Serveral companies — Adobe Systems, Deneba, Macromedia, Strata, and
others — promised to release programs to take advantage of multiprocessing.
A multiprocessor-compatible version of Photoshop, for example, was made
available. When used with software that supports multiprocessing, the
9500/180MP can handle tasks twice as fast as a single-processor Mac. Still,
the idea never caught on; only one other MP Mac was ever released.
Price: 9500/120: $4,700 then, $800 now; 9500/132: $5,300 then,
$810 now; 9500/150: $4,800 then, $850 now; 9500/180MP:
$5,700 then, $950 now
Apple code name: Tsunami
Processor and speed: PowerPC 604 at 120, 132, or 150 MHz; or PowerPC 604e at
180 or 200 MHz
Memory: 16MB of RAM, expandable to 768MB; requires 168-pin, 64-bit,
70-ns DRAM DIMMs
Equipment: Internal AppleCD 600i quadruple-speed (or eight-speed)
CD-ROM drive; 2MB of VRAM, expandable to 4MB; 512K level
2 cache; 6 PCI expansion slots; 10Base-T and AAUI-15
Ethernet connectors; one sound-output port for stereo CD audio
and one sound input port for 16-bit stereo sound input
System software notes: Requires System 7.5.2 (with System Enabler 701) or later; 150,
180, and 200 MHz versions require System 7.5.3 or later
Power Macintosh 9600
Like the Power Mac 8500 series, the 9500 series received a complete makeover
in February 1997, with an improved case design, faster clock speeds, and, of
course, a new name — the Power Mac 9600 (see Figure 13-5). Initially, Apple
made three versions: Two single-CPU models, running at 200 and 233 MHz,
and a multiprocessor model with two 604e chips running at 200 MHz.
Six months later, Apple released two dramatically faster versions of the same
machine, with speeds of 300 MHz and 350 MHz, respectively. These models
were faster than earlier Power Macs — not just because of their higher clock
speeds, but because they were among the first to include 1MB of in-line cache
connected to the processor chip. With in-line cache, the level 2 cache memory
travels to the CPU along a special high-speed connector that can shuttle data
at twice the speed of the system bus — 100 MHz instead of just 50 MHz on the
older 9500, for instance. (For more on cache, see the sidebar “The cache
story” earlier in this chapter.)
Although the 9500 and 9600 are no longer state of the art, at this writing,
they’re the best hope for moviemaking professionals who long for the G3
chip’s speed — but loathe the fact that Apple no longer makes six-slot Macs.
Get yourself a 9500 or 9600, equip it with a Newer Technology G3 upgrade
card, and you’ve got yourself the best of both worlds: a Mac that’s even faster
than the fastest G3 machine, and a full array of PCI slots.
4040-8/5 ch13.F 11/3/98 2:28 PM Page 527

528 Part II: Secrets of the Machine
■ ■
MACWORLD MAC SECRETS • 4040-8/X • Chapter 13 • FINAL • VB/dfq • 11/02/98 • p.528
MACWORLD MAC SECRETS • 4040-8/X • Chapter 13 • Proof 2 • SH • 10/20/98 • p.528
Price: 9600/200: $3,700 then, $1,000 now; 9600/200MP: $4,700
then, $1,280 now; 9600/300: $4,600 then, $1,550 now.
9600/350: $5,400 then, $1,600 now
Processor and speed: PowerPC 604e at 200, 233, 300, or 350 MHz
Memory: 32MB or 64MB of RAM, expandable to 768MB; requires 168-
pin, 64-bit, 70-ns DRAM DIMMs
Equipment: Internal 12X or 24X CD-ROM drive; 2MB of VRAM, expandable
to 4MB; 512K or 1MB level 2 cache; 6 PCI expansion slots;
10Base-T and AAUI-15 Ethernet connectors; one sound-output
port for stereo CD audio and one sound input port for 16-bit
stereo sound input
System software notes: Requires System 7.5.5 (with System Enabler 702) or later; 300
and 350 MHz versions require System 7.6.1
The Twentieth Anniversary Macintosh
Amidst plummeting sales and financial chaos, Apple celebrated its 20th
anniversary in February 1997 with the release of a special, commemorative
Mac model called the Twentieth Anniversary Macintosh. This special edition
model doesn’t look or sound like any other Mac (see Figure 13-6). The elegant
main unit consists of a flat-panel LCD display with a unique, vertically-mounted
CD-ROM drive on the front; a beautifully sculpted keyboard with built-in (and
removable) trackpad; and a Bose sound system for outstanding audio quality.
Radio and TV tuners were built in. The idea was that this machine would be
more than a computer— it would be a full-fledged entertainment center, as
high-tech, great-looking, and great-sounding as anything you could buy.
This Mac wasn’t meant for everyone. Apple only manufactured 20,000 of
them, and originally sold them only through special dealers who would
actually come to your house, deliver the computer personally, and set it up
for you. The price: $7,500.
Figure 13-6: If the Jetsons had a Mac, it might have looked something like the sleek, limited
edition Twentieth Anniversary Mac.
4040-8/5 ch13.F 11/3/98 2:28 PM Page 528

Futuristic-looking and wildly overpriced, the Twentieth Anniversary Mac offers
some cool multimedia features, but it never was a state-of-the-art computer.
Driven by a 603e chip running at 250 MHz, it’s considerably slower than other
Macs that cost much less. It’s also only got one PCI expansion slot and an
active-matrix display that supports thousands, but not millions, of colors.
Despite its uniqueness and collectability, the T.A.M. didn’t sell out overnight. In
fact, less than 18 months after its original release, the price dropped to $4,000
and by the middle of 1998, promotions for as low as $2,000 were popping up —
still a lot to pay for a 603e-based computer with limited expansion options.
Price: $7,500 then, $1,100 now
Processor and speed: PowerPC 603e at 250 MHz
Memory:
32MB expandable to 128MB (60-ns, 168-pin DIMM chips required)
Equipment: 12.1-inch active matrix, 600 by 800 pixel LCD display; CD-ROM
drive; 2GB hard drive; 256K level 2 cache; one PCI expansion
slot; communications slot; S-video input port; TV/FM Radio
System; 2MB of VRAM; ATI 3D RAGE II 64-bit graphics and
multimedia accelerator chip; 16-bit stereo input and output;
keyboard-mounted trackpad
System software notes: System 7.6.1 or later with System Enabler 704
Power Macintosh G3
These were the dream machines of early 1998 — the first Macs built around the
PowerPC 750 chip, a chip that’s inherently faster, cooler, and smaller than the
604e chip. Two of the first-generation G3 machines are housed in desktop-style
cases identical to the 7300 (see Figure 13-4); they run at 233 and 266 MHz,
respectively. The third 266 MHz G3 machine is a minitower that resembles the
9600 (see Figure 13-5). Over the months, Apple gradually substituted faster G3
chips into the same Power Mac models: a 300-MHz model in early 1998, and
333- and 366-MHz models in August 1998.
All the G3 Power Macs offer unprecedented speed. The G3 chips made the
Power Macintosh the fastest personal computer in the world in 1998 — a fact
Apple celebrated with an ad campaign that contrasted the G3 chip to the
older, slower Pentium II chip (which appeared, in the ads, aboard the back
of a snail).
However, the speed of the G3 isn’t just due to its faster microchip. Nor is the
speed a matter of sheer megahertz — as you can tell, because even the 233-
MHz G3 outpaces the 350-MHz Power Mac 9600 in speed tests. The entire
architecture of the G3 system is different, allowing data to be shuttled through
the computer’s circuitry at a higher speed and with fewer bottlenecks.
The G3 was the first Mac based on a logic board design that used to be
known as CHRP (which stands for Common Hardware Reference Platform).
CHRP, developed by Apple and IBM, was originally conceived as a system
that would run your choice of operating system: the Mac OS, Windows NT,
OS/2, or AIX (IBM’s version of the UNIX environment). The idea behind CHRP
was to create a specification that relied almost entirely on industry-standard
hardware, so that Mac-compatible machines could be built less expensively
Chapter 13: The PowerPC Macs, Model by Model 529
■ ■
MACWORLD MAC SECRETS • 4040-8/X • Chapter 13 • FINAL • VB/dfq • 11/02/98 • p.529
MACWORLD MAC SECRETS • 4040-8/X • Chapter 13 • Proof 2 • SH • 10/20/98 • p.529
4040-8/5 ch13.F 11/3/98 2:28 PM Page 529

530 Part II: Secrets of the Machine
■ ■
MACWORLD MAC SECRETS • 4040-8/X • Chapter 13 • FINAL • VB/dfq • 11/02/98 • p.530
MACWORLD MAC SECRETS • 4040-8/X • Chapter 13 • Proof 2 • SH • 10/20/98 • p.530
and by more companies. Other companies such as Motorola and Power
Computing enthusiastically started building Mac-compatible CHRP-based
models using the PowerPC 750 chip.
But when Steve Jobs returned to Apple in late 1997, he saw devastation of
Apple’s profits at the hands of the clone makers. And so it was that Apple
canceled its licensing agreements with the clone companies, thus dashing any
hopes that the standardized CHRP specification would encourage innovation
development by other computer manufacturers. The CHRP-based machines
from Motorola and Power Computing were yanked from production, and Apple
became the sole proprietor of 750-based Macs.
At any rate, the Power Mac G3 design still reflects its origins as a CHRP
machine, making much use of industry-standard components. For that
reason, the G3s are remarkably cheap to build, and therefore offer incredible
speed for a relatively low cost.
Given the fact that the G3s are based on a new chip and a new logic board,
it’s not surprising that compatibility problems arose as soon as these models
were released. Among the key issues:
■Apple’s own GeoPort isn’t supported.
■You must physically disconnect LocalTalk cables when switching
between AppleTalk to Ethernet.
■Some G3 Power Macs don’t work properly with Ethernet auto-sensing hubs.
■There are compatibility problems with some StyleWriters and HP printers.
■The contents of a RAM disk (see Chapter 9) are no longer preserved
when you restart the computer.
Despite these “gotchas,” the G3 Power Macs became instant bestsellers, both
at dealerships and from Apple’s Web site, which lets you custom-assemble
your own configuration. The success of these desktop models was a primary
factor in Apple’s financial turnaround at the beginning of 1998.
Price (examples): G3/233 desktop design: $1,700 then, $1,000 now; G3/266
minitower: $2,400 then, $1,500 now; G3/300 minitower:
$3,400 then, $2,000 now; G3/333 minitower: $3,000
Processor and speed: PowerPC 750 at 233, 266, or 300 MHz
Memory: 32MB of RAM, expandable to 192MB or 384MB
Equipment: Internal 24X CD-ROM drive; 4GB or 6GB IDE hard disk drive
(4GB or 9GB Ultra/Wide SCSI hard drives optional); 512K level
2 backside cache on processor module; 2MB of SGRAM video
memory, expandable to 6MB; 512K level 2 cache; ATI 3D RAGE
II+ 64-bit graphics and multimedia accelerator chip; 3 PCI
expansion slots; 10Base-T and AAUI-15 Ethernet connectors;
mini jacks for 16-bit stereo audio input/output; composite and
S-video connectors for video input/output (minitower only);
optional internal Zip drive.
System software notes: Mac OS 8 or higher
4040-8/5 ch13.F 11/3/98 2:28 PM Page 530
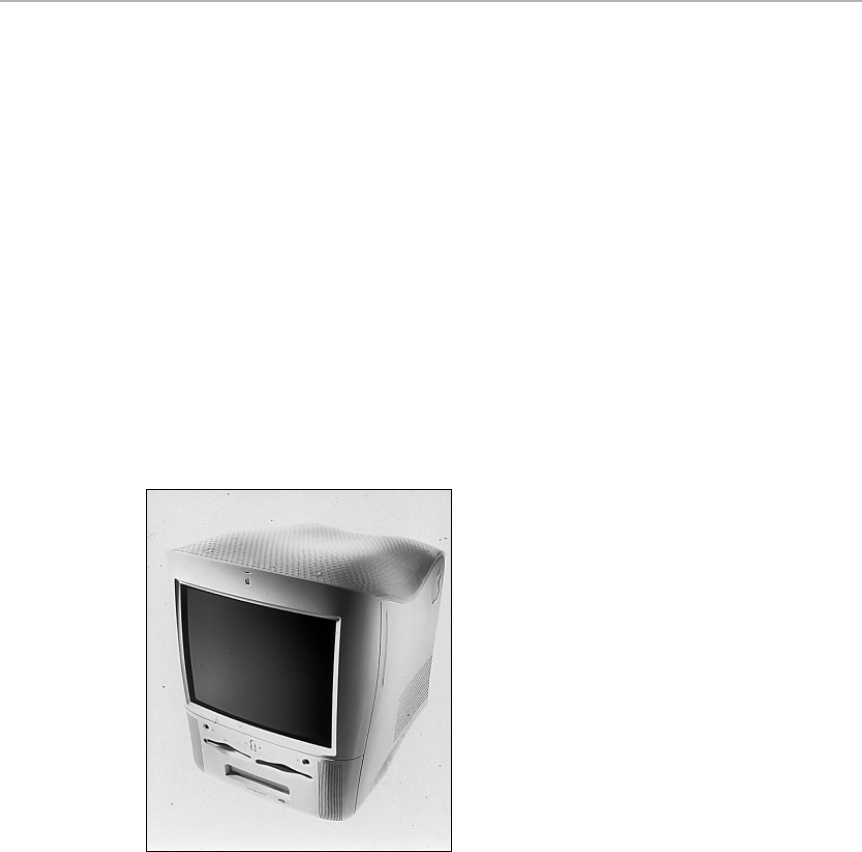
Chapter 13: The PowerPC Macs, Model by Model 531
■ ■
MACWORLD MAC SECRETS • 4040-8/X • Chapter 13 • FINAL • VB/dfq • 11/02/98 • p.531
MACWORLD MAC SECRETS • 4040-8/X • Chapter 13 • Proof 2 • SH • 10/20/98 • p.531
Power Macintosh G3 All-in-One
Yes, that — “G3 All-in-One” — is the official name of this one-piece version of the
G3 Power Mac. The All-in-One is essentially a 233- or 266-MHz G3 Power Mac
packed into a case with a 15-inch tilt-and-swivel color display (see Figure 13-7).
As usual, Apple developed this one-piece model for the education market, where
ease of set-up is a key factor. It was only available to schools and colleges.
Price (examples): G3/233: $1,500; G3/266: $1,800
Processor and speed: PowerPC 750 at 233 or 266 MHz
Memory: 32MB of RAM, expandable to 384MB
Equipment: 15-inch, multi-scan tilt-and-swivel color display; internal 24X
CD-ROM drive; 4GB hard disk; 512K level 2 backside cache on
processor module; 2MB of SGRAM video memory, expandable
to 6MB; 512K level 2 cache; ATI 3D RAGE II+ 64-bit graphics
and multimedia accelerator chip; 3 PCI expansion slots;
10Base-T Ethernet connector; mini jacks for 16-bit stereo audio
input/output; two front-mounted headphone jacks
System software notes: Mac OS 8.1 or higher
Figure 13-7: The “molar” Mac, shaped like a
giant tooth: the All-in-One.
iMac
In the history of Apple Computer, few products generated as much
excitement and anticipation as the iMac, which appeared in August 1998.
The compact, two-toned iMac is a totally redesigned one-piece Macintosh
with a revolutionary new look — a small, rounded pyramid (or alien egg, as
some called it), with elegant curves and a 1950s-inspired retro design. The
iMac features translucent aquamarine plastic panels that let you catch
shadowy glimpses of the hardware inside the case, mouse, and even cables
(see Figure 13-8). The design is so quirky and alluring that you literally have
to reach out and touch one when you see it.
4040-8/5 ch13.F 11/3/98 2:28 PM Page 531
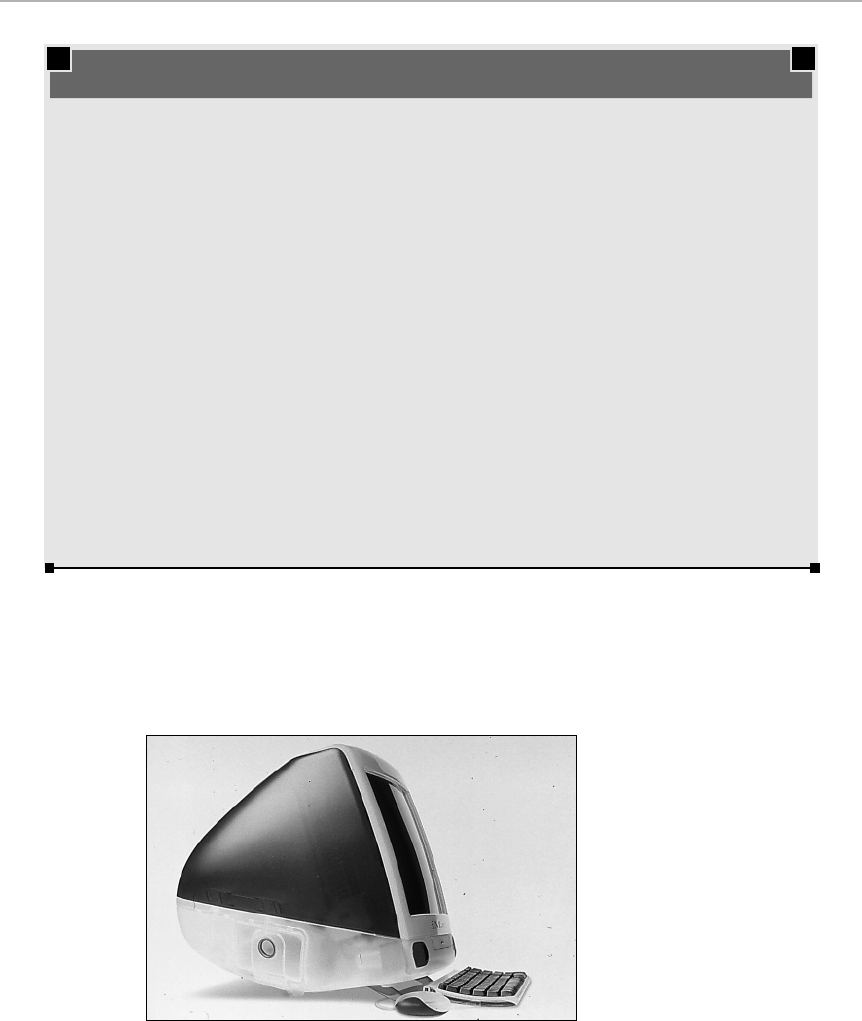
532 Part II: Secrets of the Machine
■ ■
MACWORLD MAC SECRETS • 4040-8/X • Chapter 13 • FINAL • VB/dfq • 11/02/98 • p.532
MACWORLD MAC SECRETS • 4040-8/X • Chapter 13 • Proof 2 • SH • 10/20/98 • p.532
At the same time, the iMac offers state-of-the-art technology, equipped with a
233-MHz PowerPC G3 processor, with 512K backside level 2 cache, a 66-MHz
system bus, 4GB hard drive, 24X CD-ROM drive, an integrated 15-inch
monitor and a 56K modem — all for $1,300 or less.
Figure 13-8: The sleek, retro-styled iMac features semi-transparent panels that let you peek
at the hardware inside.
MACINTOSH SECRET
Every Mac has a blob of software known as the
Toolbox. It’s a collection of behind-the-scenes
computer instructions that tell the Mac how to
do the most basic Mac tasks: draw a window,
create a menu, and so on.
On all Macs before the iMac, the Toolbox code
was permanently encoded into the Mac’s ROM
chip on its main circuit board. (Contrast with
DOS — a Disk Operating System—in which the
Toolbox-like instructions are, as the DOS name
implies, stored on the hard drive.)
The ROM scheme has some drawbacks,
however. For example, whenever Apple needs to
fix a bug in the Toolbox, it has to create a patch
in your System Folder (because it can’t very well
replace any elements of the permanently etched
ROM chip). The result is a slowdown; the Mac
first has to get its Toolbox instructions from the
ROM chip, then consult your System Folder to
see if there are any necessary updates.
The iMac marks the first time Apple, bowing to
pressure from software companies and others,
put the Toolbox code on the hard drive instead of
in a ROM chip. Open any iMac System Folder,
and there it is: a file called Mac OS ROM, whose
contents get loaded into the Mac’s memory
when you turn the computer on. (The iMac still
has a ROM chip, but it’s tiny, containing only the
software necessary to let the computer start up.)
For various technical reasons, the on-disk ROM
scheme gives a gigantic speed boost to G3-
based Macs. We expect to see Apple adopt a
similar procedure in subsequent Mac models.
The iROM: The secret Toolbox
4040-8/5 ch13.F 11/3/98 2:28 PM Page 532

Chapter 13: The PowerPC Macs, Model by Model 533
■ ■
MACWORLD MAC SECRETS • 4040-8/X • Chapter 13 • FINAL • VB/dfq • 11/02/98 • p.533
MACWORLD MAC SECRETS • 4040-8/X • Chapter 13 • Proof 2 • SH • 10/20/98 • p.533
For long-time Mac users, however, the bigger shock was what the iMac
doesn’t have — no SCSI port, no modem or printer port, and no floppy drive.
Instead, the iMac introduced the first Mac Universal Serial Bus (USB) ports,
of which it has two (see Chapter 10). The more flexible USB interface replaces
the old ABD, serial, and SCSI ports. The good news is that you can plug up to
127 devices into a USB machine, so peripheral expansion is virtually limitless;
the catch is that you need adapters to make your existing peripherals work. A
quick search of the Web reveals dozens of such adapters for sale — both
those that let you use USB devices on older Macs, as well as those those that
let the iMac use older peripherals.
Floppy disks are rapidly becoming irrelevant as more and more software
comes on CD, but plenty of us still have files stashed away on stacks of floppies.
If you want to use floppy disks on your iMac, you have a couple of options:
Newer Technology sells a USB-compatible external floppy drive, and Imation’s
SuperDisk can read standard floppies in addition to its own 120MB-format disks.
And if you’ve managed to wean yourself away from floppies completely,
Iomega is happy to sell you a USB-compatible Zip drive.
The fact that an out-of-the-box iMac doesn’t come with any kind of removable,
writeable disk drive is the singular disappointment to many potential iMac
customers. Still, the design, price, and other equipment on the iMac make it a
pretty irresistible home computer.
Price: $1,300
Processor and speed: PowerPC 750 at 233 MHz
Memory: 32MB of RAM, expandable to 128MB
Equipment: 15-inch built-in display with 1024x768 resolution; 4GB IDE hard
drive; 24x CD-ROM drive; 10/100Base-Tx Ethernet; built-in 56K
modem; two 12Mbps Universal Serial Bus (USB) ports and a
two-port USB hub on keyboard; 4Mbps infrared port; built-in
stereo speakers with SRS sound
System software notes: Mac OS 8.1 or higher
Laptop Power Macs
In the summer of 1995, Apple introduced the first PowerBooks driven by a
PowerPC chip — the PowerBook 5300 series. For these models, yet another
incarnation of the PowerPC chip was developed — the 603e chip. The 603e is
slower than the 601 (the chip in the original desktop Power Macs), but it
consumes only a third as much power and has three reduced-power sleep
modes. The 603e chip itself also is smaller than the 601, making it perfect for
a laptop.
For awhile, you could modify any 1994 PowerBook in the 500 series (the 520,
540, and so on) with a PowerPC chip, of course; but all new PowerBooks are
designed from the ground up around the PowerPC processor.
4040-8/5 ch13.F 11/3/98 2:28 PM Page 533
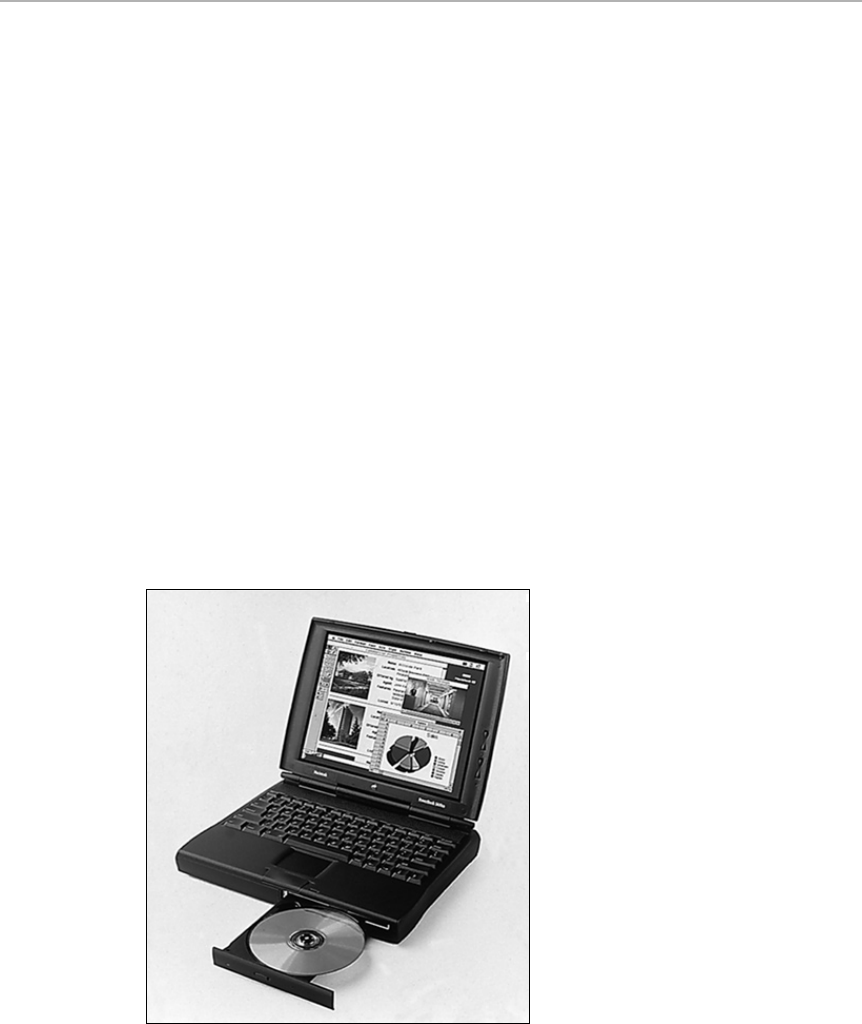
534 Part II: Secrets of the Machine
■ ■
MACWORLD MAC SECRETS • 4040-8/X • Chapter 13 • FINAL • VB/dfq • 11/02/98 • p.534
MACWORLD MAC SECRETS • 4040-8/X • Chapter 13 • Proof 2 • SH • 10/20/98 • p.534
PowerBook 1400 family
After the quality-control problems of the 5300 PowerBook series (see
“PowerBook 5300,” later in this chapter), Mac fans longed for one rock-solid,
reliable, glitch-free PowerBook. And they wanted a CD-ROM built in.
Apple was listening (see Figure 13-9). The PowerBook 1400 debuted in
October 1996, filled with crispness and solidity refinements. The trackpad,
keyboard, screen-hinge “brake,” and overall construction were all improved,
and none of the 5300-style quality problems emerged.
Moreover, this PowerBook was the first with a full-size CD-ROM — a 6X CD-ROM
unit whose tray slides out of the front edge of the machine (see Figure 13-9).
The entire drive pops neatly out of the PowerBook, too, so that you can slide
the floppy drive (or VST Zip drive, hard drive, or magneto-optical drive) into its
place. Other new features: a flip-up keyboard to make upgrading easy, and a
clear plastic cover to replace the usual dark gray top panel. Beneath this
plastic panel you can insert a BookCover — a colorful paper insert from Apple;
your travel itinerary, phone numbers, or business cards; solar-panels; leather,
woodgrain, or stainless steel covers; and so on.
Otherwise, the 1400 is much the same as the former top-of-the-line 5300ce —
at a fraction of the price. For example, the 1400 inherits the 5300ce’s brilliant,
800-by-600 dpi screen (about the equivalent desktop area of a 16-inch CRT
monitor).
Figure 13-9: The PowerBook 1400’s new case is actually the same size as its predecessor,
the 5300 — but appears slimmer and slimmer, thanks to a clean, sculpted design and tighter-
fitting clamshell halves.
4040-8/5 ch13.F 11/3/98 2:28 PM Page 534

Chapter 13: The PowerPC Macs, Model by Model 535
■ ■
MACWORLD MAC SECRETS • 4040-8/X • Chapter 13 • FINAL • VB/dfq • 11/02/98 • p.535
MACWORLD MAC SECRETS • 4040-8/X • Chapter 13 • Proof 2 • SH • 10/20/98 • p.535
The 1400’s speed didn’t increase as much as many fans had hoped — the
standard model uses the same 117-MHz PowerPC 603e processor chip (with
no level 2 cache) as the discontinued 5300ce, although a more expensive 133-
MHz model (with a cache) is available. Nor did weight (seven pounds) or
battery life (two-hour NiMH battery) improve. Otherwise, the 1400’s sleek
new case design, screen, keyboard, CD-ROM, and trackpad are so well
designed that you’ll quickly forget you’re using a laptop.
A faster 166-MHz version of the 1400, with a 12X CD-ROM and a larger hard
drive, was introduced July 1997, but the 1400 remained Apple’s low-end
PowerBook line until the May 1998 release of four G3 models.
Price: 1400cs without CD-ROM: $2,500 then, $720 now; 1400c with
166 MHz processor and CD-ROM: $4,000 then, $1,100 now
Apple code name: Epic
On the market for: 9 months (117 MHz model)
Processor and speed: 603e at 117, 133, or 166 MHz
Memory: 12 to 16MB of RAM, expandable to 64MB
Equipment: Removable Apple SuperDrive/6X, 8X or 12X CD-ROM; 11.3"
dual-scan or active-matrix color display (800 by 600 pixels);
750MB, 1GB or 2GB hard drive; enhanced, clickable trackpad;
2 PC Card slots (for two Type I or II PC Cards or one Type III
card); Nickel-Metal-Hydride battery; internal slot for 8-bit video
or Ethernet card; 16-bit stereo sound input/output ports; built-in
speaker and microphone
System software notes: 117- and 133-MHz versions: System 7.5.3 or higher; 1400c:
7.6.1 or higher; 1400cs: Mac OS 8 or higher.
PowerBook Duo 2300c
The 2300 was Apple’s first — and last — PowerPC Duo. Like other Duos, the
2300 is super-light — only 4.8 pounds — and has a docking connector that fits
all Duo docks and minidocks, as described in Chapter 12 (see “Duo 210/230”).
Like the larger 5300-series PowerBooks, the 2300 contains a 603e chip
running at 100 MHz.
The 2300 is faster than previous Duo models (although it feels very slow by
today’s standards). But it also has a better screen — a 9.5-inch active-matrix
color display that’s bigger and brighter. Unlike the PowerBook 5300, the 2300’s
trackpad lets you double-click simply by tapping on the trackpad, drag-lock
with a down-up-down tap, and briefly lift up your finger during a long drag.
Price: $3,700 then, $770 now
Apple code name: AJ
On the market for: 1 year, six months
Processor and speed: 603e at 100 MHz
Memory: 8MB of RAM, expandable to 64MB
Equipment: 9.5" active-matrix color display (640 by 480 pixels); 750MB or
1.1GB hard drive; enhanced trackpad; docking port
System software notes: System 7.5.2 or higher
4040-8/5 ch13.F 11/3/98 2:28 PM Page 535
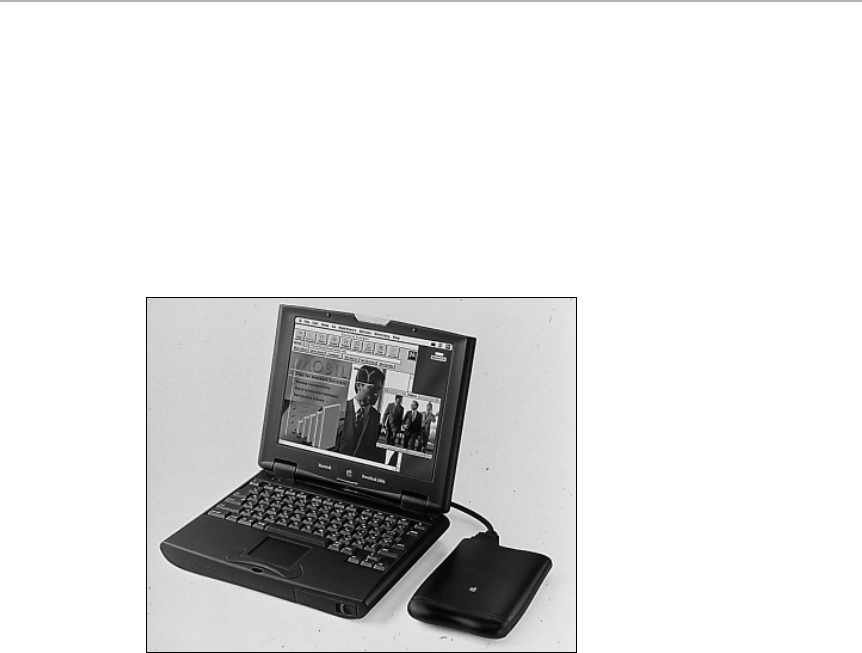
536 Part II: Secrets of the Machine
■ ■
MACWORLD MAC SECRETS • 4040-8/X • Chapter 13 • FINAL • VB/dfq • 11/02/98 • p.536
MACWORLD MAC SECRETS • 4040-8/X • Chapter 13 • Proof 2 • SH • 10/20/98 • p.536
PowerBook 2400c
As Apple’s PowerPC-based PowerBooks have gotten more powerful and
feature-laden, they’ve also gotten bulkier and heavier. A CD-ROM-equipped
PowerBook 3400, for example, weighs 7.4 pounds; and a G3 PowerBook
weighs in at close to 8 pounds.
But in May 1997, Apple introduced the smaller, sleeker, lighter PowerBook
2400 — an ultra-compact notebook computer that combines the features
of a traditional PowerBook with the slim, lightweight design of a Duo (see
Figure 13-10).
Figure 13-10: On the inside, the 2400 is based on the same high-speed PCI architecture as
the PowerBook 3400, but on the outside, it’s one of the lightest, most compact portables
Apple has ever sold.
The 2400 weighs just 4.4 pounds — it’s actually lighter than a Duo 2300 — yet
it’s got the guts of a PowerBook 3400 (described in a following section). That
is, it’s got a 180-MHz 603e chip; a vibrant, active-matrix 800-by-600 pixel
screen; two PC card expansion slots; and a full array of ports: ADB, serial,
video-out, SCSI, and sound (in and out). Like the Duo family, the 2400’s floppy
drive is an external unit that you can leave at home on the desk (although
this time, the floppy drive comes with the package). Otherwise, though, the
headaches of hunting down a dock are a thing of the past.
The 2400 has no CD-ROM drive, the tiny keyboard requires adjustment (this
model was originally designed to be marketed only in Japan), and hooking up
the external floppy drive when you need it can be a pain. But when you find
yourself dashing between flights at LaGuardia, this sweet, light machine is
the PowerBook you want in your shoulder bag.
Price: $3,500 then, $1,400 now
Processor and speed: 603e at 180 MHz
4040-8/5 ch13.F 11/3/98 2:28 PM Page 536
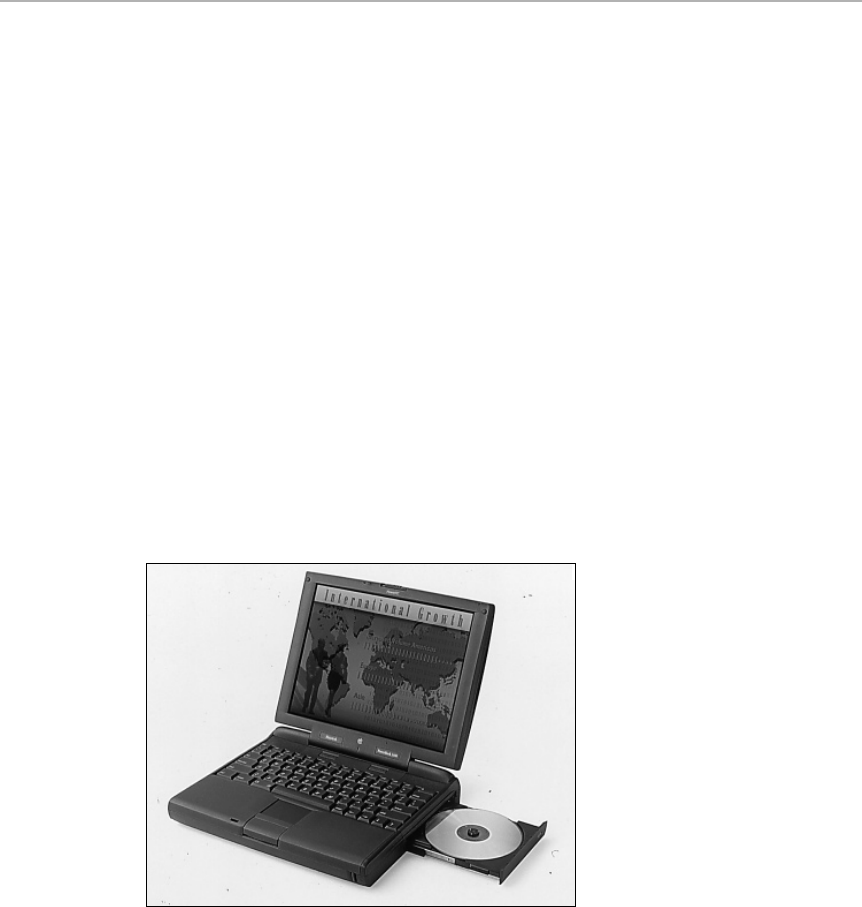
Chapter 13: The PowerPC Macs, Model by Model 537
■ ■
MACWORLD MAC SECRETS • 4040-8/X • Chapter 13 • FINAL • VB/dfq • 11/02/98 • p.537
MACWORLD MAC SECRETS • 4040-8/X • Chapter 13 • Proof 2 • SH • 10/20/98 • p.537
Memory: 16MB of RAM, expandable to 80MB
Equipment: 10.4" active-matrix color SVGA display (600 by 800 pixels);
1.3GB hard drive; 1MB VRAM; slot for 2 PC expansion cards;
built-in speaker; 16-bit sound in/out; ADB, serial, video, SCSI,
sound ports; connector for external floppy drive
System software notes: Mac OS 8 or higher
PowerBook 3400 family
Think of the PowerBook 3400 as a Power Mac 8500 crammed into a laptop.
Based on the same PCI-slot architecture found in much of Apple’s desktop
line, the 3400s were the fastest, most expandable — and most expensive —
laptops ever made when they were released in February 1997.
The 3400s are based on PowerPC 603ev chips running at 180, 200, or 240 MHz,
making previous PowerBooks (indeed, previous laptops of any kind) look like
turtles. Thanks to a 64-bit data pathway running at 40 MHz, data dances through
the circuit boards of a 3400 with few bottlenecks, delivering impressive speed.
But the 3400 is about more than sheer speed. Its video features are also
outstanding: while the pixels reveal the same 800 by 600 desktop area, they’re
larger dots, filling 12 inches diagonally (see Figure 13-11). A video output jack is
backed by enough VRAM to fill an external monitor’s 1024 by 768-pixel image.
Figure 13-11: The hefty, powerful PowerBook 3400 debuted as the fastest laptop in
the world.
Of course, all of this speed and multimedia talent didn’t come cheap: The
240-MHz version debuted at $6,400, making it one of the most expensive Macs
in history. And weighing in at 7.5 pounds, the 3400 isn’t the most portable of
the portables, either. Nevertheless, demand for the 3400 was high from the
moment it was released, as customers clamored for the power of a real PCI
Power Mac in a laptop.
4040-8/5 ch13.F 11/3/98 2:28 PM Page 537
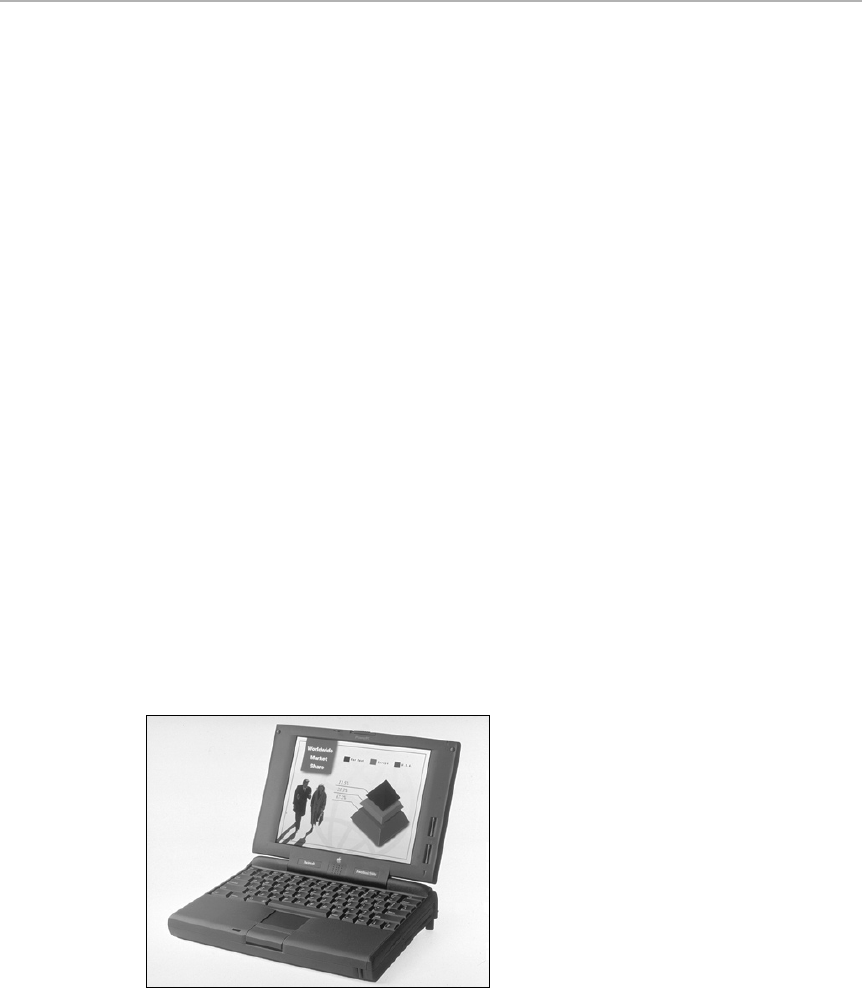
538 Part II: Secrets of the Machine
■ ■
MACWORLD MAC SECRETS • 4040-8/X • Chapter 13 • FINAL • VB/dfq • 11/02/98 • p.538
MACWORLD MAC SECRETS • 4040-8/X • Chapter 13 • Proof 2 • SH • 10/20/98 • p.538
Price: 3400/180: $4,500 then, $1,250 now; 3400/240: $6,400 then,
$1,600 now
Code name: Hooper
Processor and speed: 603ev at 180, 200, or 240 MHz
Memory: 16MB of RAM, expandable to 144MB
Equipment: 12.1" active-matrix color SVGA display (600 by 800 pixels);
256K level 2 cache; 1.3, 2, or 3GB hard drive; graphic-
acceleration hardware; slot for 2 PC expansion cards; built-in
10BASE-T Ethernet; internal 33.6-Kbps modem; 4 built-in
speakers; 16-bit sound in/out; 6X or 12X CD-ROM drive module.
System software notes: System 7.6 or higher with PowerBook 3400 Enabler
PowerBook 5300 family
Apple introduced PowerPC technology to the PowerBook line in August 1995
with the 5300 series (see Figure 13-12). The four differently named models
vary only in their screen technologies (see the specs below); the
exorbitantly-priced 5300ce was the first PowerBook to offer the now-boring
800-by-600-pixel desktop. (The physical dimensions are no larger, but the
pixels are much more tightly packed; see Chapter 11 for details.)
Three of these models contain a 603e chip running at 100 MHz — the same chip
used in the 5300- and 6300-series desktop models. The 5300ce has a faster 603e
chip — 117 MHz. Unfortunately, the 603e isn’t the speediest chip on Earth, and
these Macs don’t have a level 2 cache for frequently used instructions. As a
result, these PowerBooks are nowhere near as fast as their MHz ratings would
seem to indicate. Running native PowerPC software, you get about the speed of
the slowest Power Mac ever made (the 6100/60). And running non-native
software — such as, alas, System 7.5— these laptops can seem very slow.
Figure 13-12: The PowerBook 5300 series and the 190 share the same case design:
the first totally black PowerBooks, crammed with more removable pieces and slots and
compartments than any Mac before them.
4040-8/5 ch13.F 11/3/98 2:28 PM Page 538

Chapter 13: The PowerPC Macs, Model by Model 539
■ ■
MACWORLD MAC SECRETS • 4040-8/X • Chapter 13 • FINAL • VB/dfq • 11/02/98 • p.539
MACWORLD MAC SECRETS • 4040-8/X • Chapter 13 • Proof 2 • SH • 10/20/98 • p.539
The 5300s are bigger and chunkier-looking than earlier PowerBooks, but Apple
packed much more into them and introduced features that are now standard in
the PowerBook line. For example, these laptops have removable floppy drives;
you can pop the whole drive out of its bay and replace it with another device —
or leave it at home if you won’t be needing it when you travel.
In addition to the expansion bay, there are two PC-card slots. You’ll need those
slots if you want, for example, a modem or Ethernet hardware, because there
isn’t room inside the case for built-in versions of those features. PC cards,
popular on DOS-based laptops, were formerly known, hopelessly, as PCMCIA
cards. You can also buy PC cards that are little hard drives, pagers, and so on.
The 5300’s innovative built-in infrared transceiver lets you connect and
transfer files to any other Mac that has infrared capabilities. (If you don’t
have an IR-equipped desktop Mac, you can add an IR pod, such as the $70
Netopia Air Dock.) With the 5300’s IR transceiver, you don’t have to mess
with cables to connect to a network; you just point the transceivers at each
other (within a range of about six feet) and start transferring files.
The 5300’s represented Apple’s state-of-the-art PowerBook technology in
every respect but one: They didn’t have the improved double-clickable
trackpad found on the PowerBook 190, 1400, and every PowerBook since —
which allows you to double-click by tapping right on the trackpad. (See
Chapter 14 for details.)
The PowerBook 5300 also has the dubious distinction of being the first and
only Macintosh ever to be recalled. Shortly after the PowerBooks were
released, Apple discovered that the new lithium ion (LiIon) batteries included
with the 5300 models had an unfortunate potential to burst into flames.
About 1,000 of the 5300 machines had to be shipped back to Apple, where
they were refitted with nonexploding (and shorter-life) NiMH batteries.
Price: 5300: $2,200 then, $500 now; 5300c: $3,700 then, $680 now;
5300cs: $2,800 then, $530 now; 5300ce: $6,500 then, $700 now
Apple code name: M2
On the market for: 1 year, 1 month
MACINTOSH SECRET
Not many people use Apple’s PowerBook File
Assistant, despite its many wonders (described
in Chapter 5). Those who do, however, can play
this little undocumented game, discovered by free
book winner Robin Poirier.
If you press Option while choosing About File
Assistant from the menu, you’ll discover a
series of names flashing away in the dialog box
at warp speed. They continue racing by, too fast
to read, until you release the Option key. When
you do so, the display will freeze on the one
name that happened to be blinking into place
when you released the key. It’s like an electronic
game of musical chairs. Or maybe you’d call it a
random name generator?
The Assistant Easter egg
4040-8/5 ch13.F 11/3/98 2:28 PM Page 539

540 Part II: Secrets of the Machine
■ ■
MACWORLD MAC SECRETS • 4040-8/X • Chapter 13 • FINAL • VB/dfq • 11/02/98 • p.540
MACWORLD MAC SECRETS • 4040-8/X • Chapter 13 • Proof 2 • SH • 10/20/98 • p.540
Processor and speed: PC 603e at 100 or 117 MHz
Memory: 8MB of RAM, expandable to 64MB via one RAM card
expansion slot
Display: 5300: 9.5", 16-level grayscale, passive-matrix display, 640 by
480 pixels; 5300cs: 10.4", passive-matrix color display, 640 by
480; 5300c: 10.4", active-matrix color display, 640 by 480;
5300ce: 10.4", active-matrix color display, 800 by 600
Equipment: Removable Apple SuperDrive; internal 500MB or 1.1GB hard
disk; 2 PC Card slots (for two Type I or II PC Cards or one Type
III card); Nickel-Metal-Hydride battery; 8-bit video output port;
16-bit stereo sound input/output ports; built-in speaker and
microphone; trackpad
System software notes: System 7.5.2 or higher with PowerBook 5300 Enabler
PowerBook G3
Among the glories of the PowerPC 750 chip (see “Power Macintosh G3,”
earlier in this chapter) is that, by a happy coincidence, it’s a power-efficient,
cool-running processor. Apple wasted no time, therefore, in packing the jaw-
dropping power and speed of its G3 design into a portable.
The first G3 PowerBooks were released at the same time as the G3 desktop
models, in November 1997. The PowerBook G3 is housed in the same hefty
case as the PowerBook 3400 series (see Figure 13-11). Dramatically faster
than any preceding PowerBook, the G3 PowerBook runs at 250 MHz, with a
512K level 2 backside cache and a 50-MHz system — all of which adds up to a
laptop that, at the time it was introduced, was the fastest laptop ever made
(of any kind).
All of Apple’s best PowerBook technologies made their way into the G3: An
expansive 12.1-inch active-matrix screen, 2MB of VRAM, a four-speaker stereo
sound system, a 20X CD-ROM, a VGA video-output port, and built-in Ethernet
and modem capabilities.
The G3’s only drawback is its weight, which approaches 8 pounds with
CD-ROM and batteries loaded. That makes it the heaviest portable Apple has
introduced since 1989 — though it’s nowhere near the 15.5 pounds of the
Macintosh Portable, the original precursor to the PowerBook family.
Price: $5,700 then, $1,450 now
On the market for: 5 months
Processor and speed: PowerPC 750 at 250 MHz
Memory: 32MB of RAM, expandable to 160MB via 1 RAM slot
Equipment: 12.1" active-matrix color SVGA display (600 by 800 pixels);
512K level 2 backside cache; 5GB hard drive; graphic-
acceleration hardware; slot for 2 PC expansion cards; built-in
10BASE-T Ethernet; internal 33.6 Kbps modem; 4 built-in
speakers; 16-bit sound in/out; 20X CD-ROM drive module.
System software notes: Mac OS 8 or higher
4040-8/5 ch13.F 11/3/98 2:28 PM Page 540

Chapter 13: The PowerPC Macs, Model by Model 541
■ ■
MACWORLD MAC SECRETS • 4040-8/X • Chapter 13 • FINAL • VB/dfq • 11/02/98 • p.541
MACWORLD MAC SECRETS • 4040-8/X • Chapter 13 • Proof 2 • SH • 10/20/98 • p.541
PowerBook G3 Series
Brace yourself: This gets confusing. Just five months after shipping the
PowerBook G3, Apple replaced it with three new models called the PowerBook
G3 Series. The names are nearly identical, but the new PowerBook G3 series
computers look and feel nothing like the PowerBook G3 they replaced
All three models in the G3 series feature the best PowerBook case to roll off
the Apple assembly line in years — a beautifully contoured, multi-textured
enclosure that makes for easy gripping and carrying. These cases are nearly an
inch larger in each dimension than previous PowerBooks, making them even
less handy for use on an airplane tray table. But the extra size accommodates
a choice of bigger, brighter screens and a truly full-sized, superb keyboard.
These models also offer longer battery life, faster speed, and — a first on a
PowerBook — the all-white Apple logo that Steve Jobs began rolling out in 1998.
These PowerBooks come in three basic flavors (although by ordering from
Apple’s Web page, you could specify your own combination of speeds and
features). The high-end model (originally code-named Wall Street) came with
an incredible 14.1-inch active-matrix color display — the largest ever on a
PowerBook — and ran at 292 or (in a September 1998 overhaul) at 300 MHz.
The middle model offered a 250-MHz processor (later bumped to 266) and was
originally equipped with a 13.3-inch screen — still over an inch larger than the
original PowerBook G3 screen. (Bargain hunters noted with glee that this
“smaller” screen showed, in fact, exactly the same amount of screen area as the
much more expensive 14-incher— just slightly smaller. The middle-of-the-line
PowerBook got a 14-inch screen anyway during the September 1998 bump-up.)
The low-end model in the series (originally code-named Main Street) runs at
233 MHz and originally came with a 12.1-inch, passive, fast supertwist nematic
(FSTN) LCD screen, which isn’t nearly as bright and crisp as the other displays.
(It was replaced with the delightful 14-inch screen with the 9/98 crop of revved
models — and the low-end PowerBook gained a L2 cache at the same time.)
The PowerBook G3 series models represent portable Mac computing at its best,
with dual expansion bays that can each be fitted with a battery for double-long
battery life; a 66-MHz system bus (instead of the 50-MHz bus found in the first
PowerBook G3); and a 20X CD-ROM drive. The September 1998 overhaul even
introduced a first-time feature to PowerBooks: the ability to change the screen
resolution, despite having LCD screens with fixed pixel sizes (see Chapter 11).
Price (examples): $2,300 for 233 MHz/12.1-inch model; $2,730 for 250 MHz/
13.3-inch model; $5,600 for 292 MHz/14.1-inch model;
September 1998 models faster and priced somewhat differently
Processor and speed: PowerPC 750 at 233, 250, or 292MHz
Memory: 32MB or 64MB of RAM, expandable to 192MB
Equipment: 12.1-, 13.3- or 14.1-inch active-matrix color display; 5GB hard
drive; graphic-acceleration hardware; two hot-swappable
expansion bays; built-in 10BASE-T Ethernet; S-video out
capability on 13.3-inch and 14.1-inch configurations; 4 built-in
speakers; 16-bit sound in/out; 20X CD-ROM drive module
System software notes: Mac OS 8 or higher
4040-8/5 ch13.F 11/3/98 2:28 PM Page 541

542 Part II: Secrets of the Machine
■ ■
MACWORLD MAC SECRETS • 4040-8/X • Chapter 13 • FINAL • VB/dfq • 11/02/98 • p.542
MACWORLD MAC SECRETS • 4040-8/X • Chapter 13 • Proof 2 • SH • 10/20/98 • p.542
PowerPC Mac Secrets
■
The extension hazard
As we’ve mentioned, software that isn’t specifically written for Power Macs can
really slow down your machine. It follows, therefore, that non-native
extensions
are particularly problematic — because these programs run
constantly
in the
background. Versions of ATM before 3.8, for example, slow a Power Macintosh by
as much as 15 percent. Do a clean install of your System Folder (as described in
Chapter 36) after months of adding fun junk to your Power Mac, and you’re likely
to be shocked at how much faster it is
without
them.
So how can you tell if your entire system is being dragged down by a few non-
native extensions? Use Conflict Catcher (or the demo, included on the CD-ROM
with this book). Open the control panel, click the Report button, and choose
Patched System Traps from the pop-up menu. Read the list of your extensions.
Those with multiple asterisks beside their names are probably dragging your
entire Mac into the slow lane.
You can also use a freeware utility called PowerPeek (available on the Web at
www.zdnet.com/mac/download.html). Among other things, PowerPeek lists all
the native files on your system, so you know exactly which of your programs are
and aren’t run under emulation. PowerPeek also flashes an indicator light in the
upper-right corner of your screen to tell you whether or not your Mac is running
native code. The indicator flashes green when you’re running native code and
red when you’re running under emulation.
Not all slots are created equal
A Power Mac 9500 has six PCI slots — but don’t fill them arbitrarily. Cards in the
top three slots run slower than those plugged into the bottom three. The speed
difference has to do with the PCI architecture, which requires one controller for
every three slots. Evidently, Apple’s design taxes one trio of slots more than the
other. So if you have a choice, fill your slots from the bottom first for the best
performance.
Identifying a chip’s type and speed
Apple has used five different types of the PowerPC chip in its Power Macs,
running at speeds ranging from 60 MHz to 366 MHz. How can you tell which
chip is in
your
Power Mac and determine its actual clock speed? Is there any
way to tell what chip is running your Mac just by looking at it?
Yes. Open your Mac’s case and take a look at the FCC ID label located on the back
of the processor card. The number on the FCC ID label contains nine characters,
the last six of which identify the processor and the speed. For example, if the FCC
ID ends in 604132, it means you have a 604 processor set to run at 132 MHz. On
a G3 machine, the digits on the back of your chip end, for example, 750DIP300CH.
That tells you you’re running a PowerPC 750 (G3) chip at 300 MHz.
Worth
Learning
4040-8/5 ch13.F 11/3/98 2:28 PM Page 542

Chapter 13: The PowerPC Macs, Model by Model 543
■ ■
MACWORLD MAC SECRETS • 4040-8/X • Chapter 13 • FINAL • VB/dfq • 11/02/98 • p.543
MACWORLD MAC SECRETS • 4040-8/X • Chapter 13 • Proof 2 • SH • 10/20/98 • p.543
TRUE FACT
What do the PowerBook 5300ce, Mac Portable,
Mac IIci, and Mac SE/30 have in common? They
are all among the ten most expensive Macs ever
released.
True, by today’s standards, you would hardly think
of the IIci as a powerhouse computer (or consider
the leaden Mac Portable much of a laptop). But at
the time of their release, these machines
represented Apple’s cutting edge—and people
paid top dollar to get that new technology into
their own hands. Amazingly, people paid $8,800 to
get a brand new IIci in September 1989— enough
money to buy five Power Macintosh G3s!
You could argue that the single most expensive
Mac model ever released was the almost
universally ignored Mac XL, originally called the
Lisa, which predated the original Mac 128K by a
full year. (Though many people don’t consider
the XL a real Mac, it could run Mac software —
up to System 3.2 — and was written up in the
earliest issues of Macworld.) The Mac XL
debuted in January 1983 with a whopping price
tag of $10,000.
Here, for the record, are the nine other top-dollar
Macs, listed with their original prices:
The most expensive Macs of all time
Model Released Original price
Mac IIfx March 1990 $9,870
Mac IIx October 1988 $9,300
Quadra 950 May 1992 $8,800
Mac IIci September 1989 $8,800
Quadra 900 October 1991 $8,500
Twentieth Anniversary Mac February 1997 $7,500
PowerBook 5300ce August 1995 $6,500
Mac SE/30 January 1989 $6,500
Mac Portable September 1989 $6,500
Oh, all right — there
is
a much simpler way. Simply run Clockometer, which is
included on the CD-ROM with this book (see Figure 13-13), or your own copy of
Apple System Profiler.
Figure 13-13: The Clockometer program tells you instantly what chip’s inside your Macintosh.
4040-8/5 ch13.F 11/3/98 2:28 PM Page 543

544 Part II: Secrets of the Machine
■ ■
MACWORLD MAC SECRETS • 4040-8/X • Chapter 13 • FINAL • VB/dfq • 11/02/98 • p.544
MACWORLD MAC SECRETS • 4040-8/X • Chapter 13 • Proof 2 • SH • 10/20/98 • p.544
Zapping PRAM — the PCI way
We mention zapping your Mac’s PRAM (parameter RAM) several times in this
book; it’s a useful troubleshooting technique for stopping crashes and clearing
odd glitches from your system. However, PCI Macs store certain information,
such as data related to your video-display options, in
nonvolatile RAM
(NVRAM)
instead of PRAM.
So here’s how you can zap both at the same time. First, shut down your Mac.
Then start it again holding down the usual zap-the-PRAM key combo (Ô-Option-P-R).
After you hear the second startup chime, press Shift so that your Mac starts up
with extensions turned off. Finally, drag the file called Display Preferences out of
the Preferences folder in the System Folder and into the Trash — and restart.
The classic Power Mac car-crash sound
When something goes wrong on a Power Macintosh, you hear neither the four
tones of a Mac II-class machine nor the
Twilight Zone
theme of the Quadras.
Instead, you hear a horrific digitized recording of a car crash.
Want to hear it for yourself without actually damaging anything? The next time
you start your Power Mac, press the Interrupt switch
just
after the machine
begins to start up (before the screen even lights up). You’ll hear it, all right. (See
Chapter 7 for the locations of this switch.)
How to tell if it’s a native application
Life sure is confusing now that there are two strains of Mac software — native
and non-native. Wouldn’t it be nice if you could tell at a glance whether some
program was native or not?
You can. Just highlight an application’s icon and choose Get Info from the File
menu. If, at the bottom of the Get Info window, you see a message about turning
on virtual memory (and how much real memory you’ll save as a result), you’ve
got native software on your hands.
If not, not.
Memory savings recapped
In case you missed it: The most important money saver on a PowerPC Mac is
the virtual-memory oddity. Turn
on
virtual memory, even a little bit (or install
RAM Doubler), and each native program requires as little as
half as much
memory.
(Look at the Get Info box for a native program and see for yourself!)
(See the sidebar “Why a Power Mac needs more RAM” for the reason.) This is
one hunk of hard-disk space that’s well worth trading away.
Mac Basics
Mac Basics
Strange
But True
4040-8/5 ch13.F 11/3/98 2:28 PM Page 544

When 168 doesn’t equal 168
It’s obvious that you can’t use the 72-pin SIMMs from your old Power Mac 7100
in your new G3 machine, which requires 168-pin DIMMS. Here’s what’s not so
clear: The 168-pin DIMMS from any earlier Power Mac, such as the 7300 or 8600,
fit perfectly into the slots of new G3 Power Macs — but you can’t use them, either.
The memory chips may look the same and have the right number of pins, but the
G3 machines use a special kind of memory called
synchronous dynamic random-
access
memory that’s incompatible with earlier models.
The same is true, by the way, of video memor y (VRAM); you can’t use VRAM
from earlier Power Macs in the G3 models, even though the DIMMS contain the
same number of pins.
A deeply buried credit
You need MacsBug, Apple’s debugging software for programmers, for this one. (It’s
available on this book's CD.) Ask MacsBug to display memory address 40B2E280.
You’ll get a testimonial to Gary Davidian, the Apple software genius who single-
handedly wrote the 680x0 emulator code that lurks inside every Power Mac —
and just may have saved the company.
Chapter 13: The PowerPC Macs, Model by Model 545
■ ■
MACWORLD MAC SECRETS • 4040-8/X • Chapter 13 • FINAL • VB/dfq • 11/02/98 • p.545
MACWORLD MAC SECRETS • 4040-8/X • Chapter 13 • Proof 2 • SH • 10/20/98 • p.545
TRUE FACT
When you double-click a program’s icon, the
hard drive spins and your Mac reads the
program’s code into memory.
The PowerPC chip doesn’t handle this hard-disk-
to-RAM process the same way the
68000-series chips did. Older Macs could read
pieces of program code from the hard disk —
and get rid of that code — as necessary. For
example, when you print, your program loads
the printing code from the hard disk into RAM;
when the printing is finished, those printing
instructions are dumped out of memory.
Power Mac programs, on the other hand, can’t
read and dump code fragments as necessary.
Their code is stored on the disk as one giant
chunk. That’s one of the reasons a native
PowerPC program requires much more RAM
than its non-native counterpart; such a program
must load all program code into RAM when you
launch it. As a result, a native program takes
longer to load.
Fortunately, there’s a way to let a Power Mac
handle a native program in a code-fragments-as-
necessary fashion, just as non-native programs
do. Turn on Virtual Memory (see Chapter 9). Set
that virtual memory amount to 1MB or 2MB
more than your actual installed memory. Or,
alternatively, install RAM Doubler.
Because virtual memory, at heart, is a method of
rapidly swapping information between the hard
drive and RAM, it works beautifully on a Power
Mac. Microsoft Excel, for example, requires
6,500K less memory when virtual memory is on
or RAM Doubler is installed.
Why a Power Mac needs more RAM
4040-8/5 ch13.F 11/3/98 2:28 PM Page 545

546 Part II: Secrets of the Machine
■ ■
MACWORLD MAC SECRETS • 4040-8/X • Chapter 13 • FINAL • VB/dfq • 11/02/98 • p.546
MACWORLD MAC SECRETS • 4040-8/X • Chapter 13 • Proof 2 • SH • 10/20/98 • p.546
The much-too-colorful Mac
Purchasers who laid down multiple thousands to become adopters of Power Mac
technology are in for a fascinating surprise. On almost any Power Mac except the
6100, a couple of important choices are missing from the Monitors’ control panel —
namely, any color settings below “256.” You read that correctly: these Macs
cannot
be switched to black-and-white! And not just black-and-white —you can’t switch
these Macs into 4- or 16-color mode, either.
The only people who’ll care are those several million Mac fans who have games
and CD-ROM discs that require 16-color or black-and-white modes to run. Or
people who want fast screen redraws. Or people who want to take screen-
capture PICT files that aren’t enormous on the disk. Or, . . . oh well.
On first-generation Power Macs, this quirk kicks in if your monitor is connected
to the Power Mac’s
extra
video jack (the PDS video card’s output), not the built-
in video jack at the bottom of the case. On later Power Macs, you’ve only
got
one video jack — you’re stuck forever in 256 colors or higher.
We called one of our friends in the engineering department at Apple. We got the
classic response: “It’s a feature, not a bug.”
(What he meant, of course, was “It’s less expensive this way.”)
What to do with those old NuBus cards
Bought one of those spiffy new PCI-slotted Power Macs? Got a couple NuBus
cards left over from your previous Mac? You don’t have to dump them. You can
buy a NuBus expansion chassis from Second Wave (512-329-9283) that lets
you use those cards in your PCI slots.
Ditch the 68000 code
Some of today’s programs are labeled “fat binary,” meaning that they contain the
program code for
both
kinds of chips — both the PowerPC and the previous 68000
series. Of course, if you have only a PowerPC, you might not care to waste all that
disk space for storing code you’ll never use. And if you have only a Quadra, you
could happily do without the bulky PowerPC code. Yet, a fat-binary program is
represented by only a single icon! How can you strain out the unneeded code?
Use PowerPCheck, included on the CD-ROM with this book. It strips out the kind
of code you don’t need, leaving you with a much smaller, more compact program.
Strange
But True
4040-8/5 ch13.F 11/3/98 2:28 PM Page 546

Chapter 13: The PowerPC Macs, Model by Model 547
■ ■
MACWORLD MAC SECRETS • 4040-8/X • Chapter 13 • FINAL • VB/dfq • 11/02/98 • p.547
MACWORLD MAC SECRETS • 4040-8/X • Chapter 13 • Proof 2 • SH • 10/20/98 • p.547
Macintosh Clones: Here and Gone
In 1994, Apple announced that it would begin licensing System 7.5 and the
PowerPC Macintosh ROM chips to other computer makers so that they could
begin building Macintosh clones. No single event in history produced more
shock waves in the Mac community.
Until 1995, the only computers on Earth running Mac software were the Macs
that had rolled off Apple’s own assembly line. Now, Apple would let other
companies license its trademark operating system. Suddenly the distinguishing
characteristic of a Mac was no longer to be the computer itself but the Mac OS.
(This change of philosophy was first visible in System 7.5.1, which started up
not with the traditional “Welcome to Macintosh” message but the updated
“Mac OS” logo. And then came System 7.6, where the first command under the
menu said “About This Computer” instead of “About This Macintosh.”)
In sanctioning such a change, Apple hoped that its loss of the monopoly on
Mac-making would be recouped by collecting licensing fees — and the further
proliferation of Macintosh. Apple also hoped that by carefully controlling and
supervising the clone-maker licensing process, it would spare the world from
the kind of compatibility nightmares caused by a clone-making free-for-all (as
happened in the DOS world).
The clones arrive
By the spring of 1995, the very first Mac clones arrived, manufactured by a
small, new, Texas-based company called Power Computing. Shortly
thereafter, Radius, DayStar Digital, Motorola, APS, and UMAX started bringing
clones to market. All the clones were 100 percent Mac-compatible — although
Apple wouldn’t allow any of them to be called Mac or Macintosh.
In fact, clone sales took off as most clone companies offered more powerful
machines at prices that were 10 to 15 percent less than equivalent Apple
machines. And because companies like Power Computing were selling
computers in far lower quantities than Apple, the cloners were often able to
include the very latest and fastest PowerPC chips — at a time when these chips
were still too scarce for Apple to consider. After just two years, about 25
percent of all new Mac systems were being sold to companies other than Apple.
Apple backs out
By the summer of 1997, Apple realized it was in serious trouble. The clone
makers weren’t expanding the Mac OS market, as Apple had hoped — they were
simply stealing sales from Apple itself. At first, Apple tried to make up for some
of the loss by negotiating higher licensing fees from the clone manufacturers.
Ultimately, though, under the direction of acting CEO Steve Jobs, the company
decided it needed to get out of the licensing business; it just couldn’t compete.
4040-8/5 ch13.F 11/3/98 2:28 PM Page 547

In September 1997, Apple bought out the largest of the clone makers, Power
Computing. Apple said it would not license future versions of the Mac OS to
companies that wanted to compete in Apple’s markets.
One by one, the clone makers abandoned their Mac-compatible operations,
selling off their inventory at incredible closeout prices.
Licensing was just another in a series of financial disasters for Apple, but
from the customer’s point of view, the Mac clone era was great. Mac clones
generally offered the same variety of video options, ports, expansion slots,
and drives found on genuine Power Macs, at better prices and with greater
availability. During those two and a half glorious years, it was easier than
ever to buy a great Mac at a great price.
PowerPC and the Future
The G3 Power Macs are certainly a major leap forward, but some of the
biggest leaps are yet to come. Already, IBM has demonstrated G3 chips that
run as fast as 480 MHz.
If that’s not fast enough for you, IBM and Motorola also have prototypes of
the next-generation PowerPC G4 chip, which is expected to run at speeds of
1,000 MHz or more. (We envision having no problem adapting our lingo to
measure computer speeds in gigahertz — GHz — instead of megahertz.) One
proposed technology calls for a new G4 chip that will combine up to four
PowerPC 750 processors on a single chip.
As Microsoft might say, where do you want to go today — fast?
548 Part II: Secrets of the Machine
■ ■
MACWORLD MAC SECRETS • 4040-8/X • Chapter 13 • FINAL • VB/dfq • 11/02/98 • p.548
MACWORLD MAC SECRETS • 4040-8/X • Chapter 13 • Proof 2 • SH • 10/20/98 • p.548
4040-8/5 ch13.F 11/3/98 2:28 PM Page 548

MAC SECRETS • 4040-8/5 • ch.14.2 • Chapter 14 • Final • dfq/EAP • 10/26/98 • p.549
MAC SECRETS • 4040-8/5 • ch.14.2 • Chapter 14 • Proof 2 • EAP • 10/15/98 • p.549
MAC SECRETS • 4040-8/5 • ch.14.1 • Chapter 14 • Proof 1 • VB • 09/09/98 • p.549
Chapter 14
PowerBooks Exposed
In This Chapter
©Working with the PowerBook screen
©Secrets of the wall outlet—and the battery
©The RAM-disk, four-hour-battery trick
©Sleep mode
©Getting files in and out
©Infrared networking
©SCSI disk mode
If you own a PowerBook, you already know the secret little pleasures
associated with this strain of Macintosh: the hedonism of lying in bed with
the computer on your stomach; the joy of getting off the plane having done
meaningful work en route; and the intoxicating pleasure of sitting someplace
cool, green, and shady while word processing to the accompaniment of
birdsong until you run out of battery juice.
A Little History
It wasn’t that it never dawned on Apple to make a laptop Macintosh. Believe
us, they wanted to. The ill-fated, 16-pound Macintosh Portable was evidence
of that.
No, the complicating factor was miniaturization. A computer has lots of
components inside, and some of them are pretty chunky. (Pop off the lid of a
regular Mac and you’ll see what we mean.) Each PowerBook part is a fraction
of the size of the equivalent desktop-Macintosh component. The hard drive is
the size of a deck of cards; the main circuit board is a quarter of the size of a
regular Mac’s; even the RAM boards are smaller.
The most brilliant aspect of the PowerBook is that, in a thousand glorious
ways, it’s exactly like a regular Macintosh. The software works the same way;
the interface is the same; the keyboard shortcuts are the same.
4040-8/5 ch14.F 11/3/98 4:14 PM Page 549

Yet life with a PowerBook is distinctly different from life with a desktop Mac,
even if you never budge from your desk. This chapter is dedicated to
documenting the ways in which PowerBook computing differs from desktop
computing:
■Working with flat-panel screens
■Working from a wall outlet
■Working from a battery
■Working off a RAM disk
■PowerBook sleep mode
■Getting information into and out of the PowerBook
■Actually traveling with the PowerBook
We’ll consider these topics one by one. For specifics about particular
PowerBook models, see Chapters 12 (for models 100 through 280) and 13 (for
PowerPC models).
The Screen
If you’ve ever seen a PowerBook’s screen and realized that it’s about as thick
as a Wheat Thin, you understand that it can’t work the same way as a
standard Mac monitor. Regular TV-sized CRT monitors must be a foot deep or
more, to allow the electron gun a little perspective on its target, but a
PowerBook’s screen is only a fraction of an inch thick.
PowerBook screens use a completely different technology, having nothing to
do with the weight, depth, or electrical emissions of its desktop relations. It’s
called LCD, for liquid-crystal display. That’s the same technology used in
digital watches, PalmPilots, and other portable electronics.
Liquid crystal is an oily goop that’s sandwiched between two pieces of plastic.
This liquid is filled with crystal molecules that, under normal circumstances,
naturally curl into a spiral. This twisted macaroni shell of molecules
effectively blocks any light reflected from the back of the screen (from the
light bulbs at the edges of the screen or from daylight). The result is a dark
spot (shadow) on your screen.
But when an electric current is applied to the electrodes in front and back of
this liquid sandwich, the molecules uncurl. They align themselves into a
parallel pattern perpendicular to the screen. In other words, they no longer
block the light, and a bright spot appears on your PowerBook screen.
If you were able to follow this description even somewhat, then you’ll realize
that a light pixel on a PowerBook screen is on, and a dark spot is a pixel that’s
off. That may seem backward, but that’s how it goes.
All of this sandwiching and layering fits between a couple of plastic or glass
plates that can be a fraction of an inch thick. That’s why LCD screens are flat
Strange
But True
Mac Basics
550 Part II: Secrets of the Machine
■ ■
MAC SECRETS • 4040-8/5 • ch.14.2 • Chapter 14 • Final • dfq/EAP • 10/26/98 • p.550
MAC SECRETS • 4040-8/5 • ch.14.2 • Chapter 14 • Proof 2 • EAP • 10/15/98 • p.550
MAC SECRETS • 4040-8/5 • ch.14.1 • Chapter 14 • Proof 1 • VB • 09/09/98 • p.550
4040-8/5 ch14.F 11/3/98 4:14 PM Page 550

panels instead of deep boxes (like CRTs). These flat-panel screens also
require less power—another plus for use in laptop computers.
We’ve heard it predicted that all computer screens will one day be flat-panel
displays. In addition to their small size, weight, and thickness, they also don’t
emit the ultra-low frequency radiation that CRTs do (a rumored, but unproven,
health hazard). You can buy flat-panel monitors for desktop Macs today (one
was even built into the Twentieth Anniversary Mac), in fact, but they’re pricey.
Passive-matrix, dual-scan, and SFT screens
Passive-matrix screens adorned the lower-priced PowerBook models of old:
the grayscale Duo 210 and 230; PowerBook 160, 165c, 190, and 5300; and so
on. Passive-matrix screens have one big advantage: They cost about $800 less
than active-matrix screens, described later. Passive screens have a couple of
downers, however: submarining and ghosting. Submarining occurs when the
cursor fades out for a moment if you move it too quickly. Remember those
twisted-molecule strings? It takes them 1⁄8second to twist or untwist. If there’s
anything on the screen moving faster than eight pixels per second (such as
the cursor or a QuickTime movie), the passive-matrix LCD screen won’t be
able to keep up. The result is blurring.
Ghosting is something you’ll have to see on a PowerBook to understand. It’s
the faint outline of window edges, or some other rectangular structures,
superimposed on the screen. You can eliminate these ghosted horizontal and
vertical lines by fiddling with the contrast controls, but that sometimes
makes what you want to see (your text, for example) too light.
A passive-matrix screen also requires more adjustments than more-expensive
technologies. Every time you start PowerBooking in new lighting or at a new
temperature, you must fiddle with the contrast and brightness controls on
the corner of your screen/lid.
Passive screens also have a narrower viewing angle than active ones. If you
try to view the PowerBook screen when you’re not seated directly in front of
it, you see a sort of bluish, milky cast over the whole screen. That’s good
when you want privacy. That’s bad when you’re trying to demonstrate
something to onlookers.
Technically, Apple doesn’t even make PowerBooks with straight passive-
matrix screens anymore. More modern PowerBooks in the less-expensive
lines (5300cs, 1400cs, the least expensive G3) come with newer, hybrid
technologies called dual-scan or SFT. The idea is the same — the image isn’t
quite as crisp and responsive as active-matrix or TFT screens—but they look
a lot better than the original passive-matrix screens.
Active-matrix and TFT screens
The higher-priced PowerBooks (180, 540, 5300c, 1400c, Duo 280 and 2300c,
3400, most G3s, and so on) feature an active-matrix LCD screen. Every single
pixel on an active-matrix screen has its own private transistor. This transistor
Chapter 14: PowerBooks Exposed 551
■ ■
MAC SECRETS • 4040-8/5 • ch.14.2 • Chapter 14 • Final • dfq/EAP • 10/26/98 • p.551
MAC SECRETS • 4040-8/5 • ch.14.2 • Chapter 14 • Proof 2 • EAP • 10/15/98 • p.551
MAC SECRETS • 4040-8/5 • ch.14.1 • Chapter 14 • Proof 1 • VB • 09/09/98 • p.551
4040-8/5 ch14.F 11/3/98 4:14 PM Page 551

is responsible for turning its one pixel on (black) or off (white). On a passive-
matrix screen, by contrast, one row of electrodes goes horizontally, and
another vertically; their intersections govern the surrounding pixels —
an arrangement that offers much less precision.
As a result, an active-matrix screen has none of the visual problems
associated with passive-matrix ones. There’s no ghosting and no
submarining. As another result, however, these screens are expensive to
create, and they drain the battery faster than passive ones.
Furthermore, if any individual transistor goes on the fritz, its corresponding
pixel is simply broken. (Apple says the pixel is voided.) It’s almost inevitable,
actually; a PowerBook G3’s TFT screen, for example, has 480,000 individual
pixels or more! The point is that you’re pretty lucky to get an active-matrix
screen on which every single pixel works. Apple won’t even give you a
replacement screen unless you’ve got more than five voided pixels.
PowerBook Screen Secrets
■
Passive-matrix: Angle is everything
Fiddle with the angle of your PowerBook’s lid/screen just as much as you do
with the contrast and brightness controls! Looking straight into the faces of
those tiny pixels can make a dramatic difference in the screen’s overall clarity.
Passive-matrix: Contrast is also everything
In any given lighting/temperature situation, you can definitely find one contrast
setting that makes the passive-matrix screen look absolutely great. Get into the
habit of adjusting that little knob, slider, or button every time you whip open
the lid.
Passive-matrix: Finding the cursor
Not only is cursor submarining sometimes a problem on passive-matrix screens,
but it’s even possible to lose the cursor altogether!
We have two solutions. The hard way is to roll the trackball or trackpad furiously
in the upper-left direction. Eventually, your cursor will have no choice but to
bump into the corner where the Apple menu is — and stop. You can now start
hunting for it, knowing exactly where to look and wasting no additional time.
A better solution, in our opinion, is to use special software. Some people enjoy
that old shareware gem called Googol Eyes (included on the CD-ROM with this
book), which puts a pair of cartoony eyes on your Desktop — and they always
look at the cursor, wherever it may be. Various other shareware and commercial
programs are designed more specifically for PowerBook screens, offering
animated “Here I am!” cursor displays when you press a certain keystroke.
Worth
Learning
552 Part II: Secrets of the Machine
■ ■
MAC SECRETS • 4040-8/5 • ch.14.2 • Chapter 14 • Final • dfq/EAP • 10/26/98 • p.552
MAC SECRETS • 4040-8/5 • ch.14.2 • Chapter 14 • Proof 2 • EAP • 10/15/98 • p.552
MAC SECRETS • 4040-8/5 • ch.14.1 • Chapter 14 • Proof 1 • VB • 09/09/98 • p.552
4040-8/5 ch14.F 11/3/98 4:14 PM Page 552

Why a PowerBook two-page display isn’t
really one
If you’ve perused our Monitors chapter, you know the beauty of today’s 16-inch
monitors: With only a visit to the Monitors control panel, you can change
resolutions. A 16-inch multisync monitor can show 640 by 480 largish pixels
(like a 14-inch display), 800 by 600 smaller pixels (like a two-page display),
and so on.
Not until the September 1998 G3 PowerBooks could you change screen
resolution — and even then, you get only a simulated, blurry-edged version
of the additional resolution choices.
Working from a Wall Outlet
What’s great about the PowerBook is that you don’t need a separate
recharger. The battery is recharging whenever the computer is plugged into a
wall outlet, whether you’re working on it or not. (Recharging is faster, of
course, when the computer isn’t on.)
And where might the PowerBook-wielding soul find publicly available juice?
It’s not always easy, but it’s almost always possible. Look for electrical outlets
in every airport, train station, and bus terminal. When you’re desperate for a
charge — between legs of a flight, say — they’re a godsend. (Amtrak trains, by
the way, have two seats per car equipped with outlets. Board early!)
To find these cherished AC dispensers, you need to think like a janitor. These
outlets, after all, are provided for the benefit of the vacuum cleaners and
floor polishers that come out in the middle of the night. In various airports,
we’ve found outlets as follows:
■At the bases of pillars
■Next to the gate agent’s station, set into the floor
■In the wall, but covered with a silver spring-loaded cap to hide it
■Right next to the door you use to go onto the plane, at waist height
■In the airport’s overpriced fast-food joint or bar
The battery gauge
Every modern PowerBook comes with a tile on the Control Strip (see Chapter
4) that serves as a battery gauge/recharging indicator. Its numerical “time
remaining” display is an extremely useful gauge. You may have noticed,
however, that this meter’s accuracy falls somewhat short of NASA-quality
precision.
Chapter 14: PowerBooks Exposed 553
■ ■
MAC SECRETS • 4040-8/5 • ch.14.2 • Chapter 14 • Final • dfq/EAP • 10/26/98 • p.553
MAC SECRETS • 4040-8/5 • ch.14.2 • Chapter 14 • Proof 2 • EAP • 10/15/98 • p.553
MAC SECRETS • 4040-8/5 • ch.14.1 • Chapter 14 • Proof 1 • VB • 09/09/98 • p.553
4040-8/5 ch14.F 11/3/98 4:14 PM Page 553
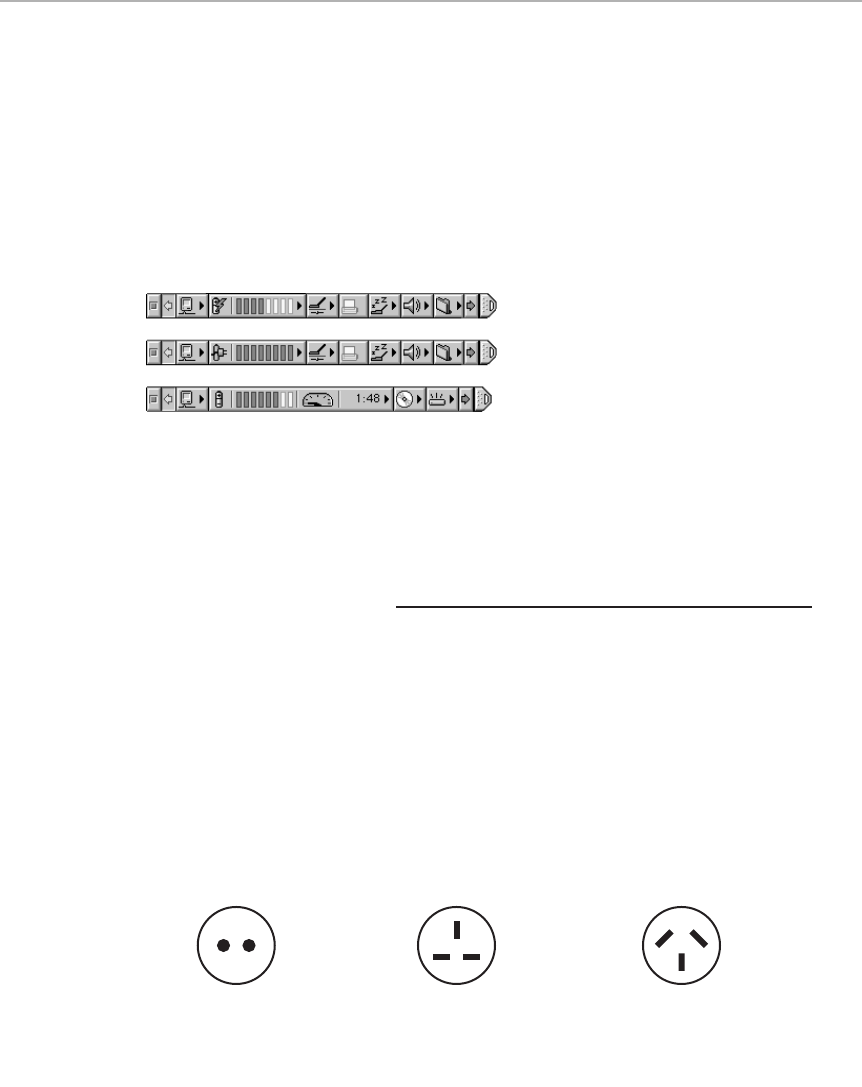
Because the chemical changes in a battery are subtle and unpredictable, and
because your work’s demands on the PowerBook components change from
moment to moment, software gauges of this type face an impossible task.
Still, if you study this Control Strip tile’s behavior, you’ll get an appreciation
for how hard it tries to be accurate. For example, when the hard drive isn’t
spinning, the “time remaining” counter revises itself upward. Launch a
Microsoft product, and the counter slips downward. In each case, it’s
extrapolating, making calculations as though your current power usage will
remain steady (see Figure 14-1). It’s saying, “Well, if you’re going to keep using
your PowerBook this way . . .”
Figure 14-1: The three states of the Control Strip battery meter. Top: the lightning-bolt-on-a-
battery icon (left) is the international symbol for: “I’m charging now, thank you.” Middle: “I’m
plugged in, but I’m all finished charging your battery.” Bottom: “I’m running on battery, and
this is my latest guess as to how much time you have left.”
Power-outlet Secrets
■
Nothing to fear when overseas
Your PowerBook is smarter than you think. It can automatically convert foreign
countries’ currents into the correct voltage for the PowerBook, be it 110V or
220V.
Before you go abroad, however, you still need to buy a
plug adapter
for the
country you’ll be in. It doesn’t affect the current — we’re talking about a simple
prong adapter that lets you plug the PowerBook into a differently shaped outlet.
(The outlets in most of Europe and Australia, for example, look like Figure 14-2.)
Figure 14-2: Outlets around the world. Get the appropriate plug converter here before you
travel. (Japan uses the same outlets as the U.S. two-prong variety.)
England, Hong Kong,
Parts of Africa
Parts of Africa, Europe,
Greenland, Iceland, former
USSR countries, Middle
East, etc.
Australia, New Zealand,
South Pacific, China
554 Part II: Secrets of the Machine
■ ■
MAC SECRETS • 4040-8/5 • ch.14.2 • Chapter 14 • Final • dfq/EAP • 10/26/98 • p.554
MAC SECRETS • 4040-8/5 • ch.14.2 • Chapter 14 • Proof 2 • EAP • 10/15/98 • p.554
MAC SECRETS • 4040-8/5 • ch.14.1 • Chapter 14 • Proof 1 • VB • 09/09/98 • p.554
4040-8/5 ch14.F 11/3/98 4:14 PM Page 554

You’ll discover that it’s much easier to find the appropriate converter plug
here,
before you travel — at a Radio Shack store, for example — than to find one in
the foreign country itself.
Juice in the air
There used to be a little
razor outlet
in every plane’s bathroom. Pathetic though
it feels to sit there on the little toilet just for the sake of eking out some work
while drawing juice from that razor outlet, it’s an emergency measure that’s
worth remembering.
We’re mixing our tenses in this paragraph deliberately, because over the last ten
years, airplane designers have stopped putting razor outlets in those
bathrooms. (Obviously, they’ve never owned PowerBooks.) About a third of the
planes we’ve traveled on in the last couple of years still have outlets on board.
But the newer planes have no outlets, nowhere, nohow. If your last PowerBook
battery dies, your hope dies with it.
A few new planes actually have outlets built into the
armrests,
which, to
PowerBook owners, is like a gift from the gods. Unfortunately, they’re available
only in the business-class or first-class sections. Jeez...the rich get all the
breaks.
Tales of the Trackpad
Beginning in 1994, the PowerBook trackball gave way to a trackpad, which
lets you control the cursor by dragging your fingertip across a two-inch
plastic square. We know plenty of people who still mourn for the easy-to-
control, easy-to-understand trackball; we can only assume that those people
forgot how often the trackball got clogged with grease and lint.
Anyway, today’s trackpad — present on all 1995-and-later PowerBooks except
the 5300 line — lets you do more than move the cursor. It also lets you click,
drag, and double-click without even touching the “mouse button” clicker.
Many PowerBook owners are unaware of these options; out of the box, the
PowerBook comes with these clicking features turned off. But visit your
Trackpad control panel (see Chapter 4) to view the three checkbox options:
■Clicking: When this option is on, you can tap the trackpad surface
itself to “click the mouse button,” and even double-click on the pad to
“double-click.”
■Dragging: This option lets you “drag the mouse” by tapping down-up-
down (and moving your finger once it’s down for the second time); you
can even continue a long drag after lifting your finger briefly.
■Drag lock: The little animated demonstrations in the Trackpad control
panel don’t make quite clear the function of this third option. In fact, this
option is by far the most useful, because dragging icons across the screen
Chapter 14: PowerBooks Exposed 555
■ ■
MAC SECRETS • 4040-8/5 • ch.14.2 • Chapter 14 • Final • dfq/EAP • 10/26/98 • p.555
MAC SECRETS • 4040-8/5 • ch.14.2 • Chapter 14 • Proof 2 • EAP • 10/15/98 • p.555
MAC SECRETS • 4040-8/5 • ch.14.1 • Chapter 14 • Proof 1 • VB • 09/09/98 • p.555
4040-8/5 ch14.F 11/3/98 4:14 PM Page 555

or adjusting sliders is otherwise very difficult on a PowerBook. When this
third checkbox option is on, you can double-click the trackpad —but if
you begin moving your finger after the second click, the Mac doesn’t
“release the mouse button” when you lift your finger —even if you lift it
forever. You must tap the trackpad again to release the drag lock.
Trackpad secrets
■
The importance of dry fingers
In general, we actually prefer the trackpad (which never needs cleaning and
never sticks) to the previous PowerBook models’ trackball. However, the
trackpad’s value plummets if your hands are damp, sweaty, or lotioned ... the
electronic sensors inside the pad get confused.
Several easy solutions await. For example, if you have just washed your hands
and are in a hurry to use the PowerBook, put a piece of paper over the trackpad
as a temporary measure. Alternatively, you can tape some plastic food wrap
over the pad surface — or buy a Teflon appliqué from a mail-order company.
Finally, there’s Apple’s Trackpad Climate Control extension, introduced with the
PowerBook 1400; it makes the trackpad less susceptible to inadvertent cursor
jumps because of damp fingers or high humidity.
Trackpad tricks
Place your fingers on the trackpad about a half inch apart, and move them, very
slightly, in opposite directions. Interestingly, the cursor jumps from one side of
the screen to the other. It’s a useful trick for moving the cursor long distances
quickly and accurately — especially if you’ve hooked up a larger external monitor
to your laptop.
Here’s a related tip, useful for leaping into the corners of your screen. Try moving
your thumb or index finger a short distance in the direction of the corner you
seek —and then tap the pad with the next finger, an inch or so from where your
first finger was moving. You’ve just fooled the thing into thinking that your finger
covered the distance between the fingers instantaneously, and it teleports the
pointer directly to the corner of your screen.
Working from a Battery
Working with a PowerBook on battery power is a strange feeling. Even if
you’re not trying to beat a deadline, the battery’s imminent demise can leave
you feeling as though you are. Unless you have extra batteries, you feel the
continuous tick of the clock at your back. Every time you hear the hard drive
whir into action, you wince because you know it’s draining precious battery
Strange
But True
556 Part II: Secrets of the Machine
■ ■
MAC SECRETS • 4040-8/5 • ch.14.2 • Chapter 14 • Final • dfq/EAP • 10/26/98 • p.556
MAC SECRETS • 4040-8/5 • ch.14.2 • Chapter 14 • Proof 2 • EAP • 10/15/98 • p.556
MAC SECRETS • 4040-8/5 • ch.14.1 • Chapter 14 • Proof 1 • VB • 09/09/98 • p.556
4040-8/5 ch14.F 11/3/98 4:14 PM Page 556

power. You fiddle with the backlighting to the lowest readable level, hoping
you’ll be granted a few extra working minutes.
If you want to study our battery-conservation secrets, please do; we’re
confident that the secrets to follow include every suggestion ever made for
conserving juice. Every now and then, though, remember that a new
PowerBook battery doesn’t cost more than a couple of nice dinners for two. If
you ask us, a second or a third PowerBook battery is a better investment
than worrying yourself sick.
Meet your battery
Apple never stops fiddling around with the design for batteries. Each new
generation of battery can power your laptop for yet another 30 minutes or so.
The batteries have been based on three basic chemical energy-cell types.
There was the nickel-cadmium batteries (or NiCad, as on PowerBooks 140
through 180); the nickel and metal hydride ones (NiMHs or NiHy— the Duo
and PowerBook 500 lines); and, more recently, the lithium ion (LiIon)
batteries of the 3400 and G3 models.
All these batteries have one thing in common, both with each other and with
batteries in PC laptops: They don’t deliver nearly the amount of power
advertised. The original NiCads (advertised to last 2–3 hours per charge)
typically ran a PowerBook for about an hour; the state-of-the-art LiIons
deliver about two hours of actual use. Of course, your mileage will vary
depending on how much you use your hard drive and backlighting— but
we’ll get to that.
Charging batteries
PowerBook batteries are good for about 500 chargings. That, as well as
common sense, should be your cue to use the PowerBook plugged into the wall
whenever possible. You’ll know when it’s time to retire a battery when it just
won’t hold a charge anymore (see the next section for details). At that point,
don’t chuck this lethal chunk of toxic chemicals into the garbage; return it to
an Apple dealer, who will send it back to Apple’s battery-recycling program.
Consider affixing a label to each of your batteries that gives a battery number
(1, 2, or 3, say) and the date you started using it. Keeping track of the
numbers will make it easier to rotate your batteries evenly. And if a battery
doesn’t seem to be able to charge anymore, the date will help you decide
whether or not old age is the problem.
The memory effect
The memory effect is a problem unique to the NiCad and NiHy batteries (and,
to a lesser extent, in NiMH ones). Here’s the symptom: Your battery suddenly
Chapter 14: PowerBooks Exposed 557
■ ■
MAC SECRETS • 4040-8/5 • ch.14.2 • Chapter 14 • Final • dfq/EAP • 10/26/98 • p.557
MAC SECRETS • 4040-8/5 • ch.14.2 • Chapter 14 • Proof 2 • EAP • 10/15/98 • p.557
MAC SECRETS • 4040-8/5 • ch.14.1 • Chapter 14 • Proof 1 • VB • 09/09/98 • p.557
4040-8/5 ch14.F 11/3/98 4:14 PM Page 557

loses half its capacity, and you find that it now gives up the ghost after, say,
45 minutes.
The problem is the memory effect. If you repeatedly discharge a battery only
to its halfway point, eventually the battery “remembers” that point, and
decides that that halfway point is the full point. Thereafter, it quits recharging
itself when it reaches that halfway point, thinking that it’s full.
This effect —which affects camcorder batteries too— has been overpublicized.
Actually, avoiding the problem is simply a matter of letting each battery run
down completely every couple of months. That’s also how you cure a battery
that does exhibit the memory effect —just leave the Mac on, even past the
low-battery error messages, until it shuts itself off. (They call this “deep
discharging.” Today’s PowerBook models include a program called Battery
Recondition that does this reconditioning for you.)
Then plug it in. The battery will have forgotten its halfway-recharging point
and will recharge fully.
Mac Basics
558 Part II: Secrets of the Machine
■ ■
MAC SECRETS • 4040-8/5 • ch.14.2 • Chapter 14 • Final • dfq/EAP • 10/26/98 • p.558
MAC SECRETS • 4040-8/5 • ch.14.2 • Chapter 14 • Proof 2 • EAP • 10/15/98 • p.558
MAC SECRETS • 4040-8/5 • ch.14.1 • Chapter 14 • Proof 1 • VB • 09/09/98 • p.558
CASE HISTORY
Reader Jay Lindell sent us the following secret.
Not only is it a good one, but his e-mail was so
hilarious that we decided to reprint it here just
as he sent it:
“After a Whopper or a handful of Cheez Doodles,
your trackball is going to respond about as
nimbly as Bob Dole to a telephone call from
Hillary Clinton. The reason? Oil and particles
transferred onto the ball then form a slippery
gook when they’re transferred to the roller pins
under the trackball.
“Apple’s fix: take an Exacto blade and GENTLY
SCRAPE THE GUNK OFF THE ROLLER!!!
Scrape...slash...shades of the shower scene
from
Psycho! If you sneeze during the process,
you better start thinking of a good one you can
tell 800-SOS-APPL!
“Here’s what I told Apple Tech they should be
telling ‘the rest of us’ instead: Take a 2-inch
piece of magic Scotch tape (better than the
shiny/yellowy kind). Remove the trackball’s
retaining ring and the ball itself. Hold the tape
between your thumb and index finger at the top
of one of the long ends, sticky side down. Place
the tape inside the hole with the area closest to
your fingers directly over (but not yet touching)
one of the rollers. Take the index finger from
your other hand and gently press the tape
against the roller. Now, just pull up on the tape.
Take a look...isn’t that amazing?! The tape lifts
the gunk off just like magic!!
“Repeat the process a few more times, being
sure to use (and, therefore, make) a different
‘lane’ on the tape. Repeat this procedure, with a
new piece of tape, if necessary, on the other
roller. Scotch tape also works great for cleaning
that saturated-fat film festival sitting invisibly on
the trackball itself. How’s that for non-invasive?
“Apple must have liked it...they sent me a FREE
locking ring. I’m guessing they gave it to me
because of how easy it is to clean the trackball
assembly this way...OK, and because of my
refusal to stop working and eating lunch at the
same time.”
The Sticky Trackball Solution
4040-8/5 ch14.F 11/3/98 4:14 PM Page 558

Chapter 14: PowerBooks Exposed 559
■ ■
MAC SECRETS • 4040-8/5 • ch.14.2 • Chapter 14 • Final • dfq/EAP • 10/26/98 • p.559
MAC SECRETS • 4040-8/5 • ch.14.2 • Chapter 14 • Proof 2 • EAP • 10/15/98 • p.559
MAC SECRETS • 4040-8/5 • ch.14.1 • Chapter 14 • Proof 1 • VB • 09/09/98 • p.559
Battery-swapping notes
When you swap batteries on a PowerBook, start by putting the machine to
sleep (except on 100-series models, which you must shut down or plug in).
You don’t have to be frantic. You have four minutes. Everything in memory,
everything on the RAM disk, any programs you were running, will all remain
exactly as they were, even with no battery or power cord in the machine.
Conserving battery power
As we’ve mentioned, the best experience using a PowerBook is when you don’t
have to worry about battery power at all. That’s why PowerBooking in a hotel
room is a completely different experience than PowerBooking on the plane.
Still, we’ve got dozens of techniques for saving juice. We’ll pile them into one
section — the secrets coming up. In the meantime, remember that the biggest
consumers of your battery power are:
■The hard drive spinning
■The neon light bulbs that illuminate the screen
■The built-in modem, if you have one
■AppleTalk
Most of our battery-saving secrets dwell on these items and ways to reduce
their appetites.
The most dramatic trick of all, however, is the RAM-disk trick. This is a
powerful method for doubling or tripling your battery charge’s life span, and
we’ve provided step-by-step instructions on how to do it. In fact, we’ve
devoted a separate section to it, following this more general discussion of
battery-saving tips.
Battery Secrets
■
Cut down on the backlighting
The screen is a big consumer of your battery juice. When you’re desperate to
conserve power, dim the backlighting.
Along the same lines, consider not using the backlighting at all. This is feasible
under two conditions: first, when you’re sitting in sunlight (see “The Screen,”
earlier in this chapter, for the rationale). Second, if you’re sitting in a meeting
and typing notes, it sometimes works well to type blind, even when you can’t
see what you’re typing.
Finally, you can use the PowerBook control panel or, on the PowerBook G3
series, Energy Saver control panel (see Chapter 4) to control automatic dimming
of the backlighting. You can set the dimming to take place after a specified
Worth
Learning
4040-8/5 ch14.F 11/3/98 4:14 PM Page 559

period of inactivity on your part. After the lighting blinks off, it comes back on
when you move the mouse or touch any key.
Avoid the hard drive I: Minimize usage
The hard drive is the #1 power drain on your PowerBook. When it’s not actually
spinning, however, it hardly drains anything at all. It drains the most energy
when it’s just
beginning
to spin. Your goal, therefore, should be to make the
drive stop spinning whenever you won’t be needing its services for a minute or
so, but to let it continue if you’ll be needing it shortly.
Obviously, this presents a question: How can you tell if it
is
spinning? If you’re in
a quiet place, you can
hear
it grind into gear. If the environment is noisy, the
Control Strip (see Chapter 4) gives you a visual indicator.
The best way to avoid using the hard drive is to load your entire work session
onto a RAM disk, as described in the next section.
The next best way is to use programs that don’t need to read information from
the hard drive very often. If there’s no need to read from the hard drive, then the
drive can sit idle. Unfortunately, Microsoft programs, among the most popular,
are also among the most disk-intensive. Word, for example, seems to make the
disk spin all the time.
Of course, using the Save command from
any
program makes the disk spin, but
that’s a little juice worth expending.
Avoid the hard drive II: Control its spin-down
The PowerBook or Energy Saver control panel lets you specify when you want the
hard drive to “spin down” (stop spinning) — between 30 seconds and 15
minutes after the last time its services were called for. Better yet, if you know
the secret, you can make the drive spin down on command!
For example, PowerBook Assistant Toolbox extension, included with System 7.5
and built into later system versions, lets you make the hard drive stop spinning
when you press Ô-Shift-Control–zero. Likewise, the Control Strip gives you a
pop-up Spin Down command. In either case, at your command, at any time, the
hard drive will stop spinning.
Suppose, for example, that you’ve been merrily typing away into ClarisWorks for
20 minutes. The hard drive has been peacefully still. But now you want to save
your work. The drive spins into action, and your file is saved. Now, as far as
you’re concerned, the drive’s work is done. If left unattended, the drive will
continue to spin needlessly for another 15 minutes (or whatever period you’ve
specified using the PowerBook control panel). That’s 15 minutes of hard-drive
juice you can save yourself by pressing the predefined keystroke instantly after
saving.
Worth
Learning
Worth
Learning
560 Part II: Secrets of the Machine
■ ■
MAC SECRETS • 4040-8/5 • ch.14.2 • Chapter 14 • Final • dfq/EAP • 10/26/98 • p.560
MAC SECRETS • 4040-8/5 • ch.14.2 • Chapter 14 • Proof 2 • EAP • 10/15/98 • p.560
MAC SECRETS • 4040-8/5 • ch.14.1 • Chapter 14 • Proof 1 • VB • 09/09/98 • p.560
4040-8/5 ch14.F 11/3/98 4:14 PM Page 560

Rest mode (processor cycling)
The PowerBook’s brain, as on any Macintosh, is its CPU (its Motorola 680x0 or
PowerPC chip). As with a human being, the more alert and lively it’s asked to
be, the more energy it uses up.
Therefore, PowerBooks have a clever battery-saving feature that kicks in without
your even knowing about it. When you’re not actually doing something with the
keyboard or mouse (when you’re just reading something, for example), the laptop
goes into
processor rest
. That is, the CPU quits worrying about doing calculations
and more or less dozes off, requiring less energy and producing less heat. In fact,
the PowerPC processor can kick into additional levels of chip-sleep, known as nap
and doze modes, to conserve power.
Then, upon the least indication that you’re at it again (such as a touch on the
trackball or keyboard), the CPU springs to full alertness.
All of this happens behind the scenes. You’ll probably never even notice this
on/off CPU cycling unless you’re running, say, a screen saver and it seems to
be acting sluggish.
You
will
notice it, however, if you’re trying to play QuickTime movies. Turn
Processor Cycling off for a huge movie-playback smoothness improvement. If
you have a PowerBook control panel (see Chapter 4), open it. While pressing the
Option key, move the Easy/Custom switch into the Custom position. (If it was
already
in that position, slide it to Easy and then back to Custom.) You’ll see the
secret new option (“Allow processor cycling”) listed as a checkbox.
If you have Mac OS 8.1 or a PowerBook G3, you may have the enhanced Energy
Saver control panel instead (again, see Chapter 4). In that case, open it, click
the Advanced Settings button, and turn on the “Allow processor cycling”
checkbox.
PowerBook G3 battery savings
The same enhanced Energy Saver control panel (see the previous secret) brings
a few extra battery-saving options to the lightning-fast PowerBook G3 series.
(Again, they’re hidden in the Advanced Settings panel.)
In addition to “Allow processor cycling,” you’re now offered a “Turn off the
PowerBook display instead of dimming it” choice. Turn this option on for the
ultimate screen saver: after the amount of inactivity you’ve specified on the
main Energy Saver panel, the laptop will cut power to its screen completely,
saving you considerable battery juice. (Press a key to turn the screen back on.)
“Turn off power to inactive PC Cards” is the same idea, except this time, after the
period of inactivity, the laptop shuts off current to any inserted PC cards (such as
modems or Ethernet cards). This, too, saves power, except that not all PC Cards
are designed to respect the PowerBook’s “power down!” command.
Chapter 14: PowerBooks Exposed 561
■ ■
MAC SECRETS • 4040-8/5 • ch.14.2 • Chapter 14 • Final • dfq/EAP • 10/26/98 • p.561
MAC SECRETS • 4040-8/5 • ch.14.2 • Chapter 14 • Proof 2 • EAP • 10/15/98 • p.561
MAC SECRETS • 4040-8/5 • ch.14.1 • Chapter 14 • Proof 1 • VB • 09/09/98 • p.561
4040-8/5 ch14.F 11/3/98 4:14 PM Page 561

Finally, the “Reduce processor speed” slows down your blazing G3, which
normally runs at several hundred MHz, down to a feeble 25 MHz. To be sure,
this is an option of dire last resort — but when the battery warnings are coming
up, you’ve got an hour to go before landing, and all you’re doing is finishing your
speech, this option may be just the ticket.
Battery shelf lives
Different kinds of PowerBook batteries have different shelf lives. The old
PowerBook 100’s lead-acid battery retains its charge for several months. More-
recent batteries, according to Apple, lose their charge much faster; after about
two weeks on the shelf, their charge is half gone. (Presumably they would be
completely depleted after a month or so.) Batteries are extremely temperature-
sensitive, though, and high or low temperatures can affect shelf life
dramatically.
A word about AppleTalk . . . and battery juice
When one of your cheerful authors first purchased his PowerBook, he was truly
appalled at the short life of each battery charge: about an hour and ten
minutes.
This
was three hours!?
562 Part II: Secrets of the Machine
■ ■
MAC SECRETS • 4040-8/5 • ch.14.2 • Chapter 14 • Final • dfq/EAP • 10/26/98 • p.562
MAC SECRETS • 4040-8/5 • ch.14.2 • Chapter 14 • Proof 2 • EAP • 10/15/98 • p.562
MAC SECRETS • 4040-8/5 • ch.14.1 • Chapter 14 • Proof 1 • VB • 09/09/98 • p.562
ANSWER MAN
Q: When my battery is running down, the Mac
starts displaying warning messages about
finishing my work and putting the PowerBook to
sleep. Why does it show three? Which one
should I believe?
A: Actually, each message is more dire than the
previous. And these days, you don’t get three
warnings — only two.
The first message says it’s going to dim your
screen. (It’s trying to squeeze out a little more
work time for you.) You can basically ignore this
message. You’ve still got about 12 minutes of
solid work time left. In System 7.6.1 and later,
this message doesn’t even appear.
The second warning — the first warning in
System 7.6.1 and later — says: “Very little of
the battery’s reserve power remains.” Now it’s
serious. At this point, you’ve got about three
minutes of power left. You should, as the
message suggests, save your work and prepare
to change batteries (or stop working).
The last warning, one of our favorites,
announces: “The Macintosh will go to sleep
within 10 seconds. Good Night.” (We love that.)
This message does not mean you’ll lose any
work or data. It simply means that the machine
is going into sleep mode. All your work will
remain frozen in RAM, just as it was when it
went to sleep.
After this, you have two days in which to find a
power outlet and plug the machine in. When you
do, or when you swap in a freshly charged
battery, you can wake up the PowerBook to find
everything just as you left it.
Why are there all those warnings?
4040-8/5 ch14.F 11/3/98 4:14 PM Page 562

Chapter 14: PowerBooks Exposed 563
■ ■
MAC SECRETS • 4040-8/5 • ch.14.2 • Chapter 14 • Final • dfq/EAP • 10/26/98 • p.563
MAC SECRETS • 4040-8/5 • ch.14.2 • Chapter 14 • Proof 2 • EAP • 10/15/98 • p.563
MAC SECRETS • 4040-8/5 • ch.14.1 • Chapter 14 • Proof 1 • VB • 09/09/98 • p.563
At last a friend alerted him to the problem: AppleTalk. This feature’s purpose in
life is to monitor your printer port for signs of network activity — which requires
electricity. Fortunately, AppleTalk may be switched on and off from the Chooser
desk accessory — or with the Control Strip.
So when you want the most out of each battery charge, turn AppleTalk
off!
It
saps nearly 30 minutes out of any battery charge.
AppleTalk . . . and Remote Access
If you’re using Apple Remote Access (ARA — see Chapter 30), don’t follow the
advice of the previous secret. To make ARA (and some other kinds of network
software) work, you need AppleTalk to be on. Yet you
don’t
need your Mac to
expend power by monitoring your printer port.
The handy solution: Open your Network or AppleTalk control panel and select
Remote Only as the network type. You’ve just turned on the
software
features of
AppleTalk, thus permitting ARA to work, without turning on the
hardware
features
that drain your battery.
Another power user: The modem port
If your PowerBook has a built-in modem, keep in mind that it’s drawing battery
power whenever a terminal-style program (such as Zterm or MicroPhone) is
open. When you finish reading messages on your favorite BBS, for heaven’s
sake, quit Zterm (or whatever front-end program you use) when you log off.
(Fortunately, graphics-based programs — such as America Online, MacCIM, and
so on — do
not
present this concern. They access your modem port only when
you’re actually connected to those services.)
A few more battery-sappers
A few other PowerBook items use up battery power. They’re all fairly negligible,
but here they are:
First, there’s the speaker. Use the Control Strip (or the Sound control panel) to
set the volume to zero if you’re absolutely maniacal about conserving juice.
Then there’s the ADB port, better known as the keyboard/mouse jack. It, too,
sucks its life-giving power from your Mac’s battery when something’s plugged
into it.
And don’t forget the monitor jack. Actually, only Duo dock or minidock owners
need to think about this, because the full-sized PowerBooks can’t even drive an
external monitor
unless
they’re plugged into the wall. Duo owners may simply
want to note that an external monitor draws some power from the battery, even
if it (the monitor) is plugged into a wall outlet.
Worth
Learning
4040-8/5 ch14.F 11/3/98 4:15 PM Page 563

Battery savings and virtual memory:
Mutually exclusive
The PowerBook manual is pretty clear on this topic. So is the software; if you try
to turn on virtual memory in the Memory control panel, a message appears
warning you that this isn’t a great idea.
The point is that (as you can read in Chapter 9) virtual memory is a scheme that
treats the hard drive as extra RAM. It requires the hard drive to spin
continuously. As a result, your battery is likely to drain very fast.
However, we pooh-pooh the notion that you shouldn’t use virtual memory on a
PowerBook! Virtual memory is
great
on a PowerBook: when you’re at your desk
at home and trying to run three big programs; when you’re in the hotel room,
touching up a giant presentation; and so on. And on all PowerPC-based
PowerBooks, turning on virtual memory permits
file mapping,
the speed and
memory enhancement described in Chapter 9 (in the sidebar “Why Power Mac
programs are RAM hogs”).
It’s only to be avoided when you’re desperate to conserve battery power.
Whenever you’re plugged in, turn on virtual memory, by all means! This is
especially true with PowerPC-based PowerBooks, which run faster when virtual
memory is on.
Of course, the best solution of all is RAM Doubler, which provides the memory-
adding features without the battery-using downside.
When a battery is depleted
Recharge your battery as soon as possible. If you leave a battery empty for
longer than two weeks, especially in a hot place like a car trunk, it may never be
rechargeable again.
The Four-Hour Charge (RAM-Disk) Trick
If you learn nothing else from this chapter, learn the following technique. It’s
a time-saving, money-saving, easy-to-use gadget that you already own.
As you discovered in Chapter 9, a RAM disk is a portion of memory that’s
treated like an additional floppy disk in some imaginary drive. It shows up on
your Desktop like any other disk icon (see Figure 14-3).
However, a RAM disk is made of RAM. It delivers information to the Mac’s
brain with immense speed (when compared with real disks). RAM disks were
invented, then, for the purpose of speeding up Mac computing.
Mac Basics
564 Part II: Secrets of the Machine
■ ■
MAC SECRETS • 4040-8/5 • ch.14.2 • Chapter 14 • Final • dfq/EAP • 10/26/98 • p.564
MAC SECRETS • 4040-8/5 • ch.14.2 • Chapter 14 • Proof 2 • EAP • 10/15/98 • p.564
MAC SECRETS • 4040-8/5 • ch.14.1 • Chapter 14 • Proof 1 • VB • 09/09/98 • p.564
4040-8/5 ch14.F 11/3/98 4:15 PM Page 564

Figure 14-3: A RAM disk is, as far as the Mac is concerned, just another disk. But there’s a
big difference.
But the RAM disk, while still speedy, is useful on the PowerBook for a
different reason: It’s a disk that requires no additional electricity. Because the
largest consumer of PowerBook battery power is the hard drive, the less you
make the hard drive work, the longer a battery charge will last. When you let
your RAM disk do the work of a hard drive, you render the hard drive
completely redundant, and it never needs to spin. A fresh PowerBook battery
will last a minimum of four hours per charge using this secret.
Here, step by step, is how the RAM-disk trick works. We’re not saying it’s
simple to set up; we’re just saying that it’s amazing.
Choosing the right size for the RAM disk
First, figure out how much disk space your RAM disk contents will require. In
other words, how many files are there on your hard drive that you want to use?
You’re always using the System Folder, whether you like it or not. You’ll
probably also want to use a word-processing program. Finally, there’s the
document you’re working on.
Look at those files on your hard drive and add up their sizes on disk. (Do a
Get Info on each.) Unless your PowerBook is spectacularly rich in upgraded
RAM, you won’t be able to fit a full-sized System Folder, word processor, and
document onto a RAM disk.
You can, however, create a stripped-down System Folder that will fit. Use the
System Folder on your Disk Tools disk, for example. It has no control panels,
no fonts to speak of, and few frills, but it’s tiny; a System Folder from the Mac
OS 8 Disk Tools disk takes up only 987K.
That’s a really stripped-down system, however, without printing features,
control panels, fonts, or anything else. You might also consider building a
stripped-down System folder manually by selecting components from your
hard drive’s existing one; you won’t crunch a Mac OS 8.5 System folder into
much less than 12MB, but older system versions are much smaller.
As software goes, Microsoft programs are terrible choices for use on
PowerBook RAM disks. They’re huge, and they need to read information from
the hard drive a lot. Still, if you’re strapped, Word 5.1 is OK; if you really want
Chapter 14: PowerBooks Exposed 565
■ ■
MAC SECRETS • 4040-8/5 • ch.14.2 • Chapter 14 • Final • dfq/EAP • 10/26/98 • p.565
MAC SECRETS • 4040-8/5 • ch.14.2 • Chapter 14 • Proof 2 • EAP • 10/15/98 • p.565
MAC SECRETS • 4040-8/5 • ch.14.1 • Chapter 14 • Proof 1 • VB • 09/09/98 • p.565
4040-8/5 ch14.F 11/3/98 4:15 PM Page 565

to get serious, consider Mariner Write (Mariner Software, 502-222-6695),
which is only 990K on the disk.
To help you compute the size of your RAM disk, here are three typical
scenarios. We’ll assume your document is 100K.
Duo 250 with 8MB of RAM
Pleasantly outfitted System 7.1 folder = 2,200K
Microsoft Word 5.1 = 880K
A document = 100K
Grand total = 3,180K; make a 3,500K RAM disk
PowerBook 1400 with 12MB of RAM
Very basic System 7.5.3 folder = 3,800K
ClarisWorks 4.0, no support files = 2,000K
A document = 100K
Grand total = 5,900K; make a 6,200K RAM disk
PowerBook G3 with 32MB of RAM
Very basic Mac OS 8.1 folder = 10,900K
ClarisWorks 5.0, no support files = 2,700K
A document = 100K
Grand total = 13,700K; make a 15MB RAM disk
In each of those scenarios, you’ll note that we’ve allotted some extra disk
space. The RAM disk, even though it’s actually a piece of memory, behaves as
though it’s a disk. Your Mac still has to have enough free memory left over to
run the programs on that disk.
In the PowerBook G3 example, then, you start with 32MB of memory. Of that,
Mac OS 8 itself uses 6.5MB just to turn on the Mac (we’re talking memory
now, not disk space). Subtract the 15MB that your RAM disk eats up.
ClarisWorks runs in 2.5MB of memory. Grand total: about 24 megs of RAM
used. You still come in well under your 32MB total.
Creating the RAM disk
Open your Memory control panel and click the RAM Disk On button. Move
the slider to the right, and then drag the little handle to the right (see Figure
14-4) until it shows the size you calculated.
If you have RAM to spare, make the RAM disk slightly bigger; a little extra
space is always good to have. After you set the slider to the size you want,
close the control panel and restart the Mac.
566 Part II: Secrets of the Machine
■ ■
MAC SECRETS • 4040-8/5 • ch.14.2 • Chapter 14 • Final • dfq/EAP • 10/26/98 • p.566
MAC SECRETS • 4040-8/5 • ch.14.2 • Chapter 14 • Proof 2 • EAP • 10/15/98 • p.566
MAC SECRETS • 4040-8/5 • ch.14.1 • Chapter 14 • Proof 1 • VB • 09/09/98 • p.566
4040-8/5 ch14.F 11/3/98 4:15 PM Page 566

Figure 14-4: The little RAM disk size slider slides toward its target size, 15MB, which is
about the minimum size for a G3-based PowerBook System folder.
Loading up the RAM disk
When you restart the Mac, you see the RAM disk at the right side of the
screen (see Figure 14-3). Wild, isn’t it? Now you’re ready to copy your files
onto it. For best results, we’re going to suggest that you put five items there:
1. Drag your specially prepared, stripped-down System Folder onto the
RAM disk (from your Disk Tools floppy, for example). Be sure to include
any system enabler your PowerBook needs to run! And if you’re using Mac
OS 8 or 8.1, be sure to include the Appearance extension! Your Mac won’t
start up without it.
You’ll notice that things copy very quickly onto a RAM disk; memory is a
much faster medium than any disk. (Alternately, you can use the normal
System Installer to install a Minimal System onto the RAM disk. Apple
recommends this method, but we find it to be a great deal of effort.)
2. Copy your word processing program and your documents onto the RAM
disk.
3. Make an alias of your hard drive. Copy the alias onto your RAM disk.
You’ll use this later to bring your hard drive back onto the screen; details
to come.
4. Finally, for added convenience, choose Control Panels from your menu.
Make an alias of the Startup Disk control panel, and put that alias onto
your RAM disk, too. Your finished RAM disk should look something like
Figure 14-5.
If not everything fits, then you may have to do some further stripping down;
ditch some fonts, trash your Preferences. Double-click the RAM disk’s System
file and throw away some sounds and keyboard layouts.
Chapter 14: PowerBooks Exposed 567
■ ■
MAC SECRETS • 4040-8/5 • ch.14.2 • Chapter 14 • Final • dfq/EAP • 10/26/98 • p.567
MAC SECRETS • 4040-8/5 • ch.14.2 • Chapter 14 • Proof 2 • EAP • 10/15/98 • p.567
MAC SECRETS • 4040-8/5 • ch.14.1 • Chapter 14 • Proof 1 • VB • 09/09/98 • p.567
4040-8/5 ch14.F 11/3/98 4:15 PM Page 567
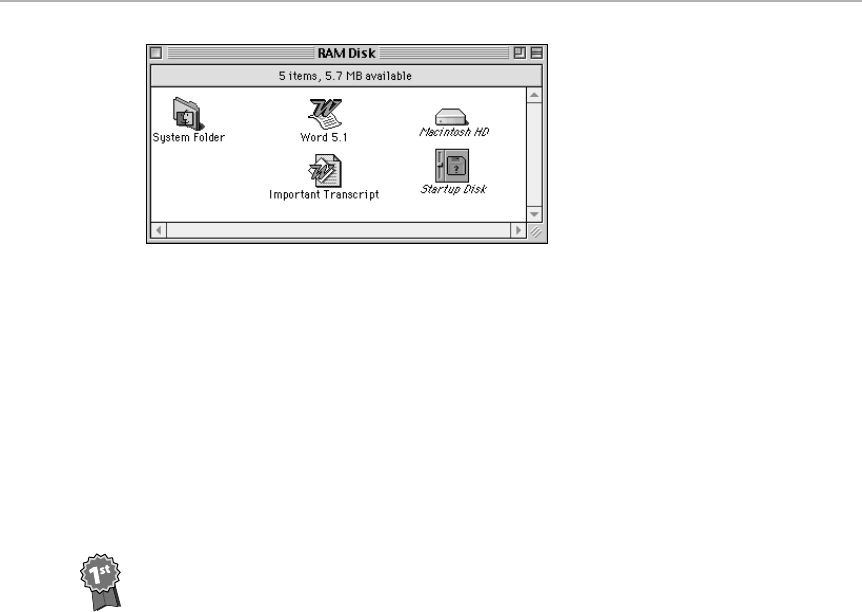
Figure 14-5: Your PowerBook RAM disk, ready to fly.
If everything fits, though, be smart: preserve your carefully assembled RAM
disk contents on your hard drive, so that you can re-create this setup the
next time you want to use it. Here’s how:
■Check your Memory control panel. If you see a “Save on Shut Down”
checkbox (as shown in Figure 14-4), turn it on. When you shut down the
PowerBook, the contents of your RAM disk will be automatically copied
onto the hard drive before the lights go out. And when you turn the Mac
on again, the RAM disk’s previous contents will be automatically copied
back onto it.
■Free book winner Jerry Byers actually figured out where the RAM disk’s
contents are stored: in your Preferences folder, as a file named Persistent
RAM Disk that’s the same size as your RAM disk. (So that’s where that
15MB of disk space went!) He notes, by the way, that this file isn’t deleted
when you turn off the RAM disk option. That’s good, since it means your
RAM disk will be automatically re-loaded the next time you turn on the
option in your Memory control panel, no matter how far in the future.
(That’s bad, however, if you mean to try the RAM disk only once, while
reading about it in Mac Secrets; that 15MB file gets forgotten in your
Preferences folder, eating up space.)
■If your PowerBook model doesn’t offer the “Save on Shut Down” option,
drag the RAM disk icon to your hard drive, where it gets copied as a RAM
disk folder. Name it “RAM disk 15MB,” or whatever its size is, so that
you’ll remember its size the next time you need to create it. (Some
people even compress that RAM disk folder, using a compression
program like StuffIt.)
Later, you can just open this folder and drag its contents to a fresh RAM disk.
Putting the RAM disk in charge
After the RAM disk is set up, you still have to tell the Mac that you want its
System Folder, and not the one on the hard drive, to be the System Folder in
charge.
Open the Startup Disk control panel (see Figure 14-6). Click RAM Disk and
close the window.
Contest
Winner
568 Part II: Secrets of the Machine
■ ■
MAC SECRETS • 4040-8/5 • ch.14.2 • Chapter 14 • Final • dfq/EAP • 10/26/98 • p.568
MAC SECRETS • 4040-8/5 • ch.14.2 • Chapter 14 • Proof 2 • EAP • 10/15/98 • p.568
MAC SECRETS • 4040-8/5 • ch.14.1 • Chapter 14 • Proof 1 • VB • 09/09/98 • p.568
4040-8/5 ch14.F 11/3/98 4:15 PM Page 568
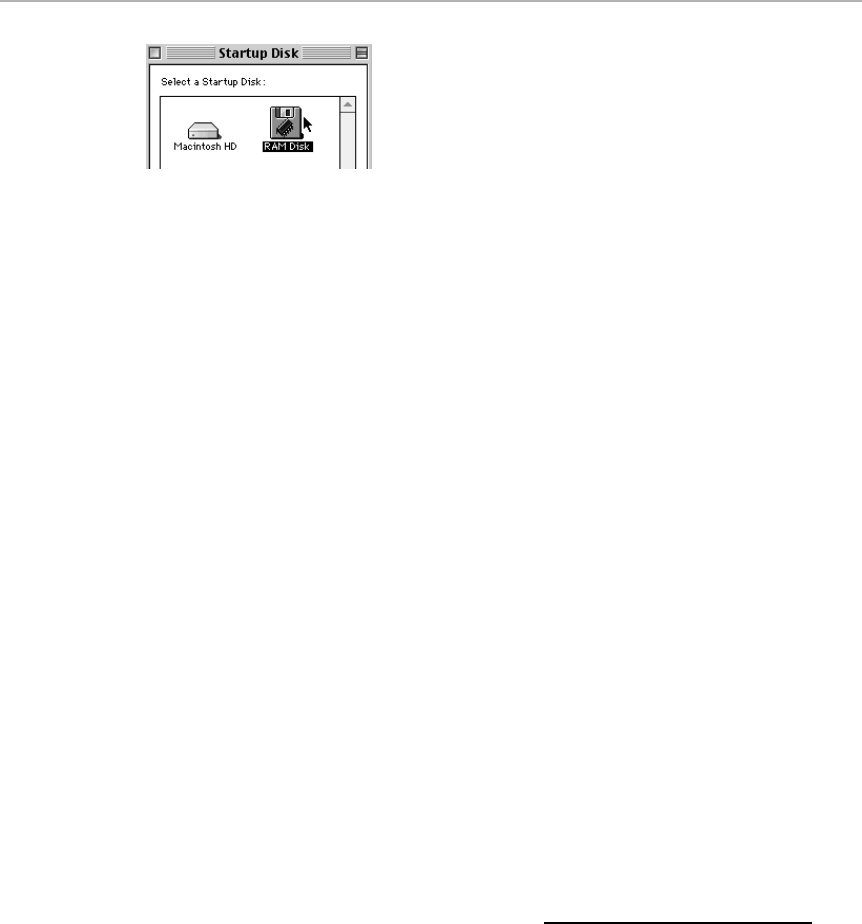
Figure 14-6: How you put the RAM disk in charge.
Then restart the Mac. You’ll be shocked at how fast your Mac starts up from
a RAM disk. When you reach the Desktop, the RAM disk is in the top right
corner of the screen. At this moment, however, your hard drive is still
spinning; you aren’t, in fact, getting any extra battery mileage at all. That’s
where the really wild technique comes in.
Trashing your hard drive
Drag your hard-drive icon to the Trash! (The File menu’s Put Away command
also works.) The Mac will warn you that you’re doing something kind of
nutty; click OK. But if the hard drive is off the screen completely, there’s no
chance that it can spin up unbidden and deplete additional power.
Yet, even after your hard drive’s icon is gone, you may still hear it spinning. If
you’re patient, it will stop on its own after a few minutes (depending on your
settings in the PowerBook control panel). If you’re not patient, make it stop
spinning using any of the techniques described in “Battery Secrets,” earlier in
this chapter. (If your hard drive won’t spin down, try turning off the Assistant
Toolbox extension, if you have it.)
At last you’ve arrived at an amazing point. Your PowerBook is absolutely
silent, runs about three times faster than it ever did before, barely using any
battery juice at all. You can type and scroll and save and trash things, and
you’ll never get that sinking feeling of hearing your hard drive spin up.
Now you’re wondering: Well, great, but how do I get my hard drive back? That’s
why you made the alias of it. At any time after the real drive icon is gone, you
can summon it back to the screen simply by double-clicking the alias.
PowerBook RAM-Disk Secrets
■
Saving and being safe
The usual warning about using a RAM disk is this: Never put a document on a
RAM disk, because a RAM disk is a fleeting, fragile thing. If the power goes out
on the Mac, so the scare-tactic goes, then your document disappears into the
ether.
Chapter 14: PowerBooks Exposed 569
■ ■
MAC SECRETS • 4040-8/5 • ch.14.2 • Chapter 14 • Final • dfq/EAP • 10/26/98 • p.569
MAC SECRETS • 4040-8/5 • ch.14.2 • Chapter 14 • Proof 2 • EAP • 10/15/98 • p.569
MAC SECRETS • 4040-8/5 • ch.14.1 • Chapter 14 • Proof 1 • VB • 09/09/98 • p.569
4040-8/5 ch14.F 11/3/98 4:15 PM Page 569

This is
not
true on a PowerBook. Anything on a PowerBook RAM disk
stays
there, even if (a) you restart the computer; or (b) the battery dies and you leave
it in the machine, dead, for up to two days; or (c) you have a system crash.
All you have to do is remember this critical phrase:
Never shut down the
PowerBook — only restart it!
If you have a system crash, press the computer’s Reset switch (which restarts
it). On all PowerBooks since 1994, that means pressing Ô, Control, and the
power button simultaneously.
When you return to the Desktop, your RAM disk will still be safe.
All of this is not to say, however, that you can be reckless. Every hour or so,
save your document; double-click your hard-drive alias (to bring your hard drive
back onto the screen); and drag-copy your RAM disk-based document back onto
the hard drive. Paranoia pays in the computer world.
Removing or resizing the RAM disk
Getting rid of the RAM disk is a little tricky. For starters, you can’t very well kill
the RAM disk while it’s the start-up disk. The first step, then, is to double-click
that Startup Disk alias (which we instructed you to copy onto your RAM disk).
You’ll see the image in Figure 14-6. Click the name of your hard drive and close
the window. Then restart the Mac. When it awakens, the RAM disk will no longer
be the disk on top.
Next, you have to get
everything
off the RAM disk. Click the RAM disk and
choose Erase Disk from the Special menu. Confirm your decision by pressing
Return. Wipe that disk clean. Only then may you open your Memory control
panel and turn the RAM Disk option off — or resize it.
Finally, you have to restart
again
.
570 Part II: Secrets of the Machine
■ ■
MAC SECRETS • 4040-8/5 • ch.14.2 • Chapter 14 • Final • dfq/EAP • 10/26/98 • p.570
MAC SECRETS • 4040-8/5 • ch.14.2 • Chapter 14 • Proof 2 • EAP • 10/15/98 • p.570
MAC SECRETS • 4040-8/5 • ch.14.1 • Chapter 14 • Proof 1 • VB • 09/09/98 • p.570
TRUE FACT
Your PowerBook has another, much less-
discussed battery. It’s the lithium backup
battery that keeps your clock going even when
the computer is off, just like the lithium backup
battery on desktop Macs.
All PowerBooks except the 100 model require an
Apple dealer or a knowledgeable technician to
change this battery.
The battery nobody knows
4040-8/5 ch14.F 11/3/98 4:15 PM Page 570

Sleep Mode
When a PowerBook is sleeping, nothing moves. The hard drive and all other
components are still and dark. The only thing that lives, in fact, is whatever
was in the computer’s memory.
That’s a great thing. It means that the next time you want to use your
computer, there’s no five-minute start-up period, no start-up chime, no
parade of icons across the bottom of the screen. You press a single key —
any key except Caps Lock — and your entire work world springs to life,
exactly as you left it.
Sleep versus restart
This is going to sound radical. But we advise you to leave the PowerBook in
Sleep mode all the time. We can think of only a few instances when you
actually have to shut down a PowerBook:
■When you want to start up with a different assortment of extensions and
control panels
■When you want to make it part of the SCSI chain of a desktop computer
■When you want to attach or remove an external monitor
■When it’s a Duo, and you want to insert it into a Duo Dock
■When you want to ship the PowerBook
Otherwise, there’s no practical reason to restart the Mac, ever. It’s even OK to
connect keyboards, mice, modems, printers, PC cards, drive-bay CD-ROM or
Zip drives, and floppy drives to PowerBooks while they’re sleeping. They
don’t have to be off.
It’s perfectly all right to travel while sleeping (the PowerBook, not you). Even
ultra-conservative Apple admits that it’s OK to carry a sleeping PowerBook.
How much time you have
After your PowerBook is asleep, a tiny trickle of battery power keeps the
contents of memory intact. The computer can sleep for as long as there’s any
battery power remaining. On a fully charged battery, that’s about a month. In
fact, even if your battery has gone dead while you were using it, saying that
no “reserve power” remained, you’ll still have two days of trickle-juice left in
the battery.
Chapter 14: PowerBooks Exposed 571
■ ■
MAC SECRETS • 4040-8/5 • ch.14.2 • Chapter 14 • Final • dfq/EAP • 10/26/98 • p.571
MAC SECRETS • 4040-8/5 • ch.14.2 • Chapter 14 • Proof 2 • EAP • 10/15/98 • p.571
MAC SECRETS • 4040-8/5 • ch.14.1 • Chapter 14 • Proof 1 • VB • 09/09/98 • p.571
4040-8/5 ch14.F 11/3/98 4:15 PM Page 571

572 Part II: Secrets of the Machine
■ ■
MAC SECRETS • 4040-8/5 • ch.14.2 • Chapter 14 • Final • dfq/EAP • 10/26/98 • p.572
MAC SECRETS • 4040-8/5 • ch.14.2 • Chapter 14 • Proof 2 • EAP • 10/15/98 • p.572
MAC SECRETS • 4040-8/5 • ch.14.1 • Chapter 14 • Proof 1 • VB • 09/09/98 • p.572
Sleep Secrets
■
50 ways to sleep your laptop
You’re probably familiar with the most common method of putting a PowerBook
to sleep: choosing Sleep from the Special menu.
That involves returning to the Finder, though, which is an extra (and, given the
crankiness of the trackball/trackpad, difficult) step, requiring you to choose
Finder from the application menu.
You can make the PowerBook sleep on command, though, without leaving
the program you’re in. In System 7.5 and later, there are two ways: press
Ô-Shift-Control–0, or use the Control Strip’s one-click Sleep command (see
Chapter 4).
Other programs can put your PowerBook to sleep, too. QuicKeys and OneClick
offer key combinations that get that Mac snoring.
Yet another approach: In systems before Mac OS 8.5, Control-click your menu-
bar clock (created by the Date & Time control panel).
ANSWER MAN
Q: I absolutely hate the way the PowerBook
always gives me that stupid warning box about
network services, whatever they are, when I try to
put it to sleep. Isn’t there any way to make it stop?
A: First of all, network services basically means
(a) your connection to other Macs, and (b) your
laser printer. It’s just warning you that if you put
the Mac to sleep, and later awaken it, the laser
printer might need to be reselected in the
Chooser. Or you might need to re-establish your
hookup with the other Macs.
In the meantime, there is a way to make this
box stop appearing. Several ways, really.
First, if you never want the message to appear,
open your Chooser and turn off AppleTalk. Of
course, then you’ll really lose network services —
you won’t be able to laser print or hook up to other
Macs at all — but at least you won’t get this
message. You’ll also get another half-hour out of
each battery charge. (If you have Apple Remote
Access, you can instead open your Network
control panel and choose Remote Only, as
described earlier.)
Another trick: Install AutoRemounter, a control
panel described in Chapter 4 (and incorporated
into the PowerBook G3 Energy Saver control
panel described in Chapter 4). Among other
functions, it lets you keep AppleTalk on without
making you suffer through that “network
services” message every time you put the
laptop to sleep.
Shut up and go to sleep
4040-8/5 ch14.F 11/3/98 4:15 PM Page 572

Waking the thing up smart
To wake up a sleeping PowerBook, the best key to press is the Shift key.
Pressing a letter key does the trick, too, but you risk
typing
that letter into
whatever document you left open on the screen.
Getting Info In and Out
When Apple designs a PowerBook, one of its objectives clearly seems to be
to give it as many ports and connectors as a desktop Mac. True, most have
only a single printer/modem jack, but the back of a modern PowerBook
otherwise has all the same jacks as a desktop Mac.
This is critical for several reasons. For one thing, suppose that you own both
a PowerBook and a desktop Mac. Every time you return from a trip with your
laptop, you’ll probably want to copy your files back to the larger Mac.
Furthermore, one of the huge selling points of a PowerBook is that it’s an
ideal portable presentation machine. Hook it up to a projector, a large
monitor, or even a TV, and suddenly you can give color presentations for
large groups, driven only by this diminutive machine.
Another of the laptop’s most important features is its capability to send
information over the phone lines — dialing into the home office, for example.
We’ll cover this capability, called Apple Remote Access, in Chapter 35.
Of CD-ROMs, Zips, and floppies
Thanks to good engineering, there aren’t any secrets pertaining to swapping
CD-ROM drives, the VST Zip drive, and the floppy drive in and out of modern
PowerBooks. Beginning with the 1997 line, Apple created laptops whose
“storage bay” (as that hole on the side is called) can be filled by different kinds
of drives without even putting the machine to sleep! (On the PowerBook G3
line, a special Control Strip module indicates visually what’s in each bay.)
In the lingo, this bay is hot-swappable. You can only do it if the current gadget
in the bay is empty; eject whatever Zip, CD, or floppy is in it before
attempting to remove the drive itself. Once that’s done, a spring-loaded
switch on the bottom of the gadget lets you unhook it from the PowerBook’s
innards and slide it out, ready for replacement by whatever other storage
doodad you want to insert.
Don’t try that on a Windows laptop.
Chapter 14: PowerBooks Exposed 573
■ ■
MAC SECRETS • 4040-8/5 • ch.14.2 • Chapter 14 • Final • dfq/EAP • 10/26/98 • p.573
MAC SECRETS • 4040-8/5 • ch.14.2 • Chapter 14 • Proof 2 • EAP • 10/15/98 • p.573
MAC SECRETS • 4040-8/5 • ch.14.1 • Chapter 14 • Proof 1 • VB • 09/09/98 • p.573
4040-8/5 ch14.F 11/3/98 4:15 PM Page 573

Transferring files from a PowerBook to
another Mac
When it comes to transferring information between a PowerBook and another
Mac, you have several options:
■Pass files back and forth on a floppy disk — a very slow procedure.
■Pass files back and forth on a Zip drive (if you’ve bought one for your
PowerBook).
■Attach the two computers as though they’re a little network. Transferring
files this way can be slow, too, but it’s certainly easy. We’ll show you how
to set up a mini-network between them, step by step, in Chapter 35.
■Recent models (since 1995): Use your infrared transmitter, a Netopia
AirDock (about $70), and the IR File Exchange program that came with
your Mac. Fast, simple, and much easier to work than using regular
LocalTalk file sharing — no passwords, privileges, or setup. (If the second
Mac is a PowerBook, you don’t even need the Netopia AirDock; just beam
from PowerBook to PowerBook.)
■Attach a hard drive, Zip drive, Jaz drive, or SyQuest to the PowerBook.
Copy files onto the external drive, shut everything down, and then attach
the drive to the desktop Mac and copy files onto it from the disk. This is
way too much trouble.
■Plug the PowerBook directly into a desktop Mac as a SCSI device itself.
It’s fast, cheap, and convenient.
We’ll cover these last three methods one by one.
Infrared Beaming
One of the PowerBook’s neatest features is also among the most overlooked:
its ability to transmit and receive information through the air, thanks to the
infrared transceiver on the back panel. (It looks like a dark translucent plastic
plate.) All PowerPC-based laptops have this transceiver. (So does the iMac.)
Sending and receiving infrared data is easy, fairly quick, and, darn it, cool.
There’s just nothing like seeing a nearby PowerBook’s name and icon show
up on your screen without connecting a single cable.
Before you begin, note that there are two different “languages” your infrared
port can speak. There’s IRTalk, which is a Macintosh-only language that’s a
lot like LocalTalk (described in Chapter 35).
Modern PowerBooks (that is, all PowerPC models except the 5300 and 1400)
can also speak IrDA, a faster, more universal networking scheme that the
Apple Newton, eMate, Windows laptops, and even some Hewlett-Packard
printers can also understand. If you want to use this option, your Control
Panels folder must contain the Infrared control panel, and your Extensions
folder must contain the files called IrDALib and IrLanScannerPPC. (On the
other hand, at this writing, no other devices we know of — including HP
574 Part II: Secrets of the Machine
■ ■
MAC SECRETS • 4040-8/5 • ch.14.2 • Chapter 14 • Final • dfq/EAP • 10/26/98 • p.574
MAC SECRETS • 4040-8/5 • ch.14.2 • Chapter 14 • Proof 2 • EAP • 10/15/98 • p.574
MAC SECRETS • 4040-8/5 • ch.14.1 • Chapter 14 • Proof 1 • VB • 09/09/98 • p.574
4040-8/5 ch14.F 11/3/98 4:15 PM Page 574
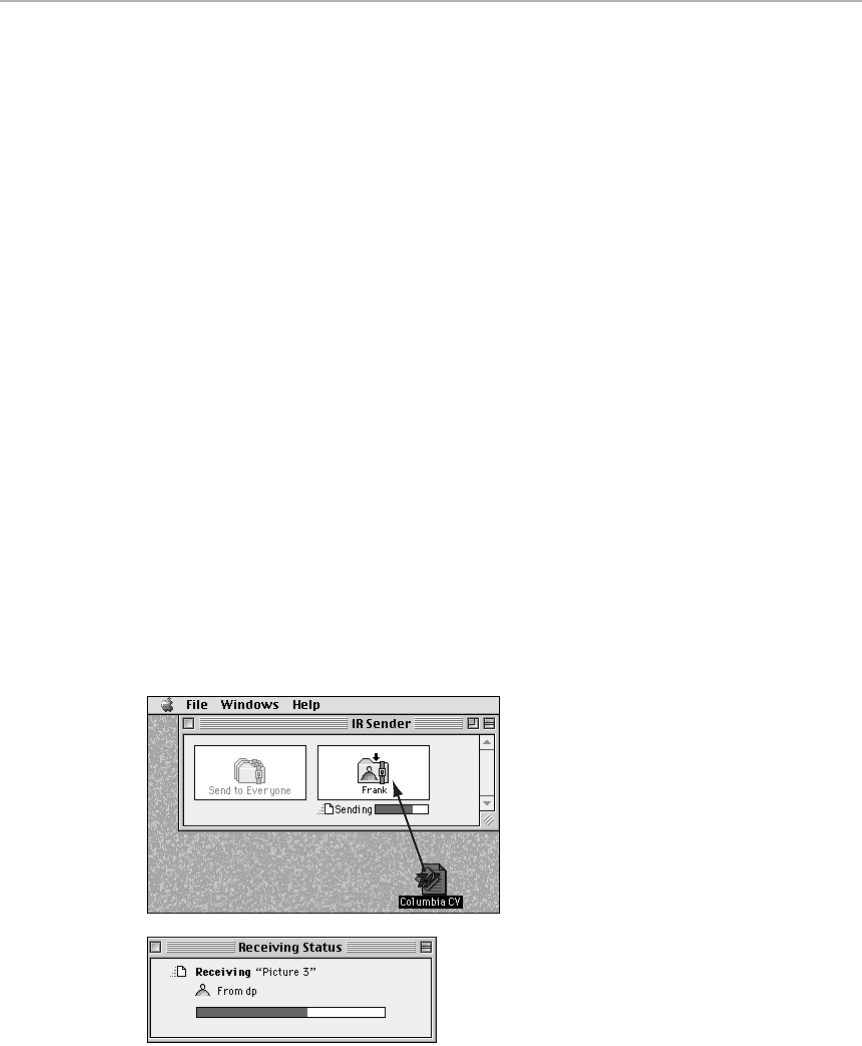
printers — have the necessary software to support IrDA beaming from the
Mac, so what’s the point?)
You also need the Open Transport extensions (see Chapter 4) to do any kind
of networking.
Here’s how it works:
1. Open your AppleTalk control panel. (If you don’t have Open Transport,
use the Network control panel instead.) Choose Infrared Port from the
pop-up menu. (You’ve just told the Mac what connection to use for its
networking.) Close and save the control panel.
If your Mac has the Infrared control panel, now open it, click Options,
and select either IRTalk or IrDA, whichever you and your fellow beamer
have agreed upon. Close and save.
2. Launch Apple IR File Exchange. (It’s a program in the Apple Extras folder
that comes on every PowerBook hard drive. If you’re using the AirDock
on a desktop Mac, you’ll have to special-install this software from your
Mac OS 8.x CD.)
3. Position the two Macs a few inches apart, back to back, so that their
transmitters are facing each other. As shown in Figure 14-7, the icons of
any PowerBooks in range show up as “drop-box” folder icons.
4. The person sending the files or folders simply drags icons from the
desktop onto the appropriate folder, as shown in Figure 14-7.
5. Wait. When the progress bar indicates that the job is over, the recipient
should open the Apple IR File Exchange folder. Inside is a folder called IR
Receiver —which contains the stuff that was beamed through empty space!
Figure 14-7: Top: Drag icons onto your friend’s folder to commence beaming. Bottom: What
the recipient sees on the screen as the beaming goes on.
Chapter 14: PowerBooks Exposed 575
■ ■
MAC SECRETS • 4040-8/5 • ch.14.2 • Chapter 14 • Final • dfq/EAP • 10/26/98 • p.575
MAC SECRETS • 4040-8/5 • ch.14.2 • Chapter 14 • Proof 2 • EAP • 10/15/98 • p.575
MAC SECRETS • 4040-8/5 • ch.14.1 • Chapter 14 • Proof 1 • VB • 09/09/98 • p.575
4040-8/5 ch14.F 11/3/98 4:15 PM Page 575

SCSI: When the PowerBook is the computer
Connecting SCSI devices to a regular PowerBook isn’t tough. You do,
however, need a special cable; Apple’s is called the HDI-30 SCSI System Cable.
(A better idea is the SCSI Doc connector from APS.) If you look at the back of
a PowerBook or a MiniDock, you’ll see why: The standard, wide SCSI
connector has been replaced by a smaller, nonstandard square jack.
If you, like millions before you, can’t tell this cable apart from the identical-
looking HDI-30 SCSI Disk Adapter cable, described below, the trick is this: the
SCSI System cable is light gray, and its smaller end appears to be missing one
pin. Apple’s Disk Adapter cable is dark gray and has all 30 pins.
With the HDI-30 System cable attached, the PowerBook behaves just like a
desktop Mac. The SCSI address of its internal hard drive is 0, as it is for any
Mac. As always with SCSI devices, turn on the external devices before you
turn on the PowerBook.
There’s one dramatic difference between PowerBooks (not Duos) and
desktop Macs when it comes to terminating interconnected SCSI devices,
however. The normal method of attaching terminator plugs is to fasten one to
each end of the chain of SCSI devices. But because the internal hard drive of
any Mac is self-terminating, you normally only have to worry about the far
end of the chain.
But the non-Duo PowerBook, for all practical purposes, has no internal
terminator. Therefore, despite the complicated-looking series of rules in the
PowerBook manual, the PowerBook difference actually boils down to this:
Put a terminator plug at the far end of the HDI-30 cable, where it attaches to the
first SCSI device.
You still need a second terminator plug at the far end of the chain of SCSI
devices, as detailed in Chapter 33. It doesn’t matter if there’s one device or
several.
For a PowerBook Duo, on the other hand, follow the rules of termination
exactly as we’ve stated them in Chapter 33 — no funny business.
SCSI Disk Mode: When the PowerBook is the
external hard drive
This arrangement, where the laptop acts as an external hard drive for
another Mac, is called SCSI Disk Mode. (The PowerBook 14x, 150, and 170
models don’t offer this feature.)
Because SCSI is a very fast method of transferring files, it’s the only way to go
when you have a lot of stuff to transfer to or from your PowerBook. After
you’ve mastered this technique, you’ll absolutely love it. Getting going,
though, requires crossing some oddball technical terrain. Here’s the step-by-
step guide. Keep in mind that the PowerBook must be the last device in the
chain of SCSI machines (if you have any others).
576 Part II: Secrets of the Machine
■ ■
MAC SECRETS • 4040-8/5 • ch.14.2 • Chapter 14 • Final • dfq/EAP • 10/26/98 • p.576
MAC SECRETS • 4040-8/5 • ch.14.2 • Chapter 14 • Proof 2 • EAP • 10/15/98 • p.576
MAC SECRETS • 4040-8/5 • ch.14.1 • Chapter 14 • Proof 1 • VB • 09/09/98 • p.576
4040-8/5 ch14.F 11/3/98 4:15 PM Page 576

1. Buy an HDI-30 SCSI Disk Adapter cable.
This is not the same as the HDI-30 SCSI System Cable we mentioned
earlier, despite the similarity of name, catalog number, price, and
appearance. Don’t use the wrong cable. Nothing will blow up, but nothing
will work, either. (Once again, the little adapter called the SCSI Doc, from
APS, is a better alternative. It can serve as either a normal SCSI adapter or
a SCSI Disk Mode adapter — you just flip a switch.)
2. Open the PowerBook Setup or PowerBook SCSI Dish Mode control panel
(see Figure 14-8). Select a SCSI address for the PowerBook.
Figure 14-8: Choose a SCSI address for your PowerBook.
If you’ve read Chapter 33, you know that a Mac’s SCSI address is always
seven and its internal drive’s address is always zero. In SCSI Disk Mode,
though, this Mac is not going to be a Mac; it’s going to be an external hard
drive! So choose an ID number between one and six. (If your desktop Mac
has a CD-ROM, don’t use 3.) If you plan to daisy-chain other SCSI devices
with the PowerBook, make sure that their numbers are different.
3. Shut down both Macs and turn off any other SCSI equipment.
4. Connect the PowerBook to the SCSI Disk Adapter cable you bought. If the
PowerBook will be the only SCSI device attached to the desktop Mac, you
don’t need a terminator. (If you’re going PowerBook to PowerBook, you
can’t use a terminator.) If other SCSI devices will be joining your
PowerBook, however, connect a terminator to the fat end of the Disk
Adapter cable.
5. Connect the terminated end of the SCSI Disk Adapter cable either to the
desktop Mac or to the last SCSI device on the chain.
If you need a walk around the block at this point, please indulge. Then:
6. Turn on the PowerBook!
This has to be the weirdest thing you’ve ever seen a Mac do. Across the
face of the otherwise completely blank PowerBook screen marches a
huge SCSI logo (some models’ screens may remain blank instead). Inside
it is a large digit, representing the SCSI address you selected. And we
mean it marches. It actually moves across the screen, bouncing off the
edges like some kind of Neanderthal screen saver.
7. Turn on any other SCSI devices. Finally, turn on the desktop Mac.
Strange
But True
Chapter 14: PowerBooks Exposed 577
■ ■
MAC SECRETS • 4040-8/5 • ch.14.2 • Chapter 14 • Final • dfq/EAP • 10/26/98 • p.577
MAC SECRETS • 4040-8/5 • ch.14.2 • Chapter 14 • Proof 2 • EAP • 10/15/98 • p.577
MAC SECRETS • 4040-8/5 • ch.14.1 • Chapter 14 • Proof 1 • VB • 09/09/98 • p.577
4040-8/5 ch14.F 11/3/98 4:15 PM Page 577

It works like magic — the PowerBook’s hard drive icon shows up on the
desktop Mac’s screen just as though it were an external hard drive. You can
drag huge amounts of files back and forth and revel in the speed of the
copying.
To reverse the procedure, turn off the desktop Mac first, then the
PowerBook, and then the other SCSI devices, if any.
If you plan to connect and disconnect your PowerBook from the SCSI chain
regularly, you can actually leave the special dark gray SCSI cable dangling,
unattached, from the end of your SCSI chain. Your desktop Mac will work fine.
Whenever you need to transfer files, just shut off all the Macs, hook up the
PowerBook to the dangling cable, switch it on first, and you’re rolling.
Keeping track of which files are current
As you toss files back and forth from PowerBook to main Mac, keeping track
of which copy of which file is the most recent can get to be a headache. The
truly nightmarish scenario unfolds when you realize you’ve done some
editing to a certain document on each machine, and you no longer remember
which sections of the document are the most current!
The only way to avoid these situations is to practice safe file synchronization
techniques. A zillion programs on the market are designed expressly for this
purpose — such as Apple’s own PowerBook Assistant or File Synchronization,
which comes with System 7.5 and later. Such a program compares the
contents of two folders (one on each Mac). Then it replaces older files with
newer ones, regardless of which Mac contains each. When it’s done, both
Macs contain the newest versions of all files.
Making presentations
Except for our multimedia tips in Chapter 23, we’re going to leave the
headache of creating your presentations up to you.
We can, however, advise you as to how to project your presentation. The
more expensive PowerBooks of each year’s crop (including the 500, 5000,
3400, and G3 lines) have built-in video-output connectors. (The PowerBook
1400 requires an add-on card for this purpose.)
You can hook up a few things to this video port. Of course, you can always
plug in a regular Mac monitor. Even if you have a grayscale screen on the
PowerBook, the external monitor can show color.
You can also hook up an LCD projection pad. This item looks like a metal-
framed, two-inch-thick slab of glass. You plug it into the Mac’s video output
jack, and then you set the slab atop an ordinary overhead projector (yes, the
same overhead projector they’ve used to show transparencies in sixth-grade
biology class since time immemorial).
578 Part II: Secrets of the Machine
■ ■
MAC SECRETS • 4040-8/5 • ch.14.2 • Chapter 14 • Final • dfq/EAP • 10/26/98 • p.578
MAC SECRETS • 4040-8/5 • ch.14.2 • Chapter 14 • Proof 2 • EAP • 10/15/98 • p.578
MAC SECRETS • 4040-8/5 • ch.14.1 • Chapter 14 • Proof 1 • VB • 09/09/98 • p.578
4040-8/5 ch14.F 11/3/98 4:15 PM Page 578

We’re not sure if you’ve seen these projectors recently, but they look great.
The black-and-white ones cost about $1,400; the nice color ones cost $3,000
or more. Most of these projection slabs expect your laptop to have a PC-style
(VGA) video-output jack instead of a standard Mac monitor jack. That’s why
all modern PowerBooks (3400, 2400, G3s, and so on) have standard VGA
monitor jacks in the back instead of Mac monitor jacks. (An adapter cable for
Mac monitors comes with the PowerBook.)
Video mirroring
Video mirroring was a great feature of pre-1997 PowerBooks. When an
external monitor or projector is connected to video-output-equipped,
pre-1997 PowerBooks, the PowerBook Display control panel lets you choose
one of these two options:
■View the same image on the PowerBook screen and on the external
monitor. (This is the only option on modern PowerBooks.)
■Treat the external monitor as an extension of the PowerBook’s monitor,
exactly as though you’re working with a multiple-monitor setup (see
Chapter 11 for details). (This is the option Apple took out of PowerBook
models, beginning with the 3400.)
Interestingly, a PowerBook has two different chunks of VRAM (video RAM, as
described in Chapter 11) — one for its own built-in screen and any external
monitor you connect. Modern PowerBooks, such as those with G3
processors, have 2MB or 4MB of external-monitor VRAM— enough to fill a
21-inch monitor in “millions of colors” mode. All previous PowerBooks,
however, have only 512K of external VRAM, enough to create a 256-color,
640 by 480-pixel image on the external monitor.
Unfortunately, 256 colors mean splotchy, ugly photographs or QuickTime
movies. Victims of those PowerBooks’ 256K external-monitor VRAM have
three choices:
■Turn the photographs into graphics files in indexed-color mode, as
described in our Photoshop Secrets in Chapter 20—period.
■Buy a video card for your 5000-series (or later) PowerBook. It boosts
your PowerBook’s VRAM to 1MB or more, making it possible to display
more colors on larger monitors.
■If you have a Duo, you can insert it into a Dock with upgraded VRAM.
Making the screens match
On all video-output-equipped PowerBooks, a few anomalies may haunt you
when it comes to seeing the same thing on both the PowerBook screen and
the external monitor (or LCD projector).
For example, if you’re using an older PowerBook, it may alarm you that the
image on the external monitor is much smaller than normal. That’s because
older PowerBook screens are 80 pixels shorter (vertically) than the usual 14-inch
Mac monitor. Video mirroring, of course, is designed to mirror on the external
Chapter 14: PowerBooks Exposed 579
■ ■
MAC SECRETS • 4040-8/5 • ch.14.2 • Chapter 14 • Final • dfq/EAP • 10/26/98 • p.579
MAC SECRETS • 4040-8/5 • ch.14.2 • Chapter 14 • Proof 2 • EAP • 10/15/98 • p.579
MAC SECRETS • 4040-8/5 • ch.14.1 • Chapter 14 • Proof 1 • VB • 09/09/98 • p.579
4040-8/5 ch14.F 11/3/98 4:15 PM Page 579

monitor exactly what you see on the PowerBook screen—which means the
external monitor will display an extra 1.1 inches of black at the top and bottom.
Conversely, if you’re using a PowerBook 5300ce, which has an 800 by 600-
pixel screen, you may see a fat black border around the PowerBook’s screen.
Once again, video mirroring ensures that the built-in screen and external
monitor show the same image — 640 pixels wide and 480 pixels tall. The
PowerBook will, therefore, crop its own display to those dimensions.
How to control mirroring on modern PowerBooks
As noted above, 1997 and later PowerBooks (3400, 2400, G3, and so on) can’t
treat an external monitor as an extension of the built-in screen. The second
monitor can only act as a duplicate of the PowerBook’s screen, and even then
only at 800 x 600 resolution. (See Chapter 11 for more on monitor resolutions.)
Even then, making everything work perfectly may require several attempts.
Connect the external monitor or projector, turn it on, and then turn on the
PowerBook.
If the external monitor works but the PowerBook screen is dark, use the
Monitors & Sound control panel (or Control Strip), watching the external
monitor as you go, to set the resolution to the setting that says Simulscan.
(On the other hand, if you don’t care about seeing the same image on the
PowerBook screen, choose any resolution you like.)
If the PowerBook screen is working but the external screen isn’t, here’s the
bizarre solution: Control-click the Monitor Resolution tile on the Control
Strips! A secret pop-up menu of resolutions appears. Choose the one with the
word Simulscan after it, and marvel as the external monitor magically springs
to life. (You may have to repeat this procedure if the PowerBook goes to
sleep or gets turned off.)
Using the fax/modem
Chapter 24 covers the general aspects of using modems and fax/modems.
PowerBook fax and modem techniques are only slightly different. For one
thing, this add-on appliance is usually built (or inserted) into the PowerBook.
The only problem you may encounter traveling with your telecom-ready
PowerBook is the phone jacks. As you may know, the most recent style of
American wall phone jacks — those installed in the last 15 years — are called
RJ-11 jacks. The end of a typical phone cable has a male RJ-11 plug. It’s
usually a clear, plastic, rectangular plug with a clip that clicks when inserted
into the proper outlet.
Unfortunately, far too many of the world’s (and even some of America’s)
hotels haven’t quite caught up to the technology. Their phone lines are
fastened to the wall with one of the older, four-screw faceplate systems,
making it tough for you to hook up your modem.
Strange
But True
580 Part II: Secrets of the Machine
■ ■
MAC SECRETS • 4040-8/5 • ch.14.2 • Chapter 14 • Final • dfq/EAP • 10/26/98 • p.580
MAC SECRETS • 4040-8/5 • ch.14.2 • Chapter 14 • Proof 2 • EAP • 10/15/98 • p.580
MAC SECRETS • 4040-8/5 • ch.14.1 • Chapter 14 • Proof 1 • VB • 09/09/98 • p.580
4040-8/5 ch14.F 11/3/98 4:15 PM Page 580
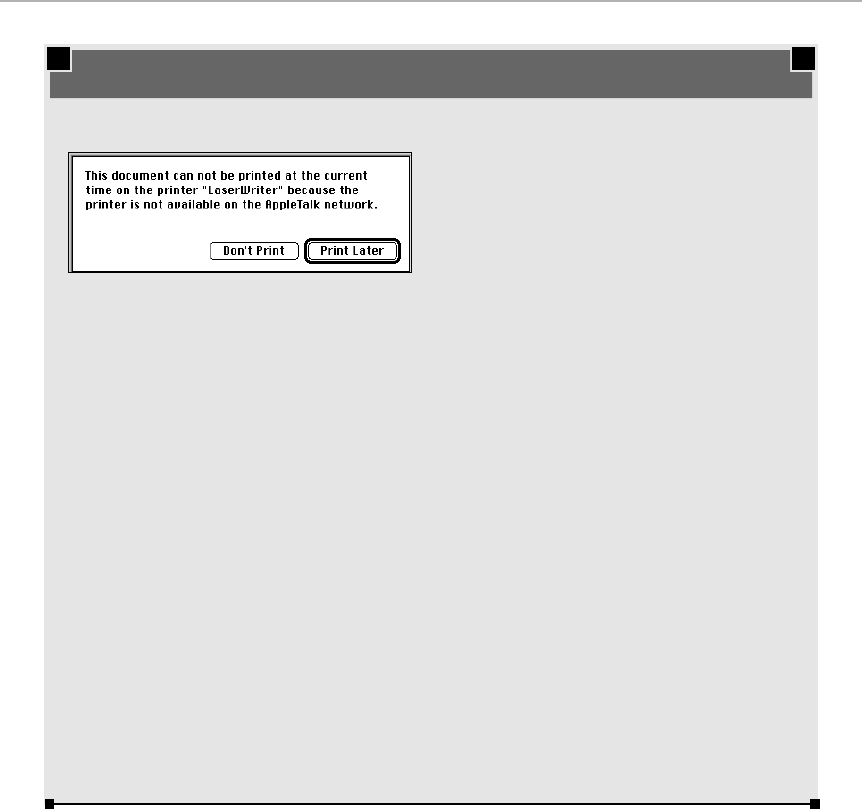
In this situation, many articles advise you to travel with a “phone jack survival
kit,” a messy-looking assortment of alligator clips and screwdrivers, along
with a manual instructing you to remove the wall plate, attach the clips to the
live terminals, and so on. Fortunately, we have three far simpler solutions:
1. Call ahead. Yes, we actually intend to suggest that you select a lodging
facility based on its phone jacks. If you’re going to be doing business via
modem or fax, you may as well be businesslike.
Chapter 14: PowerBooks Exposed 581
■ ■
MAC SECRETS • 4040-8/5 • ch.14.2 • Chapter 14 • Final • dfq/EAP • 10/26/98 • p.581
MAC SECRETS • 4040-8/5 • ch.14.2 • Chapter 14 • Proof 2 • EAP • 10/15/98 • p.581
MAC SECRETS • 4040-8/5 • ch.14.1 • Chapter 14 • Proof 1 • VB • 09/09/98 • p.581
ANSWER MAN
Q: What does the Assistant Toolbox extension
do?
A: Where do we begin?
The Assistant Toolbox extension adds a
delightful cornucopia of special features to your
PowerBook, including:
■Persistent RAM disk— If you’ve created a
RAM disk, as described earlier in this
chapter, Assistant Toolbox can automatically
copy its contents onto your hard drive when
you shut down the machine—and copy it
back onto the RAM disk when you start up
again. (Otherwise, you’d have to set up the
RAM disk manually with every startup.)
■Sleep FKey — You can put the PowerBook
to sleep by pressing Ô-Shift-0 (that’s a
zero).
■Later Laser — Later Laser gives you the
option of storing your printouts when
you’re not connected to your network;
when you reconnect, the documents print
when the printer is available. Later Laser is
only active when a laser printer is selected
in the Chooser.
■SCSI Sleep — If you were on a network,
and had brought other Macs’ hard drives to
your screen and then put the PowerBook to
sleep, this feature brings those networked
drives back onto the screen when the
PowerBook wakes up.
■Anti-Submarining Cursor — The Anti-
Submarining Cursor feature is a software
fix for the “submarining” cursor effect on
PowerBooks with grayscale passive-matrix
screens. (“Submarining” is when the cursor
disappears as it is moved quickly.)
■Always AppleTalk — This feature lets you
turn on AppleTalk (in the Chooser or from
your Control Strip) without having to restart
the computer.
All of these features work automatically if
Assistant Toolbox is installed.
Don’t have Assistant Toolbox? Your PowerBook is
probably too new. This extension was rolled into
System 7.6.1 and later. You’ve got all the features
without even needing the extension now.
Assistant Toolbox and its many wonders
4040-8/5 ch14.F 11/3/98 4:15 PM Page 581

2. Buy an acoustic coupler, a device that fastens to any telephone handset
anywhere with Velcro. Instead of connecting your modem directly to the
phone line, an acoustic coupler uses the ear- and mouthpiece of the
telephone to broadcast, and listen to, the modem signals. While that
may seem like a silly way to go, today’s acoustic couplers are really
something — they work like a charm, without the speed penalty of their
clunky ancestors.
Konexx and Teledapt sell the identical coupler for about $150. It has the
advantage of working on any telephone in the world, even pay phones,
even in other countries. One of your cheerful authors merrily used his
coupler at 14.4 Kbps on telephones in Indonesia and Thailand with great
success.
3. This final solution is pricey, but it will earn you the admiration of your
coworkers: Get yourself a cellular modem. With this kind of modem, you
won’t care if the hotel room’s jacks are clip-style, four-screw–style, or
coated in cement. (Of course, this solution only works in America. So far.)
A word or two about printing
Naturally, the PowerBook prints just as well as any other Mac, and to just as
wide a variety of printers. The question here, though, is portability. In the
following secrets, we’ll outline a few strategies.
582 Part II: Secrets of the Machine
■ ■
MAC SECRETS • 4040-8/5 • ch.14.2 • Chapter 14 • Final • dfq/EAP • 10/26/98 • p.582
MAC SECRETS • 4040-8/5 • ch.14.2 • Chapter 14 • Proof 2 • EAP • 10/15/98 • p.582
MAC SECRETS • 4040-8/5 • ch.14.1 • Chapter 14 • Proof 1 • VB • 09/09/98 • p.582
DIALOGUE
Through the X-ray machine
JS: What did you just type?
DP: I’ll reread it, but I believe it was “the X-ray
machine cannot hurt your PowerBook.”
JS: Are you nuts? What about all those — those rays
bombarding your computer? Are you forgetting that
there are people’s files on that hard drive in there?
DP: No, of course not. I’m sorry, Joe, but the whole
point of this chapter is to dispel myths about
PowerBooks, not perpetuate unsubstantiated
hearsay. . .
JS: Harmful X rays are no myth.
DP: X rays have no effect whatsoever on a
PowerBook. Or any other computer, for that matter.
JS: Except that if they happen to penetrate the hard
drive, your data can be scrambled into meaningless
hieroglyphics.
DP: Joe, you’re confusing X rays with magnetism.
It’s a common mistake. If you had opted to take even
one physics class when we were at Yale instead of
focusing almost exclusively on courses like
“Skepticism among Soviet Jewry in the Middle Ages,”
you would realize that X rays have nothing to do with
magnetism. . .
JS: What’s wrong with studying Skepticism?
DP: And I would appreciate it if you would stop
putting everything in italics.
JS: Listen, Mr. Physics, I’m not talking about the X
rays. I’m talking about the conveyor belt itself. What
do you think powers that? Hamsters on treadmills?
DP: Well, at least that’s a little more valid than your
previous wild claims. I suppose if you’re really
worried, you can take the trouble to place the Mac as
close as possible to the entrance of the X-ray
machine, so that it’ll spend as little time as possible
on the conveyor belt —
4040-8/5 ch14.F 11/3/98 4:15 PM Page 582

PowerBook Printing Secrets
■
The ol’ fax-it-to-yourself Secret
We’re rather taken with this trick, actually. If your PowerBook has a built-in fax
modem and you’re staying at a hotel, you can fax a document to the hotel’s own
fax machine. It’s a little strange — faxing from your room down to the front desk,
for heaven’s sake — but it’s a good, cheap, quick way to get something on
paper. (This technique also works in offices, of course.) We use this trick
constantly
. As a bonus, the hotel foots your paper and ink bill.
Compared with the expense, weight, and hassle of most other printing options,
we find the fax-it-to-yourself thing a clever and effective, spur-of-the-moment
printing option.
Portable printers
These devices are out there, for sure, but they’re not exactly wonderful. Citizen,
GCC, and Mannesman-Tally make portable PowerBook printers, but the speed,
ribbon life, and battery life leave a lot to be desired.
You may also be able to find numerous discontinued portable Apple printers,
such as the Apple Portable StyleWriter, a five-pound, slimline adaptation of the
StyleWriter 1200, and the Color Portable StyleWriter 2200, which provides the
same color printing capabilities of the Color StyleWriter 2400 in a super-compact
design.
Worth
Learning
Chapter 14: PowerBooks Exposed 583
■ ■
MAC SECRETS • 4040-8/5 • ch.14.2 • Chapter 14 • Final • dfq/EAP • 10/26/98 • p.583
MAC SECRETS • 4040-8/5 • ch.14.2 • Chapter 14 • Proof 2 • EAP • 10/15/98 • p.583
MAC SECRETS • 4040-8/5 • ch.14.1 • Chapter 14 • Proof 1 • VB • 09/09/98 • p.583
JS: He admits it!
DP: . . . but I still say that I’ve run PowerBooks of all
kinds through those machines. And so have pilots
aplenty — people who travel more than I do— and
I’ve never, never heard of any problems.
JS: My philosophy is simple: why take risks? If you
own a PowerBook, obviously your life is going pretty
well. So play it safe. Pass your PowerBook around the
X-ray machine and then get it visually inspected.
DP: Obviously you’re one of these people who shows
up at the airport an hour ahead of time.
JS: You’re reckless.
DP: And you’re paranoid. Listen, I take my
PowerBook everywhere. I have run it through
countless airport security devices. Nothing has ever
gone wrong. All of my files remain fjhd[ asdlf d¢–-
fdf;2231kXºººº _87§.
JS: Ah-hah! See? See that?!And where do you
suppose all those garbled characters just came from,
Mr. Basic-Laws-of-Physics?
DP: Joe. . .
JS: Mr. Don’t-you-know-the-difference-
between-X-rays-and-magnetism!?
DP: Hello. . .
JS: Mr. Garbage-Characters-Spewing-Uncontrollably-
From-His-Now-Radioactive-
PowerBook. . . ?!
DP: I dropped a box of Fig Newtons on the keyboard.
JS: Oh.
4040-8/5 ch14.F 11/3/98 4:15 PM Page 583

Printer-conversion kits
For about $100, you can buy a disk/cable kit designed to make your PowerBook
work with any of the zillion
IBM
-compatible printers on the market, including
color inkjets, laser printers, and even antiquated dot-matrix models. (The best of
these disk/cable packages is PowerPrint, from GDT/ Infowave, 604-291-9121.)
In a way, this option makes a lot of sense. It’s cheap, it’s lightweight and very
portable, and chances are good that you’ll find
some
IBM printer no matter
where you go!
Traveling with the PowerBook
After you’ve gotten your PowerBook out of the computer store, you’re going
to start going places with it (we hope). There’s more to it, however, than
simply remembering to keep it in your carry-on luggage instead of checking it.
In the Airport
The classic locale for PowerBook-spotting is the airport. We’ve had
considerable experience toting PowerBooks through these teeming public
spaces.
Let’s make this perfectly clear: The X-ray machine cannot hurt a laptop. Don’t
waste a single minute’s sleep worrying about it.
If you travel with your PowerBook while it’s asleep, then the much-derided
security check — whereby somebody in a uniform who understands nothing
about computers except their capacity to screw up a paycheck requires that
you turn on your computer long enough to view text on the screen (yes, that’s
the criterion) — will mean nothing to you. You’ll breeze through, tap a key to
wake the PowerBook up (where the menus suffice as text), put it back to
sleep, and be on your way.
Security on the road
Security is a hot topic when it comes to PowerBooks. Even undereducated
thugs, who probably don’t know the meaning of the word double-click, recognize
a PowerBook (and even a PowerBook carrying case) when they see one.
You can find all kinds of clunky devices designed to lock your laptop down to
something heavy. There are also all kinds of software protection programs
that protect your screen, or certain files, or your entire hard drive, from
anyone who doesn’t know the correct password. For information on both of
these product types, we’ll refer you to the ads in Macworld.
Mac Basics
584 Part II: Secrets of the Machine
■ ■
MAC SECRETS • 4040-8/5 • ch.14.2 • Chapter 14 • Final • dfq/EAP • 10/26/98 • p.584
MAC SECRETS • 4040-8/5 • ch.14.2 • Chapter 14 • Proof 2 • EAP • 10/15/98 • p.584
MAC SECRETS • 4040-8/5 • ch.14.1 • Chapter 14 • Proof 1 • VB • 09/09/98 • p.584
4040-8/5 ch14.F 11/3/98 4:15 PM Page 584

Our security secret is much simpler, and much more effective. Our advice:
Keep the PowerBook attached to you in public places. Don’t set it down.
We know exactly two people whose PowerBooks have been stolen. Neither
was stolen from a hotel room. Neither had secret documents swiped from the
hard drive. Both were in public places (at a rent-a-car counter and an airport
waiting lounge), and both put down the PowerBook in its case. In both cases,
somebody grabbed the bag and disappeared into the crowd.
We don’t mean to say that you have to carry it at all times; just keep in
contact. Loop the shoulder strap around your foot if you’re going to set the
thing on the ground. Or wrap it around your wrist if it’s in the waiting-lounge
chair next to you.
Inflight silliness
Once aboard the airplane, you’ll be asked to turn off your PowerBook for the
first and last 15 minutes of each flight. If you blinked during the three-day
period in 1991 when the newspapers explained why, you might have missed it.
Apparently, there was a rash of mass hysteria about laptop computers
confusing the cockpit navigational equipment. When PC World magazine
investigated, however, they found out how shaky the evidence was. Out of
19,000 reports of navigational equipment acting up that had been reported to
the FAA, three featured pilots who had learned, after the event, that a laptop
user had been aboard. That’s as solid a link as has ever been established.
We don’t know about you, but that’s a half-hour per flight that we could really
use.
Chapter 14: PowerBooks Exposed 585
■ ■
MAC SECRETS • 4040-8/5 • ch.14.2 • Chapter 14 • Final • dfq/EAP • 10/26/98 • p.585
MAC SECRETS • 4040-8/5 • ch.14.2 • Chapter 14 • Proof 2 • EAP • 10/15/98 • p.585
MAC SECRETS • 4040-8/5 • ch.14.1 • Chapter 14 • Proof 1 • VB • 09/09/98 • p.585
TRUE FACT
PowerBook carrying cases — especially the
beautiful ones that have little Apple logos on
them — are for saps. They single you out
instantaneously for theft. As reader Peter Silver
notes, highly developed PowerBook theft
operations are a feature of most university cities
now.
“Instead,” he writes, “people should use
backpacks and book bags as ordinary-looking as
they can find, with the PowerBook wrapped in
something for padding from the other stuff in the
bag. And what is the perfect such padding? An
everyday flannel pillowcase, folded in half, then
in half again, with the computer tucked into one
of the little pockets these folds make — the one
that has about the same number of layers of
flannel on either side of it. I’m not describing this
well, but the Mac fits in there like it was born to.
And I guess you could kind of sew the pillow
case a little to make it more pouch-like.”
PowerBook Pillowcases
4040-8/5 ch14.F 11/3/98 4:15 PM Page 585

Duo Notes — and Newton Stunts
The PowerBook Duo was the smallest, sexiest Macintosh ever made. It has
the pleasing heft, size, and shape of a nice hardbound book, yet it packs
some serious horsepower.
We have much more to say about the Duos; see the end of Chapter 12, for
example, for model-by-model descriptions. For still more, see the Duo
discussion in Chapter 15 of the electronic version of Macworld Mac Secrets,
4th Edition (on the CD-ROM that came with this book).
And guess what’s also there? A list of Easter eggs for the Apple Newton. (We
thought about writing “Newton Secrets,” we really did. But we couldn’t come
up with 1,200 pages’ worth.)
586 Part II: Secrets of the Machine
■ ■
MAC SECRETS • 4040-8/5 • ch.14.2 • Chapter 14 • Final • dfq/EAP • 10/26/98 • p.586
MAC SECRETS • 4040-8/5 • ch.14.2 • Chapter 14 • Proof 2 • EAP • 10/15/98 • p.586
MAC SECRETS • 4040-8/5 • ch.14.1 • Chapter 14 • Proof 1 • VB • 09/09/98 • p.586
4040-8/5 ch14.F 11/3/98 4:15 PM Page 586

MACWORLD MAC SECRETS • 4040-8/5 • ch.15.F • Chapter 15 • FINAL • VB/EAP • 10/26/98 • p.589
MACWORLD MAC SECRETS • 4040-8/5 • ch.15.1 • Chapter 15 • Proof 1 • VB •09/09/98 • p.589
Chapter 15
Mac Application Basics
In This Chapter
©How multitasking works
©Handling memory and multiple programs
©Publish and Subscribe
©Type and creator codes
©Taking your work to PCs and back
The first 14 chapters of this book could satisfy somebody who just bought
a new Macintosh and took it out of the box — those chapters cover the
hardware and the built-in software. But you didn’t buy a computer to admire
its operating system; you bought it to run programs.
This chapter lays bare the secret world of Macintosh applications: how they
work, how to manage them, and what they have in common.
Types, Creators, and Double-Clicking
In previous incarnations of the personal computer— DOS machines, for
example — you couldn’t just double-click to open a document. In DOS, you
have to type the name of the program you want to open, a space, and then
the exact name of the document you want to open with it. If you don’t
remember the name of the document precisely, you’re out of luck.
The Mac makes all of this much simpler. You don’t have to remember the
names of your programs; they’re listed for you at all times. Better still, you
don’t have to remember which program created a certain document. You just
double-click the document icon, and the program that created it—whatever
or wherever it may be—opens automatically.
The mechanism that gives the Mac this intelligence is worth examining
because it also accounts for a number of other Mac behaviors. That
mechanism is type and creator codes.
4040-8/5 ch15.F 11/3/98 4:09 PM Page 589

Creator codes
Every program ever written has its own customized four-letter code: the
creator code, which is generally hidden from you, the user. For FileMaker Pro,
the creator code is FMPR; for Microsoft Word, it’s WDBN, and so on. (When it
comes to type and creator codes, capitalization counts, and so do spaces.)
Because every document you create is also stamped with this creator code, it
always knows who its parent is. When you double-click a document icon whose
behind-the-scenes creator code is FMPR, FileMaker Pro opens automatically.
Type codes
Every icon on your disk also has an invisible type code. This piece of informa-
tion specifies which kind of file it is: text, graphic, and so on. For example,
depending on the options you choose in Excel’s Save As dialog box, this single
program can create text files (type code: TEXT), normal Excel files (XLS6), Lotus
1-2-3-exchangeable files (SYLK), Microsoft Works format (LWKS), and so on.
Every one of these documents has the same creator code, however — XCEL.
Therefore, regardless of what the icon looks like or what file type it is, if it’s
double-clicked, then it opens in Excel.
Type codes are most useful, obviously, in helping the Macintosh distinguish
among different kinds of documents. But did you ever wonder if there’s such
a thing as a type code for your programs?
Programs do have type codes. But the code is almost always the same for
every program — the code that tells the Mac that this is an application. It’s
APPL. As in Apple. As in Application. As in Always.
(OK, well, as in Almost Always. Mac OS 8 broke the 14-year consistency streak
by introducing two new creator codes for applications. There’s APPC, which
means “an application that, when dropped on the System Folder icon, gets
routed automatically into the Control Panels folder, kind of like Monitors &
Sound, Energy Saver, or Date & Time [which aren’t control panels at all].” And
there’s APPD, which is assigned to applications that get put automatically
into the Apple Menu Items folder when dropped on the System Folder. But we
digress.)
How type and creator codes affect you
Type and error codes are the sole explanation for the famous “application
could not be found” error message.
This message appears all too frequently when you double-click an icon. It
means that, in consulting the file’s creator code, the Mac didn’t find a match
among the applications on your hard drive. If you double-click a document
icon whose creator is SQGP, and there’s no application on your disk with such
a code, then you get the error message.
Mac Basics
OS
8
590 Part III: Application Secrets
■■
MACWORLD MAC SECRETS • 4040-8/5 • ch.15.F • Chapter 15 • FINAL • VB/EAP • 10/26/98 • p.590
MACWORLD MAC SECRETS • 4040-8/5 • ch.15.1 • Chapter 15 • Proof 1 • VB •09/09/98 • p.590
4040-8/5 ch15.F 11/3/98 4:09 PM Page 590

Suppose that your SQGP file was sent to you via email by a friend who uses
America Online. The message says, “Here’s a JPEG file of me with my dog
Bullwinkle.” Now you’re on to something. If you check the file’s type code
using FileTyper (see the next section), you see that, indeed, the type for this
document was JPEG. (JPEG is the four-letter type code for the standard JPEG
graphics file format, which is described in Chapter 20.)
Plenty of programs can open JPEG files: Photoshop, Word, Netscape Navigator,
PageMaker —you name it. But as long as the file’s creator code refers to a
program you don’t own, then you’ll never be able to open it by double-clicking
(unless you’re using Mac OS Easy Open; see Chapters 4 and 16).
But if you were to change the creator code to match an application you do own,
then a simple double-click would open that JPEG file! In fact, the file would even
inherit the appropriate icon identifying it with that application; the Mac uses a
file’s creator and type codes to assign icons for files in Finder windows.
Changing type and creator codes
In the standard system software, Apple doesn’t provide any way for you to
change a file’s type or creator code. (There’s a secret way to see codes using
Find File, as you’ll see in the first secret below, but no way to change them.)
You, however, are fortunate. Included on the CD-ROM with this book is
FileTyper (see Chapter 33), one of whose talents is the capability to change
type and creator codes with ease. Here’s how to do it.
Drag the file you want to change onto FileTyper’s icon in the Finder. The
dialog box in Figure 15-1 appears. (If it doesn’t, rebuild your desktop, as
described in Chapter 1.)
Figure 15-1: The FileTyper window, featuring the Type and Creator Code text boxes.
Chapter 15: Mac Application Basics 591
■ ■
MACWORLD MAC SECRETS • 4040-8/5 • ch.15.F • Chapter 15 • FINAL • VB/EAP • 10/26/98 • p.591
MACWORLD MAC SECRETS • 4040-8/5 • ch.15.1 • Chapter 15 • Proof 1 • VB •09/09/98 • p.591
4040-8/5 ch15.F 11/3/98 4:09 PM Page 591
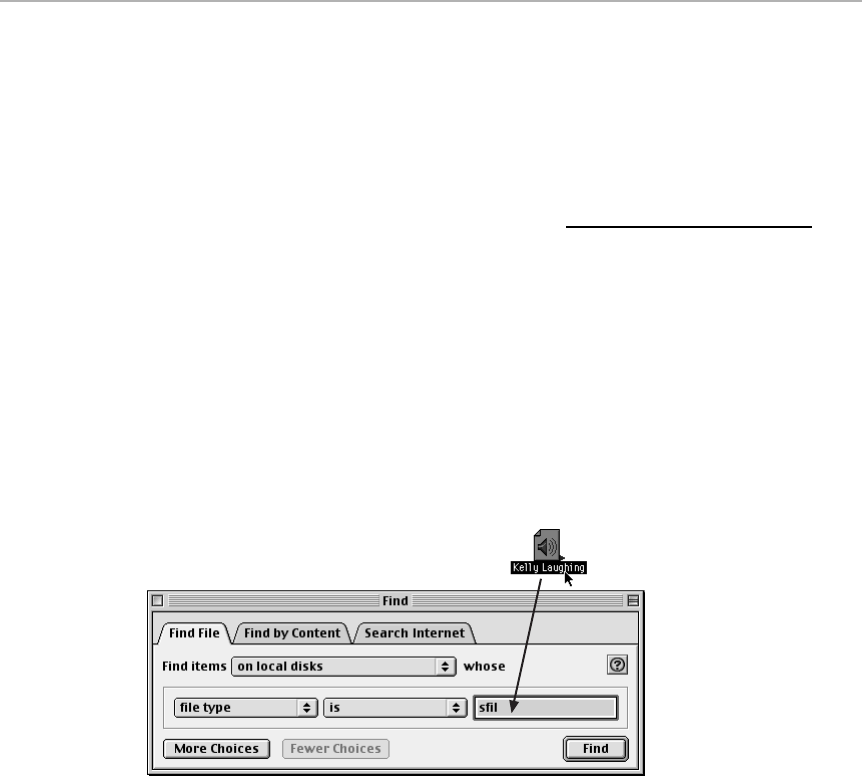
All you have to do is type a new type or creator into the text boxes. Be
careful: The code must be exactly four characters long. And capitalization
counts; if you change a file’s creator to Fmpr instead of FMPR, it will not
become a FileMaker Pro file.
When you’re finished changing the code, click Change. It’s over.
Type and Creator Code Secrets
■
Determining a file’s codes instantly
The Finder provides no way to peek at a file’s type or creator codes. But in
System 7.5 and later, you can use the Find File program in a sneaky,
undocumented way to learn just such info. From the pop-up menu, choose
file type
or
creator
as appropriate. (Or use the More Choices button to reveal
a second pop-up menu, and choose
both
codes.)
Now drag the icon of the mystery file
on top of the blank,
as shown in Figure
15-2. The Find File program instantly reveals the hidden codes in the blanks.
Figure 15-2: Set up Find File’s pop-up menus to say file type or creator, as shown at top.
Drag an icon onto the blank, and lo! — you get to see its secret codes.
Changing codes to frustrate snoopers #1
Since type and creator codes tell the Macintosh what kind of file a particular icon
is, it follows that changing a file’s codes prevents it from opening in the usual
way. Changing a type or creator code, therefore, is one of the fastest and simplest
ways to prevent an important document from being viewed by unauthorized eyes.
Let’s assume you want to lock a Microsoft Word 98 document. Using FileTyper,
as pictured in Figure 15-1, you’ll discover that a Word document’s Type code is
W8BN and its Creator code is MSWD. You can change each of the codes to any
four-character string you want, but the easiest is simply to change the
uppercase characters to lower-case and vice versa; that’s enough to get the
592 Part III: Application Secrets
■ ■
MACWORLD MAC SECRETS • 4040-8/5 • ch.15.F • Chapter 15 • FINAL • VB/EAP • 10/26/98 • p.592
MACWORLD MAC SECRETS • 4040-8/5 • ch.15.1 • Chapter 15 • Proof 1 • VB •09/09/98 • p.592
4040-8/5 ch15.F 11/3/98 4:09 PM Page 592

Mac adequately confused. After you’ve changed “MSWD” to “mswd” and
“W8BN” to “w8bn,” save and close the file.
When you try double-clicking on the altered file, it won’t open. Instead, you’ll get
an error message. Word won’t even recognize the file as one of its own. Of
course, to “unlock” the file, all you have to do is restore the original type and
creator codes.
Changing codes to frustrate snoopers # 2
Here’s a more devious variation on the preceding trick: Instead of changing the
type and creator codes
randomly
, replace them with those codes from another
file. For example, if you replace a file’s type code with the letters INIT, your file —
be it a Word document, FileMaker database, Excel spreadsheet, or whatever — will
appear in the Finder as a
system extension
. It will inherit the usual jigsaw puzzle-
shaped icon and, if you double-click on it, you’ll see the familiar dialog box telling
you to place the file in the Extensions folder and restart.
To complete the disguise, rename the file something like
AppLibTPC Enabler
and
put it in your Extensions folder. Nobody will ever suspect that your confidential
documents are quietly hidden within the System Folder, safely pretending to be
part of the Mac OS.
Unlocking a “read-only” Read Me file
SimpleText is the program used to generate 99 percent of the world’s “Read Me
First” files. Sometimes you can edit these; sometimes you can’t.
The difference is in the type codes for the two kinds of documents that
SimpleText can create. Documents with type TEXT can be edited; those with type
ttro (which stands for “TeachText, read-only”) are locked. All you have to do is
change the creator code from ttro to TEXT to unlock it — or vice versa to lock a
Read Me file you’ve created yourself.
Telltale signs of creator and
type code problems
As we mentioned earlier, a file’s icon is determined by its creator and type codes.
When your Mac encounters a file and sees that its creator code is MSWD and its
type is W8BN, it immediately throws an icon of a Microsoft Word document up
onscreen to represent that file; the codes tell it which icon to use.
Which brings us to this secret: If you try to open a file, and you get a message
saying the application that created it can’t be found — and you know perfectly
well that you do, in fact, have that application — take a look at the file’s icon. If
it has turned into a “generic” document, it could be that the icon has simply
forgotten its type and creator codes (see Figure 15-3). Without those codes, it
loses its identity and forgets which application it belongs to.
Worth
Learning
Strange
But True
Chapter 15: Mac Application Basics 593
■ ■
MACWORLD MAC SECRETS • 4040-8/5 • ch.15.F • Chapter 15 • FINAL • VB/EAP • 10/26/98 • p.593
MACWORLD MAC SECRETS • 4040-8/5 • ch.15.1 • Chapter 15 • Proof 1 • VB •09/09/98 • p.593
4040-8/5 ch15.F 11/3/98 4:09 PM Page 593
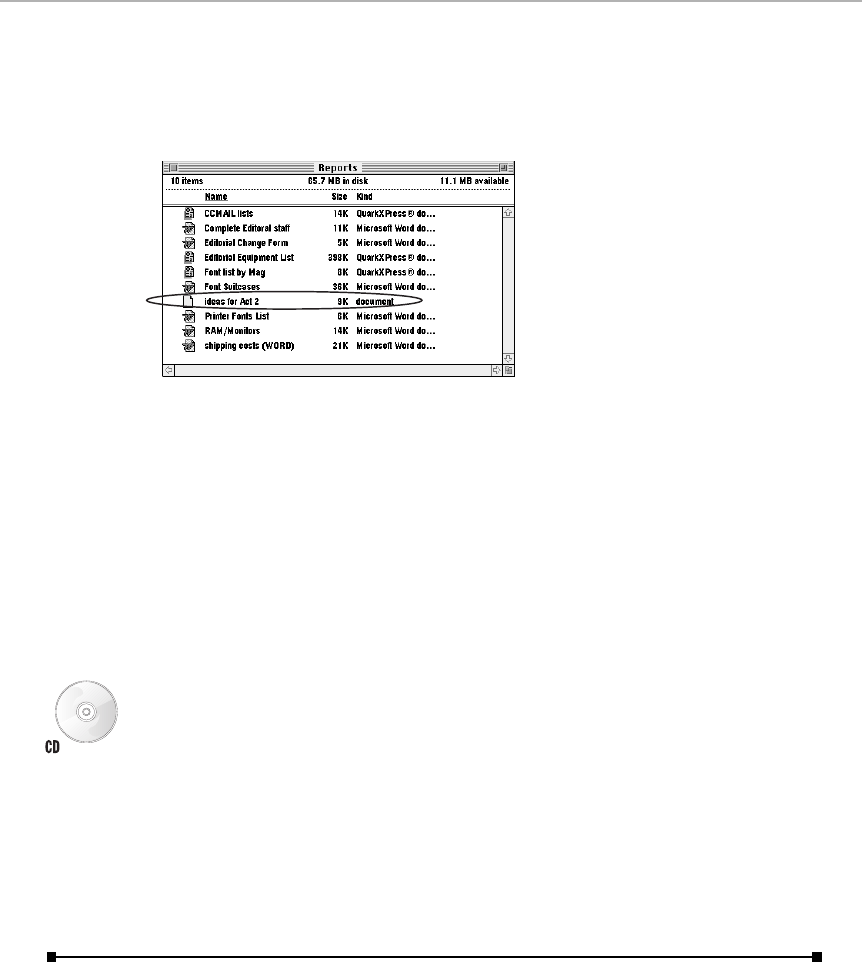
Restoring the proper codes with FileTyper or ResEdit usually solves the problem.
Just type the right codes back in, using the method described earlier in this
chapter, and the icon will take on its application-specific appearance and open
right up.
Figure 15-3: When a file gets its type and creator codes zapped, its icon becomes generic
and its kind in Finder list views defaults to “document.”
In the Finder’s list views, there is yet another indicator that a file has lost its
creator and type codes. Instead of being listed as a Microsoft Word document or
a FileMaker Pro document, the file will be listed simply as a “document.” Once
again, the coding that tells the Mac which application created the program has
been obliterated (see Figure 15-3).
Extracting fonts and sounds — the easy way
Here’s an incredibly easy way to crack open any application and peruse its
internal collection of fonts and sounds. Make a copy of the program you want to
peek into, then drag its icon onto FileTyper’s icon (provided with this book).
Change the type code to zsys and the creator code to MACS (capitalization
counts), then click Change.
When you close FileTyper, the program you just altered will have been
transformed into a
suitcase
— the same kind used to hold fonts. Double-click
the suitcase to open it and you’ll see all the program’s fonts and sounds in the
window. All you have to do is drag the icons to move or copy them! (This is a
great way to harvest new system alert sounds, especially if you try it on games
and children’s programs.)
Which Copy Will Launch?
Suppose, as is often the case, that you have more than one copy of the same
program on your hard drive. You might have Word 6 and Word 98, or
ClarisWorks 4.0 and 5.0, or several copies of SimpleText. Now you double-
click a document icon. Which version of the program will launch?
594 Part III: Application Secrets
■ ■
MACWORLD MAC SECRETS • 4040-8/5 • ch.15.F • Chapter 15 • FINAL • VB/EAP • 10/26/98 • p.594
MACWORLD MAC SECRETS • 4040-8/5 • ch.15.1 • Chapter 15 • Proof 1 • VB •09/09/98 • p.594
4040-8/5 ch15.F 11/3/98 4:09 PM Page 594

Which copy on your system
From the preceding discussion of type and creator codes, you know that the
Mac will check the document’s creator code and launch the matching
program. But if you have several copies of the program, which copy will open?
The Finder checks the following sources, in this order:
■It checks to see if a program with the matching creator code is already
running. If so, that program pops to the front.
■If the program isn’t already running, the Mac searches for a copy of the
program in the same folder, and then on the same disk, as the document.
This is probably the most useful quirk to know when it comes to
arranging your applications. For example, PowerBook users who use our
ingenious RAM-disk trick (see Chapter 14) can rest easy knowing that
double-clicking a RAM disk-based document will launch the RAM disk-
based application — not the hard drive–based copy, which would force
the hard drive to start spinning (and use battery power).
■If it’s had no luck yet, the Mac next searches the startup disk for a copy
of the program.
■Finally, the Mac searches your other drives on its quest for a matching
program to launch.
Which version of the program
Now you know which copy of the identical program will open. But what if you
have different versions of a program? After all, the creator code of a program
doesn’t usually change when the program is upgraded; ClarisWorks versions
3.0, 4.0, and 5.0 all have the creator code BOBO.
The answer is enlightening — and useful. If you have multiple versions of the
same program, the Mac launches the one you’ve most recently installed.
(Technically speaking, it opens the program whose Desktop-file entry was
most recently updated; see Chapter 1.)
That’s true even if the most recently installed copy isn’t the most recent version.
For example, if you want ClarisWorks 4.0 to launch whenever you double-click a
ClarisWorks document’s icon, install ClarisWorks 4.0 after ClarisWorks 5.0.
Here’s a quick experiment to show you how weird this all gets. Locate a copy
of SimpleText. Using the Finder’s Duplicate command, make a copy of
SimpleText (so that you now have a more recently created copy). Put the new
copy into the Trash, but don’t empty the Trash.
Now, if you double-click a SimpleText document, you’ll get an error message
to the effect that SimpleText can’t be launched because it’s in the Trash. Yet a
perfectly good copy of SimpleText — the original copy — is still sitting right
there on the hard drive! But because the most recent copy is in the Trash, the
Mac becomes oblivious to any other copies.
Strange
But True
Chapter 15: Mac Application Basics 595
■ ■
MACWORLD MAC SECRETS • 4040-8/5 • ch.15.F • Chapter 15 • FINAL • VB/EAP • 10/26/98 • p.595
MACWORLD MAC SECRETS • 4040-8/5 • ch.15.1 • Chapter 15 • Proof 1 • VB •09/09/98 • p.595
4040-8/5 ch15.F 11/3/98 4:09 PM Page 595

How the Mac Multitasks
For years, running more than one program at a time on the Mac was a strange
and alien concept. It even seemed to betray the Mac’s professed simplicity.
You did one thing at a time. Either you shuffled floppies in and out (in the
Finder), or you typed and printed (in MacWrite). Multitasking was something
fancy UNIX programmers did.
The first time anyone saw more than one program running on a Mac was
when Switcher came along. This little software program put a little double-
headed arrow on the menu bar. Click the arrow and the next program’s
window rotated into view, like a new slide in a projector. (You didn’t see the
programs’ windows simultaneously.)
The goal of early programs like Switcher was simple: to run more than one
program simultaneously. With more than one application in RAM, you would
be spared the frustrating 60-second wait as you quit MacPaint (from which
you copied a logo) and launched MacWrite (in which you wanted to paste it).
If both programs were in memory at once, jumping between them would be
instantaneous. Switcher was the precursor to MultiFinder and, eventually, the
System 7-style multitasking we take for granted today. In retrospect, we’re
amazed that Switcher went essentially unheralded and unannounced; it never
made the cover of a Mac magazine.
Allowing more than one program to run at a time also opened the door to
background tasks. These are jobs that take the computer a long time to do
(such as printing or downloading files by modem), but that don’t involve any
input from you. The dream was to let you, the user, continue to do something
useful with the Mac — word processing, say—while part of the computer’s
attention was focused on this background task. In other words, people
wished the Mac could do multitasking.
When a computer is multitasking, it doesn’t really do more than one thing
at a time. Millisecond by millisecond, it’s actually doing only one thing at a
time — but changing its job description extremely quickly. It might spend a
few milliseconds handling a printout you’re doing, then a few downloading
a Web page, then back to the printout, and so on.
All of these background tasks happen when you’re not doing anything. It
takes place, for example, during the fractions of a second between letters
you’re typing (although that doesn’t mean that you never notice background
activity, especially when you’re trying to type).
Modern Multitasking
These days, multitasking is no longer optional. You can always launch more
than one program and keep them — and the Finder — in memory at the
same time.
To help you understand what’s going on, the Mac offers you a list of running
applications: the Application menu (or the process menu, if you’re a program-
mer). The Application menu is marked at the right end of the menu bar by a
OS
8.5
596 Part III: Application Secrets
■ ■
MACWORLD MAC SECRETS • 4040-8/5 • ch.15.F • Chapter 15 • FINAL • VB/EAP • 10/26/98 • p.596
MACWORLD MAC SECRETS • 4040-8/5 • ch.15.1 • Chapter 15 • Proof 1 • VB •09/09/98 • p.596
4040-8/5 ch15.F 11/3/98 4:09 PM Page 596

tiny version of the currently running program’s icon; starting with Mac OS
8.5, this menu also shows the name of the currently running program. To
switch from one running program to another, you choose its name from this
menu. (Or, if you’ve turned this menu into a Mac OS 8.5 application palette,
click a program’s icon on the palette).
But there are several other ways to jump from one running program to another:
■Click anywhere in a visible application’s window.
■In the Finder, double-click the dimmed icon of a program that’s running.
■Double-click a document icon that was generated by one of the open
programs.
In Mac OS 8.5, press Ô-Tab. You jump to the next running program, in
alphabetical order. (Shift-Ô-Tab takes you backward alphabetically
through your open programs.) You can even redefine these keystrokes, if
Ô-Tab doesn’t strike your fancy; open the Mac OS help program (choose
Help ➪Mac OS Help) and search for “switching programs.” The resulting
screens offer AppleScripts that can reprogram the program-switching key
assignment. (For much more detail on the Mac OS 8.5 Application menu,
see Chapter 2.)
■If you don’t have Mac OS 8.5, but would still like the convenience of
pressing Ô-Tab to jump among programs, install Program Switcher,
included with this book.
Hazards of Multitasking
Multitasking isn’t just a more complicated task for the computer; it’s a more
complicated task for you, too.
Memory management
Your immediate concern when running several programs is memory. Your
Mac has a finite amount of it. You must worry not just about how much RAM
your Mac has, but also about how much each program needs, and how much
you decide to give it. You must also worry about memory fragmentation.
To change how much RAM each of your programs uses, use the Get Info
command on its icon, choose Memory from the pop-up menu (in Mac OS 8.5),
and type a new number into the box at the lower right of the Get Info window.
(Or, with AppSizer, provided on the CD-ROM with this book, you can change
the program’s memory appetite as it’s launching; see the appendix.) See
Chapter 9 for guidelines in setting this number correctly.
Chapter 9 also mentions two Macintosh tools that are absolutely ideal for
multitasking: virtual memory (built into your Memory control panel) and
RAM Doubler (from Connectix). Each lets you run more programs at once
without sacrificing significant speed.
OS
8.5
Chapter 15: Mac Application Basics 597
■ ■
MACWORLD MAC SECRETS • 4040-8/5 • ch.15.F • Chapter 15 • FINAL • VB/EAP • 10/26/98 • p.597
MACWORLD MAC SECRETS • 4040-8/5 • ch.15.1 • Chapter 15 • Proof 1 • VB •09/09/98 • p.597
4040-8/5 ch15.F 11/3/98 4:09 PM Page 597

Not knowing which program is open
Another complication of multitasking on the Mac is losing track of which
program you’re actually in. Think about it: If there’s any screen space not filled
by a program’s window, the Finder desktop shines through, right? If no program
window is open, then your screen looks exactly like you’re in the Finder!
This can cause frustrating side effects for the novice. The novice may, for
example, want to shut down for the day — but the Shut Down command is
nowhere to be found! In fact, it only looks like you’re in the Finder; actually,
you’re in some program that has no open windows.
That’s why Apple, after years of listening to this complaint, created a sweet,
simple solution in Mac OS 8.5: it added the name of the active program to the
upper-right corner of the screen, as explained in Chapter 2.
But even in systems before Mac OS 8.5, savvy Mac users know three visual
cues to determine which program is in front:
■Look at the Application menu (see Figure 15-4). Though small, it shows
the icon of the program that’s currently in front in the upper-right corner.
OS
8.5
598 Part III: Application Secrets
■ ■
MACWORLD MAC SECRETS • 4040-8/5 • ch.15.F • Chapter 15 • FINAL • VB/EAP • 10/26/98 • p.598
MACWORLD MAC SECRETS • 4040-8/5 • ch.15.1 • Chapter 15 • Proof 1 • VB •09/09/98 • p.598
ANSWER MAN
Q: What’s the Thread Manager? Sewing software?
A: The Thread Manager is an extension — built
into System 7.5.3 and later — that gives your
Mac multithreading.
Apple explains multithreading as follows:
“Multithreading allows an application process to
be broken into simple subprocesses that
proceed concurrently in the same overall
application context. A thread consists of a
register set, a program counter, and a stack.
Threads have a fast context switch time due to
their minimal context state requirement. Since
threads are hosted by an application, threads
within a given application share the address
space, file access paths, and other system
resources associated with that application…
“The Thread Manager will provide both
cooperative and preemptive threads. Cooperative
threads explicitly indicate when they are giving up
the CPU. Preemptive threads can be interrupted
and gain control at any time…”
Sure. Whatever.
What all that means in real life is that, when the
Mac is fully multithreading, more kinds of
computational tasks will be “background” tasks
— meaning that you can continue working. The
usual examples are formatting a floppy disk,
doing a database search, or applying a Photoshop
filter. Today, you sit and twiddle your thumbs
while those processes go on; multithreading
would permit you to continue working while
those activities go on in the background.
Mac OS 8’s copying and trash-emptying features
are among the first payoffs of Apple’s
multithreading technologies — while a file is
copying, or while the Trash is emptying, you can
launch a program, go online, or do any other
work, with almost no perceptible speed decrease.
Multitasking vs. Multithreading
4040-8/5 ch15.F 11/3/98 4:09 PM Page 598

■The frontmost program has a check mark beside its name in the
Application menu (see Figure 15-4).
■The first command in the menu always provides the name of the active
program (“About Quark XPress,” for example).
Figure 15-4: Visual clues as to which program is really in front: the icon atop the Application
menu and the check mark next to the program name.
When you’re running multiple programs in System 7 through 7.1, the familiar
Finder desktop is always shining through from behind any the windows of
other programs. In fact, even if you’re smart enough to choose Hide Finder
from the Application menu, the Finder desktop and icons still don’t
disappear! Worse, one accidental mouse click outside of an application’s
window instantly deposits you back in the Finder, whether you want to be
there or not. Ask any novice how many times he or she’s seen an entire word
processor window full of text completely disappear (behind some Finder
windows), and you’ll understand the extent of the problem.
Given all of this confusion, it’s no wonder that System 7.5 introduced the
option of auto-hiding the Finder completely whenever you launch another
program. (This feature’s on/off switch is in the General Controls control
panel.) And we mean really hiding it, icons and all. No wayward click will
send you back into the Finder. There’s never any doubt as to whether you’re
in the Finder or not, and there’s no Hide Finder command to only half-work.
Of course, there are disadvantages to the fully self-hiding feature, too: To go
back to the Finder without quitting, you must choose its name from the
Application menu. Furthermore, if the Finder is hidden, it’s impossible to
create clipping files on the desktop using Macintosh Drag-and-Drop—or to
insert the contents of a clipping file into an open document by dragging it
from the desktop— as described in Chapter 1.
Multitasking Secrets
■
Hide one program en route to another
Of the various ways you can switch from one program to another, three of them
let you
hide
program A as you switch from it to program B. If you press Option
while either (1) choosing a program’s name from the Application menu, (2)
clicking a program’s icon in Mac OS 8.5’s applications palette, or (3) clicking in
Mac Basics
Chapter 15: Mac Application Basics 599
■ ■
MACWORLD MAC SECRETS • 4040-8/5 • ch.15.F • Chapter 15 • FINAL • VB/EAP • 10/26/98 • p.599
MACWORLD MAC SECRETS • 4040-8/5 • ch.15.1 • Chapter 15 • Proof 1 • VB •09/09/98 • p.599
4040-8/5 ch15.F 11/3/98 4:09 PM Page 599
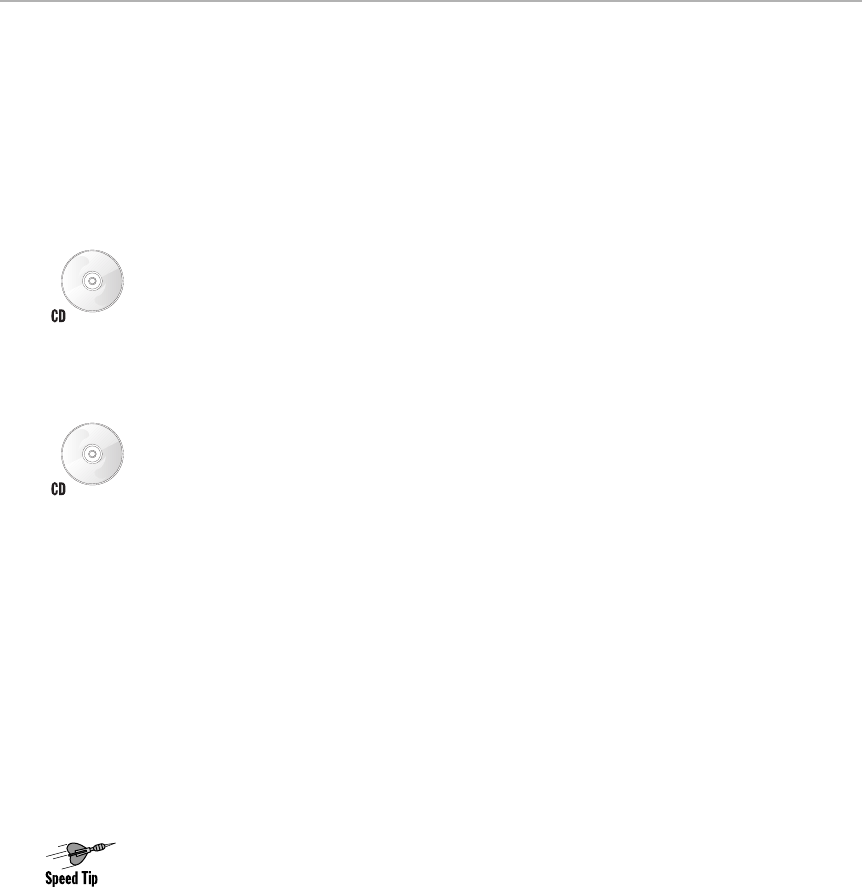
a background window to bring it forward, the program you’re working in hides
itself. The Option key is an important tool in keeping a bunch of overlapping,
confusing windows under control.
The most prominent example of this technique’s usefulness is switching to the
Finder. In this case, hiding other program windows is almost essential, because
they may be concealing the icon you need access to (the Trash and your disk icons,
for example). Therefore, if you’re in (for example) ClarisWorks, Option-clicking
whichever patch of the Desktop you can see is a common power-user habit.
No, wait — we take it back. The
real
power user switches to the Finder and
simultaneously
hides the other running programs, all in a single keystroke (such
as Control-F). How? Using OneClick, the macro program included with this book.
See Chapter 23 for details on creating OneClick macros.
Switch with a keystroke
One of the most efficient ways to jump from one program to another is to use a
macro that you’ve created with, for example, OneClick (which is on the CD-ROM
with this book). By all means, assign your favorite programs to the function keys
across the top of the keyboard. Most people are already aware that these
programs let you launch any program on your hard drive with a single keystroke.
Fewer realize, however, that the
same
macro can be used to bring that program
to the front even
after
it’s running
.
Allowing your macro to launch programs lets
you worry less about what’s running; you learn to associate Control-W, say, with
Microsoft Word, without having to remember whether or not it’s already running.
One-click quitting with OneClick
If you’re using OneClick (included with this book), you’re by now accustomed
to using its Task Bar to manage your running programs. It’s much like Mac
OS 8.5’s tear-off Application menu, in that it shows you all currently running
programs, and lets you switch among them by clicking — but OneClick’s Task
Bar offers many more features.
Such as this one, to which we’ve become
addicted:
you can
quit
any running
program just by Shift-clicking its name on the OneClick Task Bar. You’re spared
the hassle of switching to the program, using its File menu, switching to the
next, and so on.
Borrow from Windows 95
In many respects, Windows is a clunkier, less elegant OS than the Mac OS. We
must admit, however, that its
task bar
(the strip along the bottom of the screen)
is a nice idea. It fulfills the same purpose as the Mac’s Application menu —
displaying all the currently open programs — with two advantages. First, it shows
open
windows,
not just programs, and second, it’s not hidden. The beginner
isn’t expected to click in a secret place to see the list of running programs.
600 Part III: Application Secrets
■ ■
MACWORLD MAC SECRETS • 4040-8/5 • ch.15.F • Chapter 15 • FINAL • VB/EAP • 10/26/98 • p.600
MACWORLD MAC SECRETS • 4040-8/5 • ch.15.1 • Chapter 15 • Proof 1 • VB •09/09/98 • p.600
4040-8/5 ch15.F 11/3/98 4:09 PM Page 600

If you find the notion of a task bar attractive, you don’t have to switch to
Windows to get it. Just install Go Mac, a shareware program included with this
book. As described in the appendix, it adds a bottom-of-screen task bar to the
Macintosh — with even more features than Windows 95’s version.
You can also configure Mac OS 8.5’s own applications palette to resemble
Windows 95’s taskbar (although it lists only running programs, not files and
windows); see Chapter 2.
Chapter 15: Mac Application Basics 601
■ ■
MACWORLD MAC SECRETS • 4040-8/5 • ch.15.F • Chapter 15 • FINAL • VB/EAP • 10/26/98 • p.601
MACWORLD MAC SECRETS • 4040-8/5 • ch.15.1 • Chapter 15 • Proof 1 • VB •09/09/98 • p.601
ANSWER MAN
Q: What are those diamonds and flashing icons
all about? Sometimes they’re at the top of my
menu. Sometimes they’re on my Application
menu. What’s happening?
A: We’ve been discussing the ins and outs of
multitasking for several pages now. Generally,
we’ve conveyed the impression that only the
frontmost program — the active one — gets
much attention from you. Programs in the
background are permitted to use only the grains
of time in which you and the foreground
program aren’t doing anything. That leaves them
available to do tedious, computerish tasks such
as printing or receiving a fax.
When we were kids, whenever our parents had
a fancy dinner party, we were supposed to have
fun upstairs all evening and not disturb the
grown-ups in the living room. But that always
presented a quandary: What should we do if
something really important happened (like a
sister getting her tongue caught in the faucet
opening or something)?
Background programs face the same challenge:
Having been told firmly not to intrude on the
main event, they are content to huddle in the
background, waiting for the Real Work to get
done. Yet sometimes there’s a crisis. The back-
ground program doesn’t want to interrupt you —
it has too much respect for you to do that. So it
timidly starts blinking.
This blinking usually happens on the Application
menu icon. Your foreground program’s icon
starts alternating with that of the background
application that’s in trouble. If you then put your
cursor on the Application menu icon, the
distressed background program’s name appears
with a diamond beside it (in case you didn’t
recognize the blinking icon).
When you finally have a moment to respond to
the background program’s tactful signal, you
choose its name from the Application menu, and
you’re finally told what the trouble is.
By far the most common programs that present
these Notifications, as they’re called, are
PrintMonitor (see Chapter 30), the Finder, e-mail
programs, and telecom programs (including
online services such as America Online). The
Finder is generally trying to tell you that it has
run out of memory for keeping busy windows
open. PrintMonitor usually wants to say that
your printer is (a) off, (b) out of paper, or (c)
ready for the next sheet of hand-fed paper (if
you’ve used the Manual Feed option). E-mail
programs are usually trying to say that a
message has come in, and online services warn
you that you haven’t touched your keyboard for
several minutes, but you’re still running up a bill.
Diamonds in the bar
4040-8/5 ch15.F 11/3/98 4:09 PM Page 601
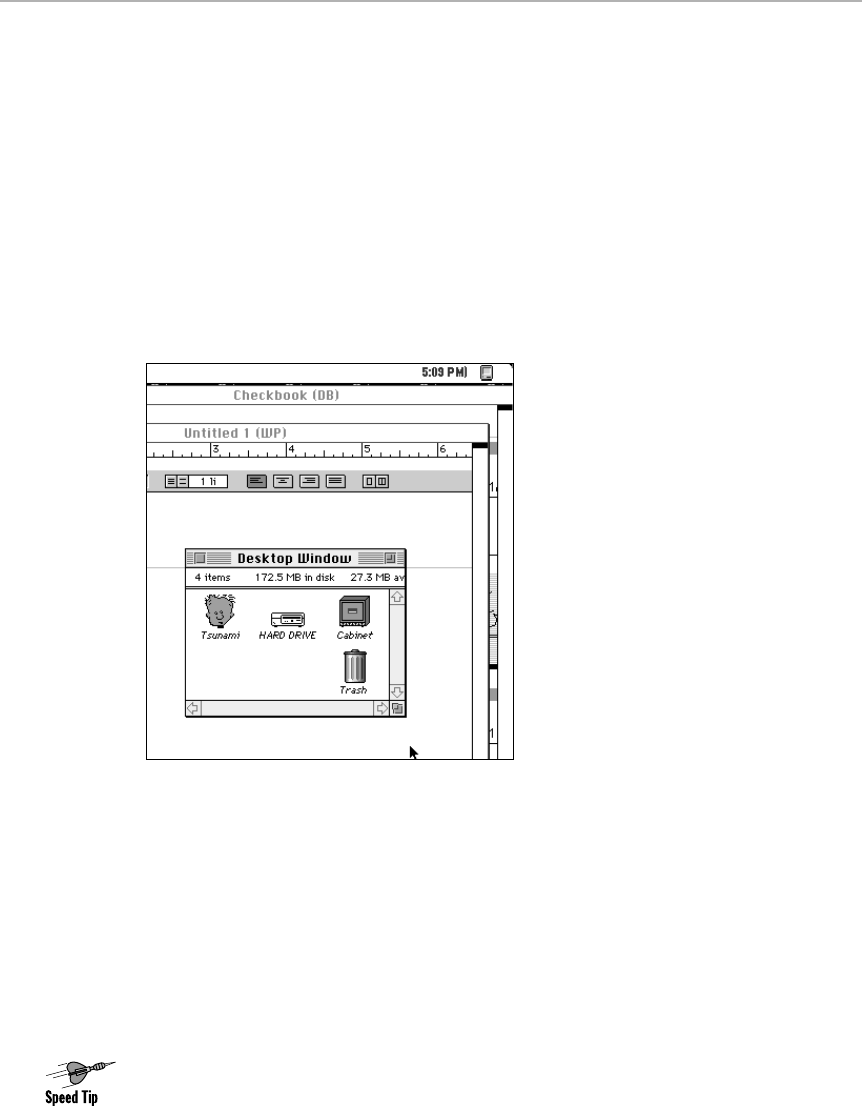
The Finder-in-a-window trick
As mentioned in a preceding secret, one way to get around the Trash-is-
covered-up problem is to Option-click the desktop when you switch from a
program to the Finder.
That solution isn’t ideal, however, if you’re running
several
programs. In that
event, you must switch to the Finder and then choose Hide Others from the
Application menu.
Here’s a trick that reduces that one step down to none. Create a folder called
“Desktop Window.” Make aliases of your disks, both attached and networked.
Also make an alias of your Trash can. Put them all into this window (see
Figure 15-5).
Figure 15-5: The Finder-in-a-window trick provides access to the icons that are usually
covered up by the windows of other programs — the Trash and your disk icons. Now you
don’t have to bother hiding all your other applications when all you want to do is jump to the
Finder and open a disk.
Now, whenever you switch to the Finder, you see the desktop landscape that
would otherwise be covered up by the windows of other programs. Double-click a
disk icon to open it. Drag anything onto the Trash alias to delete it.
Opening Desktop items without closing windows
Here’s a neat way to select and open Desktop icons, even if they’re covered up
by open windows: Press Ô-Shift-up arrow. This instantly jumps you to the
Desktop level, regardless of how many windows are open.
602 Part III: Application Secrets
■ ■
MACWORLD MAC SECRETS • 4040-8/5 • ch.15.F • Chapter 15 • FINAL • VB/EAP • 10/26/98 • p.602
MACWORLD MAC SECRETS • 4040-8/5 • ch.15.1 • Chapter 15 • Proof 1 • VB •09/09/98 • p.602
4040-8/5 ch15.F 11/3/98 4:09 PM Page 602

Then type the first letter or letters of the name of the disk icon or file you want to
select. If you want to open the Trash, for example, press T. If the Trash happens
to be behind an open window, you won’t be able to see that you’ve really selected
it — but you have. Just press either Ô-O or Ô-down arrow, and the Trash window
will open. You’ve selected and opened an item on the Desktop without seeing it,
without closing a single window, and without lifting your fingers from the keyboard.
Publish and Subscribe
Remember Copy and Paste? You select information from one document or
program. Then you paste it into a different (or the same) document or program.
The Publish and Subscribe commands found in many of today’s programs is
almost exactly the same, but there’s one critical difference: The “pasted”
material is linked to the original. When the original chart, text, or graphic
gets edited, the copies are automatically changed to match. This change can
even take place if the copies exist as files on other Macs, provided they’re
connected by a network.
Why hasn’t it caught on?
Despite the attractiveness of the idea, most people don’t use Publish and
Subscribe. We think three factors are responsible:
■If you’re not either on a network, collaborating on documents with
others, or embedding one kind of data (such as PostScript graphics)
inside another (such as a word processor), you simply don’t need
Publish and Subscribe.
■Not all programs offer Publish and Subscribe features. In fact, only
programs that deal with the layout and manipulation of text, graphics,
and charts have Publish and Subscribe features.
■Most of all, we feel that Publish and Subscribe hasn’t quite become
universal because it’s just too darned hard.
This last item we hope to do something about. We encourage you to walk
through it just this once, if only so you’ll know what Apple had in mind.
The basics of Publish and Subscribe
Copy and Paste takes place in two spots. You copy a selection (location A)
and put it down somewhere else (location B).
Publish and Subscribe, however, involves three locations. You copy a
selection (location A). When you use the Publish command, the Mac saves
that selected paragraph or picture in a new file (location B) on the hard
Chapter 15: Mac Application Basics 603
■ ■
MACWORLD MAC SECRETS • 4040-8/5 • ch.15.F • Chapter 15 • FINAL • VB/EAP • 10/26/98 • p.603
MACWORLD MAC SECRETS • 4040-8/5 • ch.15.1 • Chapter 15 • Proof 1 • VB •09/09/98 • p.603
4040-8/5 ch15.F 11/3/98 4:09 PM Page 603

drive. You must name it and place it into a folder, just as you would any
ordinary document. Sticking with this magazine analogy, the saved text or
graphics file is called an edition.
At this point, you’ve achieved nothing useful. You’ve copied some material
and saved it into its own file on the disk.
Now, however, you go to another document (location C). It may have been
created by the same program that created the edition, or it can be a totally
different program. Into this document, you import the edition file on the hard
drive, using the Subscribe To command. The contents of the edition file
appear in the new document, just as though they had been pasted there (see
Figure 15-6).
Figure 15-6: The publisher is the material in the original document. (There can be several
publishers in one document.) Using the Create Publisher command, you save the graphic into
a disk file of its own, called an edition. Finally, you can import the graphic into any number of
documents, whereupon each imported edition file is called a subscriber. The beauty of this
system: If you ever reopen the publisher document and change the graphic, it automatically
changes in all the subscriber documents, too.
This may seem to be several steps more complicated than Copy and Paste.
But if you now open the original document, change what you published, and
use the Save command, then the edition file is instantly updated to reflect the
change you made, as you’ll find out when you open the subscriber documents.
Publish and Subscribe step-by-step
Get a program that has Publish and Subscribe features. Almost any word
processor, spreadsheet, page-layout program, or graphics program does.
(The current versions of Word, Excel, FreeHand, PageMaker, Canvas,
ClarisWorks, WordPerfect, and Photoshop are some examples.) If you have
two different programs, terrific; you can publish from one to another. But if
you have only one, that’s useful, too.
A graphic in Canvas or
FreeHand
PUBLISHER SUBSCRIBERS
EDITION
A file on your hard drive A MacWrite Pro document, a
Quark Xpress document, a
Word document, and so on
604 Part III: Application Secrets
■ ■
MACWORLD MAC SECRETS • 4040-8/5 • ch.15.F • Chapter 15 • FINAL • VB/EAP • 10/26/98 • p.604
MACWORLD MAC SECRETS • 4040-8/5 • ch.15.1 • Chapter 15 • Proof 1 • VB •09/09/98 • p.604
4040-8/5 ch15.F 11/3/98 4:09 PM Page 604
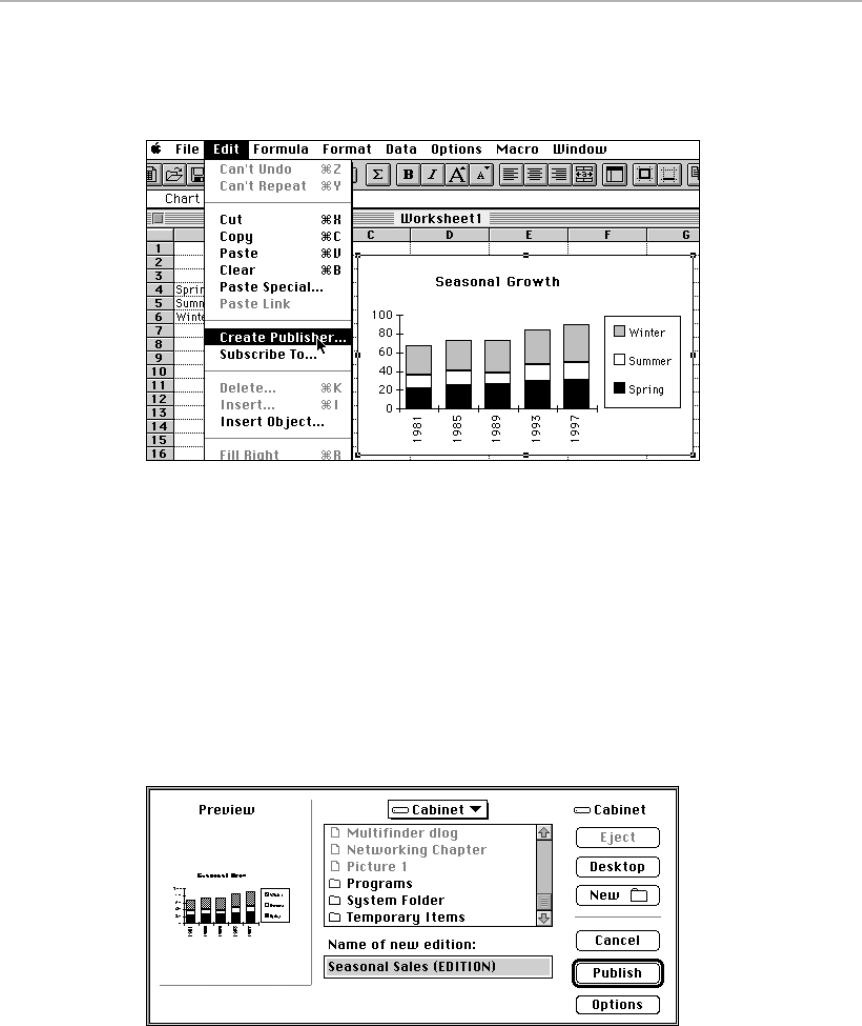
Create a graphic, chart, or block of text (from one typed character to many
pages long) and select it. From the Edit menu, find the program’s Create
Publisher command (see Figure 15-7).
Figure 15-7: First, select or highlight the material you want to be linked. Find the Create
Publisher command and choose it.
You’re asked to give this edition a title and to save it on your hard drive. Do
that (see Figure 15-8). Repeat this process with as many other selections of
source material as you want. In most programs, a gray, nonprinting border
appears around the published material.
Before you quit the first program, you must save the document that contains
the published material! If you don’t, your magical linking of material
evaporates. You are left with the lonely edition file on your hard drive, not
tied in to anything at all.
Figure 15-8: Name and publish the edition file. Depending on the program you use, the
Publish button may say Save.
Chapter 15: Mac Application Basics 605
■ ■
MACWORLD MAC SECRETS • 4040-8/5 • ch.15.F • Chapter 15 • FINAL • VB/EAP • 10/26/98 • p.605
MACWORLD MAC SECRETS • 4040-8/5 • ch.15.1 • Chapter 15 • Proof 1 • VB •09/09/98 • p.605
4040-8/5 ch15.F 11/3/98 4:09 PM Page 605

Now go to the program, document, or part of a document where you
ultimately want to integrate what you just published. Find the Subscribe To
command. Choose it; a box appears in which you can locate the edition you
created earlier (see Figure 15-9). The Mac automatically highlights the last
edition you created, regardless of the program that created it.
Figure 15-9: Now you’re fetching the edition file from within the target document. Note the
Preview; this handy feature helps you figure out if you’re opening the correct edition file. (If
you published text, you see the first few lines in the Preview.)
Double-click the name of the edition you want. It appears in your document,
usually enclosed by a nonprinting gray border (see Figure 15-10).
Figure 15-10: A gray outline appears around any published or subscribed material. It does in
most programs, anyway; in Word and Excel it doesn’t, although Word shows brackets when
you have the Show ¶ command turned on.
Editing the subscriber
After you subscribe to an edition file, you can’t do much with the imported
material. If it’s a graphic, you can move or resize it. If it’s text, you might be
able to make overall formatting changes.
But to make any serious editing changes — or any changes to individual
words in subscribed text or individual elements of a graphic— you must
reopen the original publisher document. Make some changes to it and then
606 Part III: Application Secrets
■ ■
MACWORLD MAC SECRETS • 4040-8/5 • ch.15.F • Chapter 15 • FINAL • VB/EAP • 10/26/98 • p.606
MACWORLD MAC SECRETS • 4040-8/5 • ch.15.1 • Chapter 15 • Proof 1 • VB •09/09/98 • p.606
4040-8/5 ch15.F 11/3/98 4:09 PM Page 606

save the publisher document. The edition file on disk — and, therefore, the
subscriber document — is automatically updated.
Controlling when editions are updated
We mentioned that an edition file is updated when you save the publisher
document. Actually, there’s more to it than that. You can also elect to have
the editions updated on command. You can even permanently destroy the
link between the original and the copies.
Most programs have a Publisher Options command and a corresponding
dialog box. (It’s available only when something that you published is selected
in the publisher document.)
In the dialog box, you see a Send Editions control. Generally, it’s set to “On
Save,” meaning that you have to save the publisher document to update the
edition files. But using the controls in this dialog box, you can have more
flexible control over when the edition is changed.
■To halt all edition-updating until you are ready, choose Manually.
■To stop all edition-updating forever (break the link), click Cancel Publisher.
■To send an edition update right now, before you save the publisher
document, click Send Edition Now.
Subscriber options
Most programs generally include a Subscriber Options command and dialog
box, too. In this dialog box, you see familiar controls for changing the
frequency of the updating. If you leave the Automatically button selected,
then the selected subscriber changes whenever the original (publisher)
document is saved (or you click its Save Edition Now button). You can create
the same three variations on that theme as you can with publishers.
Multitasking Pro: OpenDoc
Imagine buying software by the feature, not by the program. You’d buy a spelling
checker from Claris, a graphics editor from Deneba, and type-manipulation
controls from Adobe, and pow — you’ve got a customized program. You
wouldn’t pay for features you didn’t want, and you wouldn’t be stuck with using
one word processor even though the spelling checker is better in another.
That was the promise of OpenDoc, a now-abandoned software architecture
developed by Apple. You were supposed to buy a container program
(ClarisWorks 5 was originally supposed to be one) — a master shell — and
then you’d buy only the feature components you wanted. As you clicked the
appropriate data type in your document, the menus and tool palettes of the
master program would change to reflect the features of the components
Chapter 15: Mac Application Basics 607
■ ■
MACWORLD MAC SECRETS • 4040-8/5 • ch.15.F • Chapter 15 • FINAL • VB/EAP • 10/26/98 • p.607
MACWORLD MAC SECRETS • 4040-8/5 • ch.15.1 • Chapter 15 • Proof 1 • VB •09/09/98 • p.607
4040-8/5 ch15.F 11/3/98 4:09 PM Page 607

you’ve purchased. Click a graphic, and the menus would show those Deneba
commands for graphics; highlight some text, and those Adobe type
commands would appear.
Why was OpenDoc canceled? Partly because many of Apple’s software partners
had backed away; partly because the technology was slow, RAM-hungry, and
hard to understand; and partly because of Apple’s mid-’90s money crunch. If
you’re interested in reading more, see Chapter 15 of Macworld Mac Secrets, 4th
Edition (included on the CD that came with this book). (Chapter 27 of that same
electronic book contains a description of Apple’s Cyberdog Web browser, which
was by far the most successful example of Opendoc’s promise.)
Save, Save As, Revert
You won’t get far in your Mac life without encountering— and understanding —
the Save As and Open File dialog boxes. These complex screens are where
you specify how you want to transfer data between the hard drive (where it’s
stored) and RAM (where you work on it). Because these dialog boxes are
central to just about every Mac application in existence, we figured that this
would be the place to dissect them.
Save and Revert
As we mentioned in Chapter 9, when you double-click a document or a
program icon, your Mac feeds the information from the hard drive into
memory. By the time a document appears on the screen, you have two copies
of it — one copy on the disk and another in memory (RAM).
As you edit that document, it becomes more and more different from the
original copy still on the hard drive. At this point, you have two choices: Make
the hard drive copy match the newer version that’s in RAM — or vice versa.
The first scenario is the purpose of the Save command. When you choose
Save from a program’s File menu, the Mac stores your memory-based
document on the disk. Now both copies of the document match.
The Revert command, in the File menu of most programs, does just the
opposite. Instead of bringing the disk copy up to date so that it matches the
document in memory, it restores the memory copy to match the older disk
copy. In other words, the document reverts to the condition it was in the last
time it was saved.
This, of course, is precisely what you want to do if you make a mess of a file
— when a search-and-replace operation has gone awry, for example. The
Revert command is the ultimate Undo. (Some programs, such as Microsoft
Word, don’t offer a Revert command. You can accomplish the same effect
manually: Close the file without saving changes, then re-open it.)
If your program has neither a Revert nor a Save command (such as FileMaker),
there is no way to restore the file after you’ve worked on it for a while. If you
use FileMaker, your only protection is to make a duplicate disk copy before
Mac Basics
608 Part III: Application Secrets
■ ■
MACWORLD MAC SECRETS • 4040-8/5 • ch.15.F • Chapter 15 • FINAL • VB/EAP • 10/26/98 • p.608
MACWORLD MAC SECRETS • 4040-8/5 • ch.15.1 • Chapter 15 • Proof 1 • VB •09/09/98 • p.608
4040-8/5 ch15.F 11/3/98 4:09 PM Page 608

each use of the database (using the Save a Copy As command, for example). If
something goes wrong, you can use the copy.
Save As
The third interaction between the RAM-based and disk-based copies of a
document is the Save As command.
In a way, Save As is a cross between Save and Revert; it lets you eat your cake
and have it too. You save the changes you’ve made — they become part of
the new document — and you also close the older one without saving
changes. Then you have two different versions on disk, an old and a new one.
When working under unstable conditions — that is, when either your boss or
the software is a little flaky—you may want to create an electronic paper
trail of your progress on a certain document. Use the Save As command
frequently to create documents called Memo 1, Memo 2, Memo 3, and so on.
If an indecisive boss (or a buggy, file-corrupting program) decides that the
current version is no good, you can go back to any of the saved versions.
A visual tour of the Save box
The simple Save File dialog box — the list box that appears when you choose
Save As (or Save for the first time) — is loaded with hidden features. Here’s
our summary of the standard Save File box (see Figure 15-11). (But see “Save
and Open File 2000: Navigation Services,” later in this chapter.)
Chapter 15: Mac Application Basics 609
■ ■
MACWORLD MAC SECRETS • 4040-8/5 • ch.15.F • Chapter 15 • FINAL • VB/EAP • 10/26/98 • p.609
MACWORLD MAC SECRETS • 4040-8/5 • ch.15.1 • Chapter 15 • Proof 1 • VB •09/09/98 • p.609
ANSWER MAN
Q: You mentioned that FileMaker has no Save
command. But it has something called Save a
Copy As. Isn’t that the same as Save As? (I
discovered the same command in Photoshop, by
the way.)
A: Not quite.
The more common Save As command duplicates
your file, but leaves the new copy open on your
screen. The copy you were working on is
automatically closed — and not saved.
The Save a Copy As command — found in
FileMaker, Photoshop, HyperCard, and an
increasing number of other programs — is
slightly different. It creates a duplicate of your
file, but leaves the original copy open on your
screen. You don’t even see the new copy unless
you now open it.
In other words, Save a Copy As is something
like an Export command. If you use it
periodically, you can create a “paper trail” of
versions of your file in different stages of
development. (If such an idea appeals to you, by
the way, that’s the basis of Aladdin Systems’
FlashBack program. It keeps a running internal
list of changes you make to a certain file. If
disaster strikes, you can backtrack through the
changes you’ve made.)
Save a Copy As
4040-8/5 ch15.F 11/3/98 4:09 PM Page 609

Figure 15-11: The Save As box deconstructed.
We’re going to assume that you already know what Save and Cancel do.
A. This list shows the contents of the disk or folder identified by item D. You
use this list to navigate and to choose which folder you want to store this
file in.
Ever wonder why all the documents in the list are gray? Because gray is
the universal Mac signal “not available.” When you’re saving a new file, the
only icons that are available are containers — disks and folders, in other
words. You can’t very well store a document inside another document.
B. Item B represents a concept, not an interface element: There are two
different places where you can do typing. You can type a title (C) or you
can type to choose a folder (A). We’ll discuss this feature in more detail
in a moment; note here simply that pressing the Tab key jumps you from
area A to area C.
C. In this text box, you type the name of the file you’re creating: up to 31
letters, no colons.
D. This pop-up menu shows the name of the disk or folder whose contents
you’re browsing through. If you want to burrow deeper into folders-
within-folders, you double-click a folder name in the list (A). To back out
from the contents of a folder, however, you must use this pop-up menu. It
lists, in upside-down order, the nested folders you traveled to reach the
location you’re viewing now. That is, the disk is always second-to-last in
the pop-up menu, and the Desktop is always at the bottom.
E. This indicator identifies the disk whose contents you’re browsing.
F. This button is only available when you’re viewing an ejectable disk or its
contents. Use this button when you want to save your document onto
some disk that isn’t currently in the drive. (Unfortunately for floppy-disk
and Zip disk users who don’t have Mac OS 8 or later, this command is the
DAB
CI
E
F
G
H
610 Part III: Application Secrets
■ ■
MACWORLD MAC SECRETS • 4040-8/5 • ch.15.F • Chapter 15 • FINAL • VB/EAP • 10/26/98 • p.610
MACWORLD MAC SECRETS • 4040-8/5 • ch.15.1 • Chapter 15 • Proof 1 • VB •09/09/98 • p.610
4040-8/5 ch15.F 11/3/98 4:09 PM Page 610
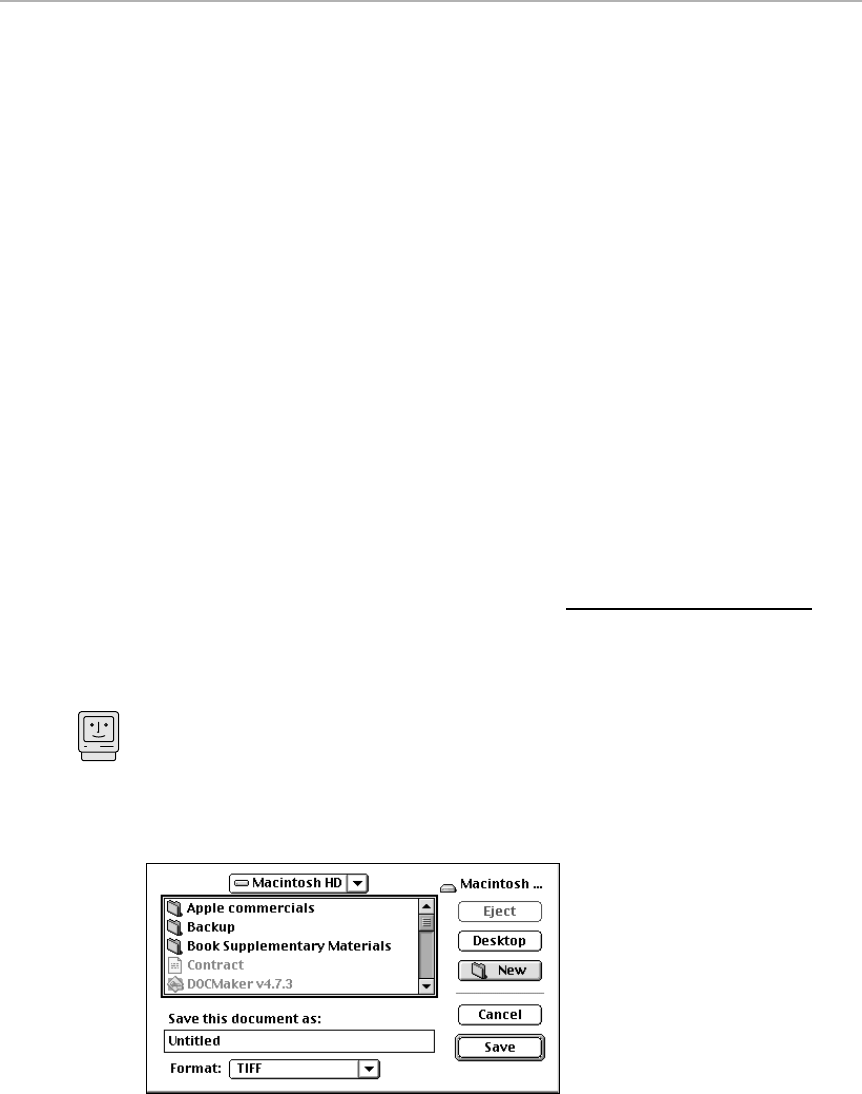
equivalent of the Special menu’s Eject Disk command: yes, it ejects the disk,
but it leaves the disk icon’s ghost on the Desktop. Within moments of your
next visit to the Desktop, your Mac begins asking you to re-insert that disk.)
G. The Desktop button takes you directly to your bird’s-eye view of the
disks accessible by your Mac. It shows each as an icon, including your
hard drive, any floppies or cartridges, and any networked drives that
you’ve mounted.
In Desktop view, you also see any folders or files whose icons you’ve
dragged out of a window onto the Desktop. Interestingly, you also see a
dimmed icon of the Trash. (We’ve always wondered why it’s always
dimmed. We’ve written documents now and then that we wouldn’t have
minded saving directly into the Trash.)
H. The New Folder lets you create (and name) a new folder, in case you’re
trying to save a document for which no existing folder is quite right. (Not
all programs offer this button, but the vast majority do.)
I. More and more programs offer specialized controls down here at the
bottom of the dialog box. Usually there’s a pop-up menu, as shown in this
illustration, that lets you specify what kind of document you want to
save: a text file, a Word file, and so on. That’s good, because saving your
work as another file type (exporting it to another file format) is one of
Save As’s most important uses.
Save/Open Dialog Box Secrets
■
Two different places you can type
When you’re staring at the Save As dialog box (see Figure 15-11) or the very
similar Open File dialog box, Apple has designated two different areas where
your typing has some effect.
First, look at area A in the previous figure. When this area is ready for typing, it
has a thick black border, as shown in Figure 15-12.
Figure 15-12: The thick outline tells you that your typing will start selecting file, folder, and
disk names.
Mac Basics
Chapter 15: Mac Application Basics 611
■ ■
MACWORLD MAC SECRETS • 4040-8/5 • ch.15.F • Chapter 15 • FINAL • VB/EAP • 10/26/98 • p.611
MACWORLD MAC SECRETS • 4040-8/5 • ch.15.1 • Chapter 15 • Proof 1 • VB •09/09/98 • p.611
4040-8/5 ch15.F 11/3/98 4:09 PM Page 611

We’ll cover exactly what you’re supposed to type when the list-outline is with you
in the next secret.
You can also type in the blank box where you’re supposed to name the file that
you’re saving. As we mentioned earlier, you can jump from one typing area (the
file name) to the other (the list of files) in either of two ways — click with the
mouse or press Tab.
What you can type in the list area
When the thick outline tells you that you are in list-typing mode, as shown in
Figure 15-12, you can select items in the list without having to use the mouse.
Here’s the ultimate list of keystrokes that move you around. Note, in all these
cases, that typing only highlights selectable items. In the Save File box, you
can’t ever highlight one of the dimmed
file
names — only
folder or disk
names.
Space Press the space bar to highlight the first item in the list.
P This letter key, or any letter key, highlights the item in the list whose
name begins with this letter — or the next closest one
after
it. If you
have several beginning with the same letter, you can type several letters
quickly — PA, for example — to close in on the one you want.
Z Type Z to highlight the file whose name starts with the letter closest to
Z (not necessarily the
last
file).
` The unshifted tilde key, in the upper-left corner of your keyboard,
highlights the
last
file in the list.
↑The arrow keys move the highlighting up and down the list, one item at
a time.
Home Scrolls to the top of the list.
End Scrolls to the bottom of the list.
PageUp Scrolls up by one screenful of items.
PageDn Scrolls down by one screenful.
How fast you have to type
When you’re typing letters to highlight a file’s name, you’re generally told to
“type a few letters quickly” to pinpoint a specific file. But how fast is quickly?
How long do you have to wait between one typing spurt and starting over?
It turns out that
you
decide what pause constitutes an “I’m going to start over
typing” period. The Mac goes by, believe it or not, your Keyboard control panel.
Set the Key Repeat Rate setting to a shorter time, and you won’t have to wait
as long before starting over when type-selecting a file in the list box.
Strange
But True
612 Part III: Application Secrets
■ ■
MACWORLD MAC SECRETS • 4040-8/5 • ch.15.F • Chapter 15 • FINAL • VB/EAP • 10/26/98 • p.612
MACWORLD MAC SECRETS • 4040-8/5 • ch.15.1 • Chapter 15 • Proof 1 • VB •09/09/98 • p.612
4040-8/5 ch15.F 11/3/98 4:09 PM Page 612

Other hidden keyboard shortcuts
You should never have to use the mouse at all when you’re opening or saving a
file. Here are the alternatives.
Ô-D Makes the list jump to the Desktop level — the same as clicking
the Desktop button — and highlights the name of your startup hard
drive. Ô-Shift-↑accomplishes the same thing.
Ô-↑Moves “upward” one level closer to the Desktop. This is how you
move outward from an inner folder to the one that contains it.
Ô-↓Opens the highlighted folder or disk; the same as pressing Return
or Enter.
Ô-→Changes the list to show you the contents of the next disk. You go
in the order that the disks appear on your Desktop, from top to
bottom. Press Ô-←to cycle through the disks in the other direction.
This keyboard shortcut is well worth learning. Without it, the only
way to switch disks is to jump to the Desktop level and then
double-click the next disk you want to view. That’s a lot of trouble.
Ô-N This is the same as clicking the New Folder button.
Ô-O This is the equivalent for clicking the Open button, when appropriate.
Ô-S The same as clicking the Save button.
Ô-. (That’s Ô-period.) It’s the same as clicking the Cancel button.
Return This key’s effect changes, which causes some confusion for
(Or Enter.) beginners. And for us.
You see, pressing Enter or Return is
usually
the same as clicking
Save. Your file gets saved, and the dialog box goes away. (Or, if
we’re talking about the Open File box, then Enter or Return opens
the highlighted file, folder, or disk.)
But
if
you’re in type-to-select-a-file mode (the thick outline is
around the list of files)
and
a folder or disk’s name is highlighted,
then Enter or Return opens the highlighted folder.
That often throws us. We press Enter, thinking we’re saving the
file. But some folder was highlighted at the time, unbeknownst to
us — and so then the file
didn’t
get saved, but we’re now inside
some arbitrary folder. Puzzled and confused, we press Enter
again.
This time we succeed in saving the document, but into the wrong
folder! No wonder beginners often complain that they create
documents and can never find them again.
Hidden things to click
Actually, there’s really only one hidden thing to click. It’s the disk name, as
identified by letter E in Figure 15-11.
Worth
Learning
Worth
Learning
Chapter 15: Mac Application Basics 613
■ ■
MACWORLD MAC SECRETS • 4040-8/5 • ch.15.F • Chapter 15 • FINAL • VB/EAP • 10/26/98 • p.613
MACWORLD MAC SECRETS • 4040-8/5 • ch.15.1 • Chapter 15 • Proof 1 • VB •09/09/98 • p.613
4040-8/5 ch15.F 11/3/98 4:09 PM Page 613

But it’s handy: It’s the same as pressing Ô-up arrow. Clicking here moves you
out of the folder whose contents you’re viewing, and one folder level closer to
the Desktop.
Double-click an alias, and Option-click
When you’re viewing the Open File dialog box shown in Figure 15-12, alias
names show up in italics. If you double-click one, the original file (from which the
alias was made) opens.
If you
Option–
double-click it, though, you don’t open it. Instead, you’re instantly
shown the contents of the
folder
that contains the original item.
Changing your mind in mid-double-click
We’ve gotten loads of mileage out of one particular quirk of the Open File dialog
box (and similar spots in the Mac OS): as you double-click to open a file in its
Open File dialog box, the Mac opens whichever file your cursor is on when you
release
the mouse.
Suppose you’ve got a folder full of Photoshop files, and you’re hoping to open a
file called Baboon. But by mistake, you point to the Aardvark photo and start to
double-click. Your finger on the mouse button goes down, up, down — and then
you realize your mistake. Without lifting your finger, slide down onto the Baboon
file’s name and
then
release. The Macintosh thoughtfully transfers your double-
click onto the Baboon file’s name.
Farewell, Boomerang — Hello, Action Files
You won’t find much disagreement about one point: the traditional Save and Open
dialog boxes leave a lot to be desired. The list is too small, you can’t resize it,
it’s ugly, it’s confusing, and so on. That’s why programmers have attacked the
problem with a vengeance, creating add-on programs to remedy the drawbacks.
Remember SuperBoomerang? This discontinued program kept track of files,
folders, and disks you’d recently opened; let you create lists of files, folders, and
disks you wanted quick access to; let you search your hard drives; and more.
Fortunately, PowerOn Software filled in the void with Action Files, a control panel
that does what Boomerang did and more. As shown in Figure 15-13, it lets you
create new folders; move things to the Trash; Get Info on files and folders; label,
rename, duplicate, or make aliases of your files — all right within the dialog box.
A few Action Files-type features made it into the Mac OS 8.5’s updated
Open/Save dialog boxes, as described in the next section. Unfortunately, you
need both Mac OS 8.5
and
all new programs to see these enhanced dialog
boxes. Action Files, on the other hand, is available now — in all your programs,
and with any recent System Folder version.
Strange
But True
614 Part III: Application Secrets
■ ■
MACWORLD MAC SECRETS • 4040-8/5 • ch.15.F • Chapter 15 • FINAL • VB/EAP • 10/26/98 • p.614
MACWORLD MAC SECRETS • 4040-8/5 • ch.15.1 • Chapter 15 • Proof 1 • VB •09/09/98 • p.614
4040-8/5 ch15.F 11/3/98 4:09 PM Page 614
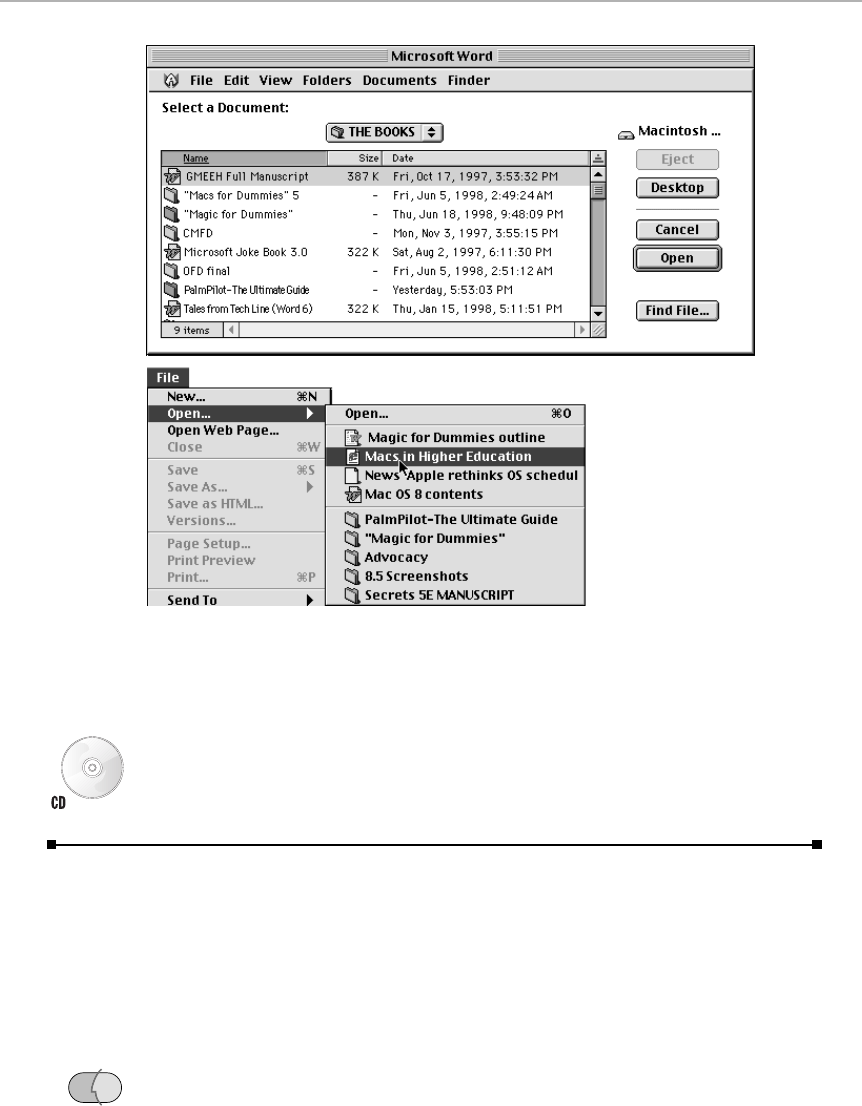
Figure 15-13: Action Files makes the standard Open and Save boxes far more efficient and
flexible (top). Come to think of it, it also lets you bypass the Open box completely by adding a
list of recently opened items to the Open command of your programs (bottom).
(The CD that accompanies this book, by the way, includes a special version
of Action Files. After 30 days, some of the features begin dropping away, as
incentive for you to use the discount coupon in the back of the book to order
the full version.)
Save and Open File 2000: Navigation Services
We’re happy to report that the 14-year-old complexities of the Save/Open File
dialog boxes may soon recede into nostalgia. Apple’s engineers, well aware of
the Save and Open boxes’ drawbacks, have designed a much clearer,
reworked design. In fact, the new Open and Save dialog boxes resemble
nothing so much as a Finder list-view window, as Figure 15-14 makes clear.
But first, a disappointing caution: Although this software is built into Mac OS
8.5, you won’t see it until each software company updates its own programs
to take advantage of it. The programs written before Mac OS 8.5 will continue
to show the old, creaky dialog boxes described in the previous sections.
OS
8.5
Chapter 15: Mac Application Basics 615
■ ■
MACWORLD MAC SECRETS • 4040-8/5 • ch.15.F • Chapter 15 • FINAL • VB/EAP • 10/26/98 • p.615
MACWORLD MAC SECRETS • 4040-8/5 • ch.15.1 • Chapter 15 • Proof 1 • VB •09/09/98 • p.615
4040-8/5 ch15.F 11/3/98 4:10 PM Page 615
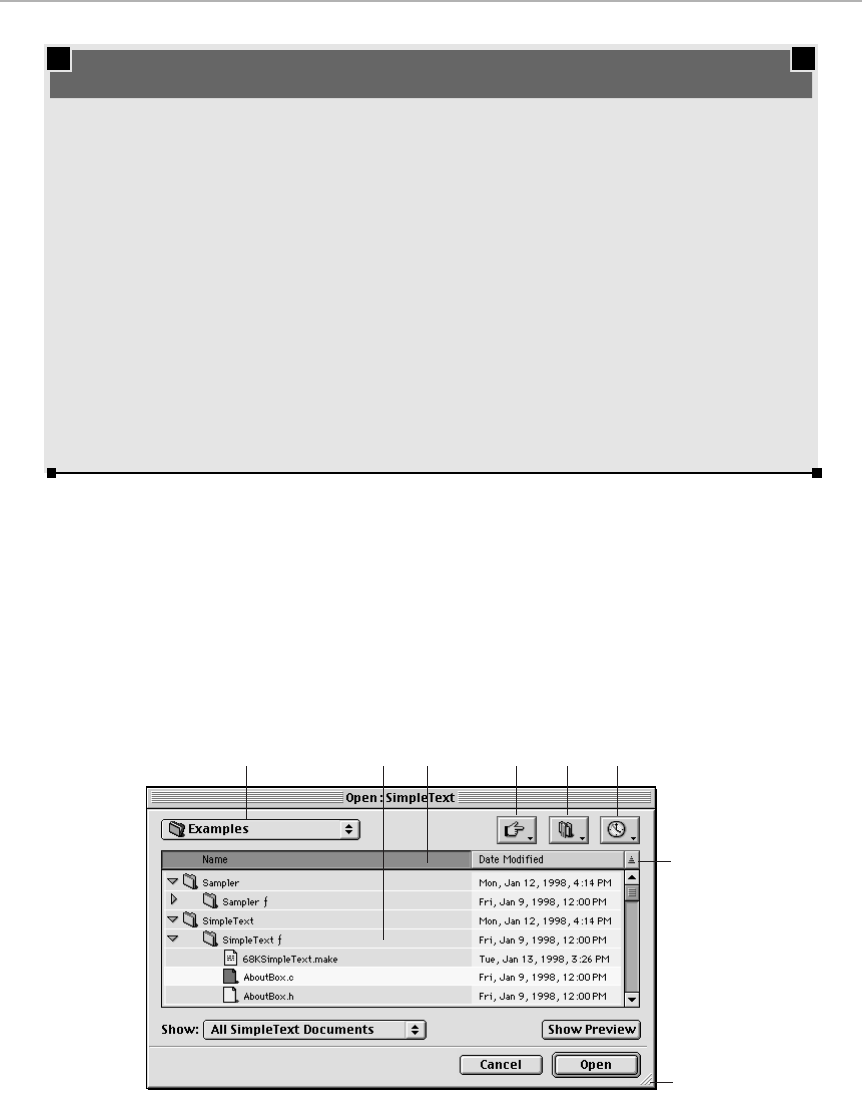
All right then: on with the tour. Figure 15-14 shows the Open File dialog box;
the Save File dialog box is essentially the same, except that you don’t see
documents and you don’t get to see flippy triangles — you must open folders
exactly the way you always have, by double-clicking.
Or, come to think of it, by dragging a disk or folder icon from your Desktop
directly into the new Open or Save dialog box (into the area indicated by B
in Figure 15-14). The list view changes instantly to reflect the contents of the
disk or folder you dragged.
Figure 15-14: Mac OS 8.5 introduced the improved Open File dialog box — coming soon to
some programs near you.
ACDEF
G
H
B
616 Part III: Application Secrets
■ ■
MACWORLD MAC SECRETS • 4040-8/5 • ch.15.F • Chapter 15 • FINAL • VB/EAP • 10/26/98 • p.616
MACWORLD MAC SECRETS • 4040-8/5 • ch.15.1 • Chapter 15 • Proof 1 • VB •09/09/98 • p.616
MACINTOCH SECRET
When you’re saving a new document, it’s often
useful to save it onto the Desktop. That way,
when you’re finished working in your program,
the new icon will be sitting out, in plain sight,
ready for you to file away.
To do so, when the Save File As: box appears,
just click the Desktop button (or press Ô-D).
Then click Save, and your file will be saved on
the Desktop.
Little-known fact, however: Technically, even
though the icon appears on the Desktop, your
file is actually being stored on your main
(startup) hard drive.
If you have more than one drive, however, it
might occasionally be useful to store that file on
the Desktop, but on one of your other drives (or
partitions). Here’s how you do it:
When the Save dialog box appears, click the
Desktop button, so that the icons of all your
drives appear. Click once on the drive you want,
then click in the box where you type the file’s
name. If you consult the upper-right corner of
the dialog box, you’ll see that, indeed, you’ve
now switched to another drive — and yet the
Desktop is still your new file’s destination.
Select the Desktop you want
4040-8/5 ch15.F 11/3/98 4:10 PM Page 616
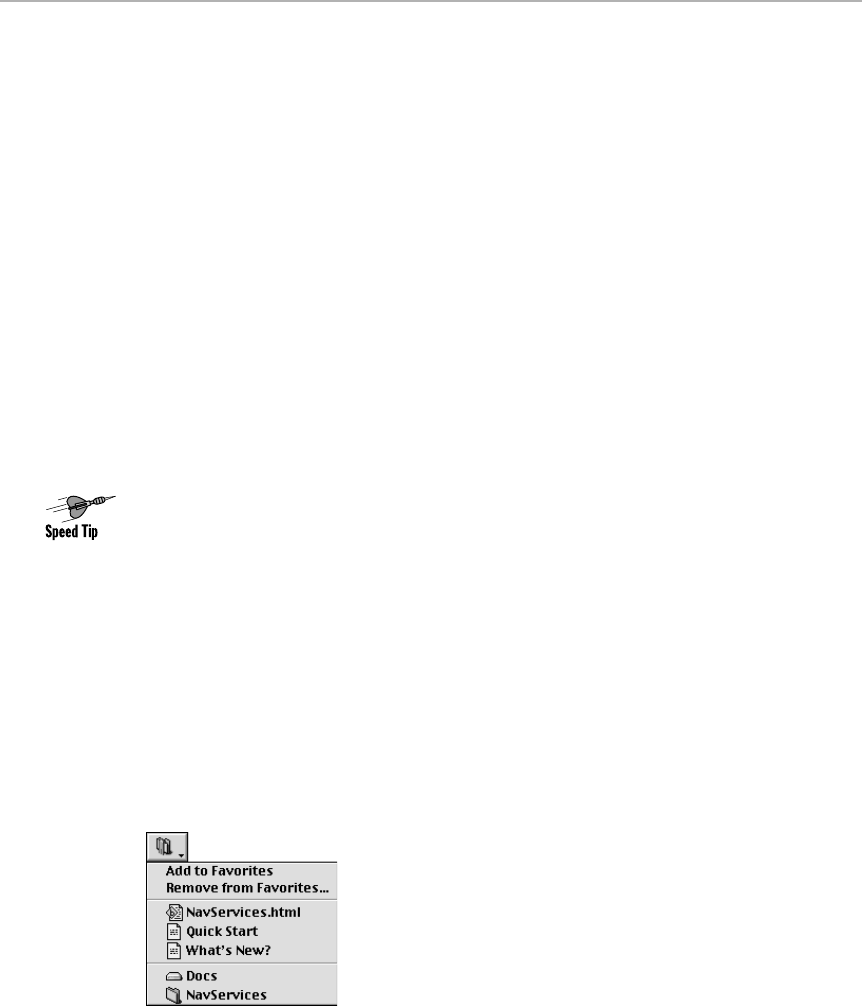
A.This pop-up menu is the same one you’ve always seen when opening a
file. It lets you move up and down the hierarchy of folders in the usual
way — but from now on, you can generally ignore this control.
B. Ah, now here’s the good stuff. For the first time, navigating folders when
opening a file makes your progress crystal clear — at all times, you see
exactly where you are in the grand scheme of folders-within-folders,
thanks to the Finder-like “flippy triangles” to the left of the folders’ names.
Cooler yet: in some programs, you can actually make multiple selections
in this dialog box, thus opening several files at once. To do so, Shift-click
them. (You can Shift-click only files; if you Shift-click a folder, you lose
any previous selecting you had done.)
C. The column headings, Name and Date, work just as they do in Finder
window list views: click the heading to change how the list is sorted.
D. This odd-looking button/pop-up menu is the Shortcuts menu, which
should have been called the Disks menu. It shows a list of all disks
connected to, or inserted in, the Mac at the moment (plus the Desktop),
so that you can jump directly to any one of them. There’s also an Eject
command available whenever you choose a removable disk’s name.
Alas, the handy Ô-arrow shortcuts that let you jump from disk to disk (in
the previous Open and Save dialog boxes) are gone. But keyboard freaks
needn’t worry — you’re not forced to use the Shortcuts pop-up menu to
change disks. Instead, press Ô-D (to jump to the Desktop level); type the
first couple of letters of the desired disk’s name; and then press Enter to
see what’s in it (or Ô-→to open its flippy triangle).
E. Item E is the Favorites pop-up menu. As described in Chapter 2, the
Favorites command (in the Mac OS 8.5 Finder’s File menu) lets you add
any icon to your list of Favorites, which appear in your menu. They
also appear here, handily enough, as shown in Figure 15-15.
If you’re opening a file, the Favorites pop-up menu lists disks, folders,
and individual files. If you’re saving a file, however, this pop-up menu lists
only disks and folders.
Figure 15-15: The Favorites pop-up menu/button lets you add a selected file, disk, or folder
to the Favorites list. The menu is divided into three sections: the Add/Remove commands, a
list of documents (in the Open dialog box, not the Save box), and a list of folders and disks.
Chapter 15: Mac Application Basics 617
■ ■
MACWORLD MAC SECRETS • 4040-8/5 • ch.15.F • Chapter 15 • FINAL • VB/EAP • 10/26/98 • p.617
MACWORLD MAC SECRETS • 4040-8/5 • ch.15.1 • Chapter 15 • Proof 1 • VB •09/09/98 • p.617
4040-8/5 ch15.F 11/3/98 4:10 PM Page 617

F. The third new pop-up button is Recent Items. It lists the last bunch of
files, folders, and disks you’ve opened. How many? That’s up to you. Use
the Apple Menu Options control panel to set this number, as described in
Chapter 4.
G. Click this tiny, pyramid-shaped triangle button to reverse the sorting
order— Z to A (or oldest first) instead of A to Z (or newest first), exactly
as in Finder-window list views (see Chapter 1).
H. For the first time in Macintosh history, you can resize the Open or Save
dialog box. Just drag this “grip strip” diagonally.
The new Navigation Services dialog box is a vast improvement over the old
Open and Save dialog boxes. Still, we pity the novice. During the year or so
it’ll take for every software company to update their programs, the novice
will have to learn both systems, old and new, depending on the age of the
programs in question.
New Open/Save Dialog Box Secrets
■
Direct to the Favorites menu
The Favorites pop-up button, a new arrival to the Open and Save (“Navigation
Services”) dialog boxes, is somewhat useful in its ability to give you quick
access to important folders and files. It’s even more useful, though, since you
can
add
items to it right from within the dialog box.
The official way is to click the item you want to add (Shift-click to select several)
and then choose Add to Favorites from the Favorites pop-up menu.
Our way is better:
drag
the item you want
onto
the Favorites button, as shown in
Figure 15-16. It’s instantly added to the list of favorites — both here and in your
menu.
Figure 15-16: Drag-and-drop is available even within the Open and Save dialog boxes.
618 Part III: Application Secrets
■ ■
MACWORLD MAC SECRETS • 4040-8/5 • ch.15.F • Chapter 15 • FINAL • VB/EAP • 10/26/98 • p.618
MACWORLD MAC SECRETS • 4040-8/5 • ch.15.1 • Chapter 15 • Proof 1 • VB •09/09/98 • p.618
4040-8/5 ch15.F 11/3/98 4:10 PM Page 618

Keystrokes of the rich and time-sensitive
Almost all of the keystroke shortcuts available in the
old
Open and Save dialog
boxes are also available in the
new
editions. See “Save/Open Dialog Box
Secrets” earlier in this section for a complete list: Ô-O to open, Option-double-
click to open the original file instead of an alias; Ô-Tab to jump between the
folder listing and the file you’re naming, and so on.
However, the new Save and Open dialog boxes offer a wealth of additional (and
some reassigned) keystrokes for the busy Mac fan. Here’s the ultimate guide:
■Ô-A: Select all (not available in all circumstances).
■Ô-D or Shift-Ô-↑: Changes current location to Desktop.
■Shift- ↑and Shift- ↓: Selects additional, multiple files (if this feature is
turned on in your program).
■Ô-↑: Moves up one folder level.
■Ô-↓: Opens the selected folder or disk.
■Ô-→: Opens the flippy triangle of a highlighted disk or folder.
■Ô-←: Closes the selected flippy triangle.
■Option- ←or Option- →: Takes you back to the last (or forward to the next)
folder or disk you were viewing, like the Back and Forward buttons in a
Web browser.
Multiple prefs for multiple purposes
The new Open and Save dialog boxes do a lot of memorizing without your even
noticing. For example, each dialog box remembers, for
each program,
which
folder you were last using when you were in that dialog box.
Since the Open dialog box remembers
one
location (and even which file you last
opened) and the Save dialog box remembers another, the hassles of opening,
processing, and saving multiple files (in a graphics program, say) becomes far
easier. Each time you use the Open command, you’re shown the folder full of
unprocessed files — but when you use Save As, you’re automatically shown the
folder of finished files — no additional navigation is necessary.
Stationery
When System 7 was introduced, one of the most interesting new features was
Stationery Pads. Whenever you save a document, you’re supposed to find, in
the Save File box, a Stationery button, as shown in Figure 15-17.
What’s supposed to happen is this: You prepare a document that contains
elements you re-use often. It may be your letterhead, a salutation, or a
contract template, where all you have to fill in is the names and numbers.
Chapter 15: Mac Application Basics 619
■ ■
MACWORLD MAC SECRETS • 4040-8/5 • ch.15.F • Chapter 15 • FINAL • VB/EAP • 10/26/98 • p.619
MACWORLD MAC SECRETS • 4040-8/5 • ch.15.1 • Chapter 15 • Proof 1 • VB •09/09/98 • p.619
4040-8/5 ch15.F 11/3/98 4:10 PM Page 619
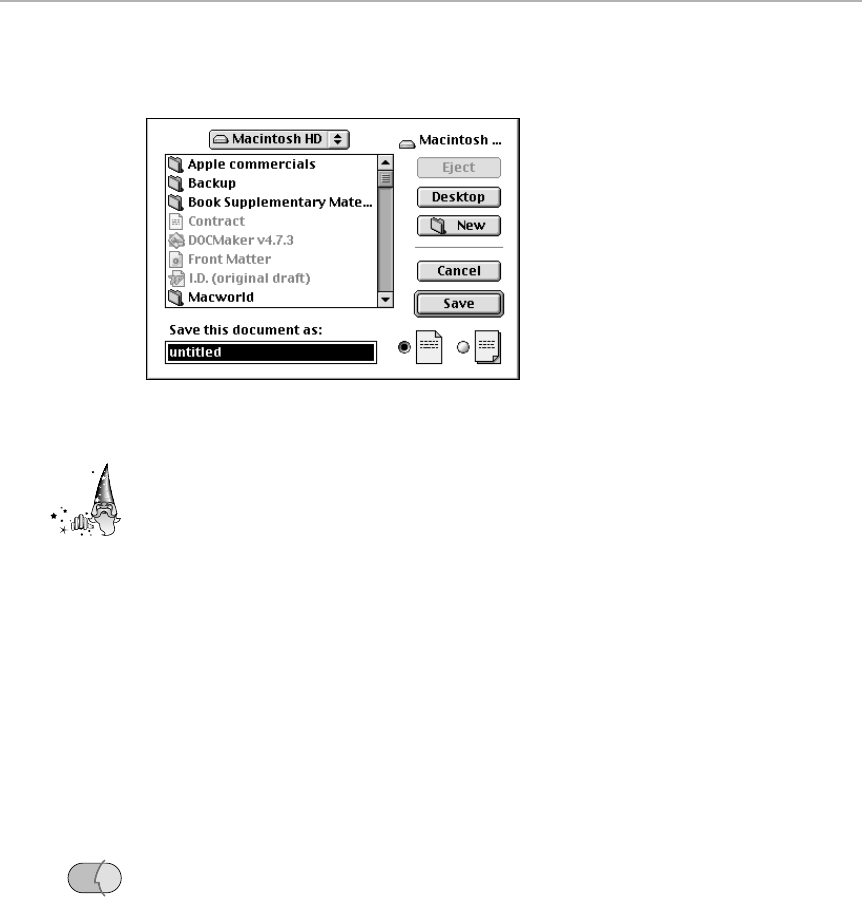
Then, when you save the document using the Save As command, you’re
supposed to be offered a Stationery option.
Figure 15-17: One of the few programs with a Stationery icon and button (lower right).
A document saved as Stationery doesn’t actually open when double-clicked.
Instead, a perfect copy of it opens, named Untitled. The original— the master —
is left safely on your disk. You can modify the Untitled copy to your heart’s
content and eventually save it with its own name. You saved yourself the effort
of re-creating whatever elements are already in it (your logo, for example).
Figure 15-17 shows the Save File box belonging to SimpleText, one of the few
programs provided with every Mac to be equipped with a Save command.
The Stationery option in SimpleText was supposed to be the model for all
System 7-savvy programs. However, other than ClarisWorks, we can’t think of
a single program that adopted SimpleText’s model (showing those two
special document icons in the lower-right of the box). Instead, most
programs offer Stationery in a pop-up menu of file formats.
If your program doesn’t have a Stationery option (or icon) in the Save File
box — or if you’d like to create Stationery while in the Finder — you can
create stationery out of any document. Go to the Finder and highlight the
icon. Choose File ➪Get Info and select Stationery Pad.
From now on, whenever you double-click this document’s icon, the Mac will
instantly create a copy of it. Before the appropriate program even opens, the
Mac will either ask you to name the document’s new copy (before Mac OS 8)
or automatically create a new, untitled copy of it (Mac OS 8 or later).
Ten Macintosh Application Basic Techniques
We were astounded when one of the most experienced, savvy Mac users we
know — a free book winner of the last Mac Secrets edition, in fact! —
confessed that he had only recently learned about pressing the Tab key in
dialog boxes. He’d gone four years without ever discovering that the Tab key
moves the cursor from blank to blank!
OS
8
Strange
But True
620 Part III: Application Secrets
■ ■
MACWORLD MAC SECRETS • 4040-8/5 • ch.15.F • Chapter 15 • FINAL • VB/EAP • 10/26/98 • p.620
MACWORLD MAC SECRETS • 4040-8/5 • ch.15.1 • Chapter 15 • Proof 1 • VB •09/09/98 • p.620
4040-8/5 ch15.F 11/3/98 4:10 PM Page 620

Worse, he chided us for publishing a 1,200-page book that failed to mention
that basic tactic. Thus was born our solemn vow: The very next edition
would contain a list of the ten basic Mac techniques we think everyone
should know. And here they are:
1. Press the Tab key to jump from blank to blank in a Macintosh dialog box.
In a well-designed program, Shift-Tab actually moves the cursor backward
through the fields. (See Figure 15-18.)
2. Most Macintosh programs come with an assortment of support files:
dictionaries, Preferences files, clip art, translators, and so on. You can’t
simply copy the program to a different disk and expect it to run normally—
you must either reinstall it from the original disks or copy every component
of it into the corresponding, identical folder locations on the new disk.
3. Instead of using menu commands, you can press keyboard equivalents
(thus avoiding lifting your hands from the keyboard). The keyboard
shortcut for each menu command is listed in the menu itself.
4. You can press Ô-A inside almost any dialog box blank to highlight all of
the text in that field — and anything you begin to type replaces what was
highlighted.
Mac Basics
Chapter 15: Mac Application Basics 621
■ ■
MACWORLD MAC SECRETS • 4040-8/5 • ch.15.F • Chapter 15 • FINAL • VB/EAP • 10/26/98 • p.621
MACWORLD MAC SECRETS • 4040-8/5 • ch.15.1 • Chapter 15 • Proof 1 • VB •09/09/98 • p.621
MACINTOSH SECRET
What happens when you launch a program?
Some, like Photoshop, open up to an empty
screen, with no windows open at all. You’re
expected to be savvy enough to choose Open
(to open an existing graphic) or New (to open a
new one) from the File menu.
Other programs automatically open an empty,
untitled document. Microsoft programs, most
word processors, and many other applications
work this way.
Some programs, however, automatically open the
last document you opened. This system works
great for programs like Quicken, Berkeley’s
Expresso, and calendar programs, where you
spend your entire life working on the same file —
your bank-account file (Quicken) or your calendar
(Up-to-Date or Expresso), for example.
Free book winner Eric Gossler faced a problem:
he travels between office and home, and always
wants these programs to open the same
document regardless of the location.
The solution: Save the document onto a
removable disk — a floppy or Zip disk, for
example. Take that disk to the second Macintosh,
and open the file once. From now on, the program
(at each location) will always expect to find your
data file on that disk — and will even request the
disk if you haven’t yet inserted it!
Expresso requires that its entire data folder be in
one place. Eric solved that one by copying the
whole folder to a Zip disk; deleting the original
from the hard drive; and placing an alias of the
Zip disk copy back onto the hard drive. (He
repeated this procedure at the office.) From now
on, when either machine’s copy of Expresso
launches, it will know where to look for the
calendar information.
You can take this stunt a step further by
designating a removable disk as your Web
browser’s Downloads folder. Now, wherever you
may browse, you’ve got your single Downloads
folder ready to collect your new goodies.
Save it where?
4040-8/5 ch15.F 11/3/98 4:10 PM Page 621
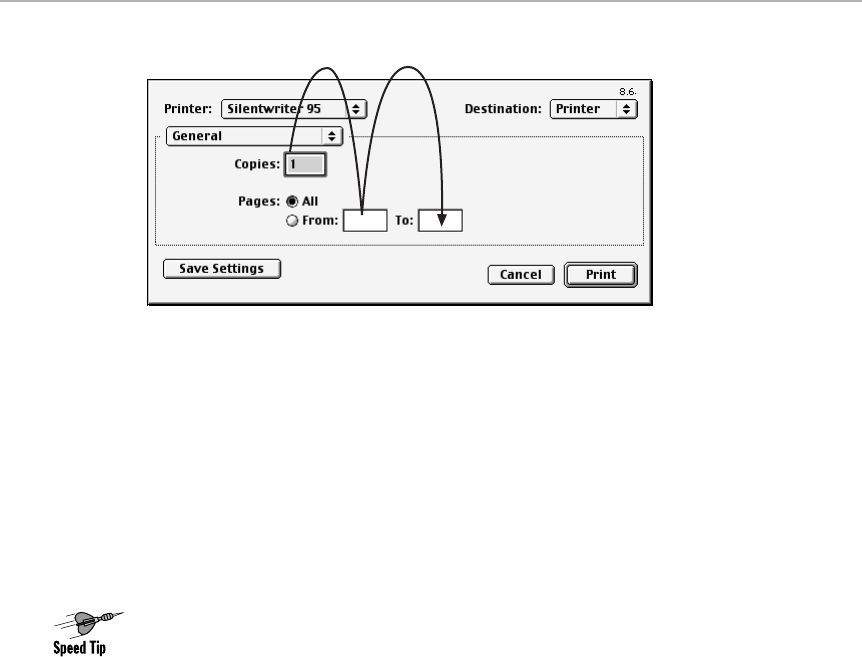
Figure 15-18: Press Tab to jump through the boxes in a dialog box. Are we forgiven now, Jerry?
5. To highlight a long block of text, click (and release the mouse button) at
the beginning of the selection. Scroll until you can see the end of the long
section — and then Shift-click there. All of the text between your initial
click and your Shift-click is now highlighted.
6. When you’re finished with a program, don’t close the document window.
Instead, quit the program (by pressing Ô-Q, for example). You release the
RAM that program was using. You also avoid the confusion that comes from
launching the program a second time and seeing nothing happen (because
the program is actually already running, but has no windows open).
7. A clever speed tactic for pros and beginners alike: Whenever you save a
document, instinctively press Ô-D (to select the Desktop) before hitting
the Save button. This places the newly created document on your
Desktop, where you can file it manually into any folder you like. (It’s the
end of the lost-document syndrome.)
8. In the Print dialog box, you don’t have to specify both the starting and
ending page numbers. If you do nothing, the entire document prints. If you
type 2 as the beginning page (and don’t specify an ending page), you’ll get
from page 2 to the end. And if you type 5 as the ending page (and don’t
specify a starting page), you’ll print from the beginning to page 5.
9. You can press Ô-period (or Esc) instead of clicking the Cancel button in
almost any dialog box. Likewise, you can press Return or Enter in almost
any dialog box instead of clicking the button with the thick black outline
(such as the Print button in Figure 15-18).
10. In case you missed it in Chapter 7: When a program freezes, try pressing
Ô-Option-Esc to “force quit” (jettison) just that program. Often it works,
freeing you to save your work in any other running programs, or finish
your download, or whatever.
The rest of the time it only further freezes your machine; in that case,
press Ô-Control-power key to restart the computer.
Tab! Tab!
622 Part III: Application Secrets
■ ■
MACWORLD MAC SECRETS • 4040-8/5 • ch.15.F • Chapter 15 • FINAL • VB/EAP • 10/26/98 • p.622
MACWORLD MAC SECRETS • 4040-8/5 • ch.15.1 • Chapter 15 • Proof 1 • VB •09/09/98 • p.622
4040-8/5 ch15.F 11/3/98 4:10 PM Page 622

MACWORLD MAC SECRETS • 4040-8/X • Chapter 16 • Proof f • SH/EAP • 10/22/98 • p.623
MAC SECRETS • 4040-8/5 • ch.16.1 • Chapter 16 • Proof 1 • VB • 09/17/98 • p.623
Chapter 16
Mac to PC and Back
In This Chapter
©Using PC disks on the Mac
©Using PC files on the Mac
©Running PC programs on your Mac
©Using PC Peripherals on your Mac
©Cross-platform networks
In a world where 90 percent of the computers are running Microsoft
Windows, the Mac’s ability to exchange files and to coexist on networks
with PCs isn’t a trivial issue. (In this chapter, we’ll refer to computers running
DOS or Windows as PCs.) Fortunately, the Mac accommodates its less-
evolved cousin extremely well these days.
Still, terminology is a problem. When someone asks, “Is the Mac PC-
compatible?”, we’re not sure what’s really being asked. There are actually
five different questions, each with its own answer:
■Can the Mac use disks from a Windows PC?
■Can the Mac use files from a Windows PC?
■Can the Mac run Windows programs?
■Can the Mac be on the same network with a Windows PC?
■Can the Mac use printers, monitors, CDs, and other Windows
paraphernalia?
We’ll tackle these issues one by one.
PC Disks
Mechanically speaking, the Mac has been able to accept 3.5-inch floppy disks
from DOS and Windows machines for years—ever since the appearance of
the SuperDrive floppy-disk drive way back in 1989.
4040-8/5 ch16.F 11/3/98 3:54 PM Page 623

However, as with most computer tasks, Mac doesn’t live by hardware alone.
You need software, too, to read PC disks — the File Exchange or PC Exchange
control panel included with System 7.5 and later. (Until Mac OS 8.5, it was
called PC Exchange. Hereafter, we’ll call it by its new name, File Exchange.)
PC floppies
With File Exchange, when you insert a PC disk, its icon shows up on your
Desktop as though it were a Mac disk. The only difference is that the disk
icon has a big “PC” written on it. If you remove or turn off File Exchange, the
Mac no longer recognizes the PC disk—you get a message asking if you want
to initialize the disk instead. (See Chapter 4 for a few File Exchange Secrets.)
(Note that just being able to see what’s on a Windows disk doesn’t mean that
you can open the files on it or run the programs on it, which you can read
about later in this chapter. It simply means that you can view, copy, or delete
those files’ icon.)
File Exchange originally recognized only floppies, but now it lets you use
other removable disks in SCSI drives from PCs, such as Zip, Jaz, and magneto
optical. You can also use PC CD-ROM discs on your Mac, but a different set of
extensions are responsible; read on.
PC CD-ROMs
Thanks to other extensions provided by Apple, you can also insert a
Windows CD-ROM disc into your Mac; its icon shows up on the screen,
exactly like a Mac CD. The necessary software is the usual set of CD-ROM
extensions in your Extensions folder, as described in Chapter 4; of these,
Foreign File Access, ISO 9660 File Access, and High Sierra File Access are the
ones specifically created for reading Windows CDs.
But once again, having these files doesn’t mean you can use any of the
information on a PC CD-ROM. To use the files on the CD-ROM, the same rules
apply as to using PC files from any other source, as described later in this
chapter. Any PC programs on the CD-ROM — such as games or application
software—can only be run with the addition of emulation software or PC
compatibility hardware, as described at the end of this chapter.
PC Disk Secrets
■
Dual-format CD-ROMs
Many software packages marked “for Windows 95/98/NT” or “for Macintosh”
actually contain the software for
both
platforms on the same CD in the box.
That’s because it’s often less expensive for a software manufacturer to press a
Mac Basics
OS
8.5
624 Part III: Application Secrets
■ ■
MACWORLD MAC SECRETS • 4040-8/X • Chapter 16 • Proof f • SH/EAP • 10/22/98 • p.624
MAC SECRETS • 4040-8/5 • ch.16.1 • Chapter 16 • Proof 1 • VB • 09/17/98 • p.624
4040-8/5 ch16.F 11/3/98 3:54 PM Page 624
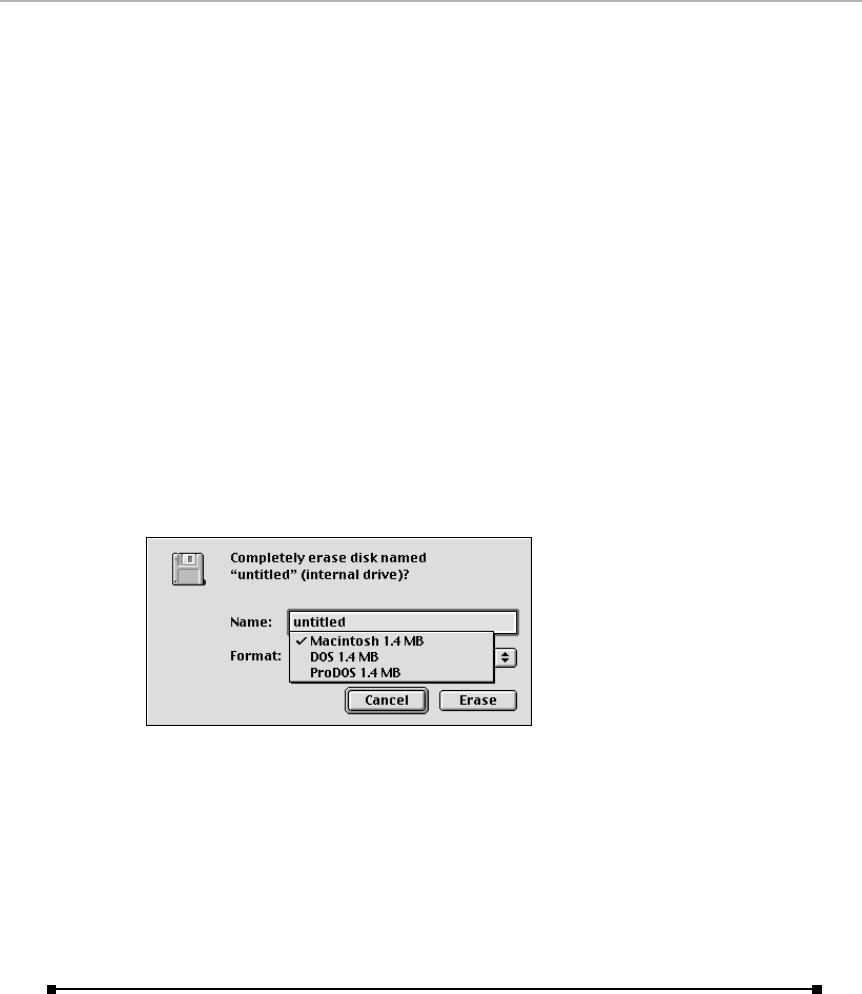
single CD-ROM — containing both sets of software — than to create two sets of
discs. In other words, if you have a copy of AcmeWebPageCreator for Windows,
try it in your Mac — you may find that it also has a complete Mac OS installer
as well.
Formatting a DOS floppy
A Mac disk and a DOS disk, as far as a disk manufacturer is concerned, are
physically identical. The only difference between a Mac and a DOS disk is the
way each is formatted. Fortunately, with File Exchange (or PC Exchange) in your
Control Panels folder, you can format a new blank disk either way. It can even
convert one kind of disk to the other.
To format a brand-new, never-been-touched disk, insert it. You’ll be asked how
you want to format the disk: as a Mac disk or a DOS disk (see Figure 16-1). You
can also choose ProDOS, which is the operating system for the old Apple II
computer.
To convert one kind of disk to another, insert a Mac or DOS disk. Then choose
Special ➪Erase Disk. You see the same set of options as those shown in
Figure 16-1.
Figure 16-1: You can format or erase a disk into your choice of PC, Mac, or even Apple II
format using the Finder’s Erase Disk command.
Formatting a DOS Zip or Jaz cartridge
While Apple’s File Exchange control panel does let you
use
Zip and Jaz disks
that came from a Windows machine, it doesn’t let you
create
them (by erasing
an existing Mac-formatted one, for example). To do that, you must use the
Iomega Tools program that came with the drive.
Converting PC Files for the Mac
Getting a PC disk or file server to show up on your Mac screen, or receiving a
PC file via e-mail, is only half the battle. The next compatibility hurdle is
getting your Mac to open PC documents.
Chapter 16: Mac to PC and Back 625
■ ■
MACWORLD MAC SECRETS • 4040-8/X • Chapter 16 • Proof f • SH/EAP • 10/22/98 • p.625
MAC SECRETS • 4040-8/5 • ch.16.1 • Chapter 16 • Proof 1 • VB • 09/17/98 • p.625
4040-8/5 ch16.F 11/3/98 3:54 PM Page 625

Sometimes you’ll have to convert those files. Sometimes no conversion is
necessary. And sometimes you’ll have to pour out the file’s contents into a
temporary, intermediary file in a format you can convert.
Category 1: No conversion necessary
The “how do I open this file?” challenge has become easier in recent years,
as more and more software companies sell their programs in both PC and
Mac versions. Such cross-platform programs generally create documents
that open identically on either computer: Word, FileMaker, WordPerfect,
ClarisWorks, Photoshop, PageMaker, Excel, and dozens of other leading
programs fall into this category. Opening documents from the PC edition of
your favorite program isn’t always 100 percent glitch-free—you occasionally
lose the formatting of special features, such as tables in word processors,
and fonts can change — but most standard files translate just fine.
What we’re saying here is that if you and the Windows machine are using
the same popular program, no conversion is necessary to open the files when
moving them between machines. A Microsoft Word 97 (Windows) document
opens perfectly in Word 98 (Macintosh), with everything intact (style sheets,
graphics, even templates and macros)— without any kind of translation.
Transfer such a file by e-mail or floppy disk, and the deed is done.
Category 2: Let your application do the
conversion
If you and the PC person with whom you’re swapping documents don’t have
the identical program, you may still be in luck if you’re trafficking in the meat-
and-potatoes data types: word-processing documents, graphics files,
spreadsheets, or databases.
For example, most Mac word processors can automatically translate
documents from many PC word processors. Microsoft Word, ClarisWorks,
and WordPerfect can each open various kinds of documents from PC word
processors. (This automatic file conversion only works if your program’s set
of translator files is correctly installed—usually somewhere in the System
folder or in the program’s own folder.) To try out this feature, launch your
word processor; choose File➪Open; and use the pop-up menu at the bottom
of the Open File dialog box to see what file formats you can open.
If the word processor versions in question are both some form of Microsoft
Word, by the way, a little extra effort may be required. Microsoft has
generally been diligent about releasing file-format filters that translate one
flavor of Word document into another. For example, a file called Word 6.0
for Windows&Macintosh lets Word 5.1 read Word 6 files (from either kind of
computer). And the file called Word 97-98 Import lets Word 5 or 6 open files
from Word 98 (for the Mac) or 97 (for Windows). (At this writing, all of these
converters are available from www.Microsoft.com/office/office/viewers.asp.)
Mac Basics
626 Part III: Application Secrets
■ ■
MACWORLD MAC SECRETS • 4040-8/X • Chapter 16 • Proof f • SH/EAP • 10/22/98 • p.626
MAC SECRETS • 4040-8/5 • ch.16.1 • Chapter 16 • Proof 1 • VB • 09/17/98 • p.626
4040-8/5 ch16.F 11/3/98 3:54 PM Page 626

Category 3: Convert the document yourself
If you don’t find that your word processor can open the Windows format,
odds are good that MacLinkPlus, included on the CD-ROM with this book
(but no longer included with the standard Apple system software) can assist.
Its list of translatable document formats is impressive—for example, it can
convert Windows WordPerfect documents into ClarisWorks format, which
ClarisWorks itself can’t do unassisted.
MacLinkPlus
MacLinkPlus can also translate PC documents into Mac documents without
opening them; translate Mac documents into PC documents; and batch-
process a bunch of files simultaneously.
MacLinkPlus consists of translator files in the System folder, and a set of
utilities that reside in the MacLinkPlus folder. Of particular interest is the
Document Converter icon in the MacLinkPlus folder. By duplicating this icon,
you can create individual Document Converters, each capable of translating
one or more files to any of hundreds of supported formats —simply by dragging
and dropping the document icons in question. (The current commercial version
of MacLinkPlus, for which a discount coupon is included at the back of this
book, makes conversion even simpler. It takes advantage of Mac OS 8-and-
later’s contextual Control-key menus to convert files when you click on them.)
First, make a copy of Document Converter. Double-click the copy. A window
opens, listing dozens of types of Mac and PC files: word processors,
spreadsheets, databases, and graphics; click the type of file you’ll want this
converter to create. You’ll notice in Figure 16-2 that most of the options end
in “with MacLinkPlus translation,” referring to the DataViz software. However,
your translator choices also include QuickTime translators, which add a
number of graphics and multimedia file types.
Figure 16-2 Use the MacLinkPlus Document Converter icon to translate Mac and PC files.
After you select the type of file you want to create, click Set. Document
Converter’s name changes to reflect the file type you selected—“to Excel
Win 5.0, 7.0,” for example (see Figure 16-3).
Chapter 16: Mac to PC and Back 627
■ ■
MACWORLD MAC SECRETS • 4040-8/X • Chapter 16 • Proof f • SH/EAP • 10/22/98 • p.627
MAC SECRETS • 4040-8/5 • ch.16.1 • Chapter 16 • Proof 1 • VB • 09/17/98 • p.627
4040-8/5 ch16.F 11/3/98 3:54 PM Page 627

Figure 16-3: The document converter icon tells you what file it will create.
To convert a document, or a folder full of documents, drag and drop the file
or folder onto your new document converter icon. The translator creates a
new document of the type you specified, keeping the original intact.
To change the document converter, double-click it and select a different file
type. By using the Finder’s Duplicate command, you can create as many
Document Converters as you need. You can also keep and use them
anywhere you need them—in folders, on Zip cartridges, and on file servers.
Category 4: Save as a simpler,
intermediary format
If all your conversion efforts have failed, you may have to export your Mac or
Windows document as a lowest-common denominator format before moving
to the other platform. For instance, just about every database program can
export or import a tab-delimited file, which is a text file with a tab inserted
between each field (between city and state, state and zip code, and so on).
Just about every database can import tab-delimited files correctly. That’s
how you might transfer your data from Microsoft Access (on Windows) to
FileMaker (on the Mac), for example.
Or suppose you don’t have the necessary converter needed to translate a
document from a different version of Microsoft Word. Fortunately, you can
always save your Word (or WordPerfect, or ClarisWorks) document into the
intermediary format known as Rich Text Format (RTF). RTF is a special cross-
platform file type that preserves most of the formatting — bold, italic, font,
and type-size information, for example — when the file is opened on the other
kind of computer. Most self-respecting word processors can open and create
RTF files.
If even that idea fails, you can always ask for a PC file saved as a plain text
file. This kind of file has no formatting at all — it’s just pure typing. But your
word processor will be able to open it, guaranteed.
How to open a PC document
Once you’ve got a PC file on the Mac, you must confront another minor
hurdle: Even if you know you have software that can open it, how do you
open it? (Hint: You can’t double-click a PC file and expect it to open into the
correct Macintosh program.)
628 Part III: Application Secrets
■ ■
MACWORLD MAC SECRETS • 4040-8/X • Chapter 16 • Proof f • SH/EAP • 10/22/98 • p.628
MAC SECRETS • 4040-8/5 • ch.16.1 • Chapter 16 • Proof 1 • VB • 09/17/98 • p.628
4040-8/5 ch16.F 11/3/98 3:54 PM Page 628
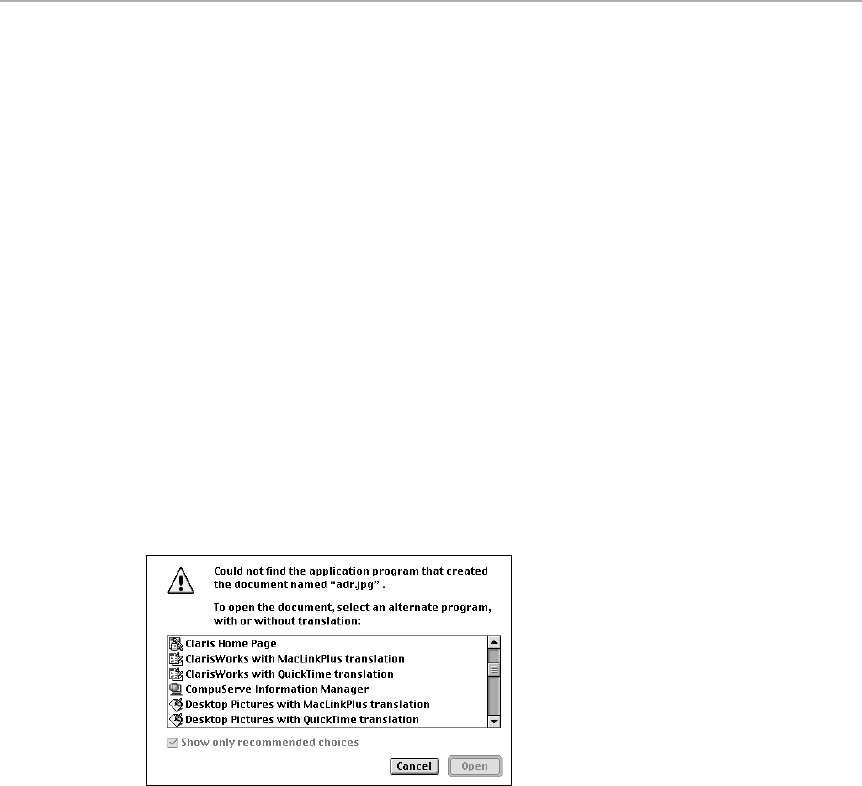
The quickest way is to drag the PC document’s icon onto your Mac program’s
icon. (For example, you might drag a Word for Windows document onto your
Word 98 icon.) You can also launch your Mac program first and use its Open
command to locate the PC file.
Alternatively, you can use one of a pair of control panels —Mac OS Easy Open
or Mac OS 8.5’s File Exchange — to open the PC file when you double-click it.
Mac OS Easy Open/File Exchange
Strangely enough, even if you’re exchanging a file that’s a no-brainer to
convert — for example, you’re trying to open an Excel 97 for Windows
document in Excel 98 for the Mac, which should require no conversion
at all — double-clicking the Windows file’s icon generally doesn’t open it.
But with the Mac OS Easy Open (or Mac OS 8.5’s File Exchange) control panel
installed, when you double-click a PC document icon, you don’t get an error
message saying that the Mac can’t find the application that created the file.
Instead, you get a list of programs and translators installed on your Mac that
might be able to open or translate-and-open the document (see Figure 16-4).
Click the name of the program; that program launches and tries to open the
document you double-clicked. (See Chapter 4 for more on Mac OS Easy Open
and File Exchange.)
Figure 16-4: Mac OS Easy Open gives you a choice of programs and translators to use.
Opening PC Files with Extension Mapping
Mac OS 8.5’s File Exchange control panel incorporates the functions of the
former Mac OS Easy Open. But if you know what type of PC document you’re
working with and which one of your programs can open it, you’re better off
setting up a different feature of File Exchange (formerly PC Exchange):
extension mapping. Unfortunately, understanding extension mapping requires
that you learn a little bit about the ugly business of PC file names.
One difference between a Mac and a PC is the way the two machines name
files. A DOS or Windows 3.1 file’s name can only be eight characters long,
followed by a period and a three-letter “extension” that identifies its type of
file. A text file might be called MAJRMEMO.TXT, for example. A Microsoft Word
for Windows file of the same name would be called MAJRMEMO.DOC.
Chapter 16: Mac to PC and Back 629
■ ■
MACWORLD MAC SECRETS • 4040-8/X • Chapter 16 • Proof f • SH/EAP • 10/22/98 • p.629
MAC SECRETS • 4040-8/5 • ch.16.1 • Chapter 16 • Proof 1 • VB • 09/17/98 • p.629
4040-8/5 ch16.F 11/3/98 3:54 PM Page 629
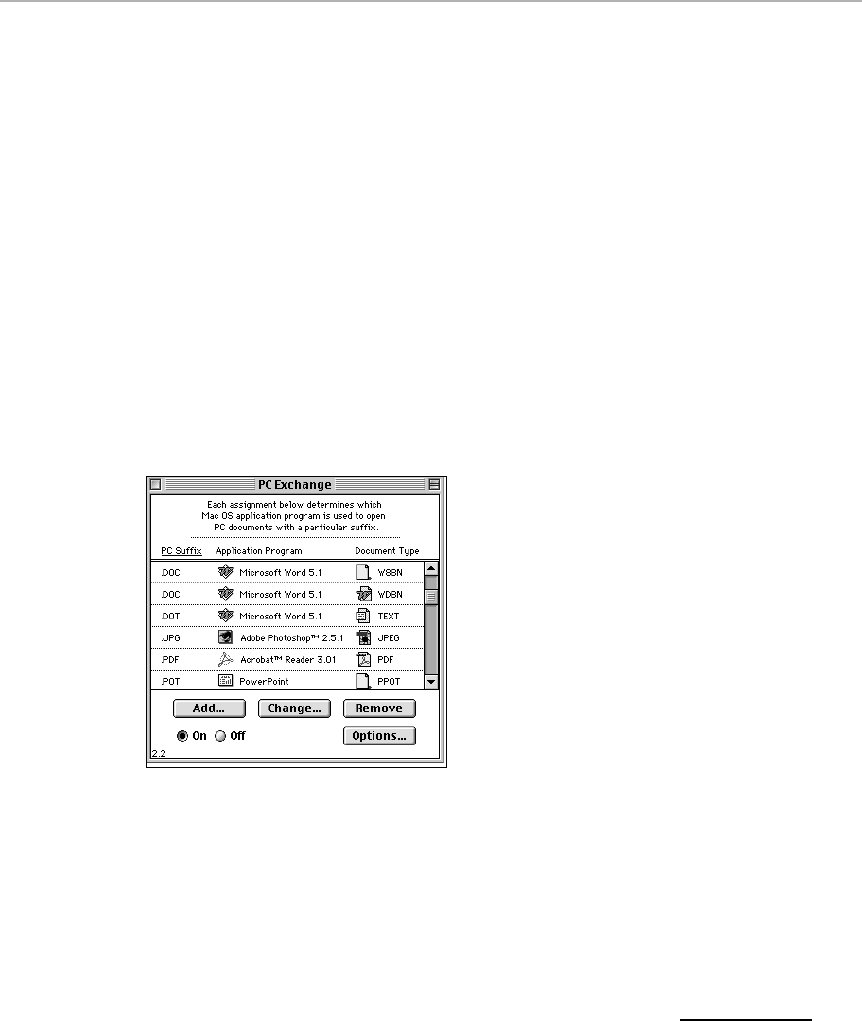
Of course, Windows 95 revolutionized the planet by allowing longer file names
on PCs —hey, just like the Mac! However, many PC users still use the old “eight-
dot-three” format. And behind the scenes, every Windows 95 and Windows 98
document still has an “eight-dot-three” (MAJRMEMO.TXT-type) file name.
When you bring a Windows 95 document to a pre-Mac OS 8.1 Mac, you get,
yet again, an eight-dot-three file name (the first six letters of the Windows 95
long name, followed by a tilde symbol and a number). In other words, My Dog
Has Fleas And Some Other Things on the Windows 95 machine becomes
MYDOGH~1.DOC on the Mac. (Starting with Mac OS 8.1, File Exchange is smart
enough to preserve the first 31 characters of the file name, plus the file name
extension. It also keeps the spaces, and uses a number sign followed by a
number to indicate deleted characters. So our document would appear as in
My Dog Has Fleas And Some#.DOC.)
Regardless of which way you see the file name, the important part is the
three-character extension. You can teach File Exchange (PC Exchange) which
Mac program to open when you double-click a PC document with a particular
three-letter extension. (See Figure 16-5.)
Figure 16-5: Extension mapping in File Exchange links a Mac program to a PC file name
extension.
The left column shows a DOS extension. The middle column shows the
application that will launch when you double-click a document with that
extension. The right column shows the icon and document type that file will
have when it opens.
Cross-Platform File-Conversion Secrets
■
Converting Fonts
MacLinkPlus usually does a good job of translating the formatting of a Windows
file into something the Mac can read. One problematic area, though, is fonts. If
630 Part III: Application Secrets
■ ■
MACWORLD MAC SECRETS • 4040-8/X • Chapter 16 • Proof f • SH/EAP • 10/22/98 • p.630
MAC SECRETS • 4040-8/5 • ch.16.1 • Chapter 16 • Proof 1 • VB • 09/17/98 • p.630
4040-8/5 ch16.F 11/3/98 3:54 PM Page 630
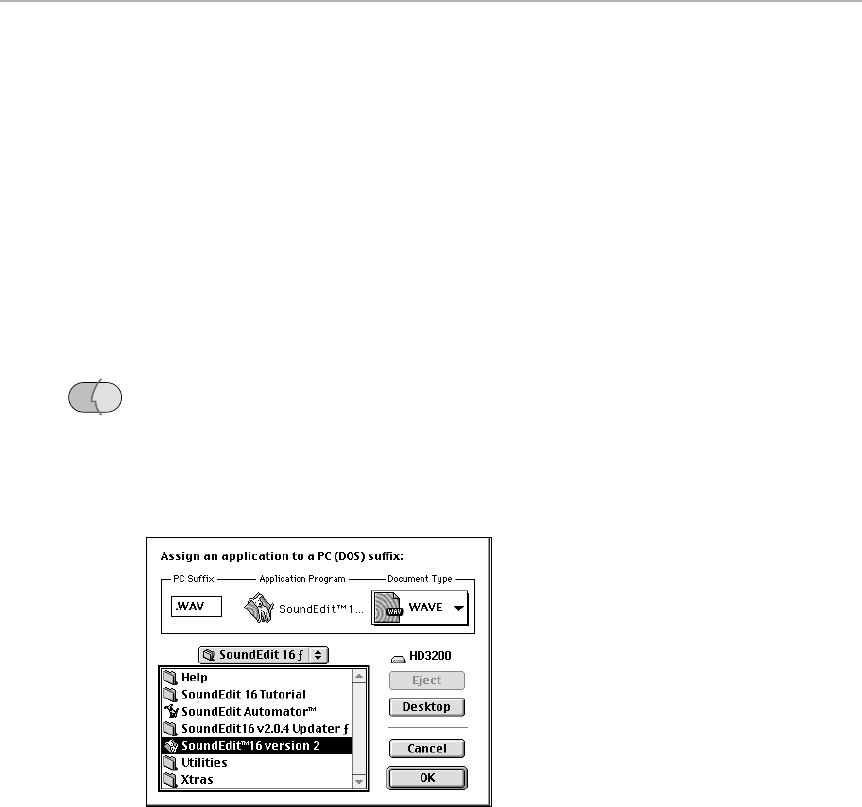
your Mac doesn’t have the exact fonts specified in the Windows document, the
Mac substitutes fonts it
does
have.
But what if you want the same font to show up on both Mac and Windows? You
could stick to fonts that you know are standard on both machines, like Times
and Helvetica. You can sometimes buy the same font for both Mac and
Windows.
Or you can use a shareware utility like TTConverter, which lets you convert Mac
TrueType fonts to Windows fonts. You can then install the fonts on the Windows
machine. For Postscript fonts, you can use a font editing program, such as
Fontographer, to convert between Mac and PC formats.
Adding your own extension mappings
PC Exchange comes with at least one extension mapping (.TXT files are mapped
to open in SimpleText) already set up; Mac OS 8.5’s File Exchange program
offers many more canned mappings. But to create a new mapping, click the
Add button in the File Exchange control panel. In the new window, click the
application that you want to launch. Finally, choose an appropriate icon from
the Document Type pop-up menu (see Figure 16-6).
Figure 16-6: Setting up extension mapping in File Exchange.
These mapping settings are stored in the File Exchange preference file in the
Preferences folder (inside the System folder). You can add an entire set of
mappings created on another Mac simply by copying the File Exchange
preference into your Preferences folder.
Naming documents for PC users
When sending files to PC users, it’s safest to use the “eight-dot-three” file name
standard. In fact, the Windows-using recipient of your file may not be able to open
the document at all unless you’ve added the three-letter extension to its name.
OS
8.5
Chapter 16: Mac to PC and Back 631
■ ■
MACWORLD MAC SECRETS • 4040-8/X • Chapter 16 • Proof f • SH/EAP • 10/22/98 • p.631
MAC SECRETS • 4040-8/5 • ch.16.1 • Chapter 16 • Proof 1 • VB • 09/17/98 • p.631
4040-8/5 ch16.F 11/3/98 3:54 PM Page 631

632 Part III: Application Secrets
■ ■
MACWORLD MAC SECRETS • 4040-8/X • Chapter 16 • Proof f • SH/EAP • 10/22/98 • p.632
MAC SECRETS • 4040-8/5 • ch.16.1 • Chapter 16 • Proof 1 • VB • 09/17/98 • p.632
As you name files bound for Windows computers, remember that you’re not
allowed to have
any
spaces in its name. (Double-check for a tiny space at the
end of a file’s name, which renders your file un-openable on a PC.) Other
characters you’re not allowed to use in a Windows file name: slashes (as in
10/25/98), as well as these characters:
? [ ] = + \ < > ; “ ,
Stripping the little boxes
Often, converted PC files end up with bunch of alien-looking squares or symbols,
as shown in Figure 16-7. You can get these when you convert word processor
or text files from a DOS disk, an e-mail message, or the Internet. These boxes
represent normally invisible codes that are responsible for
line feeds
used by
PC text-editing programs. (Behind the scenes, a PC text editor inserts a
line-feed
character, a cousin of our Return character, at the end of every line.)
If you want to nuke these symbols, you have three choices. First, if you do a lot
of nuking, run the file through Tex-Edit, included on the CD-ROM with this book;
its Strip LF’s (line feeds) command does exactly what you’d hope.
Second, you might try using your word processor’s search-and-replace command
(in Word, it’s the Replace command). Search for Control-J and replace it with
nothing. Or, paste one of the little squares into the Find What blank, and replace
that with nothing. Either way, you get rid of the annoying squares.
Finally, Microsoft Word has a highly functional, but little-known, rectangular-
selection feature. You can select a vertical strip of text, which is exactly what
you’d want to do if the control-character squares fall, as they often do, at the
left edge of the text (see Figure 16-7).
Figure 16-7: Use Word to highlight only the offending characters.
The secret: Press the Option key as you drag. Drag straight down through the
thin left-margin column of squares and then press Delete.
Compressing/Decompressing PC files
Both Mac and Windows users frequently compress files when copying them
to a disk or when sending them by e-mail.
Strange
But True
4040-8/5 ch16.F 11/3/98 3:54 PM Page 632

Chapter 16: Mac to PC and Back 633
■ ■
MACWORLD MAC SECRETS • 4040-8/X • Chapter 16 • Proof f • SH/EAP • 10/22/98 • p.633
MAC SECRETS • 4040-8/5 • ch.16.1 • Chapter 16 • Proof 1 • VB • 09/17/98 • p.633
CASE HISTORY
The PR mavens may crow about how compatible
Macs are with PCs today. But this true story from
one of our readers sheds some light on what
multiplatform life is really like in the trenches.
“I am a graphic artist for a software development
company. Although I own and have always used
the Mac, my current employment status dictates
that I work on a Windows-based PC. It has been
bearable. I use a PC, primarily with PageMaker
and Photoshop for Windows.
“Before I arrived at my office, an artist was
commissioned to design the cover for a software
manual. The artist created the elements in
Photoshop, and composed the document in
QuarkXPress. All files originated from a Mac and
were saved to a 44MB SyQuest cartridge. The
bottom line: we had files in an incompatible
format, on a storage device we couldn’t access.
“My company wanted to have their own copy,
so we had a typesetting house segment and
transfer the files to multiple floppies via PKZip
(the standard compression utility for the PC
world), then returned the cartridge to the artist.
Basically, this made matters somewhat worse;
we now had Mac files segmented on PC
floppies. Hold on — it gets better.
“I figured I’d take these floppies home to see if I
could do anything with them on my Mac. The
control panel, PC Exchange, allowed me to
access the floppies, but the Mac version of
PKUnzip (the standard decompression utility for
the PC world) is unable to handle a segmented
file. I broke out an old version of Insignia’s
SoftPC and downloaded the PC version of PKZip
from America Online. Thanks to my recent PC
experience, I was able to get PKUnzip running in
the DOS emulation program and successfully
decompress the required files. Unfortunately,
anything that comes from SoftPC is flagged as a
PC Exchange document. I then had to open
these files in my versions of Photoshop and
Quark, respectively, then resave them in the
appropriate format. So far, so good.
“I guess the typesetting house figured they would
do us an unannounced favor and converted the
Mac fonts to PC fonts. Great. Again the problem
was that the fonts were now PC Exchange
documents, and my version of Fontographer
could not even read the files. My solution was to
create a quick PC font in Fontographer, open it in
ResEdit to get the file type and creation code,
then assign that flag to the real PC font I wanted
to convert. Once saved, Fontographer was able to
read and convert the PC font to a Macintosh
TrueType font. Onward and upward.
“Now that all the files were converted, the next
issue was that I had a Quark document, and
needed a PageMaker document. I acquired a
utility to convert Quark to PageMaker, available on
America Online from Aldus Corp. Almost done?
Not quite. Apparently, the conversion utility is not
equipped to handle QuarkXPress Version 3.3.1. I
had to reinstall Version 3.2, extract the file again
from the PC floppies (I had already resaved it as a
3.3.1 document), open and save it in Version 3.2
format, then convert the file with Aldus’s utility.
“Finally, I used the Mac version of PKZip to
compress and segment the files back to PC
floppies. Both native PageMaker and Photoshop
files are transparent, so I could now decompress
and have a version of the cover design in
PageMaker for Windows.
“Easy.”
Mac to PC and Back . . . via Hell
4040-8/5 ch16.F 11/3/98 3:54 PM Page 633

634 Part III: Application Secrets
■ ■
MACWORLD MAC SECRETS • 4040-8/X • Chapter 16 • Proof f • SH/EAP • 10/22/98 • p.634
MAC SECRETS • 4040-8/5 • ch.16.1 • Chapter 16 • Proof 1 • VB • 09/17/98 • p.634
However, be careful when sending a file to a PC user. The most common
compression format for Macs is Aladdin’s StuffIt, or
.sit —
but on Windows, the
most common compression format is called
.zip
. Windows users generally can’t
open Macintosh
.sit
files. (There is a free StuffIt Expander for Windows,
available at www.aladdinsys.com, but most Windows users don’t have it.)
Instead, send the Windows users a
.zip
file. To create such a file, you can use a
program like ZIPIT, included with this book. (That program, as well as others like
StuffIt Expander, can also open .zip files you get from Windows users.)
Actually, there’s more to the story — not only do you have to worry about file
compression
, you also have to worry about file
encoding,
described in depth in
Chapter 27. (The Internet can’t, technically speaking, transmit anything but
plain text. Therefore, if you try to send a file attachment with an e-mail
message, your e-mail program
encodes
it into a stream of pure, encoded text,
which the receiving computer reconstitutes into a usable file. That’s the theory,
anyway.)
The bottom line: Your Mac e-mail program probably encodes files you’re sending
as
binhex (.hqx)
files. As you can probably predict, Windows users can’t decode
those files. Instead, therefore, when sending files to Windows users, use your
e-mail’s preferences settings to encode file attachments as
MIME (Base 64)
,
which is the encoding scheme used by Windows e-mail programs.
Exchanging Graphics with Windows Users
Exchanging graphics documents with Windows users requires more effort
than text-based documents. Graphics documents don’t always translate
exactly, and sometimes need some tweaking in a graphics editing program
after translating. However, choosing the right graphics file format in the first
place can help you avoid such problems.
For a complete rundown of graphics file formats, see Chapter 20. In the
meantime, here’s a summary:
■GIF files are cross-platform — the same file shows up correctly on Mac,
Windows, or even UNIX without translation. That’s why they are so
commonly used on Web pages on the Internet. Unfortunately, GIF files
are limited to a fairly blotchy 256 colors per file.
■JPEG files are also cross-platform, requiring no conversion between Mac
and PCs. JPEG is most often used for photos on the Web, because there’s
no limitation on the color range per file.
■TIFF files (called .TIF in Windows) are very similar on the Mac and on
Windows—but not, unfortunately, identical. The one difference is a
technical parameter called the byte order.
There are two ways to convert a TIFF file between Mac and Windows
flavors: First, when you save a file from Photoshop, GraphicsConverter,
or a similar program, you’ll be asked which byte order you want—
suitable for Macintosh or suitable for Windows. MacLinkPlus, among
4040-8/5 ch16.F 11/3/98 3:54 PM Page 634
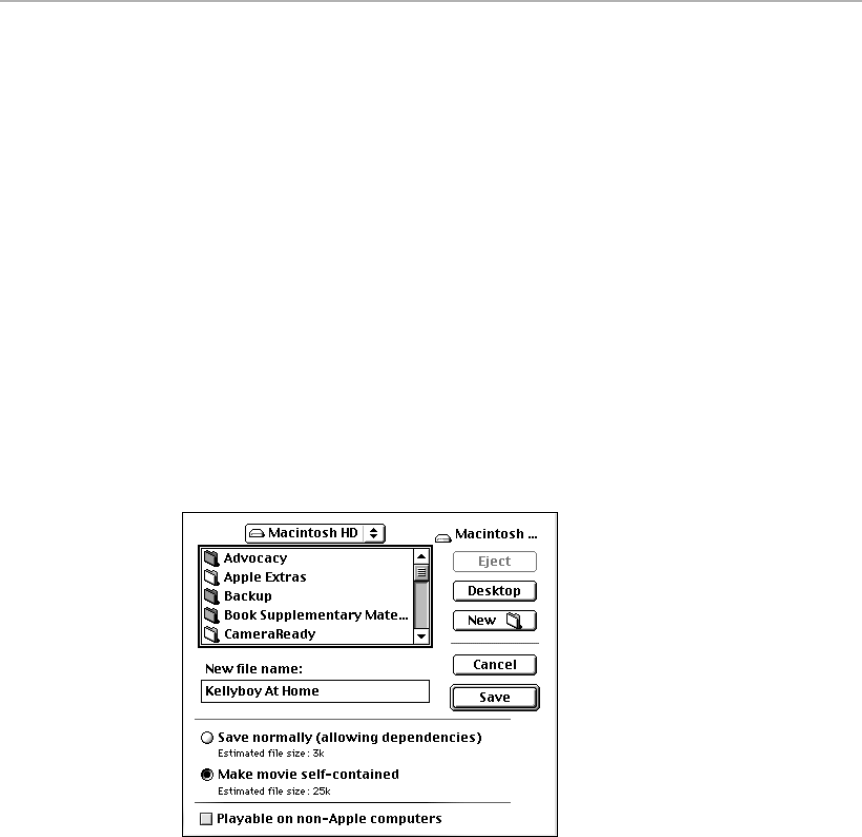
other programs, can also convert TIFF files between Mac and Windows
formats. (TIFF images are most often used in professional publishing.)
■EPS is a cross-platform standard, but here, too, there are slight
differences between Mac and PC versions. MacLinkPlus can translate
between the two versions. Unlike TIFF and GIF, EPS is an object-oriented,
or vector graphics format (see Chapter 20). Problems, such as thickening
of lines and changes in color, can arise when you convert an EPS file from
one computer format to another and, at the same time, change the EPS
format to a bitmapped format (such as TIFF).
■PICT is a Macintosh-only graphics format with no Windows counterpart.
The closest thing to PICT on the PC side is WMF (Windows Metafile).
■BMP is a common Windows graphic bitmap standard with no Mac
equivalent. You can translate it into a Mac format using MacLinkPlus.
■QuickTime movies can be played on both Mac OS and Windows. One
conversion step is necessary, however: When you save a QuickTime
movie into Windows format, you must “flatten” it. You can use Apple’s
Movie Player or other video utilities to flatten QuickTime movies, as
shown in Figure 16-8.
Figure 16-8: When saving a QuickTime movie out of MoviePlayer 2.5 (or a purchased
version of 3.0), you’re offered the chance to make the movie “playable on non-Apple
computers.” That means flattening the movie, which is what the option is called in some
other QuickTime programs.
Techie note: Flattening combines the two parts of a Mac QuickTime
movie, called the resource fork and the data fork, into a single file. When
you move any Mac file to a PC, the resource fork is always discarded.
(See Chapter 22 for more information on the resources of Mac files.)
Ordinarily, the resource fork of a Mac data file is mostly empty (containing
information about the icon), so its loss isn’t a problem. But Mac-format
QuickTime movies contain important code in the resource fork; that’s
why flattening (to move this information into the data fork) is necessary.
Chapter 16: Mac to PC and Back 635
■ ■
MACWORLD MAC SECRETS • 4040-8/X • Chapter 16 • Proof f • SH/EAP • 10/22/98 • p.635
MAC SECRETS • 4040-8/5 • ch.16.1 • Chapter 16 • Proof 1 • VB • 09/17/98 • p.635
4040-8/5 ch16.F 11/3/98 3:54 PM Page 635

Cross-Platform Networking
For communications with PCs, nothing beats a network. You can share files,
send e-mail, share printers, and do a host of other activities by sending
electrons over thin cables.
The biggest cross-platform network on earth, of course, is the Internet. It
connects Mac, Windows, UNIX, and other kinds of computers throughout the
world, 24 hours a day. Not only that, but the servers — the computers that
host Web sites, distribute e-mail, and serve files via FTP — are a mix of UNIX,
Windows NT, and (in surprisingly large numbers) Macs. You can’t tell which
operating system is running a particular Web site — and as far as you, the
Web surfer, are concerned, it doesn’t matter.
The local networks in an office or school are similar in principle to the
Internet, and sometime even use the same technology. Most often, Macs and
PCs are connected by Ethernet wiring; Ethernet is a cross-platform cabling
standard. (For more about Ethernet and the nuts and bolts of networking, see
Chapter 35.)
But although the wiring is the same, the software is different. Macs
sometimes get barred from the network fun by network software products
that don’t support the Mac. Fortunately, persistence and a little knowledge is
all you need to connect to such Windows-only networking schemes.
A Protocol Primer
To get two computers communicating, either for file-sharing, e-mail, or any
other task, they have to use the same set of protocols. You can think of
protocols as rules of the road—stop on red, go with green—that computers
obey when sending data over wires. It doesn’t matter if the computers are
Macs, Windows, or UNIX; as long as they’re communicating using the same
protocols, they’ll understand each other. If you really want to get your Mac
talking to Windows machines, you’ll have to delve into the tech-speak of
protocol-ese; here goes.
Protocols come in what you might call layers. At the bottom layer are basic
transport protocols that establish communications. On top of that are
protocols that provide services — file servers, e-mail service, Web service,
remote access service, and so on.
Ethernet wires can carry multiple protocols at the same time — which is
fortunate, because today’s computers often use different protocols for
different tasks. Your Mac might send AppleTalk signals to print, and TCP/IP
signals to access the Internet. All that’s necessary for Macs and PCs to
communicate is that they speak the same protocols.
Here are the most basic transport protocols used today:
■AppleTalk: AppleTalk has been a standard Mac networking protocol
since 1984 (see Chapter 35 for details). AppleTalk is the language spoken
by network printers; it’s also the protocol used for the Mac’s built-in File
636 Part III: Application Secrets
■ ■
MACWORLD MAC SECRETS • 4040-8/X • Chapter 16 • Proof f • SH/EAP • 10/22/98 • p.636
MAC SECRETS • 4040-8/5 • ch.16.1 • Chapter 16 • Proof 1 • VB • 09/17/98 • p.636
4040-8/5 ch16.F 11/3/98 3:54 PM Page 636

Sharing feature (again, see Chapter 35). PCs normally don’t speak
AppleTalk — unless you equip them with add-on software.
■TCP/IP: TCP/IP is the most widely used set of protocols in the world—
it’s the language of the Internet, and is becoming more and more
common on local networks as well. Mac OS, Windows 95, Windows 98,
and Windows NT all come with TCP/IP software.
■IPX/SPX: This technical-sounding item is Novell’s set of protocols for its
NetWare networking system. Although Novell’s products and customers
have been moving towards TCP/IP, the world’s offices are still filled with
IPX networks. Macs can participate on NetWare IPX networks using a
software kit from Novell called NetWare Client for Macintosh software,
which includes a control panel called MacIPX.
■NETBEUI: A common IBM protocol used in DOS and Windows for small
networks, NETBEUI was used in such networking products as Microsoft
LAN Manager, Windows for Workgroups, IBM PCLAN and LAN Server. If
this is what your office uses, you’re out of luck—no software lets Macs
communicate via NETBEUI.
Putting PCs on a Mac Network
When adding a few PCs to a mostly-Mac network, it makes the most sense to
adopt the PCs to your network rather than the other way around. This
usually means adding the AppleTalk protocol to the PCs.
You can do this with one of two products for Windows: PC MacLAN (from
Miramar) or COPSTalk (from Cops). Both let Windows access Macs that have
File Sharing turned on (see Chapter 35), plus dedicated Mac AppleShare
servers. PC MacLAN, in fact, even lets Macs access the Windows machines.
PCs running either PC MacLAN or COPSTalk can print to Mac Postscript
printers on the AppleTalk network, and Macs can print to any Postscript
printers connected to the Windows PCs.
Using an AppleTalk product for a cross-platform network also makes sense if
you’re connecting a few Macs and a few PCs together, and your background is
mostly Macintosh. Because AppleTalk is a plug-and-play, self-configuring
protocol, it’s easier to set up and run PC MacLAN or COPSTalk than to tangle
with the products discussed in the next section.
Macs on PC networks
AppleTalk doesn’t make much sense when you want to add Macs to an
established PC network. Nor does adding software to a Windows NT server,
when it’s just a few Macs in a mostly Windows environment. Instead, you
should adapt the Macs by installing special software on them.
DAVE (from Thursby) is software that adds a Mac to a Microsoft network
using the TCP/IP protocol. Macs thus equipped can log onto standard
Windows NT “domains.” To the Mac user, PCs with Microsoft file sharing
Worth
Learning
Chapter 16: Mac to PC and Back 637
■ ■
MACWORLD MAC SECRETS • 4040-8/X • Chapter 16 • Proof f • SH/EAP • 10/22/98 • p.637
MAC SECRETS • 4040-8/5 • ch.16.1 • Chapter 16 • Proof 1 • VB • 09/17/98 • p.637
4040-8/5 ch16.F 11/3/98 3:54 PM Page 637

turned on become visible in the Chooser; you select and log on to them just
as you would on a standard Mac AppleTalk network (see Chapter 35).
DAVE also lets the Macs share their hard drives with the PCs on the network.
The PC users can log onto DAVE-equipped Macs just as they would ordinarily
log onto other Windows machines.
Configuring DAVE on the Mac is usually more complex than Mac networking;
some knowledge of PC networking is very helpful. So is Thursby’s manual,
which walks you through the set-up procedure.
If the existing PC network runs the Novell NetWare networking system, you
can add your Mac to the network by installing NetWare Client for Macintosh
(or its more recent incarnation, IntranetWare Client for Mac OS). The Macs
can use either the Novell IPX protocol or TCP/IP; the client doesn’t interfere
with normal AppleTalk functions. For example, you can log into the network
server through IPX, browse the Internet using TCP/IP, and print using
AppleTalk. The Novell client software lets your Mac access the Novell
Directory Services (NDS) to log into file servers and printer functions.
Connecting to Windows NT Server
Windows NT Server, yet another common Windows-based networking
software kit, comes with software called Windows NT Services for Macintosh
(SFM). (Although SFM comes on the Windows NT Server CD-ROMs, it must be
installed and configured separately.)
Like PC MacLAN, SFM installs on the NT Server, and gives Macs access to the
server using AppleTalk. Once you’re hooked up this way, you log onto the NT
server through the Chooser, just as you would on an all-Mac system. Unlike
PC MacLAN, the SFM file service is one-way — Windows PCs can’t access the
Macs on the network.
Macs also use the printers connected to Windows NT servers — sort of. If the
printer is not a Postscript printer, then Macs can only print in black and white
and at 300 dpi — even if the printer supports color and higher resolutions.
On the other hand, SFM has the Microsoft logo on it, which makes it
attractive to many of the people who run the networks in today’s companies.
Sharing files with AppleShare IP and
Web Technology
The Personal Web Sharing feature available in Mac OS 8 and later lets
Windows users browse the files on your Mac (using the TCP/IP protocol). To
them, your Mac looks like a Web server, and your shared folder looks like a
Web site! (Personal Web Sharing is great for this purpose—sharing your
Mac’s files over a local network. But it doesn’t include the security features of
638 Part III: Application Secrets
■ ■
MACWORLD MAC SECRETS • 4040-8/X • Chapter 16 • Proof f • SH/EAP • 10/22/98 • p.638
MAC SECRETS • 4040-8/5 • ch.16.1 • Chapter 16 • Proof 1 • VB • 09/17/98 • p.638
4040-8/5 ch16.F 11/3/98 3:54 PM Page 638

a real Web server, making it less attractive for making your folders available
to the actual Internet.) (For more on Personal Web Sharing, see Chapter 4.)
Another program, called AppleShare IP, performs a similar function — letting
Windows users browse your Mac’s hard drive with their Web browser — but
with more features. For example, AppleShare IP lets Macs access files on the
network using AppleTalk. The software also has FTP capabilities that
Windows users can access (thus turning your Mac into a miniature software
library), and includes an Internet e-mail server (POP3/SMTP), an HTTP Web
server, and an AppleTalk print server.
OpenDoor’s Shareway IP, another cross-platform networking product, is
difficult to categorize. This Macintosh software can make an AppleShare-
compatible server available to any platform over a TCP/IP local-area network,
or over the Internet itself. “Any AppleShare-compatible server” includes
Windows NT running SFM, PC MacLAN, AppleShare file servers running on
Macs, or Mac workstations running personal file sharing.
Using Shareway IP, a Mac can log onto Windows NT Server via TCP/IP instead
of AppleTalk (nothing special needs to be installed on the Windows server). It
also enables Windows users to access AppleShare-compatible servers via
TCP/IP and a Web browser.
Running Windows Programs on a Mac
Now that using PC disks, documents, and networks has become child’s play,
some Mac users are getting greedy—they want to run Windows programs.
This is a more ambitious proposition. You can’t run a PC program without
running a PC operating system — DOS or Windows. And everything they say
about DOS is true: It’s hopelessly outdated, extremely complex, and nearly
impossible to troubleshoot unless you’re a true DOS expert. Windows 95,
Windows 98, and Windows NT are much easier to use than DOS, but not
much easier to troubleshoot.
If you really want to go for it, your options fall into two basic categories:
(a) use a software emulator, or (b) install a PC-compatibility board into
your Mac.
The advantage of these two solutions seem clear-cut: They can save money
(over buying a whole PC system), and they save desk space by allowing you
to run two computers with one box, one monitor, and one keyboard.
But these days, shop first; buying an actual PC may not actually cost more
than, say, a PC compatibility card in your Mac. Furthermore, both of these
solutions require you to dedicate a wide swath of your hard drive as a “virtual”
PC drive; your Mac stuff lives on one side, and your PC stuff lives on the other.
The emulator program or PC compatibility card software sets up a large Mac
file — several hundred megabytes—that acts as a virtual PC boot drive (what
Windows users would call the C: drive). Inside the virtual C: drive file is the
Windows operating system, plus all of your PC programs and data files (see
Figure 16-9).
Chapter 16: Mac to PC and Back 639
■ ■
MACWORLD MAC SECRETS • 4040-8/X • Chapter 16 • Proof f • SH/EAP • 10/22/98 • p.639
MAC SECRETS • 4040-8/5 • ch.16.1 • Chapter 16 • Proof 1 • VB • 09/17/98 • p.639
4040-8/5 ch16.F 11/3/98 3:54 PM Page 639
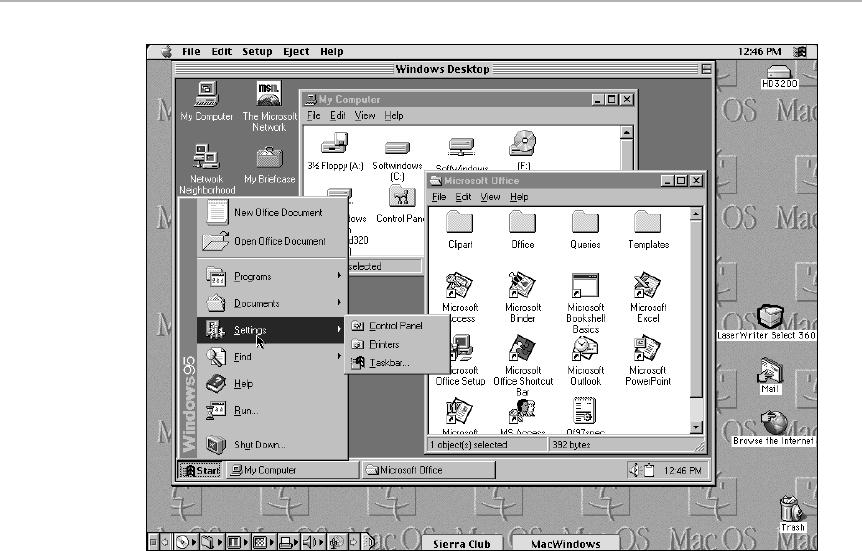
Figure 16-9: Booting Windows on a Mac with an emulator or PC compatibility card gives
you both worlds on a single screen.
Software PC Emulators
Emulators, such as VirtualPC (Connectix) and SoftWindows (Insignia), trick
your copy of Windows and your Windows programs into thinking they’re
running on an actual IBM-PC clone. But these programs must translate code
intended for an Intel processor into something a PowerPC processor can
understand. As a result, emulator software runs Windows programs more
slowly than, say, PC compatibility boards (and actual PCs).
It’s difficult to say exactly how fast Windows will run on your Mac with an
emulator; the faster your Mac’s processor, the faster the imitation Windows
PC will run. On the fastest G3 Power Macs and PowerBooks, you’ll run
Windows as fast as a medium-speed Pentium PC.
At this writing, two companies make emulator programs. Insignia Solutions
offers RealPC (an emulator that comes with DOS and is aimed at game fans)
and SoftWindows 95 (which comes with Windows 95). Its rival, Connectix,
sells Virtual PC, which you can buy equipped with DOS or Windows 95. The
Insignia emulators cost a little more than Virtual PC, but are faster, especially
if you have a slowish Mac. (Virtual PC requires a minimum of a 180 MHz
PowerPC 603e, whereas SoftWindows 95 can run on any PowerPC processor.)
640 Part III: Application Secrets
■ ■
MACWORLD MAC SECRETS • 4040-8/X • Chapter 16 • Proof f • SH/EAP • 10/22/98 • p.640
MAC SECRETS • 4040-8/5 • ch.16.1 • Chapter 16 • Proof 1 • VB • 09/17/98 • p.640
4040-8/5 ch16.F 11/3/98 3:54 PM Page 640

One Virtual PC benefit, however, is that it can run any PC operating system,
including Windows NT, UNIX, or OS/2. RealPC and SoftWindows 95 can only
run DOS, Windows 3.1, Windows 95, and Windows 98.
VirtualPC/SoftWindows Speed Secrets
■
RAM is it
VirtualPC or SoftWindows requires enough RAM in your Mac to run Mac OS, the
emulator, Windows,
and
your Windows programs — 48MB is the bare minimum
for tolerable speed. Less RAM slows Windows down, and more RAM speeds
it up.
To give the emulator — and Windows — more RAM, use the same technique
you’d use to give any Mac program more RAM (see Chapter 9): increase the
Preferred Size memory box in the emulator program’s Get Info box.
Gamers’ revenge
If you’re primarily interested in running PC
games
on your Mac, consider buying a
3dfx graphics accelerator board
to go with your emulator software. These cards,
which cost a few hundred dollars, greatly increase the speed of certain PC games
(only those specifically written to take advantage of 3dfx boards).
The Quitting-the-Finder myth
You can’t believe everything you read on the Internet. One widespread “tip”
about emulators — one submitted no fewer than 38 times to this year’s
Mac
Secrets
contest — is a myth. On some Web sites, this “tip” was actually (and
falsely) attributed to Apple cofounder Steve Wozniak, which has given it
credibility.
The myth goes like this: To get greater speed out of VirtualPC or SoftWindows,
you can trick the Mac into running without the Finder. (This involves renaming
your emulator program “Finder,” using ResEdit to change its creator code [see
Chapter 15] to
MACS
and its type code to
FNDR,
and placing this edited file into
the System Folder on a new hard drive par tition, which you designate as the
startup disk. When you start up the Mac, you launch right into the emulator and
Windows, and the Mac desktop is not displayed.)
It’s true that you can launch Windows without the Finder. The problem is that
doing so doesn’t speed up PC emulators. Not running the Finder frees a couple
of megabytes of RAM for use by your emulator — but that’s too little extra RAM
to result in any significant speed increase.
The bottom line: If you need more RAM for Windows, buy some.
Chapter 16: Mac to PC and Back 641
■ ■
MACWORLD MAC SECRETS • 4040-8/X • Chapter 16 • Proof f • SH/EAP • 10/22/98 • p.641
MAC SECRETS • 4040-8/5 • ch.16.1 • Chapter 16 • Proof 1 • VB • 09/17/98 • p.641
4040-8/5 ch16.F 11/3/98 3:54 PM Page 641

PC Compatibility Boards
A
PC compatibility board
is like a little PC motherboard running in your Mac.
Most of today’s PC compatibility cards have a Pentium or Pentium-clone
processor, their own RAM slots, and their own video RAM, sound chips, and
graphics accelerator chips. You can also find boards that offer standard PC
ports for peripherals, such as the parallel and serial ports, sound in and out,
and joystick port.
A PC compatibility board costs much more than VirtualPC and SoftWindows, but
gives you much better speed — speed similar to an actual PC (usually slightly
slower). On the other hand, PC compatibility boards for Macs don’t usually offer
the latest-generation PC processors. For instance, at this writing, nobody’s
making boards with Pentium II processors.
Apple discontinued its own line of compatibility boards in 1997. Another
company, Reply, sold its compatibility-card line to Radius, which soon after also
got out of the business. This transaction left Orange Micro as the sole provider
of compatibility cards.
Orange Micro was building its OrangePC cards long before Apple entered the
market. Today, Orange Micro offers boards at wide range of prices and feature
sets.
Besides using faster processors, one advantage of current Orange Micro boards
over the older Apple and Reply/Radius boards is that only Orange boards
support 32-bit Windows drivers. This important feature lets Windows on the Mac
use modern PC “NDIS” networking, long Windows file names, and a wider range
of peripheral gadgets.
Using PC Peripherals on the Mac
Fortunately, you don’t need to run Windows on your Mac in order to use
certain PC peripheral products — printers, CD-ROMs, scanners, monitors,
and so on. You can often plug a device directly into one of your Mac’s ports
or slots, or use a converter box.
However, physically attaching a peripheral is just the first step —the key to
using it is finding a corresponding driver for the Macintosh. Drivers are small
pieces of software that load into memory to tell the computer how to speak
with the add-on gadget; drivers aren’t, alas, cross-platform. If no one has written
a Mac driver for the peripheral device, you probably won’t be able to use it.
Monitors
There’s little or no difference between today’s PC and Mac monitors. (Years
ago, PCs introduced multi-sync monitors, which let you zoom in or out of the
image on your screen, as described in Chapter 11. Today, all Mac monitors
are multi-sync.)
642 Part III: Application Secrets
■ ■
MACWORLD MAC SECRETS • 4040-8/X • Chapter 16 • Proof f • SH/EAP • 10/22/98 • p.642
MAC SECRETS • 4040-8/5 • ch.16.1 • Chapter 16 • Proof 1 • VB • 09/17/98 • p.642
4040-8/5 ch16.F 11/3/98 3:54 PM Page 642

The only difference you might encounter is the connector. All monitors use a
15-pin connector to plug into a computer, but desktop Macs’ connector is
arranged in two rows of pins. The connector on PCs (and modern PowerBooks),
on the other hand, has three rows of five pins instead (known as the standard
VGA connector). All you need to use a PC-type connector on your Mac is an
adapter, which you can get from a computer store or from a PowerBook owner
who doesn’t need the adapter that came in the original box.
Keyboards, Mice, and Joysticks
Using a PC keyboard is trickier than using a PC monitor because the interface
to the computer differs — and we’re not just talking about a difference in
connectors. Most PC keyboards plug into a PC serial port, also known as a
PS/2 serial port. Most Mac keyboards plug into the Mac’s Apple Desktop
Bus (ADB) jack (see Chapter 10) and contain an ADB chip inside (which PC
keyboards lack).
The solution: Get an ADB-to-PS/2 converter box. Such a box plugs into the
Mac’s ADB port and offers one or more PS/2 serial ports, into which you
can plug PC keyboards, mice, some joysticks, and even receptor docks for
wireless keyboards. (Some of these converter boxes are input only, and
therefore don’t work with devices that require two-way communications,
such as software copy-protection dongles.)
USB Devices
As you can read in Chapter 10, some newer Mac models, such as the iMac,
use Universal Serial Bus (USB) jacks and cables for the keyboard and mouse
instead of ADB. USB keyboards on Macs and PCs are basically the same,
although a special software driver is still usually required for each kind of
computer.
Scanners
There isn’t much difference between Mac and PC scanners. Most scanners
plug into the Mac’s SCSI port — or a SCSI card on a PC.
As usual, the key ingredient for making a scanner work on the Mac is a
software driver (usually in the form of an extension) and scanning software
that works with the scanner. The first place to look for a Mac driver is the
scanner manufacturer’s Web site. If you can’t find it there, call the
manufacturer and ask for a Mac driver.
Printers
The biggest barrier to using PC printers with a Mac is the language used by
the computers and printers to communicate. Macs and many Windows
systems speak Postscript, described at length in Chapters 30 and 31. Macs
Chapter 16: Mac to PC and Back 643
■ ■
MACWORLD MAC SECRETS • 4040-8/X • Chapter 16 • Proof f • SH/EAP • 10/22/98 • p.643
MAC SECRETS • 4040-8/5 • ch.16.1 • Chapter 16 • Proof 1 • VB • 09/17/98 • p.643
4040-8/5 ch16.F 11/3/98 3:54 PM Page 643

and Windows machines can both print to Postscript printers if they’re both
using the same network protocol (such as AppleTalk) or are both connected
to a printer server.
However, many PC printers use Hewlett Packard’s Printer-Command
Language (HP PCL) instead of PostScript. Some printers are bilingual, and can
automatically recognize what page description language each computer is
speaking. But on their own, Macs can’t speak PCL.
You can, fortunately, equip a Mac to print to HP PCL printers with the
addition of InfoWave’s PowerPrint kit. This package contains driver software
for a variety of different types of printers, including inkjet and color printers,
and even a cable adapter that lets you connect PC printers to the Mac’s
printer port.
The expansion slot in networkable PC printers can accept a network interface
card that lets the printer accept such wiring types as LocalTalk and Ethernet.
Network printers also use a network protocol, such as AppleTalk or TCP/IP,
as described earlier in this chapter. (The LaserWriter driver — the Chooser
icon — in Mac OS 8.1 and later can print to TCP/IP printers.) Some printers
can use multiple network protocols simultaneously.
PCI Cards
The same PCI expansion slot found in most Macs (see Chapter 34) is also used
in most PCs. Many graphics accelerator cards and video cards are available
for both Mac and PC; so are more specialized PCI cards, such as video input
and output cards and data-capture cards (used in engineering). As with other
peripherals, the only difference in the Mac and PC versions is the software for
each platform — as long as the card fits into your Mac, of course.
644 Part III: Application Secrets
■ ■
MACWORLD MAC SECRETS • 4040-8/X • Chapter 16 • Proof f • SH/EAP • 10/22/98 • p.644
MAC SECRETS • 4040-8/5 • ch.16.1 • Chapter 16 • Proof 1 • VB • 09/17/98 • p.644
4040-8/5 ch16.F 11/3/98 3:54 PM Page 644

MAC SECRETS • 4040-8/5 • ch.17.F • Chapter 17 • Final • EAP • 10/23/98 • p.645
MAC SECRETS • 4040-8/5 • ch.17.1 • Chapter 17 • Proof 1 • VB • 09/18/98 • p.645
Chapter 17
Word Processing
In This Chapter
©Basic word processing power tricks
©The mother of all Microsoft Word sections
©WordPerfect and ClarisWorks tricks
©Unleashing the thundering raw power of SimpleText
A Few Words About Word Processing
It’s the Number One use of a Mac. It’s the Number One use of any personal
computer, actually. The lure of being able to rearrange text and replace
pieces of it without involving eraser crumbs or white-out is enough to draw
even card-carrying technophobes into the world of personal computing.
The Mac marketplace isn’t as riddled with competing word processors
as the IBM marketplace is. But there are more than enough choices, from
the simple and easy, like AppleWorks (formerly ClarisWorks), to the mega-
wordcrunchers like Microsoft Word and WordPerfect. (We actually know one
woman who runs her entire office using SimpleText, for Heaven’s sake. She’s
in absolute heaven.)
Universal Word Processing Secrets
■
Text-editing basics
We’re always amazed at the number of 12-year Mac veterans who are
astounded to learn that you can, for example, double-click a word to highlight it.
It occurred to us that
somebody
ought to put together a complete list of
Macintosh-standard editing techniques. Here’s our attempt:
■Drag through some text to highlight it. If you’re dragging horizontally and
accidentally dip down, move the cursor back up to the original line and
continue.
Mac Basics
4040-8/5 ch17.F 11/3/98 3:41 PM Page 645
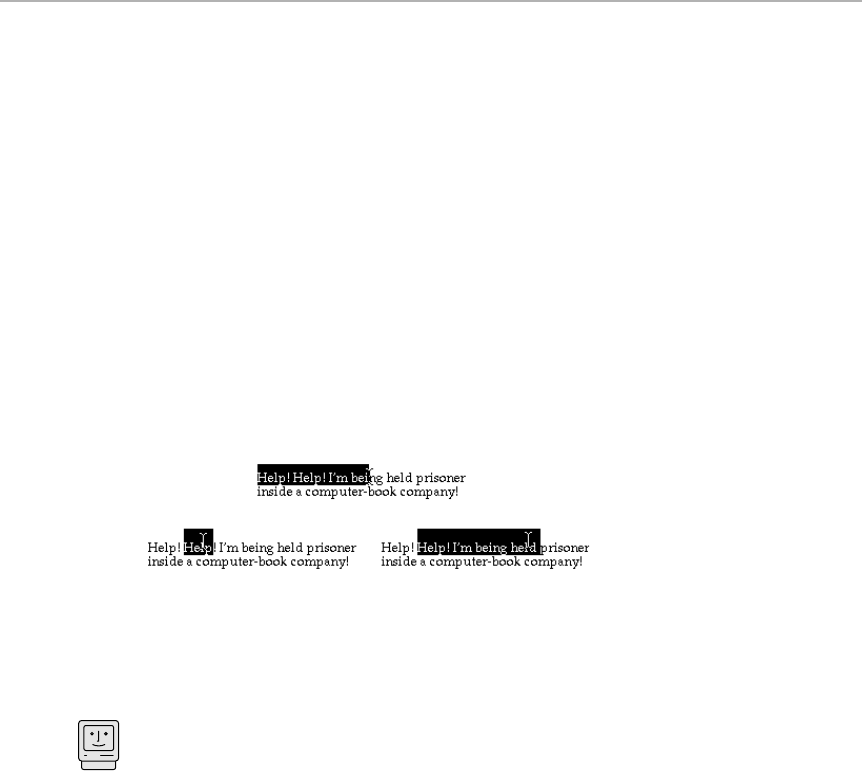
■If you’re going to select pages’ worth, click at the beginning—scroll — and
then Shift-click at the end. Everything between your clicks is highlighted.
■Double-click a word to highlight it. At that point, you can press the right or
left arrow keys to move the cursor to the right or left edge of the highlighted
word.
■Once text is highlighted, you don’t have to delete it before typing over it.
Just start typing over the highlighted text; it goes away instantly.
■There’s no apostrophe in the possessive word
its,
as in, “Poor thing! Its
paw is all dirty!”
Double-click/drag and much more
Now that you know about double-clicking to select a word, and dragging to
highlight text, you’re ready for our favorite text-selection trick of all. But you can
combine the best aspects of these two methods, resulting in a
double-click/
drag,
as shown in Figure 17-1.
Figure 17-1: The normal method of drag-selecting text (top) is too slow because you have
to be letter-accurate when you drag. This famous shortcut lets you select one word by
double-clicking (lower left). For extra efficiency, combine these two techniques into a
double-click/drag (lower right).
You point to the first word you want included in the selection. Double-click, but
keep the button down
on the second click. With the button still down, drag
sideways (or diagonally) to select text in complete-word increments.
You should probably get used to this trick; in real life, you use it more often than
you use simple dragging. After all, how many times are you trying to select only
part
of a word? (Word 98 and Word 6 both do this word-by-word selecting
automatically, thanks to the Preferences option called “When selecting,
automatically select entire word” [in Word 98] or “Automatic Word Selection”
[in Word 6].)
Every program has its own additional text-selecting shortcuts. In Word, you can
triple-click a paragraph to select it. You can Ô-click a sentence to select
it.
You
can click (to select one line) or Ô-click (to select the entire document) in the thin
margin to the left of your window. The point is: Learn your word processor’s
shortcuts and apply them!
Mac Basics
646 Part III: Application Secrets
■ ■
MAC SECRETS • 4040-8/5 • ch.17.F • Chapter 17 • Final • EAP • 10/23/98 • p.646
MAC SECRETS • 4040-8/5 • ch.17.1 • Chapter 17 • Proof 1 • VB • 09/18/98 • p.646
4040-8/5 ch17.F 11/3/98 3:41 PM Page 646
High-speed Delete
How often do you really stop to think about the ergonomics and interface design
aspects of your everyday work? Not as much as we interface nerds do, we bet.
It occurs to us that, on a Mac keyboard used by a right-handed person, the
Delete (Backspace) key is in an incredibly dumb place! Think about it for a
minute: It’s at the upper-right corner of the keyboard. And where, nine times out
of ten, is your right hand located just before pressing the Delete key? It’s on the
mouse.
(At least it is if you’re editing previous work.) That means that your right
hand is traveling back, forth, back, forth, mouse, Delete, mouse, Delete — and
your
left
hand sits there twiddling its thumb, so to speak.
Our suggestion is to install a Delete key on the
other
side of your keyboard.
This doesn’t require a soldering iron. You already have a key there that you
rarely use — a couple of them — the tilde key (~) and Esc.
Teach your Esc key to be the Delete key. We
guarantee
that you’ll love this the
minute you start editing a document. For the first time, you’ll be two-handed:
mouse with one hand, position the cursor, delete with your left hand. It’s
sheer joy.
If you use Microsoft Word 5, teaching this key to be Delete (in
addition
to your
regular Delete key, of course) is easy; see our Microsoft Word Secrets, later
in this chapter. In Word 6 and Word 98, you can’t reassign the Backspace
command. You can, however, record a macro that consists of one press of the
Delete key. You can’t assign it to the Esc or tilde key alone, unfortunately — you
must include a modifier like the Ôkey — but that’s better than nothing.
If your word processor doesn’t let you retrain your keys, use OneClick, included
on the CD-ROM with this book. Teach
it
to “press” the Delete key when you hit
Esc or the tilde key.
Master fractional character widths
If you want to look good in print, learn about
fractional character widths.
The Macintosh screen, regardless of the make or model, uses 72 dots (pixels)
for every actual-size inch. As it turns out, 1⁄72 inch is a large enough distance to
be visible, especially in a beautiful laser printout.
On the screen, the position of every character is rounded off to the nearest
1⁄72 inch (because that’s the closest the Macintosh can come to putting it where
it really belongs). For a year or two in Macintosh history, the world was filled with
awkwardly (loosely) spaced words in laser printouts, as every character’s
position was nudged into 1⁄72 inch slots.
Finally, one program after another introduced the Fractional Character Widths
option. When text is printed using fractional widths, the printer is allowed to place
each character at its typographically correct position, which isn’t necessarily in a
multiple of 1⁄72 inch. The second letter of a word may be, for example, 1⁄100 inch
closer to the first letter than it would have been allowed. As a result, the printout
Mac Basics
Chapter 17: Word Processing 647
■ ■
MAC SECRETS • 4040-8/5 • ch.17.F • Chapter 17 • Final • EAP • 10/23/98 • p.647
MAC SECRETS • 4040-8/5 • ch.17.1 • Chapter 17 • Proof 1 • VB • 09/18/98 • p.647
4040-8/5 ch17.F 11/3/98 3:41 PM Page 647
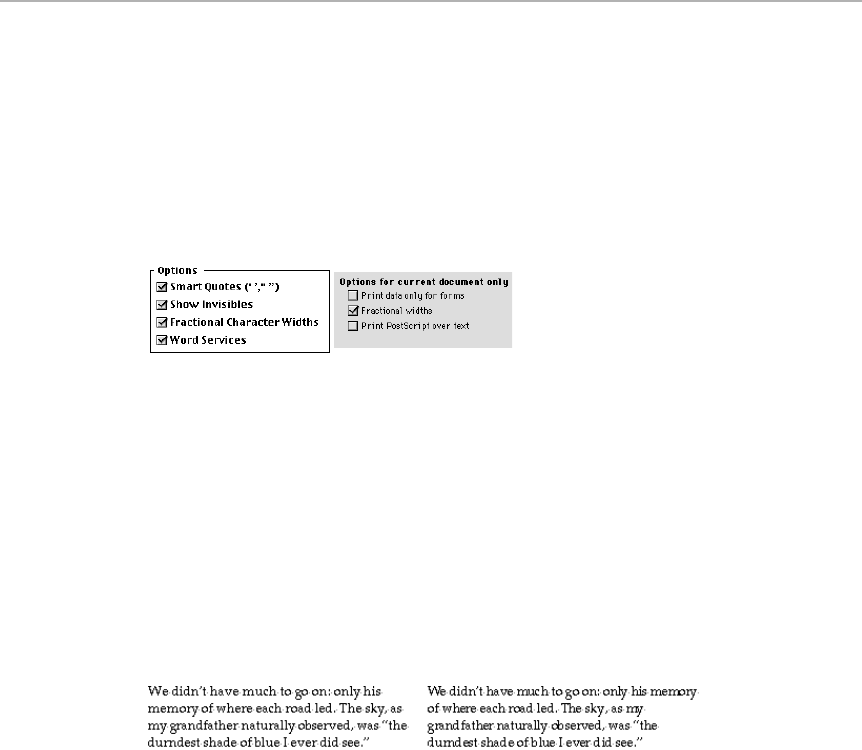
is slightly tighter, looks much more professional, and no longer has those funny
extra-wide spaces between words.
Each program has its fractional character widths on/off switch in a different
place. In Word, you must choose Options (Word 6) or Preferences (Word 98)
from the Tools menu, then click the Print tab to find the Fractional Widths
check box. In Word 5 and WriteNow, it’s in the Page Setup dialog box. And in
AppleWorks/ClarisWorks, it’s a check box in the Preferences dialog box (see
Figure 17-2).
Figure 17-2: The Fractional Character Widths option in ClarisWorks (left) and in Word 98. In
both cases, you get to this checkbox via the Preferences command.
So why doesn’t everyone leave the fractional-widths feature turned on all the
time? Because the screen display, limited as it is to 1⁄72 inch increments, suffers
when Fractional Character Widths is on. The Mac has no choice but to overlap
the characters, which makes them harder to read (see Figure 17-3). As a result,
many people do their editing with this feature
off,
and then they turn it on just
before printing. (You could easily create a QuicKeys, OneClick, or Tempo macro
to do this for you; see Chapter 22. Turning Fractional Widths on and off is also
easy to do with a Word 98 macro — and from there, you can make a toolbar icon
or keystroke trigger that macro.)
Figure 17-3: This is the trouble with fractional character widths: They make text look harder
to read on the screen. Some people, therefore, do their word processing with fractional
widths turned off (left). They turn it on for printing (right) so that the printer will give the
pages that nicely typeset look. Of course, turning fractional widths on or off affects the
spacing of the words — and therefore the page breaks, indexing, placement of graphics,
and so on — so use with care.
Fewer fonts = faster word processing
If you crave fast word processing speed, go easy on the fonts you load into your
system. Every time you launch your word processor, the program first has to peek
into your Fonts folder and load up every one of the fonts it finds there into its own
font menu. Every time you choose the pop-up font menu (or, in Microsoft Word,
open the Character dialog box), all those font choices must be loaded into the
menu before it’s displayed. It all takes time; in Word 6, it takes a
huge
amount of
time. In Word 98, you must wait out this font-loading process only first time you
launch the program each day, but it’s still time waiting.
648 Part III: Application Secrets
■ ■
MAC SECRETS • 4040-8/5 • ch.17.F • Chapter 17 • Final • EAP • 10/23/98 • p.648
MAC SECRETS • 4040-8/5 • ch.17.1 • Chapter 17 • Proof 1 • VB • 09/18/98 • p.648
4040-8/5 ch17.F 11/3/98 3:41 PM Page 648
Having 500 fonts to choose from may be fun, but, frankly, most people can word
process with just a handful. (In fact, limiting the number of fonts you use in a
document makes good page design sense; see Chapter 18 for details.) If you
keep your set of active fonts small, your word processor will launch faster, and
formatting text won’t take as long.
Of course, installing and removing fonts each time you want to do some word
processing can be a headache. But if you have a font-management utility such
as Suitcase or ATM Deluxe, you can load a particular set of fonts with a few
button clicks (see Chapter 29 for more on font management).
The basics of drag-and-drop
Being able to drag and drop chunks of text within a document — and between
documents — is a writer’s dream. To recap: Highlight some text. Release the
mouse button. Point to the highlighted area — and drag to a new position to
move the text without having to copy and paste.
You can drag highlighted text elsewhere in the document;
out
of that document and
into a different window; or even out of the window and onto the
desktop.
When
you drag text onto the desktop, it becomes a Text Clipping file, making your
Mac’s backdrop become a handy scrapbook for paragraphs and bits of text
you plan to use later. (When you want to re-insert them into something you’re
writing, just drag their icons off the desktop and into your word processing
window.) One more drag-and-drop trick: If you hold down the Option key as you
drag, you make a
copy
of the dragged text (instead of moving it).
These days, almost every self-respecting program offers this delicious feature:
Word 98, ClarisWorks/AppleWorks, America Online, Claris Emailer, InfoGenie,
Netscape Navigator, WordPerfect, SimpleText, the Scrapbook, the Note Pad, and
many more. (Word 6 lets you drag within a given document or program, but not
between
programs and not to the Desktop.)
If you have a text-based program that doesn’t have drag-and-drop, we’ve got
a trick for you: install the free extension called DragClick (it’s on this book’s
CD-ROM). Amazingly, with DragClick installed, you can drag text between just
about any two programs you can think of.
Microsoft Word
Oh, yes, we know this section is hugely out of proportion to our coverage
of other programs. But we figure if you do any serious writing at all on your
Macintosh, chances are you do it with Word. With the release of the absurdly
bloated Word 6 a few years ago, many people switched over to leaner, faster
programs — or stuck with Word 5.1. But then came Word 98 — a smart,
speedy, Mac-savvy, word-crunching powerhouse that quickly made Word
the “standard” Mac word processor, as it had been in days of old.
Mac Basics
Chapter 17: Word Processing 649
■ ■
MAC SECRETS • 4040-8/5 • ch.17.F • Chapter 17 • Final • EAP • 10/23/98 • p.649
MAC SECRETS • 4040-8/5 • ch.17.1 • Chapter 17 • Proof 1 • VB • 09/18/98 • p.649
4040-8/5 ch17.F 11/3/98 3:41 PM Page 649
Using Word straight out of the box without modifications is like buying an
expensive suit straight off the rack and then refusing the free alterations
provided by the shop’s tailor. Word is made to be customized. You can assign
a keyboard shortcut to virtually any Word command, option, or feature. You
can also doctor up the menus and toolbars however you please. And so on.
Our purpose here isn’t to provide a primer on Word. We’re going to focus on
some of the most powerful (but lesser-known) features in Word 98 and Word
6. If you’re one of the many who are contentedly sticking with Word 5, don’t
be alarmed: We still have dozens of Word 5 secrets. You’ll find the complete
collection in Chapter 17 of the electronic version of Macworld Mac Secrets,
4th Edition (on the CD-ROM that came with this book).
Customizing menus
Ever notice that there are Word commands you almost never use? Yet there
they are, taking up space on your menus. On the other hand, there are
probably plenty of other commands, buried deep within one of Word’s many
dialog boxes, that you use all the time. Why not doctor up the menus, getting
rid of the commands you don’t use and adding the ones you really need?
Adding an item to a Word menu
Here’s the easiest way to add a command to a Word menu: In Word 5 or 6,
first bring onto the screen the particular option you want to add. If the option
is on one of the toolbars — centered text, for example — make sure the
toolbar is visible. If the option appears in a dialog box, open the dialog box.
Then activate the Add to Menu command by pressing Ô-Option-plus sign
(the plus sign on the keyboard, not the numeric keypad). The pointer changes
into a boldface plus sign (see Figure 17-4).
Figure 17-4: The pointer changes to a bold plus sign, indicating that you’re in Add to
Menu mode.
After the Add to Menu plus sign appears, all you have to do is click the option
you want to install on a menu. The plus sign changes back to the standard
pointer, and the item is added to the appropriate menu (see Figure 17-5).
650 Part III: Application Secrets
■ ■
MAC SECRETS • 4040-8/5 • ch.17.F • Chapter 17 • Final • EAP • 10/23/98 • p.650
MAC SECRETS • 4040-8/5 • ch.17.1 • Chapter 17 • Proof 1 • VB • 09/18/98 • p.650
4040-8/5 ch17.F 11/3/98 3:41 PM Page 650

Figure 17-5: You can turn any of the Font dialog box formatting options into a menu command.
Open the dialog box, position the cursor directly over the check box of the option you want to
add — in this case, Small Caps. Then activate the Add to Menu command by pressing Ô-Option-
plus sign, and click. The option instantly appears on the Format menu as a new command.
In Word 98, for some odd reason, you have to activate the Add to Menu
command first, and then open the dialog box you want. Furthermore, the bold
“Add to Menu” plus sign disappears as soon as a dialog box opens. In fact,
sometimes the bold plus sign fails to appear at all. But don’t worry — after
you press Ô-Option-plus sign, the next command you click on will be added
to the appropriate menu.
Unfortunately, in both Word 98 and Word 6, this quick Add to Menu method
doesn’t work on every command. In some cases, you have to use Word’s
Customize command to add new menu items. Here’s how you do it.
Word 98: Microsoft made this menu-customizing scheme incredibly
convoluted in Word 98: Choose Tools ➪Customize. In the list of toolbars, turn
on the Menu Bar toolbar by clicking the appropriate checkbox.
A bizarre, duplicate menu bar appears immediately beneath your regular
menu bar. Now click the Commands tab in the Customize dialog box. Select a
category from the Categories list on the left; and select the command you
want from the scrolling Commands list on the right. (If you’re not sure what
category a particular command falls under, choose All Commands from the
list on the left.) Then drag the command you want up to the appropriate menu
on the duplicate menu bar. Drop it into the menu at the location of your
choice (see Figure 17-6). (Remember: drag-and-drop commands into the
duplicate menu bar, not the actual menu bar.)
You can even rename your newly installed menu command: Control-click it.
Type the new name into the Name box and press Return.
Finally, when you close the dialog box, your changes will be reflected in the
real menu bars.
Strange
But True
Chapter 17: Word Processing 651
■ ■
MAC SECRETS • 4040-8/5 • ch.17.F • Chapter 17 • Final • EAP • 10/23/98 • p.651
MAC SECRETS • 4040-8/5 • ch.17.1 • Chapter 17 • Proof 1 • VB • 09/18/98 • p.651
4040-8/5 ch17.F 11/3/98 3:41 PM Page 651
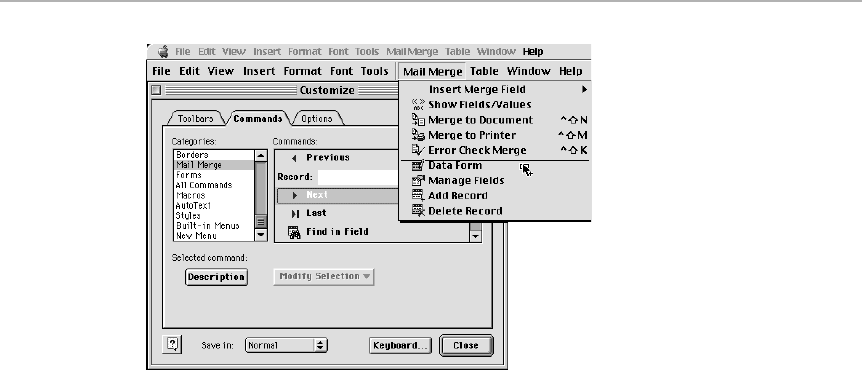
Figure 17-6: Drag a command from the Customize window to the Menu Bar toolbar, which
displays replicas of your actual menus; then drop the command exactly where you want it to
appear.
Word 6: Choose Tools ➪Customize ➪Menu tab. As in Word 98, select a
category from the Categories list on the left and select the command you
want from the list on the right. Click the command you want to add, click the
Add button (or just Press Return), and close the dialog box.
Scrolling through the list of commands in the Customize dialog box, you may
notice that most of the commands available in Word — there are hundreds of
them — are not installed on the menus by default. You have to put them
there, using the method described earlier. (If you’re using Word 4 or 5, you
can also put commands under any menu you want using the Commands
dialog box, which you open by choosing Commands from the Tools menu.)
Indeed, there are a number of commands you should install on your menus.
Here are a few we think are worthwhile.
■Small Caps: A priceless, good-looking style variation for subheads and titles.
■View Page Width: Automatically zooms the screen to the maximum
magnification that still lets you read the full width of your page.
■Insert Date Field: Plugs the current date into your document. This is
different from the Date and Time command, already on the Insert menu,
which opens a dialog box from which you then pick a date format.
■List Commands: See our “Print a list of every Word command (Word 6
and 98 )” secret, later in this chapter.
■Fractional Character Widths: See “Master fractional character widths,”
earlier in this chapter. (Word 5 only, although you can re-create the effect
with a Word 6 or 98 macro.)
652 Part III: Application Secrets
■ ■
MAC SECRETS • 4040-8/5 • ch.17.F • Chapter 17 • Final • EAP • 10/23/98 • p.652
MAC SECRETS • 4040-8/5 • ch.17.1 • Chapter 17 • Proof 1 • VB • 09/18/98 • p.652
4040-8/5 ch17.F 11/3/98 3:41 PM Page 652

■Sentence Case: Invaluable when you get an e-mail or other document
that’s been typed in all capital letters. This command converts text to
normal upper/lowercase instantly. (Word 5 only. Word 6 and 98 let you
install the Change Case command, which also gives you the Sentence
Case option. Here again, though, you can easily create macros that
change highlighted text from one case to another.)
Actually, you can do more with the Customize dialog box than add
commands to menus. You can move a command from one menu to another,
rename a command, rename a menu, or create a new menu. We’ll get to all
that in a moment.
Removing an item from a Word menu
Removing items from menus is even easier than adding them — and it
works the same way in every version of Word, from 5.0 to 98. After you zap
unneeded items from view, you’re left with shorter menus containing only
those commands you want.
Chapter 17: Word Processing 653
■ ■
MAC SECRETS • 4040-8/5 • ch.17.F • Chapter 17 • Final • EAP • 10/23/98 • p.653
MAC SECRETS • 4040-8/5 • ch.17.1 • Chapter 17 • Proof 1 • VB • 09/18/98 • p.653
CASE HISTORY
We know a very, very famous movie actor who
wrote a book a few years ago. (He’s a client, so
we’re not going to name him. But trust us: His
name-in-People-magazine quotient is among the
top ten in the nation.)
He’s a little bit intimidated by computers. When
we told him about the Remove From Menu
command we’re discussing in this section, he
asked for us to trim down the superfluous
options from his Word 5 menus.
Open Mail and Send Mail, of course, were the
first to go (why on Earth did Microsoft insist on
putting them there by default?). Our client said he
was writing a manuscript to turn in to a publisher
— so out went Table of Contents, Index,
Hyphenation, and all the page-layout commands.
Insulted, he also had us take out the spelling
checker, grammar checker, and thesaurus.
Before long, we were in a frenzy of menu-
shortening. Down the hatches went Character,
Paragraph, Section, Document, and other fancy
formatting commands. Renumber, Calculate,
Repaginate Now — “If I don’t even know what
that means,” we were told, “I certainly won’t
ever use it.”
Then we came to Find and Replace. We
explained why one might like controls like these:
“Suppose you misspelled somebody’s name all
the way through your manuscript — “ we
began. We should have known. “I won’t misspell
any names. Take it out,” he said.
When we were finished cleaning the useless and
extraneous commands out of our client’s Word
menus, there were exactly three commands left
he considered worth having: Bold, Save, and Print.
Hey, what do we know? Maybe there’s an
untapped market here.
Word menus of the rich and famous
4040-8/5 ch17.F 11/3/98 3:41 PM Page 653
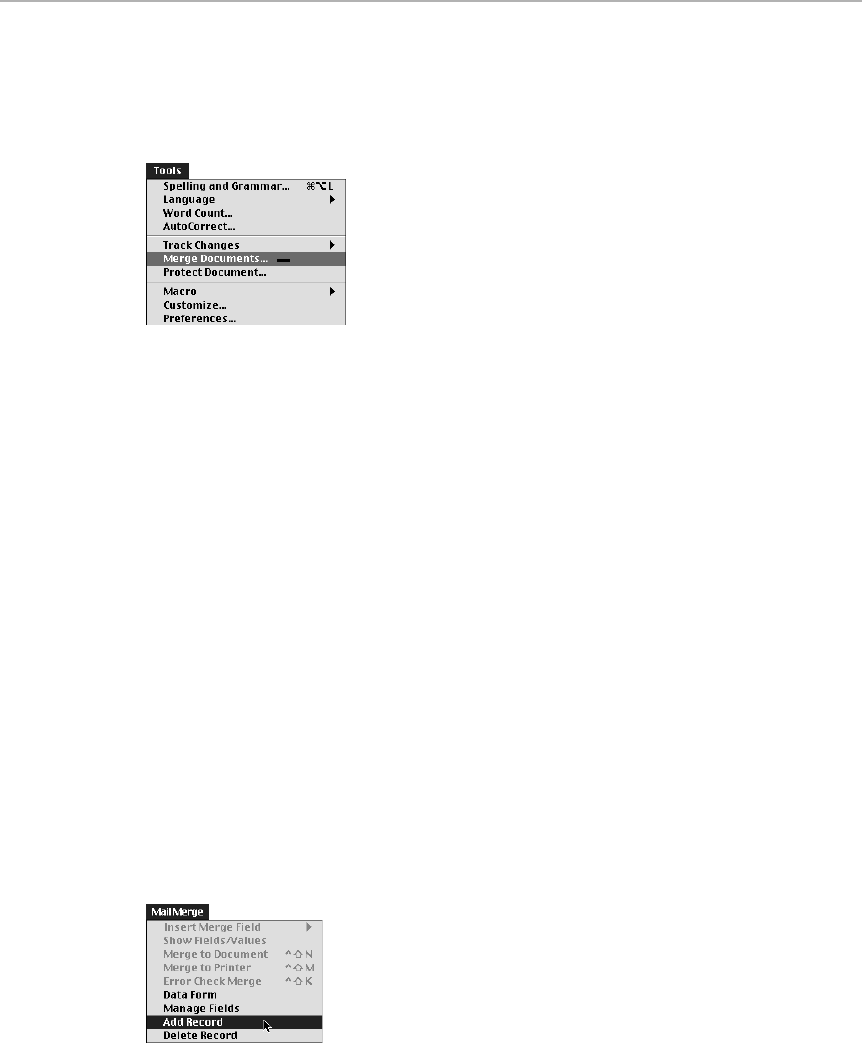
To delete commands from menus, press Ô-Option-minus sign (again, use
the main keyboard and not the numeric keypad). The pointer becomes a
boldface minus sign. When you select a command, the menu bar flashes, and
the item you selected disappears from the list (see Figure 17-7).
Figure 17-7: Selecting an item after activating the Remove From Menu command strikes it
from the menu. You know you’re in Remove From Menu mode when the pointer is a boldface
minus sign.
Word 98 is a bit fussy about this process, too. The Remove From Menu
command works, but you don’t always see the big fat minus sign. Despite
the lack of visual clues, the next command you select will be removed from
its menu.
Removing commands from menus doesn’t delete them from Word. To restore
a command you’ve removed from a menu, reinstall it using the Add to Menu
command described earlier — or use the Customize dialog box (or
Commands dialog box, in Word 5) explained in the following section.
Creating new menus
Word lets you do more than add items to existing menus. It lets you create
completely new menus, name them whatever you please, and fill them with
any of the commands available in the program. In essence, you can design
your own version of Word, scrapping the default menus completely. For
example, if you do a lot of mail merges in Word, you can make your own Mail
Merge menu, grouping all the merge-related commands you need in one place
(see Figure 17-8). Or you can set up an Open menu that lists just the files you
open frequently.
Figure 17-8: A Mail Merge menu in Word? Sure, if you want one. With Word 6 and later, you
can add any new menu you dream up.
654 Part III: Application Secrets
■ ■
MAC SECRETS • 4040-8/5 • ch.17.F • Chapter 17 • Final • EAP • 10/23/98 • p.654
MAC SECRETS • 4040-8/5 • ch.17.1 • Chapter 17 • Proof 1 • VB • 09/18/98 • p.654
4040-8/5 ch17.F 11/3/98 3:41 PM Page 654
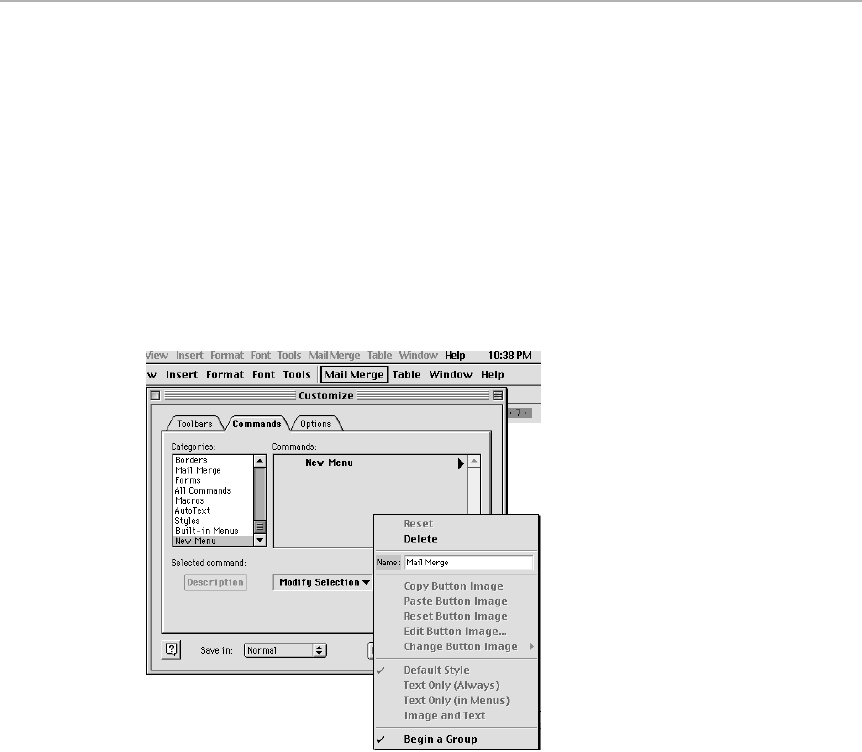
Word 98: Start by following the procedure described earlier in this chapter
for adding new items to a menu using the Customize dialog box. After
activating the Menu Bar toolbar and clicking the Commands tab, scroll to
the bottom of the Categories list (left side of the window) and click New
Menu. Drag the New Menu command from the Commands list (right side of
the window) to the Menu Bar toolbar. Put it anywhere you want — between
the Insert and Format menus, for example.
With the new menu still selected, Control-click your new menu (or,
alternatively, click the Modify Selection button in the Customize dialog box).
Type a name for your new menu into the Name field. Finally, press Return
(see Figure 17-9). (Control-clicking also offers you the Begin Group command,
which inserts a separator line into your menu-under-construction.)
Figure 17-9: Plant your new menu anywhere you want along the menu bar; then click Modify
Selection and give it a name.
Your new menu is installed. Now you can add to it any commands you want,
using the same Add to Menu technique described earlier.
Word 6: To create a new menu, choose Tools ➪Customize ➪Menu tab, and
then click the Menu Bar button. A dialog box appears, prompting you to name
your new menu and indicate where you want it to appear on the menu bar.
The next step is to add commands to this new menu. In the Customize dialog
box, first choose the name of your new menu from the Change What Menu
pop-up menu. Now, select any command from the scrolling Commands field
and click the Add button to install it on the menu. (We suggest setting the
Categories field to All Commands, so you’ll have access to every command
available in Word.)
Chapter 17: Word Processing 655
■ ■
MAC SECRETS • 4040-8/5 • ch.17.F • Chapter 17 • Final • EAP • 10/23/98 • p.655
MAC SECRETS • 4040-8/5 • ch.17.1 • Chapter 17 • Proof 1 • VB • 09/18/98 • p.655
4040-8/5 ch17.F 11/3/98 3:41 PM Page 655

Notice that each time you add a new command to your menu, you can also
indicate where on the menu it should go (by using the Position on Menu pop-
up menu). You can also give it any name you want (by typing a new name in
the Name on Menu field). If you want a group of commands to be set off by a
separator line, you can add one. The separator is the first item in the
Commands field; add it to a menu just as you would any other item.
By the way, if you don’t have Word, but would still like to rename menus and
menu commands in your word processor — or any other program, for that
matter — check out Chapter 21, where we show you how to do this using
ResEdit.
Creating new menus (Word 5.1 and earlier)
Earlier versions of Word let you create only one new menu — the Work menu.
If you’d like to know how to install and use the Work menu in Word 5, see the
electronic version of Macworld Mac Secrets, 4th Edition (on the CD-ROM that
came with this book).
Adding keyboard shortcuts
Many of the frequently used Word commands already have preset keyboard
equivalents, but plenty don’t. For example, you can trigger the Spelling and
Thesaurus commands from the keyboard, but not Word Count. Fortunately, you
can create your own key assignment for it by using the Assign to Key command.
Adding a new key assignment is similar to adding a menu command. Again,
you press Ô-Option-plus sign. But this time, use the plus sign on the numeric
keypad and not on the keyboard. The pointer changes into a boldface Ô
symbol, as shown in Figure 17-10.
Figure 17-10: The pointer appears as a boldface
Ôsymbol when in Add to Key mode. Selecting
a style with the pointer, as shown in this example,
allows you to set up a key combination for that style.
After the Ôsymbol appears, select the menu item, pop-up menu item, or
other option whose keyboard equivalent you want to create. In Word 6 and
98, the Customize dialog box opens; the cursor is blinking where it says Press
656 Part III: Application Secrets
■ ■
MAC SECRETS • 4040-8/5 • ch.17.F • Chapter 17 • Final • EAP • 10/23/98 • p.656
MAC SECRETS • 4040-8/5 • ch.17.1 • Chapter 17 • Proof 1 • VB • 09/18/98 • p.656
4040-8/5 ch17.F 11/3/98 3:41 PM Page 656

New Shortcut Key. Do so — press the key combination you want — and then
press Return.
If you choose a key combination that’s already used by another Word
command, the Customize dialog box shows you which command has it. To
reassign that keystroke to the new command anyway, just click the Assign
button. To keep the current setting, press Delete, and then try another
keystroke.
Obviously, you can’t have two commands linked to a single keystroke. However,
you can create more than one keyboard shortcut for a single command.
Customizing Word Toolbars
Microsoft introduced toolbars in Word 5.1 and added even more of them in
later versions. However, we find the program’s default toolbars visually
overwhelming; all those little 3-D buttons everywhere make us feel like we’re
staring into the cockpit of the Space Shuttle. We’ve never yet been able to
remember what those little icons mean, and the darned things take up too
much screen space.
We turn most of our toolbars off. Frankly, we prefer firing off commands from
the keyboard to clicking teeny buttons scattered all over the place. We
purposely configure the program so that it looks and works more like Word
5.0 for fast, clean, uncluttered word processing.
If you do like using toolbars, however, it makes sense to display only those
buttons that you really use. Fortunately, Word lets you add and remove
toolbars, and group buttons on them in any combination.
Moving and removing buttons
Suppose you often use the Table button on the Formatting toolbar, but rarely
use the other buttons on that toolbar. It doesn’t make sense to display a
whole toolbar just to access one button. So why not move the button to a
toolbar you use a lot, like the Formatting toolbar?
To move a button, you don’t need to mess with the Customize dialog box and
all that jazz. Instead, simply Ô-drag the button to another toolbar! Drop the
button where you want it. You can also use this same method to rearrange
the buttons within the toolbar, placing them in any order that seems logical
to you (see Figure 17-11).
Figure 17-11: You can move buttons around on a toolbar by holding down the Ôkey while
dragging them.
Before: After:
Worth
Learning
Chapter 17: Word Processing 657
■ ■
MAC SECRETS • 4040-8/5 • ch.17.F • Chapter 17 • Final • EAP • 10/23/98 • p.657
MAC SECRETS • 4040-8/5 • ch.17.1 • Chapter 17 • Proof 1 • VB • 09/18/98 • p.657
4040-8/5 ch17.F 11/3/98 3:41 PM Page 657
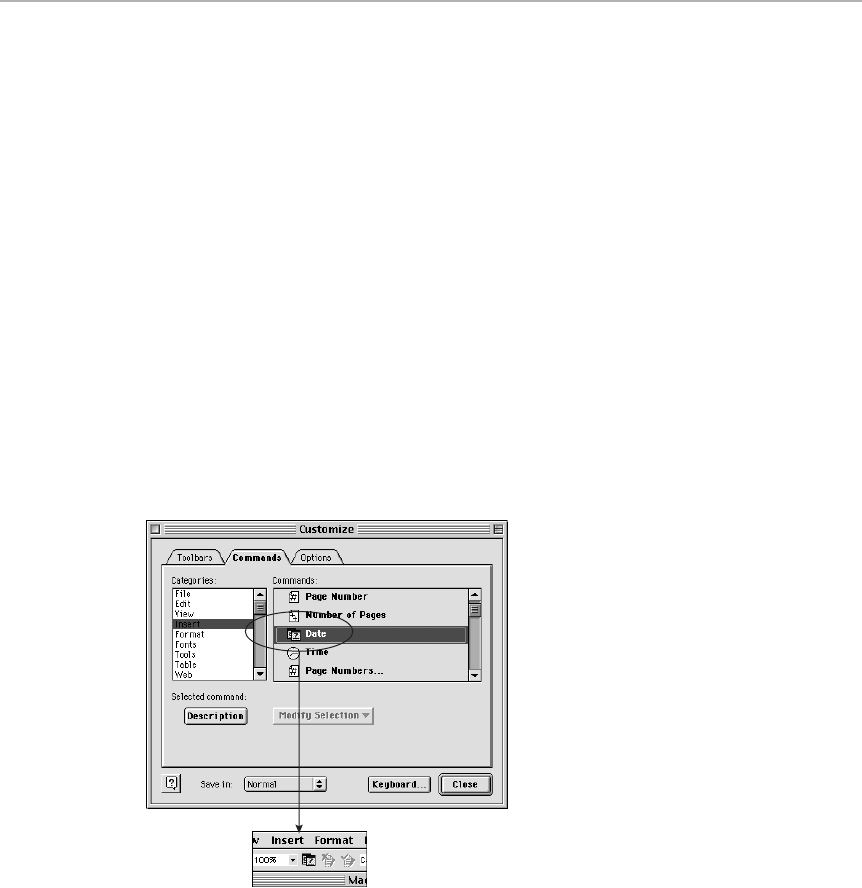
To get rid of a button completely, Ô-drag it off the toolbar, dropping it
anywhere else in the document window. Don’t worry; eliminating a button
doesn’t delete any features from Word — just the button itself. You can
always reinstall a button by opening the Customize dialog box (or the Word 5
Commands box) as described earlier.
Adding new buttons
If you don’t like Microsoft’s collection of buttons, you can make your own.
Almost any command in Word can be turned into a button. Let’s say you want
to make a new button that will automatically insert the current date into your
document — a command that Word supports but isn’t on any of the default
toolbars. Here’s how:
Word 98: Choose Tools ➪Customize ➪Commands tab ➪Insert (which
is among the categories on the left side of the dialog box). You’ll see all
the different commands Word has available under this category in the
Commands list. Scroll through the list to find the Date command. Hey, you’re
in luck — it already has an icon associated with it. Just drag the command
itself out of the dialog box and onto a toolbar — where its button is now
installed (see Figure 17-12).
Figure 17-12: Add a new button to any toolbar by dragging a command from the Customize
dialog box to the toolbar of your choice.
If you dragged a command that didn’t have a prefab icon, it shows up on the
toolbar as a text button (such as Insert Page Break). What if you’d prefer it to
have a picture button — or what if your command does have a picture button,
but you don’t like it? See “Editing button pictures,” coming up.
658 Part III: Application Secrets
■ ■
MAC SECRETS • 4040-8/5 • ch.17.F • Chapter 17 • Final • EAP • 10/23/98 • p.658
MAC SECRETS • 4040-8/5 • ch.17.1 • Chapter 17 • Proof 1 • VB • 09/18/98 • p.658
4040-8/5 ch17.F 11/3/98 3:41 PM Page 658

Wor d 6: Choose Tools ➪Customize ➪Toolbars tab ➪Insert (which is in the
Categories list). You’ll see all the ready-made buttons Word has available for
inserting various items. (To identify one, click it and read the text in the
Description area.) Sure enough, there’s an Insert Date button; it’s the one
with the tiny calendar pages. Drag the button out of the dialog box and onto
the toolbar of your choice — and it’s installed.
OK, so what if there is no button for the particular command you want added to
the toolbar? You can design such buttons from scratch. Choose All Commands
from the Categories list in the Customize dialog box. Now you can turn any item
in the Commands list into a button — by dragging it onto a toolbar.
For example, to create a button that opens the Customize dialog box itself
(which is a pretty good idea), click All Commands on the Categories list.
Then scroll down to ToolsCustomize on the Commands list. Drag that menu
item — ToolsCustomize — to a toolbar and drop it into place. As soon as you
start dragging, you’ll see the outline of a button with a tiny plus sign (see
Figure 17-13).
Figure 17-13: A command turns into a new button when you drag it to a toolbar.
Editing button pictures
Suppose you drag a new command onto a toolbar, but the command has no
prefab icon associated with it. In Word 98, it turns into a text button — no
picture. If an icon is what you’d prefer, Control-click the button you’ve just
installed. (Alternatively, click the Modify Selection button in the dialog box.)
The pop-up menu offers two pertinent choices: Change Button Image (including
a pop-up submenu of 42 pre-drawn pictures) or Edit Button Image (which
brings up a tiny graphics window, so that you can actually draw in a new
picture). (Word’s painting tools are about as easy to draw with as an elephant,
but that’s your punishment for violating the Microsoft design scheme.)
In Word 6, dragging a text-only item to a toolbar automatically opens the
Custom Button dialog box. You can choose one of the 37 ready-to-use button
images, edit an existing button (by clicking it and then clicking Edit), or just
leave it as a text button. To do that, type the name you want it to display into
the Text Button Name field — and click Assign.
In both Word 6 and 98, remember that you can add almost anything to a
toolbar using these methods: macros, style sheets, fonts, and so on (see
Figure 17-14). Accessing your favorite fonts and styles is much handier this
way if you’re using Word 6, which lacks a Font menu.
Chapter 17: Word Processing 659
■ ■
MAC SECRETS • 4040-8/5 • ch.17.F • Chapter 17 • Final • EAP • 10/23/98 • p.659
MAC SECRETS • 4040-8/5 • ch.17.1 • Chapter 17 • Proof 1 • VB • 09/18/98 • p.659
4040-8/5 ch17.F 11/3/98 3:41 PM Page 659
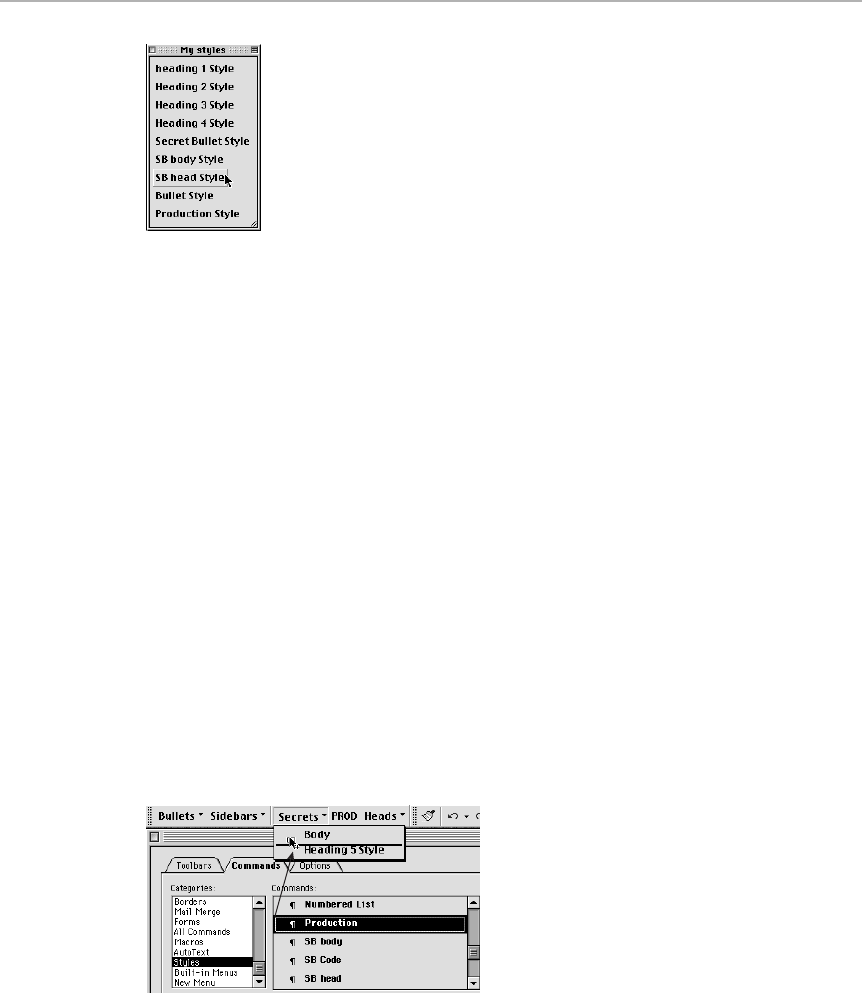
Figure 17-14: Make a toolbar containing text buttons for all the fonts or styles you use most.
Then, to apply a style, all you’ll have to do is click a button.
Toolbar pop-up menus
We’ve never been huge toolbar fans, but we have to admit that this is cool:
All three Office 98 main programs (Word, Excel and PowerPoint) let you
install custom pop-up menus on the toolbars, providing easy access to a large
number of commands without having to cram tiny buttons all over the place.
To make a new pop-up menu, choose Tools ➪Customize ➪Commands tab ➪
New Menu (at the bottom of the Categories list). On the Command field on
the right, a new item called New Menu appears. Drag it on to the toolbar of
your choice. Control-click your newly installed menu (or click Modify
Selection button in the Customize dialog box) and type a name for your new
menu into the Name field. Then press Return.
Now that you’ve installed your custom pop-up menu, you can add commands
to it. Click a category of commands from the Categories list (or All Commands).
Then start dragging commands from the Commands list onto your new menu,
as shown in Figure 17-15. You can even Ô-drag existing buttons onto your new
menu, so that they’ll appear in the pop-up menu instead of on the toolbar itself.
When you’re done, you’ll have a pop-up menu on the toolbar containing
exactly the commands you want.
Figure 17-15: Dragging commands into a newly-hatched Secrets pop-up menu on a Word 98
toolbar. The thick horizontal line indicates where in the pop-up menu your command will appear.
660 Part III: Application Secrets
■ ■
MAC SECRETS • 4040-8/5 • ch.17.F • Chapter 17 • Final • EAP • 10/23/98 • p.660
MAC SECRETS • 4040-8/5 • ch.17.1 • Chapter 17 • Proof 1 • VB • 09/18/98 • p.660
4040-8/5 ch17.F 11/3/98 3:41 PM Page 660
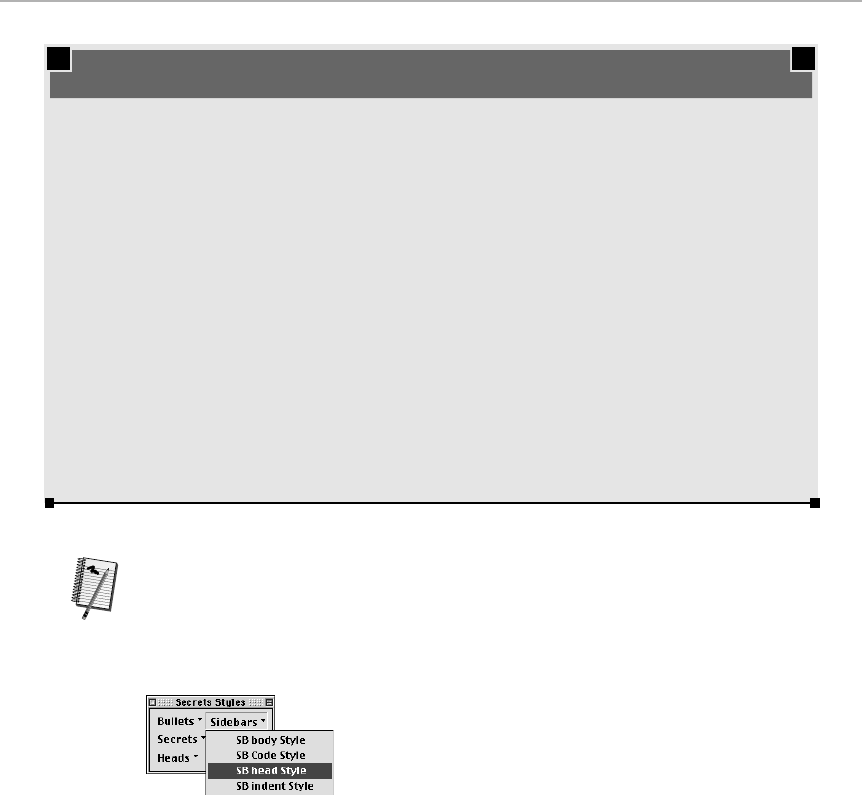
This approach is great for cleaning up existing toolbars, but it’s also useful if
you have a stylesheet-heavy document, and you want an easier way to apply
styles. Instead of having to choose styles from one giant list on the Formatting
toolbar, you can break your styles up into a few logical categories, creating a
series of shorter, easier to use style pop-up menus (see Figure 17-16).
Figure 17-16: A custom-made pop-up menu containing styles grouped into logical categories.
Styles and style sheets
A style is a set of specific character- and paragraph-formatting characteristics —
font, size, margins, line spacing, borders, and so on — all saved together under
one name.
Suppose you’re formatting a business report. You decide to set the first section
subhead in 18-point Helvetica bold, centered on the page, with a 1-point
border. After you format the text the way you want it, save all those settings
as one style, called, say, Subhead. Subsequently, any paragraph assigned the
Subhead style will automatically change font, size, margins, and so on, to
match your style definition. Word 6 and 98 let you save two kinds of styles —
Worth
Learning
Chapter 17: Word Processing 661
■ ■
MAC SECRETS • 4040-8/5 • ch.17.F • Chapter 17 • Final • EAP • 10/23/98 • p.661
MAC SECRETS • 4040-8/5 • ch.17.1 • Chapter 17 • Proof 1 • VB • 09/18/98 • p.661
ANSWER MAN
Q: I’m puzzled by an entry in Word 5’s
thesaurus; maybe you can shed some light on it.
What’s the bizarre hyphenated word that pops
up when you look up “common”?
A: The word that comes up when you look up
“common” is coaybtete-leranous.
Q: Yes, obviously. I mean what does it mean?
A: We have no idea. It’s not even a word.
Q: OK, then what about the disgusting synonym
for “matter”?
A: The synonym for “matter” to which you refer
is discharge pus.
Now, if you’re asking why those words appear,
we have no idea.
Just be glad you’re not still using Word 3 or 4,
whose spellchecker flagged the word childcare
as incorrect — and proposed, as its replacement,
kidnaper.
And gee — as long as we’re discussing the
mental problems of Microsoft programmers, let’s
not forget the psychologically dysfunctional
Word 6 spell-checker. You know the one — that’s
where, in a new Word 6 document, you type
zzzz. Word’s spelling checker flags “zzzz” as
incorrectly spelled, all right — but proposes sex
as the equivalent.
Microsoft Weird 5.1
4040-8/5 ch17.F 11/3/98 3:41 PM Page 661
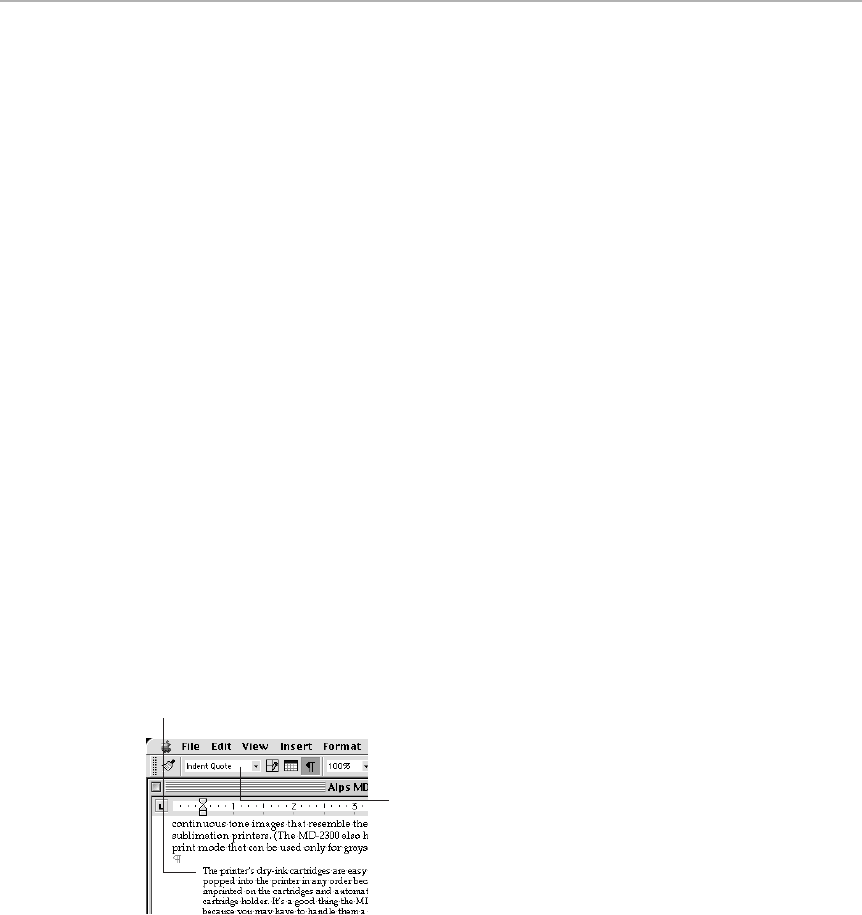
paragraph-level styles (which apply to a whole paragraph at a time) and
character-level styles (which can be applied to isolated words or characters).
Here are three key advantages to formatting paragraphs by using styles:
■Consistency. After you’ve defined a style, every paragraph to which it is
applied will be formatted identically. Because you can transfer styles from
one file to another, you can also assure consistency between documents.
(This paragraph, for example, is set in our Bullet style. It’s used anywhere
in this book where there’s a bulleted, indented block like this.)
■Speed. Applying styles is much, much faster than individually applying
each formatting option to a paragraph. By using a style sheet, you can
change numerous paragraphs in a single bound.
■Convenience. Styles can be turned into menu commands, toolbar
buttons, and keyboard shortcuts, so you can apply formatting using
whatever working style best suits you.
Sad to say, we know people who completely ignore Word’s style features.
They painstakingly format each paragraph in a long document from scratch,
wading through layers of dialog boxes — when all they had to do was create a
handful of styles that would have reduced the formatting to a few keystrokes.
Creating a style
The fastest way to create a style is by example. Format a paragraph the way
you want it. Click within the paragraph, and then click in the style box on the
Formatting toolbar (or, in Word 5, in the Ruler), as shown in Figure 17-17.
Type in a name for the new style and press Return.
Figure 17-17: The making of a new style.
Applying a style
After you’ve created a style, applying it to subsequent paragraphs is easy.
Click within the paragraph — or, to apply the style to more than one
paragraph, select all the paragraphs you want formatted. Then use the Style
pop-up menu on the Formatting toolbar (or Word 5.1 Ruler) to pick the
style you want. In Word 98, you don’t even have to remember what your
style looked like — the pop-up menu of styles shows you (see Figure 17-18).
First click in the paragraph with the
format you wish to define as a style
Then click the Style field
on the toolbar and type
the new style name
662 Part III: Application Secrets
■ ■
MAC SECRETS • 4040-8/5 • ch.17.F • Chapter 17 • Final • EAP • 10/23/98 • p.662
MAC SECRETS • 4040-8/5 • ch.17.1 • Chapter 17 • Proof 1 • VB • 09/18/98 • p.662
4040-8/5 ch17.F 11/3/98 3:41 PM Page 662
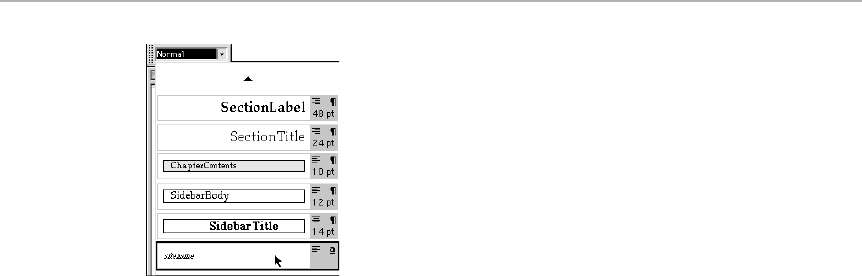
Figure 17-18: Word 98’s Style menu shows exactly what the style looks like once it’s applied.
This feature isn’t lightning-quick on slower Macs. But on a G3-based Mac, it’s dreamy.
Remember, though, you can use the methods outlined earlier in this chapter
to assign a style to a keystroke or turn it into a toolbar button, making it even
easier to apply a style once it has been defined.
Renaming, deleting, and moving styles
What happens if you need to change some characteristics of a style you’ve
created? How do you rename or delete a style? For this purpose, you use the
Style dialog box. That’s also where you transfer a document’s complete set of
styles — called a style sheet — to another document.
Open the Style dialog box by choosing Format ➪Style. Once the box is open,
you can go to town.
■To rename a style: In Word 98, click the name of the style you want to
rename; click Modify; type a new name; click OK, and then Apply. In the
Word 6 Style dialog box, click Organizer, select the style you want to rename
from the list on the left, click Rename, type the new name, and click OK.
■To modify a style’s look: In either Word 6 or 98, click the style’s name, and
then click Modify. Use the commands in the Format pop-up menu (Font,
Program, and so on) to change the formatting characteristics. (You can
also modify a style by example, as we’ll describe in the next section.)
■To transfer styles among documents: This one zaps just about every Word
user who experiments with style sheets. You create a long list of beautiful
style sheets for a screenplay you’re working on: Character Name, Stage
Directions, Dialogue, and so on. But when you open the file that contains
Scene II, none of your styles are present!
■To solve this problem, choose Format ➪Style ➪Organizer. You’ll see
the current document’s list of styles on the left side, and the styles in
the Normal template (a basic “stationary” document that all future new
documents are based on) on the right side (see Figure 17-20). By
clicking style names and clicking the Copy button, you can transfer
styles back and forth. By all means add common styles to your Normal
template, so they’ll be available to all new documents you create.
Chapter 17: Word Processing 663
■ ■
MAC SECRETS • 4040-8/5 • ch.17.F • Chapter 17 • Final • EAP • 10/23/98 • p.663
MAC SECRETS • 4040-8/5 • ch.17.1 • Chapter 17 • Proof 1 • VB • 09/18/98 • p.663
4040-8/5 ch17.F 11/3/98 3:41 PM Page 663

■If it’s too late, though, and you’ve already created new documents —
without the necessary styles — you can still import the styles. Open
the style-less document. Open the Style dialog box. Click the right-
side Close File button, and then click it again (it now says Open
File). From the pop-up menu in the next dialog box, choose Word
Documents, and navigate to the document you that contains the
styles you’d like to slurp up. You’ll see the styles listed on the right;
again, click them and use the Copy button to transfer them into the
open (style-less) document on the left.
We think it’s good to know about the Organizer, clunky as it is. But actually,
there’s a sneakier way to transfer a style sheet (a set of styles) into a different
document: Just copy and paste the contents of an existing document into a
new document. The entire style sheet of the first document is carried to the
new one, even if you now delete all the pasted text.
If the incoming styles have the same names as styles in the open document,
the new styles replace the old.
Updating a style
The beauty of styles, of course, is that you can change a style’s look once
,
and every blob of text that uses that style is instantly updated.
You can change a style’s appearance in the Style dialog box, as described
earlier. But most people use this faster method:
1. Highlight a paragraph that has the style. Change some formatting (switch
fonts, use bold, adjust the line spacing, and so on).
2. Click the style’s name on the Formatting toolbar. Press Return.
3. You’re asked what you’re trying to do: Update the style (which you are)
or reapply the style to some text where the formatting got messed up
(no, but this could be useful another time).
In Word 98, you’re also offered the unbelievably convenient checkbox at
this point: “Automatically update the style from now on.” That means
that, for this particular style, any changes you make to it, ever, will be
instantly reflected throughout the document, wherever that style may
occur — without any confirmation from you. We adored this feature until
we forgot we had it turned on once and made mincemeat of our file.
Now we adore it cautiously.
AutoCorrect, AutoText, and the Glossary
Two of Word’s best labor-saving features are AutoText and AutoCorrect.
Both are typing shortcuts; they let you store frequently used words, phrases,
graphics, or table formats, and then retrieve them with a couple of keystrokes.
These features can shave hundreds of keystrokes off your work day.
664 Part III: Application Secrets
■ ■
MAC SECRETS • 4040-8/5 • ch.17.F • Chapter 17 • Final • EAP • 10/23/98 • p.664
MAC SECRETS • 4040-8/5 • ch.17.1 • Chapter 17 • Proof 1 • VB • 09/18/98 • p.664
4040-8/5 ch17.F 11/3/98 3:41 PM Page 664

AutoCorrect (Word 6 and 98)
With AutoCorrect, you can teach Word abbreviations for frequently used
words, phrases, even whole paragraphs. Then, whenever you type the
abbreviations, Word automatically expands what you typed into the complete
entry. For example, when writing this book, we had to type phrases like
“Power Macintosh 8600/300” over and over again. To save time, we saved
that phrase as an AutoCorrect entry. Now, we just type p86, press the
spacebar, and Word does the rest.
If you have a graphic you often use as a logo or letterhead, you can save the
picture as a AutoCorrect entry, too. Call it, say, “logo1.” To add the graphic to
a document, type logo1 and press the spacebar.
AutoCorrect entries have no fixed length limit; the only limit is the amount of
memory available on your computer. Therefore, you can create AutoCorrect
entries for entire form letters, invoices, address lists, and so on, and add
them to your documents with just a keystroke or two.
Chapter 17: Word Processing 665
■ ■
MAC SECRETS • 4040-8/5 • ch.17.F • Chapter 17 • Final • EAP • 10/23/98 • p.665
MAC SECRETS • 4040-8/5 • ch.17.1 • Chapter 17 • Proof 1 • VB • 09/18/98 • p.665
MACINTOSH SECRET
In many Word dialog boxes, you can “click”
buttons by pressing only the first letter of the
button’s name — without any modifier keys. For
example, in Yes/No dialog boxes, instead of
clicking the Yes, No, or Cancel buttons, type a Y,
N, or C. This delightful shortcut works in Word 5
and up.
But here’s our wildest keyboard secret: Press
Ô-Tab in Word 6 or later. Suddenly, underlines
appear in every menu — meaning that you can
control them from the keyboard. Use the
underlined letter to drop the menu down —
Windows style. Then just type the underlined
menu-command letter to trigger that command.
To open the Customize dialog box, for example,
you can press T to activate the Tools menu, then
press C to open the Customize dialog box.
In Word 5, pressing Ô-Tab (or the decimal point
key on the numeric keypad if num lock is turned
off) makes your menu bar turn black. The same
trick goes, even though you don’t see the little
underlines: Type the first letter of a menu name
to make the menu drop. Then navigate the menu
with the first initials of the commands — or use
the arrow keys — and finally press Return to
execute the command.
In fact, believe it or not, every button, check box,
and pop-up menu in Word’s dialog boxes can be
triggered from the keyboard. To figure out which
keys to press, hold down the Ôkey after opening
any dialog box, such as Options, Customize, Font,
Paragraph or Spelling. After a moment, one letter
of each option’s name appears underlined. The
underlined character is the one to press in
combination with the Ôkey to trigger that option.
In Word 98’s Font dialog box, for example, you
can press Ô-C to make the Color pop-up menu
pop up, then use the arrow keys (up/down or
left/right) to select a color. Checkboxes, such as
Small Caps and Hidden Text, also can be toggled
on and off with Ô-key shortcuts. In the
Customize dialog box, you can switch between
the Toolbar, Commands, and Options tabs by
pressing Ô-B, Ô-C, and Ô-O.
In short, if there’s ever a program you want to
be stranded with when your mouse dies, it’s
Microsoft Word.
Word’s secret keyboard shortcuts
4040-8/5 ch17.F 11/3/98 3:41 PM Page 665

To create an AutoCorrect entry, select the text or graphic for which you want
to record an abbreviation. (Just highlight it — you don’t have to copy it.)
Then choose AutoCorrect from the Tools menu. When the AutoCorrect dialog
box opens, type the new abbreviation, click the Add button, and then press
Return (see Figure 17-19).
Figure 17-19: Teach Word to type frequently used words and phrases using the AutoCorrect
dialog box. Note that many frequently misspelled words come pre-loaded as AutoCorrect
entries, saving thousands of people from embarrassment without their even noticing it.
As you create AutoCorrect entries, sometimes you’ll want to preserve an entry’s
format (the fonts used in your letterhead, say), and sometimes you won’t
(boilerplate text — words or phrases you insert into a variety of documents).
If you want formatting preserved with an entry, click the Formatted Text
radio button in the AutoCorrect dialog box; otherwise, click the Plain Text
radio button. (Plain text entries do have a size limit — 255 characters.)
So why is it called AutoCorrect? Because the real purpose of this feature is
to correct common typos and misspellings. With AutoCorrect, you can
have Word automatically replace teh with the as you type. You can have it
automatically fix double caps at the beginning of words — LIke THis — and
turn your straight quotes ("") into curly quotation marks (“”), too.
In fact, Word 6 and 98 include hundreds of pre-defined AutoCorrect entries,
designed to catch frequent typing and spelling errors. If your typing suddenly
seems cleaner and more accurate after you install Word, it’s not your
imagination. Behind the scenes, AutoCorrect is quietly turning “andteh” into
“and the” and “comapny” into “company.”
If you come to love AutoCorrect as much as we do, don’t forget that you have
TypeIt4Me, a spectacular typing-shortcut utility (it came with this book). It
does exactly what AutoCorrect does, but it works in every program —
including Word. Check the appendix for details.
666 Part III: Application Secrets
■ ■
MAC SECRETS • 4040-8/5 • ch.17.F • Chapter 17 • Final • EAP • 10/23/98 • p.666
MAC SECRETS • 4040-8/5 • ch.17.1 • Chapter 17 • Proof 1 • VB • 09/18/98 • p.666
4040-8/5 ch17.F 11/3/98 3:41 PM Page 666

AutoText and the Glossary
Word’s AutoText command — called the Glossary in previous versions — also
stores frequently-used text and graphics. But while AutoCorrect expands
your abbreviations on the fly, AutoText requires you to trigger a special
command to expand the phrase after typing the abbreviation. (In Word 98,
you have to choose AutoText from the Insert menu; in Word 6, the default
keyboard shortcut is Ô-Option-V.) Frankly, we can’t think of many reasons
why you’d use AutoText instead of AutoCorrect, but here are a few:
■You can link an AutoText entry to a keyboard shortcut, turn it into a
toolbar button, or put it on a menu. AutoCorrect entries can only be
inserted by actually typing into your document.
■AutoText entries can be stored either globally (for use in all your Word
documents) or in one specific template. And they can be moved from
template to template using the Organizer command. AutoCorrect entries,
on the other hand, are always global, saved into your default Normal
template.
■In Word 98, AutoText spots your abbreviations on the fly and suggests —
in a pop-up yellow box — the expanded entry. (Just press Return to
trigger the expansion.) But if you prefer, you can ignore the suggestion
and keep on typing. AutoCorrect, on the other hand, doesn’t ask — it just
changes what you’ve typed, like it or not.
To save an AutoText entry, select some text or graphics, and then choose
Insert ➪AutoText ➪New. (In Word 6, choose Edit ➪AutoText). In the
AutoText dialog box, type a name for the entry, and click Add.
To recall an entry in Word 98, just start typing the entry. As soon as Word
recognizes the abbreviation, a tiny yellow box containing the expanded
AutoText entry pops up just above the cursor. If the suggested entry is
indeed what you want typed in, just press Return; Word finishes typing it for
you. If you don’t want to use the AutoText suggestion, just keep typing; the
suggestion disappears. (Alternatively, you can use the keyboard-customizing
tips found earlier in this chapter to create a keystroke that lets you insert
AutoText entries on demand.)
In Word 6, you recall an AutoText entry by typing its name, then pressing
Ô-Option-V (or clicking the AutoText button on the Standard toolbar). As
mentioned earlier, you can also use the Customize dialog box to make a
button that triggers a specific AutoText entry, or put the entry into a menu.
(For details on Word 5’s Glossary feature, see Chapter 17 of Macworld Mac
Secrets, 4th Edition, which is on the CD-ROM that accompanies this book.)
Templates and Settings files
Okay, so you’ve read and digested all of these Word-customizing features. You
added keyboard shortcuts to your favorite styles and AutoText entries. You
created a custom menu of the files you use most. You wreaked havoc with
Chapter 17: Word Processing 667
■ ■
MAC SECRETS • 4040-8/5 • ch.17.F • Chapter 17 • Final • EAP • 10/23/98 • p.667
MAC SECRETS • 4040-8/5 • ch.17.1 • Chapter 17 • Proof 1 • VB • 09/18/98 • p.667
4040-8/5 ch17.F 11/3/98 3:41 PM Page 667
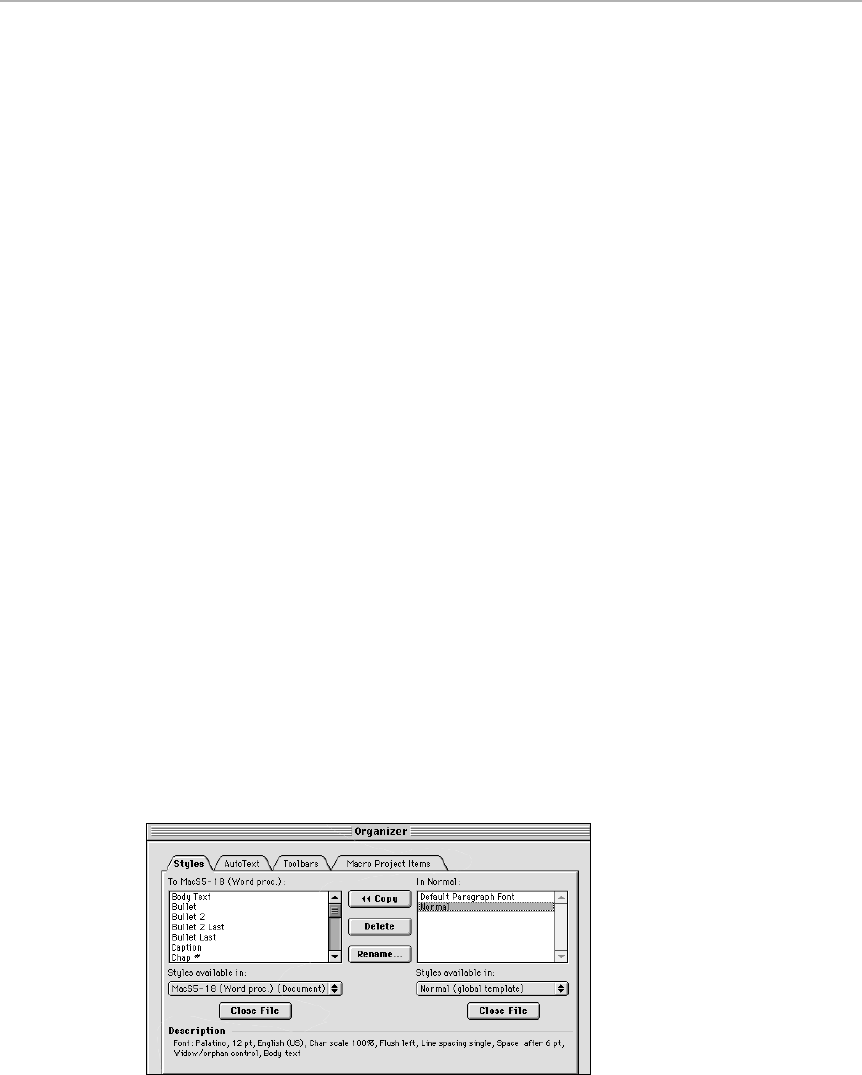
your menus, adding, subtracting, rearranging, and renaming commands until
no one but you can possibly use the program. You created a masterful,
interior-designed set of color-coordinated style sheets.
So where do all those painstakingly created customized settings live? It
depends on which version of Word you’re using.
The Normal template
With Word 6 and later, every new document you create is based on a
document template — a prepared, preformatted blank document, complete
with its own interface-customization settings. You’ll usually use the Normal
template, but you can create as many different templates as you want. All
your customized menus, toolbars, styles, keyboard shortcuts, and so on are
linked to a specific template.
Every time you customize Word’s interface (using any of the methods
described earlier in this chapter), you can choose which template inherits
your changes. In the Customize dialog box, you choose the target template
with the Save In pop-up menu (in Word 6, the “Save Changes In” menu). By
saving different sets of customized options into different templates, you can
easily switch between different settings for Word — all you have to do is
attach the template containing the options you want.
For example, Macworld magazine uses one set of style sheets. The publisher
of this book uses another. Neither wants to get files turned in that contain
style sheets from the other company. So we begin each writing project by
choosing File ➪New — and choosing a corresponding template (Macworld
or IDG Books) in the dialog box that appears. (This dialog box doesn’t appear
when you use the Ô-N keystroke, however.)
You can move your customized settings from template to template using the
Organizer (choose File ➪Templates ➪Organizer). Once you’re in the Organizer
dialog box, use the Open File and Close File commands to select the two
documents between which you wish to exchange options (see Figure 17-20).
Then use the Copy button to move the items from document to document.
Figure 17-20: Is it our imagination, or does this look like the old Font/DA Mover, one of the
Worst Hits of the ‘80s? It’s the Organizer, which lets you move settings from one Word
document into another.
668 Part III: Application Secrets
■ ■
MAC SECRETS • 4040-8/5 • ch.17.F • Chapter 17 • Final • EAP • 10/23/98 • p.668
MAC SECRETS • 4040-8/5 • ch.17.1 • Chapter 17 • Proof 1 • VB • 09/18/98 • p.668
4040-8/5 ch17.F 11/3/98 3:41 PM Page 668

Frankly, we think Word’s document template system is way too confusing—
hardly an improvement over the settings files of previous versions (see the
next section). The important thing to remember is that your customized
settings are, in fact, saved in a template — usually the Normal template — and
that’s the file you want to back up for safe-keeping, or move to another machine
if you want to transfer your custom settings to another copy of Word.
(Templates are also where the insidious Word macro viruses live, but that’s a
topic for another chapter. Chapter 22, in fact.)
Settings files (Word 5.1 or earlier)
If you’re using Word 5.1 or earlier, all your custom changes are stored in
a Word Settings file in your System folder (within the Preferences folder).
We have lots to say about the Word Settings file, but we’ve tucked this
information away in Macworld Mac Secrets, 4th Edition (on the CD-ROM that
accompanies this book).
Chapter 17: Word Processing 669
■ ■
MAC SECRETS • 4040-8/5 • ch.17.F • Chapter 17 • Final • EAP • 10/23/98 • p.669
MAC SECRETS • 4040-8/5 • ch.17.1 • Chapter 17 • Proof 1 • VB • 09/18/98 • p.669
ANSWER MAN
Q: Hey, how come my Microsoft Word spelling
checker stopped working? And how come it
doesn’t remember my preferences?
A: Clearly, you’ve moved some of Word’s 10,000
little support files since installing it. Some
features of Word won’t work if the program
doesn’t find these files exactly where it left them.
Word 5: Word, the program, must be inside a
folder that also contains a Word Commands folder.
Inside Word Commands should be all the files that
make your spelling checker work (Spelling and
U.S. English Dictionary), your thesaurus operate
(Thesaurus, U.S. English Thesaurus), the little filter
that lets Word 5 read Word 6 files (Word 6.0 for
Windows&Macintosh), and the filter that lets it
read Word 98 files (Word 97-98 Import). Move
Word itself out of the folder that contains Word
Commands, and none of these features will work.
Meanwhile, your preferences are in your System
folder’s Preferences folder, exactly where they
belong, in a file called Word Settings (5).
Word 6: This program is more forgiving about
file locations. You’re actually allowed to move
Word, the program, out of its original folder. The
spelling dictionaries, thesaurus files, and
translators are in a separate Microsoft folder on
your hard drive. (The Templates folder, Word
Extensions folder — which contains the
hyphenation dictionaries and the Word 97-98
Import filter — and help files are all within the
Word 6 folder itself.) Your preferences are once
again stored in the Preferences folder in your
System folder.
Word 98: Word must live in a folder that also
contains three other vital folders: Shared
Applications, Office, and Templates. These hold
all of Word’s various support files. It doesn’t
matter what folder all these items are in, as long
as they’re together. Take out the Shared
Applications folder, and you lose the Spelling
and Grammar checker. Move the Templates
folder, and Word won’t be able to find any stored
templates. The Office folder is particularly
critical; move it, and Word won’t even launch.
Preferences are stored in the usual place — the
Preferences folder inside the System Folder, in a
file called Word Settings (8).
Where to keep your various Word support files
4040-8/5 ch17.F 11/3/98 3:42 PM Page 669
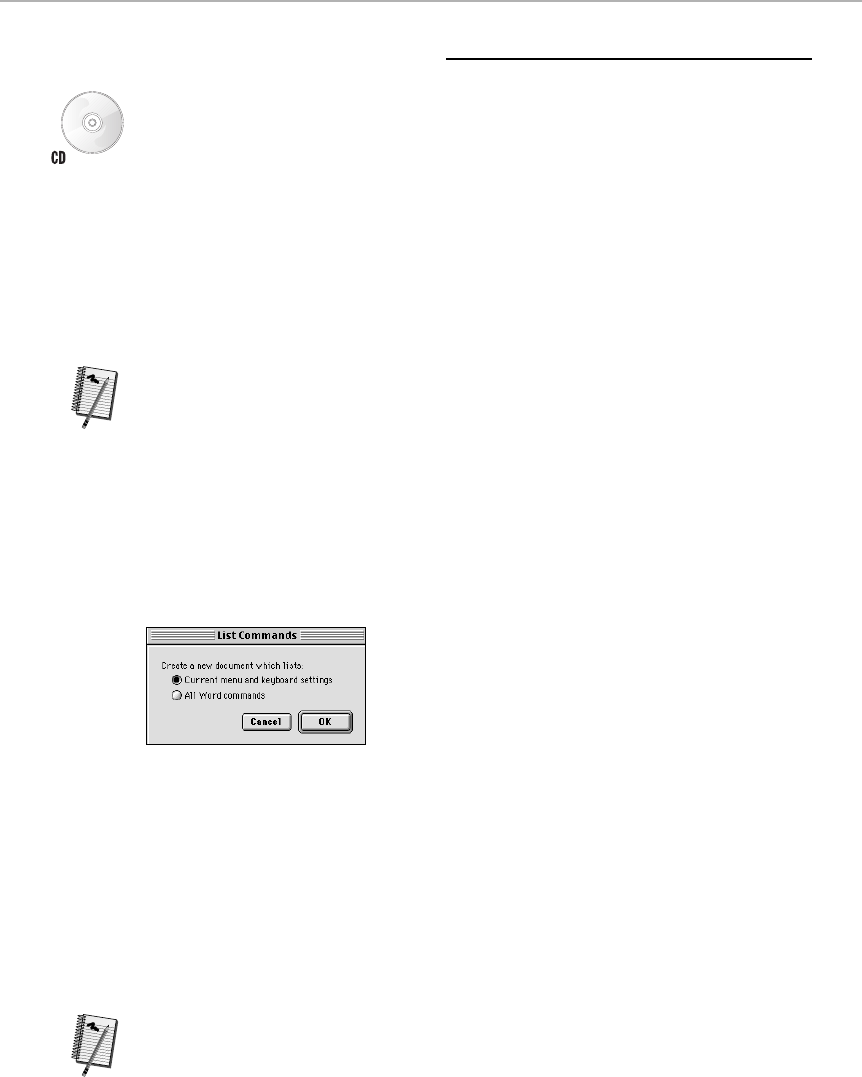
Microsoft Word Secrets
■
Except where noted, these tricks work in Word 6 and up. Our favorite Word
5-only secrets await you in the electronic
Macworld Mac Secrets, 4th Edition
(on the CD-ROM that came with this book).
Print a list of every Word command
Word is loaded with hidden commands — dozens of powerful commands for
which there are no keystrokes, no menu items, and no toolbar buttons. Of
course, any of these commands
can
be on a menu or a toolbar and
can
have
a keyboard shortcut, but it’s up to you to assign those, using the Customize
dialog box, as described earlier in this chapter.
So how do you even know what these commands are? And how do you keep track
of which keystrokes are assigned to which commands? Use the ListCommands
command, which is itself a hidden command (of course). To access it, choose
Tools ➪Customize. Select All Commands from the Categories list and scroll down
to
ListCommands
in the Commands list. Now you can assign a keyboard shortcut
to this command or stick it on a menu.
Once you do, this command produces a lengthy Word table listing every
command in the program, along with its keyboard and menu assignments.
Alternatively, you can have it list only those Word commands that are actually
active in your current configuration (see Figure 17-21).
Figure 17-21: When you use the List Commands command, you have the option of listing all
commands, or only ones you currently have set.
Changing typewriter quotes to
typographer’s quotes
Most of the time, you’ll want “smart quotes” turned on — the Word feature that
turns straight quotes, like "this," into curly quotes, like “this.” But when typing
inches or degree marks, curly quotes are inappropriate.
When that happens, getting an on-the-fly straight quote mark is simple: Just
press Ô-Z just after the quote appears. Instantly, Word 6 or 98 gets the idea —
and changes it back into a straight quote!
But what if it’s too late? What if you’ve got an entire document filled with
straight quotes? First, make sure the quote-curlifying feature is on. (Choose
Worth
Learning
Worth
Learning
670 Part III: Application Secrets
■ ■
MAC SECRETS • 4040-8/5 • ch.17.F • Chapter 17 • Final • EAP • 10/23/98 • p.670
MAC SECRETS • 4040-8/5 • ch.17.1 • Chapter 17 • Proof 1 • VB • 09/18/98 • p.670
4040-8/5 ch17.F 11/3/98 3:42 PM Page 670
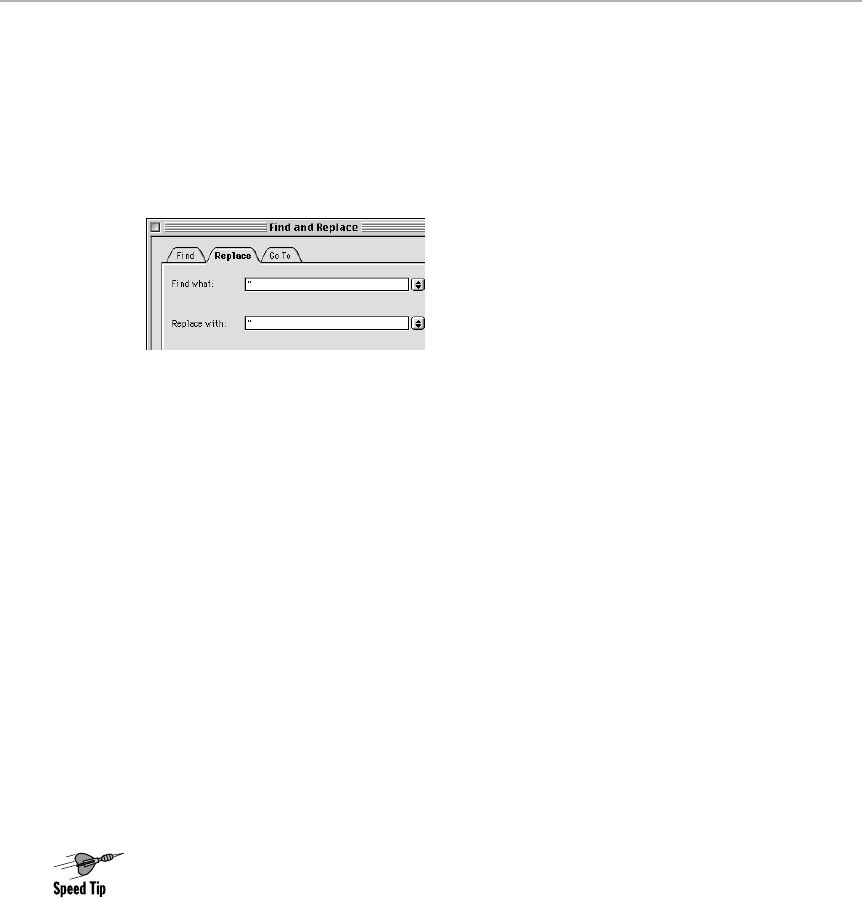
Tools ➪AutoCorrect — or Tools ➪Preferences in Word 5 — and turn on the
“Straight quotes to Smart Quotes” option.)
Now use the Replace command (Ô-H) to replace each quotation mark with
another seemingly identical quotation mark (see Figure 17-22). As the Replace
command inserts the new quotation marks, they’re changed into typographer’s
quotes.
Figure 17-22: This may feel silly: It looks as if you’re just replacing a quotation mark with
itself. But if Smart Quotes is turned on, all the straight quotes turn curly after you click
Replace All. This works with apostrophes, too. And it also works in reverse: If you turn Smart
Quotes off, the setup in this figure will render all quotes non-curly.
Instant pop-up menus — anywhere
Long before Apple introduced contextual pop-up menus in Mac OS 8, Microsoft
added them to its Office suite. In Word 6 or later, you can access some of the
most frequently used menu commands by Control-clicking anywhere in the
document window. When you do, a pop-up menu appears right under the pointer.
If you Control-click in your text, the Word 98 pop-up menu contains commands
for font and paragraph formatting, bullets and numbering, as well as the
standard Copy, Cut, and Paste commands. Best of all, Word 98 also offers
suggested alternatives for misspelled words and —
wow,
do we love this one —
a list of synonyms, right at your cursor.
Control-clicking a
table
produces a similar pop-up menu, with added commands
for inserting and deleting cells and access to Word’s Table AutoFormat
command to apply a style to the whole table.
You can also Control-click anywhere on a Word 98 toolbar for a list of all
toolbars — as well as the Customize and Toolbars commands for making your
own toolbars. Using this pop-up menu is the easiest way to open and close
toolbars on the fly.
The Word 98 Font menu
The Font menu, which Microsoft had eliminated in Word 6, is back in Word 98 —
and better than ever. Now, for the first time ever in Word, fonts appear in their
actual typefaces, so you can see the difference between, say, Helvetica
Condensed Bold and Helvetica Condensed Black just by glancing at the menu.
Chapter 17: Word Processing 671
■ ■
MAC SECRETS • 4040-8/5 • ch.17.F • Chapter 17 • Final • EAP • 10/23/98 • p.671
MAC SECRETS • 4040-8/5 • ch.17.1 • Chapter 17 • Proof 1 • VB • 09/18/98 • p.671
4040-8/5 ch17.F 11/3/98 3:42 PM Page 671
Displaying fonts in their own typeface doesn’t work for symbol and dingbat
fonts, however. Instead of Zapf Dingbats, for example, the menu entry reads:
✺❁❒❆✤✣■❇❂❁▼▲. The solution: Hold down the Shift key while choosing the
Font menu to display the font names in good old Chicago or Charcoal.
Backward-compatibility protection
If you’re using Word 98, but sharing documents with users who haven’t
upgraded yet, you can teach Word to automatically save your files in the format
of an earlier Word version. You won’t be bugged by warnings every time you
save, either — you’ll never know the difference.
For example, suppose you’re sharing files with a group of Word 5 users. In
Word 98, choose Tools ➪Preferences ➪Save. Change the “Save Word files as:”
pop-up menu to Word 5.0 for the Macintosh. From now on, every new file you
create will automatically be saved in that format. (You can always override this
new default by using the Save dialog box’s pop-up menu of file types.)
Of course, you can accomplish this same task— intentionally saving documents in
the format of an earlier version—by using the Save As command and changing
the file type yourself. But setting the default saves you steps, liberates you
from having to think about compatibility every time you save a document, and
Worth
Learning
672 Part III: Application Secrets
■ ■
MAC SECRETS • 4040-8/5 • ch.17.F • Chapter 17 • Final • EAP • 10/23/98 • p.672
MAC SECRETS • 4040-8/5 • ch.17.1 • Chapter 17 • Proof 1 • VB • 09/18/98 • p.672
MACINTOSH SECRET
Bill Gates is so fed up with programmers planting
secret credits and other surprises (Easter eggs)
in their work that he put his foot down. “You put
an Easter egg in Microsoft software,” he said,
“and you’re fired.”
Maybe that’s why there are so many Easter
eggs in Microsoft Office.
In any case, some of the Easter eggs in recent
versions of Word — on both Mac and
Windows — show a positively perverted streak
among Microsoft’s best and brightest.
See the sidebar called “Microsoft Weird 5.1”
earlier in this chapter for one example. And
consider shielding your eyes for this example —
it’s definitely on the racy side.
Anyway, the secret goes like this: In a new
Word document, type unable to fish, or unable
to follow instructions, or unable to (your favorite
word that starts with F here). Highlight that
phrase and open up Word’s thesaurus. (You
can’t use the control-key menu in Word 98 in
this case; you must use the Shift-F7
keystroke — or add the Thesaurus command to
the Tools menu, as described in “Adding an item
to a Word menu” early in this chapter.)
The synonym Word proposes, we’re guessing,
most definitely did not get inspected by the
Microsoft Family Purity Board.
But it gets worse. Now open a new document
and type I’d like to see you naked (or anything
else that begins I’d like to). Check that in Word’s
thesaurus — and you’ll find out that the other
Word programmers are every bit as lonely.
Word’s dirty little secrets
4040-8/5 ch17.F 11/3/98 3:42 PM Page 672

eliminates the warning dialog box every time you save (except for the very first
time you save a new backwardly-compatible file).
Time-saver in the Customize box
If you want to get the most out of Word 6 or Word 98, you’ll have to spend a
lot of time in the horribly designed Customize dialog box. Word 5 users, in
particular, will cry out to discover that you can’t navigate these ridiculously
tiny lists by typing the first few letters of the commands’ names — you
must,
apparently, use the microscopic scroll bar (see Figure 17-23).
Figure 17-23: You can type to select — but you have to click to indicate which list first, as
shown by the arrows.
Actually, you
can
type to select, but you first have to
click —
or press Tab
(to move to the right) or Shift-Tab (to move to the left) — to select a list (the
Categories list at left, or the Commands list at right). In typical Microsoft style,
there’s absolutely no visual indication that one list or the other is selected for
typing — but at least it can be done.
Changing font sizes from the keyboard
Word provides two different sets of commands that let you change the size of
selected text from the keyboard. These commands are particularly helpful if you
use Word for page-layout tasks that require you to fit titles into a certain space.
Pressing Ô-] increases the size of selected text by one point size. Pressing
Ô-[ decreases the size of selected text by one point size.
To change the point size in larger leaps than one point at a time, press
Ô-Shift-> (greater than) and Ô-Shift-< (less than). These commands jump from
one point size to another as they are listed in the Font Size menu (9, 10, 12,
14, 18, and so on) in the Font dialog box.
Chapter 17: Word Processing 673
■ ■
MAC SECRETS • 4040-8/5 • ch.17.F • Chapter 17 • Final • EAP • 10/23/98 • p.673
MAC SECRETS • 4040-8/5 • ch.17.1 • Chapter 17 • Proof 1 • VB • 09/18/98 • p.673
4040-8/5 ch17.F 11/3/98 3:42 PM Page 673

Turning toolbars in palettes and vice versa
You can turn any of Word’s toolbars into a movable, floating palette by double-
clicking its handle (or by simply dragging it anywhere into the document window).
Conversely, you can transform a palette back into a toolbar by double-clicking it
or dragging it to
any
edge of the screen. Keep this in mind if you have too many
toolbars stacked up at the top of your screen; you can always anchor some of
them to the bottom and sides of the screen instead.
Quick access to Symbol font
Every now and then you need to insert a special symbol into a Word document —
something like a ♠or a ♦. That’s just what the Symbol font is for; it’s a whole
collection of special symbols that can be typed right into a document.
But changing fonts in the middle of your work to type a single symbol character
is a hassle. Fortunately, Word is equipped with a special feature that lets you
jump right into the Symbol font
temporarily
. Pressing Ô-Shift-Q switches to the
Symbol font for
the next typed character.
After you type it, Word automatically
returns to your previous font.
Even better, both Word 6 and Word 98 make it easy to set up a custom
keyboard shortcut for any symbol character you want. Choose Symbol from the
Insert menu, click on the particular character you want to insert, then click
the Shortcut Key button and assign the keystroke of your choice. Word 98 also
lets you assign an AutoCorrect entry to symbol characters so that the word
“dingbat,” for example, can be automatically replaced by a ✝when you type.
(See the section on AutoCorrect earlier in this chapter for details.)
Welcome to the Word Wide Web
We don’t know how practical this is, but it’s so wild it’s worth trying, at least
once: Word 98 lets you capture pages directly from the Web and turn them into
editable Word documents. So much does it aspire to be a Web browser, in fact,
that it actually comes with a browser-style
toolbar,
complete with Back, Next,
and Home buttons.
You don’t even have to use a Web browser to pull off this stunt. Just choose
Open Web Page from Word’s file menu and type in a URL. If you have a standard
Internet connection (see Chapter 26), Word will use your TCP/IP connection to
retrieve the page itself, even maintaining the graphics and layout of the original
page and keeping any hyperlinked text active.
Word isn’t a great Web browser; it gets easily overwhelmed by complex Web
pages, large graphics, or nested frames, and may not be able to display the
page correctly. Still, this is a slick way of grabbing text off the Web and having
it ready to plug into another document without ever leaving the warmth and
comfort of your word processor.
Strange
But True
674 Part III: Application Secrets
■ ■
MAC SECRETS • 4040-8/5 • ch.17.F • Chapter 17 • Final • EAP • 10/23/98 • p.674
MAC SECRETS • 4040-8/5 • ch.17.1 • Chapter 17 • Proof 1 • VB • 09/18/98 • p.674
4040-8/5 ch17.F 11/3/98 3:42 PM Page 674

Go away, blue underlining!
Speaking of Word going Web-crazy: You may have noticed (with some alarm) that
whenever you type an e-mail or Web address, Word 98 automatically turns it into
a live hyperlink, complete with blue underlining. Click that link, and you’ll find
yourself on the Internet.
Unfortunately, that’s not what we expect clicking text to
do
in a word processor!
How do you correct a typo, for example, if you can’t click some text? Answer:
you can’t. You have no choice but to delete the entire hyperlink address and
retype it.
Strange
But True
Chapter 17: Word Processing 675
■ ■
MAC SECRETS • 4040-8/5 • ch.17.F • Chapter 17 • Final • EAP • 10/23/98 • p.675
MAC SECRETS • 4040-8/5 • ch.17.1 • Chapter 17 • Proof 1 • VB • 09/18/98 • p.675
MACINTOSH SECRET
Sick of Word 6’s lethargic speed? Microsoft
offers no apologies — only the suggestion that
you upgrade to Word 98, a much faster and
more responsive program.
For those of you still saddled with Word 6,
however, Microsoft offers the following advice.
First, avoid using fonts and extensions. (Great.
Thanks a lot.)
Microsoft further suggests that you give Word 6
more memory (using its Get Info box, as described
in Chapter 9). Finally, try these memory tweaks.
If your Mac has 4MB of RAM:
1. Launch Word 6. Choose Tools ➪Customize
➪Menu tab.
2. Under Categories, select Tools. Under
Commands, select ToolsAdvancedSettings.
Click Add; click Close.
3. If you don’t work with graphics much, from
the Tools menu, choose Advanced Settings.
In the Categories box, choose Microsoft
Word.
4. In the Option box, type BitMapMemory. In
the Setting box, type 512. Click Set and
then OK.
If these steps don’t help the speed problem,
repeat Step 3; then, in the Options box,
click the BitMapMemory setting, and then
click the Delete button. Click OK.
5. Repeat Step 3. In the Option box, type
CacheSize. In Setting, type 128. Click Set
and then OK.
If your Mac has 8MB of RAM or more:
If your documents use a lot of graphics, do Steps
1, 2, 3, and 4 — but type in a higher number in
step 4. If you have 8 megs of RAM or more, you
can set the BitMapMemory as high as 2,048K.
If you work with large documents, do Steps 1, 2,
3, and 5 — but in 5, change the CacheSize
setting to 256K. If that doesn’t help, increase it
even more — all the way up to 1,024K.
Be aware that both of these steps sap even
more memory from your Mac. Don’t do both of
the two steps above, either; just one or the
other, depending on which works.
For even faster speed, get a Power Mac — or a
different program.
The ultimate “Speed Up Word 6” guide
4040-8/5 ch17.F 11/3/98 3:42 PM Page 675
If this feature bugs you, turn it off by choosing Tools ➪AutoCorrect ➪AutoFormat,
and turning off “Internet paths with hyperlinks.” Better yet: Keep in mind that
quick thinking can save the day. If Word ever creates a hyperlink when you didn’t
want one, press Ô-Z. Presto — the hyperlink turns back into human-editable form.
Styles can have more than one name
You can give a style two different names. You might create one that adequately
describes the use of the style, such as
Chapter Subheading 3
, and another
abbreviated name to use when changing styles from the keyboard (using the
Ô-Shift-S command described below), such as
3
.
To double-name a style, either as you’re creating it or later, type both names into
the name field of the Style dialog box, separating them with a comma, as shown
in Figure 17-24.
Figure 17-24: Giving a style a second name, or even more names, is easy if you separate the
names with commas.
Change fonts from the keyboard
You can choose a new font from the keyboard by pressing Ô-Shift–F (in Word 6
or later) or Ô-Shift–E (in Word 5.1 or earlier).
When you issue this command, the Font field on the Formatting toolbar appears
highlighted. Type the first few letters of the font name you want — just pa to
select Palatino, as long as there are no other fonts that begin with those letters—
and then press Enter. Coolly enough, you can also tap the up and down arrow
keys to scroll through the fonts one at a time.
Worth
Learning
676 Part III: Application Secrets
■ ■
MAC SECRETS • 4040-8/5 • ch.17.F • Chapter 17 • Final • EAP • 10/23/98 • p.676
MAC SECRETS • 4040-8/5 • ch.17.1 • Chapter 17 • Proof 1 • VB • 09/18/98 • p.676
ANSWER MAN
Q: I’ve enjoyed your guys’ secret about triggering
any Word, Excel, or PowerPoint menu or dialog
box element from the keyboard, just by holding
down the Ôkey long enough for the cheat-sheet
labels to appear on the screen. But what about
those tabbed dialog boxes? I can’t seem to find
any way to change tabs without using the mouse.
A: You haven’t tried pressing Control-Tab (to go
forward through the tabs) or Control-Shift-Tab
(to go backwards).
Q: How do you know these things?
A: We were kidnapped as children and
brainwashed by Bill Gates.
Complete keyboard control in Office 98
4040-8/5 ch17.F 11/3/98 3:42 PM Page 676
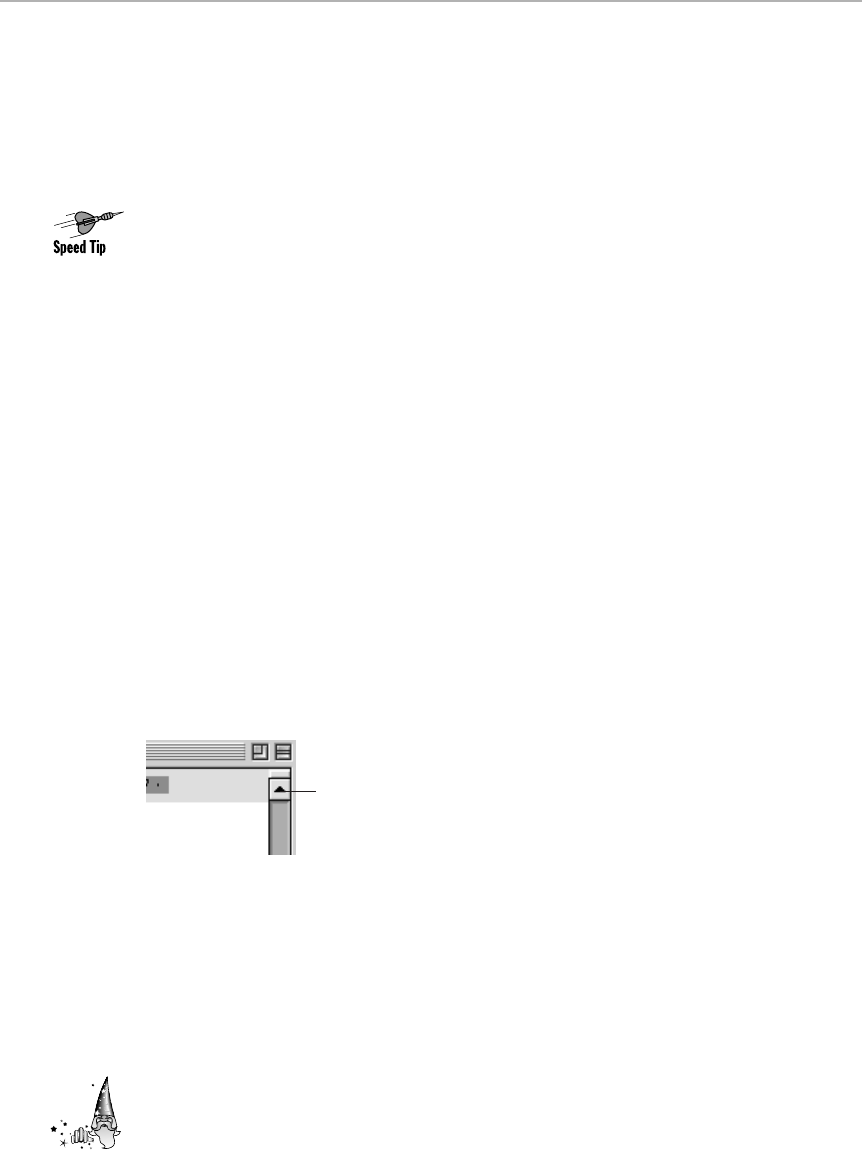
Applying styles from the keyboard
You can change styles from the keyboard, too. If you’re working with a lot of
styles, repeatedly pulling down the Style menu on the Formatting toolbar or the
Ruler can be pretty tedious. (And in Word 98, the WYSIWYG Style menu can be
very slow.) We prefer the keyboard shortcut that lets you select any one of your
defined styles with just a few keystrokes — no mouse, no menus.
Press Ô-Shift-S. The Style field on the Formatting toolbar gets highlighted. Then
just type the name of the style you want to apply, and press Return. Caution:
In Word 6 and up, you
can’t
type just the first few letters of a style’s name to
select it, as you can in Word 5; you wind up defining a whole new style whose
name is that abbreviation! You must type the
entire
style name.
Now you see the vital importance of our previous secret — the shorter the style
name, the faster you can apply it from the keyboard.
Of course, using the methods described earlier in this chapter, you can also
assign each style its
own
keyboard shortcut, reducing your keystrokes even
further. In Word 6 and up, you don’t even have to mess with the Customize
dialog box. Choose Format ➪Style, and then click the name of a style. Click
Modify ➪Shortcut Key; assign a keystroke to the style and click OK.
Split-screen shortcut
Word gives you three different ways to split a window in half horizontally,
providing two independent views of the same document.
You can double-click the split box in the upper-right corner of the window (see
Figure 17-25). You can move the pointer to the split box and then drag down to
a convenient spot. Or, easiest of all, you can press Ô-Option-S.
Figure 17-25: Split a window by double-clicking the split box, or just press Ô-Option-S.
Unsplit the window by double-clicking the small black split box.
To return to a single window view, either double-click the split box again, or
press Ô-Option-S again.
In Word 6.0, there’s actually a
fourth
route to split-window mode: Install a
window-splitting button on a toolbar and click
it.
In Word 5, whichever pane contains the cursor is the one that fills the window
when it
unsplits.
That’s important to learn; if your cursor is on page 1 in the top
pane and you’ve been editing page 100, you have a lot of scrolling to do after
the window unsplits. (In Word 6, stupidly, it’s just the opposite — the pane that
Strange
But True
Split Box
Chapter 17: Word Processing 677
■ ■
MAC SECRETS • 4040-8/5 • ch.17.F • Chapter 17 • Final • EAP • 10/23/98 • p.677
MAC SECRETS • 4040-8/5 • ch.17.1 • Chapter 17 • Proof 1 • VB • 09/18/98 • p.677
4040-8/5 ch17.F 11/3/98 3:42 PM Page 677
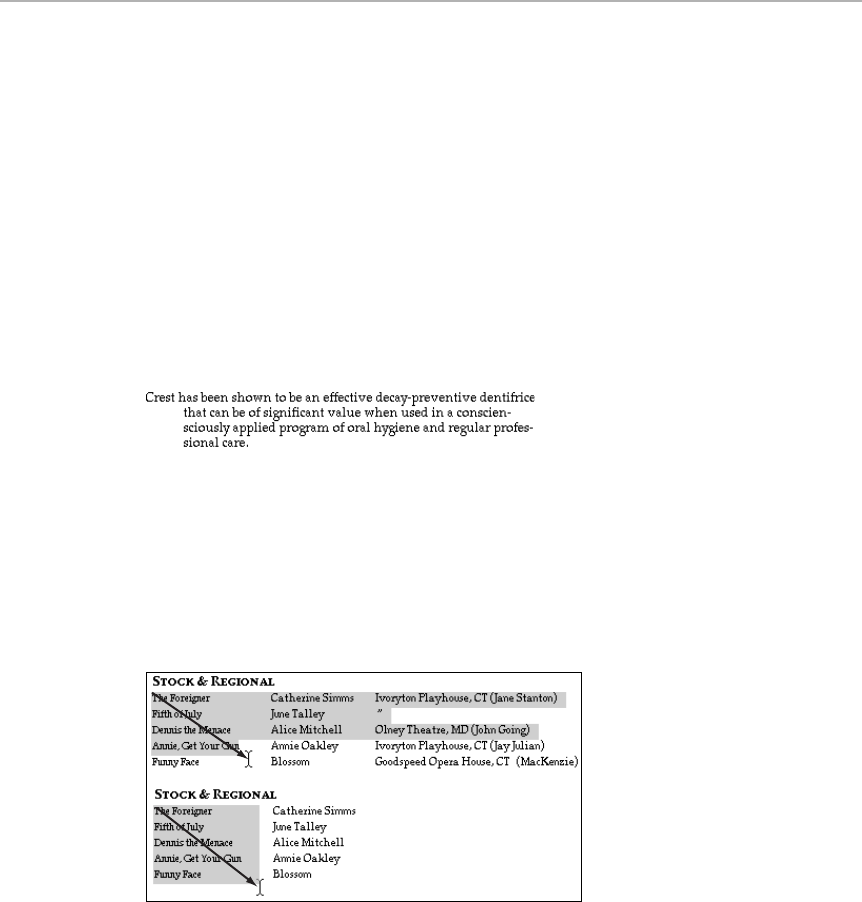
doesn’t
contain the cursor fills the window when you unsplit. Word 98 is a little
smarter; it drops you into roughly the right portion of the document, but, oddly
enough, not always at the exact location of your cursor.)
Indents from the keyboard
To set indents without dragging indent marks on the Ruler, press Ô-M (or
Ô-Shift-N in Word 5) to indent a paragraph. To move the indent-level back to
the left, press Ô-Shift-M.
You can also create
hanging indents
from the keyboard (see Figure 17-26). The
shortcut is Ô-T (or Ô-Shift-T in Word 5). In Word 6 and up, you can also un-hang
an indent —creating a paragraph in which only the first line is indented— by
pressing Ô-Shift-T after you’ve already indented the paragraph with Ô-M.
Figure 17-26: The hanging indent. Do it from the keyboard.
Selecting odd-shaped regions
When you drag your cursor in Word, you’re probably used to the highlighted part
beginning at the first character and stretching through all the text to your current
position (see Figure 17-27).
Figure 17-27: If you try to drag normally (top), you only succeed in selecting everything. But
if you Option-drag (bottom), you can select text in any rectangular area — such as a column
of text.
If you
Option
-drag, however, you select a region that only includes text in the
diagonal line from your initial click. This is a great shortcut for italicizing one
column of text (in a play program, for example). It’s also great for removing
678 Part III: Application Secrets
■ ■
MAC SECRETS • 4040-8/5 • ch.17.F • Chapter 17 • Final • EAP • 10/23/98 • p.678
MAC SECRETS • 4040-8/5 • ch.17.1 • Chapter 17 • Proof 1 • VB • 09/18/98 • p.678
4040-8/5 ch17.F 11/3/98 3:42 PM Page 678
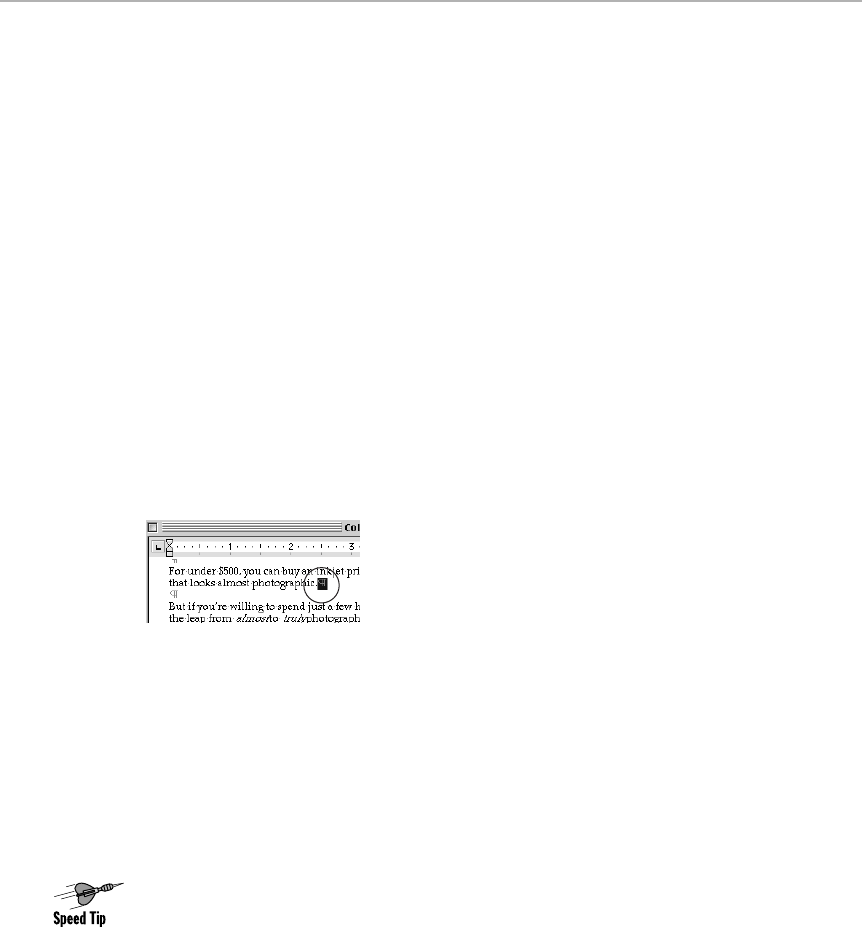
those annoying little squares that sometimes appear at the left margin of a
document that was created on a Windows machine.
Don’t spell-check the Ukranian names!
Word 98’s spelling checker is smart enough to skip over Internet addresses.
But there are plenty of other words that choke Word unnecessarily, as we
discovered when preparing a list of software to include on the CD with this book
(such as AreaCodeFinder, TypeIt4Me, Snapz, and so on).
You can make Word skip over such patches of text by highlighting it and
choosing Tools ➪Set Language; select No Proofing in the next dialog box.
Picking the paragraph
You can select the invisible, nonprinting paragraph mark (¶) at the end of a Word
paragraph quickly — and without having to turn on the Show ¶ command — by
pointing to the end of the paragraph and
double-clicking
in the white space right
after the last word of the paragraph (see Figure 17-28).
Figure 17-28: Double-click the space right after a paragraph to select the Paragraph mark.
Why bother? Here’s one good reason: Word stores each paragraph’s formatting —
style, margins, font, and so on —in that little paragraph mark. By simply dragging
a paragraph mark (or cutting and pasting it) to the end of
another
paragraph, you
transfer all of the first paragraph’s formatting to any other.
The mighty Go Back command
If you edit long documents, you’ll appreciate the Go Back command. No matter
where you are in a document, the Go Back command scrolls you back (or
forward) to the last spot in which you did any editing. The magic keystroke:
Ô-Option-Z — or just the zero key on the numeric keypad.
This command will even jump you back to another
document,
if that document is
open and it contains the location of your most recent editing action. Press the
command repeatedly, and you can find up to the last
three
spots where you
were editing.
Chapter 17: Word Processing 679
■ ■
MAC SECRETS • 4040-8/5 • ch.17.F • Chapter 17 • Final • EAP • 10/23/98 • p.679
MAC SECRETS • 4040-8/5 • ch.17.1 • Chapter 17 • Proof 1 • VB • 09/18/98 • p.679
4040-8/5 ch17.F 11/3/98 3:42 PM Page 679

Our big fat bulls-eye
Mac Secrets
suggestion: change the keystroke to
something simpler, like F1 or Ô-G.
Returning to Normal style
After you’ve tried formatting a paragraph in right-justified 18-point Monaco Bold
Shadow, you’ll probably want to change your mind and return to Normal style.
You can undo all that formatting in one fell swoop by selecting the paragraph
and pressing Ô-Shift-N (or Ô-Shift-P in Word 5). No matter which formatting
options were applied, this keystroke returns the text to the style you defined
as Normal.
This isn’t quite the same thing as Word’s Reset Paragraph (Ô-Option-Q) and
the Reset Character (Control-spacebar in Word 98, Ô-spacebar in Word 6)
commands. They strip out all extra formatting and restore the text to whatever
the style is supposed to be (not necessarily the Normal style).
In Word 5.1 or earlier, you can accomplish the same thing with the Revert to
Style command (Ô-Shift-spacebar).
Format text without selecting it
In just about every Mac program on Earth, you must
select
a word before
applying formatting to it — but not in Word 6 and later. You can apply formatting
attributes such as font, size, style, and color to a whole word by simply
positioning the insertion point anywhere within the word; Word assumes you
want the attribute applied to the
whole
word (which, in most cases, you do).
You can turn this option on and off by in Word 98 choosing Tools ➪Preferences ➪
Editing; you’ll see the “When selecting, select entire word” checkbox. In Word 6,
choose Tools ➪Options ➪Editing to access the Automatic Word Selection
checkbox.
Of course, if you want to apply an attribute to more than a single word — a whole
sentence, for instance — you still must select the text completely.
Wildcards in the spelling checker
Free book winner Paul Gerstenbluth discovered an undocumented word-lover’s
tool in Word: the asterisk (*).
Turns out that when you omit part of a word and substitute the asterisk, the
spelling checker proposes words that match whatever part of the word you
have
typed.
Why is that useful? Paul suggests numerous possibilities. If you can’t remember
how to spell
pneumonia,
just type
pneum*
and let the spelling checker provide
the rest. Solving a medical crossword puzzle? Got
b*itis
but don’t know the
middle part? Highlight it and run the spell checker to see your options
Contest
Winner
Strange
But True
680 Part III: Application Secrets
■ ■
MAC SECRETS • 4040-8/5 • ch.17.F • Chapter 17 • Final • EAP • 10/23/98 • p.680
MAC SECRETS • 4040-8/5 • ch.17.1 • Chapter 17 • Proof 1 • VB • 09/18/98 • p.680
4040-8/5 ch17.F 11/3/98 3:42 PM Page 680

(bronchitis, bursitis, and so on). Poets, too, will enjoy this feature: just type
*ing
to find a list of rhyming words that end with those letters.
Unfortunately, the asterisk trick works in Word 98 only when it’s in the middle of
a word. In Word 6, however, it can come at the beginning or end, too.
Customized spacing
Word doesn’t contain any tools for precisely adjusting the spacing between
individual words. But you can rig up some custom-sized spaces using the
following method.
Select a character with the width of the custom space you want to create. Then,
using the Color pop-up menu in the Character dialog box (Ô-D), pick White as
the color of the character.
The character becomes invisible and can be used as a space. Use large
characters to make wide spaces; use tiny characters, such as punctuation
marks, to make narrow spaces.
To make the whited-out characters readily available for spacing, save them as
AutoText or Glossary entries and assign them keyboard equivalents. When you
save the spacing characters in the Glossary, all the formatting, including the
color, are preserved.
Alternatively, you can add White as an option in the Format menu or create a
keyboard shortcut for applying it.
Merging graphics into a Word document
Most people use Word’s Print Merge feature to merge text data from other
programs (such as databases) into Word documents. But you can also merge
a Word
table
into a document, with the table serving as your data document.
Because Word table cells hold graphics as well as text, this trick means that
you can merge graphics into a document.
Place your letterhead, for example, in a table cell. Merge that table into a
regular document to automatically insert your letterhead. You’ll save disk
space — you only have to create your letterhead once, in the original data
document.
Mail merge made easy
Creating a mail merge with each piece of data in a separate field — name,
address, city, state, and so on—can get time-consuming. This is especially true
in Word, which requires any fields containing punctuation to be enclosed in
quotation marks.
Chapter 17: Word Processing 681
■ ■
MAC SECRETS • 4040-8/5 • ch.17.F • Chapter 17 • Final • EAP • 10/23/98 • p.681
MAC SECRETS • 4040-8/5 • ch.17.1 • Chapter 17 • Proof 1 • VB • 09/18/98 • p.681
4040-8/5 ch17.F 11/3/98 3:42 PM Page 681
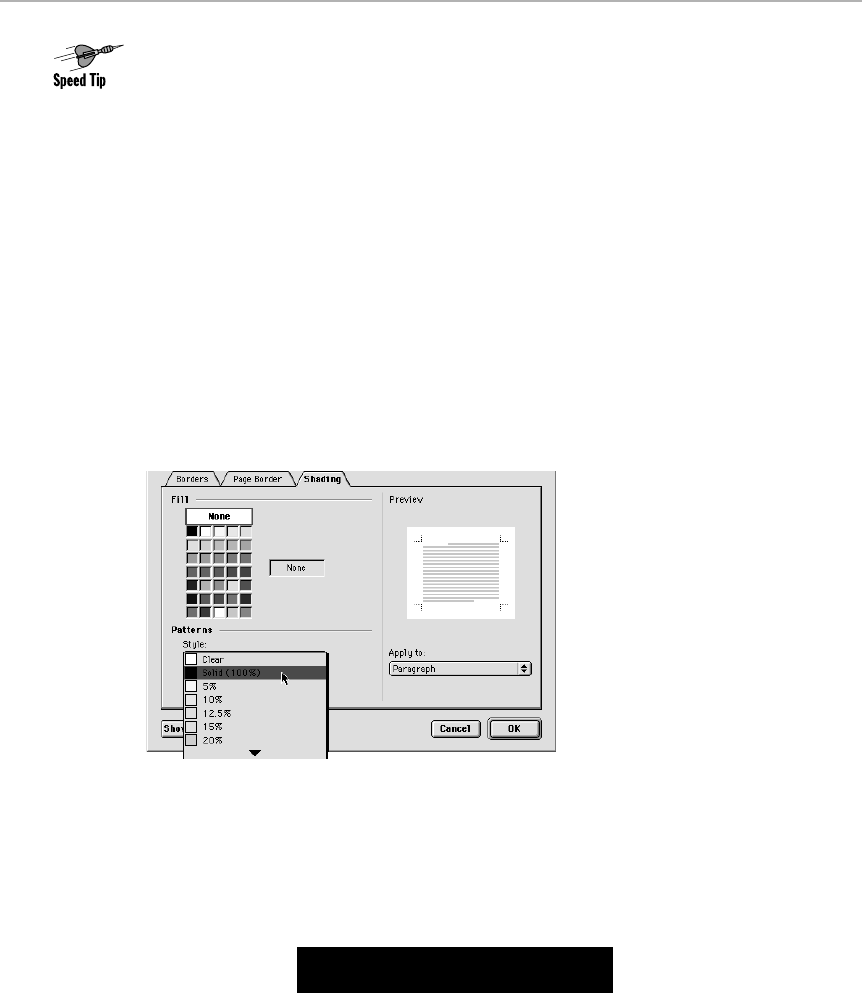
However, if you don’t need to sort your data by field, you can simplify this
process. Put each
whole
address in one cell of a Word table, complete with
punctuation, carriage returns, and other formatting. Then, when it’s time to do
the mail merge, you only have to work with a single address field.
Creating inverted text
Inverted text — white lettering against a black background — gives titles and
headings a bold, dramatic look. Here’s how to create the reversed lettering in
Word.
Select some centered text to invert. Make sure the color of the text is set to
Auto (or choose White as the text color from the Color pop-up menu in the Font
or Character dialog box. White text becomes invisible; don’t worry, it’s still
there). Don’t deselect the text yet.
Now, choose Format ➪Borders and Shading ➪Solid (100%) from the scrolling
list of shading options, as shown in Figure 17-29.
Figure 17-29: Use the Borders & Shading dialog box to add shading to type for easy
reversed-text effects.
To tighten the border around the title, use the ruler. Drag the margins in toward
the center until the title is framed the way you want. You’ll end up with
something like this:
Finally, save the inverted format as a new style. This way, you can apply the
reversed-text style again without going through all the formatting steps again.
You can create a host of other slick effects using some slight variations. Try
using a different level of border shading — say, 50 percent. Use a different text
color background. Try aligning the text to the right margin, or changing the
spacing between the text and the border.
Fun with Yeast
682 Part III: Application Secrets
■ ■
MAC SECRETS • 4040-8/5 • ch.17.F • Chapter 17 • Final • EAP • 10/23/98 • p.682
MAC SECRETS • 4040-8/5 • ch.17.1 • Chapter 17 • Proof 1 • VB • 09/18/98 • p.682
4040-8/5 ch17.F 11/3/98 3:42 PM Page 682
Adding a new row to a table
Here’s the absolute easiest way to add a new row to a Word table, without
messing with any Table commands or dialog boxes: Click in the last cell of the
last row and press the Tab key once. Word inserts a new row at the bottom.
And if you want the new row in the middle of the table and not the end? Easy.
Click at the far left edge to highlight the entire new row. Then drag and drop it to
wherever in the table you want it to go!
Deflating bloated files
When you enable Word’s Allow Fast Saves option, Word keeps track of your
changes by appending them to the end of the file. This speeds up saving a large
document, but it bloats the file. Each time you use the Save command, the file
grows larger as Word tacks on the latest set of changes.
The solution: Periodically disable the Fast Saves option — or use the Save As
command to save the file under a new name. In either case, Word performs a
full save, shrinking the file back down to its actual size.
And definitely turn off Fast Saves the last time you save your document before
trying to import it into Quark or PageMaker. You’ll have far fewer problems with
the importing process.
Our suggestion: Using Word 5’s Commands command,
add
the Allow Fast
Saves command to your menu! Then switching it on and off is simply a matter of
selecting it. If you’re using a later version of Word, record a macro that turns this
option on and off with a keystroke. (See “Word Macros: The Menu-Changer’s
Workaround” later in this chapter for tips on Word macros.)
Worth
Learning
Chapter 17: Word Processing 683
■ ■
MAC SECRETS • 4040-8/5 • ch.17.F • Chapter 17 • Final • EAP • 10/23/98 • p.683
MAC SECRETS • 4040-8/5 • ch.17.1 • Chapter 17 • Proof 1 • VB • 09/18/98 • p.683
ANSWER MAN
Q: I’ve got Word 6. It drives me crazy that every
time I save a new document, that darned
Summary box pops up. Is there a way to turn
this annoying box off?
A: Yes, it’s annoying. And yes, you can turn it
off. Choose Tools ➪Options. The option you
want to turn off is called Prompt for Summary
Info. (This feature is available in Word 98, too,
but at least it’s not turned on by default.)
Q: Okay, how about this one? Every time I open a
text file — just a text file, for Heaven’s sake! —
Word 6 gives me some stupid dialog box asking if
I mean a text file, or Text With Layout, whatever
that is.
A: You can shut this one up, too. Go to the
Finder and open your Word folder. In the Word
Extensions folder (or, in Word 5, the Word
Commands folder), you’ll find the Text With
Layout converter. Throw it away. Then you
won’t be asked about it every time you open a
text file.
That darned Summary box and more
4040-8/5 ch17.F 11/3/98 3:42 PM Page 683
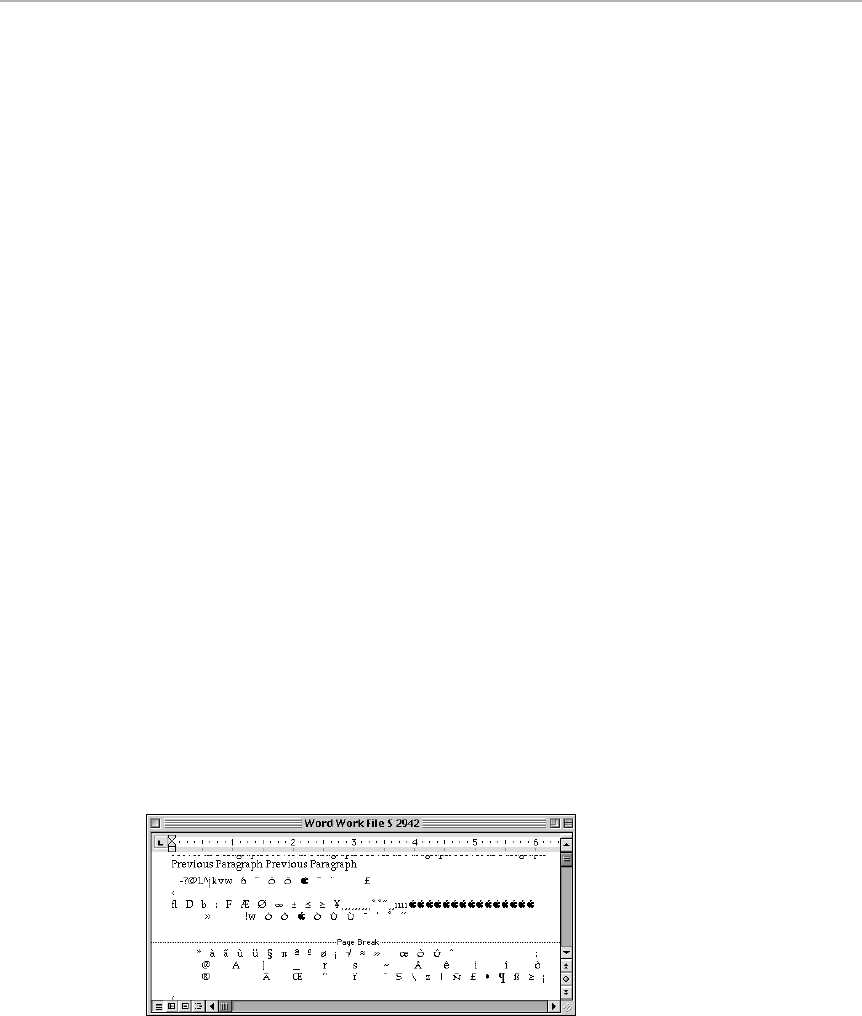
The WordTemp/Word Work files
old wives’ tale
If you’ve worked with Word for any length of time, you’ve probably seen
mysterious files lurking around your system called either WordTemp or Word
Work. The files are usually followed by a number — WordTemp-1, WordTemp-2,
and so on (if you’re using Word 5), or Word Work File A 1270, Word Work
File D 2678, and so on (if you have Word 6 or later).
What exactly
are
these files and what are you supposed to do with them?
Word Work files (or WordTemps) are temporary files that Word uses to store
unsaved data while you work. When you save your files and quit the program,
Word automatically deletes these temporary files, which are no longer needed.
Under ideal circumstances, you’d never encounter a Word Work file— because
you always exit Word the right way, using the Quit command.
But more realistically, you’ll trip over the power cord, or your system will crash,
and you’ll unwillingly abandon Word with files still open and unsaved. In such
cases, the temporary files remain. You can throw them away without a second
thought.
In principle, you should be able to recover unsaved work from these files. You
move the temp files out of the System folder (sometimes they show up in the
Trash, in a Rescued Items folder) and give them new names. Launch Word and
choose the Open command. In the List Files of Type pop-up menu, select All
Files, navigate to the renamed temp files, and open one. If your lost work shows
up, great — copy it into a new file.
But in the real world, you can generally salvage nothing at all. Word Work files
generally contain nothing but what you see in Figure 17-30. Cumulatively, your
not-so-cheerful authors have weathered hundreds of Word crashes. Only
twice
were we able to salvage anything we really needed from a WordWork file. (We
even called Microsoft on this topic; the rep conceded that the recovering-data-
from-temp-files trick is essentially bogus.)
Figure 17-30: Just when you think you’ve lost your work, you can open a salvaged Word
Work file and — find pages of gibberish.
684 Part III: Application Secrets
■ ■
MAC SECRETS • 4040-8/5 • ch.17.F • Chapter 17 • Final • EAP • 10/23/98 • p.684
MAC SECRETS • 4040-8/5 • ch.17.1 • Chapter 17 • Proof 1 • VB • 09/18/98 • p.684
4040-8/5 ch17.F 11/3/98 3:42 PM Page 684

Shortcut to the Paragraph dialog box
You don’t have to choose the Paragraph command from the Format menu to
open the Paragraph dialog box. Instead, just double-click the left or right indent
marker on the Ruler.
When the New command isn’t
the New command
What do you do when you want to create a new document in Word? You either
choose the New command from the File menu or press Ô-N — they both do the
same thing, right?
Not at all. Pressing Ô-N simply opens a new, blank document based your
default Normal template — no questions asked. Choosing New from the File
menu, however, opens a
dialog box
asking which template you want to use as
the basis for your new document.
As it turns out, the template you want to use 99 percent of the time is, in fact,
the Normal template. The point is, then, to use the New
menu command
when
you want a choice of templates — and the Ô-N
keystroke
when you just want a
simple blank page to start typing onto.
Copying section formatting
Word stores all the formatting for a section in the
section mark,
the double-
dotted line that runs across the screen at the end of a section. You can copy
the formatting — columns, page numbering, and so on — for an entire section
by simply copying the section mark. When you paste the mark at a new location,
all the text preceding it takes on the formatting stored in the mark.
Incidentally, you can double-click any section mark to open the Page Layout
dialog box. (In Word 5, this opens the Section dialog box.)
Speedier spell checking
You’re probably familiar with how Word 98 checks the spelling of your
documents while you type, drawing a wavy red line under misspelled words.
Control-click on the word in question and Word pops up a list of suggested
alternate spellings. Spell-checking couldn’t be easier.
Worth
Learning
Chapter 17: Word Processing 685
■ ■
MAC SECRETS • 4040-8/5 • ch.17.F • Chapter 17 • Final • EAP • 10/23/98 • p.685
MAC SECRETS • 4040-8/5 • ch.17.1 • Chapter 17 • Proof 1 • VB • 09/18/98 • p.685
4040-8/5 ch17.F 11/3/98 3:42 PM Page 685
But here’s an invaluable tip for users of earlier versions of Word (and Word 98
users who have the “Check spelling as you type” preference turned off). Unless
you begin spell checking with the insertion point placed at the very beginning
of the document, you inevitably get a “Continue checking from beginning of
document?” message. To avoid this, use the Select All command
first,
and
then
activate the spell checker. (That is, get into the habit of pressing Ô-A, Ô-L in
rapid succession.) Regardless of where the insertion point is in the document,
every word gets checked, without any additional dialog boxes appearing.
Introducing the Spike
What on Earth is the Spike? It’s Word’s built-in multiple cut-and-paste tool
(Word 6 or later). You can use the Spike if you want to delete several
different
pieces of text or graphics from one document and then paste
all
of them — with
a single keystroke — into another document.
To put an item in the Spike, select it, then press Ô-F3. This deletes the selected
text or graphics and stores it. Each additional piece of text you delete with Ô-F3
gets added to the Spike. When you’re ready to paste everything you’ve collected
into another document, click to pinpoint the location and then press Ô-Shift-F3.
All the items you deleted are pasted in the new location, in the order you
deleted them.
If you want to paste the contents of the Spike
without
clearing the Spike (so you
can continue adding deleted items to it), choose AutoText from the Insert menu,
find the AutoText entry called Spike, and click Insert.
Word 98 goes postal
For years, Word included a Send Mail command in the File menu that left most
users confused; it didn’t do
anything
unless you were on a network running
Microsoft Mail.
Word 98 is a different story. The Send To command provides a direct hookup to
regular e-mail programs such as Eudora Pro and Claris Emailer. Suppose you’ve
got a document in Word that you want to mail to a colleague using Claris Emailer.
In the past, you’d have to save the document; launch Emailer; create a new
message; address it; attach the Word document; and then send it off.
But Word 98 can take care of most of this for you. Just choose Mail Recipient
from the Send To submenu (see Figure 17-31). Word automatically launches
Emailer, creates a new message, and attaches the document for you. All that’s
left for you to do is plug in an address and send off the message.
And how does Word know what e-mail program to use? You had it running in the
background the very first time you used the Send To command. Thereafter, any
Office program (Word, Excel or PowerPoint) can launch the e-mail program by
itself.
Worth
Learning
Strange
But True
686 Part III: Application Secrets
■ ■
MAC SECRETS • 4040-8/5 • ch.17.F • Chapter 17 • Final • EAP • 10/23/98 • p.686
MAC SECRETS • 4040-8/5 • ch.17.1 • Chapter 17 • Proof 1 • VB • 09/18/98 • p.686
4040-8/5 ch17.F 11/3/98 3:42 PM Page 686
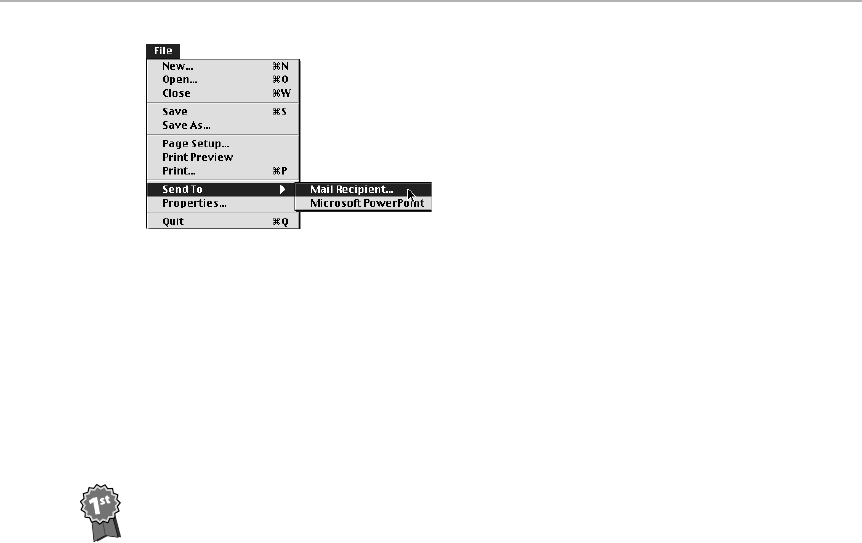
Figure 17-31: Word 98’s Send To command is a direct link to your e-mail program.
Roll credits!
Word 98 stunned Mac fans by being — well,
good.
Few could believe that
Microsoft, so often the bastion of mediocrity, had delivered a Mac-like program —
one that launches in five seconds, has a WYSIWYG Font menu, supports
QuickTime/MacinTalk/drag-and-drop, and even has a dancing, talking Mac
Classic as its Office Assistant help character.
But the ultimate proof that real Mac programmers were at work on Word 98 is
its secret Easter egg. It’s funny, witty, animated, and hip. We sent a free book to
the
Mac Secrets
reader who submitted it — but he’ll have to remain anonymous,
since he’d get in big trouble from his bosses at Microsoft if word got out that he
leaked this gem to us.
Launch Word 98. Close all toolbars except the Standard one (use the Toolbars
command in the View menu to do this, or Control-click any visible toolbar).
Undock the Standard toolbar — that is, grab its left-edge handle to pull it away
from the top of the screen. Close the Office Assistant’s window, if it’s open.
Now grab the floating Standard toolbar palette’s title bar. In one continuous
diamond-shaped drag, bounce it off the top, left side, bottom, and right side of
the screen — and then dock it at the top of the screen. (By “bounce,” we mean
drag it to the edge of the screen so that its outline snaps into edge-grabbing
position, as though you’re about to dock it there — but don’t release the mouse
button.)
Now open the Office Assistant (choose Help ➪Microsoft Word Help). Click in
the search-text area of the Assistant window and type the following, including
precise punctuation:
“Think Different”? Think Grammar!
Click Search — and watch the fun begin! First, a huge, animated, special-effect-
filled credits screen appears. Second, Max the dancing Mac Classic begins
reciting hilarious limericks and other poetry (see Figure 17-32). Our favorite:
There once a bunch of geek coders,
Who exhibited various odors.
Of coding for Mac,
They each had the knack,
But they couldn’t think of a rhyme.
Contest
Winner
Chapter 17: Word Processing 687
■ ■
MAC SECRETS • 4040-8/5 • ch.17.F • Chapter 17 • Final • EAP • 10/23/98 • p.687
MAC SECRETS • 4040-8/5 • ch.17.1 • Chapter 17 • Proof 1 • VB • 09/18/98 • p.687
4040-8/5 ch17.F 11/3/98 3:42 PM Page 687

Figure 17-32: Word 98’s credits display is not to be believed.
Word Macros: The Menu-Changer’s
Workaround
We’ve mentioned numerous useful features that Microsoft, in its questionable
wisdom, removed from Word 5. Among them is the ability to put any command
you want into your menus. Think of all the useful options that, in Word 5, you
could easily pop into your menus — but that are no longer even listed in Word’s
Customize dialog box: Fractional Widths; Allow Fast Saves; Smart Quotes
(Word 6); Background Pagination; Show Picture Placeholders; and much more.
If you complain to Microsoft, they’ll inevitably tell you to write a macro that
simulates the missing feature. Fortunately, doing so isn’t as technical as it
sounds. Here’s the quickest way to create a macro in Word 6 and 98.
Fortunately, you have to do this only once per feature.
Step 1: Set up the macro
■Wor d 6: Choose Tools ➪Macro. In the dialog box that appears, type a
name for the command you’re about to add — “FractionalWidthsOff,”
for example. In typical stupid Microsoft style, you’re not allowed to use
spaces or punctuation of any kind (see Figure 17-35). Don’t click the
default Create button, as you might guess; instead, click Record.
In the next dialog box, you’ll see three square buttons: Menu, Toolbar, or
Keyboard. Click the one that represents how you’d like to trigger your
new command when this is all over. For example, click Menu if you’ll want
the Smart Quotes feature to be a menu command. (See Figure 17-33.)
688 Part III: Application Secrets
■ ■
MAC SECRETS • 4040-8/5 • ch.17.F • Chapter 17 • Final • EAP • 10/23/98 • p.688
MAC SECRETS • 4040-8/5 • ch.17.1 • Chapter 17 • Proof 1 • VB • 09/18/98 • p.688
4040-8/5 ch17.F 11/3/98 3:42 PM Page 688
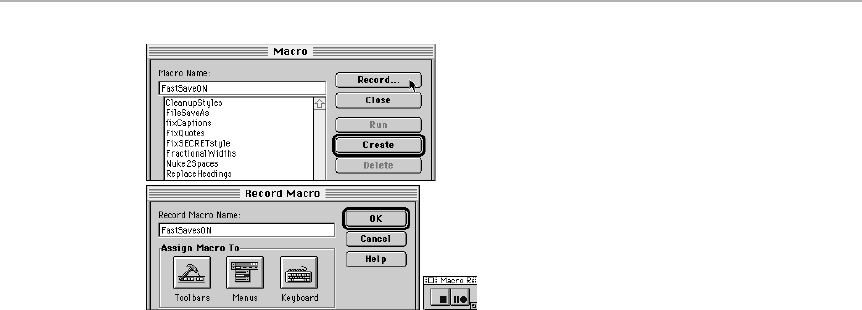
Figure 17-33 : To create a macro in Word 6, you first encounter the Macro dialog box (top).
In the next box (bottom left), you’ll see three buttons. If they’re dimmed, it’s because you use
a space or punctuation mark in your macro name. When you’re finished doing your macro’s
steps manually, click the square button on the floating Macro palette (lower right).
■Word 98: Choose Tools ➪Macro ➪Record New Macro. In the dialog box
that appears, type a name for the command you’re about to add. You’ll
see two buttons: Toolbar (for creating a button that will trigger your
macro) and Keyboard (for macros you’ll launch with a keystroke). Click
the one you want to use. (Don’t worry about this choice; you can always
turn a macro into a keyboard shortcut, menu command or button — or
all three — later on.)
Step 2: Assign a trigger
What happens next depends on which of the buttons you clicked. If you
clicked Menu (Word 6), click Add and then Close (after first specifying which
menu you want your new command added to). If you clicked Toolbar, drag
your new macro’s name from the right side of the dialog box onto any open
toolbar on the screen. And if you selected Keyboard, now press the keystroke
you’ll want to trigger this macro. Click Assign, then Close.
Step 3: Record the macro
And now you’re actually recording. Do whatever it is. For example, to
create a Fractional Widths Off command, choose Options from the Tools
menu, click the Print tab, click the Fractional Widths check box, and click OK.
(Unfortunately, you must create two macros for this example: one that’s
FractionalWidthsOn, and another for FractionalWidthsOff.)
Other examples of things to do at this stage are performing a search-and-
replace, turning other Options items on or off, or doing a repetitious editing
process (deleting the little Internet box in front of each line, for example).
When it’s all over, click the square Stop button on the floating Macro palette.
Chapter 17: Word Processing 689
■ ■
MAC SECRETS • 4040-8/5 • ch.17.F • Chapter 17 • Final • EAP • 10/23/98 • p.689
MAC SECRETS • 4040-8/5 • ch.17.1 • Chapter 17 • Proof 1 • VB • 09/18/98 • p.689
4040-8/5 ch17.F 11/3/98 3:42 PM Page 689

Now you’re in business. Your macro should always work when you trigger it
from your menu, keyboard, or toolbar. Despite the ridiculous complexity of
setting up one of these macros, we must admit that, when they actually run,
they’re fast and efficient.
Our final suggestion, however, is to quit Word promptly after creating your
macros — that’s how they get saved into your Normal template. If your Mac
were to crash before you did so, you’d lose all of the macros you just created.
WordPerfect
The first Mac edition of this popular IBM word processor left a lot to
be desired — a Mac interface, for starters. But with version 3 and later,
WordPerfect became a mean, lean, high-powered Word 6 killer that was the
Number Two word processor in the Mac marketplace. The current version is
even better, embracing just about every relevant technology developed by
Apple: QuickTime, AppleScript, Macintosh Guide, WorldScript and speech
synthesis.
During the dark period before Word 98, many faithful Microsoft customers
became disenchanted with Word 6’s slogging performance and turned to
WordPerfect instead. Here’s a collection of insightful tidbits.
WordPerfect Secrets
■
Kerning from the keyboard
You can, if you want, perform kerning numerically, by typing numbers into the
Line dialog box (Layout menu). It’s faster (if less precise) to do it by eye, though.
Just click between the letters you want to kern, and press Shift-F1 (to move the
letters one point closer) or Shift-F2 (farther apart).
Setting up your default style
If you’re a power user, you know this. If you’re sick of having to reselect Palatino
10-point and .75-inch margins every darned time you start a new document,
you’ll appreciate this. It’s the instructions for changing the default (Normal)
style.
Make sure the Layout ruler is visible (we’re talking about version 3 here). Click
the Styles button and then the Edit button. Scroll so that you can see the
Normal style name. Double-click it.
Use the regular menus to specify a type size, font, column setup, and so on.
You’ll see WordPerfect storing this information in the styles-editing window at
the bottom of the screen.
690 Part III: Application Secrets
■ ■
MAC SECRETS • 4040-8/5 • ch.17.F • Chapter 17 • Final • EAP • 10/23/98 • p.690
MAC SECRETS • 4040-8/5 • ch.17.1 • Chapter 17 • Proof 1 • VB • 09/18/98 • p.690
4040-8/5 ch17.F 11/3/98 3:42 PM Page 690

Startup macros
WordPerfect has a
macro language
— a set of commands you string together to
perform powerful text-manipulation stunts. For example, one such macro may
sweep through the document, changing all your straight quotes to curly ones,
eliminating double spaces after periods, and turning double hyphens into em
dashes.
If you create a macro called OnStartUp and (using the Librarian feature) stick
it into your USA Private Library, it runs every time you launch the program. Or, if
a macro is called OnOpenDocument and saved with a particular document, it
runs each time you open that document. (It does if you use WordPerfect’s
Open command, anyway — not if you double-click the file’s icon in the Finder to
open it.)
Character-level styles in WordPerfect
WordPerfect offers character-level styles — you can apply your styles only to
selected words or phrases, not entire paragraphs — but the feature is
completely undocumented.
To apply character styles, create and run the following one-line macro:
Formatting (Character).
Choose that new macro from your Tools menu. Now,
whenever you apply a style, it will affect only the selected text, not the entire
paragraph. A character style otherwise works just like a regular style sheet —
every occurrence changes when you update the style. For best results, create a
second macro —
Formatting (Paragraph)
— to switch back to regular paragraph-
at-a-time style-applying.
Pop text into your style sheets
In most word processors, a style sheet consists of character and paragraph
formatting
. But, in WordPerfect,
text
can be a part of a style. For example, every
paragraph in your Legal style could begin with the word
ITEM:
, automatically
typed; another style could have automatic bullets or check marks, and so on.
To set this up, click New or Edit on the Styles button bar, click Edit, and then
simply type whatever text you want as a prefix.
To crop a graphic
Press the Option key as you drag the handle of a graphics box. The frame chops
off (or reveals more of) your graphic, depending on which way you drag.
Search backward
If you press Shift while clicking the Find button in WordPerfect’s Find/Change
dialog box, WordPerfect will search your document in the direction opposite
what’s indicated.
Chapter 17: Word Processing 691
■ ■
MAC SECRETS • 4040-8/5 • ch.17.F • Chapter 17 • Final • EAP • 10/23/98 • p.691
MAC SECRETS • 4040-8/5 • ch.17.1 • Chapter 17 • Proof 1 • VB • 09/18/98 • p.691
4040-8/5 ch17.F 11/3/98 3:42 PM Page 691

The world’s best Find Next command
To find the next occurrence of a word in a WordPerfect document, you don’t
even have to visit the Find/Change dialog box. Instead, just highlight the word,
then press Ô-G to jump instantly to the next occurrence of that word.
Do a little horizontal math
You probably already know that when you have part of a table highlighted,
you can click the Sum button on the Table/Math Bar to add up the individual
columns. Here’s the secret that’s almost universally ignored: If you press the
Option key while clicking the Sum button, WordPerfect totals the horizontal
rows.
Ready-to-print cheat sheet
WordPerfect is crammed with shortcuts that use the function keys on a Mac
extended keyboard — F1, F2, F3, and so on. But how are you supposed to
remember all those Ô-Option-function key combinations? Inside your
WordPerfect folder, inside the Documentation folder, is a Function Keys
Template document — a cheat sheet that’s meant to be taped right on to your
keyboard. Print it, cut it on the dotted lines, and slap it on your keyboard for
quick reference.
Taming WordPerfect’s style sheets
WordPerfect’s style sheets function a little differently than those found in
other word processors and page layout programs. By default, WordPerfect’s
applies a new paragraph format not only to the text you have selected, but to
the remainder of your document. To make WordPerfect work like other programs,
choose Preferences from the Edit menu, click Environment, and choose Single
Paragraph from the Format menu in the dialog box. Now you can apply styles on
a paragraph-by-paragraph basis.
WordPerfect’s built-in multi-Clipboard
Normally, when you use the Copy command, the text you’re copying replaces
the previous contents of the Clipboard. WordPerfect, however, has a secret
cumulative
Clipboard. If you highlight some text and press Ô–Shift-A instead of
it Ô-C, your selection gets added to a
cumulative
Clipboard. After copying with
Ô–Shift-A repeatedly, you can choose the Paste command—and paste
everything
you’ve copied at once.
Worth
Learning
Worth
Learning
692 Part III: Application Secrets
■ ■
MAC SECRETS • 4040-8/5 • ch.17.F • Chapter 17 • Final • EAP • 10/23/98 • p.692
MAC SECRETS • 4040-8/5 • ch.17.1 • Chapter 17 • Proof 1 • VB • 09/18/98 • p.692
4040-8/5 ch17.F 11/3/98 3:42 PM Page 692

Nisus, WriteNow, MacWrite Pro
Each of these word processors has a small, but fiercely passionate, following.
Nisus Writer is a high-horsepower, multiple-Undo, programming-languaged
word processor.
MacWrite Pro is marked by the late Claris Corp.’s usual elegant, clean design —
not nearly as overwhelming as Word or WordPerfect, yet it has many of the
same features. And WriteNow was once the fastest (and smallest — a tiny 267K)
word processor ever written for the Mac. Unfortunately, these programs are no
longer sold or developed.
We have a few secrets for each of these programs; while they don’t appear
on these printed pages, they’re safely on your Mac Secrets CD-ROM, in
Macworld Mac Secrets, 4th Edition. (Many of the AppleWorks/ClarisWorks
Secrets later in this chapter work in MacWrite, too, as noted.)
AppleWorks/ClarisWorks
AppleWorks — whose name was born when Apple dismantled Claris and
adopted custody of what used to be called ClarisWorks — has a surprisingly
good word processor: clean, well designed, and extremely fast. It even has a
quick and polished style-sheet feature: click a style’s name (such as Heading 1),
and the selected text is instantly reformatted. Better yet, there are also Table
styles (various shadings and line-thickness schemes); Outline styles (Roman
numerals, diamonds, and so on); even styles for objects you create in the
drawing and painting modes (for example, particular colors and line
thicknesses).
And because ClarisWorks can open and save Microsoft Word documents (or
any of a dozen other Mac and IBM file formats), you can have the joy of writing
in ClarisWorks — and turn in finished Word files, so your correspondents and
editors will never know the difference. Most of our secrets work in versions 4
and 5.
AppleWorks/ClarisWorks Word
■
Processor Secrets
Get it from the Library
Don’t pooh-pooh the Library — a floating palette that shows thumbnail
representations of frequently used material (clip art, text, spreadsheet
cells — almost anything). You can drag one of these thumbnails into your
document to place the material there. Although you may suppose, at first, that
Chapter 17: Word Processing 693
■ ■
MAC SECRETS • 4040-8/5 • ch.17.F • Chapter 17 • Final • EAP • 10/23/98 • p.693
MAC SECRETS • 4040-8/5 • ch.17.1 • Chapter 17 • Proof 1 • VB • 09/18/98 • p.693
4040-8/5 ch17.F 11/3/98 3:42 PM Page 693
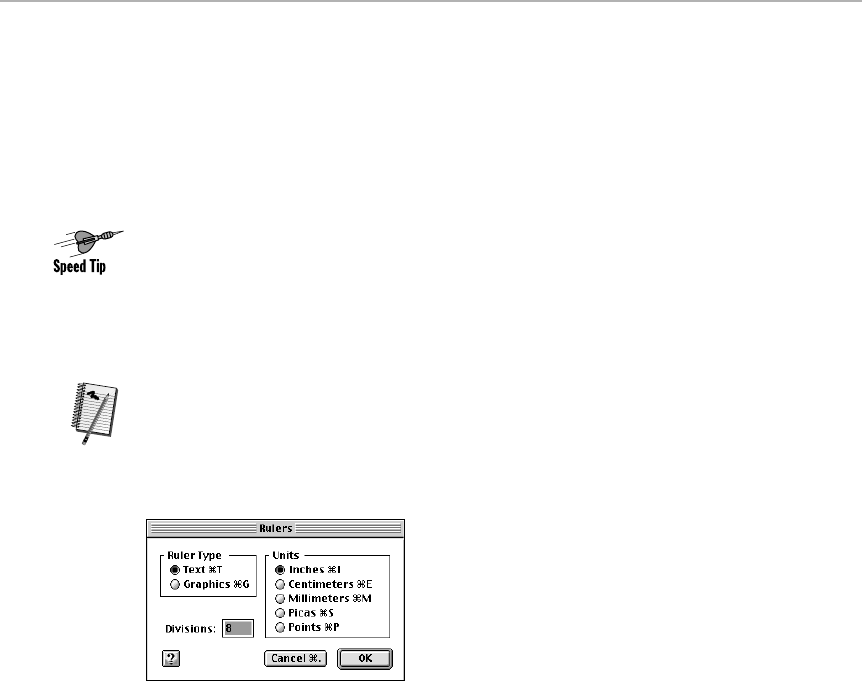
they’re for kids to store little clip-art pictures in, the Library is also extremely
useful for such hardcore business elements as your logo, your scanned
signature, return address, boilerplate text, and so on.
Quick access to Preferences
(MacWrite Pro, too)
Option-click the page number indicator (lower-left corner of the screen) to open
the Preferences dialog box — with the relevant section (such as text or
spreadsheet) already scrolled into view.
Keyboard shortcuts revealed
Like most Claris programs, AppleWorks provides plenty of keyboard shortcuts
that trigger commands
within
dialog boxes. To find out which keystrokes provide
shortcuts, press the Ôkey while in a dialog box (such as Open or Save — the
Ô-key shortcuts corresponding to each command will be displayed right on
screen. (See Figure 17-34.)
Figure 17-34: Who would suspect that ClarisWorks’s dialog boxes are every bit as keyboard-
controllable as, say, Word’s? Just press the Ôkey to reveal the secret keystrokes.
Open a document directly on startup
(MacWrite Pro, too)
Under normal circumstances, when you double-click the AppleWorks/ClarisWorks
application icon, you get a dialog box offering a choice of document types:
word processing, painting, and so on. If you want instead to open an existing
document, press Ôas the program is launching. You are presented with the
usual Open File box, from which you can select the existing document you want
to open.
Worth
Learning
694 Part III: Application Secrets
■ ■
MAC SECRETS • 4040-8/5 • ch.17.F • Chapter 17 • Final • EAP • 10/23/98 • p.694
MAC SECRETS • 4040-8/5 • ch.17.1 • Chapter 17 • Proof 1 • VB • 09/18/98 • p.694
4040-8/5 ch17.F 11/3/98 3:42 PM Page 694

Cursor manipulation keys (MacWrite Pro, too)
Here, for your reference, are the key combos for making the cursor jump around:
■Jump by one word: Option-arrow key (left/right)
■Jump to the start or end of the line: Ô-arrow key (left/right)
■Jump up or down a paragraph: Option-arrow key (up/down)
■Jump to the beginning or end of the document: Ô-arrow key (up or down) —
or just use the Home and End keys
Add the Shift key to any of these combos to
select
the text as you move the
cursor.
Selection shortcut guide (MacWrite Pro, too)
Here are the click-tricks for selecting text quickly:
■Double-click. . . to select a word.
■Triple-click. . . to select a line.
■Quadruple-click. . . to select a paragraph.
■MacWrite only:
Quintuple
-click. . . to select the entire document (except
headers and footers).
Insta-indent
Reader François Brahic points out a handy paragraph-indenting keystroke for the
AppleWorks/ClarisWorks word processor. Just place the cursor anywhere in the
paragraph and press Control-right arrow. You can do this several times, indenting
the paragraph more each time.
And Control-
left
arrow, of course, moves the paragraph’s left edge toward the
left
side of the page.
The wonderfulness of Click-and-Drop
Perhaps even more useful than AppleWorks/ClarisWorks’ drag-and-drop editing it
its “click-and-drop” feature for moving text around.
It works like this. You highlight some text. You move the cursor to a new spot —
and you Ô-Option-click. The highlighted text instantly jumps to the new location
(see Figure 17-35).
Worth
Learning
Chapter 17: Word Processing 695
■ ■
MAC SECRETS • 4040-8/5 • ch.17.F • Chapter 17 • Final • EAP • 10/23/98 • p.695
MAC SECRETS • 4040-8/5 • ch.17.1 • Chapter 17 • Proof 1 • VB • 09/18/98 • p.695
4040-8/5 ch17.F 11/3/98 3:42 PM Page 695
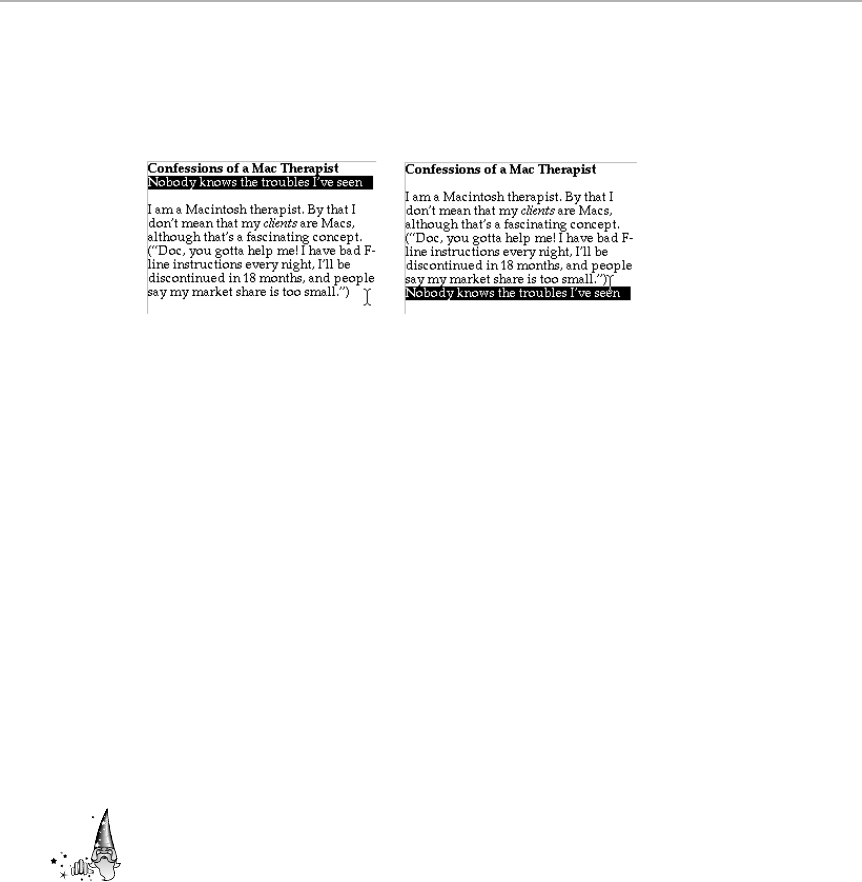
In a way, this shortcut is even more useful than Drag-and-Drop, because it’s
easier to move text long distances. For example, you wouldn’t want to move
some text from page 1 to page 35 by dragging — but it’s easy to scroll and then
click.
Figure 17-35: ClarisWorks bypasses the cut-and-paste routine with its secret text-moving
click trick. Highlight text (left), then Ô-Option-click. The text moves (right).
That amazing Font menu
One thing that’s cool about AppleWorks/ClarisWorks is its Font menu, which
displays each font name in the actual typeface. One thing that isn’t cool is that,
therefore, you can’t read the names of symbol fonts like Symbol, Zeal, or Zapf
Dingbats — you see only a string of symbols in your menu!
The trick: Just as in Word 98, you can press a key — in this case, Option — as
you pull down the menu. Every font name will appear in the usual Chicago font,
as they would in any other program.
But wait — there’s more! If you press Option
after
pulling down the menu, each
font in the menu your mouse touches instantly converts back to Chicago, leaving
the others alone.
For example, if you open the Font menu and move your cursor to what looks like
the Symbol font, press the Option key — the font’s name, Symbol, appears
instantly in normal Chicago.
In fact, the same trick works in reverse. When you pull down the Font menu with
the Option key pressed, every font’s name appears in the Chicago font. But
when you
release
the Option key, every font your cursor touches changes back
into its WYSIWYG, own-typeface mode. Press Option again, and the font’s name
switches back to Chicago yet again!
(Clearly this is part of Claris’ core programming — FileMaker Pro and
ClarisImpact 2.0 exhibit the same behaviors.)
Strange
But True
696 Part III: Application Secrets
■ ■
MAC SECRETS • 4040-8/5 • ch.17.F • Chapter 17 • Final • EAP • 10/23/98 • p.696
MAC SECRETS • 4040-8/5 • ch.17.1 • Chapter 17 • Proof 1 • VB • 09/18/98 • p.696
4040-8/5 ch17.F 11/3/98 3:42 PM Page 696

How to set up your default fonts
If you’re still manually selecting your favorite font every time you begin a new
document in ClarisWorks, it’s time to create your ClarisWorks WP Options
document.
In other words, create a new word processor document. Change the font to
something you like. (Change everything else while you’re at it — the margins, the
line spacing, and so on.) Choose Save from the File menu. In the next window,
click the Stationery button. Give your new document the name “ClarisWorks WP
Options,” and save it into the Claris folder (inside the System folder).
From now on, every time you create a new word processing document, it will
have the font you want.
By the way, you can also create stationery default documents for the other
ClarisWorks document types. Follow the same steps; but in place of the WP (for
word processing), type GP for graphics, DB for database, SS for spreadsheet,
and so on — for example, ClarisWorks GP Options.
(A related trick: Put a macro file named ClarisWorks Macros in the Claris folder
inside your System folder. ClarisWorks will automatically load these macros
when it’s first opened.)
QuickHelp’s Secret Credits
Software engineers are notorious for plugging little secret messages into their
software and the folks who wrote QuickHelp, ClarisWorks’ online help system,
didn’t hold back a bit. Open QuickHelp from the Help menu by choosing any
Worth
Learning
Chapter 17: Word Processing 697
■ ■
MAC SECRETS • 4040-8/5 • ch.17.F • Chapter 17 • Final • EAP • 10/23/98 • p.697
MAC SECRETS • 4040-8/5 • ch.17.1 • Chapter 17 • Proof 1 • VB • 09/18/98 • p.697
TRUE FACT
ClarisWorks 5.0 allows you to password protect
individual documents. Choose File ➪Document
Summary ➪Set Password. After you enter the
password and confirm it, your document
becomes unopenable without first entering the
correct password.
Or does it? Reader Ellis I. Lee points out that
Claris has padlocked the front door, but left the
back door wide open.
Because this password protection scheme
doesn’t use encryption, breaking past the
password isn’t difficult. You can easily force a
ClarisWorks word processor document open, for
example, with Microsoft Word (choose Word’s
Open command, and change the File Type to All
Files). ResEdit and CanOpener (on this book’s
CD-ROM) also make quick work of cracking into
a locked file. (The latter two programs can also
extract pictures from a password-protected
ClarisWorks drawing.)
Of course, this rather lax approach to document
security can work in your favor, too. If you forget
your password and absolutely must retrieve an
essential piece of data, you’re not up the creek
without a paddle.
Breach of security
4040-8/5 ch17.F 11/3/98 3:43 PM Page 697

of the ClarisWorks Help commands. Hold down the Option key while choosing
About QuickHelp from the menu — and the show begins. You’ll see credits
for Constant Nag, Immigration Specialist, and the Man in Love with Rita Kan,
among many others.
The longer you watch, the funnier it gets. As you run the credits, new items
appear. Revisit a few times and you’ll see credits, epigrams, and other little
items that get wackier and wackier.
Avoiding QuickHelp bloat
QuickHelp, mentioned in the previous secret, is actually a separate little
program from Altura Software. Various other programs — not just AppleWorks—
rely on QuickHelp as the basis for their electronic help system. As a result, it’s
easy to end up with multiple copies of QuickHelp. Install Macromedia Director,
Freehand and ClarisWorks, you’ll end up with three copies of QuickHelp.
Trash all but the newest version of QuickHelp on your hard drive (or download the
latest version from Altura’s web site at www.altura.com). Leave the most current
version loose in the System Folder. Then rebuild the desktop file (see Chapter 1
for instructions). Now all the programs that require the QuickHelp engine will use
the one copy stashed in the System Folder.
SimpleText: The ReadMe Machine
Don’t give us grief: SimpleText is a word processor, and it was probably the
first Mac word processor you ever used. It comes with every Mac — heck, it
comes with every program you can buy. It was originally called TeachText,
because its primary purpose was to let you read Read Me files (text files
containing last-minute information about a piece of software), which, we
gather, are meant to teach you a few critical lessons.
698 Part III: Application Secrets
■ ■
MAC SECRETS • 4040-8/5 • ch.17.F • Chapter 17 • Final • EAP • 10/23/98 • p.698
MAC SECRETS • 4040-8/5 • ch.17.1 • Chapter 17 • Proof 1 • VB • 09/18/98 • p.698
TRUE FACT
Today’s spell-checking software is certainly
more sophisticated than it was five years ago,
but it’s still far from perfect. Even the best
spelling programs choke when they encounter
certain proper names and technical terms. Still,
the erroneous suggestions spit out by a word
processor’s spell checker sometimes seem
downright suspicious. Case in point: One Mac
Secrets reader was proofing a ClarisWorks
document when his spell checker paused on the
phrase “800-SOS-APPL” — Apple’s toll-free
technical support phone number. ClarisWorks
flagged the phone number as having a
questionable spelling and suggested, as an
alternative, only one other word: Cesspool.
Got a problem? Call C-E-S-S-P-O-O-L
4040-8/5 ch17.F 11/3/98 3:43 PM Page 698

SimpleText, heir to TeachText, serves the same purpose. However, it’s been
substantially enhanced (and tripled in size). In SimpleText, multiple fonts
and sizes can appear in the same document; you can open more than one
document at once; it can read back text to you in a variety of voices (see
Chapter 23); it offers Macintosh Drag-and-Drop (see Chapter 1); it can display
GIF, PICT and JPEG graphics, not to mention QuickDraw 3D images; it can
play QuickTime movies; and you can record (and store) a sound file with
each document, if you have a microphone.
SimpleText Secrets
■
Graphics? In SimpleText!?
Yes, indeed! Of course, you can’t
paste
anything into a SimpleText document.
(A beep is all you get.)
In the previous edition of this book (which is on your CD-ROM in electronic form,
if you really want to see it), we prided ourselves on presenting the sneaky
method for embedding graphics into SimpleText. It only took three or four hours,
involving Option-spaces, trial-and-error spacing, and surgery in ResEdit.
But free book winner Bill Sveinson pointed out a far easier method. Just write up
your document in Tex-Edit Plus, a smooth SimpleText alternative that’s included
with this book. You can drag-and-drop (or paste) pictures right into your work.
Then, when you save the document, you’re offered a choice of file formats. Save it
as a SimpleText-Read Only document, and you’re done —no ResEdit required.
Edit the uneditable documents
Ever noticed this? When you double-click SimpleText, it opens a new blank
document and lets you word process. You can drag through text, cut, copy,
paste, and so on.
But when you open a Read Me file that comes with a program you buy, you’re
usually not allowed to edit it or copy from it! You can only read or print it.
The secret lies in the four-letter
type
code for the document (see Chapter 15).
There are two kinds of SimpleText documents: one that can’t be edited and one
that can. All you have to do is change the non-editable type code to the one that
can be edited.
You can do this with FileTyper (included on the CD-ROM with this book). Drag the
Read Me file’s icon onto FileTyper; in the dialog box that appears, change the
file’s type code to
ttro
(to make an uneditable document) or TEXT (to make
it editable). (Capitals count.) When you close the window, you’ll see your
document’s new icon (see Figure 17-36).
Contest
Winner
Chapter 17: Word Processing 699
■ ■
MAC SECRETS • 4040-8/5 • ch.17.F • Chapter 17 • Final • EAP • 10/23/98 • p.699
MAC SECRETS • 4040-8/5 • ch.17.1 • Chapter 17 • Proof 1 • VB • 09/18/98 • p.699
4040-8/5 ch17.F 11/3/98 3:43 PM Page 699
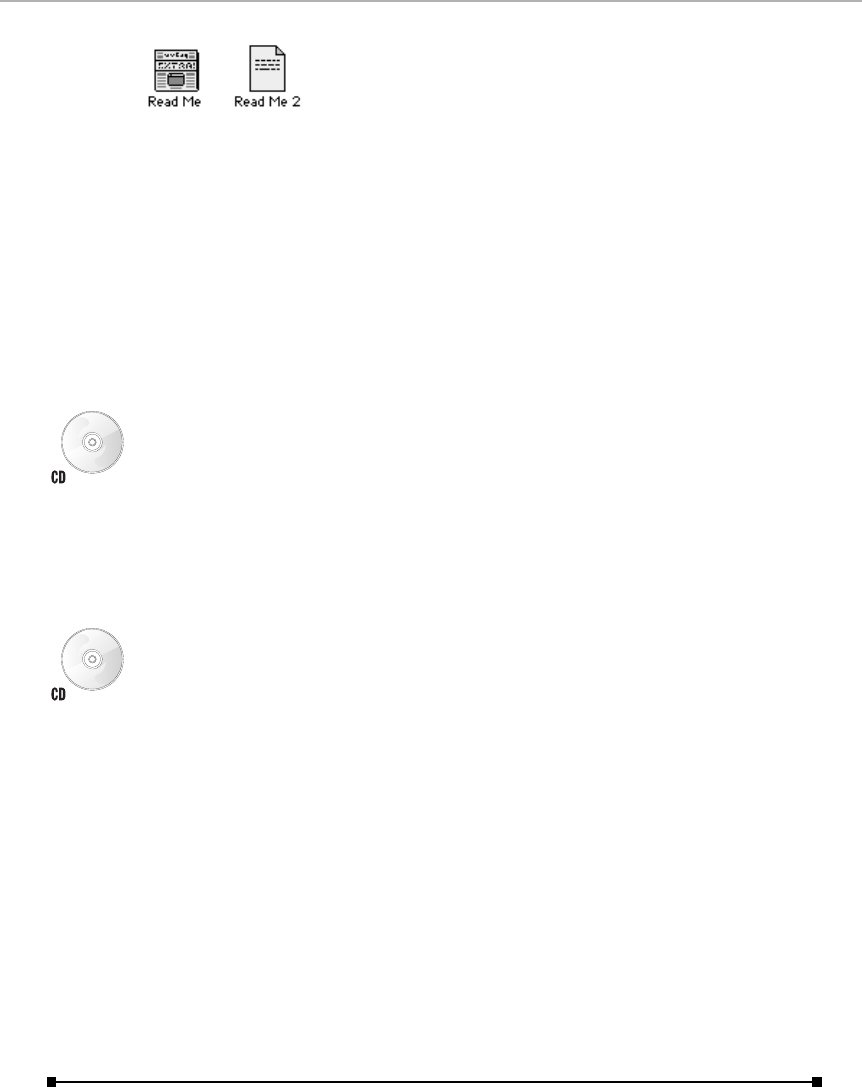
Figure 17-36: On the left: the familiar Read Me-style “Extra!” newspaper icon. This is a file
whose type has been changed to ttro. (Stands for TeachText, read only, get it?) On the right,
a normal TeachText document, like the one you’d create yourself. This one you can edit. Its
type is TEXT.
Write your own Read Me files
Suppose you want to do the opposite of the previous secret — turn an ordinary
SimpleText document into an uneditable Read Me-type file, complete with its
own little “Extra!” newspaper icon. You can do it, without even resorting to using
four-letter type codes.
Once again, the solution is to create the document using Tex-Edit, the
surprisingly powerful little word processor included on this book’s CD-ROM.
When you go to save your document, you’ll notice that one of the options listed
in the pop-up menu in the Save dialog box is TeachText Read Only. Anything
saved in Tex-Edit with this option selected will indeed become a genuine,
read-only SimpleText file.
Making SimpleText even better
SimpleText is called SimpleText for a reason — it’s not exactly a high-powered
word processor. But you can give it a free upgrade by installing SimpleText Color
Menus, a free program that patches all sorts of new features into SimpleText,
including colored text, a Find-and-Replace command, margin control for printing,
word count capabilities and more. It’s on the CD-ROM that comes with this
book.
Unexpected smarts
When you drag text out of a drag-and-drop-savvy program, it turns into an icon
on your desktop called Text Clipping. But not if you’re using the latest version of
SimpleText, and you’re reading a Read Me file. In that case, Mac OS 8 is smart
enough to name the clipping file Read Me Clipping!
Roll credits! (SimpleText only)
While pressing Ôand Option, choose About SimpleText from the Apple menu.
You get to see some additional credits. Hurray!
700 Part III: Application Secrets
■ ■
MAC SECRETS • 4040-8/5 • ch.17.F • Chapter 17 • Final • EAP • 10/23/98 • p.700
MAC SECRETS • 4040-8/5 • ch.17.1 • Chapter 17 • Proof 1 • VB • 09/18/98 • p.700
4040-8/5 ch17.F 11/3/98 3:43 PM Page 700

Macworld MAC SECRETS • 4040-8/5 • ch.18.F • Chapter 18 • FINAL • VB • 11/04/98 • p.701
Chapter 18
Page Design
In This Chapter
©The basic principles of attractive page design
©Hints and tricks for PageMaker
©Quark Power-User Secrets
©Transforming your layouts into Web pages
Today’s page-layout programs and word processors aren’t as drastically
different from each other as they once were. Word processors can easily
field the kinds of tasks that once demanded a PageMaker-type program:
wrapping text around a graphic on the page, laying out text in multiple
columns, creating reverse type (white lettering on black), and so on.
But as word processors have grown up, so have the page-layout programs:
PageMaker and QuarkXPress, the most popular pair, as well as high-end
multiple-platform powerhouses like FrameMaker. Anyone who wants to
design and publish professional magazines, books, advertising materials,
and other documents on the Mac still needs one of these page-design
workhorses. Only page-layout programs, for example, can turn your
magazine pages into color separations, which are needed to create plates
for full-color printing on a printing press. Only page-layout programs are
equipped to provide your documents with multiple underlying design
layouts (master-page templates). And only page-layout programs provide
super-precise typographical control — allowing you to adjust the space
between characters to the thousandth-of-an-inch, for example — so you
can produce truly high-quality page designs.
A few years ago, hardly a week went by without us hearing of another famous
publication finally embracing the Mac and scrapping its age-old page-makeup
routines — pasting wax-backed, column-width vinyl strips onto page-sized
cardboard sheets on which the designer’s blue pencil lines indicate where
each slab of type is to go. Nowadays, with Windows-compatible versions of
applications such as PageMaker and QuarkXPress readily available, more and
more people are trading in their old typesetting equipment for Windows-
based systems instead of Macs. But make no mistake about it: Despite any
“Mac-is-dead” hype you may hear, the Macintosh still utterly dominates the

702 Part III: Application Secrets
■ ■
Macworld MAC SECRETS • 4040-8/5 • ch.18.F • Chapter 18 • FINAL • VB • 11/04/98 • p.702
PageMaker versus Quark
DP: Ohhhh, no you don’t. We are not going to take up
valuable page space rehashing this old PageMaker-
versus-Quark argument. End of Dialogue.
JS: C’mon, c’mon. It’s a classic confrontation! What
are you, a wuss?
DP: Look, I’ve read the equivalent of this discussion
in every Mac book and magazine ever printed. It’s
meaningless. No sooner have you finished a sentence
than either PageMaker or Quark has a new version out.
And your whole debate is obsolete.
JS: No way! Look, it’s not about features. It’s about
philosophy —
DP: Well, I’m not going to get sucked into any
PM-versus-Quark debate with you. Period.
JS: — and PageMaker’s philosophy is: Make it easy
and powerful. Quark’s philosophy is to bury every
feature, and then come up with a bad manual that
doesn’t tell you where they are. And if there’s a more
customer-hostile company than Quark anywhere—
DP: You’re living in the past! Quark is light years
more elegant than PageMaker. In PageMaker, you can’t
even do basic page design stuff, like group and lock
objects on a page, or move them forward or backward
a layer at a time. And in PageMaker, you can’t set up
master pages. I don’t want to talk about this.
JS: Got news for you: PageMaker 6.0 nuked all of
those old drawbacks. You can create up to 256 master
pages in a PageMaker document. And it’s still easier
to use.
DP: Well, Quark’s got XTensions. Little plug-in
miniprograms that add some pretty incredible features.
JS: PageMaker’s got Plug-ins. Same thing, but they’re
almost all free. You don’t have to fork over hundreds or
even thousands of bucks for them.
DP: They’re not the same thing. Xtensions add
qualitative, brand-new features; PageMaker’s things
are just macros.
JS: You’ve been writing too many “. . . For Dummies”
books.
DIALOGUE
world of desktop publishing. Most of the page designs you see every day —
in magazines, newspapers, or brochures — were created on a Mac.
Page-Layout Principles
Because much of page layout involves typography (and good editing), we
encourage you to read ahead to “The Non-Typographer’s Guide to Type” in
Chapter 29.
Those Chapter 29 guidelines (kerning, type tips, hyphenation, and so on)
should carry just as much weight in page layout. More, really. As for page
design, here are some additional hints that can go a long way toward
ensuring that your documents look good.
Two font families, three at most
With 10,000 fonts at your disposal in the Macintosh world, we can
understand the temptation to go type crazy. But the best page designs rein
in those madcap font instincts. One possible guideline: Choose one serif
typeface for the main body text, and one sans serif font for headlines,
captions, and pull quotes.
A serif font, like the one you’re reading, has tiny ledges at the edges of the
letters; Times, Palatino, and New York are some examples. A sans serif font,
as shown in Figure 18-1, has no such serifs, as they’re called. Helvetica and
Avant Garde are sans serif fonts.
Figure 18-1: The top font shows the little serifs on the ends of each stroke. The lower font is
without serifs — or, in French, sans serif.
This doesn’t mean that you can’t use variations. For example, if you choose
Futura (a great-looking sans serif face) as one of your two families, you may
find that Futura Extra Bold looks good as a headline and Futura Light is
perfect for little captions. That’s all within the realm of good taste.
The point is that a little consistency gives your self-published document the
appearance — or just the illusion — of having been thoughtfully designed and
having some thematic tie-ins in its look.
Chapter 18: Page Design 703
■ ■
Macworld MAC SECRETS • 4040-8/5 • ch.18.F • Chapter 18 • FINAL • VB • 11/04/98 • p.703
DP: Now what’s that supposed to mean?
JS: Look, the newest PageMaker Plug-ins add all
kinds of additional features. And the program itself has
gotten more powerful, too. The newest version allows
you to export PageMaker documents as HTML-tagged
text for publishing on the World Wide Web. Try doing
that with QuarkXPress.
DP: OK, I will! I’ll get one of the XTensions that do
it — and do it a lot more effectively than PageMaker..
Besides, Quark is still way better for high-end color
work; it’s much better than PageMaker for separations
and trapping.
JS: Was. PageMaker 6.0 has automatic trapping and
virtually matches Quark’s high-end color capabilities.
DP: Did you say high-end? PageMaker doesn’t even
support two-color gradient fills! Not exactly a high-end
feature. We’re talking ClarisWorks-level stuff here!
JS: I can’t believe we’re discussing these minute
differences.
DP: Minute? How about character-based style
sheets? Quark’s got them, PageMaker doesn’t. You call
style sheets minute? How about Quark 4.0’s drawing
tools? Bezier curves? Text on a path? All missing in
PageMaker.
JS: OK, OK, but basically, these programs have
become almost identical. Whatever Quark had,
precision, the Measurements floating palette, drag-
and-drop libraries — PageMaker 6.5 can finally do all
the good stuff Quark 4.0 does.
DP: Except for text-to-path conversion, and multi-
columned frames, and —
JS: Well, perhaps we should mention PageMaker’s
support for multiple layers and the Hyperlinks palette —
DP: Ah, but you haven’t seen what’s coming in
Quark 4.5.
JS: Yeah, but you haven’t seen PageMaker 7.
Now do you see why I didn’t want to get into this?
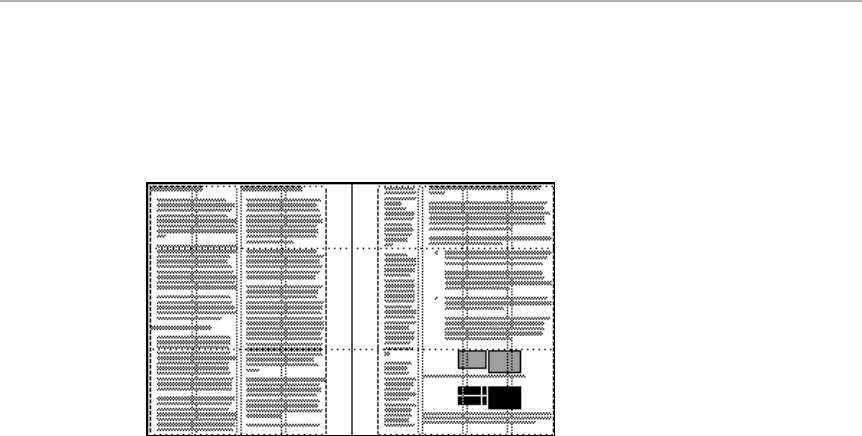
Page grid
Look at a newspaper or a magazine. You’ll discover that behind the articles
on every page, almost every publication has an invisible set of columns that
determines where text flows (see Figure 18-2).
Figure 18-2: In both PageMaker and QuarkXPress, you can add guides to the master page
by dragging them “out of” the rulers at the edges of the screen. They form the basis of the
underlying page grid. In this example, the four underlying columns are combined in different
ways to create different page effects without losing a feeling of consistency.
But if a magazine has a page grid of five very thin, invisible columns, that
doesn’t mean that every page will have text in five thin columns. The
designer is allowed to combine column widths and still remain within a
tasteful framework. An editorial page may have two columns, for example:
one that’s two invisible columns wide, and another that’s three invisible
columns wide. A Letters to the Editor section, on the other hand, may flow its
text in all five thin columns per page.
In any Mac page-layout program, you create these invisible background
columns using nonprinting guide lines. Generally, you place these guide lines
on a master page — a special electronic page whose elements underlie the
contents of every actual page in your document (see Figure 18-2).
In defense of the ragged-right margin
One trademark feature of professionally typeset publications is a justified
right margin — where the right margin is a clean, crisp vertical line. Take a
look at magazine and newspaper columns and you’ll see what we mean. And
in virtually all word-processing and page-layout programs, turning on
justification is as simple as clicking a button.
704 Part III: Application Secrets
■ ■
Macworld MAC SECRETS • 4040-8/5 • ch.18.F • Chapter 18 • FINAL • VB • 11/04/98 • p.704

Our advice: Don’t turn on justification thinking it will make your document
look more like Time magazine. Actually, forced justification can make your
document harder to read and make it look less professional.
You see, unless text is hand-tweaked to fit into those nice clean columns,
justified text can look awful, with gaping stretches of white space between
words or — even worse — goofy, awkward spaces between letters. This is
particularly true if you happen to be using a large font in narrow columns.
The justified line breaks can wreak havoc on word and letter spacing. (We
could show you a PC-produced club newsletter or two to prove our point.)
So our rule is this: If you must have justified columns of text, be prepared to
adjust the kerning (the spacing between individual letters) to get an eye-
pleasing fit. (Programs such as QuarkXPress and PageMaker enable you to
adjust overall letter and word spacing, called tracking, as well as the space
between individual characters.) You may even need to change or omit a word
here and there to make everything fit properly.
Frankly, we think there’s too much ugly justified text in this world. We find
ragged-right text easier to read. So don’t be afraid to leave text unjustified.
Break up the text
Our definition of a boring page design is one that, if you squint at it, seems to
be a wash of unbroken gray. Do what you can to break up vast, dull stretches
of body text. Use headlines. Use pull quotes (the large-type quotations that
are often set in their own boxes in the middle of pages — you’ve seen them in
innumerable magazine articles). Use subheads. You can check out this very
book for some examples of these devices. We’ve done our best to keep the
pages interesting by using sidebars, graphics, and headings.
Use rules
A rule, in this case, doesn’t mean a law: It means a straight line. Every page-
layout program lets you draw lines on your electronic pages: thick, thin,
horizontal, vertical, even in parallel sets.
Here again, look at the Sunday magazine section of your city’s newspaper.
You’ll see how a horizontal rule is used to set the masthead apart from the
articles; another may be used between columns of an article; a fat one may
separate the title of the article from the body (see Figure 18-3).
Not every publication needs to have rules. But there’s no question that rules
are one of the page designer’s most fundamental design elements.
Chapter 18: Page Design 705
■ ■
Macworld MAC SECRETS • 4040-8/5 • ch.18.F • Chapter 18 • FINAL • VB • 11/04/98 • p.705
Figure 18-3: Judicious use of horizontal or vertical rules helps break up a page and makes
certain elements stand out.
Reverse type
Okay, maybe reverse type (white lettering on black) has been a little
overused recently. And reverse type uses more ink than black-on-white, and
on cheap paper, it sometimes bleeds a little. But we still run across striking
uses, and it’s almost always a refreshing break from whatever normal type
surrounds it.
In most programs, setting up reverse type is a two-step process. First you
make the text itself white. Then you have to draw a black box behind it.
Here’s a useful trick: In both PageMaker and Quark, you can set up a very
fat rule for use as the black box. Set the rule to be very fat — 40 points, for
example — and to be drawn above the paragraph. (In PageMaker versions
before 5.0, your thickest rule can only be 12 points, so you may have to
define rules both above and below the text, each set to the maximum.) Then
define the whole thing as a style that you can apply to any headline with a
single click (see Figure 18-4).
Figure 18-4: Set up a style that automatically reverses text. Instead of having to draw a
black box by hand, let the program create fat rules for you.
706 Part III: Application Secrets
■ ■
Macworld MAC SECRETS • 4040-8/5 • ch.18.F • Chapter 18 • FINAL • VB • 11/04/98 • p.706
Widows and orphans
A widow is a line of text all by itself, separated from the rest of its paragraph.
On the other hand, an orphan is a line of text all by itself, separated from the
rest of its paragraph.
If it sounds like there’s some confusion among terms, you’re right. We looked
up these terms in several prominent style books, and guess what? The
authors can’t even agree on how they disagree! Several use the terms
synonymously. Several think that a widow is a solo line of type at the top of
the page, separated from the previous page; several think that’s an orphan.
On the other hand, some people call an orphan a lone last line on the page,
split apart from the remainder of the paragraph at the top of the next page.
We vote for the following distinction (which nonetheless doesn’t make it
right): A widow is a stray line of type at the top of a column or a page — the
last line of a preceding paragraph. It’s best avoided, either by editing the text
before it or by manipulating the type or line spacing.
An orphan, on the other hand, is a single word on a line by itself. (We mean
on the same page; if it were on a different page, it would also be a widow!) An
orphan, by this definition, isn’t necessarily objectionable. Still, some layout
pros try to avoid orphans if they are very short or only the last syllable of a
hyphenated word. (Figure 18-5 makes this clearer, or maybe not.)
Figure 18-5: A widow (A) and an orphan (B). Or quite possibly, vice versa.
Indents
Now that you’ve graduated beyond the manual typewriter, using five
spacebar clacks to represent a first-line paragraph indent doesn’t quite cut it.
First of all, as you’ll find out in Chapter 29, the space bar does a terrible job
of lining up text (it looks fine on the screen but never works in the printout).
Second, five spaces isn’t even an appropriate amount of space.
Most people we know are in the habit of using the Tab key to indent the first
line of a paragraph. And that’s fine, although we find the half-inch default
tab stops in most word processors to be a tad large. It’s better to use your
A
B
Chapter 18: Page Design 707
■ ■
Macworld MAC SECRETS • 4040-8/5 • ch.18.F • Chapter 18 • FINAL • VB • 11/04/98 • p.707

word-processor or page-layout program’s automatic first-line indent feature.
(Actually, most people we know are in the habit of using open spacing — see
the next item — and don’t indent at all.)
Actual publishers measure the first-line indent based on a unit of measurement
called the em space (the horizontal width of a capital M in the font and size
you’re using). They set the indent to be a certain number of em spaces.
How to start a paragraph
This pointer has less to do with page layout than it does with basic business-
writing protocol. You have essentially two choices when you type a business
letter (or a Macintosh computer book): You can either begin each paragraph
with an indented first line, or you can skip a blank line. This latter system is
called open spacing (see Figure 18-6).
Figure 18-6: A tale of two spacing methods. At left: indenting each paragraph. At right: open
spacing. Each denotes a new thought. Neither should be combined with the other.
Our suggestion here: If you decide to use open spacing, use your word
processor’s built-in feature for this. (It may be hiding in a paragraph-
formatting command, called Space Before or something.) It’s so much easier
to edit a document where the program automatically inserts space between
paragraphs — that weren’t created with an extra press of the Return key —
than to have to deal with 10 million double-Returns.
On the other hand, don’t forget to turn those blank lines back into double-
Returns (it’s search-and-replace time) if you plan to paste your writings into
an e-mail message. In cyberspace, all paragraphs lose the “blank line before”
status they may have had in your word processor.
Angela,
As much as I adore you, we really
need to talk about the condition of
your living room.
It pains me to have discovered an
issue of Time from early 1978 in the
cushions of your sofa. Pains me,
because a loose staple stabbed me in
the palm.
Would it be so much trouble for
you to unleash a horde of
housekeepers in your one-bedroom
once a year or so?
Angela,
As much as I adore you, we really
need to talk about the condition of
your living room.
It pains me to have discovered an
issue of Time from early 1978 in the
cushions of your sofa. Pains me,
because a loose staple stabbed me in
the palm.
Would it be so much trouble for you
to unleash a horde of housekeepers
in your one-bedroom once a year or
so?
708 Part III: Application Secrets
■ ■
Macworld MAC SECRETS • 4040-8/5 • ch.18.F • Chapter 18 • FINAL • VB • 11/04/98 • p.708
Watch those line lengths
Pages with long lines of text and narrow margins are simply more difficult to
read. Think about it: The wider you make a block of text, the further your
eyes have to travel back and forth across each line and the more information
your reader must take in with each sweep of the page. So, as a rule, keep your
margins generous and your columns narrow.
How narrow? Well, the page designer’s rule of thumb is that no column of
text should be more than two-and-a-half alphabets wide. If you can fit three
alphabets or more on one line within a column of text, your column is too wide.
(Astute readers who’ve owned previous editions of this book may, at this
moment, be smiling to themselves. They’re realizing that this very book’s
first few editions violated the two-and-a-half-alphabets rule. But not these
days, pal!)
Chapter 18: Page Design 709
■ ■
Macworld MAC SECRETS • 4040-8/5 • ch.18.F • Chapter 18 • FINAL • VB • 11/04/98 • p.709
MACINTOSH SECRET
Want to design a truly hideous ad or flyer? It’s all
the rage! Use an ugly, monospaced font (Courier
or Monaco). Scatter words all over the page.
Make each word a different type size. Connect
them with bizarre straight lines. The effect should
be something like the figure below.
Looking for an even trendier, high-tech effect? Take
it a step further: Make each word look like it was
typed on a really old, poorly-maintained Smith-
Corona manual typewriter, as in the other example
shown here. Make sure there are lots of broken,
uneven characters and ink smears, making it look
as if you are a poor slob who knows nothing about
desktop publishing. The more high-tech your
company, the cruder, sloppier and more poorly
aligned the type should be.
So why would anyone create such disasters?
You got us there — we have no idea. But as we
write this, in the mid-’90s, these concepts of
page layout are trendy. We see them everywhere
in advertising — notably Microsoft’s.
Then again, Microsoft was never exactly famous
for its good taste. We just can’t wait for this
particular trend to fade away.
The secret of page-layout failure

Keep your eyes open
For additional lessons in page layout and typography, we refer you to the
world of printed materials all around you. Most of this stuff was designed by
the pros (maybe you, O reader, are a pro, in which case we aren’t addressing
you) and can probably suggest some interesting ideas to you.
PageMaker
PageMaker was the first significant page-layout program for the Mac. In
conjunction with the Apple LaserWriter, it took the world by storm and put
the Macintosh on the map. For the first time, designers who had always
pasted up their pages manually could have an electronic pasteboard, striking,
immediate printouts, and much greater design flexibility.
For a year or two, Aldus, the company that owned PageMaker before Adobe
bought it in 1994, reigned supreme. Meanwhile, a rival upstart, QuarkXPress,
appeared on the horizon and started gobbling away at PageMaker’s market
share. Recently, however, Adobe has revved up PageMaker and has pretty
much brought it back up to par with Quark, though it still lacks some of the
high-end typographic controls and industrial-strength production tools that
make QuarkXPress so powerful.
Here are a few of our favorite PageMaker Secrets. Most of them work with any
version of the program from 4.2 onward, unless otherwise indicated.
PageMaker Secrets
■
Create evenly spaced duplicates of an object
Using the Multiple Paste command in the Edit menu, it’s easy to create several
evenly spaced copies of something —
if
you know the exact horizontal and
vertical distances by which you want to space the copies.
If you prefer to specify the amount of separation by eye instead, try this: Copy
the object you want to duplicate (a horizontal rule, for example). Press Option and
then choose Paste from the Edit menu. (Option-Paste puts a duplicate directly on
top of the original.) Drag the new copy where you want it.
Then, each time you Option-Paste again, another copy appears, the same
distance from the previous one as the first copy is from the original.
Make notes to yourself
Sometimes it’s handy to leave notes to yourself: revision dates, client feedback,
whatever. It’s easy to do. Define a style for this text called, say, Reminder.
Anytime you want to create a note to yourself, assign it to this style. Define a
710 Part III: Application Secrets
■ ■
Macworld MAC SECRETS • 4040-8/5 • ch.18.F • Chapter 18 • FINAL • VB • 11/04/98 • p.710

point size large enough that you can still read it when you zoom out to Fit in
Window view.
Then, before printing, simply change the color of the style to Paper — that is,
invisible — so that it doesn’t print. (In PageMaker 6.0 and later, the easiest way
to do this is to Ô-click the name of the style on the Style palette, which
automatically opens the Edit Style dialog box. Then click Type and change the
color to Paper in the Type Specifications dialog box.)
Default page setup
If you’re working on a number of documents that have a similar nonstandard
page setup, you can save yourself a lot of time by teaching PageMaker what its
default page setup should be.
Close all documents and then choose Document Setup from the File menu (or
Page Setup in versions earlier than 6.0). In the Page Setup dialog box, specify
your preferred page size, orientation, and so on. Click OK.
From now on, each time you create a new document, its page setup matches
your preferences.
Jumping views
Here’s an incredibly useful tip that saves all kinds of trips to the menu.
If you Ô-Option–click the page window, you jump to actual size. Then you can
Ô-Option–click a second time to zoom into Fit in Window view. (Add Shift to the
mix to jump to 200 percent.)
Using this shortcut, you can stay in Fit in Window mode as necessary to get an
overview of your document. Whenever you want to read some actual text, you
can instantly zoom any page to actual size.
You may find it even faster to use PageMaker’s keyboard shortcuts to
accomplish all of the above — Ô-1 for Actual Size, Ô-0 (that’s a zero) for Fit in
Window, and Ô-2 for 200 percent.
Speaking of Fit in Window, here’s a quick-click shortcut for doing just that. Point
to the page icon (at the bottom of the window) of the page that you want and
Shift-click. You’ll jump to that page in Fit in Window view (even if it’s the one
you’re on).
Keyboard tool shortcuts
Here’s how you can switch tools in PageMaker 6.0 and later without having to
use the mouse. (You need a keyboard with function keys for these.)
Pointer Tool:
Control-Shift–F1. (Then again, Ô-Space
also
selects the pointer,
and it’s certainly easier to remember.)
Worth
Learning
Chapter 18: Page Design 711
■ ■
Macworld MAC SECRETS • 4040-8/5 • ch.18.F • Chapter 18 • FINAL • VB • 11/04/98 • p.711

Text Tool:
Control-Shift-F2.
Ellipse Tool:
Control-Shift–F3.
Rectangle Tool:
Control-Shift–F4.
Line Tool:
Control-Shift–F5.
Horizontal/Vertical Line Tool:
Control-Shift–F6.
Polygon Tool:
Control-Shift–F7.
Magnifier Tool:
Control-Shift–F8.
Rotate Tool:
Control-Shift–F9
Cropping Tool:
Control-Shift–F10
(Some earlier versions of PageMaker also allow you to switch tools using
Control-Shift-F-key combinations, but the shortcuts aren’t exactly the same as
the ones listed here.)
Set the default font
Before you begin working on a new document, you can set the default font and
paragraph information for all new text blocks you create.
With the Pointer Tool selected, choose Type Specs from the Type menu (or just
press Ô-T). Change the settings in the dialog box to your tastes and click OK.
Then choose Paragraph (also in the Type menu) to preset your preferred
paragraph settings.
Keyboard navigation keys
Don’t bother with that mouse! Try these page-navigation shortcuts: Ô-Tab
moves to the next page and Ô-Shift–Tab moves back a page.
To slide the page around without having to use the scroll bars, press Option.
When you hold down the mouse button, the cursor changes to a hand-grabber
tool. Drag it across the page window to shift the page on your screen.
Drag the object, not the outline
Normally, when you drag a graphic or text block, PageMaker shows you only the
outline of the block while you drag. If you prefer, you can see the actual text or
the actual detailed graphic: After you first click the box, hold the mouse button
down, still, until the screen blinks. That’s your cue that you can now move the
object, whose detail will be visible as you drag.
712 Part III: Application Secrets
■ ■
Macworld MAC SECRETS • 4040-8/5 • ch.18.F • Chapter 18 • FINAL • VB • 11/04/98 • p.712

Auto-positioning from the Scrapbook
When you Ô-Option–Paste a page element from the Scrapbook back into a
PageMaker document, the object jumps exactly into the original position from
which it was copied or cut.
Keep this in mind whenever you cut or copy text or graphics for pasting into the
Scrapbook for later use. If the item is correctly positioned when you cut or copy
it, it will be correctly positioned when you Ô-Option–Paste it.
Quick style selection
When you name your most frequently used styles, precede the name with a
bullet (•, which you produce by pressing Option-8). That bullet character will
force the style names to the end of the style list, where they’re easy to find.
(Example: •Body Times 10, or •Futura 18 Heading.)
You can also force a style name to the
top
of the list if you precede it with an
Option-space (type a space while pressing Option).
A quick way to spot expensive mistakes
Before you send your finished document file off to be printed on an expensive
Linotronic, here’s a good way to get an overview (and to spot potential
problems).
First, switch the view to Entire Pasteboard. Then, with the Pointer Tool selected,
press Ô-A to see all the page elements at once, even those you may have
dragged off the page.
In this condition, you can easily spot remaining blocks of white text, which
appear as empty text blocks; empty text lines, which show up as gray blocks;
and any other wayward and unnecessary Pasteboard clutter. Every object takes
time to image when printing day comes, so the less extraneous stuff there is,
the smoother printing will go.
Graphics information panels
When you create your graphics, use a basic font like Courier to add some
information at the bottom edge. For example, include the name and figure
number of the graphic; its date, perhaps; and the name of the program that
created it.
Then, when placing it into PageMaker (or any other page-layout program, for that
matter), simply trim off this information from the bottom of the graphic using the
Cropping Tool (see Figure 18-7).
Worth
Learning
Chapter 18: Page Design 713
■ ■
Macworld MAC SECRETS • 4040-8/5 • ch.18.F • Chapter 18 • FINAL • VB • 11/04/98 • p.713
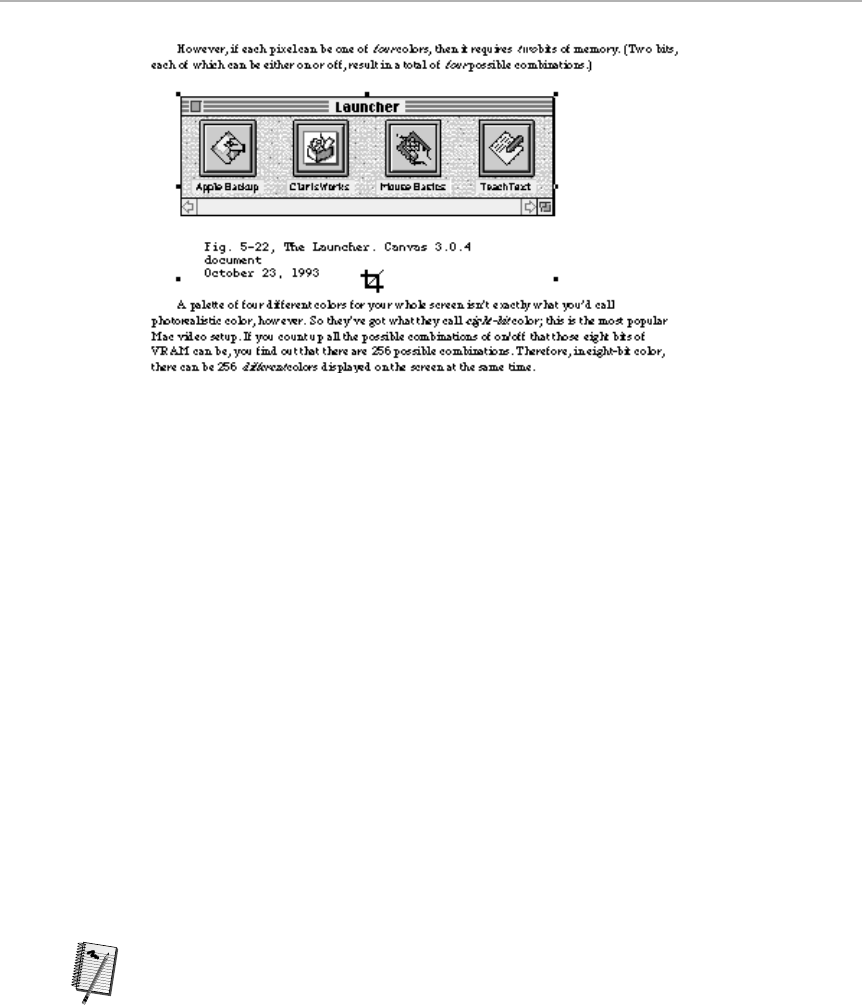
Figure 18-7: If you take the trouble to embed graphics information as part of the graphic,
you’ll be amply rewarded when deadlines and confusion descend. Just use the Cropping Tool
to bring the lower panel into view when necessary.
When confusion over figure numbers arises or when a graphic needs to be
revised, it’s a simple matter to peek at this helpful information, saving you a
good deal of otherwise-complicated record-keeping.
Notes on the Story Editor
You can open the Story Editor by pressing Ô-E, of course, but it might be faster
to triple-click anywhere in your document.
To
exit
the Story Editor, you have two ways to go back to your layout. If you press
Ô-E again, you’re teleported to the page that corresponds to your cursor’s last
location in the Story Editor.
But what if you want to remain where you were before you ever
entered
the
Story Editor? In that case, just close the Story Editor window. You’ll be back
where you started, even if you scrolled in the Story Editor.
Grab an object that’s underneath another
It’s frustrating to try to grab a rule, for example, that’s covered up by a graphic
object. At least it is until you know the secret for selecting overlapping objects:
Ô-click. Each time you Ô-click, you select the object another layer down.
The fabulous automatic scrolling trick
Here’s a great trick for getting an overview of a document.
Worth
Learning
714 Part III: Application Secrets
■ ■
Macworld MAC SECRETS • 4040-8/5 • ch.18.F • Chapter 18 • FINAL • VB • 11/04/98 • p.714
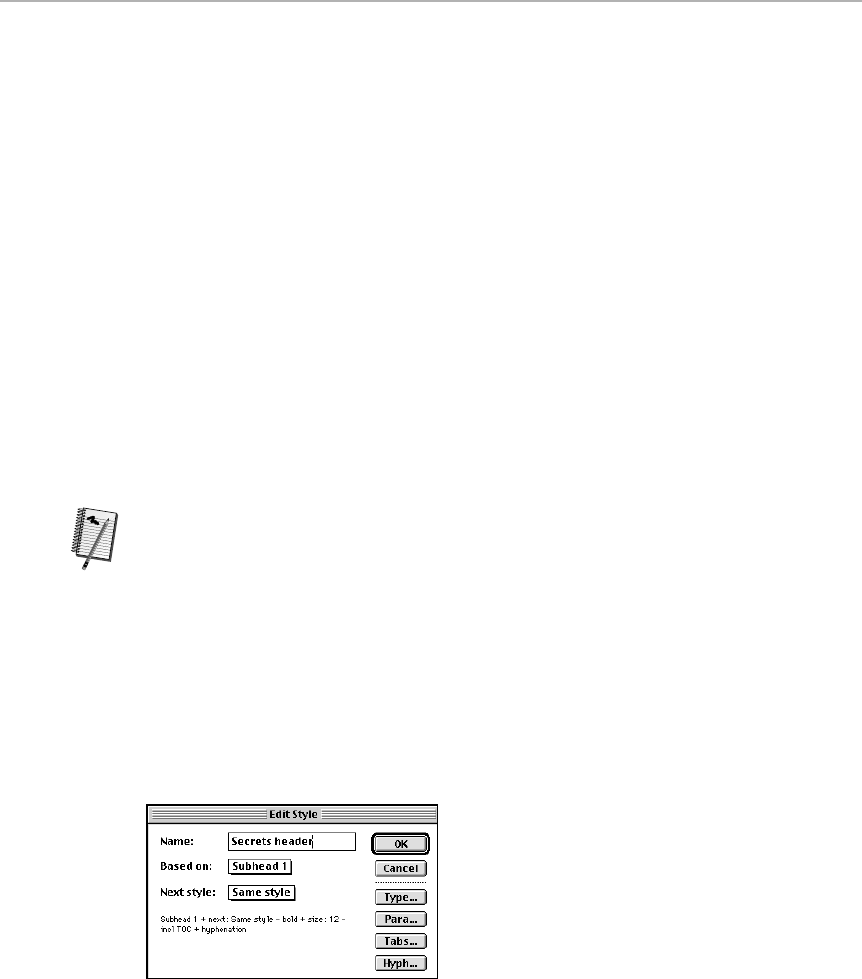
While pressing Shift, choose Go to Page from the Layout menu (the Page menu
in earlier versions of PageMaker). The program begins to flash through your
pages, one after another. When it gets to the end, it begins again with page one.
To stop the slide show, click the mouse.
Bonus hint: You may want to change all the pages to Fit in Window view before
you begin (see the next secret).
Change the zoom levels of all pages at once
PageMaker has this famous quirk: When you zoom in or zoom out, you’re only
changing the size of the
current
page or spread. If you move on to the next
page, you have to change its degree of magnification all over again.
But if you press
Option
as you choose the new zoom level from the View
submenu in the Layout menu, you do, in fact, change the magnification levels
of all the pages at once.
Define styles by example
One nice aspect of Word and other word processors is that you can format a
paragraph first, and then define it as a style simply by giving it a name.
Afterward, you can apply all of that formatting to any paragraph just by calling
up that style name.
You can accomplish the same fast-and-easy style-creation in PageMaker. Select
the text you want to format. Then format the heck out of it: font, tracking,
paragraph specs, whatever. When it’s all ready to go, open the Style palette
(Ô-Y) and then Ô-click the words No Style.
Instantly PageMaker displays a dialog box in which you can name the new style
(see Figure 18-8). All the type and formatting characteristics you set up are
already entered for you.
Figure 18-8: Define a style by example. This is where you’re finally asked to give the new
style a name of its own.
Worth
Learning
Chapter 18: Page Design 715
■ ■
Macworld MAC SECRETS • 4040-8/5 • ch.18.F • Chapter 18 • FINAL • VB • 11/04/98 • p.715
Super-nudge keys
When an object or text block is selected, you can press the arrow keys to nudge
it one point at a time in any direction.
But you knew that. Our secret here is that if you press Ôwhile nudging, you
nudge faster (
ten
points at a time).
Automatic TIFF compression
Here’s a great way to reduce the size of PageMaker files containing large TIFF
images: You can automatically compress the TIFF files as you import them into
PageMaker 5.0 or later.
To trigger the compression, import the TIFF files using the standard Place
command, but press the Ôand Option keys while clicking the OK button
in the Place dialog box. For an even higher level of compression, hold down
Ô-Option-Shift while importing the TIFF files.
When you do this, PageMaker creates a new, compressed copy of the TIFF file
and leaves the original untouched.
Automatic TIFF decompression
Suppose you use the preceding secret to compress the TIFF files you use
in a PageMaker document. And suppose you throw away the original
uncompressed versions of those TIFF files to save space. No problem — until
you find you need to use those same TIFF files in a program that
doesn’t
support compressed TIFF images. Now what do you do?
The answer: Reimport the images into PageMaker, this time holding down the
Ôkey. PageMaker will save a new, uncompressed version of the TIFF file.
QuarkXPress
We’re not exactly sure why, but everybody calls this program Quark. That’s
the company name, not the product name.
Anyway, Quark is about precision. It’s also about the capability to design text
boxes and links without having to actually have any text to play with. In other
words, you can design a newsletter’s fundamental shape in an empty Quark
document. Then, as the stories come in each month or each week, you can
just import them directly into the waiting text-box chains. PageMaker 6.5 and
later also lets you create text boxes of this type, but its support for such
frames is pretty limited; you can’t create boxes containing more than one
column of text, for example.
Strange
But True
716 Part III: Application Secrets
■ ■
Macworld MAC SECRETS • 4040-8/5 • ch.18.F • Chapter 18 • FINAL • VB • 11/04/98 • p.716
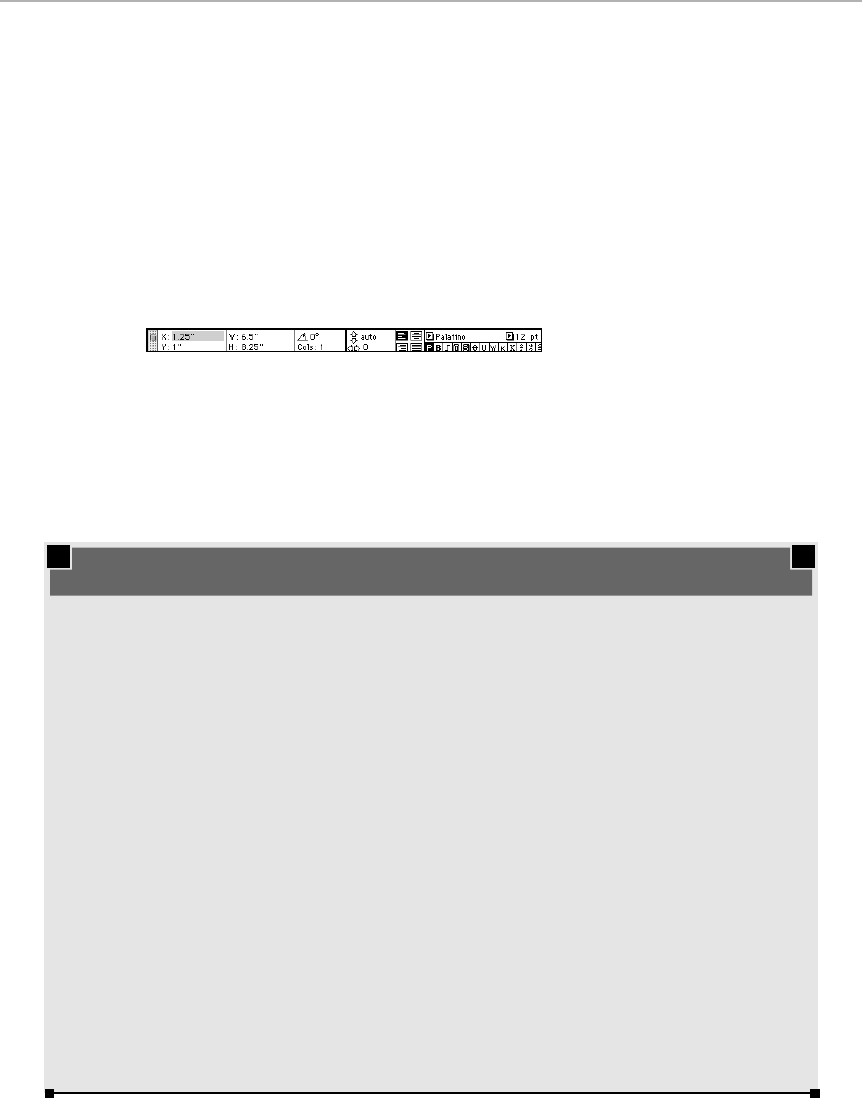
Measurements palette
One of the interface elements that first put Quark on the map (and that was
soon imitated by PageMaker’s programmers) is its floating palettes. The
Measurements palette is a good example: With a couple of clicks, you can
change the size, position, rotation angle, leading, or type style of any selected
object.
You don’t have to use the mouse to select anything on the Measurements
palette. You can, for example, press Ô-Option–M (for Measurements) to
highlight the first field (the horizontal size measurement) in the palette (see
Figure 18-9).
Figure 18-9: One keystroke takes you to the first field on the Measurements palette. Add the
Shift key to the mix, and you jump directly to the font name.
From there, you can press Tab to highlight successive fields in the palette or
Shift-Tab to go backward.
Chapter 18: Page Design 717
■ ■
Macworld MAC SECRETS • 4040-8/5 • ch.18.F • Chapter 18 • FINAL • VB • 11/04/98 • p.717
MACINTOSH SECRET
When you’re changing an item’s size or position
by typing new numbers into the Measurements
palette, you don’t have to type out inches. You
can’t exactly go wild with abbreviations and
expect Quark to know what you mean, either.
Here’s a table of exactly what Quark understands,
measurement-wise:
You can type: and Quark will know you mean:
" Inches
p Picas
pt Points
cm Centimeters
mm Millimeters
c Ciceros
You’re not allowed to type in for inches or pts for
points.
By the way, you can (and should) combine
points and picas in the same measurement. To
indicate 10 picas and 4 points, you can type
10p4. (Remember: 12 points in a pica and 6
picas per inch.)
Then there’s the Measurement palette’s best-
kept secret—it can do arithmetic. Suppose you
have a text box that’s 6p9 and you want to make
it exactly three times larger. Instead of mentally
converting points to picas and doing the math in
your head to come up with 20p3, you can just
type a *3 after the 6p9 on the Measurements
palette. Quark will automatically do the math and
convert the 6p9*3 into 20p3 for you. You can
type a +, -, * or / into any of the numeric fields
to add, subtract, multiply, or divide.
Typing measurements into the Measurements palette

Our favorite, though, is to throw the Shift key in with the Ô-Option–M
keystroke. If you do that, you jump directly to the font name field. When
you’re there, you can change the font of the selected text by typing only a
letter or two of the new font name. (Quark automatically expands what you
typed; if you type He, the program will add lvetica for you.)
We hit upon this keystroke after much consternation; we were trying to teach
a QuicKeys macro how to change a selection to a certain font automatically.
Trouble was, QuicKeys can never find the Measurements palette. If the
palette is moved, QuicKeys clicks blindly and futilely where it used to be.
Then we taught QuicKeys how to type Shift-Ô-Option–M, plus the first letters
of the desired font name. It was smooth sailing after that.
In fact, the Measurement palette is a natural for QuicKeys; any setting you
make more than once — for example, rotating a certain kind of text block 30
degrees — is something that’s much more easily and quickly typed by a
macro than by you.
Document palette
Another of Quark’s floating palettes is the handy Document Layout palette,
where each page of your publication is represented by a page icon (see
Figure 18-10).
Figure 18-10: The Document Layout palette gives you a constant overview of the pages in
your document. The Master Pages are indicated by icons at the top.
Here are a few things you can do with this palette:
■Double-click a page icon to make the document window jump to that page.
■Single-click a page number to jump to that page.
■Drag a page icon into a new position to rearrange your pages.
■Double-click a Master Page icon to edit that Master Page.
■Drag a blank page (top left of the palette) or a Master Page icon in
between two existing document-page icons to insert a new page.
Master Page icons
Document Page icons
718 Part III: Application Secrets
■ ■
Macworld MAC SECRETS • 4040-8/5 • ch.18.F • Chapter 18 • FINAL • VB • 11/04/98 • p.718
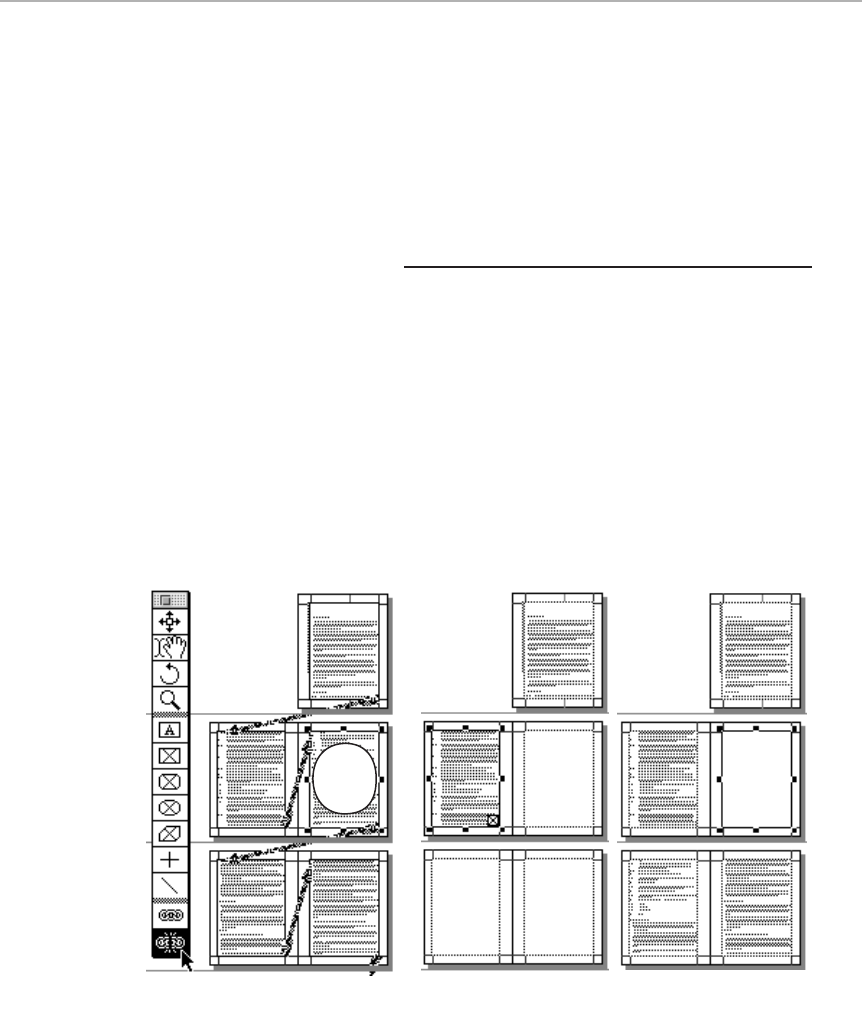
■Option-drag a page or master page into place to insert multiple new
pages. The Insert Pages dialog box appears, where you can specify how
many you want.
■Select any master or document page and click the Delete button to delete
it. (In version 3.1, the palette has a Trash can instead of a Delete button,
and in version 3.3, the button has been replaced by a page icon with an
“X” through it. To delete pages, you select them and click the icon.)
QuarkXPress Secrets
■
Take one text box out of the chain
Linked text boxes can be tricky if you’re not familiar with Quark’s quirks.
Suppose that you want to take one page’s text block out of the chain, for
instance. If you do what you’d expect you ought to do — click that text block with
the Unlinking Tool — you’ll destroy the entire chain for the rest of the document
(see Figure 18-11). And there’s no Undo.
To take just one text block out of the chain,
Shift-
click it with the Unlinking Tool.
The rest of the chain will remain — it will simply leave out the text block you
clicked.
Figure 18-11: Here’s a document set up with linked text boxes. If you want to take page 3
out of the chain (figure A), you may think to click the page with the Unlinking Tool (marked by
the X). But what you’ll get is figure B: a broken fragment of a chain. If you use our secret,
though, you’ll get figure C, which is what you wanted all along.
ABC
X
Chapter 18: Page Design 719
■ ■
Macworld MAC SECRETS • 4040-8/5 • ch.18.F • Chapter 18 • FINAL • VB • 11/04/98 • p.719
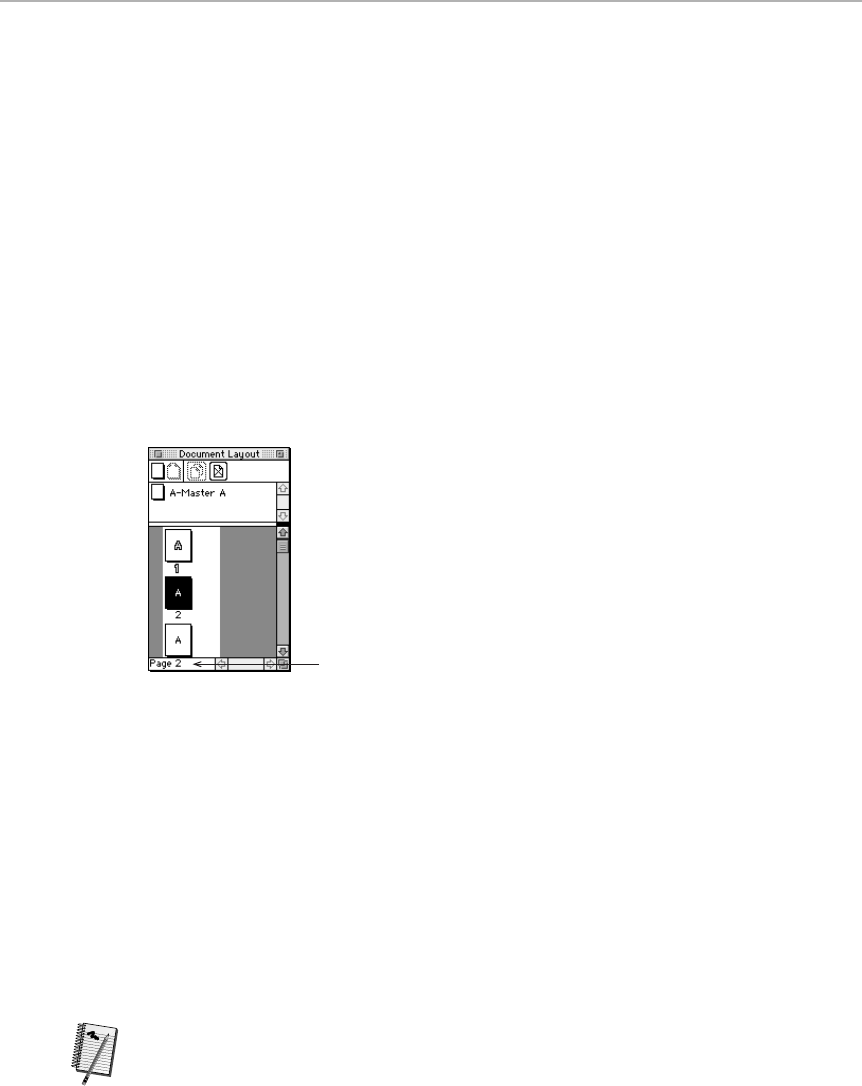
Multiple clicks to select text
As in any program, a double-click in text highlights one word. As in some word
processors, Quark lets you
triple-
click to highlight a line.
There’s more: A
quadruple
click highlights an entire paragraph, and five clicks
select the entire story.
Change the first page number
If you don’t want to start numbering your document’s pages with one, here’s a
quick way to access the Section dialog box to change this setting:
Click the page in the Document Layout palette whose numbering you want to
change. Then click the words “Page 3” (or whatever it says) at the bottom of the
palette (or the top of the Document Layout palette if you have version 3.1) as
shown in Figure 18-12.
Figure 18-12: After a page is selected, you can change its starting page number by clicking
in the strip indicated in this figure.
Drag the object, not the outline
Like PageMaker, Quark shows you the actual graphic or actual text inside a box
that you’re dragging (as opposed to just the box outline, which it usually shows).
As in PageMaker, the trick is to hold the mouse button down, stationary, for a
moment after you first click the box. You’ll see the screen blink; that’s your cue
that you can now move the object, and you’ll see all the detail inside as you drag.
How to keep a tool selected
We know you’ve wished for a way to do this! (We sure did, until we learned the
secret.)
Normally, every time you use a tool that creates, links, or unlinks something,
Quark switches you back to the Item Tool the instant your finger is off the
mouse button. But, if you
Option-
click a tool, it stays selected until you click
another tool.
Worth
Learning
720 Part III: Application Secrets
■ ■
Macworld MAC SECRETS • 4040-8/5 • ch.18.F • Chapter 18 • FINAL • VB • 11/04/98 • p.720

Instant switch to the Item Tool
Regardless of which tool is selected, pressing Ôswitches to the Item Tool for
as long as you press the key. That’s a handy shortcut when you just imported a
graphic, for example, and now want to move it slightly.
Automatic “Continued on page 4” notices
Quark lets you create this kind of
jump line
automatically. It’s smart, too. If the
continuation of the article is moved to a
different
continuation page, the jump
line that refers to it is updated automatically.
To create a jump line at the end of a column or page, create a new text block
that overlaps the main text of a story. Type Continued on page and then press
Ô-4. Quark automatically fills in the correct page number (if you have, indeed,
linked the story to a text block on another page).
On that continuation page, you can easily create a “Continued from” notice.
Again, create a small text block overlapping the main story. But this time, type
Continued on page and then press Ô-2 (see Figure 18-13).
Figure 18-13: Let Quark fill in the page numbers automatically. Type the text you want at the
end of one column (top) into a separate little text box. Do the same thing where the story
continues (bottom).
What page am I on, anyway?
Sometimes — especially when you’re working on two-page spreads — it’s hard to
tell what page you’re on in QuarkXPress. The Document Layout palette may tell
you you’re on page 4, because a tiny corner of it is still showing in the screen,
even though the text box you’re editing is actually on page 5, on the other side
of the spread.
Our tip is to use Quark’s automatic page-numbering command — Ô—3—to
instantly determine your real location. Just type Ô-3 wherever you happen to be.
Quark will fill in the page number. Once you’ve got the answer, just delete the
number and continue with your editing.
Chapter 18: Page Design 721
■ ■
Macworld MAC SECRETS • 4040-8/5 • ch.18.F • Chapter 18 • FINAL • VB • 11/04/98 • p.721

One-shot Symbol-character typing
Quark has a handy keyboard shortcut (only one keystroke) that switches you to
the Symbol font for one moment, which is ideal for popping in a single character
in that font. It’s Ô-Shift–Q. The next character you type will be from the Symbol
font. The next character after
that
will be in your original font.
You can switch from one character to the Zapf Dingbats font, too. That keystroke
is Ô-Shift–Z.
How the heck to turn off Facing Pages
It’s easy to turn a single-sided document into one with two-page spreads: Open
the Document Setup dialog box (File menu) and turn on Facing Pages.
To turn
off
Facing Pages after you turned it on, however, is trickier. Quark dims
the check box so that you can’t get to it. The solution is to delete all the facing
master pages
first. Then you can turn off the check box.
Quick access to reverse type
Exactly as we pointed out in our general page-layout secrets, the easiest way
to create white-on-black (reverse) type is to define a style. In Quark’s case,
however, you have even more control over the result. We thought we’d spell out
the process here.
Start by choosing the type style you want for the text. Now choose Rules from
the Style menu. Click the Rule Above check box in the resulting dialog box. The
box expands to look like Figure 18-14. Choose an appropriate Width (they
actually mean height for the rule).
Figure 18-14: The first step to creating easy reverse type in Quark.
If you leave the Offset at zero, you get the baseline-hugging effect shown in
Figure 18-15. (An Offset of, say, –2 points better centers this text in the rule.)
Click OK.
Then open the Color palette (View menu). Click the Text icon (the little A in a
box) and click White. The text is white on the dark rule (see Figure 18-15).
722 Part III: Application Secrets
■ ■
Macworld MAC SECRETS • 4040-8/5 • ch.18.F • Chapter 18 • FINAL • VB • 11/04/98 • p.722
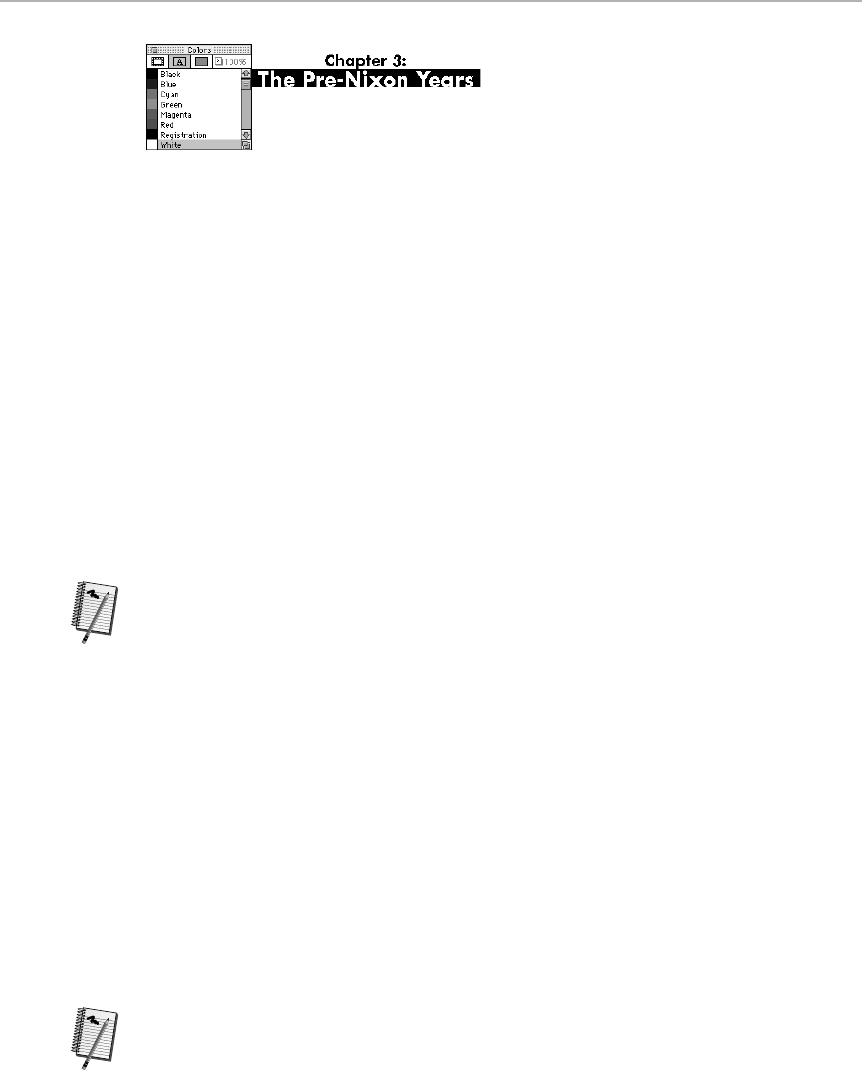
Figure 18-15: Using the Colors palette, turn the text white so that you can see it.
Finally, to define this setup as a style, just choose Style Sheets from the Edit
menu. Click New, give the style a name, and click Save. Next time you need this
nice-looking reverse-type effect, just select the paragraph and select the style
you defined from the Styles palette.
Finer nudging
Exactly as in PageMaker and other graphics programs, pressing an arrow
key moves any selected object one pixel in the corresponding direction. In
Quark, however, pressing Option and the arrow key makes the movement much
finer — tenths of a point. (The Item Tool must be selected, of course.)
Page navigation from the keyboard
This is a great trick. You probably already know that you can press the Page Up
and Page Down keys on your keyboard (if yours has these keys) to jump one
screenful backward or forward in your document.
But if you press Shift, too, you move by
pages.
That is, Shift-Page Up shows you
the top of the previous page. Shift-Page Down jumps to the top of the next page.
These are excellent shortcuts for skimming through your document (when you’re
looking for the beginning of a new section, for example).
Grab an object that’s underneath another
We mentioned this one in our PageMaker secrets, too, but the keystroke is
different here. This is the trick to select an object that’s covered up by other
objects. The secret: Hold down Ô, Shift, and Option as you click. With each
click, you select the object another layer down.
Notes on dialog boxes. . . and Apply
Most of Quark’s dialog boxes aren’t typical dialog boxes — they have title bars,
which means you can move them anywhere on the screen by dragging the title
bar.
The buttons in these dialog boxes are special, too. You can usually press them
without using the mouse: press Ô-A for Apply, for example.
Worth
Learning
Worth
Learning
Chapter 18: Page Design 723
■ ■
Macworld MAC SECRETS • 4040-8/5 • ch.18.F • Chapter 18 • FINAL • VB • 11/04/98 • p.723

This keyboard button-pressing isn’t nearly as full-fledged a feature as it is in the
Microsoft programs; you can’t activate radio buttons or check boxes from the
keyboard, for example. It only works with actual buttons.
In fact, Ô-A is a particularly useful tool to learn. In the Formats dialog box, you
can make a change and then “click” the Apply button to see its effect on the
document before committing to it. When you press
Option
and click Apply, you
enter “continuous apply” mode. That means that every time you change a
number in the dialog box, you see its effect on the text in the document
immediately. You don’t even have to click Apply.
Oh, and one more thing: Use Ô-Z while a dialog box is still open to undo all the
changes you’ve made since opening the box. Now
that’s
something they should
do in all programs!
Secret message
Here’s the smallest Quark secret of all: Open the Quark Help window. Turn
on Balloon Help and point to the word Quark. You find out that it’s “a
fundamental particle.”
Quark the Alien — and other classic
Easter eggs
Highlight any object in your layout. Press either Ô-Option-
Shift-
K or
Ô-Option-Shift-Delete. (In versions before 3.3, it was Ô-Option-K.)
Out walks Quark the Alien, antennae focused, making clomping footsteps as he
invades your document. He takes careful aim with his ray gun and blasts your
picture or text box into oblivion. (We know some editors who greatly enjoy
importing a photo of their boss into a Quark picture box and then using the
spaceman to vaporize the picture.)
Also, press Option and choose About QuarkXPress from the Apple menu. Then
Ô-Option-Shift-click the window. Presto: a picture of the programmers!
One note: The Ô-Option-K key combination also happens to activate Apple’s
CloseView control panel (which provides a magnified view of the screen,
for visually impaired). If you have CloseView installed, and you’re running
QuarkXPress 3.2 or earlier, you may not be able to coax the Quark alien to
make an appearance.
By the way, if you have QuarkXPress 4, our friend Quark the Alien has a buddy.
Make Quark the Alien appear (as just described) five times in a row. The fifth
time, you’ll get to meet the alien’s little friend!
Strange
But True
724 Part III: Application Secrets
■ ■
Macworld MAC SECRETS • 4040-8/5 • ch.18.F • Chapter 18 • FINAL • VB • 11/04/98 • p.724
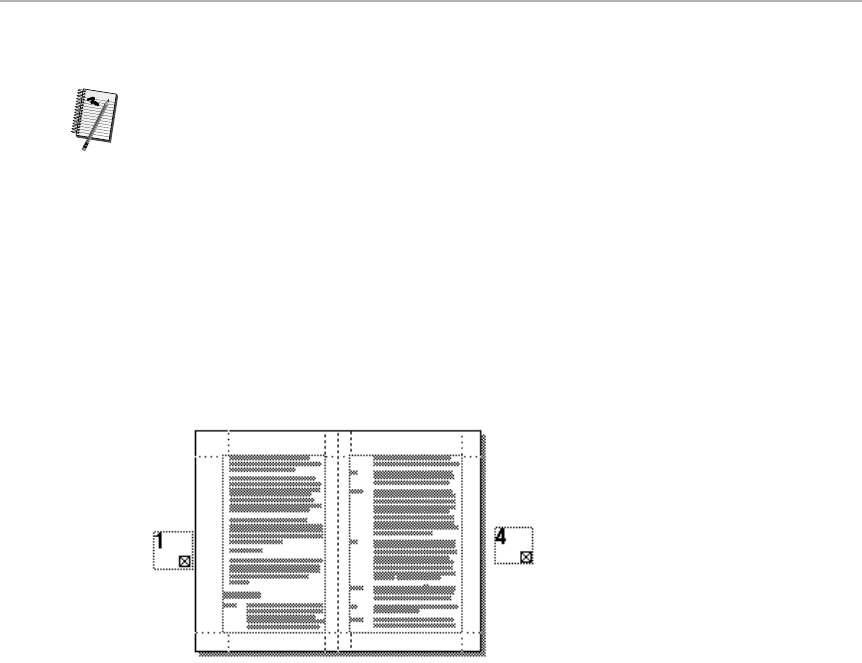
Instant paragraph format copying
After you format a paragraph, you can instantly transfer that same formatting to
any other paragraph with one click.
First, select the unformatted paragraphs. Then Option-Shift-click a paragraph
that
has
been formatted. That’s it!
Keep your page numbers straight
When you’re designing a document that will ultimately be folded into shape,
keeping track of the page numbers can be a mathematical nightmare.
It’s much easier if you create tiny annotative text blocks, each showing what the
page number
really
is, and pop them out on the pasteboard. Figure 18-16, we
hope, makes this trick clearer.
Figure 18-16: Put floating text blocks out on the pasteboard. They help you figure out which
page will be which when the document is finally printed and folded.
Zoom to your satisfaction
You don’t have to make do with the standard degrees of magnification. With this
shortcut, you can specify a
region
of the display to fill your screen, regardless of
what amount of magnification is required.
Press the Control key. (This switches you to the Magnifying Glass, regardless of
which tool is currently selected.) Then just drag diagonally across the area you
want to see more clearly. When you release the mouse, the area you selected
will fill your monitor. Quark’s zooming capabilities max out at 400 percent, but
plug-ins from Extensis and A Lowly Apprentice Productions can boost
magnification to 1,200 percent.
Worth
Learning
Chapter 18: Page Design 725
■ ■
Macworld MAC SECRETS • 4040-8/5 • ch.18.F • Chapter 18 • FINAL • VB • 11/04/98 • p.725

Faster EPS drawings
This is a neat secret — but it got us into deep trouble.
An
EPS
(encapsulated PostScript) graphic has two parts. First, there’s the
invisible part, which consists of complex PostScript-language instructions to the
printer. And, for the benefit of us humans, there’s a PICT file (a graphic image)
that appears on the screen.
The reason EPS graphics take so long to draw in Quark is that the program is
attempting to interpret the PostScript instructions for the most accurate possible
display. Here’s a trick: Use the Measurements palette to rotate each EPS graphic
some minuscule amount — .01 percent, for example. Quark is forced to display
the PICT file instead of worrying about the EPS instructions. The graphic will
always redraw much more quickly — especially if it’s a complex one.
However, rotate the graphics
back
into position when you’re ready to print.
Otherwise, the PostScript interpreter aboard your laser printer or imagesetter will
spend extra time performing all the recalculations necessary to render the image
with the minute rotation. We forgot to mention this in earlier editions of this book
and heard from more than a few furious readers who tried this little trick — and
had to wait hours for their rotated graphics to print.
How to rescue a damaged Quark document
Sooner or later, it happens to every long-time QuarkXPress user. You double
click on a Quark document but it doesn’t open. Instead, you get the dreaded
Bad File Format error message. It means your file is hopelessly corrupted,
beyond recovery.
Or is it? As it turns out, some “bad file format” problems have to do with
corruption that crops up in the graphics imported in the Quark document.
Sometimes, one of the images that you’ve pulled into a picture box is the
source of the problem.
Here’s one tried and true way to recover such a document. First launch Quark —
the application itself, not the troubled document. Open a Quark library (make
one if you don’t have one already) and expand the library palette so that it fills
the screen. Then, use the Open command in Quark to open your document.
You’ve just managed to open your document without displaying any of the
imported pictures — they’re hidden behind the library palette, so the Mac
doesn’t have to draw them. Now, with the library palette still filling the screen,
open Quark’s General Preferences dialog box and turn on the Greek Pictures
checkbox. Now close the library. With Greek Pictures turned on, plain gray
placeholders appear instead of your imported graphics. Delete the contents
of all the picture boxes, then save a new version of your document.
With any luck, scrapping the corrupted images will have solved the problem.
Just re-import the art and you’re back in business.
Strange
But True
Mac Basics
726 Part III: Application Secrets
■ ■
Macworld MAC SECRETS • 4040-8/5 • ch.18.F • Chapter 18 • FINAL • VB • 11/04/98 • p.726

Force justify those titles
Both QuarkXPress and PageMaker include a text alignment option called
force
justify,
which stretches a line of text the full width of the column — even if it
contains just one word.
Generally, this isn’t very useful or desirable. But we’ve found one way to use
force justification ver y effectively — to create titles and headlines. Type a one-
word title, apply forced justification, then hit Return. The letters of the word are
instantly re-positioned, so that the text is evenly stretched across the entire text
box, just as a headline should be.
If your title contains more than one word, however, this approach doesn’t work.
You’ll simply end up with words with normal letter spacing — and huge, ugly
white gaps between each word, as shown in the top half of Figure 18-17.
The way to get around this, as suggested by free book winner Paul McGrane, is
to insert a space in between
every
letter in the title (and
two
spaces between
each word). Because every letter is now treated as a word, you end up with a
perfectly spaced headline (see Figure 18-17).
Figure 18-17: Force-justifying a multi-word line of text in Quark or PageMaker produces ugly
word spacing, as the top example shows. But if you add a space between every letter, the
result is an evenly spaced title or headline.
Page Design and the World Wide Web
Programs such as QuarkXPress and PageMaker are primarily designed to
create documents that eventually get printed on paper — newsletters,
magazines, books, and so on. In recent years, however, the growing popularity
of the Internet has given rise to a whole new kind of publishing — online
publishing. Log onto the Internet and you’ll find hundreds of online journals,
magazines, and newsletters published exclusively on the World Wide Web (see
Chapters 25 and 28). And many traditional print publications (such as Time,
Sports Illustrated, and Macworld) now have Web-based counterparts as well.
Of course, designing and laying out pages for a printed magazine is quite
different from designing Web pages, which must be transmitted over
telephone lines and viewed on a computer screen. While page-layout
Contest
Winner
Chapter 18: Page Design 727
■ ■
Macworld MAC SECRETS • 4040-8/5 • ch.18.F • Chapter 18 • FINAL • VB • 11/04/98 • p.727

programs provide a relatively simple WYSIWYG interface for designing
pages, Web publications must be encoded using HTML (Hypertext Markup
Language), the standard language of the Web. (For more on using HTML and
the Web, see Chapters 25 and 28.)
The good news for users of PageMaker and QuarkXPress is that the market is
crawling with tools that convert existing PageMaker and Quark documents
into HTML documents, ready for publishing on the Web. PageMaker 6.5
includes commands that let you export formatted text as HTML. In the Quark
world, Xtension programs such as BeyondPress (Extensis) and HexWeb XT
(HexMac) let you turn Quark pages into Web pages without having to
reformat every bit of text from scratch. These programs preserve much of
the styling in your original documents and even convert the EPS and TIFF
graphics in your layouts into GIF and JPEG files — the graphics formats most
commonly encountered on the Web.
As Web publishing grows more popular, expect to see even better plug-ins
that allow you to convert traditional layouts into Web pages.
728 Part III: Application Secrets
■ ■
Macworld MAC SECRETS • 4040-8/5 • ch.18.F • Chapter 18 • FINAL • VB • 11/04/98 • p.728

MACWORLD MAC SECRETS 5TH EDITION• 4040-8/5 • ch19.F • Chapter 19 • FINAL • VB • 11/04/98 • p.729
MACWORLD MAC SECRETS 5TH EDITION• 4040-8/5 • ch19.F • Chapter 19 • FINAL • VB • 10/27/98 • p.729
Chapter 19
Number and Data Crunching
In This Chapter
©Spreadsheet design fundamentals
©Secrets of Excel
©Secrets of Quicken
©Secrets of FileMaker Pro and ClarisWorks
By this chapter title, we mean two things: spreadsheets and databases.
More specifically, we pretty much mean Excel, FileMaker, and the
AppleWorks/ClarisWorks equivalents thereof.
Excel isn’t just the best-selling stand-alone spreadsheet — it’s practically the
only one left for the Mac. As for databases, FileMaker is not only the best-
seller, but it’s one we, frankly, can understand. For information on
programmable relational databases such as Fourth Dimension, Helix, and
Omnis, we merrily refer you back to your bookstore’s Mac book section.
Spreadsheet Basics
We won’t waste pages showing you the basics of setting up a spreadsheet. We
assume you already know that you let the program do the math for you. Click
in any cell in the spreadsheet; type either a number or a formula that adds up
numbers in other cells.
You probably already know the value of the Sum button in Excel, which saves
hours of picky typing. Adding a column or a row of numbers is as easy as one
click, as shown in Figure 19-1.
We’re going to trust that you already know that when you copy and paste
selected cells, Excel does a weird thing. Even after you paste, the shimmering
outline still runs around the selected cells. It can be a little unnerving if
you’re used to Mac programs in which selected material gets deselected as
soon as you click elsewhere. The point is, we suppose, to indicate that you
can paste this same material again elsewhere. But, as you probably know, you
can’t get rid of that shimmering selection outline until you press Ô-period (or
make another selection, for example).
Mac Basics
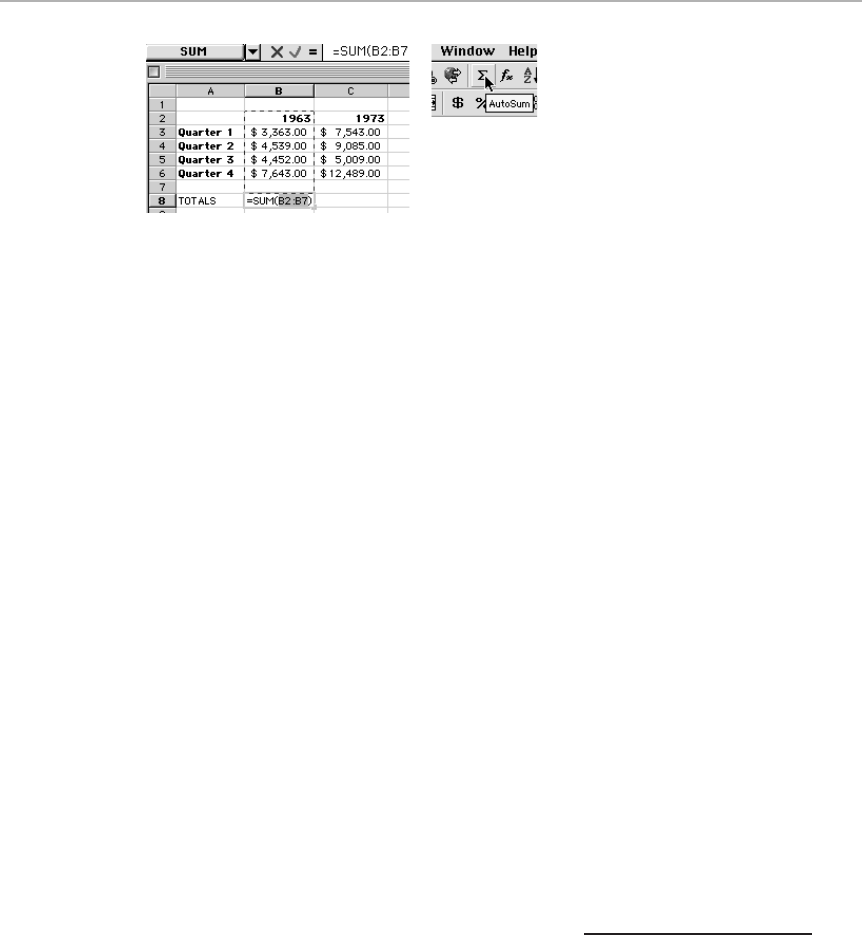
Figure 19-1: You no longer need to add up figures by typing = SUM(); Excel does this for
you. Click the cell at the bottom of a column and click the Sum button (left). Excel proposes
adding up the entire column (middle). If it inadvertently selects the column head, drag
through the numbers you do want added, and then press Enter.
Naturally, you know how to create a chart: Highlight some cells; then click the
Chart Wizard button and choose the type of chart you want to create from the
Chart Wizard dialog box. (If you’re running Excel 5 instead of Excel 98, you’ll
have to drag diagonally across the spreadsheet first, to indicate where you want
the new chart to appear, and then the Chart Wizard dialog box will appear.) If you
want to customize the chart, keep clicking the Next button in the resulting
dialog box and choose any of the formatting options presented. If you need
something quick-and-dirty, and don’t need to fuss with all the options, click the
Finish button (or, in Excel 5, the > button). Excel fast-forwards through all those
options and plops the finished chart into your spreadsheet.
The last thing we’re sure that you already know is how to enter a batch of
numbers into specific cells in an efficient manner. Highlight the cells first.
Then, after you enter each number, press Enter, and Excel will select the next
cell in the selection for editing, whether it’s to the right of or below the first
one. (If you don’t preselect the cells, then pressing Enter leaves the first cell
selected instead of advancing to the next.)
By the way, if you don’t want to hassle with selecting the cells first, try this
method: Don’t use the Enter key at all. After you enter each number, press
the Return key instead. Excel will enter the number and move to the next cell
down automatically. Finally, you can enter numbers by pressing any of the
arrow keys. If you type in a number, then press an arrow key, Excel will enter
the number and jump to the next cell, in whatever direction you’ve specified.
Excel Secrets (and ClarisWorks)
■
By the way: When Apple retook custody of ClarisWorks in 1998, it renamed the
program AppleWorks. We have no way of knowing which name your version has;
for now, we trust you’ll figure out what we mean when we say “ClarisWorks” or
“AppleWorks/ClarisWorks.”
730 Part III: Application Secrets
■ ■
MACWORLD MAC SECRETS 5TH EDITION• 4040-8/5 • ch19.F • Chapter 19 • FINAL • VB • 11/04/98 • p.730
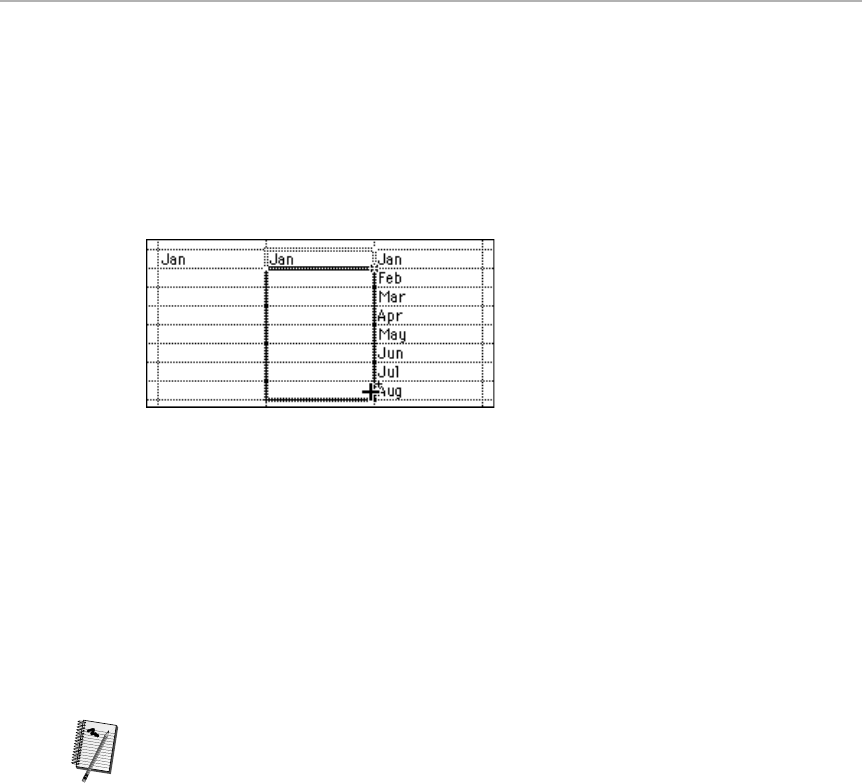
Instant completion of a row or column
Excel is exceptionally bright about doing your typing for you. If you have
any
kind
of sequence — Jan, Feb, Mar; 1960, 1965, 1970; 1, 3, 5, 7, 9 — you only need
to put in the first two and let the program do the rest.
Here’s how it works. First, type the beginning entry of the series (Jan, for
example), as shown in Figure 19-2.
Figure 19-2: Type the beginning one or two entries in the series (left) and then click the cell.
Grab the little square at the lower-right corner of the highlighting rectangle, and drag it down
or across (middle). When you let go, Excel automatically generates the next items in the list.
Select these one or two cells. Then grab the tiny square handle at the lower-right
corner of the selection rectangle. Drag it downward or rightward into new empty
cells. Excel automatically fills in the logical next values!
If you enter 1:00 p.m. and 1:30 p.m., Excel will generate 2:00 p.m., 2:30 p.m.,
3:00 p.m., and so on. If you enter 1st Street and 2nd Street, Excel will fill in 3rd
Street, 4th Street, and so on. Type in Apartment 3 and Apartment 6, and you’ll
get Apartment 9, Apartment 12, and Apartment 15. This is one
smart
program.
For even more options when dragging out a series, try holding down the Control
key while dragging the Fill handle, as described previously. Excel will present a
pop-up menu of options that provide even greater control over how the cells are
filled. For example, if you type
Mon
and
Tues
in the first few cells and then
Control-drag downward, the pop-up menu that appears will let you choose
between filling the remaining cells with all the days of the week or just
weekdays, without Saturday and Sunday!
(ClarisWorks’ Calculate menu offers a
somewhat
similar feature: the Fill Special
command. Take a look — you’ll see what we mean.)
Instant completion II: Make up your own rules
Excel’s ability to automatically complete a row or column, as described in the
previous secret, is cool — but it gets even cooler when you realize you can have
Excel fill in cells with more than the names of months or the days of the week.
Actually, it can automatically fill rows and columns with
any
list of values that
you want — cities, product lists, names of personnel, whatever.
Worth
Learning
Chapter 19: Number and Data Crunching 731
■ ■
MACWORLD MAC SECRETS 5TH EDITION• 4040-8/5 • ch19.F • Chapter 19 • FINAL • VB • 11/04/98 • p.731
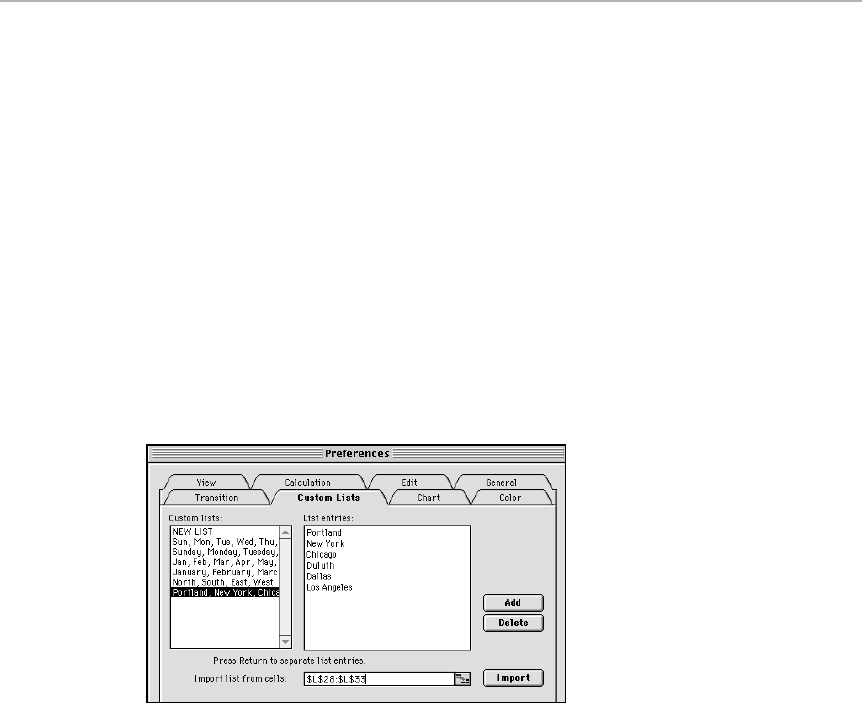
For example, suppose you have a company with offices in Portland, New York,
Duluth, Los Angeles, Dallas, and Chicago. Whenever you do sales reports in
Excel, you probably find yourself filling in cells with the names of each city —
over and over again. Wouldn’t it be nice to turn those cities into a custom list,
so that Excel will fill them in for you?
To set this up, first type all such entries somewhere in a spreadsheet. Choose
Tools ➪Preferences ➪Custom Lists tab; then click the small button just to right
of the “Import list from cells” field (see Figure 19-3). The Preferences window
collapses and you jump back into your spreadsheet.
Now select the cells containing the list data you want, and then click the button
again to return to the Preferences window. Finally, click the Import button.
That’s it. Excel has now memorized your list. From now on, all you have to do is
type
Portland
into one cell, grab the little square at the lower-right corner of the
cell’s rectangle (exactly as described in the previous secret), and drag down or
across into the adjacent cells. Excel fills the cells with the other items in your list.
Figure 19-3: Teach Excel to fill in cells with lists of your own choosing.
The two personalities of the arrow keys
Spreadsheet-software designers have always faced a tough decision. When you
press a left-arrow or right-arrow key, what should happen? Should the insertion
point walk from character to character
within
a cell? Or should it leap from cell
to cell?
In AppleWorks/ClarisWorks, you specify which behavior you want in the
Preferences dialog box. Excel, on the other hand, gives it to you both ways. It
starts up in the latter mode (Enter mode), where the arrow keys move from cell
to cell. If you press Ô-U, however, you’re in Edit mode. In this mode, the arrow
keys move the cursor from side to side within
one
cell.
Keep in mind, though, that you don’t
stay
in Edit mode; as soon as you edit
another cell, you’re back in Enter mode again.
732 Part III: Application Secrets
■ ■
MACWORLD MAC SECRETS 5TH EDITION• 4040-8/5 • ch19.F • Chapter 19 • FINAL • VB • 11/04/98 • p.732
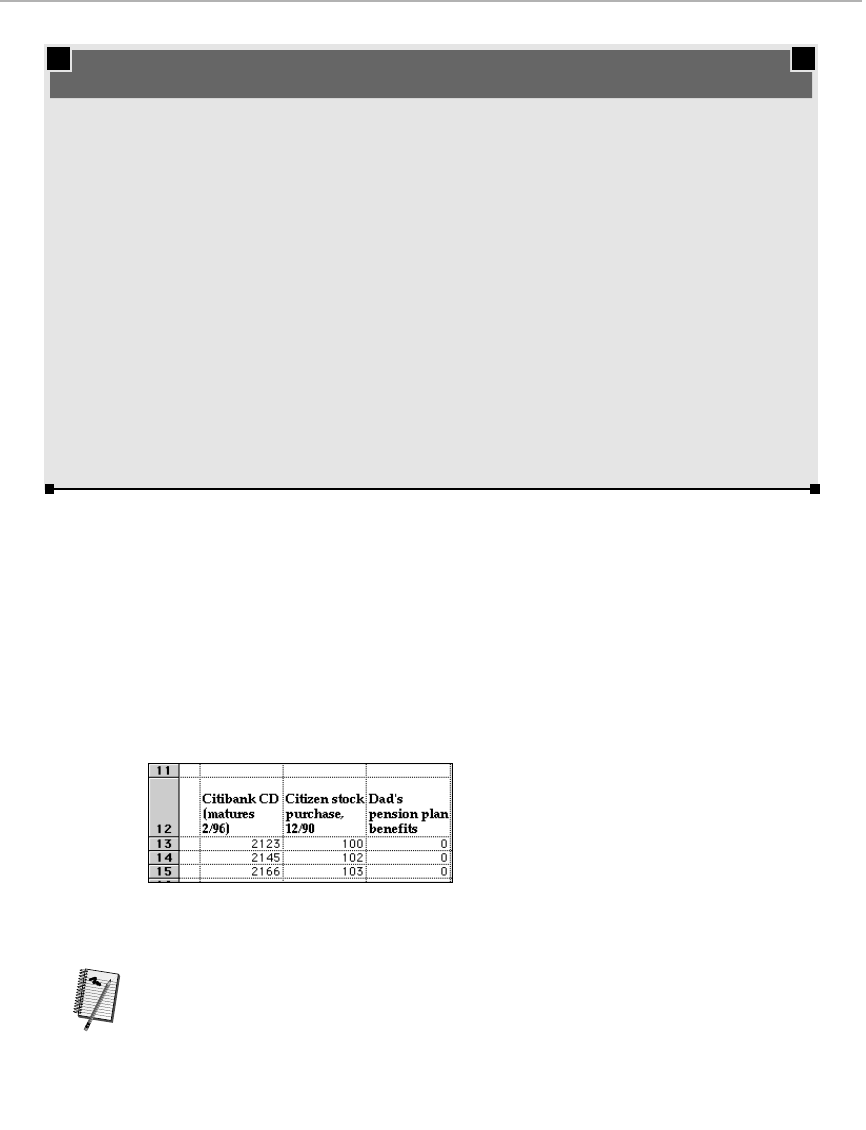
Chapter 19: Number and Data Crunching 733
■ ■
MACWORLD MAC SECRETS 5TH EDITION• 4040-8/5 • ch19.F • Chapter 19 • FINAL • VB • 11/04/98 • p.733
TRUE FACT
Ever wonder why Excel appears in the
Application menu as Microsoft Excel?
It’s the law, that’s why.
Back in 1985, Microsoft personnel were
strongly divided over what to call the new
Macintosh spreadsheet program they had under
development. The working name was Odyssey.
But several other names were also under
consideration, including Microsoft Plansheet,
Number Buddy, and — believe it or not — Mr.
Spreadsheet.
When the program was finally rolled out in May
1985 (at a press conference in Central Park’s
Tavern on the Green), it bore an altogether
different name, one dreamed up by a Microsoft
district manager: Excel.
This almost immediately resulted in a lawsuit.
Manufacturers Hanover Trust operated an
automated banking service also called Excel.
Microsoft was accused of stealing the name.
The outcome of the case: The program’s official
name had to be changed from Excel to Microsoft
Excel.
And so, in harmony with that decision, the
Application menu lists the program by its full
name: Microsoft Excel.
Introducing Mr. Spreadsheet
In fact, here’s another tip: When you’re in Edit mode (where the arrow keys
move the cursor one character at a time within a cell), press Ô-arrow to make
the insertion point jump one
word
per keypress, instead of one letter.
Several lines of type in one cell
Here’s something we bet you didn’t know that you could do: Type multiple lines
of text into one cell (see Figure 19-4).
Figure 19-4: Excel lets you wrap text within a single cell!
Here’s the secret. In Excel, select the cells where you’ll want text to wrap.
Choose Format ➪Cells ➪Alignment tab. A dialog box appears. Select Wrap Text
and click OK. Now you can type into those cells; when you press Enter, the row
height will change to accommodate the new text as necessary. (If you want to
force a line break, press Ô-Option-Return.)
In ClarisWorks, select the cells and choose Format ➪Alignment ➪Wrap.
Worth
Learning

There’s one caveat, both in Excel and ClarisWorks: If you change the type style,
the row height won’t increase or decrease to accommodate the different font or
size. You must cue it to do so by double-clicking the line below the row heading,
as shown in Figure 19-5.
Figure 19-5: If you change the size of text in Excel 5 or ClarisWorks, the row height won’t
change. To fix the situation, place the cursor on the line below the row heading (at left, just
below row 12) and double-click. The row height changes as needed (right).
The hidden Revert command
If you examine Excel’s File menu, you may be disappointed to find that it has no
Revert command, for use when you’ve made a mess of a file and want to restore
the last saved version. Ah, but there
is
a Revert command — it’s just hidden.
Simply use the Open command in the File menu and reopen the very same
document that’s already on the screen. You’ll get a little alert box asking if you
want to revert to the last saved version; you know what to do.
A word about curly quotes
Our advice on curly quotes: Don’t use ’em in a spreadsheet. Even super-advanced
spreadsheets such as Excel aren’t smart enough to recognize typographically
correct “smart quotes” in formulas. If you use quotes in a cell (to designate a text
entry instead of numbers, for example), Excel will choke on them.
If you have a program like QuicKeys that’s set to convert regular uses of the
quote key into curly quotes, define two QuicKeys within Excel’s own keyset that
reverse
the effects of the Universal keyset. (Use an Alias-type QuicKey. Define a
single quote to
type
a single quote.) See Figure 19-6.
Figure 19-6: This is the QuicKeys window where you define a QuicKeys Alias. It looks pretty
silly here — you’re asking it to type just what you’ve typed — but it’s the right way to
prevent curly quotes within a single program.
Or don’t use QuicKeys at all; use SmartKeys, included on the CD-ROM with this
book, instead. Just click the control panel’s application button to exclude Excel
from the “quotification” feature.
Strange
But True
734 Part III: Application Secrets
■ ■
MACWORLD MAC SECRETS 5TH EDITION• 4040-8/5 • ch19.F • Chapter 19 • FINAL • VB • 11/04/98 • p.734
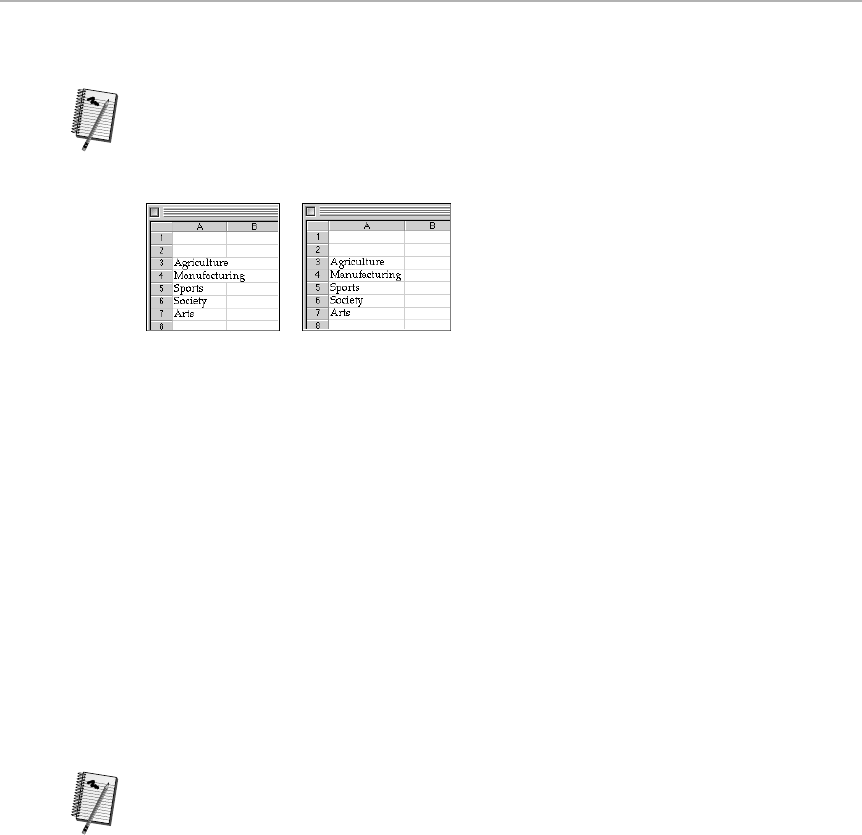
Auto-size columns (ClarisWorks, too)
This is a great feature of both Excel and AppleWorks/ClarisWorks, but it’s
hidden. If you double-click a column header line at the top of the window, the
column neatly snaps to the exact size to contain the longest entry in the column
(see Figure 19-7).
Figure 19-7: A double-click on the right-hand column header line (left) automatically resizes
the column so that it just fits the text in it (right).
If you’ve selected
multiple
columns, double-click any
one
of their header lines.
Excel/ClarisWorks will resize
all
the columns to exactly contain their contents.
How to see where the page will be cut off
Under normal circumstances, you can’t see where your spreadsheet’s page
breaks will be in Excel. You may be the victim of a rude surprise when you print
out a large sheet and find that the last column didn’t fit onto page one.
But there are a couple of quick solutions. In Excel 98, you can choose Tools ➪
Preferences ➪View tab ➪Page Breaks ➪OK. (In previous versions of Excel,
choose the Options command to find the Automatic Page Breaks checkbox
under View options.) The page breaks will appear as dotted lines right on the
spreadsheet.
Of course, this tip only allows you to
see
the page breaks — not adjust them. But in
Excel 98, you can also switch to the wild new Page Break Preview mode (choose it
from the View menu), where you can actually drag page breaks (the thick blue lines)
into new positions —
and
edit the content of the spreadsheet, all in the same
window. In Page Break Preview, the page breaks. Drag a page-break line, and you’ll
immediately see how the changes will affect the pagination of your data.
Paste only the values (ClarisWorks, too)
Here’s an old chestnut that bears repeating. Normally, when you copy and paste
cells, you simply create a new copy of the originals — formulas and all. It’s often
handy to ditch the formulas and just keep the results.
To divorce the two, copy the cells and click where you want to paste them.
Instead of choosing Paste from the Edit menu, choose Paste Special. In the
resulting dialog box, click Values and click OK.
Worth
Learning
Worth
Learning
Chapter 19: Number and Data Crunching 735
■ ■
MACWORLD MAC SECRETS 5TH EDITION• 4040-8/5 • ch19.F • Chapter 19 • FINAL • VB • 11/04/98 • p.735
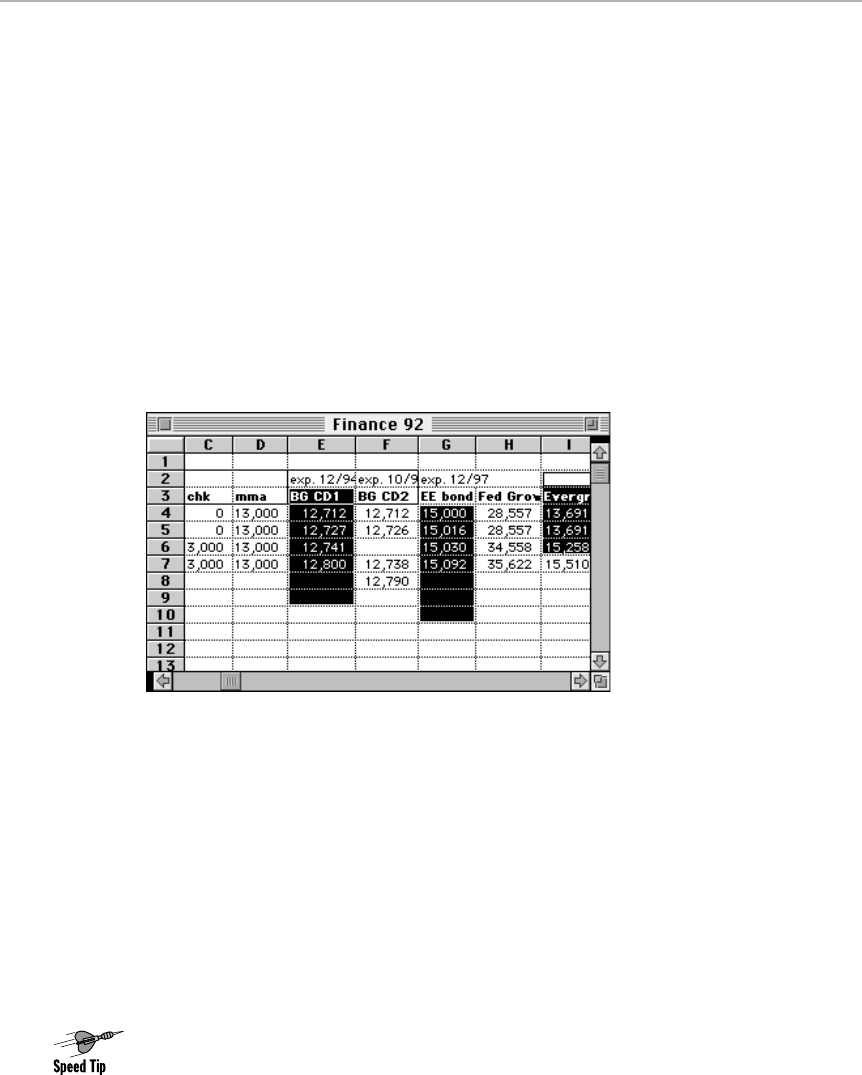
Instantly convert to values
Instead of using the Paste technique in the previous secret, you can also
instantly convert Excel cells so that they contain only the
result
of the formulas
they contain (thus wiping out the formula).
Select the cells, and then click in the formula bar (or press Ô-U). Then press on
your F9 key (if you have an extended keyboard) or Ô-equal sign (=).
Select nonadjacent cells
You may already know that you can press the Ôkey to select physically
separate (noncontiguous) cells in Excel. This technique is great when you want
to format a bunch of different columns at once — make them all bold, for
example (see Figure 19-8).
Figure 19-8: Select nonadjacent cells.
The real secret, though, is that you can use this feature to create
charts
that
only use certain lines of data. Remember, the Chart Wizard only bothers to plot
the points whose cells you have selected.
Selecting multiple worksheets
Everyone knows how to select multiple cell ranges in an Excel document, but did
you know you can select multiple
worksheets
by Shift-clicking the worksheet
tabs at the bottom of the screen? (Shift-click to select adjacent worksheet tabs
and Ô-click to select non-contiguous tabs.)
By selecting multiple sheets this way, you can delete a whole set of worksheets
simultaneously. Or you can turn off gridlines in an entire workbook instead of on
a sheet-by-sheet basis. And you can perform searches and spell checks on a
whole workbook at once. (Normally, Excel restricts Find and Replace operations
and spelling checks to the active worksheet.)
736 Part III: Application Secrets
■ ■
MACWORLD MAC SECRETS 5TH EDITION• 4040-8/5 • ch19.F • Chapter 19 • FINAL • VB • 11/04/98 • p.736

Prevent Excel from turning 3-12 into March 12
Excel, in an effort to be helpful, automatically turns anything you type into a cell
that can possibly be construed as a date
as
a date. If you type 3-12 into a cell,
as soon as you press Enter, Excel displays
12-Mar.
That’s all fine, until the day
comes when you really
want
the cell to say 3-12.
The solution is quick and simple: Enter it as a
text string.
To do so, all you have to
do is prefix the entry with an apostrophe (in other words,
’3-12
). The apostrophe
doesn’t actually appear in the cell —it does its magic behind the scenes.
Excel and fractions: Some nontrivial trivia
Here’s an extension of the previous secret. If you type 2/3 into a cell, Excel
immediately reformats it as 3-Feb; it thinks you intended to type a date. Unless,
of course, what you type
can’t
be a date, such as 18/3; in that case, Excel
leaves 18/3 in the cell as a text string.
But if you type a
zero
and a space in front (for example, 0 2/3), then Excel
realizes that you really mean a fraction. If you type 0 18/3, therefore, Excel
puts a 6 in the cell.
Excel’s toolbar/palette continuum
Excel 98 has 13 toolbars. Opening them all can make you feel downright
claustrophobic. Fortunately, as in any Office 98 program, you can turn any
one of those toolbars into a floating palette by double-clicking it. Drag any
of the palettes to the edges of the screen and they become toolbars, anchored to
the top, bottom, or sides of your monitor. (Excel 5 toolbars work the same way.)
You can also press Control while clicking any Excel toolbar or palette to open a
hidden Toolbar menu, which lets you selectively open and close the toolbars you
need —or jump directly to the Customize dialog box to create your own toolbars.
Instant access to invisible menu bars
Excel is riddled with contextual pop-up menus. (In fact, Excel had them long
before Apple decided to make them a standard part of Mac OS 8.) If you press
the Control key (in Excel 98 or 5.0) and click a cell or selected region or a chart,
you get a powerful, handy, pop-up menu springing out of your cursor (see Figure
19-9). Depending on what you click (a chart, a line, and so on), a different
magical menu appears, listing appropriate editing commands. (In Excel 4, click
with Ôand Option held down instead.)
We
prefer
these hidden menus to the actual menu-bar menus. First, one of these
menus can appear anywhere you click, which is a godsend when you’re editing a
huge spreadsheet and you’re miles from the top of the screen. Second, this
menu’s commands are tailored to the spot you clicked; it gathers from several
different menus all the most useful commands in one handy place.
Chapter 19: Number and Data Crunching 737
■ ■
MACWORLD MAC SECRETS 5TH EDITION• 4040-8/5 • ch19.F • Chapter 19 • FINAL • VB • 11/04/98 • p.737
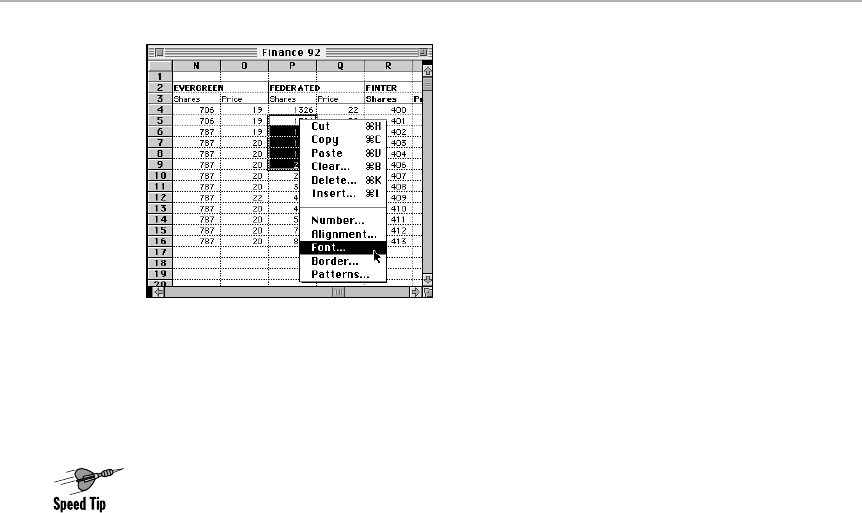
Figure 19-9: The Edit menu that springs out of nowhere.
Save time: Don’t bother finishing
the parentheses!
Excel automatically adds a closing parentheses if you’ve typed an open
parentheses as part of a formula. All you have to do is press Enter; Excel does
the rest.
Actually, Excel 98 goes much farther. It watches for many other typical formula-
entry mistakes: entering X instead of *, extra spaces, mismatched quotes,
transposed cell names (such as 1A), and so on. It doesn’t, however, make such
corrections on the fly; instead, it asks you for confirmation first. In activities as
critical as number-crunching, Microsoft evidently thinks you can’t be too careful.
Use the F8 key for selecting regions
By F8, we mean “function-key 8” at the top of an extended Mac keyboard.
(If you have a keyboard without function keys, such as the one on an older
PowerBook, you’ll have to skip these shortcuts.)
When you press F8, you see the word EXT appear in the right half of the Excel
status bar. This means you’re in Extend mode. Wherever you click the mouse or
however you use the arrow keys (or navigation keys such as Home or End), Excel
will behave as though you’re pressing the Shift key. What
that
means is that
you’re now selecting everything between the originally selected cell and the cell
to which you’re moving.
If you press
Shift-
F8, on the other hand, the word ADD appears in the status bar.
Then you can drag across various regions of your spreadsheet. With each drag,
you add new, noncontiguous regions to the selection, exactly as though you
were pressing the Ôkey.
You can also use Shift-F8 to make non-contiguous selections from the keyboard
— without using the mouse at all. First, hold down Shift and use the arrow keys
to make a selection, then press Shift-F8. Next, use the arrows keys alone
(without the Shift key) or the Page Up, Page Down, Home or End keys to move to
738 Part III: Application Secrets
■ ■
MACWORLD MAC SECRETS 5TH EDITION• 4040-8/5 • ch19.F • Chapter 19 • FINAL • VB • 11/04/98 • p.738
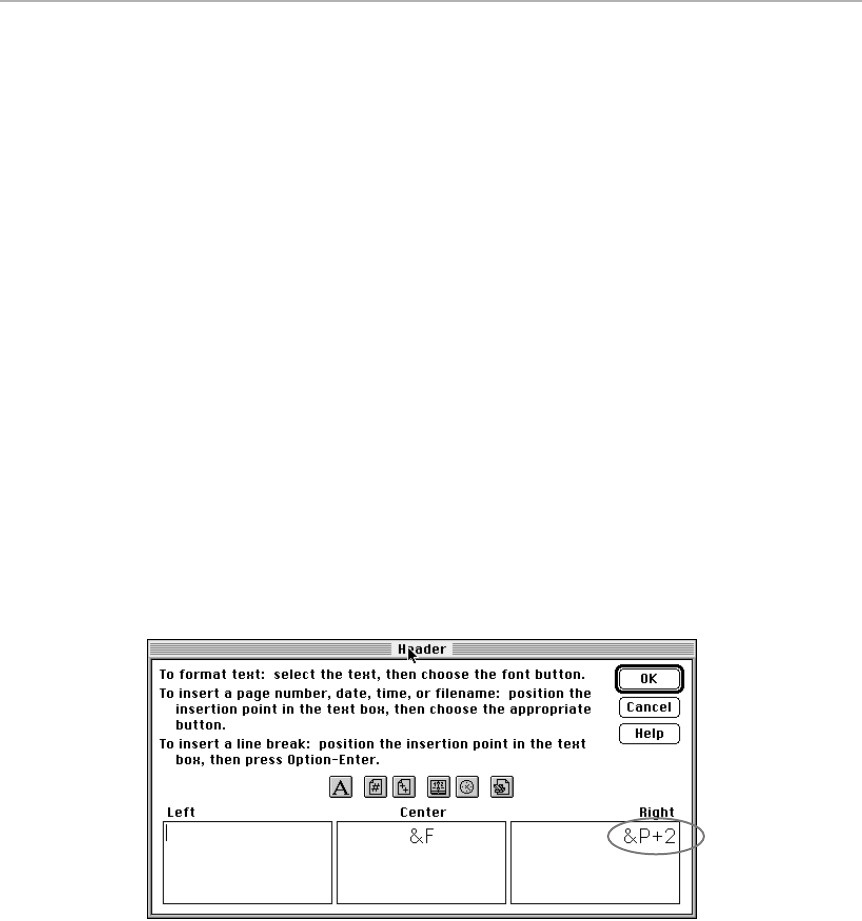
another part of the spreadsheet, and then repeat the process: First, make your
selection using Shift along with the arrow keys, then press Shift-F8. Excel will
keep all the non-contiguous cells selected.
Page-numbering tricks
Excel’s method of setting up custom page-numbering has never been a model of
intuitiveness. To get started, choose File ➪Page Setup ➪Header/Footer tab. If
you want to use one of Excel’s pre-set page numbering options, the rest is easy
— just choose the style you like from the Header (or Footer) pop-up menu.
But if you want to set up a custom numbering scheme — starting with a specific
number, for example—it’s more work. Click the Custom Header button (or the
Custom button in version 5) and then click in the right, center, or left text box.
(In version 4, you don’t have to click the Custom button; you’ll see the text
boxes right away.) Next, click the page-number icon (with the # symbol on it).
The notation
&[Page]
appears in the text box (or, in previous versions of Excel,
&p
). This represents the page number.
If you add a plus or minus symbol and an additional number (such as
+2
in
Figure 19-10), then you can create a
page number offset.
That means you can
force Excel to start numbering the pages with a number other than 1. (That’s
handy if you need to print out an insert for an existing report, for example.)
Whichever number you type here gets added to 1. So to start numbering with page
5, you put &[Page]+4 in this box. To start numbering with zero, use &[Page]-1
.
Figure 19-10: The circled notation means: “Start numbering my pages with the number 3,
even though it’s the first page.”
Show the formula in the cell
After you’ve typed a formula into an Excel cell and pressed Enter, you normally
see only the result in the cell. If you’d rather have your entire spreadsheet
display the formulas themselves, press Ô-tilde (~). In a blink, every cell shows
the actual formula instead of the result (see Figure 19-11).
Chapter 19: Number and Data Crunching 739
■ ■
MACWORLD MAC SECRETS 5TH EDITION• 4040-8/5 • ch19.F • Chapter 19 • FINAL • VB • 11/04/98 • p.739
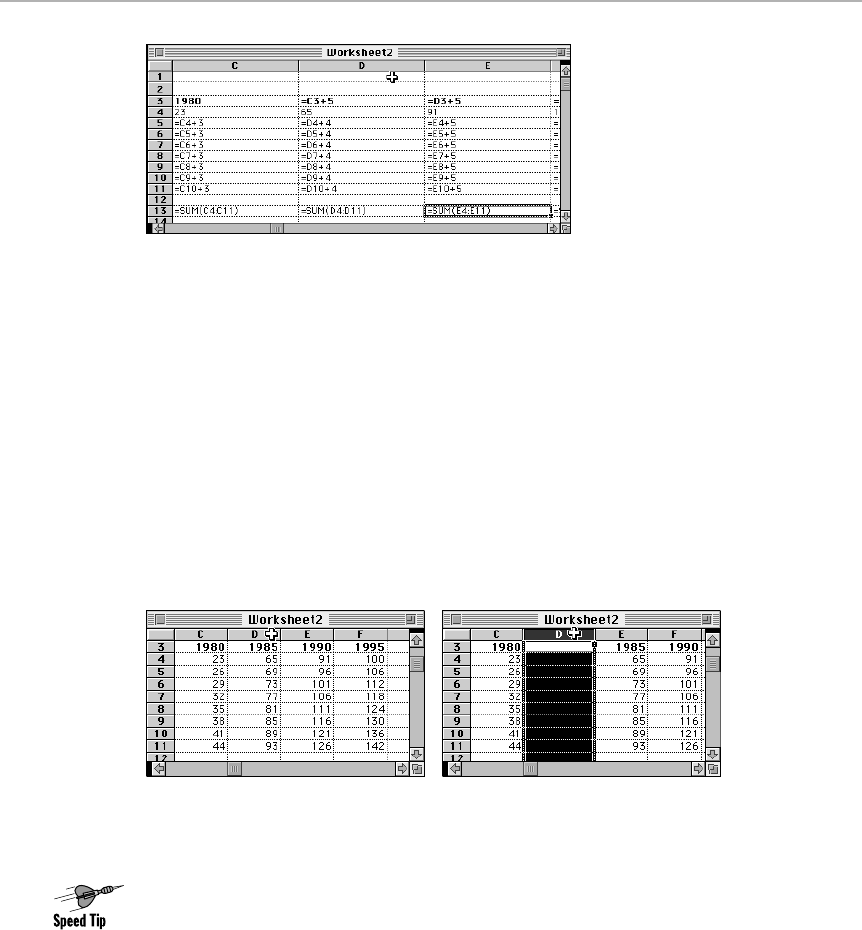
Figure 19-11: With one keystroke, you can make your spreadsheet show the formulas in
their cells instead of the results.
Don’t be alarmed: Excel widens the columns substantially to make room for
viewing the longer formulas. Press the same keystroke again to restore your
spreadsheet to its usual state.
Insert rows and columns
You may already know the Option-key trick for adding a row or a column: Just
Option-click the Excel row or column
header
to introduce a new blank row or
column (see Figure 19-12). In Excel 98, this action is accompanied by a
gorgeously smooth animation (of your existing rows or columns moving apart)
and a really cool sound effect (unless you’ve turned off sound effects).
Figure 19-12: If you Option-click the header of column D, you insert a new blank column. All
existing columns get shoved off to the right.
You can extrapolate this trick to perform some very useful stunts. Excel
will insert a blank region identical to
any
group of selected cells. To insert
a square of four cells,
select
a square of four cells while pressing Option.
The four you select will be pushed to the right to accommodate the four
new ones.
Select in Microsoft dialog boxes
Microsoft dialog boxes are especially handy because you don’t have to use the
mouse to trigger commands in them. You can usually type the letter — you don’t
even have to use the Ôkey — that begins the choice you want. In Excel 98, it’s
740 Part III: Application Secrets
■ ■
MACWORLD MAC SECRETS 5TH EDITION• 4040-8/5 • ch19.F • Chapter 19 • FINAL • VB • 11/04/98 • p.740
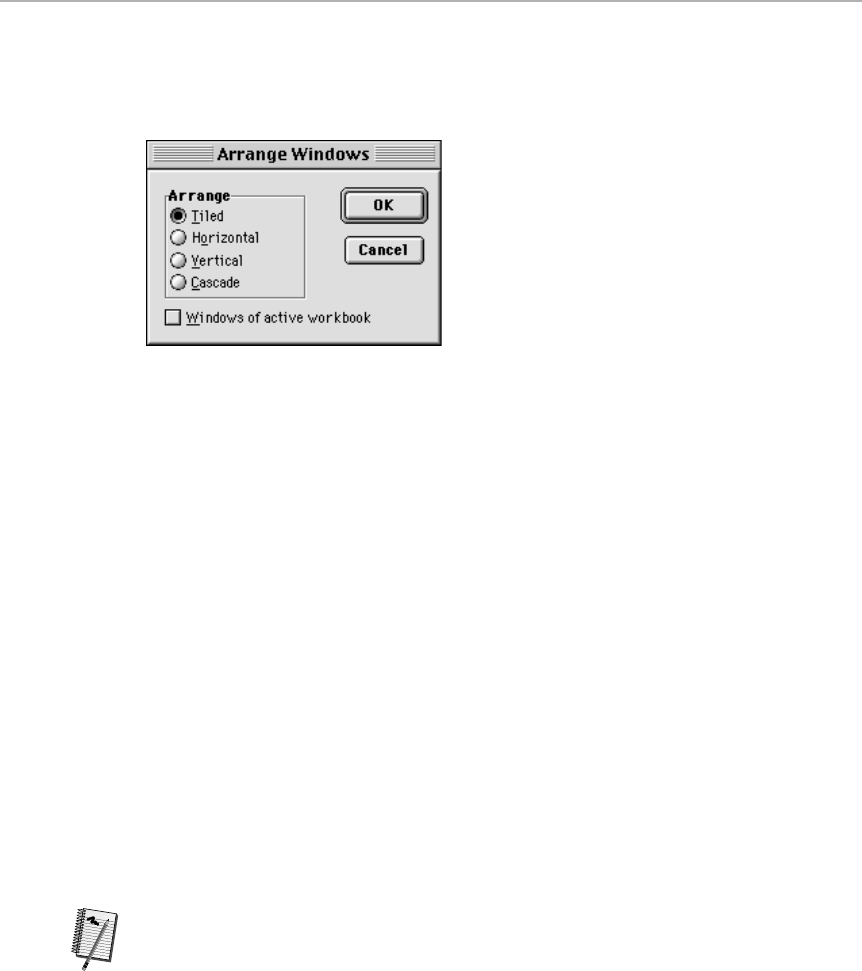
easy to figure out which key triggers each command — just hold down the Ôkey
for a moment when the dialog box opens. The “trigger” key for each command is
underlined, Windows-style (see Figure 19-13).
Figure 19-13: Type one letter of a button or box to activate it.
In the dialog box pictured in Figure 19-13, for example, you can see why T
activates Tiled. But why is O the trigger for Horizontal? Because H is tied up by
the Help button, of course!
A corollary: In dialog boxes that have fields where you can type in information
(such as the Print dialog box), you can’t just type unshifted letters to trigger
dialog box options. In those dialog boxes, you have to add Ô(Ô-O for Options,
Ô-C for Cancel, and so on).
Stop Excel from stopping leading zeros
If you type a number that begins with a zero, Excel automatically lops it off.
Type in ZIP code 06520 (New Haven, Connecticut), and Excel stubbornly displays
it as 6,520.
Here’s the solution. Select the row or column containing these numbers. Choose
Format ➪Cells ➪Number tab. In the Category field click Custom; in the Type field
(or version 5’s Code field), type 00000 (all zeros) and click OK. You’ve just forced
Excel to display a minimum of five digits for every number in the selected row or
column.
Or just format those cells as text!
These tips are irrelevant in Excel 98, by the way; its Cells dialog box offers a Zip
Code — or even Zip Code +4 — option in the Special category. And while we’re
looking at the Special category — note the automatic Phone Number and Social
Security formats. Make a mental note; there will come a time, we know it, when
you’re required to type in hundreds of phone numbers. Do it in Excel 98, and
you won’t have to type any dashes, parentheses, or spaces as formatting.
Use the formula bar from the keyboard
As all power users know, the less you have to use the mouse, the more efficient
you can be. In Excel’s case, you almost never have to use the mouse.
Worth
Learning
Chapter 19: Number and Data Crunching 741
■ ■
MACWORLD MAC SECRETS 5TH EDITION• 4040-8/5 • ch19.F • Chapter 19 • FINAL • VB • 11/04/98 • p.741
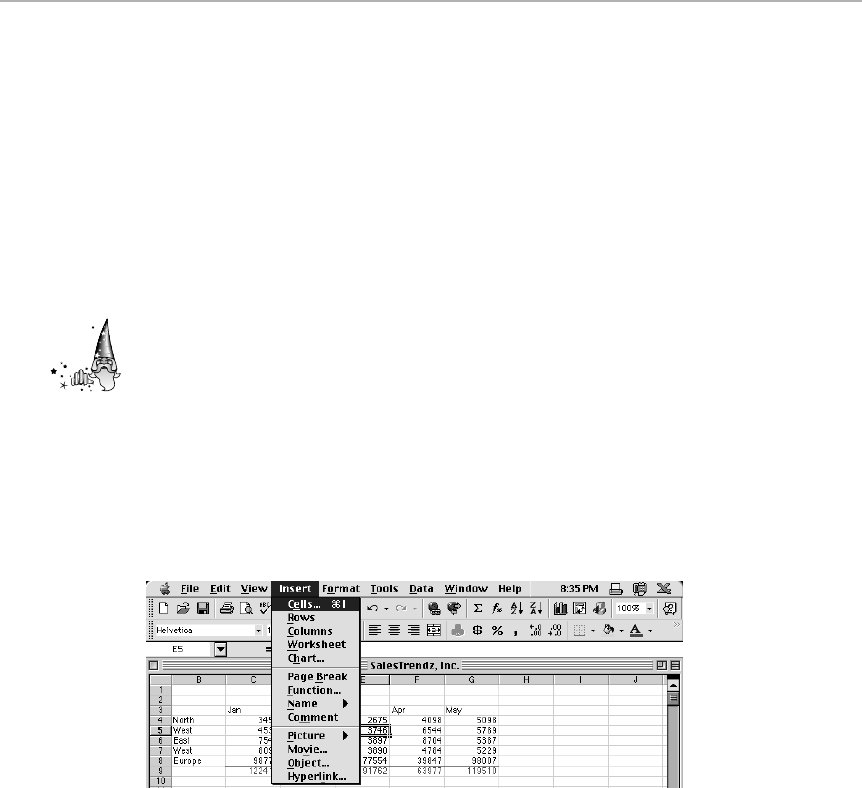
One seemingly prominent exception: To edit a formula, you have to click the
formula bar, right?
Nope. Use the handy shortcut Ô-U to jump up there. Then use the arrow keys to
tiptoe through individual characters, or use the Ô-arrow key to jump through
words or cell names. Press Shift as you use the arrow keys to highlight text, and
then press Enter when you’re finished editing. (This works in Excel 98, but the
insertion point continues to flash in the cell itself — where you do the editing —
rather than in the formula bar.)
Turn Excel into Excel for Windows
We think this is one of the wildest Excel Secrets of all time: Press the slash key
(/) or F10 with an Excel spreadsheet open and suddenly, without warning, you’re
catapulted into — Windows!
More precisely, the program switches to emulating Lotus 1-2-3, the ancient but
popular DOS spreadsheet. You get menus and dialog boxes with keyboard
shortcuts indicated by a single underlined letter in the name of each menu and
command. Instead of using the mouse, you can open a menu by typing the
appropriate one-letter shortcut, à la Windows. Each command on each menu
also has a one-letter shortcut (see Figure 19-14). The 1-2-3 emulation
disappears as soon as you actually perform a command.
Figure 19-14: What’s this? Excel for Windows? No. It’s Excel after you’ve popped it into
Alternate Menu mode.
By the way, you don’t have to use the slash key to jump into this Windows
mode. The slash is Excel’s default setting, but you can change it. Just choose
Options ➪Workspace and, in the resulting dialog box, type a new key into the
Alternate Menu Key field.
How to make those cool picture charts
You can use Excel to make charts that use icons as the bars of a graph, just
like the pictographs you see in
USA Today
(see Figure 19-15).
Strange
But True
742 Part III: Application Secrets
■ ■
MACWORLD MAC SECRETS 5TH EDITION• 4040-8/5 • ch19.F • Chapter 19 • FINAL • VB • 11/04/98 • p.742
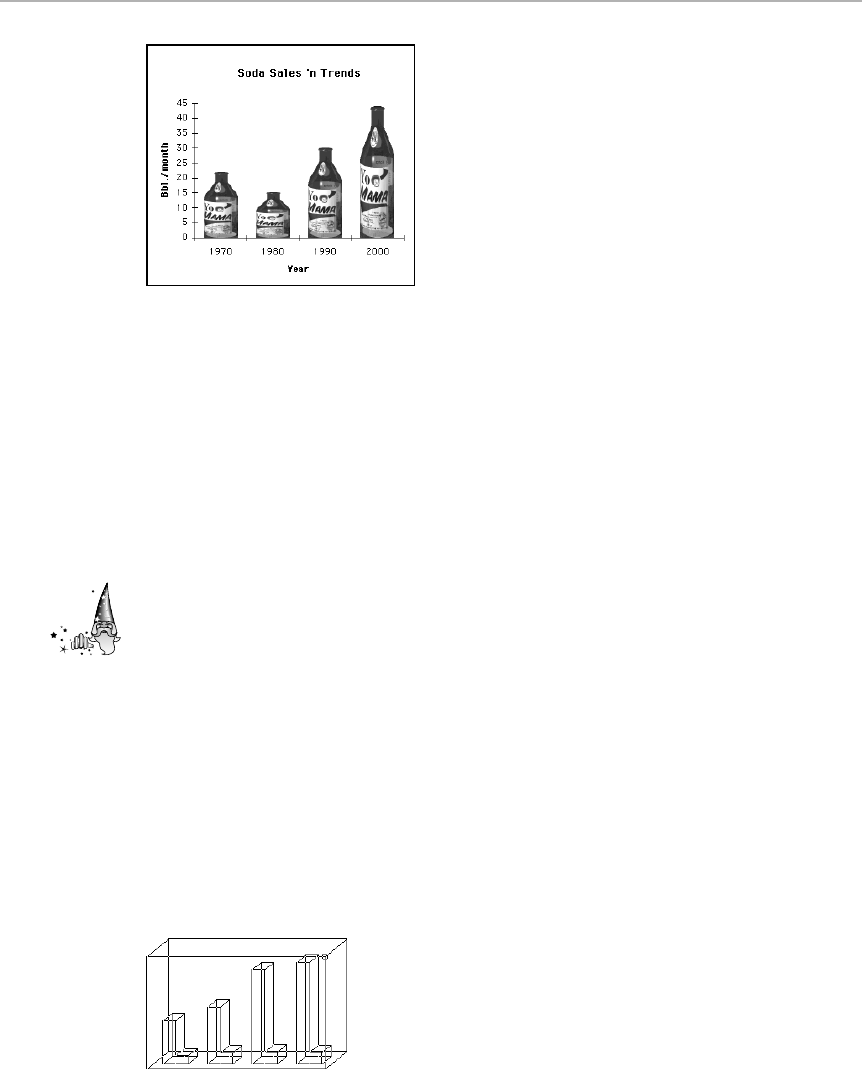
Figure 19-15: Dress up your charts — just find a good graphic, select a bar, and paste away.
All you have to do is copy your chosen bar-graph picture; double-click your Excel
chart; select the column you want (which, in version 4, requires a Ô-click); and
paste! Who knew?
For additional pictograph options, double-click one of the columns (and in Excel 98,
then click the Fill Effects button). This opens a window where you’ll find options to
specify whether you want each picture to be
stretched
or repeated inside each bar.
Drag more data into a chart
So you’ve completed a slick-looking chart for a presentation — and then realize
you have another series of data you need to include in the chart. You don’t have
to start over. With Excel 5 and 98, you can add a new data series to an existing
chart by selecting the cells containing the series and dragging them
onto
the
chart. (Use the border of the selected cells as a handle.) The new data gets
plugged into your chart automatically.
Better 3D chart previews
If you think Excel’s 3D chart styles are cool, wait’ll you try this: Hold down the Ô
key when you rotate a chart (by dragging its corner handle). Instead of the bare
wire frame view you normally get, you’ll be able to see all the bars, cylinders, or
cones that appear within the chart as you rotate it (see Figure 19-16). This way,
you can preview the effects of the rotation
before
you release the mouse button.
Figure 19-16: Pressing the Ô-key while rotating a chart gives you a better preview of how
your 3D bars and cylinders will look.
Strange
But True
Chapter 19: Number and Data Crunching 743
■ ■
MACWORLD MAC SECRETS 5TH EDITION• 4040-8/5 • ch19.F • Chapter 19 • FINAL • VB • 11/04/98 • p.743
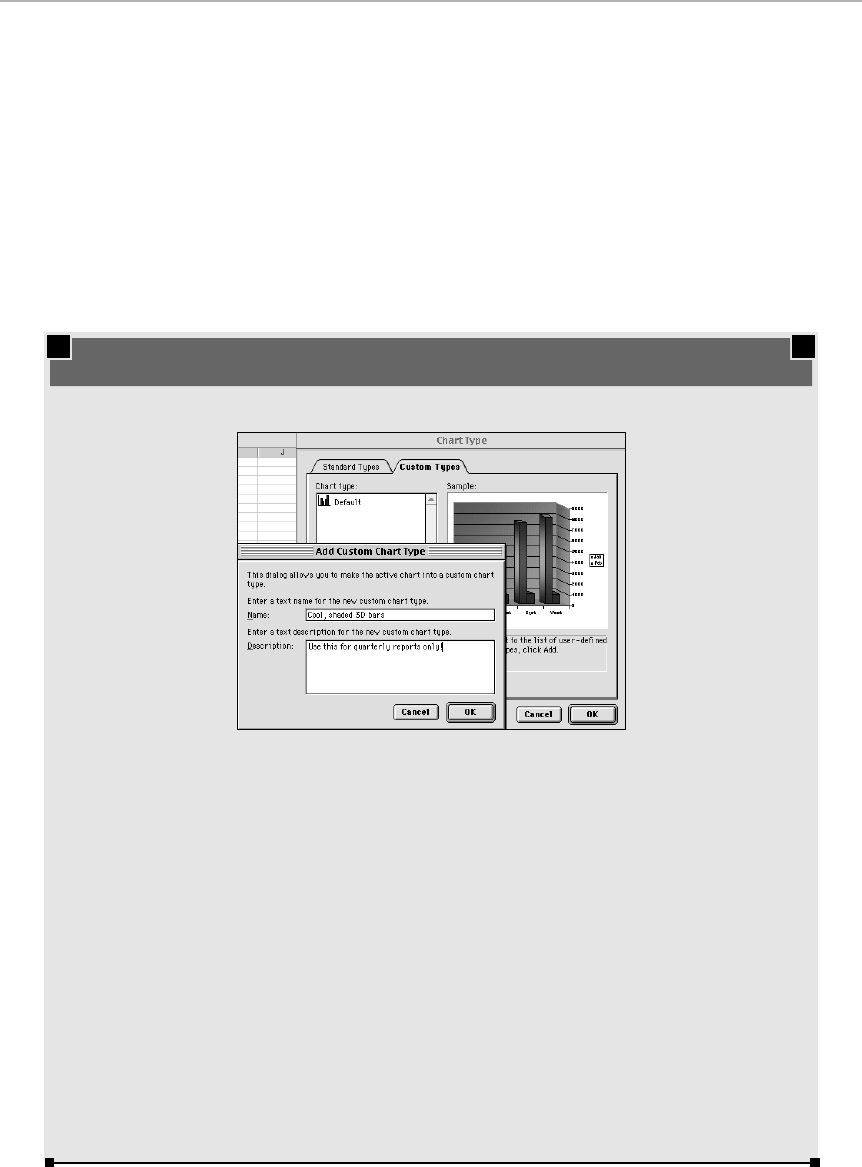
Lock out unused cells
When you think about it, you usually use only a fraction of the cells that appear
in a spreadsheet. You may have extra rows placed under the title of a chart, or
extra columns between groups of data. So why not lock out all the unused cells?
This way, you can use the Tab key to move between only those cells that are
actually used in your document.
To do this, select the cells you want to keep editable. Choose Format ➪Cells ➪
Protection tab, and deselect the Locked check box. Then, choose Tools ➪
Protection ➪Protect Sheet to lock out all the
other
cells. When you return to
your worksheet, the Tab key will take you only to the cells you left unlocked.
744 Part III: Application Secrets
■ ■
MACWORLD MAC SECRETS 5TH EDITION• 4040-8/5 • ch19.F • Chapter 19 • FINAL • VB • 11/04/98 • p.744
MACINTOSH SECRETS
This secret can revolutionize your Excel chart-
making career.
Think of the time you spend fiddling with charts —
switching fonts, dragging the legend into the right
spot, changing the colors, and so on. Instead of
repeatedly tweaking Excel’s built-in chart formats
to suit your taste, why not create and save your
own custom ready-to-use chart styles?
To do this in Excel 98, create a chart and change
its attributes — colors, styles, fonts, whatever —
so that it looks exactly the way you want. Then,
with the chart selected, choose Chart ➪Chart
Type ➪Custom Types tab; you’ll see your chart
displayed in the little preview window. Click the
User-defined radio button, then click Add. Type in
a name and description and click OK.
Finally, if you want your custom chart to
become Excel’s default, click the Set as Default
Chart button in the Chart Types window. From
now on, your chart style is the one that Excel
will use to build every new chart.
(If you’re running Excel 5, the setup for this is a
little different: Choose Tools ➪Options ➪Chart
tab ➪Use Current Chart, and then give your
chart style a name.)
Once you’ve followed the steps above, you’re
finally ready for this most glorious of Excel
secrets: One-key instant charting. Select the
data you want to chart, then press F11 — watch
in awe as Excel automatically switches to a
new worksheet and creates a new chart
according to your exact specifications. No
Charting Wizard. No dialog boxes.
Excel’s amazing one-button custom charting

The miraculous Forms command
If you use Excel to manage database-style lists, organized by columns, you can
save yourself hours of scrolling by editing data using the Form command. When
you choose Tools ➪Form, all the fields in your database appear in a single
dialog box, making it much easier to enter data. You can use this dialog box to
search your data, too. Click the Criteria button, type the item you’re looking for
into one of the fields in the dialog box, and click Find Next.
(You can add a password when you activate protection, if you want.)
Two great AppleWorks/ClarisWorks
spreadsheet shortcuts
No, the ClarisWorks spreadsheet isn’t Excel — but then, it doesn’t require 11MB
of RAM and 70MB of hard drive space, either. And it certainly has charms of its
own. For example, ClarisWorks offers a couple of neat navigation/cell management
shortcuts:
Once you’ve highlighted some cells, Option-drag to duplicate them (or drag
normally to move them). In other words, Macintosh Drag-and-Drop works great.
(This same trick works in Excel 98.)
After highlighting some cells, Ô-Option-click anywhere else on the spreadsheet.
The highlighted cells move — instantly — to the new click location. This trick
(which works in the ClarisWorks word processor, too) is actually better than
Drag-and-Drop because you don’t have to keep the starting and ending locations
close together. You can scroll for miles before Ô-Option-clicking, and the
highlighted material (wherever it is now) will jump dutifully to your cursor.
Excel and the Numbers control panel
Ever since the days of System 7.1, the Mac’s system software has included the
Numbers control panel, which lets you set the standard numerical and currency
formats used by your system. Set the Number Format pop-up menu in the
control panel to U.S., for example, and you see a $ in the Currency Symbol field.
Change it to British, and you get £ instead.
Very nice, but we couldn’t for the life of us think of anywhere that these currency
settings actually showed up — until reader Richard Evans pointed out that these
settings control how Excel formats numbers. When you apply the “Currency”
number format to cells in Excel, the program uses whatever currency format
(and decimal and thousands-punctuation) is established by the Numbers control
panel. So
that
explains it!
Worth
Learning
Chapter 19: Number and Data Crunching 745
■ ■
MACWORLD MAC SECRETS 5TH EDITION• 4040-8/5 • ch19.F • Chapter 19 • FINAL • VB • 11/04/98 • p.745
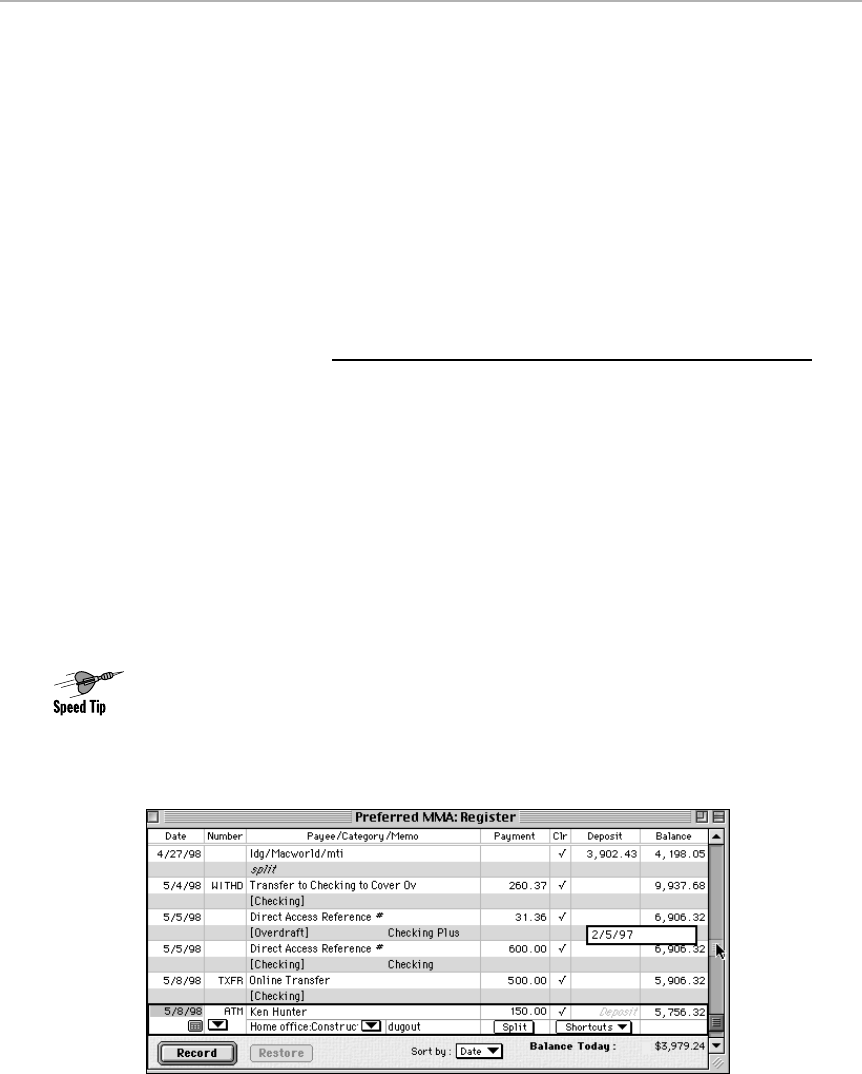
746 Part III: Application Secrets
■ ■
MACWORLD MAC SECRETS 5TH EDITION• 4040-8/5 • ch19.F • Chapter 19 • FINAL • VB • 11/04/98 • p.746
Quicken
We’ll make no bones about it: We love Quicken. This is one of the fastest,
slickest, best-designed programs we’ve ever seen — and it’s dirt cheap.
It’s a checkbook/finance program whose supercharged report facilities are
critical at tax time. With one command, you get an exportable or printable list
of every expenditure you made in any particular category (home repair, auto
expenses, and so on). When your monthly statement comes from the bank,
you’re one cool cucumber: Type in the new balance, click off the checks you
see reported, and Quicken practically reconciles your checkbook for you. You
do absolutely no math.
Quicken Secrets
■
Make your own keyboard shortcuts
Is there a Quicken command that doesn’t have a keyboard shortcut? While
pressing the Ôkey, choose that command from its menu. You get a little dialog
box in which you can specify a keyboard shortcut of your own choosing.
You can use the same trick to
change
the keyboard equivalent for a command that
does
have one preassigned, or even delete the keyboard equivalent altogether!
Scrollbar indicator
When you’re hunting for a transaction by its date, don’t waste time scrolling
through all your transactions and scanning the date blank. Instead, drag the box
in the vertical scrollbar at the right side of the window. You’ll see a little pop-out
date indicator that rapidly changes as you slide up the scroll bar. It’s a much
quicker way to home in on a certain date (see Figure 19-17).
Figure 19-17: As you drag the scroll box, a handy counter sprouts out of nowhere. It shows
where you’ll be when you let go of the mouse.

Chapter 19: Number and Data Crunching 747
■ ■
MACWORLD MAC SECRETS 5TH EDITION• 4040-8/5 • ch19.F • Chapter 19 • FINAL • VB • 11/04/98 • p.747
Smaller, faster files
Every few months, use Quicken’s “Save a Copy as” command (in the File menu).
The resulting copy of your file will be much smaller, faster to open, and less
prone to corruption.
Type to select
The various Quicken lists work just like lists of files in the Finder. That is, if you
type the first letter or letters of the items you’re looking for, the window scrolls
directly to it. Try it, for example, in the Category, Memorized Transaction, or
Account lists.
Let Quicken finish your transfer typing
To indicate a transfer of funds from one account to another, you’re supposed to
put the name of the other account in the first one’s Category blank in [brackets].
If you have only two different accounts (or not very many, anyway), you can get by
with just one
left
bracket and the first letter or two of the other account’s name.
If you’re transferring $100 from Savings into the Checking account that’s open
on the screen, for example, put 100 in the Deposit blank. Then, in the Category
blank, just type [s and Quicken will expand it to the full
[Savings].
Fast incrementing
Here’s the feature that shows how much the Quicken programmers pay attention
to detail. When you click in a field to type the date or the check number, press
the + or – key (either on your numeric keypad or the regular keyboard) to increase
or decrease the number that’s already there. If you
hold
down the + or – key, the
number starts to increase or decrease more rapidly the longer you hold the key.
When you learn how naturally and conveniently Quicken increases the speed of
number changing, you should be able to home in on a date that’s several months
away in only a few seconds.
Date-entry shortcuts
Quicken has some of the cleverest date-entry shortcuts we’ve ever seen. To
enter the current date in any date field, you can type T(for Today). To enter the
first or last day of a month, type Mor H(MontH, get it?). Years work the same
way — pressing Yenters the first day of the year, and Renters the last day of
the year. Using these shortcuts, the appropriate dates are filled in instantly; you
don’t even have to press Return or Tab.
Worth
Learning

748 Part III: Application Secrets
■ ■
MACWORLD MAC SECRETS 5TH EDITION• 4040-8/5 • ch19.F • Chapter 19 • FINAL • VB • 11/04/98 • p.748
Neat stuff to type into the Check Number blank
When your cursor is in the Check Number field for a particular transaction, you
can type the letter Nto automatically input the next higher check number. Or
type an asterisk (*) to fill in the blank with the word PRINT (meaning that the
check has yet to be printed). You can also type the letter P; that, too, enters the
word PRINT, but only if the QuickFill feature is on.
Oops — wrong account!
It happens to everyone sooner or later: You enter some richly detailed
transaction into Quicken — complete with 24 lines of Splits, an elaborate Memo
and Description, and so on — only to find out that you just input it into Quicken’s
Savings register instead of Checking. And, of course, you can’t copy or paste
entire transactions. Nor can you drag-and-drop. Grrrrrr!
TRUE FACT
One of our least-favorite aspects of adulthood is
paying bills. As it turns out, one of our favorite
aspects of the Mac is paying bills automatically
— using Quicken in conjunction with your bank.
For this service, you usually pay $10 per month
or so — unless you choose a bank, such as
Citibank, that doesn’t charge at all.
In return, you gain a remarkable feature: When
you enter a check in your Quicken registry, it’s
automatically a reality! Quicken, at the end of
your session, dials a phone number, transmits
your check information, and instructs the bank
to issue a check to the payee (or, if you’re
paying a company, it’ll make an electronic
transfer), without any further effort on your part.
There are no envelopes, no stamps, and much
less record-keeping. The real point here, though,
is this: If you’re not doing your banking
electronically, you’re wasting money. Stay with
us here: when do you pay your bills?
If you pay the bill the day it arrives in the mail,
it’s off your desk, but whoever you’re paying
gets your money today, even though it’s not
technically due for several weeks. That money
could have been sitting in your bank account,
earning interest for you, instead of in their bank
account, earning interest for them.
But if you wait until just before the due date to
mail the check, sure, you keep your money as
long as possible. But timing becomes critical; if
your check arrives late, you’re charged
penalties, interest, late fees.
If you use electronic bill-paying, though, you can
input the payment whenever you want, but the
check doesn’t get sent (by your bank) until the
date you specify. Suppose your credit-card,
mortgage, utilities, phone bill, cable TV, car
payments, and Internet account bills total about
$3,500 a month. If that money earns 5% interest
in the bank, then in the three weeks between a
bill’s arrival and the due date, it could have
racked up $10.02 in interest! Yes, $120.24 a
year is what you give away to those money-
grubbing corporations if you pay promptly. Do it
electronically, and that’s $120 a year in cold,
hard cash you save.
The beauty of online payment
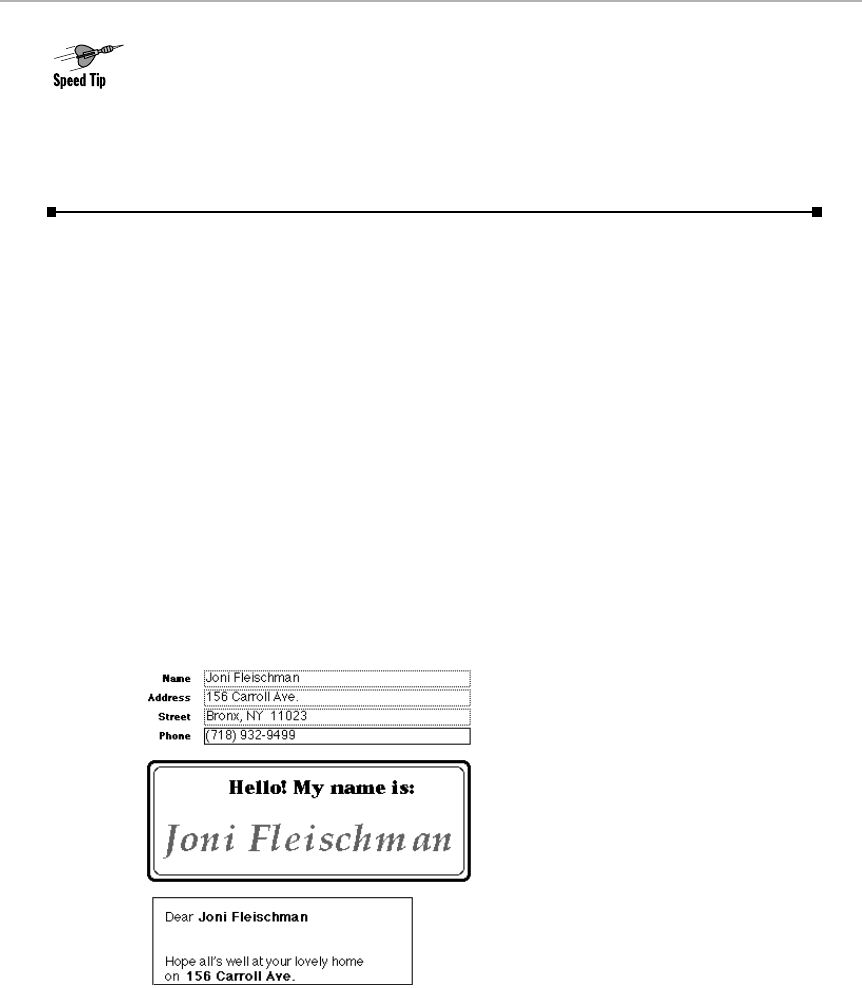
Fortunately, you don’t have to re-input the whole thing — if you know the secret.
Open Quicken’s Calendar. There you’ll see your transaction on the appropriate
date. Double-click the calendar square; double-click the problem transaction;
and, using the pop-up menu at the top of the resulting window, you can reassign
it to a different account.
Your savings: Eight minutes of redundant data entry.
FileMaker and ClarisWorks
Now we move on to data crunching. FileMaker is the leading Mac database
program. It strikes the ultimate balance between flexibility and simplicity. Its
built-in, MacDraw-like mode lets you design elaborate graphic front ends for
your data screens. Its lookup feature lets one file consult another file (one
that’s not even open) to retrieve a piece of information; versions 3 and later
even let you set up live (“relational”) two-way links to other files. You can
share a file among computers on a network, even if some are Macs and some
are PCs, and with version 4 you can publish a database on the Internet
without even having to export the data from FileMaker.
The classic, magnificent aspect of FileMaker, however, is its layouts. You can
rearrange the same information into as many different graphic arrangements
as you want. Figure 19-18, for example, shows three different ways to organize
the same set of mailing information — yet the list was typed in only once. And
you can flip instantly among any of the three views.
Figure 19-18: Multiple views, same data.
Here are our favorite FileMaker secrets. We trust you know that a field is one
blank for information (such as First Name) and that a record is a complete
“card” of information (such as the entire mailing address).
Chapter 19: Number and Data Crunching 749
■ ■
MACWORLD MAC SECRETS 5TH EDITION• 4040-8/5 • ch19.F • Chapter 19 • FINAL • VB • 11/04/98 • p.749

Oh, and by the way, if you’ve ever used ClarisWorks, you know that its
database mode is modeled very much on FileMaker. (Same original company,
same interface … no wonder!) Therefore, plenty of these tips apply equally
well to both FileMaker and AppleWorks/ClarisWorks, as indicated.
FileMaker/ClarisWorks Secrets
■
Record switching from the keyboard
You wouldn’t believe how often we get asked this question: is there any way to
move from record to record without having to use the mouse to click on the
flipbook?
And you wouldn’t believe how many times we give the same answer: yes. Press
Control-up arrow and Control-down arrow. (Pressing Ô-Tab or Ô-Shift-Tab works
equally well.)
Keep records permanently sorted
(ClarisWorks, too)
One frustrating aspect of FileMaker has remained through infinite incarnations
of the program, right down to its present-day FileMaker Pro form: its maddening
refusal to keep records sorted!
You can sort records in a number of ways. But if you reopen a file, or you return
to a layout, chances are good that the records have all sprung back into their
original out-of-order order. You can use the Sort command over again, but that’s
time-consuming.
Here’s how to freeze your records into their sorted order. First, sort the file.
Choose “Save a Copy as” from the File menu. Choose “clone (no records)” from
the pop-up menu at the bottom of the Save File dialog box. Name the new,
empty file something — Sorted List, for example.
Next, open that empty file you just created. From the File menu, choose
Import/Export; from the submenu, choose Import Records. Select the original
file. A dialog box appears, listing all the field names; just click OK.
You end up with an identical file, in which the fields are finally sorted for good.
As you add new records, of course, they’ll get out of order again (unless you
read the pertinent secret that follows). But this cloning business is so quick that
you can afford to repeat it every so often to keep things in shape. Furthermore,
once you get familiar with FileMaker’s built-in scripting, you can easily put
together a little script that sorts your records, creates the clone file, and
imports the data for you, automating the whole process.
Strange
But True
750 Part III: Application Secrets
■ ■
MACWORLD MAC SECRETS 5TH EDITION• 4040-8/5 • ch19.F • Chapter 19 • FINAL • VB • 11/04/98 • p.750
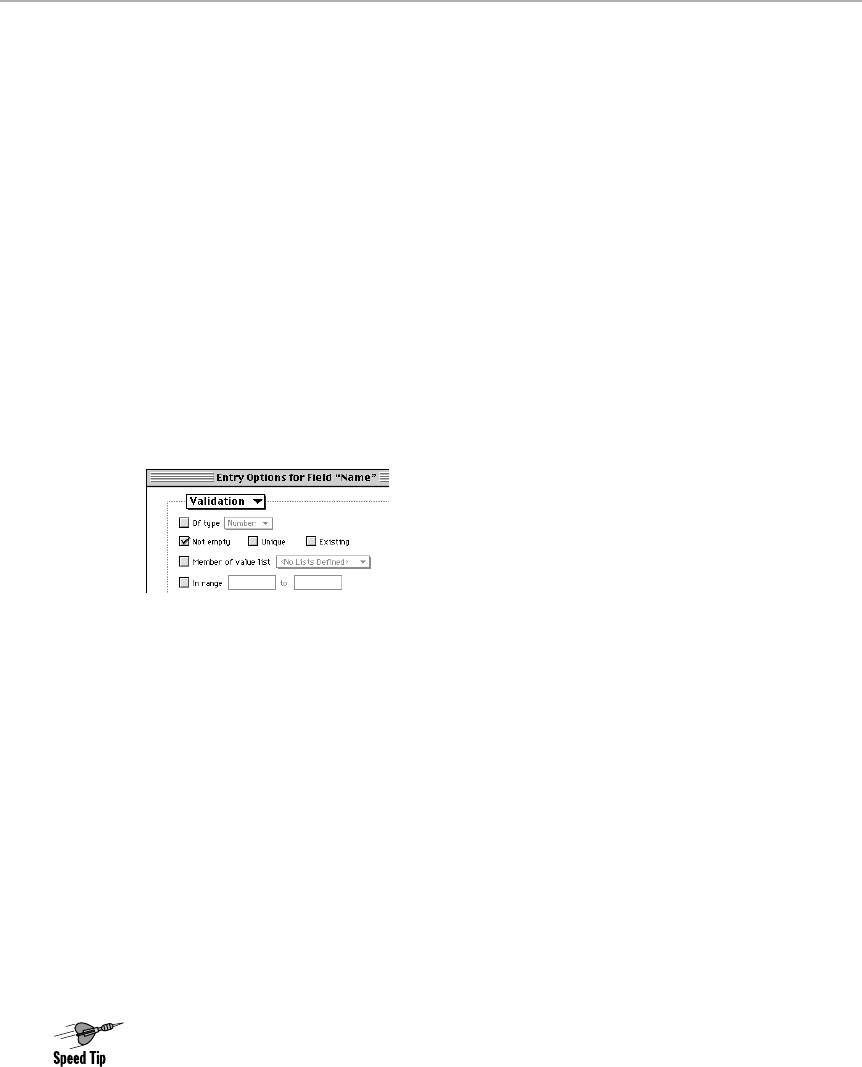
Chapter 19: Number and Data Crunching 751
■ ■
MACWORLD MAC SECRETS 5TH EDITION• 4040-8/5 • ch19.F • Chapter 19 • FINAL • VB • 11/04/98 • p.751
How to make records go into sorted position
Of course, another way to keep records in sorted order is to
add
them in sorted
order. The following technique only works on a freshly sorted database.
Suppose that you have three records called Cat, Dog, and Frog. If you want to
insert a record called Elephant, click the
Dog
record to select it. Then choose
New Record. On a sorted database, the New Record command always inserts
the new blank record immediately
below
the currently
selected
record.
How to prevent a field from being left blank
(ClarisWorks, too)
Choose Define Fields from the File menu (or, in ClarisWorks, the Layout menu)
and double-click the field’s name. Choose Validation from the pop-up menu, and
then select the “not empty” checkbox, as shown in Figure 19-19). (In ClarisWorks
it’s called “Cannot be empty.”) Click OK and then click Done.
Figure 19-19: FileMaker will insist that every field be filled if you click this checkbox.
How to find completely empty records
Choose Find from the Select menu. Type an equal sign into every field. (You’re
searching for a match in which every field is equal to
nothing.
) Click Find. Only
completely empty records will appear. If this is something you have to do
periodically, you can easily write a script using FileMaker’s built-in ScriptMaker
that would make this a one-keystroke (or even an automated) task.
The amazing instant import trick
This jaw-dropping shortcut is found in FileMaker Pro 3 and later: You can turn a tab-
delimited text file —or any other file in a format that FileMaker can understand —
into a new FileMaker database without defining a single field or importing the data
into an existing file.
To pull this trick off, launch FileMaker and choose File ➪Open. Then open a file
that’s in any format FileMaker supports for import: tab or comma-delimited text,
SYLK, DIF, ClarisWorks, and so on. When you open the file, FileMaker automatically
creates a new database, imports all the records, and defines a new field to hold
each piece of data. The new fields are named f1, f2, f3, and so on. Sure, you’ll

752 Part III: Application Secrets
■ ■
MACWORLD MAC SECRETS 5TH EDITION• 4040-8/5 • ch19.F • Chapter 19 • FINAL • VB • 11/04/98 • p.752
still have to format the fields, and you’ll probably want to rename them once the
data has all been imported. But with virtually no setup time, you’ve moved your
data into FileMaker format, ready to sort and search.
If your goal is to turn an Excel spreadsheet into a FileMaker database, it’s even
easier: FileMaker 4 can actually read and import native Excel spreadsheets, too,
without conversion.
Sort a value list (ClarisWorks, too)
FileMaker and ClarisWorks help speed data entry along by letting you set up a
value list
for a particular field: a list of possible entries. For a state field, for
example, the value list might show all 50 states, so a double-click enters the
state name and no typing is required.
Neither program gives you a way to sort the entries in a value list, however.
In ClarisWorks, in the Modify box (within the Define Fields box) for the field in
question, you can drag the entries up or down the list. In FileMaker, you’ll have
to copy them into a word processor that has a Sort command, such as Microsoft
Word. Sort them and then paste them back into the Value List (FileMaker 3 and 4)
or the Define Fields dialog box’s Options box (FileMaker 2).
Self-creating value lists
As mentioned in the previous secret, using value lists can certainly speed up
data entry, but setting up the lists takes time. You have to type in the values,
sort them into the order you want, and then manually edit the list if you want to
add or delete choices.
Or you can save yourself all that trouble by having FileMaker 3 (or later) do all
the work for you, generating and maintaining its own value lists.
Here’s how it works: When you’re defining a field that you want to have a value
list, click Options in the Define Fields dialog box, change the pop-up menu to
Validation, click the “Members of a value list” checkbox, and then choose the
Define Value Lists from the pop-up menu. (If you’re working with an existing
database, you can also get to this point by going to Layout mode; clicking the
field in question; choosing Format ➪Field Format; clicking the lower radio
button; and choosing Define Value Lists from the pop-up menu.)
In the Define Value Lists window, make up a name for the list and click the Create
button. Here’s where the process differs from the usual value-list procedure: Click
the “Use values from a field” radio button, click the Specify Field button and then
pick a field —
the same field that you’re currently defining
(see Figure 19-20).
Finish up by clicking, successively, Save, Done, OK, and Done.
From now on, that field will build its own value list as you work. Every new value
you type into the field will automatically get added to the list — in alphabetical
Worth
Learning
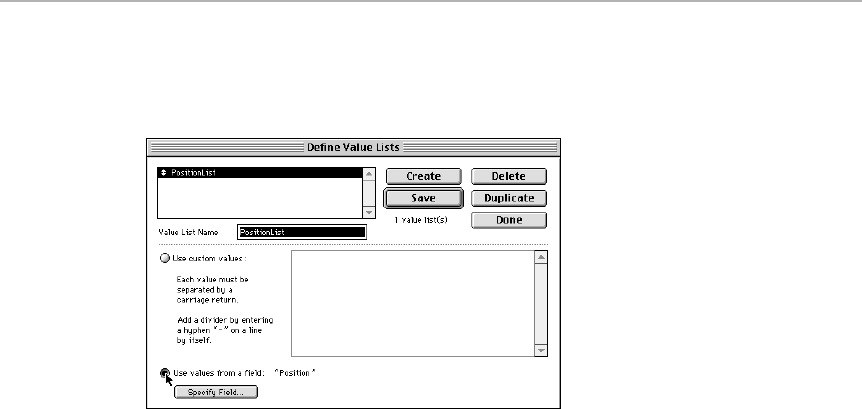
order, too. You will have to type each value in
once
, the first time it appears. But
after that, you’ll always each entry available as a ready-to-use choice for future
records.
Figure 19-20: Teaching a FileMaker field to build its own value list.
Multiple-item selections in pop-up menus
When a FileMaker field is formatted as a pop-up menu, a menu of choices
appears on your layout instead of a standard text field. You can enter data by
simply choosing an entry from the pop-up menu.
But here’s the secret: If you hold down the Shift key when making a selection from
the pop-up menu, you can choose more than one item from the menu. Each time
you hold down the Shift key and choose an item from the pop-up menu, your
selection is added to your previous entries. When the pop-up menu is open, you’ll
see your multiple entries marked by bullets. When the menu isn’t open (which is
most of the time), FileMaker will only display the most recent item selected.
Pop-up menu vs. pop-up list
Even once you know the previous delightful secret, you may still occasionally get
confused — sometimes the multiple-selection trick simply doesn’t work.
That’s because you, like thousands before you, are confusing a pop-up
list
(another one of the FileMaker field-format options) with a pop-up
menu.
Figure
19-21 shows the difference: a pop-up
list
drops down automatically when you
“tab into” that field; lets you select an item from the list by typing a couple
letters of its name; and shows only a few choices (because it has a limited
height). A pop-up
menu,
on the other hand, drops down only when clicked; drops
down to full height, showing as many choices as your screen has room for; and
permits multiple selections, as described in the previous secret.
Chapter 19: Number and Data Crunching 753
■ ■
MACWORLD MAC SECRETS 5TH EDITION• 4040-8/5 • ch19.F • Chapter 19 • FINAL • VB • 11/04/98 • p.753
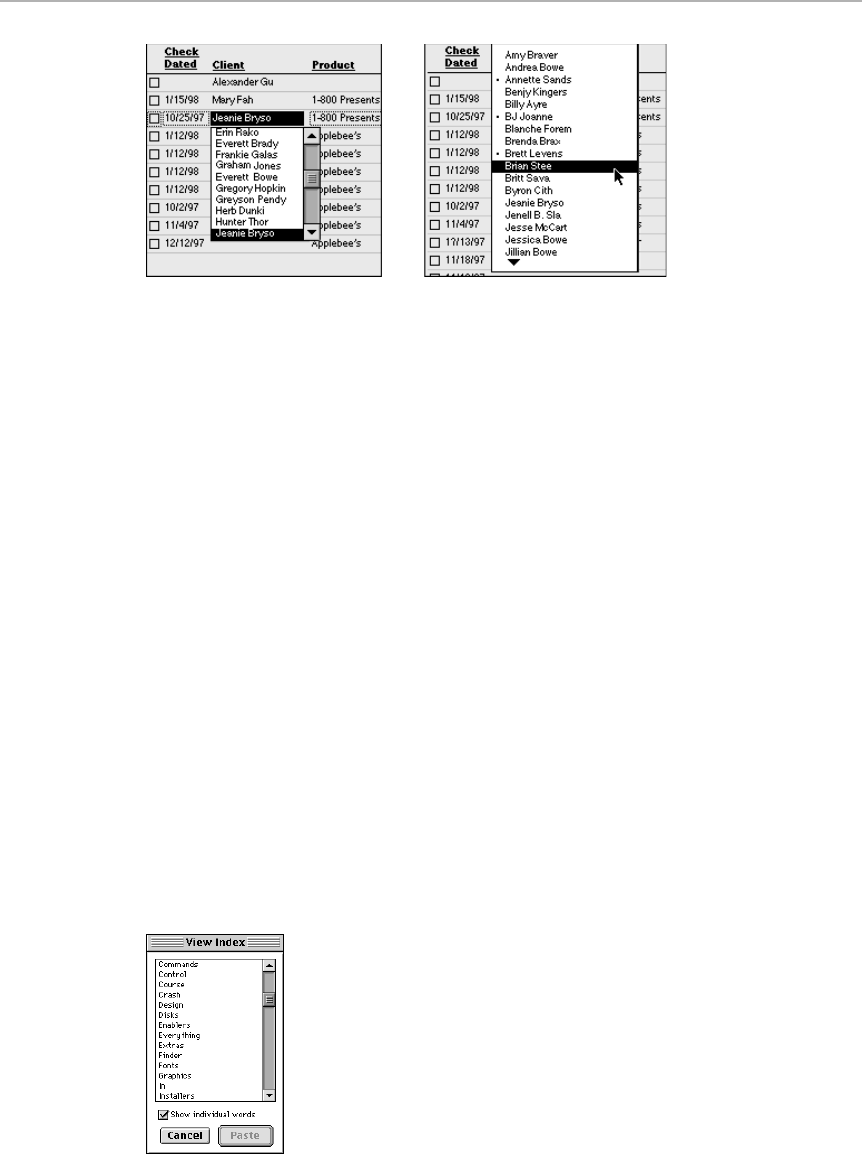
Figure 19-21: Keeping your FileMaker pop-ups straight will serve you well. A list (left) has a
fixed height, but pops up automatically; a menu (right) must be clicked with the mouse, but
permits multiple selections.
Escaping from pop-up lists
What happens when you tab into a field that displays a pop-up list, but you don’t
want to use one of the entries in the list? Either click in the field — or press
either Ô-period or Esc. You go right into typing mode, collapsing the list, without
having to click.
And if you decide you
do
want to choose an entry from the pop-up list after
making it disappear, pressing Esc again makes it pop right back up.
Index tips
FileMaker’s speed is primarily because of its indexing system. Internally, the
program keeps a high-speed list of the contents of each field: an index.
To see the index for a certain field, select it in Browse mode and press Ô-I. A list
window appears, showing every value you ever entered for this field (see Figure
19-22). In FileMaker 2, the index was composed of only the
first
word (in this
field) in every record; in a list of city names, you’ll see New instead of New York,
and so on. In version 3 and later, though, the index entries include
all
the words
in the field. And if you want to index each word in a field individually, you can do
that too, by clicking the “Show individual words” checkbox, which breaks entries
down to their component words.
Figure 19-22: The index for a field. You can slap any one of these
items into the current field by double-clicking it or selecting it and
then clicking Paste.
754 Part III: Application Secrets
■ ■
MACWORLD MAC SECRETS 5TH EDITION• 4040-8/5 • ch19.F • Chapter 19 • FINAL • VB • 11/04/98 • p.754
Avoid the “Are you sure?” message
(ClarisWorks, too)
Here’s a handy trick that works in most Claris products (FileMaker, ClarisWorks,
and so on).
Whenever you do something that throws away data — such as deleting some
records — FileMaker displays a warning message. You have to physically click
OK (you can’t just press Return or Enter) before proceeding. But if you’re
deleting dozens of records from a file, one by one, those warning messages can
get plenty annoying.
The trick: Press
Option
as you choose the Delete command (or in addition to the
keyboard equivalent of Delete). You’ll get no confirmation message.
Remember, though, that FileMaker is one of the Mac universe’s few
auto-saving
programs. It has no Save command at all. If you delete a record, therefore,
nothing
will bring it back. Undo doesn’t work after you delete records, and you can’t revert
to an unsaved version of the file, as you can with most other programs.
Turn an entire record into a graphic
This is so weird: You can copy/paste an entire FileMaker record in one fell
swoop. Just go to Preview mode and choose Copy from the Edit menu. You can
now paste that record into a word processor, page-layout program, whatever.
You’ll get a huge graphic object with everything intact: your fonts, field labels,
the works. When ungrouped, this graphic is editable — sort of; each line of text
will be in its own little text block.
Paste an entire record’s text (ClarisWorks, too)
Using the previous secret, you can copy the contents of a record into another
program as a
graphic
. But here’s an even more practical maneuver: You can
copy a whole record into another program as tab-delimited, editable
text
.
Strange
But True
Chapter 19: Number and Data Crunching 755
■ ■
MACWORLD MAC SECRETS 5TH EDITION• 4040-8/5 • ch19.F • Chapter 19 • FINAL • VB • 11/04/98 • p.755
ANSWER MAN
Q: How do the pros make those cool divider lines
between commands in FileMaker’s Scripts menu?
A: They create an empty script whose name is
simply a hyphen.
Q: Hey, we’re on a roll here! OK, I’ll bite: How
can I copy a script into another FileMaker file?
A: You can’t.
Divider lines in the Scripts menu

756 Part III: Application Secrets
■ ■
MACWORLD MAC SECRETS 5TH EDITION• 4040-8/5 • ch19.F • Chapter 19 • FINAL • VB • 11/04/98 • p.756
In FileMaker, go to the record you want to copy in Browse mode. Deselect all the
fields (by clicking in an empty part of the layout) and choose the Copy
command. (In ClarisWorks, just click any empty part of the layout to make the
entire record black before you copy.)
When you paste what you’ve copied into another program, you end up with a tab-
separated chunk of text containing all the data displayed in the current layout for
that particular record. This is an easy way to transfer the contents of an entire
record to another program without having to use the Export command — or copy
information one field at a time.
Copy/paste an entire database (ClarisWorks, too)
This is unquestionably one of the most mind-blowing FileMaker secrets around:
You can copy the data from an entire database into another program — with one
command.
The secret is to hold down the Option key while choosing the Copy command (or
press Ô-Option-C). This copies the data not just from the one record (as described
in the previous secret), but from
all
the records currently selected in FileMaker.
Just paste what you copy into a word processor; the result is a tab-delimited text
version of your entire database! Paste what you copy into Excel, for example, and
you’ve instantly turned your FileMaker database into a spreadsheet.
(Once again, the trick works in ClarisWorks, but isn’t as complicated. Just click a
blank part of your layout, then choose Select All from the Edit menu to highlight
all visible records — then copy.)
Extra screen space (ClarisWorks, too)
If you’re working on a small-screen Mac, or if you’re making large layouts,
screen space is at a premium. Get into the habit of hiding the entire panel at
the left side of the screen (see Figure 19-23).
Figure 19-23: Click the icon indicated
by the arrow (top) to hide the entire
control panel (bottom).
Worth
Learning
The control for hiding and revealing FileMaker/ClarisWorks’s left-side panel is
the tiny icon at the bottom-left of the window (to the right of the zoom controls).
Click once to hide the panel. Click again to make it reappear.
Make files smaller
As your database gets huge, consider taking a moment to save it as a
compressed
form. You can sometimes shave a sizable percentage off the
file’s size on disk using this procedure.
Just choose Save a Copy As from the File menu. From the pop-up menu at the
bottom of the Save File dialog box, choose “compressed copy (smaller).” Give
the compressed version of your file a new name and then click Save.
This process can take time, but you can bring a different program to the front
and let FileMaker run in the background. The result is a copy of your file that’s
often much smaller.
Better drag-selecting
To select a group of objects on a FileMaker layout, you normally have to drag-
enclose them; only objects completely enclosed by your dragging rectangle get
selected. But here is a simple and wondrous shortcut: If you hold down the Ô
key while dragging, you can select objects by dragging over
any part
of them.
Better object deleting
To delete an object on a layout, you must (a) select it, and (b) either press the
Delete key or use the Cut or Clear commands. Not a problem — unless you have
to delete a number of different objects spread across the layout, and you find
yourself jumping back and forth between tools and commands.
Free book winner Lubomir Stroetmann reminded us of a much better way to do
this: Hold down the Delete key
first
, and keep it down. Then start clicking on
objects. Each item gets obliterated with a single click. (Lubomir is — get this —
a 13-year-old Danish citizen studying in Germany. Never doubt the galactic reach
of
Mac Secrets!
)
Better text deleting
Normally, to delete the contents of an entire field, you have to
select
the contents
first —which involves either dragging through the text or pressing Ô-A to highlight
the entire contents of the field — and
then
hit the Delete key.
But there’s a quicker, cleaner, one-keystroke way to delete all contents of a
field, again pointed out by reader Stroetmann: Just click on or tab into a field
and press the Clear key on the numeric keypad.
Contest
Winner
Chapter 19: Number and Data Crunching 757
■ ■
MACWORLD MAC SECRETS 5TH EDITION• 4040-8/5 • ch19.F • Chapter 19 • FINAL • VB • 11/04/98 • p.757

758 Part III: Application Secrets
■ ■
MACWORLD MAC SECRETS 5TH EDITION• 4040-8/5 • ch19.F • Chapter 19 • FINAL • VB • 11/04/98 • p.758
Instant, on-demand format menus
FileMaker provides two express routes to the program’s key-formatting commands.
In Layout mode, Control-click any object; a contextual pop-up menu containing all
the appropriate formatting commands pops up right under your mouse.
You can also Option-double-click any object on a layout to go directly to the text,
date, number, or graphic formatting dialog boxes (depending on the type of
object you’ve double-clicked).
Selective Selecting
When you’re working in FileMaker’s layout mode, choosing the Select All command
normally selects every object on the layout. But suppose you want to select
only
the text labels or
only
the horizontal rules you inserted between fields?
The secret is to click first on the tool that corresponds to the type of object you
want to grab — and
then
choose Select All. If you want to change the font of your
field labels, for example, click on the text tool before choosing Select All. Instead
of selecting all the objects in the layout, FileMaker will select only the text items.
The same technique works with portals, lines, shapes, and text objects.
Alternatively, try this: simply highlight one example of the object you want to
select — one field label, for example. Now press Ô-Option-A to highlight all
similar objects on the layout. That’s a fantastic time-saver when you want to
change the font all at once for your fields, for example, or your field labels.
Change a field’s identity without
disturbing its format
When you’re designing a layout, you may find it tedious to repeatedly use the
font, size, and style submenus to customize the formatting for each field. You
can cut down on the amount of field formatting if you keep the following three
tricks in mind.
First, format
one
field to the hilt. Then Ô-click it. From now on, any new fields
you place on the layout will share the formatting of the first.
Second, remember that you can Option-drag a field that’s already been
formatted. When you release the mouse, a list box appears in which you can
choose a new field identity for the formatted copy you created.
Finally, if you double-click an
existing
field, the same little list box appears; from
it you can select a field to replace the one you clicked. The replacement field
remains exactly where the old one was, and it retains exactly the same
formatting; only its identity changes.
Worth
Learning
Worth
Learning
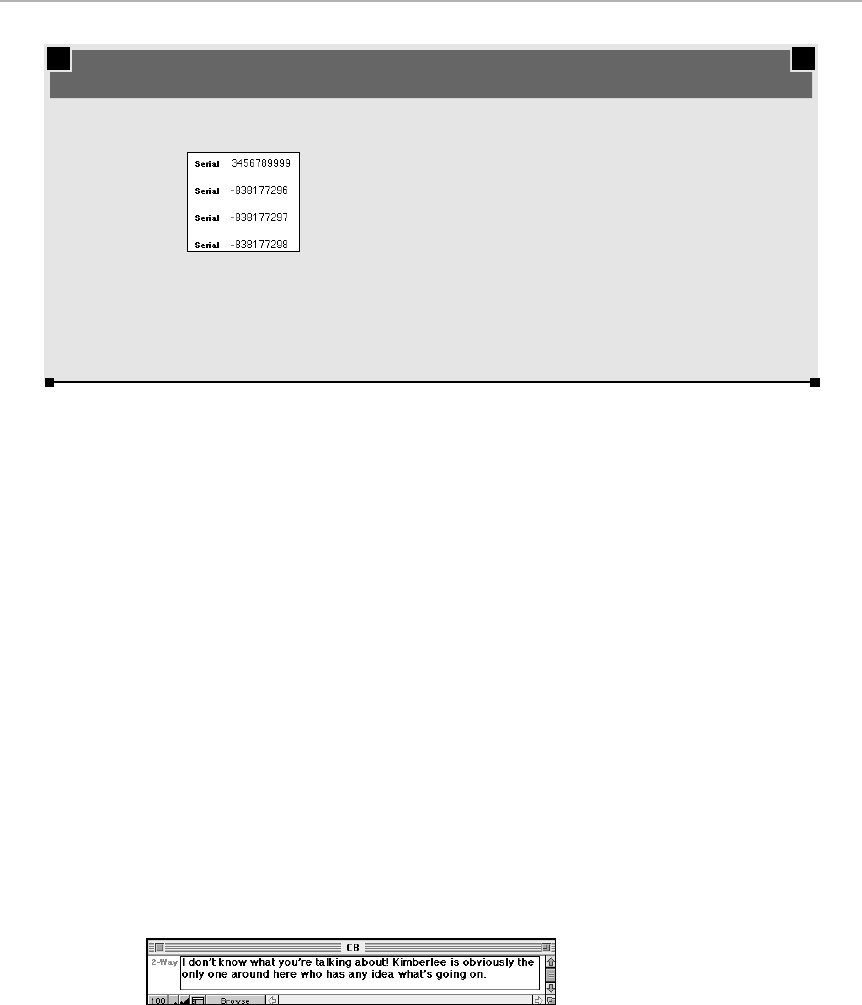
Ignore the grid
In an earlier chapter, we pointed out that you can drag icons in the Finder so
that they snap to an invisible grid if you press the Ôkey while dragging (if the
grid, in the Views control panel, is
not
turned on). If the grid
is
on, then Ô-
dragging has the opposite effect — it lets your icon dragging ignore the grid.
In FileMaker’s Layout window, it’s the same story. Press Ôas you drag an
object or a field; you can position it freely, without being affected by the grid or
the T-square lines.
Online chatter over the network
A FileMaker file can be shared over a network. You can use this feature to clever
advantage by setting up an on-screen two-way (or more-way) CB radio.
Create a new FileMaker file. Create one field, called something like “Two-Way.”
Make sure that the file is shared on the network.
That’s all there is to it! Type a message to your coworkers into this field and press
Enter. Instantly, the message appears on all their screens. They can respond
either by deleting what you typed there — or adding to it (see Figure 19-24).
Figure 19-24: The instant CB network in your office. Type back and forth; the messages are
updated in real time!
Chapter 19: Number and Data Crunching 759
■ ■
MACWORLD MAC SECRETS 5TH EDITION• 4040-8/5 • ch19.F • Chapter 19 • FINAL • VB • 11/04/98 • p.759
TRUE FACT
Here’s one of the odder bugs we’ve spotted in a
major best-selling program. If you set up a serial
number for your records, keep it under ten
digits. Here’s what FileMaker does if you
establish a ten-digit serial number and tell it to
increase the number by 1 with each new field:
In fact, any number over 21111111111 or so will
come out garbled when FileMaker tries to
increment it automatically.
Then again, by the time your company’s mailing
list hits 2 billion names, it’s time for a more
powerful database anyway.
FileMaker’s very new math

Get rid of a part
In the Layout view, you can get rid of a Part completely. (How often do you really
use the Footer Part?) Simply click the tab displaying the name of the part and
press the Delete key.
See the fonts without their faces
(ClarisWorks, too)
When FileMaker Pro shows you its font menu, each font is displayed in its own
typeface. That’s usually useful — except when you’re trying to distinguish among
more than one all-symbol font, such as Zapf Dingbats or Symbol.
To see the font list in good old Charcoal 12-point, press Option as you pull down
the menu.
Define a default font and style
If you consider the order of events in creating a FileMaker database, it may appear
that there’s no way to establish a default font for the fields as you create them.
After all, you first go to the Define Fields dialog box, where you type their names,
and then click Done. Only then are you allowed to go to the Layout mode, where
the Font commands are located. But by then it’s too late; FileMaker has already
assigned them a default font.
Here’s the trick: When the Define Fields dialog box first appears, click
Cancel.
Then go to the Layout view. Of course, it’s completely empty. Use the Format
menu to choose a type size and style — with nothing selected.
Then
after you choose Define Fields from the Select menu, create your fields
and click Done. Your new fields will be born with your favorite typeface, all ready
to go to work for you.
One-click shaded backgrounds
To create a neat-looking shaded background — the kind you often see in
professional FileMaker layouts — you don’t have to draw an enormous rectangle
object, shade it, and send it to the back. Instead, just click the Part tab in your
layout, such as Body — and then choose a new color from the Fill pop-up menu!
Avoiding and eliminating duplicate names
Using FileMaker’s calculation powers, you can set up your mailing-list database
with the same duplicate-avoidance scheme used by magazines and mail-order
companies worldwide.
Set up a
match code
field. Define it to be a calculation field. The calculation
looks like this:
760 Part III: Application Secrets
■ ■
MACWORLD MAC SECRETS 5TH EDITION• 4040-8/5 • ch19.F • Chapter 19 • FINAL • VB • 11/04/98 • p.760

Chapter 19: Number and Data Crunching 761
■ ■
MACWORLD MAC SECRETS 5TH EDITION• 4040-8/5 • ch19.F • Chapter 19 • FINAL • VB • 11/04/98 • p.761
Match Code = Left(Last Name,3) & Left(Street,3) & Zipcode
Specify that you want a Text Result. The match code produced for an address
such as Alison Panico, Box 2234, Chesterton, NY 10299 would be
Panbox10299.
The chances of there being another address that produces this
exact match code are infinitesimal.
When the day comes that you want to ferret out duplicate names, use the Find
command and type a !into the Match Code field. FileMaker immediately displays
all duplicated records. Sort them and start weeding out the ones that you don’t
want. (If you set up FileMaker to auto-enter each record’s date of creation, by
the way, figuring out which address version to keep is easier.)
Incidentally, match codes aren’t foolproof. You can certainly tell that by the fact
that, despite them, you
do
get duplicate junk mail. Still, they’re a great way to
get a running start on controlling duplicate records.
Locking and toggling tools (ClarisWorks, too)
If you’ve ever had to draw a series of objects on a form in Layout view, you know
how irritating it can be that your tool selection keeps defaulting back to the arrow
tool after you draw each object. If you want to draw a series of boxes, for example,
you have to keep reselecting the rectangle tool after you draw each box.
There’s an easy way to avoid this:
Double-click
the tool when you select it. That
tool will stay selected (and turn black) until you click another tool. What’s especially
great is that one press of the Enter key switches you back to the Arrow tool; a
second press returns to the drawing tool you originally double-clicked.
Worth
Learning
ANSWER MAN
Q: Oh, great. I typed 15,345 names in my Full
Name blank (in the form “John Sculley”) in
ClarisWorks. But now I want to sort my list
alphabetically by last name! What do I do?
A: Oh, boy, now you’ve done it.
ClarisWorks/FileMaker can’t sort by the second
word in a field. You should have set up two
fields, First Name and Last Name, to begin with,
so that you could now sort by last name.
In your situation, you’ll have to cleverly split
your Full Name field into two pieces. Create two
new fields, First Name and Last Name. Create
them as Calculation fields (but formatted to
display a Text result) that refer to your Full Name
field as follows:
First Name = LEFT(‘Full Name’, FIND(“ “,’Full
Name’,1)-1)
Last Name = RIGHT(‘Full Name’, LEN(‘Full
Name’)-FIND(“ “, ‘Full Name’,1))
(There’s a single space between each pair of
double quotes above.)
Once you’ve created these calculation fields,
clicked Done, and double-checked to see if
everything looks good, you can change the
calculation fields into Text fields and delete the
original Full Name field. Then. . . sort away!
Sorting by last name from a first+last field

In FileMaker only, there’s a more permanent, alternative solution. Choose
Preferences from the File menu and select the “Always lock layout tools” option.
(That great Enter-key stuff still applies.)
Escaping from the Define Fields dialog box
When you’re setting up fields in the Define Fields dialog box, it may seem
natural to select the Enter key to dismiss the dialog box when you’re finished —
but that doesn’t work. Instead of closing the window (as it does in the dialog
boxes for setting up entry options, values lists, and lookups), the Enter key
opens the Options dialog box. There is, however, a keyboard shortcut that will
dismiss the Define Fields dialog box — press the Esc key.
762 Part III: Application Secrets
■ ■
MACWORLD MAC SECRETS 5TH EDITION• 4040-8/5 • ch19.F • Chapter 19 • FINAL • VB • 11/04/98 • p.762

MACWORLD MAC SECRETS • 4040-8/5 • ch20.F • Chapter 20 • FINAL • VB • 11/03/98 • p.763
Chapter 20
Graphics and 3D
In This Chapter
©Formats demystified: PICT, TIFF, EPS, GIF, and others
©Painting, drawing, and PostScript-graphics tricks
©Insights on ClarisWorks, Photoshop, MacDraw, and Canvas
©Tricks for FreeHand and Illustrator
©QuickDraw 3D
Macintosh graphics — that’s almost redundant. Yes, Macintosh is
graphics. Images put the Mac on the map. An amazing amount of the
artwork that you see around you — ads, posters, album covers, product
packages in the grocery store, book covers (including ours), World Wide Web
pages — is designed on the Macintosh. Furthermore, with the recent
explosion of cheap color printers, more and more homemade art looks
professional.
File Formats
If everyone in the world understood the different file formats that computer
graphics come in, the volume of our e-mail would drop by half. Fortunately,
there is some logic to the existence and purpose of each format.
In the Mac universe, the most common graphics formats are TIFF, PICT, GIF,
JPEG, and EPS. If you’re looking for quick answers, here’s the executive
summary; read on for more detailed discussions.
■PICT files aren’t used in the professional world at all, but PICT is the
Mac’s own Clipboard format.
■TIFF files come from scanners. They’re a leading file format in the
publishing world. All the photos and screenshots in this book are TIFF
files.
■JPEG files are used for photographs on the World Wide Web. Digital
cameras, described later in this chapter, often produce them.
■GIF files are used for solid-colored objects (cartoons, logos, starbursts)
on the World Wide Web.
Mac Basics

■EPS files are used for original, high-quality, high-precision artwork in
newspapers, magazines, ads, and album covers.
Fortunately, most graphics programs can open and save more than one kind
of graphics format.
PICT files
Although you may not be aware of it, the PICT file is the one you’re most
accustomed to using. Mac file icons are little PICT files; so are the snapshots
of the screen you take by pressing Ô-Shift–3 (see Chapter 2). In the days of
yore, PICT was also the native format for most drawing programs (see
“Drawing Programs” later in this chapter), because a PICT file stores all the
relationships between grouped objects. Open a ClarisWorks-saved PICT file in
Canvas, for example, and you can ungroup it and continue to work on the art
without missing a beat.
There are two significant problems with PICT files. First, their precision isn’t
great. A PICT file may know that a line is supposed to be very thin, for
example. But it will round that line off to its nearest approximation of its
original width value — half a point, for instance. As a result, you may find
slight misalignments and changed line thicknesses when you transfer a PICT
file to another program.
Alas, PICT is the Clipboard’s natural graphics mode. If you draw a nice
precise diagram in Canvas and then copy it, your fine hairlines and careful
alignments are already gone before they’re even pasted into the Scrapbook.
764 Part III: Application Secrets
■ ■
MACWORLD MAC SECRETS • 4040-8/5 • ch20.F • Chapter 20 • FINAL • VB • 11/03/98 • p.764
TRUE FACT
If you have any doubt that the Macintosh is the
800-pound gorilla in the graphic arts, consider
the list below, compiled by Jim Henderson. You
might be surprised to find out exactly which
artwork was created on Macs. . .
■The Windows 95 logo (created with
FreeHand)
■IBM’s Aptiva point-of-purchase materials
and the boxes they ship in
■Intel’s “Flying Pentium” ads
■The graphics for Microsoft Network
■The newspaper and magazine ads for IBM,
Gateway, Dell — and Microsoft
■Outdoor advertising for Microsoft Magazine
■Windows 95 packaging
■PC Magazine, PC World magazine,
Windows Magazine, Windows Sources
magazine, Computer Shopper magazine,
and Next magazine
■The weekly internal Microsoft newsletter
MicroNews
■Many IBM and Microsoft TV ads (edited
with Mac-based Avid systems)
Mac Creations
The second major problem with PICT files, at least in professional work, is
that they have constant quarrels with professional publishing equipment
(imagesetters). Your service bureau operators are likely to groan if they spot
PICT graphics in your page, because the potential for printer errors, graphic
glitches, and other problems is much greater. Whenever possible, save your
artwork as EPS or TIFF files instead.
Mac OS X, Apple’s 1999 system-software overhaul, will finally mark the end of
the PICT file as the standard Mac file format; see “PDF (Acrobat) files,” later
in this chapter.
TIFF files
The TIFF file format, originally developed by Microsoft and Aldus, is a very
high-density bitmap — a painting, as described later in this chapter. In other
words, the Mac memorizes the color of every single dot in the file. (TIFF
stands for tagged-image file format; the “tags” are encoded “hints” that
accompany the graphic data to enhance its appearance.)
Most TIFF files start out life as the product of a scanner (see Figure 20-1). Like
any bitmap, a TIFF file takes up a lot of disk space. And, like a bitmap, you
enlarge such a graphic at your own risk; in doing so, you spread out the dots
that make it up, running the risk of producing a bitmapped-looking graphic.
Figure 20-1: If it looks like a photo, it probably entered the computer in the form of a TIFF
file from a scanner. But if it looks really good, and you found it online, it’s probably been
converted to a JPEG image to save space.
As we mentioned earlier, TIFF files are the common currency in the
publishing world. Scans, screenshots, and other book- or magazine-bound
publications are often saved as TIFF files. (Among other reasons, TIFF files
are equally welcome on both Macintosh and Windows.)
Chapter 20: Graphics and 3D 765
■ ■
MACWORLD MAC SECRETS • 4040-8/5 • ch20.F • Chapter 20 • FINAL • VB • 11/03/98 • p.765

So how do you convert and open all of these formats? Easy. Use Photoshop.
Or Picture Viewer, Apple’s free all-purpose graphics opener (part of the
QuickTime 3.0 software suite, as described in Chapter 22). Or use
GraphicConverter, which is included on the CD-ROM with this book.
JPEG files
Graphics files get pretty big. One letter-sized, full-color image can take many
megabytes of disk space.
A bunch of computer-graphics experts, calling themselves the Joint Photo-
graphic Experts Group, sat around a few years ago and tried to come up with
some formula for compressing graphics files so they took less disk space.
(The files would also take less time to send over the modem, which was
probably the more pressing concern for these Experts at the Photographic
Joint, whose job it probably was to send photos back to Time magazine via
modem.)
They came up with a scheme that succeeded impressively at reducing the
size of graphics files. They named it JPEG compression. When a computer
stores one of your files this way, it actually discards much of the color
information (that’s what makes the file smaller). If it throws away too much,
you get a crummy-looking, computery-looking picture when you open the file
back up. Even so, it turns out you can throw out more than half of the color
information from a typical photo and, upon reopening it, not notice that
anything is different.
Mac Basics
766 Part III: Application Secrets
■ ■
MACWORLD MAC SECRETS • 4040-8/5 • ch20.F • Chapter 20 • FINAL • VB • 11/03/98 • p.766
MACINTOSH SECRET
As we’ve noted, many common Macintosh
graphics formats are now usable on other kinds
of computers, such as Windows. TIFF, EPS, GIF,
and JPEG files, for example, are all common in
Windows-land today.
But taking a Macintosh graphics file to
Windows isn’t simply a matter of dragging it to
a PC-formatted floppy, as described in Chapter
16. First, you must remember to add the geeky
DOS code to the end of the file’s name. Worse,
the suffix codes have a maximum of three
letters. As a result, TIFF becomes TIF, JPEG
becomes JPG, and so on. A Macintosh JPEG file
called Flowers, for example, becomes a
Windows file called Flowers.JPG.
Moreover, some formats actually aren’t identical
on the two platforms. A Macintosh TIFF file, for
example, must be saved as a PC TIFF file if you
hope to open it under Windows (and vice
versa). (When you save such a file out of
Photoshop, you’re offered the choice of Mac or
IBM-compatible formats.) If you receive a .TIF
file from a Windows-using friend, on the other
hand, here’s a sneaky trick to make it Mac-
openable: change its type code (see Chapter 15)
from .TIF to TIFF.
Just as the Macintosh has its own private
format — PICT — so does Windows. BMP and
PTG, for example, are its equivalents of our own
home-turf file formats.
Cross-platform basics
The JPEG compression format is different from any other Mac file format
because of this information-discarding aspect. They call this lossy
compression because there’s some data loss; thus you can’t run a file
through a JPEG compressor more than once. Other compression schemes—
such as those used by DiskDoubler and StuffIt, for example — are lossless,
because when you decompress a file, it’s an exact, data-full duplicate of the
original.
(We think the computer world, so good at coming up with terminology, really
wimped out on this one. Lossy? We suppose this word was someone’s attempt
to come up with a cute antonym to lossless. But that’s like saying the
opposite of clueless is cluey, or that the opposite of hopeless is hopi.)
Anyway, JPEG files are a hot format, thanks to the World Wide Web. On the
Web, JPEG files are used for displaying photos or other high-quality artwork.
You’ll also see JPEG files by the hundred on America Online and elsewhere
online, ready for downloading and enjoying at very high quality.
EPS files
The Encapsulated PostScript file format, developed by Adobe, is so called
because it contains PostScript-language image-description codes. PostScript
is the language your Mac speaks to PostScript laser printers (and high-end
Linotronic printers).
In other words, when your Mac prints an EPS file, it’s speaking your printer’s
language. The program containing the EPS file doesn’t say to the printer:
“Pixel number 1 is dark. Pixel number 2 is white.” Instead, it sends a stream
of mathematical descriptions: “Draw a 0.33-inch-thick line starting halfway
across the page” and so on. EPS printouts, therefore, are among the highest
quality the Mac can produce (see Figure 20-2).
Figure 20-2: EPS files are generally created by programs like Illustrator and FreeHand. As a
general rule, they are composed of extremely precise-looking, smooth, sharp lines.
Because printing EPS files involves this transmission of computer code, the
potential for foul-ups is much greater. Documents that contain EPS files are
among the most likely to give you printing problems. As we noted earlier, an
EPS file may contain references to fonts that are no longer in the Mac. An EPS
Chapter 20: Graphics and 3D 767
■ ■
MACWORLD MAC SECRETS • 4040-8/5 • ch20.F • Chapter 20 • FINAL • VB • 11/03/98 • p.767

file’s instructions may fill up (and overwhelm) the printer’s memory. See
Chapter 30 for more about printing. In the meantime, remember that EPS files
look great when printed—if they print.
One more note about EPS files: They come in two parts. The critical part,
actually, is invisible to you. It’s a stream of PostScript instructions (see
Chapter 30 for a primer on PostScript language codes). These are for the
printer’s benefit.
For your benefit, most EPS files include a second component: our friend, the
PICT file. This is the on-screen stand-in for the printer instructions. (It’s this
PICT-file image that differentiates an EPS file from a regular PostScript file,
which you can’t see as a graphic image on the screen at all.)
Where things get odd is that the PICT-file portion of an EPS file is optional. In
the course of your computing days, you may run across an EPS file that’s
represented on-screen simply by a big X in a box—but that prints out
beautifully. (That’s why, when you save an Illustrator file as an EPS, you’re
given the option of including a PICT Preview.)
On the other hand, many a QuarkXPress-based publisher is zapped by the old
“missing PostScript” file. That’s when the PICT representation of the graphic
looks fine in the onscreen layout, but prints as a jagged image because the
actual EPS file (containing the PostScript printer instructions) has been
moved or lost.
GIF files
GIF stands for graphics interchange format. This format began on CompuServe,
as a means of making graphics available to users of any computer model.
Indeed, today, GIF files are used almost exclusively on the Web (and elsewhere
online). Unfortunately, its “any-computer-can-open-me” quality means that GIF
files must be the lowest common technical denominator; a GIF file can have a
maximum of 256 colors, which is not even close to the photorealism of, say,
JPEG (see Figure 20-3).
768 Part III: Application Secrets
■ ■
MACWORLD MAC SECRETS • 4040-8/5 • ch20.F • Chapter 20 • FINAL • VB • 11/03/98 • p.768
The GIF of the Magi
DP: Good thing this is a book.
JS: What?
DP: Instead of a radio show or something.
JS: What are you talking about?
DP: I’m just glad we don’t have to pronounce these
things out loud. We can just type them.
JS: What’s wrong with pronouncing graphic formats?!
DP: Well, I mean, we say PICT like “picked,” and TIFF
like “tiff,” but what about the others?
JS: What’s so difficult? EPS, you spell out the letters.
JPEG, you say “Jay peg.”
DP: Yeah, but. . . .
JS: Come on, what’s really on your mind?
DP: I just don’t want to say that other one.
JS: What other one?
DP: Every time I say it, somebody says I’m
pronouncing it wrong.
DIALOGUE

Figure 20-3: You can spot a GIF file fairly easily in your online wandering: you’ll see a photo
or other graphic that isn’t really photo-realistic. You can see the individual pixels that
compose the image, and they’re limited to a palette of 256 colors.
Thanks to the recent popularity of GIF files online, a whole raft of programs
can open them, such as the shareware Graphic Converter (on this book’s
CD-ROM), GIFConverter, and GIF Watcher. Any browser can open them
(Netscape Navigator, Microsoft Internet Explorer, America Online), and so
can normal graphics programs (such as Photoshop, Color It, and
ClarisWorks).
Startup screens
A startup screen is essentially a PICT file that’s been doctored using ResEdit,
or saved out of graphics programs such as Photoshop or Color It. (Reader
Justin Crompton notes that to save one using Photoshop, you save your
graphic using the PICT Resource format; in the “ID” dialog box, type a zero.)
As long as the file is in the System folder and its name is startupscreen, the
Mac displays this graphic when it starts up, in place of the usual “Welcome to
Macintosh” message. We’ve included a few startup screens with this book.
For instructions on making your own, see Chapter 21.
Chapter 20: Graphics and 3D 769
■ ■
MACWORLD MAC SECRETS • 4040-8/5 • ch20.F • Chapter 20 • FINAL • VB • 11/03/98 • p.769
JS: Pronouncing what wrong?
DP: No, I don’t think —
JS: Just say it!
DP: GIF.
JS: Oh, that.
DP: Satisfied?
JS: By the way, you pronounced it wrong.
DP: Oi!
JS: You pronounced it like Jif, the peanut butter.
DP: Doesn’t everyone?
JS: No, it’s GIF, with a hard G. Because it stands for
Graphic Interchange Format. Get it?
DP: Well, the last time I said it your way, some user-
group guy corrected me.
JS: Well, at least you’re not as bad as this woman at
my office . . .
DP: Yeah? Why? How does she say it?
JS: She keeps referring to them as gift files.
DP: Stick with me, kid.

PDF (Acrobat) files
Coming soon to a project near you: PDF (portable digital file) files. These
page-shaped files are remarkable in a number of useful ways:
■They can contain both text and graphics in complete layouts. Unlike
text in TIFF or GIF files, text in PDF files remains real text—it can be
searched, printed, or copied. They can even contain “hotlinks,” exactly
like Web pages — click a certain word to jump elsewhere in the
document.
■Even if you don’t have the original fonts, the type looks pretty much the
way it did on the designer’s computer.
■PDF files are cross-platform (openable by both Mac and Windows).
PDF files have a couple of disadvantages, too, however. First, you have to buy
Adobe Acrobat if you want to create PDF files. Second, your recipients must
have a program called Acrobat Reader (which is, mercifully, free) to read PDF
files. (The Reader installer puts a special version of the Adobe Type Manager
control panel into your System folder. That’s what lets you see the PDF file’s
fonts the way they’re supposed to look.)
Those disadvantages may fade away with the advent of Mac OS X, Apple’s
upcoming OS rewrite. In OS X, Acrobat files become the new standard file
format (replacing PICT). We can only assume that, as a result, the software
needed to save and open PDF files will be built into the system software.
Meanwhile, enjoy the features of Acrobat; you can start by reading the
electronic Macworld Mac Secrets, 4th Edition. It’s on this book’s CD-ROM —
in Acrobat form.
Types of Graphics Programs
The three most popular kinds of Macintosh graphics tools are painting,
drawing, and PostScript tools. In the olden days, each graphics program
was designed to create exactly one of these types of art. Today, graphics
programs often steal from each other’s territory: FreeHand, a PostScript
drawing program, now has some painting tools; Fractal’s Expressionist uses
PostScript tools to create paint-like images; Canvas handles all three kinds of
graphics; and so on.
But you won’t stand a chance of understanding these modern hybrid
graphics programs unless you first understand the three graphics modes
from which they’re descended.
Painting
The three different art types have to do with how the computer thinks of your
art. In the case of painting programs, the Mac thinks in one-dot units. To
display a zebra in Photoshop, the Mac memorizes the exact status — black
770 Part III: Application Secrets
■ ■
MACWORLD MAC SECRETS • 4040-8/5 • ch20.F • Chapter 20 • FINAL • VB • 11/03/98 • p.770
or white — of each of 484,704 pixels (screen dots). That’s how many are in an
81⁄2-by-11 painting at a screen resolution of 72 dots per inch.
In other words, the Mac stores what amounts to a map of your screen. It
remembers the precise locations of all the colored dots. Painting programs,
it’s therefore said, generate bitmapped graphics.
When you lay down some “paint,” you turn white pixels some other color.
You can erase them, but you can’t change the original shape you painted — a
circle, say, or a letter of the alphabet — because the Mac no longer thinks of
them as a circle or a letter of the alphabet. On the other hand, you have
control over each individual dot. You also have special pixel-manipulation
tools such as the Spray Can and the Lasso (see Figure 20-4).
Figure 20-4: Here are two graphics that can be created in a painting program. First, the crack
in the left figure is drawn with a pencil tool, which turns individual pixels black. On the right,
a chunk of the painting is being pulled away after having been selected by the Lasso tool.
Drawing programs, by contrast, don’t have Lasso tools.
The original painting programs all had the word paint in the title — MacPaint,
SuperPaint, UltraPaint, and so on. HyperCard’s art tools are also painting
tools. ClarisWorks has a painting window. Believe it or not, the most
expensive and powerful graphics program of all, Adobe Photoshop, is a
painting program, too— a very, very, very sophisticated version of MacPaint.
Color It, included on the CD-ROM with this book, is also very powerful — it’s
just not nearly as expensive.
Painting pointers
Paint programs have been around for so long, and they’re essentially so
simple, that few unpublicized features remain. But here, for reference, are key
paint-program tips, in case you don’t know them. These work in any program
whose name ends with “Paint,” in HyperCard, in the bitmapped modes of
Canvas and ClarisWorks, and in Photoshop and Color It.
■Option-drag a selected region to peel off a copy.
■If your Paint-bucket Tool unexpectedly fills in the entire screen with your
selected pattern, immediately choose Undo. Zoom in on the outline of
what you’re trying to fill in, find the gap in the outline (through which the
“paint” is spilling), and close it up before trying again (see Figure 20-5).
■Choose a pattern, color, and line thickness (from the corresponding
palettes or menus) before you paint a new shape. You can’t change your
mind after drawing the new element.
Mac Basics
Mac Basics
Chapter 20: Graphics and 3D 771
■ ■
MACWORLD MAC SECRETS • 4040-8/5 • ch20.F • Chapter 20 • FINAL • VB • 11/03/98 • p.771

Figure 20-5: If you try to fill in the background of the first drawing (top left), your paint
will spill through the open outline of the face (top right). Undo it. Then zoom in (bottom
left) and, with the pencil tool, close up the gap. Now the paint will stay where it belongs
(bottom right).
■Press the Shift key as you drag across the painting area to constrain your
mouse movement to a perfect horizontal or vertical line. (In Photoshop,
press the Shift key just after the first click. In most other programs, press
Shift before you click.)
■In most paint programs, you can double-click the Paintbrush tool icon to
access a palette of brush shapes.
■Look for a built-in shortcut to enlarge the entire painting window: either
double-click the Pencil tool (ClarisWorks, for example) or, with the Pencil
selected, Ô-click the artwork (MacPaint, for example). In Photoshop and
Color It, Ô-plus and Ô-minus enlarge or reduce the artwork.
For detail work, you must enlarge the painting. Every painting program on
earth has keystrokes for zooming in or out.
■If you’re painting using a pressure-sensitive digitizing tablet (such as a
Wacom pad), how hard you bear down on the stylus generally determines
the thickness (or sometimes the opacity) of the line you’re drawing.
Editing high-resolution bitmaps
In the olden days, paintings had low resolution—the same 72 dpi of the
screen. But today’s paint programs (such as ClarisWorks, Canvas, Color It,
and Photoshop) aren’t confined to the usual 72 dots-per-inch resolution. You
can change the painting to any resolution. If you set your painting to 300 or
600 dpi, for example, you can actually edit every dot a standard laser printer
is capable of putting on the page.
Of course, since the screen’s resolution can’t be changed to that degree,
you face a tradeoff: In order to view or edit every pixel (screen dot) of a
772 Part III: Application Secrets
■ ■
MACWORLD MAC SECRETS • 4040-8/5 • ch20.F • Chapter 20 • FINAL • VB • 11/03/98 • p.772

high-resolution painting, you must blow up the image so much that it
becomes many times larger than the window you’re working in. That’s why
another critical tool in today’s painting programs is the hand grabber tool,
which lets you shift the hugely enlarged image within the comparatively
small window. (Usually you can change your cursor into the grabber tool
by pressing a key —the spacebar or Option key, for example — which
makes image-shifting more natural when you’re working with a large or
high-resolution painting.)
Another warning: High-resolution paintings, such as scans, take up many
megabytes of memory and disk space. (Remember, a bitmap is nothing more
than a database of the pixels on the page and a record of the color of each.
The more dots the Mac must track, the larger the memory requirement.) For
example, to edit a six-inch, 256-color, 300 dpi ClarisWorks painting, you have
to bump the program’s memory allotment up to 13MB.
General Painting Secrets
■
Instant Eyedropper selection
The Eyedropper tool is used for color matching. If you’ve already used a color
in a painting, and you want to use it again, click the painted color with the
Eyedropper. The fill-color palette changes to match the color you click.
Since you use this tool often in color painting work, each painting program
generally offers a keyboard shortcut. In ClarisWorks, press Tab. (Press it again
to switch back to your previous tool.) In Photoshop, it’s Option. In Color It, it’s
Control.
Multiple magnifications at once
Use the New View or New Window command to open a duplicate window of your
work. You can zoom in or out in this new window independently of your original
window, making it easy to do detail work (at 400 percent, say) and keeping your
eye on the piece as a whole at the same time.
Secret powers of the ClarisWorks Lasso
ClarisWorks includes a pretty decent paint program. It handles color, grays, and
resolutions up to 360 dpi. With that much power, it could almost be called a
cousin of photo-retouching powerhouses such as Photoshop.
If you either double-click the Lasso or Ô–double-click the selection rectangle
tool (Marquee) on the tool palette, you select all dark areas of your painting
at once.
Chapter 20: Graphics and 3D 773
■ ■
MACWORLD MAC SECRETS • 4040-8/5 • ch20.F • Chapter 20 • FINAL • VB • 11/03/98 • p.773

ClarisWorks can use Photoshop plug-ins!
You’re forgiven for doing a double-take at the title of this secret. But it’s true:
beginning with ClarisWorks 5, you can use Photoshop plug-ins (add-on special-
effect filters) with ClarisWorks’s painting module!
Free book winner Rodney Furmanski points out that all you have to do is put
your favorite Photoshop plug-ins into a folder called ClarisWorks Plug-Ins. And
put
that
folder into your ClarisWorks folder.
Now, when you open a ClarisWorks painting document (or a painting frame in any
other kind of document), the Transform menu contains a new menu item: Plug-In
Effects. After selecting a part of your painting with the Lasso or Marquee tool in
ClarisWorks, choose the Plug-In Effects command.
You’re shown an Open File dialog box. Use it to navigate to your Plug-Ins folder
and select the plug-in you want (which often involves making some settings in a
dialog box). Former Claris employee Furmanski also told us why this feature isn’t
written anywhere — because it’s still buggy. But hey — works for us.
Adobe Photoshop (and Color It)
Photoshop is a huge, expensive ($900), professional-level masterpiece of a
color paint program. It’s a fantastic accompaniment to a scanner or digital
camera; it lets you retouch a photo, combine elements of different photos, or
forget about photos and simply create electronic illustrations.
With all of its heavy-duty image-processing capabilities, Photoshop can make
tremendous demands on the Mac. Even on a faster Macintosh, applying some
of the program’s image processing filters can mean lots of waiting. In fact,
Photoshop’s horsepower demands account for the sales of Mac models that
would seem hopelessly over-the-top for the average person. If you’re a
graphic designer trying to work with a 600-dpi movie poster that occupies a
few gigabytes of disk space, the concept of speed takes on a whole new
importance.
Mastering the interface
Because Photoshop is an image-editing program, palettes, dialog boxes, and
other interface elements can only take away from the space that could be
displaying your picture. Therefore, Photoshop’s designers spend an unusual
amount of energy on making those onscreen elements flexible and shrinkable.
A huge number of features are concealed, accessible only to those who know
what keys to hold down or which palette to Shift-click.
Here, for reference, is as complete a list of interface shortcuts as we can
come up with. (Most of it applies to any Photoshop version, but some tricks —
especially those involving the selection and moving tools —are unique to
Contest
Winner
774 Part III: Application Secrets
■ ■
MACWORLD MAC SECRETS • 4040-8/5 • ch20.F • Chapter 20 • FINAL • VB • 11/03/98 • p.774

Photoshop 4 and 5.) Read the whole thing; there are almost certainly a few that
you could be using. They’re listed in what we consider order of importance:
■Hit Tab to hide or show all onscreen palettes and windows, leaving
nothing on the screen but your artwork. (Or press Shift-Tab to hide all
palettes except the Tools.) This is one of the most important keystrokes
in Photoshop, especially if your monitor isn’t immense.
■Press letter keys to switch tools on the tool palette — even if the palette
isn’t visible. Here’s another great way to focus your work on your image
instead of on your software. See Figure 20-6 for a list of the tool keystrokes.
Caution: In Photoshop 4, don’t press the same letter key twice in a row
unless you intend to cycle among that tool’s personalities. For example,
pressing E repeatedly makes the eraser switch from normal (paintbrush)
mode to pencil mode, airbrush, and so on. (This annoyance was removed
in Photoshop 5.)
■Ô-plus and Ô-minus zoom in and out, respectively. Far better than using
the magnifier tool — this method also enlarges the window, so that you
actually see more.
■Press F to toggle among the various window-display modes. For example,
press F once to eliminate the artwork window’s scroll bars, title bar, and
so on — your image now fills the entire screen, which gives you the
glorious feeling that you’ve just bought a much bigger monitor. Press F
again to eliminate even more of the screen—now your menu bar itself is
hidden — and once more to return to the “in-a-window” mode.
Bonus F-press: If you have more than one document open, keep pressing
F to begin cycling through the different open windows.
■Press Return to open an Options window for whatever tool is currently
selected. (Not all tools have associated Options palettes, however.)
■Drag while holding down the Space bar to scroll your artwork window
in any direction (a shortcut for the Hand tool).
■Press Caps Lock to turn the cursor into a crosshair shape for more precise
painting. And if, in the Preferences dialog box, you opt for the crosshair
cursor all the time, Caps Lock turns it back into the default cursor shape.
■When using any painting tool (Airbrush, Brush, Pencil, Eraser, Rubber
Stamp, Smudge, Blur, Line, and so on), Shift-click to paint straight lines
between your clicks, or Shift-drag to draw perfectly horizontal, vertical,
or diagonal lines.
■When using any tool that actually applies color (Airbrush, Brush, Pencil,
Line, Paint Bucket, and so on), hold down the Option key to switch,
temporarily, to the Eyedropper tool, so that you can “pick up” a different
color for painting.
Photoshop, tool by tool
Are there any Photoshop secrets? By the truckload. But ask a grizzled
Photoshop vet to name a few favorites, and they inevitably name some fully
documented, but often overlooked, shortcuts and features of the standard
Chapter 20: Graphics and 3D 775
■ ■
MACWORLD MAC SECRETS • 4040-8/5 • ch20.F • Chapter 20 • FINAL • VB • 11/03/98 • p.775
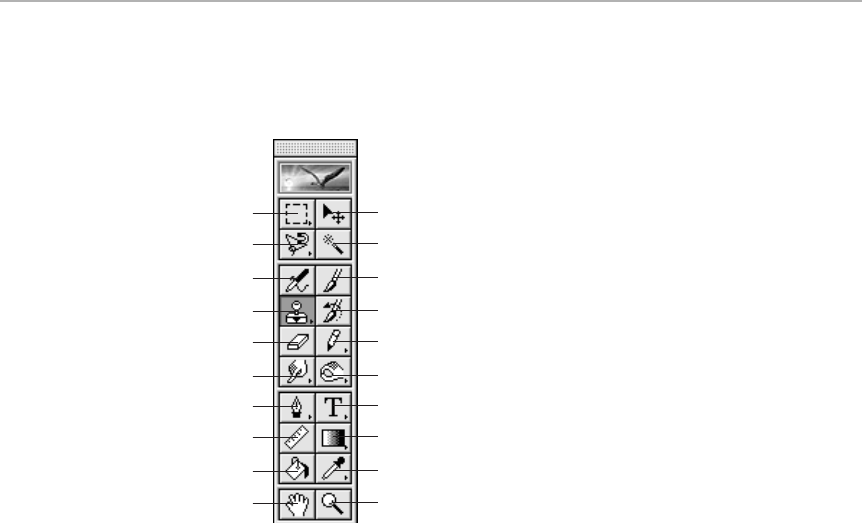
Photoshop tool palette. We ourselves often long for a complete list of keys to
hold down and places to click; here they are at last. (Figure 20-6 illustrates
these tools.)
Figure 20-6: Press the capitalized letter to choose the corresponding tool without having to
use the mouse.
Note, by the way, that many of these tools offer pop-out icon menus — that is,
if you hold the mouse button down as you click the tool icon, a fold-out set
of additional icons, reflecting that tool’s different personalities, pops out.
That’s how Adobe made the Blur and Sharpen tools fit on the same icon; the
rectangular and elliptical Marquee tools fit on a single tile; and so on. Most
of the tools also offer floating palettes that let you change their settings. To
open this palette, double-click the tool icon — or just press Return whenever
the tool is selected.
■The Marquee (press M) selects rectangular or oval areas of your
artwork. If nothing is selected, Option-drag to draw from the center of
your rectangle or oval, or Shift-drag to draw a perfect square or circle.
If part of your graphic is already selected, Option-drag to de-select
selected areas, and Shift-drag to highlight additional areas. Press the
spacebar in the middle of a drag to move the marquee as you draw it
(but not what’s inside it).
■The Lasso (press L) also selects regions—but this time, you can enclose
irregular shapes. Shift-drag to add to, or Option-drag to take away from,
a selected area. You can also Option-click to create the corners of a
straight-sided selection (press Delete if you add a corner by accident);
Control, while held down, switches to the Magic Wand tool.
Marquee
Lasso
Airbrush (J)
Rubber Stamp
Eraser
Smudge (R)
Pen
Measure
Paint Bucket
Hand Grabber
Move
Magic Wand
Paint Brush
History Brush
Pencil
Dodge
Type
Gradient
Eyedropper (I)
Zoom
776 Part III: Application Secrets
■ ■
MACWORLD MAC SECRETS • 4040-8/5 • ch20.F • Chapter 20 • FINAL • VB • 11/03/98 • p.776

■The Magic Wand (press W) selects all contiguous pixels that match the
color of the one you click. (The Tolerance control on the Magic Wand’s
options palette lets you define how closely the colors must match the
spot where you clicked.) Hold down Shift while clicking to select
additional areas, and Option to de-select the next section you click.
■The Move Tool (press V, or Ô-drag at any time) moves the selected
portion of the artwork to another position in the document. Press the
arrow keys to shift the selection a pixel at a time; Shift-arrow keys to
make the selection jump ten pixels at a time; Option-drag to duplicate
what you’re moving; and Shift-drag to force the movement along perfect
horizontal, vertical, or diagonal lines.
■The Airbrush (press A) paints a soft “spray” of the currently selected
color; the Paintbrush (B) paints a less airy line; and the Pencil (Y in
Photoshop 4, N in Photoshop 5) creates a hard-edged line as you drag.
All three tools draw a swath as thick as the shape you click on the
Brushes palette.
■The Eraser (press E) might startle former users of older paint programs.
It doesn’t necessarily turn the area you touch with it white; instead, it
changes it to whatever is the currently selected background color. If you
Option-drag, you reveal whatever was in that spot in the artwork the last
time you saved — a sensational mistake-fixing possibility, something like
a selective Revert-to-Saved command. Another frequently overlooked
opportunity: you can type a number key from 0 to 9 as you drag to
control the eraser’s opacity — in other words, you can make what you’re
erasing semi-transparent instead of erasing it completely.
■The Rubber Stamp (press S) is beloved by photo retouchers. It lets you
paint over one area of a photograph with what’s in another area. Option-
click to indicate the spot you’d like copied; then release the key and the
mouse button, move to the target area, and begin painting.
■In Photoshop 5, the Smudge Tool has been incorporated as a pop-out
icon choice of the Blur Tool; in previous versions, press U to select this
finger-painting icon. It smudges what you drag over. Add Option to enter
finger-painting mode, in which dragging not only smears the existing
“paint” but adds the currently selected foreground color as you go.
■The Blur tool (press R) is also the Sharpen tool: it blurs or sharpens
whatever you drag over (a handy thing for photo editors), depending on
whether the teardrop (blur) or triangle shape (sharpen) is selected in the
pop-out icon menu. Option-drag to switch to blur mode when you’re
sharpening, or vice-versa.
■You won’t understand the names of the Burn and Dodge tools (press O)
unless you’ve ever developed your own photos. Burning darkens an area
of the photo, and dodging lightens it up; use the pop-out icon menu to
choose which mode you want. (The other pop-out menu option: the
Sponge, which desaturates [makes less intense] the colors you drag
over.) Option-drag to switch to dodge mode when you’re burning, or
vice-versa.
Chapter 20: Graphics and 3D 777
■ ■
MACWORLD MAC SECRETS • 4040-8/5 • ch20.F • Chapter 20 • FINAL • VB • 11/03/98 • p.777

■And you won’t understand the Pen (press P) unless you’ve used a
PostScript drawing program, such as FreeHand or Illustrator (described
later in this chapter). This tool gives you another way to draw selections
directly onto the artwork using Bézier curve controls, as in FreeHand or
Illustrator. All the usual conventions apply: Click to create a corner point;
drag to create a curve; Option-click an existing point create a cusp point.
You can also press Ôwhen you want to select a point you’ve drawn,
Ô-Option-click to select the entire path you’ve just drawn, Ô-Option-
drag to duplicate the path, Control-click or Control-drag a path to
introduce a new corner or curve point, respectively; Control-click a
point to delete it; Option-click a curve point to make it a corner point;
and Control-Option-click a corner point to make it a curve point. Good
luck!
■The Text Tool (press T) befuddles many a first-time Photoshop 4 user.
Select it, then click the screen, to open a dialog box where you can type
(and format) some text. When you click OK, the text is there, floating on
its own Photoshop layer — as a graphic that’s no longer editable. If you
made a typo, you must delete the entire phrase and start over. (Fixed
in Version 5.) Shortcut-wise, there’s not much: Click and hold on the
artwork to see an L-shaped cursor that shows where the text will begin.
Or Shift-click the tool icon itself to rebuild your font menu, forcing
Photoshop to acknowledge new fonts you’ve added since launching the
program.
■The Line disappeared into the Pencil tool’s pop-out icon in Photoshop 5.
In previous versions, N was its keyboard trigger; it draws straight lines
(with arrowheads at the ends, if you wish).
■To use the Gradient tool (press G), specify a starting and ending color
(the Foreground and Background colors). Then drag across whatever
area you’d like to fill with a smooth blend between those two colors.
■The Paint Bucket (press K) fills all adjacent pixels of the same color
with the current Foreground color. (You can adjust its sensitivity in
“matching” the colors of the pixel you click.) This one can make a real
mess of things, if you’re not careful—one little “bridge” of same-colored
pixels between the area you click and the rest of the painting can lead to
an accidental “paint spill” over your entire document.
■You can choose a new foreground color by example using the Eydropper
(press I) and clicking somewhere in your document. Add Option to
change the background color instead.
■The Hand Tool (press H, or Spacebar-drag) is a shortcut for using the
scroll bars in a large document. It lets you scroll your image within its
window. When this tool is selected, holding down the Ôand Option keys
summons the magnifying-glass tool to zoom in and out, respectively.
Quick shortcut: Double-click the Hand tool itself to make the artwork fill
your screen.
■The Zoom Tool (press Z) magnifies or reduces your view of the document
(without actually affecting the document). (But as noted earlier, you’re
778 Part III: Application Secrets
■ ■
MACWORLD MAC SECRETS • 4040-8/5 • ch20.F • Chapter 20 • FINAL • VB • 11/03/98 • p.778

better off getting used to using the Ô-plus and Ô-minus keystrokes.) You
can also press Ô-Option-plus and Ô-Option-minus to enlarge or reduce
the image to Photoshop’s maximum (16 times larger or smaller than
actual size). Other buried shortcuts: Double-click the tool to return to
actual, non-magnified size. Option-click to zoom out instead of in. Press
Ôto switch, while the key is down, to the Move tool.
■New to Photoshop 5, the History Brush acts as a powerful selective
Undo. It lets you — well, how shall we put this? — erase backward
through time, down to the way your painting was at a certain moment
you select.
■The Measure Tool (press U) is also a Photoshop 5 addition; just drag
across your painting to measure distances. (The readout appears in a
separate palette.)
For a great online instruction book about Photoshop, visit the Photoshop
Web Reference pages at www.duke.edu/~ac10/photoshop.)
Photoshop Secrets
■
Color It, included on the CD-ROM with this book, offers most of Photoshop’s
features, needs half the RAM, has multiple Undos, and even the latest version
costs about one-sixth of what Photoshop does. We’ll indicate which of our
Photoshop secrets below work equally well in Color It.
Chapter 20: Graphics and 3D 779
■ ■
MACWORLD MAC SECRETS • 4040-8/5 • ch20.F • Chapter 20 • FINAL • VB • 11/03/98 • p.779
MACINTOSH SECRET
In Photoshop 4 and 5, practically everything you
do seems to generate another transparent layer.
(Open the Layers palette — choose its name
from the Window menu — to see the complete
list.) On one hand, that’s a terrific feature. It
means you edit each element of your artwork
(the background, the type, and so on)
independently, without disturbing what’s
underneath. You can even create layers that
contain color-correction settings — one that
adjusts the brightness, one that takes out some
greenish tinge, and so on. (Choose New
Adjustment Layer from the Layers palette’s pop-
up menu to create one of these layers.) At any
time later, you can change one of the color-
correction settings by double-clicking the
appropriate layer’s name.
On the other hand, layers frequently trip up
Photoshop fans. Since the layers are perfectly
transparent, the only indication of which layer
you’re currently editing — or even that you have
layers — is the Layers palette itself. If you
enclose an area with the Lasso, for example,
and press Delete, and nothing happens, you’re
probably trying to edit the wrong layer.
Furthermore, only Photoshop’s proprietary file
format understands layers. You can’t save your
work as TIFF, EPS, GIF, JPEG, or any other
standard document type until you’ve first
eliminated the layers. To do so, once the graphic
looks the way you want it, use the Flatten
Image command (in the Layer menu). Only now
are those standard file-format options available
to you (in the Save As dialog box).
Escaping Photoshop Layer Hell
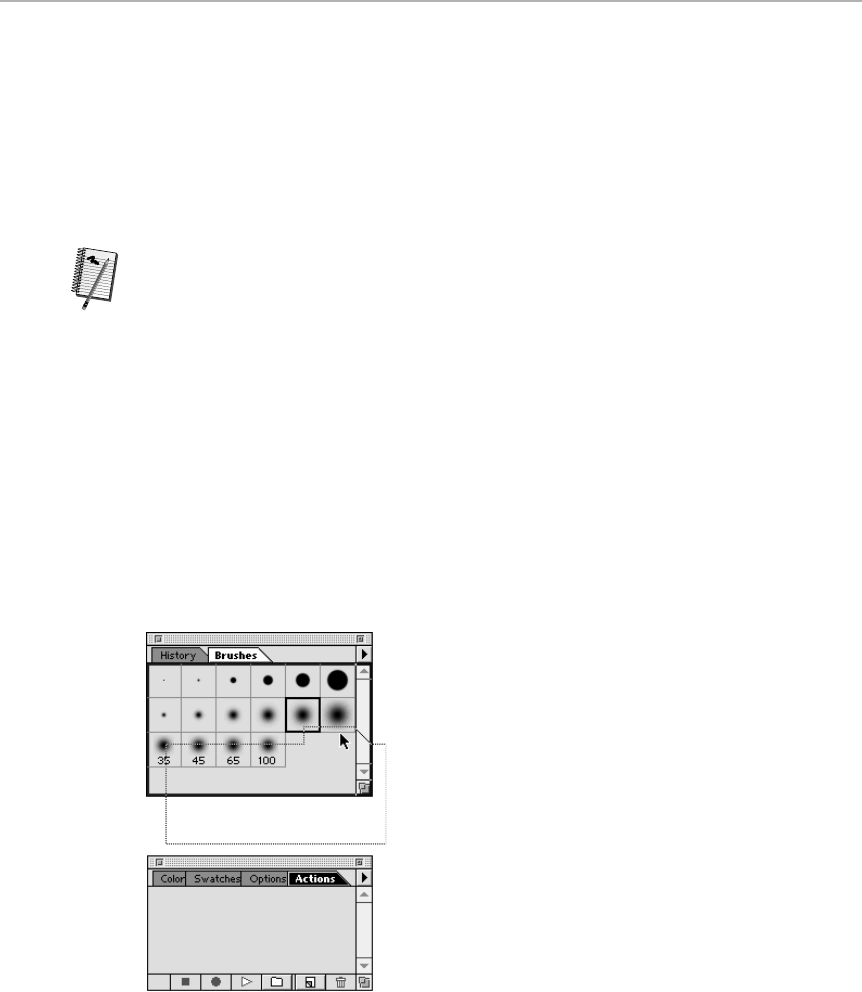
Palette management for the
big-screen impaired
As Photoshop matures, its quota of floating palettes seems continually to grow.
All the better, then, to use the following tricks for managing screen space. For
starters, learn the keystrokes for summoning the most commonly used palettes:
F5, F6, F7, F8, and F9 summon the Brushes, Color, Layers, Info, and Actions
palettes, respectively.
Or try this awesome idea: Option-click the tiny zoom box in the upper-right corner
of a palette’s little title bar to collapse it, Windowshade-like, hiding everything
but the title bar itself. Drag multiple palettes that you’ve collapsed in this way
to the bottom edge of your screen, and you’ve got yourself the Photoshop
equivalent of Mac OS 8’s pop-up windows (see Chapter 1). Click a tab to pop
up the window; double-click a tab to re-collapse it.
Shift-clicking a palette’s title bar makes the palette leap to the edge of your
monitor — a good way to get the thing out of your way as you work on the image
in the center of the screen. And remember to drag palettes next to each other
for cleanliness; they stick, as though magnetic, when placed next to each other.
Most useful (and invisible) of all: You can build your
own
darned palettes,
containing only the information you use a lot. To do so, open up the palettes
that contain the settings you like. Then drag a
tab
from one palette to another,
as shown in Figure 20-7. The result is your own private palette, tabbed the way
you like it.
Figure 20-7: You can combine tabs from multiple palettes to reduce screen clutter. Just drag.
Worth
Learning
780 Part III: Application Secrets
■ ■
MACWORLD MAC SECRETS • 4040-8/5 • ch20.F • Chapter 20 • FINAL • VB • 11/03/98 • p.780

Press arrows, don’t type numbers
Much of your work in Photoshop involves typing numbers into little dialog box
blanks; for example, when creating a new document, there are fields where
you’re supposed to specify the size of the document in pixels, points, inches,
and so on. Instead of typing numbers, consider this discovery.
When the number is highlighted, pressing the up-arrow or down-arrow keys
increase the value in appropriate increments. For example, if the number already
in the box is displayed in inches, pressing the up-arrow key repeatedly changes
the number in thousandth-of-an-inch increments. If you press Shift as you tap
those arrow keys, you increase the increments by a factor of 10 (increasing a
number by tenths of an inch instead of hundredths, for example).
Selection Secrets
To an extent, Photoshop’s Lasso and Rectangular-selection tools work as they
do in any other painting program, but you can do much more with these. After
you select something, for example, you can Ô-drag inside the selection to
deselect
a portion of it.
If you Shift-drag, you can
add
more selected material, even if it’s in a different
part of the window.
Photoshop 4: After you select a region (or several), drag inside the selected
region to move the region. But if you Ô-Option–drag, you can move just
the selection outline (the shimmering border) and
not
disturb the artwork.
Photoshop 5: Drag while pressing Ôto move the selection, or without pressing
Ôto move only the outline selection.
Change opacity while painting
This secret’s title says it all. After the Brush tool is selected, you can change
its degree of opacity without having to use the Brushes palette — just press a
number key on your keyboard, from 0 (solid black) to 1 (barely perceivable —
10 percent black).
Remembering the last values
It may disappoint you to discover that each time you open a color-correction
dialog box — Brightness, Levels, Curves, and so on — Photoshop appears to
have forgotten the settings you used the last time you accessed the command.
But if you press Option while choosing the menu command (or pressing its
equivalent keystroke), the dialog box will appear with your last set of settings
intact.
Chapter 20: Graphics and 3D 781
■ ■
MACWORLD MAC SECRETS • 4040-8/5 • ch20.F • Chapter 20 • FINAL • VB • 11/03/98 • p.781
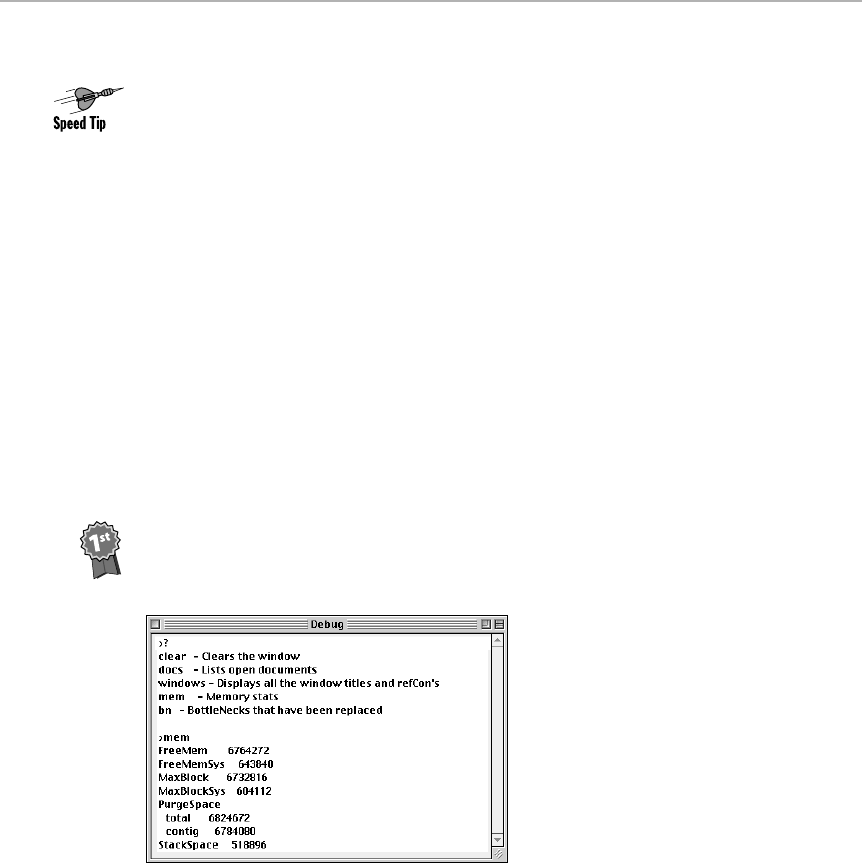
Faster filling (Color It, too)
Much of the time, you use the Edit menu’s Fill command simply to fill in the
selected region with the foreground color. Instead of using the menu for this
purpose — including OK’ing a dialog box — just press Option-Delete. That fills
the selected region with 100 percent of the foreground color. (Delete alone
fills the selection with the
background
color.)
Contextual menus
As reader W. B. Johnston discovered, Control-clicking your artwork in Photoshop
unleashes a contextual pop-up menu of useful commands, exactly as in the Mac
OS 8 Finder. For example, these commands let you change brushes or paint
modes while using any painting tool. You can also select all or duplicate a layer
when using any selection tool. The pop-up menu for the magnifying-glass tool is
especially useful: its commands include Fit in Screen, Print Size, Zoom In, and
Zoom Out.
Photoshop 4’s secret debugger
Talk about undocumented! Free book winner Josh Bernstein discovered a
secret — and useful — Photoshop debugger window. In Photoshop 4, press
Control-Option-zero to open this secret display (shown in Figure 20-8).
Figure 20-8: The secret Photoshop debugger window lets you peer into the internal workings
of this complex software.
At this point, type a question mark (?) to make the debugger show you a list
of available commands. One shows a complete list of open windows; another
displays your current memor y situation; and so on.
Contest
Winner
782 Part III: Application Secrets
■ ■
MACWORLD MAC SECRETS • 4040-8/5 • ch20.F • Chapter 20 • FINAL • VB • 11/03/98 • p.782

The legacy of classy Easter eggs
Regardless of the version, Photoshop is the reigning king of Easter eggs (buried
credits screens). Consider:
Version 3.x: Adobe may
think
it owns Photoshop. But if you press Option
while choosing About Photoshop from the Úmenu, you’ll find out what the
programmers really think. Furthermore, if (in Version 2.5 or 3) you press Ô
while choosing About Photoshop, you get to see the
double
-secret About box.
OK, now try this: Choose About Photoshop from the Úmenu and wait patiently.
After a moment, credits begin to scroll up the screen. (Press the Option key to
make them go by faster.) They get funnier as the list goes on; at the very end of
the list,
your
name appears, and you get thanked for being “one of our favorite
customers.”
When the credits end, click the Adobe logo, and watch the space just below it.
You’ll see a virtual stand-up routine typed out, joke after joke — a total of 130
hilarious Generation X pop-culture one-liners. There are references to David
Letterman (“Hey, everybody! I’m not wearing pants!”),
The Simpsons
(“‘A tense
work environment is a productive work environment’ — M. Burns”), the movie
Spaceballs
(“Ensign — pursue that vessel at Ludicrous Speed!”), and much
more.
Version 4: Photoshop 4 offers just about the gnarliest secret About box of any
program. While pressing Ô, choose About Photoshop from the Úmenu.
The Big Electric Cat appears — but you’re not done yet! Now Ô-click his nose.
Mr. Cat’s little mouth drops open, and he treats you to a resonating, gurgly
audio burp.
Gross!
Here’s another way to open the About box, by the way: click the abstract graphic
at the top of the tool palette!
Once you’re in the About box, by the way, try this trick suggested by free book
winner Stephen McCabe: Click the Adobe logo in the upper-left corner of the
About box. Your Web browser launches, of all things, and shows you a page of
links to Adobe online resources. You’re not actually on the Web, however — that
Web page is a file stored on your hard drive. But if you
Option
-click the Adobe
logo instead, you’ll suddenly find your Web browser launching, your modem
dialing, and the Photoshop “what’s new” Web site arriving on your screen!
(All of this works in PageMaker, too.)
Believe it or not, we’re still not done. Even Photoshop’s Help program has
Easter eggs. Choose Help Contents from the Help menu; while pressing Option,
choose About QuickHelp from the Úmenu. You’ll be treated to some most
whimsical credits (unearthed by reader W. B. Johnston).
Version 5: Press Ôwhile choosing About Photoshop from the Úmenu. Once
again, Adobe hasn’t abandoned its faithful Easter egg fans. We’ll let you take it
from here.
Contest
Winner
Chapter 20: Graphics and 3D 783
■ ■
MACWORLD MAC SECRETS • 4040-8/5 • ch20.F • Chapter 20 • FINAL • VB • 11/03/98 • p.783
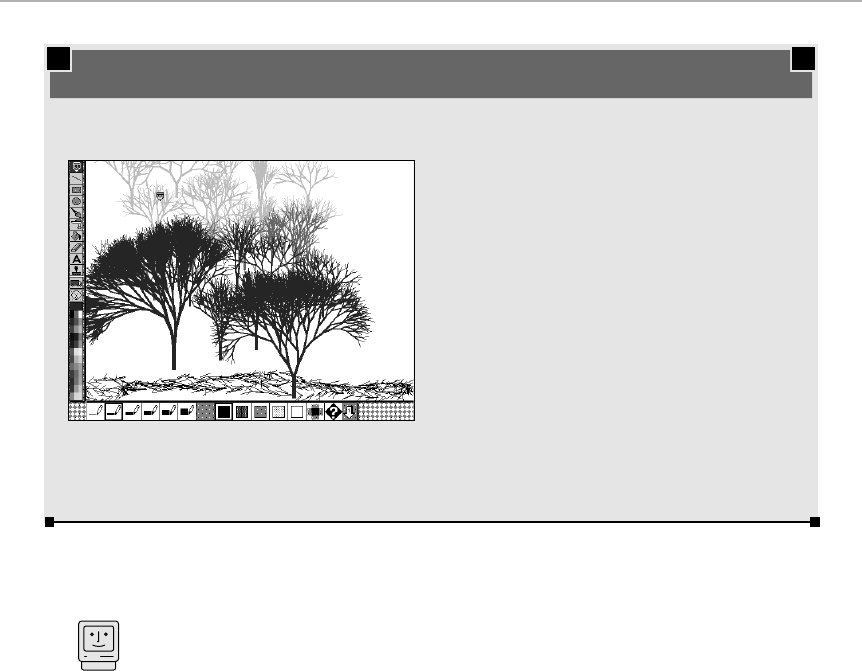
Drawing
Painting programs create bitmapped graphics. Drawing programs, on the
other hand, create what are called object-oriented graphics (sometimes called
vector drawings). When you draw a circle in one of these programs, the Mac
doesn’t store it as a map of black dots. It remembers that you drew a circle of
a fixed shading and size. That means that you can never speckle it, and you
can certainly never erase (or remove) a chunk of it.
Drawing program advantages
But there are two powerful advantages to drawing programs. First, objects
remain objects. After you draw a circle, you can return to it later and move it
by dragging it. You can overlap another object on top of it — and later change
your mind. You can change a circle’s shading long after you drew it. Or, as
shown in Figure 20-9, you can tug a shape’s handles to stretch it.
The other gigantic advantage of drawing programs over painting programs
is the printouts. As you probably know, the resolution (number of dots per
inch, and, therefore, clarity) of every Mac printer sold today is greater than
what you see on the screen. So every printout looks smoother and sharper
than its on-screen counterpart.
Mac Basics
784 Part III: Application Secrets
■ ■
MACWORLD MAC SECRETS • 4040-8/5 • ch20.F • Chapter 20 • FINAL • VB • 11/03/98 • p.784
TRUE FACT
Ask any grizzled, tanned Mac veteran to name
the five greatest Mac programs of them all. One
of the five is bound to be . . . Kid Pix.
Kid Pix? Yes. This cheapo kids’ color paint program
from Broderbund is one of the most inspired and
perfectly executed Mac programs ever written.
Each painting tool makes a sound — once when
you click it, and continuously while you paint with
it. The Kid Pix canvas fills your screen, so you
can’t accidentally lurch back into the Finder
because of a wayward click outside the document
window. Even the menu commands have little
icons to indicate their functions. Did we mention
the Tree Tool? One click and you have a fabulous
fractal-generated tree — different every time.
The greatest paint program of all?
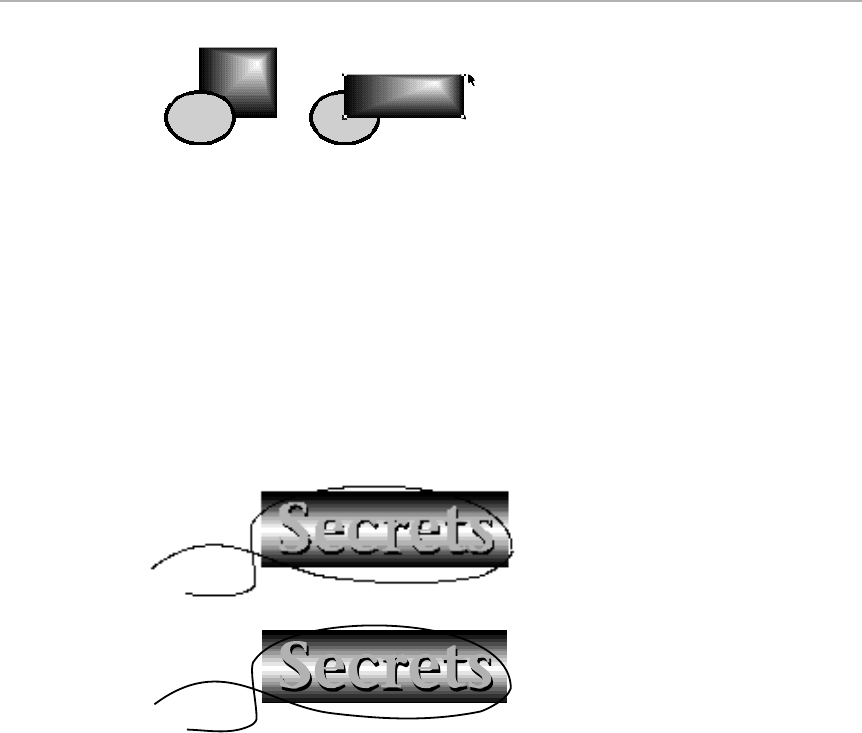
Figure 20-9: In an object-oriented (drawing) program, objects remain distinct after you draw
them. You can bring one object in front of another (note how the circle has been sent behind
the rectangle in the second figure), and you can reshape or resize objects.
Every one, that is, except bitmapped artwork. A printout from a painting
program looks every bit as jagged on paper as it did on the screen. But when
the Mac prints from a drawing program, it doesn’t tell the printer “three black
dots, then a white one….” Instead it says, “A square, one inch tall.” The
printer can now put on the page a square, one inch tall, at its (the printer’s)
much higher image quality. Figure 20-10 shows identical artwork. One piece
was drawn in ClarisWorks’ painting window, and the other was done in its
drawing window.
Figure 20-10: The identical graphic, done as a bitmap (top) and as object-oriented art
(bottom).
Selecting and grouping multiple objects
In the Finder, after you click one icon, you can select additional icons by
Shift-clicking them. It works the same way in drawing programs: click to
select one object, Shift-click to select others.
After you have selected several objects, you can group them — combine them
into a single new object — using the Group command. You can even group
groups. Of course, you can ungroup a group, or even ungroup a grouped
Chapter 20: Graphics and 3D 785
■ ■
MACWORLD MAC SECRETS • 4040-8/5 • ch20.F • Chapter 20 • FINAL • VB • 11/03/98 • p.785
group of groups. Drawing programs ungroup objects in the reverse order in
which they were grouped.
Another advantage of groups is that when you stretch the handles of a grouped
object, the entire thing stretches together (except for text, in most programs).
Universal Drawing Program Secrets
■
Publish and subscribe to yourself
Don’t scoff at this title; we’re mighty proud of this trick.
We refer, of course, to using the Publish-and-Subscribe feature (see Chapter 15)
to create intelligently linked copies within the same document. A classic case is
the business card. Design one in the upper-left corner of your document. Then
publish it, and subscribe to it 11 times, enough to fill a letter-sized page. Then,
if you have to make a change, you just change the first one, and all the copies
change, too. Try it with tickets, invitations, houses in a development, and so on.
ClarisDraw, ClarisWorks, Canvas, and most other modern drawing programs
have Publish-and-Subscribe features. (Unfortunately, the native format of Publish
and Subscribe is the PICT file, described earlier in this chapter. Proof your final
printout carefully to make sure the translation to PICT didn’t wipe out any subtle
nuances in your graphic.)
What the Shift and Option keys do
Press the Shift key when you drag something to keep your mouse movements
confined to perfectly horizontal, vertical, or (sometimes) diagonal lines. That’s
handy when you draw a line (keep it flat), make a copy of something (keep it
aligned with the original), or draw a geometrical figure (keep it perfectly square
or circular).
We noticed one inconsistency among drawing programs. In some, you must
press Shift
before
you begin the mouse movement. In others, you must press
Shift
after
clicking, but before starting to move.
Then there’s the Option key: In most (non-Claris) drawing programs, pressing
the Option key as you draw a circle, square, or regular polygon draws it from the
center instead of the edge (see Figure 20-11).
Figure 20-11: Normally, you create an enclosed geometrical figure by dragging from diagonal
corner to corner (left). But with the Option key pressed (right), you start drawing from the
center and the shape billows outward from there.
X
X
786 Part III: Application Secrets
■ ■
MACWORLD MAC SECRETS • 4040-8/5 • ch20.F • Chapter 20 • FINAL • VB • 11/03/98 • p.786

Add an arrowhead to anything
Here’s a classic cheat. Some drawing programs have an option that lets you
finish any straight line you draw with an arrowhead.
Unfortunately, you can’t add an arrowhead to a line that’s not straight. Our
workaround is shown in Figure 20-12.
Figure 20-12: Suppose you want to add an arrowhead to a curvy line, as shown at top. First,
zoom way in; blow the detail up to, say, 800 percent. Draw a very short straight line (bottom
left). Tell the drawing to put an arrowhead on the line (bottom middle). Then drag the
arrowhead onto the end of the curved line and group them together (bottom right).
Stretchy text
All those wild, super-skinny and super-fat text effects you see in Macintosh
magazine ads are easy to do — if you know the secret. Type up the text in a
drawing program. Copy the text block and paste it into your word processor or
page-layout program. Then you can grab its handles and stretch it in any
direction (see Figure 20-13).
Figure 20-13: Pop a text block into your word processor and it becomes like putty in
your hands.
BAR
HOME PARK
Chapter 20: Graphics and 3D 787
■ ■
MACWORLD MAC SECRETS • 4040-8/5 • ch20.F • Chapter 20 • FINAL • VB • 11/03/98 • p.787

Selecting tiny objects
Here’s an oldie but goodie: When you’re trying, with no success, to move some
tiny object in your drawing, draw a nice fat line. Select both it and the small
object, and use the line as a handle to move the smaller one. Deselect and
delete the line after the move is over.
PostScript Drawing Programs
PostScript drawing programs (such as FreeHand and Illustrator) are high-end,
expensive, and tough to learn. But their astonishing output shows some of
the most striking work the Mac can do. This is the kind of work you see in
package designs, line art, album covers, and technical drawings.
Paths and wireframes
In these programs, you work with lines on the screen called paths (see
Figure 20-14). As in object-oriented drawing programs, you manipulate
objects in a PostScript drawing program after they are drawn. But unlike
in an object-oriented drawing program, you do most of your work in a
wireframe mode, where none of your objects are opaque and lines have
neither thickness nor color. You see only their outlines. An editable Preview
mode (available in both FreeHand and Illustrator) shows you what your
objects and text will look like when printed — with opacity and color —
but it’s slower than working in wireframe mode.
Figure 20-14: Drawing in a PostScript program is a tad tricky. Click to plant a starting point.
Release the mouse. To create a curve, click elsewhere and drag, shaping the curve as you
go (middle). When you switch to Preview mode, you see what you have actually drawn,
depending on your Fill and Stroke settings (right).
Because PostScript line drawings of this type are so gorgeous when printed
on laser printers and (in particular) professional publishing equipment, other
kinds of graphics programs have begun adopting features from PostScript
programs. For example, ClarisWorks, Canvas, and other drawing programs
now include a “freehand tool” of some kind (in other words, one that works
like the pen tool in FreeHand or Illustrator).
Click here and release
Click here
and drag...
...to here
788 Part III: Application Secrets
■ ■
MACWORLD MAC SECRETS • 4040-8/5 • ch20.F • Chapter 20 • FINAL • VB • 11/03/98 • p.788

Faster, more reliable printing
Delays, out-of-memory messages, and PostScript errors are almost inevitable
when you print complex PostScript documents. Here are some tricks for not
overwhelming your printer (both the machine and the person):
Where possible, use blends instead of graduated fills. The effect is similar:
a smooth, gradual change in shading from one side of an object to another.
Graduated fills tax a printer much more than a blend (which is actually a
series of adjacent copies of the object, each a different shade). As an added
bonus, blends also give you more control over the rate of shading change
and look better on the screen.
■Don’t make your page size any larger than it has to be. Even if the extra
space is blank, it still uses up printer memory.
■Every line (path) you draw has an associated flatness, a PostScript
accuracy setting. You can edit this setting; in FreeHand, for example, you
select the path and open the Element Info dialog box (Ô-I). By setting this
PostScript variable to, say, 3 instead of 0, you can speed up printing by up
to four times and save precious printer memory, without sacrificing image
quality, even on very high-dpi printers. (Just don’t set it higher than 4 or
so, or you’ll start seeing some strange shapes.)
■Eliminate superfluous points from your paths. Especially troublesome
are complex paths that result from autotracing images; when the number
of points defining a path approaches 100, it’s time to simplify the path or
split it.
■Be aware that imported EPS files drastically increase the printing time of
a FreeHand or Illustrator document.
Universal PostScript Drawing Secrets
■
Better-behaved EPS files
in page-layout programs
If you import an EPS file that contains
type
into a page-layout program, you’re
practically asking for trouble printing. EPS files that contain downloadable-font
information can give PageMaker or Quark fits.
We suggest converting the text into outlines (see the next secret). That step
eliminates downloadable fonts from the file altogether, resulting in faster and
smoother printing.
Chapter 20: Graphics and 3D 789
■ ■
MACWORLD MAC SECRETS • 4040-8/5 • ch20.F • Chapter 20 • FINAL • VB • 11/03/98 • p.789
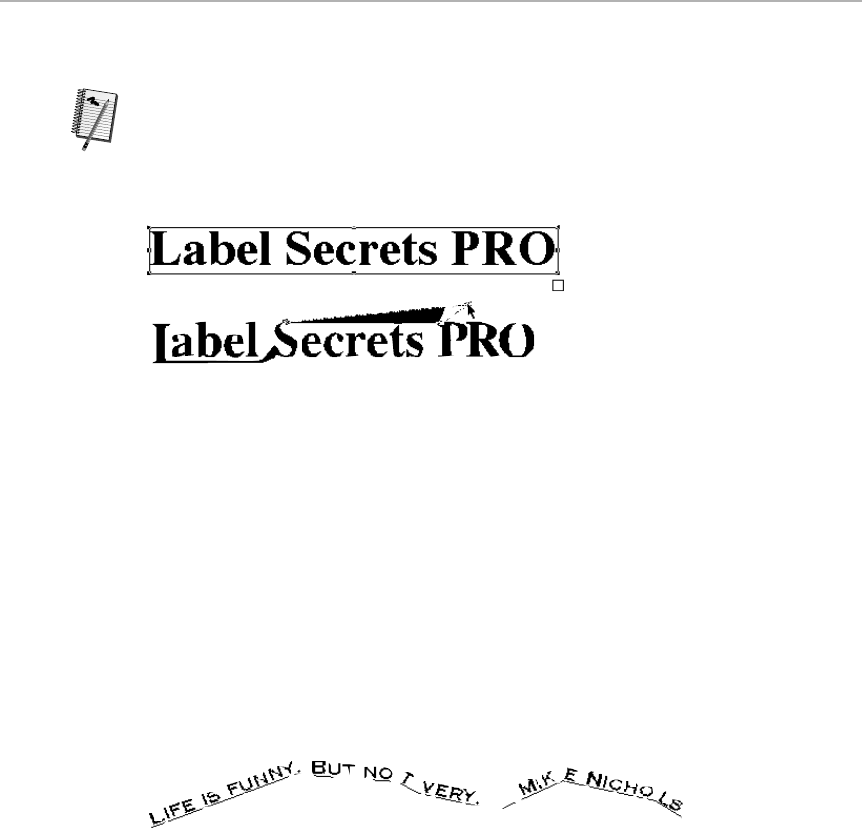
Convert text to outlines
FreeHand and Illustrator let you convert type into editable outlines. In FreeHand,
for example, you select the text block and choose Convert to Paths from the
Type menu (see Figure 20-15); in Illustrator, choose Create Outlines from the
Text menu. Then, in FreeHand, Option-click the outlines to make the individual
paths editable. In Illustrator, use the hollow-arrow tool.
Figure 20-15: If you convert your type (top) to outlines (bottom), you can twist it like taffy —
and print faster, too.
There are some incredible advantages to converting your type to outlines, by the
way, even if you have no intention of twisting it like taffy. For example, you can
send the resultant file to anybody (or any printer) without worr ying whether or
not they have the proper fonts. Furthermore, your graphic will print much faster,
since it has no fonts to download to the printer!
Text on a path
There are two ways in which FreeHand’s and Illustrator’s capability to
bind text to a path are useful. First, it’s handy to be able to do it at all (see
Figure 20-16).
Figure 20-16: Binding text to a path gives you a few unique possibilities.
Second, you can create interesting borders this way. Use a symbol font such
as Zapf Dingbats to create the type. When you bind that type around, say, a
rectangle, you have a decorative border that looks like it took much more effort
than it did!
In FreeHand, to bind text to a path, select both the text and the path and then
choose Join Elements (from the Element menu) or Attach to Path (from the
Text menu), depending on your version. In Illustrator, draw the path first. Then
choose the Path Type icon from the Text tool’s pop-out palette (see Figure
20-17). Finally, click the path you drew and start typing!
Worth
Learning
790 Part III: Application Secrets
■ ■
MACWORLD MAC SECRETS • 4040-8/5 • ch20.F • Chapter 20 • FINAL • VB • 11/03/98 • p.790

Figure 20-17: To type text on an Illustrator path, select the proper variant of the text tool.
Chapter 20: Graphics and 3D 791
■ ■
MACWORLD MAC SECRETS • 4040-8/5 • ch20.F • Chapter 20 • FINAL • VB • 11/03/98 • p.791
MACINTOSH SECRET
That cool embossed look
You’re Invited
You’re Invited
You’re Invited
Darkest type: at back, and leftmost
Background type: front layer, but centered side-to-side
Light type: sandwiched (layer wise), but rightmost
This clever secret works in any kind of graphics
program — painting, drawing, or PostScript.
Create the text block. Make two copies, so that
there are three in all: one dark, one light, and
one the color the background will ultimately be.
The tricky part is positioning these three blocks
of text in three dimensions simultaneously.
The blocks are staggered diagonally from left to
right — but they’re not stacked back-to-front as
you may think. Instead, the center text (the
background color) is in front of the others, even
though it’s not the rightmost block. The
following figure, we hope, clarifies the situation.
The background-colored type should overlap the
others — it’s on top — but it’s not the lower-
rightmost text block.
After you figure out this situation, drag them
closer and closer to each other until they’re
separated by only a pixel or two.
When the three text blocks are nearly
superimposed, group them, and then put them
against the colored background (which matches
the center text), and you’re finished.
When you put this text sandwich on top of a
background color that matches the center
(frontmost) text, you have that embossed look
that makes the lettering seem to pop right out of
the screen.

One more note: In FreeHand, you must
group
the text to its path if you want the
text to get resized when you resize the path.
Receding hairlines
In almost every PostScript and MacDraw-style drawing program, you have
complete freedom over the thickness of the lines you draw. Be careful with the
Hairline option, though — it’s treacherous. What that setting tells your Mac is,
“draw the
thinnest possible
line.” On the
screen,
and on an ordinary 300 dpi
laser printer, a hairline looks satisfyingly fine and crisp. But if you print that
illustration on a professional printer, such as a 2400 dpi imagesetter, you’ll get
a line that’s 1/2400th inch thick — for all practical purposes, invisible. (You’ll
find this vanishing-hairline syndrome even in expensive, professional clip art,
too!) For best results, specify a line thickness of, say, 0.5 points, instead.
FreeHand/Illustrator default file
You can customize your FreeHand or Illustrator working environment and avoid
having to re-establish all your favorite settings each time you start a new
document.
Begin with a new document. Make all your menu settings, choices of line
weights, fills, shades, measurement unit selections, and so on. (In Illustrator,
add the fonts to the menu and
format one character
in each font, or the font-
menu changes won’t “take.”)
Then save the document. If it’s FreeHand, call it
FreeHand Defaults
and save it
into your FreeHand folder. If it’s Illustrator, call it
Adobe Illustrator Startup
. From
now on, each new document will adopt these settings.
FreeHand Secrets
■
Selecting through overlapping objects
If you’re trying to select an object that’s lying behind something else, remember
that pressing the Control key while you click lets you select right through
whatever’s on top. A similar trick: If you group a bunch of objects, you don’t
have to ungroup them just to change or move one part. Just Option-click to
select something without removing it from its group. (By the way, you can
combine these techniques: Control-Option–click selects one item in a group
that’s hidden by other objects.)
Strange
But True
792 Part III: Application Secrets
■ ■
MACWORLD MAC SECRETS • 4040-8/5 • ch20.F • Chapter 20 • FINAL • VB • 11/03/98 • p.792

The unknown cropping tool
You can crop imported TIFF files (or any other graphics) just as easily as you can
in PageMaker after you know how to access FreeHand’s secret cropping tool.
Draw an enclosed shape (rectangle, ellipse, text outlines, and so on). Select the
TIFF image and cut it to the Clipboard. Now, select the outline shape and choose
Paste Inside from the Edit menu. To adjust the cropping, drag the handles of the
enclosed shape (see Figure 20-18).
Figure 20-18: You can fill an outline with a TIFF graphic using the Paste Inside command.
Use Option for greater precision
When you want to scale, rotate, or skew an object, most people are in the habit
of using the mouse and making the adjustment by eye.
If you prefer making the change with more precision, Option-click the object. A
dialog box appears in which you can specify the exact amount by which you want
to skew, rotate, or scale the object you clicked.
Power keys
You can change tools on the palette by pressing the number keys on your
keyboard. They are numbered numerically from 1 to 0, starting with (1) the
rectangle tool, (2) the rounded-rectangle tool, and so on.
What’s handy, especially on small-screen Macs, is that these shortcuts work
even if you hide the tool palette to reclaim more screen space.
Easter eggs ahead
In FreeHand versions 4 through 7, surprises lurk when you choose About
FreeHand from the Úmenu and then begin clicking in different spots on the
screen. Eeeek! Worrrrms!
Chapter 20: Graphics and 3D 793
■ ■
MACWORLD MAC SECRETS • 4040-8/5 • ch20.F • Chapter 20 • FINAL • VB • 11/03/98 • p.793

Illustrator Secrets
■
Adjustable nudge keys
As in most graphics programs, you can nudge a selected Illustrator object
a small distance (one point) at a time by pressing the arrow keys on your
keyboard.
Unlike most programs, though, you can change the effect an arrow key has on
the object’s movement: make it move 2 points, for example, or 10. Make the
change in the Keyboard Increments Preferences dialog box.
Zooming shortcuts
Double-click the Zoom (magnifying glass) tool to double the magnification;
Option-double-click to halve it.
Press Ô-spacebar to activate the Zoom tool, regardless of which tool is currently
selected. (Press Option-Ô–spacebar to activate “zoom out” mode.)
Photoshop fans will recognize these additional shortcuts: Double-click the
Hand-grabber tool to resize the entire document so that it fits on your monitor.
Option–double-click the same tool to zoom to actual size.
50 ways to leave your palettes
Illustrator offers dozens of ways to move, reshape, link, and combine its floating
palettes. Actually, they’re precisely the same shortcuts used in Photoshop (and
PageMaker, for that matter). See “Palette management for the big-screen
impaired” in the Photoshop Secrets earlier in this chapter.
Movable, manipulable guide lines
Guide lines in Illustrator work much like guide lines in a page-layout program:
They’re nonprinting rules that help you align and position objects and text
columns.
To move a guide, Control-Shift–drag it. Here’s a handy side effect: After the guide
line is selected (albeit invisibly), you can use Illustrator’s tools to rotate or skew it.
Multiple Easter eggs
In Illustrator 5.0 and later, if you click the status-line bar, you get a pop-up
menu listing several practical data. But if you press Option while doing so, you
get a choice of several additional, extremely hilarious displays: shopping days
left to Christmas, the current national debt, Doug O’s phone number, and more!
Worth
Learning
794 Part III: Application Secrets
■ ■
MACWORLD MAC SECRETS • 4040-8/5 • ch20.F • Chapter 20 • FINAL • VB • 11/03/98 • p.794

In Illustrator 6, if you choose About Adobe Illustrator from the Úmenu, you get
the About box. If you click the Adobe logo in the upper-left corner of this box,
you’ll be treated to an unbelievable, 15-minute, colorful animated fireworks/
laser show that features dancing logos, the Cod Squad (whatever that is), and
ultimately photos of the programmers themselves.
Furthermore, in versions 6 and 7, if you open the About box normally and wait
for 30 seconds, the credits will begin to scroll — you can accelerate them by
holding down the Option key. And finally, if you press Option while choosing
About Illustrator from the Úmenu, you get a special surprise — either a
final secret credits screen (“Perpetrated by:”) or, in version 7, a list of the
programmer’s anagrams (new words formed by scrambling their names).
3D Graphics
Until now, the world of 3D graphics has been a relatively rarefied one.
Creating three-dimensional scenes on a two-dimensional screen requires a
serious commitment of time, training, and money that only people such as
architects, industrial designers, and movie makers are willing to make.
When you create a 3D graphic, you use a program like StrataVision or Infini-D.
You work with wireframe graphics on the screen, shaping and combining the
rudimentary shapes provided by each program (spheres, cubes, cones, and
so on) into the solid objects you want to depict. You can then overlay these
objects with texture maps (flat, wrappable designs such as bricks or wood
grain) or bump maps (to give your 3D objects some degree of real-world
roughness). Using a series of dialog boxes, you also must establish the angle,
reflectiveness, and transparency of the objects in your 3D scene. You then set
up the “lights” in the room— their placement, color, intensity, and so on.
You do all of this work in wireframe or highly simplified views — 3D modeling
is definitely not WYSIWYG. Once you’ve input all of the various technical
parameters, the Mac creates a finished graphic—in technical terms, it
renders the scene. Rendering is a fantastically slow, complex, computationally
intensive task, taking hours or days for a single file. That fact easily explains
why there are people happy to pay $5,000 for the very latest, fastest Power
Mac when it comes out. (You can also now understand why a movie like Toy
Story, whose every frame was created as an individually rendered 3D
computer graphic, took several years to create.)
QuickDraw 3D
Fortunately, the cost of enjoying the 3D graphics world — measured in time,
money, and technical expertise — is dropped dramatically with the release
of Apple’s QuickDraw 3D, a technology that creates a standard, easy-to-use
interface and file format (3-D Metafile, or 3DMF). QuickDraw 3D adds 3D
graphics capabilities to the standard Mac operating system in exactly the way
that QuickTime added digital movies. Exactly as with QuickTime, the suite of
Chapter 20: Graphics and 3D 795
■ ■
MACWORLD MAC SECRETS • 4040-8/5 • ch20.F • Chapter 20 • FINAL • VB • 11/03/98 • p.795
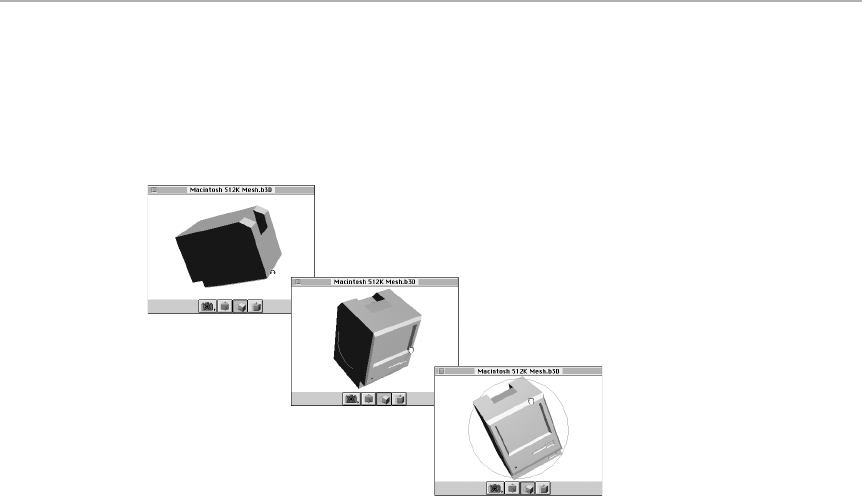
tools includes a system extension, a new Scrapbook (see Figure 20-19), a new
version of SimpleText, and tools for software companies to write programs
that take advantage of the new technology. These software components
come pre-installed on most new Macs, or can be downloaded from the Web
(www.apple.com).
Figure 20-19: The Scrapbook of things to come. By clicking and dragging, you can rotate this
Scrapbook item (a QuickDraw 3D object) in any dimension; zoom in or out; move it across
the screen; or apply a texture map to it.
Once you’ve installed QuickDraw 3D, you can, for example, drag and drop a
3D object file between SimpleText and the Scrapbook. Once in the Scrapbook,
you just drag your mouse around inside the picture window to rotate or
tumble the object you’re looking at. Better still, you can drag a 2D (regular)
graphics file on top of such an object — instantly, that object is plastered
with the graphic image. In other words, drag a scanned photo of bricks onto
a QuickDraw 3D model of a car, and suddenly you’ve got a brick car.
QuickDraw 3D isn’t quite the hit that QuickTime was—partly because 3D
modeling isn’t as popular as moviemaking, and partly because 3D requires
serious computing horsepower: a Power Mac, mucho megs of RAM, and,
preferably, a 24-bit color monitor.
Interested? Your next step is to equip yourself with a program that uses
QuickDraw 3D technology: Tilt for After Effects, Microspot 3D World ,
QuickSpace Bridges 2D & 3D (a Photoshop plug-in), Thinkfish LiveStyles,
Vertigo 3D HotTEXT, Lightworks Plug-ins, Adrenaline Charts SE, VIDI Presenter
3D, and so on. You can also buy QuickDraw 3D accelerator cards that speed
up the Mac’s display of 3D objects, such as those from Radius and XClaim.
If QuickDraw 3D ever catches on, it could be the cornerstone of a computerized
3D explosion: cheaper, easier modeling programs; more realistic games; and
even “virtual worlds” that you can visit on the World Wide Web. For more
information (and a list of QuickDraw 3D software), visit www.apple.com/
quicktime/qd3d.
796 Part III: Application Secrets
■ ■
MACWORLD MAC SECRETS • 4040-8/5 • ch20.F • Chapter 20 • FINAL • VB • 11/03/98 • p.796

MACWORLD MAC SECRETS • 4040-8/5 • ch.21.F • Chapter 21 • FINAL • VB • 11/03/98 • p.797
Chapter 21
The ResEdit Chapter
In This Chapter
©What ResEdit is
©Fundamentals of using ResEdit
©Customizing menus, buttons, and dialog boxes
©Secret messages in your system software
©Ten great ResEdit pranks
This book could not live up to its name without a chapter on ResEdit.
ResEdit isn’t just another application; it’s the key that unlocks some
of the Mac’s strangest and most elusive secrets.
And we’re talking real secrets here — not just undocumented features, obscure
key combinations, or cute hidden messages. We’re talking about the nuts-and-
bolts stuff of which programs are made — stuff that’s completely invisible to
the average user.
ResEdit lets you poke into any application’s resources, or most basic
components, and rebuild them the way you want. If you don’t like the name
of a menu command, you can change it. If you’re running short on hard
drive space, you can rip unneeded sounds and pictures right out of your
applications. You can totally redesign menus, dialog boxes, icons — all
without knowing the first thing about programming.
We would have loved to include ResEdit on the CD with this book.
Unfortunately, Apple, in its inconsistent wisdom, would have required
enormous payments — even though it makes ResEdit available for free
from its own Web site. Visit www.apple.com/.
What Is ResEdit?
Every recognizable Mac element of a program — icons, menus, dialog boxes,
cursors, background patterns, sounds, graphics — are called resources. ResEdit
stands for resource editor, and that’s just what ResEdit is: Apple’s own utility for
changing a file’s resources. Apple created ResEdit early in the Mac’s history so
that programmers could easily manipulate the basic elements of the Macintosh

interface. Over the years, successive versions of ResEdit have become safer
and more user-friendly. Today, it’s accessible enough for even a relative
beginner to use.
ResEdit lets you edit many different kinds of resources. Mac OS 8.x’s System
file alone contains 192 different types. Some are easier to edit than others. To
work with icons, for example, ResEdit provides basic painting tools. There
are tools for changing the color, size, and arrangement of window element
and dialog boxes; these tools closely resemble those you might find in a
drawing program.
Other types of resources aren’t quite so easy to handle. If you try to edit a
resource for which ResEdit has no special editing tools, the program opens
the resource in a hex editor. A hex editor is a window that displays the
resource’s code in raw hexadecimal form.
The first time you open a hex editor (see Figure 21-1), you may momentarily
think you’re working with something very foreign and incomprehensible —
like DOS.
Nonetheless, you can edit a resource using a hex editor; you just have to
know which part of the code to change. Several of the secrets described in
this section require you to work with a hex editor. But don’t worry; we’ll tell
you precisely which part of the code to select and how to change it.
798 Part III: Application Secrets
■ ■
MACWORLD MAC SECRETS • 4040-8/5 • ch.21.F • Chapter 21 • FINAL • VB • 11/03/98 • p.798
ANSWER MAN
Q: Not so fast there, Answer Man. You’re not
going to lob a term like hexadecimal at us
without defining it, are you?
A: No.
Because it’s a binary machine, the Mac has 16
“fingers” to count on instead of 10, like humans.
Therefore, it has to count beyond 15 before
advancing into two-digit numbers.
As a consequence, we humans have invented a
bizarre numbering system called hexadecimal, in
which you can count all the way up to 15 with a
single digit. You count in hex like this: 0, 1, 2, 3,
4, 5, 6, 7, 8, 9, A, B, C, D, E, F. The next number,
in our notation, would be 16. In hex, the next
number is written 10!
Here are some basic equations in hexadecimal
notation: 2 + 2 = 4. Next, we have 4 + 4 = 8.
But 8 + 7 = F. And F + 1, as we’ve said, is 10
(in hex).
Get it? (We admit that this sort of plays with
your head.)
A hex on both your houses
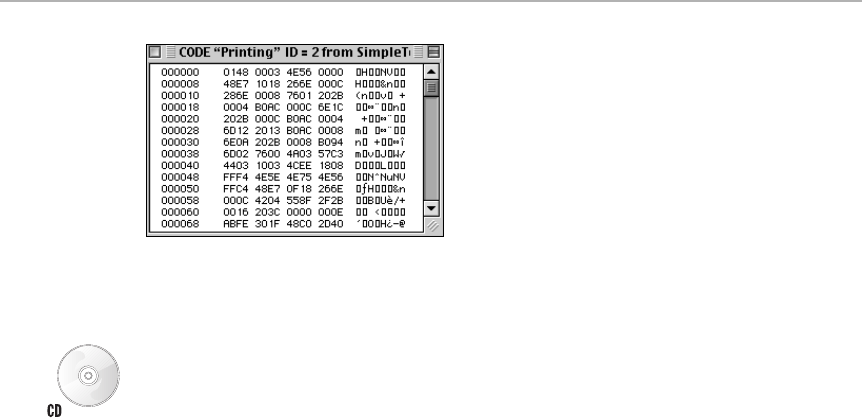
Figure 21-1: The unfriendly-looking hex editor displays a resource’s code in
hexadecimal form.
In some cases, you can also get around having to edit hex code directly by
using a ResEdit template. Templates are separate plug-ins for ResEdit that add
editing environments for specific types of resources. With a template, you
can type data into a text field, or use a set of basic painting tools to alter
resources, instead of having to type straight hex code. So even if ResEdit
itself doesn’t provide editing tools for a certain resource, you may be able to
find a template that does, saving you the hassle of having to type in hex code.
We’ve included some ResEdit templates on the CD-ROM that came with this
book — and many more are available on the Internet.
How to Use ResEdit
Editing a resource is simple: Drop the icon of the file you want to examine or
edit onto the ResEdit icon. (Actually, drop a copy of that file, for safety; more
on this topic later.)
Or, you can use the Open File dialog box that appears when you launch
ResEdit to open the file you want to change.
You can open any kind of file: applications, control panels, system extensions,
or any other file. (Most documents don’t have resources, however.) No matter
what file you open, you’ll see a window filled with icons representing all the
different types of resources used in the file, as shown in Figure 21-2.
As you can see, each resource type is identified not only by an icon, but by a
four-character code, such as FOND, DLOG, or STR#. (Some resource names
like “snd” or “STR” appear to be only three characters long, but they actually
consist of three characters and one space.) These codes often hint at their
contents. The ICON resource is where you can change the shape of your icons
(the real icons, not the kind you can paste into the Get Info box in System 7);
the DLOG is how you change a dialog box; and CURS is where the cursor
shape lives.
Chapter 21: The ResEdit Chapter 799
■ ■
MACWORLD MAC SECRETS • 4040-8/5 • ch.21.F • Chapter 21 • FINAL • VB • 11/03/98 • p.799
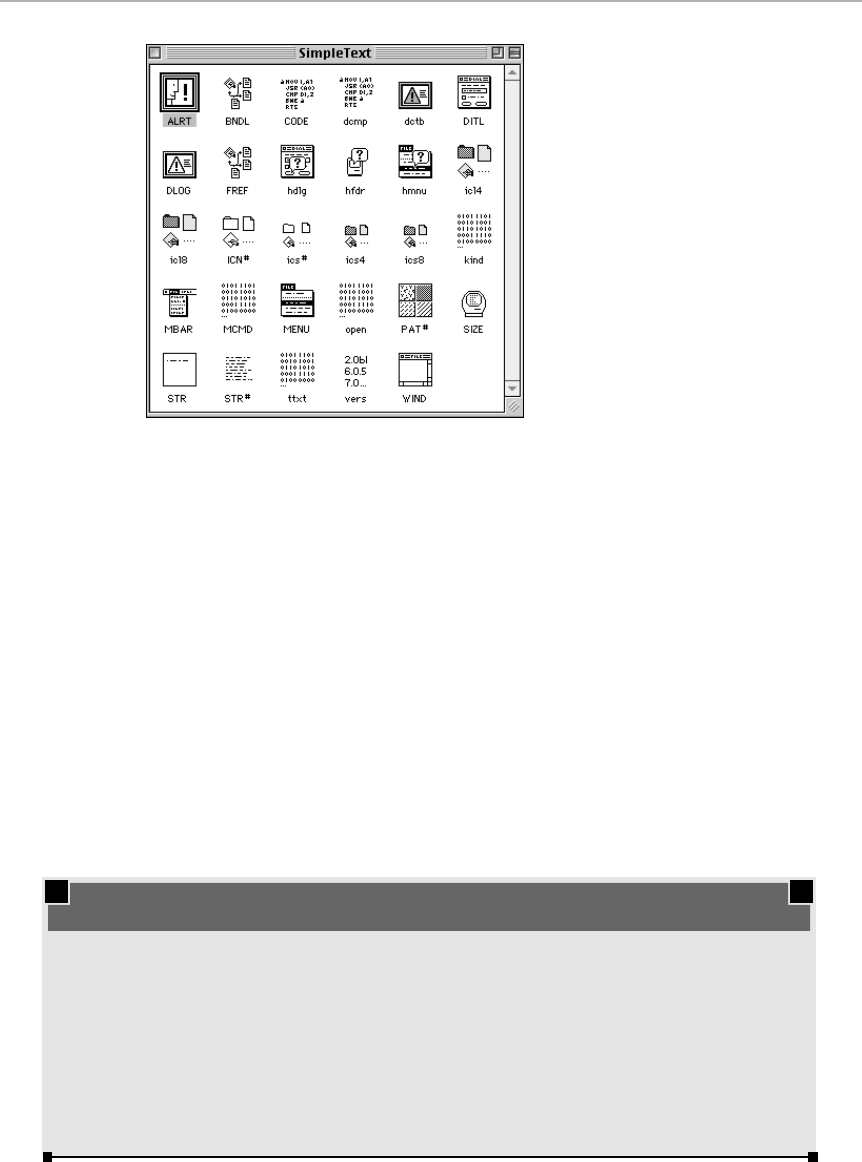
Figure 21-2: SimpleText, as seen through the eyes of ResEdit. Each resource type is
represented by an icon.
Look for the type of resource you want to edit. Then open its icon by double-
clicking. This introduces a new window that lists all the individual resources of
that particular type (for example, all the sounds in a program). Each resource
is tagged with an ID number. Double-click the resource you want to modify and
the appropriate editing window will open. (We’ll walk you through all this, step
by step, in the following secrets.)
Occasionally, when you try to open resources in the System file, you’ll
encounter a dialog box warning you that the resource is compressed and
asking if you want to edit it anyway. Click Yes and the resource will
automatically be decompressed.
That’s really all you need to know to pull off any of the tricks listed in this
section. But before you go hacking away at your System file, we need to
discuss the Peril Factor.
800 Part III: Application Secrets
■ ■
MACWORLD MAC SECRETS • 4040-8/5 • ch.21.F • Chapter 21 • FINAL • VB • 11/03/98 • p.800
ANSWER MAN
Q: I tried one of your ResEdit hacks, and it didn’t
work!
A: Hey. We tried. We tested every trick on
almost every System version we could find, but
there are some incarnations of the Mac’s
System software we simply couldn’t get our
hands on. We are sorry if something doesn’t
work on your system, or with your particular set
of extensions. But frankly, this is hacking; you
do your deed and then see if it flies.
If you operate only on a backup of the target file,
you’ve lost nothing by trying.
It don’t work!

The Peril Factor
Articles and books on ResEdit are generally introduced with a morose
warning about how perilous this program can be. We’ve heard people
describe ResEdit as if it were some kind of poisonous snake — difficult to
handle and potentially hazardous.
Actually, ResEdit is neither intimidating nor dangerous. In fact, we’re confident
that using it will never result in any kind of fatal computing disaster if you
follow these sensible guidelines:
■Make sure you have a backup, somewhere, of whichever file you try to
edit with ResEdit. (You can’t edit the active Finder — only a copy of it.)
The procedures here are all tried and tested. But if, through some slip-up,
you end up with a System file that behaves oddly, the backups make it
easy to recover.
■To make a quick backup of your System file, Option-drag it out of your
System Folder to, say, the Desktop. Make your ResEdit changes to this
copy. After saving your changes to this copy, put your original,
untouched System file (until now, still in the System Folder) into a safe,
otherwise empty folder of its own. Finally, put the edited copy — sitting
out on the Desktop — into the System Folder. You’ve just swapped them.
Now restart the Mac. (Keep your still-virginal copy around for easy
access in case you need to restore it.)
■Nothing you do in ResEdit “takes” until you save your changes using the
Save command. You can fiddle around with a file in ResEdit all you want
with virtually no danger of ruining it — just don’t save your changes
before quitting.
■After you’ve made one change to a program with ResEdit, save your work,
quit, and examine the results before making the next change. This way, if
something does go wrong, it’ll be much easier to hunt down the problem.
A primer in customizing menus
ResEdit is the Mac’s premiere menu-customizing tool. Not only can you use it
to add a Ô-key equivalent to any command on any menu in any program, you
can also rename menus and the items on them. You can even change the color
and style of menu items, which enables you, for example, to make your most
frequently used commands stand out in bright red italics. You can assign a
color to the menu background and to each of the separator lines that appear
between menu items. And perhaps wildest of all, you can add your own icons
to any menu command!
To add a keyboard command to a menu item
Open the application you wish to customize with ResEdit. Then, with a double-
click, open its MENU resource icon (see Figure 21-3). (In Mac OS 8, the Finder
has a MENU resource, but that’s not where the main menu information is stored.
Instead, you have to open and edit the fmn2 resource — or, in System 7, the
fmnu resource; we’ll get to that in the next section.)
OS
8
Chapter 21: The ResEdit Chapter 801
■ ■
MACWORLD MAC SECRETS • 4040-8/5 • ch.21.F • Chapter 21 • FINAL • VB • 11/03/98 • p.801

Figure 21-3: The MENU resource.
When you open the MENU resource, you see each of the program’s menus
displayed in a separate box within a window. For example, if you opened
SimpleText’s MENU resource, you’d see the window shown in Figure 21-4.
Scroll to the particular menu you want to edit and double-click it to open
up the menu-editing window.
Figure 21-4: The opened MENU resource, with each menu displayed.
Suppose you want to add a keyboard equivalent for the Clear command on
SimpleText’s Edit menu. Just select the command (or press Return to cycle
through the menu items one by one) and then press Tab twice. This selects
the Ô-key field in the lower-right portion of the window. Type in the letter you
want for the command (in this example, we chose D), and it’s automatically
added to the menu, as shown in Figure 21-5. (If you give a menu command a
keystroke that’s already assigned to something else, it may not work.) Save
the changes using the Save command before quitting ResEdit.
802 Part III: Application Secrets
■ ■
MACWORLD MAC SECRETS • 4040-8/5 • ch.21.F • Chapter 21 • FINAL • VB • 11/03/98 • p.802

Figure 21-5: Adding a Ô-key equivalent to a menu.
To change the names, colors, and styles of
menu items
Select a menu item (or the menu title itself). Its name appears in the Text
field. You can rename the command or title by pressing Tab (to select the
Text field) and then typing in a new name. To change the style of the text —
adding italics or underlining, for example — use the Style menu on ResEdit’s
menu bar. Figure 21-6 shows how the Clear command has been renamed
Delete and set in italics.
Figure 21-6: In this example, a menu item has been renamed, assigned a keyboard
equivalent, and set in italics.
When the menu title is selected, the three color pop-up palettes allow you to
pick a custom color for the title of the menu, the menu background, and the
default color of all text in the menu commands. When a menu command is
selected, the same three palettes let you choose new colors for the text of
the selected command, its associated Ô-key, and any mark or symbol selected
to appear next to the command. Renaming a menu or menu item can make it
easier to locate an obscure, but needed command.
Chapter 21: The ResEdit Chapter 803
■ ■
MACWORLD MAC SECRETS • 4040-8/5 • ch.21.F • Chapter 21 • FINAL • VB • 11/03/98 • p.803

Adding icons to menu commands
After opening a MENU resource, select the menu command to which you’d
like to add an icon. Then choose Menu ➪Choose Icon (see Figure 21-7 for
the Choose Icon window).
Figure 21-7: Icons in menu commands? Why not?
In the Choose Icon window, select one of the three size options: Normal,
Reduced, or Small. (The smallest icon size can’t be used if you’ve added a
Ô-key shortcut to the selected command, too.) Now click the New button.
You’ll see a simple icon-editing window. All you have to do is paste in a
graphic from another program, or draw one from scratch. (To doctor up an
existing icon, select it and click the Edit button.) When you’re finished, close
the editing window and double-click your new icon to apply it (see Figure
21-8).
For a really different look, try adding custom icons, and then deleting the
names of the commands. You’ll end up with a completely graphical menu —
one that contains only pictures and no words.
Figure 21-8: A SimpleText menu dressed up with a set of custom icons and one renamed
menu command.
Strange
But True
804 Part III: Application Secrets
■ ■
MACWORLD MAC SECRETS • 4040-8/5 • ch.21.F • Chapter 21 • FINAL • VB • 11/03/98 • p.804
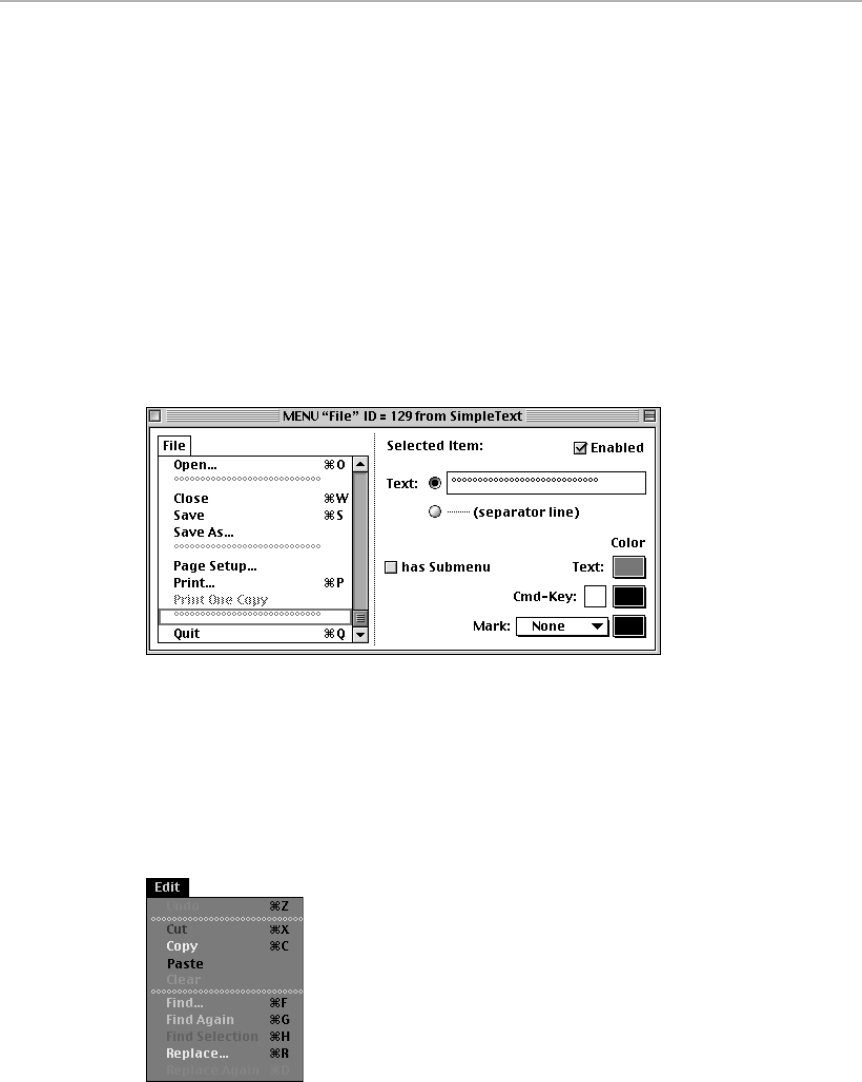
Customizing separator lines
You can select any separator line that appears in a menu and, using the pop-
up color palette, change its color. To eliminate a separator completely, select
it and click the Text radio button without typing anything in the text field.
Here’s another neat variation: Select a separator line, click the Text radio
button, and then type in a string of characters — dashes, bullets, asterisks, or
whatever — to make a custom separator. By clicking the three color swatches,
you can assign these characters (or the menu names themselves) colors and
styles to create some interesting effects, as shown in Figure 21-9. In this
example, a standard separator line was replaced with a string of tiny circular
degree characters (produced by pressing Option-Shift-8). The condensed font
style and a custom color were applied to give the separator its unique look.
(Type a left parenthesis somewhere in the string, however, if you want to
make this command unselectable.)
Figure 21-9: Creating custom separator lines.
Combining all these techniques, you can also create some wild-looking
reversed-color menus, as shown in Figure 21-10. Choose a dark color, or
black, for the background, and set the menu text to white or a light color.
(To change the background color for the menu, click the menu’s name,
such as the word Edit in Figure 21-10.)
Figure 21-10: A reversed-color menu.
Chapter 21: The ResEdit Chapter 805
■ ■
MACWORLD MAC SECRETS • 4040-8/5 • ch.21.F • Chapter 21 • FINAL • VB • 11/03/98 • p.805

Adding a keyboard equivalent in
Finder 7 or 8
In the Finder, information about menu items is stored in the fmnu resource
(System 7) or the fmn2 resource (Mac OS 8.x), both of which are a bit harder
to edit than standard MENU resources. Nevertheless, you can still add
keyboard commands to Finder menus. Here are some tricks worth trying.
Adding an Empty Trash keyboard equivalent
Perhaps to protect the novice, there’s no keyboard equivalent for the Empty
Trash command. But suppose you want one.
Open a copy of the Finder (not the one in the active System Folder) using
ResEdit. Double-click the fmn2 resource icon. You see a long list of numbered
resources. Near the top of the window, the resources numbered 521 through
525 contain information about the contents of Finder menus, according to the
following scheme:
Resource Finder menu Finder menu
ID number (Mac OS 8) (Mac OS 8.5)
#520 Apple
#521 File Apple
#522 Edit File
#523 View Edit
#524 Special View
#525 Special
If you’re running System 7.x, the same information is stored in the fmnu
resources, numbered 1252 though 1256. Open the resource corresponding
to the menu you want to edit — for example, 524 for the Special menu in Mac
OS 8. Use the Find ASCII command (Ô-G), type Empty Trash (capitals count),
and press Return to find that text in the narrow column of text on the right
side of the window. Or just scroll down until you find the words “Empty
Trash” in the column (it’s split over two lines).
Just before the phrase “Empty Trash” are four boxlike characters (which
we’ve heard called both hex bits and nybbles). Select the second hex bit
character on the line, exactly as shown in Figure 21-11, and change it to
whichever letter you want to use as the Ô-key shortcut (T, for Trash, is
the logical choice).
806 Part III: Application Secrets
■ ■
MACWORLD MAC SECRETS • 4040-8/5 • ch.21.F • Chapter 21 • FINAL • VB • 11/03/98 • p.806

Figure 21-11: Adding an Empty Trash keyboard shortcut in fmn2 resource 524.
When you insert the Tcharacter as shown, choose Save, and quit ResEdit.
Now swap the Finder you just modified with the active Finder in the System
Folder. When you restart the Mac, you’ll see that Ô-T has been added next to
the Empty Trash command on the Special menu (see Figure 21-12).
Figure 21-12: The Special menu, with an added Empty Trash keyboard shortcut.
Using this same method, you can add a keyboard equivalent to almost any
Finder command that doesn’t already have one. Always add the character in
the third space before the name of the command, replacing the hex bit
character that appears in that spot.
Note: If you want to add a keyboard equivalent for the Shut Down command,
add the character in the third space before the words Shut Down (notice the
capitalization) and not the word shut (lower case), which also appears in the
ASCII column (see Figure 21-13).
Figure 21-13: A close-up of resource 524, where you can add a keyboard equivalent to the
Shut Down command.
Chapter 21: The ResEdit Chapter 807
■ ■
MACWORLD MAC SECRETS • 4040-8/5 • ch.21.F • Chapter 21 • FINAL • VB • 11/03/98 • p.807
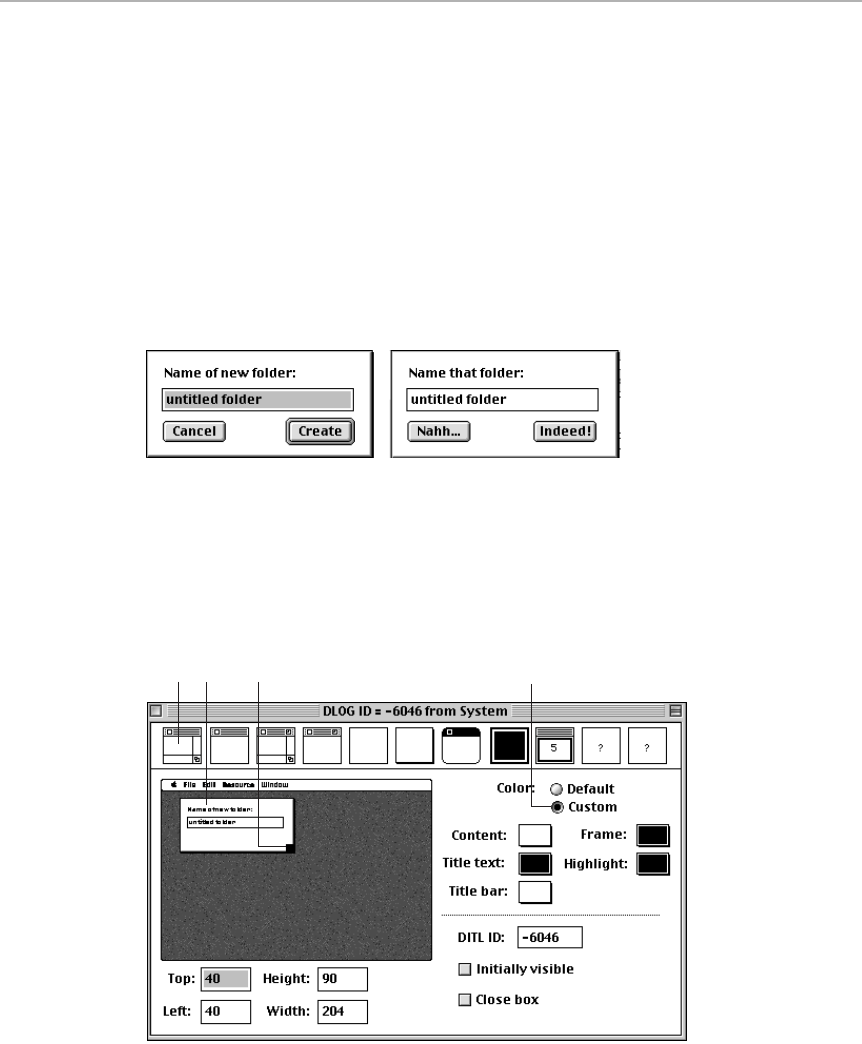
Customizing dialog boxes
You can customize dialog and alert boxes in any program by editing the
program’s DLOG, ALRT, and DITL resources. Opening a DLOG or ALRT
resource enables you to change the size, window type, position, and color of
a dialog or alert box. The DITL resources contain the actual contents of the
dialog boxes — buttons, text, and icons, all of which can be edited or
replaced.
Suppose you want to customize the dialog box that appears when you create
a new folder from within a Save File dialog box in Mac OS 8 through 8.5, as
shown in Figure 21-14. This involves resizing the dialog box, as well as
resizing, moving, and renaming the two buttons.
Figure 21-14: A typical dialog box, before and after ResEdit hacking.
Open a copy of the System file using ResEdit. Double-click the DLOG resource
icon; then double-click resource number –6046. You see the dialog editing
window (see Figure 21-15), which displays a smaller version of the “create
new folder” dialog box against a mini-Mac screen.
Figure 21-15: The DLOG editing window.
AC D B
808 Part III: Application Secrets
■ ■
MACWORLD MAC SECRETS • 4040-8/5 • ch.21.F • Chapter 21 • FINAL • VB • 11/03/98 • p.808

Here’s a guide to the dialog-editing controls that appear in this window:
A. Click one of the icons across the top to change the window type.
You can put the dialog box in a window with or without a zoom box,
resize box, title bar, drop shadow, and so on. To preview your
choice, use the Show Dialog at Full Size command from the DLOG
menu.
B. To change the color of a dialog box, select the Custom radio button,
and then use the pop-up color palettes to pick a new color for the
title text, frame, and highlighting.
C. Drag the whole dialog box across the mini-screen to change the
location where it will appear on the real screen. (You can see how
the dialog will look on the actual screen by using the Show Dialog at
Full Size command from the DLOG menu.) Double-clicking anywhere
on the mini-dialog box automatically opens the corresponding DITL
resource, which contains information about each button, text string,
field, and icon in the dialog box.
D. Resize the dialog box as you would any window, by dragging the
handle at the lower-right corner.
Editing individual dialog-box elements
After you adjust the size, color, and type of the dialog box, double-click it to
open DITL resource –6046. The DITL resource allows you to edit any element
within the dialog box.
To move a button, text string, or icon, simply drag it to a new location within
the dialog box window. To resize a button, select it and then drag the handle
in the lower-right corner (see Figure 21-16).
Figure 21-16: Drag the resize handle of a button to change its size.
To give the button a new name, or to change the static (unchanging) text that
appears in the dialog box, double-click the text or button. Then type in a new
name or text string in the text field that appears (see Figure 21-17).
Chapter 21: The ResEdit Chapter 809
■ ■
MACWORLD MAC SECRETS • 4040-8/5 • ch.21.F • Chapter 21 • FINAL • VB • 11/03/98 • p.809
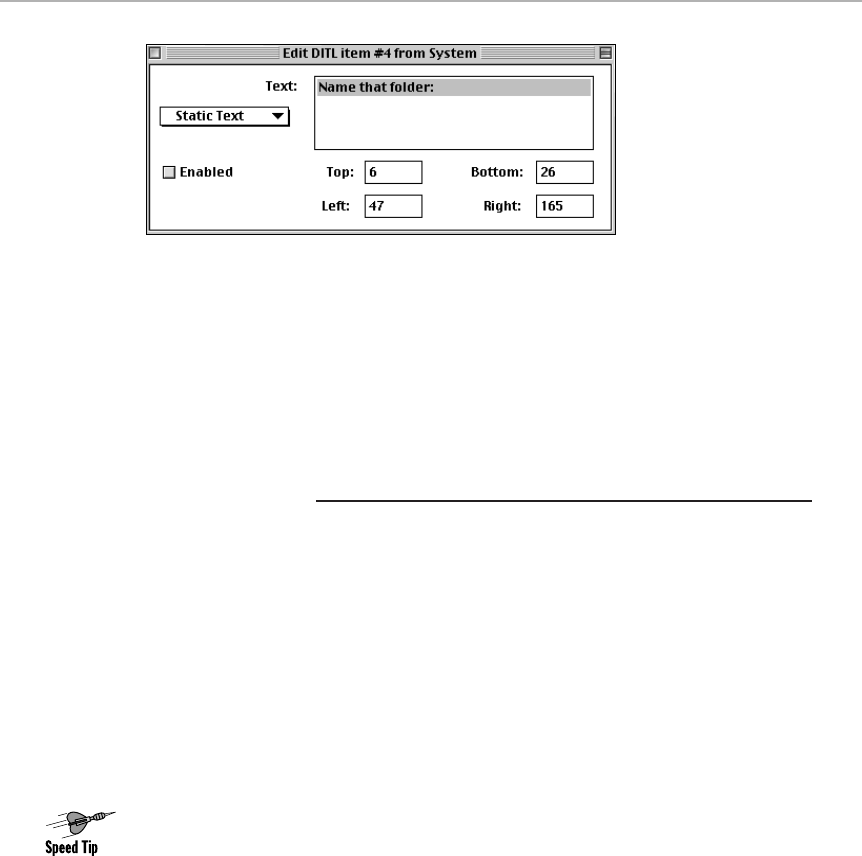
Figure 21-17: Editing text in the DITL editing window.
After you edit the DLOG and DITL resources, choose the Save command, quit
ResEdit, and restart your Mac using the modified System Folder.
Now then: the secrets. We’ve tried all of these with ResEdit 2.1.3 and
performed our surgeries with various incarnations of System 7 and
Mac OS 8 — and even with a late beta of Mac OS 8.5.
ResEdit Secrets
■
Getting rid of the jack-in-the-box
once and for all
We guarantee the first thing you’ll want to do after you start using ResEdit is get rid
of its irritating splash screen, which features an insipid jack-in-the-box. Fortunately,
this doesn’t require any hacking. Choose Preferences from ResEdit’s File menu
and deselect the check box next to Show Splash Screen. You’ll be glad you did.
ResEdit navigation shortcuts
You can use a number of keyboard shortcuts to locate resources quickly in
ResEdit, rather than scrolling through lengthy windows to find a particular item.
Many ResEdit hacks can be accomplished without a single mouse-click. Here’s
the rundown:
■As in Finder windows, you can jump to any resource icon simply by typing
its name, or just the first letter of its name. If you open the System file and
want to select the
ppat
resource, for example, type pp.
■Use the arrow keys to highlight any resource icon in a window.
■Pressing the Tab key moves you to the first icon at the top of a window.
■Instead of double-clicking a selected resource icon, you can open it by
pressing Return or Enter.
810 Part III: Application Secrets
■ ■
MACWORLD MAC SECRETS • 4040-8/5 • ch.21.F • Chapter 21 • FINAL • VB • 11/03/98 • p.810

■After you open a resource icon, you can navigate through the various
resources listed using the up-arrow and down-arrow keys. Open a
numbered resource by again pressing Return.
■Pressing Ô-up arrow or Ô-down arrow jumps you to the top or bottom of
the window.
Quicker window picker-upper
As you’ll no doubt soon discover, working in ResEdit means poking through a
series of windows within windows. Fortunately, you needn’t spend the remainder
of your adult years chasing down successive close boxes. Just close the
outermost window; all windows you’ve opened from it close automatically.
ResEdit painting shortcuts
There’s a hidden Change Color command in ResEdit’s painting tools, which appear
whenever you edit an icon or a pattern (such as the Desktop or scroll bar patterns).
Press Ôand select a color from the colors palette. Instantly, all pixels of the
current foreground (or background) color change to match the color you just
selected.
Eliminating the “alias” suffix
When you make an alias of a file using the Make Alias command, the Mac
automatically appends the word
alias
to the end of the file’s name — and most
normal people promptly hack it off. You can teach the Finder to stop adding the
suffix in the first place.
After opening a copy of the Finder 8 with ResEdit, find the STR# resource icon.
Open it, and then open resource number 8200 (in Mac OS 8 through Mac OS
8.5) or 20500 (in System 7.x). This resource window contains a series of fields
filled with pieces of text (
text strings
) used by the Finder (see Figure 21-18).
Worth
Learning
Chapter 21: The ResEdit Chapter 811
■ ■
MACWORLD MAC SECRETS • 4040-8/5 • ch.21.F • Chapter 21 • FINAL • VB • 11/03/98 • p.811
TRUE FACT
We’ll be honest—we’ve written and revised
this chapter through five editions of this book
and it just about drives us crazy every time. To
test all of our secrets, we have to doctor up one
System or Finder file after another, swap it into
the System Folder, and then restart, again and
again and again.
To ease the pain, however, we start by putting
copies of our pristine, non-hacked System and
Finder files into separate folders on the Desktop.
Then, every time we want to test another
secret, we just Option-drag one of these files to
the Desktop and start operating. This way, we
Continued
How we wrote this chapter
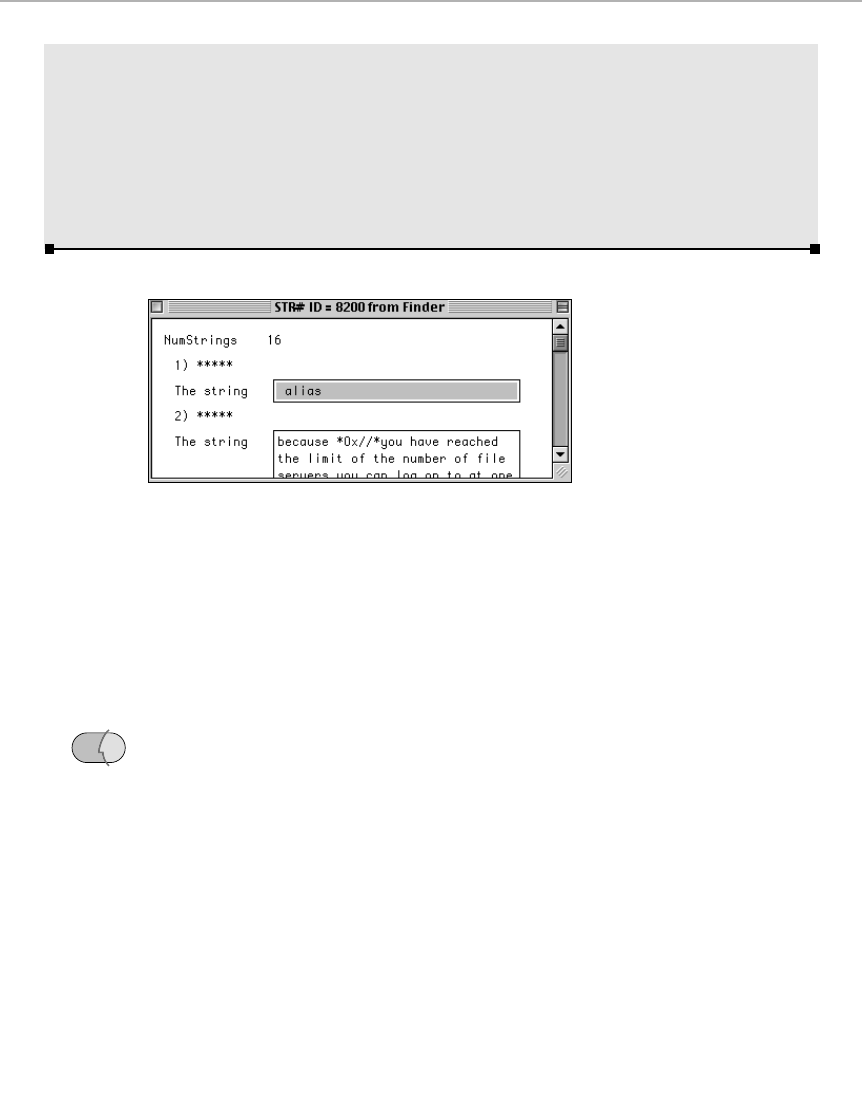
Figure 21-18: Get rid of the “alias” suffix on newly created aliases by editing the first text
string in STR# resource 8200.
The first field contains the text string that gets added to alias file names: the
word
alias
itself. All you have to do is replace the word
alias
with a single blank
space, close the resource, save the change, and quit ResEdit.
Restart your Mac using the modified Finder. Now, when you create a new alias,
only the one blank space is added to the file’s name — not the word
alias
.
(Of course, if you’re running Mac OS 8 or higher, you can avoid the whole
“alias” suffix problem altogether by using the Finder’s built-in alias-making
shortcut — just Ô-Option drag a file to a new location. Instead of a copy, you’ll
get a new alias of the file —
without
the alias suffix.)
Changing the “About This Computer” picture
Remember the old days, when choosing About This Macintosh from the Úmenu
revealed the name of your exact Mac model and even displayed a little icon of
the model itself . . . ?
Nowadays, of course, the About box is much more generic, displaying a picture
of earth from outer space emblazoned with the words
Mac OS computer
—no
matter what model you have.
You can give your Mac a more personalized look by changing that picture. Open
a copy of the Finder with ResEdit and then double-click the PICT resource icon.
OS
8
812 Part III: Application Secrets
■ ■
MACWORLD MAC SECRETS • 4040-8/5 • ch.21.F • Chapter 21 • FINAL • VB • 11/03/98 • p.812
(continued)
always have a clean, ready-to-use System or
Finder available, without having to repeatedly
dig into the System Folder.
We also load the files that we hack most often
into ResEdit’s Open Special menu, which lets
you open these files without having to return to
the Finder or step through an Open dialog box.
Finally, we begin our testing sessions by visiting
the Extensions Manager control panel and turning
off all but the most essential control panels and
extensions, dramatically speeding up the Mac’s
startup sequence. We suggest you do the same.

The two resources listed there are the two pictures that you can change — the
Mac OS-in-space picture and the smaller Mac OS logo. Just copy and paste new
PICT files to replace these, save, and then restart from the modified Finder to
see the results of your hacking. Note: It’s important that the
resource ID
numbers
for each of these PICT files remain intact. The larger PICT is ID 4000,
and the Mac OS logo is ID 4001. To change the ID numbers of the replacement
PICT files in which you paste, click the PICT resource and press Ô-I, then type
the new number in the ID field.
Give the Finder more memory
The Finder’s memory is supposed to be self-adjusting, grabbing as much RAM
as it needs, at startup, to be ready for its hard day of work. Sometimes, though,
it under-guesses; at some point in your work, you get a message saying, “There
is not enough memory to keep this window open.”
You
can’t
allocate more memory using the Finder’s Get Info window, as you
would any normal program; its Get Info box doesn’t have any memory-size
boxes. However, you can give it more memory — with ResEdit.
Open a copy of the Finder with ResEdit, double-click the SIZE resource icon.
You’ll see a resource called ID –1. Open it, and scroll down to the bottom of
the window. You’ll see two fields — Size and Min size. The Size field shows the
amount of memory currently allocated to the Finder (in
bytes
, not kilobytes).
In Mac OS 8, for example, the number is 933,888 (that is, 912K). To increase
the memory allocation, just type in a higher number. (Typing in 1,500,000, for
example, would give the Finder a memory allocation of 1,464K.) When you’re
finished, save the changes, then restart your Mac using the altered Finder.
Make a program Stationery-stupid
In Chapter 15, we mentioned that “Stationery-savvy” programs can create
Stationery documents that, when double-clicked, produce a copy of the original
as an untitled document on the screen.
We actually prefer the approach of non-savvy programs, whose Stationery
documents prompt you for a name and folder for the document copy. Here’s
how to make a program that does Stationery the correct way behave as though
it doesn’t, so you’ll always be prompted for a name and folder location when you
double-click a Stationery document.
Open the application in ResEdit. Open its SIZE resource, and double-click the
item labeled –1. Scroll down until you see the Stationery Aware option. If the 1
radio button is selected, the program handles Stationery “correctly” (that is, it
doesn’t
ask you for a file name when you double-click a Stationery document).
Just click the 0 button. The program is now Stationery “unsavvy.” Save and quit.
(However, you
can’t
make an older program Stationery-aware by selecting 1 if
the
0
button is selected when you first open it. That’s up to its programmers.)
Worth
Learning
Chapter 21: The ResEdit Chapter 813
■ ■
MACWORLD MAC SECRETS • 4040-8/5 • ch.21.F • Chapter 21 • FINAL • VB • 11/03/98 • p.813

Changing the speech samples for
MacinTalk voices
As we mentioned in Chapter 3, you can choose the voice you want your Mac to
use when rendering text into speech by changing the settings in the Speech
control panel. You can choose Fred, Victoria, Zarvox, or any other voice from the
Voice pop-up menu and then click on the little speaker button to hear a sample
of what the voice sounds like. Most of the sample phrases uttered by the voices
in the Speech control panel are pretty funny, too.
Here’s how you can create your own sample sentences for any one of these
voices. Open a copy of a MacinTalk 3 or MacinTalk Pro voice file (they’re located
in the Voices folder, inside the Extensions folder) with ResEdit. Double-click the
ttvd resource icon, then open the only ttvd resource listed. In the rightmost
column (the ASCII column) of the hex code window you’ll see the voice’s default
phrase. Simply select that text and replace it with your own (see Figure 21-19).
Figure 21-19: Edit the text in the rightmost column of the Ralph ttvd resource to change
Ralph’s sample speech.
Caution: In order for the voice to work properly, you have to replace the default
phrase with text containing exactly the same number of characters. If you’re off
by one character, the voice won’t work. Fortunately, punctuation marks and
spaces count, so you can pad your sentences if needed.
After you’ve typed in your new phrase, save the file (do not rename it) and swap
it with the original voice file in the Voices folder, then restart your Mac. (Make
sure you’ve completely removed the original voice file from the System Folder;
renaming it and leaving it in the Voices folder won’t work.)
From now on, when you click the speaker button in the Speech control panel,
the voice will speak using your custom phrase.
814 Part III: Application Secrets
■ ■
MACWORLD MAC SECRETS • 4040-8/5 • ch.21.F • Chapter 21 • FINAL • VB • 11/03/98 • p.814

Changing the system’s default font
The Mac’s default system font, 12-point Charcoal or Chicago, shows up just about
everywhere you look in the Macintosh interface: menu titles, menu commands,
title bars, dialog boxes, and so on. In Mac OS 8.5, of course, you can change this
font using the Appearance control panel.
If you’re using a previous system, you can change this default to any other font
in the system by following these steps.
If you’re using System 7.0, open a copy of the System file with ResEdit. Open the
FOND resource icon. In the FOND window, you see each of the fonts listed by
name, size, and resource ID number (see Figure 21-20). In System 7.1 or later,
you use ResEdit to open the
suitcase
of the actual font you want to turn into the
default font. Double-click the FOND resource icon to see the list of fonts.
OS
8.5
Chapter 21: The ResEdit Chapter 815
■ ■
MACWORLD MAC SECRETS • 4040-8/5 • ch.21.F • Chapter 21 • FINAL • VB • 11/03/98 • p.815
MACINTOSH SECRET
We’ll take our secrets any way we can get them
— even by e-mail all the way from Denmark.
Free book winner Lubomir Stroetmann unloaded
what must be months’ worth of ResEdit secrets
on us in just that way. Take it away, Lubomir!
After you choose File➪Verify File, Option-double-
click the name of a file you want verified. During
the Verify process, you get to see a secret
window that displays resource verification details.
If you Option-double-click a resource for which
you’ve got a built-in editor (such as MENU,
ICON, or PICT), you’re shown the contents in a
list numbered by ID number (instead of the usual
graphic editor).
Don’t miss the File➪OpenSpecial ➪Modify This
Menu command. It lets you add frequently opened
files (such as the System file, your copy of the
Finder, and so on) to the Open Special submenu.
You can tear off the pattern and color pop-up-
palletes in the Icon editors.
And now, some ResEdit Pranks:
■Edit the “vers” resource of your
applications. You can create Photoshop
“7.3” or FileMaker “8.0”!
■Use ResEdit’s Get Info command on an
application. Change its name to Finder, type
to FNDR, creator to MACS, and select the
System and United checkboxes. Put this
app in your System Folder and hide the real
Finder somewhere else. When you restart,
your doctored program will be the only
application your hapless victim can use!
■Select a symbol font (such as Zapf
Dingbats) as your font for icons (in the
Views or Appearance control panel). Now
make the actual control panel invisible,
leaving the recipient of your efforts with no
way to read his own icon names in the
Finder!
Lubomir’s ResEdit secret collection
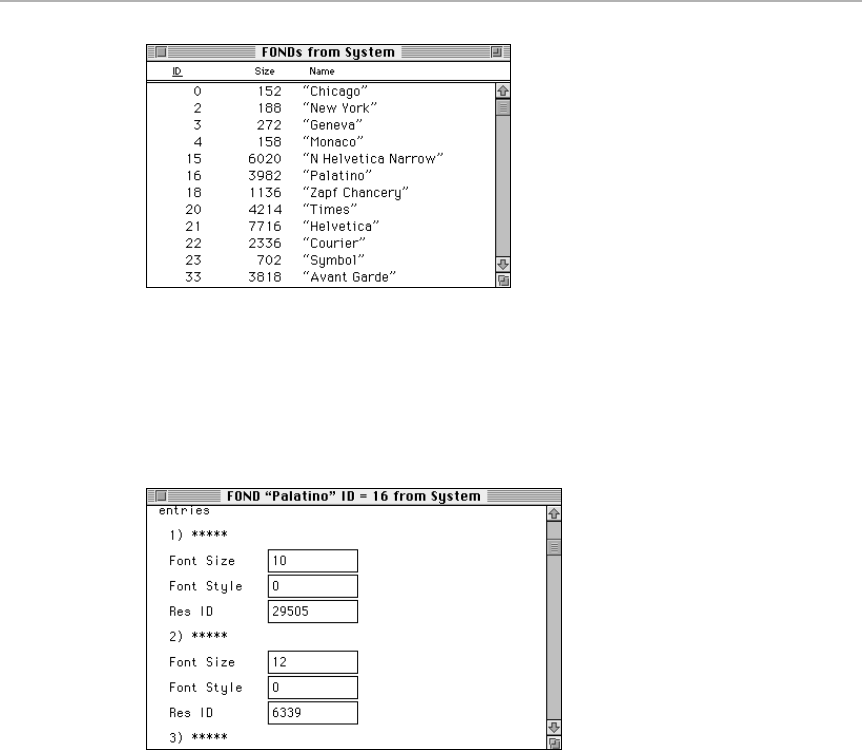
816 Part III: Application Secrets
■ ■
MACWORLD MAC SECRETS • 4040-8/5 • ch.21.F • Chapter 21 • FINAL • VB • 11/03/98 • p.816
Figure 21-20: The FOND resource lists all available fonts.
Your first task is to learn the Res ID number of the font you want to designate as
the new default system font. Scroll to your font of choice — let’s use Palatino in
this example — and open the resource. Scroll down a bit and you’ll find a series
of fields set off by asterisks, as shown in Figure 21-21.
Figure 21-21: The Palatino FOND resource, showing the style and Res ID number
for each font size.
These fields show the Res ID and style codes for each size of the font. In our
example, we want to use 12-point Palatino, which has a Res ID number of 6339.
Remember that number and close up the Palatino FOND resource.
Now open a copy of the System file with ResEdit. Double-click the FOND resource
icon in the System file and open the FOND resource for Chicago from the list of
fonts. Scroll down to the Font Size, Font Style, and Res ID fields, and find the
Res ID number for 12-point Chicago.
As you can see in Figure 21-22, this number is 12. Simply replace that number
with 6339 (Palatino’s Res ID number) and you’re done. (The exact Res ID
numbers may vary, depending on which version of the system software you’re
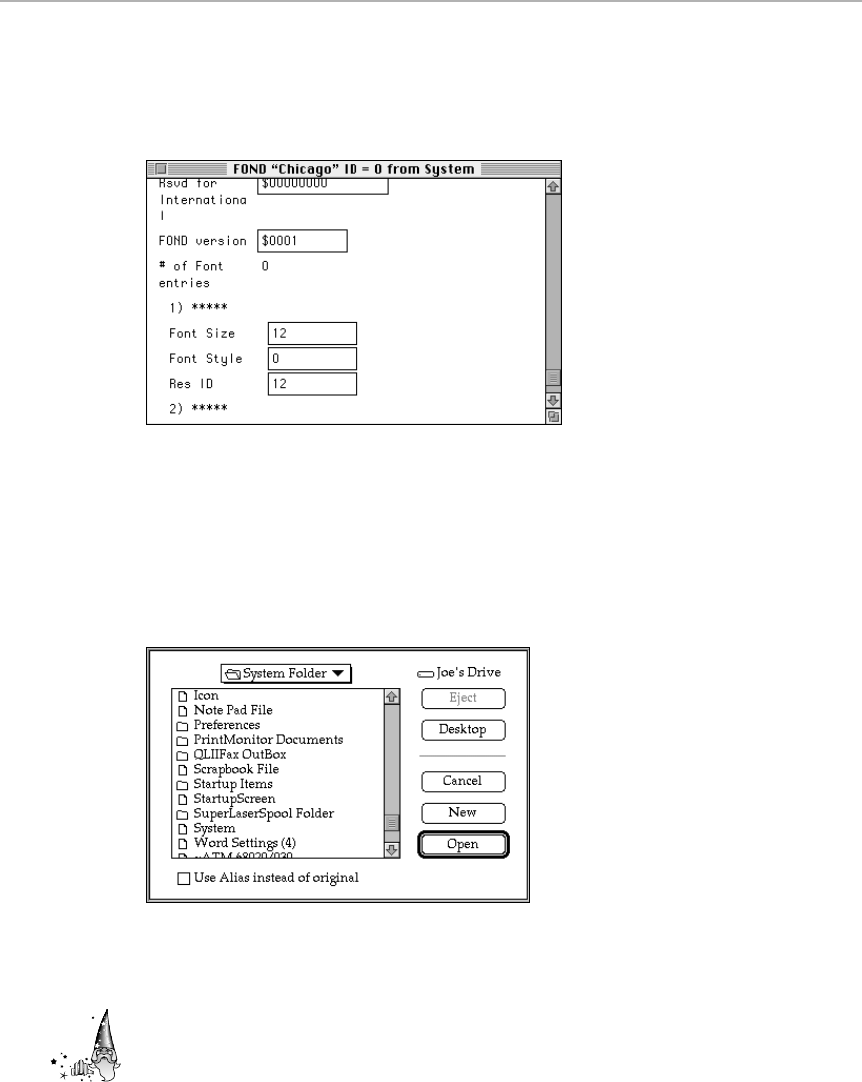
using. At any rate, just replace Chicago’s ID number with the ID number of the
font you want to make the default and this will work.) Don’t change the 12 in the
Font Size field, even if the font you’re using is a different size. Save the
changes, quit ResEdit, and restart with the modified system.
Figure 21-22: Replace the Chicago font’s Res ID number with that of another font to pick a
new default system font.
Your Mac may not take graciously to this kind of surgery at first. On restarting,
you may be greeted with a blinking question mark or experience an immediate
crash. Not to worry; just restart again and you’ll find the Mac has come to
accept this fundamental change to its system (see Figure 21-23).
Figure 21-23: A typical dialog box, after you’ve changed the default system font from
Chicago to Palatino.
One other point: If the new font you choose doesn’t have a Ô-key character in
its font set, the Ôcharacter will be missing next to menu items that have Ô-key
shortcuts. Don’t worry, though; the shortcuts still work just fine.
Strange
But True
Chapter 21: The ResEdit Chapter 817
■ ■
MACWORLD MAC SECRETS • 4040-8/5 • ch.21.F • Chapter 21 • FINAL • VB • 11/03/98 • p.817
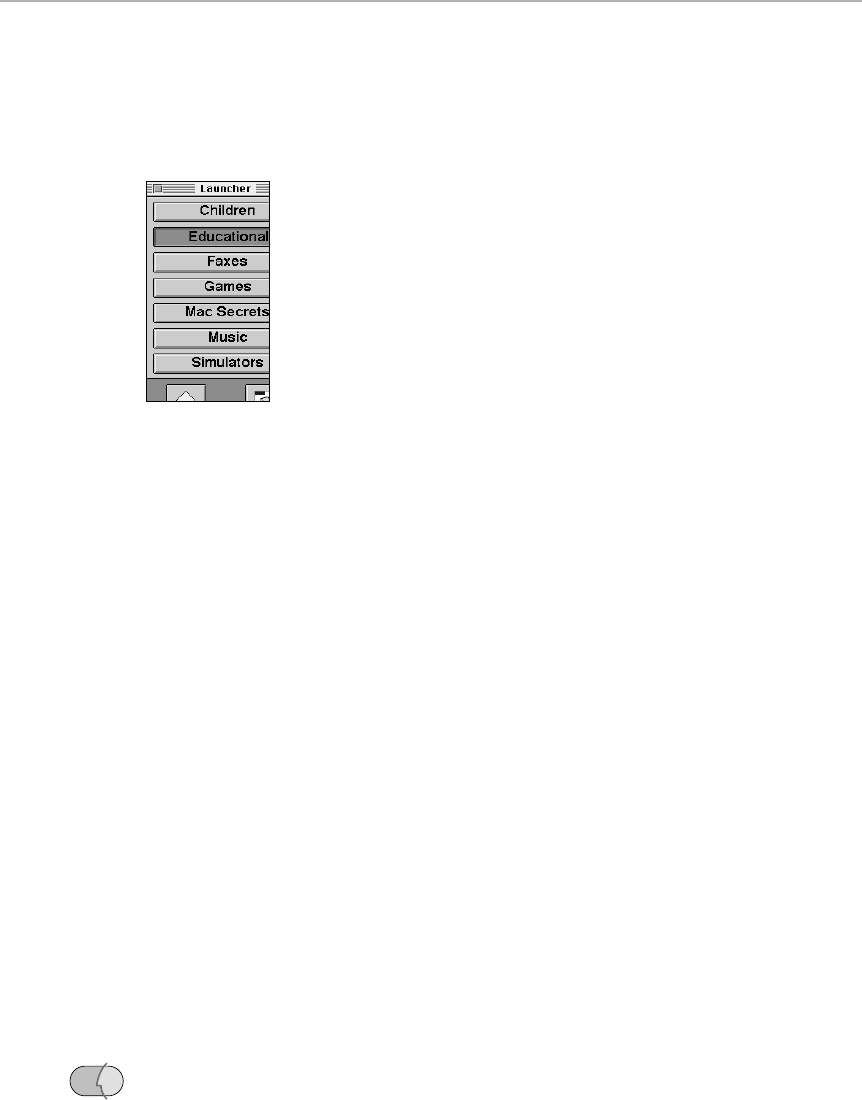
Changing the Launcher’s font
If you don’t feel brave enough to alter the Mac’s default system font, you might
want to at least change the font in the Launcher; it looks much better when you
replace the humdrum Geneva font (see Figure 21-24).
Figure 21-24: A redesigned Launcher with category labels in 16-point Helvetica and
Launcher buttons in 12-point Palatino.
Open a copy of the Launcher with ResEdit, and double-click the
fnin
resource
icon to open it. Open resource –4033. As you scroll through the resource, you’ll
see ten Font Name fields containing the name Geneva, and ten Font fields
containing the number 3. The first set of fields controls the font used in topic
buttons (at the top of the Launcher window; see Chapter 4). The next nine are
the fonts used for Launcher buttons in various sizes, to correspond with the
three different-sized Launcher buttons you can create.
Simply replace the word “Geneva” with name of the font you want to use and
replace the 3 with the corresponding appropriate font number. To figure out
a font’s number ID, open that font’s suitcase with ResEdit, open the FOND
resource, and note the ID number associated with the font in the resource list.
(Don’t use the
Res ID
number that appears in the Res ID field when you actually
open a FOND resource.) Type a point size in the Size fields to set a size for each
font.
Changing Sample Font Text
By now you’ve probably learned you can view a sample of any TrueType font or
screen font. You just double-click its icon in the System Folder or Fonts folder
and examine the odd sentence in the sample window:
Cozy lummox gives smart
squid who asks for job pen
or
How razorback-jumping frogs can level six piqued
gymnasts
. These sentences may seem odd, but they use every letter of the
alphabet — perfect for sampling a font.
You can change the text to anything you want. In Mac OS 8 through 8.5, open a
copy of the Finder in ResEdit, open the STR# resource icon, open number 5816,
and edit the text in the first field (see Figure 21-25).
OS
8
818 Part III: Application Secrets
■ ■
MACWORLD MAC SECRETS • 4040-8/5 • ch.21.F • Chapter 21 • FINAL • VB • 11/03/98 • p.818
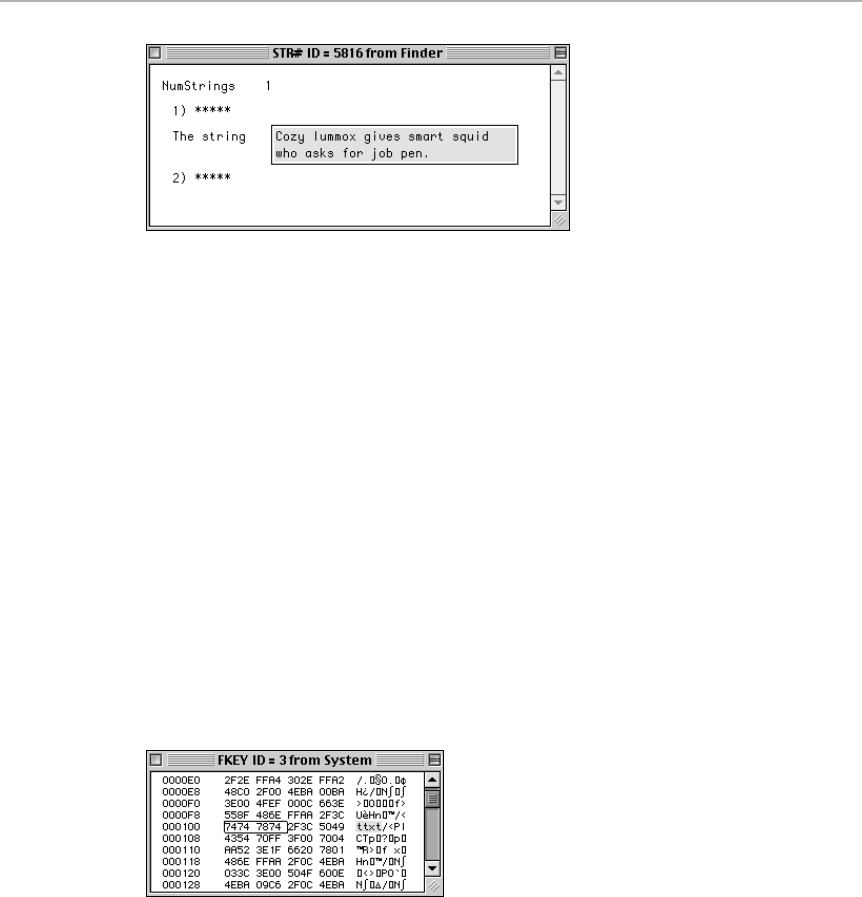
Figure 21-25: The STR# resource in which Mac OS 8’s sample font string is located,
and the resulting sample as seen when you double-click a font file.
In earlier System 7 versions, this sample text string is buried in a different
location; it’s an STR resource, with the ID number 14516 in System 7.5 and
14512 in earlier System 7 versions.
If you insist on replacing Apple’s sentence with another that uses every letter of
the alphabet, you’ll have to come up with a fitting alternative, such as
We heard
five obnoxious jet-black lizards quietly gulping milk
.
Rename the Trash
If you ever tried assigning a new name to the Trash icon on the Desktop, you
probably noticed that you
can’t
. You can rename the Trash, however, using
ResEdit. Open a copy of the Finder; open its STR# resource icon. Under Mac
OS 8 through 8.5, open resource number 4700 (or, with any earlier system,
resource number 11750). In the first field in the resource window you see the
word Trash (see Figure 21-26). Just replace that with a new name, save the
change, and quit ResEdit.
Figure 21-26: Renaming the Trash.
Change the “Copying files” message, and more
Here’s an easy one. Open a copy of the Finder. Open the STR# resource.
Scroll down to the one called 3500 in Mac OS 8.x (or 8750 in any version
of System 7) and double-click it.
Chapter 21: The ResEdit Chapter 819
■ ■
MACWORLD MAC SECRETS • 4040-8/5 • ch.21.F • Chapter 21 • FINAL • VB • 11/03/98 • p.819

In the resulting window, you’ll find a number of pieces of text that you can
change, such as the various messages the Finder displays when it’s copying
files (Copying, Writing, Verifying, and so on). Change these to your heart’s
content! Then put the Finder into the System Folder and restart.
Change the boring Alert icon
All the icons displayed in the Mac’s standard dialog and alert boxes are stored in
the System file as ICON resources. You can edit or replace these icons to spice up
run-of-the mill alert messages. For example, you can replace the plain triangular-
framed exclamation point that typically adorns an alert box with something more
intriguing, such as the bizarre electric mixer icon that for some unknown reason is
stored in the System file (ICON resource –16561).
To make such a switch, use ResEdit to open a copy of the System file. Open its
ICON resource. Select the icon you want to change and open it up to reveal the
editing window. Then either doctor it up with the painting tools or paste in a
graphic you copied from another program.
Adding buttons to Netscape Navigator
Netscape Navigator 3.x offers a row of “single-click” buttons — but unlike
Internet Explorer, Navigator doesn’t let you modify them. At least not without this
tip from free book winner Seth H. Hitching.
Open your copy of Navigator in ResEdit. Double-click the STR# resource; inside,
item –301 contains the button names, and –4000 contains the associated Web
addresses (www.macworld.com, for example).
Seth even goes so far as to edit Navigator’s Directory menu, which lists a few
additional Web pages. In the STR# resource, item –4020 contains the URLs for
this Directory menu, which you can rename in the MENU resource (item –135).
Replace the Mac OS splash screen
Starting with System 7.5.1, the traditional “Welcome to Macintosh” message
you see when you start up your Mac is immediately followed by a splash screen
featuring Apple’s new Picasso-esque Mac OS logo. Because this splash screen is
simply a PICT graphic buried in the System file (or in the System 7.5 Update file,
if you have System 7.5.1), it’s easy to replace it with any other picture you like.
To swap your own graphic in for the Mac OS picture, open a copy of the System
file (or System 7.5 Update file) with ResEdit. Open the PICT resource icon. You’ll
see that there are actually six separate PICT images of the Mac OS logo stored
there — one for monitors set to show full color, one for 4-bit color, another in
grayscale, and so on. The PICTs are in resources –16501 through –16506.
Contest
Winner
820 Part III: Application Secrets
■ ■
MACWORLD MAC SECRETS • 4040-8/5 • ch.21.F • Chapter 21 • FINAL • VB • 11/03/98 • p.820
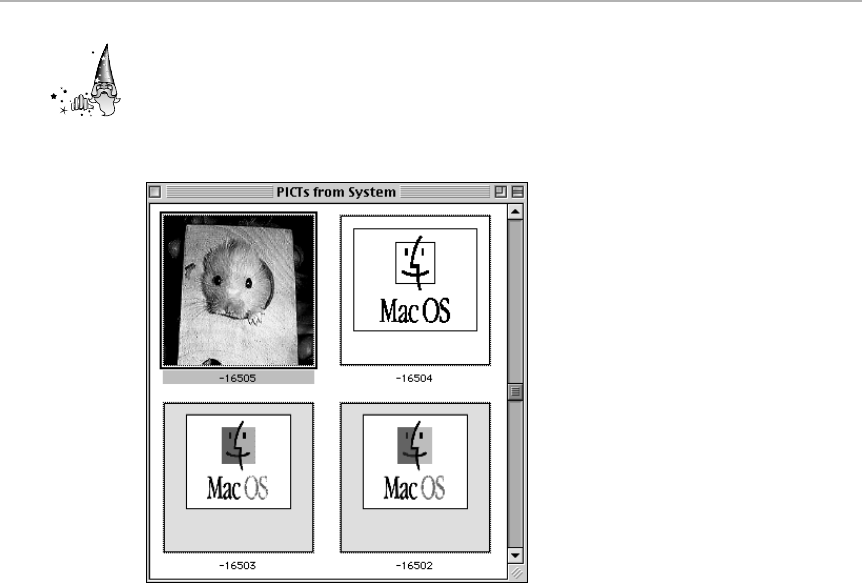
Double-click one of the resources to open it. Copy a graphic from another program,
and then paste it into the opened PICT resource, replacing the Mac OS picture with
your own (see Figure 21-27). If you want your picture to appear no matter what the
monitor color depth, paste your picture into all six of the resources, replacing all of
the original logo art. When you’re finished, save your work and quit ResEdit.
Figure 21-27: Just replace the Mac OS graphic with any other PICT file
to get a custom splash screen at startup.
When you restart, just after the “Welcome to Macintosh” message, you’ll see
your new picture at center screen.
Opening and playing sound resources
If you use ResEdit to open any program containing digitized sounds — including
the System file — you’ll find the program’s sound resources by opening the
snd
icon.
When you select a sound resource, a new menu appears in ResEdit’s menu
bar — the snd menu (see Figure 21-28). To listen to a sound, select the sound
(don’t actually open it) and choose the Try Sound command, or just press Ô-T.
The sound plays once. The Try Scale With Sound command lets you hear the
sound played on each of the different pitches in a C major scale. The Try as
HyperCard Sound command lets you hear how the sound would play if converted
into HyperCard’s sound format.
Strange
But True
Chapter 21: The ResEdit Chapter 821
■ ■
MACWORLD MAC SECRETS • 4040-8/5 • ch.21.F • Chapter 21 • FINAL • VB • 11/03/98 • p.821

Figure 21-28: ResEdit’s snd menu.
If you find a sound you like, you can select it and copy it using the Copy command.
You can then paste the sound into the Sound control panel (and make it the
default alert sound for your Mac), or paste it into the Scrapbook for future use.
To illustrate: The Jigsaw Puzzle desk accessory contains three digitized sounds.
The one called CongratsSnd plays only when you successfully complete the
puzzle. Suppose you want to grab this little xylo riff and make it your system
beep. Here’s what you do:
Open the Puzzle using ResEdit and open the snd resource icon. You see three
sound resources, neatly named and numbered (see Figure 21-29). Click the
CongratsSnd one once and then press Ô-C or choose Edit ➪Copy.
Now just open your System file, open
its
snd resource window, and paste. After
you save and quit, from now on, you can use that Jigsaw Puzzle sound as an
alert beep — or play with it as you would any sound (see Chapter 23).
Figure 21-29: The snd resources in the Jigsaw Puzzle desk accessory.
Replacing a sound resource by pasting
Anyone who’s ever logged on to America Online is familiar with the hearty
“Welcome!” you hear when you connect successfully. But suppose you want to
replace that “Welcome” with something a little more dramatic. You can easily
alter that sound, or almost any other sound in any program, with ResEdit.
Actually, there are two ways to
replace
a sound resource in an application.
You can paste in a sound from another source using standard Cut and Paste
commands. Or you can record a new sound using ResEdit’s built-in recording
features.
Copy a sound from the Scrapbook or another application using the method
described in the previous secret. Then use ResEdit to open the application
containing the sound you want to replace. After opening the application’s snd
resource icon, choose the Paste command. Your new sound is installed into
the application.
Worth
Learning
822 Part III: Application Secrets
■ ■
MACWORLD MAC SECRETS • 4040-8/5 • ch.21.F • Chapter 21 • FINAL • VB • 11/03/98 • p.822
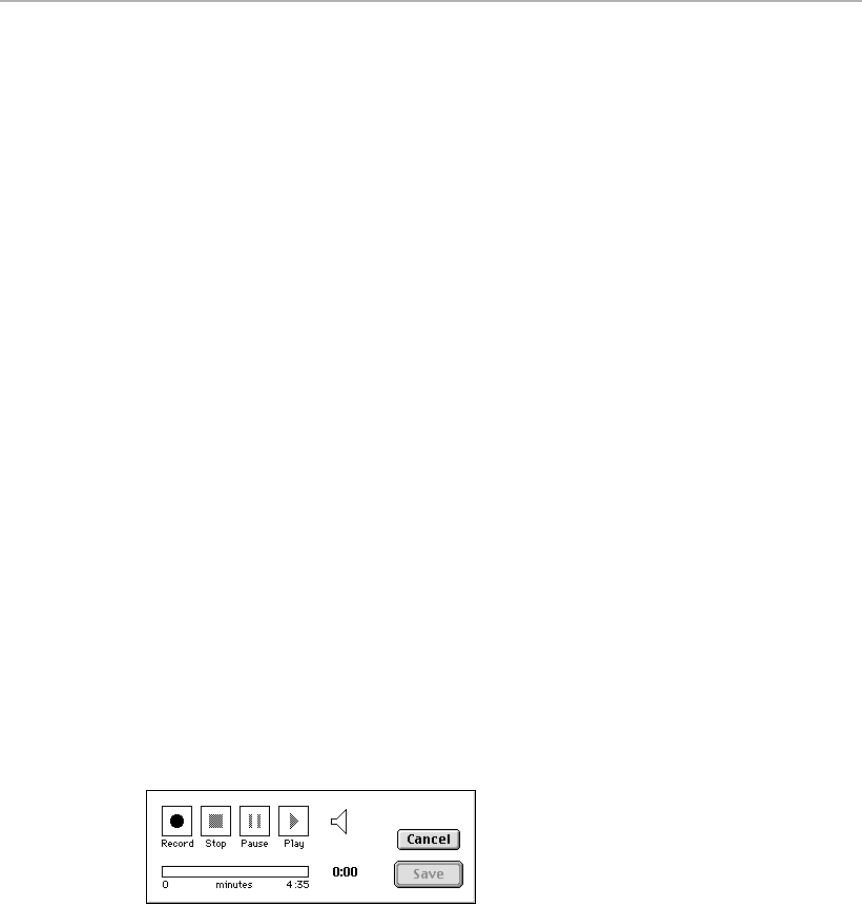
The next step is to figure out which of the application’s sounds you want to
replace. Use the Try Sound command to determine which sound is which. When
you find the one you want to replace, make note of its ID number listed in the
window. Then delete the sound by choosing the Clear command (unless you
think you’ll want to restore the sound someday, in which case you should copy
it to the Scrapbook before deleting it).
Then select the new sound you just pasted in and choose Get Resource Info
from the Resource menu (or press Ô-I). In the ID field, type in the exact ID
number of the sound you just deleted and click OK. Choose Save and quit
ResEdit.
The application now plays your pasted-in sound in place of the one you deleted.
Replace a sound by recording directly
into ResEdit
If your Mac has a microphone, you can record new sounds directly into an
application.
Suppose you want to replace America Online’s “Welcome” announcement with a
digitized recording of your
own
voice, saying “I’m back!” In America Online 3, the
snd is embedded in the program itself, just as you’d expect; in 2.7 and earlier,
it’s in the Online Sounds file, which is kept in the Online Files folder (within your
America Online folder). (And if you have America Online 4, see Chapter 26 for
instructions on replacing these sounds the easy way.)
Open the appropriate file (America Online or Online Sounds). Double-click its
snd
resource. You see the list of the familiar America Online sounds, such as
“You’ve got mail!” and “Goodbye!”
Choose Record New Sound from the
snd
menu. A recording control panel appears,
as shown in Figure 21-30. Record your new sound using the controls provided.
Figure 21-30: ResEdit has its own recording controls for adding new sounds to an
application.
Then follow the same steps outlined in the previous secret. That is, note the ID
of the sound you want to replace (the “Welcome!” message is number 256).
Delete the old sound, and assign its ID number (256) to the sound you just
recorded.
Now, whenever America Online has the impulse to shout “Welcome!”, you’ll hear
your own voice instead.
Chapter 21: The ResEdit Chapter 823
■ ■
MACWORLD MAC SECRETS • 4040-8/5 • ch.21.F • Chapter 21 • FINAL • VB • 11/03/98 • p.823
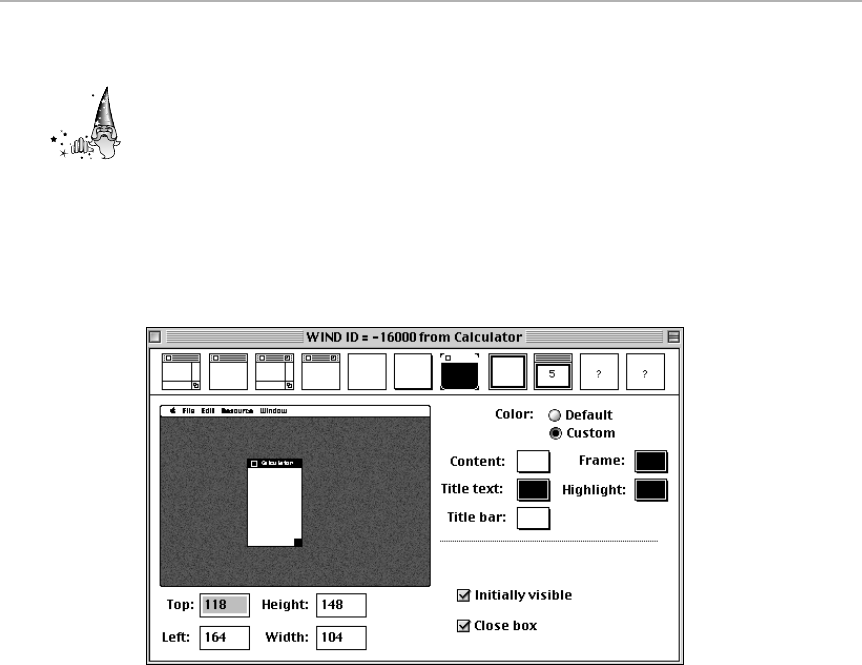
Creating a mini-calculator
Virtually everyone we know operates the Calculator desk accessory using the
numeric keypad and not by clicking the on-screen buttons. So, we figured, why
not just
eliminate
the buttons — and the title bar and close box, for that matter
— to create a tiny, but fully functional calculator that takes up much less space
on your monitor?
Here’s how we did it. Open the Calculator using ResEdit and open the WIND
icon. This contains only one resource, number –16000. Open it and you see a
window such as the one in Figure 21-31. This controls the size and type of the
Calculator window and its location on the screen.
Figure 21-31: The Calculator’s WIND resource.
After this window is open, you can change the appearance of the Calculator
window. Change the window type by clicking one of the icons across the top of
the window. In this example, we picked the plain rectangular shadowed window
that lacks a close box and title bar.
Then, by dragging the handle at the bottom right of the window that appears on
the miniscreen, resize the calculator window. It takes a little trial and error to
size the window properly, so that the readout screen is visible but the buttons
aren’t. Move the entire window to the location on the screen that you want the
Calculator to appear whenever you open it (see Figure 21-32).
Choose Save and close all the windows. Before quitting ResEdit, try opening the
Calculator. If you sized the window properly, it should look as it does in Figure
21-32.
If you haven’t framed the Calculator properly, it’s no problem; ResEdit is still
running. Just Quit the Calculator, open it again using ResEdit, and make
whatever adjustments are necessary, saving the results each time.
Strange
But True
824 Part III: Application Secrets
■ ■
MACWORLD MAC SECRETS • 4040-8/5 • ch.21.F • Chapter 21 • FINAL • VB • 11/03/98 • p.824

Figure 21-32: The modified Calculator resource.
Your new minicalculator will work just as it did at full size. You can still perform
all four standard mathematical functions by pressing the /, *, +, and – keys on
the numeric keypad, and you can still clear the display using the Clear or letter C
key. And you can still copy and paste to and from the Calculator.
A cooler, color Calculator
If stripping down your Calculator seems a bit radical, consider just coloring it.
Just open the Calculator using ResEdit and open the
ppat
icon. Open the only
resource listed, number –15999. Using the basic editing tools provided, change
the color and pattern that appear as the background (see Figure 21-33).
Figure 21-33: Editing the Calculator’s background.
Strange
But True
Chapter 21: The ResEdit Chapter 825
■ ■
MACWORLD MAC SECRETS • 4040-8/5 • ch.21.F • Chapter 21 • FINAL • VB • 11/03/98 • p.825
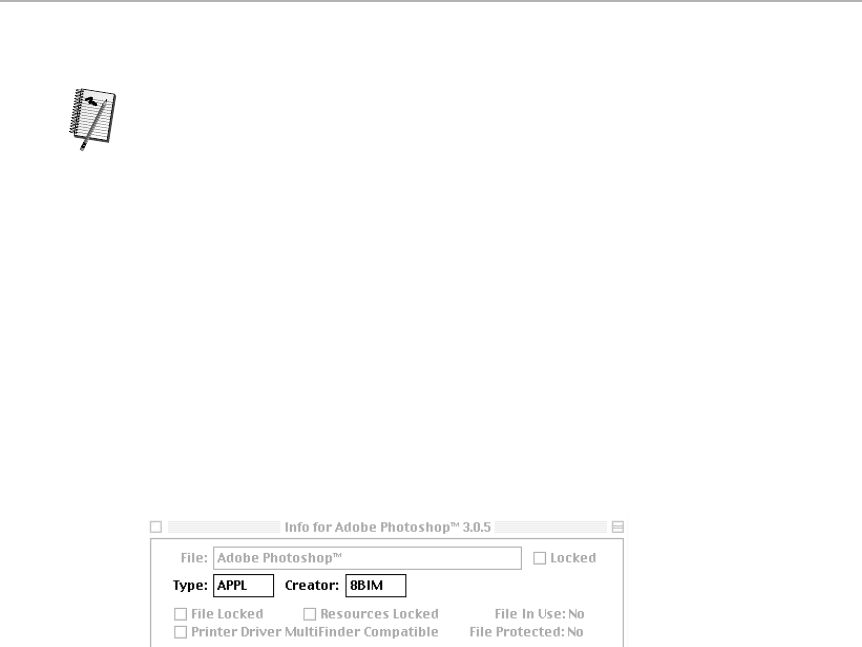
Changing the creator of system snapshots
When you take screen snapshots using Mac OS 8’s Ô-Shift-3 or Ô-Shift-4
keystrokes, the resulting graphic files are saved on disk as SimpleText
documents. If you make a practice of editing these screen shots, it gets
annoying that you can’t simply double-click one to edit it. (A double-click
launches SimpleText.)
It’s much more convenient if you teach the System to save the files automatically
in the format of your graphics program instead. This way, when you double-click a
Picture 0 or Picture 1 file, it opens your graphics program (Photoshop, Color It, or
ClarisWorks, for example) and you’re ready to edit. ResEdit makes this easy.
The first thing you must do is find out the four-letter
creator code
of your graphics
program. To do this, open the graphics application file with ResEdit and choose
Get Info from ResEdit’s File menu. In the Creator field, note the four-letter code.
In the example shown in Figure 21-34, the application is Photoshop and the code
is 8BIM. (Codes are case-sensitive, by the way; you must use 8BIM and not
8bim.) To be sure you use the proper code, select the four characters in the
Creator field and copy them using Ô-C. (See Chapter 15 for details on Type
and Creator codes.)
Figure 21-34: A peek into any file using ResEdit’s Get Info command reveals its four-letter
creator code.
Then open a copy of the System file. Open the FKEY resource icon. It contains a
couple of resources, numbered 3 and 4. (As you may have guessed, 3 contains
code for the Ô-Shift-3 keystroke and 4 holds the code for the Ô-Shift-4 keystroke.)
Open resource 3. You see a dialog box informing you that this is a compressed
file and asking if you want to open it anyway. Click Yes (or just type
Y
).
To find the string you need to edit in this window, press Ô-G to bring up the Find
ASCII window. Type
PICT
(all caps) into the text field and press Return. Then
close the Find ASCII window. Just two characters before the word PICT, you see
the four-letter code for SimpleText (or TeachText) —
ttxt
. Under System 7.x, the
ttxt appears on the line just
below
the word PICT (which will be selected as a
result of your having used the Find command).
Select these four characters and replace them with the creator code for your
graphics program, either by typing the code or by pasting it in (if you copied the
code from the creator field). So, in our example,
ttxt
becomes
8BIM
(see Figure
21-35).
Worth
Learning
826 Part III: Application Secrets
■ ■
MACWORLD MAC SECRETS • 4040-8/5 • ch.21.F • Chapter 21 • FINAL • VB • 11/03/98 • p.826
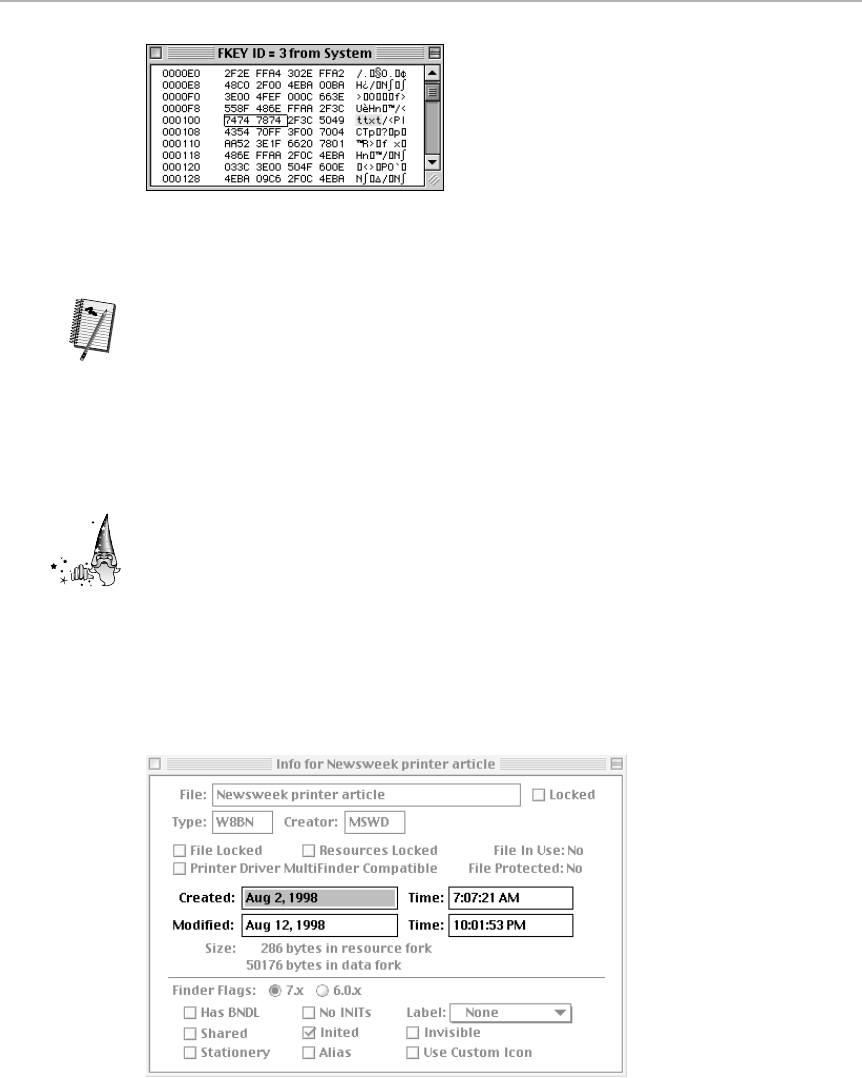
Figure 21-35: Select the four-letter code for SimpleText and replace
it with the creator code of your favorite graphics program.
Close resource 3 and open the other FKEY resource, number 4. Follow exactly
the same steps to change ttxt to 8BIM (or the four-letter code for your preferred
graphics program). Use the Save command to save the changes and quit
ResEdit. After you restart, using the modified System file, your Ô-Shift-3 and
Ô-Shift-4 screen shots will always be saved in the format of Photoshop (in this
example) — and not SimpleText documents.
Changing modification and creation dates
Here’s a fascinating, though somewhat disturbing, ResEdit hack: You can easily
change the creation and modification dates of any file! What’s more, you can
post date
the creation of a file. That’s right: You can create a Word memo and
change its creation date to sometime next week.
To do this, launch ResEdit. Choose Get File/Folder Info from the File menu and
select the file whose dates you want to change. In the Info window that appears,
you see the creation and modification dates (see Figure 21-36). Edit the dates
(and times) as you please, and then choose the Save command
before
closing
the Info window. The new dates are reflected in the Finder.
Figure 21-36: You can tamper with a file’s creation and modification dates in the
Get Info window.
Strange
But True
Worth
Learning
Chapter 21: The ResEdit Chapter 827
■ ■
MACWORLD MAC SECRETS • 4040-8/5 • ch.21.F • Chapter 21 • FINAL • VB • 11/03/98 • p.827

With this knowledge, you know how to turn in a report late, but can point to the
last modification date and prove that you actually
finished
the work on time. Of
course, you should realize that a computer’s time stamp will never hold up in
court, or even in a debate. Your ability to tinker with the time/space continuum
in this way is actually a bit sobering.
Meet rANdY and Maura
In the days of System 7, three of the Finder’s menus had icons instead of
names: the Apple menu, Help menu, and Application menu. (Under Mac OS 8.x,
of course, the Help menu lost its icon and gained a plain-English name: Help.)
But some of these menus actually
do
have names, as you can see by opening
them in ResEdit; they’re just not displayed in the Finder.
The Application menu is named Maura; the Help menu, despite its Mac OS 8
identity change, is still secretly identified as rANdY, as seen in Figure 21-37.
You can see them for yourself by opening a copy of the System file with ResEdit,
then double-clicking the MENU resource icon.
Figure 21-37: The hidden names of graphic menus.
And while we’re on the subject of Maura, check out the next secret, which
involves the menu bearing her name.
Hide and show programs with a keystroke
Earlier in this chapter, we showed you how to add a keyboard shortcut to any
menu command. Here’s a really practical application of that advice: Add
keystrokes to the Application menu’s Hide and Show commands. That way,
when you want to hide all the applications you have running in the background,
you’ll be able to do it with a single keystroke.
Worth
Learning
828 Part III: Application Secrets
■ ■
MACWORLD MAC SECRETS • 4040-8/5 • ch.21.F • Chapter 21 • FINAL • VB • 11/03/98 • p.828

Chapter 21: The ResEdit Chapter 829
■ ■
MACWORLD MAC SECRETS • 4040-8/5 • ch.21.F • Chapter 21 • FINAL • VB • 11/03/98 • p.829
MACINTOSH SECRET
Mac programmers are notorious for leaving
hidden messages buried inside program
resources. These messages — some cryptic,
some funny, some just plain bizarre—go
unseen by most people. But equipped with
ResEdit, you have the tools you need to hunt
down these little surprises and see them for
yourself. Here are a few worth tracking down:
■Open a copy of Find File with ResEdit;
double-click the DATA resource icon.
Inside, you’ll find just one resource, ID #0.
Open it and scroll through the hexadecimal
code to find the programmer’s secret
message in the right-hand column: “I liked
vacuum tubes better.”
■In System 7.5, open the System file’s STR
resources. In resources –16569 and
–16580, you’ll find out what parts of the
operating system programmer Jim Reekes
refers to as the “spatula” and the “fridge.”
■Also among the System file’s STR
resources is ID –16579. Open it for a
detailed description of the audio data
converter’s capabilities, which evidently
include dicing and slicing.
■Open the System file (7.5 or later) and
double-click the ICON resource. Have a
gander at resource numbers –16561,
–16560, –16557. What is Apple’s thing
about kitchen appliances?!
■Use ResEdit to open the AppleShare file in
your Extensions folder. Open the STR#
resource icon and double-click ID –2003.
“Oh, most heinous!”
■Open the System file’s timd resource icon.
Double-click ID 30 and scroll to the bottom
for this intriguing tip: “Secrets lurk in
ROM.”
■Open a copy of the Stickies program (it’s in
the Apple Menu Items folder), and check
out the program’s solitary WDEF resource.
The programmers have left us the following
mysterious message: DEAD BEEF.
■Open any of the ntrb or nitt resources in the
System file. These are in hexadecimal
code, but pay heed to the first word in each
string of code in the ASCII text column on
the right. Apple programmers obviously
love their work.
■Using ResEdit, open Eric’s Solitaire Sample,
the game demo that is included in the
Apple Extras folder on most Macs. Open
the STR# resource icon and double-click
the one with the name “really secret stuff.”
You’ll find out what Eric really thinks of
himself.
■In the System 7.5.5 System file, open the
lefT icon, if you have one. Open resource ID
0 to examine the hex code: Lefty’s Magic
Gibbly-Duplicating Resource.
■Open the Memory control panel with
ResEdit and double-click the vm resource
icon to reveal the only resource, ID 0. Open
it up to find the programmer’s names listed
in the rightmost column of ASCII text.
■Here’s one that requires System 7.1 or
earlier: Open the System file using ResEdit
and double-click the STR# resource icon.
Open the resource with the ID number
–16415 and you’ll see that Apple’s
programmers really do have your best
interests at heart. Sad to say, this hidden
benediction is not a part of System 7.5 or
later.
A hidden-message treasure hunt

To add the commands, open a copy of the System file with ResEdit. (If you
have System 7.5.1, open the System 7.5 Update file instead.) Open the MENU
resource icon and open the menu resource called Maura — the secret name
of the Application menu, as revealed in the previous secret. Now, following the
directions given earlier in this chapter, select each item on the menu and type a
character in the Cmd-Key field (see Figure 21-38). You can assign one keystroke
to hide the current application (the top command), one to hide all other
programs, and one to
show
all other programs. While you’re at it, after you
select the command you want to edit, choose Remove Icon from the Menu
menu (if it’s not dimmed out).
Figure 21-38: Type a character into the Cmd-Key field to assign a keyboard shortcut to each
command on the Application menu.
When you’re finished adding the keystrokes to the menu, save the file and
restart with your doctored-up System.
Remapping your keyboard
The System’s KCHR resource controls
keyboard mapping
— in other words, it
determines which key on the keyboard produces which character on the screen. For
the most part, you want to keep your keyboard mapped as originally programmed
— so that pressing the
A
key produces an
A
on screen, pressing
B
produces a
B
,
and so on.
But sometimes remapping the keys makes great sense. Here’s a classic
example: In its default configuration, the Mac’s keyboard produces the > and <
characters on screen when you press the period and comma keys with the Shift
key down. This often results in typos such as
P>O>Box 1568
or
3:45 P>M>
,
with the > inserted where a period was intended. (We’ll pretend, for the
moment, that you don’t have SmartKeys, included with this book, which solves
that problem much more easily.)
You can head off such problems by remapping the standard U.S. keyboard. You
can make the period and comma keys produce periods and commas whether or
not the Shift key is pressed.
830 Part III: Application Secrets
■ ■
MACWORLD MAC SECRETS • 4040-8/5 • ch.21.F • Chapter 21 • FINAL • VB • 11/03/98 • p.830

Open a copy of the System file using ResEdit. Find the KCHR resource icon and
open it. In the list of keyboard layouts, find the standard U.S. keyboard layout.
Open this resource to open the full keyboard display.
The bottom portion of the keyboard display window represents the actual
keyboard; press any of the modifier keys (such as Shift or Option) and you’ll see
the characters on the keys change accordingly. The upper portion of the window
is a palette of every character that can be displayed on screen. You can map
keys to characters by dragging a character from the palette on top to a key on
the bottom (see Figure 21-39).
To change the > to a period, press Shift to display the > character on the
keyboard display. Then drag the period character from the top portion of the
window down and drop it on the > key, as shown in Figure 21-39.
Figure 21-39: The KCHR display window. The lower portion represents the keyboard, while
the upper portion provides a palette of all available characters. Drag the period character from
the upper portion of the window and drop it on the > sign to replace it.
Follow the same procedure to replace the < with the comma; drag the comma
character down and drop it on the < sign.
When you’ve replaced the characters, choose Save and quit ResEdit. You’ll have
to restart your Mac with the modified System file to see the results of the
remapping.
Using this same method, consider remapping your little- or never-used bracket
keys, [ and ], to create parentheses or curly quotes.
Mix-and-match icon sizes
In the Finder’s icon views, you have exactly two size choices — large and small.
You can switch between these options using the Views menu, of course, but you
can’t
combine
the two sizes in a single window — unless you know this secret.
Using ResEdit, open a file that you would like to endow with a permanent small
icon. Open the file’s
ics8
resources (the set of smaller-sized icons used by the
program), then double-click the first
ics8
resource in the window (the one
containing the icon that represents the application itself).
Chapter 21: The ResEdit Chapter 831
■ ■
MACWORLD MAC SECRETS • 4040-8/5 • ch.21.F • Chapter 21 • FINAL • VB • 11/03/98 • p.831
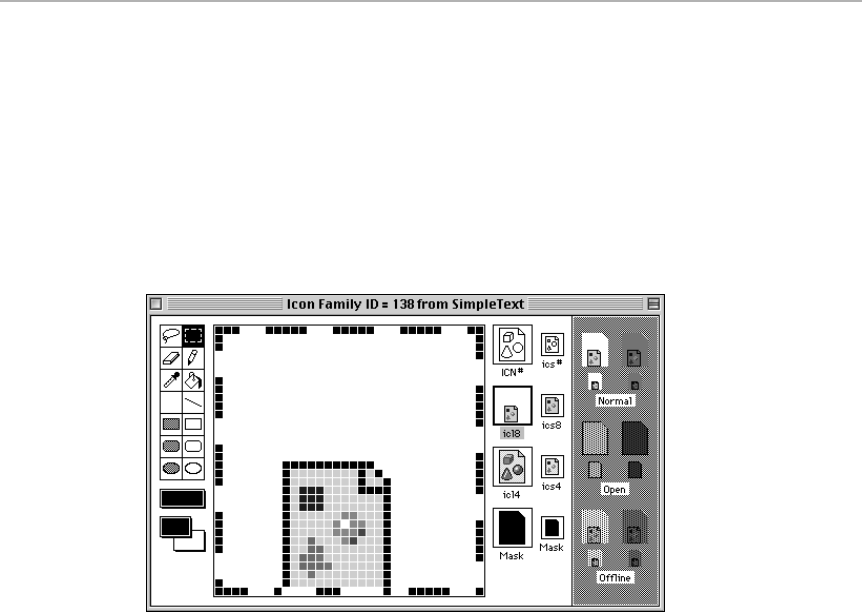
The small icon opens in an editing window. Press Ô-A to select the whole
picture, choose Copy, then close the resource. Next, open the file’s
icl8
resources (the large icons), and again open the first icon so you can edit it.
Press Ô-A again to select the whole picture, then press Delete. Now choose
Paste from the Edit menu, placing the small icon you copied from the
ics8
window into the large icon’s window. Use the Selection tool to drag the small
icon to the bottom of the window. Then, deselect the icon (by clicking anywhere
in the white space within the window) and press Ô-A
again
, this time to select
the tiny icon
and
all the white space around it (see Figure 21-40). Choose Copy,
then close the file, without saving any of the changes you made.
Figure 21-40: Paste a small icon into the large icon resource window, then select the whole
thing to create a permanent small icon view.
Return to the Finder, select the program icon you want to “shrink,” and choose
Get Info from the File menu. Click the program’s icon in the upper-left portion of
the window to select it, then choose Paste. Then the full-size icon will be
replaced with the small-icon version.
Now, no matter what icon view you pick in the Finder, the file will always display
the small icon.
Build a better beachball
Every program has a series of animated cursor icons that gets displayed
whenever you’re waiting for the Mac to do something. There’s the standard
wristwatch icon you see in the Finder, of course, but some programs use
“counting fingers,” and others, like America Online, use the “spinning
beachball.”
832 Part III: Application Secrets
■ ■
MACWORLD MAC SECRETS • 4040-8/5 • ch.21.F • Chapter 21 • FINAL • VB • 11/03/98 • p.832

Because you must
stare
at these animated icons, waiting for the Mac to finish
its business, free book winner German Velasquez thinks you might as well make
them look interesting. You can change them to whatever you want by editing a
program’s CURS resources using ResEdit.
Here, for example, is how you can jazz up the AOL beachball: Open a copy of the
America Online program with ResEdit, then double-click the CURS resource icon.
You’ll see the four resources, numbered 128 through 131 — the four frames of
the beachball animation. Double-click each one to edit it, drawing or pasting in
a replacement icon (see Figure 21-41). Of course, if you want an animated look,
your replacement icons should be designed in such a way that they create the
effect of motion when played back in sequence.
Figure 21-41: Designing a custom cursor in AOL. After creating a new cursor, be sure to drag
the small picture of the icon to the right of the editing window onto the mask icon, so that the
mask matches the icon.
Put your mouse on steroids
If the fastest mouse-tracking setting in the Mouse control panel doesn’t move
the mouse fast enough for your taste, you can turbocharge your mouse’s
tracking speed with a simple ResEdit hack:
Open a copy of the System file using ResEdit and then open the
mcky
resource.
(Mnemonic: It’s
mickey
,the mouse resource!) Find the
mcky
resource with ID 6
and open it up. Now change the eight Threshold fields to 1, 2, 3, 4, 5, 6, 7, 15.
(These numbers correspond to the eight Control Panel speed settings. They control
how far and fast you have to move the mouse before it
starts
speeding up.)
Save your work and restart your Mac with your newly edited System file installed.
Bump your mouse tracking up to the highest setting and see what you think. If
the speed doesn’t feel right, you’ll have to do some experimentation. Repeat
the steps outlined earlier, but try different numbers in the Threshold fields.
Contest
Winner
Chapter 21: The ResEdit Chapter 833
■ ■
MACWORLD MAC SECRETS • 4040-8/5 • ch.21.F • Chapter 21 • FINAL • VB • 11/03/98 • p.833
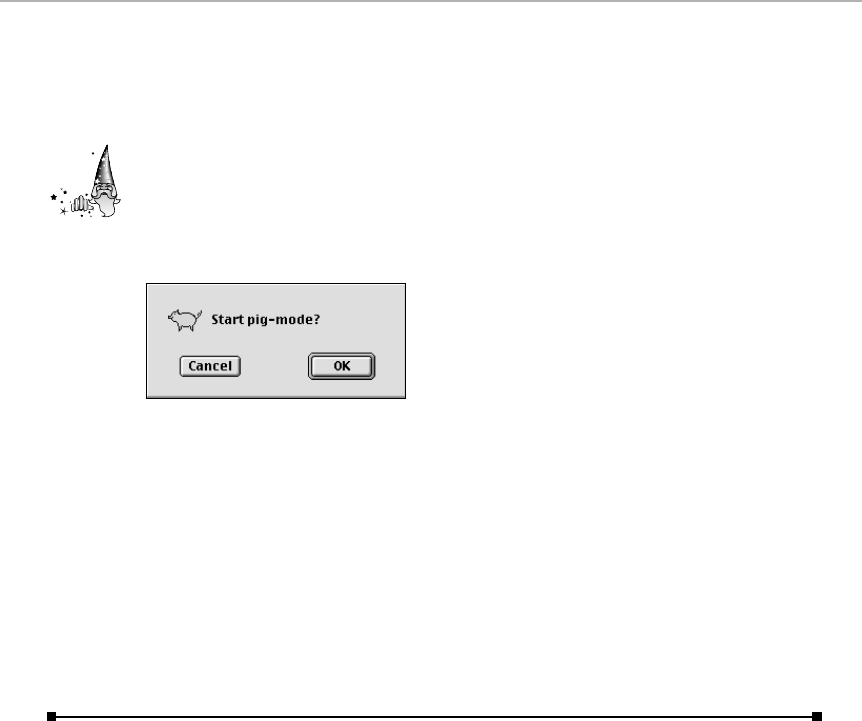
Pig-Mode
Those wacky ResEdit programmers have buried a wonderful, offbeat little
surprise for you in the About ResEdit dialog box.
To uncover the surprise, hold down the Ô, Option, and Shift keys while selecting
About ResEdit from the Úmenu. Your Mac starts oinking — yes, oinking — and
a dialog box asks if you want to “start pig-mode.” If you click OK and try this
again, you’ll once again hear the oink and see the dialog box shown in Figure
21-42.
Figure 21-42: The dialog boxes that signal the starting and stopping of pig-mode in ResEdit.
Pig-mode, as it turns out, actually does have a function. It puts ResEdit into a
special mode in which it constantly purges memory and compacts resources.
However, it makes the program run slower and is designed primarily for program-
mers who are testing custom editors. We recommend keeping ResEdit in its
no-Oink mode at all times.
The oink, however, is delightful, and we heartily recommend using ResEdit on
itself to copy this sound out of the program so you can add it to your collection
of system alert sounds. (See “Opening and playing sound resources,” earlier in
this chapter, for instructions.)
Top Ten ResEdit Pranks
You can’t spend more than a few minutes working with ResEdit without at
least thinking about the havoc you can wreak by editing program resources in
sick, twisted ways. At least we can’t.
Of course, we are in no way suggesting that you actually pull any of the
following pranks — but we won’t tell anyone if you do.
1. Switch the empty and bulging Trash icons, so that the Trash looks empty
when it contains files and bulges when empty.
2. Edit the Balloon Help text strings (most of them are in easy-to-access
STR# resources) so that pointing to a window’s Close box produces a
help balloon that says “Clicking this box will cause irreparable damage to
the motherboard.”
Strange
But True
834 Part III: Application Secrets
■ ■
MACWORLD MAC SECRETS • 4040-8/5 • ch.21.F • Chapter 21 • FINAL • VB • 11/03/98 • p.834

3. Edit the MENU resource to turn a separator line in a menu into an
alluring new menu command (like “Double Processing Speed”) that
doesn’t work.
4. Alter dialog boxes (using the DITL resource editor) so that the Cancel
and OK buttons in a standard dialog box instead say Purge All Data and
Erase Hard Disk (see Figure 21-43).
Figure 21-43: Imagine your coworker’s expression when she tries to empty the Trash and
sees this dialog box.
5. Use ResEdit’s MENU editor to change all text in menus to white,
rendering the commands completely invisible. (They will still work, if you
can find them.)
6. Replace the standard alert box icon with the System Bomb icon.
7. Remap the keyboard so that pressing any key produces a semicolon.
8. Change the names of an application’s menus so that the File menu
contains the Format commands and vice versa.
9. Install a Desktop pattern consisting entirely of Trash can icons.
10. Create a startup screen that features a realistic System bomb message,
urging the user to restart the Mac immediately.
Chapter 21: The ResEdit Chapter 835
■ ■
MACWORLD MAC SECRETS • 4040-8/5 • ch.21.F • Chapter 21 • FINAL • VB • 11/03/98 • p.835
MACWORLD MAC SECRETS • 4040-8/5 • ch.21.F • Chapter 21 • FINAL • VB • 11/03/98 • p.836

Macworld MAC SECRETS • 4040-8/5 • ch.22.F • Chapter 22 • FINAL • VB • 11/03/98 • p.837
Chapter 22
Utilities, Macros, and AppleScript
In This Chapter
©Hard-disk repair and backup software
©OneClick, Tempo, KeyQuencer, and QuicKeys macros
©AppleScript, MacsBug
©File-compression software, screen savers
©Extension managers
Instead of modifying documents, as most software does, a utility program is
designed to modify your computing environment. It affects what you see on
the screen, how your hard disk handles data, and other aspects of the computer
itself. Utilities aren’t work processors, in other words: they’re Mac processors.
We are, we’ll confess, utility junkies. Maybe it’s part of that male technology
thing, that we love tinkering with our computer almost as much as we love
using it. In the Mac world, there’s an unspoken social hierarchy: The person
who has the most little startup icons appearing across the bottom of the
screen is the coolest.
The Mac has hundreds of utilities. Many are sold by established software
companies; many more are shareware, and some are free. Here are a few of
the major utility categories:
■Hard disk defragmenters and file-recovery programs
■Antivirus software
■Macro software
■Screen savers
■File-management utilities
■File-compression programs
■Font/DA managers
■Screen-capture programs
■Colorizer/customizers
4040-8/5 ch22.F 11/4/98 11:22 AM Page 837

Once you have all this stuff going, there’s one more utility you’ll need — an
extension manager, just to manage all your other utilities!
We’ve included examples of most of these utilities on the CD-ROM that
accompanies this book (see the appendix).
Hard Disk Repair and Recovery Software
Let’s get this straight: Preventive action on your part is much better than
any hard drive repair or file-recovery software. Check out our preventive-
maintenance schedule in Chapter 8, which we guarantee will reduce the
likelihood of disaster. Chapter 8 also contains our thoughts on hard disk
formatting, defragmenting, and partitioning software.
What we haven’t yet discussed is what to do when your drive crashes. In that
event, if you had no backup, get a hard drive recovery program like Norton
Utilities or TechTool Pro. (At this writing, alas, we’re disappointed in Norton;
you wouldn’t be the first to discover that Norton finds something wrong with
every hard drive it checks, even if you’ve just checked yours and Norton
“repaired” it! Furthermore, the company, Symantec, is slow to update the
program, and charges exorbitantly for technical support.)
In any case, such programs offer to try recovering files by their file headers —
in other words, to scour the disk looking for the “footprints” of specific
programs. If the file-type method fails, you can try a complete scan of the
hard disk surface in search of anything that looks like a file. After a long time,
you see a list of hundreds of files.
Now you’re in for an emotional roller-coaster ride. You’ll discover that not
every listed file is marked “recoverable.” Sometimes unimportant files are
recoverable, but your vital ones aren’t. Worse, sometimes you recover a
“recoverable” file, only to find out that, when opened, it contains a screenful
of gibberish.
Fortunately, Apple is lessening the need for hard-drive repair programs.
Staring with Mac OS 8.5, the Mac launches its own disk-repair program, Disk
First Aid, automatically whenever you’ve had a system crash, catching
imminent drive-directory problems in the bud.
Still, having hard-drive recovery software on hand is a terrific thing.
Disk Utility Secrets
■
When 1,400K isn’t enough
Ever try to use one of those disk-recovery programs (Norton et al.) and discover
that you can’t create an “emergency floppy” from which to operate on your dead
hard drive? Even the most stripped-down System 7.5 folder won’t fit onto a high-
density floppy — let alone Mac OS 8 or later.
OS
8.5
838 Part III: Application Secrets
■ ■
Macworld MAC SECRETS • 4040-8/5 • ch.22.F • Chapter 22 • FINAL • VB • 11/03/98 • p.838
4040-8/5 ch22.F 11/4/98 11:22 AM Page 838

Here’s the sure-fire, brilliant solution. If your Mac can be started up at all, create
a
RAM disk
(as described in Chapter 9). Because you can make the RAM disk any
size you want, make it large enough to hold the System Folder
and
the recovery
program — and start up from that! (See Chapter 9 for step-by-step instructions.)
Automatic backups with SpeedDoubler
SpeedDoubler, a utility from Connectix, has plenty of useful features. But one of
the best, we think, is heavily
under
hyped: you can set up
automatic
copies that
take place at prespecified times. We can think of no simpler way to set up
automatic, middle-of-the-night backups.
To set them up, open the SpeedDoubler control panel. Click the Copy Agent tab,
making sure that the Copy Scheduling Enabled checkbox is on. Click Add; in the
resulting dialog box, you can specify what, where, how, and when you want the
program to perform your backups.
Retrospect secrets
All this talk of disk-recovery software is fine, but it would be nearly unnecessary
if you maintain a good backup of your hard drive. That’s a good argument for
owning
backup software
before you buy recovery software.
If you have Mac OS 8.5 or later, you already have a simple backup program: File
Synchronization, a control panel described in Chapter 4.
For more control, automated backups, or other special features, upgrade to
Dantz’s Retrospect program. And while you’re enjoying it, enjoy these secret
features:
■As with FileMaker and AppleWorks (ClarisWorks), you can prevent the
program from asking, “Are you sure?” when you’re deleting or duplicating
something if you press Option while clicking the Delete or Duplicate button.
■Every button in Retrospect’s main Directory window can be triggered by
pressing a two-letter combination. For example, in the Immediate
operations panel, type
I
-
B
(“immediate backup”) instead of clicking the
Backup button.
■Retrospect 3 was code-named “Peary”; in it, a history lesson lurks —
if you know how to find it. First, choose About Retrospect from the Ú
menu. In the resulting window, click the Credits “tab” to see the three-
minute display of scrolling programmers’ names.
But if you Option-click the Credits tab, instead of credits, you see the
handsome mug of Sir Robert Edwin Peary, Arctic explorer. His head
will eventually scroll off the screen, to be replaced by a complete scrolling
history book chapter about his life and accomplishments (see Figure 22-1).
OS
8.5
Chapter 22: Utilities, Macros, and AppleScript 839
■ ■
Macworld MAC SECRETS • 4040-8/5 • ch.22.F • Chapter 22 • FINAL • VB • 11/03/98 • p.839
4040-8/5 ch22.F 11/4/98 11:22 AM Page 839
Figure 22-1: Explore your copy of Retrospect, and you’ll be rewarded with another explorer.
Virus Protection
We’ll be straight with you here: We don’t use virus protection. Oh, we have
Disinfectant on hand to check out things when things get suspicious. (So do
you — it came with this book.)
But we can count on zero fingers the number of people we know who have
actually lost data to a virus. Oh, sure— we know people who’ve had
computer viruses. According to a Macworld poll, about 8 percent of Mac
users have had infections. There have been about ten widespread Mac
viruses. But almost all of these have been harmless, just gumming up the
works without destroying data.
Where viruses live
Except for Word macro viruses (see the sidebar “Word macro viruses”), you
can’t get a virus from a document. All true viruses can do their dirty work only
by infecting an application — and can’t spread unless you launch that program.
And guess what else? A disk can’t be infected if it’s locked. No way, no how.
That’s nice to remember when you’re taking a disk to somebody else’s Mac to
give them a file from your Mac: If your Zip or floppy is locked, the other
person can copy stuff off of it, but no virus can invade your disk.
You don’t have to be concerned about files you download from America Online
or from any commercial Internet site (such as software-company Web sites).
In fact, there are only a couple of ways that a virus can travel to your Mac:
■Aboard a floppy disk or cartridge brought to you by a friend
■From an Internet site not run by a commercial entity
Mac Basics
840 Part III: Application Secrets
■ ■
Macworld MAC SECRETS • 4040-8/5 • ch.22.F • Chapter 22 • FINAL • VB • 11/03/98 • p.840
4040-8/5 ch22.F 11/4/98 11:22 AM Page 840

Software protection
The commercial packages, such as Virex, Norton AntiVirus, and VirusScan,
have three functions. First, they can determine whether your disk is infected
by any known virus (including macro viruses). You can download updates
that let these programs detect new viruses that come along. Second, they can
cure your disk of most of these viruses, putting you back in business with no
side effects. These programs can be told to scan every floppy disk you insert,
so that you’re essentially protected against getting viruses through the
floppy drive. (Man, do we find that floppy-disk scanning annoying.)
But Disinfectant does all of that, too (except for the downloadable updates
part). It’s free. It has a virus-watchdog INIT and a seek-and-destroy
application, just like Virex or SAM. As of 1998, author John Norstad has
officially quit updating it — he couldn’t compete with the rafts of Word macro
viruses — but even in its most recent form, it’s all we’ve ever needed. And
you already own it; it’s included on the CD-ROM with this book.
For much more detailed and superbly written information on viruses, read
the online instructions that come with Disinfectant.
The AutoStart Worm
As this book was going to press, the first virus worth even mentioning began
rearing its head: the so-called AutoStart or HongKong virus (or worm). At its
worst, this virus can corrupt some of your files — an extreme rarity in the
Macintosh virus world.
Chapter 22: Utilities, Macros, and AppleScript 841
■ ■
Macworld MAC SECRETS • 4040-8/5 • ch.22.F • Chapter 22 • FINAL • VB • 11/03/98 • p.841
TRUE FACT
In our general pooh-poohing of the virus threat,
we’re not including Microsoft Word macro
viruses. These miniature, automated viruses are a
particularly widespread and annoying little strain.
Macros (including these viruses) live in Word 6
and Word 98 documents (as well as Excel
documents), and can even get transferred from
Windows to the Mac — which is why they’re
suddenly so prevalent. The commercial Mac virus
programs can hunt down and kill many strains of
Word macro viruses — but because macros are
so easy to write, and because there are so many
zillions of macro viruses floating around, such
programs aren’t a complete solution.
We’re rather fond of Word 98’s simple but clever
method of dealing with macro viruses, actually.
When you open any document that contains
macros — of any sort — an alert box appears.
You’re offered the chance to open the document
with or without the attached macros.
The beauty of this system is that it lets you keep
safe macros — that is, macros that exist in your
own documents. But when you open a Word
document you’ve received from somebody else,
one click eliminates any macros that were
attached to it — and with them, any chance that
a virus survives.
Word macro viruses
4040-8/5 ch22.F 11/4/98 11:22 AM Page 841

Still, we refuse to get our knickers in knots over this virus, especially because
it’s so easy to deal with:
■It only affects PowerPC-based Macs.
■You can prevent getting infected incredibly easily: Just open your
QuickTime Settings control panel and turn off the CD-ROM Auto-Play
option. (If you don’t have this control panel, you can’t get infected.)
Best of all, it’s perfectly OK to leave “Enable Audio CD AutoPlay” — the
only option you’d ever really care about—turned on. You can’t get
infected by the AutoStart worm if music CD auto-play is turned on.
■You can eradicate it, even once you’re infected, with Virex, Norton
Antivirus for Macintosh, or WormScanner (included on this book’s
CD-ROM).
■You can also eradicate it yourself. First, start up the Mac with extensions
off. Use your Find program to locate and trash the invisible files called
Desktop Print Spooler and DB; see Chapter 3 for instructions on locating
invisible files. (Don’t delete the real, non-invisible Desktop Printer
Spooler file.)
Make sure the CD-ROM AutoPlay option is turned off in your QuickTime
Settings control panel, then restart. (Unfortunately, this process only
eliminates the virus from your system— it doesn’t repair any files that
have already been damaged.)
Macro Software
Now we’re talking. We consider a macro program absolutely essential!
OneClick (included on this book’s CD-ROM), QuicKeys, Tempo II, and
KeyQuencer are macro programs. Macros let you be lazy. By performing
tedious, repetitive, boring tasks you usually have to do yourself, a macro lets
you sit back while it types the date, sorts your database, or backs up your
hard disk. This puts some workload back where it belongs: in the hands of
your computer. All you have to do is press a keystroke of your choice, and
the macro program takes over. If you’re not already using macros, you’ll be
amazed at how much effort you can save.
842 Part III: Application Secrets
■ ■
Macworld MAC SECRETS • 4040-8/5 • ch.22.F • Chapter 22 • FINAL • VB • 11/03/98 • p.842
MACINTOSH SECRET
Disinfectant has one of the most entertaining
hidden surprises of all. Just choose About
Disinfectant from the Apple menu and wait.
Bonus Secret: If you’d like to hear the entire song,
without being rudely interrupted by the foot, keep
the mouse button pressed in the menu bar.
The anti-viral About box
4040-8/5 ch22.F 11/4/98 11:22 AM Page 842

Here, for example, are 25 of the tasks for which we have macros. Remember,
we press one key to trigger each of the following:
1. Apply a certain Finder label to every file modified in the last week
2. Empty the Trash
3. Arrange palettes the way we like them
4. Change tools (PageMaker, Photoshop, Quark . . . )
5. Choose common font/size combinations
6. Convert database formats (“Smith, J.” to “J. Smith”)
7. Type today’s date
8. Drag top application window to bottom of screen
9. Go to the Finder and hide all other programs
10. Eliminate extra spaces between the sentences of a document
11. Go to end of a word-processing file
12. Type a standard phrase for answering e-mail (“Thanks for asking about
the next edition of Mac Secrets. I thought I’d take this personal moment to
tell you that it’s well under way, and should be available by . . . ”)
13. Jump to a specified folder when we Open or Save
14. Launch Excel
15. Make the Esc key work like a left-handed Delete key
16. Make the PowerBook’s hard drive stop spinning
17. Mount an AppleShare volume (disk)
18. Turn off AutoGrid when launching ClarisWorks/AppleWorks
19. Print only page 1 of something
20. Restart the Mac
21. Save every ten minutes
22. Turn off the Mac’s sound
23. Select Text Offset for a graphic (PageMaker)
24. Separate the area codes of phone numbers into two database fields
25. Strip linefeeds and funny characters from downloaded text
The key to using a macro is this: Whenever you find yourself doing anything
for the second or third time, and you anticipate doing it a few more times,
make a macro to do it. You certainly have enough keys to go around. When
you consider that Shift, Option, Control, and Ôcan be mixed in any
combination with any keys, that gives you just about 2,000 possible
keystrokes that can trigger macros—per application!
Chapter 22: Utilities, Macros, and AppleScript 843
■ ■
Macworld MAC SECRETS • 4040-8/5 • ch.22.F • Chapter 22 • FINAL • VB • 11/03/98 • p.843
4040-8/5 ch22.F 11/4/98 11:22 AM Page 843
Macro Software Secrets
■
Universal versus local
(Tempo, QuicKeys, OneClick)
You have one set of macros that works no matter which program you are in.
They constitute the Universal keyset. These are the macros that shut the Mac
down, convert your straight quotes to curly ones, and type today’s date.
You have another set of macros in each individual application. These “local”
macros
override
any Universal ones that you have assigned to the same
keystrokes. When you define an application-specific keystroke, macros warn you
that you’re using the same key combination as a Universal macro. You can just
click OK and continue on your way.
This override feature can be useful in a number of instances. The primary
example is smart quotes. Use Universal macros (the predefined QuicKeys called
QuickQuotes and Double QuickQuotes) to give you curly quotes everywhere you
can type: in file names, in your Note Pad, everywhere.
But there are some programs where you
don’t
want those QuickQuotes macros
to do their thing. You don’t want to use any curly quotes when you’re sending
e-mail, because curly quotes get converted to
U
s and
R
s when they’re received
by non-Mac computers (including the mainframes that run CompuServe, GEnie,
and the Internet). You also don’t want QuicKeys to do your curly quotes in Word
because Word’s
own
smart quotes are
smarter
than the QuicKeys quotes. (See
“Curly quotes” in Chapter 28 for our logic.)
Use your launch macro to make a program active
You can launch any program on your hard drive by pressing its macro key. But that
key’s usefulness doesn’t stop there. When you’re running several programs at
once, pressing that same key will also
bring forward
the program it originally
launched.
(Of course, if a convenient way to switch open programs is all you’re after, the
terrific Program Switcher, provided on the CD-ROM with this book, is all you need.)
Quick transposed-letters fix
When inspiration is flowing and you’re typing madly, you may inadvertently
transpose two typed letters, resulting in a word such as “adn” instead of “and.”
A macro program is ideal for fixing such a goof.
Place the insertion point just after the scrambled pair. Start your macro program
recording the following sequence: Shift-left arrow (to select the second letter)
and Ô-X (to cut it). Use the left-arrow key (to move the insertion point before the
first letter) and Ô-V (to paste it). Then use right-arrow key, spacebar (to be ready
for subsequent typing).
844 Part III: Application Secrets
■ ■
Macworld MAC SECRETS • 4040-8/5 • ch.22.F • Chapter 22 • FINAL • VB • 11/03/98 • p.844
4040-8/5 ch22.F 11/4/98 11:22 AM Page 844
When you fire off this macro, fixing those transposed-letter typos becomes
second nature. (Hint: You can use the same logic to create macros that insert
quotes or parentheses around a piece of selected text.)
The left-handed Delete key
As we’ve mentioned elsewhere, one of the most powerful efficiency advances
you can make on your Mac is to change the Esc key on your keyboard to be a
Delete key. You’ll quickly discover that editing — for a right-handed person — is
far quicker and easier if you can keep one hand on the mouse and use the other
to press your new Delete key.
Mapping the Esc key to the delete function is easy with QuicKeys or OneClick
(included on the CD-ROM with this book). In QuicKeys, use an alias keystroke; in
OneClick, just record a single press of your actual Delete key — and then assign
it as described in “OneClick Crash Course,” in the next section.
Moved to new address
We’ve got more to say about macro programs — QuicKeys, Tempo, and
KeyQuencer — but then, we’ve got much more to say about everything. To make
room for our expanded AppleScript, OneClick, and MacsBug discussions, we’ve
moved our QuicKeys/Tempo/KeyQuencer Secrets to the electronic edition of
Macworld Mac Secrets, 4th Edition
(on the CD-ROM that came with this book).
The OneClick Crash Course
Why do Mac veterans have such a love affair with OneClick, the macro/
toolbar-building program that WestCode Software, against all business sense,
decided to give away with this book?
Chapter 22: Utilities, Macros, and AppleScript 845
■ ■
Macworld MAC SECRETS • 4040-8/5 • ch.22.F • Chapter 22 • FINAL • VB • 11/03/98 • p.845
MACINTOSH SECRET
You may think that QuicKeys, OneClick,
KeyQuencer, and Tempo are the domain of
advanced users. Technically, you’re right.
But they’re also great for a wide-eyed beginner,
because macros can reduce the number of
steps you must remember.
One woman we know is a book author who’s
absolutely stricken whenever she contemplates
using a computer. Yet, at her publisher’s urging,
she got herself a PowerBook. We set up a
macro for her: When she presses Control-S, the
macro saves her work, automatically copies her
manuscript folder onto a backup floppy disk
(which lives, permanently, inside the floppy
drive), and then puts the laptop to sleep.
Her data is safe, and she doesn’t even know it.
Macros for Mac virgins
4040-8/5 ch22.F 11/4/98 11:22 AM Page 845
Maybe because OneClick does cool things no other macro program can do
(toolbars with pop-out labels, macros that generate other macros, and so on).
Maybe it’s the canned system enhancements that come ready-made when you
install the program: the System Bar (like a smarter Control Strip — it even
accepts Control Strip modules), the Launch Strip and Task Bar (like Mac OS
8.5’s application-launching palette, but infinitely more flexible), and so on.
Or maybe it’s the hundreds of add-ons written by OneClick devotees all over
the Internet, all available for free downloading from www.WestCodeSoft.com:
add-ons that search the Web, change file types (see Chapter 15), produce pop-
up calendars, add WYSIWYG font menus in all your programs, track job/client
time, and so on. (Many OneClick users never write their own macros, using
only the goodies that come with the program or can be downloaded.)
Most people think that OneClick is a toolbar program; after all, in its design,
OneClick is indeed very toolbar-oriented. Its toolbars are the ultimate in
flexibility — they can be any color, size, shape, orientation, with picture or
text buttons, and so on (see Figure 22-2). But even if you’re a toolbar loather,
don’t give up on OneClick. It’s perfectly possible to use OneClick without ever
having a toolbar touch your screen.
Figure 22-2: OneClick palettes can look like anything you can imagine.
Recording the macro
In any case, here’s the basics of creating a new macro in OneClick. Suppose
you want a new keystroke that saves the currently open document onto the
Desktop, where you’ll easily be able to find it again. Here’s how you’d create
this macro using OneClick.
1. Open OneClick by choosing OneClick Editor from the OneClick menu
(see Figure 22-3).
The Editor appears, also as shown in Figure 22-3.
Click the Palette tab, if necessary, and then check out the pop-up menu at
the lower right. Its commands let you create a palette containing macros
that work in all programs (Global) or one that works in only one specific
program (Applications).
2. Choose New Palette ➪New Global Palette.
In OneClick parlance, a palette is a group of macros (whether it’s
represented on the screen by a toolbar or not). An empty gray palette
appears on your screen.
3. Close the Editor window. To start recording your new macro, Ô-Option-
click anywhere in the palette and choose Record from the pop-up menu.
846 Part III: Application Secrets
■ ■
Macworld MAC SECRETS • 4040-8/5 • ch.22.F • Chapter 22 • FINAL • VB • 11/03/98 • p.846
4040-8/5 ch22.F 11/4/98 11:22 AM Page 846
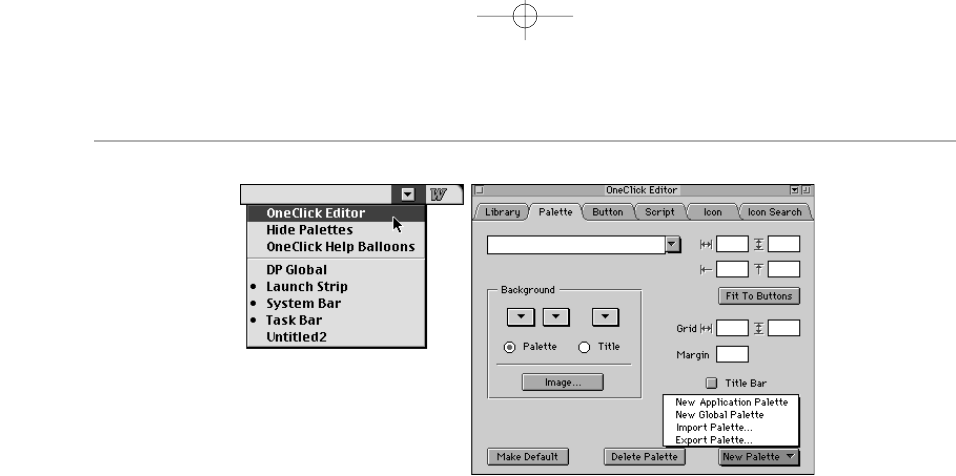
Figure 22-3: Choose from the OneClick menu (left) to open the Editor (right).
OneClick indicates that it’s recording by making the button blink along
with a microphone icon at the top of your Úmenu.
4. Do whatever it is you’ll want your OneClick macro to do.
In this case, choose File ➪Save As, and then click the Desktop button.
5. Stop recording by choosing Stop Recording from the OneClick menu
(or by clicking the blinking button on your new palette).
Click the Cancel button in the Save As dialog box that opened in step 4.
Cleaning up the macro
If you now click the tiny square button on your blank palette, OneClick will
repeat the Save As/Desktop process perfectly (and fast).
However, the macro isn’t doing much good, represented as it is by a blank
button on a blank palette. It would be much more useful if you could assign a
keystroke to it— and a button label.
To do so, Ô-Option-click your empty blank button. The OneClick Editor
appears with the Button tab already clicked; this is the design world for your
new button. Give it a name by typing into the top text box (such as Save to
Desktop). Give it a keystroke by clicking in the Key box and pressing the key,
such as Control-S, you’ll want to trigger the macro.
If you’re a toolbar-hater, close the palette and the OneClick Editor, and you’re
done. The macro works when you press its keystroke, even if its palette isn’t
on the screen. But if you do, in fact, want to trigger this macro in the future
by clicking its button (on its palette), drag and resize the button on its palette
into a pleasing place and shape. Click the Palette tab, where you’ll find all the
controls you need to color, title, and otherwise tailor this palette-in-progress.
Chapter 22: Utilities, Macros, and AppleScript 847
■ ■
Macworld MAC SECRETS • 4040-8/5 • ch.22.F • Chapter 22 • FINAL • VB • 11/03/98 • p.847
4040-8/5 ch22.F 11/4/98 11:22 AM Page 847

Further info
The OneClick manual that accompanies the software (on this book’s CD-ROM)
shows you hundreds of additional ways to put OneClick to use. And if you really
get into it, you can learn the scripting language that lets you take OneClick well
beyond its traditional role as macro program and toolbar builder.
OneClick Secrets
■
Keystrokes worth memorizing
In addition to the keystrokes
you
define (for your OneClick macros), OneClick
comes with some useful predefined keys of its own. For example:
Shift-Option — Point to any palette button to make a help balloon pop out,
identifying that button.
Ô-` — Hides or shows all your OneClick palettes.
Ô-Option-click — Produces a contextual pop-up menu when you click any palette
or button (offering such choices as Button Editor and Script Editor).
Secrets of the add-ons
OneClick comes with a million predefined toolbars, macros, and functions, of
course, and you can create a million more of your own.
But one of the best ways to get mileage out of OneClick is by using the add-ons
made by
other
people, such as those provided with this book in the OneClick
Add-Ons folder. Installing them, however, isn’t exactly a drag-and-drop operation.
Here’s how you do it.
Launch the program to which the macro will apply; for example, if this is an
e-mail processing add-on, launch Eudora or Emailer. Open the OneClick Editor
and click the Library tab. From the pop-up menu, choose Open Library; then
navigate to, and select, the add-on you want (such as Emailer Archiver).
A button now appears there on your Library screen, which you can then drag
directly onto any new palette you create in the current application. Button installed!
The AppleScript Crash Course
AppleScript is the Apple technology — built into every system software
version since 7.5 — that lets you automate Mac activities more directly than
standard macro software. Companies that process a lot of data in repetitive
848 Part III: Application Secrets
■ ■
Macworld MAC SECRETS • 4040-8/5 • ch.22.F • Chapter 22 • FINAL • VB • 11/03/98 • p.848
4040-8/5 ch22.F 11/4/98 11:22 AM Page 848

ways — such as newspaper publishers, Web site updaters, or anyone who
answers e-mail or makes backups — have found AppleScript to be a blessing.
AppleScript is the robot that automates workflow.
And AppleScript — #8 on Apple’s list of “50 Mac Advantages over Windows”
(which has no such technology) — is only getting more important. Version
1.3, part of Mac OS 8.5, has been completely rewritten in PowerPC-native form
(which means faster). This new version can control more aspects of the Mac,
including Mac OS 8.5’s new Find by Content feature, Open Transport, Desktop
Printing, and QuickTime. You can now associate AppleScripts with folders,
too, so that dropping a file into a certain folder triggers an AppleScript —
processing it a certain way in Photoshop, for example.
But we digress.
The AppleScript basics
Like QuicKeys and OneClick, AppleScript can record your actions and
reproduce them later. But AppleScript can also do something more —
scripting. A script is a series of text lines containing instructions for the Mac to
perform. As with programming, you, the script author, can’t assume anything;
every little detail must be spelled out. But unlike other computer languages,
AppleScript’s grammar is very English-like: it has verbs, nouns, adjectives,
and prepositions.
Furthermore, if you use the auto-recording feature of the Script Editor program
that comes with every Mac, AppleScript writes the script for you. (You can
even see the lines of instructions appearing in the Script Editor as you perform
the steps.) You can edit the recorded script when you stop the recording
function. When you then execute the script, your Macintosh performs your
recorded actions automatically. You can save the scripts either as documents
to edit later, as double-clickable, self-running applications (called applets), or
as commands in a special menu on your menu bar.
A script is much more powerful than a standard macro because it can be
much more specific. A certain script can grab specific text from a specific
field of a database, or highlight and chart a specific range of database cells,
and so on — automatically.
There’s only one catch: The programs you use must be AppleScriptable.
Fortunately, most of the Big Kahunas are, especially in publishing and Web
development: QuarkXPress, FileMaker, Word, Excel, ClarisWorks/AppleWorks,
Emailer, Canto Cumulus, SoftWindows 95, Timbuktu Pro, StuffIt Deluxe,
BBEdit, CodeWarrior, Eudora, Navigator, Fetch, Anarchie, Tango, RealAudio
Encoder, WordPerfect 3.1, Acrobat, PhotoFlash, DeltaGraph, JPEGView,
Informed, and StuffIt are among the many that are ready to submit to your
every automated command. In Mac OS 8.5 and later, an increasing number of
OS programs are also scriptable, including all networking components, the
Apple System Profiler, ColorSync, File Exchange control panel, Location
Manager, the Find program, and the printing software.
And — oh, yeah: the Finder is AppleScriptable, too. But we’ll get to that.
OS
8.5
Chapter 22: Utilities, Macros, and AppleScript 849
■ ■
Macworld MAC SECRETS • 4040-8/5 • ch.22.F • Chapter 22 • FINAL • VB • 11/03/98 • p.849
4040-8/5 ch22.F 11/4/98 11:22 AM Page 849
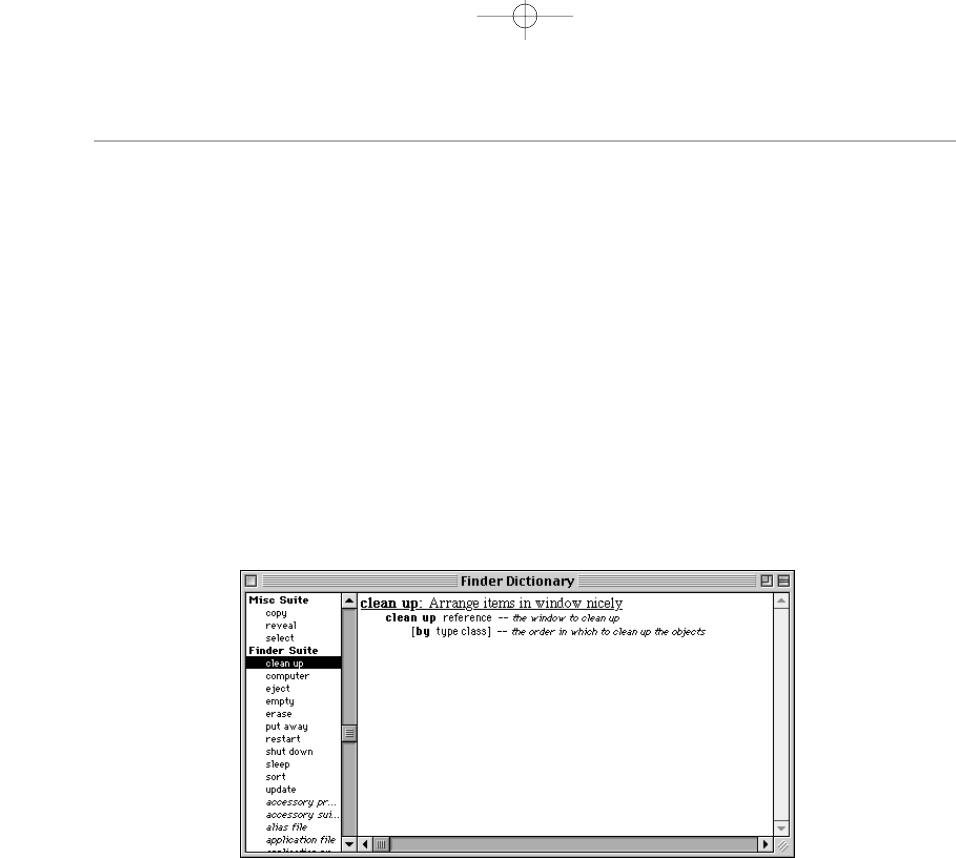
Is it scriptable?
All programs can be told, by AppleScript, to launch, quit, print, or open a file.
These four commands are known as the Required Suite, and no program
leaves home without them.
But to be genuinely scriptable, a program needs to understand a far longer
list than four measly verbs. That’s where the Dictionary comes in: it’s a list of
commands that an AppleScript can issue to control the program in question.
Opening a program’s Dictionary (and therefore finding out whether or not a
certain program is scriptable) is easy. Launch the Script Editor program (it
came in your Apple Extras folder on your hard drive, and usually comes
preinstalled in your Launcher, too). Choose File ➪Open Dictionary. Navigate
to, and open, the program you’re considering controlling with an AppleScript.
As shown in Figure 22-4, a tall, skinny list of simple English commands opens
now. Click one to see a screen that describes its correct usage.
Figure 22-4: If you open the Finder’s Dictionary, you see that almost every aspect of your
desktop activities can be controlled with AppleScript nouns (always shown in italics) and
verbs. Click an item in the list (left) to see the rules of its syntax (right).
Your first AppleScript
AppleScripts can do all kinds of incredible things: Transfer Emailer messages
into a FileMaker database; automate the placement of weekly changing
graphics at a newspaper; publish frequently updated FileMaker data to the
Web; and so on. (In its own quiet way, AppleScript is one of the things that
has made the Mac such a dominant force on the Web.)
But let’s start with something simpler. Before Mac OS 8, Apple cleverly
included a Shut Down command in the Úmenu. Thanks to that command,
novices didn’t need to freak out when in ClarisWorks, for example, unable to
find the real Shut Down command (because the Special menu isn’t visible
when you’re in another program).
850 Part III: Application Secrets
■ ■
Macworld MAC SECRETS • 4040-8/5 • ch.22.F • Chapter 22 • FINAL • VB • 11/03/98 • p.850
4040-8/5 ch22.F 11/4/98 11:22 AM Page 850
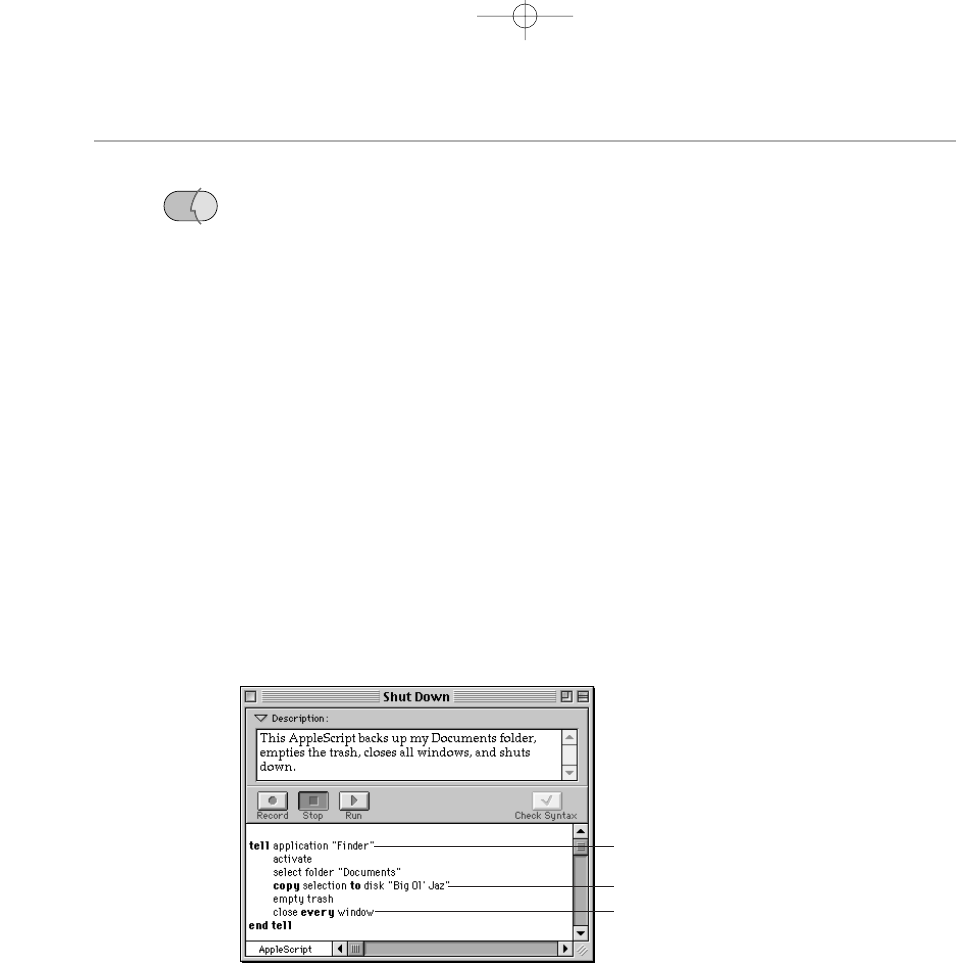
In Mac OS 8 and later, though, that command is gone from the Úmenu. (We
guess it’s because pressing the power key on the keyboard can shut down all
modern Macs.) Here’s a little AppleScript that puts that command back
where it once was—in a smarter, quicker form. Instead of just shutting down,
this easy-to-write AppleScript also backs up your Documents folder, closes all
windows, empties the trash — and then shuts down.
Before you start, set things up. Insert a backup disk into your Mac. If you
don’t have a Documents folder, create one for this exercise. Open a couple of
windows, too, and put something dispensable into the Trash. Now you’re
ready to roll.
1. Launch the Script Editor. As you can see from Figure 22-5, it’s got simple
tape-deck controls: Record, Stop, and Run.
2. Click Record. Switch to the Finder and drag your Documents folder to the
backup disk. Empty the Trash. While holding down the Option key, choose
Close All from the File menu. (For now, don’t actually shut down; you’ll add
that step manually in a moment. We’re trying to spare you the hassle of
having to shut down and restart every time you test your script!)
As you go, you can see the commands building up in the Script Editor
window (see Figure 22-5).
Figure 22-5: An AppleScript under construction. Note that every script begins and ends with a
Tell command (A), which identifies the application that’s supposed to respond (in this case, the
Finder). This script goes on to make the Finder the active program, to select the Documents
folder, drag it to a backup Jaz (B), empty the trash, and close all windows. Note that the program
automatically puts AppleScript generic keywords in bold, and the terms specific to the task at
hand in non-bold (C).
Pretty cool, eh? You’re a programmer now, pal.
Choose Save from the File menu. Save this script onto your desktop as, for
example, Shut Down Plus. From the Kind pop-up menu, choose Application—
and check the Never Show Startup Screen checkbox. If you examine your
desktop, you’ll see a new icon there—the little program (applet) you’ve
just made.
A
B
C
OS
8
Chapter 22: Utilities, Macros, and AppleScript 851
■ ■
Macworld MAC SECRETS • 4040-8/5 • ch.22.F • Chapter 22 • FINAL • VB • 11/03/98 • p.851
4040-8/5 ch22.F 11/4/98 11:22 AM Page 851

Debugging your script
If you double-click the Shut Down Plus icon, however, you’ll discover an
unfortunate fact of programming life: you’ve got a bug in your program. The
script tries to copy your Documents folder to the Jaz again — but discovers
that there’s already a folder called Documents on the Jaz. And the program
halts in midstream. The blinking icon at the upper-right corner of your screen
tells you to go to the Script Editor, where, sure enough, an error message lets
you know the problem. Click the Edit button.
You must now tell your script that it’s OK to overwrite the Documents folder
that’s already on the Jaz. After all, you’ll probably be running this script (and
backing up) daily, so you’ll definitely want your current Documents folder to
replace yesterday’s copy on that Jaz.
This is the part where you’d have to learn more about AppleScript, reading
the help materials at www.scriptweb.com and applescript.apple.com, maybe
cracking open a book or two. After a bit of digging, you’d find out that you
can make your AppleScript go ahead and overwrite an existing folder of the
same name by making these two changes:
■Add the phrase with replacing at the end of the Copy instruction. That
pair of words is AppleScript code that means: “If the folder is already on
the backup disk, just replace it.”
■Change the word Copy to Move. Unfortunately, the “with replacing”
instruction works only with the Move command, not the Copy command.
In this case, of course, that’s perfectly OK — the Mac always copies stuff
(instead of moving) when you drag icons from one disk to another.
The result is shown in Figure 22-6.
Figure 22-6: The finished script includes the shut down command and the it’s-OK-to-replace-
a-folder command.
And while we’re manually editing our script, let’s add that Shut Down
command at the end of it — so that from now on, this applet will truly shut
852 Part III: Application Secrets
■ ■
Macworld MAC SECRETS • 4040-8/5 • ch.22.F • Chapter 22 • FINAL • VB • 11/03/98 • p.852
4040-8/5 ch22.F 11/4/98 11:22 AM Page 852

the Mac off after doing its housekeeping duties. Hmm . . . wonder what the
correct AppleScript command for “shut down” is?
Let’s find out. From the File menu (of Script Editor), choose Open Dictionary.
Navigate to your System folder and open the Finder, as you did earlier (see
Figure 22-4). Scroll down far enough, and you’ll spot the command you’re
after: shut down. Who would’ve guessed?
Return to your script window. Type shut down on a line just before the end
tell command. Note that when you press Enter, the typeface changes to
match the other neatly lined up commands in your script; you’ve just
compiled that new line (made it part of the working script).
When you work on more complex scripts, you’ll become fond of the Check
Syntax button (in the Script Editor window). It analyzes your script and flags
any mistakes, typos, missing words, and so on.
For now, though, you’re essentially finished. Choose Save from the File menu.
Your little Shut Down Plus applet should work like a champ now. Drag it into
your Apple Menu Items folder (in the System folder). (If you want it to appear
at the bottom of the Úmenu, like the old •Shut Down command, precede
your Shut Down Plus icon’s name with a bullet — •— which you produce by
pressing Option-8.)
How to trigger an AppleScript
Once you’ve written an AppleScript, as you may have discovered in our little
tutorial, you can do several things with it. You can save it as a standalone,
double-clickable applet, which, like many AppleScripters before you, you can
stash in your Úmenu.
Unfortunately, when you choose an AppleScript from your Úmenu, the
AppleScript runs — and then leaves you in the Finder, instead of the original
program. If such a thing bothers you, one solution is OSA Menu, a free
extension (included with this book) that puts a new menu on your menu bar
(next to the clock). Choose a script’s name from this menu to launch it.
Another solution: if you have Mac OS 8.5 or later, you can create a folder
action — an AppleScript that’s automatically triggered when you open, close, or
move icons into or out of a particular folder. (A folder to which you’ve applied
an AppleScript displays a special icon.) To do so, Control-click the folder in
question and choose “Attach a Folder Action” from the contextual menu; in the
dialog box that appears, locate the AppleScript you want associated with that
folder. (A sample set of folder-action scripts comes with Mac OS 8.5, in the
System Folder, in the Scripts folder, and in the Folder Action Scripts folder.)
You can also trigger an AppleScript by pressing a key or clicking a button
using OneClick, which is included with this book. When creating your macro
in the OneClick Editor, click the Script tab and then type AppleScript “Shut
Down Plus” (or whatever the name of your AppleScript is). OneClick will
automatically trigger the named AppleScript when you click the corresponding
OS
8.5
Chapter 22: Utilities, Macros, and AppleScript 853
■ ■
Macworld MAC SECRETS • 4040-8/5 • ch.22.F • Chapter 22 • FINAL • VB • 11/03/98 • p.853
4040-8/5 ch22.F 11/4/98 11:22 AM Page 853

OneClick button — or press the corresponding keystroke. (You can also
embed the actual text of an AppleScript script right in the middle of a
OneClick script, as explained in its manual.)
What to do with AppleScript
This was a simple (although useful) example, of course. If you’re interested in
pursuing AppleScript, open some professionally written scripts in Script
Editor (such as those in your System folder ➪Apple Menu Items folder ➪
Automated Tasks folder) and study how they were done. Visit the Web sites
listed a few paragraphs back. Read and try the AppleScripts we’ve provided
on the CD-ROM with this book. (We’re especially fond of the Desktop Pictures
slide show.) Try out Scripter (from Main Event), an AppleScript-writing
program that makes Script Writer look like it’s for kindergartners.
You can also use AppleScript to combine features of application programs.
For example, a script may use the calculation capabilities of a spreadsheet
and the formatting capabilities of a word processor to assemble an invoice.
AppleScript is not for everyone; beginner Mac users may find the scripting
concept intimidating. The recording features are good for setting up the
automation of routine tasks, but customizing those tasks to operate on
different files, or with other applications than those originally recorded,
means editing the script.
Screen Savers and Screen Grabbers
Thousands of people live long, happy lives without using either screen savers
or screen-capture utilities. The rest, however, can’t get along without such
programs. Here’s what you need to know.
854 Part III: Application Secrets
■ ■
Macworld MAC SECRETS • 4040-8/5 • ch.22.F • Chapter 22 • FINAL • VB • 11/03/98 • p.854
MACINTOSH SECRET
It’s only natural that a program intended for novice
programmers should have Apple programmer
humor embedded in it. You’ll see: Launch the
Script Editor (which comes with System 7.5 and
later). Choose About Script Editor from the Ú
menu. Then, while pressing the Control key, click
the icon (or the words The Script Editor) to see the
words Dynamic Tofu or Guava Surprise, depending
on your version.Then click the Credits button for a
secret panel of musical credits — in fact, the Toy
Surprise Alternate Credits.
Our personal favorite is, as Mister Blobbo Sez:
Remember, kids: Time is just Nature’s way of
keeping everything from happening at once.
If you return to the Úmenu, repeat all of the
above with the About AppleScript command. As
they say in Cupertino, “Pure Guava.”
AppleScript surprise
4040-8/5 ch22.F 11/4/98 11:22 AM Page 854

Screen savers
A screen saver blanks the screen after a few minutes of inactivity on your
part. To signal you that the computer is still on, however, a screen saver must
bounce some moving image around the screen. The programmers figure: If
you must display some “I’m still on!” signal on the monitor, you may as well
make it entertaining. That’s why After Dark and similar programs let you
choose from dozens of different displays: fireworks, random patterns,
swirling lines, and, in After Dark, the now-famous Flying Toasters.
Of course, these days, the term “screen saver” is poorly chosen. Screen savers
are actually worse for your monitor than (a) turning the monitor off when you’re
not using it, or (b) setting it up to go to sleep (using, for example, the Energy
Saver control panel). Screen savers continue to exercise the phosphors on your
screen, whereas making the screen completely dark will extend the phosphors’
life. Furthermore, PowerBooks don’t benefit at all from running screen savers.
Even today’s desktop monitors wouldn’t burn in unless you left them on
continuously —unused — for two years, according to monitor engineers.
But screen savers are fun! (We’ve even got a few Screen Saver Secrets; you
can find them in the electronic edition of Macworld Mac Secrets, 4th Edition
(on the CD-ROM that came with this book.)
Screen grabbers
In the early days, Ô-Shift-3 was one of those hidden surprises built into the
Mac by crafty Apple engineers. It takes a snapshot of whatever is on the
screen, creating a PICT file called Picture 1 on your disk, even making a
satisfying camera-esque kachunk sound. This kind of graphic is known as a
screen dump, or, more pleasantly, a screen shot. As magazine and Mac book
writers, we live and breathe screen shots.
Actually, today’s Mac OS 8-and-later Macs offer many powerful variations of
the venerable old Ô-Shift-3 picture-taking keystroke. For example, try these:
■Ô-Shift-4 — Turns the cursor into a crosshair. Now you can drag a cross a
selected region of the screen, capturing only that much in your PICT file.
■Caps Lock-Ô-Shift-4 — Gives you the distinct bullseye cursor. At this
point, you can click inside any window or dialog box, neatly capturing
only that tightly cropped area.
■Add the Control key to any of the combinations above to put the captured
image on the Clipboard instead of saving it as a PICT file on your hard drive.
But despite the improvements in Apple’s screen-grabbing keystrokes, they
still can’t capture certain images — pulled-down menus, for example.
That’s why, if you have any interest in capturing what’s on your screen, we
heartily recommend that you get an actual, specialized screen-grabber
program. Our recommendations are Captivate, Screenshot (commercial
programs), Snapz, or Flash-It, which we used for this book. (As a matter of
fact, Snapz and Flash-It come with this book.)
OS
8
Chapter 22: Utilities, Macros, and AppleScript 855
■ ■
Macworld MAC SECRETS • 4040-8/5 • ch.22.F • Chapter 22 • FINAL • VB • 11/03/98 • p.855
4040-8/5 ch22.F 11/4/98 11:22 AM Page 855

They’re fast, slick, and simple. Press the key combo of your choice, and select
a destination for the captured image— the printer, the Clipboard, a PICT file,
or the Scrapbook. These programs let you capture the whole screen, just a
window, just a menu (even with submenus), or a region you drag across.
Compression Software
You want to back up a file, but it’s too big to fit on a floppy. Or you finally got
a PowerBook, but you’re out of space on the drive in a week. Or you have to
send a file to someone by e-mail, but you’re afraid it will take forever.
What you need is a file-compression program, such as StuffIt. These programs
toy with one of life’s great equations: Time = Money. In other words, you
trade away the time it takes for a compression program to encode your files
into a more compact form.
Different files get smaller, when compressed, to different degrees. Graphics
files (particularly paintings, such as TIFF and PICT files) are among the most
856 Part III: Application Secrets
■ ■
Macworld MAC SECRETS • 4040-8/5 • ch.22.F • Chapter 22 • FINAL • VB • 11/03/98 • p.856
MACINTOSH SECRET
When you get a new compressed file from a
friend or an online service, how are you supposed
to know which program is required to unstuff it?
Here’s a rundown.
■.sit —To open this kind of archive, you need
any one of the following: the commercial
StuffIt Deluxe, the shareware StuffIt Lite,
StuffIt Expander (included with this book), or
the America Online program itself.
■.zip —A Zip file is the Windows equivalent
of StuffIt. Once again, StuffIt Expander can
open it for you.
■.sea —If a file’s name ends in .sea, it’s a
self-extracting archive. It may have been
created by any of the other compression
programs. The .sea suffix tells you that you
don’t even need to worry about which
program created it. A simple double-click
will automatically expand the file. (A self-
extracting archive is always about 15K
larger than a non-self-expanding com-
pressed file. That extra bit of code is what
turns a regular compressed file into a
double-clickable program.)
■.hqx —You got this file from the Internet,
didn’t you? Anyway, it’s a BinHex file. You
can open this file, too, with StuffIt Expander.
■.uu or .uu —Another Internet scheme for
sending files through the Internet as a
bunch of encoded text (because actual files
often can’t cross from one online service to
another). To open it, use, once again, StuffIt
Expander.
■.MIME (Base64) —Yet another Internet
compression format for sending files
attached to e-mails. To open it, use, once
again, StuffIt Expander; see Chapter 27 for
details.
■.dd and .cpt —You need DD Expand (or
DiskDoubler) and Compact Pro (shareware),
respectively, to unstuff these increasingly
rare archive types.
All those names and suffixes
4040-8/5 ch22.F 11/4/98 11:22 AM Page 856

compressible files. A typical, otherwise uncompressed, scanned TIFF file may
take up 1,000K before compression, but only 120K after compression. Word-
processing and database documents also get much smaller.
Printer fonts and sounds are among the files that don’t compress much.
They’re already in an encoded form, so the compression programs can’t find
much redundancy to eliminate. (Screen fonts scrunch down just fine, however.)
Segmenting files
Compression programs like StuffIt solve an age-old (well, 15-year-old) dilemma:
How do you give somebody a file that’s too big to fit on a floppy disk?
Your first thought should be: “I know! I’ll compress it!”
If, after being compressed, the file is still too big, you have to break the
compressed file into floppy disk-sized chunks. All the compression programs
we discussed have Segment and Join commands that do just that. The
Segment commands break up a large file so that the pieces will fit on separate
floppies — and the Join commands sew them back together on the recipient’s
hard drive.
If you’re asked to choose how large the individual chunks (segments) should
be, though, be careful. Remember that an 800K floppy doesn’t hold 800K, and a
1.4MB floppy doesn’t hold 1.4MB. In fact, more realistic sizes for your segments
are about 760K and 1,350K for double-sided and high-density disks, respectively.
Disk Images, DiskCopy, and ShrinkWrap
Years ago, Apple had a problem. It wanted to distribute software via the
Internet. But some of the software it wanted to distribute, such as its
PlainTalk Speech kit, wasn’t just a single control panel; it was a suite of files
— extensions, control panels, and so on— that had to be placed into the right
spots in your System folder. To ensure that all these pieces would go into the
right places, Apple also needed an Installer program. How on earth could
Apple distribute all of these pieces electronically— while still keeping them
together, with an installer, in an arrangement the installer understood?
The solution: Apple created disk images. A disk image (a file whose name
generally ends with the suffix .img) is an increasingly common file format for
downloaded software, especially from Apple. But once you’ve downloaded an
.img file to your hard drive, you can’t do a thing with it— unless you have a
program that can open it.
In this case, the program you need is DiskDup + (shareware), Disk Copy or
Disk Image Mounter (from Apple, available from its Web site) — or the much
superior ShrinkWrap (from Aladdin, and included with this book).
Mac Basics
Chapter 22: Utilities, Macros, and AppleScript 857
■ ■
Macworld MAC SECRETS • 4040-8/5 • ch.22.F • Chapter 22 • FINAL • VB • 11/03/98 • p.857
4040-8/5 ch22.F 11/4/98 11:22 AM Page 857
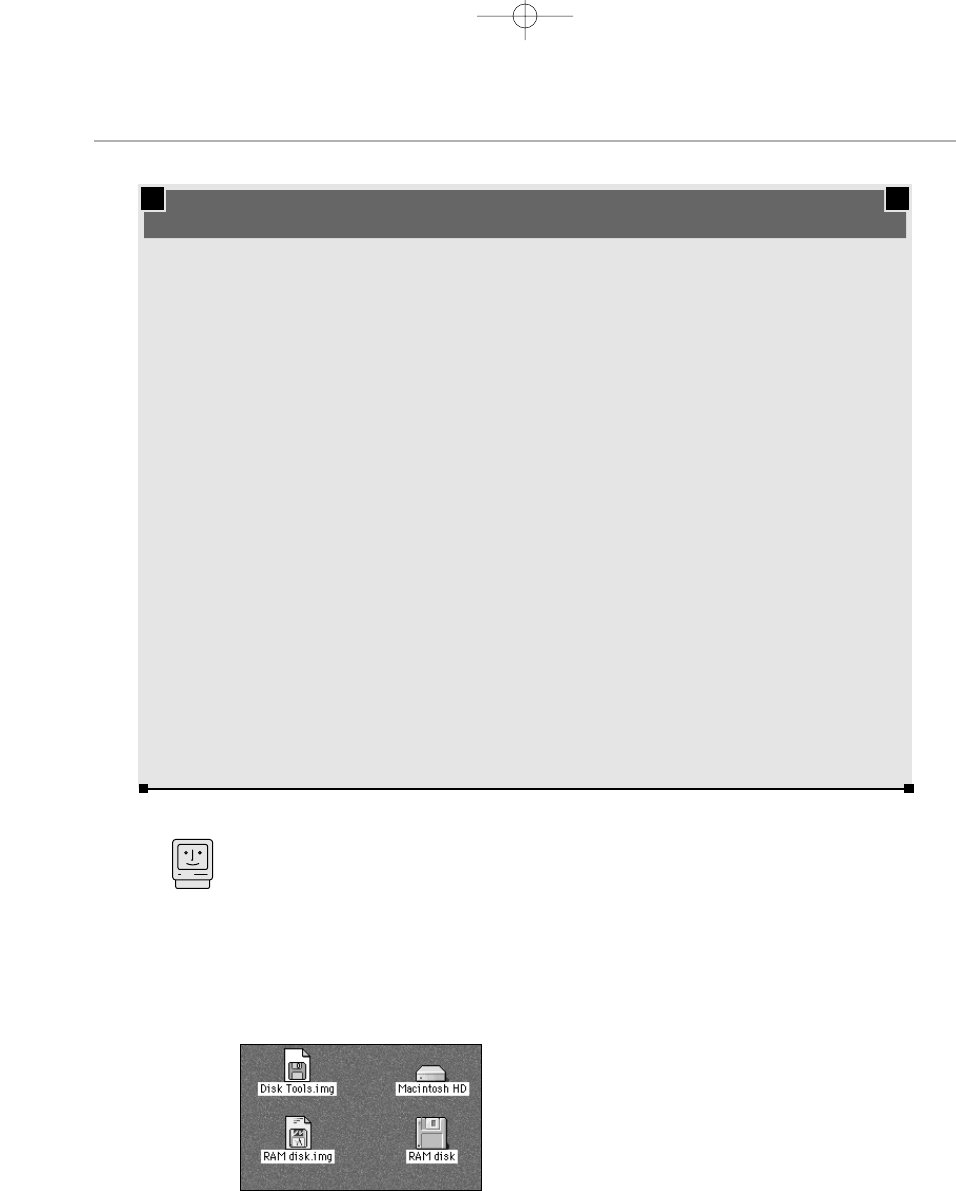
Here’s how you work ShrinkWrap: Whenever you encounter an .img file —
including the Disk Tools floppy-disk “images” that come on the Mac OS 8.5
CD-ROMs — double-click it (if you have Disk Copy) or drag it onto
ShrinkWrap’s icon. That’s it; a “virtual floppy-disk” icon appears on your
screen, exactly as though it’s a real floppy disk (the lower-right icon in Figure
22-7). Double-click it to see what Apple has in store for you—an installer, a
Disk Tools floppy’s contents, or whatever. When you’re finished using the
mounted disk image, drag its icon (not the original .img file!) to the Trash.
Figure 22-7: Clockwise from upper left: a disk image file in Disk Copy format; your hard
drive; a virtual disk (RAM disk) created by double-clicking a disk image file; and a disk image
file in ShrinkWrap format.
Mac Basics
858 Part III: Application Secrets
■ ■
Macworld MAC SECRETS • 4040-8/5 • ch.22.F • Chapter 22 • FINAL • VB • 11/03/98 • p.858
MACINTOSH SECRET
In Chapter 8, we explained the frustrating
inefficiencies of the Mac’s hard drive design
before Mac OS 8.1: the individual blocks on your
hard drive are probably 16K or 32K in size, yet
only one file may occupy a storage block. As a
result, each file smaller than a block wastes the
rest of that space. A 2K SimpleText document, for
example, wastes 30K of space on a hard drive
that has 32K blocks. We said that there’s no way
to resolve the problem except by partitioning your
hard drive into multiple volumes (desktop icons),
each of which will have smaller block sizes, thus
wasting less space — or by formatting your disk
using Mac OS 8.1-and-later’s optional HFS Plus
scheme (see Chapter 8).
If you’re using an older operating system and don’t
particularly feel like erasing your hard drive to
reclaim that wasted block space, we have a better
suggestion: install StuffIt Deluxe 4.5 or later. Its
True Finder Integration feature lets you manipulate
StuffIt archives in the Finder, exactly as though
they were ordinary folders. For example, you can
double-click a compressed StuffIt file called
Little Files.sit — it opens into a window,
exactly as a folder would, displaying all the
compressed files inside. Again, exactly as with a
folder, you can now double-click one of those files
to decompress and open it automatically.
So what’s the significance? Block size! The
Finder considers each StuffIt archive to be a
single file. By stuffing lots of little files — e-mail
messages, Read Me files, and so on — into a
single StuffIt file, you effectively cram multiple
files into a single Finder file, confident that
you’re filling the blocks completely. Using that
2K SimpleText document as an example, you’d
be able to fit about 25 of them into a StuffIt
archive (because StuffIt also compresses them)
that takes up only a single block — only 32K —
instead of leaving them loose on your hard drive,
where, with all the wasted block space, they’d
occupy a total of 800K!
How to outsmart the hard drive at its own game
4040-8/5 ch22.F 11/4/98 11:22 AM Page 858

You can also create a disk image. Why would you want to do so? Maybe you,
like Apple, want to distribute something (a little presentation, for example)
to friends, confident that all pieces will remain in their original folder
configurations. Maybe you haven’t switched to the HFS Plus hard drive-
formatting scheme (see Chapter 8), and you realize that a lot of small files
won’t waste their usual 64K apiece if they’re all stored together on a much
smaller “virtual disk.” (That last sentence will make a lot more sense once
you’ve read Chapter 8.)
Anyway, to create a disk image of your own, just drag a disk or folder onto
ShrinkWrap’s icon. The new .img file is created automatically. (You’re not
limited to creating disk images of floppies, by the way. ShrinkWrap is perfectly
happy to create disk images of entire hard drives, Zip disks, Jaz cartridges, or
whatever; it even offers to compress the contents in the process. As thousands
of teenage software pirates have discovered, that feature makes ShrinkWrap
ideal for creating easily uploaded duplicates of entire CD-ROMs.)
ShrinkWrap/DiskCopy Secrets
■
Unlock it!
Under normal circumstances, the virtual disk and folder icons ShrinkWrap and
DiskCopy put on your desktop are locked; after all, the whole point is generally to
distribute something you’ve created in its original, undisturbed form. But if you
press Shift as you drag an
.img
file onto ShrinkWrap’s icon, your virtual folder or
disk icon generally appears on your desktop in
unlocked
form (depending on the
way the original file was prepared). You can now add or delete icons from it.
You can achieve the same thing in Disk Copy; when you create a new image (by
choosing Image ➪Create Image from Disk, for example), you’ll be offered a pop-
up menu of choices: Read Only (meaning locked) and Read/Write (meaning
unlocked). Follow your heart.
No ShrinkWrap needed — and passwords
ShrinkWrap’s Preferences are worth checking out. Among our favorite features,
for example, is a
self-mounting
option. It lets you create disk-image files that
your friends can open even if they
don’t
have Disk Copy, ShrinkWrap, or a similar
program. A self-mounting disk image is just as user-friendly as, say, a self-
extracting archive, as described earlier in this chapter — just double-click to
mount the “virtual disk” on the screen.
Another great preference: You can opt to protect an archive with a password.
Yes, all you Mac fans who’ve e-mailed us with this question — now you can
protect specific folders on your hard drive from prying eyes. (Remember the
password, though. There’s no “back door” to ShrinkWrap.)
Worth
Learning
Chapter 22: Utilities, Macros, and AppleScript 859
■ ■
Macworld MAC SECRETS • 4040-8/5 • ch.22.F • Chapter 22 • FINAL • VB • 11/03/98 • p.859
4040-8/5 ch22.F 11/4/98 11:22 AM Page 859

To view the preferences, double-click ShrinkWrap itself. Choose Preferences
from the Edit menu.
Or, to change the preferences temporarily — for just a single operation — hold
down the Option key while dragging something onto ShrinkWrap’s icon.
ShrinkWrap: the secret RAM disk program
As Web-surfing fans have discovered to their delight, storing your browser’s
cache
files
(see Chapter 25) on a RAM disk (see Chapter 9) results in a huge speed
boost. As it turns out, the “virtual disks” that ShrinkWrap mounts on your desktop
can be either stored on the hard drive — or created as lightning-fast RAM disks.
To make your ShrinkWrap-mounted, imaginary disks become RAM disks, use
the program’s preferences dialog box. There you’ll see the all-important “Keep
mounted images in RAM.” When that checkbox is on, ShrinkWrap creates a
RAM disk every time it mounts a disk image. So how is this useful? Read the
next secret.
Surf the Web at 2X speed
Here it is: the secret you’ve all been waiting for! Here’s how you use ShrinkWrap
to accelerate your Web browser, as hinted in Chapters 9 and 25. As you can
read in Chapter 25, the trick works by storing your browser’s thousands of
cache files
(the individual text and graphics that make up a Web page) on a RAM
disk — and RAM is light-years faster than a hard drive.
Suppose you’ll be surfing for awhile, so you decide to make a 5-meg RAM disk —
enough to hold a
lot
of cache files.
Double-click ShrinkWrap. Choose Edit➪Preferences. Turn on “Mount images as
unlocked by default” and “Keep mounted images in RAM.” Click OK.
Next, choose Image ➪New Image; in the resulting dialog box, specify a name
for your RAM disk (something creative, like “RAM disk”) and the size you want
(5,000K is close enough). Click OK.
Now there are two new icons on your desktop. One, called RAM disk.img, is a
file. In the future, you’ll be able to re-create your RAM disk just by double-
clicking this
.img
file. (You might also stash the
.img
file in your System folder’s
Startup Items folder; that way, the RAM disk will be created every time you turn
on the Mac, ready for action.)
The other icon is the actual RAM disk icon. See Chapter 25 for instructions on
making your Web browser use
this
disk to store its cache files.
So why use ShrinkWrap instead of the Mac’s built-in RAM disk option (see
Chapter 9)? The biggest advantage: you can ditch the ShrinkWrap RAM disk (and
reclaim the memory it’s using up) without having to restart the Mac — just drag
the RAM disk icon to the trash. You can also
create
or resize a ShrinkWrap RAM
disk without having to restart.
860 Part III: Application Secrets
■ ■
Macworld MAC SECRETS • 4040-8/5 • ch.22.F • Chapter 22 • FINAL • VB • 11/03/98 • p.860
4040-8/5 ch22.F 11/4/98 11:22 AM Page 860

Fast disk duplication
If you’re ever required to make lots of copies of a certain floppy (or other disk),
keep ShrinkWrap or DiskCopy in mind. There’s no quicker, simpler way.
ShrinkWrap:
Double-click the ShrinkWrap icon. Choose File➪Preferences and
make sure Batch Floppy Mode is selected. Click OK. Now choose Image ➪
Duplicate Disk. When the Open File dialog box that appears, insert (and select)
the master floppy you want to copy.
After a moment, the program tells you to insert a blank floppy (to copy onto);
you’re off and running. Keep feeding it floppies as requested; the program turns
one after another into a duplicate of the original.
DiskCopy:
Launch the program. Insert the master floppy disk. Choose File ➪
Make Multiple Copies. Click the Read Master Floppy button. Wait for the minute
or so DiskCopy takes to memorize the contents of that disk — and then, when
the Mac spits out the master floppy, click the Make Some Copies button. Insert
the first blank disk you want copied onto; when that’s finished, insert the next
blank; and so on.
CanOpener: the Great Retriever
You can’t claim to be a utilities nut without owning CanOpener. Most people
think of it as the world’s greatest emergency retrieval system—it can open and
retrieve text, sounds, icons, or graphics from any file on Earth, no matter how
corrupted or what alien computer it came from. For example, it immediately
and easily reads BMP, CGM, CUT, EPS, GIF, ICON, IFF, IMG, Lotus BIT/RLE,
Lotus PIC, MacDraw, MacPaint, PC Paint, PCX, Photoshop, PICT, Pixel Paint,
QuickTime movies, RAW, RIFF, RIX, Silicon Graphics RGB, Sun, Targa, TIFF,
XBM, and XWD files.
Best of all, you already have it—on the CD-ROM that came with this book.
But in our experience, CanOpener’s abilities as an emergency tool are only
half its value. The rest is its resource-sucking ability; we love extracting icons,
palettes, sounds, and pictures out of every piece of software that crosses our
desks. There’s no better way to learn how a program is put together; without
the risks involved with ResEdit, you can grab the sounds out of America
Online, games, and Mac OS 8.5’s theme sound files; the hidden pictures in
commercial software; the secret icon families of any application; and so on.
Furthermore, if you’re like us, you’re constantly in word processor-document
hell. People e-mail you with attached ClarisWorks documents, Word documents,
documents you don’t even recognize. Programs come with Read Me files; every
e-mail program has its own document format; Web pages have a format of their
own. Life’s too short to waste launching and wedding programs all the time just
to read this barrage of text documents.
Chapter 22: Utilities, Macros, and AppleScript 861
■ ■
Macworld MAC SECRETS • 4040-8/5 • ch.22.F • Chapter 22 • FINAL • VB • 11/03/98 • p.861
4040-8/5 ch22.F 11/4/98 11:22 AM Page 861

Our solution: Set CanOpener up as an instant document reader. Put it on your
Desktop. To set things up, launch the program. Choose File from the
Preferences menu and set it up as shown in Figure 22-8.
Figure 22-8: If you make the settings shown here, CanOpener will immediately display the
text of any file you drop onto it, regardless of the computer or the program that created the
document. Clockwise from upper left: the File preferences window, View preferences, and
the main CanOpener window (note that only the Text checkbox is selected at the top of the
window).
From now on, whenever you drop any file onto the CanOpener icon, you’ll
immediately see whenever text was inside, displayed automatically. You
won’t see any text formatting, but you’ll usually make up the difference in
sheer happiness from the speed and simplicity of the entire operation.
862 Part III: Application Secrets
■ ■
Macworld MAC SECRETS • 4040-8/5 • ch.22.F • Chapter 22 • FINAL • VB • 11/03/98 • p.862
4040-8/5 ch22.F 11/4/98 11:22 AM Page 862

MacsBug: Weird Land of the Coder
It’s whispered in the corridors of Mac user groups and chat rooms: MacsBug.
Everybody talks about it, but nobody’s quite sure what it is or for what it’s
good. “It sure isn’t in my System folder,” says the average Mac fan.
But MacsBug is real software—free, at that—used by Mac programmers. It’s
a debugger, used to help catch bugs in software that’s being written. It acts as
a safety net between the fledgling program and your OS; when the program
crashes, the harsh, scary-looking MacsBug screen appears to give the
programmer information about what went wrong.
Unless you’re a programmer, there’s not much you can do with MacsBug
(which stands for Motorola Advanced Computer Systems Debugger) besides
fool around. But fooling around itself can be highly enjoyable—and, unlike
your ResEdit shenanigans, you can’t hurt anything by fiddling with MacsBug.
At worst, you’ll have to restart your Mac after each experiment.
How to use MacsBug
We’ve included MacsBug on the CD-ROM that comes with this book. If you’d
like to join us on our instructive little tour, drop it into your System folder
(MacsBug is neither extension nor application; it just kind of is) and then
restart the Mac.
Chapter 22: Utilities, Macros, and AppleScript 863
■ ■
Macworld MAC SECRETS • 4040-8/5 • ch.22.F • Chapter 22 • FINAL • VB • 11/03/98 • p.863
CASE HISTORY
If you know anything about Microsoft Word, you
know all about its fast save feature. When this
option is turned on, saving your documents is
much quicker; the program saves time by simply
tacking on the latest text at the end of your file
— without bothering to rewrite the entire
document on your hard drive, in sequence,
neatly tidied up, in compact form, the way it
would when fast save is turned off.
Normally, you can’t tell the difference; when you
open a fast-saved document, Word automatically
displays it with the correct pieces in the correct
places; your only clue that the document was
fast-saved is that the document file is larger on
the disk.
CanOpener, however, changes everything; with it,
you can examine a Word fast-saved document
and see all the pieces, in the order in which they
were typed. You can even see sections that were
deleted that, in the interest of time, Word hasn’t
permanently purged from the document.
Imagine, then, the shock of a lawyer negotiating
a contract recently — we’ll call him Lawyer A —
when Lawyer B called him on the phone. Lawyer
B had used CanOpener to examine Lawyer A’s
Word-document contract proposal — and
discovered that in its earlier drafts, its terms had
been far more generous to Lawyer B’s client!
There they were, in all their glory: all the
paragraphs that Lawyer A had written and later
deleted or revised — in order.
Lawyer B therefore knew exactly what Lawyer
A’s bottom line was, and — it’s safe to say —
negotiated a much better contract.
Lawyer versus Lawyer
4040-8/5 ch22.F 11/4/98 11:22 AM Page 863
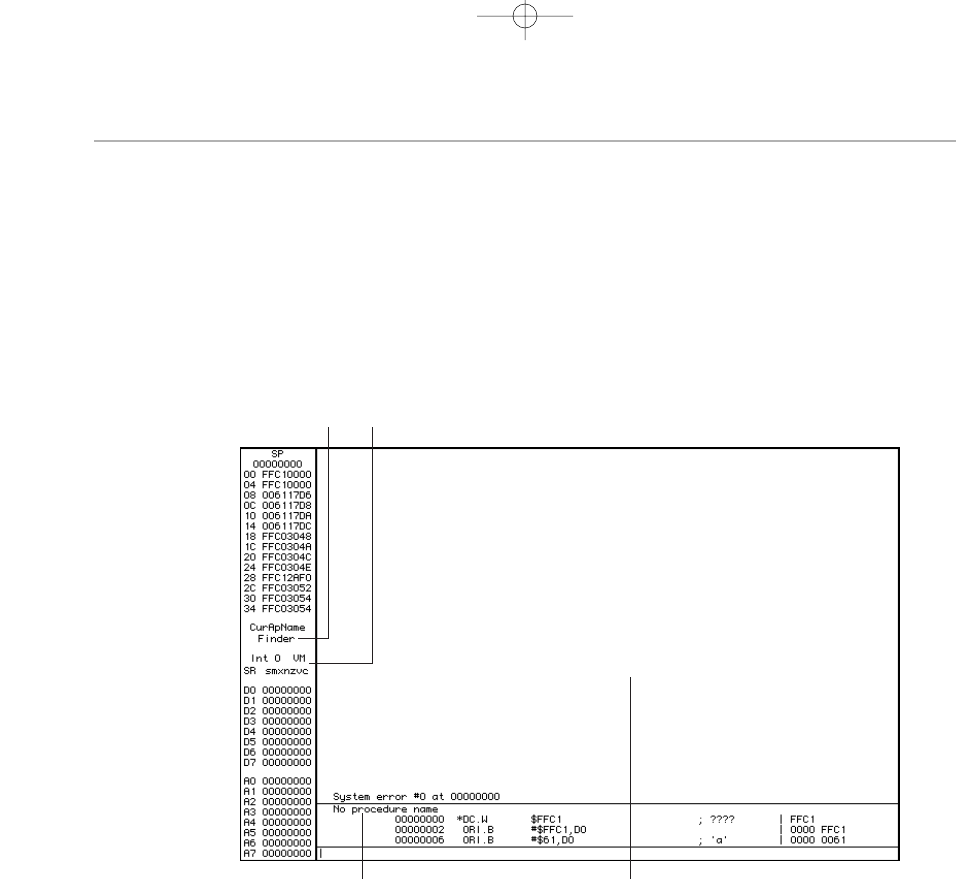
When you start up again, your “Welcome to Mac OS” screen now has a new line
of text added: “Debugger installed.” (If you have any doubt that you’re now in
the land of software geeks, open your System folder, turn on Balloon Help, and
point your cursor at the MacsBug icon for a wry and hilarious message.)
There are two ways you can “drop into” MacsBug’s creepy little world: press
Ô-power key or have a system crash. As shown in Figure 22-9, the MacsBug
world can be somewhat alarming at first. English is definitely not its first
language; assembly language, the Mac’s own machine code, is.
Figure 22-9: Don’t be afraid of the dreaded MacsBug window.
Once in MacsBug, you can type any of these codes (follow each with Return):
■EA quits and restarts the program you were using when you called up
MacsBug. (It stands for “exit to application.”)
■ERROR makes MacsBug display a list of super-geeky error codes. Type
error #11, for example, to find out what a Type 11 error is. (As Chapter
36 should make clear, the answer is all but meaningless — a Type 11
error turns out to be a “miscellaneous hardware exception” — but hey,
you asked.)
■ES stands for “exit to shell.” Quits and relaunches the Finder.
AB
CD
864 Part III: Application Secrets
■ ■
Macworld MAC SECRETS • 4040-8/5 • ch.22.F • Chapter 22 • FINAL • VB • 11/03/98 • p.864
4040-8/5 ch22.F 11/4/98 11:22 AM Page 864

■Fstands for Find. That’s how you can find a scrap of text that’s still in
memory.
■G means “go back.” You leave MacsBug and go back to whatever you
were doing (unless you got there by crashing, in which case G doesn’t
always work). Ô-G does the same thing.
■HOW makes MacsBug tell you how you got there — whether by crashing
or pressing Ô-power.
■RS stands for Restart. You can also try RB, for “reboot.”
■SWAP switches back and forth between MacsBug and whatever program
you were in.
■VMDUMP brings up screen after screen of programmery codes — the
contents of your virtual memory swap file, actually. But if you’ve got
RAM Doubler installed, MacsBug gives you instead the charming
admonishment: “Yo! You’re running RAM Doubler — not VM!”
Most of the MacsBug display is for programmers. You, however, may want to
enjoy area A in Figure 22-9. This line identifies the program that was running
when MacsBug kicked in — which can be handy when determining which of
your programs is actually doing the crashing.
Area B indicates whether or not virtual memory is turned on. Area C is the
command line, where you can type commands to MacsBug. (The mouse is
dead while in the debugger, so don’t even think about using it.) And area D is
the output region, where MacsBug gives its answers to your commands.
So what’s MacsBug good for? Let us count the ways.
MacsBug Secrets
■
Save your work after a crash
This trick is probably the most practical real-world way in which MacsBug can
help the average non-programmer. If a program crashes or freezes, summon
MacsBug (if it hasn’t appeared on its own) and type ES, followed by a Return.
(This doesn’t work if the crashed program
was
the Finder, by the way.)
If the machine was
seriously
hosed, nothing useful will happen; press Ô-Control-
power to restart. But in many cases, you’ll find yourself back in the Finder. Your
Mac is tottering, but you’ve got enough time to switch to any open programs and
save your documents there.
Then restart the Mac to make things right again.
Chapter 22: Utilities, Macros, and AppleScript 865
■ ■
Macworld MAC SECRETS • 4040-8/5 • ch.22.F • Chapter 22 • FINAL • VB • 11/03/98 • p.865
4040-8/5 ch22.F 11/4/98 11:22 AM Page 865
Do the math
MacsBug makes a quick-’n’-easy pocket calculator. Just type out the equation
you want it to do (precede each number with a # sign) and then press Return.
For example, you can type
#234 * #423 + #1.
Along with a lot of other cryptic
codes, you’ll see your answer — as usual, preceded by a # sign — in the “output
area” (see Figure 22-9).
Psychedelic monitor, dude!
This one’s goofy but fun. Type
swap
and press Return. If MacsBug replies:
“Display will be swapped after each trace or step,” type s 40 (or another
number). (If MacsBug doesn’t give you that message, type swap and press
Return until it does.)
Now your monitor blinks violently between MacsBug and whatever program you
were in, making it look like a TV whose station is undergoing nuclear attack.
There’s no way to stop the onscreen shockwaves once they’ve begun, so
choose your number-of-flashes number with care.
Menu blinking made annoying
When you choose a menu command under normal conditions, it blinks — black,
white, black — between zero and three times, depending on your setting in the
General Controls control panel.
But free book winner Matt Garrison discovered a way to extend those menu-
blinking options, for those days when your brain isn’t running on all cylinders
and you keep forgetting which command you’ve just chosen.
In MacsBug, type sw a24 #12 (instead of 12, put whatever number of blinks you
prefer). Leave MacsBug by typing
G
(and then a Return).
Now, whenever you choose a menu command, you’ll see it blink 12 times, or
50, or whatever annoying number you’ve established.
(To restore the blinking, return to MacsBug and type sw a24 #3 (for three blinks)
— or just reset it in the General Controls control panel.)
Extension Managers
So now you have your hard drive utilities, virus protectors, macro software,
screen saver, debugger, file-compression utilities, and customization software
installed. Terrific! Now you need one more: a utility to manage those utilities!
Enter the extension manager.
Contest
Winner
Strange
But True
866 Part III: Application Secrets
■ ■
Macworld MAC SECRETS • 4040-8/5 • ch.22.F • Chapter 22 • FINAL • VB • 11/03/98 • p.866
4040-8/5 ch22.F 11/4/98 11:22 AM Page 866

Why do you need a manager for these startup programs? Because, as is often
the case with utilities, extensions and control panels can conflict. They may
argue over the same piece of memory real estate, for example, and the result
is almost always a system crash. You need a way to turn your various startup
programs on and off, particularly when you try to ferret out what the conflict
is. (See Chapter 36 for more on troubleshooting.)
The Big Two of extension managers — Apple’s Extensions Manager and
Conflict Catcher — let you specify sets of extensions and control panels. You
may have a bare-minimum set to use when memory is at a premium and a
full-fledged set for normal use.
Extension Manager Secrets
■
Extension manager time-saver
If you use Extensions Manager or Conflict Catcher, you probably change your
extension/control panel lineup as the Mac is starting up. You know that you
can press the space bar until the dialog box appears, make your choices, and
click OK.
But it’s faster to make your selections
before
restarting the Mac. Just open the
Extension Manager control panel, or choose Open Conflict Catcher from its upper-
right CC menu-bar icon. You see the same selection dialog box as you do when
starting up. But if you switch your extensions and control panels while the Mac is
still on, you won’t have to wait for the dialog box to appear when you restart.
Conflict Catcher: the world’s best About boxes
Conflict Catcher (Casady & Greene) is a remarkable startup manager for several
reasons. It can automatically find out which two (or several) of your extensions
are conflicting with each other. It’s something to behold: You just sit there and
restart your Mac over and over again, as Conflict Catcher experiments with
mathematically selected combinations of extensions, until finally it figures out
which ones are fighting. (This book comes with a seven-day demo version of
Conflict Catcher. Seven days isn’t forever, but it’s enough to get you out of some
frustrating extension conflicts.)
Conflict Catcher has a proud history of awesome Easter eggs and buried credits.
In Version 2, you could Shift-Option-Ô-click the title screen to find out how much
the U.S. national debt increased in the time it took your Mac to start up!
Versions 3, 4, and 8 each offers a different built-in arcade game. To play, open
the control panel in the Finder (not during startup). Click the version number in
the lower-right corner (or choose About Conflict Catcher from the Úmenu) to get
the About box, complete with scrolling credits. (If you press Option while the
credits are rolling, they’ll reverse direction and scroll downward.)
Mac Basics
Chapter 22: Utilities, Macros, and AppleScript 867
■ ■
Macworld MAC SECRETS • 4040-8/5 • ch.22.F • Chapter 22 • FINAL • VB • 11/03/98 • p.867
4040-8/5 ch22.F 11/4/98 11:22 AM Page 867

But the fun has only just begun. Now type the word play
.
No period, no Return...
just the word. The screen changes — now you’re in arcade land! You get to play
Extension Invaders, Extension Breakout, or Extension Space Attack. (We’ll leave it
to you to figure out which keys fire your missiles and move your little guy around
the screen. Hint: the arrow keys and the spacebar are usually involved.)
Five more Conflict Catcher secrets
You can try these handy shortcuts even in the three-day version of Conflict
Catcher you got with this book:
■If only Apple would adopt this idea for the system software itself: If you have
Conflict Catcher installed, you can interrupt the startup process by pressing
Ô-period at any time during the extension-loading process. You’ll jump right
to the Finder, running with only the extensions that loaded before your
keystroke.
In Version 5, you can actually click directly on any icon
while the extensions
are loading.
The startup process pauses, a screen of information about
that extension appears, and you continue only when you’re good and ready.
■Other cool keys you can hold down during the extension-loading process
(if you have Conflict Catcher): Ô-R restarts the Mac instantly; Ô-S shuts
down; Caps Lock, when pressed at the very beginning of the Mac’s startup
process, makes Conflict Catcher’s main window automatically appear —
saving you the trouble of leaning on your spacebar for 30 seconds.
■You can even hold down the Tab key while extensions are loading to make
the startup process pause after the last extension has loaded — and stay
frozen until you release the key. We suppose this is a handy way to (a)
review what has just loaded, in your search for a particular extension icon,
or (b) admire how many extensions you have, you amazing person, you.
868 Part III: Application Secrets
■ ■
Macworld MAC SECRETS • 4040-8/5 • ch.22.F • Chapter 22 • FINAL • VB • 11/03/98 • p.868
4040-8/5 ch22.F 11/4/98 11:22 AM Page 868

MACWORLD MAC SECRETS • 4040-8/5 • ch23.F • Chapter 23 • FINAL • VB • 11/03/98 • p.869
Chapter 23
Speech, Movies, and Sound
In This Chapter
©Recording and editing sounds and QuickTime movies
©QuickTime 3.0 and MoviePlayer Pro
©How to get your Mac to talk — and listen
©Getting TV on the Mac screen — and vice versa
©QuickTime VR
©Making music with MIDI technology
©Presentations: tricks, tips, and techniques
The Macintosh has always been the ultimate multimedia machine.
Experience the frustration of setting up or using any of the Mac’s high-
tech talents on a Windows computer — speech, movies, sound, music, or all
of the above in combination — and you’ll see what we mean.
A Mac Digitized-Sound Primer
Recording sounds onto your Mac is a blast. Your cheerful authors’ Macs are
creaking with sounds from the world around us: our nieces and children, our
grandparents, subway sounds. By playing these recordings through the Mac
speaker, we can, in a manner of speaking, introduce somebody to our entire
circle in a matter of minutes.
Your Mac records sound by sampling the sound waves entering the
microphone. Sampling means taking thousands of tiny sound snapshots per
second and converting each to a number. (That’s why it’s also called
digitizing.) Most Mac sound-recording software (including recent incarnations
of the Sound control panel) lets you specify how many of these samples you
want to make per second: 11,000 or 22,000, for example. The more samples
per second, the more realistic the playback; 22 kHz is clearer than 11. (The
“kHz” is short for kilohertz, meaning thousand samples.) All of today’s Macs
can even record at a crystal-clear 44 kHz — compact-disc quality.
But no matter what the sampling rate, sound files are big. One second of 22
kHz sound gobbles up 22K on your hard drive. You can do the math: A one-
minute stereo 22 kHz sound, therefore, takes up 2,640K on your disk. (Note
Mac Basics

that 11 kHz sounds are half as large, and 44 kHz files are twice as large.
Double those sizes if you’re recording in stereo.)
How to record sounds
Making new sounds of your own is extremely simple. As with most tasks in
the computer world, you need only two items: hardware and software. The
former is your Mac’s microphone; the latter is, at minimum, your Monitors
& Sound (or Sound) control panel or SimpleSound desk accessory. More
sophisticated programs let you record longer sounds, edit them, and apply
special effects to what you’ve recorded.
Microphones
Some Macs have microphones built right into the monitor: the LC 5000 series,
PowerBooks, the iMac, and any Mac with an AudioVision/AppleVision
monitor. (The mike looks like a couple of tiny toothpick perforations in the
case.) There’s no way to prevent this kind of mike from picking up the
computer’s own fan or hard drive noises, but at least you never lose it.
From 1989 to 1991, most Mac models came with the classic Apple external
microphone, which looks like a gigantic vitamin C tablet. You plug the end of
its very thin cord into the jack on the back of the Mac that’s marked with a
microphone icon.
All recent and current Macs, though, require its successor, the PlainTalk
mike. (It costs $20, unless it came with your Mac model, such as Power Mac
G3s.) It looks different — it’s light gray and no longer SweeTarts-shaped — but
it plugs into the same jack. The older Apple mikes don’t work, nor do non-
Mac mikes, such as those from Radio Shack.
The Sound control panel
The Mac’s sound-recording software seems to leap to a new location with
each new version of the Mac OS. For years, it was in the Sound control panel;
then it jumped briefly to the short-lived Sound & Displays control panel. In
1997, recording features were available only in the SimpleSound desk
accessory (for recording) — but today, on modern Macs running Mac OS 8
and later, they’re also available in the Monitors & Sound control panel (which
also governs volumes and other settings).
In each control panel, you have to do a little digging to find the sound
settings. For example, in the Sound control panel included with System 7.5
and later (see “Sound” in Chapter 4), the pop-up menu comes up saying Alert
Sounds. For most of the special audio tricks we’ll be describing, start by
using this pop-up menu to specify where the sound is coming from and where
you want the sound to go.
870 Part III: Application Secrets
■ ■
MACWORLD MAC SECRETS • 4040-8/5 • ch23.F • Chapter 23 • FINAL • VB • 11/03/98 • p.870

Similarly, in Monitors & Sound, you must click the Sound icon at the top of
the window to view all the various sound-related possibilities.
Where sound can come from
Before you record, you must specify a sound input — that is, you must tell
the Mac where the sound is going to be coming from. If you’re using the old
Sound control panel, this entails choosing Sound In from the pop-up menu;
if you’re using Monitors & Sound, the Sound Input pop-up menu in the lower
right; if you’re using Mac OS 8.1, you must use the Sound Input Control Strip
module (see Chapter 4).
On most Macs, your choice of sound inputs includes only one or two options.
But depending on what other sound-producing gear you own, you may see
any of the following. (Sound control panel users: You may have to click the
Options button to see these.)
■Microphone: Click this icon to select the microphone (described earlier)
plugged into the microphone (Sound In) jack on the back of the
computer.
■AV Connector: This icon represents the sounds being picked up by the
mike that’s embedded in the AppleVision (or AudioVision) monitor, if
you have one.
Chapter 23: Speech, Movies, and Sound 871
■ ■
MACWORLD MAC SECRETS • 4040-8/5 • ch23.F • Chapter 23 • FINAL • VB • 11/03/98 • p.871
TRUE FACT
Your Mac actually sounds a lot better than it
sounds, if you’ll pardon the expression. That is,
the sound it records and plays back is seriously
hampered by the relatively cheap speaker built
into the Mac. You’ll be duly impressed if you
bypass the speaker and listen to the Mac’s
sounds on better equipment.
For example, plug Walkman-style headphones
into the speaker jack in the back of the computer.
(Turn the sound level down, though, in the Sound
control panel, or you’ll fry your eardrums.)
Hooking up the Mac to your stereo is also
possible. From Radio Shack, get a cord with a
male miniplug on one end (for the Mac’s speaker
jack) and a pair of male RCA plugs on the other
end. Plug these into the line inputs of your
stereo receiver, usually marked something like
Aux or Tape. (Don’t plug into the Mic or Phono
inputs of the stereo; the sound distorts horribly.)
Perhaps the most convenient proposition is to
buy a pair of speakers for your Mac. These
aren’t ordinary bookshelf speakers. They must
be shielded, powered speakers. “Shielded”
means that their big electromagnets won’t affect
the Mac or the monitor; “powered” means they
have a power plug and don’t have to be hooked
up to an amplifier. You can find them for next to
nothing these days — $10 per pair, for example.
What’s wild about listening to a higher-fidelity
sound source such as headphones or speakers
is that you may hear all kinds of other Mac
sounds. This computer is just full of busy little
whirs and hums: when the floppy drive is in use,
when the hard disk is accessed, and so on.
Sound, speakers, and you

■Internal CD: If your Mac has a built-in CD-ROM drive, it can, of course,
play normal audio compact discs. If you want to record a little bit of
music, click this option.
■Expansion Bay-PC Card: This option is for PowerBooks only. It lets you
record sound from something in the PowerBook’s expansion socket,
notably your removable CD-ROM drive. (It’s theoretically possible that
somebody will come up with a PC-card microphone, but we have yet to
see it. Wilder yet: if you choose this option in the Monitors & Sound or
SimpleSound program, the PowerBook will record from both the
expansion bay and the PC card slot simultaneously!)
■External Audio or Line In or RCA In: You also can record from a tape
deck, Walkman, DAT (digital audio tape) player, your TV set, and so on.
Just make sure that you have the correct cables; each cable must end in
a miniplug like the one on the end of Walkman headphones. You may
need to visit Radio Shack and get an adapter cable; it should have male
RCA plugs at one end (for your tape deck, VCR, and so on) and a stereo
miniplug at the other. Make sure that the Microphone icon is selected in
the Sound control panel, and you’re ready to roll.
The only trouble you may have is that AV, Power Mac, and other recent
models require an amplified input signal. That’s why the old Apple
microphones and non-Apple microphones don’t work.
On the same control panel screen, you should also see the famous
Playthrough checkbox, known in Mac OS 8 and later as Listen. On older Mac
models, the built-in speaker is silenced immediately when you plug something
into the back-panel speaker jack. On recent models, such as Power Macs,
however, you can turn the built-in speaker back on again — by choosing this
Playthrough or Listen checkbox. When this option is selected, sound flows
from the Sound In source to the Mac’s built-in speaker (and to anything
plugged into the speaker jack). Turn this option on if, for example, you want
to listen to an audio CD while you work.
If your microphone is plugged in while Listen is selected, you’ll hear anything
you say into the mike broadcast from the speaker, and you’ll have yourself
the world’s most overpriced PA system. (You may even get that irritating
squeal known as feedback.)
Where the sound can go
The other sound-related settings in Monitors & Sound are as follows (if you
have the old Sound control panel instead, choose Sound Out from the pop-up
menu to view some of these options):
■Sound Out Level: This slider controls headphones or external speakers
only. It doesn’t affect sound from the Mac’s built-in speaker. Apple
suggests that you leave this slider at maximum, and then turn the
physical volume knob on the speakers down to the volume level you like.
OS
8
872 Part III: Application Secrets
■ ■
MACWORLD MAC SECRETS • 4040-8/5 • ch23.F • Chapter 23 • FINAL • VB • 11/03/98 • p.872

■Computer Speaker Volume: Drag this slider to set the Mac’s internal
speaker sound level. (It’s much quicker to use the slider on the Control
Strip, however, as described in Chapter 4.)
■Sound Out Balance: This slider controls the left-to-right balance for
headphones or external speakers. The only reason to shift it out of the
center position is (a) to compensate for the fact that one speaker is
farther from your ear than the other, or (b) to try to hear something
more clearly that was recorded in only one track of a stereo recording.
■Computer Speaker Balance: For most people, this control does nothing.
It’s useful only on Macs with built-in stereo speakers, which pretty much
means certain high-end PowerBooks or the iMac.
■Sound Output: If your Mac offers a choice of speakers — external,
AppleVision-monitor encased, or built-in — this pop-up menu controls
where the Mac sends its sound.
■Sound Output Quality: Why would you ever want anything less than CD
quality (44.100 kHz)? We’ll just mumble something about “Well, suppose
you’re trying to hear just how bad your sound recording will sound when
it’s played on a crummy speaker or over the Internet,” and leave it at that.
Making the actual recording
Plug your microphone or stereo into the back of the Mac, as described
earlier. Use the Sound In controls, also as described earlier, to select the
appropriate sound source: Microphone, Internal CD (to record from a
CD-ROM drive), or whatever. You probably want Listen (or Playthrough)
turned off if you’re using the mike and on if you’re using an external device or
a CD. (If you’re using the CD drive, use the AppleCD Audio Player desk
accessory, or your Control Strip, to choose the track that you want to hear.)
Your Mac may use any of three methods to actually record a sound:
■SimpleSound: Choose this desk accessory from your menu. Click Add,
and then click Record.
■Monitors & Sound: Launch this program (in your Control Panels folder)
and click the Alerts icon at the top. The original version of this control
panel didn’t offer an Add button (so that you could create new sounds);
if yours doesn’t, you must use the SimpleSound method. Mac OS 8 and
later, though, does offer an Add button; click it, and then click Record.
■Sound: If you’re still using an older Mac (or older system software), open
the Sound control panel. From the pop-up menu, choose Alert Sounds;
click New; and then click Record.
If you’re using Monitors & Sound or the Sound control panel, you have ten
seconds to record. Unless you like a bunch of “dead air” at the end of your
recording, be ready with your mouse on the Stop button. The rest should
be easy.
OS
8
Chapter 23: Speech, Movies, and Sound 873
■ ■
MACWORLD MAC SECRETS • 4040-8/5 • ch23.F • Chapter 23 • FINAL • VB • 11/03/98 • p.873

What to do with sounds
Once you’ve recorded a new sound, its name shows up in your list of alert
sounds (in the Sound control panel, in Monitors & Sound when you click
Alerts).
After a sound is in your System file, you can do all kinds of things with it.
Double-click the System file to open it and reveal the sound files nestled
within. At that point, you can trash a sound by dragging it; rename it as you
would any icon; back it up; and so on.
Once you’ve mastered the art of recording sounds, you can begin putting
them to work for you. Here are some ideas of things to do with your new
custom-made sound recordings:
■Change your error beep. Whichever sound is selected in the
Sound/Monitors & Sound control panel’s list becomes your new error
beep. (Choose a short one unless you want to go stark raving mad.)
■Make sounds for friends. Any sound that you create with the Sound
control panel becomes a draggable, trashable, movable icon. To see it,
open your System Folder; then double-click your System-suitcase file.
You’ll see all your sounds listed in the window. Manipulate them as you
would any other icons — e-mail to friends, post on your Web page,
whatever.
■Annotate your word-processor documents. Word, WordPerfect, and
some other word processors let you record sounds directly into your
documents. An icon appears in the text — and the sound plays when you
click the icon. (In Word 98, you must first install the Voice Annotation
software that comes in the Value Pack folder; it isn’t automatically
installed with Word.)
■Leave a good-morning memo. Put a sound-file icon into the Startup
Items folder of the System Folder. Next time you start up the Mac, you (or
whoever next uses the Mac) will hear that cheery recording played just
as the Desktop appears.
■Suck sounds out of all your other programs. Use ResEdit, as described
in Chapter 21, to open all the programs and games on your hard drive.
Root through them in search of snd resources. Open a snd resource and
highlight one of the sounds in the list. A new menu, called snd, appears
on the menu bar. It lets you play the sound or (if you have an Apple
microphone) rerecord it.
By using the Edit menu, you can cut or copy the sounds, which is great
fun. Paste them into your Scrapbook or System file for easy future
access. Or, replace the sounds with ones you make yourself.
To get you started, here are a few programs that contain sound resources
ready for your perusal: the Jigsaw Puzzle desk accessory; the America
Online program; Kid Pix (tons of them); the System file (the famous
camera-shutter sound, among others); HyperCard (19 of them); and so
on. Games, in particular, tend to be crammed with great sounds — check
out Maelstrom, for example, included on the CD-ROM with this book.
Mac Basics
874 Part III: Application Secrets
■ ■
MACWORLD MAC SECRETS • 4040-8/5 • ch23.F • Chapter 23 • FINAL • VB • 11/03/98 • p.874

And if you have Mac OS 8.5 or later, forget about it: your system runneth
over with sounds. Once in ResEdit, open your hard drive; the System
folder; the Preferences folder; the Appearance folder; and the Theme
Sounds folder. In the files you find there are dozens of fantastic sound
effects (as usual, in the snd resource) ready to suck out and use for other
purposes.
■Tune your instrument. This tip, suggested by reader Phil Smith, is of
particular interest to musicians — but they’ll love it. Using your Mac,
make a recording of your tuning fork or electronic tuner, playing an A-440
(or whatever note you tune to). Because a digital sound file always plays
back perfectly, you’ll always have your Mac or PowerBook to tune to
when you can’t find (or don’t own) an electric tuner.
How to edit your recorded sounds
Your Macintosh came with software for recording sounds — the Sound control
panel — but no way to edit them. That’s why we’ve included SndSampler and
UltraRecorder on the CD-ROM included with this book — simple, flexible
programs for sound recording and editing. These programs let you copy, paste,
and rearrange the sound snippets you record (or get from other sources) and
save them in several sound-file formats. Make Nixon say “I am — a crook” by
editing out one word. Rearrange the phrases in your friends’ utterances. It’s all
easy — just cut and paste to rearrange, trim, or otherwise mangle the sounds
you’ve recorded.
For more power and pro-level design, consider Macromedia’s SoundEdit II.
It’s the same idea as SndSampler — but nicer to look at and with higher
horsepower.
Sound Secrets
■
Record CD quality longer than ten seconds
As noted earlier, the Monitors & Sound (and Sound) control panels stop
recording a new sound after ten seconds. The solution: use the SimpleSound
desk accessory instead. Its recordings are limited only by the amount of free
RAM on your Mac.
Stop that sound!
You can stop any sound whose playback is in progress by pressing either Esc or
Ô-period. That’s nice to know when it turns out that someone selected, as your
error beep in the Sound control panel, a full 10-second sound clip of Barney the
Dinosaur singing — and your Mac is now trying to beep three times.
Mac Basics
Worth
Learning
OS
8.5
Chapter 23: Speech, Movies, and Sound 875
■ ■
MACWORLD MAC SECRETS • 4040-8/5 • ch23.F • Chapter 23 • FINAL • VB • 11/03/98 • p.875
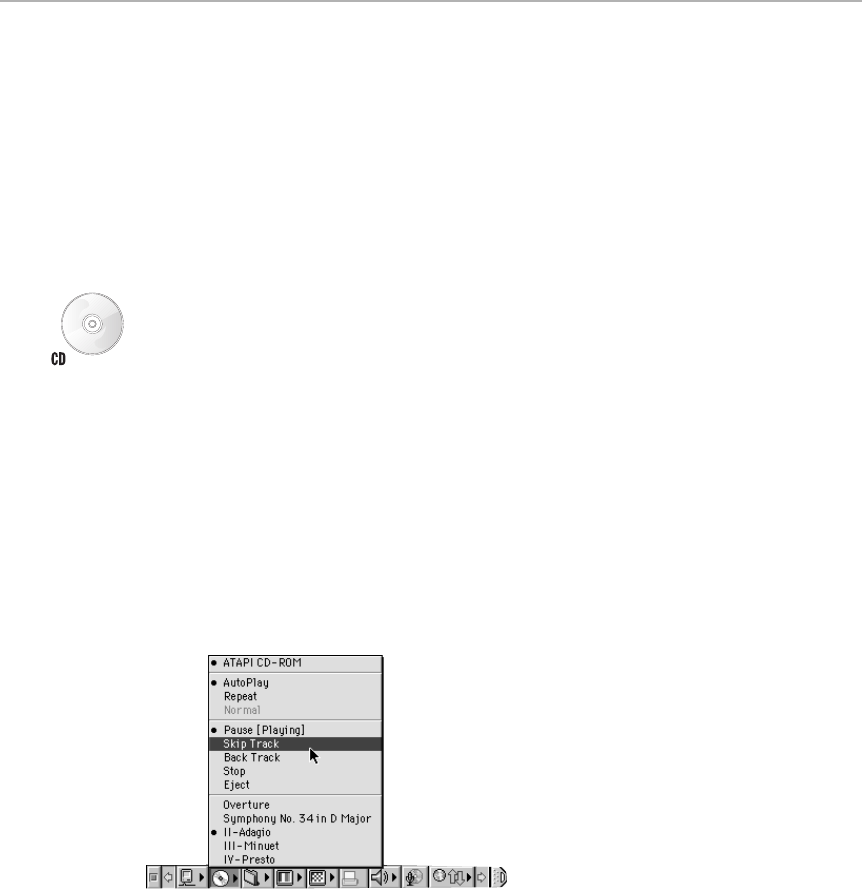
How to listen to a CD while you work
In general, you can only listen to a music CD through your Mac’s built-in speaker
if your CD-ROM drive is
built into
your Mac. If you have an external CD player,
you’ll have to use headphones or external speakers.
Use the Sound In controls of your Sound, Monitors & Sound, or Control Strip
panel to select Internal CD. If you want the music to play through your Mac
speaker, be sure that Listen (or Playthrough) is turned on; leave this option
off if you have headphones or external speakers hooked up. Use the Sound
Out controls to select the 44.100 kHz option (for best quality).
Insert your music CD. Then use the AppleCD Audio Player desk accessory to
start the music and specify the tracks to be played (see Chapter 3 for full
instructions) — or use the pop-up controls on the Control Strip, as shown in
Figure 23-1.
Alternatively, if you have QuickTime 2.5 or later, open your QuickTime Settings
control panel, and turn on the Audio Auto Play option. Thereafter, music CDs
will begin playing immediately when you insert them — no AppleCD Audio
Player desk accessory required. (Doing so doesn’t make you vulnerable to
the AutoStart virus described in Chapter 21 — only the “CD-ROM Auto Play”
option does.)
Speech-recognition bad news: When CD-ROM Playthrough is enabled, the Mac
ignores your microphone. No more “Computer, open ClarisWorks” commands,
as described later in this chapter — you must choose one deluxe AV feature or
the other.
Figure 23-1: Using the Control Strip, you can control your music CDs as you work. And how
did we get the actual track names to show up here? Easy: By typing them into AppleCD
Audio Player, as described in Chapter 3.
Record sounds from a CD
While a music CD is playing, as described in the previous secret, you can record
a snippet of up to ten seconds long the same way you’d record an error beep.
876 Part III: Application Secrets
■ ■
MACWORLD MAC SECRETS • 4040-8/5 • ch23.F • Chapter 23 • FINAL • VB • 11/03/98 • p.876
Just specify your designate your CD-ROM player as the sound-input source; start
the music playing; and use the normal Add and Record buttons, as described
earlier. You may find the Pause button (in AppleCD Audio Player or your Control
Strip) handy for getting things ready. (Note: Some models can’t record from a CD
if you’ve got anything plugged into the microphone jack on the back panel.)
For longer clips, install QuickTime. Launch the MoviePlayer program that came
with your Mac; choose Import from the File menu; and you’ll be able to directly
open the tracks of a music CD that’s inserted into your CD-ROM player. The
result is an
audio-only
QuickTime movie containing the song you selected!
(If you want to convert that QuickTime movie into an ordinary, double-clickable,
System 7 sound file — or extract sounds directly from audio CDs without the
intermediate QuickTime step — use the free program Movie2Snd, included on
the CD-ROM with this book.)
Record the Mac’s self-speech
If you try out PlainTalk, the Mac’s speech feature, as described later in this
chapter, it may seem a shame that you can’t capture the Mac’s utterances as
sound files you can distribute and cherish forever. Actually, you can. (Turn off
the speech
recognition
feature for this trick — only use the Text-to-Speech
feature, which runs on any Mac.)
Just run a cable (with a miniplug on each end) from your Mac’s speaker jack to
its microphone jack! Then launch SimpleText and start it talking; switch to the
Sound control panel. The Mac continues yakking away in the background as you
record the sound as usual.
(What’s really weird is that, if you play back your newly recorded speech sound
while SimpleText is still going, you hear both voices at once!)
Converting sound-file formats
The standard Mac sound file’s icon — what we call a “System 7 sound” — looks
like a little triangular speaker with sound waves emerging from the right side.
That’s not the only sound-file format in creation, however. On the Internet, you’re
also likely to find AIFF files and WAVE (or .WAV) files, the predominant format on
DOS/Windows computers.
Never fear: you can use and enjoy all of those formats. All you need is a
program that can read and convert such sounds into standard Mac sounds —
and the CD-ROM that comes with this book has just such a program. It’s called
SndSampler, and you can read about it in the appendix, “The CD Software
Vault.” (MoviePlayer 3, part of the QuickTime Pro kit described later in this
chapter, can also open, convert, and save AIFF and WAV files.)
Strange
But True
Chapter 23: Speech, Movies, and Sound 877
■ ■
MACWORLD MAC SECRETS • 4040-8/5 • ch23.F • Chapter 23 • FINAL • VB • 11/03/98 • p.877

Sound stuff with this book
Mac has no microphone? No problem. We’ve provided on the CD-ROM with this
book enough material to get you started on a promising sound-management
career: professional sound clips from the Kaboom! and Graphics Essentials
collections (from Nova Development and Olduvai, respectively).
Music with MIDI
The digital sounds you just read about aren’t really music, as far as the Mac
is concerned. They’re fixed digital recordings, samples, that may or may not
contain music — they might just as easily be hinge squeaks or voices.
The Mac is equally famous for its second music technology: MIDI (rhymes
with giddy). MIDI stands for Musical Instrument Digital Interface —
computerese for synthesizer hookup.
We think of MIDI as something like PostScript, the printer language spoken by
the Mac over a cable. But instead of sending page-description instructions to
a printer, MIDI cables convey music-description signals to a synthesizer. One
signal says, “Play middle C”; another says, “Push the sustain pedal down.”
The keys and pedals don’t actually move, but otherwise the instrument
responds by playing just as though a human were at the controls.
Sequencing
Because the Mac transmits hundreds of these MIDI signals per second, it can
play some very complex music indeed. It can, for example, play the synthe-
sizer’s string, woodwind, and percussion sounds simultaneously. Using a
technique called sequencing, you can record one instrument’s musical line
at a time into the Mac; then, like a multitrack tape recorder, the Mac plays
all the parts back in perfect synchronization.
Unlike a tape, however, the Mac-as-a-sequencer can change the key or tempo
independently; you don’t get Alvin and the Chipmunks when you speed up the
piece, as you do with a tape. Also, unlike a tape recorder, the Mac never makes
you wait to rewind or fast-forward; a sequencer is random access, so you can
jump instantly to any spot in the piece. Above all, composing with a sequencer
means you can fix wrong notes, add accents or crescendos, or copy and paste
parts of a song without ever having to rerecord the original performance.
What you need
All you need for MIDI sequencing are three ingredients: a synthesizer, a MIDI
interface to connect it to the Mac, and a sequencing program. (To play back
MIDI files, you don’t actually need a synthesizer; you can use QuickTime, as
we’ll explain later in this chapter. But to record music, you need a real
musical keyboard.)
878 Part III: Application Secrets
■ ■
MACWORLD MAC SECRETS • 4040-8/5 • ch23.F • Chapter 23 • FINAL • VB • 11/03/98 • p.878

The keyboard
The most important aspect of the synthesizer you buy for MIDI is that it
should be, of course, MIDI-compatible (some of the really inexpensive ones
aren’t). It should also be multitimbral (capable of playing more than one
instrument sound at a time). You can tell if a keyboard is MIDI-compatible by
checking for the presence of two round, nickel-sized MIDI jacks in the back.
You can’t really tell if it’s multitimbral by looking; get a salesperson to tell
you. The most basic multitimbral MIDI keyboards cost about $150 in music
stores; Casio, Yamaha, and Kawai each make several keyboards with street
prices in that range. The more realistic the sounds, the more the synthesizer
costs.
For multimedia work and presentations, consider getting a sound module (a
synthesizer that has no keyboard). After you record the music, you don’t
need a keyboard; remember, the Mac plays MIDI over a cable, not by pressing
keys. Therefore, a sound module, such as the cigar-box-shaped Yamaha
TG100, is portable, inexpensive, and lightweight. But when hooked up to
speakers, it still sounds like a fair representation of actual instruments.
The interface
You next need a MIDI interface to connect the synthesizer to the Mac. A MIDI
interface is generally a small box. You plug one end into the modem port of
your Macintosh; into the other end you attach MIDI cables from your synthe-
sizer. There are two cables, labeled IN and OUT, because MIDI signals only
run one way in each cable.
Don’t let them sell you some $300 professional interface. For most people,
there’s no reason in the world not to get a cheap $50 Altech or Opcode
interface with outputs for three musical keyboards (and no power plug to
hog spaces on your surge suppressor). (Actually, while we’re talking about
saving money: at this writing, you can get a CyberSound Studio kit that
includes a compact three-octave keyboard, MIDI interface, cables, and simple
recording software — for $100. Visit www.cybersound.com for details.)
The sequencer
The final element of a MIDI sequencing setup is a sequencing program. In
some ways a sequencer is unique in Mac software; there’s no Print command.
You can’t paste anything from it into PageMaker. You hardly use the Mac
keyboard at all. But a good sequencer can turn you into an orchestra.
All sequencers are fundamentally alike. In one window there are buttons
labeled Play, Stop, Rewind, Record, and so on. You click Record, and play the
synthesizer. After you click Stop, every note you played appears as a strip on
a horizontal bar graph. As with a tape recorder, you press Rewind and then
Play; the sequencer plays the synthesizer, recreating your performance to the
subtlest nuance. The sequencer captures and plays back an amazing amount
of musical feeling from the stream of numbers that pours in from the MIDI
cable (see Figure 23-2).
■Pedaling information. Actually, the sequencer only stores two tiny
messages: when the pedal goes down and when it comes back up.
Chapter 23: Speech, Movies, and Sound 879
■ ■
MACWORLD MAC SECRETS • 4040-8/5 • ch23.F • Chapter 23 • FINAL • VB • 11/03/98 • p.879

■Key velocity. Key velocity is a numerical measurement of how hard you
strike each key when you play. On a real piano, key velocity determines
volume: The harder you strike, the louder the note. In the crazy world of
synthesizers, velocity doesn’t have to control volume. Hitting a note
harder can instead make the sound have more vibrato, be brighter
sounding, or have a wah-wah effect. In fact, you can even program a
synthesizer to sound softer the harder you press a key!
■Aftertouch. Here’s a musical quality you can’t even get on a real piano:
the ability to affect the sound after you strike the note. On synthesizers
equipped with this feature, the concept is simple: You can adjust how
hard you’re pressing on a key after it’s already been struck! If you think
about it, how else could you get a crescendo in the middle of a long
trumpet note?
Figure 23-2: When you play your MIDI synthesizer, the sequencer program records all kinds
of information, in numeric form, about the music. For every single note you play, it records
(A) the measure number, musical beat, and fraction of a beat when you pressed the key; (B)
when you pressed or released the foot pedal; (C) which note you struck and how hard you
played it; and (D) how long you held the key down. You can, of course, edit any of this
information.
After all this information — and much more — is recorded, the Mac can
reproduce with uncanny accuracy your exact musical performance. The
advantage is that if you play a wrong note, you can fix the pitch of the note
without affecting any of the other musical nuances.
MIDI Secrets
■
Sharing the modem port
After your MIDI interface is hooked up to your modem port, where does your
modem go?
This age-old problem can be solved in two ways. The reliable, inexpensive way is
to buy an A/B switch box for your modem port. (Most Mac mail-order companies
carry them.) Various products have purported to do this function switching
automatically, but we’ve never seen one work right.
A
B
CD
880 Part III: Application Secrets
■ ■
MACWORLD MAC SECRETS • 4040-8/5 • ch23.F • Chapter 23 • FINAL • VB • 11/03/98 • p.880

You can also buy a
serial port expander card
(if your Mac has slots); they’re sold
by KeySpan, MegaWolf, and others. Such a card adds two or four
more
“modem
ports,” so you can have a modem, MIDI interface, label printer, and yet another
modem port–connectable peripheral all attached at the same time. All of these
ports work simultaneously.
Unfortunately, only some modem-port-using programs
recognize
these new ports
— namely, programs that are
Comm Toolbox-compatible.
Virtually every telecom
program on earth (America Online, Open Transport, and so on), as well as
3Com’s PalmPilot software, is Comm Toolbox compatible; you can safely put
your modem on one of the expanded “modem ports,” and hook your MIDI up to
your
actual
modem port. Your digital camera and Wacom tablet will just have to
wait their turns.
Hail the power of MIDI files
MIDI files, the generic interchange format for Mac music, aren’t just good for
swapping music between brands of Mac sequencers. They’re also great for
swapping music with other brands of computers! Any computer —IBM-compatible,
Amiga, whatever —can read your MIDI files. To transfer them, send them by e-mail
(see Chapter 27) or put them on an IBM or Apple II disk using PC Exchange (see
Chapter 16). We’ve included a collection on the CD-ROM with this book as
examples.
The real beauty of MIDI files, though, is their tiny size. In essence, MIDI files are
simply text files, remarkably compact when compared with actual digitized sound
files. That’s why MIDI files are so popular on the Internet; they can be uploaded
and downloaded quickly and easily.
QuickTime Movies
QuickTime is Apple’s movie technology. If you haven’t seen movies playing on
your screen before, you’re in for a treat. QuickTime movies aren’t the tiny,
jittery movies they were when QuickTime 1.0 played on Macintosh LC IIs;
today, with QuickTime 3.0 or later on a Power Mac, the quality is amazing.
We’ll tell you how to get going in QuickTime and how to go beyond the
basics. But first, we want to make sure you realize that there’s some expense,
a bit of terminology, and some serious hard drive space-guzzling ahead.
How to record your own movies
In theory, digital movies on your Mac shouldn’t be possible at all. If you work
with graphics, you know that just one full-color picture takes up a megabyte
of disk space. A TV picture is composed of thousands of individual frames
flashing by at 30 per second — in other words, to fill your whole screen with
color movies, your Mac would have to be able to process 30MB per second.
Chapter 23: Speech, Movies, and Sound 881
■ ■
MACWORLD MAC SECRETS • 4040-8/5 • ch23.F • Chapter 23 • FINAL • VB • 11/03/98 • p.881

That’s not just a lot; it’s almost impossible for the average personal
computer.
That’s why QuickTime is such an achievement. To reduce the amount of
information necessary to display video, its authors have pulled all kinds of
clever stunts. The primary cheat is, of course, that the movie you watch
doesn’t fill the screen — most QuickTime movies play in a rectangle that’s
only a quarter or half of the standard screen size. Obviously, such a small
movie drastically cuts down the amount of data the Mac needs to handle.
Next, QuickTime compresses the file, discarding redundant information as it
studies the color information in your movie.
The biggest coup in QuickTime technology is the way Apple made it so that
any QuickTime movie can play on any QuickTime-ready Mac. If you play a
certain movie on a G3 Power Mac, it plays back very smoothly, flashing 30
frames per second in its little window. Play that same movie on an LC, and
you only see eight frames per second — but you’ll still hear everything. In
other words, if a Mac is having trouble keeping up with the movie, QuickTime
is smart enough to skip frames but honor the sound track.
What you need
Any post-1990 Mac, from the LC forward, can play QuickTime movies. If you
want to make your own movies — capturing them from a camcorder or VCR
— you need digitizing circuitry. You can get these fancy electronics in one of
three ways:
■Get it built into certain Mac models (such as the Power Mac 7500, 7600,
8100, 8500, 8600, some Power Mac G3 models, and so on).
■Add it, in the form of a NuBus, PDS, or PCI card (a digitizing card), to a
Mac with slots (see Chapters 12 and 13 for model information). The least
expensive cards range from $300 to $500, such as the Xclaim 3D card and
Miro’s line of MiroMotion cards; the fancier cards, suitable for
professional TV production, approach $10,000.
■Buy a Connectix QuickCam — a golf ball-sized camera that plugs into your
Mac’s modem port. (It’s about $50 for the black-and-white-with-microphone
model; $200 for the color-with-no-microphone version.) If your Mac doesn’t
already have built-in video-recording circuitry, a QuickCam is by far the
least-expensive means of getting into QuickTime moviemaking. The
resulting flicks are jerky and small, but they’re still great fun.
■If you have a PowerBook, you can hook up a QuickCam, sure — but you’ll
get better quality movies from a zoom video camera — another golf-ball-
sized camera whose PowerBook end is a PC card that slips into the slot
on the side of your laptop. The Kritter (www.irez.com/) is one such
PowerBook camera. It can show what it’s seeing on your PowerBook
screen, like a TV — full-screen, no jerkiness — and it can record what it’s
seeing as a QuickTime movie at around 15 frames per second, in a 320 by
240-pixel window.
Finally, you need the QuickTime extension itself; it comes with every
Macintosh, or you can download the latest version from www.apple.com.
882 Part III: Application Secrets
■ ■
MACWORLD MAC SECRETS • 4040-8/5 • ch23.F • Chapter 23 • FINAL • VB • 11/03/98 • p.882

Recording and compressing
To make a QuickTime movie, plug your camcorder, TV, or VCR into the back
of your Mac (either into its built-in Video In jacks, or into the jacks provided
by your installed digitizing card). Each digitizing card (or AV-savvy Mac)
comes with its own software with tape-deck controls: Record, Play, Stop, and
so on. All you have to do is set your camcorder, TV, or VCR playing, click the
on-screen Record button, and save, and you have yourself a new QuickTime
movie on the hard drive.
When you save the file, you’re asked to choose a compression method. You
have a choice of several compression methods (called codecs, short for
compressor/decompressor). One codec works best for video, another for
animations, another for still images, and so on. Each strikes a different
balance between picture quality and the space the file takes up on your
hard disk.
Of the codecs, the most useful are Apple Video, Cinepak (Compact Video),
and QuickTime 3.0’s breathtaking Sorenson codec. Apple Video movies look
good and compress relatively quickly (and we mean relatively — saving a
QuickTime movie can take minutes or hours), but they take up a huge
amount of disk space. Cinepak takes an incredibly long time to save a movie
— sometimes overnight — and the resulting movie is, say, 10 percent grainier
than other QuickTime movies. But people love Cinepak because the files are
much smaller on the disk, and, most important of all, they play back more
smoothly. Those aspects make Cinepak-compressed movies useful for
QuickTime designed for playing from CD-ROMs.
If you’re sure that the recipients of your finished QuickTime movies have
QuickTime 3.0 or later installed, by all means compress your movie using the
newer Sorenson codec instead. The resulting movie is as tiny as Cinepak on
the disk, but astoundingly crisp, smooth, and clear in playback.
Of frame rates and tradeoffs
Smooth playback is not a point to be underestimated, either. The smooth-
ness or jerkiness — the frame rate — is measured in frames per second (fps).
Remember, TV smoothness is 30 fps. A QuickTime movie is visually satisfying
at anything over 15 fps. Unfortunately, Mac models that come with built-in
digitizing circuitry have a history of feeble frame rates. For example, a Quadra
AV or 630 with the Apple Video card can’t muster frame rates better than 12
fps; a PCI-based Power Macintosh 7500 grabs movies at a relatively slow 15
frames per second (with a 320-by-240 pixel frame size). Only the top-of-the-line
Power Macs can digitize at pro-level frame rates (25 to 30 fps).
But you can maximize your frame rates if you’re willing to make some sacrifices.
The world of QuickTime is positively brimming with tradeoffs you can make. For
example, on a certain Power Macintosh, you might capture a movie at 24 fps —
if the window is at a smallish size, 320 by 240 pixels. Capture that movie with a
“full-screen” window (640 by 480), and the frame rate drops to 15. Record sound
simultaneously, and you lose another couple of fps.
Chapter 23: Speech, Movies, and Sound 883
■ ■
MACWORLD MAC SECRETS • 4040-8/5 • ch23.F • Chapter 23 • FINAL • VB • 11/03/98 • p.883

QuickTime Digitizing Secrets
■
Use the best video signal
Getting a video picture squeezed down into a tiny QuickTime movie frame means
compressing lots of picture information — and, therefore,
losing
lots of picture
information. Therefore, the idea is to start with the highest quality you can. The
better the quality of the original video, the better the final QuickTime movie.
■Professional or semiprofessional equipment (camcorders called Hi-8, digital
S-VHS, Beta or 3/4-inch) produces better results than VHS or 8mm gear.
Use a fresh video tape. If your camcorder/VCR and your Mac’s digitizing
card both offer
S-video jacks,
use an S-video cable between them for a
strikingly improved picture.
■If possible, put a microphone directly on the person you’re recording
(instead of using the built-in camcorder microphone).
■If you’re recording indoors, you’ll have lower contrast and more static if you
just use ambient room light. Add lamps and other additional lights to avoid
those problems.
■Use a tripod for much more professional results.
Get the best frame rate
The frame rate, of course, is how smoothly your movie plays back. The first factor
that will affect the finished movie’s rate is how smoothly your Mac can digitize
the incoming video signal — if the Mac has trouble processing the incoming video
quickly, you’ll introduce skips into the QuickTime file from square one.
■Defragment your hard drive. (See Chapter 8 for instructions.) Despite our
disdain for defragmenting for everyday computing, it’s common sense for
digital video — if your hard drive has plenty of space, but the hard drive
head must jump around the disk surface to find it, the Mac can’t possibly
record the incoming QuickTime information as fast as it might.
■Turn off AppleTalk. This networking feature takes time out from the Mac’s
processing a few times per second to see if there’s any network activity.
Those interruptions will affect your QuickTime movie.
■Turn off as many extensions as you can. As with AppleTalk, many
extensions use up your Mac’s juice (a screen saver, for example).
■Change your monitor’s setting to “Thousands of colors.” QuickTime, for
various technical reasons, has been designed to operate the smoothest at
this setting — even more smoothly than at the 256-color setting, contrary
to what you might expect.
■Use the “None” codec during recording, if you have a choice. For
example, VideoShop (Avid) and Apple’s Movie Recorder programs let you
specify one compression option to use during recording, and another to
apply to the freshly captured material just after recording. Use the None
compression setting while you’re digitizing, to get the smoothest frame
884 Part III: Application Secrets
■ ■
MACWORLD MAC SECRETS • 4040-8/5 • ch23.F • Chapter 23 • FINAL • VB • 11/03/98 • p.884

rate; you can always re-compress afterward (using the Video, Cinepak, or
Sorenson codec, for example).
■Record onto the fastest hard drive you can. Bigger hard drives are usually
faster than smaller ones; SCSI drives are generally faster than IDE drives;
hard drives are generally faster than Jaz drives, which are faster than Zip
drives, which are faster than floppies. (Of course, if you’re recording
something small, and you have lots of RAM, the fastest disk of all is a RAM
disk, described in Chapter 7.)
The best video-digitizing hard drives of all are the ones that bear the label
“AV” or “AV-ready.” Unlike normal drives, they don’t perform automatic re-
calibration during the data flow, which can introduce glitches in recording.
■Keep your movie’s size to a 4:3
aspect ratio
— that is, your movie’s frame
size should be 160 pixels wide by 120 tall, or a multiple of those numbers.
For example, 640 by 480, 320 by 240, and 240 by 180 are all standard
movie sizes. Any deviation from these portions will slow down the movie.
■Go easy on the
key frames.
You’ll see a setting for key frames whenever
you create or save a QuickTime movie (in the same dialog box where you
choose a codec). A key frame is a “handle” for your Mac to grab onto, like
the thumb indentations on a fat dictionary; it permits the Mac to quickly
locate a different part of the movie, in the event that your viewer will want
to skip around or play the movie backward. In that case, specify a key
frame every second or so (every 15 frames, for example).
If your movie is meant to be played from start to finish, however, key frames do
nothing except slow down playback.
Remember your audience’s equipment
Ironically, when it comes time to master your finished QuickTime movie, your
problem may not be a QuickTime movie that’s too slow — it may be a movie
that’s too fast. We refer, of course, to preparing a QuickTime movie that will
ultimately be played from a CD-ROM. It’s important to remember that a CD is
many, many times slower than a hard drive — even the so-called “12x,” “24x,”
and other-x drives. Worse, when you’re creating a QuickTime movie for CD
playback, you generally must gear it to the lowest common denominator
equipment: a “quad-speed” drive, that older but far most commonplace device.
The point is that a movie whose frame rate is too high for the CD playing it will
look absolutely horrible. (Example: if your CD-ROM drive can deliver a maximum
frame rate of 15 fps for a particular movie, a 10 fps QuickTime file will look far
better than a 30 fps QuickTime file.)
Use a program like Adobe Premiere’s “CD-ROM movie maker” plug-in or Terran’s
Media Cleaner Pro) to process your movie destined for a CD-ROM; either one
can intelligently limit the data rate of the finished movie to play successfully
on a particular CD-ROM type. (For example, 15 fps is about the maximum for a
double-speed CD player on a QuickTime movie whose frame size is 180 by 160
pixels. If the movie is compressed using the Sorenson method, the size or
frame rate could improve.)
Chapter 23: Speech, Movies, and Sound 885
■ ■
MACWORLD MAC SECRETS • 4040-8/5 • ch23.F • Chapter 23 • FINAL • VB • 11/03/98 • p.885
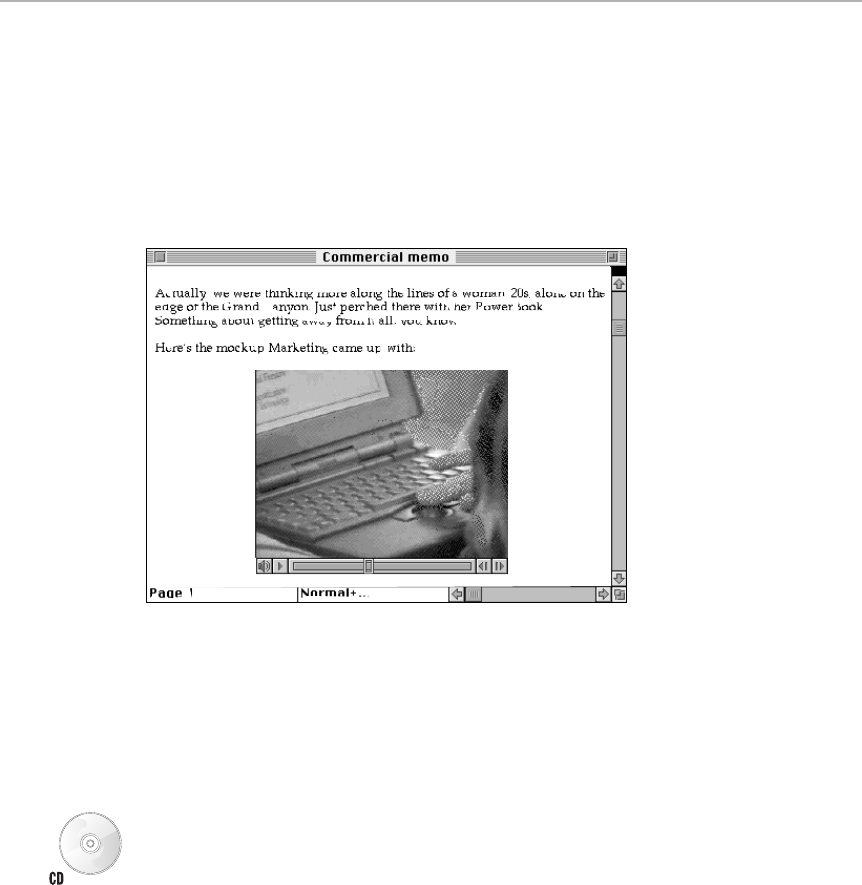
How to play back and edit movies
Once you’ve captured a pile of raw film clips (or grabbed them from America
Online, a CD-ROM of clip movies, or another source), you can play them back
in several ways. All kinds of software can play QuickTime movies: SimpleText,
Word, any presentation (slide-show) software, WordPerfect, ClarisWorks,
your favorite Web browser (with the QuickTime plug-in), and so on. (See
Figure 23-3.)
Figure 23-3: A QuickTime movie embedded in a Word file. It’s a big file on the disk, but wow,
does it convey more than words.
There’s also MoviePlayer, a straightforward QuickTime movie-editing program
that has come with the system software since System 7.5. (MoviePlayer 3.0
offers editing features only if you’ve paid for the Pro version — but see our
QuickTime secrets later in this chapter.)
Using this basic moviemaking software, you can perform simple editing on
your QuickTime movies: cutting pieces out, rearranging clips, and anything
else you can think of to do with Cut, Copy, and Paste commands. You can
even paste movies (and watch them) right in the Scrapbook desk accessory.
Ditto with ScrapIt Pro, included with this book. (See the appendix, “The CD
Software Vault” for more on the software that accompanies this book.)
To do any fancier editing (such as creating dissolves between scenes or
superimposing footage), you need an editing program like Premiere (Adobe)
or VideoShop (Strata). These programs are creaking with fancy features that
can duplicate almost every single one of the special video effects you see in
today’s TV commercials. (You generally get one of these programs with the
purchase of a video card or a video-ready Mac.)
886 Part III: Application Secrets
■ ■
MACWORLD MAC SECRETS • 4040-8/5 • ch23.F • Chapter 23 • FINAL • VB • 11/03/98 • p.886

What good is it?
In our experience, making a QuickTime movie in one of these editing
programs is like making a real movie: You spend incredible amounts of time
relative to the length of the final product. We average about a day of work per
minute of finished, polished movie.
Still, it’s pure heart-racing fun. Suddenly you’re Hollywood, with complete
control over the look of every single frame of your masterpiece. In terms of real
uses, there are promotional and training presentations, children’s programs,
games, the archiving of precious footage (digital movies never deteriorate),
and, of course, storyboarding or production of actual movies or shows.
As Macs become faster and improved versions of the QuickTime extension
appear, the frame rate of the average movie increases. So does the frame size.
For example, your garden-variety Power Mac running QuickTime 3.0 can deliver
half-screen movies with the smoothness of TV — without even batting an eye.
QuickTime Secrets
■
QuickTime 3, QuickTime Pro, and
saving money
In an effort to turn its financial situation around, Apple in 1998 released the
first-ever version of QuickTime that you have to
pay
for. QuickTime 3 itself is free
(and on this book’s CD). But a Web-site-only payment of $30 gets you a serial
number that, when typed into the QuickTime Settings control panel, unlocks the
“pro” features in the free copy. (Typing in your number also eliminates the
shareware-like splash-screen ad that appears every time you launch
MoviePlayer.)
Alas, the non-pro version has
fewer
features than QuickTime 2.5 did! To the
dismay of many, for example, the free MoviePlayer 3.0 doesn’t let you edit the
movies you’re watching by cutting and pasting — it only plays them. Nor does
the free MoviePlayer offer full-screen movie playback — only normal and double
size. And you can’t export your movie or save it into a different format using the
free MoviePlayer. (For a complete list of features that get unlocked when you
register the Pro version, visit www.apple.com/quicktime/rights/mac.)
QuickTime Pro is well worth the $30, and we think it’s about time that Apple
stops giving away its crown jewels. On the other hand, if you find yourself
needing — once — to trim off a few seconds from some QuickTime movie, you
probably won’t want to pay for the privilege.
It’s for such occasions that we share the following little tidbit: It turns out that
MoviePlayer
2.5,
the previous version, can still edit your movies — even if you’ve
installed the QuickTime 3.0 (free) extensions and control panels. (MoviePlayer
2.5 is widely available; it’s on the Mac OS 8 and 8.1 system CD, it was on the
CD that came with this book’s previous edition CD, it’s available from user
groups, and so on.)
Chapter 23: Speech, Movies, and Sound 887
■ ■
MACWORLD MAC SECRETS • 4040-8/5 • ch23.F • Chapter 23 • FINAL • VB • 11/03/98 • p.887
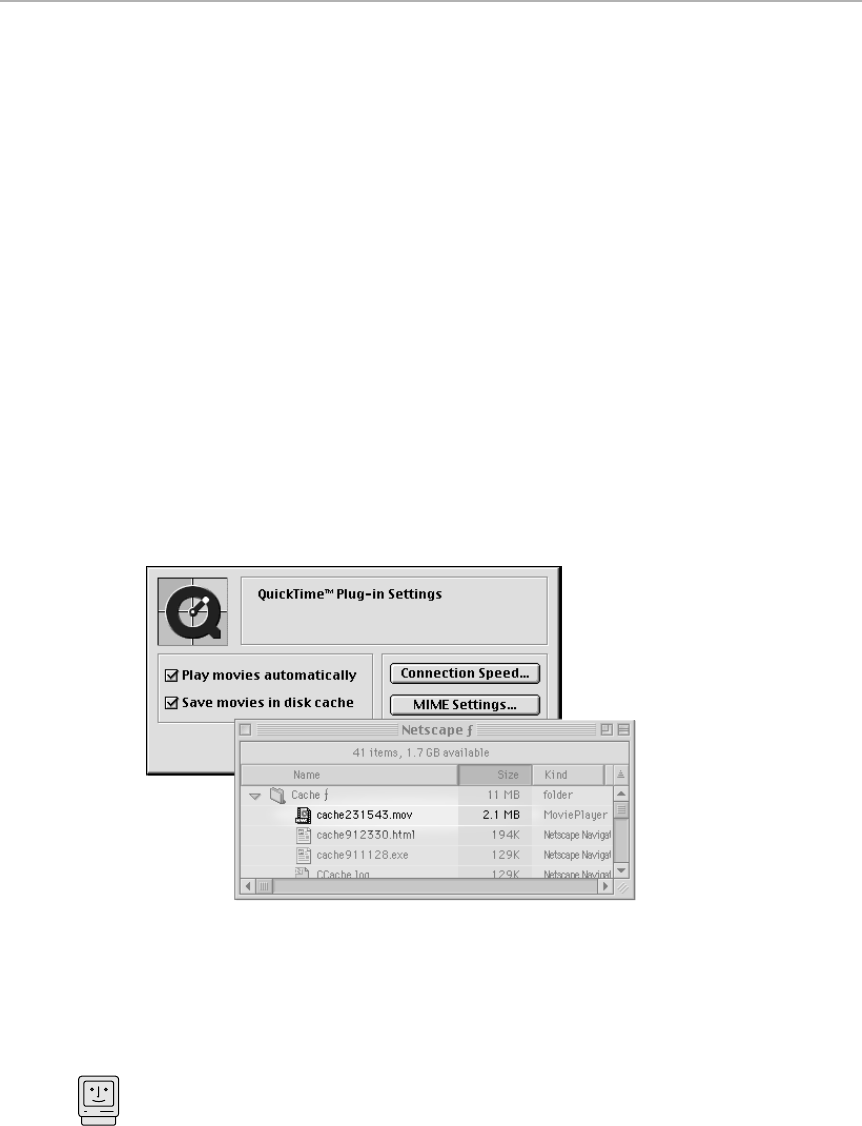
The QuickTime Pro plug-in —
and saving money
Another juicy feature of QuickTime 3 that’s available only in the Pro version is
the ability to
save
a movie you encounter on the Web. Using the QuickTime plug-
in, you used to be able to drag such movies to the desktop — right out of your
browser window — to preserve them forever.
The free version of QuickTime 3 does an astounding job at playing movies
directly off the Web. Unfortunately, only the Pro version lets you drag them to
the desktop.
Unless, of course, you know this trick (for Netscape browsers only): Control-click
any movie you find online. From the pop-up menu, choose Plug-In Settings. In
the resulting dialog box (see Figure 23-4), choose “Save movies in disk cache,”
and click OK.
From now on, whenever you view a QuickTime movie in your Web browser, it will
be
automatically
saved onto your hard drive! To find it again, open your System
folder ➪Preferences folder ➪Netscape folder ➪Cache folder. Inside, plain as
day, you’ll see a file called Cache whose icon and file size bear a distinct
resemblance to a QuickTime movie. Drag it to the desktop, double-click, and
you’re off and running.
Figure 23-4: The QuickTime 2.0 Plug-In (which is, confusingly enough, part of QuickTime 3)
offers an option (left) that stores Web-viewed QuickTime movies in your Netscape Cache
folder (right).
The classic Startup Movie trick
Here’s how to watch a QuickTime movie when you’re stranded on a desert
island without a single application. Just put a movie file named Startup Movie
loose in your System Folder. Each time you turn on the Mac, it plays in the
center of the screen. (You can interrupt the playback by pressing the spacebar.)
Mac Basics
888 Part III: Application Secrets
■ ■
MACWORLD MAC SECRETS • 4040-8/5 • ch23.F • Chapter 23 • FINAL • VB • 11/03/98 • p.888
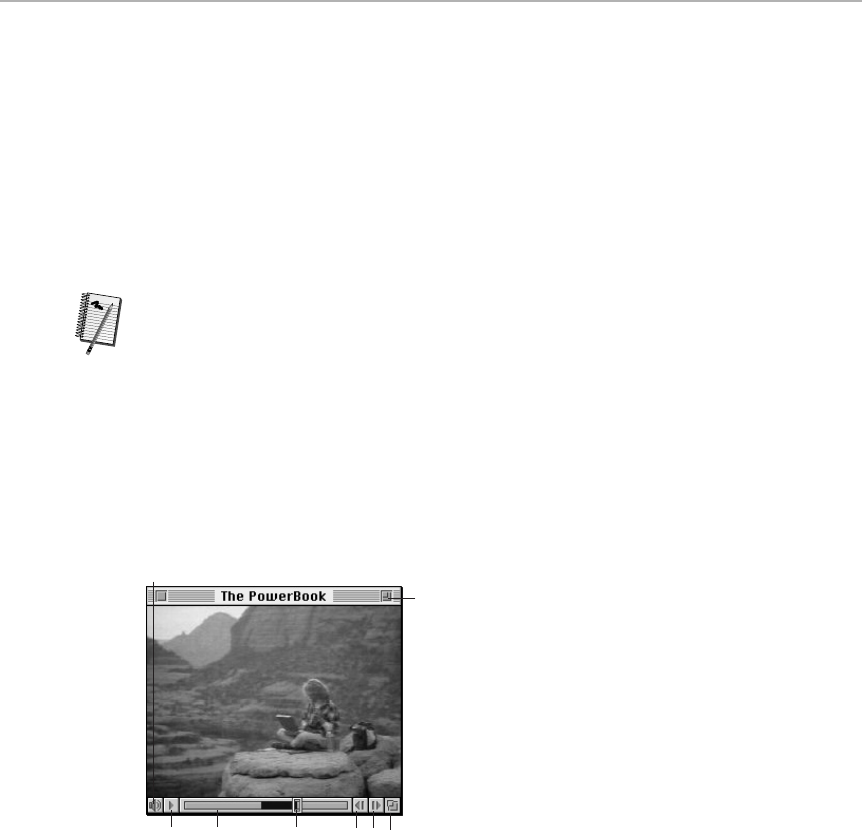
The best possible playback
When quality counts, don’t play your QuickTime movie in SimpleText or your word
processor. Instead, use the special presentation mode of MoviePlayer.
To do so, open your movie in MoviePlayer. From the File menu, choose Present
Movie (available only in MoviePlayer 2.5 or a paid-for 3.0 Pro). In the dialog box
that appears, you’re offered some fancy movie playback options, such as adding
a few seconds of blackness before or after the movie. Try the double-size or
full-screen playback options. The picture becomes blotchier, but the frame rate
remains the same, allowing you to watch the movie while standing farther away.
When you click Play, the Macintosh hides all other programs; suspends all
background operations; and devotes all of its processing power to serving up
frames of movie. You’ll notice a distinct improvement in playback smoothness
when you use the Present Movie command (compared with any old QuickTime
playback).
Hidden Standard Controller tricks
The Standard Controller is the interface you usually see for playing QuickTime
flicks. It’s the funny little scroll bar shown in Figure 23-5.
Figure 23-5: The Standard Controller for controlling QuickTime movie playback.
A.The volume control. Click this speaker icon and hold the mouse button
to get a sliding volume scale. Secret:
Option
-click the speaker icon to
immediately mute the sound. Option-click again to restore the sound.
Fans of the spoof rock-band documentary movie “This is Spinal Tap,”
meanwhile, will appreciate
this
undocumented feature. If you
Shift-
click the
volume slider, you can actually drag the slider up
beyond
the maximum.
That is, you can boost the volume to “11,” as Spinal Tap fans would say.
(You even get new little hash marks that show you where the usual volume
maximum would be.)
A
BCDEFG
H
Worth
Learning
Chapter 23: Speech, Movies, and Sound 889
■ ■
MACWORLD MAC SECRETS • 4040-8/5 • ch23.F • Chapter 23 • FINAL • VB • 11/03/98 • p.889

B.The Play/Pause button. In most programs, you can also press the
spacebar to start and stop playback.
C.The scroll bar. This strip is a map of the entire movie, no matter how long.
Click anywhere in the strip to jump to the appropriate spot.
D.The slider. This little rectangular handle indicates where you are in the
movie. Drag it back and forth to move through the frames.
Shift-drag to turn a portion of the strip black, as shown in Figure 23-5.
That’s how you
select
a chunk of movie. Anything that’s black can now be
cut or copied. (To paste it, move the slider to the point where you want to
paste, and then paste. And to
deselect
whatever’s currently selected, just
click anywhere in the selection strip.)
E.The step-backward button. Click to step one frame toward the beginning
of the movie.
F.The step-forward button. Click to step one frame toward the end of the
movie.
Secret: You can Control-click either of these step buttons to make a jog-
shuttle control appear. Keep the mouse button down and drag the tiny
handle left or right. Your movie plays backward or forward at a speed you
dictate by the distance your mouse travels,
with
sound!
Option-click these step buttons to jump to the first or last frame of the
movie. You can also Ô-click either of these step buttons to change the
playback direction of the movie!
And
Shift-
click these buttons (or press Shift-left arrow or Shift-right arrow)
to
select
a stretch of movie one frame at a time.
G. The resize box. You can drag this resize box as you would any window’s
resize box. You can make the playback frame long and thin, if you want to.
Be aware, however, that the result is an extremely slow, choppy playback.
QuickTime movies like to be played back in their original shape, and
preferably at even multiples of the original size — twice as big, half as big,
and so on.
In fact, if you
Option
-drag this resize box, the window gets larger or smaller
in those increments.
H.The zoom box. To restore a movie to its original dimensions after you
stretch its window, click this zoom box.
Quick backward playback with sound
Shift-double-click the main part of the window, where the movie plays. Try it —
it’s weird! Backward playback with sound!
Double-click the image
without
the Shift key to play forward; single-click the
image to stop it.
Strange
But True
890 Part III: Application Secrets
■ ■
MACWORLD MAC SECRETS • 4040-8/5 • ch23.F • Chapter 23 • FINAL • VB • 11/03/98 • p.890
24-bit color at twice the speed
If your Mac is equipped with enough video RAM to display 24-bit color (see
Chapter 10), QuickTime movies look their all-time best. Unfortunately, they also
play at their all-time slowest, because of the massive amounts of color
information the Mac must process every second.
If you record or save your movie in
16-bit
color, though, you notice very little
degradation from 24-bit color. As a bonus, you’ll get playback that’s
double
the
speed of 24-bit.
How is this possible? The Mac works with color in powers of two. When it’s
working in 24-bit color, it actually reserves
32
bits of data. (That’s why 24-bit
color is sometimes referred to as 32-bit color, as in
32-bit QuickDraw.
Even 32-
bit color, in other words, is only 24-bit color; 8 of the bits of information, known
as the alpha channel — ask a Photoshop guru — are reserved for special
effects.) Dropping back to 16-bit color cuts the data stream in
half.
In recognition of this wonderful trick, Apple endorses 16-bit color as the Official
Color Depth of QuickTime.
Still more keyboard shortcuts
Use the arrow keys to step through the frames of the movie one by one. Press
the up-arrow or down-arrow keys to adjust the sound level.
Press the spacebar or Return to start or stop playback. (That works on the Web,
too, if you’re using the QuickTime plug-in.) If you’re also holding down Shift, you
select the portion of the movie that plays.
And let’s not forget Ô-right arrow and Ô-left arrow. They make the QuickTime
movie play forward and backward, respectively.
Strange
But True
Chapter 23: Speech, Movies, and Sound 891
■ ■
MACWORLD MAC SECRETS • 4040-8/5 • ch23.F • Chapter 23 • FINAL • VB • 11/03/98 • p.891
ANSWER MAN
Q: I found a movie clip on the Web that I want to
play, but it says it’s an AVI movie. What the hey
is that?
A: It’s the Windows equivalent of QuickTime. Not
as good, of course, but roughly the same idea.
There are three ways to view the AVI movie.
First, download Video for Windows, a converter
file that turns QuickTime and AVI movies into
each other, from www.microsoft.com.
Alternatively, use Microsoft Internet Explorer as
your Web browser. (It can view AVI movies
directly.) Open the AVI movie (by choosing Open
from the File menu) and then drag the movie box
to your Desktop. The movie turns, as though by
magic, into a QuickTime movie clip. Open this clip
with MoviePlayer or SimpleText, choose Save As
from the File menu, and save the result as a “self-
contained” QuickTime movie. You’re done!
Finally, get QuickTime Pro, described earlier in
this chapter. Both its browser plug-in and its
MoviePlayer program can open and save AVI
files.
How do I play AVI?

Hidden messages
If the QuickTime extension is in your System Folder, you can get a sample sense
of the programmers’ humor if you choose Show Balloons from the Help menu.
Just point to the QuickTime icon in the Extensions folder.
Then point to the Musical Instruments extension while you’re at it. (“Punishment
for a misdeed”!?)
Instant credits
Talk about undocumented features! Turns out that if you paste some copied text
into a QuickTime movie (in MoviePlayer, for example), it creates text titles! You
get about two seconds of white text on a black background, in 12-point Geneva,
pasted at the insertion point. Cooler yet: If your credits text begins life in a
program that supports
styled Clipboard text
(SimpleText, ClarisWorks, America
Online 3 or later, or Microsoft Word 6 or later, for example), you can choose
fonts and sizes for the text — all of which get preserved when you paste it into
your movie!
MoviePlayer 2.0 and later is Drag-and-Drop savvy, too. For example, you can type
your credits in SimpleText, highlight them, and drag them directly into a
QuickTime movie in MoviePlayer. (As always, however, the 3.0 version of
MoviePlayer offers these features only in the Pro version.)
Instant still shots
As it is with text, so shall it be with PICT files: Once again, you can either paste or
drag-and-drop
graphics
into a QuickTime movie you’re working on in MoviePlayer.
The graphic appears immediately, preset with a two-second duration.
It’s best to drag in graphics that match the frame size of the movie you’re doing,
though. Otherwise, the entire movie’s frame size will change to accommodate
the size of the largest graphic you insert.
Four very secret menu commands
Depending upon which key you hold down on the keyboard, you can make
MoviePlayer 2.5 or 3.0 Pro’s Edit menu do some really weird things. For
example, the Shift key turns the Paste command into a Replace command;
anything you paste
replaces
whatever portion of the receiving movie you’ve
selected (instead of being inserted in front).
The Option key has a trick or two of its own. When you press Option, the Edit
menu now has Add and Trim commands. Add actually lets you
superimpose
whatever’s on the Clipboard with what’s already in the movie — an especially
Worth
Learning
892 Part III: Application Secrets
■ ■
MACWORLD MAC SECRETS • 4040-8/5 • ch23.F • Chapter 23 • FINAL • VB • 11/03/98 • p.892

useful trick when you’re working with text (you create subtitles this way) or
sound (you add a sound track to what’s already there). Trim, on the other hand,
is nearly as destructive as the Clear command whose place it takes. Trim chops
off any of the movie that isn’t
selected
. Think of it as you would the Crop
command in a graphics program.
And then there’s the secret Add Scaled command. You get it in the Edit menu
when you press Shift and Option together. It’s like Paste, except that you’re
supposed to highlight a region of the movie before pasting. Whatever you’re
pasting gets stretched or compressed in time so that it fits the highlighted
region! The sound track also gets stretched, too; in other words, you can speed
up or slow down whatever you’re pasting. That ability can be very powerful, very
comical, or just weird.
Roll credits
While your Mac is starting up, press Ô-Option-Q-T (for
QuickTime,
get it?). You
get an enormous full-screen slide show of the programmers’ mug shots,
complete with their names displayed beneath. It’s a parade of geeks!
Chapter 23: Speech, Movies, and Sound 893
■ ■
MACWORLD MAC SECRETS • 4040-8/5 • ch23.F • Chapter 23 • FINAL • VB • 11/03/98 • p.893
MACINTOSH SECRET
The world hasn’t made nearly enough fuss about
one astonishing feature of QuickTime 2 and
later: music.
QuickTime comes with an accompanying file
called QuickTime Musical Instruments. This
extension contains 30 instrument sounds from a
Roland synthesizer. You can create orchestrated
music, completely forgetting that the previous
Macintosh sound limit was four notes at a time
in a cheesy Casio-organ sound. (Moreover,
QuickTime has an opening for software plug-in
instruments from other companies, enhancing
the promise of this cool technology.)
Start with a MIDI file. (They’re available by the
thousand on America Online and elsewhere, or
you can use the ones we included on the
CD-ROM with this book, or you can record your
own if you’re a MIDI jock.) Launch Apple’s
MoviePlayer, choose Open from the File menu,
and open the MIDI file. In the Save As box that
appears, click Save. (You can also just drag a
MIDI file’s icon onto MoviePlayer’s icon to open
it as an untitled movie.)
The result is a QuickTime movie, with video or
not, that plays amazing, rich, realistic
instrumental music. And it doesn’t take up much
room on the disk, as a digitized Mac-mike
recording would.
So much synthesizer, so little time.
Your secret synth
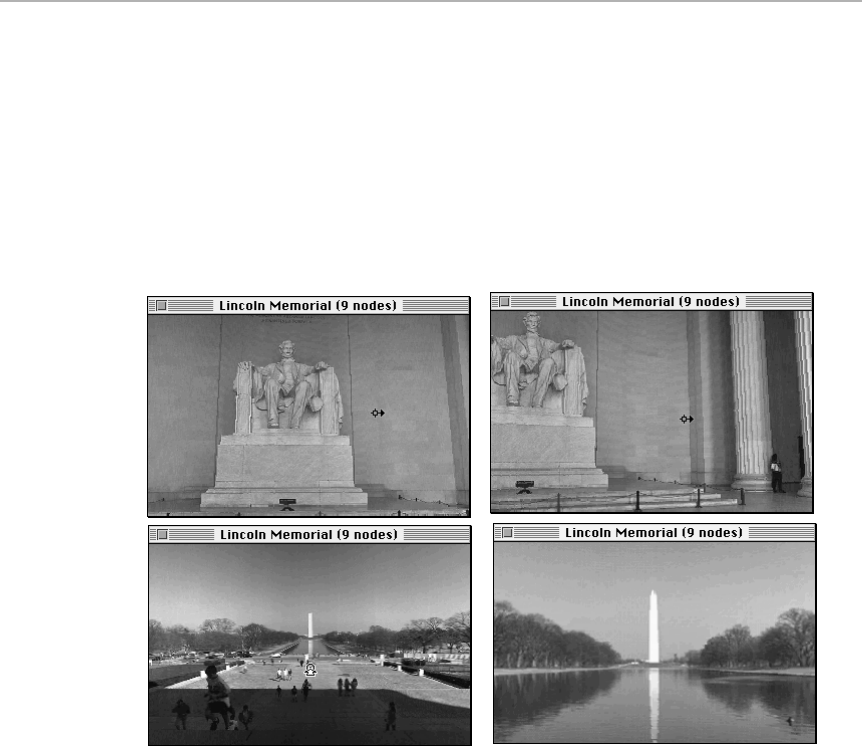
QuickTime VR
A QuickTime VR movie isn’t really much like a regular QuickTime movie.
Instead of watching a moving scene passively, you view a still photo on the
screen — and you control the movement. If you drag your mouse around
inside the photo, your camera angle changes. You can actually turn
completely around, viewing your environment from every angle; you can
even look up or down, zoom in or out, and get a spooky feeling that you’re
really there (see Figure 23-6).
Figure 23-6: As you drag your cursor inside a QuickTime VR scene, the cursor shape
changes to indicate the direction it thinks you’re “looking,” and the entire “camera angle”
changes accordingly so that you can peer in any direction (shots 1 and 2). If you turn
around far enough, you’ll be facing the opposite direction (shot 3) — and in a multinode VR,
your cursor shape may indicate that another click will jump you to another camera position
(shot 4).
The average Mac fan can’t make a QuickTime VR movie — at least not without
taking 360 degrees’ worth of still photos using a tripod-mounted camera, and
stitching them together with a QuickTime VR kit. (These kits include
PictureWorks’ Spin Panorama, Panimation’s Nodester, and Live Picture’s
PhotoVista.)
12
34
894 Part III: Application Secrets
■ ■
MACWORLD MAC SECRETS • 4040-8/5 • ch23.F • Chapter 23 • FINAL • VB • 11/03/98 • p.894

You can, however, buy products that incorporate VR technology, such as
Paramount’s Star Trek: the Next Generation Interactive Technical Manual
CD-ROM. You can also savor the QuickTime VR scenes included with this
book’s CD-ROM — some of them are mind-blowing. And you can visit Web
sites that have VR scenes embedded in them, letting you “visit” distant places
in a startlingly realistic way. For a tour of Web sites that have QuickTime VR
movies embedded in them, visit www.apple.com/quicktime/samples. (We’re
particularly impressed with QuickTime 3.0’s Web-based VR ability, which lets
you start playing with the virtual-reality scene almost instantly — in a gray,
grainy, low-res version — and then, as more of the data loads into your Mac
from the Internet, the picture becomes full color and more detailed.)
QuickTime VR Secrets
■
Zoom in, zoom out
You can do more in your VR movie than just turn your head; you can also
move forward or backward in any direction. The scheme is simple: press
Shift (or, before QuickTime 3, Option) to zoom forward, and the Control key to
zoom out.
While zooming, you’ll notice that the picture breaks up somewhat — but it
returns to a clearer image as soon as you release the key.
Change your camera position
Technically, there are three different kinds of QuickTime VR movies. We’ve
included samples of each on the CD-ROM with this book:
■Panorama movies. This is the standard VR movie type, a sort of living
photo: a single location shot that lets you turn your head 360 degrees.
■Object movies. In this kind of movie, you don’t move around at all. Instead,
a single three-dimensional object floats in front of you. Dragging the cursor
in this kind of picture moves the
object,
not the camera, permitting you
to rotate the object in space. They use this kind of movie for interactive
“virtual museum” movies, so that you can you can examine all sides of,
for example, a sculpture.
■Multi-node movies. Now we’re talking. In this kind of movie, you start out
at one location, operating exactly as you would in a panorama movie,
looking up, down, and around. Occasionally, however, you’ll notice your
cursor changing shape as it passes over specific spots in the picture.
(It becomes a tiny bullseye, like the usual cursor, with a big fat upward-
pointing arrow protruding from the top.) If you click at this moment, you’ll
actually jump to another position in the scene — your entire rotating camera
apparatus will move.
Chapter 23: Speech, Movies, and Sound 895
■ ■
MACWORLD MAC SECRETS • 4040-8/5 • ch23.F • Chapter 23 • FINAL • VB • 11/03/98 • p.895

Knowing this trick, and working with multi-node panorama movies, makes
QuickTime VR truly breathtaking. Apple released, for example, a 26-node movie
created inside a San Francisco art museum. It also created a nine-node Lincoln
Memorial movie and a 12-node Monument Valley movie; no technology — not TV,
not books — can come closer to letting you experience the feeling of actually
being somewhere.
Mac Meets TV
As we’ve mentioned in other chapters, the video signal that creates a picture
on the Mac screen is utterly unlike the one in a TV set. The electron guns
scan the screens at different rates and in different patterns.
Therefore, the fact that you can show your Mac’s picture on a TV set, or vice
versa, is remarkable.
Bringing TV to your Mac
It’s easy enough to watch TV on your Mac — if you have the right hardware.
In general, the simplest route to TV/Mac watching is to buy a Mac that offers
TV inputs, such as an AV model (tower G3 model, a Power Mac 75/76/85/8600,
a Performa or LC with the Apple TV System card, and so on). (For a complete
list of Apple’s TV cards, and which Mac models accept them, see Chapter 24
of Macworld Mac Secrets, 4th Edition on this book’s CD-ROM.)
If your Mac didn’t come with such video input jacks, you can add them in the
form of a PCI card, such as the Xclaim 3D card. If you have a recent PowerBook,
you can buy an Irez Kritter camera/PC card “zoom video” combination that
turns your laptop’s screen into a TV screen.
Run a cable from the video-output jack of your VCR, camcorder, or videodisc
player to the Video In jack on the back of the Mac. (If you’re using S-VHS or
Hi-8 equipment, use the S-video input port on the Mac for better color.) If you
want sound too, connect the audio output of your TV or VCR to the Mac’s
microphone jack.
Watching TV
After you’re wired, watching TV on the Mac is as easy as launching the Video
Player program in your Apple Extras folder (or whatever similar program your
Mac came with). Feel free to resize and reposition the video window; you’ll
find that choosing Full Size from the Monitor menu turns your entire monitor
into a glorified TV set — a sure way to get gasps from fellow Mac fans.
Unlike recording video (as QuickTime movies), simply showing the VCR,
camcorder, or videodisc player’s incoming video on your screen involves
no decrease in picture smoothness, quality, or frame size. That’s why even
a PowerBook 2400, 3400, or G3 can show full-screen video (when equipped
with the above-mentioned Zoom Video PC card).
896 Part III: Application Secrets
■ ■
MACWORLD MAC SECRETS • 4040-8/5 • ch23.F • Chapter 23 • FINAL • VB • 11/03/98 • p.896

Bringing your Mac to TV
Getting the Mac’s image to your TV or VCR is much easier than going in the
other direction. You can make this arrangement in one of two ways. First, you
can buy a Mac with NTSC video-output jacks (NTSC is techspeak for “normal
TV”), such as a Power Mac 8500, 8600, tower-style G3, or Performa or LC with
an optional Apple TV/Video System card. (The 1998 PowerBook G3 line
includes built-in, NTSC-converted, video-output jacks for this purpose.)
Second, you can buy a $200 add-on converter box, such as the Focus LTV.
The connections are what you’d guess: Run a cable from the Video Out jack
(of your Mac or your adapter box) to your VCR’s input jack. Do the same with
the sound cable.
Why the picture looks crummy on the TV
Three incompatibilities prevent the Mac’s video image from looking good on
a TV screen. One is the flickering of thin lines, especially the horizontal lines
in a title bar or the lines in a spreadsheet. You may recall from Chapter 11
that the Mac repaints its screen 60 times per second; a TV draws its screen
picture only 30 times per second, in alternate passes — one pass draws the
odd-numbered lines of the screen, and the next draws the even-numbered
lines. Any thin horizontal line in the Mac image falls in just one line of the
TV’s interlaced image; therefore, it only gets painted during an odd or an
even pass of the TV’s electron gun — 15 times per second instead of the
normal 30 — and so it flickers.
Fortunately, almost any converter box you can buy today — including the
built-in video features in video-ready Macs — has anti-flicker circuitry.
The second and more serious problem associated with getting a Mac image
on TV is overscanning. A TV paints its screen from edge to edge, extending
past the edges of the glass. You’ve probably never noticed that the outer
perimeter of your TV picture is chopped off, because (a) directors
deliberately film their TV footage with the overscanned perimeter in mind,
and (b) it’s TV; who cares if you’re missing the outer 3 percent?
In presentations, however, missing the outer edges matters. Some of the
Mac’s most important elements (the menu bar, icons, and so on) tend to be
at the edge of the Macintosh display, and on a TV they may wind up off the
screen. Keep a generous margin, therefore, when you’re designing your
presentation.
The last problem with displaying the Mac image on a TV is that, frankly, a TV
has poor resolution (dpi) compared to the Mac. Nothing ever looks quite as
good on a TV as it does on the Mac.
As a result, you should use larger font sizes and less detail when you set
up a presentation you’ll be showing on TV. Use Photoshop (or another
professional graphics or presentation program) to create antialiased
(smooth-edged) text, and avoid sharp color contrast between the text
and the background color.
Mac Basics
Chapter 23: Speech, Movies, and Sound 897
■ ■
MACWORLD MAC SECRETS • 4040-8/5 • ch23.F • Chapter 23 • FINAL • VB • 11/03/98 • p.897

PowerBook owners in particular should be careful with photos and other color
graphics. Until the 1997 family of PowerBooks, most of these laptops came
equipped with only enough video RAM to send 256 colors simultaneously to
an external monitor (such as a TV). Therefore, unless you carefully prepare
your photos as indexed-color images (as described in Chapter 28), you’ll get
blotchy, crummy photos on the TV.
Shooting the screen
Computers on the nightly news always seem to be on the blink. Their monitors
have those crazy horizontal lines rolling, rolling, rolling up the screen — but
that problem only exists in the TV picture of the computers, not in person, and
not in movies!
This problem occurs whenever you record a computer screen with a video
camera. The problem, once again, is the difference in scan rates. The symptom
is that in the TV image of the Mac, a fat whitish line always appears to be
rolling up or down your Mac screen.
There are two possible fixes. First, filming a PowerBook screen never presents
this problem. It comes out beautifully on TV (because it’s not a CRT screen).
Second, of course, you can record the output from an NTSC converter box, as
described earlier.
Multimedia presentation secrets
Our thanks to Elise Dorsey of Ready to Go, Inc., for these tried-and-true secrets.
■Make them remember. Begin and end your presentation with exciting
music and/or eye-catching graphics. People always remember the
beginning and the end the most.
■Avoid jerky or “tearing” animated objects. When animating objects to
move across a path, remember that smaller objects move faster. If you’re
using a slowish Mac, avoid animating large graphics.
And if you’re using a slower Macintosh, animate one object at a time to
avoid noticeable jerks when the Mac’s processor is drained from having
to display a second staggered animation.
■Thwart Murphy’s Multimedia Law. Things always go wrong with
software and equipment. Always.
Test your presentation — before the presentation day — on the exact
computer from which it will be displayed. Problems to look out for:
necessary software is not installed; necessary fonts are not installed;
screen displays colors differently; different Mac CPU speed affects
quality of animations; different screen size is incompatible with your
presentation; sound is not turned up enough; color depth (256 versus
thousands of colors) is set wrong; and so on.
898 Part III: Application Secrets
■ ■
MACWORLD MAC SECRETS • 4040-8/5 • ch23.F • Chapter 23 • FINAL • VB • 11/03/98 • p.898

■Make it tasteful. First, pay as much attention to how your objects exit
the screen as you do to how they enter the screen. Second, avoid
repetitive animations, such as an animation that begins each scene.
These become tedious and distracting.
■Put controls where you can find them. Put your buttons (for Next Slide,
for example) and other presentation controls in a consistent area on the
screen. Never put the buttons for controlling the entire presentation in
different locations on different screens.
■Place your colors carefully. Use cool colors for your background and
warm colors for your foreground. Cool colors are variations of red,
yellow, blue, and green that have a bluish tone; warm colors are the
same hues with a reddish tone. For example, blue-green is cool; yellow-
green is warm. Blue-purple is cool; magenta is warm.
■With fonts, think organization. Use a consistent format for the titles,
subtitles, body text, and so on. Text style is a key to your viewer of the
structure of your content. By using a consistent visual language, your
information is easier to assimilate.
Chapter 23: Speech, Movies, and Sound 899
■ ■
MACWORLD MAC SECRETS • 4040-8/5 • ch23.F • Chapter 23 • FINAL • VB • 11/03/98 • p.899
TRUE FACT
You’ve made your movies. You’ve recorded your
sound effects. You’ve composed a throbbing,
insistent beat using MIDI and your synthesizer.
Now you have to show it all to somebody.
Fortunately, an entire Mac software category is
dedicated to letting you integrate these different
pieces into an attractive viewer-controlled show.
On the most basic level, you can perform media
integration with slide-presentation programs
such as ClarisWorks, Microsoft PowerPoint, and
Aldus Persuasion. These programs let you
create static slide-show presentations, although
they can play QuickTime movies, too.
For more cinematic presentations, you need a
program such as Gold Disk Astound,
Macromedia’s Action, or Vividus’s Cinemation.
These programs let you do more than insert
pictures and movies onto a static slide; you can
animate objects to fly along paths on screen and
add a sound track that plays continuously as
scenes change. Also, you can build interactivity
into the presentations by creating buttons that
link to other objects, sounds, or scenes. Viewers
can control the flow of the presentation by
clicking the various buttons.
On the high end, script-based multimedia
packages are available, such as HyperCard and
Macromedia Director. Don’t expect to load one
of these programs and turn out a polished
presentation an hour later. All three employ
scripting languages that take months to learn.
The scripts permit a high level of interactivity
and let you control external devices such as
videodisc players from within a presentation.
Generally, integration programs are designed to
combine sounds and pictures, not create them.
But there are exceptions: Macromedia Director
and Cinemation include a full range of painting
tools so that you can create frame-by-frame
animation from within the program. Gold Disk’s
Astound includes a sound recording feature. All
the programs include a text tool, so you can
create titles and headings without having to
import every word.
Putting it together: presentation software

Speech I: The Mac Talks
The voice of your computer isn’t Swedish anymore.
For years, you could make a Mac speak out loud using an extension called
MacinTalk — if you could find MacinTalk, if it worked on your model, and if
you didn’t mind its drunken-Scandinavian accent. (Shortly after creating
Macintalk, the primary programmer left Apple, leaving the company in the
lurch and the software in the “unsupported” category for several years.)
Today, though, a talking Mac is easy to set up, fun to listen to, and essentially
free of that bizarre nasal inflection. Apple rewrote Macintalk, making it far
more flexible and powerful.
The key is to get the software kit called PlainTalk 1.5 (or a more recent
version). PlainTalk comes with System 7.5 and later (and with this book), and
updates are available from Apple’s sites on the Internet or online services.
And the beauty of Apple’s text-to-speech software is that it works on almost
any Mac. (Contrast this with Apple’s speech-recognition software, which
works only on PowerPC-based Macs and AV Quadras.)
Once you’ve installed the various PlainTalk extensions into your System
Folder, all you need is SimpleText, ClarisWorks, WordPerfect, America Online,
Tex-Edit (included with this book), Word 98, or one of a handful of other
programs equipped with a Speak command. Type a few choice sentences and
then (in SimpleText, for example) choose Speak All from the Sound menu.
Using that same menu, you can choose from among the 18 different character
voices that Apple provides.
You’ll discover that PlainTalk is amazingly intelligent when it reads. It can
generally distinguish between the two alternate meanings of “Dr.”, for example
(doctor or drive) — and it’s cyber-savvy enough to say “wink” for ;) . . . “grin”
for :) . . . and “frown” for the :( symbol!
To interrupt the Mac’s reading, press Ô-period.
Text-to-Speech Secrets
■
Make any program talk
Got a program not on the magical list of programs that are MacinTalk-savvy? No
problem. Now that you’ve got OneClick (included on the CD with this book), you
can add speech features to every program you own.
Just install OCSpeak, a button you can add to your OneClick palettes. It can
read aloud the contents of a drag-and-dropped file, a highlighted blob of text, or
whatever’s on the Clipboard, using your default voice or a random voice. See the
appendix for more on OneClick.
900 Part III: Application Secrets
■ ■
MACWORLD MAC SECRETS • 4040-8/5 • ch23.F • Chapter 23 • FINAL • VB • 11/03/98 • p.900

Make your Mac sing, too
If you play around with PlainTalk’s voices much, you’ll discover that four of them
are musically inclined! The voices called Bad News, Good News, Pipe Organ, and
Cellos each
sing
whatever you type — to familiar melodies. Bad News is a
funeral march (actually a Chopin prelude); Good News is the graduation march
(
Pomp and Circumstance
); Pipe Organ is the theme music from the
Alfred
Hitchcock Presents
TV show; and Cellos sings “In the Hall of the Mountain
King,” from
Peer Gynt,
by Edvard Grieg.
Unfortunately, you may never even realize that the Mac will sing the
entire
melody — instead of starting over after a few notes — if you let it. The trick is
not to use
any
punctuation. For example, if you try to make the Mac sing the
following to the graduation-march theme (the Good News voice), the melody will
start from the beginning at each punctuation mark:
Hey, congratulations! You’re suddenly rich! Your lottery ticket just won the big prize.
But if you type it as shown below, you’ll get the whole thing sung to the correct
melody, to great comic effect:
Hey congratulations you’re suddenly rich your lottery ticket just won the big prize.
What’s that number?
Here’s a function of Mac-talk that may surprise you. Quick: How do you
pronounce this number?
123,468,915,125
It might take you a moment or two to figure that out, but not the Mac! Have the
Mac
speak
the number. As reader Chad Chamberlain discovered, you’ll hear it
instantly and perfectly pronounce the number “one hundred twenty-three billion,
four hundred sixty-eight million, nine hundred fifteen thousand, one hundred
twenty-five”!
Macintalk Pro and non-Pro
Depending on what version of the Mac OS 8 you have — and which CD it came
on — you actually may have any of
three
MacinTalk versions. Each requires its
own extension; each comes with a set of corresponding voices from which you
can choose.
They’re called MacinTalk 2, MacinTalk 3, and MacinTalk Pro. All require the
Speech control panel, but each comes as a separate extension, to boot. Just by
looking at one of these extensions, or at one of its corresponding voices (in the
Voices folder, in your Extensions folder), you can tell which version an extension
is — a tiny 2, 3, or P (for Pro) appears on the icon. If you find a voice file that
has
no
2, 3, or P on the icon, then you’re missing the corresponding extension.
MacinTalk 3 is the standard extension; it’s accompanied by the 19 standard-
quality voices: Albert, Bad News, Bahh, Bells, Boing, Bubbles, Cellos, Deranged,
Fred, Good News, Hysterical, Junior, Kathy, Pipe Organ, Princess, Ralph,
Trinoids, Whisper, and Zarvox.
Strange
But True
Chapter 23: Speech, Movies, and Sound 901
■ ■
MACWORLD MAC SECRETS • 4040-8/5 • ch23.F • Chapter 23 • FINAL • VB • 11/03/98 • p.901
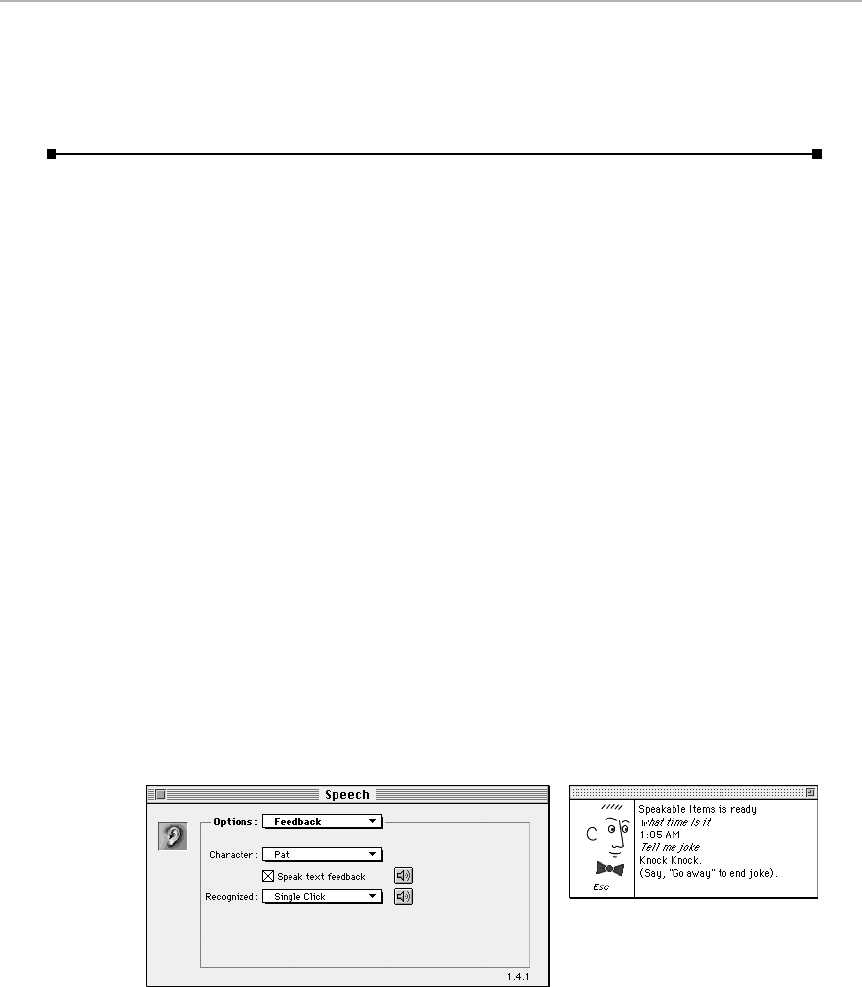
If you’re lucky, you may also have the Macintalk
Pro
extension. It makes three
special additional voices possible, such as Bruce, Agnes, and Victoria. These
voices use up more RAM, but sound that much more lifelike. (All of these
extensions and voices are downloadable from
www.apple.com
.)
Speech II: The Mac Listens
The Power Mac models’ voice-command feature seems incredibly exciting.
This is the future! This is Star Trek! This is James Bond! You speak; your
computer obeys.
Not many people actually use the Mac’s free speech-recognition software,
however. It uses a healthy chunk of RAM; it works only for American English
speakers with no accent; it can’t operate menus (it can only open things); and
some finagling is required to get it to work with G3 Macintosh models.
(Furthermore, you can only use Speech Recognition with the built-in
microphone of the PowerBook 5300 or 2300 series. The PowerBook 3400 can
use either its built-in microphone or the Apple PlainTalk microphone,
described earlier in this chapter.)
Let’s begin our tour with the Speech control panel. It has a tiny pop-up menu
with four commands. Each displays a different panel of controls: Voice,
Feedback, Listening, and Speakable Items.
Voice
The Voice pop-up menu lists the various timbres of voice that the Mac can
use to talk back to you — to reply, for example, when you ask the computer
what time it is (see Figure 23-7). You get a list of dozens of amazing voices,
ranging from the crazy old Deranged guy to the chilling calm of Mr.
Whispered.
Figure 23-7: Using the Speech control panel (left), you establish the visual and vocal identity
of whoever you want to be your Mac’s alter ego in the little feedback box on the screen.
902 Part III: Application Secrets
■ ■
MACWORLD MAC SECRETS • 4040-8/5 • ch23.F • Chapter 23 • FINAL • VB • 11/03/98 • p.902

Feedback
This panel of the Speech control panel offers a Character pop-up menu, in
which you can select, by first name, a visual cartoon character. This will be
the Mac’s personality in responding to the things you say. If you say, “Tell me
a joke,” the animated character you specify here will tell a knock-knock joke
— using the voice you specified with the Feedback pop-up menu.
You can combine any Voice with any Feedback character; Raymond can have
a female voice, if you so desire.
Listening
Using this panel, you tell PlainTalk when you want it to listen. You’ll have by
far the best results using the “push-to-talk” feature, with which the Mac
doesn’t listen at all until you’re pressing a particular key (which you specify
here). Apple implies that you can choose any key to be the push-key, but
actually your choices are Esc, a punctuation mark or bracket, and any key on
the numeric keypad except Enter.
Using the other controls, you can, if you really want to, set up the Mac to
respond to your utterance only if you begin the sentence with the computer’s
name — which defaults to “Computer.” This way, you don’t have to press a
key while talking. However, this system (which was the only system in
previous versions of PlainTalk) doesn’t have the high degree of accuracy of
the “push-to-talk” method.
Speakable Items
This final panel contains the master on/off switch for speech recognition. If
you click Off, the Mac won’t attempt to decipher anything you say — except
possibly “OK” and “Cancel,” which “click” the corresponding buttons on the
screen; this feature has its own on/off switch here.
Chapter 23: Speech, Movies, and Sound 903
■ ■
MACWORLD MAC SECRETS • 4040-8/5 • ch23.F • Chapter 23 • FINAL • VB • 11/03/98 • p.903
TRUE FACT
The eight Feedback characters offered by the
Speech control panel are designed to
communicate the Mac’s disposition as you use
the speech-recognition feature. The characters
communicate even more, however, about the
Apple programmers who created them.
Think about it. There’s Pat, who’s the spitting
image of the mystery-gendered Pat from the
Saturday Night Live skits. There’s Raymond, a
dim-witted-looking guy whom you wouldn’t be
nuts to assume is based on Dustin Hoffman’s
character in the movie Rain Man. There also are
Connie (Chung) and Sally (Jessy Raphael, of
talk-show fame).
We think it’s safe to say that these
programmers spend quite a bit of time being
influenced by pop-culture TV and movies. Our
only relief is in seeing that Vincent, the severed-
ear character, is a clear reference to van Gogh.
At least someone over there has culture.
Valley of the TV nerds

What you can say to the Mac
So, what, exactly, can you do when speech recognition is turned on and
configured?
Well, the Mac can’t take dictation, writing down what you say; for that you
need the program called PowerSecretary, as described in Chapter 10. Nor can
it execute menu commands when you speak them (“Shut down,” “Restart,”
“18 point,” and so on) — unless you first define them as AppleScripts (read
on). (A few, such as “Close window” and “Empty the Trash,” have been
programmed already for you.)
No, what PlainTalk 1.4 and later does is open things — things whose icons (or
aliases) you’ve put into the Speakable Items folder, which is inside the Apple
Menu Items folder in your System Folder. You can launch programs and
documents with the greatest of ease: “open ClarisWorks,” “open Monitors,”
and so on.
If you’re handy with AppleScript, you can increase PlainTalk’s possibilities by
writing little AppleScript “applets” (which you then put into the Speakable
Items folder). That’s how Apple pulls off some of the more elaborate PlainTalk
responses that come preinstalled — the ones you get if you say to the Mac:
“What day is it?”
“What time is it?”
“Tell me a joke.”
“Is file sharing on?”
“Find original of this.”
“View window by small icon.”
If you have so set up the Speech control panel, the Mac also acts on OK and
Cancel buttons.
Speech Secrets
■
The Mac talks — and it’s funny
For five minutes of pure hilarity, open the Speech control panel, and choose
Voices. After you select a voice from the pop-up menu and click the little
speaker icon, you’ll hear a sample sentence uttered in the voice style you
selected. The beautiful part of this is that the Apple programmers have chosen
some incredibly witty and appropriate things for their little imaginary friends to
say. Here are a few of our favorites:
Whisper: “Psssst — hey you, yeah you! Who do ya think I’m talking to, the
mouse?”
Deranged: “I need to go on a really long vacation.”
Strange
But True
904 Part III: Application Secrets
■ ■
MACWORLD MAC SECRETS • 4040-8/5 • ch23.F • Chapter 23 • FINAL • VB • 11/03/98 • p.904

Pipe Organ (singing): “We must rejoice in this morbid voice.”
Zarvox (alien-sounding monotone): “That looks like a peaceful planet.”
Albert (you have to hear it): “I have a frog in my throat. No, I mean a
real
frog!”
Make up your own jokes
Tell your Mac, “Tell me a joke.” And it actually tells you a knock-knock joke! Isn’t
that clever?
No, not really; it’s actually just reading from a script. The script, sitting in your
Speakable Items folder (in your Apple Menu Items folder, in your System folder),
is called Tell Me a Joke. You can open it up with ResEdit (see Chapter 21) and
read the surprisingly long list of canned jokes.
With some judicious editing, you can even add your
own
jokes. And then get
your Mac to call the Improv and see if they’ve got any openings.
ClarisWorks speaks out
Although you can’t tell on casual inspection, ClarisWorks can actually speak.
Version 4:
Choose File ➪Shortcuts ➪Edit Shortcuts. Scroll to the bottom of the
Available Shortcuts display and look for the little pair of lips. Click the lips icon;
click the Add button to add that icon to your Shortcuts palette.
Version 5:
From the pop-up menu at the left end of a toolbar, choose Edit Button
Bar. Double-click the name of the button bar you’d like to edit; choose Word
Processing from the pop-up menu; select the Speak Text icon (looks like a tiny
talking Mac); click add; and click Done.
Now, whenever you highlight some text — any text — in ClarisWorks and click the
Lips icon (on ClarisWorks 4’s Shortcuts palette) or the Speak Text icon (on the
ClarisWorks 5 button bar that you edited), ClarisWorks will speak! It will use
whatever voice you’ve specified as your default voice in the Speech control panel.
Actually, ClarisWorks 4 can also read incoming text to you when you’re online
(and using its Communications window) — your e-mail, your BBS text, and so on.
Choose Edit ➪Preferences ➪Communication icon ➪Speak Text. Now go online
— and start listening.
Lost treasures of PlainTalk
Apple’s programmers loaded PlainTalk with hilarious secret responses.
Unfortunately, most of these were edited out of existence by Apple Computer’s
No Fun Squad, and, thus, they don’t exist in version 1.4 or later.
If you still have an older version, speak the following to see if any of these
question/answer buried treasures are still around:
Chapter 23: Speech, Movies, and Sound 905
■ ■
MACWORLD MAC SECRETS • 4040-8/5 • ch23.F • Chapter 23 • FINAL • VB • 11/03/98 • p.905

“Do you need help?” in SimpleText/TeachText. (The Mac says: “I’m trapped
inside this computer and I can’t escape!”)
“I need help!” in SimpleText. (The Mac says: “I’m sorry, they did not have time
to add my artificial intelligence module.”)
“Tell me about Casper,” with Speech Setup open. (The Mac says: “He’s a
friendly ghost from ATG.” Casper was the code name for PlainTalk, and ATG is
the advanced technologies group.)
“What about Speech Recognition?” with Speech Setup control panel open. (The
Mac says: “Don’t forget ATG,” and displays a credit message.)
“Did anyone test you?” with Speech Setup open. (The Mac says: “Not to
mention ULQ,” and displays the text message, “Of course! I was tested by ‘Braz’
Ford and Morgan Wize.”)
“Are there any Easter Eggs?” in the Finder. (The Mac says: “If there were any, do
you think I would tell you?”)
906 Part III: Application Secrets
■ ■
MACWORLD MAC SECRETS • 4040-8/5 • ch23.F • Chapter 23 • FINAL • VB • 11/03/98 • p.906
MACINTOSH SECRET
As we’ve mentioned, you can choose from
among nine different visual personalities for your
Mac — representations of the computer itself
when it is responding to your voice commands.
You needn’t be satisfied with Apple’s TV- and
pop-culture derived personas, however. You can
substitute any character you wish, including
yourself, using ResEdit and appropriate
drawings or photos. See Chapter 21 for details
on using ResEdit. For now, here’s what to do:
Open your Speech Recognition extension with
ResEdit, and double-click the PICT resource
icon. Inside, you’ll find the graphics that
represent Apple’s default speech-recognition
feedback personalities.
All you have to do is replace the images by
pasting in new ones. Of course, you’ll notice
that the Mac uses several different expressions
for each character, and you’ll have to create an
equivalent number of your own replacement
pictures. Also, make sure that your replacement
images are exactly the same size as the ones
you’re replacing; one way to do that is to copy
each existing picture out of ResEdit and paste it
into Photoshop, where a new document window
will automatically appear at the correct size;
doctor the picture as desired, then copy it out of
Photoshop and paste back into the ResEdit
resource. (If you’ll be using speech recognition
with the Monitors control panel set to less than
256 colors, you should also create a black-and-
white version of your replacement pictures and
paste them over the appropriate black-and-white
character images in ResEdit.)
You can even change your new feedback
character’s name (as shown in the Speech
control panel’s pop-up menu). Open the STR
resource (in ResEdit) with the same ID number
as your character’s lowest-numbered PICT
resource — and just change the name inside.
When you’re finished with your ResEdit surgery,
restart the Mac. Your new character should
appear happily in the Speech control panel.
Be the star of your own Feedback screen

MACWORLD MAC SECRETS • 4040-8/X • ch24.F • Chapter 24 • Proof F • EAP • 10/16/98 • p.909
MACWORLD MAC SECRETS • 4040-8/X • ch24.1 • Chapter 24 • Proof 1 • SH • 09/24/98 • p.909
Chapter 24
Mysteries of the Modem
In This Chapter
©V.32bis and other jargon: What it means to you
©56K, ISDN and cable modems
©Modem initialization strings
©The Mac as fax
Connecting a modem to your Mac is easy; getting it to communicate with
the outside world is more challenging. Welcome to telecommunications,
a technology riddled with numbingly unintuitive terms like Cyclic
Redundancy Checking, TCP/IP, and YMODEM-G; a technology in which
several of the commonly used abbreviations are in French; a technology
requiring equipment that makes hideous sputters, whines, and squeals when
it’s working right.
Of course, we don’t believe for a minute that DOS-flavored terminology,
shrieking hardware, or even French words should stop you from mastering
the art of communicating via modem. Once you’ve gotten your Mac online,
the world is your desktop. Plug into the Internet or an online service, and
your Mac becomes a tool for shopping, conducting research, exchanging
ideas on an international level, playing games, even commuting to work —
without ever stepping out of the house. When you consider the possibilities,
it’s hard to think of a more exciting way to use your Mac — if you can get it all
to work.
In this chapter, we’ll show you how to set up a modem and coax it to talk to
other computers and fax machines. The subsequent four chapters cover the
much juicier subjects of the Internet, America Online, the World Wide Web,
and e-mail.
Hardware
Computers and telephones communicate in two fundamentally different
ways. As you probably know, your Mac thinks in binary numbers, processing
every shred of information in digital form. With each action performed by the
Mac, millions of electronic switches in its circuits are thrown either on or off,
producing a stream of 1s and 0s.
4040-8/5 ch24.F 11/3/98 3:33 PM Page 909

Most telephones don’t think in 1s and 0s; they’re analog devices, meaning
they convey data (specifically, sounds) not through a series of on and off
signals, but by means of a steady flow of electric current that’s modulated to
different frequencies, voltages, and amplitudes.
So the modem’s job is to take your Mac’s digital code — all those 1s and 0s —
and translate each little piece of code into a corresponding frequency that
can be sent over the phone line. It does this by varying (or modulating) the
electronic signal being sent through the phone line, assigning a different
frequency for each bit or group of bits. In case you haven’t already heard,
this is how modems got their name; they modulate and demodulate the
electric current passing through the phone line.
Nowadays, more and more phone companies are upgrading to digital lines
themselves, allowing for faster transmission speeds with some modem
technologies; but in general, your digital information still has to be converted
into an analog signal somewhere along its journey over the phone lines. (In
fact, phone data usually gets converted from digital to analog and back many
times during a transmission, because today’s global telephone networks are a
mix of newer digital lines and older analog systems.)
Both internal and external modems are available for the Macintosh. External
modems, which plug into one of the Mac’s serial ports, are usually equipped
with a row of status lights that tell you when the modem is ready to connect;
when the phone is off-hook; when the modem detects a tone from another
modem; and when the modem is receiving or sending data.
Modem speeds
Probably the single most significant feature of your modem is its transmission
speed. Right now, most people use modems that transmit at 28,800 bits per
second (usually written 28.8 Kbps), 33.6 Kbps, or 56 Kbps. The days of speed-
doubled modems appearing every year are over, however. Despite all the
hype, engineers tell us that with the introduction of 56K technology, modems
have hit their limit, pushing data as fast as is technically possible through the
existing pre-digital phone lines found in today’s telephone systems.
Just what do these all these numbers mean in terms of actual speed? Well,
sending a 1MB file with a 33.6 Kbps modem (under ideal phone line conditions)
takes about four minutes. The same file transferred at 9,600 bps, takes almost
15 minutes. And if you’re saddled with a vintage 2,400 bps modem, the file
transfer stretches on for more than an hour! Obviously, a faster modem
saves you a lot of time (and frustration) and can even save you money on
long-distance charges and online service fees.
So here’s our advice: When it’s time to shop for a modem, buy the fastest one
you can afford. (Read our warning about 56K modems in the next section,
however.) If you’re connected to an online service that charges by the hour,
every extra dollar you spend to upgrade to a higher transmission speed will
wind up back in your pocket as you reduce your telephone and online
charges. Even if your Internet service provider (ISP) provides unlimited
access, you’ll find the extra speed of a faster modem worth the price.
Mac Basics
910 Part IV: The World Online
■■
MACWORLD MAC SECRETS • 4040-8/X • ch24.F • Chapter 24 • Proof F • EAP • 10/16/98 • p.910
MACWORLD MAC SECRETS • 4040-8/X • ch24.1 • Chapter 24 • Proof 1 • SH • 09/24/98 • p.910
4040-8/5 ch24.F 11/3/98 3:33 PM Page 910

The truth about 56K Modems
The 56K label on today’s bestselling modems is a joke — not one 56K modem
actually transmits at 56,000 bps over real phone lines! The 56K designation is
a theoretical limit, not a measure of actual speed. In real life, you’re lucky to
get 44 Kpbs — and that’s if you have a 56K modem and if you’re connecting to
an ISP that has the exact same “flavor” (X2, K56flex, or unified) of 56K modem
on its end. Some 56K models, in fact, are barely faster than their 33.6 Kbps
counterparts.
Furthermore, even when 56K modems do transmit at speeds that approach
56K, they only do it in one direction — from an ISP to your modem. In other
words, you can’t send files at 56K; you can only receive them at that speed.
When you send (upload) a file using a 56K modem, it goes at 33.6 Kbps, max.
But there’s even bigger problem with 56K: The current 56K modems aren’t
universally compatible. There were two original 56K technology standards —
one called X2, the other K56flex — and they speak completely different
languages. If your ISP has X2 hookups and you bought a K56flex modem,
you’re out of luck — you’ll connect at 33.6 Kbps, tops.
Here’s how this ugly 56K mess evolved: Generally, whenever new modem
technologies are introduced, they’re designed to conform to an international
format set by a worldwide organization called the ITU (see “Standards and
Protocols,” later in this chapter). By adhering to the ITU’s standards, modem
manufacturers guarantee that any two 33.6 modems in the world, for
example, will communicate correctly.
But the world’s modem vendors jumped the gun with 56K technology — they
introduced 56K modems before the ITU had established a specification. Some
modem manufacturers adopted the X2 standard (developed by Rockwell
Semiconductor); others went for 3Com’s K56flex technology.
Finally, in early 1998, the ITU gave its stamp of approval to a final, unified
technology standard — unhelpfully dubbed V.90 (you say it “vee dot ninety”).
No more competing standards — yeah!
Paradise? Nope. Predictably, V.90 is incompatible with both X2 and K56flex.
Fortunately, most modem manufacturers had anticipated this moment. If you
have an X2 or K56flex modem, contact the company that made it to find out
how you can upgrade it to V.90 (usually using a software updater you can get
from the Web). But don’t actually upgrade your modem until your ISP also
upgrades to V.90! Otherwise, you’ll be stuck again with an incompatible 56K
standard, and you’ll have to do all your Internet surfing at 33.6Kbps.
Other modem shopping tips
When you go shopping for a modem, you also may notice that some
manufacturers boast transmission speeds of 115.2 Kbps or higher for their
modems. In fact, these modems usually transmit at 33.6 Kbps. They claim
faster effective throughput by including features that compress the files you’re
sending. But you never actually get speeds that high. First of all, the files you’re
Worth
Learning
Strange
But True
Chapter 24: Mysteries of the Modem 911
■ ■
MACWORLD MAC SECRETS • 4040-8/X • ch24.F • Chapter 24 • Proof F • EAP • 10/16/98 • p.911
MACWORLD MAC SECRETS • 4040-8/X • ch24.1 • Chapter 24 • Proof 1 • SH • 09/24/98 • p.911
4040-8/5 ch24.F 11/3/98 3:33 PM Page 911

sending are generally compressed already (using StuffIt, for example). Second,
any modem automatically slows down if it detects noise or other interference
on the phone line. With less-than-ideal line conditions (and most line conditions
are not ideal), you experience less-than-ideal transmission speeds.
With these modems, as with all modems, the important thing to remember is
that two modems can only communicate at the highest speed supported by
both modems. If you buy a 33.6 Kbps modem and subscribe to an online
service that offers only a 28.8 Kbps connection, you’ll be forced to log on at
28.8 Kbps. And if you equip your PowerBook with a 28.8 Kbps modem that’s
advertised to feature “built-in data compression for an effective throughput
of 115,200 bps,” but your office uses a modem that doesn’t support data
compression, you’ll still transmit at 28.8 Kbps, at best.
Standards and protocols
For telecommunications to work, the modem on the receiving end of the
phone line must follow exactly the same rules of frequency modulation and
demodulation as the modem doing the sending. If they don’t follow the same
rules, it’s impossible for them to properly decode the signals they send and
receive. In other words, there must be a standard to assure that two modem-
equipped computers can talk to each other.
Enter the ITU-T — the International Telecommunications Union —
Telecommunications Standardization Sector (formerly known as the
Comité Consultatif International Télégraphique et Téléphonique, or CCITT),
an international group of experts that decides which modem communication
methods and protocols constitute the standard. Modem manufacturers,
telecommunications carriers, and governmental bodies all sit on this
committee, which is actually an agency of the United Nations.
At any rate, with consistent standards set for transmission methods, you’re
assured that two modems can communicate with each other as long as they
support the same standard.
Here’s a rundown of the standards now in common use. The first five
standards primarily have to do with the speed of transmission; the others
relate to error correction and data compression.
■V.22bis: You don’t see this one much anymore; it’s the standard for 2,400
bps communications. The bis, by the way, is from a French word that can
mean repetition (the reprise of a song chorus) or prime, in the sense that
we might say X, X', Y; the implication is that this is a revised version of
the V.22 standard. (On the other hand, bise is also French for kiss, so
perhaps this is part of an inside joke concocted by the laff-a-minute
ITU-T.) If your modem says it is V.22bis-compliant, it simply means that
it can talk to other 2,400 bps modems.
■V.32: The standard for 9,600 bps communications.
■V.32bis: The standard for transmissions of up to 14,400 bps.
Mac Basics
912 Part IV: The World Online
■ ■
MACWORLD MAC SECRETS • 4040-8/X • ch24.F • Chapter 24 • Proof F • EAP • 10/16/98 • p.912
MACWORLD MAC SECRETS • 4040-8/X • ch24.1 • Chapter 24 • Proof 1 • SH • 09/24/98 • p.912
4040-8/5 ch24.F 11/3/98 3:33 PM Page 912

■V.34: This standard originally referred to modem transmissions of up
to 28,800 bps. In 1996, the ITU-T amended the standard to include
the specification for speeds of 31,200 bps and 33,600 bps as well. A
V.34-compliant modem doesn’t necessarily transmit faster than 28,800
bps — but it can, if the manufacturer chooses to include the higher-
speed features. Little-known fact: The V.34 standard isn’t just faster than
previous standards; it’s more reliable. Modems that comply with V.34 are
better at maintaining stable communications despite noisy phone lines
and other interference problems.
■V.90: This is the recently adopted standard for 56K data transmission,
replacing the x2 and K56flex specifications that were being used by
modem manufacturers before a universal 56K standard was established.
V.90 permits download speeds of up to 56Kbps and upload speeds of
about 33.5 Kbps.
■V.42: This standard has nothing to do with speed; it’s an error-correction
standard. It includes levels 2 through 4 of the Microcom Networking
Protocol (MNP) — a transmission scheme that checks for errors in
transmission and, if some of your data appears to have been garbled by
static on the line, automatically resends the last message. These error-
correction features are built into the hardware of V.42-compliant modems.
Chapter 24: Mysteries of the Modem 913
■ ■
MACWORLD MAC SECRETS • 4040-8/X • ch24.F • Chapter 24 • Proof F • EAP • 10/16/98 • p.913
MACWORLD MAC SECRETS • 4040-8/X • ch24.1 • Chapter 24 • Proof 1 • SH • 09/24/98 • p.913
ANSWER MAN
Q: All right, once and for all. I’m sick of not
understanding this. What’s the difference
between a 28,800 baud modem and a 28,800
bps modem?
A: The terms “baud” and “bps” both refer to a
modem’s transmission speed, the rate at which
it sends information over the telephone line.
Many people (and Macintosh books, we might
add) consider the terms interchangeable — but
they don’t mean the same thing.
Baud is the number of times a modem changes
the frequency of its signal per second, while bps
refers to the actual number of bits of digital
information transmitted each second.
So why all the confusion? In the olden days of
telecommunications, baud and bps were the
same. Slower modems — those operating at 300
bps — used to send one bit of information with
each frequency change; the 1s were represented
as tones of 2,225 vibrations per second, and the
0s as tones of 2,025 vibrations per second. With
this one-to-one correspondence between bits
and the frequencies representing them, the
number of frequency changes per second did
equal the number of bits per second. So 300
baud was the same as 300 bps.
This relationship changed with the development
of faster modems. Instead of one frequency
representing one bit, a single frequency is used
to represent groups of bits. So the number of
frequency changes per second no longer equals
the number of bits per second. A modem may
send at 600 baud (meaning there are 600
frequency modulations per second), but those
frequencies may each represent 2- or 4-bit
strings, achieving 1,200 or 2,400 bps.
The bottom line: What you care about (and
should use in conversation) is the bps of your
modem, not the baud, which is irrelevant.
Baud and bps: The true story
4040-8/5 ch24.F 11/3/98 3:33 PM Page 913

■V.42bis: A data-compression standard that greatly speeds up data
transfers by compressing data before it is sent, with decompression
handled by the receiving modem. Another transmission protocol, called
MNP Class 5, also offers data compression and is supported by many
modems. Files already compressed by a utility such as StuffIt don’t go
any faster with this kind of compression, by the way; their contents
already have been compacted as much as possible. For V.42bis to be fully
operational, you must connect the modem to your Mac with a hardware
handshake cable — a cable specially wired to take advantage of the data
compression hardware in the modem.
These standards are not mutually exclusive. A modem can (and likely does)
support more than one standard. If a modem is listed as being compliant
with the V.42, V.42bis, and V.34 standards, that means it can support data
transmissions at up to 28,800 or 33,600 bps, has built-in error correction,
and uses data-compression technology.
Now, we’ll be honest: You don’t need much knowledge of communications
protocols and standards to use your modem. For example, if your modem
supports V.42bis data compression, you really don’t have to do anything
about it. All it means is that if your modem happens to connect to another
modem that also supports the V.42bis standard, a data-compression routine
is automatically triggered to speed up the throughput. You don’t have to
issue any special commands, push any buttons, or throw any switches.
Handshaking: two modems get acquainted
When two modems connect, they first compare each other’s features to
determine the highest-level standard they’re both equipped to support.
When they’ve agreed upon a connection method, they go ahead and establish
a suitable data connection. This process of comparing features and reaching
a mutually agreeable standard is called handshaking.
Most modems are good at handshaking; that’s why you usually don’t have
to worry about which standards and protocols your modem supports. The
modems are smart enough to work things out between themselves.
To illustrate: Suppose that you try to establish a connection between two
modems — one that’s both V.34- and V.42bis-compliant, and another that is
V.32bis-compliant. The V.42bis modem first tries for the best connection
possible, employing its full battery of built-in error correction and data-
compression features. But the other modem doesn’t support those features,
so the V.42bis modem drops down — it pretends it has no error-correction
features. But there’s still another problem: One modem is trying to connect
at 28.8 Kbps, while the V.32bis is limited to 14.4 Kbps. So the faster modem
drops down to the fastest speed of the other modem. After comparing a
number of other transmission parameters, the two modems agree to a
standard 14.4 Kbps connection, without data compression or error
correction, and the connection is established.
914 Part IV: The World Online
■ ■
MACWORLD MAC SECRETS • 4040-8/X • ch24.F • Chapter 24 • Proof F • EAP • 10/16/98 • p.914
MACWORLD MAC SECRETS • 4040-8/X • ch24.1 • Chapter 24 • Proof 1 • SH • 09/24/98 • p.914
4040-8/5 ch24.F 11/3/98 3:33 PM Page 914

Beyond the modem: ISDN,
Cable Modems, ASDL
Imagine dialing into the Internet, connecting to a remote computer, and
downloading files at more than twice the speed of the very fastest modem.
Enter ISDN
You can do it — with an ISDN line. ISDN stands for Integrated Services Digital
Network. This relatively new (and expensive) technology, offered by an
increasing number of phone companies, lets you transfer data at up to
128 Kbps — and that’s without data compression. (By contrast, as we’ve said,
conventional modem technology can’t be pushed much further than 45 Kbps.)
Why are ISDN lines so fast? Because, although they operate over existing
phone wires, ISDN lines carry digital information rather than analog signals.
In other words, an ISDN line doesn’t even require a modem. Remember, the
whole job of a modem is to convert a computer’s digital information into the
analog signals used by traditional phone lines and vice versa. With a fully
digital line, that conversion isn’t necessary — and permits much faster data
throughput.
ISDN is so fast, in fact, that it may be too fast for your Mac. Power Macs and
Quadra AV models can handle communications at up to 250 Kbps, but older
Macs require a special NuBus serial card to keep up with the flow of data
pouring in and out of an ISDN line.
That’s not the only hardware needed to use an ISDN line. You also have to
buy a network terminator, an interface box that the ISDN line plugs into, as
well as a terminal adapter, which lets you connect the network terminator to
your Mac. The price of ISDN has dropped a lot, but it’s still more expensive
than plugging in a modem. At this writing, the hardware needed to connect to
an ISDN line costs about $300. (Setting up the hardware may be a headache,
too, unless your phone company is willing to do that for you.)
Operating the lines is also spendy. Prices vary by phone company, but most
charge from $50 to $100 per month for an ISDN line, plus a fee for initiating
each call, plus actual online long-distance charges.
ASDL, SDSL
ISDN’s successors are already on the way. One of these technologies, SDSL
(symmetric digital subscriber line), is twelve times faster than ISDN. With
SDSL, you can transmit data at 1.544 Mbps — that’s 1,544 Kbps — over
traditional phone lines. SDNL will allow voice and data to be transmitted
simultaneously over the same line.
Also under development is an even more staggering new technology called
ADSL (asymmetric digital subscriber line) that can theoretically permit
connections up to 6.312 Mbps, again over ordinary phone lines. At that
Chapter 24: Mysteries of the Modem 915
■ ■
MACWORLD MAC SECRETS • 4040-8/X • ch24.F • Chapter 24 • Proof F • EAP • 10/16/98 • p.915
MACWORLD MAC SECRETS • 4040-8/X • ch24.1 • Chapter 24 • Proof 1 • SH • 09/24/98 • p.915
4040-8/5 ch24.F 11/3/98 3:33 PM Page 915

speed, it will take less than two seconds to move an entire megabyte of
data over the phone lines!
At this writing, SDSL and ADSL are still in the testing stage, require extremely
expensive hardware, and can be used only to transfer data over fairly short
distances.
Cable modems
Then there’s the much-hyped cable modem — a modem that plugs into the
same coaxial cable and fiber-optic lines used by cable companies to carry
television signals into your home.
Current cable modems can deliver data at a 512 Kbps — about 10 times faster
than 56K modems. But at the moment, cable modem technology is expensive
and hard to get. Very few cable companies and ISPs are offering it, and those
that do charge a premium. Set-up requires the installation of a special
Ethernet card (needed to communicate with the cable modem) as well as the
modem itself (which you usually lease), plus any additional wiring needed
to split your existing cable line and make it accessible to your computer.
Installation can run up to $200, with fees of about $75 per month for a
two-way line that lets you both send and receive data through the cable.
Furthermore, a cable modem isn’t quite the uploading nirvana you may
imagine; the high data transfer rate may be only available downstream —
that is, going into your Mac. When you send data on these “one-way” cable
systems, you’re stuck at the same old slow speeds you can get today.
(Fortunately, a few cable companies are now offering two-way systems.)
Furthermore, the system slows down dramatically during peak use periods,
since you’re sharing the wiring with thousands of other households.
Future cable models are expected to reach transmission speeds of 10 Mbps
— more than one megabyte per second. But it will probably take years before
the cable companies re-wire and upgrade their existing systems in order to
handle widespread use of such modems.
Still, the development of these technologies simply means the price of
obtaining a high-speed connection to the Internet will continue to drop, and
that using the Internet to transfer large quantities of data will become more
and more practical.
The Software
Before your modem can communicate with the outside world, you must
communicate with your modem. That’s the job of telecommunications
software — the link between your Mac and the modem’s brain. You need
telecom software to control the modem’s settings, select data for
transmission, capture incoming data to your hard drive, and monitor
the status of phone connections.
916 Part IV: The World Online
■ ■
MACWORLD MAC SECRETS • 4040-8/X • ch24.F • Chapter 24 • Proof F • EAP • 10/16/98 • p.916
MACWORLD MAC SECRETS • 4040-8/X • ch24.1 • Chapter 24 • Proof 1 • SH • 09/24/98 • p.916
4040-8/5 ch24.F 11/3/98 3:33 PM Page 916

Connecting to the Internet or online services
When you subscribe to online services (such as America Online) or sign up
with an Internet service provider (ISP), you generally get all the software you
need to connect. In fact, AOL’s software automates much of the process of
configuring your modem with the proper settings, shielding you from the
hassle of having to manually plug settings into the various control panels that
handle online communications. More and more ISPs give you self-configuring
software, too — when you launch the set-up software, you just pick your
particular modem from a list of models and the program takes care of the rest.
The software connects you to the Internet, fetches a local access number for
you, and configures your system software as needed. (See chapters 25 and 26
for much more about hooking up to an online service or ISP.)
Going online without the Internet
Almost everyone uses a modem to connect to the Internet, through either an
ISP or a subscription service such as America Online. But you don’t need the
Internet to use a modem. You can also dial into free bulletin boards or dial
directly into other remote computers. In fact, that’s the way virtually
everyone used their modems just a few years ago.
Today, the role of the BBS (bulletin-board system) is a sliver of its former self;
the vast majority of Mac fans access the Internet for their information instead
of BBSes. Even user groups, formerly in the vanguard of local BBS creation,
have mostly moved their operations onto the World Wide Web.
For that reason, we’ve moved all of our tips regarding bulletin boards and
dialing remote computers. You’ll find it on the CD-ROM that came with this
book — in Chapter 27 of Macworld Mac Secrets, 4th Edition, which we’ve
included in electronic form. If you still use a telecom program such as ZTerm
to log into a local BBS, or you want to know how to make your Mac connect
directly to another via modem, you’ll find everything you need on the
CD-ROM.
Look in that electronic chapter, too, for our “Modem settings demystified”
discussion of full and half duplex, flow control, parity, and other geeky topics
you rarely encounter these days.
How your Mac talks to a modem
Modems speak their own language, a series of commands called the Hayes AT
command set. This collection of modem commands was originally developed
by Hayes Microcomputer for its modems, but the commands have now been
adopted as the industry standard. As the name suggests, the primary
command of the set is AT, which stands for ATtention. In a typical command,
the letters AT are immediately followed by other command letters, which
instruct the modem to perform a certain action — listen for a dial tone, turn
on the fax features, turn off data compression, and so on.
Chapter 24: Mysteries of the Modem 917
■ ■
MACWORLD MAC SECRETS • 4040-8/X • ch24.F • Chapter 24 • Proof F • EAP • 10/16/98 • p.917
MACWORLD MAC SECRETS • 4040-8/X • ch24.1 • Chapter 24 • Proof 1 • SH • 09/24/98 • p.917
4040-8/5 ch24.F 11/3/98 3:33 PM Page 917

There are dozens of AT commands (you can probably find a list of them in
the manual that came with your modem), but don’t bother memorizing them.
In the days of text-based telecom programs such as MicroPhone or ZTerm,
you actually typed these codes onto the screen in order to make your modem
do things. But today’s telecom programs generally don’t require you to fiddle
around with these commands.
There is, however, one rather vital string of Hayes commands that deserves
your attention and respect — your modem’s initialization string.
The modem initialization string
The initialization string is the cluster of Hayes commands that gets sent to
your modem the moment you launch a telecommunications program, such as
America Online or Mac OS 8’s PPP dialing software (see Chapter 25). The
initialization string tells your modem exactly which features to activate or
suppress during the current work session. This process is vital because not all
modem features are compatible with all programs. Certain features (such as
faxing capabilities, error correction, and data compression) may actually get in
the way of programs that don’t support those features. So the modem
initialization string primes your modem, getting it ready for action, restoring all
the appropriate settings in order for your telecom software to work properly.
Here’s a typical initialization string:
ATE0Q0V1X4&C1&D0M0
Each chunk of this string contains a specific modem command. For example,
Q0 tells the modem to return a result code — such as RING or CONNECT
or BUSY — when something happens. V1 specifies that the result code be
expressed in English, rather than as a numeric code. The command &D0 tells
the modem to ignore the status of the DTR (Data Terminal Ready), a signal
generated by the serial ports of some computers to monitor the flow of
data to and from the modem. DTR is always ignored when using a modem
with a Mac.
We tell you all this because sometimes you can solve major telecom snags
by adjusting this initialization string. If your modem simply won’t dial out
or refuses to communicate with CompuServe, it may be that a different
initialization string is needed to activate (or disable) the appropriate features.
Check the manuals that came with your modem and your telecom programs
to see if a change in the initialization string is needed. And if you’ve got some
kind of perverse fascination with all the different possible AT commands you
can make part of your init string, see (once again) the modem chapter of the
electronic version of Mac Secrets, 4th Edition (on the CD-ROM that came with
this book).
You may have to do a little hunting to figure out where a particular program
stores its initialization string. In America Online 3 and 4, you can edit the
initialization string by clicking Setup on the sign-up screen, and then clicking
Edit Modem Profile.
918 Part IV: The World Online
■ ■
MACWORLD MAC SECRETS • 4040-8/X • ch24.F • Chapter 24 • Proof F • EAP • 10/16/98 • p.918
MACWORLD MAC SECRETS • 4040-8/X • ch24.1 • Chapter 24 • Proof 1 • SH • 09/24/98 • p.918
4040-8/5 ch24.F 11/3/98 3:33 PM Page 918

Telecom Secrets
■
Preventing line interruptions from
extension telephones
A modem connection or file transfer can be ruined if someone unwittingly picks
up a telephone extension elsewhere in your home while your modem is online.
You can prevent this from ever happening by connecting a Radio Shack
Teleprotector #43-107 to the other telephone extensions in your house. This
gizmo makes other extensions in the house go dead when you use your modem,
so that you can’t be interrupted when online. If you have a lot of phone extensions
in your house, this can get expensive: You have to install a Teleprotector at
each
extension — not on the line connected to your modem. And, of course, the
Teleprotector does its job regardless of the
type
of call taking place on your
modem line, meaning that it disables your other telephone extensions for voice
calls as well.
Dialing out with no dial tone
Normally, a modem waits for a dial tone before starting to dial out. If the phone
system you’re on doesn’t provide an initial dial tone — or if you’re in a country
with a telephone system that uses a dial tone not recognized by your modem —
use your telecom software to insert the X3 command into your dialing string (like
this: ATX3DT555-1212). Your modem dials without a dial tone present.
Making your modem shut up —
and speak up again
Don’t you hate the blood-curdling screech that modems and fax modems emit
when connecting? It’s easy to make your modem mute by issuing the ATM0
command (that’s a zero). Just include this command in the modem initialization
string that’s fed to your modem whenever you start a new connection, as
described earlier in this chapter. To turn the speaker back on again, the
command is ATM1.
Disabling Call Waiting
Call Waiting, the optional phone-company feature that, when you’re talking on
the phone, makes a
click
to alert you that you’ve got another call coming in, can
cause serious problems during a telecommunications session. The click can
cause glitches in the transmission and ruin file transfers.
If you use a single phone line for your modem and your voice, disable Call
Waiting before you log on. In most areas of the country, you just dial *70 before
making a call.
Worth
Learning
Worth
Learning
Chapter 24: Mysteries of the Modem 919
■ ■
MACWORLD MAC SECRETS • 4040-8/X • ch24.F • Chapter 24 • Proof F • EAP • 10/16/98 • p.919
MACWORLD MAC SECRETS • 4040-8/X • ch24.1 • Chapter 24 • Proof 1 • SH • 09/24/98 • p.919
4040-8/5 ch24.F 11/3/98 3:33 PM Page 919
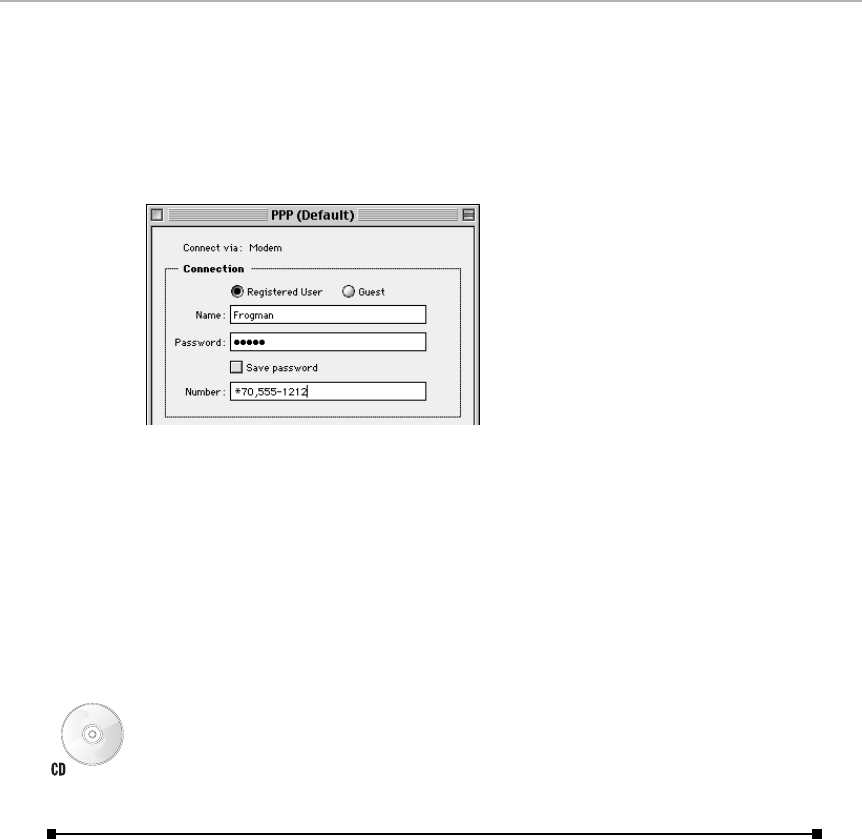
In other words, add *70 to the number string stored in your PPP control panel or
AOL software. For example, if the number you normally dial to connect to your
ISP is 555-1212, replace this number with *70,555-1212 (see Figure 24-1). The
comma adds a brief pause after the disabling command is issued and before
the number is dialed. (The *70 thing applies only to one call. As soon as your
modem hangs up, Call Waiting will be turned back on.)
Figure 24-1: Adding *70 to your dialing string disables call waiting when you’re online.
All about GeoPorts
For years, instead of having the traditional modem and printer ports on the
back, most Macs have had one or two GeoPorts — small round jacks that look
for all the world like normal modem or printer ports. Apple’s GeoPort Telecom
Adapter, a $99 gizmo that plugged into that jack, acted like a modem, but
wasn’t one. Through software, it could also serve as a fax modem,
speakerphone, and so on. The possibilities were endless.
Unfortunately, for the same $99, you could have bought an even faster
real
modem; the GeoPort adapter was a flop. Still, if you’d like to read up on the
GeoPort in detail, check out the electronic edition of
Mac Secrets, 4th Edition
(on the CD-ROM that came with this book), where you’ll find our complete
discussion of this once-promising technology.
Mac as Fax
When fax modems first debuted, the Macintosh community was skeptical, to
say the least. Many of the earliest models were only send-fax devices, capable
of sending faxes but not receiving them. Even the models with full send-and-
receive capabilities were overpriced, came with lousy software, and offered
unpredictable performance.
Today, most modems on the market today are fax modems, even those under
$100. Most are equipped with circuitry capable of reliably transmitting data
to and receiving transmissions from Group III fax machines at a rate of 9,600
bps. Fax software has come a long way, too; the best programs make faxing a
document no more complicated than printing.
920 Part IV: The World Online
■ ■
MACWORLD MAC SECRETS • 4040-8/X • ch24.F • Chapter 24 • Proof F • EAP • 10/16/98 • p.920
MACWORLD MAC SECRETS • 4040-8/X • ch24.1 • Chapter 24 • Proof 1 • SH • 09/24/98 • p.920
4040-8/5 ch24.F 11/3/98 3:33 PM Page 920

How to fax
With most fax modem packages, you can send outgoing faxes directly from
within any Macintosh application. To fax a document, the directions vary by
modem brand:
■Global Village/Boca: Hold down the Option key as you choose Print from
the File menu. Actually, you choose Fax from the File menu — the word
Print disappears when you hold down the key.
■Apple’s ExpressModem software (including the GeoPort Telecom
Adapter): Press Shift and Control while choosing Print from the
File menu. On the iMac, press Ôinstead.
■Supra and some others: The software installs a new Fax menu to
the right end of your menu bar. Choose Fax from this menu — not
only when you have a document to be faxed open on the screen, but
even when you’ve got document icons highlighted in the Finder.
Any modem brand also offers a secondary, less convenient method: you first
select the fax modem device’s name in the Chooser — just as you would
select a printer — and then choose the Print command.
In any case, the fax software prints (faxes) the document by converting each
page into a bitmapped image, dialing a fax number with the modem, and
transmitting the converted file through the phone line. The document is
transferred from your Mac to the remote fax machine without having to be
printed first.
Likewise, a fax modem lets you receive incoming faxes right on your Mac. You
can read the fax documents on-screen without ever having to print them. Of
course, if you do need a printout of a document, all you have to do is print it
as you would any other document.
Fax Modem Secrets
■
Faxing PostScript graphics
Most fax modems don’t understand PostScript. If you try to send a document
containing PostScript graphics (from Illustrator or FreeHand, for example), the
fax machine prints only PICT representations of the PostScript images, with
unacceptably jaggy results.
But you can make the results look a little better using the following method:
When you first create the PostScript graphics, make them about three times
larger than intended; import them in a page-layout program (or Color It or
Photoshop); and reduce them to the desired size. The reduction gives the final
PICT image a finer resolution in the final faxed document. (Alternatively, you can
buy a PostScript converter program like Infowave Imaging’s StyleScript, which
does the deed automatically.)
Chapter 24: Mysteries of the Modem 921
■ ■
MACWORLD MAC SECRETS • 4040-8/X • ch24.F • Chapter 24 • Proof F • EAP • 10/16/98 • p.921
MACWORLD MAC SECRETS • 4040-8/X • ch24.1 • Chapter 24 • Proof 1 • SH • 09/24/98 • p.921
4040-8/5 ch24.F 11/3/98 3:33 PM Page 921

Margins of error
Keep in mind that some fax modems and fax machines chop off the edges of
a document during the transmission process. To protect the integrity of your
documents, create extra-wide margins on documents that you plan to fax —
an extra quarter-inch on every side.
Using a fax machine as a scanner
If you happen to have a regular, paper-fed fax machine in addition to a fax
modem, you can actually use the fax machine as a scanner — turning printed
pages into digital images and capturing them on your Mac via the fax modem.
The resulting scans won’t look nearly as good as those produced by a real
scanner — they’ll be in black and white, with a resolution of 200 dpi — but it
really does work.
922 Part IV: The World Online
■ ■
MACWORLD MAC SECRETS • 4040-8/X • ch24.F • Chapter 24 • Proof F • EAP • 10/16/98 • p.922
MACWORLD MAC SECRETS • 4040-8/X • ch24.1 • Chapter 24 • Proof 1 • SH • 09/24/98 • p.922
Fax modem versus fax machine
JS: You know, people ask us all the time which
they should get — a fax modem or a fax
machine. And we, of course, always respond
with the one obvious answer . . .
DP: We tell them to buy a fax machine.
JS: Exactly! And we — wait a minute. No, we
don’t. We heartily recommend the fax
modem.
DP: You heartily recommend the fax modem.
JS: And why shouldn’t I? A decent fax modem
costs one-third as much as a stand-alone fax
machine. It’s the deal of a century.
DP: You pay less, you get less.
JS: No, you get more: A modem for dialing up
the Internet and, in some cases, a built-in
answering machine.
DP: Sure, but face it: A fax modem, no matter
how many fancy features you roll into it,
hardly takes the place of a real full-featured
fax machine.
JS: Such as?
DP: Suppose I want to fax in my order from a
preprinted order form in a catalog. Now, with
a fax machine, I’d just fill out the order form,
feed it into the machine, and send it off. Just
how could I do that with a fax modem?
JS: Well . . .
DP: You can’t fax any preprinted documents with
a fax modem. That’s a serious drawback.
You’re strictly limited to the documents on
your Mac. You can’t even fax a letter with
your signature on it, unless you first scan
your signature, save it as a graphic, and then
paste it into your letter — which, of course,
would require buying a scanner, too. And
take three times longer than simply signing a
piece of paper . . .
JS: All right, all right . . .
DP: And speaking of graphics, remember that
most fax modems can’t send PostScript
images. Artists and designers who need to
transmit high-quality graphic images to
clients can’t use a standard fax modem;
typically, they have to print their material on
a PostScript printer and then fax out the
results.
JS: OK, so a fax modem doesn’t completely
replace a regular fax machine. But it offers a
million other advantages.
DIALOGUE
4040-8/5 ch24.F 11/3/98 3:33 PM Page 922

If you’d like to try this stunt, you can find the step-by-step instructions in
Chapter 31, under “Scanning Secrets.”
Make on-screen faxes easier to read
The fax software that comes with most Global Village modems
antialiases
text,
smoothing out the edges of each character so that your incoming faxes look
less jaggy on screen. But if the smoothed-out text on a fax seems a little
too
blurry for your taste, you can adjust the degree of antialiasing by pressing the up
and down arrow keys. (The changes you make don’t affect how the fax will look
when it is printed.)
Chapter 24: Mysteries of the Modem 923
■ ■
MACWORLD MAC SECRETS • 4040-8/X • ch24.F • Chapter 24 • Proof F • EAP • 10/16/98 • p.923
MACWORLD MAC SECRETS • 4040-8/X • ch24.1 • Chapter 24 • Proof 1 • SH • 09/24/98 • p.923
DP: A million?
JS: Well, four.
DP: I’m all ears.
JS: When you need to fax a document using a
fax modem, you don’t have to print it first. In
fact, you don’t even have to lift your fingers
from the keyboard. Do you realize what a
time-saver that is? And when a fax comes
in, it pops up right on your screen. You can
preview every fax you get and delete the
ones you don’t really need. No wasted toner
and ink. Now, what could be more
convenient than that?
DP: A regular fax machine. On most monitors
you can’t even read a whole faxed page at
full size.
JS: So?
DP: So, that means you either have to change the
magnification using the fax software, or —
worse yet — scroll horizontally and vertically
to read the document. There goes all the time
you saved.
JS: OK. Let’s talk ecology.
DP: I’d love to.
JS: Fax modems save paper; you can send and
receive fax documents without printing
them. Over the course of a year, you can
save literally reams of paper. Maybe even an
entire tree! It’s an environmentalist’s dream.
DP: Not quite. Let’s not forget that using a fax
modem means leaving your Mac and modem
on 24 hours a day! An environmentalist might
not be too thrilled about all that wasted
power. And besides, let’s be honest: Sooner
or later you’re going to have to print out at
least some of those incoming faxes . . .
JS: Not really. You just save your faxes right in a
folder on your disk.
DP: Yes, but eventually, Joe, eventually you’ll
need to print something out . . .
JS: True, but on those rare occasions when I do
have to print out a fax, at least my hard
copy won’t wind up on that awful, thin,
waxy, thermal paper spit out by most fax
machines.
DP: I’ll grant you that: Fax paper is truly a
loathsome substance.
JS: I’m glad we agree.
4040-8/5 ch24.F 11/3/98 3:33 PM Page 923

924 Part IV: The World Online
■ ■
MACWORLD MAC SECRETS • 4040-8/X • ch24.F • Chapter 24 • Proof F • EAP • 10/16/98 • p.924
MACWORLD MAC SECRETS • 4040-8/X • ch24.1 • Chapter 24 • Proof 1 • SH • 09/24/98 • p.924
ANSWER MAN
Q: I’ve got an iMac and a Mac that doesn’t have
Ethernet. How can I transfer stuff from one Mac
to the other?
A: What you’re really asking is: Can I transfer
files from one Mac to another, modem to
modem, without actually placing a call?
And the answer, fortunately, is yes. Just run a
piece of phone wire from one modem (or the
iMac’s telephone jack) to the other. On each
Mac, run a program like the ClarisWorks
Communications module or Zterm (included with
this book). The following instructions describe
the ClarisWorks method:
Set the connection parameters on both
machines to this: Baud Rate: 57600; Parity:
None; Data Bits: 8; Stop Bits: 1; Handshake:
DTR & CTS.
Leave the default file transfer settings, which
should be Protocol: XMODEM Tool, Method:
MacBinary, andTransfer Options: Standard.
Choose Session ➪Open. On the sending
computer, type ATD and press Return. On the
receiving computer, type ATA and press Return.
Once the modems are connected, choose
Session ➪Send File on the sending Mac. Locate
and select the file you want to send; click Send.
On the receiving Mac, choose Session ➪
Receive File.
That’s it! The file gets sent over the phone wire
to the receiving Mac, even though you haven’t
actually made a call.
Two Macs, modem to modem
4040-8/5 ch24.F 11/3/98 3:33 PM Page 924

MACWORLD MAC SECRETS • 4040-8/5 • ch25.F • Chapter 25 • FINAL • VB • 10/28/98 • p.925
MACWORLD MAC SECRETS • 4040-8/5 • ch25.1 • Chapter 25 • Proof 1 • SH • 09/25/98 • p.925
Chapter 25
The Web, the Net,
and Everything Online
In This Chapter
©How to get online
©The Open Transport control panel suite
©The Internet: e-mail, FTP, Telnet, Gopher, IRC, newsgroups, mailing lists
©Browsing the World Wide Web
©Creating Web pages
©America Online and CompuServe
The U.S. government designed what we today call the Internet during the
1960s. It was meant to be a communications web with so many alternate
routes for messages that it would survive even if a nuclear attack took out a
major city or two. The network was originally named ARPAnet (for the
Advanced Research Projects Agency network). In the decades that followed,
the Internet grew beyond the United States, but was still used mostly by
educational and government agencies.
In the ’90s, the Internet was opened to commercial access. Once companies
were allowed to use the Internet, they began selling access to individuals like
us — and, as every headline and magazine has no doubt informed you, the
result was an explosion of interest and popularity. Today, the Internet is a
collection of thousands of regional computer networks that are capable of
connecting to each other through main communications lines that can
transport data at 45 million bits per second.
A great majority of American and European institutions have Web sites today,
making the Internet an incredible resource for your research, shopping, and
entertainment pleasure. Thanks to its global reach, any consumer can buy
directly from a company, cutting out middlemen and saving a lot of time and
money.
We’ll do plenty of gushing about the glories of the Web later in this chapter.
But first, a caution: Our tale of the Internet’s origins should clue you in as to
4040-8/5 ch25.F 11/3/98 3:31 PM Page 925

why it uses so many arcane terms and complicated protocols. It was
designed at a time when terms like Macintosh and ease of use were equally
alien — and nothing much has changed.
What’s on the Internet
The Internet’s allure boils down to several popular features. In general, you
need a separate Macintosh program (usually shareware) to access each of
the following features.
In approximate order of popularity, then, here’s what the Internet is good for
(most of which we’ll cover in this chapter):
■Electronic mail. You’ve heard of this. You send messages anywhere in the
world for pennies, and they arrive in minutes. Required software
(examples): Claris Emailer, Eudora, Outlook Express. See Chapter 27.
■The World Wide Web integrates text, pictures, sound, and video into
convenient point-and-click pages (screens). The Web is the one Internet
feature that doesn’t require a computer science degree. We’ve devoted a
separate section to this hottest of all possible cyber-passions at the end
of this chapter. Required software (examples): Netscape Navigator,
Microsoft Internet Explorer, Cyberdog.
■Usenet newsgroups. Newsgroups are public bulletin boards. They give
the Internet its color and sense of community. There are thousands of
newsgroups, on every conceivable topic. You could fritter away your
entire life just trying to keep up with a few of these newsgroups. Plenty of
people do. Required software (examples): Newswatcher, Navigator,
Outlook Express.
■File Transfer Protocol (FTP) means downloading software — like having
access to a global, all-inclusive shareware library 1,000 times the size of
America Online. Required software (examples): Fetch, Anarchie,
Navigator, Microsoft Internet Explorer.
■Internet Relay Chat (IRC) lets groups of people type messages to each
other in real time, like a typed CB radio. If you’ve used Instant Messages
or chat rooms on America Online, you get the idea. Required software
(examples): ICQ, GlobalChat, Homer, Ircle.
■Telnet is a purely text-based protocol that allows you to access
databases, bulletin boards, and downloadable files— no graphics, no
animation, just plain text-based menus. You may have to type in a
password or User ID in order to access a Telnet site. Telnet sites certainly
aren’t the most alluring sites on the Internet, but a number of specialized
databases are available only using Telnet. Required software (examples):
Better Telnet, NCSA Telnet, dataComet.
■Gopher is a menu-based system for retrieving information from databases:
university-library card catalogs, census data, whatever. Required software
(examples): TurboGopher, Gopher Surfer. To download a file, just drag its
926 Part IV: The World Online
■ ■
MACWORLD MAC SECRETS • 4040-8/5 • ch25.F • Chapter 25 • FINAL • VB • 10/28/98 • p.926
MACWORLD MAC SECRETS • 4040-8/5 • ch25.1 • Chapter 25 • Proof 1 • SH • 09/25/98 • p.926
4040-8/5 ch25.F 11/3/98 3:31 PM Page 926

icon to your desktop or hard disk. The file is copied to your computer.
(Gopher is like FTP, in that you can use it to retrieve files; but FTP shows
only lists of files on the host computer to which you’re connected, while
Gopher can show lists of files that are on many computers.)
Unfortunately, although everyone agrees that there’s a lot of great stuff and
info on the Net, it’s incredibly scattershot. You’ll find 100MB of data on
violins, say, but nothing on brass quintets. Our best advice is to (a) spend
hours and hours exploring, or (b) keep your eyes peeled for Internet
addresses in magazines, books, newspapers, and even TV ads.
Getting online I: Finding an Internet account
Even if you’ve read Chapter 24, and you have a modem, you’re still not quite
ready to go online and explore the famous Internet—and its most popular
attraction, the World Wide Web. Before you can start downloading Dilbert
cartoons, searching Apple’s Web site for the latest system update, or
e-mailing your cousin in Sierra Leone, you’ll have to wrangle yourself a
connection to the online world.
There are three ways to get such a connection. You can work at a company
that’s already wired to the Internet. You can sign up with an Internet service
provider, or ISP — a local or regional company that lets you dial into its
computer system and share its Internet access. Or you can subscribe to a
commercial online service (such as America Online).
Internet Service Providers
You’ve probably heard of some of the national ISPs: Concentric, EarthLink,
NetCom, MindSpring, IDT, IBM.net, MCI, AT&T WorldNet, and so on. Signing
up with an ISP generally costs about $20 a month (plus sometimes a setup
fee); that money generally gets you unlimited Internet access time. (If only
the phone companies offered such a deal!)
It’s important to understand that ISPs generally offer no content of their
own — no Time magazine, no encyclopedias, no stock quotes, none of the
organized, popular features of online services. All you get is a phone number
to dial for your Internet connection. Beyond that, you’re generally supposed
to set up and configure your own Internet software (Navigator, Outlook
Express, and so on). They sell you the privilege of dialing into their system,
but it’s up to you to find your way around.
Still, unless you’re a total Mac beginner, ISPs are the way to go (when compared
with the pricey, congested America Online). Your Web surfing is faster and less
prone to blackout periods when you’re connected directly to the Internet.
Choosing an ISP is a nerve-wracking procedure. Sure, you can always switch
if the one you signed up with turns out to have lousy tech support, be Mac-
hostile, or have the wrong kind of modems at their end. But if you switch,
your e-mail address switches too—and your friends won’t be able to find
you unless you tell them explicitly.
Mac Basics
Chapter 25: The Web, the Net, and Everything Online 927
■ ■
MACWORLD MAC SECRETS • 4040-8/5 • ch25.F • Chapter 25 • FINAL • VB • 10/28/98 • p.927
MACWORLD MAC SECRETS • 4040-8/5 • ch25.1 • Chapter 25 • Proof 1 • SH • 09/25/98 • p.927
4040-8/5 ch25.F 11/3/98 3:31 PM Page 927

So choose carefully. Ask your friends for recommendations, consult the
business-section ads of most newspapers, look in Mac magazines for ads,
or check the frequently updated Web sites that list (and rate) ISPs (if you
can get onto the Web already, that is). We went to www.yahoo.com, did a
search for “Internet service providers,” and came up with a list of several
comprehensive ISP–rating Web sites (assembled by CNET, Internet Life, and
PC World). These may change, but you’re sure to find something similar
whenever you look.
And what are you looking for when you read these descriptions? Above all, a
local phone number — and if you live far from a major city, an 800 number
that won’t bankrupt you. If you travel, you want an ISP with a lot of local
access numbers (such as the terrific IBM.net, www.ibm.net, which has 1,500
local numbers, all over the planet). If you have a 56K modem, make sure
you’re signing up for an ISP whose modems match your type (X2, Kflex, or
v.90, as described in the previous chapter).
If all of that research sounds like a lot of bother, and you live in a major city,
consider using the Internet Setup Assistant that comes with Mac OS 8 and
later. (If you have Mac OS 8 or later, but haven’t tried this Assistant, use your
Find command to locate it on your hard drive.)
This headache-saving program walks you through the process of choosing an
ISP — specifying where you live, what your credit-card number is, and so on.
After about 10 minutes, you’re actually online with a full-fledged Internet
account.
OS
8.5
928 Part IV: The World Online
■ ■
MACWORLD MAC SECRETS • 4040-8/5 • ch25.F • Chapter 25 • FINAL • VB • 10/28/98 • p.928
MACWORLD MAC SECRETS • 4040-8/5 • ch25.1 • Chapter 25 • Proof 1 • SH • 09/25/98 • p.928
Internet: Help versus Hype
JS: OK, I did my share: I wrote my half of this
chapter. But I still don’t feel right about this
whole Internet thing.
DP:
Internet
thing
? Joe, in case you haven’t noticed, the
Internet is the biggest technological/cultural/social
phenomenon of our time. It’s changing the way we
work, the way we shop, the way we fall in love.
JS: Please! You know perfectly well that most of
this Internet stuff you read everywhere is pure,
unadulterated hype.
DP: Hype?
JS: Look, when you peel away all the glitz and media
hysteria, it’s just a computer network. A very,
very, very big computer network.
DP: Have you tried surfing the Web? We’re talking
about a global network of information, at your
very fingertips.
JS: Yes, in a completely disorganized, random state
of undirected chaos.
DP: It’s not that bad.
JS: And it’s not surfing. It feels nothing like surfing.
It feels like sitting and watching a progress bar.
It’s a huge time waster — and everyone’s
getting sucked in by the hype.
DP: Oh, come on. You’re exaggerating.
JS: No I’m not. Last week, I wanted to do a little
research on biopharmaceutical oligonucleotides
and I had to sift through mounds of information
to find anything useful.
DP: Oligonucleotides?
JS: It’s a hobby.
DP: Well, you should’ve used a search engine.
JS: I did use a search engine. That was the problem.
AltaVista turned up 4,633 hits. Yahoo! turned up
5,024.
DIALOGUE
4040-8/5 ch25.F 11/3/98 3:31 PM Page 928

The Internet via AOL
Instead of tracking down an ISP and fending for yourself, you can sign up with
a subscription online service, such as America Online.
AOL’s Internet access (in AOL 3.0 and later) is clean, integrated, and easy,
presented with a point-and-click interface that needs no configuring. Its
simplicity explains why AOL is the world’s largest ISP.
But as millions of disgruntled former AOLaholics can tell you, America Online
has its problems. It costs slightly more than a regular ISP—$23 per month
instead of $20. The advertising is going crazy: not just a strip of crass
commercialism at the top of every screen, as you get on the World Wide Web,
but garish, hideously designed full-screen ads that must be dismissed with a
mouse click before you’re allowed entrance to AOL. And don’t even get us
started on the topic of AOL’s busy signals.
But enough about America Online; that’s what Chapter 26 discusses.
Getting online II: Preparing your Mac
The software suite collectively known as Open Transport, bless its heart,
makes getting online easy. Its three Internet-related control panels have
idiotproof blanks to be filled in— and then you’re online. (Open Transport is
a standard part of Mac OS 8 and later, but can be installed onto any ’030 or
faster Mac running System 7.1 or later. Download the latest, if you don’t
already have it, from www.apple.com.)
OS
8.5
Chapter 25: The Web, the Net, and Everything Online 929
■ ■
MACWORLD MAC SECRETS • 4040-8/5 • ch25.F • Chapter 25 • FINAL • VB • 10/28/98 • p.929
MACWORLD MAC SECRETS • 4040-8/5 • ch25.1 • Chapter 25 • Proof 1 • SH • 09/25/98 • p.929
DP: You struck gold.
JS: Gold? It took me three days to check out all the
links. And most of them turned out to be complete
dead-ends. Sixteen required plug-ins I don’t have,
nine turned out to be pornographic, and one was a
home page by a fourth grader in Elk Mound, MN.
DP: Ah, but eventually, you found the site you
wanted, didn’t you?
JS: Yes. One. One site out of thousands.
DP: See that? Thanks to the Internet, you were able to
home in on precisely the information you needed.
JS: Not quite. That site was under construction.
And you needed the beta version of Netscape
Navigator 7.0 to read it.
DP: Well, surely you must have turned up something
else that was useful.
JS: Ah, yes. Perhaps you’re referring to the Official
Fantasy Island Interactive Trivia Game and Video
Clip Archives Home Page.
DP: There you go.
JS: I plan to visit often.
DP: That’s the beauty of the Internet.
JS: Anyway, my point is that a trip to the public
library would have taken two days less, plus I
would’ve gotten some exercise and interacted
with actual, breathing human beings — including
a helpful librarian.
DP: Well, what the heck are oligonucleotides, anyway?
JS: Look it up on the Web.
4040-8/5 ch25.F 11/3/98 3:31 PM Page 929
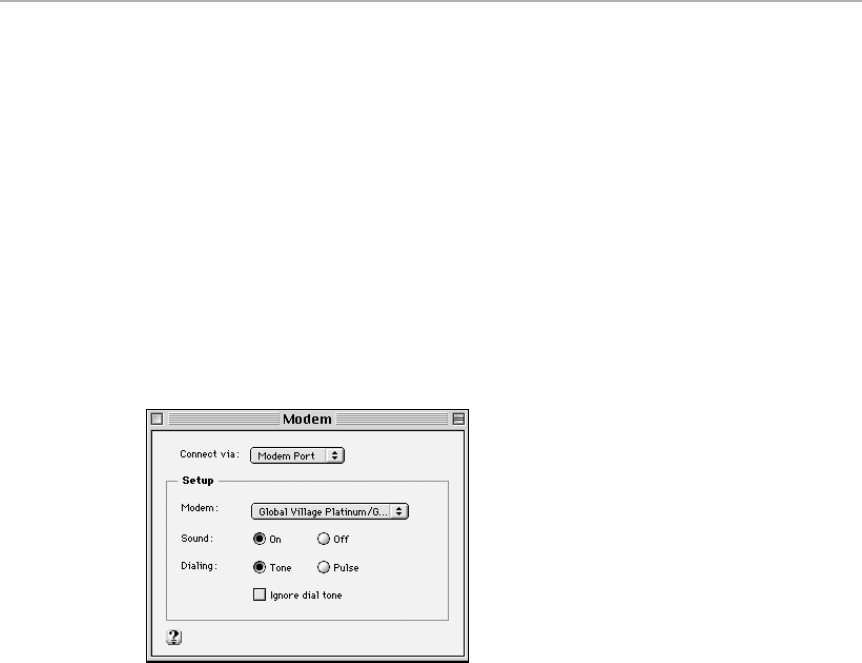
And how do you know how to fill in these control-panel blanks? Either you
consult your ISP’s Web site, or you call the ISP’s tech-support line and let the
agent walk you through the process. (Or you use the Internet Setup Assistant,
as described earlier in this chapter.)
Here’s how to set up a new Open Transport-equipped Mac for Internet
access. (If you’re not sure whether or not you have Open Transport, look in
your Control Panels folder. Do you have a control panel called AppleTalk?
Then you have Open Transport. If you have a control panel called Network
instead, you don’t. In that case, see the sidebar “Getting online without Open
Transport.”)
Step 1: The Modem control panel
In the Modem control panel, specify the precise brand and model modem you
have (see Figure 25-1).
Figure 25-1: Choose your weapon in the Modem control panel.
Technically, the pop-up menu in this control panel does nothing more than
list your System folder’s modem scripts. A modem script is a text file that
explains your modem’s features to your Mac — speed, compression, and
other parameters described in Chapter 24. You can edit the list of modem
models in the control panel’s menu by adding to, or taking away from, the
files in your Modem Scripts folder (which is in your Extensions folder).
If you don’t see your exact modem listed in the Modem control panel, then
there’s no script in your Modem Scripts folder for it. You have four options:
■Hunt through the disks that came with your modem in hopes of finding a
script for your model. If you find one, put it into the Modem Scripts
folder (which is in the Extensions folder, which is in the System folder).
■Call the modem maker’s tech-support line, or visit its Web page, in hopes
of finding a modem-script file for your model.
■Download Apple’s Modem Script Generator from www.apple.com. At this
writing, you’ll find it at this address: ftp://ftp.info.apple.com/Apple_
Support_Area/Apple_Software_Updates/US/Macintosh/Unsupported. This
930 Part IV: The World Online
■ ■
MACWORLD MAC SECRETS • 4040-8/5 • ch25.F • Chapter 25 • FINAL • VB • 10/28/98 • p.930
MACWORLD MAC SECRETS • 4040-8/5 • ch25.1 • Chapter 25 • Proof 1 • SH • 09/25/98 • p.930
4040-8/5 ch25.F 11/3/98 3:31 PM Page 930
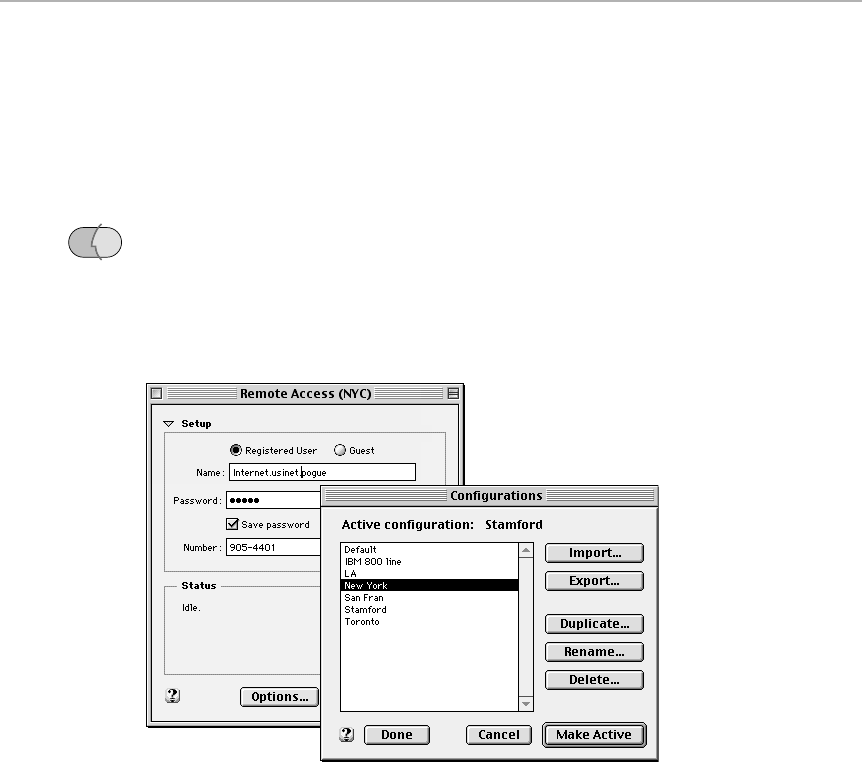
little program generates modems scripts automatically— if you know the
technical parameters to type into it. And that information must come
from your modem’s manual or tech-support line.
■If all else fails, choose one of the basic Hayes scripts from the list and
hope for the best; it often works.
Step 2: The Remote Access (PPP) control panel
PPP stands for point-to-point protocol — yet another bit of arcane Internet
terminology that you’ll never need to understand. In the Remote Access
control panel (Mac OS 8.5 and later) or the PPP control panel (previous
systems), you specify three morsels of information provided by your ISP:
your account name, password, and the local phone number your modem is
supposed to dial.
Figure 25-2: The Remote Access (formerly PPP) control panel stores your account name,
phone number, and password (left). If you plan to have more than one of those — alternate
phone numbers for different cities, for example — press Ô-K to open the Configurations
dialog box (right).
If you sit at home and use the same Mac all day, you’re done. If, however, you
travel with your Mac, or you have more than one ISP, get used to choosing
Configurations (Ô-K) from the File menu. (This useful command is available
in all the Open Transport control panels, by the way.)
Now you’re offered a list of prepared PPP (name/password/phone number)
setups, as shown at right in Figure 25-2. If you’re smart, you’ll clone your
original one (using the Duplicate button) and set up additional ones for each
city you visit. You switch among them by opening the PPP control panel
again, pressing Ô-K, and double-clicking a different configuration.
OS
8.5
Chapter 25: The Web, the Net, and Everything Online 931
■ ■
MACWORLD MAC SECRETS • 4040-8/5 • ch25.F • Chapter 25 • FINAL • VB • 10/28/98 • p.931
MACWORLD MAC SECRETS • 4040-8/5 • ch25.1 • Chapter 25 • Proof 1 • SH • 09/25/98 • p.931
4040-8/5 ch25.F 11/3/98 3:31 PM Page 931

Step 3: The TCP/IP control panel
You’d think that Apple could have simplified the geekiest Internet terminology
of all, TCP/IP (which stands, unhelpfully enough, for Transmission Control
Protocol/Internet Protocol). Instead, Apple decided to honor the geeks of the
Net by not only preserving the term, but enshrining it in this control panel
(see Figure 25-3).
Figure 25-3: The TCP/IP control panel lets you store the DNS (domain name server) codes for
your ISP.
Anyway, you have two tasks in this control panel. First, choose PPP from the
“connect via” pop-up menu at the top of the control panel. (If PPP isn’t a
choice, you need to reinstall the Open Transport/PPP software from your
system-software CD, or re-download this installer from Apple’s Web site. And
if you’re in an office, you may be instructed to choose Ethernet from this pop-
up menu instead, so that you use the office’s existing Internet connection.)
Second, you have to type in the DNS numbers — one or two long numbers
broken up by periods, as shown in Figure 25-3.
Here again, if you switch among different ISPs, you can press Ô-K to open the
Configurations window, where you can add, duplicate, delete, or make
selections among different TCP/IP setups.
That’s it — you’re ready to go online!
Getting online III: Dialing
When you launch an Internet program— such as Netscape Navigator, Internet
Explorer, Outlook Express, Claris Emailer, Fetch, Newswatcher, or any program
where blue, underlined, hyperlink text sometimes appears— your Remote
Access (or PPP, or FreePPP) control panel springs into action. It seizes control
of your Mac, throws up the status message shown in Figure 25-4, and dials your
modem. After 30 seconds of negotiation and modem-hissing, the status
message goes away. You’re now connected to the Internet.
932 Part IV: The World Online
■ ■
MACWORLD MAC SECRETS • 4040-8/5 • ch25.F • Chapter 25 • FINAL • VB • 10/28/98 • p.932
MACWORLD MAC SECRETS • 4040-8/5 • ch25.1 • Chapter 25 • Proof 1 • SH • 09/25/98 • p.932
4040-8/5 ch25.F 11/3/98 3:31 PM Page 932
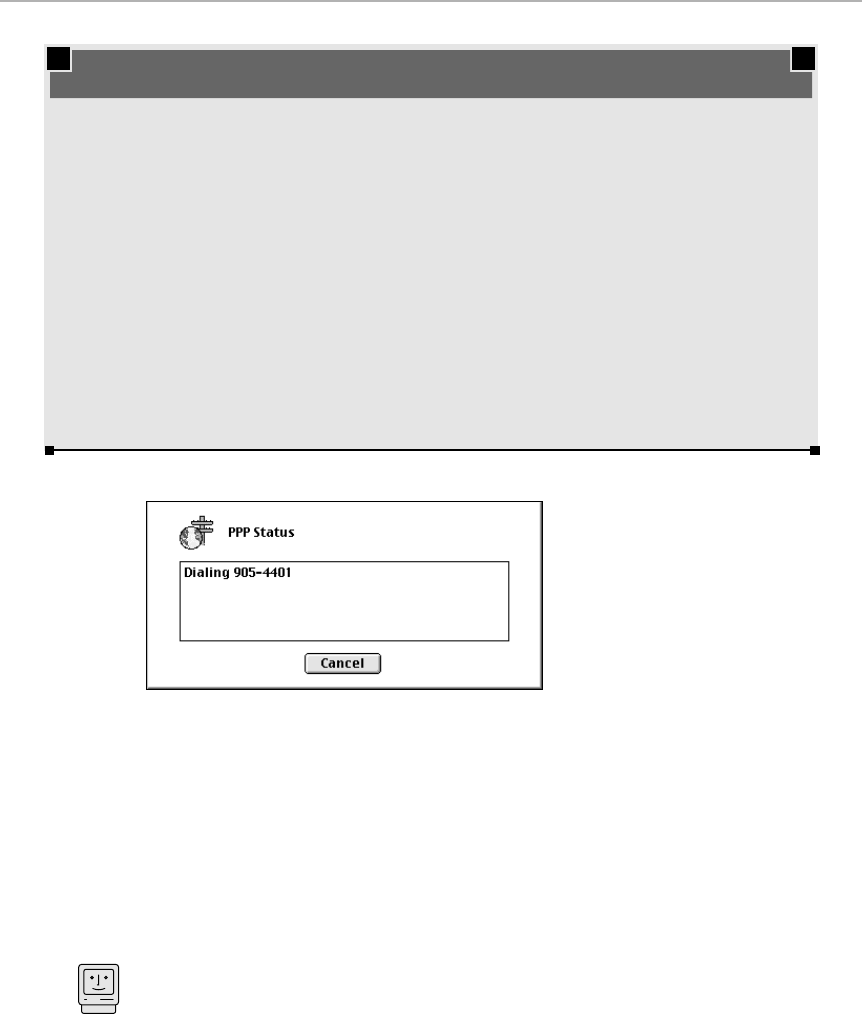
Figure 25-4: The all-too-familiar Open Transport status window takes over your Mac for a
minute or so while it connects to the Internet. (If you have Mac OS 8.5 or later, it says
Remote Access Status instead.)
This system makes it look like your Internet program has just dialed up the
Internet. What’s actually happened, though, is that your Internet program has
said to the Mac: “I’d like to go online now. Please open up an Internet
connection.” Your Internet software doesn’t actually dial; your Remote
Access (or PPP) control panel does! That’s why you see the same status
message shown in Figure 25-4 no matter which program is dialing.
That control panel’s job is to construct a bridge between your Mac and the
Net. Once that connection is made, you can run as many Internet programs
as you want over that bridge — simultaneously. You can be downloading a
program with Internet Explorer, checking your mail with Emailer, and chatting
in an America Online chat room, all simultaneously, and all over the same
Internet connection.
What gets weird is that once you quit all those programs, the remote
access/PPP connection remains open! That’s why, after checking your e-mail
Mac Basics
Chapter 25: The Web, the Net, and Everything Online 933
■ ■
MACWORLD MAC SECRETS • 4040-8/5 • ch25.F • Chapter 25 • FINAL • VB • 10/28/98 • p.933
MACWORLD MAC SECRETS • 4040-8/5 • ch25.1 • Chapter 25 • Proof 1 • SH • 09/25/98 • p.933
MACINTOSH SECRET
The software suite known as Open Transport is
by far the best software for dialing up the
Internet. It’s fast, it’s ultra-reliable, and it’s fairly
comprehensible.
If you’re using a very old Mac, however, or helping
out somebody who is, you won’t find the usual
suite of three Open Transport control panels.
Instead, you’ll find one control panel — called
MacTCP. It’s the predecessor to today’s TCP/IP
control panel, although the older MacTCP is far
more complex. You must fill it in while you’re on
the phone with your ISP’s tech-support staff.
But what about the Modem and Remote Access
(or PPP) control panels? If you don’t have Open
Transport, you don’t have them. Instead, you’re
expected to use a third-party program like the
popular FreePPP, which is included on the
CD-ROM with this book. You use it to enter your
modem type, password, local access phone
number, and so on.
FreePPP even comes with a handy extension
called PPP Menu that puts a tiny icon up on your
menu bar. Click this icon to view a menu of handy
commands, such as Connect and Disconnect.
Getting online without Open Transport
4040-8/5 ch25.F 11/3/98 3:31 PM Page 933
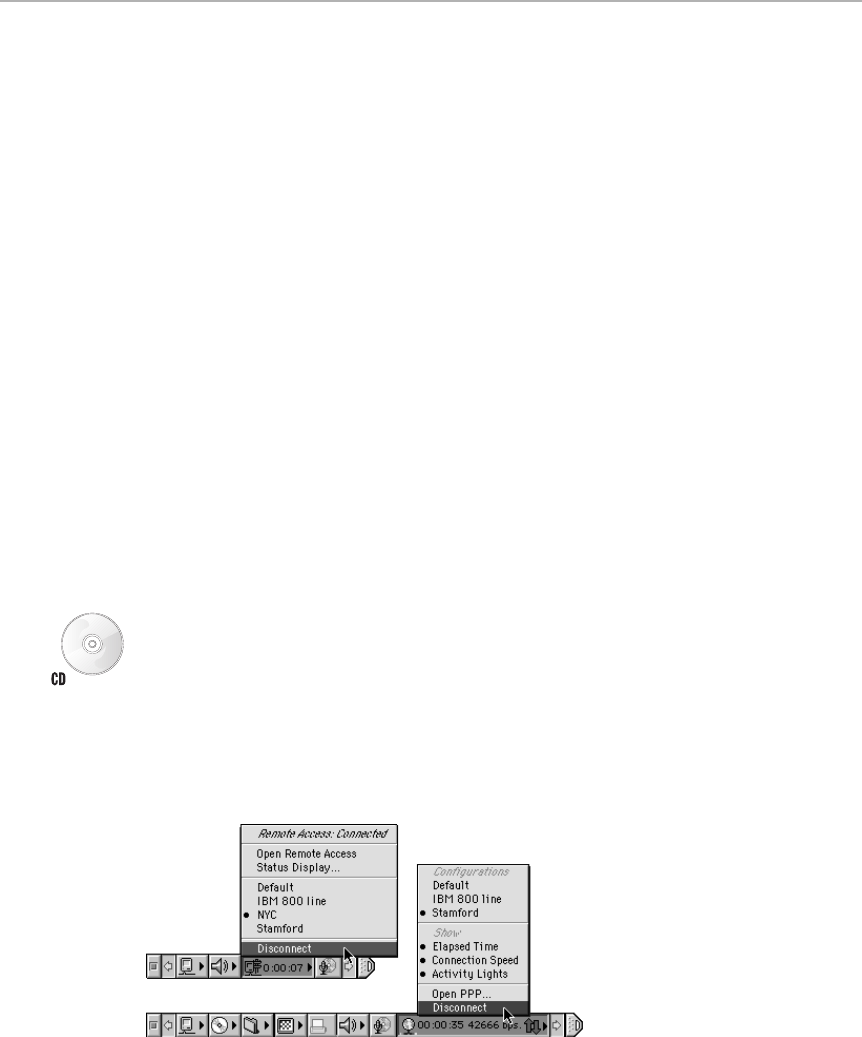
with Eudora and then quitting the program, you can now launch your Web
browser and instantly start to surf — and the Mac doesn’t dial. And no
wonder — you’re still connected, your phone line is still in use, so there’s no
dialing necessary.
Getting offline: Hanging up
Now then: what if you want to hang up? What if you’ve quit your Web browser
— and now you want to use that phone line to make a voice call, for example?
There are several ways to break a PPP connection:
■Open the Remote Access or PPP control panel again. Click the
Disconnect button. The deed is done, but that’s a lot of steps for
something you’ll be doing every day.
■Wait. If you wait long enough, the control panel will eventually detect no
activity on your Internet connection and hang up automatically. (You can
change this auto-hangup interval by opening the Remote Access or PPP
control panel and clicking Options. There you’ll see the “Disconnect if
idle for __ minutes” option.)
The only disadvantage of this automatic method is that when your Mac
does disconnect, your work is interrupted by the appearance of a
“The connection was terminated because of lack of network activity”
dialog box.
■Use a Control Strip module. If you have Mac OS 8.5, you’re all set—the
Control Strip already contains a Remote Access module that lets you
hang up, dial, view your time online, and so on (see Figure 25-5).
If you have any previous system, you can use the nearly identical OT/PPP
Strip module, included on the CD-ROM with this book. It, too, lets you
hang up your PPP connection simply by choosing the Disconnect
command from your Control Strip. (See Chapter 4 for details on the
Control Strip, and see Figure 25-5 to see OT/PPP Strip in action.)
Figure 25-5: Mac OS 8.5’s Remote Access Control Strip module (top) and the delicious
shareware OT/PPP Control Strip module (bottom) make getting online and off extremely
convenient. They also let you switch among different PPP setups without having to open the
Remote Access or PPP control panel. (OT/PPP even shows your current connection speed
and data-movement direction.)
934 Part IV: The World Online
■ ■
MACWORLD MAC SECRETS • 4040-8/5 • ch25.F • Chapter 25 • FINAL • VB • 10/28/98 • p.934
MACWORLD MAC SECRETS • 4040-8/5 • ch25.1 • Chapter 25 • Proof 1 • SH • 09/25/98 • p.934
4040-8/5 ch25.F 11/3/98 3:31 PM Page 934

■Use an AppleScript that hangs up. PPP Disconnect, for example, comes
with Open Transport (it’s in the Apple Extras folder); once you’ve stuck it
into your Apple menu, hanging up is a matter of a single menu command.
Internet Connection Secrets
■
Switching between AOL and an ISP
For years, America Online fans had to accept the fact that they couldn’t connect
to both AOL and an ISP without restarting in between. (The restart was
necessitated by AOL’s goofy AOL Link extension.) But Open Transport changes
all that; using the Configurations command in the TCP/IP control panel, you can
create one setup for AOL Link and another for your ISP — and switch between
them without having to restart. (Of course, it’s smarter still to connect to
America Online
through
your Internet account, as brilliantly described in Chapter
26 — so that you’ll never
have
to switch connection methods.)
Location Manager to the rescue
There’s no particular need to visit the Remote Access (PPP) control panel once
you’ve set up various ISP connections. Consider, instead, using the Location
Manager, described in Chapter 4.
Its handy, omnipresent Control Strip tile (see Chapter 4 for more on the Control
Strip, too) lets you change
all
of your Internet settings — including Modem,
Remote Access (PPP), and TCP/IP settings — with a single pop-up menu click.
The OT/PPP Strip Control Strip module, included on this book’s CD-ROM, isn’t
quite as comprehensive — it can’t control your Modem and TCP/IP control panel
settings. But the Remote Access (PPP) control panel’s settings are the ones
you’ll most often want to change — and that’s what OT/PPP Strip is great for,
letting you zip back and forth between settings (AOL and ISP, or one town’s
access phone number to another) without ever having to visit a control panel.
Monitoring your connection speed
When you’ve got dialing and hanging up down to a science, you don’t, under
normal circumstances, ever see the Remote Access (PPP) control panel. For
example, you let your Internet applications (such as your Web browser) initiate
the connection, and you use your Control Strip to disconnect.
But the Remote Access (PPP) control panel is actually a fascinating place to hang
out while you’re on line. As data comes and goes, little light-up graphs show
exactly what’s going on with your connection (see Figure 25-6). Better yet, you’re
told explicitly how fast your connection is, in Kbps — and that’s how we know, for
example, that the best rate you’ll get with a “56K” modem is about 43 Kbps.
Chapter 25: The Web, the Net, and Everything Online 935
■ ■
MACWORLD MAC SECRETS • 4040-8/5 • ch25.F • Chapter 25 • FINAL • VB • 10/28/98 • p.935
MACWORLD MAC SECRETS • 4040-8/5 • ch25.1 • Chapter 25 • Proof 1 • SH • 09/25/98 • p.935
4040-8/5 ch25.F 11/3/98 3:31 PM Page 935
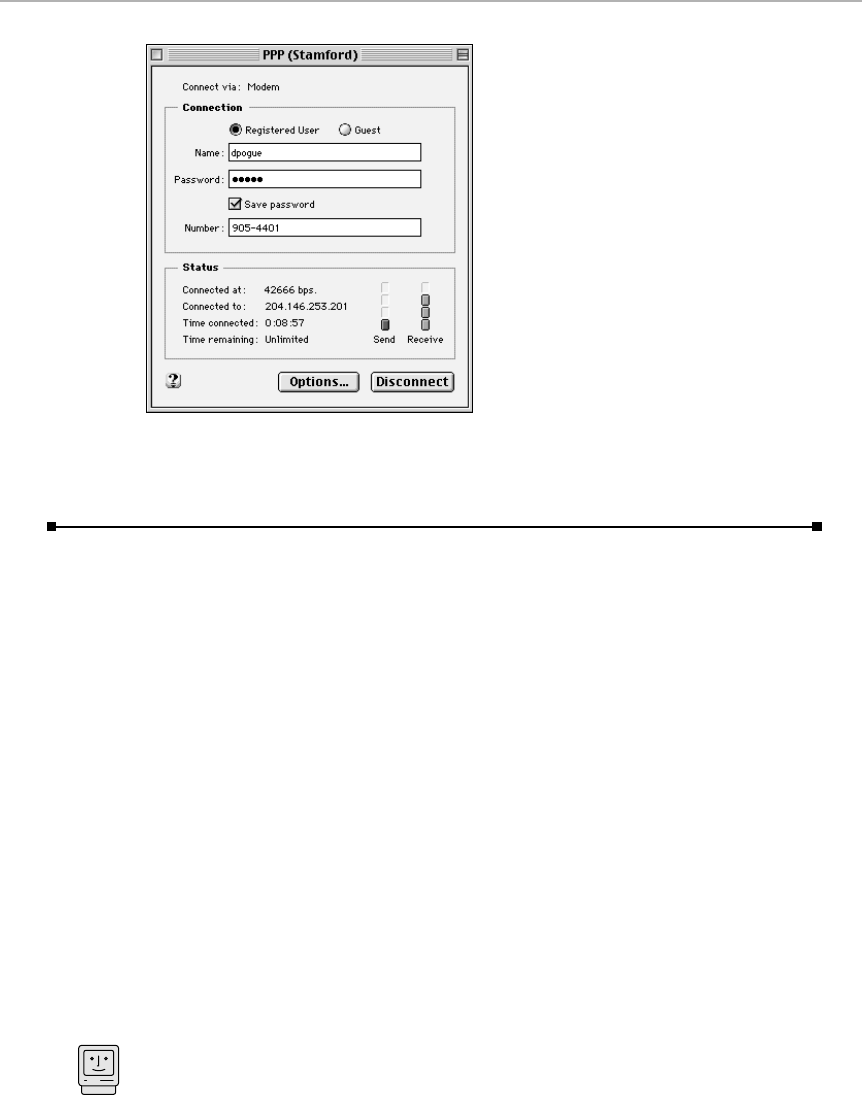
Figure 25-6: The Remote Access (PPP) control panel shows a handy set of level meters that
indicate how fast your connection is and which direction the data is flowing.
Getting Around: Internet
Addresses and URLs
Once you’ve signed up for a PPP account, set up Open Transport correctly,
dialed up your Internet service provider, and established a connection,
you’re ready to start using the Internet. As we mentioned earlier, opening a
PPP connection makes Internet services available to your Mac, but it doesn’t
connect you to any actual services — no e-mail, no Web sites, no Newsgroups.
To do any of that, you need a program designed to interpret the particular
type of Internet data you want to access: Navigator or Internet Explorer (for
the World Wide Web), Emailer, Eudora, or Outlook Express (for e-mail), Fetch
or a Web browser (for FTP file downloading), and so on. We’ll cover these
programs later in this chapter.
But all of these Internet services have one thing in common: Once they’re
open, you’re becalmed on the Information Superocean unless you know the
address of the particular Internet feature you want. Remember, the Internet
isn’t a single online service; it’s a sprawling web of regional computer
networks scattered all over the world, so you must tell your Mac with which
one of those networks you want to hook up.
Internet addresses can look intimidating, especially if you’re accustomed to
the warm comfort of services such as America Online, where other users
have screen names like FrogMan, or MathDude, or Bob99. Internet addresses
are considerably longer because they identify more than a specific person.
Mac Basics
936 Part IV: The World Online
■ ■
MACWORLD MAC SECRETS • 4040-8/5 • ch25.F • Chapter 25 • FINAL • VB • 10/28/98 • p.936
MACWORLD MAC SECRETS • 4040-8/5 • ch25.1 • Chapter 25 • Proof 1 • SH • 09/25/98 • p.936
4040-8/5 ch25.F 11/3/98 3:31 PM Page 936

Out of the thousands of computer networks plugged into the Internet, they
must pinpoint a particular protocol (the type of data being transferred), a host
(the actual file server you’re connecting to), and a domain (the location of
the file server). In the case of Web and FTP (downloadable software) sites,
the address may also specify a particular folder, subfolder, and document on
that distant hard drive.
The address of an Internet resource is called its URL — Uniform Resource
Locator. (Most people pronounce it “U. R. L.,” although a few, apparently
under the impression that the Internet is run by European noblemen,
pronounce it “Earl.”) You must know a site’s URL if you hope to connect to it.
Here’s a typical URL, along with an explanation of what all the parts mean:
A. The first part of a URL always specifies the protocol — the type of data
transfer required to interpret information from a given site. Each feature
of the Internet — FTP, Web, Telnet, and so on—uses its own protocol. In
this example, the http protocol (which stands for HyperText Transfer
Protocol) indicates that this URL points to a World Wide Web page. The
protocol part of a URL is always followed by a colon and two slashes.
Other examples: ftp://,Telnet://, and so on.
B. The next part of a URL identifies the host computer to which you’re
connecting — in this case, research. This computer might be at some
huge corporation, like Boeing, or it might be in a teenager’s living room in
Hackensack, NJ.
C. After the host name comes the domain name — the actual location of
the host computer. In this example, the domain is whirlygig.com. The
components of the host and domain names are always separated by
periods.
The .com tag at the end of this domain name indicates that this is a
commercial institution. Other domain names may end in .edu (a school
or college), .gov (a government agency), .org (a non-commercial
organization of some type), .mil ( a branch of the military), .net (a
network of some type), and so on. Sometimes the final tag on a domain
name indicates the country in which the host is located: uk = United
Kingdom; se = Sweden; jp = Japan; and so on.
D. The slash mark after the domain name means the next bit of information
in the URL pinpoints a specific directory (folder) on the host computer.
Flight is one directory (or folder) on the host computer.
E. Finally, the item notes.html is a specific document, in the directory flight,
on the file server. Using this URL would take you directly to this
document and open it up in your Web browser.
Chapter 25: The Web, the Net, and Everything Online 937
■ ■
MACWORLD MAC SECRETS • 4040-8/5 • ch25.F • Chapter 25 • FINAL • VB • 10/28/98 • p.937
MACWORLD MAC SECRETS • 4040-8/5 • ch25.1 • Chapter 25 • Proof 1 • SH • 09/25/98 • p.937
4040-8/5 ch25.F 11/3/98 3:31 PM Page 937

As you can see, URLs can be quite specific, pointing you to one particular file,
on one computer, at one location. (Not all do, however. Many URLs simply
point to the host computer; from there, you navigate, by clicking, to the
particular directory and documents you want to view.)
In the case of e-mail addresses, a URL also specifies a user. The user’s name is
always included at the beginning of the address, followed by an @ (which
means at) and the host and domain name. A guy named Schorr who works at
the company used in the previous example might have an e-mail address of
schorr@research.whirlygig.com.
By the way, these Internet addresses aren’t something you just make up.
Imagine the chaos that would erupt if several people all over the world chose
the same Internet address. No, when you want to establish a new Internet
address, you must pay to register that address with the Network Information
Center (NIC). (You can do so by visiting the NIC’s Web site, www.internic.net.)
It costs $35 per year, at this writing, to have your own “domain name,” such as
davidpogue.com. Once you’re registered, you have what’s called a Fully
Qualified Domain Name that no one else is using.
Where to Go on the Internet
No matter how you get onto the Net, you’re going to be overwhelmed. As we
said before, there’s no hierarchy to the Internet, no welcome screen, no
938 Part IV: The World Online
■ ■
MACWORLD MAC SECRETS • 4040-8/5 • ch25.F • Chapter 25 • FINAL • VB • 10/28/98 • p.938
MACWORLD MAC SECRETS • 4040-8/5 • ch25.1 • Chapter 25 • Proof 1 • SH • 09/25/98 • p.938
MACINTOSH SECRET
The type of URL we’ve discussed in this chapter
is called a domain name. Domain names are
somewhat descriptive and easy to remember.
Underneath the surface, though, each computer
on the Internet has another address — its IP
Address (IP stands for Internet protocol).
An IP Address is a number that identifies a specific
site on the Internet. The address number is
generally represented by four strings of numbers
separated by dots, like this: 165.87.201.244.
(Techies gleefully refer to this as a
dotted quad
.)
You may remember having to type this kind of
number into the TCP/IP control panel when you set
up your Internet account (see Figure 25-3).
Thankfully, you don’t have to know a site’s IP
Address to connect to it. When you attempt to
connect to a valid address, a host computer in
the domain you’re trying to connect to compares
the name you’ve typed (or clicked, if the URL is
a hypertext link on the Web) with a database of
all the names within the domain. The host
computer (a Domain Name Server) finds the
numeric IP Address corresponding to the
domain name you’ve requested, and uses the IP
Address to connect you to the appropriate
server on the network. (Whew.) This process
accounts for the bizarre “DNS (Domain Name
Server) entry not found” message Netscape
Navigator and Internet Explorer sometimes give
you; that message means that your browser
can’t find any Web page IP address
corresponding to the Web address you typed.
The Internet address nobody knows
4040-8/5 ch25.F 11/3/98 3:31 PM Page 938
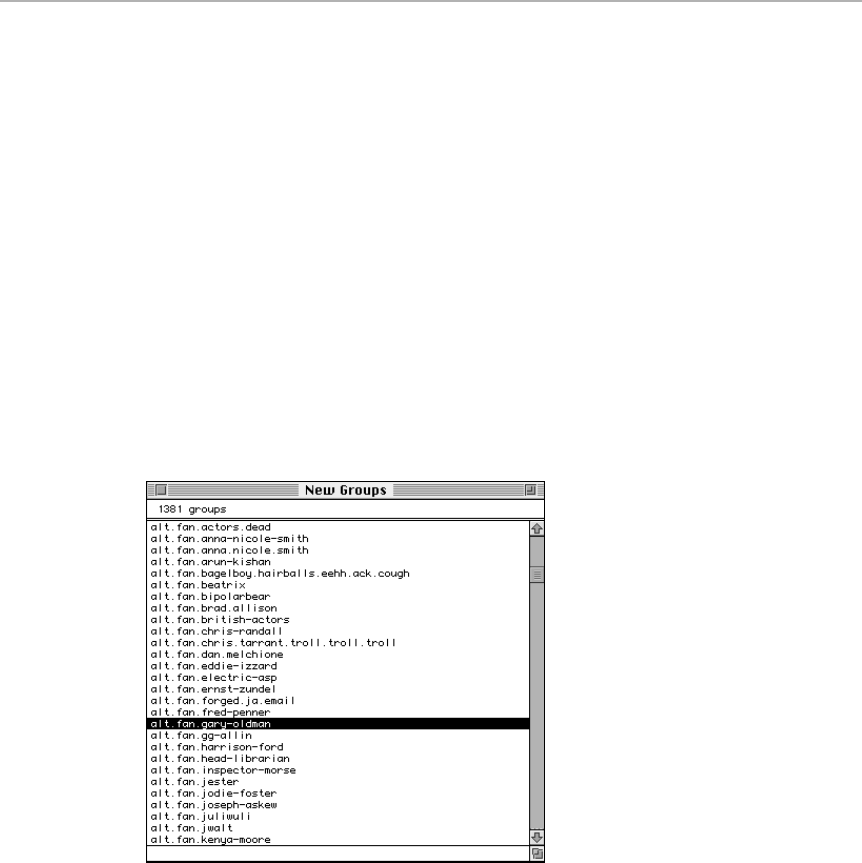
logical organization. Therefore, the best secret we have to offer is to suggest
a few typical, interesting, or famous places to go once you’re out there.
Newsgroups
A newsgroup is like a bulletin board, in which one person responds to the
previous message, someone else responds to that, and so on, for months.
There are about 16,000 different topics available, from Mickey Mouse fan clubs
to left-handed golfers. To access these groups, you need (as always) some
commercial or shareware program dedicated to the task, such as Newswatcher
or Outlook Express. You’ll immediately understand the layout: you simply
double-click a topic to see a list of messages, double-click a message to read it,
and use the Next and Prev buttons to move through the discussion.
A word of caution: Internet regulars hold a seething hostility for newcomers —
and especially for people who connect via America Online. So before you chime
in with your own thoughts, read that newsgroup for a while to get the feel of it.
Figure 25-7 lists some newsgroups.
Figure 25-7: There are newsgroups (BBS topics) of every possible description — tens of
thousands of them. Here’s a tiny few in the As.
You might sometimes open a particular newsgroup message and find no
message at all — instead, there’s some button to click to begin a download
(see Figure 25-8). True enough; despite the mixed metaphor, you can post files
in a newsgroup message. In fact, in the dozens of groups whose names begin
alt.binaries . . .,you’ll find mainly downloadable files. That’s where you find
things to download like FAQs (Frequently Asked Questions documents—
download and read so you’ll know what’s going on), Mac shareware, and the
photographs that have had Congress and many parents worried.
Chapter 25: The Web, the Net, and Everything Online 939
■ ■
MACWORLD MAC SECRETS • 4040-8/5 • ch25.F • Chapter 25 • FINAL • VB • 10/28/98 • p.939
MACWORLD MAC SECRETS • 4040-8/5 • ch25.1 • Chapter 25 • Proof 1 • SH • 09/25/98 • p.939
4040-8/5 ch25.F 11/3/98 3:31 PM Page 939
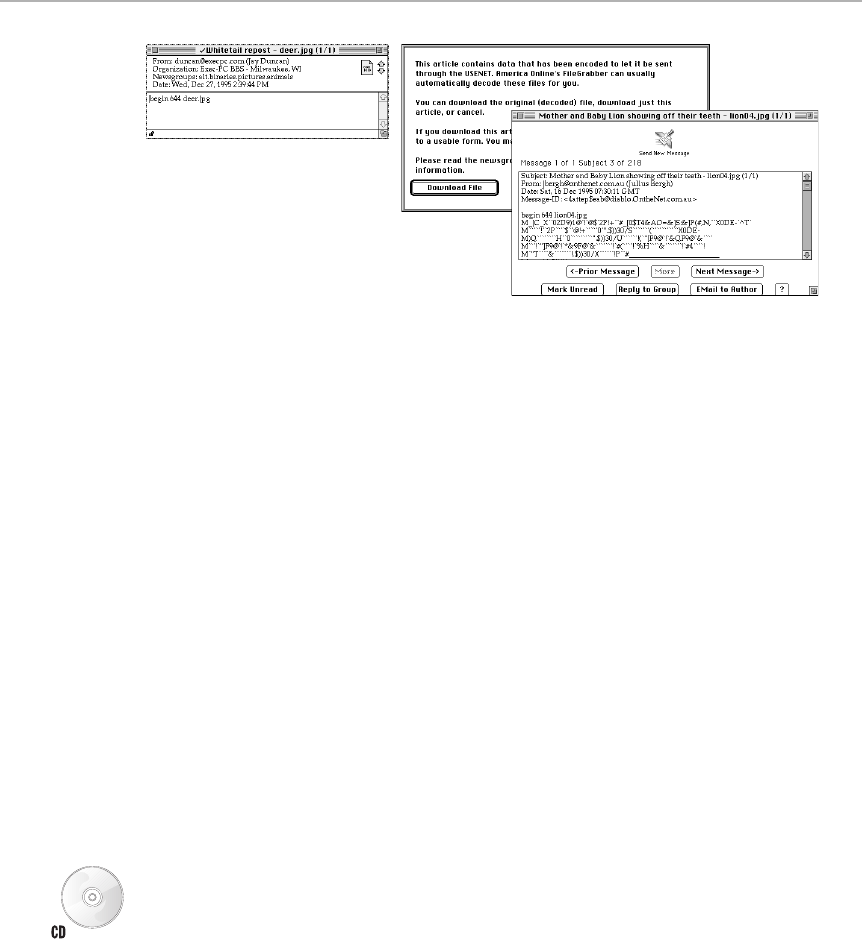
Figure 25-8: What it looks like to download a file from a newsgroup if you’re using a true
Internet message reader like NewsWatcher (left) — click the icon to download the file — and
America Online (right). The America Online message looks like the front image here — a
bunch of text gibberish — but fortunately, the America Online program offers to translate it
into a real file for you.
Every discussion name seems to begin with one of these prefixes:
alt. — an alternative newsgroup hierarchy
bit. — duplicates of mailing lists (see Chapter 27)
comp. — computers, programming, operating systems
k12. — education
misc. — miscellaneous
news. — about newsgroups themselves
rec. — recreation (games, pets, sports)
sci. — science, medicine
soc. — society, culture
talk. — general conversation, politics
After this prefix comes a bunch of other abbreviations separated by periods.
Eventually you’ll be able to understand what’s going on just by looking at the
name of a newsgroup. For example, for humor, there’s rec.humor.funny; the
arts are filed under topics like rec.arts.theatre and alt.fan.letterman;
scientists hang out at sci.astronomy, sci.environment, and so on; there’s
endless political discussions at alt.politics, personal ads at alt.personals,
music talk at rec.music.classical or alt.music (-dot anything), and Mac talk
by the bookful at comp.system.mac.graphics, comp.system.mac.apps,
comp.system.mac.games, and so on. (Chapter 27 of this book’s 4th Edition,
available in electronic form on your 5th Edition CD-ROM, contains a long list
of specific newsgroup titles.)
940 Part IV: The World Online
■ ■
MACWORLD MAC SECRETS • 4040-8/5 • ch25.F • Chapter 25 • FINAL • VB • 10/28/98 • p.940
MACWORLD MAC SECRETS • 4040-8/5 • ch25.1 • Chapter 25 • Proof 1 • SH • 09/25/98 • p.940
4040-8/5 ch25.F 11/3/98 3:31 PM Page 940

(To visit a newsgroup from America Online, use keyword newsgroups.)
FTP sites
FTP refers to software that you can download. (It stands for file transfer
protocol.) For example, ftp.support.apple.com is Apple’s primary outlet for
new and updated Apple system software and utilities. And you’ll occasionally
be directed to some company’s private FTP site when you’re trying to locate
a special file or updater.
You can use a dedicated FTP program, such as the shareware Fetch, to access
these and similar sites — or you can use your everyday Web browser instead.
In fact, these days, true FTP is taking a distant second place to downloading
files directly from Web sites, such as www.shareware.com.
(To visit an FTP site from America Online, use keyword FTP.)
Mailing lists
A mailing list is an e-mail-based discussion group; see Chapter 27 for a
complete discussion.
Internet Relay Chat
Most of the Internet, if you really think about it, is like a giant answering
machine or bulletin board: People leave messages now, with the hope that
other people will get them later.
Internet Relay Chat (IRC) is different: It’s live, real-time, typewritten
conversations between people online right now. Just as in the chat rooms on
America Online, most of the conversations that take place on IRC “channels”
are insufferably boring, filled with inside jokes, smileys, {{{{{hugs!}}}}}, and
so on. Here and there, though, IRC carries online games, instant world-crisis
news, or even the occasional organized discussion.
Once you have an Internet account (or America Online 3.0), you need only
two things more: an IRC shareware program (such as Homer, Ircle, or
GlobalChat) and the address of a good IRC server (host computer). Here are
some IRC server addresses in the U.S., each with many separate channels of
conversation:
irc.bu.edu
irc.colorado.edu
mickey.cc.utexas.edu
Once you’ve found an IRC channel, you’ll be asked to make up a nickname
and select the particular channel you want to join. In the little window where
your typing shows up before you press Return to send it into the great
electronic conversation before you, you can type various codes to gain some
control over your experience (see Table 25-1).
Chapter 25: The Web, the Net, and Everything Online 941
■ ■
MACWORLD MAC SECRETS • 4040-8/5 • ch25.F • Chapter 25 • FINAL • VB • 10/28/98 • p.941
MACWORLD MAC SECRETS • 4040-8/5 • ch25.1 • Chapter 25 • Proof 1 • SH • 09/25/98 • p.941
4040-8/5 ch25.F 11/3/98 3:31 PM Page 941

Table 25-1: IRC Control Codes
Code Description
/help Brings up a more complete list of commands than this one, with
explanations.
/list Shows you a list of channels available. The ones that begin with a #
symbol are the public channels.
/join #hottub Lets you join the conversation called #hottub (always a popular one);
obviously, you can substitute the name of any existing channel.
/names -min 20 Shows you a list of people on any channel with more than 20 people
participating.
/Quit Ends your IRC session.
The World Wide Web
The most popular part of the Internet — the part you couldn’t avoid hearing
about if you tried — is the World Wide Web. We know third graders who run
around urging schoolmates to “check out” their Web pages. Web addresses
are showing up everywhere — on business cards, in print ads, even in TV
commercials. (Have you noticed www.sony.com or www.ford.com flashing by at
the end of recent movie ads and car commercials? Those are Web sites.)
The Web has become incredibly popular for one simple reason: It isn’t like the
rest of the Internet. It looks friendly and familiar to Mac and Windows users.
When you connect to a Web file server, you don’t encounter streams of UNIX
code or view lines of monospaced text. Instead, information is displayed with
a completely graphic interface — formatted text, pictures, color icons, and
interactive buttons (see Figure 25-9).
Navigating the Web requires little more than clicking buttons and colored,
underlined text phrases known as hypertext links (shown at the bottom in
Figure 25-9). You’re automatically transported from one Web page to another,
even one file server to another — without having to type in a single Internet
address. You can also download text, pictures, sounds, movies, and other
documents to your computer with the click of a button.
When you connect to a Web site, you’re actually logging into a file server
(hard drive) on a remote computer network. Each document that you access
on that server is called a Web page. No matter how tall a particular document
is, it still constitutes one page on the Web. The hypertext links embedded in
the page can transport you to a different location in the document you’re
currently viewing, to a different document on the same file server, or even to
a file server located in a different country. That’s the beauty of the Web —
by clicking on hypertext links, you can jump seamlessly from a file server in
Show Low, AZ, to another in Florence, Italy. You can weave your way across the
globe, jumping from link to link, to track down the information you want—
that’s why it’s called the World Wide Web. The URL information your Mac
Mac Basics
942 Part IV: The World Online
■ ■
MACWORLD MAC SECRETS • 4040-8/5 • ch25.F • Chapter 25 • FINAL • VB • 10/28/98 • p.942
MACWORLD MAC SECRETS • 4040-8/5 • ch25.1 • Chapter 25 • Proof 1 • SH • 09/25/98 • p.942
4040-8/5 ch25.F 11/3/98 3:31 PM Page 942
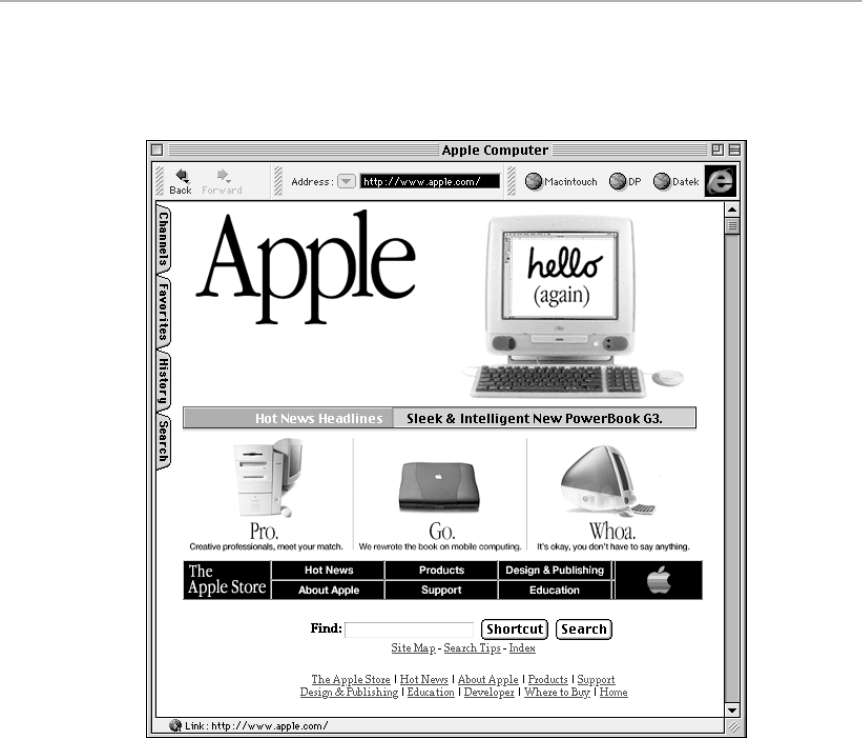
needs to make those jumps is all embedded in the hypertext links. As far as
you, the customer, are concerned, linking to a Web site down the street is no
different than linking to one in Tanzania.
Figure 25-9: A typical Web page as it appears when viewed in Internet Explorer. Just click
things that look interesting. It’s like a multimedia elevator: Push a button to get where you
want to go.
A World Wide Web warning
All of this amazing online multimedia stuff stresses your modem nearly to the
breaking point. Even with a 56 Kbps modem (see Chapter 24), you still wait
about 10 seconds, or more (if it’s a fancy page), for each Web page to float
onto your screen. (If you connect through America Online, the wait is even
longer for each page.) Don’t even try connecting to the Web with a 9,600 bps
(or slower) modem.
People who get seriously Web-addicted — and many do — wind up spending
huge amounts of money to install special high-speed phone wires (such as
T-1 or ISDN; see Chapter 24) that bypass the modem altogether. For them,
downloading software from Web pages is nearly instantaneous.
Chapter 25: The Web, the Net, and Everything Online 943
■ ■
MACWORLD MAC SECRETS • 4040-8/5 • ch25.F • Chapter 25 • FINAL • VB • 10/28/98 • p.943
MACWORLD MAC SECRETS • 4040-8/5 • ch25.1 • Chapter 25 • Proof 1 • SH • 09/25/98 • p.943
4040-8/5 ch25.F 11/3/98 3:31 PM Page 943

Even they, however, wind up waiting for Web pages to appear on their
screens—they, too, are at the mercy of the other end’s modems, network
software, and wiring speed. Getting frequent busy signals (in the form of “that
URL not available” messages) when trying to access favorite pages is a fact of
Web-surfing life.
In any case, remember that you don’t have to wait for a page to finish arriving
on your screen. You can go ahead and click whatever part of it you can see —
such as the Back button in your Web browser, for example — if you’re
impatient. You can even start downloading a file and then jump to a different
Web page; your file merrily continues downloading in the background.
Web browsers
Viewing Web pages requires a special program called a browser, such as
Netscape Navigator or Microsoft Internet Explorer. A browser interprets
information transmitted over the Internet and displays it on your screen as
graphics. The actual information your Mac gets — and that the browser
translates — is coded text. It’s in a computer language called HyperText
Strange
But True
944 Part IV: The World Online
■ ■
MACWORLD MAC SECRETS • 4040-8/5 • ch25.F • Chapter 25 • FINAL • VB • 10/28/98 • p.944
MACWORLD MAC SECRETS • 4040-8/5 • ch25.1 • Chapter 25 • Proof 1 • SH • 09/25/98 • p.944
Navigator vs. Explorer
JS: What’s this about Microsoft Internet Explorer
being faster and more stable than Netscape Navigator?
Did you write that?
DP: Happens to be true. Hate to break it to you, fans,
but I can’t use Netscape Navigator for more than about
five minutes without its unexpectedly quitting.
JS: You’re obviously using a version before 4.0.5,
which is rock-solid. And besides, Navigator is so much
faster than Explorer!
DP: Maybe, but Explorer 4.01 is 35 percent faster
than 4.0 —
JS: — which makes it approach the speed of Netscape
DP: — but much as I hate to say this, Explorer’s
features wipe the floor with Netscape.
JS: What am I hearing!? This, from the guy who wrote
a book called The Microsloth Joke Book?
DP: Believe me, I lose sleep over this.
JS: Well, what features are you talking about?
DP: It’s got a pop-up menu of sites you visited every day
in the last couple of weeks. No more, “What was that
site I visited last Tuesday?” It auto-completes URLs for
you; you just type the first few letters. It lets you block
those incredibly annoying animated GIFs on Web pages!
JS: OK, that’s pretty cool.
DP: And it needs 4 megs of RAM. Not 7 or 8, like
Netscape.
JS: You’re thinking of the entire Communicator
package. Navigator itself only needs 4 . . .
DP: And plus, you can customize the toolbar! You can
make a toolbar of your favorite Web sites; one click,
and you’re there.
JS: Netscape has that too!
DP: You’re kidding.
JS: Yeah, I just saw it in the online help the other day . . .
let’s see, sure, here it is. You can add your own favorite
pages to the Personal Toolbar; simply drag and drop a
Web page’s handle onto this toolbar.
DP: Really?
JS: (Note: This feature is not available on Mac OS
systems.)
DP: Ah.
JS: But come on, David — Microsoft? You’re gonna sit
here with a straight face and tell me you prefer the
Microsoft alternative?
DP: Hey — at least they didn’t get any money out of me.
DIALOGUE
4040-8/5 ch25.F 11/3/98 3:31 PM Page 944

Chapter 25: The Web, the Net, and Everything Online 945
■ ■
MACWORLD MAC SECRETS • 4040-8/5 • ch25.F • Chapter 25 • FINAL • VB • 10/28/98 • p.945
MACWORLD MAC SECRETS • 4040-8/5 • ch25.1 • Chapter 25 • Proof 1 • SH • 09/25/98 • p.945
Markup Language (HTML), which can transfer formatted text and graphics,
the distinguishing characteristics of the Web. (It’s sent over the Internet
using a protocol called HyperText Transfer Protocol, which explains why
every Web address starts with http.)
As you browse the Web, the browser keeps track of each Web page you visit.
You can instantly jump back to a site you’ve already been to during your
online session by choosing its name from the Go To menu — or by clicking the
Back button in the browser window.
We’ll cover Netscape Navigator/Communicator and Microsoft Internet
Explorer later in this chapter. For a discussion of Apple’s abandoned
Cyberdog, see the electronic edition of Macworld Mac Secrets, 4th Edition (on
the CD-ROM that came with this book).
Helper apps and plug-ins
Because Web sites can contain links to such a wide variety of media, most
browsers are designed to work with helper applications — little supplementary
programs that handle the display of specific kinds of media. One helper may
play QuickTime movies, another can play back AIFF sounds, a third can open
JPEG images, and yet another plays QuickTime VR movies. When the browser
encounters a specific type of data, it automatically launches the appropriate
helper application. If your Mac has the RAM available, that helper program
displays or plays back the picture, movie, or sound in a new window of its
own. (You can download a complete collection of helper apps and plug-ins,
described next, from Netscape’s own home page, www.netscape.com. Then
specify which little program you want to use for which media type using your
browser’s Preferences command.)
Helper apps are not to be confused with plug-ins. True, plug-ins accomplish
many of the same tasks as helper apps — serving as little multimedia
SimpleTexts and Movie Players for incoming Web data. But plug-ins make the
show appear to take place right on the Web page, rather than in a window of
its own. For example, MacroMedia’s Shockwave plug-in shows animations
right on certain Web pages. This kind of add-on makes the Web’s multimedia
offerings appear to be better integrated with the Web, but the cost is RAM; the
more plug-ins you have installed, the more RAM your browser needs to run.
Netscape Navigator/Communicator
At one time, the vast majority of Web surfers used a browser called Netscape
Navigator. At one time, it cost $50; today, it’s free (from www.netscape.com,
among other places).
Netscape Navigator is not to be confused with the sprawling, multimegabyte
affair called Netscape Communicator. Communicator incorporates many
Internet features for which you used to need separate programs; it can read
your e-mail, let you design Web pages, read newsgroup messages, and so on.
Fortunately, a standalone Web browser — Netscape Navigator — is still
available separately, and it’s still considerably faster than Internet Explorer.
4040-8/5 ch25.F 11/3/98 3:31 PM Page 945
Microsoft Internet Explorer
If you know anything about Microsoft, you know it’s not about to sit back and
let any company have 80 percent of any market. So how did Microsoft strike
back at Netscape? By whipping together a rival browser program of its own
and giving it away free. To the astonishment of Mac fans, Microsoft Internet
Explorer was more richly featured than Netscape Navigator. (Thousands of
people, in fact, are using Explorer without even realizing it: it’s the browsing
software built into America Online 3.0 and later.)
Cyberdog
Several years ago, Apple came up with a browser of its own: a rather remarkable
technology called Cyberdog. Based on the company’s abandoned Open Doc
software-component technology, Cyberdog was designed to serve as Web
browser, e-mail program, FTP software, Telnet software, Gopher program,
URL manager, newsgroup reader, and more. It was all integrated into a single,
consistent, elegant, drag-and-drop software suite. You’ll find our write-up in
the electronic edition of Macworld Mac Secrets, 4th Edition (on the CD that
came with this book).
Web Browser Secrets
■
The golden typing shortcut
The most important shortcut we can possibly communicate: If you’re entering a
URL that’s in a standard company’s format, such as http://www.sony.com for
Sony or http://www.adobe.com for Adobe, you can omit everything except the
company’s actual name. That is, in your Web browser’s Go To: field, you can
type only
sony
or
adobe
; Navigator or Explorer will add the rest of that junk —
http://www. and .com
—
for you. This works with any URL that starts with
http://www. and ends with .com — and thousands do. In every case, just
type the company name that appears in the middle of the address!
946 Part IV: The World Online
■ ■
MACWORLD MAC SECRETS • 4040-8/5 • ch25.F • Chapter 25 • FINAL • VB • 10/28/98 • p.946
MACWORLD MAC SECRETS • 4040-8/5 • ch25.1 • Chapter 25 • Proof 1 • SH • 09/25/98 • p.946
ANSWER MAN
Q: Sometimes when I’m Web surfing, there’s a
little N logo (or E logo) in the upper-right corner
of the screen. It looks like it’s getting bombarded
by meteorites or something. What’s that about?
A: The N is for Netscape; the E is for Explorer.
(Even America Online 4.0 has that — an A, of
course.)
Whenever this little logo is spinning, or moving,
or has meteorites, your browser is trying to tell
you that it’s working.
For example, suppose you click a link, but
nothing seems to be happening. A quick glance
at that N or E logo tells you whether or not the
Mac has crashed (no animation) — or is just
trying to get a Web page from a particularly
slow file server somewhere (animation).
The meteor shower on my Mac
4040-8/5 ch25.F 11/3/98 3:31 PM Page 946

Nor do you have to include the http:// (or ftp:// or gopher://, and so on) when
typing an Internet address. Navigator is smart enough to examine each address,
figure out what type of URL it is, and then add the appropriate protocol prefix itself.
Similarly, you can even skip the
www.
and
.com
when specifying a specific location
or document
within
a Web site. For example, to reach www.odysseus.com/
goddesses/calypso/, all you have to type is odysseus/goddesses/calypso/.
Chapter 25: The Web, the Net, and Everything Online 947
■ ■
MACWORLD MAC SECRETS • 4040-8/5 • ch25.F • Chapter 25 • FINAL • VB • 10/28/98 • p.947
MACWORLD MAC SECRETS • 4040-8/5 • ch25.1 • Chapter 25 • Proof 1 • SH • 09/25/98 • p.947
ANSWER MAN
Q: For three years straight, I haven’t been able
to turn my head without seeing a screaming
headline, book title, or worldwide cult about
Java. What is it, do I want it, and how come I
don’t get it?
We’re with you, pal. We can’t remember so
much hype about a technology that impacts our
lives so little.
Here’s what you need to know: Java is a
programming language developed by Sun
Microsystems. The idea was nice enough: the
exact same Java programs can run, unmodified,
on any kind of computer — Mac, PC, whatever.
Think of the time savings! The simplicity! The
sales!
It didn’t work out that way, despite all the
headlines, books, and cults. Nobody wound up
writing Java programs — standalone, marketable,
meaningful programs. In general, that’s because
Java programs are slow and clunky.
About the only impact Java has had on our lives
are the tiny Java thingies called applets that
you’ll run across on the occasional Web page.
By embedding a bit of Java, Web page creators
can jazz up their sites with little interactive
games, miniature programs, and more annoying
animations. On the other hand, a few Java
applets are kind of neat; we like the real-time
sports-score ticker on ESPN’s SportsZone
(espn.sportszone.com), The Trip.com’s real-
time flight tracker, which shows you exactly
where your family’s plane is at this exact moment
(flight.thetrip.com/flightstatus), and
Microsoft Expedia’s “click to select a seat on the
map of this plane” thing (expedia.com).
If you do, in fact, encounter a Web page that
requires Java, you’ll see nothing at all unless
your Web browser is set up with a Java virtual
machine — a Mac program that can run Java
programs (usually inside your Web browser
window). You’ve got a choice of three: Apple’s
own Mac OS Runtime for Java (MRJ), which is
probably sitting in your System Folder at this
very moment, plus the Java engines that come
with the Big Two Web browsers (Netscape
Navigator and Internet Explorer). (Both of those
programs are included on the CD with this book.)
If you use Netscape Navigator 4.0x, you have to
use the Netscape Navigator Java software. If you
use Microsoft Internet Explorer, however, you can
choose to use either Apple’s or Microsoft’s much
faster Java software. (Make your selection in the
Preferences dialog box. Click the Java pane, then
select either Microsoft Virtual Machine or Apple
MRJ. Be sure to turn on the just-in-time (JIT)
compiler option, a technical scheme that makes
Java programs run faster.)
Actually, that advice may not even be current as
you read this; Apple and Microsoft announced in
early 1998 that they’re working on merging their
Java “virtual machine” efforts.
The inevitable Java sidebar
4040-8/5 ch25.F 11/3/98 3:31 PM Page 947
948 Part IV: The World Online
■ ■
MACWORLD MAC SECRETS • 4040-8/5 • ch25.F • Chapter 25 • FINAL • VB • 10/28/98 • p.948
MACWORLD MAC SECRETS • 4040-8/5 • ch25.1 • Chapter 25 • Proof 1 • SH • 09/25/98 • p.948
Make the World Wide Web wider
The point of the Web is that it’s a
visual
experience. It blows our minds, therefore,
that Netscape and Microsoft seem hell-bent on
eating up
our screen real estate
with toolbars, directory buttons, a status line, scroll bars, and so on.
If you want to fill your browser window with as much of a Web page — and as
little of your browser software — as possible, use your browser’s View menu to
turn off all those ridiculous toolbars and strips.
You can even hide the box where you type in new URLs. You can still enter new
URL addresses even when the location bar is hidden; just press Ô-L to open the
URL window, type the address you want (or just a part of it, as explained in the
previous Secret), and hit Return.
In Explorer, consider dragging your various toolbars
on top
of each other, as
shown in Figure 25-7; you can always drag the little “grip-strip” dividers
horizontally when you need to see more or less of one of these toolbars.
In Netscape Navigator (but not, alas, Version 4.0 or Communicator), a series of
ingenious Control-Option keystrokes let you go even farther. As readers Greg
Brume and Alberta Draves point out, you can make Navigator fill your monitor
completely,
even obliterating scroll bars, menu bars, and the window edges. To
make this work, hold down Control-Option along with one of these letters:
A
— Fill the screen completely, resulting in an expansive, unobstructed view of
the Web
H
— Hide all scroll bars
J
— Bring back scroll bars
K
(or Page Up) — Show only the vertical scroll bar
L
(or Page Down) — Show only the horizontal scroll bar
W
— Go to the White House
M
— Go to the Fish Cam
If all of that seems a bit extreme, then at least consider compressing
Navigator’s gigantic icon pictures. To do so, choose Options ➪General
Preferences ➪Appearance tab ➪Text.
Scrolling without scrolling
Whether your scroll bars are hidden or not (see the previous secret), you can still
scroll without using your mouse. As free book winner James Muspratt discovered,
you can press the Space bar to scroll down the current Web page in both Navigator
and Explorer. (This works only when your cursor isn’t in a text field, such as the
address strip at the top of the screen — after all,
then
pressing the Space bar
makes a space!)
Contest
Winner
Strange
But True
4040-8/5 ch25.F 11/3/98 3:31 PM Page 948

He further notes that in Microsoft Internet Explorer, you can press Option-Space
to scroll back
up
the screen. We hasten to add that in Netscape Navigator, you
can also press Ô-up or Ô-down arrow to scroll the page.
The RAM-disk acceleration trick
In Chapter 9, you can read about the exhilarating joy of running programs from a
RAM Disk, a scheme that treats a portion of your Mac’s available RAM as a
virtual hard disk — a ver y, very fast vir tual hard disk. Few applications benefit so
dramatically from a RAM disk as Web browsers.
No, the RAM disk won’t speed up your modem or improve the quality of your phone
connections. But it will accelerate your browser’s ability to process the incoming
data, scroll through pages once they’ve been transmitted, and display graphics.
The idea here is to train your browser to store its Cache Files — the hundreds of
scraps of text and graphics that make up a Web page — on a RAM disk. Once
it’s finished downloading these components, the browser doesn’t have to read
the hard drive for them in order to compose the finished page; it grabs them
from
RAM,
where they’re instantly accessible.
First, create a RAM disk. You can use the Mac’s built-in Memory control panel
for this function, or ShrinkWrap (included on the CD-ROM with this book), or any
of the other methods described in Chapter 9; you’ll need a RAM disk of
between, say, one and five megabytes.
Now all you have to do is train your browser to deposit its cache files onto the
RAM disk:
Navigator 3 and earlier:
Choose Options ➪Network Preferences ➪Browse ➪
Desktop.
Communicator/Navigator 4:
Choose Edit ➪Preferences ➪Advanced ➪Cache ➪
Choose ➪Desktop.
Internet Explorer:
Choose Edit ➪Preferences ➪Advanced ➪Change Location ➪
Desktop.
No matter which browser you’re using, you now wind up looking at the contents
of your desktop. Click the RAM disk and select it as the new location for your
cache files.
Now start browsing. You’ll be absolutely thrilled with the speed increase.
The no-graphics, no-advertisements speed tip
We’re quietly astounded at the number of Mac fans we meet who aren’t aware
that they can
quadruple
the speed of their Web surfing activities — by turning off
graphics. Yes, we realize that graphics are what make the Web look so
compelling. But we also know that graphics are 90 percent of what takes Web
pages so darned long to arrive on our screens! You owe it to yourself to try, just
for a session or two, turning graphics
off
.
Chapter 25: The Web, the Net, and Everything Online 949
■ ■
MACWORLD MAC SECRETS • 4040-8/5 • ch25.F • Chapter 25 • FINAL • VB • 10/28/98 • p.949
MACWORLD MAC SECRETS • 4040-8/5 • ch25.1 • Chapter 25 • Proof 1 • SH • 09/25/98 • p.949
4040-8/5 ch25.F 11/3/98 3:31 PM Page 949
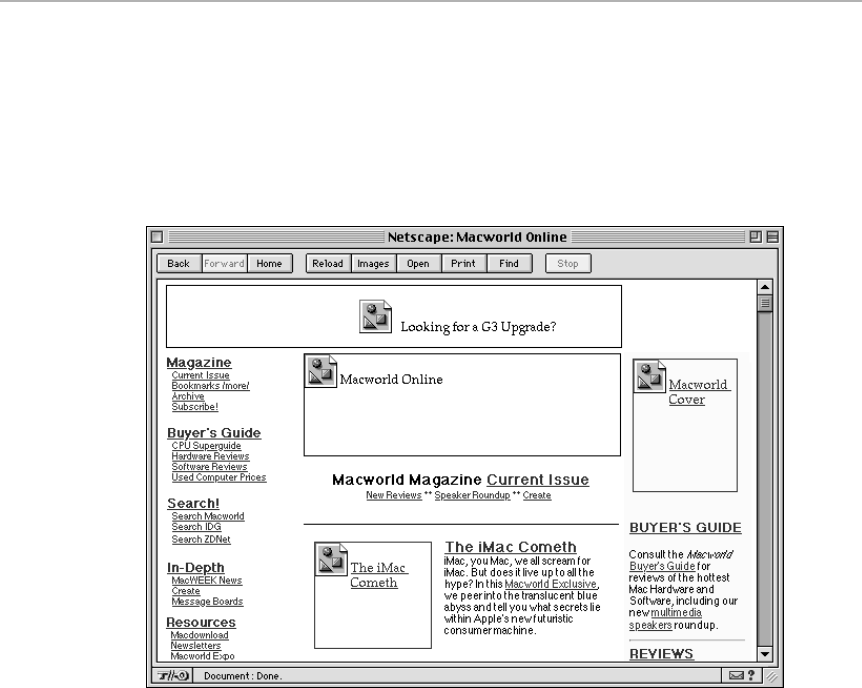
You still get fully laid-out Web pages; you still see all the text and headlines, in
their correct fonts and styles. But wherever a graphic would normally be —
wherever you would have had to wait for eight seconds — you’ll see an empty
rectangle containing a generic “graphic goes here” logo, as shown in Figure
25-10. If the Web-page designer has done a decent job, you’ll even see text
(inside the box) that identifies the graphic that would have been there. (Note to
the HTML-savvy: You use an ALT tag to create this graphics caption.)
Figure 25-10: The Macworld Web page without graphics — and ads. It loaded in one
second. Now, this isn’t so bad, is it?
If you like the sound of this arrangement, here’s how to make it so:
Netscape Navigator 3:
Choose Options ➪Auto Load Images, so that it’s no
longer checked.
Netscape Communicator/Navigator 4:
Choose Edit ➪Preferences ➪Advanced ➪
Automatically Load Images.
Internet Explorer:
Choose Edit ➪Preferences ➪Web Content ➪Show Pictures.
The speed you gain is incredible. If you ever
do
want to see a graphic that’s
missing, just hold the mouse down in the empty rectangle and choose Load This
Image (or Load Missing Image) from the pop-up menu that appears. (You can
also load all the images for the page you’re on by choosing Load Images or View
Images from your browser’s View menu.)
950 Part IV: The World Online
■ ■
MACWORLD MAC SECRETS • 4040-8/5 • ch25.F • Chapter 25 • FINAL • VB • 10/28/98 • p.950
MACWORLD MAC SECRETS • 4040-8/5 • ch25.1 • Chapter 25 • Proof 1 • SH • 09/25/98 • p.950
4040-8/5 ch25.F 11/3/98 3:31 PM Page 950

Chapter 25: The Web, the Net, and Everything Online 951
■ ■
MACWORLD MAC SECRETS • 4040-8/5 • ch25.F • Chapter 25 • FINAL • VB • 10/28/98 • p.951
MACWORLD MAC SECRETS • 4040-8/5 • ch25.1 • Chapter 25 • Proof 1 • SH • 09/25/98 • p.951
Set your own home page
When you first launch your browser, it’s configured to transport you — where
else? — to your browser company’s (or your ISP’s) home page, where you can
purchase all manner of products, accessories, and action figures.
If you’re tired of starting every one of your online sessions with a visit to the
Netscape or Microsoft site, you can change your startup page to any other site
you want.
Netscape Navigator:
Choose Options ➪General Preferences ➪Startup.
Netscape Communicator:
Choose Edit ➪Preferences ➪Navigator. Type your
preferred home-page address into the blank.
Internet Explorer:
Choose Edit ➪Preferences ➪Home/Search.
In all cases, you should now see the Home Page Location field. Replace the
address there with the URL of your choice (see Figure 25-11).
And what would make a better home page? Consider using www.macintouch.
com, a daily summary of developments in the Mac universe; www.apple.com,
Apple’s Web site; www.macsurfer.com, a daily list of headlines about the Mac
industry from around the world; your favorite newspaper’s site; a search page
like www.yahoo.com; or, of course, your own Web page.
ANSWER MAN
Q: I don’t believe it! I spent all this money on a
56K modem, but when I try to download
something from the Web, Netscape Navigator
tells me I’m downloading at 4K per second, tops!
Where did the remaining 52K per second of
speed go?
A: Well, you obviously haven’t read our masterful
expose of the 56K-modem myth in Chapter 24.
There you’ll learn that no 56K modem gets much
higher than, say, 43K per second; static on the
line, the modem on the other end, and other
factors further reduce that throughput.
Q: 43K per second? I’d give my right eyeball for
43K per second! But I’m not getting anything
close to that — I’m telling you, Netscape says
I’m getting 3 or 4K, not even in the double digits!
A: Would you let us finish?
It turns out that Netscape’s little download
window is telling you how many kilobytes (K)
per second you’re getting. K are what you’re
used to — they’re what you measure files with
in the Finder, they’re how you measure a floppy
disk, and so on.
It’s the modem measurement that’s goofy. In the
case of your modem, the K doesn’t stand for
kilobytes — it stands for kilobits per second.
Because there are eight bits in a byte, your 56K
modem is actually only a 7K modem if you’re
measuring in the familiar kilobytes.
So a download rate of 4K per second is about
right. If you’re lucky.
Such slow downloading!
4040-8/5 ch25.F 11/3/98 3:31 PM Page 951
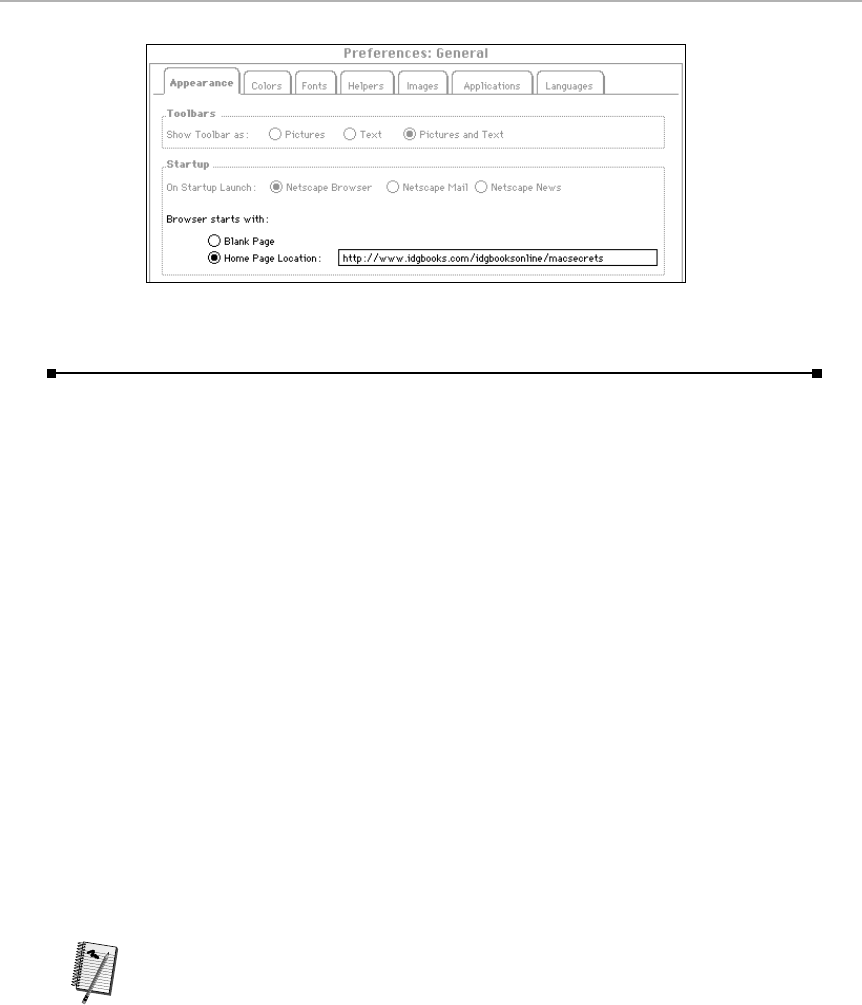
Figure 25-11: Start surfing on the Web page of your choice. Just type in the URL you want in
the Home Page Location field.
Turn your bookmarks into your home page
Here’s a great variation on the previous secret: Set your Home Page Location
to your own bookmarks list.
Start by opening the little-known bookmarks Web page that lies deep within
your hard drive:
Netscape Navigator: Use File ➪Open File. Open your hard drive ➪System
folder ➪Preferences ➪Netscape ➪the file called Bookmarks.html.
Netscape Communicator: Use File➪Open ➪Page in Navigator. Open your hard
drive ➪System folder ➪Preferences ➪Netscape Users➪(Your Name) ➪the
file called Bookmarks.html.
Internet Explorer: Use File ➪Open File. Open your hard drive ➪System
folder ➪Preferences ➪Explorer ➪the file called Favorites.htm.
When the file opens, you’ll see its location listed in the URL address strip at
the top of the window. Copy the text in that box, and paste it into the Home
Page Address field (as described in the previous Secrets).
From now on, when you launch your browser, the first thing you’ll see is a
page containing your own bookmarks. Clicking on any of the bookmarks will
take you directly to that site.
Knowing about the secret bookmark Web page can lead to all kinds of juicy
possibilities. For example, you could upload that bookmarks document to
your own Web site (see Chapter 28) — and thereby have your favorite
bookmarks available on the Web, accessible to you no matter where you go or
what computer you use to get online.
Worth
Learning
952 Part IV: The World Online
■ ■
MACWORLD MAC SECRETS • 4040-8/5 • ch25.F • Chapter 25 • FINAL • VB • 10/28/98 • p.952
MACWORLD MAC SECRETS • 4040-8/5 • ch25.1 • Chapter 25 • Proof 1 • SH • 09/25/98 • p.952
4040-8/5 ch25.F 11/3/98 3:31 PM Page 952

Launch your browser without dialing
You’re probably used to launching your Web browser and immediately
hearing the modem dial. Both Netscape and Internet Explorer assume that if
you’re launching the browser, you intend to go online.
But that isn’t always what you have in mind. Maybe you want to re-open a
Web page you’ve saved onto your hard drive. Maybe you want to see how
your Web page looks — the one you’ve designed but haven’t yet uploaded to
the Web. Maybe you’re writing a chapter about Web browsers and want to
test out some tip or trick without actually dialing.
If you use a page of bookmarks as your startup page, as described in the
previous secret, you’re already enjoying this delightful situation. If not:
Netscape Navigator: Choose Options ➪General Preferences➪Appearance ➪
Blank Page.
Netscape Communicator: Choose Edit ➪Preferences ➪Navigator ➪Blank Page.
Internet Explorer: Choose Edit ➪Preferences ➪Home/Search ➪Use None.
That’s all there is to it. You can now safely launch your browser without
actually connecting to the Internet — until you type in a URL and press
Return (or choose one of your bookmarks).
(If you want to launch your browser only occasionally without going online,
drag a saved Web page or HTML document onto its icon, instead of making
the semi-permanent changes listed above.)
Bookmark secrets
If you keep adding Web sites to your Bookmarks or Favorites, you’ll
eventually end up with one huge, unwieldy menu. Fortunately, both Netscape
and Microsoft have made it easy to rearrange this menu.
Netscape Navigator 3: Choose Window➪Bookmarks.
Netscape Communicator/Navigator 4: Choose Bookmarks from the weird little
menu-bar icon (that’s two menus to the right of the Go menu).
Internet Explorer: Choose Favorites ➪Open Favorites.
The window that now opens looks a lot like a Finder window, with all your
bookmarks displayed in a list view. Here are some of the things you can do to
impose order on a chaotic list:
■Create folders in your Bookmarks window (using the New Folder
command — its location varies by browser) to sort your bookmarks into
logical groups. Give each folder a name reflecting a particular category —
Search Engines, Research, Concerts, and so on — then drag the
appropriate bookmarks into these folders. When you’re finished, your
Bookmarks menu will be transformed into a nicely-organized hierarchical
menu (see Figure 25-12).
Chapter 25: The Web, the Net, and Everything Online 953
■ ■
MACWORLD MAC SECRETS • 4040-8/5 • ch25.F • Chapter 25 • FINAL • VB • 10/28/98 • p.953
MACWORLD MAC SECRETS • 4040-8/5 • ch25.1 • Chapter 25 • Proof 1 • SH • 09/25/98 • p.953
4040-8/5 ch25.F 11/3/98 3:31 PM Page 953
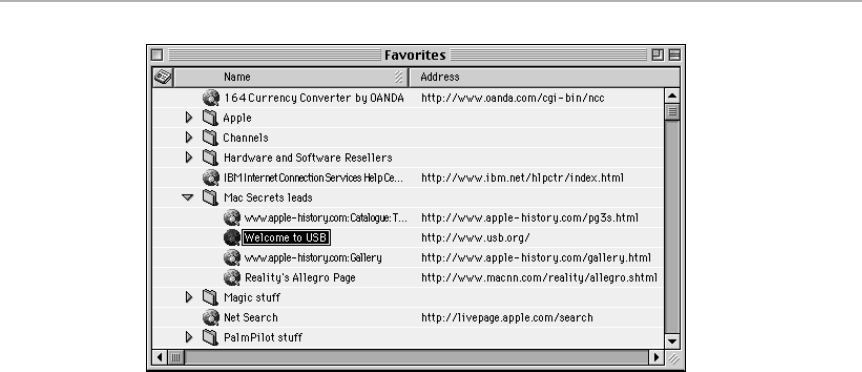
954 Part IV: The World Online
■ ■
MACWORLD MAC SECRETS • 4040-8/5 • ch25.F • Chapter 25 • FINAL • VB • 10/28/98 • p.954
MACWORLD MAC SECRETS • 4040-8/5 • ch25.1 • Chapter 25 • Proof 1 • SH • 09/25/98 • p.954
Figure 25-12: Adding folders to the Bookmarks window makes for a more organized,
hierarchical Bookmarks menu.
■Use the Insert Separator or New Divider command to add separator lines
to your Bookmarks menu. To add a separator, first click on the item in
the Bookmarks window just above where you want the separator line to
appear, then choose the command.
■Drag bookmarks, folders, and separators in the Bookmarks window to
arrange them in any order you want.
■Press Ô-X or Ô-Delete to delete a selected bookmark, folder, or separator.
■Netscape only: Click a folder in the Bookmarks window, then choose Set
to Bookmarks (or Set as Bookmarks Menu Folder) from the Items or View
menu (depending on your version of the program). Now, your Bookmarks
menu will contain only the bookmarks contained in that one folder. If you
have dozens of bookmarks stored, this is a perfect way to temporarily
filter out bookmarks you know you aren’t going to need during a given
online session. To restore your complete Bookmarks menu, click on the
top Bookmarks folder, then choose the Set to Bookmarks Menu command
again.
The cheapskate’s bookmark manager:
the Finder
If you get serious about bookmark editing, all kinds of desktop-based Web-
address managers are available, from commercial programs to shareware.
Remember, though, that the world’s least expensive bookmark manager
awaits: your own desktop. You can drag a bookmark or favorite out of the
Bookmarks or Favorites window directly onto your desktop, where it turns
into an icon. In fact, you can even drag a highlighted URL out of the address
4040-8/5 ch25.F 11/3/98 3:31 PM Page 954
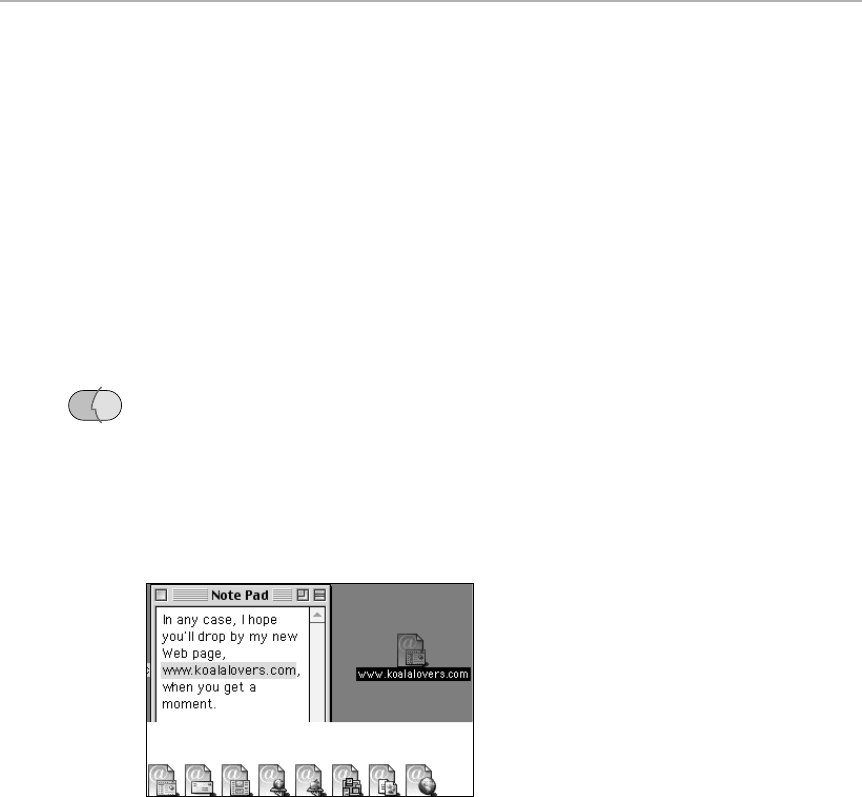
Chapter 25: The Web, the Net, and Everything Online 955
■ ■
MACWORLD MAC SECRETS • 4040-8/5 • ch25.F • Chapter 25 • FINAL • VB • 10/28/98 • p.955
MACWORLD MAC SECRETS • 4040-8/5 • ch25.1 • Chapter 25 • Proof 1 • SH • 09/25/98 • p.955
strip at the top of the window — not necessarily a bookmark — to the
desktop, too. (Reader Mark Cannata drags them, in fact, directly into his
Stickies desk accessory: the ultimate low-rent URL manager. And how does he
launch them from Stickies? Simple: He’s installed the extension called
IceTe — part of the Internet Config freeware suite—which launches your
favorite browser whenever you Ô-click a URL in any program that respects
Apple’s text-processing guidelines.)
Dragged-to-the-desktop icons can be filed into folders, inserted into your Ú
menu, launched with QuicKeys, and so on. From now on, leaping directly to a
certain Web site is only a mouse click away, no matter what program you’re
using.
The Mac-wide bookmark manager: Mac OS 8.5
In Mac OS 8.5, you can go the previous secret one better. That trick involves
dragging Bookmarks or Favorites out of your browser to the desktop.
But in Mac OS 8.5 and later, you can highlight a Web address (or any other
kind of Internet address) in any program that supports drag-and-drop editing
(see Chapter 1). Drag the highlighted text to the desktop, and you create an
Internet Location Document, which you can thereafter double-click to revisit
the address it lists. Figure 25-13 should make this clear.
Figure 25-13: Drag a highlighted Internet address out of any drag-and-drop program (top) to the
desktop to create an Internet Location Document. The various kinds of documents you may
create are shown at bottom: from left, Web pages, e-mail addresses, newsgroups, FTP sites,
AppleShare serves and zones, HTML files on your Mac, and miscellaneous Internet addresses.
The Mac instantly recognizes eight different kinds of Internet addresses, as
shown in Figure 25-13, and adds an icon to match. These kinds are:
■Web pages (http://www.apple.com)
■e-mail addresses (mailto:John@mail.apple.com)
■newsgroups (such as news:news.apple.com)
■FTP locations (such as ftp://ftp.apple.com)
OS
8.5
4040-8/5 ch25.F 11/3/98 3:31 PM Page 955

■AppleShare servers on your office network (such as afp://at/Software
Development:IL6 4th)
■AppleTalk zones on your office network (such as at://IL6 4th)
■actual Web files on your Mac, stored as a path name (such as
file:///Macintosh HD/Desktop Folder/Web Pages/index.html)
■nonstandard Internet addresses (such as <unknown URL type>://
why.not.com)
Double-click a Web page, and your browser launches and begins dialing that
site. Double-click an e-mail address to open a new, blank, pre-addressed
message to that person in your favorite e-mail program. And so on.
Cool, huh?
The mouse-click contextual menu
See a nice graphic you’d like to have as your very own? Find a page whose
URL you’d like to e-mail a friend?
That’s why both Netscape and Microsoft’s browsers have contextual menus —
pop-up menus that appear at your cursor tip — listing such commands as Save
Image to Disk, Open URL in New Window, Copy Link to Clipboard, and so on.
Drag-and-drop multimedia
While we’re on the topic of “basics” that surprise a lot of people: don’t forget
that you can drag pictures, QuickTime movies, and sounds directly out of
Mac Basics
956 Part IV: The World Online
■ ■
MACWORLD MAC SECRETS • 4040-8/5 • ch25.F • Chapter 25 • FINAL • VB • 10/28/98 • p.956
MACWORLD MAC SECRETS • 4040-8/5 • ch25.1 • Chapter 25 • Proof 1 • SH • 09/25/98 • p.956
ANSWER MAN
Q: Hey! I e-mailed you with a cool Netscape
secret, and I didn’t win anything!
A: You and everybody else, pal. These are,
apparently, the most popular secrets in Mac land.
Still, if you’ve got a lot of time to kill, here’s
what you do: Click in the URL strip at the top of
the window. Instead of the usual http://www.
stuff, simply type about: and then one of the
following words:
Mozilla, nothing, anything, news, plugins,
authors, javalogo, rsalogo, logo, ari, atotic,
blythe, chouck, dmose, dp, ebina, hagan, jeff, jg,
jsw, jwz, karlton, kipp, marca, mlm, montulli,
mtoy, paquin, robm, sharoni, terry, timm. (The
last bunch are the programmers’ home pages.)
A few of these little surprises stopped working
when Navigator was upgraded to Communicator.
Still, there’s enough still working to make you
realize you’ve stumbled onto a veritable Easter
egg factory.
Netscape’s famous About: URL
4040-8/5 ch25.F 11/3/98 3:32 PM Page 956

your Internet Explorer or Netscape browser window onto the desktop, where
that multimedia scrap now appears as an icon. Cool! (Even cooler: In a
Netscape browser, add the Option key as you drag a picture, and it turns into
a picture clipping file on the desktop instead of a GIF or JPEG.)
Reader Greg Brume’s interesting observation about this trick: if you drag a
link from a Web page to your desktop, you don’t get a little clipping file of that
URL — instead, you get the entire text of the Web page to which that link leads!
Internet Explorer Secrets
■
Internet Explorer 4 keystroke power
One of Explorer’s juiciest features is its auto-completion of URLs. If you start
typing a Web address that the program recognizes (because you’ve visited it
before), it fills in the rest of the address automatically. If it guesses right, just
press Return, and you’re done. If it guesses wrong, either keep right on typing —
or press Control-up arrow or -down arrow, which cycle through the other URLs the
program knows about that begin with the letters you’ve typed so far.
The Control key is also handy in editing your URL. In conjunction with the right-
and left-arrow keys, the Control key lets your cursor leap from chunk to chunk of
the address you’re typing. Even if the address strip is completely blank,
pressing Control-right arrow fills in http://www for you.
Ingenious searches in Internet Explorer 4
Internet Explorer Version 4 offers some highly snazzy search shortcuts. For
example, without even having to go to Yahoo or InfoSeek, just type
go
or a
question mark into the usual address strip at the top of the window, followed by
what you want to search for — and then press Return. For example, you could
type
go Electric Light Orchestra
to do a search for “Electric Light Orchestra,”
even without going to a search page!
Equally cool: Click the Search tab at the left end of the window. Type in what
you’re looking for; the results appear in the left-hand pane of the browser, as
shown in Figure 25-14.
But
that
part everybody knows. The best part is when you point to each of the
“hits.” As shown in Figure 25-14, a pop-up balloon shows you the first couple of
paragraphs of each found Web page — instantly, without your even having to go
to that page, wait for it to download, and so on. There’s no better way to weed
through a search engine’s list of found Web pages.
Strange
But True
Chapter 25: The Web, the Net, and Everything Online 957
■ ■
MACWORLD MAC SECRETS • 4040-8/5 • ch25.F • Chapter 25 • FINAL • VB • 10/28/98 • p.957
MACWORLD MAC SECRETS • 4040-8/5 • ch25.1 • Chapter 25 • Proof 1 • SH • 09/25/98 • p.957
4040-8/5 ch25.F 11/3/98 3:32 PM Page 957
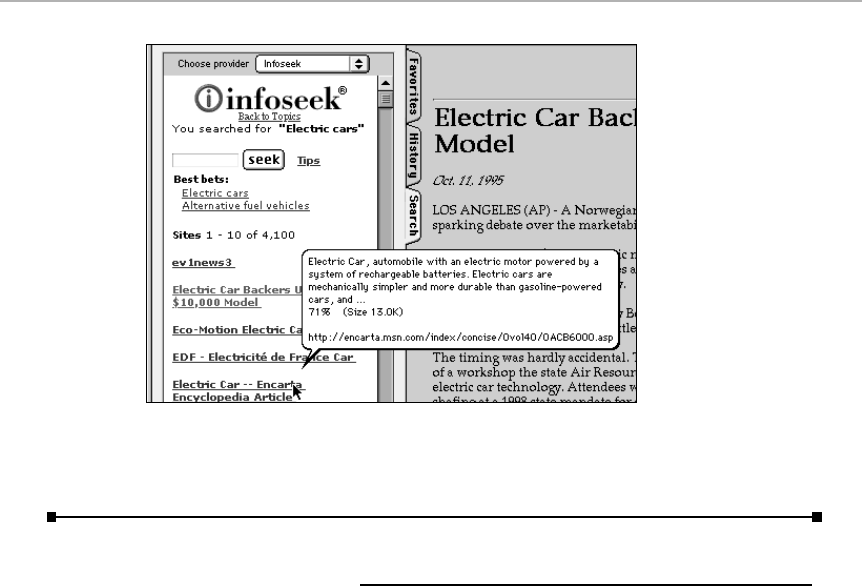
Figure 25-14: In Internet Explorer 4, just point to each search result. The balloon letsyou peer
into the future, showing what would be on that page if you were to actually click its name.
Netscape Secrets
■
Quick search in Communicator
As reader John Malm points out, it isn’t only Internet Explorer that’s got a cool
quick-Web-search mechanism. In Netscape Communicator/Navigator 4, if you
type a multi-word phrase into the “Location:” strip at the top of the browser
window and press Return, you’ll be taken directly to a page of search engines —
with your phrase already filled in as the search phrase. Try it with, say,
Apple
Computer or cookie monster dolls.
Stifle the animations
As we’ve noted earlier in this chapter, one of Internet Explorer’s most attractive
features is its preference option that lets you suppress animations on Web
pages (or allows them to loop only once). If you find those annoying ads as
wildly distracting as we do, that feature’s worth quite a bit.
Few people realize that Netscape Navigator, too, can squelch those animations.
Just press Ô-period. (For best results, wait until the text you want has already
loaded — otherwise, you’ll cut short the entire Web-page-loading process.)
958 Part IV: The World Online
■ ■
MACWORLD MAC SECRETS • 4040-8/5 • ch25.F • Chapter 25 • FINAL • VB • 10/28/98 • p.958
MACWORLD MAC SECRETS • 4040-8/5 • ch25.1 • Chapter 25 • Proof 1 • SH • 09/25/98 • p.958
4040-8/5 ch25.F 11/3/98 3:32 PM Page 958

Chapter 25: The Web, the Net, and Everything Online 959
■ ■
MACWORLD MAC SECRETS • 4040-8/5 • ch25.F • Chapter 25 • FINAL • VB • 10/28/98 • p.959
MACWORLD MAC SECRETS • 4040-8/5 • ch25.1 • Chapter 25 • Proof 1 • SH • 09/25/98 • p.959
Back to the previous site
Short but very sweet: If you
Option-
click the Back button, Navigator takes you
back to the previous Web
site,
not page, you visited.
Get Info comments that are actually useful
Almost nobody we know really types comments in a file’s Get Info box — the
window that appears when you select a file in the Finder and choose Get Info
from the File menu. In fact, we’ve always thought of the old Comments field in
the Get Info window as somewhat useless.
Navigator, however, does something meaningful with the Get Info box, as
reader Russ Stotyn discovered. Whenever you save a Web page as text, using
Navigator’s Save As command, the program automatically types the page’s URL
into the Get Info comments box of the saved file. If you later forget where on the
Web you found your saved file, a quick look at the Get Info box will tell you. (And,
of course, with System 7.5.3 and later, those comments are preserved, even
when you rebuild your Desktop.)
Where to Go on the Web
All right: you’re on the Web. Now what? Where do you find good Web URLs?
From friends, from articles, on television, and so on. Look for “http” at the
beginning of the URL — a guaranteed sign that the address points to a Web
page. (Most Web URLs’ domain name includes www, but not all of them.)
Here are a few to get you started.
Ways to search for a particular page
Each of these Web pages offers a vast searchable index of other Web pages —
not every Web page in existence, but a darned impressive percentage of
them. (We’ll leave off the http:// prefix from each of these, because you don’t
have to type it anyway into any Netscape or Microsoft browser.)
■www.yahoo.com —Yahoo! has been accepting submissions from Internet
sites since the beginning of it all. There’s an editorial filter at work here
— not every college student’s home page makes it into the directory.
■www.infoseek.com —The layout of the found items at Infoseek is cleaner
than Yahoo, and you get to see the first paragraph or so of each found
Web page’s text.
■www.hotbot.com — One magazine study showed that this search page comes
up with the fewest redundant and irrelevant “hits” when you search.
Worth
Learning
4040-8/5 ch25.F 11/3/98 3:32 PM Page 959

960 Part IV: The World Online
■ ■
MACWORLD MAC SECRETS • 4040-8/5 • ch25.F • Chapter 25 • FINAL • VB • 10/28/98 • p.960
MACWORLD MAC SECRETS • 4040-8/5 • ch25.1 • Chapter 25 • Proof 1 • SH • 09/25/98 • p.960
ANSWER MAN
Q: I’m worried about my privacy! What about
cookies? What about the Global Cache file that
tracks everywhere I’ve been on the Net? What
about my credit-card numbers?
A: If you ask us, you’re paranoid.
It’s true that some Web sites, especially those
for which you customize or create a password,
leave a preference file on your hard drive called
a cookie. However, no other Web site can
access that cookie — only the original site you
visited. Frankly, we’re not quite sure why that’s
anything to worry about, especially because
every modern Web browser alerts you shrilly
before a cookie is stored on your Mac, giving
you the chance to decline (f you’ve set your
Preferences up that way). Of course, that means
you decline the chance to use that Web site’s
customization options, too.
It’s true, too, that Netscape Navigator stores a
trail of URLs, documenting the most recent Web
sites you’ve visited, in a file on your hard drive.
(Using a program like CanOpener or Microsoft
Word’s all files opening feature, open your hard
drive ➪System folder ➪Preferences ➪Netscape
➪Global history. There it is.) This file is where
Netscape records which links you’ve clicked, so
that it can display them on your screen in the
correct “you’ve already been here” color instead
of the “you’ve never clicked here” blue.
Again, our question is: so what? Are you
worried that your spouse is going to stumble
onto this file and find out what you’ve been
doing on the Net? In that case, if you’ll excuse
us, you’ve got more urgent issues to work out
than an extra preference file on your hard drive.
As for credit cards — again, forget it. You’re 100
times more likely to get ripped off by giving your
credit-card number over the phone (to mail-
order companies) or throwing away your
carbons (at gas stations) than you are of having
your credit-card number being intercepted
online. And even so, your credit card company,
not you, pays for any fraud.
The bottom line: Relax and surf!
Privacy and paranoia
■altavista.digital.com/ —Alta Vista offers compact or detailed
searches through what the company claims is the largest Web index — it
knows about 8 billion words filling 16 million pages. It also provides a full-
text index of more than 13,000 newsgroups.
■www.excite.com/ — This is the Excite database, which contains more
than 1.5 million Web documents, covering 40,000-plus Web sites.
■www.lycos.com/ — This is the Lycos Web searcher, which features a
database with millions of link descriptors and documents; updated daily.
The index searches document title, headings, links, and keywords it
locates in these documents.
For a list of fun Web sites to visit, check out Chapter 27 of the electronic
edition of Macworld Mac Secrets, 4th Edition (on the CD-ROM that came with
this book). Also check out the Mac Secrets Ultimate Bookmark List, provided
on the CD with this book in both Netscape Navigator and Microsoft Internet
Explorer formats.
4040-8/5 ch25.F 11/3/98 3:32 PM Page 960

MACWORLD MAC SECRETS • 4040-8/5 • ch26.F • Chapter 26 • FINAL • VB/EAP • 10/28/98 • p.961
MACWORLD MAC SECRETS • 4040-8/5 • ch26.1 • Chapter 26 • Proof 1 • SH • 09/25/98 • p.961
Chapter 26
Getting the Most
Out of America Online
In This Chapter
©Dodging the AOL busy signal
©Mastering keywords and Favorite Places
©Covering your cyber-tracks
©The undocumented underbelly of AOL: secret keywords
So you use America Online, eh? Well, you and 11,999,999 other members
can’t be wrong. Power users sneer, but like it or not, AOL is now the
biggest Internet access provider in the world. To the horror of TCP/IP nerds
everywhere, AOL’s members represent 40 percent of Americans on the World
Wide Web, and its membership continues to grow.
Of course, this online population explosion is not without its drawbacks: in
many cities, AOL can’t add local access numbers fast enough to keep up
with the demand for service. Busy signals and bump-offs are an everyday
occurrence for most AOLaholics. Furthermore, in any group of 12 million
people, you’re going to find a few bad apples; savvy users nowadays have to
watch out for viruses, password-grabbing scams, and annoying jerks in chat
rooms. And let’s not forget spam, the endless avalanche of junk e-mail that
spews from Internet accounts into your AOL mailbox.
Well, you’re saying to yourself. Now that you mention it, AOL is a living hell,
isn’t it? Actually, AOL became as popular as it is for some solid reasons.
It’s much easier to configure than a genuine ISP account (see Chapter 25),
offering e-mail, Web, FTP, newsgroups, and many other Internet features in
a single consistent program. It lets you pick up an aborted download from
where you left off (let’s see you implement that, Netscape!). For worried
parents, AOL offers far more control over what kids see than the Internet
itself does.
This chapter will help make your AOL experience more pleasant. Whatever
its faults, we can say one thing for sure about America Online: it’s a seething
4040-8/5 ch26.F 11/3/98 3:29 PM Page 961

rat’s nest of secrets. (Except where marked, the secrets in this chapter apply
to both AOL 3.0 and 4.0.)
Mastering the Basics
When it comes to figuring out how to work the thing, America Online isn’t
what you’d call rocket science. Still, our AOL secrets presume that you’re
familiar with a couple of essential AOL features at the very least: keywords
and Favorite Places (known to the rest of the Internet world as bookmarks).
Making it past the busy signal
Let’s face it: trying to sign on to AOL can be frustrating. Listening to your
modem dial your local access number, only to get a busy signal over and
over, can make you pig-biting mad. Our best advice:
■Keep trying. Lame but effective, this one. At the Sign On window, click
Setup. Click the arrow next to “Try _ time(s)” to have AOL dial each
access number up to five times before giving up.
■Try another access number. Even if both of the local access numbers
you’ve chosen are busy, there may be another access number in your
area that’s less busy. To see a list of access numbers (if you can get
online), go to keyword: access and follow the instructions there.
And if you can’t get online at all through your regular numbers, choose
Select Screen Name ➪New Local # at the Sign On window. AOL dials a
toll-free number and displays a list of access numbers for your area
code — a list that may well include newly added numbers you don’t
know about.
If you can’t find a non-busy access number in your area, you may have to
try a number in a nearby area code (and pay the long-distance charges)
or resort to one of AOL’s 800 numbers to sign on: 800-716-0023 or
888-245-0113. These numbers cost 10 cents a minute, but at least they’re
a way on in case of emergency. (To use an 800 number, choose Select
Location ➪800 Number at the Sign On window.)
■If you’re really desperate (and who isn’t sometimes?), sign on using a
2400 bps access number (follow the steps just described to see a list
of numbers in your area). Almost nobody uses such ridiculously slow
connection speeds these days, so those old incoming AOL lines go
virtually unused. If you absolutely have to check your e-mail for an
important letter, for example, this may be the way to go.
■If possible, sign on during non-peak hours (better known as “the middle
of the night”). If you don’t keep late hours, let AOL do the dialing for you
with an Auto AOL session (choose Mail ➪Set Up Auto AOL). With Auto
AOL, you can instruct AOL to sign on while you sleep to send outgoing
mail, collect incoming mail, download files you’ve earmarked for later
downloading, and send and collect newsgroup postings.
962 Part IV: The World Online
■ ■
MACWORLD MAC SECRETS • 4040-8/5 • ch26.F • Chapter 26 • FINAL • VB/EAP • 10/28/98 • p.962
MACWORLD MAC SECRETS • 4040-8/5 • ch26.1 • Chapter 26 • Proof 1 • SH • 09/25/98 • p.962
4040-8/5 ch26.F 11/3/98 3:29 PM Page 962

■Use Claris Emailer to fetch your America Online mail in the middle of the
night. Not only is it a much better e-mail program, but it means you’ll
never lose a piece of e-mail that “scrolls off” into the AOL old-mail ether
after two weeks — all your e-mail will be on your hard drive.)
Surf AOL via the Internet
What if we told you that for an extra $8 a month, you could use AOL without
ever hearing another busy signal?
This is the greatest AOL tip of them all: you can, if you wish, dial into
America Online through the Internet. That is, sign up for an ISP account (see
Chapter 25), such as EarthLink, MindSpring, IBM.net, or whatever. Set up
your account exactly as described in Chapter 25. Then, on the America
Online sign-on screen, choose Location ➪TCP/IP for LAN or ISP. From now
on, you’ll dial into AOL using the ISP’s access number, avoiding the ever-
unpopular AOL busy signals.
America Online, Inc. will be so delighted that you’re not using AOL’s phone
numbers that they’ll actually pay you $12 a month in gratitude! To cash in on
your new $10-per-month AOL rate (instead of the usual $22), go to keyword:
BYOA. (It stands for the Bring Your Own Access plan.) There, and at keyword:
billing, you can switch your account to the $10-a-month, I-promise-to-dial-in-
through-the-Internet payment plan.
Your total payments: $20 per month to your ISP (or whatever it charges), and
$10 to AOL. You’re now paying a total of $8 more than you did for AOL alone.
But the quality of the service can’t be beat — and now you have America
Online and a full-fledged Internet account.
You’ll also reap several bonuses:
■You can use America Online at staggering speeds, 57 Kbps or higher, if
you have a high-speed line (such as an ISDN phone line) that the Internet
can handle, but AOL can’t.
■If you live in an area where there’s no local AOL phone number, you avoid
long-distance charges — because now you’re dialing in through your ISP’s
local number. (And, of course, you carefully chose an ISP on the basis of
its having a local number, as described in Chapter 25.)
■Browsing the Web is much faster and less troublesome when you use
Internet Explorer or Netscape Navigator directly over the Internet
(instead of via AOL).
As long as you can swing that extra $8 per month, this having-your-cake-and-
eating-it-too secret is worth its weight in gold.
Elevator buttons: Keywords
Keywords are like elevator buttons that you push to be transported directly
to specific features or areas of America Online, without having to navigate
Strange
But True
Chapter 26: Getting the Most Out of America Online 963
■ ■
MACWORLD MAC SECRETS • 4040-8/5 • ch26.F • Chapter 26 • FINAL • VB/EAP • 10/28/98 • p.963
MACWORLD MAC SECRETS • 4040-8/5 • ch26.1 • Chapter 26 • Proof 1 • SH • 09/25/98 • p.963
4040-8/5 ch26.F 11/3/98 3:29 PM Page 963
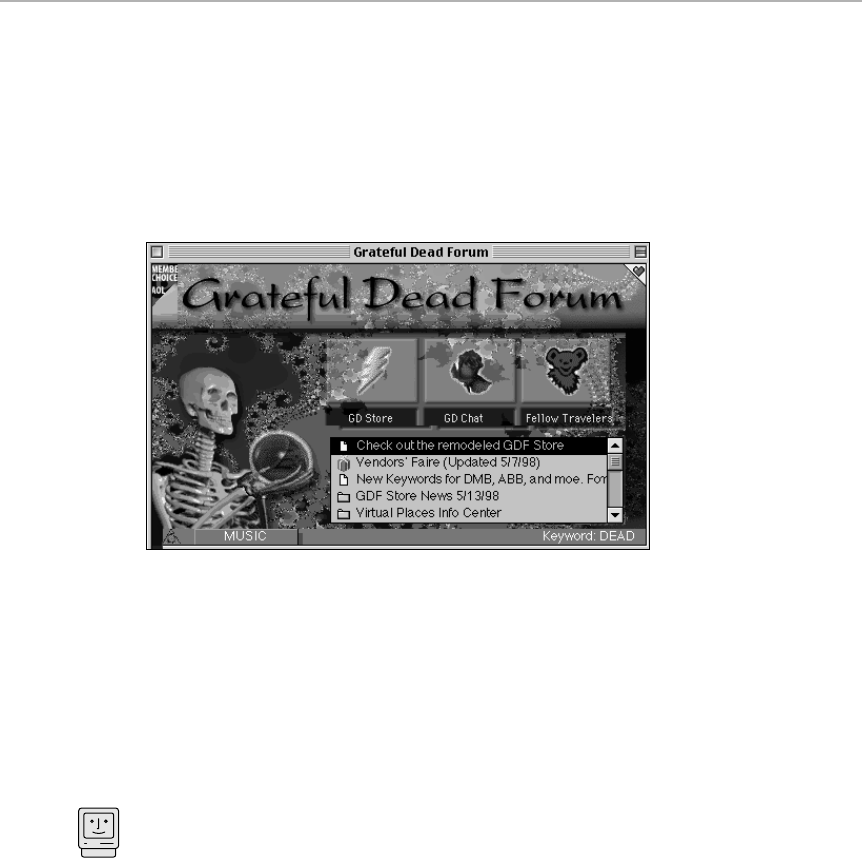
through a bunch of screens. To use a keyword, make sure the toolbar (AOL
3.0 or 4.0) is on the screen. (If it’s not, choose Window ➪Toolbar.) Click the
Keyword button. Or, if you’re a speed freak, just press Ô-K. Either way, a
dialog box appears. Type the keyword you want into the box, and press
Return. (Spaces and capitalization don’t matter.)
So how do you know what keyword takes you to a particular feature? Easy:
It’s typed at the bottom of almost every screen (see Figure 26-1).
Figure 26-1: The keyword for every America Online feature that has one appears at the
bottom. See it in the lower-right corner?
But there’s another way to get a hang of keywords: Most people aren’t
aware that there’s a list of all America Online keywords. To see it, use —
what else? — keyword: keyword.
The Favorite Places management guide
AOL’s Favorite Places feature is like the bookmarks feature of a real Web
browser. Whenever you’re viewing a Web page or AOL screen you might like
to visit again later, bookmark it by clicking the red heart at the upper-right
corner of the window. A dialog box offers you the chance to make it a
Favorite Place.
Thereafter, you can view your list of “favorite places” by choosing Go To ➪
Favorite Places (or by clicking the Favorite Places icon on the toolbar). You
can even drag-and-drop Favorite Places icons into an e-mail, where they
appear as clickable launch pads for your recipient’s enjoyment.
But there are even quicker ways to access your favorite places. For example,
you can specify a keystroke (such as Ô-2) to launch a Favorite Place. To do
so in AOL 3, choose Edit ➪Edit Go To menu; in AOL 4.0, choose the Toolbar’s
My AOL ➪Edit Shortcuts. Now the Edit Go To Menu window appears (see
Mac Basics
964 Part IV: The World Online
■ ■
MACWORLD MAC SECRETS • 4040-8/5 • ch26.F • Chapter 26 • FINAL • VB/EAP • 10/28/98 • p.964
MACWORLD MAC SECRETS • 4040-8/5 • ch26.1 • Chapter 26 • Proof 1 • SH • 09/25/98 • p.964
4040-8/5 ch26.F 11/3/98 3:29 PM Page 964

Figure 26-2); specify your name for this favorite place on the left side, and
type the keyword or Web address on the right side. From now on, you can zip
to that screen or Web page by pressing the keystroke combination listed at
the far right.
Figure 26-2: Edit your list of ten keystroke-able AOL locations, including Web pages.
Another way: Instead of clicking the red heart at the corner of a window, you
can drag it to the desktop. There it becomes a “favorite place” icon, which
you can double-click, file away in a folder, stash in your Úmenu, or
otherwise organize just as you would any finder document.
In AOL 4.0, you can even add a few Favorite Places to the Toolbar and access
them simply by clicking an icon. Start by getting rid of the three starter
Favorite Places icons at the right end of the toolbar (Quotes, Weather,
Exclusives) by Option-dragging them to the Trash can on your desktop.
Then open one of your favorite locations and drag its heart icon onto the
Toolbar. The Icon Selector window appears (Figure 26-3). Type a label (up to
9 characters — ooh, how generous!), choose an icon from the scrolling list,
and click OK. From now on, you can hop to the location by clicking the icon
on the Toolbar.
One last trick about Favorite Places: clever reader Jordan Matthiesen
discovered that your friends’ e-mail addresses can also be Favorite Places.
Choose Go To ➪Favorite Places and click New. As the Name, type your
friend’s name; as the Address, put mailto: followed by your friend’s e-mail
address. From now on, when you double-click this Favorite Place, you’ll open
a pre-addressed e-mail window to that person. There’s no time to waste!
Chapter 26: Getting the Most Out of America Online 965
■ ■
MACWORLD MAC SECRETS • 4040-8/5 • ch26.F • Chapter 26 • FINAL • VB/EAP • 10/28/98 • p.965
MACWORLD MAC SECRETS • 4040-8/5 • ch26.1 • Chapter 26 • Proof 1 • SH • 09/25/98 • p.965
4040-8/5 ch26.F 11/3/98 3:29 PM Page 965
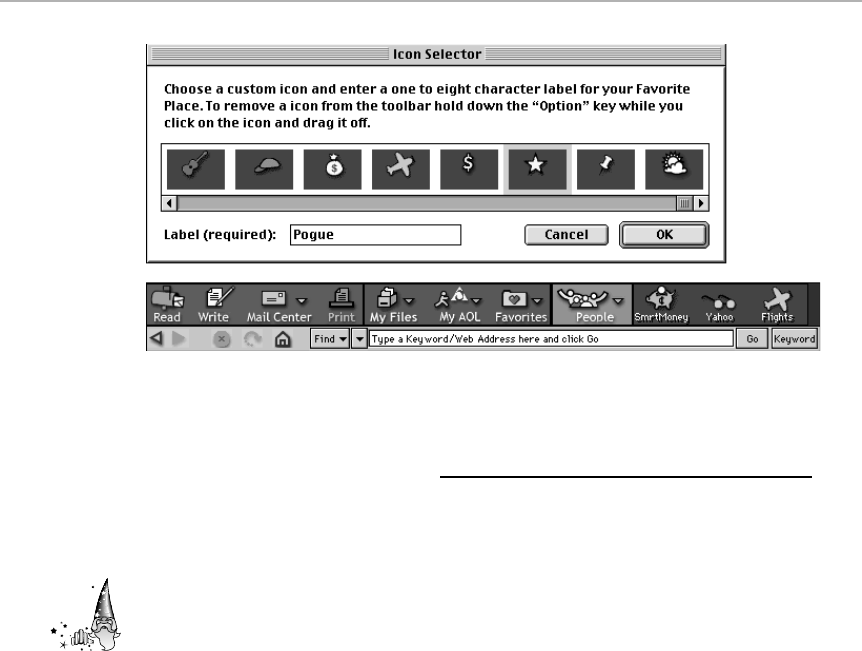
Figure 26-3: The Icon Selector window (top) lets you specify which icon you want to
represent each new Toolbar button you create (bottom).
America Online Secrets
■
Your FREE! graphics viewer and file-unstuffer
The America Online program — the contents of those disks that arrive weekly in
your mailbox — is a terrific tool for managing files you encounter online. You
don’t need to be online to perform any of the procedures in this secret —
indeed, you don’t even need to be an AOL member!
For example, this program can actually open and display every major online
graphics format — PICT, GIF, and JPEG — beautifully, which is perfect for
checking out pictures you’ve downloaded. (Just drag the graphic file’s icon onto
the AOL application’s icon. Alternatively, launch the America Online program and
use File ➪Open; then locate and open your graphics file.)
The AOL program is also terrific for compressing and decompressing StuffIt files
(when you’re caught without StuffIt Expander, of course). To unstuff something,
use the AOL File menu’s Open command; open your
.sit
file; and save the
decompressed file wherever you like.
To stuff a file, choose Compose Mail from the Mail menu. Click the Attach
button; select the file or folder you want to compress; click the Compress Files
check box; click Attach; and click Save. The result is a compressed StuffIt file
that takes much less time to send by modem.
Just say no to pop-up ads
Welcome to the Nuke Pop-Up Ads Secret. You’re about to learn a secret that
easily covers the price of this book.
Strange
But True
966 Part IV: The World Online
■ ■
MACWORLD MAC SECRETS • 4040-8/5 • ch26.F • Chapter 26 • FINAL • VB/EAP • 10/28/98 • p.966
MACWORLD MAC SECRETS • 4040-8/5 • ch26.1 • Chapter 26 • Proof 1 • SH • 09/25/98 • p.966
4040-8/5 ch26.F 11/3/98 3:29 PM Page 966

You know those pop-up ads that fill your screen every time you sign on? Of
course you do. You
hate
them. But you’ve accepted them as a part of AOL
culture; after all, you’ve read in the newspaper that AOL makes much of its
money these days from advertising. But
we know how to turn them off!
Go to keyword:
Marketing Prefs.
In the “Tell Us What Your Popup Preferences
Are” area, you’ll see the options for turning off not just the pop-up ads, but also
junk e-mail, junk postal mail, and junk phone calls. Depending on your version of
the software, you’ll probably be asked to confirm that you’re willing to sacrifice
all that wonderful promotional material — AOL doesn’t comprehend why
somebody might not want it! — but persevere.
By way of gratitude tokens, we accept flowers, new PowerBooks, and cashier’s
checks.
Shortcut to any Internet site from AOL
How would you get to a Web page from AOL 3.0? Probably you’d click the Web
button on the toolbar, wait, type the Web page’s address (URL) into the strip at
the top of the window, and press Enter.
Why bother? Just press Ô-K to make the Keyword box appear. You can now type
a complete Internet address into the Keyword blank — be it Web page, FTP site,
whatever — and press Return; you’re teleported directly to that Internet site!
Don’t sign off if you can help it (AOL 4.0)
Once you’ve made it past the busy signals onto AOL, you probably won’t want
to sign off and sign on again if you can help it. But what if you want to check a
different one of your five e-mail accounts?
Fortunately, AOL 4.0 lets you switch screen names without signing off. Choose
Sign Off ➪Switch Screen Names, and then choose the next screen name you want.
Keeping your secrets safe
There you are, late at night, surfing the Web with AOL’s built-in browser. You stop
by the Fetishes On Parade Web site, then call it a night. You sign off, confident
that your spouse will never find out about your online adventures. Silly you!
If you’ve stored your password, your spouse — or anyone else with access to
your computer — can sign on to your AOL account and find where you’ve been.
(Why store your password? So that you don’t have to retype it every time you
sign on. You do so by choosing Members ➪Preferences ➪Passwords.
If
you
don’t have snoopy family members, that is.)
The savvy spouse will first take a stroll down the History Trail, which is hidden in
AOL 4.0 behind the unassuming little unlabeled arrow to the right of the Toolbar’s
Find button (see Figure 26-4). When you click this arrow, a list of the last 25
places you’ve been — AOL areas or Web sites — appears, even if you’ve quit AOL.
Simply select an item from the list and you’re whisked to that site. The jig is up!
Worth
Learning
Chapter 26: Getting the Most Out of America Online 967
■ ■
MACWORLD MAC SECRETS • 4040-8/5 • ch26.F • Chapter 26 • FINAL • VB/EAP • 10/28/98 • p.967
MACWORLD MAC SECRETS • 4040-8/5 • ch26.1 • Chapter 26 • Proof 1 • SH • 09/25/98 • p.967
4040-8/5 ch26.F 11/3/98 3:29 PM Page 967

Figure 26-4: The History Trail shows the last 25 places you’ve been, including Web sites.
If you want to cover your tracks, you can delete the History Trail.
To delete the telltale History Trail, choose My AOL (on the Toolbar) ➪Preferences.
Click the Toolbar icon, then Clear History Trail Now, then OK. Your tracks are
obliterated.
Keeping your secrets safe, part deux
While we’re on the subject of security, suppose you’ve just sent out a series of
e-mail invitations to a surprise birthday party for your spouse. Obviously, you
don’t want your spouse seeing what you’ve been sending.
Your first thought is probably to go to the Mail Center, click the Sent Mail tab,
select the names of the messages you’ve sent, and click the Delete button.
But unbeknownst to you, there’s an additional copy of every e-mail you’ve
sent stored in your Personal Filing Cabinet (if you’ve set your Filing Cabinet
Preferences to store your outgoing mail). That Filing Cabinet is accessible,
online or off, to anyone who knows your AOL password.
To delete the e-mail in your Personal Filing Cabinet, choose (in AOL 4.0) My Files
(on the Toolbar) ➪Personal Filing Cabinet. (In AOL 3.0, choose Window ➪Your
Filing Cabinet.) In the Mail You’ve Sent tray, select the items you want to delete
(Shift-click to select multiple items) and click the Delete icon.
Your secret is safe — at least until one of the invitees spills the beans about
the party.
Us versus spam
E-mail is a wonderful invention, but junk e-mail (spam) is the scourge of the earth.
See Chapter 25 for our tips on wiping out spam; but in the meantime, if your online
mailbox looks like Figure 26-5, heed these additional AOL-specific anti-spam tips.
First, keep your
e-mail
screen name out of the public eye. Use a separate
screen name when you go into chat rooms, post to message boards or
newsgroups, join a mailing list, put up a Web site, fill out a member profile,
or do anything that makes your screen name available to the public. (Go to
keyword:
names
to set up an additional screen name.)
Strange
But True
968 Part IV: The World Online
■ ■
MACWORLD MAC SECRETS • 4040-8/5 • ch26.F • Chapter 26 • FINAL • VB/EAP • 10/28/98 • p.968
MACWORLD MAC SECRETS • 4040-8/5 • ch26.1 • Chapter 26 • Proof 1 • SH • 09/25/98 • p.968
4040-8/5 ch26.F 11/3/98 3:29 PM Page 968
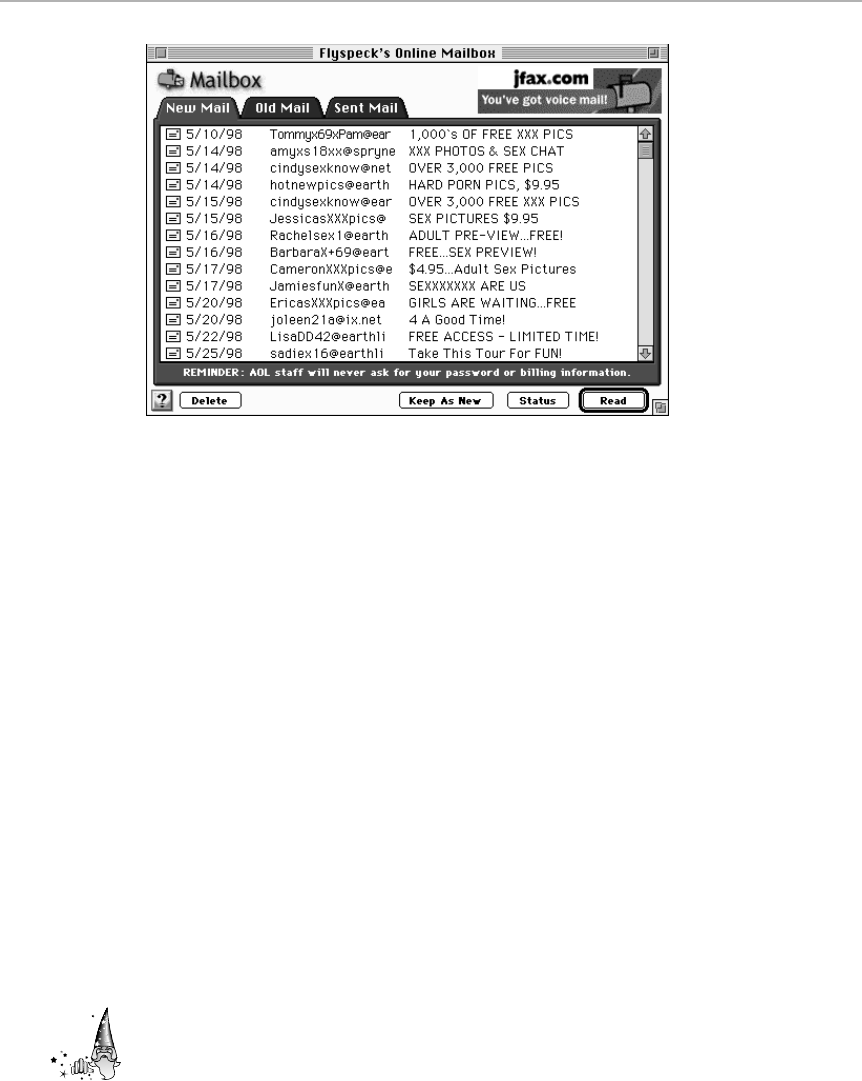
Figure 26-5: AOL is overrun with junk mail. Something must be done!
Second, use AOL’s Mail Controls (keyword:
mailcontrols,
available only when
you sign on with your master screen name) to block certain types of e-mail.
For example, the option labeled “Allow mail from AOL Members and addresses
listed” means you can receive mail from anyone with an AOL account, and
from the Internet addresses you type in. This will drastically reduce the
amount of spam you receive, since most spam comes from Internet accounts.
(Unfortunately, this option also drastically cuts down on e-mail from
friends
with
Internet accounts. If you prefer, you can take the opposite approach,
blocking
mail from specified Internet addresses.)
Third, report spammers to screen name TOSSpam (for Terms of Service: Spam).
Open the junk mail, click Forward, type
TOSSpam
in the address blank, and click
Send to report the offender. If you get a message saying the TOSSpam mailbox
is full, try TOSSpam1, TOSSpam2, and so on until the message gets through.
Checking your AOL e-mail — without AOL
Let’s say you’re traveling and get a hankering to check your e-mail. If you can
find
any
computer — Mac, Windows, whatever — that has the AOL software on it,
you can sign on as a Guest and check your mail. (At the startup screen, choose
Guest as the screen name. After the modem dials, you’ll be asked for your
name and password.)
Furthermore, thanks to
AOL NetMail
, you can even check your AOL e-mail from
any Windows machine (the kind you’re most likely to find while traveling) in the
world –
without
having the America Online software. Using Microsoft Internet
Explorer, go to www.aol.com
;
there you’ll see the NetMail button. In minutes,
you’ll be reading your AOL e-mail at a Web site! (For details, go on America
Online to keyword:
Netmail.
)
Strange
But True
Chapter 26: Getting the Most Out of America Online 969
■ ■
MACWORLD MAC SECRETS • 4040-8/5 • ch26.F • Chapter 26 • FINAL • VB/EAP • 10/28/98 • p.969
MACWORLD MAC SECRETS • 4040-8/5 • ch26.1 • Chapter 26 • Proof 1 • SH • 09/25/98 • p.969
4040-8/5 ch26.F 11/3/98 3:29 PM Page 969

No downtime while downloading
We’re hoping you already know this, but if not, you’ll thank us: Just because
you’re downloading something from America Online doesn’t mean your Mac is
tied up. You can do other things online — read mail, send Instant Messages,
and so on — while you’re downloading, of course, but you can also switch
completely out of America Online to do other work on your Mac. The cheerful
“File’s Done!” guy will announce the end of the download even if the AOL
program is in the background.
The Find In Top Window command
Meet one of the handiest — and least utilized — AOL features: the Find In Top
Window command. This command (in the Edit menu) is ideal for finding items
that are buried in a sea of data.
Suppose you’re looking at a Travel Channel message board that deals with Italy.
You’re interested only in messages about Rome, and don’t relish the thought
of scrolling through hundreds of messages, looking for the word “Rome” in the
subject line. Just choose Edit ➪Find In Top Window, type
Rome,
and click Find.
The first Rome-related message is highlighted. Click Find Next to find the next
message. The Find In Top Window command works in other areas as well,
including e-mail messages and Web pages.
A voice crying out in cyberspace
An online service might be the last program you’d expect to have Macintalk
speech features (see Chapter 23). But as free book winner Danilo Campos
(among others) discovered, if you hold down the Control key and place the
cursor over various buttons — Toolbar icons, message board buttons, Compose
Mail window buttons, Buddy List, and so on — a MacinTalk voice tells you what
each button does.
But wait, there’s more. If you visit an AOL chat room, choose Edit ➪Speak Text.
Your Mac starts
speaking
what everyone’s saying in the chat room. It even says
“grin” when it sees the standard smiley punctuation — :) — and “wink” when it
sees this symbol — ;) — which we think is pretty smart.
Turn off the Channels window (AOL 4.0)
When you sign on to AOL you’ll see the Welcome! window and the Channels
window. You will soon grow weary of watching the Channels window load, graphic
by graphic by graphic.
Fortunately, you can make the Channels window go away by choosing My AOL
(from the Toolbar) ➪Preferences. In the General tab, uncheck the box labeled
“Show Channels Screen at sign on,” and click OK. (Even without the Channels
window, you can still get to the channels by choosing Go To ➪Channels.)
Contest
Winner
Worth
Learning
Mac Basics
970 Part IV: The World Online
■ ■
MACWORLD MAC SECRETS • 4040-8/5 • ch26.F • Chapter 26 • FINAL • VB/EAP • 10/28/98 • p.970
MACWORLD MAC SECRETS • 4040-8/5 • ch26.1 • Chapter 26 • Proof 1 • SH • 09/25/98 • p.970
4040-8/5 ch26.F 11/3/98 3:29 PM Page 970

Seizing control of your buddy lists
As anyone with an AOL account and time to kill can tell you, the Buddy List is a
fascinating feature. No matter what you’re doing online, you can watch a list of your
friends and colleagues, spotting them the moment they come online. (Once they’re
on, you can chat with them via Instant Messages.) You control which buddies you
want listed — and
prevent
people from watching
you —
at keyword:
buddy.
What’s especially cool about Buddy Lists, if you use them, is that you can even
add
non-
AOL members — general Internet surfers — to your Buddy List. As with
AOL members, you’ll get notified then they’re online, and you’ll be able to chat
with them in real time, via Instant Messages, over the AOL/Internet boundary.
To pull this off, however, you need to (a) persuade your Internet friends to
register,
thus agreeing that they’re willing to be bothered, and (b) persuade
them to download and install special software (AOL Instant Messenger) that
makes them Buddy Listable. Go to keyword:
Instant Messenger
for information.
Playing sounds in chat rooms
You can play AOL sound files (“Welcome!”, “Good-bye,” and so on) in chat
rooms by typing {S name of sound (for example,
{S Welcome
) in the text-entry
box and pressing Return. Everybody else in the chat room, wherever they may
physically be in the world, hears the sound you just played.
Unfortunately, your fellow chattees can hear the sound you played
only
if that
sound file is installed on their computers. The pre-installed ones are pretty
limited: Welcome, You’ve Got Mail, Goodbye, File’s Done, BuddyIn (a door
creaking open), BuddyOut (a door slamming), and IM (the tinkly chimes you
hear when you receive an Instant Message). (Why you would want to say “File’s
Done” in a chat room is beyond us, but whatever.)
You can play sounds other than the ones that come with AOL, but the people
you’re chatting with need to have the sound files on their hard drives. If you’re
using AOL 4.0, adding sounds that can be played online is easy: drop them (in
standard System 7 sound format — see Chapter 23) into AOL’s Sounds folder,
which is in Online Files folder.
Note: Playing sounds in chat rooms gets old fast. (And playing the “You’ve got
mail” sound is a cruel joke for those waiting patiently by their e-mailboxes.)
Fortunately, you can turn off chat room sounds if you get tired of hearing them.
Go to keyword:
Preferences,
click the Chat icon, and uncheck the box labeled
“Play chat sounds sent by other members.”
Installing new AOL sounds
If you tire of that guy’s voice — the one who says
“You’ve
got
mail!”
and
“Good-
bye!” and
“Wel
come!” — feel free to replace him with a sound of your
own choosing. You might elect to replace these quips with your own voice, for
example, or with silence. All you need is ResEdit. See Chapter 21, where you’ll
find step-by-step instructions for getting ResEdit and replacing America Online
3.0’s sounds.
Strange
But True
Chapter 26: Getting the Most Out of America Online 971
■ ■
MACWORLD MAC SECRETS • 4040-8/5 • ch26.F • Chapter 26 • FINAL • VB/EAP • 10/28/98 • p.971
MACWORLD MAC SECRETS • 4040-8/5 • ch26.1 • Chapter 26 • Proof 1 • SH • 09/25/98 • p.971
4040-8/5 ch26.F 11/3/98 3:29 PM Page 971

Replacing sounds in AOL 4.0 is much easier. To replace a sound, open the
America Online folder ➪Online Files folder ➪Sounds folder. You’ll see AOL’s
canned sounds: Welcome, Goodbye, BuddyIn, BuddyOut, and so on.
Let’s say you want to replace “Welcome!” with a bit of dialog from
Godzilla
that
you downloaded. First, drag the original Welcome sound to a different folder.
Change the Godzilla sound’s name to Welcome, and drag it into the Sounds
folder. Next time you sign on, you’ll be greeted by the giant lizard, rather than
the little AOL “Welcome!” man.
(P.S. — Mac owners rarely envy Windows users, but let’s face it: AOL’s software
libraries have a lot more
.wav
files (Windows sounds) than
.snd
(Mac “System
7” sounds). No problem: just drag them onto Brian’s Sound Tool, included on
the CD-ROM with this book, to convert .wav files instantly into Mac files.
Turn Instant Messages off (and back on)
When you’re in a hurry, there’s nothing more disrupting than getting Instant
Messages (IMs) from other AOL members. Here’s the tactful solution. Send an
Instant Message to the screen name
$im_off
(and you have to type
something
into the message area, so just type a couple of spaces or something there).
Now, if someone tries to send you an Instant Message, they’ll be told
politely that you can’t receive it at the moment. And they won’t hate you for
ignoring them.
To receive IMs again, send an IM to screen name
$im_on.
(To turn off Instant
Messages from
specific people,
go to
keyword:
Buddy, click Privacy Preferences,
add the screen name of the person you don’t want to hear from. Check “Buddy
List and Instant Messages” at the bottom of the window, and click Save.)
Keep your hands on the keyboard
Reader Sean Lewis notes that the America Online software violates every
possible Macintosh interface guideline. For example, default buttons (ones that
can be “clicked” by pressing the Return key) aren’t surrounded by a thick black
border, as in normal Mac programs.
Yet despite the absence of the thick outline, you can indeed trigger the most
important button in each window — the Send button on an Instant Message, for
example, or the Send or Reply button in the e-mail window) — just press Enter.
Keywords for the profoundly bored
Not only is there a keyword for almost every America Online screen, but there’s
certainly a keyword for everybody. Reader Michael Huang, for example, found
the bizarre, clicky, sound-enhanced smiley face at keyword:
aol://1391:41-
29468
. (We prefer the more colloquial Smile4u — but that doesn’t sound so
much like a secret.)
972 Part IV: The World Online
■ ■
MACWORLD MAC SECRETS • 4040-8/5 • ch26.F • Chapter 26 • FINAL • VB/EAP • 10/28/98 • p.972
MACWORLD MAC SECRETS • 4040-8/5 • ch26.1 • Chapter 26 • Proof 1 • SH • 09/25/98 • p.972
4040-8/5 ch26.F 11/3/98 3:29 PM Page 972
Then there’s keyword:
Random
(Figure 26-6). Spin the wheel and you’ll be
whisked to an AOL area at random. Round and round she goes . . .where you’ll
wind up on AOL, nobody knows!
Figure 26-6: Spin the wheel of AOL keywords when you just don’t know where you want to
go today.
Gambling in chat rooms
Do you feel lucky? In a chat room, type this:
//roll-2-6
(Substitute any numbers you wish for the 2 and 6 — or don’t specify any
numbers at all to roll two normal dice.) Press Return. Then, in front of everybody
in the room, AOL prints:
OnlineHost: SkiBunny rolled 2 6-sided dice: 4 1
(Of course, your screen name, not SkiBunny’s, will be displayed.) Everyone in
the chat room will be suitably impressed and/or baffled.
We suspect this feature was part of America Online’s early design, when the
programmers imagined that games of chance would play a role.
Postcard from the edge
Bored? Then you’ve come to the right place: America Online is one of the
world’s greatest time-killers. For starters, click the AOL logo on the Welcome
screen. You’ll be whisked to a secret window called AOL Delights, featuring a
selection of digital postcards you can send with a single click to your online
friends. (Correction: you can send them with a single click
and
a screenful of
credit-card information. The weasels have the gall to charge you $10 for sending
one of these glorified e-mails!)
Also on this daily screen, you can check your horoscope or a digital fortune
cookie — for free, fortunately. (Note: We can’t vouch for the accuracy of the
latter: it predicted that one of your cheerful but nonathletic authors would “have
good luck with sports, especially track!!!!!!!!!!” Being wrong is one thing, but
being wrong with ten exclamation marks is unforgivable.)
Strange
But True
Chapter 26: Getting the Most Out of America Online 973
■ ■
MACWORLD MAC SECRETS • 4040-8/5 • ch26.F • Chapter 26 • FINAL • VB/EAP • 10/28/98 • p.973
MACWORLD MAC SECRETS • 4040-8/5 • ch26.1 • Chapter 26 • Proof 1 • SH • 09/25/98 • p.973
4040-8/5 ch26.F 11/3/98 3:29 PM Page 973
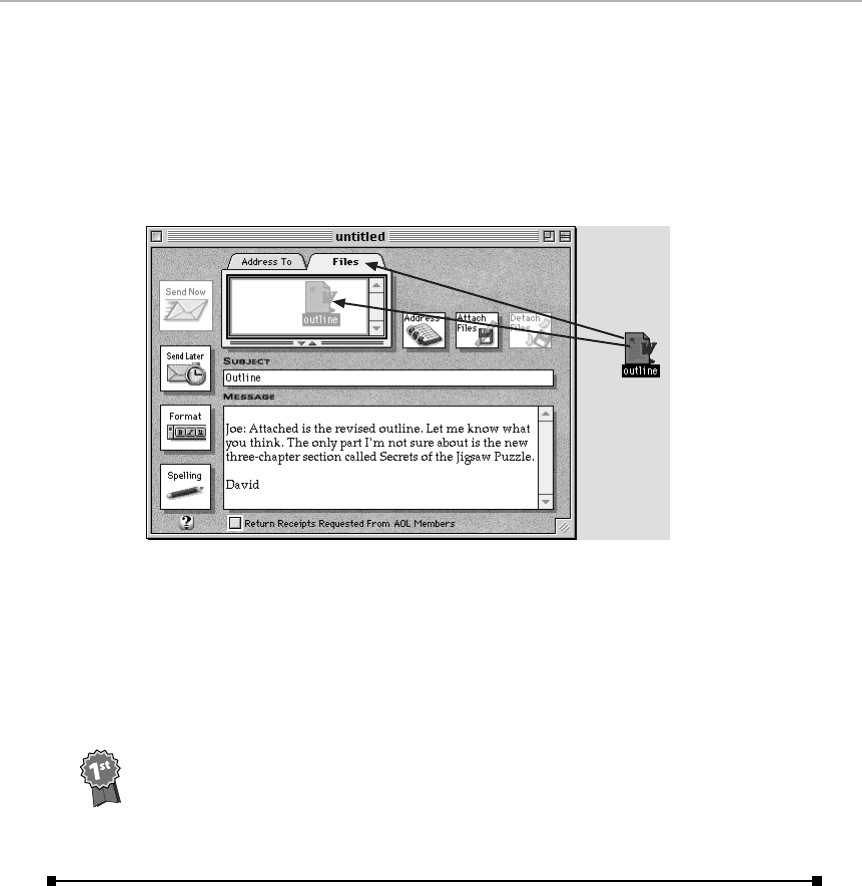
Drag-and-drop joys
As with any self-respecting e-mail program, you can attach files from your
desktop to an outgoing e-mail — without having to encounter an Open File dialog
box. Just drag an icon
from your desktop
to the tiny Files tab of your outgoing
e-mail (see Figure 26-7) — or click the Files tab to expand your drag-and-drop
target.
Figure 26-7: Drag files directly from your desktop into an outgoing e-mail message — either
onto the Files tab or into the little white Files window.
And speaking of drag-and-drop: Don’t forget that AOL supports it. For example, a
quick way to save a portion of an e-mail message is to highlight the text and
drag it onto the Desktop to create a clipping file. Later, you can open the little
nuggets you’ve dragged-and-dropped without having to sign onto AOL.
And while we’re on this drag-and-drop roll: you probably know that you can drag
an address from your AOL Address Book into an e-mail note’s Send To field.
But as free book winner Leigh Blankenship discovered, you can also drag an
address
from
an e-mail note into your Address Book. In fact, you can also drag
an address from one note to another, making it easy to add a CC, for example.
Contest
Winner
974 Part IV: The World Online
■ ■
MACWORLD MAC SECRETS • 4040-8/5 • ch26.F • Chapter 26 • FINAL • VB/EAP • 10/28/98 • p.974
MACWORLD MAC SECRETS • 4040-8/5 • ch26.1 • Chapter 26 • Proof 1 • SH • 09/25/98 • p.974
4040-8/5 ch26.F 11/3/98 3:29 PM Page 974

MACWORLD MAC SECRETS • 4040-8/X • ch27.f • Chapter 27• Proof F • LC • 10/28/98 • p.975
MACWORLD MAC SECRETS • 4040-8/X • Chapter 27• Proof 1 • SH • 09/25/98 • p.975
Chapter 27
Everything E-mail
In This Chapter
©Mastering Outlook Express, Claris Emailer, and Eudora
©E-mail etiquette
©Solving the File-Attachment Nightmare
©Spam and how to nuke it
Believe it or not, the World Wide Web isn’t the most popular feature of the
Internet; e-mail is. Nothing has revolutionized communications like e-mail.
Why do we adore e-mail so much? Because:
■It’s free. Even if you don’t have an Internet account, you can get a free
e-mail-only account from Yahoo or Hotmail.
■It’s delivered as instantaneously as the telephone — but you answer it at
your leisure, like U.S. mail. Nobody gets up from dinner to answer their
e-mail. (Well, OK, a few people do that. If you’re one of them, get a life!)
■Emailer forces people to be concise. And even when they’re not concise,
you can scroll down to the nitty-gritty. (It’s too bad telephones don’t
come with a scroll bar.)
■E-mail gives you a written record of what was said. Unlike the phone,
transactions and communications aren’t based on both parties’
recollections of what was said.
Bottom line: We’d hate to go back to a pre-e-mail era. And we wish more
people would contact us by e-mail instead of phone (which requires that we
be present), U.S. mail (which requires postage), or fax (which we can’t copy
out of).
Anatomy of an E-mail Message
Every e-mail message has recognizable parts. Each is the key to some
fascinating inner personality traits of a typical message. Figure 27-1 shows
the breakdown of a typical incoming message.
4040-8/5 ch27.F 11/3/98 3:27 PM Page 975
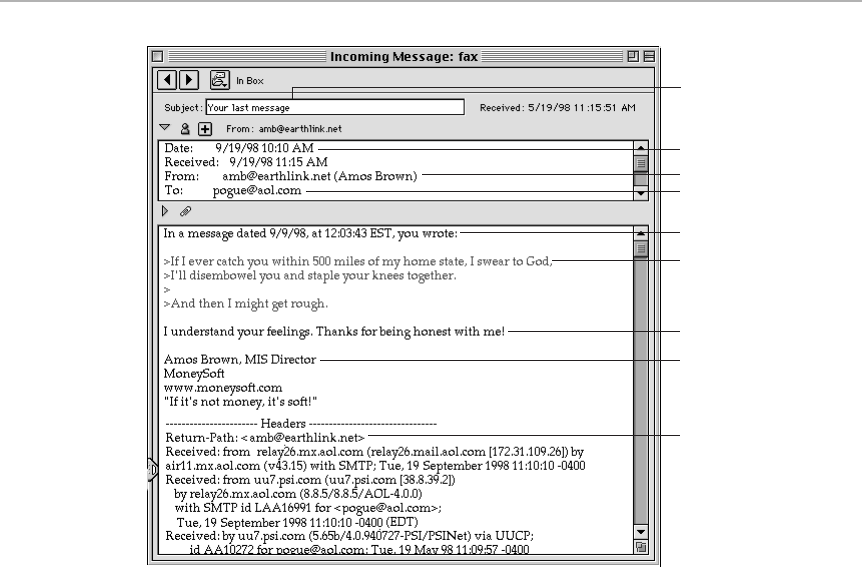
Figure 27-1: The anatomy of an e-mail message (shown here in Claris Emailer).
Here’s what you’ll find in a typical piece of e-mail:
A. This is the subject line. (Hint: If you don’t want your message to be
automatically thrown away by your recipients’ anti-junk-mail filters, don’t
put into the subject line anything with multiple exclamation points,
multiple dollar signs, or the words “MAKE MONEY CARVING
TOOTHPICKS AT HOME!”)
B. The date this e-mail was sent and received. Got some weirdness here,
like receiving this e-mail before it was sent? Then either you or your
correspondent never bothered to set the computer’s time zone. (Do
that in your Date & Time control panel, as described in Chapter 4.)
C. This information identifies the sender of this e-mail (unless it’s junk
e-mail, in which case it’s fake). Depending on the program that sent this
mail, you may see the sender’s plain-English name appearing in
parentheses, as shown here.
D. This line shows who the e-mail is addressed to. It may say “To.” It may
say “CC:,” which means you’re getting a copy of the e-mail that’s intended
to the primary addressee — who, by the way, knows that you got a copy.
If you see “BCC” (blind carbon copy), on the other hand, you got a copy
of this message secretly. People whose names are listed in the “To:” and
“CC:” don’t know that there were additional recipients. (Now you know
A
B
C
D
E
F
G
H
I
976 Part IV: The World Online
■ ■
MACWORLD MAC SECRETS • 4040-8/X • ch27.f • Chapter 27• Proof F • LC • 10/28/98 • p.976
MACWORLD MAC SECRETS • 4040-8/X • Chapter 27• Proof 1 • SH • 09/25/98 • p.976
4040-8/5 ch27.F 11/3/98 3:27 PM Page 976

why most of the junk e-mail you receive has your name listed as a BCC:
recipient— the junk mailer doesn’t want you to know how many
thousands of people got this same e-mail!)
E. This line was stamped onto the message automatically by the sender’s
e-mail program.
F. These brackets indicate that the sender is quoting back something you
wrote to him. That’s the polite thing to do; now you’ll know what on
earth he’s referring to in his message.
G. This entire white typing area is the body of the message.
H. See this blob of text? It’s called the signature. It was stamped onto this
message automatically by the sender’s e-mail program, complete with
the annoying quote.
Automatic signatures can sometimes have hilarious results, since the
person sending the message never actually sees the completed e-mail
before sending it. You may get a note that says: “I can’t possibly tolerate
one more exchange with such an empty-headed, culturally bankrupt
moron. Stuff a sock in it, loser”— but ends with a merry little sign-off
like “Cheers, Jeffrey.”
I. This blob of Unix codes is called the header. In the olden days of 1996,
this information appeared at the top of your e-mail — thus the term
“header.” Since it’s so annoying and so irrelevant, though, most e-mail
programs now put it down below the body (if they show it to you at all).
It’s essentially a bunch of computer codes that document the route this
message took to reach you. It may have bounced all over the world,
computer to computer — that’s the genius of the Internet’s design —
but eventually, it arrived at your machine.
But there’s more to e-mail than the format; more important is the content.
Read on.
The
Mac Secrets
Guide to E-mail Etiquette
When you’re online, you’re technically in a public place where your every
word and thought are read and judged by thousands of people all over the
world — but don’t let that faze you. That’s the glorious thing about being
online. It’s the only human interaction where you’re judged purely by your
thoughts. Your age, race, looks, disabilities, insecurities, hair status, accent,
height, weight, and even hygiene don’t make any difference to anybody
online. We’ve heard more than one story of love born via e-mail (or during
live chat sessions).
However, presentation counts in our society, and that’s still true in the
electronic anonymity of online communications. Here’s how to make a good
impression—and by pleasing your correspondents, create more effective
messages:
Chapter 27: Everything E-mail 977
■ ■
MACWORLD MAC SECRETS • 4040-8/X • ch27.f • Chapter 27• Proof F • LC • 10/28/98 • p.977
MACWORLD MAC SECRETS • 4040-8/X • Chapter 27• Proof 1 • SH • 09/25/98 • p.977
4040-8/5 ch27.F 11/3/98 3:27 PM Page 977

■Don’t type in all capitals. All-caps writing is hard to read and has a
special meaning in the soundless realm of online speech: It means
YOU’RE SHOUTING. Reserve it for when you really are shouting.
■Online, no one can hear you smile. In cyberspace, there’s no body
language, no raised eyebrows, nothing but your cold, hard words on
everybody else’s screens. Therefore, be aware of your tone when writing
online. Take care to consider what possible misinterpretations lie in the
way you phrase things.
A common trick toward solving this pitfall is the use of the smiley face.
You make this little grinning face by typing a colon and a closing paren-
thesis, like this — :) — which, if you turn your head 90 degrees to the left,
looks like smiling features. This little face is supposed to indicate that
you were smiling when you wrote something. There are hundreds of
similar faces:
:( Unhappy
;) Sly wink
978 Part IV: The World Online
■ ■
MACWORLD MAC SECRETS • 4040-8/X • ch27.f • Chapter 27• Proof F • LC • 10/28/98 • p.978
MACWORLD MAC SECRETS • 4040-8/X • Chapter 27• Proof 1 • SH • 09/25/98 • p.978
MACINTOSH SECRET
To everyone’s great horror, the Macintosh came
many years too late to have any effect upon the
underlying geekiness of the Internet. Remember
that this mother of all computer networks was
never intended for you, the Normal Human
Being; it was originally designed by a bunch of
1960s government and university nerds for the
purpose of exchanging military data.
As a result, to this day, you can’t get online
without filling out a bunch of patently user-
hostile blanks labeled things like SMTP Host,
POP Server, Login name, and so on. The various
e-mail programs in your life don’t even call these
morsels by the same names — that’s how
screwed up the terminology is.
In general, you have no choice but to sit on the
phone with your ISP’s tech-help line and ask
them to help you fill in the blanks. Here’s the
basic rundown of what you’ll be asked to fill in:
Account Name: This can be whatever you want.
Name it after your Internet access company, if
you want, such as “EarthLink account.”
User Name: In this box, put everything in your
e-mail address that comes before the @
symbol. If you’ve been told that your e-mail
address will be kelly@earthlink.net, then your
user name is kelly.
Email account (Emailer), POP server (Outlook
Express), or Incoming mail server (Eudora):
This item identifies the computer that dishes out
messages from the Internet to your Mac.
It usually looks like everything after the @
symbol — with the addition of pop3 or pop5 in
front of it. For example, yours might be
pop3.earthlink. net or mail.earthlink.net.
Outgoing mail server (Eudora) or SMTP Server
(Emailer, Outlook Express): This code identifies
the Internet computer that sends your mail. It
usually looks like smtp.earthlink.net or, again,
mail.earthlink.net.
Stay on hold with your ISP long enough (or
cruise your ISP’s Web site long enough) and
you’ll eventually get these blanks filled in. And
don’t be discouraged—hey, it’s your tax dollars
at work.
How to set up your e-mail account
4040-8/5 ch27.F 11/3/98 3:27 PM Page 978

: *Kissing
8-) Wearing shades
:p Sticking out tongue
8-p Drooling
:O Shock
But there are also thousands of people who find these faces insufferable.
■Learn the lingo. You’re likely to be befuddled unless you at least know
the following handful of abbreviations you’re likely to see people typing
online:
LOL Laughing out loud
ROTFL Rolling on the floor laughing
BRB Be right back
BAK Back at the keyboard
MORF Are you male or female?
FYI For your info
OIC Oh, I see
RTFM Read the f@ *#! manual
IMHO In my humble opinion
IMNSHO In my not-so-humble opinion
GMTA Great minds think alike
@$#*&!! Golly
■Quote the relevant part before responding. If we send you an e-mail
that says only, “No, we don’t think so,” you’ll smite your forehead in
frustration, having forgotten completely what the original question was.
It would have been more polite of us to quote back what you originally
asked in your e-mail. Generally, people use brackets to show the original
message, most often like this:
> Hey, Pogue and Schorr: Is online etiquette very hard to master?
>Nobody can give me a straight answer. I’m a little nervous
>about going online for the first time.
No, we don’t think so.
— David and Joe
Claris Emailer, Outlook Express, America Online 3.0 and later, and most
other e-mail-related programs offer an automatic quoting feature that
saves you the trouble of copying, pasting, and adding the brackets. Just
highlight the portion you want to quote and click the Reply button. (A
corollary: It’s not necessary to quote back the entire message, which is
simply wasting your correspondents’ time. Quote back the relevant
portion. And what if you want to quote back two separate parts of the
Chapter 27: Everything E-mail 979
■ ■
MACWORLD MAC SECRETS • 4040-8/X • ch27.f • Chapter 27• Proof F • LC • 10/28/98 • p.979
MACWORLD MAC SECRETS • 4040-8/X • Chapter 27• Proof 1 • SH • 09/25/98 • p.979
4040-8/5 ch27.F 11/3/98 3:27 PM Page 979

same message? You have no choice but to highlight the entire message,
click the Reply button, and then manually delete the excess when it
appears in the new outgoing e-mail.)
■Send it in the message, not as an attachment. As you can read later
in this chapter, file attachments on e-mail are a never-ending source of
headaches. Even if your recipient can decode and uncompress what you
sent, and even if she’s got the necessary program to read it, she must still
locate the file, figure out how to open it, and then figure out how to reply
to you (since she can’t just hit a Reply button). If you have something to
send, then OK — send it as an attachment. But if you just have something
to say, type it in the body of the e-mail message.
Mailing lists
A mailing list is like a subscription to an e-mail-based discussion group.
(You don’t need a separate program to use mailing lists; your regular e-mail
program collects the messages.) You’re automatically e-mailed a copy of
everything other people have to say about a particular topic. Sign up for
these sparingly; they can fill your e-mail box with dozens or hundreds of
messages a day.
For a more complete list of mailing lists, read the Publicly Accessible Mailing
Lists list, available in the news.lists newsgroup. (See Chapter 26 for details on
newsgroups). Also visit the Web address www.yahoo.com/Computers/Internet/
Mailing_Lists for still more information about mailing lists.
Generally, you subscribe to one of these free e-mailings by sending an e-mail
to its sign-up computer. To make it work, the receiving computer inspects
what you’ve put in either the body or the Subject line of the e-mail to see if
you typed out the correct code. (What you put in the other field generally
makes no difference.)
980 Part IV: The World Online
■ ■
MACWORLD MAC SECRETS • 4040-8/X • ch27.f • Chapter 27• Proof F • LC • 10/28/98 • p.980
MACWORLD MAC SECRETS • 4040-8/X • Chapter 27• Proof 1 • SH • 09/25/98 • p.980
JS: I certainly am happy to be writing the Fifth Edition
of Mac Secrets. Time has marched on, hasn’t it? I
mean, the computing world has gotten so much
better!
DP: I’m not quite sure where you’re going with this,
but whatever.
JS: Well, just look at all the cool things we’re writing
about now that didn’t even exist when we did the last
edition!
DP: Such as…the death of OpenDoc? The death of
the Newton? The death of Macintosh clones?
JS: Very funny. No, I mean technology. Look at
QuickTime 3.0!
DP: Oh, you mean the one you have to pay $30 for?
JS: And Microsoft Internet Explorer 4, which lets you
save entire Web sites onto your hard drive with a
single command!
DP: As long as you’re willing to surf the Web at one-
third the speed of the previous version…
JS: I can even remember writing a Secret that told
our readers how to simulate graphics in America
Online e-mail. Today, of course, anyone can have fonts,
sizes, colors, or yes, even pictures, in their e-mail!
DP: Oh, no you don’t—
JS: All thanks to the miracle of HTML mail.
DP: Are you missing entire lobes of your brain!?
HTML mail is the most disgusting, tacky, bandwidth-
clogging waste of human effort ever devised!
DIALOGUE
4040-8/5 ch27.F 11/3/98 3:27 PM Page 980

For example, to sign up for a daily list of jokes by e-mail, you send e-mail to
listserv@uga.cc.uga.edu with subscribe humor Bob Smith in the body of
the message. These days, mailing lists are getting easier to get onto; for
example, to subscribe to TidBITS, Adam Engst’s weekly magazine about
the Macintosh and the Internet, you can either send e-mail to tidbits-on@
tidbits.com (nothing special is required in the subject or body)—or just
visit www.tidbits.com and fill out a form there.
Note: When you’ve been added to the mailing list, you’ll receive e-mail
confirming your subscription. Be sure to save that message—it contains
instructions for unsubscribing from the list. That information may be useful
when you discover exactly how hard it is to keep up with 100 messages per
day! Alternatively, consider signing up for the digest option of most mailing
lists — instead of receiving every little message as it’s written, you get a
single, e-mail compilation each day containing all the individual written
transactions. (If you need help with a mailing list, or if you forget how to
unsubscribe, send e-mail to the mailing list with the word HELP by itself in
the body of the message.)
E-mail programs
To view your e-mail, you need an e-mail program. America Online, of course,
has its own built-in mail-reading feature; see Chapter 26 for details.
But for regular Internet e-mail, you need Claris Emailer, Microsoft Outlook
Express, or Eudora. There are other e-mail readers, such as the one that’s
built into Netscape Communicator, but the Big Three are by far the most
popular and richly featured.
Chapter 27: Everything E-mail 981
■ ■
MACWORLD MAC SECRETS • 4040-8/X • ch27.f • Chapter 27• Proof F • LC • 10/28/98 • p.981
MACWORLD MAC SECRETS • 4040-8/X • Chapter 27• Proof 1 • SH • 09/25/98 • p.981
JS: I resent that remark about my brain. You asked
me to write our section on e-mail attachments, you
may recall.
DP: Joe, nobody uses HMTL mail except the
nosepicking, flatbottomed scum of the earth we call
junk e-mailers. The instant I see <HTML> at the
beginning of a message in Claris Emailer, I instantly
delete it. I know it’s spam.
JS: Ah. Well, that explains a few things.
DP: What does?
JS: You’re using Emailer. A program that doesn’t do
HTML mail. You can’t even see what you’re missing!
DP: I don’t care— at least I’m not waiting five
seconds for every HTML mail message to appear on
the screen, like you have to in Eudora or Outlook
Express.
JS: Uh-huh. He’s using a four-year-old program
whose company doesn’t even exist anymore, and
he’s complaining about HTML mail…
DP: It so happens that Emailer is the only e-mail
program that can get my messages from America
Online, smartypants.
JS: Oh! — it gets better?! You not only use a passé
e-mail program, but you use it to get mail from a
passé online service! That’s rich!
DP: Listen, I have to maintain that AOL account.
I published that pogue@aol.com address in five
editions of Macs for Dummies. I can’t turn it off
now — I’d strand thousands of my readers!
JS: Should’ve thought of that before you wrote a
bestseller, my friend.
4040-8/5 ch27.F 11/3/98 3:27 PM Page 981
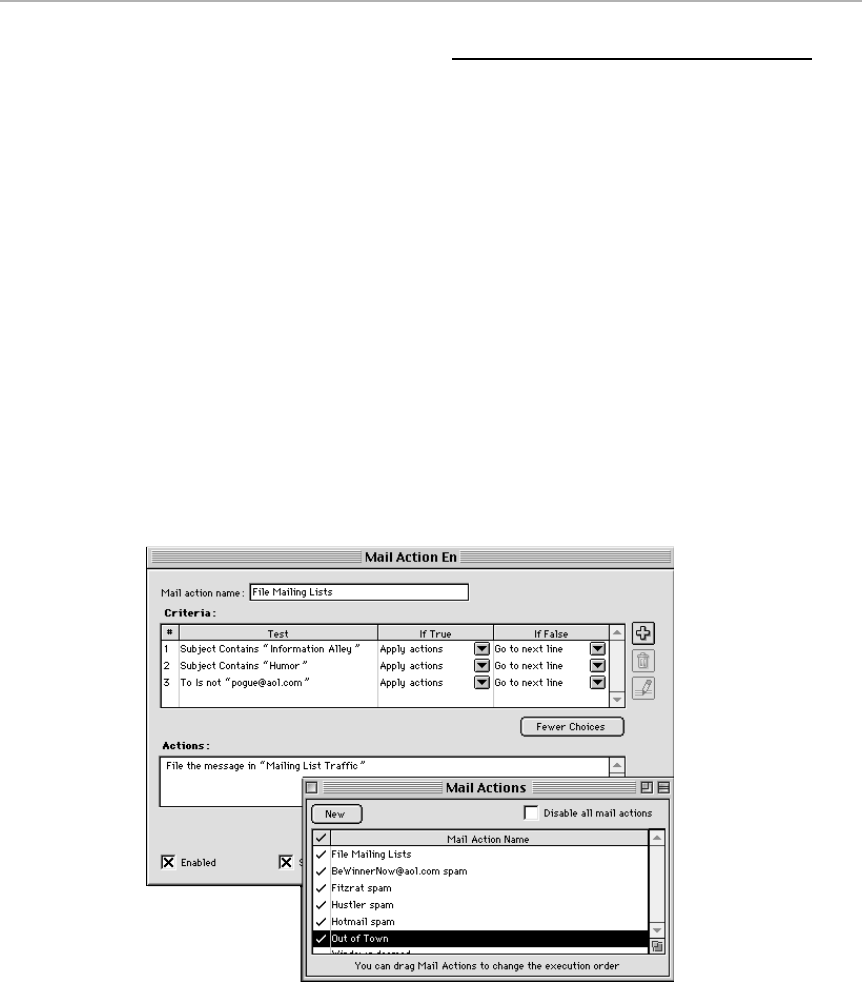
E-mail Software Secrets
■
How to make an e-mail answering machine
If you’re going to be away from home for awhile, but don’t want your e-mail to
pile up unanswered (thus making your correspondents think you’re antisocial),
consider setting up your e-mail program to answer each incoming message
automatically with a “Got your message, but can’t respond until next week” reply.
To do so in Claris Emailer, for example, choose Mail Actions from the Schedule
menu. Click Add; type a name (such as “out of town”); choose All Mail from the
pop-up menu; click “Auto reply to message,” and click Edit Reply. Then just set
up Emailer to log on automatically, as usual, and the rest is taken care of!
On behalf of the Internet’s millions of users, however, kindly unsubscribe yourself
from any Internet mailing lists — described earlier in this chapter — before doing
so. Otherwise, your “I’m on vacation” e-mails will bounce back to the mailing-list
computers, causing untold irritation directed at you. (Another solution: Use e-mail
filters, as described later in this chapter, to funnel incoming mailing-list messages
into their own folder
before
the “answering machine” mail action filter is applied,
as shown in Figure 27-2.)
Figure 27-2: If you’re going to set up an e-mail answering machine, use mail filters to handle
incoming mailing-list and spam messages before your answering-machine filter kicks in.
Here, you can see that one Claris Emailer “mail action” (left) has been set up to file mailing-
list traffic and check for spam. The auto-reply mail action doesn’t kick in until after the
mailing-list screen has been applied (lower right).
982 Part IV: The World Online
■ ■
MACWORLD MAC SECRETS • 4040-8/X • ch27.f • Chapter 27• Proof F • LC • 10/28/98 • p.982
MACWORLD MAC SECRETS • 4040-8/X • Chapter 27• Proof 1 • SH • 09/25/98 • p.982
4040-8/5 ch27.F 11/3/98 3:27 PM Page 982
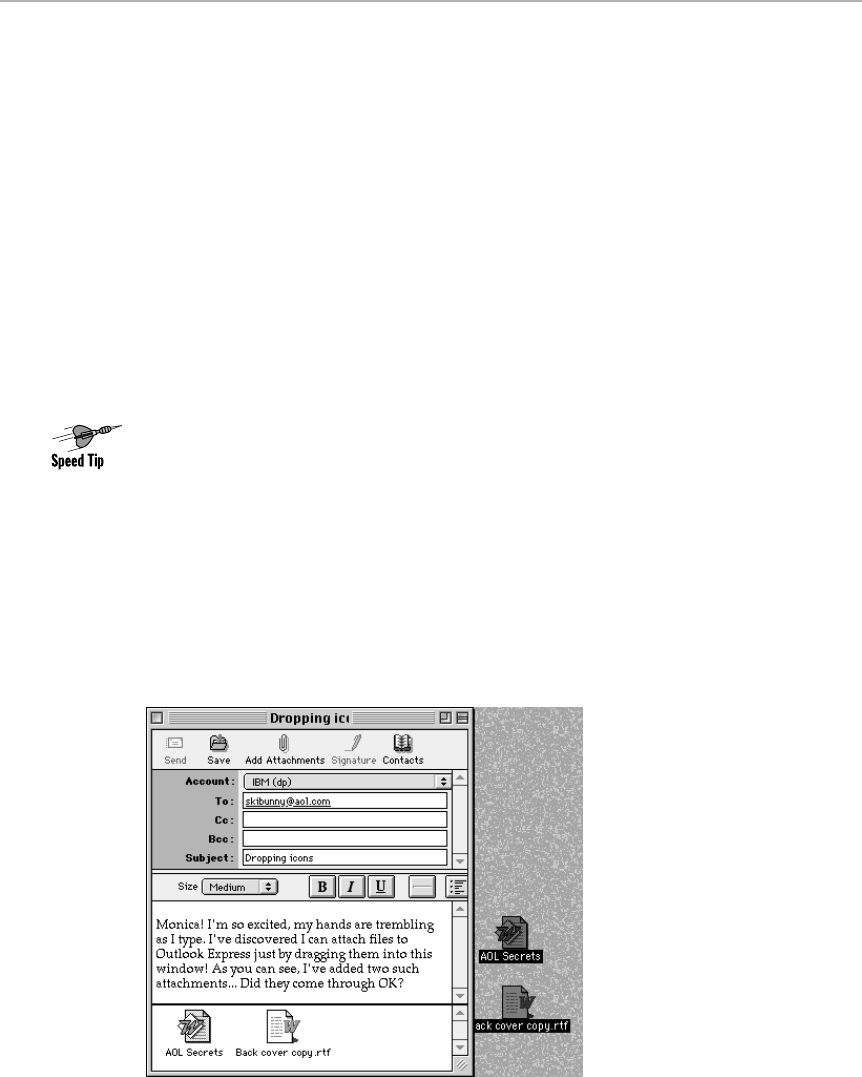
Maximize drag-and-drop power
All three of the major Mac e-mail programs offer Macintosh drag-and-drop. As
you can read in Chapter 17, editing is a snap with drag-and-drop; just highlight a
blob of text in an incoming or outgoing piece of e-mail and drag it to a new
location (instead of copying and pasting). Option-drag to make a copy of the
selected text instead. Drag-and-drop is especially handy in preparing e-mail,
since you can (for example) drag-and-drop addresses from the body of the
message into the To: blank; in Outlook Express, you can even drag the opposite
direction, highlighting an address in a message you’re reading and dragging it
directly into the address-book window.
You can even drag text
files
from the Desktop, in the form of text clippings (or, in
Emailer, even text files). Your cheerful authors keep an “e-mail excerpts” folder on
the Desktop whose sole purpose is to store text clippings dragged out of Emailer.
(You can also keep a folder full of text clippings that contain standard
responses,
which you can drag into outgoing e-mail messages whenever you like.)
Drag-and-drop is especially handy — and often overlooked — when it comes to
enclosing file attachments with your outgoing mail. Don’t bother with the Attach
File menu command, navigating through your folders to find the file you want to
send, and so on. Instead, just drag an icon
from the desktop
into the outgoing
mail. In Eudora and Outlook Express, drag the outgoing icons anywhere into the
mail-composition window. In Claris Emailer, you can drag icons onto any
gray
area (see Figure 27-3). (Emailer and Eudora also let you drop icons onto the
rolled-up
title bar
of your outgoing message — a fantastic trick, since you have to
“windowshade” your outgoing e-mail window in this way to see your Finder icons
to begin with.)
Either way, your file attachment is ready to roll.
Figure 27-3: Drag icons from the desktop directly into an e-mail window (Outlook
Express, shown here, or Eudora) or onto the gray parts of an e-mail window (Claris
Emailer) to attach them.
Chapter 27: Everything E-mail 983
■ ■
MACWORLD MAC SECRETS • 4040-8/X • ch27.f • Chapter 27• Proof F • LC • 10/28/98 • p.983
MACWORLD MAC SECRETS • 4040-8/X • Chapter 27• Proof 1 • SH • 09/25/98 • p.983
4040-8/5 ch27.F 11/3/98 3:27 PM Page 983

Speed-dialing numbers for
frequent correspondents
All three major e-mail programs — Emailer, Outlook Express, and Eudora — have
address books. Store the names of your correspondents in this list. Thereafter,
when it comes time to address a new piece of outgoing e-mail, you have but to
type the first few letters of the recipient’s name —
bea,
for example — and the
program will automatically fill in the rest of the name (
Beauregard Jason
McGillicuddy,
for example).
Trouble is, as address books fill up, it takes more and more typing to specify key
correspondents. Pity poor David Pogue, for example. His e-mail address book
contains listings for Joseph Sclar, Joseph Schulman, and Joseph Schmidt — in
addition to his frequent correspondent Joseph Schorr. Whenever he wants to
send a note to Joe, he must type all of this:
Joseph Sch —
before Claris Emailer
figures out who David intends to write. Life’s rough.
Free book winner Ronald Leroux solves half the problem with his suggestion to
start typing the
last
name — or, indeed,
any
part of the name, such as “orr” in
Joseph Schorr’s case — into the Recipient box instead (Claris Emailer only). As
soon as you press the Tab key, the actual name appears.
But free book winner Martin Durand came up with a strange, low-tech, but
instantly fruitful suggestion that we now can’t live without: In your address
book, put numbers in front of your most frequent pen pals (in the “real name”
or “nickname” fields). Call them “1 Joseph Schorr,” “2 David Pogue,” “3 Bill
Clinton,” and so on. (Print out a cheat sheet, if you’re so inclined, to tape to
the side of your Mac until you’ve got them memorized.)
From now on, addressing an e-mail to one of your top 10 (or 20, or however
you care to remember) takes only one or two keystrokes, no matter how many
similarly named people are in your address book. (Your recipient will, alas,
see
that number attached to his name when he receives your message. Your
adoption of this technique boils down, then, to the size of your address book
vs. your tolerance for bewildering your friends.)
Who are you, anyway?
Most e-mail programs let you enter your real name as well as your e-mail
address. Instead of knowing you simply as
SkiBunny384@earthlink.net
, your
correspondents will see that you’re really
SkiBunny384@earthlink.net (Barbara
Smythe).
As reader Stephen McCabe points out, however, it’s perfectly possible to set up
multiple “real names” for the same Internet account, just as America Online fans
get five different names per account. Just create multiple Accounts (in Claris
Emailer), Personalities (in Eudora), or Users (in Outlook Express). Make them
identical in every respect except for your “real name” alias.
Now you can be “Big Babs” when writing your sister, but “Barbara T. Smythe,
PhD, MD” when writing your fellow faculty members.
Contest
Winner
984 Part IV: The World Online
■ ■
MACWORLD MAC SECRETS • 4040-8/X • ch27.f • Chapter 27• Proof F • LC • 10/28/98 • p.984
MACWORLD MAC SECRETS • 4040-8/X • Chapter 27• Proof 1 • SH • 09/25/98 • p.984
4040-8/5 ch27.F 11/3/98 3:27 PM Page 984

Claris Emailer’s secret keystrokes
What
is
it about this book’s readers and Emailer keystrokes? It sometimes
seems as though a full 10% of the entries to this edition’s Secrets contest
pertained to Emailer and its keyboard shor tcuts. Let us honor the diligence of
the submitters — especially free book winner Ronald Leroux — by summarizing
those useful shortcuts in one handy place.
First, you should know that you can trigger practically anything in Emailer —
buttons, tabs, check boxes, and so on — from the keyboard. And how do you
know what the keystrokes are?
Just press and hold the Ôkey; the names of the buttons, tabs, and check
boxes all change to reveal their secret keyboard equivalents.
All right then: Fingers ready? Here’s the list of lesser-known keystrokes:
Enter Triggers the Close, Save, or OK button. (Ô-Return does the
same thing.)
Ô-[ or ] Moves on to the previous or next message.
Ô-Option-[ or ] Moves on to the previous or next message — and trashes
the one you were just looking at.
Ô-Option-F Files this message in one of your user-defined “folders” (type
the first letter or two of the folder’s name to select it from
the keyboard).
Ô-Option-K Connects to your usual e-mail accounts without displaying a
confirmation box first.
Ô-D Deletes the currently open (or, in a list view, highlighted)
message.
Ô-F Opens the Find dialog box, already filled out to find whatever
text was highlighted when you pressed Ô-F.
Ô-Option-R Opens a reply window that’s automatically addressed to
everyone who got this message (if it wasn’t just you),
or
opens a reply addressed to the original sender only —
whichever is the
opposite
of your current reply-default
setting in Setup ➪Preferences ➪Reply. Your savings:
one confirmation dialog box.
Tab Jumps you from pane to pane of the main window. From
there, you can type letter keys to select a folder, or the
up/down arrow keys to select a message.
Ô-click If you’ve got Internet Config correctly installed, you can Ô-
click an e-mail address within a message to open a new,
ready-to go e-mail window, addressed to that person. Or Ô-
click a Web address to launch your Web browser and visit
that site.
Option-click Option-click any window’s close box to close all windows
except the Browser.
Worth
Learning
Contest
Winner
Chapter 27: Everything E-mail 985
■ ■
MACWORLD MAC SECRETS • 4040-8/X • ch27.f • Chapter 27• Proof F • LC • 10/28/98 • p.985
MACWORLD MAC SECRETS • 4040-8/X • Chapter 27• Proof 1 • SH • 09/25/98 • p.985
4040-8/5 ch27.F 11/3/98 3:27 PM Page 985

And speaking of deletion: if the confirmation box is getting on your nerves
every time you try to delete something, either turn off the warnings (by
choosing Setup ➪Preferences) — or drag the selected e-mail items directly
into the Deleted Mail folder.
Outlook Express’s secret keystrokes
Outlook Express isn’t quite as rich in tweaky little secrets and undocumented
features as its rivals; as a program that only sprang into existence in 1998, it
hasn’t been around long enough. But having been designed by the same guy
who did Claris Emailer, it does offer a few neat keystrokes — and a few good
habits to get into:
Ô-Option-Delete Delete an e-mail without getting a warning box.
up- or down-arrow Highlights the next folder (if you’re in the folder list) or e-mail
(if you’re in the e-mail list). The latter is especially handy,
since the lower pane shows you the opening sentences of
each message as you flick through them (without your
actually having to open any new windows).
Ô-up arrow Hides all but the currently highlighted folder in the folder list.
(Ô-down arrow restores the full list.)
Ô-Y Shows only unread messages. (Press Ô-Y again to show all
messages, with unread ones in bold.)
986 Part IV: The World Online
■ ■
MACWORLD MAC SECRETS • 4040-8/X • ch27.f • Chapter 27• Proof F • LC • 10/28/98 • p.986
MACWORLD MAC SECRETS • 4040-8/X • Chapter 27• Proof 1 • SH • 09/25/98 • p.986
ANSWER MAN
Q: When I bought my new Mac OS 8 Mac, there
was an icon on the desktop called E-mail. When
I click it, it launches a copy of Emailer Lite. Isn’t
there any way to make it launch, say, Eudora
instead?
A: But of course! Would we have honored your
question with its own Mac Secrets sidebar if
there weren’t a good answer?
First of all, this icon (and the Browse the Web
one) are just conveniences; you can safely trash
them (as most experienced Mac fans do) if you
prefer to just double-click your favorite e-mail
and Web program icons directly.
Anyway, to answer your question: these alias-
type icons launch whatever e-mail or Web
programs are listed in Internet Config, a little
freeware program that came with your Mac.
Choose Ú➪Find File and search for Internet
Config. Open it. Click the button labeled Helpers.
In the list that appears, click the item that
begins “http:” (to change your default Web
browser) or “mailto” (to change your preferred
e-mail program). In the Open File box that
appears, navigate to, and double-click, the
browser or e-mail program you prefer.
Quit Internet Config, saving changes as you go,
and be glad you read Mac Secrets so these
darling icons wouldn’t go to waste.
The Mac OS 8 E-mail-launcher icon
4040-8/5 ch27.F 11/3/98 3:27 PM Page 986

You should also know that Ô-clicking the name of any window (in the title bar)
produces a popup
list
of open windows — a great way to burrow directly to the
window you want without having to move, close, resize, or windowshade any
of them.
Outlook Express’s address detective
Every now and then, Microsoft really does try to help; checking for errors in your
e-mail addresses is one way that really works. Whenever you address a piece of
e-mail, the program underlines that address if you’ve got it
right.
If, on the other hand, you’ve put in an address that couldn’t possibly work — you
put in two @ symbols, you didn’t put
any
@ symbol, whatever — you’ll see a
colored underline or none at all. That’s your cue that Outlook Express foresees
disaster; it’s trying to spare you the wasted time of a bounced-back,
undeliverable e-mail.
If you see a green wavy underline, you’re sending mail to somebody who’s got
multiple e-mail addresses in your Outlook Express address book. Control-click
to specify which address you want to use.
A
red
wavy underline means that you’ve typed a person’s real name (“Chris
Wilcox”) for whom you’ve got duplicate entries in your address book. Again,
Control-click to choose the one you really mean.
Eudora’s secret keystrokes
Eudora Pro has zillions of secret keystrokes, too. Lots of them are astronom-
ically tweaky (option-double-click a Web address to choose a different default
Web browser, for example). A few, though, are worth learning.
For example, Ô-clicking is a fruitful exercise in editing Eudora’s toolbars. Ô-click
between two toolbar buttons to insert a new button; Ô-click
on
a button to
change its function; and Ô-drag a button into the Trash (on your Finder desktop!)
to remove the button entirely.
You should make good use of your space bar, too. Tapping it scrolls a long
e-mail downward, or opens a selected message in a list view, or closes the
current message (if you’re looking at the bottom of it).
Eudora message selection
The Option key is your shortcut to highlighting all the messages in your In Box,
Out Box, or homemade mailboxes that match a certain criteria. For example:
Option-click one message from Harold Higgenbotham, and
all
messages from
him are now highlighted and listed together, ready for deleting or filing. Option-
click the date or subject lines of an e-mail to highlight
all
messages with that
subject (or “Re:” that subject) or date.
Worth
Learning
Chapter 27: Everything E-mail 987
■ ■
MACWORLD MAC SECRETS • 4040-8/X • ch27.f • Chapter 27• Proof F • LC • 10/28/98 • p.987
MACWORLD MAC SECRETS • 4040-8/X • Chapter 27• Proof 1 • SH • 09/25/98 • p.987
4040-8/5 ch27.F 11/3/98 3:27 PM Page 987

Eudora tab manipulation
Most of Eudora Pro’s windows are
tabbed
(see Figure 27-4) — and yet you
can drag tabs from window to window, rearranging them any way you see fit,
combining or separating them exactly as you can with today’s Adobe-software
palettes. You can tear a tab (and its associated panel) clear out of a window,
which sets it up as a new window with only a single panel; or you can go to the
opposite extreme, dragging all the tabs into a single mega-window. Let your
innate interior-decoration skills be your guide.
Figure 27-4: Drag a tab away from a Eudora window to create a new window that has only
one panel.
The wittiest balloons on earth
Eudora’s balloon help was written by some of the punchiest, funniest writers
in programmerdom. To join in the hilarity during your off-hours, you
could
turn
on balloon help (press the Help key to turn it on and off in Eudora) and start
pointing to things. Or you could use the direct way, using ResEdit (see Chapter
21) to open the Eudora Help file (and then to double-click the STR# icon). As
shown in Figure 27-5, you’re in for hours of whole-family entertainment.
Figure 27-5: Eudora’s balloon help messages are a stand-up comedy routine.
988 Part IV: The World Online
■ ■
MACWORLD MAC SECRETS • 4040-8/X • ch27.f • Chapter 27• Proof F • LC • 10/28/98 • p.988
MACWORLD MAC SECRETS • 4040-8/X • Chapter 27• Proof 1 • SH • 09/25/98 • p.988
4040-8/5 ch27.F 11/3/98 3:27 PM Page 988

The Attachment-Nightmare Guidebook
Fortunately for those of us who write books for out-of-state publishers, you
can send more via e-mail than what fits in the Outgoing Mail window itself.
With a click on a special button, you can also attach a file from your hard
drive — a graphic, a program, a Microsoft Word document, or whatever —
and send that along for the ride with your typed message.
If you’re on America Online, and sending e-mail to someone on America
Online, all of this goes smoothly. Your copy of the AOL software automat-
ically compresses the outgoing mail (using StuffIt, described in Chapter 22),
and your recipient’s copy of AOL automatically decompresses it.
The Internet, unfortunately, isn’t nearly as well designed. Weirdly enough,
the Internet can’t actually handle Mac files at all. You or your e-mail software
must first turn it into the one thing you can send: a stream of plain old ASCII
text, which can travel intact across any file server, through any mail gateway,
and into any e-mail program, Mac, Windows, or anything else.
Why you can’t open attachments
To convert an attachment into a text stream for the Internet, various e-mail
programs use encoding schemes called things like MIME (Multipurpose
Internet Mail Extensions, also known as Base64); UUencode; BinHex; and
so on. When you receive an encoded file, it’s up to your e-mail program to
convert the file back into its original binary (Mac file) form. That’s what
usually happens, behind the scenes, without your even knowing about it.
Occasionally, however, your e-mail program can’t understand the “accent” of
the sender’s encoding software. The result is a file on your hard drive that
you can’t open.
How to fix It
Fixing a file that arrives in its encoded state is usually a simple drag-and-drop
affair. Use the freeware StuffIt Expander (included on the CD-ROM with this
book) to open BinHex files (often tagged with the .hqx suffix) and StuffIt (.sit)
files. If you also install the companion shareware clunkily called DropStuff
with Expander Enhancer (also included on the CD-ROM with this book), your
decoding/decompressing options multiply: you can now handle UUencoded
files (usually tagged with a .uu suffix), as well as a number of compression
formats, including .zip, .z, .gz, and .ARC files.
Another great attachment decoder—this one free — is Laurent Hagimont’s
uucd. Just drag the mystery file on top of these programs to set them in
motion.
Strange
But True
Chapter 27: Everything E-mail 989
■ ■
MACWORLD MAC SECRETS • 4040-8/X • ch27.f • Chapter 27• Proof F • LC • 10/28/98 • p.989
MACWORLD MAC SECRETS • 4040-8/X • Chapter 27• Proof 1 • SH • 09/25/98 • p.989
4040-8/5 ch27.F 11/3/98 3:27 PM Page 989
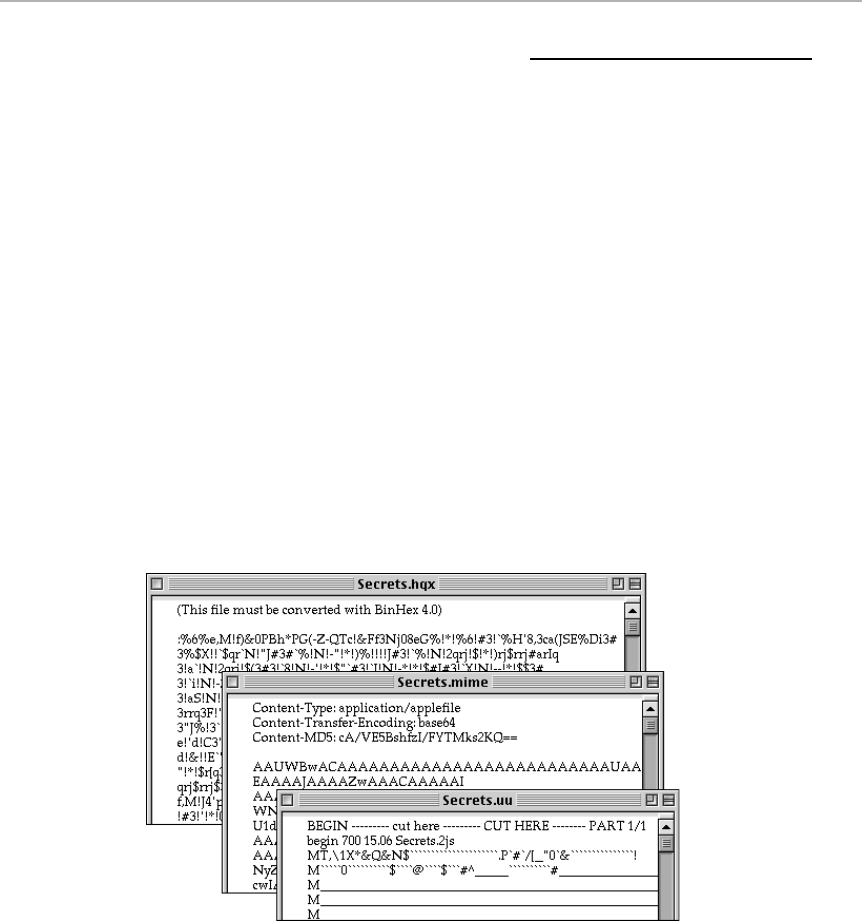
Attachment-Opening Secrets
■
Persistence pays
If your decoding effort fails, don’t be too quick to conclude that a file is
corrupted; you may be using the wrong decoding tool. There’s more than one
kind of UUencoding, for example, and a number of MIME variations. You may
have to run a file through several different utilities that all claim to do the same
thing to find one that offers the particular flavor of decoding you require.
Be a Code Detective
If an attempt to decode a file doesn’t work, open the file with your word
processor and read the header at the beginning of the code. It reveals the type
of encoding that the sender used.
For example, in Figure 27-6, you can see three file attachments that have been
opened into Microsoft Word. The first begins with a clear message that the file
must be converted with BinHex. MIME (Base64) files, like the middle document,
always contain a line at the top that says so. The third contains the letter M at
the beginning of every line. That’s your clue that it’s a UUencoded file.
Figure 27-6: A tale of three encoded files, all of which could be decoded with StuffIt
Expander and its Expander Enhancer add-on. From top to bottom: BinHex, MIME, and
UUencoding.
It’s not over till it’s over
Many e-mail file attachments have been both compressed (using StuffIt, for
example)
and
encoded (converted into Net-friendly text streams). In such cases,
990 Part IV: The World Online
■ ■
MACWORLD MAC SECRETS • 4040-8/X • ch27.f • Chapter 27• Proof F • LC • 10/28/98 • p.990
MACWORLD MAC SECRETS • 4040-8/X • Chapter 27• Proof 1 • SH • 09/25/98 • p.990
4040-8/5 ch27.F 11/3/98 3:27 PM Page 990
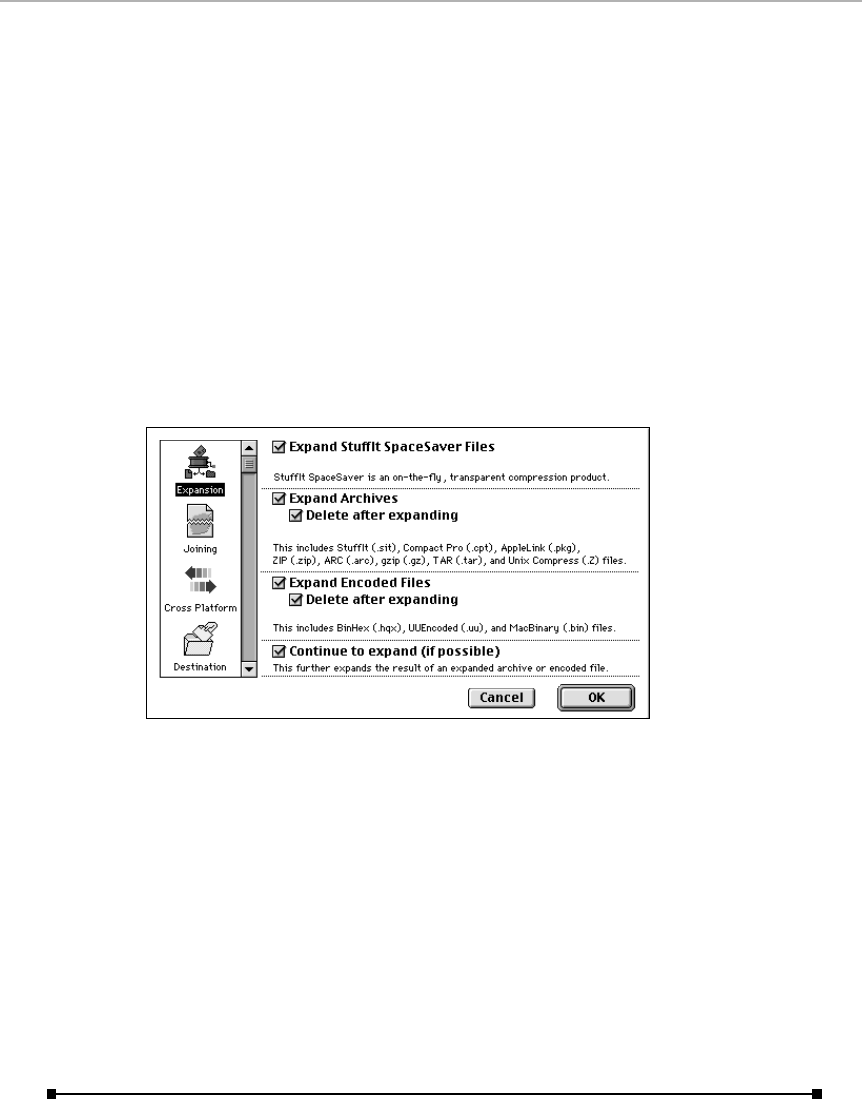
you may well have to run the attachment through a decompressing utility (like
StuffIt Expander)
twice —
once to decode, and again to decompress.
If you double-click Expander, in fact, you’ll be offered the option to perform such
double-restorations automatically, as shown in Figure 27-7.
Don’t count on double-clickability
If a file still won’t open after you’ve successfully decoded it, try opening it from
within the application that created it, using the Open command. UUencoded
files, in particular, tend to lose their
type and creator codes
(see Chapter 15) in
transit, arriving as documents with generic icons.
Opening the files from within the appropriate application solves the problem. In
other words, if you’ve received a word processing file, launch your word
processor; then choose Open from the File menu.
Figure 27-7: Double-click StuffIt Expander, and then choose Preferences from the File menu.
Among the useful options: the ability to “Continue to expand” (bottom), in the event your file
has been both encoded and compressed. Also: the option to specify a Watch Folder—your
Downloads folder, in other words — in which every incoming file will be automatically
decoded and expanded.
The AOL-to-Internet Conundrum
How much more simply can we put this? Sending file attachments between
America Online and the Internet at large is asking for disaster. AOL’s mail system
doesn’t use the standard Internet e-mail protocol; as a result, unopenable files
called things like Unknown.bin are a fact of life when sending or receiving e-mail
that crosses the AOL boundar y. You have no alternative but to ask the sender to
re-send the file, perhaps using a different compression method.
Chapter 27: Everything E-mail 991
■ ■
MACWORLD MAC SECRETS • 4040-8/X • ch27.f • Chapter 27• Proof F • LC • 10/28/98 • p.991
MACWORLD MAC SECRETS • 4040-8/X • Chapter 27• Proof 1 • SH • 09/25/98 • p.991
4040-8/5 ch27.F 11/3/98 3:27 PM Page 991

Spam and How to Nuke It
No doubt about it: unsolicited junk e-mail, better known as spam, is the ugly
underbelly of e-mail paradise. If the names and addresses were ever published
of the lowlife scum that sends out the billions of “MAKE EZ MONEY AT HOME!”
and “HOT XXXXX TEENS” come-ons each day, the problem would take care of
itself —the Internet population would drive over to the spammers’ homes and
rip apart each cell of their miserable little bodies.
But that’s the thing— spammers hide. Their e-mail doesn’t include a phone
number or postal address; you’re generally expected to visit a Web site or
respond by e-mail. (Please don’t do it! You’ll only encourage them.) Meanwhile,
our e-mail boxes fill up with useless crud that makes it harder to find the real
messages among them.
Until Congress gets in on the act, you’ll have to live with junk e-mail. You can,
however, enormously reduce its volume. Just follow the steps in our Spam-
Killing Secrets below.
Filtering
One of the most effective ways of purging spam e-mail from your life is to use
an e-mail program that has filtering. That’s a special feature in which the
program analyzes the name, subject, body, or other attributes of each piece
of incoming mail. In a fraction of a second, it routes the message into one of
several folders you’ve set up in advance, and then begins to analyze the next
message.
Every major e-mail program — Emailer, Outlook Express, Eudora, and so on—
offers a filtering feature. They’re called Mail Actions in Emailer, rules in
Outlook Express, and filters in Eudora, but the idea is the same. (America
Online’s own software doesn’t offer filtering, but you can use Claris Emailer
to handle your America Online mail and thereby add filtering.) Figure 27-2, for
example, shows the filter dialog boxes from Emailer.
Set up filters that analyze incoming mail for telltale spam clues. Route them
into a spam folder within your e-mail program, thus leaving your In Box folder
dramatically cleaner. Here are some filters that can screen your incoming mail:
■Create a two-step filter, as shown in Figure 27-8. First, the filter checks to
see if the message is from any Internet mailing lists (discussion groups)
you’ve subscribed to. If so, the message should get filed into your Mailing
List folder.
Next, the same filter should check to see if your e-mail address is in the
BCC (“blind carbon copy”) field of the e-mail — a common tactic of both
Internet mailing lists and spammers. (That’s why you had the filter weed
out legitimate mailing-list messages first.) Don’t necessarily route this
spam to your Deleted Mail folder; it’s conceivable that a legitimate mes-
sage could be sent to you using the BCC field (see “Anatomy of an E-mail,”
earlier in this chapter). File it instead into a “Spam?” folder that you can
992 Part IV: The World Online
■ ■
MACWORLD MAC SECRETS • 4040-8/X • ch27.f • Chapter 27• Proof F • LC • 10/28/98 • p.992
MACWORLD MAC SECRETS • 4040-8/X • Chapter 27• Proof 1 • SH • 09/25/98 • p.992
4040-8/5 ch27.F 11/3/98 3:27 PM Page 992
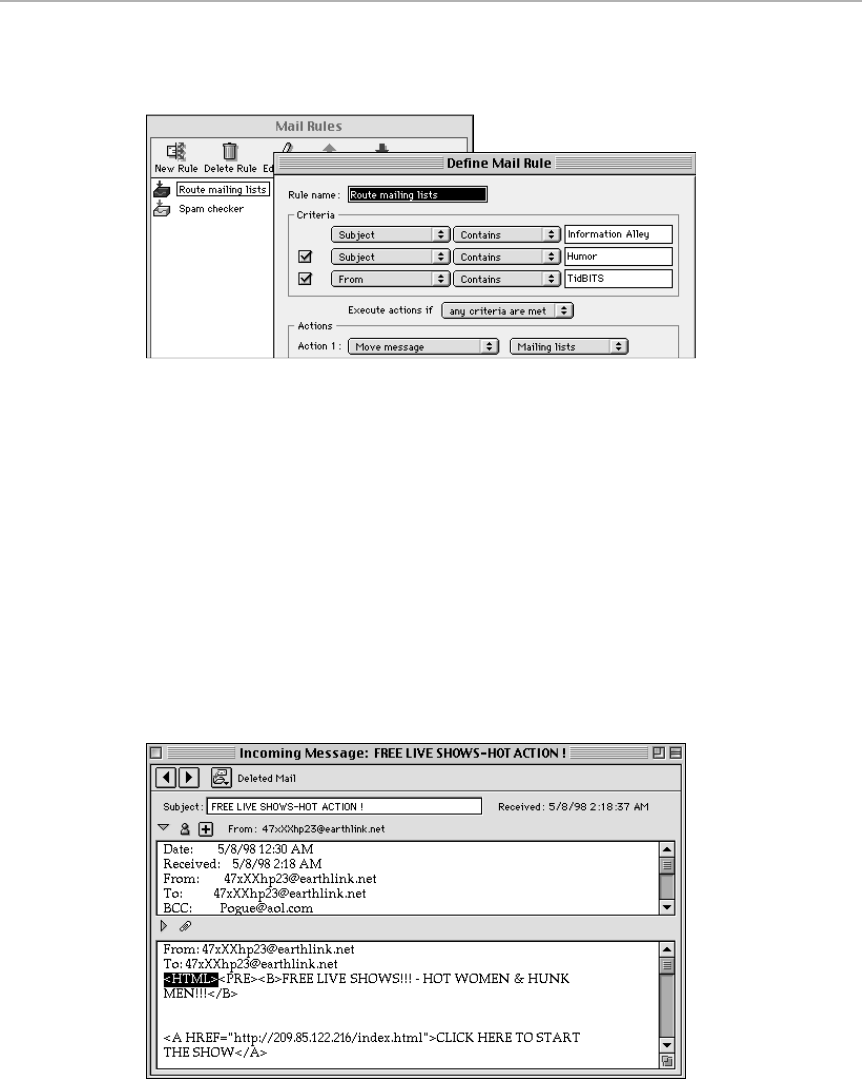
check every couple of weeks, thus giving yourself one last chance to
catch real mail before it heads to that great Internet in the sky.
Figure 27-8: In Outlook Express, you can see that the mailing-list Rules safely put the
mailing-list traffic away in its own folder before the anti-spam filter kicks in. (In the window
at left, mail rules higher on the list get executed first.)
■Create a filter that examines the message’s header for the phrase “-0600
(EST).” That scrap of data indicates the sender’s time zone, expressed
as a number of hours from Greenwich mean time. But EST (Eastern
Standard Time) isn’t six hours from Greenwich mean time. The only
headers that contain this phrase are junk mails (thanks to a bug in one
popular spam-sending program).
■At this writing, most HTML mail (e-mail that’s been formatted with fonts,
pictures, colors, and so on) is spam. You could create a filter that searches
for, for example, “<HTML>” in the body of the message and flags it as
potential spam, filing it into a folder to be inspected later (see Figure 27-9).
Figure 27-9: If you set up your e-mail program’s filters as we’ve suggested, this piece of
spam never would have made it through alive. It contains both <HTML> in the body and
your e-mail address in the BCC: line alone.
Chapter 27: Everything E-mail 993
■ ■
MACWORLD MAC SECRETS • 4040-8/X • ch27.f • Chapter 27• Proof F • LC • 10/28/98 • p.993
MACWORLD MAC SECRETS • 4040-8/X • Chapter 27• Proof 1 • SH • 09/25/98 • p.993
4040-8/5 ch27.F 11/3/98 3:27 PM Page 993

■Have your filter screen out e-mail in which the word you or friend appears
in the “To:” line of the message (unless, of course, your e-mail address
actually contains one of those words).
■Your filter should flag any messages containing the phrases “Extractor
Pro Bulk E-mail” or “This message is being brought to you by EMAIL
BLASTER 2.5.” (Those spam-sending programs advertise themselves in
everything they send.)
■If you’re really motivated, you can add filters that block any e-mail from
lists of known spammers. These lists are published online, at www.public.
usit.net/nwcs/Spam/Spam.html and www.fogcity.com/em_utilities2.0.
html, for example. Unfortunately, spammers nowadays simply switch to
different bogus addresses just to thwart the compilation of such lists.
You can also build such lists yourself, spam by spam, by setting up filters
that block all e-mail from repeat offenders. Note, however, that most
spam is forged — the address listed on the “From” and “Reply-to” lines
are fake. To spot the actual address (the one you’ll want to block), read
through the header/routing information that appears in a block of codes
at the bottom of each message. See the “Return-Path” line? That’s the
name to block.
For best results, in fact, filter out that entire domain (everything after the
@ sign, such as the boldface part of PermanentHairRemoval @quickscam.
com). Of course, don’t block that entire domain if it’s a legitimate, well-
known Internet provider (IBM, AT&T, MCI, Earthlink, Netcom, MindSpring,
Concentric, and so on) — because then you’ll also block e-mail from
legitimate senders.
Spam-Killing Secrets
■
Don’t get onto the e-mail lists at all
You may have wondered: How did you wind up on these junk lists to begin with?
Obviously, once you’re on them, you’re doomed — the spammers sell lists of
these names to other spammers, and the problem grows like ivy.
Answer: They get your e-mail address from
you.
Every time you post a message
on an online bulletin board, chat in a chat room, or even put your e-mail address
up on your Web page, you’ve just made yourself vulnerable to the spammers’
software robots. These little programs scour America Online, newsgroups (see
Chapter 26), and the Web, looking for e-mail addresses to collect.
“But if I can never post my e-mail address,” we can hear you protesting, “I’m
losing half the advantages of being online!”
Not necessarily. Consider setting up a second mailbox — that is, a second e-mail
address for your same America Online or Internet account. (That’s easy to do on
AOL; go to keyword
names
to set up a new one. If you have an Internet account,
call your ISP’s help line to arrange an additional mailbox.)
Mac Basics
994 Part IV: The World Online
■ ■
MACWORLD MAC SECRETS • 4040-8/X • ch27.f • Chapter 27• Proof F • LC • 10/28/98 • p.994
MACWORLD MAC SECRETS • 4040-8/X • Chapter 27• Proof 1 • SH • 09/25/98 • p.994
4040-8/5 ch27.F 11/3/98 3:27 PM Page 994
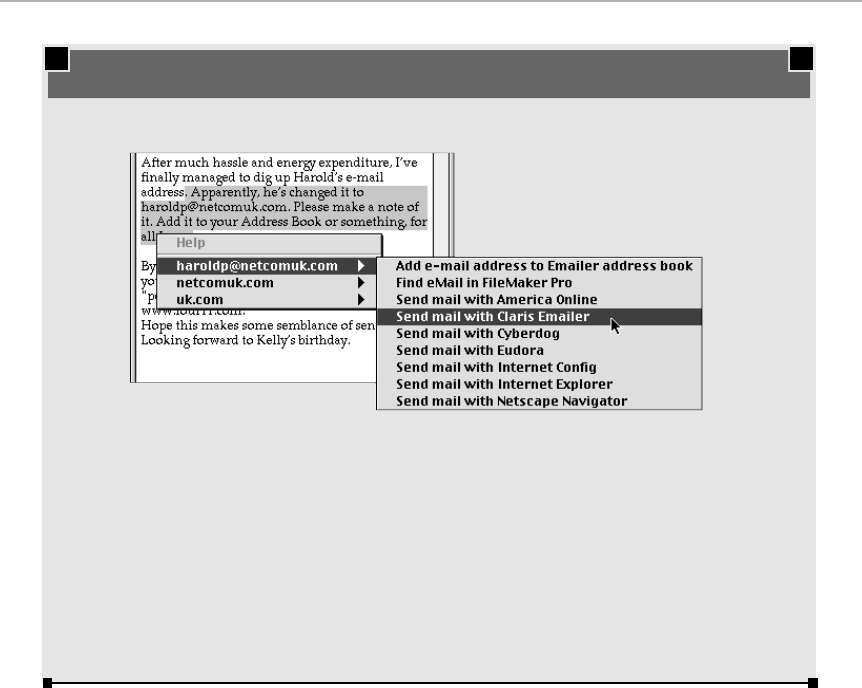
Thereafter, the game is easy to play: Use one e-mail address for public postings,
chats, and so on. Use your second, private one for e-mail only. Spam robots
can’t read private e-mail, so your secret e-mail address will remain virginal and
spam-free.
Disguise your e-mail address
Another way to keep spammers from getting your e-mail address is to disguise it
when you post messages in newsgroup bulletin boards (or when you post it on
your own Web page). Many veterans have taken to signing their messages on
these bulletin boards with deliberately scrambled addresses, such as
david at
pogueman dot com
instead of david@pogueman.com.
This process makes life a hassle for legitimate people who want to e-mail you,
of course, since it’s up to them to reconstitute the appropriate address. Still, it
keeps the spam robots off the trail.
Chapter 27: Everything E-mail 995
■ ■
MACWORLD MAC SECRETS • 4040-8/X • ch27.f • Chapter 27• Proof F • LC • 10/28/98 • p.995
MACWORLD MAC SECRETS • 4040-8/X • Chapter 27• Proof 1 • SH • 09/25/98 • p.995
MACINTOSH SECRET
One of Apple’s coolest technology successes
has been utterly ignored by the press. It’s the
Internet Address Detector (IAD).
Once you’ve downloaded this software (from
www.apple.com) and installed it, your
Control key becomes a regular Net-savvy
Sherlock Holmes. Drag sloppily through any blob
of text that contains any even remotely Net-
oriented address — an e-mail, Web, ftp, or other
kind of address — and you get a pop-up menu
filled with handy things you can do with that
address. You can add it to your e-mail program’s
address book; launch your browser to visit that
Web site; send an e-mail to the person whose
address appears; and so on, as you can see from
the example below.
Sure, the address-detecting trips over Office
98’s own control-key menus, but so what? Any
time Apple wants to save us time and trouble,
we’ll go for it!
The Internet Address Detector
4040-8/5 ch27.F 11/3/98 3:27 PM Page 995

Don’t reply!
Whatever you do, never reply to a piece of spam e-mail — even if the message
says that you can get
off
the e-mail list by doing so! Ironically, your response to
the e-mail will simply flag your e-mail address as a live, working one manned by
somebody who both takes the time to
read
the stuff and is unsophisticated
enough to fall for the “reply to be removed from the list” ploy.
Your name will become much more valuable to junk emailers, and you’ll find
yourself on the receiving end of a new wave of spam.
Strange
But True
996 Part IV: The World Online
■ ■
MACWORLD MAC SECRETS • 4040-8/X • ch27.f • Chapter 27• Proof F • LC • 10/28/98 • p.996
MACWORLD MAC SECRETS • 4040-8/X • Chapter 27• Proof 1 • SH • 09/25/98 • p.996
4040-8/5 ch27.F 11/3/98 3:27 PM Page 996

Macworld MAC SECRETS • 4040-8/X • ch28.F • Chapter 28 • FINAL • VB • 11/03/98 • p.997
Macworld MAC SECRETS • 4040-8/X • ch28.F • Chapter 28 • Final • EAP • 10/28/98 • p.997
Chapter 28
A Web Site–Making Crash Course
In This Chapter
©HTML and WYSIWYG design programs
©Creating tables
©Creating links
©Adding graphics, color, bulleted lists, and a counter to your page
©Securing Web space
©Keeping your Web pages updated
If you’re like many people, browsing the Web is only half the fun; the other
half is making your own Web pages. You might want your own Web page to
promote a business, post family pictures for other family members to see,
or just hang your work on a refrigerator that 200 million people walk by
every day.
Becoming a Web presence involves several steps:
1. Create your Web pages. Creating these special documents requires
programming, but it’s programming in one of the easiest computer
languages in the world: HyperText Markup Language, or HTML. Every
page you see on the Web has been designed using HTML, a fairly simple
language of special text codes. Fortunately, as we’ll explain, it’s possible
these days to design entire Web pages without ever actually typing any
HTML codes.
2. Arrange to get Web space. Once you’ve finished designing your
gorgeous Web pages, you need to post them on the Internet somehow;
otherwise, you’ll have to invite people over to your house to show off
your handiwork. Your next task, therefore, is to find a company who’s
willing to store your Web-page documents and leave its computers on
24 hours a day, so that your stuff is constantly available to the Internet.
(The company that provides your Internet access — whether America
Online or an ISP, as described in Chapter 26 — generally offers this
Web-hosting service at no extra charge.)
3. Send the Web pages to that Web space. To transfer your finished Web-
page documents to your Web-hosting company, you use a program like
Fetch or Claris Home Page. Behind the scenes, it uses a transmission
scheme called FTP (File Transfer Protocol). You’ll often hear Web geeks
4040-8/5 ch28.F 11/3/98 3:35 PM Page 997

use that acronym as a verb: “I’ve finished the new Web page. Now I’ll FTP
it to our Web-hosting company.”
4. Keep your Web pages updated. The best Web pages are those that
attract repeat customers — and the key is keeping the pages up to date
and fresh.
This chapter takes you through these steps one by one.
Create Your Web Pages
Behind the scenes, every Web page is actually stored as pages and pages of
textual programming codes — in the language known as HTML. Actual Web
pages, before being posted on the Internet, are merely text files filled with
these codes. (The graphics you see on a Web page aren’t actually part of
the text file — the HTML codes in that text file specify what graphic should
appear where, but the actual graphics are separate files.) In other words, you
can create Web pages by typing raw codes into SimpleText, or you can use a
$900 program like GoLive CyberStudio — but the result is the same: text files
filled with HTML code.
Welcome to HTML
Here’s a typical chunk of raw HTML before being translated into something
nice-looking by a Web browser like Netscape Navigator or Internet Explorer:
<HTML>
<HEAD>
<TITLE>The simplest HTML example</TITLE>
<H1>This is a level-one heading</H1>
Welcome to the world of HTML.
This is one paragraph.<P>
And this is a second.<P>
<B>And this is boldface. </B>
<CENTER>Ohhhhh, yeah! </CENTER>
Figure 28-1, on the other hand, shows what that blob of code produces when
viewed by a Web browser. Now you can see how the codes produce text
effects on the screen.
As you can see, HTML codes determine what formatting will apply to each
line. For example, the HTML tag for boldface is <B>. When your browser
encounters the HTML tag <B> and then finds the corresponding closing tag
</B>, it knows that the text between the two tag codes should be displayed
in a bold font. Text straddled by the <CENTER> and </CENTER> tags is
displayed with center alignment in a Web browser, and so on.
The dozens of different HTML tags can create headlines, italics, quotations,
colored text, blinking text, bulleted lists, numbered lists, and other formats.
A tag called <A HREF> lets you designate portions of a document as hypertext,
linking to another specific URL; the <IMG> tag lets you place a GIF or JPEG
graphics file (see Chapter 20) into the Web page.
998 Part IV: The World Online
■■
Macworld MAC SECRETS • 4040-8/X • ch28.F • Chapter 28 • FINAL • VB • 11/03/98 • p.998
Macworld MAC SECRETS • 4040-8/X • ch28.F • Chapter 28 • Final • EAP • 10/28/98 • p.998
4040-8/5 ch28.F 11/3/98 3:35 PM Page 998
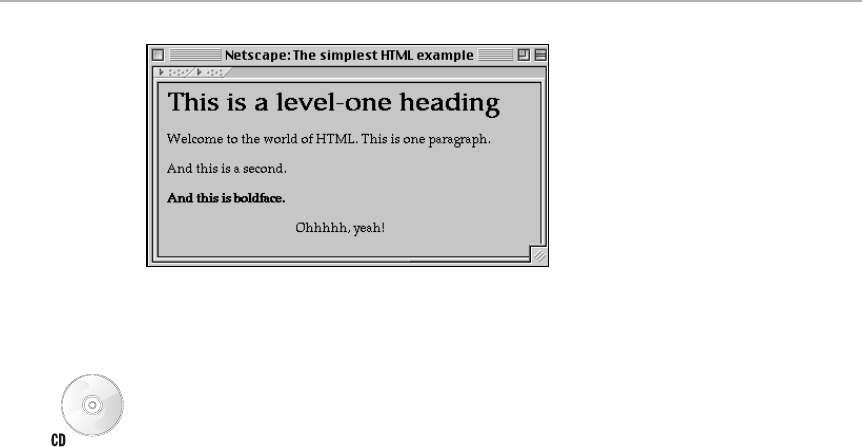
Figure 28-1: The simplest example of HTML code produces this look when viewed by
somebody visiting your page on the Web.
If you’d like a complete, plain-English description of each HTML code, what it
does, and how to use it, see the HTML Vocabulary program on the CD-ROM
that accompanies this book. We can think of few better ways to learn the
basics of Web-page coding.
WYSIWYG design programs
Obviously, then, creating your own Web documents doesn’t require much in
the way of specialized software. You can use SimpleText, in fact, if you know
which codes to use — and you type them perfectly every time. Of course,
typing codes isn’t exactly a lot of fun, and it’s frustrating not to know how
your HTML document will really look until you open it with a Web browser.
Fortunately, the software world has rushed to our aid. A broad range of
programs let you design Web pages without learning a single line of HTML
codes — basic programs like Adobe PageMill or FileMaker Home Page
(formerly from Claris), and expensive pro-level programs like Macromedia’s
DreamWeaver, GoLive’s CyberStudio, or NetObjects Fusion.
All of these programs let you apply text styles the way you’re used to doing
it (by choosing Bold from a menu, for example). They also make adding
hypertext links and graphics to your Web pages easy, and they provide a
WYSIWYG view of your work, so you know exactly what your Web page is
going to look like before you make it accessible to the rest of the world. You
generally can add the occasional HTML code to the pages you design using
these programs — but it’s not necessary.
Designing your Web page
Web pages can look like anything, as a few minutes online will show you.
Some pages look like advertisements: brightly colored photos and crisp text
against a white background, laid out professionally. Others look more like
computer games: red lettering on a black background. Some are utilitarian,
using 12-point Courier typewriter-style lettering against a default light gray
background, perhaps generated at a university or scientific institution
Chapter 28: A Web Site–Making Crash Course 999
■ ■
Macworld MAC SECRETS • 4040-8/X • ch28.F • Chapter 28 • FINAL • VB • 11/03/98 • p.999
Macworld MAC SECRETS • 4040-8/X • ch28.F • Chapter 28 • Final • EAP • 10/28/98 • p.999
4040-8/5 ch28.F 11/3/98 3:35 PM Page 999

without much concern for design awards. Yours can look like almost
anything — but make an effort to make it a good design for its purpose.
Why Web design is like page layout
In certain respects, the knowledge many Mac fans have acquired about
good-looking page design (see Chapter 18) is instantly applicable to
designing attractive and effective Web pages. For example:
■Don’t let your text run all the way across the screen. Lines of text longer
than about three alphabets’ width are too hard to read. If you’ve got an
article or other longish text you want read, indent it (or put it in one
column of an HTML table, described later) to keep its column narrower.
■Leave some white space around the elements of your page to increase
impact and legibility.
■Like a magazine cover, your home page (the first page visitors see) makes
a critical first impression. Good home pages are designed to fit the most
important information — a logo or headline, a graphic or two, a hint of
what’s to come — all on one screenful, so your visitor doesn’t have to
scroll to know what your site is all about.
Why Web design isn’t like page layout
Unfortunately, designing for the Web poses its own restrictions that you don’t
encounter when designing for paper:
■Graphics aren’t necessarily good in Web design. Every graphic makes
your page take longer to appear on your visitor’s screen, and makes it
less likely that that person will ever want to come back. Life’s too short.
Keep your graphics small and few!
■You don’t have much control over fonts. The fonts you choose on your
screen as you create the Web page won’t be the fonts used on your
visitors’ screens. If certain fonts are particularly dear to you (such
as those used in your headline or logo), you’ll have to create them in
Photoshop or Color It (included with this book) and save the result as
a graphic image. Unfortunately, the more graphics your Web page has,
the longer it takes to appear on your visitor’s screen.
(You can insert the HTML command FONT FACE to specify a font — in
fact, first, second, and third choices of a font — to be used if they’re
present on your visitor’s computer. An example looks like this:
<FONT FACE=”Palatino, Times, Helvetica”> Hello there! </FONT>
However, if your visitor’s computer doesn’t have one of those fonts,
they’ll see some random default font instead.)
■People will be reading the text on your page on a computer screen that’s
several feet away. Therefore, choose fonts that are as big as, or larger
than, printed fonts. Far too many Web pages today employ a crazy-
making 6-point font for large blocks of text. (Internet Explorer users can
click a button on the toolbar to enlarge the text on these pages — but
you’ll have happier visitors if you avoid tiny type at the start.)
1000 Part IV: The World Online
■ ■
Macworld MAC SECRETS • 4040-8/X • ch28.F • Chapter 28 • FINAL • VB • 11/03/98 • p.1000
Macworld MAC SECRETS • 4040-8/X • ch28.F • Chapter 28 • Final • EAP • 10/28/98 • p.1000
4040-8/5 ch28.F 11/3/98 3:35 PM Page 1000

■A Web site is harder to navigate than a paper magazine. Put a consistent
string of navigation buttons or links at one consistent edge of every one
of your Web pages. That way, it’s impossible for your visitors to get lost.
■Every browser is different. What looks great in Netscape Navigator may
have slight misalignments in Internet Explorer, and vice versa. Even
different versions of the same browser show some Web pages differently.
Test your page in as many different browsers as you can to avoid
unpleasant surprises.
■The electronic nature of the Web makes possible all kinds of computery
features: blinking text, animations, Java programming, and plug-ins.
Frankly, we loathe all of it. Why subject your visitors to these distracting
and time-consuming hassles? Filling your page with blinking or animations
is inviting visitors to click on through to somebody else’s page, if only to
avoid a migraine headache. And you’d better have a really good reason
to require a plug-in for enjoying your page. Such Web pages force your
visitor to scurry off to some other page to download and install some
plug-in, quit the browser, and re-launch the browser. If the payoff isn’t
pretty darned impressive, you’ll have some angry visitors who’ll never
come your way again.
■Similarly, avoid the temptation of putting a complicated repeating
background pattern behind your pages. (To do so, add the boldfaced
HTML code to the BODY tag at the top of your document, as shown in
bold here:
<BODY BGCOLOR=”#FFFFFF” background=”picture.gif”>
. . . where Picture.gif is the name of the GIF or JPEG file you want to serve
as the repeating tile.)
Our advice: Don’t do it. Underlying graphics make the text on top of it
incredibly hard to read. Use a white or very light backdrop if you want
anyone to read the text on your page.
The Web-Page Building Cookbook
Here’s how to create some of the most common Web page effects, using
either a drag-and-drop, graphic Web-page builder like Home Page — or a
text-based editor like BBEdit or even SimpleText.
If you use a program like Home Page, note that some of these techniques
require you to flip into HTML mode (choose Window ➪Edit HTML Source)
and type a couple of HTML commands. Don’t panic; a little bit of manual
programming is good for you.
And one more thing: For best results, unless you really know what you’re
doing, keep all the pieces of your Web page — the HTML (or Home Page
document), the various graphics files, and so on — in the same folder on your
hard drive. You’ll save yourself acres of typing and hours of headache later,
since a graphic that’s moved from its original folder is a graphic that, on the
Web itself, doesn’t even show up on your Web page.
Chapter 28: A Web Site–Making Crash Course 1001
■ ■
Macworld MAC SECRETS • 4040-8/X • ch28.F • Chapter 28 • FINAL • VB • 11/03/98 • p.1001
Macworld MAC SECRETS • 4040-8/X • ch28.F • Chapter 28 • Final • EAP • 10/28/98 • p.1001
4040-8/5 ch28.F 11/3/98 3:35 PM Page 1001

Similarly, don’t use spaces in the names of your HTML documents or
graphics files. Use underlines in place of spaces, or no spaces at all. The
result: Web pages that can be happily viewed by all kinds of computers,
not just Macs.
Creating a table
Tables are among the most useful helpers in Web page design. Don’t
necessarily think of tables as visible grids; instead, think of them as invisible
grids, like the Guides in a page-layout program. A huge percentage of
professionally designed Web pages, in fact, rely on tables to create their
magazine-like look (see Figure 28-2).
Figure 28-2: The Macworld magazine site (left) doesn’t look like a table, but that’s what it is.
You’ll find that out if you save the page (as “HTML Source”) to your hard drive and then open
it in a program like Home Page (right) and observing the gray table lines.
As in a word processor, the beauty of tables is that they’re stretchy; as you
add more text or a larger graphic to one cell of a table, it grows automatically,
keeping everything in the subsequent rows correctly aligned.
Creating a table in a program like Home Page is as easy as choosing Insert ➪
Table. (We won’t even attempt to explain how to create tables using
raw HTML. God help you.) Set Home Page’s Border box to 0 (or use the
BORDER=0 HTML command) to make the actual table lines invisible, if
you want.
Create a link
The “Web” part of the name World Wide Web, of course, derives from its
ability to link one HTML document with another — when you click the blue
underlined text hyperlinks or similarly linked clickable graphics. (See Chapter
25 for much more on this topic.)
To create a text link in Home Page, highlight some text; this will become the
blue, underlined, clickable hyperlink. Now choose Window ➪Open Link
Editor. A floating window appears, into which you can type the destination
1002 Part IV: The World Online
■ ■
Macworld MAC SECRETS • 4040-8/X • ch28.F • Chapter 28 • FINAL • VB • 11/03/98 • p.1002
Macworld MAC SECRETS • 4040-8/X • ch28.F • Chapter 28 • Final • EAP • 10/28/98 • p.1002
4040-8/5 ch28.F 11/3/98 3:35 PM Page 1002

Web address. (If you want the hyperlink to open another one of your own Web
pages, instead click the Browse Files button and locate the other HTML
document in your Web Page folder.)
If you’re using raw HTML, a link looks like this:
<A HREF=”products.html”>Click here for our product list. </A>
As you can probably figure out, what’s between the quotes is the hyperlink’s
destination document. What’s before the </A> is the text that actually
appears on your Web page — text that’s about to become blue, underlined,
and clickable.
Add a graphic
Prepare the graphic as a GIF or JPEG file, as described in Chapter 20. The key
here is to end the file name with .gif or .jpg, so that all the differently abled
computers of the world (such as Windows machines) will understand your
graphics when they visit your Web page. Remember: use GIF for solid colors
or cartoons for fastest loading. Use JPEG for photos.
Then drag the graphic image directly into the Home Page window to place it.
If you’re using raw HTML, use the IMG tags like this:
<IMG SRC=”headshot.jpg”>
If you want to align the picture with some text, create a table, as shown in
Figure 28-2. Put the picture in one cell, the text in another.
Add a color panel down the left side
A common Web page design (shown in Figure 28-3) features a colored panel
down the left side of the screen. Not only does it let you make a narrower,
more readable main column of text, but it gives you a magazine-style “sidebar”
in which to list the main links of your page, news of the day, or other info.
To create this effect, make a GIF graphic that’s about 30 pixels tall — but as
wide as the widest screen. Paint a color on the left couple of inches, as shown
at top in Figure 28-3. Save this GIF file into your Web-page folder. In this
example, suppose it’s called background.gif.
Flip into HTML mode (if you’re not already there). Near the top of your
document, you’ll see a BODY tag; after the BGCOLOR command, if there is
one, add the command shown in bold here:
<BODY BGCOLOR=”#FFFFFF” background=”background.gif”>
(If that sounds like the same command we discussed earlier with reference to
creating a repeating tiled graphic, you’re right. But this graphic is so wide, it
has no room to repeat itself horizontally — so it repeats vertically instead,
thus creating the colored-stripe effect.)
Chapter 28: A Web Site–Making Crash Course 1003
■ ■
Macworld MAC SECRETS • 4040-8/X • ch28.F • Chapter 28 • FINAL • VB • 11/03/98 • p.1003
Macworld MAC SECRETS • 4040-8/X • ch28.F • Chapter 28 • Final • EAP • 10/28/98 • p.1003
4040-8/5 ch28.F 11/3/98 3:35 PM Page 1003
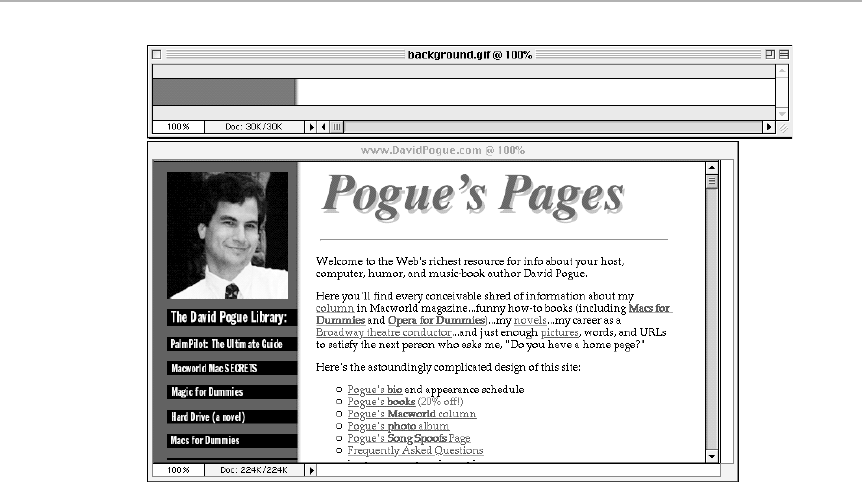
Figure 28-3: Create a horizontal strip of GIF (top), which features a colored-in left couple of
inches. When repeated down your Web page, it creates a colored vertical strip at the left
edge of the page (bottom).
Bulleted lists
Creating a bulleted list is easy in programs like Home Page — just choose
Format ➪Bullet List. In a raw HTML editor, use the UL and LI codes, like this:
<UL>
<LI> Here’s a bulleted list!
<LI> Look — a second item!
<LI> Whoa baby — three in this list!
</UL>
Life gets trickier, however, if you want to create a second paragraph within a
bulleted item. The solution: Hold down the Shift key as you press Return. The
effect is to create a new paragraph, but without creating a new bullet.
Adding a counter
We’re not exactly sure why society tolerates “number of visitors” counters on
Web pages. Sure, we love seeing how much traffic our Web pages get, too —
but we make our counters invisible, so that we don’t appear to be flaming
egomaniacs. (Besides which, there’s no telling what these counters are
actually counting, as you can read in the upcoming Answer Man sidebar.)
In any case, creating a counter isn’t easy; no one HTML code can do it.
However, whoever’s hosting your Web site (see “Secure Web Space,” later in
1004 Part IV: The World Online
■ ■
Macworld MAC SECRETS • 4040-8/X • ch28.F • Chapter 28 • FINAL • VB • 11/03/98 • p.1004
Macworld MAC SECRETS • 4040-8/X • ch28.F • Chapter 28 • Final • EAP • 10/28/98 • p.1004
4040-8/5 ch28.F 11/3/98 3:35 PM Page 1004

this chapter) can provide you with the correct instructions. That’s usually
your ISP (Internet service provider). For example, if America Online is your
service, use keyword: My Place and click the Help button to learn that the
necessary HTML code is:
<img src=”/cgi-bin/counter?screenname”>
Wherever that line appears in the text of your HTML code, the number of
visitors will appear as a number. (Put your AOL screen name, of course, in
place of the word screenname.)
HTML Secrets
■
Make Web pages the easy way
When you’re trying to design your own Web pages, don’t knock yourself out
trying to re-invent the wheel. Get into the habit of borrowing code and ideas
from any Web page that you decide you’d like to adapt.
To do so using Netscape Navigator, choose View ➪Source. You’re immediately
shown the HTML commands, in a new window, that created whatever amazing
graphics you just saw (see Figure 28-4).
Figure 28-4: A Web page (left) and the underlying HTML source code that created it (right).
By studying the HTML stuff — or copying and pasting it — you can make leaps in your own
HTML coding.
Worth
Learning
Chapter 28: A Web Site–Making Crash Course 1005
■ ■
Macworld MAC SECRETS • 4040-8/X • ch28.F • Chapter 28 • FINAL • VB • 11/03/98 • p.1005
Macworld MAC SECRETS • 4040-8/X • ch28.F • Chapter 28 • Final • EAP • 10/28/98 • p.1005
4040-8/5 ch28.F 11/3/98 3:35 PM Page 1005

Look smart and friendly: use ALT tags
As you can read in Chapter 25, one of the most powerful tricks available to a
Web surfer is the ability to turn off graphics. By asking Netscape Navigator or
Internet Explorer to display only empty rectangles where the pictures would
normally be, you can cruise the Web as though your modem just got a jet engine
implant — literally eight or ten times faster than surfing the Web with graphics.
As the first Web page in Figure 28-5 shows, however, the average Web site may
leave something to be desired when graphics are turned off: your visitors see
only empty squares where the graphics ought to be. The same page at right in
Figure 28-5 is much more satisfying, because each missing image is
identified
by a tiny caption. You know what you’re missing — and you know whether or not
it’s worth making the images appear (by clicking Navigator’s Images button, for
example).
So how do professional designers create those helpful little captions inside the
missing-graphic rectangles? By using ALT tags. If you’re using Home Page, click
an image and choose Window ➪Object Editor; a floating window appears in
which you can fill in the Alt Label box. (Whatever you type here will show up
1006 Part IV: The World Online
■ ■
Macworld MAC SECRETS • 4040-8/X • ch28.F • Chapter 28 • FINAL • VB • 11/03/98 • p.1006
Macworld MAC SECRETS • 4040-8/X • ch28.F • Chapter 28 • Final • EAP • 10/28/98 • p.1006
ANSWER MAN
Q: My buddy put up a simple little Web page
called “The Teletubby Loathing Club.” He claims
he’s getting 2,000 hits a day. Come to think of it,
everyone I’ve ever met who has a Web page
says they get similarly astronomical numbers of
“hits.” What’s going on?
A: Most of the “hits” figures you hear reported
are, indeed, grossly inflated. See, the thing is,
there are different kinds of hits (visits) on a Web
page.
Some counters simply tally the number of times
requests for data are made at your Web page.
These counts include HTML files, GIF files, and
so on. If your Web page has six graphics on it,
then one person visiting your page actually
generates seven “hits” (requests for files from
your ISP’s server).
Other counters rack up how many Web pages
each visitor sees on your site; if I visit your site
and check out three different pages, your
counter advances by three — another way in
which these statistics get inflated.
That’s why, when reading about these visitation
numbers, you should keep your eyes out for
tallies of unique hits (also known as impressions).
That’s a meaningful number; a unique hit is one
visit to your home page by one person. Even if I
visit your home page multiple times, I count as
only one visitor that day.
In the business of selling ad space on the Web,
the impression (or unique visitor) count is
important for determining ad prices. But
actually, advertisers are even more interested in
yet another statistic: the click-through rate.
That’s the percentage of visitors to your Web
page who click the ad itself.
HOW many hits?
4040-8/5 ch28.F 11/3/98 3:35 PM Page 1006
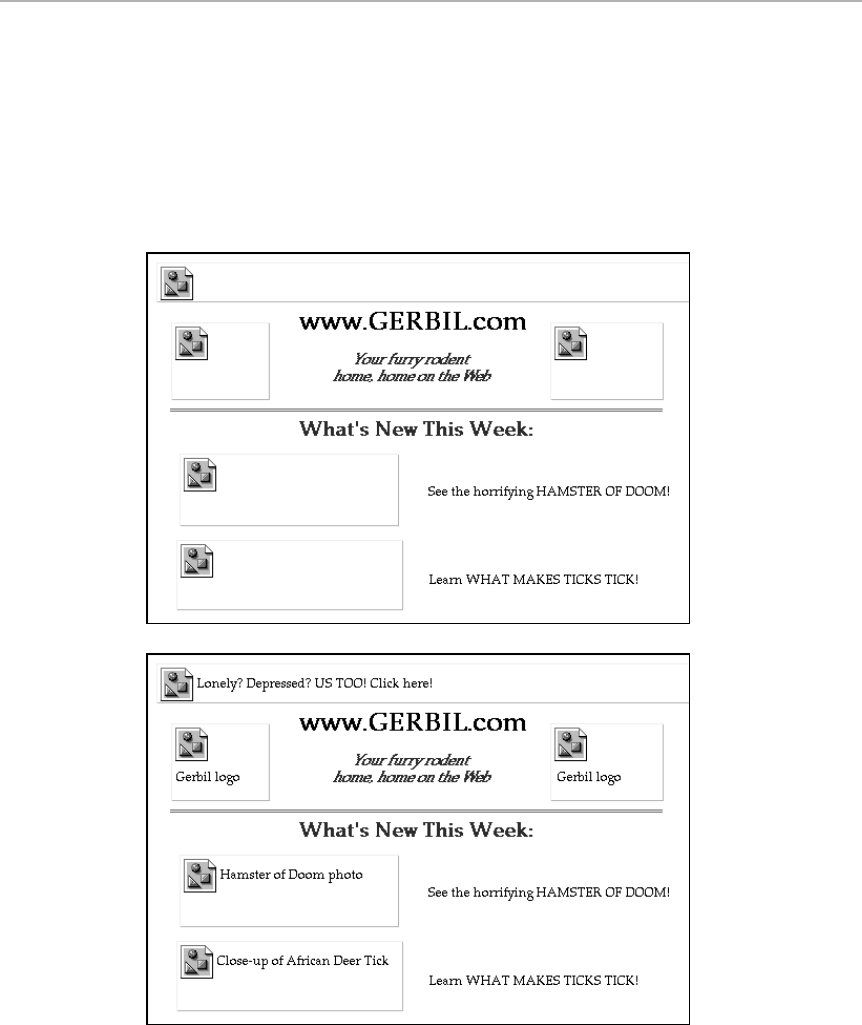
as the missing picture’s label.) If you’re editing in HTML, add the text to your
image code as shown here in bold:
<IMG SRC=”BostonMap.gif” ALT=”Map of downtown Boston”>
Not only do these labels make images-turned-off Web pages more
comprehensible, but they’re the
only
way blind computer users can surf the
Web. Special software can read Web pages out loud for the blind — but not if
there’s nothing to read.
Figure 28-5: An amateur Web page (top) and one that uses ALT tags (bottom) — with
graphics turned off.
Chapter 28: A Web Site–Making Crash Course 1007
■ ■
Macworld MAC SECRETS • 4040-8/X • ch28.F • Chapter 28 • FINAL • VB • 11/03/98 • p.1007
Macworld MAC SECRETS • 4040-8/X • ch28.F • Chapter 28 • Final • EAP • 10/28/98 • p.1007
4040-8/5 ch28.F 11/3/98 3:35 PM Page 1007

Graphics that fade in
The really savvy Web-page designers create
interlaced GIF
graphics — that is,
pictures that seem to load onto your screen in waves. After only a couple of
seconds, a blurry, grainy representation of the picture appears on your screen —
enough to judge whether or not the rest is worth waiting for — and only then
does the full-resolution image appear. How do they
do
that?
If you’re designing your Web page in Home Page, just choose Edit ➪Preferences ➪
Images, and turn on Make Interlaced GIFs. If you’re preparing your images in
Photoshop, and you save your image as “CompuServe GIF” (Photoshop’s name
for GIF files), you’ll be offered a dialog box with two choices: Normal or Interlaced.
Either way, the result is faster-loading low-res images, which your page’s visitors
will appreciate.
Graphics that change entirely
Some Web pages (such as www.outpost.com) make great use of this sneaky
feature: if you play your cards right, you can actually design graphic images that
appear nearly instantly on your visitors’ screens — in a very grainy, black-and-
white form, just enough to let them know what’s going on. Only after these
stand-in pictures have appeared do the real, full-res, color pix load.
You can pull off this special effect using the LOWSRC command in HTML,
which looks like this:
<IMG SRC=”babypic.gif” LOWSRC=”lowres_babypic.gif”>
If you’ve created two separate images — called, in this example,
babypic.gif
and
lowres_babypic.gif
— then this bit of code makes the low-res one load first, to be
followed by the hi-res one.
If you really think about this little stunt, you’ll realize that the two images don’t
actually have to be related! The two images can, in fact, be equally hi-res — but
just different. Your visitor might see, in the same spot on the screen, the first
image (“Welcome to — “), followed momentarily by the “hi-res” second image
(“Hamster Land!”). Yes, it’s cheapo animation for the programming-challenged.
Graphics: Make ’em small!
As we’ve tried to drum into your head, the images on your Web page should be
small and few. Your visitors will thank you.
But don’t just make your images small in
dimensions —
make an effort to keep
them small in
file size
, too. You do that by limiting the number of colors in each
graphics file. As we’ve mentioned elsewhere, GIF files (because they can contain
a maximum of 256 colors) are far quicker to show up on a Web page than
JPEG files. But even GIF files can be made smaller: before saving them, use
Mac Basics
Strange
But True
1008 Part IV: The World Online
■ ■
Macworld MAC SECRETS • 4040-8/X • ch28.F • Chapter 28 • FINAL • VB • 11/03/98 • p.1008
Macworld MAC SECRETS • 4040-8/X • ch28.F • Chapter 28 • Final • EAP • 10/28/98 • p.1008
4040-8/5 ch28.F 11/3/98 3:35 PM Page 1008

Photoshop’s Image ➪Mode ➪Indexed Color command. In the resulting dialog
box, choose Exact from the pop-up menu — or, at the very least, choose Web.
The latter command limits your image to the 216 “Web safe” colors that both
Macs and their color-challenged cousins, Windows machines, can display on
the Web.
Secure Web Space
Of course, writing the HTML documents is only part of establishing your own
Web site. To make your documents available to the outside world, you have
to load them on a Web file server — a computer that’s always on, always
connected to the Internet, and never being used for other, potentially
slowing purposes.
In other words, it’s typically impractical to try to set up a machine at home
for your Web site. While it can be done, you’d need an expensive, high-speed
connection (such as ISDN — a standard modem won’t cut it) and a machine
that’s dedicated to being a Web server. For most people, taking this route is
impractical and very expensive.
Fortunately, most Internet service providers (ISPs) offer a certain amount of
hard drive space — maybe two or five megs — to hold your Web pages as part
of your monthly $20 fee. Into that space, you can upload your Web pages
directly, making them available for public browsing. (If you need more space,
you can generally pay extra for the privilege.) The beauty of this system is
that your ISP takes care of keeping its computer up, running, and connected
to the Internet 24 hours a day.
Chapter 28: A Web Site–Making Crash Course 1009
■ ■
Macworld MAC SECRETS • 4040-8/X • ch28.F • Chapter 28 • FINAL • VB • 11/03/98 • p.1009
Macworld MAC SECRETS • 4040-8/X • ch28.F • Chapter 28 • Final • EAP • 10/28/98 • p.1009
ANSWER MAN
Q: Hey! I set up a Web page with my ISP, which
is Concentric. I have to tell my friends that my
Web page is at http://www.concentric.
net/~smithereen. By the time I finish, they’ve
walked away, besides which nobody knows
what I mean when I say “tilde.” How do
I get one of the cool addresses, like
www.smithereen.com?
A: Technically, signing up for your own domain
name, as those catchy little “dot com” names
are known, costs $35 per year. You go, on the
Web, to www.internic.com. There you can
search to see if somebody has already taken the
name you had in mind — and if not, you can
sign up to claim that name as your very own.
(You must pay for two years in advance.)
Unfortunately, getting that name wired to your
Web page is more complicated — so much that
hundreds of small companies have cropped up
that do nothing but perform this hookup for you.
You can consult the Yellow Pages for Internet
companies providing “domain hosting,” for
example. For about $200, they’ll both register
your chosen Web-page address and hook it up
to your actual Web page.
Setting up your own domain name
4040-8/5 ch28.F 11/3/98 3:35 PM Page 1009

If you’re an America Online subscriber, in fact, you get 2MB of Web-page
space per screen name, a total of 10 megs. Use the keyword My Place to read
about how you can create your own page on America Online, accessible by
anyone on the entire Internet. It doesn’t cost anything extra. You have your
choice of having a pretty simplistic page that shows nothing but your
America Online profile — or designing your own page, using HTML, as
we’ve been describing. People can even download stuff from your page,
look at pictures, whatever — as long as your material doesn’t take up more
than 10MB of total space.
Using your ISP’s free Web-page hosting offer is a nice start, but it has two
down sides. First, the megabyte limit is hard and fast. If you’re planning on
putting QuickTime movies of your Laguna Beach vacation up on your Web
site, you’ll either run out of space — or get a fat bill from your ISP for
exceeding your space limit.
The second downside: the Web sites hosted by AOL or your ISP won’t have
cool, catchy Web addresses like www.hamsters.com.Instead, you’ll have to
make do with something as unmemorable and lengthy as http://members.
aol.com/skibunny7 (where skibunny7 is your screen name).
Only by paying a special Web-hosting service, advertised in magazines and
on the Web by the trillions, do you have the opportunity to register a Web
address that’s short, snappy, and selected by you. (See the sidebar called
“Setting up your own domain name.”)
Send the Web Pages to Your Web Space
You’ve got the space set up and you’ve created your pages. The next step is
to test the pages locally: launch your Web browser without signing onto the
Internet, and choose File ➪Open Page. Locate and open your finished Web
pages, checking them to make sure they look good, all the links work, and
so on.
Now it’s time to send them Internet-ward. The most common method of doing
so requires a special Internet technology called FTP (file transfer protocol).
You’ll probably use one of three FTP methods to send your files and graphics:
■If you’re an America Online member, use the keyword My Place to upload
your finished HTML documents to AOL’s servers, where they’ll be
accessible by anyone on the entire Internet. (At this writing, you simply
click the icon called My FTP Space — and then click the Upload button
to start sending your Web-page files to AOL.)
■If an ISP or Web-hosting service is going to be your Web site’s home,
and if you’ve used a program like Home Page to create your Web pages,
you’re made in the shade. Use the File ➪Remote Save command, type in
the correct addresses (provided to you by your ISP), and click Save. (See
Figure 28-6.) Behind the scenes, Home Page automatically FTPs your
pages to the correct folder on your ISP’s hard drive — but to you, the
process just feels like doing a particularly time-consuming Save As.
1010 Part IV: The World Online
■ ■
Macworld MAC SECRETS • 4040-8/X • ch28.F • Chapter 28 • FINAL • VB • 11/03/98 • p.1010
Macworld MAC SECRETS • 4040-8/X • ch28.F • Chapter 28 • Final • EAP • 10/28/98 • p.1010
4040-8/5 ch28.F 11/3/98 3:35 PM Page 1010
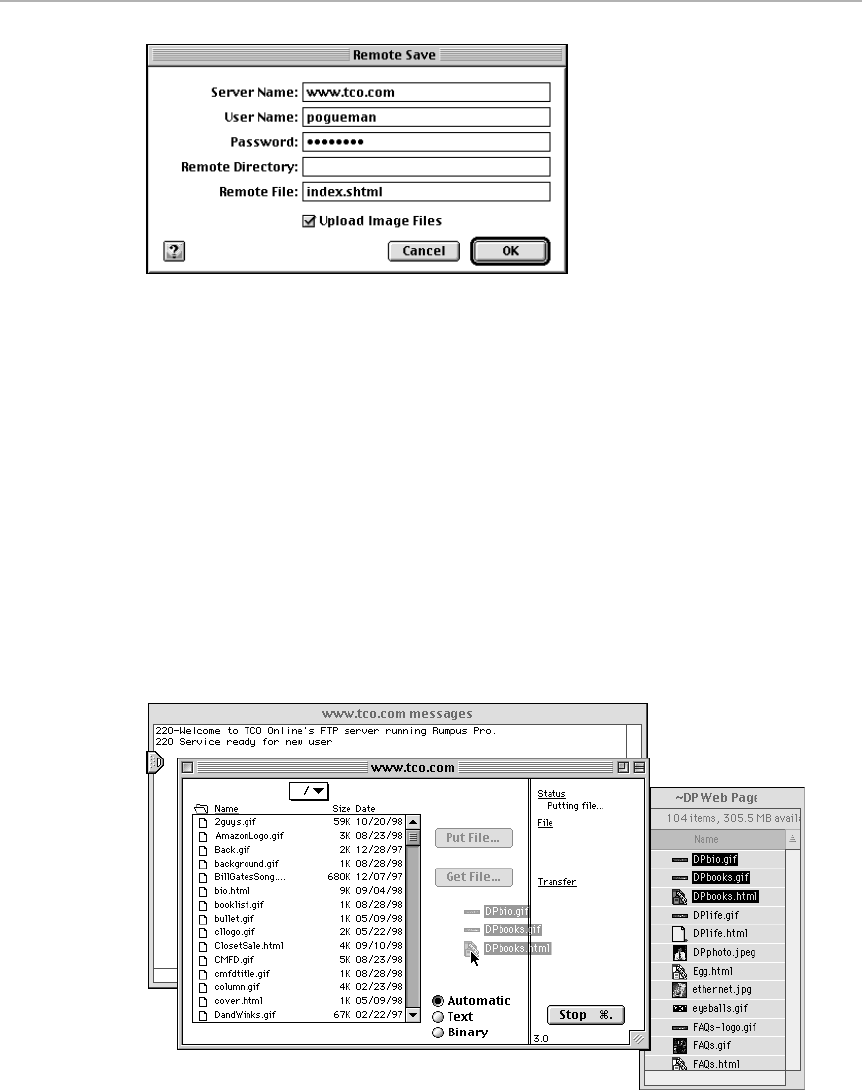
Figure 28-6: Using the Remote Save command in Home Page, you can send your newly
completed Web pages to their new home on the Internet.
■If you’ve done your pages the hard way, typing in raw HTML (or if you
use a Web-page editor that doesn’t have a Remote Save feature), you
need a program like Fetch. (It’s free, but only to individuals — the fine
folks at Dartmouth who created Fetch declined to let us include the
program with this book. You can download the program from
ftp.dartmouth.edu, www.shareware.com, America Online, or almost
anywhere.)
■Launch the program, type in the necessary directory codes (again, only
your ISP can provide them), and click OK. You’ll see a directory window
like that shown in Figure 28-7; at this point, you can simply drag the
HTML (or Home Page) documents — and accompanying graphics files —
from your Mac desktop into the list window. Fetch does the rest, sending
them to your ISP.
Figure 28-7: The Fetch software lets you drag HTML documents and Web-bound graphics
directly off your hard drive and onto the Internet.
Chapter 28: A Web Site–Making Crash Course 1011
■ ■
Macworld MAC SECRETS • 4040-8/X • ch28.F • Chapter 28 • FINAL • VB • 11/03/98 • p.1011
Macworld MAC SECRETS • 4040-8/X • ch28.F • Chapter 28 • Final • EAP • 10/28/98 • p.1011
4040-8/5 ch28.F 11/3/98 3:35 PM Page 1011

Regardless of the method you choose, within minutes, the HTML documents
you transferred will be available to the entire population of the Internet.
Keep Your Pages Updated
This step isn’t imperative — unless you want your visitors to come back
again and again. If your Web site is designed to sell or promote something,
generating lots of traffic is the whole point. If you’re just putting up photos
for your family to see, frequent updating isn’t so important.
To update your page, simply edit the HTML documents on your hard drive,
as indicated in big Step 2 of this chapter — and then re-upload them with the
same document names, thus repeating big Step 3 of this chapter. If your Web
site contains hotlinks to other pages, check them occasionally; other people’s
Web pages frequently move or get shut down. You don’t want your own Web
site to get so out of date that it’s accused of being a “cobWeb site.”
1012 Part IV: The World Online
■ ■
Macworld MAC SECRETS • 4040-8/X • ch28.F • Chapter 28 • FINAL • VB • 11/03/98 • p.1012
Macworld MAC SECRETS • 4040-8/X • ch28.F • Chapter 28 • Final • EAP • 10/28/98 • p.1012
4040-8/5 ch28.F 11/3/98 3:35 PM Page 1012

Macworld MAC SECRETS • 4040-8/5 • ch.29.F • Chapter 29 • FINAL • VB • 11/04/98 • p.1015
Chapter 29
Inside Fonts
In This Chapter
©Making sense of the formats: Bitmapped, PostScript, TrueType, and GX
©Where to put font files
©Suitcase, ATM, ATM Deluxe
©Why text prints with jaggies
©The Non-Typographer’s Guide to Type
©Solving font problems
For a term that’s not even used correctly, Macintosh fonts have certainly
changed the world.
For centuries, typographers used the word font to designate one typeface,
size, and style. Times Bold 18-point was one font. Times Bold 14 was another.
Even today, professional typographers (the non-Mac variety) still refer to one
type style as one font: Times Italic, Times Bold, and Times Roman are three
fonts. But in Macintosh parlance, one type family is usually called a font.
Times is a font. Helvetica is a font. Monaco is a font (barely).
The only Macintosh people who still count every stylistic variation as a
separate font are the manufacturers of laser printers, who can then advertise
their printers as having “35 built-in fonts!”
Anyway, fonts are both a blessing and a curse on the Mac. They’ve always
represented a technical topic. Trouble is, every time some genius gets the
bright idea to improve the situation, the Mac font world gets twice as messy.
Witness, for example, the increasing font-management nightmares caused by
the introductions of ATM, TrueType, and QuickDraw GX. And it’s not over yet.
We’re going to do our best to make all of these competing and overlapping
technologies clear. Prepare ye, though, for some tough slogging in the pages
ahead; when it comes to the programmers of font formats on the Mac, too
many cooks have definitely spoiled the broth.
The Evolution of Mac Fonts
When the Mac first appeared, fonts were extremely simple. There were ten
typefaces (see Figure 29-1).
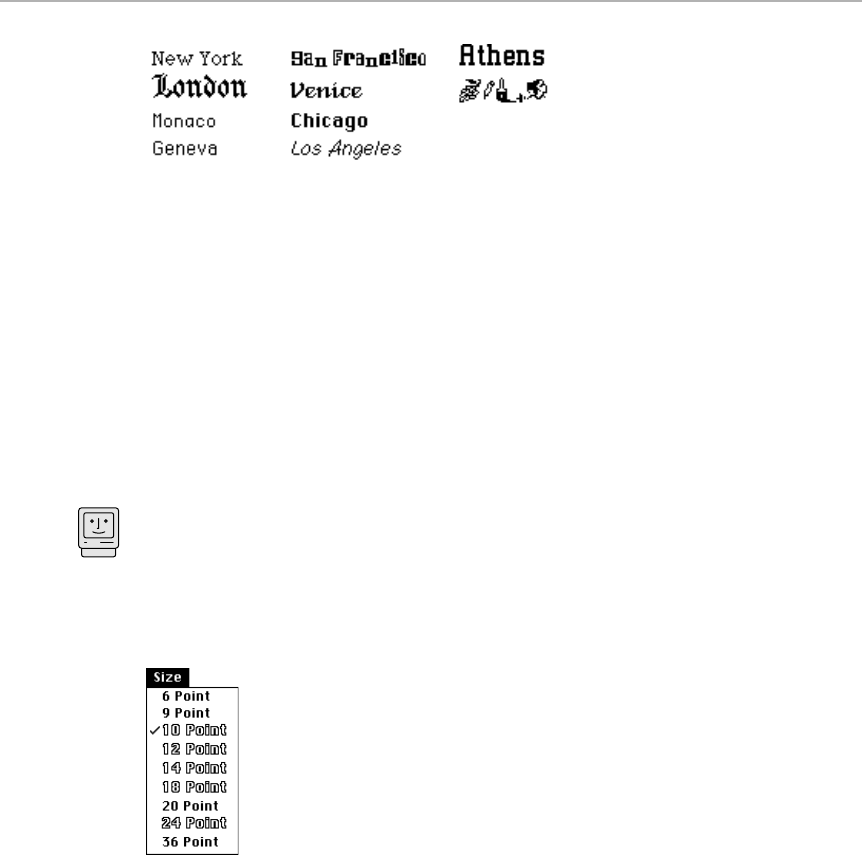
Figure 29-1: The original Mac fonts. There are some pretty clever jokes going into the names
of these fonts: New York is a take-off of Times (used by that prestigious newspaper); Geneva
is based on Helvetica (get the Swiss connection?); London is an Old English font; Monaco is
a monospaced font (every letter the same width); Cairo is a picture font, like Egyptian
hieroglyphics; and so on. (Anyone have any good theories about Chicago or San Francisco?)
Font format #1: bitmapped fonts
These first fonts were the original Mac fonts: bitmapped fonts. They were
designed exactly the way you’d imagine them to have been designed: by
somebody painstakingly drawing each letter, pixel by pixel, in a Photoshop-
like program. Each letter was composed of a map of dots (or bits). And that’s
how the Mac understood each letter: as a predefined arrangement of pixels.
Of course, bitmapped fonts weren’t ideal. Each letter of each font had to
be drawn separately in each size. Because it was so much work to design a
font, these fonts (then as now) came only in 9-, 10-, 12-, 14-, 18-, and 24-point
sizes — if that many. Venice only came in one size (14 points); London came
in one size (18 points). You knew which sizes had been predefined by looking
at the Font menu of your programs (see Figure 29-2).
Figure 29-2: The point sizes listed in hollow type are the ones that, for this font, were
created by a designer. If you choose one of the black-type fonts, the Mac will try to calculate
a reasonable facsimile by extrapolating from the installed sizes.
If you chose a point size that wasn’t predesigned by the font maker —
17-point, for example — the Mac did its best math. It examined the fonts at
the sizes that had been custom drawn and shrunk them or enlarged them
slightly, usually with hideous results.
Eventually, people learned to avoid noninstalled point sizes. The world became
filled with newsletters featuring 24-point Helvetica and 12-point New York.
Mac Basics
1016 Part V: Attachments
■ ■
Macworld MAC SECRETS • 4040-8/5 • ch.29.F • Chapter 29 • FINAL • VB • 11/04/98 • p.1016

Chapter 29: Inside Fonts 1017
■ ■
Macworld MAC SECRETS • 4040-8/5 • ch.29.F • Chapter 29 • FINAL • VB • 11/04/98 • p.1017
Like most Mac monitors of today, the Mac screen of 1984 was composed of 72
dots (pixels) per inch. That 72 dpi resolution happened to work well for fonts
because fonts were traditionally measured in points — of which, happily, there
are 72 per inch! A 12-point letter on the screen could be exactly 12 pixels tall.
The 72 dpi resolution also worked especially well with the Mac’s printer, the
ImageWriter, whose printouts in Standard mode were also 72 dpi. Each dot on
the screen produced a corresponding dot on the page. Your printouts were
WYSIWYG (what you see is what you get). (Sometimes printouts looked a
little better than the screen—if you had a bitmapped font installed that was
twice [ImageWriter], three times [ImageWriter LQ], or four times [the original
LaserWriter] the size of the type displayed on the screen, the printer driver
would automatically scale it down by the appropriate factor for smoothness.)
In terms of fonts, though, what you saw wasn’t what you wanted. Text at 72
dpi may have looked OK on a computer screen, especially compared with
what passed for type on the screens of other computer brands. But when it
hit the page, the low quality of those 72 large square dots per inch gave the
edges of each printed letter a ragged, stairstepped appearance — even with
the scaling trick described in the previous paragraph. Even today, when
things go wrong and text prints out jaggedly, you hear people saying, “My
text printed out bitmapped.”
Font format #2: PostScript fonts
The situation changed dramatically when Apple created the LaserWriter
printer. Its resolution was 300 dpi, over four times as sharp as the
ImageWriter’s Standard mode.
The most dramatic feature of the LaserWriter, though, was a new font (and
graphics) technology built into it, called Adobe PostScript. Chapter 30 has
the details; in short, the result of PostScript was that text printed by a
Macintosh no longer had to be crude 72 dpi bitmaps. Text still appeared on
the screen at that resolution—and, indeed, it always will—but when printed,
text printed by the LaserWriter was smooth, crisp, and fine. Furthermore, the
LaserWriter could print text smoothly at any point size, no matter how jagged
it was on the screen.
A new kind of font — in two parts
On the LaserWriter, those ten classic Apple fonts still printed out at exactly
the same coarse 72 dpi resolution. To work its high-res magic, the LaserWriter
required a whole new set of fonts: PostScript fonts (see Figure 29-3). To
distinguish them from the bitmapped fonts everyone knew, these fonts
had non-city names.
The LaserWriter meant that your screen and your printer had different
resolutions. To solve this incompatibility, Adobe came up with a simple
enough solution: create two files for every font — one for the screen and one
for the printer.
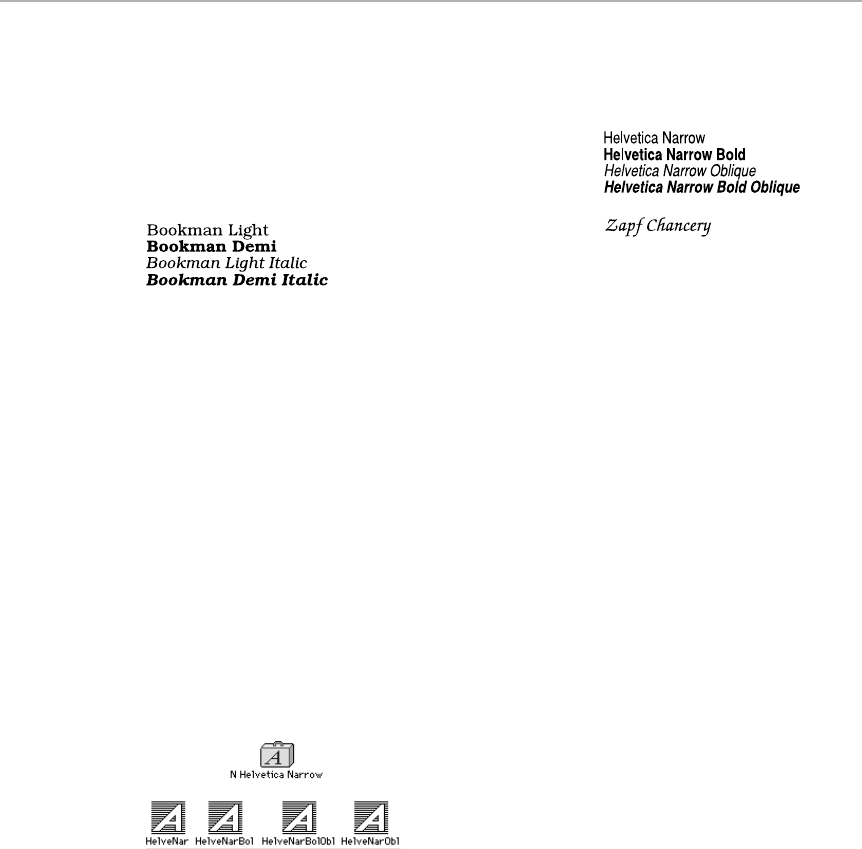
1018 Part V: Attachments
■ ■
Macworld MAC SECRETS • 4040-8/5 • ch.29.F • Chapter 29 • FINAL • VB • 11/04/98 • p.1018
Figure 29-3: The 35 built-in LaserWriter fonts.
The screen display used the bitmapped fonts people had always used. In the
age of laser printers, bitmapped fonts (also called fixed-size fonts) now took
on a third moniker: screen fonts.
This was to distinguish the screen-display fonts from the PostScript half of
each font: the printer font. This was a separate file. It was distinctive for
several reasons:
■You didn’t install it into your System file, as you did a screen font. You
left it loose in your System Folder.
■Its name didn’t match the screen font’s name. Instead, it was abbreviated
to signify that it was a printer font. The printer font for bold, oblique
Helvetica Narrow was called HelveNarBolObl (see Figure 29-4).
Figure 29-4: The two halves of a PostScript font: the screen font (top) and the printer font
files, one for each type style.
■There was one file for every single style variation of a font. To create an
italic bitmapped font, for example, the Mac simply slopes the letters
(offsetting each consecutive row of pixels). Technically, that’s an oblique
typeface, not italic. But a true italic typeface has a completely different
design. Therefore, a PostScript font required one printer font apiece for
bold, italic, and bold italic styles.
New Century Schoolbook
Roman
New Century Schoolbook
New Century Schoolbook
Italic
New Century Schoolbook
Bold Italic
Palatino
Palatino
Palatino
Palatino Bold Italic
Courier Roman
Courier Bold
Courier Italic
Courier Bold Italic
Helvetica Roman
Helvetica Bold
Helvetica Oblique
Helvetica Bold
αβχδεφγηιϕ
(Symbol)
(Zapf Dingbats)
❁❂❃❄❅❆❇
Times Roman
Times Bold
Times
Times Bold
Avant Garde
Avant Garde
Avant Garde
Avant Garde Demi
Bold

Chapter 29: Inside Fonts 1019
■ ■
Macworld MAC SECRETS • 4040-8/5 • ch.29.F • Chapter 29 • FINAL • VB • 11/04/98 • p.1019
PostScript fonts did more than solve both problems (low resolution and
small choice of sizes) associated with bitmapped fonts. Because PostScript
was a graphics language and not simply a font technology, you could perform
all kinds of wild text manipulations with PostScript text: stretch it, print at an
angle, distort it, and so on. (We showed you a couple of these techniques in
Chapter 20.)
How it works
A PostScript font is capable of all these stunts because it isn’t a bitmap. Each
character is stored as a series of mathematical equations that describe
curves forming a hollow outline of each letter (see Figure 29-5).
Figure 29-5: How the Mac thinks of a screen font (left) and a printer font (right).
The PostScript printer simply fills in this outline with black, regardless of how
many printer dots it takes. A LaserWriter fills it in with 300 or 600 dots per inch.
A PostScript imagesetter (see Chapter 30) fills it with many more dots per inch.
Because a PostScript font is a set of character outlines, you can see how easy
it is for a printer to enlarge or reduce your text. All it must do is multiply its
little equations by 0.3 or by 3 or by 33, for example, to create text that’s much
smaller or much larger than normal size. That’s why the screen still needs a
certain font in several installed sizes, but the printer doesn’t.
Despite the PostScript breakthrough, Adobe’s dual-font system wasn’t
without its drawbacks — especially the requirement to maintain two sets of
fonts in the System Folder. And then there was the screen display; PostScript
screen fonts worked just as badly as the original bitmapped fonts always had.
ATM
The screen-display problem was finally solved by the invention of Adobe
Type Manager (ATM) in 1989. In principle, this control panel treats the screen
as just another printer. That is, it interprets those same PostScript printer
fonts, in your System Folder, for drawing on the screen. Fonts still appear at
72 dpi, of course, but they have all the other advantages of PostScript fonts:
They can be stretched, angled, and—most importantly — changed to any
size without sacrificing clarity (see Figure 29-6).

With ATM, then, the Mac thinks of type as outlines, both on the screen and
when printed. Thus, ATM provides one other important benefit: smooth,
resizable text printouts on non-PostScript printers, such as ImageWriters or
StyleWriters. Suddenly, as far as type is concerned, those printers got the
royal PostScript-font treatment. Because of ATM, PostScript font jaggies have
been banished from both the screen and every kind of printer.
Figure 29-6: A 111-point Palatino letter R on the screen — both without (left) and with
ATM installed.
The latest version, ATM Deluxe, also offers font-management capabilities (like
the old font-management standby, Suitcase), allowing you to open and close
selected groups of PostScript and TrueType fonts easily and conveniently.
ATM Deluxe also performs font substitution, creating facsimiles of fonts that
aren’t installed, so you can still get an idea of what a document looks like
even if you don’t have the required fonts. For more on font substitution,
see “Close, but no Helvetica.”
Mac Basics
1020 Part V: Attachments
■ ■
Macworld MAC SECRETS • 4040-8/5 • ch.29.F • Chapter 29 • FINAL • VB • 11/04/98 • p.1020
ANSWER MAN
Q: What exactly is font substitution?
A: Adobe Type Manager Deluxe, Adobe’s
enhanced version of ATM (and a descendant of
the discontinued Super ATM), goes a long way
toward solving an old problem: You open a
document for which you don’t have all the
original fonts installed.
Instead of simply showing you Courier or New
York in the place of the missing fonts —
complete with awful line breaks that result from
the different widths of these fonts — ATM
Deluxe consults a database of all Adobe fonts.
(As you can imagine, this database takes up
considerable disk space.) It then displays a font
on the screen that looks almost like the original.
The program’s success at re-creating the exact
look of a missing font varies from font to font; its
substituted text faces look amazingly close to the
absent fonts, but its display faces (espe-cially
fancy ones) may bear little resemblance. You can,
however, always count on ATM Deluxe to draw
its substitute font at precisely the correct letter
widths. Therefore, you can always count on line
breaks, page breaks, and headlines looking
exactly as they did with the original fonts.
ATM Deluxe’s sole limitation is that it only
works with Adobe PostScript fonts. It can’t help
your library of Bitstream or other PostScript
fonts (and it certainly can’t help with non-
PostScript fonts, TrueType, or bitmapped fonts).
Close, but no Helvetica
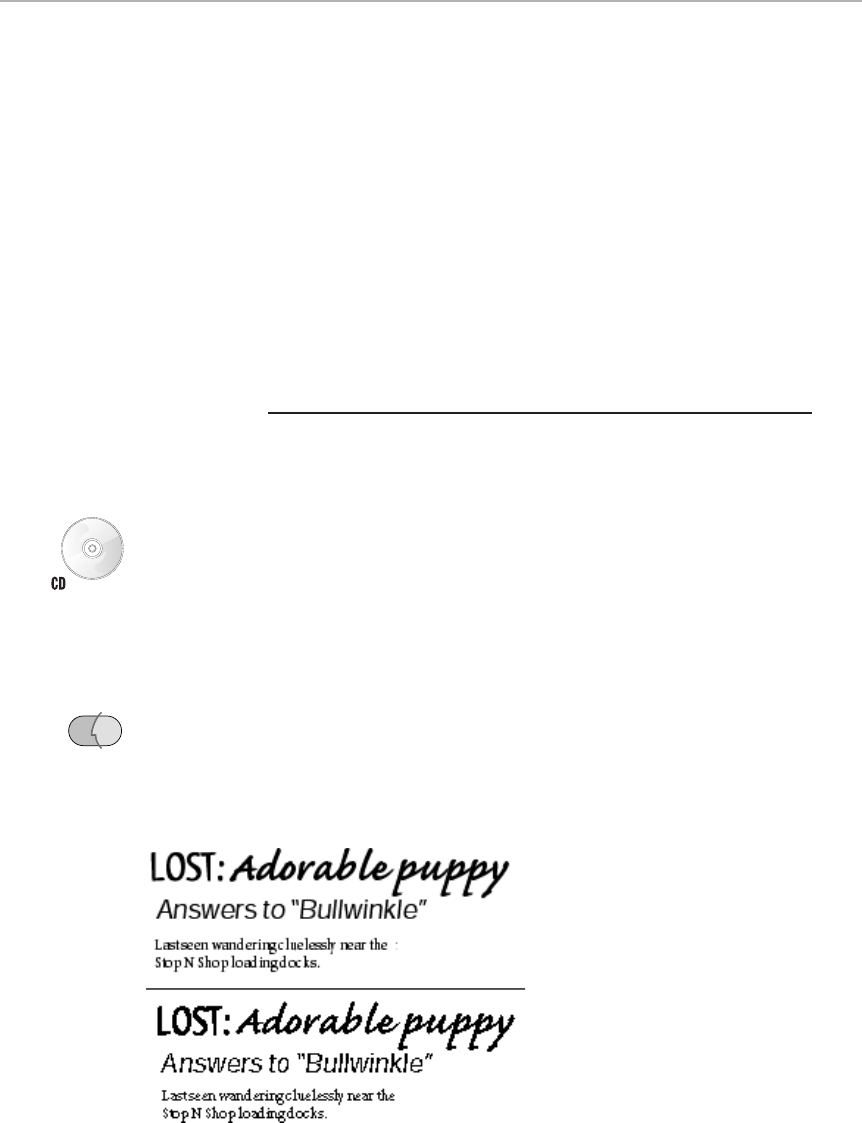
You do pay a small price for ATM’s impressive technology — much less today
than in its original incarnation, but a price nonetheless:
■ATM requires a large chunk of memory: at least 500K for itself, plus an
additional amount that you can adjust in the ATM control panel (Adobe
recommends 50K per font).
■Most people don’t have the printer-font files for the LaserWriter’s built-in
fonts (Times, Helvetica, Palatino, and so on).
■You have to buy ATM Deluxe. It costs $100, complete with 30 fonts.
On the other hand, if all you want to do is scale fonts, a non-deluxe, font-
smoothing-only version comes free with this book (see our secrets below).
And if you have Mac OS 8.1, it’s right there in the Adobe Software folder on
the 8.1 CD.
ATM Secrets
■
Your free copy of ATM
On the CD-ROM that accompanies this book is the Adobe Acrobat Installer (it’s in
the Mac Secrets Electronic Edition folder). Along with the actual Adobe Acrobat
Reader, it installs the original $99 ATM control panel — for smooth display of any
PostScript font at any size, on screen or printer. (It lacks only the font-suitcase
management features of the Deluxe edition.) See the appendix for details.
Anti-aliased text on the screen
As Figure 29-7 shows, ATM Deluxe introduced a curious new feature to the
Macintosh, a feature later incorporated into Mac OS 8.5:
antialiased onscreen
text.
“Antialiased” means “has softened, blurry edges,” as shown at right in
Figure 29-7. You may have seen this kind of special text on Web pages or in
Photoshop artwork — but ATM Deluxe can bring it to
all
text on your screen.
Figure 29-7: Top: antialiased
onscreen text, thanks to ATM Deluxe.
Bottom: normal onscreen text.
OS
8.5
Chapter 29: Inside Fonts 1021
■ ■
Macworld MAC SECRETS • 4040-8/5 • ch.29.F • Chapter 29 • FINAL • VB • 11/04/98 • p.1021

Also as shown in the figure, however, at small sizes, antialiased text can actually
be harder to read than sharp-edged text. And antialiased text takes time to create;
open a Word document that uses many different fonts, and you may wait for
several seconds while ATM Deluxe per forms all of its necessary calculations.
Those drawbacks are why ATM Deluxe offers selective control over which fonts
get the edge-softening treatment. In the program’s Preferences dialog box, you
can specify that, for example, no antialiasing should happen to fonts for which
your Mac has
installed sizes,
as explained in “Why screen fonts still exist even
with ATM,” later in this chapter.
Mac OS 8.5’s antialiased-text feature (which you can turn on and off in the
Appearance control panel, as described in Chapter 4) doesn’t offer the ability to
turn off text smoothing for installed point sizes, as ATM does. However, it offers
one enormous benefit ATM Deluxe doesn’t: Mac OS 8.5’s font smoothing works
on TrueType fonts, not just PostScript. And TrueType, we’re guessing, is what the
vast majority of Mac users use most of the time.
Font format #3: TrueType
ATM and PostScript fonts made the world’s graphic designers happy enough.
Trouble was — as far as Apple was concerned — no one was getting rich
except Adobe. Adobe made the fonts. Adobe made ATM. Worst of all, Apple
was paying Adobe a royalty of close to $750 per LaserWriter for permission
to include PostScript technology. That kept prices of laser printers high, and
it kept sales lower than Apple would have liked.
So Apple came up with a brilliant scheme. It would come up with its own
version of PostScript! Apple would own it, and, therefore, wouldn’t feel
beholden to Adobe Systems. The font technology Apple came up with was
TrueType.
A TrueType font works exactly like a PostScript font with ATM in that you can
resize, reshape, and stretch the type, and it always looks smooth and sharp
on the screen and when printed. As an added bonus, it has three advantages:
■There’s less file mess. One single icon on your disk represents both the
screen-font information and the printer-font information.
■You can find out what the font looks like by double-clicking its icon.
■A basic set of TrueType fonts comes with every Mac (see Figure 29-8).
OS
8.5
1022 Part V: Attachments
■ ■
Macworld MAC SECRETS • 4040-8/5 • ch.29.F • Chapter 29 • FINAL • VB • 11/04/98 • p.1022
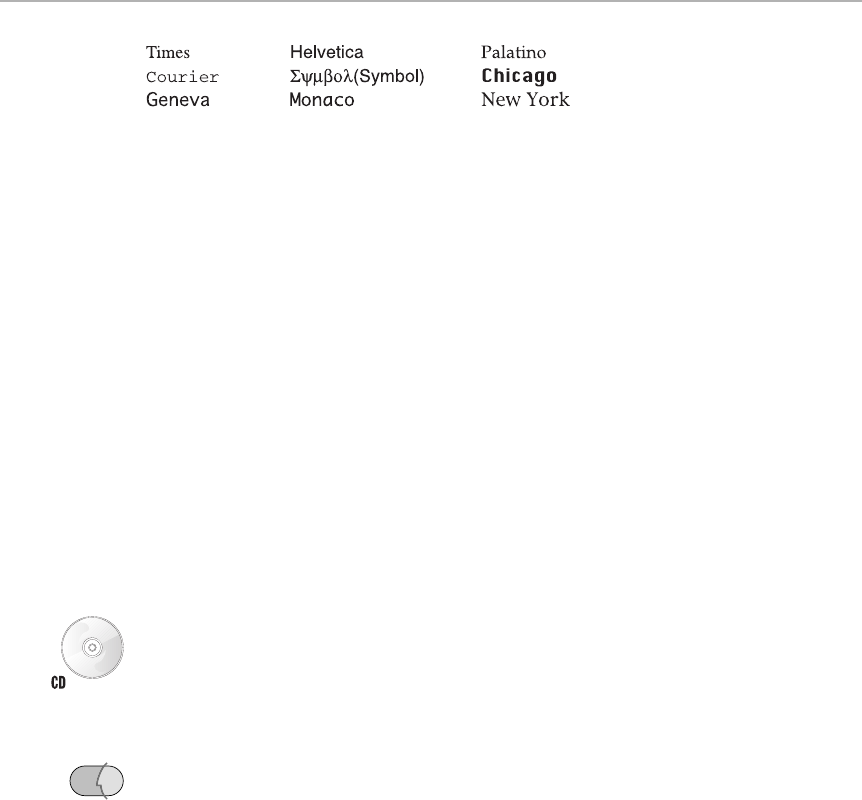
Figure 29-8: The basic set of nine TrueType fonts included with System 7 and later. Some
former bitmapped-only fonts — some of the “Apple Classic Fonts” — have been converted
into TrueType form, too.
For anyone who isn’t a graphics or publishing professional, then, TrueType is
a blessing and a hassle-saver.
Yet PostScript didn’t go away when TrueType came along. Many people had
invested huge amounts of money in PostScript fonts, and they weren’t about
to buy an entirely new library of TrueType fonts. PostScript fonts print with
fewer hassles than TrueType on professional printing equipment (such as
Linotronic gear), too.
Furthermore, TrueType is only a font technology. PostScript, on the other
hand, is a graphics technology. It does much more than manipulate text, as
you’ll find out in Chapter 30; it does lines, shadings, and colors equally well.
TrueType, which deals only with type, couldn’t possibly have replaced all the
flexibility of PostScript.
Font format #4: GX fonts
After years of behind-the-scenes programming, Apple unleashed QuickDraw GX
upon the world in 1994. The Fourth Edition of this book (provided in electronic
form on your CD) covers GX in more detail; in brief, this new printing/color/type
architecture could do amazing things for fonts. Unfortunately, to benefit from
all its magical intelligence, you would have had to get rewritten programs and
rewritten fonts.
Neither came to the marketplace in any meaningful way; as of Mac OS 8,
Apple officially abandoned QuickDraw GX, although many of its technology
advances live on in, for example, Mac OS 8.5.
Working with multiple font formats
Today, then, you’ve got three essential kinds of fonts: bitmapped, TrueType,
and PostScript (see Figure 29-9). This can be confusing, because you’re quite
likely to run into fonts of the same name in each of these formats!
OS
8
Chapter 29: Inside Fonts 1023
■ ■
Macworld MAC SECRETS • 4040-8/5 • ch.29.F • Chapter 29 • FINAL • VB • 11/04/98 • p.1023
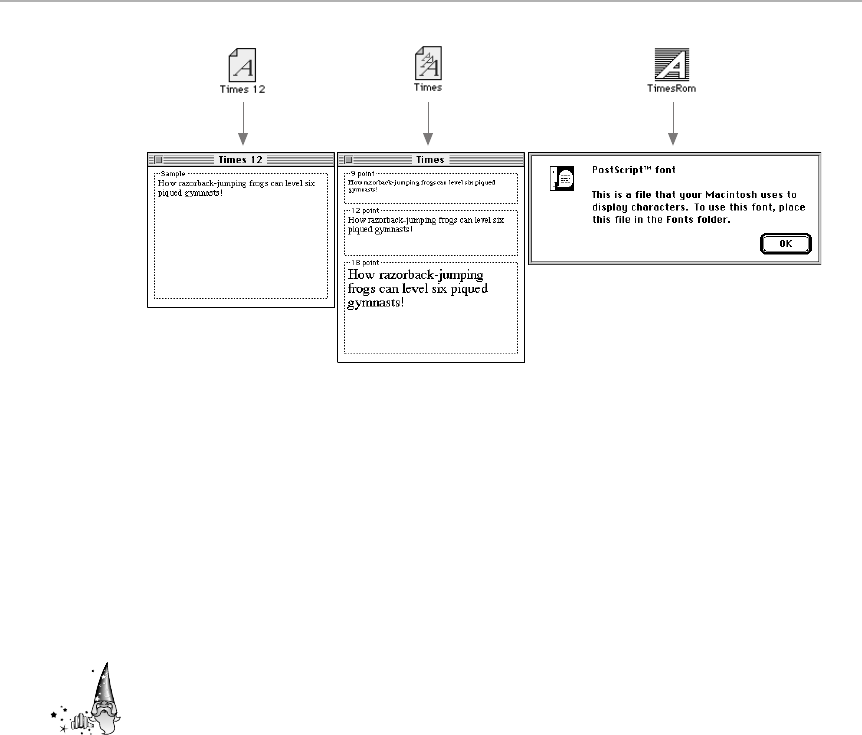
Figure 29-9: Three kinds of fonts, three reactions to a double-click. On the left, a bitmapped
(screen font) icon. Double-click it (in System 7 or later) to view a window where you see
what this screen font looks like in its one size and style. Middle: a TrueType font. Double-click
its icon to see the type style in three sample sizes. Right: a PostScript printer-font file.
Double-click it and you just get an error/help message.
Why screen fonts still exist even with ATM
If ATM consults the printer fonts to decide how to draw the characters on the
screen, then you might wonder why a PostScript font has a screen-font
portion at all.
The answer is that, without at least one point size of a screen font, the Mac
wouldn’t know that you even have a font. That font’s name wouldn’t show up
in any of your Font menus. Yes, ATM can handle the display of any point size
you select. But one point size of each PostScript font must be installed into
your system just so it will turn up in the Font menus.
In fact, we can make a good argument for keeping more than one point size of
each font installed. Whenever you display a font at a noninstalled size, ATM
must kick into gear, consulting the printer-font files and drawing the text on
your screen. That processing takes time—anywhere between a split second
and many seconds, depending on your Mac’s speed.
If you set some text in a point size for which the system contains a
bitmapped font, however, ATM doesn’t kick in at all. It simply throws the
ready-made, predefined bitmap onto the screen. You get two advantages:
speed and quality of display. (A hand-designed bitmapped font is almost
always more attractive than the computer-generated approximation.)
Strange
But True
1024 Part V: Attachments
■ ■
Macworld MAC SECRETS • 4040-8/5 • ch.29.F • Chapter 29 • FINAL • VB • 11/04/98 • p.1024
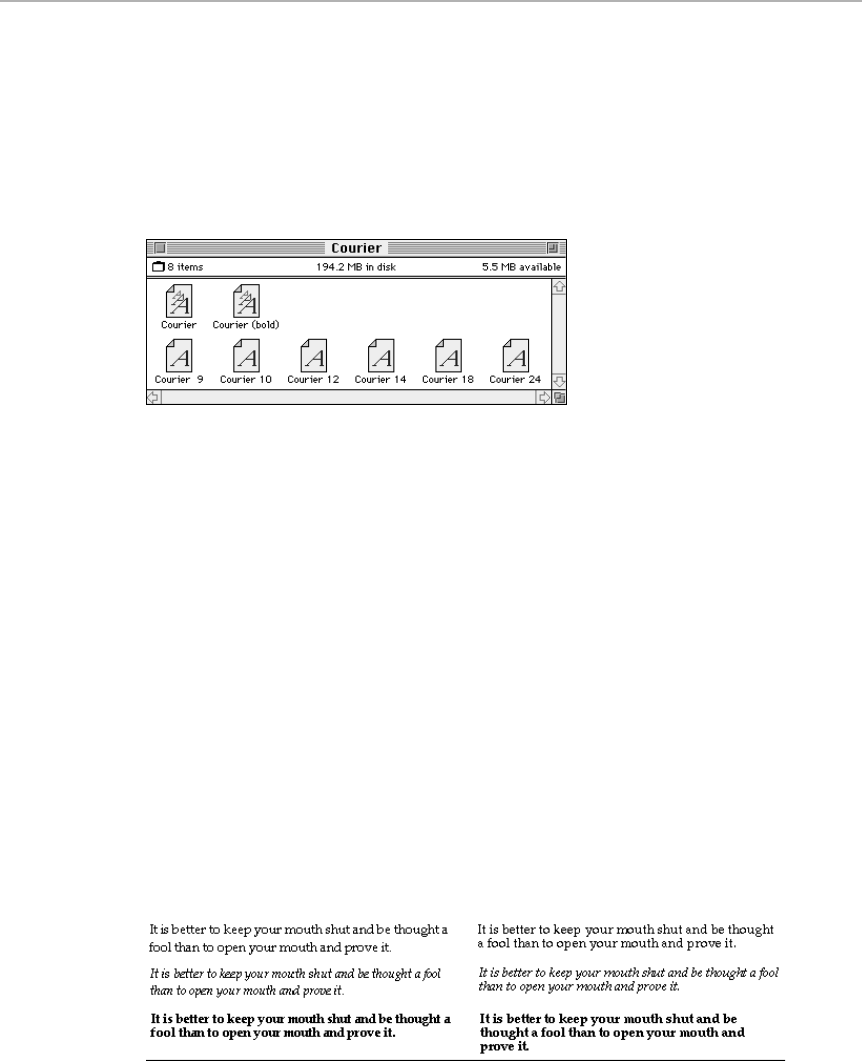
Chapter 29: Inside Fonts 1025
■ ■
Macworld MAC SECRETS • 4040-8/5 • ch.29.F • Chapter 29 • FINAL • VB • 11/04/98 • p.1025
Why screen fonts still exist
even with TrueType
In TrueType technology, outline-font and screen-font information are both
contained in the same single TrueType file. Therefore, you may wonder why
TrueType suitcases also contain bitmapped fonts for the same TrueType
typefaces! (See Figure 29-10 for proof.)
Figure 29-10: If you double-click a font suitcase that comes with System 7 or later, you’ll
discover something odd. Yes, there are TrueType font files inside; in this example, they’re called
Courier and Courier (bold). But there are also bitmapped screen fonts, each in one particular size!
We mentioned that using ATM, you must install each font into your system in
at least one point size. With TrueType, however, you don’t have to install any
screen fonts. You can put just the TrueType file by itself into your System file
or Fonts folder, and all your fonts show up correctly in your Font menus and
look good at any size.
As with ATM, the reason to keep screen fonts around even with TrueType is
speed. Without installed screen fonts, both type technologies produce a
delay when you change type sizes. But ATM uses a memory cache to store
recently built font bitmaps. TrueType must generate font shapes afresh each
time you change a font or font size, so (without screen fonts installed) it
tends to be slower.
Finally, as with PostScript fonts, a bitmapped screen font on the screen
generally looks better than its TrueType-computed equivalent (see Figure
29-11). Be careful, though: Installed-size screen fonts and TrueType- (or ATM-)
computed fonts give different line breaks in the same document.
Figure 29-11: The same font — Palatino — in its bitmapped and TrueType-generated
incarnations. Note that the line breaks are different when no screen font is installed.

1026 Part V: Attachments
■ ■
Macworld MAC SECRETS • 4040-8/5 • ch.29.F • Chapter 29 • FINAL • VB • 11/04/98 • p.1026
Which font version is that?
For best results, install into your System Folder either the TrueType version of a
certain font or the ATM/PostScript version. It’s perfectly OK to use the TrueType
Times, the PostScript Palatino, and so on; just avoid having the TrueType and
the PostScript Times both installed.
Which font you get on the screen
If you do, however, have both formats installed, the Mac selects which type
to display on the screen as follows:
■If there’s an installed bitmapped screen font in the appropriate size,
that’s what you see.
■If there’s no screen font, the Mac constructs the screen font using the
TrueType version.
■If you don’t have the TrueType version, you get the ATM-created version
(if you have ATM and the appropriate PostScript printer-font files).
■And if you have neither the appropriately sized screen font nor TrueType
nor ATM, the Mac creates a bitmapped screen font based on whichever
point sizes of that font are installed, just as the very first 1984 Macs did.
Which font you get on a PostScript printer
Printing to a PostScript printer is another story, however. Keeping track of
which type you’re actually getting on paper isn’t easy; in fact, we found the
following information surprising:
■Regardless of the type of technology used for the screen display, you get
the printer’s built-in version of the font, if available, on the printout.
Therefore, even if you install (and are using) TrueType Times on your
Mac, you get the PostScript version of Times in the printout!
This weirdness is true regardless of whether it’s a built-in printer font
(Times, Helvetica, Courier, and so on) or a PostScript font you’ve down-
loaded to the printer (see Chapter 30 for details on downloading fonts).
■If there’s no PostScript version of the font in the printer, only then does it
print the TrueType version of the type.
■If the font you’re printing isn’t a PostScript or TrueType font, then it’s a
regular old bitmapped screen font. It prints out at 72 dpi, exactly as it
appears on the screen. (Neat trick: If you happen to have a point size
installed that’s exactly four times larger than what you’re trying to print —
if you’re printing 12-point and you’ve got the 48-point size installed— the
Mac will cleverly scale down that larger bitmap, giving you much higher
quality, just as it did in the days of the ImageWriter dot-matrix printer.)
Strange
But True

Chapter 29: Inside Fonts 1027
■ ■
Macworld MAC SECRETS • 4040-8/5 • ch.29.F • Chapter 29 • FINAL • VB • 11/04/98 • p.1027
Which font you get on a non-PostScript printer
The font-preference order is different if you’re printing on a QuickDraw
printer, such as a StyleWriter, DeskWriter, ImageWriter, Epson inkjet, or non-
PostScript LaserWriter.
■The Mac first tries to print using the TrueType outlines, if it’s indeed a
TrueType font.
■If it’s not a TrueType font, the Mac attempts to use ATM. It checks to see
if you’re using a PostScript version of the font.
■If you’re using neither a TrueType nor a PostScript/ATM font, then once
again the Mac prints whatever’s on the screen as a 72 dpi bitmap.
Installing, Removing, and Moving Fonts
Now you know the techie differences between different font formats; and,
we hope, you know how to identify each kind of font file. But to make them
work — and print smooth letters on the screen and on paper—you must
know where to stick them.
We’ll assume that you know how to spot a suitcase file — akin to a folder for
font files. You may, for example, store all the different bitmapped screen
versions of a font into a single suitcase for convenience. Then there are the
printer font files, required for each style of a PostScript font.
Here’s the exact rundown of their required locations.
How to install a font
To install a font in System 7.1 and later, drop its components (suitcases
and/or printer files, TrueType or PostScript) onto your System folder icon.
You’re asked if you want the Mac to store them in the appropriate place
for you. Click OK. They’re all placed into your Fonts folder (even though,
technically, PostScript printer fonts also work if they’re in the Extensions
folder or the outer level of the System folder).
You can add fonts to your system even while programs are running. However,
as a dialog box will tell you, these fonts won’t show up in the Font menus of
those programs until you quit and relaunch them.
If you have Suitcase or ATM Deluxe, you can keep your fonts anywhere on any
drive. Keep like-named screen and printer fonts in the same folder, however.
These utilities let you manage sets of fonts. For example, you can use Suitcase,
MasterJuggler, or ATM Deluxe to create one set for a newsletter project, a
second for a flyer, and so on. You can load or unload a set at any time.

1028 Part V: Attachments
■ ■
Macworld MAC SECRETS • 4040-8/5 • ch.29.F • Chapter 29 • FINAL • VB • 11/04/98 • p.1028
How to remove a font
Begin by quitting all your programs. (You’re not allowed to remove fonts
while programs are open, and therefore using them.) Open your hard drive;
open your System folder; open your Fonts folder; and drag the appropriate
suitcase out of the Fonts window and onto the desktop (or into the Trash, if
you’re really finished with it).
How to copy a font to another disk
Suppose you want to take, say, a Zip disk to a local service bureau, and you
want to be sure to include all the fonts you used in your document. Even if
you still have programs running, you can Option-drag font suitcases out of
your Fonts folder (and onto the Zip disk’s icon).
Font Secrets
■
The following secrets apply to System 7 and later.
That 128-font limit
The Fonts folder is all well and good, but it does have its limit. You can put no
more than 128 font suitcases into the Fonts folder at a time.
This really isn’t much of a limit at all, however. The operative words are “
font
suitcases.
” A suitcase file can have almost as many TrueType fonts and screen
fonts in it as you care to pack in! You could put 50 TrueType fonts in
one
font
suitcase, which would only count as
one
file toward the Fonts folder’s limit of 128.
To add font files to a suitcase, drag them onto it. You can even add an entire
suitcase
to a suitcase.
How to create a new font suitcase
Without a font utility such as Suitcase, how are you supposed to create a font
suitcase in System 7?
You take an
existing
font suitcase (there are plenty in your Fonts folder),
duplicate it, open it, trash its contents, and rename it. Then add your own
choice of individual font files.
Worth
Learning

Chapter 29: Inside Fonts 1029
■ ■
Macworld MAC SECRETS • 4040-8/5 • ch.29.F • Chapter 29 • FINAL • VB • 11/04/98 • p.1029
Why Text Prints with Jaggies
Conventional wisdom has it that jagged text is a thing of the past in Macintosh
printouts. Outline fonts (courtesy of TrueType and ATM) have completely
eliminated the need to put up with “jaggies,” whether your printer is a Post-
Script laser printer or a QuickDraw printer (such as an inkjet). Here are the
only possible reasons that your printouts might contain stairstepped text.
It actually
is
a bitmapped font
Maybe you are, in fact, actually using a bitmapped font — some shareware
font, for example (or a city-named font from System 6). As we mentioned at
the beginning of this chapter, bitmapped fonts aren’t outline fonts capable of
looking great in any size. Get ATM and some PostScript fonts. Or start using
TrueType fonts.
It’s a PostScript font and you don’t have
the printer files
If you are using a PostScript font and you’re getting jaggies in printouts, you
may be missing the corresponding printer-font files. (Remember that a
PostScript font has two parts: the screen font and the printer font.)
You also get jaggy printouts of PostScript fonts if you put the printer fonts in
the wrong folder. See “Where Do They All Belong?” on the preceding pages for
specific information.
ANSWER MAN
Q: There’s this cool font called Mishawaka, but
it only shows up in my Eudora program. How
can I use it in all my other programs like any
normal font?
A: Man, is this a sneaky one, devised by Eerk
Hofmeester, our favorite reader in the Nether-
lands. This’ll work any time you’ve got a program
with its own embedded, private fonts.
Make a copy of the program (we’ll use this
Eudora example). Use FileTyper, included with
this book, to change the copy’s type and creator
codes to FFIL and DMOV, respectively (see
Chapter 15 for instructions and explanation). Lo
and behold: Eudora now turns into a font
suitcase!
Open your own Fonts folder and duplicate one of
the font suitcases inside. Drag the duplicate
suitcase to the Desktop, open it, and trash the
fonts inside, leaving a hollow suitcase shell.
Now just double-click your Eudora copy/font
suitcase file to open it. You’ll see the fonts there.
Drag them into your suitcase shell. Close the
suitcase-shell window, drop it onto your System
Folder icon to install it, and throw away the
Eudora copy. You’ve now got its font installed
normally in your system!
Sucking out your favorite fonts

1030 Part V: Attachments
■ ■
Macworld MAC SECRETS • 4040-8/5 • ch.29.F • Chapter 29 • FINAL • VB • 11/04/98 • p.1030
You’ll never have this problem with the built-in LaserWriter fonts (Times,
Palatino, Helvetica, and so on). But if you’re using a “downloadable” font, a
PostScript font you installed yourself, then fetch the printer portion from the
font’s original installation disk.
You’re printing from a painting program
As explained in Chapter 20, painting programs like Photoshop and
ClarisWorks’ Painting window store everything as a bitmap, no matter what
kind of fonts or ATM you have. Text you’ve typed into a painting program
prints out as a bitmap on any printer.
Inkjet printers: You’ve rotated text
Even if your type — whether TrueType or PostScript with ATM — usually
prints out fine, you may get jagged printouts from QuickDraw-style printers,
such as StyleWriters and other inkjets, if you’ve rotated the text on the screen.
For example, ClarisWorks’ drawing window lets you freely rotate text— but
the printout won’t have smooth type unless you use a PostScript laser printer.
Inkjet printers: You don’t have ATM
Even if you’re using PostScript fonts (that is, fonts whose names aren’t city
names), you’ll still get jagged printouts unless you install ATM.
Style Variations
From the very first Macintosh model, you could create an italic or bold
version of any font. In fact, you could also create a number of less-attractive
variations: underlined, outlined, shadowed, or any combination of these.
Style variations for bitmapped fonts
If you were reading about this topic in 1984, there’d be nothing much to read.
The Mac used a built-in algorithm to create these derived styles. It slanted the
letters a little to create italic. It added a couple of pixels on either side of the
letter to create bold. It did everything, however, at 72 dpi (see Figure 29-12).
Figure 29-12: At top, what 12-point Palatino Roman looks like on the screen. In the center,
the Mac’s version of italic — it’s simply a slanted version of the Roman version. At bottom, a
true Palatino italic. As you can see, it’s actually a completely different typeface.
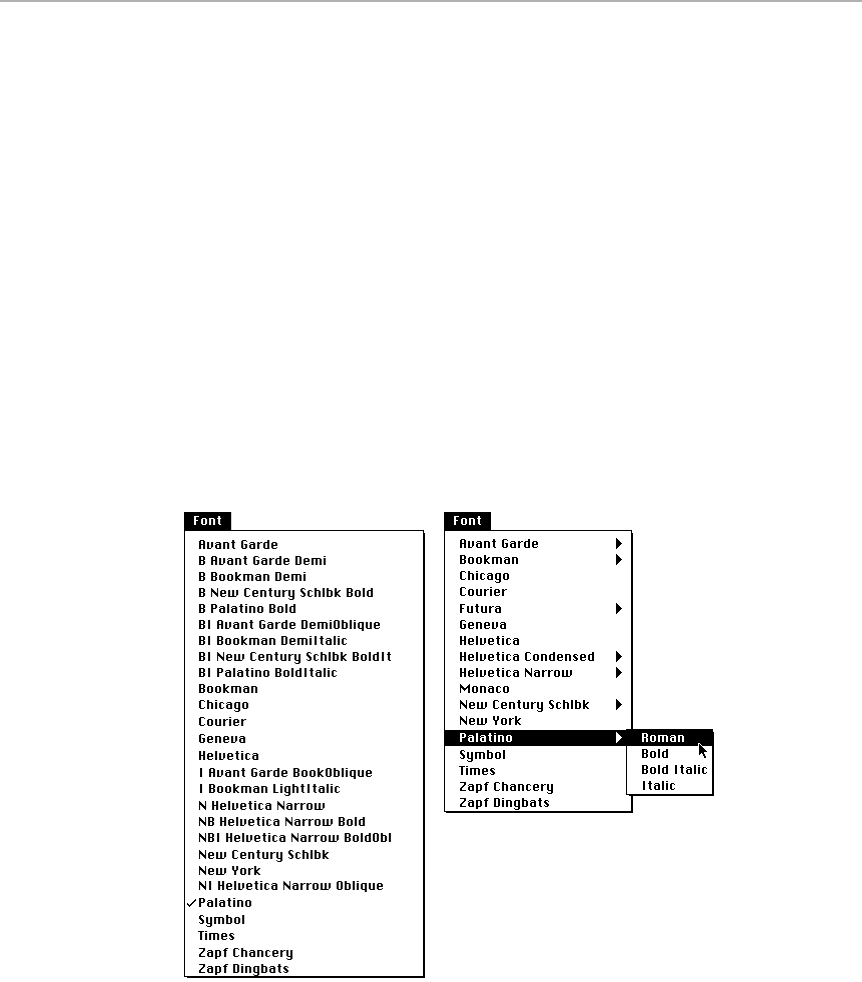
Chapter 29: Inside Fonts 1031
■ ■
Macworld MAC SECRETS • 4040-8/5 • ch.29.F • Chapter 29 • FINAL • VB • 11/04/98 • p.1031
In real typesetting, however, a different set of type is used to represent italic and
boldface. Related, but different; every character has been designed individually
in each style variation, as shown in the bottom example of Figure 29-12.
Style variations for PostScript fonts
Each PostScript font comes with several screen fonts: one each for bold,
italic, bold italic, and sometimes more. If all of these styles are installed, a few
interesting things happen:
■Your Font menus get long and disorganized. For some reason, font
companies give horribly inconvenient names to these style variations.
Adobe doesn’t call it Times Italic. It calls it I Times Italic! (The I prefix, of
course, stands for Italic.)
As a result of the superfluous Iat the beginning of the name, the italicized
font’s name isn’t alphabetically adjacent to Times Roman, as it should be.
Instead, it’s up in the Is. Multiply the problem by B Times Bold and BI
Times Bold Italic, and multiply that by 30 fonts, and you’ll see what a
poorly designed naming scheme this is (see Figure 29-13).
Figure 29-13: A typical font menu, as destroyed by various styles of the same
PostScript fonts (left), and as repaired by Adobe Type Reunion.

1032 Part V: Attachments
■ ■
Macworld MAC SECRETS • 4040-8/5 • ch.29.F • Chapter 29 • FINAL • VB • 11/04/98 • p.1032
Thank goodness for programs like Adobe Type Reunion, which
consolidate all the separate styles into shorter, simpler Font menus, as
shown in Figure 29-13.
■If you highlight some normal, upright Palatino (that is, Palatino Roman)
and choose Italic from the Format or Style menu, the Macintosh is smart
enough to use the I Palatino Italic typeface, if one is installed. In other
words, it doesn’t simply slant the letters of Palatino Roman. It actually
substitutes another font entirely.
This feature can have some unexpected results. When the Mac displays
the I Palatino Italic font on the screen, for example, the computer doesn’t
think it’s displaying an italic font. It just thinks it’s displaying a regular,
unstylized font. Therefore, you’re allowed to choose the Italic command
again, and you’ll get a double-italicized font! (See Figure 29-14.)
Fortunately, there’s only one printer font designed for italics in the typical
font. When your double-italicized (or double-bolded) font prints, then
you’ll just get a single-italicized (or -bolded) font.
Figure 29-14: The hazards of double-stylized text. On the left: from top to bottom, you see
the Roman version of the font, the authentic italic font, and then the authentic italic with the
Mac’s Italic command applied. On the right: the resulting printout. Of course, there’s no such
thing as double italic, so the third line prints the same as the second.
This second example proves an interesting point. When you’re working with
PostScript fonts, stylized text you see on the screen may not print out as
stylized text. Your success at printing stylized text is completely dependent
upon whether or not there’s a printer font designed in that style.
Look in your Fonts folder to see which style variations you actually have for a
given font. But be aware that some fonts don’t have any stylized versions.
The standard Zapf Chancery built into office laser printers, for example,
comes in only one style. You can apply styles to it on the screen. But because
there’s only one printer font (in this case, built into the typical PostScript
printer), you only get one style of printout, as shown in Figure 29-15.
William “Automatic” Teller
William “Automatic” Teller
William “Automatic” Teller
On the screen When printed
Strange
But True

Figure 29-15: What you see on the screen (left) won’t print unless you have a PostScript
printer font for each style variation you used on the screen. (There aren’t any style variations
for the Zapf Chancery font unless you purchase the full family from Adobe, so all four
printouts, on the right, look the same.)
How to apply bold and italic
When it comes to PostScript fonts in a word processor, we’re often asked
which is the better procedure: (1) type in plain Futura (for example) and
apply the Bold command to it, or (2) use the Futura Bold font instead.
Answer: The printed result is the same.
On one hand, using plain Futura and applying the Bold command seems
superior. That way, if you send your document to somebody who doesn’t
have your fonts, bold will still be bold. (If you had used Futura Bold instead,
your recipient would have seen everything as nonbold.) On the other hand, if
you apply bold to plain Futura, and you don’t have the FuturBol printer font
on hand, then you’ll be deceived; you’ll see bold on the screen, but won’t get
it in the printout. If you subscribe to that reasoning, you’ll choose the Futura
Bold font from the Font menu to begin with.
You only have that choice to make for bold and italic, by the way. If you want
Futura Demi, or Futura Condensed, or whatever, you must choose those
names from the Font menu.
Other styles and Multiple Masters
There’s more to life than bold and italic, of course. Depending on the font
you’re using, there may be as many as six or eight different weights
(thicknesses). For example, Futura comes in three different shades of bold
(Bold, Heavy, and Extra Bold).
Zapf Chancery
Zapf Chancery Italic
Zapf Chancery Bold
Zapf Chancery Bold Italic
On the screen When printed
Chapter 29: Inside Fonts 1033
■ ■
Macworld MAC SECRETS • 4040-8/5 • ch.29.F • Chapter 29 • FINAL • VB • 11/04/98 • p.1033
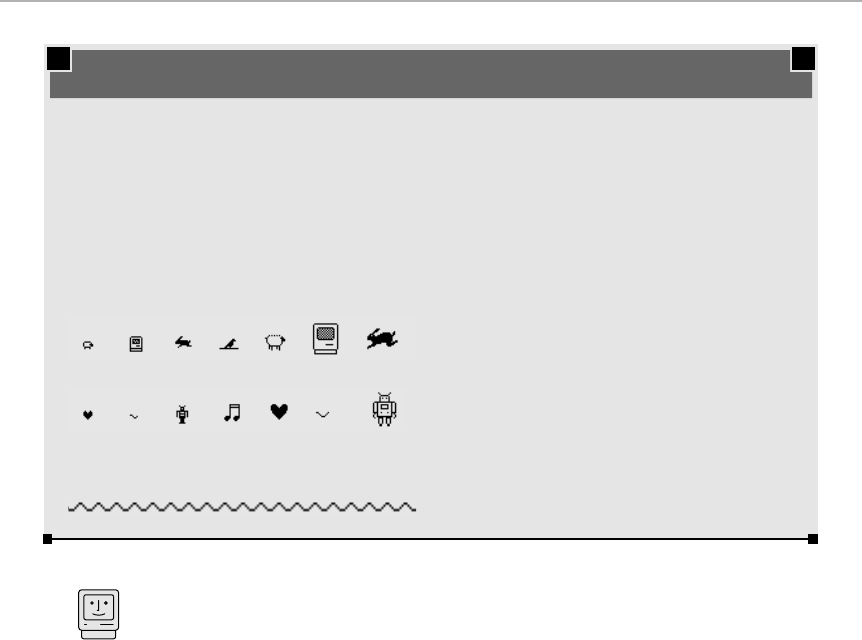
1034 Part V: Attachments
■ ■
Macworld MAC SECRETS • 4040-8/5 • ch.29.F • Chapter 29 • FINAL • VB • 11/04/98 • p.1034
Generally, you can figure out what the style names mean: Roman is the
“regular,” upright, normal-weight typeface. Oblique is a slanted face
reminiscent of italic (but in this case a type designer—rather than the Mac
— did the slanting), just as demi is a variant of bold. In fact, in order of
boldness, typical fonts are named Ultra Light, Extra Light, Light, Roman,
Medium, Demi, Bold, Extra, Black, and — for the really fat look—Ultra Bold.
If you’re a real font nut or a professional designer, you may want to get into
the expensive, but fascinating, realm of Adobe’s Multiple Masters fonts. These
are special core fonts that come with a program that you can use to fatten up,
skinny down, condense, expand, or slant the characters in any way you want
— and save the result as a new font. You can make as many font variations as
you wish, each with different thickness and spacing; the program names your
different variations with tacked-on numbers in your Font menus. (In case
you’re not nuts about font names such as “MyriaMMIt_658 wt 342 wd,” you’ll
be happy to hear that the current version of Adobe Type Reunion — called
Type Reunion Deluxe — lets you give your Multiple Masters creations normal-
sounding names.)
Mac Basics
MACINTOSH SECRET
Apple hasn’t lost its sense of whimsy, even after
all these years. Buried in your Geneva and New
York fonts are a host of great cartoon symbols
from the Mac’s original 1984 fonts. Actually, it’s
all the same symbol; here’s what it looks like at
9, 10, 12, 14, 18, 20, and 24 points:
Geneva:
New York:
That New York 10- and 20-point symbol looks
neat when you run a bunch of them together:
So how come you’ve never seen these symbols?
Because they don’t show up in Key Caps, and
they can’t be typed. Instead, you need a program
that can show you every character in the font —
such as the Insert Symbol command of
Microsoft Word, or the shareware program
PopChar, or ResEdit. Poke around enough, and
you’ll locate the character (which looks like Ÿ in
any other font); from that point, you can copy
and paste it into your important documents.
These are truly phantom symbols, by the way —
if you try to print them, enlarge them, or even
convert them to outlines in a PostScript drawing
program, they vanish! All that’s left behind is the
boring Ÿ character!
Your secret Symbol fonts

Don’t even think about printing one of these fonts unless your PostScript
printer has 3MB or more RAM in it, though.
Other derived styles
There are a few other styles in the typical Style menu that we haven’t said
much about: Underline, Shadow, and Outline.
These styles aren’t like the bolds and italics we’ve been discussing. These
styles don’t each require a printer font in your System Folder, and they do
print just as they appear on the screen.
That’s because the Mac generates these specialized styles itself (the font
designer has nothing to do with it) by modifying the PostScript code that it
sends to the printer. Be warned: The resulting printouts may not look much
like the screen representation, especially in Shadow style. (The printed
version actually creates a second complete set of type, slightly offset from the
first, printed in a light gray.)
We encourage you not to use these font variations much. We especially urge
you to forget about the Underline style (as we’ll explain later in this chapter).
Why TrueType styled text looks lousy
On the screen, the Mac creates italic and bold styles by slanting or thickening
the Roman version. In PostScript fonts, it only does this crude stylizing if you
don’t have an installed PostScript font that’s been custom designed for italic
or boldface.
TrueType is a different story. Even if you have a TrueType font installed for
Times (Italic), for example, you won’t see a true italic Times on the screen!
You see the Mac’s standard, crude slanted-Roman version.
The key, it turns out, is the bitmapped screen fonts you have installed. As we
described earlier, these fonts are generally desirable because they appear
faster on the screen and look better (than a TrueType outline-generated font).
But it’s these same screen fonts that prevent the Mac from displaying
TrueType’s true stylized variations! Remove all screen fonts for a certain font,
leaving only the TrueType file (in your Fonts folder or System file), and you
see the TrueType style’s true colors (see Figure 29-16). Ah, but there’s the
rub: Without the screen fonts, the unstyled (Roman) TrueType font looks
crummy. Unfortunately, you can’t have this cake and eat it too.
Strange
But True
Chapter 29: Inside Fonts 1035
■ ■
Macworld MAC SECRETS • 4040-8/5 • ch.29.F • Chapter 29 • FINAL • VB • 11/04/98 • p.1035
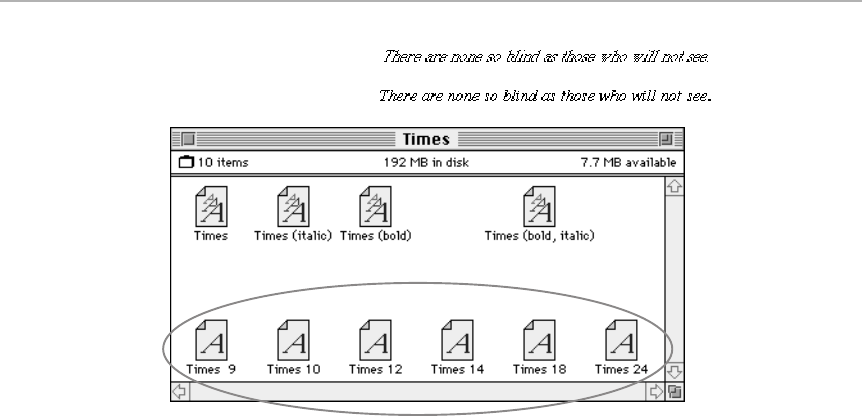
Figure 29-16: The TrueType catch-22. Stylized text looks good only if you take out all the
fixed-size fonts (bottom) from the System Folder. And yet if you do that, regular text takes
longer to appear on the screen and looks worse.
The Non-Typographer’s Guide to Type
Typography is an art and a science. The best Mac typesetters, naturally
enough, are people who used to do traditional typography and have adapted
to the Mac’s flexibility.
Still, almost anyone can improve the look of documents by boning up on
some of the basics of typography and design. This information may be more
than you want to know if you simply want to get your memos typed. On the
other hand, your Mac offers you the tools to create great-looking,
professional documents; with very little effort, you can make your documents
look as though they’ve been published.
For additional tips on great-looking, self-published documents, see our page-
layout guidelines in Chapter 18.
Proportional fonts
Here’s one of the most important differences between typewriters and Macs:
Most typewriters use monospaced type. That is, every letter is exactly the
same width, be it an Ior a W.
But each letter in a Mac font is exactly as wide as it needs to be. This fact
actually makes life considerably more complicated, as you’ll read in some of
the items below. It also, however, makes text much easier to read.
Screen fonts and TrueType:
TrueType only:
1036 Part V: Attachments
■ ■
Macworld MAC SECRETS • 4040-8/5 • ch.29.F • Chapter 29 • FINAL • VB • 11/04/98 • p.1036

Two standard Mac fonts are still monospaced like a typewriter’s: Courier
and Monaco. As shown in Figure 29-17, every character in such a font is the
same width.
Figure 29-17: In a monospaced font (Courier used here), every symbol and letter is exactly
the same width. Even when it looks goofy, as with the apostrophe.
Suit yourself, but we find monospaced fonts ugly. However, monospaced
fonts have their place. For instance, many of the less-graceful computers in
the world (DOS systems, for example) tend to use monospaced fonts all the
time. If you ever exchange files with one of these computers, or if you
download text from the Internet, eventually you’ll probably run into a file that
looks like Figure 29-18 when you open it in your word processor.
Figure 29-18: When you open an IBM or modemed file in your word processor,
nothing looks aligned.
What happened? Your word processor probably prefers to use a nice
proportional font. So, it took what used to line up nicely (when it was in some
monospaced font) and substituted a font in which the characters are all
different widths . . . and presto, nothing lines up!
In these cases, just change the font to a monospaced font, such as Courier,
and you get the nicely aligned look of Figure 29-19. A monospaced font looks
better in tables of numbers, too.
Figure 29-19: Courier makes everything line up.
Tevye................Bill McIntosh..........AEA
Golde, his wife......Jean Ogdenberg.........AFTRA
Chava, his daughter..Leslie Skolnik.........AEA
Perchik..............Michael R. Hausman.....Non-Equity
G d T it l T Ell P AEA
Tevye................Bill McIntosh..........AEA
Golde, his wife......Jean Ogdenber g.........AFTRA
Chava, his daughter..Leslie Skolnik.........AEA
Perchik..............Michael R. Hausman.....Non-Equity
Grandma Tzeitel......T racy Ellen Puge.......AEA
Wide, wide world
Pig’s-hair muffs
Chapter 29: Inside Fonts 1037
■ ■
Macworld MAC SECRETS • 4040-8/5 • ch.29.F • Chapter 29 • FINAL • VB • 11/04/98 • p.1037

1038 Part V: Attachments
■ ■
Macworld MAC SECRETS • 4040-8/5 • ch.29.F • Chapter 29 • FINAL • VB • 11/04/98 • p.1038
Spaces between sentences
Here’s a rule you actually have to unlearn from your typing classes: Type one
space after a period (on a Mac).
This principle follows from the fact that the Mac uses proportional type. Not
only is every letter the correct width, but so is a space—it’s already wider
than the typical letter, saving you the trouble of putting two spaces after a
period. If you do put two, the gap between sentences will be too big. (Use
SmartKeys, included on the CD-ROM with this book, to zap them for you
automatically. See the appendix.)
Don’t use underline style
There are two reasons not to use underlining in Macintosh documents. First,
the underline tends to look thick and gawky, and it slashes right through the
descenders in your font (the parts that stick down, as on a por a g).
The more important reason: Underlining is a decrepit workaround, invented
for the benefit of typewriters. It was used to denote emphasis. But real
publishers use italics for emphasis — with much more success. (When’s the
last time you saw anything underlined in a book or magazine?)
ANSWER MAN
Q: I heard that Mac OS 8.5 now supports
Unicode. What is that? A font? A password? A
mythical beast with one digital horn?
A: Come with us now as we visit the online
nightmare of e-mail and Web pages in the early
1990s. Picture, if you will, the difficulty of
creating e-mail or Web pages that contain foreign
symbols. You can’t use plain ASCII text (the only
set of alphabet characters universally understood
by every kind of computer at the time), because
it’s only got 256 symbols in the entire set. That’s
nowhere near enough to handle every letter in the
English alphabet, plus accented symbols, plus
non-Roman symbols such as those used in
Japanese. Furthermore, the standard ASCII set
contains a $ symbol, but not such modern
characters as the Euro monetary symbol. Clearly,
something had to be done.
So a bunch of smart computer-types got
together and decided to define a new character-
set standard — kind of a super-expanded ASCII
set — called Unicode. Because it uses a much
longer piece of data to specify each character, it
can specify many more characters.
Now it’s up to the system-software companies
such as Apple and Microsoft to agree to adopt
this new behind-the-scenes standard. And sure
enough, in Mac OS 8.5 and Windows 98, Unicode
became a standard font-specifying language.
If everyone else — software companies, Web-
page designers, and font designers — gets on
the bandwagon, pretty soon you’ll be able to
visit Web pages in, say, Japanese and see
Japanese characters instead of their ASCII
representations (which look something like
Í*EƒGƒlƒ‹ƒM*[*j).
The Unicode Question

Your Mac can do real italics. You may also want to use boldface in some
situations where you’d be tempted to use underlining, such as character
names in a script.
As a matter of fact, here’s an even better secret for getting emphasis while
still being classy: Use small caps. This special type style uses all capital
letters, but what would have been lowercase letters are set at a smaller size,
as shown here:
COTTER & KIMMEST
Attorneys at Law
125 TAYLOR STREET
SAN FRANCISCO, CA 94108
Most word processors and all page layout programs offer the small caps
option in their formatting menus or dialog boxes. (AppleWorks/ClarisWorks
doesn’t; in a pinch, though, you can always simulate small caps by simply
using all capital letters, making the initials a point or two larger.) You can also
use small caps to make your publications more professional; an abbreviation
such as A.D. won’t stick out like a sore thumb if you set it in small caps rather
than regular caps.
If you must use the underline style — if your art director demands it, for
example — consider leaving letters with descenders un-underlined, as shown
in Figure 29-20.
Figure 29-20: If you must use underlines, consider omitting characters with descenders from
the Underline style.
Use tabs, not spaces
Having just read about monospaced and proportional fonts, you’ll
understand this principle: When you’re trying to line up text, don’t do it by
pressing the spacebar! Text aligned using spaces to separate chunks of text
does not look the same in printouts as it does on the screen, as shown in
Figure 29-21.
Admittedly, learning how to use tabs in your particular word processor
involves 4 1
/2more minutes of learning than typing spaces does. But it will
pay off in spades.
Mac Basics
The Flying Nun
Worth
Learning
Chapter 29: Inside Fonts 1039
■ ■
Macworld MAC SECRETS • 4040-8/5 • ch.29.F • Chapter 29 • FINAL • VB • 11/04/98 • p.1039

1040 Part V: Attachments
■ ■
Macworld MAC SECRETS • 4040-8/5 • ch.29.F • Chapter 29 • FINAL • VB • 11/04/98 • p.1040
Figure 29-21: If you try to align columns by typing a bunch of spaces in between phrases,
you shall reap what you sow. Spaces are notoriously narrower in printouts than they are on
the screen.
Em dashes
An em dash is a long dash—like this.
Because a typewriter can’t type any shape wider than your typical letter, years
of typing teachers have instructed you to imitate an em dash by typing two
hyphens -- like this. But a double hyphen is about as good an impersonation
of a proper typographical em dash as Budget Gourmet is for a wedding dinner.
To produce a true em dash, type a hyphen while pressing Shift-Option. (Our
little secret: Because we use em dashes in this book a lot, we use SmartKeys,
included on the CD-ROM with this book, to convert our double hyphens
automatically. Microsoft Word’s AutoCorrect feature can handle that job, too.)
Usage: Use an em dash when there’s a halt in the flow of the writing. “She ran
to the edge of the cliff after him — but it was too late.” Derivation: An em is a
typographer’s term (and a darned useful Scrabble word) that refers to the
width of the capital letter Min a particular typeface.
En dashes
The next kind of dash, not as short as a hyphen nor as long as an em dash, is
called an en dash. You produce the en dash by typing a hyphen while
pressing Option.
Usage: Use an en dash to indicate a stretch of numbers or time. “See pages
79–80.” Or “Reception: 7:30–9:00 p.m.” Or “Years unemployed: 1988–1990.”
Derivation: An en is another typographer’s term. As you guessed, this one
refers to the width of the capital letter Nin a particular typeface.
Special spaces
Those special variants of dashes come from the world of typography. There
are also special spaces.
Born
Screen:
Printout:
1992 20011963
Elected President Graduated college

Chapter 29: Inside Fonts 1041
■ ■
Macworld MAC SECRETS • 4040-8/5 • ch.29.F • Chapter 29 • FINAL • VB • 11/04/98 • p.1041
For example, there’s the nonbreaking space. This kind of space looks just like
an ordinary space. But a nonbreaking space doesn’t end a word! If you put a
nonbreaking space between the words New York, these two words will always
appear on the same line (and, therefore, on the same page).
To create a nonbreaking space, type a space while pressing Option.
Leading
It rhymes with sledding. Leading is line spacing, as in single-spaced or double-
spaced. But in the world of computers, single-spaced and double-spaced text
are only two of an infinite number of settings. There’s 11/2-spaced. Triple-
spaced. And so on.
In fact, most word processors can make these adjustments in much finer
increments—in points, just like type. (A point is a typographical
measurement equal to 1/72 inch.)
Leading measurements are expressed, among professionals, as “ten on
twelve.” They’re saying that the font size is 10-point, and that the leading is
12-point. You can do the math: There’s two points’ worth of blank space
between the lines.
In Microsoft Word, you control the line spacing by selecting text and
choosing Format ➪Paragraph. In ClarisWorks, MacWrite Pro, or WriteNow,
there’s a line-spacing control right on the ruler; by clicking, you increase the
leading of the selected text in increments of half or whole points. Figure 29-22
shows a few examples of leading in action.
Figure 29-22: Four degrees of separation. These four examples show different degrees of
leading, none of which are actually single-spaced or double-spaced. They’re all in-between
gradations.
As you can imagine, the leading for your text has a huge effect on the
psychological impact of your text, on its readability, and (of course) on the
length of the document.
A marvelous bird is the pelican.
His mouth can hold more than his belican.
He can hold in his beak
Enough food for a week
I’ll be darned if I know how the helican.
A marvelous bird is the pelican.
His mouth can hold more than his belican.
He can hold in his beak
Enough food for a week
I’ll be darned if I know how the helican.
A marvelous bird is the pelican.
His mouth can hold more than his belican.
He can hold in his beak
Enough food for a week
I’ll be darned if I know how the helican.
A marvelous bird is the pelican.
His mouth can hold more than his belican.
He can hold in his beak
Enough food for a week
I’ll be darned if I know how the helican.

1042 Part V: Attachments
■ ■
Macworld MAC SECRETS • 4040-8/5 • ch.29.F • Chapter 29 • FINAL • VB • 11/04/98 • p.1042
Tracking
If leading is the control of vertical spacing of your text, then tracking is a
measure of horizontal spacing. (Kerning is slightly different; see the next
section.)
In page-layout programs, such as PageMaker, there’s an actual tracking
control. It’s measured in plain English: Tight, Loose, and so on (referring to
how closely the letters are packed in). See Figure 29-23.
Figure 29-23: Using PageMaker’s Tracking command, you can create loose, normal, or tight
letter spacing (from top to bottom in this figure).
In Word, you can achieve some control over tracking; select some text, choose
Character (or Font, in Word 6) from the Format menu, and use the Condensed
or Expanded (or Character Spacing) controls. In other word processors (such
as AppleWorks/ClarisWorks), you may not have any tracking control at all.
That’s OK; tracking is a rarefied art. Except for commercial type (such as
advertisements or newsletters), there’s little reason to mess with the tracking
of your text.
Kerning
Kerning also has to do with letter spacing. But where tracking affects the
letter spacing of an entire block of text, kerning is the act of adjusting just two
characters, relative to each other. People generally kern very large letters —
in headlines, for example — whose shapes overhang each other (see Figure
29-24). They kern for two reasons: First, kerned, compact type is easier to
read than unkerned type. Second, kerning a headline means that more can fit
into the equivalent amount of page space.
"It's a little loose," he said tightly.
"It's a little loose," he said tightly.
"It's a little loose," he said tightly.
TRUE FACT
Leading is so called because of its origins in the
world of movable typesetting. Back when every
line of text published had to be set, letter by
letter, by hand, into a printing-press frame, the
typesetter could increase the distance between
lines of type by inserting slugs of lead. The
thicker the strip of lead, the farther apart the
lines. That’s why it was called leading.
Where leading came from

Chapter 29: Inside Fonts 1043
■ ■
Macworld MAC SECRETS • 4040-8/5 • ch.29.F • Chapter 29 • FINAL • VB • 11/04/98 • p.1043
Figure 29-24: Kerning at work. The top example is what you get when you type normally into
a word processor. Each letter begins just to the right of the previous letter, as shown by the
gray lines in the top example. After the capital letters (and the hyphen and the lowercase “y”
and “d”) have been kerned (bottom), the phrase is more compact and easier to read. Note
how the lowercase “o” now tucks under the wing of the capital “T.”
You can turn kerning on or off in any page-layout program (Quark, PageMaker,
and so on) or graphics software (Canvas, FreeHand, Illustrator). In other
programs, it may either be combined with some kind of tracking control or
missing entirely (Word).
Ligatures
Here’s another typographical nicety that, technically speaking, you never
need to consider for most everyday writing. A ligature is when two letters are
run together, as in the words æsthetics, œdipus, fishy, and flugelhorn. In fact,
these are about the only examples we can think of: ae, oe, fi, and fl.
These two-letter pairs are each represented in most fonts by one symbol. If you
have QuickDraw GX and a GX-savvy program (lotsa luck), you can opt to have
ligatures created automatically. (SmartKeys, included on the CD-ROM with this
book, can do it, too.) Otherwise, here’s how you make them manually:
Symbol Get it by pressing these keys
æ Option-apostrophe
œ Option-Q
fi Shift-Option-5
fl Shift-Option-6
A word of warning, though. If you use your word processor’s spelling checker,
don’t type ligatures as you go. A spelling checker (except in QuarkXPress)
will flag these as misspellings. Instead, type your document normally; check
the spelling; then do a search-and-replace for those letter pairs, replacing
each with the appropriate ligature.
Way-out Toad
Way-out Toad

Hyphenation
You hyphenate, of course, to avoid ragged-looking right margins caused by
long words that aren’t broken at the line break. Figure 29-25 shows a good
example from a newspaper-style column.
Figure 29-25: What a difference a hyphen makes. In the first figure, the right margin looks
terrible because of the long words. Judicious use of a program’s auto-hyphenation feature
brings the type closer to having an even right margin (right).
Each program’s auto-hyphenator works differently, so we’ll refer you to your
manuals for specific instructions. However, we can give you some basic rules
for good-looking hyphenation:
■Avoid having hyphens wind up at the right margin in more than two
successive lines of text.
■Avoid breaking up a word in such a way that one letter is left alone on a
line. In fact, if you have a choice, it’s usually preferable to break a long
word in the middle, rather than leaving a two- or three-letter syllable
alone on a line.
■Try not to hyphenate words that are shorter than six letters, a word that
already has a hyphen (or a slash), the last word on a page, or the last
word of a paragraph.
Dr. Elizabeth Muranski, an
enthusiastic but
underschooled practitioner,
tells us she thinks
acupuncture’s time hasn’t
yet come in the field of
broken bones.
Dr. Elizabeth Muranski, an
enthusiastic but under-
schooled practitioner, tells
us she thinks acupuncture’s
time hasn’t yet come in the
field of broken bones.
1044 Part V: Attachments
■ ■
Macworld MAC SECRETS • 4040-8/5 • ch.29.F • Chapter 29 • FINAL • VB • 11/04/98 • p.1044
CASE HISTORY
This is only faintly related to fonts. But when
your cheerful authors were in college, we came
up with a brilliant scheme to make a million
dollars. (In those days, that was a great deal of
money.) We’d start a T-shirt company.
We even had our first two designs figured out.
You know those annoying shirts that say “I ♥
NY” or “I ♥Rush Limbaugh”?
Well, we were going to market shirts that say “I
♠my cat” and “I ♣my husband.”
Then we got lives. We hereby relinquish all
rights. As we wrote in the previous edition: Go
wild, ye entrepreneurs. (Apparently, someone
did — a Mac Secrets reader spotted an actual “I
♠my cat” T-shirt on Cape Cod shortly after the
last edition of this book!)
The T-shirt company that awaits you
Chapter 29: Inside Fonts 1045
■ ■
Macworld MAC SECRETS • 4040-8/5 • ch.29.F • Chapter 29 • FINAL • VB • 11/04/98 • p.1045
■Don’t hyphenate centered text.
■Avoid hyphenation that makes a word hard to recognize, as in recre-ation
(when you mean re-creation), read-just (when you mean re-adjust), and
tapes-tries (when you mean tapestries).
Most page-layout programs let you customize a document’s hyphenation
thresholds to take many of these guidelines into account.
Most Mac word processors have a little-known but handy feature: You can
create a discretionary hyphen. This is, if you think about it, exactly the kind of
hyphen you want: It remains invisible unless the word needs to break at the
end of a line.
Try it in Word, for example. Type the first half of the word. Then press Ô-
hyphen; absolutely nothing happens. Then finish the word. If this specially
prepared word ever needs to break at the end of a line, it will do so at the
discretionary hyphen. Even more amazing: If you delete some text to the left
of it so that the word no longer falls at the end of a line, the hyphen will
disappear, and the word will be made whole again!
There’s also a nonbreaking hyphen, which you create by pressing Ô-equal
sign; in most page-layout programs, it creates a hyphen for use between
words that you don’t want broken up across a line break.
Fractions
Despite the amazing variety of symbols and nonalphabet characters hidden
behind the Mac’s Option key, fractions aren’t to be found anywhere. You have
the yen symbol, the French cedilla, Greek symbols—but nary a proper
typographic 1⁄2symbol to be found.
Sure, you can buy an “expert” font that includes fractions and other special
characters. (We’ve included two such fonts on this book’s CD.) For most of us,
however, that’s overkill.
Otherwise, your only options are to use the confusing-looking “1 1/2” when
you mean 1.5; or type “one-and-a-half;” or use decimals; or painstakingly
construct normal-looking fractions using a combination of superscript and
subscript lettering. (A superscript character floats just above the normal
horizontal baseline of text; a subscript character, like the 2 in H20, floats
below the line. If you have ClarisWorks, you’re even better off: It offers two
additional font styles called superior and inferior (we won’t even touch the
self-esteem issues of that terminology). Apply these styles, and the affected
text moves up or down and gets smaller — perfect for making fractions.
One more tip for fractions: Don’t use the regular slash key. Instead, use the
tighter, more elegant slash produced when you press Option-Shift-1.
Worth
Learning
Strange
But True

1046 Part V: Attachments
■ ■
Macworld MAC SECRETS • 4040-8/5 • ch.29.F • Chapter 29 • FINAL • VB • 11/04/98 • p.1046
Ellipses
An ellipsis looks like three periods in a row. It’s used, for example, to indicate
that some words of a quotation are missing (“This movie is this a . . . full-
length . . . film”); in the Macintosh world, ellipses are used in menus to
suggest that you’ll be asked for further information before the command
can be executed.
The trouble with typing three periods in a row is that sometimes they get
separated from each other at the end of a line. Fortunately, the Mac’s famous
Option-semicolon keystroke produces a single, unseparatable character that
looks like — you got it — three dots. They’re even a bit more compact than
periods would be.
(Don’t use them in documents you plan to send by e-mail or transfer to a PC,
though; the beautiful one-shot ellipsis symbol is a Macintosh-only benefit!
Use three periods when you’ll be sending your words online.)
Curly quotes
Our last pair of typographical tips has to do with quotation marks and
apostrophes. You can spot the difference immediately in Figure 29-26.
Figure 29-26: The top line is what you get if you don’t take action: awkward-looking straight
quotes. Turn on your word processor’s curly quote feature (bottom), and you’ve got yourself
some classy-looking dialogue.
You can type a curly quote in any program, and in almost any font, if you
avoid the quote key on your keyboard! Instead, press as follows:
Type this: To produce this:
Option-[ “
Shift-Option-[ ”
Option-] ‘
Shift-Option-] ’
In other words, the left bracket always stands for double quotes, and the
right bracket always produces single quotes. The Option key always makes
the open quote, and adding the Shift key makes the closed quote.
"Well, I'll be a jack-o'-lantern," he muttered.
“Well, I’ll be a jack-o’-lantern,” he muttered.

All of this is moot, thank heavens, because every word processor has a built-
in “smart quotes” feature, usually in a Preferences command. They’re called
smart quotes because all you have to do is press the normal quote key at the
right end of your keyboard’s home row. The program examines the context —
are you beginning or ending a word?—and automatically substitutes a curly
quote, curled in the correct direction. (And, if you have a program that isn’t
smart enough, use SmartKeys, included on the CD-ROM with this book, to do
curly quotes for you. See the appendix.)
When to use dumb quotes
Curly quotes are, typographically speaking, only for use as quotes. Prime-
number, degree, inch marks, and feet marks are another story. They should
not be curly. Here, in order of preference (and effort), are the four best ways
to represent feet and inch marks:
Chapter 29: Inside Fonts 1047
■ ■
Macworld MAC SECRETS • 4040-8/5 • ch.29.F • Chapter 29 • FINAL • VB • 11/04/98 • p.1047
TRUE FACT
Plenty of programs do smart quotes — Claris
Works, WordPerfect, SmartKeys, QuicKeys, and
so on. Trouble is, all of these programs decide
which way to curl your quote based on whether
or not you just typed a space. If the keystroke
before the quote was a letter (and not a space),
then, obviously, you get a right-hand quote
because you’re probably finishing up a sentence
(or putting an apostrophe into a contraction).
Otherwise, the program automatically substi-
tutes a left-hand quote mark.
They’re missing one big boat: a little thing we
call editing! Any program whose smart-quote
feature simply counts on your having typed
something before the quote is ignoring all the
times you want to insert a quote or apostrophe
where there wasn’t one originally. You can see
the problem in this example:
As you type the first sentence, everything is
fine. The program puts an open quote before the
first line because it was preceded by a space. It
puts a close quote after the comma because it
wasn’t preceded by a space.
What if you decide that you really wanted to put
single quotes around feel-good? In the center
example, you see that all is well so far. You click
the mouse just after the D. The program thinks
to itself: “No, they didn’t just type a space.
Therefore, this is a close quote.”
Trouble is, it thinks that same thing when you
click before the F! It again thinks: “Still no space
has been typed. This, too, is a close quote.”
All of these programs, therefore, err on the side of
too many close quotes! What’s much preferable
are the smart quotes found in Microsoft Word
and WriteNow. When you click the mouse to add
a quote, the program actually looks back at
what’s already on the page! It therefore produces
the correct curling quote, whether you’re typing
them for the first time or editing madly.
(Fortunately, SmartKeys—included with this
book — offers a convenient workaround. If
SmartKeys produces a close quote when you
intended an open one, you just press the quote
key a second time. SmartKeys instantly replaces
the close quote with an open one.)
“It was a feel-good performance,” said she.
“It was a feel-good’ performance,” said she.
“It was a ’feel-good’ performance,” said she.
Some quotes are smarter than others

1048 Part V: Attachments
■ ■
Macworld MAC SECRETS • 4040-8/5 • ch.29.F • Chapter 29 • FINAL • VB • 11/04/98 • p.1048
■Use the Symbol font, Option-4 and Option-comma, respectively, to
produce authentic, correct typographical marks.
■Use Option-Shift-E for the single prime, and Option-Shift-G for the double
prime.
■Turn off your smart-quotes feature long enough to type the feet or inch
marks straight. Then italicize them for the finessed, correct, slanted look.
■In Microsoft Word, if you have the smart-quotes feature turned on, you
can press Command-Z just after typing the quote mark.
■Just turn off the smart-quotes feature and use straight single and double
quotes.
See Figure 29-27 for examples of the results.
Figure 29-27: At top, the best solution: Use the correct typographical feet and inches
symbols from the Symbol font. Middle: Using italicized straight quotes will do but may give
you some trouble with spacing. Bottom: straight quotes. Better than nothing.
In the meantime, keep in mind that after you create these markings, you can
save them in your word processor’s glossary or library so that you won’t
have to construct them the next time.
By the way, there’s one other great time to use dumb quotes: any time you’re
sending e-mail over the Internet. Macs are the only computers intelligent
enough to understand curly quotes sent by e-mail; if your message travels via
a non-Mac — and it will — your lucky correspondent will see either a strange
symbol or nothing at all where you have indicated quotes. (This problem
doesn’t occur on e-mail sent from America Online to America Online. Most
e-mail programs, like Claris Emailer, meanwhile, automatically convert curly
quotes into straight ones.)
If you use straight quotes in your Internet mail, they’ll come through fine— yet
another argument for using SmartKeys (which lets you specify which programs
you want smart quotes in) to add intelligence to your quotes and apostrophes.
Mac Basics
He stood 6′ 2″ tall.
He stood 6' 2" tall.
He stood 6' 2" tall.

Chapter 29: Inside Fonts 1049
■ ■
Macworld MAC SECRETS • 4040-8/5 • ch.29.F • Chapter 29 • FINAL • VB • 11/04/98 • p.1049
The Option-key character set
There’s more to a typeface than the characters in the alphabet, of course.
Almost every Mac font has dozens or hundreds of hidden symbols. They’re
tucked away behind obscure Option-, Shift-, and Control-key combinations. Of
particular usefulness are the Option-key characters: ©, †, ™, ¥, and so on.
We’re often impressed by the shrewdness of the placement of these hidden
characters. Among the Option-key characters, for example, Y is ¥, ß is S
(because ß is short for two S’s in German), √is V, and so on. To find them,
use your Key Caps desk accessory, as described in Chapter 3.
Before you go wild, however, a warning: As with curly quotes, Option-key-
generated special characters get garbled if you send them via Internet e-mail.
(E-mail sent within America Online isn’t a problem, however.)
TRUE FACT
You sometimes hear the terms ascenders,
descenders, baseline, and x-height used among
Mac users. These terms refer to the various
vertical components of a certain typeface, as
shown here.
1. The descent line. This imaginary line marks
the lowest point of any character in the font.
2. The point size. It may surprise you that the
point size is actually measured from the
ascent line (5) to the descent line (1). This
measuring scheme explains why some
fonts seem tiny at the same point sizes as
other fonts. Park Avenue, Zapf Chancery,
and other decorative fonts, for example, are
almost too small to see at 12-point size,
where 12-point Times is fine. It’s because
those decorative fonts have large
ascenders and descenders, making the
overall type seem smaller by comparison.
3. The x-height. It’s the height of most
lowercase letters.
4. The leading. It’s measured from baseline to
baseline. Typographers sometimes refer to
text as being “ten-on-twelve.” They mean
that the font is 10-point, but the leading is
12 points, leaving a 2-point gap between
lines of text.
5. The ascent line, which is at the height of
the tallest letters.
6. The capital line. As you can see from this
example, the capital letters in a font aren’t
always the tallest letters. The capital line is
often below the ascent line.
7. The mean line. This is the imaginary line that
marks the top of the x-height of the font.
8. The baseline. It’s the imaginary line upon
which all the letters sit.
Flight
106
1
23
4
5
6
7
8
The basics of font design

Option Key Secrets
■
Remembering the dead keys
The Mac has five so-called
dead keys.
When you press one of these keys,
nothing happens on the screen until you then press
another
key. To produce the
ñ character, for example, you first press Option-N. (Nothing happens.) Then you
type a regular
n
.
Just remember to UNItE! Those are the dead-letter keys — U, N, I, and E — plus
the accent-grave key (also called the tilde key, usually in the upper-left corner of
your keyboard).
(Much as we enjoy remembering EUNICE, as we’ve read in other sources, the C
isn’t actually a dead key.)
1050 Part V: Attachments
■ ■
Macworld MAC SECRETS • 4040-8/5 • ch.29.F • Chapter 29 • FINAL • VB • 11/04/98 • p.1050
MACINTOSH SECRET
If you inspect the innards of Fontographer with
ResEdit, CanOpener (which comes with this
book), or a similar innards-inspection program,
you’ll find that Fontographer’s creators have
quite a sense of humor. Reader Russ Stotyn
poked around in Fontographer with CanOpener
and found these gems among the Balloon Help
messages:
■Hint: Learning about hinting via balloon help
is like living through a bug in the Holodeck.
■Hint: Learning about hinting with balloon
help is like entering Larry Bud Melman in a
fashion show.
■Hint: Did you think we would teach you
about hinting via balloon help without a
Scooby Snack? Without two Scooby
Snacks? No way!
■Hint: If you are trying to learn about hinting
using balloon help, you probably couldn’t
tell the old Darin from the new Darin.
■Hint: If you don’t know what hexadecimal
means then you probably shouldn’t care.
■Hint: If you see this balloon call Pete at
(214) 680-2060 for a free prize. While
supplies last.
■Hint: Gotcha! Displays a selection of
incredibly advanced hinting commands.
■As the Wizard of Oz exclaimed before his
uncontrollable balloon trip, you are about to
embark into “a hazardous and technically
unexplainable journey into the outer
stratosphere.” Please see the manual.
■Hint: The Professor made a battery
recharger out of coconuts, but could he
make a raft out of logs? No. Please consult
the manual or call our tech support line.
Do these guys watch a little too much TV, or
what?
Fontographer’s secret messages

Chapter 29: Inside Fonts 1051
■ ■
Macworld MAC SECRETS • 4040-8/5 • ch.29.F • Chapter 29 • FINAL • VB • 11/04/98 • p.1051
Interestingly, dead keys (except ñ ) are only dead if the next character you type
is a
vowel
(because these markings only affect vowels in the languages that use
it). For example, when you press Option-tilde, nothing happens; if you then type
a consonant, you get both markings together (such as `m) instead of one atop
the other (such as ò).
Bringing the dead (keys) back to life
Here’s an undocumented feature: You can type one of the dead-key symbols
(`, ¨, ˜, ˆ, or ´) and see the symbol appear immediately on the screen, without
having to type an additional letter. The Secret: add Shift (or the Caps Lock key)
to the Option-key combination.
Font Futures
Today, Mac users are still stuck with three different font formats, each of
which must be handled and stored differently. It’s certainly not as graceful
a scheme as most other aspects of the Mac. People — even the pros— still
occasionally get bitmapped printouts of outline fonts that should print
gorgeously. The Courier font still shows up in printouts when a nice
ANSWER MAN
Q: Help! One of my fonts is damaged, and I can’t
throw away the suitcase!
A: Sure enough: One of the worst aspects of the
Mac’s font-suitcase scheme is the way that
your font suitcases suddenly become
“damaged.” Corrupted font files are a nightmare;
it generally takes a day or a week before you
even realize that a corrupted suitcase is the
cause of the crashes and freezes you’ve been
having.
What’s worse is the frustration you’ll encounter
when you try to throw away the suitcase. The
Finder won’t let you remove it, open it, or trash
it! You can drag till you’re blue in the face, but
trust us: That suitcase won’t budge from the
Fonts folder.
We’re particularly proud to have discovered the
solution. Take the entire Fonts folder out of the
System folder (and onto the Desktop, for
example). You should now be able to drag the
troublesome suitcase from the decommissioned
Fonts folder.
At this point, you may be able to salvage the
damaged suitcase’s contents as follows: Open it
by double-clicking. Drag the fonts out of the
suitcase window and into a new, empty
suitcase file. Trash the empty suitcase.
And if that doesn’t work, trash the defective
suitcase. Put your Fonts folder back into the
System folder.
The classic damaged suitcase problem

1052 Part V: Attachments
■ ■
Macworld MAC SECRETS • 4040-8/5 • ch.29.F • Chapter 29 • FINAL • VB • 11/04/98 • p.1052
PostScript font is what you selected. If you’re like most people, you still can’t
receive a document file and view it as it was designed, unless you happen to
have all the fonts installed that were used by the document’s designer.
Apple and Adobe have worked for years to bring some harmony to this
disorder, which affects both Macs and Windows. Both companies are well
aware that the current font situation is, shall we say, less than ideal. One way
or another, something will be done. Whether it’s a peaceable kingdom that
includes ATM and TrueType under one System, or a new, universal font
scheme such as OpenType (under development among various software
companies) is still an open question.

MACWORLD MAC SECRETS • 4040-8/5 • ch30.F • Chapter 30 • FINAL • VB • 11/04/98 • p.1053
Chapter 30
Printing Secrets
In This Chapter
©How printing works (dot-matrix, inkjet, laser)
©Tales of dpi: 300, 600, 1200, and more
©PostScript : Levels 1, 2, and 3
©Desktop Printing
©Color printing and service bureaus
©Troubleshooting
The Macintosh has always been hailed as a radical step forward in the
world of printing. For the first time in the world of personal computing,
printouts matched the screen images. People called the Mac a WYSIWYG
(What You See Is What You Get) computer.
But over the years, printing has become even more complicated. There’s
QuickDraw, GX, PostScript, TrueType, inkjets, color printing, background
printing, desktop printing — and sometimes WYS is definitely not WYG.
How Printing Works
When it comes to the look of your printouts, dpi — the number of printer dots
per inch of paper — is king, whether it hits paper by ribbon, spraying ink,
heat-fused powder, or melted crayon dots. In fact, once you’ve been around
Macs for while, you can instantly identify which printer produced a given
printout: dot-matrix, inkjet, or laser. How? Primarily by the difference in
resolution (smoothness)—measured in dpi.
Dot-matrix printers
A dot-matrix printer composes its printed image of little dots, like the dots
on your Mac’s screen. Dot-matrix printers (such as Apple’s ImageWriter II)
are often referred to as impact printers— the pins actually strike a ribbon
against the printed page. They’re also dying out, having been supplanted by
inexpensive, much higher-quality inkjet printers (even though impact printers
are the only ones that can print multi-part forms, like FedEx shipping labels). In

fact, it was with a great, universal, fond sigh that Apple discontinued the 144-dpi
ImageWriter II in the fall of 1996 after the printer’s 11 years of proud service.
Inkjet printers
If the price of a laser printer is still too high for you, there’s an inkjet model
calling your name. Such printers, like the Apple StyleWriters, HP DeskWriters,
or Epson Stylus family, use an ink-filled cartridge that slides across a moving
track, back and forth, spraying narrow sheets of ink on the page. (The newer
color inkjet printers use four or six separate ink cartridges that spray black,
yellow, cyan, and magenta inks as they move across the page.)
In theory (or should we say “on paper”?), these printers print even sharper
text and graphics than some laser printers. A typical inkjet printer sprays 720
or even 1,440 very fine dots per inch, whereas a standard laser printer’s reso-
lution is only 600 dpi. In practice, however, because of the way the ink spreads
when it hits the page, fine images printed by an inkjet printer tend to blur
slightly, making the printouts from most inkjets just short of laser-quality.
Inkjet printers offer plenty to like: they’re inexpensive ( $150 or even less) and
they’re small and light, making them easy to transport or store. They also
offer the least expensive color printing available; color inkjets run between
$200 and $400 and can turn out impressively rich, vivid color images.
Laser printers
A laser printer has more in common with a copying machine than with other
printing devices. Inside the printer, the paper wraps around a cylindrical
drum, just as it does in a copying machine. But instead of using a light-and-
lens assembly to read an original, the laser printer uses a laser diode that
beams the image of your document onto the drum. The drum uses an
electrostatic process to attract toner particles, and the toner is fused to the
printed page using a heated set of rollers. Some “laser printers” don’t have
lasers inside at all. Instead, they use a CCD (Charge-Coupled Device)
assembly to generate the image; the printed results are very similar.
The toner (the black powder that creates the printout) comes in a cartridge
that, in Apple and HP PostScript printers, includes the drum as well. When
you replace the toner, you’re essentially giving the printer a stomach
transplant.
Laser printers come in two types: QuickDraw and PostScript. For now, just
note that a PostScript printer has its own CPU and memory, and is, therefore,
faster than a QuickDraw laser.
The typical PostScript laser printer also comes with a set of resident fonts
(fonts built into the printer’s ROM chips). The basic set consists of 35 fonts
that range from Avant Garde to Zapf Dingbats. These ROM-based fonts are
desirable because they print faster. They don’t have to be downloaded to
your printer every time you process a new file. You can use as many of them
Mac Basics
1054 Part V: Attachments
■ ■
MACWORLD MAC SECRETS • 4040-8/5 • ch30.F • Chapter 30 • FINAL • VB • 11/04/98 • p.1054

as you want, in whatever order you want, and they won’t use up any precious
printer RAM. Unfortunately, some of these basic fonts are, frankly, overused.
Laser printers are available with resolutions of anywhere from 300 to 1200
dpi. As with any printer, the higher the resolution, the better the quality of
the printed output.
300 dpi laser printers
The very first laser printers had engines that printed 300 dots per inch —
a single square inch of the printed page had 90,000 dots. Though higher-
resolution printers have become standard in most offices, there are still
plenty of 300 dpi printers in use. This kind of printer is fine for letters and
basic desktop publishing.
Compared to a higher resolution printer or imagesetter, 300 dpi text is
thicker, and, in smaller sizes, a little chunky-looking. The little holes in
characters (such as the upper half of a lowercase e) may be partly filled in,
and the fine details of a decorative typeface are often lacking. When you print
a photo on a 300 dpi printer, its different shades of gray don’t get very fine.
600 and 800 dpi laser printers
The most common laser printers in use today contain a 600 dpi “engine.”
These include printers such as the Apple LaserWriter Pro series and the
Hewlett-Packard 5M and 6MP.
A more precise engine, coupled with extremely fine-grain toner powder, gives
you ultra-sharp details. A 600 dpi printer is not twice as sharp as your 300 dpi
printer. Think about it: The image from a 600 dpi printer contains 360,000 dots
per square inch, so it’s actually four times as sharp as a 300 dpi printer! Further-
more, these new printers cost less than half as much as a 300 dpi laser printer
did just a few years ago. In the years to come, even higher-grade toner and
higher-resolution print engines will become available—and commonplace.
1200 dpi laser printers
Several printers, from LaserMaster and others, are advertised to have a
resolution of 800 to 1200 dpi, supposedly going head-to-head against
professional imagesetters.
These printers do indeed make sharp printouts, but most don’t really print
1200 dots per inch. Instead, they vary the size of the dots that make up the
printed image; they also adjust the movement of the drum as the paper rides
through the printer. Those stunts, plus the use of fine-particle toner powder,
greatly improve the printouts from a conventional 300 dpi, 400 dpi, or 600 dpi
engine. Only the most expensive models, such as the HP LaserJet 4000 N, have
true 1200 dpi engines — again, four times sharper than a 600 dpi printer —
with 1,440,000 dots crammed into each square inch.
But the output from even one of these enhanced laser printers isn’t quite as
sharp as that of an imagesetter (described shortly). The limitations of toner
and paper simply can’t match an imagesetter’s fine resolution of small text
and artwork.
Chapter 30: Printing Secrets 1055
■ ■
MACWORLD MAC SECRETS • 4040-8/5 • ch30.F • Chapter 30 • FINAL • VB • 11/04/98 • p.1055

Color printers
Color printing used to be for professionals only. High-quality dye-sublimation
printers used by graphics professionals cost thousands of dollars and the
more economical color inkjets that were available were terrible, producing
washed-out, inaccurate, smeary colors. But in the last two years, there’s been
a color printing revolution, as color printer prices plummeted—and quality
soared.
Color inkjets
If you want a bargain-basement color printer, maybe a little zest to spark up
a flier you’re printing, consider a color inkjet. Popular examples include the
Epson Stylus series, the HP DeskJet C series, and the Apple Color StyleWriter
series (which Apple phased out in 1998). Some of these low-end color inkjets
cost less than $300 and their printouts are impressive; from three feet away,
we’ve seen printouts of scanned color photos that look convincingly like the
real thing. And for photographically realistic printouts, you can find models
like the Epson Stylus Photo printer, which uses six different colors of ink
instead of four, to create even smoother tones. For the best printouts, the
really amazing photo-like ones, you must use $1-per-sheet special paper, but
they blow away the printouts from other color inkjets.
If you’re shopping for a color inkjet, look at actual samples from each model
you’re considering— including output on plain paper, not just the fancy
dollar-per-sheet glossy stuff (unless that’s what you’re planning to print on all
the time). Also take into consideration the type of printing you plan on doing.
Some models, like the HP DeskJets, print crisper, sharper black text than most
inkjets, but they can’t compare to the Epson Stylus printers on photos.
Other color printers
Most Mac users look at inkjets when buying into color, but there are more
expensive, more full-featured products. Color laser printers, for example, are
available from Xerox, HP, Canon, Tektronix, and Apple. These printers use the
same laser technology as traditional monochrome laser printers, but they
fuse four different colors of toner (cyan, magenta, yellow, and black) to create
vibrant, laser-sharp color images. Most of these printers turn out up to five
full-color pages per minute at 600 or 1200 dpi. The printouts are generally
gorgeous, but even the least-expensive color lasers printers are about $4,500.
One of the big selling points about the color laser models is that they double
as full-blown workgroup black-and-white laser printers that can print from 10
to 12 pages per minute at 600 dpi.
Another novel alternative for color printing is a $400, miniature, dye-
sublimation printer (the kind that makes glossy, full-color, photo-like
prints — and usually costs about $10,000 for the machine). Several of these
are available, such as the Fargo Foto Fun. They generally print a maximum
size of 4 by 6 inches, but the quality — on shiny photographic paper — is
amazing. (For bigger dye-sub printouts, visit a local print shop/service
bureau, disk in hand.)
1056 Part V: Attachments
■ ■
MACWORLD MAC SECRETS • 4040-8/5 • ch30.F • Chapter 30 • FINAL • VB • 11/04/98 • p.1056

Imagesetters
When you seek the ultimate quality for your document, book, or magazine,
you take your file to a prepress plant or service bureau, where they’ll print
your stuff on an imagesetter.
The original phototypesetting devices of the 1960s and 1970s consisted of a
large spinning drum (a cylinder) upon which film strips containing negative
images of the type were placed. A lamp flashed through the type in the film
strip onto a roll of light-sensitive film or paper. This paper had to be devel-
oped in a processing machine. The mid-1970s brought the beginning of digital
technology to the typesetting world, in which a TV-style picture tube (a CRT)
replaced the spinning drum and light source.
Modern-day imagesetters — made by Linotronic, Agfa, VariTyper, and so on —
are very similar to those CRT typesetters, except that lasers now expose the
photographic media. Paper is pulled through an imagesetter by rollers, gears,
and springs. When you’re creating color printouts, registration (the precise
alignment of four plates, one of each color) is critical. Therefore, high-end
imagesetters are drum-based. Some imagesetters print a single sheet for
each plate.
All imagesetters are driven by a computer running software called a RIP
(short for Raster Image Processor). The RIP is essentially an extremely
sophisticated version of the PostScript interpreter that’s in your desktop
laser printer. Many RIP computers use large hard drives to store programs
and fonts. All of this sophistication, of course, costs huge amounts of money.
General Printing Secrets
■
Printing page one
In our desire to be as efficient as possible, here are some keystrokes you can
save in the Print dialog box when you don’t want to print the entire document.
First, you know (don’t you?) that you move from blank to blank in the dialog box
by pressing the Tab key (see Figure 30-1).
Most people figure out, therefore, that to print only page 1 of something, they
press Tab (to get to the From box), type 1, press Tab again (to get to the To box),
type 1, and then click Print.
Our secret du jour: Don’t even bother with the first number 1. Leave the From
box
blank.
Just put a 1 in the To box, and the Mac is smart enough to figure out
what you mean. Figure 30-1 should make this efficiency-nut’s trick clearer. (Your
print dialog box may look a little different from the one shown here, but the
same rules apply.)
Mac Basics
Chapter 30: Printing Secrets 1057
■ ■
MACWORLD MAC SECRETS • 4040-8/5 • ch30.F • Chapter 30 • FINAL • VB • 11/04/98 • p.1057
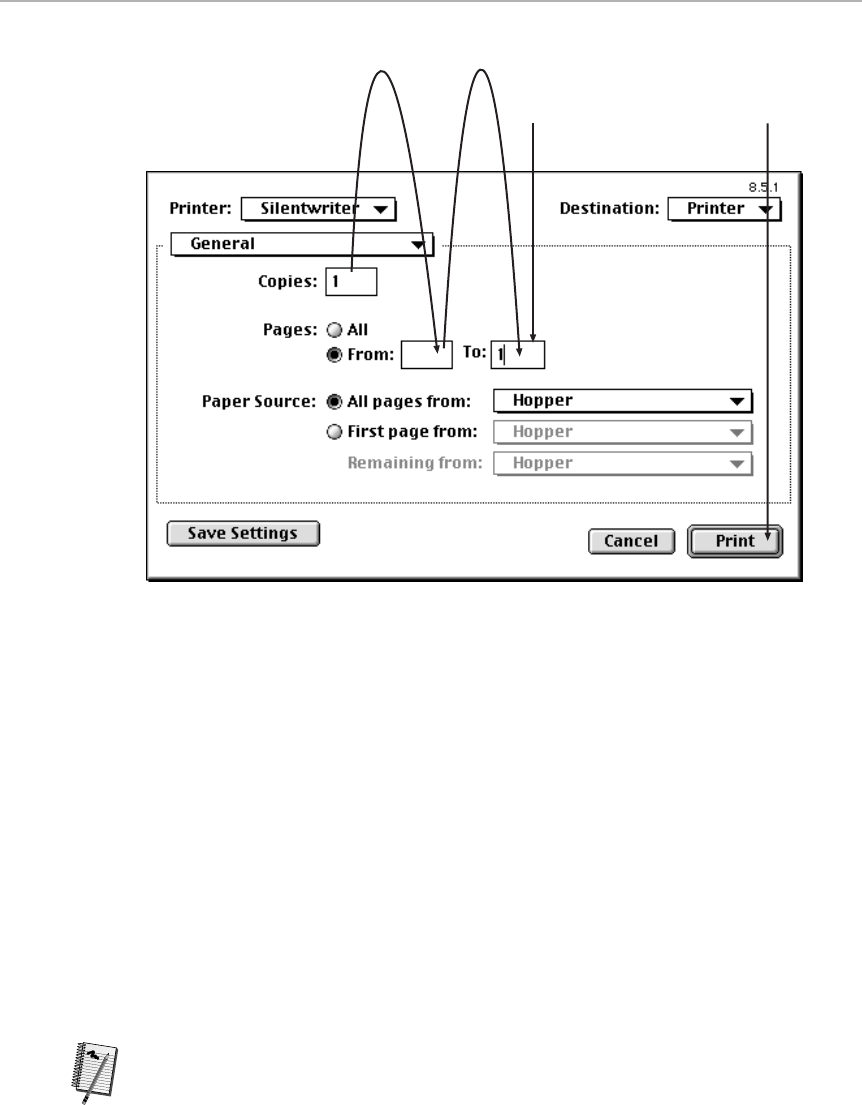
Figure 30-1: Power printing. In four keystrokes, you can get page 1, and only page 1, on its
way to the printer.
Likewise, if you only want to print from page 18 to the end, you can put 18 in
the
From
box, and leave the To box empty.
On the other hand, remember that the page numbers in this dialog box usually
refer to the
physical sheets of paper,
not to however they’re numbered on the
screen. Even if you’ve numbered the first page “p. 20” in your word processor,
the Print dialog box still thinks of it as page 1.
Label printing
Label printing isn’t quite as straightforward as printing on paper, but almost.
First, you have to buy the labels. If you’re going to use a laser printer, you must
buy special laser labels made by Avery. (Office-supply stores sell them.) Many
programs (FileMaker, Word, and so on) have form setups for standard Avery
label types.
These labels aren’t cheap. Print a test page of your labels on regular paper and
then hold that page up to the light against an unprinted page of labels to check
alignment; you’ll save the cost of wasting a sheet of labels as you fiddle with
the alignment. As a matter of fact, consider removing every
other
label from a
sheet of labels; when you hold
that
up to the test piece of paper, you’ll be able
to see much more clearly how your addresses will line up with the labels.
Worth
Learning
1Return
Tab Tab
1058 Part V: Attachments
■ ■
MACWORLD MAC SECRETS • 4040-8/5 • ch30.F • Chapter 30 • FINAL • VB • 11/04/98 • p.1058

And we’d be less than honest if we didn’t tell you about one curious label-
printing fact we’ve discovered over the years: Despite the fact that printer
companies often brag about their machines’ label-printing capabilities, many
technicians at these same companies don’t actually recommend running sheet
after sheet of labels through laser printers. In fact, many of the people who
service and repair laser printers swear that this is a mistake — sooner or later,
printing those adhesive-backed labels is going to mean trouble. The problem
occurs when one of those little labels peels away from the backing sheet as it
travels through the printer and ends up sticking to the imaging drum, feed
rollers, or some other sensitive part. We’ve seen companies pay big-time repair
bills after a laser printer choked on a label, which then proceeded to gum up the
whole inner workings of the printer.
We’re not saying you shouldn’t print labels with your laser printer. But if you’re
going to be turning out thousands of labels on a regular basis, you might
consider a dedicated label printer.
Canceling a printout
Without background printing, it’s easy to stop a printer in its tracks. Just hold
down Ô-period for a few long seconds. And then wait a minute for the printer to
finish what it’s in the middle of before responding. And with the Desktop Printing
software installed (see “Desktop Printing” later in this chapter), just click the
icon of your printer (on the desktop) and choose Printing ➪Stop Print Queue.
(You can also double-click a desktop printer icon, click on the job in progress,
then click the Trash button to cancel it completely.)
Chapter 30: Printing Secrets 1059
■ ■
MACWORLD MAC SECRETS • 4040-8/5 • ch30.F • Chapter 30 • FINAL • VB • 11/04/98 • p.1059
TRUE FACT
Sometimes a product makes such an impact on
the marketplace that its brand name becomes
synonymous with the product itself. People ask
if you’ve got a Kleenex handy, even though they
couldn’t care less about the actual brand of
tissue. The same trademark generalization has
occurred with Jell-O, Band-Aid, and Xerox.
If you’re heavily involved in desktop publishing,
you probably call your trip to the service bureau
a visit to the Lino shop, and call all of their
imagesetters Linotype machines. Yet the Lino is
only one particular brand of imagesetter (and in
the old days, it wasn’t even an imagesetter—it
was a typesetter); you’re just as likely to run
across equipment manufactured by Agfa,
VariTyper, or other firms.
The manufacturer of Linotype imagesetters, the
Linotype-Hell Company, is the descendant of
two companies whose lineage dates back to the
early history of typesetting. The founder of the
original Mergenthaler-Linotype Company, Ottmar
Mergenthaler, produced the original Linotype
machines in 1886. Many of the typefaces that
are so familiar to laser printer owners are
original Linotype-Hell designs, licensed by
Adobe or Apple. These original fonts — genuine
Lino fonts, if you think about it — include
Helvetica, Palatino, and Times Roman.
Let’s go to the Lino

But if Background Printing is on and you’re
not
using Desktop Printing, the little
background program called PrintMonitor now controls the printing tasks. You can
press Ô-period from now till Doomsday, and PrintMonitor won’t get the
message.
Unless
, that is, you pull PrintMonitor to the foreground. To do so, wait until
about 10 seconds after you used the Print command. You see PrintMonitor’s
name appear in your Application menu. Choose it. The PrintMonitor window pops
to the front, where the big, fat Cancel button is staring you right in the face.
Click it.
A minute or so may elapse before PrintMonitor actually stops the printing. But if
you catch it early enough, the printing operation is aborted. (We have much
more to say about PrintMonitor later in the chapter.)
Finally, a word of friendly advice: when all else (meaning Ô-period) fails, don’t be
timid about just shutting off the printer in midprint. Sure, you may have to help
the page-in-progress out of the machine’s innards, but no harm’s done, and you
may save a lot of time. (PrintMonitor will squawk in protest, of course, but a
couple of judicious clicks on Cancel should shut it up.)
Actually, if it’s a laser printer, this method may be even simpler: just pull out the
paper tray. Once the out-of-paper light comes on, you can switch the printer off,
push the paper tray back in, and turn the printer back on again — and you don’t
risk getting a page stuck in the guts of the machine.
Printing from the Desktop
In many cases, you don’t even have to open an application to print a document.
You can do it from the Desktop simply by highlighting the document icon — or
several icons, even those created by different programs — and choosing Print
from the Finder’s File menu. Alternatively, you can drag the icons to a desktop
printer icon if you have Desktop Printing turned on. (Read all about Desktop
Printing later in this chapter.) In either case, the Mac automatically launches
the programs that created those documents (memory permitting), asks you to
confirm the Print dialog box, then quits those programs.
There’s one huge benefit to using this method that’s often ignored: If you select
several
files and use the Finder’s Print command, you only have to confirm one
Print dialog box (per program). All the other jobs get spooled automatically. That’s
a lot better than stepping through the Print dialog box for each individual job.
QuickDraw Printing
There are two different schemes the Mac uses to tell a printer what to draw
on the page: PostScript and QuickDraw.
Worth
Learning
Worth
Learning
1060 Part V: Attachments
■ ■
MACWORLD MAC SECRETS • 4040-8/5 • ch30.F • Chapter 30 • FINAL • VB • 11/04/98 • p.1060

QuickDraw versus PostScript
QuickDraw is the built-in software that the Mac uses to draw text and
graphics on its own screen. It remained essentially unchanged from its
invention in 1984 through the debut of QuickDraw GX (read on).
A QuickDraw printer uses that same image-drawing technology to take what
you see on the screen to the printed page. When you print on a QuickDraw
printer, the Mac’s QuickDraw programs, built into its ROM chips, do the pro-
cessing. Therefore, the speed of a QuickDraw printer is directly dependent
upon the speed of your Mac. The StyleWriters, Stylus Colors, and DeskJets of
the world are all QuickDraw printers. In its day, Apple also produced a handful
of inexpensive QuickDraw laser printers: three models in the Personal
LaserWriter series (SC, LS, and 300) and the LaserWriter Select 300, for
example.
Some of today’s QuickDraw printers are very high-resolution printers. The
memos and newsletters printed with an Epson Stylus Color 800 at 1,440 dpi
resolution look great. So who needs PostScript?
The trouble with QuickDraw printers
Adobe Type Manager and TrueType technology do magical things for printed
text on QuickDraw printers. But graphics are another story.
Graphics drawn in QuickDraw graphics programs (otherwise known as
drawing programs, such as ClarisWorks/AppleWorks’s Drawing window)
look great when printed on QuickDraw printers. (See Chapter 20 for more on
graphics programs.) But graphics from a PostScript drawing program, such
as FreeHand or Illustrator, don’t translate well into QuickDraw. Such graphics
generally print as jagged, 72 dpi representations of the high-quality graphics
on the screen. Recent versions of Freehand and Illustrator do better at
converting their own PostScript graphics into QuickDraw form than before.
But to print such images at their best, you need one of these two things:
■A conversion program, such as InfoWave’s StyleScript or Birmy Graphics’
PowerRIP, that translates PostScript code into instructions that
QuickDraw printers can understand. (There’s even a freeware program
of this type called GhostScript, although figuring out its interface isn’t a
joyride.) This allows images to print at full resolution on a StyleWriter,
Stylus Color, or other non-PostScript printer.
■A PostScript printer (see “The Truth About PostScript” later in this
chapter).
What’s good about QuickDraw printers
If all you print is text, a QuickDraw printer (such as an inkjet) is a very
attractive option. Because print quality is generally outstanding, the only
drawbacks to QuickDraw printers are their slower printing speed, their
inability to print PostScript graphics unaided, and (in the case of inkjet
printers) the difficulty of finding a paper/ink combination that looks sharp,
but doesn’t smudge.
Chapter 30: Printing Secrets 1061
■ ■
MACWORLD MAC SECRETS • 4040-8/5 • ch30.F • Chapter 30 • FINAL • VB • 11/04/98 • p.1061

The StyleWriter series
This printer used to be everyone’s best buy. For about $200, you could get a
machine whose printouts looked very nearly laser-printed.
But in the years since the release of the first StyleWriters, other companies,
such as Hewlett-Packard and Epson, have produced Mac-compatible color
inkjet printers that, frankly, blow away the StyleWriter’s image quality and
price. The HP DeskJet 870ce, for example, prints crisp black text that makes
most StyleWriter output look downright crude. And color StyleWriters can’t
even come close to matching the Epson Stylus series printers when it comes
to printing color photos.
In 1997, Apple radically redesigned the StyleWriter series, shifting to a new
print engines manufactured by HP (the older StyleWriters were built around a
Canon print engine). Finally, in 1998, Apple got out of the printer business
completely.
We’ve included a few general StyleWriter secrets here, but if you’re still using
one of the older, monochrome StyleWriters, be sure to check out our stash of
more model-specific StyleWriter tips in Chapter 24 of Macworld Mac Secrets,
4th Edition (on the CD-ROM that came with this book).
StyleWriter Secrets
■
Make your own watermark
Some StyleWriter printing software (such as the Color SW 1500 printer driver)
includes a Watermark feature, which can be used to emblazon an automatic
logo or text stamp — such as CONFIDENTIAL or DRAFT — across every page that
you print. To apply one, you open the Page Setup dialog box, click the Watermark
button, and then choose the stamp you want from the pop-up menu in the
Watermark Options dialog box (see Figure 30-2). You can also adjust the density
(darkness) of the watermark and where you want it to be aligned on the page.
The secret, though, is that you’re not limited to the 16 or so pre-set watermarks
that show up in the Watermark menu. As reader Jim Jewell discovered, you can
create your own custom watermarks with your own company name or logo. Using
any graphics program (such as Color It, included on this book’s CD-ROM), design
a mark and save it as a standard PICT file. Then drop the file into the Printing
Prefs folder, which is nestled away in the Preferences folder inside the System
folder. Your custom watermark will now be available in the Watermarks pop-up
menu. (Conversely, if you open the Printing Prefs folder, you can also
remove
the
PICT files for watermark styles you never use.)
You can add watermarks when using laser printers, too, but only if you have
Version 8.5 (or later) of Adobe’s PostScript printer driver. See “PostScript Level
3” later in this chapter.
1062 Part V: Attachments
■ ■
MACWORLD MAC SECRETS • 4040-8/5 • ch30.F • Chapter 30 • FINAL • VB • 11/04/98 • p.1062
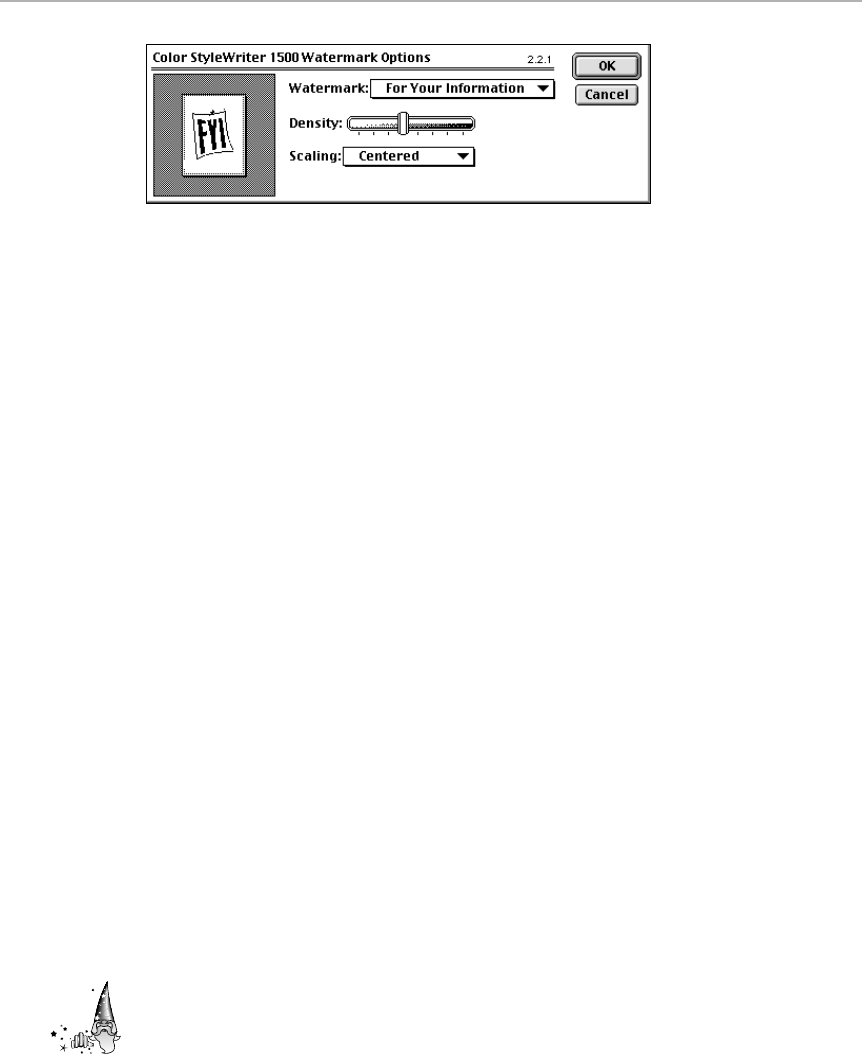
Figure 30-2: Most StyleWriter software lets you superimpose a preset watermark on print
jobs, but you can also design your own.
Paper suggestions
StyleWriter (and other inkjet) printouts take time to dry. Especially if you’re
printing larger images that require a lot of ink on shiny copier paper, be careful
not to let the sheets stack up as they emerge from the printer, because one
outgoing page may smudge the previous one. This is especially true of
transparencies.
For what it’s worth, Apple recommends 25 percent cotton bond paper. As a
general rule, smooth-finish (but not glossy) paper yield far better results with an
inkjet printer than rough, grainy paper, which tends to absorb and spread too
much of the liquid ink.
Sharing the StyleWriter on a network
The GrayShare feature (StyleWriter II and later models) or ColorShare feature (on
Color StyleWriters) not only lets you print grayscale or color images, it lets you
share the printer across a network. (Don’t ask us why these two features should
go hand-in-hand.)
To activate “sharing,” all of the StyleWriter’s software must be installed on your
Mac. The same StyleWriter software also has to be installed on any other Macs
on the network that will share the printer. Also — weirdly — the printer must be
attached to the
modem
port, not the printer port, as you’d expect. (And what if
you have a
modem
that needs the modem port? You’ll have to buy an A/B
switch box. This setup is clunky, but it works.)
Open the Chooser, select the StyleWriter icon, and click Setup. The dialog box in
Figure 30-3 appears. You can give your printer a unique name. You can even set
up a password to restrict access to certain users.
After it’s set up, people sitting at other Macs on the network will be able to
select
your
printer in their Choosers. They can then print documents just as
though the printer were any kind of networked device (such as a PostScript laser
printer).
Strange
But True
Chapter 30: Printing Secrets 1063
■ ■
MACWORLD MAC SECRETS • 4040-8/5 • ch30.F • Chapter 30 • FINAL • VB • 11/04/98 • p.1063
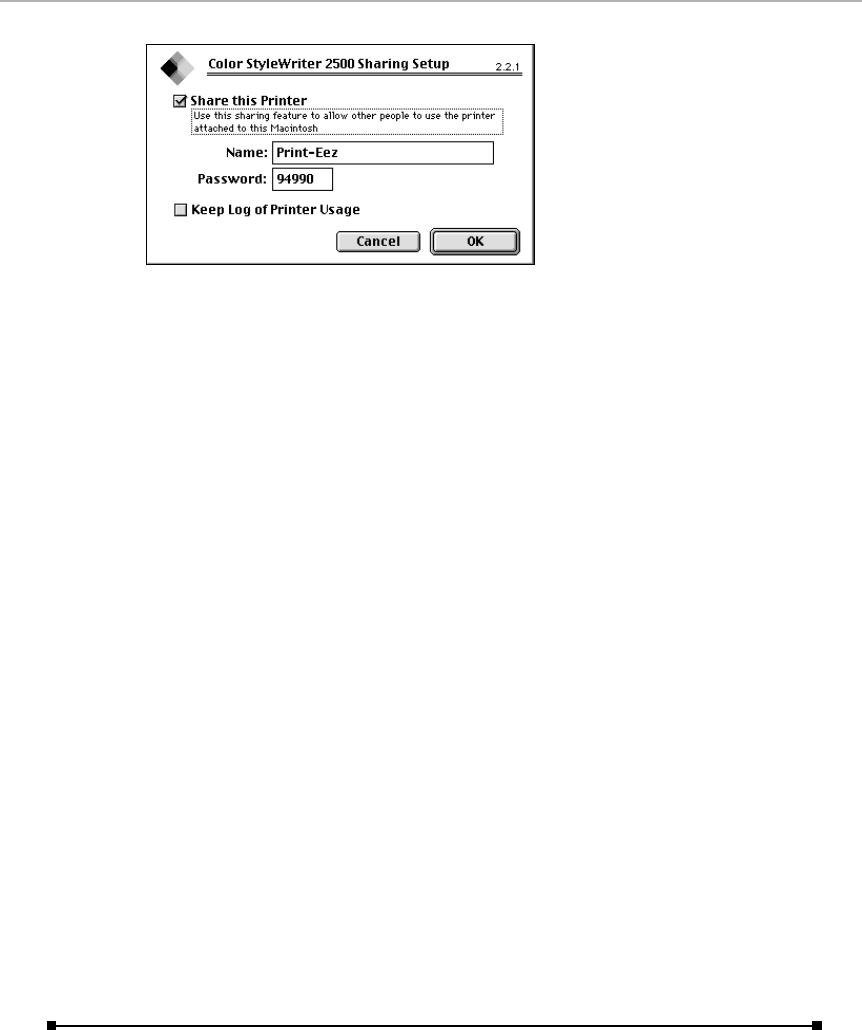
Figure 30-3: The Color StyleWriter’s unique brand of networking.
But the StyleWriter is a QuickDraw printer. Therefore, it needs a Mac to do its
processing; in this case, it’s the Mac directly attached to the StyleWriter.
Whoever happens to be using this “server” Mac will have to wait through bouts
of mysterious computer sluggishness as other people on the network send their
documents to it. Furthermore, all the fonts used in the documents sent by the
network Macs must be installed on the “server” Mac, or you’ll be in for some
unpleasant surprises when you look at the printed pages.
Still, sharing a StyleWriter among two or three Macs is a decent and inexpensive
option.
StyleWriter ink facts and fiction
All Color StyleWriters models released prior to the StyleWriter 4400 contained
print mechanisms manufactured by Canon — so, not surprisingly, you can use
Canon color inkjet cartridges with most Color StyleWriters. The Canon and Apple
cartridges are virtually identical — except for the fact that, as reader Jeremy
Bohn discovered, the Canon cartridges are cheaper and a lot easier to find. This
money-saving tidbit applies, for example, to all black-and-white StyleWriters; they
all work with the older Canon BubbleJet black ink cartridges.
And speaking of black ink, for years Apple marketed two separate products —
ink cartridges for the original StyleWriter and ink cartridges for the StyleWriter II.
The assumption was that they were
not
interchangeable; after all, if the
cartridges were identical, why on Earth would Apple call them by two different
names?
Turns out, of course, that they
are
the same, as are the cartridges for the
StyleWriter 1200. Any of these three models can use exactly the same inkjet
cartridge, regardless of what it’s named.
The Truth About PostScript
PostScript is one of those terms that you hear every two minutes in the Mac
world. Most people associate it with laser printers. Yet you can buy a laser
1064 Part V: Attachments
■ ■
MACWORLD MAC SECRETS • 4040-8/5 • ch30.F • Chapter 30 • FINAL • VB • 11/04/98 • p.1064

printer that doesn’t have PostScript, and you can buy a PostScript printer
that isn’t a laser printer. Furthermore, people talk about PostScript as though
it has something to do with text — and then you hear about a PostScript
drawing program.
PostScript is actually a computer language. It’s used to describe images —
text and graphics on the screen and on paper. If you know what you’re doing,
you can actually sit down and type out the PostScript codes necessary to
make the computer draw, say, a triangle.
The word “PostScript” pops up in conjunction with almost everything in the
Mac world: fonts, printers, graphics, commands, and so on. We’ll tackle them
one by one.
PostScript fundamentals
PostScript was released by Adobe Systems in 1985. It’s a computer language
that describes the characteristics of a page, including the text and the
pictures. (The original PostScript language was later called PostScript Level 1,
as newer versions got introduced.) The PostScript file that you create on
your Mac (or any other computer) is nothing more than a set of instructions
to the printer: “Draw a straight line, starting an inch from the top of the page.
Turn left. Draw another line.” And so on. If you open an Adobe Illustrator file
in a program that reads simple text, you’ll see what we mean. Although the
instructions that follow are rather oblique, they are, more or less, in English.
The numbers describe, in points, the precise location of the various parts of
the graphics file (see Figure 30-4).
Figure 30-4: Part of a typical Adobe Illustrator document file describing a series of polygon
shapes.
When you actually print the file on your PostScript laser printer, you get
something like Figure 30-5.
Chapter 30: Printing Secrets 1065
■ ■
MACWORLD MAC SECRETS • 4040-8/5 • ch30.F • Chapter 30 • FINAL • VB • 11/04/98 • p.1065

Figure 30-5: Printout of the Adobe Illustrator graphics file.
PostScript was designed to provide what Adobe calls device independence:
That is, the same PostScript file comes out at 72 dpi on the screen, at 600 dpi
on a PostScript laser printer, and at 2,400 dpi on a PostScript imagesetter. It
prints, therefore, at the highest resolution capability of your printer (or
screen).
PostScript gave desktop publishing the boost it needed to take over from
traditional typesetting. Older professional-level printers could only use a
single set of fonts provided by the manufacturer and could only work with a
certain kind of computer workstation. With PostScript, you can use the same
file and the same fonts on printers made by many different manufacturers —
and you know that your file will print at the highest resolution that is
possible on that printer.
PostScript fonts
A PostScript font is a file that may be compared to a coloring book. The file
contains only the hollow outlines of the letters and symbols (which is why
we call them outline fonts). (See Chapter 29 for details.)
The PostScript interpreter (the computer inside the printer), in effect,
supplies the crayons to fill in those outlines. The outlines that describe the
font may come from any of two places. It may be transferred to the printer
by your system software (a downloadable font). Or, the font may be a resident
font, permanently installed in your printer’s ROM. (On most heavy-duty
PostScript printers, you can install font cartridges or attach a font hard
drive, too.)
PostScript printing
The Mac draws images on the screen using QuickDraw. When you print to a
PostScript laser printer, therefore, the QuickDraw commands that compose
the screen image must be translated into PostScript.
After the PostScript instructions are sent to the printer, yet another conver-
sion takes place: The printer’s processor (its interpreter) translates the
PostScript instructions into a bitmap that describes exactly which micro-
scopic dots on the page need to be black.
1066 Part V: Attachments
■ ■
MACWORLD MAC SECRETS • 4040-8/5 • ch30.F • Chapter 30 • FINAL • VB • 11/04/98 • p.1066

All of this translating accounts for the delay between the time you click OK in
the Print dialog box and the moment the first page emerges from your printer.
How long the printer takes depends on the power of its processor, the size of
your document, how many fonts and graphics the document has, and how
much memory (RAM) is in the printer.
The PostScript Printer Driver
A driver is a piece of software that tells your Mac how to communicate with
some external piece of equipment — such as a laser printer. Every printer you
use must have a corresponding driver installed on your Mac.
Printer drivers go into your Extensions folder. As every first-time Mac
owner eventually discovers, you can’t print a single page until you open
your Chooser desk accessory; the icons you see there — StyleWriter 1200,
LaserWriter 8, and so on—are your printer drivers. (If you’re using the
Desktop Printing extensions described later in this chapter, the procedure
is slightly different—highlight the icon of the printer on your desktop and
press Ô-L to designate it as your preferred one.) After you select a driver,
the options in your Page Setup dialog box change to reflect the features of
the printer you specified.
The original PostScript printer driver was called, simply, LaserWriter (with
no numbers or letters tacked on at the end). The LaserWriter driver was
intended primarily for use with Apple’s own line of LaserWriter printers,
but it works with virtually any laser printer that uses Adobe’s PostScript
technology.
LaserWriter 8: PostScript Level 2
Five years after the initial release of PostScript, Adobe produced an updated
version of the PostScript language called PostScript Level 2.
Almost every PostScript printer manufactured within the last several years
supports PostScript Level 2, which has features to make printing faster and
more predictable than with the original PostScript software. A Postscript
Level 2 printer offers faster background printing, improved text and graphics
handling, better color printing on any color printer, and, in general, more
efficient PostScript files, which means faster printing of complex documents.
It also provides improved halftoning algorithms (see Chapter 31 for details on
halftones). Level 2 uses a smarter simulation method that reduces common
problems with halftone printouts— moiré patterns, for example — that even
affect high-end imagesetters.
Also, all PostScript Level 2 and later driver software comes with a folder full
of printer-description files, or PPDs. Each file tells the Mac what special
features are unique to your make and model of printer: the capability to
handle special paper sizes; multiple paper trays; duplex printing (on both
sides of each page); and so on.
Mac Basics
Chapter 30: Printing Secrets 1067
■ ■
MACWORLD MAC SECRETS • 4040-8/5 • ch30.F • Chapter 30 • FINAL • VB • 11/04/98 • p.1067

To take advantage of these offerings, Level 2 printers require Level 2
software — otherwise known as the LaserWriter 8 driver. This driver was
developed and distributed jointly by Adobe and Apple.
Actually, the two companies released the same driver under different names.
The Apple version is called LaserWriter 8. You’ll find its set of PPDs in your
System folder, in your Extensions folder, in a folder called Printer Descrip-
tions. (Feel free to discard all but the one that matches your printer.)
Although Apple has released several versions of this driver—8.3, 8.4, 8.5.1,
and so on — its name is still officially LaserWriter 8.
The Adobe edition, PSPrinter (or more recently, AdobePS),comes on two
high-density disks and includes over 200 PPDs so that you can customize
the driver for almost any printer on the market. (You can also download the
PostScript driver for free from Adobe’s Web site at www.adobe.com.)
PostScript Level 3
In April 1997, Adobe released PostScript Level 3, its first major upgrade to the
PostScript language since 1990. PostScript Level 3 is designed, yet again, to
speed up PostScript printing routines and improve the handling of graphics,
particularly in the area of color printing. It provides more ways to fine-tune
color output and improve color matching. It also uses new shading algorithms
to reduce banding, produce smoother color gradients, and improve the
resolution of black-and-white printers.
Several Internet-related features are incorporated into Level 3, too. With
Level 3, you can create Portable Document Format (PDF) files directly from the
printer driver. (A PDF is an Adobe Acrobat document, complete with fonts,
layout, color, and other graphic elements, that you can distribute to anyone
without worrying what program or fonts they own—as long as they have the
free Adobe Acrobat Reader.) Networked printers that can connect to the
Internet can grab a PDF file from a designated Web address and print it
directly from the Web site, without ever having to display it on screen.
Level 3 also expands the standard PostScript font set— the ones pre-installed
in every Level 3 printer — to 136 fonts. The result is less network traffic,
fewer font errors, and much faster printing. Finally, Adobe designed Level 3
to accept “plug-ins” that let you add new features to your printing software
simply by dropping new extensions into your System Folder. For example,
you can add a watermark feature to your PostScript printer by plugging in
Adobe’s free Watermark extension.
So how do you “upgrade” to PostScript Level 3? To tap into all of these
features you have to get a Level 3 printer, such as the LaserWriter 8500.
Taking advantage of PostScript Level 3 also requires a Level 3 printer driver.
Again, both Apple and Adobe have released their own Level 3-compatible
drivers. The Apple version is LaserWriter 8.5.1, which comes with Mac OS 8.1
OS
8
1068 Part V: Attachments
■ ■
MACWORLD MAC SECRETS • 4040-8/5 • ch30.F • Chapter 30 • FINAL • VB • 11/04/98 • p.1068

and later, and can also be downloaded from Apple’s Web site. Adobe’s Level 3
printer driver — AdobePS 8.5.1 — is free and available from Adobe’s Web site
(www.adobe.com).
Fortunately, you can use these updated drivers even with an older PostScript
Level 2 printer. You won’t be able to take advantage of most of the Level 3-
specific features, of course, but you will benefit from some of the other
improvements Apple and Adobe have made in the printer drivers.
What’s a PPD file?
As we’ve said, PPD stands for “Printer Page Description” — a small text file
that describes your printer’s possible page sizes, screen angles, its list of
built-in fonts, whether or not it has more than one paper tray, and so on. As
we mentioned earlier, PPDs live in the Printer Descriptions folder within the
Extensions folder.
One of the few times you encounter PPDs is when you first choose a new
PostScript printer in the Chooser, using the LaserWriter 8 printer driver. After
picking a printer in the Chooser, you have to click the Setup button to
configure the printer’s settings and, in the resulting dialog box, click the Use
PPD button. Then you choose the PPD that exactly matches your printer.
If you don’t have a PPD file for your printer sitting in the Printer Descriptions
folder, it won’t show up in this list. In that case, click the Use Generic button.
Your printer will work just fine, but you won’t have access to any of your
printer’s unique model-specific features — feeding paper from multiple paper
trays, for example, or color and resolution settings. (If you can’t find the right
PPD for your printer, look for it on the disks or CD that came with your
printer; you can also check the Web site of the printer manufacturer.)
Actually, PPDs are nothing new; professional programs such as Adobe
Illustrator, Aldus FreeHand, and PageMaker have used them for years.
(QuarkXPress uses them, too, but calls them PDFs and uses a proprietary
format.)
The Page Setup dialog box
The PostScript printing process begins with a mandatory visit to the Page
Setup dialog box, where you make a few decisions that dictate how your
document prints (see Figure 30-6).
The basic options are always the same. You specify the size of the paper you
print on; whether or not you want the image reduced or enlarged; and
whether you want the paper printed in portrait (taller than it is wide) or
landscape orientation (on its side). Depending on the program you’re using,
the main pop-up menu may list other “panels” of printing setup options; don’t
forget to explore them.
Chapter 30: Printing Secrets 1069
■ ■
MACWORLD MAC SECRETS • 4040-8/5 • ch30.F • Chapter 30 • FINAL • VB • 11/04/98 • p.1069
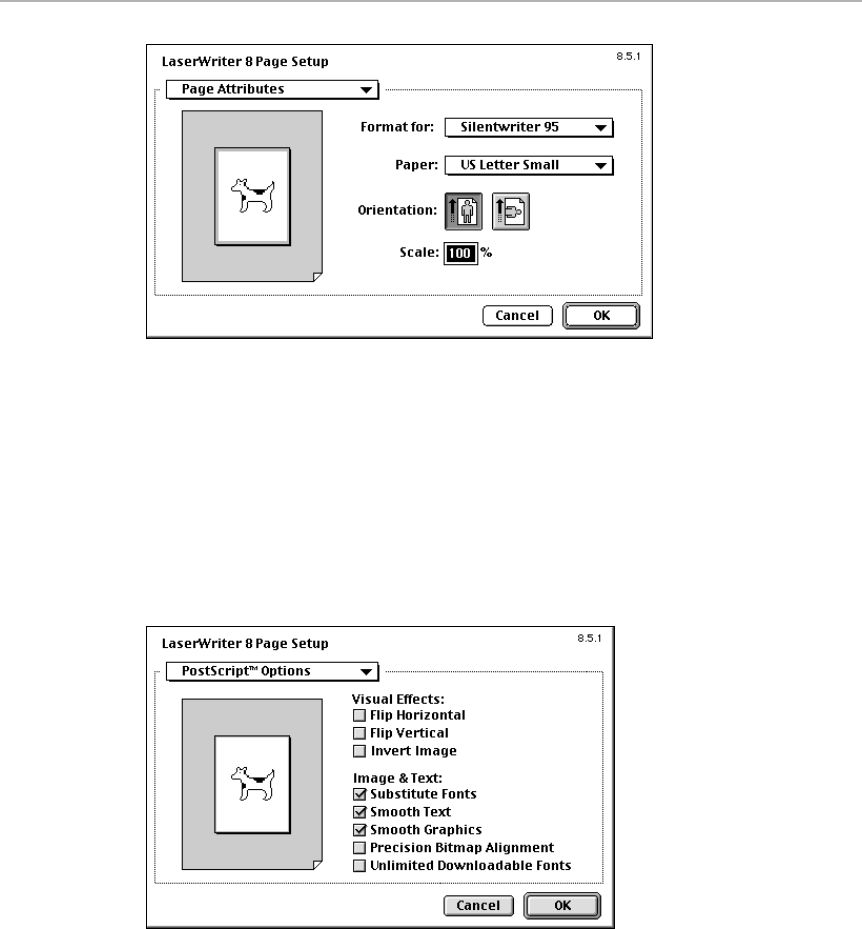
Figure 30-6: The standard LaserWriter 8.5.1 Page Setup box. This box may differ slightly,
depending on the application and printer driver version.
Ineffectual FX
Among this main pop-up menu’s options, you may find something called
PostScript Options (see Figure 30-7). (If you’re using the older LaserWriter
driver, these options are called Printer Effects and they appear right in the
Page Setup window. And in early versions of LaserWriter 8, you access them
by clicking the Options button in the Page Setup window.)
Figure 30-7: The increasingly useless options of the Page Setup dialog box
In today’s world of powerful, high-tech PostScript printers, the Printer
Effects/Options are next to useless. Unchecking them conserves RAM, saves
printing time, and leaves the printing quality unaffected.
1070 Part V: Attachments
■ ■
MACWORLD MAC SECRETS • 4040-8/5 • ch30.F • Chapter 30 • FINAL • VB • 11/04/98 • p.1070

But because they’re always there, staring you in the face, we’d like to
demystify them. (If you haven’t yet upgraded to the LaserWriter 8 driver,
some of these options are hidden in the dialog box that appears when, in the
Page Setup dialog box, you click Options.)
■Flip Horizontal and Flip Vertical. These options are used for mirroring
your document; as illustrated by the sample Dogcow image in the dialog
box, they flip the printed image right-for-left or upside-down. You may
occasionally need to print something flipped horizontally when you print
onto film using a Linotronic imagesetter if your pages must be “emulsion
side down.”
You never need Flip Vertical, as far as we can imagine. You can accomplish
the same thing by simply selecting Flip Horizontal and then turning the
page upside-down in your hand — and you get your printout much sooner!
We think it’s safe to say that we’re the only people in America, by the way,
to notice that this bug in the Dogcow: when you turn on Flip Horizontal,
the Dogcow picture doesn’t change to a perfect mirror image of the
unflipped Dogcow. The horizontally flipped one has a bigger eyeball —
and a patch of black fur on his rump!
■Invert Image. This choice prints a negative of your pages: black-for-white
and white-for-black. You can use it, we guess, at Halloween.
Strange
But True
Chapter 30: Printing Secrets 1071
■ ■
MACWORLD MAC SECRETS • 4040-8/5 • ch30.F • Chapter 30 • FINAL • VB • 11/04/98 • p.1071
ANSWER MAN
Q: OK, I took your advice and upgraded from the
old LaserWriter 7 printer driver to LaserWriter
8.x. But I was horrified to discover that the
Larger Print Area option has vanished from the
Page Setup options! Why on earth did Apple
leave stuff like Precision Bitmap Alignment in
there and remove a perfectly good feature that
let me print with narrower margins on my laser
printer? You call this progress?
A. Relax. You can still print with narrowest
possible margins on a laser printer, even though
the Larger Print Area is gone. (The “Larger Print
Area” checkbox was hidden behind an Options
button in pre-8.0 LaserWriter Page Setup boxes.
When it’s turned on, your LaserWriter can print
to within .25" of the edges of each sheet of
paper. Without it, you can come to within only
half an inch of the paper’s edge.)
Check out the paper size options in the Paper
pop-up menu in the Page Setup dialog box. You’ll
see that there are now two size options for all
the standard page sizes — US Letter and US
Letter Small. US Letter is the same as the old
Larger Print Area mode.
The other option — US Letter Small — leaves
the half-inch margins around every laserprinted
sheet — in other words, it’s the equivalent of
the old US Letter size without Larger Print Area
turned on. Evidently, Apple finally realized how
popular the larger-print-area option was, and so
they brought it out of its hidden dialog box and
into the foreground. (If you don’t see US Letter
Small listed among the Paper sizes, it means
your laser printer is set up to always print to the
larger print area when US Letter is selected.)
The disappearance of “Larger Print Area”

■Substitute Fonts (formerly Font Substitution).In the early days, there were
only two kinds of fonts: laser fonts and ImageWriter fonts. As you can read
in Chapter 29, these two categories actually corresponded to PostScript
fonts and bitmapped fonts (which print jaggedly on the LaserWriter).
In those uncertain days of 1985 and 1986, people sometimes used the
fonts they were accustomed to—Geneva, New York, Venice — in
preparing documents. Of course, such fonts inevitably came out looking
jagged, because no PostScript instructions (outline fonts) were involved.
As a helping hand, Apple offered the Font Substitution option. It
automatically swapped a PostScript font for its non-PostScript
equivalent. That is, wherever you used Geneva in your document, the
laser printed Helvetica; wherever you used New York, you got Times; for
Monaco, you got Courier. Unfortunately, the characters in each of these
fonts simply aren’t the same widths. As a result, your Helvetica, Monaco,
and Times text had ridiculous word spacing when it finally hit paper.
Today, this option is irrelevant in terms of print quality. Today, Geneva,
Monaco, and New York are TrueType fonts, so they’ll never print jaggedly
on a laser printer at all. Leave this option off.
■Smooth Text (formerly Text Smoothing). If, by some freak of fate, you’re
still using bitmapped fonts (such as Venice or London), this setting
supposedly makes them look better by smoothing the ragged edges.
■Smooth Graphics (formerly Graphics Smoothing). This option performs a
similar smoothing operation, but it applies only to bitmapped pictures—
those you created in Photoshop or another painting program.
■Precision Bitmap Alignment. Here’s another obsolete feature. You’re
supposed to use this option when you’re printing MacPaint-style
documents (72 dpi bitmapped art).
It so happens that 72 doesn’t divide evenly into 300 dpi, which is the
resolution of a laser printer. Precision Bitmap Alignment reduces the
overall image by four percent so that each on-screen dot perfectly fills
up four of your 300 dpi printer’s dots.
Ignore this option. Instead, when you go to print, simply specify that you
want to print at 96 percent of full size! The effect is exactly the same, but
you save the trouble of trudging through two dialog boxes. (Come to think
of it, using our 96 percent method has an additional advantage. If you use
Precision Bitmap Alignment, only the bitmapped graphics are reduced 4
percent, while text and vector graphics remain at full resolution. The
result: alignment and scaling differences between screen and paper.)
■Unlimited Downloadable Fonts. This setting, another holdover from the
days of memory-strapped laser printers, lets you print documents that
contain too many fonts for your printer to handle otherwise.
This feature works by flushing fonts from RAM as soon as they’re used
and then downloading the next batch. This constant downloading and
flushing makes the printing take longer, of course, but it may be the
answer when lack of printer memory would otherwise render your
document unprintable.
1072 Part V: Attachments
■ ■
MACWORLD MAC SECRETS • 4040-8/5 • ch30.F • Chapter 30 • FINAL • VB • 11/04/98 • p.1072

One caveat: If you’re printing an EPS graphic that contains the only
instance of a certain font, this setting may not download that font
correctly. The Courier font will be substituted instead. If that syndrome
happens to you, you may have to turn off Unlimited Downloadable Fonts
and find another solution.
■Larger Print Area. As we mentioned in the sidebar “The Disappearance
of ‘Larger Print Area,’ in LaserWriter 8.4 and up, this checkbox has been
renamed the US Letter paper size—as opposed to US Letter Small.
Anyway, the purpose is the same: to expand your printer’s printing area
to within a quarter-inch of the edge of the page all around (instead of its
default half-inch).
■Faster Bitmap Printing. This option has been removed completely from
LaserWriter 8, but you’ll see it if you use the earlier LaserWriter driver.
When originally designed, Faster Bitmap Printing forced the Mac to
preprocess bitmapped (MacPaint-style images) before sending them
to the printer, resulting in faster overall printing.
This was one of the best jokes in the world of Mac, however. Today’s
laser printers are so efficient that Faster Bitmap Printing actually results
in slower bitmap printing! Leave this option off.
Chapter 30: Printing Secrets 1073
■ ■
MACWORLD MAC SECRETS • 4040-8/5 • ch30.F • Chapter 30 • FINAL • VB • 11/04/98 • p.1073
TRUE FACT
Look at Figure 30-7. In fact, look at your own
Page Setup or Print Options dialog box. Look at
that animal, the one who stands in for your actual
document image, the one who obediently flips,
shrinks, grows, turns black, and hangs upside
down to illustrate the effects of the various printer
effects as you turn them on and off.
What is that animal? Is it a dog? Is it a cow? No.
According to anonymous sources at Apple, this
animal is the Dogcow. The Dogcow has become
legendary among the Mac intelligentsia. There
are Dogcow T-shirts. Dogcow discussions on
the Internet. And in the newest Print dialog
boxes (for the StyleWriter, for example, or the
Level 2 PostScript driver), the Dogcow has been
elevated to a much more prominent position.
You can predict, we’ll bet, the sound she makes:
Moof! (Yes, the Dogcow is a she — as is every
cow. Otherwise she’d be a dogbull. This little
factoid, pointed out to us by reader Ben Galanti,
is, believe it or not, fully documented by Apple
in a technical note to Mac developers at
devworld.apple.com/dev/dts/history.
html.)
Frankly, we feel that one lonely person’s heart
may be repeatedly broken by all of this glee over
the bizarre mutant hybrid animal: whoever first
drew the little cutie. How do you think that
person feels about her artistic skills, when her
one attempt at system-software art has become
a cultural laughingstock? She couldn’t even
draw a cow (or a dog, or whatever it’s supposed
to be), for goodness’ sake!
We have a sneaking feeling the other Apple
employees know who it is. It’s the Apple
programmer who refuses to play Pictionary at
the company picnic.
The inevitable Dogcow sidebar
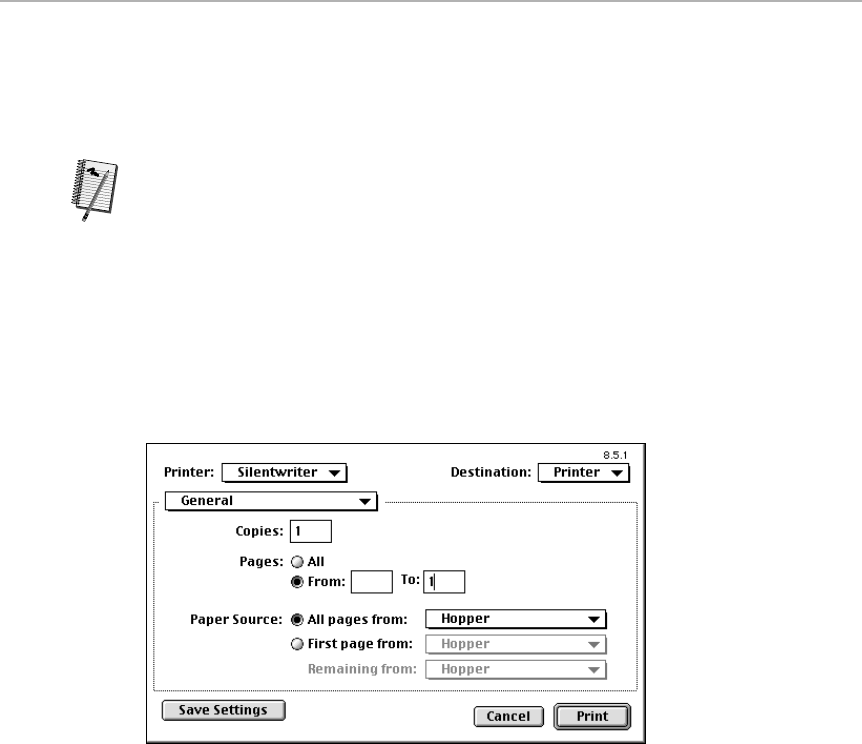
The Print dialog box
The Print dialog box — the one you see when you actually choose a program’s
Print command — remained essentially unchanged through several successive
versions of the LaserWriter printer driver.
But in LaserWriter 8.4 and later, the Print dialog box got a major facelift (see
Figure 30-8). First—and terrifically—you can now choose which printer you
want to use for each printout (if it’s a PostScript laser printer) by using the
Printer pop-up menu, ignoring the Chooser altogether.
Furthermore, Apple took options that used to clutter up the Print window
and buried them deeper in the dialog box. The basic options — the number
of copies you want to print, which pages, and from which paper tray— are
still visible when you first open the window. To get to the other options,
you use the Print window’s main pop-up menu; the dialog box “panel”
changes depending on which of the eight categories you have selected in
the pop-up menu.
Figure 30-8: The LaserWriter 8 Print dialog box.
Here’s a rundown of the available options in the pop-up menu:
■General. These options are displayed when you first open the Print
window. Specify which pages of your document to print, the number of
copies, and the paper source (manual feed, paper trays, and so on).
■[Your Program Here]. After General and before Background Printing,
you’ll usually find a pop-up item with the name of the application from
which you’re trying to print: Microsoft Word, ClarisWorks, and so on. It
lists additional options specific to this program.
■Background Printing. This is a brilliant addition to the Print dialog box,
allowing you to decide on the fly whether or not you want each print job
to be processed in the background. (For an explanation of background
printing, see our discussion in the “PostScript Printer Guidebook”
section, later in this chapter.) You also have the option of scheduling a
Worth
Learning
1074 Part V: Attachments
■ ■
MACWORLD MAC SECRETS • 4040-8/5 • ch30.F • Chapter 30 • FINAL • VB • 11/04/98 • p.1074

print job for a later time. You can set a large print job to run during your
lunch hour, for example.
■Cover Page. This option forces your printer to spit out a cover page
before (or after) each job you send to it. The cover page lists your name
(as defined in the File Sharing control panel on your Mac), the name of
the document you’re printing, the program from which you’re printing,
the name of the printer, and so on. Cover pages can be useful in large
offices, where dozens of people are grabbing printouts from the same
printer, but they do waste a sheet of paper for every printout.
■Color Matching. This is where you set your printer to output either
Color/Grayscale or plain black-and-white pages. If you’re using Apple’s
ColorSync color calibration system, this is also where you set the Printer
Profile, the file that tells your Mac how your particular printer handles
color reproduction. (See Chapter 4 for more on ColorSync.)
■Layout. This option migrated from the Page Setup dialog box in earlier
versions of LaserWriter 8. It lets you tile multiple pages of a document
onto one sheet of paper. You can print your documents 2, 4, or even 16
to a page, with or without window borders. (See our secret later in this
chapter about how you can use this feature to save toner and paper.)
■Error handling. If you happen to encounter a PostScript error when
printing, this option lets you decide how you want to find out about the
problem (exactly as the PrintMonitor program’s Preferences command
used to do). Do you want an error message to flash on your screen, or do
you want the printer to spit out a detailed report? Our advice: Choose
the No Special Reporting option — and read the Printing Troubleshooting
section later in this chapter.
■Save as File. Provides the options to save your document as a PostScript
file or EPS (Encapsulated PostScript file), rather than send it directly to a
printer. (If you’ve bought Adobe Acrobat, you’ll also be offered Distiller
as a choice — which turns your printout into a PDF file.) See the “Intro to
PostScript files” and “EPS on the fly” secrets below for details.
■Printer Specific Options. Here you’ll find any other options specific to
your particular printer, such as how many paper trays are installed,
when the printer drops down into its low-power (sleep) mode, or how
dark you want your printouts to be. For these options to be available,
you must have the correct PPD installed. (See the section “What’s a PPD
file?” earlier in this chapter.)
PostScript (LaserWriter 8) Printing Secrets
■
The secret “memorize these settings” keystroke
We went quietly mad for months as our Macs insisted that “US Letter Small,”
the Page Setup option that, in ensuring extra-large margins, often chops off the
edges of our sheet-music and graphics printouts, was the default in all our
programs.
Chapter 30: Printing Secrets 1075
■ ■
MACWORLD MAC SECRETS • 4040-8/5 • ch30.F • Chapter 30 • FINAL • VB • 11/04/98 • p.1075
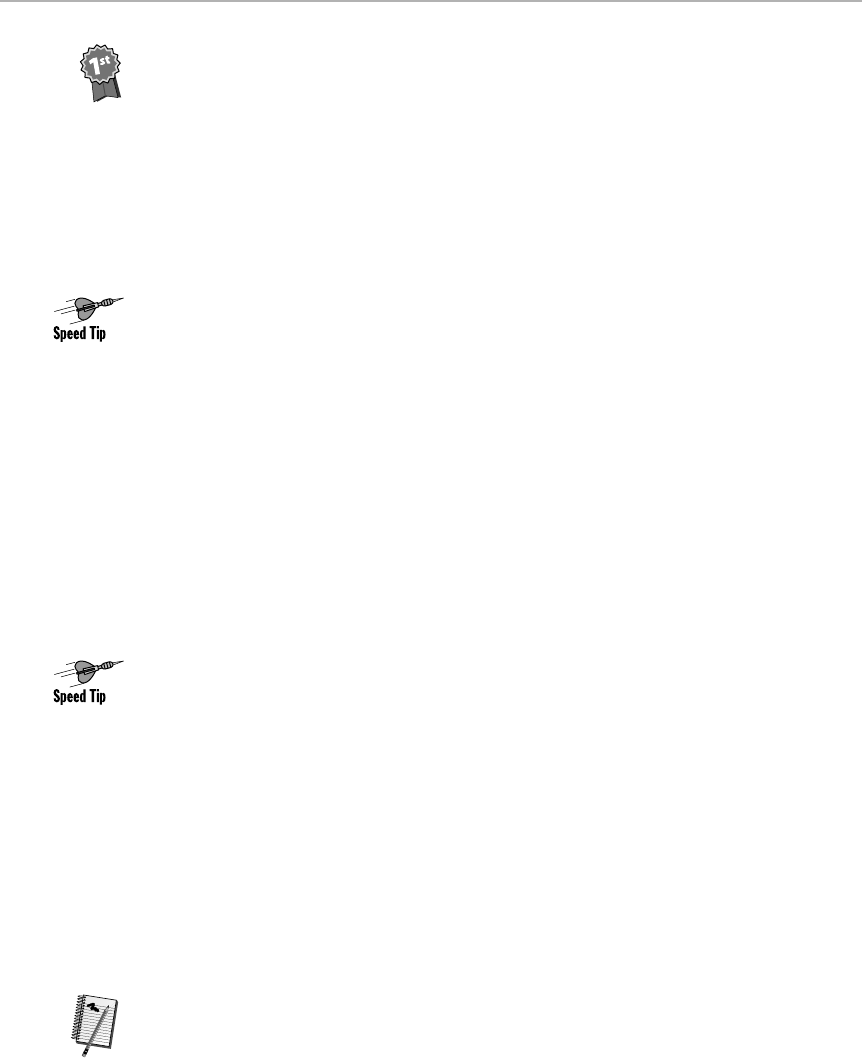
Free book winner eight times over (and our tech editor) Dennis Cohen finally
found the solution: If you
Option-click
the OK button to dismiss the Page Setup
dialog box, you’ll make your changes stick as the permanent settings for all
future printouts (at least until you Option-click again). (A message even appears,
telling you as much.)
Now our default page size is US Letter — normal margins — and we’re much
happier campers.
Print & Page Setup dialog box shortcuts
With LaserWriter 8.4 and later, you have to use a pop-up menu in the Print and
Page Setup dialog boxes to switch between the various categories of options
available for each print job. But as reader Francis George discovered, you can
jump from category to category without using the mouse: Pressing Ô-up-arrow
and Ô-down-arrow lets you move from panel to panel in both dialog boxes,
without lifting your fingers from the keyboard.
Intro to PostScript files
One of the options in a PostScript printer’s Print dialog box is PostScript File.
(With LaserWriter 8.4 and later, you must switch the Print pop-up menu to “Save
as File” to see this option.) Instead of actually printing your document on paper,
the Mac creates a file on your hard drive that contains all the necessary printing
information for that document. After you create a PostScript file, all you have to
do is send it to your printer, using the LaserWriter Utility or Apple Printer Utility.
Contained in that PostScript file are all the instructions the printer needs to
start spewing out pages. In other words, that time-consuming QuickDraw-to-
PostScript conversion process has already happened. Printing a ready-made
PostScript file, therefore, is much faster than printing using the Print command.
That’s good to know when you’re in a hurry, such as when you’re printing at a
service bureau or copy shop, and you’re being charged by the hour. PostScript
files are ideal for service-bureau visits for another reason, too — you don’t have
to take along the program that created them. The file by itself (and any special
fonts you used) is all you need.
Read our section on service bureaus later in this chapter for details.
EPS on the fly
This is a
really
hot feature that appeared with the debut of LaserWriter 8. The
Level 2 driver can actually create an EPS file of any document, even in programs
that don’t give you that option. (An EPS file, as you can read in Chapter 20, is a
high-resolution graphics format. EPS files are most often imported into
other
programs, such as the page-layout programs described in Chapter 18.)
Suppose you want to create an EPS file of a ClarisWorks document. Choose
Print from the File menu. Choose Save as File from the main pop-up menu in
Worth
Learning
Contest
Winner
1076 Part V: Attachments
■ ■
MACWORLD MAC SECRETS • 4040-8/5 • ch30.F • Chapter 30 • FINAL • VB • 11/04/98 • p.1076
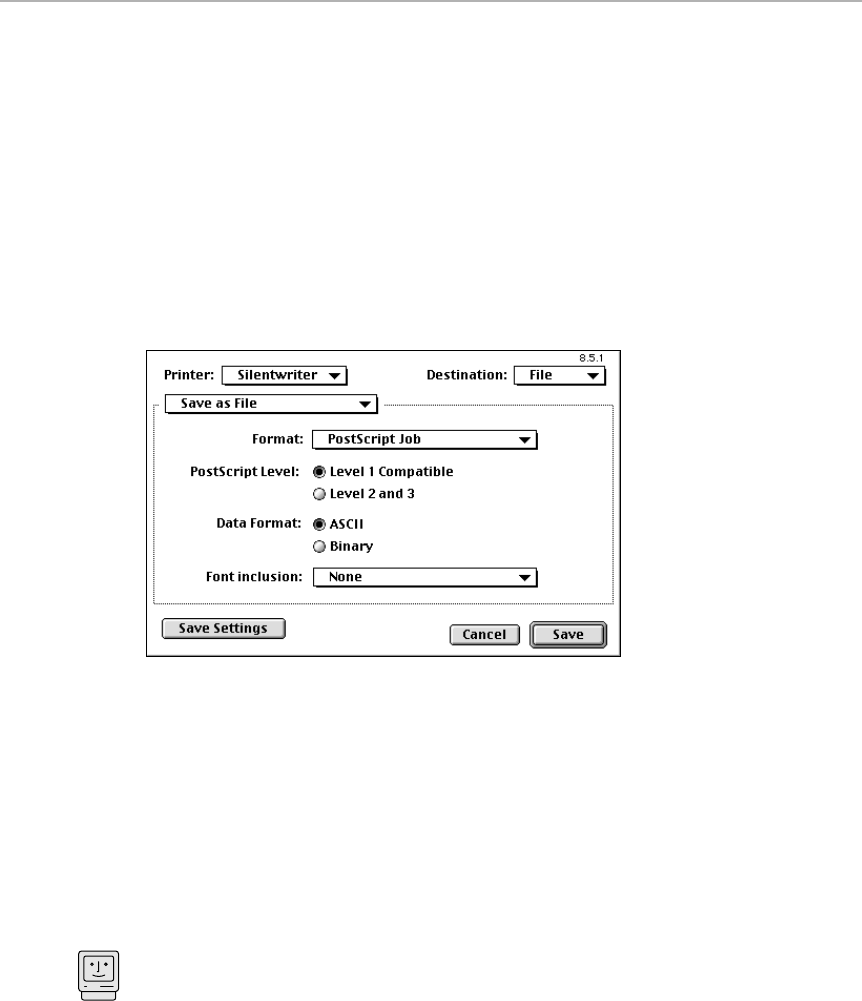
the Print dialog box, and choose File from the Destination pop-up menu. (We’re
assuming you’re using the LaserWriter 8.4 or later driver; in earlier LaserWriter
versions, click the Destination: File radio button instead.)
From the Format pop-up menu, choose EPS Mac Standard Preview. Next, take a
look at the extremely useful Font Inclusion pop-up menu (see Figure 30-9). If you
choose All, the actual PostScript fonts needed to print your graphic are embedded
directly into the EPS file!
That’s an important feature that has two important
effects. First, the size of your EPS file on the disk grows tremendously, because
it includes all the font information for all the fonts in the file. Second, despite its
unwieldy size, you can now give this EPS file to a service bureau or a friend,
confident that it will always print correctly, whether or not your recipient happens
to own the fonts you used.
Figure 30-9: Creating different types of EPS files is a snap with the Level 2 driver.
Finally, click Save, and a new dialog box appears so you can name your EPS file
and save it.
Note: With versions of the LaserWriter 8 driver prior to 8.4, you click Save after
choosing the EPS format, and
then
set the Font Inclusion option in the Save
dialog box.
Save bucks on cables
You’re supposed to connect your Mac to a PostScript laser printer with two
PhoneNet or LocalTalk connectors (about $20 each) and phone-wire cabling.
If you’re a one-Mac operation, however, a plain old $12 StyleWriter cable
works just as well. Run it from your Mac’s printer port to the printer’s usual
AppleTalk jack.
You’ve just saved $33. No need to thank us.
Mac Basics
Chapter 30: Printing Secrets 1077
■ ■
MACWORLD MAC SECRETS • 4040-8/5 • ch30.F • Chapter 30 • FINAL • VB • 11/04/98 • p.1077
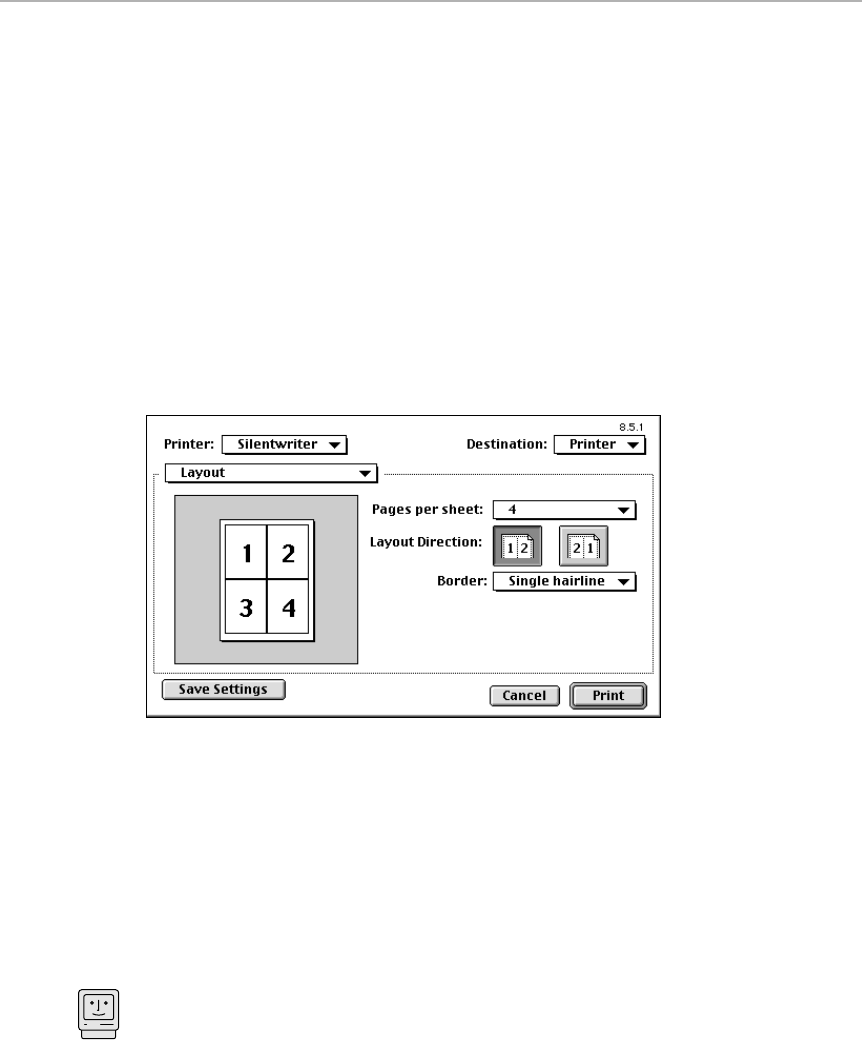
Save toner — and paper, too
This secret has saved us literally reams of paper. The LaserWriter 8 driver lets
you set up layouts that tile more than one page per sheet of paper. We’ve found
that for proofing many documents, half- or quarter-size pages are perfectly
adequate. You can still read the text, catch spelling or formatting errors, and get
a sense of the overall look of each page — before printing a full-size final draft.
And by printing two or four pages on each sheet of paper, you use only a fraction
of the paper and toner.
To print these mini-pages, choose the Layout option from the main pop-up menu
in the Print dialog box, then choose the number of pages you want printed on
each sheet in the Pages Per Sheet pop-up menu (see Figure 30-10). (With
versions of the LaserWriter 8 driver before 8.4, open the Page Setup dialog box,
then use the Layout pop-up menu to choose 2 Up [for two document pages per
sheet] or 4 Up [four per sheet]).
Figure 30-10: Creating a multi-page layout using the LaserWriter 8 Print dialog box.
The printer driver automatically scales and rotates the pages of your document
to make them fit properly on a single sheet.
Eking out a few more pages
When your printer reports that the toner cartridge is out of powder, this old trick
can squeeze out a few desperate additional pages.
Remove the cartridge (remember, you’re supposed to do any cartridge-
removing in dim light). Tilt it gently from side to side so that you redistribute
what remaining powder there is inside the container. Replace the cartridge.
You should now be able to print a few dozen or even a few hundred
additional pages.
Mac Basics
1078 Part V: Attachments
■ ■
MACWORLD MAC SECRETS • 4040-8/5 • ch30.F • Chapter 30 • FINAL • VB • 11/04/98 • p.1078

Refilling cartridges
A typical laser printer toner cartridge lasts for between 2,000 and 6,000 pages,
depending on the model and the type of work you do. Inevitably, though, it gives
out. Copies become lighter, and you may see the dreaded amber light appear on
your Apple laser printer.
You can save quite a lot of money if you use refilled cartridges. However,
the quality level varies considerably. The only advice we can offer is to get a
recommendation from a friend or coworker, or local user group. You might ask
the recharging service for some sample pages. (In any case, you can’t
damage
your printer by using a recycled cartridge.)
Multiple pages in manual feed
Most people think of the manual-feed slot on a laser printer as a one-page-at-a-
time mechanism. You can, however, get a laser printer’s manual feed to work
with multiple pages automatically — if you master a simple technique.
Fan your stack of paper slightly so that the leading edge of the stack looks like
a little staircase. Gently slide the stack into the printer’s manual feeder, being
careful not to disrupt the “staircase.” The printer should now be able to grab the
pages one at a time.
Depending on your printer, you should be able to reliably feed several pages
using this method. Don’t make the stack too thick (five pages seems like the
maximum) and don’t overdo the fanning. If the pages are staggered more than
a couple of millimeters, they won’t feed continuously.
Manual feed part II
If you occasionally print manual-feed pages, you may be less than pleased when
you print with Background Printing turned on. You’re told, for
every page,
that
PrintMonitor requests your attention. You have to choose PrintMonitor from the
Application menu. A message appears saying that “the LaserWriter is waiting
for a sheet of paper.” As they say, this is a feature, not a bug.
If you aren’t using Desktop Printing, you can rid yourself of this warning.
Launch PrintMonitor (if it’s not already running, you can double-click its icon
in the Extensions folder of your System Folder). From the File menu, choose
Preferences. In the dialog box that appears, choose “Give no notification”
(see Figure 30-11).
If you
are
using Desktop Printing, this little trick doesn’t work. Instead, exit
Desktop Printing, select the printer icon on your desktop, and deselect
(uncheck) Printing ➪Manual Feed Alert.
Worth
Learning
Chapter 30: Printing Secrets 1079
■ ■
MACWORLD MAC SECRETS • 4040-8/5 • ch30.F • Chapter 30 • FINAL • VB • 11/04/98 • p.1079
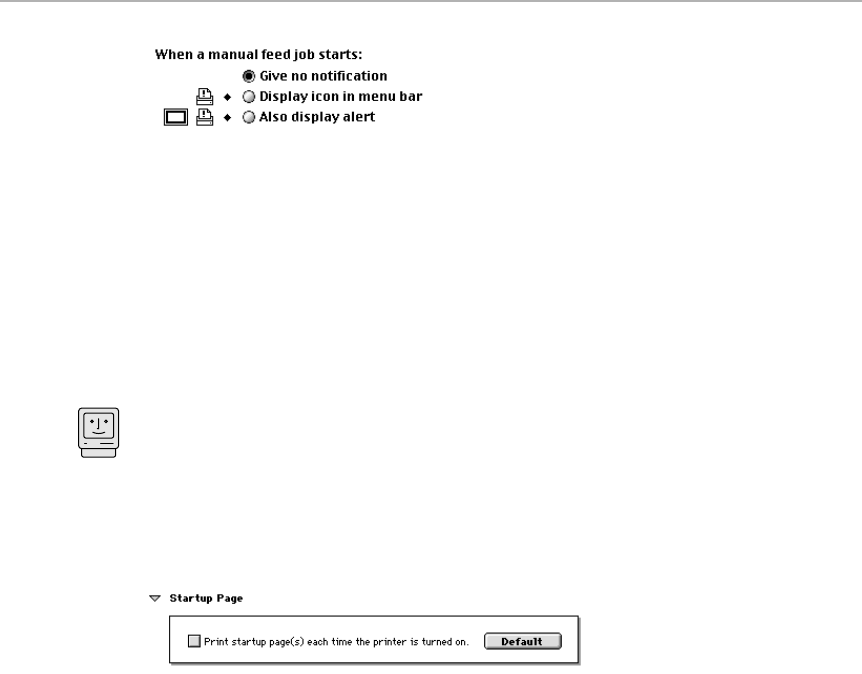
Figure 30-11: PrintMonitor lets you control what degree of annoyingness it uses to get your
attention when you’re doing manual-feed printing.
Squelching the startup page
We certainly hope that your laser printer doesn’t still spit out a pointless and
wasteful startup page every time you turn it on. No one knows why they set up
laser printers to do this, but it annoys the heck out of most people. (It doesn’t
thrill the rain forests, either.) And making the laser printer stop spitting out
startup pages is so easy!
Turn on the printer. Launch Desktop Printer Utility (or LaserWriter Utility, or Apple
Printer Utility, or whatever it was called when you bought your Mac). Choose your
printer from the list of printers and click Open Printer. Click the triangle next to
the words Startup Page to reveal the startup page options, then turn off the
startup page option (see Figure 30-12). If you’re using the older Apple Printer
Utility or LaserWriter utility, choose Startup Page Options and click Off. Wasn’t
that easy?
Figure 30-12: Make the start page stop!
Printing envelopes
Envelopes frequently jam when going through a laser printer; they’re too stiff to
bend around the mechanism of the paper path. Try these tricks:
■Before printing, “break the spine” of the envelope. Run the flap edge of the
envelope between your thumb and forefinger, bending it at about a 45-
degree angle as it passes through. Do this twice, bending once in each
direction so that the envelope ends up flat. Avoid paper cuts by folding the
flap over backward.
For an even better pass through the printer, break the stiffness along
both
edges. This makes the envelope more flexible and the likelihood of
jamming is reduced.
■Open the door at the end of the LaserWriter so that the paper path is
straight. Almost every PostScript laser printer has a door or latch in the
back, which makes the paper slide straight out the back of the printer
instead of curling into the normal output tray.
Mac Basics
1080 Part V: Attachments
■ ■
MACWORLD MAC SECRETS • 4040-8/5 • ch30.F • Chapter 30 • FINAL • VB • 11/04/98 • p.1080

■Stick with plain bond paper for envelope stock if possible. Thick, rag-based
papers seem to fare worse when traveling through a laser printer.
Preserving your prints
A laser printout is, after all, just a bunch of black dust that’s clinging to the
paper. As such, the black stuff can be prone to chipping, smearing, or peeling.
To minimize these aftereffects, our desktop-publishing friends swear by this
technique: go to an art-supply store and buy a can of a spray-on fixative. Hold
the can far away from the page and spray a very light coating.
Desktop Printing
One of the coolest parts of Apple’s LaserWriter 8.4 and later software is
Desktop Printing. Originally introduced as part of QuickDraw GX (discussed
later in this chapter), desktop printing puts an icon representing each of your
printers right on your Mac’s Desktop — a blessing for Mac users who work in
networked offices (though mostly irrelevant to anyone with just one printer).
To print a file on a particular printer, you don’t have to go to the Chooser;
instead, you simply drag the document’s icon on top of the printer’s icon! If
you double-click a printer icon, you see a full list of the files waiting to be
printed on the printer it represents. You can manipulate the printouts-to-be
in all kinds of useful ways, as we’ll show you in the Secrets section that
follows.
Desktop Printing, a standard part of System 7.6 and later, also gives you a
new Printing menu on the menu bar that lets you stop and start printing;
another printer menu (represented by a tiny printer icon) that lets you
switch between different printers (see Figure 30-13); a Control Strip module
that also lets you change printers; and a Desktop Printers folder in your Ú
menu that lets you open any of your desktop-printer icons without actually
going back to the Desktop.
Figure 30-13: With Desktop Printing, you get a new menu so you can switch between
printers without using the Chooser.
Creating a desktop-printer icon still requires a visit to the Chooser. Once
you’ve selected a printer there, the printer’s icon shows up on the Desktop.
You can then switch between printers, stop and start print queues, put jobs
on hold, schedule them for future output, transfer them from one printer to
Chapter 30: Printing Secrets 1081
■ ■
MACWORLD MAC SECRETS • 4040-8/5 • ch30.F • Chapter 30 • FINAL • VB • 11/04/98 • p.1081
another, and monitor all your printing activity — all without so much as a
glance at the Chooser.
Desktop Printing 2.0 Secrets
■
Desktop printers minus the desktop
OK, they’re
called
desktop printers, but you don’t have to keep them on the
Desktop. With Desktop Printing 2.0, you can store the printer icons in any folder
and create as many aliases of them as you want. You can put aliases of your
printers in all the folders you use the most; you’ll never be more than a short
drag away from a print job.
A printer by any other name
You can rename desktop printer icons whatever you want, regardless of how the
corresponding printers are named in the Chooser. This means you no longer
have to remember which printer in the office is the HP LaserJet 4V and which
is the HP LaserJet 5M. On your Mac, you can call them “Color Printer Next to
Microwave” and “Big Printer Near Bob’s Cubicle,” if you so desire.
Remembering which printer is which
Having followed the advice of the previous secret, suppose you’ve renamed the
four printers in your office John, Paul, George and Ringo. Problem is, now you
can’t remember if Ringo is the solid-ink color printer on the second floor or the
600 dpi laser on the third floor.
There’s an easy way to refresh your memory: Select a printer icon and choose
Get Info from the File menu (Ô-I). The Get Info window will tell you the printer’s
real name.
Select a default printer
Your
default printer
is the one currently targeted in the Chooser — the one you’ll
end up printing to from within a program if you choose the Print command and
don’t switch the pop-up menu.
To designate a printer as the default printer, just select its icon and press
Ô- L; it automatically becomes the targeted printer in all your applications.
Of course, you can also choose the printer from the printer menu that gets
installed when you use Desktop Printing 2.0, but we like this secret because you
can do it without lifting your fingers from the keyboard. Navigate to the Desktop
by pressing Ô-Shift-up arrow. Type the first few letters of your printer’s name to
select its icon. Then press Ô-L and you’re finished. (You’ll be able to tell which
1082 Part V: Attachments
■ ■
MACWORLD MAC SECRETS • 4040-8/5 • ch30.F • Chapter 30 • FINAL • VB • 11/04/98 • p.1082

of your desktop-printer icons is the default printer by the bold black outline
around its icon.)
Faster batch printing
If you have a batch of files that need to be printed, don’t drag them to the
printer icon one at a time; drag
all
of them at the same time. You’ll only have to
confirm your request once in the Print dialog box, and then all your documents
will print.
Making extra copies
To print multiple copies of a file, you can select it in a print queue (after you’ve
opened a desktop-printer icon by double-clicking) and choose the Duplicate
command from the File menu. The file will print as many times as you dupe it.
Print while you’re at lunch
Background printing is convenient, but if you’re doing other processor-intensive
work, having the Mac feed pages to the printer can slow you down. Instead,
schedule jobs to print during your lunch hour — or even after you leave for the day.
In LaserWriter 8.4 (or later)’s Print dialog box, switch the main pop-up menu to
Background Printing. Then click the Print At radio button and set the time/date
that you want the printout to occur.
But suppose you’ve already sent a job to the printer — and
then
decide you’d
rather schedule it to print later. To do this, put the job on hold (by clicking the
Hold button in the print queue window), then click the Timer button. In the Set
Print Time dialog box, click the At Time radio button, then set the date and time
you want the job to print, and press Return.
Print queue shortcuts
As we mentioned earlier, when you double-click a printer icon, you see a list of
the files waiting to be printed on that particular printer. The four buttons along
the top of the printer window let you pause, resume, postpone, or cancel jobs in
the print queue. (First click the icon for the job you want to change, then click
the appropriate button.)
But reader Philip Tan noticed that there are a few other less-obvious controls
hidden in this window as well. If you press both Option and Shift keys, the Pause
button turns into a Stop button, so you can stop all jobs being fed to the printer
(as opposed to just pausing a particular print job in the queue). The same key
combination turns the Resume button into a Start button, which you can click to
reactivate the print queue.
Worth
Learning
Chapter 30: Printing Secrets 1083
■ ■
MACWORLD MAC SECRETS • 4040-8/5 • ch30.F • Chapter 30 • FINAL • VB • 11/04/98 • p.1083

QuickDraw GX
In earlier editions of this book, this section contained a breathy description
of QuickDraw GX and how this emerging Apple printing technology — which
came with System 7.5 and was originally touted as a knock-your-socks-off
major upgrade to QuickDraw — was going to change the world of Mac
printing as we knew it
Now, however, QuickDraw GX is dead — a promising Apple technology that
simply failed to take off. Apple abandoned GX during its 1997 financial crisis.
Indeed, GX had the potential to be a dramatic leap forward in printing on
the Mac — not just printing, actually, but font handling, color, document
distribution, screen display, and much more. Whereas LaserWriter 8 was
only a driver enhancement that affected PostScript printers only, QuickDraw
GX was to bring changes and enhancements to drivers and just about every-
thing else related to type, printing, and graphics on both PostScript and
non-PostScript printers. QuickDraw GX promised to add all kinds of stunning
font controls, color management and graphics capabilities to the Mac.
Fortunately, some of the best features of QuickDraw GX have emerged in
Apple’s Desktop Printing software and in Version 8.5 of Adobe’s PostScript
printer driver. If you’d like to read our complete discussion of what GX
promised to deliver when it was still a living, breathing Apple technology,
read Chapter 24 of the electronic edition of Macworld Mac Secrets, 4th Edition
(on the CD that came with this book).
PostScript Printer Guidebook
Believe it or not, a PostScript laser printer is a computer unto itself. Most
models contain a Motorola processor, just like a Mac. (If you still need
convincing, consider a laser printer’s price.)
Fortunately, using and maintaining this second computer of yours isn’t nearly
as complicated as using the first one (your Mac). But there’s still plenty to
learn.
Background printing
Background printing means that you can keep working on your Mac while
your document is being printed. Without background printing, your Mac
simply displays a “Now printing” message for as long as the printing takes.
You can move the mouse, but you can’t type, use menus, click buttons, or
get any work done at all until the Mac’s attention returns to you. And, though
we’re discussing background printing here in the context of PostScript
printers, most non-PostScript printers (such as inkjets) can also print in
the background.
1084 Part V: Attachments
■ ■
MACWORLD MAC SECRETS • 4040-8/5 • ch30.F • Chapter 30 • FINAL • VB • 11/04/98 • p.1084

The primary on/off switch for Background Printing has traditionally been in
the Chooser. Just open the Chooser, click the icon representing your printer,
and click On or Off (see Figure 30-14).
Figure 30-14: With older printer drivers, you turn background Printing on or off in the
Chooser, depending on what kind of hurry you’re in.
With LaserWriter 8.5.1, the Background Printing option no longer appears in
the Chooser. Instead, you decide on a job-by-job basis which items you want
to print in the background. In the Print dialog box, select Background
Printing from the main pop-up menu. You can then select either the
Foreground or Background radio button—or schedule your job to print later,
as shown in Figure 30-15. (LaserWriter 8.4 offers Background Printing on/off
buttons in Chooser and the Print dialog box.)
Chapter 30: Printing Secrets 1085
■ ■
MACWORLD MAC SECRETS • 4040-8/5 • ch30.F • Chapter 30 • FINAL • VB • 11/04/98 • p.1085
MACINTOSH SECRET
Under Desktop Printing 2.0, desktop printers
appear on your Desktop as cute printer icons —
except when you encounter them in Open or
Save dialog boxes, where they appear, not as
tiny pictures of LaserWriters or StyleWriters, but
as plain old ordinary folders!
So what happens if you unwittingly open one of
these “folders” and save a file into it? It
becomes embedded in the desktop printer itself
and vanishes from sight! The file won’t be visible
in any Finder windows, nor will it appear in
print queue if you double-click the desktop-
printer icon.
How can you retrieve the otherwise hidden file?
Launch the program you used to create the file,
choose the Open command, and open the
desktop-printer icon folder again; your hidden
file will still be there. At least now you can open
the file and re-save it into a new location.
Alternatively, you can restart your Mac with
extensions turned off. Your desktop printer icons
will show up with big X’s through them, but if
you double-click on the icons, they open just like
folders and you can pull your seemingly lost files
out of limbo.
The Desktop Printing Bermuda Triangle

Figure 30-15: Now you can turn Background Printing on and off in the Print dialog box.
Printing is faster if it’s the Mac’s only focus of attention. Therefore, when
you’re in a hurry, and you have no additional work to do on the Mac, turn
Background Printing off.
The messages you see during printing
Whether printing is foreground or background, a series of status messages
appears on your screen while the printing is happening. (If you’re printing in
the background, you can’t see the messages unless you pull PrintMonitor to
the front. More on PrintMonitor in a moment.)
“Looking for LaserWriter”
The first message you see is “Looking for LaserWriter: Claire’s Printer” (or
whatever you’ve named the printer that’s selected in the Chooser). This
message simply means that the Mac is trying to confirm that your Chooser-
selected printer is attached and turned on. If not, the message will change
momentarily to tell you that the printer is “not found.”
“Initializing printer”
Each time you turn on your PostScript printer, it must be initialized. (The
Mac doesn’t bother to initialize it until you actually try to print something.)
When it initializes a PostScript printer, the Mac transmits a printer-
preparation file to the printer. This file contains PostScript instructions
specific to the printer driver you installed. (In this age of laser printers that
can be shared between Macs and IBMs, initialization tells the printer that it’s
connected to a Mac, for one thing.)
For speediest printing, install the same LaserWriter driver on all Macs. Now
the printer will only be initialized once, when the very first document of the
day is printed.
1086 Part V: Attachments
■ ■
MACWORLD MAC SECRETS • 4040-8/5 • ch30.F • Chapter 30 • FINAL • VB • 11/04/98 • p.1086

“Starting job”
After all the preliminaries are out of the way, the task of printing your
document begins. In Apple parlance, each document that you’re trying to
print is called a job.
“Processing job”
Now the printer begins to process the printing information from your
document. In other words, it interprets the PostScript instructions coming
from the Mac and begins to form them into an image, so to speak, in its head.
This processing process can take seconds, minutes, or even hours, depending
on the complexity of the document and the number of fonts used in it.
What a difference RAM makes
We mentioned that a printer is actually a computer unto itself. It has its own
memory, too.
While 2MB may be enough memory for a typical Mac application, 2MB in a
printer is barely enough to process a single letter-sized page with a couple of
different fonts. The original Apple LaserWriters had less RAM than that, and
had constant problems printing complex files.
You can install additional memory into most PostScript printers. (Visit Apple’s
Web site and download the Acrobat PDF file called Apple_Memory_Guide. It
includes memory configuration information for all Macs and Apple printers.)
That’s lucky, because hardly any printers come with even enough RAM to
handle complex graphics and text on full-width, legal-size pages. And the
situation’s only going to get worse: All the latest printing features —Level 3
PostScript, for instance, or Apple’s FinePrint and PhotoGrade enhancements,
and, most of all, color printing — suck up RAM with abandon.
Desktop Printer Utility (Apple Printer Utility,
LaserWriter Utility)
This oddball, forgotten, under-documented gem is a program that Apple
throws onto your System disks. Its name changes every other year: first it
was the LaserWriter Font Utility; then just LaserWriter Utility; then the Apple
Printer Utility; and then, when Apple stopped making printers altogether in
1998, it became the Desktop Printer Utility. In any case, it performs a
collection of useful tasks related to your PostScript printer.
With your permission, we’ll refer to it by its current name, the Desktop
Printer Utility (DPU).
Chapter 30: Printing Secrets 1087
■ ■
MACWORLD MAC SECRETS • 4040-8/5 • ch30.F • Chapter 30 • FINAL • VB • 11/04/98 • p.1087

Naming the printer
When System 7 first came out, our clients kept asking: “Isn’t there a way to
name printers anymore?” (In the pre-System 7 days, you got a special little
program called Namer with your laser printer. You used it to give your
PostScript printers names so that each would show up in the Chooser
with a different title. But there’s no Namer in System 7 or later.)
Today, you use DPU to name your printers.
Printing a PostScript file
As we mentioned earlier, the Print dialog box (which appears whenever you
choose the Print command) lets you print to a PostScript File instead of to
paper. (See “How to make a PostScript file,” earlier in this chapter.) When you
select this option, the Mac creates a new file on your hard drive, containing
PostScript instructions for whatever you just tried to print.
Only trouble is, no one bothers to tell you how you print a PostScript file after
you create it. DPU is your answer (unless you prefer a shareware alternative,
such as DropPS). Choose Utilities➪Send PostScript File (or Download
PostScript File, in earlier versions of the program). You’re asked what file
you want to send to the printer; find the PostScript file you created earlier
and open it. Provided your PostScript printer is on, the file finally prints.
1088 Part V: Attachments
■ ■
MACWORLD MAC SECRETS • 4040-8/5 • ch30.F • Chapter 30 • FINAL • VB • 11/04/98 • p.1088
CASE HISTORY
When you’re connected to a network of Macs
and printers, you have no privacy.
We know a woman who landed in some serious
hot water at the PR firm where she worked.
She’d been thinking of quitting her job there for
weeks. Just when she got up the courage to
start sending out résumés to other companies,
her boss called her into his office. He demanded
to know why she was spending company time
and resources seeking a new job.
She was flabbergasted. How could this guy
have known? She hadn’t told a soul she was
planning to leave!
Actually, she’d told everybody. She had failed to
realize a simple fact: When you print on a
network, anyone else who’s trying to use the
same laser printer gets a message on the screen
that describes what that printer is doing.
The woman hadn’t changed the name of her
résumé. Her boss had tried to send a document
to the same laser printer. And the message on
his screen said, “Now processing job: Pam ‘95
Résumé.”
He didn’t have to be a rocket scientist to guess
what she was doing. (And he was glad he
hadn’t yet installed the LaserWriter 8 driver,
which no longer announces the names of the
documents over the network.)
The telltale print job

Downloading a new font to the laser printer
You can also use DPU to download a font to the printer.
A PostScript laser printer comes with a certain set of fonts built in: Times,
Helvetica, and a few others. If you want to print using a laser font that’s not
built in — Bodoni, say — you must send (download) that font to the printer
before printing the document.
Fortunately, most well-behaved programs do this font downloading
automatically. (Even DPU itself, when downloading a PostScript file you
created, downloads any necessary fonts before printing.) Now you know
why certain text documents take longer to print than others: The Mac needs
extra time to print any document that contains a font not already built into
the printer.
You can avoid this time delay — well, divide it up, anyway — by sending the
fonts to the printer separately. You may do this, for example, when you’re on
a deadline and the designer is still working on the document. You can get the
printer ready by sending the fonts to it ahead of time.
To send the fonts, launch DPU and open your printer by selecting its name in
the Printer Selector window and clicking Open Printer. Then click the triangle
next to the word Fonts to reveal the font options. The window shows a list of
all the fonts currently stored in your printer, as shown in Figure 30-16.
Figure 30-16: The Desktop Printer Utility reveals the fonts stored in your printer’s memory.
Click the Add button. Now use the Open dialog box that appears to locate the
fonts that you want to download (see Figure 30-17). Each time you select a
font, click the Add button. When you’ve got them all, click Send to transfer
them to the printer.
Mac Basics
Chapter 30: Printing Secrets 1089
■ ■
MACWORLD MAC SECRETS • 4040-8/5 • ch30.F • Chapter 30 • FINAL • VB • 11/04/98 • p.1089
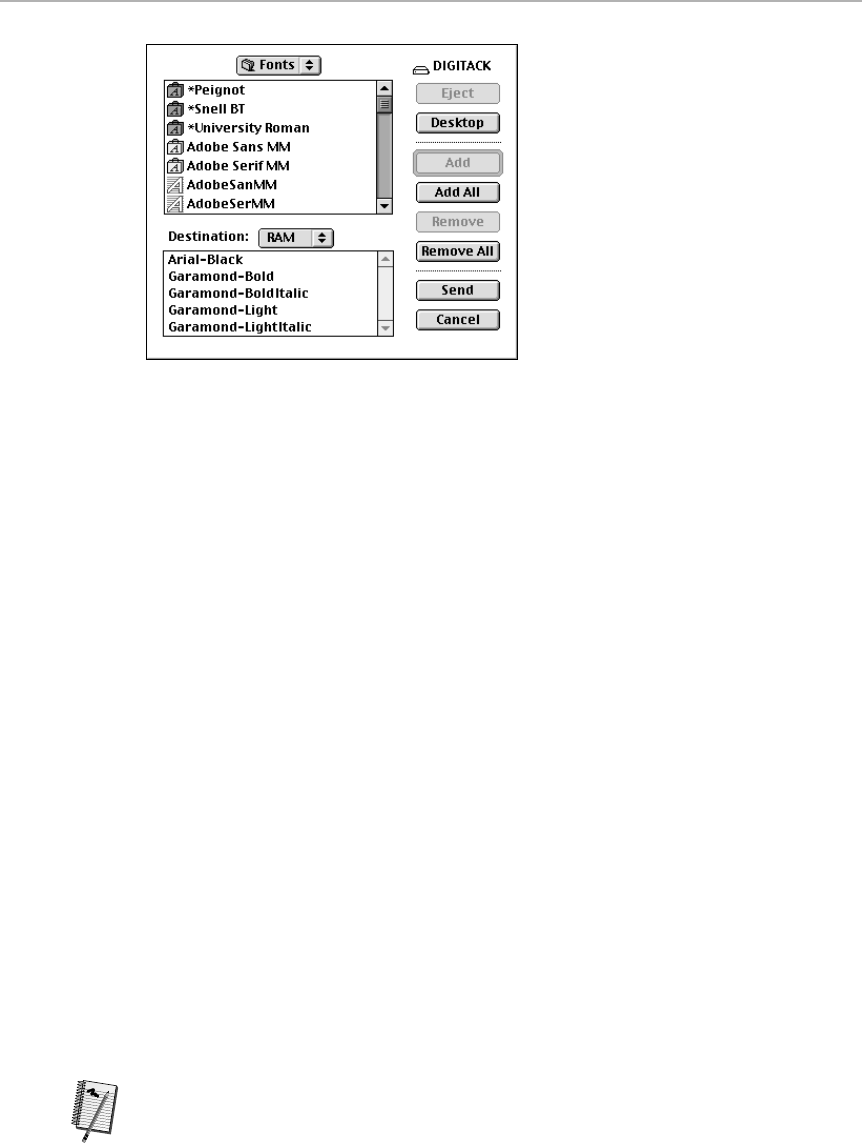
Figure 30-17: Getting ready to send non-built-in fonts to the laser printer using DPU.
Remembering the font: the printer’s task
One additional little secret about downloadable fonts: If you send a font to
the printer using DPU, the font stays there in the printer’s memory until you
turn off the printer.
But if a program downloads a font in the course of printing a document, it
immediately flushes that font from the printer’s memory as soon as the
document is finished printing. This flushing does make your printer ready for
its next task, and it does save printer memory. But it makes documents take
longer to print because fonts must be loaded first and flushed after. If you
plan to do lots of printing involving the same downloadable fonts, use DPU to
send the font before printing the document.
Finding your printer’s fonts
Of course, you have a general knowledge of which fonts your laser printer has
built in. But it may be wise to know more specifically; documents you prepare
using the built-in fonts print faster than those with downloadable fonts.
A quick, paperless way to find out is to use DPU, as described above in the
“Downloading a new font to the laser printer” section. After opening a
connection to your printer using DPU, click the triangle next to the word
Fonts to display the font options. DPU does a quick inventory of your
printer’s resident fonts and displays them in a scrolling list, as shown in
Figure 30-16. This can be especially useful in troubleshooting printing
problems. It doesn’t just list the built-in fonts; it shows all available fonts,
including those that you’ve downloaded to the printer manually.
Want to see samples of all your available fonts? Choose Print Font Samples
from the Utilities menu to print out a sample page that displays all your fonts.
Worth
Learning
1090 Part V: Attachments
■ ■
MACWORLD MAC SECRETS • 4040-8/5 • ch30.F • Chapter 30 • FINAL • VB • 11/04/98 • p.1090

PrintMonitor/Desktop PrintMonitor
Despite the confusing fact that it resides in your Extensions folder, Print-
Monitor is, in fact, an application. Yet you probably can’t ever remember
double-clicking its icon. That’s because PrintMonitor launches itself, unbid-
den, every time you print a file when Background Printing is turned on.
Meanwhile, if you’re using Desktop Printing, PrintMonitor never appears
at all; its functions are handled instead by an application called Desktop
PrintMonitor. That’s the program that shows you the progress of your print
jobs when you double-click on a desktop printing icon. (When you turn
Desktop Printing on, PrintMonitor gets turned off and moved into the
Extensions (Disabled) folder.)
But PrintMonitor and Desktop PrintMonitor both do essentially the same
thing. They’re both print spoolers. When you use the Print command, the
Mac creates a spool file on your hard drive—in the PrintMonitor Documents
folder, inside the System Folder. (A spool file is a disk-based version of the
printout that awaits its time to be sent to the printer.) PrintMonitor now
takes charge of the printing process. It grabs the first spooled file and directs
it to your chosen printer. When the Mac’s preprocessing of the file is finished,
PrintMonitor quietly departs from your screen, even if the pages haven’t
actually come out of your printer yet.
Mac Basics
Chapter 30: Printing Secrets 1091
■ ■
MACWORLD MAC SECRETS • 4040-8/5 • ch30.F • Chapter 30 • FINAL • VB • 11/04/98 • p.1091
CASE HISTORY
One of your cheerful authors found himself with a
PowerBook full of Finale files (sheet music for an
orchestra) to print out. He was in a small New
England town where he could find only a single
laser printer: a slow one belonging to a Mailboxes
Etc. outlet. He was relieved to have found a place
where he could print out these 1,200 pages of
orchestra sheet music, but alarmed that the copy
shop not only charged 25 cents per printout —
but $15 per hour of printing time!
An experiment (printing out the cello part)
quickly revealed that these graphics-intensive
documents took forever to print on the shop’s
antique, hand-cranked, gas-powered laser
printer. Each page had to be converted,
processed, and only then sent to the printer,
where it printed on its own sweet (and
expensive) time.
PrintMonitor, of all things, came to the rescue.
Safely back in his hotel room, your cheerful
protagonist opened the System Folder; opened
the Extensions folder; and double-clicked
PrintMonitor. From its File menu, he chose Stop
Printing (as he had learned to do years ago
while on planes).
Now he opened up each Finale file and chose
Print from Finale’s File menu, confident that his
laptop would do the time-consuming work of
pre-processing the printout — without actually
printing anything.
Upon arriving at the print shop the next day, he
hooked up his laptop to the laser printer,
launched PrintMonitor, and chose Resume
Printing from its File menu, thus uncorking the
torrent of saved-up printouts that now flew to
the laser printer in half the time. Having already
done the necessary printing conversions, the
PowerBook had but to transfer the data to the
printer, which took much less time (and cost
much less money).
The day PrintMonitor saved $341.82

When things go smoothly, you’re never aware of PrintMonitor. Unless there’s
a printing problem, the only way you’d know that PrintMonitor was running
is the fact that it’s listed, temporarily, in the Application menu. Desktop
PrintMonitor is even more elusive—it doesn’t even show up in the Appli-
cation menu. (Then again, it doesn’t have to: With Desktop Printing, you can
click on desktop printer icons and use the Printing menu to change printer
settings in the Finder, without having to launch a separate program.)
Remember that PrintMonitor only plays a role in printing if you’ve turned on
Background Printing in the Chooser. If you intend to print one document at a
time and take a coffee break while printing is in progress, you may not even
need background printing.
But to use your time most effectively, have your Mac multitask and process
the job in the background. You pay a small price for using background
printing, both in the time it takes a document to print and in the peppiness
of your Mac while things are being printed in the background.
The PrintMonitor window remains hidden even when it’s running. You can,
however, bring it forward (while it’s running) by choosing its name from the
Application menu. (To access Desktop Printing’s controls, just go back to the
Finder and use the Printing menu.) You can also force PrintMonitor to show
itself during every print job by turning on the “Show the PrintMonitor
window when printing” option in PrintMonitor’s Preference dialog box.
You can also summon PrintMonitor on command (to change its settings, for
example), even when you’re not printing anything. Just go to your Extensions
folder and double-click the PrintMonitor icon. It launches like any other
application. After changing your settings using File ➪Preferences, you can
make PrintMonitor go away just by clicking on the Desktop (unless
PrintMonitor is actually processing a document).
Color Separations
Printing on a Color StyleWriter or even a color PostScript printer is fine for
printing a color flyer or two. But when you want to publish thousands of
copies, or when you’re doing professional work, you need the help of
professionals. You need to take your files to a shop that can generate color
separations.
1092 Part V: Attachments
■ ■
MACWORLD MAC SECRETS • 4040-8/5 • ch30.F • Chapter 30 • FINAL • VB • 11/04/98 • p.1092
TRUE FACT
Ever wonder about the derivation of the term
print spooler? We always assumed the word
”spool” is a metaphor: Your printed documents
are waiting to be printed, like thread waiting to
be pulled off a spool. But in fact, SPOOL is an
acronym meaning Simultaneous Peripheral
Operations Off-Line. (We like our thread
explanation better.)
What SPOOL stands for

Four-color printing used to be a photographic process. Today, separations
are typically generated by high-end digital scanning equipment from such
companies as Hell, Crosfield, and Scitex. Your graphic is scanned, and the
color information is separated electronically into its component four colors:
cyan, magenta, yellow, and black. That’s where the terms four-color printing
and color separations come from.
You can perform the scanning, placing, and separating into component files
yourself. Depending on your quality requirements, however, you’ll need some
expensive equipment. And you’ll need to work closely with your print shop’s
staff to figure out the best settings for the separations.
Before you take the plunge, study the subject. You’re going to get involved in
such arcane arts as trapping and choking. Violent though these terms sound,
they’re techniques for handling colors that abut each other on the page to
avoid leaving a gap if the color plates aren’t precisely aligned when the
printing begins.
Prepare carefully for a trip to the service bureau to print film. A normal
imagesetter isn’t always capable of providing precise enough registration for
high-quality color. In other words, one plate may not line up against another.
You don’t want to find that out after you’ve spent serious money for four-
color printing.
Secrets of the Service Bureau
So now you’ve run proofs of your work. It looks absolutely perfect, and you
want to take it over to your friendly Lino shop for high-resolution output.
Before signing a work order, be certain your job is absolutely ready. Here
are a few tips we’ve gleaned from the School of Painful Experience.
Service bureau checklist
■Fill out the form. Most service bureaus give you an order form on which
you describe the files you’re sending. To avoid delays and extra expense
for the staff to fix errors for you, answer every question.
■Check the software. Every service bureau has the popular programs on
hand (such as Illustrator, Photoshop, PageMaker, Word, and QuarkXPress).
But if you’re using a less-ubiquitous program— Canvas, Publish-It Easy, or
ReadySetGo, for example —find out if the service bureau has it. And check
the version number. If your version is more recent than the service
bureau’s, they may not be able to open the files at all.
■List the fonts; provide a printout proof. Next to missing graphic files, the
Number One source of output problems at a service bureau is missing or
mislabeled fonts. The service-bureau technician won’t even know there’s
a problem unless you provide a printout to check the work against.
■Be wary of TrueType. Despite the convenience and good looks of
TrueType fonts, many service bureaus won’t touch them. Older
Chapter 30: Printing Secrets 1093
■ ■
MACWORLD MAC SECRETS • 4040-8/5 • ch30.F • Chapter 30 • FINAL • VB • 11/04/98 • p.1093

imagesetters’ RIPs (controlling computers) may need a hardware update
to work with the newer font format, and some service bureau owners
may not want to make such an investment (which can cost thousands of
dollars). Before choosing fonts for a document, call your service bureau
about this.
■Make a last check. Before you pack up your work or send it via modem,
make test prints on your own printer. The service bureau needs a test
print to verify that the work has been printed satisfactorily. If your
document takes 45 minutes to print on your laser printer, it will take
much, much longer on an imagesetter. If it won’t print at all for you,
don’t expect the imagesetter to do any better.
PostScript files and PDFs
If your service bureau doesn’t have the program or font you used to create
your document, you may be tempted to save the file as a PostScript file
(see “Desktop Printer Utility,” earlier in this chapter). As we mentioned in
“PostScript Printing Secrets,” PostScript files are easy to make.
But sending PostScript files to the service bureau requires some thought.
Talk to the technicians. You may need to configure the Page Setup box in
your publishing program to match the requirements of the printing shop.
Above all, you must be absolutely certain that your document is perfect!
Unlike a regular document file, where you (or the service bureau) can always
make last-minute changes, a PostScript file is etched in stone. A PostScript
expert can, in theory, open up the file, scroll painstakingly through it, and
perhaps fix a misspelling. But he or she will bill you at a high hourly rate for
such exasperating work. A PostScript file is essentially a one-way street; don’t
take the plunge without setting it up carefully.
In fact, here’s our tip about sending ready-to-print files to a service bureau:
Consider creating them as PDF (Adobe Acrobat) files instead. Although you
have to buy Adobe Acrobat to create them, they have all the advantages of
PostScript files — plus the big bonus of being able to see exactly what they’ll
look like before you send them out.
Service Bureau Secrets
■
Don’t use Helvetica Narrow
Yes, we know, Helvetica Narrow is a common font on PostScript laser printers.
Weirdly, it’s
not
common on imagesetters. If you must condense Helvetica, use
the horizontal scaling feature in your page-layout program, or buy Helvetica
Condensed, which actually looks far superior.
Worth
Learning
1094 Part V: Attachments
■ ■
MACWORLD MAC SECRETS • 4040-8/5 • ch30.F • Chapter 30 • FINAL • VB • 11/04/98 • p.1094

Don’t use PICT
Don’t save your graphics in PICT format. That’s a strange piece of advice, isn’t
it? You’d think PICT would be the perfect choice. It’s the Mac’s most basic and
common graphics file format (see Chapter 20).
But professional imagesetters aren’t Macs. They’ve been known to hang up
for agonizing periods when sent a PICT file. Instead, save bitmapped images
(paintings, such as Photoshop images) in TIFF format, and save object-oriented
graphics as EPS files. These files take huge amounts of disk space, but they’ll
be much surer (and quicker) to print.
The page-layout trap: non-embedded graphics
QuarkXPress doesn’t actually embed your graphics into the page-layout document
itself. Instead, it simply keeps track of where that graphics file
is
on your hard
drive. The nice result of that system is that the document file remains small. The
not-so-nice result is that it’s extremely easy to leave important graphics behind
on your hard drive when you send the Quark file to a service bureau for printing!
(PageMaker, which used to store graphics within the document, can now use this
on-disk referral system, too, so it requires the same amount of caution.)
If you have QuarkXPress 3.2 or later, it’s not too hard to avoid this kind of
trauma: When you’re ready to send your files out for printing, use the program’s
Collect for Output command. It automatically copies every single graphics file
used in your document into one folder that you designate — and it generates a
neat output report that lists every graphic that appears in the document, along
with all the fonts, colors, and style sheets. Service bureaus
love
receiving this
output report because it tells them everything they need to know about your file.
At any rate, before leaving for the service bureau, be certain that you have
included every graphic file used in the document. Don’t rename the files, either.
If you do, the page-layout program will simply report the graphic file as “missing.”
Slide printing tips
To get a presentation that you created on the Mac — in Persuasion or PowerPoint,
for example — transferred to slides, you must send your file to a service bureau
equipped with a
film recorder.
A film recorder writes the image onto the slide in horizontal lines. Therefore,
although your presentation software may make it easy for you to create stunning
gradients (ramps of graduated color) that change in density from left to right or
diagonally, bear in mind that film recorders can take a long time to process such
a slide.
A gradient that changes color from top to bottom, on the other hand, won’t be
nearly so challenging for the film recorder. (We’re not saying that you shouldn’t
use diagonal blends; we’re just pointing out that such designs may carry a price.)
Worth
Learning
Strange
But True
Chapter 30: Printing Secrets 1095
■ ■
MACWORLD MAC SECRETS • 4040-8/5 • ch30.F • Chapter 30 • FINAL • VB • 11/04/98 • p.1095

Printing Troubleshooting
After all is said and done, it doesn’t matter if you’re using a QuickDraw or
PostScript printer, Level 1, 2, or 3, in the background or foreground, if the
document won’t print right.
When the printout doesn’t match the screen
What put the Macintosh on the market was its ability to display an image that
closely matched the one that came out on the printed sheet. But the trip from
screen to printer isn’t always an easy one, and things can change along the
way. Here are some examples of WYS not matching WYG:
■Screen resolution. Not all Mac monitors have true WYSIWYG screen
resolutions. Today, you can’t count on a monitor’s being 72 dpi (see
Chapter 11 for examples). It’s possible that the screen image may be
slightly larger or smaller than the printout.
■Low-res screen, hi-res printer. There’s quite a bit of difference between
the 72 dpi display of a monitor and the 300 dpi (or higher) resolution of
a printer. Very fine details of a document simply can’t show up on the
screen; they won’t show up until you actually print. Two common
examples: the letter spacing of type may be off, and graphics may not
be positioned as precisely as you thought they would be.
Some publishing programs (and word processors) let you zoom in,
magnifying your document on the screen. Only then can you see the
fine points of the text you’re about to print.
■The printer-driver difference. Different printer drivers may have
different effects on output. In other words, the way the words fall on
each line, and the way the lines fall on each page, may actually shift
considerably depending on which icon you selected in the Chooser!
The solution to this problem is simple. Before finalizing your document’s
layout, open the Chooser. Select the printer driver you’ll ultimately be
printing with, even if no such printer is connected to the Mac.
■PostScript versus QuickDraw. As we mentioned earlier, the kind of image
you’re printing and the kind of printer you’re using may also cause
unexpected results. A QuickDraw printer may have trouble printing
rotated text or graphics that you prepared in Illustrator, for example.
■Font problems. The difference between the way type appears on your
screen and the way it appears on the printed page may be caused by
something rather simple. If you’re using a PostScript font, the printer-font
portion (see Chapter 29) may have been installed incorrectly.
Furthermore, among the popular font families (such as Times), a raft
of font-conflict problems may zap you. Believe it or not, there are two
different screen versions of the common fonts — one each from Adobe
and Apple. They’re named and designed similarly, but their actual letter
spacing is different. It’s perfectly possible, therefore, that your printout
1096 Part V: Attachments
■ ■
MACWORLD MAC SECRETS • 4040-8/5 • ch30.F • Chapter 30 • FINAL • VB • 11/04/98 • p.1096

(using the laser printer’s built-in Times font) might not match the screen
(which uses the Apple screen font). Likewise, if you’ve installed both the
TrueType and PostScript version of the same font, the document may
look fine on the screen, but the printed results may be unpredictable.
(See Chapter 29 for details on printed deviations from TrueType on-
screen display.)
Even worse surprises may result if you get caught in the snarl of
competing font companies with fonts of the same name. Two fonts of the
same name from different suppliers may differ in their metrics (width and
height information).
■Color differences and ColorSync. Color work can be complex. Each
brand of monitor has a different overall color tone and gamma setting
(see Chapter 11). Chances are good that the colors you see on the
monitor won’t quite match the ones produced on a color printer.
To get around the differences, Apple created a technology called
ColorSync. It’s a system of calibrating your color monitor so that its
colors match those printed by a particular color printer. (Several
competing products, such as EfiColor, are also gaining popularity.)
ColorSync works very well among Apple products—monitors, scanners,
printers — and the required “device profile” files are now available for
color products from HP, Epson, Lexmark, and other major manufacturers.
Font and graphics problems
Question: My document prints, but the fonts are coming out all jagged.
What’s wrong?
Answer: See the section of Chapter 29 called “Why Text Prints with Jaggies.”
Question: I’m trying to print out a document with an Illustrator EPS file
containing Futura, but I’m getting Courier instead. Why can’t this printer
work properly?
Answer: You should first suspect that your printer font isn’t properly
installed. Once again, see Chapter 29.
Next, you may simply be overwhelming your printer’s memory. Try using
fewer fonts. Finally, check to see if you selected “Unlimited Downloadable
Fonts” under Options in your Page Setup box. If so, fonts are flushed from
the printer right after use, to make way for new fonts. It’s a way of managing
printer memory better. But if a font is used only in an imported graphic (and
not in the publishing or word processing document itself), the fonts may not
be downloaded properly, and font substitution may result.
You have two ways out. First, use that font in the text of your document
(color it white if you don’t want it to show up in your printout). Second,
turn off the Unlimited Downloadable Fonts option.
Question: My illustrations looked beautiful until I imported them into my
publishing program and printed them; now they’re printing bitmapped and
jagged. What’s wrong?
Chapter 30: Printing Secrets 1097
■ ■
MACWORLD MAC SECRETS • 4040-8/5 • ch30.F • Chapter 30 • FINAL • VB • 11/04/98 • p.1097

Answer: In most publishing programs, such as QuarkXPress, the image you
see on the screen is only a stand-in for the actual EPS file, which resides
safely on your hard drive. When it comes time to print, Quark consults the
file on the disk in order to print.
If the EPS file has been moved or renamed, Quark does the only thing it can:
prints the low-resolution PICT representation of the file that’s used in the on-
screen document. This PICT portion of the EPS file may look fine at the 72 dpi
of your Mac’s screen, but it will look chunky or ragged when printed. The
solution is to re-import the EPS file from wherever it now lies.
Question: Why can’t I print my FreeHand files on my StyleWriter? They either
don’t print, or they come out jagged and bitmapped.
Answer: Illustrations done in FreeHand and Illustrator are PostScript
graphics. The best a QuickDraw printer (such as the StyleWriter—or most
fax/modems, by the way) can do is to print the PICT portion of the image, if
it’s available. Here’s a solution: Import the PostScript artwork into a program
such as Photoshop or Color It (which comes on the CD-ROM with this book);
convert it into a TIFF file with high resolution and print that.
Here’s another solution: as mentioned earlier in the chapter, buy a translator
program, such as InfoWave’s StyleScript or Birmy Graphics’ PowerRIP for
about $100.
General printer errors
Question: Every time I try to print a document, I get a message about an
“Undefined Offending Command,” and, a few seconds later, another message
that the document is “OK, but can’t be printed.” Or sometimes I’ll get
“PostScript error occurred.” What’s going on?
Answer: For some reason, your file is choking the printer; maybe the
document is simply too complex.
First, try printing the document one page at a time rather than all at once. If
that doesn’t help, go to the Page Setup box and turn off those silly printer
effects (Graphics Smoothing and so on). They don’t make much difference
in the quality of your output, but they do steal RAM that may be needed to
image the document.
Try turning off Background Printing. Finally, try restarting the printer. This
last step flushes out the RAM and gives you a fresh start.
If all else fails, go back to your document and use a smaller number of fonts,
or replace some downloadable fonts with those that are built into the printer
(Times, Palatino, and so on). Consider making your illustrations less complex.
Question: My printing appears to go okay, but when I look at the pages, the
image on the edges of the pages are clipped off. What gives?
Answer: You realize, of course, that a laser printer can’t print all the way to
the edge of the page. As described in the “The Disappearance of ‘Larger Print
Mac Basics
1098 Part V: Attachments
■ ■
MACWORLD MAC SECRETS • 4040-8/5 • ch30.F • Chapter 30 • FINAL • VB • 11/04/98 • p.1098

Area’” sidebar earlier in this chapter, a quarter-inch from the edge of the
paper is about the best a laser printer can print (even if you turn on the
larger-print area option).
If you have this problem when printing on legal-size paper, it may be that your
printer doesn’t have enough RAM to process a page of that size. It may be
time to get some additional RAM installed, if your printer can be upgraded.
Complex printing errors
When you work on documents with complex graphics and many font
changes, and when you’re baby-sitting a high-resolution laser printer or
imagesetter, the problems get harder to handle.
Question: I’m frustrated. When I try to print a file, I get a slew of printer
errors. Sometimes it’s “Limitcheck,” then it’s “VMerror,” or “–8133.” On
occasion, the printer just restarts.
Answer: “VMerror” is what it says: a virtual-memory error. It means that your
printer has run out of memory and can’t process your document. You can
simplify your document by using fewer fonts or by making the graphics less
complex.
The Limitcheck error occurs most often when you’re trying to print a
document with a linked EPS file created in a drawing program like Illustrator.
It means that there are too many elements (paths or complex patterns).
There are several ways to clean up such a document. First, open it and get rid
of elements you don’t need. Just coloring them white won’t help (the printer
must still process them).
Second, Illustrator has a pair of settings called Split Path Resolution and Split
Long Paths that make it easier for a printer to handle the file. Unfortunately,
these options make it difficult to edit your document later; you can’t undo
the path-splitting process. Make this change, therefore, to a copy of the file.
If you’re using blends, you might have to make them use fewer steps. You can
also turn off Background Printing or restart the printer.
If you’ve done the best you can, your printer may simply need more RAM.
Consider printing the EPS file separately from the document file and then
putting them together the old-fashioned way, by pasting one atop the other.
The “–8133” error is just a general PostScript error. It means something is
wrong; it’s no more explicit than that.
Question: Every time I try to print a document, the printer resets itself or
halts on just one page, but I’m only using one font on that page. What’s wrong?
Answer: Maybe it’s a bad printer or screen font. While the text may appear
fine on your Mac’s screen, a damaged printer font can prevent the document
from being printed.
Chapter 30: Printing Secrets 1099
■ ■
MACWORLD MAC SECRETS • 4040-8/5 • ch30.F • Chapter 30 • FINAL • VB • 11/04/98 • p.1099

Question: When I try to print blends or halftone patterns on my printer, I get
a banding or moiré effect. What can I do?
Answer: PostScript can only print 256 different shades of gray, and a
standard laser printer can’t even lay down that many (only a high-res laser
printer or an imagesetter can approach that number).
Some imagesetter manufacturers have developed new software to optimize
printing of halftones and blends to get around this limitation. In the
meantime, check with the publisher of your drawing or publishing software
on how to deal with this problem. Some software publishers can send you
technical memos that show you how to calculate the number of permissible
steps in a blend. QuarkXPress can automatically figure it for you, as long as
you know the target line screen and dpi of your output device.
Just one general hint: Reducing the length of your blend helps, because each
step in the blend occupies a smaller amount of space, thus reducing the
banding effect.
Poor printout quality
Question: My printouts aren’t coming out with even blacks anymore. The
black areas look like a dark gray.
Answer: Sounds like you’re running low on toner powder. In dim light,
remove the cartridge and rock it gently to redistribute the powder — then get
a fresh cartridge ready to roll when this one gives out.
Question: Each page has a regularly spaced blob or spot or dot on it. Do I
need a new cartridge?
Answer: No. There’s a blob or spot or dot on the roller inside the printer.
Open the printer (you should probably let it cool since those rollers get very
hot). Hunt the surface of the roller for a caked-on piece of toner or crud, and
scrape it off with a Q-tip. (This goes for a continuous thin streak, too.)
Question: There’s a white streak running horizontally through the page, one
dot high, in the same place every time. Should I clean my rollers again?
Answer: Sorry, no. This time it sounds like a piece of RAM has gone bad. You
must get the printer repaired.
1100 Part V: Attachments
■ ■
MACWORLD MAC SECRETS • 4040-8/5 • ch30.F • Chapter 30 • FINAL • VB • 11/04/98 • p.1100
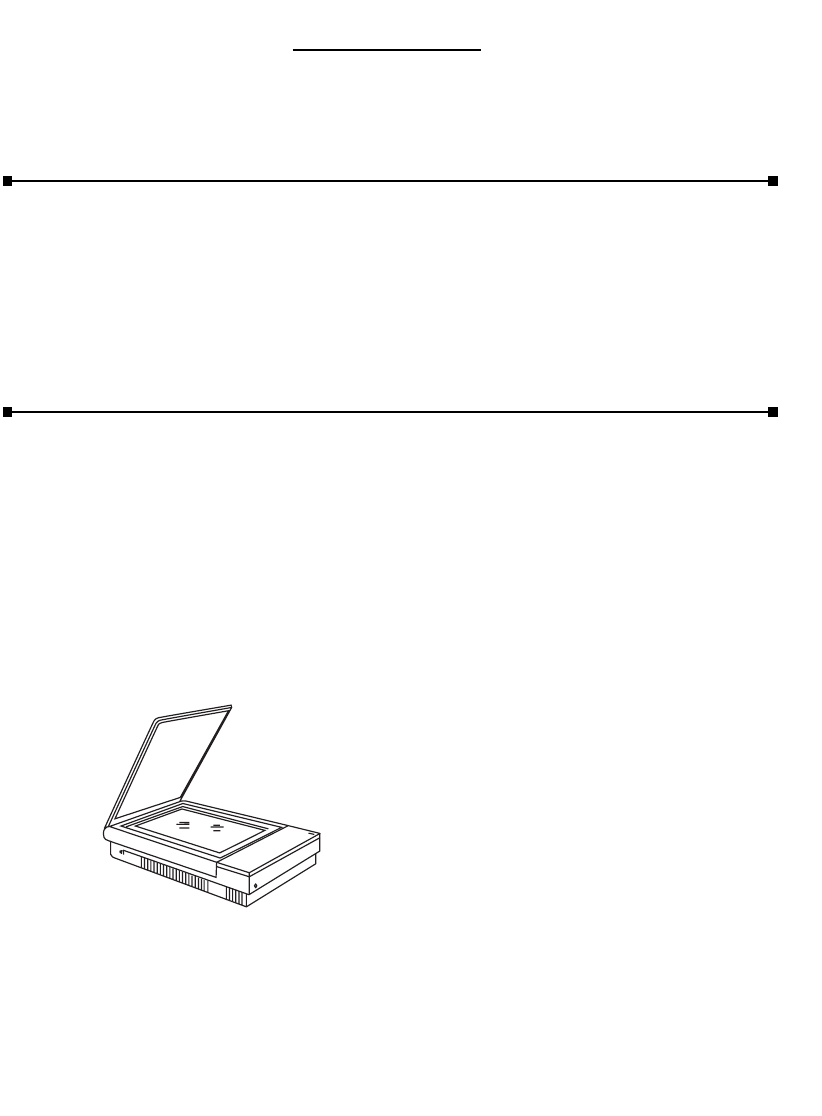
MACWORLD MAC SECRETS • 4040-8/5 • ch31.F • Chapter 31 • FINAL • VB • 11/03/98 • p.1101
Chapter 31
Scanners and Digital Cameras
In This Chapter
©Hooking up your scanner
©Color scanning
©Buying a scanner
©All about OCR
©A digital camera crash course
The Macintosh is a terrific tool for manipulating information. For most
people, that information gets into the Mac by being typed on a keyboard.
Or it enters the Mac’s memory bank from a disk, from another Mac in the
network, or even via modem.
But one kind of information can’t be typed, downloaded, or recorded from a
microphone: visual information. When you want to modify a photograph in
Photoshop, pop a line drawing into your newsletter, even import some pages
of text that aren’t worth retyping, that’s when scanners and digital cameras
come into play (see Figure 31-1).
Figure 31-1: The conventional flatbed scanner looks like a squashed copying machine.
Scanning is great fun, actually. You can repair, retouch, or delete people from
photos; you can turn drawings, photographs or newspaper clippings into
files that can be e-mailed anywhere in the world; you can scan in typewritten
pages to avoid having to retype them; you can scan documents to preserve
them forever...no wonder people get hooked.

How It Works
A scanner is the sibling of a copying machine. Macintosh flatbed scanners
consist of a long table with a cover (like a flattened copy machine). Under the
cover, you see a piece of clear glass. Beneath the glass is a light source
connected to a motor-driven assembly.
When you use the scanner, the light flashes on and the motor hauls the lamp
across the image area. An array of CCD sensors (short for Charge-Coupled
Device, a light-sensitive chip) picks up the image of the item on the scanner’s
glass bed and converts it to electronic current. This information is then
converted into digital data that can be read and processed by your scanning
software.
If you stop to think about it, a scanner is the opposite of a printer. A printer
takes what’s on the screen and sends it to a piece of paper. A scanner takes
what’s on paper and sends it to your screen.
Hooking Up Your Scanner
Scanners are generally SCSI devices, which means they have to be attached
and terminated in the same way you hook up a hard drive or CD-ROM player
to your Mac...uh-oh. See Chapter 33 for our enthusiastic take on SCSI chains;
if you have problems getting your scanning software to recognize the
scanner, or your Mac won’t boot, it’s time to try the usual ritual of shuffling
SCSI equipment around (as described in Chapter 33). We’ve found, for some
reason, that many scanners seem to work more predictably when situated at
the end of the SCSI chain.
Color Scanning
There are two kinds of color scanners. Some use a single-pass process, in
which three separate lights — corresponding to red, green, and blue — flash
on and off to capture the matching color information in your document or
photo. The lamps on other scanners make three passes, in which red, green,
and blue filters are used, in turn, to capture those portions of the color
spectrum.
Each method has drawbacks. The single-pass process may introduce
sharpness errors because of the effects of the three lights flashing on and off.
The three-pass scanner may have registration problems (where the three
elements of the color image don’t exactly line up).
In the past, this sort of high-end color processing was the province of high-
priced, drum-based scanners. In those machines, the scanned item was
placed on a large drum, and the image was exposed onto film. These handy
devices cost $40,000 or more. But today’s flatbed scanners provide results
comparable to many of the more expensive products, especially after you
tweak the image a bit in Photoshop or Color It.
1102 Part V: Attachments
■ ■
MACWORLD MAC SECRETS • 4040-8/5 • ch31.F • Chapter 31 • FINAL • VB • 11/03/98 • p.1102

Which Scanner to Buy
The most common scanners for desktop publishing use are the flatbed
models we’ve been discussing. In recent years, the price of color scanners
has dropped so much that grayscale models (at one time the low-cost
alternative) have just about disappeared. Color scanners capable of
producing 24-bit color images at 300 dpi or higher start at about $150; more
sophisticated models can cost as much as $3,000. (Among the most popular
are those from Agfa, UMAX, and HP.) Because new models are being released
all the time and existing ones updated, the first step in buying a new scanner
is to read reviews in a Macintosh magazine like Macworld. We’ve found that
quality among same-priced scanners can vary dramatically, so read about,
compare, and, if possible, test scanners before buying one.
Scanners usually come with their own special software. Many scanners also
come with “plug-ins” — add-on software that lets you scan an image directly
into image-editing programs such as Photoshop and Color It. In fact, you often
get a feature-limited version of Photoshop free when you buy a new scanner.
Other kinds of scanners
Not all scanners are flatbed. Some models, like the Visioneer PaperPort
Strobe, are sheetfed; in other words, the document is inserted as though the
scanner were a fax machine. A roller assembly moves the pages across the
light source, which, unlike the lamps in a flatbed scanner, doesn’t move. This
sheet-fed technology has its limits. It can’t handle pages that are too large or
too thick to roll through the machine.
One advantage of sheet-fed scanners is their size; most are barely larger than
the roller mechanism itself. They’re designed to fit just behind your
keyboard, so that you can quickly feed in paper documents for scanning
without even having to turn away from your computer. As long as you don’t
need professional-quality color, and as long as you’re mainly scanning text,
this inexpensive, slimline gadget is terrific for processing the various scraps
of paper that inhabit your life.
Overhead scanners are an expensive type, usually costing several thousand
dollars. They have a base onto which you place the original to be scanned.
The imaging assembly is mounted at the top of the device. This contraption
may be very useful if you’re trying to capture the image of an actual 3D
object, such as a box or a smallish sculpture.
Then there are slide scanners, such as the Polaroid SprintScan series and the
Nikon Coolscan. These convert a piece of positive film, say a 35mm slide, into
an image file. A slide scanner passes light directly through the film, much like
a slide projector. These scanners have much higher resolution than standard
flatbed scanners — 2,700 to 4,800 dots per inch, as compared with 600 or so
for a flatbed — and the resulting Macintosh graphic file is, therefore, of much
better quality than you’d get from a flatbed. Greater detail is captured, and
the resulting file prints out better on high-end color equipment.
Chapter 31: Scanners and Digital Cameras 1103
■ ■
MACWORLD MAC SECRETS • 4040-8/5 • ch31.F • Chapter 31 • FINAL • VB • 11/03/98 • p.1103

But slide scanners are expensive ($800 or more), and they’re limited to
dealing with positive film. You can’t even use them to scan a piece of paper
with text, graphics, or a traditional photograph! You must first convert these
originals to slides before scanning.
If you need to scan both slides and printed material, keep in mind that some
flatbed scanners come with an optional mount that accommodates slides.
This two-scanners-in-one setup may sound like a great deal, but be
forewarned: The optics in most lower-cost flatbed scanners usually aren’t of
high enough quality to create good scans from slides.
Choosing a Resolution
When you scan, your software will present you with a choice of resolutions —
which, as in printing, is measured in dots per inch. Faxes look terrible because
they’re usually 200 dpi; books look great because they’re 2,400 dpi. In
printing, greater resolution is always better.
In scanning, however, more dots per inch don’t necessarily make better scans.
There are several problems with high-dpi scans: (1) They take much longer to
make; (2) they take up huge amounts of space on your hard disk; (3) they’re
incredibly slow to process in Photoshop (or whatever touch-up program you
use); (4) they take much longer to print; (5) they’re more likely to interpret
dust, streaks on the glass, or imperfections in the original as significant data.
So clearly there’s such a thing as too much resolution; why scan at 1200 dpi if
you’ll be printing on a 300-dpi laser printer? But too low a resolution will
make your finished document look grainy or pixellated (made up of
discernible square dots). Endless debate rages, then, among the imaging
elite: What’s the best dpi for a given purpose?
1104 Part V: Attachments
■ ■
MACWORLD MAC SECRETS • 4040-8/5 • ch31.F • Chapter 31 • FINAL • VB • 11/03/98 • p.1104
CASE HISTORY
Another true story, submitted by a graphics
service bureau:
A customer called us, saying that she wanted a
poster made from a color slide. It was a picture
of her recently deceased father with a couple of
his fishing buddies in a boat.
This woman mentioned there was a slight
problem: In the photograph, her father was
facing away from the camera. She wanted our
photo expert to flip the negative so that you
could see his face.
When it was explained that this would only
provide a mirror image of the back of his head,
she became irate and screamed into the phone:
“If you can take the pimples off those glamour
girls, why can’t you put a face on my father?!”
Retouching has its limits

Rule 1: The best dpi for a scan depends on the dpi of the printer you’ll
be using.
For example, if you’re scanning photos for display on the Mac screen, as part of
a Web page, scan at 72 dpi — the screen resolution. There’s absolutely no point
in scanning at a higher resolution. If you’re scanning a photo that you’ll be
publishing in a magazine, though, you’d want a much higher resolution. (You’ll
also want a higher resolution if you plan to enlarge what you’re scanning.)
Your assumption, then, might be to scan at the same dpi as the printer. Nope.
Suppose you have a grayscale photo on the screen that you want to print on
your laser printer. How does a laser printer print different shades of gray
when it can only print black dots? It creates the illusion of gray shades by
varying the sizes of the solid black dots it puts on the paper — a halftone. See
the “Of LPI and DPI” sidebar later in this chapter for an example.
Obviously, it takes several of a laser printer’s smallest dots to create one of
these larger, variable-size halftone dots. That’s why it doesn’t make sense to
scan something at the same resolution as the printer: It takes at least two
printer dots to represent each gray dot on the scan as a halftone.
Rule 2: When the printout will be a halftone, your scan is just wasting time
and disk space if it’s more than half the dpi of the printer. That is, if you have a
typical 600-dpi laser printer, your grayscale image should be composed of no
more than 300 dpi. Table 31-1 should be your guide.
Table 31-1 : Scanner DPI Guidelines
Printer and image Maximum useful dpi
professional color images 300*
color slides 300
color laser printer 180
onscreen display 72
(multimedia or Web page)
laser-printed grayscale 150
(300 dpi printer)
laser printed grayscale 300
(600 dpi printer)
StyleWriter-printed 180
grayscale
*Note: If you’ll be printing on a dye-sublimation printer, these rules don’t apply; create your scan at the
maximum resolution of the printer.
Worth
Learning
Chapter 31: Scanners and Digital Cameras 1105
■ ■
MACWORLD MAC SECRETS • 4040-8/5 • ch31.F • Chapter 31 • FINAL • VB • 11/03/98 • p.1105
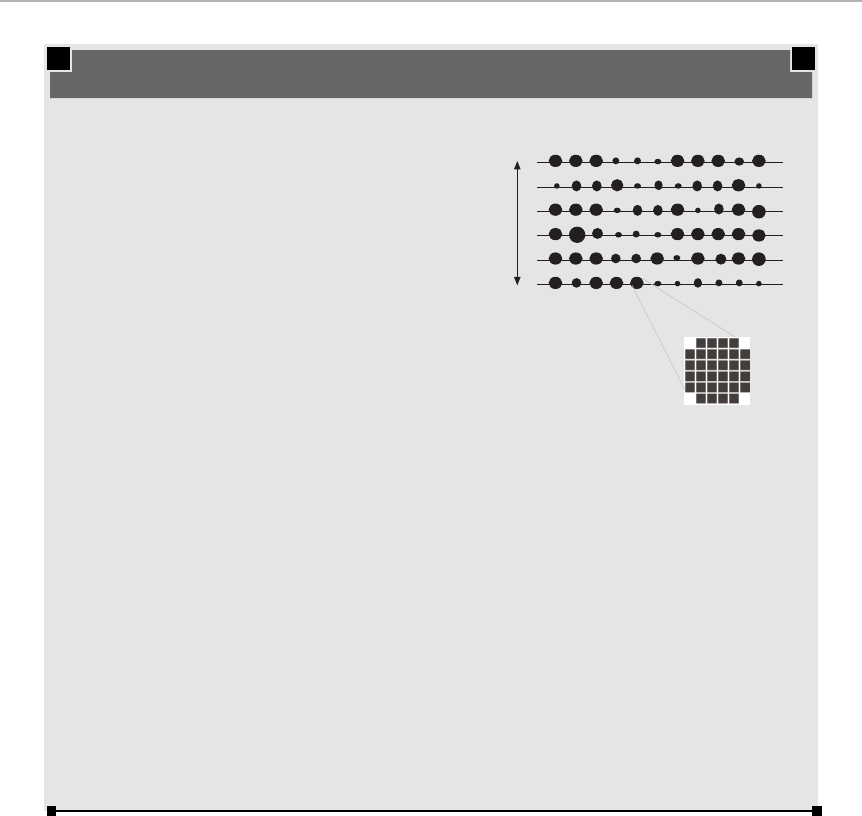
For best results, though, there’s one more rule to follow. If you have a
scanner, you probably also have a scan-editing program such as Photoshop
or Color It. Such programs possess a great talent: They can convert a graphic
to a lower-resolution edition in a process known as downsampling. The result
is always better than if you’d scanned at that lower resolution to begin with.
If you want a great 150-dpi finished scan, you get much better results
scanning at a higher dpi and downsampling it in Photoshop (or whatever) to
the resolution you want. For example, suppose that you have a 300-dpi laser
printer and a 600-dpi grayscale scanner. Set the software to scan at 600 dpi.
Then, in Photoshop, change the resolution (using the Image Size command)
to 150 dpi, the ideal setting for a 300-dpi printer.
1106 Part V: Attachments
■ ■
MACWORLD MAC SECRETS • 4040-8/5 • ch31.F • Chapter 31 • FINAL • VB • 11/03/98 • p.1106
ANSWER MAN
Q: Here it is, the inevitable question. What’s the
difference between LPI and DPI?
A: DPI, dots per inch, is a measure of your
printer’s resolution. As you know, 300 dpi is the
standard quality for a laser printer.
LPI, on the other hand, is a much less discussed
term. It has only to do with a single computing
act: printing color or grayscale graphics, such as
photos, on a printer capable of printing only
black and white.
To simulate different gray shades, the printer
varies the sizes of its all-black dots. It places
these dots along a grid of evenly spaced lines,
as shown in this magnified view. The more
gridlines per inch (lpi), the more convincing the
shade of gray. These phony gray shades, which
you see every day in every newspaper,
constitute what’s called halftone images.
Actually, of course, a laser printer can’t vary the
size of its dots. To create a halftone, the printer
creates larger dots composed of its much smaller,
regularly sized dots, as shown here. Immediately,
you can tell that dpi and lpi are related. If the
printer’s regular dots are smaller, then the number
of different sizes of composite dots is larger, and,
therefore, so is the different number of simulated
gray shades the printer can produce.
Most scanner software offers you a choice of
lpi. The usual rule of thumb is to set your
scanner at twice the output resolution of the
printer that will ultimately print this graphic. If
your printer’s resolution is 60 lpi (that is, a 300-
dpi laser printer), scan at 120 lines. If you are
enlarging the image before it’s printed, choose a
higher lpi setting. (Of course, if the images are
shown only on the Mac screen, scan at 72 dpi,
which is the screen’s resolution.)
Scanning at an lpi higher than twice the ultimate
printing resolution won’t improve the quality of
the image; it will only waste disk space and
slow down printing.
Of LPI and DPI
lines per inch
dots per inch
To put it another way: You’ll always get the best results by scanning at the
highest optical resolution of your scanner. The maximum resolution of most
scanners is described by two numbers — the optical resolution (usually about
300 or 600 dpi) and the interpolated resolution (always a much higher
number, such as 2,400 or 4,800 dpi).
Forget about the interpolated resolution. Interpolation is just math performed
by the scanning software to increase the apparent resolution of a scan by
smoothing out its jaggy lines; it has little impact on color scans. (See the
scanning secrets later in this chapter for more details about interpolation.)
Optical resolution, on the other hand, has to do with the actual number of
sensors packed into each inch of the scan head. A 600 dpi scanner has 600
sensors per inch. That’s the number to worry about. Your scanner will always
do its best scanning at maximum optical resolution.
Scanning Secrets ■
The time-space-money continuum
Graphic images can take up huge amounts of disk space, especially if you decide
to scan at a very high resolution. To save time
and
disk space, crop the image to
the actual area that will be used, if you can, at the point when it’s
scanned
(instead of cropping the resulting file). Most scanning software lets you preview a
quick, low-resolution version of your scan
before
triggering the actual full-blown
scan. You can usually crop the scan right in the preview window, targeting only the
portion of the image you want. As a bonus, you speed up processing of the image
Worth
Learning
Chapter 31: Scanners and Digital Cameras 1107
■ ■
MACWORLD MAC SECRETS • 4040-8/5 • ch31.F • Chapter 31 • FINAL • VB • 11/03/98 • p.1107
TRUE FACT
In recent versions of scanner-friendly software, a
peculiar term is beginning to crop up. It’s TWAIN,
which is not Elmer Fudd’s way of referring to a
locomotive. It’s a new kind of communications
protocol dreamed up by Aldus, Caere, Hewlett-
Packard, Logitech, and Eastman Kodak. It lets you
scan an original document directly into the
program you happen to be working in without
having to use a special scanning program — if
your program is TWAIN-savvy.
For example, there’s a free TWAIN Plug-In for
Photoshop. This plug-in (a modular software add-
on) lets you scan an image using the DeskScan II
software (for example) — but the image appears
in a new window in Photoshop. Similarly, you
can scan an image directly into PageMaker 5 and
6, which can also speak TWAIN.
Quark offers a Photoshop XTension for Quark-
Xpress that lets you accomplish the same thing in
a roundabout way. When you choose Acquire
from the File menu, it activates the TWAIN Plug-In
from Photoshop, which then activates DeskScan
II. The beauty of it all is that it really works.
The best part about TWAIN, though, is what it
stands for: Technology Without An Important
Name. (No joke!)
Where the TWAIN shall meet

later on, because an image’s size determines how long it takes your graphics
program to handle the image. Furthermore, if you import a full-sized TIFF file into a
publishing program and crop it
there,
the image may take nearly as long to print
as the full image would have itself. Service bureaus are known to charge high
hourly rates for documents that take extra time to image.
Secrets to feeding in originals
If you’re scanning a large number of pages, the temptation is to leave the
scanner’s cover open all the time as you scan away. But you may regret your
haste. The quality of the scan can suffer if the page isn’t completely flat on the
scanner’s glass bed. Parts of the image may come out fuzzy. (For some
scanners, you can buy a document feeder, which will automatically feed the
loose pages to the scanner bed.) If you’re scanning text from large books,
scan good photocopies of the pages instead.
Slides, negatives — and the great
PhotoCD alternative
If you have slides, negatives, or undeveloped film that you want converted
into digital form, don’t rush out for a slide or film scanner. Have them made
into a PhotoCD instead.
You can bring those slides to any neighborhood Kodak film-developing outfit.
(Hint: Mail-order places are generally cheaper than walk-in shops.) A few days
later, at a cost of about $1 per slide, you’ll be given a CD-ROM containing each
slide, represented as a
gorgeously
scanned graphics file, in five different sizes
(resolutions). Unless you scan hundreds of slides/film per year, this is less
expensive than buying a slide or film scanner. Furthermore, you save the time
and hassle of having to do the scanning yourself. And finally, you don’t have to
use up any hard-disk space; those enormous files are safely, and permanently,
stowed on that CD-ROM.
About those 2,400-dpi scanners
It’s not a bad idea to read the fine print in the manufacturer’s ads or sales
literature, which usually says that resolution is
interpolated.
That means that the
scanning software divides each pixel in your scanned image into smaller pixels
to
simulate
a sharper image.
On line drawings, this process may actually help, because interpolation is apt to
smooth jagged lines. But interpolation will never be quite as good as higher
resolution. Interpolation won’t, for example, fill in the details in an image that
can’t be picked up by the scanner’s optical source.
As we mentioned earlier in this chapter,
optical resolution
is the true indication
of the native sharpness of the scanner. Most popular flatbed scanners offer
Worth
Learning
1108 Part V: Attachments
■ ■
MACWORLD MAC SECRETS • 4040-8/5 • ch31.F • Chapter 31 • FINAL • VB • 11/03/98 • p.1108

resolutions between 300 and 600 dpi. True 1200-dpi scanners cost lots more
and may be overkill for basic desktop-publishing use.
Turn your fax machine into a scanner
When you think about it, fax machines and scanners do almost exactly the same
thing. They both use light-sensitive hardware to convert the light and dark areas
on a piece of paper (or a slide) into a stream of electronic data. On a fax
machine, the data is then broadcast over a telephone line, while the scanner
records the information digitally and transfers it to your hard drive.
It naturally follows, then, that with the aid of a fax modem, you can use your fax
machine’s scanning capabilities to digitize a document and send it directly to
your computer, in essence turning your fax machine into a scanner. Here’s how
you can do it:
First, disconnect your fax machine from the telephone jack in the wall and plug it
directly into your fax modem’s line jack. Load your fax machine with the document
you want to scan. Next, launch your fax software and set it up to manually receive
a fax. (Fax software is designed to answer incoming calls
automatically
, listen
for a fax signal, and then start receiving, but most include a manual receive
command — and that’s what you have to activate. This bypasses the program’s
automatic answering function and forces your modem to start listening for a fax
transmission at your signal, regardless of whether the phone is off the hook or
not. The keystroke in Global Village software, for example, is Ô-Shift-6.)
Now, start sending the fax from your fax machine. If your fax machine insists
that you dial a number before sending, just dial a one-digit number, then start
sending. At this point, your fax modem will already be listening for the fax
transmission and should start receiving the fax.
Granted, this method will only work with black-and-white images and the
resolution will be crude — most fax machines create low-res images at about
200 dpi. But it will enable you to transform a hard-copy image or document into
a file on your computer.
We found that this secret doesn’t work with every brand of fax machine; some
are fussier about being connected to a live telephone line than others. If these
steps don’t work for you, try following the same procedures, but keep your fax
machine connected to the telephone jack until the screech of the fax
transmission begins, then quickly pull the wire out of the phone jack and plug it
into your fax modem.
Straightening out crooked images
If you don’t position your original artwork on your scanner just right, it’s easy to
end up with a slightly crooked scan. Fortunately, most scanning software
includes a “straightening” function that tries to rotate your scan back into
position automatically.
Strange
But True
Chapter 31: Scanners and Digital Cameras 1109
■ ■
MACWORLD MAC SECRETS • 4040-8/5 • ch31.F • Chapter 31 • FINAL • VB • 11/03/98 • p.1109

Sometimes, however, the software doesn’t get it quite right, or you may be
scanning into a program that doesn’t do the straightening for you.
Mac Secrets
Reader Bill Soucy suggests a quick, easy way to rotate scans into their proper
orientation without having to do a lot of guesswork:
In an image-editing program like Photoshop, select the line tool (the one that
draws only straight lines) to a thickness of 0 pixels. Now find a line or an edge in
the image that you think should be perfectly horizontal; trace it with the line tool.
(Don’t worry about messing up your image; with the thickness set to 0, the line
won’t actually show up.) As you drag the line tool along the edge, look at the
Info palette, and make a note of the angle of the line displayed on the palette —
that’s the information you need to rotate the image back into a perfectly straight
position (see Fig. 32-2).
The final step is to use the program’s Rotate command (in Photoshop, use
Arbitrary Rotate) to rotate the whole image by the same angle you saw in the
Info palette. If the line you drew was 15 degrees, for example, then rotating the
whole image counterclockwise by 15 degrees will straighten it up.
Fig. 32-2: Just how crooked is this picture? In Photoshop, draw an invisible line along an
area you think should be horizontal and look at the angle in the Info palette — the number
next to the letter A near the bottom of the palette. Rotating the picture counter-clockwise by
that exact amount (10.6 degrees, in this example) will bring it all back into alignment.
36 bits and the human eye
Most scanners are billed as
24-bit
devices. That is, they can see about 16
million different colors in a particular photo — about the same as your eyeball.
So why are the more expensive color scanners advertised to have 36-bit color?
These scanners can discern differences between
billions
of different colors,
translating them into documents on your Mac that contain color gradations your
eye can’t even perceive.
1110 Part V: Attachments
■ ■
MACWORLD MAC SECRETS • 4040-8/5 • ch31.F • Chapter 31 • FINAL • VB • 11/03/98 • p.1110

There’s not much point to paying extra for these scanners unless you work in
professional publishing, where color accuracy is vital in day-to-day business. The
extra color information winds up being useful primarily to Photoshop, for use
when you convert the scan into a more standard 24-bit (see Chapter 11 for
details on all this bit talk); it averages the additional color information, thus
arriving at more accurate color selections for the millions of colors you
can
detect with your unaided eye.
All About OCR
Normally, if you scan an item, the result is a picture — usually a TIFF graphics
file. The Mac thinks of that scanned image as a bunch of pixels. If those dots
happen to form words, the Mac doesn’t know about it. The only way you can
edit those words is by using the Eraser tool in your painting program.
But with an OCR program — short for optical character recognition — the Mac
can be asked to analyze those patterns of dots to see what the text is and to
store the text in a brand-new text file. You can then open this exported text
file in your word processor and go to town, editing it and formatting it.
OCR equipment cost tens of thousands of dollars when it first became
popular in the 1970s. But today, for a few hundred dollars, you can buy
software for your Macintosh that works even better than those early
machines. Chances are that a scaled-down “lite” version of one of the popular
OCR packages even came with your scanner, so you can try it out. OCR
software is, however, memory-intensive, and it requires lots of processing
power. As a matter of fact, some of the better OCR programs require 10MB of
memory or more, and can’t run on anything less than a PowerPC-based Mac.
How OCR software works
A scanned image is made up of lots of little dots — the image is called a bitmap.
(See Chapter 20 for more on bitmapped graphics.) The scanner itself doesn’t
discriminate between text, drawings, or photos; it simply records the light and
dark areas of a page and converts them into an electronic reproduction.
OCR software examines the little dots and, using various programming
schemes, attempts to determine whether those assemblages of dots
correspond to letters and numbers. Some of the more sophisticated OCR
programs even attempt to duplicate the original typeface and layout of a
document.
An OCR program may consult a kind of database of letter shapes in its
attempts to recognize the characters. Some programs are trainable; that is,
you can teach them to recognize oddly shaped or distorted characters. This
new information is recorded in a preference file, and the program uses that
data to improve the accuracy of character recognition the next time.
Chapter 31: Scanners and Digital Cameras 1111
■ ■
MACWORLD MAC SECRETS • 4040-8/5 • ch31.F • Chapter 31 • FINAL • VB • 11/03/98 • p.1111
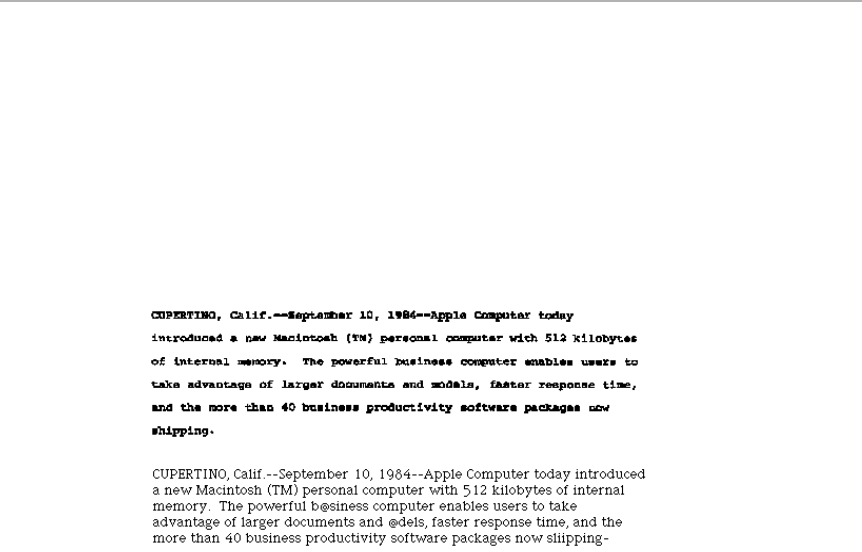
Faxes and OCR
Faxes, because of their fuzzy edges and low resolution, can easily confound
the best OCR software. Because most fax machines have Normal and Fine
settings, you have the best results with faxes sent in the Fine mode. Caution
whoever is sending the fax to make the copy as clean as possible.
Recent fax/modems, however, come with specialized software (from STF and
Global Village, for example) that provides OCR recognition of faxed pages.
The result is often far more accurate than that produced by some stand-alone
OCR programs, and the price is quite a bit less, too (see Figure 31-3).
Figure 31-3: Fax OCR software can take a murky, muddy fax (top) and do a pretty decent job
of converting it into a word-processor file. (The bottom figure is a screenshot from the
resultant Microsoft Word file.) As you can see, your keen eye is definitely necessary to spot
the glitches (note the last word of the paragraph).
The end of spell-checking?
OCR software can save hours of drudgery in retyping a manuscript, but it
isn’t 100 percent accurate. While 99 percent accuracy may be achieved on an
especially clean manuscript, that means at least one typo per 100 characters.
Worse, the errors made by OCR software aren’t the simple ones of letter
transposition or minor (but consistent) misspellings made by the human
typist. Instead, they’re errors of visual identity. The letter m might become rn
when recognized by the OCR program, or li becomes h, and so on. These can
be especially sinister mistakes because a spelling checker won’t catch them.
What on the original said yarn may be translated into yam, and the spelling
checker won’t blink an eye. (Your client may well do so, however.)
Run your spelling checker on your OCR-resultant documents, by all means.
But in the end, a human proofreader is essential — particularly if numbers
are involved. (Numbers are easily misrecognized by OCR software, and the
consequences, if undetected, could be disastrous.) OCR software may mean
less work for typists, but proofreaders won’t be looking for new jobs anytime
soon.
1112 Part V: Attachments
■ ■
MACWORLD MAC SECRETS • 4040-8/5 • ch31.F • Chapter 31 • FINAL • VB • 11/03/98 • p.1112

OCR Secrets ■
The importance of a clean original
When you’re working with a poor-quality original scan, you may discover that you
could have retyped the material in the amount of time you spend fussing with
the OCR program.
Use a clean, clear copy of a manuscript or book. Copy that’s indistinct or
marked up will wreak havoc on the accuracy of a scan. Even a pen mark on
a single character will prevent the OCR software from recognizing the word.
Some OCR programs even skip an entire
line
when encountering markings
that it considers unfamiliar.
Resolution: Bigger isn’t better
If your scanning software lets you adjust the scan resolution (such as 300, 400, or
600 dpi), bigger is not always better. A higher-resolution scan may draw attention
to minor imperfections in character shapes or slight smudges. Furthermore, doing
the scan itself takes longer at higher dpi settings. For OCR purposes, if the text is
of normal size (10- or 12-point or so), 200 or 300 dpi is sufficient.
Millions of colors don’t help a bit
Almost any scanner sold today is capable of scanning in photo-realistic 24-bit
color. But when it comes to OCR, all that color doesn’t help. In fact, it may even
hurt — by making scans take longer and resulting in less accurate OCR.
If you’re working with pages of plain, black-and-white text, turn the color scanning
features off. (You do this by selecting the black-and-white (or
1-Bit
or
Line Art
)
setting in your scanning software before you scan. Black-and-white scans take
much
less time than color scans. Also, most OCR programs think best in black
and white, anyway. Subtle changes in color and tone may only confuse the OCR
software over the shape of some letters, producing less accurate results.
What a difference the brightness makes
The brightness controls are
critically
important in achieving a high accuracy rate
of text recognition. When scanning smudged or dark copy, for example,
lightening the scan by 25 percent or so can dramatically improve the OCR
accuracy. (This fact is especially true of the one and only OCR-ready hand
scanner, the Typist from Caere Corporation.)
OCR on dot-matrix printouts
If the manuscript was printed by a dot-matrix printer, such as an ImageWriter,
see if your OCR software has a special setting for recognizing such documents.
Chapter 31: Scanners and Digital Cameras 1113
■ ■
MACWORLD MAC SECRETS • 4040-8/5 • ch31.F • Chapter 31 • FINAL • VB • 11/03/98 • p.1113

Otherwise, here’s a trick: Photocopy the document and scan in the
copy.
The
copying will, in essence, connect the separate dots that make up the characters
and improve the accuracy of the translation.
Digital Cameras
It used to be that if you wanted to edit and display photos on your Mac, you
had to shoot traditional prints or slides and then digitize them, one by one,
using a flatbed or drum scanner. Then, a few years ago, Apple introduced the
QuickTake, a simple point-and-shoot digital camera. The $600 QuickTake
offered limited capacity, a fixed-focus lens, and mediocre picture quality. But
the fact that it could take pictures without film — and let you dump them into
your page layouts and Web pages without having to mess with a scanner —
still generated a lot of excitement. (Actually, digital cameras had been around
for years before the QuickTake, but most were high-end, professional-quality
cameras that cost tens of thousands of dollars.)
Since then, all the big-name manufacturers — Kodak, Olympus, Polaroid, Nikon,
and Canon, to name a few — have introduced digital camera lines. With each
new generation of cameras, the quality gets better and the prices drop.
Digital cameras generally look and feel like traditional automatic cameras,
but they don’t use film. Instead, when an image is captured by the lens, it’s
immediately digitized by a light-sensitive semiconductor called a charge-
coupled device, or CCD — the very same type of device found in scanners —
and stored in memory. In a way, digital cameras are a lot like scanners — but
instead of recording a digital image of a flat page or slide, the digital camera
has a lens that captures an entire scene.
Of course, capturing full color high-resolution pictures requires lots of
memory, so most of the popular digital cameras can’t hold many pictures.
After you’ve taken enough photos to fill the camera’s memory, you must
connect it to your Mac and download the images to your hard drive.
Depending on the camera’s memory, it may be able to hold as few as 8 or
as many as 40 high-quality images (or many more low-res ones). Once your
digital photos are safely stored on your computer, you can go right on shooting
more pictures. Most popular digital cameras let you plug in removable memory
cards for storing images, so you can take dozens of pictures without having to
run back to your Mac to empty the camera’s brain.
The good and bad of digital
The most obvious benefit of digital cameras that they don’t require any film;
you can take as many pictures as you like, simply deleting the ones that you
don’t like and saving the keepers on your hard drive. There’s no expense for
film or developing.
1114 Part V: Attachments
■ ■
MACWORLD MAC SECRETS • 4040-8/5 • ch31.F • Chapter 31 • FINAL • VB • 11/03/98 • p.1114

A second benefit is that because your pictures are digital, it’s easy to edit and
retouch them — no darkroom required. If a picture looks a little washed out,
you can use a program such as Adobe Photoshop, Photo Deluxe, or Color It
(included on the CD-ROM with this book) to play with the brightness,
contrast, color balance, and so on. With a little image-editing know-how, you
can even completely remove unwanted portions of a picture, retouch faces,
and perform other more radical modifications (see Chapter 20).
However, the image quality of photos produced by consumer-level digital
cameras still can’t compare to pictures shot with a traditional 35mm camera.
Even with prices dropping, you still have to pay hundreds of dollars more for
a digital camera than a comparably-equipped film-loaded camera.
Buying a digicam
Still, for many typical uses — plugging photos into newsletters, adding pictures
to your web pages, creating photo ID cards, or assembling an online family
photo album — digital cameras are perfectly adequate, economical, fun, and
addictive to use.
Digital cameras vary widely in price, shape, and features. Some let you
preview your pictures on a small, color LCD screen right on the camera
(great for editing on the fly and deleting the pictures that don’t come out
well). Some let you connect the camera directly to a TV or VCR to show off
your latest pictures, without even having a computer. (We’ve yet to attend a
party where showing on TV the pictures we’ve just taken isn’t a huge hit.) A
few models offer zoom lenses, which we find very useful.
Consider the cost of the storage disks, too: buy a few of the RAM cards used
by most cameras, and you’ve spent enough to have bought your digicam all
over again. Sony Mavica cameras use ordinary floppy disks as storage,
although (a) they fill up almost instantly and (b) they severely limit the
resolution of the photos you can take.
Above all, though, consider the resolution of the camera you’re going to buy.
The cheapo models capture 640 by 480 dots (pixels), which is great for Web
pages but lousy for printing. Spend a couple hundred dollars more, and you
can get cameras that capture megapixel resolution — that is, 1,000-something
dots square. Those captured images make huge files on your hard drive, but
when printed on the right printer (such as an Epson Stylus inkjet), the result
is nearly photographic in quality.
Printing digital pictures
Most digital cameras let you shoot pictures in any of two or more different
quality modes. In low-quality mode, you can shoot dozens of pictures before
having to empty out the camera. Unfortunately, these low-res images —
although great for displaying on screen at normal size or on Web pages —
look jaggy and crude if you print them on a color printer (especially if you try
to enlarge them).
Chapter 31: Scanners and Digital Cameras 1115
■ ■
MACWORLD MAC SECRETS • 4040-8/5 • ch31.F • Chapter 31 • FINAL • VB • 11/03/98 • p.1115

For that reason, use your camera’s highest quality setting when taking photos
you intend to print out. At high resolution, each picture contains millions of
pixels — which generally fills your camera’s memory after only a handful of
photos. But once you bring these photos into a program like Photoshop,
reduce the physical dimensions until the resolution is 150 to 220 dpi, and
print them out on a high-quality photo printer (such as a color inkjet) on
glossy inkjet paper, you’ve got yourself a portable photo lab whose results
look very close to actual photographic prints.
1116 Part V: Attachments
■ ■
MACWORLD MAC SECRETS • 4040-8/5 • ch31.F • Chapter 31 • FINAL • VB • 11/03/98 • p.1116

Macworld MAC SECRETS • 4040-8/5 • ch.32.F • Chapter 32 • FINAL • VB • 11/03/98 • p.1117
Chapter 32
CD-ROM, DVD, and
Other Such Words
In This Chapter
©How a CD-ROM works
©Transfer rates and access times
©PhotoCD
©CD-R and CD-RW
©DVD
CD-ROM Basics
Just a few years ago, CD-ROM drives were expensive add-ons found only on
higher-end multimedia computer systems. Today, of course, virtually every
Mac comes with a built-in CD-ROM drive — including most PowerBooks.
Apple provides its system software primarily on CD. And most other new
software titles are available on CD-ROM.
A CD-ROM itself is a silvery, plastic-coated disc, usually 43⁄4inches across. It
weighs about half an ounce. It has two remarkable attributes that make it cry
out to be used with a personal computer: It’s dirt cheap to manufacture, and
it holds a lot of information — about 600MBs worth. (All the data on a
CD-ROM is stored on its silvery underside.) True, in this world of 2GB Jaz
disks and multi-gigabyte DVDs, the 600MB CD-ROM might not seem very
impressive. But remember, CDs cost just pennies to produce. As a result,
they’re ideal for archiving large amounts of data and distributing software.
The speed issue
CD-ROM has a major drawback: It’s slow. Although the newest CD-ROM drives
operate many times faster than earlier models, CDs still lag far behind even
inexpensive hard drives.
When evaluating a CD-ROM drive’s speed, you’re confronted with two issues:
access time and transfer rate. Both are important, but not as important as you
might think.
Mac Basics

The access time is how long it takes the drive to find a particular piece of
information on a CD. Early drives had dismal access times — about 500
milliseconds (ms), as compared to 8 to 10 ms for the average hard drive.
Current CD-ROM drives offer access times as low as 85 ms — better, but still
ten times slower than a hard drive.
The other key speed issue is transfer rate. That’s the speed at which the
drive can send information to your Mac once it has been located on the CD,
which is especially significant when it comes to reading large video and
sound files. The first CD-ROM drives delivered only about 150K of information
to the Mac per second; today, “24X” drives are advertised to have
3,600K/second transfer times. That’s a big improvement — but once again,
not breathtaking compared with a plain old SCSI-2 hard drive, which can
transfer data at 10 megabytes per second. (“Ultra” SCSI drives transfer data
up to 40MB per second. See Chapter 33 for details.)
The great “8X, 16X, 24X” myth
In practice, there’s often very little difference between the speed of, say, an
8X-speed and 16X-speed drive. True, a 16X-speed drive is theoretically capable
of transferring data to your Mac at twice the speed of an 8X-speed drive. But
often the sheer transfer rate isn’t what determines a CD’s overall speed.
Meanwhile, most interactive CDs these days are engineered to accommodate
the lowest common denominator: a quad-speed drive. All those extra Xs in
your “24X” drive are worthless in that case; the QuickTime movies play back
with exactly the same quality your 4X-owning neighbor gets.
The lesson here: Don’t spend extra for the fastest CD-ROM drive. You’ll do
just as well with a slower drive — and you’ll save a lot of money.
How a CD works
A CD is a sandwich: layers of clear acrylic covering outside, layers of
aluminum and plastic inside.
Data gets etched into a single, continuous spiral on the disc. The data
consists of pits and lands (the plateaus between the pits). As the disc spins,
the CD-ROM drive shines a narrow beam of laser light through the clear
plastic to strike the pits. The flickering light created by striking pits and
lands with the laser beam is converted by the drive’s complex electronics
into data. The laser device is attached to a long arm that moves back and
forth across the disc. Incredibly, a data track on a CD-ROM is about 1⁄100th
the thickness of a human hair. That’s why a disc so small can store 600MB
of computer information — that track is three miles long!
A phonograph record spins at a constant rate, usually 331⁄3rpm, from the
edge of the record toward the center. In contrast, the CD-ROM drive reads
data from the inside of the disc outward. The drive speed varies according
to the position of the laser beam; the disc gradually slows down as the laser
travels toward the outer edge of the disc. (In other words, the surface of the
disc is always moving at the same speed past the laser.)
1118 Part V: Attachments
■ ■
Macworld MAC SECRETS • 4040-8/5 • ch.32.F • Chapter 32 • FINAL • VB • 11/03/98 • p.1118

When the laser is at the beginning, or inside, of the disc, the disc spins at
about 500 rotations per minute; by the end or edge of the disc, it’s down to
200 rpm. The data flows past the laser beam between 1.2 and 1.4 meters per
second.
What to Do with 600MB
The term CD-ROM stands for Compact Disc — Read-Only Memory. As we
mentioned in other chapters, ROMs on your Mac are chips that have software
permanently “burned” onto them. A CD-ROM is also a read-only device: You
can get information off it, but you can’t store your own files there. (Unless, of
course, you’ve got a recordable, rewritable CD, which we’ll explain in a
moment.)
So what comes on CD today? Almost everything: libraries of clip art, QuickTime
movies, and fonts; interactive comic-book adventures with sound and video;
electronic encyclopedias; and more.
And now that even PowerBooks have CD-ROM drives (and now that the iMac
has only a CD drive), almost all software companies provide their products
on CD. The CDs are cheaper to mass-duplicate than floppy disks, take up less
space, and can’t be erased by mistake. And you, the buyer, are saved from
the misery of feeding floppies into a disk drive for 90 minutes. (A CD holds
as much as 416 floppies.) Instead, you load a single CD-ROM and let the
installation take care of itself.
Getting Your CD-ROM Up and Running
A typical CD-ROM comes with a set of oddly labeled system extensions that
let your Mac read the little discs. The Apple CD-ROM drives, for example,
include Foreign File Access, High Sierra File Access, and ISO 9660 File Access
— and that’s just to read the discs. You probably have additional extensions
Chapter 32: CD-ROM, DVD, and Other Such Words 1119
■ ■
Macworld MAC SECRETS • 4040-8/5 • ch.32.F • Chapter 32 • FINAL • VB • 11/03/98 • p.1119
TRUE FACT
The major manufacturers got together at the
dawn of CD-ROMs to establish a set of
standards so that every maker’s CD-ROM player
can play the same discs. CDs that meet this
standard can be played on CD-ROM players for
both Mac and IBM.
The first meetings to discuss CD-ROM format
standards were held in 1985. Those attending
included representatives from Apple Computer,
Digital Equipment, Hitachi, LaserData, Microsoft,
3M, Philips, and others. They held their
meetings in a spot called High Sierra, near Lake
Tahoe, NV.
To this day, the CD-ROM format we’ve come to
know is called the High Sierra standard. High
Sierra is a part of the general ISO (International
Standards Organization) 9660 CD format.
Where’s High Sierra?

that let your drive read Photo CDs (Apple Photo Access) or use your CD-ROM
unit to play audio discs (Audio CD Access). Without these extensions installed,
your Mac acts as though you don’t even have a CD-ROM drive; your drive
slurps up any disc you insert, but no icon appears on your Desktop.
PhotoCD
Kodak’s PhotoCD works like this. You take a roll of 35mm film to a local
camera shop. They send the film to a photo lab, where the photos are
scanned with an ultra high-resolution film scanner.
1120 Part V: Attachments
■ ■
Macworld MAC SECRETS • 4040-8/5 • ch.32.F • Chapter 32 • FINAL • VB • 11/03/98 • p.1120
MACINTOSH SECRET
Apple’s system software CDs for Mac OS 8.0
and later are designed to be startup disks: If you
pop the system software CD into your Mac and
restart (on some models, you must now hold
down the C key), your Mac boots off the CD.
This handy feature lets you use Disk Tools (also
on the CD) to inspect and repair any damage on
your hard drive and proceed with a clean, safe
installation of new system software. And, if
you’re upgrading to Mac OS 8.1 or later, this
procedure gives you the option of reformatting
your hard drive to take advantage of Apple’s
new space-saving HFS+ disk format (see
Chapter 8 for details).
There’s one catch: If you don’t happen to have
an Apple CD-ROM drive, you can’t start up from
the system software CD. The System Folder on
the CD contains only the extensions needed to
mount disks from an Apple drive, not any third-
party CD-ROM drives. If you have a Mac clone
with an internal CD-ROM drive, or an external
drive from another manufacturer, the Mac OS 8
CD may refuse to start up your machine. (Oddly,
the older System 7.5.x versions of the system
software CD did support third-party drives.)
If you want to install from the CD and still
bypass your usual startup disk, your only hope
is to create a customized version of the Disk
Tools floppy disk that will allow you to start up
from a floppy and mount a CD. Here’s how you
do it:
First you’ll have to create a Disk Tools floppy
disk. The disk images are located on the Mac
OS 8 (or later) CD. If you have a PowerPC-based
Mac, use the Disk Tools PPC image. For other
Macs, use the Disk Tools 1 image. (See Chapter
22 for details on disk-image files.)
In the System Folder of the Disk Tools disk, pull
the Apple CD-ROM extension out of the
Extensions folder and replace it with the
extension used by your CD-ROM drive. (You’ll
find this file — such as CD-ROM Toolkit — in the
Extensions folder of your startup disk; the name
of the file varies depending on the manufacturer.
You can also find the file on the disk that came
with your third-party CD-ROM drive. ) If there’s
not enough room on the floppy to add the
extension, just trash the Disk First Aid or Drive
Setup files first. Don’t worry about getting rid of
them; you’ll have access to copies of those
utilities once you mount the system software
CD.
Finally, restart your computer from your
doctored-up Disk Tools floppy disk. With the
new CD-ROM driver installed, you should now
be able to mount the system software CD and
perform whatever maintenance and installation
tasks you wish on your hard drive.
When startup CDs won’t start up

After the photos are digitized, they’re recorded onto a PhotoCD disc. The
PhotoCD can hold up to 100 photos. You get each photo in five different
resolution levels, ranging from thumbnail size up through a gigantic 3072-
by 2048-pixel size — big and detailed enough for professional use.
PhotoCD costs about $30 for a 24-exposure roll and takes about a week to
process. Be aware that the photos are often multimegabyte affairs, even
though they’re compressed with Kodak’s special compression scheme.
That much data can consume substantial chunks of your hard drive.
If you don’t have enough photos to fill a CD the first time out, you can send
the disc back with another roll of film and add more scans to the disc.
After your pictures are transferred to PhotoCD, you’ll be amazed at how easy
they are to work with. Kodak’s Slide Show Viewer program lets you preview
the PhotoCD. If you run a graphics program like Photoshop, you can transfer
the image you view directly to it, either by copying and pasting, or by using a
menu command. Desktop publishing programs such as QuarkXPress also let
you import PhotoCD images directly into page layouts.
Make Your Own CDs
If building a clean room and buying expensive CD duplication equipment
doesn’t quite fit your budget, you have two other options: CD-R, short for
CD-Recordable (Kodak’s PhotoCDs are actually CD-Rs) and the newer CD-RW
(CD-Rewritable). If you need to make just a small number of CDs, one of these
may be the technology for you.
CD-R
CD-R systems let you record the disc just once; if you make a mistake in what
you record, you must create another disc from scratch. All recent recordable
CD-ROM drives offer multisession recording, meaning that you can go back
and add material to a partially-recorded disc.
A CD-R player uses a laser beam to apply heat to the disc. The heat generates
nonreflective spots on the disc surface, very much like the pits on a conven-
tional CD. Like the most expensive CD products, the CD-R disc is gold-plated,
which is said to provide superior reflective characteristics. Once you’ve
“burned” a CD using a CD-R drive, you can read the disc using any CD-ROM
drive (except the ancient, first-generation, single-speed drives.)
CD-R technology has become so inexpensive that almost anyone can become
a CD-ROM publisher. Sony, JVC, Yamaha, and other companies make record-
able CD-ROM drives starting at about $500. The blank CD-R discs have also
gotten dirt cheap. Originally, the write-once discs cost at least $20 each, but
now it’s not uncommon to find them for $1 or less. At that price, you can
afford to turn out your own CD-ROM titles in quantity, or create permanent
archives at a very low cost.
Chapter 32: CD-ROM, DVD, and Other Such Words 1121
■ ■
Macworld MAC SECRETS • 4040-8/5 • ch.32.F • Chapter 32 • FINAL • VB • 11/03/98 • p.1121

On the other hand, recordable CDs aren’t necessarily ideal for archiving large
amounts of stuff. For example, a 2GB Jaz disk holds more than three times the
amount of data contained on a CD-ROM disc — and you can erase it as many
times as you want.
CD-RW
CD-RW drives, introduced in 1997, work a lot like CD-R drives, but they let
you erase and reuse a disc — hundreds of times. Like a CD-R drive, the CD-RW
mechanism records data by burning nonreflective spots onto a layer of the
disc surface; but the spots left behind by the CD-RW recording laser aren’t
necessarily permanent. Under the heat of a laser, the spots can be wiped
clean and the disc can be used again and again.
There are a few drawbacks to CD-RW. First of all, these drives cost a couple of
hundred dollars more than a CD-R drive. Also, CD-RWs require special discs
that still cost about $20 to $25 each — considerably more than the CD-R variety.
(On the other hand, the fact that you can reuse CD-RW discs actually makes
them more cost-effective than Jaz, Zip or magneto-optical disks for short-term
archiving.)
The other big issue is compatibility. Only the newest standard CD-ROM
drives can read CD-RW discs. That’s because the material used in CD-RW
disks is substantially less reflective than the material used in standard CDs;
most second-generation CD-ROM drives can’t even see the dots burned on a
CD-RW disc. So, if you expect to create discs and distribute them to a wide
range of users, CD-RW might not make sense.
1122 Part V: Attachments
■ ■
Macworld MAC SECRETS • 4040-8/5 • ch.32.F • Chapter 32 • FINAL • VB • 11/03/98 • p.1122
TRUE FACT
Manufacturing a CD is such a complex process
that the manufacturing plants cost $30 million to
build. With data on a compact disc reduced to
microscopic levels, manufacturing must be done
under extraordinarily clean circumstances. CD
plant workers must wear protective clothing and
face masks. The work is actually done in a so-
called clean room that’s carefully controlled to
be free of even the smallest contaminants. A
single particle of dust is more than 100 times
larger than a data pit on a finished CD!
Before they can build a master, workers transfer
the data to 9-track computer tape. From there,
the data is etched onto a glass master disk,
called a float glass. A laser beam burns data
onto the float glass.
Next, the glass master is silver-plated to create
a negative. The negative is called a father disc,
which, in turn, is used to generate a series of
positive-imaged discs labeled mothers. The
mothers beget sons (we’re not making this up),
which are the actual molds used to stamp the
finished CDs.
The actual injection-molding or stamping
process takes about 15 seconds per disc. A
laser beam inspects the discs for flaws, after
which the disc is coated with reflective
aluminum (or gold, in the case of the purist-style
audio CDs). Finally, they apply clear acrylic to
the aluminum coating; then the disc goes off to
inspection and packaging.
How a CD is made

On the other hand, the CD-RW format is compatible with the newer DVD
drives that come in some Mac models.
The DVD
Now that the CD-ROM has finally come into its own as a widely-accepted
standard, built into every new Mac and PC, it’s about to be made obsolete by
an even more promising technology — DVD. Some people claim the initials
stand for something, such as digital versatile disc or digital video disc. But in
fact, DVD is a pure marketing designation that stands for nothing in
particular.
A DVD disc looks just like a traditional CD, but can hold up to 26 times more
data — 17 gigabytes. That’s enough room to store eight hours of full-screen
video. The DVD’s incredible storage capacity results from a lavish array of
technological tricks: The tiny pits etched into the surface of a DVD disc are
only half the size of those on a traditional CD. The spacing between tracks
has also been compressed by half. In addition, a DVD disc is two-sided, with
data stored on both the top and underside of the disc (unlike regular CDs,
whose data is stored only on the underside). Each side, in turn, can have up
to two layers, with data stored separately on each. Single-layer DVD discs
store 4.7GB on each side, while the dual-layer discs pack 8.5GB on a side. (At
this writing, most DVD titles don’t take advantage of the dual-sided, dual-
layer technology, however. They’re almost all single-sided, single-layer discs.)
On current DVD drives, playing a two-sided disc means ejecting the disc and
manually flipping it over. But the next generation of DVD players will be able
to read both sides of a disc without interruption. Complex games and
multimedia reference works that currently require shuffling a number of
different CDs will become much easier to use once they’re released in DVD
format and can be contained on a single disc.
As with today’s CD discs, you won’t be able to tell by looking whether a DVD is
designed to play music (like audio CDs), video (like today’s laserdiscs), or
computer data (like today’s CD-ROMs). Actually, there are five different DVD
formats: DVD-Video (for movies), DVD-Audio (for audio-only, like a traditional
audio CD), DVD-ROM (for storing computer data, like a CD-ROM), DVD-R (the
DVD equivalent of CD-R, for writing your own data to DVD disc), and DVD-RAM
(an erasable version of DVD-R, for multi-use data storage).
The first DVD drives for Macs became available in 1997, but it wasn’t until
1998 that Apple began replacing standard CD-ROM drives with DVD drives on
some models. Fortunately, a DVD drive can play the thousands of existing
(original-format) CD-ROM discs as well as the new format.
Playing DVD movies on your Mac
Most DVD titles today are Hollywood-style movies. In fact, if you go to your
local electronics store, you’ll find several shiny new DVD players that hook
up to your television.
Chapter 32: CD-ROM, DVD, and Other Such Words 1123
■ ■
Macworld MAC SECRETS • 4040-8/5 • ch.32.F • Chapter 32 • FINAL • VB • 11/03/98 • p.1123

Playing these video discs on your Mac isn’t as simple as popping them into
your DVD-equipped computer. First of all, two system extensions are required
to mount DVD discs on your Mac desktop — they’re called Apple DVD-ROM
and UDF Volume Access. (UDF stands for universal disk format, the standard
format used to store data on DVD discs.)
Second, DVD-Video movies are encoded and stored on DVD using a special
compression method called MPEG-2. To play back such movies, you need
either software or hardware that can decode the MPEG-2 Video and Dolby AC-
3 audio tracks. If you’re looking for smooth, full-screen playback, that means
investing in a separate PCI decoder card that decodes the MPEG-2 video data
— or buying a $600 to $800 drive that includes an on-board MPEG decoder.
(Apple’s QuickTime MPEG Extension lets you play back MPEG movies using
QuickTime applications, but the playback quality is poor on all but the very
fastest Macs.)
Fortunately, a few PowerBook G3 and desktop Mac models now include an
optional DVD/MPEG card. It allows you to watch DVD movies from your local
Blockbuster with gorgeous fidelity. The software’s amazing, too, letting you
flip between, for example, full-screen and letterboxed mode.
If you’re on the World Wide Web (see Chapter 25), you can read more on DVD
technology at http://www.sel.sony.com/SEL/consumer/dvd/index.html.
CD-ROM Secrets
■
Auto-playing CDs
Beginning with the introduction of QuickTime 2.5, you no longer must use
the AppleCD Audio Player desk accessory to play your music CDs. Visit your
QuickTime Settings control panel, described in Chapter 4, where you’ll find the
on/off switch for the
auto-play
feature. It makes a music CD begin playing
automatically when you insert it.
In fact, in the coming years, we may see auto-playing CD-
ROM
discs, too — not
music CDs, but regular Mac games, software installers, and other computer
data — that also auto-play when inserted. (They must be specifically designed
to do so before the QuickTime auto-play feature will work on them.)
The green-magic-marker trick
You may have heard, and chuckled at, the high-end audio world’s particular
brand of psychic phenomena: that if you outline the edge of an audio CD with a
green magic marker, that disc will sound noticeably purer and better. We’re not
going to make too much fun of this concept; despite its flimsy scientific
foundation, we know some music fans who absolutely swear by it.
Strange
But True
Worth
Learning
1124 Part V: Attachments
■ ■
Macworld MAC SECRETS • 4040-8/5 • ch.32.F • Chapter 32 • FINAL • VB • 11/03/98 • p.1124

However, we
can
say that this doesn’t work on CD-ROM discs. The colors in
Myst don’t get any brighter, the entries in the electronic encyclopedias don’t
get any livelier, and no additional fonts appear on Adobe’s Type-On-Call disc.
Protecting your discs
Our advice here is the same as it was for SyQuest cartridges:
Keep them in the
case.
One scratch across the plastic (on the underside, that is — which is the
only side that counts, actually) and your disc is dead meat.
Take your discs out of their cases only when you want to play them, and handle
them by the edges (or by sticking your finger through the hole in the middle).
Instant menu access to your songs
The Apple Menu Options control panel (introduced with System 7.5) makes your
Úmenu sprout submenus. Now, insert an audio CD into your player. When its
icon appears, click it, choose Make Alias from the File menu, name the alias
something like “Current CD,” and stick the alias into your Apple Menu Items
folder.
Now, whenever you choose Current CD from your Úmenu, the submenu shows
a list of the songs on that CD, even if it’s not the same disc you originally
inserted.
Unfortunately, even if you name the songs (using AppleCD Audio Player), they still
show up in the Úsubmenu as being called Track 1, Track 2, and so on. Still, this
menu setup is a handy table-of-contents shortcut to your favorite songs.
Make a QuickTime audio track
Launch a QuickTime movie program such as Movie Player (see Chapter 23).
Choose Open from the File menu, and select a favorite track on a music CD.
You’ll be asked to save the incoming file; select your hard drive, type a name,
and save away. Now wait for the (lengthy) conversion process.
When it’s all over, you’ll see a strange sight: a movie’s controller bar with no
movie! Click the Play button, though, and you’ll realize that you have a
QuickTime soundtrack that you can manipulate as you would any QuickTime
movie. Play it, import it into Premiere as music for your other movies, slap it into
a Word document, and so on.
Determine the playing time of an audio CD
Everyone knows that the readout on the AppleCD Audio Player can tell you the
total playing time of the audio CD you currently have inserted in your CD-ROM
Chapter 32: CD-ROM, DVD, and Other Such Words 1125
■ ■
Macworld MAC SECRETS • 4040-8/5 • ch.32.F • Chapter 32 • FINAL • VB • 11/03/98 • p.1125

drive. But there’s an easy way to figure out how long a CD will play without
leaving the Finder. Just click on the Audio CD icon and choose the Get Info
command (either from the File menu, or by pressing Ô-I, or by Control-clicking
the CD icon and using the contextual pop-up menu). The total playing time of the
CD is displayed in the comments field of the Get Info window (See Fig 32-1).
Playing multiple-CD games with IDE drives
Most CD-ROM drives are SCSI devices, but certain models (such as the CD drive
that comes with the PowerBook 1400c) are IDE devices. (For a discussion of
SCSI and IDE, see the next chapter.) Normally, the SCSI and IDE drives behave
exactly the same, but not always. We’ve noticed one oddity that rears its ugly
head when it comes to playing games that require you to switch CDs mid-game.
It seems that with some IDE drives, when a game prompts you to insert a
second CD, the drive fails to spit out the first CD — making it impossible to
switch and continue the game!
Fig. 32-1: At last, the comments field in the Get Info window serves an actual purpose —
revealing the total playing time of an audio CD.
Here’s how you can get around this messy situation: Before you start playing,
insert the last of the CDs required for the game. Once its icon shows up on the
desktop, eject it — but not by dragging it into the trash. If you’re running Mac OS
8 or later, eject the CD by holding down the Option key and choosing “Eject and
Leave Behind” from the Special menu. This pops the CD out of the drive but
leaves its ghosted icon on the desktop. (If you’re running System 7.6 or any
earlier version, just choose Eject from the Special menu, or press Ô-E, to
achieve the same result.)
Repeat this process with each of the CDs needed to play the game, so that you
have ghosted icons for all the discs mounted. Finally, insert the first CD and
start playing. Now the CD will pop out as it’s supposed to when the game
prompts you for the next disk.
1126 Part V: Attachments
■ ■
Macworld MAC SECRETS • 4040-8/5 • ch.32.F • Chapter 32 • FINAL • VB • 11/03/98 • p.1126
How to destroy your keyboard with a CD-ROM
We fervently hope that you haven’t been so unfortunate as to discover this
disastrous combination: An internal CD-ROM drive, a keyboard — and a cup of
hot coffee. The scenario is as follows: 1) You insert a CD into your Mac’s built-in
CD-ROM drive. 2) You place a cup of coffee on the desk in front of — and several
inches away from — your computer. 3) You eject the CD, dragging its icon into
the Trash. 4) A moment later, the CD-ROM drive tray obediently slides out,
colliding with your coffee cup and dumping its contents directly into your
keyboard. The next thing you know, your dripping keyboard won’t type any
characters except a semi-colon and a lower-case F.
We’re aware that this is a decidedly low-tech tip, only peripherally related to
CD-ROMs. But we’ve seen this happen to people on several occasions, and one
of your cheerful authors (
hint:
It wasn’t David) has mangled at least one
keyboard this way, too. Thus a hearty
Mac Secrets
warning: Keep the path in
front of that CD-ROM drive clear of all obstacles.
(On the other hand, we’re not as dumb as the guy who called Apple to complain
that his “cup holder” had broken off.
He’d
been putting his coffee cup
into
the
CD-ROM tray!)
Strange
But True
Chapter 32: CD-ROM, DVD, and Other Such Words 1127
■ ■
Macworld MAC SECRETS • 4040-8/5 • ch.32.F • Chapter 32 • FINAL • VB • 11/03/98 • p.1127
ANSWER MAN
Q: OK, I’ve got you. You wrote that I have to have
all those Apple extensions (ISO 9660, High Sierra,
blah blah blah) installed in order to have CD-ROM
discs show up on my Desktop. But the CD that
came with my Power Mac shows up just fine,
even when I’ve started up with all extensions off!
It’s soooo satisfying to catch you guys making
an error.
A: Not so fast, smart guy.
Apple’s done you a favor. It’s provided each
PowerPC-based Mac (see Chapter 13) with a
secret, invisible extension, called “.AppleCD,”
that’s programmed not to get turned off when
you hold down the Shift key at startup. (Holding
Shift, of course, turns off all normal extensions.)
That was done so that, in times of strife, you
can start up your Mac from the CD even when
you’re having extension problems.
Q: Oh, yeah? So how come I can’t get any other
CD-ROM discs to mount when I’ve turned
extensions off?
A: Think about it: except for the system-
software CD-ROM that came with your Mac,
what other discs have that invisible CD-
mounting extension on them?
Q: Um . . . none, I guess. Sorry to waste your
time.
Extensions off?
Macworld MAC SECRETS • 4040-8/5 • ch.32.F • Chapter 32 • FINAL • VB • 11/03/98 • p.1128

Macworld MAC SECRETS • 4040-8/5 • ch.33.F • Chapter 33 • FINAL • VB • 11/03/98 • p.1129
Chapter 33
The SCSI Chain, IDE,
and FireWire
In This Chapter
©The three rules of SCSI
©The ultimate SCSI troubleshooting guide
©The cheaper heir to SCSI: IDE
©SCSI 1, 2, 3, Fast, Wide, and Ultra
©What’s to become of SCSI?
S
CSI is short for Small Computer System Interface. It’s the name given to
the circuitry in almost every Mac ever made that lets you hook up hard
drives, removable disk (Zip/Jaz/SyQuest) players, scanners, CD-ROMs, tape
drives, high-end color printers, and other external devices to your Mac. (In
the beginning, it was originally pronounced either scuzzy or sexy. We prefer
the latter. Most people use the former.)
SCSI, as all world-weary Mac veterans know, is used in all kinds of terminology.
There’s the SCSI port on the back of the Mac. There’s a SCSI device (any equip-
ment plugged into that port). There are SCSI cables. Unfortunately, the terms
you hear most are SCSI conflicts and SCSI problems. Of all Mac components,
SCSI is the most user-hostile, the one most likely to cause problems, and one
of the very few ways an unsuspecting user can actually damage a Mac by
being underinformed.
Why do these problems arise? SCSI is a system of sending information incredi-
bly fast through a very narrow set of wires. Worse, SCSI messages can be sent
to several different devices, all on a single cable; you may have a Zip drive, a
scanner, and a CD-ROM player all chained together. Electronic confusion can
result, along with bizarro symptoms ranging from the blinking question-mark
at startup to seeing your hard drive icon show up twice on the desktop.
There are rules for safe SCSI connections. You’ve probably read them before;
Heaven knows, we’ve read them plenty of times. The secret we wish to
impart, above all, is that these rules are made to be broken in the world of
SCSI. You may have to experiment. You may have to plug and unplug devices.
You may have to explicitly violate one of those golden rules of SCSI. But with

a little patience, almost any chain of SCSI devices can be made to work
together — and after it’s set up, you don’t have to mess with it again.
Fortunately, if you have no SCSI devices at all, or if you have an iMac or
another model that doesn’t have a SCSI jack, you’ll never have to
troubleshoot a SCSI chain. You don’t know how lucky you are.
The Importance of Drivers
The SCSI standard allows up to seven devices be connected together, one
plugged into the next, in a daisy chain. If hooked up properly, your Mac
recognizes these peripherals when you power them all up.
Each device communicates with the Mac through a software program called
adevice driver. On a hard drive, the driver is installed by the formatting
program (such as Apple Drive Setup; see Chapter 8). This driver gives the
Mac its instructions about reading data from, and writing data to, the SCSI
device you hooked up. A scanner’s driver is usually a system extension that
allows it to work with your Macintosh, as do CD-ROM drives and other
peripherals.
If this extension is ever absent from your System folder, the corresponding
SCSI gadget simply won’t work. Try it yourself: take the icon called Apple
CD-ROM out of your Extensions folder and restart the machine. Now you can
insert CD-ROM discs from now until doomsday, and they’ll never show up on
the desktop. Another extension is required for Zip and Jaz disks; another,
probably, for your scanner; and so on. Fortunately, you can’t mistakenly
throw away the driver extension for your all-important hard drive; this
driver is invisible.
The Three Rules of SCSI
As we mentioned, SCSI holds great potential for creating problems on your
Mac. We also mentioned some rules that, when followed, are supposed to
protect you against these problems.
Rule #1: Termination
The first golden rule of SCSI: A terminator must be on each end of the chain of
devices. A terminator, loosely speaking, is a shock absorber that absorbs the
messages pushed out of your Mac’s SCSI jack down the SCSI wire. It prevents
power from hitting the end of the cable and bouncing back, creating an echo.
This signal reflection could result in all sorts of unsavory consequences, as
we’ll explain later in this chapter.
The first and last
Your Macintosh’s internal drive already has terminator resistors installed.
If you ever open up your Mac to look at its internal hard drive, you’ll see
1130 Part V: Attachments
■ ■
Macworld MAC SECRETS • 4040-8/5 • ch.33.F • Chapter 33 • FINAL • VB • 11/03/98 • p.1130
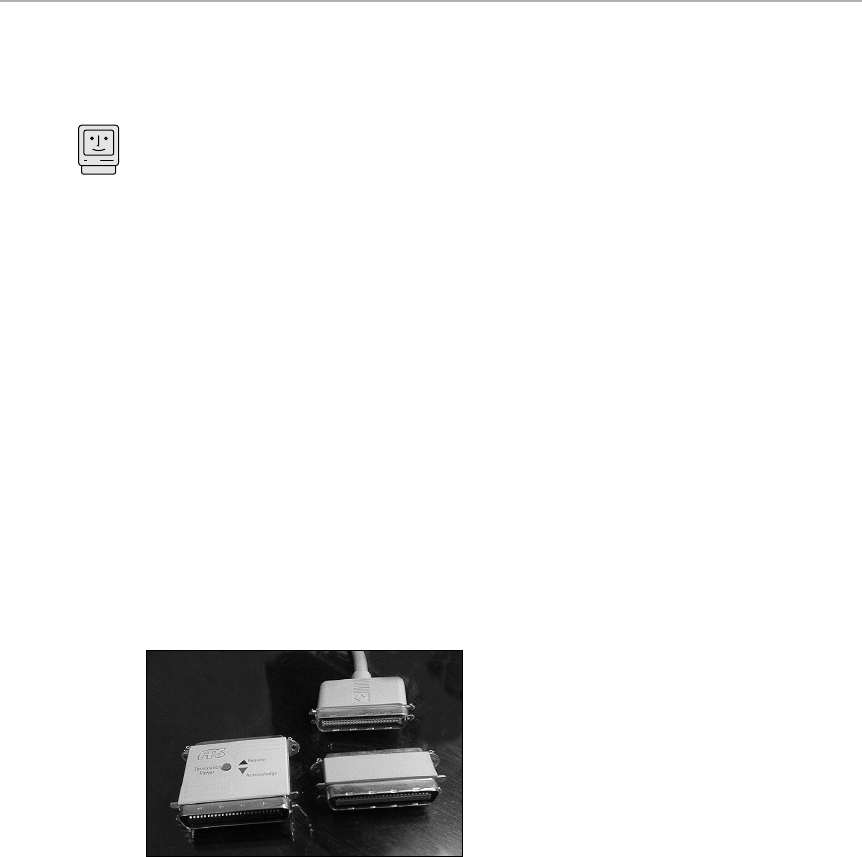
several little, usually orange, electrical components plugged into the bottom
of the drive. Those are your terminators. The internal drive is generally the
first device on the chain.
Termination must also be installed on the last device in the chain, whether
it’s a hard drive, scanner, or whatever (see Figure 33-1). Usually, it comes in
the form of a fat gray plug that gets plugged into the empty jack on your last
SCSI gadget. If there’s only one set of jacks on the device, you can get what’s
called a “pass-through” terminator that has a plug on one end and a jack on
the other. The jack is for your SCSI cable. See Figure 33-2 for a photo of some
SCSI terminator plugs.
Figure 33-1: Standard SCSI setup. Because the Mac (at left) already has internal terminators,
all you have to do is put a terminator on the last physical SCSI device.
Figure 33-2: Left: An APS SCSI Sentry — a terminator plug that automatically turns itself on
or off as needed. Right: A standard SCSI terminator plug, posed here next to a SCSI cable.
External drives, internal terminators
Fortunately, the days of cheapskate manufacturers are nearly over; in the
early years, some companies sold internally terminated hard drives and
scanners. That meant you couldn’t string such a drive together with other
SCSI devices unless it was the last item in the chain. Other cheapskate
manufacturers let you switch termination on and off, but required you to
flip a tiny, confusing set of DIP switches to do so.
Gadget B
Mac Basics
Chapter 33: The SCSI Chain, IDE, and FireWire 1131
■ ■
Macworld MAC SECRETS • 4040-8/5 • ch.33.F • Chapter 33 • FINAL • VB • 11/03/98 • p.1131

Today’s best SCSI appliances — Zip drives come to mind — have a termination
on/off switch, which at least saves you the cost of a terminator plug.
Active termination
Active termination, found on such classy SCSI gadgets as the Jaz drive
and hard drives sold by APS, is circuitry that turns termination on or off
automatically as needed.We wish all other SCSI manufacturers would adopt
this headache-relieving technology.
Rule #2: SCSI addresses
Remember, the Mac can send information to up to six attached pieces of
SCSI equipment. To make sure that each SCSI device receives the correct
messages from the Mac, each must have a unique address or ID number.
1132 Part V: Attachments
■ ■
Macworld MAC SECRETS • 4040-8/5 • ch.33.F • Chapter 33 • FINAL • VB • 11/03/98 • p.1132
TRUE FACT
As we said, termination rules on the Macintosh
are not cut in stone. Here are a few exceptions
to the Termination Rule.
PowerBook: PowerBook models (except those
with IDE internal drives) have what Apple calls
“a small, built-in terminator” attached to the
internal drive. But this terminator isn’t sturdy
enough to handle a large SCSI chain. So here’s
the oddball recommendation: If you have more
than one SCSI peripheral attached, connect a
terminator to the first external device and the
last one! If you count, you’ll realize that you then
have three terminators attached (including the
internal one). Chapter 14 provides more details
about PowerBook termination.
Mac Plus: The Plus doesn’t have any internal
connections for a hard drive. Therefore, the first
hard drive you plug into it must have
termination. You still need a second terminator
at the end of the chain if you add additional
devices.
Macintosh IIfx: For this model, Apple designed
the infamous black terminator, a 200-ohm
terminating resistor, which includes a capacitor
that supposedly absorbs power spikes. A
regular terminator, according to Apple, can
cause problems.
Tower-style Macs: Many Quadras, tower G3s,
9500s, and other tower-style models make life
even more difficult. They each have two SCSI
buses: one chain for the internal drives and
another for the external devices. But because
the SCSI chip is addressing both banks as
though they’re one gigantic chain, you’re still
limited to seven devices on the chain. Talk about
confusing!
To add to that confusion, the internal SCSI bus is
already terminated at the beginning and end. So
if you’re installing any additional hard drives into
the commodious drive bay of these models, you
must first remove the internal termination, or
you’re asking for trouble.
Quadra 800: This model self-terminates its own
chain, but only when SCSI devices are installed
internally, within its large drive bay. If you install
an external SCSI device, the 800’s active
termination is automatically disabled, and you’re
back to the usual inconvenient SCSI termination
ritual.
More exceptions than rules
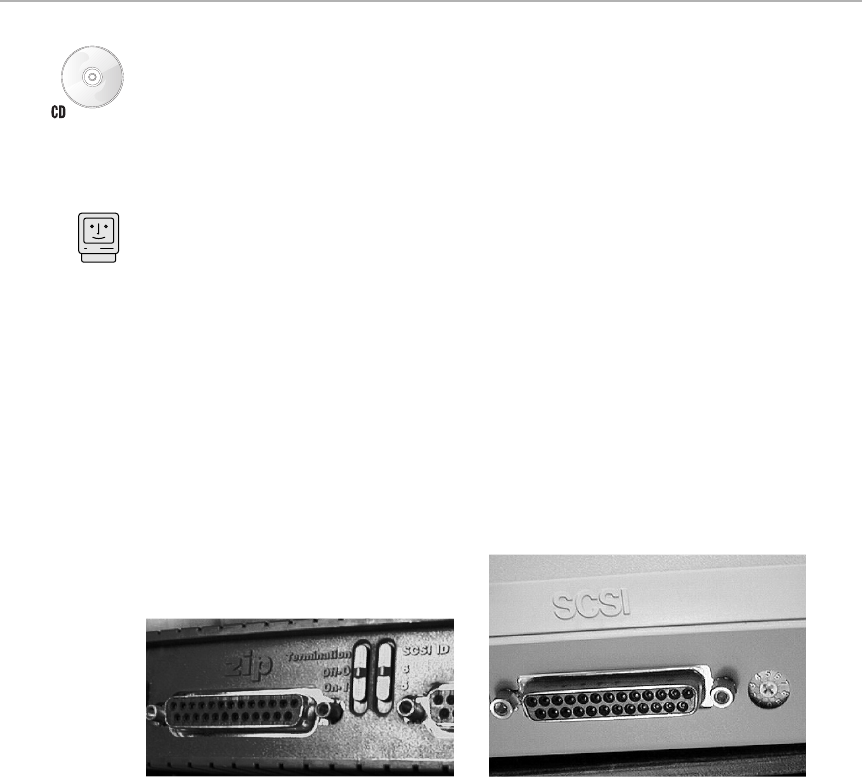
Your Macintosh reserves ID number seven for itself. Apple always sets the
internal drive’s ID to zero and the built-in CD-ROM, if there is one, to three.
That leaves the numbers 1, 2, 4, 5, and 6 available for your add-on gear. (Of
course, some non-Apple internal drives are sometimes set to different SCSI
numbers. If you’re not absolutely certain, install the SCSIProbe control
panel included on the CD-ROM with this book and check for yourself. See
the appendix.)
The key to SCSI address numbers is that every device’s ID number must be
different. If two or more devices have the same ID number, the instructions to
the drives will get confused. The drives, your Mac, and you are all likely to
crash.
How to physically change the addresses
External devices usually include a switch, dial, or set of DIP switches that let
you change the address number (see Figure 33-3). (We prefer the dial. Although
it’s a little harder to change, it’s less apt to be changed accidentally when you
move or reconnect the drive. Memo to manufacturers who use those hateful
DIP switches: Get with the program. This is the Mac.)
Remember: Before turning on your Mac, make sure that there are no
duplicate SCSI ID settings!
Figure 33-3: On the Zip drive, your choices of SCSI addresses are limited: 5 or 6 (left). On
normal SCSI gadgets, you can choose anything from 1 to 6 using a wheel or pushbuttons
(right).
How to choose the address numbers
The last actual device on your SCSI chain doesn’t have to have the highest or
lowest ID number. The physical order of the devices can be independent of
their ID numbers. The main thing is to give every device a different SCSI
address.
However, Apple recommends that you give higher numbers to the devices
you’ll use most frequently — give ID 6 to an external hard drive you start up
from, for example — and lower numbers to SCSI devices you’ll use less
frequently — give ID 1 to a tape backup machine, for example.
Mac Basics
Chapter 33: The SCSI Chain, IDE, and FireWire 1133
■ ■
Macworld MAC SECRETS • 4040-8/5 • ch.33.F • Chapter 33 • FINAL • VB • 11/03/98 • p.1133

Rule #3: Cabling
Cables are often ignored as a source for SCSI-related troubles. But over time,
internal wires can fray and jacks can become damaged, causing unexplained
havoc across your SCSI chain. (We actually have a client who threw away a
500MB hard drive that he couldn’t get to work. We rescued it from the garbage
and discovered that its SCSI cable had become pinched by a heavy piece of
equipment. The drive, on the other hand, was fine.)
The first rule here: Keep the cables as short as possible. Although the Mac
SCSI standard allows you to use up to 18 feet of cable, you must subtract
from that figure the amount of cable inside an external SCSI case. With so
many fragile electronic signals traveling so fast and so far, it’s not uncommon
for troubles to occur even if the overall length of the cables is within the
limit. Furthermore, you’ll have problems using a SCSI cable longer than two
feet with any PowerBook model.
Almost every new external SCSI component comes with the cable you need
to connect it to your Mac. That’s usually a smallish, 25-pin connector on the
Mac end (called a DB-25 connector) and a very wide 50-pin (Centronics-style)
connector at the other. A few drives (such as most Zip drives) have the
smaller, 25-pin jacks just like the Mac; an appropriate SCSI cable (small
connector on each end) is usually provided.
What is usually not included with your new gizmo is the cable you need to
daisy-chain it to another device. If you have SCSI peripherals already, before
you buy another SCSI device for the chain, buy another cable, too. And make
sure you buy the correct kind: 25-to-25 pin, 25-to-50, or 50-to-50, depending on
your setup.
One more SCSI truth: the quality of the cables you use to connect SCSI
gadgets can make a huge difference in the success of your operation! The
thick, shielded SCSI from Apple and APS are the most expensive and the
most reliable we’ve ever used. They’re worth every penny. Since the first four
editions of this book appeared, 50 readers have written us to confirm this: A
new, shielded, Apple or APS cable instantly solved an otherwise baffling SCSI
problem.
The Great SCSI power-off myth
Ever since the Mac was introduced, every book, manual, and article pounded
the following warning into our soft little brains: Never connect or disconnect
a SCSI device while the Mac is on! According to the myth, you’ll crash your
computer or even damage your Mac’s SCSI controller chip.
Well, we have some shocking news. We asked an Apple hard-drive engineer
about this famous bit of Mac lore. Know what he said about “hot-plugging,”
as he calls it? “I’ve been hot-plugging hard drives daily for ten years, and I’ve
never had a single problem. We hot-plug hard drives all the time.”
Worth
Learning
1134 Part V: Attachments
■ ■
Macworld MAC SECRETS • 4040-8/5 • ch.33.F • Chapter 33 • FINAL • VB • 11/03/98 • p.1134

It’s true. If you’re careful, it’s perfectly possible to plug and unplug SCSI
devices while everything’s on.
So where did the great Power-Off Myth come from? Even our engineer friend
concedes that it’s possible to cause damage if you don’t hot-plug correctly. And
what’s “correctly?” All the pins of the SCSI connector should arrive or depart at
the same moment. In other words, don’t pull the right side off, and then the
left; attach the SCSI connector flat, all at once, face-to-face with its jack. If the
connector is attached or removed unevenly, you risk creating a power surge on
the subset of pins that are momentarily in contact with the jack.
The Myth arose for a second reason, too: If a hard drive isn’t already attached
as the Mac starts up, the drive’s icon won’t show up on the Desktop. This
would certainly alarm the novice. If you hot-plug a hard drive without
restarting the Mac, its icon still doesn’t automatically appear. However, you
can use SCSIProbe, included on the CD-ROM with this book, to “pull” its icon
onto the screen after it’s attached. (That’s how the Apple engineers do it.)
One additional caveat: If a new hard drive you’re attaching has the same SCSI
address as one that’s already attached (see Rule #2), the Mac may very well
wipe out the new drive’s folder hierarchy. This is no myth.
Obviously, then, it’s safest to follow the official Apple guidelines — to turn off
the Mac and all SCSI devices when connecting or disconnecting them. But, if
you’re savvy, or impatient, there’s no reason to be terrified by the Great SCSI
Power-Off Myth.
Chapter 33: The SCSI Chain, IDE, and FireWire 1135
■ ■
Macworld MAC SECRETS • 4040-8/5 • ch.33.F • Chapter 33 • FINAL • VB • 11/03/98 • p.1135
ANSWER MAN
Q: Do I have to have all my SCSI-chain
equipment turned on when I use my Mac? It
seems like I’m wasting a lot of electricity if I’m
not going to use my scanner today.
A: Talk about frequently-asked questions!
The answer to this one is: you can if you can.
That is, you may be able to leave some of the
SCSI devices off without problems, depending
on the individual pieces of equipment.
The only way to tell whether a device will bring
down the entire SCSI chain when the power is
off is to try it. (This kind of experimentation
won’t hurt your Mac or your SCSI chain.) Apple
claims that PowerPC-based Macs require a fully
powered chain — yet simple experiments show
that this rule rarely holds true.
On the other hand, most of these devices draw
very little current, and their life expectancy is at
least several years. If it turns out all your
gadgets need to be on before the Mac turns on,
don’t lose sleep over it.
On and off

SCSI Secrets
■
Mount a cartridge without a driver, method 1
As described earlier in this chapter, you generally can’t use a piece of SCSI
equipment without a corresponding piece of software — the SCSI
driver
for that
gadget. For example, if you insert a Zip, Jaz, or SyQuest disk after the Macintosh
is on, its icon won’t
mount
(appear on the desktop) unless the corresponding
driver extension is in your System folder.
But here’s a trick for mounting such removable disks. When you’re caught
without its driver, restart (or start) the Mac — and insert the disk
just after
the
“Welcome to Macintosh” sign appears. By the time you arrive at the Finder,
you’ll find that your Zip, Jaz, or SyQuest disk is neatly mounted on the desktop.
Moreover, you can now remove that disk and replace it with another; as far as
the Mac is concerned, that SCSI gadget is a fully accredited component of your
setup for as long as the Mac is on.
Mount a cartridge without a driver, method 2
SCSIProbe, included on the CD-ROM with this book, can bring a Zip, Jaz,
SyQuest, or similar disk onto the screen if you’ve started up the Mac without
the appropriate driver extension installed —
and
didn’t remember to put a disk
in the drive, as described in the previous secret.
After inserting the disk, open the control panel and type the letter M (or click
the Mount button). Your Zip/Jaz/SyQuest pops onto the screen. (The program
included with Zip and Jaz drives called Iomega Guest does the same thing, by
the way, but takes longer and isn’t always easy to find in a pinch.)
Two ways to know what’s going on
Want a great education about your Mac’s SCSI chain in five minutes? Choose
Apple System Profiler, which is listed in your Úmenu in System 7.5 and later.
Once it launches, choose Volume Information from the Select menu.
As shown in Figure 33-4, you’re shown a wealth of detail about your SCSI
gadgets, including which SCSI chain each is on; what its ID number is; how
big it is (and how full it is); and more.
A quicker, but less detailed, display is available in, of all things, the PC Exchange
control panel (see Chapter 4). It shows a quick summary of all of your attached
SCSI gear and, in rare circumstances, may even be able to mount them.
1136 Part V: Attachments
■ ■
Macworld MAC SECRETS • 4040-8/5 • ch.33.F • Chapter 33 • FINAL • VB • 11/03/98 • p.1136
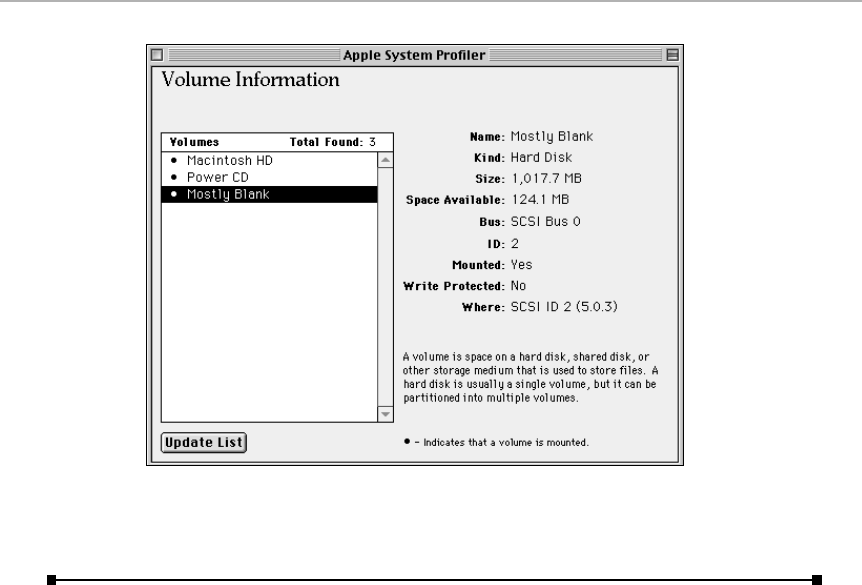
Figure 33-4: Apple System Profiler shows all your SCSI gadgets, on all chains; click one to
read all about it.
SCSI Troubleshooting
If all goes well, after you have your SCSI chain set up, you can turn on every-
thing and start your computer. After your Desktop pattern appears, you
should see the icons for all your external hard drives in the proper places
at the right side of your Mac’s Desktop.
If every component and every cable is textbook-perfect, you can get back
to work or play on your Mac without any further incident. There are times,
though, when things just don’t work the way they ought to work, and you
begin to learn what the term “SCSI hell” is all about.
Sometimes SCSI troubles are very obvious. Sometimes they’re so subtle you
don’t even suspect SCSI. So let’s take them in turn.
Spotting the symptoms
You won’t believe how many different kinds of Mac troubles can be caused
by SCSI glitches. These include a completely frozen, empty gray screen at
startup; the blinking question-mark disk icon at startup; a Sad Mac icon at
startup; a freeze when the Happy Mac icon appears; or a freeze at the
“Welcome to Macintosh” startup screen. Sometimes a specific SCSI device’s
icon won’t show up on your desktop, or you get random freezes when you
attempt to save or copy large files onto a specific hard drive.
Chapter 33: The SCSI Chain, IDE, and FireWire 1137
■ ■
Macworld MAC SECRETS • 4040-8/5 • ch.33.F • Chapter 33 • FINAL • VB • 11/03/98 • p.1137

A SCSI conflict can affect a system software installation, too (for example, the
Mac won’t recognize one of the installation disks). If something bad is afoot
in your SCSI chain, the installation process can come to a screeching halt.
Solving the problems
First, determine if it’s really a SCSI problem. As explained in Chapter 36, begin
by pressing the Shift key during startup (to turn off all your extensions).
Disconnect the SCSI cable from the back of your computer. Now you have no
external SCSI gear. Try to start up again.
If your computer works, then you’ve confirmed that something in the SCSI
chain is wrong. If your computer still won’t work, then perhaps the problem
is with your internal drive or system software. Try starting up with the
startup CD-ROM, or the Disk Tools floppy, that came with your Mac.
If you’re able to start successfully, you may simply have to update your
internal drive with your formatting software (see Chapter 8 for more on hard-
disk drivers and updating them). Damaged or incompatible hard-disk drivers
— software — are sometimes responsible for all sorts of ills that are blamed
on the hardware. Sometimes one crash can do a device driver in. Frequent
crashes when you are trying to access data from your hard drive or write
data to it may indicate a damaged driver.
Which SCSI device is it?
If the trouble lies in the SCSI chain, disconnect the newest device on the
chain. Recheck your cables and termination again and then power up. If it
works, then you’ve narrowed the problem down to that new device. To
isolate the problem, connect only that device to your Mac and see if it works.
This is the time to check the manual. It may tell you that your new device is
internally terminated or that it works best in a certain SCSI chain location.
1138 Part V: Attachments
■ ■
Macworld MAC SECRETS • 4040-8/5 • ch.33.F • Chapter 33 • FINAL • VB • 11/03/98 • p.1138
ANSWER MAN
Q: I want to transfer stuff from one Macintosh to
another. Can I connect them back-to-back with a
SCSI cable?
A: No, no, for God’s sake, no! Don’t do it! You
have so much to live for!
You’ll fry one or both of your Macs.
There’s one exception to that dire warning: you
can connect one Mac to another if one of them
is a PowerBook, as described in Chapter 14.
Even then, though, you must use a special
adapter to convert the SCSI signal.
Q: OK, well, then, can I share one SCSI gadget
— my scanner, say — between two Macs?
A: Absolutely — one at a time. You can’t leave
two Macs connected to a SCSI gadget
simultaneously.
Mac-to-Mac SCSI

If you’re still having no luck
Take a deep breath. Review each of the following steps, in order. If you follow
them all, you will solve what’s wrong. You may never know why things
weren’t working, but you’ll be pleased enough that everything finally works.
1. Make sure that every device is plugged into a power outlet. Make sure
that they’re all switched on. Check that each connector is firmly attached
to its SCSI jack.
2. Change the ID numbers of your SCSI gear. Try reversing the numbers, for
example — but be absolutely certain, before you turn on the Mac, that
there’s no numbering conflict. Use SCSIProbe, included on the CD-ROM
with this book, to see what’s going on.
3. Change the termination. As we said, not everything in SCSI-land is clear-
cut. First, try removing all terminator plugs from your external drives.
(You can’t hurt your equipment by having too few terminators.) If that
doesn’t work, put a terminator plug on the last device in the chain.
4. Suspect your cables. Check their length. The total combined length can’t
exceed 18 feet; 12 feet is safer. Swap the cables among the devices in
your chain. Replace them, if you have spares. Try Apple cables.
5. Place your SCSI devices in a different physical sequence. Put the last
device on the chain first or somewhere in the middle. (But don’t forget:
When you make these changes, reinstall the termination on the last item
in the chain and check for secure connections and correct ID numbers.)
6. Make sure that you’ve installed the proper software driver for each
device. Without the driver, your Mac may not even know that a SCSI
device is there.
7. Put a terminator in the middle of the chain.
What if the drive just won’t mount?
You restart your computer, and everything seems to be working fine — except
that the hard drive icon doesn’t appear on your Desktop!
At times like this, you really need a utility that lets you examine your SCSI
setup. One such tool is SCSIProbe, provided on the CD-ROM with this book.
SCSIProbe shows you the SCSI address numbers of your various devices and
whether or not they’re mounted. In this case, if you didn’t turn on your
external device soon enough before booting your Mac, SCSIProbe’s Mount
button will actually pull your external drive’s icon onto the Desktop.
If SCSIProbe doesn’t work, or your system crashes when you try to mount the
drive, try replacing the device driver with your formatting software first and
see if it works.
If you still can’t get the drive to mount, use Apple’s Disk First Aid or a
commercial set of hard-disk repair/recovery tools, such as Norton Utilities.
For greater insights into hard-drive lore, consult Chapter 8.
Chapter 33: The SCSI Chain, IDE, and FireWire 1139
■ ■
Macworld MAC SECRETS • 4040-8/5 • ch.33.F • Chapter 33 • FINAL • VB • 11/03/98 • p.1139

Beyond SCSI
The Macintosh Plus was the first personal computer to offer a SCSI jack. It took
12 years for the Mac’s SCSI equipment to improve since that 1985 moment.
Fast, Wide, and Ultra
Today, the original SCSI electronics have been fondly dubbed SCSI-1 —
because most high-powered Mac models today come with improved
electronics called SCSI-2. There’s only one difference that you should care
about between SCSI: the Next Generation and the original: speed. You can
buy SCSI-2 equipment in any of several flavors, each with a cute and
unhelpful name.
As you read about them, remember one key buying point: With all add-on
SCSI products, you need both a circuit board (such as a PCI or NuBus card)
that lets your Mac “talk” this new standard and the corresponding kind of
hard drive. The card and the drive together cost $2,000 or more — which may,
nonetheless, be a reasonable price to pay if you’re in a speed-dependent
business such as video digitizing, setting up a Mac to serve a large network,
prepress, or large database applications.
SCSI-2 Fast (10 megs per second)
This kind of equipment sends data twice as fast as regular SCSI, with a
maximum speed of 10MB per second instead of 5MB. Most high-end Macs
1140 Part V: Attachments
■ ■
Macworld MAC SECRETS • 4040-8/5 • ch.33.F • Chapter 33 • FINAL • VB • 11/03/98 • p.1140
CASE HISTORY
One of your cheerful authors tells the following
illustrative tale. He wanted to attach an external
drive to a Macintosh that already had a SyQuest
drive and a scanner. The new external drive was
connected directly to the Mac, the removable
drive was in the middle of the chain, and the
scanner was at the end of the chain, properly
terminated.
The way it’s written, this setup should have
worked. In fact, the Mac started up fine, and the
drives mounted properly. But every so often,
when a lot of data was being written to or from
one of the drives in the chain, the Mac froze and
the activity light on that drive remained lit. The
Mac had to be restarted.
He did the usual SCSI troubleshooting dance:
moved drives to different spots in the chain (with
appropriate changes to the termination); swapped
cables; and juggled ID numbers. The drives and
removable cartridges were reformatted. But the
problems persisted.
On the suggestion of an Apple technician who
specialized in SCSI voodoo, the new drive was
placed last on the chain, with double
termination — one terminator block ahead of the
drive and one attached to the empty SCSI jack
at the rear of the drive. And the problems
vanished!
The moral: When the rules of SCSI let you down,
break the rules of SCSI.
SCSI voodoo in action

(such as recent Power Macs in the 7000, 8000, 9000, and G3 series) offer two
SCSI chains — an internal and an external. On these models, the internal SCSI
chain has Fast SCSI-2 circuitry, saving you the cost of a SCSI-2 card for these
models. Such models also come with a Fast SCSI-2 internal hard drive to take
advantage of the circuitry, meaning that these models can transfer up to
10MB per second to or from the Mac’s brain.
SCSI-2 Wide (10 megs per second)
SCSI-2 Wide is another way to double regular SCSI’s speed. This kind of
equipment has wires 16 bits “wide” instead of 8, so it can shove information
through them twice as fast. Actually, there aren’t any SCSI-2 Wide products
available for the Mac — only Fast/Wide (read on).
SCSI-2 Fast/Wide (20 megs per second)
Combine the doubled speed of SCSI-2 Fast with the wider “pipes” of SCSI-2
Wide, and you get this high-speed conduit, whose top speed is 20MB per
second. You can buy certain Power Macintosh G3 machines with a Fast/Wide
PCI card (and matching huge hard drive). If you’re into digital video, huge
Photoshop files, or just not waiting for things, that hard drive speed — coupled
with the G3’s own fast processor — are key components of the speed demon’s
dream machine.
SCSI-3 Ultra Wide (40 megs per second)
Welcome to the ’90s. This modern, goosed-up SCSI system can flood your
Mac’s little brain with 40 megabytes per second — at this writing, the fastest
possible hard drive system available for the Mac.
No Mac comes with Ultra Wide circuitry directly from Apple. You have to
buy it, in the form of PCI card/hard drive bundles from such companies as
MicroNet, Atto, LaCie, and APS; at this writing, the card and hard drive
together cost about $1,200.
SCSI comprehension (0 megs per second)
The main things to remember when you go questing for better SCSI speed
are, first, faster is more expensive; and second, get a card and hard drive
together. If you don’t, you’re in for trying to understand instructions like
these from a recent Macworld article:
Remember that if you use, for example, a SCSI-2 Fast drive on an Ultra Wide
SCSI port, you’ll be limited to SCSI-2 Fast’s 10-MBps transfer rate. You can
connect an Ultra Narrow SCSI drive to an internal SCSI-2 Fast connector and
an Ultra Wide SCSI drive to an internal SCSI-2 Wide connector (which some
SCSI cards have), but you’ll need an adapter to connect to an external SCSI-
1 port or to connect a Wide drive to a non-Wide connector or a non-Wide
drive to a Wide connector. Ultra Wide SCSI cards come with both Ultra Wide
and Ultra internal connectors, but if you use both internal connectors, you
won’t be able to use the external connector.
Got that?
Chapter 33: The SCSI Chain, IDE, and FireWire 1141
■ ■
Macworld MAC SECRETS • 4040-8/5 • ch.33.F • Chapter 33 • FINAL • VB • 11/03/98 • p.1141

IDE: Cheaper, Sooner, and Less Flexible
For years, it was safe to assume that if it was a Mac, it had a SCSI hard drive
inside. No longer. More and more new Mac models (such as the 6000 line,
recent PowerBooks, and the basic Power Mac G3 models) come with a
completely different kind of device-chain circuitry inside — a protocol
borrowed from the world of DOS clones. It’s called the Intelligent Drive
Electronics design — IDE for short.
Apple uses IDE circuitry primarily because IDE drives are cheaper than SCSI
drives (because of competition in the DOS world). Anyway, Apple figures that
most people won’t know or care that an IDE drive is inside. You still get the
standard SCSI jack on the back of your computer, into which you can plug the
usual assortment of SCSI devices. They’ll work perfectly well with (and
independently of) the internal IDE hard drive.
You don’t need to fuss with terminators or addresses in the world of IDE. In
the unlikely event that you want to expand your IDE chain, you’ll be limited
to one additional device. (An IDE chain can have only two devices — a master
and a slave. A slave drive can’t start up the Mac, by the way.)
If you wish, you can replace your IDE hard drive with a larger one.
Unfortunately, though, now you’ll be trafficking in the icky world of PC
clones, where nothing is standard and everything is incompatible. When
shopping for a new IDE drive, you must buy one that meets the following
technical criteria, even if you don’t know what these things mean:
1142 Part V: Attachments
■ ■
Macworld MAC SECRETS • 4040-8/5 • ch.33.F • Chapter 33 • FINAL • VB • 11/03/98 • p.1142
TRUE FACT
Apple doesn’t bandy about official figures as to
just how fast the SCSI port is of each Macintosh
model. However, here we’ve listed a few
examples. Speeds are dependent on the kind of
storage device installed, the kind of formatting
software, extensions, SCSI setup, the size of
files being transferred, and so forth.
How fast is your Mac’s SCSI port?
Model Maximum SCSI port speeds
Macintosh II, IIx, IIci 1.25MB/second
Macintosh LC family 1.5MB/second
Centris, Quadra 605 through 900 5MB/second
PowerBook 100/500 series 1.5MB/second
Duo 200 series 1.5MB/second
Power Mac 6100, 7100, 7200 5MB/second
Power Mac 7300 and higher 10MB/second (internal bus; 5MB/sec. external)

■The drive must support the identify command.
■It must work at least at PIO mode 2 performance level.
■It must have write caching on so that auto-reallocation of new spares is
invoked.
Apple suggests that drives manufactured by IBM, Quantum, Conner, Seagate,
or WD (Western Digital) will give you the best luck.
FireWire
Whoever elected SCSI, anyway? It’s awkward, it’s a headache, it’s limited.
Fortunately, America’s best engineers are designing improvements. Most
of these improvements have to do both with improving the speed of data
transfer and relieving the headaches of setting up SCSI gadgets. For example,
there’s talk these days of something called Fiber Channel, which uses fiber-
optic or copper cable that can be 100 meters long, with no ID numbers or
terminators to worry about, 127 devices per daisy chain, and data-transfer
rates of up to 100MB per second.
But believe it or not, there’s a new technology already in stores that makes
SCSI look like your father’s data bus. What if you could connect your hard
drives, CD-ROMs, printers, videotape recorders, scanners, and other
devices — up to 63 in a chain — to a single jack on the Mac? What if you
could connect and unplug them freely, without even having to shut down
the computer? What if the cables were smaller, cheaper, and longer than
SCSI cables? What if transfer speeds approached 50 megs per second? And —
while we’re dreaming — how about eliminating the hassles of termination and
ID switches forever?
That’s FireWire: a new, six-pin, multimedia-oriented system of connecting
Mac peripherals. Otherwise known in the industry as spec P1394, FireWire
is far less expensive and easier to work with than any flavor of SCSI. Apple
developed this new standard with Texas Instruments. It’s available today as
a PCI card option, and may well be built into upcoming Macintosh models.
The digital video revolution
FireWire’s first significant presence is primarily in digital video products.
Products such as Radius MotoDV and ProMax’s FireMax are FireWire PCI
card/software kits that let you transfer movies from a digital camcorder (not
the usual 8mm or VHS) to your Mac. You can edit this video on the Mac as
you would QuickTime (see Chapter 23) and then send it back out to the
digital camcorder. The resulting video shows none of the picture degradation
generally associated with making copies of copies — because the data is
digital all the way. (If you’re going shopping for a digital camcorder, make
sure it comes with a FireWire jack built in.)
Chapter 33: The SCSI Chain, IDE, and FireWire 1143
■ ■
Macworld MAC SECRETS • 4040-8/5 • ch.33.F • Chapter 33 • FINAL • VB • 11/03/98 • p.1143

FireWire isn’t just for Macs; it can also send data to Windows machines
(Microsoft Windows 98 has FireWire drivers) or directly to other FireWire
gadgets — camcorder to camcorder, for example. Video and film-making
buffs are ecstatic.
Beyond video
Of course, utopia won’t truly arrive until FireWire moves beyond movie-
making and begins to show up in standard add-on gear: CD-ROM drives, Zip
and Jaz drives, hard drives, scanners, printers, and so on. Frankly, we can’t
wait; we don’t care if we never see a SCSI terminator again.
1144 Part V: Attachments
■ ■
Macworld MAC SECRETS • 4040-8/5 • ch.33.F • Chapter 33 • FINAL • VB • 11/03/98 • p.1144

MACWORLD MAC SECRETS • 4040-8/5 • ch34.F • Chapter 34 • FINAL • VB • 11/03/98 • p.1145
Chapter 34
NuBus, PCI, and Other Slots
In This Chapter
©What NuBus is
©What PDS means
©What PCI does
©How to install a card
©The future of slots
What if you had a Windows PC instead of a Mac? If you wanted to install
a new video card or modem board, you couldn’t just open the PC’s
case and insert the card. No, you might have to fiddle around with a bunch
of little jumper plugs and DIP switches, and then you’d have to configure the
software to tell your computer that something had been installed.
With your Macintosh, you just insert the board in the slot, reboot your
Mac, and you’re in business. Although you sometimes may have to install
a control panel to make some settings to the board, a NuBus or PCI device
is self-configuring. But that easy setup process belies the sophisticated
technology behind it.
NuBus Cards
The expansion slot standard used on Macs until late 1995 was called NuBus
(pronounced new bus, which, at the time, it was). The technology was
originally developed in the 1970s at the laboratories of MIT and was per-
fected by Texas Instruments for use in workstation computers. Apple’s
version of NuBus wasn’t released until March 1987, when the Macintosh II
was produced. The Mac II (and its successors, the IIx and IIfx) contained six
expansion slots; no model since has had as many.
The big idea
The theory behind NuBus is simple: It’s a bus (an electronic pathway) that
lets you expand your Macintosh. Without having to buy a new computer, you
can add features as you need them.

By far, the most common NuBus component is a video card (see Chapter 11
for more on monitors) — a circuit board into which you can plug your
monitor. Today’s Mac models have built-in video memory, but Macs of the
’80s and early ’90s required a video board to provide 24-bit color or graphics
acceleration.
Some other reasons you might buy a NuBus card:
■To hook your Macintosh to an Ethernet or Token Ring network
■To speed up SCSI transfers (see Chapter 33 for details on SCSI-2 and -3)
■To capture video images, either still frames or movies, for processing on
your Macintosh (using a video capture board)
■To replace some of the functions of your Mac’s main logic board in the
pursuit of accelerating your Mac (using an accelerator board)
■To put a PC inside your Mac so that you can run DOS and Windows
programs without buying a whole new computer (see Chapter 16)
PDS Cards
Certain Mac models — such as the LC series — have a Processor-Direct Slot
(PDS) instead of a NuBus slot. The PDS is another way of expanding your
Mac’s capabilities. A card installed in this slot hooks directly to your Mac’s
main logic board; the PDS board becomes, in effect, a part of that logic board.
(A NuBus board, on the other hand, can be a computer unto itself.) A PDS
card is ideal for less ambitious hardware add-ons, such as cache boards and
accelerators.
Unlike the NuBus board, which can work in most any Mac with slots, the PDS
board has to be designed to support a specific model or range of models.
(There are, however, adapters that let you plug NuBus cards into some PDS
slots.)
The PCI Revolution
NuBus is out. Beginning with the late-1995 Power Mac models, Apple
introduced a new expansion-card technology to the Mac. It’s called the
Peripheral Component Interconnect (PCI) Local Bus. Over 150 other
companies have also endorsed this new technology. All of today’s desktop
Macs — and even PowerBooks — feature PCI circuitry instead of NuBus.
In some ways, PCI and NuBus are very similar: Visually, for example, there’s
not much difference. Where a NuBus card has a plastic connecting plug at the
bottom, the PCI board’s “pins” are etched into the bottom edge of the board
itself. Installation is simply a matter of sliding the board securely into its slot.
Likewise, PCI cards perform much the same jobs as NuBus cards — adding
1146 Part V: Attachments
■ ■
MACWORLD MAC SECRETS • 4040-8/5 • ch34.F • Chapter 34 • FINAL • VB • 11/03/98 • p.1146

high-speed networking, accelerated video display, video digitizing, high-
speed SCSI data transfer, or DOS/Windows capability to your Mac.
In other ways, however, PCI and NuBus are worlds apart.
Why PCI?
There were three reasons behind Apple’s decision to adopt the PCI standard.
First, speed: A PCI card today runs at 33 MHz (compare with NuBus: 10 MHz)
and can transfer data to your Power Mac about twice as fast. This speed is
extremely valuable to people who depend on networks, work with digital
audio, or make digital movies.
But if speed were the only issue, Apple could have done better, adopting one
of many slot designs floating around in today’s technology circles — things
called FutureBus, S-Bus, or the VESA Local Bus. A second reason was cost.
In theory, at least, PCI cards are cheaper than NuBus cards, largely because
they’re so popular already in the competitive PC clone market.
The final reason for Apple’s switch to PCI was political: Apple needed to
reach a compromise with IBM in the design of the new hybrid “PowerPC
Platform” (CHRP) computers (see the end of Chapter 13). To create such
machines, Apple and IBM had to choose components that would work with
any operating system — and NuBus wasn’t among them. Of course, the CHRP
initiative ultimately fell through — but PCI is one pleasant lingering
aftereffect.
PCI futures
Despite the PCI technology’s superiority, NuBus didn’t disappear overnight.
NuBus boards will still be manufactured for several years to satisfy the needs
of millions of Mac users who haven’t migrated to PCI-equipped Macs. Even
with a PCI-only Macintosh, your previous investment in NuBus cards isn’t
worthless; for $600 or less, Second Wave (512/329-9283) will sell you an
Xpanse PN, a PCI card with a 30-inch cable to an external box that holds
two NuBus cards. (They also sell four- or even eight-NuBus-card models,
all connected to a single PCI slot.)
How to Install a Card
If you follow instructions, you don’t endanger your warranty by installing a
card yourself. Although directions may differ from model to model, here are
the basics:
First, turn off the Mac and all connected equipment. Leave the power cord
plugged in, however, to act as a ground. You’re usually told to let the Mac sit
for a few minutes to give the storage capacitors in the power supply a chance
Chapter 34: NuBus, PCI, and Other Slots 1147
■ ■
MACWORLD MAC SECRETS • 4040-8/5 • ch34.F • Chapter 34 • FINAL • VB • 11/03/98 • p.1147

to drain current. That’s just to prevent you or the card from getting “zapped”
with some stray electrons. (We’ve never known any Mac or owner to be
zapped from not having waited long enough after shutting down the
machine, however.)
Then open your Mac. Depending on which model you have, you may need a
screwdriver to remove one or more screws to get the Mac’s case off. Place
them in a safe place (such as an ashtray) so that you can find them later.
Truth be told, we know plenty of people with desktop-style machines who
change their expansion board lineup so often they never bother to reinstall
the screws.
This, by the way, is the moment when you’re happy you bought one of
Apple’s 1997-or-later tower models — the ones that fold open like a book,
instantly making all interior components accessible without further
dismantling.
Losing charge
Before you touch anything inside your Mac, touch the power supply case
(the large silver metal cube inside the Mac where the power cord attaches
from the outside) to discharge static electricity from your body. If your work
area has a carpeted floor, or you’re living in a dry climate, you might get a
tiny, harmless shock. Your hair won’t stand on end (if you still have hair and
it’s not already standing up).
Some kinds of PCI or NuBus cards have external connectors that are designed
to protrude out the back of the Mac (a jack for your monitor or a camcorder,
for example). In that case, remove the plastic or metal cover plate at the rear
of your Mac. It pushes out from inside. We recommend that you pop it out
with the end of a pencil, however, having had our knuckles ripped too many
times by those sharp little prongs. Save the plate, in case you intend to
remove the board later on. (We learned this lesson the hard way, when the
day came that we wanted to sell a Quadra 800 and couldn’t find the missing
back-panel slot plate. The buyer put up a fuss.)
The board meeting
Remove the card from its antistatic bag, holding the board by its edges or
by the metal faceplate, if it has one, at one end of the card. Take the card to
your open computer. Look at the bottom of the Mac to spot the actual thin
rectangular slot connector. Then align the card so that the matching con-
nector on one long edge of it mates with the slot on the Mac floor. The
components on the board (all the little transistors and things sticking out
of one side of the board) usually face the power supply.
1148 Part V: Attachments
■ ■
MACWORLD MAC SECRETS • 4040-8/5 • ch34.F • Chapter 34 • FINAL • VB • 11/03/98 • p.1148

Gently press the card until it’s seated on its connector. Wiggle it back and forth
slightly, to see that it’s connected firmly. If you can’t get the board to fit inside
the connector slot, first check whether you’re dealing with a NuBus, PCI, or
PDS board (the connectors are all slightly different). Don’t force it; you don’t
want a big repair bill if you bend or break the connector. If you can’t seat the
board in its place, call the manufacturer or dealer or your favorite Mac guru for
assistance. Most PCI slots must now be screwed into the brace attached to the
back-panel opening.
After the board is installed, close the Mac’s cover. Before replacing and
tightening the screws, hook up your accessories and start up the Mac, just
to be sure everything is working. (It’s perfectly okay to start up your Mac
without its cover on.)
Removing the card
Removing a card works almost exactly like installing one: you open the Mac’s
cover, wait a few moments (if you believe in that), and touch the power supply.
If it’s a PCI card, unscrew the screw that fastens it to the Mac’s slot frame.
Then grasp the card at two points: the metal clip at the rear of the Mac and
the other bare corner of the card. (If it’s not a card designed to protrude out
the back of the Mac, there may not be a metal clip. Grab that back upper
corner instead.) Tug upward, using the metal clip as your main handle. We
usually find it easier to pull a card out diagonally, with the back end (with
the clip) coming up first.
Chapter 34: NuBus, PCI, and Other Slots 1149
■ ■
MACWORLD MAC SECRETS • 4040-8/5 • ch34.F • Chapter 34 • FINAL • VB • 11/03/98 • p.1149
ANSWER MAN
Q: Can I use PCI cards sold for Windows
computers in my Power Mac?
A: In general, yes. There are conditions,
however. First, the PCI card must, of course,
come with a software extension — a driver —
that tells your Mac how to communicate with it.
Second, cards that need to load at startup, like
video cards and hard drive controller cards, must
be “Open Firmware”-compliant. (Open Firmware-
compatible cards automatically work in any
Open Firmware-compatible computer, such as
the Mac.)
If the card doesn’t need to be loaded when the
Mac turns on — a network card, for example —
it doesn’t have to be Open Firmware-compliant.
Using a PC PCI in a Mac

1150 Part V: Attachments
■ ■
MACWORLD MAC SECRETS • 4040-8/5 • ch34.F • Chapter 34 • FINAL • VB • 11/03/98 • p.1150
ANSWER MAN
Q: Yeah — what IS a DAV slot? My 8500 has
one.
A: Though one of your cheerful authors would
like to reply that DAV was named in honor of
him, it actually stands for digital audio/video.
This connector is found in certain “AV”-equipped
Macs: the 5400, 5500, 6400, 6500, 7500, 7600,
8500, 8600, and G3 tower, for example.
The DAV connector accommodates certain
video compression/decompression cards,
notably MPEG boards sold by Apple and by
Wired Inc. (Visit Wired’s Web site,
www.wired.com, for an amazingly complete
discussion of MPEG and DAV slots.) For now, all
you need to know is that MPEG boards play full-
screen, extremely high-quality movies on your
screen from a CD-ROM.
What’s a DAV slot?

Macworld MAC SECRETS • 4040-8/5 • ch35.F • Chapter 35 • FINAL • VB • 11/04/98 • p.1151
Chapter 35
The Networking Chapter
In This Chapter
©Networking basics and terminology
©LocalTalk, PhoneNet, Ethernet, Token Ring
©How to connect a Mac to a PostScript printer
©How to hook two Macs together
©File servers, print servers, fax servers, net modems, and e-mail
©PowerTalk and Open Transport
©Apple Remote Access
©Troubleshooting a network
The Wiring Setup
Feel free to lord this fact over your Windows-loving pals: Every Mac model
ever made comes with built-in networking circuitry and built-in networking
software. For free. And because the cable is the same one you use to hook up
a printer, you can connect Macs together without buying a single additional
component.
And why would you want to? So that you can transfer files from one Mac to
another without needing disks. So that you can send e-mail from one part of
your building to another. So that the four of you in your small-business office
can share the same laser printer. And so that everybody can tap into the
same FileMaker Pro database, calendar program, or fax modem.
In this chapter, you’ll learn about the two different ways to wire Macs
together using Ethernet (expensive but fast) or using LocalTalk (dirt cheap
but slower). We’ll also let you in on some dramatic shortcuts you can take if
you’re interested in transferring stuff between two of your own Macs — a
PowerBook to a desktop Mac, for example — without having to go through a
long song-and-dance of passwords and software setup.
Mac Basics

Wiring setup 1: LocalTalk
If you’re on a budget, don’t need to network every day, or don’t plan to
transfer large files, you’ll probably be happy with the Mac’s original, built-in
networking system. It’s called LocalTalk.
The actual cables you need for this arrangement depend on how many Macs
you’re connecting.
Use a printer cable for two Macs
If you’re connecting only two things, such as a Mac to a PowerBook, you can
use your printer cable — just a standard StyleWriter (serial) cable. Plug one
end into each Mac’s printer port.
1152 Part V: Attachments
■ ■
Macworld MAC SECRETS • 4040-8/5 • ch35.F • Chapter 35 • FINAL • VB • 11/04/98 • p.1152
MACINTOSH SECRET
In this chapter, we’ll bend over backward to
avoid the geeky lingo that infests most
networking chapters. But unfortunately, the
moment you leave the safety of this book, you’ll
be bombarded. Here’s a primer in the italicized
networking terms you’re most likely to hear.
Like any other great development in technology,
networks were invented, in part, out of
economy. Because Apple originally charged
$6,000 for one laser printer, people eagerly
sought methods of sharing a single printer
among multiple Macs. Therefore, today’s
networkable printers and modems are known
generically as shared devices.
Then there are file servers. A file server is a
hardware and software setup — usually another
Macintosh — that lets you share files with other
people on the network. A file server’s icon
shows up on your Mac’s screen as another disk
that you can open and whose files you can
access. Using Apple’s AppleShare technology,
this same file server’s icon can also show up on
other people’s Macs. Everyone can be working
with the file server’s files at once.
Today, there are other kinds of servers, from
database servers (such as FileMaker) to
address-book servers (such as Now Contact), all
designed to let multiple Mac users access a
common bunch of folders and files.
When a Mac prints out something on a laser
printer down the hall, it sends the printing
information over the network cables in the form
of electronic messages. These messages are
sometimes called packets.
Because networks are like streets and
highways, complete with intersections and two-
way movement, the activity on a network is
called traffic. Packets can be said to represent
individual vehicles as they hug the yellow line of
the network cable. If the packet is a city bus,
then the passengers on that bus are the data
contained within the packet: instructions to a
printer, an e-mail for a coworker, and so on.
After you connect several Macs, shared
devices, and servers, you have yourself a LAN: a
local-area network.
Terminology made simple

For a PowerBook owner who returns home and wants to transfer files to a
desktop Mac, simply swiping the cord from the printer (temporarily) is a
convenient and quick way to create an instant two-Mac network.
Use PhoneNet connectors for multiple Macs
If you’re connecting more than two machines, you’ll have to get additional
cables. For each piece of equipment, Mac or laser printer, you need a little
$15 PhoneNet connector. (PhoneNet is actually one particular brand. If you
call a computer store, or Mac Warehouse, or some other place and order “a
PhoneNet-type connector,” they’ll know what you mean.)
Then you string the PhoneNet connectors together using ordinary telephone
wire. As shown in Figure 35-1, each of the two sockets on a PhoneNet
connector can accommodate the little clip at the end of a piece of phone
wire. When you hook things together, hook everything into a continuous
chain (it can’t form a loop anywhere). As far as hooking up the network is
concerned, Macs and laser printers are treated exactly alike.
You must also insert a terminating resistor into the empty socket of the
PhoneNet connector at each end of the equipment chain. The terminator plug
just looks like a little end-of-phone-wire clip that’s been broken off, as shown
in Figure 35-1. Without it, you may get errors when sending files or messages,
and some network devices may not function at all. The terminating resistors
at each end of the wire absorb any stray electrical signals; otherwise, these
signals may bounce back down the wire, confusing your Macintosh and other
devices with phantom signals.
And where do you get the terminator plugs? Whenever you buy a PhoneNet
connector, a terminator is included in the plastic package.
The total length of the phone wires is about 3,000 feet, and the total number
of Macs involved can’t exceed 30. Beyond those limits, you need Ethernet
wiring instead (described in the next section).
Once you’re wired, read “Setting up the software,” later in this chapter, for
the next step.
Chapter 35: The Networking Chapter 1153
■ ■
Macworld MAC SECRETS • 4040-8/5 • ch35.F • Chapter 35 • FINAL • VB • 11/04/98 • p.1153
ANSWER MAN
Q: Look, as long as I’m getting all this
terminology at once, how about defining the
difference between LocalTalk and AppleTalk? I’m
totally confused.
A: After SneakerNet — running to a coworker’s
Mac, bearing a floppy disk in hand — the most
common method of Macintosh networking is
Apple’s LocalTalk.
LocalTalk and AppleTalk aren’t, of course, the
same thing. LocalTalk is the wiring; AppleTalk is
the kind of message that travels over it.
AppleTalk could be likened to the spoken word,
and LocalTalk to the telephone and wires that
carry the spoken word.
Who’s doing all the talking?
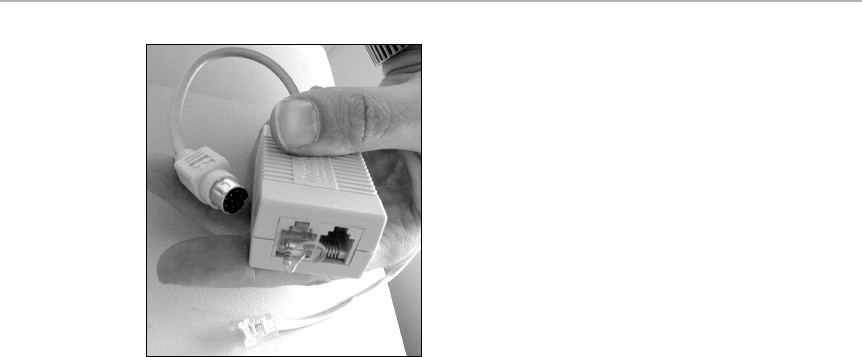
Figure 35-1: A PhoneNet network connector, complete with terminating resistor.
Wiring Setup 2: Ethernet
A LocalTalk network works well for a handful of Macs. But the larger the
network gets, the slower it gets. In other words, copying a file from one Mac
to another slows traffic to a crawl, especially if someone else on the network
is also copying files. In time-critical businesses, this kind of delay can be
disruptive and annoying.
Fortunately, for companies that are network-dependent, there’s a much
faster, alternate kind of wiring system: Ethernet, which is rapidly taking over
the world of Mac networks.
Ethernet and speed
Messages travel at about 230,000 bits per second on a LocalTalk network.
They travel at up to 10 million bps on an Ethernet setup. (For some
perspective, this page contains about 20,000 bits.)
According to our figures, then, Ethernet network speed is 43 times faster than
LocalTalk. In practice, however, the true throughput bogs down, depending
on the level of network traffic, the type of data being exchanged, and so on. In
real life, Ethernet runs about three times faster than a LocalTalk connection,
with a total capacity of 3 to 5 times that of LocalTalk networks.
Setting up an Ethernet network: the hubs
In general, Ethernet is slightly harder to set up than LocalTalk — for two
reasons. First, if you intend to include more than two Macs or printers in your
network, you must connect each directly to a central gadget called a hub. (The
result forms a star pattern; an octopus diagram. Contrast with LocalTalk, where
each Mac is hooked up to the previous one, in a daisy chain.)
1154 Part V: Attachments
■ ■
Macworld MAC SECRETS • 4040-8/5 • ch35.F • Chapter 35 • FINAL • VB • 11/04/98 • p.1154
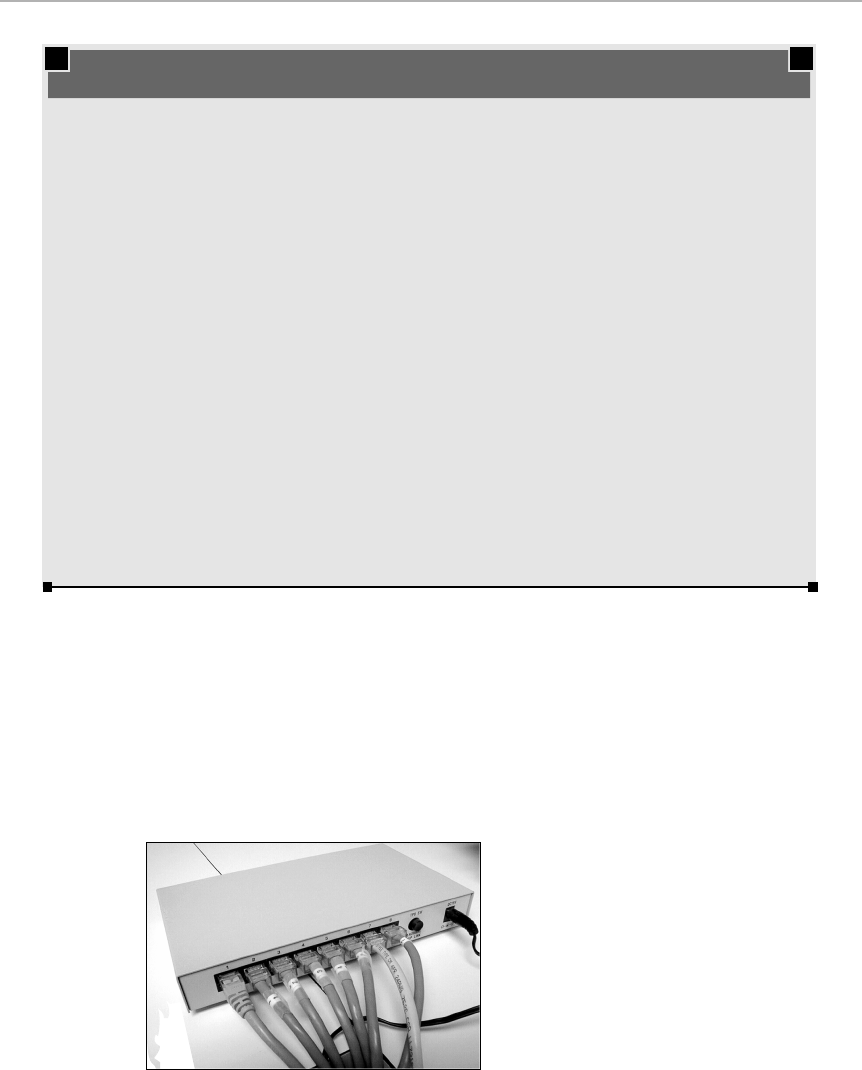
This hub looks like, well, a hub: a small box with jacks for five, ten, or more
Ethernet cables (see Figure 35-2). (An Ethernet cable, known as 10BaseT or
even 100BaseT, looks like a slightly overweight telephone cable, with fatter
versions of phone-cable clips on each end. These jacks and clips are called
RJ45 connectors by the telephone installers, who you may want to involve in
wiring your office for Ethernet.) A hub costs from $75 to $500, depending on
its features and number of jacks, and comes from a mail-order outfit or a
computer store.
Figure 35-2: An Ethernet hub accommodates five or more Macs and printers; in professional
installations, this gadget is generally hidden in a wiring closet somewhere, along with the
office’s phone switch box.
Chapter 35: The Networking Chapter 1155
■ ■
Macworld MAC SECRETS • 4040-8/5 • ch35.F • Chapter 35 • FINAL • VB • 11/04/98 • p.1155
ANSWER MAN
Q: In the last edition of this book, you promised
you’d tell us how to set up a LocalTalk network
using the telephone wires already in the walls of
our houses — and yet you never did! What’s the
story?
A: Well, let’s just mumble something about
early senility, and leave it at that. Meanwhile,
here’s how you do it, thanks to free book winner
Henry Miller-Jones.
The purpose of this stunt is, yes, to let you
network Macs in different rooms of your house
without having to rip open the walls. The trick
works on a little-known fact: each phone cable
buried in the walls of your house is composed of
four tiny wires: yellow, black, red, and green.
But only two of them are needed for your actual
phone line. If you have two lines, you’re out of
luck — all four of these wires are in use. But if
you have only one phone line, read on.
Separate the wires that lead to your phone jack.
The red and green wires are used by your actual
phone line. Connect the yellow and black wires
(the unused ones) to a two-line splitter (or a
separate phone-jack plate) from Radio Shack.
Now run a piece of telephone wire from each
Mac’s PhoneNet connector to this newly
created wall jack, and you should be in
business!
Technically, you can pull off this stunt if you
have any odd number of phone lines, but figuring
out which of the many wires is the unused pair
is more difficult. For example, you must ensure
that the unused pair of wires completes a loop
within the house, and isn’t connected to an
outside line.
The network already in your walls

Hubs are likable gadgets for three reasons:
■Hubs aren’t platform-specific — there’s no Mac/Windows distinction.
■When your network gets big, you can plug one hub directly into another,
as though your octopus patterns are sharing arms.
■If you have multiple hubs, and one of them goes bad (or some loose
connection develops), the rest of the network remains intact.
Setting up an Ethernet network: the Mac jacks
The other part of what makes Ethernet slightly more complicated than
LocalTalk is the fact that, unlike LocalTalk, not every Mac has the appropriate
jack. (After all, every Mac has a printer port!) Various Mac models have come
in any of three different Ethernet-ready states:
■No Ethernet at all. Older Macs, such as the Mac II series, didn’t come
with any Ethernet circuitry. You must buy an Ethernet NuBus card, insert
it into the NuBus slot, and hope for the best.
Recent PowerBooks don’t have Ethernet jacks either, but are Ethernet-
ready. You need only to buy an Ethernet PC card, such as the Global
Village 56K Combo PC card.
■AAUI jack. Most Quadras and first-generation Power Macs offered this
kind of jack: it’s shaped like a monitor jack, rectangular with sloping right
and left sides, but it’s smaller, about 3/4inches wide. Into this jack you
plug a $30 adapter that offers jacks of its own — 10baseT jacks (the ones
that look like fat telephone jacks).
■10baseT jacks. These jacks, the very same telephone-wall-jack-style
jacks described above in our discussion of Ethernet hubs, are the most
convenient of all. They come on most of today’s Mac models, and they
mean that you don’t have to buy transceivers, as you do for Macs with
AAUI jacks. You simply plug an Ethernet cable directly into the Mac.
Once your Ethernet setup is complete — you’ve bought your hubs, adapters
(if necessary), and Ethernet cable and set up your star patterns — the
software setup is exactly the same as that described in the remainder of this
chapter.
Wiring Setup 3: Token Ring
Token Ring is a rarely used alternative to Ethernet. A Token Ring network can
be more effective than Ethernet at keeping network traffic humming under
heavy load conditions. But it’s also more expensive than Ethernet, more
difficult to expand in networks with large numbers of nodes, and requires a
great deal more planning and thought while designing. As a result, Ethernet is
still the preferred high-speed choice of most Macintosh networks.
1156 Part V: Attachments
■ ■
Macworld MAC SECRETS • 4040-8/5 • ch35.F • Chapter 35 • FINAL • VB • 11/04/98 • p.1156

File Sharing Basics
Once you’ve got your wiring set up (with Ethernet or LocalTalk), you must
now turn your attention to the software on the Macs involved. The Mac’s
networking software is amazingly sophisticated. You could spend days
setting up passwords, different degrees of access to different folders on each
Mac, and so on — and many professionals do.
There are lots of uses for a network: e-mail, sharing a database or calendar,
and so on. One of the most popular features, however, is file sharing, which
simply makes certain files on your Mac available to people using other Macs.
What’s especially great about file sharing is that, for once in your Macintosh
life, you don’t have to spend any extra money or add any extra gear to get it.
This feature is built right into every Mac.
Apple calls this feature Personal File Sharing. It lets up to 30 people share files
on each others’ Macs; no dedicated Mac is required, as it was under previous
file-sharing schemes. (Apple still sells a separate product called AppleShare,
however. It turns a dedicated Mac into a centralized file server that can share
files among thousands of Mac, Apple II, and DOS computers.)
In the next section, we’ll first show you how to hook one Mac to one other
Mac — a frequent operation for small offices or PowerBook owners. Later in
this chapter, we’ll show you how to go full bore, setting up a complete office
network.
The Software Setup: File sharing for one
The discussion later in this chapter emphasizes the levels of security you
can set up for each disk or folder that you want to share. But if you’re the
only person who uses your Mac, all that rigmarole is overkill. If you have two
Macs — one PowerBook and one desktop Mac, let’s say — then you’re
probably more interested in some fast-and-easy system of transferring files
between them.
Chapter 35: The Networking Chapter 1157
■ ■
Macworld MAC SECRETS • 4040-8/5 • ch35.F • Chapter 35 • FINAL • VB • 11/04/98 • p.1157
MACINTOSH SECRET
In Chapter 30’s “PostScript printer secrets,” you
can read our money-saving trick for connecting
a single Mac to a single printer without having
to buy PhoneNet connectors: just use a simple
StyleWriter cable. But you can use a variation of
the same trick for a two-device Ethernet
hookup. Here, though, you save even more
money, because you don’t have to buy an
Ethernet hub.
The principle is the same: if you’re connecting
only two Macs, or one Mac and one Ethernet-
ready printer, you don’t have to buy a hub. You
can connect them with a special cable called a
twisted Ethernet, or crossover, cable. (You can
get such a cable from a mail-order joint such as
the Global Computer Supplies, 310-635-8144,
for under $10.) One wire — no hub, no
transceivers — instant Ethernet connection!
Connecting two Macs with Ethernet on the cheap

For your benefit, here’s a greatly shortened version of the usual file-sharing
saga. We’ll assume that you’re interested in maximum convenience and
minimum security, so the steps are vastly streamlined.
For clarity, we’ll pretend that you’re seated at your Power Mac and want to
bring the PowerBook’s icon onto the screen. You could just as easily reverse
the procedure, of course, and access the desktop Mac from the PowerBook.
Another note: You only have to go through all of the following steps one time!
Thereafter, you’ll be able to connect the Macs with a quick double-click.
Setting up the PowerBook
Follow these steps on the PowerBook:
1. Open the PowerBook’s Chooser (from the menu). Make sure AppleTalk
is Active.
2. Open the AppleTalk control panel. (On older Macs, it’s called Network.)
Choose the kind of network you’re using — Ethernet or LocalTalk. On
a PowerBook, the “Modem/Printer” option means LocalTalk. Close
and save.
3. Open the File Sharing control panel. (On older Macs, it’s called Sharing
Setup.) In the dialog box, enter your name and a name for the Macintosh.
Hint: If you’re the only one who uses this Mac, use a short, easy-to-type
1158 Part V: Attachments
■ ■
Macworld MAC SECRETS • 4040-8/5 • ch35.F • Chapter 35 • FINAL • VB • 11/04/98 • p.1158
ANSWER MAN
Q. My Mac’s printer port is connected by
LocalTalk to a LaserWriter, but my office has an
Ethernet network. When I select Ethernet in the
AppleTalk control panel, my Mac doesn’t see the
LaserWriter. Can I access Ethernet and LocalTalk
simultaneously?
A. Yes. Solution A: Buy a $250 gadget called a
Dayna Mini EtherPrint. It basically turns your
laser printer into an Ethernet gadget, so that
everyone in the office can use it.
Solution B: This solution is free, but only one
Mac can then use the laser printer. What you
need is Apple’s free LaserWriter Bridge 2.0
software; its sole purpose is to give an
Ethernetted Mac a secondary connection to
LocalTalk. Once it’s installed, use the AppleTalk
(or, on older Macs, Network) control panel to
choose Ethernet as your main network protocol,
then open the LaserWriter Bridge control panel
to set up a secondary LocalTalk connection.
If LaserWriter Bridge didn’t come on your System
CD-ROM, you can get it as part of Network
Software Installer software from Apple’s Web
page (www.support.apple.com/wwwdocs/
apple_sw_updates.html).
As noted above, though, only your Mac will be
able to access that laser printer — not any other
Macs on the network. That is, not unless you
also buy Apple’s $100 LocalTalk Bridge
software, which can connect LocalTalk and
Ethernet networks.
Ethernet and LocalTalk simultaneously

name for yourself, such as your initials or “me.” (You don’t need a
password for this security-free scenario.)
4. Click the upper Start button. Close and save.
Setting up the desktop Mac
Your PowerBook is ready for action. Now connect it to your desktop Mac, as
outlined at the beginning of this chapter. After the Macs are physically
connected, here’s how you bring the PowerBook’s icon onto the Power Mac’s
screen. (Follow these steps on the desktop Mac.)
1. Open the AppleTalk (or Network) control panel; make sure the correct
wiring type is selected (Ethernet or LocalTalk). Close and save.
2. Open the File Sharing control panel. (On older Macs, it’s called Sharing
Setup.) Enter the same name or initials as you did in step 3 of “Setting up
the PowerBook.” Close the window.
3. Open the Chooser. Make sure AppleTalk is on. Click AppleShare.
4. On the right, you see the name of your PowerBook (see Figure 35-3).
Double-click its name. A window like the middle one in Figure 35-3
appears. Click OK in this dialog box and the next.
5. The PowerBook’s icon should now appear at the right side of your Power
Mac’s screen. You can open the PowerBook’s window and use its
contents as usual.
To save time the next time, make an alias of the PowerBook drive icon (which
is now on your desktop Mac’s screen). The next time you want to hook up,
you won’t have to bother with any of the steps we just outlined. Instead, just
double-click the alias you just made. The PowerBook’s actual icon pops onto
your screen.
Mac Basics
Chapter 35: The Networking Chapter 1159
■ ■
Macworld MAC SECRETS • 4040-8/5 • ch35.F • Chapter 35 • FINAL • VB • 11/04/98 • p.1159
MACINTOSH SECRET
Obviously, we’re not the only ones who think
that the usual File Sharing mechanism is way
too complex for just transferring files between
Macs. In its latest PowerBook (and iMac)
models, Apple has reduced this procedure to a
graceful art — you just aim the PowerBooks’
infrared (IR) lights at each other, run the
included IR File Exchange, and fire away; your
files are neatly placed into a folder on the other
PowerBook in folders called, for example, “From
Steve Jobs.” No wires, no control panels. Nice.
And if you’re trying to zap your files from a
PowerBook to a desktop Mac, you can buy a
Farallon AirDock for $70, which you plug into
your desktop Mac, thus equipping it with its
own infrared transceiver. Unfortunately, the
AirDock connects to your modem port — and
the last thing most people need is another
appliance fighting for the modem jack. Until
Apple starts putting an infrared transceiver on
desktop Macs, too, wireless network nirvana is
attainable only by PowerBook and iMac owners.
More streamlined yet

Figure 35-3: Logging on to your PowerBook starts at the Chooser (top left); you’re then
asked to select which machine you want (middle), and finally which hard drive you want
(lower right).
File synchronization
Now that you have two Macs, you have a new problem: how to keep track of
duplicate sets of files. Suppose you’re writing a book. You work on Chapter 3
on your PowerBook during a trip; when you return home, you’ll have to
remember that the Chapter 3 on your PowerBook is more recent than the one
on your desktop machine. Multiply that situation by the hundreds of files you
may have, and you can get an idea of the problem.
We can think of several schemes for keeping track of which files are most
recent, but they all involve extreme discipline (keeping the files you modify in
a single PowerBook folder, for example). It may be simpler to use a file-sync
program, whose job it is to bring the files on both computers up to date with
each other. Apple’s own file-sync software, File Assistant, should do the trick;
it comes with System 7.5 and later.
If you have Mac OS 8.5, you can use the File Synchronization control panel
instead (see Chapter 4).
OS
8.5
1160 Part V: Attachments
■ ■
Macworld MAC SECRETS • 4040-8/5 • ch35.F • Chapter 35 • FINAL • VB • 11/04/98 • p.1160

The Software Setup: File Sharing for
an Office
Now you’ve seen how easy it is to connect just two Macs. Setting up a more
secure, more flexible system involves more steps — but thanks to Apple’s
software design, every step is logical.
Step 1: Set up the AppleTalk Control Panel
The Macintosh can use several different network types: LocalTalk, Ethernet,
infrared beaming, and so on. But only one can be active at a time. To switch
from one to the other, you go to a control panel (see Figure 35-4). Which
control panel you have for this purpose depends on whether or not you’ve
installed Open Transport, described at the end of this chapter.
Open the AppleTalk control panel (if you have Open Transport) or the
Network control panel (if you don’t). Specify the kind of network you have:
Ethernet or LocalTalk. (If you plan to use LocalTalk, choose the Printer Port
menu item, as shown in Figure 35-4.) Close and save.
Figure 35-4: In the AppleTalk control panel, specify the kind of wiring you plan to use. (If you
don’t have Open Transport, use the very similar Network control panel instead.)
Step 2: Set up the File Sharing control panel
Next, open the File Sharing control panel. (On older Macs, you have a Sharing
Setup control panel instead.) Type in your name. Also type in the name of
your Macintosh as you want it to appear in the Chooser windows of other
Macs trying to gain access to your drives. (See Figure 35-5.)
Chapter 35: The Networking Chapter 1161
■ ■
Macworld MAC SECRETS • 4040-8/5 • ch35.F • Chapter 35 • FINAL • VB • 11/04/98 • p.1161
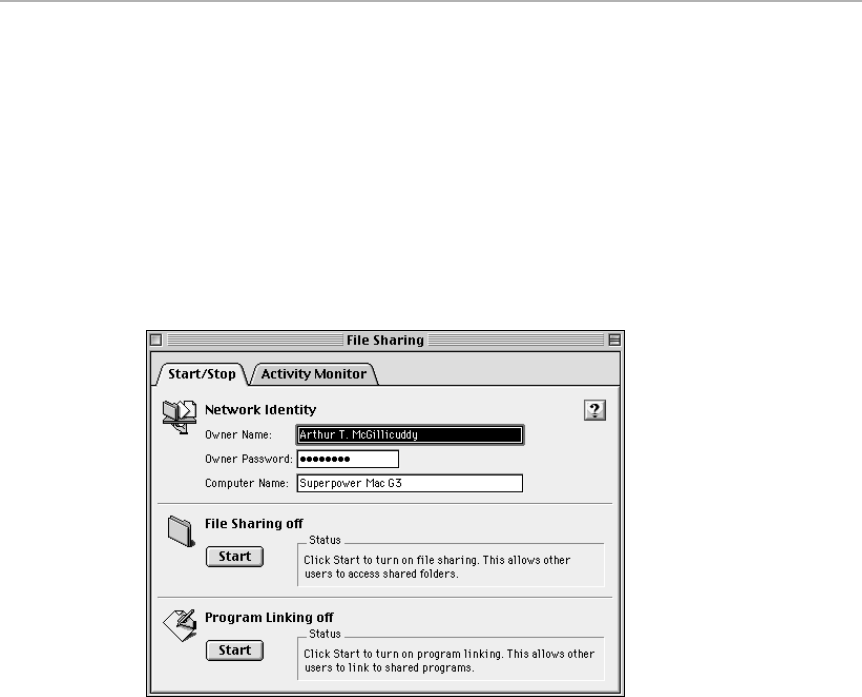
You can leave the password field blank, but the control panel will scold you.
If you do turn on file sharing without having entered a password, anyone on
your network who knows your name (as you entered it in the Owner Name
blank) has access to all of your files. (Of course, if it’s just you in your little
office, by all means leave the password blank — you’ll save a lot of time over
the coming weeks.)
Finally, click Start. The Mac begins making itself ready for file-server mode.
This process can take a few minutes, depending on the number and size of
the disks you’re sharing. (This feature uses up memory, too. The more files
and disks you share, the more memory it uses. It’s a good idea for PowerBook
users to turn off file sharing, therefore, when on the road.)
Figure 35-5: The File Sharing control panel (on older Macs, Sharing Setup) offers you the
chance to enter your network identity, set a password for yourself, and turn file sharing and
program linking on or off. This illustration shows both features in their off state.
When file sharing has started completely, the button in the File Sharing box
changes to say Stop. As you may have already surmised, clicking Stop turns
off file sharing, thereby making your Macintosh invisible to other network
users.
Close and save the control panel.
Step 3: Set up Users & Groups
If you’re the only person who will be using your little network — for example,
connecting a PowerBook to another Mac — skip this step.
1162 Part V: Attachments
■ ■
Macworld MAC SECRETS • 4040-8/5 • ch35.F • Chapter 35 • FINAL • VB • 11/04/98 • p.1162

Otherwise, having switched on file sharing, you present a virtual doorway to
everybody else on the network — but you have yet to provide them a key to
that door. That’s where the Users & Groups control panel comes in.
This control panel provides a switch to grant or deny access to your
computer’s shared functions for each of the people on your network. Those
functions are file sharing, program linking, and (if you installed it) remote
access.
The Users & Groups control panel actually doesn’t look much like a control
panel when you open it. It looks like a window, as shown in Figure 35-6 (but
you see your own name on the top icon).
The Mac creates a Guest and an Owner icon automatically after you turn on
file sharing. However, only you create User icons. You’re supposed to create
one for each person who may want to connect to your Mac.
Strange
But True
Chapter 35: The Networking Chapter 1163
■ ■
Macworld MAC SECRETS • 4040-8/5 • ch35.F • Chapter 35 • FINAL • VB • 11/04/98 • p.1163
ANSWER MAN
Q: OK, I’m in the AppleTalk control panel like you
said. I see that Ethernet is a choice there. But
what are all those other things?
A: The choices in the AppleTalk or Network
control panel represent drivers. A driver is the
software used to translate the communications
between the Mac and an external device. Of the
many available network drivers, the following
are the most common:
■Printer Port. This driver is installed in
every Macintosh — it’s the LocalTalk driver.
It lets you use the Mac’s printer port as
your network connection. On a PowerBook,
it probably says Modem/Printer Port, since
a modern PowerBook has only a single jack
for both purposes.
■Ethernet. This driver appears only if your
Mac has an Ethernet jack, as described at
the beginning of this chapter. (This choice
may say EtherTalk instead.)
■TokenTalk. Use this driver if your Mac has
a Token Ring card installed. (Probably not.)
■Infrared Port (IRTalk). Got a PowerBook?
This choice tells it to use the built-in
infrared transmitter as its networking port.
See Chapter 14 for details on using infrared
beaming.
■Remote Only. This driver gets installed
when you install the program called Apple
Remote Access, which comes on today’s
system-software CDs. For details, see the
Apple Remote Access section of this
chapter.
Actually, we should have called the Remote
Only icon a non-driver. When you click it,
the software actually disconnects the
LocalTalk connection at the computer’s
printer port, freeing that port for non-
networking functions such as using a
modem (yes, on the printer port).
What are all those network choices?
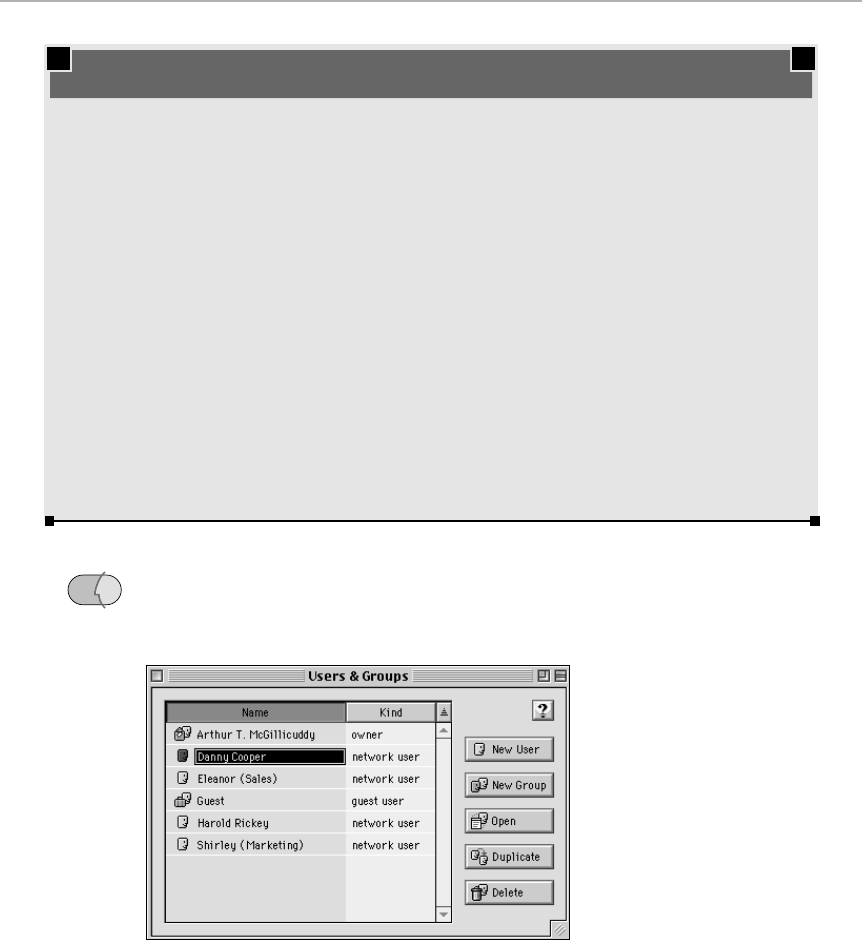
To do so, choose New User from the File menu (or, in Mac OS 8 and later, click
the New User button). When you double-click a User icon, it opens into a
configuration window (see Figure 35-7).
Figure 35-6: The Users & Groups program. Note the word “owner” next to the first name; it
identifies that user as this Mac’s owner. You can’t change the owner’s name in the Users &
Groups control panel; you can only do that in the File Sharing control panel. You can change
other users’ names, however, exactly as you’d change any icon’s name.
OS
8
1164 Part V: Attachments
■ ■
Macworld MAC SECRETS • 4040-8/5 • ch35.F • Chapter 35 • FINAL • VB • 11/04/98 • p.1164
ANSWER MAN
Q: I think I’ve caught a mistake in your book. You
just said that if I don’t give myself a password,
then anyone on the network can get at all of my
disks. But I happen to know that no disk gets
shared until I click on it and choose Sharing from
the File menu.
A: You do have to turn on sharing for each folder
or disk independently — to let other people in.
But when file sharing is turned on, the system
software automatically makes all mounted
drives available to the owner. That usually
means you.
Isn’t that a nice gesture? If you try to access
your own Mac from elsewhere on the network,
you can open all the folders and disks on your
own Mac, even if you didn’t turn on sharing for
any of them!
Therefore, as we said, leaving your password
blank essentially lets anyone else on the
network impersonate you just by typing your
name. They are free to root through, read,
change, and trash anything on your hard drive
(or drives).
If your sole purpose in networking is to connect
your own PowerBook to your own Mac, this
feature can actually be a time-saver. But if you
really don’t know everyone on your network, it’s
not such a fun thought.
Why anyone can be you
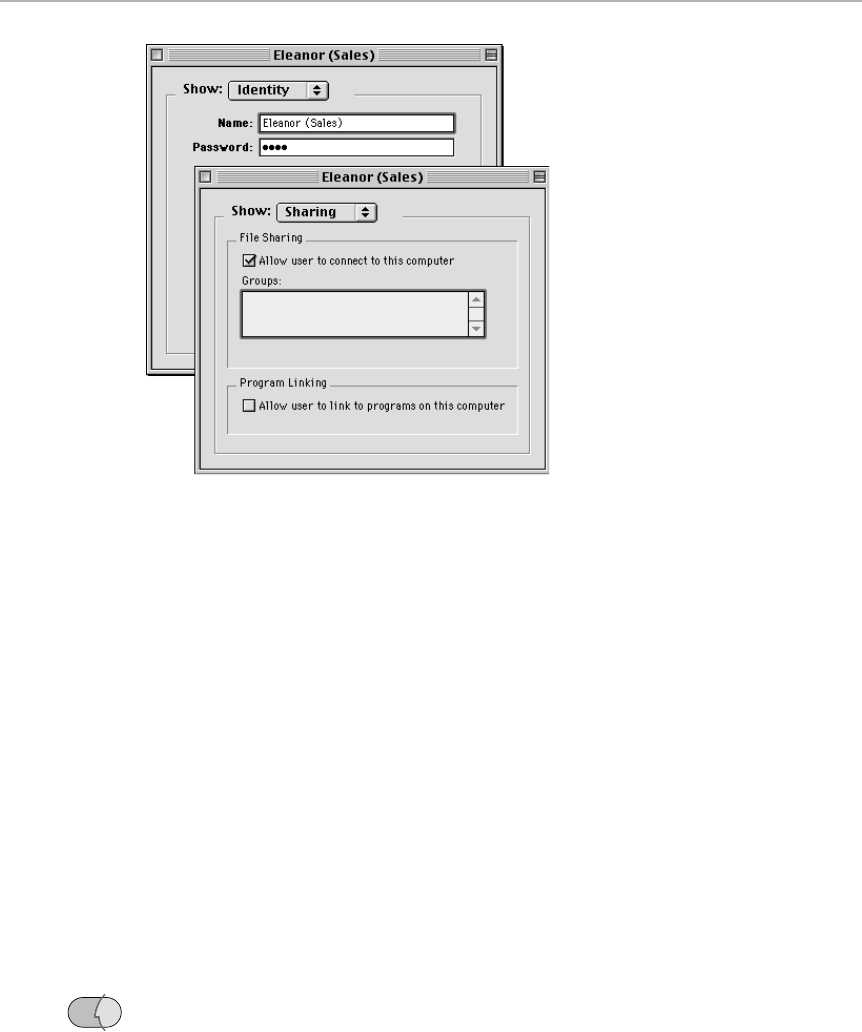
Figure 35-7: The settings panels for one of the Users & Groups icons. Upper left: the Identity
panel, where you give each of your coworkers a password. Lower right: The Sharing panel,
where you specify how much access each person has to your Macintosh.
Here are the options you can set for each coworker who might want to log
onto your Mac:
■Allow guests to connect. This check box determines whether or not
someone can see the files in your shared disks or folders at all.
If you turn off this option for the Guest icon, then when somebody on the
network tries to log on to your Mac, the Guest button is dimmed in the
Chooser (see Figure 35-3).
■Program Linking. This option controls other people’s access to the
linkable programs on your hard drives. There aren’t any such programs,
as we’ll explain later in this chapter. Ignore this.
■Remote Access. You only see this option if you installed Apple’s dial-in
network software, Apple Remote Access. We’ll discuss this software later
in the chapter.
The Owner icon
In Mac OS 8 and later, your name appears at the top of the list, and it’s
labeled Owner. (Before Mac OS 8, it has a unique icon, distinguished by a
bold outline.) When you double-click your own icon, the resulting window
has some extra settings not available to other user types. Here’s an overview
of the on/off switches that govern your own access to your Mac from
elsewhere on the network:
OS
8
Chapter 35: The Networking Chapter 1165
■ ■
Macworld MAC SECRETS • 4040-8/5 • ch35.F • Chapter 35 • FINAL • VB • 11/04/98 • p.1165

■Enable user to connect. We don’t know why you’d want to keep yourself
from getting to the contents of your own machine, but you can turn this
feature on and off here. This option affects only file sharing (the
capability to mount your hard disk icons onto the desktop of another
Macintosh on the network).
■Enable user to change password. Of course, you can change your
password any time you’re seated at your own Mac; just use the File
Sharing (or Sharing Setup) control panel. This option, however, lets you
change your password remotely, from the Chooser of another Mac on the
network.
■Enable user to see entire disk. As we mentioned a moment ago, this
option is only available to you, the Mac’s Owner.
For anybody else on the network, even when file sharing is turned on,
your Mac’s disks are completely inaccessible and invisible unless you
select each disk and turn on Sharing (from the File menu).
Under normal circumstances, however, you are allowed to get at your
disks from any Mac on the network even if you don’t turn on sharing for
any of them. As you see by the wording here — “Allow user to see entire
disk” — you’re also allowed to see everything on your disk, even if you’ve
only specifically shared a folder or two on it.
If you turn off this check box, however, you’ll be treated just like any
other user out there on the network. You’ll be unable to see any of your
disks (from another Mac on the network) unless you first turn on sharing
for each one.
■Program Linking and Remote Access. As we mentioned, Program Linking
is useless. We’ll get to Remote Access later in this chapter.
You don’t have to enter a password, but it’s a good security precaution.
Unlike almost everything else on the Mac, the password is case sensitive. The
passwords Fish, FISH, and fish are considered three different passwords.
The Guest icon
The Guest icon is the biggest security hole in the system. If you set up the
Guest icon to permit access to your Mac, then anyone on the network can get
access to your shared disks without having to know any legitimate user’s
name or password. Use with discretion unless (a) you’re the only person who
uses your network, or (b) you trust your friends.
Groups
Whenever more than one user needs access to a particular folder on your
system, you can save time by creating a group. The group contains the names
of all the users who belong to it — one for each project team or department,
for example. Each user can be a member of more than one group. The great
advantage of a group is that, in a single step, you can adjust the access levels
for everybody who’s part of it.
After you create icons for all the individual users, you create a group like this:
1166 Part V: Attachments
■ ■
Macworld MAC SECRETS • 4040-8/5 • ch35.F • Chapter 35 • FINAL • VB • 11/04/98 • p.1166
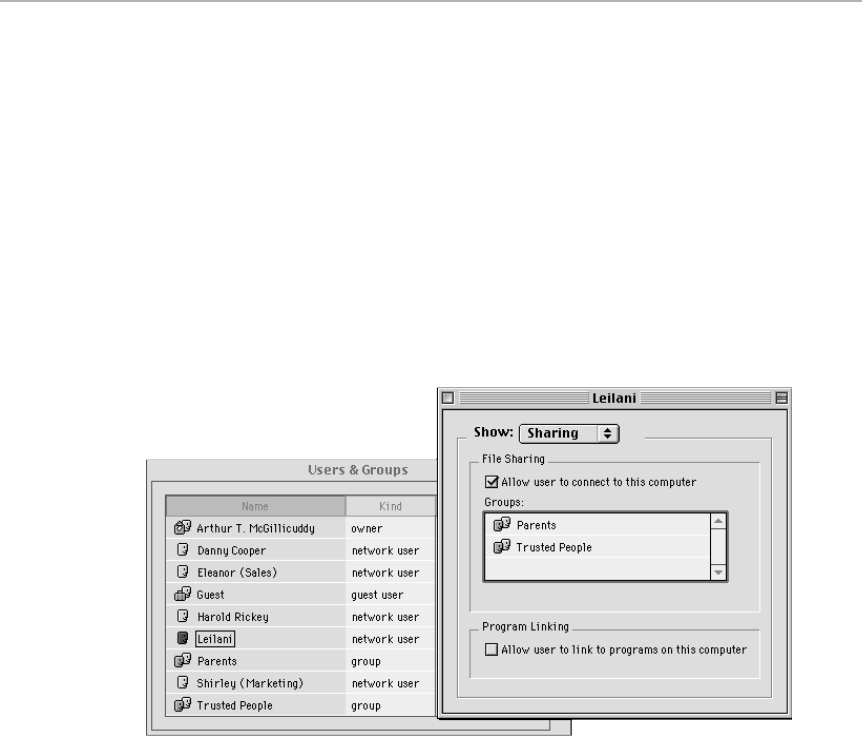
1. Open the Users & Groups control panel.
2. Choose New Group from the File menu (or, in Mac OS 8, click New
Group). A new double-headed icon appears, called New Group. Simply
start typing to rename the group.
3. To make a user part of this new group, drag the user’s icon onto the
group icon. It’s almost like dropping a file into a folder, except that the
user’s icon both stays in the window and goes into the group.
To see what groups a user belongs to, double-click the User icon; in Mac OS 8
or later, then choose Sharing from the pop-up menu (see Figure 35-8).
To see which users belong to a group, double-click the group’s icon. To
remove a user from a group, drag the user’s icon out of the Group window
and into the Trash.
Figure 35-8: The user window on the right shows the groups to which Leilani belongs,
Parents and Trusted People. Opening the Parents group icon shows Leilani as a member, as
you would suspect.
Step 4: Sharing Specific Folders
Even after all of this setting up, no one but you, the Macintosh Owner, can
access the files on your Mac! You have yet to designate which files and disks
you want to make available to others. (You can’t share individual files with
others on the network, only folders and disks.)
For each disk or folder you want to share, you must perform the following
steps:
1. Highlight the folder or disk icon you want to share with the network.
2. Choose File ➪Sharing. (If you haven’t already turned on File Sharing in
the File Sharing control panel, you’ll be asked to do so now.)
Chapter 35: The Networking Chapter 1167
■ ■
Macworld MAC SECRETS • 4040-8/5 • ch35.F • Chapter 35 • FINAL • VB • 11/04/98 • p.1167
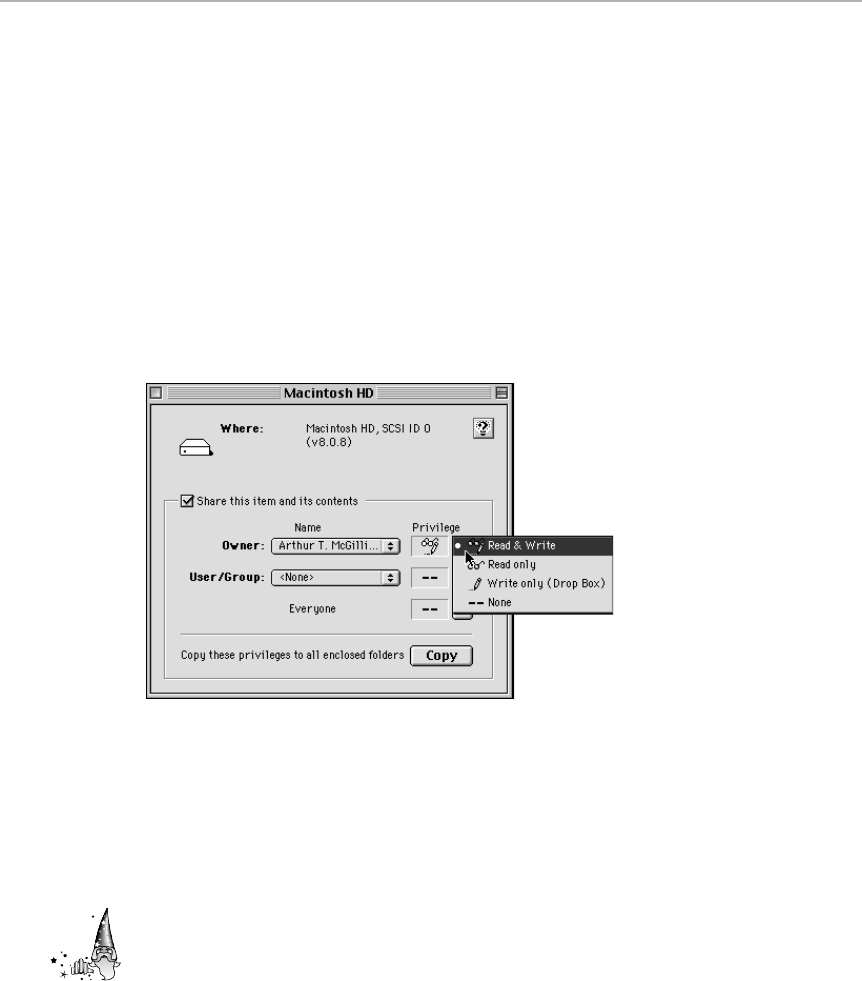
3. In the dialog box that appears, specify how much access you want to
provide to this file or folder. (See the next section.) Close the window.
Click Save.
The Sharing window
Just deciding to share a folder isn’t the end of your decision making. You can
also specify what degree of access you want to grant. For example, you can
say that it’s OK for people to look at the contents of a folder, but not to
change anything. Or, they can look and change things, but they can’t throw
anything away. (We’ll be honest: This stuff may be tough reading. It’s easier
to grasp when you actually do it.)
The Sharing window appears when you highlight a disk or folder, and then
choose Sharing from the File menu. (See Figure 35-9.)
Figure 35-9: The hard drive’s Sharing window.
The privileges — Read & Write, Read Only, and Write Only (Drop Box) — are
the pop-up menu options at the right side of the dialog box, as shown in
Figure 35-9. (Before Mac OS 8, these options are checkboxes called See
Folders, See Files, and Make Changes.) The clients are listed in the pop-up
menus. They have the names Owner, User/Group, and Everyone.
Already things get confusing. Ready for this? The Owner in this window has
absolutely no relationship with the Owner of the Mac!
Here’s the explanation. Even if it’s your shared Mac, other people can create
new folders on your hard drive. The person who creates a new folder on your
Mac is, of course, the Owner of that folder. Other than you, he or she is the
only one who can change the access privileges for that folder. He or she can
also transfer ownership to somebody else, using this same Sharing window.
The Owner in this Sharing window, therefore, refers to the Owner of the
individual folder or disk, not to the Owner of the Mac. (Nonetheless, if the
Strange
But True
1168 Part V: Attachments
■ ■
Macworld MAC SECRETS • 4040-8/5 • ch35.F • Chapter 35 • FINAL • VB • 11/04/98 • p.1168

folder is on your Mac, then you still have full access to it, too.) Odd though it
may seem, you can actually let somebody else on the network be the Owner
of a disk attached to your Mac, too.
Why would you want other people to have their own folders on your hard
drive? Well, suppose you’re the editor of a newspaper. You may want each of
the newspaper’s departments — Editorial, Advertising, and so on — to be able
to maintain its own folder on your central Mac.
Different degrees of access
After you open the Sharing window for a certain folder or disk, you can
control how much access each network member has. You have options for
each folder or disk. In this explanation, let’s suppose that you choose a
network member named Dad from the User/Group pop-up menu. You
therefore specify how much access Dad has to a selected folder when he
accesses your Mac from his.
■Read & Write. If this option is selected, Dad has full access to the folder.
He can open and save changes to the files in it. (Called Make Changes
before Mac OS 8.)
■Read Only. If this box is checked, Dad can see the file icons within
this folder — but can’t do anything to them. For example, he can open
documents, copy stuff from them, and even edit the documents — but if
he tries to save any changes, all kinds of bizarre error messages result.
They range from “Out of memory” to “This document is read-only.”
(Called See Files before Mac OS 8.)
■Write only (drop box). If this option is checked, Dad can see your folder.
(It shows up with the belted icon shown in Figure 35-10.) But he can’t
open it. He can drop other icons into it, however. This arrangement is
ideal when, for example, several department heads are supposed to turn
in reports to you (but you don’t want them to read each others’ reports).
(Called See Folders before Mac OS 8.)
Note, by the way, that you can’t make a drop-box icon the only shared
folder on a disk. Your networked coworkers can’t even see a drop-box
icon unless it’s inside a folder that has more access privileges. Therefore,
put your drop-box folder inside a hard drive or folder for which “Read
Only” or “Read & Write” has been selected.
As shown in Figure 35-10, others on the network know, with a glance at a
folder’s icon, how you’ve set it up. In fact, even the opened windows for
shared folders and disks have telltale visual cues to indicate their security
status. If you have full Read & Write access to a window, the upper-left corner
looks normal. If you have Read Only access, however (where you’re not
allowed to save changes to anything inside), you see the slashed pencil
icon shown in Figure 35-10.
And what about the drop-box option? What icon do you see in the upper-left
corner of those windows?
Chapter 35: The Networking Chapter 1169
■ ■
Macworld MAC SECRETS • 4040-8/5 • ch35.F • Chapter 35 • FINAL • VB • 11/04/98 • p.1169

Trick question. If the drop box (Write Only) option is on, you create a
completely locked folder. The user can’t even open the folder icon, and,
therefore, no window for it can ever appear!
Figure 35-10: A tale of icons. Top row: a normal Mac OS 8 folder; a folder that’s being
shared; a folder that’s being shared and being accessed at the moment; and what somebody
else’s hard drive looks like when it’s brought onto your screen. Bottom row: a folder that’s
inside a shared folder (the black tab lets you know that although you haven’t explicitly turned
on sharing for this folder, it’s inside one for which you did turn on sharing); a drop-box folder;
and the window-corner icon that tells you: No Changes Allowed!
Open for business
If you’ve followed this discussion, your Macintosh is now a full-fledged file
server — even if there aren’t actually any other Macs connected to it. (We’ll
cover how you connect to this Mac in a moment.)
A few additional thoughts about sharing the folders and disks of your Mac:
First of all, you can use the Sharing command to set up different degrees of
access for a maximum of ten folders and disks. Of course, that’s really not
much of a limitation, because any one folder or disk can contain hundreds of
other folders that all switch on simultaneously.
Sharing Command Secrets
■
Who’s Everyone?
When you set up your sharing levels for a certain folder or disk, you can set
privileges for Everyone. Keep in mind that Everyone refers to guests
and
all
other users you set up in your Users & Groups control panel. People often think
Everyone means only guests and may inadvertently grant access.
Give the Everyone category the
least
access of any.
Turn RAM into speed
As you can read in Chapter 9, the ultimate means of speeding up access to files
is to copy them onto a
RAM disk.
Nowhere is this speedup more noticeable than
in file sharing. Both you (the user of the shared Mac) and your coworkers (who
log onto your Mac to share the files) will notice a dramatic acceleration of
1170 Part V: Attachments
■ ■
Macworld MAC SECRETS • 4040-8/5 • ch35.F • Chapter 35 • FINAL • VB • 11/04/98 • p.1170
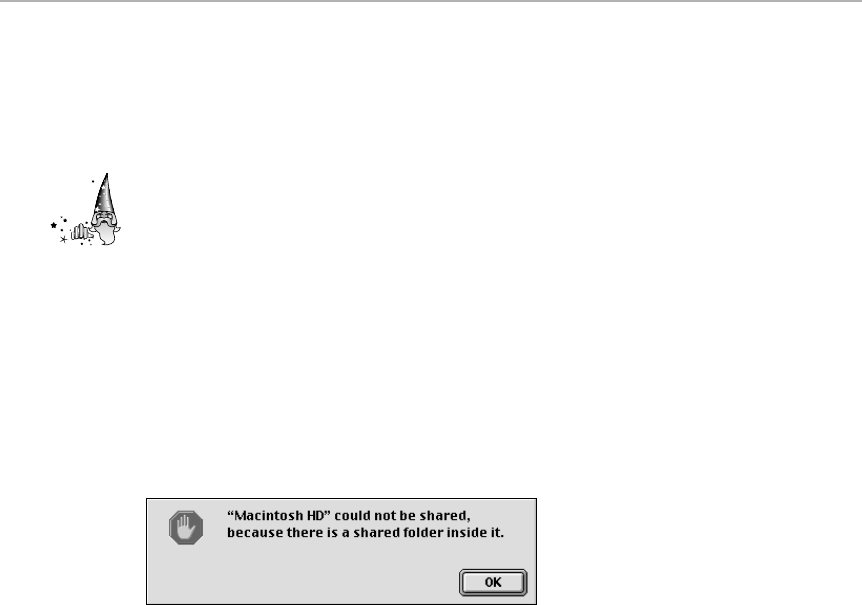
opening, copying, and saving any files you’ve put onto a shared RAM disk.
(See Chapters 9 and 21 for instructions on creating the RAM disk.)
A dangerous option
The check box in the Sharing window called “Make all currently enclosed folders
like this one” can be a tad dangerous if you’re not thinking. It immediately
nukes the access-level settings for any folders
inside
the folder for which you
select this box.
More than one Mac user has spent hours setting up explicit access privileges
for some folders — and then wiped out all that work with one click! Use this
option only if you mean to. It has no Undo button!
How to find out which inner folder is shared
If you try to turn on File Sharing for a disk or a folder, you may sometimes get
the message shown in Figure 35-11.
Figure 35-11: The frustrating message. Somewhere, some folder is being shared. But
which one?
This message indicates that, at some point, you turned on sharing for some
folder somewhere within your disk. This can be a royal pain if you don’t
remember
which
folder — perhaps buried deeply somewhere in your hard drive —
is being shared.
Fortunately, there’s a quick way to hunt down the offending item. Open the File
Sharing control panel and click the Monitor tab. (On pre-Mac OS 8 systems,
open the File Sharing Monitor control panel instead.) The list at left shows all
your shared folders. Note the name, close the window, and find that folder. Turn
off sharing for it. At last you can turn on sharing for the enclosing disk or folder.
Monitoring and ejecting network denizens
After you open your Mac for business, others on the network can begin to tromp
through your files (to the extent you’ve let them, of course). It may reassure you
to know that the Mac gives you an easy way to keep track of who’s doing what
on your disk.
The key to these features is the File Sharing control panel’s Monitor tab (or,
before Mac OS 8, the File Sharing Monitor control panel). See Figure 35-12.
Strange
But True
Chapter 35: The Networking Chapter 1171
■ ■
Macworld MAC SECRETS • 4040-8/5 • ch35.F • Chapter 35 • FINAL • VB • 11/04/98 • p.1171
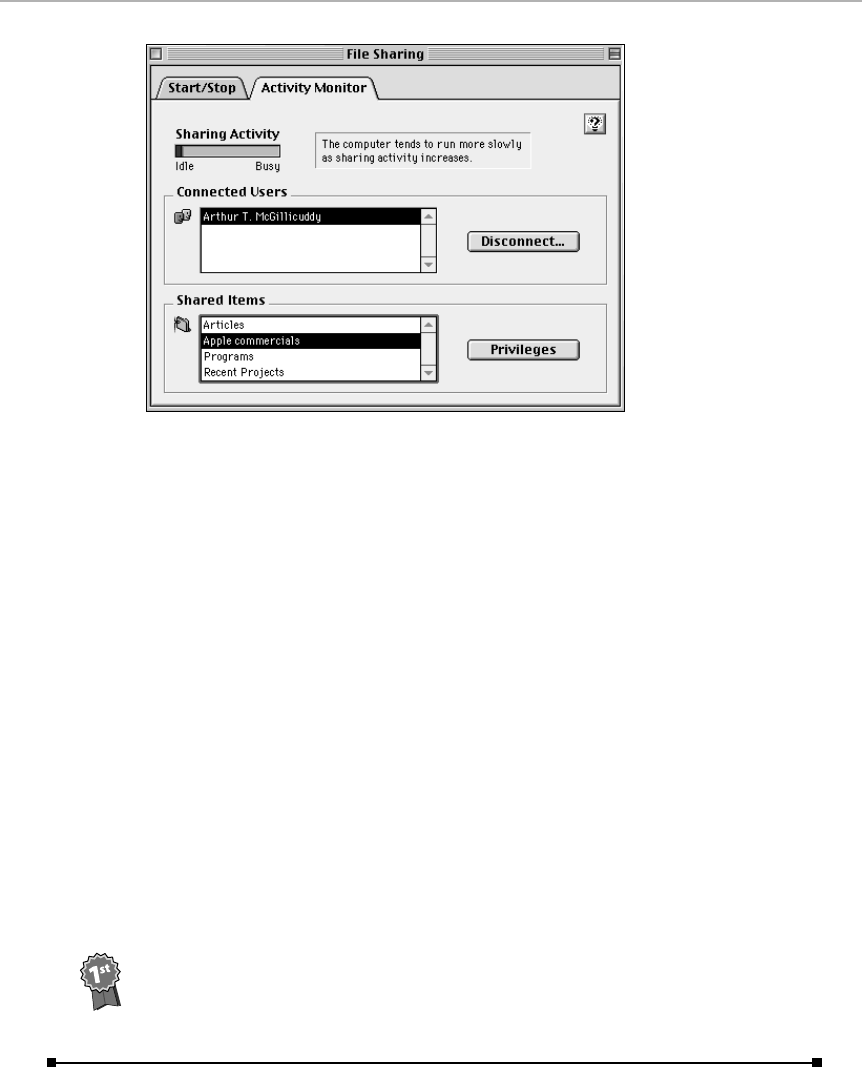
Figure 35-12: The File Sharing control panel’s monitoring tab lets you keep track of what
people are doing on your Mac.
At the top, you see a list of all the network Mac users who are connected to your
Mac. In the list at the bottom, you see each folder or disk you are sharing.
(Don’t forget that all the items
inside
each folder or disk are also shared.)
If you decide to boot somebody out of your system, click that person’s name (or
Shift-click to select several) in the top list, and then click Disconnect. You’re
asked how much warning you want to give these people that they are to be
disconnected — type 0 if you want them off
now
— and click OK.
This unceremonious network dump is only a temporary solution, however. After
you disconnect someone, he or she can merrily log right back on to your Mac. (If
you really want to keep somebody out, change the appropriate Users & Groups
icon settings.)
Your FREE network chat software!
The File Sharing control panel described in the previous secret harbors an even
more secret secret that lets you send America Online-like “instant messages” to
anyone else on the network!
As free book winner Paul Schreiber discovered, all you have to do is open the
File Sharing control panel and Option-click the name of anyone who’s listed
there (that is, anyone who’s connected to your Mac). Up pops a never-before-
seen window in which you can type a message to that person!
Contest
Winner
1172 Part V: Attachments
■ ■
Macworld MAC SECRETS • 4040-8/5 • ch35.F • Chapter 35 • FINAL • VB • 11/04/98 • p.1172

Step 5: Logging on to Other Macs
So far, we’ve exclusively discussed how to set up your Mac for other people to
access. But you can only play host for so long; sooner or later, you’ll want to
be the visitor, working with files on other Macs on the network while seated
at your own.
The table of contents for your network is, of all things, the Chooser (or, in
Mac OS 8.5, the much nicer Network Browser described in Chapter 3).Most
people think of the Chooser as a mechanism for selecting a printer. In fact, it’s
called the Chooser (and not, say, Printer Choice) because you also use it to
select other kinds of external devices attached to the Mac: network modems,
fax/modems, and electronic mail servers, for example — and, in this case, a
file server.
Here are the steps for logging on to another Mac on the network:
1. Open the Chooser. Click the AppleShare icon. The names of other
network Macs show up in the right side of the window, provided their
owners are sharing them (see Figure 35-3). (If no Mac names show up
here, see the Troubleshooting section at the end of the chapter.)
2. Double-click the name of the Mac whose contents you want to see. The
name-and-password window appears, as shown way back in Figure 35-3.
If the owner of the Mac permits access for guests, then the Guest button
is available. Otherwise, Guest is dimmed, and you must type in your
official name and password — as it’s been previously established on the
other Mac. If in doubt, chat with its owner, open up its Users & Groups
control panel, and see that you’re represented there by an icon whose
name and password are what you want.
The password is case sensitive; enter it here exactly as it originally was
set up. If (in the Users & Groups control panel on the other Mac) your
User icon was set up so that you’re allowed to change your password,
you also at this point can click the Set Password button to change your
password.
3. Click OK. Yet another window appears (at right in Figure 35-3), showing
all the shared folders or disks on the Mac you selected.
4. Click the name of the folder or disk that you want to open. Shift-click to
select more than one, or type the first letters of its name to scroll directly
to it.
If you plan to log onto this folder or disk every day, you can save yourself
all the trouble of these first five steps if you click the check box to the
right of a volume’s name. The Mac automatically brings that folder or
disk’s icon onto your Mac’s desktop the next time you restart your Mac
(if the other Mac is turned on).
5. Click OK.
Chapter 35: The Networking Chapter 1173
■ ■
Macworld MAC SECRETS • 4040-8/5 • ch35.F • Chapter 35 • FINAL • VB • 11/04/98 • p.1173
At last, you’ve broken through. The icons for the folders or disks you’ve
selected now appear on your Desktop exactly as though they were disks
attached to the Mac. A network-accessed volume always looks like the one in
the upper right of Figure 35-10, regardless of whether it’s a disk or a folder,
and no matter what its actual icon looks like (on its home-base Mac).
If something didn’t work right, march over to the owner of the Mac you’re
trying to work with. Check the Sharing menu item for the folder or disk in
question. Consult the Users & Groups control panel. Make sure you have
the correct privileges for the folder or disk you’re trying to work with.
File-sharing Secrets
■
Log-on shortcuts
When you visit the Chooser to log on to another Mac, you can use a few clever
shortcuts to reduce the whole affair to a few keystrokes.
For example, instead of clicking the AppleShare icon in the Chooser, you can
just type the letter A to select the icon. Now press Tab to activate the File
Server window — the list of Macs on the network. (Actually, if you’re in a big
corporation, pressing Tab now activates the
Zones
pane, which appears at the
lower left of the Chooser window. Zones are like sub-networks; type the first
couple of letters to select the one you want, and then press Tab again to
highlight the list of individual Macs.)
Type the first letter (or letters) of the name of the file server you want. Press
Return to open the next dialog box, in which you type your password or log on
as a Guest.
If you want to log on as a Guest, just press Ô-G. If the Guest radio button is
selected and you want to log on as a Registered user, press Ô-R to activate
the Registered User option. Then type your password and press Return.
Password secrets
Mac file-sharing passwords can be a maximum of eight characters long.
Capitalization counts.
If security matters to you, don’t use a password that anyone can guess (like
your name or spouse’s name). A good trick is to substitute the number 1 for the
letter L (or I) and the number 0 for letter O in an ordinary word — B1NG0 instead
of BINGO, for example. This trick foils hackers who have programs that try every
word in the dictionary until they break your password.
1174 Part V: Attachments
■ ■
Macworld MAC SECRETS • 4040-8/5 • ch35.F • Chapter 35 • FINAL • VB • 11/04/98 • p.1174

When No One’s Home: Remote Access
Apple Remote Access (ARA) is a program from Apple that lets a modem-
equipped Macintosh connect to an AppleTalk network over the phone. Using
the Mac’s file-sharing feature, you can copy or read files on the home-base
Macs. You can even print things — from your PowerBook in Tulsa, you can
print on the LaserWriters in Toledo.
The Mac doing the dialing has every bit as much access to the network as
any Mac that’s actually in the office. You can check e-mail or retrieve data
from a database. All you need is a fast modem on each end of the line.
ARA comes free with every Mac — well, half of it does; you generally get the
part that does the dialing, called ARA Client. You still have to purchase the
ARA server software, the part that can receive calls. In any case, you might,
for example, install the ARA Client on your PowerBook and the host portion
on your host Mac.
Remote Access Secrets
■
Disconnect the local network
When you’re using ARA on a networked Mac to dial in to a distant network, you
wind up connected to two networks at once — the one where you are, and the
one you’re dialing into. From your view in the Chooser, your Mac is connected to
both networks at once.
You can, if you want, disconnect from the local network and see only the remote
network. You may need to do this, for example, if you run into a
network number
conflict
(when a device on the remote network has the same number as one on
the local network). More commonly, you may want to disconnect from the local
network so that you can use your printer port for a
printer
(like a StyleWriter)
instead of being hooked up to the local network.
To disconnect from the local network, open the AppleTalk control panel
(called Network on older Macs). Choose Remote Only. Now, in effect, you’ve
got AppleTalk turned
on
for your dial-up modem connection, but
off
for your
actual printer port.
Switch on your Mac automatically
Unless you relish high electric bills, you probably don’t want to leave your home
Mac on, awaiting calls from your PowerBook, during your entire six-week trip to
the Alaskan tundra. Fortunately, it’s easy to turn on the home Mac from
wherever you are and shut it off when you’re finished remote accessing — if
you’re willing to spend $50.
Chapter 35: The Networking Chapter 1175
■ ■
Macworld MAC SECRETS • 4040-8/5 • ch35.F • Chapter 35 • FINAL • VB • 11/04/98 • p.1175

The device is called a PowerKey Remote (from Sophisticated Circuits,
800-827-4669), a one-inch, inconspicuous gadget that goes between your
Mac and the modem. When a call comes in, it turns on your Mac, and you’re in
business. It comes with a software control panel that automatically shuts down
the Mac a few minutes after you hang up.
If you have a Mac model that can’t be turned on with the keyboard power button,
you also need the regular $119 PowerKey (a surge-protected multi-outlet box
that lets you turn on the Mac from the keyboard). Actually, even owners of Macs
that can be turned on with the keyboard should consider the PowerKey; it lets
you power up not just the Mac but any attached hard drives, Zip drives,
CD-ROMs, and other peripherals with the same phone call.
Expanding the Net
In the really big companies, people want to connect more than 10 or 20 Macs;
they want to join several LANs together — or to break one increasingly
unwieldy network into several smaller ones. This is where bridges and routers
come in. These gadgets connect two or more LANs together. The resulting
jumbo-network is sometimes called an intranet.
After they’re connected by these devices, the networks are said to be in
zones. (If they’re present in your company, you’ll see a list of zones at the
lower-left of your Chooser when you click the AppleShare icon.) Network
traffic generated by somebody on one floor isn’t passed through the router to
any other floor unless it’s supposed to (for example, if you send e-mail to
somebody on a different floor). And even then, only the floor with the
destination device experiences network traffic; the other floors’ routers and
bridges ignore the signal.
Routers are smart little devices. First, they can join networks of different
types: an Ethernet system on one floor, LocalTalk on another, and so on.
Second, routers send data along the best-available wiring routes, based on
traffic levels, availability, and the general status of wide-area connections.
When connected by a router, separate networks remain independent, but you
can still easily access any device anywhere on any of the networks (see
Figure 35-13).
Like routers, bridges connect networks — but only networks of the same type
(LocalTalk to LocalTalk, Ethernet to Ethernet, and so on). A bridge’s primary
job is to monitor the network traffic on either side and pass only data
intended for the other side. The benefit of a bridge is that network traffic isn’t
passed on to the opposite side of the bridge unless its destination device
actually resides there.
1176 Part V: Attachments
■ ■
Macworld MAC SECRETS • 4040-8/5 • ch35.F • Chapter 35 • FINAL • VB • 11/04/98 • p.1176
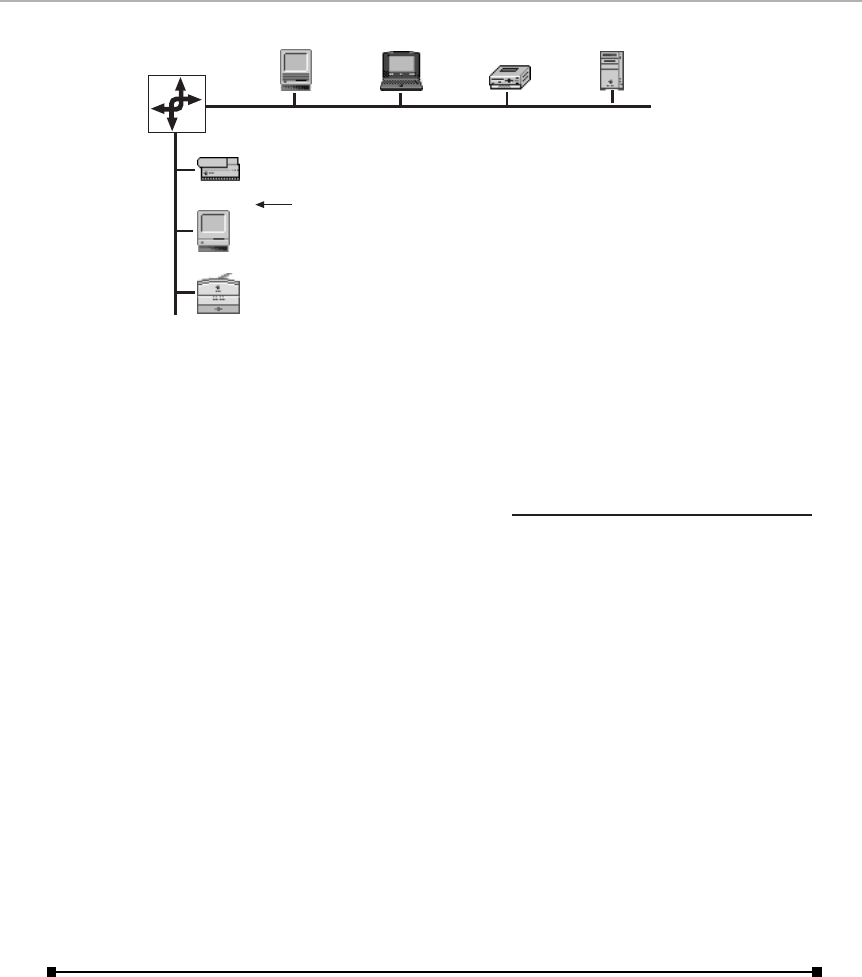
Figure 35-13: The PowerBook in Zone 1 does not affect network traffic in Zone 2 when it
communicates with the Power Mac in the same zone as itself. However, when the
PowerBook prints, its AppleTalk printing traffic passes through the AppleTalk Internet Router
to the LaserWriter in the lower zone.
General Networking Secrets
■
Reducing traffic on the network
Of all the types of network traffic, printing is one of the most common.
If your network has more than one zone, put a LaserWriter (or other network
printer) in each zone where printing is heavy. As a result, the printer traffic in
one zone doesn’t affect AppleTalk traffic in any other zone. The result: lower
overall traffic and a faster, more efficient network.
Installing system software over a network
In the beginning chapters of this book, we mentioned that Apple’s system
software Installer doesn’t work over a network.
Depending on your point of view, we lied. See Chapter 5 for our trick that, in
essence, lets you use the standard Apple Installer to install a System Folder
onto another Mac over the network.
What Else a Network is Good For
Now you have a bunch of equipment wired together. In this section, we’ll
show you what you can do on a network: file sharing, print serving, sending
ZONE 2
ZONE 1
This network (Zone 2) is separate from the
network above (Zone 1). Zone 1 netwok traffic
doesn't appear in Zone 2 unless communicating
directly with a device in Zone 2.
I
nternet
Router
Chapter 35: The Networking Chapter 1177
■ ■
Macworld MAC SECRETS • 4040-8/5 • ch35.F • Chapter 35 • FINAL • VB • 11/04/98 • p.1177

messages to friends and coworkers at other Macs, and teaching your
applications to communicate with one another.
File servers
Next to sharing printers, the most common advantage that a network offers is
the accessibility of file servers. A file server acts as a remote hard drive for
network users. Sitting at their Macs, several people can open files from that
server at once. A server’s icon appears on each user’s Desktop just like an
ordinary disk. If you’ve read this far in the chapter, you already know what
Apple calls its built-in file-server software: file sharing.
Print servers
Print servers are another kind of network service. We mentioned print
spoolers (such as PrintMonitor) in Chapter 30. A print server is little more
than a print spooler that does spooling for more than one user, and the files
are stored on a networked computer instead of in your own Mac’s
PrintMonitor Documents folder.
One of the primary differences between a local print spooler and a network
print server is that the server can accept and control print jobs for multiple
printers. This difference can be a very real time-saver for print-happy users in
a large office.
E-mail
Electronic mail is one of the most ingenious and practical uses of a network.
You open a desk accessory or application, click the name of somebody in
your office, type a message, and click Send — and your message (or maybe
just a notice) pops up on the recipient’s screen. If that person’s away from
the desk or busy, the e-mail waits patiently until he or she returns, even if the
Mac isn’t turned on!
E-mail beats voice mail for several reasons. You can ignore it. It forces people
to get to the point. It can be printed and saved forever. It can be sent to a
group of people simultaneously. It can be forwarded to somebody else. It can
include a Macintosh document or a voice recording. You can request a receipt
e-mail back, so you can make sure that your e-mail reached its destination.
You can check to see whether or not someone has read your e-mail.
The best known e-mail programs are Lotus cc:Mail, Quarterdeck (formerly
Microsoft) Mail, CE Software’s Quick Mail, and FirstClass (from SoftArc).
They’re remarkably similar — and indispensable in any office. And more and
more offices are now using Apple Internet Mail Server (sometimes called
MailShare) as a free solution, running Claris Emailer or Eudora as clients (the
receivers of information sent by a server).
1178 Part V: Attachments
■ ■
Macworld MAC SECRETS • 4040-8/5 • ch35.F • Chapter 35 • FINAL • VB • 11/04/98 • p.1178

Net modems
For people using Macs in offices, a modem and a dedicated phone line for it
aren’t exactly standard employee perks. Even with just ten people in the
office, installing modem phone lines for everybody would cost over $500,
plus $1,200 for no-frills 56K modems. Then, just maintaining standard service
on the phone lines would incur monthly charges of at least another $400 or
$500 — plus long-distance charges.
Enter the net modem. Hook one of these to its own phone line, and you and
your coworkers can dial up your favorite bulletin boards, online services, or
connect to an Internet service provider with ease, without installing phone
lines and modems on every computer.
A net modem requires only a single phone line, yet it can be shared over a
LocalTalk or Ethernet network, exactly like a laser printer. The network
administrator can even grant access privileges to each user on the network,
allowing password-protected access to the modem through the Chooser. A
net modem can be shared not only as a dial-out modem among everyone in
the office, but can also be used by people outside the office to dial into the
office network (using Apple Remote Access, described earlier in the chapter).
Net modems are more expensive than standard modems, but the fact that
they can be shared makes them cost-effective for larger offices. A Global
Village OneWorld network modem, for example, costs just under $1,000,
connects to a single phone line, and provides modem services for an entire
office connected via Ethernet.
The only real drawback of a net modem is that only one person on the
network can use it at a time.
Fax servers
Fax servers are based on the same concept as net modems, allowing an
entire network of users to share a single phone line and modem. The fax
server lets a group of network users send and receive faxes, right from their
own computers, through a single fax modem attached to one Mac on the
network — the fax server Mac. The fax server receives job requests from the
network, lines them up in a queue, and then attends to the task of imaging fax
pages, dialing the modem, and transmitting the data, one fax at a time.
In most cases, sending a fax on a network equipped with a fax server is as
simple as printing the document to a LaserWriter or StyleWriter. You simply
target the fax server as your printing device instead of your regular printer.
(Most fax software lets you switch from your standard printer driver to the
fax server driver with a single keystroke, bypassing the Chooser.) You add
the name and phone number of the destination fax machine on your screen,
click Send, and you’re finished — the fax server does the rest. Because the fax
server handles the job of imaging the fax pages and connecting to a remote
fax machine, your Mac is freed for you to continue working right away.
Chapter 35: The Networking Chapter 1179
■ ■
Macworld MAC SECRETS • 4040-8/5 • ch35.F • Chapter 35 • FINAL • VB • 11/04/98 • p.1179

As with net modems, the drawback with a fax server is that you’re still stuck
with a single phone line that must be shared by multiple users; the systems
can send no more than one fax at a time. However, with a fax server, faxes are
automatically sent in the order they are received, so you don’t have to wait to
send a fax. All you have to do is zap the job to the fax server and forget about
it. Eventually, the fax server will send a message back to your Mac, telling you
whether or not the fax was successfully sent.
Fax server packages are expensive, but they’re cheaper and much more
stable than they used to be. A package that includes a standard fax modem
along with software for up to 50 users costs about $1,500. And as with normal
fax modems, the recipients of your faxes are generally astounded at the crisp
print quality: because the faxes began life on your Mac (instead of being
scanned in by a cheap, crummy fax machine scanner), they don’t have the
crumbly-edged look of traditional faxes.
Program linking
If you’ve tried the Mac’s built-in File Sharing networking features (described
earlier in this chapter), you may have encountered a strange, mostly
undocumented item in the File Sharing (or Sharing Setup) control panel
called program linking.
Program linking is a system of letting one Mac program control another Mac
program, even if they’re not on the same Mac (across a network, for
example). For example, using a shareware utility called Remote Shutdown,
you can restart or shut down any Mac on the network without leaving the
comfort of your own Mac.
When System 7 was first released, Apple evangelized the power of program
linking to developers. One day, companies were told, there’d be no such thing
as a 13MB word processor such as Microsoft Word — each company would
sell tiny, efficient modules, each dedicated to one small task, all working
together via program linking. (This vision was part of Apple’s so-called
OpenDoc technology, a now-abandoned system of interlinking different
applications.)
To date, though, not very many programs use program linking for more than
simple remote-control functions, such as the Remote Shutdown example we
mentioned.
PowerTalk, R.I.P.
The concept of PowerTalk, included with “System 7 Pro” through 7.6, is
brilliant. Imagine that you have a folder full of icons on your Desktop, each
representing a person you deal with. One may live in a straw hut in Pakistan,
reachable only via the Internet. Another may be in the Marketing department
three floors below you.
1180 Part V: Attachments
■ ■
Macworld MAC SECRETS • 4040-8/5 • ch35.F • Chapter 35 • FINAL • VB • 11/04/98 • p.1180

Now, suppose that you want to send a file to one of them. You polish up your
design in, say, Photoshop, and then you drop the file’s icon on top of the
Pakistani’s icon. The Mac takes it from there, automatically dialing into the
Internet, entering all the necessary password information, correctly
addressing and sending your file electronically, and hanging up — without
any further help from you.
Furthermore, suppose that you have an In Box icon on your Desktop. You can
double-click it to see, represented as an icon, all your incoming stuff: faxes,
e-mail, and so on. And imagine having to remember only one password for all
your various online services and e-mail accounts.
That was the promise of PowerTalk: to reduce to invisibility the complexities
of networking, online services, e-mail, and so on.
Unfortunately, the actual PowerTalk rat’s nest of extensions and control
panels was so complex, users thought they were in a Monty Python skit. The
instructions were so full of meaningless double-talk that you began to wonder
if PowerTalk might have been designed by, say, Microsoft. As a result, it never
caught on, and Apple eventually discontinued it.
Open Transport Arrives
Open Transport, introduced with the PCI-slot Power Macintosh models and
now available for any Mac (except 68000 and 68020-based models), is a
dramatic behind-the-scenes rewrite of the Mac’s networking software. Its
primary purpose, according to Apple, is to make multiprotocol networking
easy — that is, connections to various kinds of computers (Macs, PCs, and so
on), different networking languages (X-OTI, UNIX STREAM, DLPI), different
networking “environments” (serial, dial-up network, LAN, WAN), and different
“protocols” (AppleTalk, TCP/IP, serial, and so on).
If that all sounds like a lot of geek talk, you’re right. The average person,
though, still has reason to get excited about Open Transport. It offers plenty
of advantages:
■Open Transport offers the ability to switch among different networking
systems without restarting the Mac or quitting any programs. For
example, you can change (on a PowerBook, for example) how you’re
connecting to the Internet — with PPP or with Ethernet — without
restarting the Mac. Such switching is also great if you need to switch
among Internet service providers, each with its own configuration;
among different cities, each with its own Internet local phone number;
or even between an AOL Link and an Internet account (you know who
you are).
To switch among Internet setups, all you have to do is open the TCP/IP
control panel; choose Configurations from the File menu; and choose a
setup (see Figure 35-14). See Chapter 25 for details on using Open
Transport for Internet connections.
Chapter 35: The Networking Chapter 1181
■ ■
Macworld MAC SECRETS • 4040-8/5 • ch35.F • Chapter 35 • FINAL • VB • 11/04/98 • p.1181
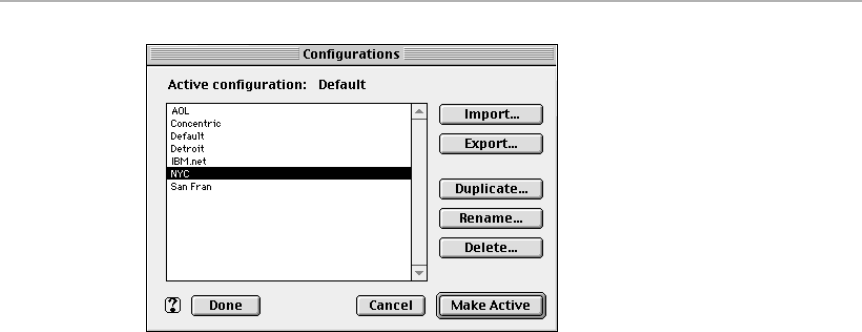
Figure 35-14: Switching from one Internet connection type to another is as easy as choosing
in Open Transport’s TCP/IP control panel.
■One of Open Transport’s biggest pluses is for people who manage
network servers — a Web site, for example — where multiple
simultaneous connections are common. MacTCP (Open Transport’s
predecessor) was limited to about 50 simultaneous connections, and
bogged down quickly.
Furthermore, Open Transport 1.1 or later gives overall network and
Internet connections a speed boost and better stability.
■Open Transport means that programmers can more easily write
programs that work with all those various networking protocols.
■Open Transport is written in PowerPC native code, whereas the older
MacTCP wasn’t.
Millions of people are merrily using the networking and Internet features
we’ve described in this book, utterly unaware that they’re using Open
Transport. All you actually see of Open Transport is a set of four gracefully
designed control panels: AppleTalk (replaces the Network control panel),
Modem, PPP (called Remote Access in Mac OS 8.5), and TCP/IP (replaces the
MacTCP control panel). (Unless, of course, you stumble across the nine Open
Transport shared libraries in the Extensions folder!)
For more detail on Open Transport, read about those four control panels in
Chapter 4. Also read Chapter 25, where we walk you through setting them up
for an Internet account. Beyond that information, we leave you to your
network designer — and Apple, whose explanation of Open Transport is filled
with writing such as this:
“Manual configuration of static AppleTalk addresses supports Mac OS
products that utilize WAN datalinks where non-full-mesh topologies are
important. This includes datalinks such as Frame Relay, SMDS, and ATM.”
1182 Part V: Attachments
■ ■
Macworld MAC SECRETS • 4040-8/5 • ch35.F • Chapter 35 • FINAL • VB • 11/04/98 • p.1182

Network Troubleshooting
Things go wrong on networks all the time. You may try to print something
and be told that “The LaserWriter ‘Accounting’ cannot be found.” As in any
system with as many fragile and interdependent components, chinks can
develop in hundreds of hard-to-get-at spots.
Try not to think of your network as a mass of wires and computers. Think
of the network as systems and subsystems. When a problem is befuddling
you, try replacing subsystems — one complete Mac with all its wiring, for
example — rather than components. You’ll find the trouble far more quickly.
AppleTalk troubles
Even with a network as easy to use as AppleTalk, problems can still be tricky
(especially as networks grow larger). AppleTalk problems usually have one of
the following three components.
Chapter 35: The Networking Chapter 1183
■ ■
Macworld MAC SECRETS • 4040-8/5 • ch35.F • Chapter 35 • FINAL • VB • 11/04/98 • p.1183
ANSWER MAN
Q: I’m trying to print on my StyleWriter, but the
stupid Mac keeps saying that the “port is in
use — make AppleTalk inactive.” But when I try
to make AppleTalk inactive in the Chooser or
even the Control Strip, I get the same message!
What gives?
A: Steady there, pal. It’s all part of the great
plan.
It turns out that when Apple wrote its Open
Transport software, it had to make a lot of
different parts of the system software aware of
the new (Open Transport) ways of doing things.
But Apple forgot to notify two key components
about the changes: the Chooser and the Control
Strip!
Therefore, if you turn AppleTalk off using either
of those two doodads, the “classic AppleTalk”
circuitry is turned off, but not Open Transport’s
version of AppleTalk. When you then try to use
your printer port for a non-AppleTalk gadget
such as a printer or digital camera, you get one
of those delightful messages: “Printer port is in
use by another application,” or “Cannot find
printer,” or “StyleWriter requires that AppleTalk
is inactive. Please make AppleTalk inactive.”
Whether you understand any of that or not, the
solution is simple.
Start by opening the AppleTalk control panel.
Choose Edit ➪User Mode. Click Advanced and
click OK.
Now click Options, Inactive, and then OK; close
and save the window. Now, by golly, AppleTalk
is really, really off.
If this problem is chronic, and you’ve got Mac
OS 8.1 or later, consider setting up your
Location Manager (see Chapter 4) to switch
AppleTalk on and off. It’s a fully modern module
that turns AppleTalk completely on and off.
The dang “port is in use!”

Broken or loose connections
Check the network connections. Every connector should be solidly plugged
in. If your network includes a networkable printer (such as a laser printer), a
simple way to isolate the problem is to open the Chooser on each Macintosh.
If the networked printer shows up in the Chooser, the connection between
that Macintosh and the printer is good. By making this test on Macs that are
successively farther away from the printer, you can discover where the
connection is broken and isolate the problem.
In our experience, especially in LocalTalk networks, a telephone cable that
works perfectly well as a telephone cable may not work as a network cable. If
your LocalTalk network isn’t working, replacing the phone wires should be
one of your first thoughts.
Circular wiring
Diagramming the network is a good idea, even before you have problems, but
it’s also an excellent way of discovering circular or other improper
connections. AppleTalk is a bus topology network: The network should have
two (and only two) end points, each terminated, and no circular connections.
Other common problems and solutions
We can’t cover every possible cause for network failures. But the following
common problems and solutions may aid you in becoming a network-savvy
person. If you have access to CompuServe, America Online, or Apple’s Web
1184 Part V: Attachments
■ ■
Macworld MAC SECRETS • 4040-8/5 • ch35.F • Chapter 35 • FINAL • VB • 11/04/98 • p.1184
TRUE FACT
On the Power Mac 6100, 7100, and 8100, a
special treat awaits: a little program called
Network Selector. Since non-PCI Power Macs
are capable of running either “Classic AppleTalk”
networking or Open Transport, this little program
lets you switch between them. (More recent
Macs, those with PCI slots inside, can’t run
classic AppleTalk; they’re Open Transport all the
way.)
As we’ve mentioned, non-PCI Power Macs can
run either “Classic AppleTalk” networking or
Open Transport. Apple programmers faced,
therefore, a conundrum: AppleTalk networks
require the MacTCP control panel for Internet
connections, but Open Transport requires the
TCP/IP control panel — and yet, the two control
panels are mutually incompatible. What’s a
programmer to do?
Here’s how they solved this little user-interface
problem: When you use the Network Selector
program to switch to Open Transport
networking, the Mac automatically makes the
TCP/IP control panel invisible! That’s right — it
completely disappears from the visible surface
of your hard drive. And when you switch back to
AppleTalk, the Mac re-visifies the TCP/IP control
panel and makes the MacTCP control panel
invisible.
Talk about protecting us from ourselves!
The disappearing control panels — magically delicious!

pages (see the Introduction), you’ll find hundreds of useful articles on
networking and troubleshooting in Apple’s Tech Info Library.
Missing device problems
Symptom:
■Can’t access file server, printer, another zone on the network, or another
network.
Possible causes:
■Break in connector; damaged pins on connector box; damaged cables.
■Device turned off.
■System software versions not consistent across the network.
■Wrong networking method is selected in the AppleTalk control panel (for
example, you’re using Ethernet, but LocalTalk is selected).
■Incorrect or missing software printer driver, or other device drivers.
Ghosting problems
Symptom:
■Network device appears and disappears in the Chooser.
Possible causes:
■Loose connector; damaged cable or extenders.
■Improper termination.
■The cables are too long (check the user manual).
■You’ve got too many devices on the network.
■Electromagnetic interference from a large appliance.
■Network not designed properly.
Speed degradation
Symptoms:
■Slow printing, slow file transfer (that is, even slower than usual).
■Network appears to be dead.
Possible causes:
■You have too many devices, or too much traffic, on the network.
■System software versions not consistent across the network.
■Viruses.
■Someone on the network has turned on the Calculate Folder Sizes option
in the Views control panel on a pre-Mac OS 8 Macintosh. When a Mac
Chapter 35: The Networking Chapter 1185
■ ■
Macworld MAC SECRETS • 4040-8/5 • ch35.F • Chapter 35 • FINAL • VB • 11/04/98 • p.1185

with this option switched on mounts a remote volume, the host Mac
must crawl through the necessary calculations and slow down the
network substantially.
File Sharing problems
Symptom:
■File Sharing won’t start. You’re told it “could not be enabled,” or the “File
Sharing is starting up” message stays on-screen indefinitely.
Possible causes:
■Some of the required extensions (such as File Sharing Extension, File
Sharing Library, or the nine Open Transport shared libraries) or control
panels (such as AppleTalk or File Sharing) aren’t loaded.
■Damaged PRAM (parameter RAM) settings (see Chapter 35).
■Damaged Users & Groups Data File, AppleShare PDS file (invisible), or
other file-sharing or system software.
Mac OS 8.5: The Network Browser
For over a decade, Mac fans have signed onto other hard drives on the
network by opening the Chooser, clicking the AppleShare icon, and selecting
a Mac from the list that appeared. 1998 brought the end of that less-than-
intuitive scheme. With the debut of Mac OS 8.5, the Network Browser
application simplifies that circuitous route to the Macs on your network. (See
“Network Browser” in Chapter 3 for an illustration.)
What you see in the Network Browser looks exactly like a Finder window —
except that instead of seeing folders denoted by “flippy triangles,” you see
network zones. Click a flippy triangle to view the individual Macs available
within each of those zones, and double-click a Mac to bring its icon onto your
screen (after entering the password, of course).
What makes the Network Browser handy isn’t just its logical, map-like layout.
The Servers, Favorites, and Servers pop-up buttons are also available in the
upper-right corner of the window (see Chapter 15). These buttons make it
easy to summon a frequently used server back onto your screen. (You can
drag-and-drop server icons onto the Favorites pop-up button, too.)
Otherwise, the features of this special application are essentially like those of
the new Open and Save dialog boxes that debuted with Mac OS 8.5; see
Chapter 15 for a complete tour.
1186 Part V: Attachments
■ ■
Macworld MAC SECRETS • 4040-8/5 • ch35.F • Chapter 35 • FINAL • VB • 11/04/98 • p.1186

Macworld MAC SECRETS • 4040-8/5 • ch.36.F • Chapter 36 • FINAL • VB • 11/04/98 • p.1187
Chapter 36
Troubleshooting
In This Chapter
©The Secrets Rule of Three
©Error messages explained
©Oddities on the screen
©Startup troubles
©Disk troubles
©File, desktop, and icon ailments
©Keyboard snafus
Principles of Troubleshooting
The Macintosh has an infinite number of cooks. There are the programmers
at Apple who wrote the system software. There are the programmers who
wrote the software you use, including the extensions and control panels that
modify the system software. And then there’s the hardware, complete with a
number of additional software elements (in the ROM chips, for example),
both from Apple and other companies.
With so many instructions being shouted at it, no wonder the Mac can get
flustered and throw up its hands in frustration. The problems you may
encounter vary:
■Mysterious system crashes or freezes
■Error messages
■Startup problems (the blinking question-mark icon or the Sad Mac icon)
■Application problems, when the Mac simply doesn’t do what it’s
supposed to
■Printing troubles
■Disk problems (their icons don’t show up on the desktop or the Mac
reports that they’re “not a Macintosh disk”)

A word about troubleshooting
There’s a certain emotional element to a Mac going wrong. The Mac, after
all, is betraying you, usually at a moment when you can least afford it. We
don’t know about you, but when our Macs go goofy, we feel a rising well of
frustration and loss of control. Our heart rate doesn’t go back to normal
until some semblance of normal operation has returned.
Therefore, our troubleshooting advice for you is to establish control first, even if
it means that you have to strip down your system. Once you know the machine
is working properly, you can restore your software and hardware add-ons, one
at a time, until you discover which element is causing the problem.
It’s important to understand that in many cases, you never find out what
caused the problem. You may rearrange the SCSI devices attached to your
Mac and find the problem gone. You may change the order in which your
extensions load and find that you have no more mysterious crashes. Or, you
may reinstall your system software and clear up some odd behavior you’d
noticed. In all of these examples, you’ll never know why you had a problem.
You’ll have isolated only the general area of the problem.
Still, you’ll be just as happy that the problem is gone.
More troubleshooting
Before you become alarmed at the relative thinness of this chapter, please
be advised that you’ll find substantial troubleshooting chunks at the end
of some chapters. Separate troubleshooting sections appear for fonts
(Chapter 29); printing problems (Chapter 30); SCSI (Chapter 33); and
networking (Chapter 35).
In this chapter, we hope to give you some Mac-guru wisdom on the general
concept of troubleshooting, as well as mention a number of miscellaneous,
mysterious, very common Mac problems and how to solve them.
The
Secrets
Rule of Three
Wouldn’t it feel good to know a three-step procedure guaranteed to wipe
out any mysterious software problems? There is such a trick. Our sure-fire
solution is grounded on a simple idea: Your Mac worked when it left Apple’s
factory. (Some of our friends chuckle at this statement. Still, we have to start
somewhere.)
Therefore, our troubleshooting concept is simple: To hunt down the problem,
you restore the Mac to the way it was when you bought it. It’s a three-step
process.
Except in cases when something’s genuinely wrong with your Mac (that is, it
requires a service call), this three-step process is nearly infallible.
Strange
But True
1188 Part V: Attachments
■ ■
Macworld MAC SECRETS • 4040-8/5 • ch.36.F • Chapter 36 • FINAL • VB • 11/04/98 • p.1188

Step 1: Start up with the Shift key
The first things you should suspect when you’re having strange system
problems are the extensions and control panels you installed. These, after
all, didn’t come from Apple.
This is an easy step. Restart the Mac. As it’s starting up, press the Shift key.
You can release the key as soon as you see the “Extensions off” message.
This simple step, we’ve found, promptly cures more than half of the
mysterious system errors that plague a typical Mac. Of course, all you’ve
achieved so far is to temporarily eliminate the problem— an extremely
useful accomplishment if you don’t have time to fiddle around with hours
of troubleshooting steps.
You still have to figure out which extension was causing the problem, though.
And the most efficient way to do that is to use Conflict Catcher, or even the
demo version thereof, which is included on the CD-ROM with this book. See
the appendix for instructions.
(And if the purpose of your turning extensions off is to permit a safe, clean
installation of new system software, as described next, you don’t have to
worry that the Shift key will turn off the very extensions needed to run your
CD-ROM drive. On all recent Macs, the system software CD-ROM itself
contains the extensions that allow it to mount and start your Mac. Clever,
huh?)
Step 2: A clean reinstall of the System
System software, like politicians and fresh fruit, may go bad over time.
Fortunately, you have an infinite supply of healthy replacement copies
(your system disks or system CD-ROM).
However, as we mentioned in Chapter 5, there’s more to fixing your System
Folder than simply running the Installer. The Installer program, as a
convenience to you, is designed to replace only those components of the
System Folder that need updating. If your System file is already corrupted,
it stays corrupted. If you have a damaged font suitcase, it remains damaged.
And so on.
The only way to guarantee a virgin System Folder is to perform a clean install.
The method for doing so becomes easier with each successive release of the
Mac OS.
■Mac OS 8 and 8.1 — Start up from your system software CD, if possible.
Run the Installer. Click Continue on the welcome screen.
Now turn on the checkbox called “Perform Clean Installation” (see
Figure 36-1), and then install normally.
The installer automatically checks your hard drive before proceeding,
and then gives you a duplicate, fresh System folder. Your old, messed-up
one is deactivated and automatically renamed Previous System Folder.
Mac Basics
Mac Basics
Chapter 36: Troubleshooting 1189
■ ■
Macworld MAC SECRETS • 4040-8/5 • ch.36.F • Chapter 36 • FINAL • VB • 11/04/98 • p.1189

Figure 36-1: In Mac OS 8 and 8.1, the Clean Installation option stares you right in the face.
■System 7.6 or 7.6.1 and Mac OS 8.5 — Insert your system CD. Double-
click the Installer icon. After you’ve clicked the Start button on the
Software Installations screen, click the Options button on the regular
Installer screen. You’ll be offered the “Create additional System folder
(clean install)” option — that’s the one you want.
■System 7.5-point-something —Insert your system CD (or the first Installer
disk). Double-click the Installer icon. Click Continue. At the main installa-
tion screen— where you’d normally click the Install button— press
Ô-Shift-K. You’ll be asked which you want: a brand-new System Folder, or
just an updated existing System Folder. You want the whole new one. Click
your choice, click OK, click Install, and then follow the directions.
■Earlier System versions, Performas — Before doing the clean install, you
should check the hard drive for corruption. (Later installer versions do
this automatically in the process of installing the new System folder.)
To do so, start up your Mac from the Disk Tools disk that came with the
Mac or the system CD-ROM, if you have one. Run the program on it called
Disk First Aid. (Your version of Disk First Aid can’t repair any problems it
finds on the disk it’s on — nor on the startup disk — which is why you
have to start up your Mac from the Disk Tools disk. Of course, if you have
an external drive of some kind, such as a Jaz, Zip, or SyQuest cartridge,
you can start up from that disk and run Disk First Aid off of it.) Disk First
Aid may well discover — and fix — problems with your hard drive that
have been responsible for whatever glitches you’ve been having.
Now you can proceed with installing a new System Folder. Open your
System Folder. The purpose here is to separate the Finder and the System
suitcase icon. Drag the Finder out onto the desktop, for example.
Close the System Folder window, press Return, and rename the System
Folder. (Call it “Old System,” for example.) The point of these two steps is
1190 Part V: Attachments
■ ■
Macworld MAC SECRETS • 4040-8/5 • ch.36.F • Chapter 36 • FINAL • VB • 11/04/98 • p.1190

to make the Installer think that there’s no System Folder on your hard
drive. Thwarted from simply building a new System Folder around your
old one, the Installer will build a completely new System Folder.
Now run the System Software Installer from your Apple CD-ROM (or your
Install 1/Install Me First floppy) in the usual way. If you have a recent
Performa, this means running your Restore System Software program (on
the Performa CD-ROM). If you have a very old Performa, run the Apple
Restore program.
Customizing your fresh System Folder
The new System Folder won’t have any of the extensions, fonts, control
panels, Apple menu items, and sounds you may have added to your original
System Folder. Nor will it have any Apple system-update files (such as System
7.5 Updates). And it won’t have any Preference files your software has created
over the years. Re-creating all of them— your settings, passwords, toolbar
configurations, and so on — could take hours. That’s why your old System
Folder remains with its new name (“Previous System Folder,” for example).
After you’ve confirmed that the clean reinstall successfully restored your
Mac to health, you can put those add-on components back into the new
System Folder. Yet you don’t want to reinstate whatever problem you were
having to begin with.
Where possible, therefore—especially in the case of fonts—re-install this
stuff from original master disks, not from your problematic previous System
Folder. Preferences files are tricky; you can usually get away with dragging
them out of your old System Folder’s Preferences folder into the new one, but
remember that corrupted Preference files are a leading cause of Mac glitches
within particular programs. If you can limit your Preferences file-dragging to
the programs you’ve spent the most time customizing (such as your
Microsoft, Web browser, and QuicKeys files), you may spare yourself yet
another round of troubleshooting.
Chapter 36: Troubleshooting 1191
■ ■
Macworld MAC SECRETS • 4040-8/5 • ch.36.F • Chapter 36 • FINAL • VB • 11/04/98 • p.1191
ANSWER MAN
Q: Hey! I can’t follow any of your “clean install”
instructions because I have a PowerBook (or a
Performa) that didn’t come with system disks.
And no, I don’t have a CD-ROM drive for it.
A: Tsk, tsk — you were supposed to have made
a set of backup disks when you bought the
computer. Apple even gave you a Floppy Disk
Maker program on the hard drive to make this
process easier for you.
If you can’t borrow a set from a friend or
download a set from Apple’s Web site (versions
through 7.1 are available), you’ll have to buy a
set of system disks by calling 800-SOS-APPL.
Hey! I don’t have system disks!

Some gurus recommend putting only a few add-on items at a time into the
new System Folder, restarting each time, so that you locate the problematic
component immediately after installing it. In practice, we rarely have the
patience for this procedure—and rarely run into problems dumping all
important items at once into the new System folder.
P.S. — If you really want to save time, use Conflict Catcher 8. Its System Merge
feature automates the process of copying all your customized goodies from
your old, defunct System folder into your new, clean one.
The glory of a clean reinstall
In any case, reinstalling a System Folder can work wonders on a sick Mac.
Over and over and over again, we’ve solved the weirdest problems using this
technique, both on our own Macs and our friends’ Macs. We’ve often had
clients considering us geniuses after a clean reinstall, especially when we’ve
helped them do so over the phone — “That did it! My problem’s gone! You’re
amazing! How the hell did you fix it?!”
Many problems solved by a clean reinstall sound like they have nothing to do
with system software: a SCSI drive that’s not working; font problems; printing
troubles. A clean reinstall solves it all.
In fact, if it weren’t that running the Installer entails 45 minutes of inserting
disks and copying add-on components from the old System Folder, we’d
suggest doing a clean reinstall first when you start getting system troubles.
1192 Part V: Attachments
■ ■
Macworld MAC SECRETS • 4040-8/5 • ch.36.F • Chapter 36 • FINAL • VB • 11/04/98 • p.1192
MACINTOSH SECRET
If you’ve ever done a clean system reinstall, as
directed in this chapter, we know one thing for
sure: You’d much rather not have to endure that
entire ordeal again the next time troubles arise.
Fortunately, we have two tricks to make your
future life easier.
First of all, the minute you’re finished performing
a clean reinstall, back up the new System
Folder! Drag the entire fresh folder onto a Zip,
Jaz, or SyQuest disk. Better yet, make a disk
image of your freshly installed System folder
using ShrinkWrap (see Chapter 22). Next time
you’re tempted to perform a clean reinstall,
you’ll have this fresh, wholesome System Folder
ready to use (after first renaming and disabling
your old System Folder, of course).
Our second suggestion: For goodness’ sake,
apply a colored label to the contents of your
Control Panels, Extensions, Preferences, Fonts,
and Apple Menu Items folders. As we
mentioned in Chapter 2, there’s a wonderful
reason to apply a label from your Labels menu to
everything in a fresh System Folder in this way:
later, when you examine the contents of these
folders, you’ll see at a glance which items you
or your software have added to the System
Folder — as opposed to the items that were
originally installed by the Apple installer. This
makes it much easier to reinstate your custom
components from the old System Folder to the
new one.
Never do another clean reinstall

Step 3: Unplug the SCSI chain
As you know from Chapter 33, the equipment plugged into the SCSI port on
the back of the Mac can have a huge and devastating effect on your Mac’s
behavior. In that chapter, you’ll find specific ideas for hunting down the
causes of the conflict.
The first step is to figure out if you have a SCSI problem. Therefore, when you
have a strange, repeating system problem, Step Three of our three-step
troubleshooting process is to disconnect your SCSI chain from the Mac so
that your SCSI port is left empty. If the problem disappears, you know where
to begin your troubleshooting search, following the suggestions at the end of
Chapter 33.
Other things to try
We truly believe that our three-step plan is nearly foolproof. After all, once
you’ve turned off your extensions, reinstalled the System, and unplugged
the SCSI chain, your Mac should be pretty much the way it was when you
bought it!
If you’re still having some unexplained erratic behavior, here are a few more
treatments worth trying, roughly in this order.
Zap the PRAM
The PRAM (parameter RAM) is a tiny cache of memory kept alive by your
Mac’s built-in battery. It’s responsible for keeping the Mac’s clock ticking and
maintaining the settings you make in your control panels— such as sound,
mouse speed, memory, network, SCSI, and screen settings.
Rarely, rarely (but still sometimes), this tiny bit of memory gets corrupted
somehow. Typical symptoms: Your control panels won’t retain their settings;
you can’t print; you have strange networking problems.
To reset the PRAM, restart the Mac. As it’s starting up, hold down the Ô,
Option, letter P, and letter R keys until you hear the second or third startup
chord. Release the keys. (On a PCI-slotted Power Mac, turn off the Mac and
hold down the keys before turning it on again.)
Zapping the PRAM often erases your control panel settings: your preferred
mouse-tracking speed, desktop pattern, speaker volume level, and so on. Still,
it’s but the work of a moment to reset them using your control panels.
(PowerBook owners’ note: Don’t press the PRAM keys beyond the second
chime. If you do, the PowerBook will shut down and can’t be restarted until
you press the back-panel power switch for 30 seconds.)
Chapter 36: Troubleshooting 1193
■ ■
Macworld MAC SECRETS • 4040-8/5 • ch.36.F • Chapter 36 • FINAL • VB • 11/04/98 • p.1193
Rebuild the Desktop
Several times in this book, we’ve mentioned the Desktop file, the invisible
database on every disk that stores information about all your icons — what
they look like, which programs they belong to, and where they’re positioned
in Finder windows. If the information in this Desktop file gets mangled, it
causes problems.
The cure is simple: You can rebuild the Desktop file by holding down the
Option and Ôkeys while restarting your Mac — or, for a more thorough job,
by using TechTool, included on the CD-ROM with this book. For a complete
discussion of Desktop rebuilding, see Chapter 1.
Throw away the Prefs file
Whenever you launch a modern software program, it generally consults the
Preferences file in your System Folder’s Preferences folder before its loading
process is complete. If that Prefs file is damaged, so is your work session.
Therefore, if you’re having trouble in one particular program, quit the
program. Then open your System Folder, open your Preferences folder, and
trash the program’s Prefs file. The very next time you launch that program, it
will automatically create a new Prefs file — one without any corruptions. (One
reason a corrupted Prefs file often eludes diligent troubleshooters is that
reinstalling an entire program generally preserves your existing Preference
file, corruptions and all.)
This trick is especially useful in that most frequently used program of all—
the Finder. The Finder Prefs file stores all kinds of settings important to your
Mac work environment: the font and icon-layout settings used for Finder
windows; list-view window settings; whether or not the “Are you sure?”
message appears when you empty the Trash; and so on.
Mac Basics
1194 Part V: Attachments
■ ■
Macworld MAC SECRETS • 4040-8/5 • ch.36.F • Chapter 36 • FINAL • VB • 11/04/98 • p.1194
TRUE FACT
For over a decade, rebuilding the Desktop file
meant losing whatever comments you had
typed into the “Get Info” boxes of your files and
folders. Indeed, even the “Rebuild the desktop?”
dialog box mentioned this unfortunate side
effect. For years, Apple promised that it would
get around to fixing this silly bug in some future
system update.
That day finally arrived. In System 7.5.3 and
later, no such warning appears in the “Rebuild?”
dialog box when you press Ô-Option at startup,
and your Get Info comments are, indeed,
preserved. Hallelujah.
However, not all is yet right with the world.
Experts agree that using TechTool, included with
this book, remains a safer and more thorough
method of rebuilding your Desktop file — but it
still doesn’t preserve your comments when it
nukes your Desktop file. Guess you can’t have
everything — unless you use Conflict Catcher 8,
which both saves your comments and fully
replaces your Desktop file.
Whither away the Get Info comments?

Therefore, if you start noticing weird goings-on with your icons, windows, or
Trash, try discarding the Finder Prefs file. Restart the Mac to generate a
fresh, clean copy.
Other Preference file-related troubles to watch for:
■Network problems. If you’re having trouble with networking and your
hardware doesn’t seem to be the problem, try deleting the File Sharing
folder and the User & Groups data file, both located in the Preferences
folder. Then, after restarting, go to the File Sharing (or Sharing Setup)
control panel, enter a new Owner password, and turn on File Sharing.
This creates a new Users & Groups data file, replacing the corrupt data.
Of course, you also lose any previously defined users and group data.
■PC Exchange. You’ve been happily mounting PC disks on your Mac for
months, then, all of a sudden, your Mac won’t accept DOS disks anymore.
Once again, the solution is simple. Drag PC Exchange Preferences file out
of the Preferences folder and into the Trash. The next time you start your
Mac, a new Preferences file is created.
■Apple Menu Options. If you encounter, on startup, a message that says
“There is not enough memory to load all of your extensions” — and you
know that you do indeed have enough memory — the likely culprit is the
Apple Menu Options Prefs file. Trash it and restart.
■Space hogs. Most Preference files are very small; they only contain basic
settings information. But certain files in the Preferences folder can take up
quite a bit of space. CD-ROM caching programs, such as CD AutoCache or
CD-ROM Toolkit, for example, store in the Preferences folder directory
information from the CD-ROMs you use. These directories add up quickly,
especially if you use a large number of different CD-ROMs. Finally, there’s
the Cache folder for your Web browser (Netscape Navigator, Microsoft
Internet Explorer, and AOL’s browser, for example). It can quickly mount
up to dozens of megabytes if you don’t watch over it carefully. (You can
adjust your browser’s Cache-folder buildup potential in the Preferences
command of the browser itself.)
If you find megabytes mysteriously disappearing from your hard drive, check
the Preferences folder for such files, which can be dumped periodically.
There’s only one problem with the drag-your-Preferences-to-the-Trash
approach to problem-solving, by the way—you lose your preferences.
Cumulatively, they represent hours of work that you’ll have to re-create from
scratch if they become corrupt. We highly recommend backing up your
Preferences folder (from inside your System Folder) religiously. When
troubles later arise, you can drag the corrupt file to the Trash and replace it
with the backup.
Replace the battery
Every Mac has a battery — not just PowerBooks. We refer, of course, to the
built-in five- to seven-year battery that maintains the clock even when the
computer is off.
Worth
Learning
Chapter 36: Troubleshooting 1195
■ ■
Macworld MAC SECRETS • 4040-8/5 • ch.36.F • Chapter 36 • FINAL • VB • 11/04/98 • p.1195

In the olden days, nobody thought much about the lithium battery. These
days, however, it’s suddenly rearing its ugly head — all over the world,
millions of Macs are reaching their fifth and seventh birthdays. People’s
lithium batteries are dying, causing all kinds of bizarre behavior usually
related to file dates. For example, if your Mac suddenly starts stamping
every new or modified file with the year 1904 or 1957, you’ve got yourself a
dead lithium battery. Other symptoms: your clock won’t keep its time, your
network or printer settings won’t stick, your monitor color setting keeps
reverting to some oddball choice.
As reader Brian Koh points out, you can save money by replacing the lithium
battery of most Mac models yourself. In most Macs, the battery is a 3.6-volt
battery about half the length of a standard AA; it’s Radio Shack part 23-026,
Apple part number 742-0011, Maxell model ER3S — and costs about $10. (If
you don’t feel like heading out in the rain to Radio Shack, you can also order
these batteries from Resource 800 (800-430-7030, www.dallas.net/~r800.)
To install, open your Mac’s case; locate and snap off the black retainer cover
on the circuit board; install the battery in the same orientation as the
original, and snap the black cover back on. (Because you’ve just “zapped
your PRAM,” in effect, you must now reset your control panel and Chooser
settings.) Details on the process at www.academ.com/info/macintosh.
Unfortunately, many previous generations of Macs use different batteries.
The LC batteries are 4.5-volt with a complicated harness connector, and the
earliest Macs used a regular AA, 3.6-volt battery. So how can you tell before
you begin whether or not your Mac is one that’s user-replaceable? By
consulting GURU, a shareware program included on the CD-ROM with this
book that, for every Mac model ever made, tells you whether or not you can
replace the battery yourself.
If your Mac model isn’t one of the lucky ones, you’ll have to get the battery
replaced by an Apple technician, usually at a cost of about $25.
Update your hard disk driver
Follow this step only if your Mac started life using one system version (such
as System 7.0) and then was upgraded to a newer one (such as Mac OS 8).
As we mentioned in Chapter 8, not all software is compatible with new
system versions — that includes the invisible software that controls your
hard drive (its driver).
If our first three steps haven’t resolved the problems your Mac’s been giving
you, and your hard drive is a candidate, follow the instructions in Chapter 8
for updating your driver. Fortunately, updating the driver doesn’t involve
erasing your hard drive or having to copy your files off it. Further, all of
Apple’s current system-software installers offer the option of updating your
hard-disk driver automatically (click the Options button, for example, on the
main Mac OS 8 installer screen).
Mac Basics
1196 Part V: Attachments
■ ■
Macworld MAC SECRETS • 4040-8/5 • ch.36.F • Chapter 36 • FINAL • VB • 11/04/98 • p.1196

Remove your expansion cards
If you’ve tried the usual array of troubleshooting steps and something still
seems to be wrong, question any NuBus, PCI, or PDS cards you’ve installed
(see Chapter 34). The point, remember, is to restore the Mac to its fresh-from-
factory condition in your quest to find the problem. An out-of-date or poorly
seated card could easily escape your notice.
Run a hard disk diagnosis program
Even our troubleshooting process can’t solve certain hard-drive problems.
They have to do with the invisible files the Mac maintains on your hard drive:
the Desktop files, the list of fragmented files, and so on. If these files become
damaged, a hard disk repair program may come to the rescue.
Chapter 36: Troubleshooting 1197
■ ■
Macworld MAC SECRETS • 4040-8/5 • ch.36.F • Chapter 36 • FINAL • VB • 11/04/98 • p.1197
MACINTOSH SECRET
Hard disk utility software (Disk First Aid, Norton
Utilities, TechTool Pro, and so on) is all well and
good, but it has one inconvenience: You
generally can’t use it to analyze or repair the
disk it’s on. And it can’t operate on the startup
disk, either (which is usually your internal hard
drive, usually precisely the disk you want to
repair).
For a while, each commercial hard disk program
came with an “Emergency Disk” — a floppy
containing a tiny System Folder (enough to start
up the Mac) and the utility program itself. (In the
case of Disk First Aid, the Emergency Disk is
called Disk Tools.) This arrangement was
colossally inconvenient, though. (1) If you didn’t
have the Emergency Disk with you when things
went wrong, you were out of luck. (2) If you
didn’t have the exact Emergency Disk for your
model, you were out of luck. (3) And, as new
Mac models and new System versions
appeared, the likelihood of your being able to
create a correct, working Emergency Disk grew
increasingly slim.
There’s a better solution (for PowerBooks and
most pre-G3 Mac models). Open your Memory
control panel. Turn on the RAM Disk option.
Move the slider until the displayed size
is enough to hold a bare-bones System Folder
and your disk utility program. (See Chapter 14
for much more on this process.) Restart the
Mac. When it comes to, you’ll see a new disk
icon on your Desktop: the RAM disk.
Onto this disk, copy the System suitcase file
from your System Folder, plus the Finder, plus
any enabler your model needs to run, plus (if
you have Mac OS 8 or later) the Appearance
extension. (Put all this into a folder called
“System Folder” on the RAM disk.) Copy the
disk-repair program onto it, too. Finally, use your
Startup Disk control panel to choose the RAM
disk as the next startup disk. Restart the Mac a
second time. (G3 desktop Mac models’ RAM
disk contents don’t survive a restart, alas.)
Now the Mac is running off the RAM disk. Your
hard disk utility program can safely (and really
quickly) operate on your internal hard drive,
which is no longer the startup disk and no longer
the disk that contains the hard disk program.
If your Mac doesn’t have enough RAM to create
a big enough RAM disk, by the way, consider
creating a RAM disk just big enough to hold a
mini-System Folder. Once the Mac is running,
you can always then run the disk-utility program
from a floppy (instead of copying it to the RAM
disk).
Create your own emergency disk in an emergency

Your Mac came with such a program: Disk First Aid. It’s not as good as the
commercial drive-repair programs like TechTool Pro. But today’s Disk First
Aid can indeed solve a number of these hidden disk problems. Just run Disk
First Aid (after starting up the Mac from your Disk Tools floppy or Apple
CD-ROM) and click the Start button.
For PowerBooks only: Reset the Power Manager
The Power Manager is a special circuit in the PowerBook that supervises the
use of battery juice. When the Power Manager gets confused, all kinds of
terrible things can result: problems turning on the computer, charging your
battery, using the trackpad, starting up, going to sleep, and so on. Here’s how
you reset the Power Manager to its default state.
Always begin by unplugging the power adapter and removing all batteries.
Leave the laptop that way for 10 minutes. If the problem doesn’t go away
when you try turning it on again, continue as follows:
■PowerBook 190, 1400, 2400, 3400, 5300, and G3 series — Shut down the
PowerBook. Turn it on while holding down the Ô, Option, P, and R keys
(yep, the same keystroke as resetting the PRAM, as described earlier).
You’ll hear a single chime, then the screen will go dark and the green
Sleep light will be on. Press the reset button on the back of the machine
(under the external video port, if you have one).
■PowerBook 140, 145, 145B, 160, 165, 170, and 180 — Unplug the power
cord and take out the battery. Leave the PowerBook like this, powerless,
for five minutes. Then, using two paper clips, simultaneously press and
hold down the reset and interrupt buttons (the two pinholes on the back
panel, next to the power button) for ten seconds. Hook up power again.
■PowerBook 150 — Unplug the power cord and take out the battery. With
an unfolded paper clip, push the reset button in the back (the pinhole
marked by a triangle) for ten seconds. Plug in the power adapter, and
then briefly push the paper clip into the reset hole again. Finally, when
you push the on button (on the back panel), the PowerBook should turn
on. Reinsert the battery and charge it overnight.
■PowerBook 500 series — Unplug the power cord and take out the
battery. Leave the PowerBook like this, powerless, for five minutes. Press
Ô-Option-Control-power key for ten seconds. Reinsert the battery and
power cord.
■PowerBook Duos — Hold in the power button on the back panel for 45
seconds. (If this doesn’t snap the PowerBook back into health, unplug
the battery and power cord for 10 minutes.)
■PowerBook 190, 1400, 2400, 3400, 5300, and G3 — Turn the computer
off. Restart it by holding down the reset button for 20 seconds. (On the
190 and 5300, the reset button is below the monitor jack; on the 1400, it’s
between the keyboard and modem/printer jack; on the 3400, it’s to the
left of the modem/printer jack; and on the 2400, it’s above the floppy-
drive connector.)
1198 Part V: Attachments
■ ■
Macworld MAC SECRETS • 4040-8/5 • ch.36.F • Chapter 36 • FINAL • VB • 11/04/98 • p.1198

If that restarting process doesn’t work, try it again a few more times.
■1998 PowerBook G3 Series — Press Shift-Function-Control-power button.
(“Function” is the Fn key at the lower-left corner of the keyboard.)
In all of these cases, you should now be able to turn the PowerBook on
normally. Note, however, that this procedure deletes your RAM disk, if you’ve
set one up.
And how does the Power Manager get corrupted in the first place? According
to Apple, the number one cause is plugging the power adapter into the
PowerBook before plugging it into the wall! Apple says we should always plug
the cord into an outlet before plugging it into the PowerBook.
Who knew?
Avoiding Troubles in the First Place
Of course, it’s much better to spend 30 seconds preventing problems than to
spend three hours solving them. Chapter 8 contains our preventive-
maintenance schedule for your hard drive. We urge you to follow it.
Here’s the other killer secret, which we’ve used to save hours of installing
and troubleshooting time in the last few years: Turn off your extensions before
you install anything.
That is, the next time you get a new program, or an updated version of an old
one, restart the Mac with the Shift key down. You’ve just restored your Mac
to its original birth condition, which is exactly how your new software
expects to find it. You’ve just dodged a whole host of potential conflicts and
corruption that can occur during the installation process— many of which
may not crop up to haunt you until weeks later.
And if the software you’re installing comes on a CD-ROM? Then turn off all
your extensions except the ones you need to run your CD-ROM drive (see
Chapter 4 for the list). Doing so is easy with Extensions Manager, Conflict
Catcher, or a similar extensions-management program (see Chapter 22).
Ironically, this step is especially valid when you’re installing Apple’s own
system-software updates.
The
Mac Secrets
Error-Message Table
Wouldn’t it be great if your Mac could tell you exactly what went wrong in the
aftermath of a crash? Imagine recovering from a crash and seeing a dialog
box that says, “Your system has crashed due to a programming error. The
Make Compost command in EnviroHelper Pro 2.0 conflicts with the desk
accessory TimeKiller 3.1. Please update the desk accessory to version 3.3.2
to eliminate this conflict.”
Mac Basics
Strange
But True
Chapter 36: Troubleshooting 1199
■ ■
Macworld MAC SECRETS • 4040-8/5 • ch.36.F • Chapter 36 • FINAL • VB • 11/04/98 • p.1199

In reality, the Mac’s error codes aren’t nearly that enlightening. For one thing,
the error definitions themselves provide little information that you can
actually use; knowing that your crash was caused by an “unimplemented
core routine” (Error 12 or Error -4) doesn’t shed much light on why a
program keeps crashing. When something goes wrong deep inside the Mac, it
can only report to you that something is wrong. It has no idea which specific
series of keystrokes, mouse clicks, and software interactions actually caused
the problem. Error messages are of primary value only to programmers —
and not very helpful even to them. Furthermore, Mac error messages are
often flat-out wrong. The Mac says you had an “illegal instruction” problem
(Error 3) when in reality you simply used up all your RAM.
In the first few editions of this book, we explained all this. We said that a list
of Mac error messages, and their meanings, is pointless.
Yet the mail from readers of each edition was always the same: “Please print
a list of the error messages!” And so, here it is.
As you’ll see, these descriptions only rarely provide a clue for action on your
part (that is, disk is full). The rest of the time, there’s a bug in your software,
and there’s not much you can do about it. As you’ll read in the following list,
many bugs result from programmers failing to clean up after themselves
during programming— or being unable to anticipate their program’s
interactions with other software.
There are two categories of error messages. Those with positive numbers are
the so-called DS errors (which originally stood for, well, deep doo-doo — but
which Apple, concerned about its younger audiences, eventually redefined as
Dire Straits). These are serious system crashes that require you to restart the
machine. Errors with negative numbers aren’t so severe; usually you just
have to click OK to proceed.
DS Errors
By far the most common positive-numbered error codes are Type 1, Type 3,
and Type 11. You can read about them below; for now, note that the primary
steps to solving repeated problems of these types are (a) update or turn off
your extensions, (b) update your hard disk driver, and (c) do a clean reinstall
of your System Folder. All three of these techniques are explained at the
beginning of this chapter. Fortunately, Type 1, 3, and 11 errors have become
nearly extinct in Mac OS 8 and later.
ID=01: Bus Error (Type 1 error)
The Mac has tried to access memory that doesn’t exist — for example, the
program you’re using assumed that the Mac has more RAM available than it
actually does. This kind of glitch — probably one of the most common— is
called a bus error. You can remedy the problem by allocating more memory to
the program that crashed, adding more RAM to your system, or by simply
restarting your Mac so that the RAM available isn’t fragmented (but is
available on contiguous chunks).
Mac Basics
1200 Part V: Attachments
■ ■
Macworld MAC SECRETS • 4040-8/5 • ch.36.F • Chapter 36 • FINAL • VB • 11/04/98 • p.1200

ID=02: Address Error
Mac Plus and SE only: Your processor tried to access an odd-numbered RAM
address when it should have accessed an even-numbered one.
ID=03: Illegal Instruction
Your software issued an instruction your Mac’s processor model doesn’t
understand. The cause may be an out-of-date system extension or hard disk
driver.
ID=04: Zero Divide Error
When programmers test their works in progress, they might deliberately
instruct the computer to divide a number by zero, to see how well the
program handles errors. They occasionally forget to take this instruction out,
as you’ve just discovered.
ID=05: Range Check Error
The software checked to see if a number—part of some internal calculation
— is within a certain range. It wasn’t.
ID=06: Overflow Error
A number was too large for the space the software allotted for it.
ID=07: Privilege Violation
This only crops up during the writing of a program. The Mac attempted to
process a command in User mode instead of Supervisor mode.
ID=08: Trace Mode Error
When debugging newly written software, programmers sometimes walk
through it, line by line, using what’s called Trace mode. This message
indicates that your Mac’s processor has accidentally switched into Trace
mode.
ID=09 and ID=10: Line 1010 & 1111 Trap
Once again, the software has issued an instruction that the processor doesn’t
understand.
ID= 11: Miscellaneous Hardware Exception
A Type 11 message is the Power Mac equivalent of a generic Type 1 error. It
simply refers to an error that has occurred in the native Power PC code.
Technically, Apple calls it a “hardware exception error.” Realistically, it’s an
extension conflict, a corrupted font, or a Power Mac-hostile program. Do a
clean reinstall, as described earlier in the chapter. And if you’re getting lots of
Type 11 errors, remember that Apple has been methodically eliminating them
with each successive release of the system software. Keep your Mac’s System
Folder current.
Chapter 36: Troubleshooting 1201
■ ■
Macworld MAC SECRETS • 4040-8/5 • ch.36.F • Chapter 36 • FINAL • VB • 11/04/98 • p.1201

ID=12: Unimplemented Core Routine
As with the ID=04 error, an instruction was left over from the debugging
process.
ID=13: Uninstalled Interrupt
An interrupt is a moment during the running of a program when an external
device, such as the keyboard or the disk drive, asks for attention. If there are
no instructions in RAM that tell the Mac how to talk to that device, you get
this error.
ID=15: Segment Loader Error
To conserve RAM, a non-Power Mac program is loaded into RAM in segments
as needed. A system-software program called the segment loader oversees
this swapping. If, for some reason, the segment loader can’t do its thing, this
error results.
ID=17-24: Package Load Error
We’ll pass this along exactly as we heard it, although we make no pretense to
understanding it ourselves: The Macintosh OS contains certain “packages” of
routines that perform related operations. There are eight of these packages,
0-7. Errors 17 through 24 indicate failures to load the corresponding package.
For example, PACK 4 (which would get an error code of 20) is the Standard
File Package (the code that handles the Open File and Save File dialog boxes).
ID=25: Memory Full Error
You’ve probably run out of memory, although this message sometimes
appears erroneously.
ID=26: Bad Program Launch
Macintosh applications come in two flavors: 68K code (for pre-Power Macs)
and PowerPC code. If either of the “closets” where this code is stored is
damaged, you get this error message when you try to run the program. (Time
to reinstall.)
ID=27: File System Corrupted
Your Mac keeps an internal map that shows it where everything is on each of
your drives. If that map gets hosed, this error pops up. Disk First Aid time!
ID=28: Stack Ran into Heap
Fancy way of saying you ran out of memory.
ID=33: Negative ZbcFree Error
The Macintosh Memory Manager software is so confused, it thinks there’s a
negative number of available “zone control blocks” from which to allocate
memory.
1202 Part V: Attachments
■ ■
Macworld MAC SECRETS • 4040-8/5 • ch.36.F • Chapter 36 • FINAL • VB • 11/04/98 • p.1202

Negative Error Codes
There are many more negative-numbered error messages than positive.
Furthermore, they make even less sense to the nonprogrammer. (Helpful
example: “Packet too large or first entry of the write-data structure didn’t
contain the full 14-byte header.” Sure.)
Table 36-1 provides the general categories for each number range, along with
a few that actually make sense to human beings. Note that some of the
numbers may overlap, since these error messages vary according to the
context (what you’re doing at the time).
Table 36-1 The Authoritative List of Negative Error Codes
Error Number What Causes It
0 through –8 General System errors.
–9 through –21 Color Manager errors.
–17 through –61 System errors involving files and disks (input and output).
–34 Disk is full.
–35 No such disk, or the Mac can’t find the disk it’s looking for.
–37 Illegal filename (for example, the name includes a colon).
–39 A corrupted file is on the disk, or the disk is having problems.
Often accompanied by the message “end of file” or “no
additional data in the format.” It points in the general direction
of a corrupt file. It means that the Mac started to process a file,
but couldn’t finish reading it — as if the end of the file had been
chopped off. If you encounter this particular message at startup,
it could mean your Launcher has become corrupt. Drag the
Launcher into the Trash and reinstall it.
–41 File is too big to fit in memory.
–42 Too many files open.
–43 File not found — you’re trying to open a file that’s been moved
or deleted.
–44 and –46 Disk is locked.
–45 You’re trying to save or copy something to a locked disk.
–53 through –57 Illegal disk request.
–60 Something’s wrong with the disk directory.
–64 through –66 Font problems, or the required disk (or disk drive) isn’t available.
–64 through –90 Problems reading disks (timing and track troubles).
–91 through –99 AppleTalk errors.
Chapter 36: Troubleshooting 1203
■ ■
Macworld MAC SECRETS • 4040-8/5 • ch.36.F • Chapter 36 • FINAL • VB • 11/04/98 • p.1203

Error Number What Causes It
–108 through –117 Various memory-allocation errors.
–120 through –127 HFS errors (disks, folders)
–126 through –128 Menu problems.
–130 through –132 More HFS errors.
–147 through –158 Color management problems.
–185 through –199 Resource Manager errors (problems managing data).
–200 through –232 Problems with sound or sound files.
–250 through –261 Problems with the MIDI Manager.
Details on the most common
error messages
Table 36-1 covers both common and obscure error numbers. Here, for your
post-crash enjoyment, are more complete descriptions of the most commonly
spotted error messages.
“No Co-Processor Installed”
The “no co-processor” message is almost never accurate— every Mac made
today has a math co-processor chip (a floating point unit, FPU; described in
Chapter 12), yet this message seems to crop up all time. (Power Macs don’t
have a separate FPU chip; that circuitry is built into the PowerPC chip itself.)
The answer is so weird it’s almost funny. Whenever a software problem erupts,
the Mac rapidly runs through an internal list of error messages, trying to find
an accurate description. If it doesn’t find anything appropriate to report, it
helplessly shows you the last error message in its list. Naturally, the “no co-
processor” error is the last one on the list.
The “no co-processor” message has nothing to do with whether your Mac has
an FPU — or whether your software needs one.
Bus errors
If you get a system crash with the “bus error” note, you’re using buggy
software that’s trying to save data someplace it shouldn’t. (Netscape
Navigator and Microsoft Internet Explorer are among the worst offenders.).
Fortunately, you don’t see much of these errors in today’s Mac OS 8
environment.
Other sources of bus errors are extensions. Follow Step 1 in the Rule of Three
at the beginning of this chapter to ferret out the cause.
1204 Part V: Attachments
■ ■
Macworld MAC SECRETS • 4040-8/5 • ch.36.F • Chapter 36 • FINAL • VB • 11/04/98 • p.1204

“Application busy or missing” or
“Application not found”
As we mentioned in Chapter 1, you get this kind of message when you
double-click a document for which the Mac doesn’t think it has the program
to open it.
The possible solutions are:
■You really don’t have the required program. If you double-click an Excel
document and you don’t have Excel on any disk, this is the message you
get. Except for installing Excel, there’s nothing you can do.
■You do have the required program, but the Mac is confused. It’s an easy
one to fix: Just rebuild the Desktop file (see Chapter 1). Or, you may have
two copies of the same program, perhaps with different version numbers.
Clear out the older one.
■You have the required program, but it’s an outdated version, and the
document you’re trying to double-click is from a newer version. Update
the program.
■You have the required program, but the document’s four-letter creator
code somehow has gotten zapped, so the Mac doesn’t know which
program it’s supposed to use to open the document. You can restore the
creator code by using either Drop•Info or ResEdit (both included with
this book) to type the code back in. See Chapter 15 for detailed
instructions, and see Chapter 4 for details on Mac OS Easy Open,
which can eliminate most “Application not found” messages.
“Application unexpectedly quit”
Usually this message means that a program ran out of memory. Normally, a
program sees the end of its memory supply coming and warns you. But
sometimes it gets caught unaware, like a center fielder who slams into the
outfield wall going for a fly. You can try giving the program a larger memory
allotment (see Chapter 9 for instructions on using the Get Info window to
do so).
Then again, this might be one of the standard problems: an old version of the
program; a program incompatible with your OS version; a program
incompatible with virtual memory or 32-bit addressing; or Netscape
Navigator/Communicator, which is just buggy all the way around.
“Port is in use,” “Please make AppleTalk
inactive,” or “Cannot find printer”
“Port is in use by another application” is the mother of all annoying error
messages. It appears when you’re trying to use your printer port for an
inkjet printer (like the StyleWriter), digital camera, or other printer-port-
connectable gadget. PowerBook owners, you’re especially susceptible to this
nightmare—you have only a single modem/printer port on the back of your
Mac. If the computer thinks that the port is busy, you won’t be able to hook
Chapter 36: Troubleshooting 1205
■ ■
Macworld MAC SECRETS • 4040-8/5 • ch.36.F • Chapter 36 • FINAL • VB • 11/04/98 • p.1205

up your PalmPilot, digital camera, modem, or any doodad that would
normally plug in there.
The most common reasons the modem port is “in use” are (a) you’re still
online and don’t know it, or (b) you have fax software that’s been taught to
watch the port continuously for incoming faxes. The solution to the first
problem is to restart the Mac; the solution to the second is to turn off your
fax software.
The most common reason that the printer port is “in use,” however, is that
you’ve got AppleTalk turned on. AppleTalk, as you may know from Chapter
35, is Apple’s networking software. If it’s on, the networking software ties up
your printer port by watching it for incoming network messages. Forget
about trying to use a non-AppleTalk printer, such as an inkjet.
Now, all this gets really interesting when you try to turn AppleTalk off (as the
error message recommends)—but you can’t! You try using the Chooser; you
try to turn it off using the Control Strip; but the error message keeps
appearing.
If you’ve fallen into this unpleasant cycle, see the sidebar “Answer Man:
The dang ‘port is in use!’” near the end of Chapter 25.
“The File Sharing extension is not installed”
You get this message when you choose Sharing from the File menu (see
Chapter 35 for details on making your Mac’s hard drive available to other
Macs on the network).
Sometimes, of course, it’s true — the File Sharing software isn’t installed.
Use the Installer on your system disks to install it. On the other hand, this
message also appears when a much simpler problem exists: You need to turn
on AppleTalk in the Chooser.
“This startup disk may not be used with this
Macintosh. A newer version is required.”
You see this message when you’re trying to start up a Mac from a disk that
contains a System folder that’s too old to run your Mac. For example, Mac OS
8 is the earliest OS that can start up a Power Macintosh G3; if you insert a
System 7.5 CD-ROM, the startup process may look as though it’ll work —until
a few seconds into the startup, when this message appears. Start it up instead
with, for example, the Disk Tools or system CD-ROM that came with the
machine.
“The command cannot be completed because it
cannot be found”
This all-time Goofy Grammar Hall of Fame winner sometimes appears when
you try to paste a new icon onto your hard drive (described in Chapter 1). Of
1206 Part V: Attachments
■ ■
Macworld MAC SECRETS • 4040-8/5 • ch.36.F • Chapter 36 • FINAL • VB • 11/04/98 • p.1206

course, the reason you’re doing that task is that the drive’s previous icon has
disappeared. Try as you might, pasting the new icon into the drive’s Get Info
box won’t work.
This problem crops up when you’re trying to change your hard drive’s icon
for the second time. The first time you pasted a new icon for your hard drive,
two things happened behind the scenes. First, an invisible file called Icon
(with a Return character before the word, if you can believe that) was
created on the hard drive (you can see it using ResEdit). Second, the Mac
switched on an internal toggle switch — the custom icon bit — that tells it to
use the new icon file.
If that original invisible icon file is missing for some reason, the Mac consults
the custom icon bit, goes searching for your custom icon file, doesn’t find it,
and displays the generic disk icon in its place. If you try to paste on a new
custom icon, you get this message. It tells you that the Mac can’t find the old
icon (the “it” that “can’t be found” in the error message) over which to paste
the new one. Wild, eh?
The real solution, obviously, is to reset the erroneous bit. ResEdit won’t work;
it operates only on files, not disks. The simplest solution is to use Disk
Rejuvenator, included on the CD-ROM with this book; it neatly solves this
problem.
“That folder is in use and cannot be deleted.”
This infuriating message most often refers to an item in the Trash, especially
the familiar “Rescued Items” described in Chapter 2. Here’s a sneaky way to
delete that which is un-deletable.
1. Drag the folder (we’ll use the Rescued Items folder in this example) to
the Desktop.
2. Rename the Rescued Items folder to the name of another folder on your
disk. For example, if you have a Downloads folder, change the name of
Rescued Items to Downloads.
3. Open the Downloads folder. Move all of the items in it to the newly
named Downloads folder on your Desktop.
4. Trash the original Downloads folder. Move the new Downloads folder to
the location of the former Downloads folder.
You may now be able to empty the Trash, having successfully outfoxed the
Mac at its own game. After all, you’re now trashing a perfectly ordinary folder.
Oddities on the Screen
Sometimes, no error message is necessary to tell you that something’s gone
wrong. One glance at the screen tells you that something’s amiss. Here’s how
to handle these situations.
Chapter 36: Troubleshooting 1207
■ ■
Macworld MAC SECRETS • 4040-8/5 • ch.36.F • Chapter 36 • FINAL • VB • 11/04/98 • p.1207

Generic icons
As we mentioned in Chapter 1, the solution to your files losing their icons is
to rebuild the Desktop.
Confused bundle bit
Every now and then, however, you’ll discover that only one program’s set of
icons is turning up blank. If that’s the case, the “bundle bit” (a tiny software
pointer that associates a program with its set of icons) may have become
confused. You can use a shareware program like ReBundler or Save-a-BNDL,
or you can reinstall the program onto your disk.
After you have the bundle problem resolved, you still have to rebuild the
Desktop to make the icons reappear—unless you use this trick. Select a file
whose icon is missing. Choose Get Info from the File menu. Click the icon and
press Ô-C (copy); then press Ô-V (paste). You just pasted the generic icon
back onto itself. Finally, press Ô-X (cut) to remove the “custom” icon. This
forces the Finder to reread the BNDL information from the file on disk instead
of from the Desktop databases.
Parent programs on not-yet-mounted disks
If your generic-icons problem persists even after you’ve rebuilt the Desktop,
there may be a more complex problem afoot. As you know from Chapters 1
and 15, a file’s icon is stored in the resources of the program that created it. If
PageMaker isn’t on your hard drive, then all your PageMaker documents will
show up blank, no matter how many times you rebuild.
If you have multiple hard drives (or multiple partitions, or a hard drive and a
Zip or Jaz, say), it’s possible that the Finder program is launched before all of
the other disks have been brought “online.” As far as the Finder knows, you
don’t have PageMaker at all — because the disk that contains PageMaker
hasn’t been brought onto the screen yet. The result: generic PageMaker
document icons.
The solution is to force all attached partitions and disks to mount before the
Finder launches. To do so, install SCSIProbe (included on the CD-ROM with
this book). Open the control panel; click Options; and turn on the “Mount
Volumes During Startup” option. (Conflict Catcher 8 offers a similar option.)
Shimmering monitor
A monitor shimmer is usually caused by interference, such as a lamp, a fan, or
other appliance that’s very close to it, or an air conditioner running on the
same circuit. Consider putting the a/c on a separate circuit. You can also
spend $250 or so for a line conditioner for the Mac.
If none of these steps solves the problem, it’s possible the monitor actually
needs to be repaired.
1208 Part V: Attachments
■ ■
Macworld MAC SECRETS • 4040-8/5 • ch.36.F • Chapter 36 • FINAL • VB • 11/04/98 • p.1208
Black Úmenu
On a Mac with a color monitor, the Úmenu is usually marked on the menu
bar by an Úicon with horizontal colored stripes (Apple’s logo). If it shows up
as solid, puffy black when the rest of the screen is in color, then you’ve
probably set your monitor to thousands of grays mode, which, nonsensically
enough, puts your screen in color — except for the Úmenu.
Finder changes don’t stick
If your changes to the way the Finder displays windows and icons don’t seem
to stick when you restart the Mac (for example, when you change the Views
control panel settings), you may have a damaged Finder Preferences file.
Open your System Folder; open the Preferences folder; find the Finder
Preferences file; trash it; and restart the computer. The problem should be
gone now.
No Mac icon on the System Folder
The System Folder on your startup disk usually displays a little Mac icon, as
shown in Figure 36-2.
Figure 36-2: On the left, a normal System Folder. On the right: Where is the little Mac icon?
If the System Folder has a normal folder icon instead, there are only three
possibilities:
■You have two System Folders on your drive, and this isn’t the one
currently running.
■You’re not looking at the System Folder of the startup drive, but instead
it’s the System Folder on another disk.
■The real System Folder is inside another folder (possibly this one).
Startup Troubles
There’s almost nothing worse than encountering Mac problems before the
thing has even started up! This guide will be of some assistance.
The Sad Mac icon
The Sad Mac icon can appear, among other times, when you press (or some
object on your desk presses) the Interrupt switch on your Mac, either
Strange
But True
Chapter 36: Troubleshooting 1209
■ ■
Macworld MAC SECRETS • 4040-8/5 • ch.36.F • Chapter 36 • FINAL • VB • 11/04/98 • p.1209

inadvertently or on purpose. See Chapter 7 for more about the Interrupt
switch.
Otherwise, your troubleshooting efforts should focus on when the sad-Mac
logo appears. If you see the normal Welcome to Macintosh message and then
the sad Mac face, you’re in luck—your problem’s with the System folder, not
with the actual hardware. Just try starting up from a different system disk, or
follow Step 2 of our Rule of Three.
If, however, you get the sad Mac immediately when you turn the Mac on, your
main circuit board (logic board) or RAM chips are probably not seated right
(Figure 36-3). In our experience, the Sad Mac most often appears just after
you’ve installed new RAM chips or changed your SCSI-chain setup (see
Chapter 33). It tells you that one of the chips is defective or improperly
seated (try reseating the chips) or that your SCSI chain is improperly
numbered or terminated.
The Sad Mac can also appear mysteriously as a result of a number of other
conditions, most of which you can solve by following our Rule of Three
(especially Step 3). In fact, the sad Mac often goes away by itself, even if you
don’t change a thing.
Figure 36-3: The dreaded Sad Mac icon.
Beneath the Mac icon there’s a row or two of special codes (such as 0F000D,
which you may recognize from Chapter 21 as being hexadecimal notation). In
theory, they can help you figure out exactly what’s wrong with the Mac. In
practice, these codes are designed for techies and may not even be accurate.
For the Mac SE and all later Macs, you actually get two lines of codes that are
supposed to help you figure out what’s wrong. The only useful numbers are
the bottom row and the second half of the top row. Table 36-2 lists some
common codes and what they mean. By code, we mean here the second four
characters on the top row.
Be aware of two things about these codes. First, they don’t apply to Macs
before the SE, and they don’t apply to PowerBooks. Second, some of these
codes may suggest something obvious for you to try: If it’s code 0006, you
may as well try plugging and unplugging the keyboard cable. But in general,
our original words apply: The problem usually goes away by itself or goes
away when you follow our Rule of Three steps.
1210 Part V: Attachments
■ ■
Macworld MAC SECRETS • 4040-8/5 • ch.36.F • Chapter 36 • FINAL • VB • 11/04/98 • p.1210

Table 36-2 Sad Mac Codes
Code Explanation
0001 The ROM chip is having trouble (may not be seated correctly).
0002 Something’s wrong with a SIMM in bank B, if your Mac has two banks of
SIMMs.
0003 Something else is wrong with bank B.
0004 Something’s wrong with a SIMM in bank A.
0006 Something’s wrong with your ADB (keyboard/mouse) jack.
0008 Again, an ADB problem.
000A There’s a problem with the NuBus slots.
000B Trouble with the SCSI chip.
000C It’s floppy drive trouble.
000D Something’s wrong with the printer or modem port.
If it still doesn’t go away, and you’ve even tried reseating the RAM chips, then
it’s time to call a dealer.
Especially long startup times
A two-second pause between the monitor’s lighting up and the appearance of
the “happy Mac” icon is normal. But if the standstill is abnormally long (longer
than about eight seconds), or if the disk/question mark icon briefly appears
on your screen before the startup process begins, you have a problem.
Fortunately, it’s an especially easy one to fix. In the Startup Disk control
panel, you probably selected a different disk to start up from—a disk that’s
no longer available, such as a Zip or Jaz disk. Open the Startup Disk control
panel, click your proper startup hard drive, and the problem goes away.
The blinking question-mark icon at startup
The Mac blinks the question-mark/disk icon when it can’t find a System
Folder. Of course, you can always get around this by inserting your startup
CD. But that’s not a long-term solution — something is clearly wrong with
your hard drive, which is supposed to have its own System Folder.
Apply the Rule of Three. Restart the Mac. Restart the Mac with the Shift key
held down. Unhook external SCSI devices. (This often solves the problem; see
“SCSI Troubleshooting” in Chapter 33.) Try starting up from your Disk Tools
disk. Do a clean reinstall of your system software. Run the Disk First Aid
program. If your hard drive still isn’t showing up on the screen, get a program
Chapter 36: Troubleshooting 1211
■ ■
Macworld MAC SECRETS • 4040-8/5 • ch.36.F • Chapter 36 • FINAL • VB • 11/04/98 • p.1211

such as TechTool Pro or Norton Utilities and see if it can bring your drive
back to life.
Actually, if all else fails, the problem may be far simpler. If anything is keeping
the mouse (or PowerBook trackball button) pressed as the Mac is trying to
turn on, this same blinking question mark may result. Lift that stack of
books/Jaz cartridge/cinder block off the mouse button, and your Mac will
proceed to start up as usual.
Crashing on startup
Clearly, you’ve got an extension conflict. You can temporarily get up and
running without any of these extensions — and without any conflicts — by
following Step 1 of our Rule of Three.
To find and eliminate the conflict, however, your first thought should be to
use Conflict Catcher (see Chapter 22), which automates this testing process
and tells you what the conflict was.
Twilight Zone theme, car crash, or
four notes
If, when starting up, your Mac plays a note-by-note chord, evil brass fanfare,
“Twilight Zone” theme, car crash, or cartoony breakdown sound, it’s trying to
tell you that it didn’t pass one of its routine startup tests. (See “The Chimes
of Death” in Chapter 7).
You most often hear these chimes just after you’ve installed new memory
into the Mac; it means that one of the SIMMs isn’t seated right (see Chapter 9
for details). The chimes also sound if something is pressing your Mac’s
Interrupt switch at startup (see Chapter 7).
Disk Troubles
Like all living things, hard drives and other kinds of disks have occasional
bad hair days. You can cope, though, as follows.
Hard disk troubleshooting
For a huge helping of hard drive troubleshooting, see Chapter 8. In the
meantime, if your hard drive isn’t showing up, or is acting flaky, try these
steps, in order:
■Restart the Mac.
■After starting up from a different disk (such as your system CD-ROM),
run Disk First Aid. (Click the Repair button more than once; sometimes
this takes several tries.)
1212 Part V: Attachments
■ ■
Macworld MAC SECRETS • 4040-8/5 • ch.36.F • Chapter 36 • FINAL • VB • 11/04/98 • p.1212

■Reinstall the hard disk driver. (Don’t initialize your drive, just update; see
Chapter 8 for details.)
■Rebuild the Desktop (see Chapter 1).
■Do a clean install of the system software (see the beginning of this
chapter).
■Zap the PRAM, as outlined at the beginning of this chapter.
■Check your SCSI setup (see Chapter 33).
If you’ve tried everything and haven’t succeeded in resurrecting your hard
drive, you can always wipe it out, reformat it, and start from scratch. But if
there’s data on the drive that’s worth paying big bucks for, remember that
there’s one last resort: sending it to DriveSavers (415-883-4232). They have
clean rooms, deoxidants, and all kinds of high-tech gear devoted exclusively
to getting data off a drive, and they report a success rate of more than 90
percent.
All floppy disks show up locked
Of course, all your floppies aren’t really locked. We’ve seen this in several
Macs, and the problem is simple enough: dust on the drive mechanism.
If you’re technically minded, open the Mac case. Use a screwdriver to gently
take out the floppy-drive unit. (On some Macs, you also have to lift out the
hard drive unit first. Just remember where everything came from!)
Look at it closely. You see a toothpick-like, spring-loaded, white plastic pin.
This pin usually slips into the locked/unlocked hole in a disk, and it tells the
Mac whether the disk is locked or not. Over time, this pin gets caked with
dust and gunk and becomes less springy; eventually, it may stay in the down
position, making the Mac think that the disk is locked. Clean the pin carefully,
test for springiness, and reinstall everything.
Chapter 36: Troubleshooting 1213
■ ■
Macworld MAC SECRETS • 4040-8/5 • ch.36.F • Chapter 36 • FINAL • VB • 11/04/98 • p.1213
Macworld MAC SECRETS • 4040-8/5 • ch.36.F • Chapter 36 • FINAL • Laura • 10/28/98 • p.1213
ANSWER MAN
Q: I read your writeup of blinking question-marks
at startup. But my Performa still does it even
after a clean install — in fact, it was a clean
install of Mac OS 8 that started the problem!
A: You must have a 5400, 5500, 6400, 6500, or
Twentieth Anniversary Macintosh model.
Q: Right! How did you know?
A: We’re the authors. We know all, we see all.
Anyway, you’re the victim of a bug in the hard
drive driver. The solution is to get a later version
of Drive Setup (see Chapter 8) — version 1.3.1
or later. Launch this program, use the Update
Driver command (see Chapter 8 again), and
you’re back in business.
My Performa still blinks the question mark!

File, Desktop, and Icon Troubles
This section of our encyclopedia of woes pertains to files and icons that
go awry.
Can’t empty the Trash
If you can’t empty the Trash, try one of the following:
■Hold down Option as you choose Empty Trash.
■Quit your programs and try again. (Maybe another program is using
the Trash.)
■Restart the Mac without any extensions (see Step 1 at the beginning of
this chapter) and try again.
■Try the stunt described under “That folder is in use and cannot be
deleted,” earlier in this chapter.
■Try a different startup disk. Also try a clean system reinstall.
1214 Part V: Attachments
■ ■
Macworld MAC SECRETS • 4040-8/5 • ch.36.F • Chapter 36 • FINAL • VB • 11/04/98 • p.1214
Macworld MAC SECRETS • 4040-8/5 • ch.36.F • Chapter 36 • FINAL • Laura • 10/28/98 • p.1214
CASE HISTORY
Scott Gaidano of DriveSavers told us the
following true story about one of his clients.
In early 1993, a cruise ship was just starting its
1,000-mile cruise up the Amazon. Three hundred
passengers were on board. Just as the ship set
out, it struck an underwater barge and sank. (It
was the same day as the World Trade Center
bombing, so there wasn’t much news of it.)
Two of the passengers were a couple, a
juggling team, who had been hired as onboard
entertainment. The story of their journeys was
painstakingly written up — on their PowerBook
100, now deep underwater in the sunken cruise
ship.
Two days after the ship sank, the guy persuaded
his fiancée to get into scuba gear and swim
down into the lime-green, piranha-filled ship.
She swam down two flights of stairs, down the
corridor, and into what had been their
stateroom. Sure enough, there was the
PowerBook on the desk. She also grabbed, from
the dresser drawer, the diamond ring her great-
grandmother had given her, a bag of juggling
equipment, and her contact lenses that were
bobbing in their case on the ceiling of the
stateroom.
She brought it all to the surface. She sent the
PowerBook to Scott, whose staff decontam-
inated it, desalinized it — and successfully
rescued the files!
You think
you’ve
got trouble?

Keyboard Ailments
As we mentioned in Chapter 10, your keyboard is actually a computer unto
itself. As such, it gets problems all its own.
Dead key
When we say “dead key” here, we don’t mean one of those Option-key
characters. We mean a broken key.
You can get the keyboard repaired professionally, of course. But chances are
good that the problem is just a gummed-up contact, which you can clean.
Turn off the Mac. Carefully pry the plastic key off its stem. Then take a can of
WD-40 aerosol lubricant (available at hardware stores). Insert the narrow
plastic WD-40 tube into the point where the key plunger enters the black
body of the key. Give a short spray. Press the key plunger a few times and
then hook everything back up to see if the key works. If the key still isn’t
fixed, repeat a couple more times.
Crazy slow typing
If the Mac suddenly gets incredibly slow to respond to your typing, chances
are that the culprit is one of the following:
■The Key Caps desk accessory is open somewhere in the background. It’s
intercepting every keystroke, displaying the appropriate symbols, and
gumming up everything. Close it.
■You’re multitasking. The Mac is splitting its focus between your typing
and its background task (printing, copying, or downloading files, for
example).
■If your Mac is on a network, bad equipment or frayed wiring may be
transmitting garbled signals over the network lines. Disconnect yourself
from the network and see if the slowdown persists. If the problem
vanishes as soon as your Mac is cut loose from the network, you know
you’ve got a network problem on your hands. See Chapter 35 for some
tips on network troubleshooting.
■Your SCSI chain is acting up. See Chapter 33 for instructions on solving
SCSI problems.
Chapter 36: Troubleshooting 1215
■ ■
Macworld MAC SECRETS • 4040-8/5 • ch.36.F • Chapter 36 • FINAL • VB • 11/04/98 • p.1215
Macworld MAC SECRETS • 4040-8/5 • ch.36.F • Chapter 36 • FINAL • Laura • 10/28/98 • p.1215

When All Else Fails
If you can’t find your trouble described and troubleshot in this chapter, and
you have access to the Internet, visit Apple’s Technical Information Library
on the World Wide Web. It contains a searchable collection of thousands of
tiny articles on techie subjects that aren’t available anywhere else. (You
might search, for example, for “PowerBook 2400 and batteries.”) The address
is http://til.info.apple.com.
If you really think something’s mechanically or electrically wrong with the
equipment, don’t forget that Apple is taking especially good care of you and
your Mac lately.
If you bought a PowerBook and it’s less than a year old, Apple will send
someone to pick it up, ship it overnight to their repair facility, fix it, and air-
express it back to you. Free.
The number to call, both for help and for repairs, is 800-SOS-APPL.
1216 Part V: Attachments
■ ■
Macworld MAC SECRETS • 4040-8/5 • ch.36.F • Chapter 36 • FINAL • VB • 11/04/98 • p.1216
Macworld MAC SECRETS • 4040-8/5 • ch.36.F • Chapter 36 • FINAL • Laura • 10/28/98 • p.1216
MACINTOSH SECRET
After having read literally tens of thousands of
e-mails and BBS postings, we know one thing
for sure: A huge percentage of crashes, freezes,
and incompatibility problems are caused by the
same culprits. Over and over again, the problem
turns out to be an outdated or incompatible copy
of one of the following programs. Pay special
attention to these offenders when you upgrade
anything on your Mac, such as the system
software or the Mac itself.
How can you cultivate instincts about which
extensions are causing your headaches? Think
about how deeply your software is designed to
modify the normal system software. Consider
how radically it changes the Mac’s behavior.
The more dramatic the interference, the more
likely an extension is to be a troublemaker.
Fax software, font-management software,
screen saver, virus checkers, anything-Doubler,
software that changes your Mac’s whole look
(like ClickChange and Kaleidoscope) are the first
things we suspect.
How to pinpoint suspect extensions

MACWORLD MAC SECRETS • 4040-8/5 • Appendix.F • FINAL • VB •11/04/98 • p.1217
Appendix
The Secrets Software
We understand that despite the countless hours your cheerful authors
have spent researching and writing this book, you may well consider
the software supplied with this book to be the main course. Bon appetit!
What You’ve Got Here
This CD contains three categories of software: commercial software,
shareware, and freeware.
Commercial Software: These are full-fledged, non-demo versions of
commercial programs. You may get the actual, current software package
(such as OneClick) or a previous shipping version of something (such as
Color It). In exchange, the software companies hope you’ll want to upgrade
to newer versions as they appear.
They’ve made doing so attractive, too, by including coupons with special
offers at the back of this book.
Shareware: Shareware lets you try out the programs without paying a dime
up front. Then, if you like the software and want to continue to use it, the
honor system dictates that you pay them the small fees their authors
request (usually between $5 and $35).
In exchange for paying the fee, some authors give you a password to unlock
additional features or eliminate persistent reminders to pay up. Often you’ll
get a manual or a disk back by mail, containing the newest version of the
software, along with a selection of other products in the author’s line.
Freeware: Some of the programs on our disks are designated as freeware; no
payment is requested. The author retains the copyright.
Disclaimer
We’ve tested every program here on PowerBooks and standard desktop
Macs. Still, here’s about the only guarantee we can make: this stuff works
on our machines. We can’t promise that it all works smoothly with whatever
junk you’ve already got in your System Folder. Strange as it may sound, we
also can’t promise that it all works together without a little experimentation
— you’ve got to be pretty bold to throw 90 control panels into your System
Folder at once.

Some of the potential problems are common sense: don’t install Action Files
if you already have Super Boomerang. Don’t install Hidden Finder Features
(which gives Mac OS 8-type features to System 7.5) if you have Mac OS 8. And
so on.
If you have trouble, here are four ways out. First, consult our own
troubleshooting chapter (Chapter 36), where you’ll find out how to do basic
conflict-hunting (holding down the Shift key works wonders; doing a clean re-
install works miracles).
Second, contact the company or shareware author who created the program.
You’ll find phone numbers, e-mail addresses, and Web-page addresses in the
folders of the individual programs on this CD.
Finally, if you have no luck, e-mail us. While we don’t know each program as
intimately as the people who wrote it, we’ll see what we can do to help.
How the CD-ROM Is Organized
These folders are on the CD-ROM:
Mac SECRETS Electronic Edition — The electronic version of this book,
provided in Adobe Acrobat format, so that you can search the entire text for
specific topics instantly.
As a bonus, we’ve also included the entire text of the previous edition, in case
you’re interested in reading up on an older topic (OpenDoc, Word 5.1, or
Cyberdog, say) that’s no longer covered in the current edition. (If you do
decide to peruse that 4th Edition, be sure to install its special font before
proceeding, as directed by the Read Me file.)
Complete Software Collection — All the Mac Secrets software, in alphabetical
order (exactly as it appears in this chapter). Each program is in a folder with
its own on-disk manual and other information.
Listed by Chapter — Aliases of the same software folders, grouped in folders
corresponding to this book’s chapters. This way, if you’ve just read about
something in the book, you can find it instantly on the CD-ROM.
Listed by Category — Aliases of the same software, this time in folders
organized by the kind of software inside: Games, Utilities, Fun Stuff, and so
on.
Commercial Software — Actual, fully functional software provided by
commercial software companies — OneClick, CanOpener, MacLinkPlus,
and so on.
Icons, Sounds, Graphics, Movies — From Nova, Zedcor, Component
Software, Olduvai, and others: sampler sets of commercial graphics, sound,
and icon collections.
Shareware & Freeware — Aliases to all the non-commercial software.
In the following discussions, we’re assuming you’re running System 7.5 or later.
1218 Macworld Mac Secrets, 5th Edition
■ ■
MACWORLD MAC SECRETS • 4040-8/5 • Appendix.F • FINAL • VB •11/04/98 • p.1218

The Secrets Software Described
Action Files 1.1P
(Commercial software from Power On Software.) Action Files enhances the
look and feel of the standard Open and Save dialog boxes. It makes them
movable and resizable, for example, and adds a menu across the top. These
menus create new folders, make aliases, duplicate files and folders, rename
items, or move any item to the trash. Action Files’s Find command finds files
by name, size, kind, label, creation date, modification date, file type, creator
and more — without ever leaving the Open or Save dialog box.
Action Files also adds columns of file information to the Open and Save
boxes, including a file’s size, date, label, and kind using any font. You can sort
the list by name, size, date, kind, and label.
Note: This version of Action Files is essentially a demo. When you install it,
you’ll be asked for a serial number. If you haven’t purchased a serial number,
you can still use Action Files for a 30-day free trial. After 30 days, most of
Action Files’ features are automatically disabled.
A few goodies remain, however: you can still change the text font and style
used in your Open and Save dialog boxes; change the sorting order; specify
which columns you want shown; use the pop-up menu of disks; and so on.
(The commands that turn off after 30 days turn red; the commands still listed
in black continue to work.)
If you decide to buy a serial number, thus preserving all of Action File’s
features beyond the trial month, see the coupon in the back of this book for
a special offer.
Appendix 1219
■ ■
MACWORLD MAC SECRETS • 4040-8/5 • Appendix.F • FINAL • VB •11/04/98 • p.1219
TRUE FACT
If you’ve owned previous editions of this book,
don’t be fooled — although some titles of the
programs we’re including here look familiar,
most are here in newer versions.
Many of the programmers whose work is
represented on our CD will be aghast to notice
that we’ve done away with those cute custom
folders... the ones with the miniature icon inside
each folder. We discovered that when you open
a window containing a hundred of these things,
a CD is painfully slow. So all of the programs
now come packed in plain, boring, ordinary
folders — and the windows open a lot faster.
In the previous editions of this book, we told you
where to find the manual for each program. This
time, we’re just gonna say it once: the manual is
a document inside the folder containing the
software. If it’s not, we’ll say so. Ditto with the
software authors’ contact information and
shareware payment details — it’s all right there,
nestled in with the software itself.
Everything’s different, nothing’s changed
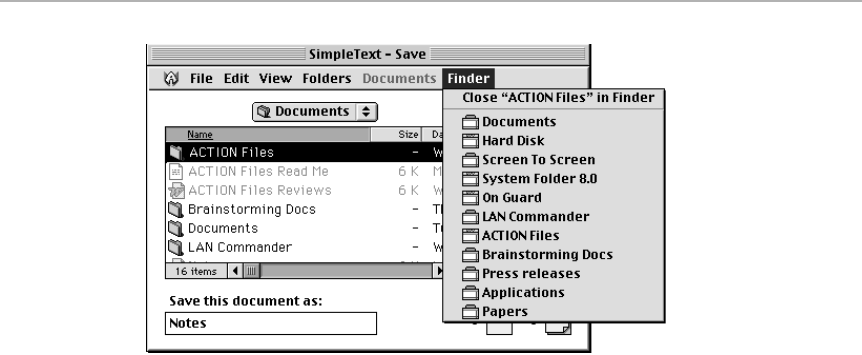
Anagrams
(Andrew Trevorrow, Nick Spencer, $15 shareware.) An anagram is a phrase
created by scrambling the letters of another phrase. For example, an
anagram of information superhighway is “New utopia? Horrifying sham!”
You just type in a word — your name, for instance — and this program
automatically spews out thousands of English phrases, or pseudo-phrases,
composed of those rearranged letters. Anagrams (the program) offers several
clever methods of weeding out the junky nonsense phrases, making it much
easier for you to locate the meaningful ones.
Apeiron
(Ambrosia Software, $15 shareware.) Apeiron is a wild high-speed arcade-
style variant on the old Centipede game. According to the author: “During a
port through the looking glass, the mirror shatters and your ethereal energy
(you know, the stuff that allows you to get up and go to work on a Monday
morning) is trapped within one of the crystal shards. Immediately the
residents of the mushroom patch sense your presence. Led by the Pentipede,
these critters relentlessly hunt the crystal, intent upon sucking the trapped
energy out. With plasma cannon blazing, you must hold out as long as
possible.”
AppDisk
(Mark Adams, $15 shareware.) AppDisk is a RAM disk application. What is a
RAM disk? It’s a piece of software that lets you use some extra RAM memory
as a really fast hard disk (and extend the life of a PowerBook battery; see
Chapters 9 and 14). The disk appears on your desktop just like any other
1220 Macworld Mac Secrets, 5th Edition
■ ■
MACWORLD MAC SECRETS • 4040-8/5 • Appendix.F • FINAL • VB •11/04/98 • p.1220

hard disk, and you can copy files to it normally. When you turn off your Mac
or restart, the contents of the RAM disk are lost — so AppDisk has several
options to automatically save a copy of the RAM disk contents onto your
hard disk.
To launch AppDisk, double-click its icon. AppDisk instantly creates a RAM
disk on your desktop. (To change the RAM disk’s capacity, change AppDisk’s
Get Info memory size before launching it.)
Apple Spec Database
(Apple Computer, free.) Without adding another 1,400 pages, we weren’t able
to fill Chapters 12 and 13 with as much detail about every Mac model ever
made as we would have liked. If you really, really want to know about the
possibilities of a particular model, or when it was introduced, or how much
VRAM it has, consult this amazingly complete database from Apple. (Apple
occasionally posts new versions of this database at http://support.info.
apple.com/applespec/applespec.qry.) AppleSpec Database © 1998 Apple
Computer, Inc. Used with permission. All rights reserved.
Appendix 1221
■ ■
MACWORLD MAC SECRETS • 4040-8/5 • Appendix.F • FINAL • VB •11/04/98 • p.1221
MACINTOSH SECRET
We’ve discovered that AppDisk can be
extremely useful for extending the life of any
copy-protected software you’ve purchased.
Some of today’s copy-protected software uses
a hard-disk install method: you’re permitted to
install the program one or two times onto a hard
drive. Once there, it behaves exactly like any
other program. If you choose not to install it
onto a hard drive, you’re asked to insert the
original key floppy disk every single time you run
the program. This scheme is used by Performer,
Vision, Final Draft, and other niche-market
software.
Trouble is, floppies go bad; your key disk may stop
working. Worse, standard hard drive maintenance,
such as defragmenting or repartitioning, loses
your precious hard-disk-installed copy forever.
Using AppDisk, however, you can protect yourself.
We’ll use Performer in this example.
Using AppDisk, create a RAM disk large enough
to contain a copy of Performer. Use the hard-
disk installation procedure to install a copy of
Performer onto the RAM disk. Quit Performer.
Now use AppDisk’s Save command. You’ve just
preserved the installed commercial program
forever, in its no-key-disk-required condition!
Run Performer’s installer a second time, and this
time uninstall Performer from the RAM disk!
You’ve now reclaimed that precious installation
back onto the floppy. Finally, quit AppDisk and
do not save changes!
At this point, you have a good hard-disk
installation left on your master floppy and a
RAM disk that, as long as you never save
changes, has a permanent supply of HD installs.
You can make as many copies of the AppDisk as
you want.
A hot AppDisk secret

AppleScript Utilities
(Apple Computer, free.) To find out more about AppleScript, the Mac’s built-in
automation/macro feature, see Chapter 22. This collection of finished
AppleScript serves both as productive tools and as a demonstration of
AppleScript’s power. (For more scripts and information about how you can take
advantage of this remarkable tool, visit http://applescript.apple.com.)
This collection includes such AppleScripts as Add Prefix/Suffix to Files,
Total Size of Selected Items, Trim File Names, Go to Website, Desktop
Picture Slideshow, Set View Prefs for All Folders, and so on.
This folder also contains the OSA menu, a free extension that adds a list of
AppleScript commands to your menu bar, making your finished AppleScripts
always available.
AppleScript Utilities © 1997 Apple Computer, Inc. Used with permission. All rights reserved.
AppSizer
(Peirce Software, $20 shareware.) If you read Chapter 9, you know the drill
when it comes to changing how much memory a particular program uses
when it’s running — highlight its icon, choose File ➪Get Info, and so on.
AppSizer, however, lets you change how much RAM a launching program will
use on the fly — just press the Control key as it launches.
Avara
(Ambrosia, $20 shareware.) Are you prepared for battle? With its fast and
furious action and unique 3D game play, you can’t help but be absorbed in
this game. Using both the mouse and keyboard, you have complete 360-
degree control to counter-maneuver and quickly target your enemy. You’re
not limited to sliding around in predetermined mazes, as in many of the older
3D games. Avara’s maneuverability is unique, allowing warriors to freely
climb, jump, and run on any of the structures in the battlefield.
Add to this Avara’s networkablity — play over the Internet or your office
network — and the game gets even more interesting. Develop your skills and
strategy in the many solo levels, and when you’re ready, access the Avara
Internet Tracker to locate worthy opponents. The Tracker offers users a
continually updated list of Avara games in progress all over the Net.
BeHierarchic
(Fabien Octave, shareware $10.) BeHierarchic is a powerful Úmenu
enhancer. It lets you see more than five levels of submenus (for folders
nested in folders); can change the font and size used for your Úmenu; can
group and rearrange the items in your Úmenu; adjust a program’s memory
appetite as it’s launching; list the items on your Desktop; and much more.
(Don’t be fooled by the fact that BeHierarchic has been around along time,
1222 Macworld Mac Secrets, 5th Edition
■ ■
MACWORLD MAC SECRETS • 4040-8/5 • Appendix.F • FINAL • VB •11/04/98 • p.1222
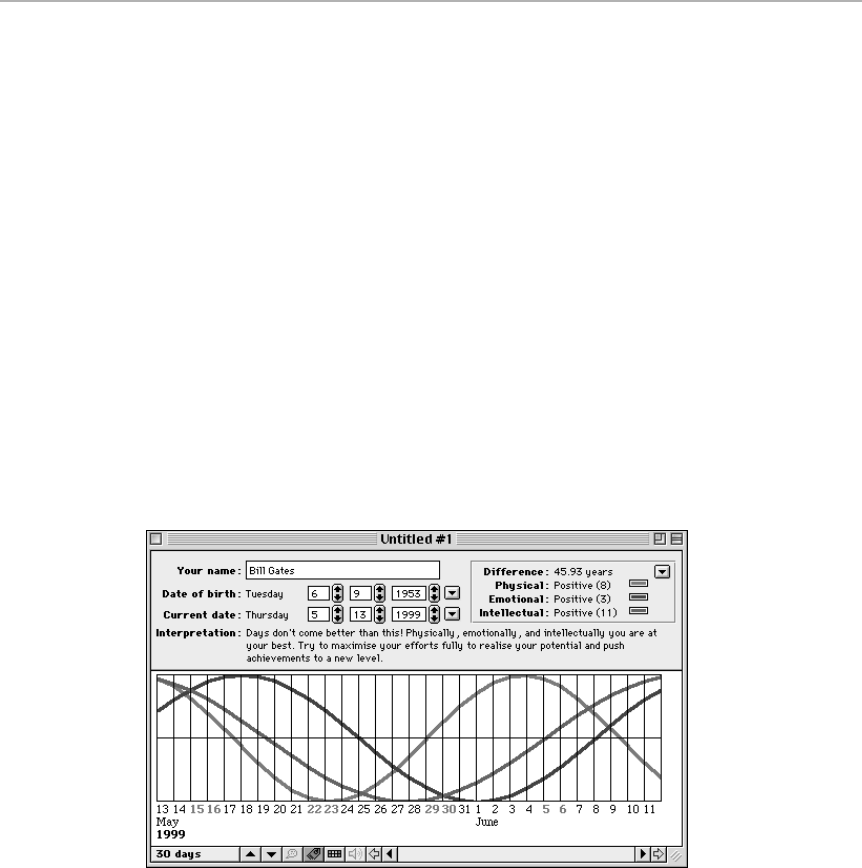
having been originally designed as an add-on to give Mac OS 8-style
submenus to any folders listed in the Úmenu; this version works at least
through Mac OS 8.1.)
Big Picture
(John Montbriand, $20 shareware.) Big Picture is the ultimate drag-and-drop
graphics-file opener and slide-show maker. Whatever it is you’ve just
downloaded from the Web, Big Picture can show it to you. Understands GIF,
PICT, MacPaint, BMP, JPG, StartupScreen, and QuickTime file formats. Also
generates double-clickable, standalone slide-show documents.
Biorhythms
(Andrew Regan, $20 shareware.) According to popular legend, our minds,
bodies, and emotions are governed by three natural cycles known as
biorhythms. Once we realize how we are affected, we can plan our lives
accordingly, so that we take advantage of our peaks of energy and exercise
special caution on “critical” days.
Biorhythms is generally agreed to be the most powerful, attractive and
original biorhythms program available on any platform. Supports Apple
events and Macintosh Drag and Drop.
Brian’s Sound Tool
(Brian Scott, free.) A quick, clean, drag-and-drop program that converts
sound files between Mac and Windows (such as .WAV) formats. Converts
between almost any Mac format (System 7 sound file, FSSD file, any file
containing snd resources, Sound Mover suitcases, Mac CD files, and many
Appendix 1223
■ ■
MACWORLD MAC SECRETS • 4040-8/5 • Appendix.F • FINAL • VB •11/04/98 • p.1223

others) and Windows formats (.WAV files, Sound Blaster .VOC files,
Sun(/NeXT) µ-Law, Amiga 8SVX, and AIFF).
Cache-22
(Newer Technology, free.) As you may remember from Chapters 12 and 13,
nothing gooses a Mac’s speed like a high-speed memory cache. But how do
you know if your Mac has one? And if you just installed, say, a Level 2 cache
into your Power Mac, how do you know if it’s working?
This program tells you what PowerPC chip you have, what caches, and how
big they are.
CanOpener
(Commercial software from Abbott Systems.) CanOpener is an indispensable
utility that gives you emergency access to any file. It lets you copy text,
pictures, or sounds out of any file, including foreign files, corrupted files, and
mystery files. It’s a lifesaver for recovering text from damaged files. See
Chapter 22 for details, and see the discount coupon in the back of the book
to upgrade to the latest version.
Chiral
(Ambrosia, $15 shareware.) Cross the addictive real-time flipping action of
Tetris with the thinking of molecular science, and you’ve got Chiral, a visually
stunning game from Ambrosia Software. Your test tube is filling up with
atoms. Can you bond them into molecules fast enough — and keep your
molecules stable?
Clean Install Assistant
(Marc Moini, free for individuals.) As you can read in Chapter 36, a clean
system install is one of the most useful troubleshooting steps you can take.
Unfortunately, it often takes a lot of time, because you need to figure out
which files to move to the new system and which ones to leave behind
(extensions, control panels, printer drivers, application-specific items,
special folders, etc.).
Clean-Install Assistant does this sorting and moving automatically, using its
list of factory-issue Mac OS files. It’ll carefully collect your additions and
move them to a separate folder so you can update the System Folder, then
it’ll move them back to the right places in the new System Folder with a
single click!
(Yes, we know that Conflict Catcher 8 offers this feature in a much more
streamlined way — but this one’s free.)
1224 Macworld Mac Secrets, 5th Edition
■ ■
MACWORLD MAC SECRETS • 4040-8/5 • Appendix.F • FINAL • VB •11/04/98 • p.1224

Clip Jokes
(Pogue & Schorr, free.) A bunch of jokes downloaded from the Internet, in
text-clipping format. We just threw ’em on here for fun.
Clockometer
(Newer Technology, free.) Clockometer tells you exactly how fast your Mac is
running, in MHz. If you’ve installed a clock-speed accelerator (such as the
Newer Technology MacClip or PowerClip), then at what speed is that
computer running? Or what if someone installed the accelerator in one of ten
6100s in the office? How do you quickly determine which one it’s in?
Clockometer answers the question in one second.
Color It!
(Commercial software from MicroFrontier.) Color It! is a powerful 24-bit
painting and retouching program. It’s along the lines of Photoshop — but it’s
quicker to load, simpler to learn, offers multiple Undos, and requires half as
much memory.
Color It! lets you either create new color paintings or retouch scanned
photos — from black-and-white all the way up to millions of colors. It reads
MacPaint, PICT, TIFF, Photoshop, and EPS files and offers an impressive list
of features: multiple Undo; work with multimegabyte files even with limited
RAM; editable tool palette; custom patterns; image masking; and image-
processing filters.
By the way, whenever you launch Color It, your new painting window will be
filled by a colorful ad encouraging you to upgrade to Color It! Version 3. Just
double-click the Eraser tool to nuke the message.
Appendix 1225
■ ■
MACWORLD MAC SECRETS • 4040-8/5 • Appendix.F • FINAL • VB •11/04/98 • p.1225

Conflict Catcher 8 Demo
Conflict Catcher 8 is a startup-file manager. If you press the space bar as your
Mac starts up, you’re shown a list of every extension and control panel in
your Mac. At this pause in the Mac’s start-up sequence, you can switch
extensions on or off (by clicking); rearrange the loading order (by dragging);
view them sorted by type, name, or loading order; group them into mutually
required, or mutually incompatible, clusters; or group them into named
subsets. Conflict Catcher can actually show the names of your extension
icons as they load.
Best of all: if you’re having some mysterious glitch or crash, you click on CC’s
Conflict Test button. After a few restarts, CC triumphantly names the problem
extension and offers to turn it off for you. Conflict Catcher 8 also offers the
Clean Install System Merge feature described in Chapter 36 — after clean-
installing a new System Folder, Conflict Catcher can reduce to only a few
minutes the task of bringing your customized fonts, sounds, control panels,
preferences, extensions, and Apple menu items into the new System Folder.
This demo version expires a week after you first use it — long enough to get
out of whatever extension conflict you’re currently suffering. (The clean-
install feature doesn’t work in the demo version, however.)
Control Strip modules
These modules add additional functions to Apple’s Control Strip (see Chapter
4 for installation and removal discussions).
Control Panels Strip (Ammon Skidmore, free) provides a fast, easy way to
open control panels, and access to items in the Extensions, Control Strip
Modules, and Startup Items folders.
Terminator Strip (Ammon Skidmore, $5) provides a variety of functions,
including hiding or showing of the Control Strip depending on the mouse
location, quitting all applications, quitting the Finder (saving precious RAM),
shutting down, and much more.
BunchOApps (Patrick McClaughry, free) lists the most recently run programs
(and also programs you want to remain permanently in the list). Selecting an
application from either list launches the application.
CoolViews
(Quadratic Software, $20 shareware.) CoolViews is a utility for MacOS 8.0
and 8.1 that gives you more control over the list views in Finder windows
(as described in Chapter 1). With CoolViews, you can reorder and resize
columns, use solid background colors in lists, override date formats, and
create global list view preferences. (Mac OS 8.5 offers several of these
features; check the Quadratic Web site, www.quadratic.com, for an updated
version that works with Mac OS 8.5.)
1226 Macworld Mac Secrets, 5th Edition
■ ■
MACWORLD MAC SECRETS • 4040-8/5 • Appendix.F • FINAL • VB •11/04/98 • p.1226

DemoGod
(Bill Karsh, $25 shareware.) DemoGod lets educators and presenters use eye-
catching effects to enliven and clarify demonstrations of Mac software. At any
time while using the Mac, you press a single key to freeze the screen — and
now you can paint or type on the screen, draw fat red marker lines, isolate a
single window (hiding everything else), focus an animated spotlight on a
particular area, and more. Try it — you won’t believe how cool this Mac
Secrets exclusive software can be.
DeskPicture
(Peirce Software, $20 shareware.) For systems before Mac OS 8: DeskPicture
lets you display full-screen pictures on your desktop and manipulate them to
your taste, exactly as you can in Mac OS 8 and later.
Desktop Patterns (Wraptures)
(Commercial software from Form & Function — a Mac Secrets exclusive.) We
dearly love the ability to tailor our desktops with the control panel called
Desktop Patterns (System 7.5 through 7.6), Desktop Pictures (Mac OS 8
through Mac OS 8.1), or Appearance (Mac OS 8.5 and later). But we’re really
tired of the set of boring patterns that Apple provides. Therefore, we welcome
these 19 amazing, photo-realistic desktop patterns from Form & Function.
They’re adapted from Wraptures, a gorgeous collection of photo-realistic
backdrops for multimedia and Web creation.
To install, drag one of these clipping files into the mini-desktop window of the
appropriate control panel (Desktop Patterns, Desktop Pictures, or — in Mac
OS 8.5 — Appearance). Click the Set Desktop Pattern button to install the
pattern onto your actual desktop.
Desktop Picture Gallery
Sick of staring at teddy bears or Bondi Blue as your desktop background?
Then try installing any of these much more imaginative desktop “photos.” To
install, just drag-and-drop onto the mini-desktop in Desktop Pictures control
panel (Mac OS 8 through Mac OS 8.1), or the Desktop tab in the Appearance
control panel (Mac OS 8.5 and later). If you have something before Mac OS 8,
Appendix 1227
■ ■
MACWORLD MAC SECRETS • 4040-8/5 • Appendix.F • FINAL • VB •11/04/98 • p.1227

use DeskPicture, also included on the Mac Secrets CD, to install these pictures
instead.
This folder contains desktop pictures by three different artists:
■Ira Altschiller ($10 shareware) — Ten original images inspired by the
Hubble space telescope.
■Shay Fulton ($5 shareware) — Desktop Pictures Galore, fifteen originals
to suit every taste.
■W.B. Johnston (free) — Ten stunning full-screen backdrops featuring
brilliant 3-D perspective.
There’s also Shark, the man-eating, open-jawed shark photo featured on the
screens of 1998’s G3 PowerBooks in Apple’s advertisements.
Disinfectant
(John Norstad, free.) Disinfectant, a freeware application and extension, is
one of the best antivirus programs available for the Macintosh. It recognizes
and eradicates 25 Mac viruses and all known variations. Disinfectant also
recognizes many possible unknown variations. It detects the viruses and,
when possible, repairs infected files. It also includes a virus-protection
extension that loads at startup and continually protects your Mac from
infection by any of the known non-HyperCard Mac viruses.
Note: Disinfectant doesn’t protect against the AutoStart virus described in
Chapter 22, nor against Word macro viruses (also discussed there) — in fact,
this is the final version of the program. Still, we find it extremely useful in
eradicating all previous virus types.
Disinfectant’s manual, by the way, is all electronic. Launch Disinfectant, then
choose Ú➪Disinfectant Help.
DiskTracker
(Mark Pirri, $20 shareware.) DiskTracker is an extremely powerful and
flexible disk cataloging and management system. With DiskTracker, you can
quickly and easily create a catalog of every file on your floppy disks, Zip
disks, Jaz cartridges, SyQuests, hard drives, CD-ROMs, optical drives,
servers, or whatever. DiskTracker even “sees” the files in StuffIt and
Compact Pro archives and self-expanding applications.
After scanning your disks, you can then search the catalog at high speed with
the powerful searching facility. You can easily create disk labels, scan disks
in the background, launch files directly from the program, search on almost
20 different criteria, locate the disks with the most free space at a glance,
and more!
1228 Macworld Mac Secrets, 5th Edition
■ ■
MACWORLD MAC SECRETS • 4040-8/5 • Appendix.F • FINAL • VB •11/04/98 • p.1228
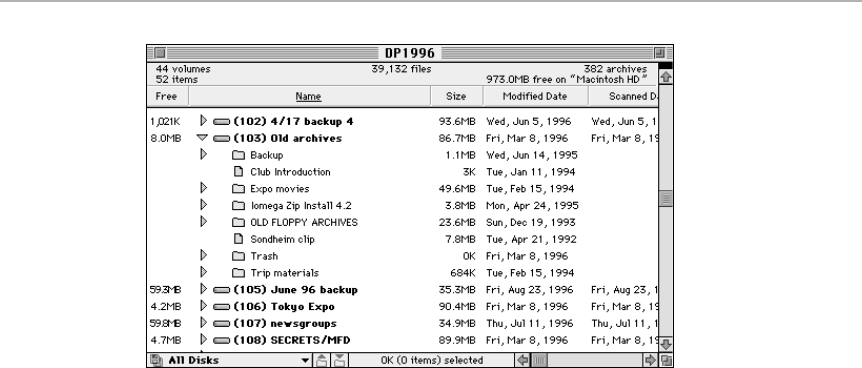
DragAnyWindow
(Alessandro Levi Montalcini, $5 shareware.) Doesn’t this always seem to
happen? There’s some information you need to see in order to finish filling in
a dialog box, but the information is covered by that very dialog box, and the
dialog box is not movable! DragAnyWindow changes that by letting you, well,
drag any window.
DragClick
(Greg Friedman, free.) Macintosh drag-and-drop is the best thing to happen
to the Mac OS since System 7. (See Chapter 1 for more about how great it is
to drag highlighted text into and out of your word processor windows.) Only
one problem: not all programs support Drag-and-Drop.
Well, they do now. DragClick adds automatic text dragging to almost any
program that uses the normal Mac routines for the display and manipulation
of text — including Word 5, America Online 2.7, and other non-drag-and-drop-
savvy programs. Just click on selected text, and drag to the desktop or into a
program that does support drag-and-drop.
DropStuff
(Aladdin, $30 shareware.) DropStuff makes the creation of StuffIt compressed
archives a piece of cake. Simply drag the file you’d like to compress onto the
DropStuff icon. The program automatically compresses it, creating the new
compressed file and adding “.sit” (which is universally used to let people
know that they’re dealing with StuffIt compressed files) to the end of the
original document name.
As a bonus, DropStuff (whose full name is “DropStuff with Expander
Enhancer”) adds a vast array of new downloaded-Internet-file-opening smarts
Appendix 1229
■ ■
MACWORLD MAC SECRETS • 4040-8/5 • Appendix.F • FINAL • VB •11/04/98 • p.1229

to its companion program, StuffIt Expander (which is also included with this
book): it lets StuffIt Expander open .gz, .z, .uu, .ARC, .ZIP, and .uu files, too.
(As with any utility, check the Web site — in this case, www.aladdinsys.com
— for updates if you’re using Mac OS 8.5 or later.)
Dvorak Keyboard Layouts
(Dvorak International, free.) When Charles Sholes designed the 100-year-old
typewriter keyboard layout we still use today, he was trying to design
something as clumsy as possible — he didn’t want fast typing to jam his
prototype typewriter. August Dvorak, in 1930, designed an improved layout,
in which all the frequently used letters are directly beneath your fingers.
Typists swear that the Dvorak layout lets them type faster, more accurately,
and with far less finger movement than the traditional layout.
Fortunately, you have a Mac; you can see for yourself. Simply drop this
keyboard layout icon onto your System Folder and select it with your
Keyboard control panel (see Chapter 4).
After installing this layout, consult the chart (provided in the Read Me file) or
your Key Caps desk accessory to learn the new locations of the keys.
eDOC
(Michel & François Touchot, $25 shareware.) EDoc is along the same lines as
Adobe Acrobat, but far faster, less expensive, less memory-hungry, and more
flexible. It lets you create standalone, double-clickable documents that other
people can read, search, copy from, or print — without needing a word proces-
sor. Documents in eDoc format maintain their original layout, complete with
graphics, styles, colors, fonts (if present on the recipient’s machine), and so
on; in other words, eDoc files are great for distribution via Web page, e-mail,
disk, CD, and so on. No matter what kind of Mac the recipients have, they’ll be
able to double-click your file and read its contents — looking exactly the way
you had originally designed it.
Escape Velocity
(Ambrosia, $20 shareware.) Escape Velocity combines elements of classic
“trading” games, arcade space shoot-outs, and strategy simulations. Whether
you choose to build a trading empire, aid the Rebellion in a civil war, or strike
out on your own as a ruthless pirate, Escape Velocity provides a multitude of
options for the game connoisseur. This open-ended game play allows each
player to chart his or her own course while playing. There is no “right” way
to play Escape Velocity, as long as you have fun.
1230 Macworld Mac Secrets, 5th Edition
■ ■
MACWORLD MAC SECRETS • 4040-8/5 • Appendix.F • FINAL • VB •11/04/98 • p.1230

Extensis PhotoBevel
(Commercial software from Extensis Software.) This plug-in for Photoshop
(and Photoshop-plug-in-compatible programs, such as Color It) does one
thing very well: it creates raised-looking lettering (and other raised-looking
images) right in your artwork document. It’s one of the plug-ins in PhotoTools
2.0 for the Mac, a $130 program.
EZNote
(John Holder, $20.) Have you ever needed to jot down a note quickly and
be able to easily find it later? Ever wanted to save some text while Web
browsing for later reading? EZNote can do these things and more at the touch
of a key or click of a mouse without making you leave the application you’re
in. Hit another key at any time to bring up a list of all your notes, which you
can edit, delete, search, replace, print and move from category to category
with ease.
FileTyper
(Daniel Azuma, $10 shareware.) FileTyper is a very popular, small, “drop box”
program that you can use to quickly change Type and Creator codes,
attribute flags (such as invisibility status), and date stamps of your files and
folders. It includes many powerful features such as batches, filtering, and
directory searches. (See Chapter 15 for a complete discussion of Type and
Creator codes, and Chapter 1 for a discussion of making files invisible with
this program.)
Finder View Settings
(Alessandro Levi Montalcini, $10 shareware.) Finder View Settings is ideal for
Mac OS 8 through 8.1. This control panel makes it much easier to manage the
MacOS 8 folder-specific view settings. It can globally override all of your
folder-specific view settings, making MacOS 8 behave more like System 7 or
Mac OS 8.5, or easily change the requested view settings for single folders or
entire disks.
Appendix 1231
■ ■
MACWORLD MAC SECRETS • 4040-8/5 • Appendix.F • FINAL • VB •11/04/98 • p.1231

FinderPop
(Turlough O’Connor, free.) This amazing control panel, an essential for Mac
OS 8 and later, is discussed in detail in Chapter 2. In short, it extends the Mac
OS 8 Finder’s Control-click (contextual) menus. Now you can choose a font
and size for your contextual menus; have contextual menus pop up when you
click and hold (no Control key required); switch programs from a contextual
menu; list your favorite files and folders in a universal contextual menu; and
much more.
Even better: for fans of the discontinued commercial PopupFolder utility,
FinderPop lets you Ô-click a folder to view a pop-up menu of its contents —
which you can use to open, Get Info on, trash, or otherwise manipulate the
files inside. You gotta love this kind of freeware!
Flash-It
(Nobu Toge, $15 shareware.) Flash-It is a shareware screen-capture utility —
the program, in fact, we used to take all the screen illustrations in this book.
Flash-It defines up to five screen-capture key combinations (called HotKeys).
Each HotKey performs one of the following functions:
■Captures a portion of the screen image to the Clipboard.
■Leaves the captured image in the Clipboard or saves it to a PICT-based
disk file or to the Scrapbook or sends it to the printer.
■Lets you choose the destination of the image on the fly.
Flash-It works even while menus are being displayed. It can capture only the
frontmost window (or alert/dialog box) or only the displayed menu; if you
want, you can capture the pointer (or cursor) as part of the image.
Font-O-Rama!
(Henry Starr, $10 shareware.) Font-o-rama dramatically simplifies font
selection. If you spend any time at all scrolling through font menus, testing
different font styles, or trying to get just the right font size, then Font-o-rama
will save you time.
It’s a dialog box (which you can summon with a single keypress) featuring a
huge multi-column list area that’s big enough to display all your fonts at once.
You don’t have to scroll through a long font menu looking for “Garamond
Ultra Italic” — just click on it. You’re instantly shown what the font looks like,
including some useful statistics. Better yet:
■Font-o-rama works in common applications, like PageMaker,
QuarkXPress, or Microsoft Word.
■Font families are grouped together and sorted by style.
■You can select fonts, sizes, and styles using only the keyboard.
■You can print catalogs of fonts in various styles and sizes.
1232 Macworld Mac Secrets, 5th Edition
■ ■
MACWORLD MAC SECRETS • 4040-8/5 • Appendix.F • FINAL • VB •11/04/98 • p.1232
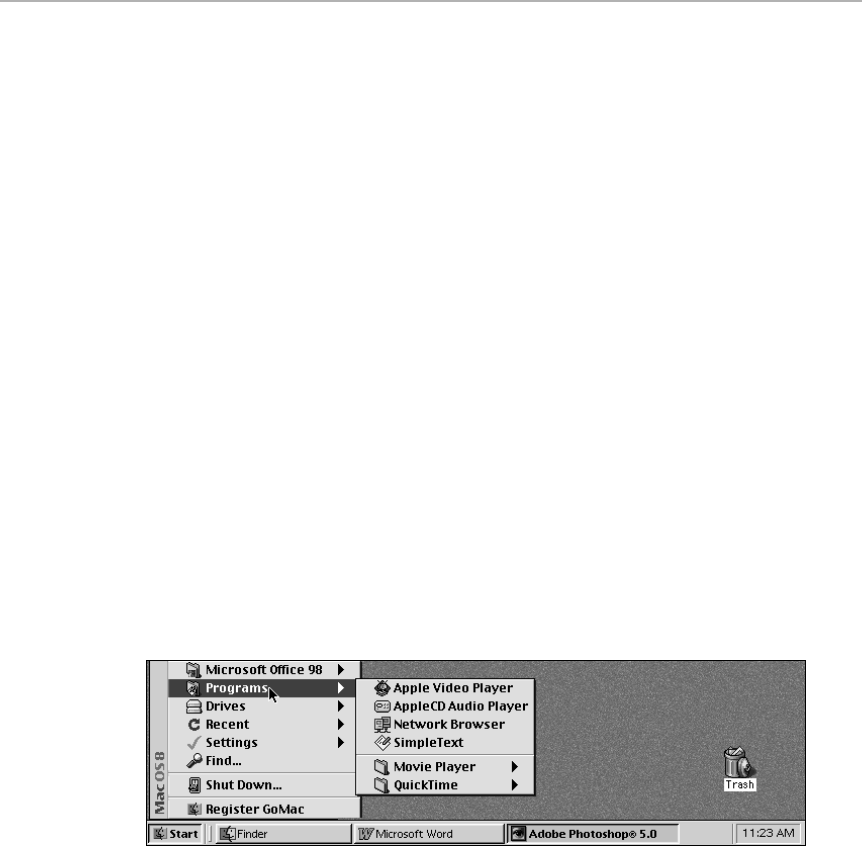
Fraction Fonts
(Tom Schmidt, $10 each or $15 together.) SansFractions and SeriFractions
were created to fill a numerical void in the font world: the lack of fractions.
SansFractions is very similar to Helvetica, and SeriFractions is similar to
Times. Each font has a full set of diagonal and vertical fractions for 1/2
through 8/9, and also 16ths and 32nds. Each also has a partial set of
mathematical symbols, including the true multiplication symbol. (Most
people just use a lowercase x.) Both TrueType and PostScript versions are
included.
FreePPP
(Rockstar Studios, free.) This is the software your Mac needs to connect to
the Internet. Use it if you don’t have Open Transport, Apple’s own dialing and
networking software (which comes with System 7.6 and later). See Chapter 25
for details on Open Transport and FreePPP.
GoMac
(Proteron, $20 shareware.) As hostile as we Mac fans may be toward
Windows, some people appreciate the occasional nice feature in that Dark
Side OS. GoMac is for those people. It imitates the look and behavior of the
task bar in Windows 95. Below are outlined the primary features of the
Program Bar, Start Menu, and Keyboard Switcher.
The Program Bar lets you switch among open windows; it also serves as a
drag-and-drop launcher for icons on your desktop. You can also quit or hide
running programs by Control-clicking their buttons on the Program bar. And
(our fave!) clicking on the clock pops up this month’s calendar.
The Start Menu offers an Úmenu-like launcher for your favorite files and
programs. (GoMac adds a Start Menu Items folder to your System Folder.) It
also offers Find, Shut Down, and other useful commands.
The Keyboard Switcher lets you switch among running programs by
pressing Ô-Tab (or another stroke of your choice).
Actually, GoMac does lots of other stuff, too — in a very clean, well-
implemented way.
Appendix 1233
■ ■
MACWORLD MAC SECRETS • 4040-8/5 • Appendix.F • FINAL • VB •11/04/98 • p.1233

Googol Eyes
(Bohm S. Kim, free.) The search is over! For all of us who have been
desperate to have a pair of onscreen eyes follow our cursor around, Googol
Eyes is the answer. Actually, this little program can be more than a silly RAM-
waster: if you have multiple monitors or a PowerBook screen that’s hard to
read, this short program can help you find those “lost” cursors.
If you’d like to have Googol Eyes launch every time you turn on your Mac,
drag its icon (or alias) into the Startup Items folder in your System Folder. If
you’d like to have more than a single set of eyes staring at your cursor,
duplicate the program, rename the copies, highlight them all, and double
click ’em.
GraphicConverter
(Thorsten Lemke, $35 shareware.) GraphicConverter is one of the world’s
most popular graphics programs. It can open, edit, manipulate, color-correct,
and export virtually any graphic format the world has ever known, Macintosh
or not: PICT, Startup-Screen, MacPaint, TIFF (all types), RIFF, PICS, 8BIM,
8BPS/PSD, JPEG/JFIF, GIF, PCX/SCR, GEM-IMG/-XIMG, BMP (RLE compressed
BMPs also), and 50 more you’ve never heard of. Also does slide shows. An
outstanding, must-have addition for anyone who doesn’t own Photoshop.
GURU
(Newer Technology, free.) GURU is a fast, slick program that tells you about
your Mac model’s RAM possibilities: the amount of RAM your computer can
handle, how many slots you can fill, and what combinations of chips you’ll
need to reach a certain maximum amount of RAM.
Harry
(Ambrosia Software, $20 shareware.) Join Harry, the Handsome Executive as
he scoots and kicks his swivel chair through the halls of ScumCo in this
action game. The path to job security is fraught with many perils: Harry must
avoid dart-throwing middle managers, rebellious customer service drones,
crazed chemists, and a host of other enemies. All the while, he must maintain
corporate favor or risk the feared pink slip.
1234 Macworld Mac Secrets, 5th Edition
■ ■
MACWORLD MAC SECRETS • 4040-8/5 • Appendix.F • FINAL • VB •11/04/98 • p.1234

Harry is not without his own weapons: he can acquire explosive soda cans
from vending machines, and he knows how to handle an industrial-strength
staple gun. Meanwhile, ScumCo’s President, Dr. Ubermann, has orchestrated
a top-secret chemical manufacturing project. Perhaps uncovering it will help
Harry answer the question that has been plaguing him since his first day on
the job: “Just what does ScumCo do, anyway?” Harry features a sizzling MIDI
instrument set, active panning stereo, 360-degree scrolling, and more.
Hi-Res Map
(Göran Svegler, free — a Mac Secrets exclusive.) The Map control panel is all
very well, but the map it shows you is, let’s face it, pathetic. Try to zoom in
(as described in Chapter 4), and all you get is a blotchy mess.
But paste in Göran’s Hi-Res Map, a huge, color, much larger and more
detailed map, and now you can see oceans, mountains, rivers, and state
boundaries. (See “Map” in Chapter 4 for details.)
Holiday Lights
(Rob Mathews, $15 shareware.) Holiday Lights (based on the wildly popular
Xmas Lights program) is an entertaining application that places flashing light
bulbs around the edge of your screen, as though a well-insulated elf had
crawled into your computer and stapled them there. The lights flash in the
background while you continue to work; it’s not just a screen-saver! The
“bulbs” include standard Christmas tree lights, chili peppers, stockings, holly,
snowmen, happy faces, and more.
Holiday Lights also includes cheery background music, using Apple’s
QuickTime Musical Instruments (see Chapter 23)... holiday lights (including
Halloween)...and a built-in snowy screen saver to put you in the holiday
spirit. It’s a multimedia extravaganza!
HTML Vocabulary
(Carl Bäckström, free.) As described in Chapter 28, this handy little program
identifies every single HTML code (used to create Web pages), what it
means, and how you use it. An indispensable reference for anyone designing
Web sites.
Icon, Sound, Clip Art Samplers
A folder full of commercially designed icons, sounds, and graphics ready for
you to use on your desktop or in your documents. They include:
■12 EPS files from the Art Explosion CD (Nova Development)
■30 drag-and-droppable clip-art files from the Graphics Essentials CD
(Olduvai Software)
Appendix 1235
■ ■
MACWORLD MAC SECRETS • 4040-8/5 • Appendix.F • FINAL • VB •11/04/98 • p.1235

■50 drag-and-droppable clip-art files from the Art Today collection
(www.arttoday.com), a division of Zedcor
■75 fantastic icons from the Icon Gallery collection (Component Software),
suitable for pasting onto any of your own icons (see Chapter 1)
■32 double-clickable sound files from the Graphics Essentials CD (Olduvai
Software)
■25 graphics for building Web pages — quick to download, appropriately
sized and colored — from Nova Development’s Web Explosion CD
■20 professionally drawn color icons from the Zonkers collection
(Nova Development), suitable for pasting onto any of your own icons
(see Chapter 1)
Internet Explorer
(Microsoft, free.) Just in case you’re still using Microsoft Internet Explorer
3.01 or the dog-slow 4.0 version — here’s Internet Explorer 4.0.1, the feature-
rich Web browser described in Chapter 25.
Kaleidoscope
(Greg Landweber, Arlo Rose, $25 shareware.) Kaleidoscope gives your
Macintosh a complete visual overhaul, letting you choose from thousands of
different interface designs using plug-in files called schemes. Kaleidoscope
patches nearly all of the Macintosh interface elements, including the basic
windows, scroll bars, menus, and buttons, as well as pop-up windows, tabs,
bevel buttons, and sliders under Mac OS 8. The 2.0 scheme format offers non-
rectangular windows, enhanced menus, background patterns, double-headed
scroll bars, tabs, sliders, cursors, and many other enhancements.
Kaleidoscope is much like the Themes that were cut from Mac OS 8.5 at the
last minute (see Chapter 4) — but Kaleidoscope exists now, and you don’t
have to have Mac OS 8.5 to use it.
1236 Macworld Mac Secrets, 5th Edition
■ ■
MACWORLD MAC SECRETS • 4040-8/5 • Appendix.F • FINAL • VB •11/04/98 • p.1236

Label Secrets Pro
(Jeff Robbin and David Pogue — a Mac Secrets exclusive.) Your cheerful
authors dreamed up the idea for Label Secrets when writing Chapter 2, which
deals with the pointlessness of the Label menu. We thought: if only it could
be made to do something useful!
Now it does. Each time you turn on your Mac, the Label menu at your Finder
desktop — or the File ➪Label submenu in Mac OS 8 and later — displays a
different message containing one of the Macintosh secrets from this book. It
shows an actual Macintosh secret every day for a year, right on your Mac
screen!
Label Secrets Pro 3.0 offers an updated set of secrets (for those fans who’ve
exhausted the 2.0 set).
By the way, there’s a Label Secrets Pro secret. If you’re clever, you’ll figure out
how to add your own secrets (or edit ours), right in the control panel! (Hint:
it involves pressing the Option key while opening the control panel.)
Mac Libs
(Michael Benson, $10 shareware.) Ever played Mad Libs? It’s a hilarious party
game where you ask each guest to supply a word (like nouns, verbs, names,
etc.). You, the emcee, plug these words into a pre-written story template —
which you read back only when all the missing words have been provided. If
the rules are correct and the appropriate words are chosen, the generated
story is grammatically correct, though frequently silly, and always amusing.
Using Mac Libs, you can play the game without pencil or paper — even all by
yourself!
Appendix 1237
■ ■
MACWORLD MAC SECRETS • 4040-8/5 • Appendix.F • FINAL • VB •11/04/98 • p.1237

Mac Secrets
Ultimate Bookmark List
(Pogue & Schorr, free.) Here they are, all in one place: the best Web sites for
the Macintosh fan to go for news, troubleshooting, gossip, Easter eggs,
updates, and more. Provided in both Netscape Navigator and Microsoft
Internet Explorer formats. Just double-click this document to open your
page of links.
Mac Secrets,
Electronic Edition
At last: an electronic, searchable edition of Macworld Mac Secrets! The full
text is here, complete with layout, fonts, and graphics. It’s great to have on
the PowerBook for trips, or on the regular Mac for reference.
Note the following about this special bonus:
For your entertainment pleasure, both the edition in your hands and the
previous one (the Fourth Edition) are included here. The old version is here
in case you’re interested in reading up on an older topic (OpenDoc, Word 5.1,
or Cyberdog, say) that’s no longer covered in the current edition.
Adobe Acrobat Reader is required to open the Mac Secrets Electronic
Editions. Acrobat Reader is in the same folder; install it first.
Crucial instructions: The best way to read the book on the screen is (1)
press Ô-M, which enlarges the type so that it just fits your screen, and then
(2) press Return or Enter repeatedly to scroll neatly to the next electronic
page-full.
This book is our livelihood. Please don’t distribute, upload, e-mail, or
otherwise duplicate the electronic editions. Doing so is not only a violation of
federal copyright law, but it also kills our book’s sales, which is kind of mean.
Mac Start-up Sound Collection
For your listening pleasure: the ultimate collection of startup and crash
(“Chimes of Death”) sounds (see Chapter 7), from every Mac model that ever
lived. Were you about to spend $4,000 on a new laptop just so you could hear
what its startup chime sounds like? Now you don’t have to! Just double-click
a sound file to hear it.
We live to serve.
Start-up Sound © 1984 Apple Computer, Inc. Used with permission. All rights reserved.
MacLinkPlus
(Commercial software from DataViz — a Mac Secrets exclusive.) MacLinkPlus
is the leading file-conversion utility for Mac users who exchange documents
with Windows users. (See Chapter 16 for more on converting file formats.)
1238 Macworld Mac Secrets, 5th Edition
■ ■
MACWORLD MAC SECRETS • 4040-8/5 • Appendix.F • FINAL • VB •11/04/98 • p.1238

For years, Apple licensed MacLinkPlus to include with its system software —
up until Mac OS 8.5, when Steve Jobs’ cost-cutting measures ended that
arrangement. Fortunately, your cheerful authors and DataViz have picked up
the slack: MacLinkPlus 9.7.1, the final version to ship with the Mac OS, is
yours free with this book. (Note, however, that you can get the current, even
fuller-featured new version at a substantial discount — see the coupon at the
back of this book.)
MacsBug
(Apple, free.) MacsBug is a programmer’s utility, not for the faint of heart (but
definitely for the curious), that lets you peer into the Mac’s behind-the-
scenes memory contents. See Chapter 22 for a tutorial and description.
Maelstrom
(Ambrosia, $15 shareware.) Maelstrom is a fast action arcade-style game that
uses rendered 3-D graphics, high-speed animation, and four-channel digitized
sound effects. It’s a modernized update to the old arcade game Asteroids.
MIDI files for Chapter 23
A MIDI file is the musical equivalent of a plain text file: it’s the exchange
format between MIDI music programs.
As it turns out, QuickTime is a MIDI program. As described in Chapter 23,
you can import these files into Movie Player, assign each music track to a
QuickTime Musical Instrument, and orchestrate your own music!
Mouse Jolt
(Ian Schenkel, $5 shareware.) As you can read in Chapter 10, it’s bad news to
plug or unplug your ADB mouse or keyboard while the computer is turned
on. Not only do you risk frying your Mac, but you also reset the mouse to its
slowest, most annoying speed.
Mouse Jolt solves the second problem. A click on its application (or its
included Control Strip module) resets your mouse to its previous speed
without having to restart the Mac.
Movie2Snd
(Scott Lindsey, free.) Movie2Snd is a very simple application that extracts
soundtracks from QuickTime movies. You can also use Movie2Snd to extract
sounds from audio CDs. (See Chapter 23.)
Appendix 1239
■ ■
MACWORLD MAC SECRETS • 4040-8/5 • Appendix.F • FINAL • VB •11/04/98 • p.1239

Drop-launch a movie onto the application (or choose a movie from the open
dialog). You will be prompted for a location for the resulting sound file. That
sound file is a plain ol’ System 7 sound file that can be played by double-
clicking it.
Navigator Button editor
(Skylar Stein, $5 shareware.) Microsoft Internet Explorer lets you add toolbar
buttons for your favorite Web sites. Netscape Navigator for the Mac doesn’t.
At least, not until now.
Navigator Button Editor customizes those six less-than-lovable directory
buttons in Netscape Navigator. It can even expand the “Guide” button pop-up
menu in Communicator 4. (Navigator Button Editor works with Navigator
version 1.1N through 3.x and Netscape Navigator/Communicator 4.03. Future
versions will certainly be supported when necessary.)
Netscape Navigator
(Netscape, free.) As you can read in Chapter 25, the war between Microsoft
and Netscape has resulted in one Web browser after another. At this stage in
the war, Netscape Navigator is faster than Microsoft Internet Explorer, but
has fewer features; take your pick. We’re particularly fond of this version of
Navigator, which is the stablest version we’ve ever used.
Olduvai Font Sampler
(Commercial software from Olduvai.) Ten interesting fonts from Olduvai
Software’s Graphics Essentials CD-ROM. To install, drag onto your System
Folder. See Chapter 29 for more on fonts.
OneClick
(Commercial software from WestCode Software.) Ah, how did we live without
OneClick? Clean design, high speed, easy to use — this is the macro program
for the efficiency freak. It’s won every award from every magazine, lets you
record and play back almost anything you can do on the Mac, comes with a
Web site filled with ready-to-use macros written by other people — and it’s
yours free with this book. You just saved $60.
But there’s a tiny catch:
You must get a serial number from the WestCode Web site before you can use
your free copy of OneClick!
Here’s the Web address: www.westcodesoft.com/macsecrets
Worth
Learning
1240 Macworld Mac Secrets, 5th Edition
■ ■
MACWORLD MAC SECRETS • 4040-8/5 • Appendix.F • FINAL • VB •11/04/98 • p.1240
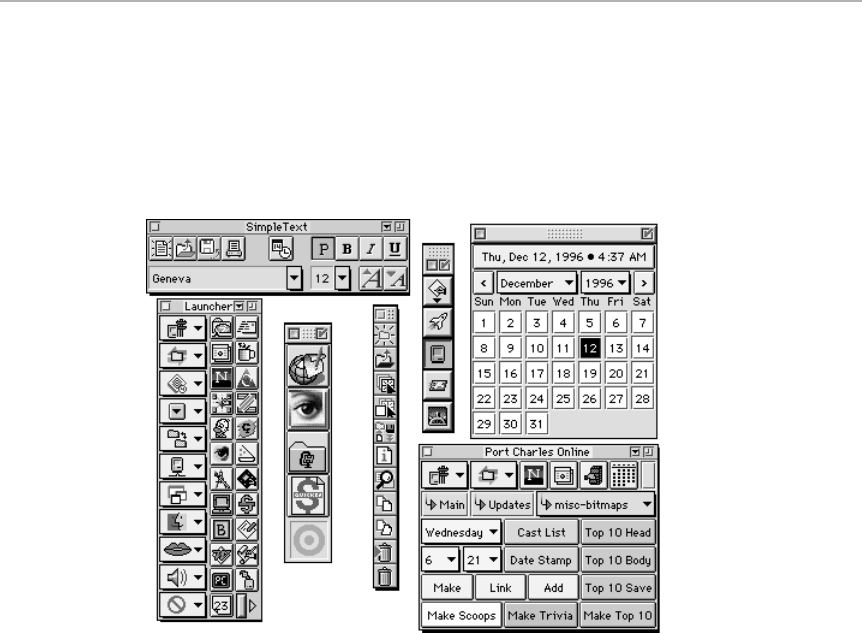
Once you have your serial number, write it down — and then install OneClick.
The next time your Mac starts up, you’ll be asked for this number. (Without
your serial number, you can use OneClick only in a limited-time demo mode.)
After that, go wild. See Chapter 22 for a tutorial in using this powerful time-
saver. OneClick palettes can look like anything you want, or you can make
macros that have no visible buttons to click at all (only keystrokes).
Please note two other items about this version (which is the full, shipping,
commercial version):
■WestCode is giving you OneClick, but the gift doesn’t come with tech
support.
■Version 1.4 isn’t fully Mac OS 8.5 compatible. A free updater will be
available to all Mac Secrets readers, however. Visit www.westcodesoft.
com to get your free updater.
OT/PPP Strip
(Dennis J. Wilkinson, free.) As we mentioned in Chapter 25, getting onto the
Internet is easy — any Web browser or e-mail program will do the dialing for
you. Trouble is, when you quit your Web browser or e-mail program, your
Mac remains connected to the Internet, tying up the phone line.
The OT/PPP Strip is a plug-in for Apple’s Control Strip (see Chapter 4) that
displays information about your Open Transport/PPP “state of affairs” (your
Internet dial-up connection). One glance tells you whether or not you’re
online, how long you’ve been connected, your connection speed, and more.
And when you’re finished surfing cyberspace, a Disconnect command makes
it easy to hang up your Mac’s phone connection.
Appendix 1241
■ ■
MACWORLD MAC SECRETS • 4040-8/5 • Appendix.F • FINAL • VB •11/04/98 • p.1241
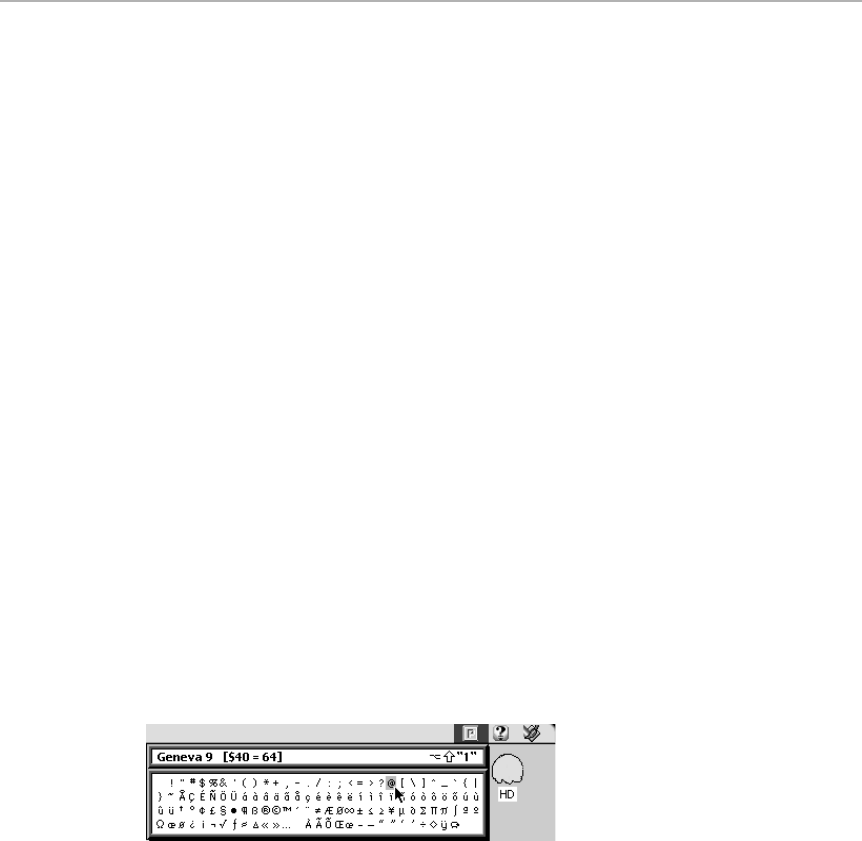
This delightful module also allows you to switch between multiple PPP
configurations (different local-access phone numbers, for example) as
you’ve set them up in the PPP or Remote Access control panel.
Outlook Express
(Microsoft, free.) Here’s Microsoft’s e-mail program, as described in Chapter
27. We thought we’d save you the download. (Note that the same installer on
this CD gives you both Internet Explorer and Outlook Express. If you want
only one or the other, use the Custom Install option.)
Pogue’s Song Spoofs
As performed at Mac user groups nationwide, at Macworld Expos, on various
computer TV shows, and in his own living room — it’s David Pogue at the
piano, singing his satirical ditties, mockin’ out Steve Jobs, Bill Gates, and the
whole crazy, mixed-up Mac industry. Mostly sound files — with one fake-out
QuickTime “rock video” movie as a bonus.
PopChar Pro
(Günther Blaschek, $40 shareware.) PopChar Pro, one of the most famous
shareware programs of all time, makes “typing” of unusual characters easy
without having to remember keyboard combinations. It installs a menu that
shows all characters available in the current font. Any character can be
inserted in the current document by simply selecting it from the menu, as
shown here:
PowerPC Check
(Alessandro Montalcini, shareware $10.) PowerPCheck is a drag-and-drop
utility that looks for native PowerPC code inside applications, control panels,
extensions, and so on. And — more to the point — it can remove the code
your Mac model doesn’t need (PowerPC or 68K code), resulting in a huge
disk-space savings.
1242 Macworld Mac Secrets, 5th Edition
■ ■
MACWORLD MAC SECRETS • 4040-8/5 • Appendix.F • FINAL • VB •11/04/98 • p.1242

Program Switcher
(Michael Kamprath, $25 shareware.) Getting tired of mousing up to the
Application menu to switch between programs? Program Switcher lets you
switch between running programs via a simple keystroke (Ô-Tab, as in Mac
OS 8.5, or whatever keystroke you choose). About a thousand variations and
additional features make Program Switcher much more than meets the eye.
QuickPop
(John Holder, $10 shareware.) QuickPop does two things very well. The first
is to let you assign “hotkeys” to up to 30 Apple Menu Items, control panels,
applications, documents, or monitor depth (colors) or speaker volume
settings. When the Hotkeys are pressed from within most any program, the
selected item instantly launches.
The second is to make a menu pop up anywhere on the screen when you
hold down a particular key and click. From this pop-up menu you can launch
any of those same kinds of files (documents, applications, control panels,
etc.). It’s launching heaven!
QuickTime 3
(Apple, free.) In case your Mac is still trundling along with an obsolete
version of Apple’s amazing digital movie technology, here’s the latest,
brimming with such features as smoother playback and enhanced
compression technologies. As explain in Chapter 23, you must pay $30 at
www.apple.com (or buy Mac OS 8.5) to get QuickTime 3.0 Pro, which lets you
make and edit moves. But this free software lets you play the latest movies —
including those directly on World Wide Web pages. See Chapter 23 for much
more detail about QuickTime.
QuickTime VR Movies
(Apple, free.) As explained in Chapter 23, QuickTime VR movies look like still
photos — until you start dragging your cursor around inside the picture.
Then the “camera” starts panning around, up, down, zooming in or out,
letting you feel as though you’re actually there on the spot where the photo
was taken. This collection of VR movies shows off the power of VR; be sure to
read Chapter 23 to learn about the secret Zoom In/Zoom Out keystrokes.
Quiet Start
(Tom Bridgewater, free.) Quiet Start is an extension that keeps some
Macintosh models from making the usual chime at startup or restart. It
was designed particularly for owners of older PowerBooks who may find
themselves in an environment where the chime would be disturbing to others
(such as a classroom).
Appendix 1243
■ ■
MACWORLD MAC SECRETS • 4040-8/5 • Appendix.F • FINAL • VB •11/04/98 • p.1243

RAMometer
(Newer Technology, free.) This program is a high-speed, no-cost RAM Tester.
It runs an extensive series of tests and provides a solid test bed for your
memory. If you suspect that your RAM is going bad, then fire up a copy of
RAMometer and check it out.
ResEdit Templates
As described in Chapter 21, a template is a ResEdit module that lets you
edit some aspect of a program (in ResEdit) graphically — instead of as
hexadecimal gobbledygook. These templates provide graphic editors for
kcs#, w900, fmn2, mach, sysz, and thng resources.
For more on ResEdit and using templates, see Chapter 21.
ScrapIt Pro
(John Holder, $15 shareware.) ScrapIt Pro is the Mother of All Scrapbooks. It
stores and indexes anything you can copy to the clipboard, import, or drag
& drop: sounds, PICTures, text, QuickTime movies, and lots more — all
accessible at the click of a mouse. You can print thumbnail pictures or text
lists of all items in any Scrapbook file. You can quickly and easily search
through all the text items or item names of a scrap file to find what you’re
looking for. You can actually edit text, play movies, and copy pictures —
right in the window.
SCSIProbe
(Robert Polic, free.) As you can read in Chapter 33, keeping tabs on the SCSI
chain is often half legerdemain and half blind luck. SCSIProbe is an
indispensable tool that helps you manage the complexities of your SCSI
setup. With SCSIProbe you can determine the device type, vendor, product,
and version for every device connected to your bus. It even helps you mount
removable devices by a simple keyboard command.
ShareDraw
(Peirce Software, $25 shareware.) ShareDraw is a full-featured drawing
application, along the lines of the ClarisWorks drawing window or the now-
discontinued MacDraw. (See Chapter 20 for details on drawing programs,
which are ideal for making posters, maps, technical diagrams, and so on.)
ShareDraw has hundreds of features, including multi-copy effects, powerful
gradients, graphics library support, color blends, text binding to any curve, a
very handy live help system, project management, 24-bit color, rulers, grids,
and PICT or EPS file export. Use the live help feature to see how each menu
and tool works.
1244 Macworld Mac Secrets, 5th Edition
■ ■
MACWORLD MAC SECRETS • 4040-8/5 • Appendix.F • FINAL • VB •11/04/98 • p.1244

ShrinkWrap
(Aladdin, $30 shareware.) Without a word of warning, Apple and many other
software companies have begun providing software in a strange and
confusing format — disk images (see Chapter 22). You can drag a disk image
file onto ShrinkWrap to create a virtual floppy on your desktop. From there,
the Mac treats them as though they were actual floppies. And since
ShrinkWrap can “mount” many disks in this way, you can install software that
would ordinarily require dozens of floppy disks — without ever inserting a
single disk.
ShrinkWrap can also create disk images with equal ease — just drag-and-drop
— perfect for sending out over the Internet. Actually, ShrinkWrap performs
dozens of other useful functions — see Chapter 22 for ideas.
SimpleText Color Menu
(Alessandro Levi Montalcini, $10 shareware.) SimpleText Color Menu is
a drag-and-drop utility that installs an extra cool Color menu and an extra
useful Goodies menu inside your copy of SimpleText (versions 1.1 through
1.4). Using these menus, you can create Read Me documents with colored
text; Search and Replace commands; extended editing keys; window
switching; word counting; page margins; and Internet URL handling. Who
knew little SimpleText could do so much?
Slot Info
(Newer Technology, free.) Slot Info lets you see what’s in your computer —
without your having to open its case. The program tells you which version of
ROMs are on cards in your computer, what motherboard-based video
controller is in your Mac, and so on.
SmartKeys
(Maurice Volaski, $10 shareware.) SmartKeys is a control panel designed to
help you type. First, SmartKeys automatically corrects typing that violates
conventional typesetting rules, such as typing more than one consecutive
space. (Also in this category — converting straight quotes into curly ones,
and creating a long dash — like this — when you type two hyphens.) Second,
SmartKeys automatically corrects fast typing errors, words that are often
misspelled, such as “teh” for “the” and “THe” for “The.” Third, SmartKeys can
quietly keep a log of everything you type so that, in the event of a system
crash, you can recover anything you typed even if you didn’t save.
Snapz Pro
(Ambrosia, $15 shareware.) Snapz lets you quickly and easily capture the
image displayed on your monitor and save it to a PICT file for later editing.
Appendix 1245
■ ■
MACWORLD MAC SECRETS • 4040-8/5 • Appendix.F • FINAL • VB •11/04/98 • p.1245

Snapz offers several unique features over both the built-in Ô-Shift-3 capture
facility and other screen-capture utilities. Snapz captures images when other
programs fail, such as (a) when a screen saver display is on the screen, (b) in
the middle of the action in a game, (c) while a menu is pulled down, or even
(d) while your Macintosh is starting up. If it’s on your screen, Snapz can
capture it.
SndSampler
(Alan Glenn, $20 shareware.) SndSampler a great tool for recording, editing,
and working with Macintosh sounds. First, of course, it gets you around the
Sound control panel’s 10-second length limit when recording sounds — but
SndSampler lets you do so much more: stereo, CD quality, special effects,
mixing, file-format conversion, and more.
Square One Lite
(Commercial software from Binary Software.) Square One, a commercial
program from Binary Software, is a great-looking, drag-and-drop-savvy
launcher — a floating palette whose tiles represent your favorite files and
programs. Click any tile to launch the associated item.
Install a new file or program just by dragging it onto your palette; use the
pop-up menu to launch associated documents; quit any running program
remotely; and more. (See the back of the book for a coupon that lets you
upgrade to the full, non-Lite version for a mere pittance.)
Startup Doubler
(Marc Moini, $20 shareware.) Amazing as it may sound, Startup Doubler
makes your Mac start up quicker. Its software acceleration compensates for
slow disk speeds to make extensions and control panels load faster. The
speed boost varies (it’s a bigger jump on slow Macs), but the saved seconds
spent waiting really add up.
Note: Startup Doubler works by “memorizing” your extensions and control
panels. Therefore, the first time you start up after installing Startup Doubler,
you won’t notice any speed gain. But during the second startup — and
thereafter — you’ll enjoy the fruits of Startup Doubler’s acceleration.
Stuffit Expander
(Aladdin, free.) Virtually every file or program you can download from an
online service or the Internet arrives on your desktop in a specially encoded
compact form. StuffIt Expander is an all-purpose file re-expander. It turns
downloaded files ending with the suffixes .sit, .cpt, and .hqx back into human
1246 Macworld Mac Secrets, 5th Edition
■ ■
MACWORLD MAC SECRETS • 4040-8/5 • Appendix.F • FINAL • VB •11/04/98 • p.1246

form; and if you add the companion shareware program DropStuff with
Expander Enhancer (also included with this book), it will open .gz, .z, .uu,
.ARC, .ZIP, and .uu files, too.
Our advice: leave an alias of StuffIt Expander out on your desktop, ready for
downloaded-file drag-and-drops. Oh, and one more thing: If you hold down
the Control key when dropping a file on the icon, StuffIt Expander will delete
the original archive after expanding it.
Swoop
(Ambrosia, $15 shareware.) Swoop is a fast, vertical shoot-’em-up arcade
game in which you battle 3-D rendered aliens with a variety of powerful
weapons. The gameplay is a combination of frantic rapid-fire activity and
even more frantic dodging. Not a game for wusses.
TechTool
(MicroMat, free.) TechTool is an important Mac utility program. It does five
things beautifully: (1) Checks your system files for damage. (2) Zaps your
parameter RAM (PRAM) in a more thorough way than pressing the usual
keystroke, Ô-Option-P-R. (3) Rebuilds the desktop; once again, TechTool does
better than the usual Ô-Option keystroke, since it actually deletes the old
desktop file instead of just rebuilding it. (4) Shows system and drive info
about your particular Mac. (5) Shows manufacture date and hours of use!
Find out when your Mac was made and how many total hours of usage it
has had.
Tex-Edit Plus
(Tom Bender, $5 shareware.) Tex-Edit Plus is a drag-and-droppable, multi-
window, styled text editor that fills the gap between the bare-bones SimpleText
and a full-featured word processor. Tex-Edit is small, fast, easy to use, and
requires little memory.
With Tex-Edit you can do everything SimpleText does, plus: reformat
downloaded e-mail or text; correct word-wrap problems and remove
extraneous, non-Mac characters; prepare text for upload to a BBS, so that
people with MS-DOS systems can view the document as it was intended to
be viewed; instantly quote a brief passage from received e-mail, allowing the
senders to remember their original message; read any text document aloud,
if you have Apple’s Speech Manager extension; create simple hypertext
documents; attach sound annotations to ordinary mail, and more. See
Chapter 17 for a couple other Tex-Edit tricks.
Appendix 1247
■ ■
MACWORLD MAC SECRETS • 4040-8/5 • Appendix.F • FINAL • VB •11/04/98 • p.1247

TypeIt4Me
(Riccardo Ettore, $30 shareware.) TypeIt4Me is a typing saver. Your cheerful
authors used it to write this book, and in the process only had to type about
70% of the pages in your hands. TypeIt4Me did the rest — by expanding
abbreviations as we typed.
And where, you may ask, did these abbreviations come from? As you go about
your daily life, you teach TypeIt4Me. You make up your own abbreviations for
words you use a lot: you might use Mc for Macintosh, bc for because, aol for
America Online, and so on. Over time, your word list grows, and the amount of
typing you save grows! It’s good for people with repetitive-stress disorders, it’s
good for people who want to speed up their typing (and increase accuracy),
it’s great for people in technical fields, and it’s a blessing for anyone who uses
the Mac for typing.
Ultra Recorder
(E.J. Campbell, $20.) Ultra Recorder is the ultimate sound recording,
playback, conversion, and editing tool for sound! (Between this program and
SndSampler, also included with this book, you’ll be in sound heaven.) Ultra
Recorder can play and convert sounds stored in a variety of sound formats.
Just drag a folder, disk, or alias over Ultra Recorder’s icon, and it will play all
the sounds inside. Ultra Recorder also has a state-of-the-art recording
interface, even letting you record sounds in the background.
UnmountIt
(Jim Luther, free.) UnmountIt lets you easily unmount and eject disks (such
as CDs, Zips, and Jaz disks) when File Sharing is turned on. (Without
UnmountIt, the Mac doesn’t let you eject such disks without turning off File
Sharing first.) You can use UnmountIt a couple of ways; for example, you can
leave it on your desktop. Whenever you want to unmount a sharable disk,
just drag its icon to UnmountIt. UnmountIt will launch, unmount and eject the
volumes, and then UnmountIt will quit.
WormScanner
(James Walker, free.) The AutoStart virus (described in Chapter 22) is the
first truly dangerous Mac virus in the Mac’s entire history. As you can read
in Chapter 22, preventing the AutoStart virus from attacking your Mac is
pitifully easy: just open your QuickTime Settings control panel and turn off
“Enable CD-ROM AutoPlay.” That’s it! You’re protected.
If your Mac is already infected, however, you can detect and eradicate the
virus (which is actually a worm) using WormScanner.
1248 Macworld Mac Secrets, 5th Edition
■ ■
MACWORLD MAC SECRETS • 4040-8/5 • Appendix.F • FINAL • VB •11/04/98 • p.1248

X-Words Deluxe
(Freeverse Software, $20 shareware.) X-Words is Scrabble. A fantastic
electronic edition of Scrabble. It features a wide range of word lists that let
you tailor the game to kids, adults, experts, or polyglots. X-Words can even
be made to simulate the vocabulary of historical figures. It has a built-in
dictionary of 20,000 words, allowing full definitions to be checked for most
words. It allows complete control over board design, multiplier squares,
letter frequency, and the ability to designate special bonus words. In other
words, you can play exactly the way you like.
X-Words also keeps full statistics on your game and allows you to track
your improvement over time. And, unlike most programs of this complexity,
X-Words Deluxe is a model of elegant interface design and ease of use.
Note: X-Words can’t keep statistics unless you copy the X-Words Deluxe
folder to your hard drive before playing.
You Don’t Know Jack Lite
(Berkeley Systems, a Mac Secrets exclusive.) You Don’t Know Jack, as you
probably know, is just about the most hilarious, fast-paced, sarcastic game
ever written for the Mac. At its heart, it’s a trivia game — but with more
wordplay, Dennis Millerish humor, sound effects, and twists than Trivial
Pursuit even dreams of.
This is a 50-question version of You Don’t Know Jack (the full commercial
version has 400 questions) — which is enough for a few rounds of late-night
hilarity.
Important Note: This game’s installer gives you QuickTime 2.1, which may be
older than what you already have. Check your Extensions folder; if you have
QuickTime 2.5 or later, don’t use the Easy Install option. Instead, launch the
“Double-Click-Me To Install Jack” program. Click Continue; on the next screen,
click Custom. Choose the installation option called YOU DON’T KNOW JACK
GAME, and then proceed with the installation. (You’ll be asked to restart the
Mac before you can actually play.)
Zipit
(Tom Brown, $15 shareware.) Zip format is the Windows, DOS, and Unix
equivalent of StuffIt for the Macintosh. Millions of downloadable files on the
Internet end in the letters .zip.
While StuffIt Expander (included with this book) can open Zip files, it can’t
create them. That’s why there’s Zipit. It’s designed to let you easily create and
decompress zip archives.
Appendix 1249
■ ■
MACWORLD MAC SECRETS • 4040-8/5 • Appendix.F • FINAL • VB •11/04/98 • p.1249

ZTerm
(Dave Alverson, $30 shareware.) ZTerm is an award-winning shareware
telecommunications program that you can use to dial bulletin boards or
other Macs. ZTerm gives you a Phone List file that can hold many Dialing
setups. Each setup contains the phone number, port settings, and many
other settings. Each dial setup appears in the Dial menu to allow easy
connection to all of the services you connect to.
1250 Macworld Mac Secrets, 5th Edition
■ ■
MACWORLD MAC SECRETS • 4040-8/5 • Appendix.F • FINAL • VB •11/04/98 • p.1250

MACWORLD MAC SECRETS • 4040-8/5 • EULA.F • FINAL • VB •11/03/98 • p.1292
IDG BOOKS WORLDWIDE, INC.
END-USER LICENSE AGREEMENT
READ THIS. You should carefully read these terms and conditions before
opening the software packet(s) included with this book (“Book”). This is a
license agreement (“Agreement”) between you and IDG Books Worldwide,
Inc. (“IDGB”). By opening the accompanying software packet(s), you
acknowledge that you have read and accept the following terms and
conditions. If you do not agree and do not want to be bound by such
terms and conditions, promptly return the Book and the unopened
software packet(s) to the place you obtained them for a full refund.
1. License Grant. IDGB grants to you (either an individual or entity) a
nonexclusive license to use one copy of the enclosed software
program(s) (collectively, the “Software”) solely for your own personal or
business purposes on a single computer (whether a standard computer
or a workstation component of a multiuser network). The Software is in
use on a computer when it is loaded into temporary memory (i.e., RAM)
or installed into permanent memory (e.g., hard disk, CD-ROM, or other
storage device). IDGB reserves all rights not expressly granted herein.
2. Ownership. IDGB is the owner of all right, title, and interest, including
copyright, in and to the compilation of the Software recorded on the
disk(s)/CD-ROM. Copyright to the individual programs on the
disk(s)/CD-ROM is owned by the author or other authorized copyright
owner of each program. Ownership of the Software and all proprietary
rights relating thereto remain with IDGB and its licensors.
3. Restrictions on Use and Transfer.
(a) You may only (i) make one copy of the Software for backup or
archival purposes, or (ii) transfer the Software to a single hard
disk, provided that you keep the original for backup or archival
purposes. You may not (i) rent or lease the Software, (ii) copy or
reproduce the Software through a LAN or other network system or
through any computer subscriber system or bulletin-board
system, or (iii) modify, adapt, or create derivative works based on
the Software.
(b) You may not reverse engineer, decompile, or disassemble the
Software. You may transfer the Software and user documentation
on a permanent basis, provided that the transferee agrees to
accept the terms and conditions of this Agreement and you retain
no copies. If the Software is an update or has been updated, any
transfer must include the most recent update and all prior
versions.

MACWORLD MAC SECRETS • 4040-8/5 • EULA.F • FINAL • VB •11/03/98 • p.1293
4. Restrictions on Use of Individual Programs. You must follow the
individual requirements and restrictions detailed for each individual
program in the Appendix “The CD Software Vault” in this Book. These
limitations are contained in the individual license agreements recorded
on the disk(s)/CD-ROM. These restrictions may include a requirement
that after using the program for the period of time specified in its text,
the user must pay a registration fee or discontinue use. By opening the
Software packet(s), you will be agreeing to abide by the licenses and
restrictions for these individual programs. None of the material on this
disk(s) or listed in this Book may ever be distributed, in original or
modified form, for commercial purposes.
5. Limited Warranty.
(a) IDGB warrants that the Software and disk(s)/CD-ROM are free from
defects in materials and workmanship under normal use for a
period of sixty (60) days from the date of purchase of this Book. If
IDGB receives notification within the warranty period of defects in
materials or workmanship, IDGB will replace the defective
disk(s)/CD-ROM.
(b) IDGB AND THE AUTHORS OF THE BOOK DISCLAIM ALL OTHER
WARRANTIES, EXPRESS OR IMPLIED, INCLUDING WITHOUT
LIMITATION IMPLIED WARRANTIES OF MERCHANTABILITY
AND FITNESS FOR A PARTICULAR PURPOSE, WITH RESPECT
TO THE SOFTWARE, THE PROGRAMS, THE SOURCE CODE
CONTAINED THEREIN, AND/OR THE TECHNIQUES DESCRIBED
IN THIS BOOK. IDGB DOES NOT WARRANT THAT THE
FUNCTIONS CONTAINED IN THE SOFTWARE WILL MEET YOUR
REQUIREMENTS OR THAT THE OPERATION OF THE SOFTWARE
WILL BE ERROR-FREE.
(c) This limited warranty gives you specific legal rights, and you may
have other rights which vary from jurisdiction to jurisdiction.
6. Remedies.
(a) IDGB’s entire liability and your exclusive remedy for defects in
materials and workmanship shall be limited to replacement of the
Software, which may be returned to IDGB with a copy of your
receipt at the following address: Disk Fulfillment Department,
Attn: Macworld Mac Secrets, 5th Edition, IDG Books Worldwide,
Inc., 7260 Shadeland Station, Ste. 100, Indianapolis, IN 46256, or
call 1-800-762-2974. Please allow 3–4 weeks for delivery. This
Limited Warranty is void if failure of the Software has resulted
from accident, abuse, or misapplication. Any replacement
Software will be warranted for the remainder of the original
warranty period or thirty (30) days, whichever is longer.

(b) In no event shall IDGB or the authors be liable for any damages
whatsoever (including without limitation damages for loss of
business profits, business interruption, loss of business
information, or any other pecuniary loss) arising from the use of
or inability to use the Book or the Software, even if IDGB has been
advised of the possibility of such damages.
(c) Because some jurisdictions do not allow the exclusion or
limitation of liability for consequential or incidental damages, the
above limitation or exclusion may not apply to you.
7. U.S. Government Restricted Rights. Use, duplication, or disclosure of
the Software by the U.S. Government is subject to restrictions stated in
paragraph (c) (1) (ii) of the Rights in Technical Data and Computer
Software clause of DFARS 252.227-7013, and in subparagraphs (a) through
(d) of the Commercial Computer–Restricted Rights clause at FAR
52.227-19, and in similar clauses in the NASA FAR supplement, when
applicable.
8. General.This Agreement constitutes the entire understanding of the
parties and revokes and supersedes all prior agreements, oral or written,
between them and may not be modified or amended except in a writing
signed by both parties hereto which specifically refers to this Agreement.
This Agreement shall take precedence over any other documents that
may be in conflict herewith. If any one or more provisions contained in
this Agreement are held by any court or tribunal to be invalid, illegal, or
otherwise unenforceable, each and every other provision shall remain in
full force and effect.
MACWORLD MAC SECRETS • 4040-8/5 • EULA.F • FINAL • VB •11/03/98 • p.1294
