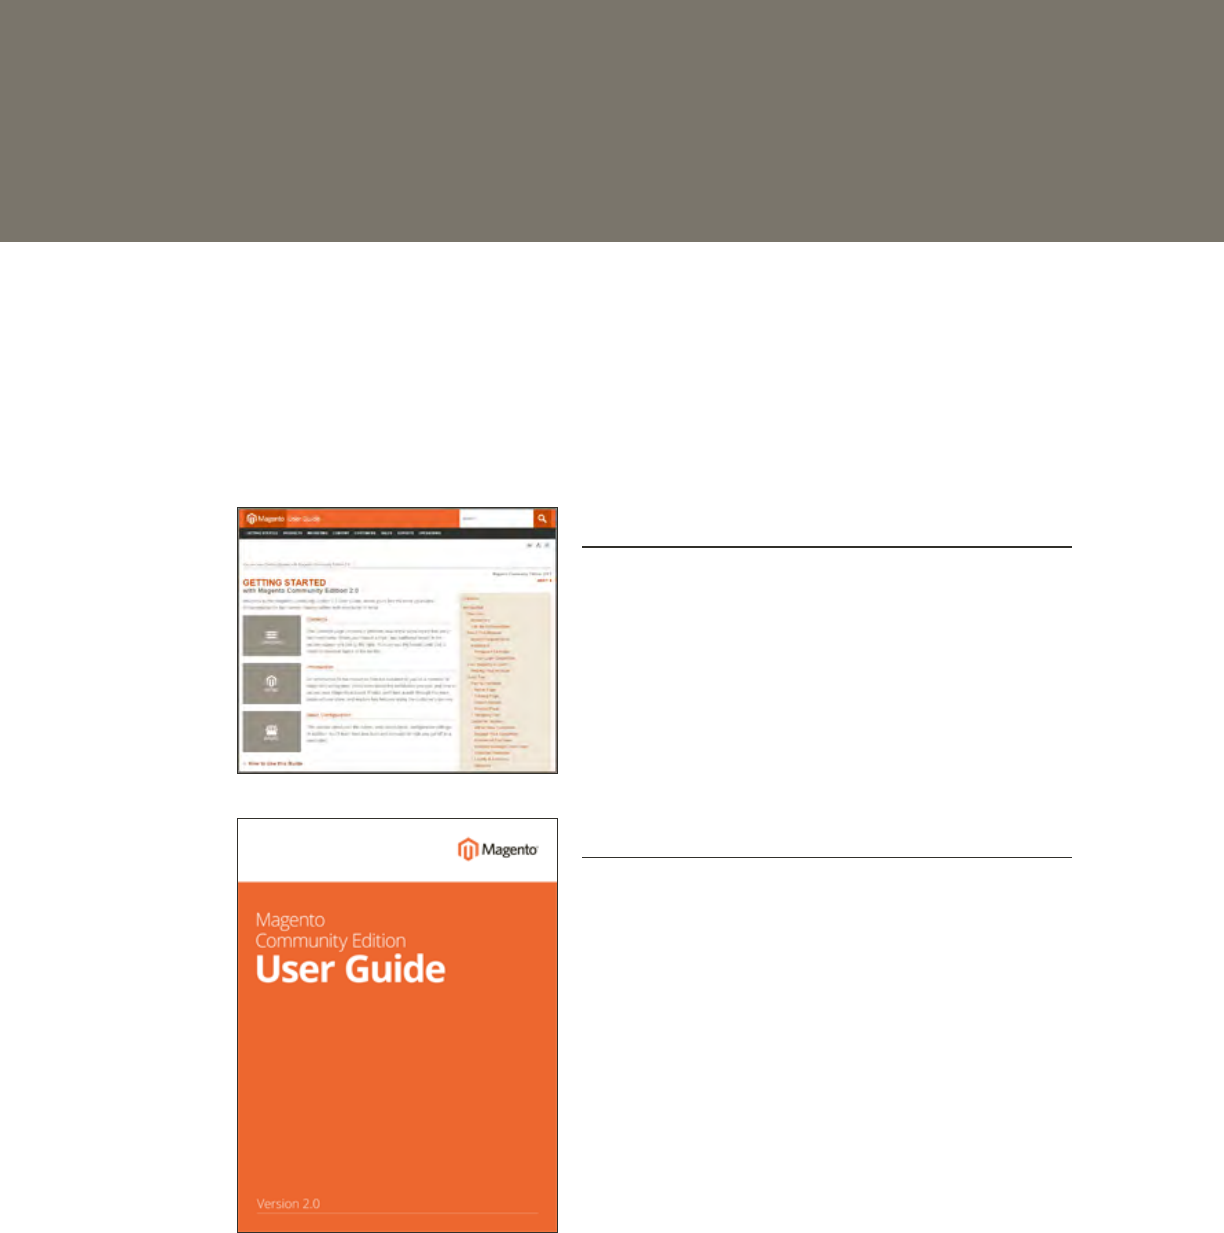
Magento Community Edition 2.0 User Guide
User Manual:
Open the PDF directly: View PDF ![]() .
.
Page Count: 1036 [warning: Documents this large are best viewed by clicking the View PDF Link!]
- Magento Community Edition 2.0 User Guide
- Contents
- Getting Started
- Products
- CHAPTER 10: Products Menu
- CHAPTER 11: Creating Products
- CHAPTER 12: Basic Settings
- CHAPTER 13: Advanced Settings
- CHAPTER 14: Categories
- CHAPTER 15: Using Product Attributes
- Marketing
- CHAPTER 16: Marketing Menu
- CHAPTER 17: Shopping Tools
- Promotions
- Communications
- SEO & Search
- Content
- Customers
- Sales
- CHAPTER 42: Sales Menu
- Order Management
- Payments
- Shipping
- Reports
- Operations
- Stores
- System
- CHAPTER 68: System Menu
- CHAPTER 69: Data Transfer
- CHAPTER 70: Integrations
- CHAPTER 71: Tools
- CHAPTER 72: Permissions
- CHAPTER 73: Security
- Appendices
- Index

Magento
Community Edition
User Guide
Version 2.0
Contents
GETTING STARTED 1
Introduction 2
CHAPTER 1: Welcome 3
Resources 4
Join the Conversation! 7
CHAPTER 2: About this Release 9
System Requirements 10
Installation 13
Prelaunch Checklist 14
Your Login Credentials 16
For Your Records 17
CHAPTER 3: Your Magento Account 19
Creating a Magento Account 20
Sharing Your Account 23
CHAPTER 4: Quick Tour 27
The Path to Purchase 28
Home Page 30
Catalog Page 32
Search Results 34
Product Page 36
Shopping Cart 38
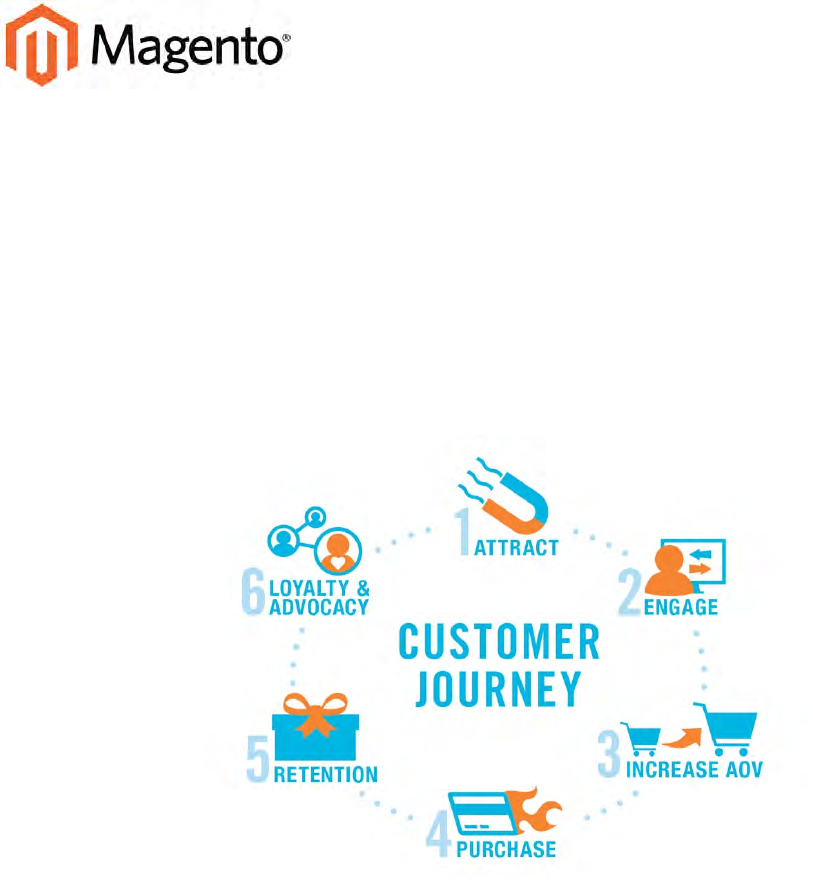
Customer Journey 40
Attract New Customers 42
ii Copyright © 2016 Magento, Inc. All rights reserved.
Engage Your Customers 43
Moment of Purchase 45
Increase Average Order Value 46
Customer Retention 47
Loyalty & Advocacy 48
Success! 49
Basic Configuration 51
CHAPTER 5: Store Admin 53
Admin Sign In 54
Your Admin Account 56
Admin Sidebar 57
Admin Workspace 60
Dashboard 61
Message Inbox 65
Global Search 69
Grid Controls 70
Grid Layout 72
Actions Control 73
CHAPTER 6: Store Details 77
Store Information 78
Locale Options 80
State Options 81
Country Options 82
Merchant Location 84
Currency 85
Store Email Addresses 86
Contact Us 88
CHAPTER 7: Storefront Branding 91
Uploading Your Logo 92
Adding a Favicon 95
Magento Community Edition 2.0 User Guide iii
Contents

Store Demo Notice 97
Changing the Welcome Message 98
Copyright Notice 99
CHAPTER 8: Websites, Stores & Views 101
Configuration Scope 102
Single Store Mode 104
CHAPTER 9: Industry Compliance 105
PCI Compliance Guidelines 106
Privacy Policy 107
Cookie Law Compliance 108
Cookie Restriction Mode 109
Cookie Reference 111
PRODUCTS 113
CHAPTER 10: Products Menu 115
Catalog Workspace 117
Product Scope 120
CHAPTER 11: Creating Products 123
Catalog URLs 124
Dynamic URL 124
Static URL 124
URL Key 124
HTML Suffix 125
Category Path 125
Product Workspace 127
Attribute Set 127
Online Status 128
Expand/Collapse 128
Save Menu 129
iv Magento Community Edition 2.0 User Guide
Contents
Default Field Values 130
Product Types 132
Simple Product 134
Configurable Product 139
Adding Configurations 144
Grouped Product 152
Virtual Product 159
Bundle Product 164
Customizing the Bundle 165
Downloadable Product 174
Download Options 182
CHAPTER 12: Basic Settings 185
Product Details 186
Images and Video 189
Media Gallery 194
Image Zoom 195
Light Boxes and Sliders 195
Adding Product Video 196
Placeholders 199
Watermarks 200
Swatches 203
Text-Based Swatches 203
Swatches in Layered Navigation 204
Creating Swatches 205
Search Engine Optimization 210
Websites 212
CHAPTER 13: Advanced Settings 213
Advanced Pricing 214
Group Price 217
Special Price 218
Tier Price 219
Magento Community Edition 2.0 User Guide v
Contents
Minimum Advertised Price 221
MAP Logic 221
Configuring MAP 223
Advanced Inventory 227
Stock Options 232
Product Stock Options 234
Stock Message Scenarios 236
Product Page Stock Messages 236
Product Page Stock Messages 236
Catalog Page Stock Messages 238
Catalog Page Stock Messages 238
Product Alerts 240
Product Alert Run Settings 242
Custom Options 243
Related Products 246
Up-sells 247
Cross-sells 248
Design 250
Autosettings 252
Product Reviews 254
CHAPTER 14: Categories 257
Creating Categories 259
Modifying Categories 262
Root Categories 263
Hidden Categories 266
General Information 267
Display Settings 270
Custom Design 272
Category Products 274
CHAPTER 15: Using Product Attributes 275
Adding an Attribute 276
vi Magento Community Edition 2.0 User Guide
Contents
Attribute Input Types 282
Date & Time Options 284
MARKETING 287
CHAPTER 16: Marketing Menu 289
CHAPTER 17: Shopping Tools 291
Opportunities to Engage 292
Email a Friend 293
Wish List 296
Configuring the Wish List 297
Sharing a Wish List 298
Product Relationships 300
Compare Products 301
Recently Viewed / Compared Products 303
Product Reviews 304
Product Ratings 306
Promotions 309
CHAPTER 18: Catalog Price Rules 311
Creating a Catalog Price Rule 312
Price Rule with Multiple SKUs 318
CHAPTER 19: Cart Price Rules 319
Creating a Cart Price Rule 320
Coupon Codes 332
Coupons Report 334
Free Shipping Promotion 336
Buy X Get Y Free 339
Discount with Minimum Purchase 341
Magento Community Edition 2.0 User Guide vii
Contents
Communications 345
CHAPTER 20: Email Templates 347
Supported Email Clients 348
Preparing Your Email Logo 350
Configuring Email Templates 351
Configuring Sales Email 354
Payment Failed Email 357
Customizing Email Templates 359
Header Template 360
Footer Template 364
Message Templates 368
Email Template List 372
CHAPTER 21: Sales Documents 373
Preparing Your Invoice Logo 374
Adding Reference IDs to Header 376
Customer Address Templates 378
CHAPTER 22: Newsletters 381
Configuring Newsletters 382
Newsletter Templates 384
Sending Newsletters 386
Managing Subscribers 388
CHAPTER 23: RSS Feeds 391
CHAPTER 24: Using Variables 395
Adding Predefined Variables 396
Adding Custom Variables 397
Markup Tags 399
Custom Variable 399
Using Markup Tags in Links 402
Variable Reference 405
viii Magento Community Edition 2.0 User Guide
Contents
SEO & Search 409
CHAPTER 25: Catalog Navigation 411
Top Navigation 412
Breadcrumb Trail 414
Product Listings 416
Pagination Controls 419
Layered Navigation 421
Layered Navigation with Filterable Attributes 422
Price Navigation 426
Configuring Layered Navigation 429
CHAPTER 26: Catalog Search 431
Quick Search 432
Advanced Search 433
Search Results 435
Configuring Catalog Search 436
Using a Flat Catalog 437
CHAPTER 27: Search Terms 441
Popular Search Terms 442
Adding Search Terms 444
Search Terms Report 446
CHAPTER 28: SEO Best Practices 447
Meta Data 448
Canonical Meta Tag 449
Using a Sitemap 451
Sitemap Configuration 452
Search Engine Robots 455
CHAPTER 29: URL Rewrites 457
URL Rewrite Configuration 458
Automatic Product Redirects 459
Magento Community Edition 2.0 User Guide ix
Contents
Creating URL Rewrites 461
Product Rewrites 462
Category Rewrites 466
CMS Page Rewrites 468
CHAPTER 30: Google Tools 471
Google Analytics 472
Google Adwords 473
CONTENT 475
CHAPTER 31: Content Menu 477
CHAPTER 32: Pages 479
Core Content 480
Default Pages 482
Workspace Controls 484
Page Search 488
Page Actions 491
Applying Actions 491
Page Grid Layout 492
Adding a New Page 495
Assigning a New Home Page 498
Media Storage 500
Using the Editor 501
Inserting a Link 501
Inserting an Image 502
Inserting a Widget 503
Inserting a Variable 504
CHAPTER 33: Content Blocks 505
Adding New Blocks 506
Adding Social Plugins 508
Adding a Lightbox or Slider 511
x Magento Community Edition 2.0 User Guide
Contents
Positioning Blocks 512
Using a Widget 515
Using a Layout Update 518
CHAPTER 34: Widgets 519
Widget Types 520
Creating a Widget 521
New Products List 526
Design & Theme 531
CHAPTER 35: Design Menu 533
CHAPTER 36: Page Setup 535
HTML Head 536
Header 537
Footer 538
CHAPTER 37: Page Layout 539
Standard Page Layouts 540
Storefront Examples 542
1 Column Layout 542
2 Columns with Left Bar 543
2 Columns with Right Bar 543
3 Columns 544
Layout Updates 545
Standard Block Layout 546
Layout Update Examples 549
Layout Update Syntax 552
Controlling Block Order 556
XML Load Sequence 557
CHAPTER 38: Themes 559
Using the Default Theme 560
Installing a New Theme 562
Magento Community Edition 2.0 User Guide xi
Contents
Theme Assets 563
Merging CSSFiles 564
Merging JavaScript Files 565
Scheduling Design Changes 566
CUSTOMERS 567
CHAPTER 39: Customers Menu 569
All Customers 571
Now Online 572
CHAPTER 40: Customer Accounts 575
Customer Sign In 576
Account Dashboard 578
Configuring Customer Accounts 581
Online Session Length 582
Account Scope 583
Login Landing Page 584
New Account Options 585
Name and Address Options 587
Password Options 589
CHAPTER 41: Customer Groups 591
SALES 595
CHAPTER 42: Sales Menu 597
Order Management 599
CHAPTER 43: Orders 601
Order Workspace 604
Order Actions 606
Order Search 607
xii Magento Community Edition 2.0 User Guide
Contents
Order Grid Layout 609
Order Workflow 611
Processing Orders 612
Allow Reorders 614
Order Status 615
Order Status Workflow 615
Custom Order Status 616
Scheduled Order Operations 620
Pending Payment Order Lifetime 621
Scheduled Grid Updates 621
CHAPTER 44: Invoices 623
Printing Multiple Invoices 624
CHAPTER 45: Billing Agreements 625
CHAPTER 46: Shipments 627
CHAPTER 47: Transactions 629
CHAPTER 48: Credit Memos 631
Printing Credit Memos 635
Product Return Workflow 637
Payments 639
CHAPTER 49: Basic Payment Methods 641
Check / Money Order 642
Cash On Delivery 644
Bank Transfer 646
Purchase Order 648
Zero Subtotal Checkout 650
CHAPTER 50: PayPal 653
PayPal Business Account 654
PayPal All-In-One Payment Solutions 655
Magento Community Edition 2.0 User Guide xiii
Contents

PayPal Payments Advanced 656
Checkout Workflow 656
Checkout Workflow 656
Order Processing Workflow 656
Order Processing Workflow 656
Requirements 658
Setting Up PayPal Payments Advanced 658
PayPal Payments Pro 659
Checkout Workflow 659
Checkout Workflow 659
Order Processing Workflow 660
Order Processing Workflow 660
Requirements 661
Setting Up PayPal Payments Pro 661
PayPal Payments Standard 662
Checkout Workflow 662
Checkout Workflow 662
Merchant Requirements 663
Setting Up PayPal Payments Standard 663
PayPal Payment Gateways 664
PayPal Payflow Pro 665
Customer Workflow 665
Customer Workflow 665
Online Order Processing Workflow 665
Online Order Processing Workflow 665
Requirements 666
Setting Up PayPal Payflow Pro 666
PayPal Payflow Link 667
Customer Workflow 667
Customer Workflow 667
Order Workflow 668
Order Workflow 668
xiv Magento Community Edition 2.0 User Guide
Contents
Requirements 669
Setting Up PayPal Payflow Link 669
PayPal Express Checkout 670
Checkout Workflow 670
Checkout Workflow 670
Requirements 671
Setting Up PayPal Express Checkout 671
PayPal Billing Agreements 684
Billing Agreement Workflow 685
Billing Agreement Workflow 685
PayPal Settlement Reports 686
PayPal Fraud Management Filter 689
PayPal Payment Solutions 690
PayPal by Country 691
CHAPTER 51: Other Payment Solutions 693
Testing Credentials 693
Braintree 694
Setting Up Braintree 694
Authorize.Net Direct Post 695
Shipping 697
CHAPTER 52: Shipping Settings 699
Point of Origin 700
Multiple Addresses 701
Shipping Policy 702
CHAPTER 53: Basic Shipping Methods 703
Free Shipping 704
Flat Rate Shipping 706
Table Rates 708
Dimensional Weight 716
Magento Community Edition 2.0 User Guide xv
Contents
CHAPTER 54: Carriers 717
UPS 718
USPS 719
FedEx 720
DHL 721
CHAPTER 55: Shipping Labels 723
Shipping Label Workflow 724
Configuring Shipping Labels 725
Creating Shipping Labels 729
Label Packages 737
REPORTS 743
CHAPTER 56: Reports Menu 745
CHAPTER 57: Marketing Reports 749
CHAPTER 58: Review Reports 751
CHAPTER 59: Sales Reports 753
CHAPTER 60: Customer Reports 757
CHAPTER 61: Product Reports 759
Refresh Statistics 762
OPERATIONS 763
CHAPTER 62: Stores Menu 765
CHAPTER 63: All Stores 767
Creating a Store View 768
Adding a Language 770
Translating Products 771
Translating Content 773
xvi Magento Community Edition 2.0 User Guide
Contents

Creating a Store 774
Creating a Website 778
Store URLs 779
Using a Custom Admin URL 783
CHAPTER 64: Configuration 785
CHAPTER 65: Taxes 787
Tax Rules 788
Tax Classes 792
Fixed Product Tax 793
Configuring FPT 794
EU Place of Supply 799
Tax Zones and Rates 800
Import/Export Tax Rates 802
Value Added Tax (VAT) 805
Configuring VAT 805
VATValidation 808
Customer Registration Workflow 808
Checkout Workflow 809
Configuring VAT ID Validation 811
Tax Quick Reference 816
Tax Calculation Methods 816
Catalog PricesWith or Without Tax 816
Shipping Prices With or Without Tax 817
Tax Amounts as Line Items 817
International Tax Guidelines 818
U.S. Tax Guidelines 820
Tax Classes 820
Calculation Settings 820
Default Tax Destination Calculation 820
Price Display Settings 820
Shopping Cart Display Settings 821
Magento Community Edition 2.0 User Guide xvii
Contents

Orders, Invoices, Credit Memos, Display Settings 821
Fixed Product Taxes 821
Canadian Tax Guidelines 822
EU Tax Guidelines 827
Warning Messages 833
Calculation Settings 833
Discount Settings 835
CHAPTER 66: Currency 837
Currency Configuration 838
Currency Symbols 842
Updating Currency Rates 843
CHAPTER 67: Attributes 845
Product Attributes 846
Creating a Product Attribute 851
Attribute Sets 856
System 859
CHAPTER 68: System Menu 861
CHAPTER 69: Data Transfer 865
Working with CSV Files 866
Product CSV Structure 866
Customer CSV Structure 868
Data Validation 870
Import 872
Import History 877
Importing Product Images 878
Import Guidelines 880
New Entities 880
New Entities 880
Existing Entities 880
xviii Magento Community Edition 2.0 User Guide
Contents
Existing Entities 880
Complex Data 881
Complex Data 881
Invalid Files 881
Invalid Files 881
Export 882
Export Criteria 884
Export Filters 885
Exclude Attributes 885
Product Attribute Reference 886
Complex Data 899
Advanced Pricing 901
Customer Attribute Reference 903
CHAPTER 70: Integrations 907
Onboarding Workflow 908
Magento Marketplace 911
Magento Connect 912
CHAPTER 71: Tools 913
Cache Management 914
Full-Page Cache 918
Alternate Media Storage 920
Using a Database 921
Database Workflow 921
Using a Content Delivery Network 923
CDN Workflow 923
Backups 926
Index Management 928
Indexing Events 931
Cron (Scheduled Tasks) 934
Web Setup Wizard 936
Setup Tools 937
Magento Community Edition 2.0 User Guide xix
Contents
Web Setup 938
CHAPTER 72: Permissions 945
Adding Users 946
Locked Users 949
User Roles 950
CHAPTER 73: Security 953
Security Best Practices 954
Start Right 954
Protect the Environment 955
Protect Magento 957
Don’t be Taken for a Ride 958
Be Prepared! 958
Monitor for Signs of Attack 959
Follow Your Disaster Recovery Plan 960
Configuring Admin Security 962
CAPTCHA 964
Admin CAPTCHA 965
Customer CAPTCHA 968
Encryption Key 970
Session Validation 971
Browser Capabilities Detection 973
Action Log 974
APPENDICES 975
APPENDIX A: Release Notes 977
APPENDIX B: Change Log 979
APPENDIX C: Glossary 981
APPENDIX D: Configuration Reference 991
xx Magento Community Edition 2.0 User Guide
Contents

About this Guide
This guide answers the “why, where, and how” questions that most merchants have when
learning to use Magento. You’ll find lots of step-by-step instructions, screenshots and
examples, plus a comprehensive configuration reference that is linked throughout the material.
After learning the basics, you can use this guide as a springboard into more advanced topics
and resources.
Online User Guide
The online guide is the primary user documentation for
the current release of Magento Community Edition 2.0.
The content is continually updated to provide you with the
best possible assistance. To learn about recent additions
or changes to existing topics, see the Change Log in the
appendix of this guide.
PDF User Guide
You’ll find the same great information in both the online
(HTML) and offline (PDF) user guides, so you can use
the format you prefer. Simply click the link to open the
PDF in your browser. You can also right-click the
download link to save the file to your computer. The
Documentation Archive in the appendix of this guide will
eventually have PDF download links for every major
version of the product.
Magento Community Edition 2.0 User Guide xxii


Introduction
This section of the guide provides an overview
of the resources that are available to you as a
member of the Magento community. You’ll learn
about the current release, and how to log into
your Magento account. Finally, you’ll take a
guided tour of Magento from two different
perspectives, with links you can explore to learn
more about each topic.
Welcome
Resources
Join the Conversation!
About This Release
System Requirements
Installation
Prelaunch Checklist
Your Login Credentials
For Your Records
Your Magento Account
Creating a Magento Account
Sharing Your Account
Quick Tour
Path to Purchase
Home Page
Catalog Page
Search Results
Product Page
Shopping Cart
Customer Journey
Attract New Customers
Engage Your Customers
Moment of Purchase
Increase Average Order Value
Customer Retention
Loyalty & Advocacy
Success!
2 Magento Community Edition 2.0 User Guide
CHAPTER 1:
Welcome
Welcome to the next generation of the world’s leading digital commerce platform! Built on
open-source technology, Magento Community Edition 2.0 provides online merchants with
unparalleled flexibility and control over the look, content, and functionality of their online
stores. Magento’s intuitive Admin features powerful marketing, search engine
optimization, and product management tools that give you the power to create sites that
are tailored to your unique business needs. Robust and scalable, Magento 2.0 offers you a
stable, secure, and customizable solution for your growing business.
Home Page
Magento Community Edition 2.0 User Guide 3
Resources
Magento provides a wealth of business and technical resources, self-help tools, and services to
help you succeed.
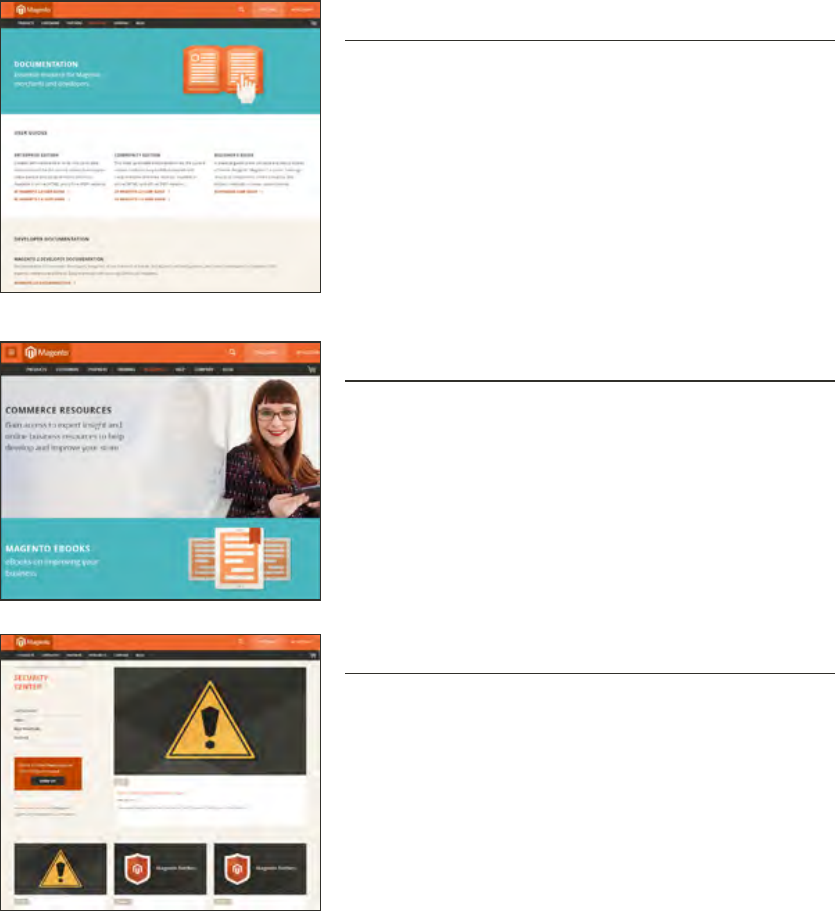
Product Documentation
Whether you’re a merchant, designer, developer, or all of
the above, this is where you’ll gain a deeper insight into
how you can leverage the power of Magento to grow your
business.
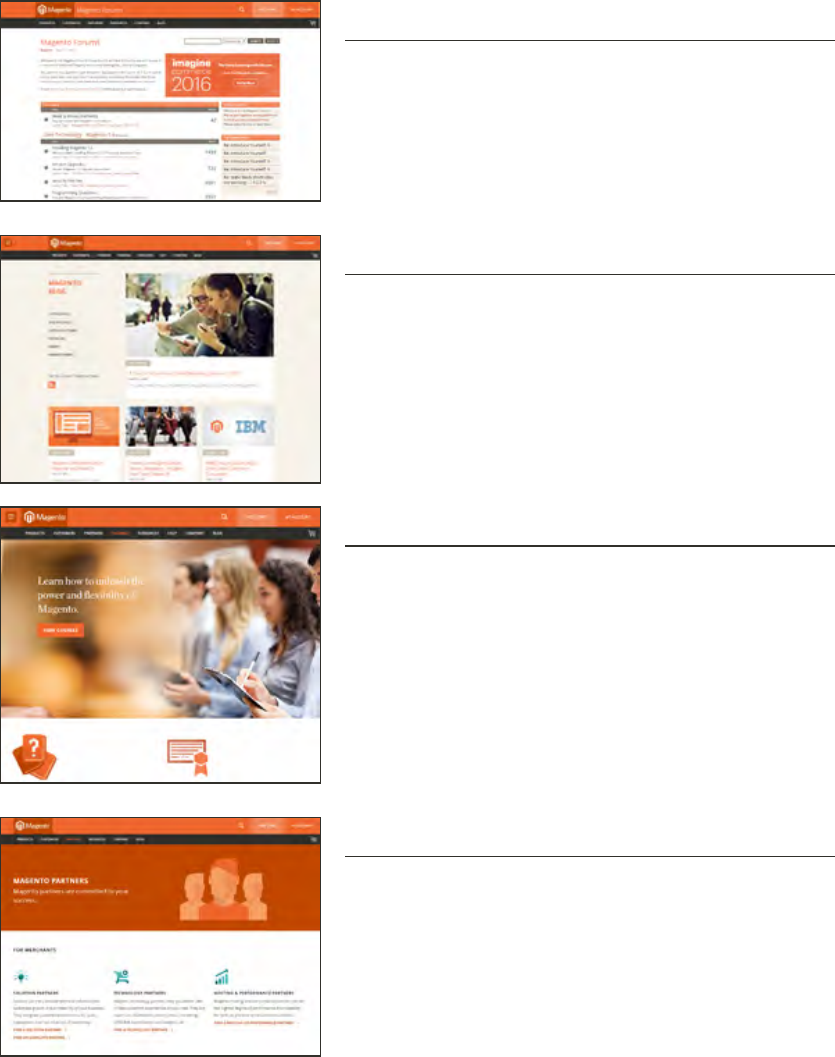
Commerce Resources
Gain access to expert insight and online business
resources to help develop and improve your store.
Ebooks, Magento whitepapers, and webinars.
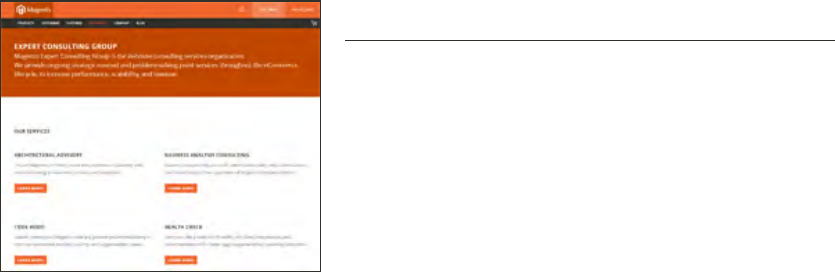
Security Center
Join Magento’s Security Alert Registry to get the latest
information on potential vulnerabilities and Security Best
Practices.
Resources CHAPTER 1: Welcome
4 Magento Community Edition 2.0 User Guide
Forums
The Magento forums provide access to a network of
dedicated Magento enthusiasts who share tips, tricks
and support.
Blog
Check out the Magento blog for the latest information
about new features, trends, best practices, upcoming
events, and more!
Training & Certification
Learn how to unleash the power and flexibility of
Magento. We provide training for every role in your
business, including marketers, designers, developers,
and more. Experienced Magento professionals can
validate their real-world skills by earning Magento
certification.
Partners
Magento partners are committed to your success, and
provide custom integrations, best-in-class customer
experiences, strategic marketing initiatives, and expert
performance and scalability optimization for both on-
premise and cloud-based solutions.
CHAPTER 1: Welcome Resources
Magento Community Edition 2.0 User Guide 5
Expert Consulting Services
Our Expert Consulting Group (ECG) helps Magento
merchants and Solution Partners maximize their
success. Our experts offer comprehensive analysis and
best practice recommendations, from architecture
planning through post-deployment.
Resources CHAPTER 1: Welcome
6 Magento Community Edition 2.0 User Guide

Join the Conversation!
Keep up with the latest news from the ecosystem, and connect with other merchants and
developers on social media networks.
Magento Forums
This is the place to find solutions, become acquainted
with international communities, and join a special interest
chat! Share your knowledge and earn kudos from others!
Facebook
Find out what’s happening and join the discussion on our
Facebook page!
Twitter
Follow us on Twitter!
LinkedIn
Join a Magento group on LinkedIn.
CHAPTER 1: Welcome Join the Conversation!
Magento Community Edition 2.0 User Guide 7
CHAPTER 2:
About this Release
We are pleased to present Magento Community Edition 2.0.4. This release includes
functional fixes and performance enhancements, and addresses several security issues. To
learn more, see the Release Notes in the Magento developer documentation.
World’s Leading Digital Commerce Platform
Magento Community Edition 2.0 User Guide 9

System Requirements
For more information, see System Requirements in the Magento 2.0 developer documentation.
SYSTEM REQUIREMENTS
ENVIRONMENT
Operating System Linux x86-64
Composer Composer is required for developers who want to contribute to code
base,or develop extensions.
Web Server Apache 2.2 or 2.4 The apache mod_rewrite module must
be enabled. To learn more, see:Apache.
Nginx 1.8.x (or latest stable version)
PHP PHP 7.0.2 (Magento 2.0.1 and later only)
PHP 5.6.x (or latest stable version)
PHP 5.5.x (or latest stable version)
Required extensions:
bc-math (Enterprise Edition only)
curl
gd,ImageMagick 6.3.7 (or later) or both
intl
mbstring
mcrypt
mhash
openssl
PDO_MySQL
SimpleXML
soap
xml
xsl
zip
Optional, but recommended
System Requirements CHAPTER 2: About this Release
10 Magento Community Edition 2.0 User Guide

SYSTEM REQUIREMENTS
opcache This extension is bundled in many PHP
distributions. To verify, see: CentOS or
Ubuntu.
php_
xdebug2.2.0
or later
Recommended for development
environments only.
Additional configuration:
safe_mode off
memory_limit minimum 512 MB
Database MySQL 5.6.x (Oracle or Percona)
Magento Enterprise Edition 2.0 can use three master databases to
provide scalability for the different functional areas of checkout,
orders, and product data.
SSL A valid security certificate is required for HTTPS.
Self-signed certificates are not supported.
Mail Server Mail Transfer Agent (MTA) or SMTPserver
SUPPORTED APPLICATIONS
Reverse Proxy / Web
Accelerator
Varnish 3.5
Varnish 4.x (or latest stable version.)
Cache Storage Redis 3.x
Memcache 1.4.x
Session Storage memcached latest stable version for session storage with either
memcache or memcached PHP extensions (latest stable version)
Search Apache Solr (Enterprise Edition only)
Messaging RabbitMQ (Enterprise Edition only)
CHAPTER 2: About this Release System Requirements
Magento Community Edition 2.0 User Guide 11
SUPPORTED BROWSERS
BROWSER VERSION OS
Storefront/Admin
Firefox Latest, latest -1*Any
Chrome Latest, latest -1 Any
Safari Latest, latest -1 Mac OS
Microsoft Edge Version 11 or later Windows
Storefront Only
Internet Explorer Version 9 or later Windows
Desktop Storefront
Safari Mobile iPad 2
iPad Mini
iPad with Retina Display OS 7 or later
Mobile Storefront
Safari Mobile iPhone 4 or later IOS 7 or later
Chrome for Mobile Latest, latest -1 Android 4 or later
*The version before the most current.
System Requirements CHAPTER 2: About this Release
12 Magento Community Edition 2.0 User Guide
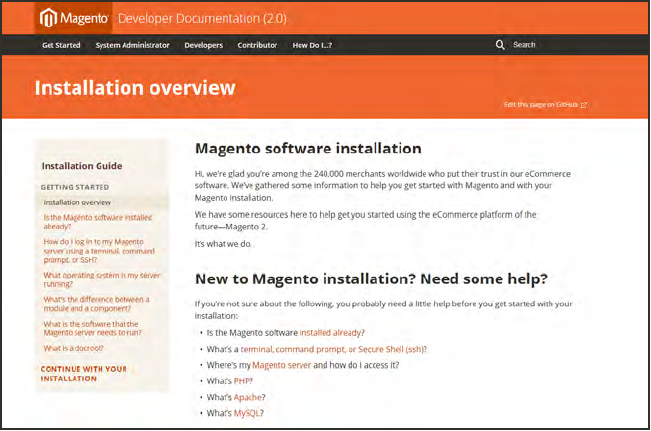
Installation
To install Magento 2 on your server, see the Installation Guide in our technical documentation.
For an overview of the second part of the installation process, see Web Setup Wizard in the
System Operations section of this guide.
Installation Guide
CHAPTER 2: About this Release Installation
Magento Community Edition 2.0 User Guide 13

Prelaunch Checklist
After you complete the design, development, and testing of your store, check the following
configuration settings to make sure everything is correct before the store “goes live.” For a
comprehensive description of every configuration setting, see the Configuration Reference.
General Settings
Store URLs
Verify that the store URLs for the storefront and Admin are correct for a live production
environment.
Security Certificate
Before launching your store, install a 100% Signed and Trusted Security Certificate for
the domain specified in the Base URL.
Store Email Addresses
Complete all the email addresses that are used to send and receive email notifications,
such as new orders, invoices, shipments, credit memos, product price alerts,
newsletters, and so on. Make sure that each field contains a valid business email
address.
Marketing Settings
Email Templates
Update the default email templates to reflect your brand. Make sure to update the
configuration if you create new templates.
Sales Communications
Make sure that your invoices and packing slips include the correct business information
and reflect your brand.
Google Tools
Magento is integrated with Google API to allow your business to use Google Analytics
and Google AdWords.
Installation CHAPTER 2: About this Release
14 Magento Community Edition 2.0 User Guide

Sales & Marketing Settings
Cart Options
Take a look at the cart configuration settings, to see if there’s anything that you want to
change. This is where you can set the minimum order amount and lifetime of the prices in
the cart.
Checkout Options
Take a look at the checkout options, to see if there’s anything that you want to change.
This is where you can set up terms and conditions, and configure guest checkout.
Taxes
Make sure that taxes are properly configured according to your business tax rules and
local requirements.
Shipping Methods
Enable all carriers and shipping methods to be used by the company.
PayPal
If you plan to offer your customers the convenience of paying with PayPal, open a PayPal
Merchant Account, and set up a payment method. Run some test transactions in
Sandbox Mode before the store goes live.
Payment Methods
Enable the payment methods that you plan to use, and make sure that they are properly
configured. Check the order status settings, accepted currency, allowed countries, and
so on.
System Settings
Cron (Scheduled Tasks)
Cron jobs are used to process email, catalog price rules, newsletters, customer alerts,
Google sitemaps, update currency rates, and so on, Make sure that Cron jobs are set to
run at the appropriate time interval, in minutes.
CHAPTER 2: About this Release Installation
Magento Community Edition 2.0 User Guide 15

Your Login Credentials
Before you go any further, make sure that you have the information that you need to access the
Admin of your store, and your Magento account.
Storefront URL
The address for your storefront is usually the domain that is assigned to your IP
address. Some stores are installed the root, or topmost directory. Others are
installed in a directory below the root. Your store might be located in a subdomain
that is associated with your primary domain. Your store URL might look like one of
the following:
http://mydomain.com
http://www.mydomain.com/mystore
http://www.mydomain.com/mystore
http://xxx.xxx.xxx.xxx
If you don’t yet have a domain, your store URL will include a series of four numbers,
each separated by a period in “dotted quad” notation.
Admin URL
The address for your store Admin was set up during the installation. The default
address is the same as your store, but with /admin at the end. Although the
examples in this guide use the default directory, we recommend that run your
Admin from a location that is unique to your store.
http://mydomain.com/admin
http://www.mydomain.com/admin
Magento Account
Your Magento account provides access to information about your products and services,
account settings, billing history, and support resources. to access your account, visit the
Magento site and click the My Account link in the header.
Customer Account
While you’re learning your way around the store, make sure to set up a test customer
account, so you can experience the store and checkout process from the customer’s
perspective.
Installation CHAPTER 2: About this Release
16 Magento Community Edition 2.0 User Guide
For Your Records
As a best practice, keep a record of the details of your installation, your login credentials, and
the email address that is associated with each account. You can print this page, write down
your credentials, and keep it in a safe, convenient place.
Store and Admin
Store URL:
Admin URL:
Admin User Name:
Admin Password:
Admin Email Address:
Magento Account
User Name:
Password:
Email Address:
Test Customer Account
User Name:
Password:
Email Address:
Installation Information
Magento Version:
Encryption Key:
Database Name:
DatabaseUser Name:
Database Password:
CHAPTER 2: About this Release Installation
Magento Community Edition 2.0 User Guide 17

Notes
18 Magento Community Edition 2.0 User Guide
CHAPTER 3:
Your Magento Account
Your Magento account has a separate login from your store, and can be accessed from
either the Magento website or from your store’s Admin. From the dashboard of your
Magento account, you can find information that is related to the products and services
that you have purchased, as well as your contact and billing information.
Your Magento Account
Magento Community Edition 2.0 User Guide 19
Creating a Magento Account
Anyone can open a free Magento account from our website. The email address that is used to
open a Magento account can be associated with only one account, and the screen name that
you enter becomes your identity in the Magento forums.
To create a Magento account:
1. Visit the Magento site at: http://www.magento.com
2. In the upper-right corner, choose My Account. Then under New Customers, tap Register.
Log In to Your Account
3. Under Personal Information, do the following:
a. Enter your First Name,Last Name, and Email Address.
b. Set My Company Primarily to the best description of what your company does. Then, set
My Role to the best description of what you do for the company.
4. Under Login Information, do the following:
a. Enter a Screen Name to identify you in the Magento Community Forums.
Your screen name can be from four to fifteen characters long, can include numbers and the
underscore, but must start with a letter.
b. Enter a Password for your account. Then, enter it again to confirm.
Your password can be from eight to sixteen characters long, and must include at least one
capital letter, one number, and one special character or one lowercase letter.
c. When complete, tap Submit. Your account dashboard appears.
Creating a Magento Account CHAPTER 3: Your Magento Account
20 Magento Community Edition 2.0 User Guide
Create an Account
To log in to your Magento account:
1. Go to the Magento site: http://www.magento.com
2. In the upper-right corner, click My Account.
3. Enter the Email address that is associated with your account. Then, enter your Password.
4. When complete, tap Login.
To receive a new password:
1. If you forget your password, click Forgot Your Password?
2. Enter the Email Address that is associated with your account, and tap Submit.
You will receive an email from Magento with a temporary password that you can use to log
into your account. Then, reset your password from the dashboard of your account.
CHAPTER 3: Your Magento Account Creating a Magento Account
Magento Community Edition 2.0 User Guide 21
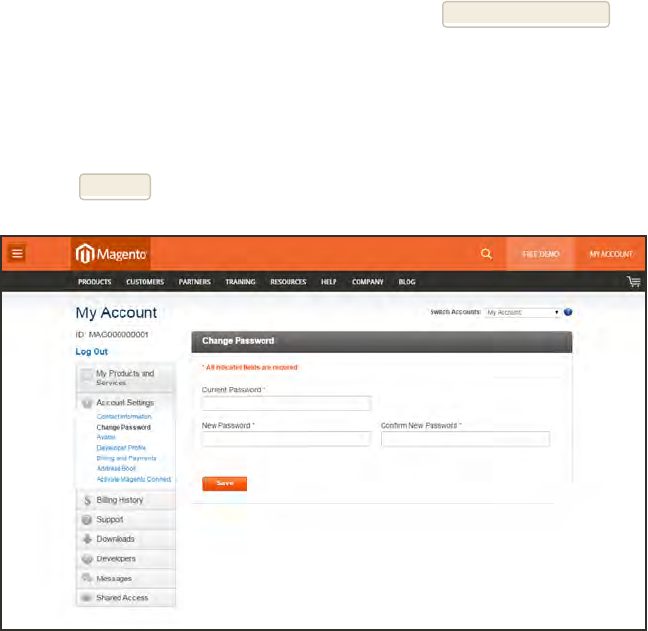
To reset your password:
1. Log in to your Magento account.
2. In the panel on the left, choose Account Settings. Then, tap Change Password
3. Enter your Current Password.
If you forgot your password, enter the temporary password that was sent to you.
4. Enter your New Password. Then, enter it again to confirm.
5. When complete, tap Submit.
Change Password
Creating a Magento Account CHAPTER 3: Your Magento Account
22 Magento Community Edition 2.0 User Guide
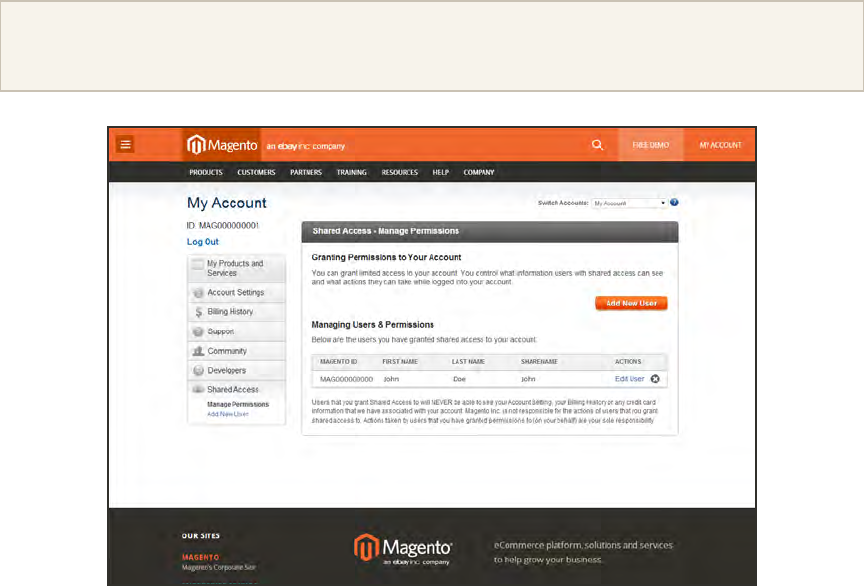
Sharing Your Account
Your Magento account contains information that can be useful to trusted employees and service
providers who help to manage your site. As the primary account holder, you have authority to
grant limited access to your account to other Magento account holders. When your account is
shared, all sensitive information—such as your billing history or credit card information—
remains protected. It is not shared at any time with other users.
All actions taken by users with shared access to your account are your sole responsibility. Magento
Inc. is not responsible for any actions taken by users to whom you grant shared account access.
Shared Access
To set up a shared account:
1. Before you begin, get the following information from the new user’s Magento account:
lAccount ID
lEmail address
2. Log in to your Magento account.
3. In the panel on the left, under Shared Access, choose Add New User. Then, do the following:
lEnter the Account ID of the new user’s Magento account.
lEnter the Email address that is associated with the new user’s Magento account.
4. In the Shared Information section, do the following:
CHAPTER 3: Your Magento Account Sharing Your Account
Magento Community Edition 2.0 User Guide 23
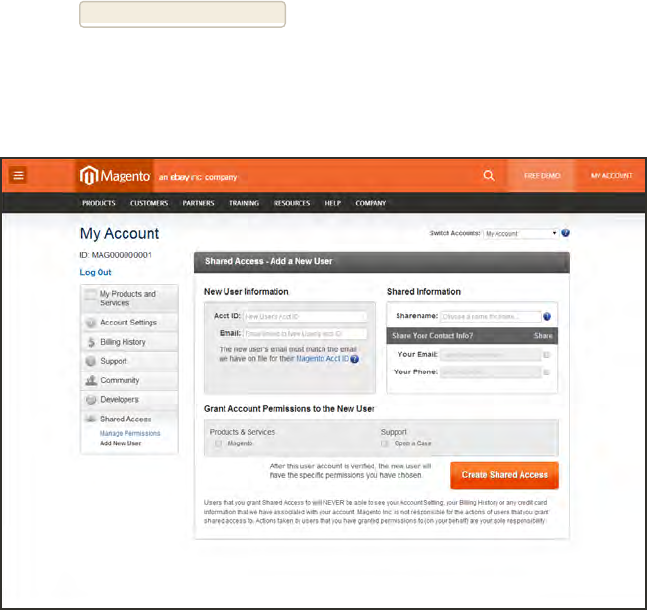
a. Enter a Sharename to identify your shared account. Because the Sharename becomes an
option in the Switch Accounts list, it should be something that the other person will
recognize as your account.
b. To share your personal contact information, mark the checkbox of each item that you want
to make available to the other person:
lYour Email
lYour Phone
5. In the Grant Account Permissions section, mark the checkbox of each item that you want to
share.
6. When complete, tap Create Shared Access.
You are notified when the new role is saved, and the new user record appears in the Manage
Users & Permissions section of the Shared Access page. Magento also sends an email invitation
with instructions for accessing the shared account to the new user.
Add a New User
Sharing Your Account CHAPTER 3: Your Magento Account
24 Magento Community Edition 2.0 User Guide
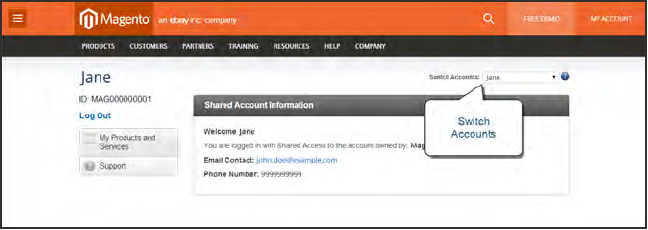
To access a shared account:
1. When you receive the invitation to a shared account, log in to your own Magento account.
Your account dashboard has a new Switch Accounts control in the upper-right corner, with
options for “My Account” and the name of the shared account.
2. To gain access to the shared account, set Switch Accounts to the name of the shared account.
The shared account displays a welcome message and contact information. The left panel
includes only the items that you have permission to use.
Switch Accounts
3. When you are ready to return to your own account, set Switch Accounts to “My Account.”
CHAPTER 3: Your Magento Account Sharing Your Account
Magento Community Edition 2.0 User Guide 25

Notes
26 Magento Community Edition 2.0 User Guide
CHAPTER 4:
Quick Tour
In this quick tour, we’ll take a look at each page that customers usually visit while
shopping in your store. The path that customers follow that leads to a sale is sometimes
called the “path to purchase.” Then, we’ll take a look at the major landmarks along the
journey, and how Magento Community 2.0 can be used to attract and engage customers,
increase the average order, and to build loyalty and advocacy.
Customer Journey
Magento Community Edition 2.0 User Guide 27
The Path to Purchase
The path customers follow that leads to a sale is sometimes called the “path to purchase.” In
this quick tour, we’ll take a look at pages of strategic value that customers usually visit while
shopping in your store. Then, we’ll consider different store features that can be leveraged at
each stage of the customer journey.
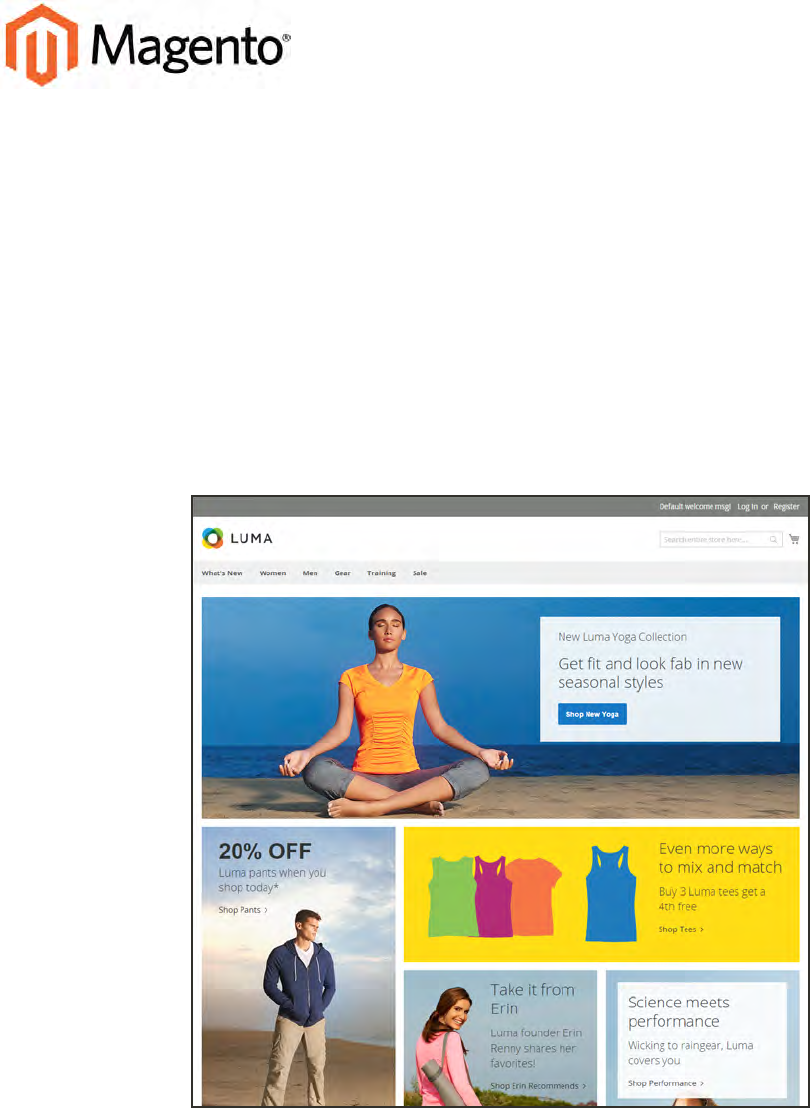
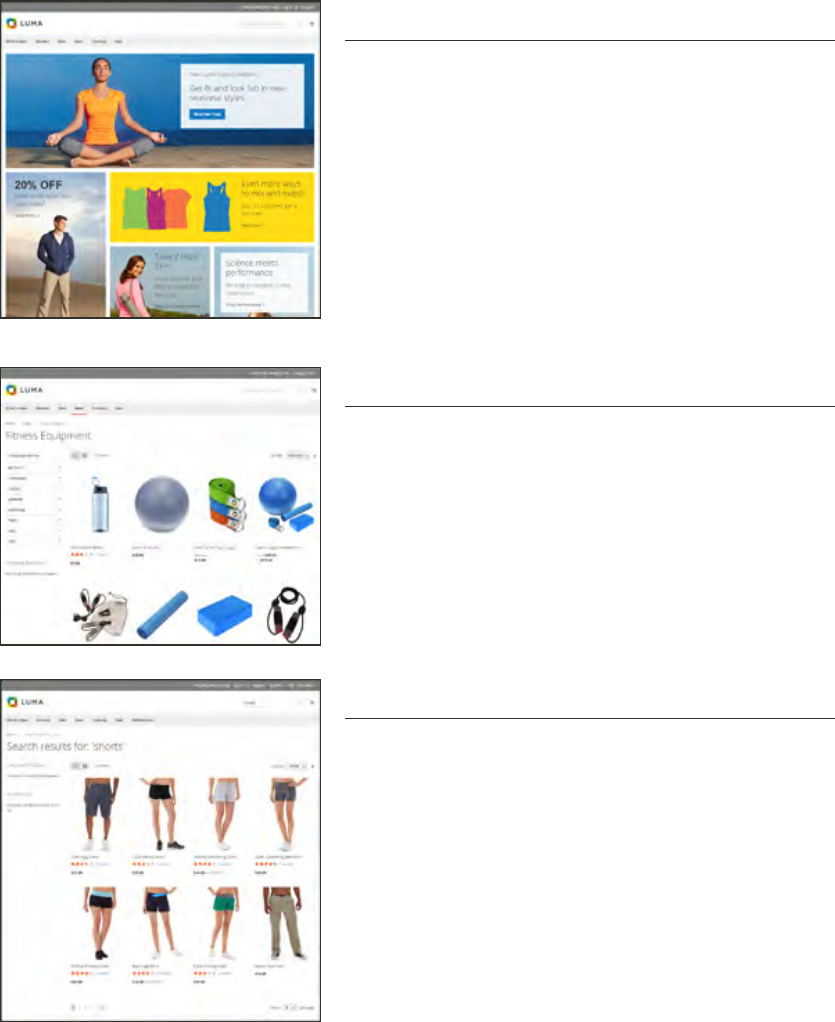
Home Page
Your home page is like the front window display of your
store. As the primary landing page, its design entices
visitors to come inside for a closer look.
Catalog Page
This page shows products from your catalog in either a
list or grid format. The selection can be based on a
category chosen from the main menu, a choice made in
the layered navigation on the left, or the results of a
search. Any item can be examined in more detail, or
placed directly into the shopping cart.
Search Results
Did you know that people who use search are nearly
twice as likely to make a purchase as those who rely on
navigation alone? You might consider these shoppers to
be “pre-qualified.”
The Path to Purchase CHAPTER 4: Quick Tour
28 Magento Community Edition 2.0 User Guide
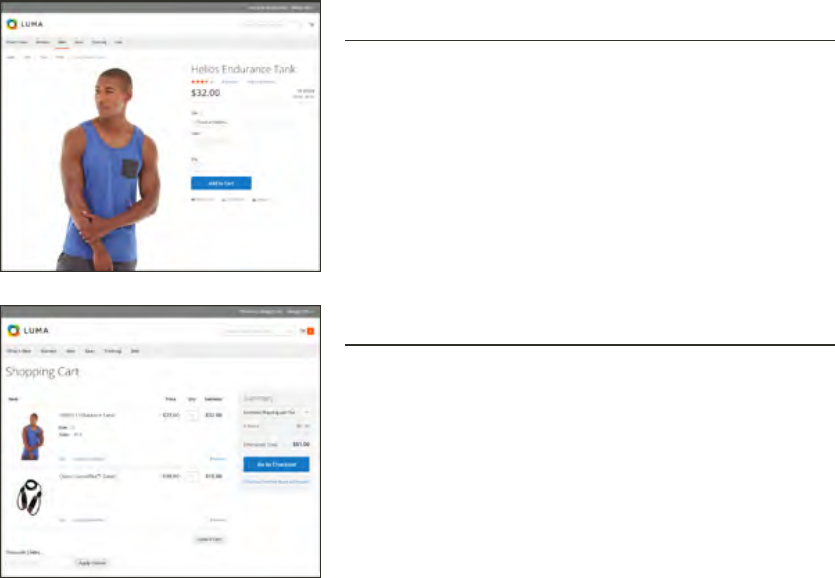
Product Page
The product page provides detailed information about a
specific item in your catalog. Shoppers can read reviews,
add the product to their wish lists, compare it to other
products, share the link with friends, and most
importantly, place the item into their shopping carts.
Shopping Cart
The shopping cart lists each item by price and quantity
selected, and calculates the subtotal. Shoppers can
apply discount coupons, and generate an estimate of
shipping and tax charges.
CHAPTER 4: Quick Tour The Path to Purchase
Magento Community Edition 2.0 User Guide 29

Home Page
Did you know that most people spend only a few seconds on a page before they decide to stay
or go somewhere else? That’s not long to make an impression! Studies show that people also
love photographs, especially of other people. Whatever design you choose, everything on your
home page should move visitors along toward the next step in the sales process. The idea is to
guide their attention in a cohesive flow from one point of interest to the next.
Callouts
lMain Menu
lSearch
lYour Account
lFeature a Brand
lOffer a Promotion
lOffer a Discount
lHear from an Expert
lAppeal to a Lifestyle
lShop by Fabric
lPopular Products
lFooter Links Block
lFooter Content
lSubscribe!
The Path to Purchase CHAPTER 4: Quick Tour
30 Magento Community Edition 2.0 User Guide

Home Page
CHAPTER 4: Quick Tour The Path to Purchase
Magento Community Edition 2.0 User Guide 31

Catalog Page
Catalog page listings typically have small product images and brief descriptions, and can be
formatted as a list or as a grid. You can add banners, videos, and keyword-rich descriptions,
and also create special designs for a promotion or season. You might create a special category
to feature a lifestyle or brand that is a curated collection of products from different categories.
The initial product description usually gives shoppers just enough information to merit a closer
look. People who know what they want can add the product to their carts and go. Customers
who shop while logged in to their accounts enjoy a personalized shopping experience.
Callouts
lMini Shopping Cart
lBreadcrumb Trail
lChange the List Style
lSort the List
lFilter the List
lGo to Next Page
lRead a Review
lShow More per Page
The Path to Purchase CHAPTER 4: Quick Tour
32 Magento Community Edition 2.0 User Guide
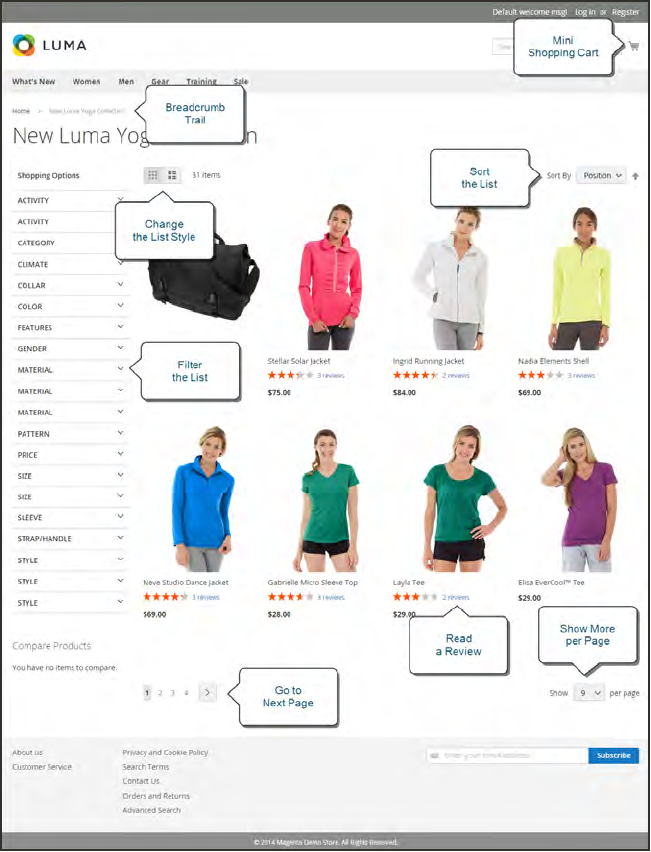
Catalog Page
CHAPTER 4: Quick Tour The Path to Purchase
Magento Community Edition 2.0 User Guide 33

Search Results
Did you know that people who use search are nearly twice as likely to make a purchase as those
who rely on navigation alone? You might consider these shoppers to be “pre-qualified.”
Your store has a Search box in the upper-right corner, and a link to Advanced Search in the
footer. All of the search terms that shoppers submit are saved, so you can see exactly what
they’re looking for. You can offer suggestions, and enter synonyms and common misspellings.
Then, display a specific page when a search term is entered.
Callouts
lSearch Criteria
lSort By
lSearch Results
lShow per Page
lNext Page
lAdvanced Search
The Path to Purchase CHAPTER 4: Quick Tour
34 Magento Community Edition 2.0 User Guide
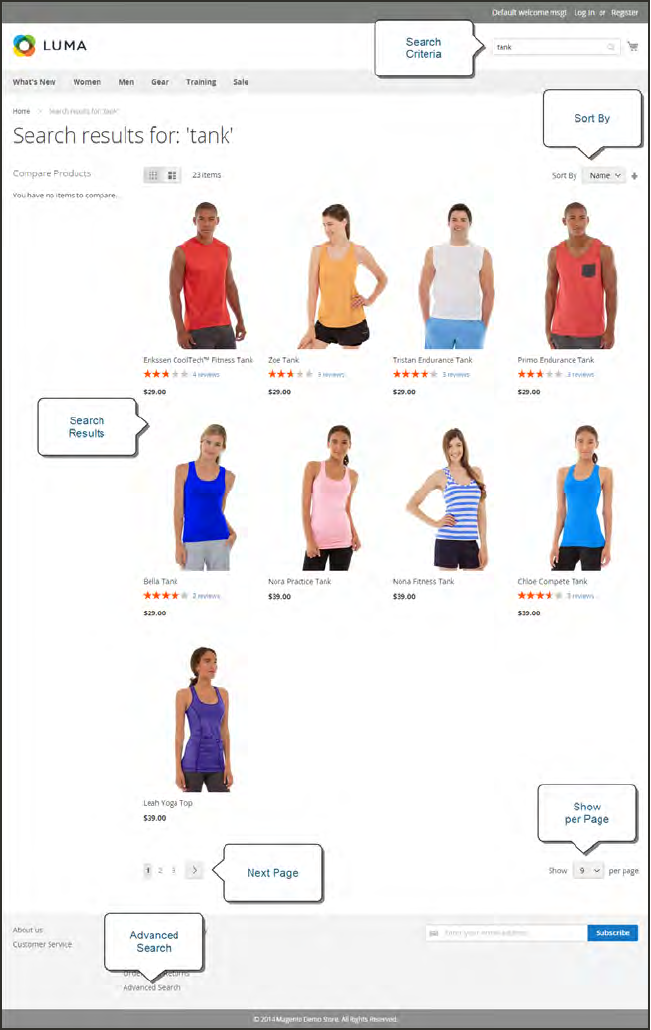
Search Results Page
CHAPTER 4: Quick Tour The Path to Purchase
Magento Community Edition 2.0 User Guide 35

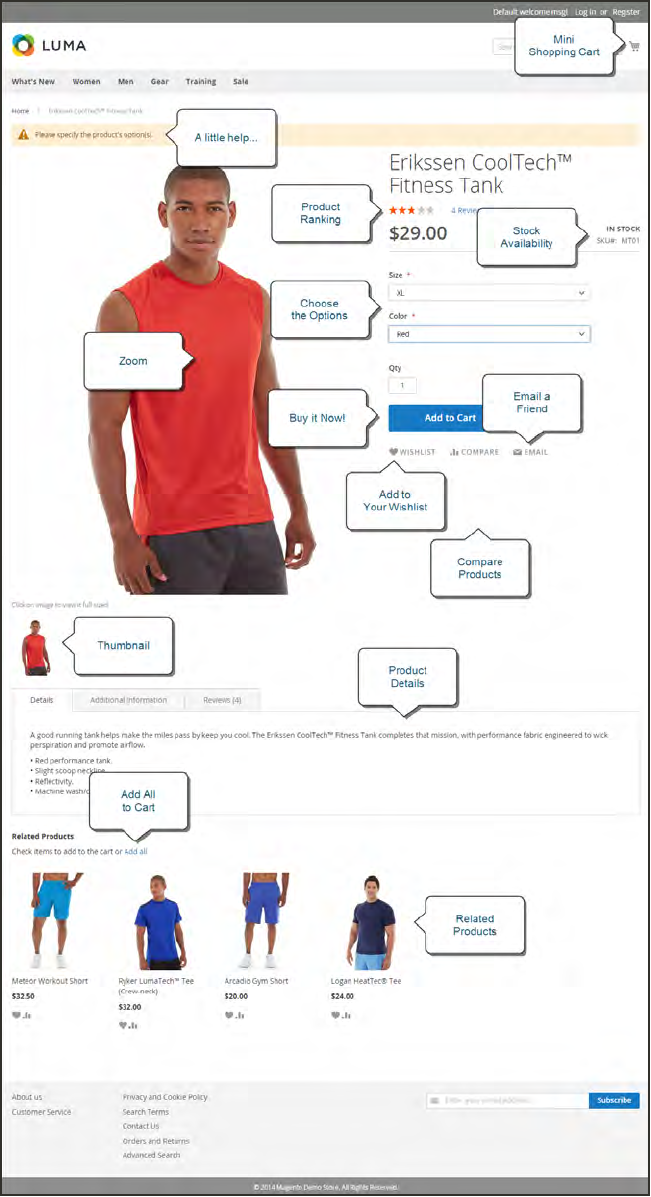
Product Page
The product page has a lot going on! The first thing that catches your eye on the product page
is the main image with a high-resolution zoom and thumbnail gallery. In addition to the price
and availability, there’s a tabbed section with more information and a list of related products.
Callouts
lMini Shopping Cart
lA little help…
lProduct Rating
lStock Availability
lChoose the Options
lZoom
lBuy it Now!
lEmail a Friend
lAdd to Your Wish List
lCompare Products
lThumbnail
lProduct Details
lAdd All to Cart
lRelated Products
The Path to Purchase CHAPTER 4: Quick Tour
36 Magento Community Edition 2.0 User Guide
Product Page
CHAPTER 4: Quick Tour The Path to Purchase
Magento Community Edition 2.0 User Guide 37

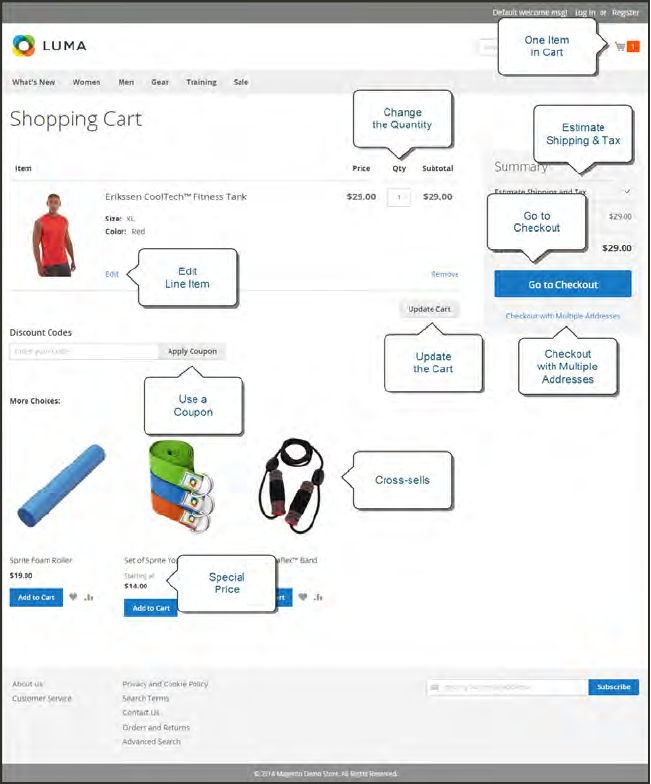
Shopping Cart
The cart is where order total can be determined, along with discount coupons and estimated
shipping and tax, and is a great place to display your trust badges and seals. It’s also an ideal
opportunity to offer one last item. As a cross-sell, you can select certain items to be offered as
an impulse purchase whenever a specific item appears in the cart.
Callouts
lOne Item in Cart
lChange the Quantity
lEstimate Shipping & Tax
lGo to Checkout
lEdit Line Item
lUpdate the Cart
lCheckout with Multiple Addresses
lUse a Coupon
lCross-sells
lSpecial Price
The Path to Purchase CHAPTER 4: Quick Tour
38 Magento Community Edition 2.0 User Guide
Shopping Cart Page
CHAPTER 4: Quick Tour The Path to Purchase
Magento Community Edition 2.0 User Guide 39

Customer Journey
Attract New Customers
Magento Community Edition 2.0 includes SEO
functionality out of the box. Improve your search ranking
and attract the most visitors to your site.
Engage Your Customers
Design your site with prepared templates, or create a
custom design with features that invite people to interact
with your store.
Increase AOV
Increase average order value with promotions and
content that encourage your customers to shop more.
Customer Journey CHAPTER 4: Quick Tour
40 Magento Community Edition 2.0 User Guide
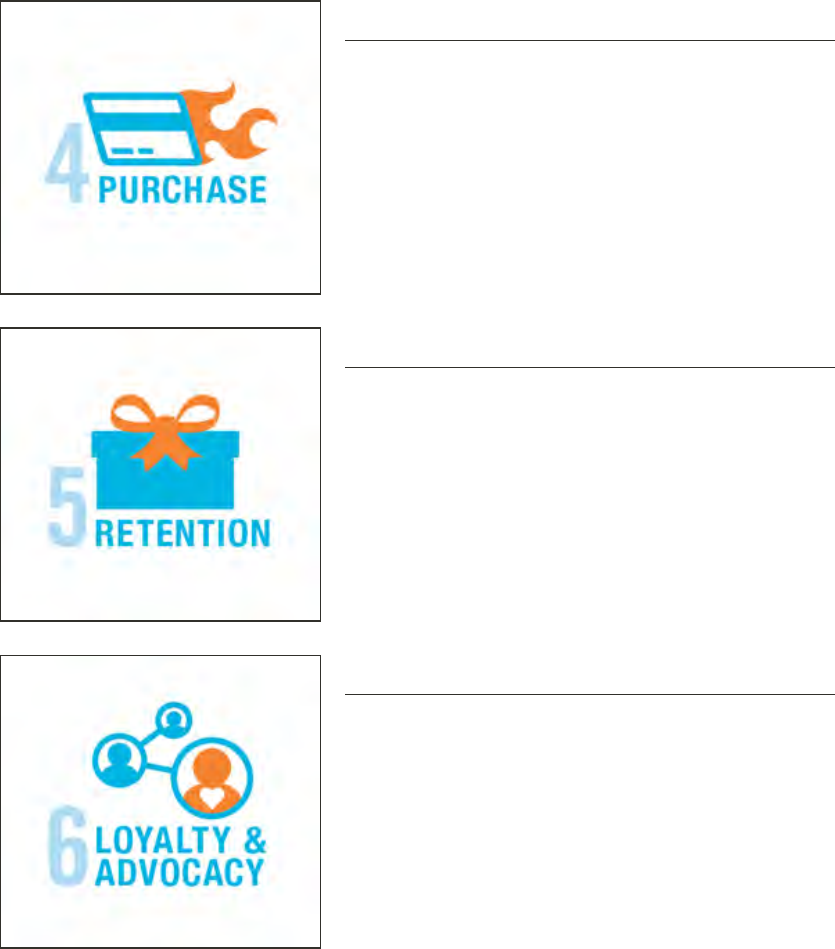
Moment of Purchase
Give your customers a faster and easier way to check
out. Calculate shipping and taxes automatically, and
integrate multiple payment methods on a single page.
Customer Retention
Create and manage newsletters and promotions to keep
your customers coming back for more.
Loyalty & Advocacy
Encourage customers to write product reviews, create
wish lists, and send email about products to their friends.
This will strengthen your relationship with your
customers, who in return, will speak positively of your
business to friends andfamily.
CHAPTER 4: Quick Tour Customer Journey
Magento Community Edition 2.0 User Guide 41

Attract New Customers
Magento Community Edition 2.0 is packed with features that make it easy to create a “search
engine friendly” websites and increase the likelihood of bringing the right customers to your
site.
Search Engine Optimization
Magento offers powerful, native capabilities to streamline Search Engine Optimization (SEO)
practices for content and site exposure that are integrated with the Admin, and tied directly into the
user experience.
Custom URLs
Custom URLs are short, clean, and easy to remember. You can also autogenerate search-friendly
URLs to streamline your purchase path.
Meta Data
Improve your search engine rankings by choosing specific criteria that helps search engines to find
and index your products more easily. Meta data can be entered for product, category, and content
pages.
Sitemap
Link to a sitemap from the footer of your store to give customers an overview of the catalog structure,
with links to all categories and products in the store. Easy integration with Google Sitemap.
Analytics
In addition to monitoring your site from the Admin dashboard, you can integrate third-party analytics
tools such as Google Analytics, for detailed statistics on traffic and sales.
Customer Journey CHAPTER 4: Quick Tour
42 Magento Community Edition 2.0 User Guide
Engage Your Customers
Magento Community Edition 2.0 makes it easy to create a customized, engaging site
experience. Encourage your customers to spend more time exploring your site, and give them
the tools to make it easy to find what they want faster.
Content Management
Magento’s CMS makes it easy to store pages, orparts of
pages, that you can use in your store. It’s so intuitive that
someone without a technology background can create
and manage site content.
Design & Theme
Control the visual elements of your store with a collection
of templates and skin files. You can apply these visual
elements to all pages in your store, giving your store a
cohesive look and feel.
Multiple Stores, Sites & Views
Control the look and feel of multiple sites, introduce new
market and languages, and track analytics from a single
Admin.
Multiple Devices
Magento’s powerful features make it easy to create
storefronts optimized for iPhone, Android, and Mobile
Opera browsers to help you engage consumers with
mobile commerce now, and into the future.
CHAPTER 4: Quick Tour Customer Journey
Magento Community Edition 2.0 User Guide 43
Shopping Tools
Your store includes a set of shopping tools that create
opportunities for your customers to interact with your
store, connect on social media, and share with friends.
Sophisticated Search
Filter product by price, manufacturer, or any other criteria
to reduce the time to purchase.
Customer Journey CHAPTER 4: Quick Tour
44 Magento Community Edition 2.0 User Guide
Moment of Purchase
Now that you’ve given your customer an engaging shopping experience, make it easy for them
to complete their purchases. Magento is designed to help you streamline your checkout process
experience while boosting conversion rates.
Order Processing
Magento supports a complete order processing workflow. It's easy to customize order statuses and
track communications between sales reps and customers.
Shipping Labels
Merchants have complete control over package characteristics such as weight and size. Shipping
labels, rate, and bar code information originates directly from the carrier. Labels can be generated for
single or multiple orders.
Multiple Shipping Options
Magento supports a variety of shipping methods so you can give your customers a choice at
checkout. Customers can see a real-time estimate of shipping charges right from the shopping cart.
Multiple Payment Options
Magento Community Edition 2.0 supports the payment methods and currencies needed for global
commerce. You can choose the ones you want to offer, and at checkout, your customers can choose
the ones they prefer.
PayPal Merchant Solutions
It's easy to integrate a PayPal Payments account to provide your customers faster, more secure
checkout options.
Shopping Assistance
Assisted shopping makes it easy for customer service reps to create orders for customers.
Security
Whether an order is fulfilled online or over the phone, Magento provides sophisticated security,
including CAPTCHA and SSL encryption, with best-in-breed encryption and hashing algorithms to
protect the security of the system.
CHAPTER 4: Quick Tour Customer Journey
Magento Community Edition 2.0 User Guide 45

Increase Average Order Value
Magento Community Edition 2.0 provides a range of tools to help you tailor the shopping
experience, and encourage your customers to put more items in their shopping carts and spend
more money.
Promotions
Use catalog and shopping cart price rules to create promotions that kick into gear when a set of
conditions is met.
Coupons
Create limited-time offers and coupons that customers can scan with their phone and apply to a
purchase.
Product Suggestions
Another way to increase AOV is to offer suggestions for related products and opportunities to up-sell
and cross-sell at strategic points along the path to conversion.
User Permissions &Roles
Restrict access to data in the Admin on a “need to know” basis. Create multiple admin roles for read-
only or and editing privileges. Track and review all activity at a granular level to specific stores and
websites.
Full-Page Caching
Enhance performance by caching primary pages. Caching pages improves server response times,
reduces load, and increases sustainable traffic.
You can use tags to define which components to cache, so only relevant pages are cached as
updates take place. It also has the ability to identify and differentiate visitors from shoppers.
Customer Journey CHAPTER 4: Quick Tour
46 Magento Community Edition 2.0 User Guide
Customer Retention
Magento makes it easy for you to get repeat business and build brand loyalty. Magento gives
you total control and flexibility over creating and revising goodies like rewards programs,
custom coupons and automated emails to keep your customers coming back again and again.
Custom Coupons
Create coupons codes for social media, email, or print
campaigns. You can incorporate coupon codes into any
design you like.
Newsletters
Stay in touch with current customers who’ve opted to
receive newsletters. You can create as many newsletter
templates as you want.
RSS Feed
When RSS feeds are enabled, any additions to products,
specials, categories, and coupons are automatically sent
to the subscribers of each feed. A link to all RSS feeds
that you publish is in the footer of your store.
CHAPTER 4: Quick Tour Customer Journey
Magento Community Edition 2.0 User Guide 47

Loyalty & Advocacy
Give customers a direct connection to your brand by allowing them to create customer accounts
where they can see their purchase history, wishlist, and newsletter subscriptions. Use product
ratings and reviews to give new customers objective product opinions and promote a sense of
community. These features turn customer satisfaction into one of the most powerful and cost-
efficient marketing tools at your disposal.
Dashboard Snapshots
Knowing what’s of interest on your site is crucial to maximize your marketing budget. Use this
information to determine what you should cross- and up-sell to loyal customers, or which products to
put on sale.
Customer Accounts
Opening as account provides customers with a personalized shopping experience that they can share
with their friends. Customers can save their shopping preferences, and manage their own store billing
and shipping information.
Advocacy Tools
Customers who share their wishlists with family and friends make a powerful endorsement of your
brand. Customers create these personalized lists from products they choose. When shared by email
or RSS feed, these simple lists become powerful advocacy tools.
Reviews & Ratings
Product reviews give your customers a way to engage with your brand while fostering a sense of
community. You can curate your reviews with tools to help you edit and approve comments for
inappropriate content before they go live.
Customer Journey CHAPTER 4: Quick Tour
48 Magento Community Edition 2.0 User Guide

Success!
Opening your Magento store for business requires the following areas of consideration. While
there are virtually any number of customizations you can make to the storefront and Admin,
you can use each link in this is list as a place to start.
Implementation
If you need help setting up your store, you can choose
from our vast network of Magento Solutions Partners.
Design
You can use a prepared theme and design your own
home page, or work with an experienced Magento
designer or Magento Associate to customize your site.
Product Catalog
Configure products, create categories, import existing
product catalogs, and leverage APIs or third-party data
management solutions.
Payment Methods
Magento supports a wide variety of payment methods,
services, and gateways that you can offer for your
customers’ convenience.
CHAPTER 4: Quick Tour Customer Journey
Magento Community Edition 2.0 User Guide 49

Shipping Methods
Magento shipping methods are easy to set up and give
you the ability to connect with carriers who can ship your
products all over the world.
Taxes
Manage your taxes with our native tools, or add third-
party extensions from Magento Marketplace.
Thanks for your order!
Magento can help you to build relationships with your
customers, and bring them back to your store, again and
again.
Customer Journey CHAPTER 4: Quick Tour
50 Magento Community Edition 2.0 User Guide

Basic Configuration
This section of the guide introduces your store's
Admin, and walks you through the basic
configuration settings. You’ll learn the concepts of
store hierarchy and configuration scope, and
establish best practices for industry standards and
requirements.
Magento Community Edition 2.0 User Guide 51

Contents Store Admin
Your Admin Account
Admin Sidebar
Admin Workspace
Dashboard
Message InBox
Global Search
Grid Controls
Actions Control
Store Details
Store Information
Locale Options
State Options
Country Options
Merchant Location
Currency
Store Email Addresses
Contact Us
Storefront Branding
Uploading Your Logo
Uploading a Favicon
Welcome Message
Store Demo Notice
Copyright Notice
Websites, Stores & Views
Configuration Scope
Single Store Mode
Industry Compliance
PCI Compliance
Privacy Policy
Cookie Law Compliance
Cookie Restriction Mode
Cookie Reference
52 Magento Community Edition 2.0 User Guide

CHAPTER 5:
Store Admin
Your store Admin is the password-protected back office where you can set up products,
promotions, manage orders, and perform other administrative tasks. All basic
configuration tasks and store management operations are performed from the Admin.
Your initial sign-in credentials were set up during the Magento installation. If you forget
your password, a temporary password can be sent to the email address that is associated
with the account. For increased security, you can configure your store to require a case-
sensitive user name and password. For additional security, the Admin login can be
configured to require a CAPTCHA. To learn more, see: Configuring Admin Security.
lAdmin Sign In
lYour Admin Account
lAdmin Sidebar
lAdmin Workspace
Magento Community Edition 2.0 User Guide 53
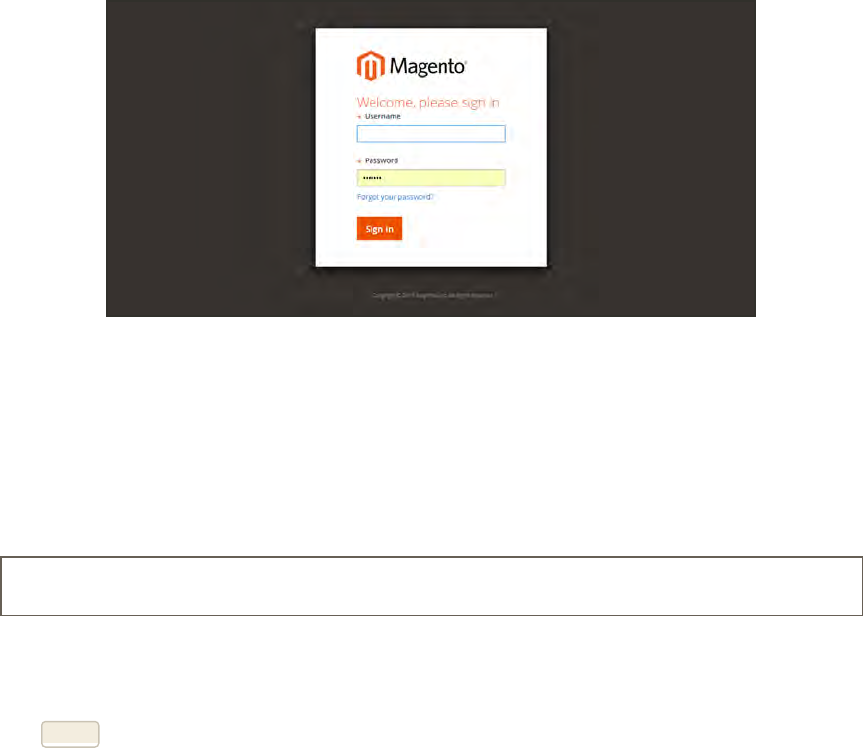
Admin Sign In
The first thing you will learn is how to sign in and out of the Admin, and to reset your
password. All of the instructions in the rest of this guide are written for a user with full
administrative privileges, and begin with the assumption that you are logged in to the Admin.
To learn more about Admin users and roles, see: Permissions
Admin Sign In
To sign in to the Admin:
1. In the address bar of your browser, enter the URL that was specified during the installation,
followed by the base URLof your store’s Admin. The default Admin URLs look something like
this:
http://www.yourdomain.com/admin
You can bookmark the page, or save a shortcut on your desktop for easy access.
2. Enter your Admin User Name and Password.
3. Tap Login.
Admin Sign In CHAPTER 5: Store Admin
54 Magento Community Edition 2.0 User Guide
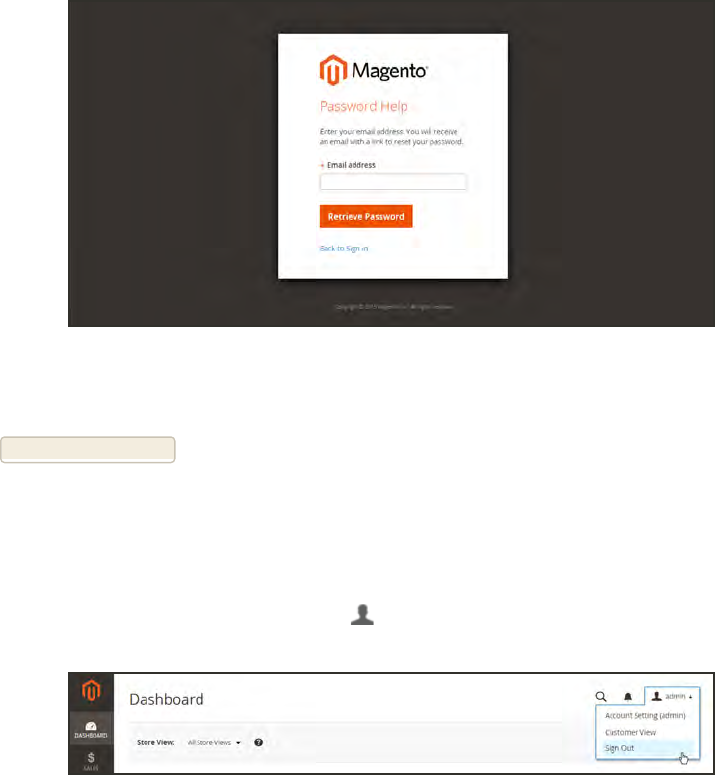
To reset your password:
1. If you forget your password, click the Forgot Your Password? link.
Forgot Password
2. Enter the Email Address that is associated with the Admin account.
3. Tap Retrieve Password.
If there is an account associated with the email address, an email will be sent to reset your
password.
To sign out of the Admin:
In the upper-right corner, tap the Account icon. Then on the menu, choose Sign Out.
Sign Out
The Sign-In page returns, with a message that you are logged out. It’s always a good idea to
sign out of the Admin whenever you leave your computer unattended.
CHAPTER 5: Store Admin Admin Sign In
Magento Community Edition 2.0 User Guide 55
Your Admin Account
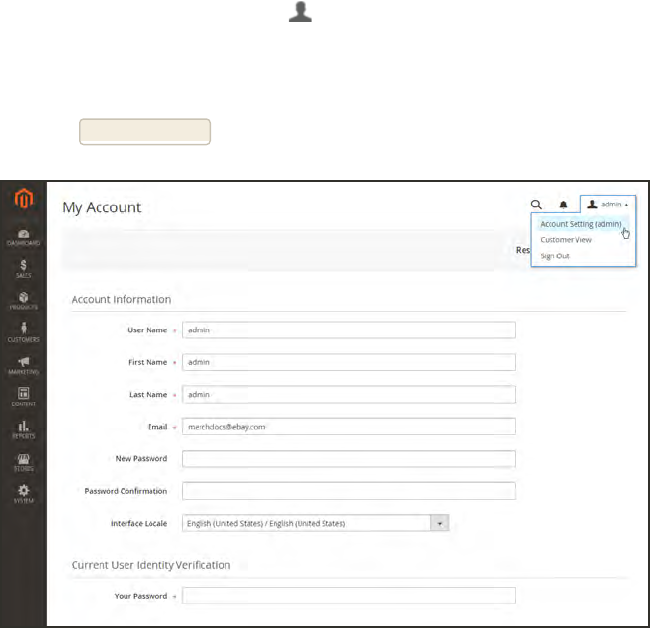
Your Admin account was initially set up during the installation, and might contain placeholder
information. You can personalize your user name and password, and update your first and last
name, and email address at any time. To learn more about Admin accounts and roles, see:
Permissions.
To edit your account information:
1. In the upper-right corner, tap the Account icon. Then, choose Account Setting.
2. Make any changes necessary changes to your account information. If you change your login
credentials, make sure to write them down.
3. When complete, tap Save Account.
Account Information
Your Admin Account CHAPTER 5: Store Admin
56 Magento Community Edition 2.0 User Guide
Admin Sidebar
The sidebar on the left is the main menu for your store’s Admin, and is designed for both
desktop and mobile devices. The flyout menu provides access to all the tools you need to
manage your store on a daily basis.
Dashboard
The Dashboard provides a quick overview of the sales
and customer activity in your store, and is usually the
first page that appears when you log in to the Admin.
Sales
The Sales menu is where you can find everything related
to the operations of processing orders, invoices,
shipments, credit memos, and transactions.
Products
The Products menu controls everything related to your
product catalog and inventory.
Customers
The Customers menu is where you can manage
customer accounts, and see which customers are online
at the moment.
CHAPTER 5: Store Admin Admin Sidebar
Magento Community Edition 2.0 User Guide 57
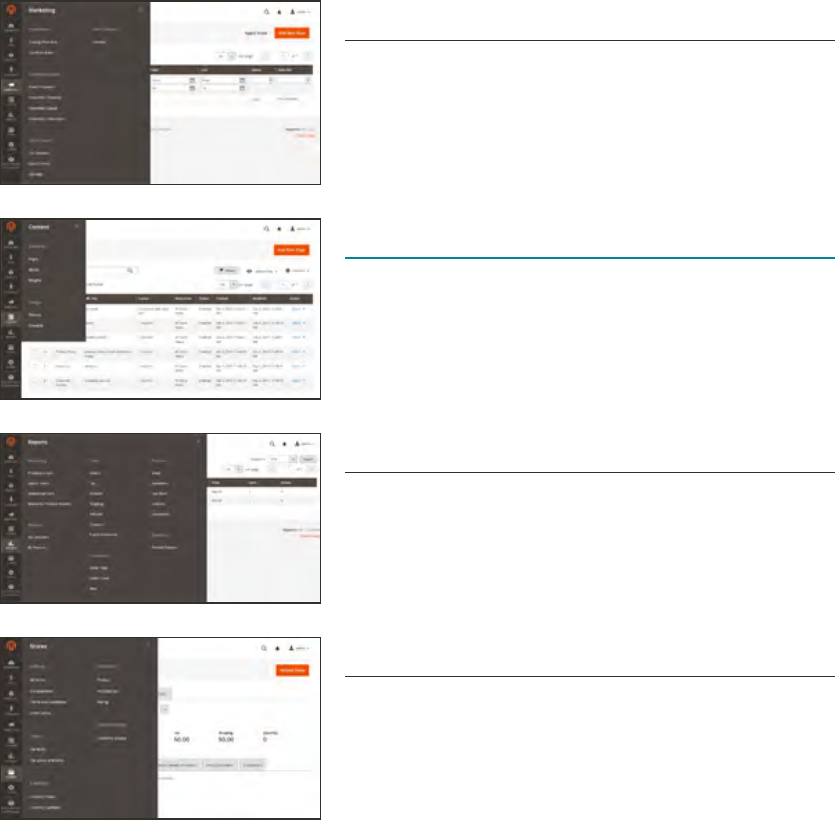
Marketing
The Marketing menu is where you set up catalog and
shopping cart price rules and coupons. Price rules trigger
actions when a set of specific conditions is met.
Content
The Content menu is where you manage the content
elements and design of your store. You will learn how to
create pages, blocks, and frontend apps, and manage the
presentation of your store.
Reports
The Reports menu provides a broad selection of reports
that give you insight into every aspect of your store,
including sales, shopping cart, products, customers,
tags, reviews, and search terms.
Stores
The Store menu includes tools to configure and maintain
every aspect of your store.
Admin Sidebar CHAPTER 5: Store Admin
58 Magento Community Edition 2.0 User Guide
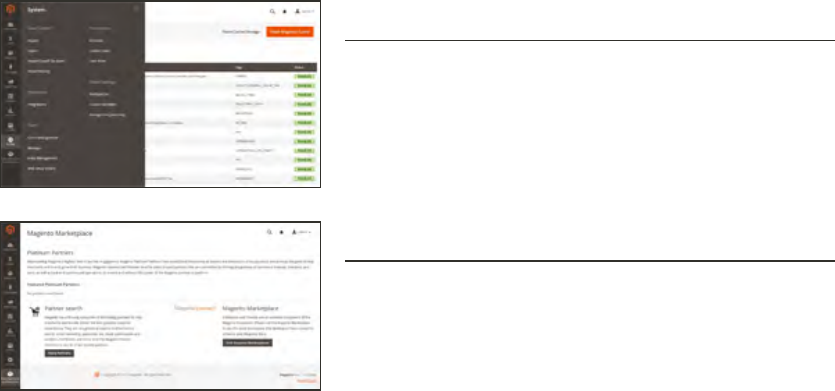
System
The System menu includes tools install extensions and
manage Web Services for integration with other
applications.
Find Partners & Extensions
This is where you can find a marketplace Magento
Partners and solutions for your store.
CHAPTER 5: Store Admin Admin Sidebar
Magento Community Edition 2.0 User Guide 59

Admin Workspace
The Admin workspace provides access to all the tools, data, and content that you need to run
your store. The main pages have a grid that lists the data for the section, with a set of tools to
search, sort, filter, select, and apply actions.
Admin Workspace
CONTROL DESCRIPTION
Search The Global Search box can be used to find any value in the database,
including product, customer, and order records.
Sort The header of each column can be used to sort the list in ascending or
descending order.
Filter The filters in the header of each column can be used to limit the list to specific
values. Some filters have additional options that can be selected from a list
box, and for others, you can simply type the value you want to find.
Paginate The pagination controls are used to view the additional pages of results.
Actions The Actions control applies an operation to all selected records. To select a
record, mark the checkbox in the first column, or use the Mass Actions
control to select multiple records.
Mass Actions The Mass Actions control is used to select multiple records to be the target of
action. Options: Select All / Unselect All, Select Visible / Unselect Visible
Workspace Controls
Admin Workspace CHAPTER 5: Store Admin
60 Magento Community Edition 2.0 User Guide
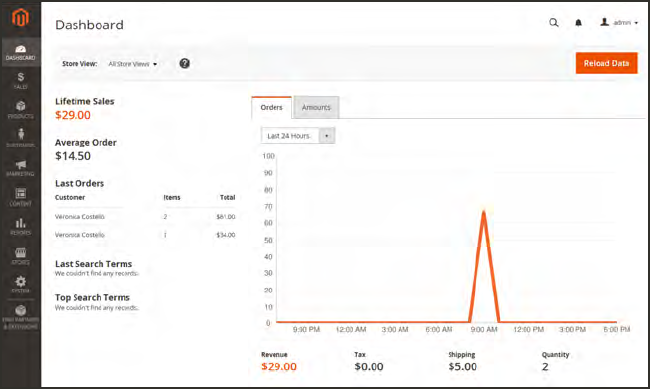
Dashboard
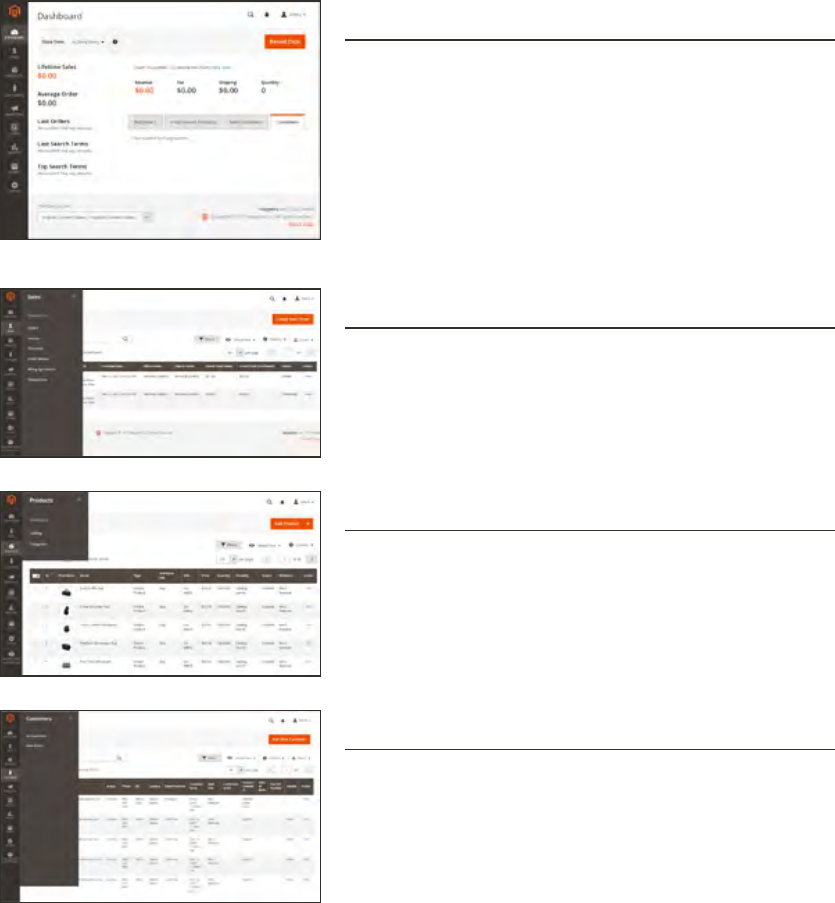
The dashboard is usually the first page that appears when you log in to the Admin, and gives
an overview of sales and customer activity. The blocks on the left provide a snapshot of lifetime
sales, average order amount, the last five orders, and search terms. The graph shows the orders
and amounts for the selected date range. You can use the tabs above the graph to toggle
between the two views. The tabs at the bottom provide quick reports about your best-selling
and most viewed products, new customers and those who have purchased the most.
The dashboard is the default startup page for the Admin, although you can change the
configuration to display a different page when you log in. You can also set the starting dates
used in dashboard reports, and disable the display of the charts section.
You can produce Dashboard snapshot reports for each store view. The tabs at the bottom of the
page summarize your best-selling and most viewed products, new customers, and those who
have purchased the most during the time period specified.
Dashboard
CHAPTER 5: Store Admin Admin Workspace
Magento Community Edition 2.0 User Guide 61
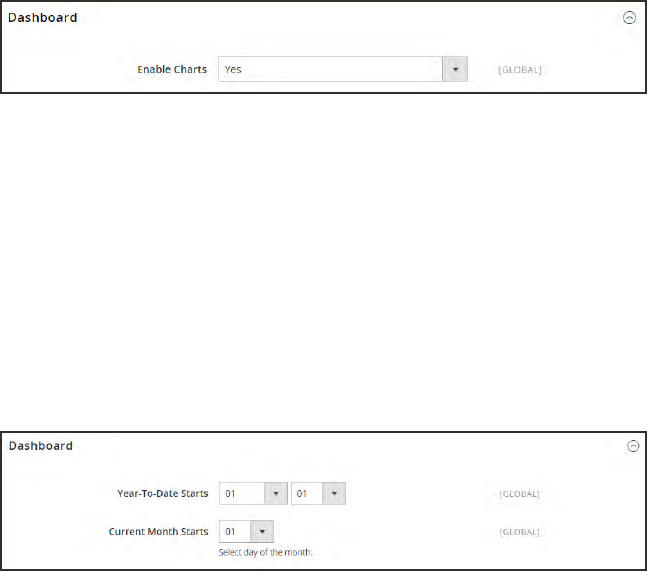
To configure the chart:
1. On the Admin sidebar, tap Stores. Under Settings, choose Configuration. Then, do any of the
following:
Enable Charts
1. In the panel on the left, under Advanced, choose Admin.
2. In the Dashboard section, set Enable Charts to “Yes.”
Dashboard
Set the Beginning Dates
1. In the panel on the left under General, choose Reports.
2. In the Dashboard section do the following:
a. Set Year-To-Date Starts to the Month and Day.
b. Set Current Month Starts to the Day.
Dashboard
Admin Workspace CHAPTER 5: Store Admin
62 Magento Community Edition 2.0 User Guide
Choose the Data Source
If you have a lot of data to process, the performance of the Dashboard can be improved by
turning off the display of real time data.
1. In the panel on the left, tap to expand Sales. Then, choose Sales.
2. Tap to expand the Dashboard section, and do the following:
lFor real-time data, set Use Aggregated Data (beta) to “Yes.”
lFor historical data, set Use Aggregated Data (beta) to “No.”
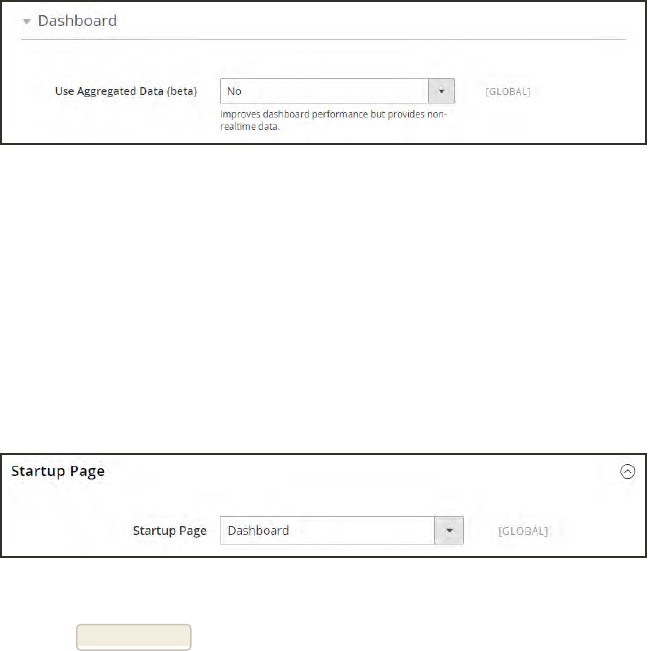
Dashboard
Change the Startup Page
1. In the panel on the left, tap to expand Advanced. Then, choose Admin.
2. Tap to expand the Startup Page section.
3. Choose the Startup Page that you want to appear when you log in to the Admin. The list
includes every page in the Admin menu structure.
Startup Page
2. When complete, tap Save Config.
CHAPTER 5: Store Admin Admin Workspace
Magento Community Edition 2.0 User Guide 63
REPORT DESCRIPTION
Sales The Dashboard reports on Lifetime Sales, Revenue, Tax, Shipping,
and Quantity for the time period specified.
Orders The Orders tab at the top displays a chart of all orders during the
specified time period. Below the chart is the total revenue, tax,
shipping, and quantity ordered. The lifetime sales amount and the last
five orders are on the left.
Amounts The Amounts tab at the top displays a chart of all order amounts
during the specified time period. The average order amount and the
last five orders are on the left.
Search Terms The last five search terms, and top five search terms appear on the
left.
Products The Bestsellers tab shows the price and quantity ordered of your
best-selling products. The products that have been viewed the most
during the specified time period are listed on the Most Viewed
Products tab.
Customers The Customers tab at the bottom lists the customers who have
ordered the most during the specified range of time. The New
Customers tab lists all new customers who have registered for an
account during the time period. On the left, the Last Orders section
lists the most recent orders by customer.
Dashboard Reports
Admin Workspace CHAPTER 5: Store Admin
64 Magento Community Edition 2.0 User Guide
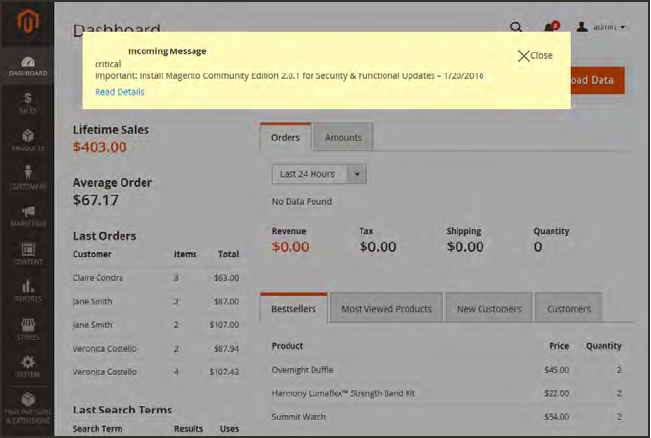
Message Inbox
Your store has an inbox for the messages received from Magento. The messages are rated by
importance, and might refer to system updates, patches, new releases, scheduled maintenance,
upcoming events, and more. Any message that is considered to be of major importance appears
in a pop-up window when you log into your store. You can manage the messages in your inbox
as you manage your email. Check it often to receive notice of important system updates and
news from Magento.
The notification configuration determines how often your message inbox is updated. If your
store Admin has a secure URL, you must set the notifications to be delivered over HTTPS.
Incoming Message
CHAPTER 5: Store Admin Admin Workspace
Magento Community Edition 2.0 User Guide 65
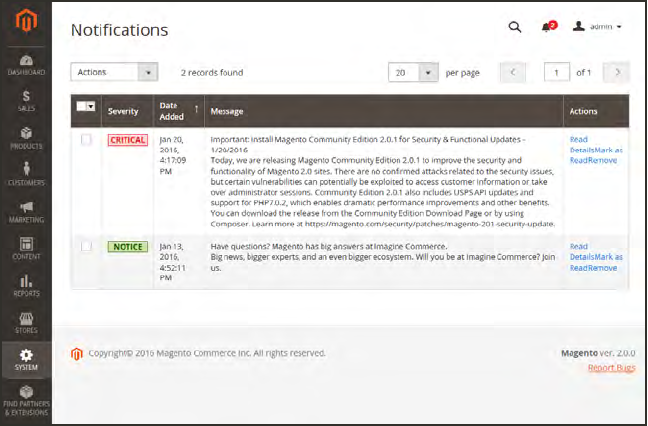
To manage incoming messages:
1. When the Incoming Messages box appears, do one of the following:
lTap Read Details for more information.
lTap the Close box to remove the popup and continue.
A Latest Message notice also appears to the left, just below the header of your store. As with
the popup box, you can tap Read Details for more information.
2. To read your messages, tap Go to messages inbox.
The messages in your inbox are marked by severity, with the most recent at the top.
Notifications
3. After reading a message, do any of the following in the Actions column:
lFor more information, tap Read Details.
lTo keep the message, tap Mark As Read.
lTo delete the message from your inbox, tap Remove.
Admin Workspace CHAPTER 5: Store Admin
66 Magento Community Edition 2.0 User Guide

To apply an action to multiple messages:
1. On the Admin sidebar, tap System. Then under Other Settings, choose Notifications.
2. In your message inbox, do one of the following:
lMark the checkbox at the beginning of each message you want to manage.
lChoose one of the group selection options above the list to select multiple messages.
3. When the messages that you want to manage are selected, set Actions to one of the following:
lMark as Read
lRemove
4. Tap Submit to complete the process.
Mark as Read
CHAPTER 5: Store Admin Admin Workspace
Magento Community Edition 2.0 User Guide 67
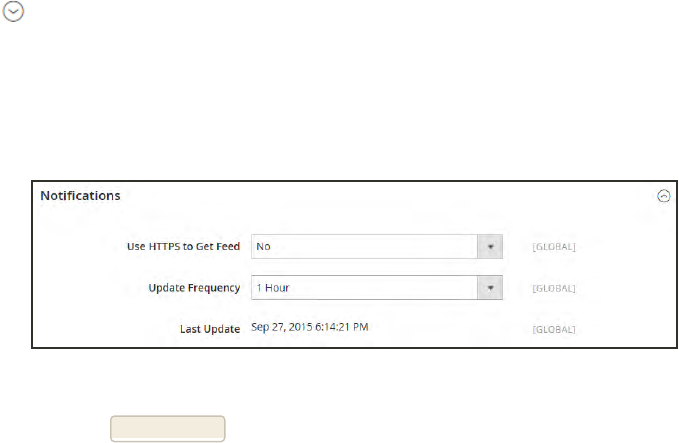
To configure notifications:
1. On the Admin sidebar, tap Stores. Then under Settings, choose Configuration.
2. Scroll down, and in the panel on the left under Advanced, choose System.
3. Expand the Notifications section, and do the following:
a. If your store Admin runs over a secure URL, set Use HTTPS to Get Feed to “Yes.”
b. Set Update Frequency to determine how often your inbox is updated. The interval can be
from one to twenty-four hours.
Notifications
4. When complete, tap Save Config.
Admin Workspace CHAPTER 5: Store Admin
68 Magento Community Edition 2.0 User Guide
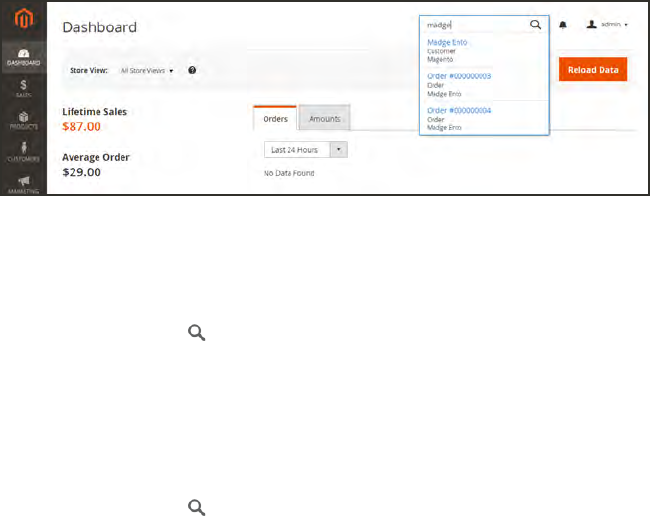
Global Search
The spy glass at the top of the Admin can be used to find any record in the database. The
results can include customers, products, orders, or any related attribute. For example, if you
enter a customer name, the results might include the customer record as well as any orders
that are associated with the name.
Search
To find a close match:
1. In the header, tap the spy glass to open the search box. Then, enter the first few letters of
what you want to find.
2. In the search results, click any item to open the record.
To find an exact match:
1. In the header, tap the spy glass to open the search box. Then, enter the full word, such as a
customer name, product name or SKU, that you want to find.
2. In the search results, click any item to open the record.
CHAPTER 5: Store Admin Admin Workspace
Magento Community Edition 2.0 User Guide 69
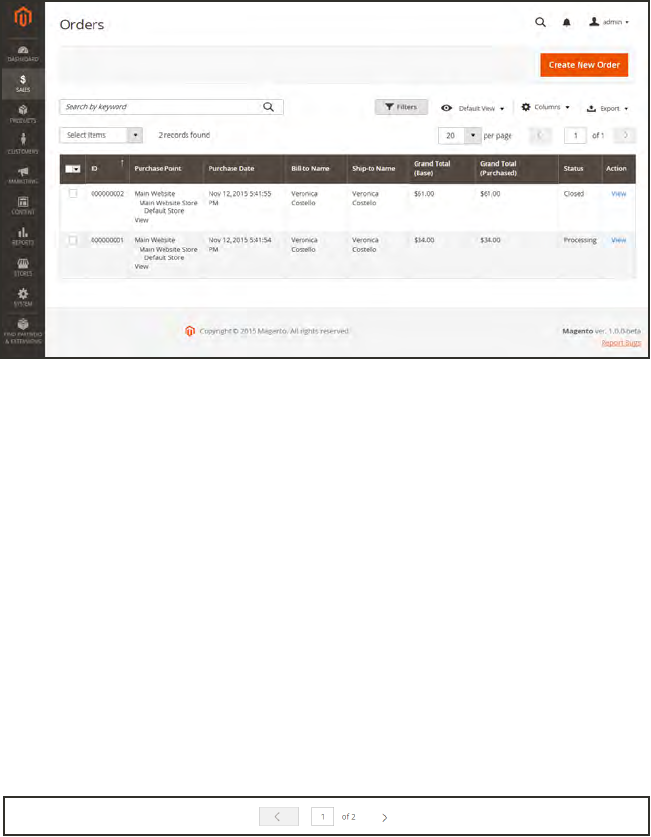
Grid Controls
Admin pages that manage data display a collection of records in a grid. The controls at the top
of each column can be used to sort the data. The current sort order is indicated by an ascending
or descending arrow in the column header. You can specify which columns appear in the grid,
and drag them into different positions. You can also save different column arrangements as
views that can be used later. The Action column lists operations that can be applied to an
individual record. The data from the current view can be exported to a CSV or XML file.
Orders Grid
To sort the list:
1. Tap any column header. The arrow indicates the current order as either ascending or
descending.
2. Use the pagination controls to view additional pages in the collection.
To paginate the list:
1. Set the Pagination control to the number of records that you want to view per page.
2. Tap Next and Previous to page through the list, or enter a specific Page Number.
Next and Previous
Admin Workspace CHAPTER 5: Store Admin
70 Magento Community Edition 2.0 User Guide
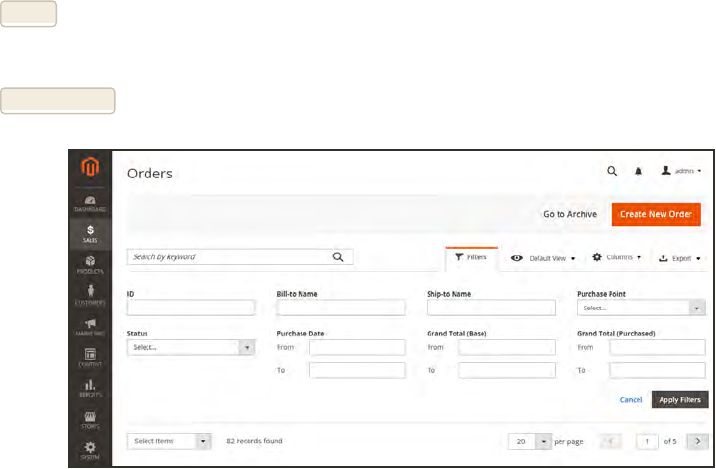
To filter the list:
1. Tap Filters.
2. Complete as many filters as necessary to describe the record you want to find.
3. Tap ApplyFilters.
Filter Controls
CHAPTER 5: Store Admin Admin Workspace
Magento Community Edition 2.0 User Guide 71
Grid Layout
The selection of columns and their order in the grid can be changed according to your
preference. The new layout can be saved as a grid “view.” By default, only nine of twenty
available columns are included in the grid.
To change the selection of columns:
1. In the upper-right corner, tap the Columns control. Then, do the following:
lMark the checkbox of any column you want to add to the grid.
lClear the checkbox of any column you want to remove from the grid.
2. Make sure to scroll down to see all available columns.
To move a column:
1. Tap the header of the column, and hold.
2. Drag the column to the new position, and release.
To move a row:
1. Tap the row and hold.
2. Drag the row to the new position, and release.
To save a grid view:
1. Tap the View control. Then, tap Save Current View.
2. Enter a name for the view. Then, click the arrow to save all changes.
The name of the view now appears as the current view.
To change the view:
Tap the View control. Then, do one of the following:
lTo use a different view, tap the name of the view.
lTo change the name of a view, tap the Edit icon. Then, update the name.
Admin Workspace CHAPTER 5: Store Admin
72 Magento Community Edition 2.0 User Guide

Actions Control
When working with a collection of records in the grid, you can use the Actions control to apply
an operation to one or more records. The Actions control lists each operation that is available
for the specific type of data. For example, for product records, you can use the Actions control
to update the attributes of selected products, change the status from “Disabled” to “Enabled,”
or to delete records from the database. .
You can make as many changes as necessary, and then update the records in a single step. It’s
much more efficient than changing the settings individually for each product.
The selection of available actions varies by list, and additional options might appear,
depending on the action selected. For example, when changing the status of a group of records,
a Status box appears next to the Actions control with additional options.
Applying an Action to Selected Records
Step 1: Select Records
The checkbox in the first column of the list identifies each record that is a target for the action.
The filter controls can be used to narrow the list to the records you want to target for the
action.
1. Mark the checkbox of each record that is a target for the action. Or, use one of the following
Mass Actions to select a group of records:
lSelect All / Unselect All
lSelect Visible / Unselect Visible
CHAPTER 5: Store Admin Admin Workspace
Magento Community Edition 2.0 User Guide 73

2. If needed, set the filters at the top of each column to show only the records that you want to
include.
3. In the first column, set the checkbox state to one of the following:
Any Lists all records, regardless of filter settings.
Yes List only records that match the filter settings.
No List only records that do not match the filter settings.
Step 2: Apply an Action to Selected Records
1. Set the Actions control to the operation that you want to apply.
Example: Update Attributes
1. In the list, mark the checkbox of each record to be updated.
2. Set the Actions control to “Update Attributes,” and tap Submit.
The Update Attributes page lists all the available attributes, organized by group in the panel
on the left.
Update Attributes
3. Mark the Change checkbox next to each attribute, and make the necessary changes.
4. Tap Save to update the attributes for the group of selected records.
2. When complete, tap Submit.
Admin Workspace CHAPTER 5: Store Admin
74 Magento Community Edition 2.0 User Guide
ACTION DESCRIPTION
Select All Marks the checkbox of all records in the list.
Unselect All Clears the checkbox of all records in the list.
Select Visible Marks the checkbox of records on the current page.
Unselect Visible Clears the checkbox of records on the current page.
Mass Actions
STATE DESCRIPTION
Any Lists all records, regardless of checkbox status.
Yes Lists only records with the checkbox selected.
No Lists only records without the checkbox selected.
Checkbox States
CHAPTER 5: Store Admin Admin Workspace
Magento Community Edition 2.0 User Guide 75

Notes
76 Magento Community Edition 2.0 User Guide
CHAPTER 6:
Store Details
The basic information for your store includes the store name and address, telephone
number and email address, that appear on email messages, invoices, and other
communications sent to your customers.
General Configuration
Magento Community Edition 2.0 User Guide 77
Store Information
The Store Information section provides the basic information that appears on sales documents
and in other communications.
Store Information
Store Information CHAPTER 6: Store Details
78 Magento Community Edition 2.0 User Guide

To enter your store information:
1. On the Admin sidebar, tap Stores. Then under Settings, choose Configuration.
2. In the panel on the left under General, choose General.
3. Expand the Store Information section, and do the following:
a. Enter the Store Name that you want to use in all communications.
b. Enter the Store Phone Number, formatted as you want it to appear.
c. In the Store Hours of Operation field, enter the hours your store is open for business. For
example: Mon - Fri, 9-5, Sat 9-noon PST
d. Select the Country where your business is located.
e. Select the Region/State with the country.
f. Enter the Store Address. If the address is long, continue the address on Store Address
Line 2.
g. If applicable, enter the VAT Number of your store. To verify the number, click the Validate
VATNumber button.
4. When complete, tap Save Config.
CHAPTER 6: Store Details Store Information
Magento Community Edition 2.0 User Guide 79
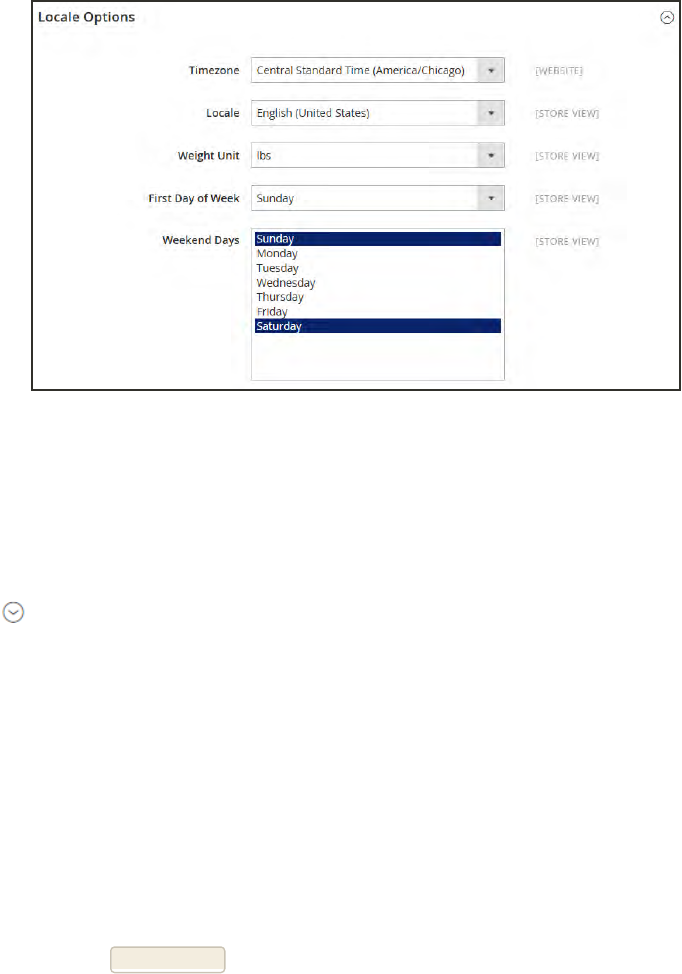
Locale Options
The locale determines the language, country, tax rate, and other settings that are used
throughout the store. The Locale Options determine the time zone and language used for each
store, and identify the days of the work week in your area.
Locale Options
To set the store locale:
1. On the Admin sidebar, tap Stores. Then under Settings, choose Configuration.
2. In the panel on the left under General, choose General.
3. Expand the Locale Options section.
4. Select your Timezone from the list. Then, do the following:
a. Set Locale to the store language.
b. Set Weight Unit to the unit of measurement that is typically used for shipments from your
locale.
c. Set First Day of the Week to the day that is considered to be the first day of the week in
your area.
d. In the Weekend Days list, select the days which fall on a weekend in your area. (To select
multiple options, hold down the Ctrl (PC) or Command (Mac) key.)
5. When complete, tap Save Config.
Locale Options CHAPTER 6: Store Details
80 Magento Community Edition 2.0 User Guide
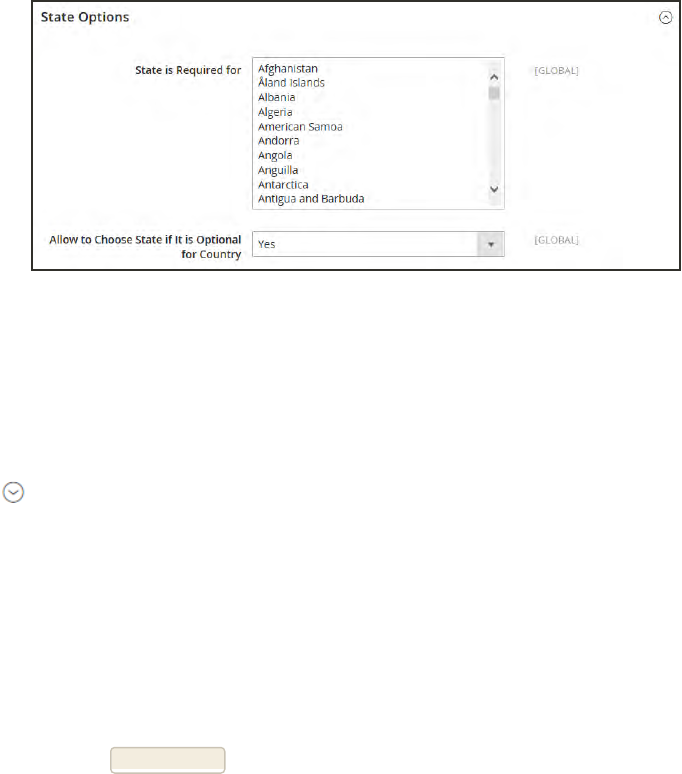
State Options
In many countries, the state, province, or region is a required part of a postal address. The
information is used for shipping and billing information, to calculate tax rates, and so on. For
countries where the state is not required, the field can be omitted entirely from the address, or
included as an optional field.
Because standard address formats vary from one country to another, you can also edit the
template that is used to format the address for invoices, packing slips, and shipping labels.
State Options
To set up the state options:
1. On the Admin sidebar, tap Stores. Then under Settings, choose Configuration.
2. In the panel on the left under General, choose General.
3. Expand the State Options section, and do the following:
a. In the State is required for list, select each country where Region/State is a required entry.
b. Set the Allow to Choose State if It is Optional for Country field to one of the following:
Yes In countries where the state field is not required, includes the State field as
an optional entry.
No In countries where the state field is not required, omits the State field.
4. When complete, tap Save Config.
CHAPTER 6: Store Details State Options
Magento Community Edition 2.0 User Guide 81
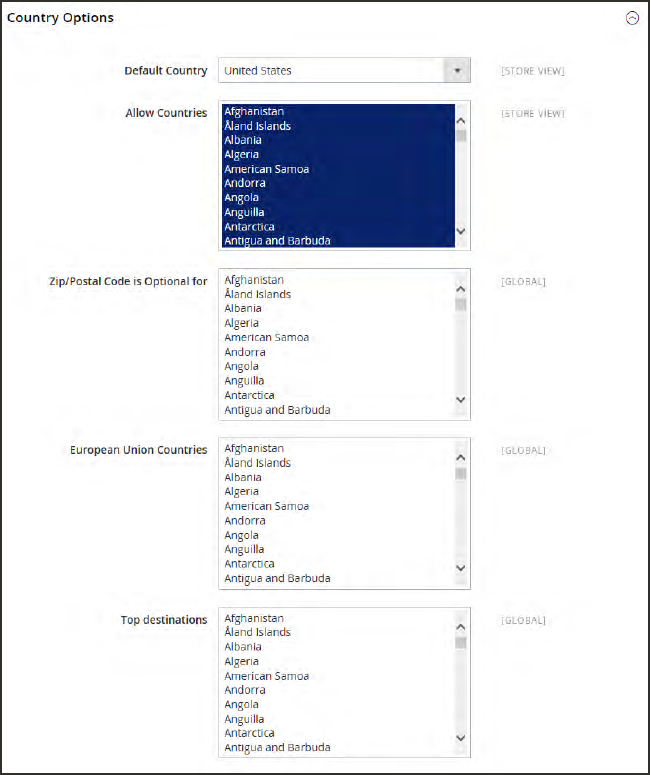
Country Options
The Country Options identify the country where your business is located, and the countries
from which you accept payment.
Country Options
Country Options CHAPTER 6: Store Details
82 Magento Community Edition 2.0 User Guide

To set the country options for your store:
1. On the Admin sidebar, tap Stores. Then under Settings, choose Configuration.
2. In the panel on the left under General, choose General.
3. Expand the Country Options section, and do the following:
a. Choose the Default Country where your business is located.
b. In the Allow Countries list, select each country from which you accept orders. By default,
all countries in the list are selected. To select multiple countries, hold down the Ctrl (PC)
or Command (Mac) key.
c. In the Zip/Postal Code is Optional for list, select each country where you conduct
business that does not require a ZIP or postal code to be included as part of the street
address.
d. In the European Union Countries list, select each country in the EU where you conduct
business. By default, all EU countries are selected.
e. In the Top Destinations list, select the primary countries that you target for sales.
4. When complete, tap Save Config.
CHAPTER 6: Store Details Country Options
Magento Community Edition 2.0 User Guide 83
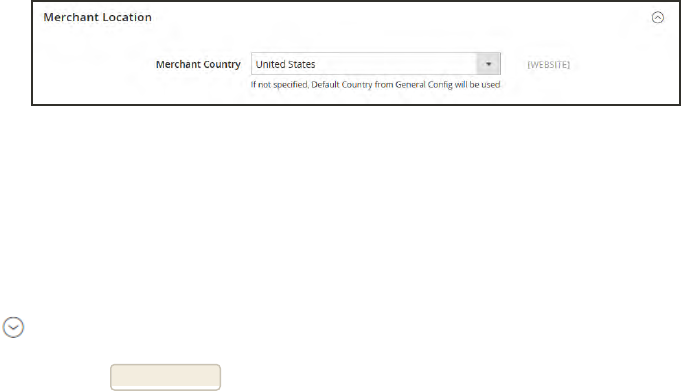
Merchant Location
The Merchant Location setting is used to configure payment methods. If no value is entered,
the Default Country setting is used.
Merchant Location
To enter the merchant location:
1. On the Admin sidebar, tap Stores. Then under Settings, choose Configuration.
2. In the panel on the left under Sales, choose Payment Methods.
3. Expand the Merchant Location section. Then, choose your Merchant Country.
4. When complete, tap Save Config.
Merchant Location CHAPTER 6: Store Details
84 Magento Community Edition 2.0 User Guide
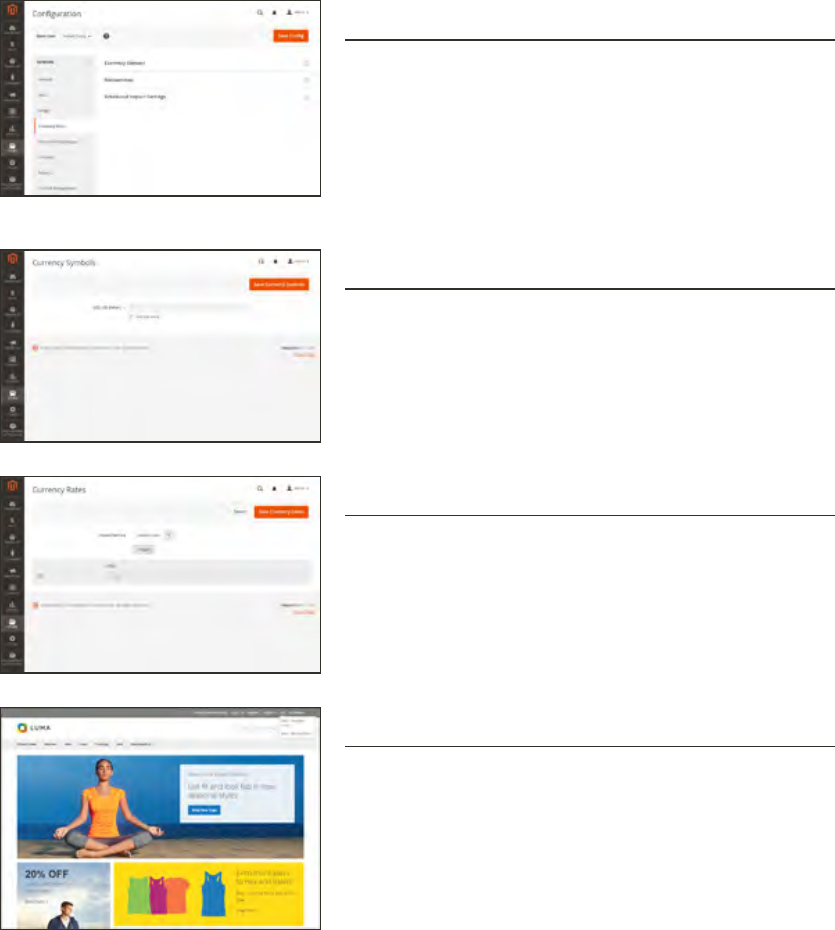
Currency
Currency Setup
Defines the base currency and any additional currencies
that are accepted as payment. Also establishes the
import connection and schedule that is used to update
currency rates automatically.
Currency Symbols
Defines the currency symbols that appear in product
prices and sales documents such as orders and invoices.
Magento support currencies from over two hundred
countries around the world.
Updating Currency Rates
Currency rates can be updated manually or imported into
your store as needed, or according to a predefined
schedule.
Currency Chooser
If multiple currencies are available, the currency chooser
appears in the header of the store.
CHAPTER 6: Store Details Currency
Magento Community Edition 2.0 User Guide 85
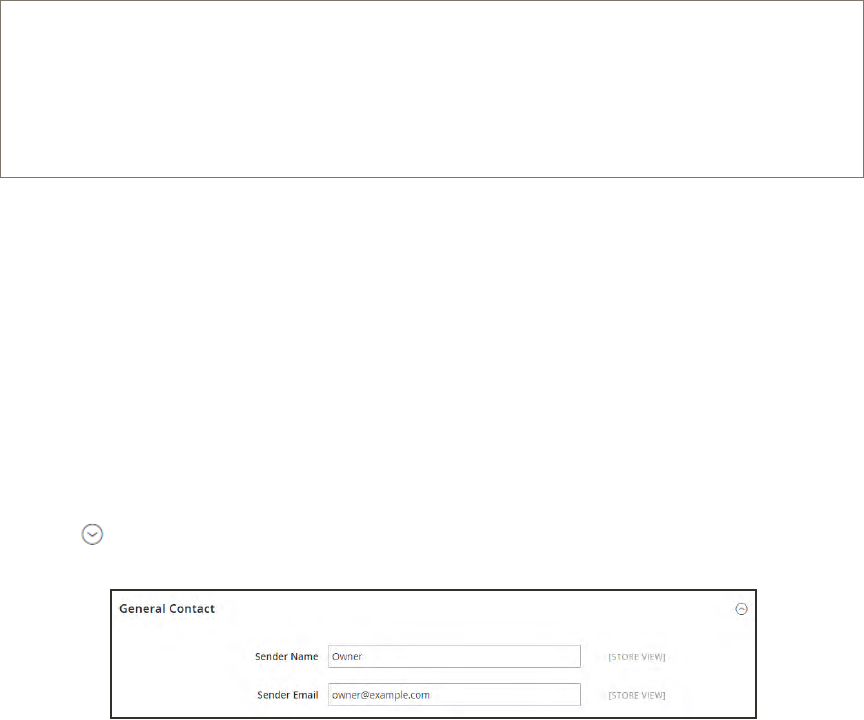
Store Email Addresses
You can have up to five different email addresses to represent distinct functions or departments
for each store or view. In addition to the following predefined email identities, there are two
custom identities that you can set up according to your needs.
lGeneral Contact
lSales Representative
lCustomer Support
Each identity and its associated email address can be associated with specific automated email
messages and appear as the sender of email messages that are sent from your store.
Process Overview:
Step 1: Set Up the Email Addresses for Your Domain
Step 2: Configure the Email Addresses for Your Store
Step 3: Update the Sales Email Configuration
Step 1: Set Up the Email Addresses for Your Domain
Before you can configure email addresses for the store, each must be set up as a valid email
address for your domain. Follow the instructions from your server administrator or email
hosting provider to create each email addresses that is needed.
Step 2: Configure the Email Addresses for Your Store
1. On the Admin sidebar, tap Stores. Then under Settings, choose Configuration.
2. In the panel on the left under General, choose Store Email Addresses.
3. Expand the General Contact section, and do the following:
General Contact
a. In the Sender Name field, type the name of the person to appear as the sender of any
email messages that is associated with the General Contact identity.
b. In the Sender Email field, type the associated email address.
4. Repeat this process for each store email addresses that you plan to use.
Store Email Addresses CHAPTER 6: Store Details
86 Magento Community Edition 2.0 User Guide
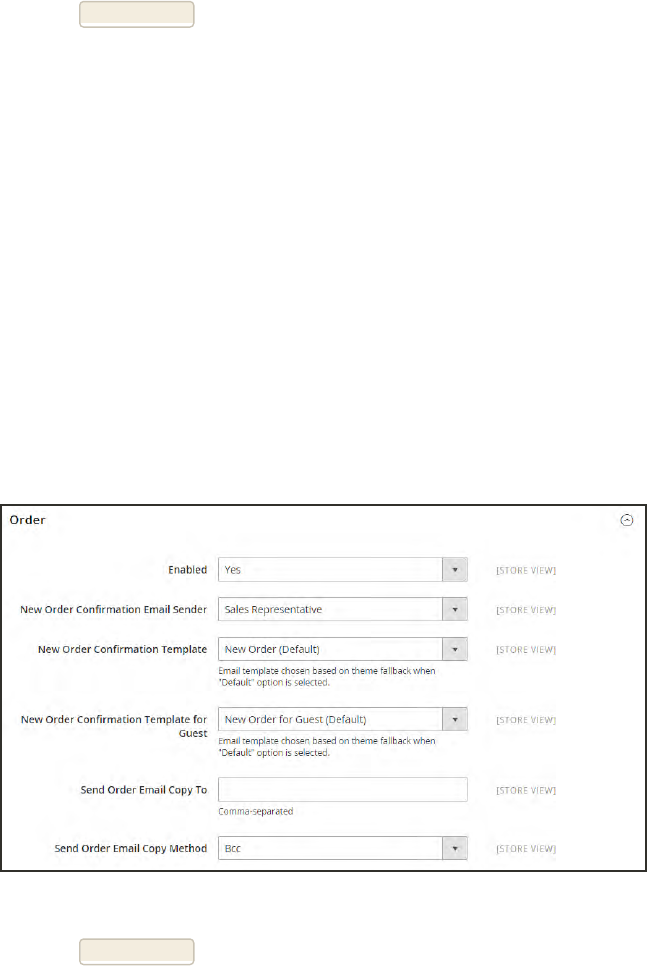
5. When complete, tap Save Config.
Step 3: Update the Sales Email Configuration
If you use custom email addresses, make sure to update the configuration of any related email
messages, so the correct identity appears as the sender.
1. In the panel on the left, under Sales, choose Sales Emails. The page has a separate section for
each of the following:
lOrder and Order Comments
lInvoice and Invoice Comments
lShipment and Shipment Comments
lCredit Memo and Credit Memo Comments
2. Starting with Order, expand the section for each message, and make sure that the correct
sender is selected.
Sales Email Order Configuration
3. When complete, tap Save Config.
CHAPTER 6: Store Details Store Email Addresses
Magento Community Edition 2.0 User Guide 87
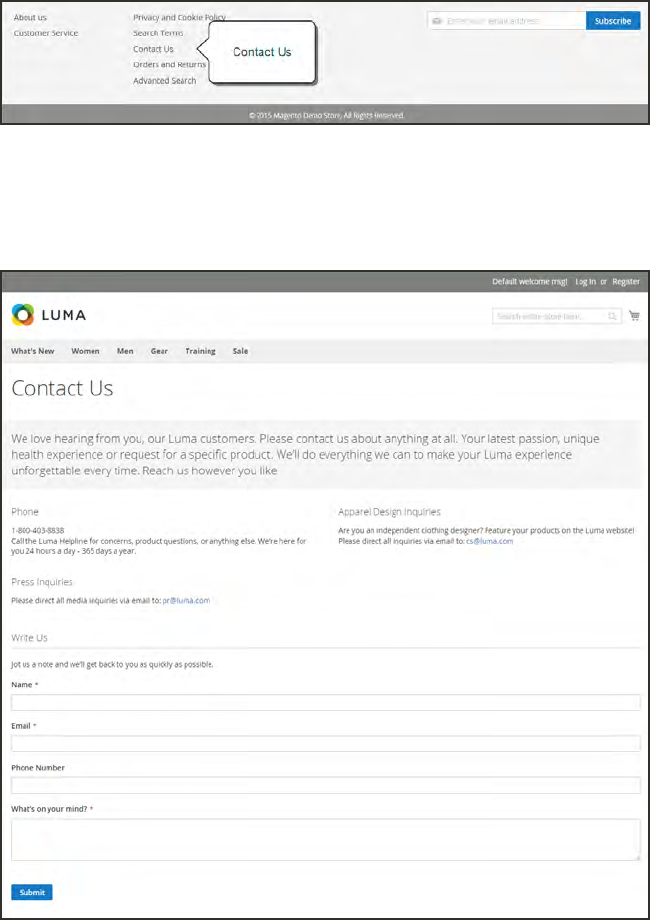
Contact Us
The Contact Us link in the footer of the store is an easy way for customers to keep in touch with
you. Customers can complete the form to send a message to your store.
Contact Us in Footer
After the form is submitted, a thank you message appears. The contact-us-info block
contains the form, and can be easily customized.
Contact Us Form
Contact Us CHAPTER 6: Store Details
88 Magento Community Edition 2.0 User Guide
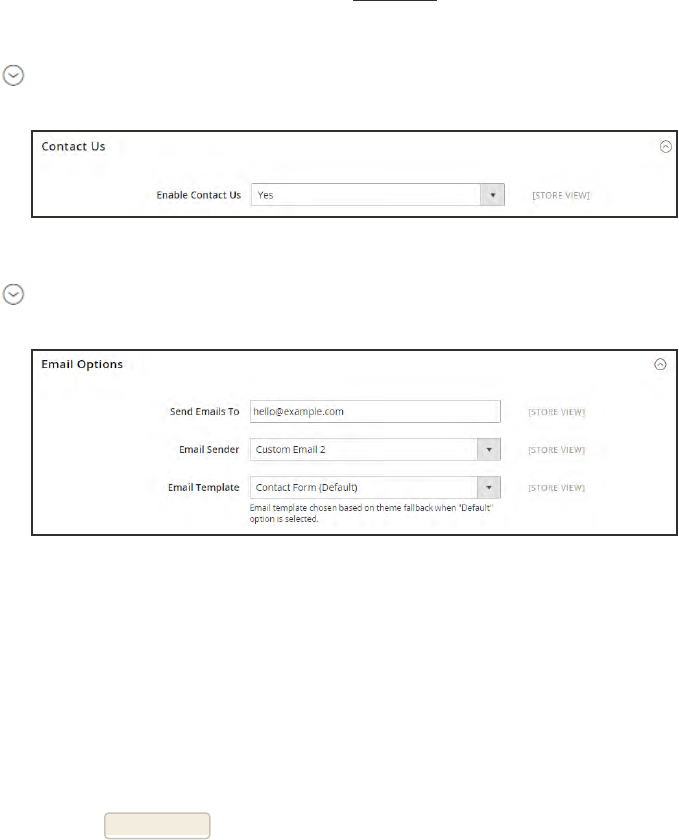
To configure Contact Us:
1. On the Admin sidebar, tap Stores. Then under Settings, choose Configuration.
2. In the panel on the left under General, choose Contacts.
3. Expand the Contact Us section. If necessary, set Enable Contact Us to “Yes.”
Contact Us
4. Expand the Email Options section. Then, do the following:
Email Options
a. In the Send Emails to field, enter the email address where messages from the Contact Us
form are sent.
b. Set Email Sender to the store identity that appears as the sender of the message from the
Contact Us form. For example: Custom Email 2.
c. Set Email Template to the template that is used for messages sent from the Contact Us
form.
5. When compete, tap Save Config.
To customize the Contact Us form:
1. On the Admin sidebar, tap Content. Then under Elements, choose Blocks.
2. Find the Contact Us Info block in the list, and open in Edit mode.
CHAPTER 6: Store Details Contact Us
Magento Community Edition 2.0 User Guide 89

Contact Us Info
3. Scroll down to the Content field, and make any changes necessary.
lUse the editor toolbar to format the text, and add images and links.
lTap Show / Hide Editor to work directly with the HTML.
Contact Us Content
4. When complete, tap Save Block.
Contact Us CHAPTER 6: Store Details
90 Magento Community Edition 2.0 User Guide
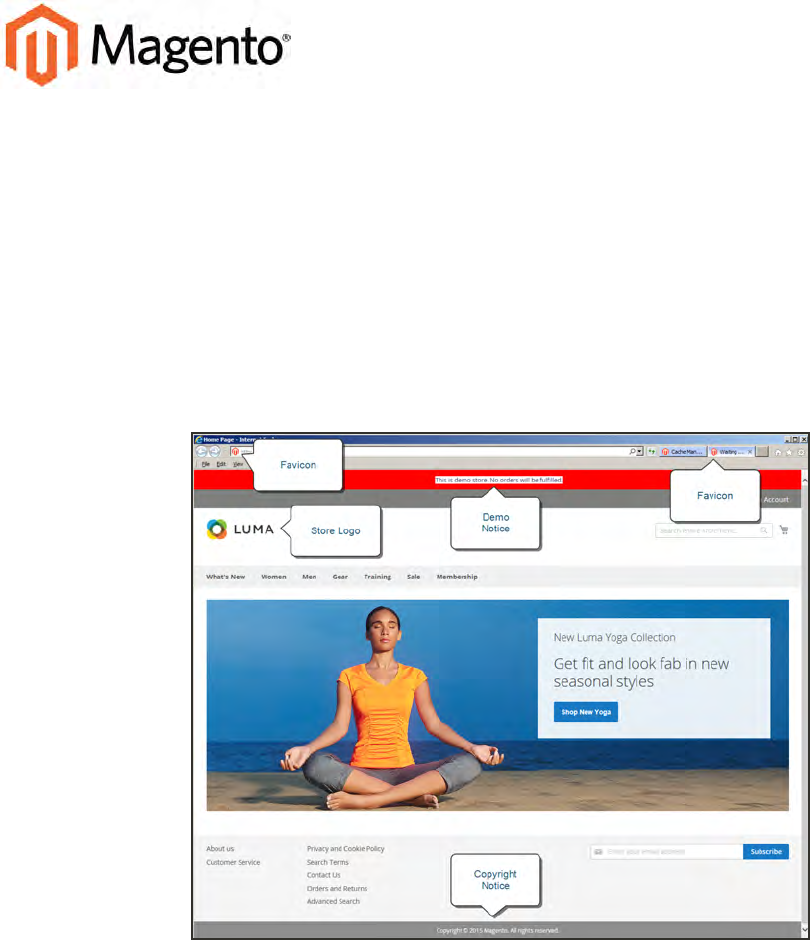
CHAPTER 7:
Storefront Branding
One of the first things you’ll want to do is to change the logo in the header, and upload a
favicon for the browser. You’ll also want to update the copyright notice in the footer,.
These are a few simple design tasks that you can take care of right away. While your store
is in development, you can turn on the store demo notice, and then remove it when you’re
ready to launch.
Storefront Branding
Magento Community Edition 2.0 User Guide 91
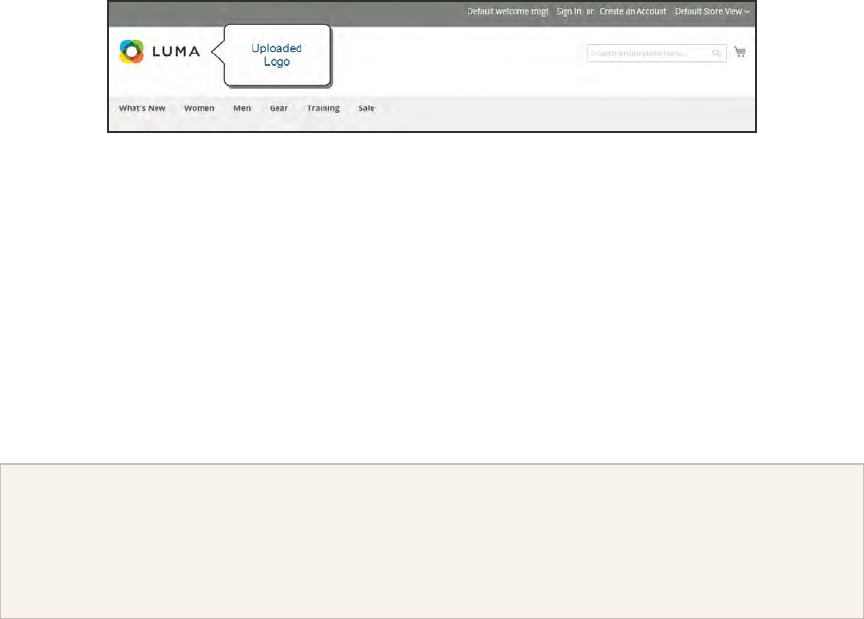
Uploading Your Logo
The size and location of the logo in the header is determined by the store’s theme. Your logo
can be saved as either a GIF, PNG, JPG, or SVG file type, and uploaded from the Admin of
your store. The default Magento logo in the sample data is an SVG file, which is a scalable
XML-based vector graphic format.
Logo in Header
The logo image resides in the following location on the server. Any image file with by that
name and at that location is used as the theme logo.
Actual path: app/design/frontend/[vendor]/[theme]
/web/images/logo.svg
Relative path: images/logo.svg
If you don’t know the size of the logo, or any other image that is used in your theme, open the
page in a browser, right-click the image, and inspect the element.
In addition to the logo in the header, your logo also appears on email templates and on PDF
invoices and other sales documents. The logos used for email templates and invoices have
different size requirements, and must be uploaded separately. To learn more, see:
Communications.
Uploading Your Logo CHAPTER 7: Storefront Branding
92 Magento Community Edition 2.0 User Guide
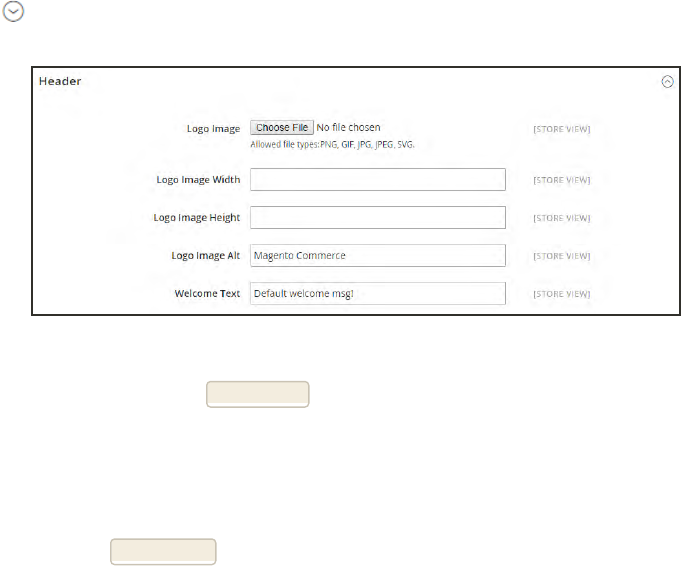
To upload your logo:
1. On the Admin sidebar, tap Stores. Then under Settings, choose Configuration.
2. In the panel on the left under General choose Design.
3. If you have multiple stores or views, set Store View in the upper-left corner to the view where
the configuration applies. Then, clear the checkbox after each field so new values can be
entered.
4. Expand the Header section. Then, do the following:
Header
a. To upload a new logo, tap Choose File. Then, choose the file from your computer.
b. Enter the Logo Image Width and Logo Image Height.
c. In the Logo Image Alt field, enter the text that you want to appear when someone hovers
over the image.
5. When complete, tap Save Config .
CHAPTER 7: Storefront Branding Uploading Your Logo
Magento Community Edition 2.0 User Guide 93

FILE FORMAT DESCRIPTION
PNG (Portable Network Graphics) This newer alternative to the GIF format
supports up to 16 million colors (24 bit). The lossless compression
format produces a high-quality bitmap image with crisp text, but a
larger file size than some formats. The PGNformat supports
transparent layers, and is designed to be both viewed and streamed
online. The related MNG (APNG) formats support simple animation.
GIF (Graphics Interchange Format) A widely supported, and older bitmap
format that is limited to 256 (8 bit) colors. The GIF format supports
simple animation and transparent layers.
JPG/JPEG (Joint Photographics Expert Group) A compressed bitmap format that
is used by most digital cameras. The lossy compression causes
some data loss, which is sometimes noticeable as blurry spots in
text.
SVG (Scalable Vector Graphic) An XML-based open standard, scriptable
vector format developed by the World Wide Web Consortium. SVG
files support both animation and interaction.
ICO (Icon) A Microsoft Windows file format for icons.
Image File Formats
Uploading Your Logo CHAPTER 7: Storefront Branding
94 Magento Community Edition 2.0 User Guide
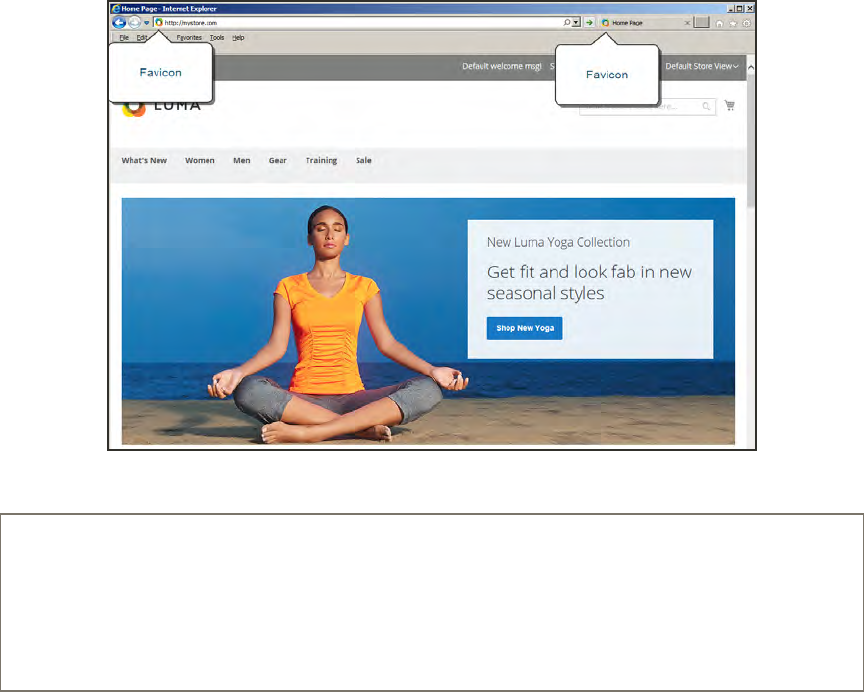
Adding a Favicon
Favicon is short for “favorite icon,” and refers to the little icon on the tab of each browser page.
Depending on the browser, the favicon also appears in address bar, just before the URL.
Favicons are generally 16 x 16 pixels or 32 x 32 pixels in size. Magento accepts ICO, PNG, JPG,
and SVG file types, although not all browsers support these formats. The most widely-
supported file format to use for a favicon is ICO. There are many free tools available online that
you can use to generate an ICO image or convert an exiting image to the format.
Favicon in Address Bar
Process Overview:
Step 1: Create a Favicon
Step 2: Upload the Favicon to Your Store
Step 3: Refresh the Cache
Step 1: Create a Favicon
1. Create a 16x16 or 32x32 graphic image of your logo, using the image editor of your choice.
2. (Optional) Use one of the available online tools to convert the file to the .ico format. Then, save
the file to your computer.
CHAPTER 7: Storefront Branding Adding a Favicon
Magento Community Edition 2.0 User Guide 95
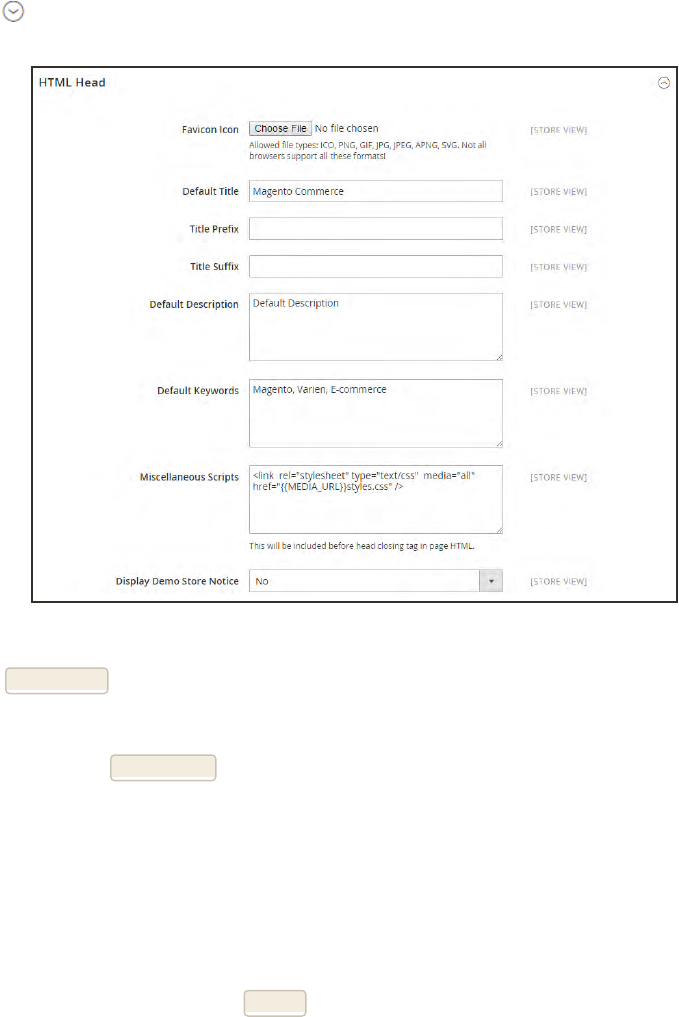
Step 2: Upload the Favicon to Your Store
1. On the Admin sidebar, tap Stores. Then under Settings, choose Configuration.
2. In the panel on the left under General, choose Design.
3. Expand the HTML Head section. Then, do the following:
HTML Head
a. Tap Choose File. Then, find the favicon file that you prepared.
b. If you want to delete the current favicon, mark the Delete Image checkbox.
4. When complete, tap Save Config.
Step 3: Refresh the Cache
1. When prompted to refresh the cache, click the Cache Management link in the message at the
top of the workspace.
2. In the list, mark the Page Cache checkbox that is marked “Invalidated.”
3. Set Actions to “Refresh.” Then, tap Submit.
4. To view the new favicon, return to your storefront and press F5 to refresh the browser.
Adding a Favicon CHAPTER 7: Storefront Branding
96 Magento Community Edition 2.0 User Guide
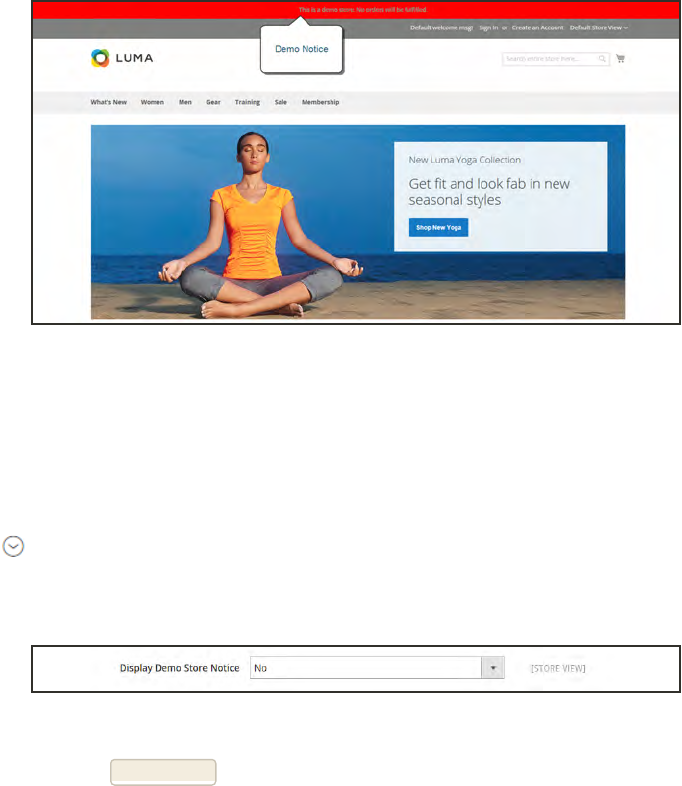
Store Demo Notice
If your store is online, but still under construction, you can display a store demo notice at the
top of the page to let people know that the store is not yet open for business. When you are
ready to “go live,” simply remove the message. It’s like flipping the sign hanging in the window
from “Closed” to “Open.” The format of the demo notice is determined by the theme of your
store.
Store Demo Notice
To set the store demo notice:
1. On the Admin sidebar, tap Stores. Then under Settings, choose Configuration.
2. In the panel on the left, under General, choose Design.
3. Expand the HTMLHead section.
4. Scroll down to the bottom, and set the Display Store Demo Notice to your preference.
HTMLHead
5. When complete, tap Save Config.
CHAPTER 7: Storefront Branding Store Demo Notice
Magento Community Edition 2.0 User Guide 97
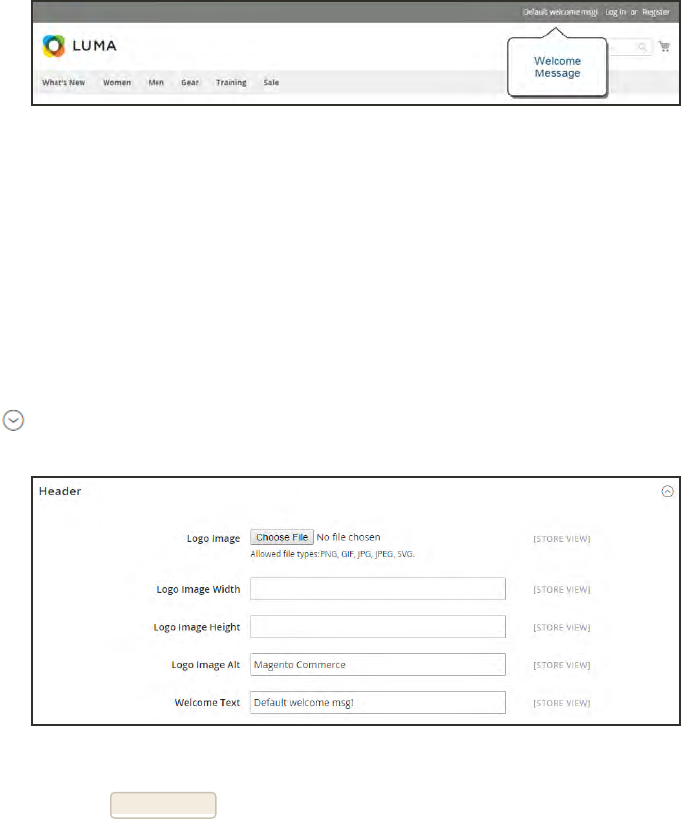
Changing the Welcome Message
The Welcome message in the header expands to include the name of the customer who is
logged in. Before you launch your store, be sure to change the default Welcome text for each
store view.
Welcome Message
To change the welcome message:
1. On the Admin sidebar, tap Stores. Then under Settings, choose Configuration.
2. In the panel on the left, under General, choose Design.
3. If you have multiple stores or views, set the Store View in the upper-left corner to the store or
view where the configuration applies. Then, clear the checkbox after each field so new values
can be entered.
4. Expand the Header section. Then, enter the Welcome Text that you want to appear.
Header
5. When complete, tap Save Config.
6. When prompted to update the Page Cache, click the Cache Management link at the top of the
workspace. Then, follow the instructions to refresh the cache.
Changing the Welcome Message CHAPTER 7: Storefront Branding
98 Magento Community Edition 2.0 User Guide

Copyright Notice
Your store has a copyright notice in the footer of each page. As a best practice, the copyright
notice should include the current year, and identify your company as the legal owner of the
content on the site.
Copyright Notice
The &Copy; character code is used to insert the copyright symbol, as shown in the following
examples:
Copyright &Copy; 2016 Magento, Inc. All rights reserved.
Long Format Example
&Copy; 2016 Magento, Inc. All rights reserved.
Short Format Example
To change the copyright notice:
1. On the Admin sidebar, tap Stores. Then under Settings, choose Configuration.
2. In the panel on the left under General, choose Design.
3. Expand the Footer section.
Footer
4. In the Copyright box, enter the copyright notice that you want to appear in the footer of each
page. Use the &Copy; character code to insert a copyright symbol.
5. When complete, tap Save Config.
CHAPTER 7: Storefront Branding Copyright Notice
Magento Community Edition 2.0 User Guide 99

Notes
100 Magento Community Edition 2.0 User Guide
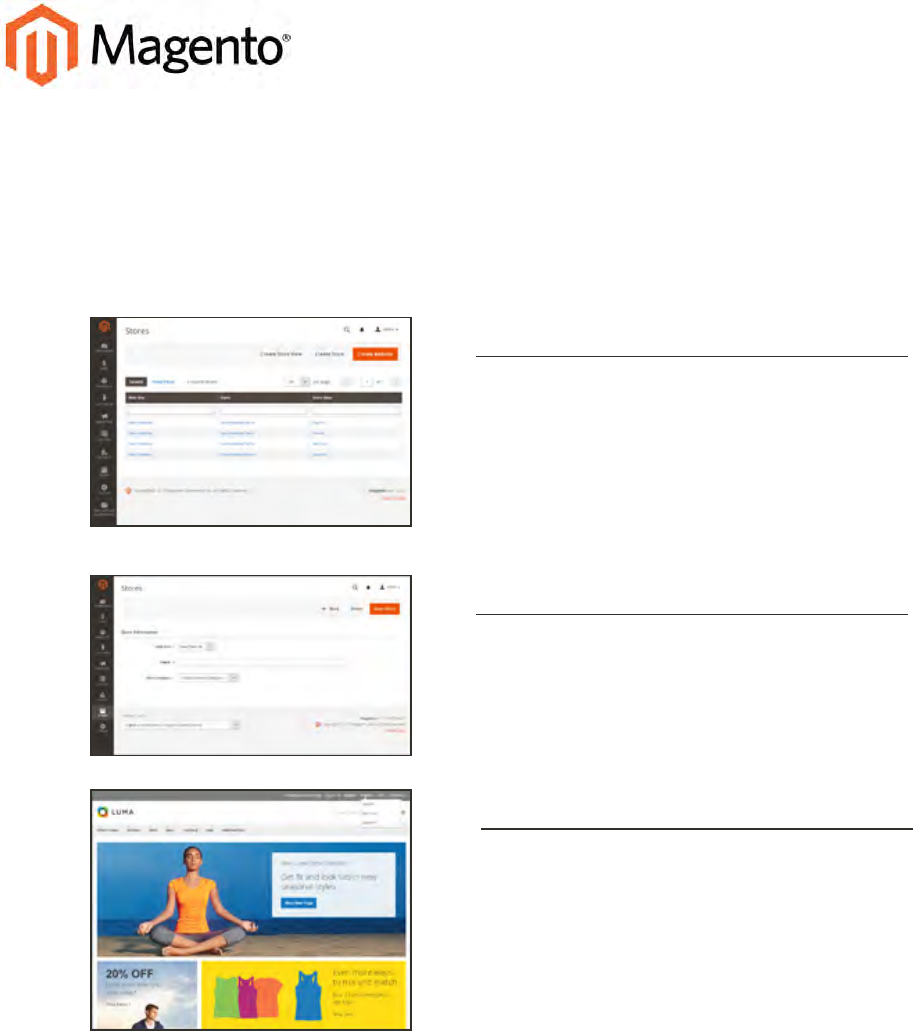
CHAPTER 8:
Websites, Stores & Views
A single installation of Magento Community Edition 2.0 can include multiple websites,
stores, and views, all managed from the same Admin.
Websites
Magento 2 installations begin with a single website
called “Main Website.” You can also set up
multiple websites, each with its own domain.
Stores
A single website can have multiple stores, each
with a separate main menu. Each store can have a
different product selection and appearance, but are
managed from the same Admin.
Store Views
Store views are usually used to make the store
available in different languages. Customers can
use the language chooser in the header to change
the store view.
Magento Community Edition 2.0 User Guide 101
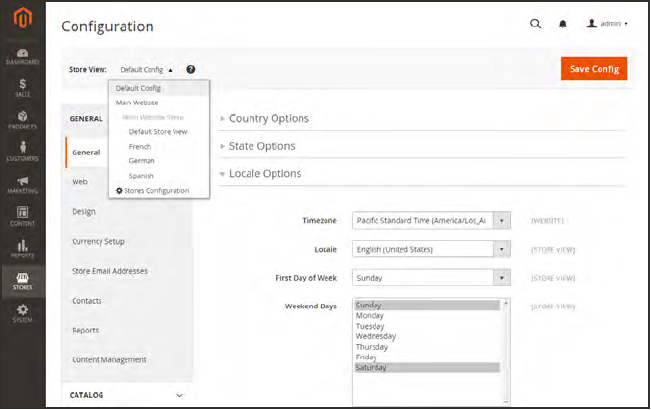
Configuration Scope
The scope determines which website, store, or view is affected by a configuration setting. If your
installation has multiple websites, stores, or views, you can set the scope of a configuration
setting to apply to a specific part of the installation. For Admin users with restricted access,
the list of available areas includes only those to which the user has access.
The Store View control in the upper-left corner of the Admin determines the scope of the current
configuration settings. By default, the scope is set to “All Store Views.” Configuration scope
applies to products categories, attributes, customer management setting, and so on. The scope
of each item appears in brackets after the field to indicate the range of the setting. If your
installation includes multiple websites, stores or views, you should always first set the Store
View control to identify where the configuration settings apply.
Store View Control
Any item with the scope of [STORE] can be set differently for each view. For example, because
the scope of a product name and description is [STORE], the fields can have a different value
for each language. However, some configuration settings—such as postal code—are [GLOBAL]
because the same setting is used throughout the system. The [WEBSITE] scope also applies to
the entire site, including all views.
Configuration Scope CHAPTER 8: Websites, Stores & Views
102 Magento Community Edition 2.0 User Guide
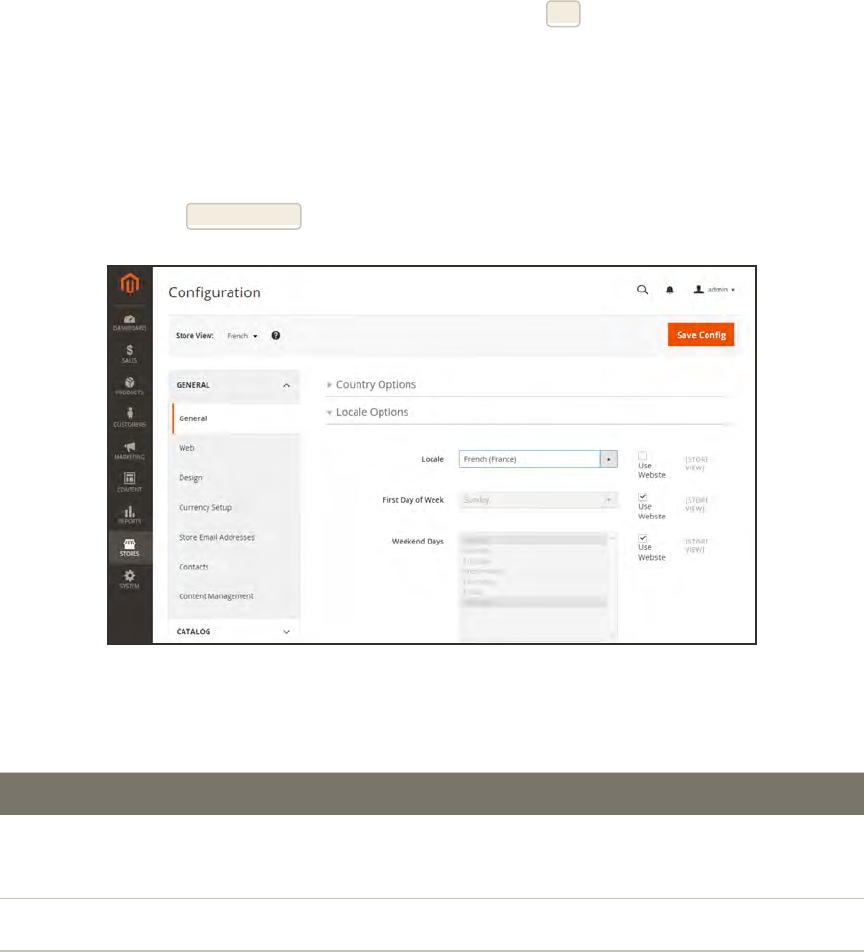
To set the configuration scope:
Before making a configuration setting that applies only to a specific website, store, or view, do
the following:
1. On the Admin sidebar, tap Stores. Then under Settings, choose Configuration.
2. Navigate to the configuration setting to be changed. Then, do the following:
a. In the upper-left corner, set Store View to the specific view where the configuration is to
apply. When prompted to confirm scope switching, tap OK.
A checkbox appears after each field, and sometimes additional fields become available.
b. Clear the Use Website checkbox after any field that you want to edit. Then, update the
value for the view.
c. Repeat this process for every field that needs to be updated on the page.
3. When complete, tap Save Config.
Setting the Locale for a View
Scope Settings
SCOPE DESCRIPTION
Store The setting is limited to the store view, which is often used to display
a store in multiple languages.
Website The setting is limited to the website.
Global The setting applies to the entire installation.
CHAPTER 8: Websites, Stores & Views Configuration Scope
Magento Community Edition 2.0 User Guide 103
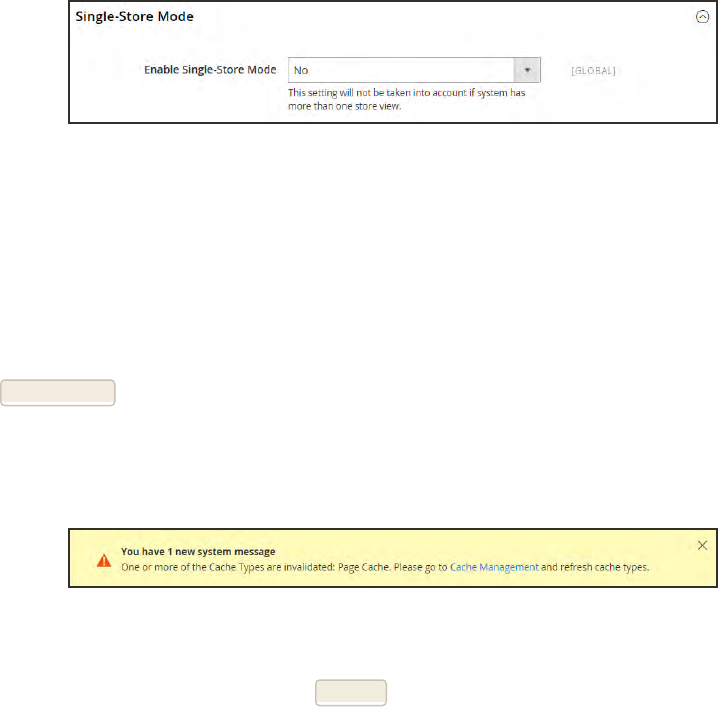
Single Store Mode
If your Magento Community 2.0 installation has only a single store and view, you can simplify
the display by turning off all Store View options and scope indicators. Most of the screenshots
in this guide were taken with Single Store Mode disabled, which causes a scope indicator to
appear after each configuration setting. Single Store Mode is automatically overridden if you
later add a store view.
Single Store Mode Disabled
To set single store mode:
1. On the Admin sidebar, tap Stores. Then under Settings, choose Configuration.
2. Scroll down to the bottom of the page, and expand the Single Store Mode section.
3. Set Enable Single Store Mode to “Yes.”
4. Tap Save Config.
5. When prompted to refresh the cache, do the following:
a. Tap the Cache Management link in the system message at the top of the page.
System Message
b. Mark the Page Cache checkbox.
c. With Actions set to “Refresh,” tap Submit.
Single Store Mode CHAPTER 8: Websites, Stores & Views
104 Magento Community Edition 2.0 User Guide

CHAPTER 9:
Industry Compliance
Magento Community Edition 2.0 offers a range of security and privacy capabilities that
meet legal requirements and industry guidelines for online merchants. Some are mandated
by the payment card industry, and others are required by law, depending on your location.
lLegal Requirements
lIndustry Guidelines
lBest Practices
You will learn about PCI compliance, and the importance of establishing procedures to
protect payment information. You will also learn how to bring your store into compliance
with the Cookie Law, which is a requirement in some countries, and considered a “best
practice” in others. In addition, you will learn how to customize and maintain a privacy
policy for your store.
Magento Community Edition 2.0 User Guide 105

PCI Compliance Guidelines
The Payment Card Industry (PCI) has established a set of requirements for businesses that
accept payment by credit card over the Internet. In addition to the need to maintain a secure
hosting environment, there are additional requirements that merchants must meet to ensure
the privacy of cardholder data. Every merchant who handles customer credit card information
is required by the Payment Card Industry to conduct business within the following guidelines:
Install and maintain a firewall configuration to protect cardholder data.
Do not use vendor-supplied defaults for system passwords and other security
parameters.
Protect stored cardholder data.
Encrypt transmission of cardholder data across open, public networks.
Use and regularly update antivirus software.
Develop and maintain secure systems and applications.
Restrict access to cardholder data by business need to know.
Assign a unique ID to each person with computer access.
Restrict physical access to cardholder data.
Track and monitor all access to network resources and cardholder data.
Regularly test security systems and processes.
Maintain a policy that addresses information security.
PCI Requirements
As your business grows, you may be required to file a compliance report on an annual basis.
PCI reporting requirements increase in proportion to merchant level, but are waived for
businesses that process fewer than 20,000 credit card transactions per year. To learn more,
visit the PCI Security Standards Council website.
PCI Compliance Guidelines CHAPTER 9: Industry Compliance
106 Magento Community Edition 2.0 User Guide
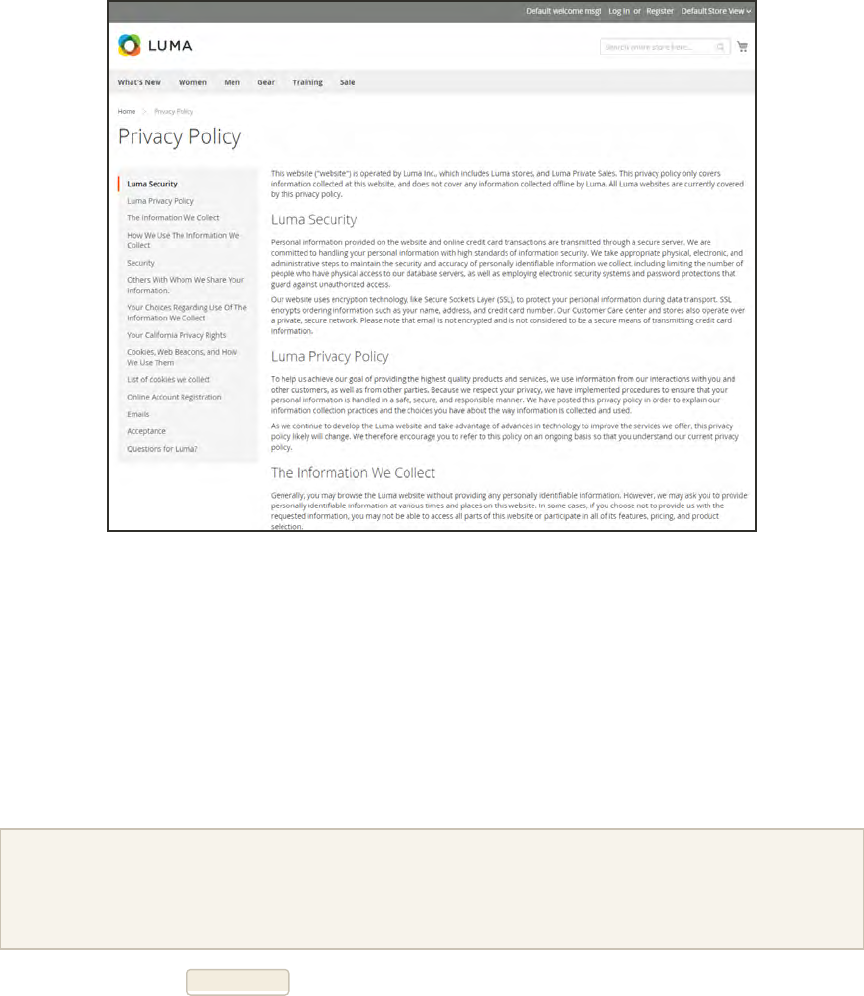
Privacy Policy
Your store includes a sample privacy policy that must be updated with your own information.
Your privacy policy should describe the type of information that your company collects, and
how it is used. It should also list the filenames of cookies that are placed on the computers of
people who visit your store. Any additional cookies that are associated with third-party
extensions and add-ons should be included in the list.
Privacy Policy
To edit your privacy policy:
1. On the Admin sidebar, tap Content. Then under Elements, choose Pages.
2. Find the privacy policy in the list, and tap to open the page in edit mode.
3. In the panel on the left, choose Content.
4. Make the necessary changes to the content.
If you change the URLkey of the privacy policy, you must also create a custom URL rewrite to
redirect traffic to the new URL key. Otherwise, the link in the footer will return “404 Page Not
Found.”
5. When complete, tap Save Page.
CHAPTER 9: Industry Compliance Privacy Policy
Magento Community Edition 2.0 User Guide 107
Cookie Law Compliance
Cookies are small files that are saved to the computer of each visitor to your site, and used as
temporary holding places for information. Information that is saved in cookies is used to
personalize the shopping experience, link visitors to their shopping carts, measure traffic
patterns, and improve the effectiveness of promotions. To keep pace with legislation in many
countries regarding the use of cookies, Magento offers merchants a choice of methods for
obtaining customer consent:
Method 1: Implied Consent
Implied consent means that visitors to your store have a clear understanding that cookies are a
necessary part of operations, and by using your site, have indirectly granted permission to use
them. The key to gaining implied consent is to provide enough information for a visitor to
make an informed decision. Many stores display a message at the top of all standard pages
that provides a brief overview of how cookies are used, with a link to the store’s privacy policy.
The privacy policy should describe the type of information that your store collects, and how it
is used.
Method 2: Expressed Consent
Operating your store in cookie restriction mode requires visitors to express their consent before
any cookies can be saved to their computers. Unless consent is granted, many features of your
store will be unavailable. For example, if Google Analytics is available for your store, it can be
invoked only after the visitor has granted permission to use cookies.
Cookie Law Compliance CHAPTER 9: Industry Compliance
108 Magento Community Edition 2.0 User Guide
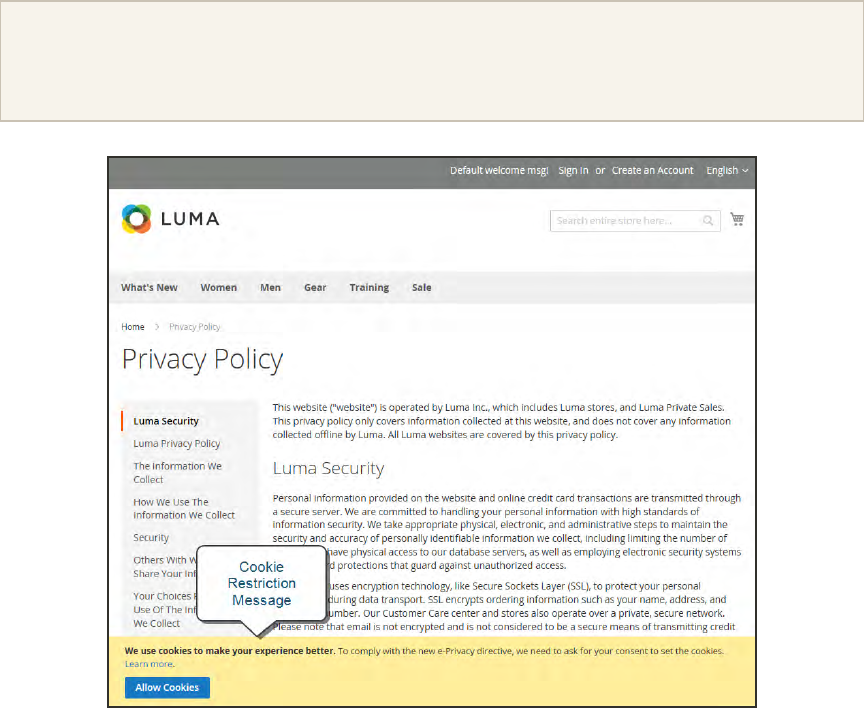
Cookie Restriction Mode
When Cookie Restriction Mode is enabled, visitors to your store are notified that cookies are
required for full-featured operations. Depending on your theme, the message might appear
above the header, below the footer, or somewhere else on the page. The message links to your
privacy policy for more information, and encourages visitors to click the Allow button to grant
consent. After consent is granted, the message disappears.
Your privacy policy should include the name of your store and contact information, and
explain the purpose of each cookie that is used by your store. To learn more, see: Cookie
Reference.
If you change the URLkey of the privacy policy, you must also create a custom URL rewrite to
redirect traffic to the new URL key. Otherwise, the link in the Cookie Restriction Mode message will
return “404 Page Not Found.”
Cookie Restriction Notice In Footer
Step 1: Enable Cookie Restriction Mode
1. On the Admin sidebar, tap Stores. Then under Settings, choose Configuration.
2. In the panel on the left, under General, choose Web. Expand the Default Cookie Settings
section, and do the following:
CHAPTER 9: Industry Compliance Cookie Law Compliance
Magento Community Edition 2.0 User Guide 109
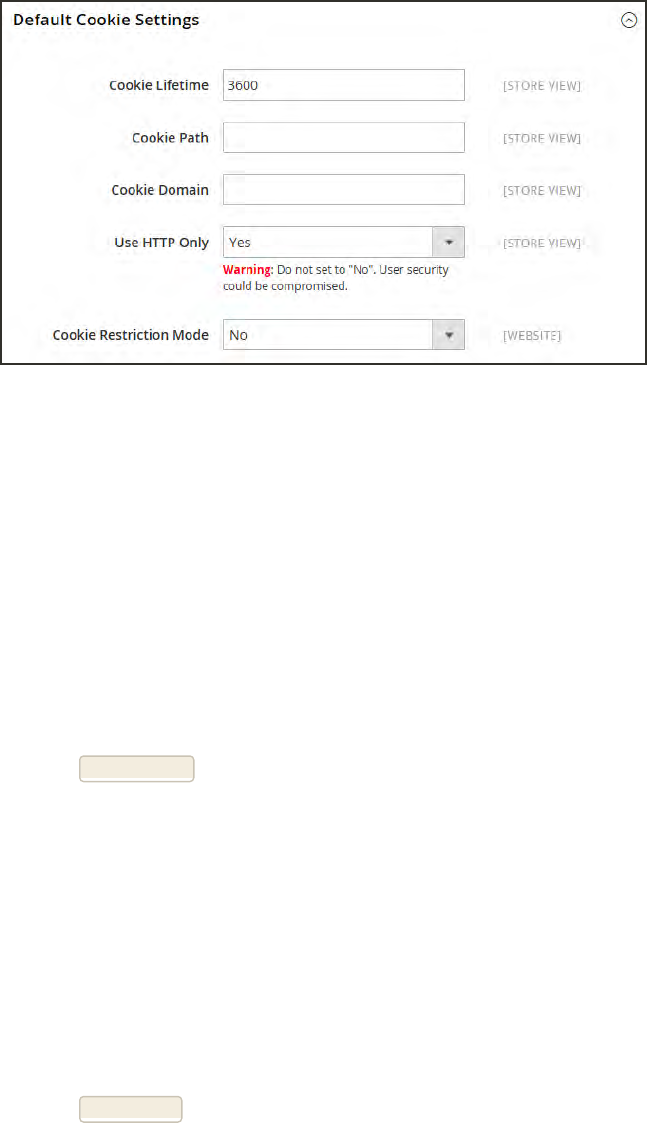
Default Cookie Settings
a. Enter the Cookie Lifetime in seconds.
b. If you want to make cookies available to other folders, enter the Cookie Path. To make the
cookies available anywhere in the site, enter a forward slash.
c. To make the cookies available to a subdomain, enter the subdomain name in the Cookie
Domain field. (subdomain.yourdomain.com) To make cookies available to all subdomains,
enter the domain name preceded by a period. (.yourdomain.com)
d. To prevent scripting languages such as JavaScript from gaining access to cookies, make
sure that Use HTTPOnly is set to “Yes.”
e. Set Cookie Restriction Mode to “Yes.”
3. When complete, tap Save Config.
4. When prompted to update the cache, click the Cache Management link in the system message.
Then, refresh the invalid cache.
Step 2: Update Your Privacy Policy
1. On the Admin sidebar, tap Content. Then under Elements, choose Pages.
2. Find your Privacy Policy in the list, and open the page in edit mode.
3. In the panel on the left, click Content. Then, update the content as needed to describe the
information that your company collects, and how it is used.
4. When complete, tap Save Page.
Cookie Law Compliance CHAPTER 9: Industry Compliance
110 Magento Community Edition 2.0 User Guide
Cookie Reference
Magento Standard Cookies
COOKIE NAME COOKIE DESCRIPTION
CART The association with your shopping cart.
CATEGORY_INFO Stores the category info on the page, that allows to display
pages more quickly.
COMPARE The items that you have in the Compare Products list.
CUSTOMER An encrypted version of your customer id with the store.
CUSTOMER_AUTH Indicates if you are currently logged into the store.
CUSTOMER_INFO An encrypted version of the customer group you belong to.
CUSTOMER_SEGMENT_IDS Stores the Customer Segment ID.
EXTERNAL_NO_CACHE Indicates if caching is disabled or enabled.
FRONTEND Your session ID on the server.
GUEST-VIEW Allows guests to edit their orders.
LAST_CATEGORY The last category you visited.
LAST_PRODUCT The most recent product you have viewed.
NEWMESSAGE Indicates whether a new message has been received.
NO_CACHE Indicates whether it is allowed to use cache.
PERSISTENT_SHOPPING_CART A link to information about your cart and viewing history if you
have asked the site.
RECENTLYCOMPARED The items that you have recently compared.
STF Information on products you have emailed to friends.
CHAPTER 9: Industry Compliance Cookie Law Compliance
Magento Community Edition 2.0 User Guide 111

COOKIE NAME COOKIE DESCRIPTION
STORE The store view or language you have selected.
USER_ALLOWED_SAVE_COOKIE Indicates whether a customer allowed to use cookies.
VIEWED_PRODUCT_IDS The products that you have recently viewed.
WISHLIST An encrypted list of products added to your Wishlist.
WISHLIST_CNT The number of items in your Wishlist.
Google Analytics Cookies
COOKIE DESCRIPTION
_utma Distinguishes users and sessions.
_utmb Determines new sessions/visits.
_utmc Determines if the user was in a new session/visit.
_utmz Stores the traffic source or campaign that explains how the user
reached your site.
Cookie Law Compliance CHAPTER 9: Industry Compliance
112 Magento Community Edition 2.0 User Guide


Contents
Products Menu
Inventory Workspace
Product Scope
Creating Products
Catalog URLs
Product Workspace
Default Field Values
Product Types
Simple Product
Configurable Product
Adding Configurations
Grouped Product
Virtual Product
Bundle Product
Downloadable Product
Download Options
Basic Settings
Product Details
Images and Videos
Media Gallery
Product Videos
Placeholders
Watermarks
Swatches
Creating a Swatch
Search Engine Optimization
Websites
Advanced Settings
Pricing
Group Price
Special Price
Tier Price
Minimum Advertised Price
MAPLogic
MAPConfiguration
Inventory
Stock Options
Product Stock Options
Stock Message Scenarios
Product Alerts
Product Alert Run Settings
Custom Options
Related Products
Up-sells
Cross-sells
Design
Autosettings
Product Reviews
Ratings
Categories
Creating Categories
Modifying Categories
Root Categories
Hidden Categories
General Information
Display Settings
Custom Design
Category Products
Product Attributes
Adding an Attribute
Attribute Input Types
Date & Time Options
114 Magento Community Edition 2.0 User Guide
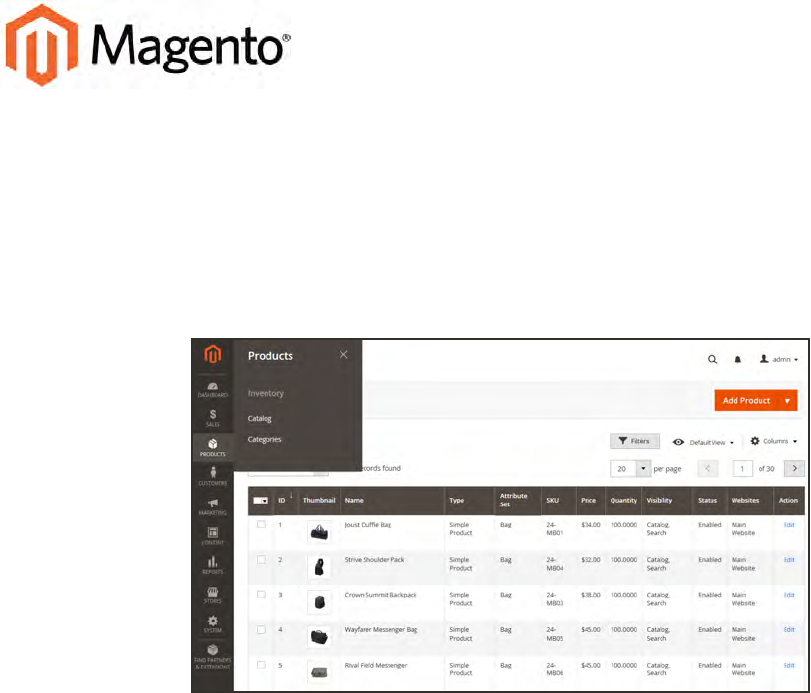
CHAPTER 10:
Products Menu
The Products Menu provides easy access to product creation, category and inventory
management, as well as tools to manage catalog content.
Products Menu
Magento Community Edition 2.0 User Guide 115
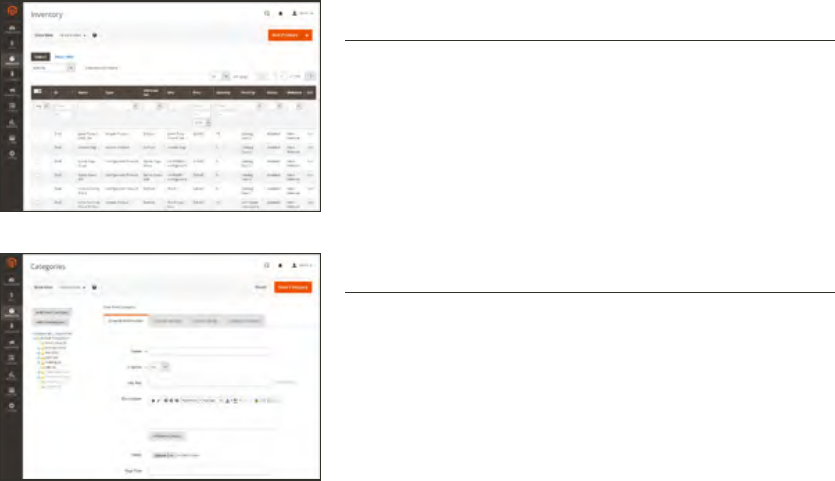
Catalog Workspace
The Catalog grid lists all products in the catalog. Use the standard controls to sort and filter
the list, find products, and apply actions to selected products. From the grid, you can create
new products and edit existing ones.
Catalog Grid
CONTROL DESCRIPTION
Store View Sets the scope of the product to a specific view.
Add Product Click the Add Product button to create a new simple product. To
choose a specific product type, click the down arrow. Options
include:
Simple Product
Configurable Product
Grouped Product
Virtual Product
Bundle Product
Downloadable Product
Search Initiates a catalog search based on the current filters.
Reset Filter Restores all filters to a blank state.
Workspace Controls
CHAPTER 10: Products Menu Catalog Workspace
Magento Community Edition 2.0 User Guide 117
CONTROL DESCRIPTION
Actions Lists all actions that can be applied to selected products in the list. To
apply an action to a product or group of products, mark the checkbox
in the first column of each product. Options:
Delete
Change Status
Update Attributes
Mass Actions Can be used to select multiple records as the target of action. The
checkbox is marked in the first column of each selected record.
Options:
Select All
Unselect All
Select Visible
Unselect Visible
Submit Applies the current action to selected product records.
Edit Opens the product in edit mode. You can accomplish the same thing
by clicking anywhere on the row.
Workspace Controls (cont.)
COLUMN DESCRIPTION
Selection State Determines how products are listed when the checkbox is marked.
Options:
Any Lists all records, regardless of checkbox status.
Yes Lists only records with the checkbox marked.
No Lists only records without the checkbox marked.
ID A unique, sequential number that is assigned when a new product is
saved for the first time.
Thumbnail Displays a thumbnail of the main product image.
Name The product name.
Type The product type. Options:
Columns
Catalog Workspace CHAPTER 10: Products Menu
118 Magento Community Edition 2.0 User Guide
COLUMN DESCRIPTION
Simple Product
Virtual Product
Bundle Product
Downloadable Product
Grouped Product
Configurable Product
Attribute Set The product template upon which the product is based.
SKU A unique Stock Keeping Unit that is assigned to the product.
Price The unit price of the product.
Quantity The quantity currently in stock.
Visibility Indicates where in the catalog the product is visible. Options:
Not Visible Individually
Catalog
Search
Catalog, Search
Status Indicates the current status of the product. Options:
Enabled
Disabled
Websites Indicates the website(s) where the product is available.
Columns (cont.)
CHAPTER 10: Products Menu Catalog Workspace
Magento Community Edition 2.0 User Guide 119
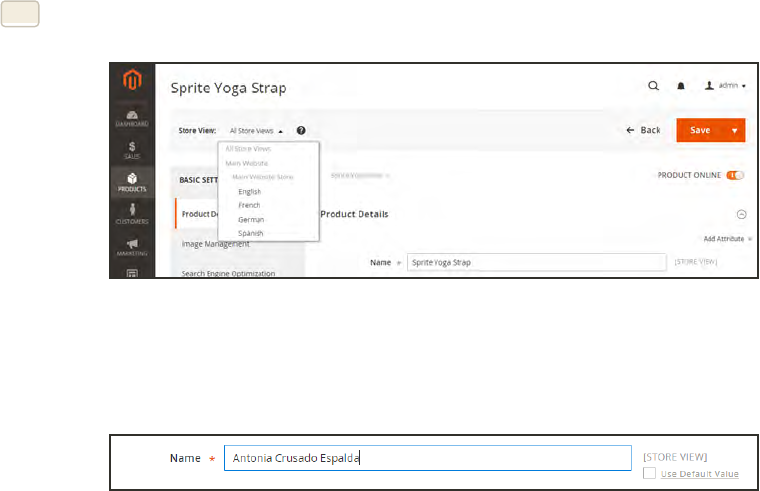
Product Scope
For installations with multiple websites, stores, and views, the scope determines where
products are available for sale, and manages the product information for each store view.
Initially, all products that you create are published to the default website, store, and view.
If you have only a single store with the default view, you can run your store in Single Store
Mode to hide the scope settings from view. However, if your store has multiple views, a scope
indicator appears to the right of each field.
To edit the product information for a specific view, use the Store View control in the upper-left
corner to select the view. After the view is selected, additional controls become available for any
field that can be edited at the store view level. In the following example, although the Spanish
store view is selected, the product information is still in the language of the default store view.
The process of editing a product for a store view can be likened to adding a layer of product
information that is specific to the view. For example, you can switch to the Spanish view, and
translate the text fields, such as product title, description, and the meta data. To learn more,
see: Translating Products.
To edit product information for a different view:
1. In the upper-left corner, set Store View to the specific view to be edited. When prompted, tap
OK to change the scope.
Store View
2. A checkbox appears after any field that can be edited for the store view. To edit a field, clear the
Use Default Value checkbox. Then, update the field with the new value for the view.
Editing a Field for a View
Catalog Workspace CHAPTER 10: Products Menu
120 Magento Community Edition 2.0 User Guide

3. When complete, tap Save.
4. In the upper-left corner, set Store View back to the default store view.
5. To see the change in your store, do the following:
a. In the upper-right corner, tap the Admin menu arrow. Then, choose Customer View.
Customer View
b. In the upper-right corner of the store, set the Language Chooser to the store view to find
the product that you edited.
Language Chooser
CHAPTER 10: Products Menu Catalog Workspace
Magento Community Edition 2.0 User Guide 121

Notes
122 Magento Community Edition 2.0 User Guide
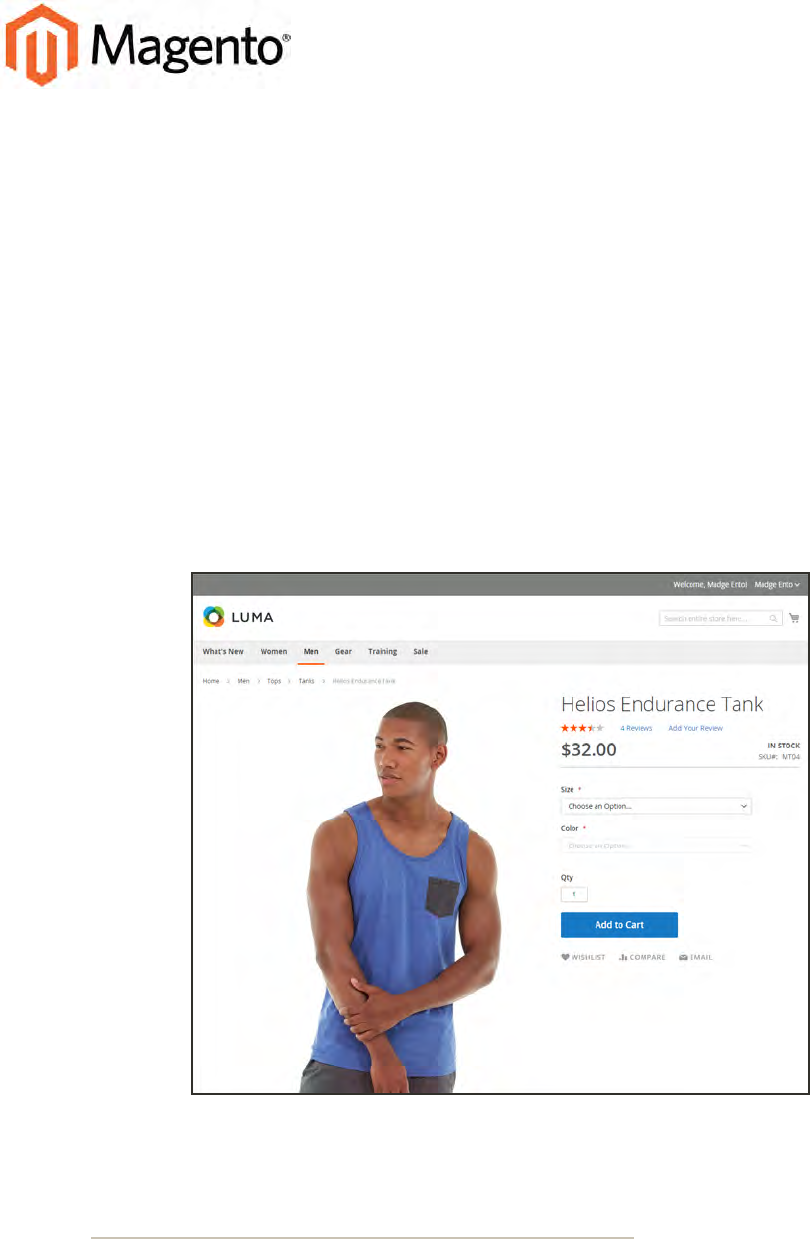
CHAPTER 11:
Creating Products
Choosing a product type is one of the first things you must do to create a new product. In
this chapter, you will learn how to create a product of each type. In addition to the basic
product types, the term, complex product1refers to a product that requires the
customer to choose from a selection of options before making a purchase. To learn more
about the available options, see Basic Settings and Advanced Settings.
If you are just starting out, you can create a few sample products to experiment with each
product type. For a deeper understanding, make sure to read about catalog navigation,
how to set up categories and attributes, and the catalog URL options that are available to
you.
Product Catalog
1A product that requires the customer to choose from a selection of options.
Magento Community Edition 2.0 User Guide 123
Catalog URLs
The URLs you assign to products and categories play a major role in determining how well
your site is indexed by search engines. Before you start building your catalog is an ideal time to
consider the available options.
Dynamic URL
A dynamic URL is created “on the fly,” and might include a query string with variables for the
product ID, sort order, and the page where the request was made. When a customer searches
for a product in your store, the resulting URL might look something like this:
http://mystore.com/catalogsearch/result/?q=tee+shirt
Static URL
A static URL is a fixed address for a specific page. A static URL can be displayed in a search-
engine friendly format, or one that references products and categories by ID. Search-engine
friendly URLs include words that people might use to look for a product, and require Web
Server Rewrites to be enabled.
http://mystore.com/accessories/eyewear.html
http://mystore.com/catalog/product/view/id/409/s/chelsea-tee-
409/category/16/
URL Key
The URL key is the part of a static URL that describes the product or category. When you
create a product or category, an initial URL key is automatically generated, based on the name.
The URL key should consist of lowercase characters with hyphens to separate words. A well-
designed, “search engine friendly” URL key might include the product name and key words to
improve the way it is indexed by search engines. The URL key can be configured to create an
automatic redirect if the URL key is changed.
Catalog URLs CHAPTER 11: Creating Products
124 Magento Community Edition 2.0 User Guide

HTML Suffix
Your catalog can be configured to either include or exclude the suffix as part of category and
product URLs. There are various reasons why people might choose to use or to omit the suffix.
Some believe that the suffix no longer serves any useful purpose, and that pages without a
suffix are indexed more effectively by search engines. However, your company might have a
standardized format for URLs that requires a suffix.
Because the suffix is controlled by the system configuration, you should never type the suffix
directly into the URL key of a category or product. (Doing so will result in a double suffix at
the end of the URL.) Whether you decide to use the suffix or not, be consistent and use the
same setting for all your product and category pages. Here are examples of a category URL
with, and without, the suffix.
http://mystore.com/accessories/eyewear.htm
http://mystore.com/accessories/eyewear.html
http://mystore.com/accessories/eyewear/retro-chic-eyeglasses
Category Path
You can configure the URL to either include or exclude the category path. By default, the
category path is included in all category and product pages. The following examples show the
same product URL with, and without, the category path.
http://mystore.com/accessories/eyewear/retro-chic-eyeglasses
http://mystore.com/retro-chic-eyeglasses
To prevent search engines from indexing multiple URLs that lead to the same content, you can
exclude the category path from the URL. Another method is to use a canonical meta tag to let
search engines know which URLs to index and which to ignore.
To configure catalog URLs:
1. On the Admin sidebar, tap Stores. Then under Settings, choose Configuration.
2. In the panel on the left under Catalog, choose Catalog.
3. Expand the Search Engine Optimizations section, and do the following:
a. Set Product URL Suffix to “html” or “htm.” Enter the suffix without a period, because it is
applied automatically.
b. Set Category URL Suffix to “html” or “htm.” Enter the suffix without a period, because it
is applied automatically.
CHAPTER 11: Creating Products Catalog URLs
Magento Community Edition 2.0 User Guide 125
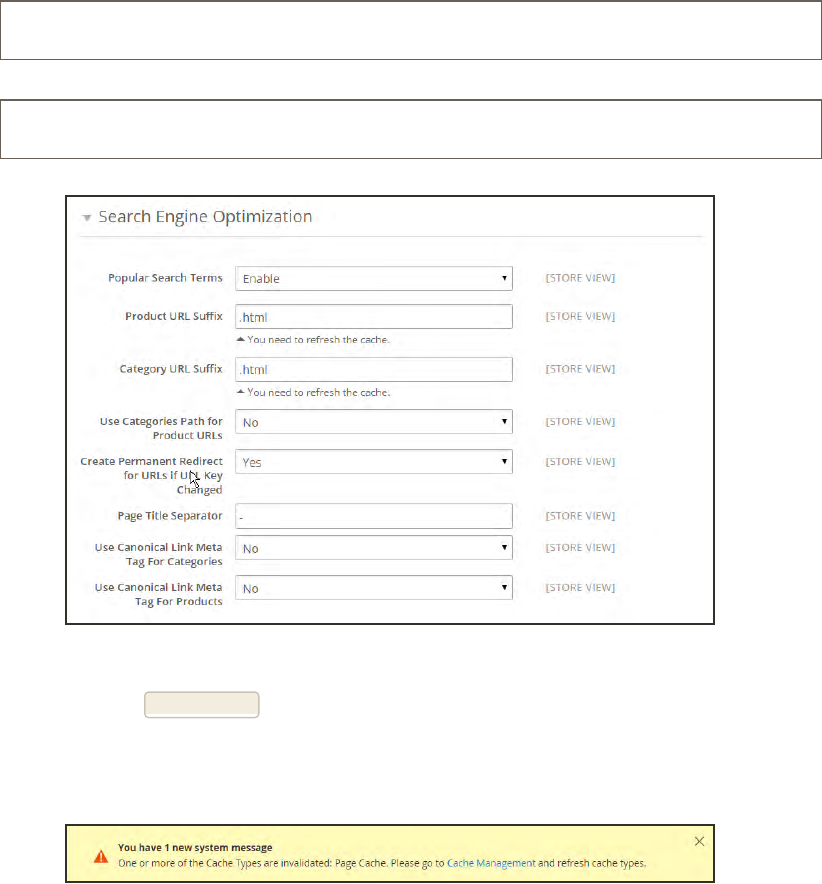
c. Set Use Categories Path for Product URLs to your preference.
http://mystore.com/furniture/living-room/microfiber-sofa-sleeper
URL with Category Path
http://mystore.com/microfiber-sofa-sleeper
URL without Category Path
Search Engine Optimization
4. When complete, tap Save Config.
5. When prompted, click the Cache Management link in the system message, and refresh the
invalid cache.
Refresh Cache
Catalog URLs CHAPTER 11: Creating Products
126 Magento Community Edition 2.0 User Guide
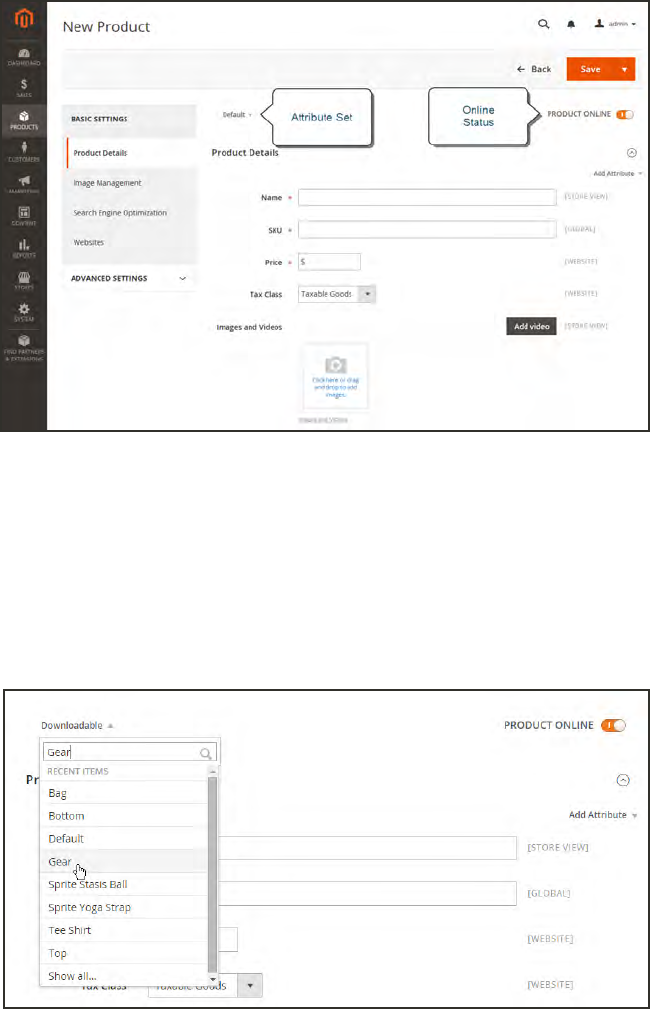
Product Workspace
The panel on the left of the product workspace lists the selection of Basic and Advanced
Settings, with the current selection on the right. The workspace includes multiple Save options
and gives you control over the online status of the product.
Product Workspace
Attribute Set
The name of the attribute set appears in the upper-left corner, and determines the fields that
make up the product record. When creating a new product, an existing attribute set can be
chosen by clicking the down arrow next to the default attribute set name.
Attribute Sets
CHAPTER 11: Creating Products Product Workspace
Magento Community Edition 2.0 User Guide 127
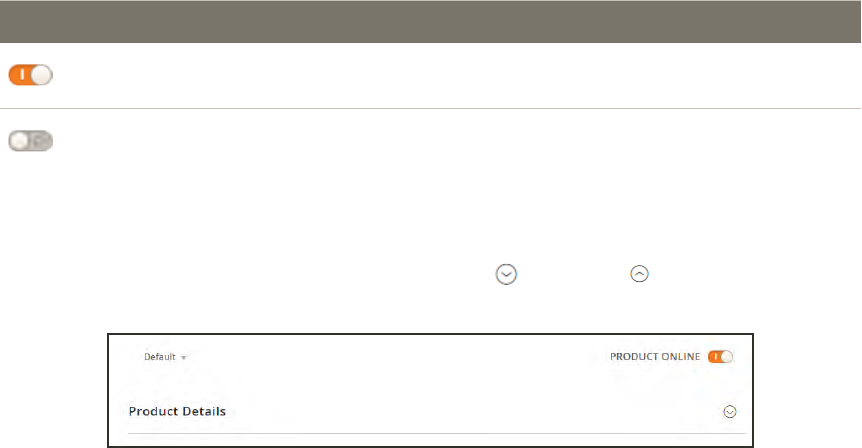
Online Status
The online status of the product is indicated by the switch in the upper-right corner. To change
the online status, simply click the switch.
CONTROL DESCRIPTION
Indicates that the product is currently online.
Indicates that the product is currently offline.
Expand/Collapse
To expand or collapse a section, tap either the expand or collapse button to the right.
Product Details
Product Workspace CHAPTER 11: Creating Products
128 Magento Community Edition 2.0 User Guide
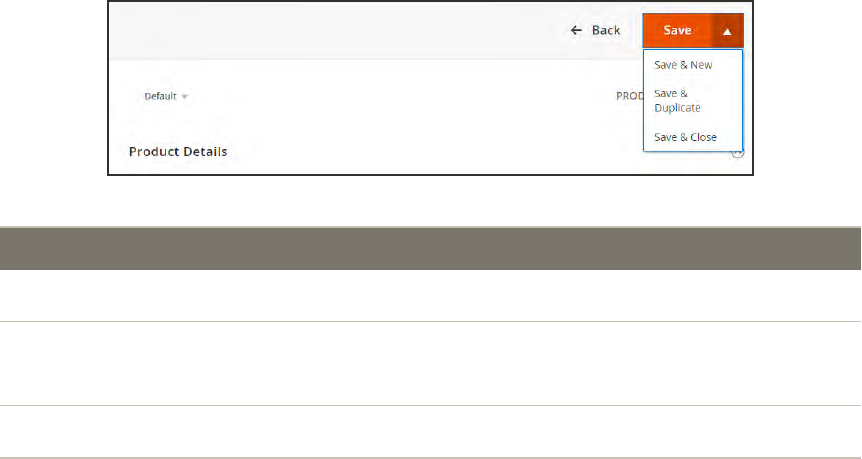
Save Menu
The Save menu includes several options that let you save and continue, save and create a new
product, save and duplicate the product, or save and close.
Save Menu
COMMAND DESCRIPTION
Save Save the current product, and continue working.
Save & New Save and close the current product, and begin a new product, based on the
same product type and template.
Save & Duplicate Save and close the current product, and open a new duplicate copy.
Save & Close Save the current product and return to the Inventory workspace.
CHAPTER 11: Creating Products Product Workspace
Magento Community Edition 2.0 User Guide 129
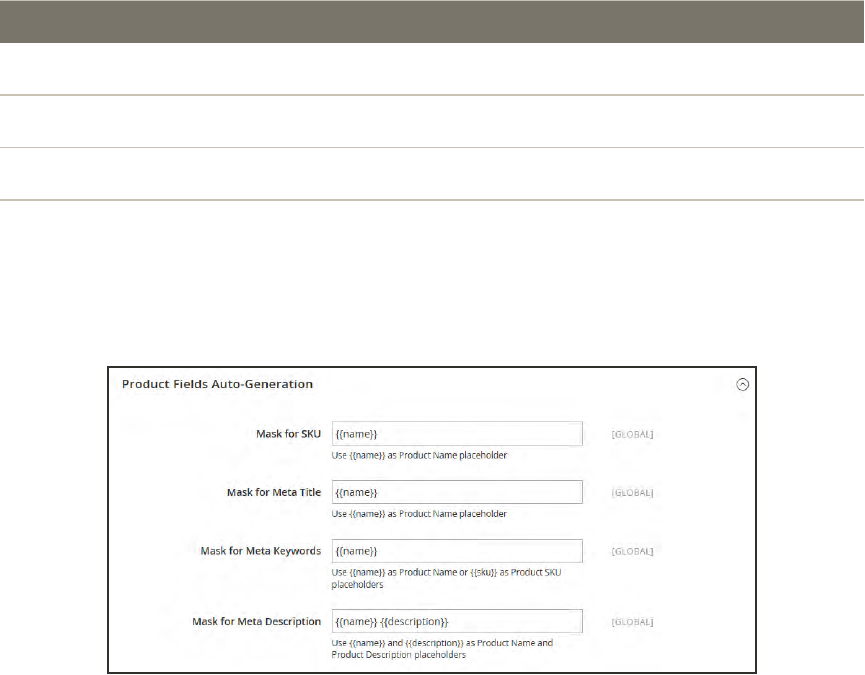
Default Field Values
To save time when creating products, the default value of several product fields references
values from another field. You can either accept the default value, or enter another. The
following fields have automatically generated default values:
FIELD DESCRIPTION
SKU Based on product Name.
Meta Title Based on product Name.
Meta Keywords Based on product Name.
Meta Description Based on product Name and Description.
The placeholders that represent the value of another field are enclosed in double-curly braces.
Any attribute code that is included in the product attribute set can be used as a placeholder.
Product Fields Auto-Generation
Product Workspace CHAPTER 11: Creating Products
130 Magento Community Edition 2.0 User Guide
To edit the placeholder value:
1. On the Admin sidebar, tap Stores. Then under Settings, choose Configuration.
2. In the panel on the left under Catalog, choose Catalog.
3. Expand the Product Fields Auto-Generation section. Then, make any changes needed to the
placeholder values.
For example, if there’s a specific keyword that you want to include for every product, or a
phrase that you want to include in every meta description, you can type the value directly into
the appropriate field.
If you want to keep the existing placeholder values, be careful to preserve the double curly braces
that enclose each markup tag.
4. When complete, tap Save Config.
PLACEHOLDER
{{color}}
{{country_of_manufacture}}
{{description}}
{{gender}}
{{material}}
{{name}}
{{short_description}}
{{size}}
{{sku}}
Common Placeholders
CHAPTER 11: Creating Products Product Workspace
Magento Community Edition 2.0 User Guide 131
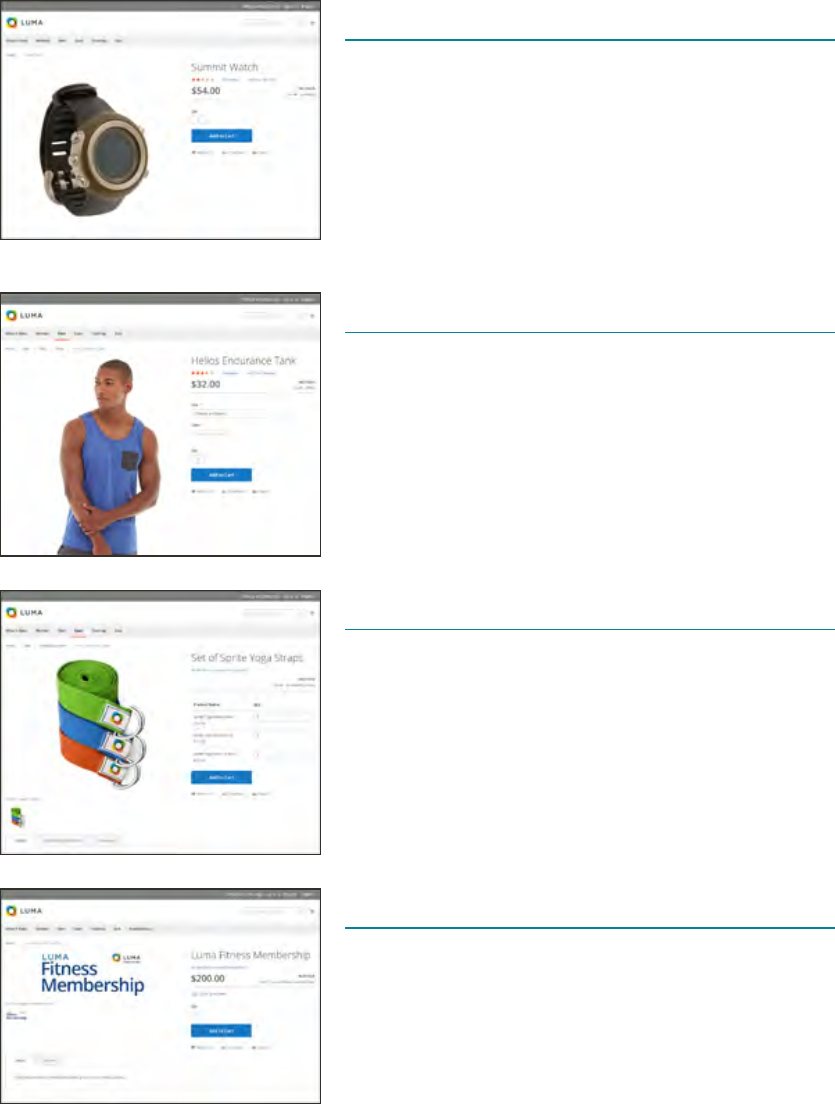
Product Types
Simple Product
A simple product is a physical item with a single SKU.
Simple products have a variety of pricing and of input
controls which makes it possible to sell variations of the
product. Simple products can be used in association with
grouped, bundle, and configurable products.
Configurable Product
A configurable product appears to be a single product
with lists of options for each variation. However, each
option represents a separate, simple product with a
distinct SKU, which makes it possible to track inventory
for each variation.
Grouped Product
A grouped product presents multiple, standalone
products as a group. You can offer variations of a single
product, or group them for a promotion. The products can
be purchased separately, or as a group.
Virtual Product
Virtual products are not tangible products, and are
typically used for products such as services,
memberships, warranties, and subscriptions. Virtual
products can be used in association with grouped and
bundle products.
Product Types CHAPTER 11: Creating Products
132 Magento Community Edition 2.0 User Guide
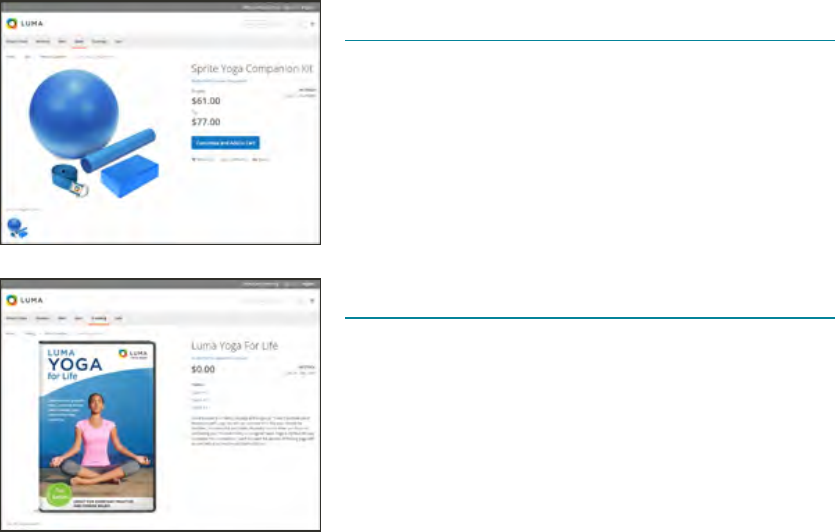
Bundle Product
A bundle product let customers “build their own” from an
assortment of options. The bundle could be a gift basket,
computer, or anything else that can be customized. Each
item in the bundle is a separate, standalone product.
Downloadable Product
A digitally downloadable product that consists of one or
more files that are downloaded. The files can reside on
your server or be provided as URLs to any other server.
CHAPTER 11: Creating Products Product Types
Magento Community Edition 2.0 User Guide 133
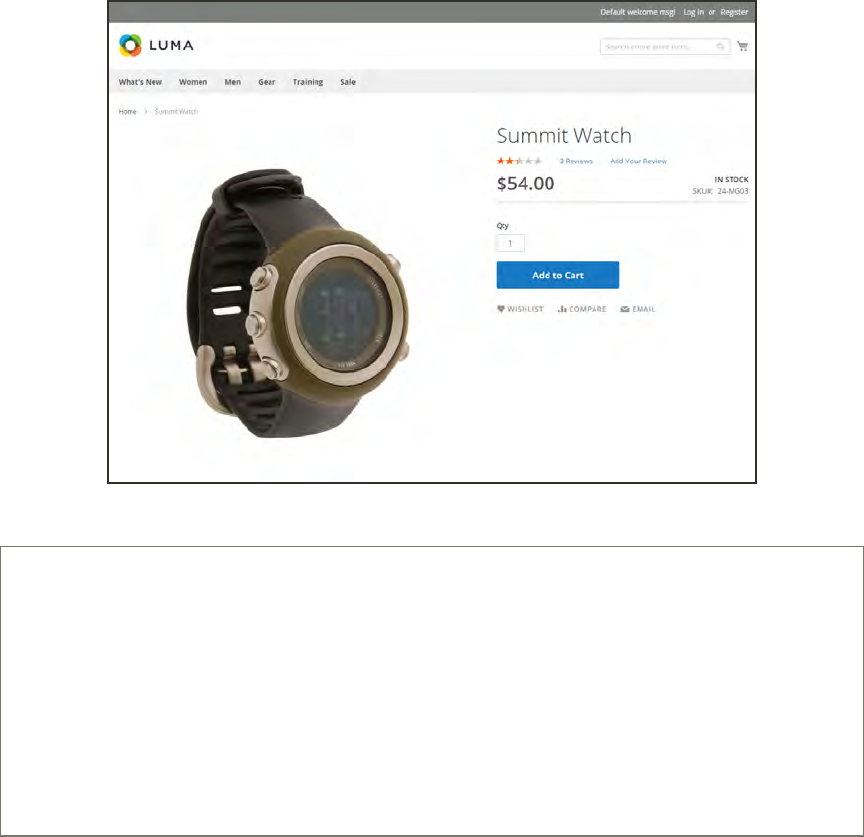
Simple Product
One of the keys to harnessing the power of product types is learning when to use a simple,
standalone product. A simple products can be sold individually, or as part of a grouped,
configurable, or bundle product. A simple product with custom options is sometimes referred to
as a composite product.
The following steps take you through the process of creating a simple product using the default
product template with basic settings. When you finish the basics, you can complete the
advanced settings as needed.
Simple Product
Process Overview:
Step 1: Choose the Product Type
Step 2: Choose the Product Template (Optional)
Step 3: Complete the Required Fields
Step 4: Complete the Remaining Product Details
Step 5: Publish the Product
Step 6: View the Product in Your Store
Simple Product CHAPTER 11: Creating Products
134 Magento Community Edition 2.0 User Guide
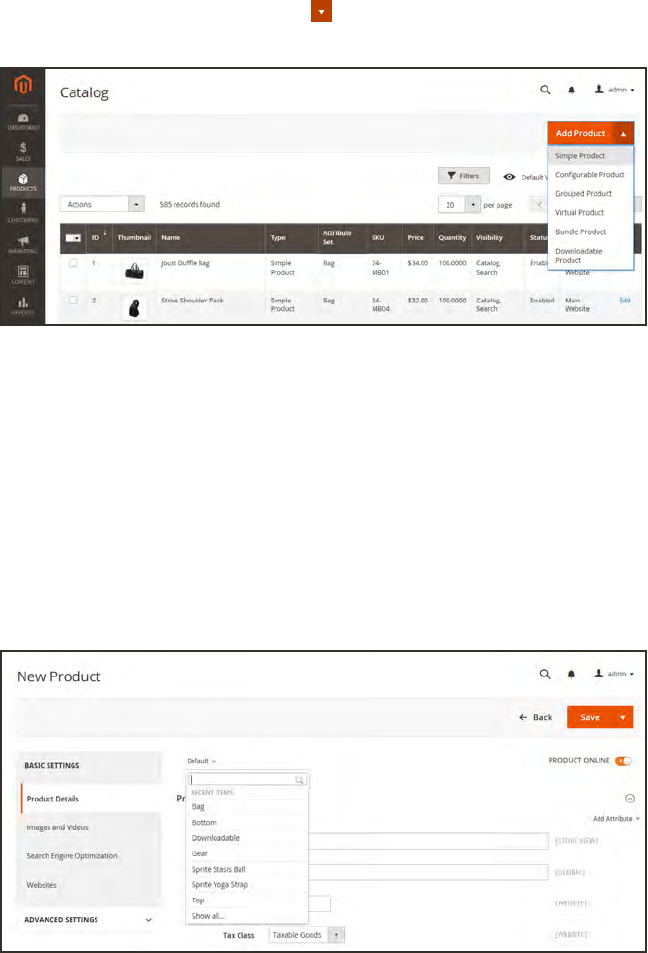
Step 1: Choose the Product Type
1. On the Admin sidebar, tap Products. Then under Inventory, choose Catalog.
2. In the upper-right corner on the Add Product menu, choose Simple Product.
Add Simple Product
Step 2: Choose the Product Template (Optional)
To choose the product template, do one of the following:
lIn the Search box, enter the name of the template.
lIn the list, choose the template that you want to use.
The form is updated to reflect the template.
Choose Template
CHAPTER 11: Creating Products Simple Product
Magento Community Edition 2.0 User Guide 135
Step 3: Complete the Required Fields
1. In the Product Details section. do the following:
a. Enter the product Name.
b. You can either use the default SKU that is based on the product name, or enter another.
c. Enter the product Price.
2. Because the product is not yet ready to publish, set the Product Online switch to the “Off”
position.
3. Tap Save, and continue with the next step.
With the required fields complete, the product can be saved as needed.
Step 4: Complete the Remaining Product Details
1. Set Tax Class to one of the following:
lNone
lTaxable Goods
2. If you're ready to add a product image, do one of the following:
lDrag an image from your desktop, and drop it on the camera tile in the Images and
Videos box.
lIn the Images box, tap the camera tile, and navigate to the image file on your computer.
Then, select the image, and tap Open.
Aplaceholder appears until a product image is uploaded.
3. Enter the Quantity of the product that is currently in stock.
4. Enter the product Weight.
5. To assign the product to a Category, do one of the following:
lStart typing to find a match. Then, choose the Category.
lTap Show List to see the category tree. Then, drill down and tap each category that you
want to assign to the product.
lTap New Category. Enter the Category Name and choose the Parent Category to determine
its position in the menu structure. Then, tap Create Category.
Simple Product CHAPTER 11: Creating Products
136 Magento Community Edition 2.0 User Guide
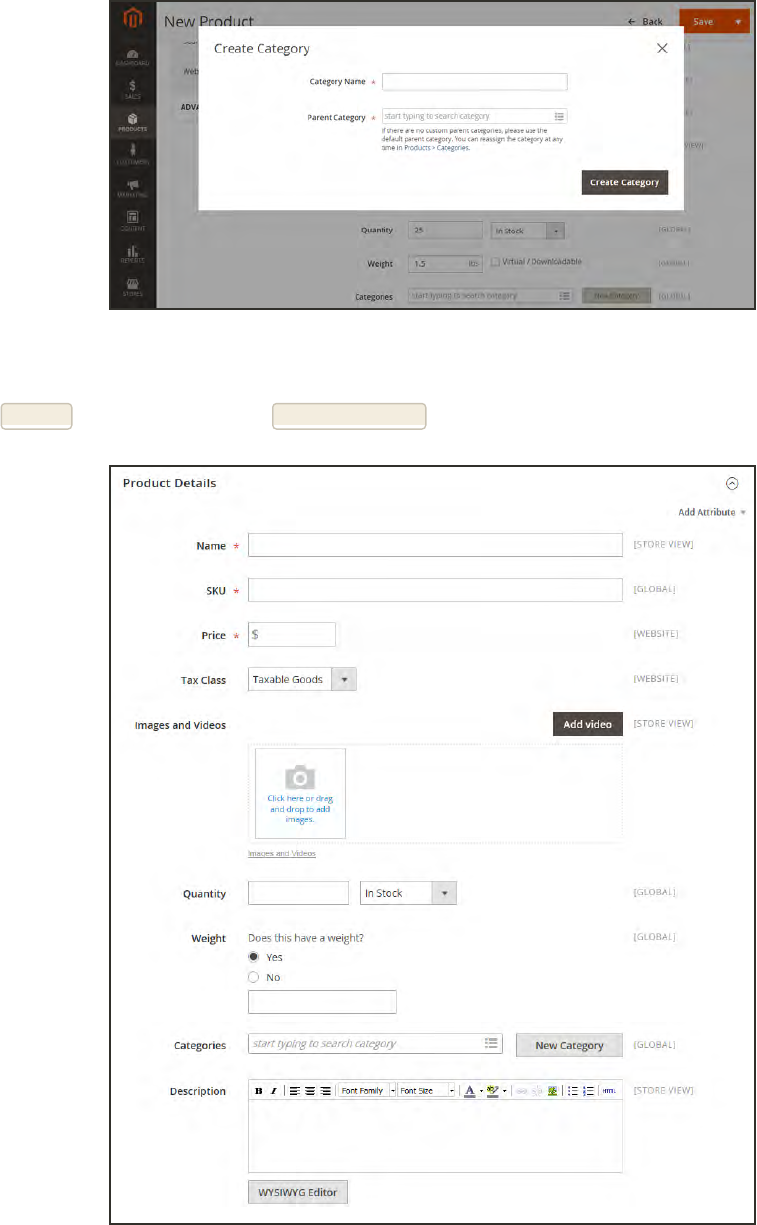
Create Category
6. Enter the product Description directly into the text box, and format as needed. Then, tap
Submit. You can also use the WYSIWYG Editor, for additional control.
Product Details
CHAPTER 11: Creating Products Simple Product
Magento Community Edition 2.0 User Guide 137
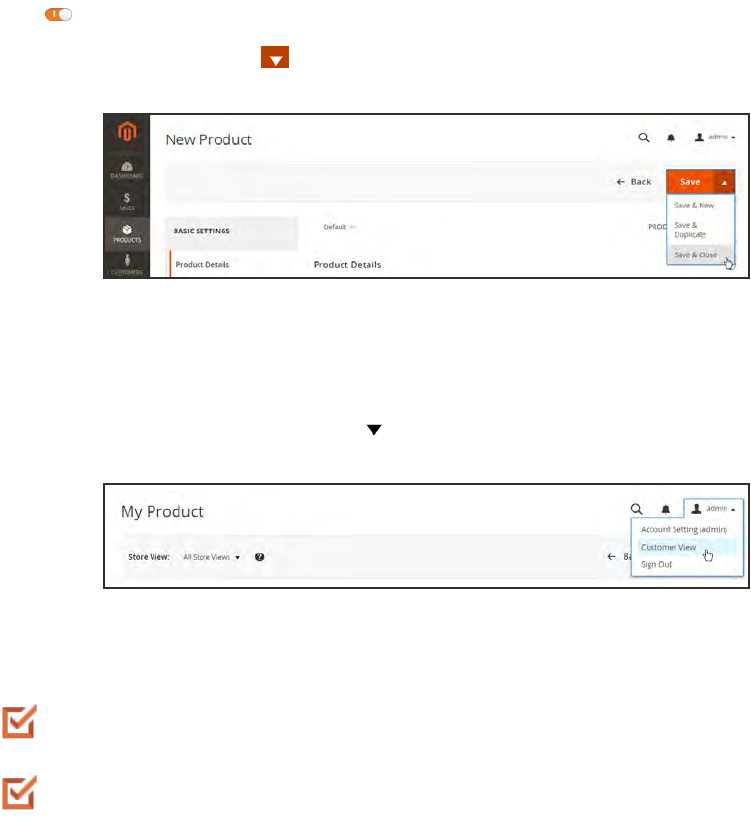
Step 5: Publish the Product
1. If you are ready to publish the product in the catalog, set the Product Online switch to the
“On” position.
2. When complete, on the Save menu, choose Save & Close.
Save & Close
Step 6: View the Product in Your Store
In the upper-right corner on the Admin menu, choose Customer View.
Customer View
THINGS TO REMEMBER
Simple products can be included in configurable, bundle, and grouped product types.
A simple product can have custom options with a variety of input controls, which makes it
possible to sell many product variations from a single SKU.
Simple Product CHAPTER 11: Creating Products
138 Magento Community Edition 2.0 User Guide

Configurable Product
A configurable product looks like a single product with drop-down lists of options for each
variation. Each option is actually a separate simple product with a unique SKU, which makes
it possible to track inventory for each product variation. You could achieve a similar effect by
using a simple product with custom options, but without the ability to track inventory for each
variation.
Although a configurable product uses more SKUs, and may initially take a little longer to set
up, it can save you time in the long run. If you plan to grow your business, the configurable
product type is a good choice for products with multiple options.
Configurable Product
CHAPTER 11: Creating Products Configurable Product
Magento Community Edition 2.0 User Guide 139

Process Overview:
Part I: Create the Configurable Product
Step 1: Choose the Product Type
Step 3: Complete the Required Fields
Step 4: Complete the Remaining Product Details
Step 5: Save and Continue
Step 1: Choose the Product Type
1. On the Admin sidebar, tap Products. Then under Inventory, choose Catalog.
2. In the upper-right corner on the Add Product menu, choose Configurable Product.
Add Configurable Product
Configurable Product CHAPTER 11: Creating Products
140 Magento Community Edition 2.0 User Guide
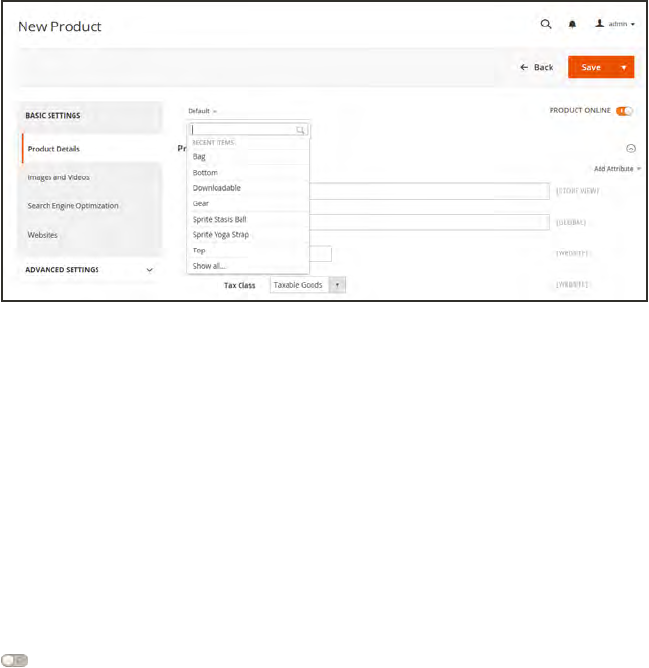
Step 2: Choose the Product Template
The product template that is used to create a configurable product determines the selection of
fields that are available, and must include at least one drop-down attribute. The drop-down
attributes are included in an attribute set, which is then used as a template for the configurable
product.
The template used in this example has drop-down attributes for color and size. To choose the
product template, click the template field and do one of the following:
lIn the Search box, enter the name of the template.
lIn the list, choose the template that you want to use.
The form is updated to reflect the template.
Choose Template
Step 3: Complete the Required Fields
1. In the Product Details section, enter the product Name.
2. Either accept the default SKU that is based on the product name, or enter another value.
3. Enter the product Price.
4. If necessary, change the Tax Class. The default setting is “Taxable Goods.”
5. Because the product is not yet ready to publish in your catalog, set the Product Online switch
to the “Off” position.
CHAPTER 11: Creating Products Configurable Product
Magento Community Edition 2.0 User Guide 141
Step 4: Complete the Remaining Product Details
1. (Optional) You can add an image that represents the configurable product as a whole, or wait
until later when you set up the configurations. In this example, we use an image that shows
the top in all three colors. An image uploaded here becomes the image of the “parent product.”
lDrag an image from your desktop, and drop it on the camera tile in the Images and
Videos box.
lIn the box, tap the camera tile, and navigate to the image file on your computer. Then,
select the image, and tap Open.
Aplaceholder appears until an image is uploaded. If you prefer, you can later add video to the
gallery.
2. The Quantity field is not available because it’s determined by each product variation.
3. To assign the product to a Category, do one of the following:
lStart typing to find a match. Then, choose the Category.
lTap the Show List icon to view the Category tree. Then, drill down through the available
categories, and tap each category that you want to assign to the product.
lTap New Category. Enter the Category Name and choose the Parent Category to determine
its position in the menu structure. Then, tap Create Category.
4. Enter the product Description directly into the text box, and format as needed. Then, tap
Submit. You can also use the WYSIWYG Editorfor additional control.
Configurable Product CHAPTER 11: Creating Products
142 Magento Community Edition 2.0 User Guide
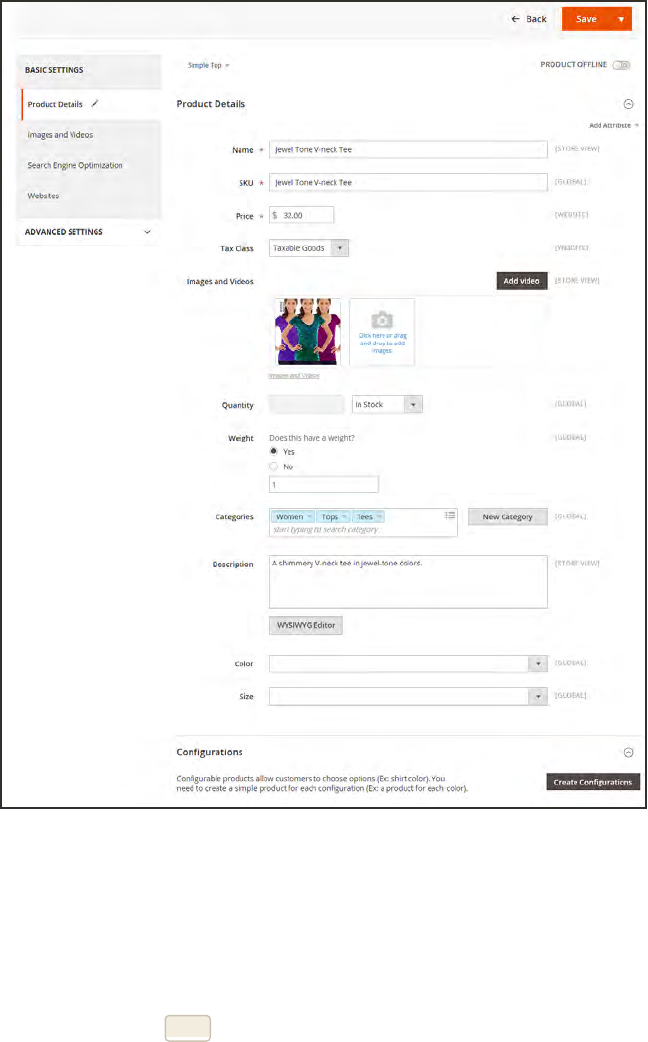
Product Details
Step 5: Save and Continue
This is a good time to save your work. In the next step, you’ll set up the configurations for each
variation of the product.
1. In the upper-right corner, tap Save.
2. Continue with Adding Configurations.
CHAPTER 11: Creating Products Configurable Product
Magento Community Edition 2.0 User Guide 143
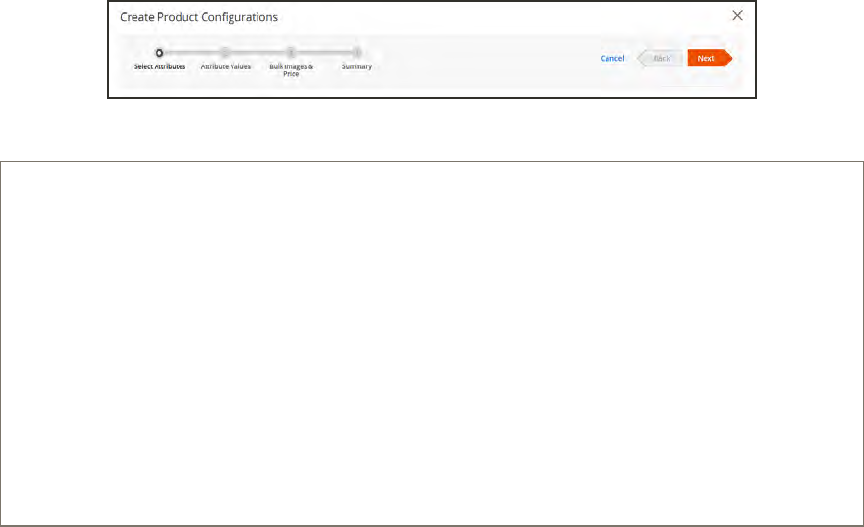
Adding Configurations
The following example shows how to add configurations for three colors and three sizes. In all,
nine simple products will be created with unique SKUs to cover every possible combination of
variations. The progress bar at the top of the page shows where you are in the process, and
guides you through each step.
Progress Bar
Process Overview:
Part II: Add Configurations
Step 1: Choose the Attributes
Step 2: Enter the Attribute Values
Step 3: Configure the Images, Price, and Quantity
Step 4:Generate the Product Configurations
Step 5: Publish the Products
Step 6: Configure the Shopping Cart Thumbnails (Optional)
Step 7: View the Products in Your Store
Configurable Product CHAPTER 11: Creating Products
144 Magento Community Edition 2.0 User Guide
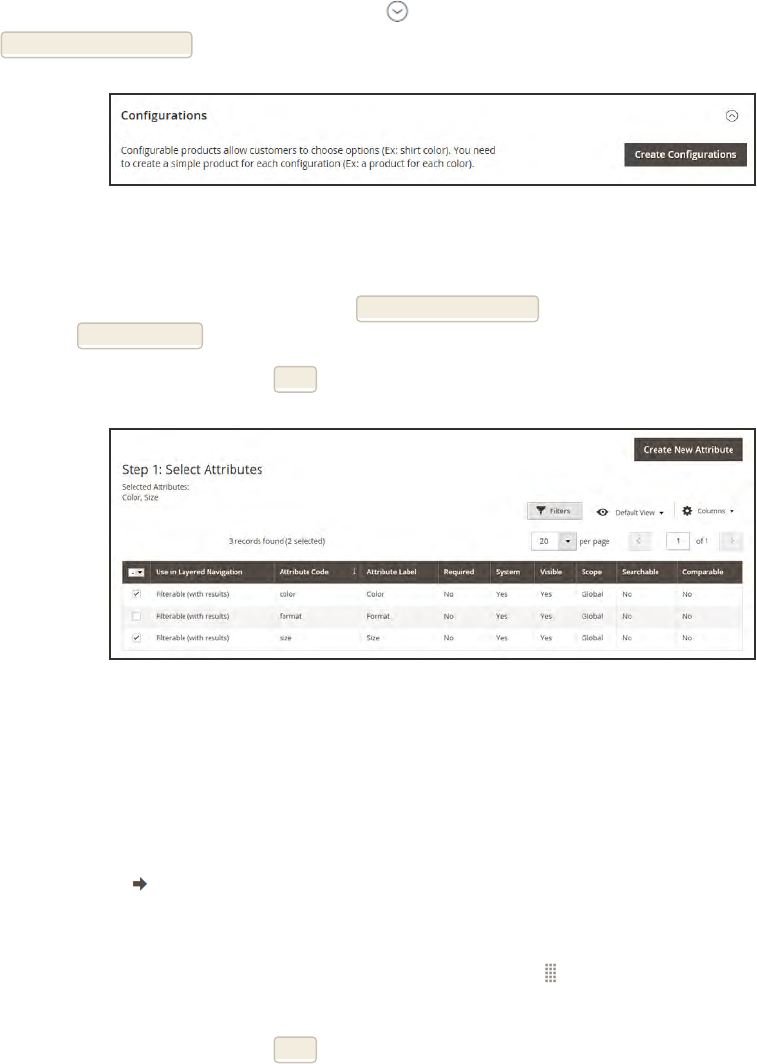
Step 1: Select Attributes
1. At the bottom of Product Details, expand the Configurations section. Then, tap
CreateConfigurations.
Configurations
2. Mark the checkbox of each attribute that is to be used as a configuration.
3. If you need to add a new attribute, tap CreateNewAttribute. Complete the attribute properties,
and tap SaveAttribute. Then, mark the checkbox to select the attribute.
4. In the upper-right corner, tap Next.
Select Attributes
Step 2: Enter Attribute Values
1. Mark the checkbox of each variation of the product.
2. To add a new value, click Create New Value. Then, enter the new value in the input box, and
tap the Enter arrow.
3. Repeat these steps for each attribute that is included as a configuration.
You can rearrange the list of attributes by dragging the box in the upper-left corner to a new
position.
4. In the upper-right corner, tap Next.
CHAPTER 11: Creating Products Configurable Product
Magento Community Edition 2.0 User Guide 145
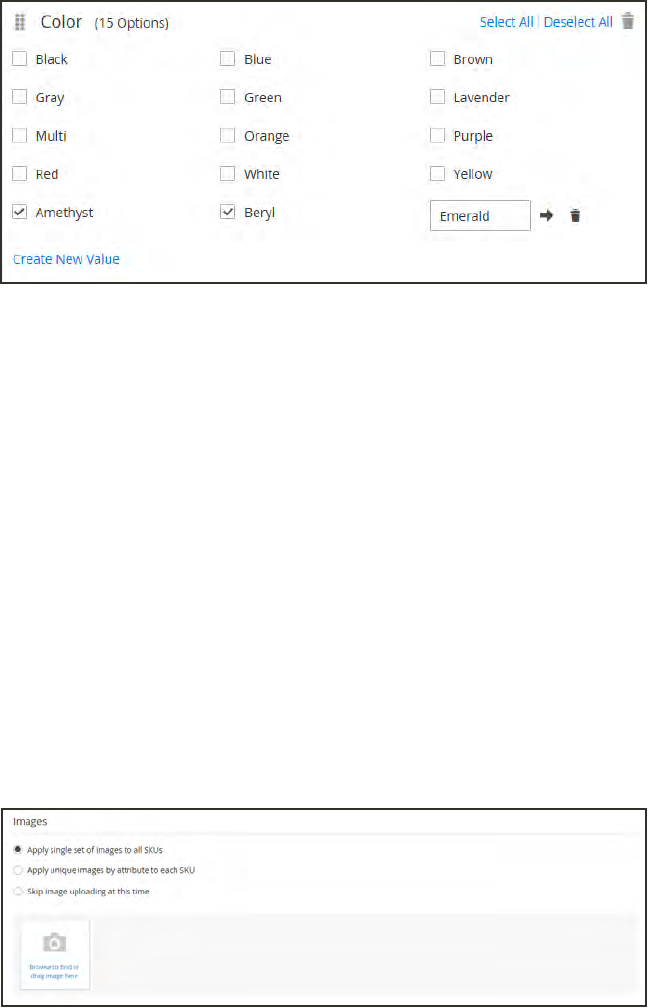
Step 3: Configure the Images, Price, and Quantity
This step determines the images, pricing and quantity of each configuration. The available
options are the same for each, and you can choose only one. You can apply the same setting to
all SKUs, apply a unique setting to each SKU, or skip the settings for now.
1. Choose the configuration options that apply.
Configure the Images
Method 1: Apply a Single Set of Images to All SKUs
1. Select Apply single set of images to all SKUs.
2. Browse to each image that you want to include in the product gallery, or drag them to the
box.
Use Same Images for All SKUs
Method 2: Apply Unique Images for Each SKU
Because we already uploaded an image for the parent product, we’ll use this option to upload
an image of each color. This is the image that will appear in the shopping cart when someone
buys the shirt in a specific color.
1. Select Apply unique images by attribute to each SKU.
Configurable Product CHAPTER 11: Creating Products
146 Magento Community Edition 2.0 User Guide
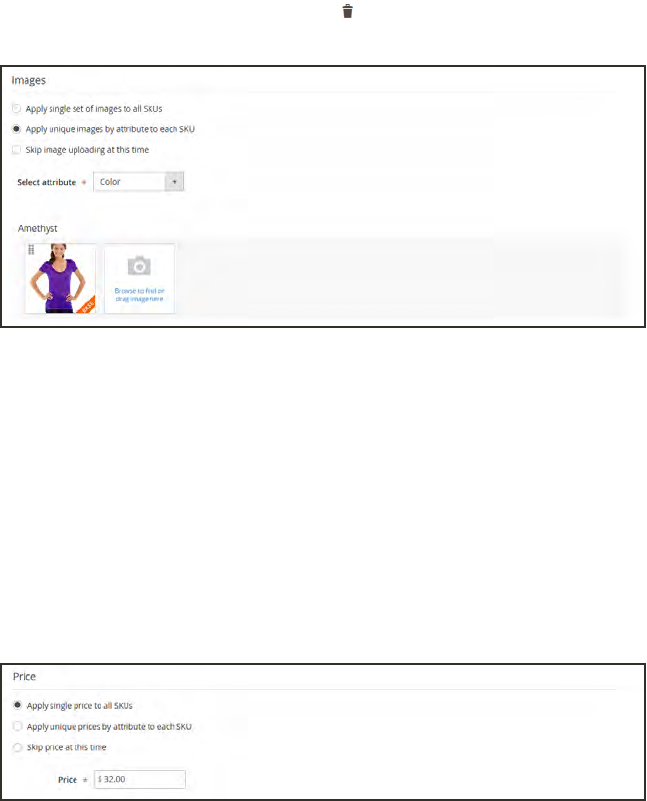
2. Select the attribute that the images illustrate. For example: color.
3. For each attribute value, either browse to the images that you want to use for that
configuration, or drag them to the box.
If you drag the an image to a value box, it appears in the sections for the other values, as well.
If you want to delete an image, tap the trashcan icon.
Unique Images per SKU
Configure the Prices
Method 1: Apply the Same Price to All SKUs
1. If the price is the same for all variations of the product, select Apply single price to all
SKUs.
2. Enter the Price.
Same Price per SKU
Method 2: Apply a Different Price for Each SKU
1. If the price differs for each or for some variations of the product, select Apply unique
prices by attribute to each SKU.
2. Select the attribute that is the basis of the price difference.
3. Enter the price for each attribute value. In this example, the XL size costs more.
CHAPTER 11: Creating Products Configurable Product
Magento Community Edition 2.0 User Guide 147
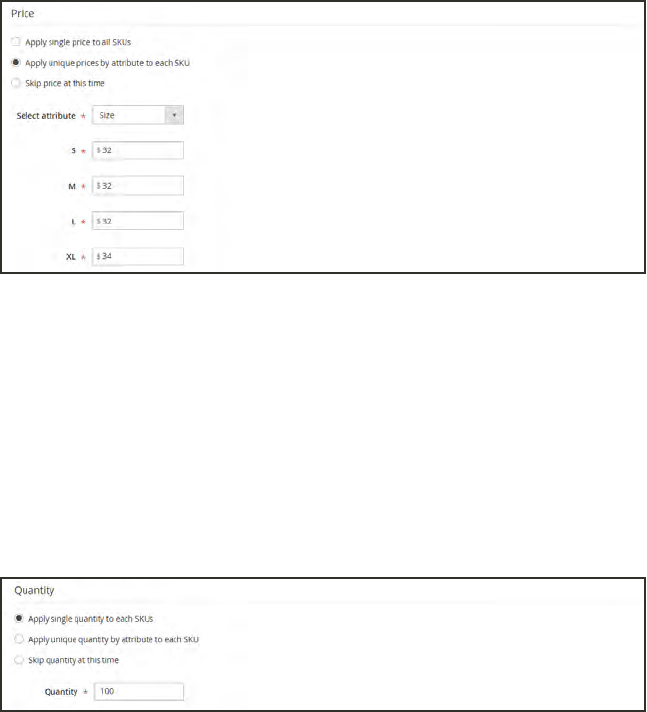
Unique Price per SKU
Configure the Quantity
Method 1: Apply the Same Quantity to All SKUs
1. If the quantity is the same for all SKUs, select Apply single quantity to each SKU.
2. Enter the Quantity.
Same Quantity for All SKUs
Method 2: Apply Different Quantity by Attribute
1. If the quantity is the different for each SKU, select Apply unique quantity by attribute to
each SKU.
2. Enter the Quantityfor each.
Configurable Product CHAPTER 11: Creating Products
148 Magento Community Edition 2.0 User Guide
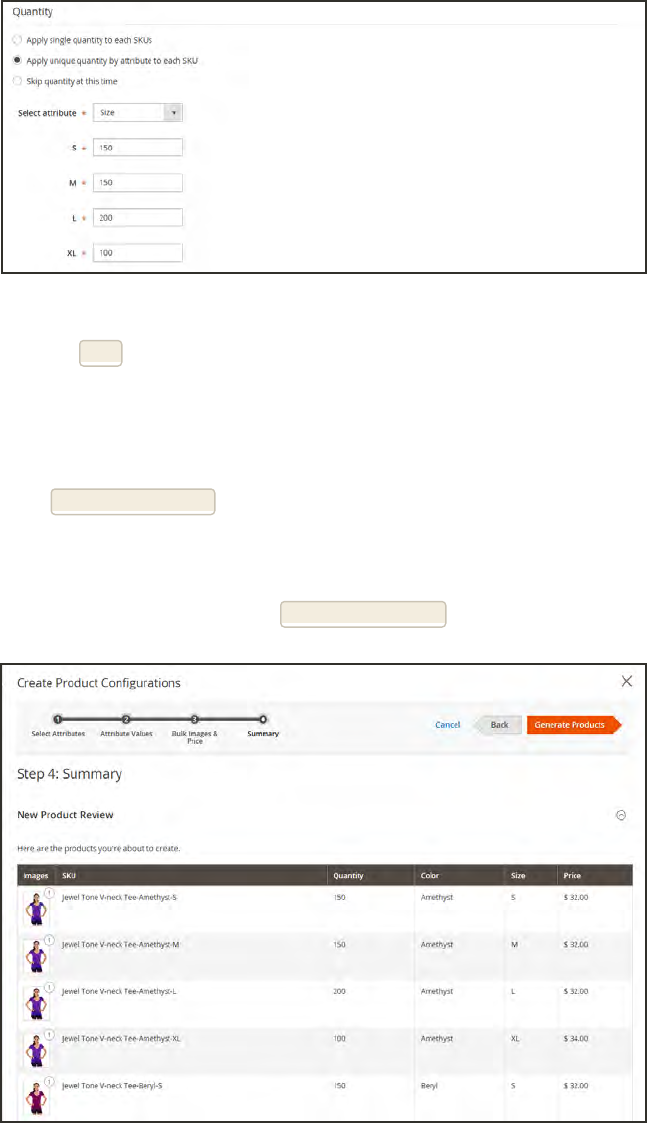
Different Quantities per Attribute
2. When complete, tap Next in the upper-right corner.
Step 4: Generate the Product Configurations
1. Wait a moment for the list of products to appear. When you are ready to add the products to
your catalog, tap GenerateProducts.
The product variations now appear at the bottom of Product Details in the Configuration
section.
2. If you want to edit any of the settings, tap EditConfigurations.
Generate Products
CHAPTER 11: Creating Products Configurable Product
Magento Community Edition 2.0 User Guide 149

Step 5: Publish the Products
1. If you are ready to publish the products in the catalog, set the Product Online switch to the
“On” position. Otherwise, leave the switch in the “Off” position until the product is ready to
publish.
2. When complete, on the Save menu, choose Save & Close.
Save & Close
3. When prompted to refresh the cache, tap the Cache Management link in the system message,
and refresh the invalid cache.
4. On the Admin sidebar, tap Products. Your new configurable product and its variations appears
in the grid at the top of the list.
Step 6: Configure the Shopping Cart Thumbnails (Optional)
If you have a different image for each variation you can set the configuration to use the correct
image for the shopping cart thumbnail.
1. On the Admin sidebar, tap Stores. Then under Settings, choose Configuration.
2. In the panel on the left under Sales, choose Checkout. Then, expand the Shopping Cart
section.
3. Set Configurable Product Image to “Product Thumbnail Itself.”
4. When complete, tap SaveConfig.
Configurable Product CHAPTER 11: Creating Products
150 Magento Community Edition 2.0 User Guide
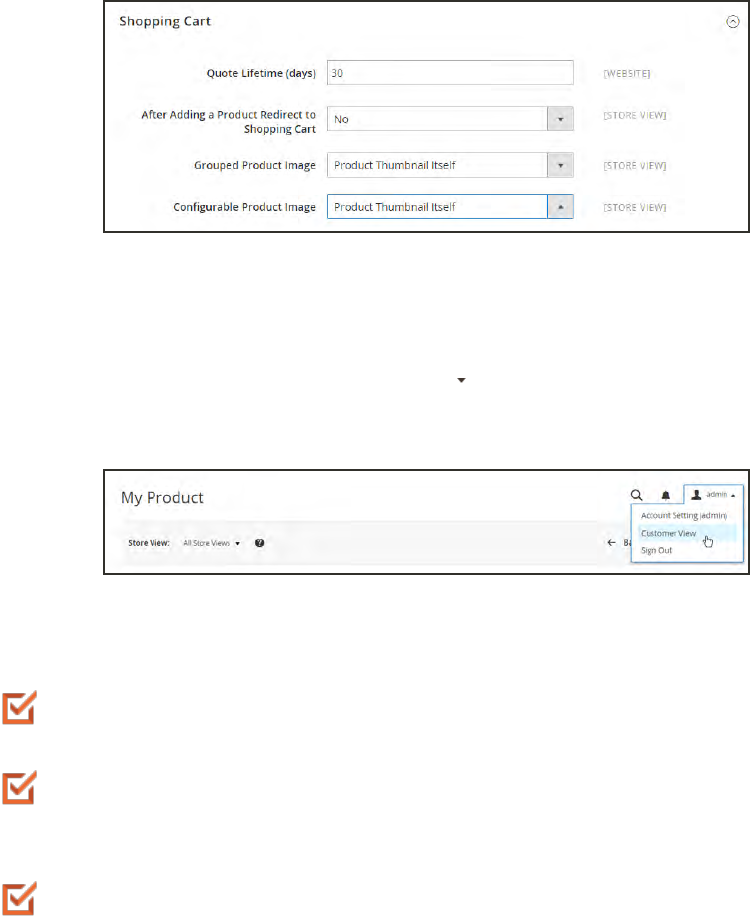
Shopping Cart - Configurable Product Image
Step 7: View the Product in Your Store
When the product is online, tap the Admin arrow in the upper-right corner, and choose
Customer View to see how they look in your store.
Customer View
THINGS TO REMEMBER
A configurable product allows the shopper to choose options from drop-down lists. Each
option is actually a separate, simple product.
Each drop-down list values is based on an attribute of the “Dropdown”input type. The
drop-down attributes must be included in the attribute set, which is then used as a
template for the configurable product.
The thumbnail image in the shopping cart can be set to display the image from the
configurable product record, or from the product variation.
CHAPTER 11: Creating Products Configurable Product
Magento Community Edition 2.0 User Guide 151
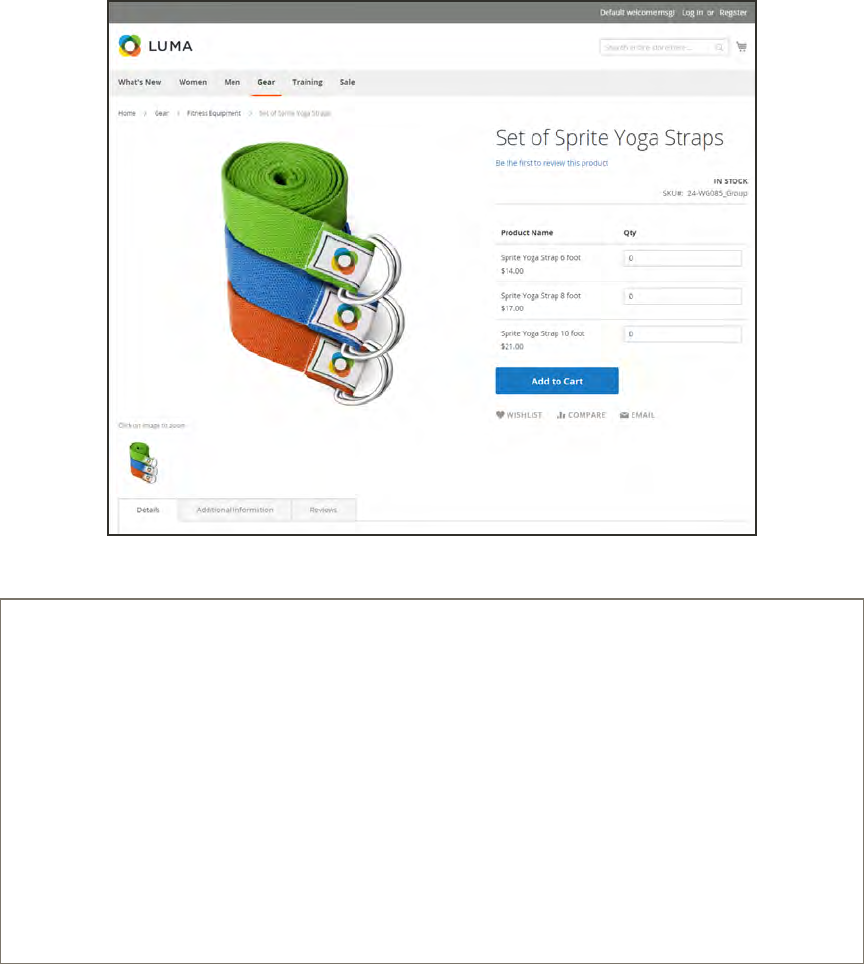
Grouped Product
A grouped product is made up of simple standalone products that are presented as a group.
You can offer variations of a single product, or group them by season or theme to create a set of
different products. Each product can be purchased separately, or as part of the group. In the
shopping cart, each item is listed separately.
Grouped Product
Process Overview:
Step 1: Choose the Product Type
Step 2: Choose the Product Template (Optional)
Step 3: Complete the Required Fields
Step 4: Complete the Remaining Product Details
Step 5: Add the Grouped Products
Step 6: Publish the Product
Step 7: Configure the Shopping Cart Thumbnails (Optional)
Step 8: View the Product in Your Store
Grouped Product CHAPTER 11: Creating Products
152 Magento Community Edition 2.0 User Guide

Step 1: Choose the Product Type
1. On the Admin sidebar, tap Products. Then under Inventory, choose Catalog.
2. In the upper-right corner on the Add Product menu, choose Grouped Product.
Add Grouped Product
Step 2: Choose the Product Template (Optional)
To choose the product template, do one of the following:
lIn the Search box, enter the name of the template.
lIn the list, choose the template that you want to use.
The form is updated to reflect the template.
Choose Template
CHAPTER 11: Creating Products Grouped Product
Magento Community Edition 2.0 User Guide 153

Step 3: Complete the Required Fields
1. In the Product Details section, do the following:
a. Enter the product Name.
b. Either accept the default SKU that is based on the product name, or enter another value.
2. Because the product is not yet ready to publish, set the Product Online switch to the “Off”
position.
Step 4: Complete the Remaining Product Details
1. To add an image that represents the product group, do one of the following:
lDrag an image from your desktop, and drop it on the camera tile in the Images and
Videos box.
lIn the Images and Videos box, tap the camera tile, and navigate to the image file on
your computer. Then, select the image, and tap Open.
Aplaceholder appears until a product image is uploaded.
2. The Quantity is grayed out because it’s derived from the individual products that make up the
group.
3. To assign the product to a Category, do one of the following:
lStart typing to find a match. Then, choose the Category.
lTap the Show List icon to view the Category tree. Then, drill down through the available
categories, and tap each category that you want to assign to the product.
lTap New Category. Enter the Category Name and choose the Parent Category to determine
its position in the menu structure. Then, tap Create Category.
Add Categories
4. Enter the product Description directly into the text box, and format as needed. Then, tap
Submit. You can also use the WYSIWYG Editor, for additional control.
Grouped Product CHAPTER 11: Creating Products
154 Magento Community Edition 2.0 User Guide
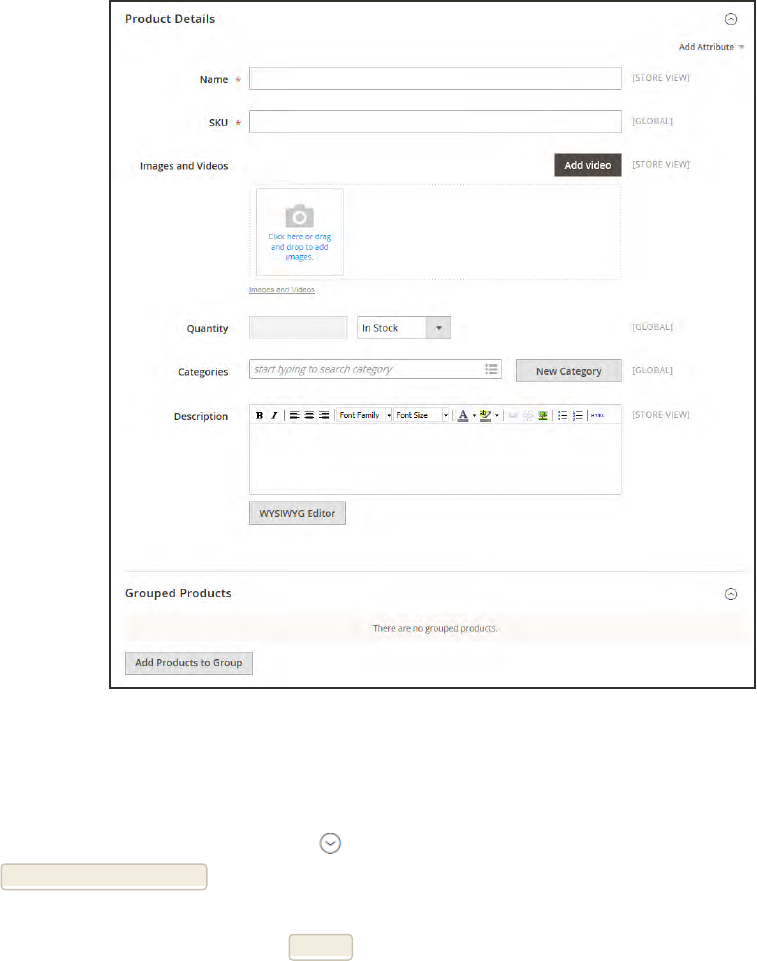
Product Details
Step 5: Add the Grouped Products
1. At the bottom of the page, expand the Grouped Products section. Then, tap
AddProductstoGroup.
2. In the grid, use the filters at the top of the columns to find the products that you want to
include in the group. Then, tap Search.
3. In the list, mark the checkbox of each item that you want to include in the group.
CHAPTER 11: Creating Products Grouped Product
Magento Community Edition 2.0 User Guide 155
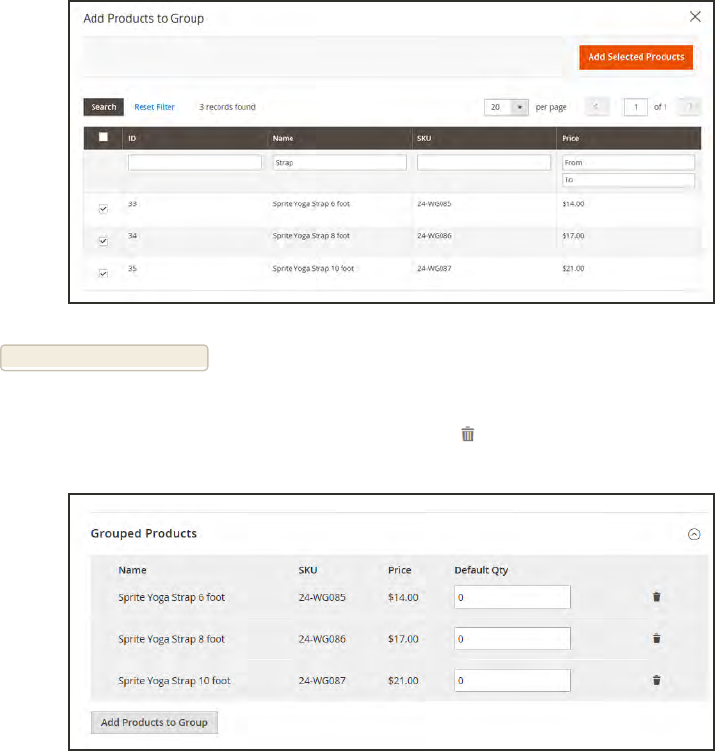
4. Tap AddSelectedProducts to add them to the grouped product. Then, do any of the following:
lTo specify a default quantity for any of the items, enter the number in the Default Qty field.
lTo remove any product from the list, tap the Delete icon.
Products Added
Grouped Product CHAPTER 11: Creating Products
156 Magento Community Edition 2.0 User Guide
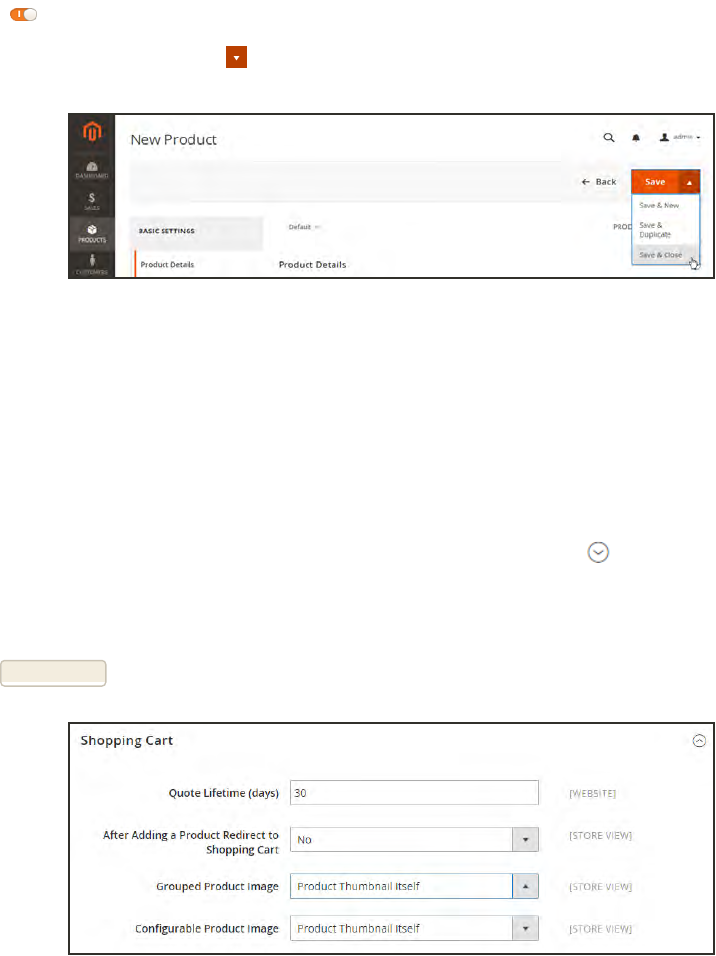
Step 6: Publish the Product
1. If you are ready to publish the product in the catalog, set the Product Online switch to the
“On” position.
2. When complete, on the Save menu, choose Save & Close.
Save & Close
Step 7: Configure the Shopping Cart Thumbnails (Optional)
If you have a different image for each variation you can set the configuration to use the correct
image for the shopping cart thumbnail.
1. On the Admin sidebar, tap Stores. Then under Settings, choose Configuration.
2. In the panel on the left under Sales, choose Checkout. Then, expand the Shopping Cart
section.
3. Set Grouped Product Image to “Product Thumbnail Itself.”
4. Tap Save Config.
Shopping Cart
CHAPTER 11: Creating Products Grouped Product
Magento Community Edition 2.0 User Guide 157
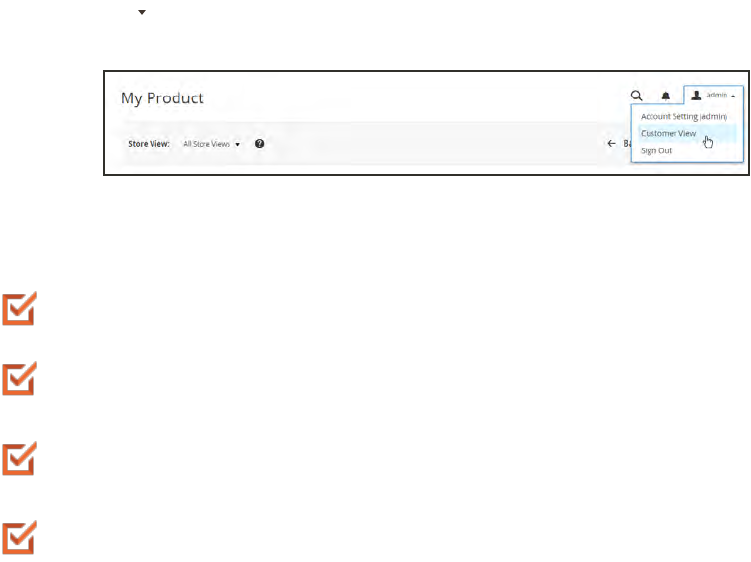
Step 8: View the Product in Your Store
On the Admin menu, choose Customer View.
Customer View
THINGS TO REMEMBER
A grouped product is essentially a collection of simple associated products.
Simple and virtual products that are part of a grouped product cannot have custom
options.
Each item purchased appears individually in the shopping cart, rather than as part of the
group.
The thumbnail image in the shopping cart can be set to display the image from the
grouped parent product , or the associated product.
Grouped Product CHAPTER 11: Creating Products
158 Magento Community Edition 2.0 User Guide

Virtual Product
Virtual products are used to represent non-tangible items such as memberships, services,
warranties, or subscriptions. Virtual products can be sold individually, or included as part of
the following product types:
lGrouped Product
lBundle Product
Aside from the absence of the Weight field, the process of creating a virtual product and a
simple product is the same.
Virtual Product
Process Overview:
Step 1: Choose the Product Type
Step 2: Choose the Product Template (Optional)
Step 3: Complete the Required Fields
Step 4: Complete the Remaining Product Details
Step 5: Publish the Product
Step 6: View the Product in Your Store
CHAPTER 11: Creating Products Virtual Product
Magento Community Edition 2.0 User Guide 159

Step 1: Choose the Product Type
1. On the Admin sidebar, tap Products. Then under Inventory, choose Catalog.
2. In the upper-right corner on the Add Product menu, choose Virtual Product.
Add Virtual Product
Step 2: Choose the Product Template (Optional)
To choose the product template, do one of the following:
lIn the Search box, enter the name of the template.
lIn the list, choose the template that you want to use.
The form is updated to reflect the template.
Choose Template
Virtual Product CHAPTER 11: Creating Products
160 Magento Community Edition 2.0 User Guide
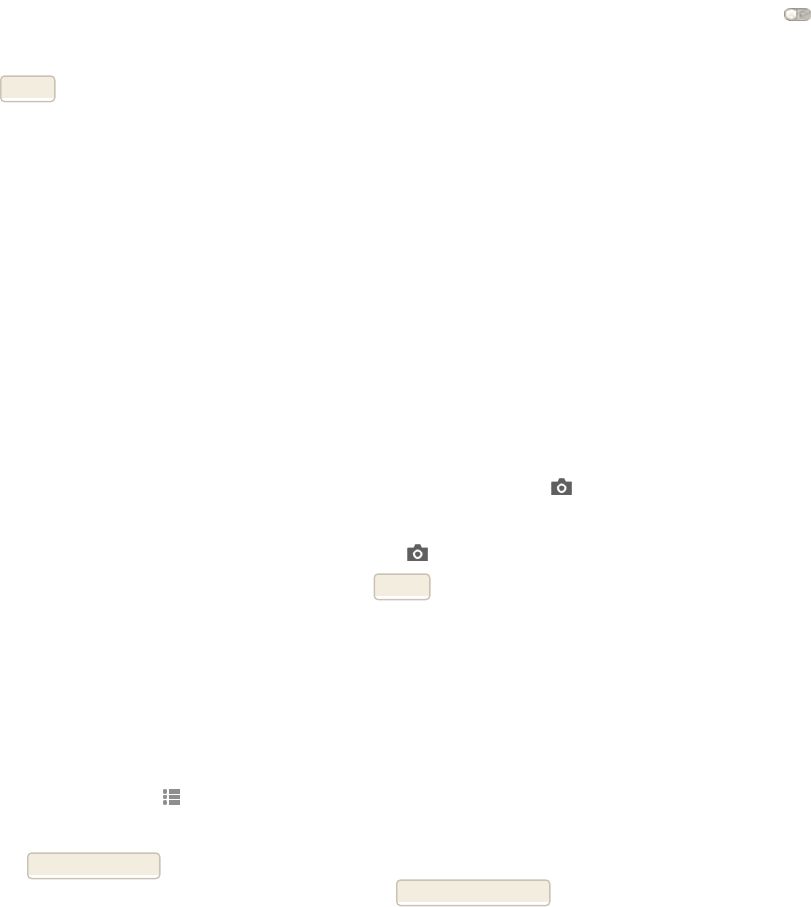
Step 3: Complete the Required Fields
1. In the Product Details section. do the following:
a. Enter the product Name.
b. Either accept the default SKU that is based on the product name, or enter another value.
c. Enter the product Price.
2. Because the product is not yet ready to publish, set the Product Online switch to the “Off”
position.
3. Tap Save and continue with the next step.
With the required fields complete, the product can be saved as needed.
Step 4: Complete the Remaining Product Details
1. Set Tax Class to one of the following:
lNone
lTaxable Goods
To learn about requirements for the taxation of digital goods and services, see the white paper,
Identification & Taxability of Digital Products on the Avalara site.
2. If you're ready to add Images, do one of the following:
lDrag an image from your desktop, and drop it on the camera tile in the Images and
Video box.
lIn the Images and Video box, tap the camera tile, and navigate to the image file on your
computer. Then, select the image, and tap Open.
Aplaceholder appears until a product image is uploaded.
3. If applicable, enter the Quantity of the product that is currently available.
4. To assign the product to a Category, do one of the following:
lStart typing to find a match. Then, choose the Category.
lTap the Show List icon to view the Category tree. Then, drill down through the available
categories, and tap each category that you want to assign to the product.
lTap New Category. Enter the Category Name and choose the Parent Category to determine
its position in the menu structure. Then, tap Create Category.
CHAPTER 11: Creating Products Virtual Product
Magento Community Edition 2.0 User Guide 161
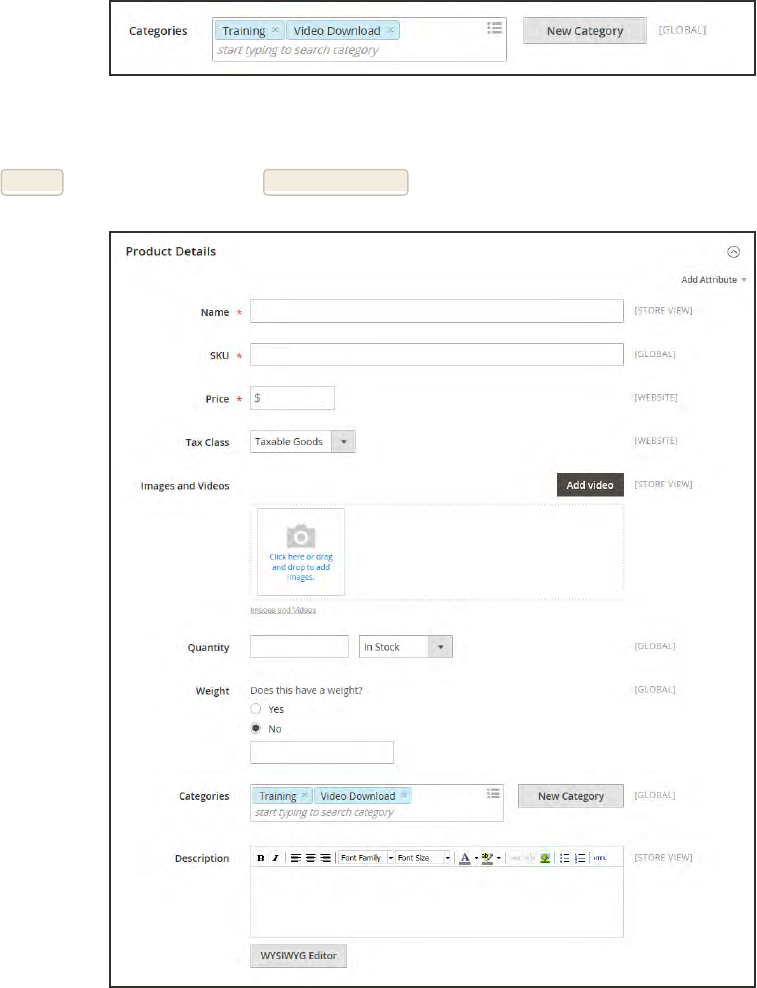
Choose Category
5. Enter the product Description directly into the text box, and format as needed. Then, tap
Submit. You can also use the WYSIWYG Editor, for additional control.
Product Details
Virtual Product CHAPTER 11: Creating Products
162 Magento Community Edition 2.0 User Guide
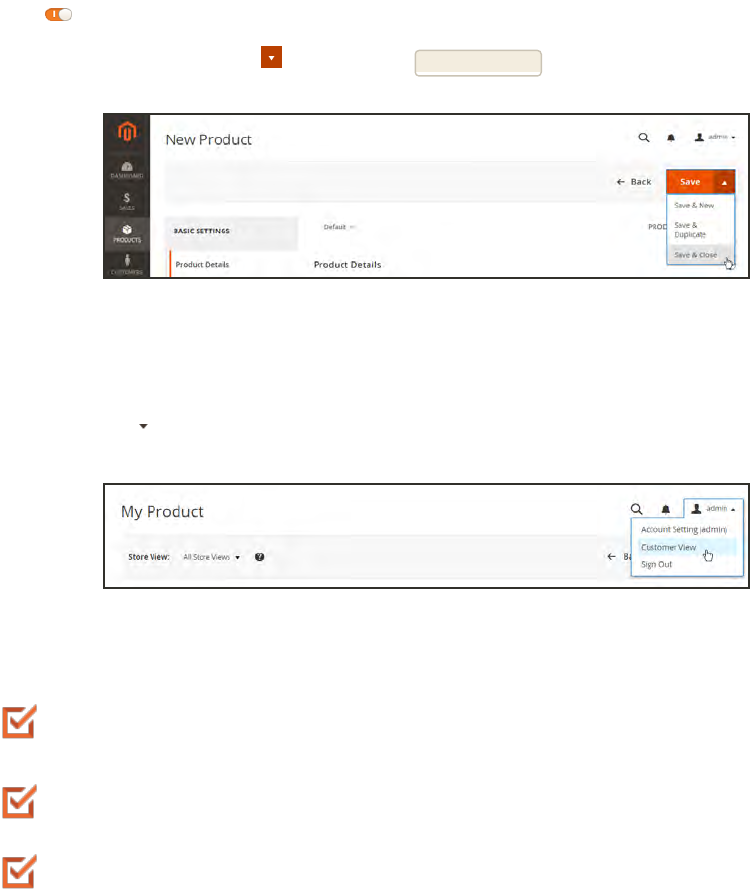
Step 5: Publish the Product
1. If you are ready to publish the product in the catalog, set the Product Online switch to the
“On” position.
2. When complete, on the Save menu, choose Save & Close.
Save & Close
Step 6: View the Product in Your Store
On the Admin menu, choose Customer View.
Customer View
THINGS TO REMEMBER
Virtual products are used for non-tangible products such as services, subscriptions, and
warranties.
Virtual products are much like simple products, but without the Weight.
Shipping Options do not appear during checkout unless there is a tangible product in the
cart.
CHAPTER 11: Creating Products Virtual Product
Magento Community Edition 2.0 User Guide 163
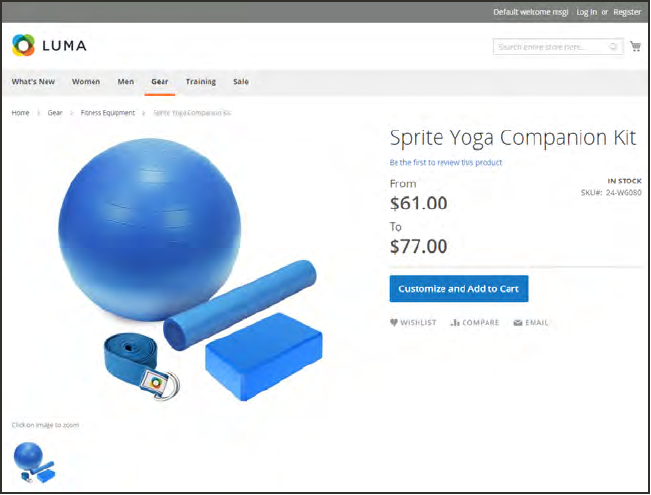
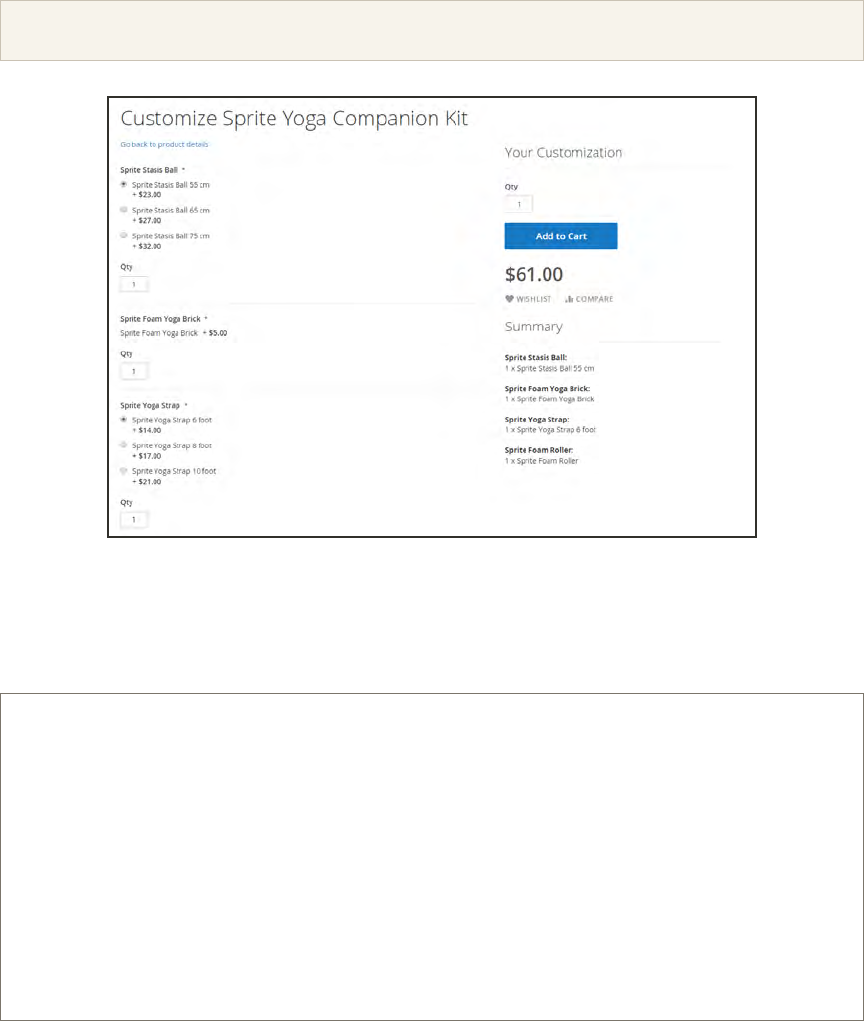
Customizing the Bundle
The selection of options in the bundle appears when the customer taps either the Customize
and Add to Cart button. Because the products that are included in the bundle vary, the SKU,
Price, and Weight can be set to either a dynamic or fixed value.
Minimum Advertised Price (MAP) is not available for Bundle products with dynamic pricing.
Customize Bundle
The following instructions walk you through the process of creating a bundle product with the
basic settings. After you complete the required settings and save the product, you can complete
the remaining information as needed.
Process Overview:
Step 1: Choose the Product Type
Step 2: Choose the Product Template
Step 3: Complete the Required Fields
Step 4: Complete the Remaining Product Details
Step 5: Add the Bundle Items
Step 6: Publish the Product
Step 7: View the Product in Your Store
CHAPTER 11: Creating Products Bundle Product
Magento Community Edition 2.0 User Guide 165

Step 1: Choose the Product Type
1. On the Admin sidebar, tap Products. Then under Inventory, choose Catalog.
2. In the upper-right corner on the Add Product menu, choose Bundle Product.
Add Bundle Product
Step 2: Choose the Product Template
To choose the product template, do one of the following:
lIn the Search box, enter the name of the template,
lIn the list, choose the template that you want to use.
The form is updated to reflect the template.
Choose Template
Bundle Product CHAPTER 11: Creating Products
166 Magento Community Edition 2.0 User Guide

Step 3: Complete the Required Fields
1. In the Product Details section. do the following:
a. Enter the product Name.
b. Either accept the default SKU that is based on the product name, or enter a different
value. Then set the type of value to one of the following:
lDynamic
lFixed
c. To set the product Price, do the following:
lIf you want the price to change according to the options selected, leave Price blank, and
choose “Dynamic.”
lTo have a set price for the bundle, choose “Fixed,” and enter the Price.
Dynamic or Fixed SKU and Price
2. Because the product is not yet ready to publish, set the Product Online switch to the “Off”
position.
3. Tap Save and continue with the next step.
Now that the required fields are complete, the product can be saved whenever needed.
Step 4: Complete the Remaining Product Details
1. If the product is set to Fixed Pricing, set Tax Class to one of the following:
lNone
lTaxable Goods
2. If you're ready to add a product image, do one of the following:
lDrag an image from your desktop, and drop it on the camera tile in the Images and
Videos box.
lIn the Images and Videos box, tap the camera tile, and navigate to the image file on
your computer. Then, select the image, and tap Open.
Aplaceholder appears until a product image is uploaded.
3. The Quantity field is grayed out because the value is determined by each item in the bundle.
CHAPTER 11: Creating Products Bundle Product
Magento Community Edition 2.0 User Guide 167
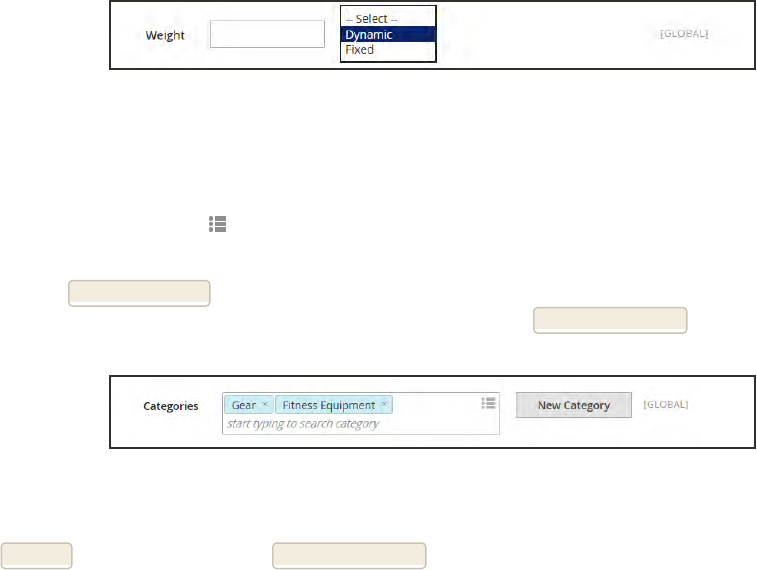
4. To choose how Weight is determined for shipping, do one of the following:
lIf you want the weight to change according to the options included, choose “Dynamic.”
lFor a set product weight, choose “Fixed,” and enter the Weight.
Dynamic or Fixed Weight
5. To assign the product to a Category, do one of the following:
lStart typing to find a match. Then, choose the Category.
lTap the Show List icon to view the Category tree. Then, drill down through the available
categories, and tap each category that you want to assign to the product.
lTap New Category. Enter the Category Name and choose the Parent Category to
determine its position in the menu structure. Then, tap Create Category.
Categories
6. Enter the product Description directly into the text box, and format as needed. Then, tap
Submit. You can also use the WYSIWYG Editor for additional control.
Bundle Product CHAPTER 11: Creating Products
168 Magento Community Edition 2.0 User Guide
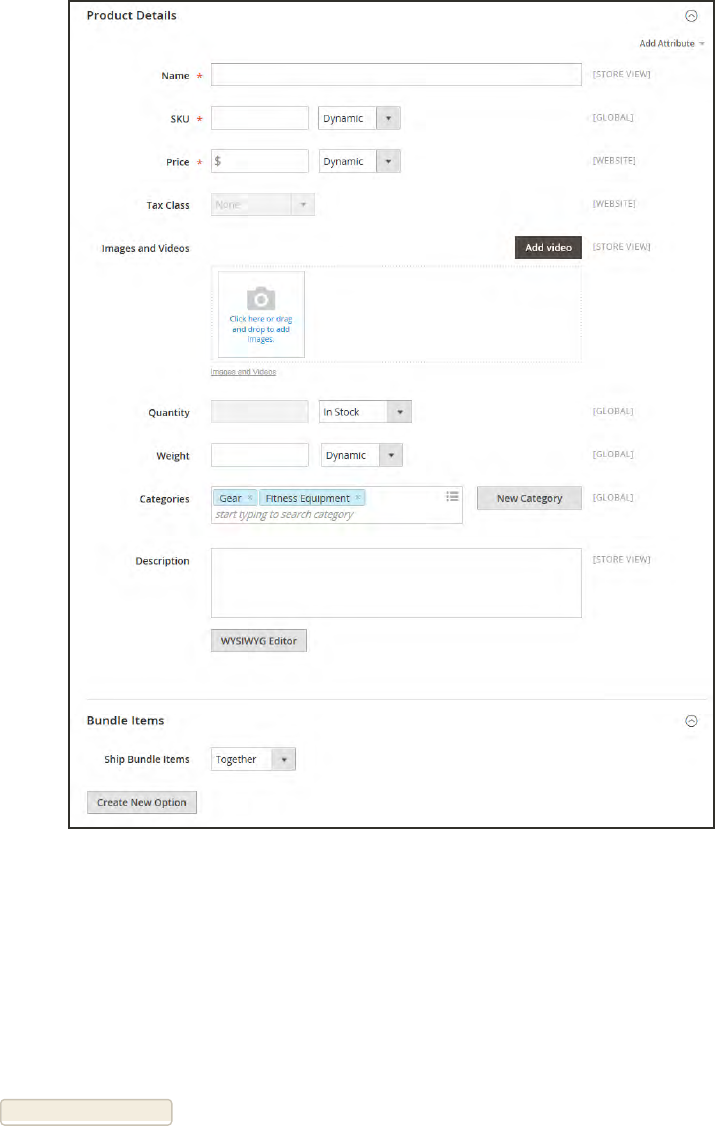
Bundle Details
Step 5: Add the Bundle Items
1. In the Bundle Items section, set Ship Bundle Items to one of the following:
lSeparately
lTogether
2. Tap Create New Option, Then, do the following:
a. Enter an Option Title to be used field label.
b. Set Input Type to one of the following:
CHAPTER 11: Creating Products Bundle Product
Magento Community Edition 2.0 User Guide 169

lDrop-down
lRadio buttons
lCheckbox
lMultiple Select
c. To make the field a required entry, mark the Required checkbox.
New Option
d. Tap Add Products to Option. Then, mark the checkbox of each product that you want to
include in this option. If there are many products, use the list filters and pagination
controls to find the products you need.
e. Tap Add Selected Products.
Add Selected Products
f. Choose one item to be the Default selection.
g. In the Default Quantity column, enter the quantity of each item that is to be added to the
bundle when a customer chooses the item.
h. To prevent customers from changing the quantity of any item, clear the User Defined
checkbox of any item that you do not want changed. By default, the quantity of all items
can be changed.
3. Repeat these steps for each item you want to add to the bundle.
4. To remove any item from the bundle, tap the Delete icon.
5. Repeat these steps to add as many options as needed in the bundle.
Bundle Product CHAPTER 11: Creating Products
170 Magento Community Edition 2.0 User Guide
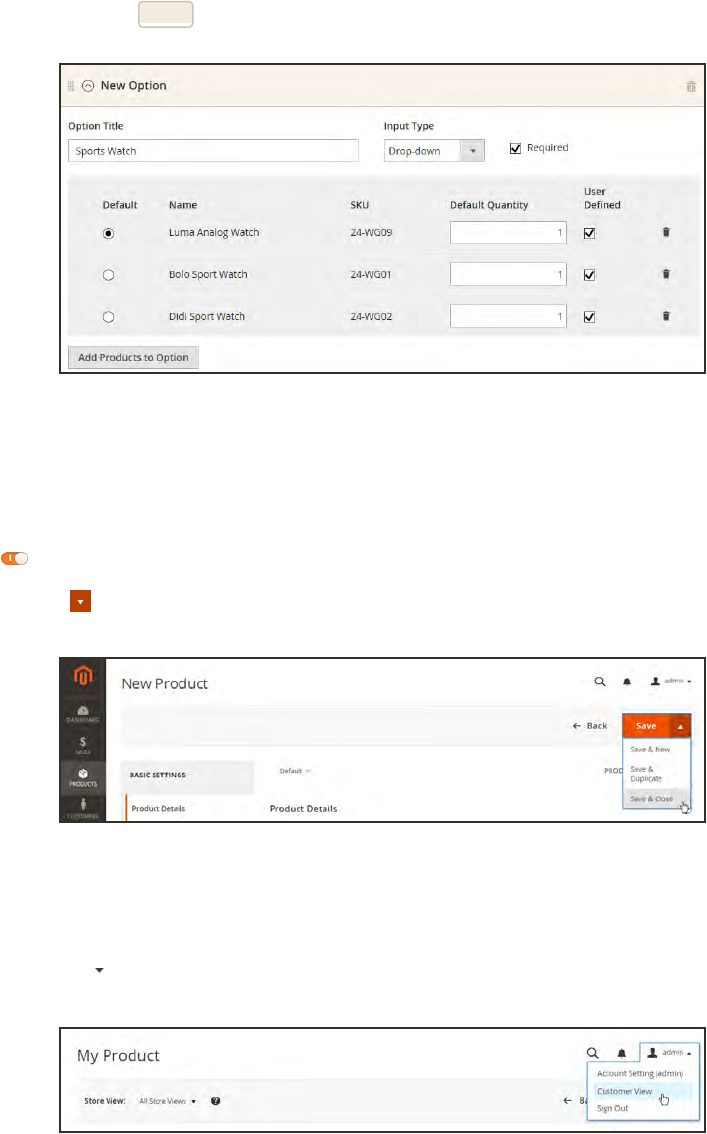
6. When complete, tap Save.
Option Items
Step 6: Publish the Product
1. If you are ready to publish the product in the catalog, set the Product Online switch to the
“On” position.
2. On the Save menu, choose Save & Close.
Save & Close
Step 7: View the Product in Your Store
On the Admin menu, choose Customer View.
Customer View
CHAPTER 11: Creating Products Bundle Product
Magento Community Edition 2.0 User Guide 171
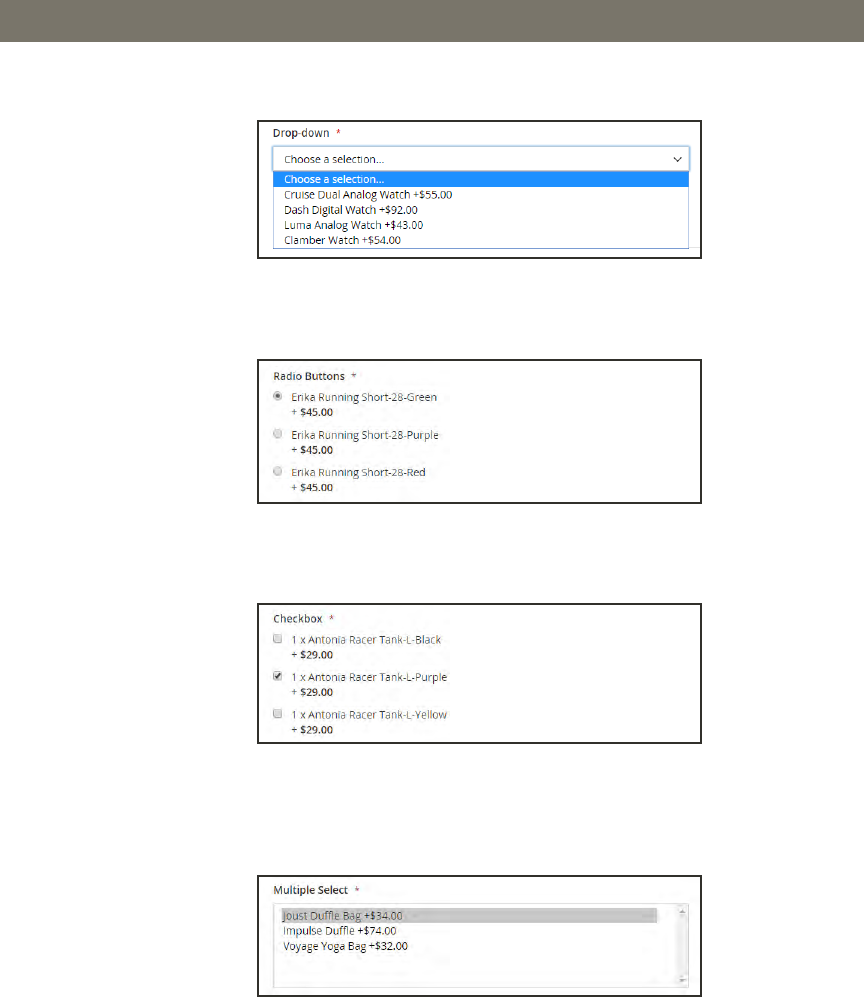
CONTROL DESCRIPTION
Drop-down Displays a drop-down list of options with the product name and price.
Only one item can be selected.
Radio Buttons Displays a radio button for each option, followed by the product name
and price. Only one item can be selected.
Checkbox Displays a checkbox for each option, followed by the product name
and price. Multiple items can be selected.
Multiple Select Displays a list of options with the product name and price. To select
multiple items, hold down the Ctrl (or Option) key, and click each
item.
Input Controls
Bundle Product CHAPTER 11: Creating Products
172 Magento Community Edition 2.0 User Guide
FIELD DESCRIPTION
SKU Determines if each item is assigned a variable, dynamic SKU, or if a
fixed SKU is used for the bundle. Options include: Fixed/Dynamic.
Weight Specifies the weight is calculated based on the items selected, or is
a fixed weight for the entire bundle. Options include:
Fixed/Dynamic.
Price View Determines if the product price is shown as a range, from the least
expensive to the most expensive (Price Range), or with the least
expensive shown (As Low As). Options include: Price Range/ As
Low As.
Ship Bundle Items Specifies if individual items can be shipped separately.
Field Descriptions
THINGS TO REMEMBER
Customers can “build their own” bundle product.
Bundle items can be simple or virtual products without custom options.
The Price View can be set to a price range or to “As Low As.”
SKU and Weight can be either “Fixed” or “Dynamic.”
The Quantity can be a preset or user-defined value.
Bundle items can be shipped together or separately.
CHAPTER 11: Creating Products Bundle Product
Magento Community Edition 2.0 User Guide 173

Downloadable Product
A downloadable product can be anything that you can deliver as a file, such as an eBook,
music, video, software application, or update. You can offer an album for sale, and sell each
song individually. You can also use a downloadable product to deliver an electronic version of
your product catalog.
Because the actual download doesn’t become available until after the purchase, you can provide
samples, such as an excerpt from a book, a clip from an audio file, or a trailer from a video that
the customer can try before purchasing the product. The files that you make available for
download can be either uploaded to your server, or from a different server.
Downloadable Product
Downloadable products can be configured to require that the customer log in to an account to
receive the link, or can be sent by email and shared with others. The status of the order before
the download becomes available, default values, and other delivery options are set in the
configuration. To learn more, see: Download Options .
The following instructions take you through the process of creating a downloadable product
with the basic fields. After you complete the required settings and save the product, you can
add images and complete the remaining product information as needed.
Downloadable Product CHAPTER 11: Creating Products
174 Magento Community Edition 2.0 User Guide
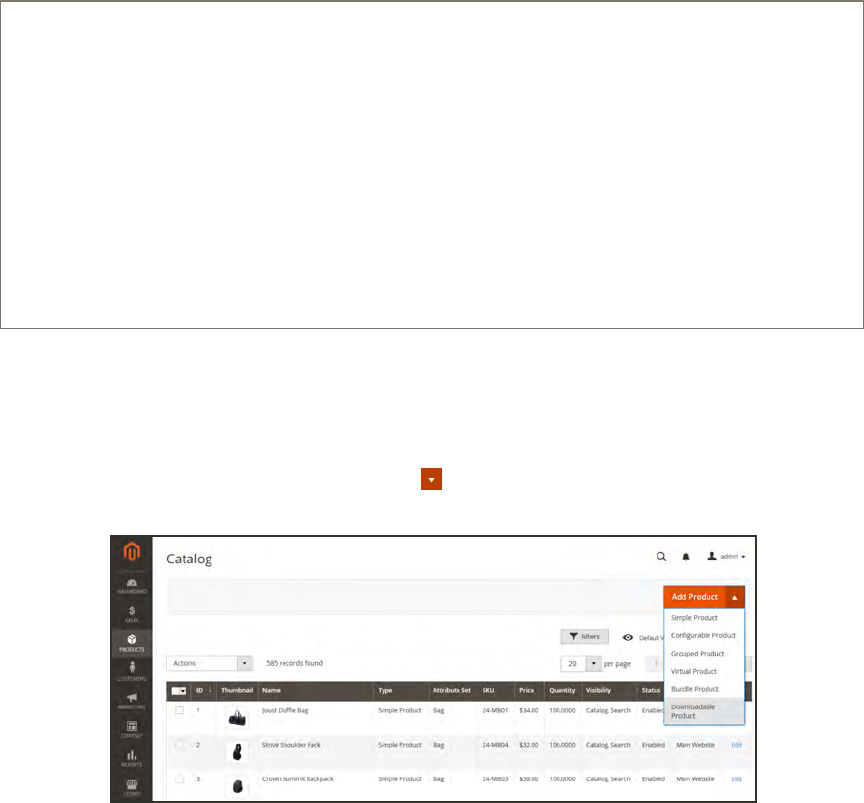
Process Overview:
Step 1: Choose the Product Type
Step 2: Choose the Product Template
Step 3: Complete the Required Fields
Step 4: Complete the Remaining Product Details
Step 5: Complete the Downloadable Information
Step 6: Publish the Product
Step 7: View the Product in Your Store
Step 1: Choose the Product Type
1. On the Admin sidebar, tap Products. Then under Inventory, choose Catalog.
2. In the upper-right corner on the Add Product menu, choose Downloadable Product.
Add Downloadable Product
Step 2: Choose the Product Template (Optional)
The sample data includes a product template called “Downloadable” that has special fields for
downloadable products. You can use an existing template, or create another before the product
is saved. To use an existing template, do one of the following:
lIn the Search box, enter the name of the template.
lIn the list, choose the Downloadable template.
The form is updated to reflect the template.
CHAPTER 11: Creating Products Downloadable Product
Magento Community Edition 2.0 User Guide 175
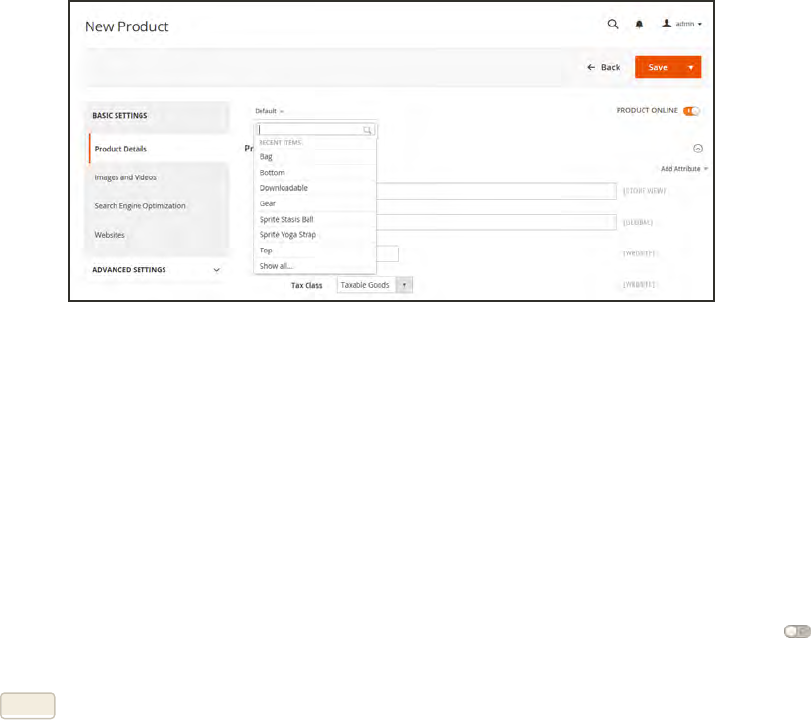
Choose Template
Step 3: Complete the Required Fields
1. In the Product Details section. do the following:
a. Enter the product Name.
b. Either accept the default SKU that is based on the product name, or enter another value.
c. Enter the product Price.
2. Because the product is not yet ready to publish, set the Product Online switch to the “Off”
position.
3. Tap Save and continue with the next step.
With the required fields complete, the product can be saved as needed.
Downloadable Product CHAPTER 11: Creating Products
176 Magento Community Edition 2.0 User Guide
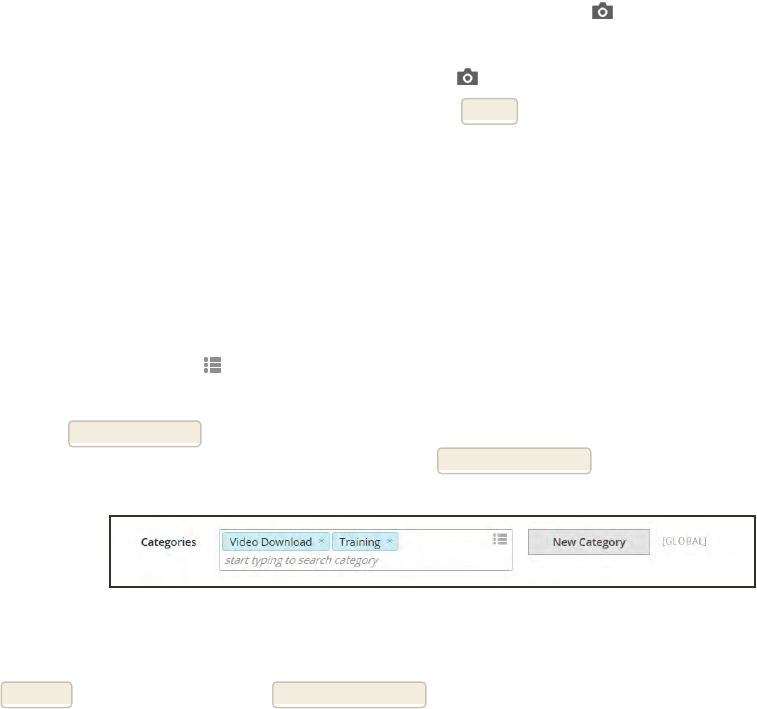
Step 4: Complete the Remaining Product Details
1. Set Tax Class to one of the following:
lNone
lTaxable Goods
To learn about requirements for the taxation of digital goods and services, see the white paper,
Identification & Taxability of Digital Products on the Avalara site.
2. If you're ready to add a product image, do one of the following:
lDrag an image from your desktop, and drop it on the camera tile in the Images and
Videos box.
lIn the Images and Videos box, tap the camera tile, and navigate to the image file on
your computer. Then, select the image, and tap Open.
Aplaceholder appears until a product image is uploaded.
3. If applicable, enter the Quantity of the product that is currently available for download.
4. Skip the Weight field, and mark the Virtual / Downloadable checkbox, if necessary.
5. To assign the product to a Category, do one of the following:
lStart typing to find a match. Then, choose the Category.
lTap the Show List icon to view the Category tree. Then, drill down through the available
categories, and tap each category that you want to assign to the product.
lTap New Category. Enter the Category Name and choose the Parent Category to determine
its position in the menu structure. Then, tap Create Category.
Choose Category
6. Enter the product Description directly into the text box, and format as needed. Then, tap
Submit. You can also use the WYSIWYG Editor, for additional control.
CHAPTER 11: Creating Products Downloadable Product
Magento Community Edition 2.0 User Guide 177
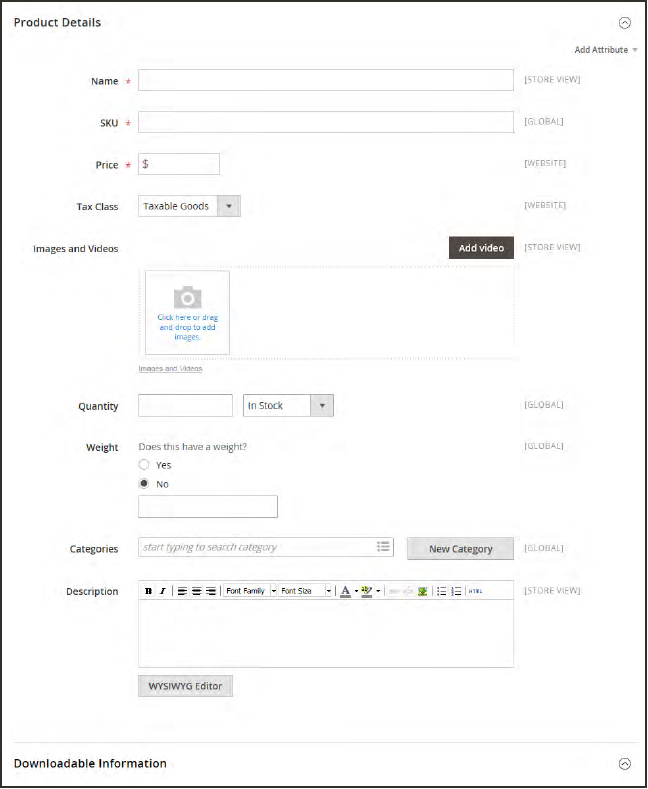
Product Details
Step 5: Complete the Downloadable Information
The Downloadable Information is divided into two sections. The first section describes each
download link, and thesecond section describes each sample file. The default value for many of
these options can be set in the configuration.
Links
1. In the Links section, enter the Title that you want to use as a heading for the download
links.
2. Set Links can be purchased separately to one of the following:
Downloadable Product CHAPTER 11: Creating Products
178 Magento Community Edition 2.0 User Guide
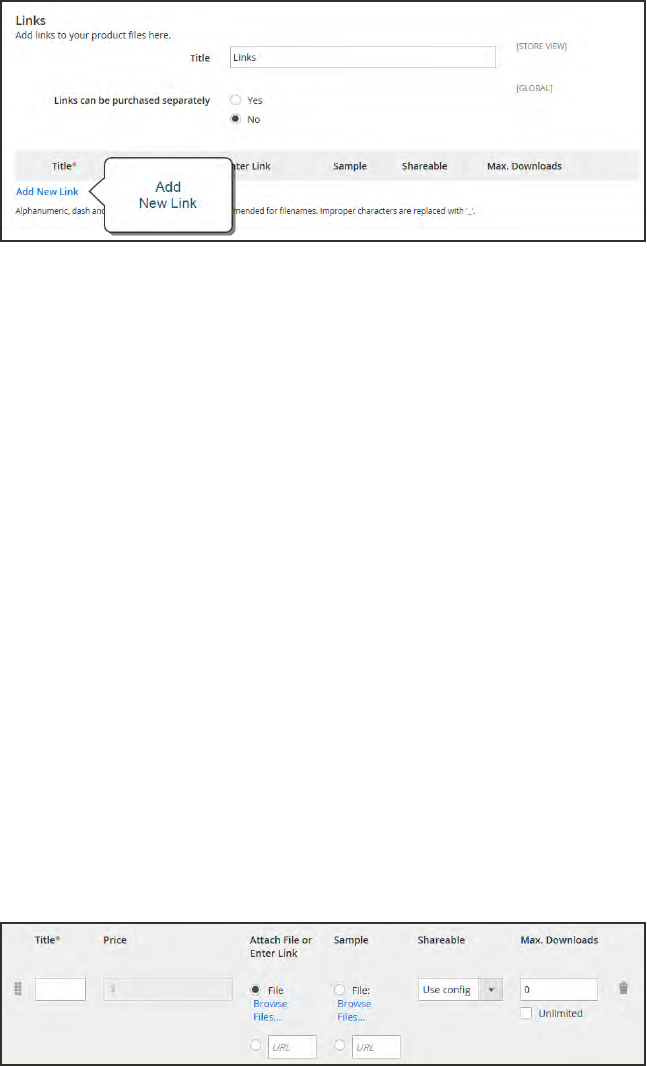
lTo offer multiple download links, such as to sell individual songs on an album, choose
“Yes.”
lTo offer a single download of this item, choose “No.”
Links Title
3. Click Add New Link. Then, do the following:
a. Enter the Title and Price of the download.
b. Choose one of the following distribution methods:
Attach File Choose the File option. Then, browse to the file, and select it
to upload.
Enter Link Choose the URL option, Then, enter the full URL to the
download file.
c. Set Shareable to one of the following:
No Requires customers to log in to their accounts to access the
download link.
Yes Sends the link by email, which customers can share with
others.
d. Do one of the following:
lTo limit downloads per customer, enter the number of Max. Downloads.
lTo allow unlimited downloads, mark the Unlimited checkbox.
Link Detail
4. To add another link, click Add New Link. Then, repeat these steps.
CHAPTER 11: Creating Products Downloadable Product
Magento Community Edition 2.0 User Guide 179
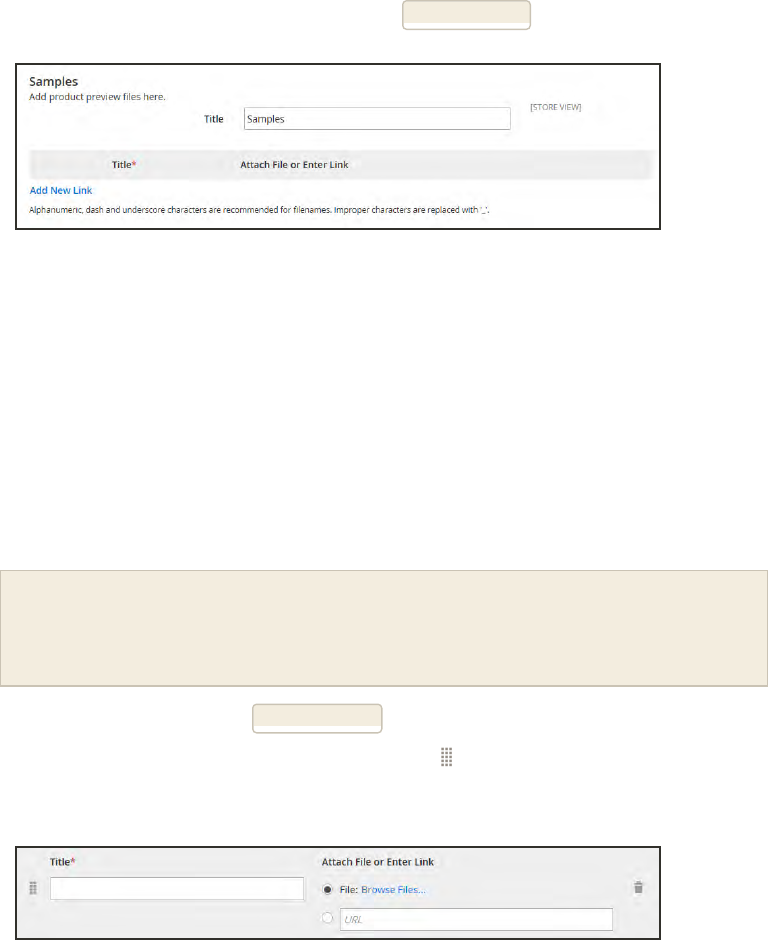
Samples
1. In the Samples section, enter the Title that you want to use as a heading for the samples.
2. To complete the information for each sample, tap Add New Link.
Samples
3. Complete the link detail as follows:
a. Enter the Title of the individual sample.
b. Choose one of the following distribution methods:
Attach File Choose the File option. Then, browse to the file, and select it
to upload.
Enter Link Choose the URL option, Then, enter the full URL to the
sample file.
Downloadable product file names can include letters and numbers. You can to use either
a dash or underscore character to represent a space between words. Any invalid
characters in the file name are replaced with an underscore.
c. To add another sample, tap Add New Row, and repeat these steps.
d. To change the order of the samples, tap the sort icon, and drag the sample to a
new position.
Sample Detail
Downloadable Product CHAPTER 11: Creating Products
180 Magento Community Edition 2.0 User Guide
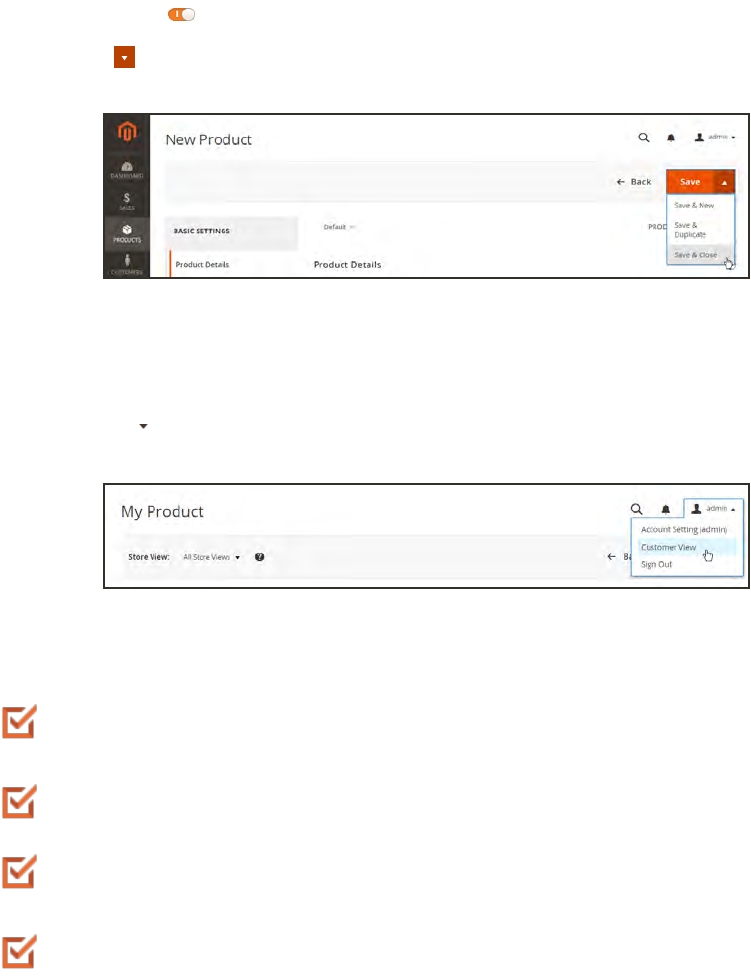
Step 6: Publish the Product
1. If you are ready to publish the downloadable product in your catalog, set the Product Online
switch to the “On” position.
2. On the Save menu, choose Save & Close.
Save & Close
Step 7: View the Product in Your Store
On the Admin menu, choose Customer View.
Customer View
THINGS TO REMEMBER
Downloadable products can be uploaded to the server, or linked to from another server on
the Internet.
You can determine the number of times a customer can download a product.
Customers who purchase a downloadable product can be required to log in before going
through checkout.
The delivery of a downloadable product can be made when the order is in either a
“Pending” or “Invoiced” state.
CHAPTER 11: Creating Products Downloadable Product
Magento Community Edition 2.0 User Guide 181
Download Options
The downloadable configuration settings determine the default values and delivery options for
downloadable products, and specify if guests can purchase downloads.
To configure download options:
1. On the Admin sidebar, tap Stores. Then under Settings, choose Configuration.
2. In the panel on the left under Catalog, choose Catalog.
3. Expand the Downloadable Product Options section, and do the following:
a. To determine the stage in the order workflow when the download becomes available, set
Order Item Status to Enable Downloads to one of the following:
lPending
lInvoiced
b. To set a default limit on the number of downloads that a single customer can make, enter
the number in the Default Maximum Number of Downloads field.
c. Set Shareable to one of the following:
Yes Allows customers to email the download link to others.
No Prevents customers from sharing the download link with others by
requiring customers to log in to their accounts to access download links.
d. In the Default Sample Title field, enter the heading that you want to appear above the
selection of samples.
Sample Title
Downloadable Product CHAPTER 11: Creating Products
182 Magento Community Edition 2.0 User Guide
e. In the Default Link Title field, enter the default text that you want to use for download
links.
f. If you want the download link to open in a new browser window, set Opens Links in New
Window to “Yes.” This setting is used to keep the browser window to your store open.
g. To determine how downloadable content is delivered, set Use Content Disposition to one
of the following:
Attachment Delivers the download link by email as an attachment.
Inline Delivers the download link as a link on a web page.
h. If you want to require that purchasers register for a customer account and log in before
purchasing a download, set Disable Guest Checkout if Cart Contains Downloadable
Items to “Yes.”
4. When complete, tap Save Config.
Downloadable Product Options
CHAPTER 11: Creating Products Downloadable Product
Magento Community Edition 2.0 User Guide 183

Notes
184 Magento Community Edition 2.0 User Guide
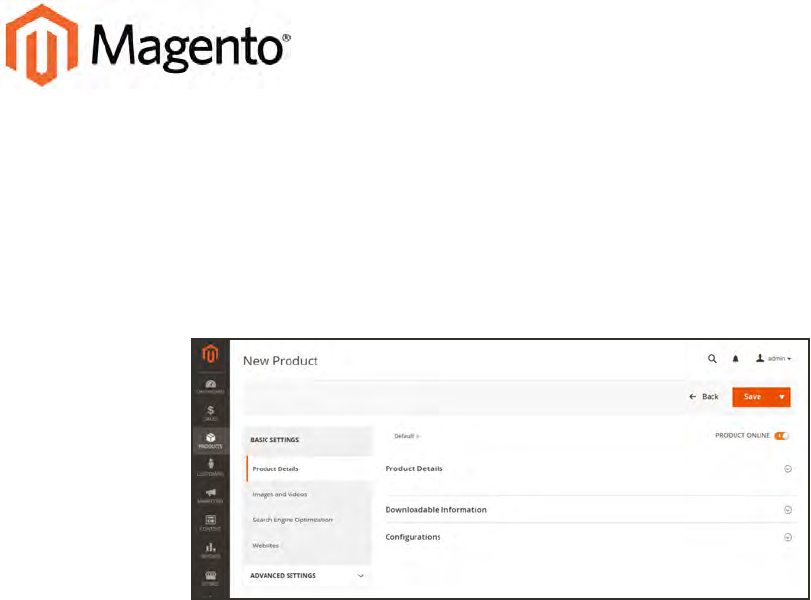
CHAPTER 12:
Basic Settings
The Basic Settings section is designed to help you create products quickly, and includes
Product Details, Images and Videos, Search Engine Optimization, and Websites.
Basic Settings
Magento Community Edition 2.0 User Guide 185
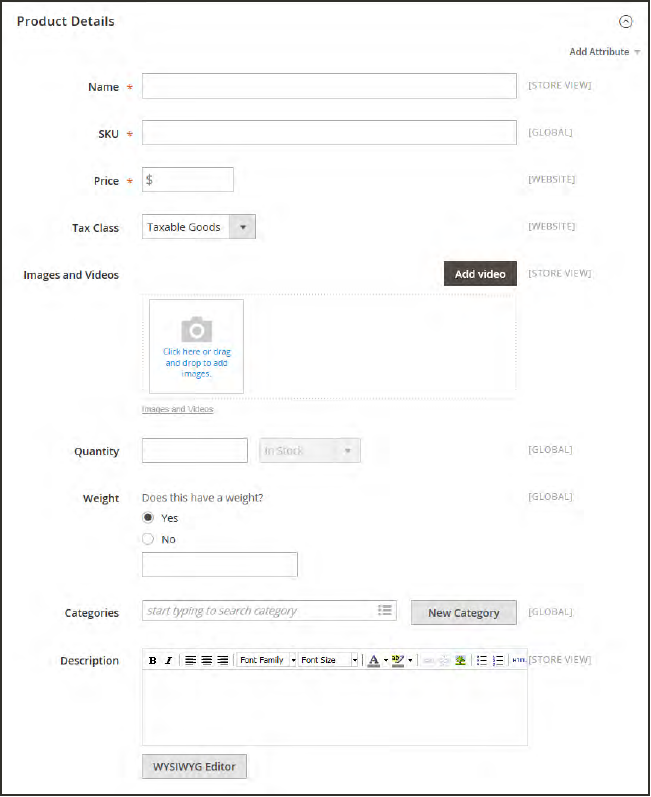
Product Details
The Product Details section provides basic information about the product, and gives you the
ability to add attributes and categories as you define the product. To learn more, see the
instructions for each product type.
Product Details
Product Details CHAPTER 12: Basic Settings
186 Magento Community Edition 2.0 User Guide
FIELD SCOPE DESCRIPTION
Name Store View (Required) The name of the product, as you want it to
appear in the catalog.
SKU Global (Required) The Stock Keeping Unit is a unique
identifier for each individual product or service
provided. A default SKU is auto-generated, based on
the product name.
Price Website (Required) The retail price of the product.
Tax Class Website The tax class that is associated with the product.
Images and Videos Store View Displays the images and videos that are currently
available for the product.
Add Video Associates a new video with
the product.
Quantity Global The number of items currently in stock.
Weight Global Determines if the product has weight, and specifies
the value for shipping calculations. In the United
States, weight is measured in pounds and ounces,
whereas countries on the metric system use grams
and kilograms. The unit of measurement defined for
your locale in the configuration.
Categories Global Indicates the categories that are assigned to the
product.
New Category Assigns an additional
category to the product.
Description Store View The main product description that appears on the
product page. The product description is initially
entered as plain text. The WYSIWYG Editor can be
used to format the text with HTML tags, if permitted
by the description attribute properties .
Field Descriptions (Default Template)
CHAPTER 12: Basic Settings Product Details
Magento Community Edition 2.0 User Guide 187

FIELD SCOPE DESCRIPTION
Do not paste text directly from a word processor,
because it might include print control codes that do not
render correctly online. If using a word processor to
compose the text, first save the description as a .txt
file to strip out any control codes before copying and
pasting it into the product description field.
WYSIWYG Editor Launches the Editor in a pop-
up window.
Field Descriptions (Default Template) (cont.)
Product Details CHAPTER 12: Basic Settings
188 Magento Community Edition 2.0 User Guide
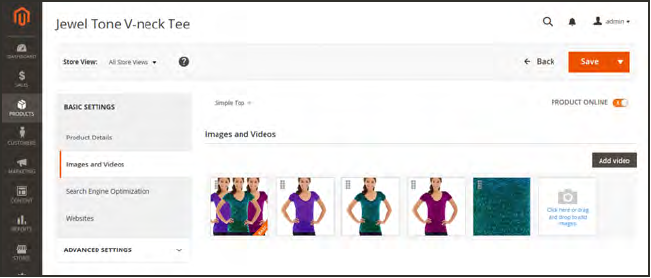
Images and Video
Using high-quality images of consistent proportion gives your catalog a professional look with
commercial appeal. If you have a large catalog with several images per product, you can easily
have hundreds, if not thousands of product images to manage. Before you get started, establish
a naming convention for your image files, and organize them so you can find the originals if
you ever need them.
Product Images
A single product image is rendered in different sizes throughout the catalog. The size of the
image container on the page is defined in the style sheet, but how the image is used is
determined by the role that is assigned to the image. The main product image, or “base” image,
must be large enough to produce the magnification that is needed for zoom. In addition to the
main image, a smaller version of the same image might appear in product listings, or as a
thumbnail in the shopping cart. You can upload an image in the largest size that is needed,
and let Magento render the sizes needed for each use. The same image can be used for all roles,
or a different image can be assigned to each role. By default, the first image that is uploaded is
assigned to all three roles.
From the Product Detail section, you can perform basic image management tasks such as
upload multiple images, link to video, rearrange their order, and determine how each is used.
For additional control, open the image in “detail view.” If you have a large quantity of images
to manage, it can be more efficient to import them as a batch, rather than upload individual
images. To learn more, see: Importing Product Images.
CHAPTER 12: Basic Settings Images and Video
Magento Community Edition 2.0 User Guide 189
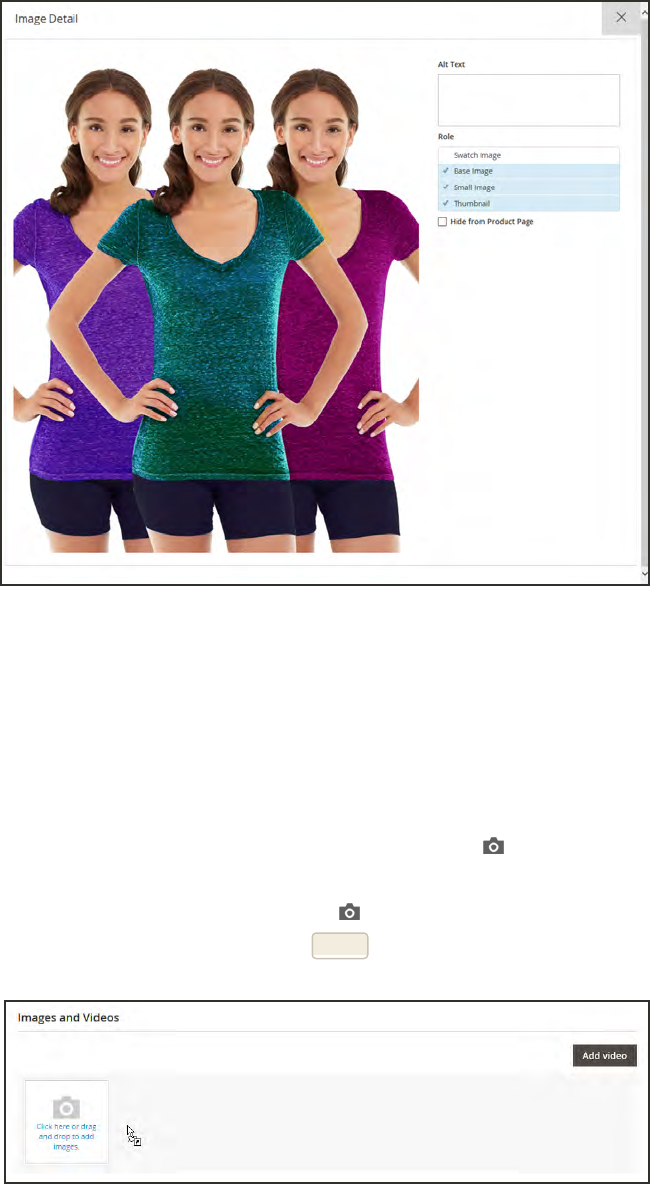
Image Detail
To manage images:
1. Open the product in edit mode. Then, do any of the following:
Upload an Image
lDrag an image from your desktop, and drop it on the camera tile in the Images and
Videos box.
lIn the Images and Video box, tap the camera tile, and browse to the image file on your
computer. Then, select the image, and tap Open.
Drag and Drop Image
Images and Video CHAPTER 12: Basic Settings
190 Magento Community Edition 2.0 User Guide
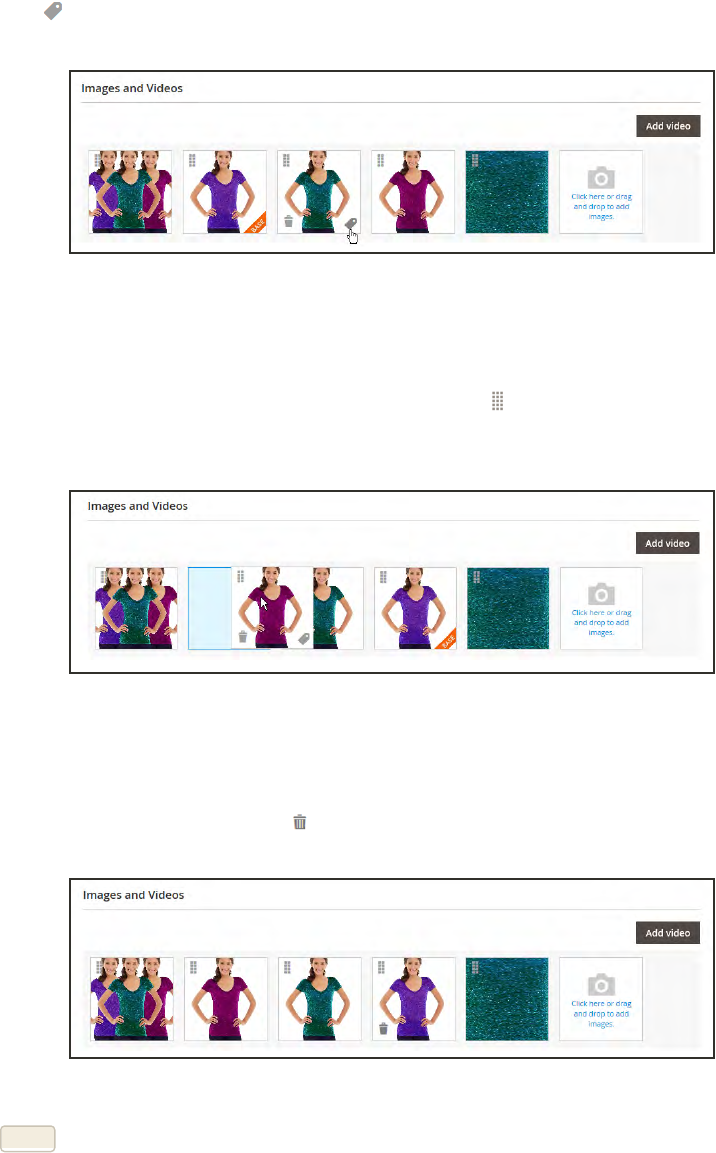
Assign the Base Image
An orange banner appears in the lower-right corner of the current base image. To assign a
different image as the base, move the mouse over the image that you want to use, and tap the
tag icon in the lower-right corner.
Make Base
Rearrange Images
To change the order of images in the gallery, tap the Sort icon at the bottom of the image.
Then, drag the image to a different position in the Images box.
Change Order
Delete an Image
To remove an image, tap the Delete icon in the lower-left corner of the image.
Remove Image
2. Tap Save
CHAPTER 12: Basic Settings Images and Video
Magento Community Edition 2.0 User Guide 191
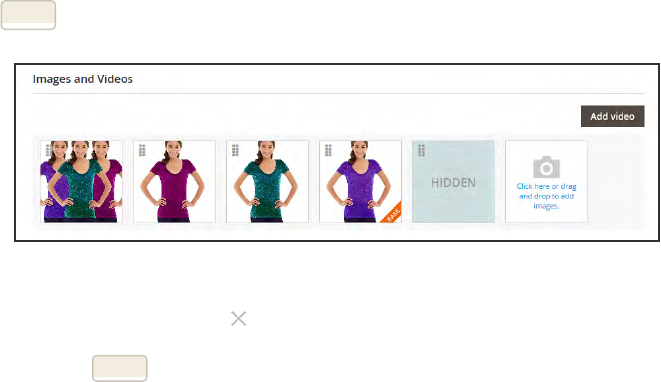
To view image detail:
1. To open an image in detail view:
lTap the Image Management link below the image tiles.
lIn the panel on the left under Basic Settings, tap Image Management.
Then, do any of the following:
Enter Alt Text
Image Alt text is referenced by screen readers to improve web accessibility, and by search
engines when indexing the site. Some browsers display the Alt text on mouseover. Alt text can
be several words long, and include carefully selected key words.
In the Alt Text box, enter a brief description of the image.
Assign Roles
By default, all three roles are assigned to the first image that is uploaded to the product. To
reassign a role to another image, do the following:
1. Tap an image tile to open the image in detail view.
2. In the Role box, choose the role that you want to assign to the image.
The assigned role appears with a checkmark in selected mode, and the previous image is no
longer assigned to the role.
Hide Images
To exclude an image from the thumbnail gallery, mark the Hide from Product Page checkbox.
Then, tap Save.
Hidden Image
2. To exit Detail View, click the Close box in the upper-right corner.
3. When complete, tap Save
Images and Video CHAPTER 12: Basic Settings
192 Magento Community Edition 2.0 User Guide

IMAGE ROLE DESCRIPTION
Swatch Images A swatch image can be illustrate a color, texture, finish, or pattern.
Swatch images that are specific to the product can be uploaded to
the image gallery.
Base Image The base image is the main image on the product detail page. Image
zoom is activated if you upload an image that is larger image than the
image container. Example sizes:
470 x 470 pixels (without Zoom)
1100 x 1100 pixels (with Zoom)
Small Image The small image is used for the product images in listings on
category and search results pages, and to display the product images
needed for sections such as for Up-sells, Cross-sells, and the New
Products List. Example size:
470 x 470 pixels
Thumbnail Thumbnail images appear in the thumbnail gallery, shopping cart, and
in some blocks such as Related Items. Example size:
50 x 50 pixels
Image Roles
CHAPTER 12: Basic Settings Images and Video
Magento Community Edition 2.0 User Guide 193
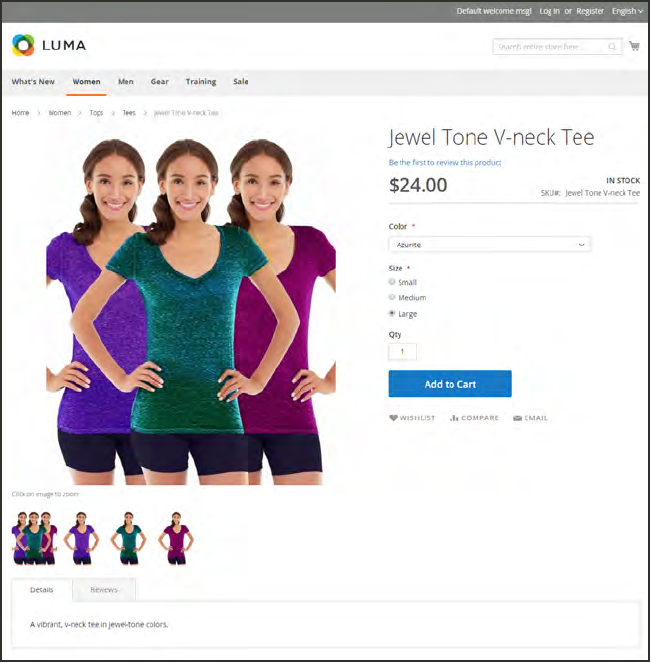
Media Gallery
The media gallery on the product page displays multiple images, video, or swatches related to
the product. Each thumbnail can show a different view or variation of the product. Click a
thumbnail to browse through the gallery, Although the position of the gallery varies by theme,
the default position is just below the main image on the product page.
Media Gallery
Images and Video CHAPTER 12: Basic Settings
194 Magento Community Edition 2.0 User Guide
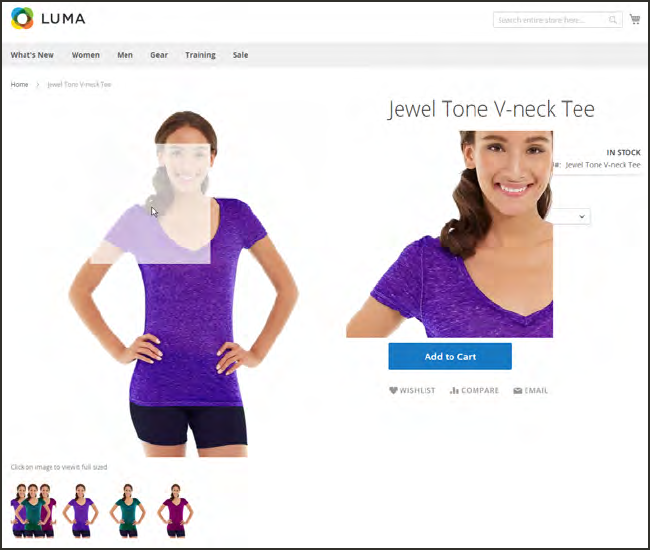
Image Zoom
Customers can view a magnified portion of the image on mouseover, if the image is large
enough to create the zoom effect. When zoom is activated, you can click the main image and
move the cursor around to magnify different parts of the image. The magnified selection
appears to the right of the image.
Image Zoom
Light Boxes and Sliders
There are many third-party light boxes and sliders that you can use to enhance the
presentation of your product images. Look for extensions in Magento Marketplace.
CHAPTER 12: Basic Settings Images and Video
Magento Community Edition 2.0 User Guide 195
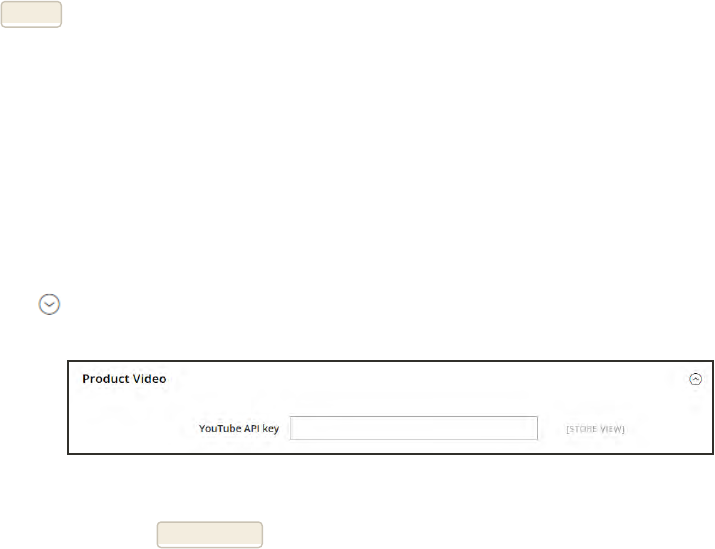
Adding Product Video
To add product video, you must first obtain an API Key from your Google account, and enter it
in the configuration of your store. Then, you can link to the video from the product.
Step 1: Get Your YouTube APIKey
1. Log in to your Google account, and visit the Google Developers Console. Then, do the
following:
a. Under Use Google APIs, click Enable and manage APIs.
b. In the panel on the left choose Credentials. Expand the Add Credentials menu, and
choose APIkey.
c. When prompted to create a new key, choose Server key. Enter a name for the key, and tap
Create.
2. Wait a few moments while the key is generated. Then, copy the key to the clipboard.
In the next step, you will paste the key into your store’s configuration.
Step 2: Configure Magento
1. On the Admin sidebar, tap Stores. Then under Settings, choose Configuration.
2. In the panel on the left under Catalog, choose Catalog.
3. Expand the Product Video section. Then, paste your YouTube APIkey.
Product Video
4. When complete, click Save Config.
5. When prompted, refresh the cache.
Images and Video CHAPTER 12: Basic Settings
196 Magento Community Edition 2.0 User Guide
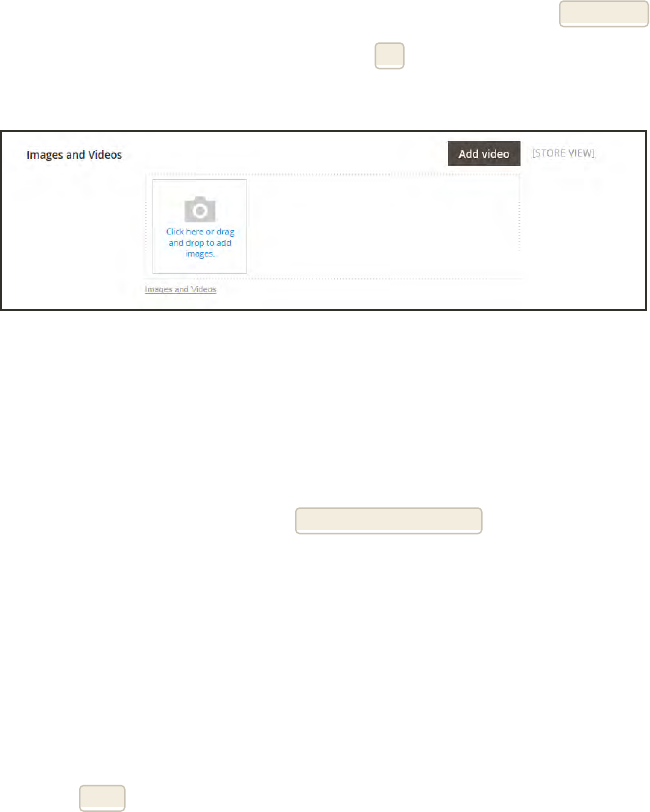
Step 3: Link to the Video
1. Open a product in edit mode. Then in the Images and Video section, tap Add Video.
If you haven’t yet entered your YouTube APIkey, tap OKto continue. You won’t be able to link
to a YouTube video, but you can go through the process.
Add Video
2. Enter the URLof the YouTube or Vimeo video.
3. Enter the Title and Description of the video.
4. To upload a Preview Image, browse to the image and select the file.
5. If you prefer to use the video meta data, tap Get Video Information.
6. To determine how the video is used in the store, mark the checkbox of each Role that applies:
lBase Image
lSmall Image
lSwatch Image
lThumbnail
lHide from Product Page
7. When complete, tap Save.
CHAPTER 12: Basic Settings Images and Video
Magento Community Edition 2.0 User Guide 197
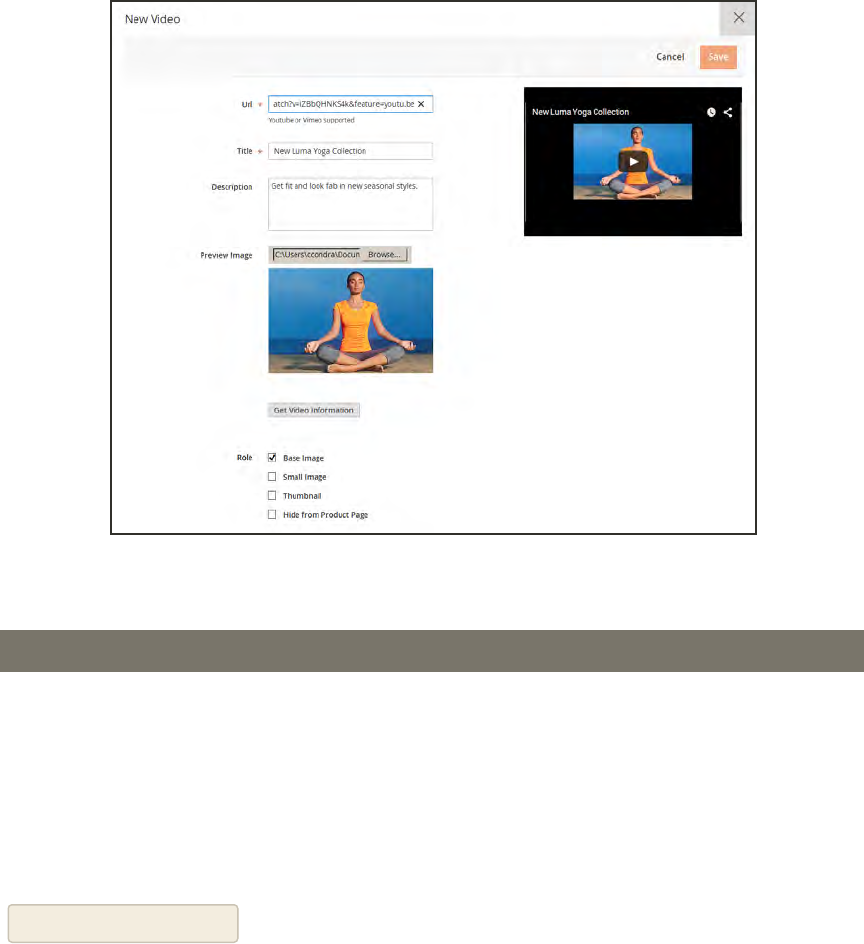
New Video
FIELD DESCRIPTION
URL The URLof the associated video.
Title The video title.
Description The video description.
Preview Image An uploaded image that is used as a preview of the video in your
store.
Get Video Information Retrieves the video meta data that is stored on the host server. You
can use the original data, or update it as needed.
Role Determines how the preview image is used in your store. Options:
Base Image
Small Image
Thumbnail
Swatch Image
Hide from Product Page
Field Descriptions
Images and Video CHAPTER 12: Basic Settings
198 Magento Community Edition 2.0 User Guide
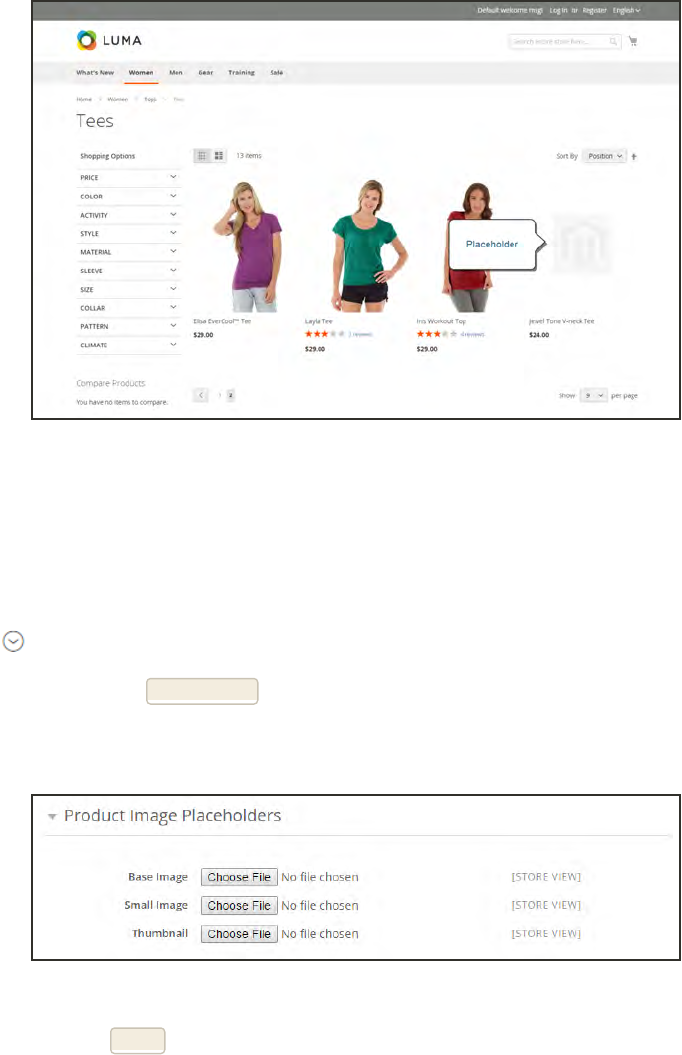
Placeholders
Magento uses temporary images as placeholders until the permanent product images become
available. A different placeholder can be uploaded for each role. The initial placeholder image is
the Magento logo, which you can replace with an image of your choice.
Image Placeholder
To upload placeholder images:
1. On the Admin sidebar, tap Stores. Then under Settings, choose Configuration.
2. In the panel on the left under Catalog, and choose Catalog.
3. Expand the Product Image Placeholders section.
4. For each image role, tap Choose File. Find the image on your computer and upload the file.
You can use the same image for all three roles, or upload a different placeholder image for each
role.
Product Image Placeholders
5. When complete, tap Save.
CHAPTER 12: Basic Settings Images and Video
Magento Community Edition 2.0 User Guide 199
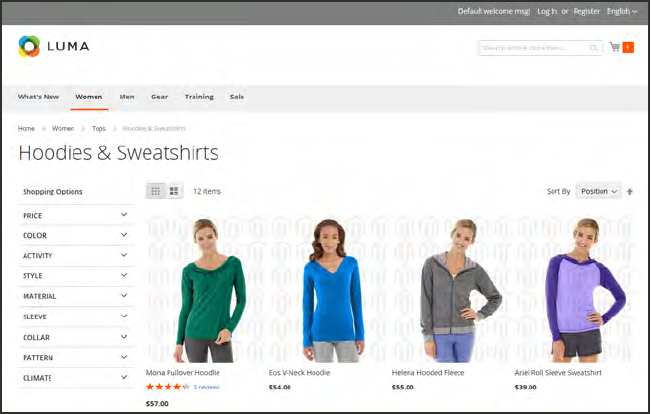
Watermarks
If you go to the expense of creating your own original product images, there is not much you
can do to prevent unscrupulous competitors from stealing them with the click of a mouse.
However, you can make them a less attractive target by placing a watermark on each image to
identify them as your property. A watermark file can be either a .jpg (jpeg), .gif, or .png image.
Both ,gif and .png formats support transparent layers, which can be used to give the
watermark a transparent background.
The watermark used for the “small” image in the following example is a black logo with a
transparent background, and saved as a .png file with the following settings:
Size: 50x50
Opacity: 5
Position: Tile
Tiled Watermark
Images and Video CHAPTER 12: Basic Settings
200 Magento Community Edition 2.0 User Guide
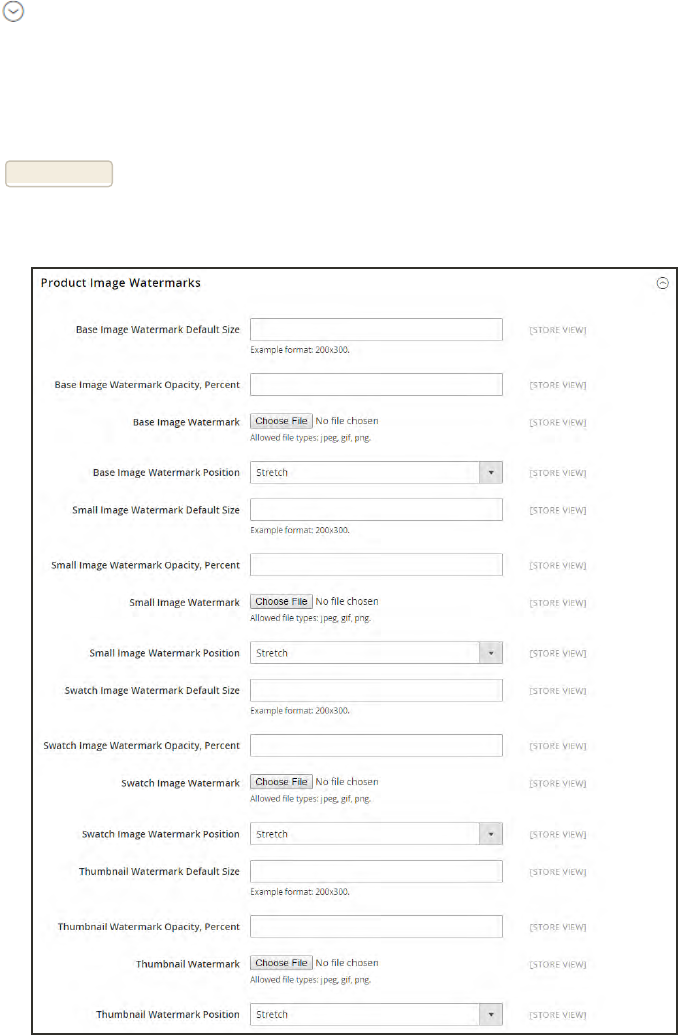
To add watermarks to product images:
1. On the Admin sidebar, tap Stores. Then under Settings, choose Configuration.
2. In the panel on the left under General, choose Design.
3. Expand the Product Image Watermarks section. Then, complete the following steps for the
Base, Small, and Thumbnail images:
a. Enter the Watermark Default Size, in pixels. For example: 200 x 200
b. Enter the Watermark Opacity, Percent, as a percentage. For example: 40
c. Tap Choose File, and choose the image file to upload.
d. Set Watermark Position to your preference.
Product Image Watermarks
CHAPTER 12: Basic Settings Images and Video
Magento Community Edition 2.0 User Guide 201
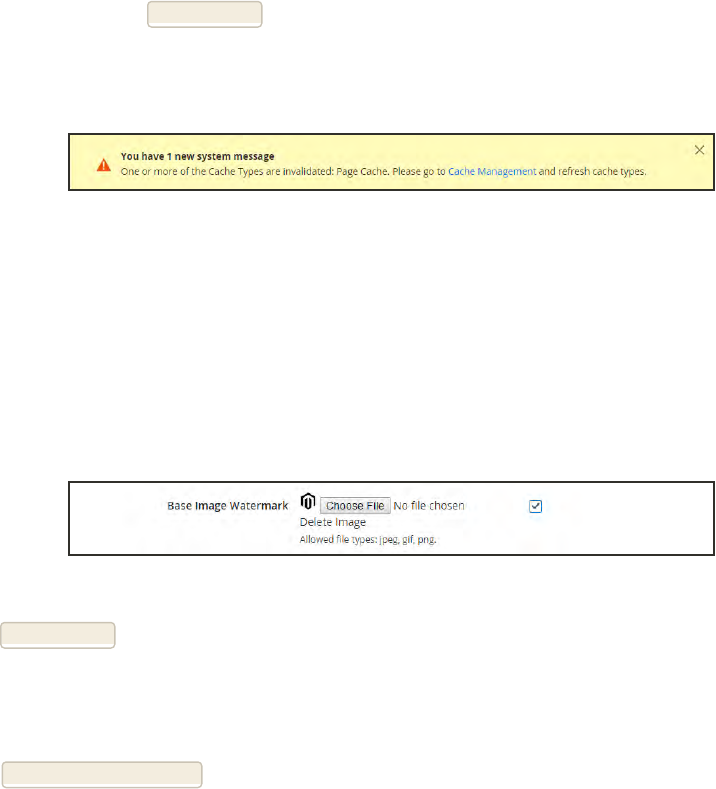
4. When complete, tap Save Config.
5. When prompted to refresh the cache, tap the Cache Management link in the system message.
Then, refresh the invalid cache.
Refresh Cache
To delete a watermark:
1. Do one of the following:
lUnder the watermark thumbnail, tap Delete Image.
lMark the checkbox to the right of the watermark thumbnail.
Delete Watermark
2. Tap Save Config. Then, do the following:
a. When prompted to refresh the cache, tap the Cache Management link in the system
message. Then, refresh the invalid cache.
b. If the watermark image persists in the storefront, return to Cache Management and tap
FlushMagentoCache.
Images and Video CHAPTER 12: Basic Settings
202 Magento Community Edition 2.0 User Guide
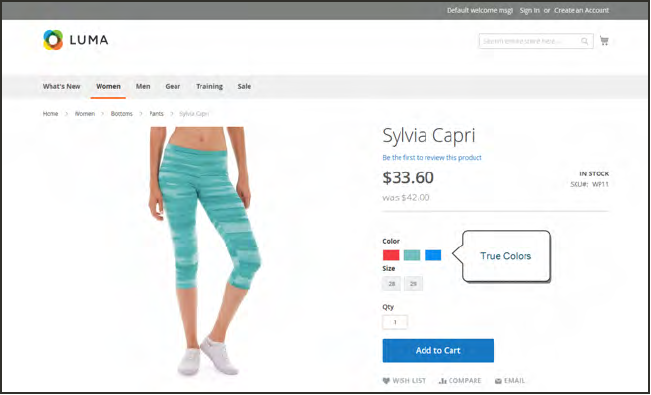
Swatches
Customers have high expectations when it comes to color, and it is crucial that product
descriptions accurately represent each available color, pattern, or texture. For example, the
capris in the illustration below are not simply available in red, green, and blue. Rather, they are
available only in very specific shades of red, green, and blue, which are probably unique to this
product.
For configurable products, color can be indicated by a visual swatch, text swatch, or a drop-
down input control. Swatches can be used on the product page, in product listings, and in
layered navigation. On the product page, swatches are synchronized to display the
corresponding product image when the swatch is chosen. When chosen, the corresponding
value appears in the input field, and the swatch is outlined as the current selection.
Swatches on Product Page
Text-Based Swatches
If an image isn’t available for a swatch, the attribute value appears as text. A text-based swatch
is like a button with a text label, and behaves in the same way as a swatch with an image.
When text-based swatches are used to show the available sizes, any size that is not available is
crossed out.
CHAPTER 12: Basic Settings Images and Video
Magento Community Edition 2.0 User Guide 203
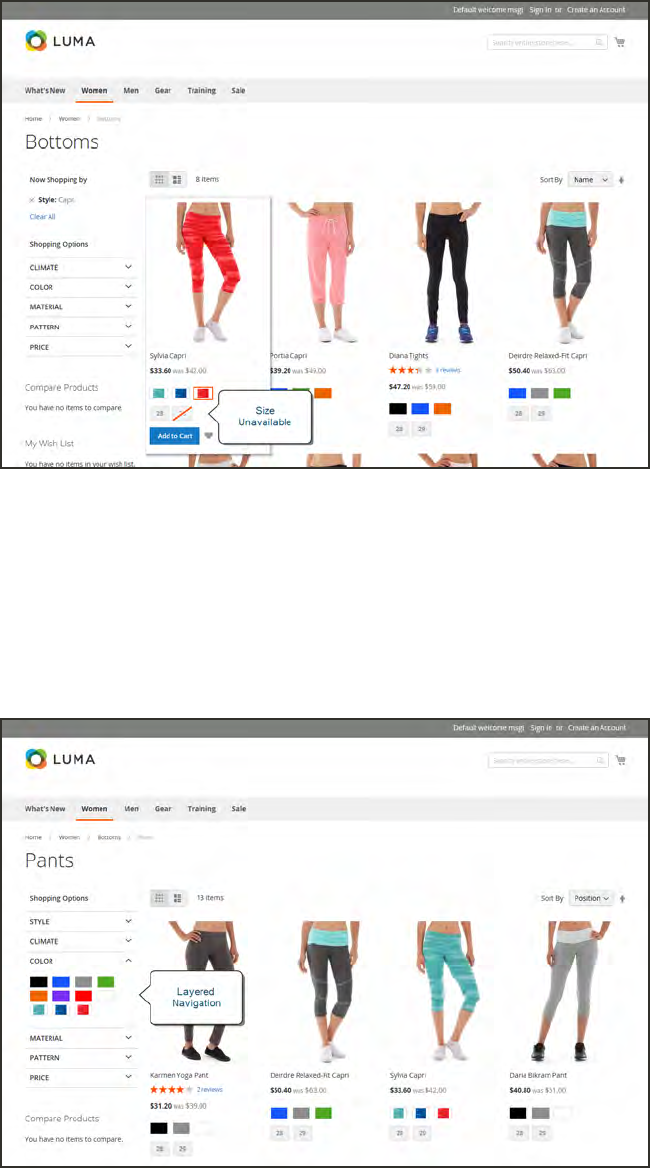
Text-Based Swatches for Size
Swatches in Layered Navigation
Swatches can also be used in layered navigation, provided that the Use in Layered Navigation
property of the color attribute is set to “Yes.” The following example shows both text-based
and color image swatches in layered navigation.
Swatches in Layered Navigation
Images and Video CHAPTER 12: Basic Settings
204 Magento Community Edition 2.0 User Guide

Creating Swatches
Swatches can be defined as a component of the color attribute, or set up locally for a specific
product as uploaded product images.
In the following examples, the Sylvia Capris are available in specific values of red, green, and
blue. Because the swatches were taken from the product image, each is a true representation of
the color. The color attribute is used to manage the information for all product colors and
swatches.
Step 1: Create the Swatches
Use either of the following methods to create swatches for your products:
Method 1: Add a Color Swatch
1. To capture the true color of a product, open the image in a photo editor and use the eye
dropper tool to identify the exact color. Then, take note of the equivalent hexadecimal value.
Hexadecimal Color Values
2. On the Admin sidebar, tap Stores. Then under Attributes, choose Product.
3. In the grid, open the color attribute in edit mode.
4. Verify that Catalog Input Type for Store Owner is set to “Visual Swatch.”
5. Under Manage Swatch (values of your attribute.) tap Add Swatch to add a new definition to
the bottom of the list. Then, do the following:
CHAPTER 12: Basic Settings Images and Video
Magento Community Edition 2.0 User Guide 205
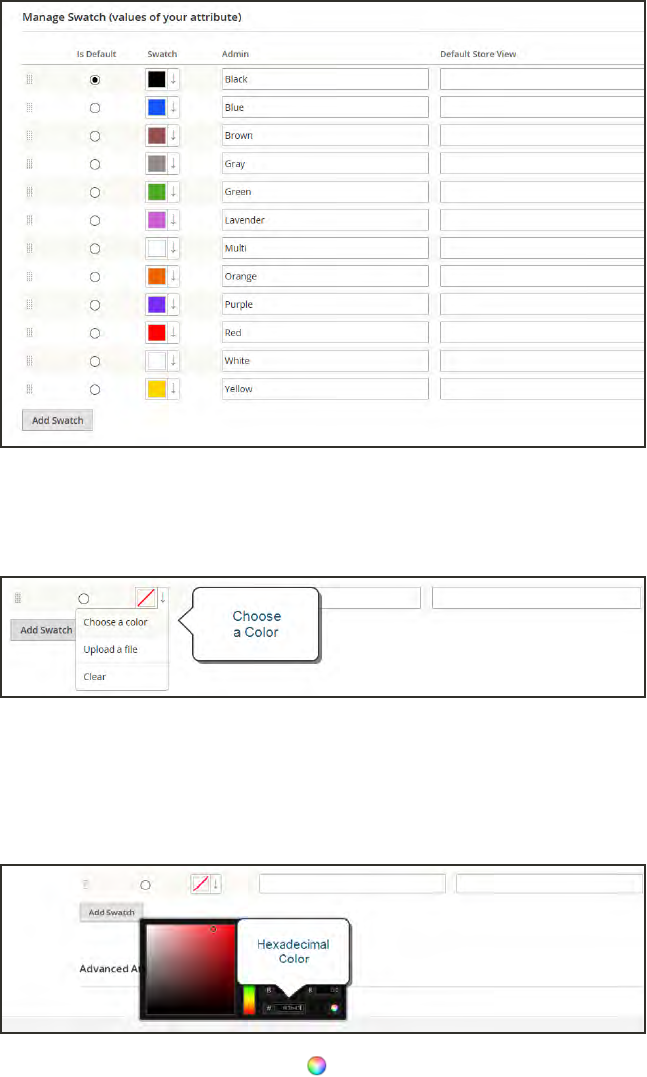
Manage Swatch Values
a. On the swatch menu, select Choose a color.
Choose a Color
b. In the color picker, place your cursor in the #field, and press the Backspace key to delete
the current value. Then, enter the six numbers that represent the hexadecimal value of the
new color..
c. To save the swatch, tap the Color Wheel button in the lower-right corner of the color
picker.
d. Enter the labels for the Admin and Storefront. In this example, we include the SKU in the
admin label for reference because these colors are used only for a specific product. You can
include a space or underscore in the label, but not a hyphen.
e. Under Is Default, select the swatch that you want to use as the default option.
Images and Video CHAPTER 12: Basic Settings
206 Magento Community Edition 2.0 User Guide
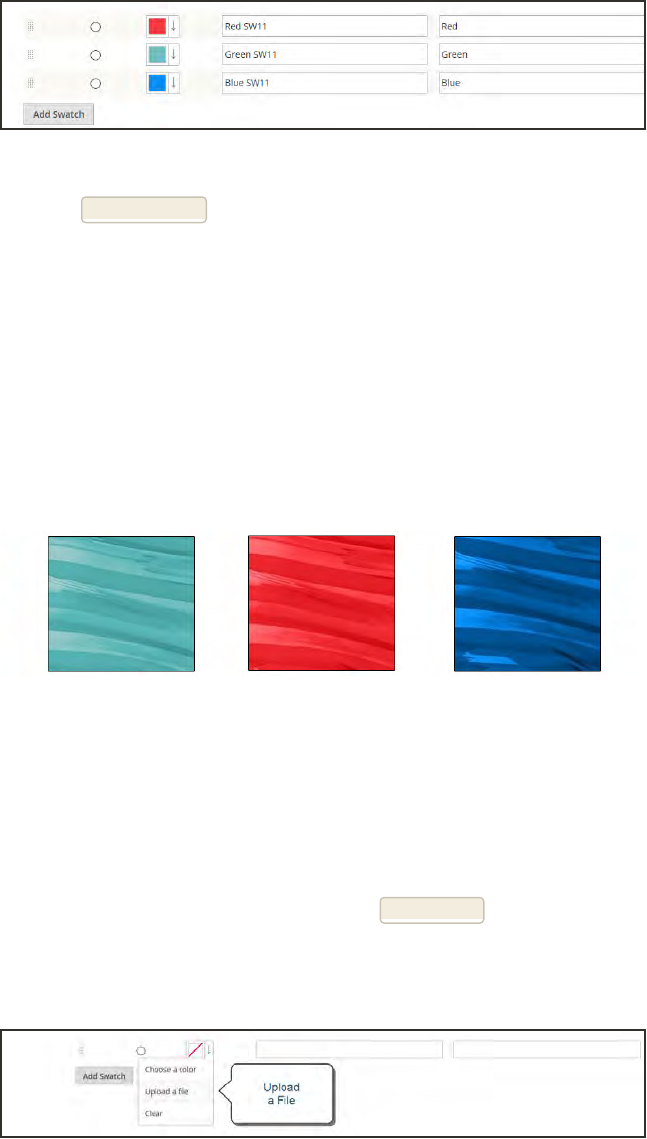
f. To change the order, simply drag the swatch into position.
Swatch Labels
6. When complete, tap Save Attribute. Then when prompted, refresh the cache.
7. The last step is to open each product in Edit mode, and update the Color attribute with the
correct swatch. To update multiple products at the same time, follow the steps below.
Method 2:Upload a Swatch Image
1. To capture an image for a swatch, open the product image in a photo editor, and save a square
area of the image that depicts the color, pattern, or texture. Then repeat for each variation of
the product. The size and dimensions of the swatch is determined by the theme. As a general
rule, saving an image as a square helps to preserve the aspect ratio of a pattern.
Swatch Images
2. On the Admin sidebar, tap Stores. Then under Attributes, choose Product.
3. In the grid, open the color attribute in edit mode.
4. Verify that Catalog Input Type for Store Owner is set to “Visual Swatch.”
5. Under Manage Swatch (values of your attribute.) tap Add Swatch to add a new definition to
the bottom of the list. Then, do the following:
a. On the swatch menu, choose Upload a file.
Upload a File
b. Navigate to the swatch file that you prepared and choose the file for upload.
CHAPTER 12: Basic Settings Images and Video
Magento Community Edition 2.0 User Guide 207
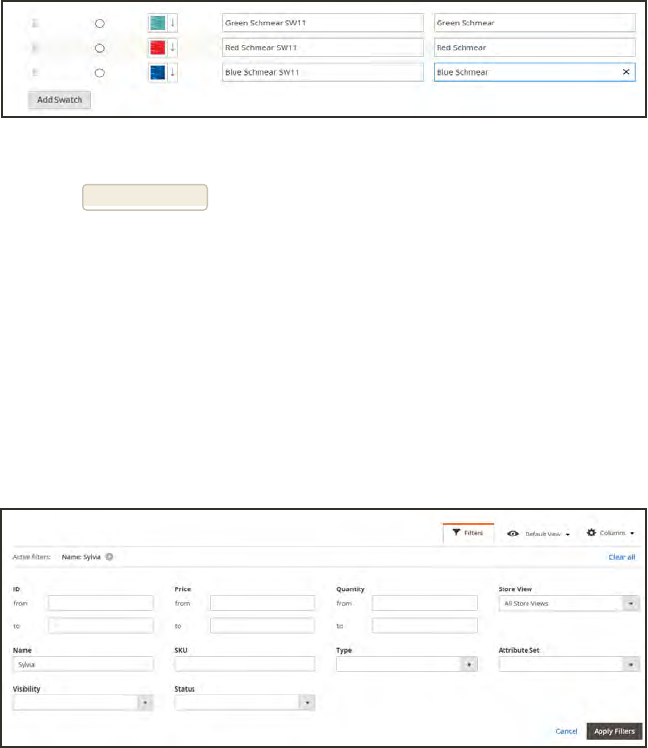
c. Repeat these steps for each swatch image.
d. Enter the labels for the Admin and Storefront. In this example, we include the SKU in the
admin label for reference because these colors are used only for a specific product. You can
include a space or underscore in the label, but not a hyphen.
Enter Labels
6. When complete, tap Save Attribute. Then when prompted, refresh the cache.
7. The last step is to open each product in Edit mode, and update the Color attribute with the
correct swatch. To update multiple products at the same time, follow the steps below.
Step 2: Update Your Products
1. On the Admin sidebar, tap Products. Then under Inventory, choose Catalog.
2. Filter the list by Name or SKU to include only the applicable products. The following example
filters the list on a partial product name.
Filters
3. In the grid, mark the checkbox of each product to which the swatch applies. In this example,
all blue capris are selected. Then, set the Actions control to “Update Attributes.”
Images and Video CHAPTER 12: Basic Settings
208 Magento Community Edition 2.0 User Guide
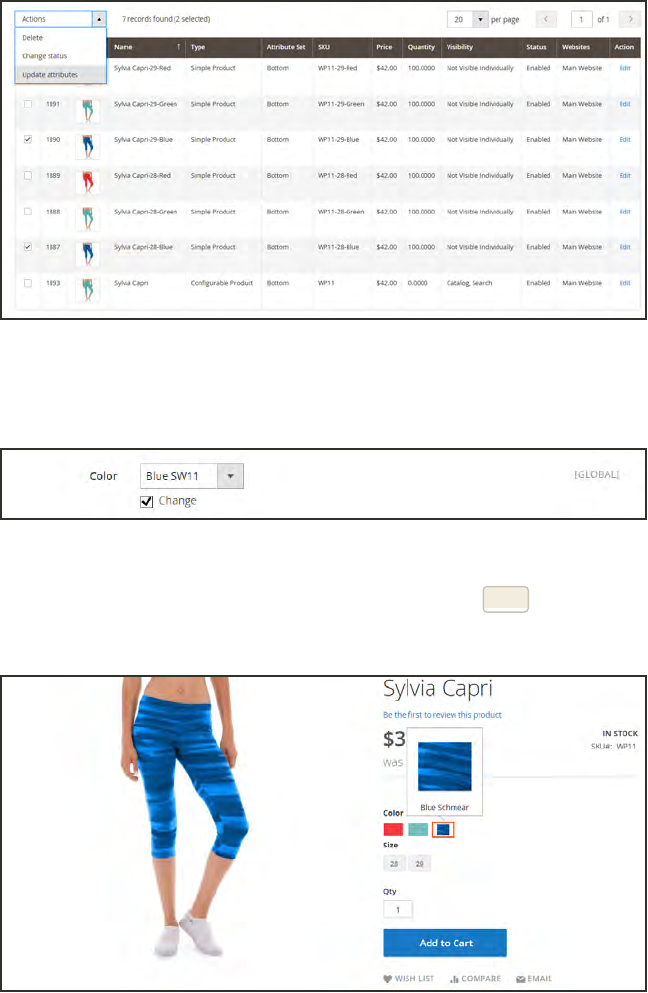
Update Attributes
4. Scroll down to the Colorattribute, and mark the Change checkbox.
Change
5. Choose the swatch that applies to the selected products, and tap Save. Then when prompted,
refresh the cache.
Swatch in Storefront
CHAPTER 12: Basic Settings Images and Video
Magento Community Edition 2.0 User Guide 209
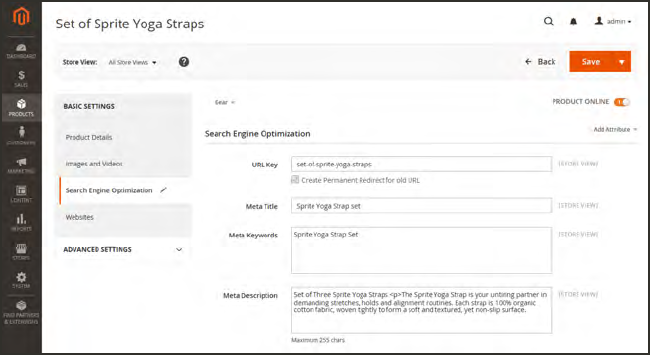
Search Engine Optimization
The Search Engine Optimization page of basic product settings includes the primary fields used
by search engines to index the product. Although some search engines ignore meta keywords,
others continue to use them. The current best practice is to incorporate high-value keywords in
both the meta title and meta description. The default value for each meta data field is auto-
generated based on the configuration setting. Each field contains a placeholder that is replaced
by an actual value. To learn more, see: Default Field Values .
Search Engine Optimization
Search Engine Optimization CHAPTER 12: Basic Settings
210 Magento Community Edition 2.0 User Guide
FIELD SCOPE DESCRIPTION
URL Key Store View Determines the online address of the product. The
URLkey is added to the base URL of the store, and
appears in the address bar of a browser. Magento
initially creates a default, “search engine friendly”
URL, that is based on the product name.
The URL Key should be all lowercase characters, with
hyphens instead of spaces. Do not include a suffix
such as .html in the URL Key, because it is managed
in the configuration.
Meta Title Store View The title appears in the title bar and tab of your
browser, and is also used as the title on a search
engine results page (SERP1). The meta title should be
unique to the page, and less than 70 characters in
length.
Auto-generated value: {{name}}
Meta Keywords Store View Relevant keywords for the product. Consider using
keywords that customers might use to find the
product.
Auto-generated value: {{name}}
Meta Description Store View The meta description provides a brief overview of the
page for search results listings. An ideal length is
between 150-160 characters in length, with a
maximum of 255 characters. Although not visible to
the customer, some search engines include the meta
description on the search results page.
Auto-generated value: {{name}}
{{description}}
Field Descriptions
1Search Engine Results Page
CHAPTER 12: Basic Settings Search Engine Optimization
Magento Community Edition 2.0 User Guide 211
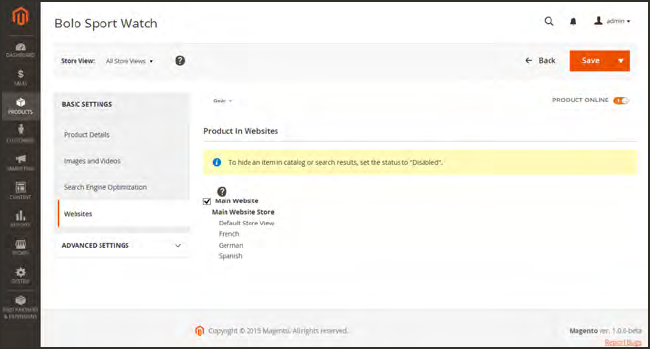
Websites
The Websites page shows the current scope of the product within the store hierarchy. In the
following screenshot, the marked checkbox indicates the website, store, and views where the
product is available. To assign a product to a specific store view, use the Store View control in
the upper-right corner of the page.
Websites
Websites CHAPTER 12: Basic Settings
212 Magento Community Edition 2.0 User Guide
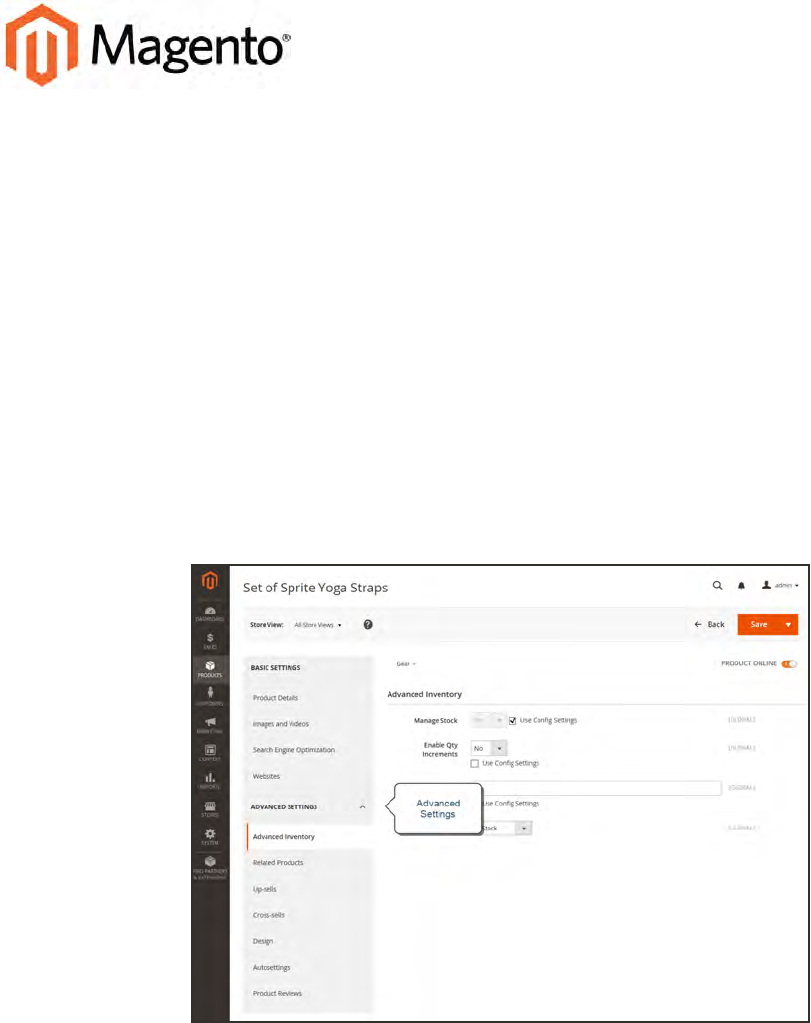
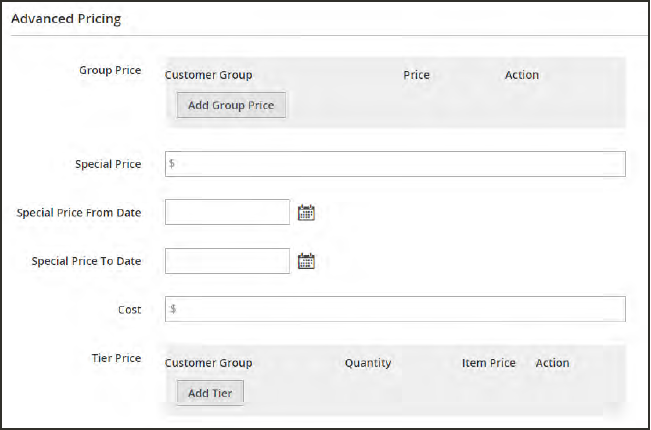
Advanced Pricing
The Advanced Pricing settings are used to define the conditions for special pricing based on
customer group and website, and for quantity discount tier pricing.
Advanced Pricing
Advanced Pricing CHAPTER 13: Advanced Settings
214 Magento Community Edition 2.0 User Guide
FIELD DESCRIPTION
Group Price Sets up promotional prices for specific customer groups within the
selected website. Options include:
Web Site Identifies the website where the group price
rule applies. This option appears only if the
installation has multiple websites.
Customer Group (Required) Identifies the customer group that
qualifies to receive the group price.
Price (Required) Specifies the product price for
members of the customer group, within the
specific website.
Actions Deletes the current Group Price rule.
Add Group Price Inserts an additional row for a new Group Price rule
Special Price Offers a discounted price during the time period defined by the
From/To dates.
In the storefront when a special price is available, the retail price is
crossed out and the special price appears below in large, bold text.
Special Price From Date Sets the first date the Special Price is available. You can either enter
the date or select it from the calendar.
Special Price To Date Sets the last date the Special Price is available. You can either enter
the date or select it from the calendar.
Cost The actual cost of the item.
Tier Price Offers a quantity discount to members of a specific customer group
and website. Options include:
Web Site Identifies a specific website where the tier
price rule applies.
Customer Group Identifies a specific customer group that
qualifies to receive the tier price discount.
Field Descriptions
CHAPTER 13: Advanced Settings Advanced Pricing
Magento Community Edition 2.0 User Guide 215
FIELD DESCRIPTION
Quantity (Required) The quantity that must be
purchased to receive the tier price.
Item Price (Required) The discounted product price for
the quantity purchased.
Actions Deletes the current tier price rule.
Add Tier Inserts an additional row for a new tier price rule definition.
Field Descriptions (cont.)
Advanced Pricing CHAPTER 13: Advanced Settings
216 Magento Community Edition 2.0 User Guide
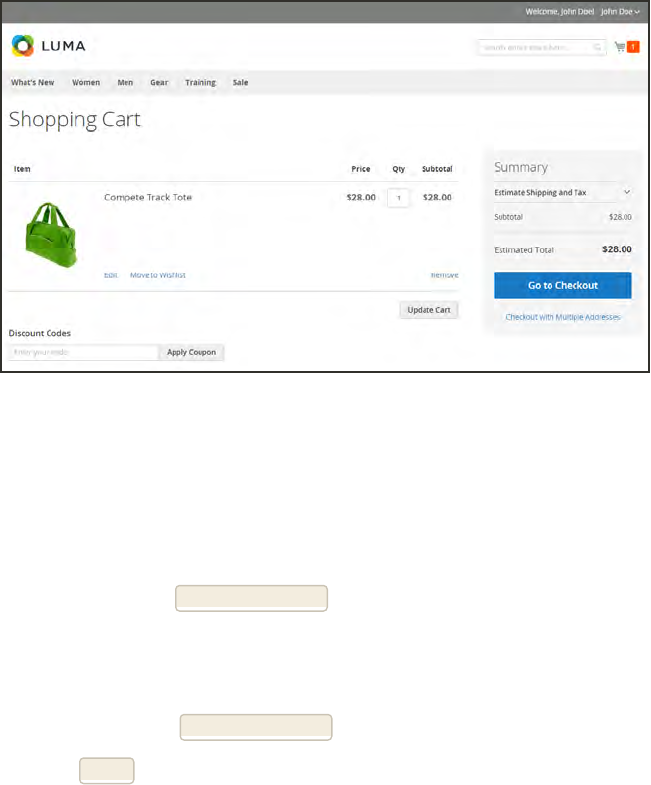
Group Price
You can extend a discounted price to members of a specific customer group, if they shop while
logged in to their accounts. The discounted price appears in the shopping cart instead of the
regular price.
Group Price Applied in Shopping Cart
To set up a group price:
1. Open the product in edit mode.
2. In the panel on the left under Advanced Settings, choose Advanced Pricing.
3. In the Group Price section, tap Add Group Price. Then, do the following:
a. Set Customer Group to the group that is to receive the discounted price.
b. Enter the discounted Price.
4. To add another group price tap Add Group Price and repeat the previous steps.
5. When complete, tap Save.
CHAPTER 13: Advanced Settings Advanced Pricing
Magento Community Edition 2.0 User Guide 217
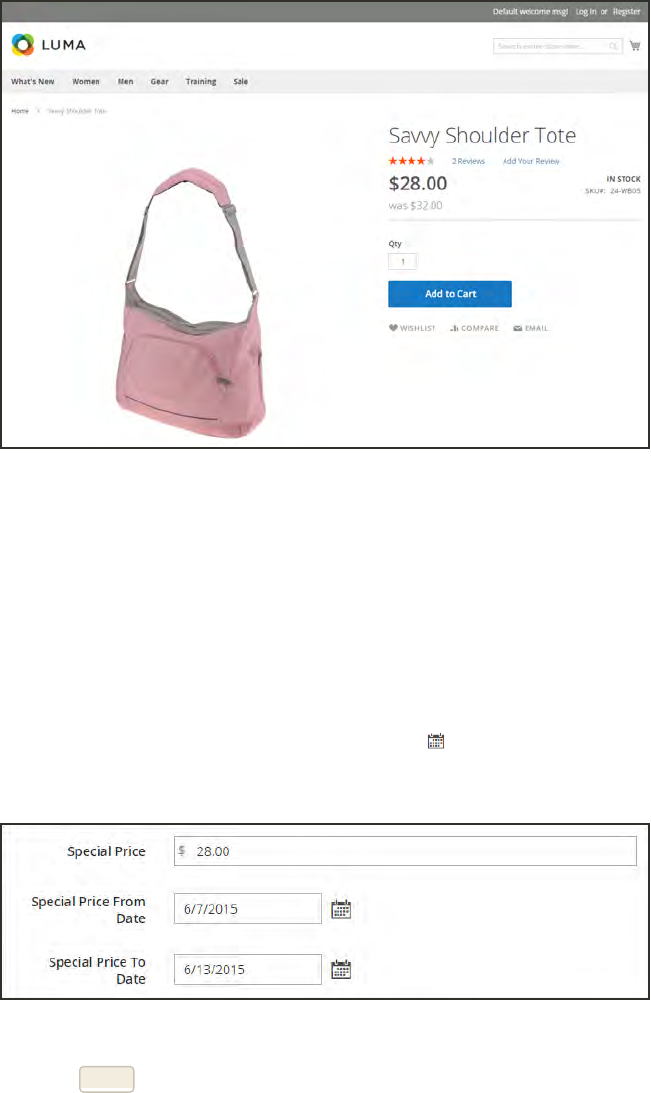
Special Price
To offer a special price, enter the discounted price and the dates when the special price is in
effect. The special price appears instead of the regular price, followed by “was (previous price).”
Special Price
To apply a special price:
1. Open the product in edit mode.
2. In the panel on the left under Advanced Settings, choose Advanced Pricing.
3. Enter the amount of the Special Price.
4. Complete the Special Price From Date and Special Price To Date to define the period of time
that the special price is in effect. Use the Calendar button to the right of each field to set
the dates.
Special Pricing Settings
5. When complete, tap Save.
Advanced Pricing CHAPTER 13: Advanced Settings
218 Magento Community Edition 2.0 User Guide

Tier Price
Tier pricing lets you offer a quantity discount from the catalog list and product detail pages.
The discount can be applied to a specific store view or customer group.
Tier Price “As Low as”
lOn the catalog page, the product price includes the words, “As Low As,” followed by the
lowest tier price.
lThe product page calculates the quantity discount and displays a message such as:
Buy 3 for $5.00 each and save 29%
The prices in the storefront take precedence from the highest to the lowest quantity. Therefore,
if you have a tier for the quantity 5 and one for the quantity 10, and a customer adds 5, 6, 7, 8
or 9 items to the shopping cart, the customer receives the discounted price that you specified
for the quantity 5 tier. As soon as the customer adds the 10th item, the discounted price
specified for the quantity 10 tier supersedes the tier for a quantity of 5, and discounted price for
10 applies.
CHAPTER 13: Advanced Settings Advanced Pricing
Magento Community Edition 2.0 User Guide 219
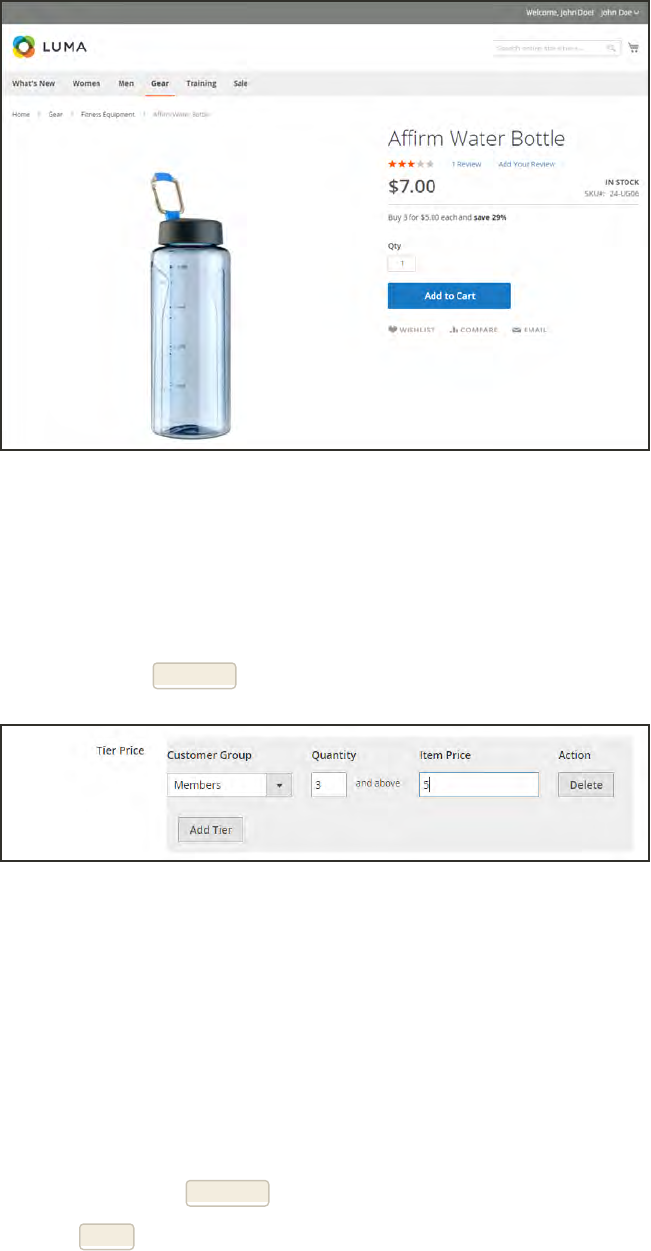
Tier Price on Product Page
To set up a tier price:
1. Open the product in edit mode.
2. In the panel on the left under Advanced Settings, choose Advanced Pricing.
3. In the Tier Price section, tap Add Tier. Then, do the following:
Tier Pricing
a. If your store has multiple websites, choose the Website where the tier pricing applies.
b. Choose the Customer Group to which the tier pricing applies.
c. In the Qty field, enter the quantity that must be ordered to receive the tier price.
d. In the Item Price field, enter the adjusted price of the item.
To apply the same tier to more than one group, create a separate tier for each group, but
with the same Qty and Price information.
4. To add another group price, tap Add Tier and repeat the previous steps.
5. When complete, tap Save.
Advanced Pricing CHAPTER 13: Advanced Settings
220 Magento Community Edition 2.0 User Guide
Minimum Advertised Price
Merchants are sometimes prohibited from displaying a price that is lower than the
manufacturer’s suggested retail price (MSRP). Magento’s Minimum Advertised Price (MAP)
gives you the ability to remain in compliance with the manufacturer’s requirements while
offering your customers a better price. Because requirements differ from one manufacturer to
another, you can configure your store to prevent the display of your actual price on pages where
it is not allowed to appear according to the terms of the manufacturer.
MAP Logic
For products with prices that depend on a selected options, (such as custom options, or simple
products with their own SKUs and stock management), the following logic is used:
lMAP is applied to the main price. The prices of options, bundle items, and associated
products (which add or subtract from the main price) appear normally.
lIf a product does not have a main price, and its price is derived from the associated product
prices (such as in a grouped product), the MAP settings of the associated products are
applied.
lIf a product in the cart has the Manufacturer’s Suggested Retail Price (MSRP) specified, the
price is not crossed-out.
For other price settings, the following MAP logic is used:
lIf tier pricing is set, the tier price appears according to the Display Actual Price setting.
lIf a special price is set, it is considered to be the actual price for MAP.
In the order management and customer management tools, as well as in the reports sections of
the Admin, only the actual price appears.
CHAPTER 13: Advanced Settings Advanced Pricing
Magento Community Edition 2.0 User Guide 221
Using MAP with Product Types
PRODUCT TYPE DESCRIPTION
Simple,Virtual The actual price does not automatically appear on catalog list and
product pages, but is included only according to the Display Actual
Price setting. Custom option prices appear normally.
Grouped The prices of associated simple products do not automatically
appear on catalog list and product pages, but are included only
according to the Display Actual Price setting.
Configurable The actual price does not automatically appear on catalog list and
product pages, but is included only according to the Display Actual
Price setting. Option prices appear normally.
Bundle (with fixed price) The actual price does not automatically appear on catalog pages, but
is included only according to the Display Actual Price setting. The
prices of bundle items appear normally.
MAP is not available for bundle products with dynamic pricing.
Downloadable The actual price does not automatically appear on catalog list and
product pages, but is included only according to the Display Actual
Price setting. The price associated with each download link appears
normally.
Using MAP with Price Settings
PRICE SETTING DESCRIPTION
Tier Price If tier pricing is set, the tier pricing message is not displayed in the
catalog. On the product page a notification is displayed that indicates
that the price can be lower when ordering more than a certain
quantity, but the discount is displayed in percentages only. For
associated products of a grouped product, the discounts are not
displayed on the product page.
The tier price is shown according to the Display Actual Price setting.
Special Price If the Special price is specified, the special price is displayed
according to the Display Actual Price setting.
Advanced Pricing CHAPTER 13: Advanced Settings
222 Magento Community Edition 2.0 User Guide

Configuring MAP
Your store’s MAP settings can be applied to all products in your catalog, or configured for only
specific products. When Minimum Advertised Price is enabled globally, all product prices in the
storefront are hidden from view. There are a variety of configuration options that you can use to
remain in compliance with the terms of your agreement with the manufacturer, while still
offering your customers a better price.
Actual Price Appears “On Gesture”
On the global level, you can enable or disable MAP, apply it to all products, define how the
actual price is displayed, and edit the text of the related messages and information tips that
appear in the store.
When MAP is enabled, the product-level MAP settings become available. You can apply MAP to
an individual product by entering the MSRP, and choosing how you want the actual price to
appear in the store. Product-level MAP settings override the global MAP settings.
CHAPTER 13: Advanced Settings Advanced Pricing
Magento Community Edition 2.0 User Guide 223
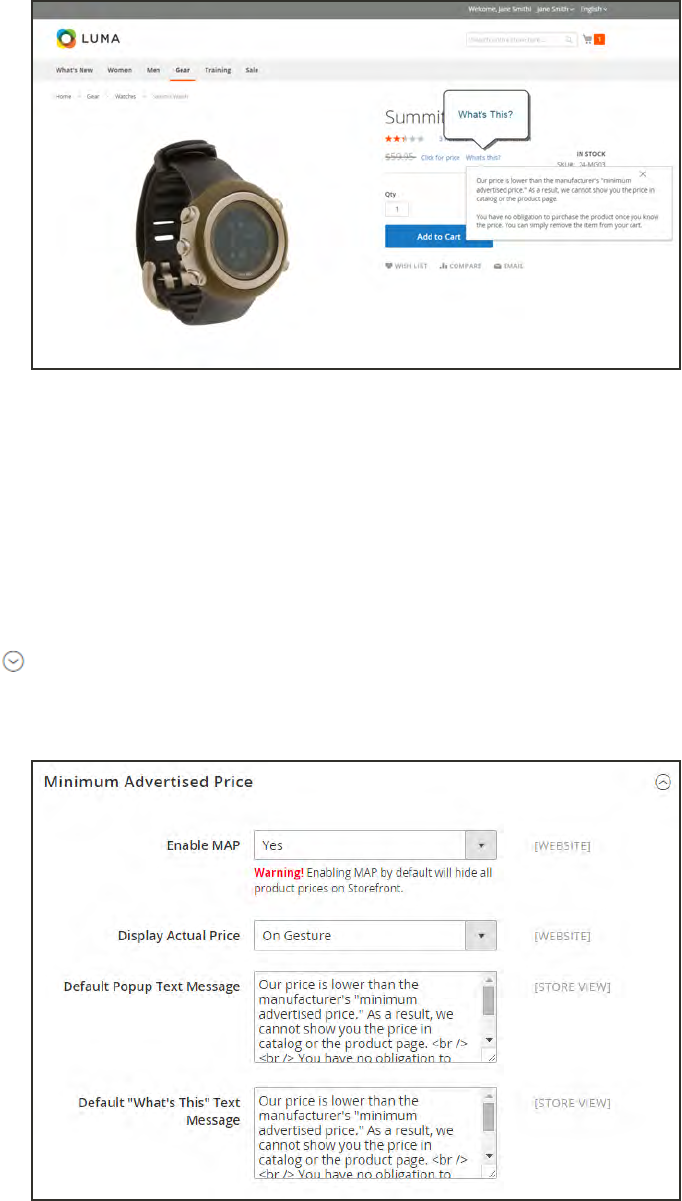
What’s This?
To configure MAP:
1. On the Admin sidebar, tap Stores. Then under Settings, choose Configuration.
2. If applicable, in the upper-right corner, set Store View to the view where the configuration
applies.
3. In the panel on the left under Sales, choose Sales.
4. Expand the Minimum Advertised Price section.
5. If necessary, set Enable MAP to “Yes.” Then, do the following:
Minimum Advertised Price
Advanced Pricing CHAPTER 13: Advanced Settings
224 Magento Community Edition 2.0 User Guide
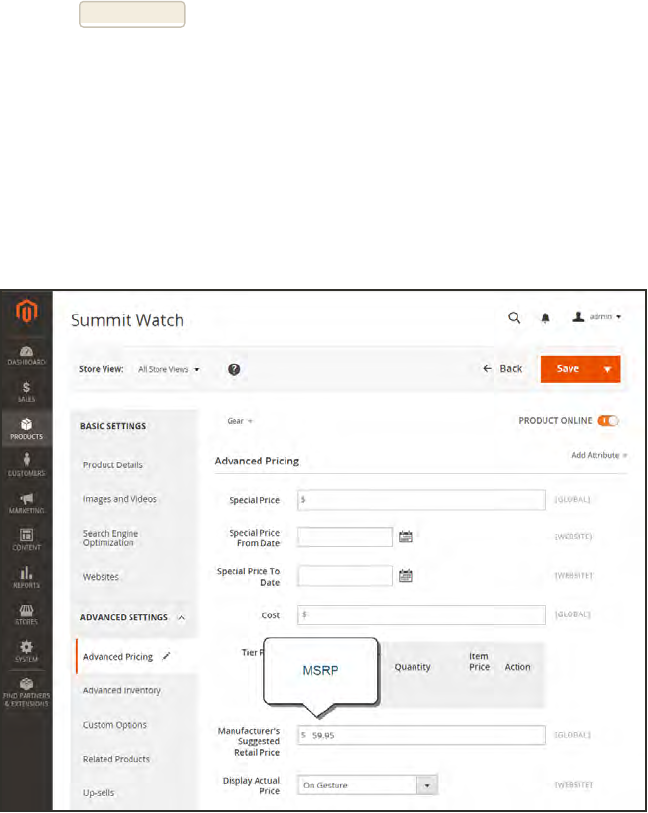
Method 1: Configure MAPfor All Products:
1. To determine when and where you want the actual price to be visible to customers, set Display
Actual Price to one of the following:
lIn Cart
lBefore Order Confirmation
lOn Gesture (on click)
2. Enter the text that you want to appear for the Default Popup Text Message.
3. Enter any additional explanation in the Default “What’s This” Text Message field.
4. When complete, tap Save Config .
Method 2: Configure MAP for a Single Product
1. On the Admin sidebar, tap Products. Then under Inventory, choose Catalog.
2. Open the product in Edit mode.
3. In the panel on the left under Advanced Settings, choose Advanced Pricing. Then, do the
following:
Manufacturer’s Suggested Retail Price
CHAPTER 13: Advanced Settings Advanced Pricing
Magento Community Edition 2.0 User Guide 225

a. Enter the Manufacturer’s Suggested Retail Price.
In this example, the product price is $54.00, and the MSRP is 59.95.
b. Set Display Actual Price to one of the following:
Use config (Default) Applies the MAP configuration setting.
On Gesture Displays the actual product price in a popup when the customer
clicks the “Click for price” or “What’s this?” link.
In Cart Displays the actual product price in the shopping cart.
Before Order
Confirmation
Displays the actual product price at the end of the checkout
process, just before the order is confirmed.
The Manufacturer’s Suggested Retail Price and Display Actual Price fields appear only when
Minimum Advertised Price is enabled in the configuration.
4. When complete, tap Save.
Advanced Pricing CHAPTER 13: Advanced Settings
226 Magento Community Edition 2.0 User Guide
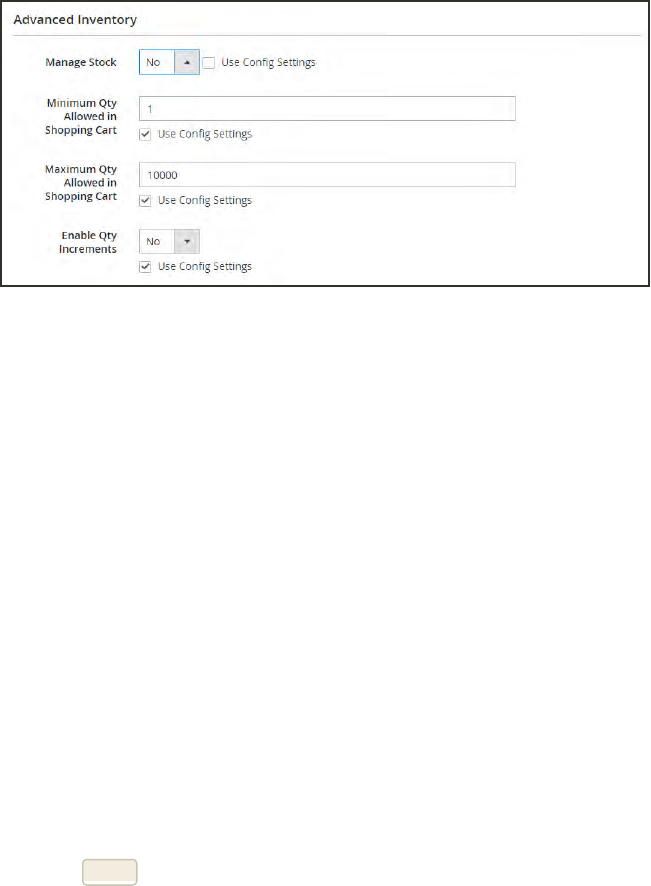
Advanced Inventory
Each product in your catalog has both a short and long version of the Advanced Inventory
options, depending on whether you want to manage stock for the product. The long form
appears when Manage Stock is set to “Yes.” The initial values reflect the default Product Stock
Options set in the configuration.
Advanced Inventory (Short Form)
Method 1: Without Stock Management
1. Open the product in edit mode.
2. In the panel on the left under Advanced Settings, choose Advanced Inventory.
3. Set Manage Stock to “No.” If necessary, clear the Use Config Settings checkbox to make the
field available.
4. Enter the Minimum Qty Allowed in Shopping Cart.
5. Enter the Maximum Qty Allowed in Shopping Cart.
6. If you want to sell by quantity increment, do the following:
a. Set Enable Qty Increments to “Yes.”
b. In the Qty Increments field, enter the number of products that must be purchased in an
incremental step. For example, if you enter 6, the customer must purchase the product in
quantities of 6, 12, 18, and so on.
7. When complete, tap Save.
CHAPTER 13: Advanced Settings Advanced Inventory
Magento Community Edition 2.0 User Guide 227

FIELD SCOPE DESCRIPTION
Manage Stock Global Determines if inventory control is used to manage this
product in your catalog. Options: Yes / No
Minimum Qty Allowed in
Shopping Cart
Global Determines the minimum number of the product that
can be purchased in a single order.
Maximum Qty Allowed in
Shopping Cart
Global Determines the maximum number of the product that
can be purchased in a single order.
Enable Qty Increments Global Determines if the product can be sold in quantity
increments. Options: Yes / No
Qty Increments Global Enter the number of products that must be purchased
at the same time. For example, if set to 6, the
customer must purchase a quantity of 6, 12, 18, and
so on.
When a product is sold in quantity increments, the
number appears in the upper-right corner, next to the
shopping cart link. If the customer tries to purchase
the product in any other quantity, a message appears
in the shopping cart,
Field Descriptions
Method 2: With Stock Management
1. Open the product in edit mode.
2. In the panel on the left under Advanced Settings, choose Advanced Inventory.
3. Set Manage Stock to “Yes.” If necessary, clear the Use Config Settings checkbox to make the
field available. Then, do the following:
a. Enter the Qty currently in stock.
b. Enter the Qty for Item’s Status to Become Out of Stock.
c. Enter the Minimum Qty Allowed in Shopping Cart.
d. Enter the Maximum Qty Allowed in Shopping Cart.
4. If the quantity is a decimal value, do the following:
a. Set Qty Uses Decimals to “Yes.”
b. If the quantity purchased Can be Divided into Multiple Boxes for Shipping, select “Yes.”
Advanced Inventory CHAPTER 13: Advanced Settings
228 Magento Community Edition 2.0 User Guide
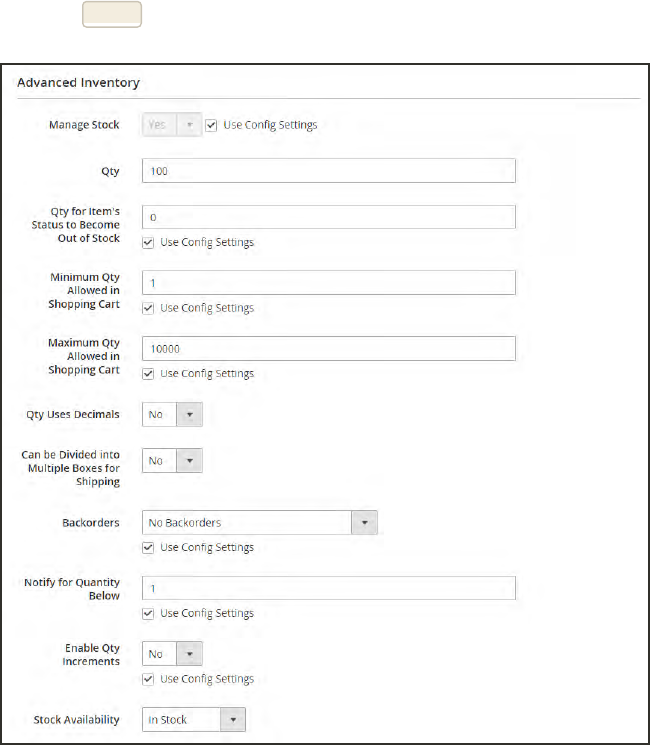
5. Set Backorders to one of the following:
lNo Backorders
lAllow Qty Below 0
lAllow Qty Below 0 and Notify Customer
6. In the Notify for Quantity Below field, enter the stock level that triggers a Quantity Below
notification.
7. To sell the product in quantity increments, do the following:
a. Set Enable Qty Increments to “Yes.”
b. In the Qty Increments field, enter the number of products that must be purchased in an
incremental step. For example, if you enter 6, the customer must purchase the product in
quantities of 6, 12, 18, and so on.
8. If the product is currently in stock, set Stock Availability to “In Stock.”
9. When complete, tap Save .
Advanced Inventory (Long Form)
CHAPTER 13: Advanced Settings Advanced Inventory
Magento Community Edition 2.0 User Guide 229

FIELD SCOPE DESCRIPTION
Manage Stock Global Determines if inventory control is used to manage this
product in your catalog. Options:
Yes Displays the long form with all stock
management options.
No Display the short form without stock
management options.
Qty Global The quantity of the item that is currently in stock.
Qty for Item’s Status to
Become Out of Stock
Global Determines the stock level at which a product is
considered to be out of stock.
Minimum Qty Allowed in
Shopping Cart
Global Determines the minimum number of the product that
can be purchased in a single order.
Maximum Qty Allowed in
Shopping Cart
Global Determines the maximum number of the product that
can be purchased in a single order.
Qty Uses Decimals Global Determines if customers can use a decimal value
rather than a whole number when entering the quantity
ordered. Options:
Yes Permits values to be entered as
decimals, rather than whole
numbers, which is suitable for
products sold by weight, volume or
length.
No Requires quantity values to be
entered as whole numbers.
Can be Divided into
Multiple Boxes for
Shipping
Global Determines if parts of the product can be shipped
separately. Options: Yes / No
Field Descriptions
Advanced Inventory CHAPTER 13: Advanced Settings
230 Magento Community Edition 2.0 User Guide

FIELD SCOPE DESCRIPTION
Backorders Global Determines how backorders are managed.
Backorders do not change the processing status of
the order. Funds are still authorized or captured
immediately when the order is placed, regardless of
whether the product is in stock. Products are shipped
as they become available. Options:
No
Backorders
Does not accept backorders when
product is out of stock.
Allow Qty
Below 0
Accepts backorders when the
quantity falls below zero.
Allow Qty
Below 0 and
Notify
Customer
Accepts backorders when the
quantity falls below zero, but notifies
customers that orders can still be
placed.
Notify for Quantity Below Global Determines the stock level at which notification is
sent that the inventory has fallen below the threshold.
Enable Qty Increments Global Determines if the product can be sold in quantity
increments. Options: Yes / No
Stock Availability Global Determines the current availability of the product.
Options:
In Stock Makes the product available for
purchase.
Out of Stock Unless Backorders are activated,
prevents the product from being
available for purchase and removes
the listing from the catalog.
Field Descriptions (cont.)
CHAPTER 13: Advanced Settings Advanced Inventory
Magento Community Edition 2.0 User Guide 231
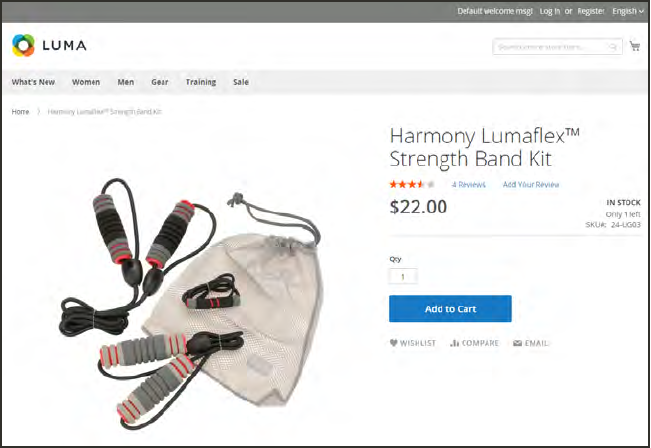
Stock Options
Your catalog can be configured to display the availability of each item as “In Stock” or “Out of
Stock,” The configuration setting applies to the catalog as a whole, and the message changes
according to the stock status of the product. There are several display variations possible,
including how “out of stock” products are managed in the catalog and in product listings.
The out of stock threshold indicates when a product needs to be reordered, and can be set to
any number greater than zero. Another way you can use the stock availability threshold is to
manage products that are in high demand. If you want to capture new customers, rather than
sell to high-quantity buyers, you can set a maximum quantity to prevent a single buyer from
taking out your entire inventory.
In Stock, Only 1 Left
Advanced Inventory CHAPTER 13: Advanced Settings
232 Magento Community Edition 2.0 User Guide

To configure stock options:
1. On the Admin sidebar, tap Stores. Then under Settings, choose Configuration.
2. In the panel on the left under Catalog, choose Inventory.
3. Expand the Stock Options section, and do the following:
a. To return items to stock if an order is canceled, Set Items’ Status to be in Stock When
Order in Canceled to “Yes.”
b. To adjust the quantity on hand when an order is placed, set Decrease Stock When Order
is Placed to “Yes.”
c. Set Display Out of Stock Products to “Yes” to continue to display products in the catalog
that are no longer in stock.
If price alerts are enabled, customers can sign up to be notified when the product is back in
stock.
d. To display the message, “Only x left,” enter the number in the Display X left Threshold
field.
The message begins to appear when the quantity in stock reaches the threshold. For
example, if set to 3, the message “Only 3 left” appears when the quantity in stock reaches
3. The message adjusts to reflect the quantity in stock, until the quantity reaches zero.
e. To display an “In Stock” or “Out of Stock” message on the product page, set Display
Products Availability In Stock on Storefront to “Yes.”
Stock Options
4. When complete, tap Save Config.
CHAPTER 13: Advanced Settings Advanced Inventory
Magento Community Edition 2.0 User Guide 233
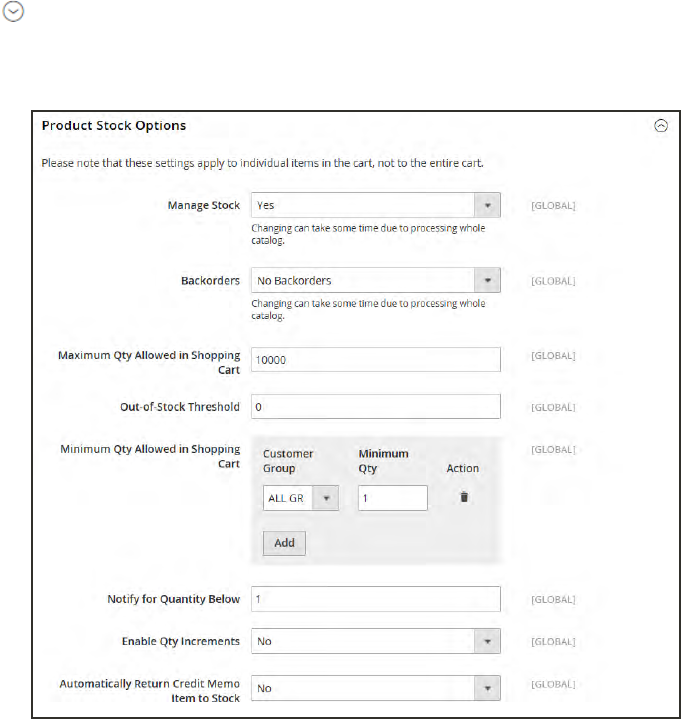
Product Stock Options
The Product Stock Options configuration determines the default product inventory settings at
the product level. The configuration applies to individual products, rather than to the contents
of the cart as a whole.
To configure the default inventory settings:
1. On the Admin sidebar, tap Stores. Then under Settings, choose Configuration.
2. In the panel on the left under Catalog, choose Inventory.
3. Expand the Product Stock Options section, and do the following:
a. To activate inventory control for your catalog, set Manage Stock to “Yes.”
Product Stock Options
Advanced Inventory CHAPTER 13: Advanced Settings
234 Magento Community Edition 2.0 User Guide

b. Set Backorders to one of the following:
No Backorders To not accept backorders when product is out of stock.
Allow Qty Below
0
To accept backorders when the quantity falls below zero.
Allow Qty Below
0 and Notify
Customer
To accept backorders when the quantity falls below zero, and notify
the customer that the order can still be placed.
c. Enter the Maximum Qty Allowed in Shopping Cart.
d. Enter the Qty for Item's Status to Become Out of Stock.
e. Enter the Minimum Qty Allowed in Shopping Cart.
f. In the Notify for Quantity Below field, enter the stock level that triggers notification that
the item is out of stock.
g. To activate quantity increments for the product, set Enable Qty Increments to “Yes.” Then
in the Qty Increments field, enter the number of the items that must be purchased to meet
the requirement. For example, an item that is sold in increments of 6 can be purchased in
quantities of 6, 12, 18, and so on.
h. When a credit memo is issued for the item, set Automatically Return Credit Memo Item to
Stock to “Yes” if you want to return the item to inventory by default.
4. When complete, tap Save Config.
CHAPTER 13: Advanced Settings Advanced Inventory
Magento Community Edition 2.0 User Guide 235
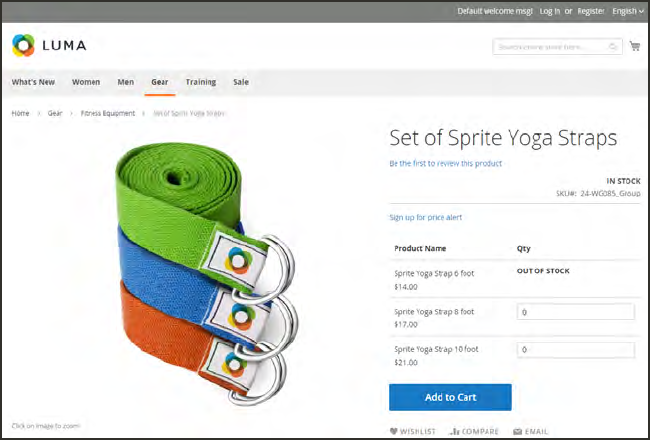
Stock Message Scenarios
You can use a combination of configuration settings to control stock availability messages on
product pages and in listings of products on catalog pages.
Grouped Product with “Out of Stock” Message
Product Page Stock Messages
There are several variations of messaging available for the product page, depending on the
combination of Manage Stock and Stock Availability settings.
Advanced Inventory CHAPTER 13: Advanced Settings
236 Magento Community Edition 2.0 User Guide
Example 1: Show Availability Message
Scenario 1: This combination of settings causes the availability message to appear on the
product page, according to the stock availability of each product.
STOCK OPTIONS MESSAGE
Display product availability in stock in the frontend: Yes
Product Inventory
Manage Stock Yes
Stock Availability In Stock
Out of Stock
“Availability: In
Stock”
“Availability: Out of
Stock”
Scenario 2: When stock is not managed for a product, this combination of settings can be
used to display the availability message on the product page.
STOCK OPTIONS MESSAGE
Display product availability in stock in the frontend: Yes
Product Inventory
Manage Stock No “Availability: In
Stock”
Example 2: Hide Availability Message
Scenario 1: This combination of configuration and product settings prevents the availability
message from appearing on the product page.
STOCK OPTIONS MESSAGE
Display product availability in stock in the frontend: No
Product Inventory
Manage Stock Yes
Stock Availability In Stock
Out of Stock
None
None
CHAPTER 13: Advanced Settings Advanced Inventory
Magento Community Edition 2.0 User Guide 237
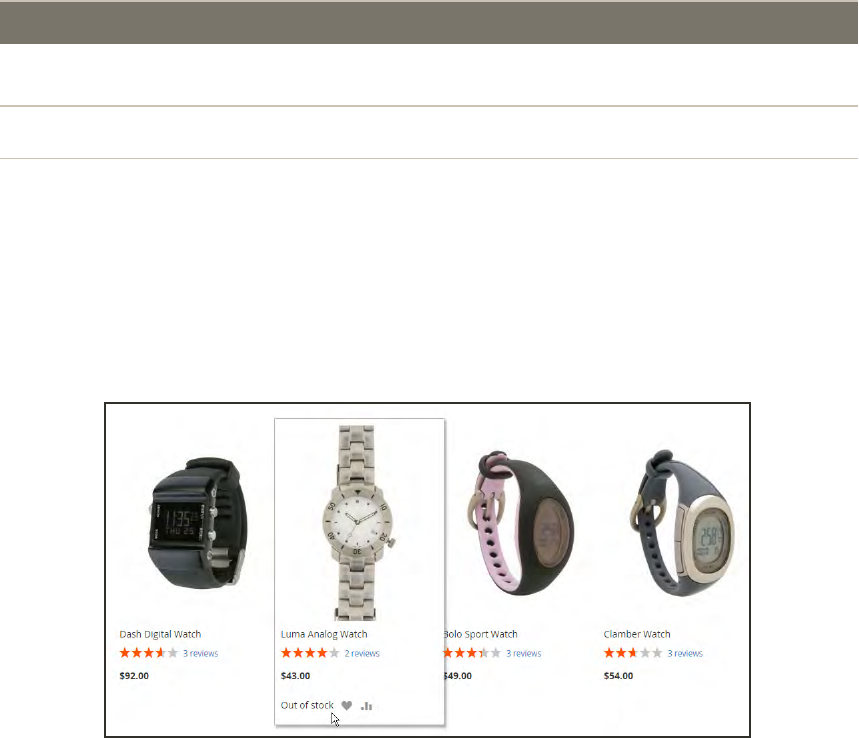
Scenario 2: When stock is not managed for a product, this combination of configuration and
product settings prevents the availability message from appearing on the product page.
STOCK OPTIONS MESSAGE
Display product availability in stock in the frontend: No
Product Inventory
Manage Stock No None
Catalog Page Stock Messages
The following display options are possible for the category and search results lists, depending
on the product availability and configuration settings.
“Out of Stock” Message on Category Page
Advanced Inventory CHAPTER 13: Advanced Settings
238 Magento Community Edition 2.0 User Guide

Example 1: Show Product with “Out of Stock Message”
This combination of configuration settings includes out of stock products in the category and
search results lists, and displays an “out of stock” message.
STOCK OPTIONS MESSAGE
Display Out of Stock Products
Display product availability in stock in the frontend
Yes
Yes “Out of stock”
Display Out of Stock Products Yes
Display product availability in stock in the frontend No None
Example 2: Show Product without “Out of Stock Message”
This combination of configuration settings includes out of stock products in the category and
search results lists, but does not display a message.
STOCK OPTIONS MESSAGE
Display Out of Stock Products
Display product availability in stock in the frontend
Yes
No
None
Example 3: Hide Product Until Back in Stock
This configuration setting omits out of stock products entirely from the category and search
results lists, until they are back in stock.
STOCK OPTIONS MESSAGE
Display Out of Stock Products No None
CHAPTER 13: Advanced Settings Advanced Inventory
Magento Community Edition 2.0 User Guide 239
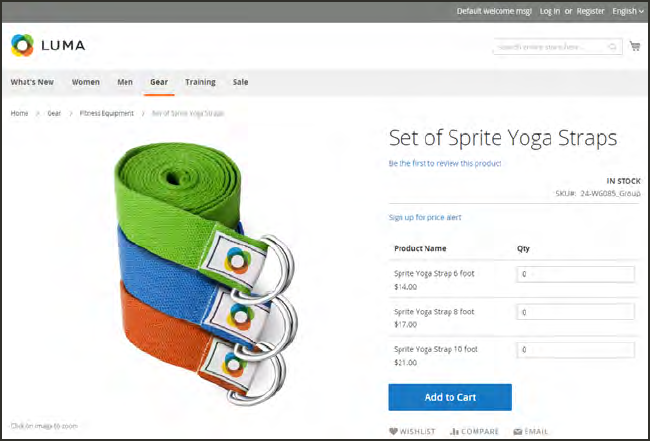
Product Alerts
Customers can subscribe to two types of alerts by email: price change alerts and in-stock alerts.
For each type of alert, you can determine if customers are able to subscribe, select the email
template that is used, and identify the sender of the email.
Sign Up for Price Alert
When price change alerts are enabled, a “Sign up for price alert” link appears on every product
page. Customers can click the link to subscribe to alerts related to the product. Guests are
prompted to open an account with your store. Whenever the price changes, or the product goes
on special, everyone who has signed up to be notified receives an email alert.
The in-stock alert creates a link called “Sign up to get notified when this product is back in
stock” for every product that is out of stock. Customers can click the link to subscribe to the
alert. When the product is back in stock, customers receive email notification that the product
is available. Products with alerts have a Product Alerts tab in the Product Information panel
that lists the customers who have subscribed to an alert.
Advanced Inventory CHAPTER 13: Advanced Settings
240 Magento Community Edition 2.0 User Guide

To set up product alerts:
1. On the Admin sidebar, tapStores. Then under Settings, choose Configuration.
2. In the panel on the left under Catalog, choose Catalog.
3. Click to expand the Product Alerts section, and do the following:
a. To offer price change alerts to your customers, set Allow Alert When Product Price
Changes to “Yes.”
b. Set Price Alert Email Template to the template that you want to use for the price alert
notifications.
c. To offer alerts when out-of-stock products become available again, set Allow Alert When
Product Comes Back in Stock to “Yes.”
The “Sign up to get notified when this product is back in stock” message appears only when
Inventory Stock Options - Display Out of Stock Products is set to “Yes.”
d. Set Stock Alert Email Template to the template that you want to use for product stock
alerts.
e. Set Alert Email Sender to the store contact that you want to appear as the sender of the
email alert.
Product Alerts
4. When complete, tap Save Config.
CHAPTER 13: Advanced Settings Advanced Inventory
Magento Community Edition 2.0 User Guide 241
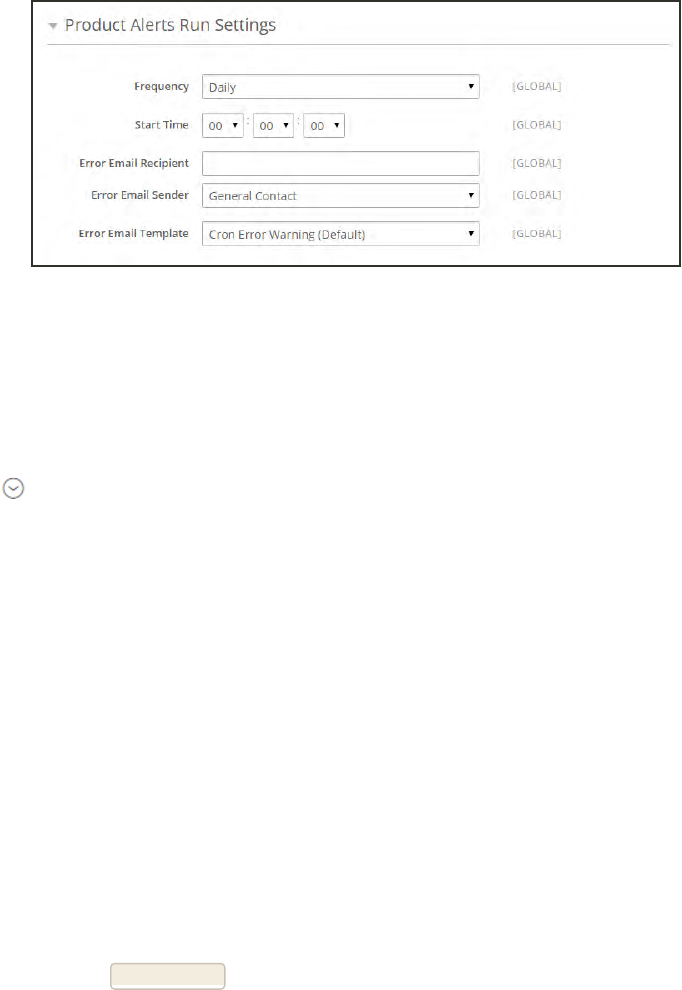
Product Alert Run Settings
These settings enable you to select how often Magento checks for changes that require alerts to
be sent. Additionally, you can select the recipient, sender, and template for emails that are sent
if the sending of alerts fails.
Product Alert Run Settings
To set up product alerts:
1. On the Admin sidebar, tap Stores. Then under Settings, choose Configuration.
2. In the panel on the left under Catalog, choose Catalog.
3. Expand the Product Alerts Run Settings section, and do the following:
a. To determine how often product alerts are sent, set Frequency to one of the following:
lDaily
lWeekly
lMonthly
b. To determine the time of day product alerts are sent, set Start Time to the hour, minute,
and second.
c. In the Error Email Recipient field, enter the email of the person to be contacted if an error
occurs.
d. In the Error Email Sender field, select the store identity that appears as the sender of the
error notification.
e. Set Error Email Template to the transactional email template to be used for the error
notification.
4. When complete, tap Save Config.
Advanced Inventory CHAPTER 13: Advanced Settings
242 Magento Community Edition 2.0 User Guide
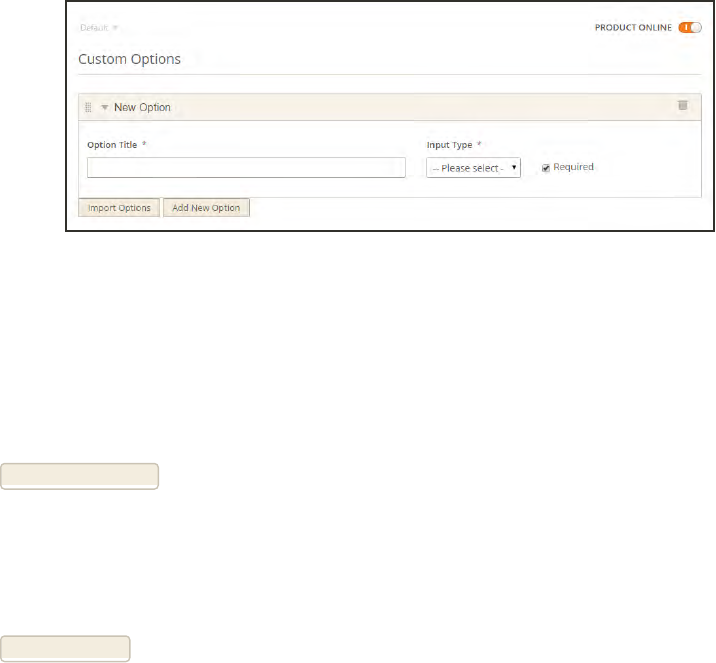
Custom Options
Adding custom options to a product is an easy way to offer customers a selection of options
with a variety of text, selection, and date input types. Custom options are a good solution if
your inventory needs are simple. However, because custom options are variations of a single
SKU, they cannot be used to manage stock. If you have multiple products with the same
options, you can set the custom options in one product, and then import the options to other
products.
Custom Options
To create custom options:
1. Open the product in edit mode.
2. In the panel on the left under Advanced Settings, choose Custom Options.
3. Tap Add New Options. Then, do the following:
a. In the Option Title field, enter a name for the option.
b. Set the Input Type for data entry.
c. If the option is not required to purchase the product, clear the Required checkbox.
4. Tap Add New Row. Then, complete the following:
a. In the Title field, enter a name for this option.
b. In the Price field, enter any markup or markdown from the base product price that applies
to this option.
c. Set Price Type to one of the following:
Fixed The price of the variation differs from the price of the base product by
a fixed monetary amount, such as $1.
Percentage The price of the variation differs from the price of the base product by
a percentage, such as 10%.
CHAPTER 13: Advanced Settings Custom Options
Magento Community Edition 2.0 User Guide 243
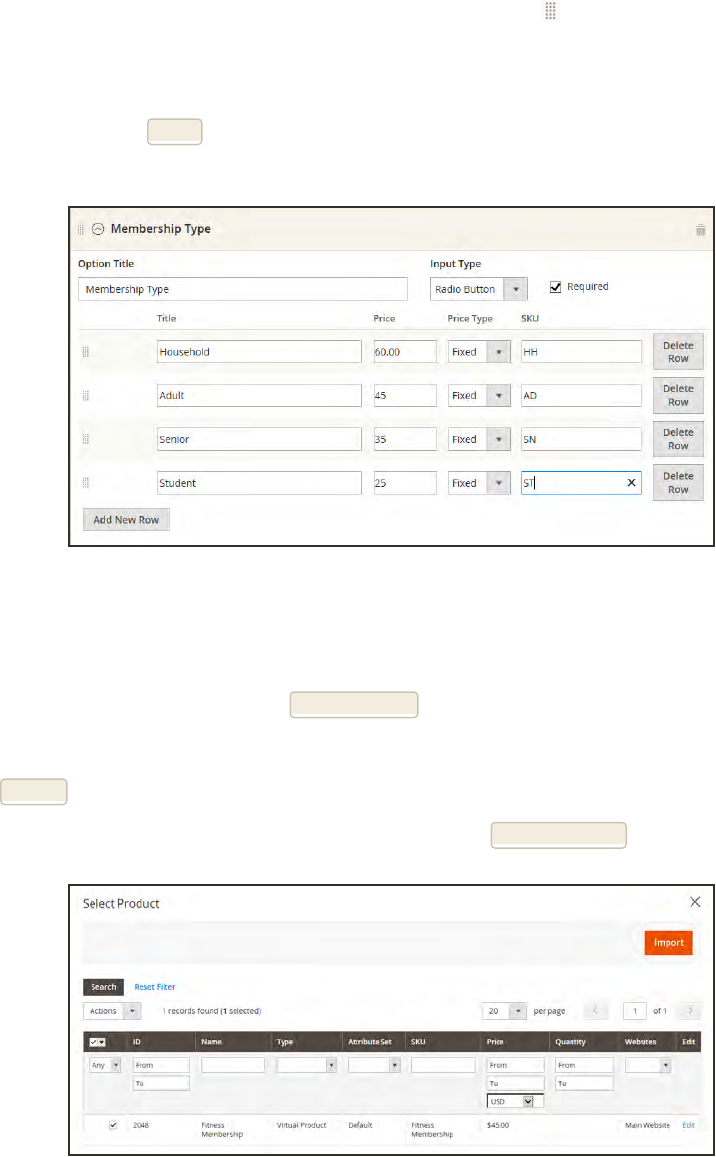
d. Enter a SKU for the option. The option SKUis a suffix that is added to the product SKU.
e. To change the order of the options, tap the Sort Order icon , and drag the option to a
new position in the list.
f. Repeat this step for each option to be added.
5. When complete, tap Save.
Change Order of Options
To import custom options:
1. In the Custom Options section, tap Import Options.
2. In the list, mark the checkbox of the product with the options that you want to import.
3. Tap Import.
4. When complete, you can add more custom options, or tap Save and Close.
Importing Custom Options
Custom Options CHAPTER 13: Advanced Settings
244 Magento Community Edition 2.0 User Guide

INPUT TYPE DESCRIPTION
TEXT
Field A single line input field for text.
Area A multiple-line input box for paragraphs of text. You can use the
WYSIWYG Editor to format the text with HTML tags, or type HTML
directly into the text area.
FILE
File A file to be uploaded by the customer.
SELECT
Drop-down A drop-down list of options. Only one item can be selected at a time.
Radio Buttons A set of options that allows only one to be selected at a time.
Checkbox A checkbox is a variation of a Yes/No option. If the product has more
than one checkbox, multiple selections can be made at the same
time.
Multiple Select A drop-down list of options that accepts multiple selections. To
select multiple options, hold down the Ctrl (PC) or Command (Mac)
key.
DATE
Date An input field for a date value. The date can be typed directly into the
field, selected from a list or calendar. The method of input used and
format of the date is determined by the Date & Time Custom Options
configuration.
Date &Time An input field for date and time values.
Time An input field for a time value.
Input Controls
CHAPTER 13: Advanced Settings Custom Options
Magento Community Edition 2.0 User Guide 245

Related Products
Related products are meant to be purchased in addition to the item the customer is viewing.
The customer can place the item in the shopping cart by simply clicking the checkbox. The
placement of the Related Products block varies according to theme and page layout. In the
example below, it appears at the bottom of the Product View page. With a 2 column layout, the
Related Product block often appears in the right sidebar.
Related Products
To set up related products:
1. Open the product in edit mode.
2. In the panel on the left under Advanced Settings, choose Related Products.
Related Products
Related Products CHAPTER 13: Advanced Settings
246 Magento Community Edition 2.0 User Guide
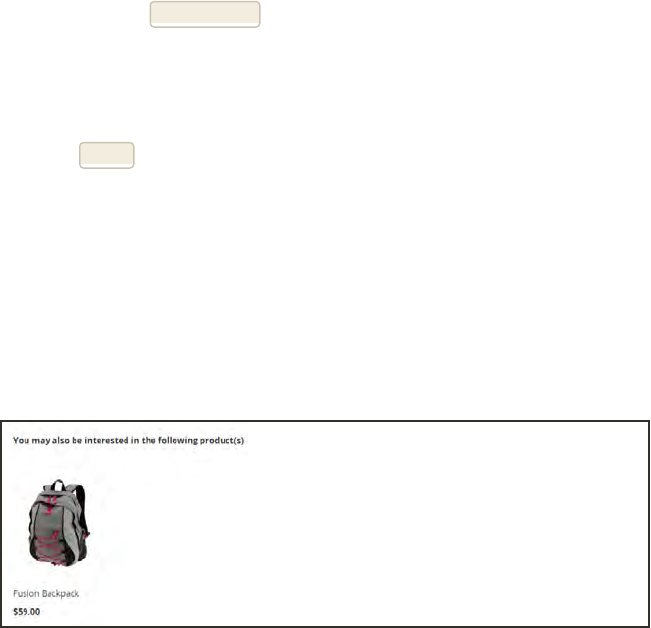
3. In the upper-left corner, tap Reset Filter to list all the available products, or use the search
filters at the top of each column to find specific products.
4. In the list, mark the checkbox in the first column of any product you want to feature as a
related product.
5. When complete, tap Save.
Up-sells
Up-sell products are items that your customer might prefer instead of the product currently
considered. An item offered as an up-sell might be of a higher quality, more popular, or have
better profit margin. Up-sell products appear on the product page under a heading such as,
“You may also be interested in the following product(s).”
Upsell
To select up-sell products:
1. Open the product in edit mode.
2. In the panel on the left under Advanced Settings, choose Up-sells.
CHAPTER 13: Advanced Settings Up-sells
Magento Community Edition 2.0 User Guide 247
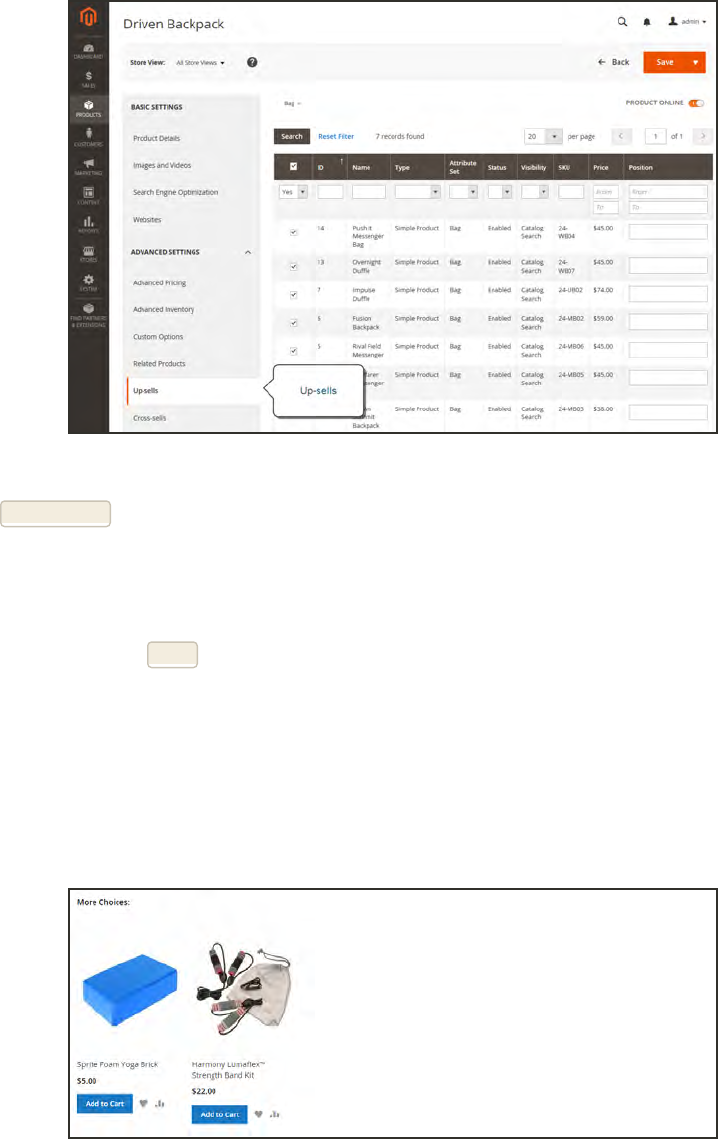
Upsell Product
3. Tap Reset Filter to list all the available products, or use the search filters at the top of each
column to find specific products.
4. In the list, mark the checkbox in the first column of each product you want to feature as an up-
sell.
5. When complete, tap Save.
Cross-sells
Cross-sell items are similar to impulse purchases positioned next to the cash register in the
checkout line. Products offered as a cross-sell appear on the shopping cart page, just before the
customer begins the checkout process.
Cross-sells in Shopping Cart
Cross-sells CHAPTER 13: Advanced Settings
248 Magento Community Edition 2.0 User Guide
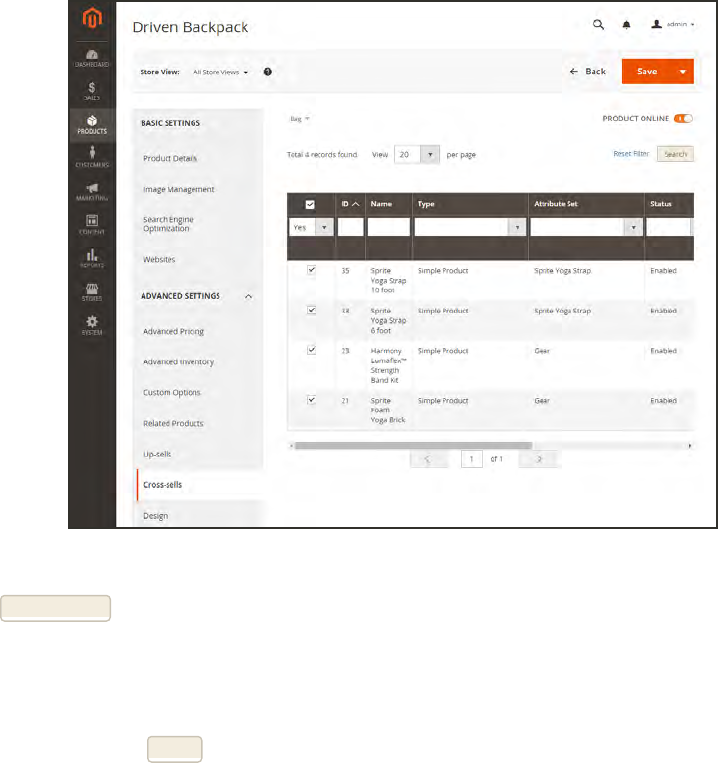
To set up cross-sell products:
1. Open the product in edit mode.
2. In the panel on the left under Advanced Settings, choose Cross-sells.
Cross-sell Products
3. Tap Reset Filter to list all the available products, or use the search filters at the top of each
column to find specific products.
4. In the list, mark the checkbox in the first column of any product you want to feature as a cross-
sell for the product
5. When complete, tap Save.
CHAPTER 13: Advanced Settings Cross-sells
Magento Community Edition 2.0 User Guide 249
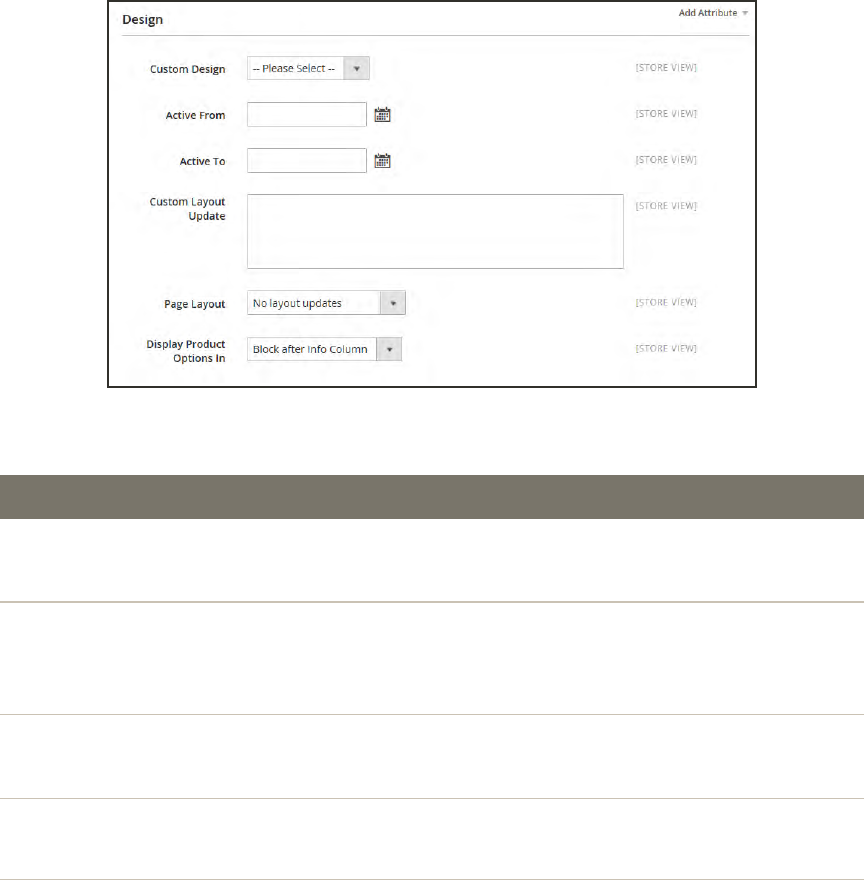
Design
The product Design settings give you the ability to apply a different theme to the product page,
and update the XML code that controls the page layout.
Design
FIELD SCOPE DESCRIPTION
Custom Design Store View To apply a custom theme, select the one you want
from the list of available themes.
Active From Store View If applying a custom theme for a period of time, enter
the beginning date, or select the date from the
Calendar.
Active To Store View If applying a custom theme for a period of time, enter
the ending date, or select the date from the Calendar.
Custom Layout Update Store View You can further customize the theme with XML
coding.
Page Layout Store View To apply a different layout to the product page, select
one of the following:
Field Descriptions
Design CHAPTER 13: Advanced Settings
250 Magento Community Edition 2.0 User Guide

FIELD SCOPE DESCRIPTION
No layout updates This option is preselected by
default and does not apply
layout changes.
Empty This option lets you define
your own layout, such as a 4-
column page. Requires an
understanding of XML.
1 column Applies the 1-column layout.
2 columns with left
bar
Applies the 2 column layout.
2 columns with
right bar
Applies the 2-columns with
right bar layout.
3 columns Applies the 3 column layout.
Display product options in Store View Options include: Product Info Column / Block after
Info Column
Field Descriptions (cont.)
CHAPTER 13: Advanced Settings Design
Magento Community Edition 2.0 User Guide 251
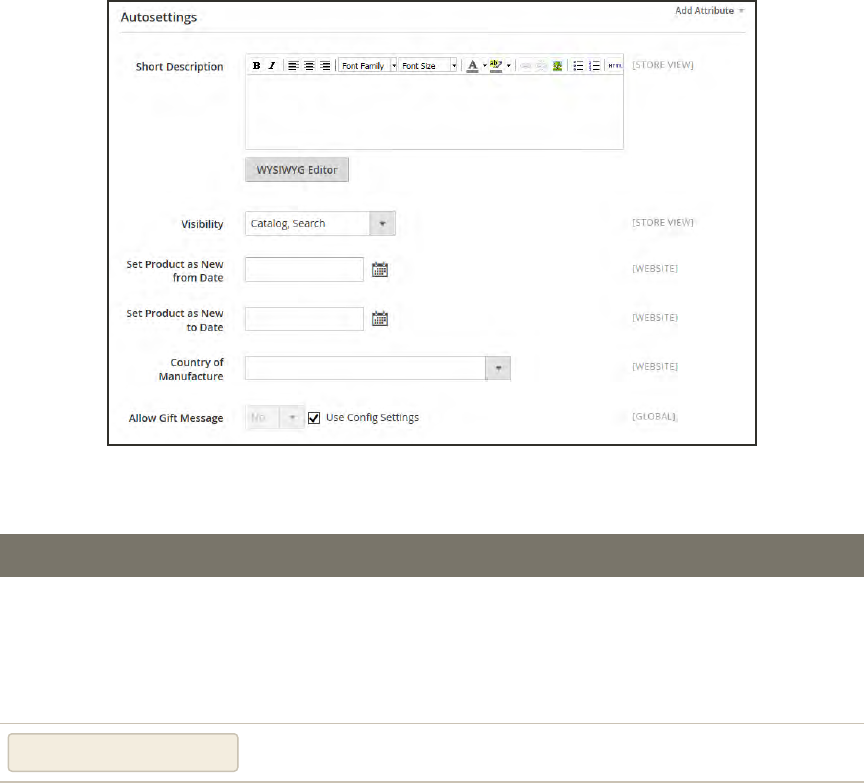
Autosettings
The Autosettings page includes attributes that are dependencies for other operations. For
example, the Set Product as New From / To values determine if the product appears in the
“New Products” block on the home page. You can use the default values for all of these fields, or
change them as needed.
Autosettings
FIELD SCOPE DESCRIPTION
Short Description Store View Provides a summary of the product description that
might appear on catalog pages, depending on theme.
It can also be used instead of the full description for
product RSS feeds that are sent to shopping sites.
WYSIWYGEditor Opens the editor in a popup window.
Visibility Store View Determines the level of visibility the product has
throughout the store. Options:
Not visible individually
Catalog
Search
Catalog, Search
Field Descriptions
Autosettings CHAPTER 13: Advanced Settings
252 Magento Community Edition 2.0 User Guide
FIELD SCOPE DESCRIPTION
Set Product as New from
Date
Website Sets the first date the product will be featured in the
“New Product” block on the home page. The date can
be typed in the box, or selected from the calendar.
Set Product as New to
Date
Website Sets the last date the product will be featured in the
“New Product” block on the home page. The date can
be typed in the box, or selected from the calendar.
Country of Manufacture Website Identifies the country where the product was
manufactured.
Allow Gift Message Global Determines if a gift message can be added to an
order. Clear the checkbox to override the default
setting. Options: Yes / No
Field Descriptions (cont.)
CHAPTER 13: Advanced Settings Autosettings
Magento Community Edition 2.0 User Guide 253
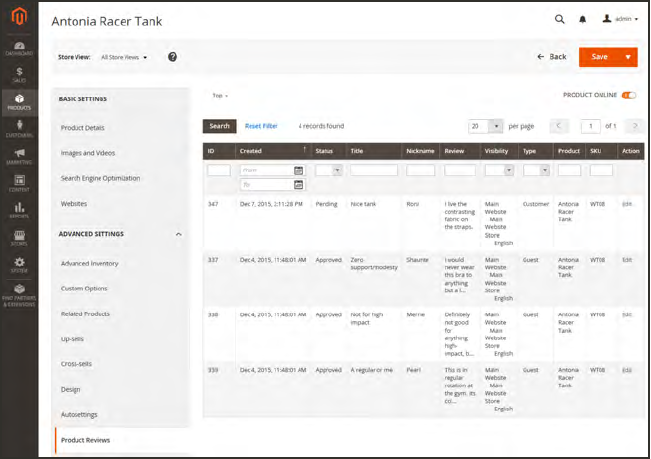
Product Reviews
The Product Reviews page displays all reviews for the product. Reviews can be moderated and
edited in the same manner as from the Review page. To learn more, see: Product Reviews and
Product Ratings.
Product Reviews
To moderate a review:
1. Open the product in edit mode.
2. In the panel on the left under Advanced Settings, choose Product Reviews.
3. Find a review with a status of “Pending,” and open the record in edit mode.
4. Edit the text of the review, as needed.
5. Set Status to one of the following:
lApproved
lNot Approved
Product Reviews CHAPTER 13: Advanced Settings
254 Magento Community Edition 2.0 User Guide
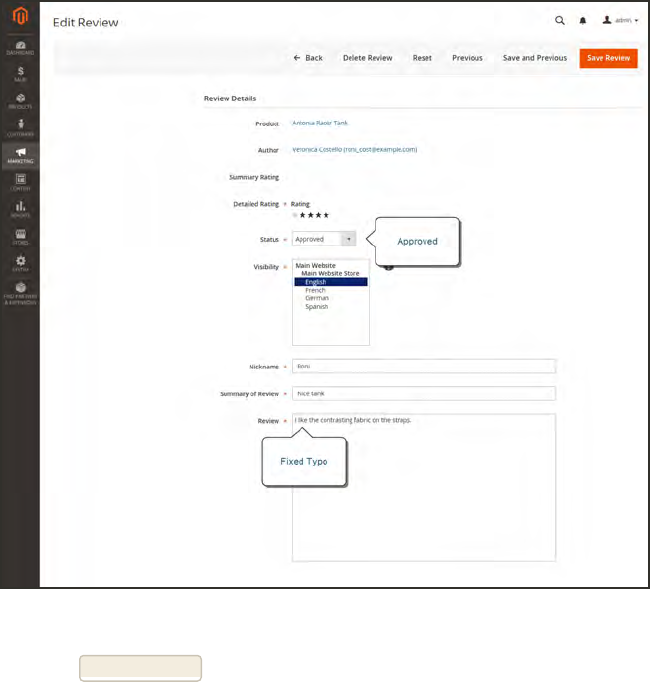
Approving a Review
6. When complete, tap Save Review.
CHAPTER 13: Advanced Settings Product Reviews
Magento Community Edition 2.0 User Guide 255

Notes
256 Magento Community Edition 2.0 User Guide
CHAPTER 14:
Categories
Before you add products to your catalog, you need to establish the basic category structure
of your catalog. Every product must be assigned to at least one category. Categories are
usually created in advance, before products are added to the catalog. However, you can
also add categories “on the fly” while creating a product.
The category structure of your catalog is like an upside-down tree, with the root at the top.
Each section of the tree can be expanded and collapsed. Any disabled or hidden categories
are grayed out. The first level of categories below the root typically appear as options in the
main menu. Below that, you can have as many additional subcategories as you need.
Category Tree
Magento Community Edition 2.0 User Guide 257

FIELD DESCRIPTION
Add Root Category Creates a new root category.
Add Subcategory Adds a subcategory below the current category or subcategory.
Collapse All / Expand All Either collapses or expands the category tree.
Delete Category Removes the current category or subcategory from the tree.
Reset Removes unsaved changes, and restores the previous settings.
Save Category Saves any changes made to the category.
Controls
258 Magento Community Edition 2.0 User Guide
CHAPTER 14: Categories
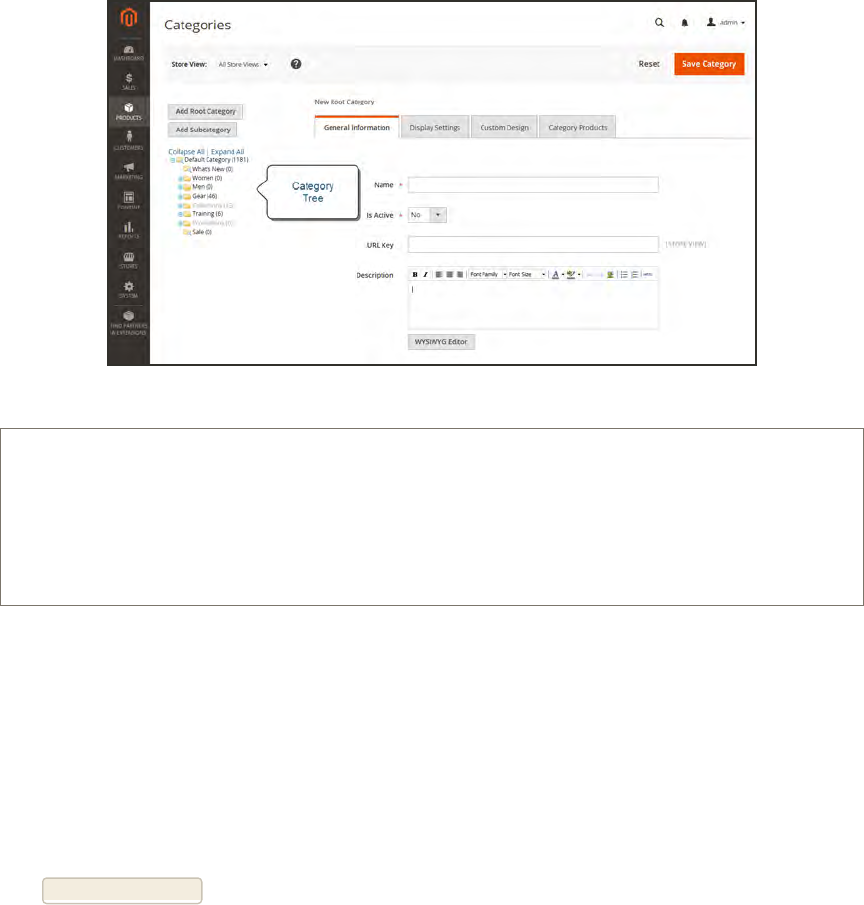
Creating Categories
The category structure of your catalog is represented as an upside-down tree, with the root at
the top. Each section of the tree can be expanded and collapsed. Any disabled or hidden
categories are grayed out. Categories can be dragged and dropped to other locations in the tree,
and each category has an ID number in parentheses after the category name at the top of the
page.
Category Tree
Process Overview:
Step 1: Create a Category
Step 2: Complete the General Information
Step 3: Complete the Display Settings
Step 1: Create a Category
1. On the Admin sidebar, tap Products. Then under Inventory, choose Categories.
2. In the category tree, tap the parent category of the new category. The parent is one level above
the new category.
If you’re starting from the beginning without any data, there might be only two categories in
the list: “Default Category,” which is the root, and an “Example Category.”
3. Tap Add Subcategory.
CHAPTER 14: Categories Creating Categories
Magento Community Edition 2.0 User Guide 259

Step 2: Complete the General Information
1. On the General Information tab, do the following:
a. (Required) Enter the Name of the category.
b. (Required) To enable the category, set Is Active to “Yes.”
c. You can enter a URL Key for the category, or let the system automatically create one that
is based on the category name.
2. In the Description box, enter a paragraph or two of descriptive text for the category landing
page.
3. To display an Image at the top of the category landing page, tap Choose File, and choose the
image to upload.
4. Complete the following category meta data:
lPage Title
lMeta Keywords
lMeta Description
5. (Required) To include the category in the main menu, set Include in Navigation Menu to “Yes.”
6. Tap Save Category.
Step 3: Complete the Display Settings
You can configure the category landing page to display both a static block and product list, or
one or the other. A static block can provide additional information, including text, images, and
even embedded video.
1. On the Display Settings tab, set Display Mode to one of the following:
lProducts Only
lStatic Block Only
lStatic Block and Products
2. If applicable, set CMSBlock to the static block that you want to appear on the category page.
3. If you want this category page to display the “Filter by Attribute” section of layered navigation,
set Is Anchor to “Yes.”
Creating Categories CHAPTER 14: Categories
260 Magento Community Edition 2.0 User Guide
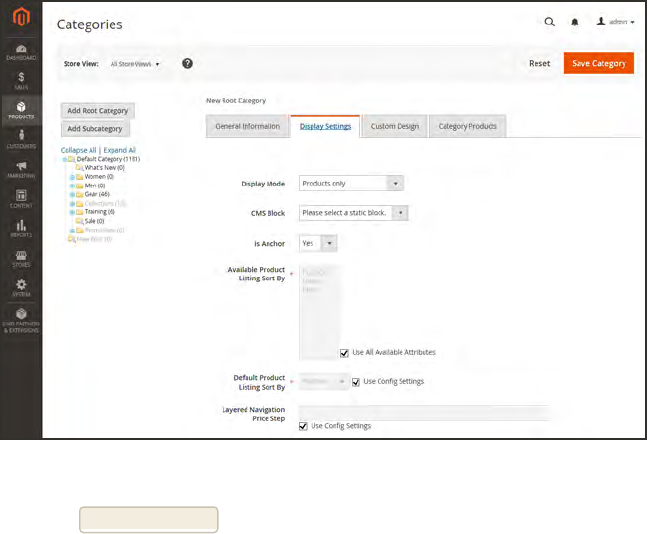
4. Clear the checkbox under Default Product Listing Sort By. Then select one of the available
values to sort the list. By default, all available attributes are listed. The default values typically
include:
lBest Value
lName
lPrice
Display Settings
5. When complete, tap Save Category.
CHAPTER 14: Categories Creating Categories
Magento Community Edition 2.0 User Guide 261

Modifying Categories
After a category is established, it can be edited, moved to another position in the category tree,
or deleted from the catalog. If your catalog is live, first consider how the change might impact
any existing links to products in the category. For example, if your product URLs include the
category path, and the category name is changed, any existing links to products in the category
will be broken. To avoid this problem, you can configure your catalog to automatically create a
permanent redirect if the URLkey changes. You can also use the URL Rewrite tool to redirect
traffic from an old URL to a new one.
To move a category:
1. On the Admin sidebar, tap Products. Then under Inventory, choose Categories.
2. To move a category, drag-and-drop the category to a new position in the tree. Changes to the
category structure are saved automatically.
To delete a category:
3. In the category tree, select the category that you want to delete.
A deleted category cannot be restored, so make sure that you have selected the correct category
before proceeding.
4. Tap Delete Category. Then when prompted to confirm, tap OK.
Creating Categories CHAPTER 14: Categories
262 Magento Community Edition 2.0 User Guide
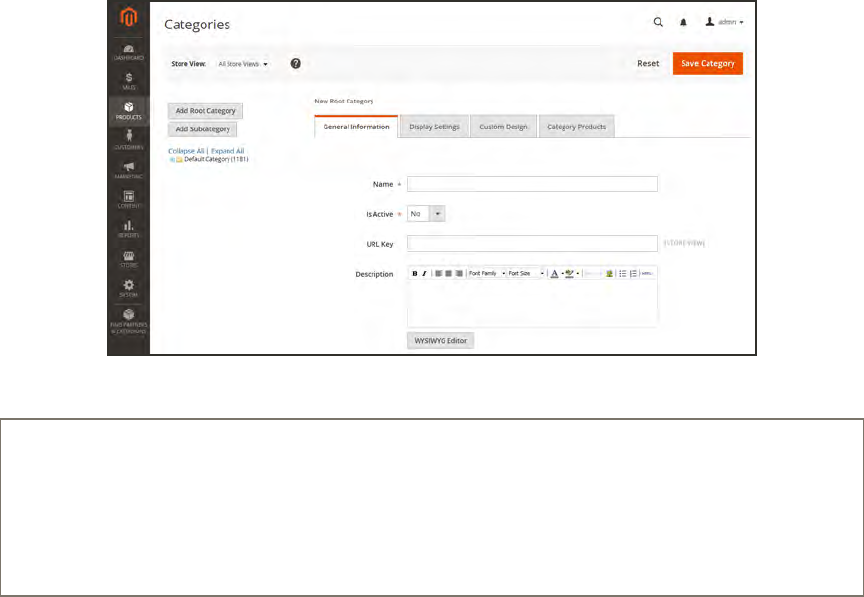
Root Categories
The category structure is like an upside-down tree, with the root on top. All categories in your
catalog are nested below the root. Because the root category is the highest level of the catalog,
your store can have only one root category active at a time. You can, however, create additional
root categories for alternate catalog structures, different stores, and views. Cart price rule
conditions can be based on any category that is a child of the store’s root. The root category is
not visible to customers in the store, and does not have a URLkey.
New Root Category
Process Overview:
Step 1: Create a New Root Category
Step 2: Add Subcategories to the New Root
Step 3: Apply the New Root Category to Your Store
CHAPTER 14: Categories Creating Categories
Magento Community Edition 2.0 User Guide 263
Step 1: Create a New Root Category
1. On the Admin sidebar, tap Products. Then under Inventory, choose Categories.
2. Tap Add Root Category.
3. On the General Information tab, do the following:
a. Enter a Name for the root category.
b. Set Is Active to “Yes.”
c. Enter the URL Key for the root category.
d. Enter a Description of the root category.
a. To upload an Image for the category, tap Choose File and select the image.
b. Complete the following meta data:
lPage Title
lMeta Keywords
lMeta Description
c. To show the root category in the main menu, set Include in Navigation Menu to “Yes.”
4. On the Display Settings tab, set Is Anchor to “Yes.”
5. When complete, tap Save Category.
Step 2: Add Subcategories to the New Root
1. In the category tree on the left, select the new root category that you created in the last step.
2. Tap Add Subcategory.
3. Enter a Name for the subcategory.
4. Set Is Active to “Yes.”
5. Tap Save Category.
6. Repeat this process to create as many subcategories as needed.
Creating Categories CHAPTER 14: Categories
264 Magento Community Edition 2.0 User Guide
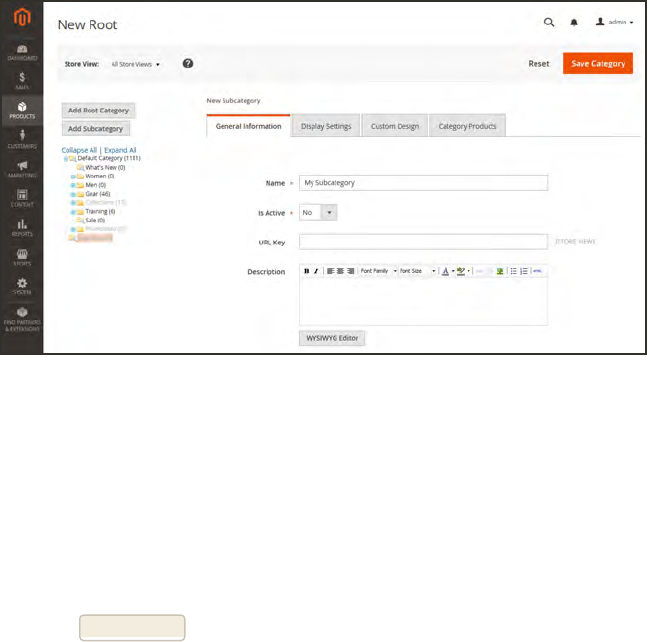
New Root with Subcategory
Step 3: Apply the New Root Category to Your Store
1. On the Admin sidebar, tap Stores. Then under Settings, choose All Stores.
2. Under Store, tap the Main Website Store link.
3. Set Root Category to the new root category.
4. When complete, tap Save Store.
CHAPTER 14: Categories Creating Categories
Magento Community Edition 2.0 User Guide 265

Hidden Categories
There are many ways to use hidden categories. You might want to create additional category
levels for your own internal purposes, but show only the higher-level categories to your
customers. Or, you might want to link to a category that is not included in the navigation
menu.
To create hidden categories:
1. On the Admin sidebar, tap Products. Then under Inventory, choose Categories.
2. In the category tree, select the category you want to hide.
3. On the General Information tab, do the following:
a. Set Is Active to “No.”
b. Set Include in Navigation Menu to “No.”
4. On the Display Settings tab, set Is Anchor to “No.”
5. Although the category is hidden, you can still create additional subcategories beneath it, and
make them active. Complete the following settings for each hidden subcategory:
a. On the General Information tab, set Is Active to “Yes.”
b. On the Display Settings tab, set Is Anchor to “Yes.”
As active categories, you can now link to them from other places in your store, but they will not
appear in the navigation menu.
6. When complete, tap Save Category.
Creating Categories CHAPTER 14: Categories
266 Magento Community Edition 2.0 User Guide
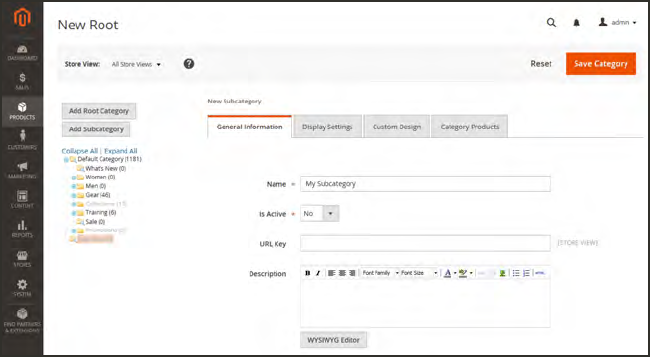
General Information
The General Information tab contains the basic information about the category. You can
activate the category, enter meta data to improve the way the category is indexed by search
engines, define the URL key, and include the category in the main menu.
General Information
CHAPTER 14: Categories General Information
Magento Community Edition 2.0 User Guide 267
FIELD DESCRIPTION
Name (Required) The category name appears in the navigation, and also in
the URL key of the category page and associated product pages.
Is Active (Required) To make this category available, select “Yes.”
Options:Yes/No
URL Key The URL Key is a relative path to the category, and is automatically
generated when the category is saved. The URL Key must be all
lower-case characters, with no spaces. As a best practice, each
word is separated by a hyphen. If you edit the default URL key, a
custom redirect is created automatically. A root category does not
have a URL key.
Description The category description, if used, appears below the category image-
and before the product list.
Image If supported by your theme, a thumbnail image can be associated
with each category and appear as part of the option in the main menu
of the store.
WYSIWYG Editor Opens the editor.
Image The category image, if used, appears at the top of the category page,
before the description and product list.
As an alternative, you can display a CMS static block in place of the
description and image. (See Category Display Settings.)
Browse Locates the image file to be uploaded from the directory of your
system.
Page Title The category page title appears in the browser tab and title bar. As a
best practice, the title should be not more than twelve words in
length, and should include a combination of primary and secondary
keywords.
Field Descriptions
General Information CHAPTER 14: Categories
268 Magento Community Edition 2.0 User Guide

FIELD DESCRIPTION
Meta Keywords Keywords are used by some search engines, and not by others. You
can use a keyword search tool to identify high value keywords that
relate to your category. A general rule is to use no more than thirty
keywords, or 180 characters. Avoid repeats, and empty words such
as “a,” “an,” “or” and “that.”
Meta Description Enter a description of the category, using approximately twenty-five
words or 150 characters.
Include in Navigation
Menu
(Required) Determines if the category is included in the main menu.
Options:
Yes Include this category in the top navigation,
select “Yes.”
No Hides the category, although it is active.
Hidden categories do not appear in the top
navigation, but are included in layered
navigation.
Field Descriptions (cont.)
CHAPTER 14: Categories General Information
Magento Community Edition 2.0 User Guide 269
Display Settings
The Display Settings determine which content elements appear on a category page and the
order in which products appear. You can enable CMS blocks, set the anchor status of the
category, and manage sorting options from the Display Settings tab.
Display Settings
Display Settings CHAPTER 14: Categories
270 Magento Community Edition 2.0 User Guide
FIELD DESCRIPTION
Display Mode Determines the content elements displayed on the category page.
Options:
Products Only
Static Block Only
Static Block and Products
CMS Block To display a CMS static block at the top of the category page, select
the name of the block from the list.
Is Anchor When set to “Yes,” includes the “filter by attribute” section in the
layered navigation. Options:Yes/No
Available Product Listing
Sort By
(Required) The default values are Position, Name, and Price. To
customize the sorting option, clear the Use All Available Attributes
checkbox and select the attributes you want to use. You can define
and add attributes as needed.
Default Product Listing
Sort By
(Required) To define the default “Sort By” option, clear the “Use
Config Settings” checkbox and select an attribute.
Layered Navigation Price
Step
By default, Magento displays the price range in increments of 10,
100, and 1000, depending on the products in the list. To change the
Price Step range, clear the “Use Config Settings” checkbox.
Field Descriptions
CHAPTER 14: Categories Display Settings
Magento Community Edition 2.0 User Guide 271
Custom Design
The Custom Design tab gives you control over the look and feel of a category and all assigned
product pages, and page layout. You can customize a category page its assigned products for a
promotion or to differentiate the category. For example, you might develop distinctive design
for a brand or special line of products.
Custom Design
Custom Design CHAPTER 14: Categories
272 Magento Community Edition 2.0 User Guide
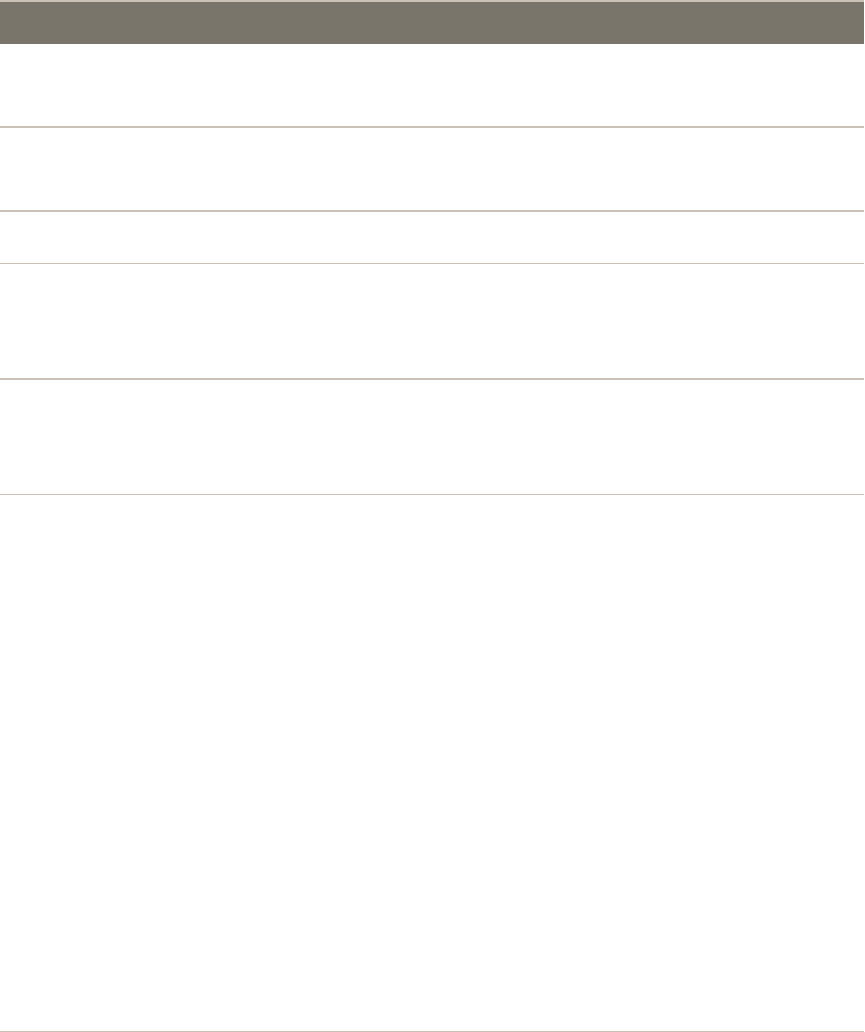
FIELD DESCRIPTION
Use Parent Category
Settings
Allows the current category to inherit the design settings from the
parent category. Options:Yes/No
Apply to Products Applies the custom settings to all products in the category.
Options:Yes/No
Custom Theme Applies a custom theme to the category.
Active From The beginning of a date range that specifies the first day the theme is
to be used in the store. The date can be entered or selected from the
calendar.
Active To The end of a date range that specifies the last day the theme is to be
used in the store. The date can be entered or selected from the
calendar
Page Layout Applies a different layout to the category page. Options:
No layout updates Pre-selected by default, and does not apply
layout changes to the category page.
Empty Use to define your own page layout.
(Requires an understanding of XML.)
1 column Applies a one-column layout to the category
page.
2 columns with left
bar
Applies a two-column layout with a left
sidebar to the category page.
2 columns with
right bar
Applies a two-column layout with a right
sidebar to the category page.
3 columns Applies a three-column layout to the category
page.
Custom Layout Update Updates the theme layout with custom XML code.
Field Descriptions
CHAPTER 14: Categories Custom Design
Magento Community Edition 2.0 User Guide 273
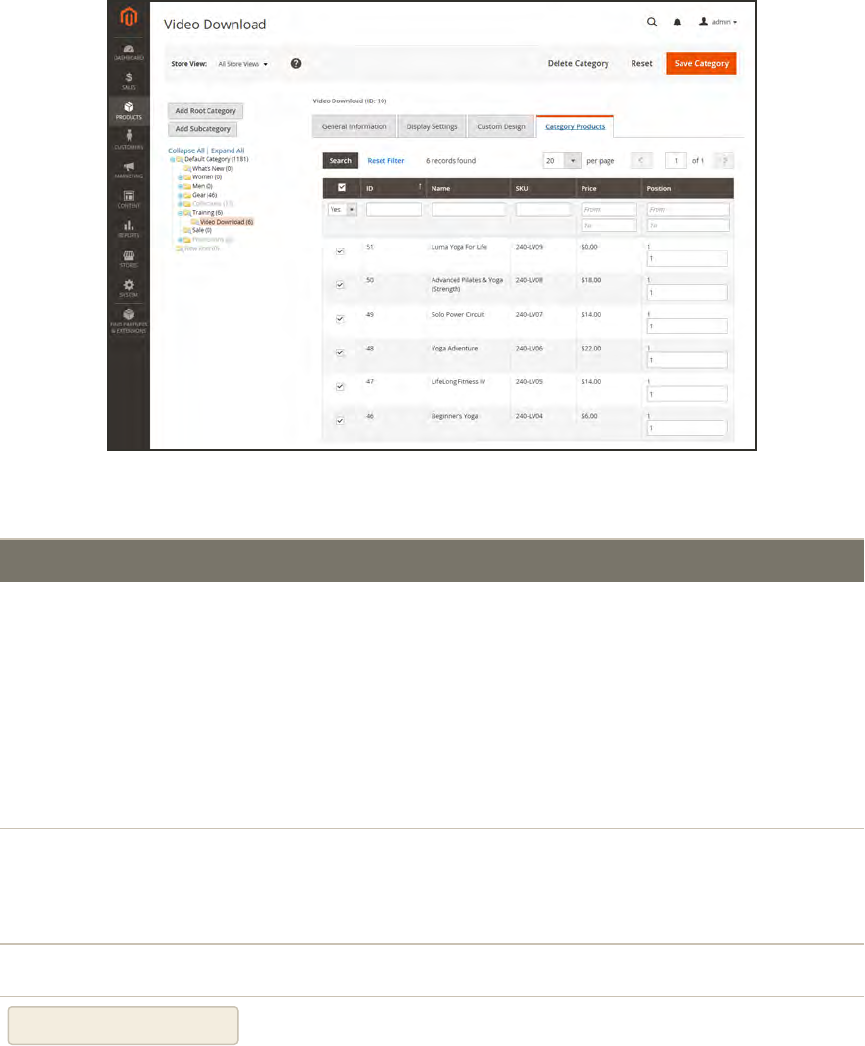
Category Products
The Category Products tab lists the products that are currently assigned to the category. The
search filters at the top of each column are used to add and remove products from the category.
Category Products
FIELD DESCRIPTION
Selection The checkbox in the header of the first column can be used to select
or deselect all products.
The control in the first row determines the type of search, and can be
set to incude any record, or only those that are either assigned or not
assigned to the category. The checkbox in the first column of each
row identifies products to be added to the category. Options: Yes /
No / Any
Search Filters The filter controls at the top of each column can be used to enter
specific values you want to either include or omit from the list,
depending on the Select All setting.
Reset Filter Clears all search filters.
Search Searches the catalog based on the filter criteria, and displays the
result.
Controls
Category Products CHAPTER 14: Categories
274 Magento Community Edition 2.0 User Guide
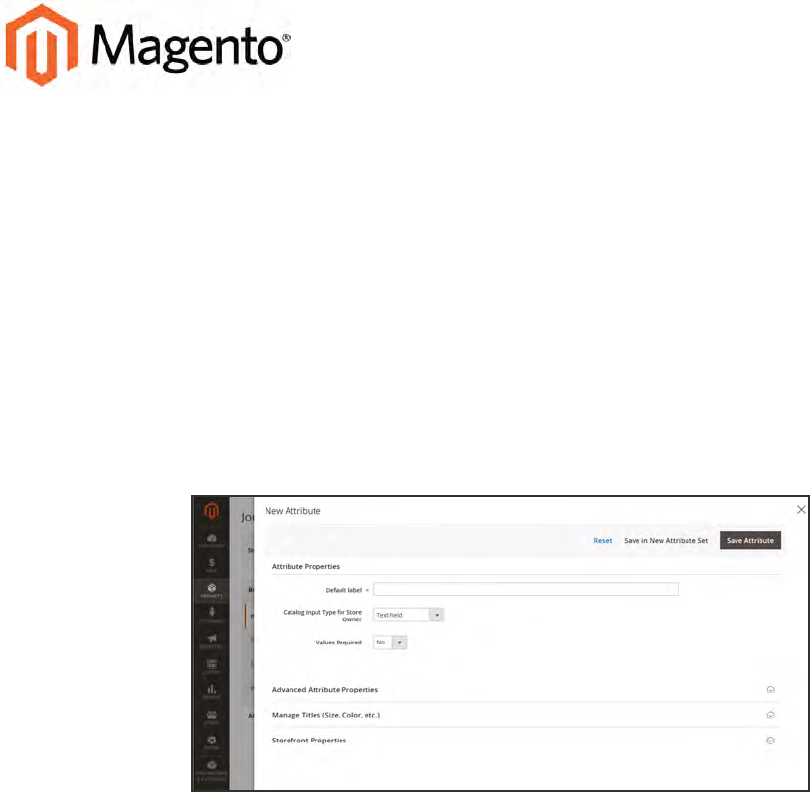
CHAPTER 15:
Using Product Attributes
Attributes are the building blocks of your product catalog, and describe specific
characteristics of a product. Attributes determine the type of input control that is used for
product options, provide additional information for product pages, and are used as search
parameters and criteria for layered navigation, product comparison reports, and
promotions. You can create as many attributes as you need to describe the products in
your catalog. Other attributes such as price, are built into the core Magento platform and
are referred to as “system attributes.”
Creating a New Attribute from an Open Product
Magento Community Edition 2.0 User Guide 275
Adding an Attribute
Although attributes are managed from the Stores menu, you can add new attributes “on the fly”
while working on a product. You can choose from the list of existing attributes, or create a new
attribute. The new attribute is added to the attribute set used by the product.
Process Overview:
Step 1: Add a New Attribute
Step 2: Describe the Basic Properties
Step 3: Describe the Advanced Properties
Step 4: Enter the Field Label
Step 5: Describe the Frontend Properties
Adding an Attribute CHAPTER 15: Using Product Attributes
276 Magento Community Edition 2.0 User Guide
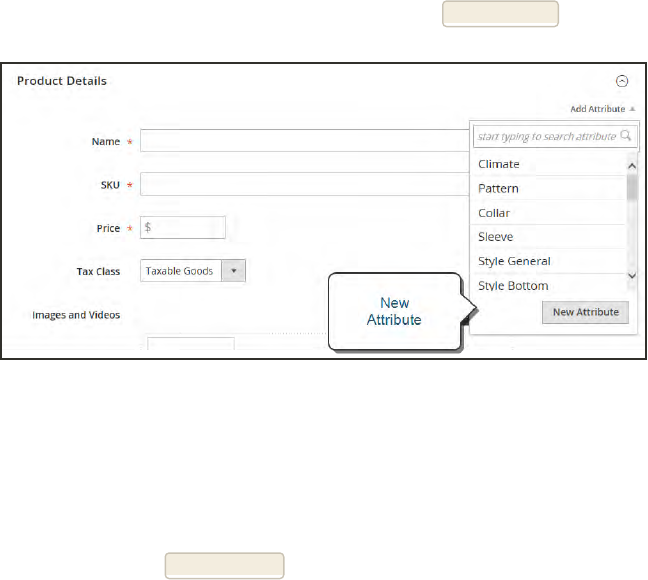
Step 1: Add a New Attribute
1. Open the product in edit mode. Under Product Details , tap Add Attribute.
New Attribute
2. To add an existing attribute to the product, do one of the following:
lType the name of an existing attribute into the search box.
lClick the search box, and choose an existing attribute from the list.
3. To define a new attribute, tap New Attribute. Then, do the following:
CHAPTER 15: Using Product Attributes Adding an Attribute
Magento Community Edition 2.0 User Guide 277
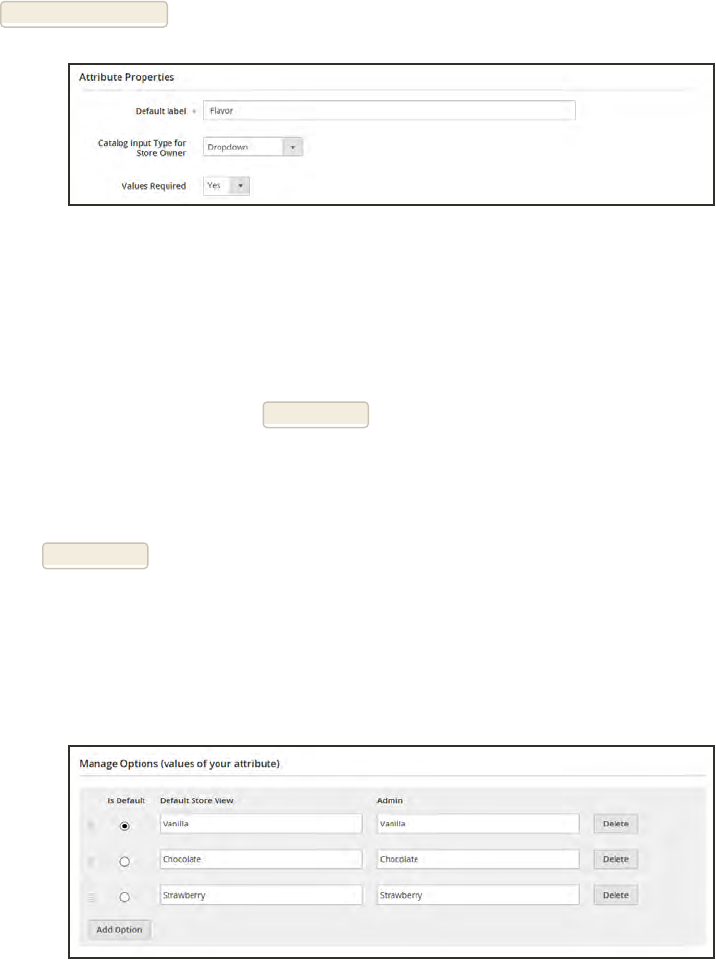
Step 2: Describe the Basic Properties
1. On the Admin sidebar, tap Stores. Then under Attributes, choose Product.
2. Tap Add New Attribute.
Attribute Properties
3. Under Attribute Properties, enter a Default Label to identify the attribute.
4. Set Catalog Input Type for Store Owner to the type in input control to be used for data entry.
5. For Dropdown and Multiple Select input types, do the following:
a. Under Manage Options, tap Add Option.
b. Enter the first value that you want to appear in the list. You can enter one value for the
Admin, and a translation of the value for each store view. If you have only one store view,
you can enter only the Admin value and it will be used for the storefront as well.
c. Tap Add Option and repeat the previous step for each option that you want to include in
the list.
d. Select Is Default to use the option as the default value.
6. If you want to require the customer to choose an option before the product can be purchased,
set Values Required to “Yes.”
Manage Options
Adding an Attribute CHAPTER 15: Using Product Attributes
278 Magento Community Edition 2.0 User Guide

Step 3: Describe the Advanced Properties (if needed)
1. Enter a unique Attribute Code in lowercase characters, and without spaces.
Advanced Attribute Properties
2. Set Scope to indicate where in your store hierarchy the attribute can be used.
3. If you want to prevent duplicate values from being entered, set Unique Value to “Yes.”
4. To run a validity test of any data entered into a text field, set Input Validation for Store Owner
to the type of data that the field should contain. This field is not available for input types with
values that are selected. The test can validate any of the following:
lDecimal Number
lInteger Number
lEmail
lURL
lLetters
lLetters (a-z, A-Z) or Numbers (0-9)
Input Validation
CHAPTER 15: Using Product Attributes Adding an Attribute
Magento Community Edition 2.0 User Guide 279

Step 4: Enter the Field Label
1. Expand the Manage titles section.
2. Enter a Title to be used as a label for the field. If your store is available in different languages,
you can enter a translated title for each view.
Manage Titles
Step 5: Describe the Storefront Properties
1. In the panel on the left, choose Storefront Properties.
2. If the attribute is to be available for search, set Use in Search to “Yes.”
3. To include the attribute in Product Compare, set Comparable on Storefront to “Yes.”
4. For dropdown, multiple select and price fields, do the following:
a. To use the attribute as a filter in layered navigation, set Use in Layered Navigation to
“Yes.”
b. to use the attribute in layered navigation on search results pages, set Use in Search
Results Layered Navigation to “Yes,”
c. In the Position field, enter a number to indicate the relative position of the attribute in the
layered navigation block.
5. To use the attribute in price rules, set Use for Promo Rule Conditions to “Yes,”
6. To allow the text to be formatted with HTML, set Allow HTML Tags on Frontend to “Yes.”
This setting makes the WYSIWYG editor available for the field.
To include the attribute in catalog page listings, set Visible on Catalog Pages on Storefront to
“Yes.”
Adding an Attribute CHAPTER 15: Using Product Attributes
280 Magento Community Edition 2.0 User Guide
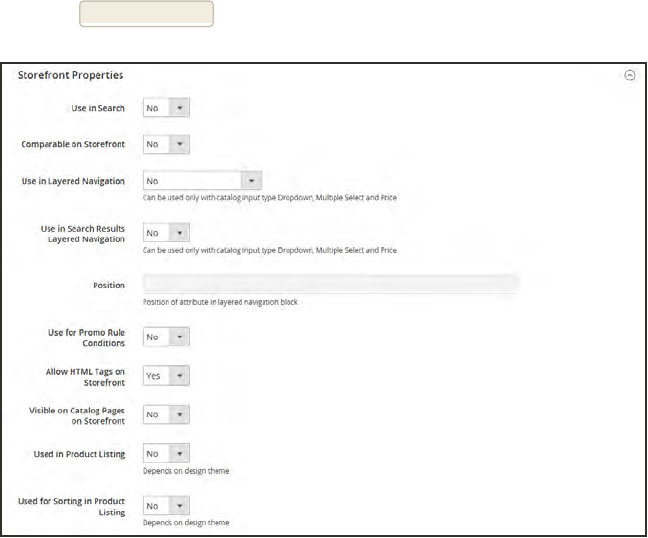
7. Complete the following settings if supported by your theme:
a. To include the attribute on the product detail page, set Visible on Catalog Pages on
Storefront to “Yes.”
b. To include the attribute in product listings, set Used in Product Listing to “Yes.”
c. To use attribute as a sort parameter for product listings, set Used for Sorting in Product
Listing to “Yes.”
8. When complete, tap Save Attribute.
Storefront Properties
CHAPTER 15: Using Product Attributes Adding an Attribute
Magento Community Edition 2.0 User Guide 281
Attribute Input Types
When viewed from the Admin, attributes are the fields that you complete when you create a
product. The input type that is assigned to an attribute determines the type of data that can be
entered and the format of the field or input control. From the standpoint of the customer,
attributes provide information about the product, and are the options and data entry fields
that must be completed to purchase a product.
PROPERTY DESCRIPTION
Text Field A single line input field for text.
Text Area A multiple-line input field for entering paragraphs of text such as a
product description. You can use the WYSIWYG Editor to format the
text with HTML tags, or type the tags directly into the text.
Date Date values can be entered by making a selection from a drop-down
list, or popup calendar . Depending on your system configuration,
dates can be typed directly into a field, or selected from the calendar
or list. To format date and time values, see: Date & Time Custom
Options.
Yes/No Displays a drop-down list with pre-defined options of “Yes” and “No.”
Dropdown Displays a drop-down list of values. Only one item can be selected at
a time. The Dropdown input type is a key component of configurable
products.
Multiple Select Displays a drop-down list of values. To select more than one option,
hold the Ctrl key down and click each item.
Price This input type is used to create price fields that are in addition to the
predefined attributes, Price, Special Price, Tier Price and Cost. The
currency used is determined by your system configuration.
Media Image Associates an additional image with a product, such as a product
logo, care instructions, or ingredients from a food label. When you
add a media image attribute to the attribute set of a product, it
becomes an additional image type, along with Base, Small, and
Thumbnail. The media image attribute can be excluded from the
thumbnail gallery, but can still be used.
Attribute Input Types CHAPTER 15: Using Product Attributes
282 Magento Community Edition 2.0 User Guide
PROPERTY DESCRIPTION
Fixed Product Tax Lets you define FPT rates based on the requirements of your locale.
Visual Swatch Displays a swatch that depicts the color, texture, or pattern of the
product. A visual swatch can be filled with a hexadecimal color value,
or display an image.
Text Swatch Displays a text value such as size. A text swatch looks like a button,
and can be used to represent an attribute value such as size.
CHAPTER 15: Using Product Attributes Attribute Input Types
Magento Community Edition 2.0 User Guide 283
Date & Time Options
You can customize the format of date and time fields, and select the input control that is used
for data entry. Dates values can be selected from a drop-down list, or pop-up calendar.
Pop-up Calendar
Attribute Input Types CHAPTER 15: Using Product Attributes
284 Magento Community Edition 2.0 User Guide
To format date/time fields:
1. On the Admin sidebar, tap Stores. Then under Settings, choose Configuration.
2. In the panel on the left, tap Catalog. Then, choose the Catalog option.
3. Expand the Date & Time Custom Options section, and do the following:
a. To use a popup calendar as the input control for date fields, set Use JavaScript Calendar
to “Yes.”
b. To establish the Date Fields Order, set each to one of the following:
lMonth
lDay
lYear
c. Set your preferred Time Format to one of the following:
l12h AM/PM
l24h
d. To establish the Year Range for the drop-down year values, enter the year in YYYY format
to set the from and to dates. If blank, the field defaults to the current year.
Date & Time Custom Options
4. When complete, tap Save Config.
CHAPTER 15: Using Product Attributes Attribute Input Types
Magento Community Edition 2.0 User Guide 285

Notes
286 Magento Community Edition 2.0 User Guide


CHAPTER 16:
Marketing Menu
The Marketing menu provides access tools for managing promotions, communications,
SEO, and user-generated content.
Marketing Menu
Magento Community Edition 2.0 User Guide 289

Promotions
Create catalog and cart price rules that trigger
discounts based on a variety of conditions. Set up
promotions that spring into action when the required
conditions are met.
Communications
Customize all notifications sent from your store.
Create newsletters and publish RSS feeds.
SEO & Search
Analyze search terms to help customers find products
in the store, manage meta data, and create a site
map. Use redirects to manage URL changes and avoid
broken links.
User Content
Leverage user-generated product reviews to create a
sense of community, and increase sales.
290 Magento Community Edition 2.0 User Guide
CHAPTER 16: Marketing Menu
CHAPTER 17:
Shopping Tools
Your store includes a set of shopping tools that create opportunities for customers to
interact with your store, and share the experience with friends.
Product Page
Magento Community Edition 2.0 User Guide 291
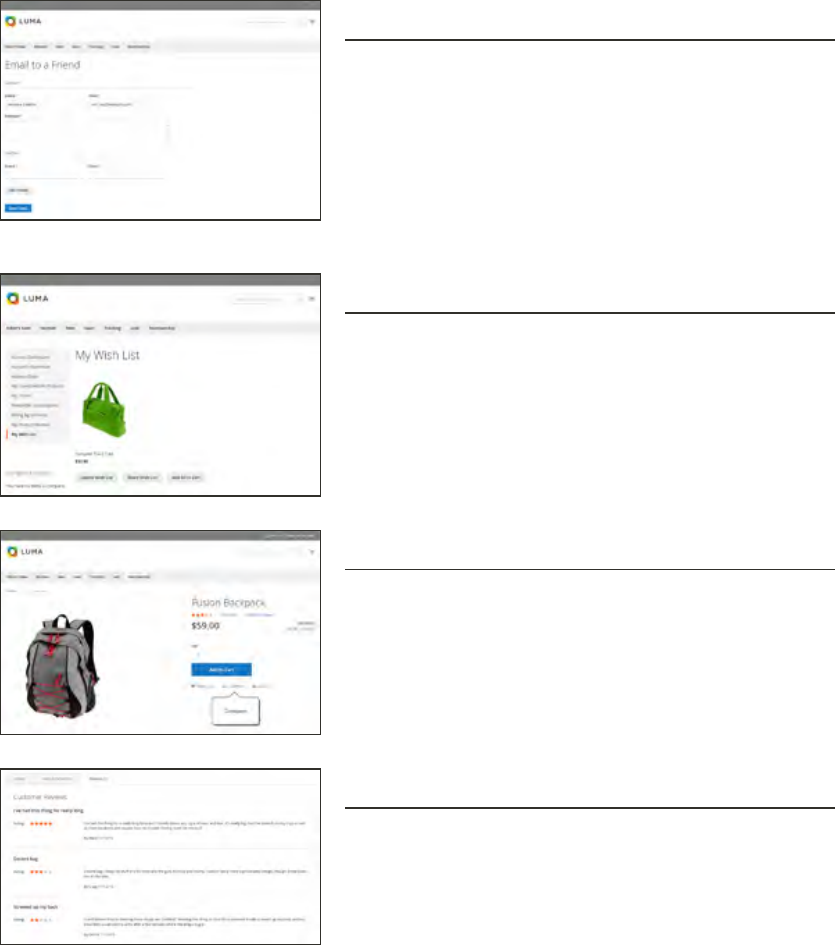
Opportunities to Engage
Email a Friend
The Email a Friend link makes it easy for your
customers to share links to products with their
friends.
Wish List
A wish list is a list of products that a registered
customer can share with friends, or save to transfer to
the cart at a later date.
Compare Products
The Compare Products block lets your customers
quickly compare the features of one product with
another.
Product Reviews
Product reviews help build a sense of community, and
are considered to be more credible than any
advertising money can buy.
Opportunities to Engage CHAPTER 17: Shopping Tools
292 Magento Community Edition 2.0 User Guide

Email a Friend
The Email a Friend link makes it easy for your customers to share links to products with their
friends. In the Magento demo store, the Email a Friend link appears as an envelope icon. The
message template can be customized for your voice and brand. To prevent spamming, you can
limit the number of recipients for each email, and the number of products that can be shared
over a one-hour period.
Email a Friend
To configure Email a Friend:
1. On the Admin sidebar, tap Stores. Then under Settings, choose Configuration.
2. In the panel on the left under Catalog, choose Email to a Friend.
3. Expand the Email Templates section. Then, do the following:
CHAPTER 17: Shopping Tools Email a Friend
Magento Community Edition 2.0 User Guide 293

Email Templates
a. Set Enabled to “Yes.”
b. Set Select Email Template to the template you want to use as the basis of the messages.
c. If you want to require that only registered customers can send email to friends, set Allow
for Guests to “No.”
d. In the Max Recipients field, enter the maximum number of friends who can be on the
distribution list for a single message.
e. In the Max Products Sent in 1 Hour field, enter the maximum number of products that
can be shared by a single user with friends over a one-hour time period.
f. Set Limit Sending By to one of the following methods to identify the sender of emails:
IP Address (Recommended) Identifies the sender by the IP address of
the computer that is used to send the emails.
Cookie (unsafe) Identifies the sender by browser cookie. This method is less
effective because the sender can delete the cookie to bypass
the limit.
4. When complete, tap Save Config.
Email a Friend CHAPTER 17: Shopping Tools
294 Magento Community Edition 2.0 User Guide
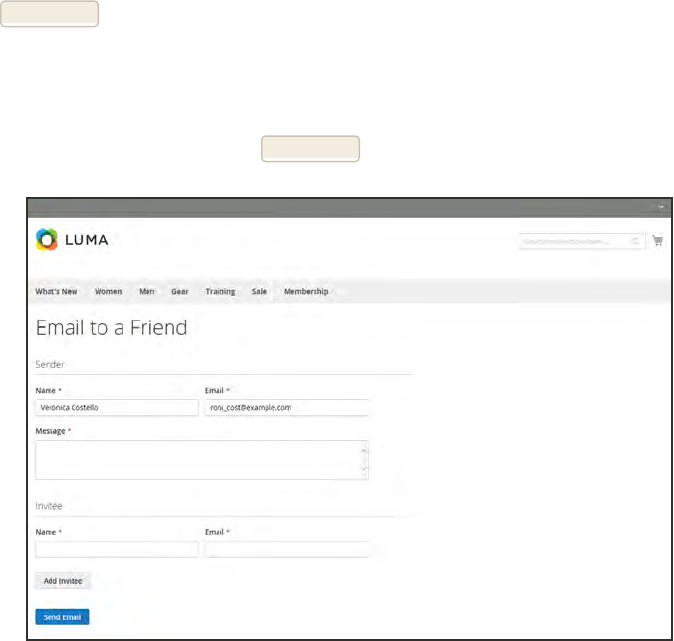
To send email to a friend:
1. On a catalog page, click the Email a Friend link. Then, do one of the following:
lLog in to your customer account.
lSign up for a new account.
2. Complete the Message and enter the recipient Name and Email Address. To add more
recipients, do the following:
a. Tap Add Invitee.
b. Enter the Name and Email Address of the additional person.
You can send the message to as many additional people as the configuration allows.
3. When ready to send the message, tap Send Email.
Email a Friend Form
CHAPTER 17: Shopping Tools Email a Friend
Magento Community Edition 2.0 User Guide 295

Wish List
A wish list is a list of products that a registered customer can share with friends, or save to
transfer to the cart at a later date. When wish lists are enabled, the Add to Wishlist link
appears on the category and product pages of each product in the store. Depending on the
theme, it might be a text link or a graphic image.
Shared wish lists are sent from a store email address, but the body of the message contains a
personalized note from the customer. You can customize the email template that is used when
wish lists are shared, and choose the store contact that appears as the sender.
Wish lists can be updated from the dashboard of the customer account, Items can be added or
transferred between the wish list and cart by the customer or by the store administrator.
Wishlist in Customer Account
When a product with multiple options is added to a wish list, any options that have been
selected by the customer are included in the wish list item description. For example, if the
customer adds the same pair of shoes, but in three different colors, each pair appears as a
separate wish list item. On the other hand, if the customer adds the same product to the wish
list multiple times, the product appears only once, but with an updated quantity that reflects
the number of times the product was added.
Wish List CHAPTER 17: Shopping Tools
296 Magento Community Edition 2.0 User Guide
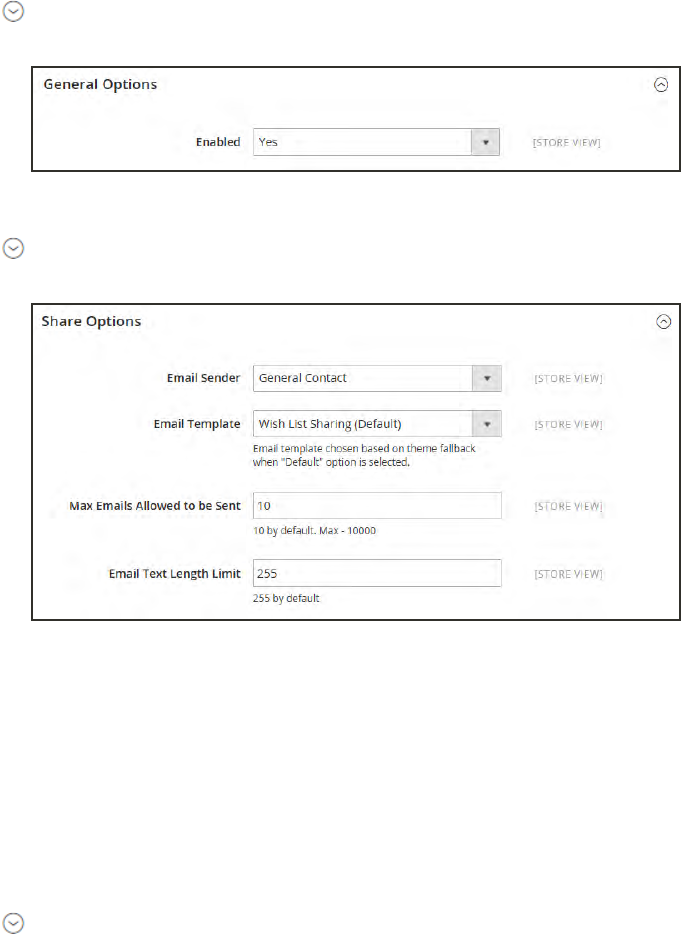
Configuring the Wish List
The configuration enables wish lists, and determines the email template and sender of email
messages that are used when a wish list is shared.
To configure the wish list:
1. On the Admin sidebar, tap Stores. Then under Settings, choose Configuration.
2. In the panel on the left under Customers, choose Wish List.
3. Expand the General Options section. Then, verify that Enabled is set to “Yes.”
General Options
4. Expand the Share Options section. Then, do the following:
Share Options
a. Set Email Sender to the store contact that appears as the sender of the message.
b. Set Email Template to the template to be used when a customer shares a wish list.
c. To limit the number of emails a customer can send in a batch, enter the Max Emails
Allowed to be Sent. The default value is 10, and the maximum allowed is 10,000.
d. To limit the size of the message, enter the Email Text Length Limit. The default value is
255.
5. Expand the My Wish List Link section. Then, set Display Wish List Summary to one of the
following:
CHAPTER 17: Shopping Tools Wish List
Magento Community Edition 2.0 User Guide 297
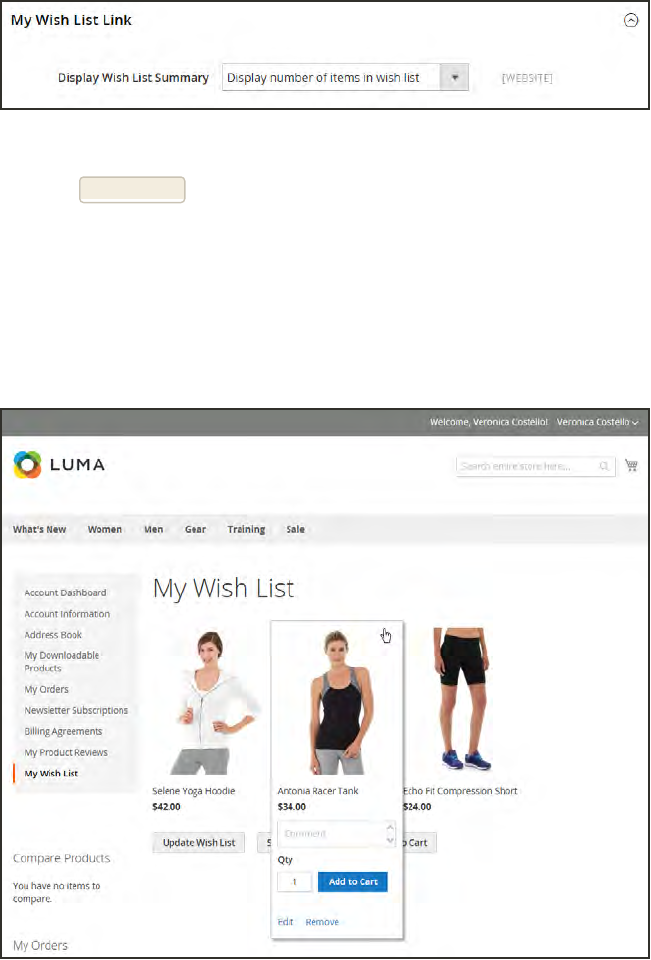
lDisplay number of items in wish list
lDisplay item quantities
My Wish List Link
6. When complete, tap Save Config.
Sharing a Wish List
Customers can manage their wish lists from the dashboard of their accounts. Store
administrators can also help customers manage their wish lists from the Admin.
Customer Dashboard with Wish List
Wish List CHAPTER 17: Shopping Tools
298 Magento Community Edition 2.0 User Guide
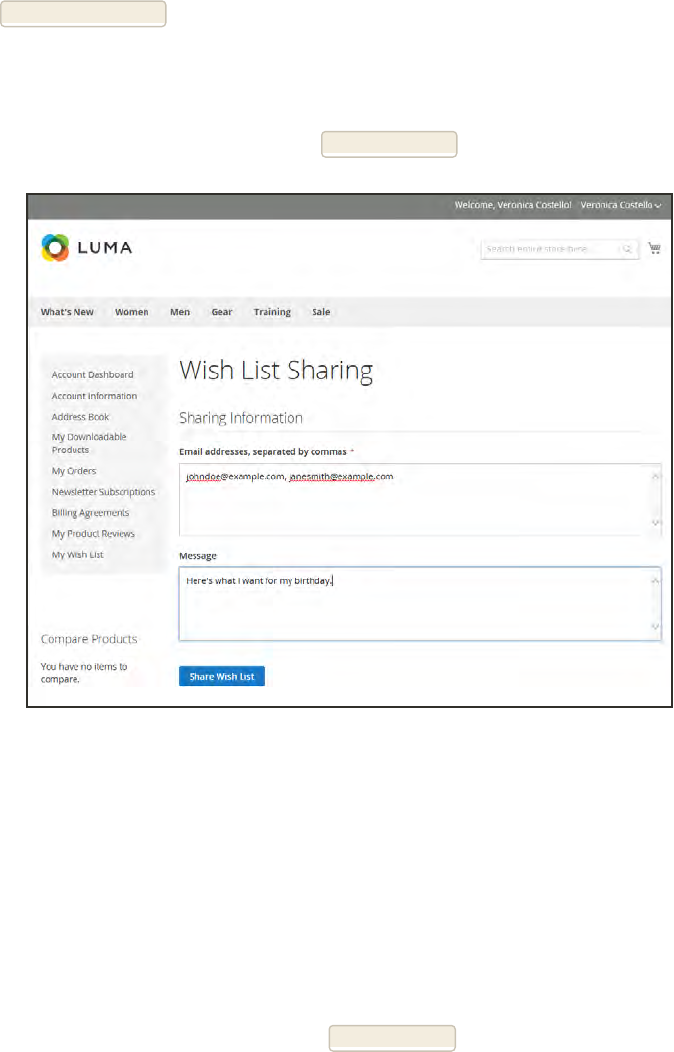
To share your wish list:
1. In the panel on the left of your customer account dashboard, choose My Wish List.
2. To add a comment to a specific item, hover over the image. Then type your Comment in the
box.
3. To share your wish list, do the following:
a. Tap Share My Wish List.
b. Enter the email address of each recipient, separated by a comma.
c. Enter a Message for the body of the email.
4. When you’re ready to send the message, tap Share Wish List.
Customer Dashboard with Wish List
To transfer an item to your cart:
1. To add a single item, do the following:
a. Hover over the item.
b. Enter the Qty that you want to add to the cart.
c. Tap Add to Cart.
2. To transfer all wish list items to the cart, tap Add All to Cart.
CHAPTER 17: Shopping Tools Wish List
Magento Community Edition 2.0 User Guide 299
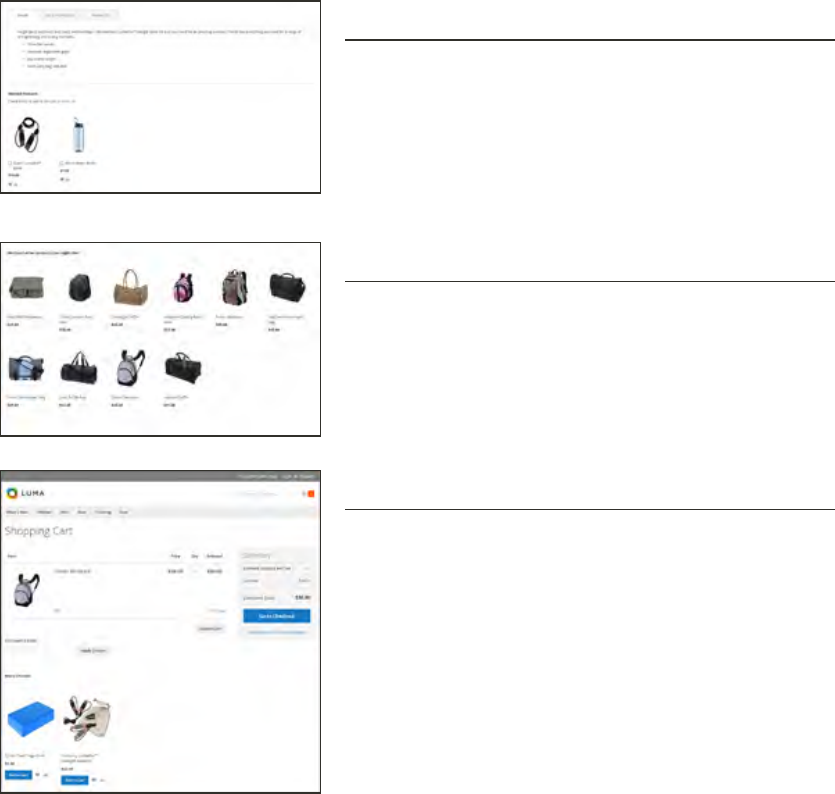
Product Relationships
Products in your catalog can be promoted on other pages by defining the nature of the
relationship between the products. The options available are: Up-sell products, Related
products, and Cross-sell products.
Related Products
Related products are meant to be purchased in
addition to the item the customer is viewing. They
complement, enhance, or add optional features to the
product.
Up-sells
Up-sell products are items that are similar, but are
perhaps of a higher-quality, more popular, or have a
better profit margin than the item the customer is
considering.
Cross-sells
Cross-sell products are offered on the shopping cart
page as last-minute purchases before the checkout
process begins.
Product Relationships CHAPTER 17: Shopping Tools
300 Magento Community Edition 2.0 User Guide
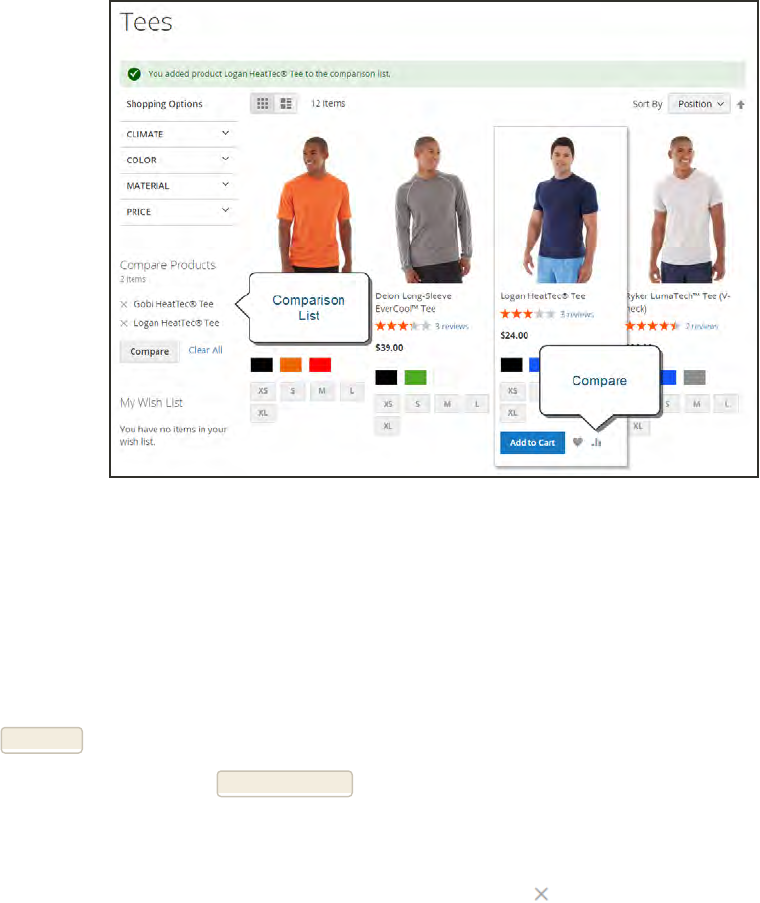
Compare Products
Compare Products generates a detailed, side-by-side comparison of two or more products. You
can customize the report to include additional attributes or remove ones that you don’t want to
include. Depending on the theme, the Add to Compare link might be represented by an icon or
text.
Compare Products
To compare products:
1. From your storefront, find the products that you want to compare, and click the Compare link
for each.
2. Depending on the theme and page layout, there might be a Compare Products block in the
sidebar. If so, you can mark the checkbox of the products to include in the report, and tap
Compare. The Compare Products report opens in a new window.
3. To print the report, tap Print This Page.
4. After navigating to other pages, you can click the link in the header or sidebar to return to the
report.
lTo remove a single product from the report, tap Delete .
lTo remove all products from the report, click the Clear All link.
CHAPTER 17: Shopping Tools Compare Products
Magento Community Edition 2.0 User Guide 301
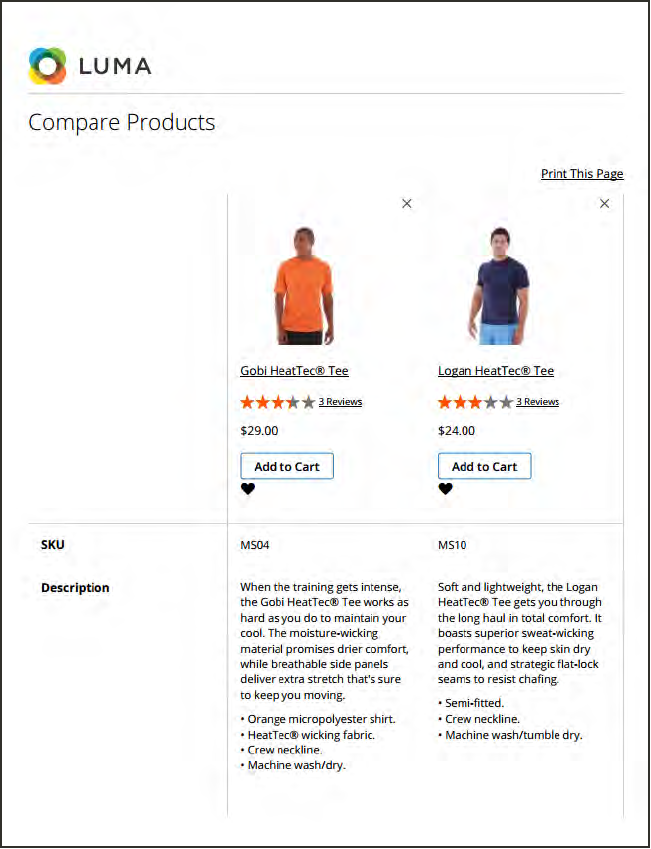
Compare Products
Compare Products CHAPTER 17: Shopping Tools
302 Magento Community Edition 2.0 User Guide
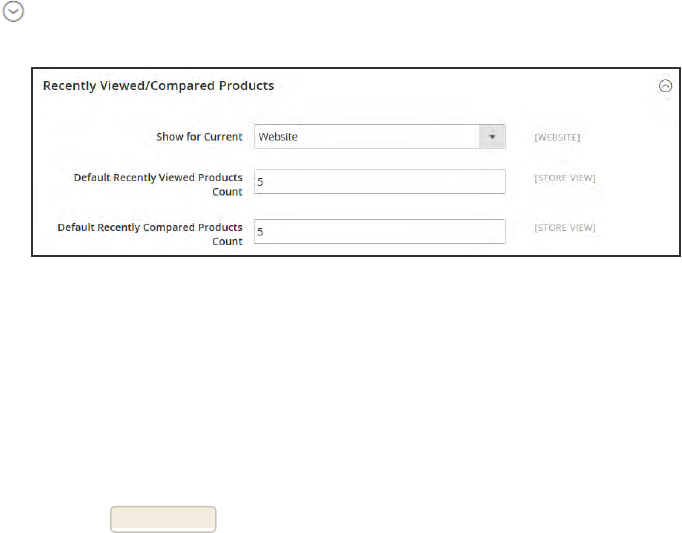
Recently Viewed / Compared Products
The Recently Viewed and Recently Compared blocks usually appear in the right sidebar of a
catalog page. The number of products listed in each block can be configured for each website,
store, or store view.
To configure Recently Viewed/Compared Products:
1. On the Admin sidebar, tap Stores. Then under Settings, choose Configuration.
2. In the panel on the left under Catalog, choose Catalog.
3. Expand the Recently Viewed/Compared Products section. Then, do the following:
Recently Viewed/Compared Products
a. Set Show for Current to the website, store, or store view where the configuration applies.
b. In the Default Recently Viewed Products Count field, enter the number of recently viewed
products to appear in the list.
c. In the Default Recently Compared Products Count, enter the number of recently
compared products to appear in the list.
4. When complete, tap Save Config.
CHAPTER 17: Shopping Tools Recently Viewed / Compared Products
Magento Community Edition 2.0 User Guide 303
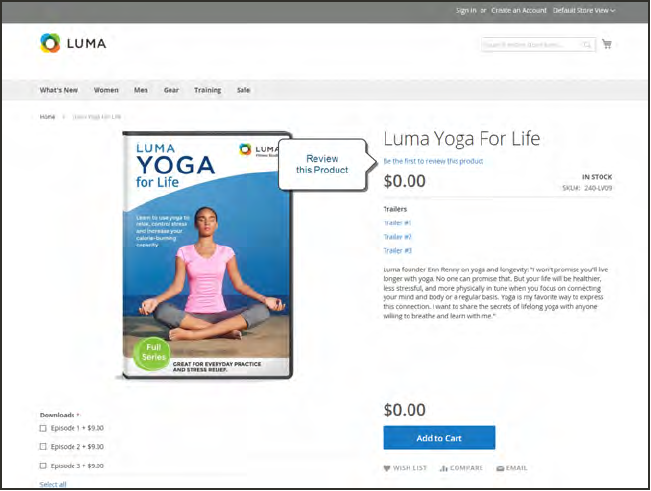
Product Reviews
Product reviews help to build a sense of community, and are considered more credible than any
advertising money can buy. In fact, some search engines give sites with product reviews a
higher ranking than those without. For those who find your site by searching for a specific
product, a product review is essentially the landing page of your store. Product reviews help
people find your store, keep them engaged, and often lead to sales.
The configuration determines whether customers must open an account with your store before
writing product reviews, or if they can submit reviews as guests. Requiring reviewers to open an
account prevents anonymous submissions, and improves the quality of reviews.
Add Your Review
Customers can write reviews for any product in your catalog. Reviews can be written from the
product page by clicking the “Add Your Review” link. For products that haven't been reviewed,
the link says, “Be the first to review this product.” The Reviews tab lists all current reviews, and
the form that is used to submit a review.
The number of stars indicates the satisfaction rating. Visitors can click the link to read the
reviews and write their own. As an incentive, customers can receive reward points for
submitting a review. When a review is submitted, it is sent to the Admin for moderation. When
approved, the review is published in your store.
Product Reviews CHAPTER 17: Shopping Tools
304 Magento Community Edition 2.0 User Guide
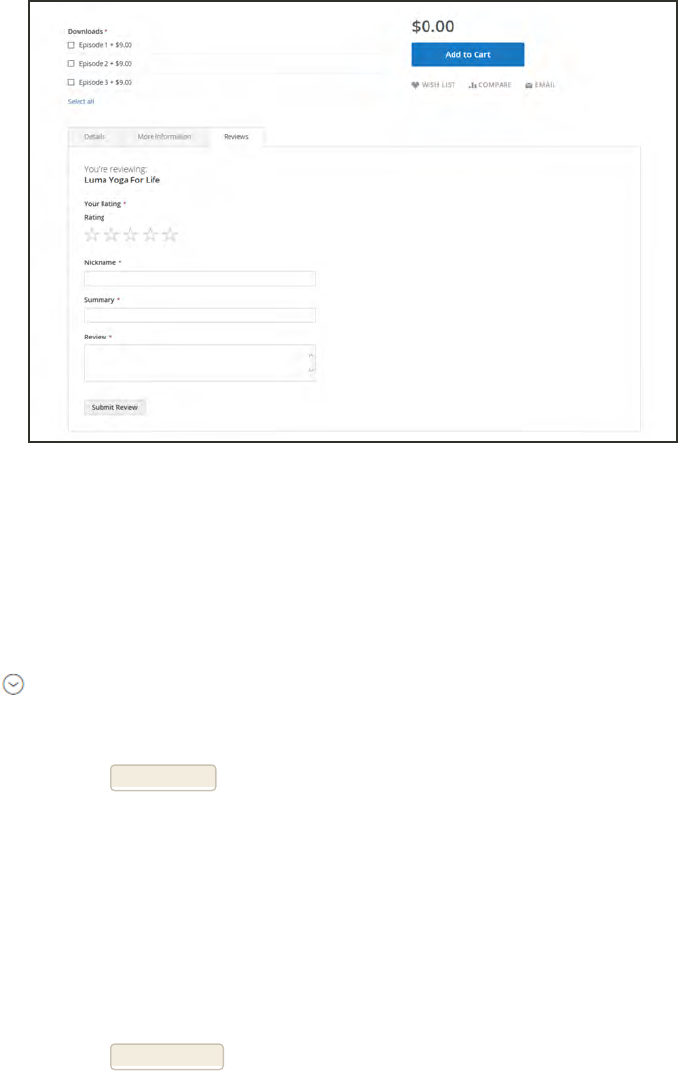
Reviews Tab
To configure product reviews:
1. On the Admin sidebar, tap Stores. Then under Settings, choose Configuration.
2. In the panel on the left, under Catalog, select Catalog.
3. Expand the Product Reviews section.
4. Set Allow Guests to Write Reviews according to your preference.
5. When complete, tap Save Config.
To moderate reviews:
1. On the Admin sidebar, tap Marketing. Then under User Content, choose Reviews.
2. In the list, click a pending review to view the details, and edit if necessary.
3. To approve a pending review, change the Status from “Pending” to “Approved.” To reject a
review, select “Not Approved.”
4. When complete, tap Save Review.
CHAPTER 17: Shopping Tools Product Reviews
Magento Community Edition 2.0 User Guide 305
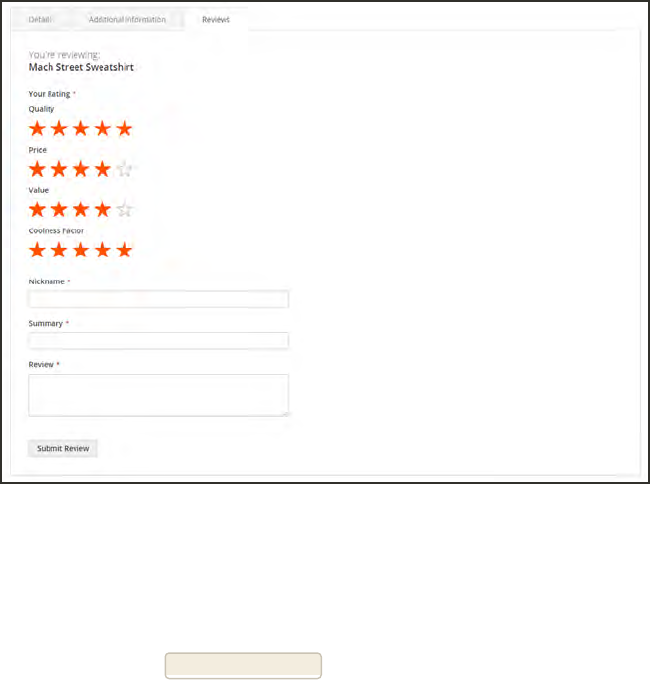
Product Ratings
When customers review a product, the default ratings are quality, price, and value. In addition
to these, you can add your own custom ratings. The five-star ratings that appear on catalog
pages are averaged for each product.
Ratings
To create your own ratings:
1. On the Admin sidebar, tap Stores. Then under Attributes, choose Ratings.
2. In the upper-right corner, tap Add New Rating.
Product Reviews CHAPTER 17: Shopping Tools
306 Magento Community Edition 2.0 User Guide
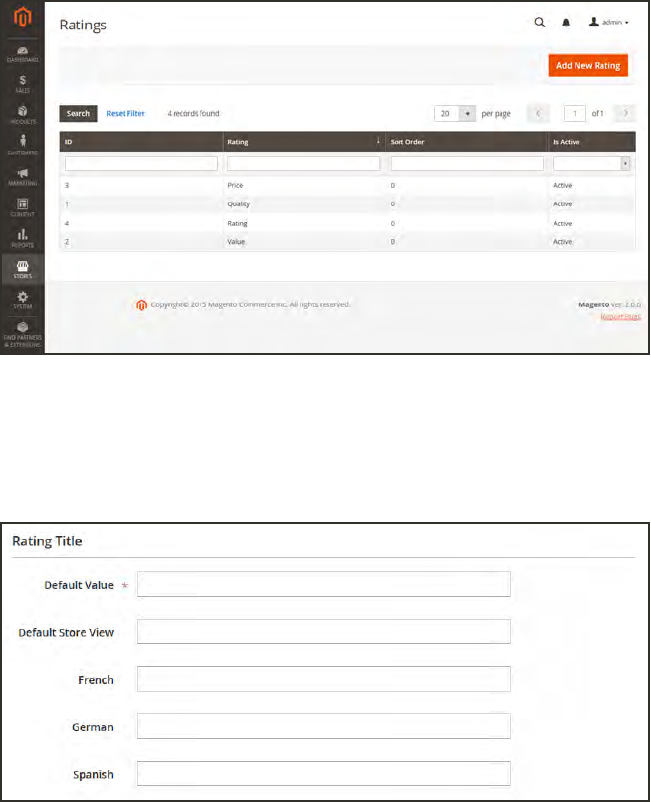
Ratings
3. In the Rating Title section, enter the Default Value for the new rating. If applicable, enter the
translation for each store view.
Rating Title
4. In the Rating Visibility section, set Visibility In to the store view where the rating is to be used.
(Hold down the Ctrl key to select multiple options.)
Ratings are not visible unless assigned to a store view.
5. In the Sort Order field, enter a number to determine the order of this rating when listed with
others.
CHAPTER 17: Shopping Tools Product Reviews
Magento Community Edition 2.0 User Guide 307
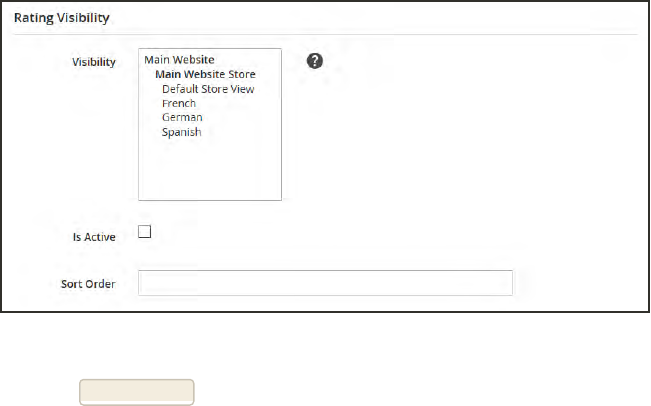
Rating Visibility
6. When complete, tap Save Rating.
Product Reviews CHAPTER 17: Shopping Tools
308 Magento Community Edition 2.0 User Guide

Promotions
In this section of the guide, you will learn how to
set up product relationships, and use price rules to
trigger discounts based on a variety of conditions.
You can use price rules to offer customer
incentives, such as to:
lSend your best customers a coupon for a
discount on a specific product
lOffer free shipping for purchases over a certain
amount
lSchedule a promotion for a period of time
Price rules are set up in advance, and spring into
action whenever the required conditions are met.
Magento Community Edition 2.0 User Guide 309

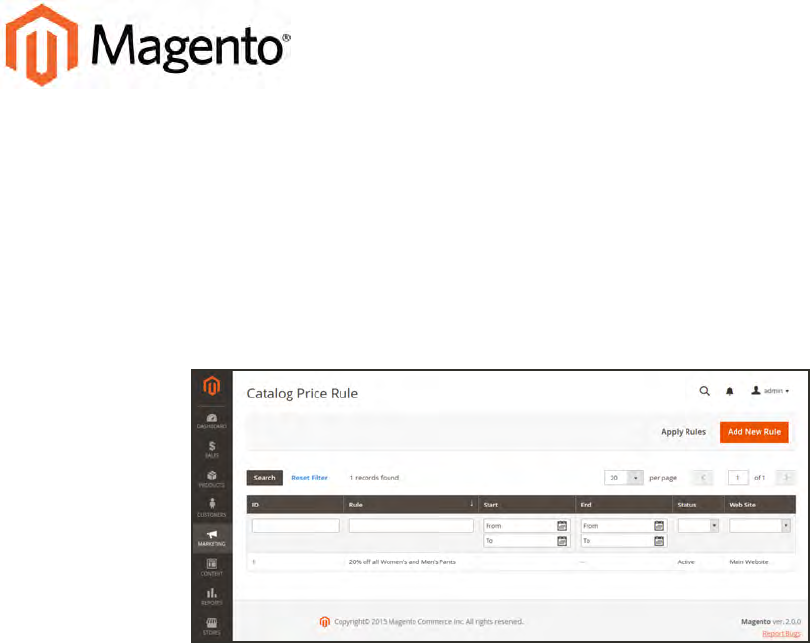
CHAPTER 18:
Catalog Price Rules
Catalog price rules can be used to selectively offer products at a discounted price, based on
a set of conditions. Catalog price rules do not use coupon codes, because they are triggered
before a product is placed into the shopping cart.
Catalog Rules
Magento Community Edition 2.0 User Guide 311
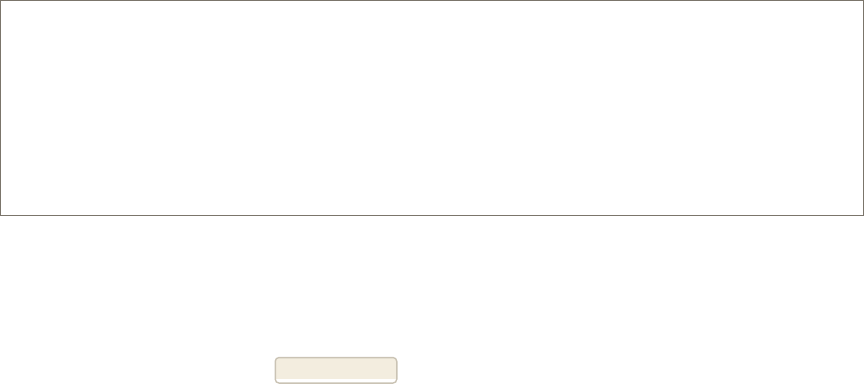
Creating a Catalog Price Rule
Process Overview:
Step 1: Add a New Rule
Step 2: Define the Conditions
Step 3: Define the Actions
Step 4: Apply the Rule
Step 1: Add a New Rule
1. On the Admin sidebar, tap Marketing. Then under Promotions, choose Catalog Price Rule.
2. In the upper-right corner, tap Add New Rule.
The options in the panel on the left include Rule Information, Conditions, and Actions.
3. On the Rule Information page, do the following:
a. Complete the Rule Name and Description fields. These fields are for your internal
reference only.
b. Set Status to “Active.”
c. Select the Websites where the rule is to be available.
4. To establish the scope of the rule, do the following:
a. Select the Websites where the promotion is to be available.
b. Select the Customer Groups to which this rule applies.
312 Magento Community Edition 2.0 User Guide
Creating a Catalog Price Rule CHAPTER 18: Catalog Price Rules
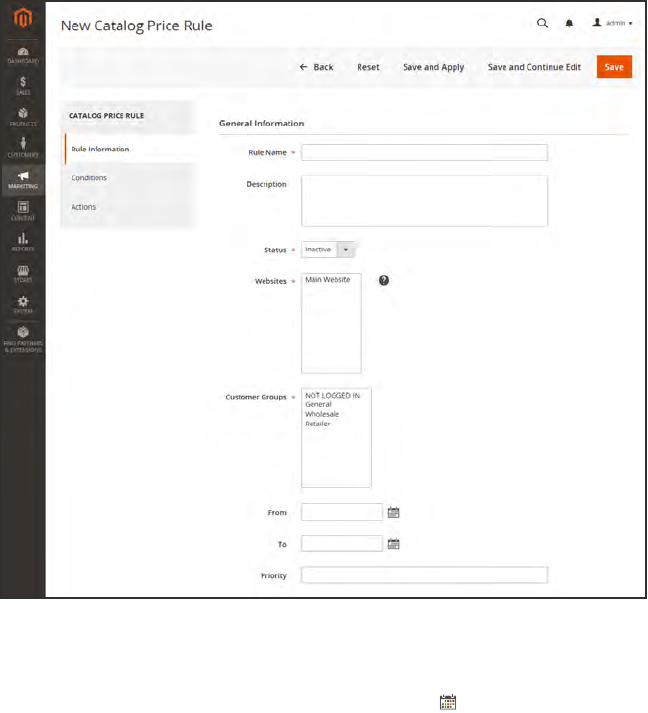
Rule Information
5. Set From and To dates to define the range of dates when the rule will be in effect. You can
either enter the dates, or select the dates from the Calendar .
lIf you leave the dates blank, the rule is enabled as soon as the price rule is saved.
6. Enter a number to establish the Priority of this rule in relation to other rules.
Magento Community Edition 2.0 User Guide 313
CHAPTER 18: Catalog Price Rules Creating a Catalog Price Rule

Step 2: Define the Conditions
Most of the available conditions are based upon existing attribute values. To apply the rule to
all products, leave the conditions blank.
1. In the panel on the left, choose Conditions. The first rule begins:
Condition - Line 1
The statement has two bold links, which when clicked, display the options for that part of the
statement. If you save the condition without making additional selections, the rule applies to
all products.
lClick the ALLlink, and select “ALL” or “ANY.”
lClick the TRUE link, and select “TRUE” or “FALSE.”
lLeave the condition unchanged to apply the rule to all products.
You can create different conditions by changing the combination of these values.
If ALL of these conditions are TRUE:
2. Tap the Add button at the beginning of the next line.
a. In the list under Product Attribute, choose the attribute that you want to use as the basis
of the condition. For this example, the condition is “Attribute Set.”
Condition Line 2, Part 1
For an attribute to appear in the list, it must be configured to be used in promo rule conditions.
To learn more, see: .
314 Magento Community Edition 2.0 User Guide
Creating a Catalog Price Rule CHAPTER 18: Catalog Price Rules
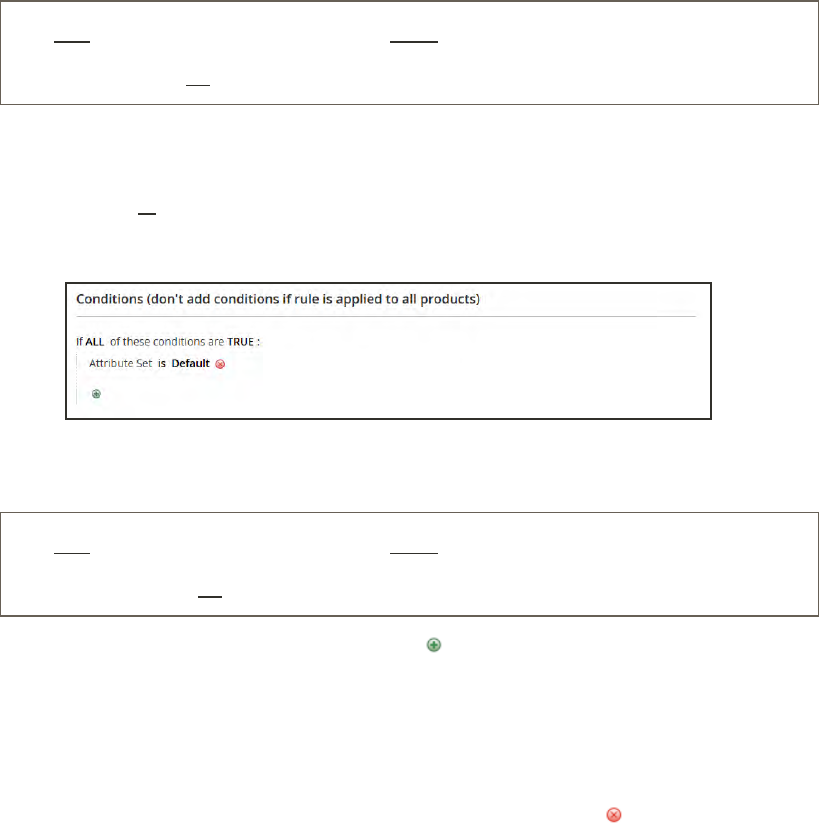
The selected condition appears in the statement, followed by two more bold links. The
statement now says:
If ALL of these conditions are TRUE:
Attribut Set is …
b. Click the is link, and choose the comparison operator that describes the condition to be
met. In this example, the options are “IS” or “ISNOT.”
c. Then, click the ... “more” link, and choose the attribute set upon which the condition is
based.
Condition Line 2, Part 3
The selected item appears in the statement to complete the condition.
If ALL of these conditions are TRUE:
Attribute Set is Default
3. To add another line to the statement, tap the Add button, and choose one of the following:
lConditions Combination
lProduct Attribute
Then, repeat the process until the condition is complete.
If at any time you want to delete part of the statement, tap the Delete button at the end of
the line.
Magento Community Edition 2.0 User Guide 315
CHAPTER 18: Catalog Price Rules Creating a Catalog Price Rule
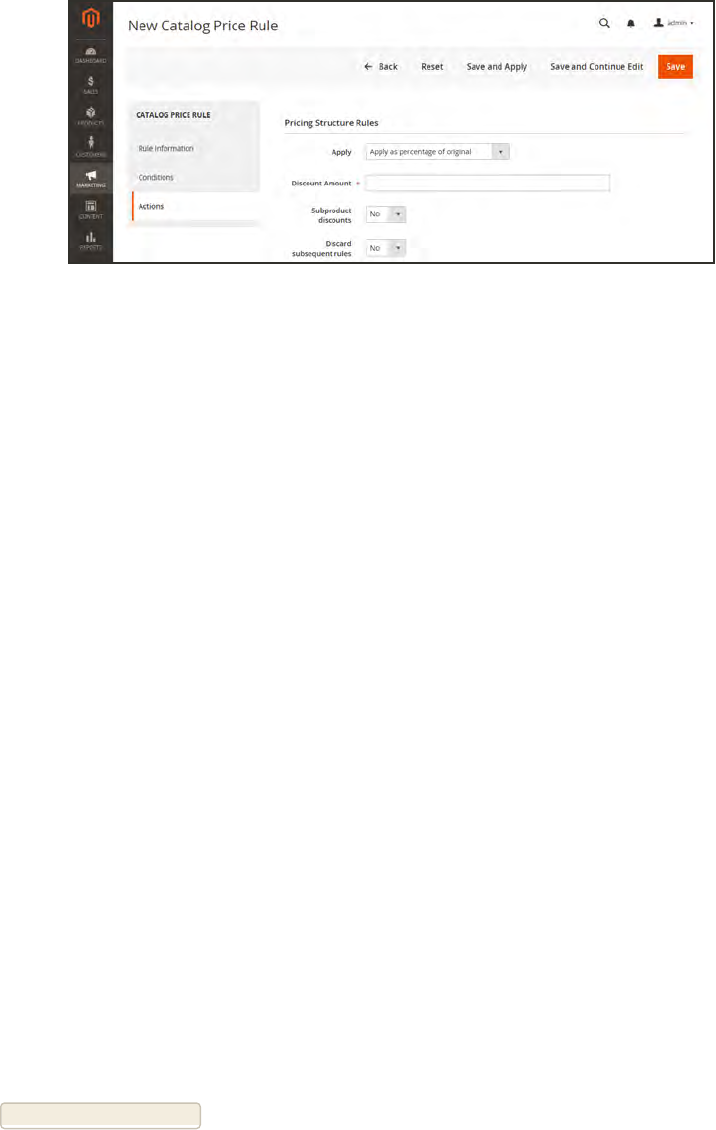
Step 3: Define the Actions
1. In the panel on the left, select Actions.
Actions
2. Under Pricing Structure Rules, set Apply to one of the following:
Apply as percentage of
original
Discounts item by subtracting a percentage from the original
price. For example:
Enter 10 in Discount Amount for an updated price that is 10%
less than the original price.
Apply as fixed amount Discounts item by subtracting a fixed amount from original
price. For example:
Enter 10 in Discount Amount for an updated price that is $10
less than the original price.
Adjust final price to this
percentage
Discounts item by defining the final price based on percentage.
For example:
Enter 10 in Discount Amount for an updated price that is 10% of
the original price.
Adjust final price to
discount value
Sets the price to a fixed amount.
3. Do one of the following:
lEnter the Discount Amount.
lTo apply the discount amount to associated products, set Subproduct Discounts to “Yes.”
Select the pricing structure, and enter the Discount Amount.
4. To stop processing other rules after this rule is applied, set Discard Subsequent Rules to
“Yes.” This safeguard prevents customers from receiving multiple discounts for the same
product.
5. Tap Save and Continue Edit.
316 Magento Community Edition 2.0 User Guide
Creating a Catalog Price Rule CHAPTER 18: Catalog Price Rules
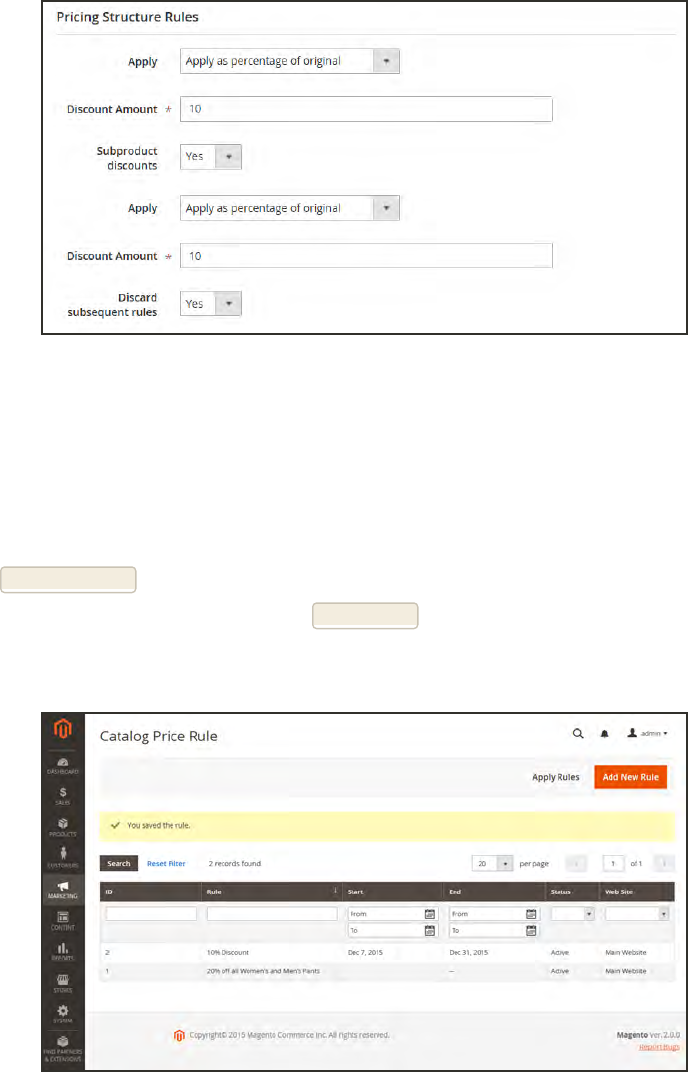
Pricing Structure Rules
Step 4: Apply the Rule
As new rules are added, the prices and the priorities are recalculated accordingly.
1. To apply a new rule immediately, do one of the following:
lTap Save and Apply.
lFrom the Catalog Price Rules grid, tap Apply Rules.
2. Test the rule to make sure that it works correctly.
Apply Rules
When you create a new price rule, it might take an hour or so to become available. Make sure
to allow enough time for it to get into the system. Then, test the rule to make sure that it
works correctly. Unless otherwise specified, price rules are automatically processed with other
system rules each night.As new rules are added, Magento recalculates the prices and the
priorities accordingly.
Magento Community Edition 2.0 User Guide 317
CHAPTER 18: Catalog Price Rules Creating a Catalog Price Rule
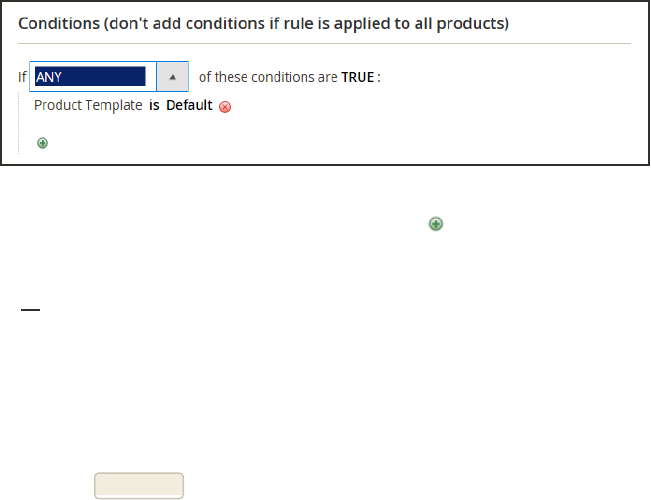
Price Rule with Multiple SKUs
A single price rule can be applied to multiple SKUs, which makes it possible to create a variety
of promotions based on a product, brand, or category. In the following illustration, multiple
products are selected for a catalog price rule.
To apply a price rule to multiple SKUs:
1. On the Admin sidebar, tap Marketing. Then under Promotions, choose Catalog Price Rules.
2. Do one of the following:
lFollow the instructions to create a catalog price rule.
lOpen an existing catalog price rule.
3. In the panel on the left, chooseConditions. Then, do the following:
a. In the first line, set the first parameter to “ANY.”
If ANY of these conditions are TRUE
b. If the price rule doesn't have a line for SKU, Tap Add at the beginning of the next line.
Then, in the list under Product Attribute, select SKU.
c. Click the …“more” link to display more options. Then, tap the Chooser button to display
the list of available products.
d. In the list, select the checkbox of each product that you want to include. Then, tap Select
to add the SKUs to the condition.
4. Complete the rule, including any Actions to be taken when the conditions are met.
5. To apply the rule, tap Save Rule .
When you create a new price rule, it might take an hour or so to become available. Make sure to
allow enough time for it to get into the system. Then, test the rule to make sure that it works
correctly. Unless otherwise specified, price rules are automatically processed with other system
rules each night.
Price Rule with Multiple SKUs CHAPTER 18: Catalog Price Rules
318 Magento Community Edition 2.0 User Guide
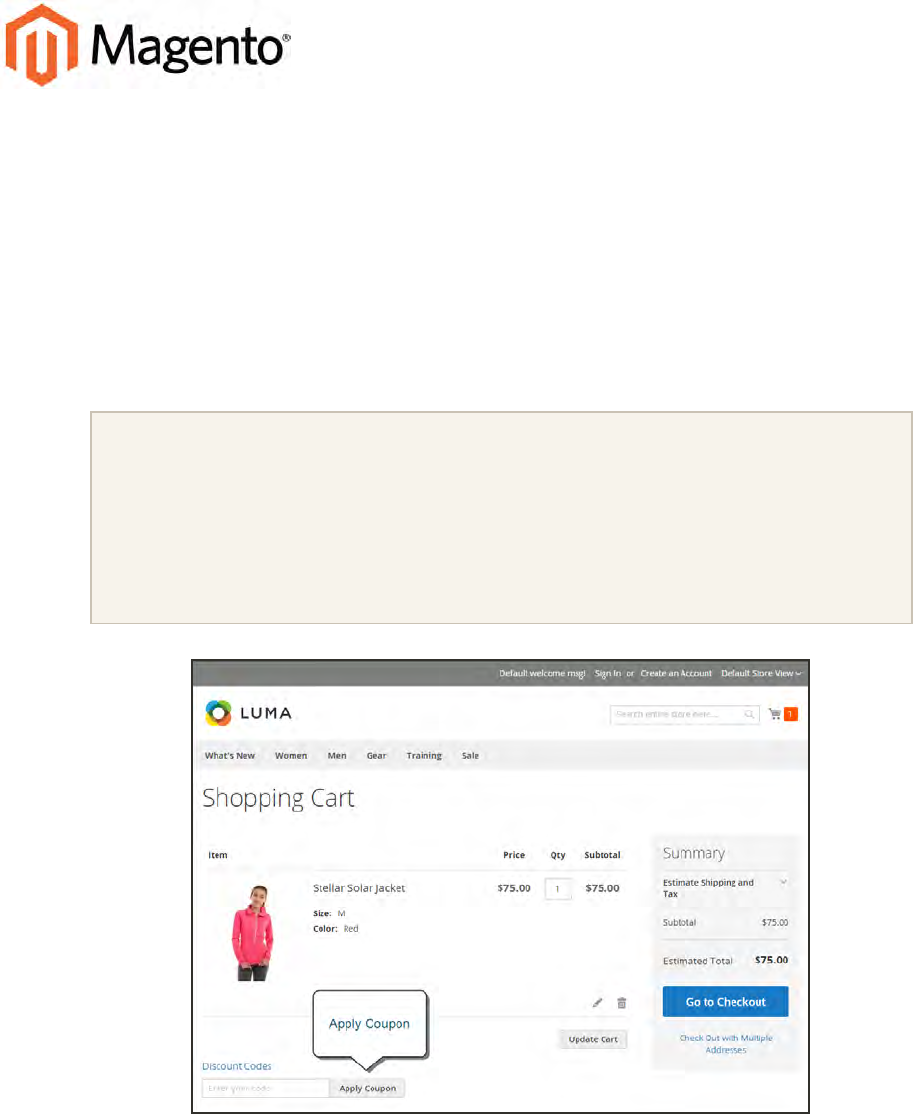
CHAPTER 19:
Cart Price Rules
Cart price rules apply discounts to items in the shopping cart, based on a set of
conditions. The discount can be applied automatically as soon as the conditions are met,
or when the customer enters a valid coupon code. When applied, the discount appears in
the cart under the subtotal. A cart price rule can be used as needed for a season or
promotion by changing its status and date range.
Important! Cart price rules using the Payment Method condition are currently not working
correctly in the Magento storefront. Price rules activated either by a specific coupon or
automatically are not applied. They do, however, work correctly for orders created in the
Admin. Rules with payment method conditions that were created with a prerelease version of
Magento 2 or Magento 1.x, load correctly in the Admin. The recommended temporary
workaround is to create the order manually in the Admin.
Apply Coupon in Cart
Magento Community Edition 2.0 User Guide 319

Creating a Cart Price Rule
Process Overview:
Step 1: Add a New Rule
Step 2: Define the Conditions
Step 3: Define the Actions
Step 4: Complete the Labels
Step 6: Apply the Rule
Step 1: Add a New Rule
1. On the Admin sidebar, tap Marketing. Then under Promotions, choose Cart Price Rules.
Cart Price Rules
The options in the panel on the left include Rule Information, Conditions, Actions, and Labels.
320 Magento Community Edition 2.0 User Guide
Creating a Cart Price Rule CHAPTER 19: Cart Price Rules
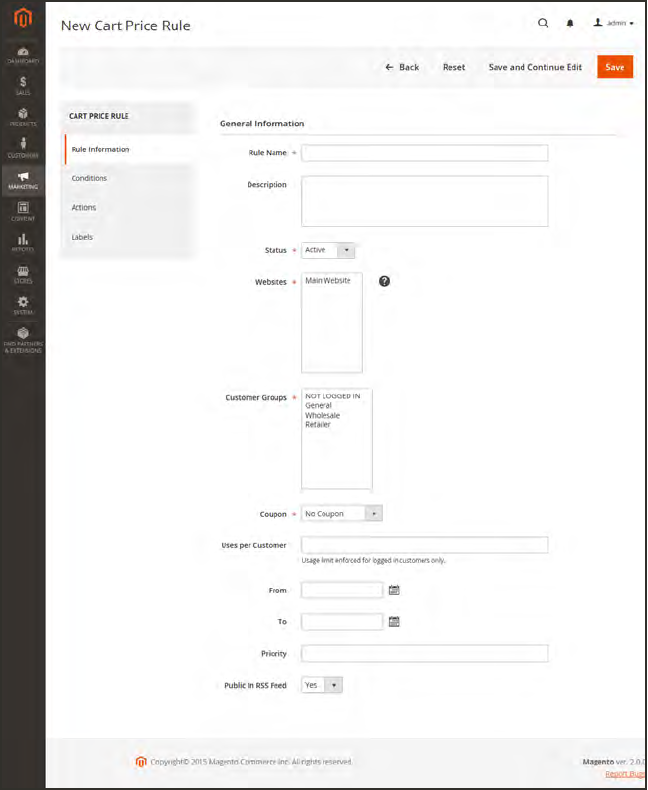
General Information
2. Under General Information, complete the Rule Name and Description.
3. For the rule to go into effect immediately, set Status to “Active.”
4. To establish the scope of the rule, do the following:
a. Select the Websites where the promotion is to be available.
b. Select the Customer Groups to which the promotion applies.
lFor the promotion to be available only to registered customers, do not select the
“NOTLOGGEDIN” option.
5. To associate a coupon with the price rule, set Coupon to “Specific Coupon.” Then, do the
following:
a. Enter a numeric Coupon Code that the customer must enter to receive the discount.
b. To set a limit on the number of times the coupon can be used, complete the following:
Magento Community Edition 2.0 User Guide 321
CHAPTER 19: Cart Price Rules Creating a Cart Price Rule
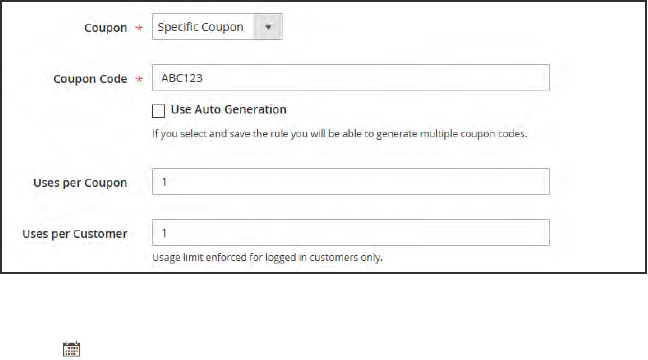
Uses per Coupon Determines how many times the coupon code can be used.
If there is no limit, leave the field blank.
Uses per Customer Determines how many times the coupon code can be used
by the same registered customer who belongs to any of the
selected customer groups. The setting does not apply to
guest shoppers who are members of the NOT LOGGED IN
customer group, or to customers who shop without logging
in to their accounts. If there is no limit, leave the field
blank.
Coupon Settings
6. Use the Calendar to set the From and To date range for the promotion.
7. Enter a number to determine the Priority of this price rule in relation to the Action settings of
other price rules that might be active at the same time. (Number 1 has the highest priority.)
8. To apply the rule to published listings in RSS feeds, set Public In RSS Feed to “Yes.”
322 Magento Community Edition 2.0 User Guide
Creating a Cart Price Rule CHAPTER 19: Cart Price Rules
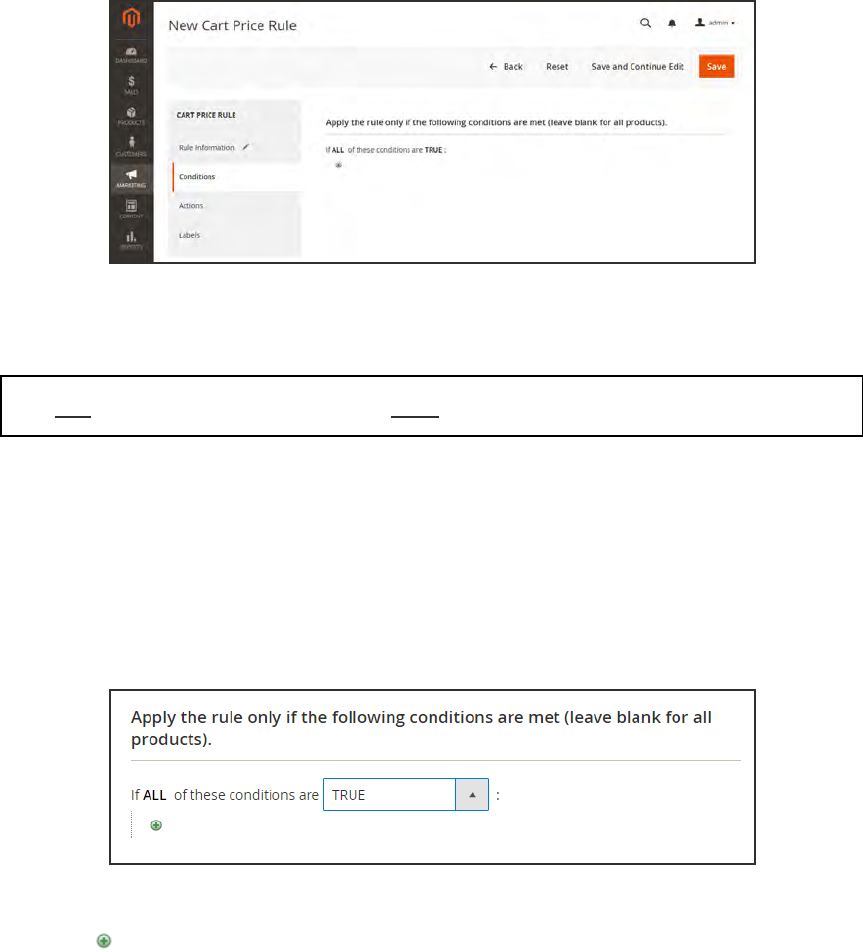
Step 2: Define the Conditions
In this step, the conditions are described that must be met for an order to qualify for the
promotion. The rule goes into action whenever the set of conditions is met.
Conditions
1. In the panel on the left, select Conditions. The first rule appears by default, and states:
If ALL of these conditions are TRUE:
The statement has two bold links which when tapped, display the selection of options for that
part of the statement. You can create different conditions by changing the combination of these
values. Do any of the following:
lClick the ALL link, and select “ALL” or “ANY.”
lClick the TRUE link and select “TRUE” or “FALSE.”
lLeave the condition unchanged to apply the rule to all products.
Condition - Line 1
2. Tap Add at the beginning of the next line. Then, choose one of the following options from
the list to describe the condition that you want to set for the rule.
lProduct attribute combination
lProducts subselection
lConditions combination
Magento Community Edition 2.0 User Guide 323
CHAPTER 19: Cart Price Rules Creating a Cart Price Rule
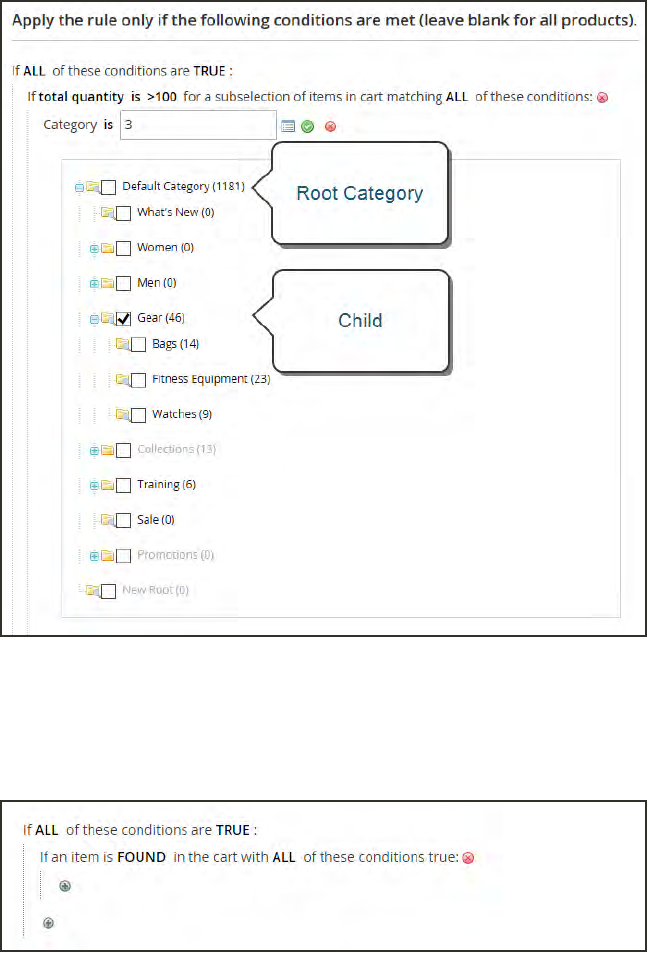
lCart Attribute
A condition can be based on any category that is a child of the store’s root category. When you
choose Products subselection >Product attribute > Category, the category tree shows the
available categories under the store root.
Choosing a Category for a Condition
For the condition in this example, we choose Product Attribute Combination, which says, “If
an item is FOUND in the cart with ALLof the conditions TRUE.” You could also change the
condition to “If an item is NOTFOUND in the cart with ANY of these conditions true:”
Condition - Line 2, Part 1
When you make a selection, the basic structure of the statement appears in the box with
additional links to mark where you can select information. Each bold word is a building block
that describes a different aspect of the condition. For this example, the selected condition is
that the price in the cart “equals or greater than 100.”
324 Magento Community Edition 2.0 User Guide
Creating a Cart Price Rule CHAPTER 19: Cart Price Rules
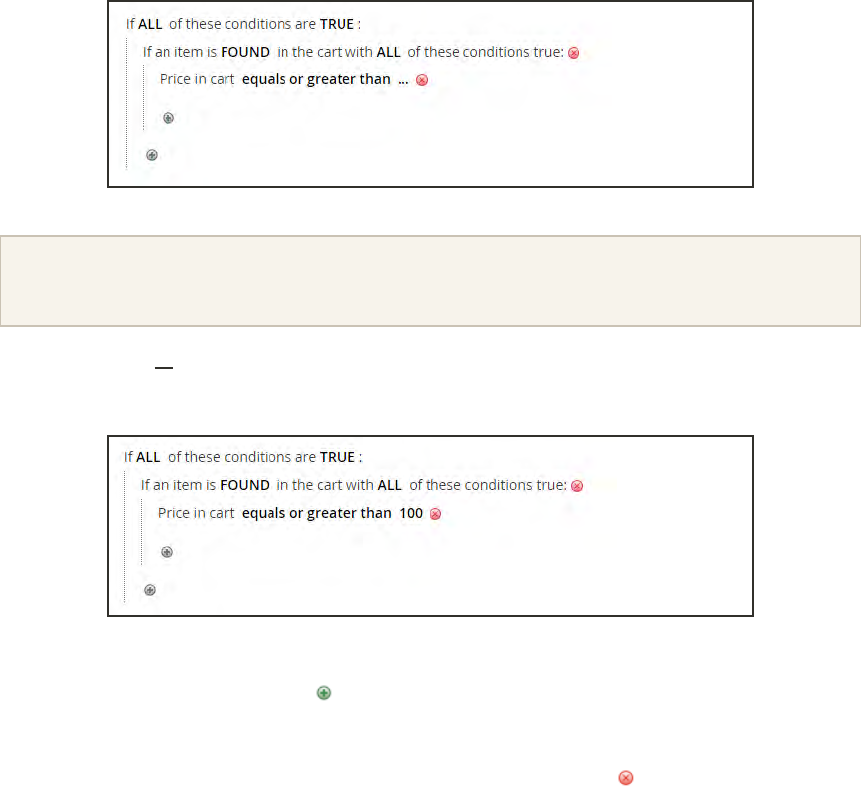
Condition - Line 2, Part 1
For an attribute to appear in the list, its Use for Promo Rules Conditions property must be set to
“Yes.”
3. Click the ellipsis ... link, which means “there is more,” and enter the amount that triggers the
discount. The amount appears in the statement to complete the condition.
Completed Condition
4. To add more conditions, tap Add and define another condition.
You can repeat the process as many times as needed to describe the condition.
If at any time you want to delete part of the statement, click Delete at the end of the line.
Step 3: Define the Actions
The shopping cart price rule actions describe how prices are updated when the conditions of
the rule are met.
Magento Community Edition 2.0 User Guide 325
CHAPTER 19: Cart Price Rules Creating a Cart Price Rule
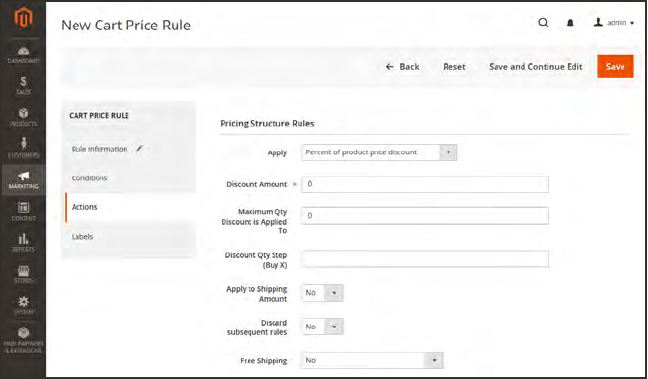
Cart Price Rule Actions
1. In the panel on the left, choose Actions. Then, do the following:
a. Set Apply to one of the following discount options:
Percent of product price
discount
Discounts item by subtracting a percentage from the
original price. The discount applies to each qualifying item
in the cart. For example:
Enter 10 in Discount Amount for an updated price that is
10% less than the original price.
Fixed amount discount Discounts item by subtracting a fixed amount from original
price. The discount applies to each qualifying item in the
cart. For example:
Enter 10 in Discount Amount for an updated price that is
$10 less than the original price.
Fixed amount discount
for whole cart
Discounts the entire cart by subtracting a percentage from
the cart total. For example:
Enter 10 in Discount Amount to subtract 10% from the cart
total.
Buy X get Y free Defines a quantity that the customer must purchase to
receive a quantity for free. (The Discount Amount is Y.)
b. Enter the Discount Amount as a number, without symbols. For example, depending on
the discount option selected, the number 10 might indicate a percentage, a fixed amount,
or a quantity of items.
c. In the Maximum Qty Discount is Applied To field, enter the maximum number of the
same product that can qualify for the discount in the same purchase.
d. To apply the discount to the shipping amount, set Apply to Shipping Amount to “Yes.”
326 Magento Community Edition 2.0 User Guide
Creating a Cart Price Rule CHAPTER 19: Cart Price Rules
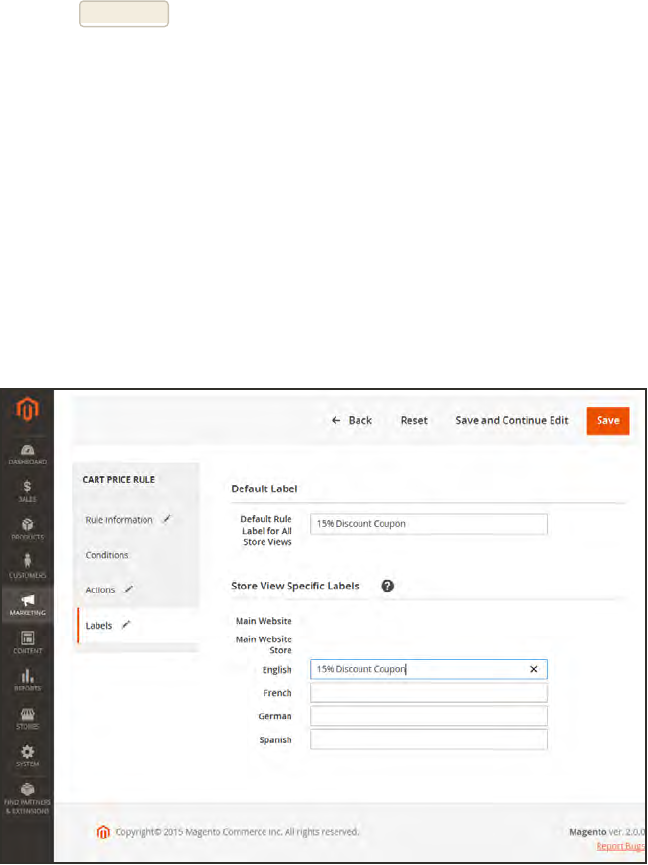
e. To stop processing other rules after this rule is applied, set Discard Subsequent Rules to
“Yes.” This safeguard prevents customers from receiving multiple discounts for the same
product.
f. To give the customer reward points for triggering the price rule, enter the number of points
the price rule is worth.
g. If you want to extend free shipping for orders that meet conditions, set Free Shipping to
one of the following:
lFor matching items only
lFor shipment with matching items
You can continue to define as many levels as needed to describe the conditions to be met.
2. When complete, tap Save Rule.
Step 4: Complete the Labels
The label appears on the order below the subtotal to identify the discount. You can enter a
default label for all store views, or enter a different label for each view.
1. In the panel on the left, choose Labels.
2. Do one of the following:
lUnder Default Label, enter the text for the Default Rule Label for All Store Views.
lUnder Store View Specific Labels, enter an appropriate label for each store view.
Default Label
Magento Community Edition 2.0 User Guide 327
CHAPTER 19: Cart Price Rules Creating a Cart Price Rule
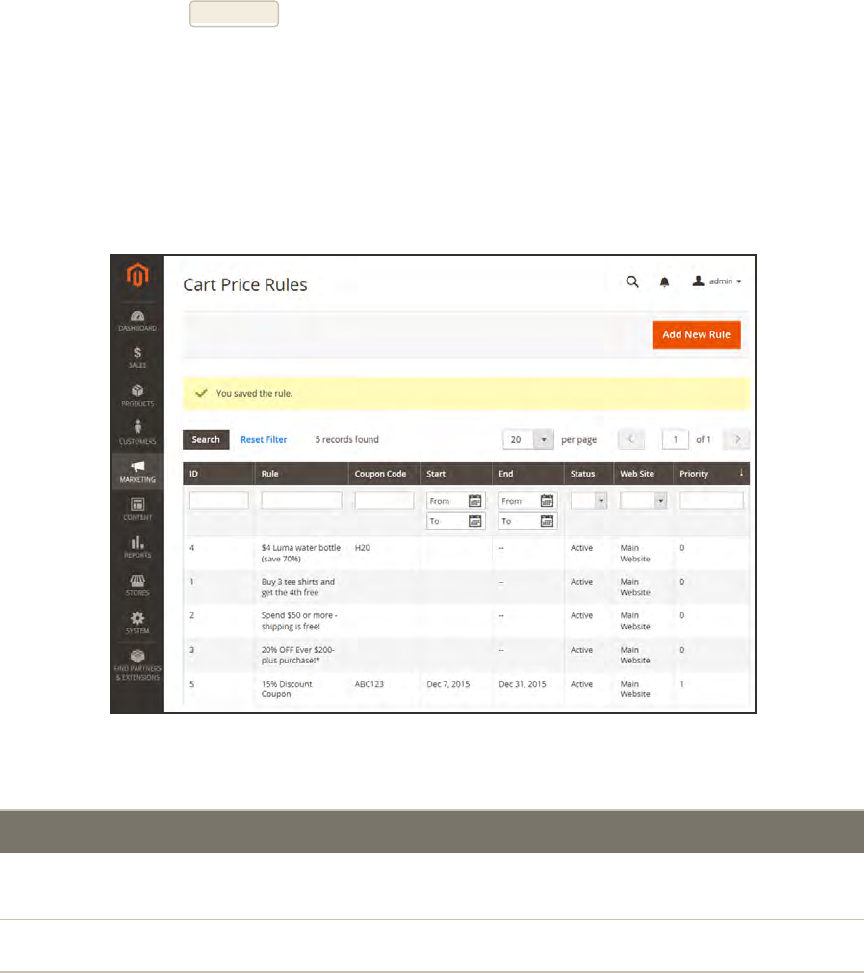
3. In the Store View Specific Labels section, enter the label text for each store view. For example,
if each store view is in a different language, enter the label translation for each view.
Step 5: Apply the Rule
1. When complete, tap Save Rule.
2. Test the rule to make sure that it works correctly.
When you create a new price rule, it might take an hour or so to become available. Make sure
to allow enough time for it to get into the system. Then, test the rule to make sure that it
works correctly. Unless otherwise specified, price rules are automatically processed with other
system rules each night.As new rules are added, Magento recalculates the prices and the
priorities accordingly.
Cart Price Rule Saved
FIELD DESCRIPTION
RULE INFORMATION
Rule Name (Required) The name of the rule is for internal reference.
Description A description of the rule should include the purpose of the rule, and
explain how it is used.
Field Descriptions
328 Magento Community Edition 2.0 User Guide
Creating a Cart Price Rule CHAPTER 19: Cart Price Rules

FIELD DESCRIPTION
Status (Required) Determines if the rule is currently active in the store.
Options: Active / Inactive
Websites (Required) Identifies the websites where the rule can be used.
Customer Groups (Required) Identifies the customer groups to which the rule applies.
Coupon (Required) Indicates if a coupon is associated with the rule. Options:
No Coupon No coupon is associated with the rule.
Specific Coupon A specific coupon is associated with the rule.
Coupon Code When prompted, enter
the Coupon Code that
the customer must enter
to take advantage of the
promotion.
Use Auto
Generation
Select the checkbox to
automatically generate
multiple coupon codes
that can be used with the
promotion.
Auto Displays the Coupons Information section to
define the format of the coupon codes to be
generated.
Uses per Coupon The number of times the coupon code can be used.
Uses per Customer Determines how many times the coupon code can be used by the
same registered customer who belongs to any selected customer
group. Does not apply to guest shoppers who are members of the
NOT LOGGED IN customer group, or to customers who shop
without logging in to their accounts. For no limit, leave blank.
From The first date the coupon can be used.
To The last date the coupon can be used.
Field Descriptions (cont.)
Magento Community Edition 2.0 User Guide 329
CHAPTER 19: Cart Price Rules Creating a Cart Price Rule

FIELD DESCRIPTION
Priority A number that indicates the priority of this rule in relation to others.
The highest priority is number 1.
Public in RSSFeed Determines if the promotion is included in your store’s public RSS
feed. Options: Yes / No.
ACTIONS
Apply Determines the type of calculation that is applied to the purchase.
Options:
Percent of product
price discount
Discounts item by subtracting a percentage
from the original price.
For example: Enter 10 in Discount Amount
for an updated price that is 10% less than the
original price.
Fixed amount
discount
Discounts item by subtracting a fixed
amount from original price.
For example: Enter 10 in Discount Amount
for an updated price that is $10 less than the
original price.
Fixed amount
discount for whole
cart
Discounts the entire cart by subtracting a
fixed amount from the cart total.
For example: Enter 10 in Discount Amount to
subtract $10 from the cart total.
Buy X Get YFree
(discount amount is
Y)
Defines a quantity that the customer must
purchase to receive a quantity for free. (The
Discount Amount is Y.)
Discount Amount (Required) The amount of discount that is offered.
Maximum Qty Discount is
Applied To
Sets the maximum number of products that the discount can be
applied to in the same purchase.
Discount Qty Step (Buy X) Sets the number of products represented by “X” in a “Buy X Get Y
Free” promotion.
Field Descriptions (cont.)
330 Magento Community Edition 2.0 User Guide
Creating a Cart Price Rule CHAPTER 19: Cart Price Rules

FIELD DESCRIPTION
Apply to Shipping Amount Determines if the discount can be applied to the cost of shipping.
Options: Yes / No.
Discard Subsequent
Rules
Determines if additional rules can be applied to this purchase. To
prevent multiple discounts from being applied to the same purchase,
select “Yes.” Options: Yes / No
Free Shipping Determines if free shipping is included in the promotion, and if so, for
which items. Options:
No Free shipping is not available when a coupon
that is based on the rule is used.
For matching items
only
Free shipping is available only for specific
items in the cart that match the rule.
For shipment with
matching items
Free shipping is available for the entire cart
when a coupon that is based on the rule is
used.
LABELS
Default Rule Label for All
Store Views
A default label that identifies the discount and can be used for all
store views.
Store View Specific Labels If applicable, a different label that identifies the discount for each
store view.
Field Descriptions (cont.)
Magento Community Edition 2.0 User Guide 331
CHAPTER 19: Cart Price Rules Creating a Cart Price Rule

Coupon Codes
Coupons codes are used with cart price rules to apply a discount when a set of conditions is
met. For example, a coupon code can be created for a specific customer group, or for anyone
who makes a purchase over a certain amount. To apply the coupon to a purchase, the customer
can enter the coupon code in the cart, or possibly at the cash register of your “brick and mortar”
store. Here are a few ways that you can use coupons in your store:
lEmail coupons to customers
lProduce printed coupons
lCreate in-store coupons for mobile users
Coupon codes can be sent by email, or included in newsletters, catalogs, and advertisements.
The list of coupon codes can be exported and sent to a commercial printer. You can also create
in-store coupons with a quick response code that shoppers can scan with their smart phones.
The QR code can link to a page on your site with more information about the promotion.
Method 1: Create a Specific Coupon
1. Follow the instructions to create a cart price rule.
2. On the General Information page, set Coupon to “Specific Coupon.”
a. Enter a numeric Coupon Code to be used with the promotion.
b. To limit the number of times the coupon can be used, complete the following:
lUses per Coupon
lUses per Customer
For unlimited use, leave these fields blank.
c. To make the coupon valid for a limited period of time, complete the From and To dates.
To select the date, tap the Calendar button next to each field. If you leave the date
range empty, the rule will never expire.
3. Complete the cart price rule.
Coupon Codes CHAPTER 19: Cart Price Rules
332 Magento Community Edition 2.0 User Guide
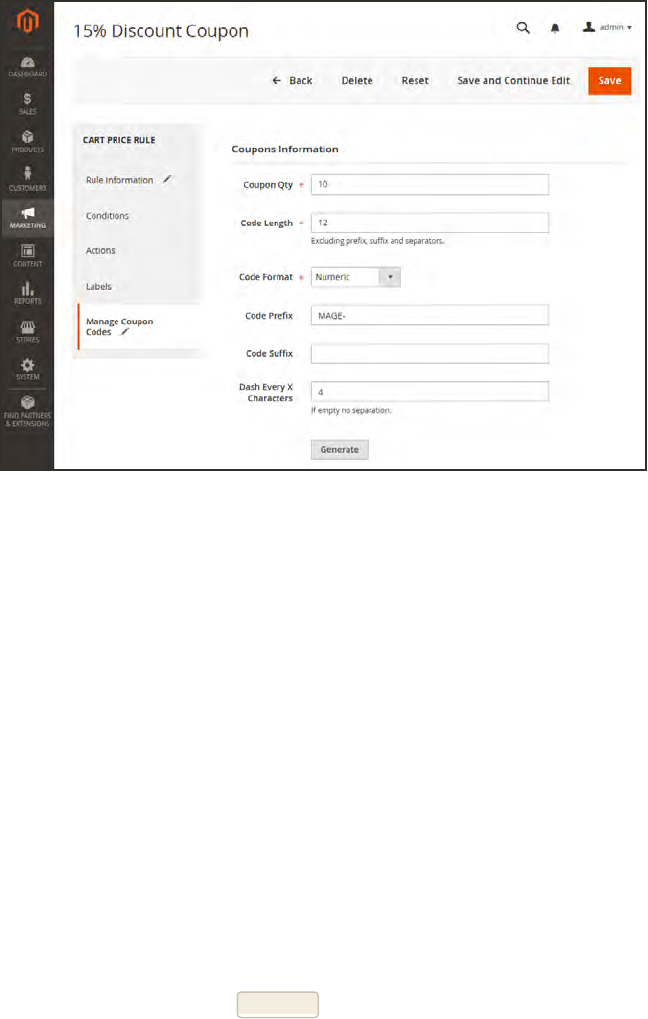
Method 2: Generate a Batch of Coupons
1. Follow the instructions to create a cart price rule.
2. On the General Information page, mark the Use Auto Generation checkbox.
3. In the panel on the left, choose Manage Coupon Codes. Then under Coupons Information, do
the following:
Manage Coupon Codes
a. In the Coupons Qty field, enter the number of coupons that you want to generate.
b. Enter the Code Length, not including the prefix, suffix, or separators.
c. Set the Code Format to one of the following:
lAlphanumeric
lAlphabetical
lNumeric
d. (Optional)Enter a Code Prefix to be added to the beginning of the code.
e. (Optional) Enter a Code Suffix to be added to the end of the code.
f. (Optional) In the Dash Every X Characters field, enter the number of characters.between
each dash. For example, if the code is twelve characters long, and there is a dash every
four characters, it will look like this: xxxx-xxxx-xxxx. Dashes make codes easier to read
and enter.
4. After completing the code format, tap Generate. The list of generated codes appears below.
CHAPTER 19: Cart Price Rules Coupon Codes
Magento Community Edition 2.0 User Guide 333
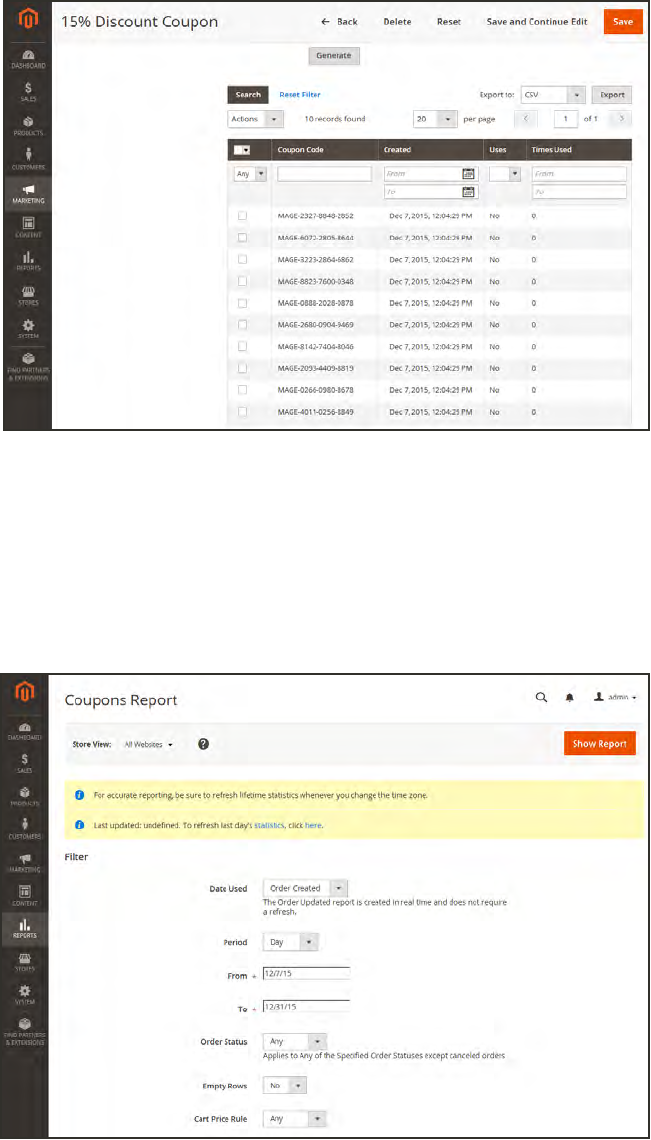
Generated Coupon Codes
Coupons Report
The Coupons Report can be filtered for a specific store view, time period, order status, and price
rule,
Coupon Report Filters
Coupon Codes CHAPTER 19: Cart Price Rules
334 Magento Community Edition 2.0 User Guide
To run the report:
1. On the Admin sidebar, tap Reports. Then under Sales choose Coupons.
2. If you have multiple store views, set Store View in the upper-left corner to establish the scope
of the report.
3. To refresh the sales statistics for the day, click the message at the top of the workspace.
4. To filters the data, so the following:
a. Set Date Used to one of the following:
lOrder Created
lOrder Updated
The Order Updated report is created in real-time, and does not require a refresh.
b. To define the period of time covered by the report, set Period to one of the following:
lDay
lMonth
lYear
c. Enter the From and To dates in M/D/YY format to define the date range of the report.
d. To print a report for a specific order status, set Order Status to “Specified,” Then, choose
the order status from the list.
e. Set omit rows without data from the report, set Empty Rows to “No.”
f. Do one of the following:
lTo include all coupon activity from all price rules, set Cart Price Rule to “Any.”
lTo include only activity that is related to a specific price rule, set Cart Price Rule to
“Specified,” Then, select the specific cart price rule in the list.
5. When ready to run the report, tap Show Report. The report appears at the bottom of the page.
CHAPTER 19: Cart Price Rules Coupon Codes
Magento Community Edition 2.0 User Guide 335

Free Shipping Promotion
Free shipping can be offered as a promotion, either with, or without a coupon. A free shipping
coupon, or voucher, can also be applied to customer pick-uporders, so the order can be
invoiced and “shipped” to complete the workflow.
Some shipping carrier configurations give you the ability of offer free shipping based on a
minimum order. To expand upon this basic capability, you can use shopping cart price rules to
create complex conditions based on multiple product attributes, cart contents, and customer
groups.
Process Overview:
Step 1: Enable Free Shipping
Step 2: Create the Shopping Cart Price Rule
Step 3: Test the Rule
Step 1: Enable Free Shipping
1. Enable Free Shipping in your store’s configuration.
2. Complete the free shipping settings for any carrier service that you want to use for free
shipping.
Step 2: Create a Shopping Cart Price Rule
1. On the Admin sidebar, tap Marketing. Then under Promotions, choose Cart Price Rules.
2. Follow the steps below to set up the type of free shipping promotion that you want to offer.
Example 1: Free Shipping for Any Order
1. Complete the Rule Information settings as follows:
a. Enter a Rule Name for internal reference.
b. Enter a brief Description to describe the rule.
c. Set Status to “Active.”
d. Set Website to “Main Website.” (Click to make sure the entry is selected.)
e. Select the Customer Groups to which the rule applies.
f. Set Coupon to one of the following:
Free Shipping Promotion CHAPTER 19: Cart Price Rules
336 Magento Community Edition 2.0 User Guide
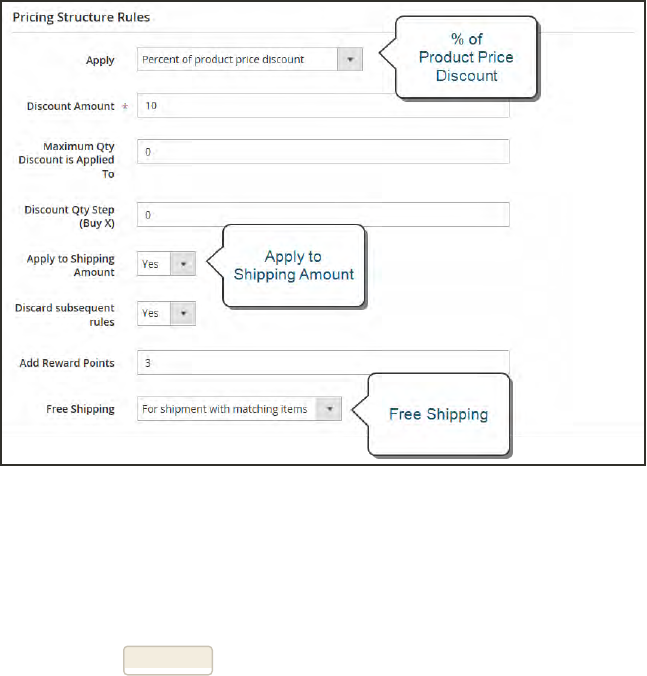
lTo offer a free shipping promotion without a coupon, accept the default, “No
Coupon” setting.
lTo use a coupon with the price rule, select “Specific Coupon.” If necessary,
complete the instructions to set up a coupon.
2. In the panel on the left, choose Actions. Then under Pricing Structure Rules, do the
following:
a. Set Apply to “Percent of product price discount.”
b. Set Apply to Shipping Amount to “Yes.”
c. Set Free Shipping to “For shipment with matching items.”
Price Rule Action
3. In the panel on the left, choose Labels. Then, do one of the following:
lEnter a Default Rule Label for All Store Views. This label is visible to the customer.
lIf your store is available in multiple stores, enter Store View Specific Labels for each view.
4. When complete, tap Save Rule.
CHAPTER 19: Cart Price Rules Free Shipping Promotion
Magento Community Edition 2.0 User Guide 337
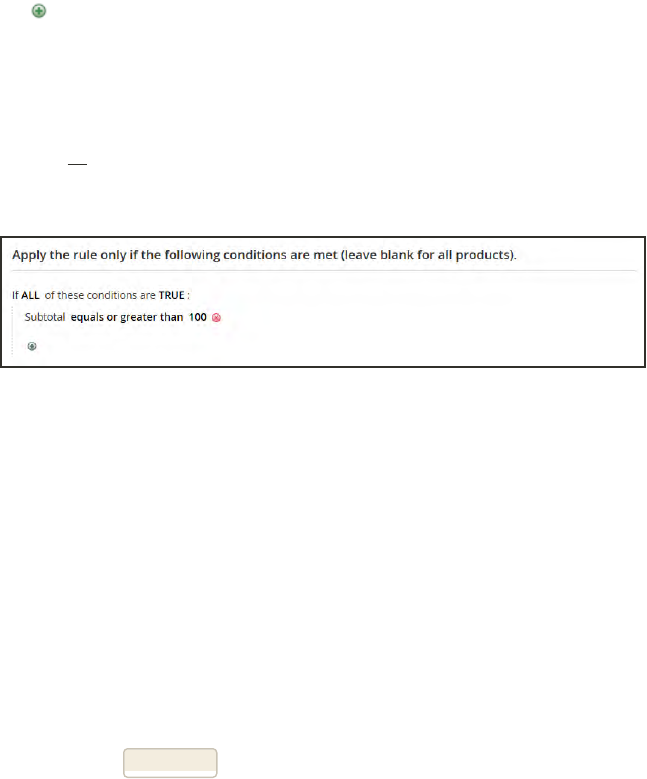
Example 2: Free Shipping for Orders Over $Amount
1. Complete the General Information settings as described in the previous example.
2. In the panel on the left, choose Conditions.
3. Tap Add to insert a condition. Then, do the following:
a. In the list under Cart Attribute, choose Subtotal.
b. Click the underlined is link, and choose “equals or greater than.”
c. Click the …“more” link, and enter a threshold value for the Subtotal, such as 100, to
complete the condition.
Condition
4. In the panel on the left, select Actions. Then, do the following:
a. Set Apply to “Percent of product price discount.”
b. Set Apply to Shipping Amount to “Yes.”
c. Set Free Shipping to “For shipment with matching items.”
5. In the panel on the left, select Labels. Then, do one of the following:
lEnter a Default Rule Label for All Store Views. The label is visible to the customer during
checkout.
lIf your store is available in multiple views, enter a label for each view, as needed.
6. When complete, tap Save Rule.
Step 3: Test the Rule
When you create a new price rule, it might take an hour or so to become available. Make sure
to allow enough time for it to get into the system. Then, test the rule to make sure that it
works correctly. Unless otherwise specified, price rules are automatically processed with other
system rules each night.
Free Shipping Promotion CHAPTER 19: Cart Price Rules
338 Magento Community Edition 2.0 User Guide
Buy X Get Y Free
This example shows how to set up a cart price rule for a “Buy X, Get Y Free” promotion. The
format of the discount is as follows:
Buy X quantity of product, get Y quantity for free.
Process Overview:
Step 1: Create a Cart Price Rule
Step 2: Define the Conditions
Step 3: Define the Actions
Step 4: Complete the Label
Step 5: Apply the Rule
Step 1: Create a Cart Price Rule
Complete Step 1 of the cart price rule instructions to complete the general information.
Step 2: Define the Conditions
Complete Step 2 of the shopping cart instructions to define the conditions for the price rule.
The conditions can be triggered by purchasing a specific product, making a purchase of a
certain amount, or any other scenario.
Step 3: Define the Actions
1. In the panel on the left, choose Actions. Then, do the following:
a. Set Apply to “Buy X get Y free (discount amount is Y).”
b. Set Discount Amount to 1. This is the quantity the customer will receive for free.
c. To limit the number of discounts that can be applied when the condition is met, enter the
number in the Maximum Qty Discount is Applied To field. For example, enter “1” to
discount only one item.
d. In the Discount Qty Step (Buy X) field, enter the quantity that the customer must
purchase to qualify for the discount.
CHAPTER 19: Cart Price Rules Buy X Get Y Free
Magento Community Edition 2.0 User Guide 339
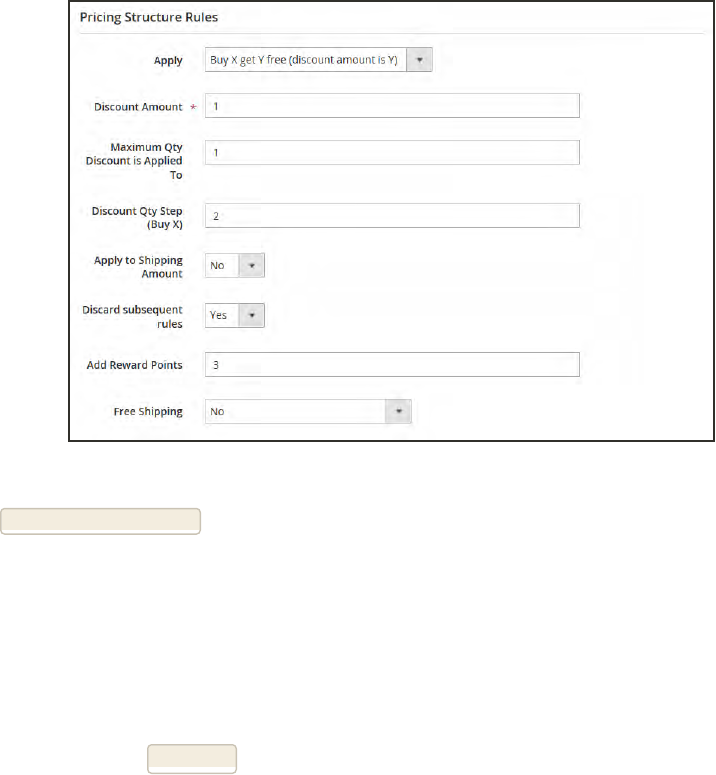
Buy X Get Y Free
2. Tap Save and Continue Edit. Then, complete the rest of the rule as needed.
Step 4: Complete the Label
Complete Step 4 of the cart price rule instructions to enter the label that appears during
checkout.
Step 5: Apply and Test the Rule
When complete, tap Save Rule.
When you create a new price rule, it might take an hour or so to become available. Make sure
to allow enough time for it to get into the system. Then, test the rule to make sure that it
works correctly. Unless otherwise specified, price rules are automatically processed with other
system rules each night.
Buy X Get Y Free CHAPTER 19: Cart Price Rules
340 Magento Community Edition 2.0 User Guide
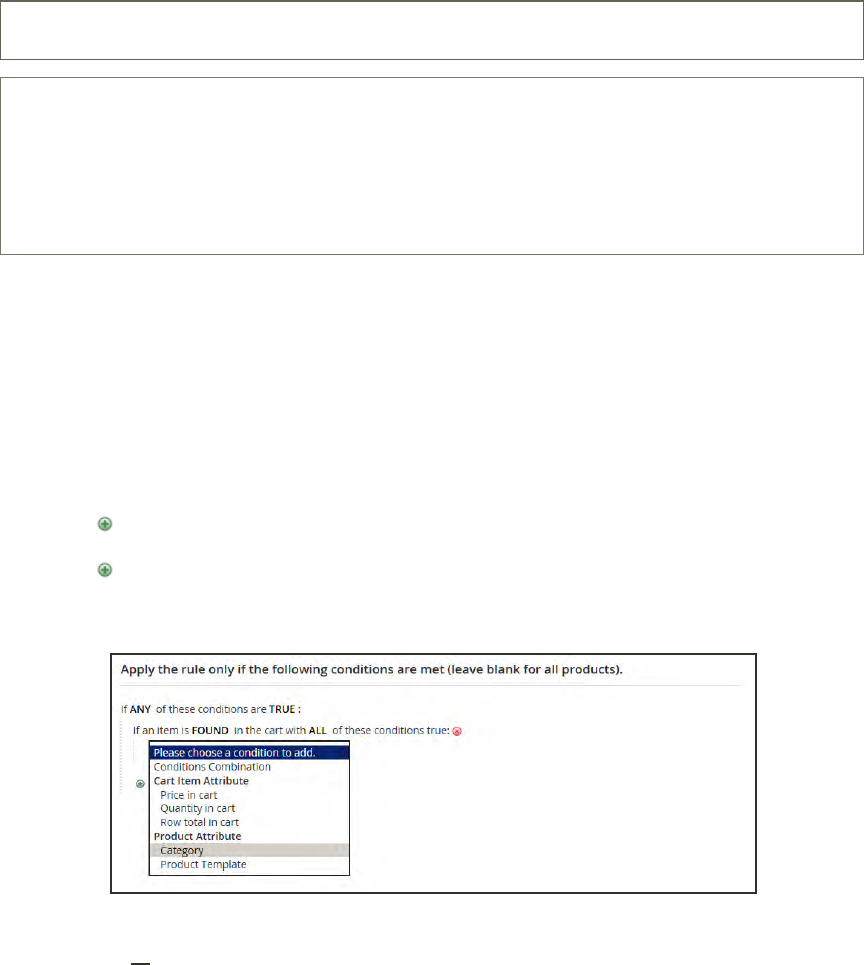
Discount with Minimum Purchase
Cart price rules can be used to offer a percentage discount based on a minimum purchase. In
the following example, a 25% discount is applied to all purchases over $200.00 in a specific
category. The format of the discount is as follows:
X% off all Y (category) over $Z dollars
Process Overview:
Step 1: Create a Shopping Cart Rule
Step 2: Define the Conditions
Step 3: Define the Actions
Step 1: Create a Shopping Cart Rule
Follow the basic instructions to create a cart rule.
Step 2: Define the Conditions
1. In the panel on the left, choose Conditions.
2. Tap Add at the beginning of the next line, and choose Product Attribute Combination.
3. Tap Add at the beginning of the next line. Then in the list under Product Attribute, choose
Category.
Choose Condition to Add
a. Click the …“more” link to display additional options.
CHAPTER 19: Cart Price Rules Discount with Minimum Purchase
Magento Community Edition 2.0 User Guide 341
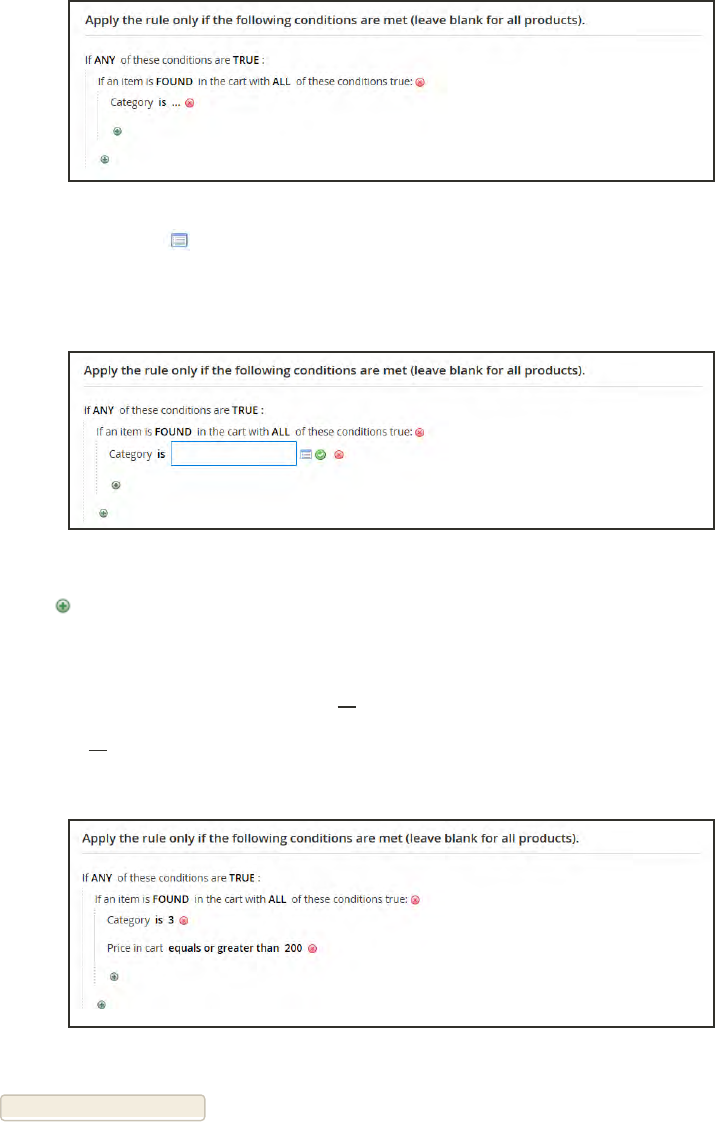
Category IS
b. Tap the Chooser button to display the available categories. In the category tree, mark
the checkbox of each category that you want to include. Then, press Enter to add the
categories to the condition.
Category Tree
4. Tap Add at the beginning of the next line, and do the following:
a. In the list under Cart Item Attribute, choose Price in cart.
a. Click the first underlined parameter, IS. Then in the list, choose “equals or greater than.”
b. Click the ... “more” link and enter the amount that the Price in Cart must be to meet the
condition. For example, enter 200.00.
Enter the Price to Complete the Condition
5. Tap Save and Continue Edit .
Discount with Minimum Purchase CHAPTER 19: Cart Price Rules
342 Magento Community Edition 2.0 User Guide
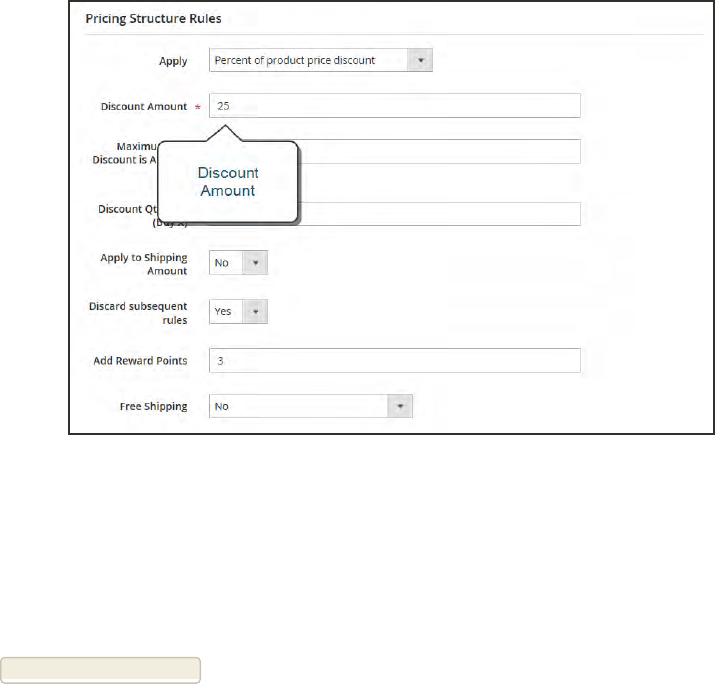
Step 3: Define the Actions
1. In the panel on the left, choose Actions. Then, do the following:
Actions
a. Set Apply to “Percent of product price discount.”
b. Enter the Discount Amount. For example, enter 25 for a twenty-five percent discount.
c. If you want to prevent the purchase from qualifying for additional promotions, set Stop
Further Rules Processing to “Yes.”
2. Tap Save and Continue Edit . Then, complete the rule as needed.
CHAPTER 19: Cart Price Rules Discount with Minimum Purchase
Magento Community Edition 2.0 User Guide 343

Notes
344 Magento Community Edition 2.0 User Guide

Communications
One of the tasks to complete before launching
your store is to review the email templates that are
used for all communications sent from your store
to make sure that they reflect your brand. In this
section of the guide, you will learn how to
customize email and newsletter templates, as
well as PDF invoices and packing slips. You will
also learn how to personalize the content with
variables and markup tags.
Magento Community Edition 2.0 User Guide 345

Contents Email Templates
Supported Email Clients
Preparing Your Email Logo
Configuring Email Templates
Sales Emails
Payment Failed Emails
Customizing Email Templates
Header Template
Footer Template
Message Template
Email Template List
Sales Documents
Preparing Your Invoice Logo
Adding Reference IDs to Header
Customer Address Templates
Newsletters
Configuring Newsletters
Newsletter Templates
Sending Newsletters
Managing Subscribers
RSS Feeds
Using Variables
Adding Predefined Variables
Adding Custom Variables
Markup Tags
Using Markup Tags in Links
Variable Reference
346 Magento Community Edition 2.0 User Guide
CHAPTER 20:
Email Templates
Email templates define the layout, content, and formatting of automated messages sent
from your store. They are called transactional emails1because each one is associated
with a specific type of transaction, or event.
Magento includes a set of responsive email templates that are triggered by a variety of
events that take place during the operation of your store. Each template is optimized for
any screen size, and can be viewed from the desktop, as well as on tablets and
smartphones. You will find a variety of prepared email templates related to customer
activities, sales, product alerts, admin actions, and system messages that you can
customize to reflect your brand.
1An automated email message that is sent in response to a specific event or transaction.
Magento Community Edition 2.0 User Guide 347

Supported Email Clients
A wide range of technologies is supported by the various email clients and services available
today. Although there is some variation in the way email messages are rendered, we have found
the following services to be compatible with Magento Community Edition 2.0.
OPERATING SYSTEM CLIENTS SUPPORTED
OS X 10.8 Apple Mail 6
OS X 10.7 Outlook 2011
Outlook 2013
Windows 8 Outlook 2010
Windows 7 Outlook 2007
Outlook 2003
Desktop Clients
OPERATING SYSTEM CLIENTS SUPPORTED
Android 4.2, “Jelly Bean” Native email app
Android 2.3, “Gingerbread” Native email app
Gmail App (Android 4.2) Native email app
Blackberry 5 OS Native email app
IOS 8 iPhone 6
iPhone 6 Plus
IOS 7 iPad (Retina)
iPad Mini
iPhone 5s
Mail on these devices:
IOS 6 iPhone 5
iPhone 4s
Mobile Clients
Supported Email Clients CHAPTER 20: Email Templates
348 Magento Community Edition 2.0 User Guide

EMAIL APPLICATION BROWSERS SUPPORTED*
AOL Mail Chrome
Internet Explorer
Firefox
Gmail Chrome
Internet Explorer
Firefox
Yahoo! Mail Chrome
Internet Explorer
Firefox
Outlook.com Chrome
Internet Explorer
* The latest version of each browser was used for testing.
Web Clients
CHAPTER 20: Email Templates Supported Email Clients
Magento Community Edition 2.0 User Guide 349
Preparing Your Email Logo
Logos can be saved as any of the following file types. Logos with transparent backgrounds can
be saved as either .gif or .png files.
ljpg / jpeg
lgif
lpng
To ensure that your logo renders well on high-resolution devices, the uploaded image should be
three times the size of the dimensions that are specified in the header template. Typically,
original logo artwork is created as a vector image, so it can be scaled up without losing
resolution. The image can then be saved in one of the supported bitmap image formats.
Logo Three Times Display Size
To take advantage of the limited vertical space in the header, make sure to crop the image to
eliminate any wasted space at the top or bottom. When editing the image, be careful to
preserve the aspect ratio1of the logo, so the height and width resize proportionally.
As a general rule, you can make an image smaller than the original, but not larger without
losing resolution. Taking a small image and scaling it up in a photo editor lowers the
resolution of the image. For example, if the display dimensions of the logo are 168 pixels wide
by 48 pixels high in the header template, the uploaded image should be 504 pixels wide by 144
pixels high.
LOGO DIMENSIONS 1 X (DISPLAY SIZE) 3 X (IMAGE SIZE)
Width: 168 px 504 px
Height: 48 px 144 px
1The proportional relationship between the width and height of an image.
Preparing Your Email Logo CHAPTER 20: Email Templates
350 Magento Community Edition 2.0 User Guide
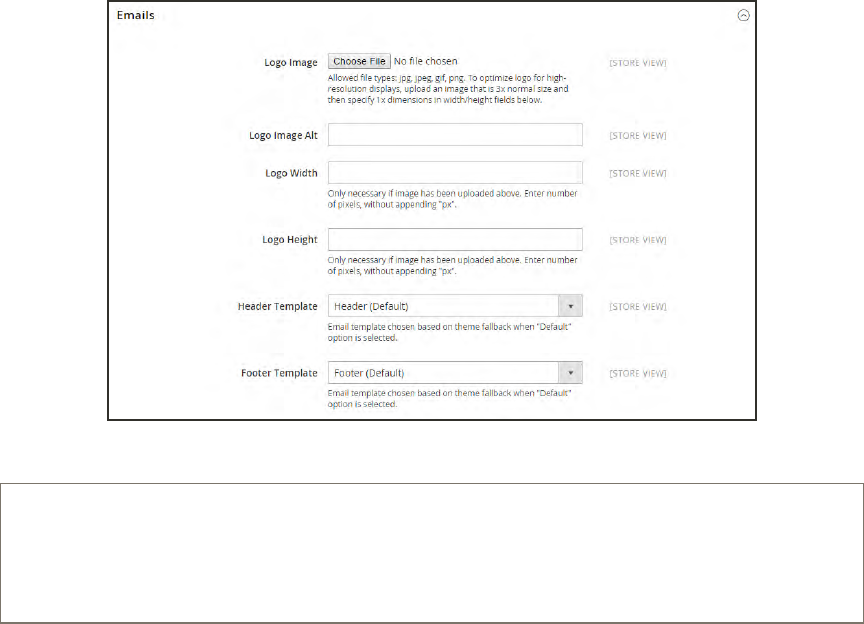
Configuring Email Templates
The configuration determines the logo, as well as the header and footer templates that are used
for all email messages sent from your store.
Emails
Process Overview:
Step 1: Upload Your Logo
Step 2: Select the Header and Footer Templates
CHAPTER 20: Email Templates Configuring Email Templates
Magento Community Edition 2.0 User Guide 351
Step 1: Upload Your Logo
1. On the Admin sidebar, tap Stores. Then under Settings, choose Configuration.
2. In the panel on the left, under General, choose Design.
3. Expand the Emails section. Then, do the following:
a. To upload your prepared Logo Image, tap Browse. Find the file on your computer, and
select the file.
b. In the Logo Image Alt field, enter alternate text to identify the image.
c. Enter the Logo Width and Logo Height in pixels. Enter each value as a number, without
the “px” abbreviation. These values refer to the display dimensions of the logo in the
header, and not to the actual size of the image.
Step 2: Choose the Header and Footer Templates
If you have custom header and footer templates for your store, or for different stores, you can
specify which templates are used for each, according to the scope of the configuration.
1. Choose the Header Template to be used for all transactional email messages.
2. Choose the Footer Template to be used for all transactional email messages.
3. When complete, tap Save Config.
Configuring Email Templates CHAPTER 20: Email Templates
352 Magento Community Edition 2.0 User Guide

FIELD SCOPE DESCRIPTION
Logo Image Store View Identifies the logo file that appears in the header of
transactional email messages. To support high-
resolution displays, it is recommended that you upload
an image that is three times the display dimensions.
For example, if the actual display dimensions of the
logo are 100 pixels high and 200 pixels wide, you
should upload an image that is 300 pixels high and 600
pixels wide.
To delete the current image and upload another, select
the Delete Image checkbox. Then, browse to select
the new image. Allowed file types:
.jpg / .jpeg
.gif
.png
Logo Image Alt Store View Enter alternative text that appears if the logo image is
not available.
Logo Width Store View Enter the display width of the image in pixels, as a
number. Do not include the “px” abbreviation. It is
important to specify both width and height to preserve
the aspect ratio when the image is rendered at
different sizes.
Logo Height Store View Enter the display height of the image in pixels, as a
number. Do not include the “px” abbreviation. It is
important to specify both width and height to preserve
the aspect ratio when the image is rendered at
different sizes.
Header Template Store View Select the template to be used for the header of all
transactional email messages.
Footer Template Store View Select the template to be used for the footer of all
transactional email messages.
Field Descriptions
CHAPTER 20: Email Templates Configuring Email Templates
Magento Community Edition 2.0 User Guide 353
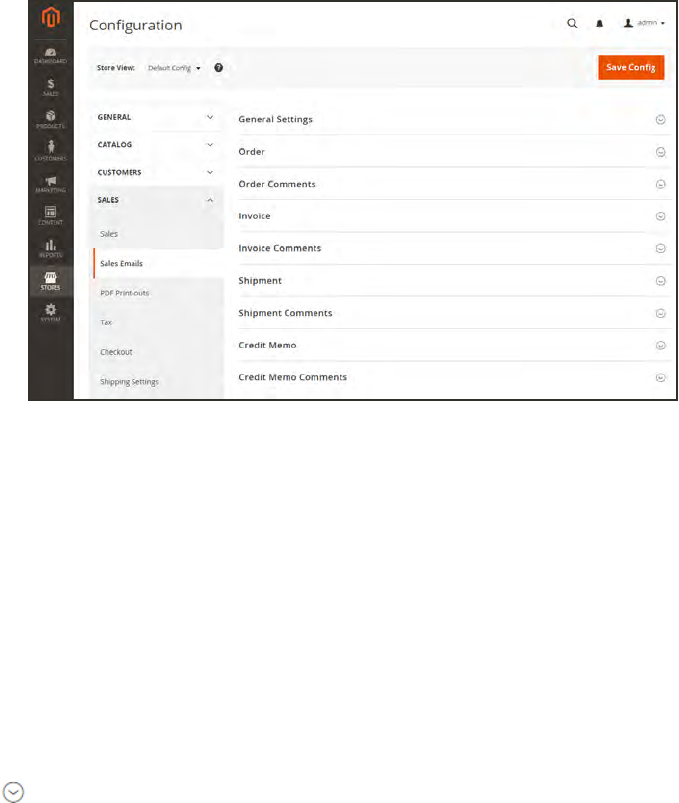
Configuring Sales Email
A number of email messages are triggered by the events related to an order, and the
configuration is similar. You must identify the store contact that appears as the sender of the
message, the email template to be used, and anyone else who is to receive a copy of the
message.
Sales Emails
Step 1: Update the Email Templates
Make sure that you have updated each email template to reflect your brand. For a complete
list of templates, see: Email Template List.
Step 2: Configure the Sales Emails
1. On the Admin sidebar, tap Stores. Then under Settings, choose Configuration.
2. In the panel on the left under Sales, choose Sales Emails.
3. Expand the Order section. Then, do the following:
Configuring Email Templates CHAPTER 20: Email Templates
354 Magento Community Edition 2.0 User Guide
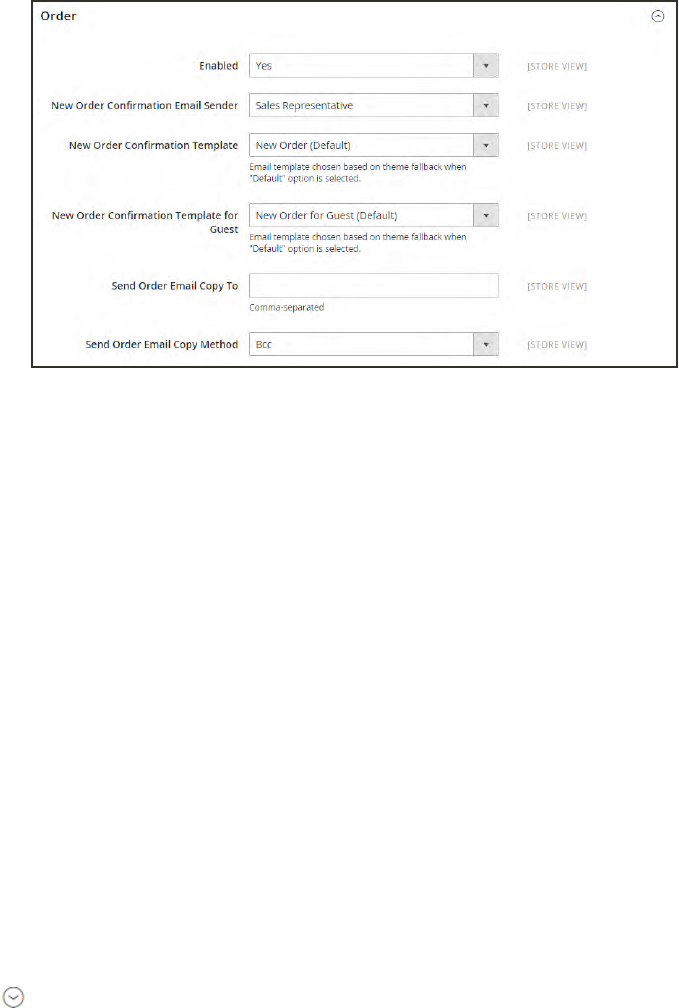
Order
a. Verify that Enabled is set to “Yes.”
b. Set New Order Confirmation Email to the store contact that appears as the sender of the
message.
c. Set New Order Confirmation Template to the template that is used for the email that is
sent to registered customers.
d. Set New Order Confirmation Template for Guest to the template that is used for the
email that is sent to guests who do not have an account with your store.
e. In the Send Order Email Copy To field, enter the email address of anyone who is to
receive a copy of the new order email. If sending a copy to multiple recipients, separate
each address with a comma.
f. Set Send Order Email Copy Method to one of the following:
Bcc Sends a “blind courtesy copy” by including the recipient in the
header of the same email that is sent to the customer. The BCC
recipient is not visible to the customer.
Separate Email Sends the copy as a separate email.
4. Expand the Order Comments section, and repeat these steps.
CHAPTER 20: Email Templates Configuring Email Templates
Magento Community Edition 2.0 User Guide 355
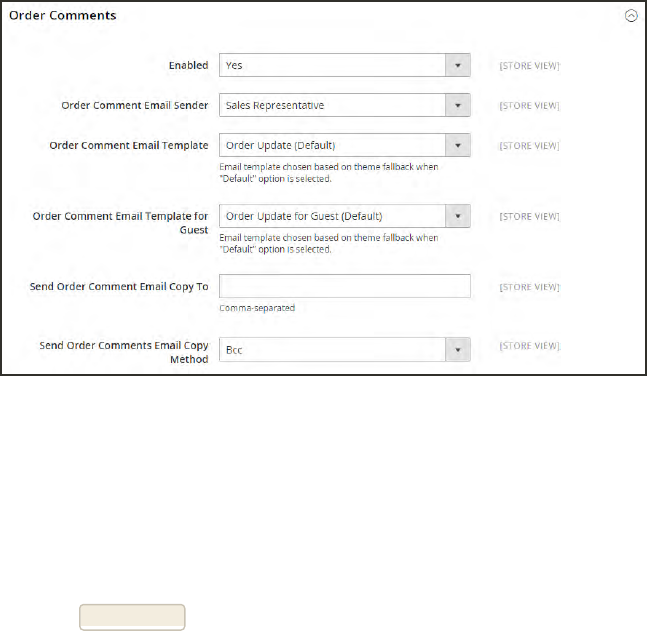
Order Comments
5. Complete the configuration for the remaining sales emails:
lInvoice
lShipment
lCredit Memo
6. When complete, tap Save Config.
Configuring Email Templates CHAPTER 20: Email Templates
356 Magento Community Edition 2.0 User Guide
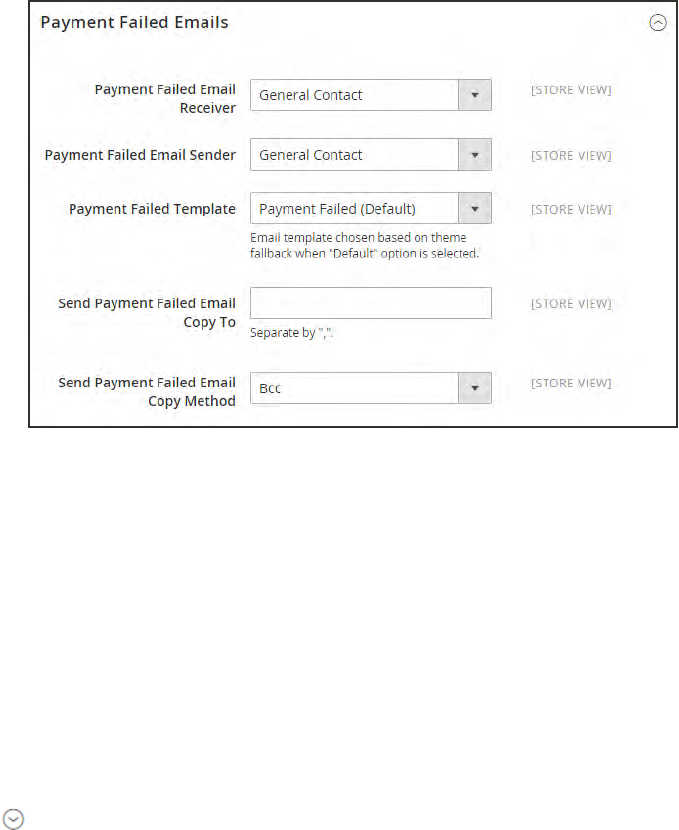
Payment Failed Email
A notification is sent to the customer if the payment method that is chosen during checkout
fails to complete the transaction.
Payment Failed Emails
Step 1: Update the Email Templates
Make sure that you have updated each email template to reflect your brand. For a complete
list of templates, see: Email Template List.
Step 2: Configure the Payment Failed Emails
1. On the Admin sidebar, tap Stores. Then under Settings, choose Configuration.
2. In the panel on the left under Sales, choose Checkout.
3. Expand the Payment Failed Emails section. Then, do the following:
a. Set Payment Failed Email Receiver to
b. Set Payment Failed Email Sender to the store contact that appears as the sender of the
message.
c. Set Payment Failed Template to the template that is used for the email that is sent when
the payment method fails during checkout.
d. In the Send Payment Failed Email Copy To field, enter the email address of anyone who
is to receive a copy of the payment failed notification. If sending a copy to multiple
recipients, separate each address with a comma.
CHAPTER 20: Email Templates Configuring Email Templates
Magento Community Edition 2.0 User Guide 357

e. Send Payment Failed Copy Method to one of the following:
Bcc Sends a “blind courtesy copy” by including the recipient in the
header of the same email that is sent to the customer. The BCC
recipient is not visible to the customer.
Separate Email Sends the copy as a separate email.
4. When complete, tap Save Config.
Configuring Email Templates CHAPTER 20: Email Templates
358 Magento Community Edition 2.0 User Guide
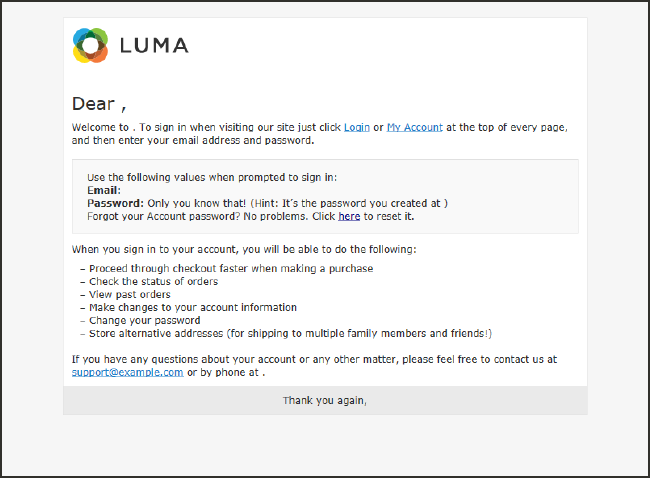
Customizing Email Templates
Magento includes a default email template for the body section of each message that is sent by
the system. The template for the body content is combined with the header and footer
templates to create the complete message. The content is formatted with HTML and CSS, and
can be easily edited, and customized by adding variables and frontend apps. Email templates
can be customized for each website, store, or store view. Make sure to update the system
configuration after creating a customized template, so the custom template is used instead of
the default.
The default templates include your logo and store information, and can be used without further
customization. However as a best practice, you should view each template, and make any
necessary changes before they are sent to customers.
Preview of Welcome Template
CHAPTER 20: Email Templates Customizing Email Templates
Magento Community Edition 2.0 User Guide 359
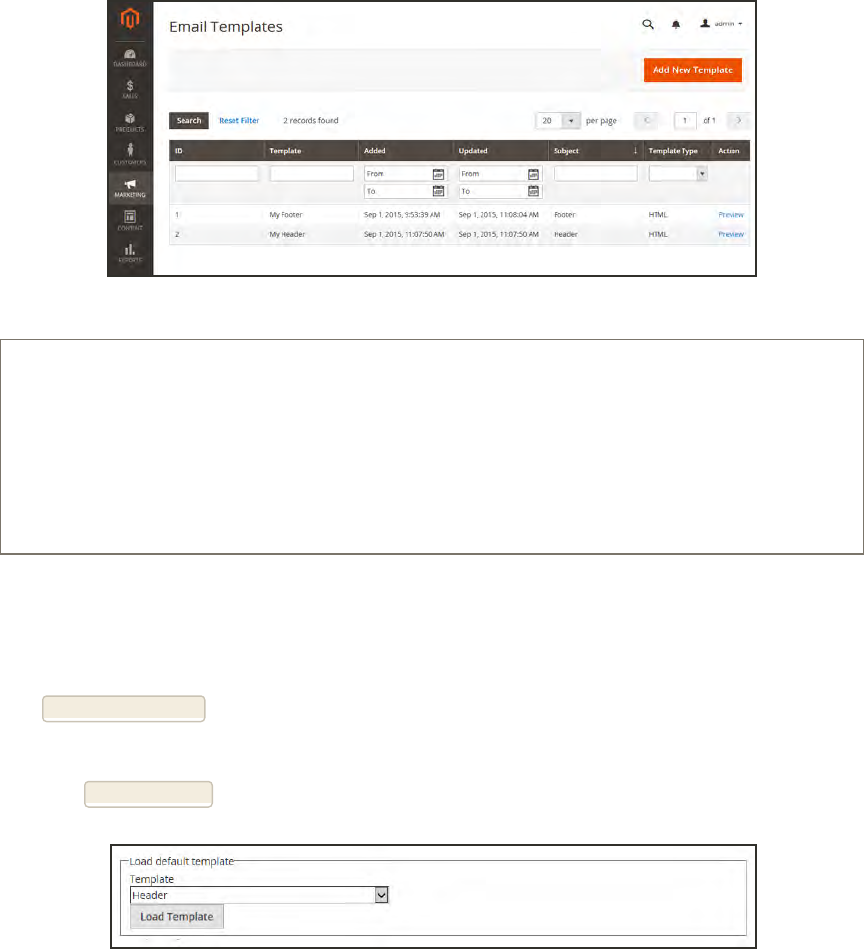
Header Template
The email header template includes your logo that is linked to your store. In addition, you can
easily insert variables to add store contact information to the header.
Email Templates
Process Overview:
Step 1: Load the Template
Step 2: Customize the Template
Step 3: Preview the Template
Step 4: Update the Configuration
Step 1: Load the Default Template
1. On the Admin sidebar, tap Marketing. Then under Communications, choose Email Templates.
2. Tap Add New Template. Then, do the following:
a. In the Template list under Magento_Email, choose “Header.”
b. Tap Load Template.
Default Header Template
Customizing Email Templates CHAPTER 20: Email Templates
360 Magento Community Edition 2.0 User Guide
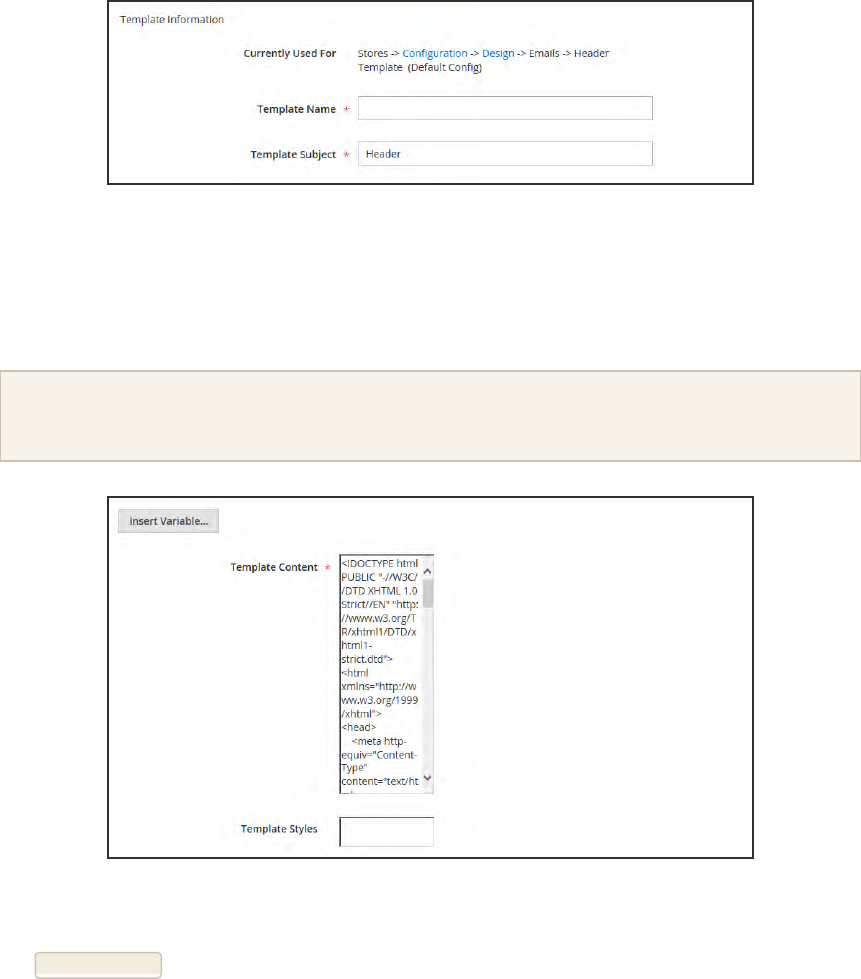
Step 2: Complete the Template Information
1. In the Template Name field, enter a name for your custom header.
2. Enter a Template Subject to help organize the templates. The list of templates can be sorted
and filtered by the Subject column.
Header Template Information
Step 3: Customize the Template Content
1. In the Template Content box, modify the HTML as needed.
When working in the template code, be careful not to overwrite anything that is enclosed in double
braces.
Template Content
2. To insert a variable, position the cursor in the code where you want the variable to appear, and
tap Insert Variable. Then, choose the variable that you want to insert.
When a variable is selected, a markup tag for the variable is inserted in the code.
CHAPTER 20: Email Templates Customizing Email Templates
Magento Community Edition 2.0 User Guide 361
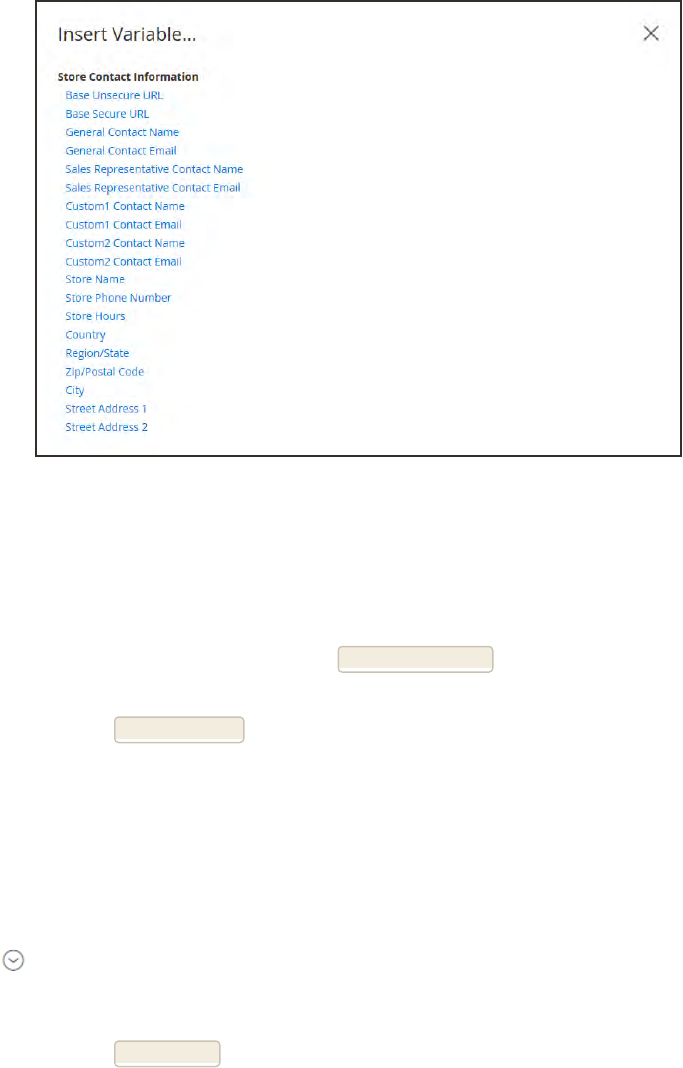
Insert Variable
Although he Store Contact variables are the ones most often included in the header, you are
not limited to the variables in this list. You can enter the code for any system or custom
variable directly into the template.
3. If you need to make any CSSdeclarations, enter the styles in the Template Styles box.
4. When you are ready to review your work, tap Preview Template. Then, make adjustments to the
template as needed.
5. When complete, tap Save Template.
Your custom header now appears in the list of available Email templates.
Step 4: Update the Configuration
1. In the list, tap the new header to reopen the template in edit mode.
2. Tap the last link in the breadcrumb trail at the top of the Template Information section. Then,
expand the Emails section.
3. Set Header Template to the name of the new header template.
4. When complete, tap Save Config.
Customizing Email Templates CHAPTER 20: Email Templates
362 Magento Community Edition 2.0 User Guide
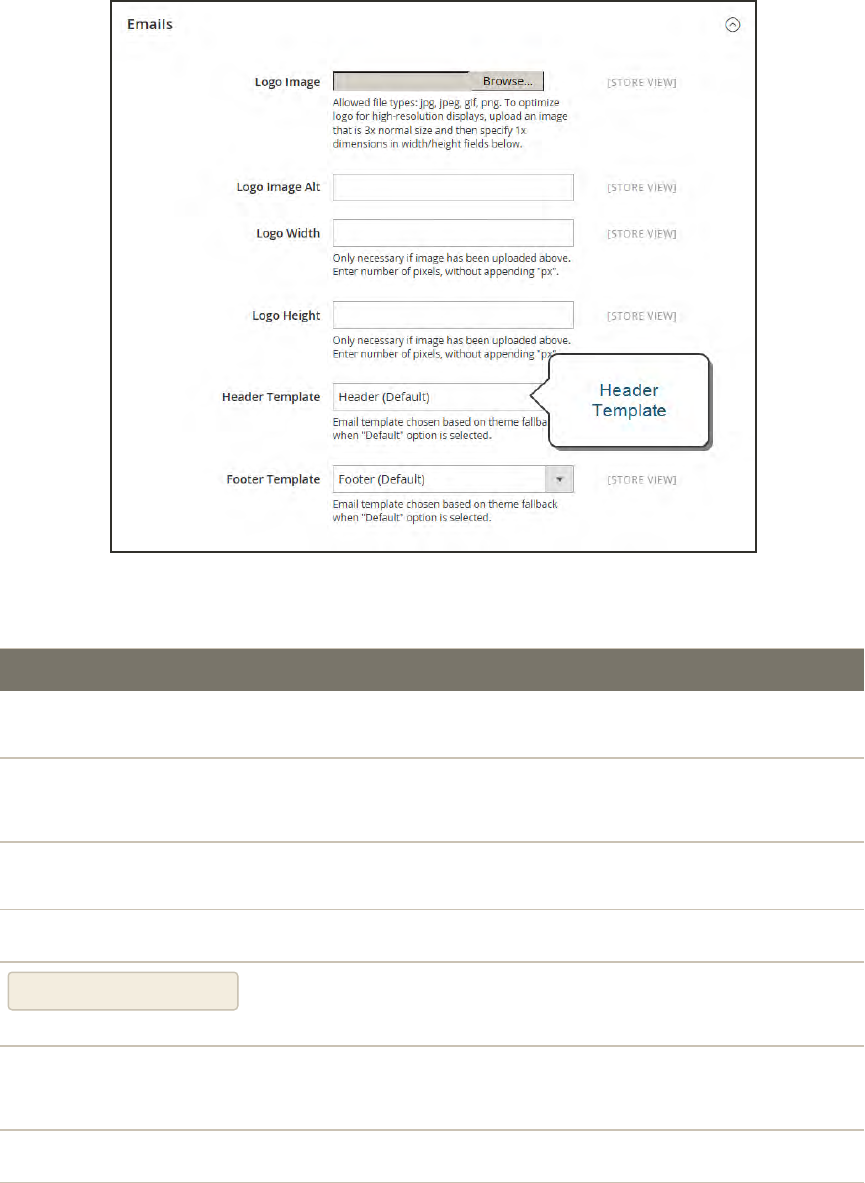
Header Template Configuration
FIELD DESCRIPTION
LOAD DEFAULT TEMPLATE
Template Lists the selection of available templates, and identifies the template
to be customized.
TEMPLATE INFORMATION
Template Name The name of your custom template.
Insert Variable Inserts a Store Contact Information variable into the template at the
cursor location.
Template Subject The Template Subject appears in the Subject column, and can be
used to sort and filter the templates in the list.
Template Content The content of the template in HTML.
Template Styles Any CSS style declarations that are needed to format the template
header can be entered in the Template Styles box.
Field Descriptions
CHAPTER 20: Email Templates Customizing Email Templates
Magento Community Edition 2.0 User Guide 363
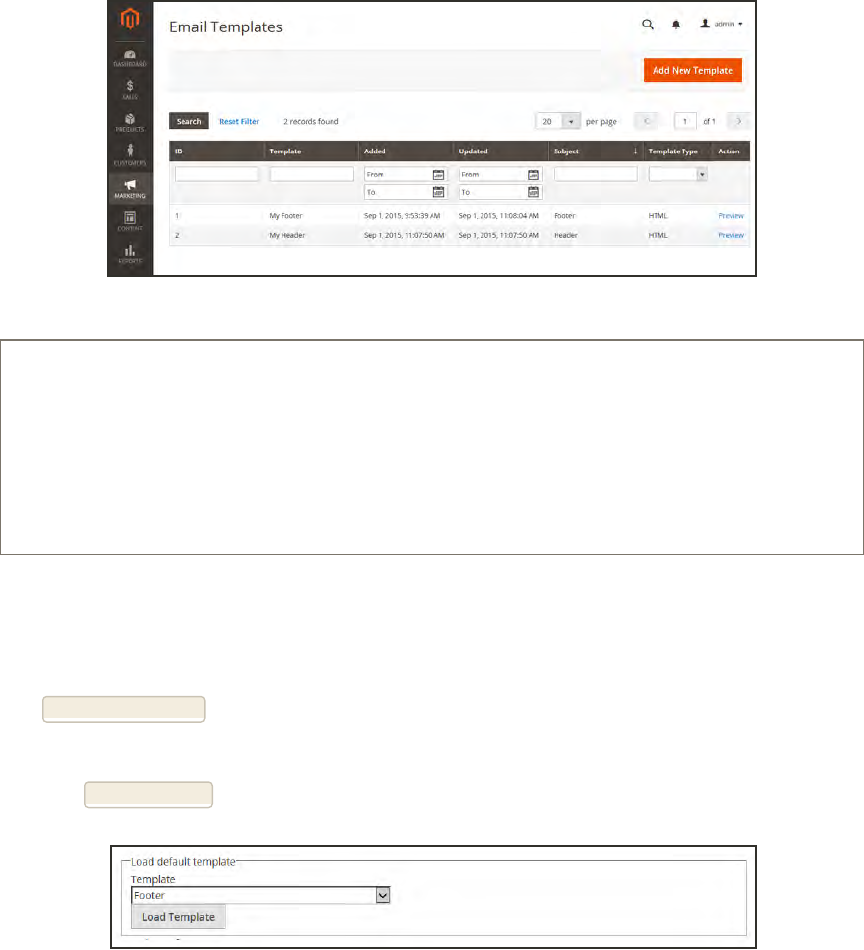
Footer Template
The email template footer contains the closing and signature line of the email message. You can
change the closing to fit your style, and add additional information, such as the company
name and address below your name.
Email Templates
Process Overview:
Step 1: Load the Template
Step 2: Customize the Template
Step 3: Preview the Template
Step 4: Update the Configuration
Step 1: Load the Default Template
1. On the Admin sidebar, tap Marketing. Then under Communications, choose Email Templates.
2. Tap Add New Template. Then, do the following:
a. In the Template list under Magento_Email, choose “Footer.”
b. Tap Load Template.
Default Footer Template
Customizing Email Templates CHAPTER 20: Email Templates
364 Magento Community Edition 2.0 User Guide
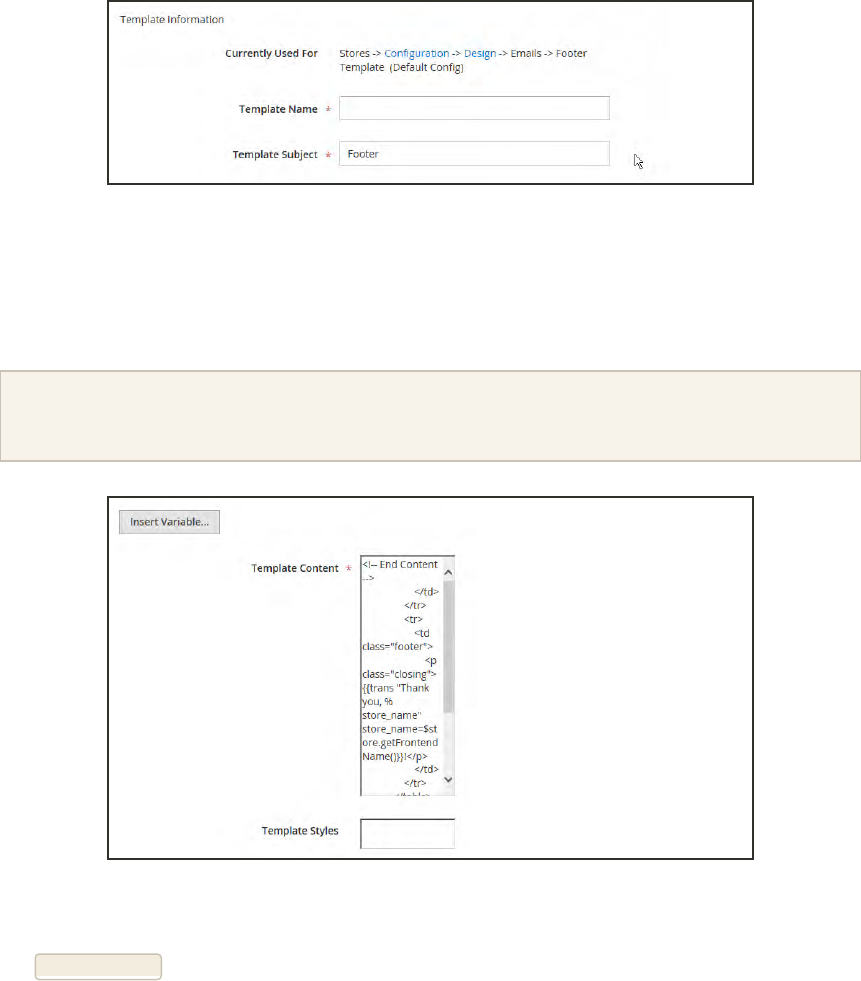
Step 2: Complete the Template Information
1. In the Template Name field, enter a name for your custom footer.
2. Enter a Template Subject to help organize the templates. The list of templates can be sorted
and filtered by the Subject column.
Footer Template Information
Step 3: Customize the Template Content
1. In the Template Content box, modify the HTML as needed.
When working in the template code, be careful not to overwrite anything that is enclosed in double
braces.
Template Footer Content
2. To insert a variable, position the cursor in the code where you want the variable to appear, and
tap Insert Variable. Then, choose the variable that you want to insert.
When a variable is selected, a markup tag for the variable is inserted in the code.
CHAPTER 20: Email Templates Customizing Email Templates
Magento Community Edition 2.0 User Guide 365
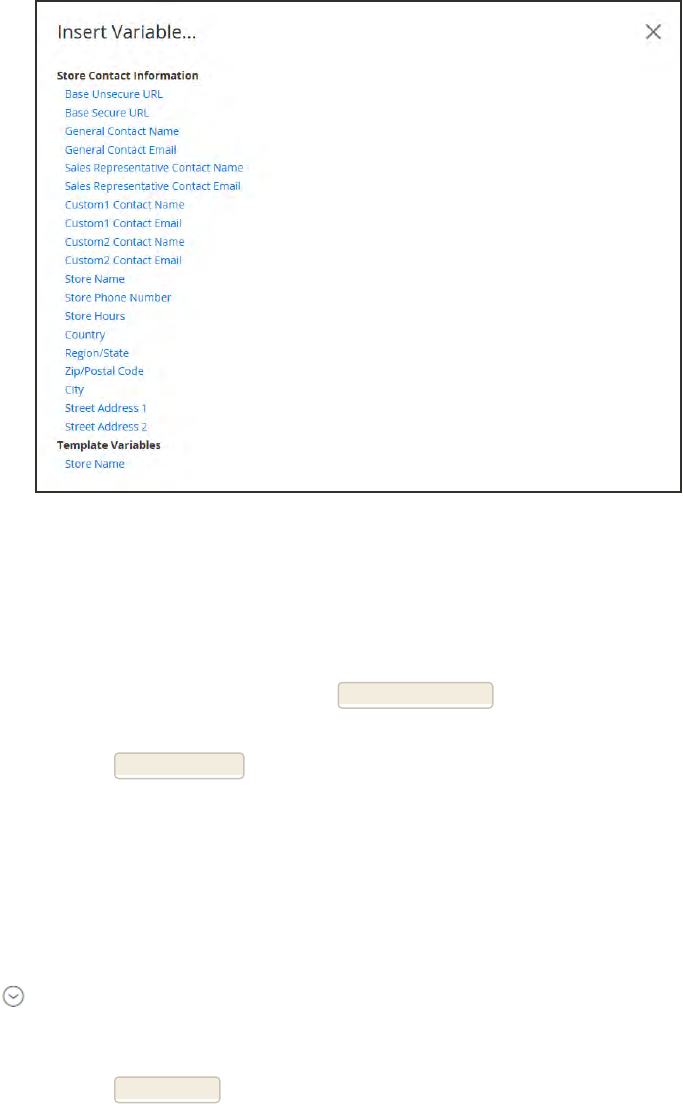
Insert Variable
Although the Store Contact variables are the ones most often included in the footer, you are not
limited to the variables in this list. You can enter the code for any system or custom variable
directly into the template.
3. If you need to make any CSSdeclarations, enter the styles in the Template Styles box.
4. When you are ready to review your work, tap Preview Template. Then, make adjustments to the
template as needed.
5. When complete, tap Save Template.
Your custom footer now appears in the list of available Email templates.
Step 4: Update the Configuration
1. In the list, tap the new footer to reopen the template in edit mode.
2. Tap the last link in the breadcrumb trail at the top of the Template Information section. Then,
expand the Emails section.
3. Set Footer Template to the name of the new template.
4. When complete, tap Save Config.
Customizing Email Templates CHAPTER 20: Email Templates
366 Magento Community Edition 2.0 User Guide
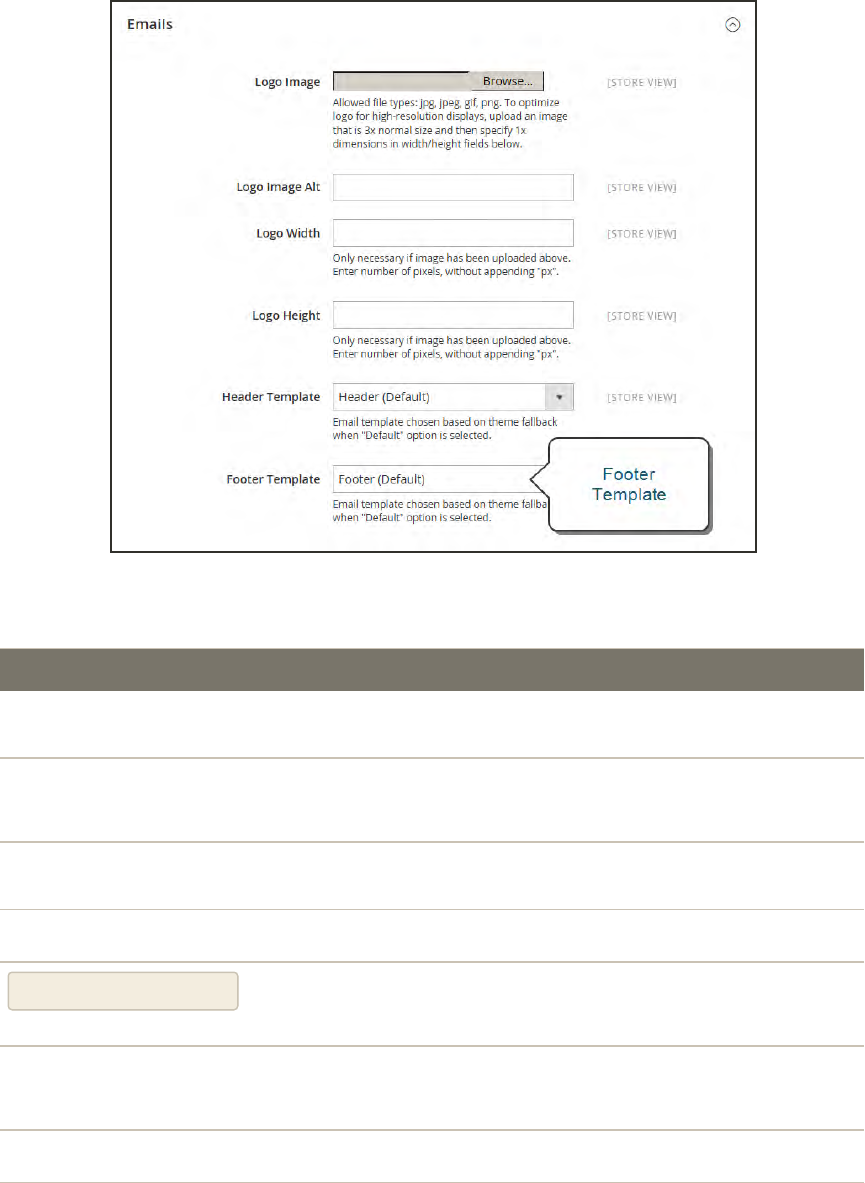
Footer Template Configuration
FIELD DESCRIPTION
LOAD DEFAULT TEMPLATE
Template Lists the selection of available templates, and identifies the template
to be customized.
TEMPLATE INFORMATION
Template Name The name of your custom template.
Insert Variable Inserts a Store Contact Information variable into the template at the
cursor location.
Template Subject The Template Subject appears in the Subject column, and can be
used to sort and filter the templates in the list.
Template Content The content of the template in HTML.
Template Styles Any CSS style declarations that are needed to format the template
footer can be entered in the Template Styles box.
Field Descriptions
CHAPTER 20: Email Templates Customizing Email Templates
Magento Community Edition 2.0 User Guide 367
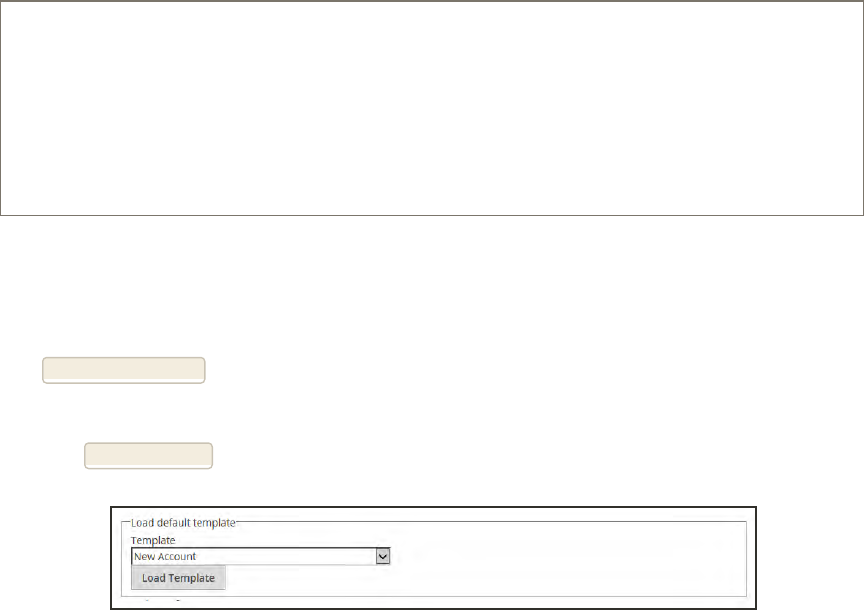
Message Templates
The process of customizing the body of each message is the same as the customizing the header
or footer. The only difference is that a different template is used for each activity or event. You
can use the templates as they are, or customize them to match your voice and brand. You
might start with the most important messages, such as those related to customer accounts and
activities. The selection of variables varies by template. In addition to the standard Store
Contact Information, some templates have additional variables available. For a complete list,
see the Email Template List at the end of this section.
Process Overview:
Step 1: Load the Template
Step 2: Customize the Template
Step 3: Preview the Template
Step 4: Update the Configuration
Step 1: Load the Default Template
1. On the Admin sidebar, tap Marketing. Then under Communications, choose Email Templates.
2. Tap Add New Template. Then, do the following:
a. In the Template list, choose the message template that you want to customize.
b. Tap Load Template.
Default Message Template
Step 2: Complete the Template Information
1. In the Template Name field, enter a name for your custom footer.
2. By default, the Template Subject contains the first line of the message, which is the
salutation. You can leave it as is, or enter something more descriptive. Because the Template
Subject can be used to sort the list, try to choose a word or phrase can applies to multiple
messages. For ideas, see the Email Template List at the end of this section.
Customizing Email Templates CHAPTER 20: Email Templates
368 Magento Community Edition 2.0 User Guide

Message Template Information
Step 3: Customize the Template Content
1. In the Template Content box, modify the HTML as needed.
When working in the template code, be careful not to overwrite anything that is enclosed in double
braces.
Template Message Content
2. To insert a variable, position the cursor in the code where you want the variable to appear, and
tap Insert Variable. Then, choose the variable that you want to insert.
When a variable is selected, a markup tag for the variable is inserted in the code.
CHAPTER 20: Email Templates Customizing Email Templates
Magento Community Edition 2.0 User Guide 369
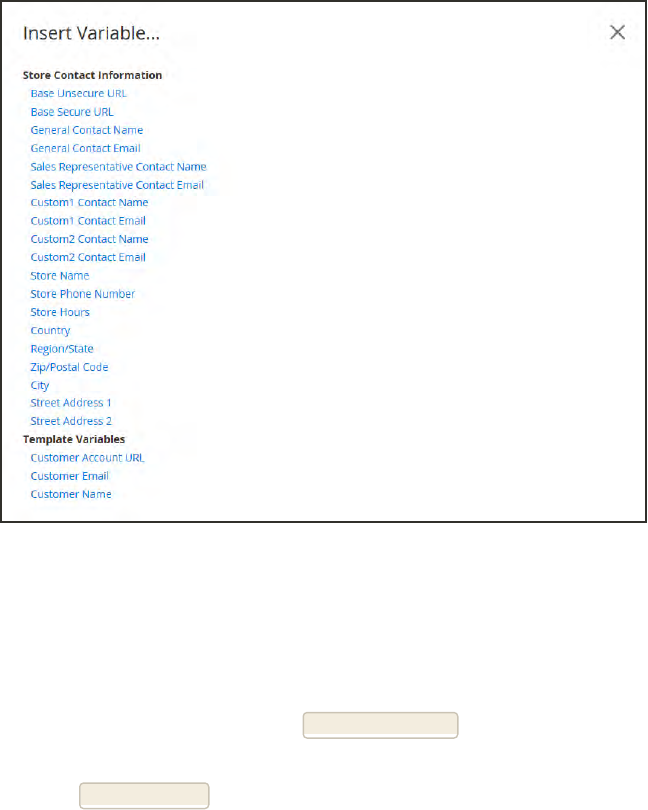
Insert Variable
In addition to the Store Contact variables, the list includes the Customer Account URL,
Customer Email, and Customer Name. However, you are not limited to the variables in this
list. You can enter the code for any system or custom variable directly into the template.
3. If you need to make any CSSdeclarations, enter the styles in the Template Styles box.
4. When you are ready to review your work, tap Preview Template. Then, make adjustments to the
template as needed.
5. When complete, tap Save Template.
Your custom footer now appears in the list of available Email templates.
Customizing Email Templates CHAPTER 20: Email Templates
370 Magento Community Edition 2.0 User Guide

Step 4: Update the Configuration
1. In the list, tap the new message template to reopen it in edit mode.
2. In the breadcrumb trail at the top of the Template Information section, take note of the section
after the last link. Tap the link to open the configuration page.
3. Expand the section. For this example, the template is located in the Create New Account
Options section.
4. Find the email template field in the form, and choose the new template that you created.
Welcome Email Configuration
5. When complete, tap Save Config.
FIELD DESCRIPTION
LOAD DEFAULT TEMPLATE
Template Lists the selection of available templates, and identifies the template
to be customized.
TEMPLATE INFORMATION
Template Name The name of your custom template.
Insert Variable Inserts a variable into the template at the cursor location.
Template Subject The Template Subject appears in the Subject column, and can be
used to sort and filter the templates in the list.
Template Content The content of the template in HTML.
Template Styles Any CSS style declarations that are needed to format the template
can be entered in the Template Styles box.
Field Descriptions
CHAPTER 20: Email Templates Customizing Email Templates
Magento Community Edition 2.0 User Guide 371

Email Template List
Customer Account
lNew Account
lNew Account Confirmation Key
lNew Account Confirmed
lNew Account Without Password
lForgot Password
lRemind Password
lReset Password
Customer Activity
lContact Form
lSend Product Link to Friend
lWishlist Sharing
Newsletters
lSubscription Confirmation
lSubscription Success
lUnsubscription Success
Product Alert
lCron Error Warning
lPrice Alert
lStock Alert
Promotions
lPromotion Notification / Reminder
Admin Activity
lForgot Admin Password
lReset Password
Email Templates
lEmail - Footer
lEmail - Header
lExport Failed
lImport Failed
Product Alerts
lProduct Alerts Cron Error
lProduct Price Alert
lProduct Stock Alert
Order
lNew Order / New Order for Guest
lOrder Update / Order Update for Guest
lPayment Failed
Invoice
lNew Invoice / New Invoice for Guest
lInvoice Update / Invoice Update for Guest
Shipment
lNew Shipment / New Shipment for Guest
lShipment Update / Shipment Update for
Guest
Credit Memo
lCredit Memo Update
lCredit Memo Update for Guest
lNew Credit Memo
lNew Credit Memo for Guest
System Notifications
lSitemap Generate Warnings
lCurrency Update Warnings
Email Templates
Email Template List CHAPTER 20: Email Templates
372 Magento Community Edition 2.0 User Guide

CHAPTER 21:
Sales Documents
In addition to the email messages related to a sale, your store generates invoices, packing
slips, and credit memos in both HTMLand PDF formats. Before your store goes live, make
sure to update these documents with your logo and store address. You can customize the
address format, and also include additional information for reference.
lInvoices
lPacking Slips
lCredit Memos
Magento Community Edition 2.0 User Guide 373
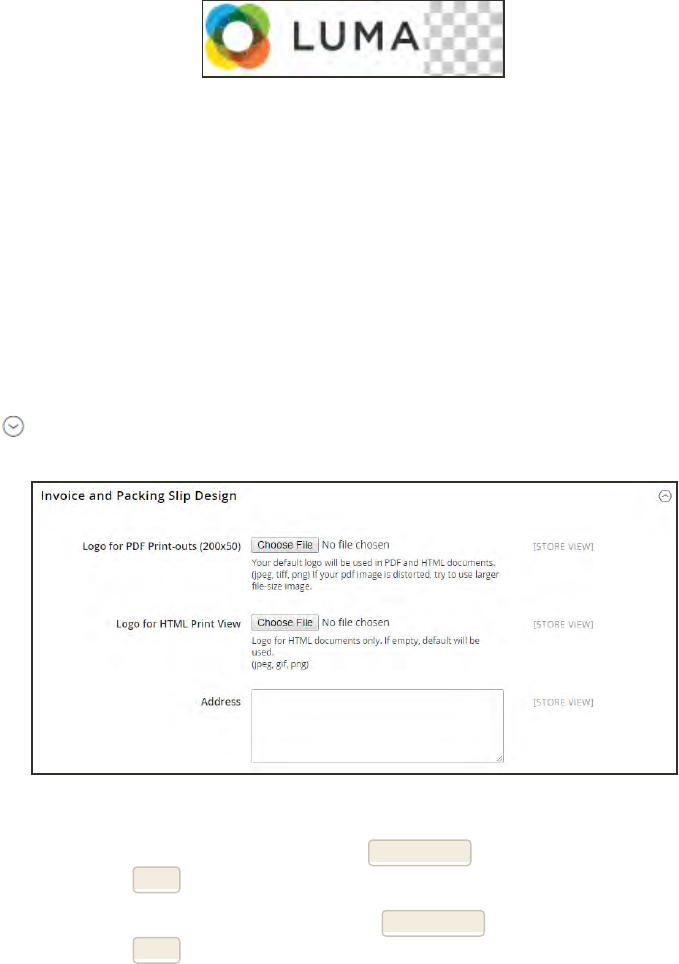
Preparing Your Invoice Logo
Unlike the logo images used in HTML, the logo for PDF invoices and other sales documents can
be a high-resolution, 300 dpi image. However, the image must be rendered to fit a space that is
200 pixels wide by 50 pixels high. Be careful to preserve the aspect ratio when you resize the
logo. Resize the logo to fit the height, and don’t worry about any unused space to the right.
200 x 50 pixels
One way to resize your logo to fit the required size is to create a new, blank image with the
correct dimensions. Then, paste your logo image and resize it to fit the height. With most
image editing programs, you can either scale it by a percentage to preserve the aspect ratio, or
hold down the shift key and manually resize the image.
To configure invoices and packing slips:
1. On the Admin sidebar, tap Stores. Then under Settings, choose Configuration. Then in the
panel on the left, under Sales, choose Sales.
2. Expand the Invoice and PackingSlip Design section. Then, do the following:
Invoice and Packing Slip Design
a. To upload the Logo for PDF Print-outs, tap Choose File. Find the logo that you have
prepared, and tap Open.
b. To upload the Logo for HTML Print View,tap Choose File. Find the logo that you have
prepared, and tap Open.
Preparing Your Invoice Logo CHAPTER 21: Sales Documents
374 Magento Community Edition 2.0 User Guide

3. Enter your address as you want it to appear on invoices and packing slips.
4. When complete, tap Save Config.
For reference, a thumbnail of the uploaded image appears before each field. Don’t worry if the
thumbnail appears distorted. The proportion of the logo will be correct on the invoice.
To replace an image:
1. Tap Choose File and choose a different logo file.
2. Mark the Delete Image checkbox for the image you want to replace.
3. Tap Save Config.
FORMAT REQUIREMENTS
PDF
File Format jpg (jpeg), png, tif (tiff)
Image Size 200 pixels wide x 50 pixels high
Resolution 300 dpi recommended
HTML
File Format jpg (jpeg), png,gif
Image Size Determined by theme.
Resolution 72 or 96 dpi
Image Formats
CHAPTER 21: Sales Documents Preparing Your Invoice Logo
Magento Community Edition 2.0 User Guide 375
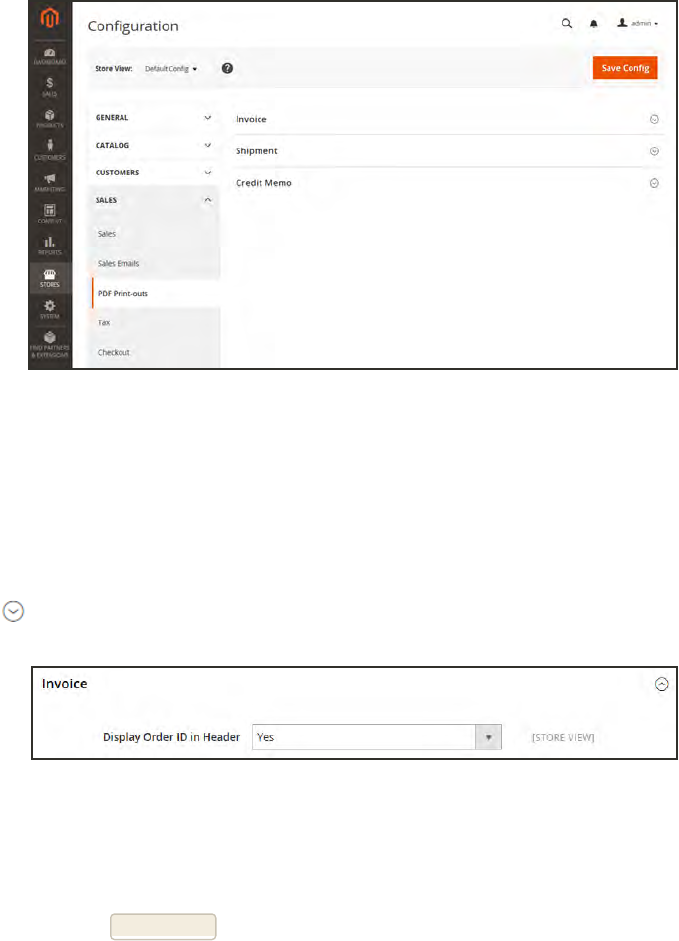
Adding Reference IDs to Header
The order ID and customer IP address can be included in the header of sales documents that
accompany an order. Follow the instructions below to include either, or both of these identifiers
for reference in the header of invoices, shipment packing slips, and credit memos.
PDF Print-outs
To show the Order ID:
1. On the Admin sidebar, tap Stores. Then under Settings, choose Configuration.
2. In the panel on the left under Sales, choose PDF Print-outs.
3. Expand the Invoice section.
Invoice
4. Set Display Order ID in Header to “Yes.”
5. Repeat these steps for the Shipment and Credit Memo sections.
6. When complete, tap Save Config.
Preparing Your Invoice Logo CHAPTER 21: Sales Documents
376 Magento Community Edition 2.0 User Guide
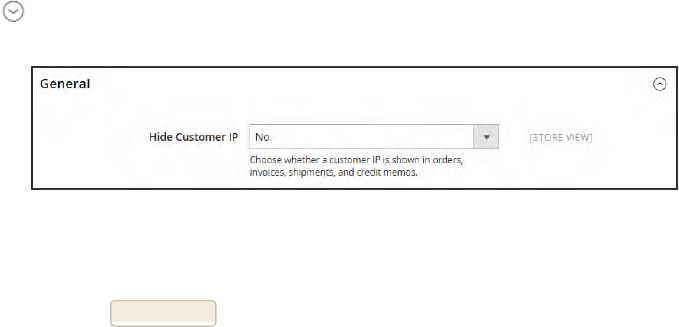
To show the customer IPaddress:
1. On the Admin sidebar, tap Stores. Then under Settings, choose Configuration.
2. In the panel on the left under Sales, choose Sales.
3. Expand the General section.
General
4. Set Hide Customer IP to “No.”
5. When complete, tap Save Config.
CHAPTER 21: Sales Documents Preparing Your Invoice Logo
Magento Community Edition 2.0 User Guide 377
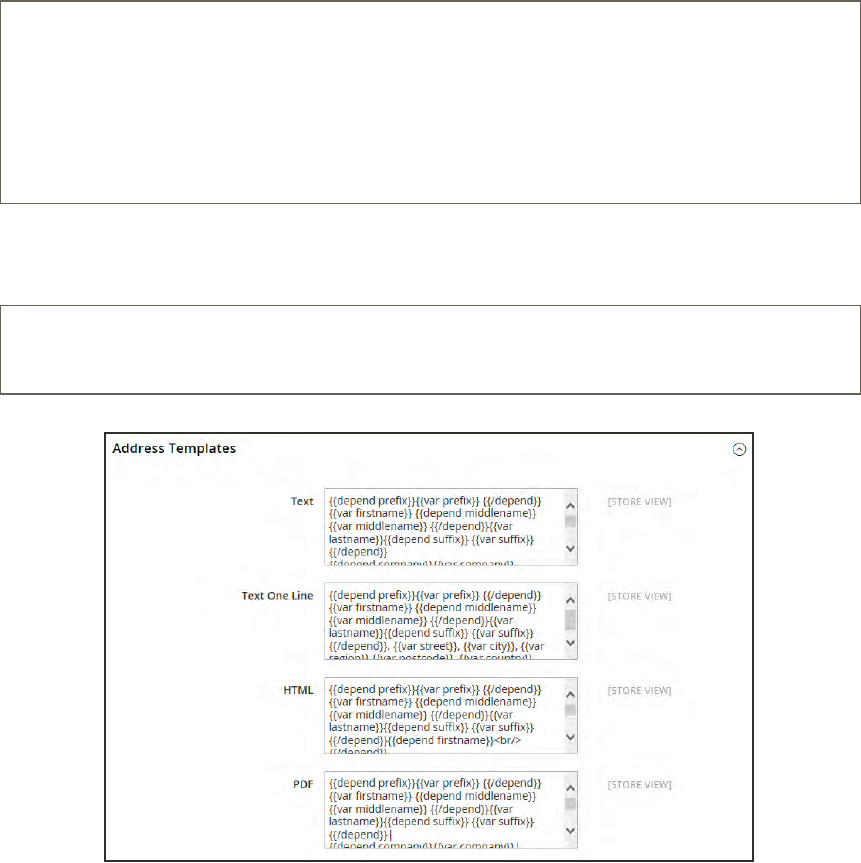
Customer Address Templates
You can modify the template that controls the format of customer billing and shipping
addresses that appear on printed invoices, shipments, and refunds, as well as in the addresses
book of the customer account.
Example 1: Text Templates
{{depend address attribute code}} a space, a character, or UI label
{{/depend}};
{{if address attribute code}}{{var address attribute code}} a space,
a character, or UI label
{{/if}}
For Text, Text One Line, HTML and PDF Address Templates
Example 2: JavaScript Template
#{address attribute code} or User Interface label #{address
attribute code}
For JavaScript Address Template
Address Templates
Preparing Your Invoice Logo CHAPTER 21: Sales Documents
378 Magento Community Edition 2.0 User Guide

To change the order of address fields:
1. On the Admin sidebar, tap Stores. Then under Settings, choose Configuration.
2. In the panel on the left, under Customers, choose Customer Configuration.
3. Expand the Address Templates section. The section includes a separate set of formatting
instructions for each of the following:
lText
lText One Line
lHTML
lPDF
4. Edit each template as needed, using the examples for reference.
5. When complete, tap Save Config.
CHAPTER 21: Sales Documents Preparing Your Invoice Logo
Magento Community Edition 2.0 User Guide 379

Notes
380 Magento Community Edition 2.0 User Guide

CHAPTER 22:
Newsletters
Publishing a regular newsletter is considered to be one of the most powerful and affordable
marketing tools available. Magento Community Edition 2.0 gives you the ability to
publish and distribute newsletters to customers who have subscribed, plus tools to
produce your newsletter, build and manage your list of subscribers, develop content, and
drive traffic to your store. You can also use Page Hierarchy to create an archive of past
issues.
You can add capabilities by integrating your Magento installation with a third-party
newsletter service provider and by adding extensions. To learn more, see Magento Connect.
Magento Community Edition 2.0 User Guide 381
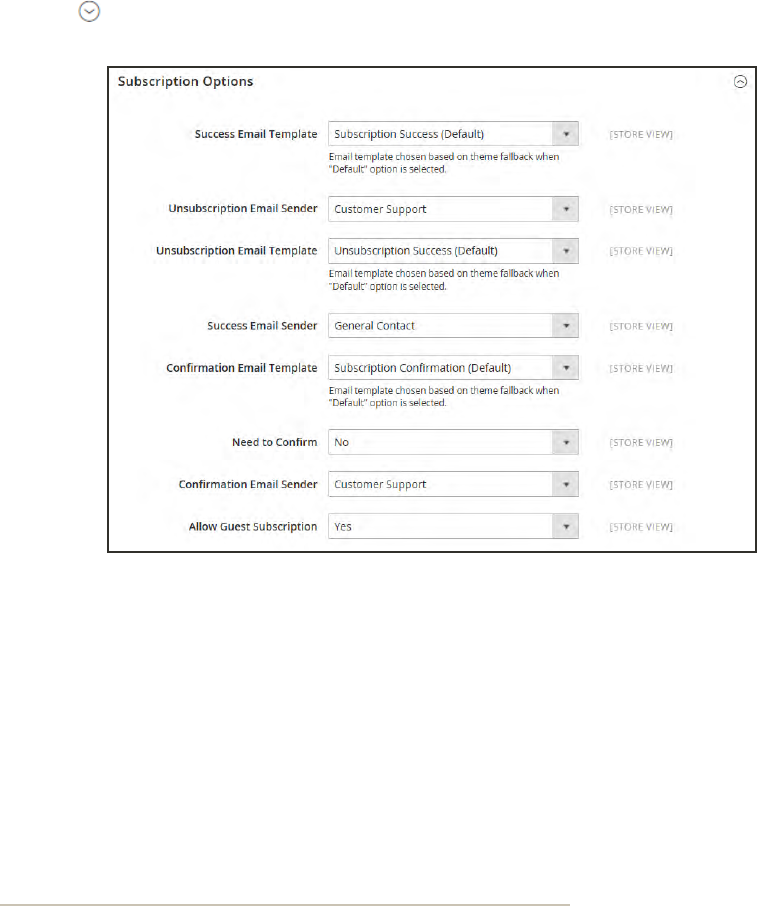
Configuring Newsletters
The first step in creating newsletters is to configure the newsletter settings for your site. You
can require customers to click a confirmation link that is sent by email to confirm the
subscription. This double opt-in1, method requires customers to confirm twice that they want
to receive your newsletter, and reduces the possibility that it might be considered to be spam.
To configure subscription options:
1. On the Admin sidebar, tap Stores. Then under Settings, choose Configuration.
2. In the panel on the left under Customers, choose Newsletter.
3. Expand the Subscription Options section. Then, do the following:
Subscription Options
1The process for subscribing email recipients by requiring them to take a secondary step to confirm that they want
to receive emails.
Configuring Newsletters CHAPTER 22: Newsletters
382 Magento Community Edition 2.0 User Guide

a. Confirm the email template and sender of the each of the following email messages that
are sent to subscribers:
lSuccess email
lConfirmation email
lUnsubscription email
b. To require the use of double-opt in to confirm subscriptions, set Need to Confirm to “Yes.”
c. To allow people who do not have an account with your store to subscribe to the newsletter,
set Allow Guest Subscriptions to “Yes.”
4. When complete, tap Save Config.
CHAPTER 22: Newsletters Configuring Newsletters
Magento Community Edition 2.0 User Guide 383
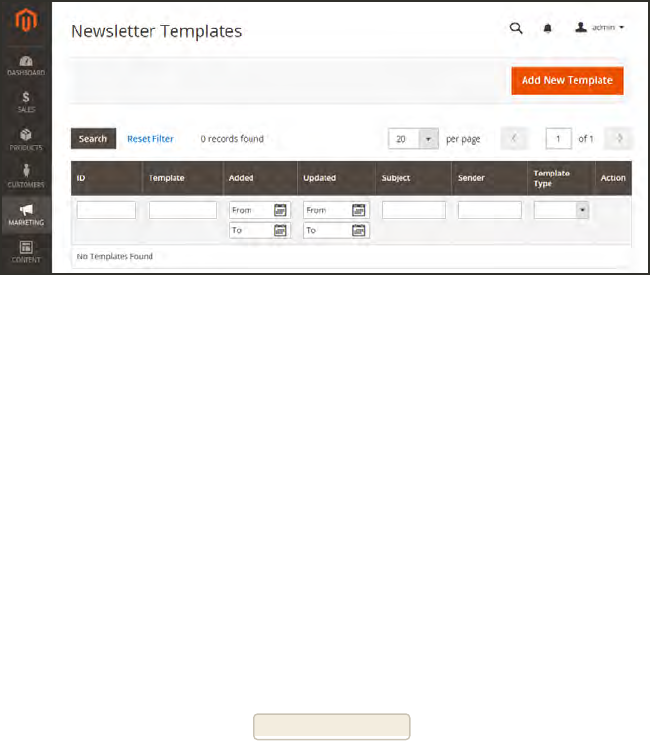
Newsletter Templates
You can create as many newsletter templates as you need for different purposes. You might
send a weekly product update, a monthly newsletter, or annual holiday newsletter.
Newsletter Templates
To create a newsletter template:
1. On the Admin sidebar, tap Marketing. Then under Communications, choose Newsletter
Template.
2. To add a new template, click the Add New Template button. Then, do the following:
a. In the Template Name enter name for internal reference.
b. In the Template Subject field, describe the purpose of the newsletter.
c. In the Sender Name field , enter the name of the person who is to appear as the sender of
the newsletter.
d. In the Sender Email field, enter the email address of the newsletter sender.
e. At the Template Content field, tap Show / HIde Editor to display the WYSIWYG editor.
Then, update the content as needed. To learn more, see: Using the Editor.
Newsletter Templates CHAPTER 22: Newsletters
384 Magento Community Edition 2.0 User Guide
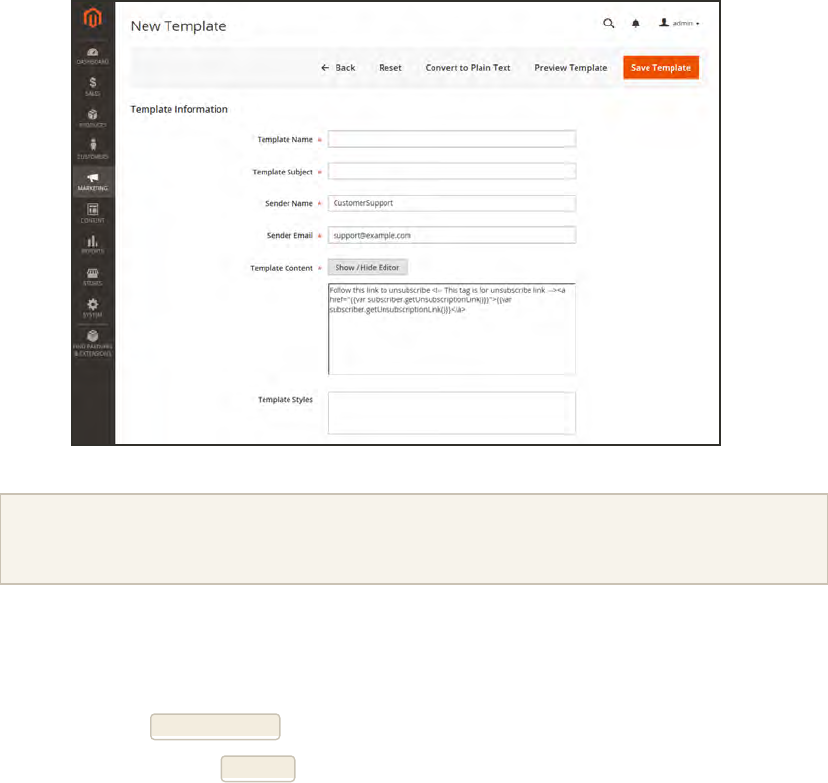
Template Information
Do not remove the unsubscribe link at the bottom of the template content. In some
jurisdictions, the link is required by law.
f. In the Template Styles field, enter any CSSdeclarations that are needed to format the
content.
g. Tap Preview Template to see how it looks. Then, make any changes that are needed.
3. When complete, tap Save Template.
After you save a template, a Save As button appears the next time you edit the template. It can
be used to save variations of the template without overwriting the original.
CHAPTER 22: Newsletters Newsletter Templates
Magento Community Edition 2.0 User Guide 385
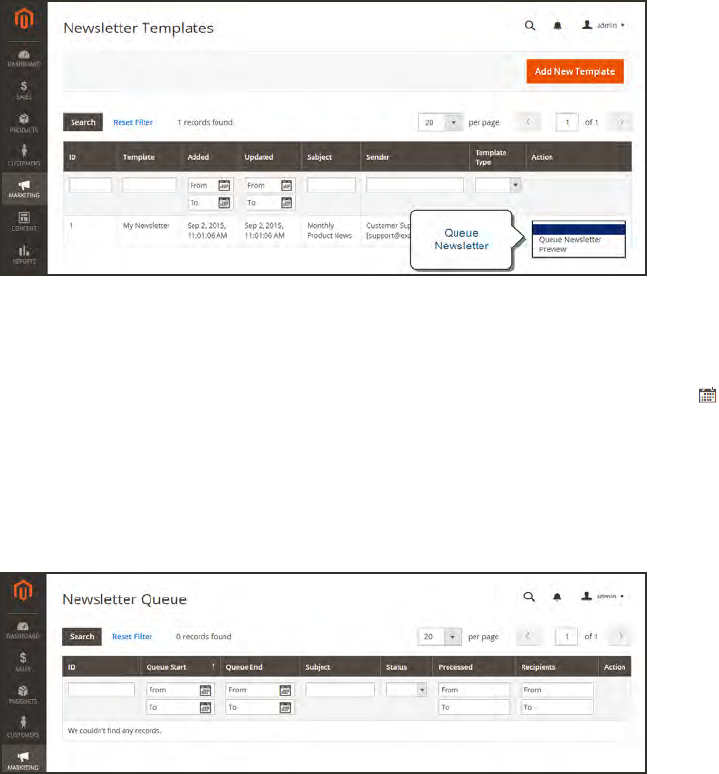
Sending Newsletters
To manage the load on the server, newsletters with many subscribers are sent in batches. The
process is managed as a queue of separate batches. Any problems that occur during the
transmission appear on the Newsletter Problem Report.
To send a newsletter:
1. Find the newsletter to be sent in the Newsletter Templates list. Then, set the Action column to
“Queue Newsletter.”
Add to Newsletter Queue
2. On the Admin menu, tap Marketing. Then under Communications, choose Newsletter Queue.
3. Both the Queue Start and Queue End dates can be defined as a range. Use the Calendar to
select the date for each. The value in the date field reflects the system date and time.
Magento manages sending the newsletters in batches, according to the start and end dates.
You can check the newsletter queue periodically to check the status and see how many have
been processed.
Newsletter Queue
Sending Newsletters CHAPTER 22: Newsletters
386 Magento Community Edition 2.0 User Guide
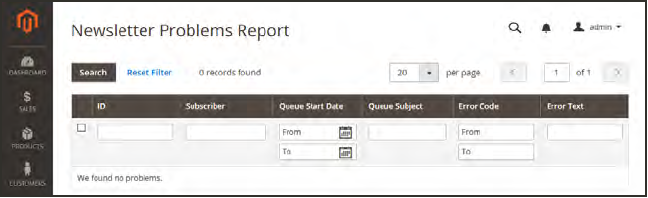
To check for problems:
1. On the Admin menu, tap Reports.
2. Under Marketing, choose Newsletter Problem Reports.
Newsletter Problems Report
CHAPTER 22: Newsletters Sending Newsletters
Magento Community Edition 2.0 User Guide 387
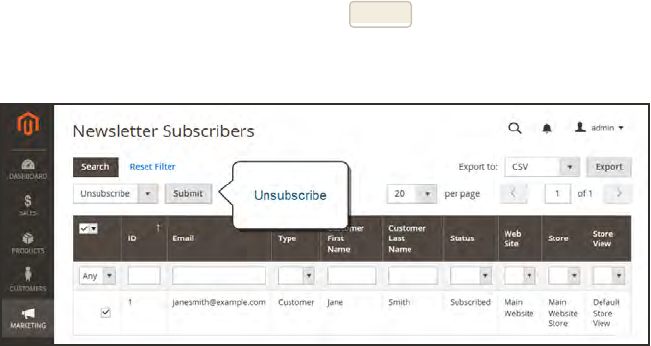
Managing Subscribers
As a best practice you should manage your subscription list on a regular basis, and make sure
to process any requests to unsubscribe. In some jurisdictions, it is required by law that requests
to unsubscribe are processed within a specific period of time.
If you want to use a third-party service to send newsletters, you can export your subscription
list as a CSV or XML file.
To cancel a subscription:
1. On the Admin sidebar, tap Marketing. Then under Communications, choose Newsletter
Subscribers.
2. Find the subscriber in the list. Then, mark the checkbox in the first column.
3. Set the Action control to “Unsubscribe.” Then, tap Submit.
The status of the record changes to “Unsubscribed.”
Unsubscribe
Sending Newsletters CHAPTER 22: Newsletters
388 Magento Community Edition 2.0 User Guide
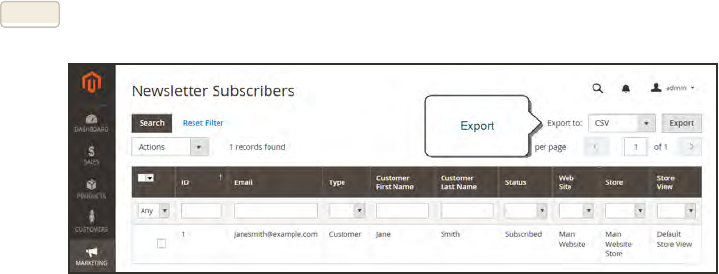
To export the list of subscribers:
1. From the Newsletter Subscribers list, use the filter controls to include only records with a
Status of “Subscribed,” and for the appropriate website, store, or store view.
2. Set the Export to control to one of the following:
lCSV
lXML
3. Tap Export. Then, look for the prompt at the bottom of the screen, and save the file.
Export Newsletter Subscribers
CHAPTER 22: Newsletters Sending Newsletters
Magento Community Edition 2.0 User Guide 389

Notes
390 Magento Community Edition 2.0 User Guide
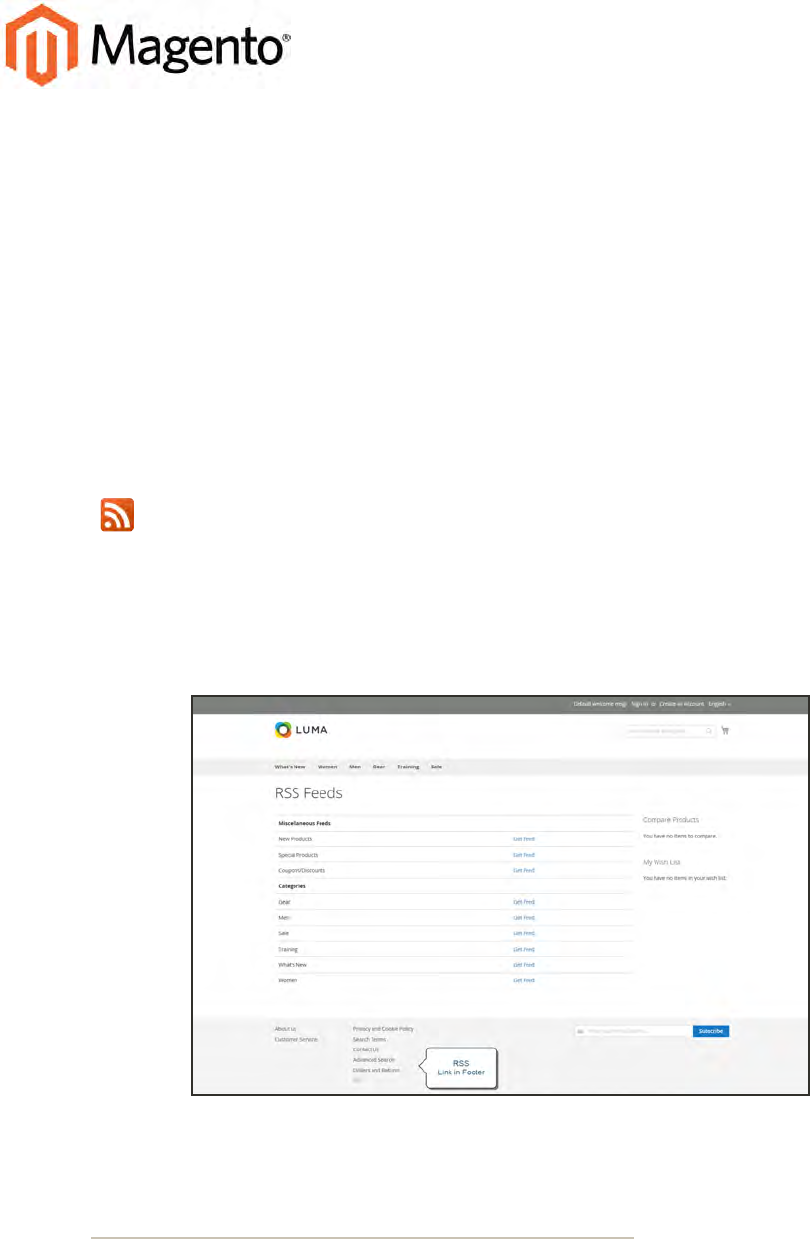
CHAPTER 23:
RSS Feeds
RSS (Really Simple Syndication) is an XML-based data format that is used to distribute
information online. Your customers can subscribe to your RSS feeds to learn of new
products and promotions. RSS Feeds can also be used to publish your product information
to shopping aggregation sites, and can be included in newsletters.
When RSS feeds are enabled, any additions to products, specials, categories, and coupons
are automatically sent to the subscribers of each feed. A link to all RSS feeds that you
publish is in the footer of your store.
The orange RSSsymbol is typically used to identify an RSSfeed.
The software that is required to read an RSS feed is called a feed reader1, and allows
people to subscribe to headlines, blogs, podcasts, and much more. Google Reader is one of
the many feed readers that are available online for free.
RSSFeeds
1Software that is used to read syndicated content from RSS feeds.
Magento Community Edition 2.0 User Guide 391
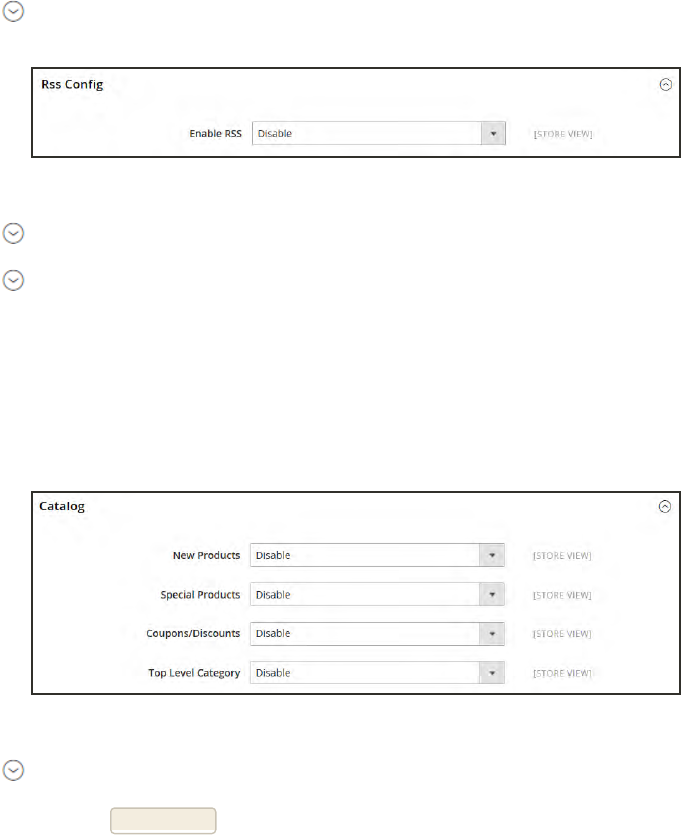
To set up RSS feeds for your store:
1. On the Admin sidebar, tap Stores. Then under Settings, choose Configuration.
2. In the upper-right corner, set Store View to the store view where you want the feeds to be
available.
3. In the panel on the left, under Catalog, choose RSS Feeds.
4. Expand the Rss Config section. Then, set Enable RSS to “Enable.”
RSS Feeds
5. Expand the Wish List section. Then, set Enable RSS to “Enable.”
6. Expand the Catalog section, set any, or all of the following feeds to “Enable.”
lNew Products
lSpecial Products
lCoupons/Discounts
lTop Level Category
Catalog
7. Expand the Order section. Then, set Customer Order Status Notification to “Enable.”
8. When complete, tap Save Config.
392 Magento Community Edition 2.0 User Guide
CHAPTER 23: RSS Feeds
RSS FEED DESCRIPTION
Wish List When enabled, an RSS feed link appears at the top of customer wish
list pages. Additionally, the wish list sharing page includes a
checkbox that lets you include a link to the feed from shared wish
lists.
New Products Publishes notification of new products added to the catalog.
Special Products Publishes notification of any products with special pricing.
Coupons / Discounts Publishes notification of any special coupons or discounts that are
available in the store.
Top Level Category Publishes notification of any change to the top-level category
structure of your catalog, which is reflected in the main menu.
Customer Order Status Gives customers the ability to track their order status by RSS feed.
When enabled, an RSS feed link appears on the order.
Types of RSS Feeds
Magento Community Edition 2.0 User Guide 393
CHAPTER 23: RSS Feeds

Notes
394 Magento Community Edition 2.0 User Guide

CHAPTER 24:
Using Variables
Variables are pieces of information that can be created once and used in multiple places,
such as email templates, blocks, and content pages. Your store includes a large number of
predefined variables that can be used to personalize communications. In addition, you can
create your own custom variables.
lPredefined Variables
lCustom Variables
Magento Community Edition 2.0 User Guide 395
Adding Predefined Variables
Predefined variables are easy to add to content email templates and content pages to
personalize communications.
To add a variable to an email template:
1. On the Admin sidebar, tap Marketing. Then under Communications, choose Email Templates.
2. Do one of the following:
lOpen an existing template.
lCreate a new template.
3. In the Template Content box, position the insertion point where you want the variable to
appear. Then, tap Insert Variable.
4. In the list of available variables, choose the one you want to insert into the template.
5. When complete, tap Save Template.
Adding Predefined Variables CHAPTER 24: Using Variables
396 Magento Community Edition 2.0 User Guide
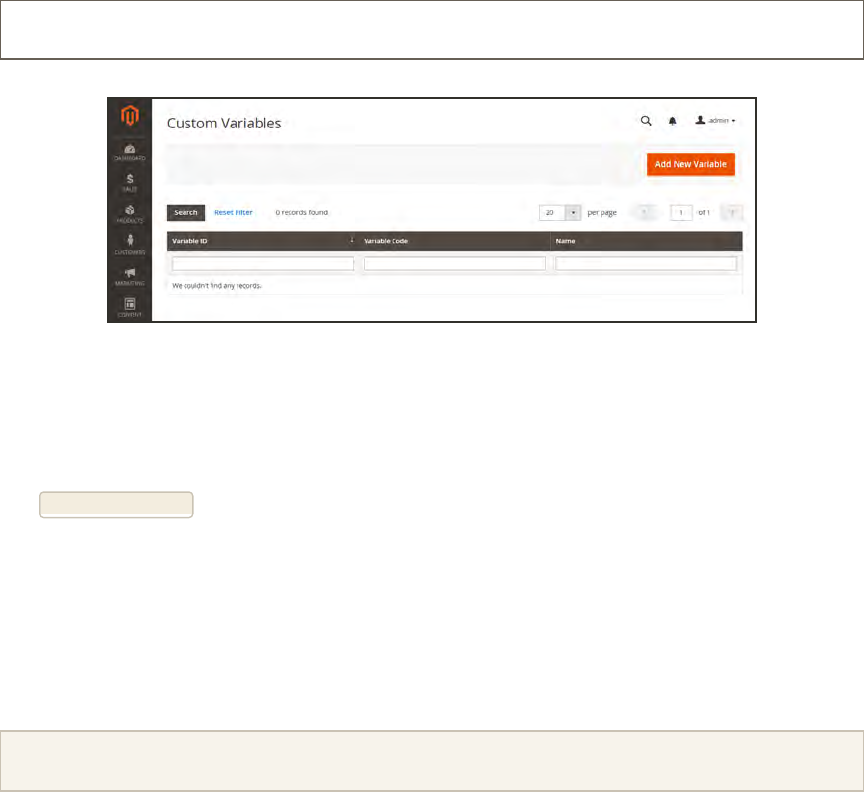
Adding Custom Variables
If you know a little basic HTML, you can create custom variables and use a markup tag to
incorporate them into pages, blocks, banners, and email templates.
{{CustomVar code= "my_custom_variable"}}
Custom Variables
To create a custom variable:
1. On the Admin sidebar, tap System. Then under Other Settings, choose Custom Variables.
2. Tap Add New Variable.
3. Enter an identifier in the Variable Code field. Use all lowercase characters, without spaces.
4. Enter a Variable Name, which is used for internal reference. Then, do one of the following:
lIn the Variable HTML Value text field, enter any content you want to include, using basic
HTML tags. This option allows you to format the value.
lIn the Variable Plain Value field, enter the variable value as plain text.
You can drag the lower-right corner to make the boxes bigger.
CHAPTER 24: Using Variables Adding Custom Variables
Magento Community Edition 2.0 User Guide 397
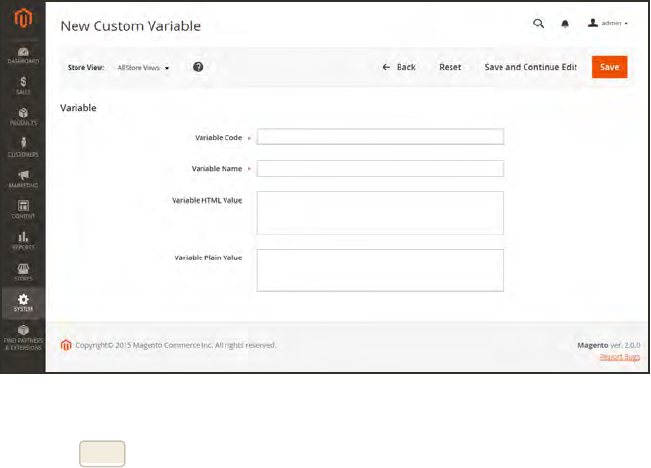
New Custom Variable
5. When complete, tap Save.
Adding Custom Variables CHAPTER 24: Using Variables
398 Magento Community Edition 2.0 User Guide
Markup Tags
A markup tag is a snippet of code that contains a relative reference to an object in your store,
such as a variable, URL, image, or block. Markup tags can be incorporated into the HTML of
content pages, blocks, email templates, newsletters, and so on.
Markup tags are enclosed in double, curly braces, and can either be generated by the Widget
tool, or typed directly into HTML content. For example, rather than hard-coding the full path
to a page, you can use a markup tag to represent the store URL. The markup tags featured in
the following examples include:
Custom Variable
The Variable markup tag can be used to insert a custom variable into an email templates,
blocks, newsletters, and content pages,
{{CustomVar code= "my_custom_variable"}}
Store URL
The Store URL markup tag represents the base URL of your website, and is used as a substitute
for the first part of a full URL, including the domain name. There are two versions of this
markup tag: One that goes directly to your store, and the other with a forward slash at the end
that is used when a path is added.
{{store url='apparel/shoes/womens'}}
Media URL
The dynamic media URL markup tag represents the location and file name of an image that is
stored on a content delivery network (CDN). The tag can be used to place an image on a page,
block, banner, or email template.
{{media url='shoe-sale.jpg'}}
CHAPTER 24: Using Variables Markup Tags
Magento Community Edition 2.0 User Guide 399
Block ID
The Block ID markup tag is one of the easiest to use, and can be used to place a block directly
on a CMS page, or even nested inside another block. You can use this technique to modify a
block for different promotions or languages. The Block ID markup tag references a block by its
identifier.
{{block id='block-id'}}
Template Tag
A template tag references a PHTML template file, and can be used to display the block on a
CMSpage or static block. The code in the following example can be added to a page or block to
display the Contact Us form.
{{block type="core/template" name="contactForm"
template="contacts/form.phtml"}}
“Contact Us” Template Tag
The code in the next example can be added to a page or block to display the a list of products
in a specific category, by category ID.
{{block type="catalog/product_list" category_id="22"
template="catalog/product/list.phtml"}}
“Category Product List” Template Tag
Markup Tags CHAPTER 24: Using Variables
400 Magento Community Edition 2.0 User Guide
Widget Code
The Widget tool can be used to display lists of products, or to insert complex links, such as one
that goes to a specific product page, based on product ID. The code that is generated includes
the block reference, location of the code module, and corresponding PHTML template. After the
code is generated, you can copy and paste it from one place to another.
The code in the following example can be added to a page or block to display the list of new
products.
{{widget type="catalog/product_widget_new"
display_type="new_products" products_count="10"
template="catalog/product/widget/new/content/new_grid.phtml"}}
“New Products Grid” Code
The code in the next example can be added to a page or block to display a link to a specific
product, by product ID.
{{widget type="catalog/product_widget_link" anchor_text="My Product
Link"
title="My Product Link" template="catalog/product/widget/link/link_
block.phtml"
id_path="product/31"}}
“Link to Product” Code
CHAPTER 24: Using Variables Markup Tags
Magento Community Edition 2.0 User Guide 401
Using Markup Tags in Links
You can use markup tags with HTML anchor tags, and link directly to any page in your store.
The link can be incorporated into content pages, blocks, banners, or email and newsletter
templates. You can also use this technique to link an image to a specific page.
Process Overview:
Step 1: Identify the Destination URL
Step 2: Add the Markup to the URL
Step 3: Complete the Anchor Tag
Step 1: Identify the Destination URL
If possible, navigate to the page that you want to link to, and copy the full URL from the
address bar of your browser. The part of the URL that you need comes after the “dot com
forward slash.” Otherwise, copy the URL Key from the CMS page that you want to use as the
link destination.
http://mystore.com/apparel/shoes/womens
http://mystore.com/apparel/shoes/womens.html
Full URL to Category Page
http://mystore.com/apparel/shoes/womens/nine-west-pump
http://mystore.com/apparel/shoes/womens/nine-west-pump.html
Full URL to Product Page
http://mystore.com/about-us
Full URL to CMS Page
Markup Tags CHAPTER 24: Using Variables
402 Magento Community Edition 2.0 User Guide
Step 2: Add the Markup to the URL
The Store URL tag represents the base URL of your website, and is used as a substitute for the
“http address” part of the store URL, including the domain name and “dot com.” There are two
versions of the tag, which you can use, depending on the results you want to achieve.
store direct_url Links directly to a page.
store url Places a forward slash at the end, so additional references can be
appended as a path.
In the following examples, the URL Key is enclosed in single quotes, and the entire markup tag
is enclosed in double curly braces. When used with an anchor tag, the markup tag is placed
inside the double quotes of the anchor. To avoid confusion, you can alternate using single-and
double quotes for each nested set of quotes.
1. If you are starting with a full URL, delete the “http address” part of the URL, up through and
including the “dot.com forward slash.” In its place, type the Store URL markup tag, up
through the opening single quote.
http://mystore.com/apparel/shoes/womens
{{store url='apparel/shoes/womens'}}
Store URL Markup Tag
Otherwise, type the first part of the Store URL markup tag, and paste the URL key or path that
you copied earlier.
{{store url='
{{store url='apparel/shoes/womens'}}
Store URL Markup Tag with URL Key
2. To complete the markup tag, type the closing double quotes and double braces.
CHAPTER 24: Using Variables Markup Tags
Magento Community Edition 2.0 User Guide 403

Step 3: Complete the Anchor Tag
1. Wrap the completed markup tag inside an anchor tag, using the markup tag instead of the
target URL. Then, add the link text, and closing anchor tag.
<a href="{{markup tag goes here}}">Link Text</a>
Markup in Anchor Tag
2. Paste the completed anchor tag into the code of any CMS page, block, banner, or email
template, where you want the link to appear.
<a href="{{store url='apparel/shoes'}}">Shoe Sale</a>
Complete Link with Markup
Markup Tags CHAPTER 24: Using Variables
404 Magento Community Edition 2.0 User Guide

Variable Reference
Most email templates have a section of additional variables that are specific to the template.
The following are examples of some frequently used templates.
VARIABLE MARKUP TAG
Email Footer
Template
{{template config_path="design/email/footer_template"}}
Email Header
Template
{{template config_path="design/email/header_template"}}
Email Logo Image
Alt
{{var logo_alt}}
Email Logo Image
URL
{{var logo_url}}
Email Logo Image
Height
{{var logo_height}}
Email Logo Image
Width
{{var logo_width}}
Template CSS {{var template_styles|raw}}
Email Template Variables
VARIABLE MARKUP TAG
Base Unsecure
URL
{{config path="web/unsecure/base_url"}}
Base Secure
URL
{{config path="web/secure/base_url"}}
General Contact
Name
{{config path="trans_email/ident_general/name"}}
General Contact
Email
{{config path="trans_email/ident_general/email"}}
Store Contact Information Variables
CHAPTER 24: Using Variables Variable Reference
Magento Community Edition 2.0 User Guide 405
VARIABLE MARKUP TAG
Sales
Representative
Contact Name
{{config path="trans_email/ident_sales/name"}}
Sales
Representative
Contact Email
{{config path="trans_email/ident_sales/email"}}
Custom1
Contact Name
{{config path="trans_email/ident_custom1/name"}}
Custom1
Contact Email
{{config path="trans_email/ident_custom1/email"}}
Custom2
Contact Name
{{config path="trans_email/ident_custom2/name"}}
Custom2
Contact Email
{{config path="trans_email/ident_custom2/email"}}
Store Name {{config path="general/store_information/name"}}
Store Phone
Telephone
{{config path="general/store_information/phone"}}
Store Hours {{config path="general/store_information/hours"}}
Country {{config path="general/store_information/country_id"}}
Region/State {{config path="general/store_information/region_id"}}
Zip/Postal Code {{config path="general/store_information/postcode"}}
City {{config path="general/store_information/city"}}
Street Address 1 {{config path="general/store_information/street_line1"}}
Street Address 2 {{config path="general/store_information/street_line2"}}
Store Contact
Address
{{config path="general/store_information/address"}}
Store Contact Information Variables (cont.)
Variable Reference CHAPTER 24: Using Variables
406 Magento Community Edition 2.0 User Guide

VARIABLE MARKUP TAG
Customer Account URL {{var this.getUrl($store, 'customer/account/')}}
Customer Email {{var customer.email}}
Customer Name {{var customer.name}}
New Account Template Variables
VARIABLE MARKUP TAG
Billing Address {{var formattedBillingAddress|raw}}
Email Order Note {{var order.getEmailCustomerNote()}}
Order ID {{var order.increment_id}}
Order Items Grid {{layout handle="sales_email_order_items"
order=$order area="frontend"}}
Payment Details {{var payment_html|raw}}
Shipping Address {{var formattedShippingAddress|raw}}
Shipping Description {{var order.getShippingDescription()}}
New Order Template Variables
CHAPTER 24: Using Variables Variable Reference
Magento Community Edition 2.0 User Guide 407

Notes
408 Magento Community Edition 2.0 User Guide

SEO & Search
In this section of the guide, we'll take a look at the
search capabilities of your store, what you can
learn from customer search terms, and how to
make your products easy to find. Finally, you’ll
learn best practices and techniques that you can
use to bring more traffic to your store.
Magento Community Edition 2.0 User Guide 409

Contents Catalog Navigation
Top Navigation
Breadcrumb Trail
Product Listings
Pagination Controls
Layered Navigation
Filterable Attributes
Price Navigation
Configuring Layered Navigation
Catalog Search
Quick Search
Advanced Search
Search Results
Search Suggestions
Search Configuration
Using a Flat Catalog
Search Terms
Popular Search Terms
Adding Search Terms
Search Terms Report
SEO Best Practices
Meta Data
Canonical Meta Tag
Using a Sitemap
Sitemap Configuration
Search Engine Robots
SEO URL Rewrites
Configuring URLRewrites
Automatic Product Redirects
Creating URL Rewrites
Product
Category
CMS Page
410 Magento Community Edition 2.0 User Guide

CHAPTER 25:
Catalog Navigation
The term navigation1refers to the methods shoppers use to move from page to page
throughout your store. The main menu, or top navigation of your store is actually a list of
category links, and provides easy access to the products in your catalog. You will also find
categories in the breadcrumb trail that runs across the top of most pages, and in the
layered navigation that appears on the left side of some two- or three-column pages.
For a product to be visible in your store, it must be assigned to at least one category. Each
category can have a dedicated landing page with an image, static block, a description, and
a list of products in the category. You can also create special designs for category pages
that are active only for a specific period of time such as for a holiday or promotion.
1The primary group of web page links that a customer uses to navigate around the website; the navigation
links to the most important categories or pages on an online store.
Magento Community Edition 2.0 User Guide 411
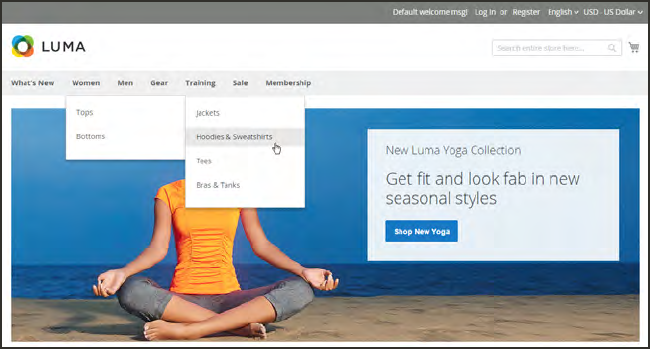
Top Navigation
The main menu of your store is like a directory to the different departments in your store. Each
option represents a different category of products. The position and presentation of the top
navigation might vary by theme, but the way it works is essentially the same.
Top Navigation
The category structure of your catalog can influence how well your site is indexed by search
engines. The deeper a category, the less likely it is to be thoroughly indexed. As a general rule,
anywhere between one and three levels is considered to be the most effective. The maximum
number of levels that are available in your top navigation is set in the system configuration.
Top Navigation CHAPTER 25: Catalog Navigation
412 Magento Community Edition 2.0 User Guide
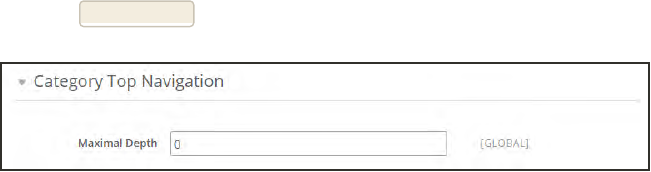
To set the depth of the top navigation:
1. On the Admin sidebar, tap Stores. Then under Settings, choose Configuration.
2. In the panel on the left, expand Catalog. Then, choose Catalog.
3. Expand the Category Top Navigation section.
4. To limit the number of subcategories that appear in the top navigation, enter the number in the
Maximal Depth field.
The default Maximal Depth value is zero, which does not place a limit on the number of
subcategory levels.
5. When complete, tap Save Config.
Category Top Navigation
CHAPTER 25: Catalog Navigation Top Navigation
Magento Community Edition 2.0 User Guide 413
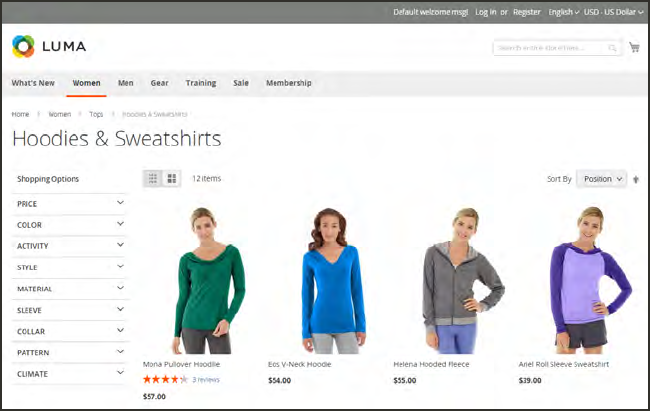
Breadcrumb Trail
A breadcrumb trail is a set of links that shows where you are in relation to other pages in the
store. You can click any link in the breadcrumb trail to return to the previous page. Here’s an
example of a breadcrumb trail from the demo store:
The breadcrumb trail can be configured to appear on content pages, as well as catalog pages.
The format and position of the breadcrumb trail varies by theme, but it is usually located just
below the header.
Breadcrumb Trail
Breadcrumb Trail CHAPTER 25: Catalog Navigation
414 Magento Community Edition 2.0 User Guide
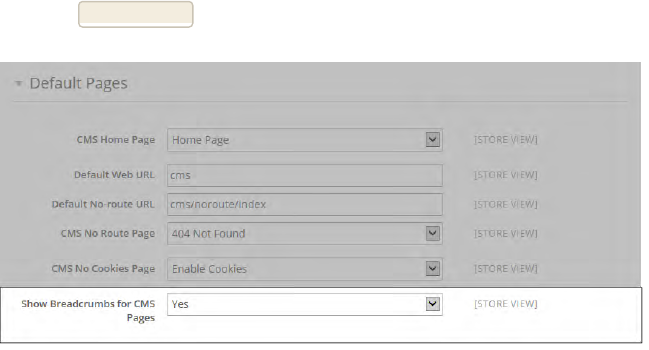
To add breadcrumbs to CMS pages:
1. On the Admin sidebar, tap Stores. Then under Settings, choose Configuration.
2. In the panel on the left under General, choose Web. Then, do the following:
a. Expand the Default Pages section.
b. Set Show Breadcrumbs for CMS Pages to “Yes.”
3. When complete, tap Save Config.
Show Breadcrumbs for CMS Pages
CHAPTER 25: Catalog Navigation Breadcrumb Trail
Magento Community Edition 2.0 User Guide 415
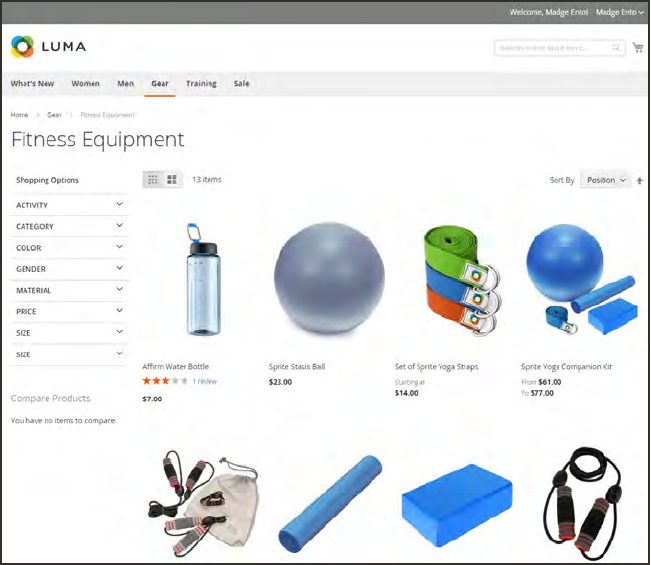
Product Listings
Product listings can be set to appear by default as either a list or grid. You can also determine
how many products appear per page, and which attribute is used to sort the list. Each catalog
page with a product list has a set of controls that can be used to sort the products, change the
format of the list, sort by attribute, and advance from one page to the next.
Products Displayed as a Grid
Product Listings CHAPTER 25: Catalog Navigation
416 Magento Community Edition 2.0 User Guide
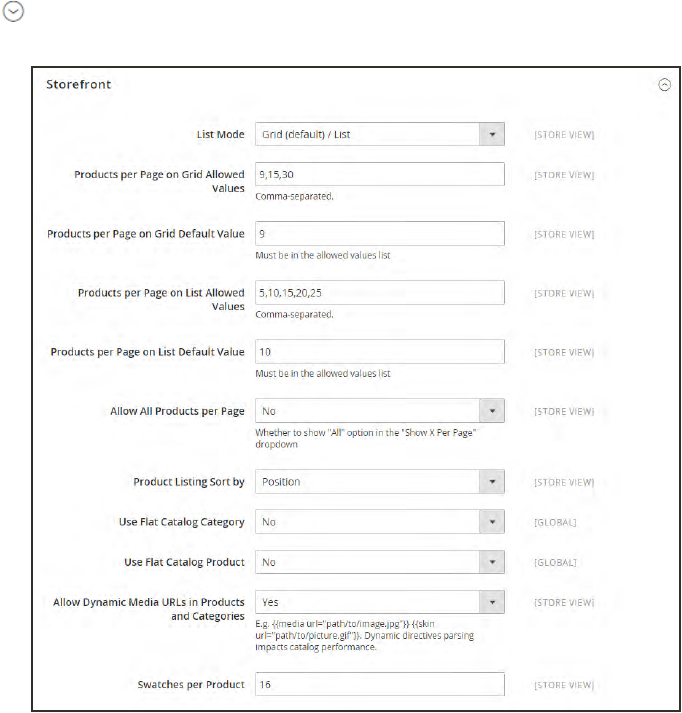
To configure product listings:
1. On the Admin sidebar, tap Stores. Then under Settings, choose Configuration.
2. Scroll down and in the panel on the left, tap Catalog. Then choose Catalog.
3. Expand the Storefront section, and do the following:
Storefront
a. Set the default List Mode to one of the following:
lGrid Only
lList Only
lGrid (default) / List
lList (default / Grid
b. In the Products per Page on Grid Allowed Values field, enter the number of products
that you want to appear per page when shown in grid format. To enter a selection of
values, separate each number by a comma.
c. In the Products per Page on Grid Default Value field, enter the default number of
products to appear in the grid per page.
CHAPTER 25: Catalog Navigation Product Listings
Magento Community Edition 2.0 User Guide 417
d. In the Products per Page on List Allowed Values field, enter the number of products that
you want to appear per page when shown in list format. To enter a selection of values,
separate each number by a comma.
e. In the Products per page on List Default Value field, enter the default number of products
that appear in the list, per page.
f. To give customers the option to list all products, set Allow All Products on Page to “Yes.”
g. Set Product Listing Sorted by to the default attribute that is initially used to sort the list.
4. If using a flat catalog, do the following:
a. To display a flat category listing of products, set Use Flat Catalog Category to “Yes.”
b. To display a flat product listing, set Use Flat Catalog Product to “Yes.”
5. If you want to allow dynamic references for media assets in category and product URLs, set
Allow Dynamic Media URLs in Products and Categories to “Yes.”
6. When complete, tap Save Config.
CONTROL DESCRIPTION
View As Displays the list in either a Grid or List format.
Sort By Changes the sort order of the list.
Show Per Page Determines how many products appear per page.
Pagination Links Navigation links to other pages.
Page Controls
Product Listings CHAPTER 25: Catalog Navigation
418 Magento Community Edition 2.0 User Guide
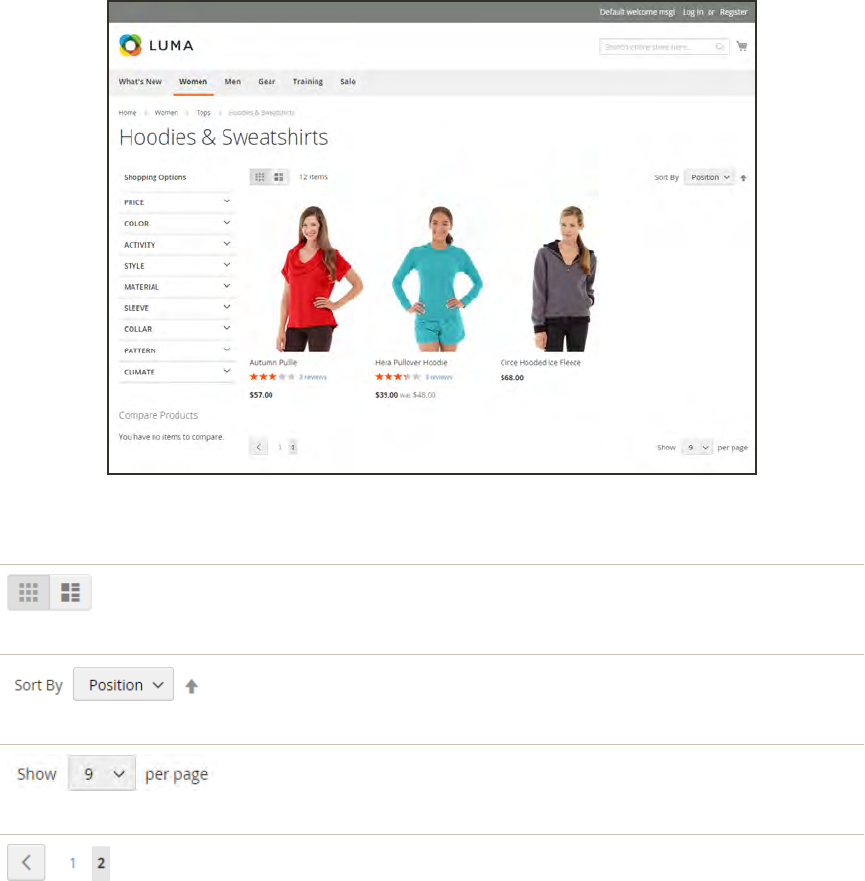
Pagination Controls
The Pagination settings appear at the top and bottom of the list, and control the format of the
pagination links for product listings. You can set the number of links that appear in the
control, and configure the Next and Previous links. For the pagination links to appear, there
must be more products in the list than are allowed per page in the product list configuration.
Pagination Controls
View As
Displays the list in either a Grid or List format.
Sort By
Changes the sort order of the list.
Show Per Page
Determines how many products appear per page.
Pagination Links
Navigation links to other pages.
Pagination Controls
CHAPTER 25: Catalog Navigation Pagination Controls
Magento Community Edition 2.0 User Guide 419
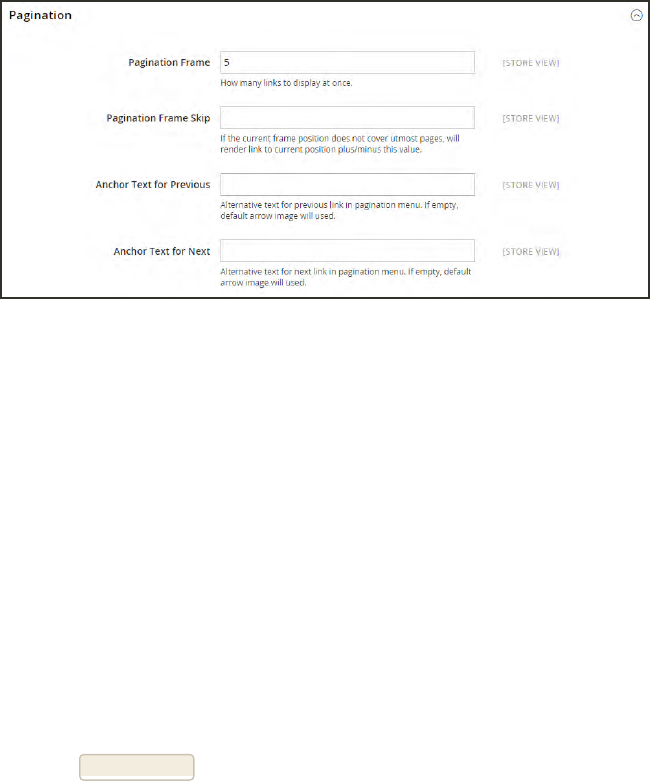
To configure the pagination controls:
1. On the Admin sidebar, tap Stores. Then under Settings, choose Configuration.
2. In the panel on the left under General, choose Design. Then, expand the Pagination section
and do the following:
Pagination
a. In the Pagination Frame field, enter the number of links that you want to appear in the
pagination control.
b. In the Pagination Frame Skip field, enter the number of links that you want to skip ahead
before displaying the next set of links in the pagination control.
For example, if the pagination frame has five links, and you want to jump to the next five
links, how many links do you want to skip ahead?If you set this to four, then the last link
from the previous set will be the first link in the next set.
c. In the Anchor Text for Previous field, enter the text that you want to appear for the
Previous link. Leave blank to use the default arrow.
d. In the Anchor Text for Next field, enter the text that you want to appear for the Next link.
Leave blank to use the default arrow.
3. When complete, tap Save Config.
Pagination Controls CHAPTER 25: Catalog Navigation
420 Magento Community Edition 2.0 User Guide
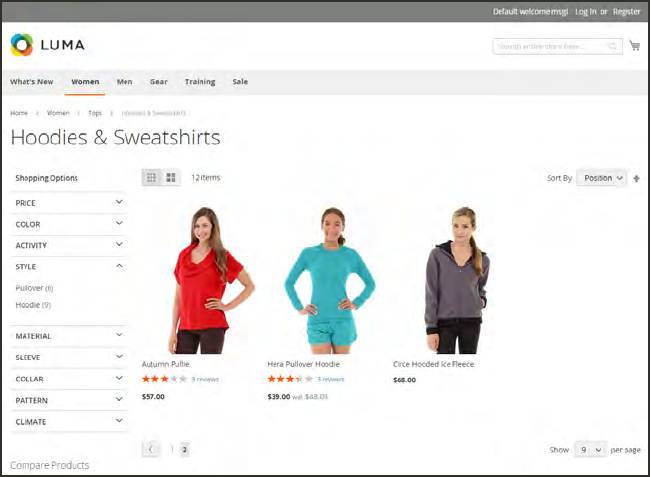
Layered Navigation
Layered navigation makes it easy to find products based on category, price range, or any other
available attribute. Layered navigation usually appears in the left column of search results and
category pages and sometimes on the home page. The standard navigation includes a “Shop
By” list of categories and price range. You can configure the display of layered navigation,
including product count and price range.
Layered Navigation by Category and Price
CHAPTER 25: Catalog Navigation Layered Navigation
Magento Community Edition 2.0 User Guide 421
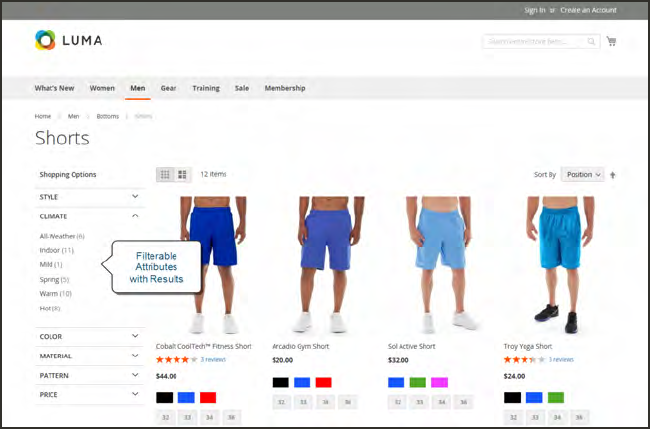
Layered Navigation with Filterable Attributes
Layered navigation can be used to search for products by category or by attribute. For example,
when a shopper chooses the Mens/Shorts category from the top navigation, the initial results
include all products in the category. The list can be filtered further by choosing a specific style,
climate, color, material, pattern, or price—or a combination of values. Filterable attributes
appear in an expanding section that lists each attribute value. As an option, the number of
matching results can appear in parentheses after the value.
The attribute properties, combined with the product input type determines which attributes
can be used for layered navigation. Layered navigation is available only for “anchor” categories,
but can also be added to search results pages. The Catalog Input Type for Store Owner property
of each attribute must be set to “Dropdown,” “Multiple Select,” or “Price.” To make the
attributes filterable, the Use in Layered Navigation property of each must be set to either
“Filterable (with results)” or “Filterable (no results).”
Filterable Attributes In Layered Navigation
Layered Navigation CHAPTER 25: Catalog Navigation
422 Magento Community Edition 2.0 User Guide
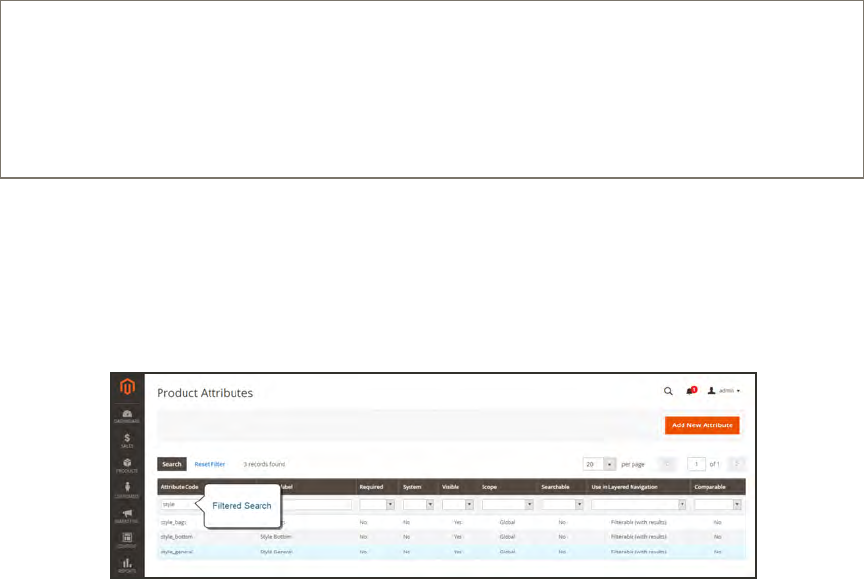
The following instructions show how to set up basic layered navigation with filterable
attributes. For advanced layered navigation with price steps, see: Price Navigation.
Process Overview:
Step 1: Set Up the Attribute Properties
Step 2: Make the Category an Anchor
Step 3: Test the Results
Step 1: Set Up the Attribute Properties
1. On the Admin sidebar, tap Stores. Then under Attributes, choose Product.
2. Find the attribute in the list, and open in edit mode. Then, do the following:
Filtered Search on Attribute Code
a. In the panel on the left, choose Frontend Properties. Then, set Use In Layered Navigation
to one of the following:
lFilterable (with results)
lFilterable (no results)
b. Set Use In Search Results Layered Navigation to “Yes.”
3. Repeat these steps for each attribute that you want to include in layered navigation.
CHAPTER 25: Catalog Navigation Layered Navigation
Magento Community Edition 2.0 User Guide 423
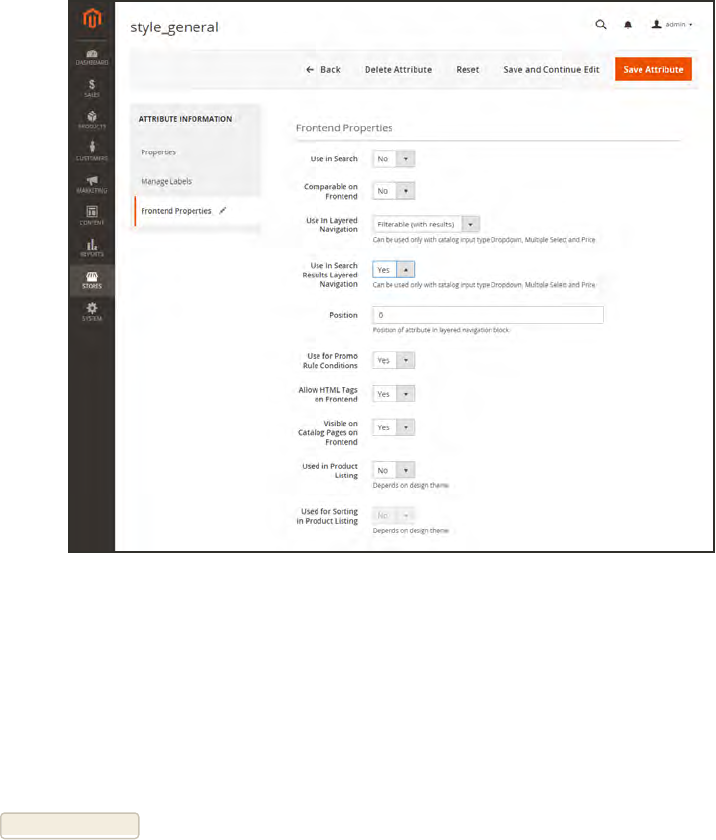
Attribute Frontend Properties
Step 2: Make the Category an Anchor
1. On the Admin sidebar, tap Products. Then under Inventory choose Categories.
2. In the categories tree on the left, select the category where you want to use layered navigation.
3. On the Display Settings tab, set Is Anchor to “Yes.”
4. Tap Save Category.
Layered Navigation CHAPTER 25: Catalog Navigation
424 Magento Community Edition 2.0 User Guide
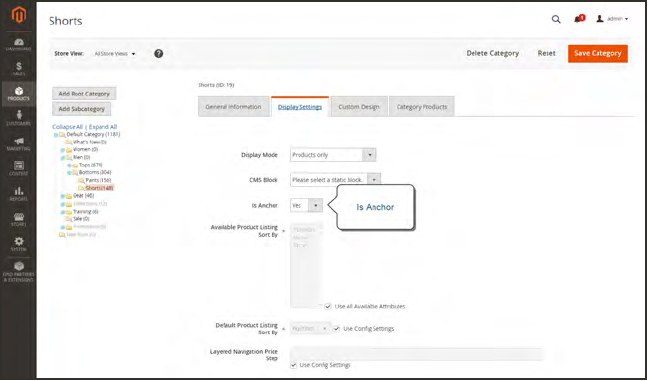
Category Display Settings
Step 3: Test the Results
To test the setting, go to your store and choose the category in the top navigation. The
selection of filterable attributes appears in the layered navigation section of the category page.
CHAPTER 25: Catalog Navigation Layered Navigation
Magento Community Edition 2.0 User Guide 425

Price Navigation
Price navigation can be used to distribute products by price range in layered navigation. You
can also split each range in intervals. There are ways to calculate price navigation:
lAutomatic (Equalize Price Ranges)
lAutomatic (Equalize Product Counts)
lManual
With the first two methods, the navigation steps are calculated automatically. The manual
method lets you specify a division limit for price intervals. The following example shows the
difference between price navigation steps of 10 and 100.
Iterative splitting provides the best distribution of products among price ranges. With iterative
splitting, after choosing the $0.00-$99 range, the customer can drill-down through several
sub-ranges of prices. Price-range splitting stops when the number of products reaches the
threshold set by the Interval Division Limit.
Example: Price Navigation Steps
PRICE STEP BY 10 PRICE STEP BY 100
$20.00 - $29.99 (1)
$30.00 - $39.99 (2)
$70.00 - $79.99 (1)
$100.00 - $109.99 (1)
$120.00 - $129.99 (2)
$150.00 - $159.99 (1)
$180.00 - $189.99 (1)
$420.00 - $429.99 (1)
$440.00 - $449.99 (1)
$710.00 and above (1)
$0.00 - $99.99 (4)
$100 - $199.99 (5)
$400.00 - $499.99 (2)
$700.00 and above (1)
Layered Navigation CHAPTER 25: Catalog Navigation
426 Magento Community Edition 2.0 User Guide
To configure price navigation:
1. On the Admin sidebar, tap Stores. Then under Settings, choose Configuration.
2. In the panel on the left under Catalog, choose Catalog.
3. Expand the Layered Navigation section.
4. To show the number of products in parentheses after each filtered item, set Display Product
Count to “Yes.”
5. Set Price Navigation Steps Calculation to one of the following methods:
Method 1: Automatic (equalize price ranges)
Leave Price Navigation Steps Calculation set to the default, “Automatic (Equalize Price
Ranges.)” This setting uses the standard algorithm for price navigation.
Layered Navigation
Method 2: Automatic (equalize product counts)
1. Set Price Navigation Steps Calculation to “Automatic (equalize product counts).”
2. Set Display Price Interval as One Price to “Yes” if you want to display a single price when
multiple products with the same price.
3. In the Interval Division Limit field, enter the threshold for a number of products within a
price range. The range cannot be further split beyond this limit., The default value is 9.
CHAPTER 25: Catalog Navigation Layered Navigation
Magento Community Edition 2.0 User Guide 427

Automatic (equalize product counts)
Method 3: Manual
1. Set Price Navigation Steps Calculation to “Manual.”
2. Enter a value to determine the Default Price Navigation Step.
3. Enter the Maximum Number of Price Intervals allowed, up to 100.
Manual
6. When complete, tap Save Config.
Layered Navigation CHAPTER 25: Catalog Navigation
428 Magento Community Edition 2.0 User Guide
Configuring Layered Navigation
The layered navigation configuration determines if a product count appears in parentheses after
each atribute, and the size of the step calculation that is used in price navigation.
To configure layered navigation:
1. On the Admin sidebar, tap Stores. Then under Settings, choose Configuration.
2. In the panel on the left, expand the Catalog section. Then choose Catalog.
3. Expand the Layered Navigation section, and do the following:
Layered Navigation
a. To display the number of products found for each attribute, set Display Product Count to
“Yes.”
b. Set Price Navigation Step Calculation to “Automatic (equalize price ranges).”
4. When complete, tap Save Config.
CHAPTER 25: Catalog Navigation Layered Navigation
Magento Community Edition 2.0 User Guide 429
Notes
430 Magento Community Edition 2.0 User Guide

CHAPTER 26:
Catalog Search
Research shows that people who use search are more likely to make a purchase than those
who rely on navigation alone. In fact, according to some studies, people who use search
are nearly twice as likely to make a purchase. In this section of the guide, we will explore
how customers search for products in your catalog, and how you can configure catalog
search.
lQuick Search
lAdvanced Search
lSearch Results
lSearch Suggestions
lConfiguring Catalog Search
lFlat Catalog
Magento Community Edition 2.0 User Guide 431
Quick Search
The Search box in the header of the store helps visitors find products in your catalog. The
search text can be the full or partial product name, or any other word or phrase that describes
the product. The search terms that people use to find products can be managed from the
Admin.
To do a quick search:
1. In the Search box, enter the first few letters of what you want to find.
Any matches in the catalog appear below, with the number of results found.
2. Either press the Enter key or tap a result in the list of matching products.
Search
Quick Search CHAPTER 26: Catalog Search
432 Magento Community Edition 2.0 User Guide
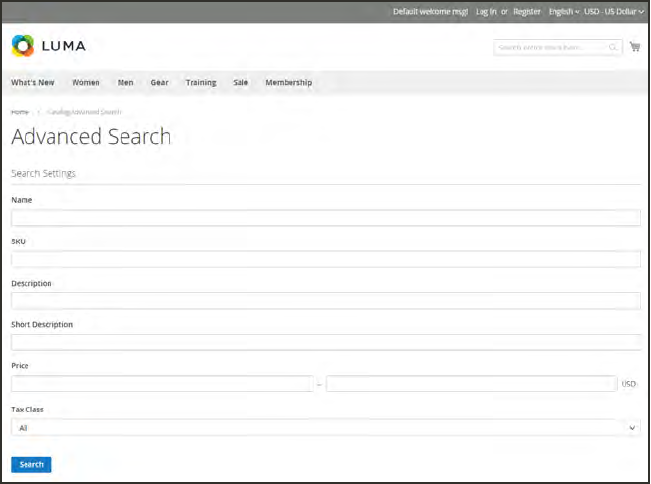
Advanced Search
Advanced Search lets shoppers search the catalog based on values entered into a form. Because
the form contains multiple fields, a single search can include several parameters. The result is a
list of all products in the catalog that match the criteria. A link to Advanced Search is in the
footer of your store.
Advanced Search
Each field in the form corresponds to an attribute from your product catalog. To add a field, set
the frontend properties of the attribute to “Include in Advanced Search.” As a best practice,
include only the fields that customers are most likely to use to find a product, because having
too many will slow down the search.
CHAPTER 26: Catalog Search Advanced Search
Magento Community Edition 2.0 User Guide 433
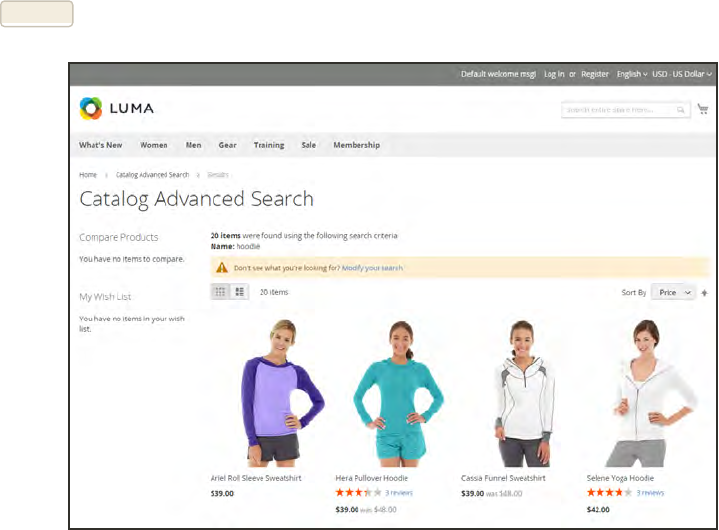
To use advanced search:
1. In the footer of the store, click Advanced Search.
2. In the Advanced Search form, full or partial values in as many fields as necessary.
3. Tap Search to display the results.
Search Results
4. If you don’t see what you are looking for in the search results, tap Modify your search and try
another combination of criteria.
Advanced Search CHAPTER 26: Catalog Search
434 Magento Community Edition 2.0 User Guide
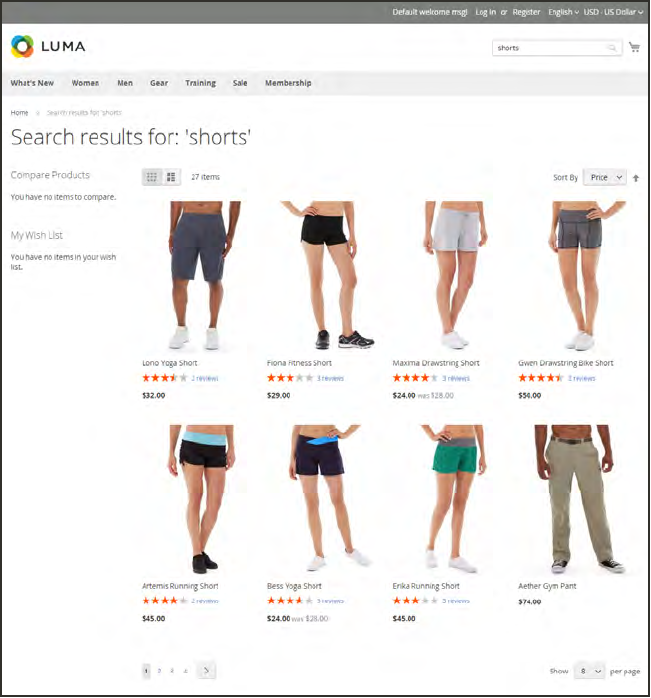
Search Results
The Search Results list includes all products that match the search criteria entered in the Quick
Search box or the Advanced Search form. Every product list in the catalog has essentially the
same controls. The only difference is that one is the result of a search query, and the other is
the result of navigation.
The results can be formatted as either a grid or list, and sorted by a selection of attributes.
Pagination controls appear if there are more products than fit on the page, and are used to
move from one page to the next. The number of records per page is determined by the Catalog
Frontend configuration. To learn more, see: Product Listings
Search Results with Pagination Controls
CHAPTER 26: Catalog Search Search Results
Magento Community Edition 2.0 User Guide 435
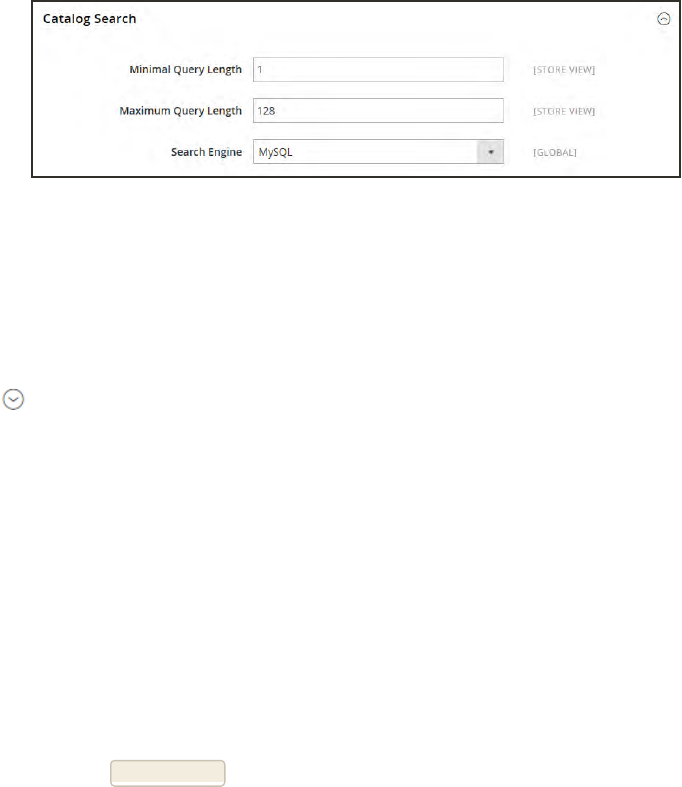
Configuring Catalog Search
By adjusting the Catalog Search configuration, you can control the behavior of the search
operations and determine the size of valid query text, and the display of search
recommendations.
Catalog Search
To configure catalog search:
1. On the Admin sidebar, tap Stores. Then under Settings, choose Configuration.
2. In the panel on the left under Catalog, choose Catalog.
3. Expand the Catalog Search section, and do the following:
4. To limit the length and word count of search query text, do the following:
a. Set Minimal Query Length to the minimum number of characters that can be submitted in
a query.
b. Set Maximum Query Length to the maximum number of characters that can be submitted
in a query.
5. Accept the default, Search Engine, “MySQL.”
6. To limit the number of records that can be used with layered navigation, enter the maximum
number allowed in the Apply Layered Navigation if Search Results are Less Than field. To
allow any number of records, enter zero.
7. When complete, tap Save Config.
Search Results CHAPTER 26: Catalog Search
436 Magento Community Edition 2.0 User Guide
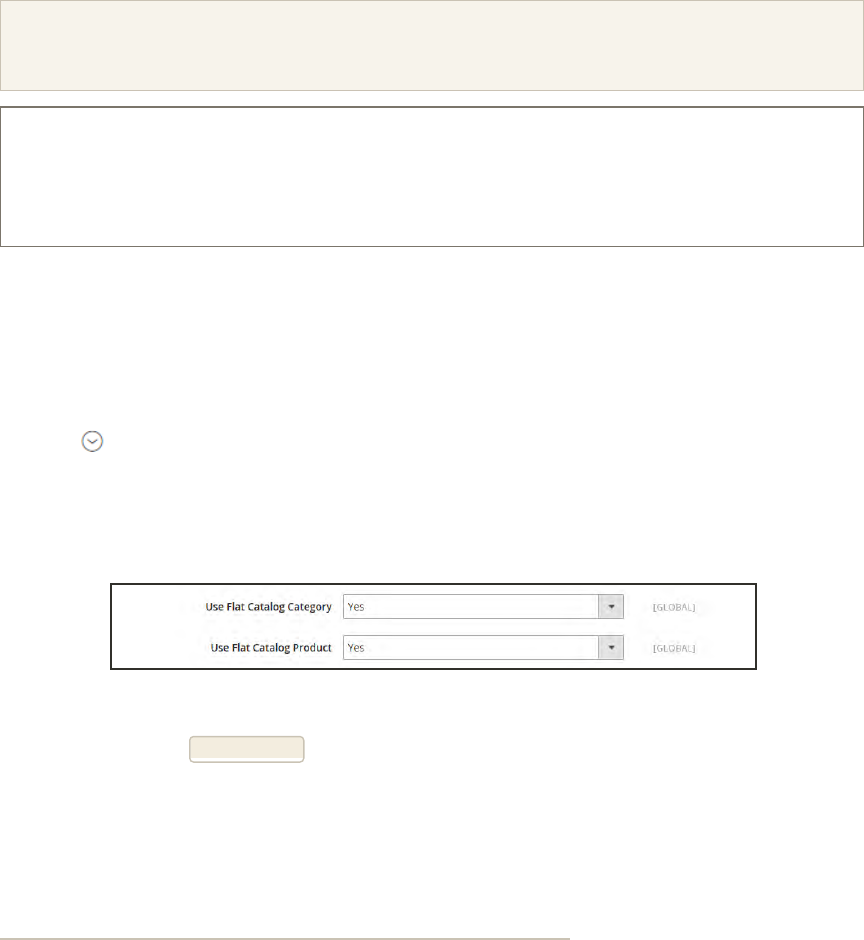
Using a Flat Catalog
Magento typically stores catalog data in multiple tables, based on the Entity-Attribute-Value
(EAV1) model. Because product attributes are stored in many tables, SQL queries are
sometimes long and complex.
In contrast, a flat catalog creates new tables on the fly, where each row contains all the
necessary data about a product or category. A flat catalog is updated automatically—either
every minute, or according to your cron job. Flat catalog indexing can also speed up the
processing of catalog and cart price rules. A catalog with as many as 500,000 SKUs can be
indexed quickly as a flat catalog.
Before you enable a flat catalog for a live store, make sure to test the configuration in a
development environment.
Process Overview:
Step 1: Enable the Flat Catalog
Step 2: Verify the Results
Step 1: Enable the Flat Catalog
1. On the Admin sidebar, tap Stores. Then under Settings, choose Configuration.
2. In the panel on the left under Catalog, choose Catalog.
3. Expand the Storefront section. Then, do the following:
a. Set Use Flat Catalog Category to “Yes.”
b. Set Use Flat Catalog Product to “Yes.”
Flat Catalog Configuratio
4. When complete, tap Save Config.
1Entity Attribute Value
CHAPTER 26: Catalog Search Search Results
Magento Community Edition 2.0 User Guide 437
5. When prompted to update the cache, click the Cache Management link in the system message,
and follow the instructions to refresh the cache.
Refresh Cache
Step 2: Verify the Results
Method 1: Verify the Results for a Single Product
1. On the Admin sidebar, tap Products. Then under Inventory, choose Catalog.
a. In the Inventory list, choose a product to modify. Then, open the product in edit mode.
b. In the Name field, add the text “_DEMO” to the product name.
2. Tap Save.
3. On a new browser tab, navigate to the home page of your store. Then, do the following:
a. Search for the product you edited.
b. Use the navigation to browse to the product under its assigned category.
If necessary, refresh the page to see the results. The change will appear within the minute or
according to your cron job schedule.
Method 2: Verify the Results for Multiple Products
1. On the Admin sidebar, tap Products. Then under Inventory, choose Categories.
2. In the upper-left corner, set Store View to one of the following:
lAll Store Views
lA specific store view
3. In the category tree, select an existing category. Tap Add Subcategory, and do the following:
a. In the Name field, enter “Test Category.”
b. Set Is Active to “Yes.”
c. Click Save Category.
Search Results CHAPTER 26: Catalog Search
438 Magento Community Edition 2.0 User Guide
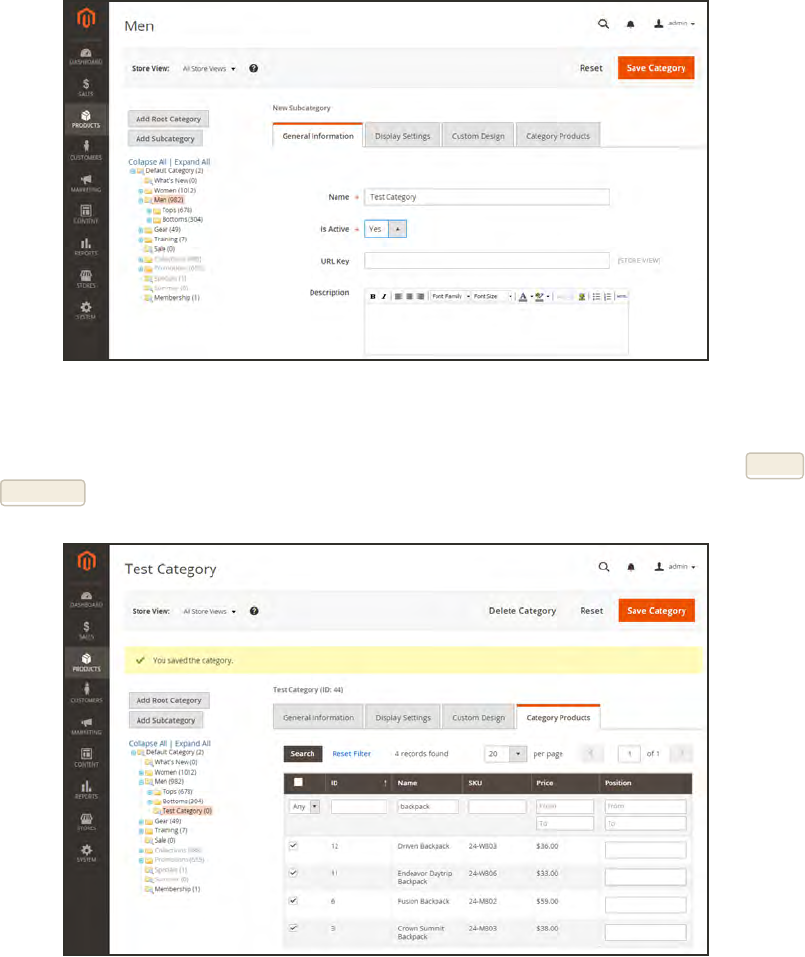
Test Subcategory
d. On the Category Products tab, tap Reset Filter to display all products.
e. Mark the checkbox of several products to add them to the new category. Then, tap Save
Category.
Test Category Products
4. On a new browser tab, navigate to the home page of your store. Then, use the store navigation
to browse to the category you created.
If necessary, refresh the page to see the results. The change will appear within the minute or
according to your cron job schedule.
CHAPTER 26: Catalog Search Search Results
Magento Community Edition 2.0 User Guide 439

Notes
440 Magento Community Edition 2.0 User Guide
CHAPTER 27:
Search Terms
You can learn what your customers are looking for by examining the search terms they use
to find products in your store. If enough people look for a product that you don’t carry,
perhaps it’s time to add it to your catalog. Meanwhile, rather than have them leave them
empty handed, why not redirect them to another product in your catalog? Here are a few
ways you can leverage customer search terms:
Landing Page
The landing page for a search term can be a content page, a category page, a product detail
page, or even a page on a different site.
Synonyms
One way to improve the effectiveness of catalog search is to include different terms that people
may use to describe the same item. You don’t want to lose a sale just because someone is
looking for a “sofa,” and your product is listed as a “couch.” You can capture a broader range of
search terms by entering the words, “sofa” “davenport,” and “loveseat” as synonyms for “couch,”
and direct them to the same landing page.
Misspelled Words
Use search terms to capture common misspellings and redirect them to the appropriate page.
For example, if you sell wrought iron patio furniture, you know that many people misspell the
term as “rod iron,” or even “rot iron.” You can enter each misspelled word as a search term, and
make them synonyms for “wrought iron.” Even though the word is misspelled, the search will be
directed to the page for “wrought iron.”
Magento Community Edition 2.0 User Guide 441
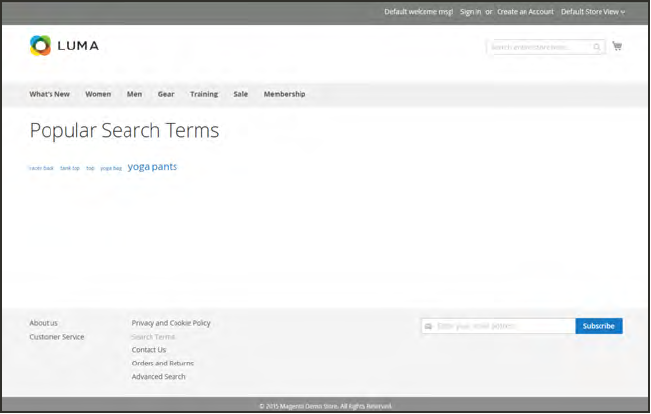
Popular Search Terms
The Search Terms link in the footer of your store displays the search terms used by visitors to
your store, ranked by popularity. Search terms appear in a “tag cloud” format, where the size of
the text indicates the popularity of the term.
By default, Popular Search Terms is enabled as a search engine optimization tool, but has no
direct connection to the catalog search process. Because the Search Terms page is indexed by
search engines, any terms on the page can help improve your search engine ranking and the
visibility of your store.
Popular Search Terms
Popular Search Terms CHAPTER 27: Search Terms
442 Magento Community Edition 2.0 User Guide
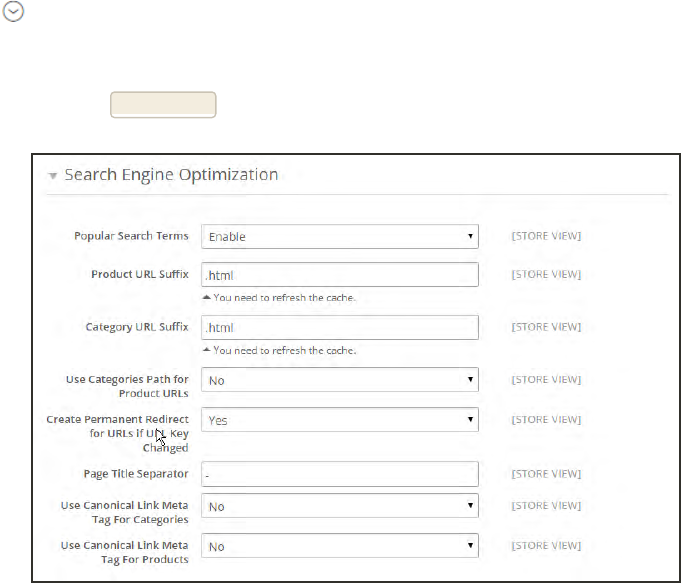
To configure Popular Search Terms:
1. On the Admin sidebar, tap Stores. Then under Settings, choose Configuration.
2. In the panel on the left under Catalog, choose Catalog.
3. Expand the Search Engine Optimizations section.
4. Set Popular Search Terms to “Enable.”
5. When complete, tap Save Config.
Search Engine Optimization
CHAPTER 27: Search Terms Popular Search Terms
Magento Community Edition 2.0 User Guide 443
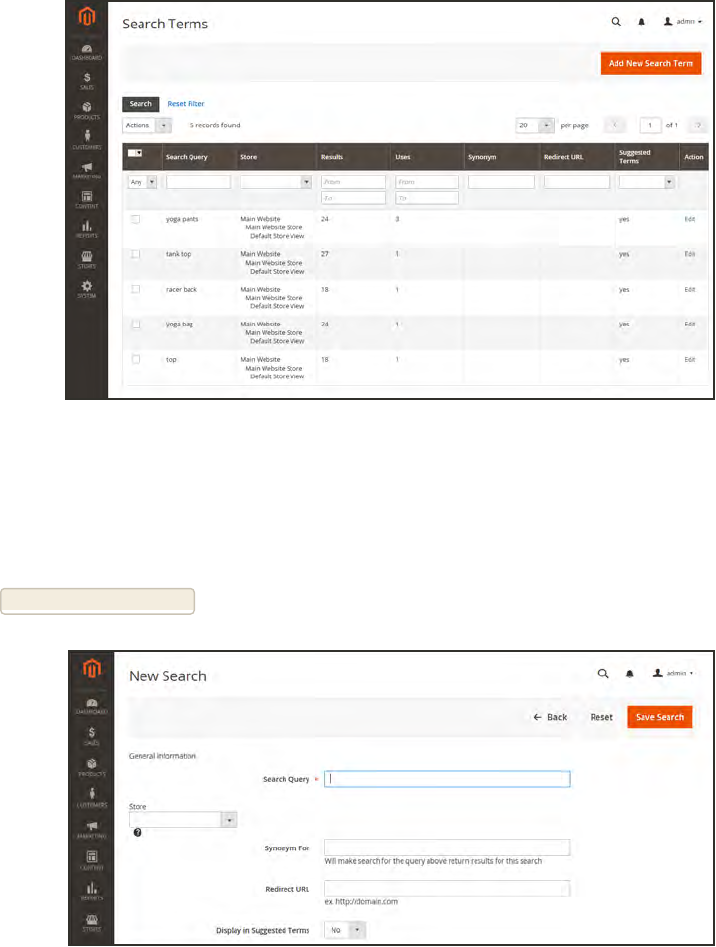
Adding Search Terms
As you learn new words that people use to search for products in your catalog, you can add
them to your search terms list to direct people to the most closely matching products in your
catalog.
Search Terms
To add a new search term:
1. On the Admin sidebar, tap Marketing. Then under SEO & Search, choose Search Terms.
2. Tap Add New Search Term. Then, do the following:
General Information
Adding Search Terms CHAPTER 27: Search Terms
444 Magento Community Edition 2.0 User Guide
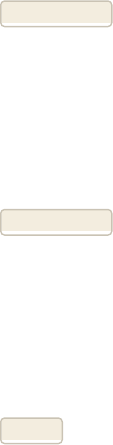
a. In the General Information section, in the Search Query box, type the word or phrase that
you want to add as a new search term.
b. If your store is available in multiple languages, choose the applicable Store view.
c. If the term is a synonym for another search term, enter the other term in the Synonym
For field. Any search for the synonym is automatically redirected to the page for the other
term.
d. To redirect the search results to another page in your store, or to another website, enter the
full URL of the target page in the Redirect URL field.
e. If you want this term to be available for use as a suggestion whenever a search returns no
results, set Display in Suggested Terms to “Yes.”
3. When complete, tap Save Search.
To edit a search term:
1. In the Search Terms grid, click the row of any record to open the search term in edit mode.
2. Make the necessary changes.
3. When complete, tap Save Search.
To delete a search term:
1. In the list, mark the checkbox of the term to be deleted.
2. In the upper-left corner of the list, set Actions to “Delete.”
3. When complete, tap Submit.
CHAPTER 27: Search Terms Adding Search Terms
Magento Community Edition 2.0 User Guide 445
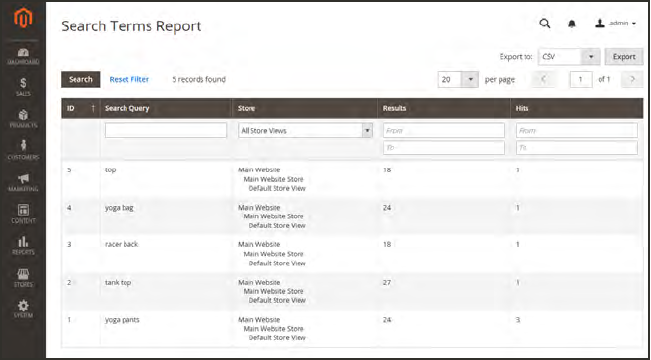
Search Terms Report
The Search Terms report shows the number of results for each term, and the number of times
(hits) the term was used. The report data can be filtered by term, store, results, and hits, and
exported for further analysis.
To view the search terms report:
1. On the Admin sidebar, tap Reports. Then under Marketing, choose Search Terms.
2. Use the controls to filter the report as needed.
Search Terms Report
Search Terms Report CHAPTER 27: Search Terms
446 Magento Community Edition 2.0 User Guide
CHAPTER 28:
SEO Best Practices
Search engine optimization is the practice of fine-tuning the content and presentation of a
site to improve the way the pages are indexed by search engines. Magento Community 2.0
includes a number of features to support your ongoing SEO effort.
Commerce Resources
See the latest Magento eBooks to gain access to expert
insight and online business resources to help develop
and improve your store.
Magento Community Edition 2.0 User Guide 447
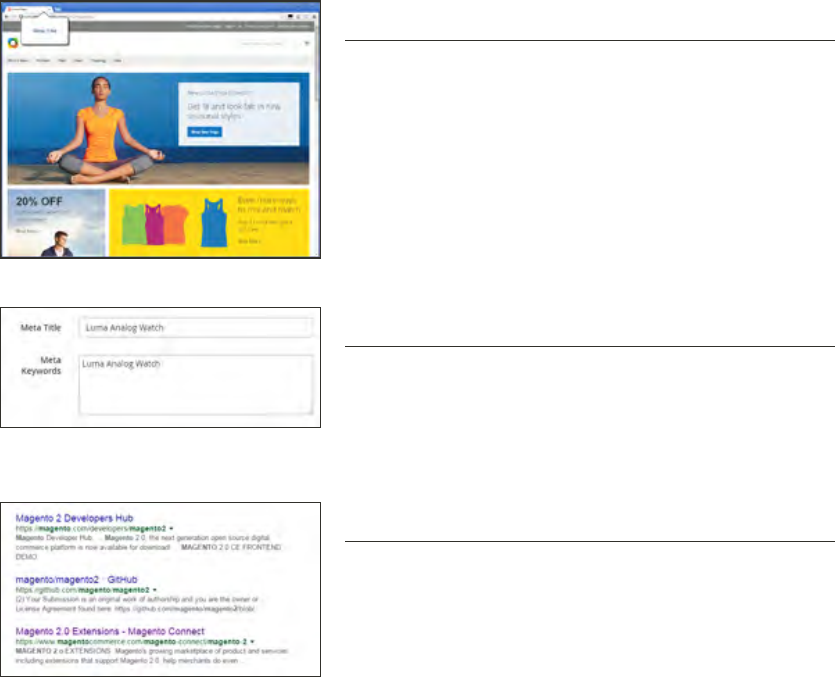
Meta Data
Your store is loaded with places where you can enter keyword-rich meta data to improve the
way search engines index your site. While setting up your store, you might enter preliminary
meta data, with the intention of finishing it later. Over time, you can fine-tune the meta data
to target the buying patterns and preferences of your customers.
Meta Title
The meta title appears in the title bar and tab of your
browser, and search results listings. The meta title
should be unique to the page, and less than seventy
characters in length.
Meta Keywords
Although some search engines ignore meta keywords,
others continue to use them. The current best practice is
to incorporate high-value keywords in the meta title and
meta description.
Meta Description
Meta descriptions provide a brief overview of the page for
search results listings. Ideally, a meta description should
be between 150-160 characters in length, although the
field will accept up to 255 characters.
Meta Data CHAPTER 28: SEO Best Practices
448 Magento Community Edition 2.0 User Guide
Canonical Meta Tag
Some search engines penalize websites that have multiple URLs that point to the same content.
The canonical meta tag tells search engines which page to index when multiple URLs have
identical or very similar content. Using the canonical meta tag can improve your site ranking
and aggregate pageviews. The canonical meta tag is placed in the <head> block of a product or
category page. It provides a link to your preferred URL, so search engines will give it greater
weight.
Example 1: Category Path Creates Duplicate URLs
For example, if your catalog is configured to include the category path in product URLs, your
store will generate multiple URLs that point to the same product page.
http://mystore.com/furniture/living-room/microfiber-sofa-sleeper
http://mystore.com/microfiber-sofa-sleeper
Example 2: Category Page Full URL
When canonical meta tags for categories are enabled, the category page of your store includes a
canonical URL to the full category URL:
http://mystore.com/furniture/living-room/microfiber-sofa-sleeper
Example 3: Product Page Full URL
When canonical meta tags for products are enabled, the product page includes a canonical
URL to the domain-name/product-url-key because product URL keys are globally unique.
http://mystore.com/microfiber-sofa-sleeper
If you also include the category path in product URLs, the canonical URL remains domain-
name/product-url-key. However, the product can also be accessed using its full URL, which
includes the category. For example, if the product URL key is microfiber-sofa-sleeper and is
assigned to the Furniture > Living-Room category, the product can be accessed using either
URL.
You can avoid being penalized by search engines by omitting the category from the URL, or by
using the canonical meta tag to direct search engines to index either by product or category. As
a best practice, it is recommended that you enable canonical meta tags for both categories and
products.
CHAPTER 28: SEO Best Practices Meta Data
Magento Community Edition 2.0 User Guide 449
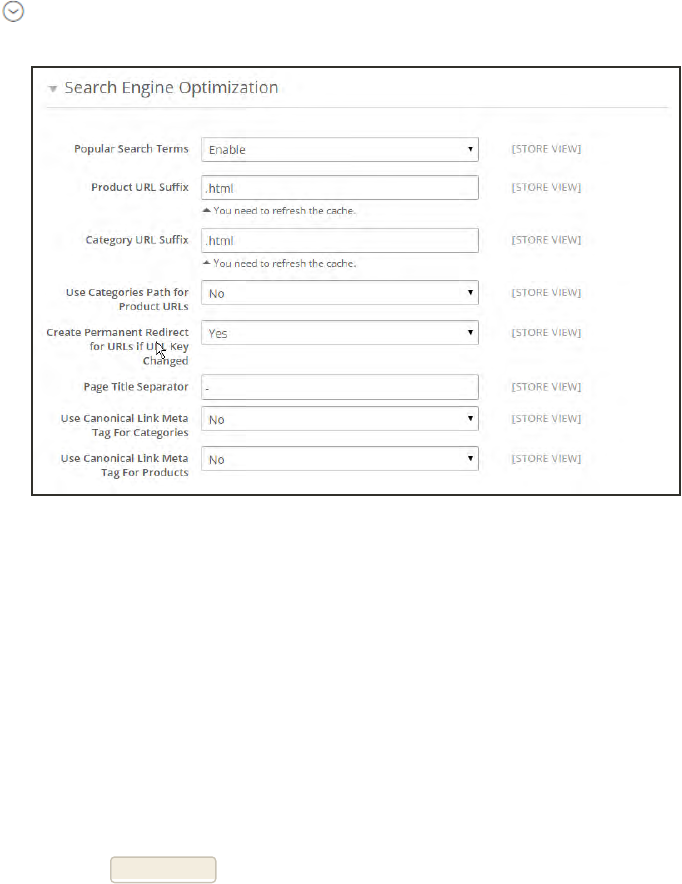
To enable the canonical meta tag:
1. On the Admin sidebar, tap Stores. Then under Settings, choose elect Configuration.
2. In the panel on the left under Catalog, choose Catalog.
3. Expand the Search Engine Optimizations section.
Search Engine Optimizations
4. If want search engines to index only pages that have a full category path, do the following:
a. Set Use Canonical Link Meta Tag for Categories to “Yes.”
b. Set Use Canonical Link Meta Tag for Products to “No.”
5. If you want search engines to index only product pages, do the following:
a. Set Use Canonical Link Meta Tag for Products to “Yes.”
b. Set Use Canonical Link Meta Tag for Categories to “No.”
6. When complete, tap Save Config .
Meta Data CHAPTER 28: SEO Best Practices
450 Magento Community Edition 2.0 User Guide

Using a Sitemap
A sitemap improves the way your store is indexed by their search engine, and is specifically
designed to find pages that might be overlooked by web crawlers. A sitemap can be configured
to index all pages, and even images.
When enabled, Magento creates afile called sitemap.xml that is saved to the root directory of
your installation. The configuration lets you set the frequency of the updates, and the priority
for each type of content. Your sitemap should be updated as frequently as the content on your
site changes, which might be daily, weekly, or monthly.
While your site is in development, you might include instructions in the robots.txt file for
webcrowlers to avoid indexing the site. Then before the launch, you can change the instructions
to allow the site to be indexed.
Process Overview:
Step 1: Configure and Enable the Sitemap
Step 2: Configure and Enable robots.txt (Optoinal)
Step 3: Submit Your Sitemap to Search Engines
Step 4: Restore the Previous Robot Instructions (Optional)
Step 1: Configure and Enable the Sitemap
Complete the XMLSitemap configuration to determine what is included, and how frequently
the sitemap is updated.
Step 2: Configure and Enable robots.txt (Optional)
Complete the Search Engine Robots configuration with instructions that direct search engines
to crawl the parts of your site that you want to be indexed.
Step 3: Submit Your Sitemap to Search Engines
You can submit your sitemap to different search engines by providing them a link to the
sitemap.xml file in the root of your Magento installation. For more information, see the search
engine instructions. Here are links to instructions for the two top search engines:
lGoogle
lMicrosoft Bing
Step 4: Restore Previous Robot Instructions (Optional)
You can now restore either the original, or default restrictions.
CHAPTER 28: SEO Best Practices Using a Sitemap
Magento Community Edition 2.0 User Guide 451
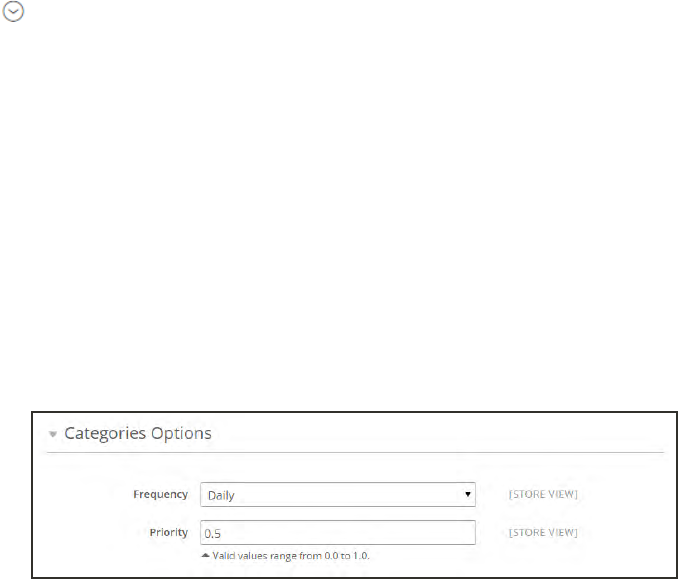
Sitemap Configuration
Your sitemap should be updated as frequently as the content on your site changes, which could
be on a daily, weekly, or monthly basis. The configuration lets you set the frequency and
priority for each type of content.
Step 1: Set the Frequency and Priority of Content Updates
1. On the Admin sidebar, tap Stores. Then under Settings, choose Configuration.
2. In the panel on the left under Catalog, choose XML Sitemap.
3. Expand the Categories Options section. Then, do the following:
a. Set Frequency to one of the following:
lAlways
lHourly
lDaily
lWeekly
lMonthly
lYearly
lNever
b. In the Priority field, enter a value between 0.0 and 1.0. Zero has the lowest priority.
Categories Options
4. Click to expand the Products Options section. Then, complete the Frequency and Priority
settings as needed.
5. To determine the extent that images are included in the sitemap, set Add Images into Sitemap
to one of the following:
lNone
lBase Only
lAll
Sitemap Configuration CHAPTER 28: SEO Best Practices
452 Magento Community Edition 2.0 User Guide
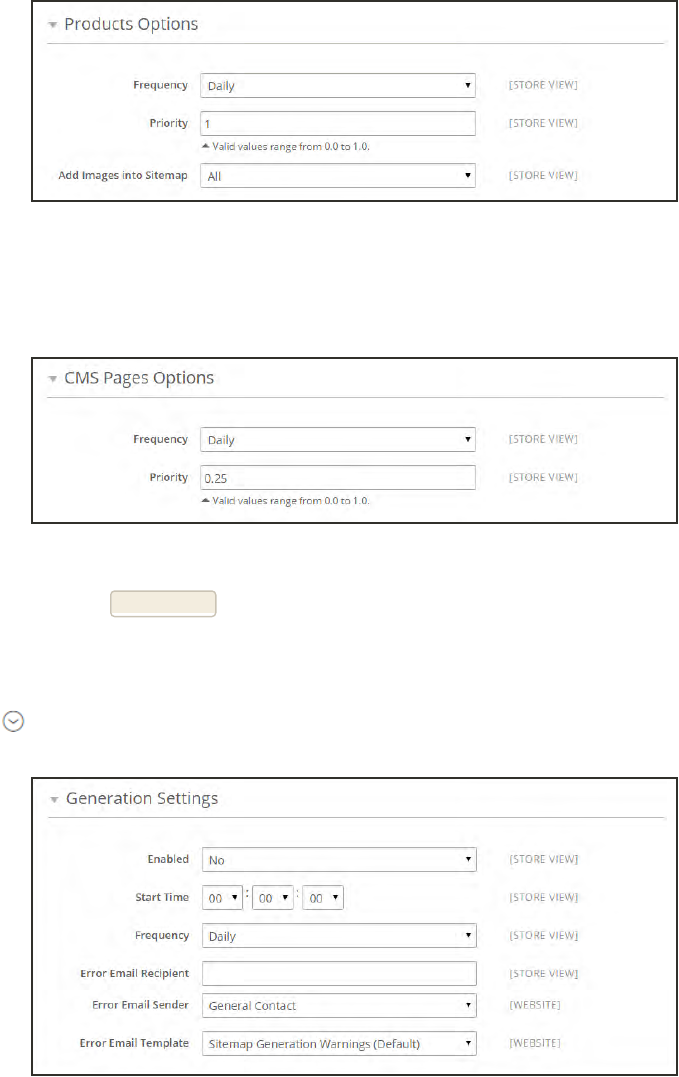
Products Options
6. Click to expand the CMS Pages Options section. Then, complete the Frequency and Priority
settings as needed.
CMS Pages Options
7. When complete, tap Save Config.
Step 2: Complete the Generation Settings
1. Expand the Generation Settings section.
Generation Settings
2. To generate a sitemap, set Enabled to “Yes.” Then, do the following:
a. Set Start Time to the hour, minute and second that you want the sitemap to be updated.
b. Set Frequency to one of the following:
CHAPTER 28: SEO Best Practices Sitemap Configuration
Magento Community Edition 2.0 User Guide 453
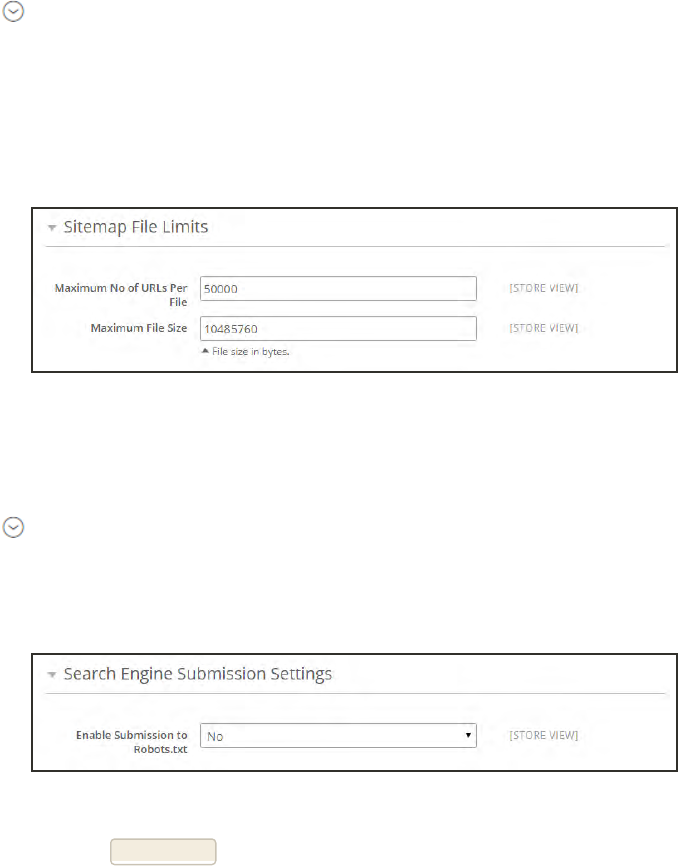
lDaily
lWeekly
lMonthly
c. In the Error Email Recipient field, enter the email address of the person who is to receive
notification if an error occurs during a sitemap update.
d. Set Error Email Sender to the store contact who appears as the sender of the error
notification.
e. Set Error Email Template to the template used for the error notification.
Step 3: Set the Sitemap File Limits
1. Expand the Sitemap File Limits section. Then, do the following:
a. In the Maximum No of URLs per File field, enter the maximum number of URLs that can
be included in the sitemap. By default, the limit is 50,000.
b. In the Maximum File Size field, enter the largest size in bytes that is allocated for the
sitemap. The default size is 10,485,760 bytes.
Sitemap File Limits
Step 4: Set the Search Engine Submission Settings
1. Expand the Search Engine Submission Settings section.
2. If using a robots.txt file to provide instructions to search engines that crawl your site, set
Enable Submission to Robots.txt to “Yes.”
Search Engine Submission Settings
3. When complete, tap Save Config.
Sitemap Configuration CHAPTER 28: SEO Best Practices
454 Magento Community Edition 2.0 User Guide

Search Engine Robots
The Magento configuration includes settings to generate and manage instructions for web
crawlers and bots that index your site. The instructions are saved in a file called “robots.txt”
that resides in the root of your Magento installation. The instructions are directives that are
recognized and followed by most search engines.
By default, the robots.txt file that is generated by Magento contains instructions for web
crawler to avoid indexing certain parts of the site that contain files that are used internally by
the system. You can use the default settings, or define your own custom instructions for all, or
for specific search engines. There are many articles online that explore the subject in detail.
Search Engine Robots
To configure robots.txt:
1. On the Admin sidebar, tap Stores. Then under Settings, choose Configuration.
2. In the panel on the left under General, choose Design.
3. Expand the Search Engine Robots section. Then, do the following:
a. Set Default Robots to one of the following:
INDEX, FOLLOW Instructs web crawlers to index the site and to check back later
for changes.
NOINDEX, FOLLOW Instructs web crawlers to avoid indexing the site, but to check
back later or changes.
CHAPTER 28: SEO Best Practices Search Engine Robots
Magento Community Edition 2.0 User Guide 455
INDEX, NOFOLLOW Instructs web crawlers to index the site once, but to not check
back later for changes.
NOINDEX, NOFOLLOW Instructs web crawlers to avoid indexing the site, and to not
check back later for changes.
b. If needed, enter custom instructions into the Edit Custom instruction of robots.txt file
box: For example, while a site is in development, you might want to disallow access to all
folders.
c. To restore the default instructions, tap Reset to Default.
4. When complete, tap Save Config.
Examples of Custom Instructions
User-agent:*
Disallow:
Allows Full Access
User-agent:*
Disallow: /
Disallows Access to All Folders
Disallow: /lib/
Disallow: /*.php$
Disallow: /pkginfo/
Disallow: /report/
Disallow: /var/
Disallow: /catalog/
Disallow: /customer/
Disallow: /sendfriend/
Disallow: /review/
Disallow: /*SID=
Default Instructions
Search Engine Robots CHAPTER 28: SEO Best Practices
456 Magento Community Edition 2.0 User Guide
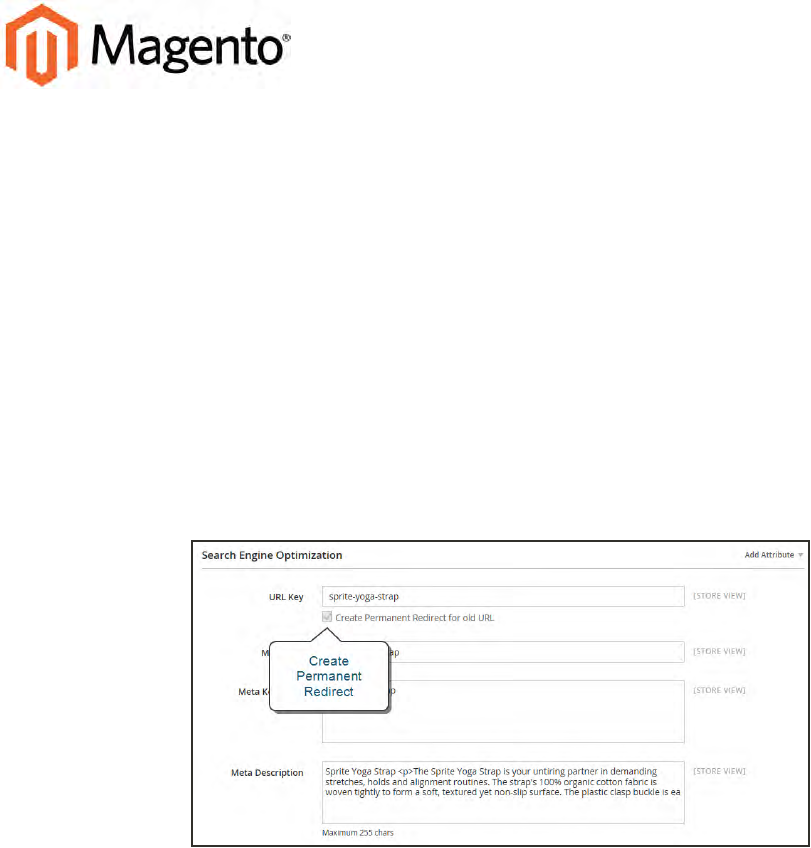
CHAPTER 29:
URL Rewrites
The URL Rewrite tool lets you change any URL that is associated with a product, category,
or CMS page. When the rewrite goes into effect, any links that point to the previous URL
are redirected to the new address.
The terms rewrite and redirect are often used interchangeably, but refer to slightly different
processes. A URL rewrite changes the way a URL appears in the browser. A URL redirect,
on the other hand, updates the URL that is stored on the server. A URL redirect can be
either temporary or permanent. Your store uses URLrewrites and redirects to make it easy
for you to change the URL key of a product, category, or page and preserve existing links.
Create Permanent Redirect for Old URL
Magento Community Edition 2.0 User Guide 457
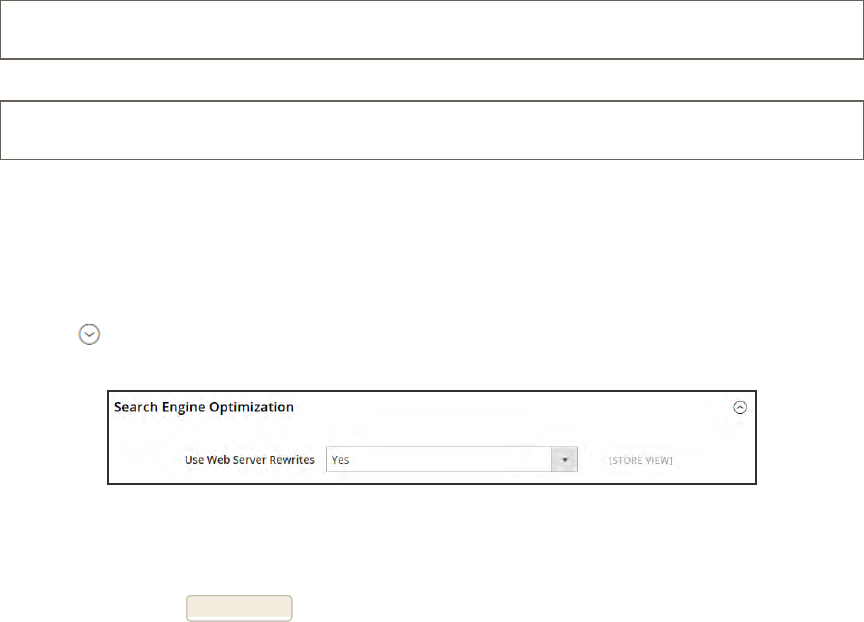
URL Rewrite Configuration
URLrewrites make it possible to make existing URLs more “search engine friendly” and also
easier for humans to read. Enabling Web Server Apache Rewrites is part of the initial Magento
setup. Magento routinely uses URLrewrites to remove the file name “index.php” that normally
appears in the URLjust after the root folder. When Web Server Rewrites are enabled, the
system rewrites each URLto omit “index.php.” The rewrite removes words that convey nothing
of value to search engines or customers, and has no impact on performance or site rank.
http://www.yourdomain.com/magento/index.php/storeview/url-identifier
URL without Web Server Rewrite
http://www.yourdomain.com/magento/storeview/url-identifier
URL with Web Server Rewrite
To enable URL rewrites:
1. On the Admin sidebar, tap Stores. Then under Settings, choose Configuration.
2. In the panel on the left under General, choose Web.
3. Expand the Search Engine Optimization section.
Search Engine Optimization
4. Set Use Web Server Rewrites to “Yes.”
5. When complete, tap Save Config.
URL Rewrite Configuration CHAPTER 29: URL Rewrites
458 Magento Community Edition 2.0 User Guide
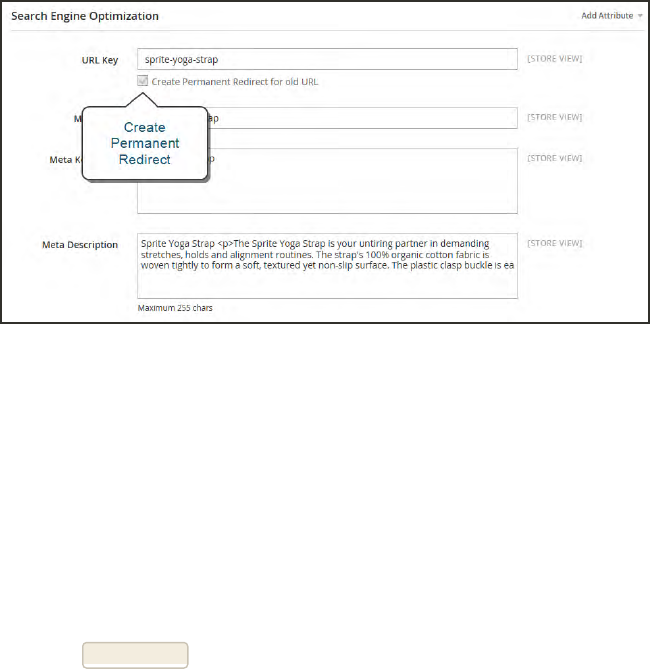
Automatic Product Redirects
Your store can be configured to automatically generate a permanent redirect whenever the URL
key of a product changes. In the Search Engine Optimization section of the product record, the
checkbox below the URL key indicates if permanent redirects are enabled for your catalog. If
your store is already configured to automatically redirect catalog URLs, making a redirect is as
easy as updating the URL key.
Create Permanent Redirect for Old URL
To set up automatic redirects:
1. On the Admin sidebar, tap Stores. Then under Settings, choose Configuration.
2. In the panel on the left under Catalog, select Catalog.
3. Expand the Search Engine Optimization section.
4. Set Create Permanent Redirect for URLs if URL Key Changed to “Yes.”
5. When complete, tap Save Config.
CHAPTER 29: URL Rewrites Automatic Product Redirects
Magento Community Edition 2.0 User Guide 459
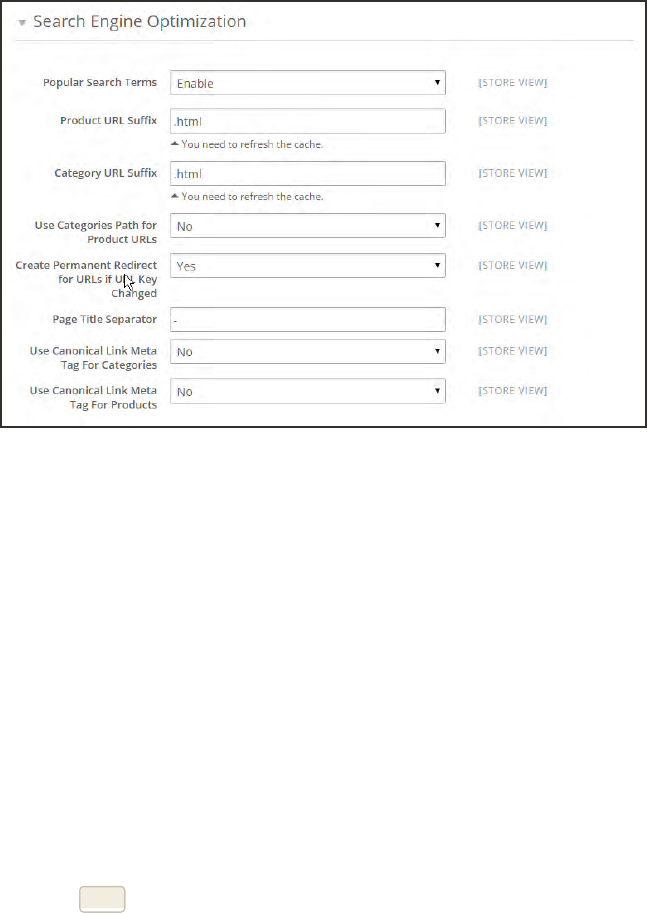
Search Engine Optimization
To automatically redirect catalog URLs:
1. On the Admin sidebar, tap Products. Then under Inventory, choose Catalog.
2. Find the product in the list, and click to open the record.
3. In the panel on the left, choose Search Engine Optimization.
4. In the URL Key field, do the following:
a. Make sure that the Create Permanent Redirect for old URL checkbox is selected. If not,
follow the instructions to enable automatic redirects.
b. Update the URL Key as needed, using all lowercase characters and hyphens instead of
spaces.
5. When complete, tap Save.
6. When prompted to refresh the cache and index, follow the links in the messages that appear at
the top of the workspace. The permanent redirect is now in effect for the product and any
associated category URLs.
7. To view the redirect records, do the following:
8. On the Admin sidebar, tap Marketing. Then under SEO & Search, choose URLRewrites. The
most recent permanent redirects appear at the top of the list.
Automatic Product Redirects CHAPTER 29: URL Rewrites
460 Magento Community Edition 2.0 User Guide
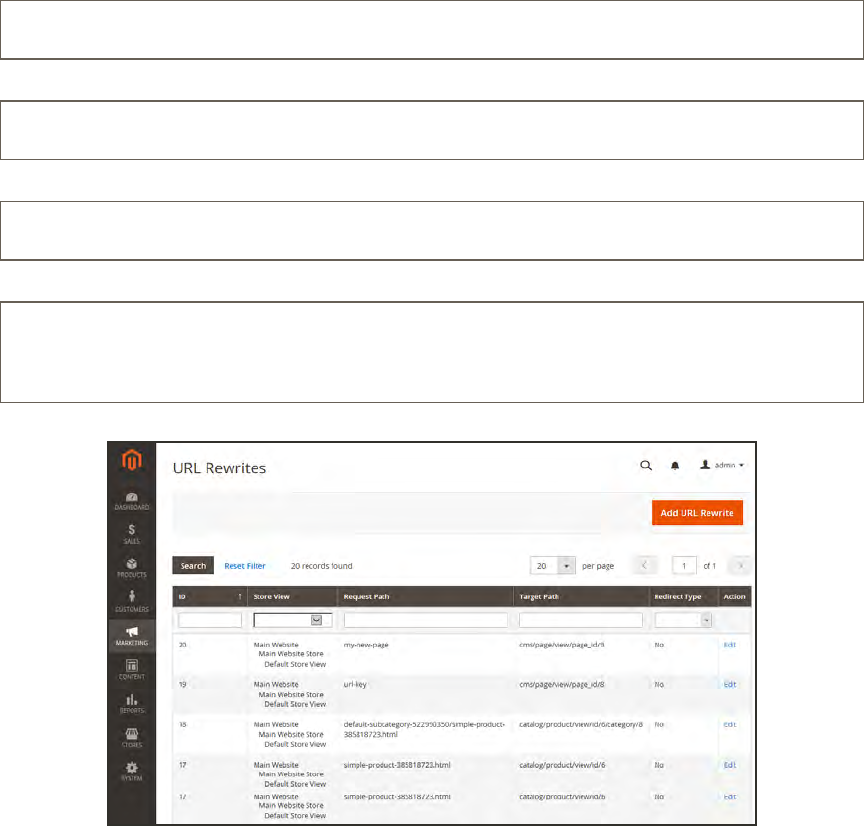
Creating URL Rewrites
The URL Rewrite tool can be used to create product and category rewrites, and custom rewrites
for any page in your store. When the rewrite goes into effect, any existing links that point to the
previous URL are seamlessly redirected to the new address.
URL rewrites can be used to add high-value keywords to improve the way the product is
indexed by search engines. You can also use rewrites to create additional URLs for a temporary
seasonal change, or permanent change. Rewrites can be created for any valid path, including
CMS content pages. Internally, the system always references products and categories by their
ID. No matter how often the URL changes, the ID remains the same. Here are some ways you
can use URL rewrites:
http://www.example.com/catalog/category/id/6
System URL
http://www.example.com/peripherals/keyboard.html
Original URL
http://www.example.com/ergonomic-keyboard.html
Redirected Product URL
http://www.example.com/all-on-sale.html
http://www.example.com/save-now/spring-sale
Additional Category URLs
URL Rewrites
CHAPTER 29: URL Rewrites Creating URL Rewrites
Magento Community Edition 2.0 User Guide 461
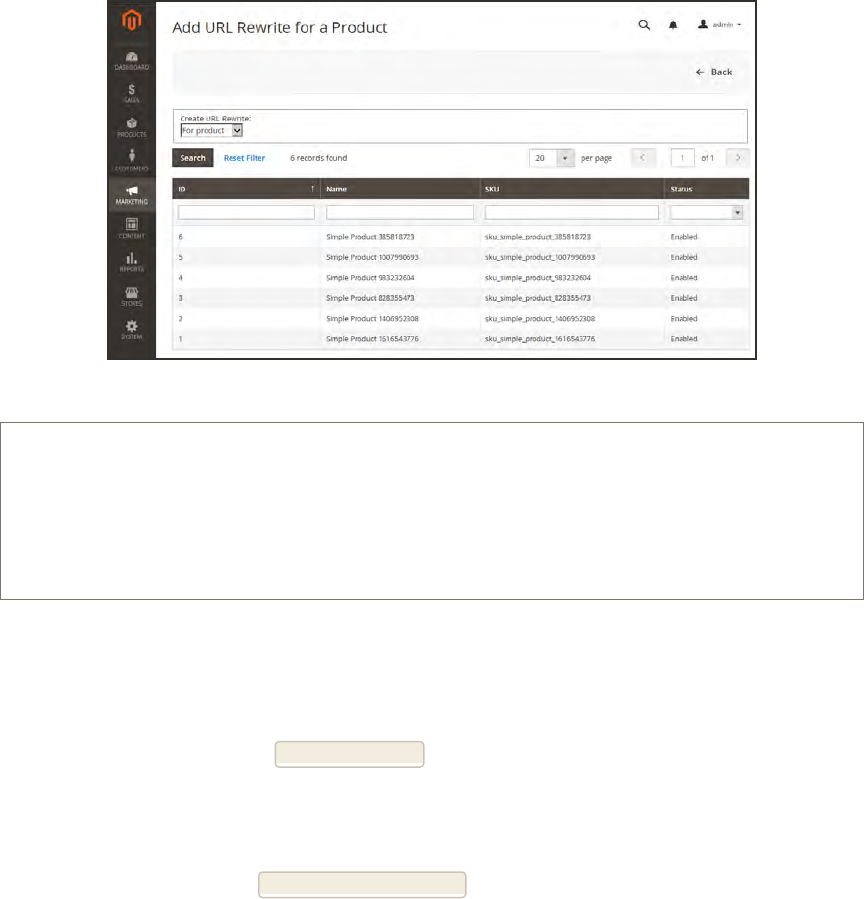
Product Rewrites
Before you begin, you should know exactly what you want the redirect to accomplish. To
prevent mistakes, it might help to write down the paths as “from” and “to.”
From The Target Path displays the internal URLthat is used by the system, with the
product ID. It is entered automatically, and grayed out.
To Although the Request Path initially displays the current URL, it represents the
path that you are requesting.
Add URL Rewrite for Product
Process Overview:
Step 2: Create the Rewrite
Step 3: Refresh the Index
Step 4: Test the Result
Step 1: Create the Rewrite
1. On the Admin sidebar, tap Marketing. Then under Search & SEO, choose URLRewrites.
2. In the upper-right corner, tap Add URL Rewrite.
3. Set Create URL Rewrite to “For product.”
4. In the grid, find the product to be redirected. Then, open the record in edit mode.
5. Below the category tree, tap Skip Category Selection.
Creating URL Rewrites CHAPTER 29: URL Rewrites
462 Magento Community Edition 2.0 User Guide
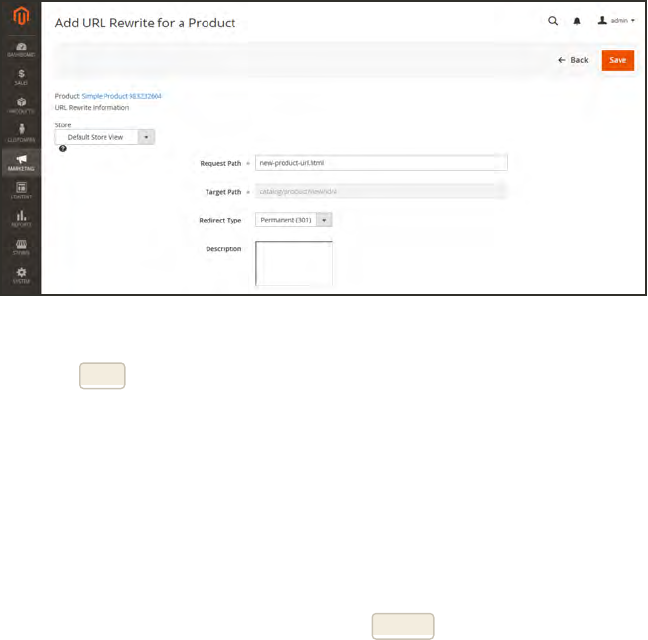
In the URLRewrite Information, the current product URLappears as the Request Path. The
Target Path contains the internal URLthat is used by the system. It it grayed out and cannot
be changed.
a. If you have multiple store views, set Store to the view where the rewrite applies.
b. In the Request Path field, enter the new URLkey and suffix, if applicable, for the product.
c. Set Redirect to one of the following:
lTemporary (302)
lPermanent (301)
d. For your own reference, enter a brief Description of the rewrite.
URL Rewrite Information
6. When complete, tap Save.
Your new product rewrite now appears at the top of the list.
Step 2: Refresh the Index
1. On the Admin sidebar, tap System. Then under Tools, choose Index Management.
2. Select the Catalog URL Rewrites checkbox.
3. Set the Actions control to “Reindex Data.” Then, tap Submit.
Step 3: Test the Result
Test the rewrite from your store to make sure that it works correctly.
CHAPTER 29: URL Rewrites Creating URL Rewrites
Magento Community Edition 2.0 User Guide 463

FIELD DESCRIPTION
Create URL Rewrite Indicates the type of rewrite to be made. The type cannot be changed
after the rewrite is created. Options:
For Category
For Product
Custom
Request Path The path where the product is to be redirected. Depending on your
configuration, the Request Path might include the .html suffix and
category. A Request Path must be unique, and cannot be in use by
another redirect. If you have made several attempts to redirect the
same page, delete any unsuccessful redirects and refresh the cache.
For example:
brandname
brand/brandname
catalog/category/view/id/56
private-sale-shoes/prima-pump.html
brand/brandname.html
Target Path The internal path used by the system that points to the product. To
avoid getting a 404 "Page Not Found" error, the target path must
exactly match what the system expects to find.
Redirect Indicates whether the rewrite is temporary or permanent. Options :
No No redirect is specified.
Temporary (302) Indicates to search engines that the
rewrite is for a limited time. Search
engines do not preserve page rank
information for temporary rewrites.
In the URLRewrite grid, temporary
redirects are identified by the letter
“R” in the Options column.
Permanent (301) Indicates to search engines that the
rewrite is permanent. Search engines
generally preserve page rank
information for permanent rewrites.
Field Descriptions
Creating URL Rewrites CHAPTER 29: URL Rewrites
464 Magento Community Edition 2.0 User Guide

FIELD DESCRIPTION
In the URLRewrite grid, permanent
redirects are indentified by the letters
“RP” in the Options column.
Description Describes the purpose of the rewrite. This field is for reference and is
not visible to customers.
Field Descriptions (cont.)
CHAPTER 29: URL Rewrites Creating URL Rewrites
Magento Community Edition 2.0 User Guide 465
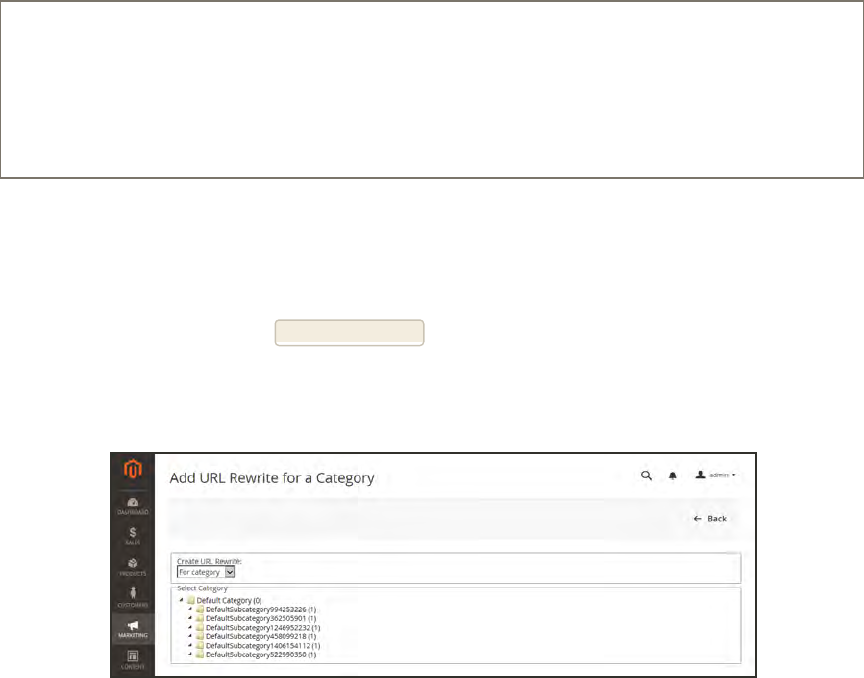
Category Rewrites
If a category changes, or no longer exists, you can use a category rewrite to redirect links that
point to the previous category to another URL.
Stores that are configured to include categories in the URL key have multiple URLs that point
to the same product. To manage the multiple paths for SEO, see: Canonical Meta Tag.
Process Overview:
Step 1: Create the Rewrite
Step 2: Refresh the Index
Step 3: Test the Result
Step 1: Create the Rewrite
1. On the Admin sidebar, tap Marketing. Then under SEO & Search, choose URL Rewrites.
2. In the upper-right corner, tap Add URL Rewrite.
3. Set Create URL Rewrite to “For category.” Then in the category tree, choose the category that is
to be redirected.
URL Rewrite for Category
4. In the URL Rewrite section, do the following:
a. If you have multiple stores, select the Store where the rewrite applies.
b. In the Request Path field, enter the URLkey of the category to be redirected.
c. Set Redirectto one of the following:
lTemporary (302)
lPermanent (301)
d. For your own reference, enter a brief description of the rewrite.
Creating URL Rewrites CHAPTER 29: URL Rewrites
466 Magento Community Edition 2.0 User Guide
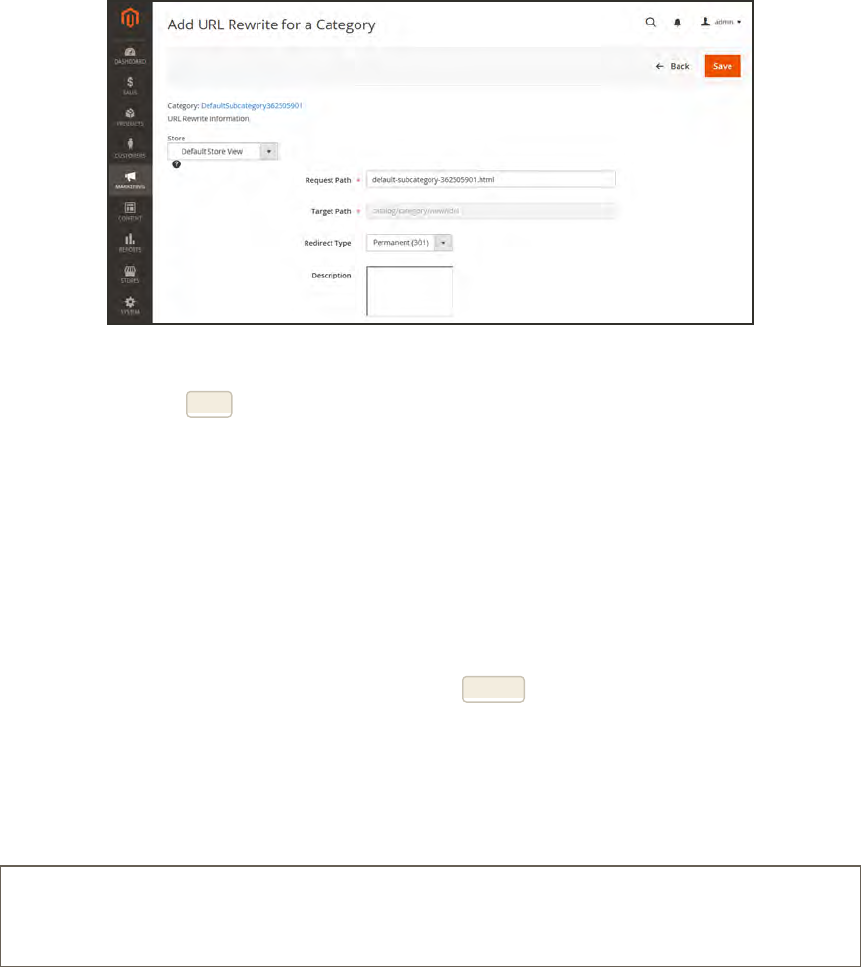
Select Category
5. When complete, tap Save button.
Your new category rewrite now appears at the top of the list of rewrites.
6. Test the rewrite from your store, to make sure that it works correctly.
Step 2: Refresh the Index
1. On the Admin sidebar, tap System. Then under Tools, choose Index Management.
2. Mark the Catalog URL Rewrites checkbox.
3. Set the Actions control to “Reindex Data,” and tap Submit.
Step 3: Test the Result
Test the redirect from your store, to make sure that it works correctly. Make sure that the
URLyou test goes directly to the intended category, rather than to a subcategory. For example:
http://yourstore.com/catalog/category/view/id/56
http://yourstore.com/catalog/category/view/s/my-category/id/56/
CHAPTER 29: URL Rewrites Creating URL Rewrites
Magento Community Edition 2.0 User Guide 467
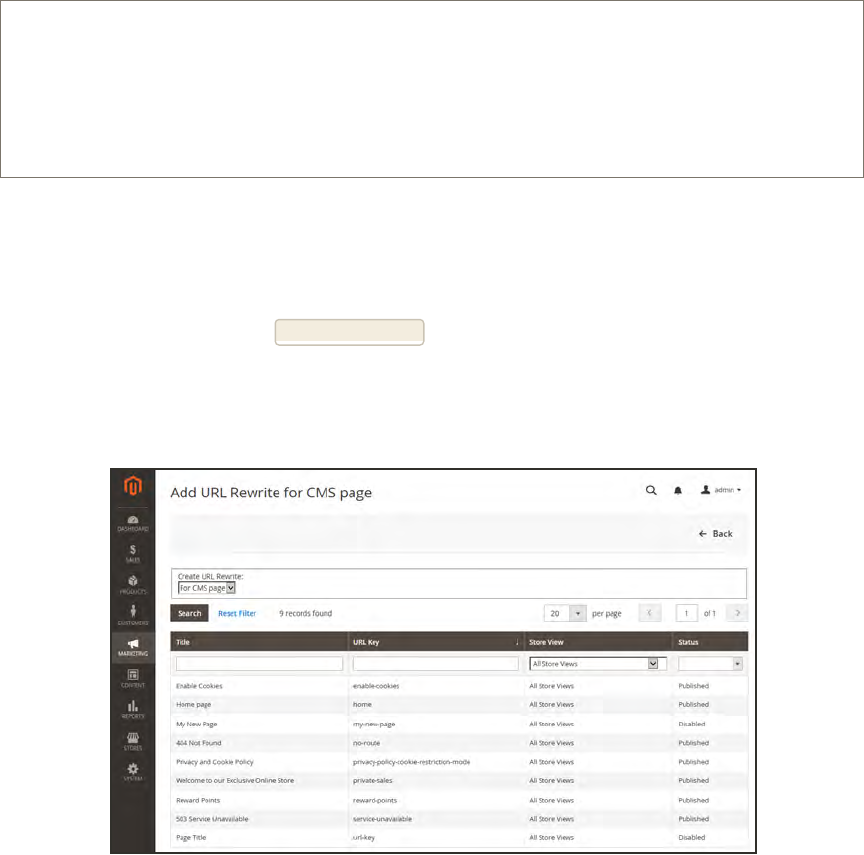
CMS Page Rewrites
You can redirect the URLs of contentpages, as well as other pages. For example, if you change
the URLkey of the privacy policy from privacy-policy-cookie-restriction-mode to
privacy-policy, the link in the cookie restriction mode returns “404 - Page Not Found.” To
redirect traffic to the new URL key, create a custom rewrite with the following settings:
Request Path: privacy-policy-cookie-restriction-mode
Target Path: privacy-policy
Redirect: Permanent (301)
Process Overview:
Step 1: Create the Rewrite
Step 2: Refresh the Index
Step 3: Test the Result
Step 1: Create the Rewrite
1. On the Admin sidebar, tap Marketing. Then under SEO & Search, choose URL Rewrites.
2. In the upper-right corner, tap Add URL Rewrite.
3. Set Create URL Rewrite to “for CMS page.”
4. Find the page that you want to redirect in the grid, and open the record.
Custom URL Rewrite
Creating URL Rewrites CHAPTER 29: URL Rewrites
468 Magento Community Edition 2.0 User Guide
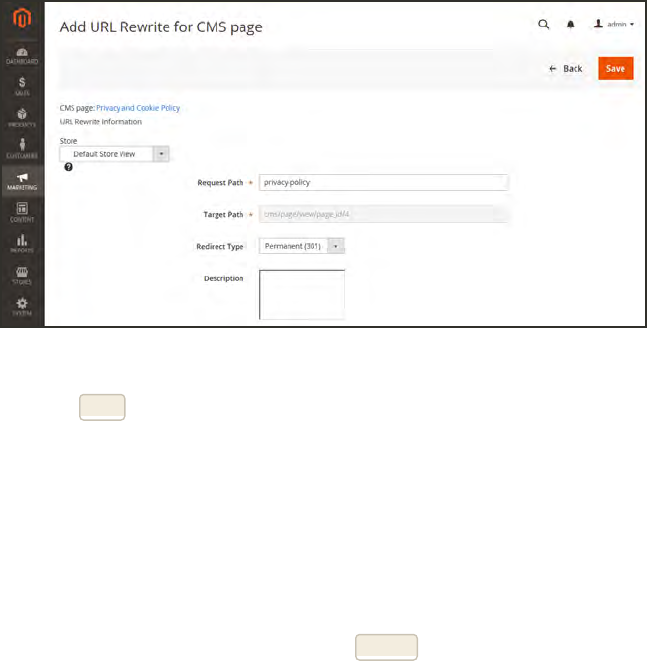
5. Under URL Rewrite Information, do the following:
a. If you have multiple store views, select the Store where the rewrite applies.
b. In the Request Path field, enter the URLkey, of the CMS page to be redirected.
lTo redirect to another CMS page in your store, enter the relative path, without a leading
forward slash.
lTo redirect to a page on a different site, enter the fully qualified URL of the destination.
c. Set Redirectto one of the following:
lTemporary (302)
lPermanent (301)
d. For your own reference, enter a brief description of the rewrite.
URLRewrite Information
6. When complete, tap Save.
The new rewrite appears in the grid at the top of the list.
Step 2: Refresh the Index
1. On the Admin sidebar, tap System. Then under Tools, choose Index Management.
2. Mark the Catalog URL Rewrites checkbox.
3. Set the Actions control to “Reindex Data,” and tap Submit.
Step 3: Test the Result
Test the rewrite from your store to make sure that it works correctly.
CHAPTER 29: URL Rewrites Creating URL Rewrites
Magento Community Edition 2.0 User Guide 469

Notes
470 Magento Community Edition 2.0 User Guide

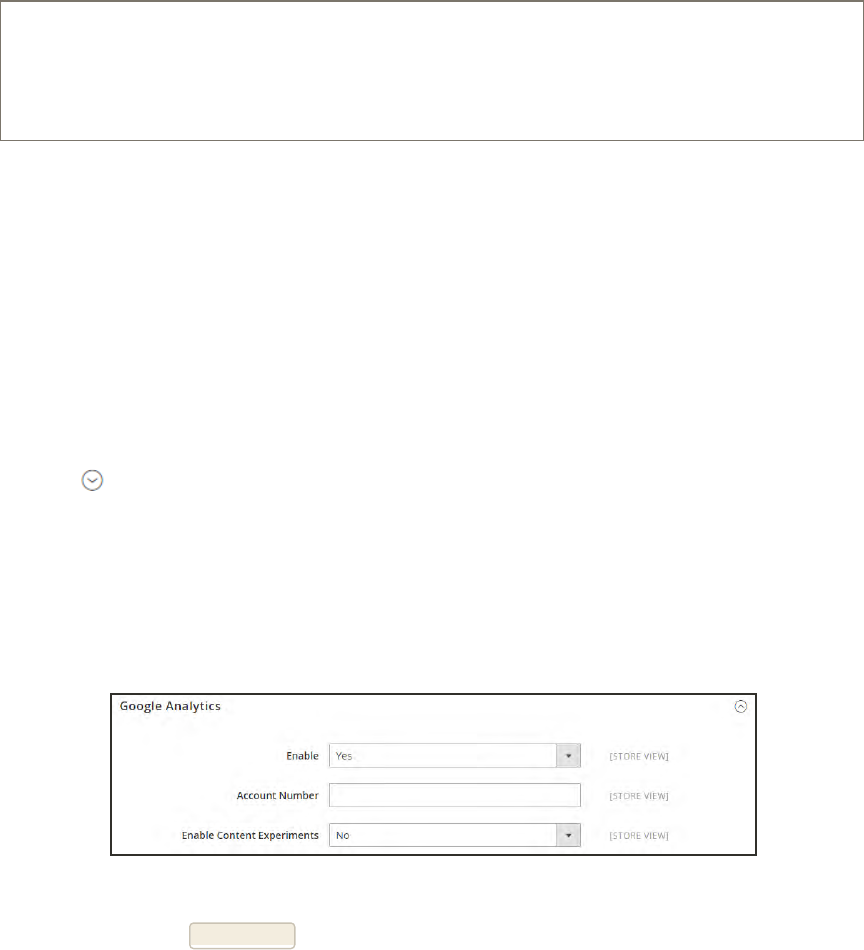
Google Analytics
Google Universal Analytics gives you the ability to define additional custom dimensions and
metrics for tracking, with support for offline and mobile app interactions, and access to
ongoing updates.
Process Overview:
Step 1: Sign Up for Google Universal Analytics
Step 2: Complete the Magento Configuration
Step 1: Sign Up for Google Universal Analytics
Visit the Google website, and sign up for a Google Universal Analytics account.
Step 2: Complete the Magento Configuration
1. Return to your store, and log in to the Admin. On the Admin sidebar, tap Stores. Then under
Settings, choose Configuration.
2. In the panel on the left, under Sales, choose Google API.
3. Expand the Google Analytics section. Then, do the following:
a. Set Enable to “Yes.”
b. If you want to conduct A/B testing and other performance tests on your content, set
Content Experiments to “Yes.”
c. Enter your Universal Analytics Account Number.
Google Analytics
4. When complete, tap Save Config.
Google Analytics CHAPTER 30: Google Tools
472 Magento Community Edition 2.0 User Guide
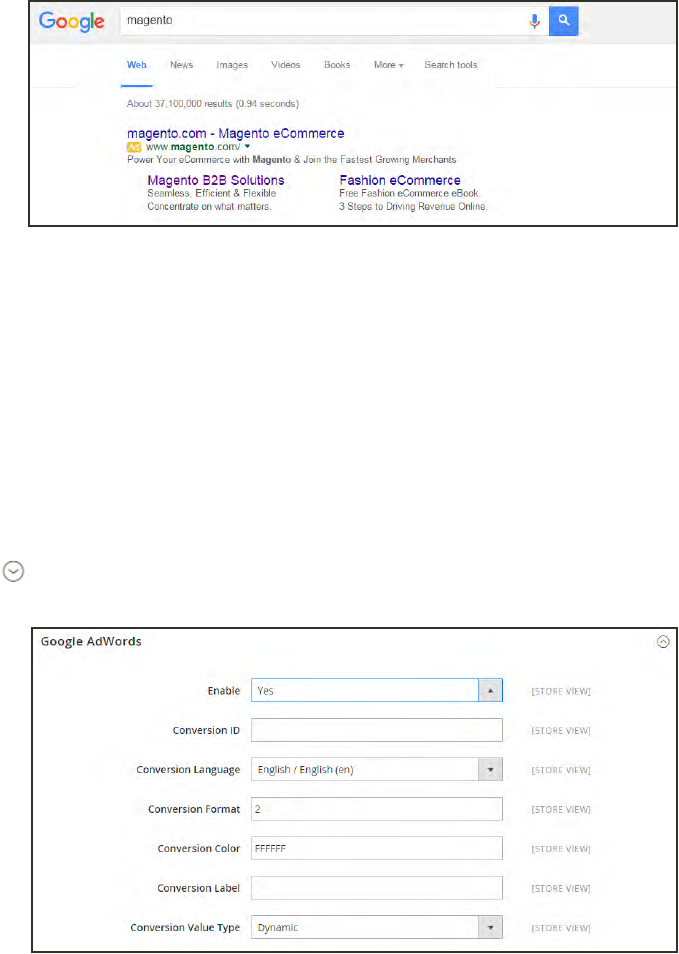
Google Adwords
Google Adwords is a service that is used to place ads in Google Search results, with tools to
manage the campaigns.
Magento Ad in Google Search Results
Step 1: Sign Up for Google Adwords
Visit Google Adwords, and sign up for an account.
Step 2:Configure Your Store
1. On the Admin sidebar, tap Stores. Then under Settings, choose Configuration.
2. In the panel on the left, under Sales, choose Google API.
3. Expand the Google Adwords section. Then, do the following:
Google Adwords
a. Set Enable to “Yes.”
b. Enter the Conversion IDfrom your Google AdWords script.
CHAPTER 30: Google Tools Google Adwords
Magento Community Edition 2.0 User Guide 473

c. Set Conversion Language to the language that is identified in your Google AdWords
script.
d. In the Conversion Format field, enter the numeric value from your Google AdWords
script.
e. In the Conversion Color field, enter the hexadeciamal value from your Google AdWords
script.
f. In the Conversion Label field, enter the text string from your Google AdWords script.
g. The Conversion Value Type is preset to a dynamic variable based on the Total Cost of
sales.
4. When complete, tap Save Config.
Google Adwords CHAPTER 30: Google Tools
474 Magento Community Edition 2.0 User Guide


Content Elements Content Menu
Pages
Core Content
Default Pages
Workspace Controls
Page Search
Page Actions
Grid Layout
Adding a New Page
Assigning a New Home Page
Media Storage
Using the Editor
Inserting a Link
Inserting an Image
Inserting a Widget
Inserting a Variable
Blocks
Adding a New Block
Adding Social Plugins
Adding a Lightbox or Slider
Positioning Blocks
Using a Widget
Using a Layout Update
Widgets
Widget Types
Creating a Widget
New Products List
476 Magento Community Edition 2.0 User Guide

CHAPTER 31:
Content Menu
The term content marketing1refers to the art of promoting your products or services by
providing valuable information to your customers at no charge. The quality of your content
helps distinguish your store from others, increases your visibility to search engines, and
provides support to your customers. This soft-sell approach is often more effective than
advertising, builds credibility and trust, and can turn your store into a destination.
Content is still king.
Your content should reflect the branding of your store, and be delivered with your
distinctive visual presentation and voice to convey your message. Use pictures to tell a
story. Educate, inspire, and entertain. Keep in mind that with quality content, sometimes
less is more.
Content Menu
1The art of promoting products or services by providing valuable information at no charge.
Magento Community Edition 2.0 User Guide 477
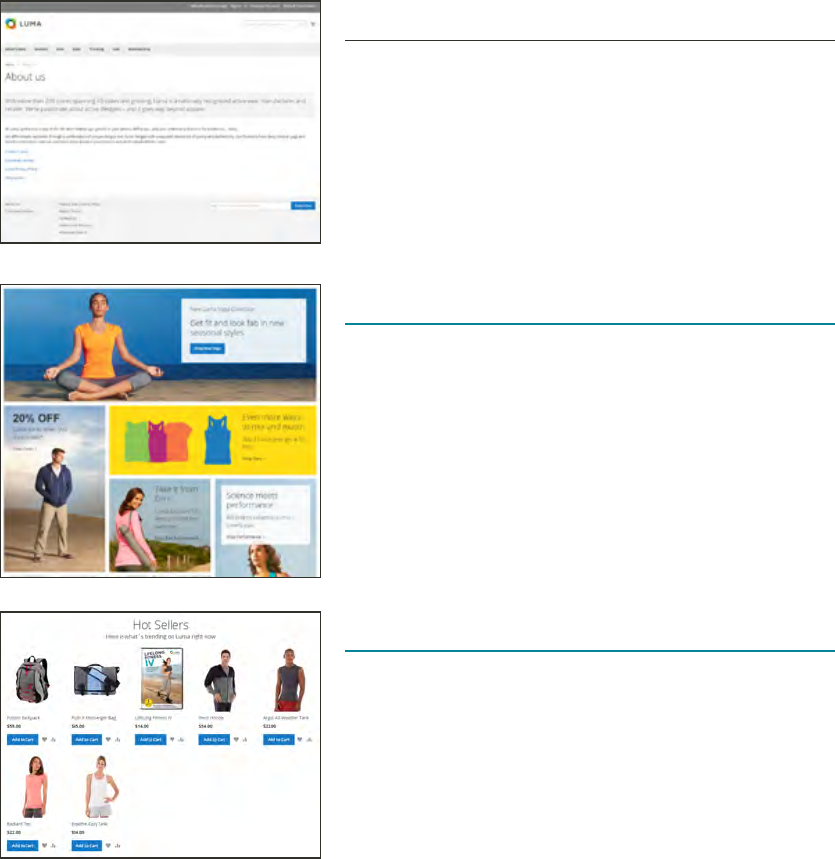
Menu Options
Pages
Create pages with text, images, blocks, variables, and
widgets, that can be incorporated into the navigation
of your store, and linked to other pages..
Blocks
Create blocks of content without writing any code.
Blocks can contain text, images, and even video, and
can be assigned to any part of the page layout.
Widgets
Display dynamic data and add blocks, links, and
interactive elements most anywhere in your store.
478 Magento Community Edition 2.0 User Guide
CHAPTER 31: Content Menu

CHAPTER 32:
Pages
All content can be viewed in terms of its shelf life, just as any product in a store. Did you
know that the shelf life of social media content is less than twenty-four hours? The
potential shelf life of the content you create can help you decide where to invest your
resources.
Content with a long shelf life is sometimes referred to as evergreen content1. Examples
of evergreen content include customer success stories, "how to" instructions, and
Frequently Asked Questions (FAQ.) In contrast, content is perishable by nature includes
events, industry news, and press releases.
1Content that has a long shelf life.
Magento Community Edition 2.0 User Guide 479
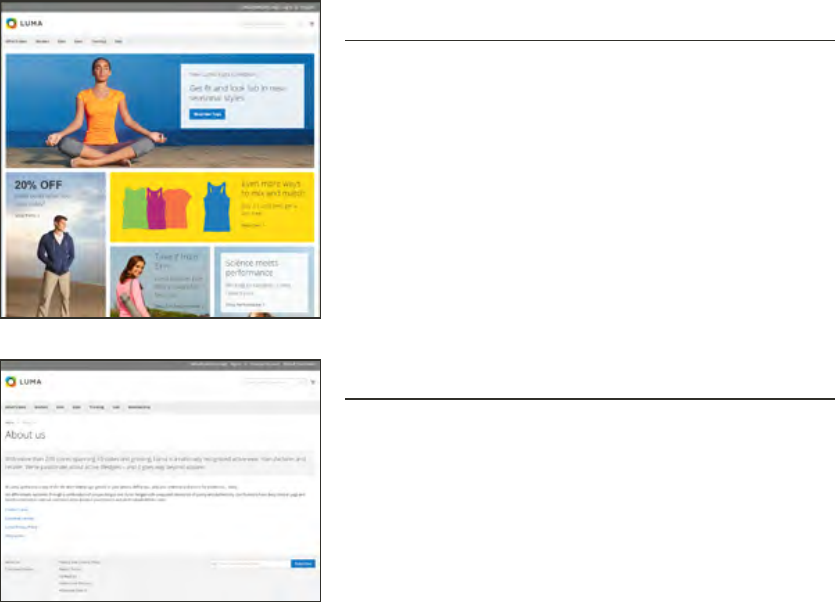
Core Content
The Magento demo store has examples of core content pages to help you get started. Take a
look at the following pages in your store, to make sure that the content conveys your message,
voice, and brand.
Content Pages
Home
The demo “Home” page includes a banner, an image
carousel, several static blocks with links, and a list of
new products.
About Us
The “About Us” page is linked from the footer of your
store. You can include images, video, links to press
releases and announcements. The sample page has an
image on the right, and one of a decorative sort to
indicate the end of the page.
Core Content CHAPTER 32: Pages
480 Magento Community Edition 2.0 User Guide
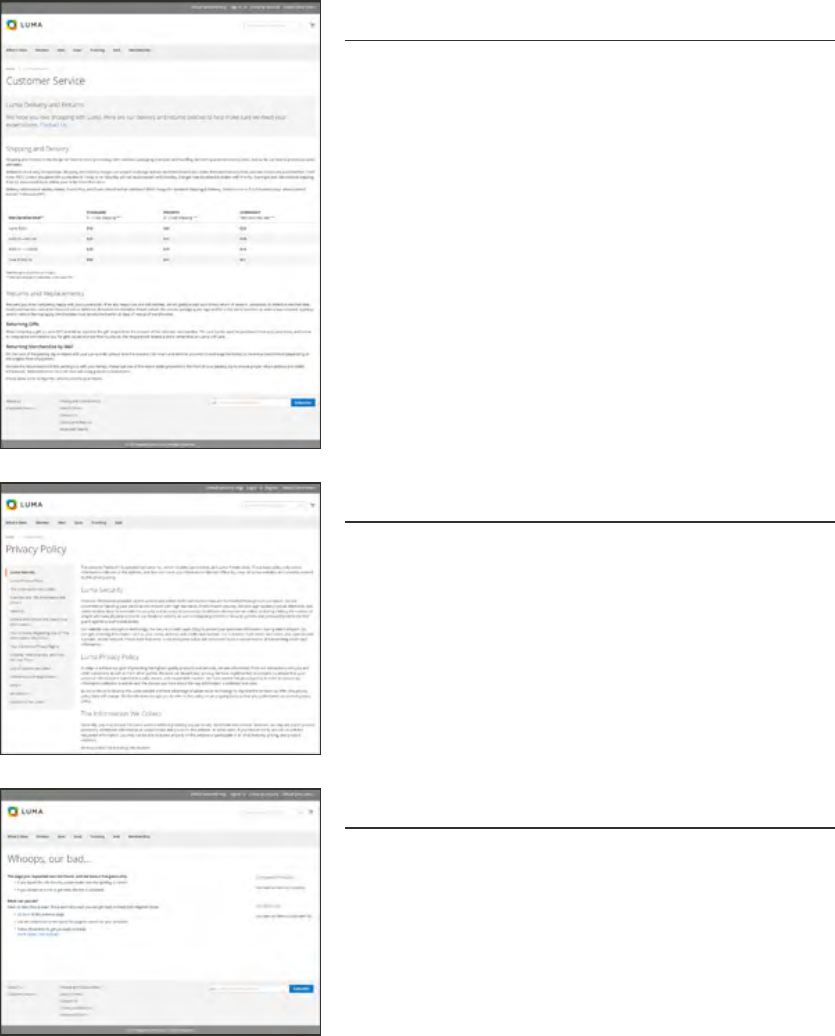
Customer Service
The “Customer Service” page is another node in the
page hierarchy. The two headers on the page have
content that only becomes visible when the header is
clicked.
Privacy Policy
Your store’s “Privacy Policy” page should be updated
with your own information. As a best practice, your
privacy policy should explain to your customers the
type of information that your company collects and
how it is used.
Page Not Found
The “404 Page Not Found” page is named for the
response code that is returned when a page cannot be
found. URLredirects reduce the number of times that
this page appears. However, for those times when it is
necessary, you might as well take advantage of the
opportunity to offer some links to products that the
customer might find interesting.
CHAPTER 32: Pages Core Content
Magento Community Edition 2.0 User Guide 481
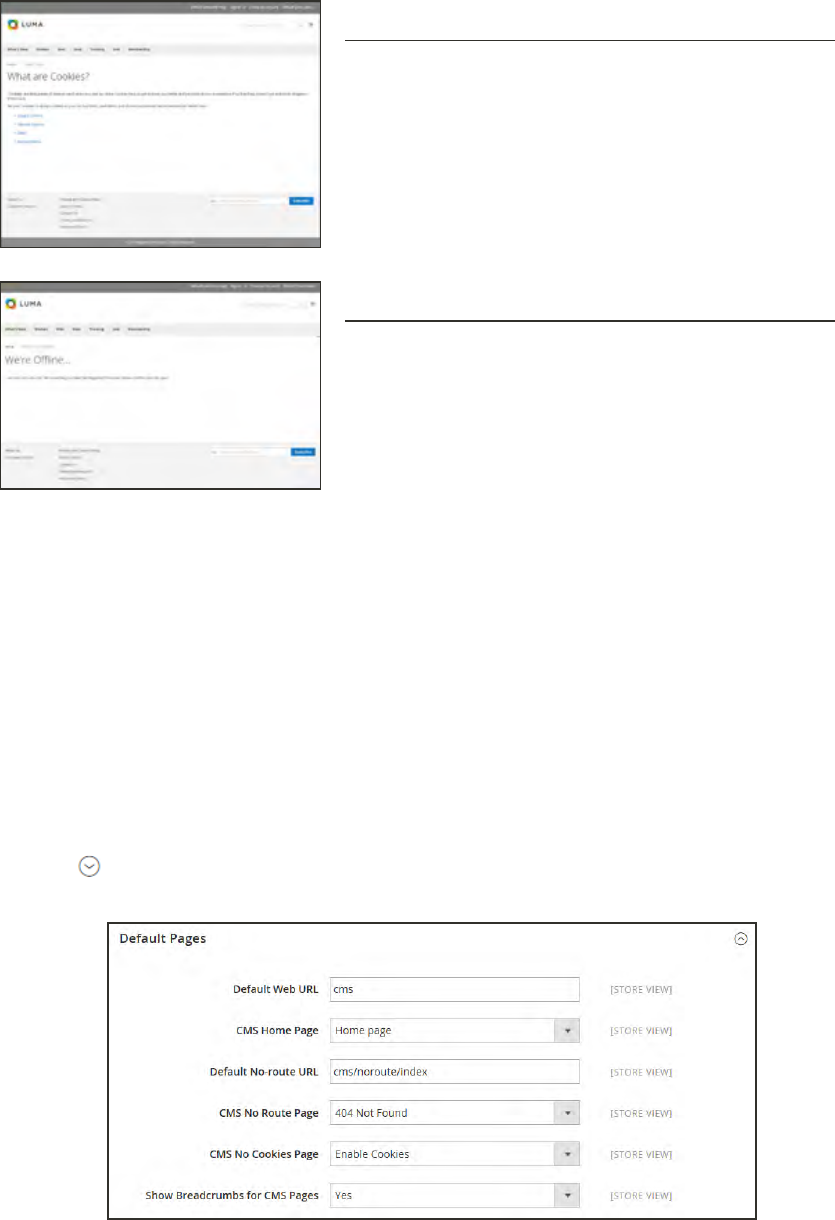
Enable Cookies
The “Enable Cookies” page appears when visitors to
your site do not have cookies enabled in their
browsers. The page provides step-by-step, illustrated
instructions to enable cookies for the most popular
browsers.
Service Unavailable
The “503 Service Unavailable" page is named for the
response code that is returned when the server is
unavailable.
Default Pages
The Default Pages configuration determines the landing page that is associated with the base
URL, and the corresponding home page. It also determines which page appears when a “Page
Not Found” error occurs, and if a breadcrumb trail appears at the top of each page.
To configure the default pages:
1. On the Admin sidebar, tap Stores. Then under Settings, choose Configuration.
2. In the panel on the left under General, choose Web.
3. Expand the Default Pages section. Then, do the following:
Default Pages
Core Content CHAPTER 32: Pages
482 Magento Community Edition 2.0 User Guide
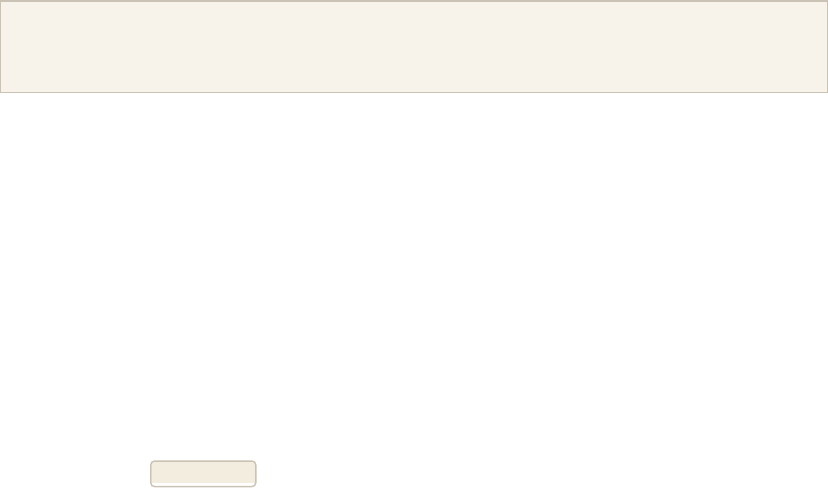
a. In the Default Web URL field, enter the relative path to the folder in the Magento
installation that contains the landing page. The default value is “cms.”
For a specific store view, clear the Use Default checkbox next to the Default Web URL field,
and any other default fields to be changed.
b. Set CMSHome Page to the CMS page to be used as the home page.
c. In the Default No-route URL field, enter the relative path to the folder in the Magento
installation where the page is redirected when a “404 Page Not Found” error occurs. The
default value is “cms/index/noRoute.”
d. Set CMS No Route Page to the CMS page that appears when a “404 Page Not Found”
error occurs.
e. Set CMS No Cookies Page to the CMS page that appears when cookies are disabled in the
browser.
f. If you want a breadcrumb trail to appear at the top of all CMS pages, set Show
Breadcrumbs for CMS Pages to “Yes.”
4. When complete, tap Save Config.
CHAPTER 32: Pages Core Content
Magento Community Edition 2.0 User Guide 483
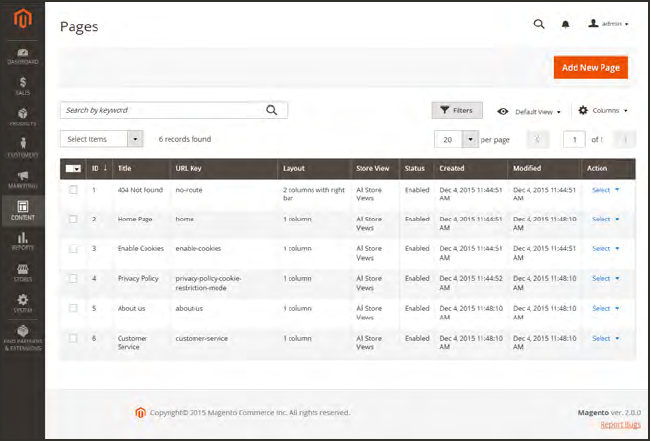
Workspace Controls
The Pages workspace includes tools to help you quickly find the pages you need, and
commands to perform routine maintenance on individual or multiple pages. You can also
quickly update page properties from the grid.
Pages Grid
Workspace Controls CHAPTER 32: Pages
484 Magento Community Edition 2.0 User Guide
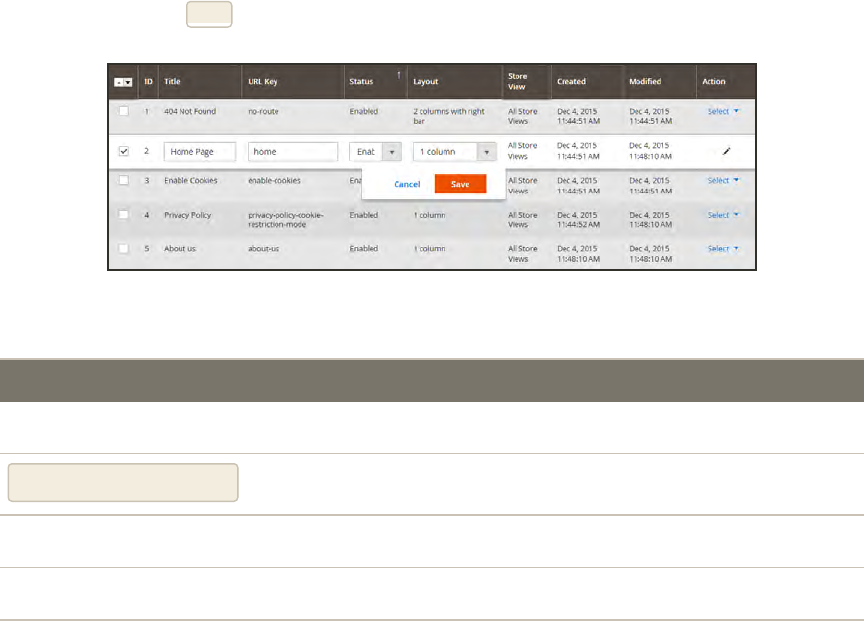
To quickly update page properties:
1. Double-click any page in the grid;
2. Update any of the following properties:
lTitle
lURL Key
lStatus
lLayout
3. When complete, tap Save.
Update Page Properties
CONTROL DESCRIPTION
Store View Sets the scope to a specific view.
Add New Page Adds a new page.
Search Initiates a catalog search based on the current filters.
Reset Filter Restores all filters to a blank state.
Actions Lists all actions that can be applied to selected items in the list. To
apply an action to a page, or to multiple pages, mark the checkbox in
the first column of each record that is subject to the action. Options:
Delete
Change Status
Update Attributes
Workspace Controls
CHAPTER 32: Pages Workspace Controls
Magento Community Edition 2.0 User Guide 485
CONTROL DESCRIPTION
Select Can be used to select multiple records as the target of action. The
checkbox is marked in the first column of each selected record.
Options: Select All / Deselect All
Submit Applies the current action to selected records.
Edit Opens the record in edit mode. You can accomplish the same thing
by clicking anywhere on the row.
Workspace Controls (cont.)
Workspace Controls CHAPTER 32: Pages
486 Magento Community Edition 2.0 User Guide
COLUMN DESCRIPTION
Select The checkbox in the first column is used to apply the following
actions to specific or multiple pages:
Delete
Disable
Enable
ID The ID is an incrementing number that is assigned to each page.
Title The page title appears at the top of each page.
URLKey The URLkey is similar to a file name, and identifies the page in the
URL.
Layout Determines if the page appears with sidebars to the right or left of the
main content area. Options:
1 column
2 columns with left bar
2 columns with right bar
3 columns
Empty
Store View Can be used to associate the page with a specific store view.
Status Indicates if the page is currently online or offline. Options:Disabled /
Published
Created The date the page was created.
Modified The data the page was last modified.
Version Control Indicates if the page is maintained under version control.
Options:Yes / No
Action The actions that can be applied to an individual record include:
Edit Opens the page in edit mode.
Delete Deletes the page.
Preview Displays the page in preview mode.
Columns
CHAPTER 32: Pages Workspace Controls
Magento Community Edition 2.0 User Guide 487
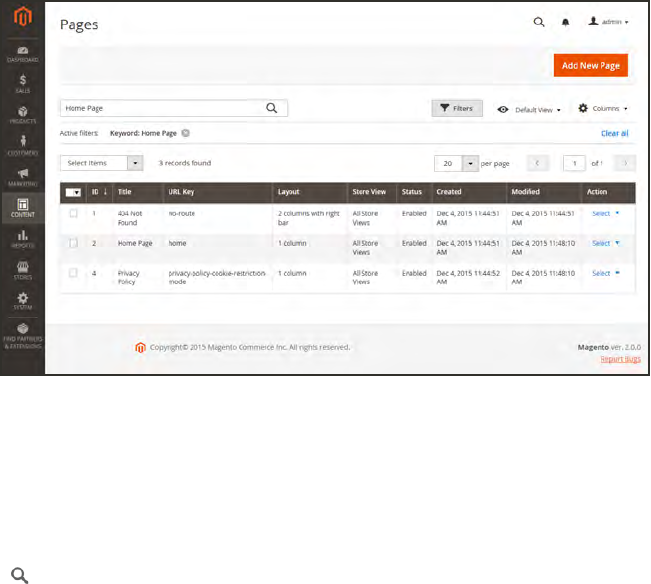
Page Search
The Search box in the upper-left of the page grid can be used to find specific pages by keyword.
For a more advanced search, you can filter the search by multiple parameters.
Keyword Search Results
To search by keyword:
1. Enter a search term into the page search box.
2. Tap Search to display the results.
Workspace Controls CHAPTER 32: Pages
488 Magento Community Edition 2.0 User Guide
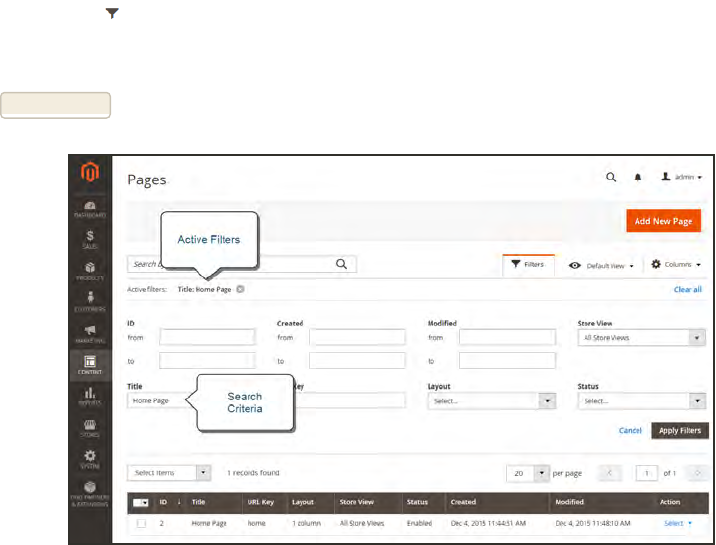
To filter search:
1. If necessary, click Clear All to clear the previous search criteria.
2. Tap the Filters tab to display the selection of search filters.
3. Complete as many of the filters as necessary to describe the page(s) that you want to find.
4. Tap Apply Filters to display the results.
Filtered Search
CHAPTER 32: Pages Workspace Controls
Magento Community Edition 2.0 User Guide 489
FILTER DESCRIPTION
ID Filter the search by page record ID.
URLKey Filter the search by the URL Key.
Version Control Filter the search on the basis of version control:Yes / No
Created Filter the search by the date the page was created.
Layout Filter the search based on page layout. Options:
1 column
2 columns with left bar
2 columns with right bar
3 columns
Empty
Modified Filter the search based on the date the page was last modified.
Store View Filter the search based on store view. Options: (All available Store
Views)
Title Filter the search based on the page title.
Status Filter the search on the page status. Options:Disables / Published
Apply Filters Applies all filters to the search.
Cancel Cancels the current search.
Clear All Clears all search filters.
Search Filters
Workspace Controls CHAPTER 32: Pages
490 Magento Community Edition 2.0 User Guide
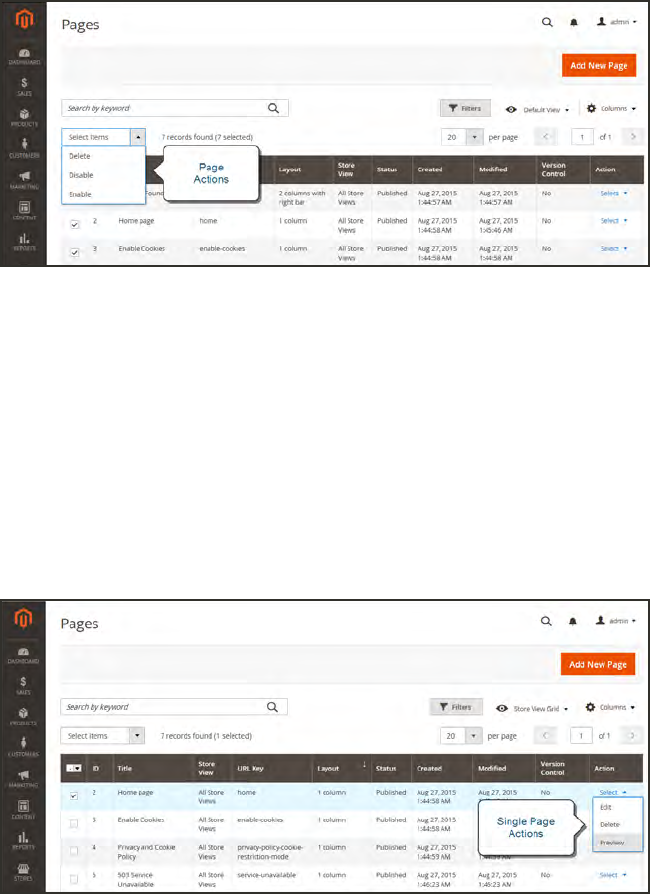
Page Actions
The following actions can be applied to selected pages. To select individual pages, mark the
checkbox in the first column. To select or deselect all pages, use the control at the top of the
column.
lDelete
lDisable
lEnable
Page Actions
Applying Actions
The Action column on the far right can be used to apply any of the following actions to the
individual page:
lEdit
lDelete
lPreview.
Single Page Actions
CHAPTER 32: Pages Workspace Controls
Magento Community Edition 2.0 User Guide 491
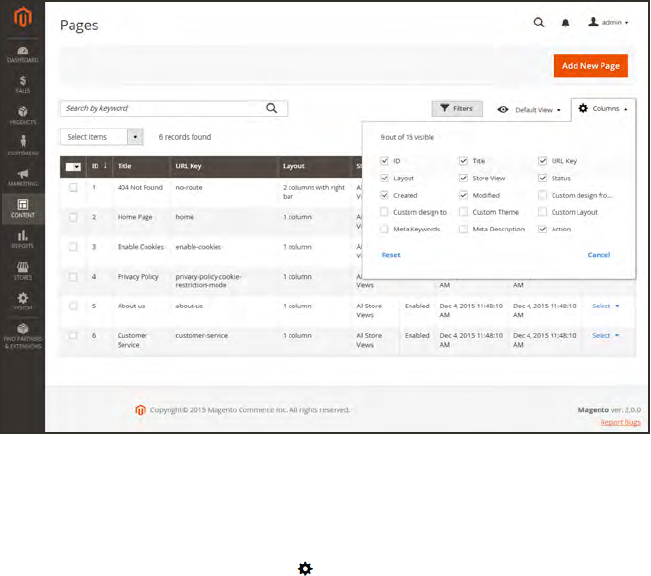
Page Grid Layout
The selection of columns and their order in the grid can be changed according to your
preference. To keep the new column arrangement, you can save it as a view.
Page Grid Columns
To change the selection of columns:
In the upper-right corner, tap the Columns control. Then, do the following:
lMark the checkbox of any column you want to add to the grid.
lClear the checkbox of any column you want to remove from the grid.
To move a column:
1. Tap the header of the column, and hold.
2. Drag the column to the new position, and release.
Workspace Controls CHAPTER 32: Pages
492 Magento Community Edition 2.0 User Guide
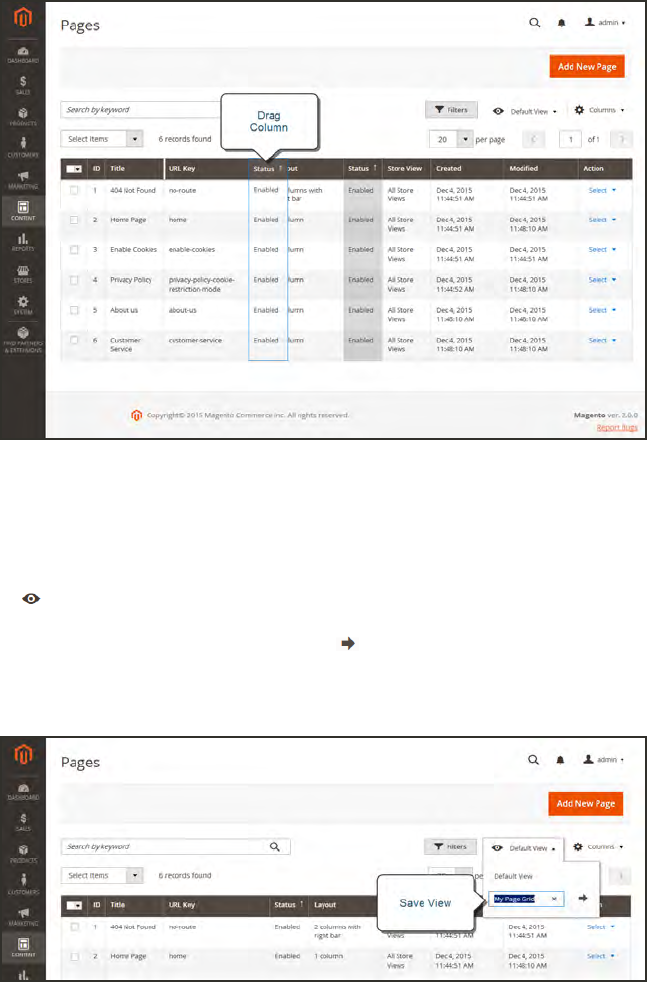
Moving a Column
To save a view:
1. Tap the View control. Then, tap Save Current View.
2. Enter a name for the view. Then, click the arrow to save all changes.
The name of the view now appears as the current view.
Save Current View
CHAPTER 32: Pages Workspace Controls
Magento Community Edition 2.0 User Guide 493
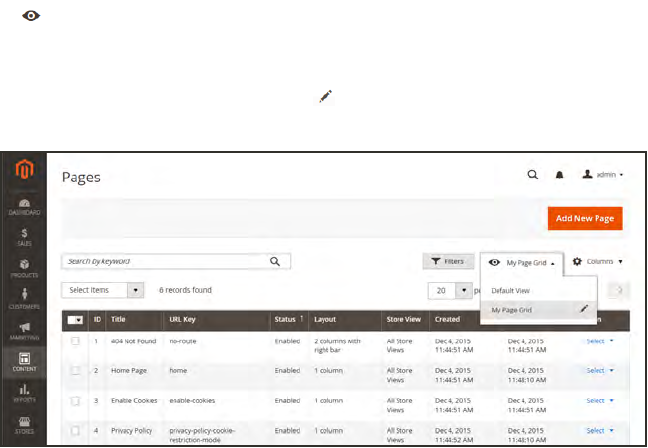
To change the view:
Tap the View control. Then, do one of the following:
lChoose the view that you want to use.
lTo change the name of a view, tap the Edit icon. Then, update the name.
Choose a View
Workspace Controls CHAPTER 32: Pages
494 Magento Community Edition 2.0 User Guide
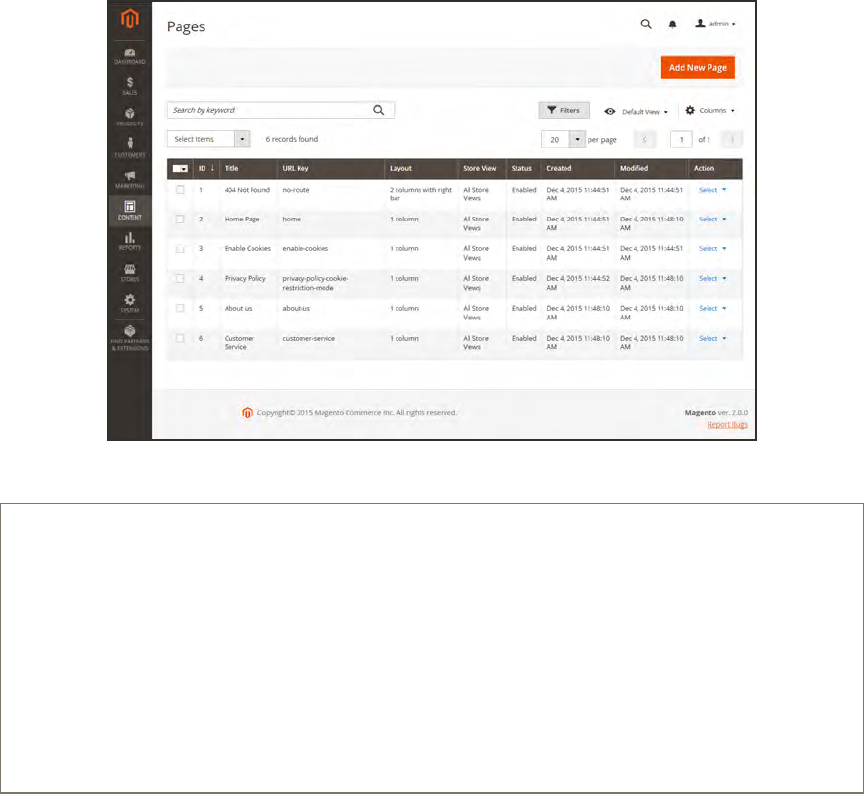
Adding a New Page
The process of adding a new content page to your store is essentially the same for any type of
page you might want to create. You can include text, images, blocks of content, variables, and
frontend apps. Most content pages are designed to be read by search engines first, and by
people second. Keep the needs of each of these two very different audiences in mind when
choosing the page title and URL, composing the meta data, and writing the content.
The following instructions walk you through each step to create a basic page. Some advanced
features are skipped over, but covered in other topics. Each is marked as “Advanced,” with a
link to learn more.
Pages
Process Overview:
Step 1: Add a New Page
Step 2: Select the Page Layout
Step 3: Complete the Content
Step 4: Complete the Meta Data
Step 5:Preview the Page
Step 6: Publish the Page
CHAPTER 32: Pages Adding a New Page
Magento Community Edition 2.0 User Guide 495
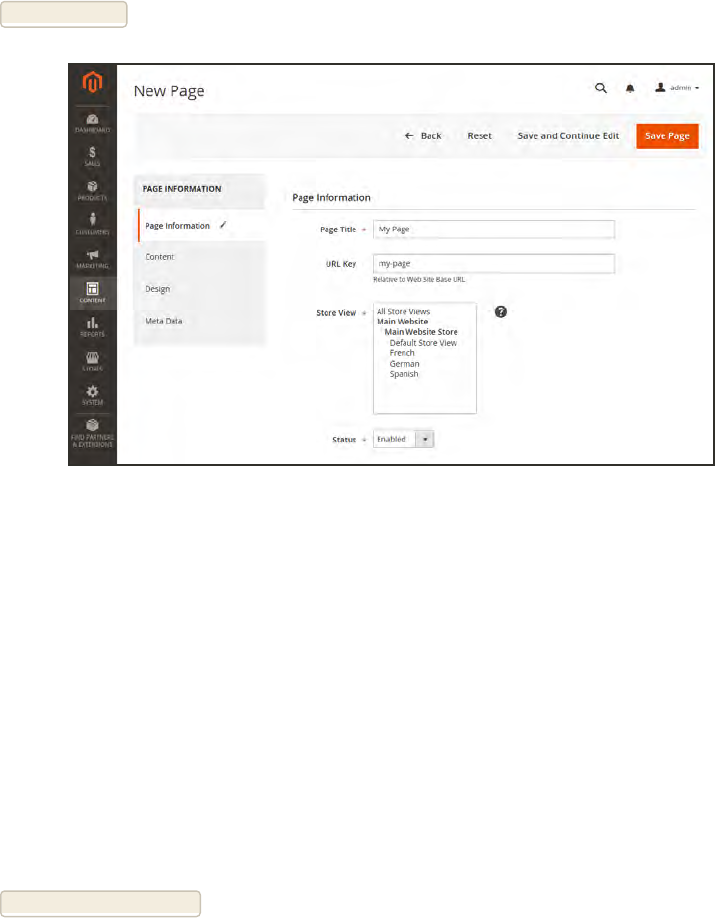
Step 1: Add a New Page
1. On the Admin sidebar, tap Content. Then under Elements, choose Pages.
2. Tap Add New Page.
Page Information
3. In the Page Information section, do the following:
a. Enter the Page Title. The Page Title is meta data that appears in the title bar and tab of
the browser.
b. Enter a URL Key for the page, using lowercase characters, and hyphens instead of spaces.
The URL Key is added to the base URL to create the online address of the page.
c. In the Store View list, select each view where this page is to be available.
d. Set Status to “Disabled.” (You can change this later when the page is ready to go live.)
e. (Advanced) Version control maintains an archive of all page revisions. To learn more,
see:.
4. Tap Save and Continue Edit.
Step 2: Choose the Page Layout
1. In the panel on the left, choose Design.
2. In the Page Layout section, set Layout to one of the following:
Adding a New Page CHAPTER 32: Pages
496 Magento Community Edition 2.0 User Guide
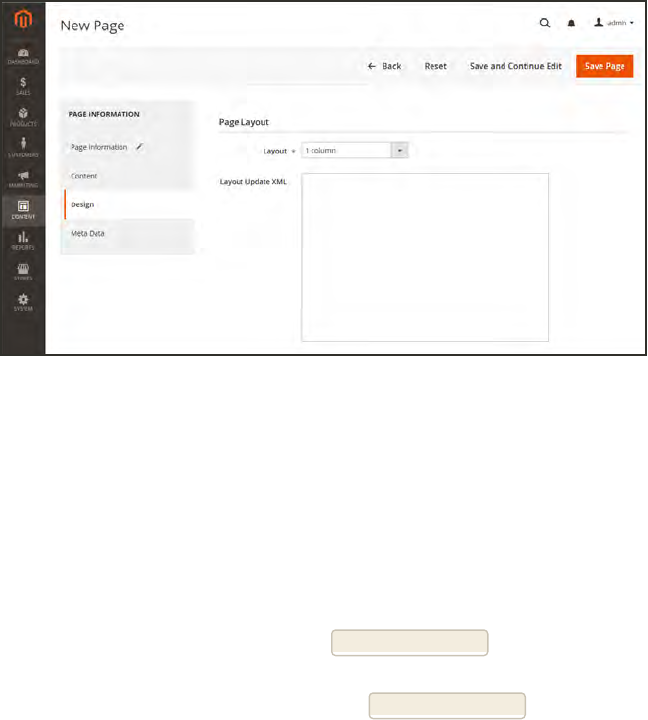
l1 column
l2 columns with left bar
l2 columns with right bar
l3 columns
To learn more, see: Page Layout.
3. (Advanced) Custom page layouts are used to make custom modifications to the page layout.
To learn more, see:Layout Updates .
4. (Advanced) The Custom Design section can be used to change the theme, layout, or style of the
page for period of time, such as for a season or promotion. To learn more, see: Custom Design.
Page Layout
Step 3: Complete the Content
1. In the panel on the left, choose Content.
2. In the Content Heading box, type the text for the main heading at the top of the page.
3. You can work in either of the following modes:
lIf you prefer to use the WYSIWYG editor, tap Show / Hide Editor. To learn more, see: Using
the Editor.
lIf you prefer to work directly with the HTML, tap Show / Hide Editor again to return to code
view.
4. Complete the content and format the text as needed. You can add images, variables, and a
variety of frontend apps with dynamic data.
CHAPTER 32: Pages Adding a New Page
Magento Community Edition 2.0 User Guide 497
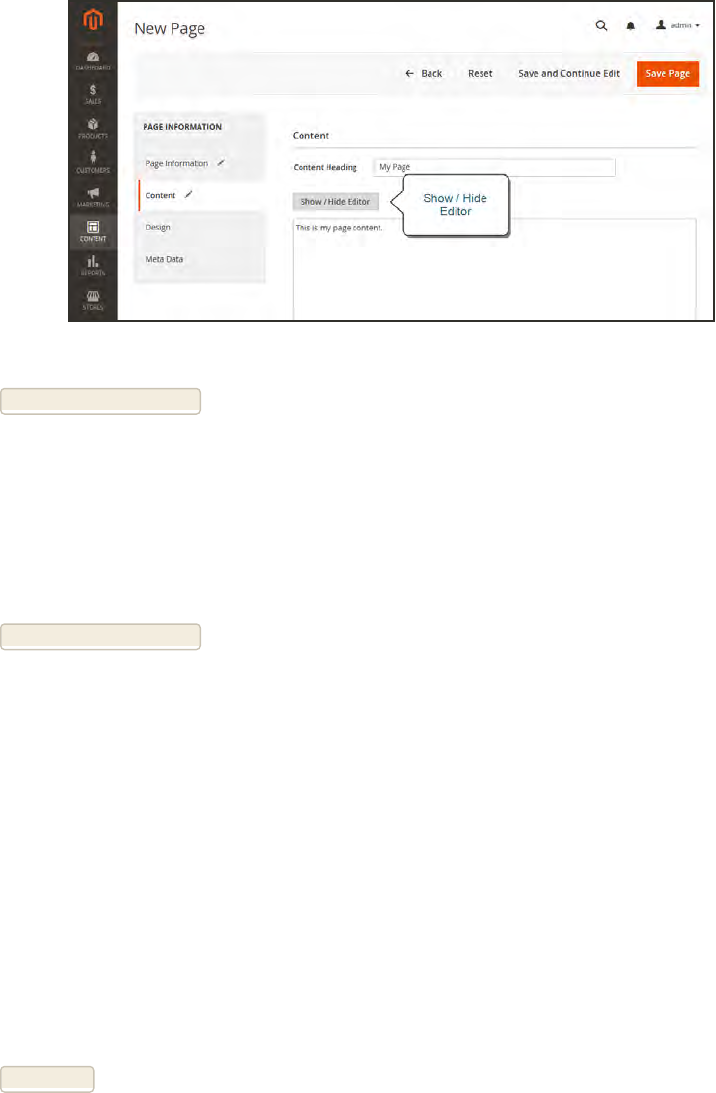
Show / Hide Editor
5. Tap Save and Continue Edit.
Step 4: Complete the Meta Data
1. In the panel on the left, choose Meta Data.
2. Complete the Keywords and Description for the page. This information helps search engines
to index the page.
3. Tap Save and Continue Edit.
Step 5: Preview the Page
1. To proofread the page and check the formatting, tap Preview at the top of the workspace.
2. The preview opens in a new browser tab. To return to your work, either close the preview tab, or
switch to the tab that is open to the Admin of your store.
Step 6: Publish the Page
1. When you are ready to publish the page, do the following:
a. In the panel on the left, choose Page Information.
b. Set Status to “Published.”
2. Tap Save Page.
Now that your page is complete, it can be added to your store navigation, linked to other
pages, or from the footer of your store. You can also use it as your new home page.
Assigning a New Home Page
Adding a New Page CHAPTER 32: Pages
498 Magento Community Edition 2.0 User Guide
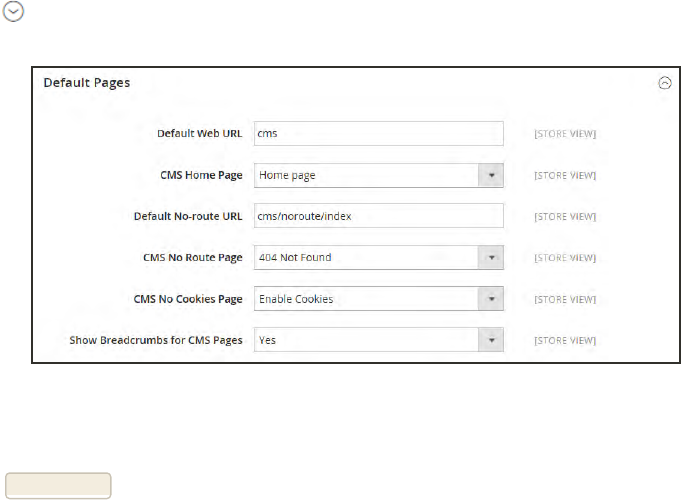
You can maintain a selection of different home pages, and activate the page that you want to
use as the default home page.
To Assign a New Home Page
1. Complete the steps to add a new page.
2. On the Admin sidebar, tap Stores. Then under Settings, choose Configuration.
3. In the panel on the left under General, choose Web.
4. Expand the Default Pages section. Then, do the following:
Default Pages
a. Set CMS Home Page to the new page.
b. Tap Save Config.
5. In the message at the top of the workspace, tap the Cache Management link, and refresh any
invalid caches.
CHAPTER 32: Pages Adding a New Page
Magento Community Edition 2.0 User Guide 499
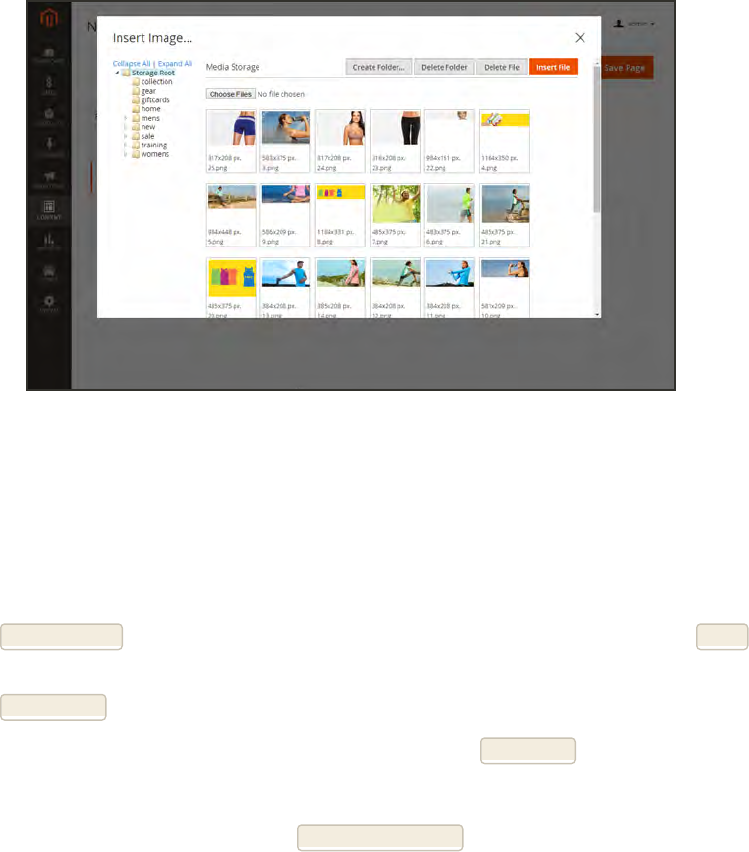
Media Storage
Media storage helps you organize and gain access to media files that are stored on the server.
The path to the location of the files is determined by the Base URL configuration. Files in
media storage can be accessed from the editor while working on pages and static blocks. Media
storage is usually located in the file system on the same server as the Magento program files.
Alternatively, the files can be managed in a database, or located on a separate server or content
delivery network.
Media Storage
To upload an image to media storage:
1. In the directory tree on the left, navigate to the folder where the image will be stored. If
necessary, press the right mouse button, and create any new folders that are needed.
2. From the editor, do the following:
a. Tap Browse Files. Navigate to the file on your computer, and select it. Then, tap Open to
copy the file name to Media Storage.
b. Tap Upload File to upload the the image to Media Storage.
3. To link the image to a file, click to select the image. Then, tap Insert File.
4. To complete the Alt tag, place the cursor between the double-quotes, and enter the alt text.
5. To see the image in WYSIWYG mode, tap Show / Hide Editor.
Media Storage CHAPTER 32: Pages
500 Magento Community Edition 2.0 User Guide
Using the Editor
The WYSIWYG editor gives you the ability to enter and format while working in a “What You
See Is What You Get” view of the content. If you prefer to work directly with the underlying
HTMLcode, you can easily change modes. The editor can be used to create content for pages,
blocks, and product descriptions. When working in the product catalog, the editor is accessed
by clicking the WYSIWYG Editor button.
For a complete list of toolbar buttons, see: Using the Editor.in the online guide.
Editor Toolbar
Inserting a Link
An easy way to insert a link is to use the Link button in the editor toolbar. It doesn’t require
any knowledge of HTML, and the result is the same.
To insert a link:
1. Highlight the text where you want to create the link. Then, in the editor toolbar, tap the Link
button.
Insert Link Button
2. In the Link URL field, enter one of the following:
lThe URLKey of a page in your store.
lThe full URLof an external page to be linked.
3. Set Target to one of the following:
lOpen link in the same window
lOpen in a new window
4. In the Title field, enter the tooltip text to appear when someone hovers over the link.
CHAPTER 32: Pages Using the Editor
Magento Community Edition 2.0 User Guide 501

5. Tap Insert to create the link.
Inserting an Image
From the editor, you can insert an image that has been uploaded to Media Storage, or link to
an image that resides on another server.
Media Storage
Method 1: Insert an Image from Media Storage
1. If necessary, tap Show / Hide Editorto work directly with the code.
2. Position the cursor where you want the code for the image to be inserted. Then, tap Insert
Image.
3. Choose the image that you want to use, and tap Insert File.
4. To view the image in WYSIWYG mode, tap Show / Hide Editor again.
Method 2: Insert an Image from Another Server
Use this method to insert an image that is available online, but resides on another server. You
must have the full URL of the image to complete the process.
1. If necessary, tap Show / Hide Editor to work in WYSIWYG mode.
2. Position your cursor where you want the image to appear.
3. On the Editor toolbar, tap the Insert Image button. Then, do the following:
Using the Editor CHAPTER 32: Pages
502 Magento Community Edition 2.0 User Guide
Insert Image Button
a. In the Image URL field, paste the full URL to the image on the other server.
b. In the Image Description field, enter a brief description of the image.
c. In the Title field, enter a relevant title for the image.
4. Tap Insert to complete the process.
Inserting a Widget
The Widget tool can be used to add a variety of content elements to the page, including links to
any content page or node, product, or category. Links can be positioned on the page in a block
format, or incorporated directly into the content. You can use the Widget tool to create links to
the following types of content:
lContent Pages
lCatalog Categories
lCatalog Products
By default, links inherit their style from the style sheet of the theme.
To insert a widget:
1. Open the content page to be edited.
2. In the panel on the left, choose Content. Then, use either of the following methods:
Method 1: WYSIWYG Mode
1. Tap Show / Hide Editor to work in WYSIWYG mode.
2. Position the cursor in the text where you want the widget to appear.
3. On the editor toolbar, tap Insert Widget.
Method 2: HTMLMode
From the HTMLeditor, tap Insert Widget.
3. When prompted, choose the Widget Type. This example shows how to insert a link to a
product.
CHAPTER 32: Pages Using the Editor
Magento Community Edition 2.0 User Guide 503
4. To use the product name, leave the Anchor Custom Text field empty.
5. Enter a Anchor Custom Title for best SEO practice. (The title isn't visible on the page.)
6. Set Template to one of the following:
lTo incorporate the link into text, select “Product Link Inline Template.”
lTo place the link on a separate line, select “Product Link Block Template.”
7. Tap Select Product, and do the following:
a. In the tree, navigate to the category you want.
b. In the list, choose the linked product.
c. Click Insert Widget to place the link on the page. In the HTML, a markup tag for the link
appears at the top of the page, enclosed in double curly braces.
d. If needed, use Cut (Ctrl + x) and Paste (Ctrl + v) to position the markup tag in the code
where you want the link to appear.
8. Tap Show / Hide Editor to see the link in WYSIWYG mode.
You can continue editing the page, and incorporate other links into the content.
Inserting a Variable
Your store includes many predefined variables that can be incorporated into content pages and
other communications.
To insert a variable on a page:
1. Do one of the following:
lOpen an existing page.
lCreate a new page.
2. In the panel on the left, choose Content. Then from the editor, do one of the following:
lPosition the cursor where you want the variable to appear, and tap Insert Variable.
lIf you prefer to work with the code, click Show / Hide Editor. Position the insertion point in
the text where you want the variable to appear. Then, tap Insert Variable.
3. In the list of available variables, choose the one you want to insert into the page.
4. When complete, tap Save.
Using the Editor CHAPTER 32: Pages
504 Magento Community Edition 2.0 User Guide
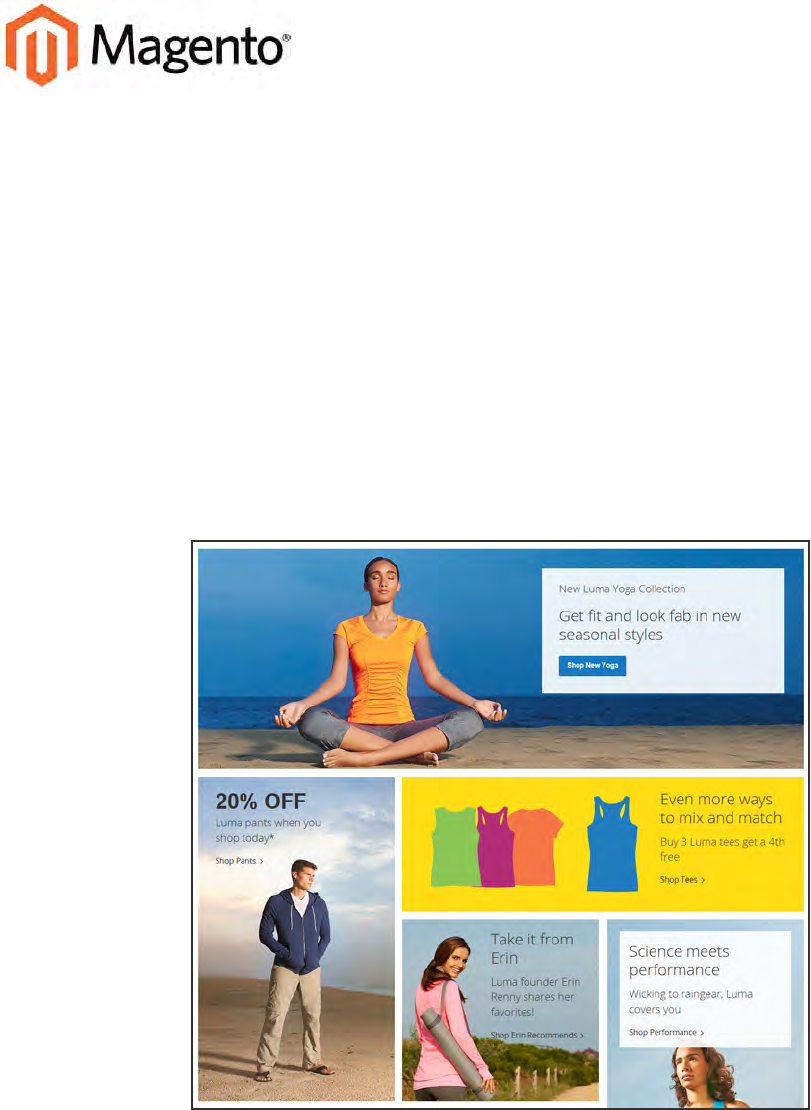
CHAPTER 33:
Content Blocks
A block is a modular unit of content that can be positioned most anywhere on the page.
Content blocks are sometimes referred to as static blocks, or CMSblocks, and can be used
to display fixed information such as text, images, and embedded video, as well as dynamic
information from a widget or that originates in a database or other source. Most elements
on the home page are blocks that can be easily managed.
You can create custom blocks of content without writing any code, and assign them to
appear in a specific place in the page layout. Blocks can also be defined and positioned by
making a layout update in XML code.
Blocks on Home Page
Magento Community Edition 2.0 User Guide 505
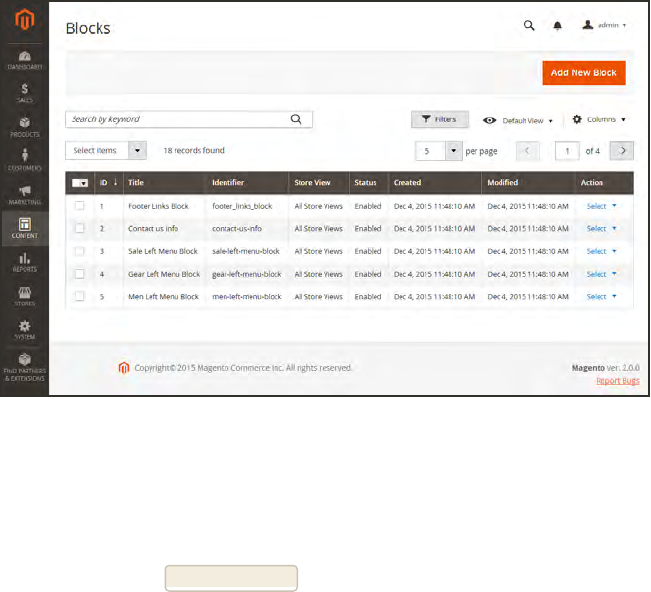
Adding New Blocks
Custom blocks of content can be added to any page, group of pages, or even to another block.
You can place code for a carousel image slider in a block, and then position the block on the
home page.
The Blocks workspace uses the same basic controls as the Pages workspace to help you find
blocks and perform routine maintenance operations.
Blocks Workspace
To create a block:
1. On the Admin sidebar, tap Content. Then under Elements, choose Blocks.
2. In the upper-right corner, tap Add New Block. Then, do the following:
a. Assign a Block Title for internal reference.
b. Assign a unique Identifier to the block. Use all lowercase characters, with underscores
instead of spaces.
c. Choose the Store View(s) where the block will be available.
d. Set Status to “Enabled” to make the block visible in the store.
506 Magento Community Edition 2.0 User Guide
Adding New Blocks CHAPTER 33: Content Blocks
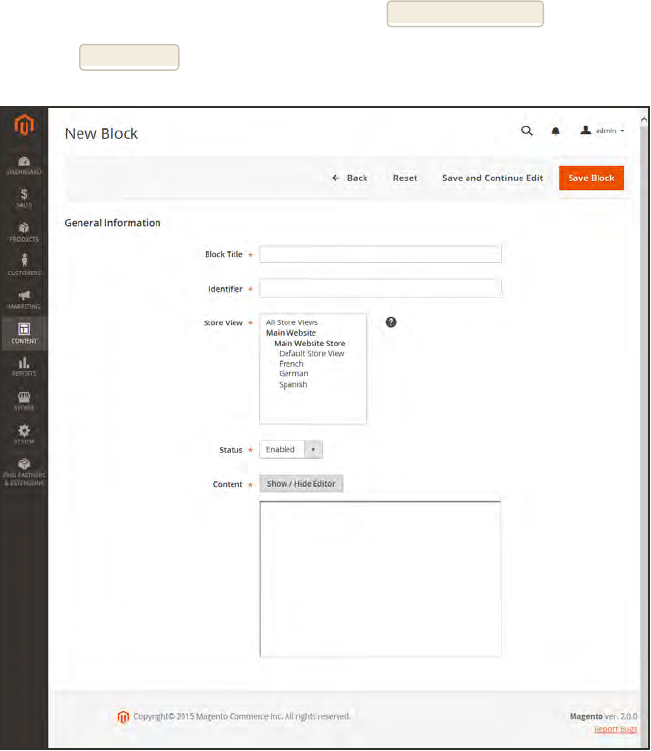
e. Complete the Content of the block
lYou can use the editor to format text, create links and tables, images, video, and audio.
lIf you prefer to work with the HTMLcode, tap Show / Hide Editor.
3. When complete, tap Save Block.
General Information
Magento Community Edition 2.0 User Guide 507
CHAPTER 33: Content Blocks Adding New Blocks
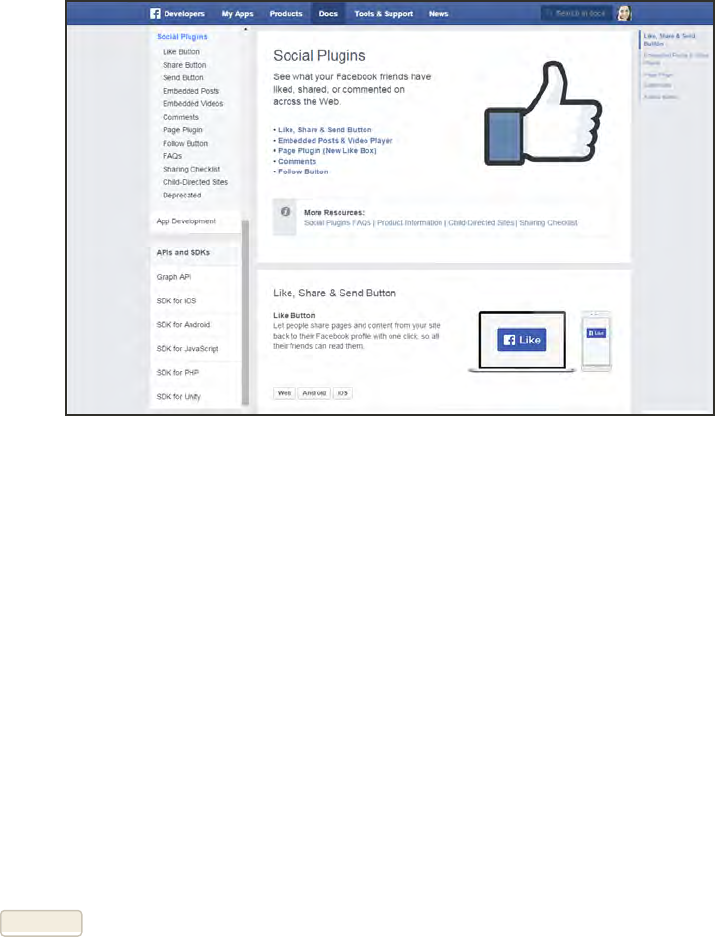
Adding Social Plugins
Social networking sites have a numerous oplugins that can easily be added to your store. In
addition, there are many extensions on Magento Connect that can be used to integrate your
store with social media. The following example shows how to add a Facebook “Like” button to
your store.
Facebook Plugins
Step 1: Get the Button Code
1. On the Facebook website, go to the button setup page.
2. In the URL to Like field, enter the URLof the page in your store that you want people to Like.
For example, you might enter the URLof your store’s home page. Then, do the following:
a. Choose the Layout for the button.
b. Enter the Width in pixels that is available on your site for the button and any associated
text message.
c. Set Action Type to one of the following:
lLike
lRecommend
3. Tap Get Code to copy the generated code to the clipboard.
Adding New Blocks CHAPTER 33: Content Blocks
508 Magento Community Edition 2.0 User Guide
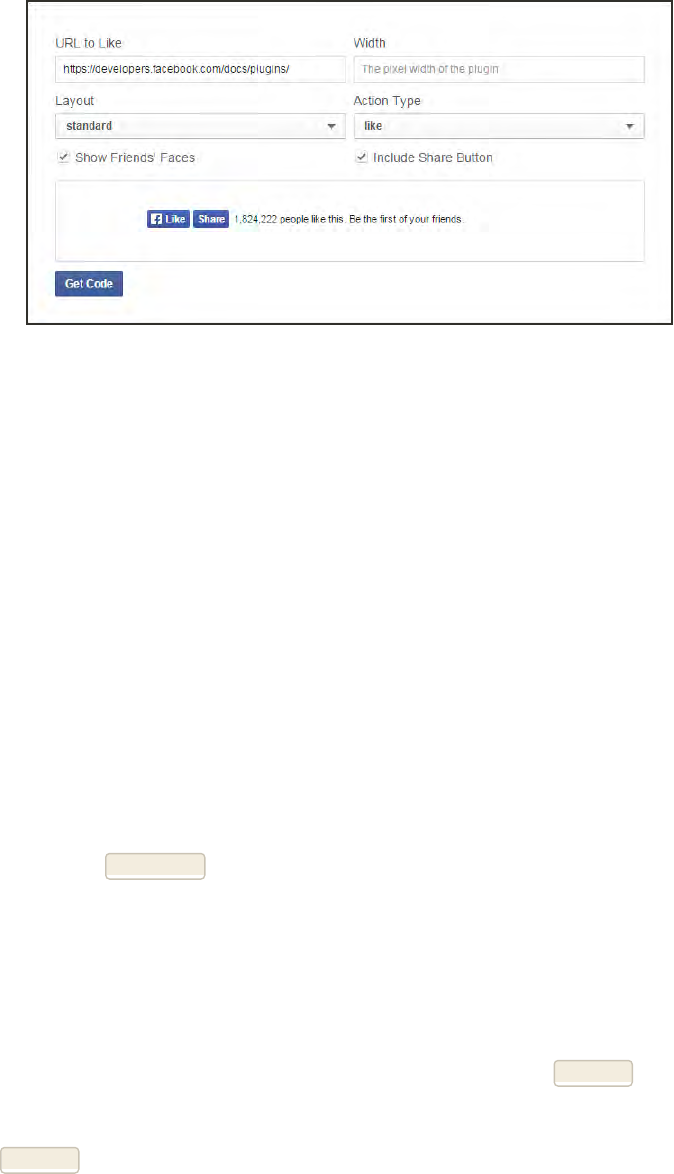
Like Button Setup
Step 2: Create a Content Block
1. Return to your store. On the Admin sidebar, tap Content. Then under Elements, choose
Blocks.
2. In the upper-right corner, click tap Add New Block. Then, do the following:
a. Enter a descriptive Block Title for internal reference. For example: Facebook Like Button.
b. Assign a unique Identifier to the block, using all lowercase characters, and underscores
instead of spaces. For example: facebook_like_button.
c. If your Magento installation has multiple stores or store views, choose Store View(s)
where you want the block to appear.
d. Set Status to “Enabled.”
e. Paste the snippet of code that you copied from the Facebook site into the Content box.
3. When complete, tap Save Block.
Step 3: Place the Block
1. On the Admin sidebar, tap Content. Then under Elements, choose Frontend App.
2. In the upper-right corner, tap Add New Widget. Then, do the following:
a. In the Settings section, set Type to “CMSStatic Block.” Then, tap Continue.
b. Verify that Design Theme is set to the current theme.
c. Tap Continue.
3. In the Storefront Properties section, do the following:
CHAPTER 33: Content Blocks Adding New Blocks
Magento Community Edition 2.0 User Guide 509
a. In the Widget Title field, enter a title for internal reference.
b. Set Assign to Store Views to “All Store Views,” or to the view where the app will be
available. To select more than one, hold the Ctrl key down and select each option.
c. Enter a number in the Sort Order field to determine the order of the block if it assigned to
appear in the same location on the page as other content elements. The top position is
zero.
4. In the Layout Updates section, tap Add Layout Update. Then, do the following:
5. Set Display On to the category, product, or page where you want the block to appear. To place
the block on a specific page, do the following:
a. Set Pageto where you want the block to appear.
For example, if you choose “All Pages,” and position the block in either the header or
footer, the block will appear in the same place on every page of the store.
b. Choose the Block Reference to identify the place on the page where the block is to be
placed.
c. Accept the default setting for Template, which is set to "CMS Static Block Default
Template."
d. Tap Save and Continue Edit.
6. In the panel on the left, choose Widget Options.
7. Tap Select Block…. Then in the list, choose the block that you want to place.
8. When complete, tap Save.
9. When prompted, follow the instructions at the top of the workspace to update the index and
page cache.
The app now appears in the list.
Step 4: Verify the Location in Your Store
Return to your storefront to verify that the block is in the correct location. To move the block,
you can reopen the widget try a different page or block reference.
Adding New Blocks CHAPTER 33: Content Blocks
510 Magento Community Edition 2.0 User Guide
Adding a Lightbox or Slider
There is a wide assortment of jQuery-based image lightboxes and sliders available on Magento
Connect, and many are free. To add a lightbox or slider to your store, download the extension
from Magento Connect, and follow the instructions from the developer.
CHAPTER 33: Content Blocks Adding New Blocks
Magento Community Edition 2.0 User Guide 511
Positioning Blocks
The code that controls the page layout and placement of blocks is written in XML Widgets
make it easy to position a block at a specific place on the page, and even for a specific product
or category without writing any code. You can select each option from a list, rather than trying
to remember all of the possible combinations.
The following list shows the locations by page type where blocks are typically placed. To learn
more about how areas on the page are defined, see:Standard Page Layouts.
Category and CMS Pages
BLOCK REFERENCE POSITION
Breadcrumbs The navigation aid at the top of many pages that shows your current
location as a link. Any additional content placed in the Breadcrumbs
reference floats to the right of the breadcrumbs, if displayed.
Left Column Content is added to the left column.
Main Content Area Content is added to the main content area.
My Cart Extra Actions Content appears below the Cart Subtotal in the My Cart popup
located within the top link.
Navigation Bar Content appears below the main navigation bar.
Page Bottom Content appears at the bottom of the page.
Page Footer Content appears above the footer of the page.
Page Header Content appears below the header of the page.
Page Top Content appears at the top of the page.
Right Column Content appears in the right column.
Store Language Content appears in the upper-left corner of the header.
Positioning Blocks CHAPTER 33: Content Blocks
512 Magento Community Edition 2.0 User Guide

Product Page
BLOCK REFERENCE POSITION
Alert URLs Content appears below the title of the product on the product detail
page.
Bottom Block Options
Wrapper
If custom options are added, content appears below the Add to Cart
button.
Breadcrumbs Content appears to the right of breadcrumbs—the navigation aid that
provides links as a path—that’s showcased below the navigation
bar.
Info Column Options
Wrapper
If a custom options are added, content appears to the right. The
same location applies to configurable options.
Left Column Content appears below the left column blocks.
Main Content Area Content appears below the main content area.
My Cart Extra Actions Content appears below the Cart Subtotal in the My Cart popup
located within the top link.
Navigation Bar Content appears below the main navigation bar.
Page Bottom Content appears at the bottom of the page.
Page Footer Content appears above the footer of the page.
Page Header Content appears below the header of the page.
Page Top Content appears at the top of the page.
PayPal Express Checkout
(Payflow Edition) Shortcut
Wrapper
If the PayPal payment method is enabled, content appears below the
PayPal buy button.
PayPal Express Checkout
Shortcut Wrapper
If the PayPal payment method is enabled, content appears below the
PayPal buy button.
Product Tags List Content appears below the products tag bar.
Product View Extra Hint Content appears below the main top price of the product.
CHAPTER 33: Content Blocks Positioning Blocks
Magento Community Edition 2.0 User Guide 513

BLOCK REFERENCE POSITION
Right Column Content appears below the right column blocks.
Store Language Content appears to the right of the language chooser.
Tags List Before Content appears above the Add Your Tags field.
Positioning Blocks CHAPTER 33: Content Blocks
514 Magento Community Edition 2.0 User Guide
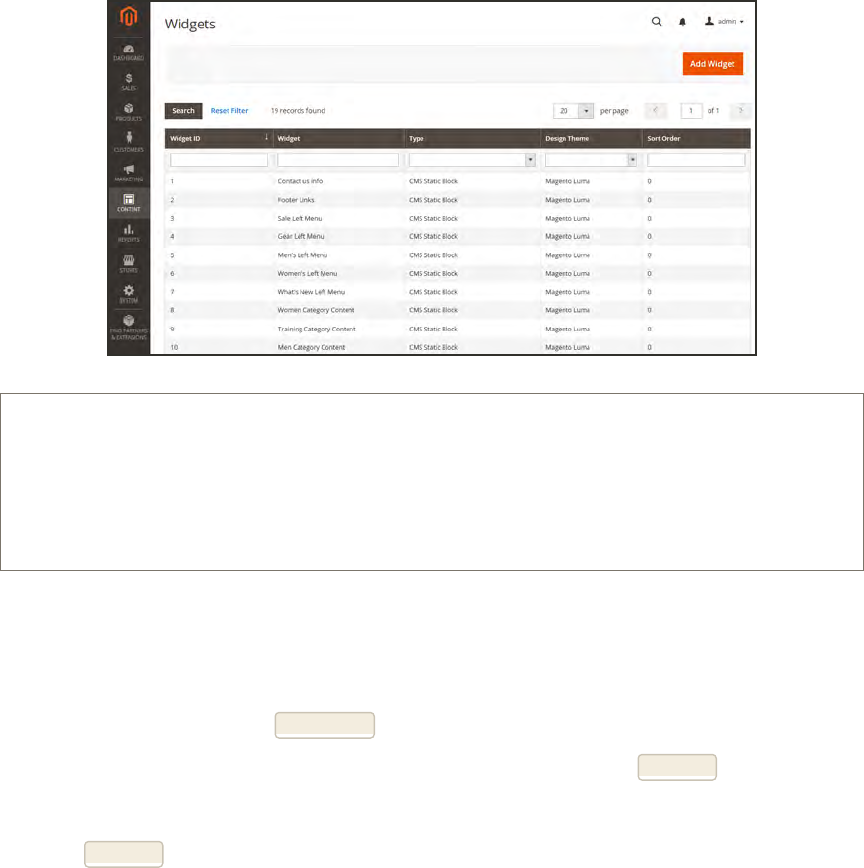
Using a Widget
The CMS Static Block widget gives you the ability to place an existing content block most
anywhere in your store.
Process Overview:
Step 1: Choose the Type
Step 2: Complete the Layout Updates
Step 3: Place the Block
Step 1: Choose the Type
1. On the Admin sidebar, tap Content. Then under Elements, choose Widgets.
2. In the upper-right corner, tap Add Widget. Then do the following:
a. In the Settings section, set Type to “CMSStatic Block.” Then, tap Continue.
b. Verify that Design Theme is set to the current theme.
c. Tap Continue.
CHAPTER 33: Content Blocks Positioning Blocks
Magento Community Edition 2.0 User Guide 515
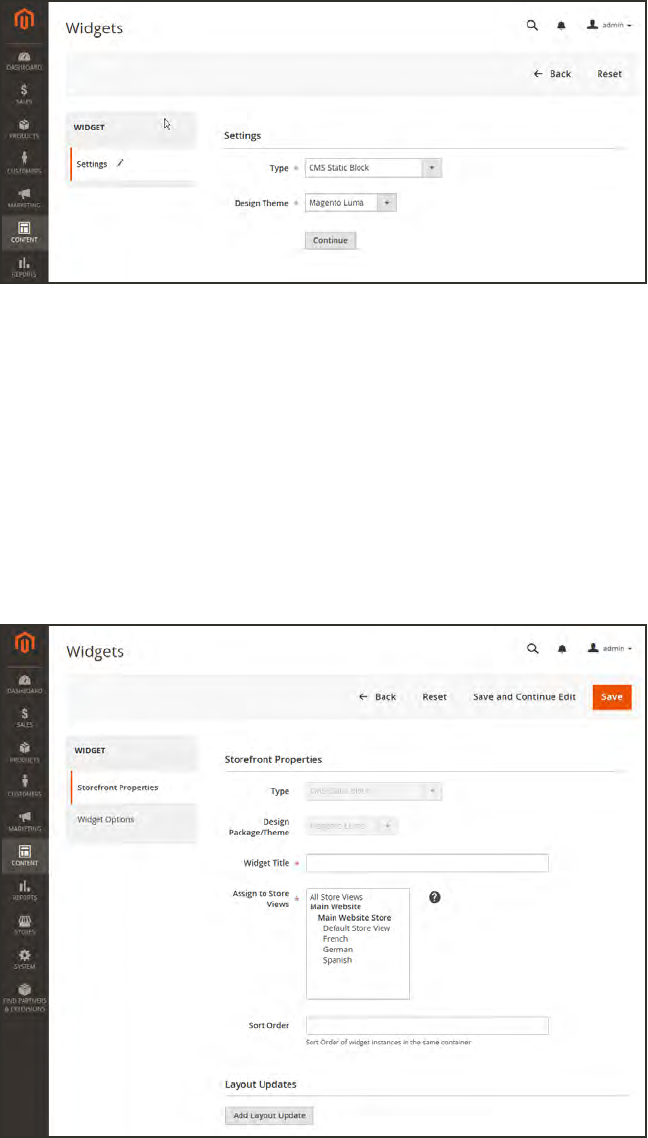
Settings
3. In the Storefront Properties section, do the following:
a. In the Widget Title field, enter a descriptive title for internal reference.
b. Set Assign to Store Views to “All Store Views,” or to the view where the app will be
available. To select more than one, hold the Ctrl key down and select each option.
c. Enter a number in the Sort Order field to determine the order of the block if it assigned to
appear in the same location on the page as other content elements. The top position is
zero.
Storefront Properties
Positioning Blocks CHAPTER 33: Content Blocks
516 Magento Community Edition 2.0 User Guide
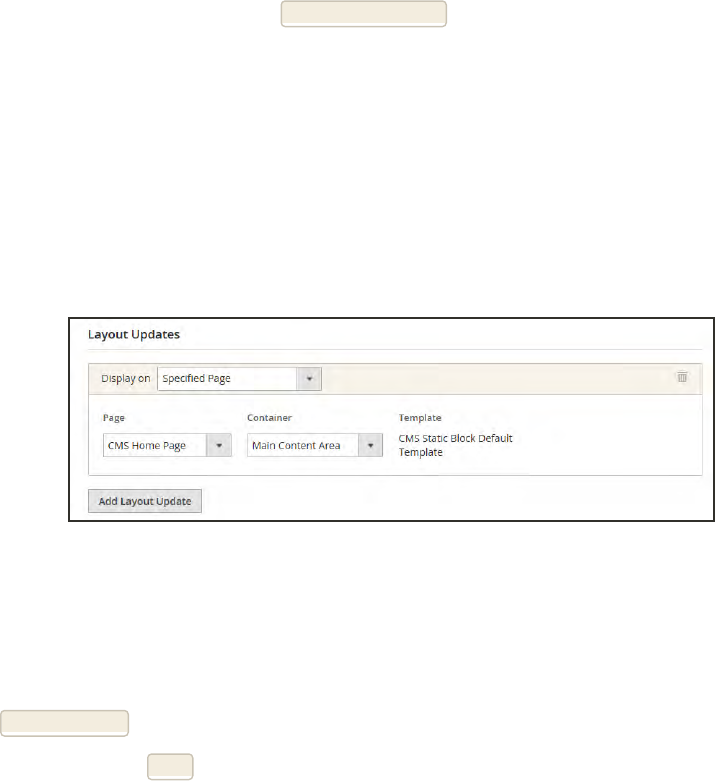
Step 2: Complete the Layout Updates
1. In the Layout Updates section, tap Add Layout Update. Then, do the following:
2. Set Display On to the category, product, or page where you want the block to appear. To place
the block on a specific page, do the following:
a. Choose the Page where you want the block to appear.
b. Choose the Block Reference that identifies the place on the page where the block is to be
placed.
c. Accept the default setting for Template, which is set to "CMS Static Block Default
Template."
Layout Updates
Step 3: Place the Block
1. In the panel on the left, select Widget Options.
2. Tap Select Block…. Then in the list, choose the block that you want to place.
3. When complete, tap Save.
The app now appears in the list.
4. When prompted, follow the instructions at the top of the workspace to update the index and
page cache.
5. Return to your storefront to verify that the block appears in the correct location. To move the
block, you can reopen the frontend app try a different page or block reference.
CHAPTER 33: Content Blocks Positioning Blocks
Magento Community Edition 2.0 User Guide 517
Using a Layout Update
Blocks can be placed in the left or right sidebar of a specific page by making a layout update to
the XML code. With a few simple changes to the code, you can position the block in either
sidebar, and control its position in relation to other blocks.
The term callout1is sometimes used to refer to a block that is defined as a layout update with
XMLcode. The term sidebar2refers to the left or right columns of the page layout. When
entering layout update code, make sure to follow the syntax exactly as shown in the example.
To place a block in the sidebar, the page must have a two-or three-column layout. To learn more,
see: Page Layout.
To place a block in the sidebar of a page:
1. On the Admin sidebar, tap Content. Then under Elements, choose Blocks.
2. In the grid, find the block you want to place, and take note of its Identifier. Make sure that you
have the correct spelling.
3. On the Admin sidebar, tap Content. Then under Elements, choose Pages.
4. Find the page where you want to place the block, and open the page in edit mode.
5. In the panel on the left, choose Design. Then, do the following:
a. In the Layout Update XML box, enter the code for the right or left sidebar.
<reference name="right">
<block type="cms/block" name="right.permanent.callout">
<action method="setBlockId"><block_id>your-block-id</block_
id></action>
</block>
</reference>
Code for CMS Block in Sidebar
b. Change the reference name to identify either the “right” or “left” column, according to the
layout of the page.
c. Change the block_id to the identifier of the block that is being placed.
6. When complete, tap Save Page.
1A term that is sometimes used to describe a block that is defined as a layout update using XML code.
2The right or left column of a two-column page layout.
Positioning Blocks CHAPTER 33: Content Blocks
518 Magento Community Edition 2.0 User Guide

CHAPTER 34:
Widgets
A widget is a snippet of code that makes it possible to display a wide range of content and
place it at specific block references in your store. Many display real-time, dynamic data
and create opportunities for your customers to interact with your store. The Widget tool
makes it easy to place existing content such as blocks with images and text, and
interactive elements most anywhere in your store.
You can use widgets to create landing pages for marketing campaigns, display
promotional content at specific locations throughout the store. Widgets can also be used to
add interactive elements and action blocks for external review systems, video chats, voting,
and subscription forms, or to provide navigation elements for tag clouds and image
sliders.
Magento Community Edition 2.0 User Guide 519

Widget Types
TYPE DESCRIPTION
CMS Page Link Displays a link to a selected page. Allows you to specify custom text
and title. When the link is complete, it can be used in content pages
and blocks.
CMS Static Block Displays a block of content at a specific location on a page.
Catalog Category Link Displays either an inline or block-style link to a selected catalog
category. When the link is complete, it can be used in content pages
and blocks.
Catalog New Products List Displays a block of products which have been designated as new, for
the duration of time specified in the product record.
Catalog Product Link Displays either an inline or block-style link to a selected catalog
product. When the link is complete, it can be used in content pages
and blocks.
Catalog Products List Displays a list of products from the catalog.
Orders and Returns Gives customers the ability to submit their own requests for returned
merchandise authorization.
Recently Compared
Products
Displays the block of recently compared products. You can specify
the number of products included, and format them as a list or product
grid.
Recently Viewed Products Displays the block of recently viewed products. You can specify the
number of products included, and format them as a list or product
grid.
Widgets
Widget Types CHAPTER 34: Widgets
520 Magento Community Edition 2.0 User Guide
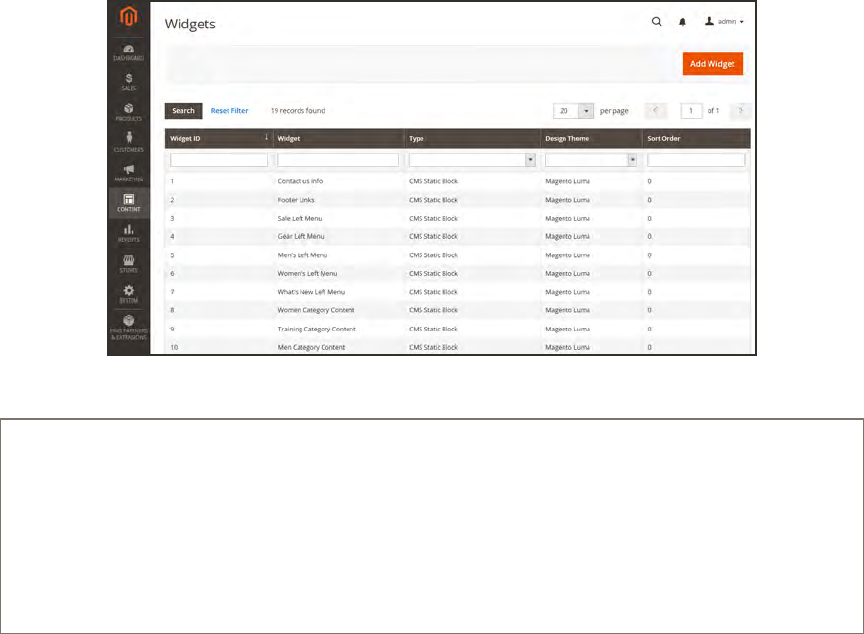
Creating a Widget
The process of creating a widget is nearly the same for each type. You can follow the first part
of the instructions, and then complete the last part for the specific type of widget.
Widgets
Process Overview:
Step 1: Choose the Type
Step 2: Specify Where It Goes
Step 3: Complete the Options
Step 4: Check It Out!
CHAPTER 34: Widgets Creating a Widget
Magento Community Edition 2.0 User Guide 521

Step 1: Choose the Type
1. On the Admin sidebar, tap Content. Then under Elements, choose Widgets.
2. Tap Add Widget. Then, do the following;
a. In the Settings section, set Type to the type of widget that you want to create. ”Then, tap
Continue.
b. Verify that Design Theme is set to the current theme.
3. Tap Continue.
Widget Settings
Creating a Widget CHAPTER 34: Widgets
522 Magento Community Edition 2.0 User Guide
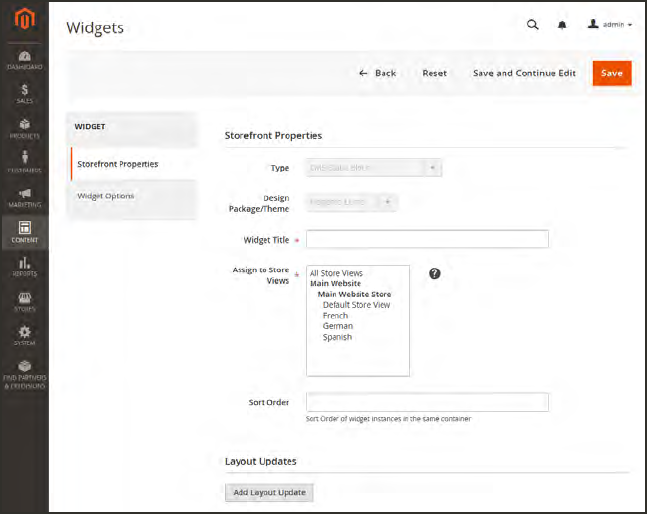
4. Under Storefront Properties, do the following:
a. In the Widget Title field, enter a descriptive title for internal reference only.
b. Set Assign to Store Views to “All Store Views,” or to the view where the app will be
available. To select more than one, hold the Ctrl key down and select each option.
c. Enter a number in the Sort Order field to determine the order of the block if it appears in
the same location as other content elements. The top position is zero.
Storefront Properties
CHAPTER 34: Widgets Creating a Widget
Magento Community Edition 2.0 User Guide 523
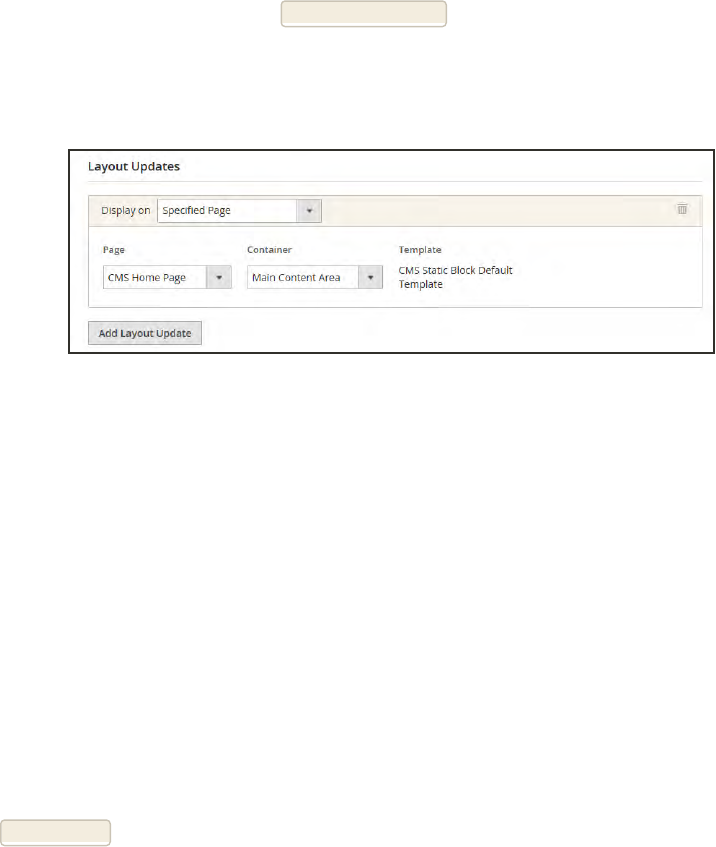
Step 2: Specify Where It Goes
1. In the Layout Updates section, tap Add Layout Update.
2. Set Display On to the type of page where it is to appear.
3. In the Block Reference list, choose the area of the page layout where it is to be placed.
Layout Updates
4. If the widget is a link, set Template to one of the following:
Block Template Formats the content so it can be placed as standalone unit on
the page.
Inline Template Formats the content so it can be placed inside other content. For
example, a link that goes inside a paragraph of text.
Step 3: Complete the Options
The options for each widget type vary slightly, but the process is essentially the same. The
following example displays the product list for a specific category, with pagination controls.
1. In the panel on the left, choose Widget Options.
2. Tap Select Block.
3. Enter a Title to appear above the list. For example, “Featured Products.”
4. For pagination controls, set Display Page Control to “Yes.” Then, do the following:
a. Enter the Number of Products per Page.
b. Enter the total Number of Products to Display.
c. Set Condition to the category of products to be featured. The process is the same as
setting a condition for a price rule.
Creating a Widget CHAPTER 34: Widgets
524 Magento Community Edition 2.0 User Guide
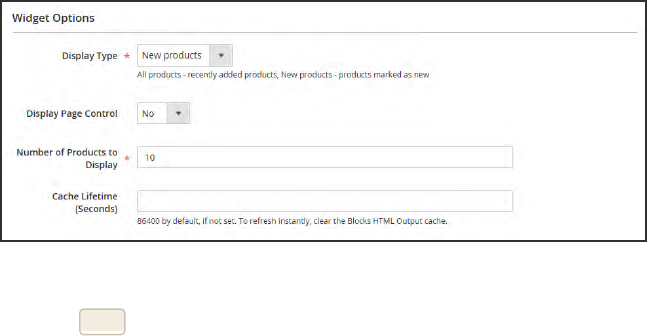
Widget Options
5. When complete, tap Save.
6. When prompted, follow the instructions at the top of the workspace to update the cache, as
needed.
Step 4: Check It Out!
Return to your storefront to verify that the widget is working correctly. To move it to a different
location, you can reopen the widget and try a different page or block reference.
CHAPTER 34: Widgets Creating a Widget
Magento Community Edition 2.0 User Guide 525
New Products List
The list of new products is an example of dynamic content, and consists of live data that is
pulled from your product catalog. By default, the “New Products” list includes the first eight of
the most recently added products. However, it can also be configured to include only products
within a specified date range.
Process Overview:
Step 1: Set the Date Range for Each Product
Step 2: Create the Widget
Step 3: Choose the Location
Step 4: Configure the List
Step 5: Preview Your Work
Step 1: Set the Date Range for Each Product
To make a product appear in the list by date range, the “New From” dates must be entered in
the product. The product then appears in the New Products list during the date range
specified.
1. On the Admin sidebar, tap Products. Then under Inventory, choose Catalog.
2. Find each product that you want to feature, and open in edit mode. Then, do the following:
a. In the Set Product as New From Date field, tap the calendar . Then, choose the first
date that you want the product to be featured.
b. In the Set Product as New To Date field, tap the calendar . Then, choose the last date
that you want the product to be featured.
3. When complete, tap Save.
4. When you are prompted to reindex and refresh the page cache, click the links at the top of the
workspace, and follow the instructions.
The products now appear in the New Products list during the specified date range.
Creating a Widget CHAPTER 34: Widgets
526 Magento Community Edition 2.0 User Guide
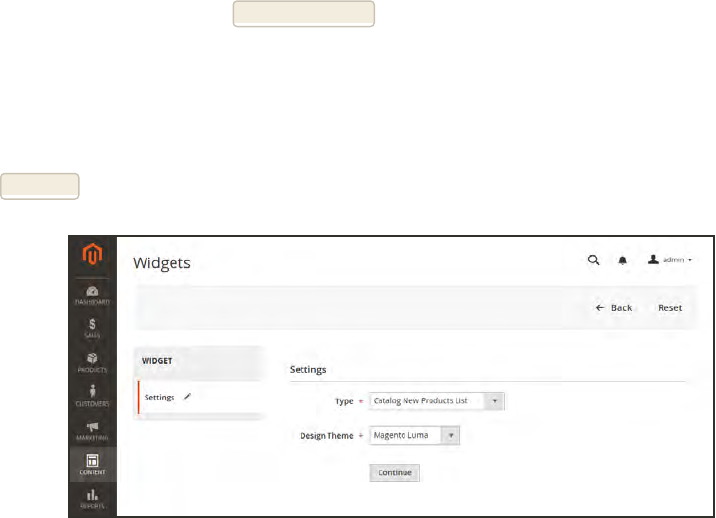
Step 2: Create the Widget
The code that determines the content of the New Products list and its placement in your store
is generated by the Widget tool.
1. On the Admin sidebar, tap Content. Then under Elements, choose Widgets.
2. In the upper-right corner, tap Add New Widget.
3. In the Settings section, do the following:
a. Set Type to “Catalog New Products List.”
b. Choose the Design Theme that is used by the store.
4. Tap Continue.
Widget Type
5. In the Storefront Properties section, complete the following fields:
Widget Title Enter a descriptive title for your widget. This title is visible only
from the Admin.
Assign to Store Views Select the store views where the widget will be visible. You can
select a specific store view, or "All Store Views."
Sort Order (Optional) Enter a number to determine the order this items
appears with others in the same part of the page. (0 = first, 1 =
second, 3= third, and so on.)
CHAPTER 34: Widgets Creating a Widget
Magento Community Edition 2.0 User Guide 527
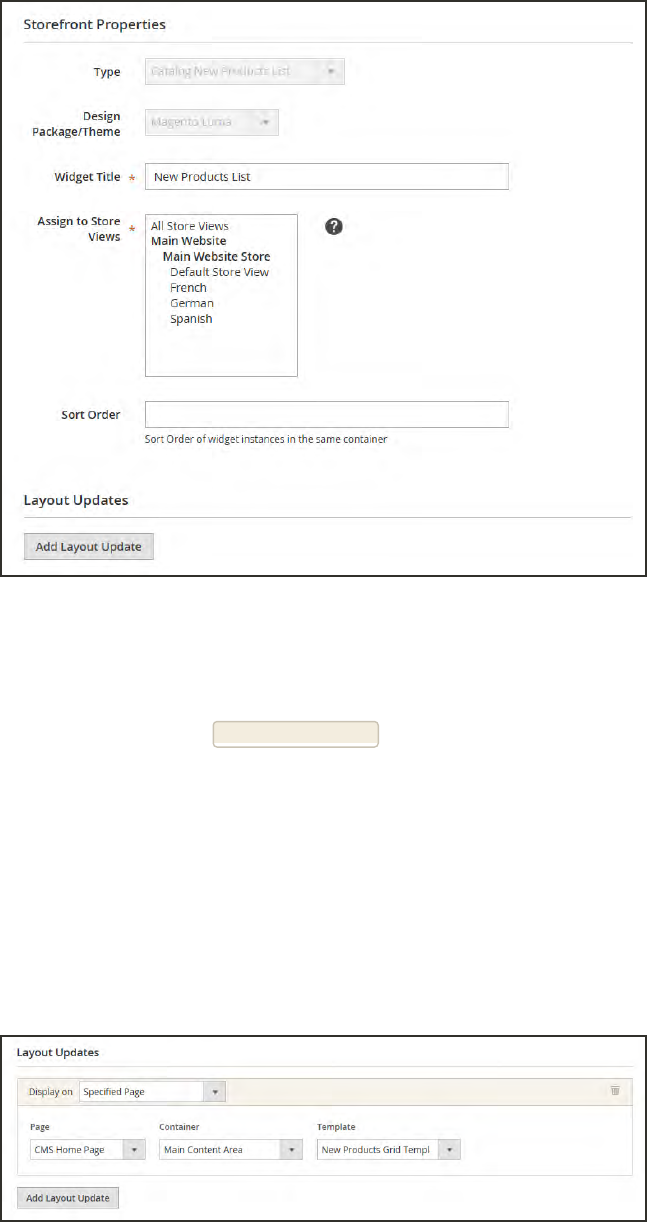
Storefront Properties
Step 3: Choose the Location
1. In the Layout Updates section, tap Add Layout Update. Then, do the following:
a. Set Display On to “Specified Page.”
b. Set Page to “CMS Home Page.”
c. Set Block Reference to “Main Content Area.”
d. Set Template to one of the following:
lNew Product List Templates
lNew Products Grid Template
Layout Updates
Creating a Widget CHAPTER 34: Widgets
528 Magento Community Edition 2.0 User Guide
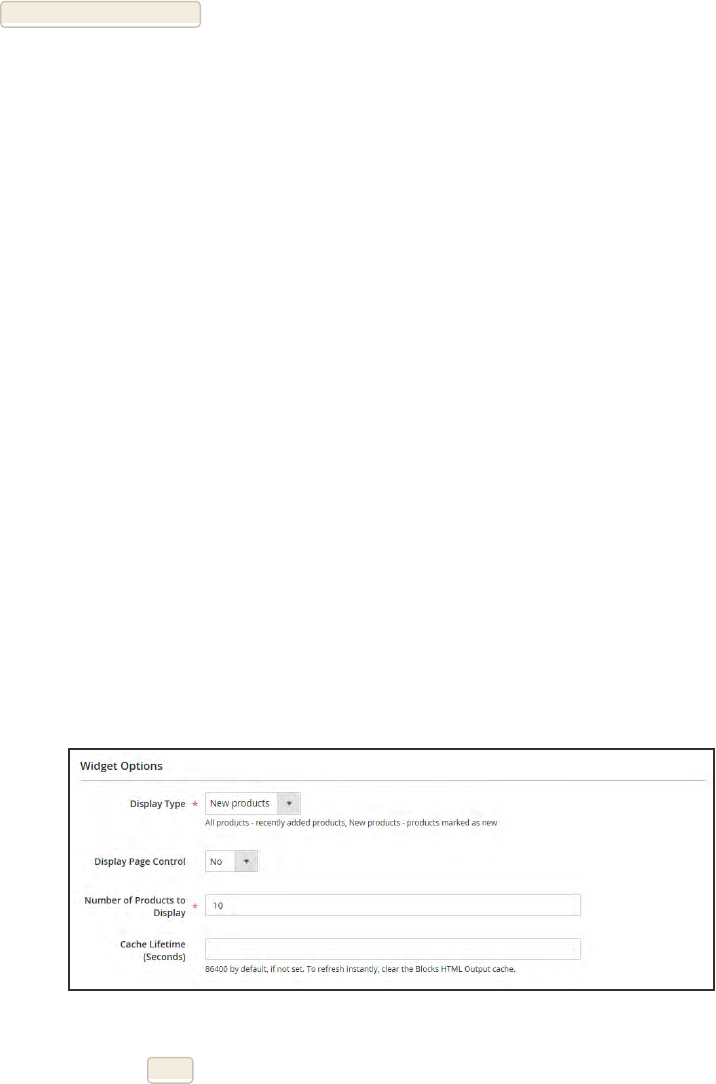
2. Tap Save and Continue Edit.
Step 4: Configure the List
1. In the panel on the left, choose Widget Options. Then, do the following:
2. Set Display Products to one of the following:
All Products Lists products in sequence, starting with those most recently
added.
New Products Lists only the products which are identified as “New.” A product
is considered to be new during the date range specified in the
“Set Product As New From” date and “Set Product As New To”
date. fields of the product. The list will be blank if the date range
expires and no additional products have been set as "New."
3. Complete the remaining information as follows:
a. To provide navigation control for lists with multiple pages, set Display Page Control to
“Yes.” Then, in the Number of Products per Page field, enter the number of products you
want to appear on each page.
b. Set Number of Products to Display to the number of new products you want to include in
the list. The default setting is 10.
c. In the Cache Lifetime (Seconds) field, select how often you want to refresh the list of new
products. By default, the cache is set to 86400 seconds, or 24 hours.
Widget Options
4. When complete, tap Save.
5. When prompted to refresh the cache, click the link in the message at the top of the workspace,
and follow the instructions.
CHAPTER 34: Widgets Creating a Widget
Magento Community Edition 2.0 User Guide 529
Step 5: Preview Your Work
1. On the Admin sidebar, tap Content. Then under Elements, choose Pages.
2. Find the page in the grid where the New Products list is to appear. Then, in the Action
column, click the Preview link.
Creating a Widget CHAPTER 34: Widgets
530 Magento Community Edition 2.0 User Guide

Design & Theme
Your store's theme is like a window dressing that
can be changed for a season or promotion. In this
section, you will learn about page layouts, how to
make simple HTMLchanges, and apply a new
theme to your store.
Magento Community Edition 2.0 User Guide 531

Contents Design Menu
Page Setup
HTML Head
Header
Footer
Page Layout
Standard Page Layouts
Storefront Examples
Layout Updates
Standard Block Layout
Layout Update Examples
Layout Update Syntax
Controlling Block Order
XMLLoad Syntax
Themes
Using the Default Theme
Installing a New Theme
Theme Assets
Scheduling Design Changes
532 Magento Community Edition 2.0 User Guide
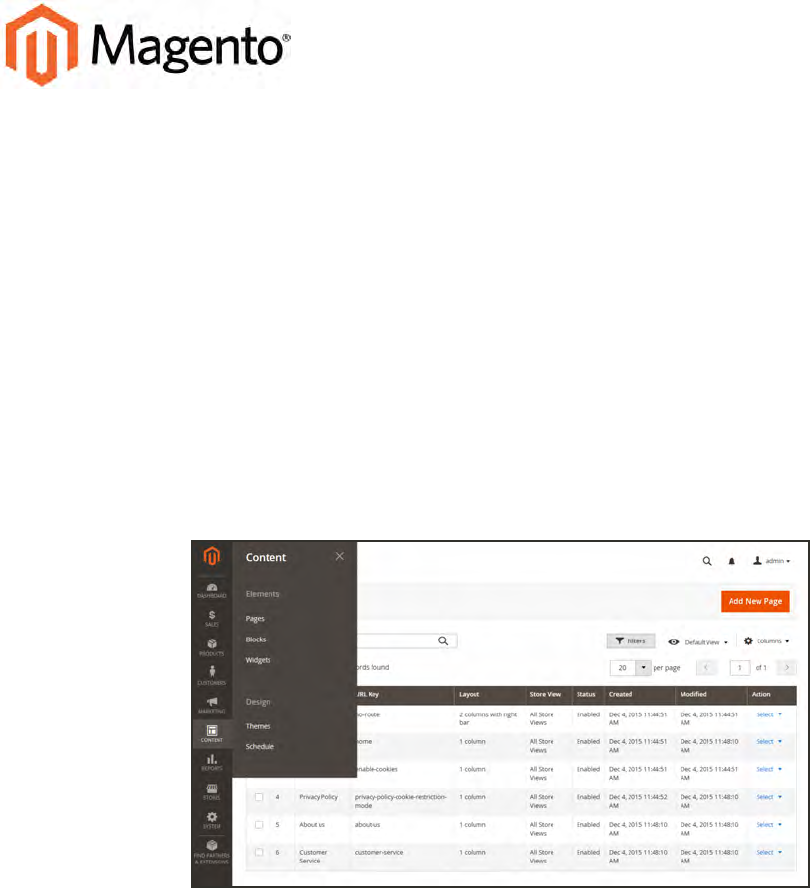
CHAPTER 35:
Design Menu
Magento provides a variety of easy-to-use design options that you can use to make simple
changes to your store. In addition, you will find many professionally designed themes
available on Magento Connect. Like the window dressing of your store, you can change the
theme for the season or for a promotion.
More advanced users will appreciate the flexibility of working with Magento’s object-
oriented environment that assembles pages from separate components. After you
understand the basics, you’ll appreciate working in such a flexible and fluid environment.
To learn more, see the Magento Design’s Guide.
Design Menu
Magento Community Edition 2.0 User Guide 533
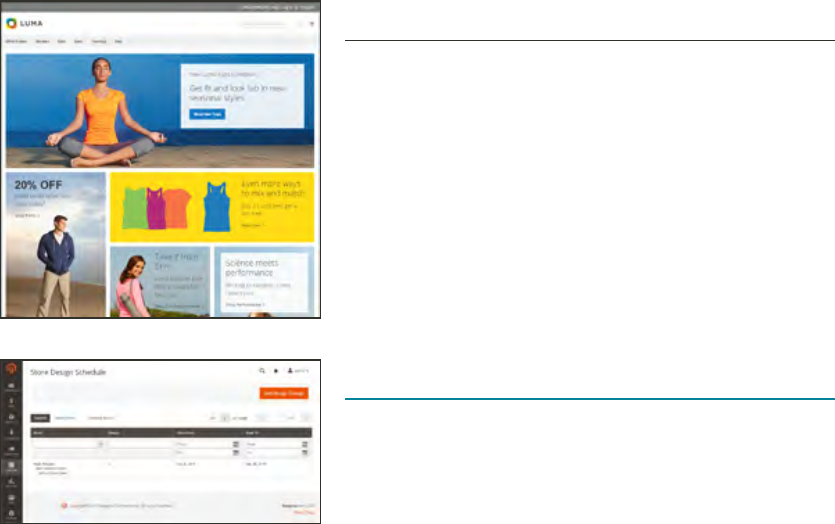
Menu Options
Themes
The theme determines the visual presentation of your
store, and consists of a collection of layout files,
template files, translation files, and skins.
Schedule
Themes can be activated for a period of time,
according to a schedule. Use the schedule to plan
theme changes in advance for a season or promotion.
534 Magento Community Edition 2.0 User Guide
CHAPTER 35: Design Menu
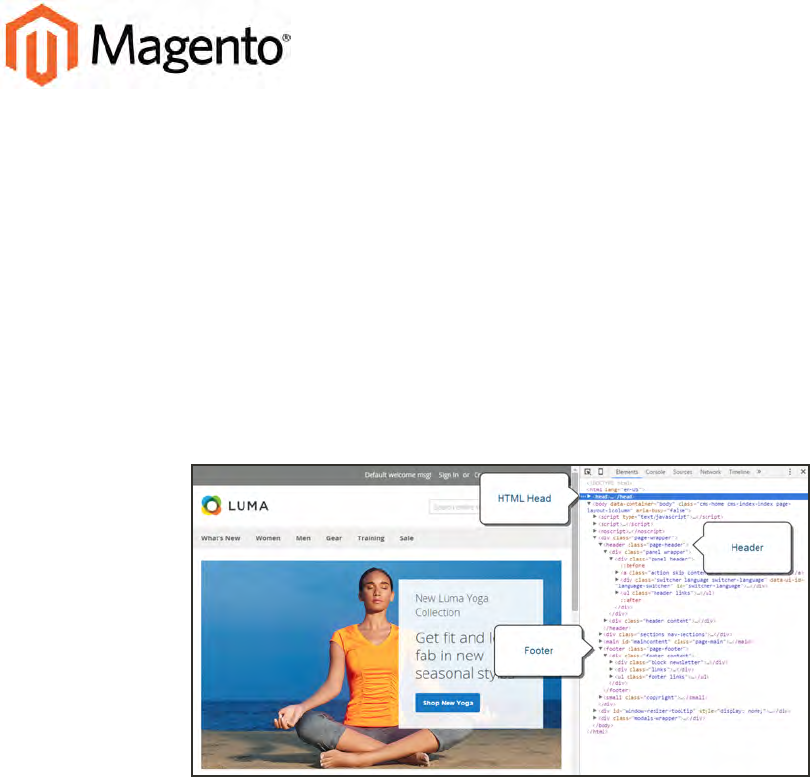
CHAPTER 36:
Page Setup
The main sections of the page are controlled, in part, by a set of standard HTML tags.
Some of these tags can be used determine the selection of fonts, color, size, background
colors, and images that are used in each section of the page. Other settings control page
elements such as the logo in the header, and the copyright notice in the footer. The Page
Setup sections correspond to the underlying structure of the HTMLpage, and many of the
basic properties can be set from the Admin.
HTML Page Sections
Magento Community Edition 2.0 User Guide 535
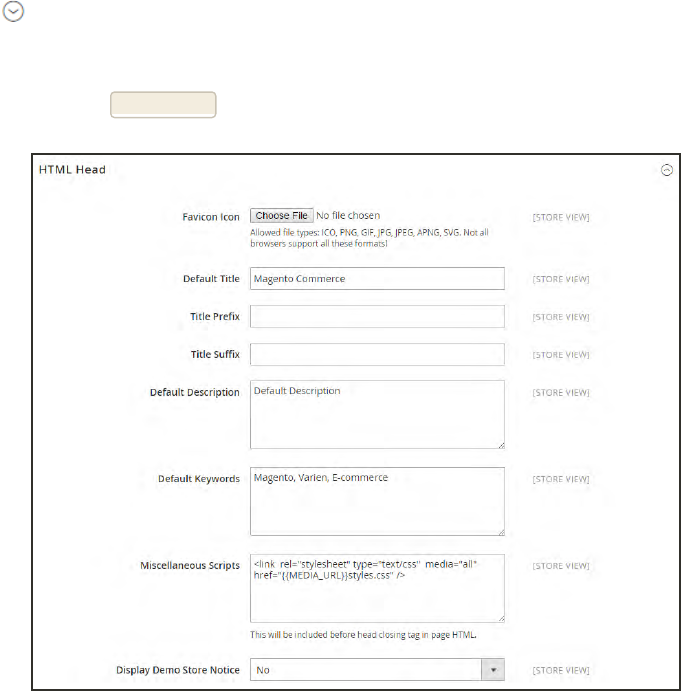
HTML Head
The settings in the HTMLHead section correspond to the <head> tag of an HTMLpage, and
can be configured for each store view. In addition to meta data for the page title, description,
and keywords, the section includes a link to the favicon, and miscellaneous scripts.
Instructions for search engine robots and the display of the store demo notice are also
configured in this section.
To configure the HTML Head:
1. On the Admin sidebar, tap Stores. Then under Settings, choose Configuration.
2. In the panel on the left under General, choose Design.
3. If you have multiple stores or views, set the Store View in the upper-left corner to the store
view where the configuration applies. (When configuring a specific store view, you must clear
the Use Default checkbox after each field so new values can be entered.)
4. Expand the HTMLHead section.
5. Update the fields as needed. (See the Configuration Reference for a description of each field,)
6. When complete, tap Save Config.
HTML Head
HTML Head CHAPTER 36: Page Setup
536 Magento Community Edition 2.0 User Guide
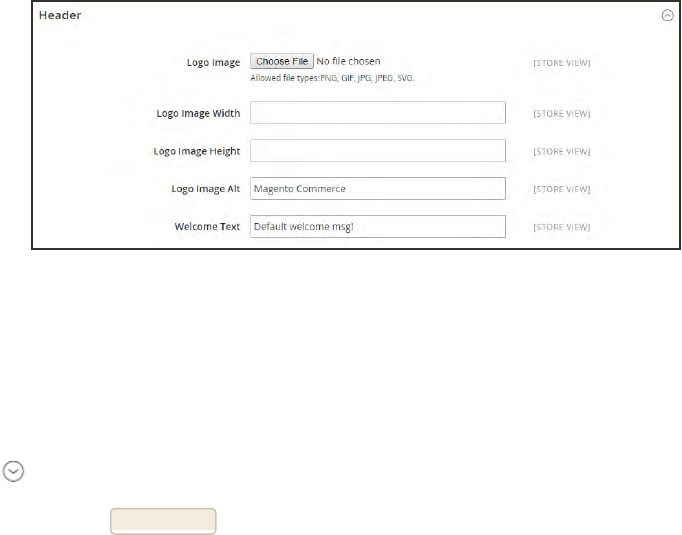
Header
The Header section identifies the path to your store logo, and specifies the logo alt text and
welcome message.
Header
To configure the header:
1. On the Admin sidebar, tap Stores. Then under Settings, choose Configuration.
2. In the panel on the left, under General, choose Design.
3. Expand the Header section. Then, make any changes necessary.
4. When complete, tap Save Config.
CHAPTER 36: Page Setup Header
Magento Community Edition 2.0 User Guide 537
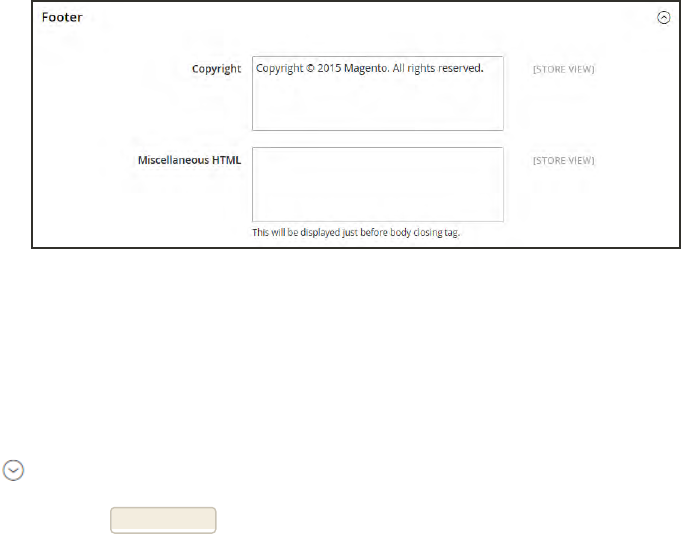
Footer
The Footer configuration section is where you can update the copyright notice that appears at
the bottom of the page, and enter miscellaneous scripts that must be positioned before the
closing <body> tag..
Footer
To configure the footer:
1. On the Admin sidebar, tap Stores. Then under Settings, choose Configuration.
2. In the panel on the left, under General, choose Design.
3. Expand the Footer section. Then, make any changes necessary.
4. When complete, tap Save Config.
Footer CHAPTER 36: Page Setup
538 Magento Community Edition 2.0 User Guide

CHAPTER 37:
Page Layout
The layout of each page in your store consists of distinct sections, or containers, that
define the header, footer, and content areas of the page. Depending on the layout, each
page might have one, two, three columns, or more. You can think of the layout as the
“floor plan” of the page.
Content blocks float to fill the available space, according to the section of the page layout
where they are assigned to appear. You will discover that if you change the layout from a
three-column to a two-column layout, the content of the main area expands to fill the
available space, and any blocks that are associated with the unused side bar seem to
disappear. However, if you restore the three-column layout, the blocks reappear. This fluid
approach, or liquid layout, makes it possible to change the page layout without having to
rework the content. If you are used to working with individual HTML pages, you will
discover that this modular, “building block” approach requires a different way of thinking.
Magento Community Edition 2.0 User Guide 539
Standard Page Layouts
1 Column
The “1 Column” layout can be used to create a
dramatic home page with a large image or focal point.
It’s also a good choice for a landing page, or any other
page that has a combination of text, images, and
video.
2 Columns with Left Bar
The “2 Columns with Left Bar” layout is often used for
pages with navigation on the left, such as a catalog or
search results pages with layered navigation. It is also
an excellent choice for home pages that need
additional navigation or blocks of supporting content
on the left.
2 Columns with Right Bar
With a “2 Columns with Right Bar” layout, the main
content area is large enough for an eye-catching
image or banner. This layout is also often used for
Product pages with blocks of supporting content on
the right.
Standard Page Layouts CHAPTER 37: Page Layout
540 Magento Community Edition 2.0 User Guide
3 Columns
The “3 Column” layout has a center column that is
wide enough for the main text of the page, with room
on each side for additional navigation and blocks of
supporting content.
Empty
The “Empty” layout can be used to define custom
page layouts. To learn more, see the Magento
Designer’s Guide.
CHAPTER 37: Page Layout Standard Page Layouts
Magento Community Edition 2.0 User Guide 541
Storefront Examples
The column dimensions are determined by style sheet of the theme. Some themes apply a fixed
pixel width to the page layout, while others use percentages to make the page respond to the
width of the window or device.
Most desktop themes have a fixed width for the main column, and all activity takes place
within this enclosed area. Depending on your screen resolution, there is empty space on each
side of the main column.
1 Column Layout
The content area of a “1 Column” layout spans the full-width of the main column. This layout
is often used for a home page with a large banner or slider, or pages that require no navigation,
such as a login page, splash page, video, or full-page advertisement.
1 Column Layout
Storefront Examples CHAPTER 37: Page Layout
542 Magento Community Edition 2.0 User Guide
2 Columns with Left Bar
The content area of this layout is divided into two columns. The main content column floats to
the right, and the side bar floats to the left.
2 Columns Left Bar
2 Columns with Right Bar
This layout is a mirror image of the other two-column layout. This time, the side bar floats to
the right, and the main content column floats to the left.
CHAPTER 37: Page Layout Storefront Examples
Magento Community Edition 2.0 User Guide 543
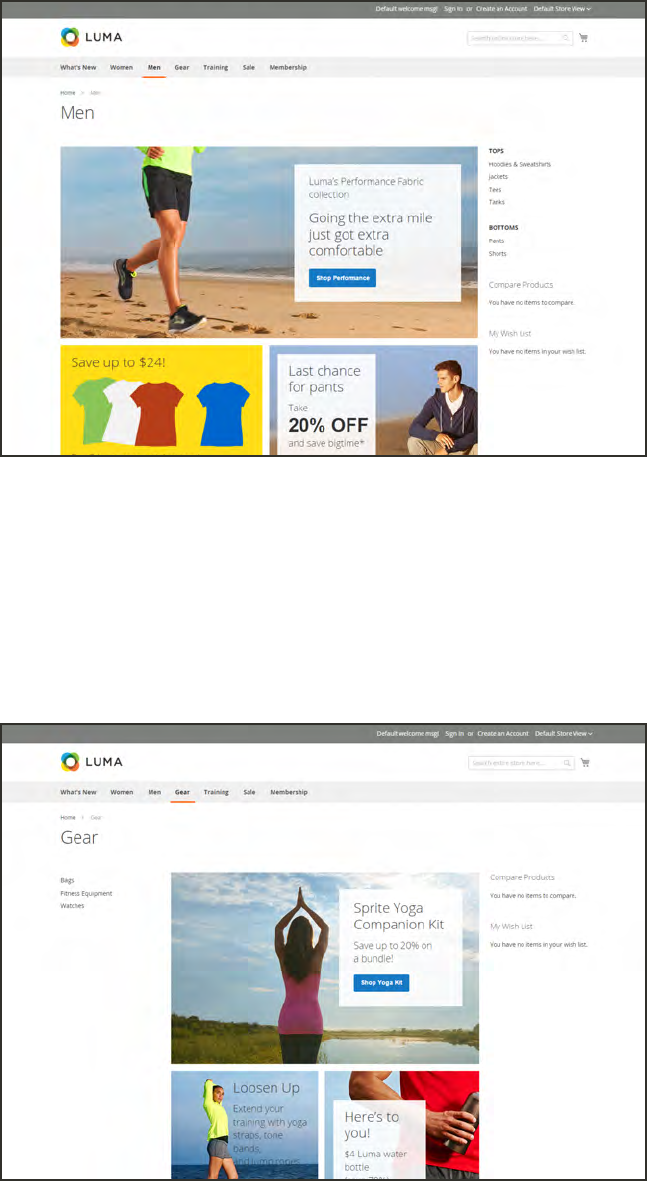
2 Columns Right Bar
3 Columns
A 3-column layout has a main content area with two side columns. The left side bar and main
content column are wrapped together, and float as a unit to the left. The other side bar floats
to the right.
3 Columns
Storefront Examples CHAPTER 37: Page Layout
544 Magento Community Edition 2.0 User Guide

Layout Updates
Before you begin working with custom layout updates, it is important to understand how the
pages of your store are constructed, and the difference between the terms layout and layout
update. The term layout1refers to the visual and structural composition of the page. However,
the term layout update2refers to a specific set of XML instructions that determines how the
page is constructed.
The XML layout of your Magento Community Edition 2.0 store is a hierarchical structure of
blocks. Some elements appear on every page, and others appear only on specific pages. You can
see how these structural blocks are referenced by examining the layout update code for your
home page. To do so, simply open your home page in edit mode, and choose the Design tab to
view the Page Layout section. Depending on the theme, it might contain instructions to remove
blocks, unset blocks, and add blocks by referencing specific areas of the page layout.
In many cases, the same result can be achieved with the Frontend App tool. To place a block of
content as a frontend app, you must identify the page, and the location on the page where you
want the block to appear. You can use the Frontend App tool to place a block on most any page
in your store, including the home page and all content pages. However, to place a block in the
sidebar of a specific page, you must make the change by entering code as a layout update.
1The visual and structural composition of a page.
2A specific set of XML instructions that determines how the page is constructed.
CHAPTER 37: Page Layout Layout Updates
Magento Community Edition 2.0 User Guide 545
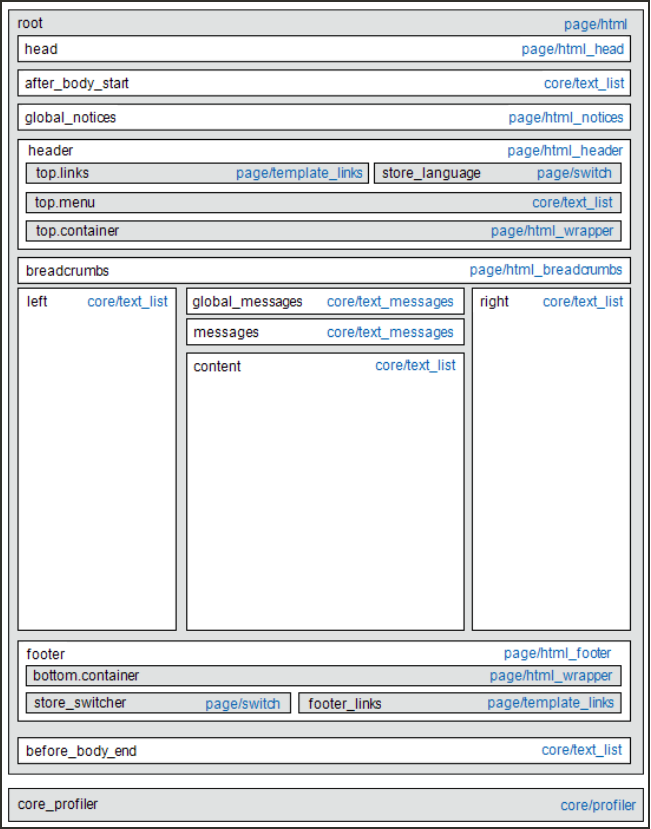
Standard Block Layout
In the following diagram, the block names that can be used to refer to a block in the layout are
black, and the block types, or block class paths, are blue.
Standard Block Layout
Layout Updates CHAPTER 37: Page Layout
546 Magento Community Edition 2.0 User Guide

BLOCK TYPE DESCRIPTION
page/html There can be only one block of this type per page. The block name
is "root," and, it is one of the few root blocks in the layout. You can
also create your own block and name it "root," which is the
standard name for blocks of this type.
page/html_head There can be only one block of this type per page. The block name
is "head," and it is a child of the root block. This block must not be
removed from layout.
page/html_notices There can be only one block of this type per page. The block name
is "global_notices," and it is a child of the root block. If this block is
removed from the layout, the global notices will not appear on the
page.
page/html_header There can be only one block of that type per page. The block name
is "header," and it is a child of the root block. This block
corresponds to the visual header at the top of the page, and
contains several standard blocks. This block must not be
removed.
page/html_wrapper Although included in the default layout, this block is deprecated,
and only is included to ensure backward compatibility. Do not use
blocks of this type.
page/html_breadcrumbs There can be only one block of this type per page. The name of this
block is "breadcrumbs," and it is a child of the header block. This
block displays breadcrumbs for the current page.
page/html_footer There can be only one block of this type per page. The block name
is "footer," and it is a child of the root block. The footer block
corresponds to the visual footer at the bottom of the page, and
contains several standard blocks. This block must not be
removed.
page/template_links There are two blocks of this type in the standard layout. The
"top.links" block is a child of the header block, and corresponds to
the top navigation menu. The "footer_links" block is a child of the
footer block, and corresponds to the bottom navigation menu. It is
possible to manipulate the template links, as shown in the
examples.
Block Descriptions
CHAPTER 37: Page Layout Layout Updates
Magento Community Edition 2.0 User Guide 547

BLOCK TYPE DESCRIPTION
page/switch There are two blocks of this type in a standard layout. The "store_
language" block is a child of the header block, and corresponds to
the top language switcher. The "store_switcher" block is a child of
the footer block, and corresponds to the bottom store switcher.
core/messages There are two blocks of this type in a standard layout. The "global_
messages" block displays global messages. The "messages"
block is used to display all other messages. If you remove these
blocks, the customer won't be able to see any messages.
core/text_list This type of block is widely used throughout Magento, and is used
as a placeholder for rendering children blocks.
core/profiler There is only one instance of this type of block per page. It is used
for the internal Magento profiler, and should not be used for any
other purpose.
Block Descriptions (cont.)
Layout Updates CHAPTER 37: Page Layout
548 Magento Community Edition 2.0 User Guide
Layout Update Examples
The following blocks types can be manipulated with custom layout instructions. Each action
must be specified using the full syntax of the instruction. In the following examples, a
simplified notation is used to refer to each action, which corresponds to the full syntax of the
instruction.
?
<!-- Action can be specified inside either a <block>
or <reference> instruction. -->
<action method="someActionName">
<arg1>Value 1</arg1>
<arg2>Value 2</arg2>
<!-- -->
<argN>Value N</argN>
</action>
<!-- -->
Full Syntax
?
someActionName($arg1, $arg2, ..., $argN)
Simplified Syntax
CHAPTER 37: Page Layout Layout Updates
Magento Community Edition 2.0 User Guide 549
page/template_links
ACTION DESCRIPTION
addLink($label, $url, $title, $prepare
Adds another link to the end of the list of existing links. Just
specify the $label (link caption), $url (link URL) and
$title (link tooltip), and you'll see a new link in the
corresponding place. The $prepare parameter must be "true"
if you want the URL to be prepared, or converted to the full URL
from the shortened URL. For example, the new page becomes
BASE_URL/newpage if prepared.
removeLinkByUrl($url) Removes a link from the block by its URL. Note that the URL
must be properly specified and exactly match corresponding
URL of the link you want to remove.
Syntax
cms/block
ACTION DESCRIPTION
setBlockId($blockId) Specifies the ID of a CMS block, so its content can be fetched
and displayed when the page is rendered.
Syntax
?
<!--...-->
<reference name="content">
<block type="cms/block" name="additional.info"
as="additionalInfo">
<action method="setBlockId"><id>additional_info</id></action>
</block>
</reference>
<!-- -->
Layout Updates CHAPTER 37: Page Layout
550 Magento Community Edition 2.0 User Guide
core/text
A core/text block can be used to enter free form text directly into the template.
ACTION DESCRIPTION
addText($textContent) Specifies text to be rendered as the block's content. After the
text is specified, the layout update instructions must continue
to be a valid XMLstatement. If you use HTML tags as part of
the text, it is recommended to use:
<![CDATA[...]]>
Syntax
?
<!--...-->
<reference name="content">
<block type="core/text" name="test.block">
<action method="addText">
<txt><![CDATA[<h2>ATTENTION!</h2><p>Check your options
carefully before you submit.</p>]]></txt>
</action>
</block>
</reference>
<!-- -->
page/html_welcome
This block can be used to duplicate the “Welcome, <USERNAME>!” message that appears in the
header block. When the user is not logged in, the welcome message specified in the
configuration appears.
CHAPTER 37: Page Layout Layout Updates
Magento Community Edition 2.0 User Guide 551

Layout Update Syntax
Custom layout updates can be applied to product category pages, product pages, and content
page to achieve a variety of results, such as:
<block> Create new block.
<reference> Update existing content.
<action> Assign actions to blocks.
<remove> Remove blocks.
Any change made to the layout is applied when the associated entity—which can be either a
product, category, or CMS page—becomes active in the frontend of the store.
Custom layout update instructions consist of well-formed XML tags, without the <?xml ...>
declaration and root tag. As with normal XML, every tag must either be empty or properly
closed, as shown in the following examples:
<tag attribute="value" />
<tag attribute="value"> ... </tag>
Layout Updates CHAPTER 37: Page Layout
552 Magento Community Edition 2.0 User Guide
<block>
Creates a new block within the current context. Layout block nesting defines the ordering of
block initialization location of the blocks on the page.
NAME VALUE
type *block class path
An identifier of the block class path that corresponds to the class of the
block. See the list of the available block types below.
name *block name identifier
A name that can be used to address the block in which this attribute is
assigned. If you create a new block with the name that is the same as
one of the existing blocks, your newly created block substitutes the
previously existing block. See the list of names of existing blocks
below.
before block name | '-'
Is used to position the block before a block with the name specified in
the value. If "-" value used the block is positioned before all other sibling
blocks.
after block name | '-'
Is used to position the block after a block with the name specified in the
value. If "-" value used the block is positioned after all other sibling
blocks.
template template filename
A template filename used for the specific block type. As you have no
way to see the list of template files, use whatever template value is
demanded for every block type listed below.
as block alias
An alias name by which a template calls the block in which this attribute
is assigned. Sometimes it's necessary to specify the alias for a specific
block type.
Syntax
CHAPTER 37: Page Layout Layout Updates
Magento Community Edition 2.0 User Guide 553

<reference>
Changes the context for all included instructions to a previously defined block. An empty
<reference> tag if of no use, because it affects only the instructions which are children.
NAME VALUE
name *block name
A name of a block to reference.
Syntax
<action>
Used to access block API, in other words, call block's public methods. It is used to set up the
execution of a certain method of the block during the block generation. Action child tags are
translated into block method arguments. The list of all available methods depends on the block
implementation (e.g. public method of the block class).
NAME VALUE
method *block method name
A name of the public method of the block class this instruction is
located in that is called during the block generation.
Syntax
<remove>
Removes an existing block from the layout.
NAME VALUE
name *block name
The name of the block to be removed.
Syntax
<extend>
This instruction performs final modifications to blocks which are already part of the layout.
Every attribute in the <block> instruction—except for the block name—is subject for change. In
addition, the special attribute parent can be used to change the parent of the block. Simply put
the name of the new parent block into the <extend> instruction, and the parent of the block
that is referenced will be changed in the layout.
Layout Updates CHAPTER 37: Page Layout
554 Magento Community Edition 2.0 User Guide

NAME VALUE
name *block name
The name of any block to be extended.
* any other
Any other attribute specific for the <block> instruction.
parent block name
The name of the block that should become a new parent for the
referenced block.
*Indicates a required value
Syntax
CHAPTER 37: Page Layout Layout Updates
Magento Community Edition 2.0 User Guide 555

Controlling Block Order
Sometimes more than one content element is assigned to the same structural block. For
example, there might be several block that appear in a sidebar. You can control the order of
blocks by including a “before” or “after” positioning property in the code. To place a block either
before, or after a specific block, replace the hyphen with the block identifier, as shown in the
following examples:
before="-" Places the block at the top of the sidebar, before other blocks.
after="-" Places the block at the bottom of the sidebar, after other blocks.
<block type="cms/block" before="-" name="left.permanent.callout">
<block type="cms/block" before="some-other-block"
name="left.permanent.callout">
<block type="cms/block" after="-" name="left.permanent.callout">
<block type="cms/block" after="some-other-block"
name="left.permanent.callout">
Code to Position ContentBlocks
Layout Updates CHAPTER 37: Page Layout
556 Magento Community Edition 2.0 User Guide

XML Load Sequence
For developers, it is important to understand that blocks and layout updates must be loaded in
the correct order, in keeping with the rules of precedence and load sequence1which
determine how the page is rendered. Magento supports the following page layout scenarios:
Scenario 1: Default Layout
The default layout consists of the visual elements that are visible from every page of the store.
Whether it is a menu item, or a shopping cart block, each item has a handle2in the default
section of the layout definition.
Scenario 2: Changes to Specific Pages
The second case allows you to create a different layout for a specific page. The XMLlayout for
specific pages is constructed in the same sequence that Magento loads modules, and is
determined by the system configuration.
In addition to the instructions in the layout update files which are specific to each module, you
can make a custom layout update that applies to a special case in the backend, and is merged
each time the special case occurs.
1The order in which scripts are loaded into memory. To work correctly, some scripts must be loaded before others.
2In programming, a name used to reference an object.
CHAPTER 37: Page Layout Layout Updates
Magento Community Edition 2.0 User Guide 557

Notes
558 Magento Community Edition 2.0 User Guide
CHAPTER 38:
Themes
A theme is a collection of files that determines the visual presentation of your store. When
you first install Magento Community Edition 2.0, the design elements of the store are
based on the “Default” Theme. In addition to the initial default theme that comes with
your Magento installation, there is a wide variety of themes that are available “off the
shelf” on Magento Connect.
Magento themes include layout files, template files, translation files, and skins. A skin is a
collection of supporting CSS, images, and JavaScript files that together, create the visual
presentation and interactions that your customers experience when they visit your store.
Themes and skins can be modified and customized by a developer or designer who has
knowledge of Magento theme design and access to your server. To learn more, see the
Frontend Developer Guide.
Luma Theme
Magento Community Edition 2.0 User Guide 559
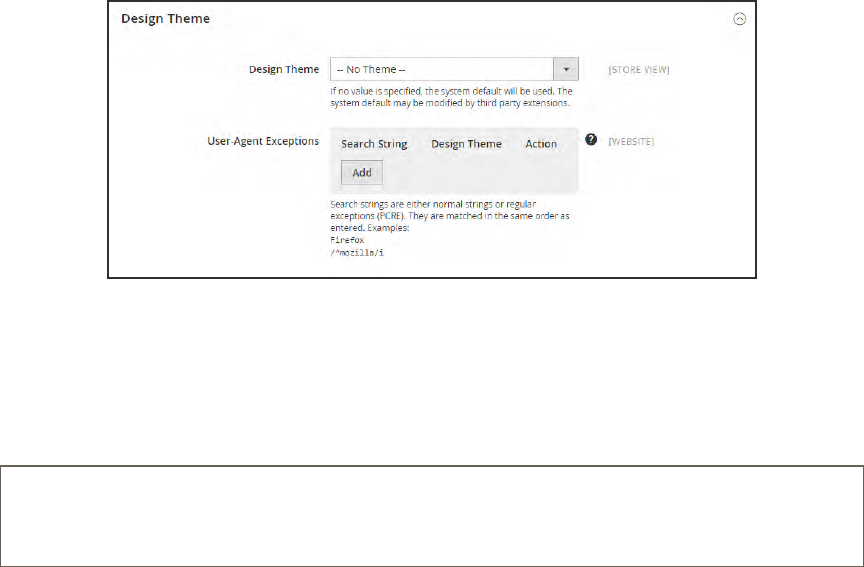
Using the Default Theme
Magento’s default responsive theme renders the display of your storefront for different devices,
and incorporates best practices for desktop, table, and mobile devices. To learn more, see the
Responsive Theme Developer’s Guide.
Design Theme
Some themes are designed to be used only with specific devices. When Magento detects a
specific browser ID, or user agent, it uses the theme that is configured to be used for the specific
browser. The search string can also include Perl-Compatible Regular Expressions (PCRE). To
learn more, see: User Agent.
Firefox
/^mozilla/i
Using the Default Theme CHAPTER 38: Themes
560 Magento Community Edition 2.0 User Guide
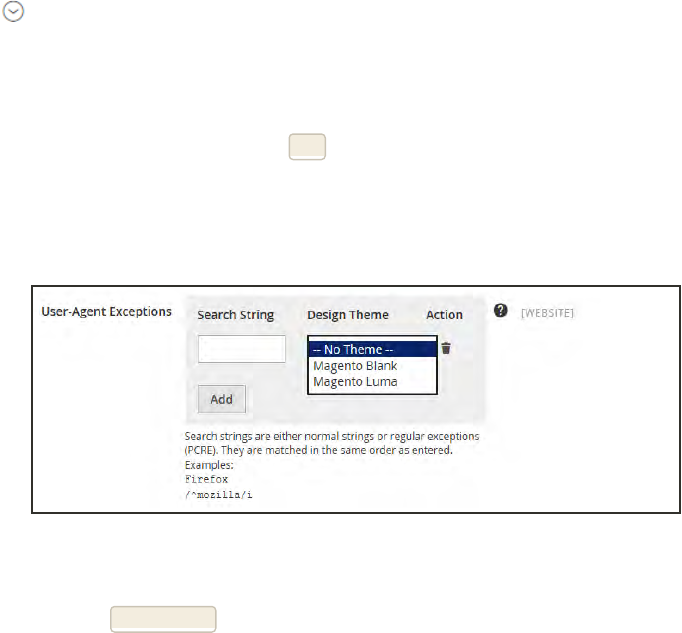
To view the default theme:
1. On the Admin sidebar, tap Stores. Then under Settings, choose Configuration.
2. In the panel on the left under General, choose Design.
3. Expand the Design Theme section.
4. Set Design Theme to the theme that you want to apply to the store.
5. If the theme is to be used for only a specific device, do the following:
a. Under User-Agent Exceptions, tap Add.
b. In the Search String field, enter the browser ID for the specific device.
Search strings are matched in the order they are entered.
User-Agent Exceptions
c. Repeat the process to enter additional devices.
6. When complete, tap Save Config.
CHAPTER 38: Themes Using the Default Theme
Magento Community Edition 2.0 User Guide 561
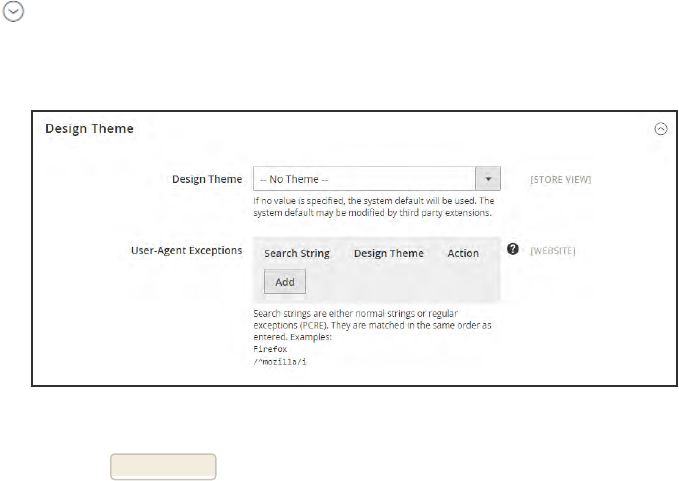
Installing a New Theme
When you first install Magento, the design elements of the store are based on the “Default”
theme. You can modify the theme, add themes created by others, or create new ones. To learn
more, see the Designer’s Guide.
Magento Connect contains a wide selection of extensions that you can install to enhance the
appearance of your store. The following example shows how to add a mobile theme from
Magento Connect.
Step 1: Install a New Theme
1. On the Admin sidebar, tap Find Partners & Extensions.
2. Under Magento Marketplace, tap Visit Magento Marketplaces.
3. Find the Magento 2 theme that you want to install, and follow the instructions to install the
theme on your server.
Step 2: Apply the Theme to Your Store
1. On the Admin sidebar, tap Stores. Then under Settings, choose Configuration.
2. In the panel on the left under General, choose Design.
3. Expand the Themes section.
4. Set Design Theme to the new theme.
Design Theme
5. When complete, tap Save Config.
Installing a New Theme CHAPTER 38: Themes
562 Magento Community Edition 2.0 User Guide
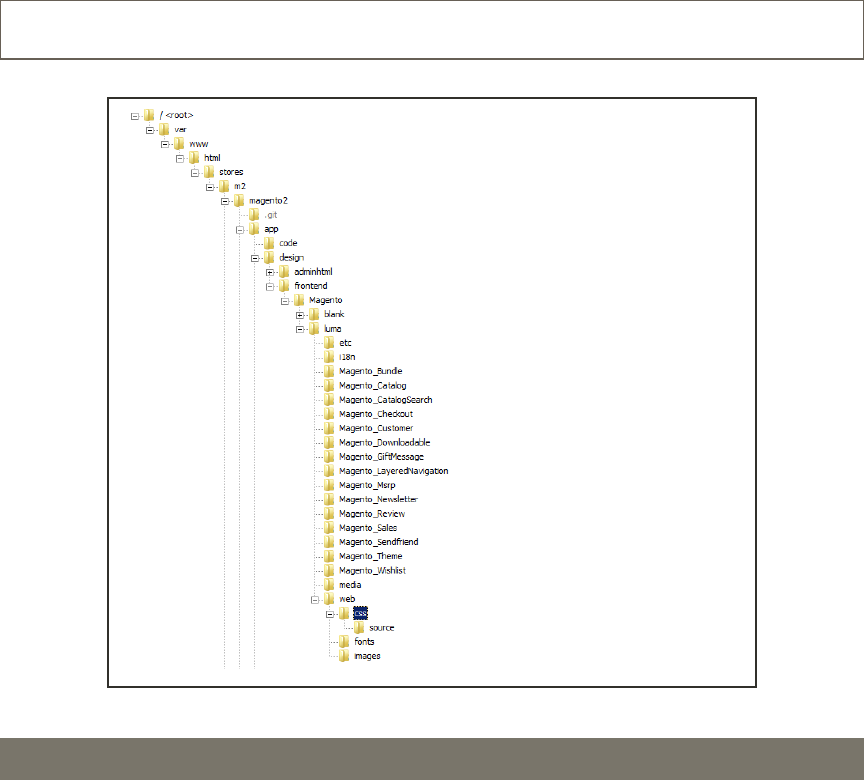
Theme Assets
For a standard installation, the assets associated with a theme are organized in the web folder
at the following location below the Magento root.
[magento_root]/app/design/frontend/Magento/[theme_name]/web
Theme Assets
FOLDER DESCRIPTION
CSS Contains the CSSfiles that control the visual styling that is associated with the
skin.
fonts Contains any additional fonts that are used by the theme and that are not
available by default on most systems.
images Contains all images used by the theme, including buttons, background images,
and so on.
CHAPTER 38: Themes Theme Assets
Magento Community Edition 2.0 User Guide 563
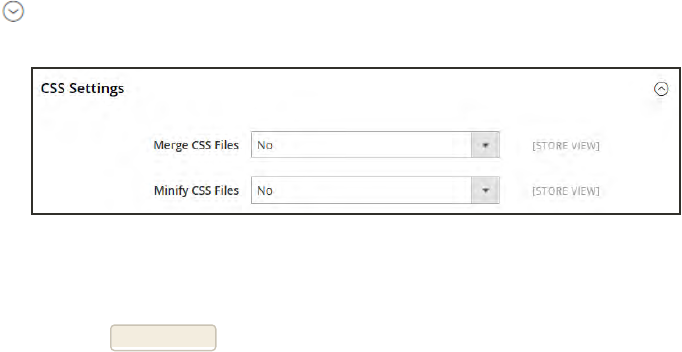
Merging CSSFiles
As part of an effort to optimize your site and reduce page load time, you can reduce the number
of separate CSSfiles by merging them into a single condensed file. If you open a merged
CSSfile, you’ll find one continuous stream of text, with line breaks removed. Because you can’t
edit the merged file, it’s best to wait until you are out of the development mode, and no longer
making frequent changes to the CSS.
To merge CSS files:
1. On the Admin sidebar, tap Stores. Then under Settings, choose Configuration.
2. In the panel on the left under Advanced, choose Developer.
3. Expand the CSS Settings section.
CSSSettings
4. Set Merge CSSFiles to “Yes.”
5. When complete, tap Save Config.
Theme Assets CHAPTER 38: Themes
564 Magento Community Edition 2.0 User Guide
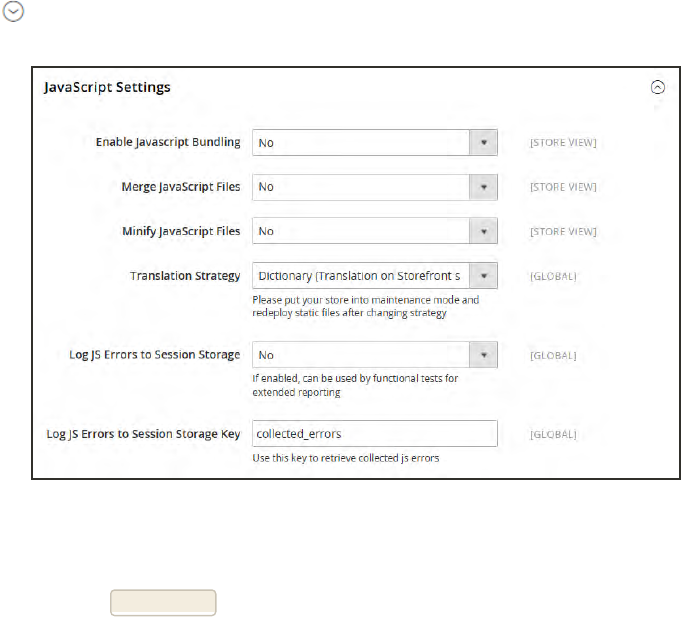
Merging JavaScript Files
Multiple JavaScript files can be merged into a single, condensed file to reduce page load time. If
you open a merged JavaScriptfile, you’ll find one continuous stream of text, with line breaks
removed. If you are finished with the development process, and the code contains no errors,
you might consider merging the files.
To merge JavaScript files:
1. On the Admin sidebar, tap Stores. Then under Settings, choose Configuration.
2. In the panel on the left under Advanced, choose Developer.
3. Expand the JavaScript Settings section.
JavaScript Settings
4. Set Merge JavaScript Files to “Yes.”
5. When complete, tap Save Config.
CHAPTER 38: Themes Theme Assets
Magento Community Edition 2.0 User Guide 565
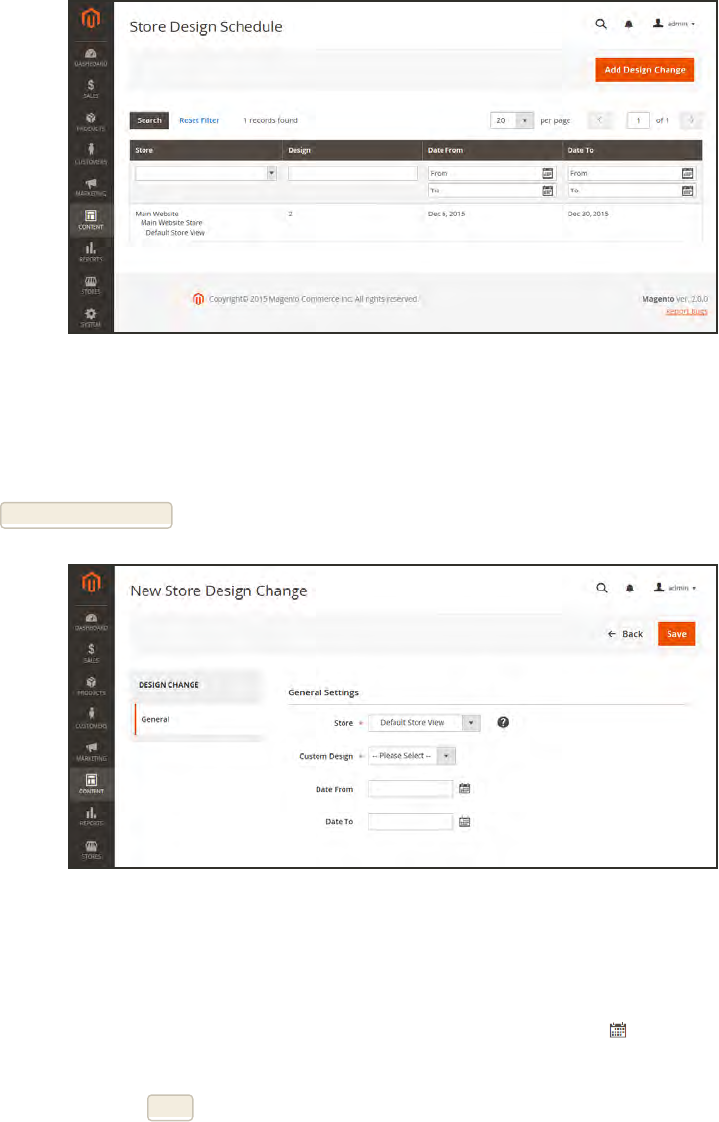
Scheduling Design Changes
Design changes can be scheduled in advance, so they go into effect on schedule. You can use
scheduled design changes for seasonal changes, promotions, or just to add variation.
Store Design Schedule
To schedule a design change:
1. On the Admin sidebar, tap Content. Then under Design, choose Schedule.
2. Tap Add Design Change. Then under General Settings, do the following:
New Design Change
a. Set Store to the view where the change applies.
b. Set Custom Design to the theme, or variation of a theme, that is to be used.
c. To define the period when the change is in effect, use the calendar to choose the values
for the Date From and Date To fields.
3. When complete, tap Save.
Scheduling Design Changes CHAPTER 38: Themes
566 Magento Community Edition 2.0 User Guide


Contents Customers Menu
All Customers
Now Online
Customer Accounts
Customer Sign In
Account Dashboard
Configuring Customer Accounts
Online Session Length
Account Scope
Login Landing Page
New Account Options
Name and Address Options
Password Options
Creating a New Account
Updating Customer Accounts
Customer Groups
568 Magento Community Edition 2.0 User Guide
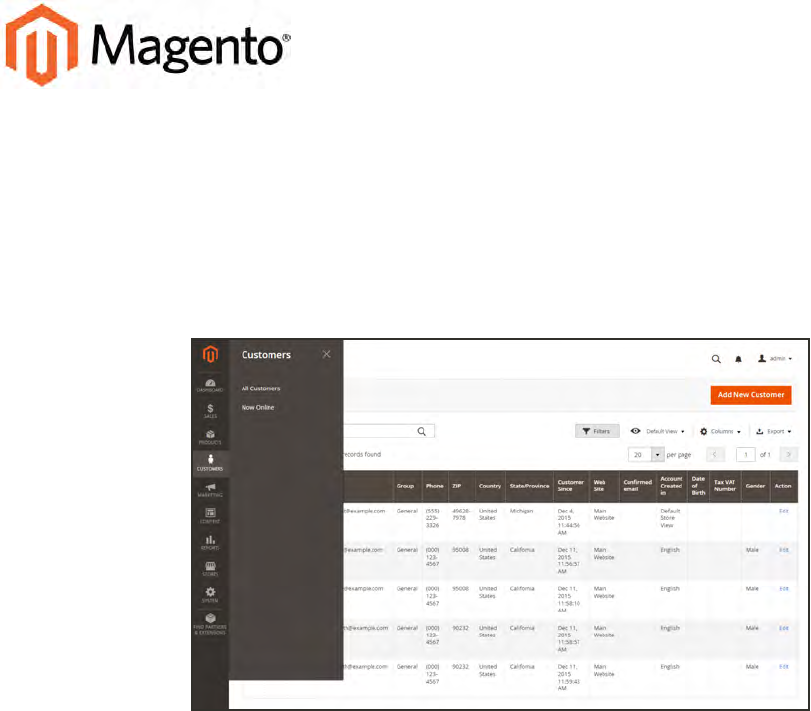
CHAPTER 39:
Customers Menu
The Customers menu provides access to customer account management tools, and gives
you the ability to see who is currently online in your store.
Customers Menu
Magento Community Edition 2.0 User Guide 569
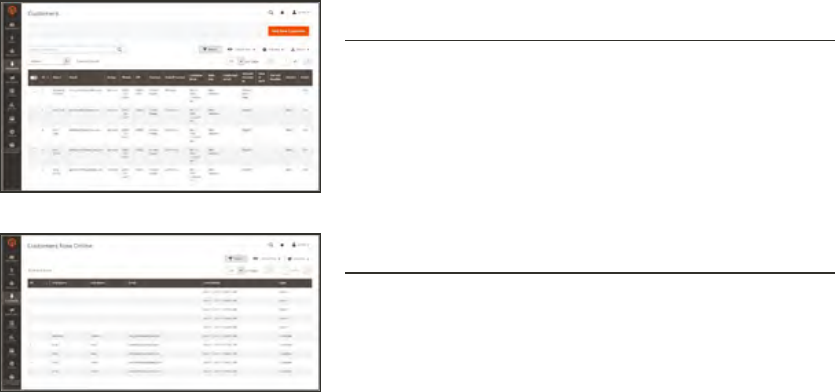
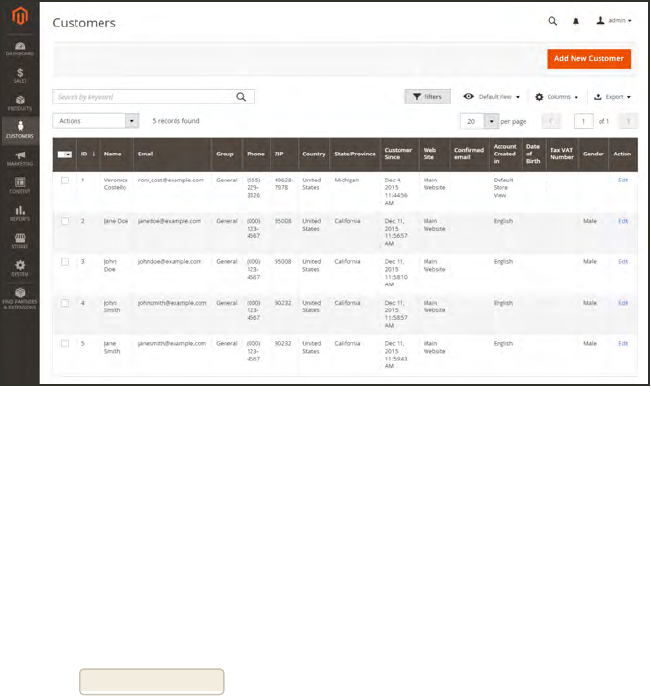
All Customers
The Customers page lists all customers who have registered for an account with your store, or
were added by the administrator.
All Customers
To view customer information:
1. On the Admin sidebar, tap Customers. Then, choose All Customers.
2. Open any customer record in edit mode.
3. In the panel on the left, choose the information you need to edit. Then, make the necessary
changes.
4. When complete, tap Save Customer.
CHAPTER 39: Customers Menu All Customers
Magento Community Edition 2.0 User Guide 571
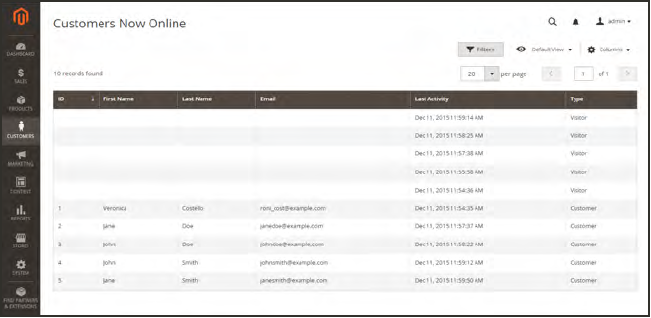
Now Online
The Now Online option on the Customers menu lists all customers and visitors who are
currently online in your store. The length of the online session is set in the configuration, and
determines how long the customer’s activity is visible from the Admin. By default, a customer’s
online session lasts fifteen minutes.
Online Customers
To see all customers who are online now:
1. On the Admin sidebar, tap Customers. Then, choose Online Now.
2. In the list, open any record to view the customer’s information and activity.
Now Online CHAPTER 39: Customers Menu
572 Magento Community Edition 2.0 User Guide

COLUMN DESCRIPTION
ID The customer ID of a registered customer.
First Name The first name of a registered customer.
Last Name The last name of a registered customer.
Email The email address of a registered customer.
IP Address The IPaddress of the computer that customers and guests are using
to access your store.
Session Start Time The starting date and time of the current session.
Last Activity The date and time of the customer’s last activity in yur store.
Type Options include: Customer / Visitor
Last URL The last URL the customer visited.
Column Descriptions
CHAPTER 39: Customers Menu Now Online
Magento Community Edition 2.0 User Guide 573

Notes
574 Magento Community Edition 2.0 User Guide
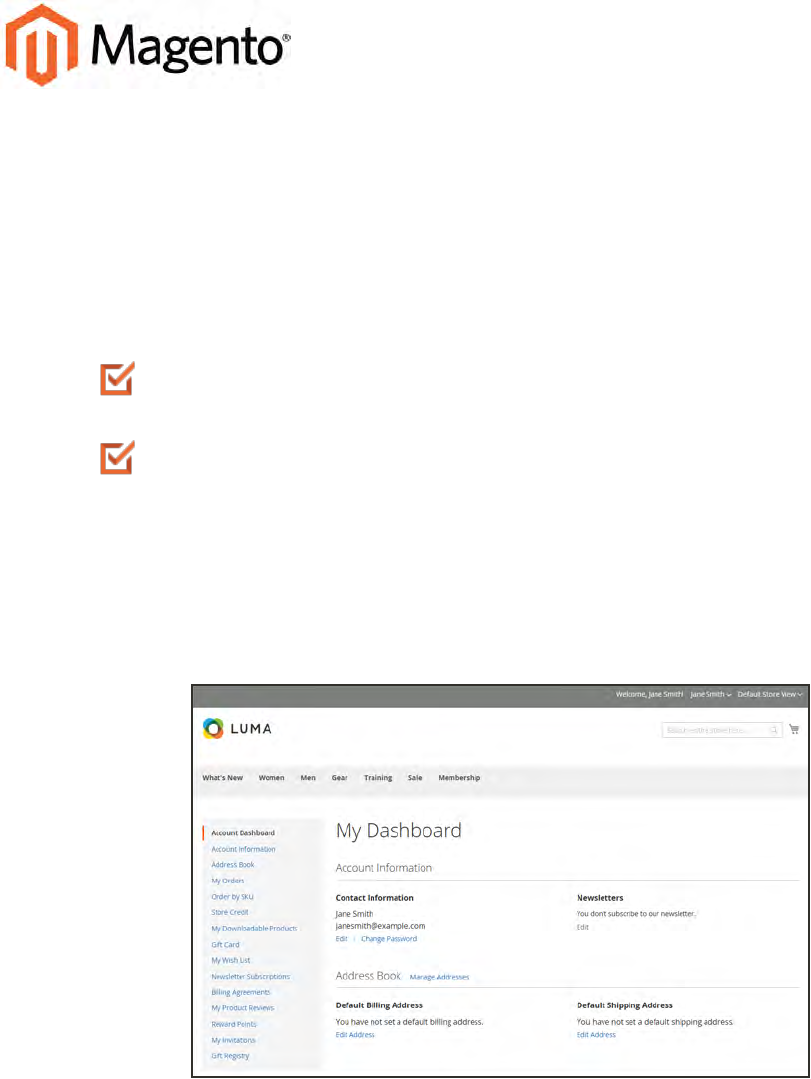
CHAPTER 40:
Customer Accounts
The header of every page in your store extends an invitation for shoppers to “Log in or
register” for an account with your store. Customers who open an account with your store
enjoy a range of benefits, including:
Faster checkout. Registered customers move through checkout faster because
much of the information is already in their accounts.
Self service. Registered customers can update their information, check the status
of orders, and even reorder from their account dashboard.
Customers can access their account dashboard by clicking the “My Account” link in the
header of the store. They can use their account dashboard to view and modify their
information, including past and current addresses, billing and shipping preferences,
newsletter subscriptions, wishlist, and more.
Account Dashboard
Magento Community Edition 2.0 User Guide 575
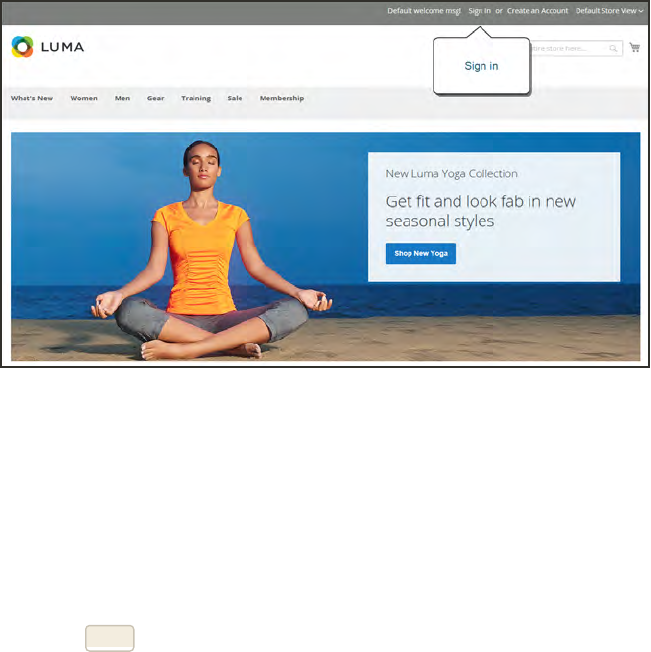
Customer Sign In
Customer have easy access to their accounts from every page in your store. Depending on the
configuration, customers can be redirected to their account dashboard, or continue shopping
after they log in to their accounts. When customers forget their passwords, a reset link is sent
to the email address that is associated with the account.
Sign In
To sign in to your customer account:
1. In the header of the store, tap Sign in.
2. When prompted, enter the Email Address that is associated with your account, and your
Password. Then,tap Login.
Customer Sign In CHAPTER 40: Customer Accounts
576 Magento Community Edition 2.0 User Guide
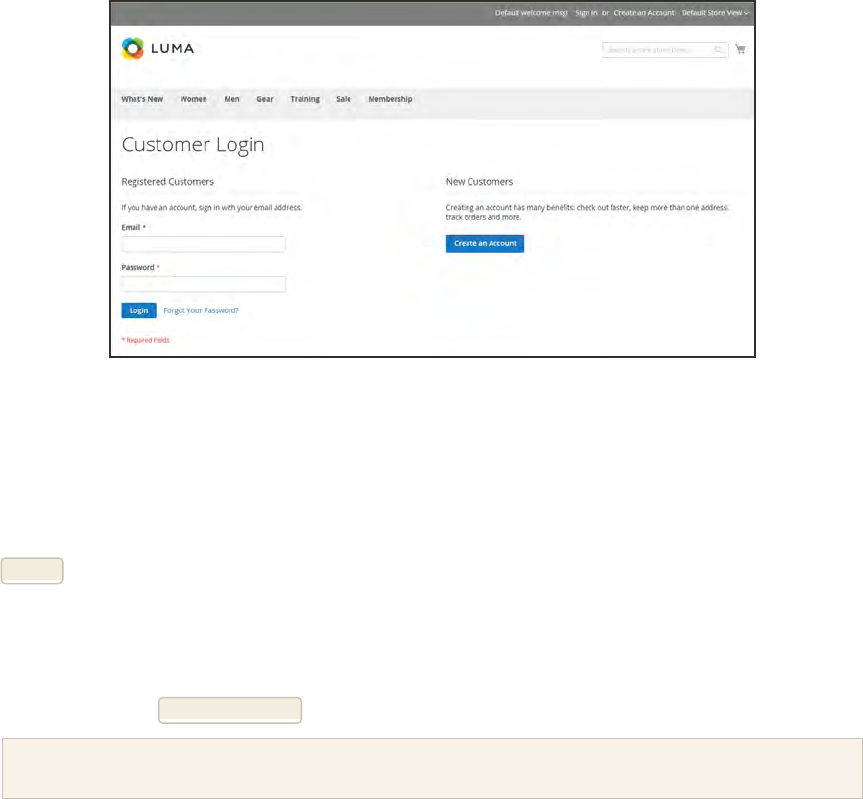
Customer Login
To reset your password:
1. On the Login page, tap Forgot Your Password?.
2. When prompted, enter the Email Address that is associated with your account, and tap
Submit.
If the email address you entered matches the one that is associated with the account, you will
receive a "Password Reset Confirmation" email with a link to reset your password.
3. Tap the link in the email, and when prompted, enter your New Password. Enter it again to
confirm, and tap Reset Password.
Your new password must be six or more characters in length, without spaces.
When you receive confirmation that the password is updated, you can use the new password to
log in to your account.
CHAPTER 40: Customer Accounts Customer Sign In
Magento Community Edition 2.0 User Guide 577
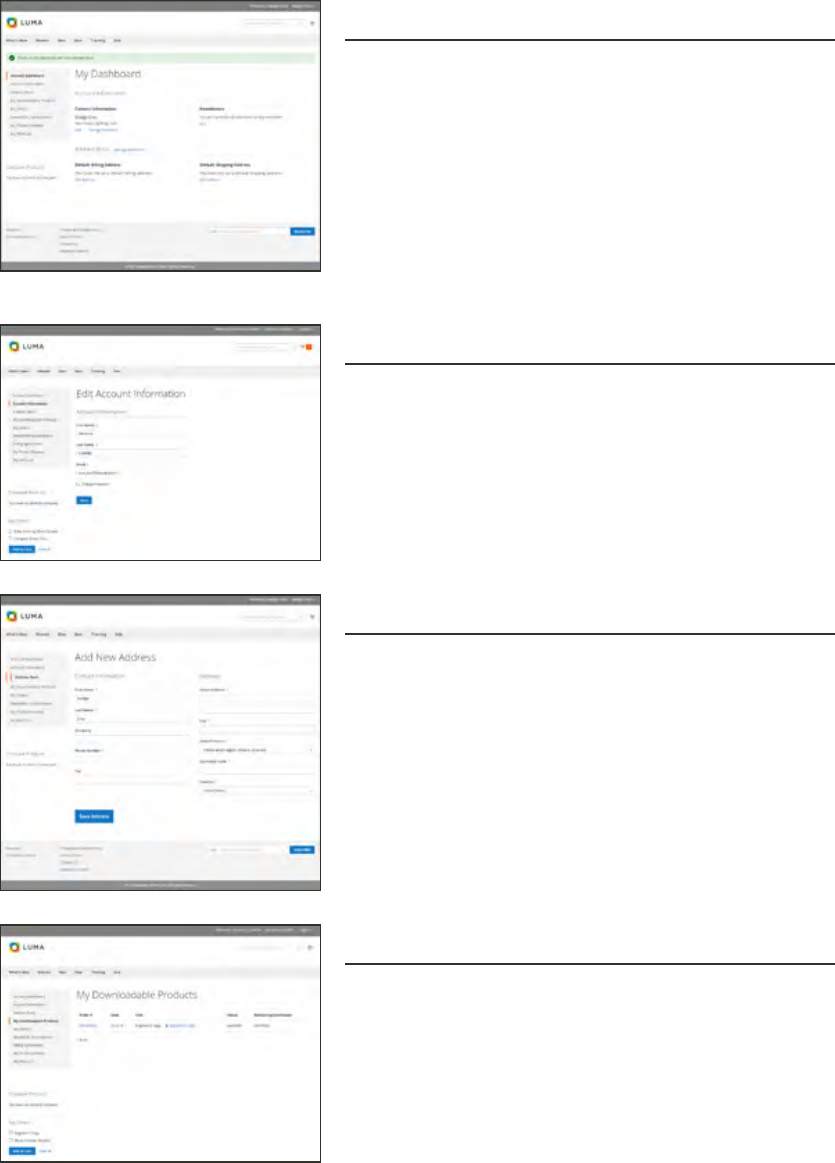
Account Dashboard
My Dashboard
The customer’s account dashboard gives them the
ability to track orders, manage shipping addresses,
and manage other store activities.
Account Information
Customers can update their account information and
change their password as needed.
Address Book
The customer address book includes the default
billing and shipping address, and additional address
entries.
Downloadable Products
Lists all downloadable products the customer has
purchased, with a link to each.
Account Dashboard CHAPTER 40: Customer Accounts
578 Magento Community Edition 2.0 User Guide
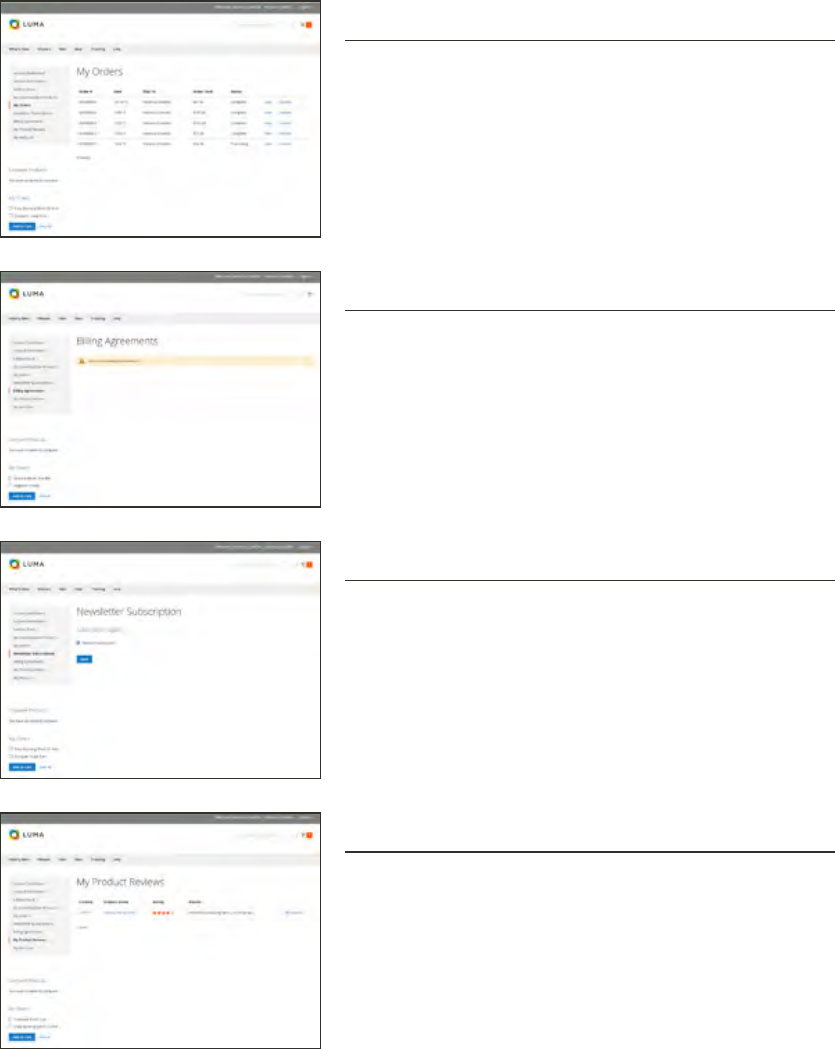
Orders
Displays a list of all customer orders, with a link to
each. If enabled in the configuration, any order can be
reordered by simply clicking the Reorder link.
Billing Agreements
Displays a list of any customer billing agreements.
Newsletter Subscriptions
Lists all available newsletters. Those to which the
customer is currently subscribed have a checkmark.
My Product Reviews
Displays a list of all product reviews submitted by the
customer, with a link to each.
CHAPTER 40: Customer Accounts Account Dashboard
Magento Community Edition 2.0 User Guide 579
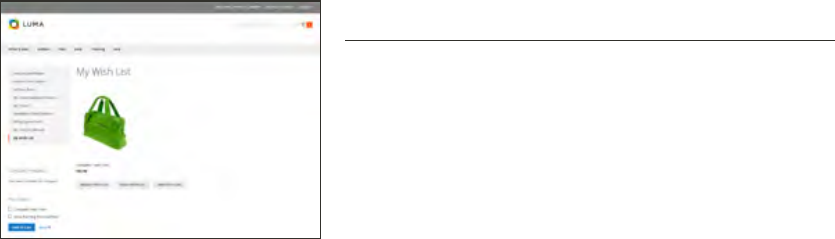
Configuring Customer Accounts
The customer account settings determine the information that is collected during customer
registration, and the experience that customers have during the process. Customer
configuration settings include:
lOnline Session Length
lAccount Scope
lLogin Landing Page
lNew Account Options
lName and Address Options
lPassword Options
CHAPTER 40: Customer Accounts Configuring Customer Accounts
Magento Community Edition 2.0 User Guide 581
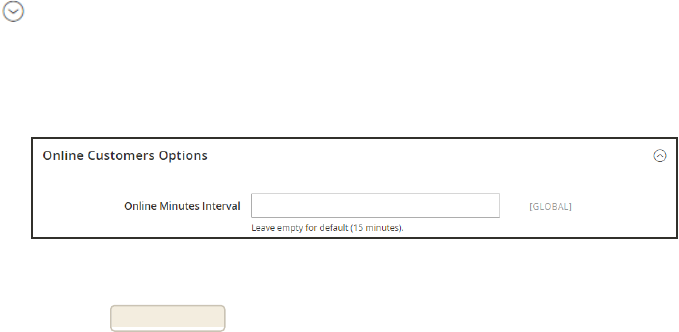
Online Session Length
The length of each customer session is set by default to fifteen minutes. If there is no keyboard
activity during that time, the current session ends, and customers must log back into their
accounts to continue shopping. If Persistent Cart is enabled, the contents of their carts are
saved for the next time they sign in to their accounts.
To configure the online session length:
1. On the Admin sidebar, tap Stores. Then under Settings, choose Online Now.
2. In the panel on the left under Customers, choose Customer Configuration.
3. Expand the Online Customers Options section.
4. In the Online Minutes Interval field, enter the number of minutes before the customer session.
Leave the field empty to accept the default interval of fifteen minutes.
Online Customers Options
5. When complete, tap Save Config.
Configuring Customer Accounts CHAPTER 40: Customer Accounts
582 Magento Community Edition 2.0 User Guide

Account Scope
The scope of customer accounts can be limited to the website where the account was created, or
shared with all websites and stores in the store hierarchy.
To set the scope of customer accounts:
1. On the Admin sidebar, tap Stores. Then under Settings, choose Configuration.
2. In the panel on the left, under Customers, choose Customer Configuration.
3. Expand the Account Sharing Options section.
Account Sharing Options
4. Set Share Customer Accounts to one of the following:
Global Shares customer account information with every website and store in the
Magento installation.
Per Website Limits customer account information to the website where the account was
created.
5. When complete, tap Save Config.
CHAPTER 40: Customer Accounts Configuring Customer Accounts
Magento Community Edition 2.0 User Guide 583
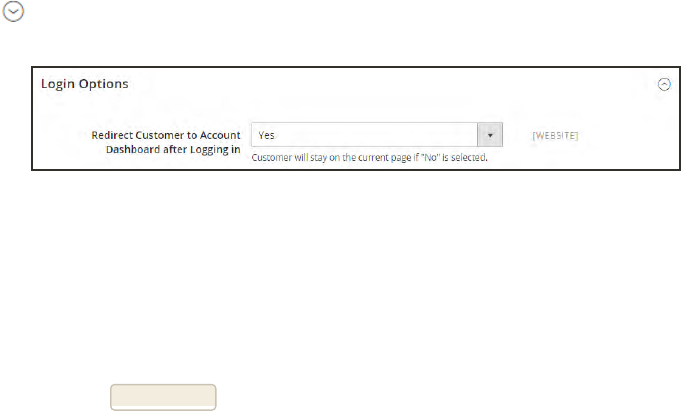
Login Landing Page
You can configure your store to redirect customers to their account dashboard after they log in,
or let them continue shopping.
To set the login landing page:
1. On the Admin sidebar, tap Stores. Then under Settings, choose Configuration.
2. In the panel on the left, under Customers, choose Customer Configuration.
3. Expand the Login Options section.
Login Options
4. Set Redirect Customer to Account Dashboard after Logging in to one of the following:
Yes The account dashboard appears when customers log in to their accounts.
No Customers can continue shopping after logging in to their accounts.
5. When complete, tap Save Config.
Configuring Customer Accounts CHAPTER 40: Customer Accounts
584 Magento Community Edition 2.0 User Guide
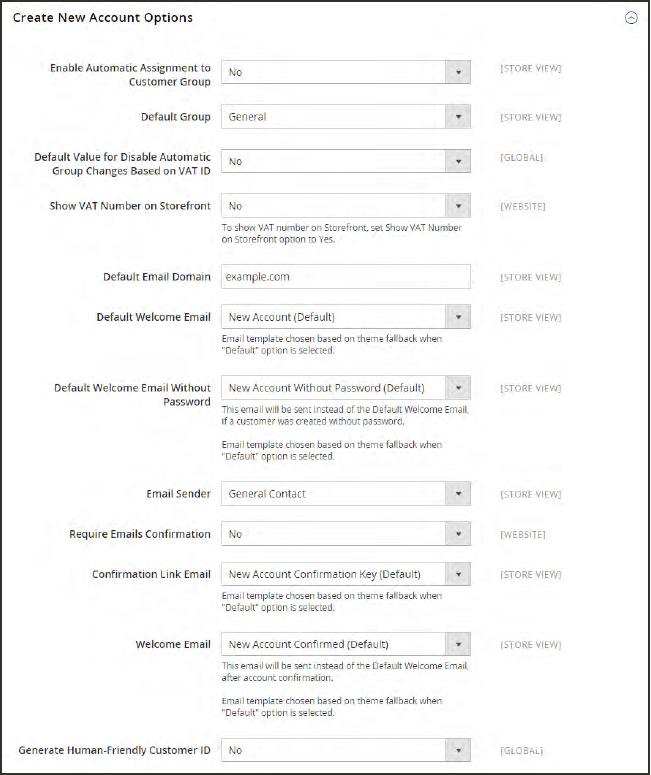
New Account Options
In the Create New Account Options section of the configuration, the basic account options are
combined with more advanced options that relate to VAT IDValidation and custom
integrations. The following instructions cover only the most frequently used options. To learn
about automatic customer group assignments, see: VATValidation.
Create New Account Options
CHAPTER 40: Customer Accounts Configuring Customer Accounts
Magento Community Edition 2.0 User Guide 585
To set up the basic customer account options:
1. On the Admin sidebar, tap Stores. Then under Settings, choose Configuration.
2. In the panel on the left under Customers, choose Customer Configuration.
3. Expand the Create New Account Options section. Then, do the following:
a. Set Default Group to the customer group that is assigned to new customers when an
account is created.
a. If you have a Value Added Tax number, and want it to be visible to customers, set Show
VAT Number on Storefront to “Yes.”
b. Enter the Default Email Domain for the store. For example: mystore.com
c. Set Default Welcome Email to the template that is used for the Welcome email sent to
new customers.
d. Set Default Welcome Email without Password to the template that is used when a
customer account is created that does not yet have a password. For example, a customer
account created from the Admin does not yet have a password assigned.
e. Set Email Sender to the store contact that appears as the sender of the Welcome email.
f. To require that customers confirm their request to open an account with your store, set
Require Emails Confirmation to “Yes.” Then, set Confirmation Link Email to the template
that is used for the confirmation email.
g. Set Welcome Email to the template that is used for the Welcome message that is sent
after the account is confirmed.
4. When complete, tap Save Config.
Configuring Customer Accounts CHAPTER 40: Customer Accounts
586 Magento Community Edition 2.0 User Guide
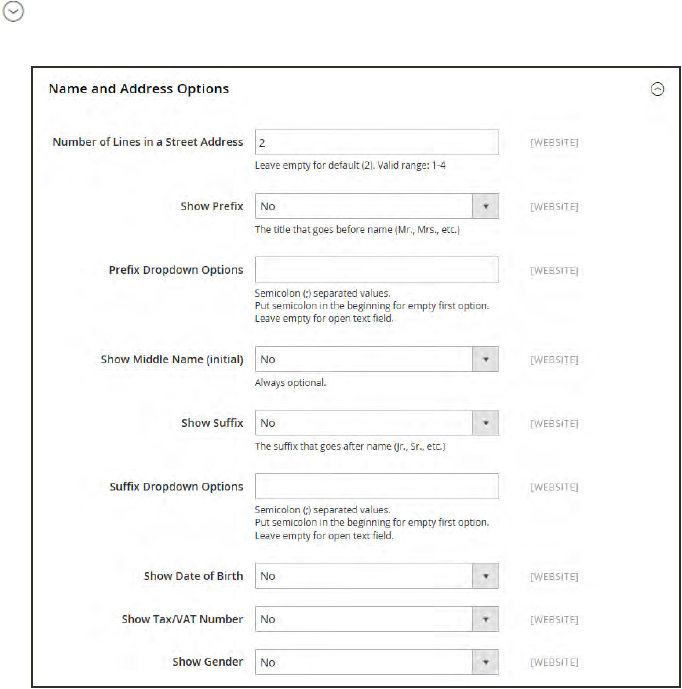
Name and Address Options
The Name and Address Options determine the values in the drop-down lists for the prefix and
suffix part of the customer name.
To configure the customer name and address:
1. On the Admin sidebar, tap Stores. Then under Settings, choose Configuration.
2. In the panel on the left, under Customers, choose Customer Configuration.
3. Expand the Name and Address Options section.
Name and Address Options
CHAPTER 40: Customer Accounts Configuring Customer Accounts
Magento Community Edition 2.0 User Guide 587

1. Enter the Number of Lines in a Street Address. If left blank, the street address defaults to 2.
2. To include a prefix before the name, do the following:
a. Set Show Prefix to one of the following:
lOptional
lRequired
b. In the Prefix Dropdown Options field, enter each prefix that you want to appear in the
list, separated by a semicolon. Place a semicolon before the first value to display an empty
value at the top of the list.
3. To include a suffix after the name, do the following:
a. Set Show Suffix to one of the following:
lOptional
lRequired
b. In the Suffix Dropdown Options field, enter each prefix that you want to appear in the
list, separated by a semicolon. Place a semicolon before the first value to display an empty
value at the top of the list.
4. To include additional fields, do the following:
a. Set Show Date of Birth to “Yes.”
b. Set Show Tax/VAT Number to “Yes.”
c. Set Show Gender to “Yes.”
5. When complete, tap Save Config.
Configuring Customer Accounts CHAPTER 40: Customer Accounts
588 Magento Community Edition 2.0 User Guide

Password Options
The customer password options determine the email templates that are used when customers
forget their passwords, and the lifetime of the password recovery link. You can allow customers
to change their own passwords, or require that only store administrators can do so.
To configure customer password options:
1. On the Admin sidebar, tap Stores. Then under Settings, choose Configuration.
2. In the panel on the left under Customers, choose Customer Configuration.
3. Expand the Password Options section. Then, do the following.
Password Options
a. Set Forgot Email Template to the template that is used for the email sent to customers
who have forgotten their passwords.
b. Set Remind Email Template to the template that is used when a password hint is sent to
customers.
c. Set Forgot and Remind Email Sender to the store contact that appears as the sender of
the Forgot Email and Remind Email notifications.
d. In the Recovery Link Expiration Period field, enter the number of days before the
password recovery link expires.
e. To require that only the store administrator can change customer passwords, set Require
admin user to change user password to “Yes.”
4. When complete, tap Save Config.
CHAPTER 40: Customer Accounts Configuring Customer Accounts
Magento Community Edition 2.0 User Guide 589

Notes
590 Magento Community Edition 2.0 User Guide
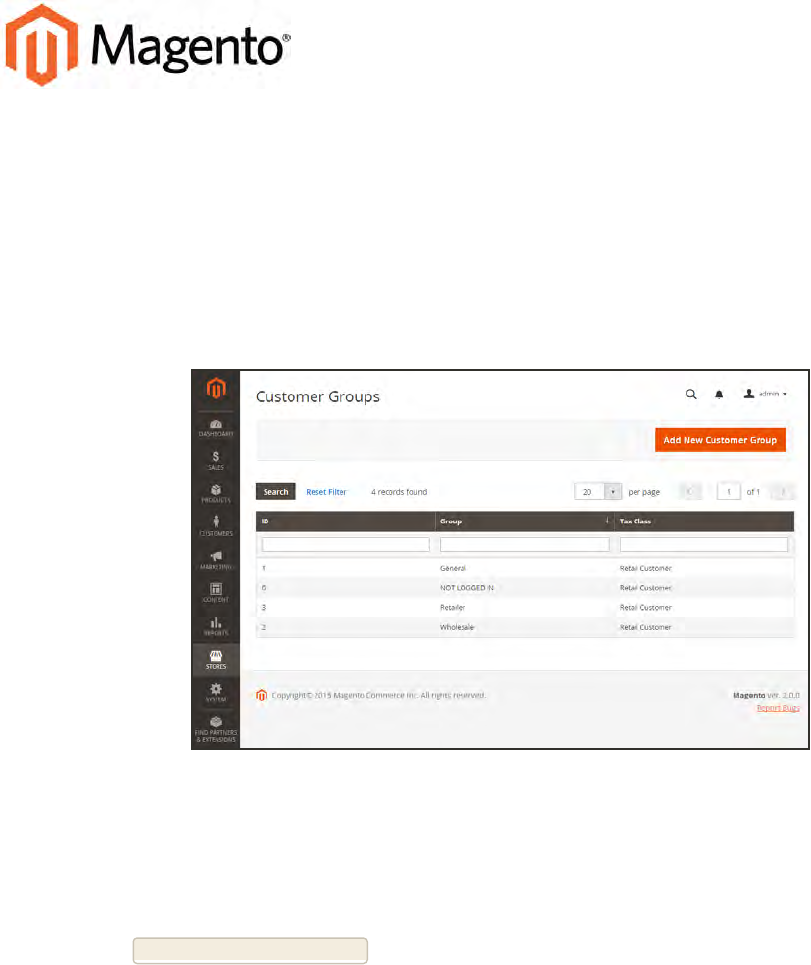
CHAPTER 41:
Customer Groups
Customer groups determine which discounts are available, and the tax class that is
associated with the group. The default customer groups are General, Not Logged In, and
Wholesale.
Customer Groups
To create a customer group:
1. On the Admin sidebar, tap Stores. Then under Other Settings, choose Customer Groups.
2. Tap Add New Customer Group. Then, do the following:
a. Enter a unique Group Name less than 32 characters to identify the group.
b. Select the Tax Class that applies to the group.
Magento Community Edition 2.0 User Guide 591
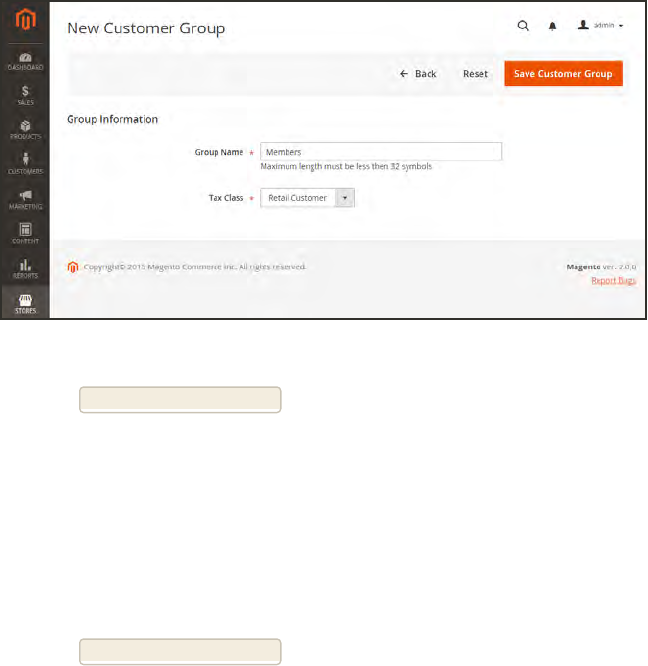
Group Information
3. When complete, tap Save Customer Group.
To edit a customer group:
1. On the Admin sidebar, tap Stores. Then under Other Settings, choose Customer Groups.
2. Open the record in edit mode.
3. Make the necessary changes.
4. When complete, tap Save Customer Group.
592 Magento Community Edition 2.0 User Guide
CHAPTER 41: Customer Groups
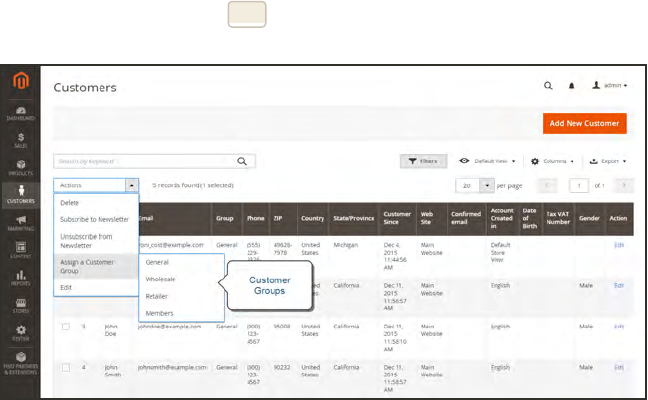
To assign a customer to a different group:
1. On the Admin sidebar, tap Customers. Then, choose All Customers.
2. Find the customer in the list, and mark the checkbox in the first column. Then, do the
following:
a. Set the Actions control to “Assign a Customer Group.”
b. Set the Group control to the new group.
c. When prompted to confirm, tap OK.
Assign a Customer Group
Magento Community Edition 2.0 User Guide 593
CHAPTER 41: Customer Groups

Notes
594 Magento Community Edition 2.0 User Guide


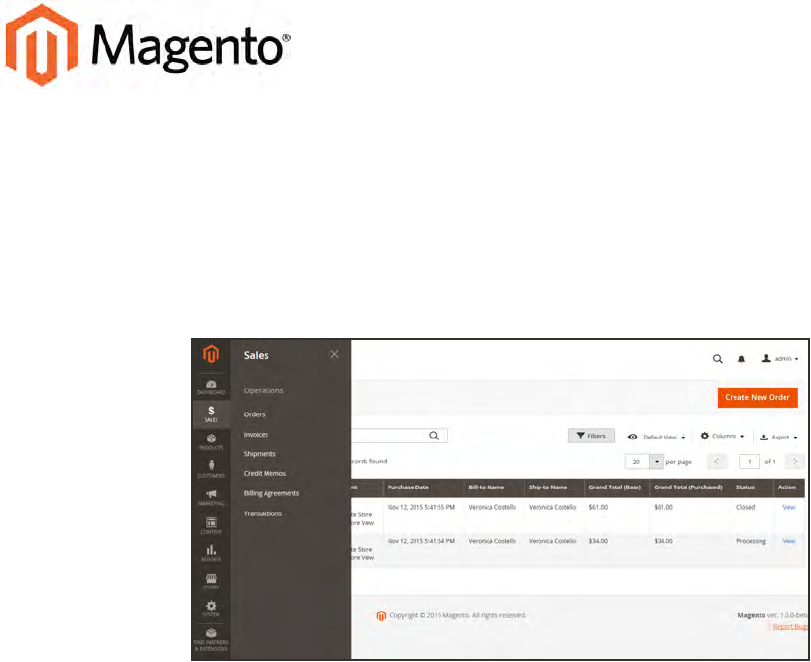
CHAPTER 42:
Sales Menu
The Sales menu lists transactions according to where they are in the order workflow. You
might think of each of option as a different stage in the lifetime of an order.
Sales Menu
Magento Community Edition 2.0 User Guide 597
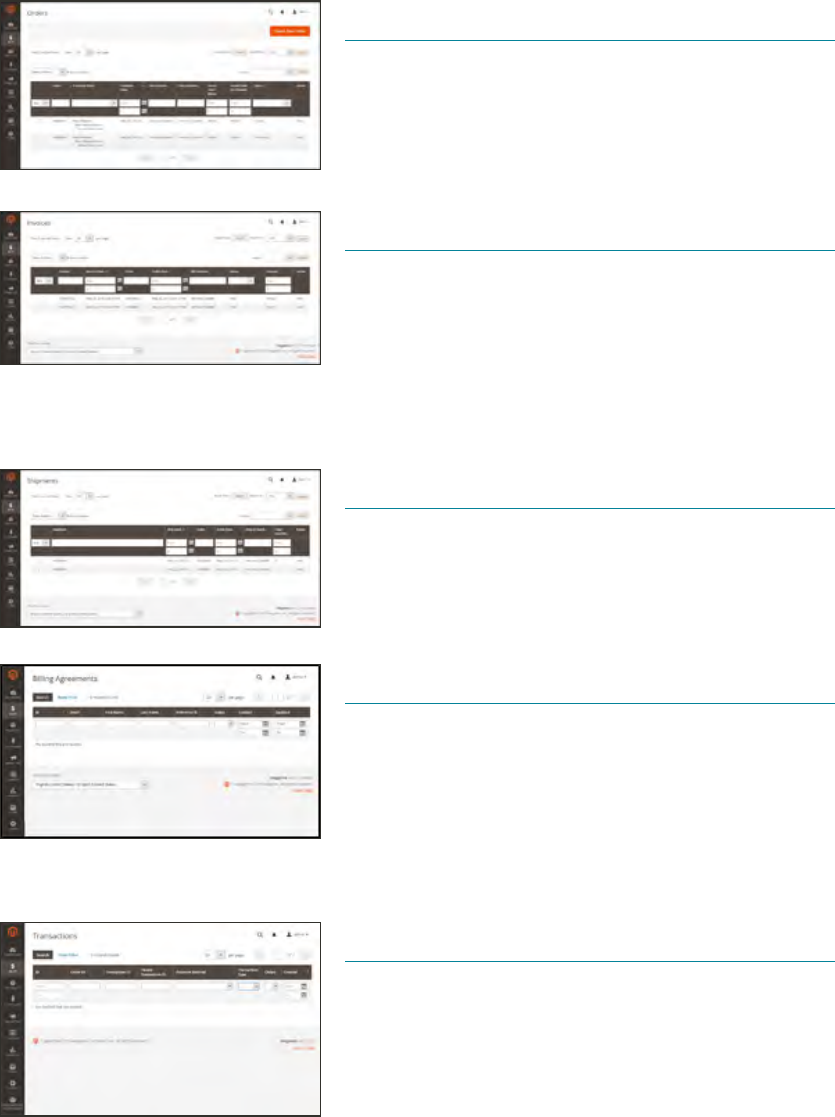
Menu Options
Orders
When an order is placed, a sales order is created as a
temporary record of the transaction. Payment has not
been processed, and the order can still be canceled.
Invoices
An invoice is a record of the receipt of payment for an
order. Multiple invoices can be created for a single order,
each with as many, or as few of the purchased products
that you specify. Depending on the payment action,
payment can be automatically captured when the invoice
is generated.
Shipments
A shipment is a record of the products in an order that
have been shipped. As with invoices, multiple shipments
can be associated with a single order, until all of the
products in the order are shipped.
Billing Agreements
A billing agreement is similar to a purchase order, except
that it isn’t limited to a single purchase. During checkout,
the customer chooses Billing Agreement as the payment
method. A billing agreement streamlines the checkout
process because the customer doesn’t have to enter
payment information for each purchase.
Transactions
The Transactions page lists all payment activity that has
taken place between your store and all payment
systems, and provides access to more detailed
information.
598 Magento Community Edition 2.0 User Guide
CHAPTER 42: Sales Menu

Order Management
In this section of the guide, you will learn about
each stage of the order workflow, and how to
process orders, create invoices, and shipments.
You will also learn how to issue credit memos and
manage returns.
Magento Community Edition 2.0 User Guide 599

Contents Orders
Order Workspace
Order Actions
Order Search
Grid Layout
Order Workflow
Processing Orders
Allow Reorders
Order Status
Order Status Workflow
Custom Order Status
Scheduled Operations
Pending Payment Order Lifetime
Scheduled Grid Updates
Invoices
Printing Multiple Invoices
Billing Agreements
Shipments
Transactions
Credit Memos
Printing Credit Memos
Product Return Workflow
600 Magento Community Edition 2.0 User Guide
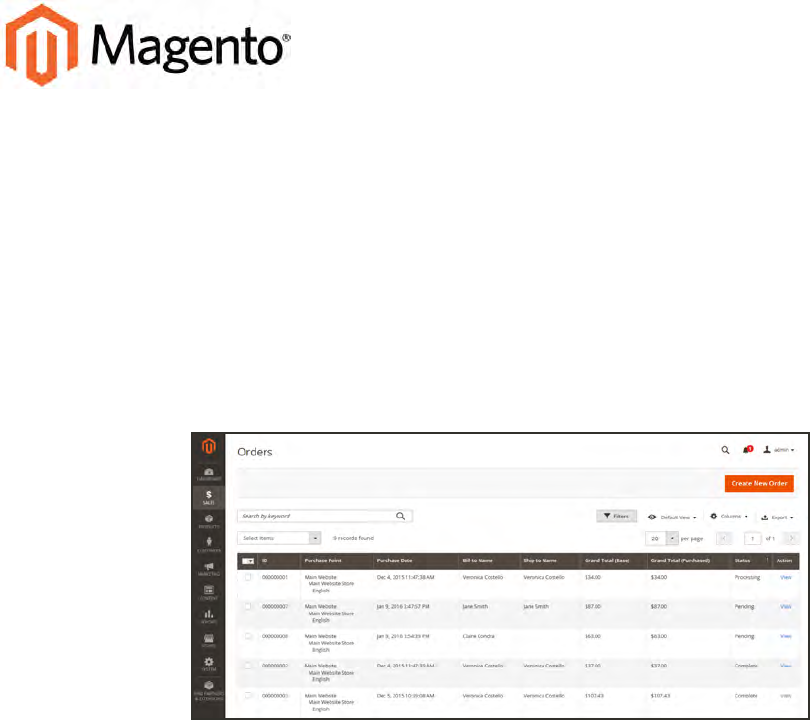
CHAPTER 43:
Orders
The Orders workspace lists all current orders. Each row in the grid represents an order,
and each column represents an attribute, or data field. Use the standard controls to sort
and filter the list, find orders, and apply actions to selected orders. You can view existing
orders, and create new orders. The tabs above the pagination controls can be used to filter
the list, change the default view, change and rearrange columns, and export data.
Orders
Magento Community Edition 2.0 User Guide 601
CONTROL DESCRIPTION
Search Initiates a search for orders based on keywords entered in the search
box, and current filters.
Create New Order Creates a new order.
Go to Archive Displays the list of archived orders.
Search Initiates a search for orders based on the current filters.
Reset Filter Restores all filters to a blank state.
Actions Lists all actions that can be applied to selected orders. To apply an
action to an order, or group of orders, mark the checkbox in the first
column of each order. Order actions:
Cancel
Hold
Unhold
Print Invoices
Print Packing Slips
Print Credit Memos
Print All
Move to Archive
Mass Actions Can be used to select multiple records as the target of action. Mark
the checkbox in the first column of each record that is subject to the
action. Options: Select All, Unselect All, Select Visible, and
Unselect Visible
Submit Applies the current action to the selected order records.
Edit Opens the order in edit mode.
Workspace Controls
602 Magento Community Edition 2.0 User Guide
CHAPTER 43: Orders

COLUMN DESCRIPTION
Selection State Filters the list of orders based on checkbox status. Options:
Any Lists all records, regardless of checkbox status.
Yes Lists only records with the checkbox marked.
No Lists only records without the checkbox marked.
ID A unique, sequential number that is assigned when a new order is
saved for the first time.
Purchase Point Identifies the store view where the order was placed.
Purchase Date The date the order was placed.
Bill-to Name The name of the person who is responsible to pay for the order.
Ship-to Name The name of the person to whom the order is to be shipped.
Grand Total (Base) The grand total of the order.
Grand Total (Purchased) The grand total of products purchased in the order.
Status The current order status.
Action The View link opens the order.
Columns
Magento Community Edition 2.0 User Guide 603
CHAPTER 43: Orders
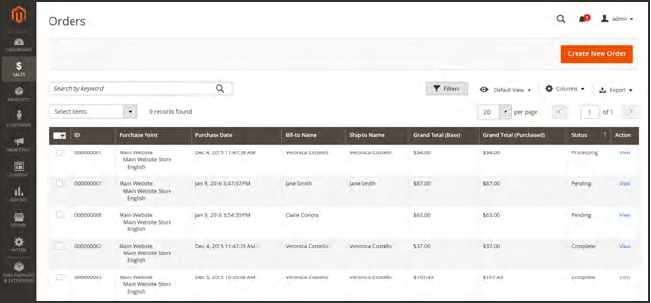
Order Workspace
The Order workspace lists all current orders. Each row in the grid represents a customer order,
and each column represents an attribute, or data field . Use the standard controls to sort and
filter the list, find orders, and apply actions to selected orders. From the grid, you can view
existing orders, and create new orders. The tabs above the pagination controls are used to filter
the list, change the default view, change and rearrange columns, and export data.
Orders
Order Workspace CHAPTER 43: Orders
604 Magento Community Edition 2.0 User Guide

CONTROL DESCRIPTION
Search Initiates a search for orders based on keywords entered in the search
box, and current filters.
Create New Order Creates a new order.
Go to Archive Displays the list of archived orders.
Search Initiates a search for orders based on the current filters.
Reset Filter Restores all filters to a blank state.
Actions Lists all actions that can be applied to selected orders. To apply an
action to an order, or group of orders, mark the checkbox in the first
column of each order. Order actions:
Cancel
Hold
Unhold
Print Invoices
Print Packing Slips
Print Credit Memos
Print All
Move to Archive
Mass Actions Can be used to select multiple records as the target of action. Mark
the checkbox in the first column of each record that is subject to the
action. Options: Select All, Unselect All, Select Visible, and
Unselect Visible
Submit Applies the current action to the selected order records.
Edit Opens the order in edit mode.
Workspace Controls
CHAPTER 43: Orders Order Workspace
Magento Community Edition 2.0 User Guide 605

COLUMN DESCRIPTION
Selection State Filters the list of orders based on checkbox status. Options:
Any Lists all records, regardless of checkbox status.
Yes Lists only records with the checkbox marked.
No Lists only records without the checkbox marked.
ID A unique, sequential number that is assigned when a new order is
saved for the first time.
Purchase Point Identifies the store view where the order was placed.
Purchase Date The date the order was placed.
Bill-to Name The name of the person who is responsible to pay for the order.
Ship-to Name The name of the person to whom the order is to be shipped.
Grand Total (Base) The grand total of the order.
Grand Total (Purchased) The grand total of products purchased in the order.
Status The current order status. Options:
Action The View link opens the order.
Columns
Order Actions
To apply an action to specific orders, mark the checkbox in the first column of each order. To
select or deselect all orders, use the control at the top of the column.
Order Workspace CHAPTER 43: Orders
606 Magento Community Edition 2.0 User Guide
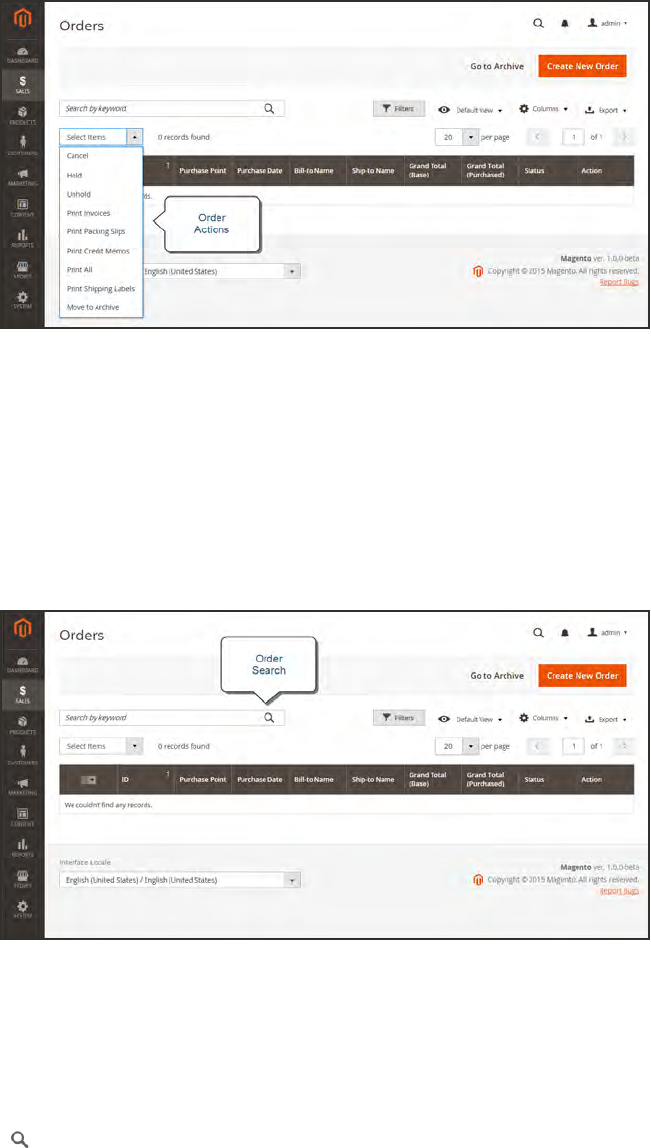
Order Actions
Order Search
The Search box in the upper-left of the Orders grid can be used to find specific orders by
keyword, or by filtering the order records that appear in the grid..
Search Results
To search for a match:
1. Enter a search term into the page search box.
2. Tap Search to display the results.
CHAPTER 43: Orders Order Workspace
Magento Community Edition 2.0 User Guide 607
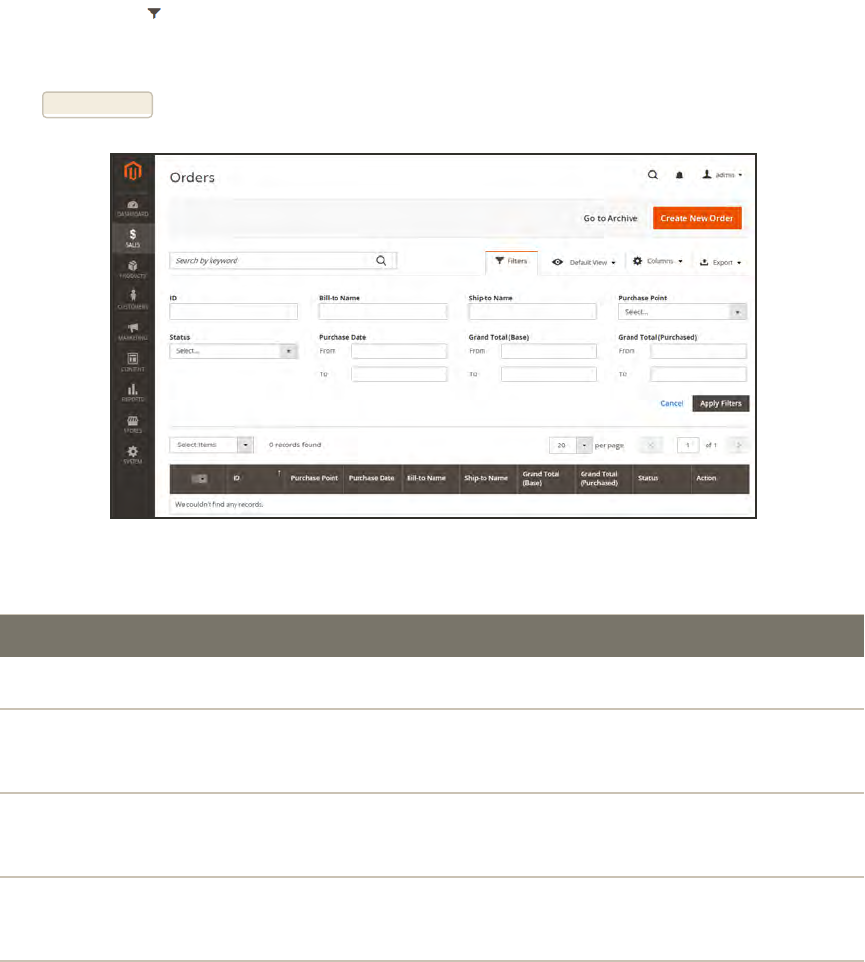
To filter the search:
1. Tap the Filters tab to display the selection of search filters.
2. Complete as many of the filters as needed to describe the order(s) that you want to find.
3. Tap Apply Filters to display the results.
Order Filters
FILTER DESCRIPTION
ID Filters the search based on order ID.
Bill-to Name Filters the search by the name of the person who is responsible to
pay for the order.
Ship-to Name Filters the search by the name of the person to whom each order is
shipped .
Purchase Point Filters the search by website, store, or store view where the order
was placed.
Status Filters the search based on order status. Options:
Canceled
Closed
Complete
Suspected Fraud
On Hold
Search Filters
Order Workspace CHAPTER 43: Orders
608 Magento Community Edition 2.0 User Guide
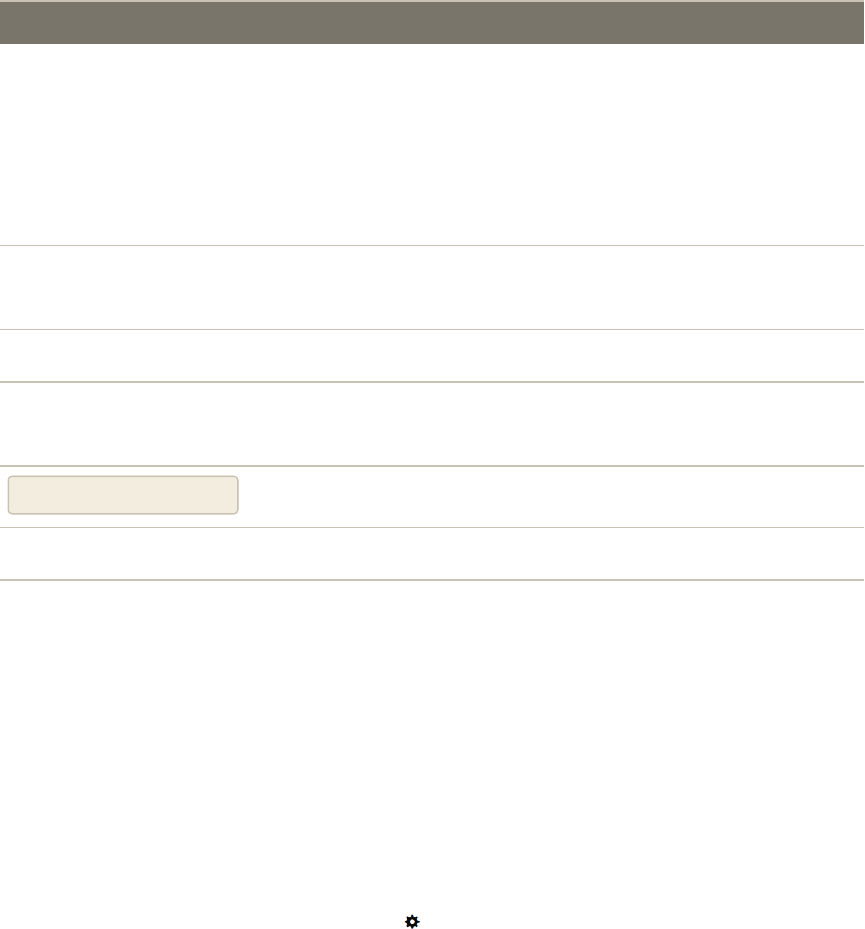
FILTER DESCRIPTION
Payment Review
PayPal Canceled Reversal
Pending
Pending Payment
Processing
Purchase Date Filters the search based on the date purchased. To find orders within
a range of dates, enter both the From and To dates.
Grand Total (Base) Filters the search based on the Grand Total of each order.
Grand Total (Purchased) Filters the search based on Grand Total of items purchased in each
order.
Apply Filters Applies all filters to the search.
Cancel Cancels the current search.
Clear All Clears all search filters.
Search Filters (cont.)
Order Grid Layout
The selection of columns and their order in the grid can be changed according to your
preference. The new layout can be saved as a grid “view.” By default, only nine of twenty
available columns are included in the grid.
To change the selection of columns:
In the upper-right corner, tap the Columns control. Then, do the following:
lMark the checkbox of any column you want to add to the grid.
lClear the checkbox of any column you want to remove from the grid.
Make sure to scroll down to see all available columns.
CHAPTER 43: Orders Order Workspace
Magento Community Edition 2.0 User Guide 609
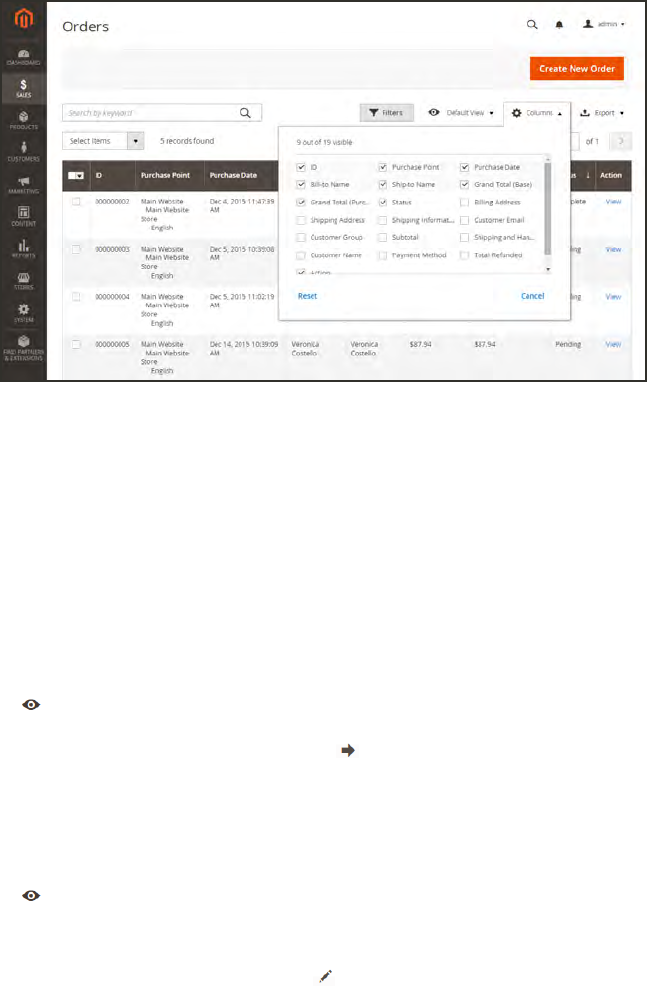
Order Grid Columns
To move a column:
1. Tap the header of the column, and hold.
2. Drag the column to the new position, and release.
To save a grid view :
1. Tap the View control. Then, tap Save Current View.
2. Enter a name for the view. Then, click the arrow to save all changes.
The name of the view now appears as the current view.
To change the view:
Tap the View control. Then, do one of the following:
lTo use a different view, tap the name of the view.
lTo change the name of a view, tap the Edit icon. Then, update the name.
Order Workspace CHAPTER 43: Orders
610 Magento Community Edition 2.0 User Guide

Order Workflow
When a customer places an order, a sales order is created as a temporary record of the
transaction. In the Orders grid, sales orders initially have a status of "Pending," and can be
canceled at any time until the payment is processed. After payment is confirmed, the order can
be invoiced and shipped.
1Place Order. The checkout process begins when the shopper clicks the Go to Checkout
button on the shopping cart page or reorders directly from their customer account.
2Order Pending. In the Orders grid, the status of the sales order is initially “Pending.”
Payment has not been processed, and the order can still be canceled.
3Receive Payment. The status of the order changes to “Processing.” when payment is
received or authorized. Depending on the payment method, you might receive notification
when the transaction is authorized or processed.
4Invoice Order. An order is typically invoiced after payment is received. Some payment
methods generate an invoice automatically when payment is authorized and captured.
The payment method determines which invoicing options are needed for the order. After
the invoice is generated and submitted, a copy is sent to the customer.
5Ship Order. The shipment is submitted, and the packing slip and shipping label are
printed. The customer receives notification, and the package is shipped. If tracking
numbers are used, the shipment can be tracked from the customer’s account.
CHAPTER 43: Orders Order Workflow
Magento Community Edition 2.0 User Guide 611
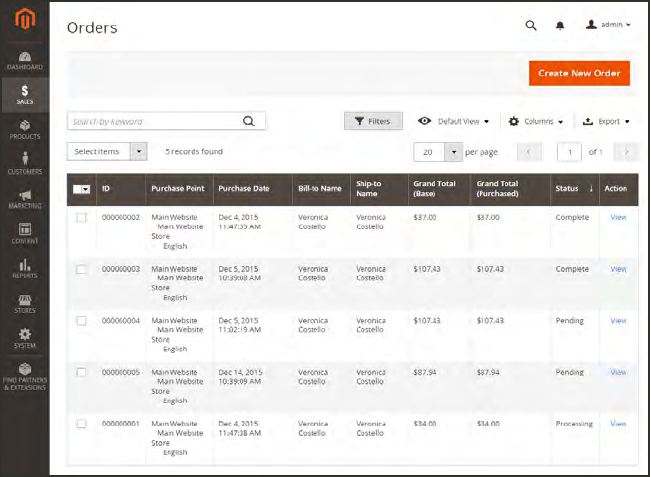
Processing Orders
When a customer places an order, a sales order is created as a temporary record of the
transaction. The sales order has a status of “Pending” until payment is received. Sales orders
can be canceled until an invoice is generated. An easy way to think of it is this: Orders become
invoices, and invoices become shipments. The Orders grid lists all orders, regardless of where
they are in the workflow.
Orders
Order Workflow CHAPTER 43: Orders
612 Magento Community Edition 2.0 User Guide
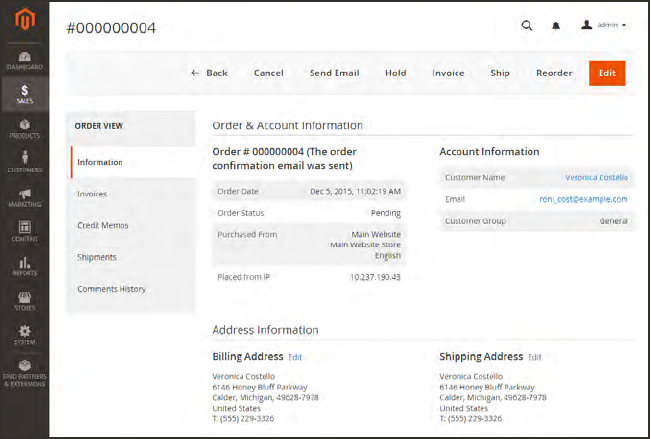
To view an order:
1. On the Admin sidebar, tap Sales. Then under Operations, choose Orders.
2. Find the order in the grid, and in the Action column, click View.
lA pending order can be modified, put on hold, canceled, or invoiced and shipped.
lA completed order can be reordered.
View Order
CHAPTER 43: Orders Order Workflow
Magento Community Edition 2.0 User Guide 613
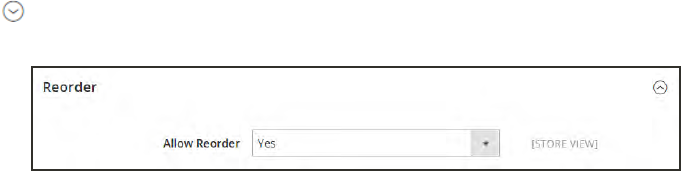
Allow Reorders
When enabled, reorders can be made directly from the customer account or from the original
order in the Admin. Reorders are enabled by default.
To configure customer reorders:
1. On the Admin sidebar, tap Stores. Then under Settings, choose Configuration.
2. In the panel on the left, under Sales, choose Sales.
3. Expand the Reorder section.
Reorder
4. Set Allow Reorder to your preference.
Order Workflow CHAPTER 43: Orders
614 Magento Community Edition 2.0 User Guide
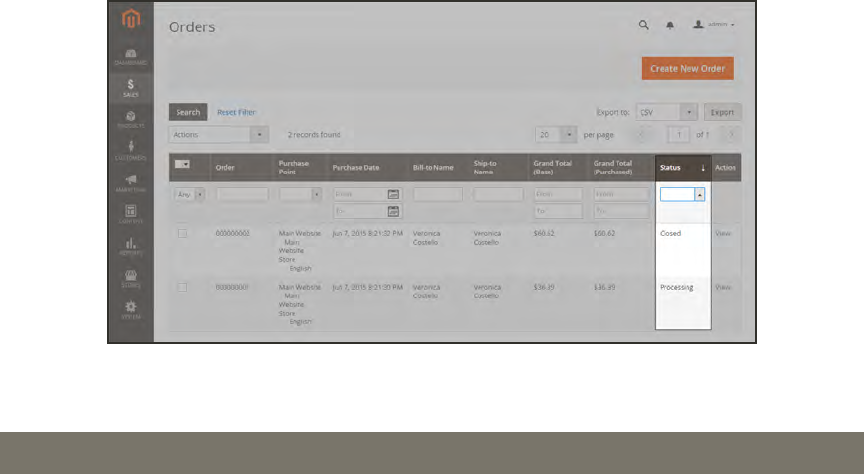
Order Status
All orders have an order status that is associated with a stage in the order processing workflow.
The status of each order is shown in the Status column of the Orders grid. Your store has a set
of predefined order status and order state settings. The order state describes the position of an
order in the workflow.
OrderStatus
ORDER STATUS ORDER STATE
Processing
Suspected Fraud
Pending Payment
Payment Review
Suspected Fraud
Pending
On Hold
Complete
Closed
Canceled
PayPal Canceled Reversal
Pending PayPal
PayPal Reversed
New
Pending Payment
Processing
Complete
Closed
Canceled
On Hold
Payment Review
Predefined Order Status
Order Status Workflow
CHAPTER 43: Orders Order Status
Magento Community Edition 2.0 User Guide 615
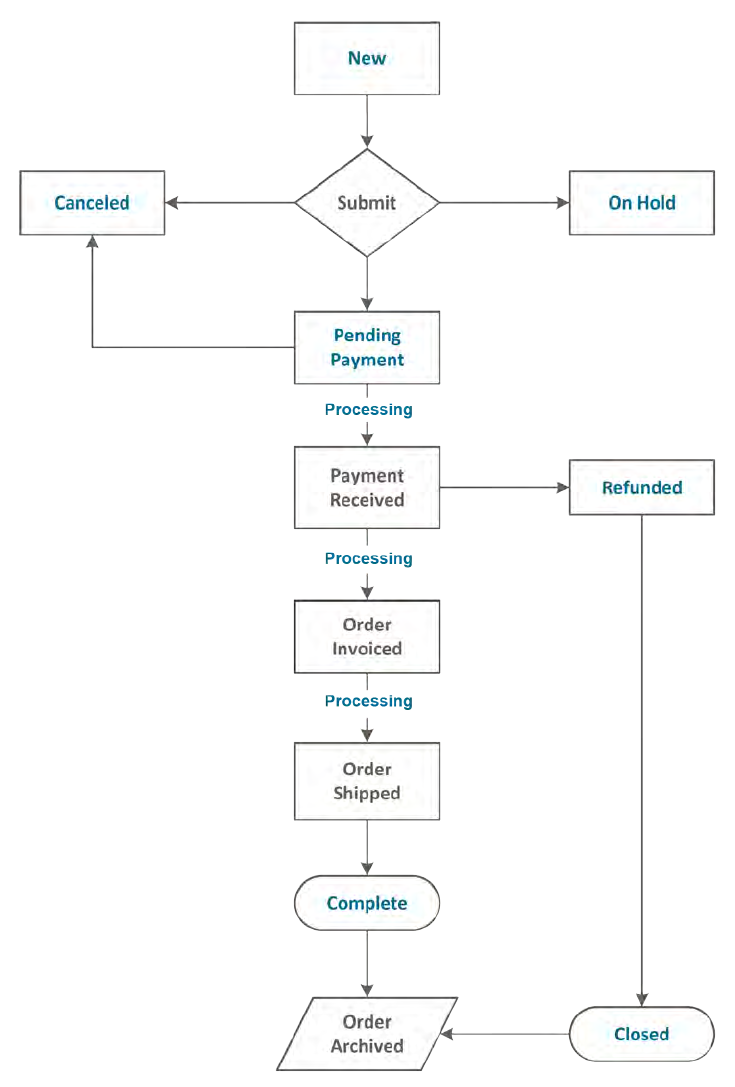
Custom Order Status
Order Status CHAPTER 43: Orders
616 Magento Community Edition 2.0 User Guide
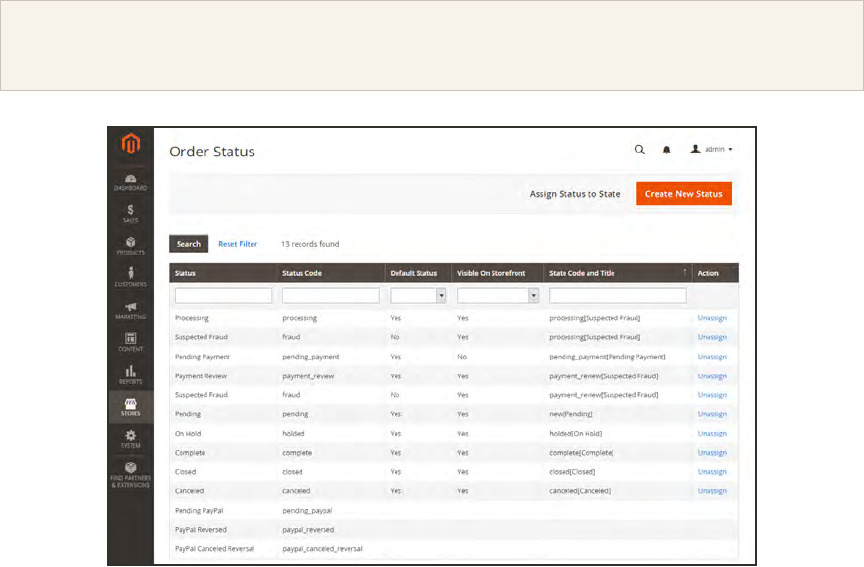
In addition to the preset order status settings, you can create custom order status settings of
your own, assign them to order states, and set a default order status for order states. For
example, you might need a custom order status for orders such as “packaging” or
“backordered,” or for a status that is specific to your needs. You can create a descriptive name
for the custom status, and assign it to the associated order state in the workflow.
Only default custom order status values are used in the order workflow. Custom status values that
are not set as default can be used only in the comments section of the order.
Order Status Settings
CHAPTER 43: Orders Order Status
Magento Community Edition 2.0 User Guide 617
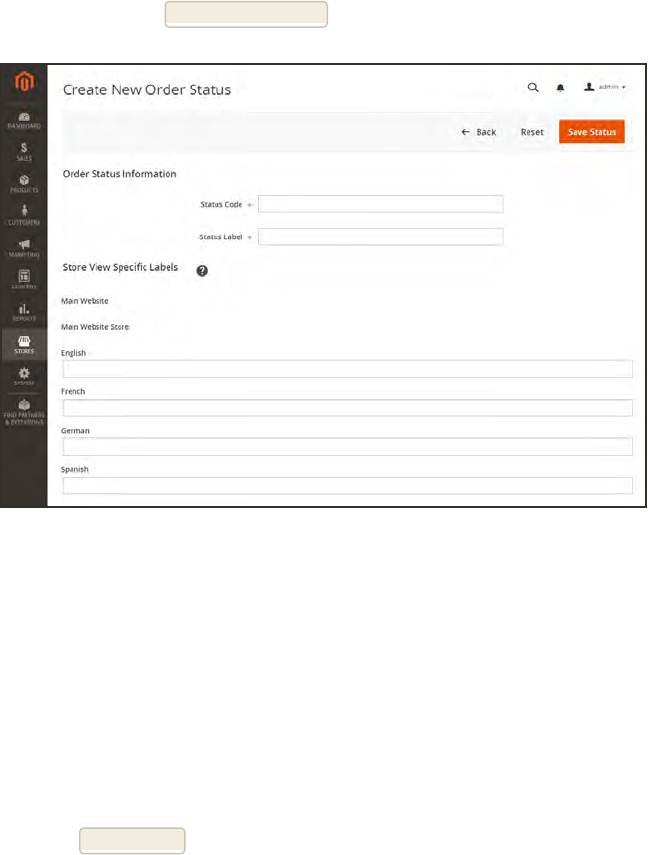
To create a custom order status:
1. On the Admin sidebar, tap Stores. Then under Settings, choose Order Status.
2. In the upper-right corner, tap Create New Status.
Create New Order Status
3. Under Order Status Information section, do the following:
a. Enter a Status Code for internal reference. The first character must be a letter (a-z), and
the rest can be any combination of letters and numbers (0-9). Use the underscore
character instead of a space.
b. Enter a Status Label to identify the status setting in both the Admin and storefront.
4. In the Store View Specific Labels section, enter any labels that are needed for different store
views.
5. When complete, tap Save Status .
Order Status CHAPTER 43: Orders
618 Magento Community Edition 2.0 User Guide
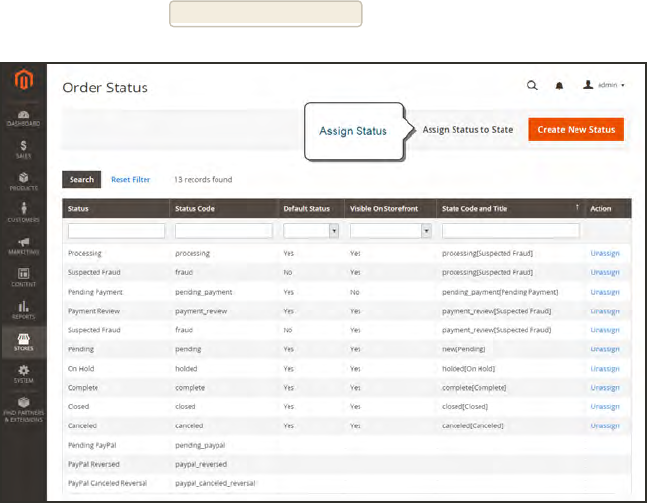
To assign an order status to a state:
1. On the Order Status page, tap Assign Status to State.
Assign Status
2. In the Assignment Information section, do the following:
a. Choose the Order Status that you want to assign. They are listed by status label.
b. Set Order State to the place in the workflow where the order status belongs.
c. To make this status the default for the order state, mark the Use Order Status as Default
checkbox.
d. To make this status visible from the storefront, mark the Visible On Storefront checkbox.
CHAPTER 43: Orders Order Status
Magento Community Edition 2.0 User Guide 619

Assign Status to State
3. When complete, tap Save Status Assignment.
To edit an existing order status:
1. In the Order Status grid , open the status record in edit mode.
2. Update the status settings as needed.
3. When complete, tap Save Status.
To remove an order status from an assigned state:
A status setting cannot be unassigned from a state if the status is currently in use.
1. In the Order Status grid, find the order status record to be unassigned.
2. In the Action column on the far right of the row, tap the Unassign link.
A message appears at the top of the workspace that the order status has been unassigned.
Although the order status label still appears in the list, it is no longer assigned to a state.
Order status settings cannot be deleted.
Scheduled Order Operations
Magento cron jobs can be used to schedule the following order management tasks:
lPending Payment Order Lifetime
lScheduled Grid Updates
Scheduled Order Operations CHAPTER 43: Orders
620 Magento Community Edition 2.0 User Guide
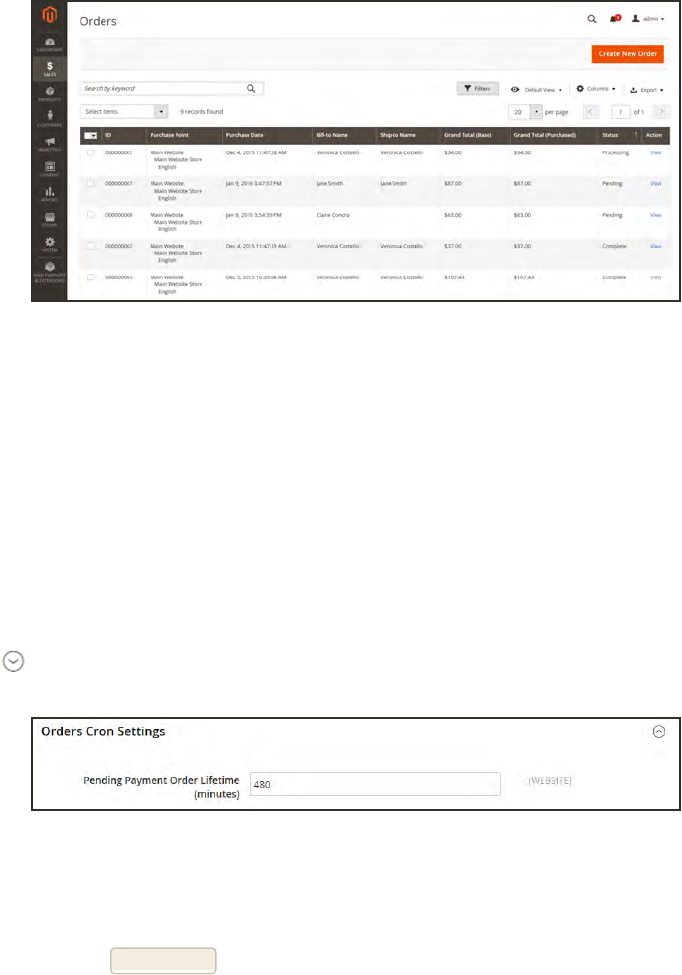
Orders Grid with Pending Orders
Pending Payment Order Lifetime
The lifetime of orders with pending payments is determined by the Orders Cron Settings
configuration.The default value is set to 480 minutes, which is eight hours.
To set the lifetime of orders with pending payments:
1. On the Admin sidebar, tap Stores. Then under Settings, choose Configuration.
2. In the panel on the left under Sales, choose Sales.
3. Expand the Orders Cron Settings section.
Orders Cron Settings
4. In the Pending Payment Order Lifetime (minutes) field, enter the number of minutes before a
pending payment expires.
5. When complete, tap Save Config.
Scheduled Grid Updates
The Grid Settings configuration schedules updates to the following order management grids,
and reindexes the data as scheduled by Cron:
lOrders
lInvoices
lShipments
CHAPTER 43: Orders Scheduled Order Operations
Magento Community Edition 2.0 User Guide 621
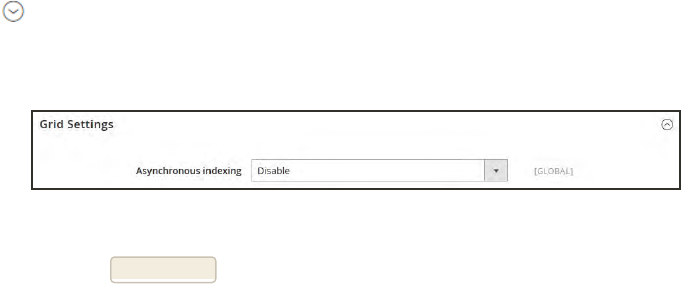
lCredit Memos
The benefits of scheduling these tasks is to avoid the locks that occur when data is saved, and
to reduce processing time. When enabled, any updates take place only during the scheduled
cron job. For best results, Cron should be configured to run once every minute.
To enable scheduled grid updates and reindexing:
1. On the Admin sidebar, tap Stores. Then under Settings, choose Configuration.
2. In the panel on the left under Advanced, choose Developer.
3. Expand the Grid Settings section.
4. Set Asynchronous Indexing to “Enable.”
Grid Settings
5. When complete, tap Save Config.
Scheduled Order Operations CHAPTER 43: Orders
622 Magento Community Edition 2.0 User Guide
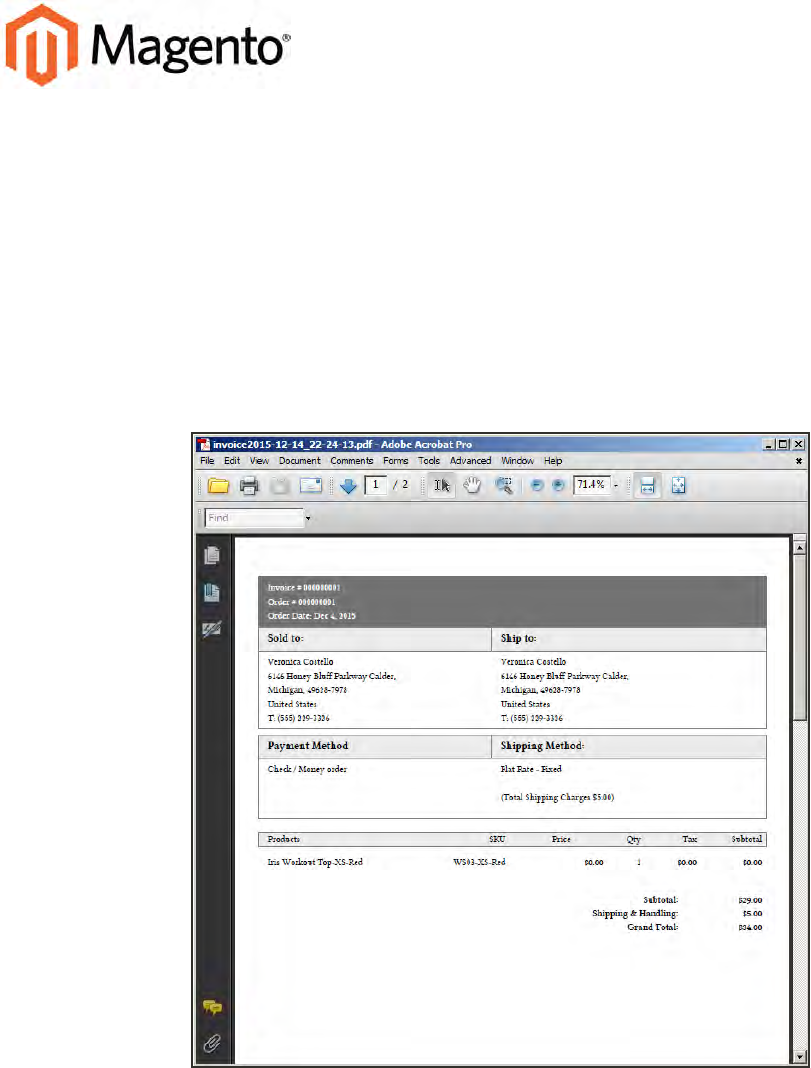
CHAPTER 44:
Invoices
An invoice is a record of the record of payment for an order. Multiple invoices can be
created for a single order, and each can include as many or as few of the purchased
products that you specify. You can upload a high-resolution logo for a print-ready
PDFinvoice, and include the Order ID in the header. To customize the invoice template
with your logo, see: Preparing Your Invoice Logo.
PDF Invoice
Magento Community Edition 2.0 User Guide 623
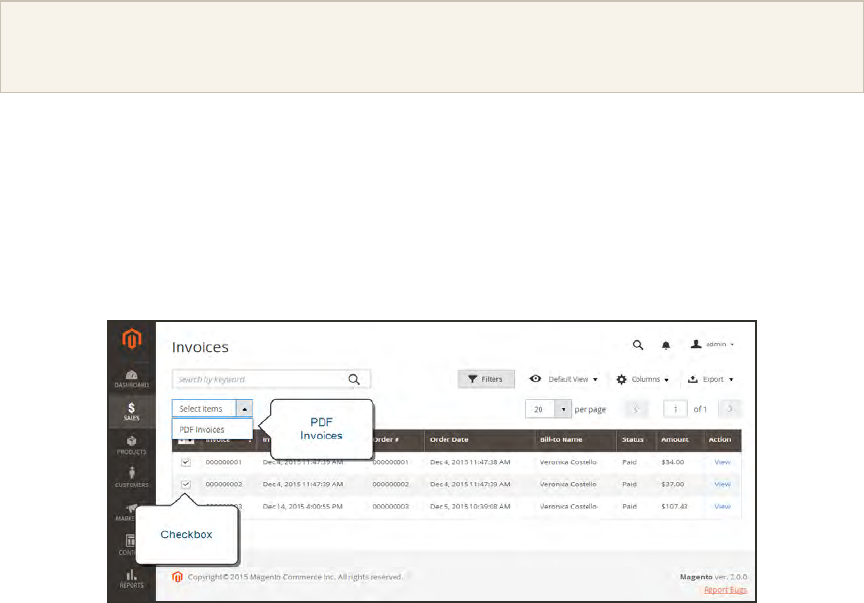
Printing Multiple Invoices
Invoices can be printed individually or as a batch. However, before an invoice can be printed, it
must first be generated for the order. To add your logo and address to the invoice, see:
Preparing Your Invoice Logo.
To view or print the PDF, you must have a PDFreader. You can download Adobe Reader at no
charge.
To print multiple invoices:
1. On the Admin sidebar, tap Sales. Then under Operations, choose Invoices.
2. In the Invoices grid, mark the checkbox of each invoice to be printed.
3. Set the Actions control to “PDF Invoices.”
Print Invoices
The invoices are saved in a single PDF file that can be sent to a printer, or saved.
CHAPTER 44: Invoices
624 Magento Community Edition 2.0 User Guide
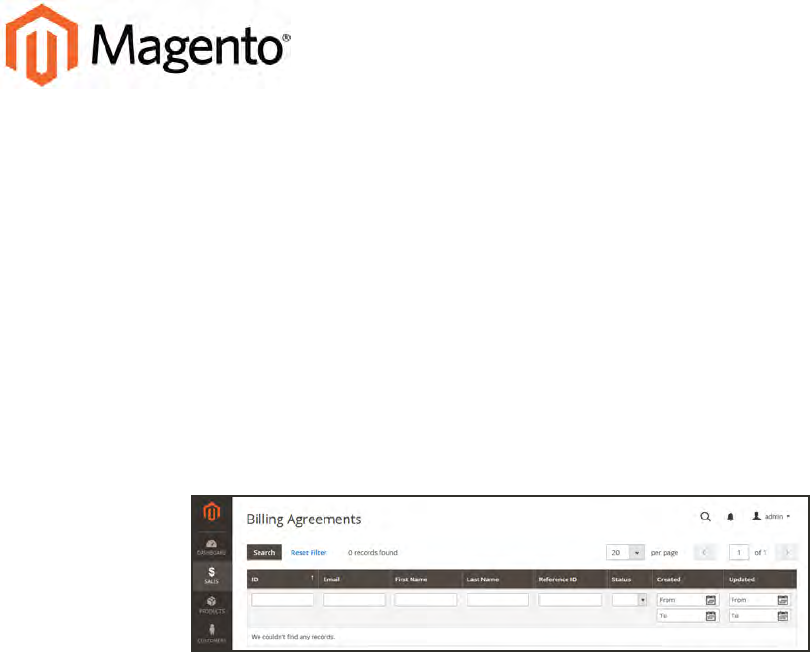
CHAPTER 45:
Billing Agreements
The Billing Agreements grid lists all billing agreements between your store and its
customers. The store administrator can filter the records by the customer or billing
agreement information including billing agreement reference ID, status, and creation date.
Each record includes general information about the billing agreement, and all sales orders
that have used it as a payment method. The store administrator can view, cancel, or delete
customer’s billing agreements. A canceled billing agreement can be deleted only by the
store administrator.
Billing Agreements
Magento Community Edition 2.0 User Guide 625

Notes
626 Magento Community Edition 2.0 User Guide
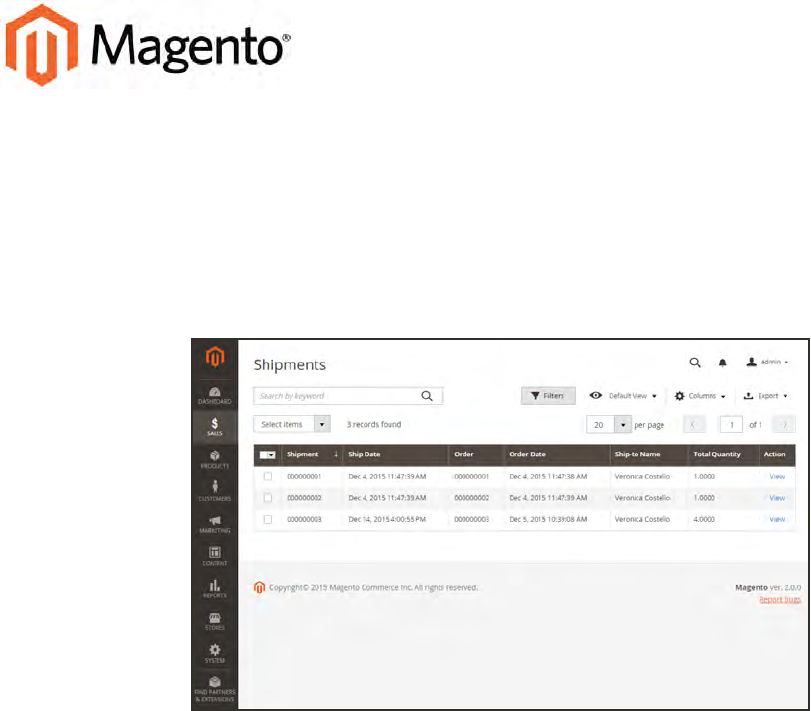

Notes
628 Magento Community Edition 2.0 User Guide
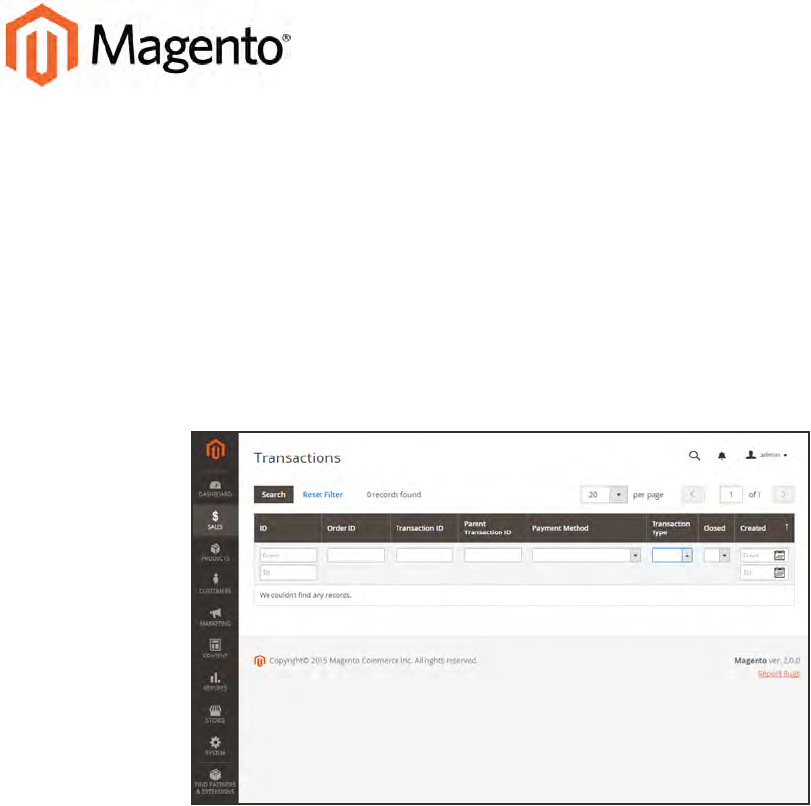
CHAPTER 47:
Transactions
The Transactions grid lists all payment activity that has taken place between your store
and a payment system, and provides access to more detailed information.
To view transactions:
On the Admin sidebar, tap Sales. Then under Operations, choose Transactions.
Transactions
Magento Community Edition 2.0 User Guide 629

Notes
630 Magento Community Edition 2.0 User Guide
CHAPTER 48:
Credit Memos
A credit memo is a document that shows the amount that is owed to the customer. The
amount can be applied toward a purchase, or refunded to the customer. You can print a
credit memo for a single order, or for multiple orders as a batch. Before a credit memo can
be printed, it must first be generated for the order. The credit memo grid lists the credit
memos that have been issued. to customers.
Credit Memos
Magento Community Edition 2.0 User Guide 631
To create a credit memo:
1. On the Admin sidebar tap Sales. Then under Operations, choose Orders.
2. Find the completed order in the grid. Then in the Action column, click the View link to open
the order.
3. In the upper right corner, tap Credit Memo. (The button appears only after an order is invoiced.)
Create Credit Memo
The New Credit Memo page looks similar to the completed order page, with an Items to Refund
section that lists each item from the invoice.
Items to Refund
If an online payment method was used, you will not be able to edit these fields.
4. Do one of the following:
lIf the product is to be returned to inventory, mark the Return to Stock checkbox.
lIf the product will not be returned to inventory, leave the checkbox blank.
632 Magento Community Edition 2.0 User Guide
CHAPTER 48: Credit Memos
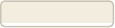
The Return to Stock checkbox appears only if inventory Stock Options are set to “Decrease Stock
When Order Is Placed.”
5. Complete the following:
a. In the Qty to Refund box, enter the number of items to be returned. Then, press the Enter
key to record the change. The Update Qty’s button becomes active.
b. Enter 0for the Qty to Refund of any items that are not to be refunded.
c. Tap Update Qty’s to recalculate the total. (The amount to be credited cannot exceed the
maximum amount that is available for refund.)
6. In the Refund Totals section, do the following, as applicable:
a. In the Refund Shipping field, enter any amount that is to be refunded from the shipping
fee. This field initially displays the total shipping amount from the order that is available
for refund. It is equal to the full shipping amount from the order, less any shipping
amount that has already been refunded. Like the quantity, the amount can be reduced, but
not increased.
b. In the Adjustment Refund field, enter a value to be added to the total amount refunded as
an additional refund that does not apply to any particular part of the order (shipping,
items, or tax). The amount entered cannot raise the total refund higher than the paid
amount.
c. In the Adjustment Fee field, enter a value to be subtracted from the total amount
refunded. This amount is not subtracted from a specific section of the order such as
shipping, items, or tax.
d. If the purchase was paid with store credit, mark the Refund to Store Credit checkbox. The
amount will be credited to the customer’s account balance.
e. To add a comment, enter the text in the Credit Memo Comments box.
f. To send an email notification to the customer, mark the Email Copy of Credit Memo
checkbox.
g. To include the comments you have entered in the email, mark the Append Comments
checkbox.
The status of a credit memo notification appears in the completed credit memo next to the
credit memo number.
7. To complete the process and generate the credit memo, choose one of the following refund
option buttons, according to the payment type:
lRefund Offline
lRefund Online
8. To add a comment to the completed credit memo, scroll down to the Comments History
section, and enter the comment in the box. A history of all activity related to the order is listed
below.
Magento Community Edition 2.0 User Guide 633
CHAPTER 48: Credit Memos
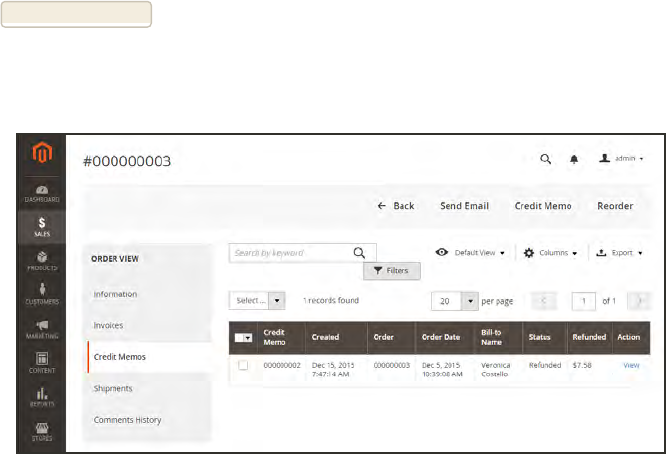
lTo send the comment to the customer by email, mark the Notify Customer by Email
checkbox.
lTo post the comment in the customer’s account, mark the Visible on Frontend checkbox.
Then, tap Submit Comment .
9. In the panel on the left, choose Credit Memos. Any credit memos that are associated with this
order appear in the list.
Completed Credit Memo
634 Magento Community Edition 2.0 User Guide
CHAPTER 48: Credit Memos
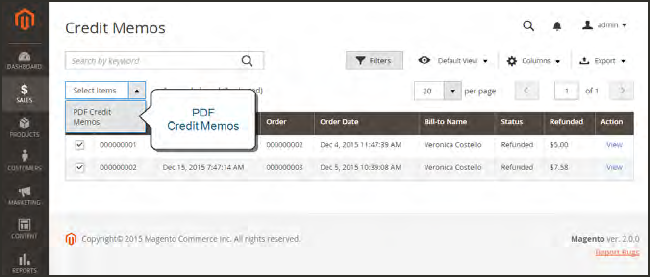
Printing Credit Memos
To print or view the completed credit memo, you must have a PDFreader installed on your
computer. You can download Adobe Reader at no charge.
Credit Memos
To print a credit memo:
1. On the Admin sidebar, tap Sales. Then under Operations, choose Credit Memos.
2. Use one of the following methods to print the credit memo:
CHAPTER 48: Credit Memos Printing Credit Memos
Magento Community Edition 2.0 User Guide 635
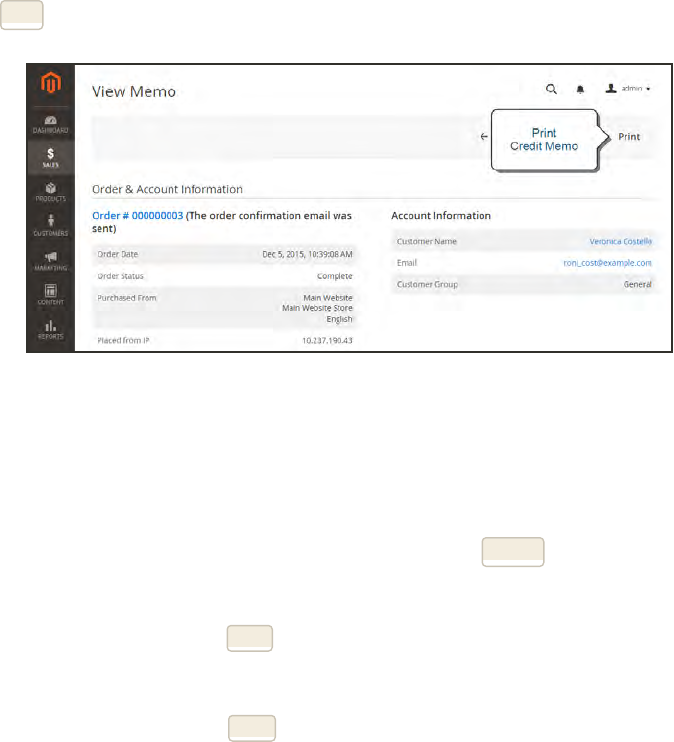
Method 1: Print current credit memo
1. In the grid, open the credit memo.
2. Tap Print.
Print Credit Memo
Method 2: Print multiple credit memos
1. In the list, mark the checkbox of each credit memo that you want to print.
2. Set the Actions control to “PDF Credit Memos. Then, tap Submit.
3. When prompted, do one of the following:
lTo save the document, tap Save. Then, follow the prompts to save the file to your
computer. When the download is complete, open the PDF in Adobe Reader, and print
the document.
lTo view the document, tap Open. The printed-ready PDF credit memo opens in Adobe
Reader. From here, you can either print the credit memo or save it to your computer.
Printing Credit Memos CHAPTER 48: Credit Memos
636 Magento Community Edition 2.0 User Guide
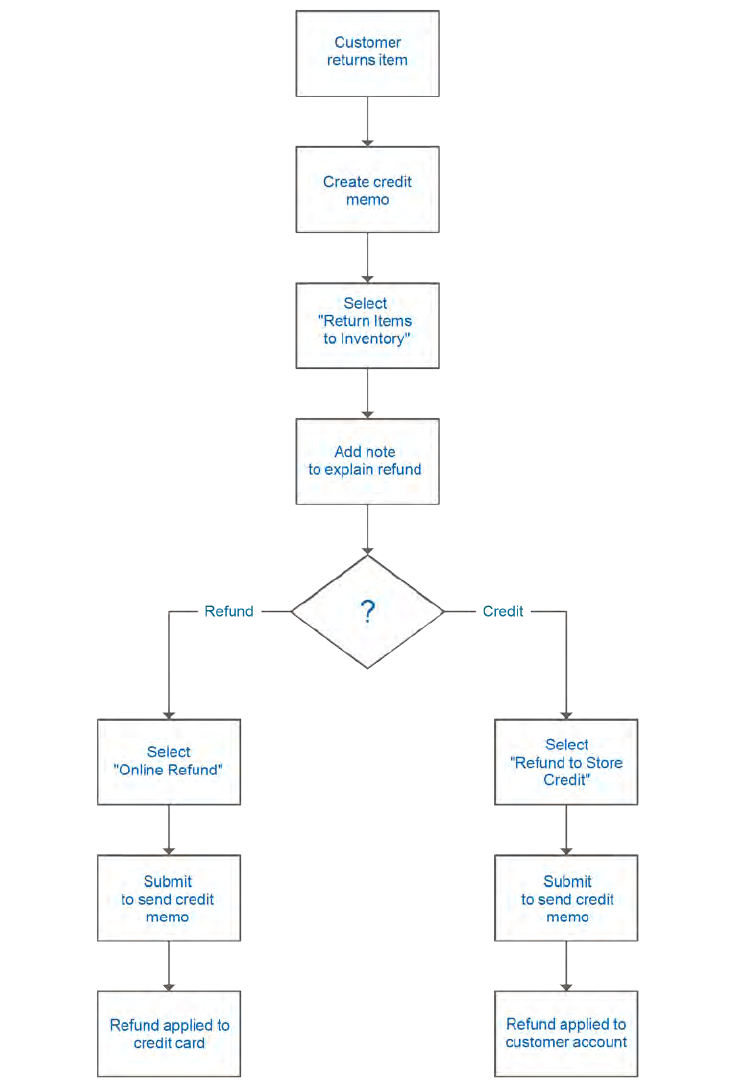
Product Return Workflow
Product Return Workflow
CHAPTER 48: Credit Memos Product Return Workflow
Magento Community Edition 2.0 User Guide 637

Notes
638 Magento Community Edition 2.0 User Guide

Payments
Magento Community Edition 2.0 supports a
variety of payment methods, services, and
gateways that you can offer for your customers’
convenience.
Magento Community Edition 2.0 User Guide 639

Contents Basic Payment Methods
Check / Money Order
Cash On Delivery
Bank Transfer
Purchase Order
Zero Subtotal Checkout
PayPal
PayPal Business Account
PayPal All-In-One Solutions
PayPal Payments Advanced
PayPal Payments Pro
PayPal Payments Standard
PayPal Payment Gateways
PayPal Payflow Pro
PayPal Payflow Link
PayPal Express Checkout
PayPal Fraud Management Filter
PayPal Payment Solutions
PayPal Solutions by Country
Other Payment Solutions
Testing Credentials
Authorize.Net Direct Post
640 Magento Community Edition 2.0 User Guide
CHAPTER 49:
Basic Payment Methods
The payment methods covered in this section are built in to Magento, and do not require
the services of a third-party payment processing company.
Offline Payments
Magento supports a number of offline payment methods,
including payment by check or money order, and cash on
delivery (COD),
Online Payments
Bank transfer is a basic payment method that is included
with all Magento stores. Additional online payment
methods such PayPal, and credit card payments through
payment gateways are covered later in the guide.
Magento Community Edition 2.0 User Guide 641
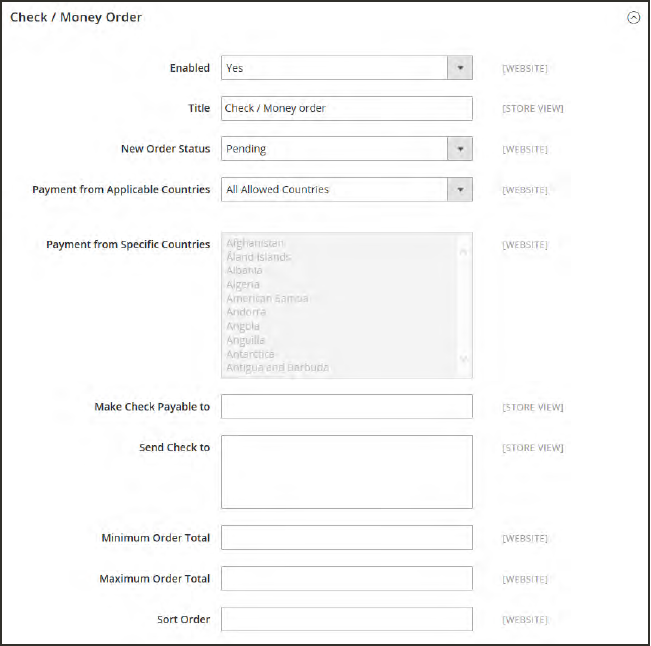
Check / Money Order
Magento Community Edition 2.0 allows you to accept payments by check or money order. The
Check / Money Order payment method is enabled for your story by default. You can accept
checks and money orders from only specific countries, and fine-tune the configuration with
minimum and maximum order total limits.
Check / Money Order
Check / Money Order CHAPTER 49: Basic Payment Methods
642 Magento Community Edition 2.0 User Guide
To configure payment by check or money order:
1. On the Admin sidebar, tap Stores. Then under Settings, choose Configuration.
2. In the panel on the left under Sales, choose Payment Methods.
3. Expand the Check / Money Order section. Then, do the following:
a. To accept payment by check or money order, set Enabled to “Yes.”
b. Enter a Title to identify the Check / Money Order payment method during checkout.
c. Set New Order Status to "Pending” until receipt of payment is confirmed.
d. Set Payment from Applicable Countries to one of the following:
All Allowed
Countries
Customers from all countries specified in your store configuration
can use this payment method.
Specific Countries After choosing this option, the Payment from Specific Countries list
appears. Select each country in the list where customers can make
purchases from your store.
e. In the Make Check Payable To field, enter the name of the party to whom the check must
be payable.
f. In the Send Check To field, enter the street address or PO Box where the checks are
mailed.
g. Set Minimum Order Total and Maximum Order Total to the order amounts required to
qualify for this payment method.
An order qualifies if the total falls between, or exactly matches, the minimum or maximum total
values.
h. Enter a Sort Order number to determine the position of Check / Money Order in the list of
payment methods that is shown during checkout. (0 = first, 1 = second, 2 = third, and so
on.)
4. When complete, tap Save Config.
CHAPTER 49: Basic Payment Methods Check / Money Order
Magento Community Edition 2.0 User Guide 643
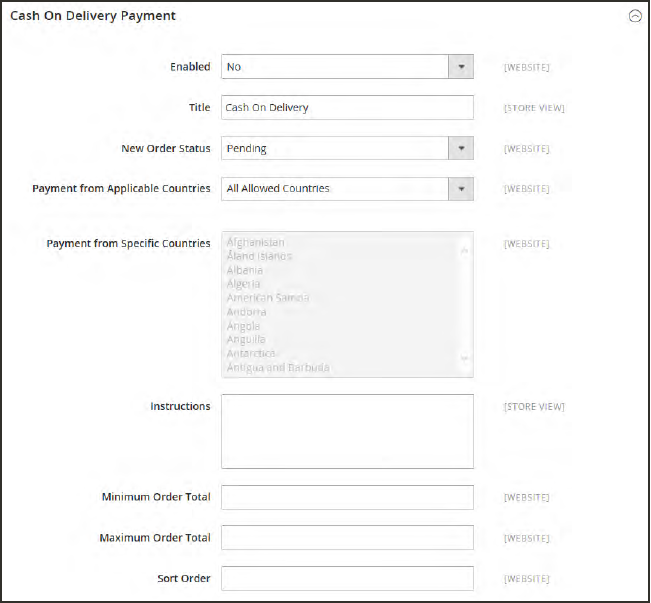
Cash On Delivery
Magento Community Edition 2.0 allows you to accept CODpayments for purchases. You can
accept COD payment from only specific countries, and fine-tune the configuration with
minimum and maximum order total limits.
The shipping carrier receives payment from the customer at the time of delivery, which is then
transferred to you. You can make an adjustment for any fee charged by the carrier service in
your shipping and handling charges.
Cash On Delivery Payment
Cash On Delivery CHAPTER 49: Basic Payment Methods
644 Magento Community Edition 2.0 User Guide
To set up cash on delivery payments:
1. On the Admin sidebar, tap Stores. Then under Settings, choose Configuration.
2. In the panel on the left, under Sales, select Payment Methods.
3. Expand the Cash On Delivery Payment section. Then, do the following:
a. To activate Cash On Delivery Payment, set Enabled to “Yes.”
b. Enter a Title to identify the COD payment method during checkout.
c. Set New Order Status to “Pending” until receipt of payment is confirmed.
d. Set Payment from Applicable Countries to one of the following:
All Allowed
Countries
Customers from all countries specified in your store configuration
can use this payment method.
Specific Countries After choosing this option, the Payment from Specific Countries list
appears. Select each country in the list where customers can make
purchases from your store.
e. Enter Instructions for making a COD payment.
f. Set Minimum Order Total and Maximum Order Total to the order amounts that are
required to qualify for COD payment.
An order qualifies if the total is between, or matches, the minimum or maximum order total.
g. Enter a Sort Order number to determine the sequence in which Cash On Delivery is listed
with other payment methods during checkout. (0 = first, 1 = second, 2 = third, and so on.)
4. When complete, tap Save Config.
CHAPTER 49: Basic Payment Methods Cash On Delivery
Magento Community Edition 2.0 User Guide 645
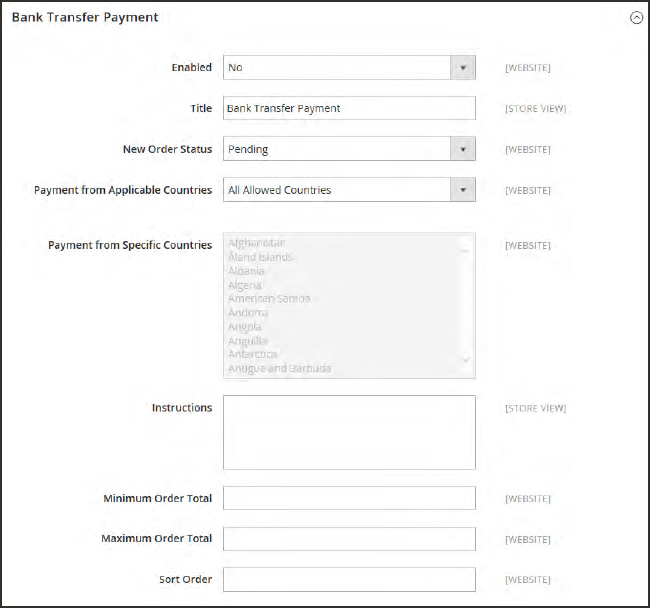
Bank Transfer
Magento Community Edition 2.0 allows you to accept payment that is transferred from a
customer’s bank account and deposited into your merchant bank account.
Bank Transfer Payment
Bank Transfer CHAPTER 49: Basic Payment Methods
646 Magento Community Edition 2.0 User Guide
To configure bank transfer payments:
1. On the Admin sidebar, tap Stores. Then under Settings, choose Configuration.
2. In the panel on the left, under Sales, choose Payment Methods.
3. Expand the Bank Transfer Payment section. Then, do the following:
a. To activate bank transfers, set Enabled to “Yes.”
b. Enter a Title to identify the Bank Transfer Payment method during checkout.
c. Set New Order Status to “Pending” until payment is authorized.
d. Set Payment from Applicable Countries to one of the following:
All Allowed
Countries
Customers from all countries specified in your store configuration
can use this payment method.
Specific Countries After choosing this option, the Payment from Specific Countries list
appears. Select each country in the list where customers can make
purchases from your store.
e. Enter the Instructions your customers must follow to set up a bank transfer. Depending on
the country where your bank is located and the requirements of the bank, you might need
to include the following information:
lBank account name
lBank account number
lBank routing code
lBank name
lBank address
f. Set Minimum Order Total and Maximum Order Total to the amounts required to qualify to
use this payment method.
An order qualifies if the total falls between, or exactly matches, the minimum or maximum total
values.
4. Enter a Sort Order number to determine the position of Bank Transfer in the list of payment
methods during checkout. (0 = first, 1 = second, 2 = third, and so on.)
5. When complete, tap Save Config.
CHAPTER 49: Basic Payment Methods Bank Transfer
Magento Community Edition 2.0 User Guide 647
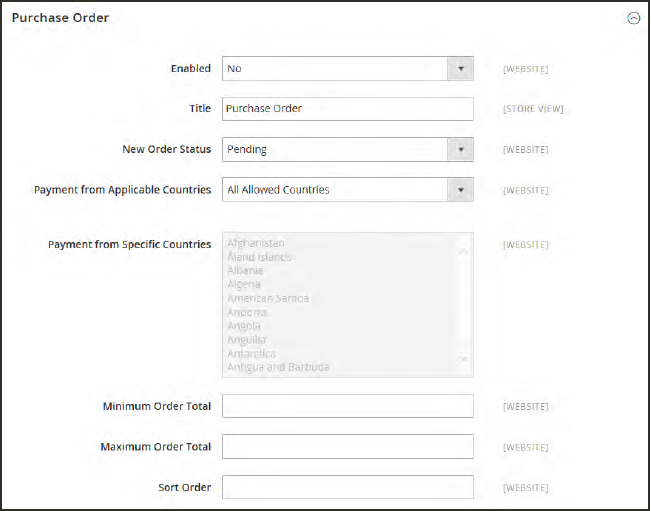
Purchase Order
A purchase order (PO) allows commercial customers to pay for authorized purchases by
referencing the PO number. The purchase order is authorized and issued in advance by the
company that is making the purchase. During checkout, the customer chooses Purchase Order
as the method of payment. Upon receipt of your invoice, the company processes the payment
in their accounts payable system, and pays for the purchase.
Before accepting payment by purchase order, always establish the credit worthiness of the
commercial customer.
Purchase Order
Purchase Order CHAPTER 49: Basic Payment Methods
648 Magento Community Edition 2.0 User Guide

To configure payment by purchase order:
1. On the Admin sidebar, tap Stores. Then under Settings, choose Configuration.
2. In the panel on the left, under Sales, choose Payment Methods.
3. Expand the Purchase Order section. Then, do the following:
a. To activate this payment method, set Enabled to “Yes.”
b. Enter a Title to identify this payment method during checkout.
c. Set New Order Status to “Pending” until payment is authorized.
d. Set Payment from Applicable Countries to one of the following:
All Allowed
Countries
Customers from all countries specified in your store configuration
can use this payment method.
Specific Countries After choosing this option, the Payment from Specific Countries list
appears. Select each country in the list where customers can make
purchases from your store.
e. Set Minimum Order Total and Maximum Order Total to the amounts required to qualify
for this payment method.
An order qualifies if the total falls between, or exactly matches, the minimum or maximum total
values.
f. Enter a Sort Order number to determine the position of Purchase Order in the list of
payment methods during checkout. (0 = first, 1 = second, 2 = third, and so on.)
4. When complete, tap Save Config.
CHAPTER 49: Basic Payment Methods Purchase Order
Magento Community Edition 2.0 User Guide 649
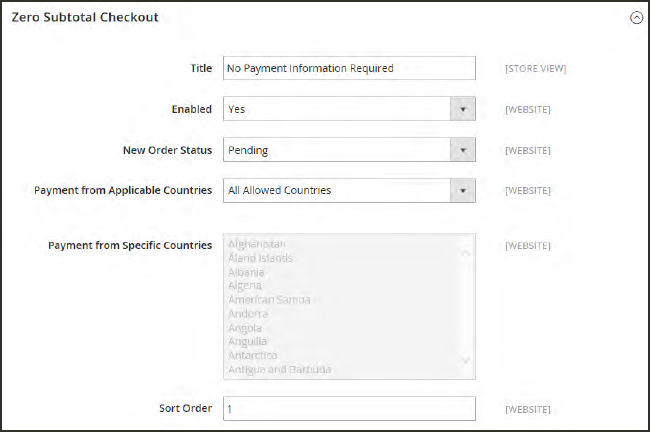
Zero Subtotal Checkout
Zero Subtotal Checkout is available only for orders created from the Admin, and can be used for
orders with a subtotal of zero that are taxed after a discount is applied. For example, Zero
Subtotal Checkout might be used in the following situations:
lA discount covers the entire price of the purchase, with no additional charge for shipping.
lThe customer adds a downloadable or virtual product to the shopping cart, and the price
equals zero.
lThe price of a simple product is zero, and the Free Shipping method is available.
lAcoupon code covers the full price of products and shipping.
To save time, zero subtotal orders can be set to invoice automatically.
Zero Subtotal Checkout
Zero Subtotal Checkout CHAPTER 49: Basic Payment Methods
650 Magento Community Edition 2.0 User Guide

1. On the Admin sidebar, tap Stores. Then under Settings, choose Configuration.
2. In the panel on the left, under Sales, select Payment Methods.
3. Click to expand the Zero Subtotal Checkout section. Then, do the following:
a. Enter a Title to identify the Zero Subtotal method during checkout.
b. Set Enabled to “Yes” to activate Zero Subtotal Checkout.
c. If orders typically wait for authorization, set New Order Status to “Pending” until payment
is authorized.
Pending The order is waiting for authorization.
Processing Payment has been authorized, and the transaction is being
processed.
d. Set Automatically Invoice All Items to “Yes” if you want to automatically invoice all items
that have a zero balance.
e. Set Payment from Applicable Countries to one of the following:
All Allowed
Countries
Customers from all countries specified in your store configuration
can use this payment method.
Specific Countries After choosing this option, the Payment from Specific Countries list
appears. Select each country in the list where customers can make
purchases from your store.
f. Enter a Sort Order number to determine the position of Zero Subtotal Checkout in the list
of payment methods during checkout. (0 = first, 1 = second, 2 = third, and so on.)
4. When complete, tap Save Config.
CHAPTER 49: Basic Payment Methods Zero Subtotal Checkout
Magento Community Edition 2.0 User Guide 651

Notes
652 Magento Community Edition 2.0 User Guide
CHAPTER 50:
PayPal
PayPal is a global leader in online payments and a fast and secure way for your customers
to pay online. With PayPal and Magento Community Edition 2.0, you can accept
payments from all major debit and credit cards, and PayPal account holders. Since
customers don’t even need a PayPal account to pay with PayPal, both you and your
customers can get extra convenience without extra effort.
The selection of available PayPal solutions varies by merchant location. To learn more, see:
PayPal Payment Solutions. PayPal Express Checkout and PayPal Payments Standard can
be used in all parts of the world.
You cannot have more than one PayPal method enabled at a time, with the exception of
PayPal Express Checkout. PayPal Express Checkout can be used in combination with other
PayPal payment methods. except PayPal Payments Standard. PayPal Payments Standard
cannot be enabled simultaneously with any other method, including PayPal Express Checkout.
Magento Community Edition 2.0 User Guide 653
PayPal Business Account
To offer PayPal as a payment method in your store, you must have a PayPal business account
and/or a PayPal Payflow account. The account requirements are specified in the description of
each PayPal solution. Your PayPal merchant account is also used to manage any fraud filters
that are applied to purchases made from your store.
Customers who use PayPal Express Checkout or Express Checkout for Payflow Pro must have a
PayPal buyer account. PayPal Payments Standard (which is some countries is called Website
Payments Standard) can be used directly or through a buyer account, provided that the
merchant enables PayPal Account Optional. By default, this parameter is enabled. Customers
can choose to enter their credit card information, or create a buyer account with PayPal. When
disabled, customers must first create a PayPal buyer account before making a purchase.
Website Payments Pro, Website Payments Pro Payflow Edition, Payflow Pro Gateway, and
Payflow Link require customers to enter credit card information during checkout.
PayPal Business Account CHAPTER 50: PayPal
654 Magento Community Edition 2.0 User Guide
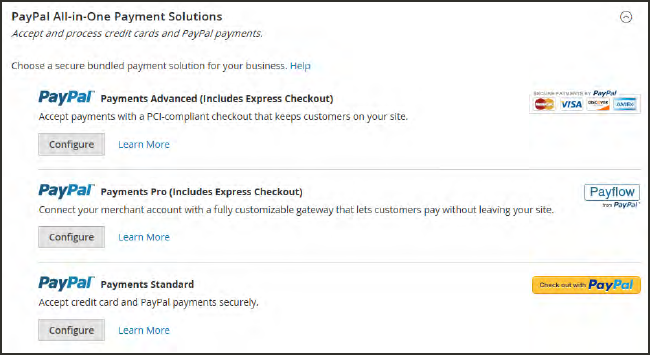
PayPal All-In-One Payment Solutions
In the United States, PayPal offers the following PCI-compliant solutions to meet the needs of
your growing business.
lPayPal Payments Advanced
lPayPal Payments Pro
lPayPal Payments Standard
For the solutions available in other countries, see:PayPal Solutions by Country.
PayPal All-In-Payment Solutions
CHAPTER 50: PayPal PayPal All-In-One Payment Solutions
Magento Community Edition 2.0 User Guide 655
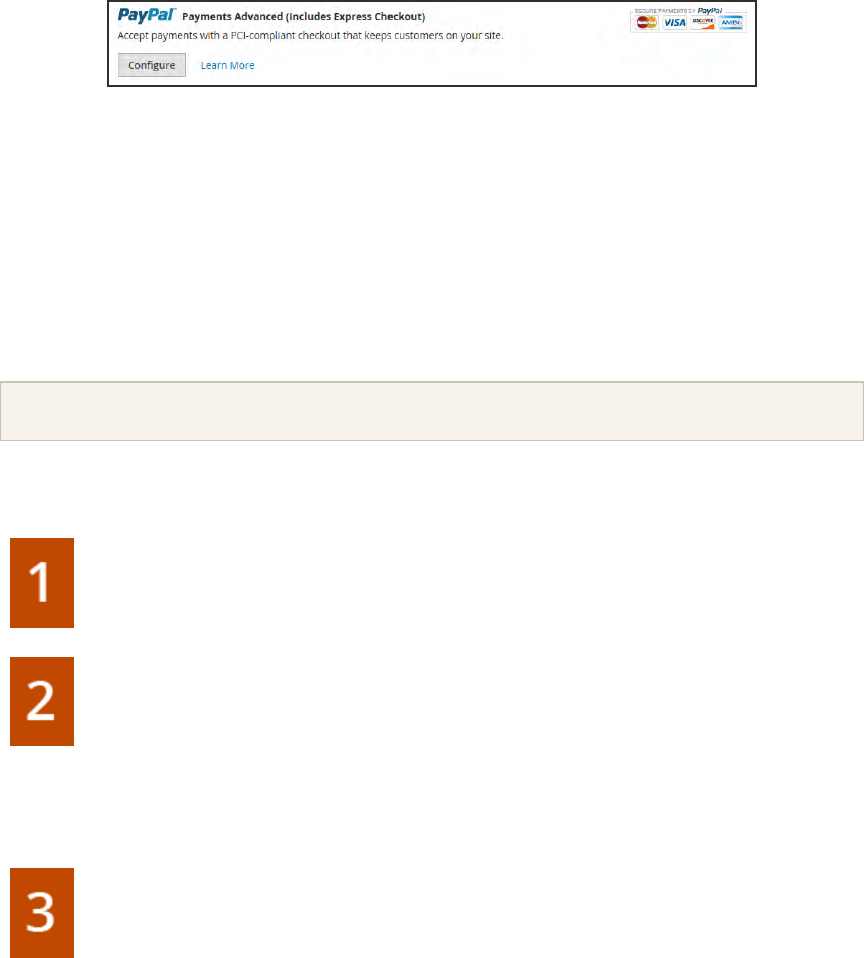
PayPal Payments Advanced
PayPal Payments Advanced is a PCI-compliant solution that lets your customers pay by debit
or credit card without leaving your site.It includes an embedded checkout page that can be
customized to create a seamless and secure checkout experience.
PayPal Payments Advanced
Even customers without a PayPal account can make purchases through PayPal’s secure
payment gateway. Accepted cards include Visa, MasterCard, Switch/Maestro, and Solo credit
cards in the United States and United Kingdom. For additional convenience, PayPal Express
Checkout is included with PayPal Payments Advanced.
You can have two PayPal solutions active at the same time: Express Checkout, plus any All-In-
One or Payment Gateway solution. If you change payment solutions, the one that was used
previously is disabled.
PayPal Payments Advanced cannot be used for orders created from the Admin of your store.
Checkout Workflow
Customer Chooses Payment Method. During checkout, the customer chooses to pay
with PayPal Payments Advanced. The Pay Now button appears instead of the Place
Order button.
Pay Now. The customer taps Pay Now, and a PayPal-hosted form appears. The
customer enters the card information, and the card is verified. If successful, the order
confirmation page appears.
Pay with PayPal. The form also includes the Pay with PayPal button, which redirects
the customer to the PayPal site, where payment can be made with PayPal Express
Checkout.
Troubleshooting. If the transaction fails for any reason, an error message appears on
the checkout page and the customer is instructed to try again. Any issues are managed
by PayPal.
Order Processing Workflow
Processing orders with PayPal Payments Advanced is the same as for any regular PayPal order.
PayPal All-In-One Payment Solutions CHAPTER 50: PayPal
656 Magento Community Edition 2.0 User Guide

Orders are invoiced and shipped, and credit memos generated for both online and offline
refunds. However, multiple online refunds are not available for orders paid with PayPal
Payments Advanced.
Customer Places Order. In the final stage of checkout, the customer taps the Place
Order button.
PayPal Responds. PayPal evaluates the request. If found to be valid, PayPal
processes the transaction.
Magento Sets Order Status. Magento receives response from PayPal, and sets the
order status to one of the following:
Processing. The transaction was successful.
Pending Payment. The system did not receive any response from PayPal.
Canceled. The transaction was not successful for some reason.
Suspected Fraud. The transaction did not pass some of the PayPal fraud filters; the
system receives the response from PayPal that the transaction is reviewed by PayPal
Fraud Service.
Merchant Fulfills Order. The merchant invoices and ships the order.
CHAPTER 50: PayPal PayPal All-In-One Payment Solutions
Magento Community Edition 2.0 User Guide 657
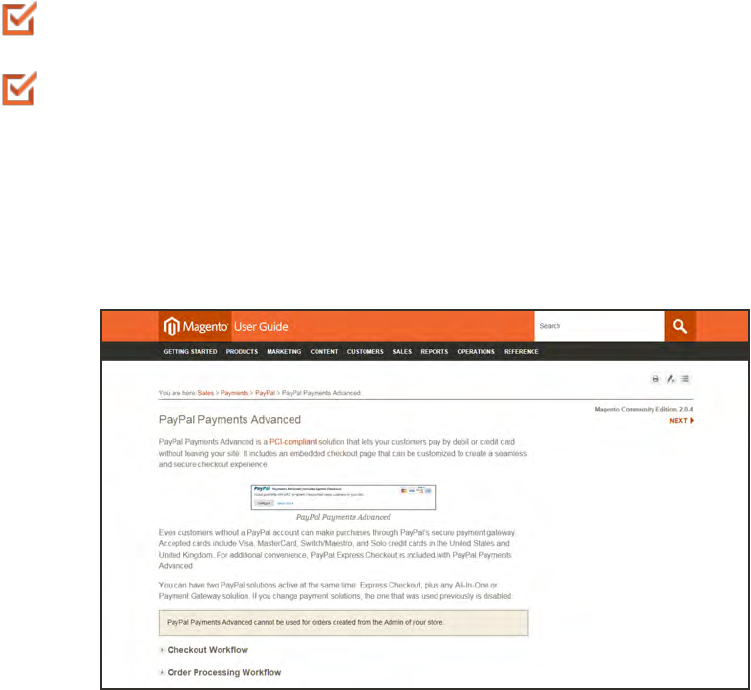
Requirements
PayPal Business Account
If you manage multiple Magento websites, you must have a separate PayPal merchant
account for each website.
Setting Up PayPal Payments Advanced
For step-by-step configuration instructions, see PayPal Payments Advanced in the Magento
Community Edition 2.0online user guide.
Setting Up PayPal Payments Advanced
PayPal All-In-One Payment Solutions CHAPTER 50: PayPal
658 Magento Community Edition 2.0 User Guide
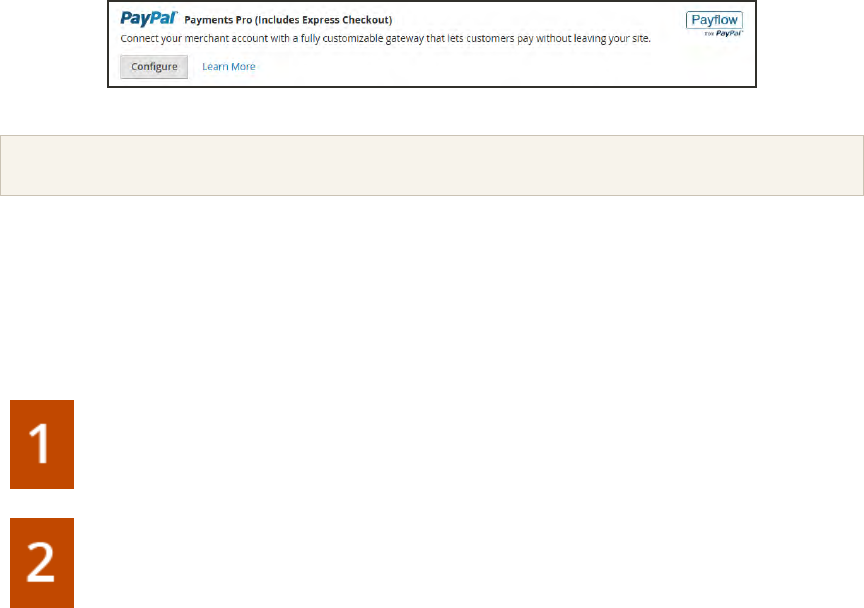
PayPal Payments Pro
PayPal Payments Pro brings you all the benefits of a merchant account and payment gateway
in one, plus the ability to create your own, fully customized checkout experience. PayPal
Express Checkout is automatically enabled with PayPal Payments Pro, so you can tap into
more than 110 million active PayPal users.
PayPal Payments Pro
For merchants outside the US, this method is called “PayPal Website Payments Pro.”
You can have two PayPal solutions active at the same time: PayPal Express Checkout, plus any
one of the All-In-One solutions. If you change payment solutions, the one used previously is
automatically disabled.
Checkout Workflow
Customer Goes to Checkout. Customer adds products to cart, and taps Proceed to
Checkout.
Customer Chooses Payment Method. During checkout, customer chooses the
PayPal Direct Payment option, and enters the credit card information.
lIf paying with PayPal Payments Pro, the customer stays on your site during the
checkout process.
lIf paying with PayPal Express Checkout, the customer is redirected to the
PayPal site to complete the transaction.
At the customer’s request, the store administrator can also create an order from the
Admin, and process the transaction with PayPal Payments Pro.
CHAPTER 50: PayPal PayPal All-In-One Payment Solutions
Magento Community Edition 2.0 User Guide 659
Order Processing Workflow
Order Placed. The order can be processed either the Admin of your store, or from your
PayPal merchant account.
Payment Action. The payment action specified in the configuration is applied to the
order. Options include:
Authorize. Magento creates a sales order with the “Processing” status. In this case, the
amount of money to be authorized is pending approval.
Sale. Magento creates both a sales order and invoice.
Capture. PayPal transfers the order amount from the buyer’s balance, bank account or
credit card to the merchant’s account.
Invoicing. An invoice is created in Magento after PayPal sends an instant payment
notification message to Magento.
Make sure that instant payment notifications are enabled in your PayPal merchant
account.
If required, an order can be partially invoiced for a specified quantity of products. For
each partial invoice submitted, a separate Capture transaction with a unique ID becomes
available, and a separate invoice is generated.
Authorization-only payment transactions are closed only after the full order amount is
captured.
An order can be voided online at any time until the order amount is fully invoiced.
Returns. If for any reason the customer returns the purchased products and claims a
refund, as with order amount capturing and invoice creation, you can create an online
refund either from the Admin or from your PayPal merchant account.
PayPal All-In-One Payment Solutions CHAPTER 50: PayPal
660 Magento Community Edition 2.0 User Guide
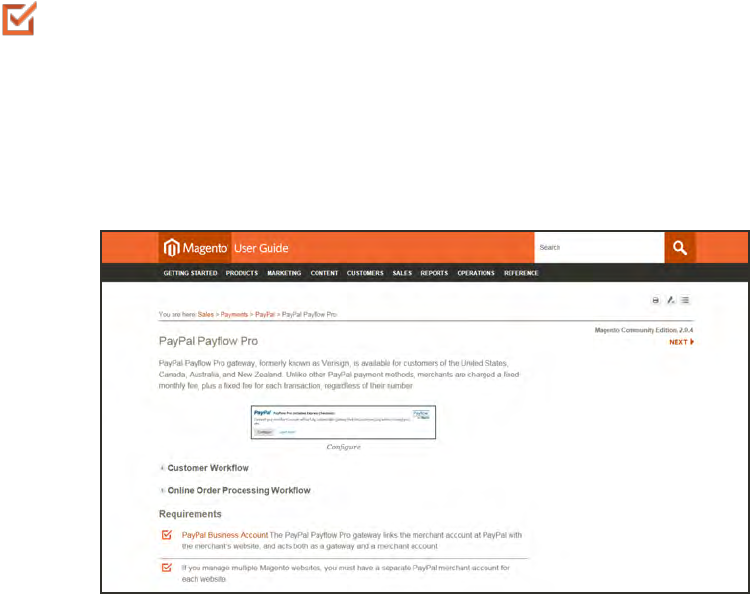
Requirements
PayPal Merchant Account (with Direct Payments Activated)
Setting Up PayPal Payments Pro
For step-by-step configuration instructions, see PayPal Payments Pro in the Magento
Community Edition 2.0 online user guide.
Setting Up PayPal Payment Pro
CHAPTER 50: PayPal PayPal All-In-One Payment Solutions
Magento Community Edition 2.0 User Guide 661
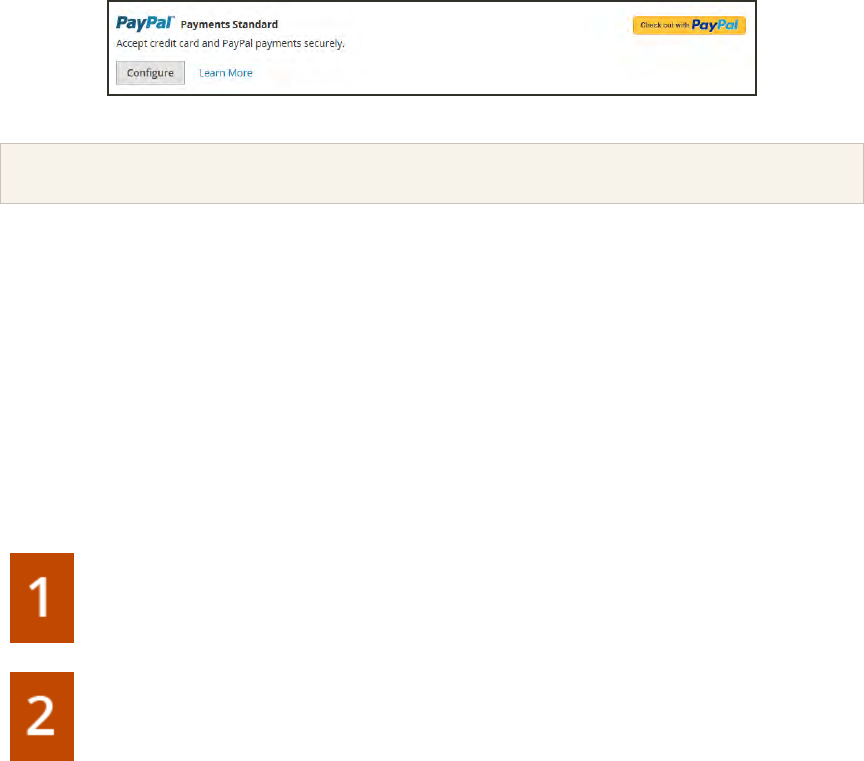
PayPal Payments Standard
PayPal Payments Standard is the easiest way to accept payments online. You can offer your
customers the convenience of payment both by credit card and PayPal by simply adding a
checkout button to your store.
PayPal Payments Standard
For merchants outside the US, this method is called “PayPal Website Payments Standard.”
With PayPal Payments Standard, you can swipe credit cards on mobile devices. There is no
monthly fee, and you can get paid on eBay. Supported credit cards include Visa, MasterCard,
Discover, and American Express. In addition, customers can pay directly from their personal
PayPal accounts. PayPal Payments Standard is available in all countries on the PayPal
worldwide reference list.
Checkout Workflow
For customers, PayPal Payments Standard is a one-step process if the credit card information
the their personal PayPal accounts is up to date.
Customer Places Order. The customer taps the “Pay Now” button to complete the
purchase.
PayPal Processes the Transaction. The customer is redirected to the PayPal site to
complete the transaction.
PayPal All-In-One Payment Solutions CHAPTER 50: PayPal
662 Magento Community Edition 2.0 User Guide
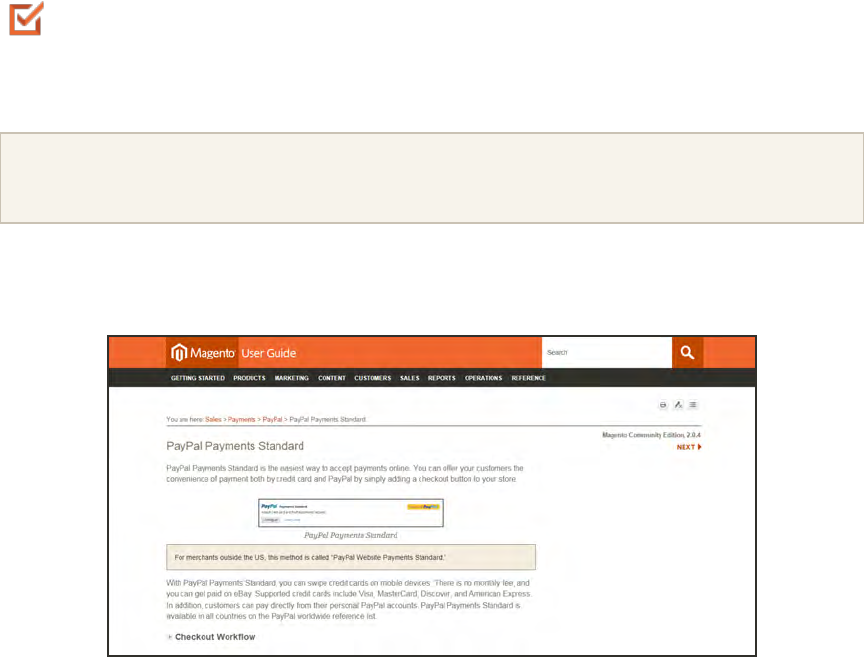
Merchant Requirements
PayPal Business Account
Setting Up PayPal Payments Standard
PayPal Payments Standard cannot be used simultaneously with any other PayPal method, including
Express Checkout. If you change payment solutions, the one used previously is disabled.
For step-by-step configuration instructions, see PayPal Payments Standard in the online user
guide.
Setting Up PayPal Payments Standard
CHAPTER 50: PayPal PayPal All-In-One Payment Solutions
Magento Community Edition 2.0 User Guide 663
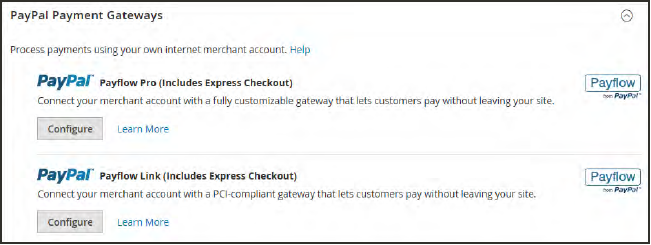
PayPal Payment Gateways
PayPal offers a choice of two payment gateway solutions for your business. You can let PayPal
host your checkout on its secure payment site, or you can take control of the entire payment
experience with a completely customizable solution.
lPayPal Payflow Pro
lPayPal Payflow Link
PayPal Payment Gateways
PayPal Payment Gateways CHAPTER 50: PayPal
664 Magento Community Edition 2.0 User Guide
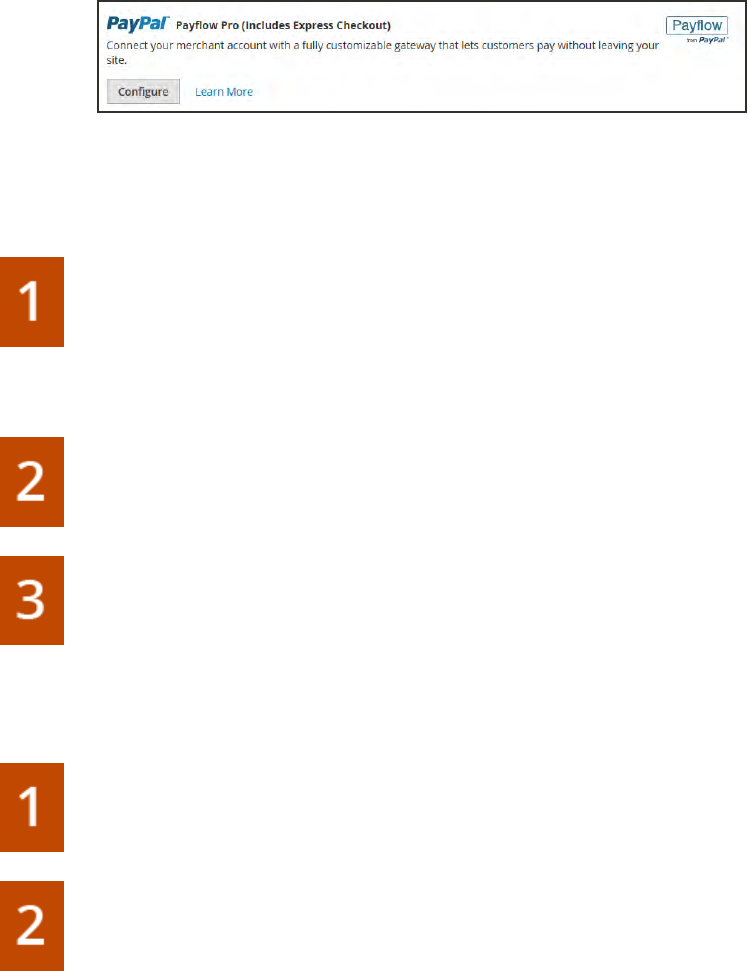
PayPal Payflow Pro
PayPal Payflow Pro gateway, formerly known as Verisign, is available for customers of the
United States, Canada, Australia, and New Zealand. Unlike other PayPal payment methods,
merchants are charged a fixed monthly fee, plus a fixed fee for each transaction, regardless of
their number.
Configure
Customer Workflow
Customer Goes to Checkout. During checkout, the customer chooses to pay with
PayPal PayFlow Pro, and enters the credit card information.
Customers are not required to have personal PayPal accounts. However, depending on
the merchant country, customers can also use their personal PayPal account to pay for
the order.
Customer Submits Order. The customer submits the order, and the order information
is sent to PayPal for processing. The customer does not leave the checkout page of your
site.
PayPal Completes the Transaction. Payments are accepted at the time the order is
placed. Depending on the payment action specified n the configuration, either a sales
order or a sales order and an invoice is created.
Online Order Processing Workflow
Admin Submits Online Invoice. The store administrator submits an online invoice.
and as a result a corresponding transaction and an invoice is created.
PayPal Receives the Transaction. The order information is sent to PayPal. A record of
the transaction and an invoice is generated. You can view all Payflow Pro Gateway
transactions in your PayPal merchant account.
CHAPTER 50: PayPal PayPal Payment Gateways
Magento Community Edition 2.0 User Guide 665
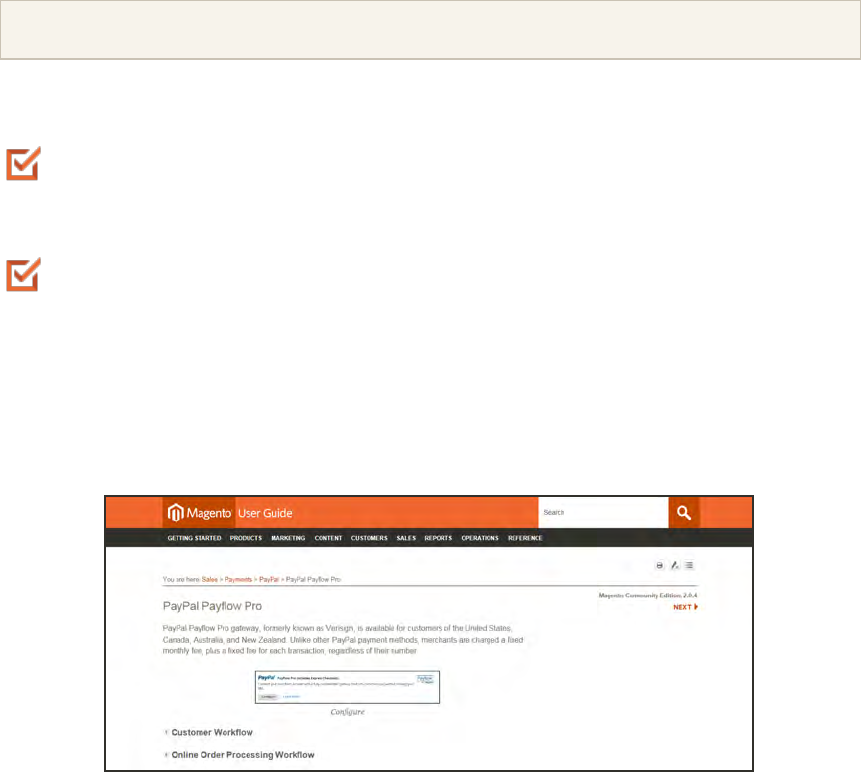
Partial invoices and partial refunds are not supported by PayPal Payflow Pro.
Requirements
PayPal Business Account The PayPal Payflow Pro gateway links the merchant account
at PayPal with the merchant’s website, and acts both as a gateway and a merchant
account.
If you manage multiple Magento websites, you must have a separate PayPal merchant
account for each website.
Setting Up PayPal Payflow Pro
For step-by-step configuration instructions, see PayPal Payflow Pro in the Magento Community
Edition 2.0online user guide.
PayPal Payflow Pro
PayPal Payment Gateways CHAPTER 50: PayPal
666 Magento Community Edition 2.0 User Guide
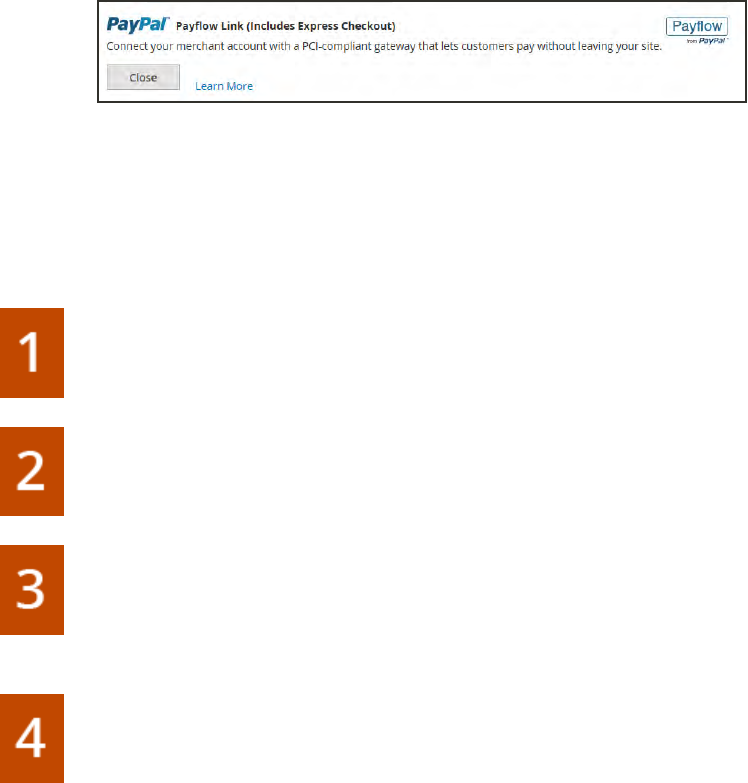
PayPal Payflow Link
PayPal PayFlow Link is available for merchants in the United States and Canada only.
Customers are not required to have a personal PayPal account, and enter their credit card
information in a form that is hosted by PayPal. The information is never stored on your
Magento server. PayFlow Link cannot be used for orders that are created from the Admin.
Configure
Credit memos are supported for both online and offline refunds. However, multiple online
refunds are not supported.
Customer Workflow
Customer Goes to Checkout. During checkout, the customer chooses to pay with
PayPal PayFlow link, and enters the credit card information.
The customer is not required to have a personal PayPal account.
Customer Chooses Pay Now. The customer taps the Pay Now button to submit the
order.
Customer Enters Credit Card Info. The customer enters the credit card information on
a form that is hosted by PayPal/
If the customer clicks the Cancel Payment link, the customer returns to the Payment
Information stage of checkout, and the order status changes to “Canceled.”
Customer Submits the Order. The credit card information is submitted directly to
PayPal, and is not retained anywhere on the Magento site.
CHAPTER 50: PayPal PayPal Payment Gateways
Magento Community Edition 2.0 User Guide 667

Order Workflow
PayPal Receives Request. PayPal receives the request from the customer to Pay
Now.
PayPal Verifies the Payment Information. PayPal verifies the credit card information,
and assigns the appropriate status. If verified, the “Pending Payment” status is initially
assigned to the order, until the transaction is settled. Options:
Processing. The transaction was successful.
Pending Payment. The system did not receive any response from PayPal.
Canceled. The transaction was not successful for some reason.
Suspected Fraud.The transaction did not pass some of the PayPal fraud filters. The
system receives the response from PayPal that the transaction is under review by Fraud
Service.
If the customer clicks the Cancel Payment link, the customer returns to the Payment
Information stage of checkout, and the order status changes to “Canceled.”
Customer Is Redirected to Confirmation Page. If the transaction completes
successfully, the customer is redirected to the order confirmation page in your store.
If the transaction fails on any reason, an error message appears on the checkout page
and the customer is directed to repeat the checkout process. These situations are
managed by PayPal.
Merchant Fulfills Order. The merchant invoices, and ships the order as usual.
PayPal Payment Gateways CHAPTER 50: PayPal
668 Magento Community Edition 2.0 User Guide
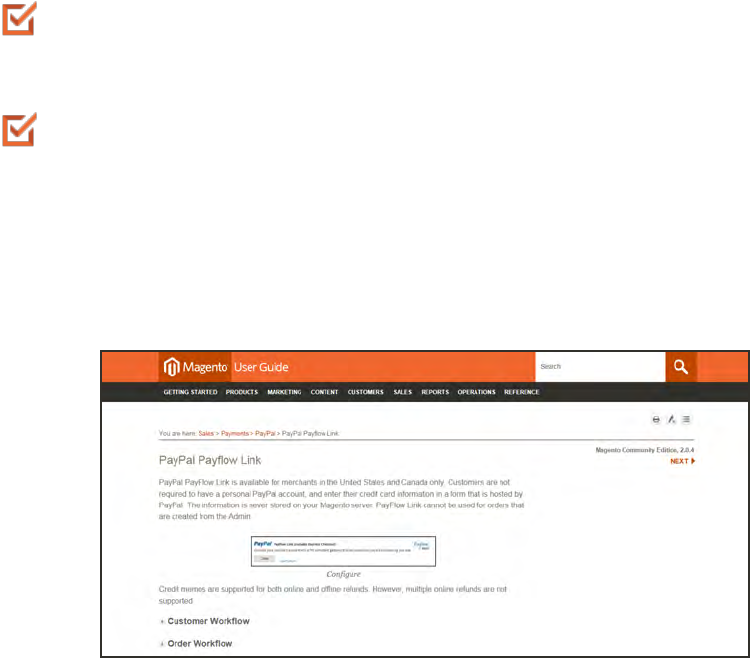
Requirements
PayPal Business Account The PayPal Payflow Pro gateway links the merchant account
at PayPal with the merchant’s website, and acts both as a gateway and a merchant
account.
If you manage multiple Magento websites, you must have a separate PayPal merchant
account for each website.
Setting Up PayPal Payflow Link
For step-by-step configuration instructions, see PayPal Payflow Link in the Magento
Community Edition 2.0online user guide.
PayPal Payflow Link Setup
CHAPTER 50: PayPal PayPal Payment Gateways
Magento Community Edition 2.0 User Guide 669
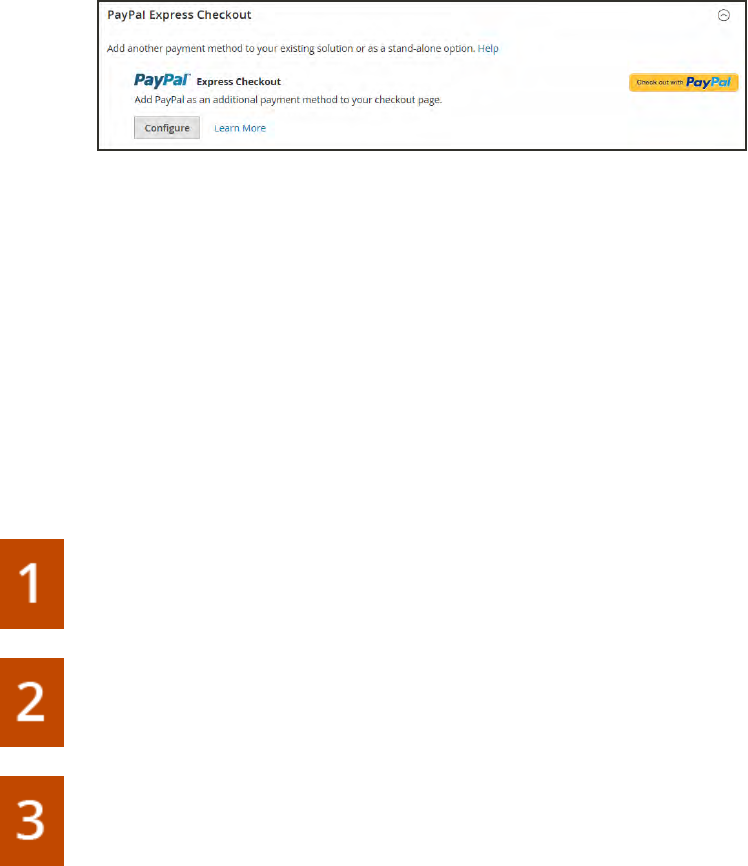
PayPal Express Checkout
PayPal Express Checkout helps boost sales by giving your customers the ability to pay by credit
card or from the security of their personal PayPal accounts. During checkout, the customer is
redirected to the secure PayPal site to complete the payment information. The customer is then
returned to your store to complete the remainder of the checkout process. Choosing Express
Checkout adds the familiar PayPal button to your store, which has been reported to increase
sales.*
Customers with current PayPal accounts can make a purchase in a single step by clicking the
“Check out with PayPal” button. Express Checkout can be used as a standalone, or in
combination with one of PayPal’s All-In-One solutions. If you already accept credit cards
online, you can offer Express Checkout as an additional option to attract new customers who
prefer to pay with PayPal.
Checkout Workflow
Unlike other payment methods, PayPal Express Checkout allows the customer to check out at
the beginning of the usual checkout workflow from the product page, the mini shopping cart,
and shopping cart.
Customer Places Order. The customer taps the “Check out with PayPal” button. .
Customer Is Redirected to PayPal Site. The customer is redirected to the PayPal site
to complete the transaction. / The customer taps the “Check out with PayPal” button.
and is redirected to the PayPal site to complete the transaction.
Customer Logs into their PayPal Account. The customer must log in to their PayPal
account to complete the transaction. The payment system uses the customer’s billing
and shipping information from their PayPal account.
PayPal Express Checkout CHAPTER 50: PayPal
670 Magento Community Edition 2.0 User Guide
Customer Returns to the Checkout Page. The customer is redirected back to the
checkout page in your store to review the order.
Customer Places Order. The customer places the order, and the order information is
submitted to PayPal.
PayPal Settles the Transaction. PayPal receives the order and settles the transaction.
PayPal Express Checkout does not support orders with multiple-addresses.
Requirements
Merchant: Personal PayPal Account
Customer: Personal PayPal Account
Setting Up PayPal Express Checkout
You can have two PayPal solutions active at the same time: Express Checkout, plus an All-In-
One solution. If you enable a different solution, the one used previously is automatically
deactivated.
Process Overview:
Step 1: Configure Your PayPal Account
Step 2: Complete the Required Settings
Step 3: Complete the Basic Settings
Step 4: Complete the Advanced Settings
CHAPTER 50: PayPal PayPal Express Checkout
Magento Community Edition 2.0 User Guide 671
Step 1: Configure Your PayPal Account
1. Before you begin, you must configure your PayPal merchant account on the PayPal website.
a. Log in to your PayPal Advanced account at manager.paypal.com.
b. Go to Service Settings > Hosted Checkout Pages > Set Up, and make the following
settings:
AVS No
CSC No
Enable Secure Token Yes
c. Save the settings.
2. PayPal recommends that you set up an additional user on your account. To set up an
additional user, do the following:
a. Go to manager.paypal.com and log in to your account.
b. Follow the instructions to set up an additional user.
c. Save the changes.
3. Expand the Required PayPal Settings section, and do the following:
a. Enter the Email Address that is associated with your PayPal merchant account.
Important! Email addresses are case sensitive. To receive payment, the email address you
enter must match the email address specified in your PayPal merchant account.
b. Set API Authentication Methods to one of the following:
lAPI Signature
lAPI Certificate
c. If necessary, click the Get Credentials from PayPal button. Then, complete the following:
lAPI Username
lAPI Password
lAPI Signature
d. If you are using credentials from your sandbox account, set Sandbox Mode to “Yes.”
If necessary, click the Sandbox Credentials button and follow the instructions to set up
your testing environment.
e. If your system uses a proxy server to establish the connection between Magento and the
PayPal payment system, set API Uses Proxy to “Yes.” Then,, complete the following:
PayPal Express Checkout CHAPTER 50: PayPal
672 Magento Community Edition 2.0 User Guide
lProxy Host
lProxy Port
4. When these sections are complete, set Enable this Solution to “Yes.”
5. To offer financing through PayPal to your customers, see PayPal Credit to learn more.
You have now completed the Required PayPal Settings. At this point, you can either continue
with the Basic and Advanced Settings, or click the Save Config button. You can return later
fine-tune the configuration.
Step 2: Begin the Configuration
1. On the Admin sidebar, tap Stores. Then under Settings, choose Configuration.
2. In the panel on the left under Sales, choose Payment Methods.
3. If your Magento installation has multiple websites, stores or views, in the upper-left corner,
choose the Store View where the configuration applies.
4. In the Merchant Location section, select the Merchant Country where your business is located.
5. Expand the PayPal Express Checkout section. Then, tap Configure.
Step 3:Complete the Required Settings
a. Enter the Email Address that is associated with your PayPal merchant account.
Important! Email addresses are case sensitive. To receive payment, the email address you
enter must match the email address specified in your PayPal merchant account.
b. Set API Authentication Methods to one of the following:
lAPI Signature
lAPI Certificate
c. If necessary, tap Get Credentials from PayPal. Then, complete the following:
lAPI Username
lAPI Password
lAPI Signature
d. If you are using credentials from your sandbox account, set Sandbox Mode to “Yes.”
If necessary, click the Sandbox Credentials button and follow the instructions to set up
your testing environment.
e. If your system uses a proxy server to establish the connection between Magento and the
PayPal payment system, set API Uses Proxy to “Yes.” Then,, complete the following:
CHAPTER 50: PayPal PayPal Express Checkout
Magento Community Edition 2.0 User Guide 673
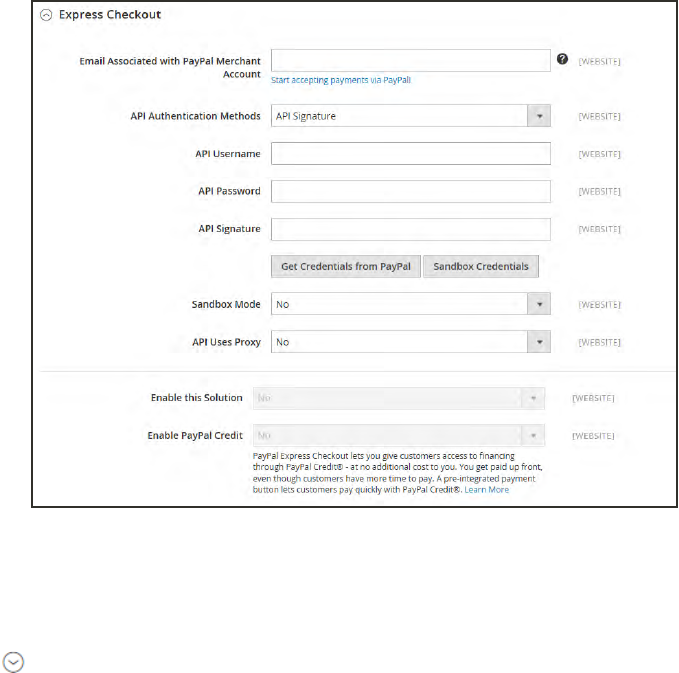
lProxy Host
lProxy Port
6. Set Enable This Solution to “Yes.”
7. If you want to offer PayPal Credit to your customers, set Enable PayPal Credit to “Yes.”
You have now completed the required settings. You can either continue with the remaining
settings, or save and return later fine-tune the configuration.
Required Settings
Step 4: Complete the Basic Settings
1. Expand the Basic Settings - PayPal Express Checkout section.
2. Enter a Title to identify this payment method during checkout. It is recommended to set the
title to “PayPal” for each store view.
3. If you offer multiple payment methods, enter a number in the Sort Order field to determine the
sequence in which PayPal Payments Standard is listed with the other methods. Payment
methods appear in ascending order based on the Sort Order value.
4. Set Payment Action to one of the following:
PayPal Express Checkout CHAPTER 50: PayPal
674 Magento Community Edition 2.0 User Guide
Authorization Approves the purchase, but puts a hold on the funds. The amount is not
withdrawn until it is “captured” by the merchant.
Sale The amount of the purchase is authorized and immediately withdrawn
from the customer’s account.
Order The amount of the order is neither captured nor authorized in the
customer’s balance, bank account, or credit card at PayPal. The Order
payment action represents an agreement between the PayPal payment
system and the merchant, which enables the merchant to capture one or
more amounts up to the “ordered” total from the customer’s buyer
account, over a period of up to 29 days. After the funds are “ordered,”
the merchant can capture them at any time during the following 29 day
period. Capturing of the order amount can be done only from the
Magento Admin by creating one or more invoices.
5. To display the “Check out with PayPal” button on the product page, set Display on Product
Details Page to “Yes.”
6. If Payment Action is set to “Order,” complete the following fields:
Authorization
Honor Period
(days)
Determines how long the primary authorization remains valid. The
value should be equal to the corresponding value in your PayPal
merchant account. The default value in your PayPal merchant account is
3. To increase this number you need to contact PayPal. The
authorization becomes invalid at 11:49 p.m., U.S. Pacific Time, of the
last day.
Order Valid Period
(days)
Determines how long the order remains valid. When the order becomes
invalid, you can no longer create invoices for it. Specify the value equal
to the Order Valid Period value in your PayPal merchant account. The
default value in your PayPal merchant account is 29. To change this
number, you must contact PayPal.
Number of Child
Authorizations
Specifies the maximum number of authorizations for a single order,
which determines the maximum number of online partial invoices that
you can create for an order. The number in this field should be equal to
the corresponding setting in your PayPal merchant account. The default
number of child authorizations in your PayPal account is 1. To increase
this number, you must contact PayPal.
CHAPTER 50: PayPal PayPal Express Checkout
Magento Community Edition 2.0 User Guide 675
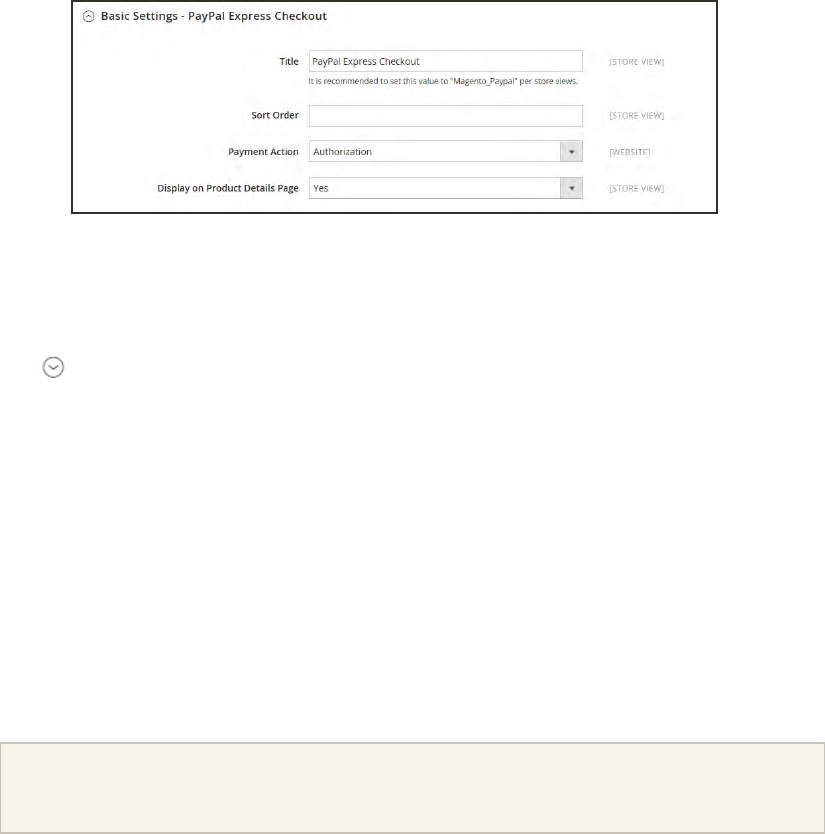
Basic Settings
Step 5: Complete the Advanced Settings
1. Expand the Advanced Settings section. Then, complete the following:
a. Set Display on Shopping Cart to “Yes.”
b. Set Payment Applicable From to one of the following:
All Allowed
Countries
Accepts payment from the countries already specified in your
configuration.
Specific Countries Accepts payments from only the countries you specify. Hold the
Ctrl key down and in the Payment Applicable From list, click each
country where you accept payment.
c. Set Debug Mode to “Yes” to write communications with the payment system into the log
file. The log file for PayPal Payments Advanced is payments_payflow_advanced.log.
In accordance with PCI Data Security Standards, credit card information is not recorded in the
log file.
d. To enable host authenticity verification, set Enable SSL Verification to “Yes.”
e. To display a full summary of the customer’s order by line item from the PayPal site, set
Transfer Cart Line Items to “Yes.”
To include up to ten shipping options in the summary, set Transfer Shipping Options to
“Yes.” (This option appears only if line items are set to transfer.)
f. To determine the type of image used for the PayPal acceptance button, set Shortcut
Buttons Flavor to one of the following:
Dynamic (Recommended) Displays an image that can be dynamically
changed from the PayPal server.
Static Displays a specific image that cannot be dynamically changed.
PayPal Express Checkout CHAPTER 50: PayPal
676 Magento Community Edition 2.0 User Guide

g. To allow customers without PayPal accounts to make a purchases with this method, set
Enable PayPal Guest Checkout to “Yes.”
h. Set Require Customer’s Billing Address to one of the following:
Yes Requires the customer’s billing address for all purchases.
No Does not require the customer’s billing address for any purchases.
For Virtual Quotes
Only
Requires the customer’s billing address for virtual quotes only.
i. To specify whether the customer can sign a billing agreement with your store in the PayPal
payment system when there are no active billing agreements available in the customer
account, set Billing Agreement Signup to one of the following:
Auto The customer can either sign a billing agreement during the
Express Checkout flow or use another method of payment.
Ask Customer The customer can decide whether to sign a billing agreement during
the Express Checkout flow.
Never The customer cannot sign a billing agreement during the Express
Checkout flow.
Merchants must ask PayPal Merchant Technical Support to enable billing agreements in their
accounts. The Billing Agreement Signup parameter is enabled only after PayPal confirms that
billing agreements are enabled for your merchant account.
j. To allow the customer to complete the transaction from the PayPal site without returning
to your Magento store for Order Review, set Skip Order Review Step to “Yes.”
CHAPTER 50: PayPal PayPal Express Checkout
Magento Community Edition 2.0 User Guide 677
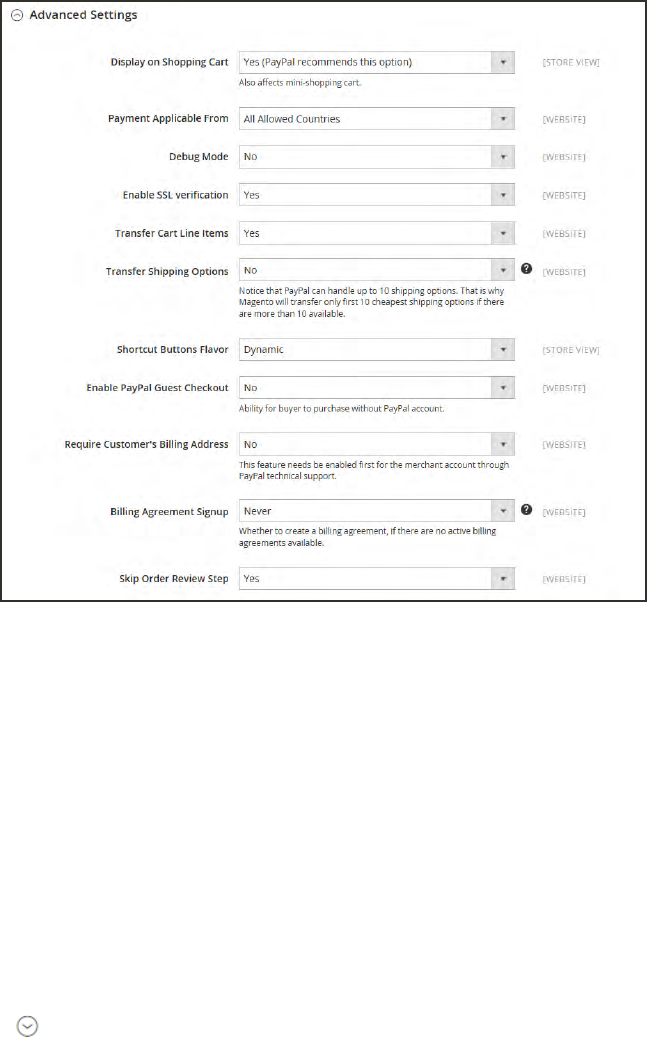
Advanced Settings
2. Complete the following sections as needed for your store:
PayPal Billing Agreement Settings
Abilling agreement is a sales agreement between the merchant and customer that has been
authorized by PayPal for use with multiple orders. During the checkout process, the Billing
Agreement payment option appears only for customers who have already entered into a billing
agreement with your company. After PayPal authorizes the agreement, the payment system
issues a unique reference ID to identify each order that is associated with the agreement.
Similar to a purchase order, there is no limit to the number of billing agreements a customer
can set up with your company.
1. Expand the PayPal Billing Agreement Settings section.
2. Set Enabled to “Yes.” Then, do the following:
a. Enter a Title to identify the PayPal Billing Agreement method during checkout.
b. If you offer multiple payment methods, enter a number in the Sort Order field to
determine the sequence in which Billing Agreement appears when listed with other
payment methods during checkout.
PayPal Express Checkout CHAPTER 50: PayPal
678 Magento Community Edition 2.0 User Guide

c. Set Payment Action to one of the following:
Authorization Approves the purchase, but puts a hold on the funds. The
amount is not withdrawn until it is “captured” by the
merchant.
Sale The amount of the purchase is authorized and immediately
withdrawn from the customer’s account.
d. Set Payment Applicable From to one of the following:
All Allowed
Countries
Accepts payment from the countries already specified in your
configuration.
Specific Countries Accepts payments from only the countries you specify. Hold
the Ctrl key down and in the Payment Applicable From list,
click each country where you accept payment.
e. To record communications with the payment system in the log file, set Debug Mode
to “Yes.”
The log file is stored on the server and is accessible only to developers. In accordance
with PCI Data Security Standards, credit card information is not recorded in the log file.
f. To enable SSL verification, set Enable SSL verification to “Yes.”
g. To display a summary of each line item in the customer’s order on your PayPal
payments page, set Transfer Cart Line Items to “Yes.”
h. To allow customers to initiate a billing agreement from the dashboard of their
customer account, set Allow in Billing Agreement Wizard to “Yes.”
CHAPTER 50: PayPal PayPal Express Checkout
Magento Community Edition 2.0 User Guide 679
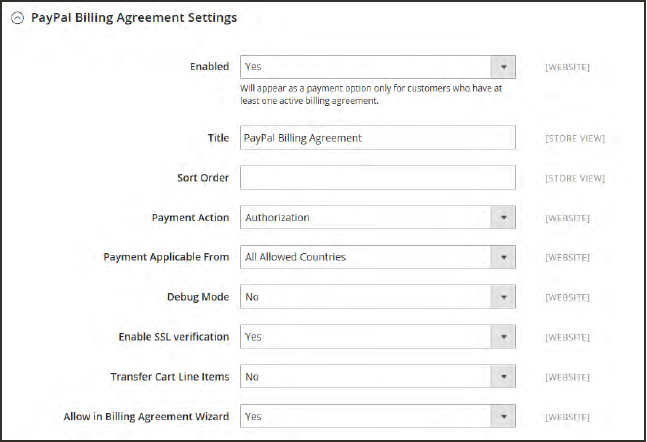
Billing Agreement Settings
Settlement Report Settings
1. Click to expand the Settlement Report Settings section.
2. If you have signed up for PayPal’s Secure FTP Server, enter the following SFTP login
credentials:
lLogin
lPassword
3. To run test reports before “going live” with Express Checkout on your site, set Sandbox
Mode to “Yes.”
4. Enter the Custom Endpoint Hostname or IP Address. By default, the value is:
reports.paypal.com
5. Enter the Custom Path where reports are saved. By default, the value is:
/ppreports/outgoing
6. To generate reports according to a schedule, under Scheduled Fetching, make the
following settings:
a. Set Enable Automatic Fetching to “Yes.”
b. Set Schedule to one of the following:
lDaily
lEvery 3 Days
lEvery 7 Days
PayPal Express Checkout CHAPTER 50: PayPal
680 Magento Community Edition 2.0 User Guide
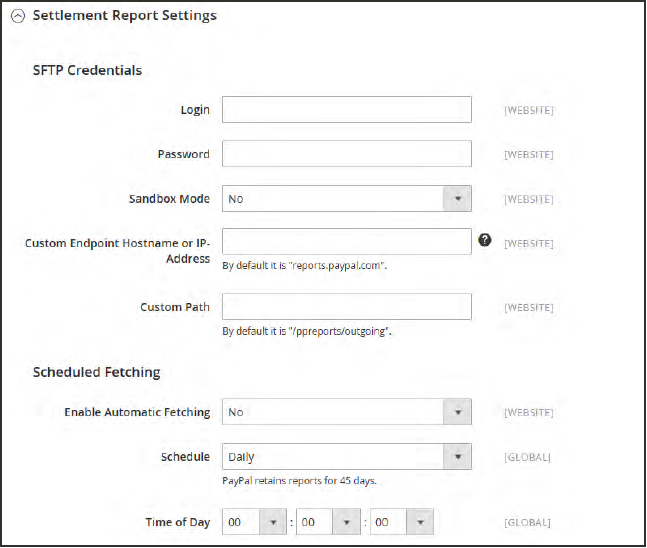
lEvery 10 Days
lEvery 14 Days
lEvery 30 Days
lEvery 40 Days
PayPal retains each report for forty-five days.
c. Set Time of Day to the hour, minute, and second when you want the reports to be
generated.
Settlement Report Settings
Frontend Experience Settings
The frontend experience settings give you the opportunity to choose which PayPal logos appear
on your site, and to customize the appearance of your PayPal merchant pages.
1. Click to expand the Frontend Experience Settings section.
2. Select the PayPal Product Logo that you want to appear in the PayPal block in your
store. The PayPal logos are available in four styles and two sizes. Options include:
lNo Logo
lWe Prefer PayPal (150 x 60 or 150 x 40)
CHAPTER 50: PayPal PayPal Express Checkout
Magento Community Edition 2.0 User Guide 681

lNow Accepting PayPal (150 x 60 or 150 x 40)
lPayments by PayPal (150 x 60 or 150 x 40)
lShop Now Using PayPal (150 x 60 or 150 x 40)
3. To customize the appearance of your PayPal merchant pages, do the following:
a. Enter the name of the Page Style that you want to apply to your PayPal merchant
pages. Options include:
paypal Uses the PayPal page style.
primary Uses the page style that you identified as the “primary” style
in your account profile.
your_custom_
value
Uses a custom payment page style, which is specified in your
account profile.
b. In the Header Image URL field, enter the URL of the image that you want to appear
in the upper-left corner of the payment page. The maximum file size is 750 pixels
wide by 90 pixels high.
PayPal recommends that the image be located on a secure (https) server. Otherwise, the
customer’s browser may warn that “the page contains both secure and nonsecure items.”
c. Enter the six-character hexadecimal code, without the “#” symbol, for each of the
following:
Header
Background Color
Background color for the checkout page header.
Header Border
Color
2-pixel border around the header.
Page Background
Color
Background color for the checkout page and around the
header and payment form.
PayPal Express Checkout CHAPTER 50: PayPal
682 Magento Community Edition 2.0 User Guide
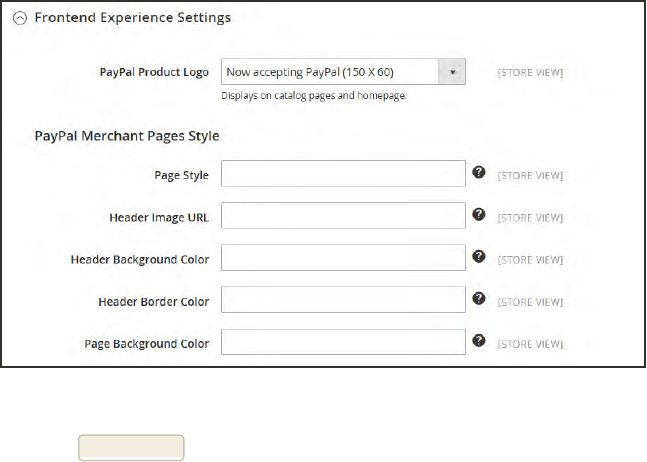
Frontend Experience Settings
3. When complete, tap Save Config.
CHAPTER 50: PayPal PayPal Express Checkout
Magento Community Edition 2.0 User Guide 683
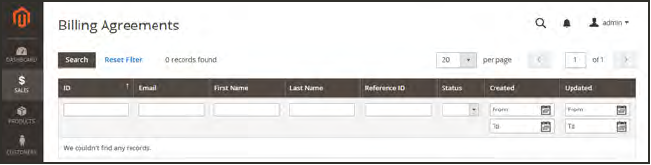
PayPal Billing Agreements
To simplify the checkout process, customers can enter into a billing agreement with PayPal, as
the payment service provider. During checkout, the customer chooses the billing agreement as
the payment method. The payment system verifies the billing agreement by its unique number,
and charges the customer's account. With a billing agreement in place, it is no longer necessary
for the customer to enter payment information for each purchase. Customers can manage their
billing agreements from the dashboard of their customer account, where the status of each is
shown as “Active” or “Canceled.” When a billing agreement is canceled, it cannot be reactivated.
The Billing Agreements grid lists all billing agreements between your store and its customers.
The store administrator can filter the records by the customer or billing agreement information
including billing agreement reference ID, status, and creation date. Each record includes
general information about the billing agreement, and all sales orders that have used it as a
payment method. The store administrator can view, cancel, or delete customer’s billing
agreements. A canceled billing agreement can be deleted only by the store administrator.
Billing Agreements
PayPal Express Checkout CHAPTER 50: PayPal
684 Magento Community Edition 2.0 User Guide

Billing Agreement Workflow
Customer signs up for a billing agreement. From your store, customers can sign up
for a billing agreement from their customer accounts, or while checking out with PayPal
Express Checkout. After a billing agreement is in place, additional billing agreements
can be added only from the customer account. There is no limit to the number of billing
agreements a customer can create.
During checkout, the customer chooses the billing agreement as the payment method.
When the customer places the order, the billing agreement reference ID and sales order
payment details are transferred to PayPal.
Sign Up at Checkout
Customers who pay for a purchase with PayPal Express Checkout can mark a
checkbox to create a billing agreement. The billing agreement is not used for the current
order, but becomes available as a payment method the next time the customer places an
order. The billing agreement reference ID is sent to the customer and to the store.
Sign Up from Admin
On a customer’s request, the store administrator can create a sales order using the
customer’s billing agreement.
PayPal Verifies and Records Agreement. When a billing agreement is created, it is
submitted to the PayPal payment system and recorded in the customer account, along
with reference information. If the payment is authorized, an order is created in Magento.
CHAPTER 50: PayPal PayPal Express Checkout
Magento Community Edition 2.0 User Guide 685
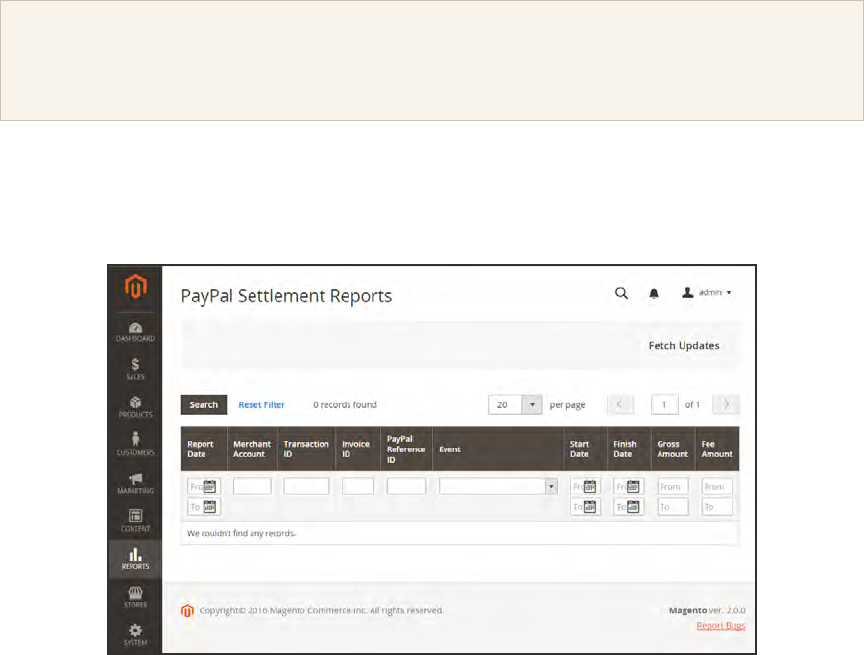
PayPal Settlement Reports
The PayPal Settlement report provides the store administrator with the information about each
transaction that affects the settlement of funds.
Before generating settlement reports, the store administrator must request PayPal Merchant
Technical Services to create an SFTP user account, enable settlement reports generation, and
enable SFTP in their PayPal business account.
After configuring and enabling settlement reports in the PayPal merchant account, Magento
will start generating reports during the following twenty-four hours. The list of available
settlement reports can be viewed from the Admin.
To view settlement reports:
1. On the Admin sidebar, tap Reports. Then under Sales, choose select PayPal Settlement.
2. For the most recent updates, tap Fetch Updates in the upper-right corner.
The system connects to the PayPal SFTP server to fetch the reports. When the process is
complete, a message appears with the number of reports fetched. The report includes the
following information for each transaction:
PayPal Express Checkout CHAPTER 50: PayPal
686 Magento Community Edition 2.0 User Guide

FIELD DESCRIPTION
Report Date The date when the settlement report was generated.
Merchant Account The encrypted merchant account number generated by PayPal.
Transaction ID The identification of a transaction of the money moving event.
Transaction ID is generated by PayPal and cannot be changed by
the merchant.
Invoice ID The identification of an invoice generated within Magento. The field
can be populated with either an invoice ID sent with the capture
request or with the value of the invoice ID (if any) from the
authorizing transaction.
PayPal Reference ID The identification of a related, pre-existing transaction or event.
Event Code The code assigned to the transaction according to the event that has
initiated it. Among these can be website payments standard
payment, express or direct checkout API, pre-approved payment,
subscription payment, and so on.
Initiation Date The date and time the transaction was initiated.
Completion Date The date and time the transaction was completed.
Gross Amount The amount of the payment between the two parties and before fees.
Fee Amount The amount of fee associated with the settlement. All transaction
fees are included in this amount. Fees are never amortized across
several transactions.
Settlement Report
CHAPTER 50: PayPal PayPal Express Checkout
Magento Community Edition 2.0 User Guide 687

FIELD DESCRIPTION
PayPal Reference ID Type One of the following reference codes:
Order ID
Transaction ID
Subscription ID
Preapproved Payment ID Options include:
Custom The text entered by the merchant on
the transaction in PayPal.
Transaction Debit or Credit The direction of money movement of
gross amount.
Fee Debit or Credit The direction of money movement for
fee.
Field Descriptions
PayPal Express Checkout CHAPTER 50: PayPal
688 Magento Community Edition 2.0 User Guide
PayPal Fraud Management Filter
PayPal fraud management filters make it easier to detect and respond to fraudulent
transactions, and can be configured to flag, hold for review, or deny riskier payments. Magento
order status values changed according to the fraud filter settings.
ACTION DESCRIPTION
Review If you set the filter action to “Review,” the suspected order receives the
status ”Payment Review” when the order is placed. You can review the order
and approve, or cancel the payment in the Admin, or on the PayPal side.
When you click the Accept Payment or the Deny Payment buttons, no new
transactions for the order are created.
If you change the status of the transaction on the PayPal site, you must click
the Get Payment Update button in the upper-right corner of the Order page in
the Admin to apply the changes. If you click Accept Payment or Deny
Payment, the changes made at the PayPal site are applied.
Deny If you set the filter action to “Deny,” the suspected order cannot be placed by
the customer, because the corresponding transaction is rejected by PayPal.
To deny the payment from the Admin, click the Deny Payment button in the
upper-right corner of the page. The order status changes to “Canceled,” the
transaction is reverted, and funds are released on the customer’s account.
The corresponding information is added in the Comments History section of
the order view.
Flag If you set the filter action to “Flag”, the suspected order gets the status
”Processing” when it is placed. The corresponding transaction is marked with
a “flag” in the list of the merchant account transactions.
Filter Actions
CHAPTER 50: PayPal PayPal Fraud Management Filter
Magento Community Edition 2.0 User Guide 689

PayPal Payment Solutions
PAYPAL SOLUTION DESCRIPTION
ALL-IN-ONE SOLUTIONS
PayPal Payments Advanced (Includes Express
Checkout)
Allows you to accept payments with a
PCI-compliant checkout that keeps
customers on your site.
PayPal Payments Pro (Includes Express Checkout)
PayPal Website Payments Pro (Outside US)
Allows you to accept payments with a
completely customizable checkout.
PayPal Payments Standard (Includes Express
Checkout)
PayPal Website Payments Standard (Outside US)
Adds PayPal as an additional payment
method to your checkout page.
PAYMENT GATEWAYS
PayPal Payflow Pro (Includes Express Checkout) Connects your merchant account with a
fully customizable gateway that lets
customers pay without leaving your site.
PayPal Payflow Link (Includes Express Checkout) Connects your merchant account with a
PCI-compliant gateway that lets
customers pay without leaving your site.
EXPRESS CHECKOUT
PayPal Express Checkout
OTHER PAYPAL SOLUTIONS
PayPal Integral Evolution
PayPal Pasarela Integral
PayPal Pro
PayPal Website Payments Plus
PayPal Website Payments Pro Hosted Solution
PayPal Payments Pro Hosted Solution (includes Express Checkout)
PayPal Payment Solutions CHAPTER 50: PayPal
690 Magento Community Edition 2.0 User Guide

PayPal by Country
COUNTRY PAYPAL PAYMENT SOLUTION
Australia PayPal Website Payments Standard
PayPal Payflow Pro
PayPal Website Payments Pro Hosted Solution
PayPal Express Checkout
Canada PayPal Website Payments Standard
PayPal Website Payments Pro
PayPal Payflow Pro
PayPal Payflow Link (includes Express Checkout)
PayPal Express Checkout
France PayPal Integral Evolution
PayPal Website Payments Standard
PayPal Express Checkout
Germany PayPal Express Checkout
Hong Kong SAR China PayPal Website Payments Pro Hosted Solution
PayPal Website Payments Standard
PayPal Express Checkout
Italy PayPal Pro
PayPal Payments Standard
PayPal Express Checkout
Japan PayPal Website Payments Plus
PayPal Website Payments Standard
PayPal Express Checkout
New Zealand PayPal Payflow Pro
PayPal Website Payments Standard
PayPal Express Checkout
Spain PayPal Pasarela Integral
PayPal Website Payments Standard
PayPal Payment Solutions
CHAPTER 50: PayPal PayPal Payment Solutions
Magento Community Edition 2.0 User Guide 691

COUNTRY PAYPAL PAYMENT SOLUTION
PayPal Express Checkout
United Kingdom PayPal Payments Pro Hosted Solution (includes Express
Checkout)
PayPal Payments Standard
PayPal Express Checkout
United States PayPal Payments Advanced (Includes Express Checkout)
PayPal Payments Pro (Includes Express Checkout)
PayPal Payments Standard+
PayPal Payflow Pro (Includes Express Checkout)
PayPal Payflow Link (Includes Express Checkout)
PayPal Express Checkout
OTHER COUNTRIES
PayPal Express Checkout and PayPal Website Payments Standard are available in the following
countries:
Argentina, Austria, Belgium, Brazil, Bulgaria, Chile, Costa Rica, Cyprus, Czech Republic,
Denmark. Dominican Republlic, Ecuador. Estonia, Finland. French Guiana. Gibraltar. Greece.
Guadeloupe, Hungary, Iceland. India. Indonesia. Ireland. Israel, Jamaica, Latvia. Leichtenstein.
Lithuania. Luxembourg, Malaysia. Malta. Martinique. Mexico, Netherlands. Norway, Philippines.
Poland. Portugal, Réunion, Romania, San Marino, Singapore, Slovakia, Slovenia, South Africa,
South Korea,, Sweden, Switzerland, Taiwan, Thailand, Turkey, United Arab Emirates, Uruguay,
Venezuela, Vietnam
PayPal Payment Solutions (cont.)
PayPal Payment Solutions CHAPTER 50: PayPal
692 Magento Community Edition 2.0 User Guide
CHAPTER 51:
Other Payment Solutions
Magento Community Edition 2.0 supports additional third-party payment gateways and
solutions that offer merchant services in all parts of the world. Unlike some payment
solutions that transfer control to another site to complete the transaction, a payment
gateway makes it possible for you to accept credit card payments directly from your store
without the customer leaving your site. Payment gateways and solutions include:
lBraintree
lAuthorize.Net Direct Post
Testing Credentials
When testing the configuration of a payment gateway, use the following credentials for test
transactions.
Visa 4111111111111111
MasterCard: 5555555555554444
American Express: 378282246310005
Expiration Date: Any future date
CVV/CVC: 123 or 000
Magento Community Edition 2.0 User Guide 693

Braintree
Braintree offers a fully customizable checkout experience with fraud detection and PayPal
integration. Braintree reduces the PCI compliance burden for merchants because the
transaction takes place on the Braintree systerm.
Configure Braintree
Setting Up Braintree
For step-by-step configuration instructions, see Braintree in the Magento Community Edition
2.0online user guide.
Braintree CHAPTER 51: Other Payment Solutions
694 Magento Community Edition 2.0 User Guide

Authorize.Net Direct Post
Authorize.Net handles all steps in the transaction process—such as payment data collection,
data submission, and response to the customer—while the customer remains in your store.
Authorize.Net Direct Post can be used with orders created from the Admin as well as from the
store.
Customer Workflow
Customer chooses payment method. During checkout, the customer chooses
Authorize.Net Direct Post as the payment method.
Customer submits the order. The customer enters the credit card information, reviews
the order, and taps the Place Order button.
Authorize.Net completes the transaction. Authorize.Net validates the card
information, and processes the transaction.
lIf successful, the customer is redirected to the order confirmation page.
lIf the transaction fails, an error message appears, and the customer can try a different
card, or choose a different payment method.
Setting Up Authorize.Net Direct Post
For step-by-step configuration instructions, see Authorize.Net Direct Post in the Magento
Community Edition 2.0online user guide.
CHAPTER 51: Other Payment Solutions Authorize.Net Direct Post
Magento Community Edition 2.0 User Guide 695

Notes
696 Magento Community Edition 2.0 User Guide

Shipping
Studies show that stores offering customers a
choice of several shipping methods have higher
conversion rates than those that use a single
method for all shipments. In this section, you will
learn how to set up a variety of shipping methods
and carriers, and print shipping labels.
Magento Community Edition 2.0 User Guide 697

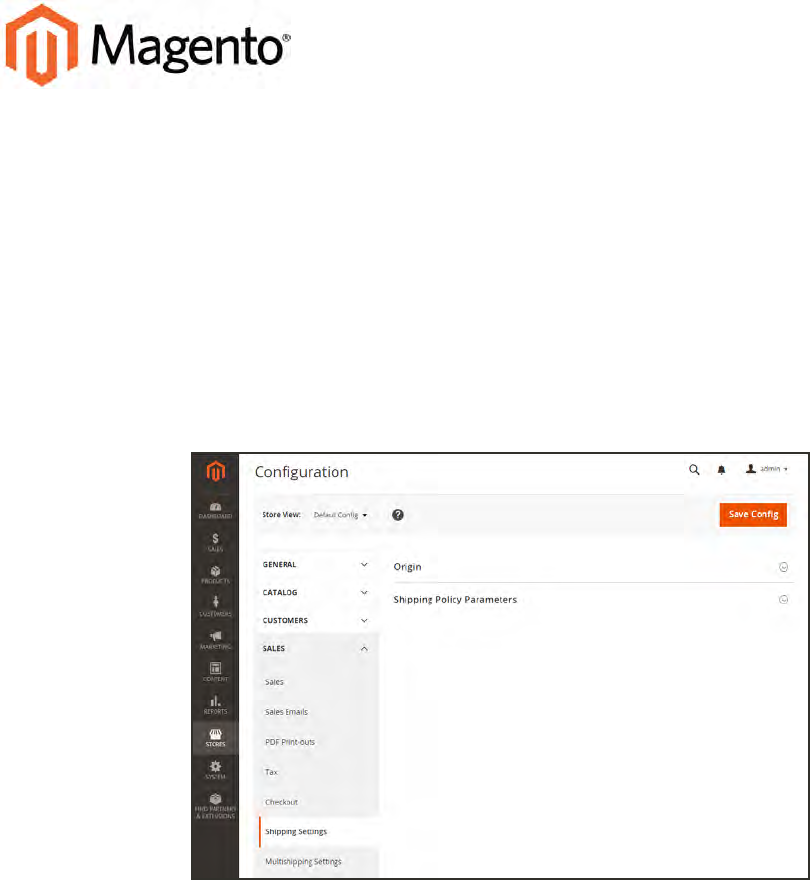
CHAPTER 52:
Shipping Settings
The shipping configuration establishes the point of origin for all shipments, your shipping
policy, and the handling of shipments to multiple addresses.
lPoint of Origin
lShipping to Multiple Addresses
lShipping Policy
Shipping Settings
Magento Community Edition 2.0 User Guide 699
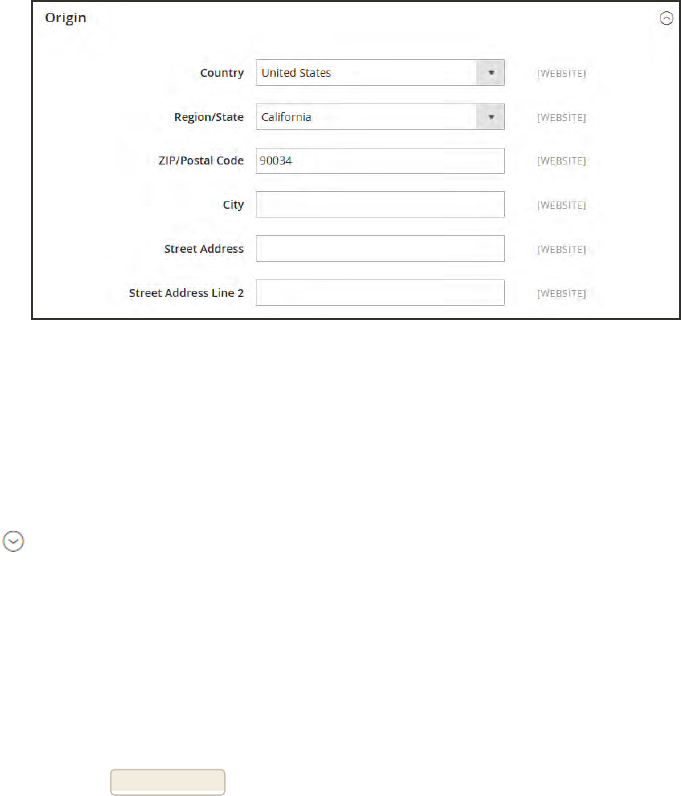
Point of Origin
The configuration establishes the point of origin for all shipments made from your store or
warehouse. The point of origin is also referenced to determine the tax rate for products sold.
Origin
To establish the point of origin:
1. On the Admin sidebar, tap Stores. Then under Settings, choose Configuration.
2. In the panel on the left, under Sales, choose Shipping Settings.
3. Expand the Origin section, and complete the following:
lCountry
lRegion / State
lZIP / Postal Code
lCity
lStreet Address (and line 2, if needed)
4. When complete, tap Save Config.
Point of Origin CHAPTER 52: Shipping Settings
700 Magento Community Edition 2.0 User Guide
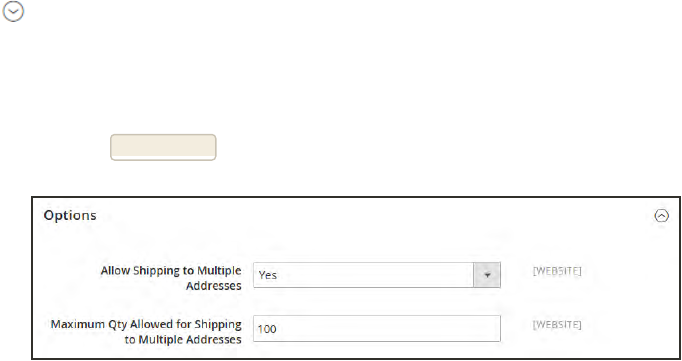
Multiple Addresses
The Multiaddress Shipping options enable customers to ship an order to multiple addresses
during checkout, and determine the maximum number of addresses to which an order can be
shipped.
To configure multiple address shipping:
1. On the Admin sidebar, tap Stores. Then under Settings, choose Configuration.
2. In the panel on the left under Sales, choose Multishipping Settings.
3. Expand the Options section. Then, do the following:
a. Set Allow Shipping to Multiple Addresses to “Yes.”
b. Enter the Maximum Qty Allowed for Shipping to Multiple Addresses.
4. When complete, tap Save Config.
Multiaddress Shipping Options
CHAPTER 52: Shipping Settings Multiple Addresses
Magento Community Edition 2.0 User Guide 701
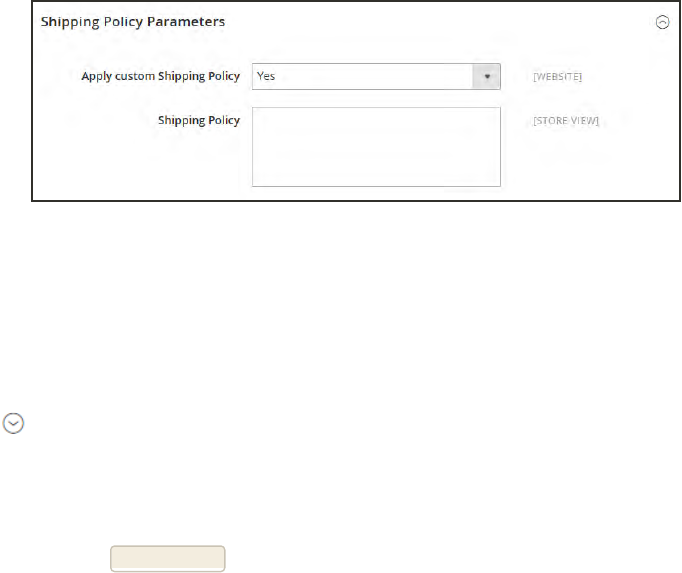
Shipping Policy
To display your shipping policy during checkout, complete the Shipping Policy Parameters in
the configuration.
Shipping Policy Parameters
To configure your shipping policy:
1. On the Admin sidebar, tap Stores. Then under Settings, choose Configuration.
2. In the panel on the left, under Sales, choose Shipping Settings.
3. Expand the Shipping Policy Parameters section, and do the following:
a. Set Apply Custom Shipping Policy to “Yes.”
a. Either paste or enter your Shipping Policy into the text box.
4. When complete, tap Save Config.
Shipping Policy CHAPTER 52: Shipping Settings
702 Magento Community Edition 2.0 User Guide

CHAPTER 53:
Basic Shipping Methods
Magento Community Edition 2.0 supports a wide range of shipping methods and carriers.
In this chapter you will learn how to set up that shipping methods that do not require an
account with a third-party provider.
lFree Shipping
lFlat Rate
lTable Rates
lDimensional Weight
Magento Community Edition 2.0 User Guide 703
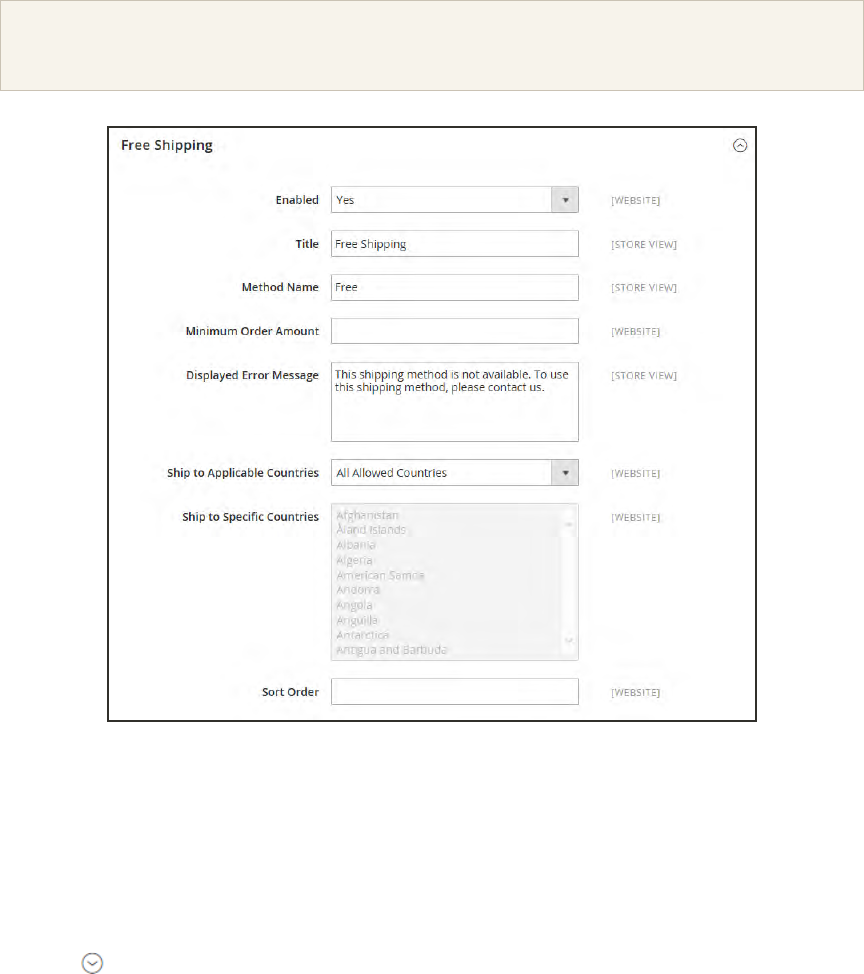
Free Shipping
Free shipping is one of the most effective promotions you can offer. It can be based on a
minimum purchase, or set up as a cart price rule that is applied when a set of conditions is
met. If both apply to the same order, the configuration setting takes precedence over the cart
rule.
Check your shipping carrier configuration for any additional settings that may be required for free
shipping.
Free Shipping
Step 1: Configure Free Shipping
1. On the Admin sidebar, tap Stores. Then under Settings, choose Configuration.
2. In the panel on the left, under Sales, choose Shipping Methods.
3. Expand the Free Shipping section. Then, do the following:
a. Set Enabled to “Yes.”
b. Enter a Title to identify the Free Shipping method during checkout.
Free Shipping CHAPTER 53: Basic Shipping Methods
704 Magento Community Edition 2.0 User Guide

c. Enter a Method Name to describe this shipping method.
d. Enter the Minimum Order Amount to qualify for free shipping.
To use Free Shipping with Table Rates, make the Minimum Order Amount so high that it is
never met. This prevents Free Shipping from going into effect, unless it is triggered by a price
rule.
e. In the Displayed Error Message box, type the message to appear if free shipping becomes
unavailable.
f. Set Ship to Applicable Countries to one of the following:
All Allowed
Countries
Customers from all countries specified in your store configuration
can use free shipping.
Specific Countries After choosing this option, the Ship to Specific Countries list
appears. Select each country in the list where free shipping can be
used.
g. Set Show Method if Not Applicable to one of the following:
Yes Always shows the Free Shipping method, even when not applicable.
No Shows the Free Shipping method only when applicable.
h. Enter a Sort Order number to determine the position of free shipping in the list of
shipping methods during checkout. (0 = first, 1 = second, 2 = third, and so on.)
4. When complete, tap Save Config.
Step 2: Enable Free Shipping in the Carrier Configuration
Make sure to complete any configuration that is required for each carrier that you plan to use
for free shipping. For example, if your UPS configuration is otherwise complete, make the
following settings to enable and configure free shipping:
1. From the Shipping Methods configuration, click to expand the UPS section.
2. Expand the UPS section. Then, set Free Method to “Ground.”
3. To require a minimum order for free shipping, set Free Shipping with Minimum Order
Amount to “Enable.”
4. Enter the required amount in the Minimum Order Amount for Free Shipping field.
5. When complete, tap Save Config.
CHAPTER 53: Basic Shipping Methods Free Shipping
Magento Community Edition 2.0 User Guide 705
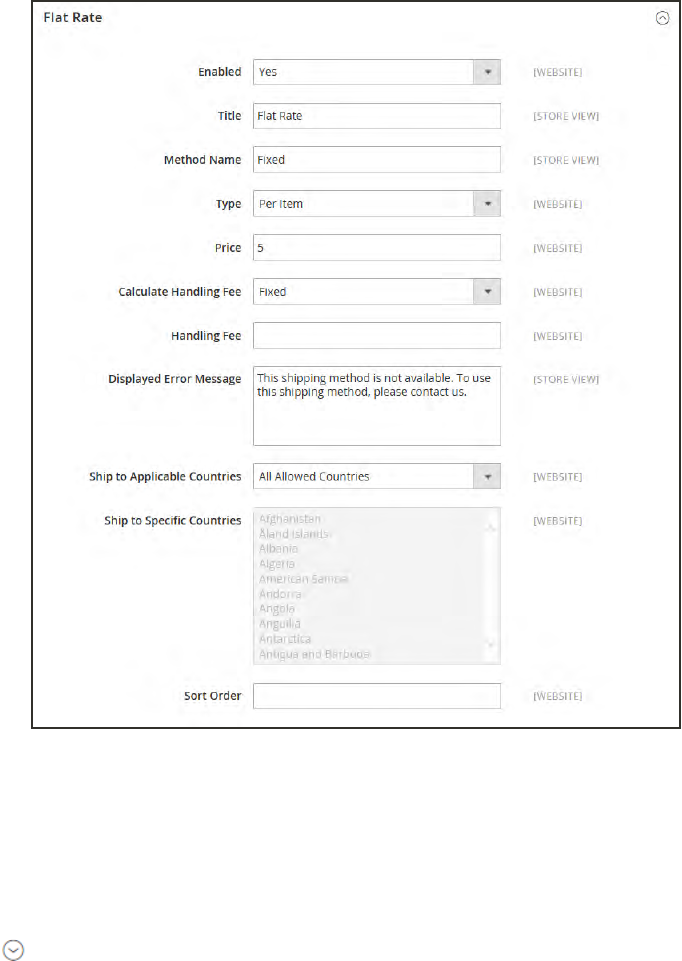
Flat Rate Shipping
Flat rate is a fixed, predefined charge that can be applied per item, or per shipment. Flat rate is
a simple shipping solution, especially when used with the flat-rate packaging that is available
from some carriers.
Flat Rate
To set up flat rate shipping:
1. On the Admin sidebar, tap Stores. Then under Settings, choose Configuration.
2. In the panel on the left, under Sales, choose Shipping Methods.
3. Expand the Flat Rate section. Then, do the following:
Flat Rate Shipping CHAPTER 53: Basic Shipping Methods
706 Magento Community Edition 2.0 User Guide
a. Set Enabled to “Yes.”
Flat Rate appears as an option in the Estimate Shipping and Tax section of the shopping
cart, and also in the Shipping section during checkout.
b. Enter a descriptive Title for the Flat Rate method.
c. Enter a Method Name to appear next to the calculated rate in the shopping cart. The
default method name is “Fixed.” If you charge a handling fee, you can change the Method
Name to “Plus Handling,” or something else that is suitable.
d. To describe how flat rate shipping can be used, set Type to one of the following:
None Disables the payment type. The Flat Rate option is listed in the
cart, but with a rate of zero—which is the same as free shipping.
Per Order Charges a single flat rate for the entire order.
Per Item Charges a single flat rate for each item. The rate is multiplied by the
number of items in the cart, regardless of whether there are multiple
quantities of the same, or of different items.
e. Enter the Price that you want to charge for flat rate shipping.
f. If charging an additional handling fee, set Calculate Handling Fee to one of the following:
lFixed
lPercent
Then, enter the Handling Fee rate according to the method used to calculate the fee. For
example, if the fee is calculating based on a percentage, enter 0.06 for 6 percent. If using a
fixed amount calculation, enter the fee as a decimal.
g. In the Displayed Error Message box, type the message that appears if Flat Rate Shipping
becomes unavailable.
h. Set Ship to Applicable Countries to one of the following:
All Allowed
Countries
Customers from all countries specified in your store configuration
can use flat rate shipping.
Specific Countries After choosing this option, the Ship to Specific Countries list
appears. Select each country in the list where flat rate shipping can
be used.
i. Enter a Sort Order number to determine the position of the Flat Rate in the list of
shipping methods during checkout. (0 = first, 1 = second, 2 = third, and so on.)
4. When complete, tap Save Config.
CHAPTER 53: Basic Shipping Methods Flat Rate Shipping
Magento Community Edition 2.0 User Guide 707
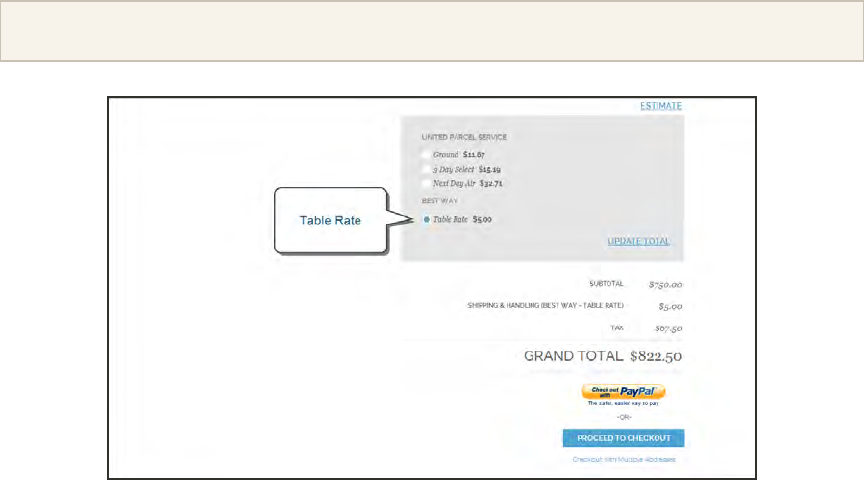
Table Rates
The table rate shipping method references a table of data to calculate shipping rates based on a
combination of conditions, including:
lWeight v. Destination
lPrice v. Destination
l# of Items v. Destination
For example, if your warehouse is in Los Angeles, it costs less to ship to San Diego than to
Vermont. You can use table rate shipping to pass the savings on to your customers.
The data that is used to calculate tables rates is prepared in a spreadsheet and imported into
your store. When the customer requests a quote, the results appear in the shipping estimate
section of the shopping cart.
Only one set of table rate data can be active at a time.
Table Rate in Shopping Cart
Table Rates CHAPTER 53: Basic Shipping Methods
708 Magento Community Edition 2.0 User Guide
Process Overview:
Step 1: Complete the Default Settings
Step 2: Prepare the Table Rate Data
Step 3: Import the Table Rate Data
Step 4: Verify the Rates
Step 1: Complete the Default Settings
The first step is to complete the default settings for table rates. You can complete this step
without changing the scope of the configuration.
1. On the Admin sidebar, tap Stores. Then under Settings, choose Configuration.
2. In the panel on the left under Sales, choose Shipping Methods.
3. Expand the Table Rates section. Then, do the following:
a. Set Enabled to “Yes.”
b. Enter the Title that you want to appear for table rates section during checkout. (The
default title is “Best Way.”)
c. Enter the Method Name that you want to appear as a label next to the calculated rate in
the shopping cart.
d. Set Condition to one of the following calculation methods:
lWeight v. Destination
lPrice v. Destination
l# of Items v. Destination
e. For orders that include virtual products, set Include Virtual Products in Price Calculation
to “Yes” if you want to be able to include the virtual product(s) in the calculation.
Because virtual products—such as services—have no weight, they cannot change the result of
a calculation that is based on the Weight v. Destination condition. However, virtual products
can change the result of a calculation that is based on either the Price v. Destination or # of
Items vs Destination condition.
f. If charging a handling fee, set Calculate Handling Fee to one of the following:
lFixed
lPercent
Then, enter the Handling Fee rate according to the method used to calculate the fee.
CHAPTER 53: Basic Shipping Methods Table Rates
Magento Community Edition 2.0 User Guide 709
If the handling fee is based on a percent, enter the whole number without the percent sign.
g. In the Displayed Error Message box, type the message that appears when this method is
not available.
h. Set Ship to Applicable Countries to one of the following:
All Allowed
Countries
Customers from any country specified in your store configuration
can use table rate shipping.
Specific Countries After choosing this option, the “Ship to Specific Countries” list
appears. Select each country where customers can use table rate
shipping.
i. Enter a Sort Order number to determine where table rates appear in the list of shipping
methods during checkout. (0 = first, 1 = second, 2 = third, and so on.)
4. When complete, tap Save Config.
Table Rates CHAPTER 53: Basic Shipping Methods
710 Magento Community Edition 2.0 User Guide
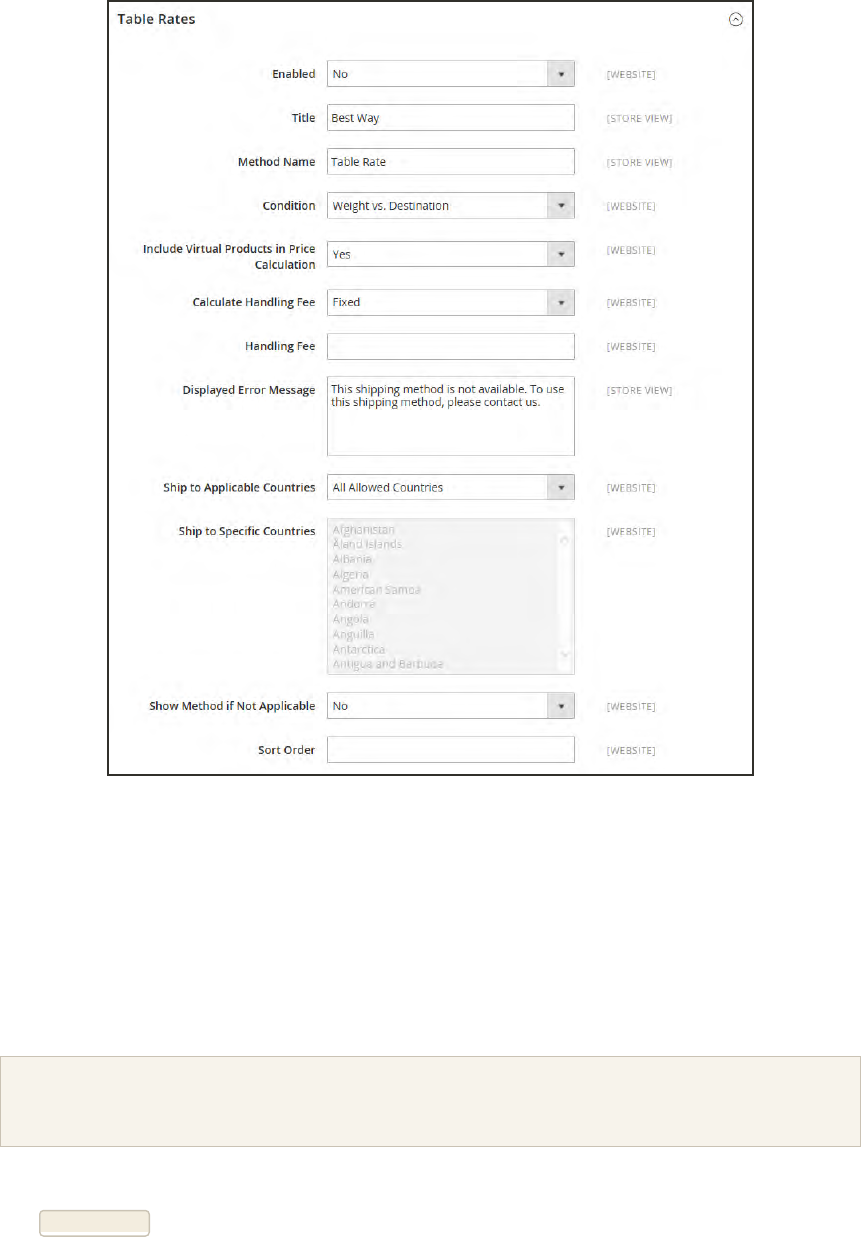
Table Rates
Step 2: Prepare the Table Rate Data
1. In the upper-left corner, set Store View to “Main Website,” or to any other website where the
configuration applies.
The Export and Import options appear in the Table Rates section, with “Use Default”
checkboxes to the right of each option.
To change any of the current settings, you must first clear the “Use Default” checkbox next to the
field.
2. To change the Condition, clear the Use Default checkbox. Then, choose another option.
3. Tap Export CSV. Then, save the tablerates.csv file to your computer.
CHAPTER 53: Basic Shipping Methods Table Rates
Magento Community Edition 2.0 User Guide 711
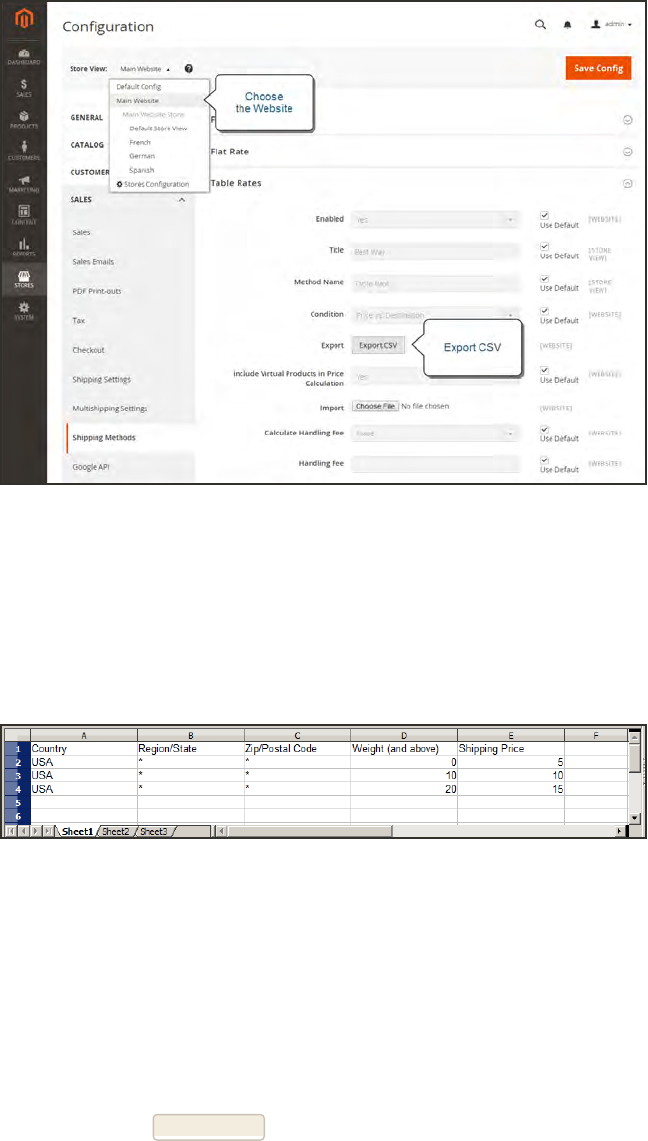
Export CS
4. Open the file in a spreadsheet. Then, complete the table with appropriate values for the
shipping calculation condition.
lUse an asterisk (*) as a wildcard to represent all possible values in any category.
lThe Country column must contain a valid three-character code for each row.
Weight vs. Destination
5. When complete, save the tablerates.csv file.
Step 3:Import the Table Rate Data
1. Return to the Table Rates section of your store configuration.
2. In the upper-left corner, set Store View to the website where this method will be used.
3. Next to the Import field, tap Choose File. Select your completed tablerates.csv file, and import
the rates.
Table Rates CHAPTER 53: Basic Shipping Methods
712 Magento Community Edition 2.0 User Guide
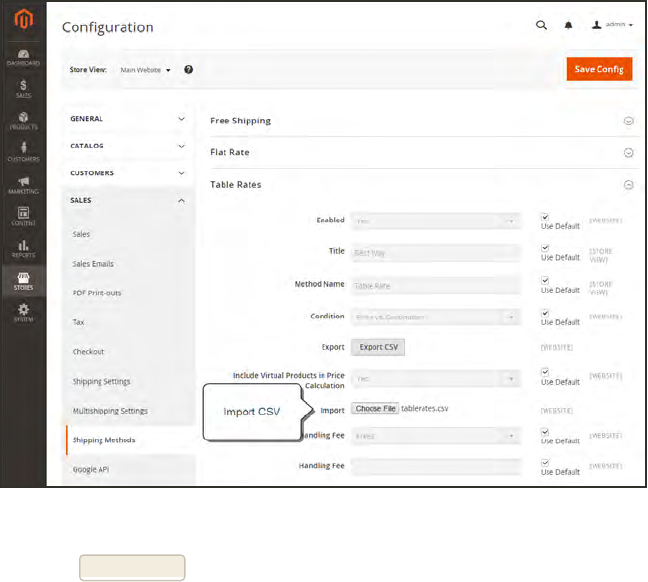
Import Table Rates
4. When complete, tap Save Config.
CHAPTER 53: Basic Shipping Methods Table Rates
Magento Community Edition 2.0 User Guide 713
Step 4: Verify the Rates
To make sure that the table rate data is correct, go through the payment process with several
different addresses to make sure the shipping and handling rates are calculated correctly.
Example 1: Price v. Destination
This example uses the Price v. Destination condition to create a set of three different shipping rates
based on the amount of the order subtotal for the continental United States, Alaska, and Hawaii. The
asterisk (*) is a wildcard that represents all values.
COUNTRY
REGION /
STATE
ZIP / POSTAL
CODE
ORDER
SUBTOTAL
(and above)
SHIPPING
PRICE
USA * * 0 15
USA * * 50 10
USA * * 100 5
USA AK * 0 20
USA AK * 50 15
USA AK * 100 10
USA HI * 0 20
USA HI * 50 15
USA HI * 100 10
Table Rates CHAPTER 53: Basic Shipping Methods
714 Magento Community Edition 2.0 User Guide
Example 2: Weight v. Destination
This example uses the Weight v. Destination condition to create a set of three different shipping rates
based on the weight of the order..
COUNTRY
REGION /
STATE
ZIP / POSTAL
CODE
WEIGHT (AND
ABOVE)
SHIPPING
PRICE
USA * * 0 5
USA * * 10 10
USA * * 20 15
Example 3: Restrict Free Shipping to the Continental United States
1. Create a tablerates.csv file that includes all the state destinations to which you are willing
to provide free shipping.
2. Complete the table rate configuration with the following settings:
SETTING VALUE
Condition Price v. Destination
Method Name Free Shipping
Ship to Applicable Countries Specific Countries
Ship to Specific Countries Select only United States
Show method if not applicable No
3. Set Store View to the main website. Then, tap Import to import the tablesrates.csv file.
CHAPTER 53: Basic Shipping Methods Table Rates
Magento Community Edition 2.0 User Guide 715
Dimensional Weight
Dimensional weight, sometimes called volumetric weight, is a common industry practice that
bases the transportation price on a combination of weight and package volume. In simple
terms, dimensional weight is used to determine the shipping rate based on the amount of space
a package occupies in the cargo area of the carrier. Dimensional weight is typically used when a
package is relatively light compared to its volume.
All major carriers now apply dimensional weight to some shipments. However, the manner in
which dimensional weight pricing is applied varies from one carrier to another.
lDHL
lFedEx
lUPS
lUSPS
We recommend that you become familiar with the method used by each carrier to determine
and apply dimensional weight. If your company has a high volume of shipments, even a slight
difference in shipping price can translate to thousands of dollars over the course of a year.
Magento’s native shipping configuration does not include support for dimensional weight.
Dimensional Weight CHAPTER 53: Basic Shipping Methods
716 Magento Community Edition 2.0 User Guide
CHAPTER 54:
Carriers
If you have a commercial account with a supported carrier, you can offer your customers
the convenience of choosing that carrier during checkout. The rates are automatically
downloaded, so you do not need to look up the information.
Before you can offer your customers a selection of shipping carriers, you must first
complete the shipping settings to establish the point of origin for your store. Then,
complete the configuration for each carrier service that you want to offer. The configuration
options vary for each carrier. However, all require that you first open a shipping account
with the carrier, and enter your account number or user ID, and the gateway URL to their
system into the configuration of your store. See Magento Connect for additional shipping
services for your Magento Community Edition 2.0 installation.
See the online user guide for step-by-step configuration instructions for the following
carriers:
UPS
United Parcel Service offers domestic and international shipping services by land and air to
more than 220 countries.
USPS
The United States Postal Service is the independent postal service of United States
government. USPS offers domestic and international shipping services by land and air.
FedEx
Offers domestic and international shipping services by land and air to more than 220
countries.
DHL
Offers integrated international services and tailored, customer-focused solutions for
managing and transporting letters, goods and information.
Magento Community Edition 2.0 User Guide 717
UPS
United Parcel Service offers domestic and international shipping services by land and air to
more than 220 countries.
UPS now uses dimensional weight to determine some shipping rates.
Process Overview:
Step 1: Open a UPS Shipping Account
Step 2: Enable UPS for Your Store
Step 3: Complete the Container Description
Step 4: Set Up Handling Fees
Step 5: Specify Allowed Methods and Applicable Countries
For step-by-step instructions, see UPS in the Magento Community Edition 2.0online user
guide.
UPS CHAPTER 54: Carriers
718 Magento Community Edition 2.0 User Guide

USPS
The United States Postal Service is the independent postal service of United States government,
offering domestic and international shipping services by land and air.
Process Overview:
Step 1: Open a USPS Shipping Account
Step 2: Enable USPSfor Your Store
Step 3: Complete the Packaging Description
Step 4: Set Up Handling Fees
Step 5: Specify Allowed Methods and Applicable Countries
For step-by-step instructions, see USPS in the Magento Community Edition 2.0online user
guide.
CHAPTER 54: Carriers USPS
Magento Community Edition 2.0 User Guide 719
FedEx
FedEx is one of the world’s largest shipping service companies, providing air, freight, and
ground shipping services with several levels of priorities.
FedEx now uses dimensional weight to determine some shipping rates.
Process Overview:
Step 1: Register for FedEx Web Services Production
Step 2: Enable FedExfor Your Store
Step 3: Package Description and Handling Fee
Step 4: Allowed Methods and Applicable Countries
For step-by-step instructions, see FedEx in the Magento Community Edition 2.0online user
guide.
FedEx CHAPTER 54: Carriers
720 Magento Community Edition 2.0 User Guide

DHL
DHL offers integrated international services and tailored, customer-focused solutions for
managing and transporting letters, goods and information.
Process Overview:
Step 1: Enable DHL
Step 2: Enter Package Description and Handling Fee
Step 3: Specify Allowed Shipping Methods
Step 4: Specify Applicable Countries
For step-by-step instructions, see DHL in the Magento Community Edition 2.0online user
guide.
CHAPTER 54: Carriers DHL
Magento Community Edition 2.0 User Guide 721

Notes
722 Magento Community Edition 2.0 User Guide
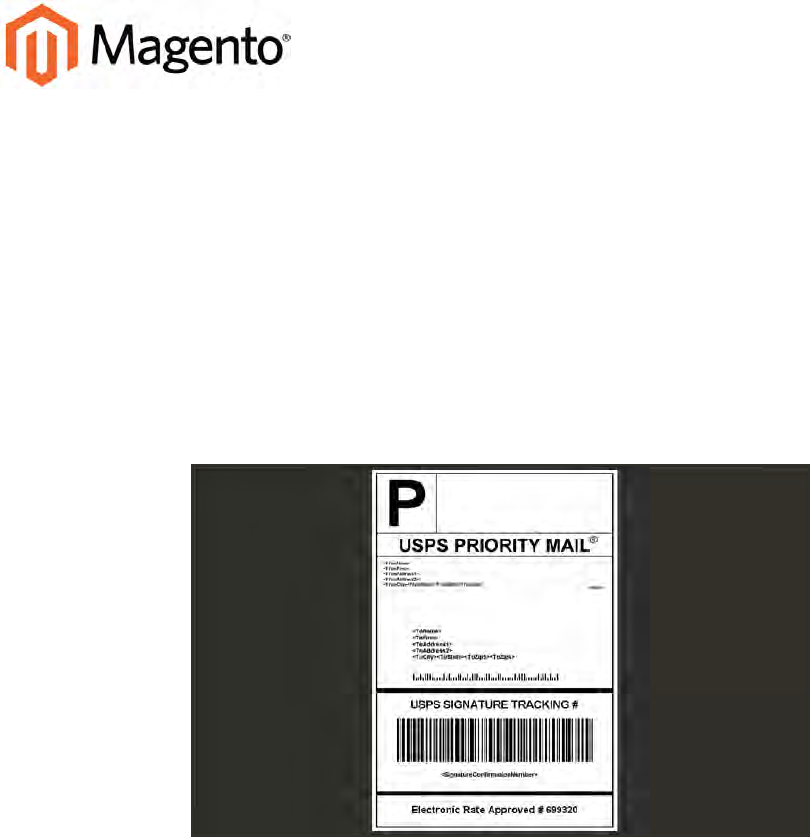
CHAPTER 55:
Shipping Labels
Magento Community Edition 2.0 includes a high level of integration with major shipping
carriers, which gives you access to carrier shipping systems to track orders, create shipping
labels, and more. Shipping labels can be created for regular shipments and products with
return merchandise authorization. In addition to the information provided by the shipping
carrier, the label also includes the Magento order number, number of the package, and the
total quantity of packages for the Magento shipment.
USPS Priority Shipping Label
Magento Community Edition 2.0 User Guide 723

Shipping Label Workflow
Shipping labels can be produced at the time a shipment is created, or later. Shipping labels are
stored in PDF format and are downloaded to your computer.
1Administrator submits shipping label request. The store Administrator completes the
information necessary to generate labels, and submits the request.
2Request sent to carrier. Magento contacts the shipping carrier, and creates an order in
the carrier’s system. A separate order is created for each package that is shipped.
3Carrier sends label and tracking number. The carrier sends the shipping label and
tracking number for the shipment.
lA single shipment with multiple packages receives multiple shipping labels.
lIf you generate the same shipping labels multiple times, the original tracking numbers
are preserved.
lFor returned products with RMA numbers, the old tracking numbers are replaced with
new ones.
4Administrator downloads and prints the label. After the shipping label is generated,
the new shipment is saved and the label can be printed. If the shipping label cannot be
created due to problems with the connection or any other reason, the shipment is not
created.
Depending on your browser settings, the PDF file can be opened and printed. Each label
appears on a separate page in the PDF.
Shipping Label Workflow CHAPTER 55: Shipping Labels
724 Magento Community Edition 2.0 User Guide

Configuring Shipping Labels
The following settings must be made at the product level, as well as in the configuration of
each carrier that is used to print labels. To print labels, all carriers require that you open an
account. Then, complete the configuration in your store for each carrier that you plan to use.
Step 1:Verity the Country of Manufacture
The country of manufacture is required for all products that are shipped internationally by
USPS and FedEx, If you have many products that need to be updated, you can either import
the updates, or use the Inventory grid to update multiple records.
1. On the Admin sidebar, tap Products. Then under Inventory, choose Catalog.
Method 1:Update a Single Record
a. In the grid, find the product to be updated, and open in edit mode.
b. In the panel on the left under Advanced Settings, choose Autosettings.
c. Update the Country of Manufacture field.
d. When complete, tap Save.
Country of Manufacture
CHAPTER 55: Shipping Labels Configuring Shipping Labels
Magento Community Edition 2.0 User Guide 725
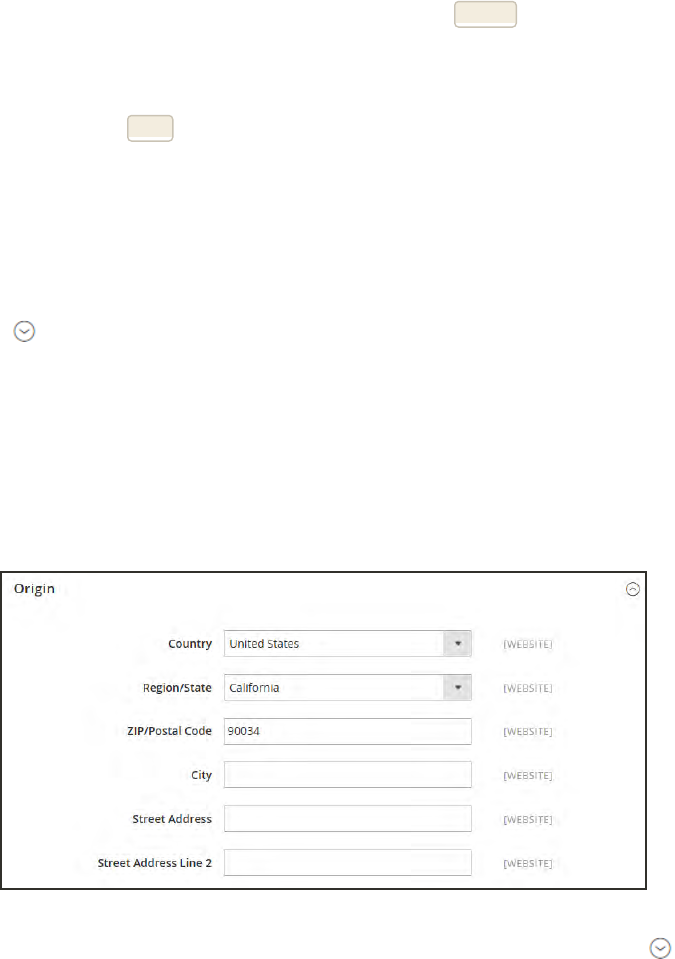
Method 2:Update Multiple Records
a. In the grid, mark the checkbox of each product to be updated. For example, all products
that are manufactured in China.
b. Set the Actions control to “Update Attributes.” Then, tap Submit.
c. In the Update Attributes form, find the Country of Manufacture field and mark the
Change checkbox. Then, choose the country.
d. When complete, tap Save.
Step 2: Verify the Store Information
1. On the Admin sidebar, tap Stores. Then under Settings, choose Configuration.
2. In the panel on the left, under Sales, choose Shipping Settings. then, do the following:
a. Expand the Origin section, and verify that the following fields are complete:
Street Address The street address of the place from which shipments are sent. For
example, the location of your company or warehouse. This field is
required for shipping labels.
Street Address
Line2
Any additional address information, such as the floor, entrance and
so on. We strongly recommend that you use this field.
Origin
b. In the panel on the left under Sales, choose Shipping Methods. Then, expand the
USPS section, and verify that the following fields are complete:
Configuring Shipping Labels CHAPTER 55: Shipping Labels
726 Magento Community Edition 2.0 User Guide

Secure Gateway
URL
Magento automatically enters the gateway URL.
Password The password is provided by USPS, and gives you access to their
system through Web Services.
Length, Width
Height, Girth
The default dimensions of the package. To make these fields
appear, set Size to “Large.”
c. Expand the FedEx section, and verify that the following fields are complete:
lMeter Number
lKey
lPassword
This information is provided by the carrier, and is required to gain access to their system
through Web Services.
d. In the panel on the left under General, choose General. Expand the Store Information
section, and verify that the following fields are complete:
Store Name The name of the store or store view.
Store Contact
Telephone
The telephone number of the primary contact for the store or store
view.
Country The country where your store is based.
VAT Number If applicable the Value Added Tax number of your store. (Not
required for stores based in the U.S.)
Store Contact
Address
The street address of the primary contact for the store or store view.
e. If you have multiple stores, and the contact information differs from the default, set Store
View for each, and verify that the information is complete. If the information is missing,
you’ll get an error when you try to print the labels.
CHAPTER 55: Shipping Labels Configuring Shipping Labels
Magento Community Edition 2.0 User Guide 727
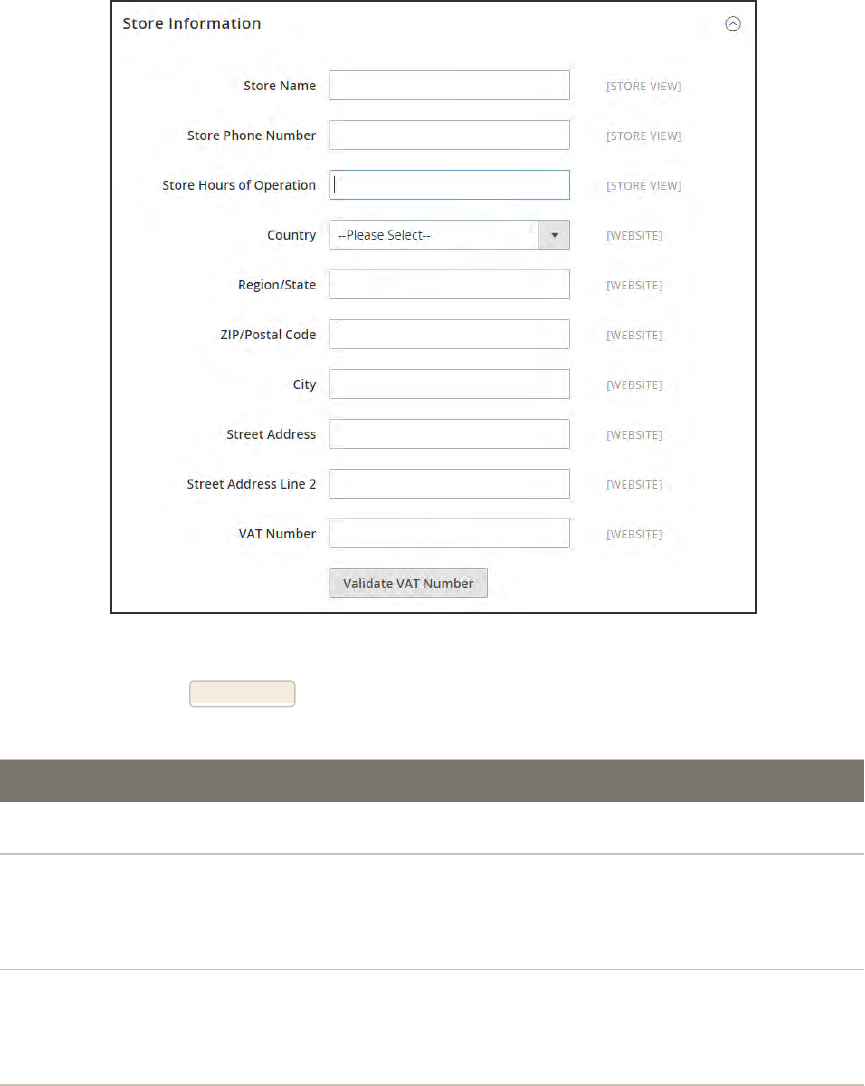
Store Information
3. When complete, tap Save Config.
CARRIER REQUIREMENTS
USPS Requires a USPS account.
UPS Requires a UPS account. Shipping labels are available only for shipments
that originate in the U.S. Specific credentials are required for stores outside
the US.
FedEx Requires a FedEx account. For stores outside of the U.S., shipping labels
are supported for international shipments only. FedEx does not allow
domestic shipments that originate outside of the U.S
DHL Requires a DHL account. Shipping labels are supported only for shipments
that originate in the U.S.
Carrier Requirements
Configuring Shipping Labels CHAPTER 55: Shipping Labels
728 Magento Community Edition 2.0 User Guide

Creating Shipping Labels
To create shipping labels, you must first set up your shipping carrier account to support labels.
Then, follow the prompts to enter a description of the package and its contents.
Process Overview:
Step 1: Contact Your Shipping Carriers
Step 2: Update the Configuration for Each Carrier
Step 3: Create Shipping Labels
Step 4: Print the Labels
Step 1: Contact Your Shipping Carriers
Before you begin, make sure that your shipping accounts are set up to process labels. Some
carriers might charge an additional fee to add shipping labels to your account.
1. Contact each carrier that you use to activate shipping labels for your store.
2. Follow the instructions provided by each carrier to add shipping label support to your account.
FedEx Contact FedEx Web Services regarding their label evaluation process.
USPS Contact uspstechsupport@esecurecare.net to request that API Signature
Confirmation V3 be enabled for your live USPS API Access account.
UPS Contact UPS to confirm your account type supports shipping labels. To
generate shipping labels, you must use the UPS XML option.
DHL Contact the DHL Resource Center to learn more about their services or send
an inquiry through their Contact Center.
Step 2: Update the Configuration for Each Carrier
1. Make sure that your Store Information is complete.
2. Follow the instructions below for each carrier account that has been activated for label printing.
CHAPTER 55: Shipping Labels Creating Shipping Labels
Magento Community Edition 2.0 User Guide 729
UPS Configuration
United Parcel Service ships both domestically and internationally. However, shipping labels
can be generated only for shipments that originate within the United States.
1. On the Admin sidebar, tap Stores. Then under Settings, choose Configuration.
2. In the panel on the left under Sales, choose Shipping Methods.
3. Expand the UPS section. Then, verify that your UPS Shipper Number is correct. Your
Shipper Number appears only when United Parcel Service XML is enabled.
4. When complete, tap Save Config.
USPS Configuration
The United States Postal Service ships both domestically and internationally.
1. Continuing in the Shipping Methods configuration, expand the USPS section. Then, do
the following:
a. Verify that the Secure Gateway URL is entered. The correct URL should be entered
automatically.
b. Enter the Password provided to you by USPS.
c. Set Size to “Large.” Then, enter the following dimensions:
lLength
lWidth
lHeight
lGirth
2. When complete, tap Save Config.
Creating Shipping Labels CHAPTER 55: Shipping Labels
730 Magento Community Edition 2.0 User Guide
FedEx Configuration
FedEx ships domestically and internationally. Stores located outside the United States can
create FedEx labels for international shipments only.
1. Continuing in the Shipping Methods configuration, expand the FedEx section. Then,
make sure that the following FedEx credentials are correct:
lMeter Number
lKey
lPassword
2. When complete, tap Save Config.
DHL Configuration
DHL provides international shipping services.
1. Continuing in the Shipping Methods configuration, expand the DHL section. Then, do the
following:
a. Verify that the Gateway URL is entered. The correct URL should be entered automatically.
b. Make sure that the following credentials are complete:
lAccess ID
lPassword
lAccount Number
2. When complete, tap Save Config.
CHAPTER 55: Shipping Labels Creating Shipping Labels
Magento Community Edition 2.0 User Guide 731
Step 3: Create Shipping Labels
Process Overview:
Method 1: Create Label for New Shipment
Method 2: Create Label for Existing Shipment
Method 1: Create Label for New Shipment
1. On the Admin sidebar, tap Sales. Then under Operations, choose Orders.
2. Find the order in the grid, and open the record. The status of the order must be either
“Pending” or “Processing.”
3. In the upper-right corner, tap Ship. Then, confirm the shipping information according to
carrier requirements.
4. In the lower-right corner, mark the Create Shipping Label checkbox. Then, tap Submit
Shipment, and do the following:
a. To add products from the order to the package, tap Add Products. The Quantity
column shows the maximum number of products that are available for the package.
b. Mark the checkbox of each product to be added to the package, and enter the
Quantity of each. Then, tap Add Selected Product(s) to Package.
lTo add a new package, tap Add Package.
lTo delete a package, tap Delete Package.
If you use a package type other than the default, or require a signature, the cost of shipping
might differ from what you have charged the customer. Any difference in the cost of shipping is
not reflected in your store.
5. When complete, tap OK.
If you need to cancel an order, tap Cancel. A shipping label will not be created, and the Create
Shipping Label checkbox is cleared.
Magento connects to the shipping carrier system, submits the order, and receives a shipping
label and tracking number for each package.
lIf the label is successfully created, the shipment is submitted, the tracking number
appears in the form, and the label is ready to print.
lIf the carrier cannot create the label due to the problems with connection, or for any
other reason, the shipment is not processed.
Creating Shipping Labels CHAPTER 55: Shipping Labels
732 Magento Community Edition 2.0 User Guide
Method 2: Create Label for Existing Shipment
1. On the Admin sidebar, tap Sales. Then under Operations, choose Orders.
2. Find the order in the grid, and open the Shipping form. Then, do the following:
a. In the Shipping and Tracking Information section, tap Create Shipping Label.
b. Distribute the ordered product(s) to the appropriate package(s), and tap OK.
c. To review the package information, tap Show Packages.
Magento connects to the shipping carrier system, submits an order, and receives a shipping
label and a tracking number.
If a shipping label for this shipment already exists in the system, it is replaced with a new one.
However, existing tracking numbers are not replaced. Any new tracking number is added to
the existing one.
Step 4: Print the Labels
Shipping labels are generated in PDF format, and can be printed from the Admin. Each label
includes the order number and package number.
Because an individual shipment order for each package is created, multiple shipping labels might
be received for a single shipment.
Process Overview:
Method 1: Print Label from Shipment Form
Method 2: Print Labels for Multiple Orders
CHAPTER 55: Shipping Labels Creating Shipping Labels
Magento Community Edition 2.0 User Guide 733
Method 1: Print Label from Shipment Form
1. On the Admin sidebar, tap Sales. Then, do one of the following:
lChoose Orders. Find the order in the grid, and open the record. In the panel on the left,
choose Shipments. Then, open the shipment record.
lChoose Shipments. Find the order in the grid, and open the record.
2. To download the PDFfile, go to the Shipping and Tracking section of the form, and tap
Print Shipping Label. Depending on your browser settings, the shipping labels can be
viewed and printed directly from the PDF file.
The Print Shipping Label button appears only after the carrier generates labels for the
shipment. If the button is missing, click Create Shipping Label. The button appears after
Magento receives the label from the carrier.
Method 2: Print Labels for Multiple Orders
1. On the Admin sidebar, tap Sales. Then, choose one of the following:
lOrders
lShipments
2. In the grid, mark the checkbox of each order with shipping labels to be printed.
3. Set the Actions control to "Print Shipping Labels."
4. Tap Submit.
A complete set of shipping labels is printed for each shipment that is related to the selected
orders.
Creating Shipping Labels CHAPTER 55: Shipping Labels
734 Magento Community Edition 2.0 User Guide
SETTING DESCRIPTION
Type Package types differ by carrier and method. The default package
type for each carrier is initially selected.
USPS does not require the package type for domestic shipments.
Customs Value (International shipments only) The declared value or sales price of the
contents of an international shipment.
Total Weight The total weight of all products added to the package is calculated
automatically. The value can also be changed manually, and entered
as pounds or kilograms.
Length, Width, Height (Optional) The package dimensions are used for custom packages
only. You can specify the measurements units as inches or
centimeters.
Not Required No confirmation of delivery is sent to the
store by the shipping carrier.
No Signature A delivery confirmation without the signature
of the recipient is sent to the store by the
shipping carrier.
Signature Required The shipping carrier obtains the signature of
the recipient and provides the store with a
printed copy.
Direct (FedEx Only) FedEx obtains a signature from
someone at the delivery address. If no one is
available to sign for the package, the carrier
tries to deliver the package at another time.
Indirect (FedEx Residential Deliveries Only) FedEx
obtains the signature of someone, possibly a
neighbor or building manager, at the delivery
address. The recipient can leave a signed
FedEx door tag to authorize the package to
be left without anyone present to sign for it.
Contents (USPS Only) Select one of the following
descriptions of the package:
Required Carrier Configuration Settings
CHAPTER 55: Shipping Labels Creating Shipping Labels
Magento Community Edition 2.0 User Guide 735

SETTING DESCRIPTION
Gift
Documents
Commercial Sample
Returned Goods
Merchandise
Other
Explanation (USPS Only) A detailed description of the
package contents.
Adult Required The shipping carrier obtains the signature of
an adult recipient and provides the store with
a printed copy.
Required Carrier Configuration Settings (cont.)
Creating Shipping Labels CHAPTER 55: Shipping Labels
736 Magento Community Edition 2.0 User Guide
Label Packages
The Create Packages window appears when you choose to create a shipping label. You can start
configuring the first package immediately.
To configure a package:
1. Complete the fields as described below.
If you select the non-default value in the Type field or choose to require a signature confirmation,
the price of a shipment may differ from the one you charged to the customer.
2. To view a list of shipped products and add them to the package, tap Add Products.
The Qty column shows the maximum quantity that is available to add. For the first package,
the number is the total quantity of the product to be shipped.
3. Specify the products and quantities. To add the products to the package, tap Add Selected
Product(s) to Package .
lTo add a new package, tap Add Package. You can add several packages, and edit them at
the same time.
lTo delete a package, tap Delete Package.
After products are added to the package, the quantity cannot be edited directly.
To increase the quantity:
1. Tap Add Selection .
2. Enter the additional quantity.
The number is added to the previous quantity of the product in the package.
CHAPTER 55: Shipping Labels Creating Shipping Labels
Magento Community Edition 2.0 User Guide 737
To decrease the quantity:
1. Delete the product from the package.
2. Tap Add Selection.
3. Enter the new, smaller value.
After you distribute all products, the total number of the packages you are going to use equals
the number of the last package in the list. The OK button is disabled until all shipped items are
distributed to packages, and all necessary information is complete.
4. When complete, tap OK to generate the labels.
If you need to stop the process, tap Cancel. The packages are not saved, and the shipping label
process is canceled.
Creating Shipping Labels CHAPTER 55: Shipping Labels
738 Magento Community Edition 2.0 User Guide

FIELD DESCRIPTION
Type Specifies the type of a package. Select one of the predefined values.
Available package types are different for each shipping carrier.
When the Create Packages pop-up window opens, the default
package for the shipping carrier appears in the Type field. If you
select a package that is not designed by a shipping carrier, you must
enter the dimensions of the package.
For shipping labels created for DHL, FedEx, and UPS shipments, the
“Type of Goods” field is set to “Merchandise.” For USPS, the Type
field reflects the value from the Contents field in the Create
Packages window.
Total Weight The total weight of a package. The field is pre-populated with the total
weight of products in a package. The unit of measurement can be set
to either pounds or kilograms.
Length The length of a package, integer and floating point numbers. The field
is enabled if the custom package type is used. The unit of
measurement can be set to either inches or centimeters.
Field Descriptions
CHAPTER 55: Shipping Labels Creating Shipping Labels
Magento Community Edition 2.0 User Guide 739

FIELD DESCRIPTION
Width The width of a package, integer and floating point numbers. The field
is enabled if the custom package type is used. The measurement
units can be specified using the drop-down menu next to the Height
field; select between inches and centimeters.
Height The height of a package, integer and floating point numbers. The field
is enabled if the custom package type is used. The measurement
units can be specified using the drop-down menu next to the Height
field; select between inches and centimeters.
Signature Confirmation Defines delivery confirmation. Options:
Not Required No delivery confirmation letter is sent to you.
No Signature A delivery confirmation letter without a
recipient’s signature is sent to you.
Signature Required The shipping carrier obtains the recipient’s
signature and provides you with its printed
copy.
Adult Required The shipping carrier obtains the adult
recipient’s signature and provides you with
its printed copy.
Field Descriptions (cont.)
Creating Shipping Labels CHAPTER 55: Shipping Labels
740 Magento Community Edition 2.0 User Guide

FIELD DESCRIPTION
Direct (FedEx only) FedEx obtains a signature from someone at
the delivery address and reattempts delivery
if no one is available to sign for the package.
Indirect (FedEx
only)
FedEx obtains a signature in one of three
ways: (1) from someone at the delivery
address; (2) from a neighbor, building
manager or other person at a neighboring
address; or (3) the recipient can leave a
signed FedEx Door Tag authorizing release
of the package without anyone present.
Available for residential deliveries only.
The options may vary slightly for different
shipping methods. For the most up to date
information refer to shipping carrier’s
resources.
Field Descriptions (cont.)
CHAPTER 55: Shipping Labels Creating Shipping Labels
Magento Community Edition 2.0 User Guide 741

FIELD DESCRIPTION
Contents (Available for USPS shipments only) Description of the package
contents. Options:
Gift
Documents
Commercial Sample
Returned Goods
Merchandise
Other
Explanation (USPS shipments only) Detailed description of the package content.
Field Descriptions (cont.)
Creating Shipping Labels CHAPTER 55: Shipping Labels
742 Magento Community Edition 2.0 User Guide


CHAPTER 56:
Reports Menu
Magento Community Edition 2.0 provides a wide selection of reports to keep you informed
on your marketing efforts, sales products, and customer activity. The Reports menu
provides easy access to current information about your sales, products, customers, and
promotions.
Reports Menu
Magento Community Edition 2.0 User Guide 745
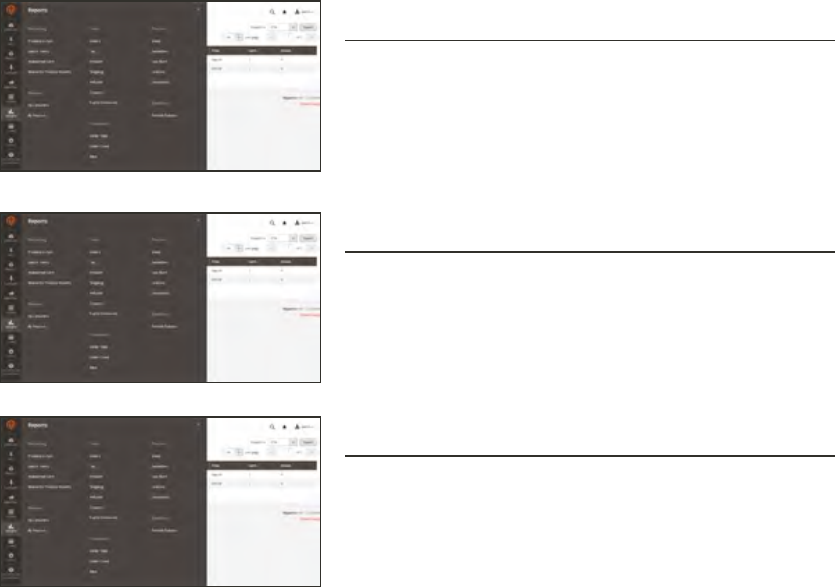
Menu Options
Marketing Reports
A selection of marketing reports, including Products in
Cart, Search Terms, Abandoned Carts, and Newsletter
Problem Reports.
Review Reports
The selection of product review reports includes By
Customer and By Product.
Sales Reports
The selection of sales reports includes Orders, Tax,
Invoiced, Shipping, Refunds, Coupons, and PayPal
Settlement.
746 Magento Community Edition 2.0 User Guide
CHAPTER 56: Reports Menu
Customer Reports
The selection of customer reports includes Order Total,
Order Account, and New.
Product Reports
The selection of product reports includes Views,
Bestsellers, Low Stock, Ordered, and Downloads.
Statistics
Statistics is a tool that reduces the performance impact
of generating reports by calculating and storing statistical
data. Rather than recalculate the statistics every time a
report is generated, the stored statistics are used until
you refresh the statistics.
Magento Community Edition 2.0 User Guide 747
CHAPTER 56: Reports Menu

Notes
748 Magento Community Edition 2.0 User Guide
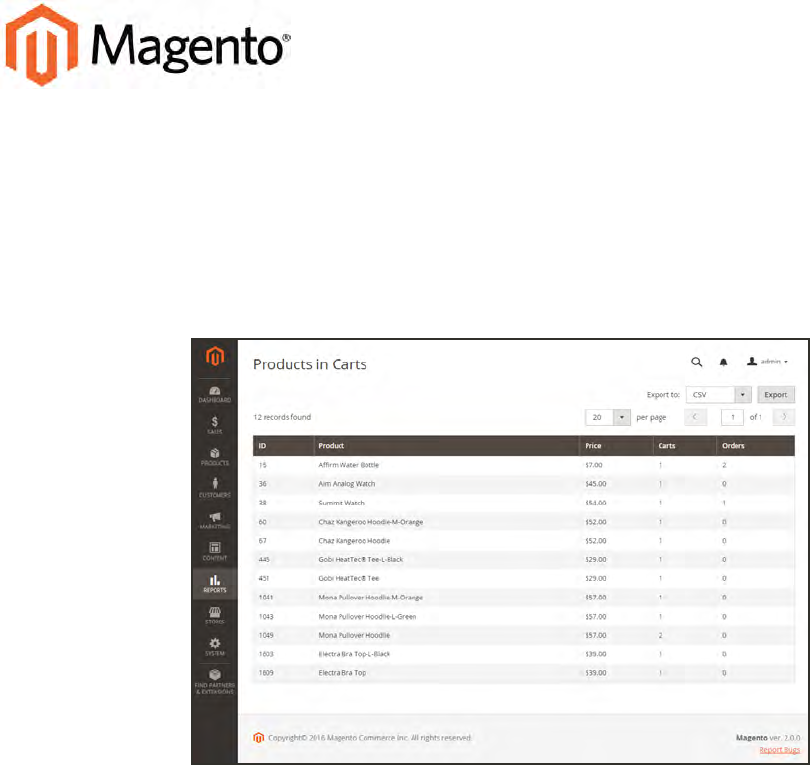
CHAPTER 57:
Marketing Reports
Marketing reports provide information about the status of shopping carts, the use of
search terms, and newsletter transmissions.
Products in Cart Report
Magento Community Edition 2.0 User Guide 749
Reports
Products in Cart
The Products in Cart Report lists all products currently in
shopping carts, and includes the name and price of each
item, the number of carts with the item, and the number
of times each item has been ordered.
Search Terms
The Search Terms Report shows what your customers
are looking for in each store view. The report includes the
number of matching items found in the catalog, and how
many times the search term has been used.
Abandoned Carts
The Abandoned Carts Report lists all registered
customers who have abandoned carts that have not yet
expired. The report includes the customer name and
email address, the number of products in the cart and
subtotal, the date created, and date last updated.
Newsletter Problems
The Newsletter Problems Report includes information
about any newsletter queue that failed to transmit
successfully. The report includes the name of each
subscriber, and queue date and subject, the information
about the error.
750 Magento Community Edition 2.0 User Guide
CHAPTER 57: Marketing Reports
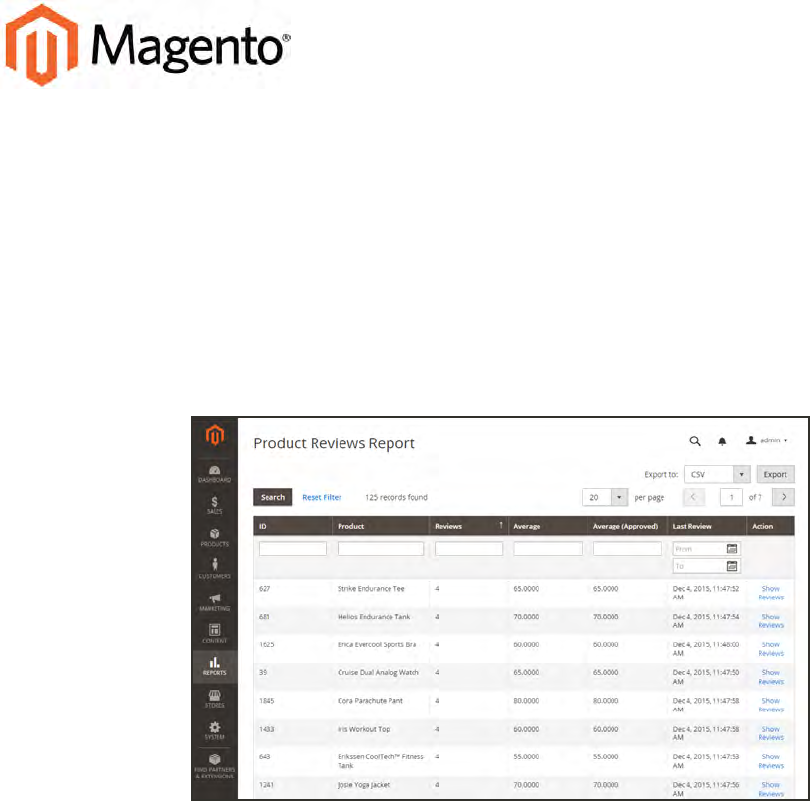
CHAPTER 58:
Review Reports
The Review Reports provide information about product reviews by customer and by
product.
lBy Customers
lBy Products
Review Report by Product
Magento Community Edition 2.0 User Guide 751
Reports
By Customers
The Customer Reviews Report lists all customer who
have submitted product reviews. The report includes the
number of reviews submitted by each customer, and a
link to the list of reviews.
By Products
The Product Reviews Report lists all products that have
been reviewed by customers. The report includes the
number of reviews and average rating, the product was
last reviewed, and a link to the list of reviews for each
product.
752 Magento Community Edition 2.0 User Guide
CHAPTER 58: Review Reports
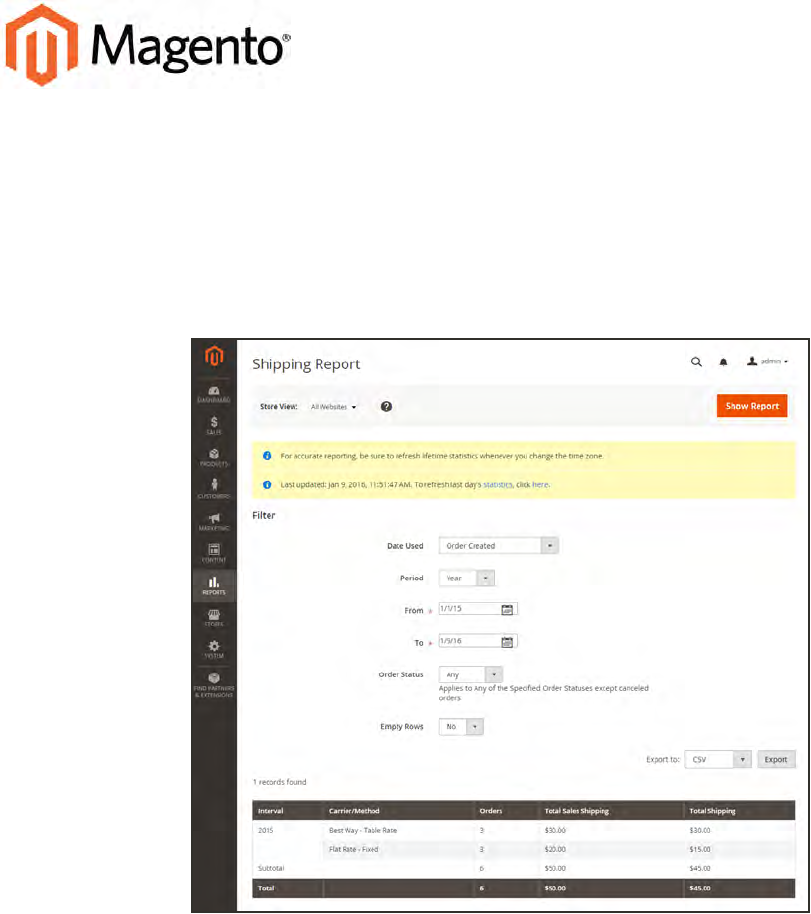
CHAPTER 59:
Sales Reports
The selection of sales reports includes Orders, Tax, Invoiced, Shipping, Refunds, Coupons,
and PayPal Settlement.
Shipping Report
Magento Community Edition 2.0 User Guide 753
Reports
Orders
The Orders Report can be filtered by time interval, date
and status. The report includes the number of orders
placed and canceled, with totals for sales, amounts
invoiced, refunded, tax collected, shipping charged, and
discounts.
Tax
The Tax Report can be filtered by time interval, date, and
status. The report includes the tax rule applied, tax rate,
number of orders, and amount of tax charged.
Invoiced
The Invoice Report can be filtered by time interval, date,
and status. The report includes the number of orderss
and invoices during the time period, with amounts
invoiced, paid, and unpaid.
754 Magento Community Edition 2.0 User Guide
CHAPTER 59: Sales Reports
Shipping
The Shipping Report can be filtered by time interval, date,
and status. The report includes the number of orders for
carrier or shipping method used,with amounts for total
sales shipping and and total shipping.
Refunds
The Refunds Report can be filtered by time interval, date,
and status. The report includes the number of refunded
orders, and total amount refunded online and offline.
Coupons
The Coupons Report can be filtered by time interval,
date, and status. The report includes each coupon code
used during the specified time interval, related price rule,
and number of times used with totals and subtotals for
sales and discounts.
PayPal Settlement
The PayPal Settlement Report can be filtered by date,
merchant account, transaction ID, invoice ID, or PayPal
reference ID. The report includes the type of event, such
as a debit card transaction, the start and finish dates,
gross amount, and related fees. The report can be
automatically updated with the most current data from
PayPal.
Magento Community Edition 2.0 User Guide 755
CHAPTER 59: Sales Reports

Notes
756 Magento Community Edition 2.0 User Guide
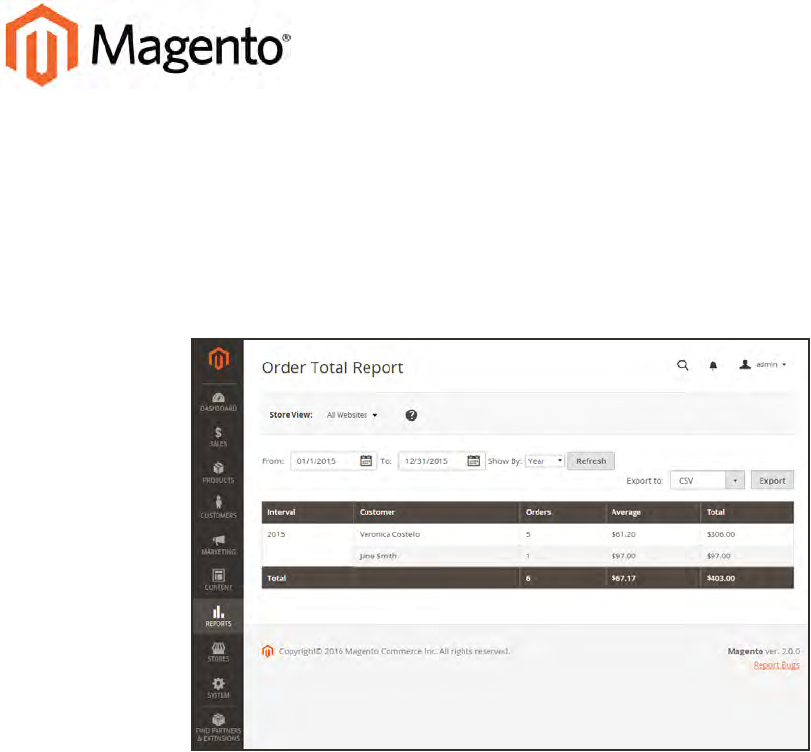
CHAPTER 60:
Customer Reports
Customer reports provide insight into customer activity during a specified period of time
or date range.
Order Total Report
Magento Community Edition 2.0 User Guide 757
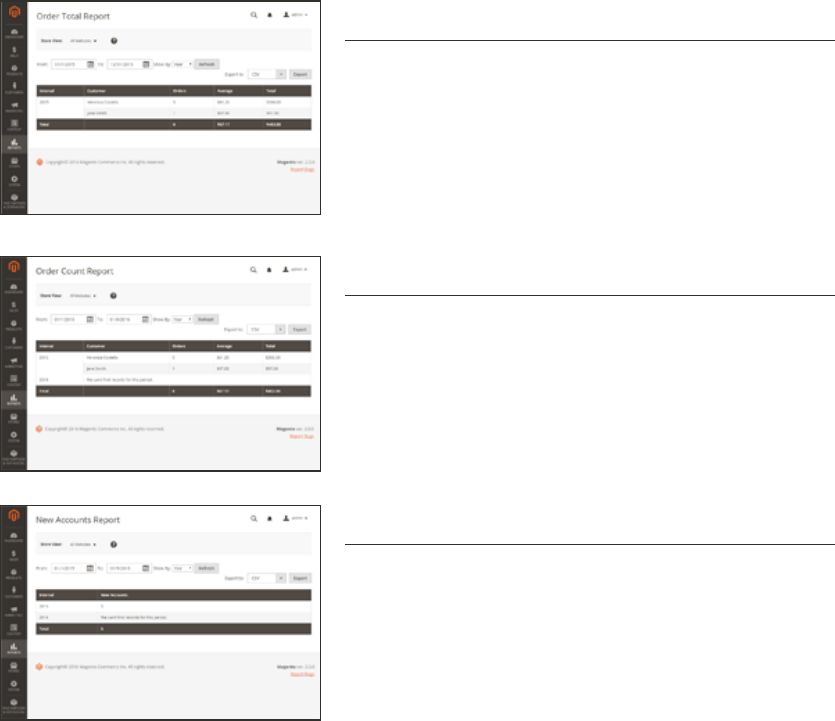
Reports
Order Total
The Order Total Report shows customer orders for a
specified time interval or date range. The report includes
the number of orders per customer, average order
amount, and total amount.
Order Count
The Order Count Report shows the number of orders per
customer for a specified time interval or date range. The
report includes the number of orders per customer,
average order amount, and total amount.
New Accounts
The New Accounts Report shows the number of new
customer accounts opened during a specified time
interval or date range.
758 Magento Community Edition 2.0 User Guide
CHAPTER 60: Customer Reports
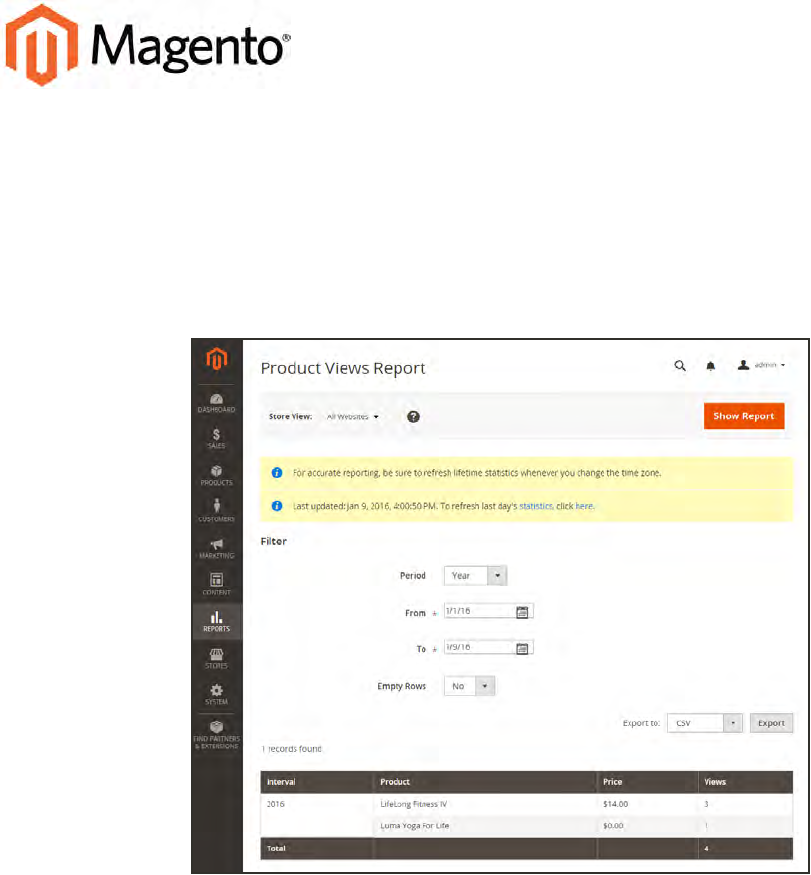
CHAPTER 61:
Product Reports
The product reports give you insight regarding products viewed and ordered, bestsellers,
stock levels, and downloads.
Product Views Report
Magento Community Edition 2.0 User Guide 759

Reports
Product Views
The Product Views Report shows the products that have
been viewed during a time interval or range of dates. The
report includes the product name, price, and number of
views.
Bestsellers
The Bestsellers Report Report shows the five top-selling
five during an interval of time or date range. The report
includes the product name, price, and quantity ordered.
Low Stock
The Low Stock Report lists all products with stock levels
within a specified range.
Ordered Products
The Ordered Products Report lists all products ordered
for a specified time interval or date range. The report
includes the product name and quantity ordered.
760 Magento Community Edition 2.0 User Guide
CHAPTER 61: Product Reports
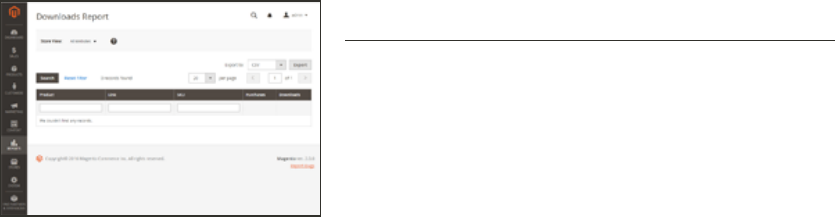
Downloads
The Downloads Report lists all downloads during the
specified time interval or date range. The report includes
the product name, download link, and SKU, with the
number of purchases and downloads.
Magento Community Edition 2.0 User Guide 761
CHAPTER 61: Product Reports
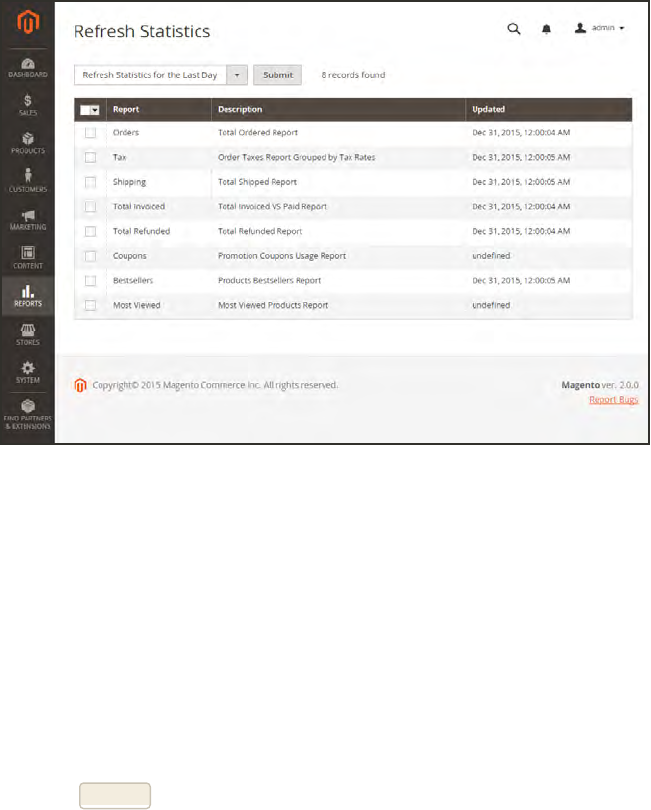
Refresh Statistics
To reduce the performance impact of generating sales reports, Magento calculates and stores
the required statistics for each report. Rather than recalculate the statistics every time a report
is generated, the stored statistics are used, unless you refresh the statistics. To include the
most recent data, the report statistics must be refreshed before a sales report is generated.
Refresh Statistics
To refresh report statistics:
1. On the Admin sidebar, tap Reports. Then under Statistics, choose Refresh Statistics.
2. In the list, mark the checkbox of each report to be refreshed.
3. Set the Actions control to one of the following:
lRefresh Lifetime Statistics
lRefresh Statistics for the Last Day
4. When complete, tap Submit.
Refresh Statistics CHAPTER 61: Product Reports
762 Magento Community Edition 2.0 User Guide


Contents
In this section of the guide, you’ll learn how to set
up a store hierarchy, create attributes, and
manage the settings used by each store to
calculate taxes, and currency rates,
Stores Menu
All Stores
Creating a Store View
Creating a Store
Creating a Website
Store URLs
Configuration
Taxes
Tax Rules
Tax Zones and Rates
Value Added Tax (VAT)
Configuring VAT
VATIDValidation
Configuring VAT ID Validation
Tax Quick Reference
International Tax Guidelines
U.S. Tax Guidelines
Canadian Tax Guidelines
EU Tax Guidelines
Warning Messages
Currency
Currency Configuration
Currency Symbols
Updating Currency Rates
Attributes
Product Attributes
Creating an Attribute
764 Magento Community Edition 2.0 User Guide
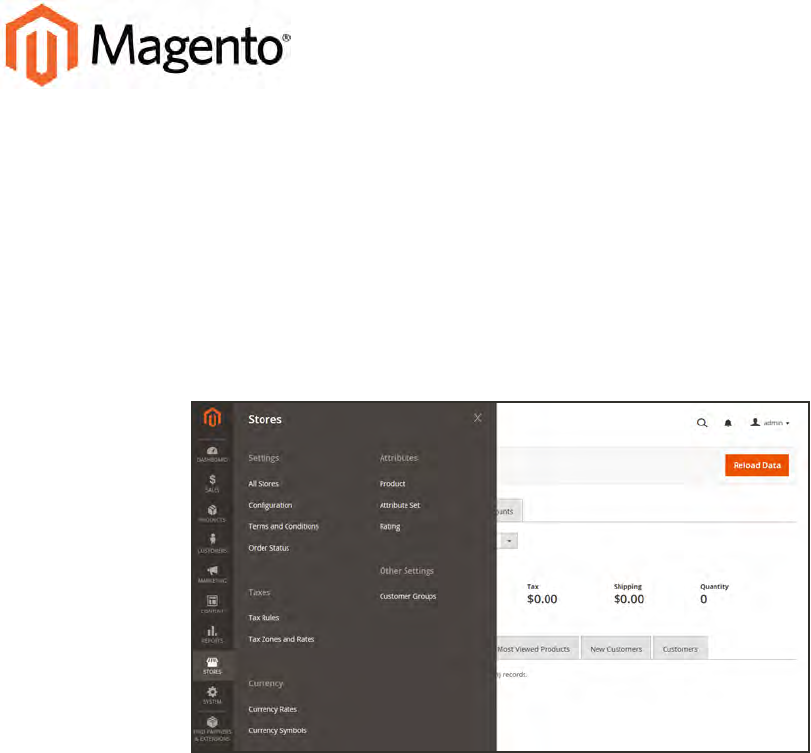
CHAPTER 62:
Stores Menu
The Stores menu manages settings that are used less frequently, but referenced throughout
your Magento installation, including setting up the store hierarchy, configuration, sales
and order settings, tax and currency, product attributes, product review ratings, and
customer groups.
Stores Menu
Magento Community Edition 2.0 User Guide 765
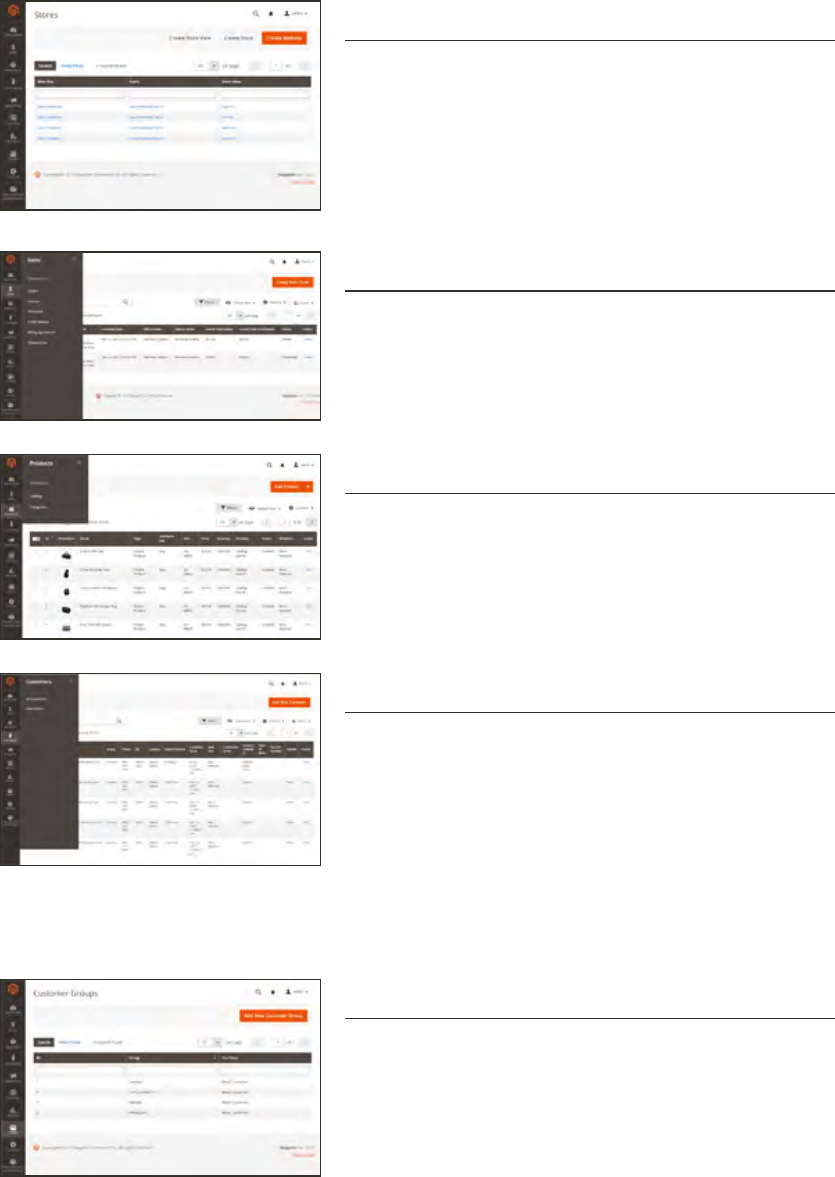
Menu Options
All Stores
Manage the hierarchy of websites, stores and store
views in your Magento installation, and all configuration
settings. In addition, you can set up the Terms and
Conditions of a sale, and manage order status settings.
Taxes
Set up the tax rules for your store, define customer and
product tax classes, and manage tax zones and rates.
You can also import tax rate data into your store.
Currency
Manage the rates for the currencies that are accepted as
payment in your store, and customize the currency
symbols that appear in product prices and sales
documents.
Attributes
Manage all attributes that are used in products and
product ratings. You can create new attributes, edit
existing attributes, manage product templates, and set
up product review ratings.
Other Settings
Customer Groups
Customer groups determine which discounts are
available, and the tax class that is associated with the
group.
766 Magento Community Edition 2.0 User Guide
CHAPTER 62: Stores Menu
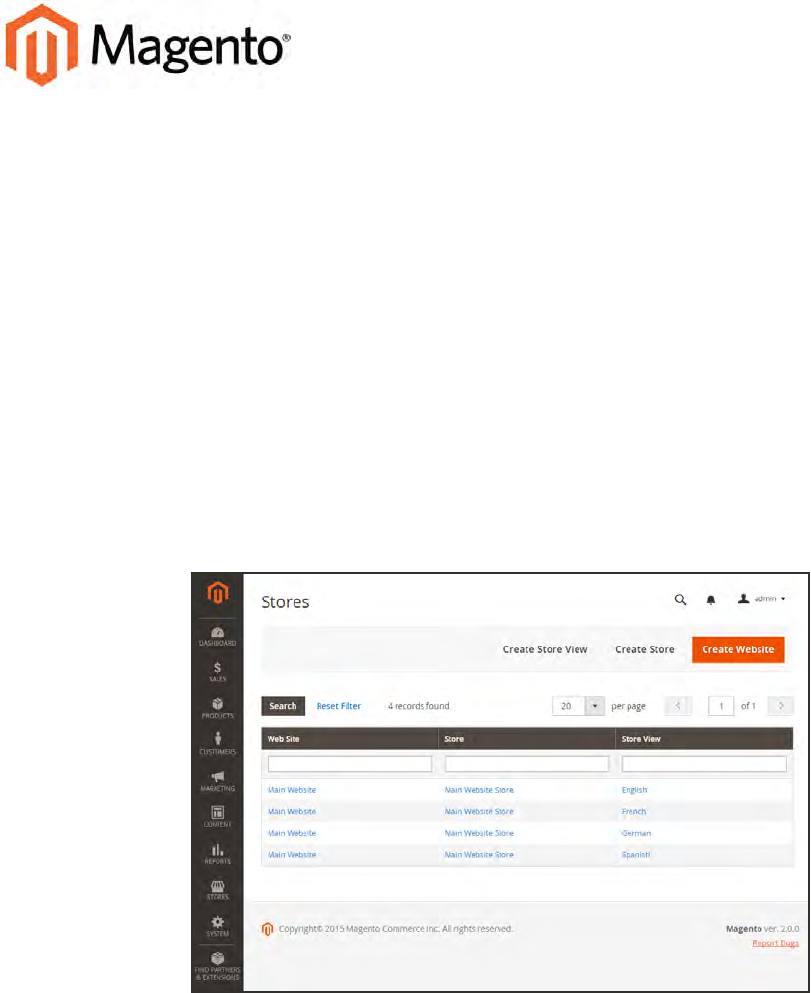
CHAPTER 63:
All Stores
When Magento Community Edition 2.0 is installed, a main website, and store view are
created. You can create additional websites, stores, and store views, as needed. For
example, in addition to your main website, you might have a additional websites with
separate domains. Within each website, you can have multiple stores, and within each
store, separate store views. Many installations have one website and one store, but with
multiple store views to support different languages.
Before you begin, plan your store hierarchy in advance because it is referred to throughout
the configuration. Each store can have a separate root category, which makes it possible to
have an entirely different set of main menu options for each store.
All Stores
Magento Community Edition 2.0 User Guide 767

Creating a Store View
Store views are typically used to make the store available in different languages. Shoppers can
use the language chooser in the header of the store to change the store view.
Store Views in Language Chooser
Creating a Store View CHAPTER 63: All Stores
768 Magento Community Edition 2.0 User Guide

To create a new store view:
1. On the Admin sidebar, tap Stores. Then under Settings, choose All Stores.
2. Tap Create Store View. Then, do the following:
Store View Information
a. Set Store to the parent store of this view.
b. Enter a Name for this store view. The name appears in the language chooser in the store
header. For example: Spanish.
c. Enter a Code in lowercase characters to identify the view. For example: spanish.
d. To activate the view, set Status to “Enabled.”
e. (Optional) Enter a Sort Order number to determine the sequence in which this view is
listed with other views.
3. When complete, tap Save Store View.
CHAPTER 63: All Stores Creating a Store View
Magento Community Edition 2.0 User Guide 769

Adding a Language
Most of the text that appears to be hard-coded on pages throughout your store can be instantly
changed to a different language by changing the locale of the view. Changing the locale doesn’t
actually translate the text word-for-word, but simply references a different translation table
that provides the interface text that is used throughout the store. The text that can be changed
includes navigational titles, labels, buttons, and links such as “My Cart” and “My Account.”
You can also use the Inline Translation tool to touch up text in the interface.
At the time of this writing, there are no language packs available for Magento 2.0, although many
are in development. Check the current availability of language packs for Magento 2.x on Magento
Marketplace / Connect. As soon as language packs become available, we will add complete
instructions here.
After changing the language of the locale, the remaining content that you have created,
including product names and descriptions, categories, CMS pages, and blocks must be
translated separately for each store view. Language packs are not required to translate content.
Creating a Store View CHAPTER 63: All Stores
770 Magento Community Edition 2.0 User Guide
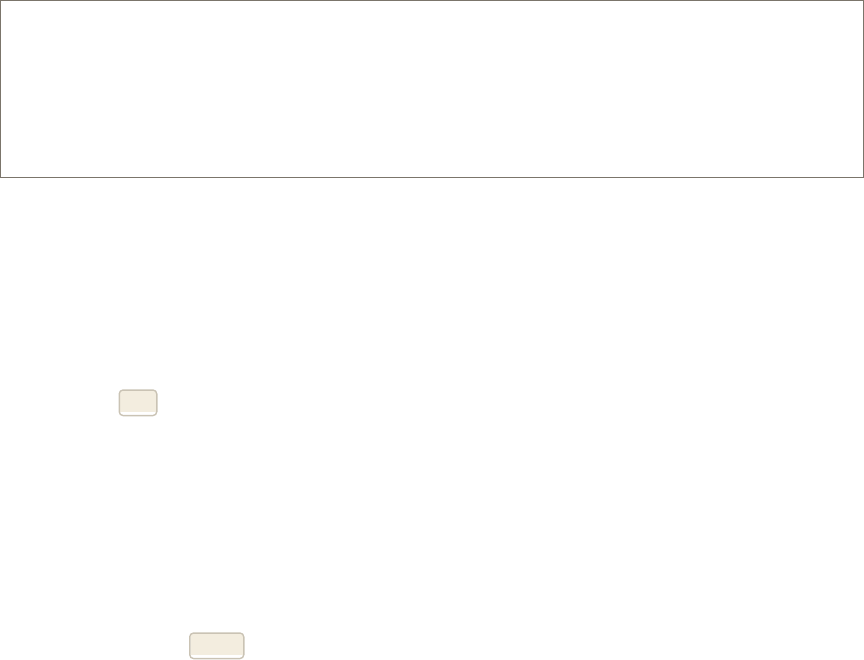
Translating Products
If your store has multiple views in different languages, the same products are available in each
store view. You can use the same basic product information, such as SKU, price, and inventory
level, regardless of language. Then, translate only the product name, description fields, and
meta data as needed for each language.
Process Overview:
Step 1: Translate Product Fields
Step 2: Translate Field Labels
Step 3: Translate All Categories
Step 1: Translate Product Fields
1. On the Admin sidebar, tap Products. Then under Inventory, choose Catalog.
2. In the grid, find the product to be translated, and open in edit mode.
3. In the upper-left corner set Store View to the view for the translation. When prompted to
confirm, tap OK.
4. For each field to be edited, do the following:
a. Clear the Use Default Value checkbox to the right of the field.
b. Either paste or type the translated text into the field.
Make sure to translate all text fields, including image labels and Alt text, Search Engine
Optimization fields and any Custom Options information.
5. When complete, tap Save.
Step 2: Translate Field Labels
1. On the Admin sidebar, tap Stores. Then under Attributes, choose Product.
2. In the list, find the attribute to be translated, and open in edit mode.
3. In the panel on the left, choose Manage Labels.
4. In the Manage Titles section, enter a translated label for each store view.
CHAPTER 63: All Stores Creating a Store View
Magento Community Edition 2.0 User Guide 771

Enter Translated Labels
5. When complete, tap Save Attribute.
Step 3: Translate All Categories
1. On the Admin sidebar, tap Products. Then under Inventory, choose Categories.
2. In the upper-left corner set Store View to the view for the translation. When prompted to
confirm, tap OK.
3. In the tree, find the category to be translated and open in edit mode.
4. On the General Information tab, translate the following fields:
lName
lDescription
lPage Title
lMeta Keywords
lMeta Description
5. To translate the URL Key, do the following:
a. Clear the Use Default Value checkbox to the right of the field.
b. Enter the translated text.
c. Make sure that the Create Permanent Redirect for old URL checkbox is selected
Translate URL Key
6. When complete, tap Save Category.
7. Repeat the process for all categories used in the store.
Creating a Store View CHAPTER 63: All Stores
772 Magento Community Edition 2.0 User Guide
Translating Content
If your store has multiple views in different languages, and you have set the locale for each
view to a different language, the result is a partially translated site. The next step is to create a
translated version of each page that is available from the specific store view. The Store View
column of the Manage Pages list shows each view that has a translated version of the page.
To translate a content page, you must create a new page that has the same URLKey as the
original, but is assigned to the specific store view. Then, update the page for the specific view
with the translated text. The following example shows how to create a translated version of the
“About Us” page for the Spanish store view.
To create a translated page for a view:
1. On the Admin sidebar, tap Content. Then under Elements, choose Pages.
2. In the grid, find the page to be translated, and open in edit mode.
3. Copy the URL Key to the clipboard. Then, press the Back button to return to the Pages grid.
4. Tap Add New Page. Then, do the following:
a. Enter the translated Page Title.
b. Paste the URL Key that you copied from the original page.
c. In the Store View box, choose the store view where the page is to be available.
d. In the panel on the left, choose Content. Then, complete the translated text for the page.
e. On the Design tab, set the column Layout of the page.
f. On the Meta Data tab, enter the translated text for the Keywords and Description.
5. When complete, tap Save Page. Then when prompted, refresh any invalid caches.
6. To verify the translation, go to the storefront and use the language chooser to change the store
view.
Notice that there are still some elements on the page that need to be translated, including the
company footer links block, the welcome message, and product information.
CHAPTER 63: All Stores Creating a Store View
Magento Community Edition 2.0 User Guide 773

Creating a Store
Before you begin, take some time to plan your store hierarchy because it is referred to
throughout the configuration. Each store can have a separate root category, which makes it
possible to have a different main menu for each store.
A single installation of Magento can have multiple stores that share the same Admin. Multiple
stores can share the same domain, be set up as subdomains of the same domain, or have
entirely different domains. Stores that have the same IPaddress and domain, use the same
security certificate, and share a single checkout process. If you want each store to have a
dedicated checkout process under its own domain, each store must have a distinct IPaddress
with a separate security certificate. Here are some examples of how URLs can be configured for
multiple stores:
yourdomain.com/store1
yourdomain.com/store2
Each store has a different path, but shares the same domain.
store1.yourdomain.com
store2.yourdomain.com
Each store has a different subdomain of the primary domain.
store1.com
store2.com
Each store has a dedicated domain.
The important thing to understand is that the stores use the same Magento code, share the
same Admin, and catalog. They can, however, have different identities, product selections, and
themes.
Process Overview:
Step 1: Choose the Store Domain
Step 2: Create the New Store
Step 3: Create a Default Store View
Step 4: Configure the Store URL
Creating a Store CHAPTER 63: All Stores
774 Magento Community Edition 2.0 User Guide
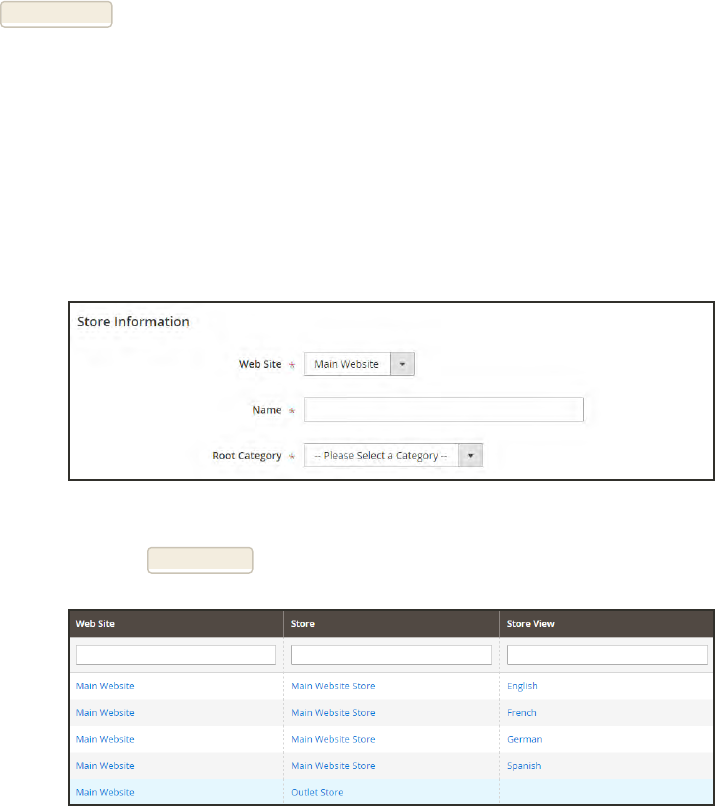
Step 1: Choose the Store Domain
The first step is to choose how you want to position the store. Will the stores share the same
domain, each have a subdomain, or have distinctly different domains? For each store, do one
of the following:
lTo place the store one level below the primary domain, you don’t have to do anything.
lSet up a subdomain of your primary domain.
lSet up a different primary domain.
Step 2: Create the New Store
1. On the Admin sidebar, tap Stores. Then under Settings, choose All Stores.
2. Tap Create Store. Then, do the following:
a. Choose the Web Site that is to be the parent of the new store. If the installation has only
one web site, accept the default, “Main Website.”
b. Enter a Name for the new store. The name is for internal reference only.
c. Set Root Category to the root category that defines the category structure for the main
menu of the new store. If you have already created a specific root category for the store,
select it. Otherwise, select “Default Category.” You can come back later and update the
setting.
Store Information
3. When complete, tap Save Store.
New Store
CHAPTER 63: All Stores Creating a Store
Magento Community Edition 2.0 User Guide 775
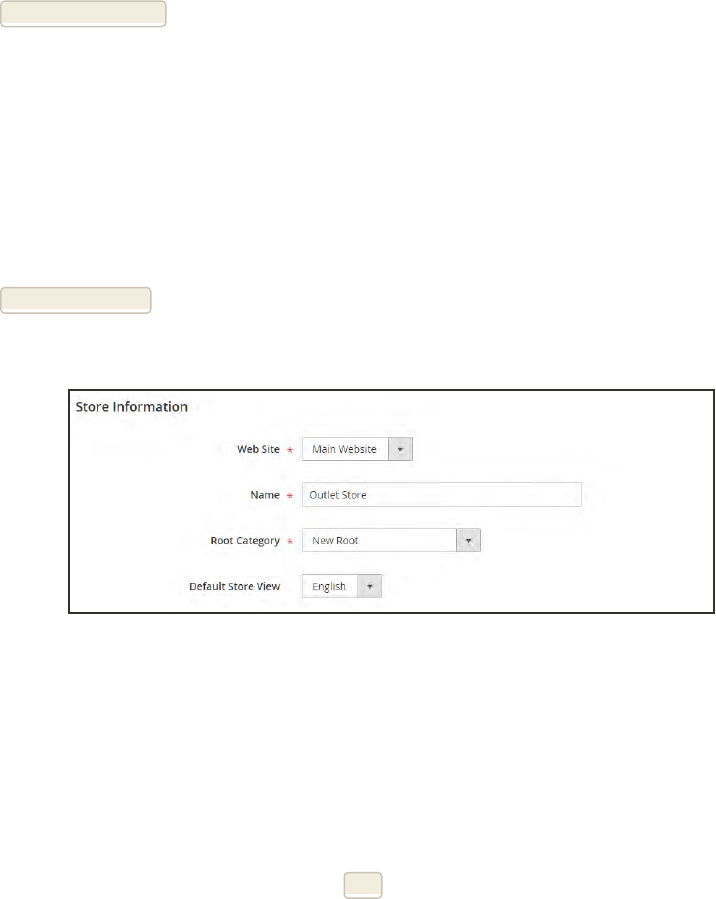
Step 3: Create a Default Store View
1. Tap Create Store View. Then, do the following:
a. Set Store to the new store you created.
b. Enter a Name for the view. For example, "English."
c. Enter a Code for the view in lowercase characters.
d. Set Status to "Enabled."
e. In the Sort Order field, enter a number to determine the store's position when listed with
other stores.
2. Tap Save Store View.
If you were to open your store in edit mode, you would see that it now has a default view.
New Store with Default View
Step 4: Configure the Store URL
1. On the menu bar, tap Stores. Then under Settings, choose Configuration.
2. In the panel on the left under General, choose Web.
3. In the upper-left corner, set Store View to the view that you created for the new store. When
prompted to confirm scope switching, tap OK.
Creating a Store CHAPTER 63: All Stores
776 Magento Community Edition 2.0 User Guide
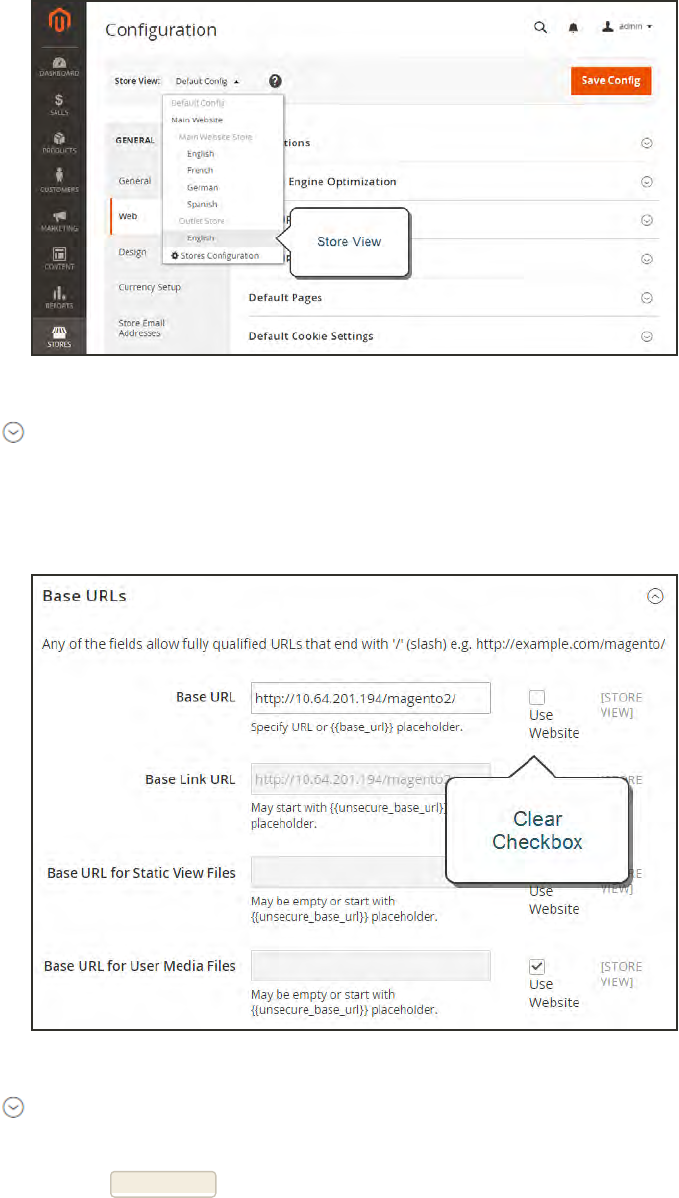
Choose the New Store View
4. Expand the Base URLs section. Then, do the following:
a. After the Base URL field, clear the Use Website checkbox.
b. Enter the Base URL for the store.
Base URLs
5. Expand the Secure Base URLs section, and repeat the previous step as needed to
configure the store’s secure URL.
6. When complete, tap Save Config.
CHAPTER 63: All Stores Creating a Store
Magento Community Edition 2.0 User Guide 777
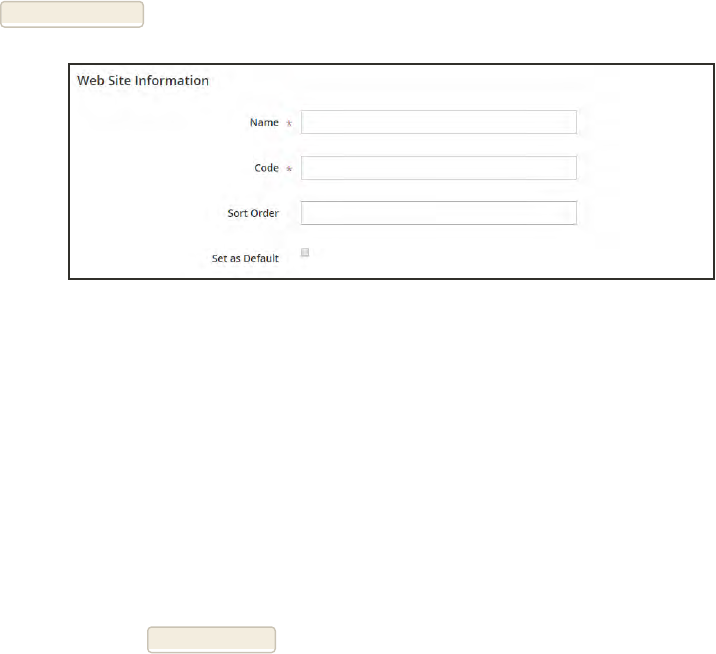
Creating a Website
Multiple websites can be set up that use the same Magento installation. The websites can be set
up to use the same domain, or different domains.
Step 1: Create a New Website
1. On the Admin sidebar, tap Stores. Then under Settings, choose All Stores.
2. Tap Create Website. Then, do the following:
Website Information
a. In the Name field, enter the domain of the new website. For example, “domain.com.”
b. Enter a Code that will be used on the server to point to the domain. The code must begin
with a lower-case letter, and can include any combination of letters (a-z), numbers (0-9),
and the hyphen (-) character.
c. (Optional) Enter a Sort Order number to determine the sequence in which this site is
listed with other sites. Enter a zero to make this site appear at the top of the list.
d. To make this the default website for your Magento installation, mark the Set as Default
checkbox.
3. When complete, tap Save Website.
4. Set up each store and store view that is needed for the new website.
Step 2: Configure the Store URL
Follow the instructions to configure the store URLs.
Creating a Website CHAPTER 63: All Stores
778 Magento Community Edition 2.0 User Guide
Store URLs
Each website in a Magento installation has a base URL that is assigned to the storefront and
another URL that is assigned to the Admin. If you have a security certificate for your domain,
you can configure either or both base URLs to operate over an encrypted SSL channel. All
Magento resources and operations can be used over a secure SSL channel.
Standard base URLs begin with “http,” and secure base URLs begin with “https.” Magento uses
variables to define internal links in relation to the base URL, which makes it possible to move
an entire store from one location to another without updating the links.
Base URL http://www.yourdomain.com/magento/
Secure Base URL https://www.yourdomain.com/magento/
URL with IPaddress http://###.###.###.###/magento/
The base URLs that are associated with your store were initially set up during the Web
Configuration step of the Magento installation. If you had a security certificate available at the
time, you could also choose to use secure (https) URLs for the store, Admin, or both. If you
didn’t have a domain or security certificate at the time of the installation, make sure to update
the configuration before launching your store.
If your Magento installation includes multiple stores, or if you plan to later add more stores,
you can have the option to include the store code in the URL.
Important! Do not change the Admin URL from the default Base URL configuration. To change the
Admin URL or path, see: Using a Custom Admin URL.
To configure the Base URL:
1. On the Admin sidebar, tap Stores. Then under Settings, choose Configuration.
2. In the panel on the left, under General, choose Web.
3. Expand the Base URL section, and do the following:
a. Enter the fully qualified Base URL for your store. Make sure to end the URLwith a
forward slash, so it can be extended with additional URLKeys from your store. For
example:
http://yourdomain.com/
CHAPTER 63: All Stores Store URLs
Magento Community Edition 2.0 User Guide 779
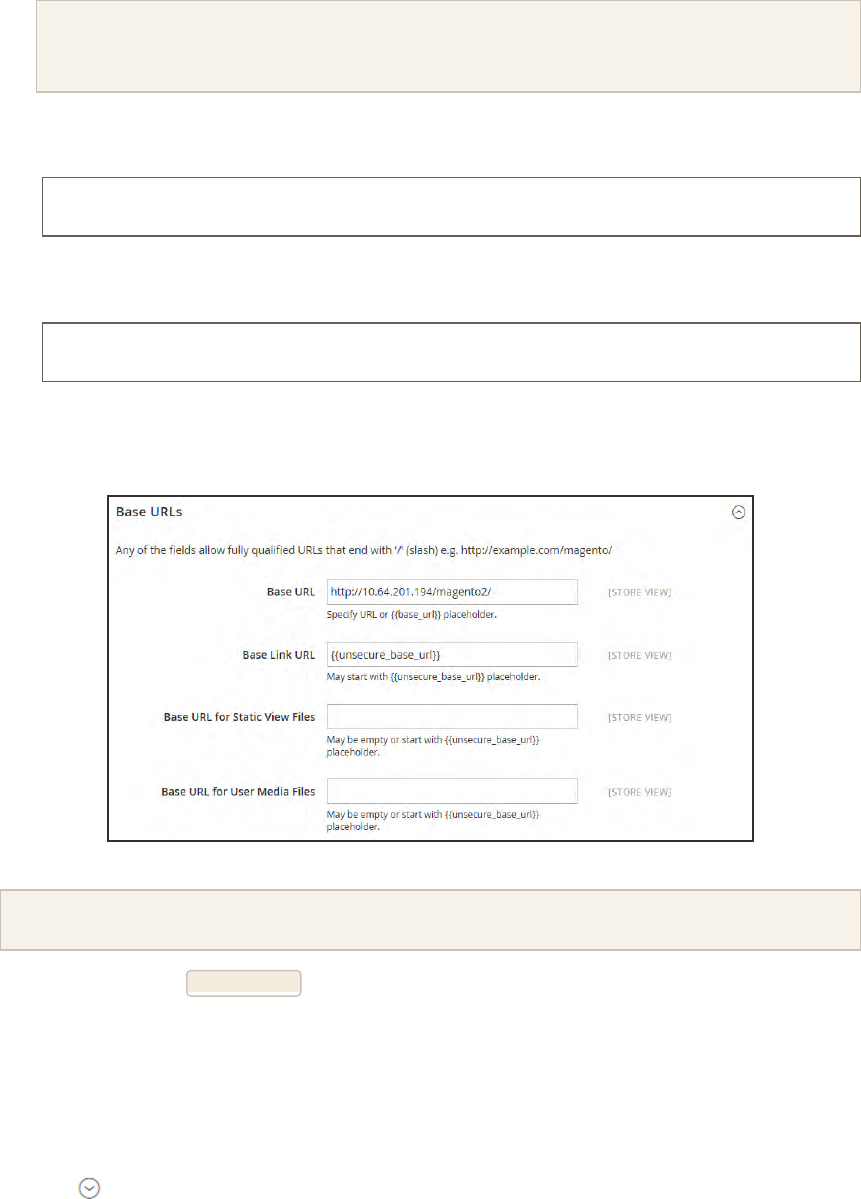
Do not change the placeholder in the Base Link URL field. It is a placeholder that is used to
create relative links to the base URL.
b. (Optional) To specify an alternate location for the Base URL for Static View Files, enter
the path starting with the following placeholder:
{{unsecure_base_url}}
c. (Optional) To specify an alternate location for the Base URL for User Media Files, enter
the path starting with the following placeholder:
{{unsecure_base_url}}
For a typical installation, there is no need to update the paths for the static view files or
media files because they are relative to the base URL.
Base URLs
Placeholders enclosed in double braces are markup tags for variables.
4. When complete, tap Save Config.
To include the store code in URLs:
1. On the Admin sidebar, tap System. Then under Settings, choose Configuration.
2. In the panel on the left, under General, choose Web.
3. Expand the URL Options section.
4. Set Add Store Code to your preference.
Store URLs CHAPTER 63: All Stores
780 Magento Community Edition 2.0 User Guide
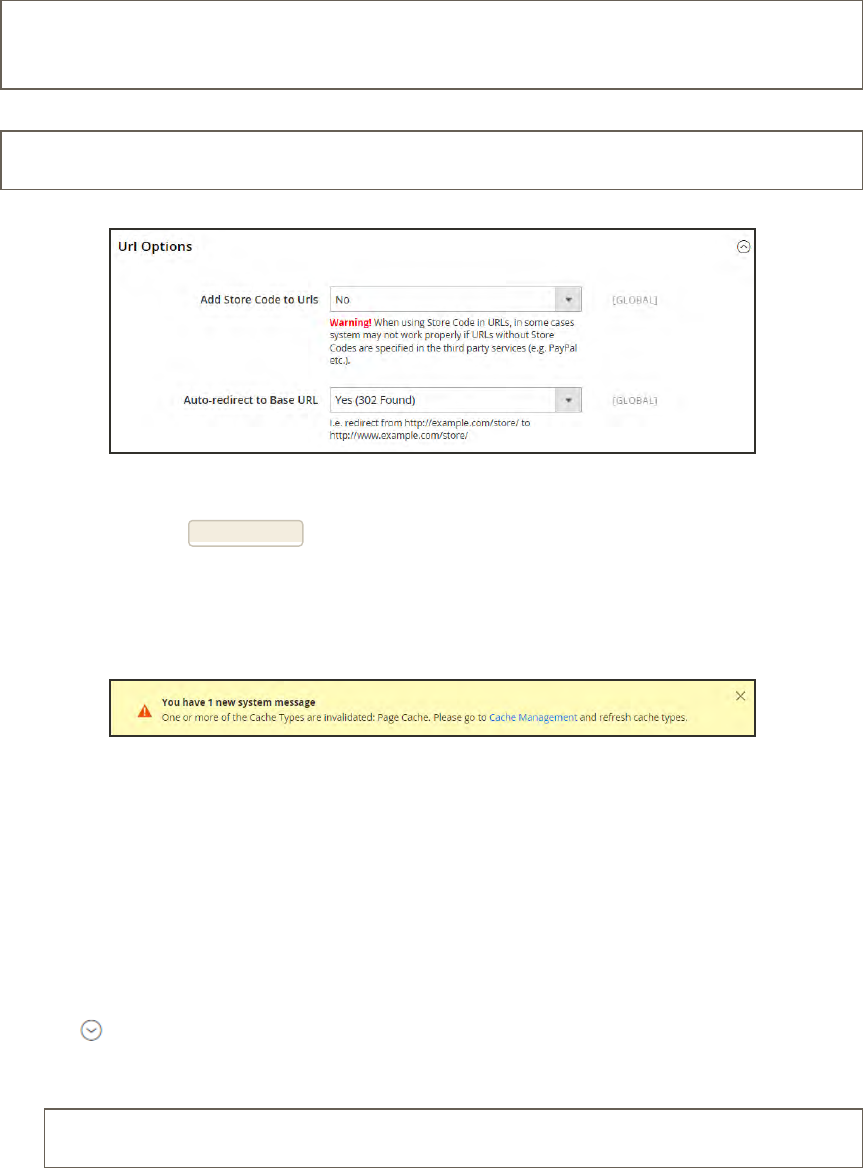
http://www.yourdomain.com/magento/store-view/index.php/url-
identifier
URL with Store Code
http://www.yourdomain.com/magento/index.php/url-identifier
URL without Store Code
URLOptions
5. When complete, tap Save Config.
6. After the setting is saved, you will be prompted to refresh the cache. Tap the Cache
Management link in the message at the top of the workspace. Then, follow the instructions to
refresh the cache.
Refresh Cache
To configure the secure base URL:
If your domain has a valid security certificate, you can configure the URLs for either the
storefront and Admin—or both—to run over a secure (https) channel. Without a security
certificate, your store cannot automatically switch to a secure channel (https) for transactions
that normally take place over an encrypted, secure socket layer (SSL).
1. Expand the Base URLs (Secure) section. Then, do the following:
a. Enter the full Secure Base URL, followed by a forward slash. For example:
https://yourdomain.com/
b. Do not change the placeholder in the Secure Base Link URL field. It is a placeholder that
is used to create relative links to the secure base URL.
CHAPTER 63: All Stores Store URLs
Magento Community Edition 2.0 User Guide 781
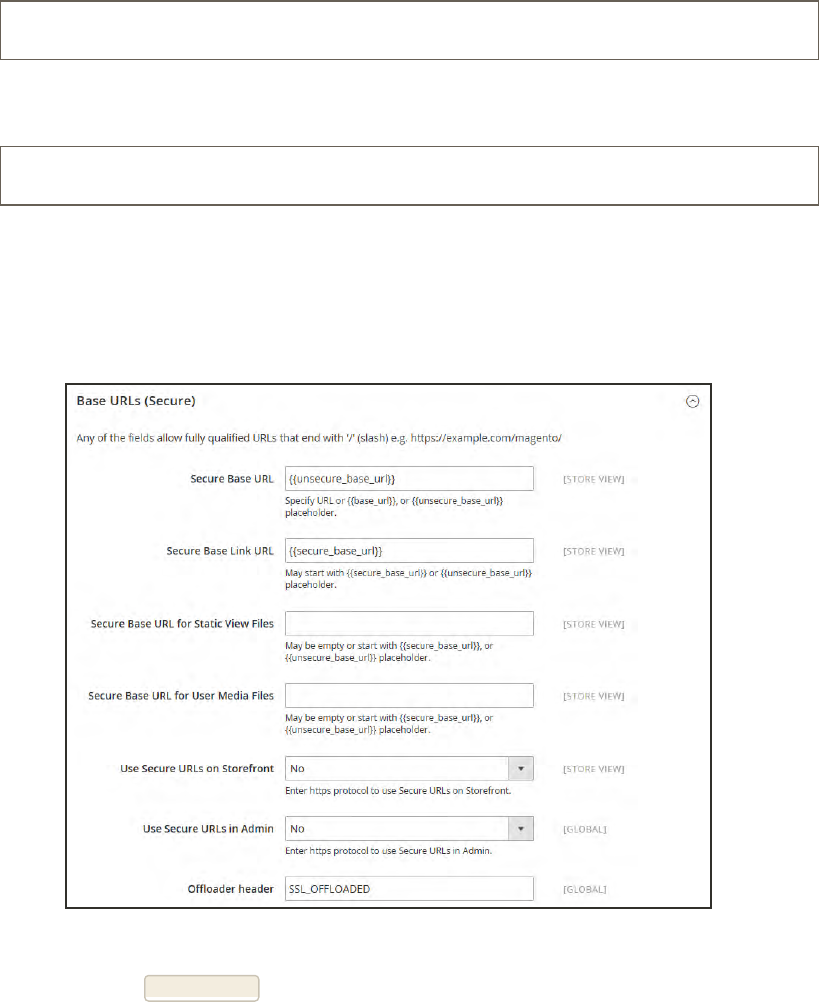
c. (Optional) To specify an alternate location for the Secure Base URL for Static View Files,
enter the path starting with the following placeholder:
{{secure_base_url}}
d. (Optional) To specify an alternate location for the Secure Base URLfor User Media Files,
enter the path starting with the following placeholder:
{{secure_base_url}}
e. If you want to run the entire storefront over a secure (https) channel, set Use Secure
URLs in Frontend to “Yes.”
f. If you want to run the entire Admin over a secure (https) channel, set Use Secure URLs
in Admin to “Yes.”
Base URLs (Secure)
2. When complete, tap Save Config.
Store URLs CHAPTER 63: All Stores
782 Magento Community Edition 2.0 User Guide
Using a Custom Admin URL
As a security best practice, Magento recommends that you use a unique, custom Admin URL
instead of the default “admin” or the overused “backend.” Although it will not directly protect
your site from a determined bad actor, it can reduce exposure to scripts that try to gain
unauthorized access.
Check with your hosting provider before implementing a custom Admin URL. Some hosting providers
require a standard URL to meet firewall protection rules.
In a typical Magento installation, the Admin URLand path is immediately below the Magento
base URL. The path to the store Admin is one directory below the root.
http://yourdomain.com/magento/
Default Base URL
http://yourdomain.com/magento/admin
Default Admin URL and Path
Although it is possible to change the Admin URL and path to another location, any mistake
removes access to the Admin, and must be corrected from the server.
As a precaution, do not try to change the Admin URL by yourself unless you know how to edit
configuration files on the server.
Method 1: Change from the Magento Admin:
1. On the Admin sidebar, tap Stores. Then under Settings, choose Configuration.
2. In the panel on the left, under Advanced, choose Admin.
3. Expand the Admin Base URL section. Then, do the following:
a. Set Use Custom Admin URL to “Yes.” Then, enter the Custom Admin URL in the
following format:
http://yourdomain.com/magento/
Important! The Admin URL must be in the same Magento installation, and have the same
document root as the storefront.
CHAPTER 63: All Stores Store URLs
Magento Community Edition 2.0 User Guide 783
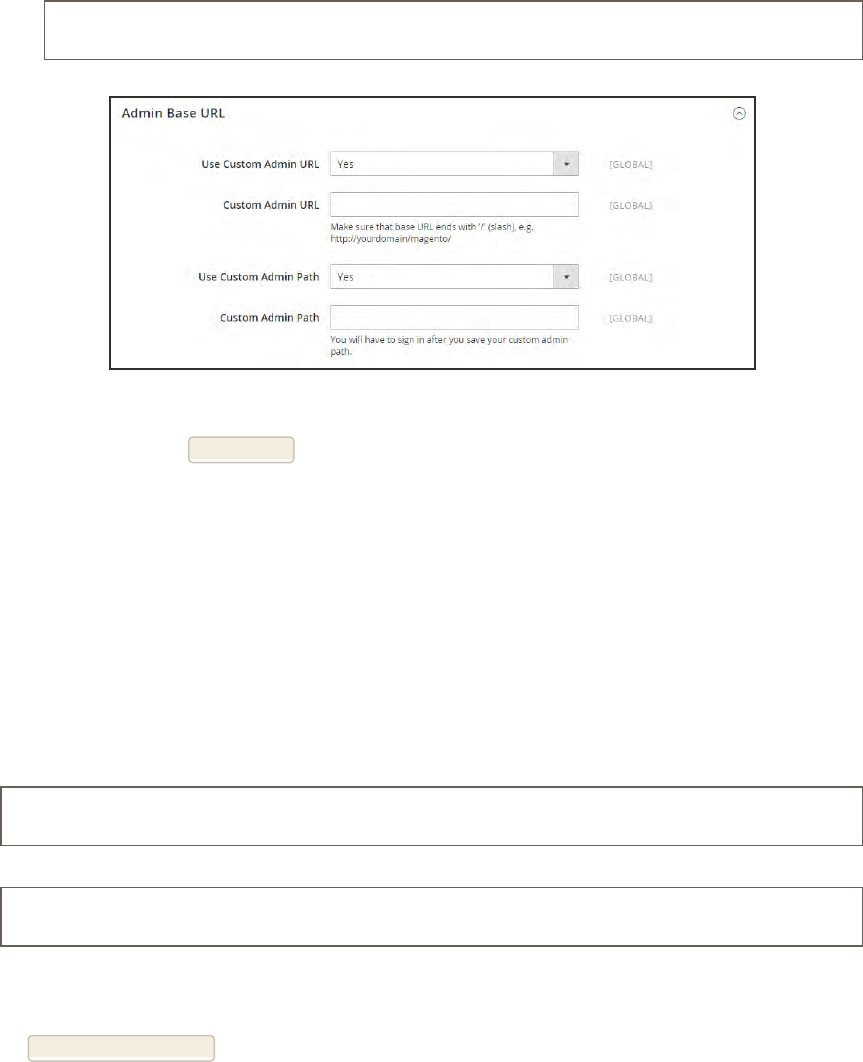
b. Set Custom Admin Path to “Yes.” Then, enter the Custom Admin Path. The path that you
enter is appended to the Custom Admin URL after the last forward slash.
sample_custom_admin
Admin Base URL
4. When complete, tap Save Config.
After the changes are saved, you must log in to the Admin using the new Admin URL and
path.
Method 2: Change from the Server Command Line
1. Open the app/etc/env.php file in a text editor, and change the name of the [admin] path.
Make sure to use only lowercase characters. Then, save the file.
On the server, the admin path is located in the app/etc/env.php file. Look for the
<adminhtml> argument in the <admin> section:
# <frontName><![CDATA[admin]]></frontName>
Default Admin Path
# <frontName><![CDATA[backend]]></frontName>
New Admin Path
2. Use one of the following methods to clear the Magento cache:
lOn the Admin sidebar, tap System. Under Tools, choose Cache Management. Then, tap
Flush Magento Cache.
lOn the server, navigate to the var/cache folder, and delete the contents of the cache
folder.
Store URLs CHAPTER 63: All Stores
784 Magento Community Edition 2.0 User Guide
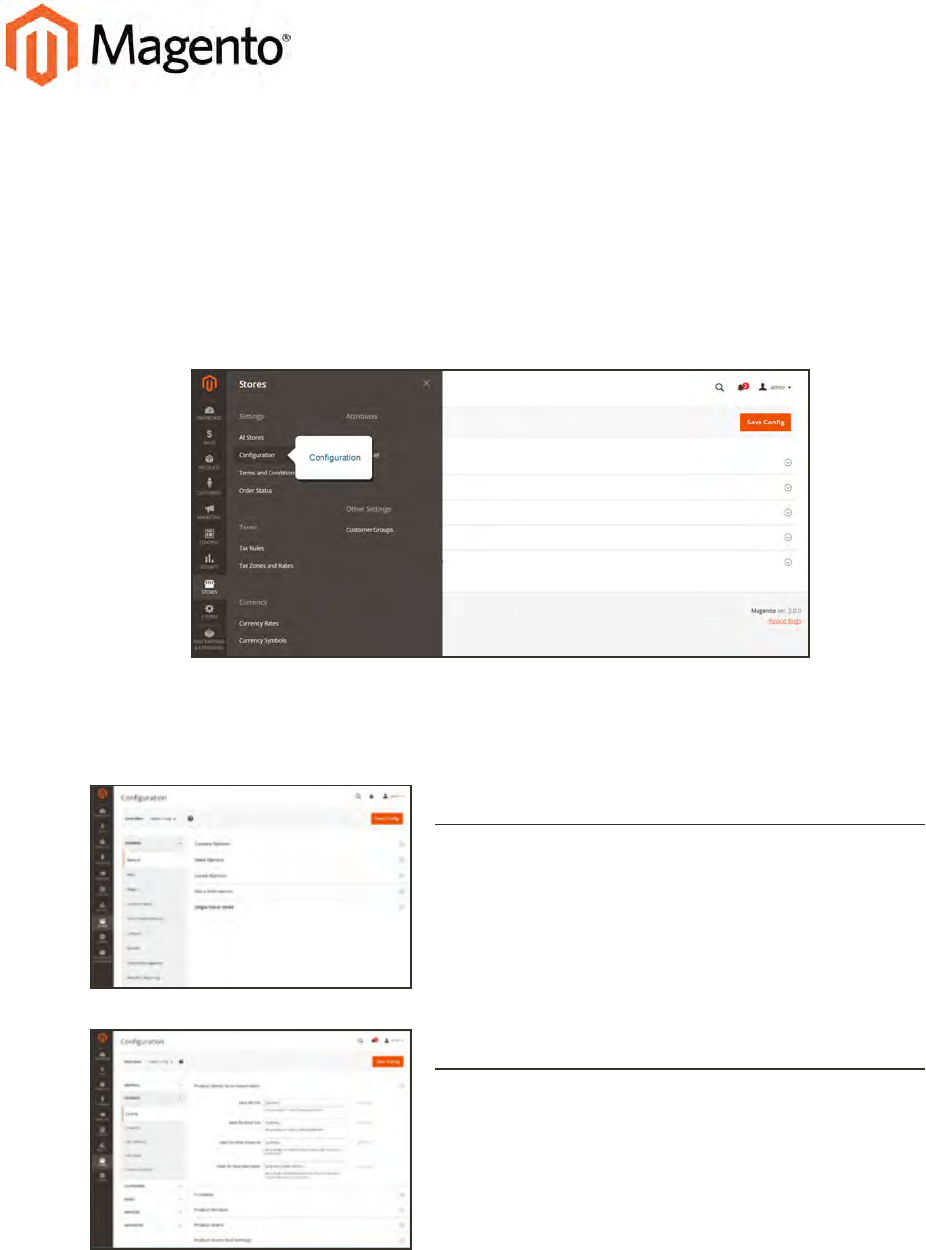
CHAPTER 64:
Configuration
The Configuration Reference has field descriptions for every configuration setting in
Magento Community Edition 2.0. To learn how to apply configuration settings to specific
store views, see: Configuration Scope.
Configuration
Configuration Tabs
General
Includes basic configuration settings for the store, URLs,
theme, currency, email addresses, store contacts, editor,
and dashboard reports.
Catalog
Determines product and inventory settings, controls
sitemap and RSS feed generation, and specifies the
email template that is used to share products with
friends.
Magento Community Edition 2.0 User Guide 785
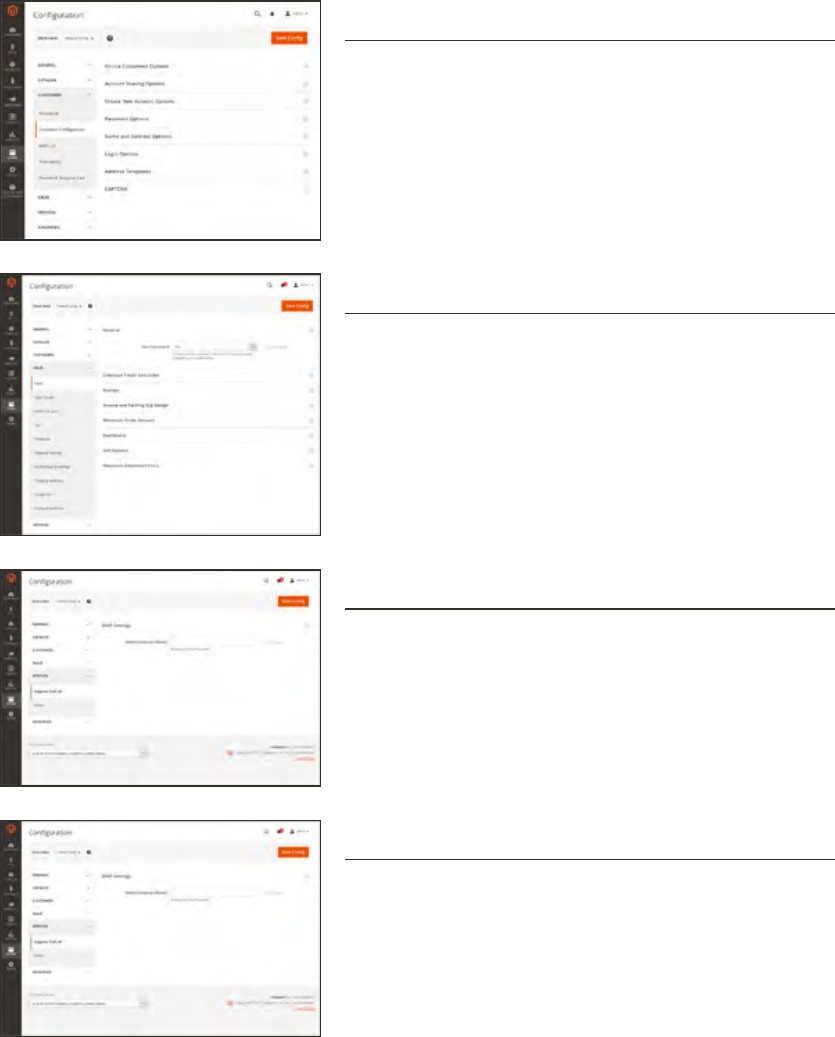
Customers
Establishes basic customer account and login options,
newsletter settings, ,wish list, and the format of auto-
generated coupon codes.
Sales
Determines checkout and tax settings, payment and
shipping options, sales email and PDF print-outs, and
GoogleAPI settings.
Services
Configures Magento APIsettings, including SOAP and
OAuth.
Advanced
Determines default Admin settings, various system
configuration settings, advanced module controls, and
developer tools.
786 Magento Community Edition 2.0 User Guide
CHAPTER 64: Configuration

CHAPTER 65:
Taxes
In this section of the guide, you will learn how to set up taxes according to the
requirements of your locale. You can set up tax classes for products and customer groups,
and create tax rules that combine product and customer classes, tax zones, and rates. In
addition, you'll learn more advanced topics such as setting up fixed product taxes,
compound taxes, and displaying consistent prices across international borders. If you are
required to collect a value-added tax, you will learn how to set up your store to
automatically calculate the appropriate amount with validation.
Magento provides a variety of options to define taxes. Tax classes are used to define “tax
rules.” Tax rules are a combination of a Product Class, a Customer Class and a Tax Zone
and Rate. Magento also supports the calculation of Value-Added Tax (VAT) for business-
to-business transactions in the European Union.
Magento Community Edition 2.0 User Guide 787
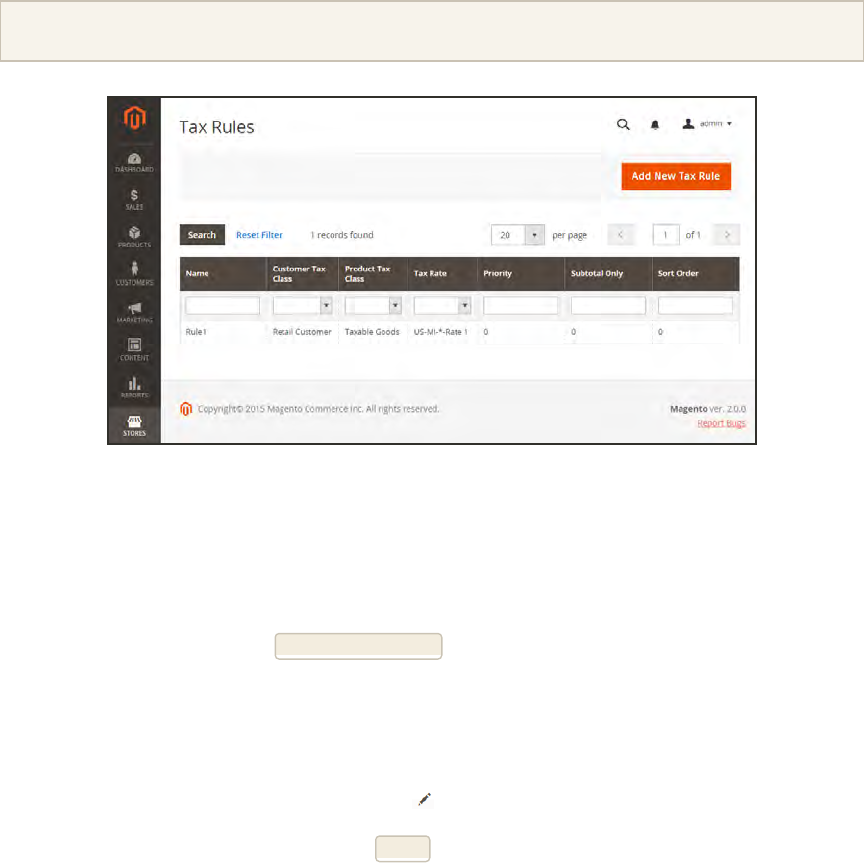
Tax Rules
Tax rules incorporate a combination of product class, customer class and tax rate. Each
customer is assigned to a customer class, and each product is assigned a product class.
Magento analyzes the shopping cart of each customer and calculates the appropriate tax
according to the customer and product classes, and the region (based on the customer’s
shipping address, billing address or shipping origin).
When numerous taxes must be defined, you can simplify the process by importing them.
Tax Rules
Step 1: Complete the Tax Rule Information
1. On the Admin sidebar, tap Stores. Then under Taxes, choose Tax Rules.
2. In the upper-right corner, tap Add New Tax Rule.
3. Under Tax Rule Information, enter a Name for the new rule.
4. Choose the Tax Rate that applies to the rule. If you need to edit an existing tax rate, do the
following:
a. Hover over the tax rate, and tap the Edit icon.
b. Update the form as needed, and tap Save.
Tax Rules CHAPTER 65: Taxes
788 Magento Community Edition 2.0 User Guide
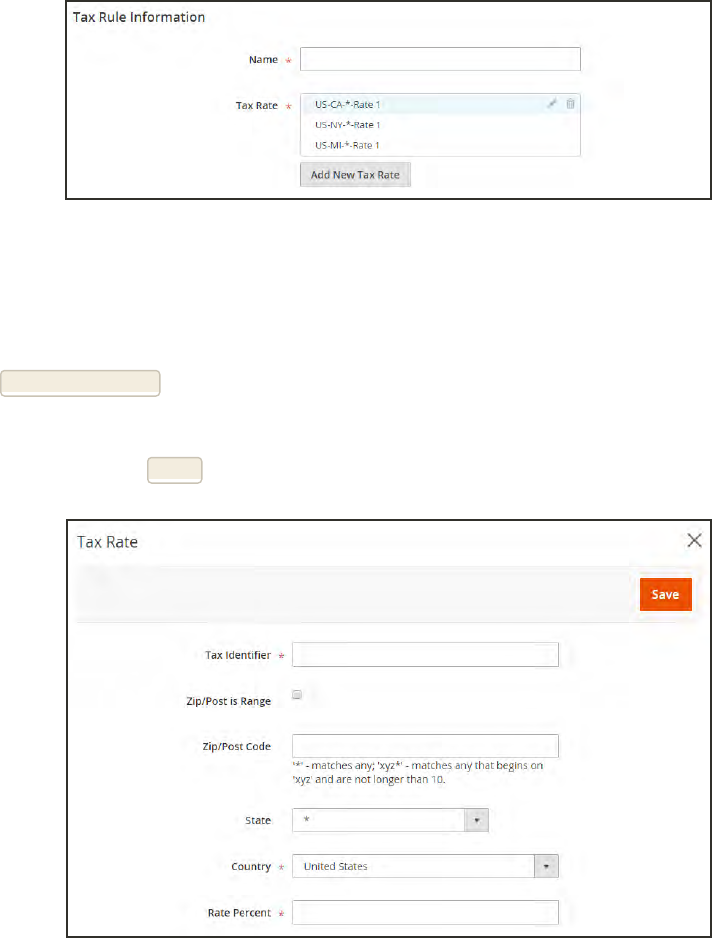
Tax Rule Information
To enter tax rates, use either of the following methods:
Method 1: Enter Tax Rates Manually
1. Tap Add New Tax Rate.
2. Complete the form as needed. For more information, see: Tax Zones and Rates.
3. When complete, tap Save.
New Tax Rate
CHAPTER 65: Taxes Tax Rules
Magento Community Edition 2.0 User Guide 789
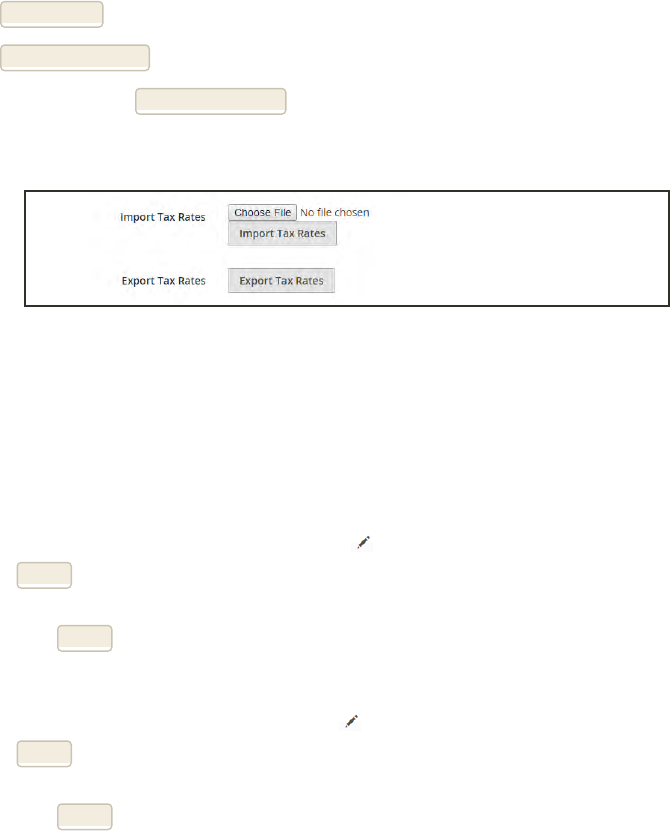
Method 2: Import Tax Rates
1. Scroll down to the section at the bottom of the page.
2. To import tax rates, do the following:
a. Tap Choose File, and navigate to the CSV file with the tax rates to be imported.
b. Tap Import Tax Rates.
3. To export tax rates, tap Export Tax Rates.
To learn more, see: Import/Export Tax Rates.
Import / Export Tax Rates
Step 2: Complete the Additional Settings
4. Tap Additional Settings to open the section. Then, do the following:
a. Choose the Customer Tax Class to which the rule applies.
lTo edit a customer tax class, tap the edit icon. Then, update the form as needed, and
tap Save.
lTo create a new tax class, tap Add New Tax Class. Then, complete the form as needed,
and tap Save.
b. Choose the Product Tax Class to which the rule applies.
lTo edit a product tax class, tap the edit icon. Then, update the form as needed, and
tap Save.
lTo create a new tax class, tap Add New Tax Class. Then, complete the form as needed,
and tap Save.
c. In the Priority field, enter a number to indicate the priority of this tax, when more than
one tax applies. If two tax rules with the same priority apply, then the taxes are added
together. If two taxes with different priority settings apply, then the taxes are
compounded.
d. If you want taxes to be based on the order subtotal, mark the Calculate off Subtotal Only
checkbox.
e. In the Sort Order field, enter a number to indicate the order of this tax rule when listed
with others.
Tax Rules CHAPTER 65: Taxes
790 Magento Community Edition 2.0 User Guide
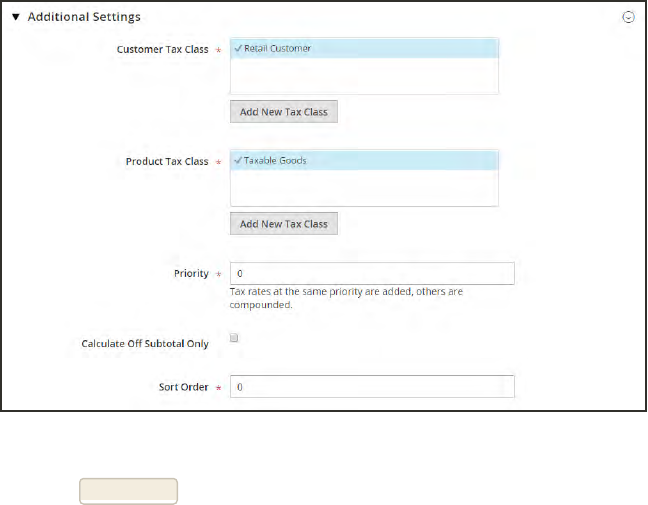
Additional Settings
5. When complete, tap Save Rule.
CHAPTER 65: Taxes Tax Rules
Magento Community Edition 2.0 User Guide 791

Tax Classes
Tax classes can be assigned to customers, products, and shipping. Magento analyzes the
shopping cart of each customer and calculates the appropriate tax according to the class of the
customer, the class of the products in the cart, and the region (as determined by the customer’s
shipping address, billing address or shipping origin). New tax classes can be created when a
tax rule is defined.
Customer
You can create as many customer tax classes as you
need, and assign them to customer groups. For example,
in some jurisdictions, wholesale transactions are not
taxed, but retail transactions are. You can associate
members of the Wholesale Customer group with the
Wholesale tax class.
Product
Product classes are used in calculations to determine the
correct tax rate is applied in the shopping cart. When you
create product, it is assigned to a specific tax class. For
example, food might not be taxed, or taxed at a different
rate.
Shipping
If your store charges an additional tax on shipping, you
should designate a specific product tax class for
shipping. Then in the configuration, specify it as the tax
class that is used for shipping.
Tax Classes CHAPTER 65: Taxes
792 Magento Community Edition 2.0 User Guide

Fixed Product Tax
Some tax jurisdictions have a fixed tax that must be added to certain types of products. You
can set up a fixed product tax (FPT) as needed for your store's tax calculations. For example, in
some countries FPT can be used to set up a Waste Electrical and Electronic Equipment
Directive (WEEE) tax, also known as "ecological tax" or "eco tax," that is collected on certain
types of electronics to offset the cost of recycling. This tax is a fixed amount, rather than a
percentage of the product price.
Fixed product taxes apply at the item level, based on the product. In some jurisdictions this
tax is subject to an additional % tax calculation. Your tax jurisdiction might also have rules
about how the product price appears to customers, either with or without tax. Be sure that you
understand the rules, and set your FPT display options accordingly.
We recommend that you exercise caution when quoting FPTprices in email, because the
difference in price can affect customer confidence in their orders. For example, if you display
Order Review prices without showing FPT, customers who buy items with associated FPT will
see a total that includes the FPT tax amount, but without an itemized breakdown. The
difference in price might lead some customers to abandon their carts because the total differs
from the amount expected.
FPT DISPLAY SETTING AND CALCULATION
Not Taxed Excluding FPT FPT appears as a separate row in the cart, and the
value is used in appropriate tax calculations.
Including FPT FPT is added to the base price of an item; but is not
included in tax- rule-based calculations.
Excluding FPT,
FPT Description,
Final Price
Prices appeare without FPT amount or description.
FPT is not included in tax-rule-based calculations.
Taxed Excluding FPT FPT appears as a separate row in the cart, and the
value is used in appropriate tax calculations.
Including FPT FPT is included in the price of an item, and no change
to tax calculations is required.
Excluding FPT,
FPT Description,
Final Price
Prices appear without the FPT amount or description.
However, FPT is included in tax-rule-based
calculations.
FPT Display Prices
CHAPTER 65: Taxes Fixed Product Tax
Magento Community Edition 2.0 User Guide 793
Configuring FPT
Magento has a Fixed Product Tax input type that creates the section of fields that is needed to
manage the tax for each region.
The following instructions show how to set up a fixed product tax for your store, using “eco
tax” as an example. After setting the scope for the tax and the countries and states where the
tax applies, and depending on the options you choose, the input fields can change according to
the local requirements. To learn more, see: Creating Attributes.
Process Overview:
Step 1: Enable Fixed Product Tax
Step 2: Create an FPT Attribute
Step 3: Add the FPT Attribute to an Attribute Set
Step 4: Apply FPT to Products
Step 1: Enable Fixed Product Tax
1. On the Admin sidebar, tap Stores. Then under Settings, choose Configuration.
2. In the panel on the left under Sales, choose Tax.
3. Expand the Fixed Product Taxes section. Then, do the following:
a. Set Enable FPT to “Yes.”
b. To determine how fixed product taxes are used in store prices, choose the FPTsetting for
each of price display location. (The options are the same for each location.)
LOCATION OPTIONS
Product View Page lIncluding FPTOnly
lIncluding FPT and FPTdescription
lExcluding FPT. Including FPT description and final price
lExcluding FPT
Sales Modules
Emails
c. Set Apply Tax to FPT as needed.
d. Set Include FPT in Subtotal as needed.
Fixed Product Tax CHAPTER 65: Taxes
794 Magento Community Edition 2.0 User Guide
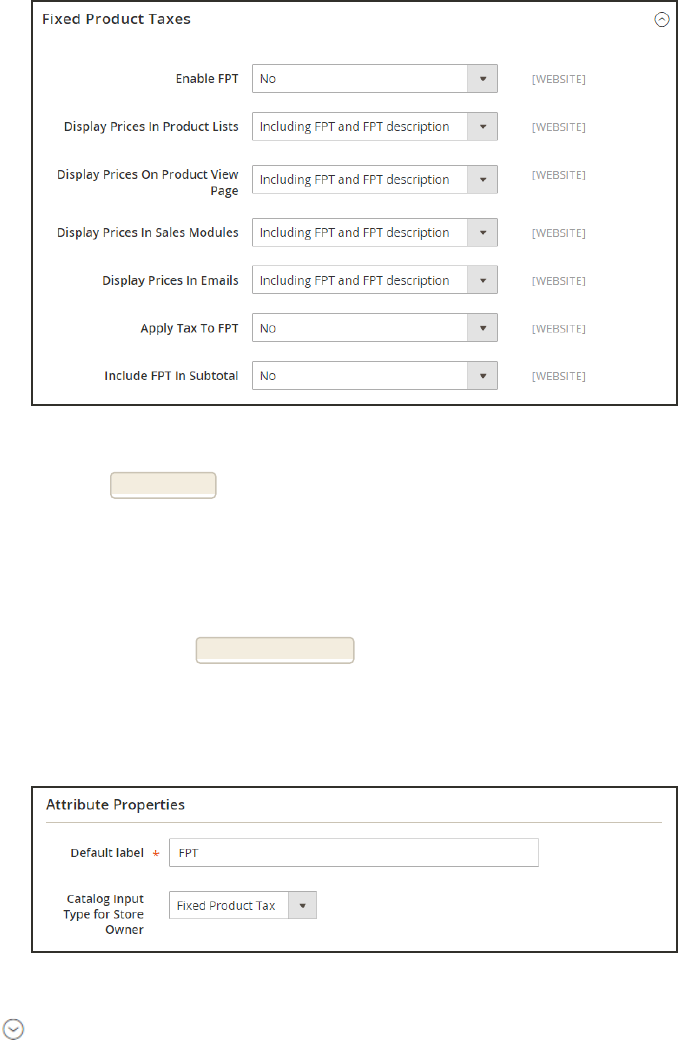
Fixed Product Taxes
4. When complete, tap Save Config.
Step 2: Create an FPT Attribute
1. On the Admin sidebar, tap Stores. Then under Attributes choose Product.
2. In the upper-right corner, tap Add New Attribute. Then, do the following:
a. Enter a Default Label to identify the attribute.
b. Set Catalog Input for Store Owner to “Fixed Product Tax.”
Attribute Properties
3. Expand the Advanced Attribute Properties section. Then, do the following:
a. In the Attribute Code field, enter a unique identifier in lowercase, without spaces or
special characters. The maximum length is 30 characters. You can leave the field blank to
the text from the Default Label field.
b. If you want the FPT field to appear in the Inventory grid, set Add to Column Options to
“Yes.”
CHAPTER 65: Taxes Fixed Product Tax
Magento Community Edition 2.0 User Guide 795
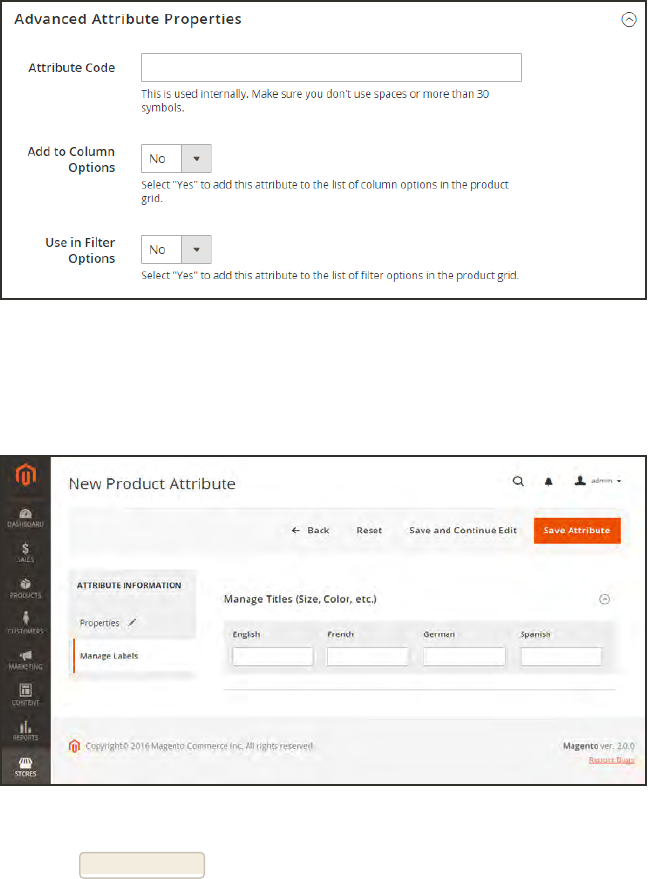
c. If you want to be able to filter products in the grid based on the value of the FPT field, set
Use in Filter Options to “Yes.”
Advanced Attribute Properties
4. (Optional) In the panel on the left, choose Manage Labels. Then, enter a label to use instead of
the default label for each store view.
Manage Labels
5. When complete, tap Save Attribute. Then when prompted, refresh the cache.
Fixed Product Tax CHAPTER 65: Taxes
796 Magento Community Edition 2.0 User Guide
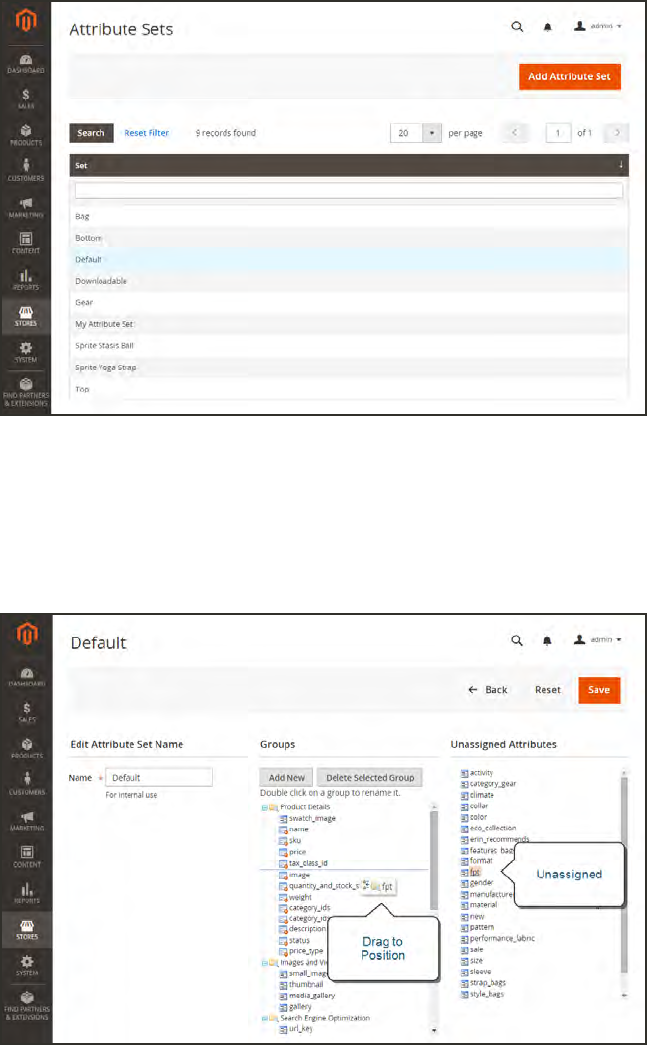
Step 3: Add the FPT Attribute to an Attribute Set
1. On the Admin sidebar, tap Stores. Then under Attributes, choose Attribute Set.
2. In the list, tap the attribute set to open the record in edit mode.
3. Drag the FPT attribute from the list of Unassigned Attributes on the right to the Groups list
in the center column.
Each group folder corresponds to a section of product information. You can place the attribute
wherever you want it to appear when the product is open in edit mode.
Edit Attribute Set
CHAPTER 65: Taxes Fixed Product Tax
Magento Community Edition 2.0 User Guide 797
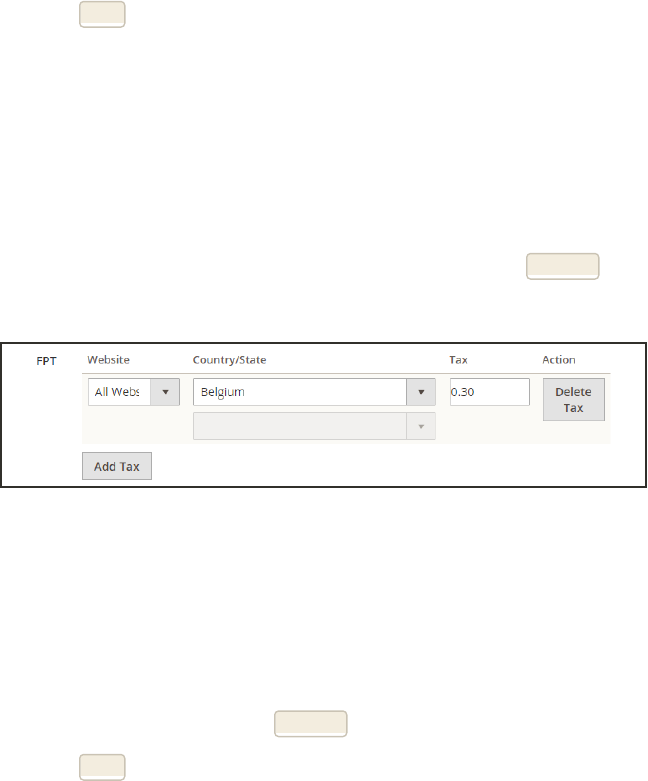
4. When complete, tap Save.
5. Repeat this step for each attribute set that needs to include fixed product tax.
Step 4: Apply FPT to Specific Products
1. On the Admin sidebar, tap Products. Then under Inventory, choose Catalog.
2. Open the product that needs a fixed product tax in edit mode.
3. Find the FPT section of fields that you added to the attribute set. Tap Add Tax, and do the
following:
Fixed Product Tax for Belgium
a. If your Magento installation has multiple websites, choose the appropriate Website and
base currency. In this example, the field is set by default to “All Websites [USD],”
a. Set Country/State to the region where the fixed product tax applies.
b. Enter the fixed product tax as a decimal amount in the Tax field.
c. To add more fixed product taxes, tap Add Tax, and repeat the process.
4. When complete, tap Save.
Fixed Product Tax CHAPTER 65: Taxes
798 Magento Community Edition 2.0 User Guide
EU Place of Supply
European Union (EU) merchants must report their digital goods sold by quarter to each
member country. Digital goods are taxed based on the customer's billing address. The law
requires merchants to run a tax report and identify the relevant tax amounts for digital goods,
as opposed to physical goods.
Merchants must report all digital goods sold by EU member countries on a quarterly basis to a
central tax administration, along with payment due for tax collected during the period.
Merchants who have not yet reached the threshold (50k/100k Euro of annual business) must
continue to report physical goods sold to the EU states where they have registered VAT
numbers.
Merchants who are audited for taxes paid for digital goods, must provide two pieces of
supporting information to establish the customer place of residence.
lThe customer’s billing address and a record of a successful payment transaction can be used
to establish the customer place of residence. (Payment is accepted only if the billing address
matches payment provider information.)
lThe information can also be captured directly from the data store in the Magento database
tables.
To collect digital goods tax information:
1. Load the tax rates for all EU member countries.
2. Create a digital goods product tax class.
3. Assign all your digital goods to the digital goods product tax class.
4. Create tax rules for your physical goods, using physical product tax classes, and associate them
with the appropriate tax rates.
5. Create tax rules for your digital goods, using use the product tax class for digital goods, and
associate them with the appropriate tax rates for EU member countries.
6. Run the tax report for the appropriate period, and collect the required digital goods
information.
7. Export the tax amounts that are related to the tax rates for the digital goods product tax class.
See also:
European Commission Taxation and Customs Union
EU 1015 Place of Supply Changes
CHAPTER 65: Taxes EU Place of Supply
Magento Community Edition 2.0 User Guide 799
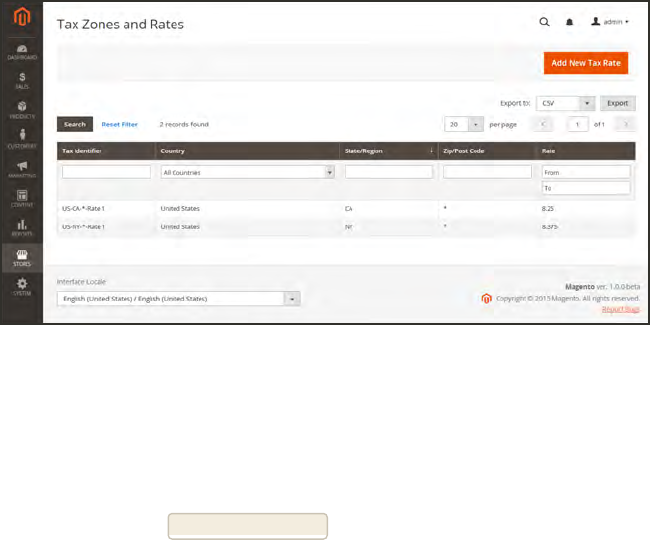
Tax Zones and Rates
Tax rates generally apply to transactions that take place within a specific geographical area.
The Tax Zones and Rates tool enables you to specify the tax rate for each geographical area
from which you collect and remit taxes. Because each tax zone and rate has a unique identifier,
you can have multiple tax rates for a given geographic area (such as places that do not tax food
or medicine, but do tax other items).
Store tax is calculated based on the store’s address. The actual customer tax for an order is
calculated after the customer completes the order information. Magento then calculates the tax
based upon the tax configuration of the store.
Tax Zones and Rates
To define a new tax rate:
1. On the Admin sidebar, tap Stores. Under Taxes, choose Tax Zones and Rates.
2. In the upper-right corner, tap Add New Tax Rate.
3. Enter a Tax Identifier.
4. To apply the tax rate to a single ZIP or postal code, enter the code in the Zip/Post Code field.
5. The asterisk wildcard (*) can be used to match up to ten characters in the code. For example,
90* represents all ZIP codes from 90000 through 90999.
6. To apply the tax rate to a range of ZIP or postal codes, do the following::
a. Mark the Zip/Post is Range checkbox.
b. Enter the first ZIP or postal code in the range.
c. Enter the last ZIP or postal code in the range.
d. Choose the State where the tax rate applies.
Tax Zones and Rates CHAPTER 65: Taxes
800 Magento Community Edition 2.0 User Guide
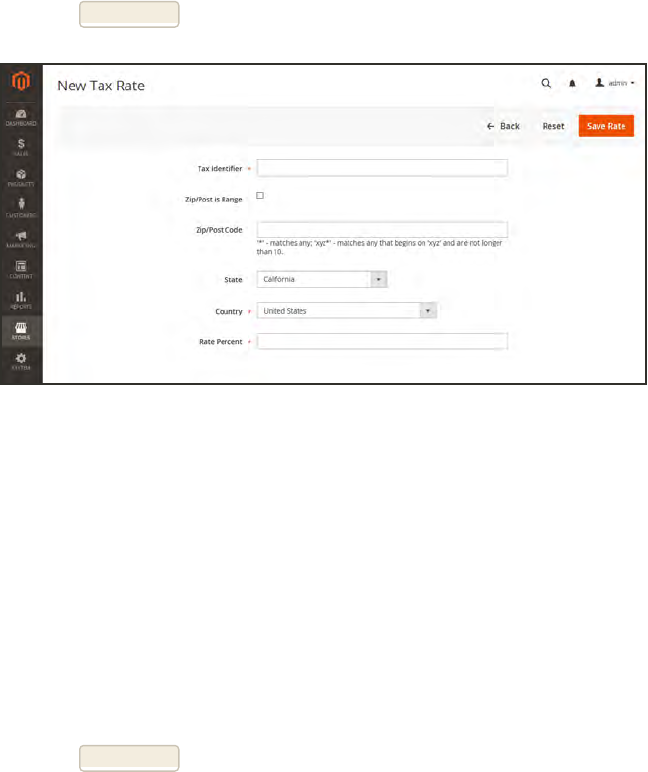
e. Choose the Country where the tax rate applies.
f. Enter the Rate Percent that is used for the tax rate calculation.
7. When complete, tap Save Rate.
New Tax Rate
To edit an existing tax rate:
1. On the Admin sidebar, tap Stores. Then under Taxes, choose Tax Zones and Rates.
2. Find the tax rate in the Tax Zones and Rates grid, and open the record in edit mode.
If there are many rates in the list, use the filter controls to find the rate you need.
3. Make the necessary changes to the Tax Rate Information.
4. Update the Tax Titles as needed.
5. When complete, tap Save Rate.
CHAPTER 65: Taxes Tax Zones and Rates
Magento Community Edition 2.0 User Guide 801
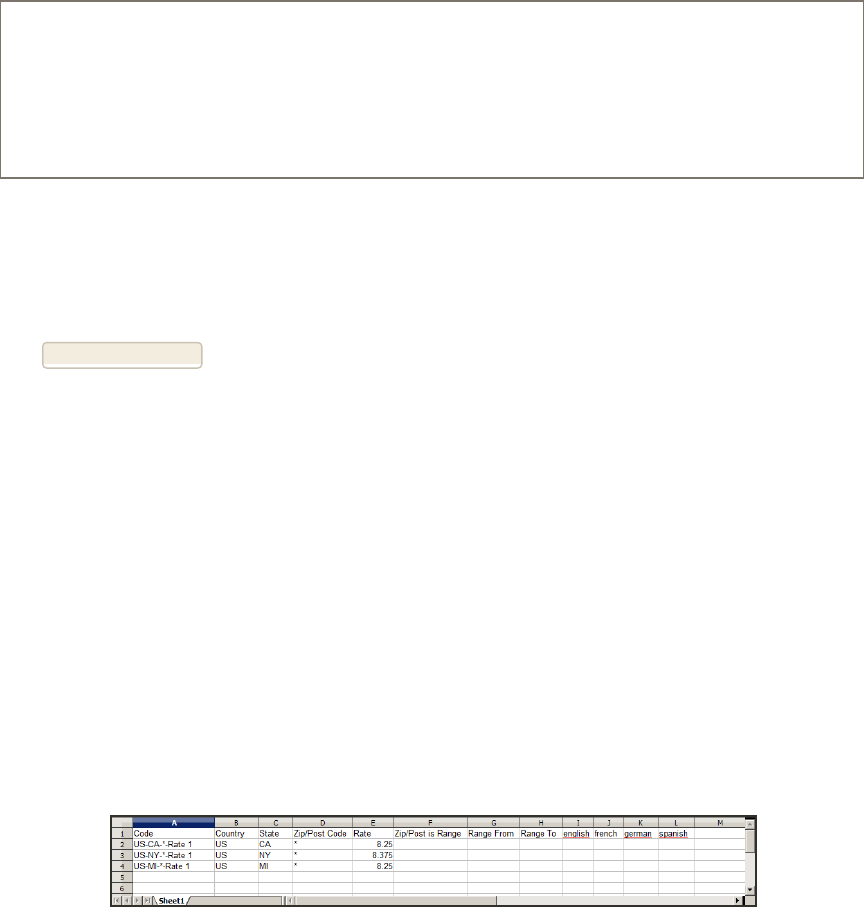
Import/Export Tax Rates
If you conduct business in several states and ship a large quantity of product, it is more
efficient to download tax rates by ZIP code than enter the rates manually. The rates can then be
imported into Magento. The following example shows how to import a set of California tax
rates that was downloaded from the Avalara website. Avalara is a Magento Technology Partner,
and provides tax rate tables that can be downloaded at no charge for every ZIP code in the
United States.
Process Overview:
Step 1: Export the Magento Tax Rate Data
Step 2: Prepare the Import Data
Step 3: Import the Tax Rates
Step 1: Export the Magento Tax Rate Data
1. On the Admin sidebar, tap System. Then under Data Transfer, choose Import/Export Tax
Rates.
2. Tap Export Tax Rates. Look for the download file in the lower-left corner of the browser
window.
3. Save the file, and then open it in a spreadsheet. (In this example, we use OpenOffice Calc.)
The exported Magento tax rate data includes the following columns:
lCode
lCountry
lState
lZip/Post Code
lRate
lRange From
lRange To
lA column for each store view
Exported Tax Rate Data
Tax Zones and Rates CHAPTER 65: Taxes
802 Magento Community Edition 2.0 User Guide

4. Open the new tax rate data in a second instance of the spreadsheet, so you can see both, side
by side.
In the new tax rate data, take note of any additional tax rate data that you might need to set
up in your store before the data is imported. For example, the tax rate data for California also
includes:
lTaxRegionName
lCombinedRate
lStateRate
lCountyRate
lCityRate
lSpecialRate
If you need to import additional tax zones and rates, you must first define them from the
Admin of your store, and update the tax rules as needed. Then, export the data, and open the
file in OpenOffice Calc, so it can be used for reference. However, to keep this example simple,
we will import only the standard tax rate columns.
Step 2: Prepare the Import Data
You now have two spreadsheets open, side by side. One with the Magento export file structure,
and the other with the new tax rate data that you want to import.
1. To create a place to work in the spreadsheet with the new data, insert as many blank columns
at the far left as needed. Then, use cut and paste to rearrange the columns so they match the
order of the Magento export data.
2. Rename the column headers to match the Magento export data.
3. Delete any columns that have no data. Otherwise, the structure of the import file should match
the original Magento export data.
4. Before saving the file, scroll down and make sure that the tax rate columns contain only
numeric data. Any text found in a tax rate column will prevent the data from being imported.
5. Save the prepared data as a .CSVfile. When prompted, verify that a comma is used a Field
delimiter, and double quotes as the Text delimiter. Then, tap OK.
CHAPTER 65: Taxes Tax Zones and Rates
Magento Community Edition 2.0 User Guide 803
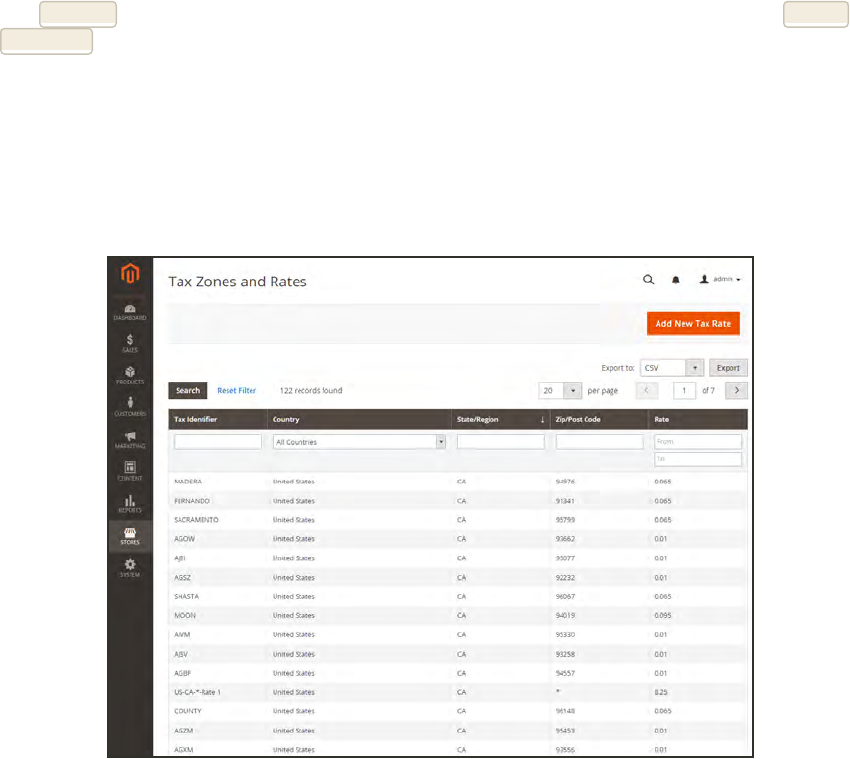
Step 3: Import the Tax Rates
1. On the Admin sidebar, tap System. Then under Data Transfer, choose Import/Export Tax
Rates.
2. Tap Browse, and choose the .CSV tax rate file that you prepared to import. Then, tap Import
Tax Rates.
It might take several minutes to import the data. When the process is complete, the message,
"The tax rate has been imported" appears. If you receive an error message, correct the problem
in the data and try again.
3. On the Admin sidebar, tap Stores. Then under Taxes, choose Tax Zones and Rates. The
imported rates appear in the list. Use the page controls to view the new tax rates.
Imported Tax Rates
4. Run some test transactions in your store with customers from different ZIP codes to make sure
that the new tax rates work correctly.
Tax Zones and Rates CHAPTER 65: Taxes
804 Magento Community Edition 2.0 User Guide
Value Added Tax (VAT)
Some countries charge a value added tax, or VAT, on goods and services. There can be different
VAT rates depending on which stage you as a merchant are at in the manufacture or
distribution of the products, materials, or services that you sell to your customers. In this case
you may need to use more than one VAT rate in your store for tax calculation purposes.
Configuring VAT
The following instructions include a sample procedure to set up a 20% VAT in the U.K. for
sales to retail customers. For other tax rates and countries, follow the general procedure but
enter specific information that corresponds to your country, VAT rate, customer types, and so
on.
Before proceeding, make sure to find out which rules and regulations apply to VAT in your area.
In certain business-to-business transactions, VAT is not assessed. Magento can validate a
customer’s VAT ID to ensure that VAT is assessed (or not assessed) properly. To learn more,
see: VAT Validation.
Process Overview:
Step 1: Set Up Customer Tax Classes
Step 2: Set Up Product Tax Classes
Step 3: Set Up Tax Zones and Rates
Step 4: Set Up Tax Rules
Step 5: Apply Tax Classes to Products
Step 1: Set Up Customer Tax Classes
1. On the Admin sidebar, tap Stores. Then choose, select Tax Zones and Rates.
2. Ensure that there is a customer tax class that is appropriate to use with the VAT. For this
example, ensure that there is a customer tax class named Retail Customer. If Retail Customer
does not exist, click the Add New button and add it.
Step 2: Set Up Product Tax Classes
1. On the Admin menu, select Sales > Tax > Product Tax Classes.
2. Click the Add New button and create three new classes:
CHAPTER 65: Taxes Value Added Tax (VAT)
Magento Community Edition 2.0 User Guide 805
lVAT Standard
lVAT Reduced
lVAT Zero
3. Click the Save Class button for each new class that you add.
Step 3: Set Up Tax Zones and Rates
1. On the Admin menu, select Sales > Tax > Manage Tax Zones & Rates.
For this example you can remove the U.S. tax rates, or leave them as they are.
2. Click the Add New Tax Rate button. Add new rates as follows:
NEW TAX RATE SETTINGS
VAT Standard Tax Identifier: VAT Standard
Country and State: United Kingdom
Rate Percent: 20.00
VAT Reduced Tax Identifier: VAT Reduced
Country and State: United Kingdom
Rate Percent: 5.00
3. Click the Save Rate button for each rate.
Step 4: Set Up Tax Rules
A tax rule is a combination of a customer tax class, a product tax class, and a tax rate.
1. On the Admin menu, select Sales > Tax > Manage Tax Rules.
2. Add new tax rules as follows:
NEW TAX RULE SETTINGS
VAT Standard Name: VAT Standard
Customer Tax Class: Retail Customer
Product Tax Class: VAT Standard
Tax Rate: VAT Standard Rate
Value Added Tax (VAT) CHAPTER 65: Taxes
806 Magento Community Edition 2.0 User Guide

NEW TAX RULE SETTINGS
VAT Reduced Name: VAT Reduced
Customer Tax Class: Retail Customer
Product Tax Class: VAT Reduced
Tax Rate: VAT Reduced Rate
3. Click the Save Rule button for each rate.
Step 5: Apply Tax Classes to Products
1. On the Admin menu, select Catalog > Manage Products.
2. Open a product from your catalog in edit mode.
3. On the General page, find the Tax Class field. Then, select the VAT Class that applies to the
product.
4. When complete, click the Save button.
CHAPTER 65: Taxes Value Added Tax (VAT)
Magento Community Edition 2.0 User Guide 807
VATValidation
VATIDValidation automatically calculates the required tax for B2B transactions that take
place within the European Union (EU), based on the merchant and customer locale. Magento
performs VAT ID validation using the web services of the European Commission server.
VAT-related tax rules do not influence other tax rules, and do not prevent the application of other tax
rules. Only one tax rule can be applied at a given time.
lVAT is charged if the merchant and customer are located in the same EU country.
lVAT is not charged if the merchant and customer are located in different EU countries, and
both parties are EU-registered business entities.
The store administrator creates more than one default customer group that can be
automatically assigned to the customer during account creation, address creation or update,
and checkout. The result is that different tax rules are used for intra-country (domestic) and
intra-EU sales.
Important: If you sell virtual or downloadable products, which by their nature do not require
shipping, the VAT rate of a customer’s location country should be used for both intra-union and
domestic sales. You must create additional individual tax rules for product tax classes that
correspond to the virtual products.
Customer Registration Workflow
If VAT ID Validation is enabled, after registration each customer is proposed to enter the VAT
ID number. However only those who are registered VAT customers are expected to fill this field.
After a customer specifies the VAT number and other address fields, and chooses to save, the
system saves the address and sends the VAT ID validation request to the European
Commission server. According to the results of the validation, one of the default groups is
assigned to a customer. This group can be changed if a customer or an administrator changes
the VAT ID of the default address or changes the whole default address. The group can be
temporarily changed (group change will be emulated) in some cases during one-page checkout.
If enabled, you can override VAT ID Validation for individual customers by selecting the
checkbox on the Customer Information page.
Value Added Tax (VAT) CHAPTER 65: Taxes
808 Magento Community Edition 2.0 User Guide
Checkout Workflow
If a customer’s VAT validation is performed during checkout, the VAT request identifier and
VAT request date are saved in the Comments History section of the order.
The system behavior concerned with the VAT ID validation and the customer group change
during the checkout depends on how the Validate on Each Transaction and the Disable
Automatic Group Change settings are configured. This section describes the implementation of
the VAT ID Validation functionality for the checkout on the frontend.
In case a customer uses Google Express Checkout, PayPal Express Checkout or another
external checkout method, when the checkout is performed completely on the side of the
external payment gateway, the Validate on Each Transaction setting cannot be applied. Thus
the customer group cannot change during checkout.
CHAPTER 65: Taxes Value Added Tax (VAT)
Magento Community Edition 2.0 User Guide 809
VATValidation Checkout Workflow
Value Added Tax (VAT) CHAPTER 65: Taxes
810 Magento Community Edition 2.0 User Guide
Configuring VAT ID Validation
Example: Minimal Tax Rules Required for VATID Validation
TAX RULE #1
Customer Tax Class Customer tax classes must include:
A class for domestic customers
A class for customers with invalid VAT ID
A class for customers, for whom VAT ID validation failed
Product Tax Class Product tax classes must include a class for products of all types,
except bundle and virtual.
Tax Rate The tax rate must include the VAT rate of the merchant’s country.
TAX RULE #2
Customer Tax Class A class for intra-union customers.
Product Tax Class A class for products of all types, except virtual.
Tax Rate VAT rates for all EU countries, except merchant’s country. Currently
this rate is 0%.
TAX RULE #3 (REQUIRED FOR VIRTUAL AND DOWNLOADABLE PRODUCTS)
Customer Tax Class Customer tax classes must include:
A class for domestic customers
A class for customers with invalid VAT ID
A class for customers, for whom VAT ID validation failed
Product Tax Class A class for virtual products.
Tax Rate VAT rate of the merchant’s country.
TAX RULE #4 (REQUIRED FOR VIRTUAL AND DOWNLOADABLE PRODUCTS)
Customer Tax Class A class for intra-union customers.
Product Tax Class A class for virtual products.
Tax Rate VAT rates for all EU countries, except merchant’s country. Currently
this rate is 0%.
CHAPTER 65: Taxes Value Added Tax (VAT)
Magento Community Edition 2.0 User Guide 811

Process Overview:
Step 1: Create VAT-Related Customer Groups
Step 2: Create VAT-Related Classes, Rates and Rules
Step 3: Enable and Configure VAT ID Validation
Step 4: Set your VAT ID and Location Country
Step 5: Verify the List of EU Member Countries
Step 1: Create VAT-Related Customer Groups
VAT ID Validation automatically assigns one of the four default customer groups to customers
according to VAT ID validation results:
lDomestic
lIntra-EU
lInvalid VAT ID
lValidation error
You can create new customer groups for VAT ID Validation or use existing groups, if they
comply with your business logic. When configuring VAT ID Validation, you must assign each
of the created customer groups as a default for customers with appropriate VAT ID validation
results.
Step 2: Create VAT-Related Classes, Rates, and Rules
Each tax rule is defined be three entities:
lCustomer Tax Classes
lProduct Tax Classes
lTax Rates
Create the tax rules that you need to use VAT IDValidation effectively.
lTax rules include tax rates and tax classes.
lTax classes are assigned to customer groups.
Step 3: Enable and Configure VAT ID Validation
1. On the Admin sidebar, tap Stores. Under Settings, choose Configuration.
2. If necessary, set the Store View for the configuration.
3. In the panel on the left under Customers, choose Customer Configuration.
Value Added Tax (VAT) CHAPTER 65: Taxes
812 Magento Community Edition 2.0 User Guide
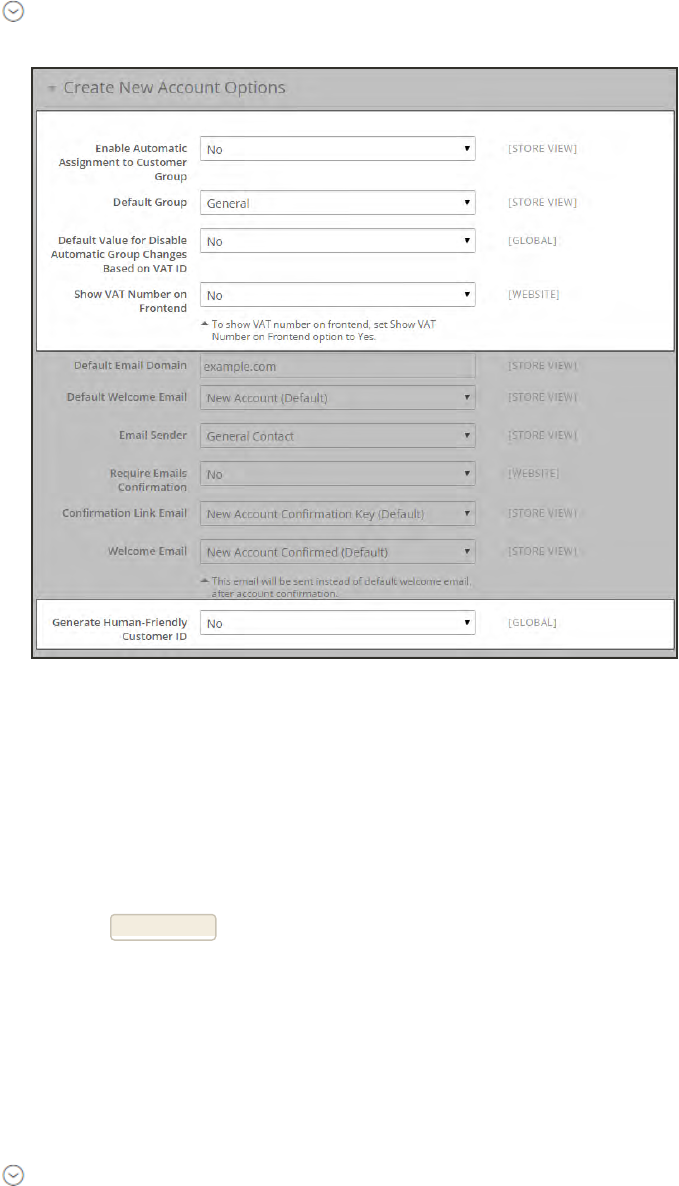
4. Expand the Create New Account Options section.
Create New Account Options
5. Set Enable Automatic Assignment to Customer Group to “Yes.” Then complete the following
fields as needed.
lDefault Group
lDefault Value for Disable Automatic Group Changes Based on VATID
lShow VAT Number on Frontend
6. When complete, tap Save Config.
Step 4: Set Your VAT ID and Location Country
1. On the Admin sidebar, tap Stores. Under Settings, choose Configuration.
2. If needed, set Store View to the applicable store view.
3. In the panel on the left under General, choose General.
4. Expand the Store Information section. Then, do the following:
CHAPTER 65: Taxes Value Added Tax (VAT)
Magento Community Edition 2.0 User Guide 813
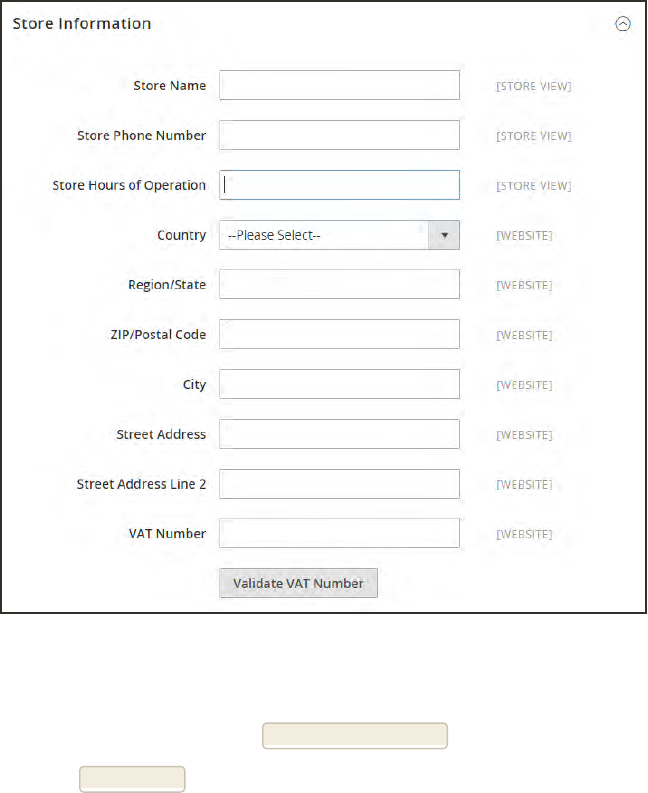
Store Information
a. Select your Country.
b. Enter your VAT Number. Then, tap Validate VAT Number. The result appears immediately.
5. When complete, tap Save Config.
Value Added Tax (VAT) CHAPTER 65: Taxes
814 Magento Community Edition 2.0 User Guide
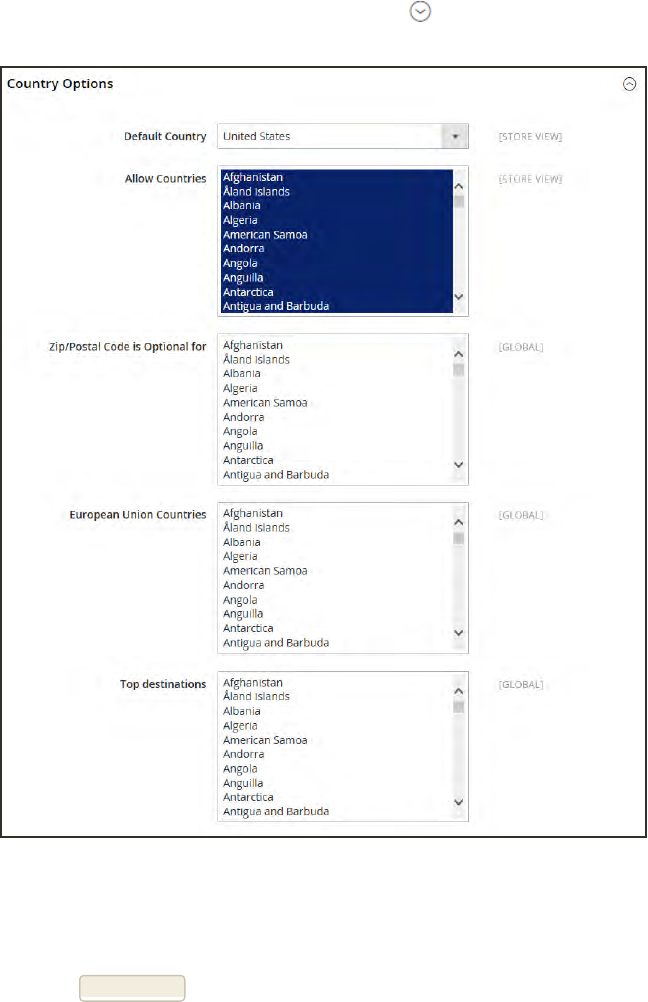
Step 5: Verify the List of EU Member Countries
1. Continuing in the General configuration section, expand the Countries Options section.
Countries Options
2. In the list of European Union Countries, verify that each member country of the EU is
selected.
3. When complete, tap Save Config.
CHAPTER 65: Taxes Value Added Tax (VAT)
Magento Community Edition 2.0 User Guide 815
Tax Quick Reference
Some tax settings have a choice of options that determines the way the tax is calculated and
presented to the customer. To learn more, see: International Tax Guidelines.
Tax Calculation Methods
Tax calculation method options include Unit Price, Row Total, and Total. The following table
explains how rounding (to two digits) is handled for different settings.
SETTING CALCULATION AND DISPLAY
Unit Price Magento calculates the tax for each item and displays prices tax-
inclusive. To calculate the tax total, Magento rounds the tax for each
item, and then adds them together.
Row Total Magento calculates the tax for each line. To calculate the tax total,
Magento rounds the tax for each line item and then adds them
together.
Total Magento calculates the tax for each item and adds those tax values
to calculate the total unrounded tax amount for the order. Magento
then applies the specified rounding mode to the total tax to determine
the total tax for the order.
Tax Configuration Options
Catalog PricesWith or Without Tax
The possible display fields vary depending on the calculation method and whether the catalog
prices include or exclude taxes. Display fields have two-decimal precision in normal
computations. Some combinations of price settings display prices that both include and
exclude tax. When both appear on the same line item, it can be confusing to customers, and
triggers a warning.
Tax Quick Reference CHAPTER 65: Taxes
816 Magento Community Edition 2.0 User Guide
SETTING CALCULATION AND DISPLAY
Excluding Tax Using this setting, the base item price is used as it is entered and the
tax calculation methods are applied.
IncludingTax Using this setting, the base item price excluding tax is calculated
first. This value is used as the base price, and the tax calculation
methods are applied.
Tax Configuration Options
Important! Changes have been made from earlier versions for EU merchants or other VAT merchants
who display prices including tax and operate in several countries with multiple store views. If you load
prices with more than two digits of precision, Magento automatically rounds all prices to two digits to
ensure that a consistent price is presented to buyers.
Shipping Prices With or Without Tax
SETTING DISPLAY CALCULATION
Excluding Tax Appears without tax. Normal calculation. Shipping is added
to cart total, typically displayed as a
separate item.
Including Tax Can be tax inclusive, or tax
can be displayed
separately.
Shipping is treated as another item in
cart with taxes, using the same
calculations.
Tax Configuration Options
Tax Amounts as Line Items
To display two different tax amounts as separate line items, such as GST and PST for Canadian
stores, you must set different priorities for the related tax rules. However, in previous tax
calculations, taxes with different priorities would automatically be compounded. To correctly display
separate tax amounts without an incorrect compounding of the tax amounts, you can set different
priorities, and also select the Calculate off subtotal only checkbox. This produces correctly
calculated tax amounts that appear as separate line items.
CHAPTER 65: Taxes Tax Quick Reference
Magento Community Edition 2.0 User Guide 817
International Tax Guidelines
TAX OPTION RECOMMENDED SETTING
Load catalog prices Excluding tax
FPT No, because FPT is not taxed.
Tax based on Shipping origin
Tax Calculation On total
Tax shipping? No
Apply Discount Before tax
Comment All tax zones are the same priority; ideally, a zone for state and one or
more zones for zip code lookup.
U.S. Tax Configuration
TAX OPTION RECOMMENDED SETTING
Load catalog prices Excluding tax
FPT Yes, including FPT and description
Tax based on Shipping address
Tax Calculation On total
Tax shipping? Yes
Apply Discount Before tax, discount on prices, including tax.
Comment For merchants marking up supplier invoices (including VAT).
UK B2C Tax Configuration
TAX OPTION RECOMMENDED SETTING
Load catalog prices Excluding tax
FPT Yes, including FPT and description
U.K. B2B Tax Configuration
International Tax Guidelines CHAPTER 65: Taxes
818 Magento Community Edition 2.0 User Guide

TAX OPTION RECOMMENDED SETTING
Tax based on Shipping address
Tax Calculation On item
Tax shipping? Yes
Apply Discount Before tax, discount on prices, including tax.
Comment For B2B merchants to provide simpler VAT supply chain
considerations. Tax calculation on row is also valid; however, check
with your taxing jurisdiction. Setup assumes a merchant is in the
supply chain and that goods sold are used by other vendors for VAT
rebates and so on. This makes it easy to discern tax by item for
faster rebate generation. Note that some jurisdictions require different
rounding strategies not currently supported by Magento, and that not
all jurisdictions allow item or row level tax.
U.K. B2B Tax Configuration (cont.)
TAX OPTION RECOMMENDED SETTING
Load catalog prices Excluding tax
FPT Yes, including FPT, description, and apply tax to FPT.
Tax based on Shipping origin
Tax Calculation On total
Tax shipping? Yes
Apply Discount Before tax
Comment Merchants located in a GST/PST province (Montreal) should create
one tax rule and show a combined tax amount.
Be sure to consult a qualified tax authority if you have any questions.
For information about the tax requirements of specific provinces, see
the following:
Revenu Québec
Government of Saskatchewan
Manitoba Information for Vendors
Canada Tax Configuration
CHAPTER 65: Taxes International Tax Guidelines
Magento Community Edition 2.0 User Guide 819
U.S. Tax Guidelines
Tax Classes
TAX CLASS RECOMMENDED SETTING
Tax Class for Shipping None
Calculation Settings
CALCULATION RECOMMENDED SETTING
Tax Calculation Method Based On Total
Tax Calculation Based On Shipping Origin
Catalog Prices Excluding Tax
Shipping Prices Excluding Tax
Apply Customer Tax After Discount
Apply Discount on Prices Excluding Tax
Default Tax Destination Calculation
SETTING RECOMMENDED SETTING
Default Country United States
Default State State where business is located.
Default Post Code The postal code that is used in your tax zones.
Price Display Settings
SETTING RECOMMENDED SETTING
Display Product Prices in Catalog Excluding Tax
Display Shipping Prices Excluding Tax
International Tax Guidelines CHAPTER 65: Taxes
820 Magento Community Edition 2.0 User Guide
Shopping Cart Display Settings
SETTING RECOMMENDED SETTING
Display Prices Excluding Tax
Display Subtotal Excluding Tax
Display Shipping Amount Excluding Tax
Display Gift Wrapping Prices Excluding Tax
Display Printed Card Prices Excluding Tax
Include Tax in Grand Total Yes
Display Full Tax Summary Yes
Display Zero Tax Subtotal Yes
Orders, Invoices, Credit Memos, Display Settings
SETTING RECOMMENDED SETTING
Display Prices Excluding Tax
Display Subtotal Excluding Tax
Display Shipping Amount Excluding Tax
Include Tax in Grand Total Yes
Display Full Tax Summary Yes
Display Zero Tax Subtotal Yes
Fixed Product Taxes
SETTING RECOMMENDED SETTING
Enable FPT No, except in California.
CHAPTER 65: Taxes International Tax Guidelines
Magento Community Edition 2.0 User Guide 821
Canadian Tax Guidelines
The following example shows how to set up GSTtax rates for Canada and PSTtax rates for
Saskatchewan, with tax rules that calculate and display the two tax rates. Because this is an
example configuration, be sure to verify the correct tax rates and rules for your tax
jurisdictions. When setting up taxes, set the store scope to apply the configuration to all
applicable stores and websites.
lFixed product tax is included for relevant goods as a product attribute.
lIn Quebec, PST is referred to as TVQ. If you need to set up a rate for Quebec, make sure to
use TVQ as the identifier.
Process Overview:
Step 1: Complete the Tax Calculation Settings
Step 2: Set Up Canadian Goods & Services Tax (GST)
Step 3: Set Up Canadian Provincial Sales Tax (PST)
Step 4: Create a GSTTax Rule
Step 5: Create a PSTTax Rule for Saskatchewan
Step 6: Save and Test the Results
Step 1: Complete Tax Calculation Settings
1. On the Admin menu, select System >Configuration. Then in the panel on the left, under
Sales, select Tax.
2. Click to expand each section, and complete the following settings:
FIELD RECOMMENDED SETTING
Tax Calculation Method Based On Total
Tax Calculation Based On Shipping Address
Catalog Prices Excluding Tax
Shipping Prices Excluding Tax
Apply Customer Tax After Discount
Apply Discount on Prices Excluding Tax
Apply Tax On Custom Price (if available)
Tax Calculation Settings
International Tax Guidelines CHAPTER 65: Taxes
822 Magento Community Edition 2.0 User Guide
FIELD RECOMMENDED SETTING
Tax Class for Shipping Shipping (shipping is taxed)
Tax Classes
FIELD RECOMMENDED SETTING
Default Country Canada
Default State (as appropriate)
Default Postal Code * (asterisk)
Default Tax Destination Calculation
FIELD RECOMMENDED SETTING
Include Tax in Grand Total Yes
Display Full Tax Summary Yes
Display Zero in Tax Subtotal Yes
Shopping Cart Display Settings
FIELD RECOMMENDED SETTING
Enable FPT Yes
All FPT Display Settings Including FPT and FPT description
Apply Discounts to FPT No
Apply Tax to FPT Yes
Include FPT in Subtotal No
Fixed Product Taxes
Step 2: Set Up Canadian Goods & Services Tax (GST)
To print the GST number on invoices and other sales documents, include it in the name of the
applicable tax rates. The GST will appear as part of the GST amount on any order summary.
CHAPTER 65: Taxes International Tax Guidelines
Magento Community Edition 2.0 User Guide 823
FIELD RECOMMENDED SETTING
Tax Identifier Canada-GST
Country Canada
State * (asterisk)
Zip/Post is Range No
Zip/Post Code * (asterisk)
Rate Percent 5.0000
Manage Tax Zones & Rates
Step 3: Set Up Canadian Provincial Sales Tax (PST)
Set up another tax rate for the applicable province.
FIELD RECOMMENDED SETTING
Tax Identifier Canada-SK-PST
Country Canada
State Saskatchewan
Zip/Post is Range No
Zip/Post Code * (asterisk)
Rate Percent 5.0000
Tax Rate Information
International Tax Guidelines CHAPTER 65: Taxes
824 Magento Community Edition 2.0 User Guide
Step 4: Create a GST Tax Rule
To avoid compounding the tax and to correctly display the calculated tax as separate line
items for GSTand PST, you must set different priorities for each rule, and select the “Calculate
off subtotal only” checkbox. Each tax appears as a separate line item, but the tax amounts are
not compounded.
FIELD RECOMMENDED SETTING
Name Retail-Canada-GST
Customer Tax Class Retail Customer
Product Tax Class Taxable Goods
Shipping
Tax Rate Canada-GST
Priority 0
Calculate off subtotal only Select this checkbox.
Sort Order 0
Tax Rule Information
Step 5: Create a PST Tax Rule for Saskatchewan
For this tax rule, make sure to set the priority to 0 and select the "Calculate off subtotal only"
checkbox. Each tax appears as a separate line item, but the tax amounts are not compounded.
FIELD RECOMMENDED SETTING
Name Retail-Canada-PST
Customer Tax Class Retail Customer
Product Tax Class Taxable Goods
Shipping
Tax Rate Canada-SK-PT
Priority 1
Tax Rule Information
CHAPTER 65: Taxes International Tax Guidelines
Magento Community Edition 2.0 User Guide 825

FIELD RECOMMENDED SETTING
Calculate off subtotal only Select this checkbox.
Sort Order 0
Tax Rule Information (cont.)
Step 6: Save and Test the Results
1. When complete, click the Save Config button.
2. Return to your storefront, and create a sample order to test the results.
International Tax Guidelines CHAPTER 65: Taxes
826 Magento Community Edition 2.0 User Guide

EU Tax Guidelines
The following example depicts a store based in France that sells > 100k Euros in France and >
100k Euros in Germany.
lTax calculations are managed at the website level.
lCurrency conversion and tax display options are controlled individually at the store view
level, (Click the Use Website checkbox to override the default).
lBy setting the default tax country you can dynamically show the correct tax for the
jurisdiction.
lFixed product tax is included for relevant goods as a product attribute.
lIt might be necessary to edit the catalog to ensure that it shows up in the correct
category/website/store view.
Process Overview:
Step 1: Create Three Product Tax Classes
Step 2: Create Tax Rates for France and Germany
Step 3: Set Up the Tax Rules
Step 4: Set Up a Store View for Germany
Step 5: Configure Tax Settings for France
Step 6: Configure Tax Settings for Germany
Step 1: Create Three Product Tax Classes
For this example, it is assumed that multiple VAT-Reduced product tax classes are not needed.
1. Create a VAT-Standard product tax class.
2. Create a VAT-Reduced product tax class.
3. Create a VAT-Free product tax class.
CHAPTER 65: Taxes International Tax Guidelines
Magento Community Edition 2.0 User Guide 827
Step 2: Create Tax Rates for France and Germany
Create the following tax rates:
TAX RATE SETTING
France-StandardVAT Country: France
State/Region: *
ZIP/Postal Code: *
Rate: 20%
France-ReducedVAT Country: France
State/Region: *
ZIP/Postal Code: *
Rate: 5%
Germany-StandardVAT Country: Germany
State/Region: *
ZIP/Postal Code: *
Rate: 19%
Germany-ReducedVAT Country: Germany
State/Region: *
ZIP/Postal Code: *
Rate: 7%
Tax Rates
International Tax Guidelines CHAPTER 65: Taxes
828 Magento Community Edition 2.0 User Guide

Step 3: Set Up the Tax Rules
Create the following tax rules:
TAX RULE SETTING
Retail-France-StandardVAT Customer Class: Retail Customer
Tax Class: VAT-Standard
Tax Rate: France-StandardVAT
Priority: 0
Sort Order: 0
Retail-France-ReducedVAT Customer Class: Retail Customer
Tax Class: VAT Reduced
Tax Rate: France-ReducedVAT
Priority: 0
Sort Order: 0
Retail-Germany-
StandardVAT
Customer Class: Retail Customer
Tax Class: VAT-Standard
Tax Rate: Germany-StandardVAT
Priority: 0
Sort Order: 0
Retail-Germany-
ReducedVAT
Customer Class: Retail Customer
Tax Class: VAT-Reduced
Tax Rate: Germany-ReducedVAT
Priority: 0
Sort Order: 0
Tax Rules
CHAPTER 65: Taxes International Tax Guidelines
Magento Community Edition 2.0 User Guide 829

Step 4: Set Up a Store View for Germany
1. On the Admin sidebar, tap Stores. Then under Settings, choose All Stores.
2. Under the default website, create a store view for Germany. Then, do the following:
a. On the Admin sidebar, tap Stores. Then under Settings, choose Configuration.
a. In the upper-left corner, set Default Config to the French store.
b. On the General page, expand the Countries Options section, and set the default
country to “France.”
c. Complete the locale options as needed.
3. In the upper-left corner, choose the German Store View. Then, do the following:
a. On the General page, expand Countries Options, and set the default country to
“Germany.”
b. Complete the locale options as needed.
Step 5: Configure Tax Settings for France
Complete the following General tax settings:
FIELD RECOMMENDED SETTING
Tax Class for Shipping Shipping (shipping is taxed)
Tax Calculation Method Based
On
Total
Tax Calculation Based On Shipping Address
Catalog Prices Including Tax
Shipping Prices Including Tax
Apply Customer Tax After Discount
Apply Discount on Prices Including Tax
Apply Tax On Custom Price (if available)
Default Country France
General Settings
International Tax Guidelines CHAPTER 65: Taxes
830 Magento Community Edition 2.0 User Guide

FIELD RECOMMENDED SETTING
Default State
Default Postal Code * (asterisk)
Include Tax in Grand Total Yes
Enable FPT Yes
All FPT Display Settings Including FPT and FPT description
Apply Discounts to FPT No
Apply Tax to FPT Yes
Include FPT in Subtotal Yes
General Settings (cont.)
CHAPTER 65: Taxes International Tax Guidelines
Magento Community Edition 2.0 User Guide 831
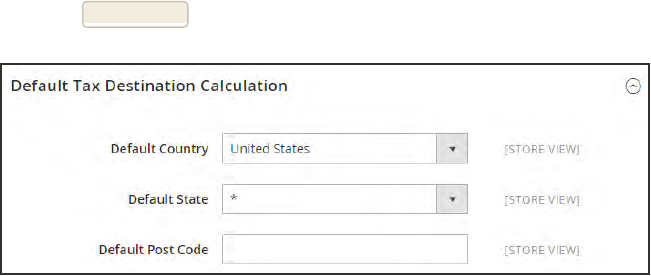
Step 6: Configure Tax Settings for Germany
1. On the Admin sidebar, tap Stores. Then under Settings, choose Configuration.
2. In the panel on the left, under Sales,choose Tax. Then, do the following:
a. In the upper-right corner, choose the German Store View.
b. To the right of the Default Country field, clear the Use Website checkbox. Then, set
Default Country to “Germany.”
c. To the right of the Default State field, clear the Use Website checkbox. Then, set Default
State to “*.”
d. To the right of the Default Post Code field, mark the Use Website checkbox. Then, set
Default Post Code to “*.”
3. When complete, tap Save Config.
Default Tax Destination Calculation
International Tax Guidelines CHAPTER 65: Taxes
832 Magento Community Edition 2.0 User Guide
Warning Messages
Some combinations of tax-related options might be confusing to customers and trigger a
warning. These conditions might occur when the tax calculation method is set to “Row” or
“Total,” and the customer is presented with prices that both exclude and include tax, or a tax
on an item basis in the cart. Because the tax calculation is rounded, the amount that appears
in the cart might differ from the amount that a customer expects to pay.
If your tax calculation is based on a problematic configuration, the following warnings appear:
Warning. Tax discount configuration might result in different discounts than a customer
might expect for store(s); Europe Website (French), Europe Website (German). Please
see source for more details.
Warning. Tax configuration can result in rounding errors for store(s): Europe Websites
(French), Europe Websites (German).
Calculation Settings
Use the following tables for reference when configuring tax calculation settings:
Tax Calculation Method Based On: Excluding Tax
PRICE DISPLAY UNIT PRICE ROW TOTAL TOTAL
Tax Class for Shipping Shipping (is taxed)
Excluding tax OK OK OK
Including tax OK OK OK
Including and
Excluding tax
OK OK Warning
Tax Excluded
Catalog Prices: Including Tax
PRICE DISPLAY UNIT PRICE ROW TOTAL TOTAL
Excluding tax OK OK OK
Including tax OK OK OK
Tax Included
CHAPTER 65: Taxes Warning Messages
Magento Community Edition 2.0 User Guide 833
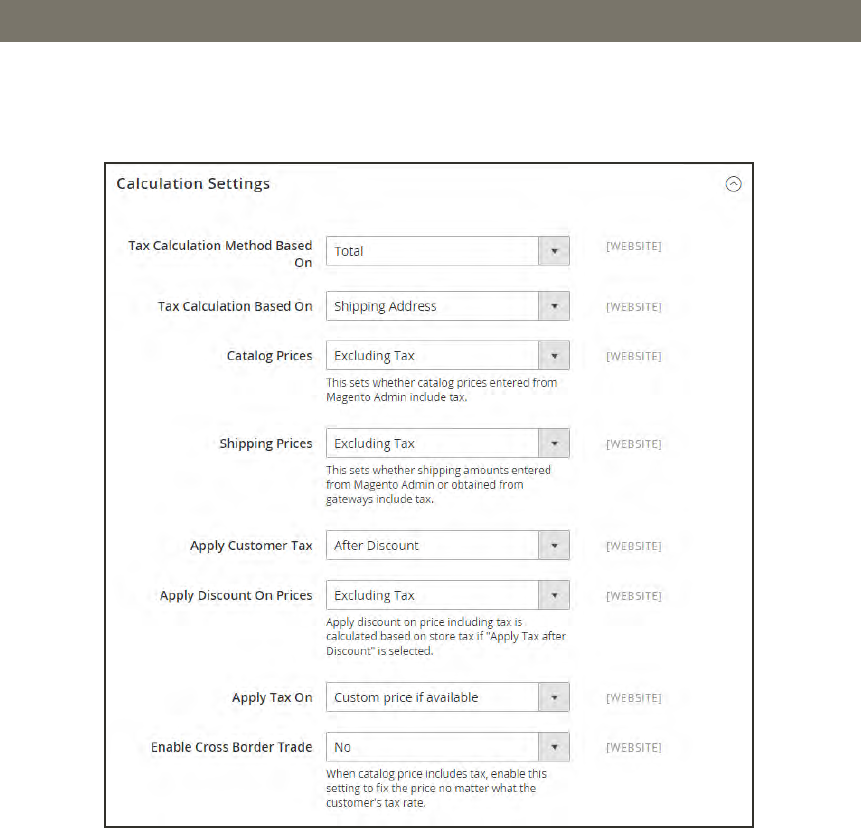
PRICE DISPLAY UNIT PRICE ROW TOTAL TOTAL
Including and
Excluding tax
OK Warning Warning
Tax Included (cont.)
Calculation Settings
Warning Messages CHAPTER 65: Taxes
834 Magento Community Edition 2.0 User Guide

Discount Settings
We strongly recommend that you use the following settings to avoid issues when configuring
taxes in relation to discounts.
FIELD RECOMMENDED SETTING
Apply Customer Tax After Discount
Apply Discount on Prices US and Canada Excluding Tax
EU Including Tax
Recommended Settings
CHAPTER 65: Taxes Warning Messages
Magento Community Edition 2.0 User Guide 835

Notes
836 Magento Community Edition 2.0 User Guide
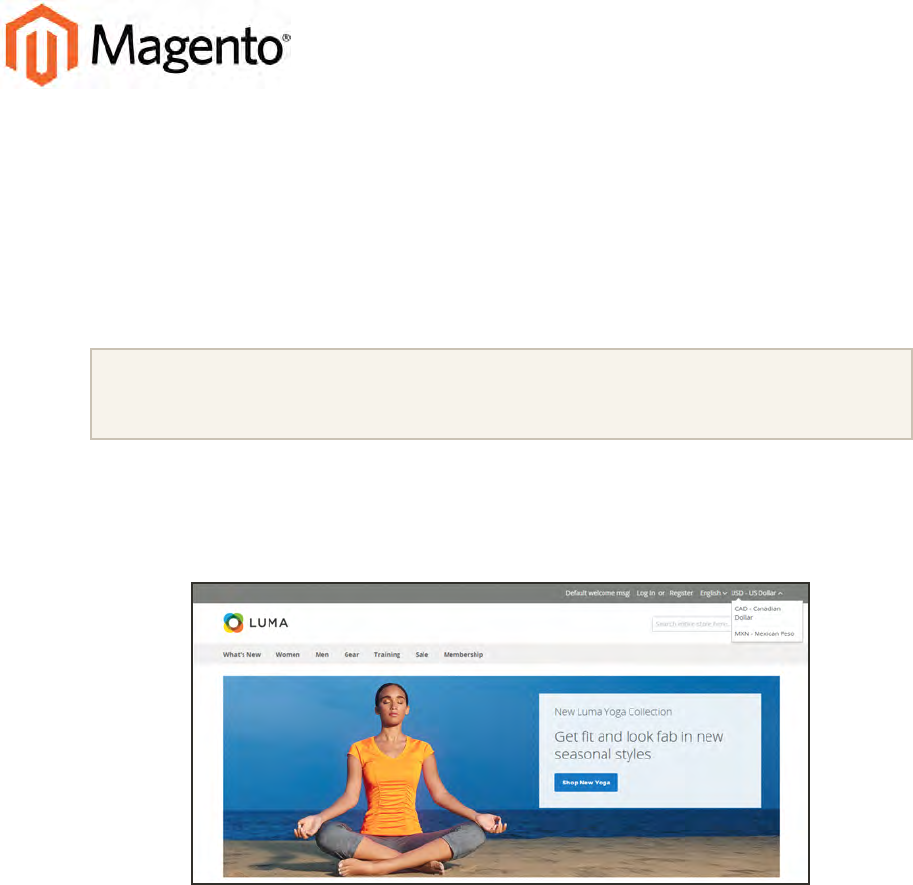
CHAPTER 66:
Currency
Magento Community Edition 2.0 gives you the ability to accept currencies from more than
two hundred countries around the world. If the store supports multiple currencies, a
Currency Chooser appears in the header after currency rates are updated.
If you accept payment in multiple currencies, make sure to monitor the currency rate settings,
because any fluctuation can impact your profit margin.
Currency symbols appear in product prices and sales documents such as orders and
invoices. You can customize the currency symbols as needed, and also set the display of
the price separately for each store or view.
Currency Chooser
Magento Community Edition 2.0 User Guide 837
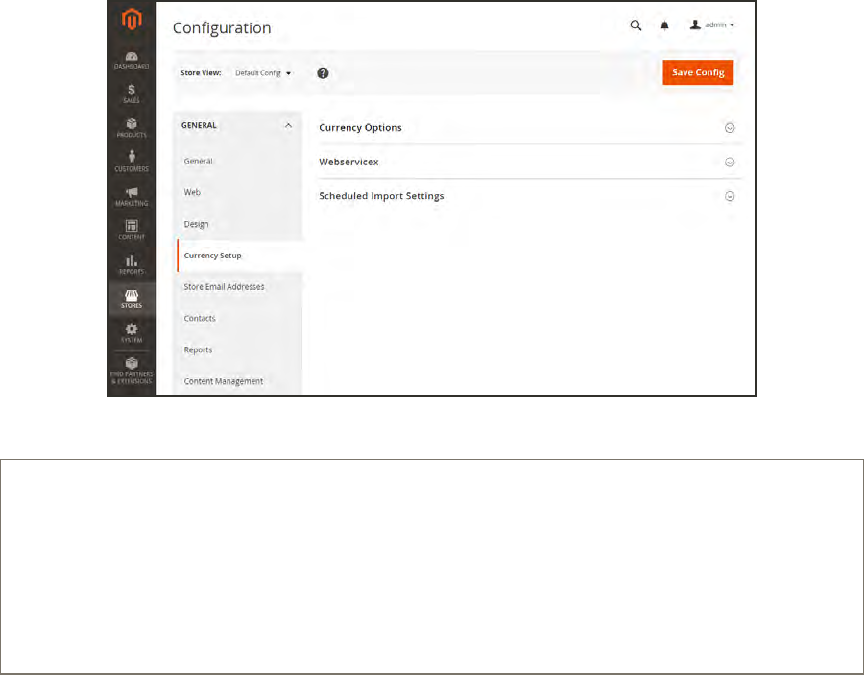
Currency Configuration
Before setting up individual currency rates, first specify which currencies you accept, and the
currency that you want to use to display prices in your store.
Currency Setup
Process Overview:
Step 1: Choose the Accepted Currencies
Step 2: Configure the Import Connection
Step 3: Configure the Scheduled Import Settings
Step 4: Update the Currency Rates
Currency Configuration CHAPTER 66: Currency
838 Magento Community Edition 2.0 User Guide
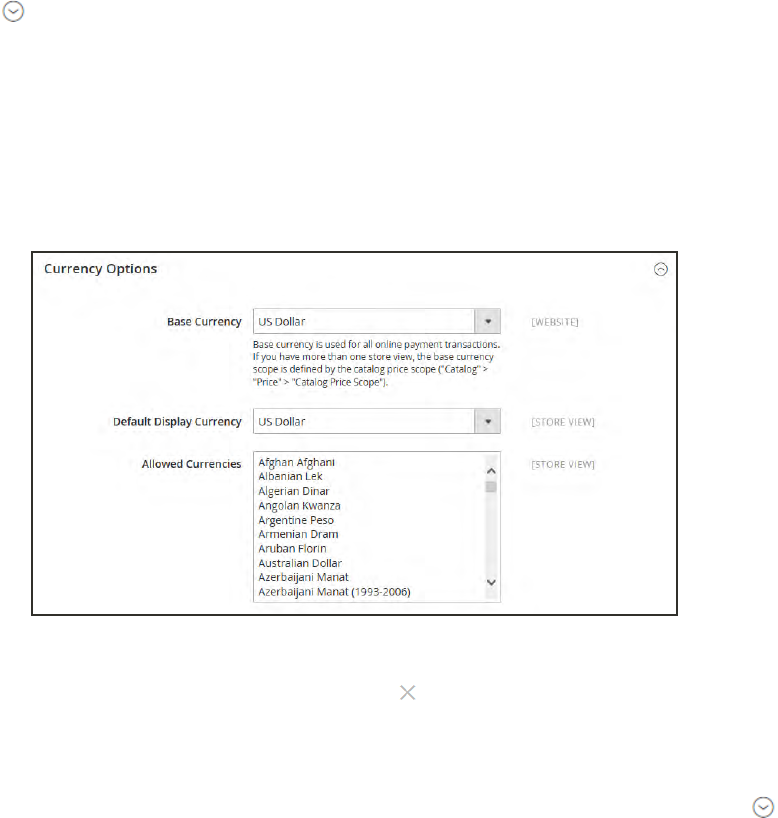
Step 1: Choose the Accepted Currencies
1. On the Admin sidebar, tap Stores. Then under Settings, choose Configuration.
2. In the panel on the left under General, choose Currency Setup.
3. Expand the Currency Options section, and do the following:
a. Set Base Currency to the primary currency that you use for online transactions.
b. Set Default Display Currency to the currency that you use to display pricing in your store.
c. In the Allowed Currencies list, select all currencies that you accept as payment in your
store. Make sure to also select your primary currency. (For multiple currencies, hold down
the Ctrl key and select each option.)
Currency Options
4. When prompted to refresh the cache, tap the Close box in the upper-right corner of the
system message. We’ll refresh the cache later.
5. To define the scope of the base currency, do the following:
a. In the panel on the left under Catalog, choose Catalog. Then, scroll down and expand
the Price section.
b. Set Catalog Price Scope to either “Global” or “Website.”
CHAPTER 66: Currency Currency Configuration
Magento Community Edition 2.0 User Guide 839
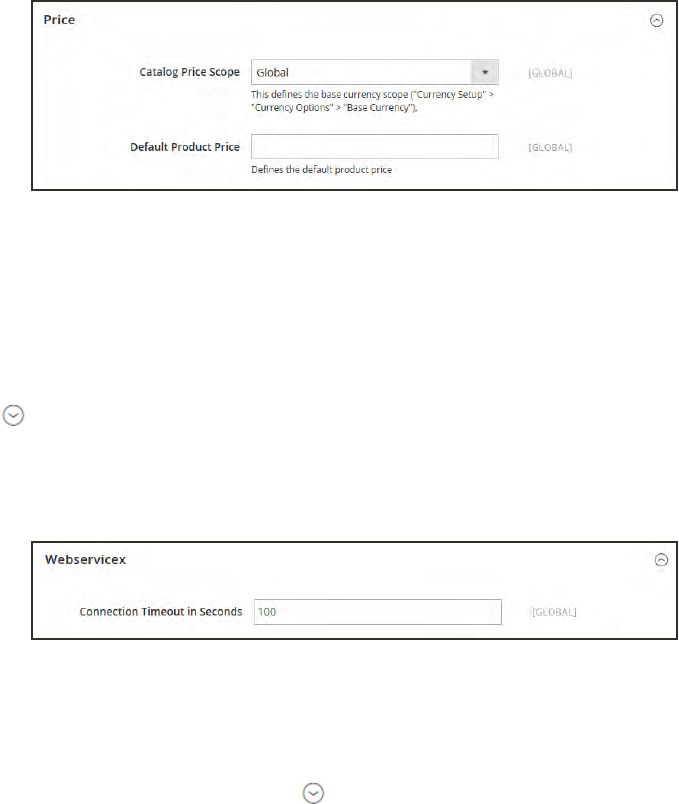
Price
Step 2: Configure the Import Connection
1. Scroll back up to the top of the page. In the panel on the left under General, choose Currency
Setup.
2. Expand the WebserviceX section.
3. In the Connection Timeout in Seconds field, enter the number of seconds of inactivity to
allow before the connection times out.
WebserviceX
Step 3: Configure the Scheduled Import Settings
1. Continuing with Currency Setup, expand the Scheduled Import Settings section.
2. To automatically update currency rates, set Enabled to "Yes." Then, do the following:
a. Set Service to the rate provider. The default value is “Webservicex.”
b. Set Start Time to the hour, minute, and second that the rates will be updated according to
the schedule.
c. To determine how often the rates are updated, set Frequency to one of the following:
lDaily
lWeekly
lMonthy
d. In the Error Email Recipient field, enter the email address of the person who is to receive
email notification if an error occurs during the import process. To enter multiple email
addresses, separate each with a comma.
Currency Configuration CHAPTER 66: Currency
840 Magento Community Edition 2.0 User Guide
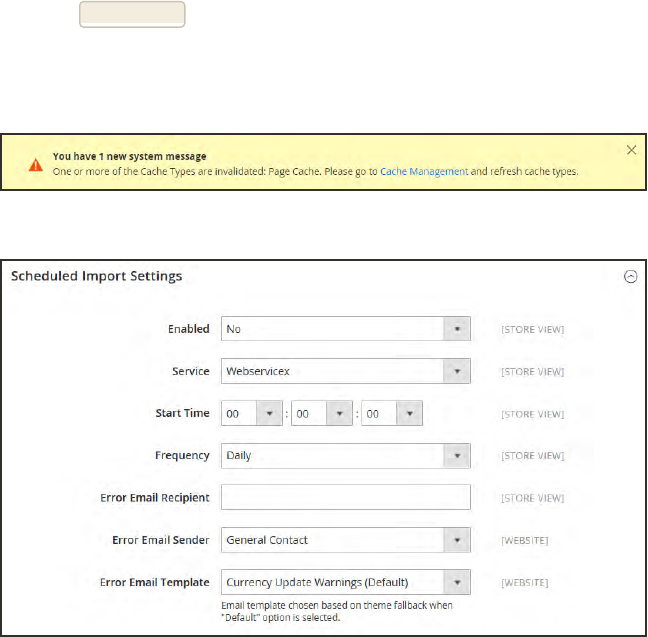
e. Set Error Email Sender to the store contact that appears as the sender of the error
notification.
f. Set Error Email Template to the email template used for the error notification.
3. When complete, tap Save Config.
4. When prompted to update the cache, tap the Cache Management link. Then, refresh the
invalid cache.
Refresh Cache
Scheduled Import Settings
Step 4: Update the Currency Rates
The currency rates must be updated with the current values before they go into effect. Follow
the instructions to update the rates manually or to import the rates automatically.
CHAPTER 66: Currency Currency Configuration
Magento Community Edition 2.0 User Guide 841
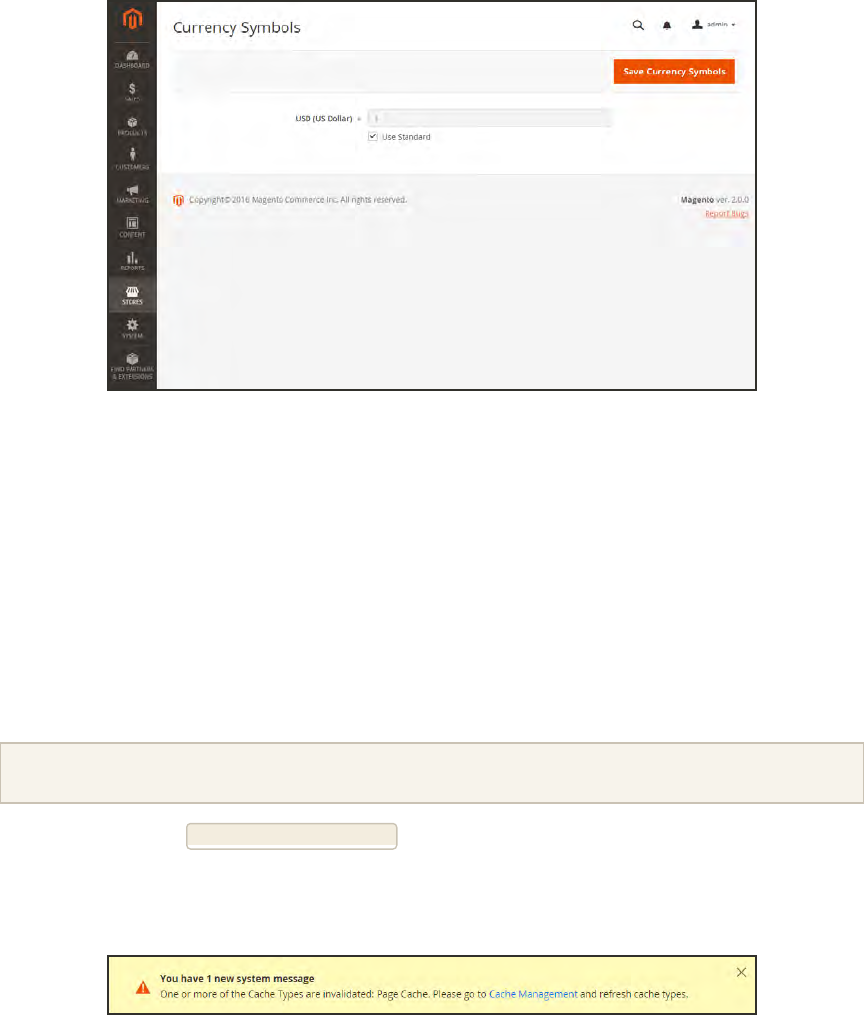
Currency Symbols
Manage Currency Symbols gives you the ability to customize the symbol associated with each
currency that is accepted as payment in your store.
Currency Symbols
To customize currency symbols:
1. On the Admin sidebar, tap Stores. Then under Currency, choose Currency Symbols.
Each currency that is currently enabled for your store appears in the Currency list.
2. Enter a custom symbol for each currency you want to use, or mark the Use Standard checkbox
to the right of each currency.
3. To override the default symbol, clear the Use Standard checkbox. Then, enter the symbol that
you want to use.
It is not possible to change the alignment of the currency symbol from left to right.
4. When complete, tap Save Currency Symbols.
5. When prompted to update the cache, tap the Cache Management link. Then, refresh any
invalid cache.
Refresh Cache
Currency Symbols CHAPTER 66: Currency
842 Magento Community Edition 2.0 User Guide
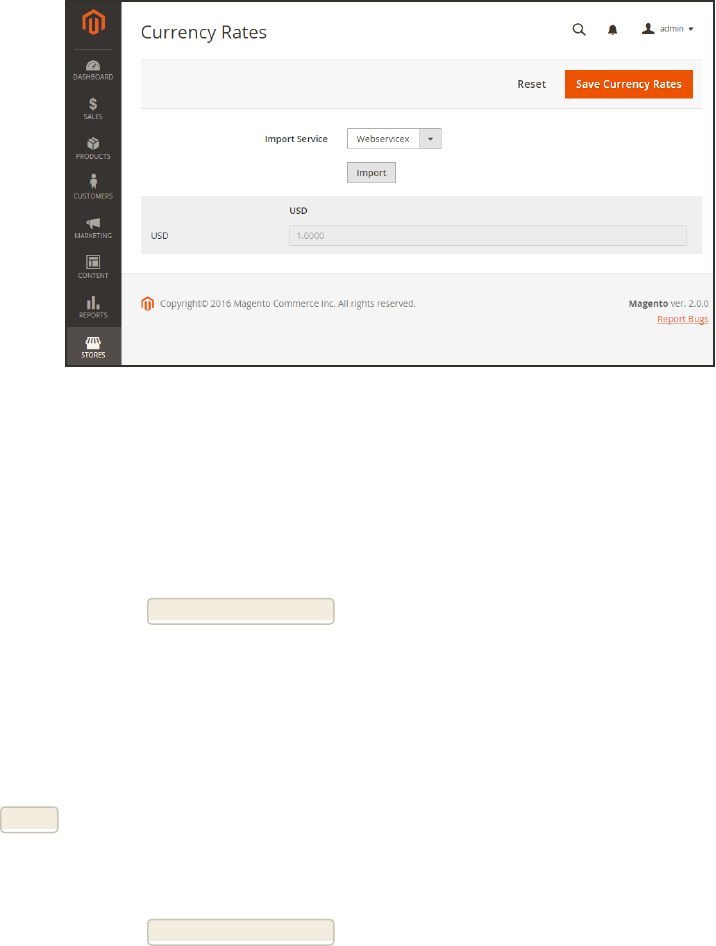
Updating Currency Rates
Currency rates can be set manually, or imported into the store. To ensure that your store has
the most current rates, you can configure the currency rates to be updated automatically on
schedule.
Before importing currency rates, complete the Currency Rate Setup to specify the currencies
that you accept, and to establish the import connection and schedule.
Updating Currency Rates
To manually update a currency rate:
1. On the Admin sidebar, click Stores. Then under Currency, choose Currency Rates.
2. Tap the rate you want to change, and enter the new value for each currency supported.
3. When complete, tap Save Currency Rates.
To import currency rates:
1. On the Admin sidebar, tap Stores. Then under Currency, choose Currency Rates.
2. Set Import Service to the currency rate provider. WebserviceX is the default provider.
3. Tap Import.
The updated rates appear in the Currency Rates list. If the rates have changed since the last
update, the old rate appears below for reference.
4. When complete, tap Save Currency Rates.
CHAPTER 66: Currency Updating Currency Rates
Magento Community Edition 2.0 User Guide 843
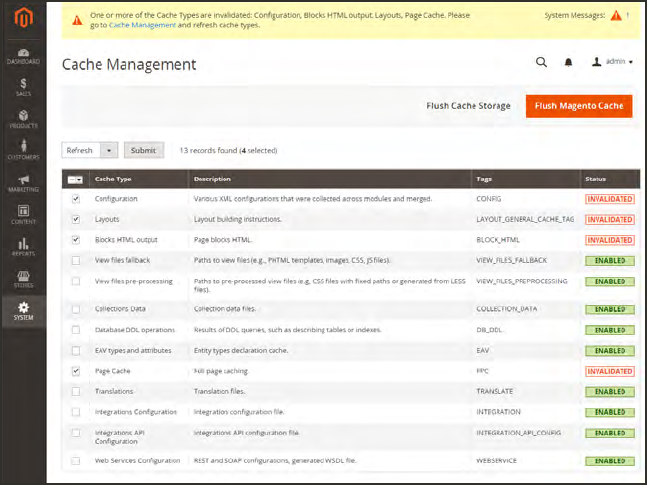
5. When prompted to update the cache, tap the Cache Management link. Then, refresh all
invalid caches.
Refresh Invalid Caches
To import currency rates on schedule:
1. Make sure that Cron is enabled for your store.
2. Complete the Currency Rate Setup to specify the currencies that you accept, and to establish
the import connection and schedule.
3. To verify that the rates are imported on schedule, check the Currency Rates list. Then, wait for
the duration of the frequency setting established for the schedule, and check the rates again.
Updating Currency Rates CHAPTER 66: Currency
844 Magento Community Edition 2.0 User Guide

CHAPTER 67:
Attributes
Magento uses attributes to manage the information associated with products, customers,
and product ratings. Attributes are pieces of information that might appear as fields in
forms, reports, product reviews, layered navigation, and email messages. Some attributes
are built into the system, and others can be created to address specific needs.
You can find more information about attributes in the Products and Data Transfer sections
of this guide. To learn more, see:
lUsing Product Attributes
lProduct Attribute Reference
lCustomer Attribute Reference
Magento Community Edition 2.0 User Guide 845
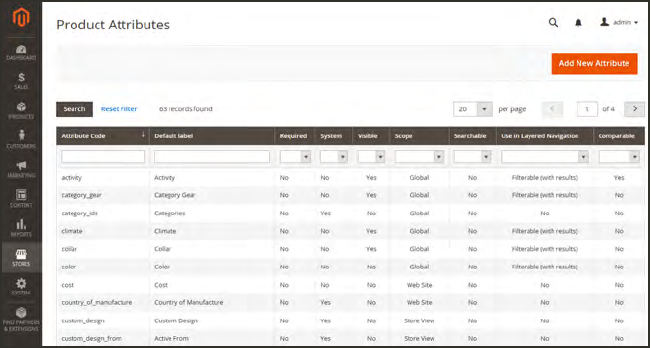
Product Attributes
Product attribute properties determine how an attribute can be used in the catalog, its
appearance and behavior in the store, and in data transfer operations. The properties and labels
associated with each attribute determine how it can be used, and its presentation in the store.
Properties The Properties section includes both basic and advanced attribute
properties.
Labels The label identifies an attribute in the Admin and also in the storefront
of each store view. If your store is available in multiple languages, you
can enter a different translated label for each language.
Storefront
Properties
The Storefront Properties determine how an attribute can be used in your
store, its appearance, and behavior. You can specify if attributes are
available for search, layered navigation, product comparisons, price
rules, and sorting. For text attributes, you can enable the WYSIWYG
editor, and determine if HTML tags can be used to format the values.
To learn how to use attributes while creating a product, see: Using Product Attributes.
Product Attributes Page
Product Attributes CHAPTER 67: Attributes
846 Magento Community Edition 2.0 User Guide

Properties
PROPERTY DESCRIPTION
ATTRIBUTE PROPERTIES
Default Label The label that identifies the attribute during data entry.
Catalog Input Type for
Store Owner
Determines the data type and input control that is used to manage
the product from the store Admin. Options include:
Text Field A single line input field for text.
Text Area A multiple-line input field that can display
paragraphs of text formatted with HTML.
Date An input field for date values. The date can
be typed directly into the field, or selected
from a list or calendar.
Yes/No A drop-down list with predefined options of
“Yes” and “No.”
Multiple Select A drop-down list of options that allows
multiple selections. To select more than one
option, hold down the Ctrl key and click each
item.
Dropdown A drop-down list of options that allows only
one selection.
Price An input type that can be used to create
price fields in addition to the predefined
attributes: Price, Special Price, Tier Price
and Cost.
Media Image An additional image that can be included in
the attribute set of a product.
Visual Swatch
Property Descriptions
CHAPTER 67: Attributes Product Attributes
Magento Community Edition 2.0 User Guide 847
PROPERTY DESCRIPTION
Text Swatch
Fixed Product Tax An input type that gives you the ability to
define FPT rates based on the requirements
of your locale.
Values Required To require that a value to be entered in this field before the record can
be saved, set Values Required to “Yes.” Options include:Yes/No
ADVANCED ATTRIBUTE PROPERTIES
Attribute Code (Required) A unique identifier for internal use. The Attribute Code
must begin with a letter, but can include a combination of lowercase
letters (a-z) and numbers (0-9).The code must be less than thirty
characters in length and cannot include any special characters or
spaces, although an underscore (_) can be used to indicate a space.
Scope Limits the use of an attribute to a specific store view or website.
Options include:
Store View
Website
Global
Default Value Assigns a starting value to the attribute to help during data entry. To
assign a default value for Multiple Select or Dropdown input types,
see: Creating Attributes.
A default value cannot be set for Multiple Select, Dropdown, or Fixed
Product Tax input types.
Unique Value To prevent duplicate values in a data entry field, set Unique Value to
“Yes.” Options include:Yes/No
Input Validation for Store
Owner
Performs a validation check of the data entered in the field, based on
the following options:
None
Decimal Number
Property Descriptions (cont.)
Product Attributes CHAPTER 67: Attributes
848 Magento Community Edition 2.0 User Guide
PROPERTY DESCRIPTION
Integer Number
Email
URL
Letters
Letters (a-z, A-Z) or Numbers (0-9)
Add to Column Options Determines if the column appears in the product grid. Options: Yes /
No
Use in Filter Options Determines if the attribute is used as a filter control at the top of
columns in the grid. Options: Yes / No
Property Descriptions (cont.)
Storefront Properties
PROPERTY DESCRIPTION
Use in Search Select “Yes” if you want people to be able to search the catalog
based on the value of this attribute. Options include:Yes/No
The following attributes appear when Search is enabled:
Search Weight To weight the search results, set Search
Weight to a number from 1 to 5.
Visible in Advanced
Search
Gives shoppers the ability to enter search
criteria through a form. Options
include:Yes/No
Using too many attributes can slow down
search.
Comparable on Storefront Select “Yes” to include this attribute as a row in the Compare
Products report. Options include:Yes/No
Use In Layered Navigation (Dropdown, Multiple Select and Price input types only) Includes the
attribute as a filter in the “Shop By” section of layered navigation.
Options include:
Property Descriptions
CHAPTER 67: Attributes Product Attributes
Magento Community Edition 2.0 User Guide 849

PROPERTY DESCRIPTION
No The attribute is not used in layered
navigation.
Filterable (with
results)
Lists only products that match the filter
value.
Filterable (no
results)
Lists all attribute values, even those that do
not apply to any product in the list. Layered
navigation appears on a category page only
if there are filterable attributes available.
Use In Search Results
Layered Navigation
To include the attribute in the layered navigation for search results,
select “Yes.” Options include:Yes/No
Position Determines the position of the attribute in layered navigation in
relation to other filterable attributes.
Use for Promo Rule
Conditions
To make the attribute available for use in price rules, select “Yes.”
Options include:Yes/No
Allow HTML Tags on
Storefront
(Text Field and Text Area input types only) To be able to format the
attribute value with HTMLtags, select “Yes.” Options include: Yes /
No
Visible on Catalog Pages
on Storefront
(Simple and virtual products only) To include the attribute on the
Additional Information tab of the product page, select “Yes.” Options
include:Yes/No
Used in Product Listing Depends on the theme. To include the attribute in product summaries
that appear in catalog listings, select “Yes.”
Used for Sorting in Product
Listing
Depending on theme, includes the attribute as a “Sort By” option for
catalog listings. Options:Yes / No
Property Descriptions (cont.)
Product Attributes CHAPTER 67: Attributes
850 Magento Community Edition 2.0 User Guide
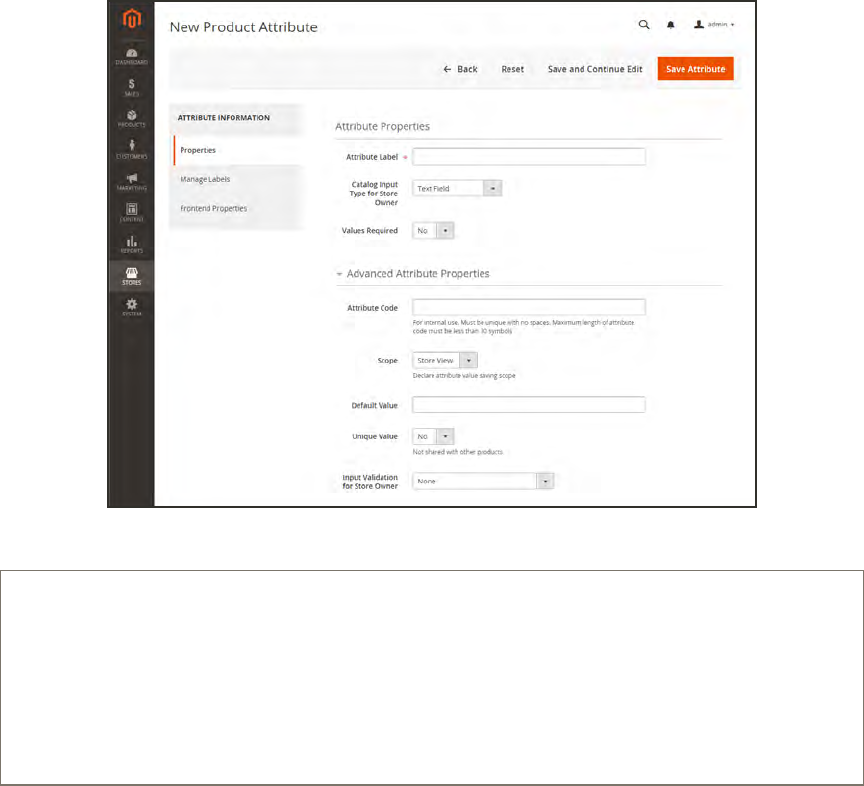
Creating a Product Attribute
Attributes can be created while working on a product, or from the Product Attributes page. The
following example shows how to create attributes from the Stores menu.
New Attribute Properties
Process Overview:
Step 1: Describe the Basic Properties
Step 2: Describe the Advanced Properties
Step 3: Enter the Field Label
Step 4: Describe the Storefront Properties
CHAPTER 67: Attributes Product Attributes
Magento Community Edition 2.0 User Guide 851

Step 1: Describe the Basic Properties
1. On the Admin sidebar, tap Stores. Then under Attributes, choose Product.
2. Tap Add New Attribute.
Attribute Properties
3. Under Attribute Properties, enter a Default Label to identify the attribute.
4. Set Catalog Input Type for Store Owner to the type in input control to be used for data entry.
5. For Dropdown and Multiple Select input types, do the following:
a. Under Manage Options, tap Add Option.
b. Enter the first value that you want to appear in the list. You can enter one value for the
Admin, and a translation of the value for each store view. If you have only one store view,
you can enter only the Admin value and it will be used for the storefront as well.
c. Tap Add Option and repeat the previous step for each option that you want to include in
the list.
d. Select Is Default to use the option as the default value.
6. If you want to require the customer to choose an option before the product can be purchased,
set Values Required to “Yes.”
Manage Options
Product Attributes CHAPTER 67: Attributes
852 Magento Community Edition 2.0 User Guide
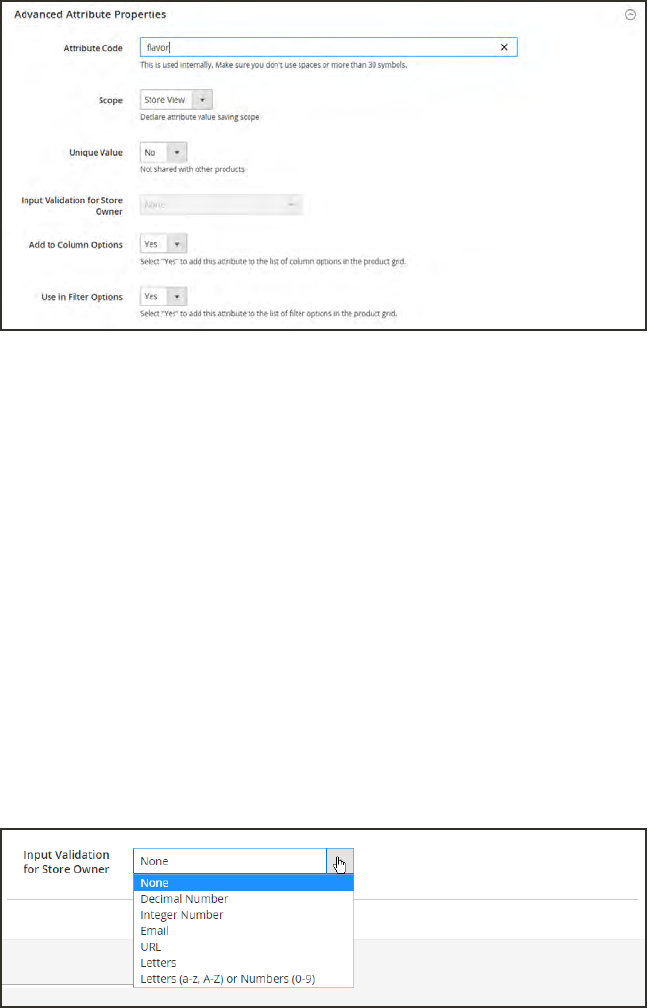
Step 2: Describe the Advanced Properties (if needed)
1. Enter a unique Attribute Code in lowercase characters, and without spaces.
Advanced Attribute Properties
2. Set Scope to indicate where in your store hierarchy the attribute can be used.
3. If you want to prevent duplicate values from being entered, set Unique Value to “Yes.”
4. To run a validity test of any data entered into a text field, set Input Validation for Store Owner
to the type of data that the field should contain. This field is not available for input types with
values that are selected. The test can validate any of the following:
lDecimal Number
lInteger Number
lEmail
lURL
lLetters
lLetters (a-z, A-Z) or Numbers (0-9)
Input Validation
CHAPTER 67: Attributes Product Attributes
Magento Community Edition 2.0 User Guide 853
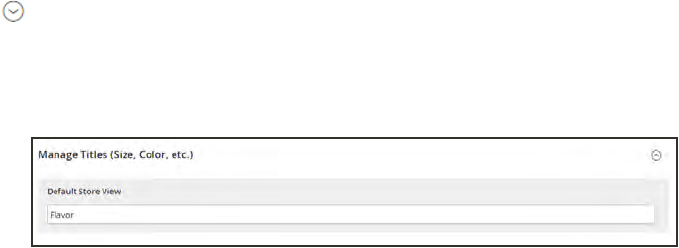
Step 3: Enter the Field Label
1. Expand the Manage titles section.
2. Enter a Title to be used as a label for the field. If your store is available in different languages,
you can enter a translated title for each view.
Manage Titles
Step 4: Describe the Storefront Properties
1. In the panel on the left, choose Storefront Properties.
2. If the attribute is to be available for search, set Use in Search to “Yes.”
3. To include the attribute in Product Compare, set Comparable on Storefront to “Yes.”
4. For dropdown, multiple select and price fields, do the following:
a. To use the attribute as a filter in layered navigation, set Use in Layered Navigation to
“Yes.”
b. to use the attribute in layered navigation on search results pages, set Use in Search
Results Layered Navigation to “Yes,”
c. In the Position field, enter a number to indicate the relative position of the attribute in the
layered navigation block.
5. To use the attribute in price rules, set Use for Promo Rule Conditions to “Yes,”
6. To allow the text to be formatted with HTML, set Allow HTML Tags on Frontend to “Yes.”
This setting makes the WYSIWYG editor available for the field.
To include the attribute in catalog page listings, set Visible on Catalog Pages on Storefront to
“Yes.”
7. Complete the following settings if supported by your theme:
a. To include the attribute on the product detail page, set Visible on Catalog Pages on
Storefront to “Yes.”
b. To include the attribute in product listings, set Used in Product Listing to “Yes.”
c. To use attribute as a sort parameter for product listings, set Used for Sorting in Product
Listing to “Yes.”
Product Attributes CHAPTER 67: Attributes
854 Magento Community Edition 2.0 User Guide
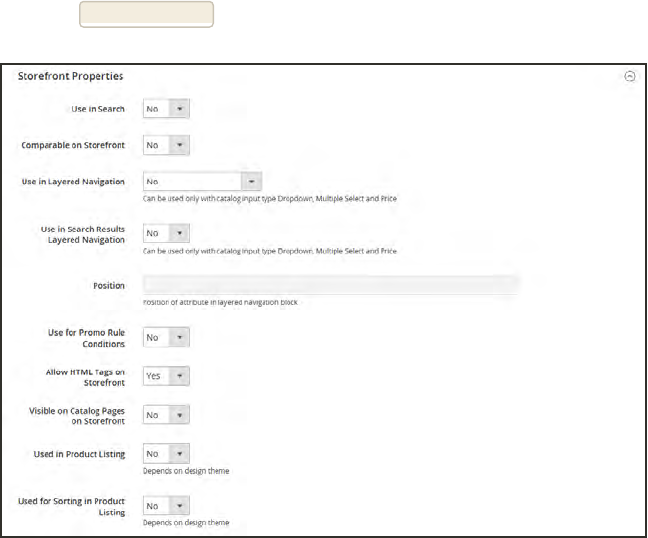
8. When complete, tap Save Attribute.
Storefront Properties
CHAPTER 67: Attributes Product Attributes
Magento Community Edition 2.0 User Guide 855
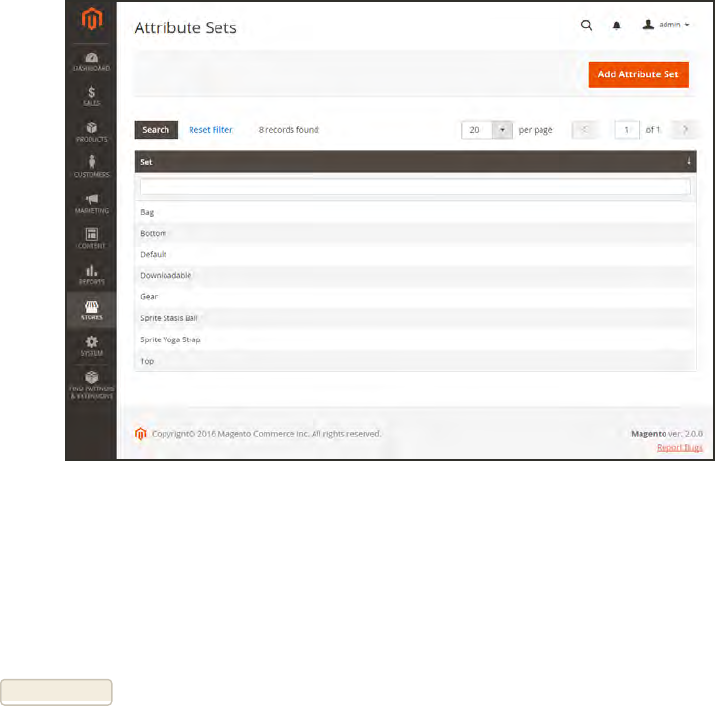
Attribute Sets
One of the first steps when creating a product is to choose the attribute set that is used as a
template for the product record. The attribute set determines the fields that are available during
data entry, and the values that appear to the customer.
The attributes are organized into groups that determine where they appear in the product
record. Your store comes with an initial attribute set called “default” which includes a set of
commonly-used attributes. If you would like to add only a small number of attributes, you can
add them to the default attribute set. However, if you sell products that require specific types of
information, such as cameras, it might be better to create a dedicated attribute set that
includes the specific attributes that are needed to describe the product.
Attribute Sets
To create an attribute set:
1. On the Admin sidebar, tap Stores. Then under Attributes, choose Attribute Set.
2. Tap Add New Set. Then, do the following:
Product Attributes CHAPTER 67: Attributes
856 Magento Community Edition 2.0 User Guide
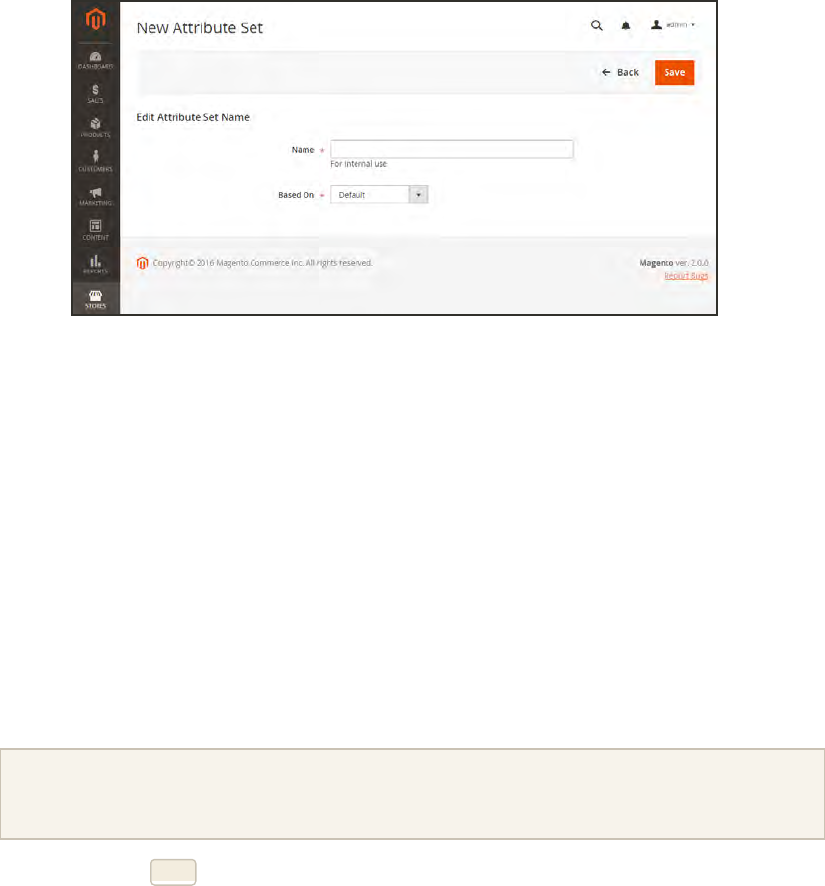
Edit Set Name
a. Enter a Name for the attribute set.
b. Set Based On to an existing attribute set to be used as a template.
c. Tap Save . The next page displays the following:
lThe left column shows the name of the attribute set. The name is for internal reference,
and can be changed as needed.
lThe center of the page lists the current selection of attribute groups.
lThe right column lists the selection of attributes that are currently not assigned to the
attribute set.
d. To add a new attribute to the set, drag the attribute from the Unassigned Attributes list
to the appropriate folder in the Groups column.
System attributes are marked with a dot and cannot be removed from the Groups list. They can
however, be dragged to another Group in the attribute set.
3. When complete, tap Save.
CHAPTER 67: Attributes Product Attributes
Magento Community Edition 2.0 User Guide 857
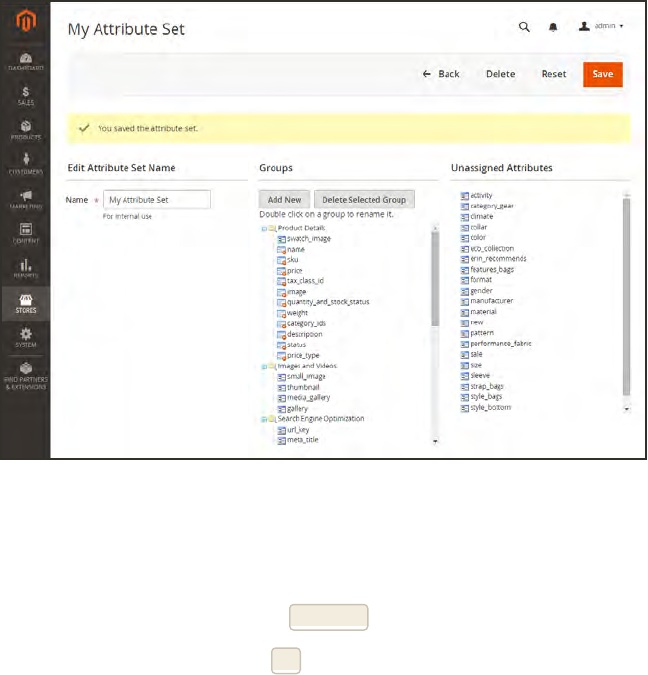
Edit Attribute Set
To create a new attribute group:
1. In the Groups column the attribute set, tap Add New.
2. Enter a Name for the new group, and tap OK.
3. Do either of the following:
lDrag Unassigned Attributes to the new group.
lDrag attributes from any other group to the new group.
The new group becomes a section of attributes in any product that is based on the attribute set.
Product Attributes CHAPTER 67: Attributes
858 Magento Community Edition 2.0 User Guide

System
In this section of the guide, you’ll learn how to
import and export data, manage security and
permissions, install extensions and integrations,
and use the many tools that are available to
maintain your store at peak performance.
Magento Community Edition 2.0 User Guide 859

Contents Data Transfer
Working with CSVFiles
Import
Export
Product Attribute Reference
Customer Attribute Reference
Integrations
Magento Marketplace
Magento Connect
Tools
Cache Management
Full Page Cache
Alternate Media Storage
Using a Database
Using a CDN
Backups
Index Management
Manual Reindexing
Indexing Modes
Web Setup Wizard
Permissions
Adding Users
Locked Users
User Roles
Security
Security Best Practices
Admin Security
CAPTCHA
Encryption Key
Session Validation
Browser Capabilities Detection
Action Log
860 Magento Community Edition 2.0 User Guide
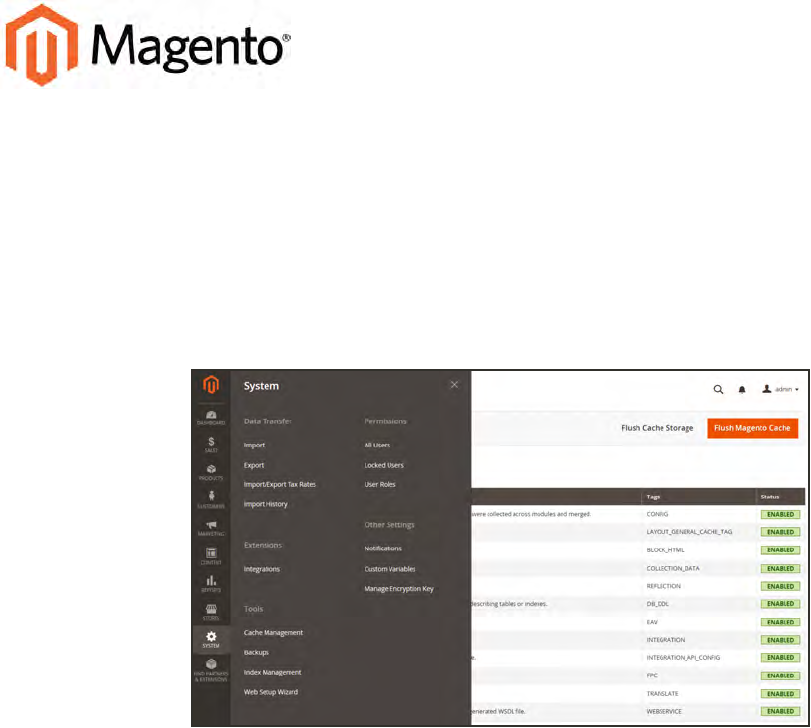
CHAPTER 68:
System Menu
The System Menu includes tools to import and export data, install extensions, manage
system caches and indexes, manage permissions, backups, system notifications, and
custom variables.
System Menu
Magento Community Edition 2.0 User Guide 861
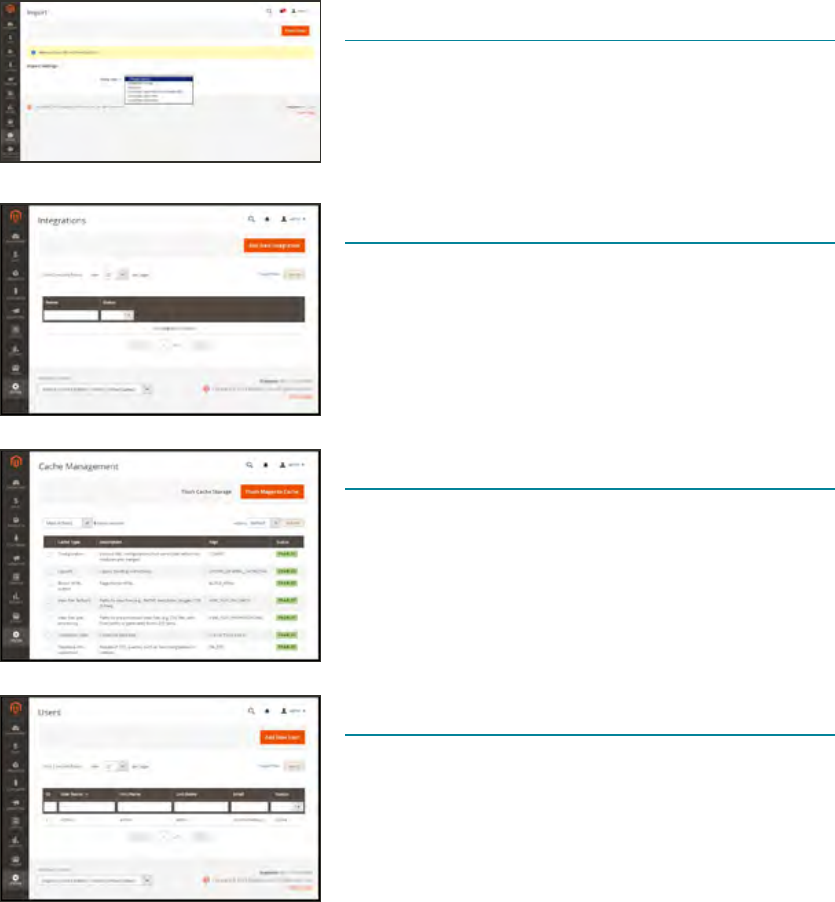
Menu Options
Data Transfer
The Import and Export tools give you the ability to
manage multiple records in a single operation. You
can import new items, and also update, replace, and
delete existing products and tax rates.
Extensions
Manage integrations and extensions for your store.
Tools
Manage your system resources, including cache and
index management, backups, and installation
settings.
Permissions
Magento uses roles and permissions to create different
levels of access for Admin users, which gives you the
ability to grant permission on a “need to know” basis
to people who work on your site.
862 Magento Community Edition 2.0 User Guide
CHAPTER 68: System Menu
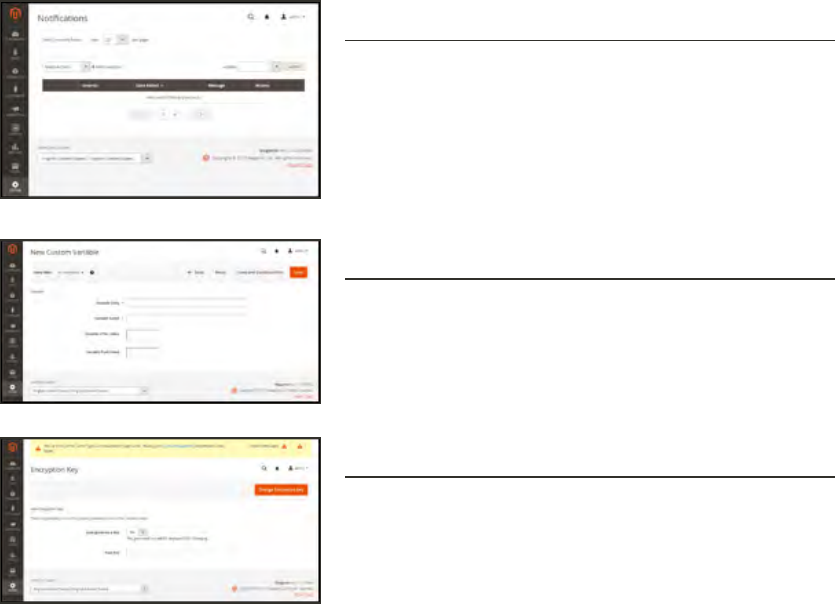
Other Settings
Notifications
Your store has an inbox for the messages received
from Magento. The messages are rated by importance,
and might refer to system updates, patches, new
releases, scheduled maintenance, upcoming events,
and more.
Custom Variables
If you know a little basic HTML, you can create
custom variables and use a markup tag to incorporate
them into pages, blocks, banners, and email
templates.
Manage Encryption Key
The encryption key is used to protect passwords and
other sensitive data. Magento can autogenerate an
encryption key, or you can use one from another
source.
Magento Community Edition 2.0 User Guide 863
CHAPTER 68: System Menu

Notes
864 Magento Community Edition 2.0 User Guide

CHAPTER 69:
Data Transfer
The Import and Export tools give you the ability to manage multiple records in a single
operation. You can not only import new items, but also update, replace, and delete
existing sets of products. For example, you can add new products to your inventory,
update product data and advanced price data, and replace a set of existing products with
new products. If you have a large catalog of products, it’s much easier to export the data,
edit the data in a spreadsheet, and import it back into your store.
lWorking with CSVFiles
lImport
lExport
lProduct Attribute Reference
lCustomer Attribute Reference
Magento Community Edition 2.0 User Guide 865

Working with CSV Files
The comma-separated-value (CSV) file format is used as the basis of data transfer operations,
and is supported by all spreadsheet and database applications. The following file types are
supported for import and export:
Import CSV and ZIP (a compressed CSV file.)
Export CSV
Important! We recommend that you use a program that supports UTF-8 encoding, such as
Notepad++ or OpenOffice Calc, to edit CSV files. Microsoft Excel inserts additional characters into
the column header of the CSV file, which can prevent the data from being imported back into
Magento. If you work on the Mac, you can save your data in the CSV (Windows) format.
CSV files have a specific structure that must match the database. Each column heading
corresponds to the Attribute Code of the field that is represented by the column. To ensure that
the column headings can be read by Magento, first export the data from your store as a CSV
file. You can then edit the data and re-import it into Magento.
If you open an exported CSVfile in a text editor, you will see that values are separated by
commas, and multiple values are enclosed in double-quotes. During import, you can specify a
custom separator character, although a comma is the default.
Product CSV Structure
A full export of the product database contains information about each product in the catalog,
and the relationships between them. Each record has fixed selection of columns that
corresponds to the attributes in the catalog, although the order of the attributes is ignored
during the import process.
Working with CSV Files CHAPTER 69: Data Transfer
866 Magento Community Edition 2.0 User Guide
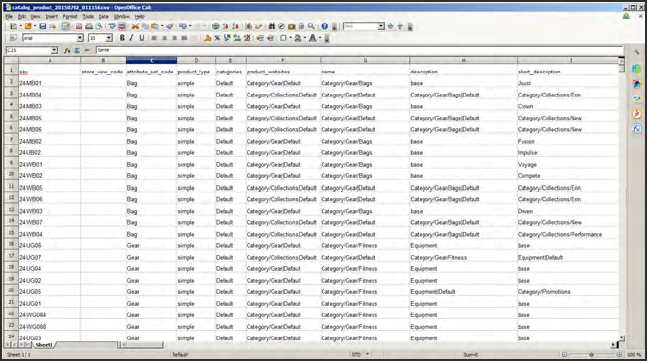
Exported Product CSV in OpenOffice Calc
The first row of the table contains the names of each attribute, which are used as column
headers. The remaining rows describe the individual product records. Any row that begins with
a value in the SKU column is the beginning of a new product record. A single product might
include several rows that contain information about multiple images or product options. The
next row that has a value in the SKU column begins a new product.
The category column contains a path for each category to which the product is assigned. The
path includes the root category, followed by a forward slash (/) between each level. By default,
the pipe “|” character is used to separate different category paths. For example:
Default Category/Gear|Default Category/Gear/Bags.
To import data, you need to include only the SKU and any columns with changes. Any blank
columns are ignored during the import process. It is not possible to add attributes during the
import process. You can include only existing attributes.
For a detailed description of each product attribute, see: Product Attribute Reference.
CHAPTER 69: Data Transfer Working with CSV Files
Magento Community Edition 2.0 User Guide 867
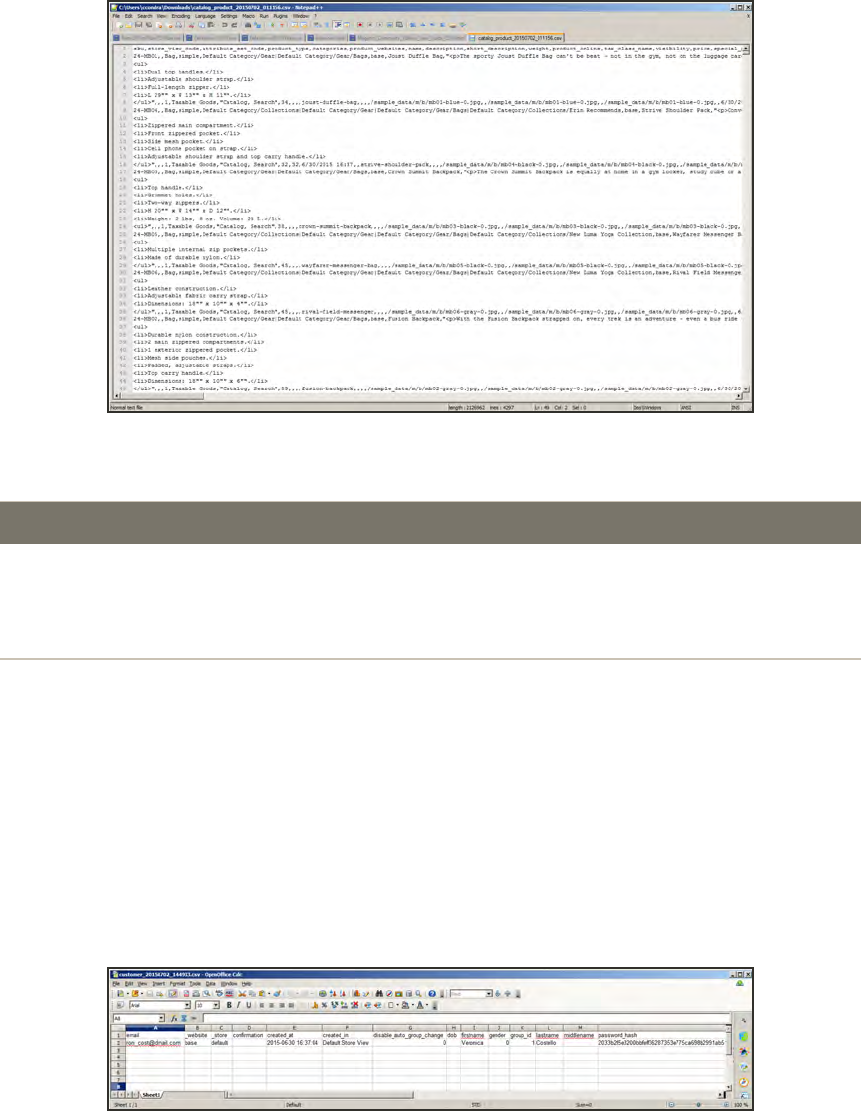
Exported Product CSV in Notepad++
COLUMN NAME DESCRIPTION
_<name> Column headers that begin with an underscore contain service entity
properties or complex data. Service columns are not product
attributes.
<attribute name> Column headers with an attribute code or field name identify the
column of data. A column might represent a system attribute, or one
that was created by the store administrator.
CSV Product Structure
Customer CSV Structure
The customers CSV file contains customer information from the database, and has the
following structure:
Exported Customer CSV in OpenOffice Calc
The first row of the table contains the names of the attribute columns (which are the same as
attribute codes). There are two types of column names, as shown in the following table. Other
rows contain attribute values, service data, and complex data. Each row with non-empty
Working with CSV Files CHAPTER 69: Data Transfer
868 Magento Community Edition 2.0 User Guide
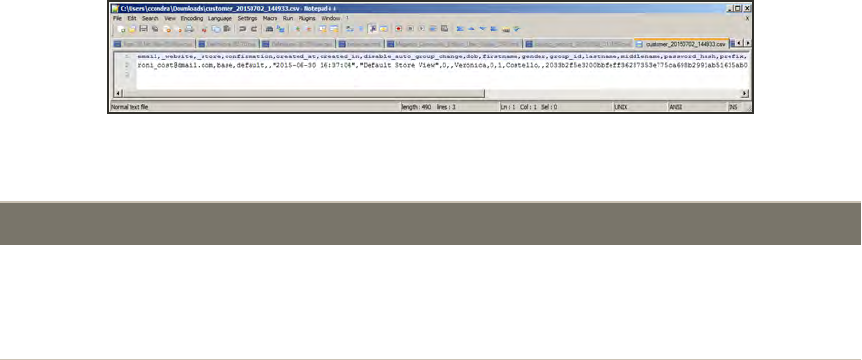
values in the “email” and “_website” columns starts the description of the subsequent
customer. Each row can represent customer data with or without address data, or the address
data only. In case a row contains only the address data, values in the columns, related to the
customer profile, will be ignored and may be empty.
To add or replace more than one address for a customer, in the import file add a row for each
new address with empty customer data and the new or updated address data below the
customer data row.
For a detailed description of each customer attribute, see: Customer Attribute Reference.
Exported Customer CSV in Notepad++
COLUMN NAME DESCRIPTION
_<name> Column headers that begin with an underscore contain service entity
properties or complex data. Service columns are not customer
attributes.
<attribute name> The names of the columns with values of both system-created
attributes, and attributes created by the store administrator.
CSV Customer Structure
CHAPTER 69: Data Transfer Working with CSV Files
Magento Community Edition 2.0 User Guide 869

Data Validation
All data must pass validation before it can be imported into the store, to ensure that the values
are consistent with the system database. Validation begins when you tap the Check Data
button. During the process, all entities in the import file are verified for the following:
Attributes Column header names are verified to ensure that they match the
corresponding attributes in the system database. The value of
each attribute is checked to ensure that it meets the requirements
of the data type (decimal, integer, varchar, text, and datetime)
Complex Data Values that originate from a defined set, such as a drop-down or
multiple select input type, are verified to ensure that the values
exist in the defined set.
Service Data The values in service data columns are verified to ensure that the
properties or complex data values are consistent with what is
already defined in the system database.
Required Values For new entities, the presence of required attribute values in the
file is checked. For existing entities, there is no need to re-check
the existence of required attribute values.
Separators Although the separators aren’t visible when viewed in a
spreadsheet, data values in a CSVfile are separated by comma,
and text values are enclosed in double-quotes. During the
validation process, the separators are verified, and each set of
quotes that enclose character strings is verified to be formatted
correctly.
The results of the validation appear in the Validation Results section, and include the following
information:
lThe number of entities checked
lThe number of invalid rows
lThe number of errors found
If the data is valid, an “Import Success” message appears.
File is Valid!
Working with CSV Files CHAPTER 69: Data Transfer
870 Magento Community Edition 2.0 User Guide

If validation fails, read the description of each error, and correct the problem in the CSV file.
For example, if a row contains an invalid SKU, the import process stops, and that row, and all
subsequent rows are not imported. After correctly the problem, import the data again. If many
errors are encountered, it might take several attempts to pass validation.
MESSAGES
DATA VALIDATION
lProduct with specified SKU not found in rows: 1
lURL key for specified store already exists
l'7z' file extension is not supported
l'txt' file extension is not supported
ERRORS
lWrong field type. Type in the imported file %decimal%, expected type is %text%.
lValue is not allowed. Attribute value does not exist in the system.
lField %column name% is required.
lWrong value separator is used.
lWrong encoding used. Supported character encoding is UTF-8 and Windows-1252.
lImported file does not contain SKU field.
lSKU does not exist in the system.
lColumn name %column name% is invalid. Should start with a letter. Alphanumeric.
lImported file does not contain a header.
l%website name% website does not exist in the system.
l%storeview name% storeview does not exist in the system.
lImported attribute %attribute name% does not exist in the system.
lImported resource (image) could not be downloaded from external resource due to timeout or
access permissions.
lImported resource (image) does not exist in the local media storage.
lProduct creation error displayed to the user equal to the one seen during manual product save.
lAdvanced Price creation error displayed to the user equal to the one seen during the manual
product save.
lCustomer creation error displayed to the user equal to the one seen during the manual customer
save.
Data Validation Messages
CHAPTER 69: Data Transfer Working with CSV Files
Magento Community Edition 2.0 User Guide 871
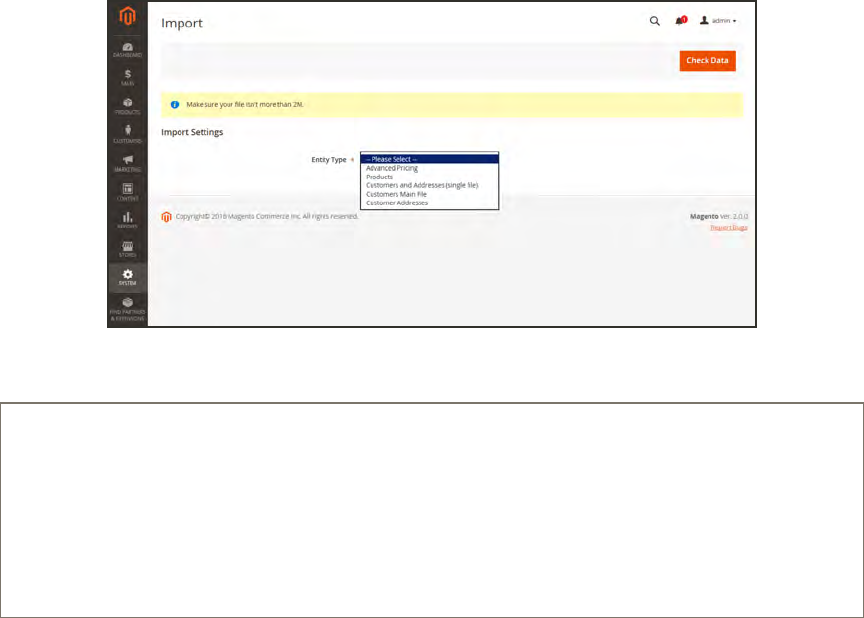
Import
Data for all product types can be imported into the store. In addition, you can import customer
data, customer address data, and product images. Import supports the following operations:
lAdd/Update
lReplace Existing Complex Data
lDelete Entities
The size of the import file is determined by the settings in the php.ini file on the server. The
system message on the Import page indicates the current size limit.
Import
Process Overview:
Step 1: Prepare the Data
Step 2: Choose the Import Behavior
Step 3: Identify the Import File
Step 4: Check the Import Data
Import CHAPTER 69: Data Transfer
872 Magento Community Edition 2.0 User Guide
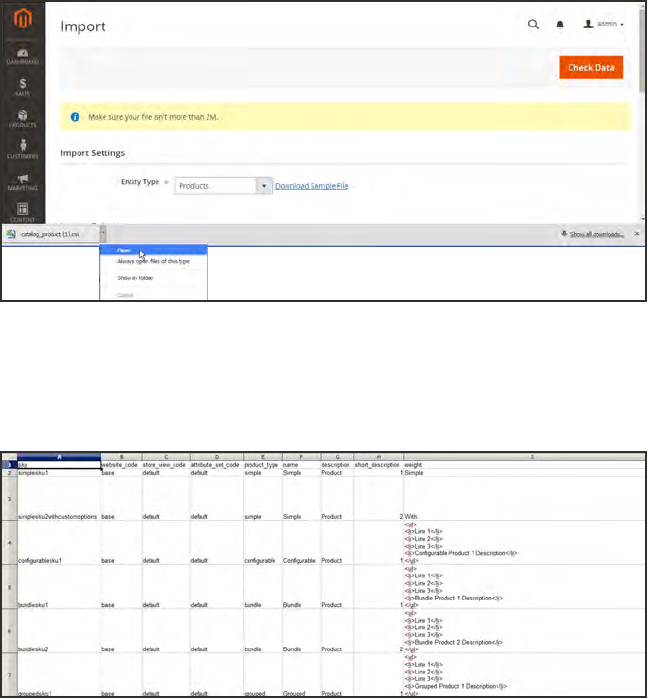
Step 1: Prepare the Data
1. On the Admin sidebar, tap System. Then under Data Transfer, choose Import.
2. Under Import Settings, set Entity Type to one of the following:
lAdvanced Pricing
lProducts
lCustomers and Addresses
lCustomers Main File
lCustomer Addresses
3. Tap Download Sample File. Then on the download menu in the lower-left corner of your
browser window, choose Open.
Download Sample File
The sample file includes column headings with placeholder data for example product types.
Downloaded Sample File
CHAPTER 69: Data Transfer Import
Magento Community Edition 2.0 User Guide 873
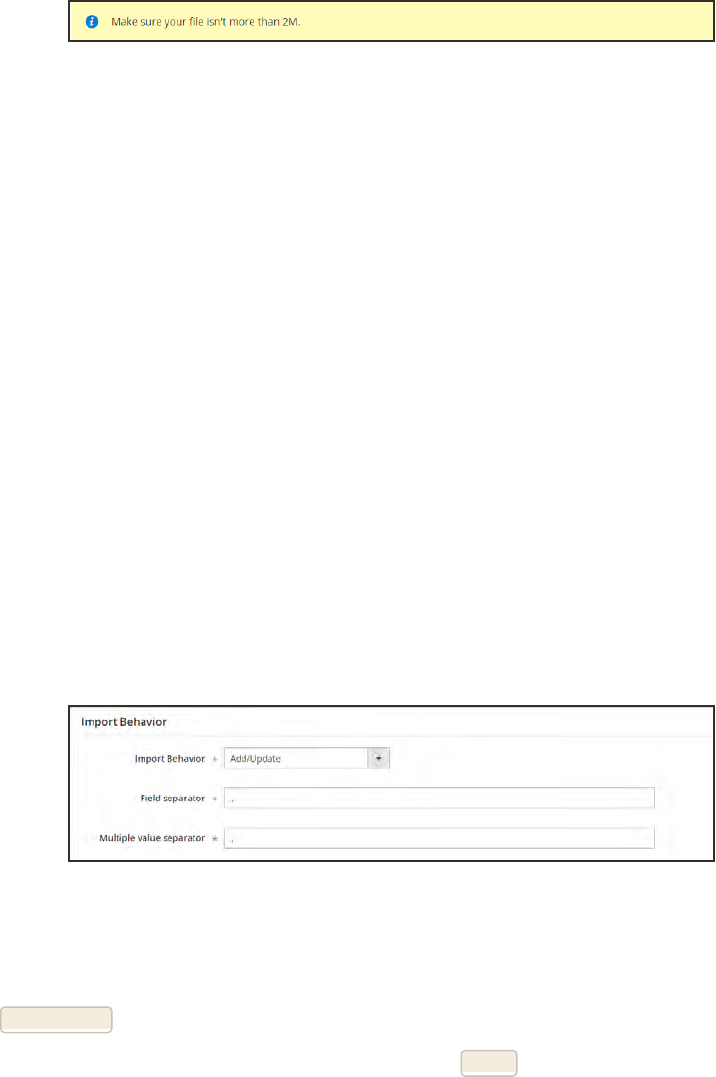
4. Examine the structure of the sample file. As you prepare your CSV import file, make sure that
the column headings are spelled correctly.
5. Verify that the size of your import file does not exceed the limit shown in the message.
6. If the import data includes paths to product images, make sure that the image files have been
uploaded to the appropriate location. The default location on the Magento server is:
pub/media/import.
If the images reside on an external server, make sure that you have the full URLto the
directory that contains the images.
Step 2: Choose the Import Behavior
1. Set Import Behavior to one of the following:
lAdd/Update
lReplace Existing Complex Data
lDelete Entities
2. Do the following:
a. Accept the default value of a comma (,) for the Field separator.
b. Accept the default value of a comma (,) for the Multiple value separator.
In a CSV file, a comma is the default separator. To use a different character, make sure that the
data in the CSV file matches the character that you specify.
Import Behavior
Step 3: Identify the Import File
1. Tap Choose File to select the file to import.
2. Find the CSV file that you prepared to import, and tap Open.
3. If the import data includes paths to product images, enter one of the following in the Images
File Directory field:
Import CHAPTER 69: Data Transfer
874 Magento Community Edition 2.0 User Guide
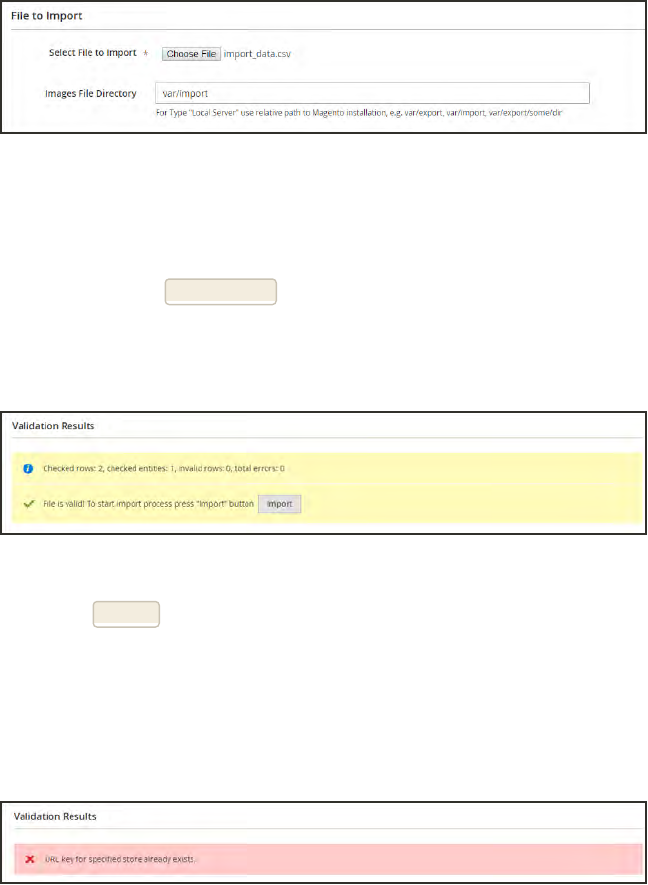
lThe path to the uploaded images on the Magento server. For example: var/import.
lThe full URL to the images on another server. For example: http://domain.com/images
To learn more about importing product images, see: Importing Product Images.
File to Import
Step 4: Check the Import Data
1. In the upper-right corner, tap Check Data.
2. Then, wait a few moments for the validation process to complete. If the import data is valid,
the following message appears:
File is Valid!
3. If the file is valid, tap Import. Otherwise, correct each problem with the data that is listed in
the message, and try to import the file again.
4. The import process continues to the end of the data, unless an error is encountered.
If an error message appears in the Validation Results, correct the problem in the data, and
import the file again. For a list of known errors, see: Import Troubleshooting.
URLKey Already Exists
A message appears when the import is complete.
CHAPTER 69: Data Transfer Import
Magento Community Edition 2.0 User Guide 875
OPERATION DESCRIPTION
Add/Update New product data is added to the existing product data for the
existing entries in the database. All fields except sku can be
updated.
New tax classes that are specified in the import data are created
automatically.
New product categories that are specified in the import file are
created automatically.
New SKUs that are specified in the import file are created
automatically
Replace Existing Complex
Data
The existing product data is replaced with new data.
Exercise caution when replacing data because the existing product
data will be completely cleared and all references in the system will
be lost.
If a SKU in the import data matches the SKU of an existing entity, all
fields, including the SKU are deleted, and a new record is created
using the CSV data.
An error occurs if the CSV file references a SKU that does not exist
in the database. You can Check Data to display error.
Delete Entities Any entities in the import data that already exist in the database are
deleted from the database.
Delete ignores all columns in the import data, except for SKU. You
can disregard all other attributes in the data.
An error occurs if the CSV file references a SKU that does not exist
in the database. You can Check Data to display error.
Import Behavior
Import CHAPTER 69: Data Transfer
876 Magento Community Edition 2.0 User Guide
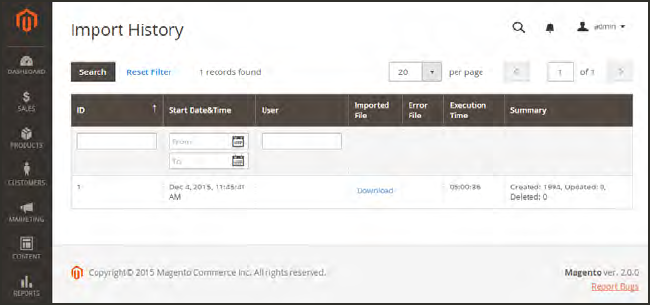
Import History
Maintains a record of data that has been imported into your store, including the start date and
time, user, execution time, and a link to the imported file.
To view the import history:
1. On the Admin sidebar, tap System.
2. Under Data Transfer, choose Import History.
Import History
CHAPTER 69: Data Transfer Import
Magento Community Edition 2.0 User Guide 877
Importing Product Images
Multiple product images of each type can be imported into Magento, and associated with a
specific product. The path and file name of each product image is entered in the CSV file, and
the image files to be imported are uploaded to the corresponding path on the Magento server or
external server.
Magento creates its own directory structure for product images that is organized alphabetically.
When you export product data with existing images to a CSV file, you can see the alphabetized
path before the file name of each image. However, when you import new images, you don’t
need to specify a path, because Magento manages the directory structure automatically. Just
make sure to enter the relative path to the import directory before the file name of each image
to be imported.
To upload images, you must have login credentials and correct permissions to access to the
Magento folder on the server. With the correct credentials, you can use any SFTP utility to
upload the files from your desktop computer to the server.
Before you try to import a large amount of images, review the steps in the import method that
you want to use, and run through the process with a few products. After you understand how it
works, you’ll feel confident importing large quantities of images.
Important! We recommend that you use a program that supports UTF-8 encoding to edit CSV files,
such as Notepad++ or OpenOffice Calc. Microsoft Excel inserts additional characters into the
column header of the CSV file, which can prevent the data from being imported back into Magento.
Method 1: Import Images from the Local Server
1. On the Magento server, upload the image files to the pub/media/import folder. This is the
default folder for importing product images.
[magento installation folder]/pub/media/import
You can use a different folder on the Magento server, as long as the path to the folder is
specified during the import process.
2. In the CSV data, enter the name of each image file to be imported on the correct row, by sku,
and in the correct column according to image type (base_image,small_image,
thumbnail_image, or additional_image).
Make sure to include the relative path to the import directory before each file name, as follows:
/pub/media/import/image.jpg
Import CHAPTER 69: Data Transfer
878 Magento Community Edition 2.0 User Guide
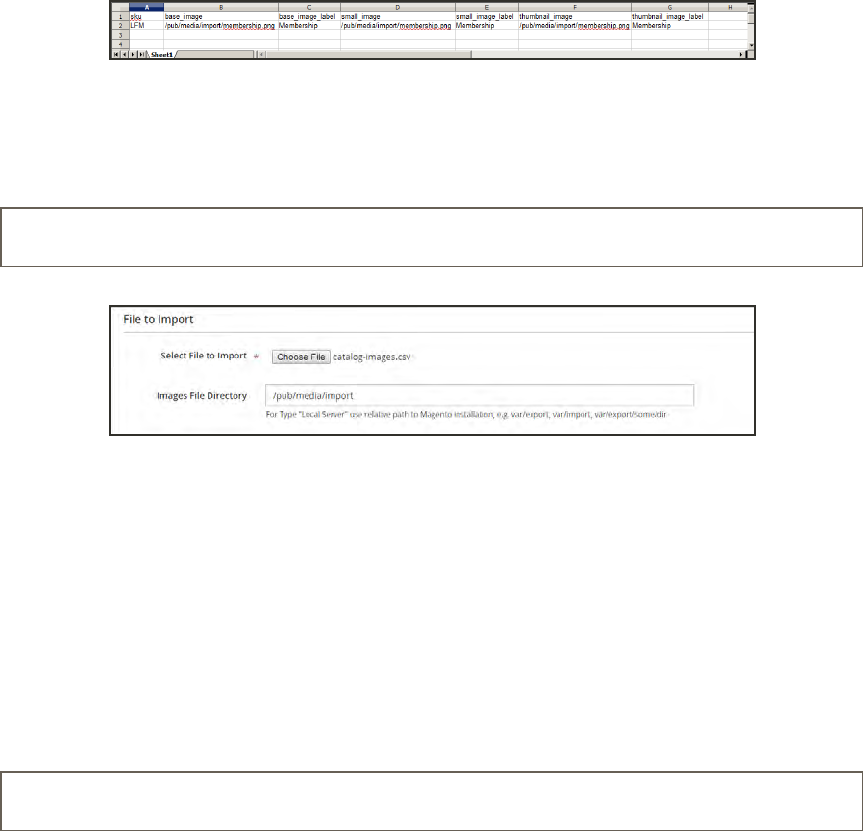
The CSV file needs to include only the sku column and the related image columns.
CSV Image Import Data
3. Follow the instructions to import the data.
After selecting the file to import, enter the relative path following Images File Directory:
/pub/media/import
Images File Directory
If importing multiple images for a single sku, insert a blank row below the sku, and enter the
additional image file names in the appropriate columns. The additional rows are understood to
belong to the parent sku.
Method 2: Import Images from External Server
1. Upload the images to be imported to the designated folder on the external server.
2. In the CSV data, enter the full URL for each image file in the correct column by image type
(base_image,small_image,thumbnail_image, or additional_image).
http://example.com/images/image.jpg
3. Follow the instructions to import the data.
CHAPTER 69: Data Transfer Import
Magento Community Edition 2.0 User Guide 879

Import Guidelines
New Entities
Entities are added with the attribute values specified in the CSV file.
If there is no value, or there is a non-valid value, for a required attribute with no default
value set, then the entity (the corresponding row or rows) cannot be imported.
If there is no value, or there is a non-valid value, for a required attribute with the default
value set, then the entity (the corresponding row or rows) is imported, and the default
value is set for the attribute.
If the complex data is not valid, then the entity (the corresponding row or rows) cannot be
imported.
Existing Entities
For attributes that are not complex data, the values from the import file, including the
empty values for the non-required attributes, replace the existing values.
If there is no value, or there is a non-valid value, for a required attribute, then the existing
value is not replaced.
If the complex data for the entity is invalid, the entity (the corresponding row or rows)
cannot be imported, except the case, when Delete Entities was selected in the Import
Behavior drop-down menu.
Import CHAPTER 69: Data Transfer
880 Magento Community Edition 2.0 User Guide

Complex Data
If an attribute that is specified in the import file already exists, and its value is derived from a
defined set of values, the following applies:
If the value is not already included in the defined set of values, the row can be imported
and a default value, if defined, is set for the attribute.
If the value is already included in the defined set, the corresponding row cannot be
imported.
If an attribute name is specified in the import file but is not yet defined in the system, it is not
created, and its values are not imported.
Invalid Files
A file cannot be imported if all rows are invalid.
A non-existing service data or complex data name is specified in the import file, such as a
column with a “_<non-existing name>” heading.
CHAPTER 69: Data Transfer Import
Magento Community Edition 2.0 User Guide 881
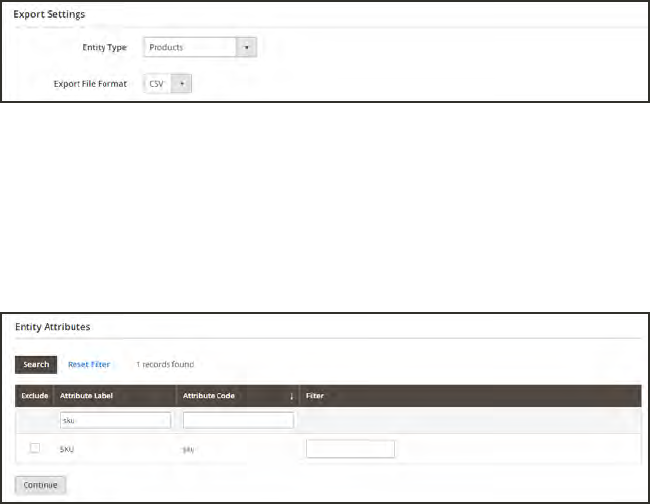
Export
The best way to become familiar with the structure of your database is to export the data and
open it in a spreadsheet. Once you become familiar with the process, you’ll find that it is an
efficient way to manage large amounts of information.
To export data:
1. On the Admin sidebar, tap System. Then under Data Transfer, choose Export.
2. In the Export Settings section, specify the following:
a. Set Entity Type to one of the following:
lProducts
lCustomers Main File
lCustomer Addresses
b. Accept the default Export File Format of “CSV.”
Export Settings
3. The Entity Attributes section lists all the available attributes in alphabetical order. You can use
the standard list controls to search for specific attributes, and to sort the list. The Search and
Reset Filter controls control the display of the list, but have no effect on the selection of
attributes to be included in the export file.
Filtered Entity Attributes
Export CHAPTER 69: Data Transfer
882 Magento Community Edition 2.0 User Guide
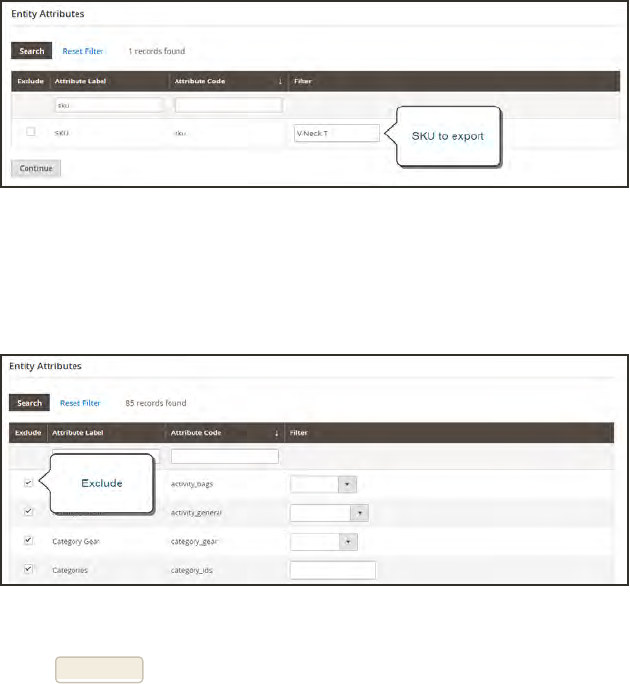
4. To filter the exported data based on attribute value, do the following:
lTo export only records with specific attribute values, enter the required value in the Filter
column. The followng example exports only a specific SKU.
Export Product Based on SKU
lTo omit an attribute from the export, mark the Exclude checkbox at the beginning of the
row. For example, to export only the sku and image columns, select the checkbox of every
other attribute. The column appears in the export file, but without any values.
Exclude Attributes
5. Scroll down and tap Continue in the lower-right corner of the page.
Look for the download prompt in the lower-right corner of your browser. The exported CSV file
can be saved or opened in a spreadsheet. You can edit the data and import it back into your
store.
CHAPTER 69: Data Transfer Export
Magento Community Edition 2.0 User Guide 883
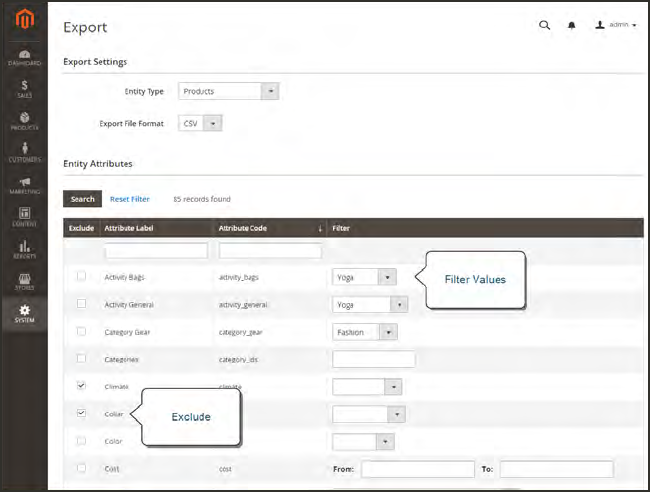
Export Criteria
Export filters are used to specify the data that you want to in the export file, based on attribute
value. In addition, you can specify which attribute data you want to include or exclude from
the export.
Export Criteria
Export CHAPTER 69: Data Transfer
884 Magento Community Edition 2.0 User Guide
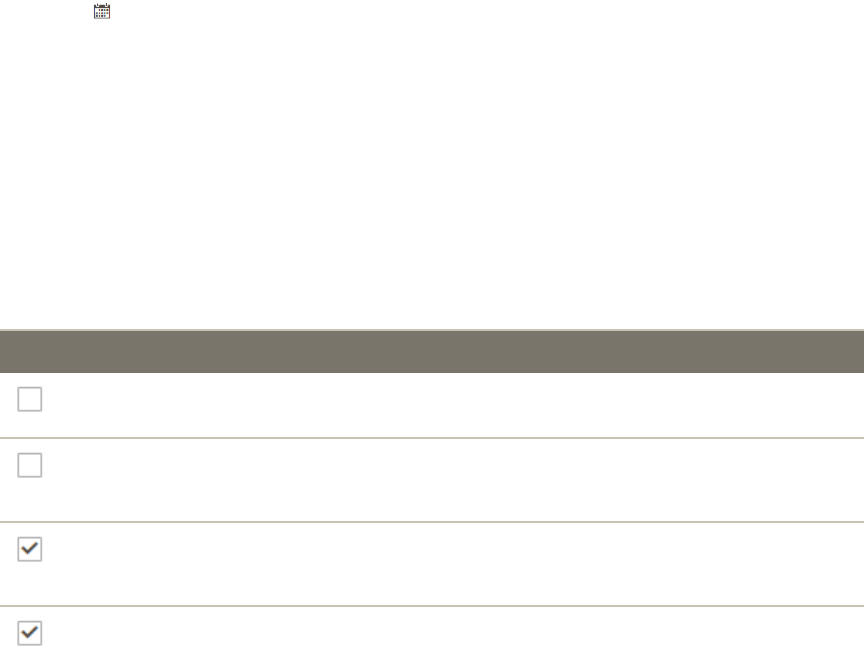
Export Filters
You can use filters to determine which SKUs are included in the export file. For example, if you
enter a value in the Country of Manufacture filter, the exported CSV file will incude only
products manufactured in that country.
The type of filter corresponds to the data type. For date fields, you can choose the date from the
Calendar . To learn more, see: Attribute Input Types. The format of the date is determined
by the locale.
To inlcude only records with a specific value, such as a sku, type the value into the Filter field.
Some fields such as Price, Weight, and Set Product as New have a from/to range of values.
Exclude Attributes
The checkbox in the first column is used to exclude attributes from the export file. If an
attribute is excluded, the associated column in the export data is included, but empty.
EXCLUDE FILTER RESULT
No The exported file contains each attribute for all existing records.
Yes The export file contains each attribute with only the records allowed
by the filter.
No The export file does not include the column for the excluded
attribute, but does include all existing records.
Yes The export file does not include the column for the excluded
attribute, and contains only the records allowed by the filter.
Export Criteria
CHAPTER 69: Data Transfer Export
Magento Community Edition 2.0 User Guide 885
Product Attribute Reference
The following table lists the attributes from a typical product export, in the default order in
which they appear. Each attribute is represented in the CSV file as a column, and product
records are represented by rows. Columns that begin with an underscore contain service data
such as properties or option values for complex data.
The installation used to export this data has the sample data installed, and has two websites
and several store views. Although this list includes all columns that are typically exported, the
sku is the only required value. To import data, you can include only the columns with
changes. The sku should be the first column, but the order of the rest of the attributes doesn’t
matter.
ATTRIBUTE DESCRIPTION
sku (Required) The Stock-Keeping Unit is a unique,
alphanumeric identifier that is used to track inventory. A
SKU can be up to 64 characters in length. For example:
sku123
A SKU longer than 64 characters will cause import to
fail.
store_view_code Identifies the specific store view(s) where the product is
available. If blank, the product is available at the default
store view. For example: storeview1
english,spanish
attribute_set_code Assigns the product to a specific attribute set or product
template, according to product type. Once the product is
created, the attribute set cannot be changed. For
example:
default
product_type Indicates the type of product.Values include:
Simple Product CSV File Structure
Product Attribute Reference CHAPTER 69: Data Transfer
886 Magento Community Edition 2.0 User Guide

ATTRIBUTE DESCRIPTION
simple Tangible items that are generally
sold as single units or in fixed
quantities.
grouped A group of separate products
that is sold as a set.
configurable A product with multiple options
that the customer must select
before making a purchase.
Inventory can be managed for
each set of variations because
they represent a separate
product with a distinct SKU. For
example, a combination of color
and size for a configurable
product is associated with a
specific SKU in the catalog.
virtual A non-tangible product that does
not require shipping and is not
kept in inventory. Examples
include services, memberships,
and subscriptions.
bundle A customizable product set of
simple products that are sold
together.
categories Indicates each category that is assigned to the product.
Separate categories and subcategories with a forward
slash. To indicate multiple category paths, separate each
path with a pipe “|” symbol. For example:
Default Category/Gear|Default Category/Gear/Bags
Simple Product CSV File Structure (cont.)
CHAPTER 69: Data Transfer Product Attribute Reference
Magento Community Edition 2.0 User Guide 887

ATTRIBUTE DESCRIPTION
product_websites The website code of each website where the product is
available. A single product can be assigned to multiple
websites, or limited to one. If specifying multiple
websites, separate each with a comma and without a
space. For example:
base
base,website2
name The product name appears in all product listings, and is
the name that customers use to identify the product.
description The product description provides detailed information
about the product, and might include simple HTMLtags.
short_description The use of the short product description depends on the
theme. It might appear in product listings and is
sometimes used in RSS feed listings sent to shopping
sites.
weight The weight of the individual product. The actual product
weight is determined by the carrier at the time of
shipment.
product_online Determines if the product is available for sale in the
store. Values include:
1 (Yes) The product is immediately
available for sale in your store.
0 (or blank) (No) The product is not included in
online catalog listings.
tax_class_name The name of the tax class that is associated with this
product.
visibility Determines if the product is visible in the catalog, and
made available for search. Values include:
Simple Product CSV File Structure (cont.)
Product Attribute Reference CHAPTER 69: Data Transfer
888 Magento Community Edition 2.0 User Guide

ATTRIBUTE DESCRIPTION
Not Visible
Individually
The product is not included in
product listings, although it might
be available as a variation of
another product.
Catalog The product appears in all
catalog listings.
Search The product is available for
search operations.
Catalog, Search The product is included in
catalog listings and is also
available for search.
price The price that the product is offered for sale in your store.
special_price The discounted price of the product during the specified
date range.
special_price_from_date The beginning date of the time period when the special
price is in effect.
special_price_to_date The last date of the time period when the special price is
in effect.
url_key The part of the URLthat identifies the product. The
default value is based on the product name. For example:
product-name
meta_title The meta title appears in the title bar and tab of the
browser and search results lists. The meta title should be
unique to the product, incorporate high-value keywords,
and be less than 70 characters in length.
meta_keywords Meta keywords are visible only to search engines, and
are ignored by some search engines. Choose high-value
keywords, separated by a comma. For example:
keyword1,keyword2,keyword3.
Simple Product CSV File Structure (cont.)
CHAPTER 69: Data Transfer Product Attribute Reference
Magento Community Edition 2.0 User Guide 889
ATTRIBUTE DESCRIPTION
meta_description Meta descriptions provide a brief overview of the product
for search results listings. Ideally, a meta description
should be between 150-160 characters in length,
although the field accepts up to 255 characters.
base_image The relative path for the main image on the product page.
Magento stores files internally in an alphabetical folder
structure.You can see the exact location of each image
in the exported data. For example:
/sample_data/m/b/mb01-blue-0.jpg
To upload a new image or write over an existing image,
enter the file name, preceded by a forward slash. For
example: /image.jpg
base_image_label The label that is associated with the base image.
small_image The file name of the small image that is used on catalog
pages, preceded by a forward slash. For example:
/image.jpg
small_image_label The label associated with the small image. For example:
Small Image 1, Small Image 2
thumbnail_image The file names of any thumbnail image to appear in the
gallery on the product page, preceded by a forward slash.
For example:
/image.jpg
thumbnail_image_label The label associated with any thumbnail images. For
example:
Thumbnail 1, Thumbnail 2
created_at Indicates the date when the product was created. The
date is automatically generated when the product is
created, but can be edited later.
updated_at Indicates the date when the product was last updated.
Simple Product CSV File Structure (cont.)
Product Attribute Reference CHAPTER 69: Data Transfer
890 Magento Community Edition 2.0 User Guide
ATTRIBUTE DESCRIPTION
new_from_date Specifies the “from” date for new product listings, and
determines if the product is featured as a new product.
new_to_date Specifies the “to” date for new product listings, and
determines if the product is featured as a new product.
display_product_options_in If the product has multiple options, determines where
they appear on the product page. Values include:
Product Info Column
Block after Info Column
map_price The minimum advertised price of the product. (Appears
only if MAP is enabled.)
msrp_price The manufacturer’s suggested retail price for the product.
(Appears only if MAP is enabled.)
map_enabled Determines if Minimum Advertised Price is enabled in
the configuration. Values include:
1 (Yes) MAP is enabled.
0 (or blank) (No) MAP is not enabled.
gift_message_available Determines if a gift message can be included with the
product purchase. Values include:
1 (Yes) The option to include a gift
message is presented to the customer.
0 (or blank) (No) The option to include a gift
message is not presented to the
customer.
custom_design Lists the available themes that can be applied to the
product page.
custom_design_from Specifies the beginning date when the selected theme is
applied to the product page.
Simple Product CSV File Structure (cont.)
CHAPTER 69: Data Transfer Product Attribute Reference
Magento Community Edition 2.0 User Guide 891

ATTRIBUTE DESCRIPTION
custom_design_to Specifies the end date when the selected theme is
applied to the product page.
custom_layout_update Additional XML code that is applied as a layout update to
the product page.
page_layout Determines the page layout of the product page. Values
include:
No layout updates No change is made to the page
layout.
1 column Applies a one- column layout to
the product page.
2 columns with left
bar
Applies a two-column layout with
a left sidebar to the product
page.
2 columns with
right bar
Applies a two-column layout with
a right sidebar to the product
page.
3 columns Applies a three-column layout to
the product page.
empty Applies a blank layout to the
product page.
product_options_container If the product has multiple options, determines where
they appear on the product page. Values include:
Product Info Column
Block after Info Column
msrp_display_actual_price_
type
Determines where the actual price of a product is visible
to the customer.Values include:
Simple Product CSV File Structure (cont.)
Product Attribute Reference CHAPTER 69: Data Transfer
892 Magento Community Edition 2.0 User Guide

ATTRIBUTE DESCRIPTION
In Cart Displays the actual product price
in the shopping cart.
Before Order
Confirmation
Displays the actual product price
at the end of the checkout
process, just before the order is
confirmed.
On Gesture Displays the actual product price
in a popup when the customer
clicks the “Click for price” or
“What’s this?” link.
country_of_manufacture Identifies the country where the product was
manufactured.
additional_attributes Additional attributes created for the product. For
example:
has_options=0,required_options=0
color=Black,has_options=0,required_options=0,size_
general=XS
qty The quantity of the product that is currently in stock.
out_of_stock_qty The stock level that determines the product to be out of
stock.
use_config_min_qty Determines if the default value from the configuration is
used, and corresponds to the Use Config Settings
checkbox. Values include:
1 (Yes) The default configuration setting
is used for the value of this attribute.
0 (or blank) (No) The default configuration can be
overridden for the value of this attribute.
is_qty_decimal Determines if the qty attribute has a decimal value.
Values include:
Simple Product CSV File Structure (cont.)
CHAPTER 69: Data Transfer Product Attribute Reference
Magento Community Edition 2.0 User Guide 893
ATTRIBUTE DESCRIPTION
1 (Yes) The value of the qty attribute is a
decimal value.
0 (or blank) (No) The value of the qty attribute is a
whole number (integer).
allow_backorders Determines if your store allows backorders, and how
they are managed.
use_config_backorders Determines if the default configuration setting for
backorders is used, and corresponds to the state of the
Use Config Settings checkbox. Values include:
1 (Yes) The default configuration setting
is used for the value of this attribute.
0 (or blank) (No) The default configuration can be
overridden for the value of this attribute.
min_cart_qty Specifies the minimum quantity of the item that can be
purchased in a single order.
use_config_min_sale_qty Determines if the default configuration setting for
minimum quantity is used, and corresponds to the state
of the Use Config Settings checkbox.. Values include:
1 (Yes) The default configuration setting
is used for the value of this attribute.
0 (or blank) (No) The default configuration can be
overridden for the value of this attribute.
max_cart_qty Specifies the maxinum quantity of the product that can
be purchased in a single order.
use_config_max_sale_qty Determines if the default configuration setting for
maximum quantity is used, and corresponds to the state
of the Use Config Settings checkbox.. Values include:
Simple Product CSV File Structure (cont.)
Product Attribute Reference CHAPTER 69: Data Transfer
894 Magento Community Edition 2.0 User Guide

ATTRIBUTE DESCRIPTION
1 (Yes) The default configuration setting
is used for the value of this attribute.
0 (or blank) (No) The default configuration can be
overridden for the value of this attribute.
is_in_stock Indicates if the product is in stock.
notify_on_stock_below Specifies the stock level that triggers an “out of stock”
notification.
use_config_notify_stock_qty Determines if the default configuration setting is used to
trigger stock level notification, and corresponds to the
state of the Use Config Settings checkbox. Values
include:
1 (Yes) The default configuration setting
is used for the value of this attribute.
0 (or blank) (No) The default configuration can be
overridden for the value of this attribute.
manage_stock Determines if inventory control is used to manage the
product. Values include:
1 (Yes) Activates full inventory control to
manage stock levels of the product.
0 (or blank) (No) The system does not keep track of
the number of items that are currently in
stock.
use_config_manage_stock Determines if the default configuration setting for
managing stock is used, and corresponds to the state of
the Use Config Settings checkbox. Values include:
1 (Yes) The default configuration setting
is used for the value of this attribute.
0 (or blank) (No) The default configuration can be
overridden for the value of this attribute.
Simple Product CSV File Structure (cont.)
CHAPTER 69: Data Transfer Product Attribute Reference
Magento Community Edition 2.0 User Guide 895

ATTRIBUTE DESCRIPTION
use_config_qty_increments Determines if the default configuration setting for
quantity increments is used, and corresponds to the
state of the Use Config Settings checkbox.. Values
include:
1 (Yes) The default configuration setting
is used for the value of this attribute.
0 (or blank) (No) The default configuration can be
overridden for the value of this attribute.
qty_increments Determines if the product is sold in quantity
increments. Options include: Yes / No
use_config_enable_qty_inc Determines if the default configuration setting to enable
quantity increments is used, and corresponds to the
state of the Use Config Settings checkbox. Values
include:
1 (Yes) The default configuration setting
is used for the value of this attribute.
0 (or blank) (No) The default configuration can be
overridden for the value of this attribute.
enable_qty_increments Determines if quantity increments are enabled for the
product.
is_decimal_divided Determines if parts of the product can be shipped
separately. Options include: Yes / No
website_id For installations with multiple websites, identifies a
specific website where the product is available. If blank,
the product is available in all websites.
related_skus Lists the sku of each product that has been identified as
aRelated Product. For example:
24-WG080,24-UG03,24-UG01,24-UG02
crosssell_skus Lists the sku of each product that has been identified
as a Cross-sell.
Simple Product CSV File Structure (cont.)
Product Attribute Reference CHAPTER 69: Data Transfer
896 Magento Community Edition 2.0 User Guide

ATTRIBUTE DESCRIPTION
upsell_skus Lists the sku of each product that has been identified
as an Upsell.
additional_images The file names of any additional image to be associated
with the product, preceded by a forward slash. For
example:
/image.jpg
additional_image_labels The labels associated with any additional images. For
example:
Label 1, Label 2
custom_options For example:
name=Color,type=drop_down,required=1,price=,price_
type=fixed,sku=,option_
title=Black|name=Color,type=drop_
down,required=1,price=,price_type=fixed,sku=,option_
title=White
SERVICE DATA FOR PRODUCT VARIATIONS
_super_products_sku The generated SKU for a configurable product variation.
For example: WB03-XS-Green
Applies to:
Configurable Products
_super_attribute_code The attribute code of a configurable product variation. For
example: color
Applies to:
Configurable Products
_super_attribute_option The value of a configurable product variation. For
example: green
Applies to:
Configurable Products
_super_attribute_price_corr A price adjustment that is associated with a configurable
product variation.
Simple Product CSV File Structure (cont.)
CHAPTER 69: Data Transfer Product Attribute Reference
Magento Community Edition 2.0 User Guide 897

ATTRIBUTE DESCRIPTION
Applies to:
Configurable Products
_associated_sku The SKU of a product that is associated with a grouped
product.
Applies to:
Grouped Products
Bundle Products
_associated_default_qty Determines the quantity of the associated product that is
included. Applies to:
Configurable Products
Grouped Products
Bundle Products
_associated_position Determines the position of the associated product when
listed with other associated products. Applies to:
Configurable Products
Grouped Products
Bundle Products
Simple Product CSV File Structure (cont.)
Product Attribute Reference CHAPTER 69: Data Transfer
898 Magento Community Edition 2.0 User Guide
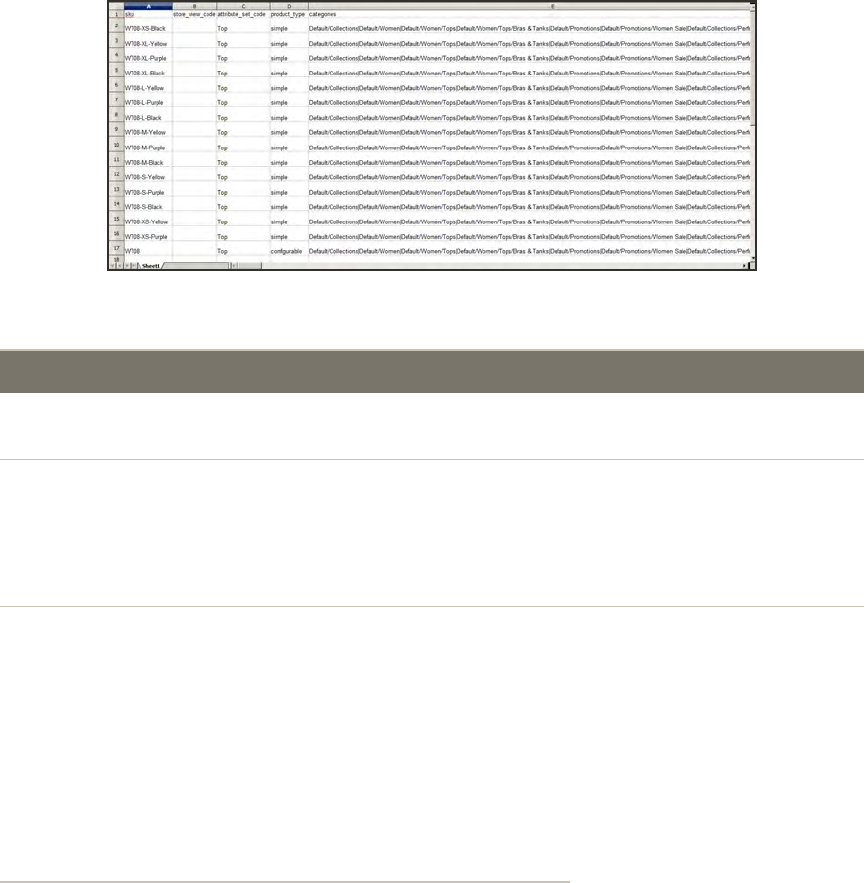
Complex Data
The term complex data1refers to the data that is associated with multiple product options.
The following product types use data that originates from separate products to create product
variations and multiple options.
lConfigurable
lGrouped
lBundle
If you were to export a configurable product, you would find the standard attributes that make
up a simple product, plus the additional attributes that are needed to manage complex data.
Exported Configurable Product Data
ATTRIBUTE DESCRIPTION
CONFIGURABLE PRODUCTS
configurab
le_
variation_
labels
Labels that identify product variations. For example:
Choose Color:
Choose Size:
configurab
le_
variations
Describes the values associated with a product variation. For example:
sku=sku-red
xs,color=red,size=xs,price=10.99,display=1,image=/pub/media/import/image1.
png|sku=sku-red-
m,color=red,size=m,price=20.88,display=1,image=/pub/media/import/image2.p
ng
Complex Data Attributes
1Data that is associated with multiple product options.
CHAPTER 69: Data Transfer Product Attribute Reference
Magento Community Edition 2.0 User Guide 899

ATTRIBUTE DESCRIPTION
GROUPED PRODUCTS
associated_
skus
Identifies the SKUs of the individual products that make up the group.
BUNDLE PRODUCTS
bundle_
price_type
Determines if the price of a bundle item is fixed or dynamic.
bundle_sku_
type
Determines if each item is assigned a variable, dynamic SKU, or if a fixed SKU
is used for the bundle. Options include: Fixed / Dynamic.
bundle_
weight_type
Determines if the weight of a bundle item is variable or fixed.
bundle_
values
Describes teach value associated with a bundle option. For example:
name=Bundle Option One,type=dropdown; required=1, sku=sku-
option2,price=10, price_type=fixed
Complex Data Attributes (cont.)
Product Attribute Reference CHAPTER 69: Data Transfer
900 Magento Community Edition 2.0 User Guide
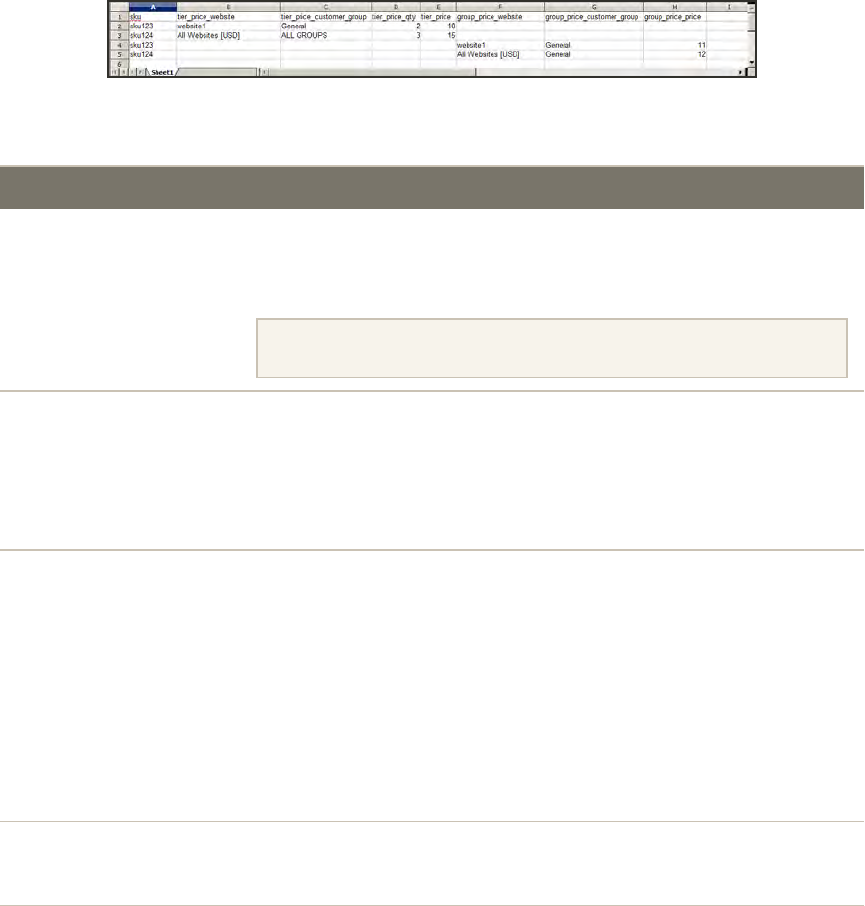
Advanced Pricing
Advanced Price Import/Export allows you to quickly update pricing information for product
groups and tier prices. The process to import and export advanced price data is the same as
any other entity type. The sample CSV file contains tier and group prices for each product type
that supports advanced pricing. Making changes to advanced pricing does not affect the rest of
the product record.
Advanced Price Sample File
ATTRIBUTE DESCRIPTION
sku (Required) The Stock-Keeping Unit is a unique, alphanumeric
identifier that is used to track inventory. A SKU can be up to 64
characters in length. For example: sku123
A SKU longer than 64 characters will cause import to fail.
tier_price_website The website code identifies each website where tier pricing is
available. For example:
website1
All Websites [USD]
tier_price_
customer_group
Identifies the customers groups where tier pricing is available. For
example:
ALL GROUPS
NOTLOGGEDIN
General
Wholesale
Retailer
tier_price_qty The quantity of the product that must be ordered to receive the tier
price discount.
tier_price The discounted tier price of the product. For bundle products, tier
price is calculated as a percentage.
Advanced Pricing Attributes
CHAPTER 69: Data Transfer Product Attribute Reference
Magento Community Edition 2.0 User Guide 901

ATTRIBUTE DESCRIPTION
group_price_website The website code of each website where group pricing is available. If
specifying multiple websites, separate each with a comma and
without a space. For example:
website1
All Websites [USD]
group_price_
customer_group
Identifies the customers groups where group pricing is available. For
example:
NOTLOGGEDIN
General
Wholesale
Retailer
group_price The discounted group price of the product. For bundle products, group
price is calculated as a percentage.
Advanced Pricing Attributes (cont.)
Product Attribute Reference CHAPTER 69: Data Transfer
902 Magento Community Edition 2.0 User Guide

Customer Attribute Reference
The following tables list the attributes from a typical export of the Customers Main File and
Customer Addresses. The installation that was used to export this data has two websites and
several store views, with the sample data installed.
Each attribute, or field, is represented in the CSV file as a column, and customer records are
represented by rows. Columns that begin with an underscore are service entities that contain
properties or complex data.
ATTRIBUTE DESCRIPTION
email
_website
_store
confirmation
created_at
created_in
disable_auto_group_change
dob
firstname
gender
group_id
lastname
middlename
password_hash
prefix
rp_token
Customers Main File
CHAPTER 69: Data Transfer Customer Attribute Reference
Magento Community Edition 2.0 User Guide 903
ATTRIBUTE DESCRIPTION
rp_token_created_at
store_id
suffix
taxvat
website_id
password
Customers Main File (cont.)
ATTRIBUTE DESCRIPTION
_website
_email
_entity_id
city
company
country_id
fax
firstname
lastname
middlename
postcode
prefix
region
region_id
street
suffix
Customer Addresses
Customer Attribute Reference CHAPTER 69: Data Transfer
904 Magento Community Edition 2.0 User Guide

ATTRIBUTE DESCRIPTION
telephone
vat_id
vat_is_valid
vat_request_date
vat_request_id
vat_request_success
_address_default_
billing_
Identifies the default billing address. A value of 1 indicates that the
address is the default billing address of the customer. Values: 1 / 0
_address_default_
shipping_
Identifies the default shipping address. A value of 1 indicates that the
address is the default shipping address of the customer. Values: 1 / 0
Customer Addresses (cont.)
CHAPTER 69: Data Transfer Customer Attribute Reference
Magento Community Edition 2.0 User Guide 905

Notes
906 Magento Community Edition 2.0 User Guide
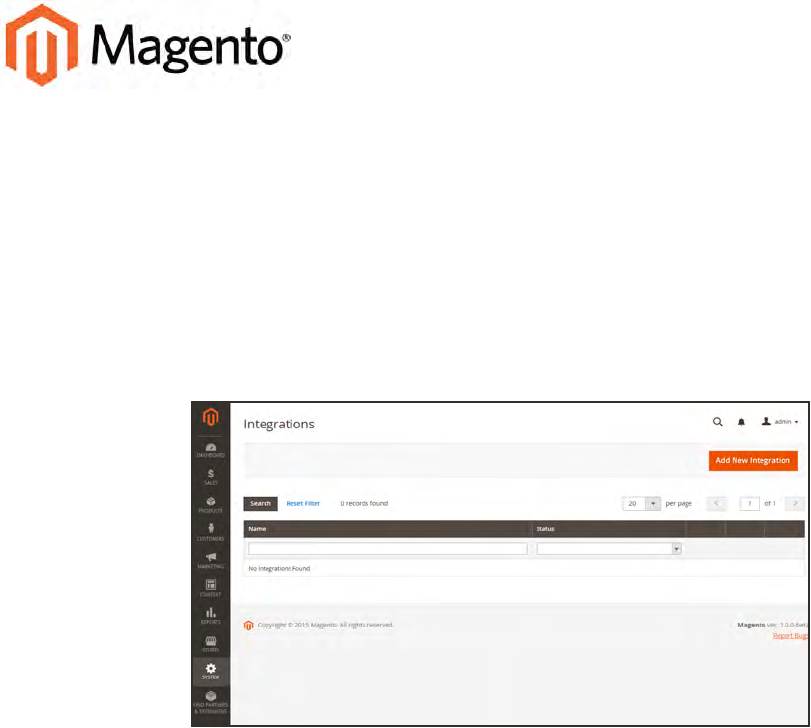
CHAPTER 70:
Integrations
Establishes the location of OAuth credentials and redirect URL for third-party
integrations, and identifies the available API resources that are needed for the integration.
The following path uses our Web APIs to onboard a merchant to a third-party SaaS
platform.
Integrations
Magento Community Edition 2.0 User Guide 907

Onboarding Workflow
Authorize the integration. Go to the system/integration screen, find the relevant
integration, and authorize.
Verify and establish login. When prompted, accept the access requested. If redirected
to a third-party, log in to the system, or create a new account. After a successful login,
you return to the integration page.
Receive confirmation of authorized integration. The system sends notification that
the integration has been authorized successfully. After setting up an integration and
receiving the credentials, it is no longer necessary to make calls to access or request
tokens.
908 Magento Community Edition 2.0 User Guide
Onboarding Workflow CHAPTER 70: Integrations
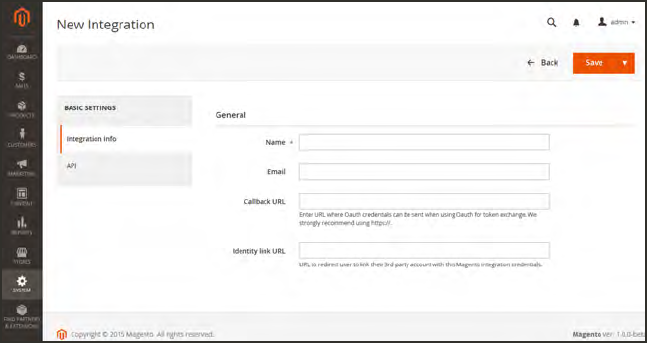
To add a new integration:
1. On the Admin sidebar, tap System. Then under Extensions, choose Integrations.
2. Enter the following Integration Info:
a. Enter the Name of the integration, and the contact Email address.
b. Enter the Callback URL where OAuth credentials can be sent when using OAuth for token
exchange. We strongly recommend using https://.
c. Enter the Identity Link URL to redirect the users to a third-party account with these
Magento integration credentials.
New Integration
3. In the panel on the left, choose API. Then, do the following:
a. Set Resource Access to one of the following:
lAll
lCustom
b. For custom access, mark the checkbox of each resource that is needed:
Magento Community Edition 2.0 User Guide 909
CHAPTER 70: Integrations Onboarding Workflow
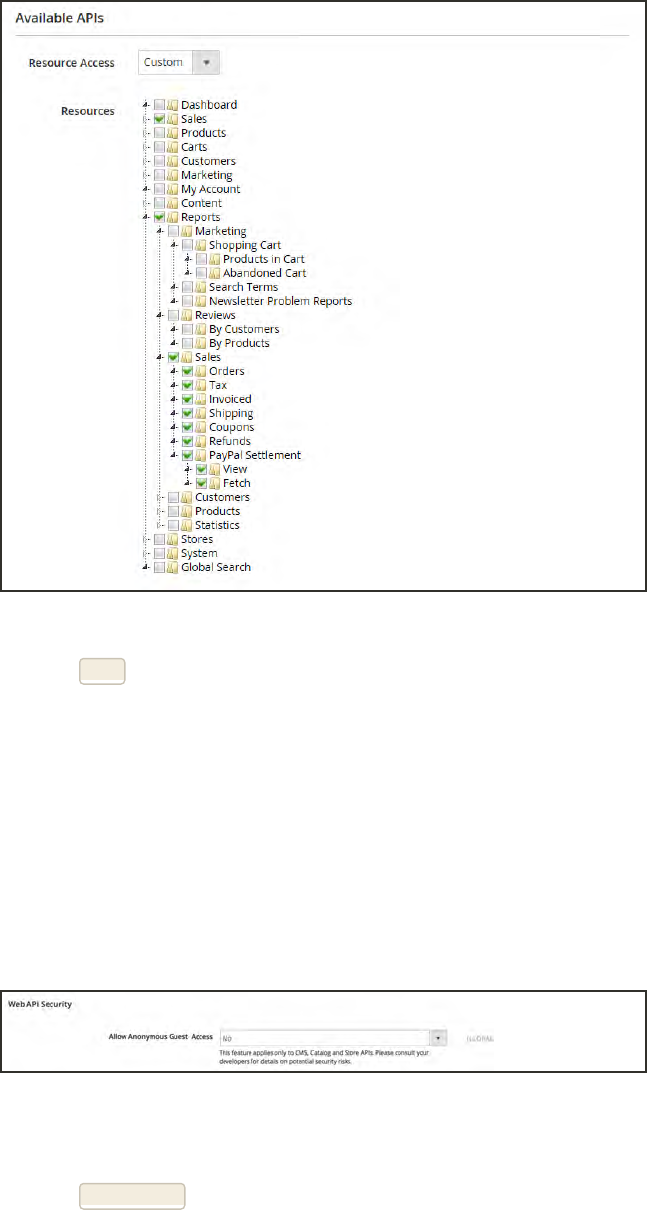
Resources Needed for Custom Access
4. When complete, tap Save.
To change the APIguest access security setting:
By default, the system does not permit anonymous guest access to CMS, catalog, and other
store resources. If you need to change the setting, do the following:
1. On the Admin sidebar, tap Stores. Then under Settings, choose Configuration.
2. In the panel on the left under Services, choose Magento Web API.
3. Expand the Web API Security Setting section.
Web API Security
4. Set Allow Anonymous Guest Access to “Yes,”
5. When complete, tap Save Config.
To learn more, see: “Restricting access to anonymous web APIs” in the Magentodeveloper
documentation.
910 Magento Community Edition 2.0 User Guide
Onboarding Workflow CHAPTER 70: Integrations
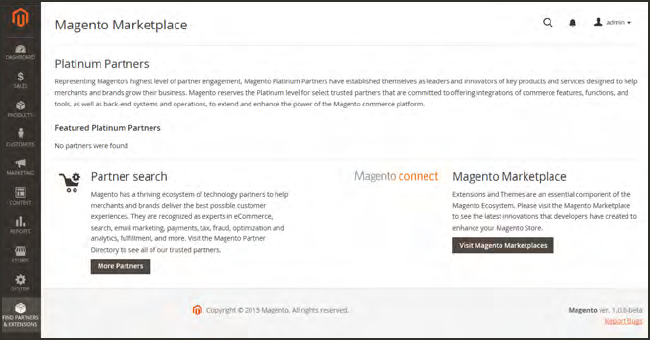
Magento Marketplace
Magento Marketplace is the next generation of the world’s largest eCommerce application store,
offering merchants a curated selection of solutions, and providing qualified developers the
tools, platform, and prime location to build a thriving business.
To learn more, Find Partners & Extensions in the Admin sidebar.
Magento Marketplace
CHAPTER 70: Integrations Magento Marketplace
Magento Community Edition 2.0 User Guide 911
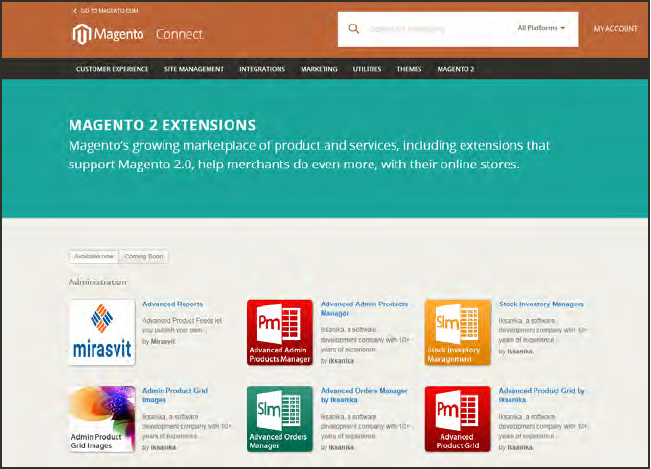
Magento Connect
Magento Connect is Magento’s original marketplace for Magento extensions. There are
hundreds of extensions and themes available from all over the world. Magento out-of-the-box
supports a few of the most popular ones. However, community members are developing and
publishing new extensions in order to extend Magento with various new features.
Magento Connect
Magento Connect CHAPTER 70: Integrations
912 Magento Community Edition 2.0 User Guide

CHAPTER 71:
Tools
In this section of the guide, you will learn how to perform routine index and cache
management operations, back up the system, and use tools that help our Support team
troubleshoot and resolve issues.
lCache Management
lAlternate Media Storage
lBackups
lIndex Management
lWeb Setup Wizard
lPermissions
lSecurity
Magento Community Edition 2.0 User Guide 913
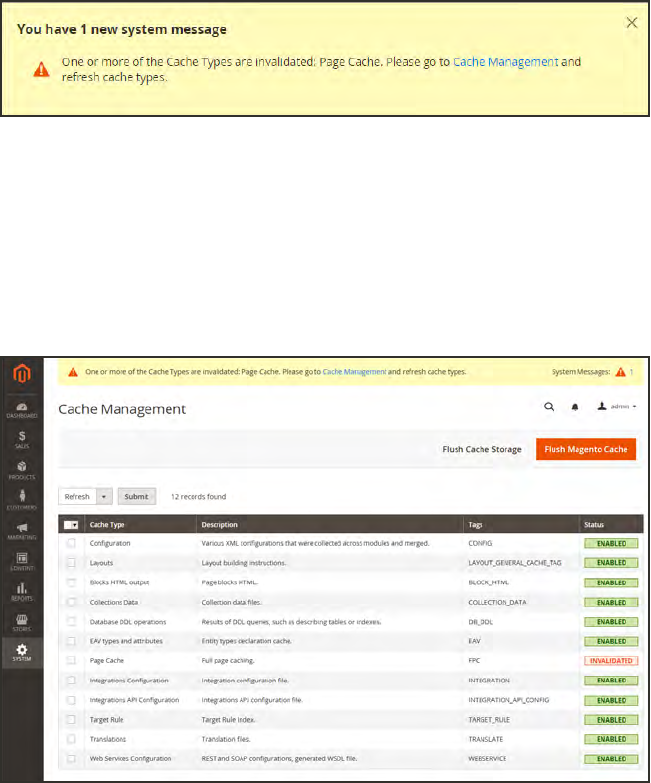
Cache Management
Magento’s cache management system is an easy way to improve the performance of your site.
Whenever a cache needs to be refreshed, a notice appears at the top of the workspace to guide
you through the process. Follow the link to Cache Management, and refresh the invalid caches.
Update Cache Message
The Cache Management page shows the status of each primary cache and its associated tag.
The large buttons in the upper-right corner can be used to flush the Magento Cache, or the all-
inclusive Cache Storage. At the bottom of the page there are additional buttons to flush the
catalog product images cache and JavaScript/CSS cache. After clearing a cache, always refresh
your browser to make sure that you can see the most recent files.
Cache Management
Cache Management CHAPTER 71: Tools
914 Magento Community Edition 2.0 User Guide
To refresh specific caches:
1. Do one of the following:
lClick the Cache Management link in the message above the workspace.
lOn the Admin sidebar, tap System. Then under Tools, choose CacheManagement.
2. For each cache to be refreshed, mark the checkbox at the beginning of the row.
3. Set Actions to “Refresh,” and tap Submit.
To perform mass actions:
1. To select a group of caches, set Mass Actions to one of the following:
lSelect All
lSelect Visible
2. Mark the checkbox of each cache to be targeted by the action.
3. Set Actions to “Refresh,” and tap Submit.
To flush the product image cache:
1. From the Cache Storage Management page, under Additional Cache Management, click Flush
Catalog Images Cache to clear pre-generated product image files.
The message, “Image cache was cleaned” appears at the top of the workspace.
2. Make sure to also clear the cache of your browser.
To flush the JavaScript/CSS cache:
1. From the Cache Storage Management page, under Additional Cache Management, click Flush
JavaScript/CSS Cache to clear any JavaScript and CSSfiles that have been merged into a
single file.
The message, “The JavaScript/CSS cache has been cleaned” appears at the top of the
workspace.
2. Make sure to also clear the cache of your browser.
CHAPTER 71: Tools Cache Management
Magento Community Edition 2.0 User Guide 915
CONTROL DESCRIPTION
Mass Actions Marks the checkbox of multiple caches. Options include:
Select All Marks the checkbox of all caches.
Unselect All Clears the checkbox of all caches.
Select Visible Marks the checkbox of all visible caches.
Unselect Visible Clears the checkbox of all visible caches.
Actions Determines the action to be applied to all selected caches. Options
include:
Enable Enables all selected caches.
Disable Disables all selected caches.
Refresh Refreshes all selected caches.
Submit Applies the action to all selected caches.
Control Descriptions
BUTTON DESCRIPTION
Flush Magento Cache Removes all items in the default Magento cache (var/cache),
according to their associated Magento tags.
Flush Cache Storage Removes all items from the cache, regardless of Magento tag. If your
system uses an alternate cache location, any cached files used by
other applications are removed in the process.
Flush Catalog Images
Cache
Removes all automatically resized and watermarked catalog images
that are stored at: media/catalog/product/cache.
If recently uploaded images aren't reflected in the catalog, try flushing
the catalog and refreshing your browser.
Flush JavaScript/CSS
Cache
Removes the merged copy of JavaScript and CSS files from the
cache. If recent changes to the style sheet or JavaScript aren't
reflected in the store, try flushing the JavaScript/CSS cache and
refreshing your browser.
Flush Static Files Cache Removes preprocessed view files and static files.
Button Descriptions
Cache Management CHAPTER 71: Tools
916 Magento Community Edition 2.0 User Guide

CACHE DESCRIPTION
Configuration Various XML configurations that were collected across modules and
merged. Associated Tag: CONFIG
System: config.xml
local.xml
Module: config.xml
Layouts Layout building instructions.
Associated Tag: LAYOUT_GENERAL_CACHE_TAG
Blocks HTML output Page blocks HTML. Associated Tag: BLOCK_HTML
Collections Data Collection data files. Associated Tag: COLLECTION_DATA
Database DDL operations Results of DDL queries, such as describing tables or indexes.
Associated Tag: DB_DDL
EAV types and attributes Entity types declaration cache. Associated Tag: EAV
Page Cache Full page caching. Associated Tag: FPC
Integrations Configuration Integration configuration file. Associated Tag: INTEGRATION
Integrations API
Configuration
Integrations API configuration file.
Associated Tag: INTEGRATION_API_CONFIG
Target Rule The target rule index.
Associated Tag: IARGET_RULE
Translations Translation files. Associated Tag: TRANSLATE
Web Services
Configuration
REST and SOAP configurations, generated WSDL file.
Associated Tag: WEBSERVICE
Cache Descriptions
CHAPTER 71: Tools Cache Management
Magento Community Edition 2.0 User Guide 917

Full-Page Cache
We currently recommend that Full Page Cache is used only in a development environment.
Magento Community Edition 2.0 uses full-page caching on the server to quickly display
category, product, and CMS pages. Full-page caching improves response time and reduces the
load on the server. Without caching, each page might need to run blocks of code and retrieve
information from the database. However, with full-page caching enabled, a fully-generated page
can be read directly from the cache. For more technical information, see: Configure and Use
Varnish
Cached content can be used to process the requests from similar types of visits. As a result,
pages shown to a casual visitor might differ from those shown to a customer. For the purposes
of caching, each visit is one of three types:
Non-sessioned During a non-sessioned visit, a shopper views pages, but does not
interact with the store. The system caches the content of each page
viewed, and serves them to other non-sessioned shoppers.
Sessioned During a sessioned visit, shoppers who interact with the store—through
activities such as comparing products or adding products to the
shopping cart—are assigned a session ID. Cached pages that are
generated during the session are used only by that shopper during the
session.
Customer Customer sessions are created for those who have registered for an
account with your store and shop while logged in to their accounts.
During the session, customers can be presented with special offers,
promotions, and prices that are based on the customer group to which
they are assigned.
Cache Management CHAPTER 71: Tools
918 Magento Community Edition 2.0 User Guide
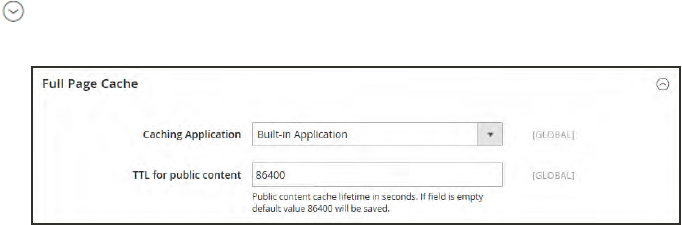
To configure the full-page cache:
1. On the Admin sidebar, tap Stores. Then under Settings, choose Configuration.
2. In the panel on the left under Advanced, choose System.
3. Expand the Full Page Cache section.
Full Page Cache
4. Set Caching Application to one of the following:
lBuilt-in Application
lVarnish Caching
5. To set the time-out for the page cache, enter the TTL for public content. (The default value is
86400)
6. If using Varnish, complete the Varnish Configuration section as follows:
a. In the Access list field, enter the IPaddresses that can purge the Varnish configuration to
generate a config file. Separate multiple entries with a comma. The default value is
“localhost.”
b. In the Backend host field, enter the IPaddress of the backend host that generates config
files. The default value is “localhost.”
c. In the Backend port field, identify the backend port that is used to generate config files.
The default value is: “8080.”
d. To export the configuration as a varnish.vcl file, tap the button for the version of
Varnish that you use.
lExport VCL for Varnish 3
lExport VCL for Varnish 4
CHAPTER 71: Tools Cache Management
Magento Community Edition 2.0 User Guide 919
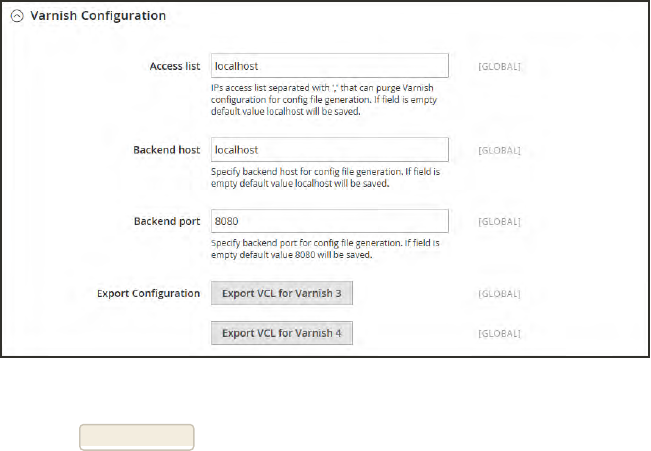
Varnish Configuration
7. When complete, tap Save Config.
Alternate Media Storage
Magento Community Edition 2.0 gives you the option to store media files in a database on a
database server, or on a Content Delivery Network (CDN), as opposed to storing them on the
file system of the web server. The advantage of using alternate storage is that it minimizes the
effort required to synchronize media when multiple instances of the system that are deployed
on different servers that need access to the same images, CSS files, and other media files.
lDatabase
lContent Delivery Network (CDN)
Alternate Media Storage CHAPTER 71: Tools
920 Magento Community Edition 2.0 User Guide

Using a Database
By default, all images, compiled CSS files, and compiled JavaScript files of the Magento
instance are stored in the file system on the web server. You can choose to store these files in a
database on a database server. One advantage of this approach is the option of automatic
synchronization and reverse synchronization between the web server file system and the
database. You can use the default database to store media or create a new one. To be able to use
a newly created database as media storage, you must add information about it and its access
credentials to the local.xml file.
Database Workflow
1Browser requests media. A page from the store opens in the customer’s browser, and
the browser requests the media that is specified in the HTML.
2System looks for media in file system. The system searches for the media in the file
system and if found, passes it to the browser.
3System locates media in database. If the media is not found in the file system, a
request for the media is sent to the database that is specified in the configuration.
4System locates media in database. A PHP script transfers the files from the database
to the file system, and sent to the customer’s browser. The browser request for media
triggers the script to run as follows:
lIf web server rewrites are enabled for Magento and supported by the server, the PHP
script runs only when the requested media is not found in the file system.
lIf web server rewrites are disabled for Magento, or not supported by the server, the
PHP script runs anyway, even if the required media is available in the file system.
CHAPTER 71: Tools Alternate Media Storage
Magento Community Edition 2.0 User Guide 921
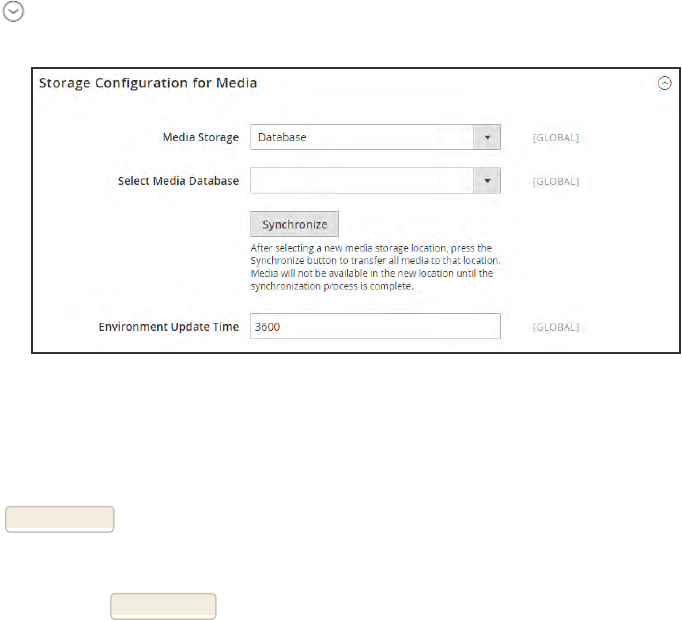
To use a database for media storage:
1. On the Admin sidebar, tap Stores. Then under Settings, choose Configuration.
2. In the panel on the left, under Advanced, choose System.
3. In the upper-left corner set Store View to “Default Config,” to apply the configuration at the
global level.
4. Expand the Storage Configuration for Media section. Then, do the following:
Storage Configuration for Media (Database)
a. Set Media Storage to “Database.”
b. Set Select Media Database to the database you want to use.
c. Tap Synchronize to transfer the existing media to the newly selected database.
d. Enter the Environment Update Time in seconds.
5. When complete, tap Save Config.
Alternate Media Storage CHAPTER 71: Tools
922 Magento Community Edition 2.0 User Guide
Using a Content Delivery Network
Storing media files in a CDN is another alternative supported in Magento. There is no full
integration with a specific CDN, and you are responsible for choosing and configuring a CDN
on your own.
After configuring the CDN, you must complete the configuration from the Admin. The changes
can be made at either the global or website level. When a CDN isused for media storage, all
paths to media on store pages are changed to the CDN paths that are specified in the
configuration.
CDN Workflow
1Browser requests media. A page from the store opens in the customer’s browser, and
the browser requests the media that is specified in the HTML.
2Request sent to CDN; images found and served. The request is sent first to the
CDN. If the CDN has the images in storage, it serves the media files to the customer's
browser.
3Media not found, request sent to Magento web server. If the CDN doesn’t have the
media files, the request is sent to the Magento web server. If the media files are found in
the file system, the web server sends them to the customer’s browser.
Important! For security, when a CDN is used as media storage, JavaScript may not function
properly if the CDN is located outside of your subdomain.
CHAPTER 71: Tools Alternate Media Storage
Magento Community Edition 2.0 User Guide 923

To configure a content delivery network:
1. On the Admin sidebar, tap Stores. Then under Settings, choose Configuration.
2. In the panel on the left under General, choose Web.
3. In the upper-left corner, set Store View as needed.
4. Expand the Base URLs section. Then, do the following:
Base URLs
a. Update the Base URL for Static View Files with the URL of the location on the CDN
where static view files are stored.
b. Update the Base URL for User Media Files with the URL of the JavaScript files on the
CDN.
Both these fields can be left blank, or can start with the placeholder: {{unsecure_base_
url}}
5. Expand the Base URLs (Secure) section.
Alternate Media Storage CHAPTER 71: Tools
924 Magento Community Edition 2.0 User Guide
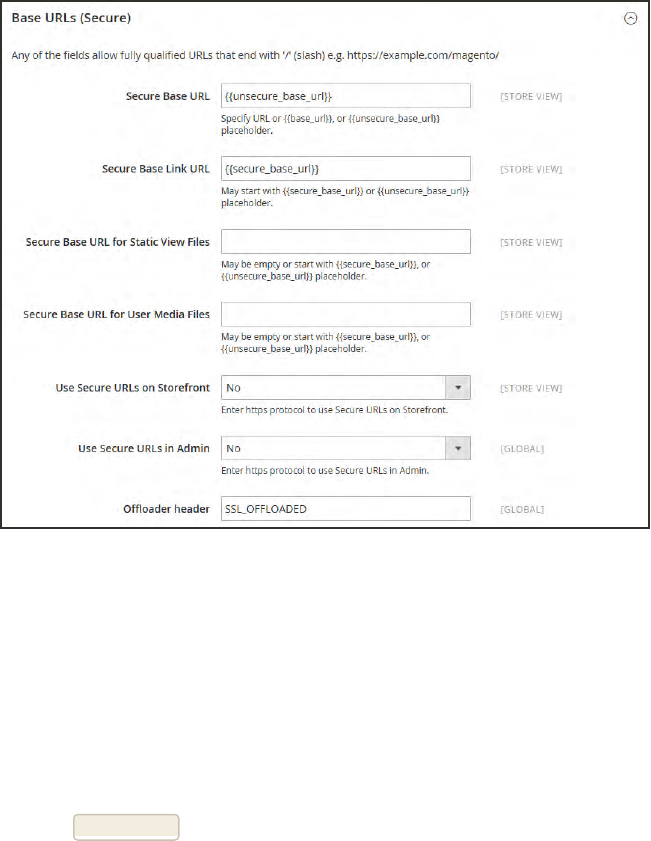
Base URLs (Secure)
a. Update the Secure Base URL for Static View Files with the URL of the location on the
CDN where static view files are stored.
b. Update the Secure Base URL for User Media Files with the URL of the JavaScript files on
the CDN.
Both these fields can be left blank, or can start with the placeholder: {{unsecure_base_
url}}
6. When complete,tap Save Config.
CHAPTER 71: Tools Alternate Media Storage
Magento Community Edition 2.0 User Guide 925
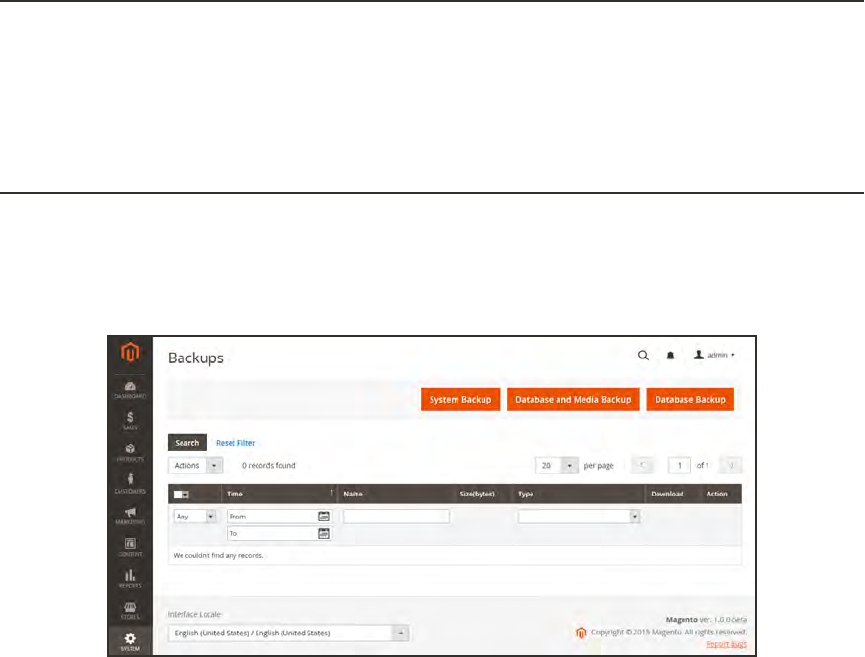
Backups
Magento Community Edition 2.0 gives you the ability to back up different parts of the system—
such as the file system, database, and media files—and to rollback automatically. A record for
each backup appears in the grid on the Backups page. Deleting a record from the list deletes
the archived file as well. Database backup files are compressed using the .gz format. For the
system backups and database and media backups, the .tgz format is used. As a best practice,
you should restrict access to backup tools, and back up before installing extensions and
updates.
Restrict Access to Backup Tools
Access to the Backups and Rollback management tool can be restricted by configuring user
permissions for backup and rollback resources. To restrict access, leave the corresponding
checkbox unselected. If you need to grant access to rollback resources, you must grant access to
backup resources as well.
Backup Before Installing Extensions and Updates
Always perform a backup before you install an extension or update Magento. Magento Connect
Manager (MCM) includes a backup option that you can use before installing an extension or upgrading
to a new release.
Backups
Backups CHAPTER 71: Tools
926 Magento Community Edition 2.0 User Guide
To create a backup:
1. On the Admin sidebar, tap System. Then under Tools, choose Backups.
2. In the upper-right corner, tap the button for the type of backup you want to create:
System Backup Creates a complete backup of the database and the file system. During the
process, you can choose to include the media folder in the backup.
Database and Media
Backup Creates a backup of the database and the media folder.
Database Backup Creates a backup of the database.
3. To put the store into maintenance mode during the backup, mark the checkbox. When the
backup is complete, maintenance mode is turned off automatically.
4. For a system backup, mark the Include Media folder to System Backup checkbox if you want
to include the media folder. Then when prompted, confirm the action.
CHAPTER 71: Tools Backups
Magento Community Edition 2.0 User Guide 927
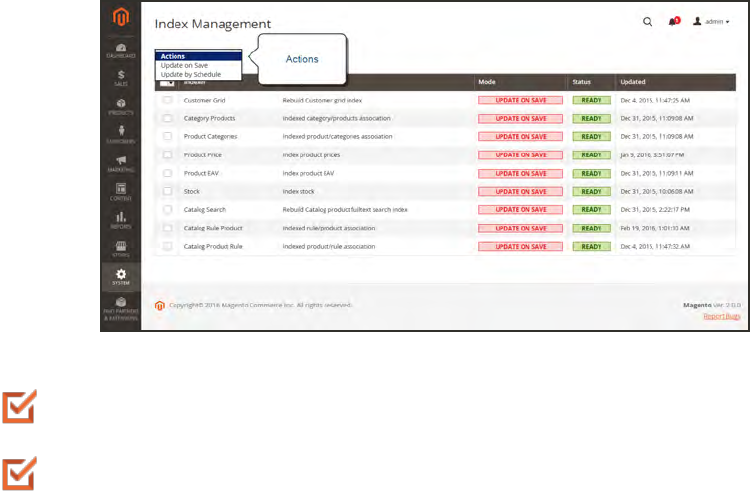
Index Management
Magento reindexes automatically whenever one or more items change. Actions that trigger
reindexing include price changes, creating catalog or shopping cart price rules, adding new
categories, and so on. To optimize performance, Magento accumulates data into special tables
using indexers. As the data changes, the indexed tables must be updated—or reindexed.
Reindexing is performed as a background process, and your store remains accessible during the
processes.
Reindexing data speeds up processing, and reduces the time the customer has to wait. For
example, if you change the price of an item from $4.99 to $3.99, Magento reindexes the data to
show the price change in the store. Without indexing, Magento would have to calculate the
price of every product on the fly—taking into account shopping cart price rules, bundle pricing,
discounts, tier pricing, and so on. Loading the price for a product might take longer than the
customer is willing to wait.
The indexers can be set to either update on save, or on schedule. Reindexing is performed as a
background process that is scheduled as a cron job, and your store remains accessible during
the processes. A system message appears if a cron job is not available to update any indexers
that become invalid.
Index Management
Index Management has a slightly different presentation for flat product catalogs.
To avoid problems when multiple Admin users update objects that trigger automatic
reindexing, we recommend that you set all indexers to run on schedule as cron jobs.
Otherwise, every time an object is saved, any objects with interdependencies might
cause a deadlock. Symptoms of a deadlock include high CPU usage and MySQL
errors. As a best practice, we recommend that you use scheduled indexing .
Index Management CHAPTER 71: Tools
928 Magento Community Edition 2.0 User Guide
CHAPTER 71: Tools Index Management
Magento Community Edition 2.0 User Guide 929
To change the index mode:
1. On the Admin sidebar, tap System. Then under Tools, choose Index Management.
2. Mark the checkbox of each indexer that you want to change.
3. Set Actions to one of the following:
lUpdate on Save
lUpdate by Schedule
4. Tap Submit to apply the change to each selected indexer.
COLUMN DESCRIPTION
Indexer The name of the indexer.
Description A description of the indexer.
Mode Indicates the current update mode for each indexer. Options:
Update on Save The index is set to update whenever a
change is saved.
Update on
Schedule
The index is set to update on schedule
according to a cron job.
Status Displays one of the following:
Ready The index is up-to-date.
Scheduled Reindexing is scheduled to take place.
Running Reindexing is currently running.
Reindex Required A change has been made that requires
reindexing, but the indexers cannot be
updated automatically. Check to see if cron
is available and configured correctly.
Updated Indicates the date and time an index was last updated.
Column Descriptions
Index Management CHAPTER 71: Tools
930 Magento Community Edition 2.0 User Guide
Indexing Events
Reindexing Triggers
INDEX TYPE REINDEXING EVENT
Product Prices Add customer group
Change configuration settings
Flat catalog1product data Add store
Add store group
Add, edit, or delete attribute (for searching and filtering)
Flat catalog category data Add store
Add store group
Add, edit, or delete attribute (for searching and filtering)
Catalog category/product
index
Add, edit, or delete products (single, mass, and import)
Change product-to-category relations
Add, edit, or delete categories
Add or delete stores
Delete store groups
Delete websites
Catalog search index Add, edit, or delete products (single, mass, and import)
Add or delete stores
Delete store groups
Delete websites
Stock status index Change inventory configuration settings.
Category permissions
index
Add store, add store group, add or delete or update attribute (for
searching and filtering)
1The flat product and category indexers also influence how catalog and shopping cart price rules are indexed. If
you have a large number of SKUs (about 500,000 or more), you will notice a dramatic improvement in indexing time
for price rules. To take advantage of this improvement, you must enable Use Flat Catalog Product.
CHAPTER 71: Tools Index Management
Magento Community Edition 2.0 User Guide 931
Index Actions and Controls
ACTION RESULT TO CONTROL
Creating a new store, new
customer group, or any
action listed in “Actions
that Cause a Full
Reindex.”
Full reindex Full reindexing is performed on the
schedule determined by your Magento
cron job.
Bulk loading of items in the
following ways:
lMagento import/export
lDirect SQL query
lAny other method that
directly adds, changes,
or deletes data.
Partial reindex (only
changed items are
reindexed)
At the frequency determined by your
Magento cron job.
Changing scope (for
example, from global to
website)
Partial reindex (only
changed items are
reindexed)
At the frequency determined by your
Magento cron job.
Index Actions
Events that Trigger Full Reindexing
INDEXER EVENT
Catalog Category Flat
Indexer
Create a new web store
Create a new web store view
Create, or delete an attribute that is any of the following:
lSearchable or visible in advanced search
lFilterable
lFilterable in search
lUsed for sorting
Change an existing attribute to be any of the preceding.
Enable flat category storefront options
Full Reindex Triggers
Index Management CHAPTER 71: Tools
932 Magento Community Edition 2.0 User Guide

INDEXER EVENT
Catalog Product Flat
Indexer
Create a new web store
Create a new web store view
Create, or delete an attribute that is any of the following:
lSearchable or visible in advanced search
lFilterable
lFilterable in search
lUsed for sorting
Change an existing attribute to be any of the preceding.
Enable flat category storefront options
Stock status indexer When the following Catalog Inventory options change in the system
configuration:
Stock Options Display Out of Stock Products
Product Stock
Options
Manage Stock
Price Indexer Adding a new customer group.
When any of the following Catalog Inventory options change in the
system configuration:
Stock Options Display Out of Stock Products
Product Stock
Options
Manage Stock
Price Catalog Price Scope
Category or Product
Indexer
Create or delete a store view
Delete a store
Delete a website
Full Reindex Triggers (cont.)
CHAPTER 71: Tools Index Management
Magento Community Edition 2.0 User Guide 933
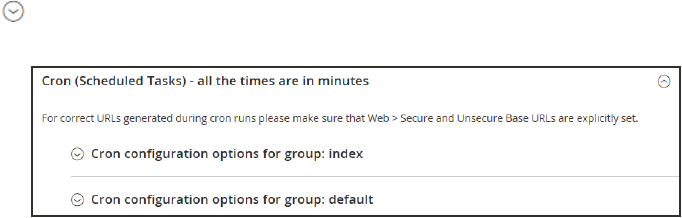
Cron (Scheduled Tasks)
Magento performs some operations on schedule by periodically running a script. You can
control the execution and scheduling of Magento cron jobs from the Admin. Store operations
that run according to a cron schedule include:
lEmail
lCatalog Price Rules
lNewsletters
lXMLSitemap Generation
lCurrency Rate Updates
In addition, you can configure the following to run according to a cron schedule:
lOrder System Grid Updates and Reindexing
lPending Payment Lifetime
Make sure that the base URLs for the store are set correctly, so the URLs that are generated
during cron operations are correct. To learn more, see: Setting Up Cron Jobs.
To configure cron:
1. On the Admin sidebar, tap Stores. Then under Settings, choose Configuration.
2. In the panel on the left under Advanced, choose System.
3. Expand the Cron section.
Cron (Scheduled Tasks)
Cron (Scheduled Tasks) CHAPTER 71: Tools
934 Magento Community Edition 2.0 User Guide
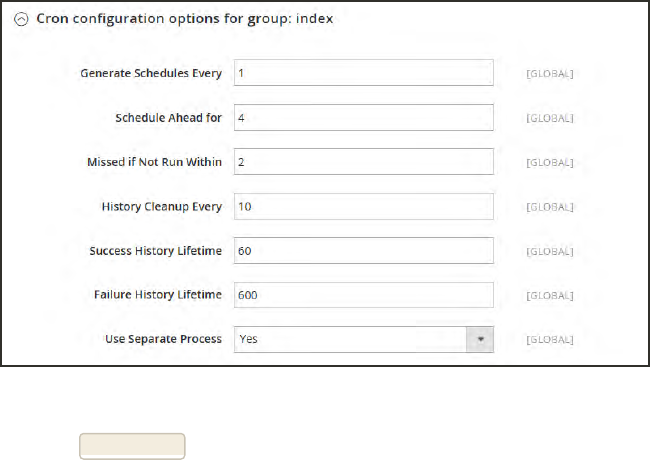
4. Then, complete the following settings for the Index and Default groups. The settings are the
same in each section.
lGenerate Schedules Every
lSchedule Ahead for
lMissed if not Run Within
lHistory Cleanup Every
lSuccess History Lifetime
lFailure History Lifetime
lUse Separate Process
Cron Configuration for Group:Index
5. When complete, tap Save Config.
CHAPTER 71: Tools Cron (Scheduled Tasks)
Magento Community Edition 2.0 User Guide 935
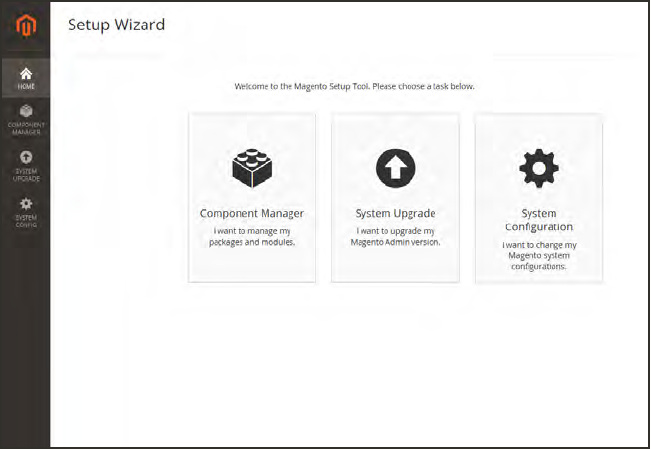
Web Setup Wizard
The Setup Wizard can be used to upgrade your Magento installation, manage Magento
Marketplace extensions, and update the system configuration.
Web Setup Wizard
Web Setup Wizard CHAPTER 71: Tools
936 Magento Community Edition 2.0 User Guide
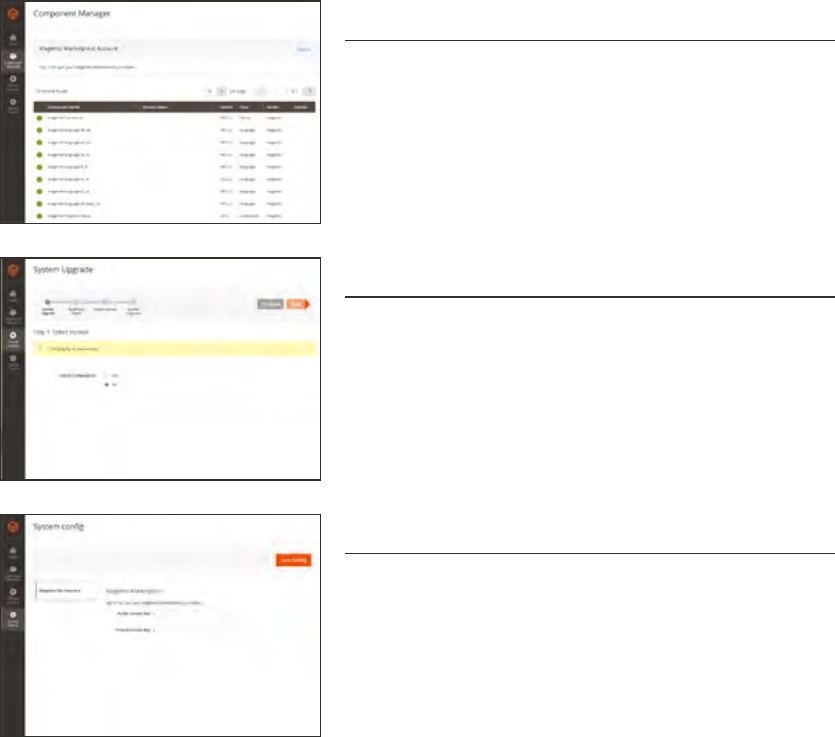
Setup Tools
Component Manager
Component Manager lists each component that is
currently installed, and can be used to synchronize
any extensions you have purchased from Magento
Marketplace with your system.
System Upgrade
The System Upgrade tool can be used to upgrade your
installation of Magento. During the process, it checks
your system for readiness, creates a backup, and then
upgrades your system.
System Config
The System Config tool can be synchronized with your
Marketplace account, based on your public and
private access keys.
CHAPTER 71: Tools Web Setup Wizard
Magento Community Edition 2.0 User Guide 937
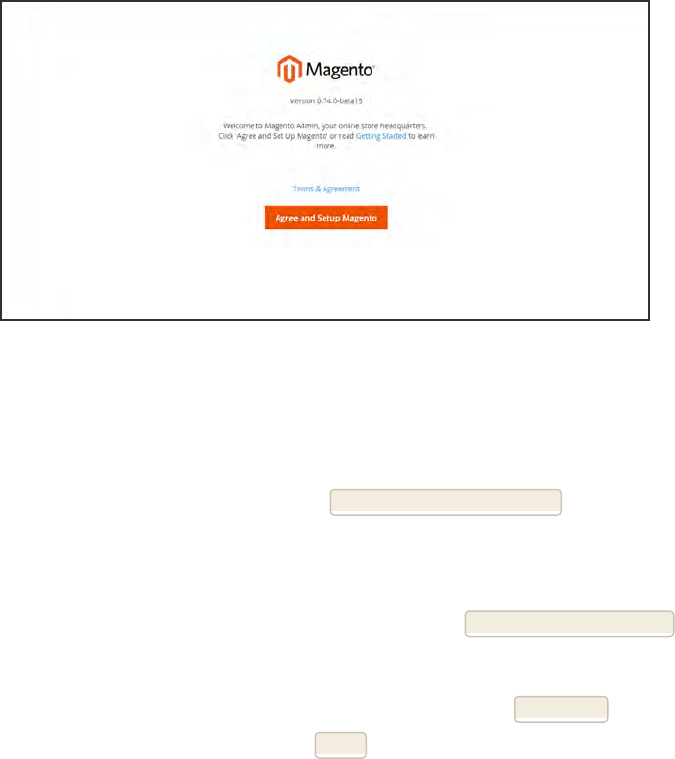
Web Setup
The Web Setup setup is the second part of the Magento installation that checks system
readiness, establishes the database connection, and creates the initial Admin account. The
Magento setup can be rerun at any time from the System menu.
Magento Setup
To launch Magento Setup:
1. On the Admin sidebar, tap System. Then under Tools, choose Web Setup Wizard.
2. Read the Terms & Agreement. If you agree, tap Agree and Setup Magento to continue.
Step 1: Readiness Check
1. To verify that your system meets the system requirements, tap Start Readiness Check.
2. When the results appear, tap Details for more information. Then, do one of the following;
lIf your system fails the readiness check, correct the issue and tap Try Again.
lIf your system meets the requirements, tap Next.
Web Setup Wizard CHAPTER 71: Tools
938 Magento Community Edition 2.0 User Guide
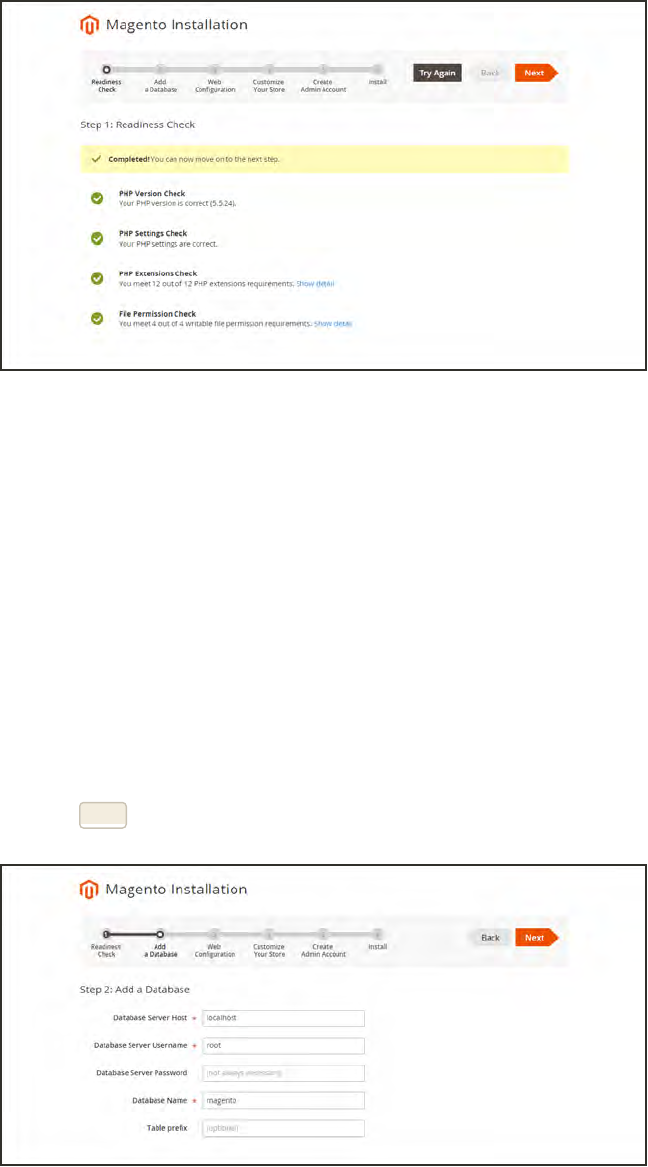
Readiness Check
Step 2:Add a Database
1. To change the MySQL database or update the credentials, do the following:
a. Enter the Database Server Host. If the database resides on the same server as the
Magento code, enter “localhost.”
b. Enter the Database Server Username.
c. Enter the Database Server Password.
d. Enter the Database Name.
e. If applicable, enter the Table prefix.
2. When complete, tap Next. Your credentials must be correct to continue to the next step.
Add a Database
CHAPTER 71: Tools Web Setup Wizard
Magento Community Edition 2.0 User Guide 939
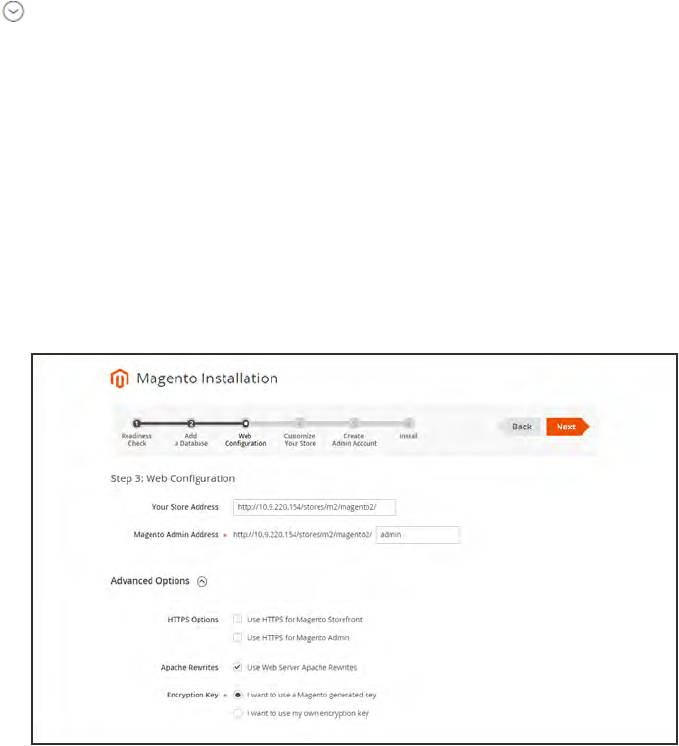
Step 3: Web Configuration
1. Under Web Configuration, do the following:
a. In the Your Store Address field, enter the full URL of your Magento store.
b. In the Magento Admin Address field, enter the full URL of the Magento Admin.
2. Expand the Advanced Options, and do the following:
a. Mark the checkbox of the HTTPS Options that apply to your system:
lUse HTTPS for Magento Storefront
lUse HTTPS for Magento Admin
b. To enable your server to use Apache Rewrites, mark the checkbox.
c. Mark the checkbox of the Encryption Key setting that applies to your system:
lI want to use a Magento generated key.
lI want to use my own encryption key.
Web Configuration
Step 4: Customize Your Store
1. To install or reinstall the Sample Data, do the following:
a. To create a sample store with sample products, mark the Use Sample Data checkbox.
b. If you are reinstalling the sample data, also mark the Clean up automatically checkbox.
2. Set Store Default Time Zone to the correct time zone for your locale.
3. Set Store Default Currency to the default currency that you accept as payment.
Web Setup Wizard CHAPTER 71: Tools
940 Magento Community Edition 2.0 User Guide
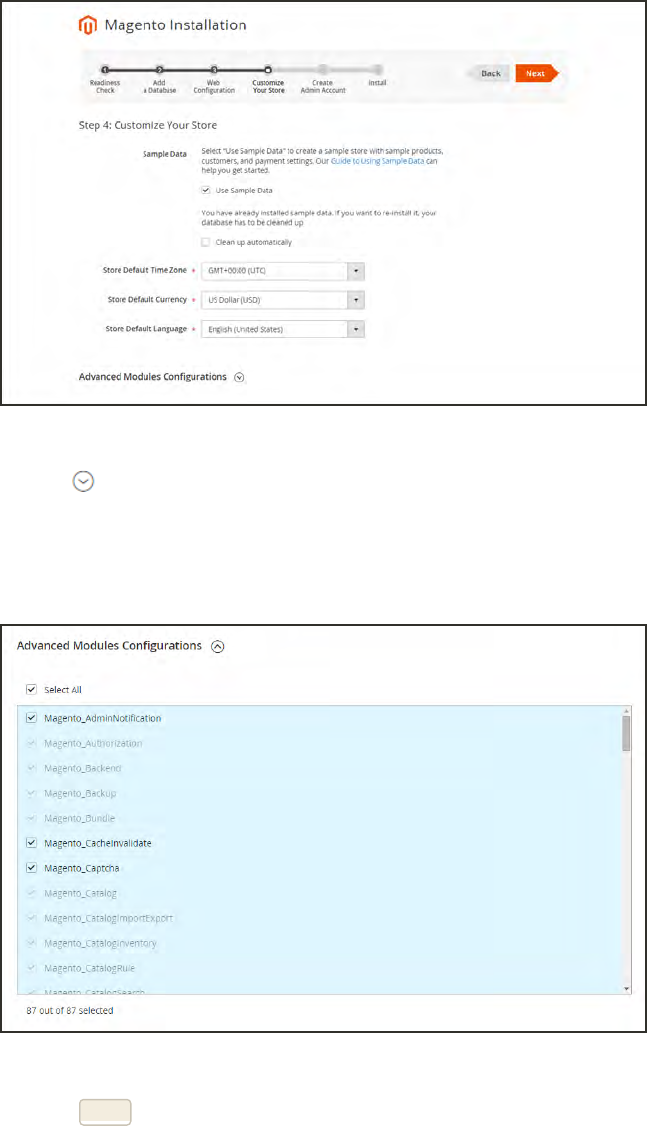
4. Set Store Default Language to the primary language of your store.
Customize Your Store
5. (Optional) Expand the Advanced Modules Configuration, and do the following:
a. To install only specific modules, clear the Select All checkbox.
b. In the list, select the checkbox of each module you want to install.
Advanced Modules Configuration
6. When complete, tap Next.
CHAPTER 71: Tools Web Setup Wizard
Magento Community Edition 2.0 User Guide 941
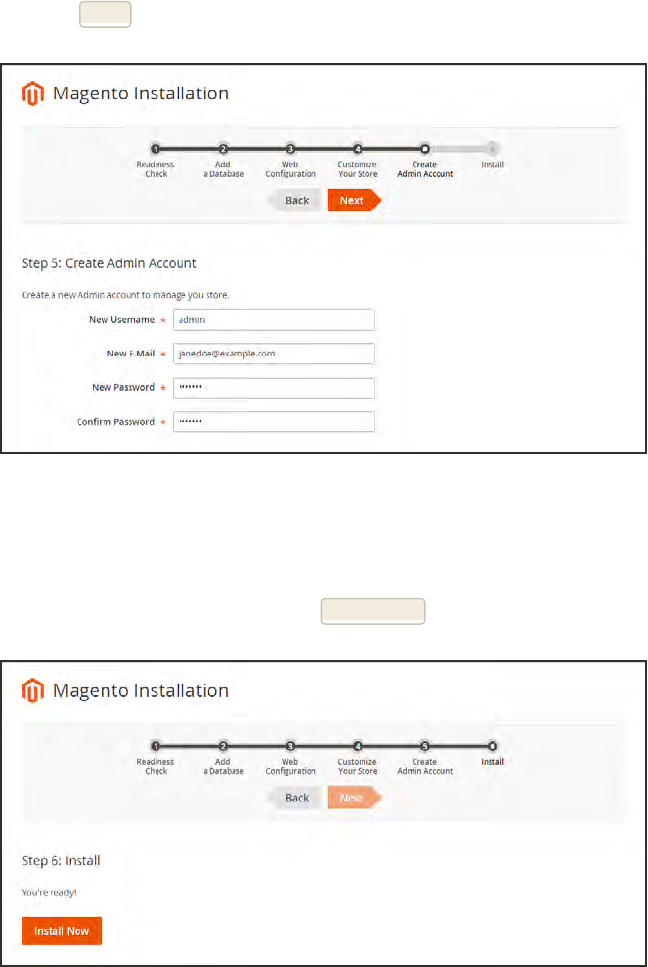
Step 5: Create Admin Account
1. Enter a New Username for the Admin account.
2. Enter a New E-Mail for the Admin account.
3. Enter a New Password for the Admin account. Then in the Confirm Password field, enter
your new password again.
4. When complete, tap Next.
Create Admin Account
Step 6: Install
1. When you are ready to complete the setup, tap Install Now.
Install
Web Setup Wizard CHAPTER 71: Tools
942 Magento Community Edition 2.0 User Guide
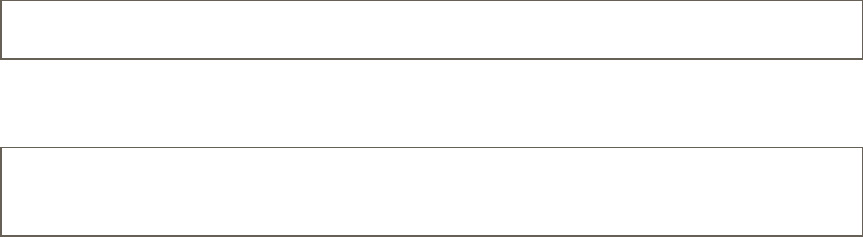
2. When the installation completes, a page appears with your Magento Admin and database
credentials, but without the passwords. You can print the page and keep it for your records.
Then, do of the following:
lLaunch Magento Storefront
lLaunch Magento Admin
3. If the installation fails to complete, view the Console Log to learn more. Then, correct the
problem and try again.
A little Housekeeping
After Setup is complete, do the following to set the recommended permissions for all files and
folders in your Magento2 installation:
1. Change to the Web user who has full permissions to the Magento2 folder. (For example, apache
or root.)
su – apache
2. Change directories to the Magento2 folder, and set the following permissions. You can copy the
code, and paste it as a single command.
find . -type d -exec chmod 700 {} \; && find . -type f -exec chmod
600 {} \; && chmod +x bin/magento
CHAPTER 71: Tools Web Setup Wizard
Magento Community Edition 2.0 User Guide 943

Notes
944 Magento Community Edition 2.0 User Guide
CHAPTER 72:
Permissions
Magento uses roles and permissions to create different levels of access to the Admin. When
your store is first set up, you receive a set of login credentials for the Administrator role
that has full permissions. However, you can restrict the level of permissions on a “need to
know” basis for other people who work on your site. For example, a designer can be given
access to only the Design tools, but not to areas with customer and order information.
In addition, you can further restrict Admin access to only a specific site, or set of sites and
their associated data. If you have multiple brands or business units with separate stores
on the same Magento installation, you can provide Admin access to each of your business
units but hide and protect their data from other Admin users.
If an Admin user’s access is restricted to specific websites and/or stores, the websites and
stores for which they are not authorized will either not be visible to them, or grayed-out as
inactive. Only the sales and other data for permitted websites and stores is shown.
All Users
Magento Community Edition 2.0 User Guide 945
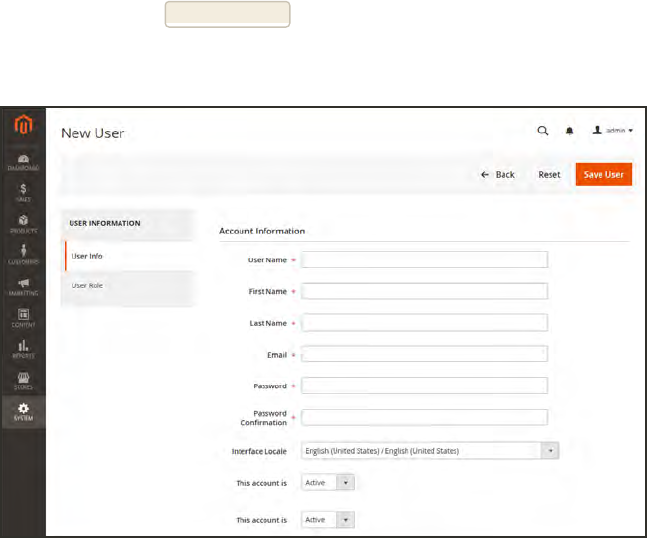
Adding Users
When your store is first installed, your login credentials give you full administrative access. As
a best practice, one of the first things you should do is to create another user account with full
Administrator permissions. That way, you can use one account for your everyday
Administrative activities, and reserve the other as a “Super Admin” account in case you forget
your regular credentials or they somehow become unusable.
If there are others on your team, or service providers who need access, you can create a separate
user account for each, and assign restricted access. To limit the websites or stores that admin
users can access when they log in, you must first create a role with limited scope and access to
resources. Then, you can assign the role to a specific user account. Admin users who are
assigned to a restricted role can see and change data only for websites or stores that are
associated with the role. They cannot make changes to any global settings or data.
Step 1: Create a New User
1. On the Admin sidebar tap System. Then under Permissions, choose All Users.
2. In the upper-right corner, tap Add New User.
3. In the Account Information section, do the following:
New User Account Information
Adding Users CHAPTER 72: Permissions
946 Magento Community Edition 2.0 User Guide

a. Enter the User Name for account.
The User Name should be easy to remember. It is not case-sensitive. For example, if your
user name is “John,” you can also log in as “john.”
b. Complete the following information:
lFirst Name
lLast Name
lEmail address
This email address must be different from the one that is associated with your original
Admin account.
c. Assign a Password to the account.
The password should be seven or more characters long, and include both letters and
numbers.
d. In the Password Confirmation box, repeat the password to make sure it was entered
correctly.
e. If your store has multiple languages, set Interface Locale to the language to be used for
the Admin interface.
4. Set This Account is to “Active.”
5. Under Current User Identity Verification, enter Your Password.
Current User Identity Verification
CHAPTER 72: Permissions Adding Users
Magento Community Edition 2.0 User Guide 947
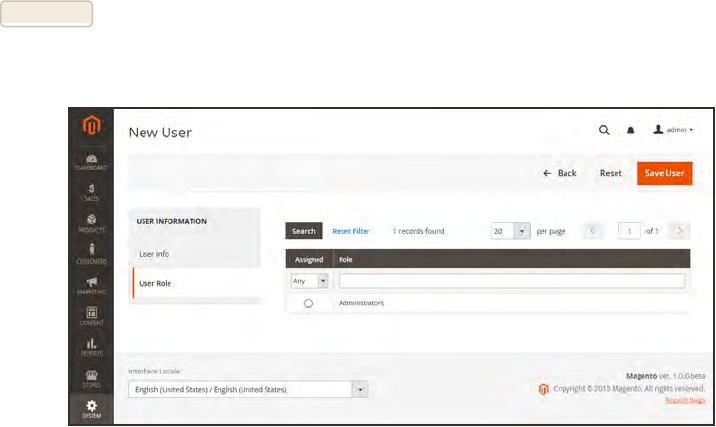
Step 2: Define the Role
1. In the panel on the left, choose User Role. The grid lists all the existing roles. Initially, the
only role available is Administrators.
2. In the Assigned column, select the Administrators option.
3. Tap Save User.
You now have two accounts with Administrator access.
Add New User Role
Adding Users CHAPTER 72: Permissions
948 Magento Community Edition 2.0 User Guide
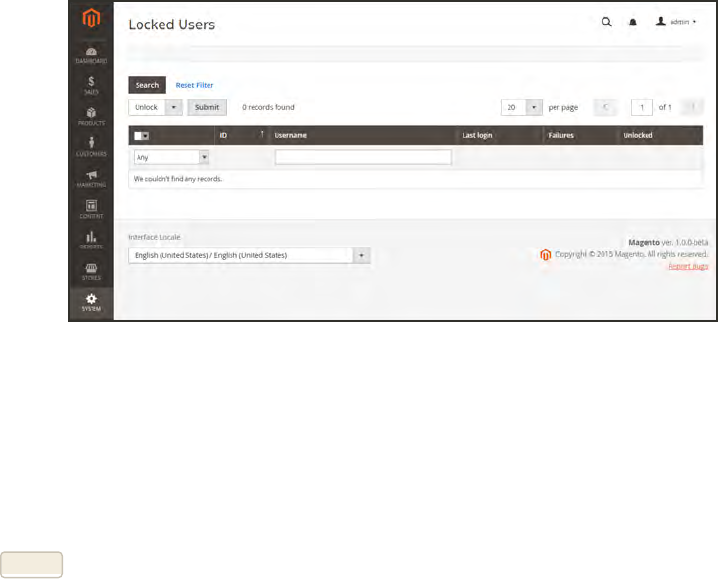
Locked Users
For the security of your business, user accounts are locked after six failed attempts to log in to
the Admin. Any user account that is currently locked appears in the grid. The account can be
unlocked by any other user with full Administrator permissions.
In the configuration, you can set the maximum number of times an Admin user can try to login
before the account is locked. To learn more, see: Configuring Admin Security.
To unlock an admin account:
1. On the Admin sidebar, tap System. Then under Permissions, choose Locked Users.
2. In the grid, mark the checkbox of the locked account.
3. In the upper-left corner, set the Actions control to “Unlock.”
4. Tap Submit to unlock the user account.
CHAPTER 72: Permissions Locked Users
Magento Community Edition 2.0 User Guide 949

User Roles
To give someone restricted access to the Admin, the first step is to create a role that has the
appropriate level of permissions. The role can have varying levels of permissions to the
following resources:
lPrice Resources
lPromotion Resources
lProduct Resources
After the role is established you can add new users and assign the restricted role to grant them
limited access to the Admin.
Role Name
User Roles CHAPTER 72: Permissions
950 Magento Community Edition 2.0 User Guide
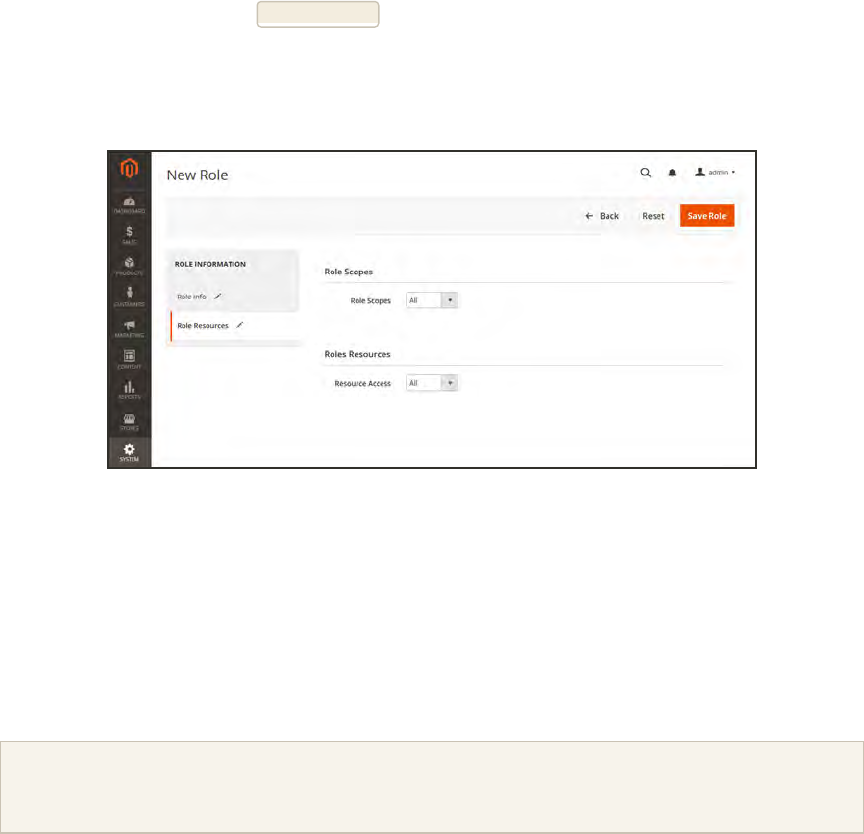
To define a role:
1. On the Admin sidebar, tap System. Then under Permissions, choose User Roles.
2. In the upper-left corner, tap Add New Role.
3. In the Role Information section, enter a descriptive Role Name.
4. In the panel on the left, choose Role Resources.
Role Scopes
5. Under Role Scopes , set Role Scopes to “Custom.” Then, mark the checkbox of each website
and view to which the role is to have permission to access.
6. In the Roles Resources tree, mark the checkbox of each Admin Resource that you want the role
to be able to access.
In the tree, the color of each node changes from white to gray each time the section is expanded
or collapsed. If the node is collapsed, you can click the node to show additional resources.
Important! Be sure to disable access to the Permissions tool if you are limiting access for a given
role. Otherwise, users will be able to modify their own permissions.
CHAPTER 72: Permissions User Roles
Magento Community Edition 2.0 User Guide 951
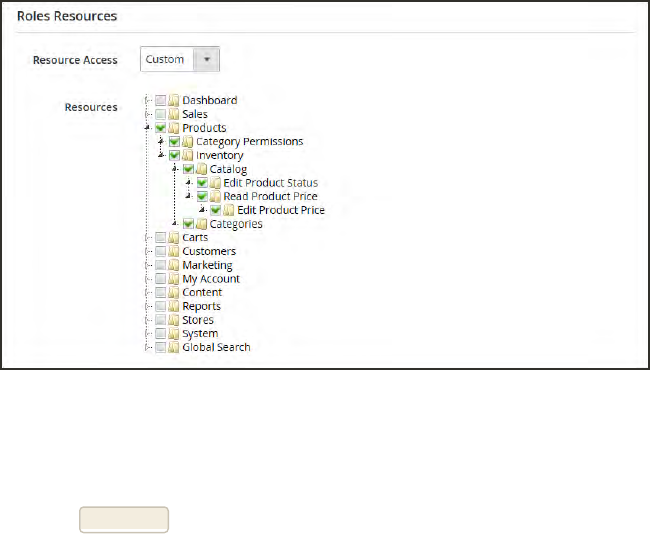
Role Resources Assigned
7. (Optional) In the panel on the left, choose Role Users. Then, assign additional Administrator
user accounts to the new role.
8. When complete, tap Save Role.
The role now appears in the grid, and can be assigned to new user accounts.
User Roles CHAPTER 72: Permissions
952 Magento Community Edition 2.0 User Guide

CHAPTER 73:
Security
In this section of the guide, you will learn security best practices, how to manage Admin
sessions and credentials, implement CAPTCHA, and manage website restrictions.
lSecurity Best Practices
lConfiguring Admin Security
lCAPTCHA
lEncryption Key
lBrowser Capabilities Detection
lAction Log
Magento Community Edition 2.0 User Guide 953
Security Best Practices
All eCommerce sites are attractive targets to hackers because of the personal and payment
information that is required to complete a sale. Even if the system does not directly process
credit card transactions, a compromised site might reroute customers to a false page, or alter
an order before it is transmitted to the payment processor.
A compromised site can have long-term consequences for both customers and merchants.
Customers might suffer financial loss and identify theft, while merchants can face damage to
their reputations, loss of merchandise, higher processing fees, revoked privileges with financial
institutions, and the threat of lawsuits.
This guide outlines a multifaceted approach to improve the security of your Magento
installation. Although there is no single way to eliminate all security risks, there are many
things that you can do to make your site a less attractive target. It is crucial for hosting
providers, system integrators, and merchants to work together to establish and maintain a
secure environment, implement methods for early detection, and determine a plan of action in
the event of a breach.
Start Right
Work with reliable hosting providers and solution integrators. When evaluating their
qualifications, ask about their approach to security. Verify that they have a secure software
development life cycle in accord with industry standards such as The Open Web Application
Security Project (OWASP), and that they test their code for security issues.
If you are starting a new site, consider launching the entire site over HTTPs. Taking the lead on
this issue, Google now uses HTTPs as a ranking factor.
For an existing installation, plan to upgrade the entire site to run over to a securely encrypted,
HTTPs channel. Although you will need to create redirects from HTTP to HTTPs, the effort will
future-proof your site. We recommend that you plan to make this change sooner, rather than
later.
Security Best Practices CHAPTER 73: Security
954 Magento Community Edition 2.0 User Guide

Protect the Environment
Protecting the environment is the most critical aspect of ensuring the security of your store.
Keep all software on the server up to date, and apply security patches as recommended. This
applies not only to Magento, but to any other software that is installed on the server, including
database software and other websites that use the same server. Any system is only as secure as
the weakest link.
Make sure that the server operating system is secure. Work with your hosting provider to
ensure that there is no unnecessary software running on the server.
Use only secure communications protocol (SSH/SFTP/HTTPS) to manage files, and
disable FTP.
Magento includes .htaccess files to protect system files when using the Apache
web server. If you use a different web server such as Nginx, make sure that all
system files and directories are protected. For an sample Nginx configuration, see:
magento-nginx.conf on GitHub.
Use strong and unique passwords, and change them periodically.
Keep the system up to date, and immediately install patches when new security issues
are discovered.
Closely monitor any issues that are reported for software components used by your
Magento installation, including the operating system, MySQL database, PHP, Redis (if
used), Apache or Nginx, Memcached, Solr, and any other components in your specific
configuration.
Limit access to cron.php file to only required users. For example, restrict access by IP
address. If possible, block access completely and execute the command using the
system cron scheduler.
Server Environment
Automate the deployment process, if possible, and use private keys for data transfer.
Limit access to the Magento Admin by updating the whitelist with the IP address of each
computer that is authorized to use the Admin and Magento Connect downloader. For
examples of how to whitelist IP addresses, see: Secure Your Magento Admin.
Do not install extensions directly on a production server.
Advanced Techniques
CHAPTER 73: Security Security Best Practices
Magento Community Edition 2.0 User Guide 955

To disable the Magento Connect downloader on the production site, either remove or
block access to the /downloader directory. You can also use the same whitelisting
methods.
Use two-factor authorization for Admin logins. There are several extensions available that
provide additional security by requiring an additional passcode that is generated on your
phone, or a token from a special device.
Review your server for “development leftovers.” Make sure there are no accessible log
files, publicly visible .git directories, tunnels to execute SQL, database dumps, phpinfo
files,or any other unprotected files that are not required, and that might be used in an
attack.
Limit outgoing connections to only those that are required, such as for a payment
integration.
Use a Web Application Firewall to analyze traffic and discover suspicious patterns, such
as credit card information being sent to an attacker.
Advanced Techniques (cont.)
Make sure that all applications running on the server are secure.
Avoid running other software on the same server as Magento, especially if it is accessible
from the Internet. Vulnerabilities in blog applications such as Wordpress can expose
private information from Magento. Install such software on a separate server or virtual
machine.
Keep all software up to date, and apply patches as recommended.
Server Applications
Make sure that the computer that is used to access the Magento Admin is secure.
Keep your antivirus software up to date, and use a malware scanner. Do not install any
unknown programs, or click suspicious links.
Use a strong password to log in to the computer, and change it periodically. Use a
password manager such as LasstPass,1Password, or Dashlane to create and manage
secure, unique passwords.
Do not save FTP passwords in FTP programs, because they are often harvested by
malware and used to infect servers.
Admin Desktop Environment
Security Best Practices CHAPTER 73: Security
956 Magento Community Edition 2.0 User Guide
Protect Magento
Your effort to protect your Magento installation starts with the initial setup, and continues
with the security-related configuration settings, password management, and ongoing
maintenance.
Use the latest version of Magento to ensure that your installation includes the most
recent security enhancements.
If for any reason you cannot upgrade to the latest version, make sure to install all security
patches as recommended by Magento. Although Magento issues security patches to fix
major issues, new product releases include additional improvements to help secure the
site.
Use a unique, custom Admin URL instead of the default “admin” or the often-used
“backend,” Although it will not directly protect your site from a determined attacker, it can
reduce exposure to scripts that try to break into every Magento site. (Never leave your
valuables in plain sight.)
Check with your hosting provider before implementing a custom Admin URL. Some
hosting providers require a standard URL to meet firewall protection rules.
Block access to any development, staging, or testing systems. Use IP whitelisting and
.htaccess password protection. When compromised, such systems can produce a data
leak or be used to attack the production system.
Use the correct file permissions. Core Magento and directory files should be set to ready
only, including app/etc/local.xml files.
Use a strong password for the Magento Admin. To learn more, see: Creating a strong
password.
Take advantage of Magento’s security-related configuration settings for Admin Security,
Password Options, and CAPTCHA.
Your Magento Installation
CHAPTER 73: Security Security Best Practices
Magento Community Edition 2.0 User Guide 957

Don’t be Taken for a Ride
Install extensions only from trusted sources. Never use paid extensions that are
published on torrent or other sites. If possible, review extensions for security issues
before installing them.
Do not click suspicious links, or open suspicious email.
Do not disclose the password to your server or to the Magento Admin, unless you are
required to do so.
Be Prepared!
Develop a disaster recovery/business continuity plan. Even a basic plan will help you get
back on track in the event of a problem.
Ensure that your server and database are automatically backed up to external location. A
typical setup requires daily incremental backups, with a full backup on a weekly basis.
Make sure to test the backup regularly to verify that it can be restored.
For a large site, simple text file dumps of the database take an unacceptable amount of
time to restore. Work with your hosting provider to deploy a professional database backup
solution.
Security Best Practices CHAPTER 73: Security
958 Magento Community Edition 2.0 User Guide

Monitor for Signs of Attack
If your system is not immediately patched after a major security breach, there is a high
probability that your site is already compromised. Complete a security review periodically to
check for signs of attack, and also when contacted by customers with security-related concerns.
Check periodically for unauthorized Admin users.
(Magento Enterprise only) Check the Admin Actions Log for suspicious activity.
Use automated log review tools such as Apache Scalp.
Work with your hosting provider to review server logs for suspicious activity, and to
implement an Intrusion Detection System (IDS) on your network.
Use a file and data integrity checking tool such as TripWire to receive notification of any
potential malware installation.
Monitor all system logins (FTP, SSH) for unexpected activity, uploads, or commands.
Security Review
CHAPTER 73: Security Security Best Practices
Magento Community Edition 2.0 User Guide 959
Follow Your Disaster Recovery Plan
In the event of a compromise, work with your internal IT security team if available, or hosting
provider, and system integrator to determine the scope of the attack. Taking into consideration
the type of compromise and the size of the store. Then, adjust the following recommendations
to your business needs.
1. Block access to the site, so the attacker cannot remove evidence or steal more information.
2. Backup the current site, which will include evidence of the installed malware or compromised
files.
3. Try to determine the scope of the attack. Was credit card information accessed? What
information was stolen? How much time has elapsed since the compromise? Was the
information encrypted? Typically you can expect the following types of attack:
Defacing of Site Site access is compromised, but often the payments information
is not. User accounts might be compromised.
Botnetting Your site becomes part of a botnet that sends spam email.
Although data is probably not compromised, your server is
blacklisted by spam filters which prevents email that you send to
customers from being delivered.
Direct Attack on Server Data is compromised, backdoors and malware are installed, and
the site no longer works. Payment information—provided that it
is not stored on the server— is probably safe.
Silent Card Capture In this most disastrous attack, intruders install hidden malware
or card capture software, or possibly modify the checkout process
to collect and send out credit card data. Such attacks can go
unnoticed for extended periods of time, and result in major
compromise of customer accounts and financial information.
4. Try to find the attack vector to determine how the site was compromised, and when. Review
server log files and file changes. Note that sometimes there are multiple different attacks on the
same system.
5. If possible, wipe and reinstall everything. In case of virtual hosting, create a new instance.
Malware might be hidden in an unsuspected location, just waiting to restore itself. Remove all
unnecessary files. Then, reinstall all required files from a known, clean source such as files from
your own version control system, or the original distribution files from magento.com.
6. Apply all the latest security patches necessary.
7. Reset all credentials, including the database, file access, payment and shipping integrations,
web services, and Admin login.
Security Best Practices CHAPTER 73: Security
960 Magento Community Edition 2.0 User Guide
8. If payment information was compromised, it might be necessary to inform your payment
processor.
9. Inform your customers about the attack and the type of information affected. If payment
information was compromised, they should look for unauthorized transactions. If personal
information, including email addresses was compromised, they might be targeted with
phishing attacks or spam.
Acknowledgments
Parts of this article were inspired by real-world solutions that were shared by community
members. The resulting article incorporates content from the community, with input from our
team.
lBryan (BJ) Hoffpauir for sharing his insight on the Magento forum, and for contributing
recommendations in the Attack Response Plan section of this article. See the original post by
beejhuff for more information.
lAnna Völkl (@rescueann), Magento developer at LimeSoda.
lRobert Mangiafico (@robfico) CTO at LexiConn.
l@dracony_gimp for his security presentation, Being Hacked is Not Fun.
lWillem de Groot for providing a sample Nginx configuration.
CHAPTER 73: Security Security Best Practices
Magento Community Edition 2.0 User Guide 961
Configuring Admin Security
For increased security, you can configure the length of keyboard inactivity before the current
session expires, and require the user name and password to be case-sensitive. For additional
security, the Admin login can be configured to require a CAPTCHA.
Security
Configuring Admin Security CHAPTER 73: Security
962 Magento Community Edition 2.0 User Guide
To configure Admin security:
1. On the Admin sidebar, tap Stores. Then under Settings, choose Configuration.
2. In the panel on the left, under Advanced, choose Admin. Then, do the following:
a. To append secret key to the Admin URL to protect against exploits, set Add Secret Key to
URLs to “Yes.” This setting is enabled by default.
b. To require the user name and password to have the same upper-and lowercase characters
as those that are saved in the system, set Login is Case Sensitive to “Yes.”
c. To require Admin users to sign in again after a period of keyboard inactivity, set Admin
Session Lifetime (seconds) to a number greater than 60. To not set a limit on the length
of a session, leave the field blank.
d. In the Maximum Login Failures to Lockout Account field, enter the number of times
Admin users can try to log in before their accounts are locked.
e. In the Lockout Time (minutes) field, enter the number of minutes an Admin account is
locked before the user can try to log in again.
f. In the Password Lifetime (days) field, enter the number of days an Admin password can
be used before it expires.
g. If you want to require Admin users to change their passwords before they expire, set
Password Change to “Forced.”
3. When complete, tap Save Config.
CHAPTER 73: Security Configuring Admin Security
Magento Community Edition 2.0 User Guide 963
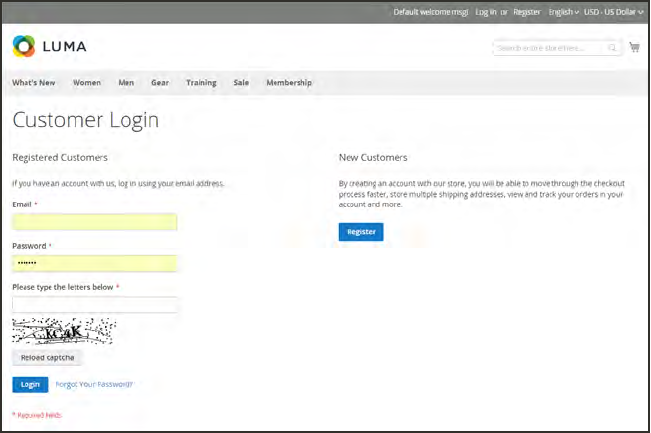
CAPTCHA
A CAPTCHA is a visual device that ensures that a human being, rather than a computer, is
interacting with the site. CAPTCHA is an acronym for “Completely Automated Public Turing
test to tell Computers and Humans Apart,” and can be used for both Admin and customer
account logins.
You can reload the CAPTCHA as many times as is necessary by clicking the Reload icon in the
upper-right corner of the image. The CAPTCHA is fully configurable and can be set appear
every time, or only after a number of failed login attempts.
Customer Login with CAPTCHA
CAPTCHA CHAPTER 73: Security
964 Magento Community Edition 2.0 User Guide
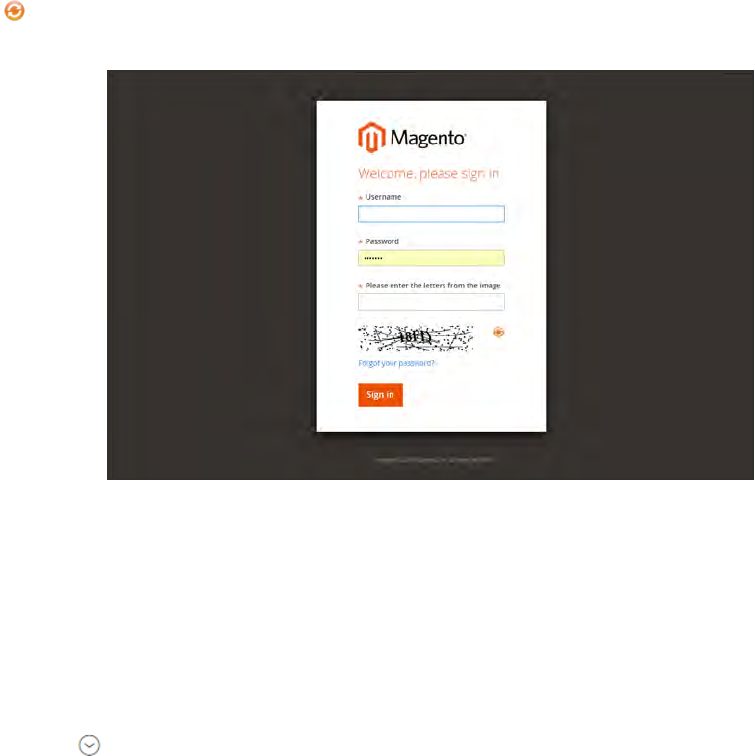
Admin CAPTCHA
For an extra level of security, you can add a CAPTCHA to the Admin SignIn and Forgot
Password page. Administrator users can reload the displayed CAPTCHA by clicking the Reload
icon in the upper-right corner of the image. The number of reloads is unlimited.
Admin Sign In with CAPTCHA
To configure an Admin CAPTCHA:
1. On the Admin sidebar, tap Stores. Then under Settings, choose Configuration.
2. In the panel on the left, under Advanced, choose Admin.
3. In the upper-right corner, set Store View to “Default.”
4. Expand the CAPTCHA section, and do the following:
a. Set Enable CAPTCHA in Admin to “Yes.”
b. Enter the name of the Font to be used for the CAPTCHAsymbols. Default font:
LinLibertine
To add your own font, the font file must reside in the same directory as your Magento
instance, and be declared in the config.xml file of the Captcha module.
c. Select the Forms where the CAPTCHA is to be used:
lAdmin Login
lAdmin Forgot Password
d. Set Displaying Mode to one of the following:
CHAPTER 73: Security CAPTCHA
Magento Community Edition 2.0 User Guide 965

Always CAPTCHA is always required to log in the Admin.
After
number
of
attempts
to login
When selected displays the Number of Unsuccessful Attempts to Login field.
Enter the number of login attempts allowed. A value of 0 (zero) is similar to
setting Displaying Mode to Always. This option does not cover the Forgot
Password form. If CAPTCHA is enabled and set to be appear on this form, then
it is always included on the form.
e. Enter the Number of Unsuccessful Attempts to Login before the CAPTCHA appears. If
set to zero, the CAPTCHAis always used.
f. In the CAPTCHA Timeout (minutes) field, enter the number of minutes before the
CAPTCHAexpires. When the CAPTCHAexpires, the user must reload the page.
g. Enter the Number of Symbols used in the CAPTCHA, up to eight. For a variable number
of symbols that changes with each CAPTCHA, enter a range, such as 5-8.
h. In the Symbols Used in CAPTCHA field, specify the symbols that can be used in the
CAPTCHA. Only letters (a-z and A-Z) and numbers (0-9) are allowed. The default set of
characters does not include similar symbols such as I or 1. For best results, use symbols
that users can readily identify.
i. To require that users enter the characters exactly as shown set Case Sensitive to “Yes.”
5. When complete, tap Save Config….
CAPTCHA CHAPTER 73: Security
966 Magento Community Edition 2.0 User Guide
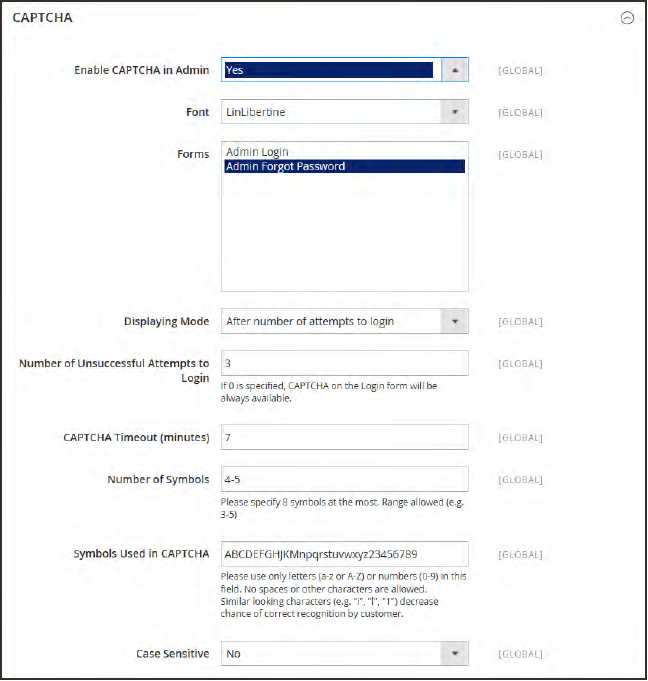
Admin CAPTCHA Configuration
CHAPTER 73: Security CAPTCHA
Magento Community Edition 2.0 User Guide 967
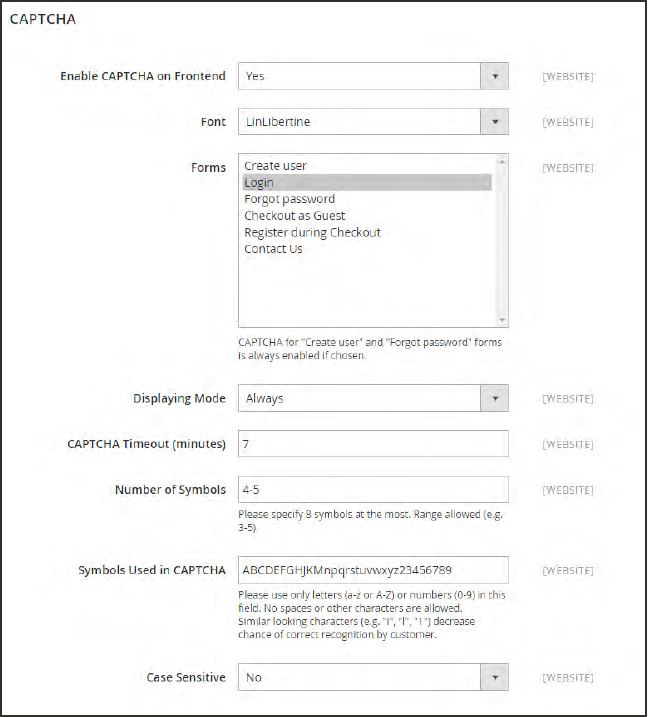
Customer CAPTCHA
Customers can be required to enter a CAPTCHA each time they log in to their accounts, or after
several unsuccessful attempts to log in. CAPTCHA can be used for the following forms in the
storefront:
lCreate User
lLogin
lForgot Password
lCheckout as Guest
lRegisterDuring Checkout
lContact Us
Customer CAPTCHA Configuration
CAPTCHA CHAPTER 73: Security
968 Magento Community Edition 2.0 User Guide
To configure a Storefront CAPTCHA:
1. On the Admin sidebar, tap Stores. Then under Settings, choose Configuration.
2. In the panel on the left, under Customers, choose Customer Configuration.
3. Expand the CAPTCHA section, and do the following:
a. Set Enable CAPTCHA on Frontend to “Yes.”
b. Enter the name of the Font to be used for the CAPTCHAsymbols.
To add your own font, the font file must reside in the same directory as your Magento
instance, and be declared in the config.xml file of the CAPTCHA module.
c. Choose one of the following Forms where CAPTCHA is to be used.
lCreate User
lLogin
lForgot Password
lCheckout as Guest
lRegister during Checkout
d. Set Displaying Mode to one of the following:
Always CAPTCHA is always required to access the selected form(s).
After number
of attempts to
login
Enter the number of login attempts before the CAPTCHAappears. A value
of 0 (zero) is similar to “Always.” When selected, the number of
unsuccessful login attempts appears.
This option does not apply to the Forgot Password form, which always
display the CAPTCHA, if enabled,
e. Enter the Number of Unsuccessful Attempts to Login before the CAPTCHA appears. If
set to zero, the CAPTCHAis always used.
f. In the CAPTCHA Timeout (minutes) field, enter the number of minutes before the
CAPTCHAexpires. When the CAPTCHAexpires, the user must reload the page to generate
a new CAPTCHA.
g. Enter the Number of Symbols in the CAPTCHA, up to eight. For a variable number of
symbols that change with each CAPTCHA, enter a range such as 5-8.
h. In the Symbols Used in CAPTCHA field, specify the symbols that can be used in the
CAPTCHA. Only letters (a-z and A-Z) and numbers (0-9) are allowed. The default set of
characters does not include similar symbols such as I or 1. For best results, use symbols
that users can readily identify.
i. To require that the user enter the upper-and lowercase characters exactly as shown set
Case Sensitive to “Yes.”
4. When complete, tap Save Config.
CHAPTER 73: Security CAPTCHA
Magento Community Edition 2.0 User Guide 969
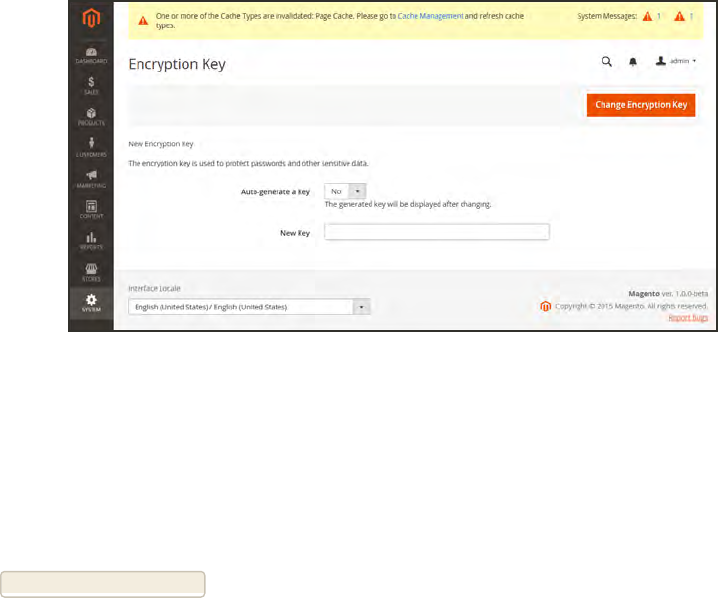
Encryption Key
The encryption key is used to protect passwords and other sensitive data. During the Magento
setup, you have the option to generate an encryption key, or use an another.
Encryption Key
To change the encryption key:
1. On the Admin sidebar, tap System. Then under Other Settings, choose Manage Encryption
Key.
2. Set Auto-generate Key to “Yes.”
3. Tap Change Encryption Key.
Encryption Key CHAPTER 73: Security
970 Magento Community Edition 2.0 User Guide

Session Validation
Magento Community 2.0 allows you to validate session variables as a protective measure
against possible session fixation attacks, or attempts to poison or hijack user sessions. The
Session Validation Settings determine how session variables are validated during each store
visit, and if the session IDis included in the URLof the store.
Session Validation Settings
The validation checks to see that visitors are who they say they are by comparing the value in
the validation variables against the session data that is already stored in $_SESSION data for
the user. Validation fails if the information is not transmitted as expected, and the
corresponding variable is empty. Depending on the session validation settings, if a session
variable fails the validation process, the client session immediately terminates.
Enabling all of the validation variables can help prevent attacks, but might also impact the
performance of the server. By default, all session variable validation is disabled. We recommend
that you experiment with the settings to find the best combination for your Magento
installation. Activating all of the validation variables might prove to be unduly restrictive, and
prevent access to customers who have Internet connections that pass through a proxy server, or
that originate from behind a firewall. To learn more about session variables and their use, see
the system administration documentation for your Linux system.
CHAPTER 73: Security Session Validation
Magento Community Edition 2.0 User Guide 971

To configure the Session Validation Settings:
1. On the Admin sidebar, tap Stores. Then under Settings, choose Configuration.
2. In the panel on the left under General, choose Web.
3. Expand the Session Validation Settings section. Then, do the following:
a. To verify that the IP address of a request matches what is stored in the $_SESSION
variable, set Validate REMOTE_ADDR to “Yes.”
b. To verify that the proxy address of an incoming request matches what is stored in the $_
SESSION variable, set Validate HTTP_VIA to “Yes.”
c. To verify that the forwarded-for address of a request matches what is stored in the $_
SESSION variable, set Validate HTTP_X_FORWARDED_FOR to “Yes.”
d. To verify that the browser or device that is used to access the store during a session
matches what is stored in the $_SESSION variable, set Validate HTTP_USER_AGENT to
“Yes.”
e. If you want a user to stay logged in while switching between stores, set Use SID on
Frontend to “Yes.”
If including SID with analytics, you must configure your analytics software to filter the SID
from URLs, so the page visit counts are correct.
4. When complete, tap Save Config.
Session Validation CHAPTER 73: Security
972 Magento Community Edition 2.0 User Guide
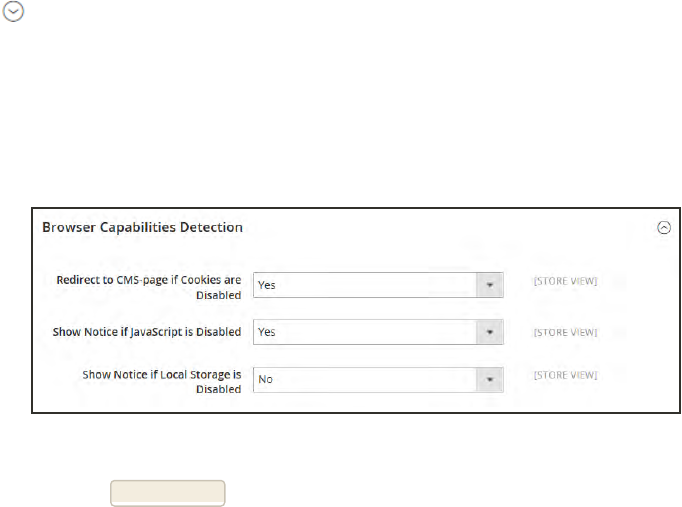
Browser Capabilities Detection
As is true of most websites and applications on the Internet, Magento requires that the visitor’s
browser allow both cookies and JavaScript for full operations. However, occasionally a user’s
browser is set to the highest privacy setting that prevents both cookies and JavaScript. Your
store can be configured to test the capabilities of each visitor’s browser, and to display a notice
if the settings need to be changed.
lIf the browser’s privacy settings disallow cookies, you can configure the system to
automatically redirect them to the Enable Cookies page, which explains how to make the
recommended settings with most browsers.
lIf the browser’s privacy settings disallow JavaScript, you can configure the system to display
the following message above the header of every page:
To configure browser capabilities detection:
1. On the Admin sidebar, tap Stores. Then under Settings, choose Configuration.
2. In the panel on the left under General, choose Web.
3. Expand the Browser Configuration Detection section, and do the following:
a. To display instructions that explain how to configure the browser to allow cookies, set
Redirect to CMS-page if Cookies are Disabled to “Yes.”
b. To display a banner above the header when JavaScript is disabled in the user’s browser, set
Show Notice if JavaScript is Disabled to “Yes.”
Browser Capabilities Detection
4. When complete, tap Save Config.
CHAPTER 73: Security Browser Capabilities Detection
Magento Community Edition 2.0 User Guide 973
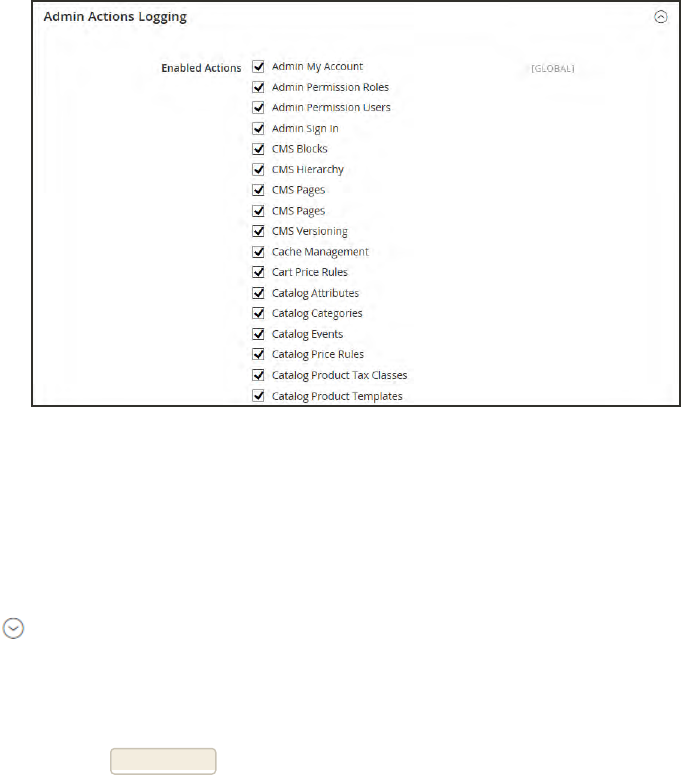
Action Log
The Action Log tracks the activities of administrators who work in your store. For most events,
the available information includes the action, the name of the user who performed it, whether it
was a success or failure, and the ID of the object on which the action was performed.
Additionally the IP and date are always logged.
Admin Actions Logging
To configure the Action Log:
1. On the Admin sidebar, tap Stores. Then under Settings, choose Configuration.
2. In the panel on the left under Advanced, choose Admin.
3. Expand the Admin Actions Logging section, and do the following:
lTo enable admin logging, mark the checkbox.
lTo disable admin logging, clear the checkbox.
4. When complete, tap Save Config.
Action Log CHAPTER 73: Security
974 Magento Community Edition 2.0 User Guide

Appendices
Magento Community Edition 2.0 User Guide 975


APPENDIX A:
Release Notes
Release notes provide a detailed description of each product release, with links to
additional technical information, installation instructions, and support resources.
Magento 2.x has a quarterly product release cycle, which is represented by the first decimal
position in the version number. In addition, there might be interim patch releases to
resolve security issues, and make necessary updates to the software. Patch releases are
represented by the second decimal position in the version number. This user guide reflects
the most current version of the product, which appears in the upper-right corner of each
page.
We sometimes refer to the current quarterly release, which at this time is 2.0, or to a
specific patch release, such as 2.0.2. The designation 2.x is a general reference that
includes any future or past version of the product.
As a best practice, we recommend that you keep your Magento 2.x installation up to date,
so you can benefit from the latest features and advancements in digital commerce.You can
find the release notes for the current and previous versions of [[[Undefined variable
MyVariables.Product Name 2.x]]] online.
lMagento Enterprise Edition 2.0.4 Release Notes
lMagento Enterprise Edition 2.0.3 Release Notes
lMagento Enterprise Edition 2.0.2 Release Notes
lMagento Enterprise Edition 2.0.1 Release Notes
lMagento Enterprise Edition 2.0 Release Notes
Magento Community Edition 2.0 User Guide 977

Notes
978 Magento Community Edition 2.0 User Guide
APPENDIX B:
Change Log
Our documentation is continually updated with new topics, clarifications, and corrections
to existing content. The Change Log in the online user guide lists the major updates,
organized by month. If you can’t see the most recent changes, refresh your browser or clear
the cache. Check back every now and then to see what’s new!
Change Log
Magento Community Edition 2.0 User Guide 979

Notes
980 Magento Community Edition 2.0 User Guide
APPENDIX C:
Glossary
A
above the fold
The web page content that is immediately visible in the browser window; section of a page
that is displayed without the need to scroll.
Admin
The password-protected back office of your store where orders, catalog, content, and
configurations are managed.
alt text
The text that is displayed in place of an image when the user is unable to view the image.
anchor text
The visible text that is anchored to another page or page section; the literal text of a
hyperlink.
API
Application Program Interface: A software interface that lets third-party applications read
and write to a system using programming language constructs or statements.
aspect ratio
The proportional relationship between the width and height of an image.
attribute
A characteristic or property of a product; anything that describes a product. Examples of
product attributes include color, size, weight, and price.
authorization
To give a service permission to perform certain actions or to access resources.
average inventory cost
Product price, less coupons or discounts, plus freight and applicable taxes. The average is
determined by adding the beginning cost of inventory each month, plus the ending cost of
inventory for the last month of the period.
Magento Community Edition 2.0 User Guide 981

B
B2B
Business to Business: A type of business transaction between two business entities that are not
the final consumers of the goods or services.
B2C
Business to Consumer: Business transactions between a business entity and a consumer.
banner
Promotional graphics displayed either horizontally on the top of a web page or vertically on the
left or right margins. Website advertisements are often displayed as banners.
base currency
The primary form of currency used in store transactions.
base currency rate
The base currency rate is the default for your store.
batch processing
To perform a task or make a change to multiple items all at once, without manual repetition.
bounce rate
The percentage of visitors to your site that leave without viewing any other pages.
brand
A unique identity that defines a particular product or group of products.
breadcrumb
A navigation aid that helps the user to keep track of their location within your store.
brick and mortar
A retail business with a permanent physical location, as opposed to being entirely virtual.
broken link
A hyperlink that fails to send the user to its intended web page.
C
callout
A term that is sometimes used to describe a block that is defined as a layout update using XML
code.
canonical URL
The canonical meta tag redirects search engines to the correct URL, when seemingly duplicate
content is encountered on the server.
982 Magento Community Edition 2.0 User Guide
APPENDIX C: Glossary

capture
The process of converting the authorized amount into a billable transaction. Transactions cannot
be captured until authorized, and authorizations cannot be captured until the goods or services
have been shipped.
cardholder
A person who opens a credit card account and is authorized to make purchases.
cascading style sheet
The markup standard used to apply styles to HTML elements on the page.
category
A set of products that share particular characteristics or attributes.
CCV
Credit Card Verification code. (See CVV)
checkout process
The process of gathering the payment and shipping information that is necessary to complete the
purchase of items in the shopping cart. In the final step, the customer reviews and places the
order.
CMS
Content Management System: A software system that is used to create, edit, and maintain
content on a website.
complex data
Data that is associated with multiple product options.
complex product
A product that requires the customer to choose from a selection of options.
composite product
Any product type that offers customers a choice of options.
Content Delivery Network
A large distributed network of servers that specializes in the high performance delivery of multi-
media content.
content marketing
The art of promoting products or services by providing valuable information at no charge.
conversion
A marketing term that indicates a goal has been reached. If the goal is to sell a product,
conversion is reached when a visitor to your site becomes a buyer.
conversion rate
The percentage of visitors who are converted into buyers.
Magento Community Edition 2.0 User Guide 983
APPENDIX C: Glossary
credit memo
A document issued by the merchant to a customer to write off an outstanding balance because of
overcharge, rebate, or return of goods.
CSS
Cascading Style Sheets: A style sheet language that controls the appearance of HTML
documents; a way to control the appearance of text, graphics, lists, links, and all other elements
on a web page.
CSV
Comma Separated Values: A type of file used to store data values which are separated from
each other by commas.
CVM
Card Verification Method: A way to verify the identity of the customer by confirming a 3-digit or 4-
digit credit card security code with the payment processor.
CVV
The Card Verification Value, also known as the Card Security Code, provides an additional level
of security for online transactions.
D
domain
The address of a website on the web; what the customer types in their browser address bar to
access the store.
double opt-in
The process for subscribing email recipients by requiring them to take a secondary step to
confirm that they want to receive emails.
dynamic content
A web page that displays different content depending on the user request.
Dynamic Media URL
A link to an image that contains a relative reference to the file location in media storage.
E
EAV
Entity Attribute Value
evergreen content
Content that has a long shelf life.
984 Magento Community Edition 2.0 User Guide
APPENDIX C: Glossary
F
FAQ
Frequently Asked Questions.
favicon
Short for favorites icon; a 16x16 or 32x32 pixel icon associated with a website; is displayed in the
browser address bar and next to the site name in a bookmark list.
feed reader
Software that is used to read syndicated content from RSS feeds.
FOB
Freight On Board: A shipping term indicating who is responsible for paying transportation
charges.
frontend properties
Properties that determine the presentation and behavior of an attribute from the standpoint of the
customer in your store.
fulfillment
The process of managing customer shipments.
G
gateway
A transaction bridge between a customer and a payment processing service that is used to
transfer money between the customer and the merchant.
gross margin
The difference between the cost and price of a product.
H
handle
In programming, a name used to reference an object.
home page
The first home page a visitor sees when they access your website URL. Considered the most
important page on your website according to search engine indexing.
HTML
HyperText Markup Language: A standard for tagging and structuring text, images, videos, and
other media on a web page.
Magento Community Edition 2.0 User Guide 985
APPENDIX C: Glossary
I
invoice
A document that provides a detailed description of a purchase, including products purchased,
quantity, price, shipping cost, sales tax, and total.
J
JavaScript
A scripting language used with HTML to produce dynamic effects and interactions on web pages.
jQuery
A popular JavaScript library that is often used to create dynamic and responsive effects.
K
keyword
A term or phrase used in a search to filter for content that is of significant importance to that term
or phrase.
L
landing page
A page on your site where a visitor arrives after clicking a link or advertisement.
layout
The visual and structural composition of a page.
layout update
A specific set of XML instructions that determines how the page is constructed.
link juice
The value and authority transferred from one web page to another via hyperlinks (or links). Link
juice affects a website’s page rank, a factor used to rank a search engine results page.
liquid layout
A flexible approach to web design that specifies the size and position of elements as
percentages rather than as exact measurements in pixels.
load sequence
The order in which scripts are loaded into memory. To work correctly, some scripts must be
loaded before others.
locale
A set of configurations that defines the user’s language, country, tax rate, and other settings.
login
The process of signing into an online account.
986 Magento Community Edition 2.0 User Guide
APPENDIX C: Glossary
M
markdown
The amount subtracted from the original price of a product.
markup
A percentage added to the cost of an item to determine the retail price.
media storage
A dedicated space on the content delivery network for your store's assets.
merchant account
An account with a bank or financial institution that makes it possible to accept credit card
transactions.
meta tags
Information in a web page that is not displayed on the page itself, but is used by search engines
to determine the page title, description, and page keywords.
My Term
My definition
N
navigation
The primary group of web page links that a customer uses to navigate around the website; the
navigation links to the most important categories or pages on an online store.
O
opt-in
The process by which a user consents to receiving emails from an online store.
P
packing slip
A document that is usually included in a shipped package that describes the contents. Packing
slips do not include financial or account information.
path to purchase
The path a prospect follows that leads to a sale.
payment bridge
An application that helps merchants meet PCI- DSS requirements.
payment gateway
A service that charges your customers’ credit cards and sends the funds to your merchant
account, for deposit into your business bank account.
Magento Community Edition 2.0 User Guide 987
APPENDIX C: Glossary

Payment Gateway
A third-party service that processes transactions for external payment methods.
Payment Method
A way for the customer to pay for the merchandise in your store. Payment methods can be
internal or external. The Payment Methods section of the System Configuration includes all basic
payment methods and gateways.
PCI
Payment Card Industry: Refers to debit and credit cards and their associated businesses.
privacy policy
A document that explains the merchant’s policies for handling customer information.
purchase order (PO)
A written sales contract between a buyer and seller that describes the merchandise or service to
be purchased from a vendor.
R
redirect
A method used to alert browsers and search engines that a page has been moved. 301 Redirect:
Permanent change 302 Redirect: Temporary change
relative link
A hyperlink that includes only the address of the linked page that is relative to the linking page,
rather than the full URL.
return policy
A document that explains the merchant’s rules regarding the return of products by customers.
robots.txt
A file placed on a website that tells search engine crawlers which pages not to index.
RSS feed
Really Simple Syndication: A technology that creates web content syndication and allows web
users to subscribe to product feeds, websites, and blogs.
S
SaaS
Software as a Service: A software delivery model where the vendor provides the software and
hosting environment, and customers pay for the service by subscription or per use.
Sass/Compass
A CSS pre-compiler that provides organizable, reusable CSS.
security certificate
Information that is used by the SSL protocol to establish a secure connection.
988 Magento Community Edition 2.0 User Guide
APPENDIX C: Glossary

SEO
Search Engine Optimization: The process of improving a website’s search engine rankings in
order to increase valued visitors.
SERP
Search Engine Results Page
settlement
Settlement occurs when the acquiring bank and the issuer exchange funds and the proceeds are
deposited into the merchant account.
shipping carrier
A company that transports packages. Common carriers include UPS, FedEx, DHL, and USPS.
shopping cart
A grouping of products that the customer wishes to purchase at the end of their shopping
session.
sidebar
The right or left column of a two-column page layout.
sitemap
A page that provides search engines with an efficient, alternate route through your site.
SKU
Stock Keeping Unit: A number or code assigned to a product to identify the product, options,
price, and manufacturer.
splash page
A promotional page with a product or advertisement; normally displayed before the home page.
SSL certificate
A validation and security mechanism that identifies the merchant and encrypts credit card and
other sensitive information.
static block
A fixed content block that can be displayed on various content pages in a store.
static content
Content that does not change frequently. See also dynamic content.
T
theme
A package that contains graphics and appearance information, and customizes the look and feel
of the store.
transactional email
A notification email sent to the customer when a transaction is processed.
Magento Community Edition 2.0 User Guide 989
APPENDIX C: Glossary
transactional emails
An automated email message that is sent in response to a specific event or transaction.
U
URL
Uniform Resource Locator: The unique address of a page on the internet.
usability
Refers to the degree to which a product or service is easy to use by its customers.
W
widget
A prepared snippet of code that adds functionality and/or dynamic effects to your store.
WYSIWYG
What You See Is What You Get: An editor that displays formatted text as it will appear in its final
published form.
X
XML
Extensible Markup Language: A markup format derived from SGML that it used to format
information for publication and distribution.
990 Magento Community Edition 2.0 User Guide
APPENDIX C: Glossary
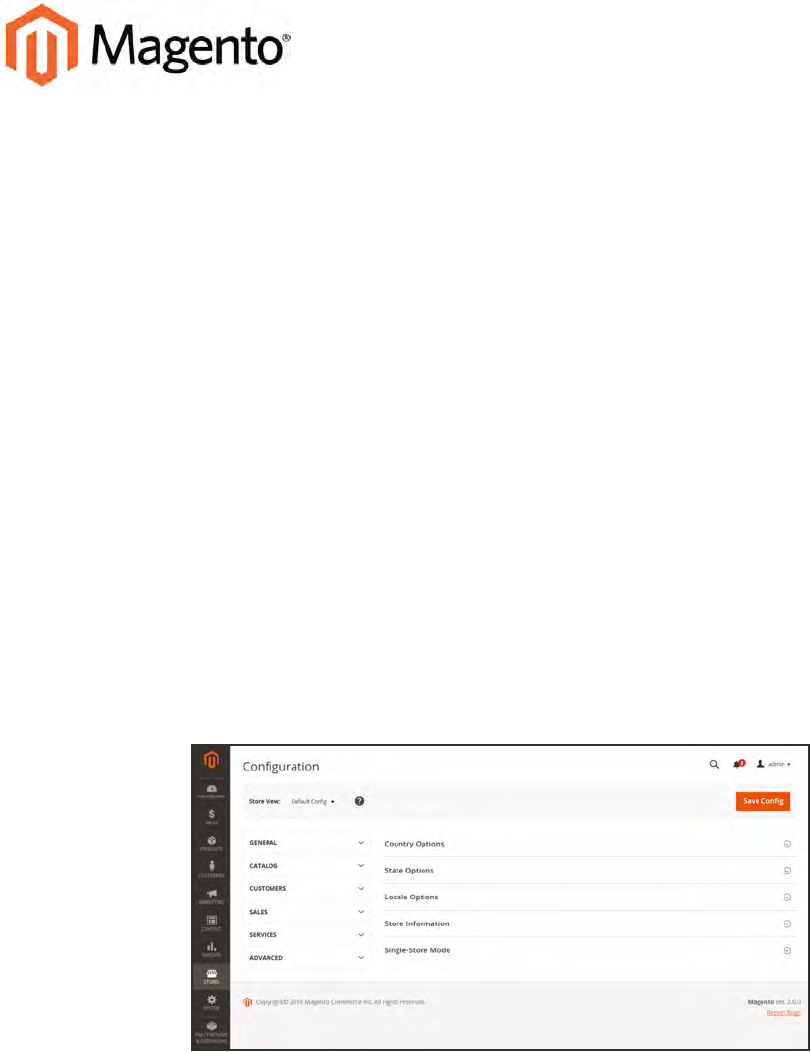
APPENDIX D:
Configuration Reference
This reference has field descriptions for every configuration setting in Magento Community
Edition 2.0. To learn how to apply configuration settings to specific store views, see:
Configuration Scope.
From the HTMLversion of the guide, you can drill down through any section of the
reference, and follow the links to corresponding topics in the user guide. From step-by-step
instructions, click any linked caption below a screenshot to jump to the field descriptions.
Click any of the following links to go to the corresponding section in the online reference:
lGeneral
lCatalog
lCustomers
lSales
lServices
lAdvanced
Configuration
Magento Community Edition 2.0 User Guide 991

Notes
992 Magento Community Edition 2.0 User Guide

Index
[
[GLOBAL] 102
[STORE] 102
[WEBSITE] 102
1
1 Column Layout 272, 540, 542
2
2 Columns
with Left Bar 273, 540, 543
with Right Bar 273, 540
3
3 Column Layout 541, 544
4
404 Page Not Found 481-482
5
503 Service Unavailable 482
A
About Us page 480
Account
customer information 578
Magento 19
share 23
Actions
control 60, 73
Actions, Mass 75
Add
Root Category 264
Address
Book, customer 578
Address format 378
Address templates 378
Address, customer 587
Admin 53, 73
access 945
account, unlock 949
Actions Log 974
CAPTCHA 964
login 53
Notifications 65
permissions 945
role 946
role, create 948
role, custom 950
security 953
993
sidebar 57
Startup Page 63
user 946
user, create 946
Advanced Search 433
Advocacy Tools 48
All Customers 571
Allow
Countries 82
HTML Tags on Frontend 850
Allowed Currencies 839
Analytics 42, 48
Anchor category 263-264
Android, email 348
Antivirus software 106
Any, checkbox 75
AOV 46
API 49
Apple Mail 348
Approve product review 304-305
Attribute
code 848
entities 880
filterable 422
group 858
input types 282
predefined 395
system 857
Attribute set 139
Attributes
Product 275
product, add 276
Australia, PayPal solutions 691
Authorize.Net
Direct Post Method 695
Auto-generated fields 130
Automatic
redirect 459
Autosettings 252
Average Order Value 46
B
Backend See also
Admin 53
Backup
delete 926
permissions 926
Base
currency 843
image 193
JavaScript URL 924-925
media URL 924-925
Base URL 779
Base URL Home page 482
Best practice
industry 105
Bestsellers 64
Billing
agreement 579
agreement, PayPal Express Checkout 684
Block 395
category 270, 272
Index
994 Magento Community Edition 2.0 User Guide
create 506
ID, markup tag 400
Block reference 518, 546, 556
category 512
CMS pages 512
product page 513
Blog, as Home Page 482
Blog, Magento 5, 7
Braintree 694
Branding 91
Breadcrumb trail 414
Breadcrumb Trail 482
Browser Capabilities Detection 973
Bundle Product 133, 164
Business location 82
Buy X, Get Y Free 339
C
Cache 914
JavaScript 915
Storage Management 914
Callout 518
Canada
Example Tax Configuration 822
Canada, PayPal solutions 691
Canadian tax 817
Canceled, order status 615
Canonical meta tag 125, 449
CAPTCHA 964, 968
configuration, Admin 965
configuration, store 968
Cardholder data 106
Cash On Delivery 644
Catalog 49
Category Link 520
flat 437
images 189
indexing 437
New Products List 520
Price Rules 309, 311
Product Link 520
Catalog Prices, tax 816
Catalog Workspace 117
Categories
Custom Design 273
Display Settings 271
General Information 268
Category
create 259
Description 268
Display Settings 270
General Information 267
grayed out 259
ID 259
image 268
landing page 260, 272
modify 262
name 268
page 270
path, in URL 125, 449
Products 274
root 263
Index
Magento Community Edition 2.0 User Guide 995
tree 259
URL key 259
Category hidden 266
Category Products 117-118, 258, 274, 485,
602-603, 605-606
CDN 923
JavaScript use 923
media retrieval 923
Certification 5
Change Log 979
Check / Money Order 642
Checkbox 60
states 75
Checkout process 45
Checkout with PayPal 670
Chrome, email 349
Clear cache 914
Closed, order status 615
CMS 43, 477
Block, category 271
Page Link 520
page redirect 468
Pages 479, 495
Static Block 520
Widget 521
COD 644
Column 539
layout 272, 518
sort 70
Comma-separated values 866
Community 48
Compare Products 292, 301, 849
Comparison operator 315
Complete, order status 615
Compliance, industry 105
Conditions, price rule 323
Configurable Product 132
create 139
image 151
Configuration 991
search, default 436
security 953
Configuration, Basic 51
Consent, cookies 108
Consulting 5
Contact Us
form 400
Content 475, 477, 479
Delivery Network 923
management system 43
menu 57
page 495
Cookie
domain 109
law 108
lifetime 109
Restriction Mode 107-108
use, Magento 111
Cookie, Limit Sending By 294
Copyright notice 538
Copyright Notice, change 99
Countries Options 82
Index
996 Magento Community Edition 2.0 User Guide
Coupon 46-47, 332, 391
Coupon Usage, report 335
Create
Packages, shipping labels 737
Store View 769, 776
Website 767, 774
Credentials, credit card 693
Credit
card 693
memo 631
Credit Card, test numbers 693
Credit Memo
Print 635
Cron 934
Cron job 437
Cross-sells 248, 300
CSS
email 359
CSS, merge 564
CSV file 712, 866, 880
category path 866
customer structure 868
structure 866
csv separator 866
Currency 85
rates 843
Rates 837
Setup 843
symbols 843
Symbols 842
Currency Chooser 837
Current Configuration Scope 102-103
Custom
Design
Category 272
layout 273
Layout Update
product 250
Layout Update, category 273
redirect 468
Theme 250, 273
URL 42
variable 395
Custom Order Status 617
Customer
account 48, 575
dashboard 575
VAT Validation 812
Account scope 583
Address 587
address template 378
CSV structure 868
engagement 43
group
create 591
VAT 812
journey 40-41
Order Status, RSS feed 393
Reports 757
retention 47
segment 46
Service page 481
Index
Magento Community Edition 2.0 User Guide 997
Support 86
VAT 812
Customers 64, 567
menu 57
Customers online 572
Customers, menu 569
D
Dashboard 48, 61
charts 62
configuration 61
customer 575
menu 57
Database
and Media Backup 927
backup 927
compression, backup 926
media storage 921
Date, input type 282
Day of Week 80
Default
Config 102
Country 82
Display Currency 843
Default Pages 482
Default theme 560
Demo
login 54
Design 43, 49, 531, 533
custom, category 272
product 250
Schedule 566
Development environment 437
DHL 717, 721
shipping labels 728
Digital Goods, tax 799
Dimensional weight 716
Direct Post Method, Authorize.Net 695
Discount 311, 650
quantity 219
Display
in Suggested Terms 444
Mode, category 271
not required State 81
Settings
Category 270
Store Demo Notice 97
Distributing newsletters 386
Documentation 4
Double opt-in 382
Downloadable Product 133
configure 182
create 174
Drill-down, price 426
Dropdown
input type 282
Duplicate
content 449
Dynamic
URL 124
values, bundle product 164
Index
998 Magento Community Edition 2.0 User Guide
E
EAV 437
eBook download 174
ECG 6
Eco tax 793
Ecosystem, Magento 7
Editor, WYSIWYG 501
Email
a Friend 292-293
a Friend, configure 293
addresses, domain 86
addresses, store 86
campaign 47
CSS file 351
footer 352
header 351
header template 360
logo 351
message templates 368
template 359
template, configure 347
Email clients 348
Email template 372
variables 395
Email Template
configuration 351
email, browsers 349
Empty, page layout 273, 541
Enable
Cookies 482
Encryption 106
Entity Attributes 883
Equalize
Price Ranges, layered navigation 427
Product Counts, layered navigation 427
EU Member Countries 815
EU Place of Supply 799
European Union
Example Tax Configuration 827
Evergreen content 477
Export 882
product data 882
product types 882
Settings 882
Export, criteria 884
Export, Exclude 885
Export, filters 885
Expressed consent, cookies 108
F
Facebook 7, 508
Favicon 95
FedEx 717, 720
shipping labels 728
Feed reader 391
Fields, default values 130
Filter
by Attribute 261
controls 71
Filterable
attribute 422, 850
Filters 60
Index
Magento Community Edition 2.0 User Guide 999
Firefox, email 349
Firewall 106
Fixed Product Tax 793
input type 283
Flat
catalog 437
setup 437
Rate Shipping 706
Flush
JavaScript cache 915
product image cache 915
Footer 99, 538
Forum, Magento 5, 7
FPT 793
attribute 795
configuration 794
in attribute set 797
in product 798
France, PayPal solutions 691
Free
shipping 704
shipping, price rule 336
FTP calculations 793
Full
page cache, settings 919
reindex 932
G
Gateway, payment 693
General
Contact 86-87
Germany, PayPal 691
Global
search 60, 69
Gmail 348
Goods & Services Tax 822
Google 471
Analytics 471
Analytics, cookies 112
Merchant Center 471
Reader 391
Sitemap 451, 471
Universal Analytics 472
Grid
Catalog 117
filter 71
sort 70
Grid, columns 492
Grid, Product 416
Group price 217
Grouped Product 132
create 152
GST 822
H
Handle 557
Header 537
welcome message 98
Header template, email 360
Help 4
Hidden category 259, 266
Home page 480
Index
1000 Magento Community Edition 2.0 User Guide
Home Page, create 499
Home Page, default 482
Hong Kong, PayPal solutions 691
HTML
editor 501
email 359
Head 536
in product description 850
product descriptions 282
HTML, Page Setup 535
I
Image
cache, flush 915
import 878
size 189
URL 502
zoom 195
Image, placeholders 199
Image, watermarks 200
Implementation 49
Implied consent, cookies 108
Import
Behavior 881
guidelines 880
images 878
table rates, shipping 712
Tax Rates 802
In Anchor, category 271
In Stock 232
Inbox, Admin 65
Include / Exclude Tax 833
Include in
Advanced Search 433
Navigation Menu 266, 269
Incoming Messages 66
Index 928
actions 932
Management 928
modes 928
Indexing speed 437
Input type
Date 282
Dropdown 282
Fixed Product Tax 283
Media Image 282
Multiple Select 282
Price 282
Text Area 282
Text Field 282
Yes/No 282
Insert image 502
Install
Magento 53
Internet Explorer
email 349
Inventory
Configuration 234
Manage Stock 232
Invoice
Print 624
Index
Magento Community Edition 2.0 User Guide 1001
Invoiced
order, download product 181
IP Address, Limit Sending By 294
IP ddress 779
iPhone, email 348
Is Active 268
Is Anchor 261, 264
Italy, PayPal solutions 691
Iterative splitting, price navigation 426
J
Japan, PayPal solutions 691
JavaScript
cache 915
JavaScript, merge 565
K
Knowledge base 4
L
Label
price rule 323
shipping 729
Landing page 441
Landing page, login 584
Language 102
Language Pack, Add 770
Layered navigation
configuration 429
Layered Navigation 271, 421, 849
filterable 422
Interval Division Limit 427
product count 421
Layered Price Navigation Step 271
layout
update 545
Layout
custom 273
Layout Update 557
syntax 549, 552
widget 517, 528
Like button, Facebook 508
Link
image 502
LinkedIn 7
Linux 10
List, Product 416
Listing Sort By, category 271
Load sequence 557
local.xml 921
Locale 80
Locale, language 770
Login 576
Admin 53
demo store 54
Landing page 584
Magento account 19
Logo 537
email 350
header 92
Logo image, email 353
Logo size, email 353
Index
1002 Magento Community Edition 2.0 User Guide
Loyalty program 48
M
Magento
account 19
Connect 50, 562, 912
cookies 111
Solutions Partners 49
Magento Connect, Install Extension 770
Magento Marketplace 911
Magnify image 195
Main menu 412
Manage
Stock 232
Stores 767, 774
MAP 221
MAP (Minimum Advertised Price) 221
Mark as Read 67
Marketing
menu 57
Reports 749
Marketplace 911
markup tag 504
Markup tag 395, 399, 402
Mass Actions 75
Media
image, input type 282
retrieval, CDN 923
Storage 502, 922
Storage, database 921
URL 502
URL, markup tag 399
Media Storage 500
Menu
Customers 569
Products 115
Merchandising tools 46
Merchant level, PCI 106
Merchant solutions, PayPal 45
Message
InBox 65
Messages, Admin 65
Meta
Information 42, 448
category 267
Description 448
Keywords 267, 448
page 495
Title 448
tag, canonical 449
Minimum Advertised Price 221, 223
Miscellaneous
HTML 538
Misspelled words
redirect 441
Moderate, product reviews 304-305
Money Order 642
Multiple
Select, input type 282
Music download 174
My
Account 19
Index
Magento Community Edition 2.0 User Guide 1003
Orders 579
Product Reviews, customer 579
MySQL 11
Fulltext Search 436
N
Name and Address Options 587
Name, customer 587
Navigation 266, 411
Breadcrumb trail 414
menu 260, 269
Top 412
New
Customers 64
order state 615
Products list 391, 520, 527
New Zealand, PayPal solutions 691
Newsletter 47, 381
configuration 382
Queue 386
templates 384
Next page link 419
Nginx 10
No
checkbox 75
layout updates 273
Non-sessioned visit 918
Notifications, Admin 65
O
Offline, refund 633
On Hold, order status 615
Online customers 572
Online refund 633
Opt-in 382
Oracle 11
Order 615
fulfillment 50
status 615, 617
Order processing 45
Orders and Returns 520
Out of Stock 232
Outlook 348-349
P
Page 479
create 495
session, customer 918
Translate 773
Page Footer 538
Page Layout 250, 273, 539, 542
examples 542
product 250
Page Not Found 481
Page Search 488
Page Setup 535
Pages
Default 482
Pagination 419
controls 60, 70, 435
Parent
category 273
Index
1004 Magento Community Edition 2.0 User Guide
Partial
reindex 932
Partners, find 57
partners, Magento 5
Password 106, 576
Password Options 589
Pay Now button, PayPal 662
payment
gateways 664
Payment
gateways 49, 693
methods 49
options 45
Review, order status 615
services 49
Payment Card Industry (PCI) 106
Payment Methods
Authorize.Net 695
Cash on Delivery 644
Check / Money Order 642
Purchase Order 648
Zero Subtotal Checkout 650
PayPal 653
business account 654
Express Checkout 653, 670
Billing Agreements 684
merchant solutions 45
Payflow Link 667
Payflow Pro 665
Payments Advanced 656
Payments Pro 660
Payments Standard 662
Settlement Report 686
solutions 692
Webiste Payments Standard 662
PCI Compliance 106
PDF
credit memo 631
PDF Printouts 376
Pending
order status 615
order, download product 181
Payment, order status 615
PayPal, order status 615
Reviews 304-305
Percona 11
Permanent
(301) 464
Redirect 459
Permissions
admin 945
backup 926
custom 950
rollback 926
PHP script
database media storage 921
Placeholders, image 199
PO 648
Poll 292
Popular Search Terms 442
Postal code, optional 83
Previous page link 419
Index
Magento Community Edition 2.0 User Guide 1005
Price
display 843
drill-down 426
input type 283
navigation 421, 426
Range, bundle product 164
Special 218
Tier 219
View, bundle product 164
Price group 217
Price Rule
Catalog 311, 318
condition, attributes 846
coupon 332
promotions 339, 341
Shopping Cart 319
Price Type
Fixed 243
Percentage 243
Print
credit memo 631
shipping labels 724
Privacy
policy 107, 110, 481
Processing, order status 615
Product
attributes, add 276
Bundle 164
catalog 49
Configurable 139
create 123
data, export 882
Description
HTML 850
Downloadable 133
file structure 866
Group price 217
Grouped 152
image cache 915
image, watermarks 200
image, zoom 195
images 189
Information
Design 250
list 261, 850
by category 400
markup tag 400
new 400
name 187
ratings 48
relationships 246-248
reviews 48, 304
moderate 304-305
Rewrite 466
Simple 134
suggestions 46
type
export 882
Video 196
Virtual 159
Product Alerts
configuration 240
Index
1006 Magento Community Edition 2.0 User Guide
run settings 242
Product Attributes 275
Product Field Auto-Generation 130
product images 194
Product List 416
Product Scope 120
Product Stock Options 234
Product View Page, visible on 850
Product, workspace 127
Products
menu 57
Products menu 115
Promotions 309
Price Rules 339
Provincial Sales Tax 822
PST 822
Publish
page 498
Purchase Order 648
Q
QR code 332
Quantity
Discount 219
Quick Search 432
attributes 846
R
Rating, product 306
Recently Compared Products 520
Recently Viewed Products 303, 520
Record selection 60
Redirect 466
custom 468
misspelled words 441
type 464
URL 457
Refresh
cache 915
report data 762
statistics 762
Refund
offline 633
online 633
Reindex
events 931
full 932
partial 932
Reindex Required 438
Related
Products 246
Report
Coupon Usage 335
statistics, refresh 762
Reports 743
Marketing 749
menu 57
Sales 753
Reset, password 576
Responsive Web Design (RWD) 560
Return to Stock 632
Reviews 292
Index
Magento Community Edition 2.0 User Guide 1007
Reviews and Ratings 304-305
Reward Points
product review 304
Rewrite
product 466
type 464
RMA 47
robots.txt 451
Role
custom 950
Resources 951
scope 951
Rollback
resources 926
Root
category 259, 263
RSS feed 48, 391
Run settings, product alerts 242
S
Sales
email 87
menu 57
Representative 86
Sales Reports 753
Sample
page 480
Schedule
Design changes 566
Scheduled Jobs, cron 934
Scope 102, 848
Customer account 583
settings 103
Scope, product 120
Search
Admin 69
configure 436
default 436
global 69
Pages 488
quick 432
results 435
tools, storefront 431
Search engine
friendly URLs 124
optimization 42
Search Engine Optimization 211
Search Terms 441
add 444
Security 106, 953
systems 106
Web API 910
Security certificate 779
Select
All 73
Visible 73
Select All 75
Select Visible 75
Selection, records 60
Sender Email 86
SEO 42
Index
1008 Magento Community Edition 2.0 User Guide
SERP 211
Service Unavailable 482
Session
cookie 109
customer 918
ID 918
Session Validation 971
Sessioned visit 918
Settlement Report, PayPal Express
Checkout 686
SFTP
user account, PayPal 686
Share account, Magento 23
Ship
Bundle Items 173
Shipping
carriers 717, 720-721
Dimensional weight 716
labels 729
options 45
rates
import 708
refund 631
Shipping Labels 45, 723
configure 725
create 724
Shipping Methods 50, 703-704, 706, 708,
720-721
Shipping Prices, tax 817
Shipping Settings 700
Shop By 421
Shopping
history 47
Shopping Cart
price rule 319, 332, 339, 341
Sidebar, block reference 518
Simple product, create 134
Sitemap 42, 451
SKU 187
in price rules 318
multiple 318
use of 139
Slider
jQuery 511
Small Image 189, 193
Software download 174
Solutions Partners, Magento 49
Sort 60
attributes 846
controls 70
product list 271
Spain, PayPal solutions 691
Spam 382
Special Price 218
Special Products, RSS feed 393
SSL 779
Startup Page
Admin 63
State is required for 81
States Options 81
Static Block
category page 260
Index
Magento Community Edition 2.0 User Guide 1009
Static URL 124
Status
change 73
Stock Availability 232
catalog page 238
product page 237
scenarios 236
Storage
configuration, media 922
Store
URL 54
Store Demo Notice 97
Store Hierarchy 767, 774
Store Information 77-78
Store URL, markup tag 399
Storefront
Branding 91
CAPTCHA 964
Stores
menu 57
Stores, multiple 101, 767
Subcategory 259, 266
Subdomain, CDN 923
Surveys 292
Suspected Fraud, order status 615
Swatch 193
Swatches 203
Swatches, create 205
Switch Accounts 25
Synchronization 921
Syndicated content 391
Synonyms 444
search terms 441
Syntax
layout update 552
System
attribute 857
backup 927
menu 57
notifications 67
passwords 106
System Requirements 10
T
Table Rate, shipping 708
Tag
cloud 442
Tags
product
RSS feed 391
Target Path, redirect 464
Tax 50, 787-788
Calculation Settings 833
class
customer group 591
VAT 812
Class
Customer group 792
class, price 187
Digital Goods 799
Discount Settings 833, 835
Index
1010 Magento Community Edition 2.0 User Guide
rates
VAT 812
Rounding 816
rules 788
VAT 812
Warning Messages 833
Tax as line item 817
Tax Calculation Methods 816
Tax Class, VAT 827
Tax Rate
Point of Origin 700
Tax Rates
Import 802
Tax Zones and Rates 800
Tax, Quick Reference 816
Template
layout update, widget 521
tag 400
variables 395
Templates, transactional email 368
Temporary (302) redirect 464
Test, payment gateway 693
Text
Area, input type 282
editor 501
Field, input type 282
Theme 43, 531, 533
change 562
Theme, default 560
Third-party
applications 49
Thumbnail 193
Image 194
Tier Price 219
Timezone 80
Top Level Category, RSS feed 393
Top navigation 412
Training 5
Transactional emails 293
templates 368
Translate
Field Labels 771
Page 773
Product Fields 771
Translate Store 770
TVQ 822
Twitter 7
U
Under construction 97
United Kingdom, PayPal solutions 692
United Parcel Service 718
United States
Tax Configuration 820
United States, PayPal solutions 692
Universal Analytics, Google 472
Unlock
Admin account 949
Unselect
All 73
Visible 73
Unselect All 75
Index
Magento Community Edition 2.0 User Guide 1011
Unselect Visible 75
Up-sell products 247, 300
Update Attributes 74
UPS 717-718
shipping labels 728
URL 923
category path 125
custom 42
dynamic 124
Key 124, 211
category 267
page 495
Key, category 268
options 124
redirect 457
rewrite 262
static 124
suffix 211
Use
Default checkbox 103
for Promo Rule Conditions 850
Use Secure URLs (SSL) 779
User
guides 4
User guides 4
User Role, Admin 948
USPS 717, 719
shipping labels 728
V
Value Added Tax 787-788, 805
Variable, markup tag 399
Variables 395-397, 504
email 359
VAT 805
ID location 813
VAT Tax Class 827
VAT Validation 811
configure 812
Video, product 196
Virtual
Product 132, 159
Visit
non-sessioned 918
sessioned 918
W
Watermarks, product image 200
Web API Security 910
Web server
synchronization 921
Webinars 5, 7
Websites
multiple 101, 767
product 212
WEEE tax 793
Weight
Bundle Product 173
product 187
Weight, dimensional 716
Welcome 3
message 98, 537
Index
1012 Magento Community Edition 2.0 User Guide
message, block 549
White list 386
Widget 401, 503, 521
add to page 503
code 401
email 359
New Products 527
Widgets 519
Wiki 4
Wishlist 292, 298
configuration 297
in RSS feed 393
Workflow
order 615
Workspace, product 127
WYSIWYG Editor 501
enable 282
X
XML 545, 556
Y
Yes, checkbox 75
Yes/No, input type 282
YouTube 7
Z
Zero Subtotal Checkout 650
Zones, tax 800
Index
Magento Community Edition 2.0 User Guide 1013

Notes
1014 Magento Community Edition 2.0 User Guide
