MagicDraw ReportWizard UserGuide Magic Draw Report Wizard User Guide
User Manual:
Open the PDF directly: View PDF ![]() .
.
Page Count: 378 [warning: Documents this large are best viewed by clicking the View PDF Link!]
- Contents
- 1. MagicDraw Report Wizard Overview
- 2. Report Wizard Template Language
- 3. Template Variables
- 4. Helper Modules
- 4.1 $report
- $report.createValueSpecificationText(specification)
- $report.filterDiagram(diagramList, diagramTypes)
- $report.filterElement(elementList, humanTypes)
- $report.filter(elementList, propertyName, propertyValue)
- $report.findElementInCollection(elementList, name)
- $report.findRelationship(modelPackage)
- $report.findRelationship(modelPackage, recursive)
- $report.getAppliedStereotypeByName(element, stereotypeName)
- $report.getBaseClassAssociations(classifier)
- $report.getBaseClassInheritableAttributes(classifier)
- $report.getBaseClassInheritableOperations(classifier)
- $report.getBaseClassPorts(classifier)
- $report.getBaseRealizedInterfaces(behavioredClassifier)
- $report.getBaseRelations(classifier)
- $report.getBaseClassifiers(child)
- $report.getClientElement(element)
- $report.getComment(element)
- $report.getDerivedClassifiers(parent)
- $report.getDiagramElements(diagram)
- $report.getDiagramType(diagram)
- $report.getDSLProperty(element, propertyName)
- $report.getElementComment(element)
- $report.getElementName(element)
- $report.getIconFor(element)
- $report.getIconFor(element, prefix, suffix, hashCode)
- $report.getIconFor(type)
- $report.getIconFor(type, prefix, suffix, hashCode)
- $report.getIncludeUseCase(useCase)
- $report.getInnerElement(element)
- $report.getInteractionMessageType(message)
- $report.getMetaClass(stereotype)
- $report.getPresentationDiagramElements(diagram)
- $report.getPresentationDiagramElements(diagram, includeNonManipulator)
- $report.getPresentationElementBounds(diagram, element)
- $report.getPresentationElementBounds(element)
- $report.getPresentationElementRectangle(diagram, element)
- $report.getQualifiedName(namedElement, separator)
- $report.getPackageQualifiedName(namedElement, separator)
- $report.getReceivingOperationalNode(element)
- $report.getRelationship(element)
- $report.getRelationship(element, recursive)
- $report.getRelativeActor(element)
- $report.getSendingOperationalNode(element)
- $report.getSlotValue(element, ClassifierName, DefiningFeatureName)
- $report.getStereotypeProperty(element, stereotypeName, propertyName)
- $report.getStereotypeProperty(element, profileName, stereotypeName, propertyName)
- $report.getStereotypePropertyString(element, stereotypeName, propertyName)
- $report.getStereotypes(element)
- $report.getSupplierElement(element)
- $report.getUsageElements(usagesMap, element)
- $report.getUsages(selectedObjects)
- $report.hasStereotype(element)
- $report.containsStereotype(element, stereotypeName)
- $report.containsStereotype(element, stereotypeName, includeDerived)
- $report.isDerivedClassifier(parent, child)
- $report.isNamedElement(element)
- $report.isNull(obj)
- $report.isRelationship(element)
- $report.serialize(hyperlink)
- $report.getUsedBy(element)
- $report.hasProperty(element, propertyName)
- $report.findElementByName(source, regex)
- $report.getPresentationElements(diagram)
- $report.getUsageRepresentationText(baseElement, bool)
- $report.getUseCaseNumber(element)
- $report.getElementURL(element)
- $report.isEmpty(obj)
- $report.getBasicFlows(usecase:UseCase) : List<FlowStep>
- $report.getAlternativeFlows(usecase:UseCase) : List<FlowStep>
- $report.getExceptionalFlows(usecase:UseCase) : List<FlowStep>
- 4.2 $project
- $project.getName()
- $project.getTitle()
- $project.getFileName()
- $project.getExtension()
- $project.getDirectory()
- $project.getVersionList()
- $project.getType()
- $project.getDiagrams()
- $project.getDiagrams(type)
- $project.getPresentationDiagrams()
- $project.getPresentationDiagrams(type)
- $project.isRemote()
- $project.isDirty()
- $project.getElementByID(id)
- $project.getAllElementId()
- $project.getXmiVersion()
- $project.getVersion()
- $project.getModel()
- $project.getModuleList()
- $project.getSharedModule(module)
- 4.3 $iterator
- 4.4 $list
- 4.5 $bookmark
- $bookmark.openURL(url, content)
- $bookmark.openURL(url, content)
- $bookmark.openURL(uri, content)
- $bookmark.open(content)
- $bookmark.open(bookmarkId, content)
- $bookmark.create(bookmarkObject)
- $bookmark.create(bookmarkId, bookmarkObject)
- $bookmark.create(bookmarkId, bookmarkObject, elementType)
- $bookmark.getBookmarkId(id)
- 4.6 $sorter
- $sorter.sort(Collection, fieldName)
- $sorter.sort(Collection)
- $sorter.sortByFirstNumber(Collection, fieldName)
- $sorter.sortByFirstNumber(Collection)
- $sorter.sortByLocale(Collection, String)
- $sorter.sortByLocale(Collection, String, String)
- $sorter.humanSort(collection, fieldName)
- $sorter.humanSort(collection)
- 4.7 $template
- 4.8 $file
- $file.silentCreate(template)
- $file.silentCreate(template, importObject)
- $file.silentCreate(template, outputFileName, importObject)
- $file.silentCreate(templateType, template, outputname, importObject)
- $file.create(template)
- $file.create(template, importObject)
- $file.create(template, outputFileName, importObject)
- $file.create(templateType, template, outputname, importObject)
- $file.createAndWait(templateFilename)
- $file.createAndWait(template, contextValue)
- $file.createAndWait(String templateFileName, String outputFileName, Object contextValue)
- $file.createAndWait(String templateFileName, String outputFileName, String ContextName, Object contextValue)
- $file.createAndWait(String templateFileName, String outputFileName, Map<String, Object> context)
- $file.copy(inputFilename)
- $file.copy(inputFilename, outputFilename)
- $file.exists(pathname)
- $file.computeName(directory, name)
- $file.computeName(directory, name, fileType)
- 4.9 $array
- 4.10 $group
- 4.11 $map
- 4.12 $date
- 4.13 $profiling
- $profiling.getGeneralizationName(modelName)
- $profiling.getDeclaringElementName (modelName, propertyName)
- $profiling.getPropertyTypeName (modelName, propertyName)
- $profiling.getPropertyTypeName (element, propertyName)
- $profiling.getElementProperties(modelName)
- $profiling.getElementProperties(element)
- $profiling.getElementProperty(element, propertyName)
- $profiling. getHumanPropertyName(element, propertyName)
- 4.14 $image
- 4.1 $report
- 5. Report Wizard Template Editor
- 6. Generating Reports from Report Wizard
- 7. Generating Reports from the Containment Tree
- 8. Generating Reports from the Command Line
- 9. Report Wizard Quick Print
- 10. Report Wizard Environment Options
- 11. Debug Report Template
- 12. Use Case Driven
- 13. Javadoc Syntax Tool
- 14. Import Tool
- 15. JavaScript Tool
- 16. Groovy Script Tool
- 17. Ruby Script Tool
- 18. Dialog Tool
- 19. Text Tool
- 20. Model Validation Tool
- 21. Metrics Tool
- 22. Dependency Matrix Tool
- 23. Generic Table Tool
- 24. Query Tool
- Appendix A: Report Extensions
- Appendix B: Office Open XML Format Template
- Appendix C: OpenDocument Format Template
- Appendix D: HTML Tag Support
- Appendix E: DocBook Support

MAGICDRAW REPORT
WIZARD
18.1
user guide
No Magic, Inc.
2015
All material contained herein is considered proprietary information owned by No Magic, Inc. and is not to be
shared, copied, or reproduced by any means. All information copyright 1998-2015 by No Magic, Inc. All Rights
Reserved.

CONTENTS
3
Copyright © 1998-2015 No Magic, Inc.
REPORT WIZARD 15
1. MagicDraw Report Wizard Overview 15
1.1 Report Wizard Dialog 15
1.1.1 Control Buttons 16
1.1.2 Content Management Pane 16
1.1.2.1 Template Management Pane 17
1.1.2.2 Report Data Management Pane 27
1.1.2.3 Select Element Scope Pane 46
1.1.2.4 Generate Output Pane 47
1.2 MRZIP File Automatic Deployment 50
2. Report Wizard Template Language 52
2.1 Velocity Template Language 52
2.2 Report Wizard Custom Language 52
2.2.1 #forrow Directive 52
2.2.2 #forpage Directive 52
2.2.2.1 OpenDocument Specific Usage 53
2.2.3 #forcol Directives 54
2.2.4 #includeSection Directive 55
2.2.5 #include, #parse, and #includeSection: A Comparison 55
2.3 Formatting Template Code 56
2.4 Unparsed Code 57
3. Template Variables 58
3.1 Retrieving Slot Value 61
3.1.1 Using Normal UML Specification to Retrieve Slot Values 61
3.1.2 Using Slot Property to Retrieve Slot Values 61
3.1.2.1 Retrieving Slot Information from an Element 61
3.1.2.2 Retrieving Slot Information from an Element and a Classifier’s Name 62
3.1.2.3 Retrieving Slot Value from an Element, a Classifier’s Name, and a Defining Feature
Name 62
3.1.2.4 Code Examples to Retrieve Slot Values 64
4. Helper Modules 68
4.1 $report 68
4.1.1 $report.createValueSpecificationText(specification) 68
4.1.2 $report.filterDiagram(diagramList, diagramTypes) 68
4.1.3 $report.filterElement(elementList, humanTypes) 68
4.1.4 $report.filter(elementList, propertyName, propertyValue) 69
4.1.5 $report.findElementInCollection(elementList, name) 69
4.1.6 $report.findRelationship(modelPackage) 69
4.1.7 $report.findRelationship(modelPackage, recursive) 70
4.1.8 $report.getAppliedStereotypeByName(element, stereotypeName) 70
4.1.9 $report.getBaseClassAssociations(classifier) 70
4.1.10 $report.getBaseClassInheritableAttributes(classifier) 70
4.1.11 $report.getBaseClassInheritableOperations(classifier) 70
4.1.12 $report.getBaseClassPorts(classifier) 71
4.1.13 $report.getBaseRealizedInterfaces(behavioredClassifier) 71
4.1.14 $report.getBaseRelations(classifier) 71
4.1.15 $report.getBaseClassifiers(child) 71
4.1.16 $report.getClientElement(element) 71
4.1.17 $report.getComment(element) 72
4.1.18 $report.getDerivedClassifiers(parent) 72
4.1.19 $report.getDiagramElements(diagram) 72
4.1.20 $report.getDiagramType(diagram) 72
4.1.21 $report.getDSLProperty(element, propertyName) 73
4.1.22 $report.getElementComment(element) 73

CONTENTS
4
Copyright © 1998-2015 No Magic, Inc.
4.1.23 $report.getElementName(element) 73
4.1.24 $report.getIconFor(element) 73
4.1.25 $report.getIconFor(element, prefix, suffix, hashCode) 74
4.1.26 $report.getIconFor(type) 74
4.1.27 $report.getIconFor(type, prefix, suffix, hashCode) 75
4.1.28 $report.getIncludeUseCase(useCase) 75
4.1.29 $report.getInnerElement(element) 75
4.1.30 $report.getInteractionMessageType(message) 76
4.1.31 $report.getMetaClass(stereotype) 76
4.1.32 $report.getPresentationDiagramElements(diagram) 76
4.1.33 $report.getPresentationDiagramElements(diagram, includeNonManipulator) 76
4.1.34 $report.getPresentationElementBounds(diagram, element) 77
4.1.35 $report.getPresentationElementBounds(element) 77
4.1.36 $report.getPresentationElementRectangle(diagram, element) 77
4.1.37 $report.getQualifiedName(namedElement, separator) 78
4.1.38 $report.getPackageQualifiedName(namedElement, separator) 78
4.1.39 $report.getReceivingOperationalNode(element) 78
4.1.40 $report.getRelationship(element) 79
4.1.41 $report.getRelationship(element, recursive) 79
4.1.42 $report.getRelativeActor(element) 79
4.1.43 $report.getSendingOperationalNode(element) 79
4.1.44 $report.getSlotValue(element, ClassifierName, DefiningFeatureName) 79
4.1.45 $report.getStereotypeProperty(element, stereotypeName, propertyName) 80
4.1.46 $report.getStereotypeProperty(element, profileName, stereotypeName, propertyName)
80
4.1.47 $report.getStereotypePropertyString(element, stereotypeName, propertyName) 81
4.1.48 $report.getStereotypes(element) 81
4.1.49 $report.getSupplierElement(element) 81
4.1.50 $report.getUsageElements(usagesMap, element) 81
4.1.51 $report.getUsages(selectedObjects) 82
4.1.52 $report.hasStereotype(element) 82
4.1.53 $report.containsStereotype(element, stereotypeName) 82
4.1.54 $report.containsStereotype(element, stereotypeName, includeDerived) 82
4.1.55 $report.isDerivedClassifier(parent, child) 83
4.1.56 $report.isNamedElement(element) 83
4.1.57 $report.isNull(obj) 83
4.1.58 $report.isRelationship(element) 83
4.1.59 $report.serialize(hyperlink) 83
4.1.60 $report.getUsedBy(element) 84
4.1.61 $report.hasProperty(element, propertyName) 84
4.1.62 $report.findElementByName(source, regex) 84
4.1.63 $report.getPresentationElements(diagram) 85
4.1.64 $report.getUsageRepresentationText(baseElement, bool) 85
4.1.65 $report.getUseCaseNumber(element) 86
4.1.66 $report.getElementURL(element) 86
4.1.67 $report.isEmpty(obj) 86
4.1.68 $report.getBasicFlows(usecase:UseCase) : List<FlowStep> 87
4.1.69 $report.getAlternativeFlows(usecase:UseCase) : List<FlowStep> 87
4.1.70 $report.getExceptionalFlows(usecase:UseCase) : List<FlowStep> 88
4.1.70.1 $report.getOwnedElementsIncludingAdditional(element, includePureOwned) :
List<Element> 88
4.2 $project 90
4.2.1 $project.getName() 90
4.2.2 $project.getTitle() 90
4.2.3 $project.getFileName() 90

CONTENTS
5
Copyright © 1998-2015 No Magic, Inc.
4.2.4 $project.getExtension() 90
4.2.5 $project.getDirectory() 90
4.2.6 $project.getVersionList() 90
4.2.7 $project.getType() 91
4.2.8 $project.getDiagrams() 91
4.2.9 $project.getDiagrams(type) 91
4.2.10 $project.getPresentationDiagrams() 92
4.2.11 $project.getPresentationDiagrams(type) 92
4.2.12 $project.isRemote() 92
4.2.13 $project.isDirty() 92
4.2.14 $project.getElementByID(id) 93
4.2.15 $project.getAllElementId() 93
4.2.16 $project.getXmiVersion() 93
4.2.17 $project.getVersion() 93
4.2.18 $project.getModel() 93
4.2.19 $project.getModuleList() 94
4.2.20 $project.getSharedModule(module) 94
4.3 $iterator 95
4.3.1 $iterator.wrap( list ) 95
4.3.2 $<IteratorTool instance>.hasMore() 95
4.3.3 $<IteratorTool instance>.more() 95
4.3.4 $<IteratorTool instance>.remove() 95
4.3.5 $<IteratorTool instance>.reset() 95
4.3.6 $<IteratorTool instance>.stop() 95
4.3.7 $<IteratorTool instance>.toString() 96
4.4 $list 96
4.4.1 $list.contains(list, element) 96
4.4.2 $list.get(list, index) 96
4.4.3 $list.isArray(object) 96
4.4.4 $list.isEmpty(list) 97
4.4.5 $list.isList(object) 97
4.4.6 $list.set(list, index, value) 97
4.4.7 $list.size(list) 97
4.5 $bookmark 98
4.5.1 $bookmark.openURL(url, content) 98
4.5.2 $bookmark.openURL(url, content) 98
4.5.3 $bookmark.openURL(uri, content) 98
4.5.4 $bookmark.open(content) 99
4.5.5 $bookmark.open(bookmarkId, content) 99
4.5.6 $bookmark.create(bookmarkObject) 99
4.5.7 $bookmark.create(bookmarkId, bookmarkObject) 99
4.5.8 $bookmark.create(bookmarkId, bookmarkObject, elementType) 99
4.5.9 $bookmark.getBookmarkId(id) 100
4.6 $sorter 100
4.6.1 $sorter.sort(Collection, fieldName) 100
4.6.2 $sorter.sort(Collection) 100
4.6.3 $sorter.sortByFirstNumber(Collection, fieldName) 101
4.6.4 $sorter.sortByFirstNumber(Collection) 101
4.6.5 $sorter.sortByLocale(Collection, String) 101
4.6.6 $sorter.sortByLocale(Collection, String, String) 102
4.6.7 $sorter.humanSort(collection, fieldName) 102
4.6.8 $sorter.humanSort(collection) 103
4.7 $template 103
4.7.1 $template.getName() 103

CONTENTS
6
Copyright © 1998-2015 No Magic, Inc.
4.7.2 $template.getResourcesLocation() 103
4.7.3 $template.getTemplateFile() 104
4.7.4 $template.getTemplateLocation() 104
4.7.5 $template.getOutputFile() 104
4.7.6 $template.getOutputFileNoExt() 104
4.7.7 $template.getOutputLocation() 104
4.8 $file 105
4.8.1 $file.silentCreate(template) 105
4.8.2 $file.silentCreate(template, importObject) 105
4.8.3 $file.silentCreate(template, outputFileName, importObject) 105
4.8.4 $file.silentCreate(templateType, template, outputname, importObject) 106
4.8.5 $file.create(template) 106
4.8.6 $file.create(template, importObject) 106
4.8.7 $file.create(template, outputFileName, importObject) 107
4.8.8 $file.create(templateType, template, outputname, importObject) 107
4.8.9 $file.createAndWait(templateFilename) 108
4.8.10 $file.createAndWait(template, contextValue) 108
4.8.11 $file.createAndWait(String templateFileName, String outputFileName, Object
contextValue) 108
4.8.12 $file.createAndWait(String templateFileName, String outputFileName, String
ContextName, Object contextValue) 109
4.8.13 $file.createAndWait(String templateFileName, String outputFileName, Map<String,
Object> context) 109
4.8.14 $file.copy(inputFilename) 109
4.8.15 $file.copy(inputFilename, outputFilename) 111
4.8.16 $file.exists(pathname) 111
4.8.17 $file.computeName(directory, name) 111
4.8.18 $file.computeName(directory, name, fileType) 112
4.9 $array 112
4.9.1 $array.createArray() 112
4.9.2 $array.createArray(collection) 112
4.9.3 $array.subList(list, size) 112
4.9.4 $array.addCollection(parent, child) 113
4.9.5 $array.createHashSet() 113
4.10 $group 113
4.10.1 $group.create() 113
4.10.2 $group.init() 113
4.10.3 $group.groupNames() 113
4.10.4 $group.contains(groupName) 113
4.10.5 $group.put(groupName, object) 114
4.10.6 $group.get(groupName) 114
4.10.7 $group.remove(groupName) 114
4.10.8 $group.removeAll() 114
4.10.9 $group.clear() 114
4.11 $map 115
4.11.1 $map.createHashMap() 115
4.12 $date 115
4.12.1 $date 115
4.12.2 $date.long 115
4.12.3 $date.full_date 115
4.12.4 $date.get('format') 115
4.12.4.1 Year 116
4.12.4.2 Month 116
4.12.4.3 Days 116

CONTENTS
7
Copyright © 1998-2015 No Magic, Inc.
4.13 $profiling 117
4.13.1 $profiling.getGeneralizationName(modelName) 117
4.13.2 $profiling.getDeclaringElementName (modelName, propertyName) 117
4.13.3 $profiling.getPropertyTypeName (modelName, propertyName) 117
4.13.4 $profiling.getPropertyTypeName (element, propertyName) 118
4.13.5 $profiling.getElementProperties(modelName) 118
4.13.6 $profiling.getElementProperties(element) 118
4.13.7 $profiling.getElementProperty(element, propertyName) 118
4.13.8 $profiling. getHumanPropertyName(element, propertyName) 118
4.14 $image 119
4.14.1 Scaling Images 119
4.14.1.1 $image.scale(image, scaleWidth, scaleHeight) 119
4.14.1.2 $image.scale(image, scaleFactor) 119
4.14.1.3 Scaling Quality 120
4.14.2 Rotating Images 122
4.14.2.1 $image.rotateRight(image) 122
4.14.2.2 $image.rotateLeft(image) 122
4.14.3 Fixed-Pixels Image Resizing 123
4.14.3.1 $image.setSize(image, sizeWidth, sizeHeight) 124
4.14.3.2 $image.setHeight(image, size) 124
4.14.3.3 $image.setHeight(image, size, keepRatio) 124
4.14.3.4 $image.setWidth(image, size) 125
4.14.3.5 $image.setWidth(image, size, keepRatio) 125
4.14.4 Fixed-Measurement Image Resizing 126
4.14.4.1 $image.setSize(image, measureWidth, measureHeight) 126
4.14.4.2 $image.setHeight(image, measureSize) 127
4.14.4.3 $image.setHeight(image, measureSize, keepRatio) 127
4.14.4.4 $image.setWidth(image, measureSize) 127
4.14.4.5 $image.setWidth(image, measureSize, keepRatio) 128
4.14.4.6 $image.setDPI(dotsPerInches) 128
4.14.5 Including External Images 130
4.14.5.1 $image.include(location) 130
4.14.6 Splitting Images 131
4.14.6.1 $image.split($diagram.image, columns, rows) 131
4.14.6.2 $image.split($diagram.image) 132
5. Report Wizard Template Editor 133
5.1 Installation 133
5.2 Opening Template Editor 133
5.3 Data File 135
6. Generating Reports from Report Wizard 139
6.1 Concepts 139
6.2 Default Templates 139
6.3 Architecture Templates 140
6.3.1 Behavioral Report 140
6.3.2 Environment Report 140
6.3.3 Implementation Report 140
6.3.4 Structural Report 140
6.3.5 Use Case Report 140
6.4 Generating Use Case Description Reports 141
6.5 Web Publisher 2.0 Reports 149
6.5.1 Generating Reports 149
6.5.2 Web Publisher 2.0 Features 153
6.5.2.1 Report Layout 153
6.5.2.2 Containment Menu 154
6.5.2.3 Contents Layout 156

CONTENTS
8
Copyright © 1998-2015 No Magic, Inc.
6.5.2.4 Quick Search Box 160
6.5.2.5 NEW! Displaying Requirement ID Properties in the Containment Tree 160
6.5.2.6 Changing a Homepage Image 163
6.5.2.7 Element Description 164
6.5.2.8 Shortcut to Homepage 165
6.5.2.9 Property Visibility 165
6.5.2.10 Showing or Hiding Context Menu 166
6.5.2.11 Exporting a Linked File into an Output Folder 167
6.5.2.12 Enabling the Appears in Tab in an Output Report 168
6.5.2.13 Navigating to Element Active Hyperlinks 169
6.5.2.14 Opening an Activity, State Machine, Collaboration, or Interaction Diagram 170
6.5.2.15 Opening the Sub-diagrams of a State with Submachine 171
6.6 Web Publisher Collaboration Reports 172
6.6.1 Generating Reports 172
6.6.2 Web Publisher Collaboration Feature 174
6.6.2.1 Adding Comments 174
6.6.2.2 Altering Model Contents 175
6.6.3 XML Integration 176
6.7 NEW! Web Portal Reports 177
6.7.1 Generating Reports 178
6.7.2 Commenting on a Report 179
6.7.3 Reading Comments 180
6.8 Uploading Reports to Remote Locations 182
6.8.1 Quick Guide 182
6.8.2 Detailed Explanations 188
6.8.2.1 Using Profile Management Dialog 188
6.8.2.2 Upload Problems 190
6.9 Adding Variables into an Output Report Filename 191
6.9.1 Date Variable 192
6.9.1.1 Date Variables with Default Format 192
6.9.1.2 Date Variable with Custom Format 192
6.9.2 Template Variable 192
6.9.2.1 Including Template Variables in an Output Report Filename 192
6.9.2.2 Adding a Value of a Top-level Variable 192
6.9.2.3 Adding a Value of a Child Variable 193
6.9.3 Random Number 193
6.9.3.1 Random Number with the Default Distributed Integer Value 193
6.9.3.2 Random number with a distributed integer value between 0 (inclusive) and speci-
fied value (exclusive) 193
6.9.4 Project Attribute 194
6.9.4.1 Project Name 194
6.9.4.2 Teamwork version 194
6.9.5 Exception Flow 194
6.10 FAQs 196
7. Generating Reports from the Containment Tree 201
8. Generating Reports from the Command Line 203
8.1 Generate - the Command to Generate Reports 203
8.2 Generating a Report from Teamwork Server 206
8.3 Properties Filename 207
8.3.1 XML Properties File 208
8.4 Uploading Generated Reports to Servers 208
8.5 Syntax Rules 212
9. Report Wizard Quick Print 213
10. Report Wizard Environment Options 216
10.1 Configuring Report Engine Properties 218

CONTENTS
9
Copyright © 1998-2015 No Magic, Inc.
10.2 Configuring Template Mappings 219
10.3 Monitor Template Folder Option 221
10.4 Reset to Defaults Option 221
11. Debug Report Template 223
11.1 Invalid Property 223
11.2 Invalid Reference 223
11.3 Invalid Method Reference 224
11.4 Exception 224
11.5 Invalid Syntax 224
11.5.1 Enabling or Disabling Warning Messages 225
11.5.1.1 Modifying config.xml 225
11.5.1.2 Adding Tags and Values 225
12. Use Case Driven 226
12.1 Use Case Specification Report 226
12.2 Method Specification Report 226
12.3 Use Case Project Estimation Report 226
12.3.1 Classifying Actors 227
12.3.2 Unadjusted Actor Weights 227
12.3.3 Determining Scenarios and Transactions of Use Cases 228
12.3.4 Unadjusted Use Case Weights 228
12.3.5 Unadjusted Use Case Point 228
12.4 Project Characteristics 229
12.4.1 Technical Factors 229
12.4.1.1 Technical Factor Value 230
12.4.1.2 Technical Complexity Factor 230
12.4.2 Environmental Factors 231
12.4.2.1 Environmental Factor Value 232
12.4.2.2 Environmental Factor 232
12.4.3 Project Estimation 233
12.4.3.1 Adjusted Use Case Points 233
12.4.3.2 Estimated Effort in Person Hours 233
12.4.3.3 Estimated Effort in Scheduled Time 233
12.4.3.4 Estimated Effort in Working Days 233
13. Javadoc Syntax Tool 234
13.1 Javadoc Syntax 236
13.2 Javadoc Tool API 238
13.2.1 JavaDocTool 238
13.2.1.1 Document 238
13.2.1.2 DocumentImpl 239
13.2.1.3 Tag 239
13.2.1.4 TagImpl 239
13.2.1.5 ParamTag 239
13.2.1.6 ThrowsTag 239
13.2.1.7 SeeTag 239
13.2.1.8 SerialFieldTag 239
14. Import Tool 242
14.1 Import Syntax 242
14.2 Import Usage 243
14.2.1 Preparatory Step 243
14.2.2 Usage in Example 1 243
14.2.3 Usage in Example 2 244
14.2.4 Usage in Example 3 244
15. JavaScript Tool 246
15.1 JavaScript Tool API 246

CONTENTS
10
Copyright © 1998-2015 No Magic, Inc.
15.1.1 'eval' Method 246
15.1.2 'execute' Method 247
15.1.3 'call' Method 249
15.2 References to Elements 250
16. Groovy Script Tool 252
16.1 Groovy Script Tool API 252
16.1.1 'eval' Method 252
16.1.2 'execute' method 253
16.2 References to Elements 254
17. Ruby Script Tool 255
17.1 Ruby Script Tool API 255
17.1.1 ‘eval’ Method 255
17.1.1.1 eval(String script) 255
17.1.1.2 eval(String script, String bindingName, Object bindingObject) 255
17.1.1.3 eval(String script, Map bindingMap) 255
17.1.2 ‘execute’ Method 256
17.1.2.1 execute(String filename) 256
17.1.2.2 execute(String filename, String bindingName, Object bindingObject) 256
17.1.2.3 execute(String filename, Map bindingMap) 256
17.2 References to Elements 257
18. Dialog Tool 258
18.1 Dialog Tool API 258
18.1.1 ‘message’ Method 258
18.1.2 ‘confirm’ Method 259
18.1.3 ‘input’ Method 259
18.1.3.1 Input Dialogs with Text 259
18.1.3.2 Input Dialogs with Text and Initial Value 260
18.1.3.3 Input Dialog with Text and Initial Value Array 260
18.1.4 ‘sort’ Method 260
18.1.4.1 Sort and Enable Dialogs 261
18.1.4.2 Sort and Enable Dialogs with Text 261
19. Text Tool 263
19.1 Text Tool API 263
20. Model Validation Tool 266
20.1 Model Validation Tool API 266
20.1.1 Validate Methods 267
20.1.2 Getting the Suite Name List 268
20.1.3 Getting the Validation Data from Validation Results 268
20.2 Code Examples for Model Validation Tool 269
21. Metrics Tool 270
21.1 Metrics Tool API 270
21.1.1 Calculation Methods 271
21.1.2 Getting Metric Data from Metric Results 273
21.1.3 Getting Metric Values 274
21.1.4 Getting the Metric Name List 276
21.1.5 Getting the Result Attribute “is above limit” from a Metrics Name 276
21.1.6 Getting the Result Attribute “is below limit” from a Metric Name 277
21.2 Code Examples for Metric Tool 277
22. Dependency Matrix Tool 279
22.1 Dependency Matrix Tool API 280
22.1.1 Using Diagrams to Get Data from Dependency Matrix 280
22.1.1.1 Getting Dependency Matrix Instances from Diagram Elements 281
22.1.1.2 Getting Dependency Matrix Instances from Diagram Names 281
22.1.2 Getting Row Elements 281

CONTENTS
11
Copyright © 1998-2015 No Magic, Inc.
22.1.2.1 Getting All Row Elements 281
22.1.3 Getting Column Elements 282
22.1.3.1 Getting all column elements 282
22.1.4 Getting Relations between Row and Column Elements 282
22.2 Example of Dependency Matrix Tool 283
23. Generic Table Tool 284
23.1 Generic Table Tool API 285
23.1.1 Getting Generic Table Data 286
23.1.1.1 Getting Generic Table Instances from Diagram Elements 286
23.1.1.2 Getting Generic Table Instances from Diagram Names 286
23.1.2 Closing Tables 287
23.1.2.1 Closing All Diagram Tables 287
23.1.2.2 Closing a Specific Table Diagram 287
23.1.2.3 Closing a Table Diagram with a Specific diagramName 287
23.1.3 Getting Row Elements 287
23.1.3.1 Getting All Row Elements 287
23.1.3.2 Getting Row Elements in Specific Row Numbers 288
23.1.4 Getting Column Names 288
23.1.4.1 Getting Column Names from Column ID 288
23.1.4.2 Getting Column Names from Column Numbers 288
23.1.4.3 Getting All Column Names 288
23.1.4.4 Getting All Column IDs 289
23.1.5 Getting Cell Values 289
23.1.5.1 Getting Values from Row Element and Column ID 289
23.1.5.2 Getting Values from Row Element and Column Name 290
23.1.5.3 Getting Values from Row Element and Column Number 290
23.1.5.4 Getting Values from Row and Column Numbers 290
23.1.5.5 Getting Values from Row Element and Column IDs as String 290
23.1.5.6 Getting Values from Row Element and Column Name as String 291
23.1.5.7 Getting Values from Row Element and Column Number as String 291
23.1.5.8 Getting Values from Row and Column Numbers as String 291
23.1.6 Getting Visible Column and Cell Values 291
23.1.6.1 Getting All Visible Column IDs 292
23.1.6.2 Getting Visible Column Names from Column Numbers 292
23.1.6.3 Getting Visible Values from Row Elements and Column Number 292
23.1.6.4 Getting Visible Values from Row Number and Column Number 292
23.1.6.5 Getting Visible Values from Row Element and Column Number as String 292
23.1.6.6 Getting Visible Values from Row and Column Numbers as String 293
23.2 Code Examples for Generic Table Tool 293
24. Query Tool 294
24.1 Query Tool API 294
24.2 Recognizable Query Patterns 295
24.2.1 Query by Type 295
24.2.2 Query by Attribute 296
24.2.3 Query by Substring Matching Attribute 296
24.2.4 Query Element without Children 297
24.2.5 Query by Element ID 297
24.2.6 Query by Descendent 297
24.2.7 Query by Child Element 298
24.2.8 Additional Conditions for Query Patterns 298
24.3 Query Methods 300
24.3.1 Retrieving an Array of Element by Query Pattern 300
24.3.2 Getting a Single Result from Query Functions 301
24.3.2.1 Getting the First Element from a Collection 301
24.3.2.2 Getting the Last Element from a Collection 301
24.3.2.3 Getting the nth Element from a Collection 301

CONTENTS
12
Copyright © 1998-2015 No Magic, Inc.
24.3.2.4 Getting the Unique Element from a Collection 302
24.3.3 Retrieving an Array of Elements by Name 302
24.3.4 Retrieving Elements by ID 302
24.4 Examples 303
Appendix A: Report Extensions 305
1. Custom Tool 305
1.1 Context Name 306
1.2 Context Object 306
2. Tool Interface 306
2.1 Class Tool 308
2.2 Concurrent Tool 308
3. Creating Custom Tool 308
3.1 Developing a Tool Class 309
3.2 Creating an Extension Package 309
4. Installing Custom Tool 309
5. Importing Custom Tool to Template 310
5.1 Attributes 310
6. Auto Importing Template Tool 310
Appendix B: Office Open XML Format Template 312
1. Microsoft Office Word Document (DOCX) 312
1.1 Limitations When Used in Microsoft Office Word Document 312
2. Microsoft Office Excel Worksheet (XLSX) 314
2.1 Multi-Line Statements in XLSX 314
2.2 Creating Data for Multiple Rows 316
2.3 Creating Data for Multiple Columns 316
2.4 Displaying Content in a Cell 316
2.5 Limitation When Used in Microsoft Office Excel Worksheet 317
3. Microsoft Office PowerPoint Presentation (PPTX) 318
3.1 Multi-line Statements in PPTX 318
3.2 Creating Data for Multiple Slides 319
3.3 Creating a Page with Conditions 320
3.4 Limitation When Used in Microsoft Office PowerPoint Presentation 321
Appendix C: OpenDocument Format Template 323
1. OpenDocument Text 323
2. OpenDocument Spreadsheet 323
2.1 Creating Data for Multiple Rows 325
2.2 Creating Data for Multiple Columns 325
3. OpenDocument Presentation 326
3.1 Creating Data for Multiple Slides 328
3.2 Creating Page with Conditions 329
4. OpenDocument Conversion Tool 330
4.1 Microsoft Office ODF Extensions 330
4.2 OpenOffice.org 330
5. OpenDocument References 331
Appendix D: HTML Tag Support 332
1. Supported HTML Tags 332
1.1 Font Tags 332
1.1.1 Size 332
1.1.2 Face 333
1.1.3 Color 333
1.2 Font Style Tag 334
1.3 Phrase Elements 335
1.4 Ordered and Unordered Lists and List Item Tags 335

CONTENTS
13
Copyright © 1998-2015 No Magic, Inc.
1.4.1 Ordered Lists 335
1.4.2 Nested Ordered Lists 336
1.4.3 Unordered Lists 337
1.4.4 Nested Unordered Lists 337
1.5 Definition List Tags 338
1.6 Line and Paragraph Tags 338
1.7 Preformatted Text 339
1.8 Heading Tags 340
1.9 Link Tags 341
1.10 Table Tags 341
1.10.1 Table Elements 341
1.10.2 Row Elements 343
1.10.3 Cell Elements 345
1.10.4 Header Elements 347
1.11 Image Tags 348
1.11.1 src 348
1.11.2 Width 348
1.11.3 Height 348
1.12 Superscript and Subscript Tag 349
1.12.1 Superscript 349
2. Supported CSS 350
2.1 Background 350
2.1.1 Color Specification 350
2.1.2 Supported Tags 352
2.2 Border 352
2.2.1 Border Width 352
2.2.2 Length Specification 352
2.2.3 Border Color 353
2.2.4 Border Style 353
2.2.5 Supported Tags 354
2.3 Margin 354
2.3.1 Supported Tags 354
2.4 Padding 356
2.4.1 Supported Tags 356
2.5 Color 357
2.5.1 Supported Tags 357
2.6 Display 357
2.6.1 Supported Tags 357
2.7 Font 358
2.7.1 Font Family 358
2.7.2 Font Style 358
2.7.3 Font Variant 358
2.7.4 Font Weight 358
2.7.5 Font size 358
2.7.6 Supported Tags 358
2.8 Text Align 359
2.8.1 Supported Tags 359
2.9 Text Transform 359
2.9.1 Supported Tags 360
2.10 White-Space 360
2.10.1 Supported Tags 360
2.11 Width 361
2.12 Text Decoration 362
2.12.1 Supported Tags 362
2.13 Vertical Align 363
Appendix E: DocBook Support 364
1. The Supported HTML Tags 365

CONTENTS
14
Copyright © 1998-2015 No Magic, Inc.
1.1 HTML Paragraph Elements 365
1.1.1 Paragraph 365
1.1.2 Preformatted Text 365
1.2 HTML Font Styles 365
1.2.1 Teletype Text 366
1.2.2 Italics 366
1.2.3 Bold 366
1.2.4 Strikethrough 366
1.2.5 Underline 367
1.3 HTML Phrase Elements 367
1.3.1 Emphasis 367
1.3.2 Strong 368
1.3.3 Citation 368
1.3.4 Definition 368
1.3.5 A Fragment of Computer Code 368
1.3.6 Sample Text 369
1.3.7 Keyboard Input 369
1.3.8 Variable 369
1.4 HTML Link Element 370
1.5 HTML Image Element 370
2. The Supported HTML Lists 370
2.1 Unordered Lists 370
2.2 Ordered Lists 371
2.3 Definition Lists 372
3. The Supported HTML Table Elements 373
4. The Supported Style Sheet Properties 374
4.1 Font 375
4.1.1 Font Style 375
4.1.2 Font Weight 375
4.2 Text Align 376
4.3 Text Decoration 376
4.4 Vertical Align 377

Copyright © 1998-2015 No Magic, Inc.
15
REPORT WIZARD
1. MagicDraw Report Wizard Overview
Report Wizard is a report engine for MagicDraw version 14.0 and greater. It is designed to solve several prob-
lems of our legacy report engines (XSL/XSLT and JPython).
The Report Wizard report engine is built on top of Velocity Engine (Open Source Templating engine) and is
integrated with the MagicDraw application. To make the best of Report Wizard, you need to understand the
Report Wizard UI, the Velocity Template Language (VTL), the application's Open API, and the helper modules.
Report Wizard supports text-based templates to generate reports. Each report file format depends on the type
of the templates. The type of template files that Report Wizard supports includes plain text, RTF, HTML, Office
Open XML (ISO/IEC 29500:2008), OpenDocument format (ISO/IEC 26300), and XML template (DocBook or
FO). It also supports the MS Word template in VBA Editor on Windows 8.
All commercial MagicDraw editions will have full use of all features within Report Wizard. The MagicDraw Com-
munity edition allows you to generate reports with watermarks.
Before generating a report, you need to open Report Wizard.
To open Report Wizard:
• On the Tools menu, click Report Wizard. The Report Wizard dialog will appear.
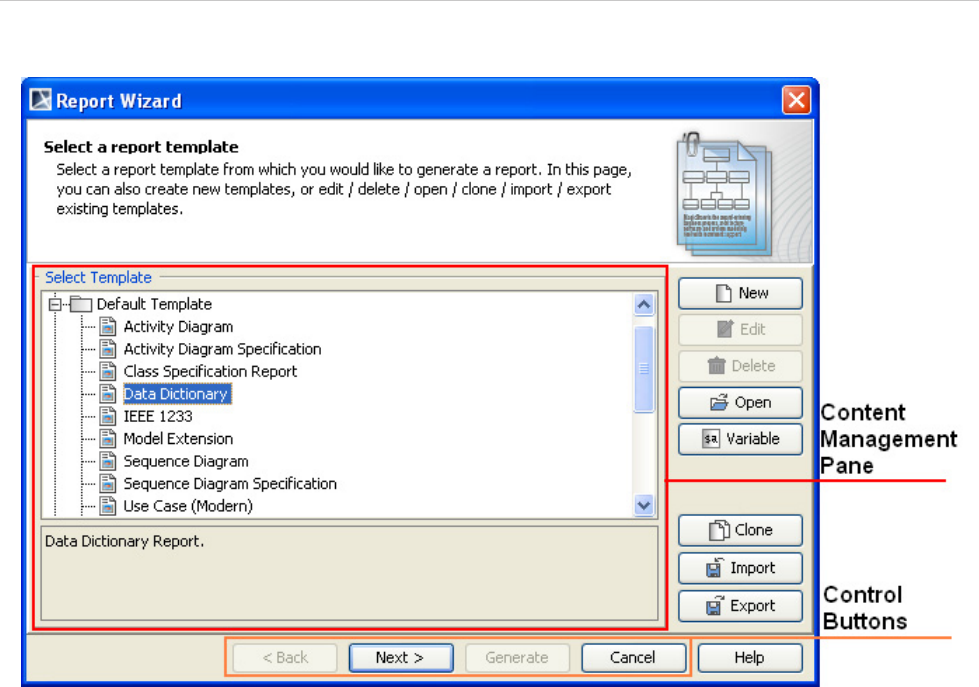
1.1 Report Wizard Dialog
The Report Wizard dialog (Figure 1) consists of 2 panes: (1.1.1) Control buttons and (1.1.2) Content Manage-
ment pane.
REPORT WIZARD
MagicDraw Report Wizard Overview
16
Copyright © 1998-2015 No Magic, Inc.
Figure 1 -- Report Wizard Dialog
1.1.1 Control Buttons
There are 4 control buttons:
(i) The Back button is used for proceeding to the previous content management pane.
(ii) The Next button is used for proceeding to the next content management pane.
(iii) The Generate button is used for generating a report.
(iv) The Cancel button is used for cancelling the report generation process.
1.1.2 Content Management Pane
This pane is used for managing the template content and includes the following sub-panes:
(1.1.2.1) Template Management pane
(1.1.2.2) Report Data Management pane
(1.1.2.3) Select Element Scope pane
(1.1.2.4) Generate Output pane
Click the Back or Next button to go to a specific pane.
REPORT WIZARD
MagicDraw Report Wizard Overview
17
Copyright © 1998-2015 No Magic, Inc.
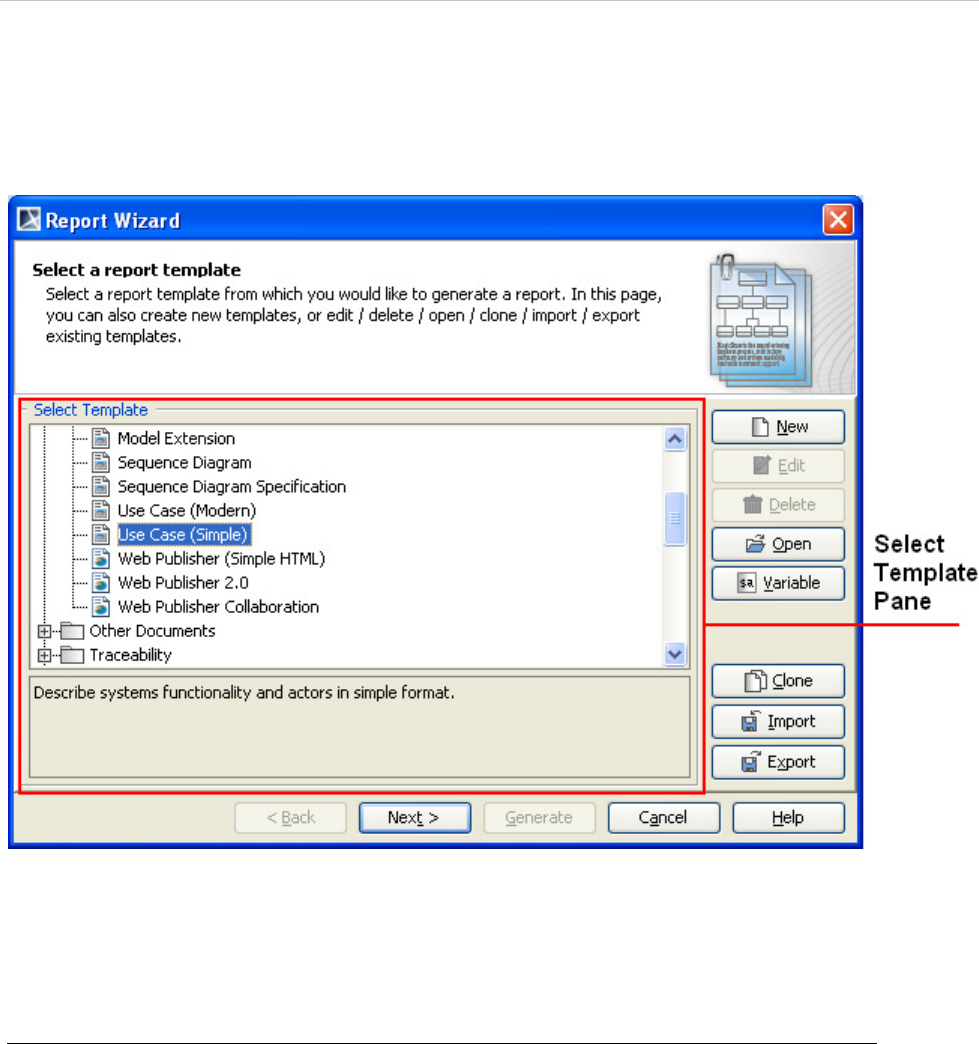
1.1.2.1 Template Management Pane
The Template Management pane lists all report templates that you can use to generate your report in the
Select Template sub-pane (Figure 2).
Figure 2 -- Select Template Pane
Report Wizard provides predefined templates such as Use Case, Model Extension, Data Dictionary, IEEE
1233, Class Specification Diagram, Business Process Diagram, and Web Publisher templates. Choose the rel-
evant template to manage or generate a report.
To select a template:
1. On the Tools menu, click Report Wizard. The Report Wizard dialog will open.
2. In the Select Template pane (Figure 2), select a template. A template description will be
displayed in the lower part of the Select Template pane.
You can manage the template from the Template Management pane or click the Next button to go to the next
step for generating the report.
This pane contains 8 buttons: (a) New, (b) Edit, (c) Delete, (d) Open, (e) Variable, (f) Clone, (g) Import, and
(h) Export.
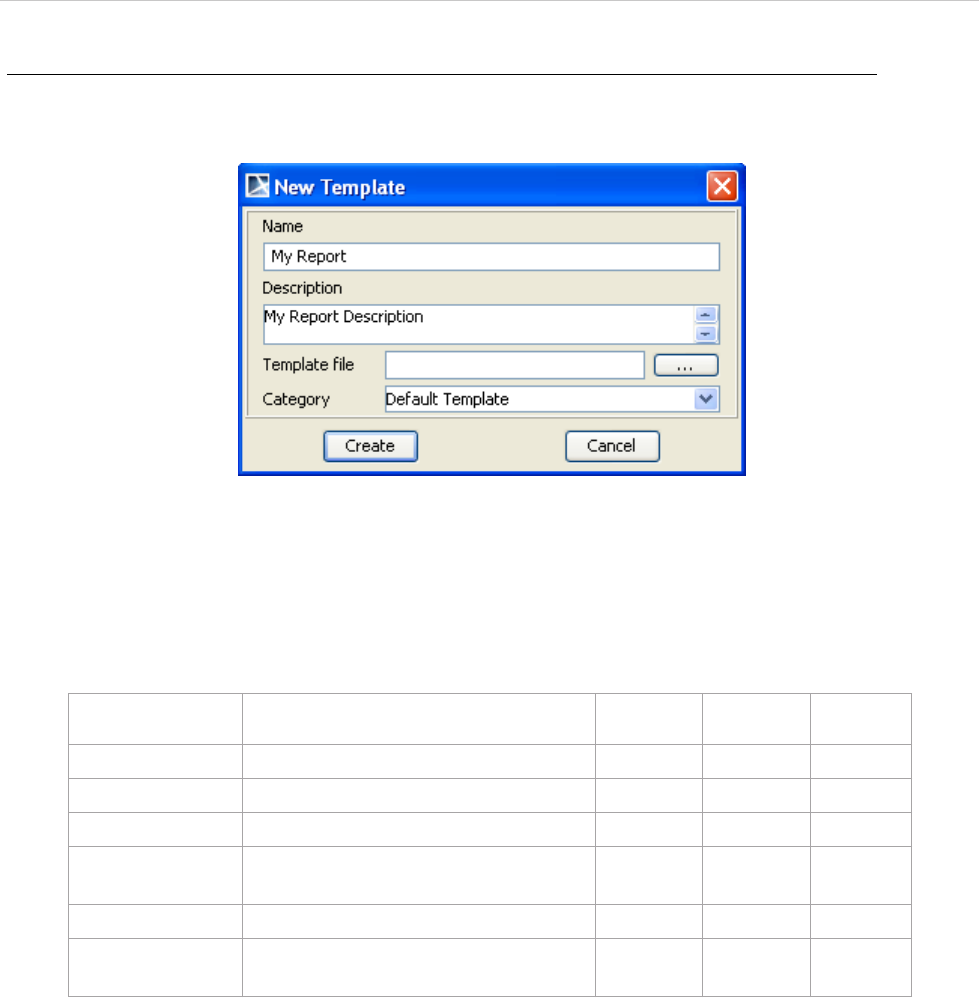
(a) New button
The function of New button (Figure 2) is to open the New Template dialog through which you can create a new
template.
REPORT WIZARD
MagicDraw Report Wizard Overview
18
Copyright © 1998-2015 No Magic, Inc.
To create a new template:
1. In the Report Wizard dialog, click the New button. The New Template dialog will open
(Figure 3).
Figure 3 -- New Template Dialog
2. Enter the template name, description, and location of the new template in the New Template
dialog.
Table 1 -- New Template Dialog Fields and Buttons
3. Click the "…" button. The Select Location dialog will appear (Figure 4).
Field Name Description Default
Value
Type Required
Name Enter a new template name. Blank Text Yes
Description Enter a template description. Blank Text No
Template file Select an RTF template. Blank Text Yes
Create Create a new template under the
Template tree.
Disable - -
Cancel Close the dialog. Enable - -
Category Choose the existing category or enter
a new category name.
- Text No
REPORT WIZARD
MagicDraw Report Wizard Overview
19
Copyright © 1998-2015 No Magic, Inc.
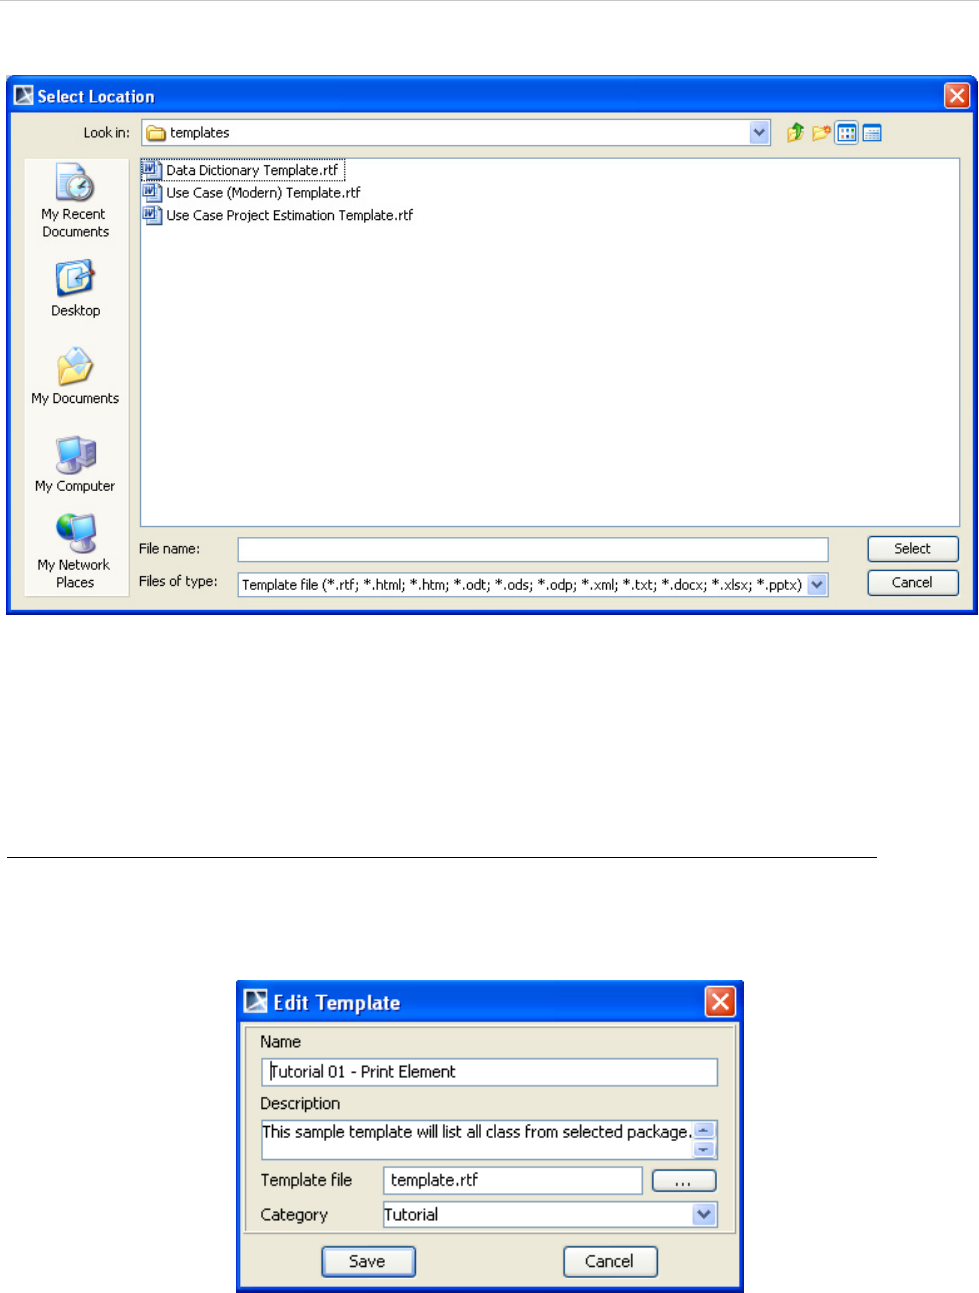
Figure 4 -- Selecting Template File in the Select Location Dialog
4. Select the template file location and type. Enter the filename and click Select.
(b) Edit button
The Edit button (Figure 2) is used for editing a template and save it in Report Wizard.
To edit a template:
1. In the Report Wizard dialog, select a template and click the Edit button. The Edit Template
dialog will appear (Figure 5).
Figure 5 -- Edit Template Dialog
2. Edit the template name and description and locate the template file’s location.
REPORT WIZARD
MagicDraw Report Wizard Overview
20
Copyright © 1998-2015 No Magic, Inc.
Table 2 -- Edit Template Dialog Fields and Buttons
(c) Delete button
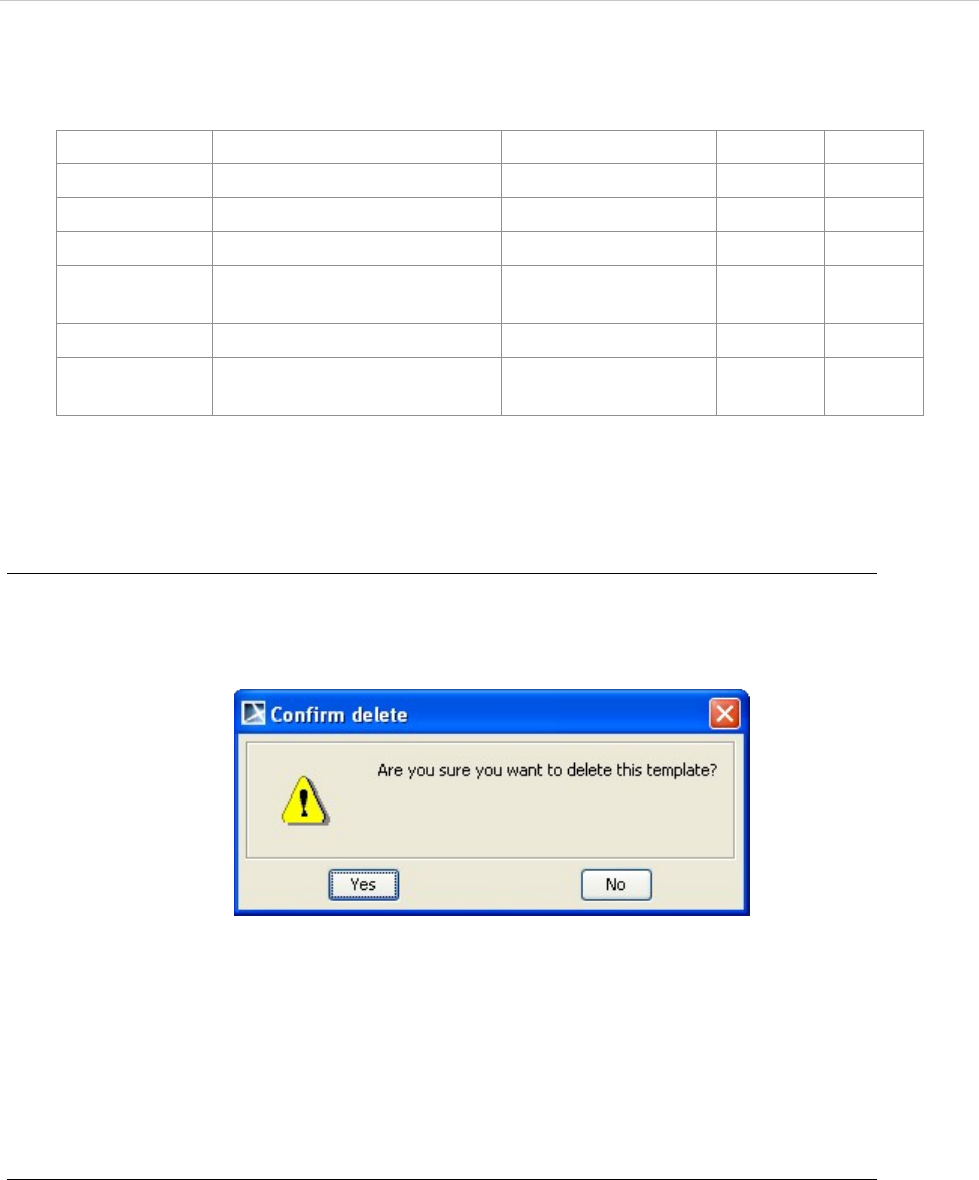
You can delete a template from Report Wizard by clicking the Delete button (Figure 2).
To delete a template:
1. In the Report Wizard dialog, select a template and click the Delete button. The Confirm
delete dialog will appear (Figure 6).
Figure 6 -- Confirm Delete Dialog
2. Click either Yes to delete the selected template from the template list or No to cancel the
operation.
(d) Open button
The Open button (Figure 2) opens a template file in the default editor.
To open a template field in the default editor:
• In the Report Wizard dialog, select a template and click the Open button. The template file will open in
the default editor.
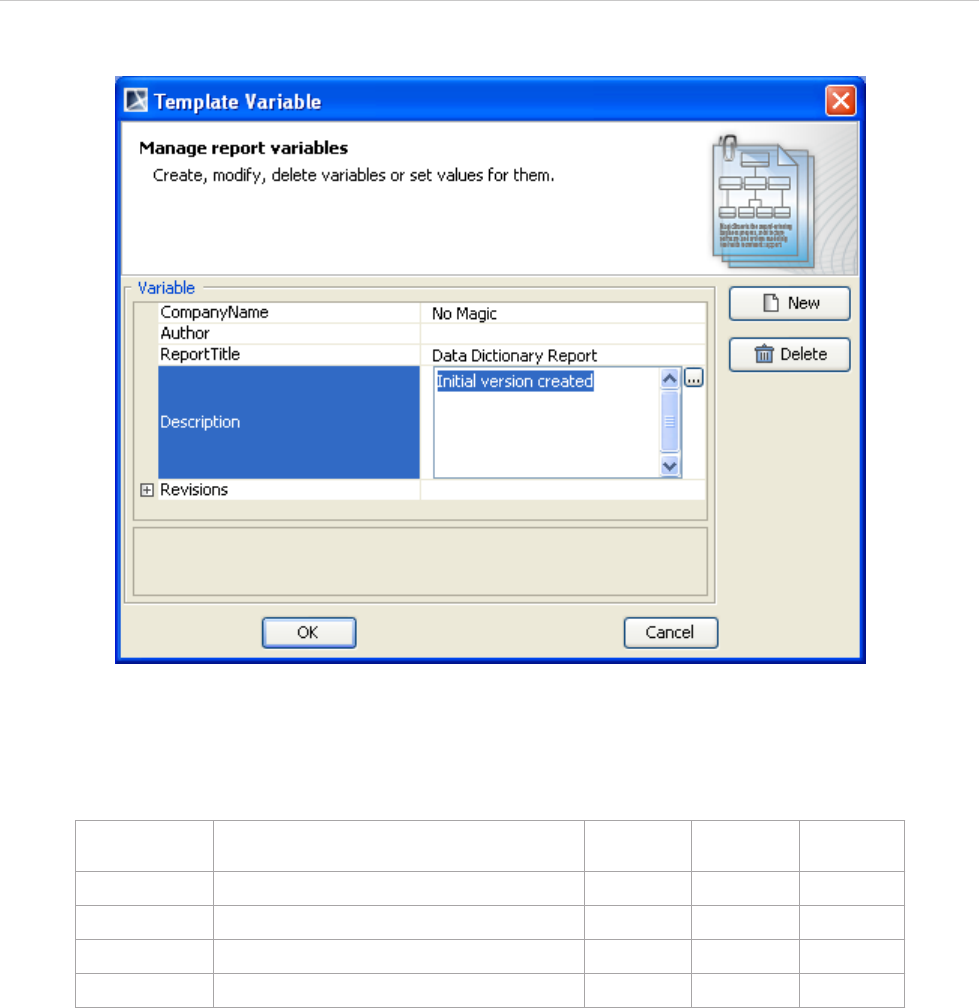
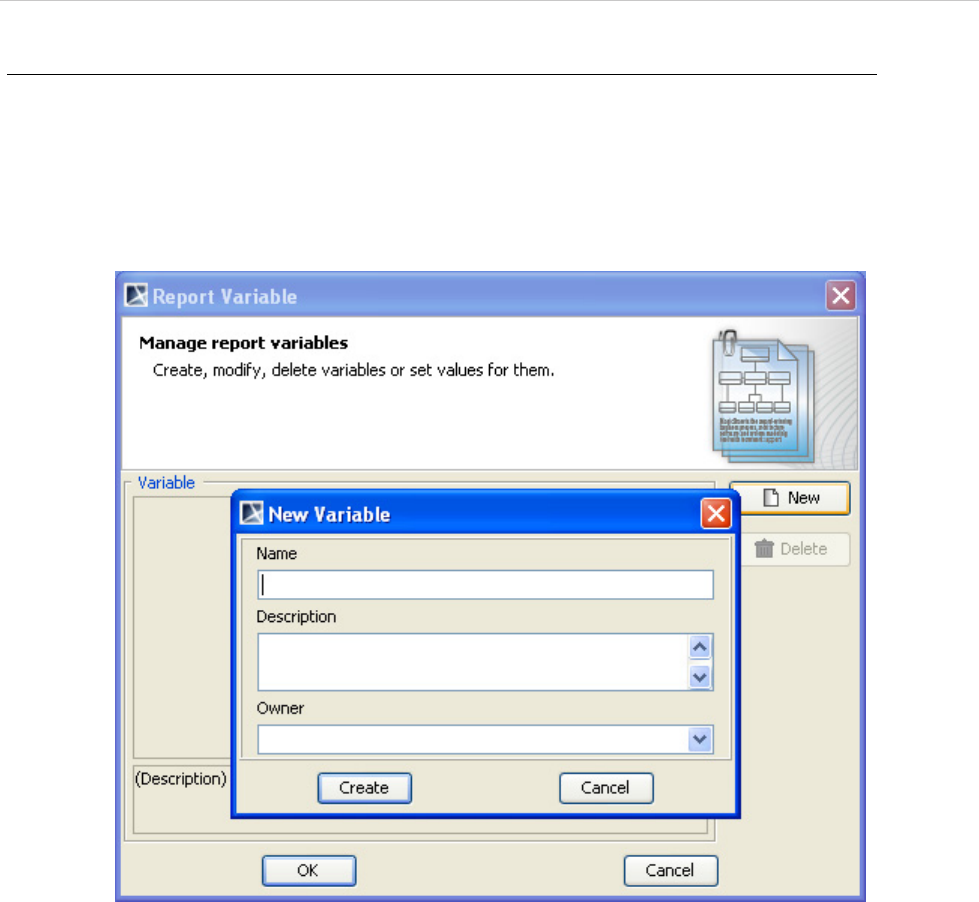
(e) Variable button
If you click the Variable button (Figure 2) in the Template Management pane, the Template Variable dialog
(Figure 7) will appear, allowing you to create a new template variable and modify or delete an existing template
variable.
Field Name Description Default Value Type Required
Name Edit the template name. Existing name Text Yes
Description Edit the template description. Existing description Text No
Template file Change the RTF template. Existing template file Text Yes
Save Save the edited template
under the Template tree.
Enable - -
Cancel Close the dialog. Enable - -
Category Choose an existing category
or enter a new category name.
Existing category Text No
REPORT WIZARD
MagicDraw Report Wizard Overview
21
Copyright © 1998-2015 No Magic, Inc.
Figure 7 -- Template Variable Dialog
Table 3 -- Variable Dialog Fields and Buttons
The Template Variable dialog (Figure 7) contains 1.1.2.1.1 Variable Pane and 1.1.2.1.2 Control Buttons.
1.1.2.1.1 Variable Pane
This pane consists of a report description table and the Variable Value text box. The first column of the table is
the variable name, and the second column is the variable value. You can use the Variable Value text box or
the second column of the table to view the value of a selected variable. To edit the value, please do so in the
second column of the table.
1.1.2.1.2 Control Buttons
There are two control buttons in the Template Variable dialog: OK and Cancel.
Field Name Description Default
Value
Type Required
Name Enter the variable name. Blank Text Yes
Value Enter the variable description. Blank Text No
New Create a new template description. Enable - -
Cancel Close the dialog. Enable - -
REPORT WIZARD
MagicDraw Report Wizard Overview
22
Copyright © 1998-2015 No Magic, Inc.
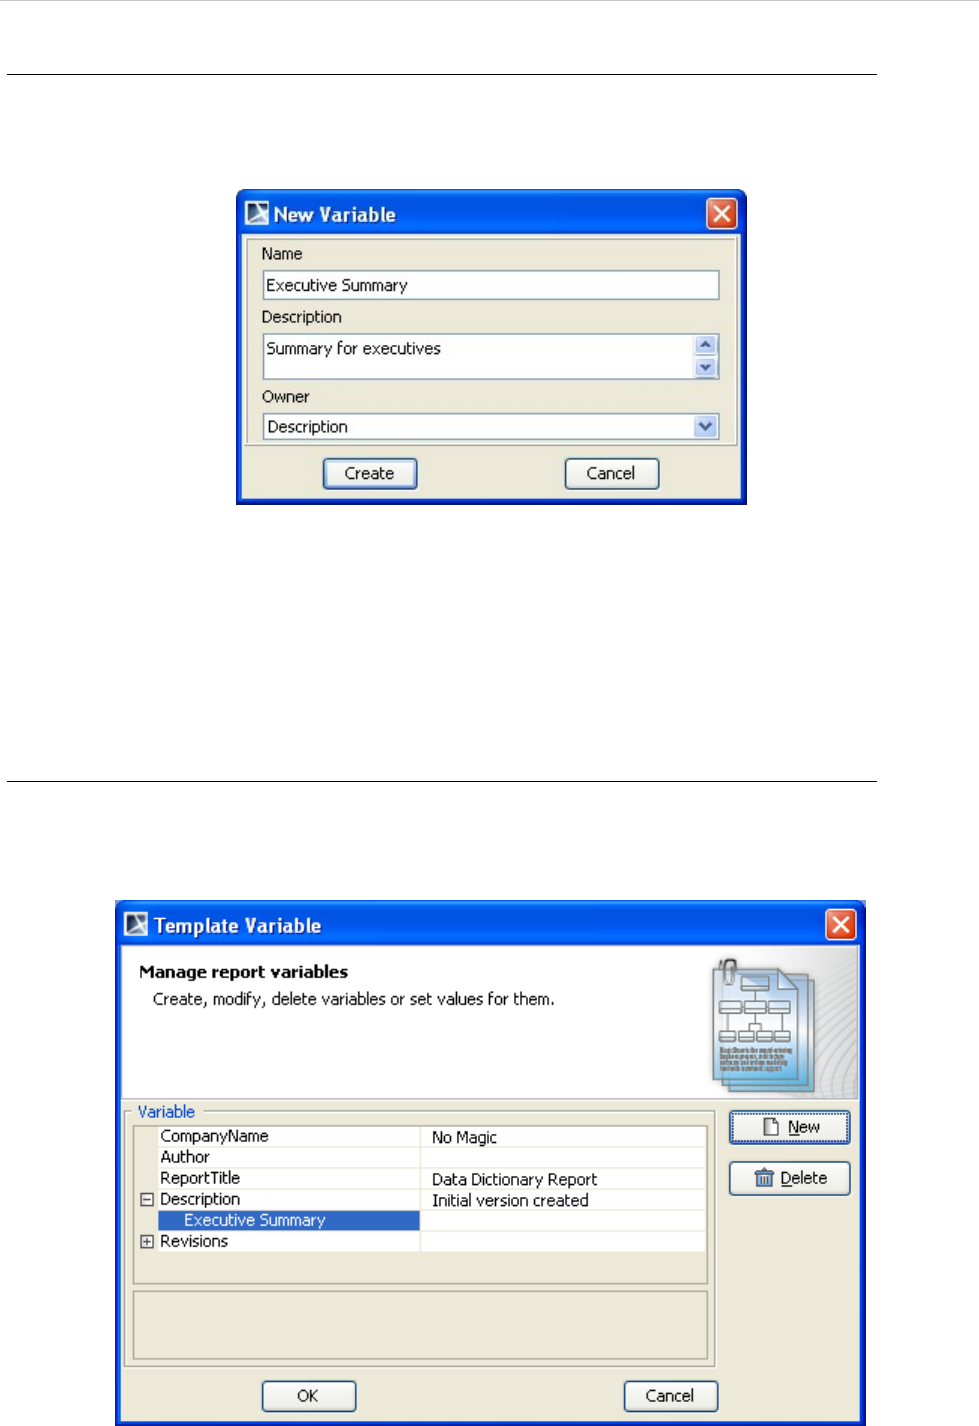
To create a new variable:
1. In the Template Variable dialog, click the New button. The New Variable dialog will appear
(Figure 8).
Figure 8 -- New Variable Dialog
2. Enter the variable name and value. Next, select an owner for this new variable from the
Owner drop-down list and then click Create. You will see the newly-created variable’s name
and value in the Variable pane.
3. In the Template Variables dialog, click OK.
You can modify a variable value in either the (i) Variable pane or (ii) Variable Value dialog.
(i) To modify a value in the Variable pane:
• Click a variable name column in the Variable pane and modify the variable value in the table
(Figure 9).
Figure 9 -- Modifying a Variable Value in the Variable Pane
REPORT WIZARD
MagicDraw Report Wizard Overview
23
Copyright © 1998-2015 No Magic, Inc.
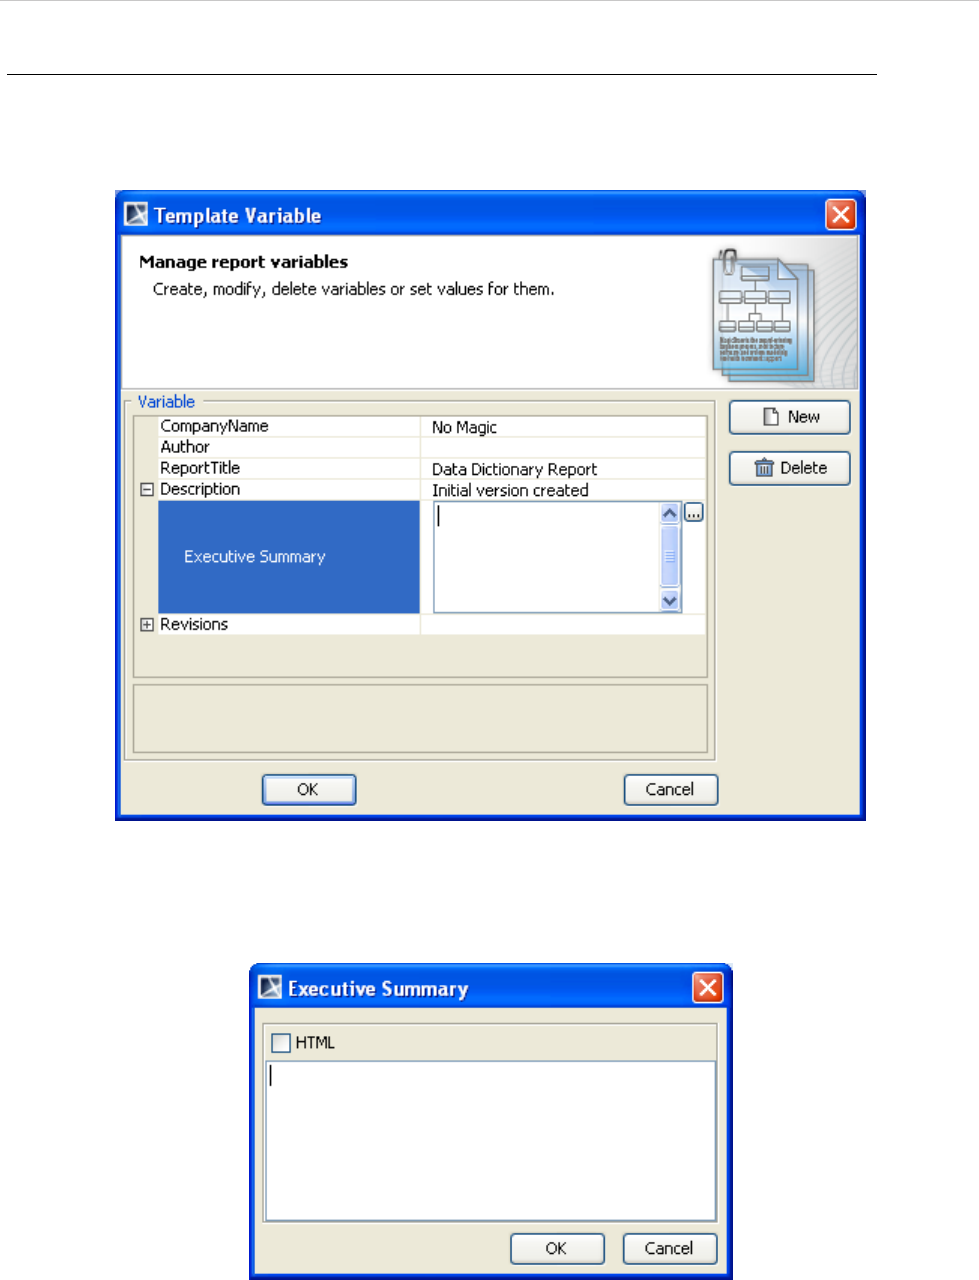
(ii) To modify a variable value in the Variable Value dialog:
1. Click a variable value column in the table in the Variable pane and click the “...” button
(Figure 10). The Variable Value dialog will appear (Figure 11).
Figure 10 -- Modifying a Variable Value with the “...” Button
2. Modify the variable value and click OK (Figure 11).
Figure 11 -- Variable Value Dialog
3. When you finish modifying variables and their values in the Template Variable dialog, click
either OK to confirm the changes or Cancel to discard them.
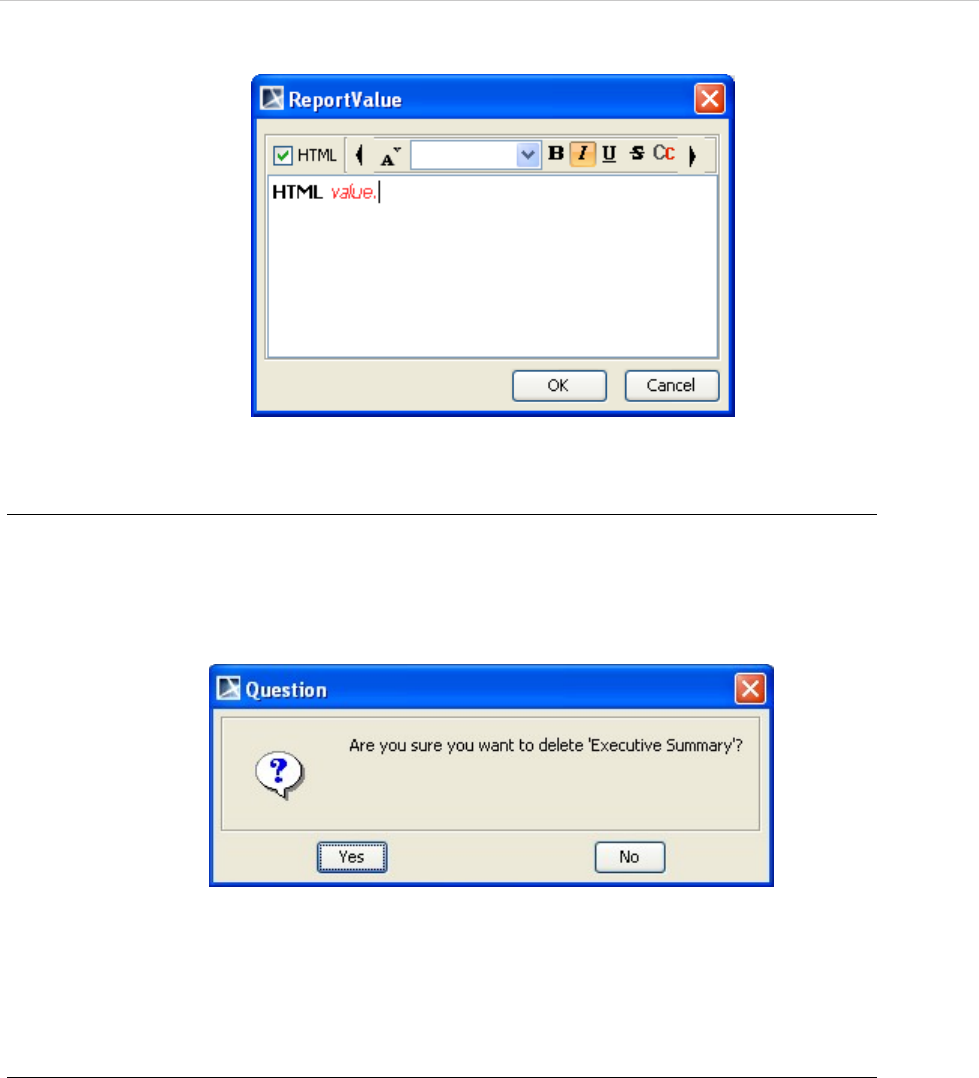
You can enter the value of a report variable in either plain text or HTML. You can switch from plain text to HTML
or vice versa by selecting the HTML check box in the Variable Value dialog (Figure 13).
REPORT WIZARD
MagicDraw Report Wizard Overview
24
Copyright © 1998-2015 No Magic, Inc.
Figure 12 -- Entering Report Variable Value in HTML
To delete a variable:
1. Select a variable in the table and click the Delete button. The Question dialog will appear
prompting you for confirmation before deleting the selected variable.
2. Click Yes to delete the selected variable (Figure 13).
Figure 13 -- Deleting A Variable
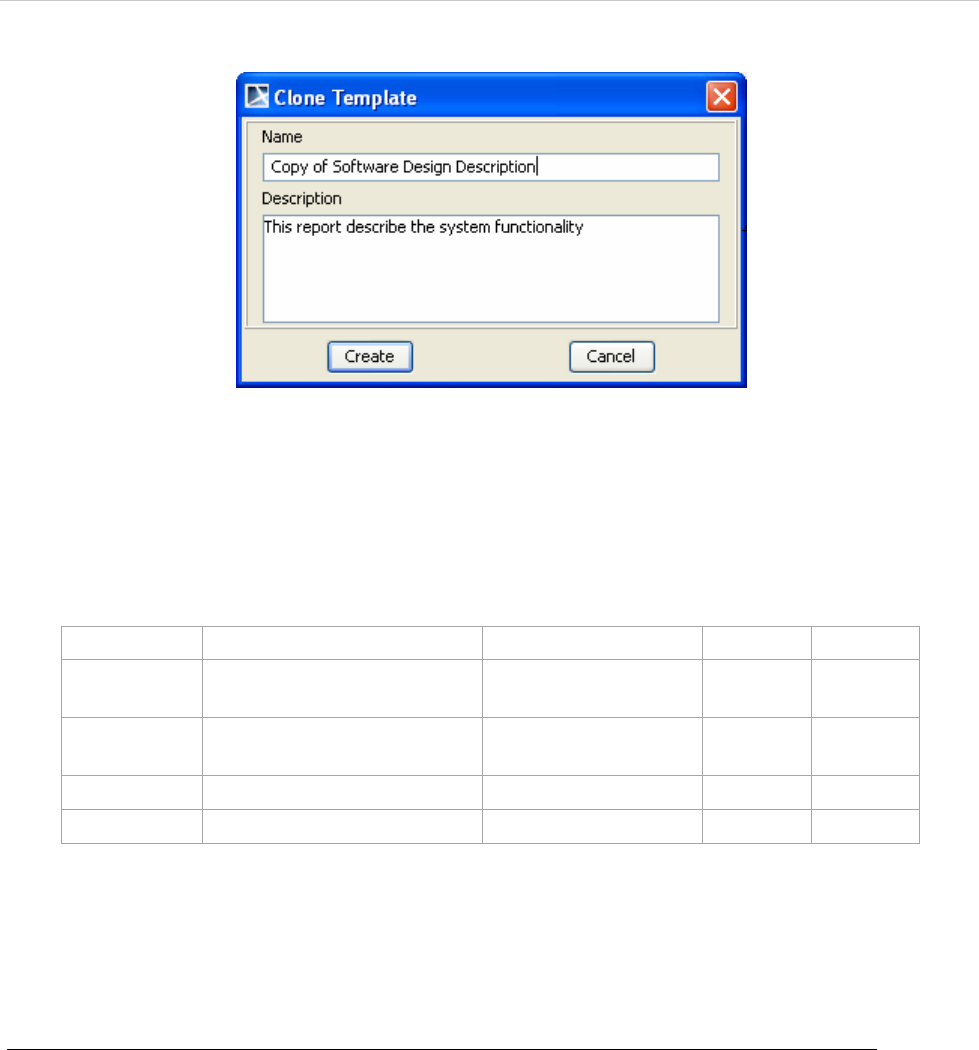
(f) Clone button
Click the Clone button (Figure 2) to clone a template.
To clone a template:
1. In the Report Wizard dialog, select a template and click the Clone button. The Clone
Template dialog will appear (Figure 14).
REPORT WIZARD
MagicDraw Report Wizard Overview
25
Copyright © 1998-2015 No Magic, Inc.
Figure 14 -- Clone Template Dialog
2. Enter the name and description. The name of the cloned template should begin with Copy of
(name of template).
3. Click the Create button to clone the template.
Table 4 -- Clone Template Dialog Fields and Buttons
(g) Import button
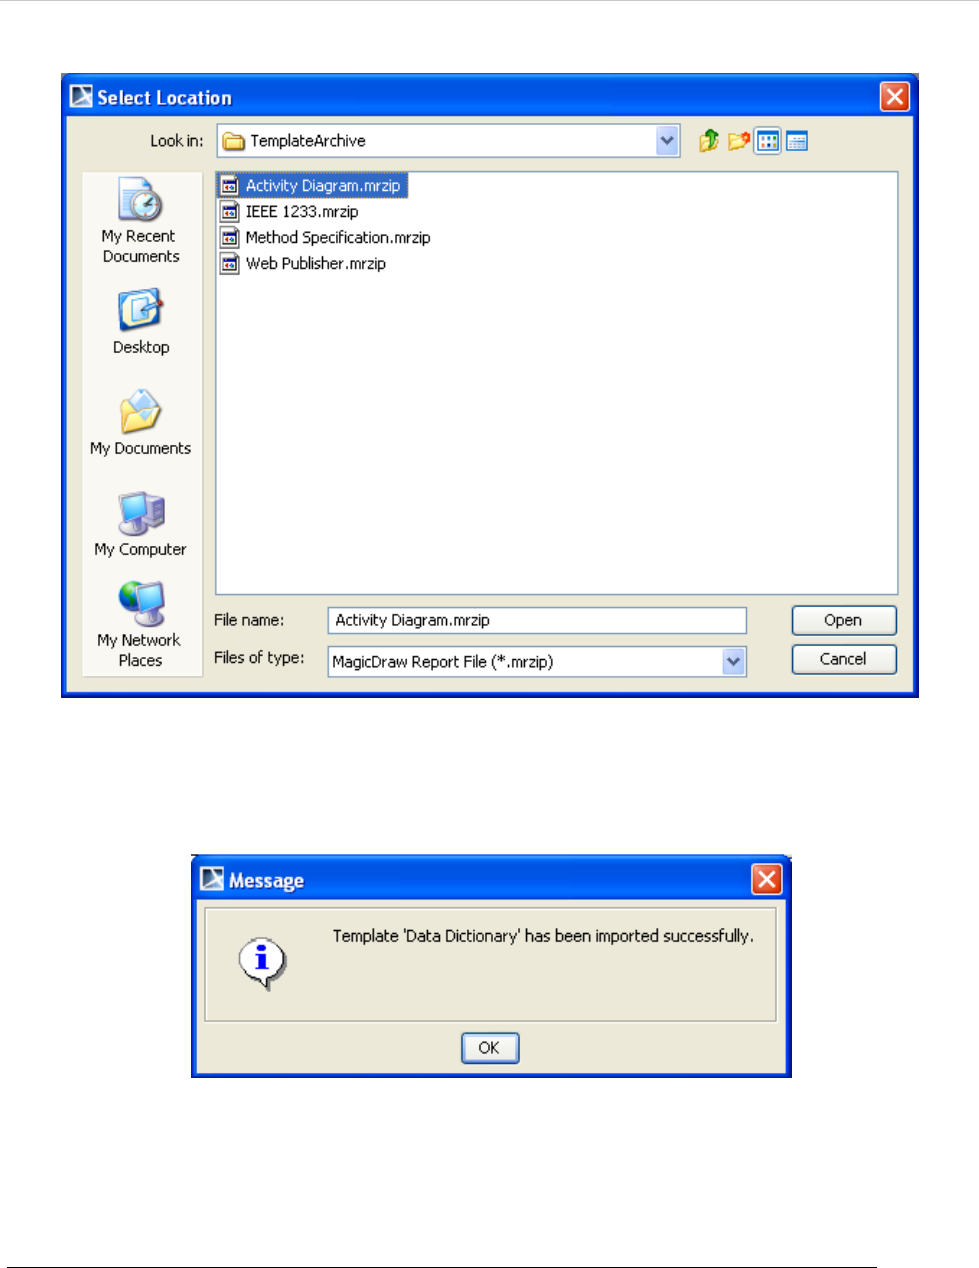
Click the Import button (Figure 2) to import a template.
To import a template:
1. In the Report Wizard dialog, click the Import button. The Select Location dialog will appear
(Figure 15).
Field Name Description Default Value Type Required
Name Enter a new template name. Copy of the selected
template name
Text Yes
Description Enter the template descrip-
tion.
Existing description Text No
Create Create a template. Enable - -
Cancel Close the dialog. Enable - -
REPORT WIZARD
MagicDraw Report Wizard Overview
26
Copyright © 1998-2015 No Magic, Inc.
Figure 15 -- Select Location Dialog
2. Select a Report Wizard template with the filename extension *.mrzip and click Open. The
following Message dialog will open (Figure 16).
Figure 16 -- Message Dialog of Successful Import
(h) Export button
Click the Export button (Figure 2) in the Report Wizard dialog to export a template.
To export a template:
1. In the Report Wizard dialog, select a template and click the Export button. The Select
Location dialog will open (Figure 17).

REPORT WIZARD
MagicDraw Report Wizard Overview
27
Copyright © 1998-2015 No Magic, Inc.
Figure 17 -- Select Location Dialog
2. Select a directory or folder where you want to export the template.
3. Type the filename and click Save.
4. The following Message dialog will open (Figure 18). Click OK.
Figure 18 -- Message Dialog of Successful Export
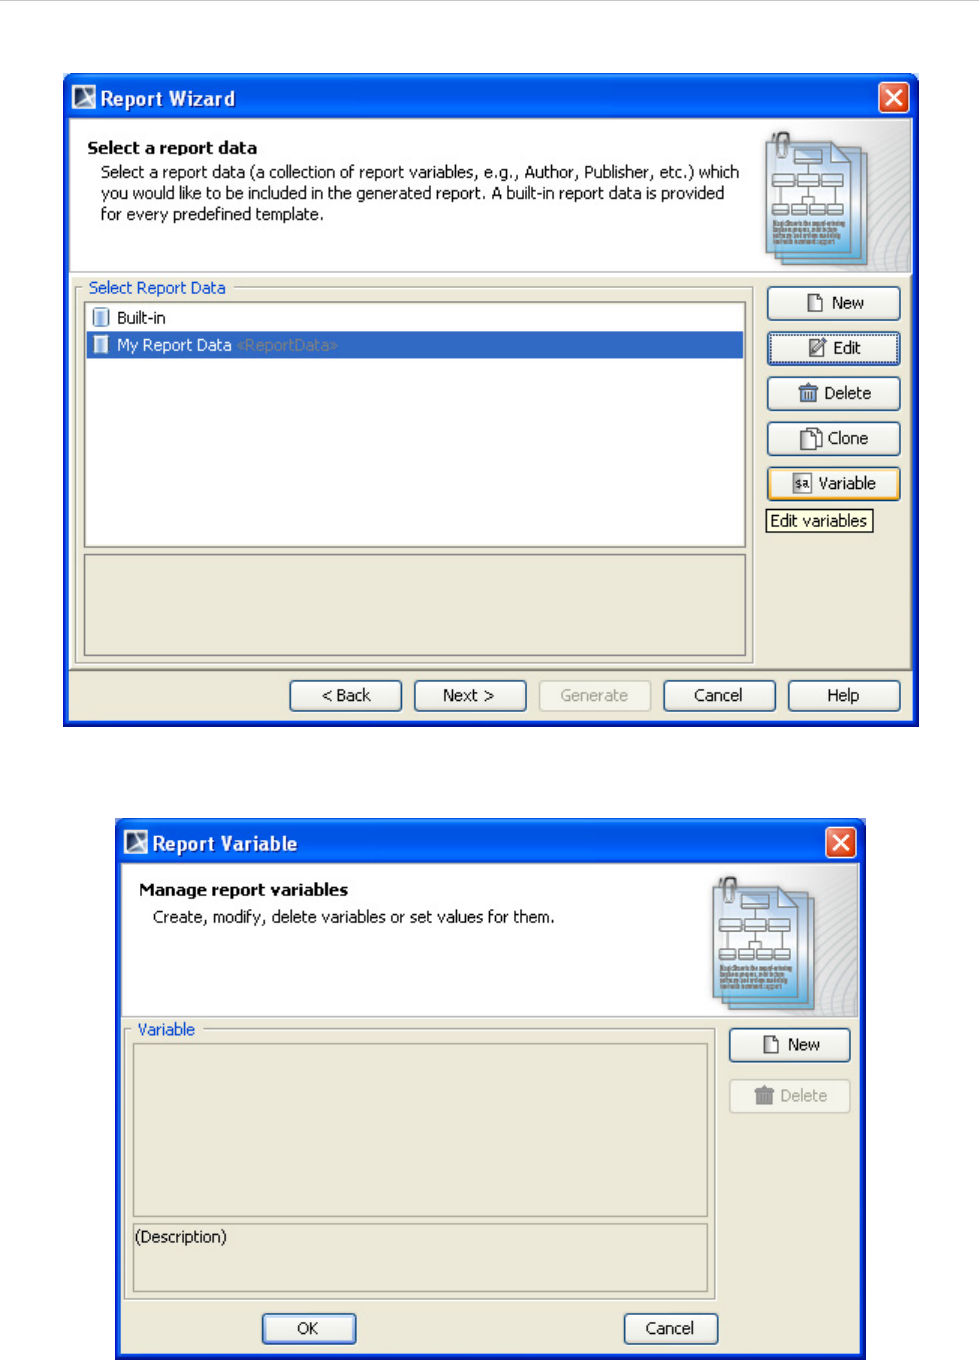
1.1.2.2 Report Data Management Pane
A Report Data is a collection of variables. You can create a Report Data and organize its variables through the
Report Data Management pane in the Report Wizard dialog. You can now create a Report Data as an ele-
ment in the Containment tree inside a MagicDraw project with the use of profiles, allowing you to commit the
Report Data to Teamwork Server and share it with other users.
You can also create child variables under any variables. This will help you organize information into groups,
keep revision history, and many more.
Figure 19 below shows the Report Data Management pane in the Report Wizard dialog.
REPORT WIZARD
MagicDraw Report Wizard Overview
28
Copyright © 1998-2015 No Magic, Inc.
Figure 19 -- Report Data Management Pane
Use the Report Data Management pane to select and organize a Report Data and its variables. Report Wizard
provides a built-in Report Data for every predefined template. A detailed description of the Report Data will be
displayed in the Select Report Data pane.
The Report Data Management pane allows you to:
• create, edit, delete, or clone a Report Data
• create or organize variables in a Report Data.
The Report Data Management pane contains several buttons: (a) New, (b) Edit, (c) Delete, (d) Clone, and (e)
Variable buttons (Figure 19). These buttons can help you create a Report Data and its variables.
(a) New button
Click the New button to create a new Report Data (Figure 19).
To create a new report:
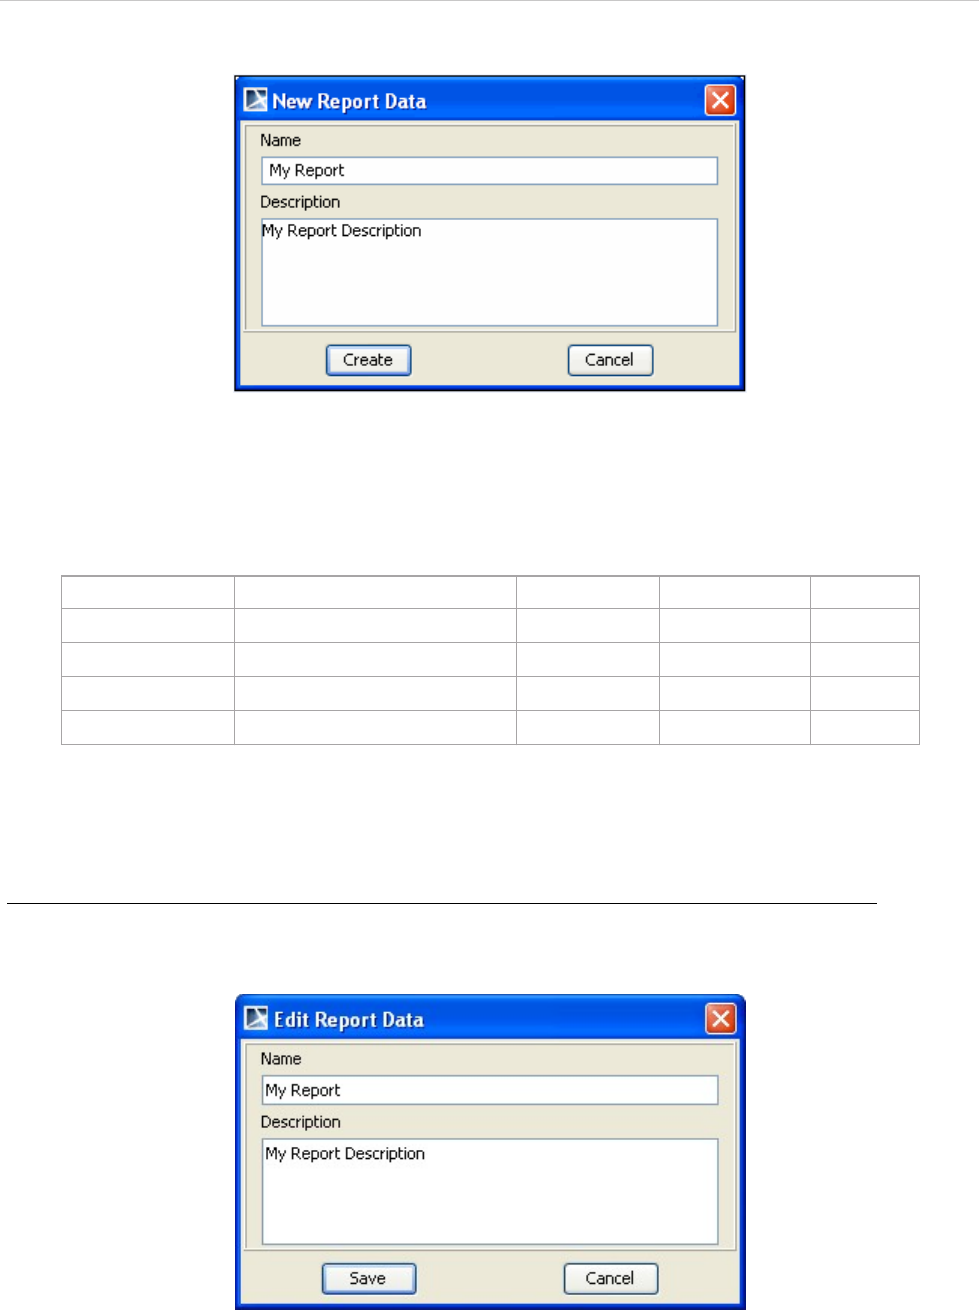
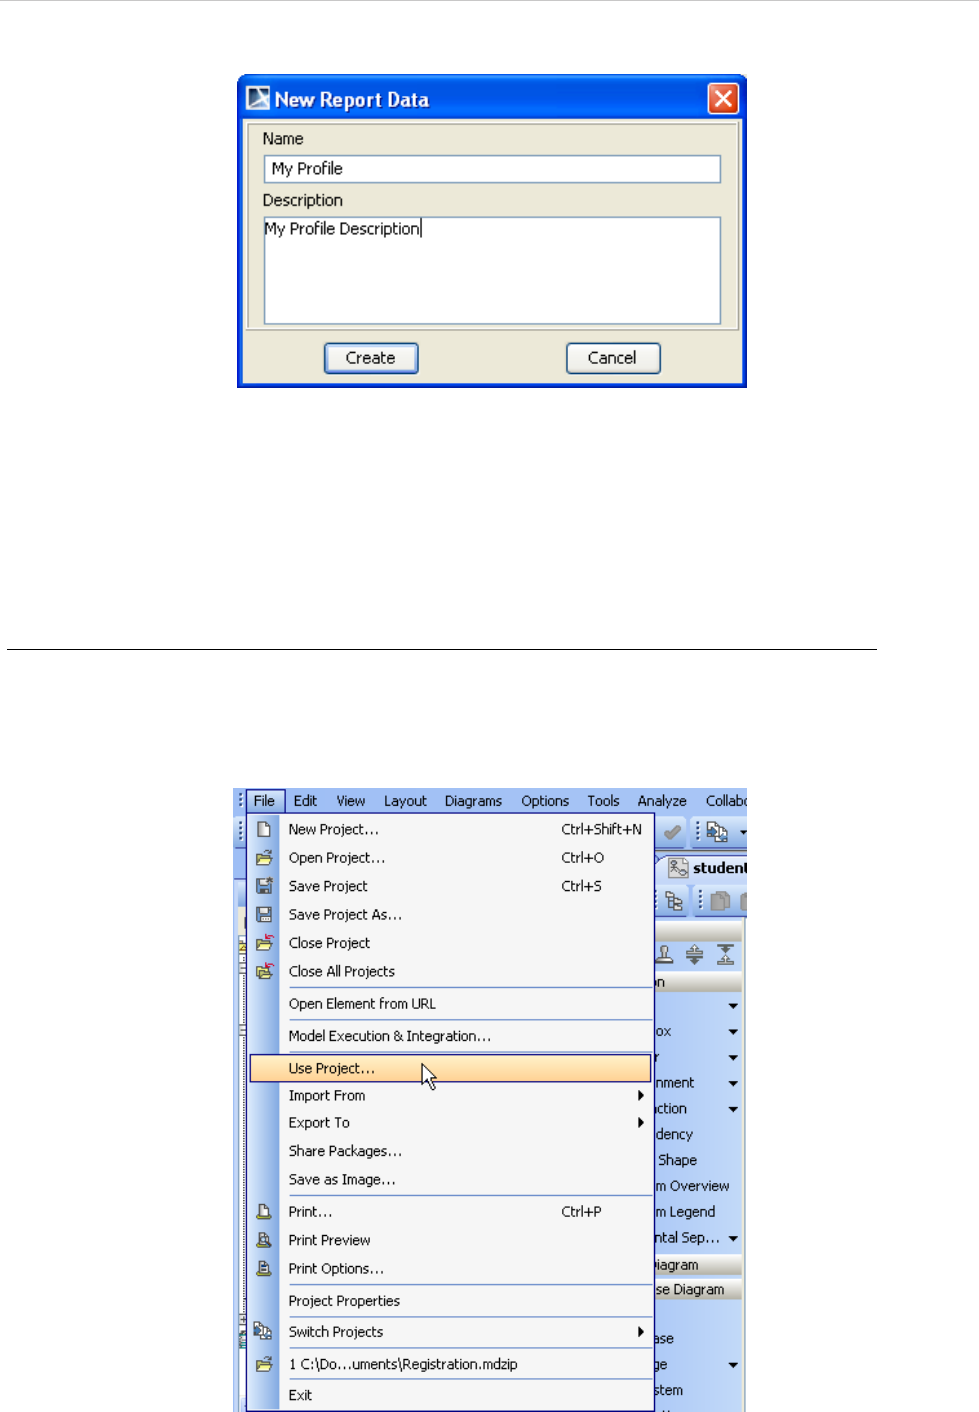
1. Click the New button. The New Report Data dialog will appear (Figure 20).
REPORT WIZARD
MagicDraw Report Wizard Overview
29
Copyright © 1998-2015 No Magic, Inc.
Figure 20 -- New Report Data Dialog
2. Enter a new report name and description, and then click Create.
Table 5 -- New Report Data Fields and Buttons
(b) Edit button
Click the Edit button to edit a Report Data (Figure 19).
To edit a Report Data:
1. Click the Edit button. The Edit Report Data dialog will appear (Figure 21).
Figure 21 -- Edit Report Data Dialog
2. Edit the report’s name and description, and then click Save.
Field Name Description Default Value Type Required
Name Enter the report’s name. Blank Text Yes
Description Enter the report’s description. Blank Text No
Create Create the report. Disable - -
Cancel Close the dialog. Enable - -
REPORT WIZARD
MagicDraw Report Wizard Overview
30
Copyright © 1998-2015 No Magic, Inc.
Table 6 -- Edit Report Data Dialog Fields and Buttons
(c) Delete button
Click the Delete button to delete a Report Data (Figure 19).
To delete a report:
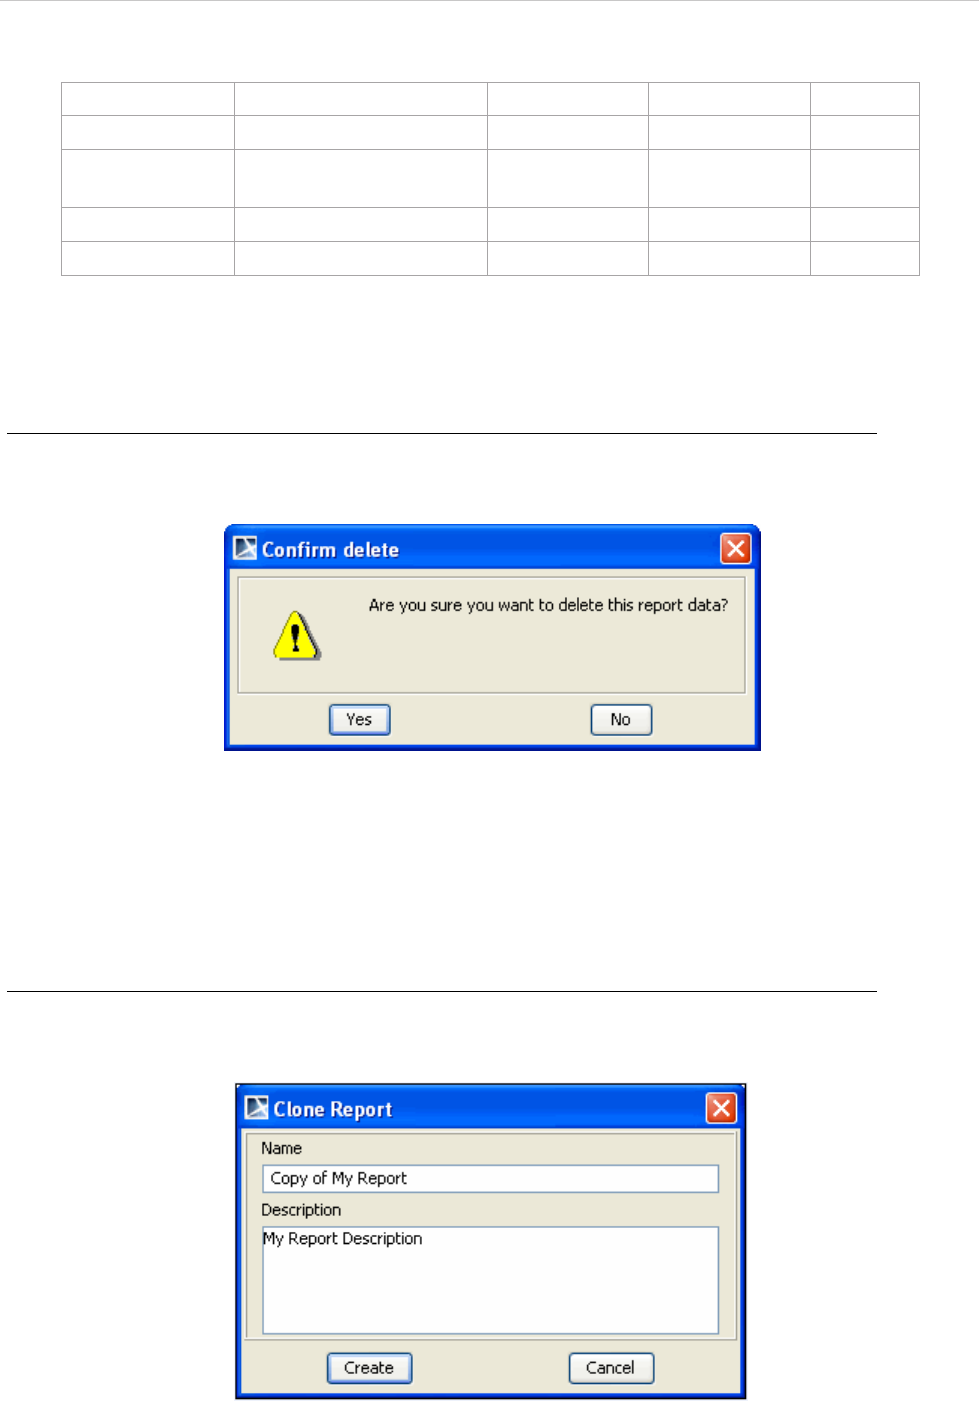
1. Click the Delete button. The Confirm delete dialog will appear (Figure 22).
Figure 22 -- Confirm Delete Dialog
2. Click either Yes to delete the selected data or No to cancel the operation.
(d) Clone button
Click the Clone button to clone a Report Data (Figure 19).
To clone a report:
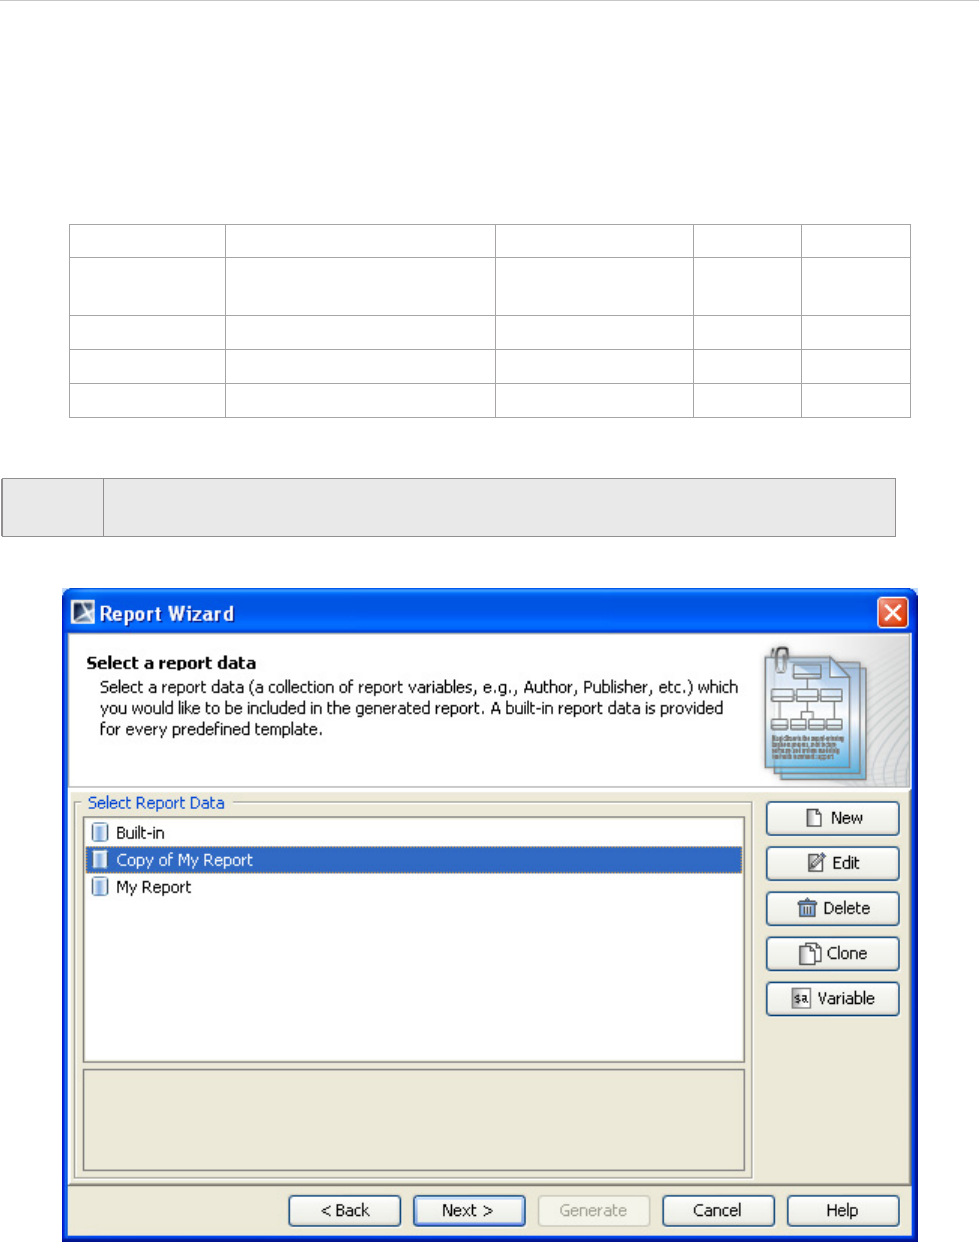
1. Click the Clone button. The Clone Report dialog will appear (Figure 23).
Figure 23 -- Clone Report Dialog
Field Name Description Default Value Possible Value Required
Name Edit the report’s name. Existing Name Text Yes
Description Edit the report’s descrip-
tion.
Existing
Description
Text No
Save Save the report. Enable Enable/Disable -
Cancel Close the dialog. Enable Enable/Disable -
REPORT WIZARD
MagicDraw Report Wizard Overview
31
Copyright © 1998-2015 No Magic, Inc.
2. Enter the name and description of the report. The name should begin with Copy of (cloned
report name).
3. Click the Create button. The cloned Report Data will then be created (Figure 24).
Table 7 -- Clone Report Dialog Fields and Buttons
Figure 24 -- Copy of My Report Created in the Report Data Management Pane
Field Name Description Default Value Type Required
Name Enter the report name. Copy of the selected
report name
Text Yes
Description Enter the report description. Existing Description Text No
Create Create the clone report. Enable - -
Cancel Close the dialog. Enable - -
NOTE Whenever a cloned Report Data is created, a copy of the Report Data (variable) will also
be created.
REPORT WIZARD
MagicDraw Report Wizard Overview
32
Copyright © 1998-2015 No Magic, Inc.
(e) Variable button
Click the Variable button to create a new variable (Figure 19).
To create a new variable:
1. Click the Variable button. The New Variable dialog will then open.
2. Type the variable name and value, and then click Create.
You can create report data in either (i) Report Wizard where all data will be saved into an XML file or (ii) a
MagicDraw project, in which case the report data will be saved with the project itself. Saving report data in a
project will enable you to commit the report to Teamwork Server.
1.1.2.2.1 Creating a Report Data in Report Wizard
To create report data in Report Wizard:
1. Open the Select Report Data pane.
2. Click the New button (Figure 25).
Figure 25 -- Creating Report Data in Report Wizard
3. Enter the new report’s name and description in the New Report Data dialog (Figure 26).
REPORT WIZARD
MagicDraw Report Wizard Overview
33
Copyright © 1998-2015 No Magic, Inc.
Figure 26 -- Entering Report’s Name and Description in the New Report Data Dialog
4. Click Create.
1.1.2.2.2 Creating a Report Data in a MagicDraw Project
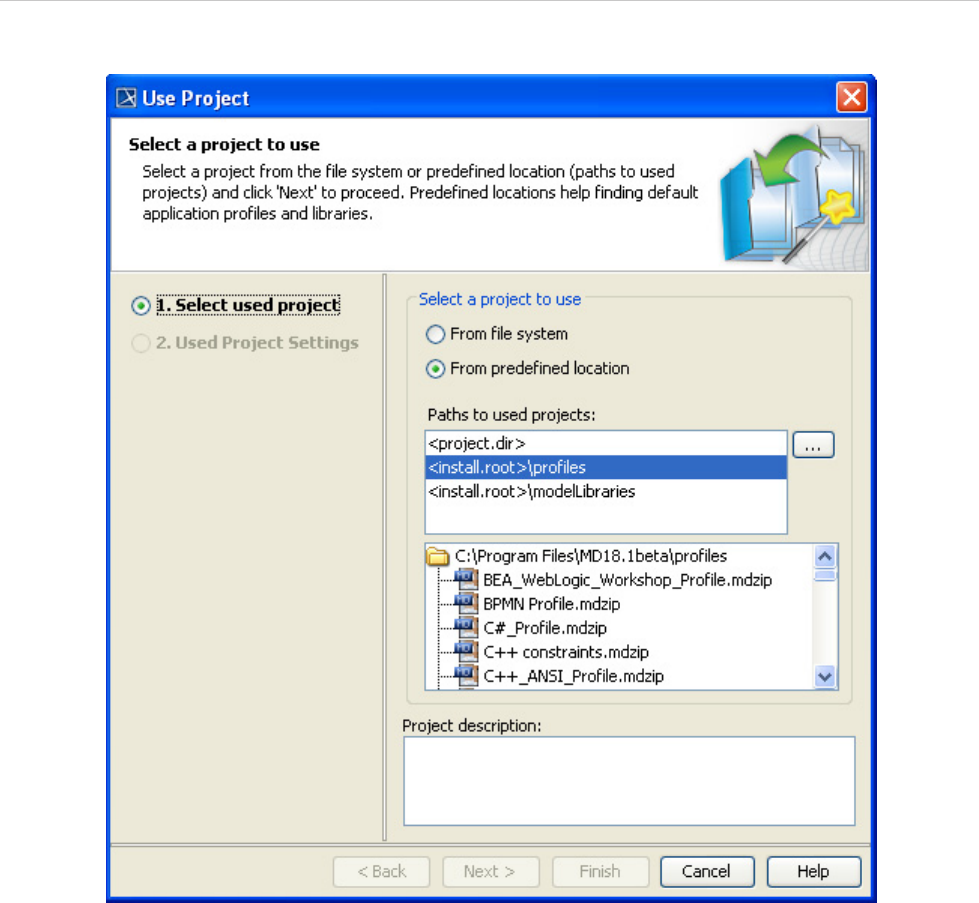
Before creating report data in a MagicDraw project, you need to use a report profile, Report Pro-
file.mdzip, which is located in the <install.root>\profiles folder.
To use a report profile (Report Profile.mdzip):
1. Click File > Use Project... on the MagicDraw main menu (Figure 27). The Use Project dialog
will open and the project module path <install.root>\profiles will be selected by default
(Figure 28).
Figure 27 -- The Use Project Menu
REPORT WIZARD
MagicDraw Report Wizard Overview
34
Copyright © 1998-2015 No Magic, Inc.
Figure 28 -- The Use Project Dialog
REPORT WIZARD
MagicDraw Report Wizard Overview
35
Copyright © 1998-2015 No Magic, Inc.
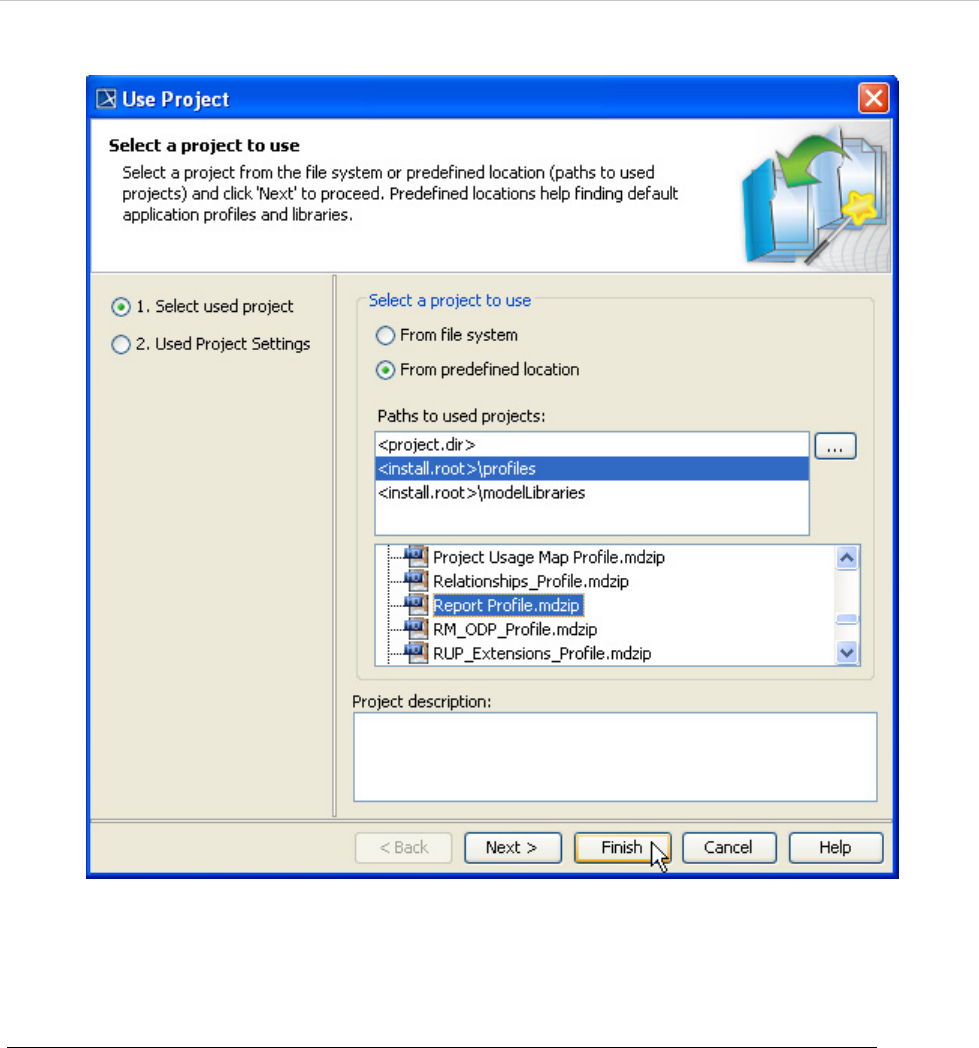
Figure 29 -- Selecting Project Module Path
2. Select Report Profile.mdzip and click Finish. The “Report Profile” profile will open in the
Containment tree as a read-only profile. You can now use it in your project.
To create a Report Data in a MagicDraw project:
1. Use Report Profile.mdzip in your MagicDraw project (see "To use a report profile (Report
Profile.mdzip):", on page 33).
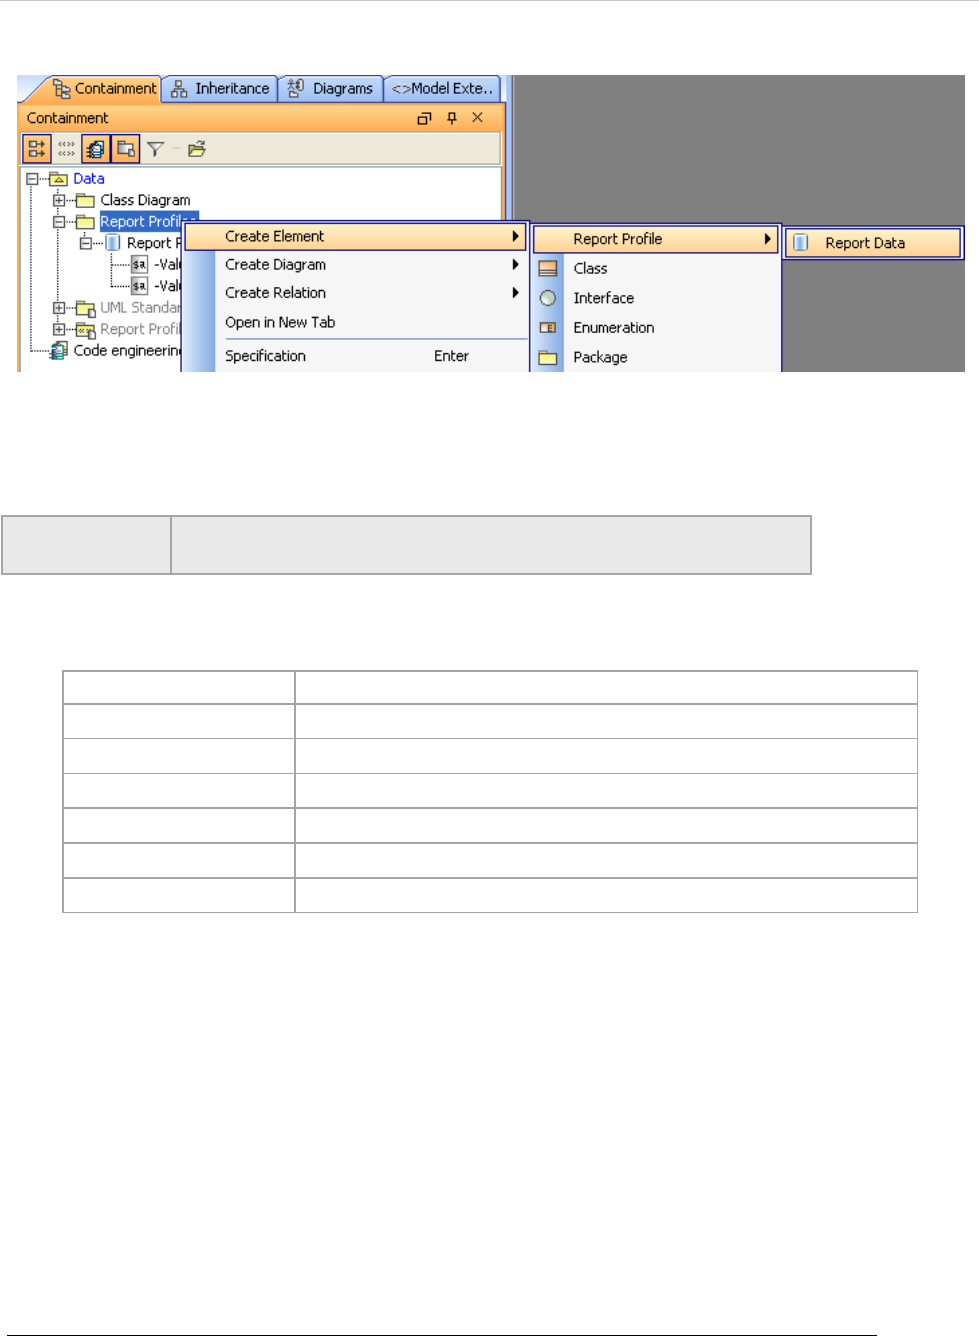
2. Right-click a data model in the Containment tree and select Create Element > Report
Profile > Report Data from the shortcut menu (Figure 30).
REPORT WIZARD
MagicDraw Report Wizard Overview
36
Copyright © 1998-2015 No Magic, Inc.
Figure 30 -- Creating Report Data in MagicDraw Project
3. Type the name of the Report Data element in the Containment tree.
Table 8 -- Tag Values of Report Data
1.1.2.2.3 Creating and Modifying Report Data Variables
Variables are created because some information is not “naturally” contained in a model such as the company's
name, author's name, revisions, and many more. Although you can put all the information in a model's specifi-
cation (Document/Hyperlinks in the Specification dialog), it is very hard and tedious to get data from the
model's specification, as this results in more lines of codes and scripts in the report templates. Therefore,
instead of writing lines of codes, you can simply create a variable, give it a name, and call it directly from the
template. For example, you can create a variable called “Author” in Report Wizard and write $Author in the
template. When you generate the report, you will see the value inside “Author.” In short, a variable is used to
represent data, which you want to include in the report, not in the model.
Variables contain information that you want to store in a project, such as names and dates.
To create a variable for a Report Data:
• Right-click a Report Data in the Containment tree and select Create Element > Variable (Figure 31).
The variable will appear inside the Report Data.
NOTE You can right-click a data model, a package, or a profile in the Contain-
ment tree to create a Report Data.
Tag Values Function
autoImageSize Change the image size.
imageFormat Select an image format, either JPEG or PNG.
emptyText Store a string value that will be replaced with an empty variable.
data Contain elements that will be published by Report Wizard.
template Determine which template to use a particular Report Data.
generateRecursively Determine whether or not a report will be generated recursively.

REPORT WIZARD
MagicDraw Report Wizard Overview
37
Copyright © 1998-2015 No Magic, Inc.
Figure 31 -- Creating Variable for Report Data
You can also create, edit, and delete variables through the Report Variable dialog in Report Wizard.
To open the Report Variable dialog:
1. Click Tools > Report Wizard... on the MagicDraw main menu.
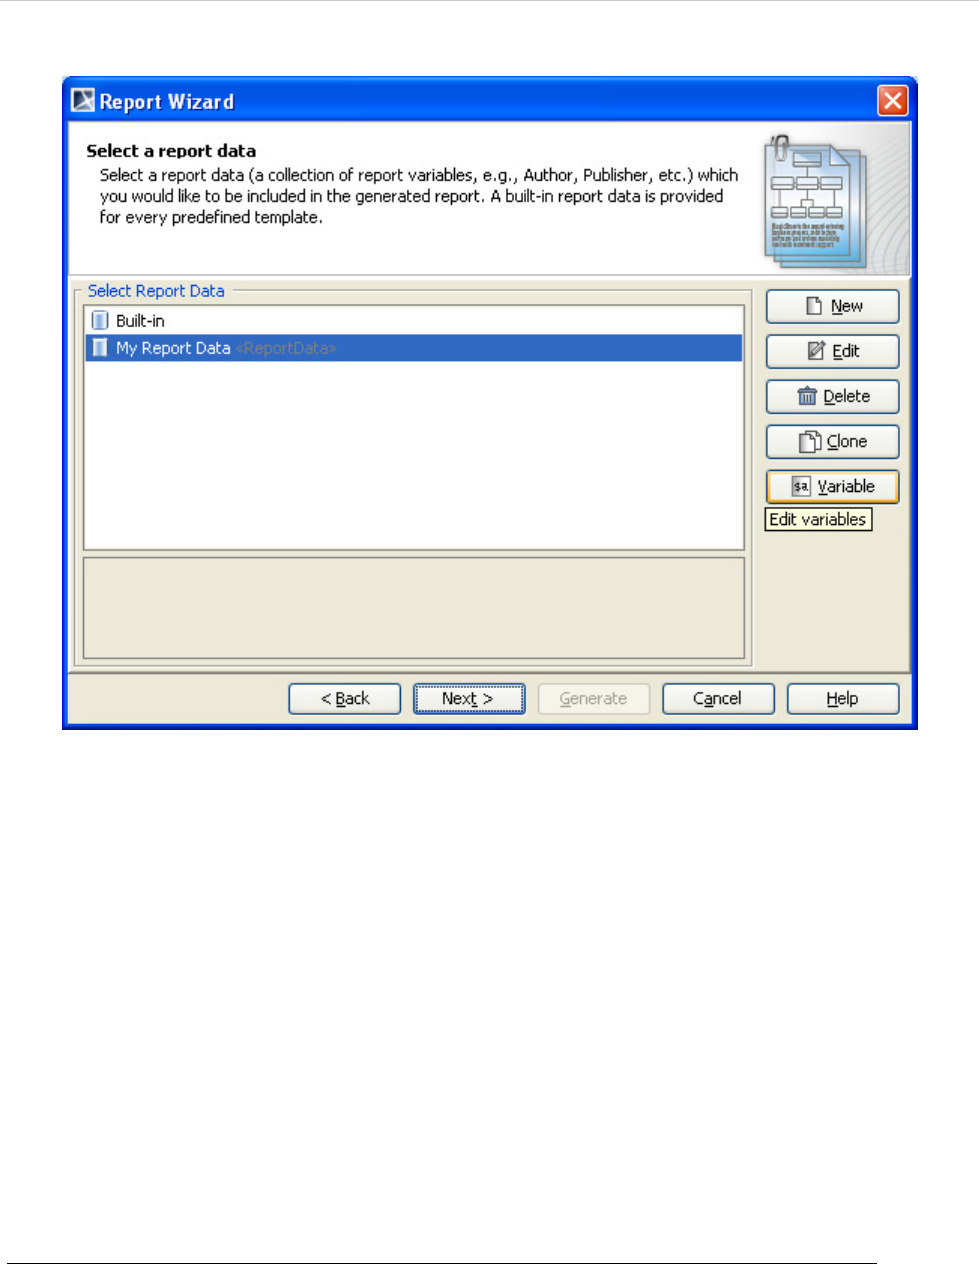
2. Select a report template and click Next (Figure 32).
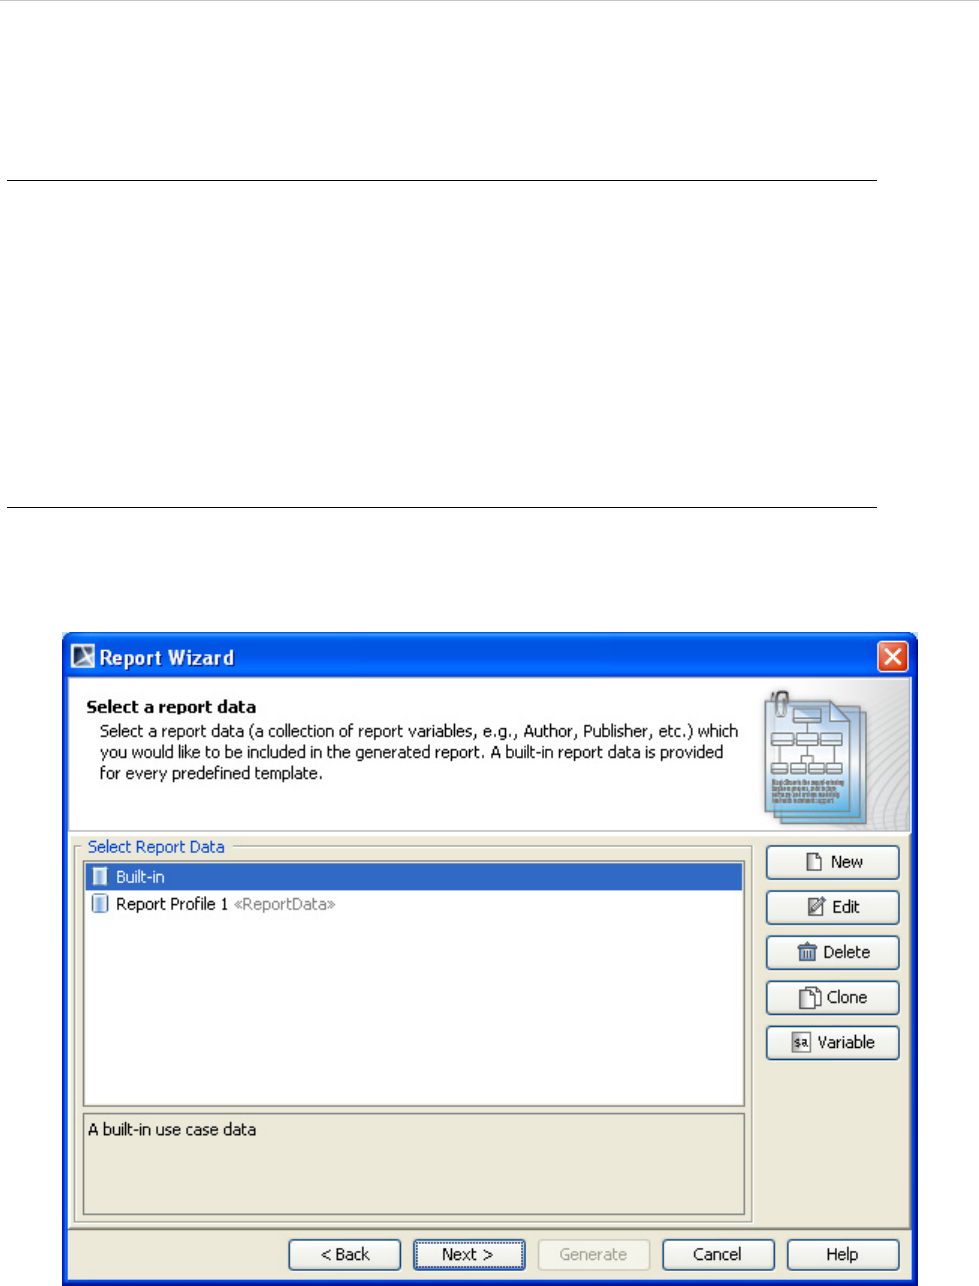
Figure 32 -- Opening Report Wizard Dialog
3. Either create (with the New button) or select a Report Data and click the Variable button
(Figure 33). The Report Variable dialog will open (Figure 34).
REPORT WIZARD
MagicDraw Report Wizard Overview
38
Copyright © 1998-2015 No Magic, Inc.
Figure 33 -- Opening the Variable Dialog
Figure 34 -- The Report Variable Dialog
REPORT WIZARD
MagicDraw Report Wizard Overview
39
Copyright © 1998-2015 No Magic, Inc.
To create a variable in Report Wizard:
1. Open the Report Variable dialog (see "To open the Report Variable dialog:", on page 37
above).
2. Click New. The New Variable dialog will open. Fill in the variable name and description
(Figure 35). You can create either (i) a parent variable or (ii) a child variable in the Owner
box.
Figure 35 -- New Variable Dialog
(i) To create a parent variable, type the variable name in the Name box, enter the description,
select an empty value in the Owner box, and then click Create (Figure 36).
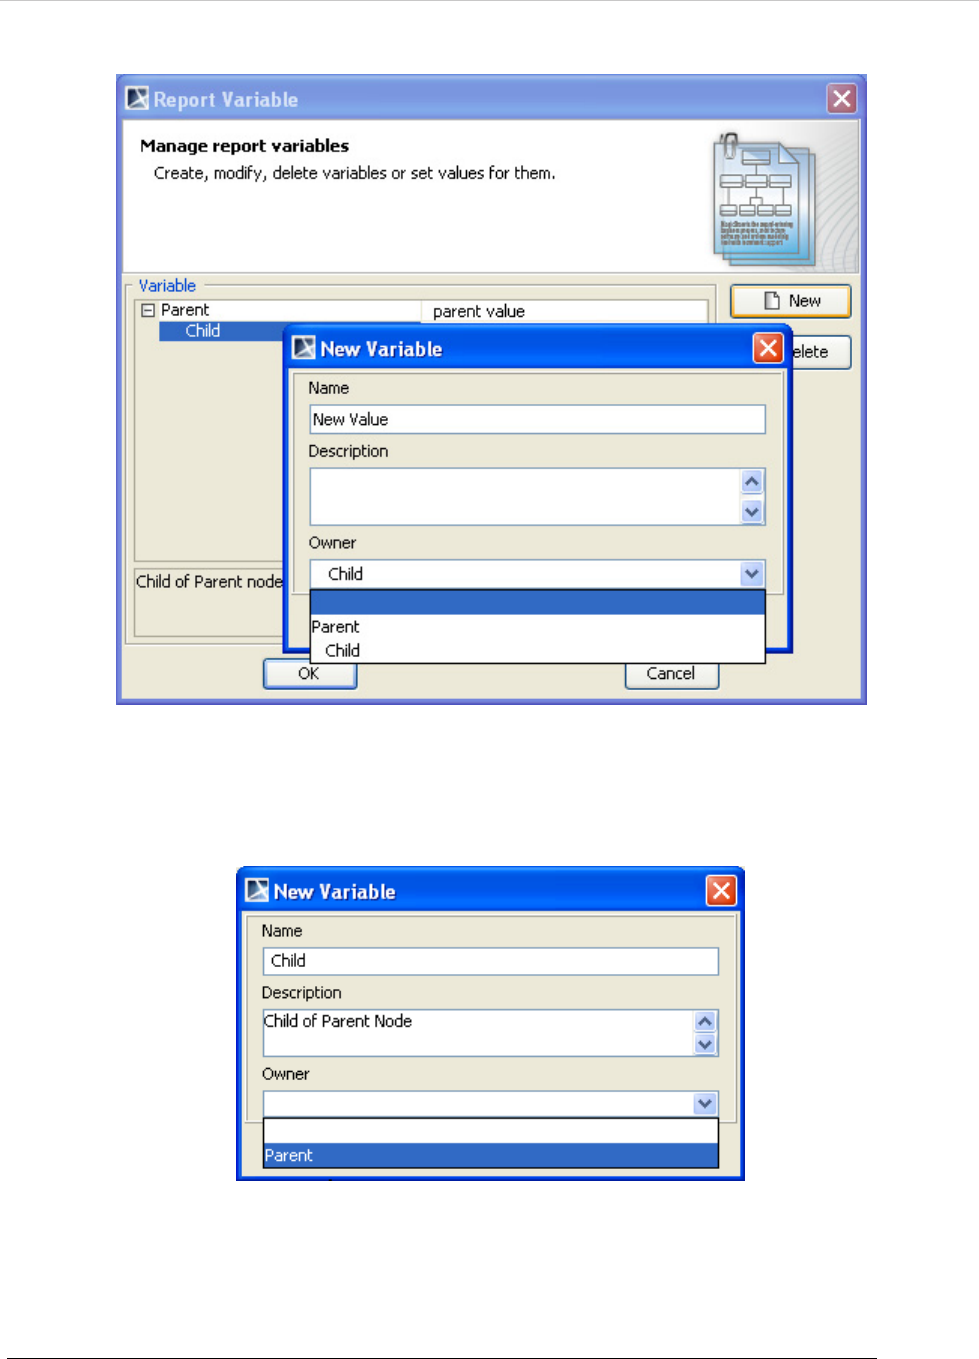
REPORT WIZARD
MagicDraw Report Wizard Overview
40
Copyright © 1998-2015 No Magic, Inc.
Figure 36 -- Creating a Parent Variable
(ii) To create a child variable, type the variable name in the Name box, enter the description,
select Parent in the Owner box, and then click Create (Figure 37).
Figure 37 -- Creating a Child Variable
3. The new variable will appear in the table in the Report Variable dialog.
4. Click OK to save the variables in the Report Data.
To edit a variable in Report Wizard:
1. Open the Report Variable dialog (see "To open the Report Variable dialog:", on page 37
above).
REPORT WIZARD
MagicDraw Report Wizard Overview
41
Copyright © 1998-2015 No Magic, Inc.
2. Double-click the column next to the variable name column and click the ... button (Figure 38).
A dialog will open for you to edit the variable value.
Figure 38 -- Editing Variables
3. Click OK. The new variable value will appear in the column next to the variable name column.
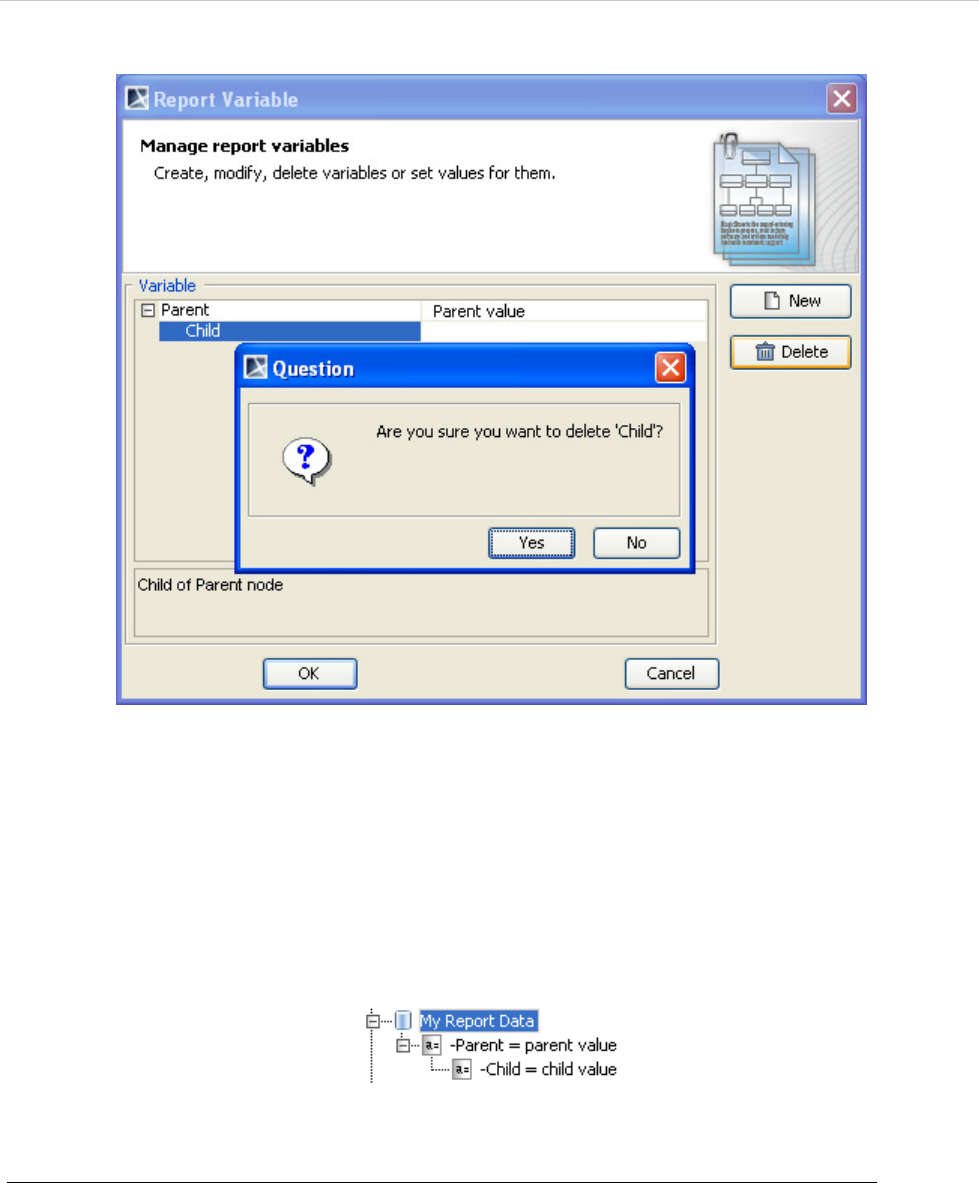
To delete a variable in Report Wizard:
1. Open the Report Variable dialog.
2. Click a variable in the table, and then click Delete. A dialog will open prompting you for
confirmation before deleting the selected variable (Figure 39).
REPORT WIZARD
MagicDraw Report Wizard Overview
42
Copyright © 1998-2015 No Magic, Inc.
Figure 39 -- Deleting Variable
3. Click Yes, and the variable will be deleted.
1.1.2.2.4 Including Variables in a Template
When you include the variables you have created in a template, you will have each variable value included in
the generated report. This section will use the following Report Data as an example (Figure 40).
Figure 40 -- Sample of Report Data
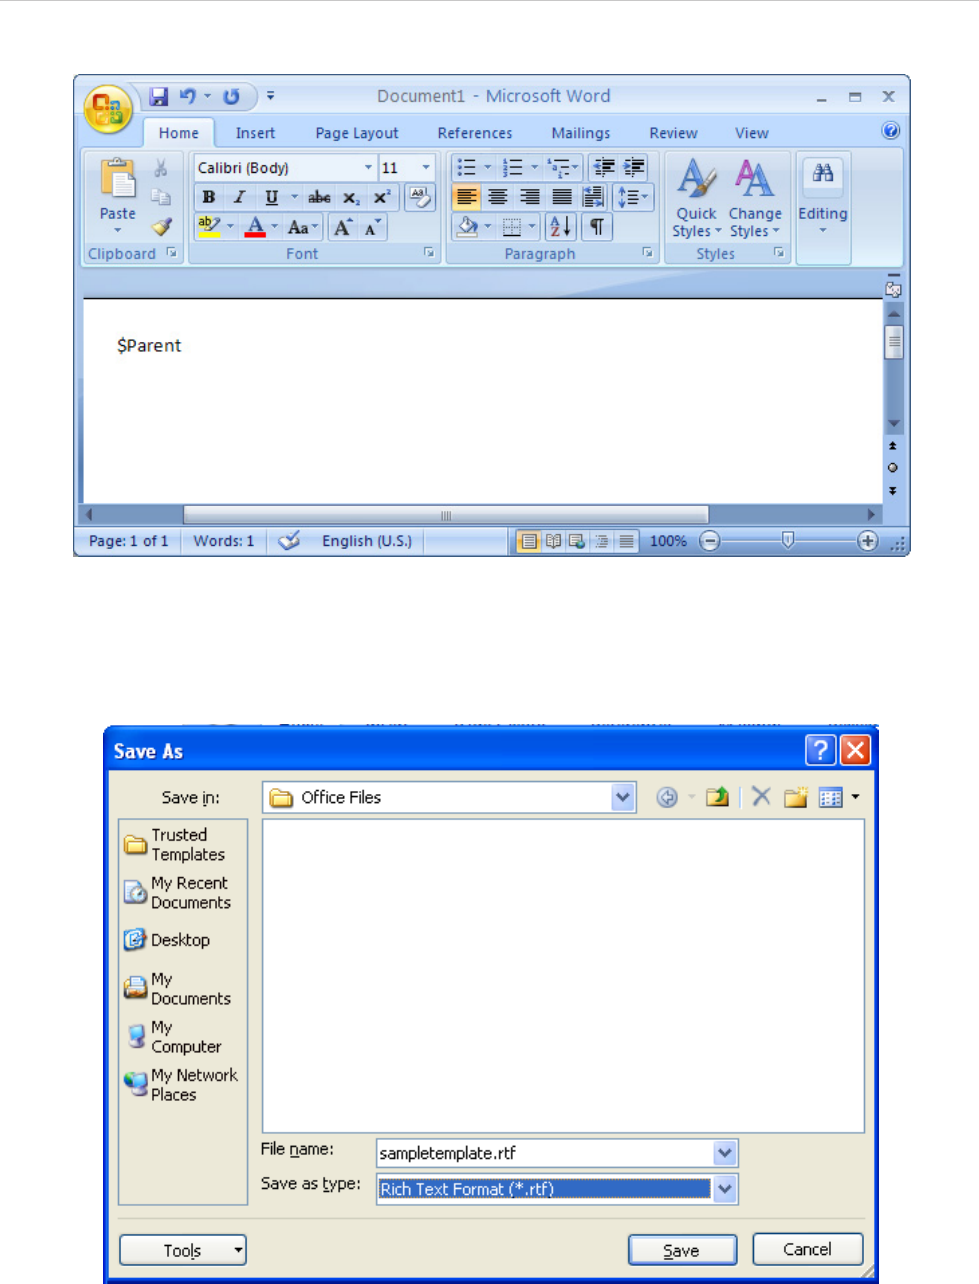
To get the value of a top-level variable:
1. Open a blank document in Microsoft Word.
2. Type: $Parent (Figure 41).
REPORT WIZARD
MagicDraw Report Wizard Overview
43
Copyright © 1998-2015 No Magic, Inc.
Figure 41 -- Referencing to Parent Variable in the Template
3. Save the file as “sampletemplate.rtf”. Choose Rich Text Format (*.rtf) as the file type
(Figure 42).
Figure 42 -- Saving Template as .rtf File in Microsoft Word
4. Open the Report Wizard dialog and create a new template with the New button. The New
Template dialog will open.
5. Type the name and description of the new template. Click the “...” button to select
“sampletemplate.rtf” as the template file.
REPORT WIZARD
MagicDraw Report Wizard Overview
44
Copyright © 1998-2015 No Magic, Inc.
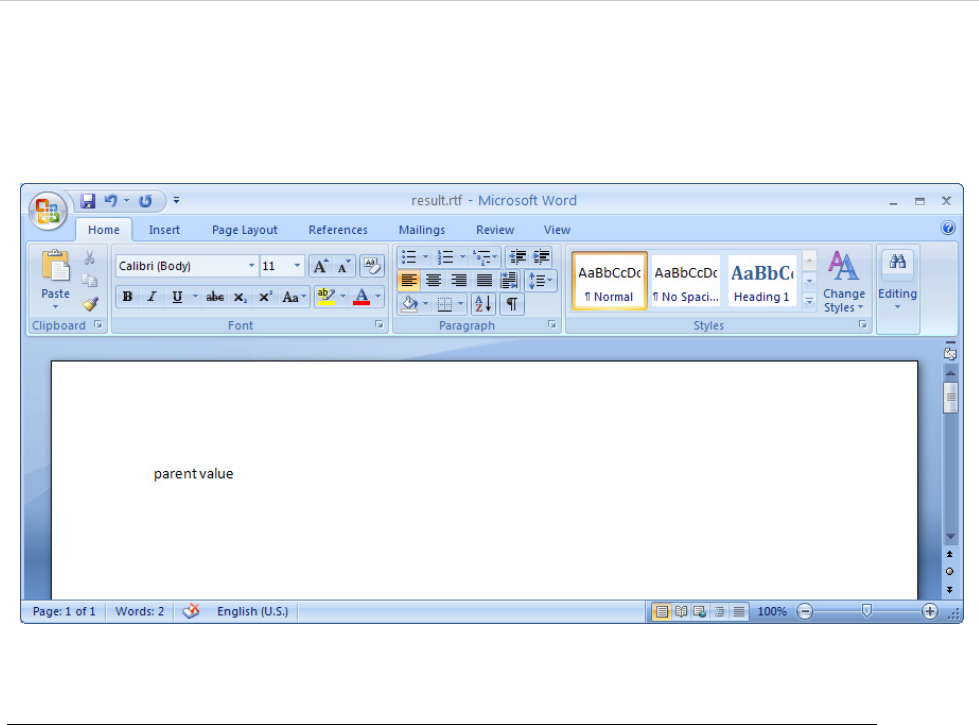
6. Click Create > Next. The Select Report Data pane will open.
7. Select My Report Data and click Generate to generate a report. The output of the generated
report will be as shown in Figure 43:
Figure 43 -- Output of $parent after Report Generation
To get the value of the child of a variable:
1. Open a blank document in Microsoft Word.
2. Type any of the following to print a child variable (Figure 44):
(i) $Parent.get(1): to get a child value by index.
(ii) $Parent.get(“Child”): to get a child value by name comparison.
(iii) $Parent.Child: to get a child value by referencing its name (in this case “Child”).

REPORT WIZARD
MagicDraw Report Wizard Overview
45
Copyright © 1998-2015 No Magic, Inc.
Figure 44 -- Referencing to Child Variable in the Template
3. Save the file as “sampletemplate.rtf”. Choose Rich Text Format (*.rtf) as the file type.
4. Open the Report Wizard dialog and create a new template by clicking the New button. The
New Template dialog will open.
5. Type the name and description of the new template. Click the “...” button to select
“sampletemplate.rtf” as the template file.
6. Click Create > Next. The Select Report Data pane will open.
7. Select My Report Data and click Generate to generate a report. The output of the generated
report will be as shown in Figure 45:
Figure 45 -- Output of $Parent.get(1), $Parent.get("Child"), and $Parent.Child
REPORT WIZARD
MagicDraw Report Wizard Overview
46
Copyright © 1998-2015 No Magic, Inc.
1.1.2.3 Select Element Scope Pane
The Select Element Scope pane (Figure 46) allows you to select the scope of MagicDraw data to generate a
report.
Figure 46 -- Select Element Scope Pane
Table 9 below describes the detail of each component in the Select Element Scope pane.
Table 9 -- Components in the Select Element Scope Pane
Component Name Description
All data tree Select the desired packages from the All data tree then add them to the
Selected objects tree.
Selected objects
tree Select packages and click the Add, Add All, or Add Recursively button.
The selected packages will be added to the Selected objects tree.
Add button Select packages and click Add. The selected packages will be added to the
Selected objects tree.
Add All button Select packages and click Add All. The selected packages and the ele-
ments directly owned by those packages will be added to the Selected
objects tree.
Add Recursive
button Select packages and click Add Recursively. The selected packages and
its recursive packages will be added to the Selected objects tree.
Remove button Select packages and click Remove. The selected packages will be
removed from the Selected objects tree.

REPORT WIZARD
MagicDraw Report Wizard Overview
47
Copyright © 1998-2015 No Magic, Inc.
You can perform the following operations in the Select Element Scope pane:
(i) Add packages into the selected object tree.
(ii) Remove a selected package from the selected object tree.
(iii) Select or clear the Generate Recursively option.
(iv) Show auxiliary resources.
(v) Show only package elements.
(i) To add packages:
• In the Select Element Scope pane (Figure 46), select the packages from the All data tree and click
Add, Add All, or Add Recursively to add them into the Selected objects tree.
(ii) To remove packages:
• In the Select Element Scope pane (Figure 46), select the packages from the Selected objects tree
and click Remove or Remove All to remove them from the Selected objects tree.
(iii) To select or clear the Generate Recursively option:
• Select or clear the Generate Recursively check box in Figure 46.
(iv) To show auxiliary resources:
• Select or clear the Auxiliary Resources check box in Figure 46.
(v) To show only package elements:
• Select or clear the Show Only Package Element check box in Figure 46.
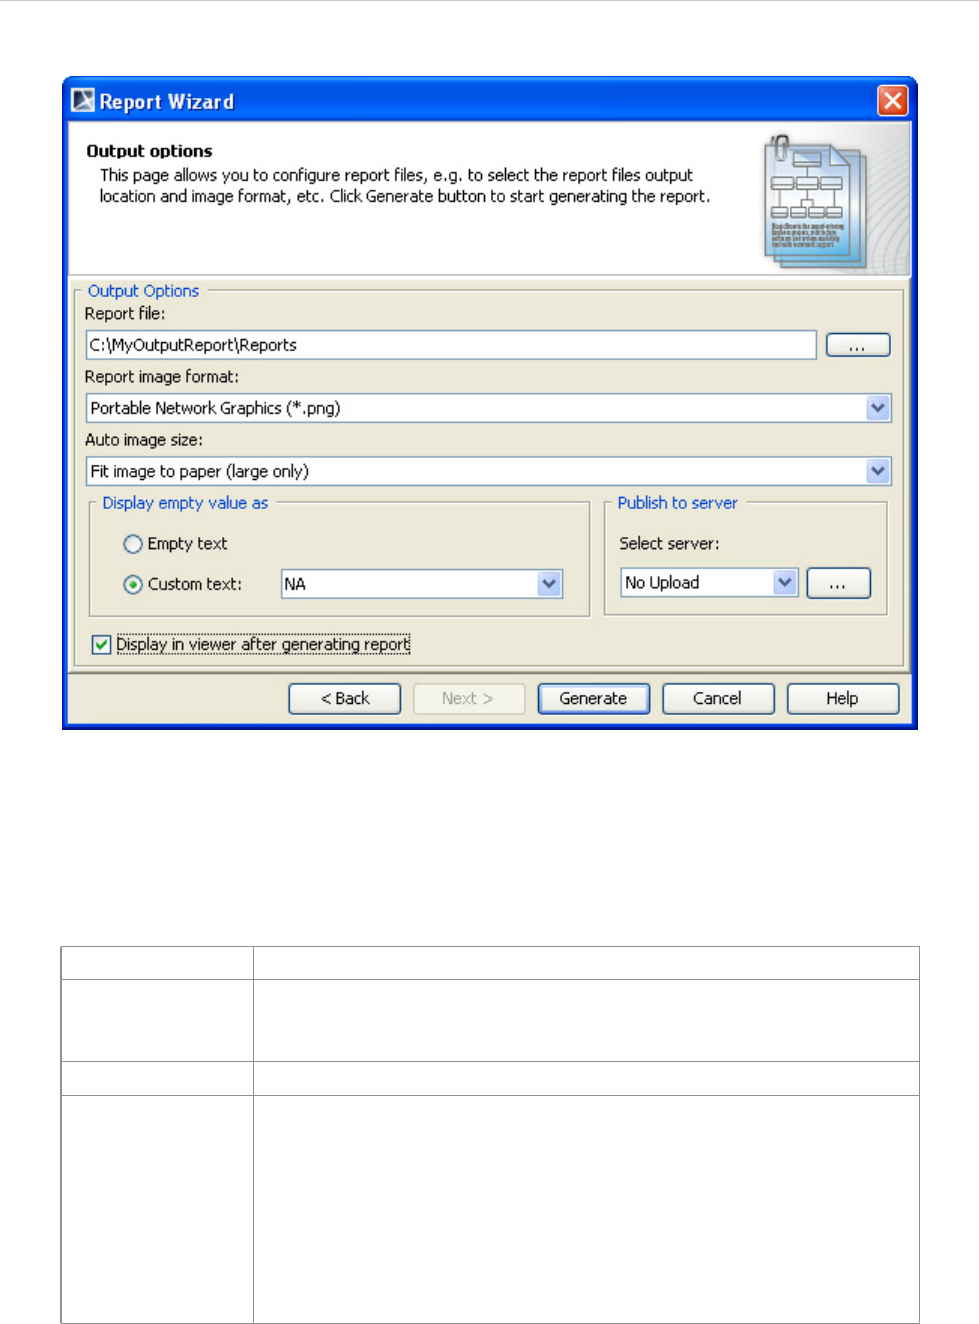
1.1.2.4 Generate Output Pane
The Generate Output pane in Report Wizard allows you to configure report files, for example, to select the
report files’ output location and image format and to display the report in the viewer (Figure 47).
Remove All button Click Remove All and all packages in the Selected objects tree will be
removed.
NOTE Figure 46 shows the UML 2 Elements package and the Generate Recursively check
box were selected. It means that the UML 2 Elements package and its subpackages will
be generated in the report.
Component Name Description
REPORT WIZARD
MagicDraw Report Wizard Overview
48
Copyright © 1998-2015 No Magic, Inc.
Figure 47 -- Generate Output Pane
Table 10 below describes the function of each option in the Generate Output pane of Report Wizard.
Table 10 -- Components in the Generate Output Pane
Component Name Description
Report File Show the report file’s location and name. The default report location will
be \data\template_folder\reports\. The default report name will be the
same as the report name defined by the user.
... button Open the Select Location dialog in order to locate the report file.
Report Image
Format Select an image format for your report: JPG, PNG, SVG, EMF, or WMF.
Note:
• Use *.JPG and *.PNG for any template format.
• Use *.SVG for text and HTML templates.
• Use *.EMF and *.WMF for text and Microsoft Office templates
(RTF, DOCX, XLSX, and PPTX).
REPORT WIZARD
MagicDraw Report Wizard Overview
49
Copyright © 1998-2015 No Magic, Inc.
Auto image size Change the size and orientation of an image before inserting it into a doc-
ument. There are 4 options available:
• No Resize: Image will not be resized or rotated.
• Fit image to paper (large only): Large image will be fitted within
the paper size.
• Fit and rotate (clockwise) image to paper (large only): Large
image will be fitted within the paper size and rotated clockwise.
• Fit and rotate (counter-clockwise) image to paper (large
only): Large image will be fitted within the paper size and
rotated counter-clockwise.
Display empty
value as • Empty text: Leave an empty value of the report output blank.
• Custom text as: Enter a custom value for an empty value. The default
value is NA.
Display in viewer
after generating
report
Display a complete report in the viewer. Otherwise, the report will be cre-
ated and kept in a selected location.
Generate Generate a report.
Cancel Cancel the report generation process and close the Report Wizard dia-
log.
Help Provide the Help content.
NOTE • Displaying an empty value with a text feature (displaying empty
value as) was deprecated. This feature will be removed in the next
version of MagicDraw. Alternatively, you can select one of the
following two options.
(i) Use a template code to replace empty value with text. For example:
Using normal code.
#if (!$var || $var == "")
Empty
#end
Using macro code.
#macro (replaceNullValueWithText $var)
#if (!var || $var == "")
EMPTY
#end
#end
(ii) Use report wizard environment option to configure empty.
Add the property “template.output.on.blank.field” and value in the
Report Wizard Environment option to enable this feature. The value of
this property will be inserted in the generated output when the variable
is empty (see 10 Report Wizard Environment Options).
Component Name Description
REPORT WIZARD
MagicDraw Report Wizard Overview
50
Copyright © 1998-2015 No Magic, Inc.
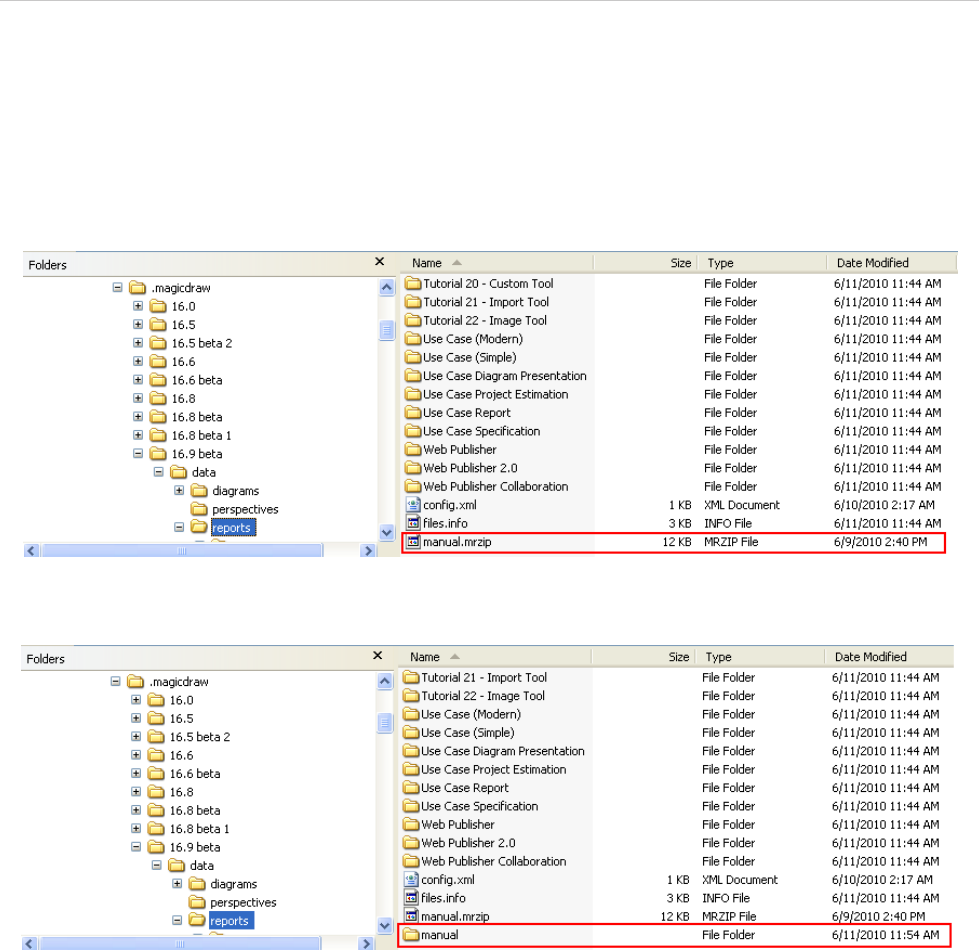
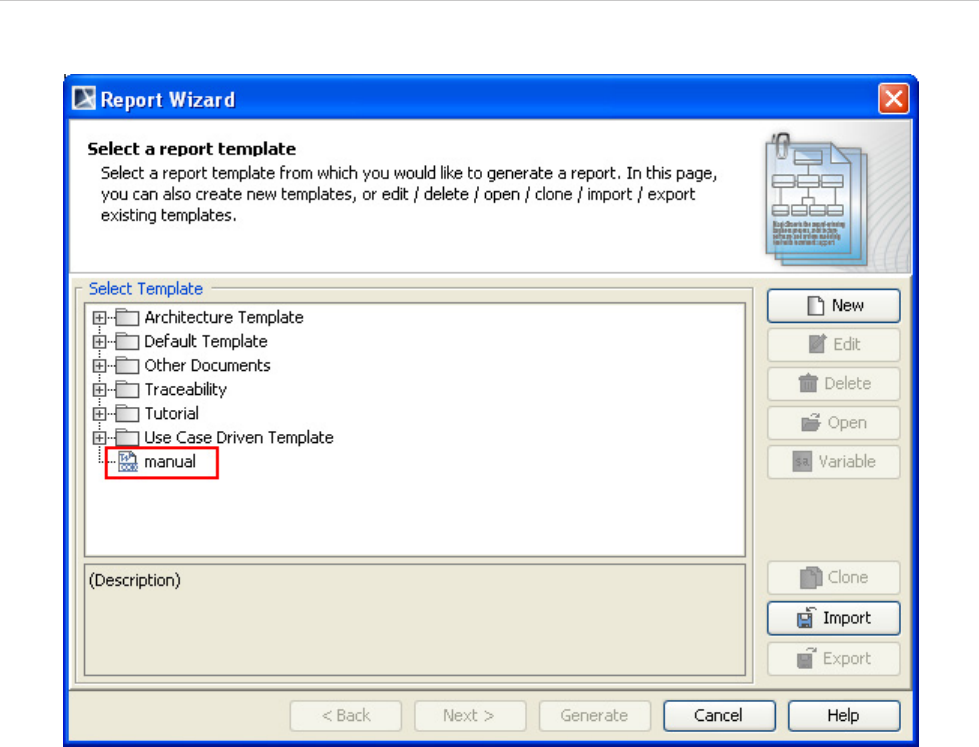
1.2 MRZIP File Automatic Deployment
An MRZIP file is a report template package file. You can place an MRZIP file into your template folder “<user
folder>/data/reports”, and MagicDraw will automatically deploy the template into the Report Wizard dialog.
Figure 48, 49, and 50 below will show you how Report Wizard can automatically deploy an MRZIP file.
Figure 48 -- Copying MRZIP File into a Template Folder
Figure 49 -- Automatic Deployment of MRZIP File
REPORT WIZARD
MagicDraw Report Wizard Overview
51
Copyright © 1998-2015 No Magic, Inc.
Figure 50 -- Report Template Installed in the Report Wizard Dialog
REPORT WIZARD
Report Wizard Template Language
52
Copyright © 1998-2015 No Magic, Inc.
2. Report Wizard Template Language
Report Wizard is built on Velocity Engine. Knowledge of the Velocity Template Language and the Report Wiz-
ard Custom Language used within the Report Wizard template is necessary for understanding, editing, or cre-
ating templates.
2.1 Velocity Template Language
The user guide for Velocity (VTL) can be found at: http://velocity.apache.org/engine/devel/user-guide.html.
2.2 Report Wizard Custom Language
2.2.1 #forrow Directive
The Velocity Template Language does not support loops inside a table structure. However, the Report Wizard
engine introduces a new custom syntax that allows looping inside the table structure in order to clone the table
rows.
The syntax is : #forrow <query data> #endrow
For example:
The output will be:
2.2.2 #forpage Directive
The #forpage directive is used to provide a loop over the codes within a page. This directive provides imple-
mentation like #forrow, but it creates a loop over a page instead of a row. For example:
The report will contain a UseCase name for each document page.
NOTE • The formal reference such as ${hello} is not supported in RTF templates.
• A macro cannot be used as macro parameter in any RTF report template. This is a
limitation of VTL itself: Velocity treats a macro like copy-and-paste content defined in
the macro (between #macro and #end) at the inserted position.
• In an RTF report template, the style and formatting defined on a directive will have no
effect on the report output. In addition, the paragraph symbol at the end of a line will
also be removed.
Name Owner
#forrow ($uc in $UseCase) $uc.name $uc.owner.humanName #endrow
Name Owner
UC1 Package Requirement
UC2 Package Requirement
#forpage($uc in $UseCase)
$uc.name
#endpage
REPORT WIZARD
Report Wizard Template Language
53
Copyright © 1998-2015 No Magic, Inc.
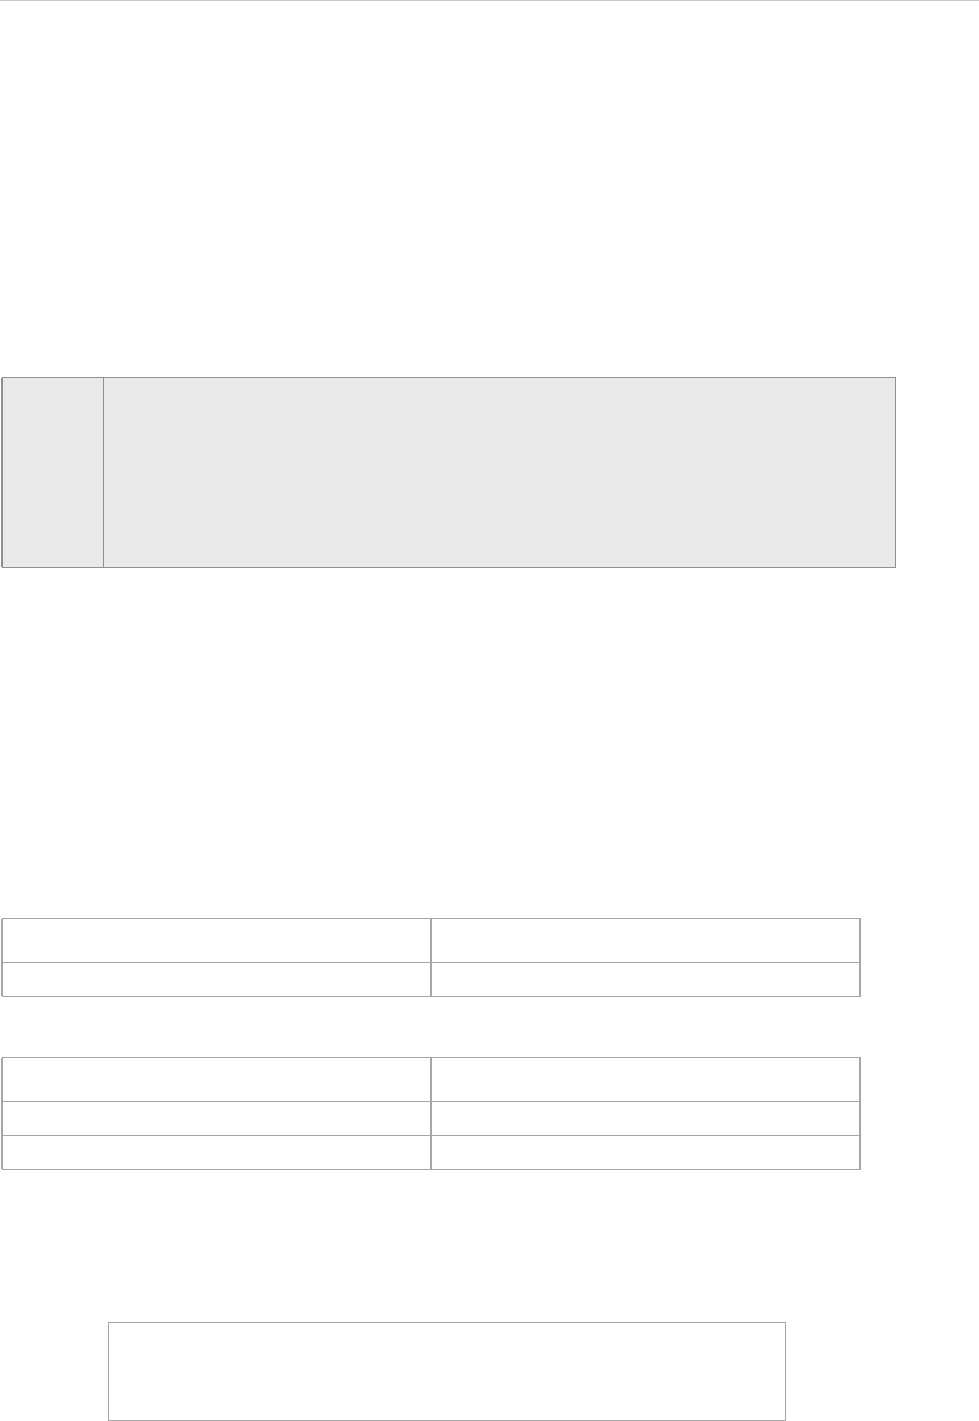
2.2.2.1 OpenDocument Specific Usage
When this directive appears in the OpenDocument Presentation template, it will create a loop over all directives
that are present on the current page. All directives on this page will be included inside #forpage (Figure 52).
Figure 51 -- OpenDocument Presentation #forpage Template
Figure 52 -- OpenDocument Presentation #forpage Template - UseCase
Figure 51 and Figure 52 are sample templates that generate the same output. For more information, see the
OpenDocument Presentation template section.
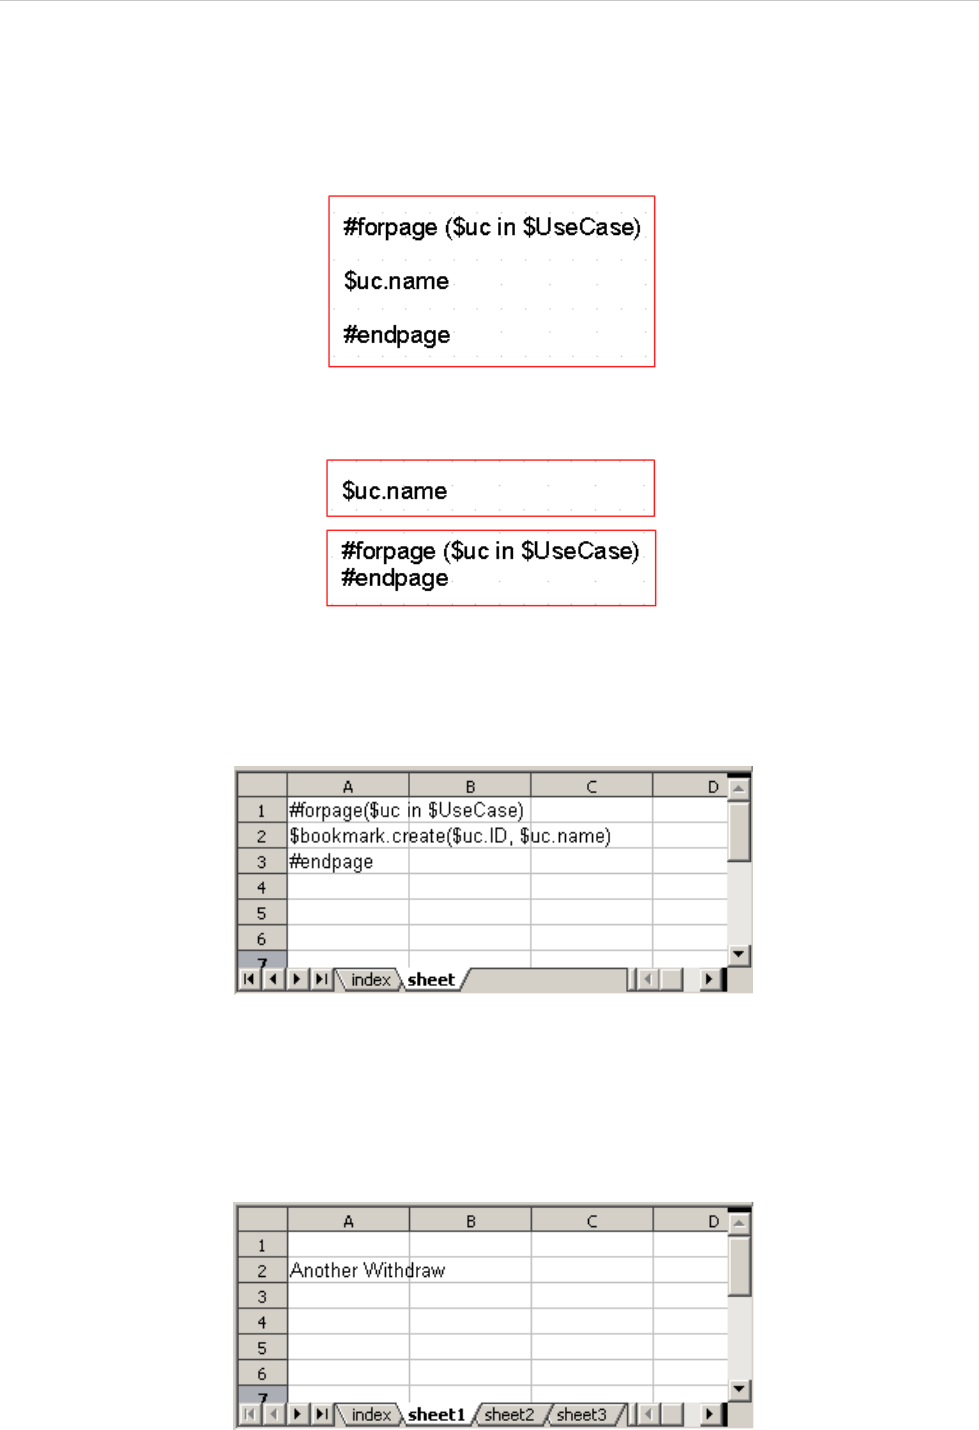
Figure 53 -- OpenDocument Spreadsheet for #forpage Template
Figure 53 displays an example of the #forpage directive inside an ODS file. When this directive is used in an
ODS template, it will create a sheet for codes within the template sheet.
Figure 54 shows the output produced from the template.
Figure 54 -- OpenDocument Spreadsheet Output for #forpage Template
REPORT WIZARD
Report Wizard Template Language
54
Copyright © 1998-2015 No Magic, Inc.
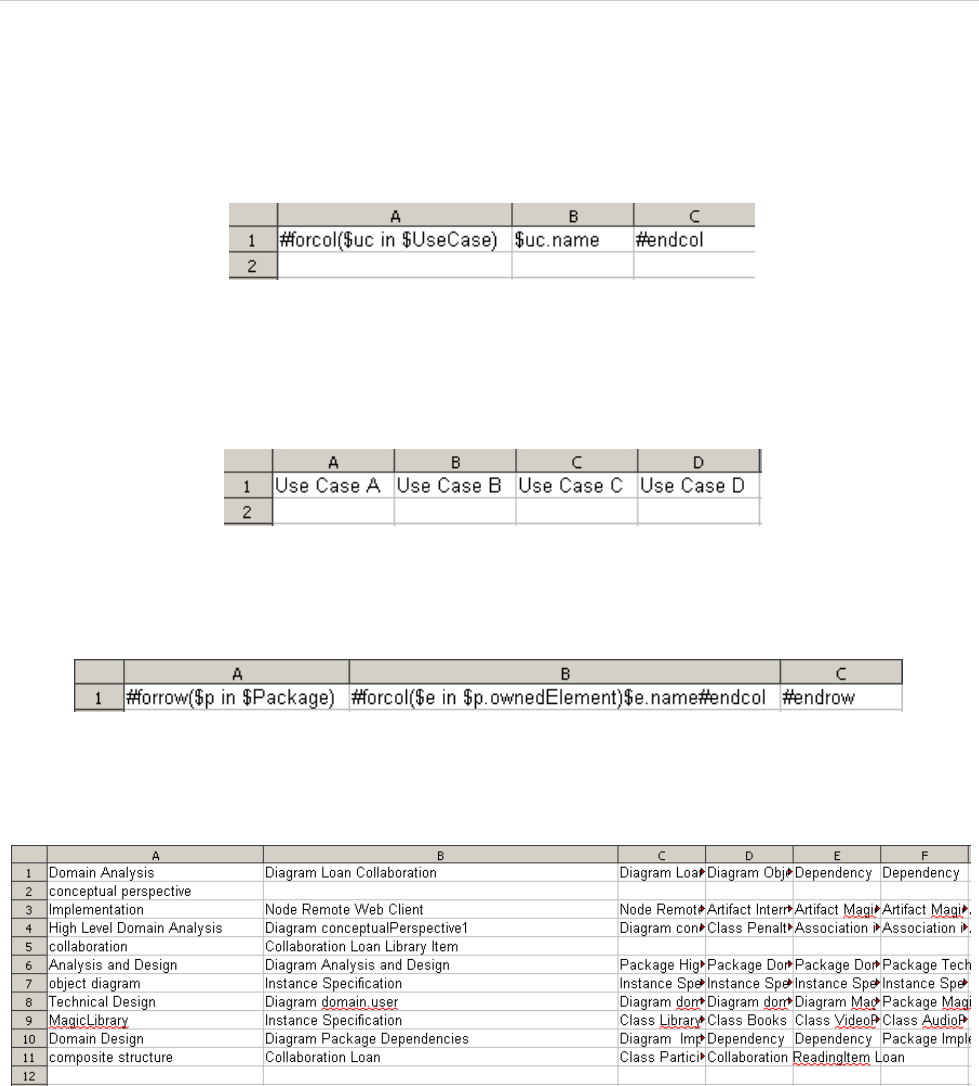
2.2.3 #forcol Directives
This directive is designed only for the Spreadsheet templates, which are ODS and XLSX. This directive pro-
vides looping over the column.
Figure 55 -- OpenDocument Spreadsheet #forcol Template
Based on the sample in Figure 55, the engine will generate a report with different columns for each Use Case
name. The output from this sample will be as shown in Figure 56:
Figure 56 -- OpenDocument Spreadsheet #forcol Output
You can combine both #forrow and #forcol (Figure 57) and produce a more complex report output.
Figure 57 -- OpenDocument Spreadsheet #forrow and #forcol Templates
Figure 58 shows an output generated from the Magic Library sample project.
Figure 58 -- OpenDocument Spreadsheet #forrow and #forcol Output Report
Since the #forrow syntax is similar to the #foreach syntax, the #foreach syntax can then be used in
#forrow.
You can find more samples about the usage of #forrow and #forcol in the Report Wizard dialog, “Other
Documents” templates.

REPORT WIZARD
Report Wizard Template Language
55
Copyright © 1998-2015 No Magic, Inc.
2.2.4 #includeSection Directive
The original Velocity Engine provides two include directives: (i) #include and (ii) #parse.
(i) #include allows you to import another template. The contents of the file will not be rendered through the
template engine.
(ii) #parse allows you to import another template. The contents of the file will be rendered through the template
engine. However, the file being included will be inserted with all contents.
Report Wizard introduces a statement, which allows a template to include any section of a document from
another template. This statement requires the template to define the beginning and the end of the section.
The logical concept of the #includeSection and #parse directives is similar. Both directives allow a tem-
plate to include another template and render it through the template engine. However, #includeSection can
be used to specify only the section that you would like to include.
To declare a section, for example, type:
To include a section, for example, type:
2.2.5 #include, #parse, and #includeSection: A Comparison
The #include and #parse directives are built-in directives provided by Velocity. The #includeSection
directive is a custom directive implemented by MagicDraw. Table 11 below shows the differences among these
three directives.
#sectionBegin (sectionName)
...
#sectionEnd
#includeSection (templateFilename, sectionName)
REPORT WIZARD
Report Wizard Template Language
56
Copyright © 1998-2015 No Magic, Inc.
Table 11 -- Directives Differences
2.3 Formatting Template Code
Report Wizard supports the Tab key to help you format template code at ease. The Tab key is useful to indent
velocity code. You can press the Tab key after the symbol "#" or "$" followed by the velocity code. The Tab key
can help you format the template code, but it does not affect the output of a generated report. See Figure 59 for
example.
Figure 59 -- Indented Template Code
The velocity code in Figure 59 uses the Tab key to indent code. However, the generated report does not
include those indents. The Tab key support is available in RTF, DOCX, and ODT format files.
#include #parse #includeSection
Execution
Time Executed at runtime. Executed as a separate
template at runtime.
Executed at translation
time.
Variable
Scope Variables declared in the
parent template are not
accessible in the
included page.
Variables declared in
the parent template can
be accessed in the
included page.
Variables declared in the
parent template can be
accessed in the included
page.
Rendering The Include template is
not rendered through the
template engine.
The Include template is
rendered through the
template engine as a
separate process.
The Include template is
rendered through the
template engine as a
single process.
Include only
required
section
No No Yes
Size of parent
template The size of the parent
template remains
unchanged.
The size of the parent
template remains
unchanged.
The size of the parent
template is increased by
the included section.
Processing
overhead The #include directive
increases the processing
overhead with the
necessity of an additional
call to the template
engine.
The #parse directive
increases the
processing overhead
with the necessity of an
additional call to the
template engine.
The #includeSection
directive does not
increase the processing
overhead.
Support RTF
template No No Yes
Support ODF
template No No Yes
Support DOCX
template No No Yes
Support XLSX
template No No No
Support PPTX
template No No No
REPORT WIZARD
Report Wizard Template Language
57
Copyright © 1998-2015 No Magic, Inc.
2.4 Unparsed Code
Velocity allows the template designer to easily use a large amount of uninterpreted and unparsed content in
VTL code. This is especially useful if you want to avoid multiple directives or sections whose content would oth-
erwise be invalid (and thus unparseable) VTL.
The syntax is as follows:
For example, the following code:
Will be rendered as:
#[[ Unparsed Code ]]#
#[[
#foreach($c in $Class)
$c.name
#end
]]#
#foreach($c in $Class)
$c.name
#end
Note The Unparsed Code support is available in HTML, XML, and text files
only.
REPORT WIZARD
Template Variables
58
Copyright © 1998-2015 No Magic, Inc.
3. Template Variables
The variables imported to the template are collected by the type of element selected in the package scope. Use
the fourth step in the Report Wizard dialog to select the package scope (see subsection 1.1.2.3 above).
In this example, we take a class diagram with the class name Customer (Figure 60) to print it in a report.
Figure 60 -- Class Diagram: Customer
To print attributes of the Customer class in a report:
• Right-click the Customer class diagram and open the Specification dialog. The element type will
appear on the dialog title, and the attribute names will appear on the right-hand side of the dialog box
(Figure 61).
Figure 61 -- Specification Dialog

REPORT WIZARD
Template Variables
59
Copyright © 1998-2015 No Magic, Inc.
With the following VTL code, you can print the attributes of the Class element:
The output will be as follows:
Table 12 gives and explains the additional properties which are not part of the UML specifications, but retriev-
able by Report Wizard.
Table 12 -- Additional Properties Retrievable by Report Wizard
#foreach ($class in $Class)
Name: $class.name
Owner: $class.owner.name
Visibility: $class.visibility
Is Abstract: $class.isAbstract
#end
Name: Customer
Owner: com
Visibility: public
Is Abstract: false
Element Owner Property Name Function
Diagram image To return the diagram’s image.
Diagram diagramType To return the diagram’s type.
Element image To generate the element’s image or to print an empty
text if the element does not refer to any diagram.
Element elementType To return a name of an element’s type (metaclass / ste-
reotype) in lowercase letters and without spaces. For
example:
• return "usecase" for a Use Case
• return "class" for a Class
• return "callbehavioraction" for a Call Behavior Action
• return "flowport" for a Flow Port (a stereotype defined
in SysML)
Element humanName To return an element’s human readable name, which is
a string concatenation between the human element
type and the element’s name.
Element humanType To return an element’s type in a human readable for-
mat.
Element appliedStereotype To return an applied stereotype of an element.
Element activeHyperlink To return an active hyperlink of an element.
Element hyperlinks To return all hyperlinks attached to an element.
Element toDo To return an element’s ToDo attribute in text format.
Element elementID To return an element’s ID.
Element documentation To return an element’s comment/documentation.
Element presentationElement To return a presentation element.
Element typeModifier To return an element’s type modifier.
Element tags To return a list of element tags.

REPORT WIZARD
Template Variables
60
Copyright © 1998-2015 No Magic, Inc.
Some predefined variables, which are not part of the UML specifications, are usable in the templates:
• $elements contains a list of all the elements selected from the element scope.
• $packageScope contains a selected package from the element scope.
• $elementScope contains selected elements from the element scope.
• $empty contains a String for empty value, which is specified from the Output Options pane.
Element text To return a text representation of an element. In gen-
eral, a 'text' property returns a string which “textually
represents” the element. The string may vary depend-
ing on the symbol properties and environment options.
This property returns the result from OpenAPI Repre-
sentationTextCreator.getRepresentedText(Ele-
ment element).
Element slots To return a list of element’s slots.
Element elementURL To return an element’s URL.
Classifier baseClassifier To return a base classifier of an element.
BehavioredClassifi
er realizedInterface To return a Classifier’s Realized Interface.
Package appliedProfile To return a list of profiles applied to a package.
Stereotype metaClass To return a Meta Class of a stereotype.
DurationConstraint min To return a minimum value of the Duration Constraint.
DurationConstraint max To return a maximum value of the Duration Constraint.
TimeConstraint min To return a minimum value of the Time Constraint.
TimeConstraint max To return a maximum value of the Time Constraint.
MultiplicityElement multiplicity To return a multiplicity value.
Property navigable To return a navigable value.
Property ownedBy To return a property’s owner.
Lifeline type To return a lifeline type.
Message event To return a message event.
Message operation To return a message operation.
Message signal To return a message signal.
Message number To return a message number.
Trigger eventType To trigger an event type.
RequirementsUse
Case number To return a use case number.
NOTE humanName and humanType are locale-specific text. If you plan to generate a report in
different languages, try to avoid humanType and humanName. Instead, use element-
Type for a non-locale-specific report.
Element Owner Property Name Function
REPORT WIZARD
Template Variables
61
Copyright © 1998-2015 No Magic, Inc.
3.1 Retrieving Slot Value
Instead of using Stereotype and Tag, some projects may use Instance Specification and Slot to define new
attributes of an element.
Figure 62 -- Instance Specification and Slot Defining Element Attributes
There are two ways to retrieve a slot value. One is to use a normal UML Specification structure. The other one
is to use a slot property.
3.1.1 Using Normal UML Specification to Retrieve Slot Values
To retrieve Name slot value, for example, type:
3.1.2 Using Slot Property to Retrieve Slot Values
You can use a slot property as a shortcut to get the following information from a slot.
3.1.2.1 Retrieving Slot Information from an Element
The following code retrieves slot information from an element.
#foreach($instance in $InstanceSpecification)
#foreach($slot in $instance.slot)
#if($slot.definingFeature.name == 'Name')
#if($slot.value.size() > 0)
#set($v =
$slot.value.get(0).text)
#else #set($v = "")
#end
Slot value is $v
#end
#end
#end
$element.slots
REPORT WIZARD
Template Variables
62
Copyright © 1998-2015 No Magic, Inc.
Where:
• $element is an element.
• slots is a property for getting slots variable.
If you want to obtain a collection of slots variable of an element, for example, type:
3.1.2.2 Retrieving Slot Information from an Element and a Classifier’s Name
The following code retrieves slot information from an element and a classifier’s name.
Where:
• $element is an element.
• slots is a property for getting the slots variable.
• ClassifierName is the classifier’s name.
The code returns:
• A list of slot variables whose classifier name are ClassifierName.
• If there are multiple classifiers match the ClassifierName, the code returns the slot property of the first
classifier.
• If there is no classifier that matches the ClassifierName, the code returns null.
If you want to retrieve all slot values from the “Communicate” classifier, for example, type:
3.1.2.3 Retrieving Slot Value from an Element, a Classifier’s Name, and a Defining Feature Name
#foreach($slot in $instanceSpecification.slots)
$slot.name
#end
$element.slots.ClassifierName
or
$element.slots.get(“ClassifierName”)
$instanceSpecification.slots.Communicate
$instanceSpecification.slots.get("Communicate")
$element.slots.ClassifierName.DefiningFeatureName
or
$element.slots.ClassifierName.get("DefiningFeatureName")
or
$element.slots.get("ClassifierName").DefiningFeatureName
or
$element.slots.get("ClassifierName").get("DefiningFeatureName")
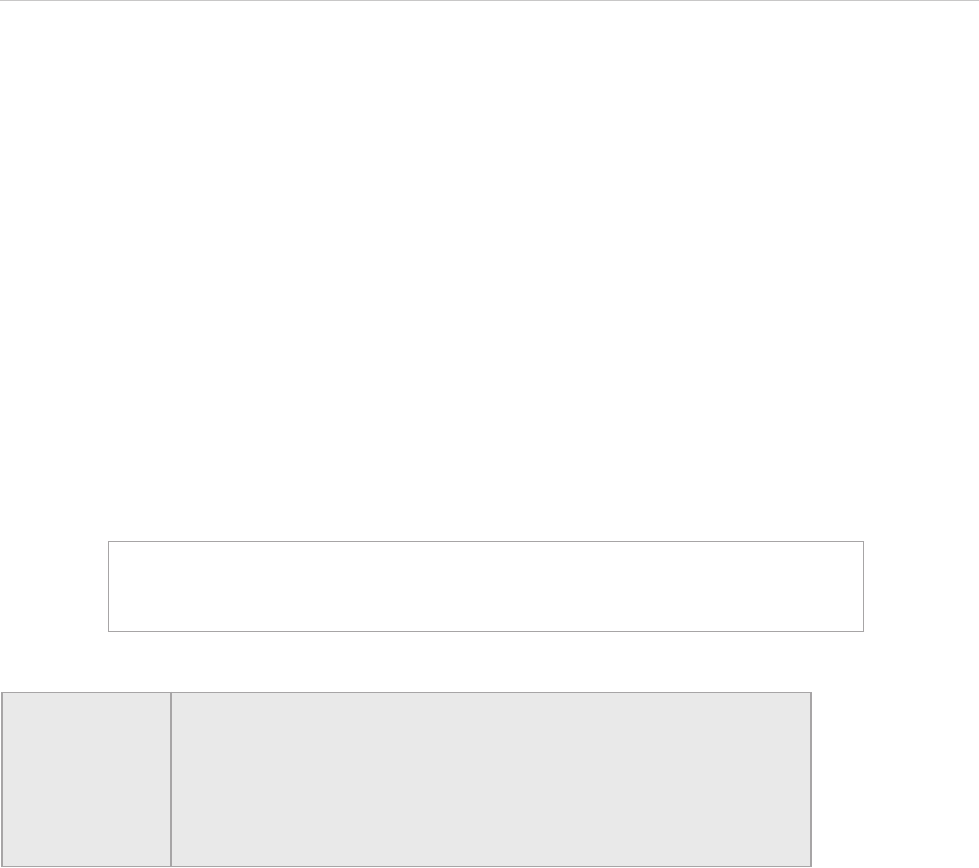
REPORT WIZARD
Template Variables
63
Copyright © 1998-2015 No Magic, Inc.
Where:
• $element is an element.
• slots is a property for getting slots variable.
• ClassifierName is the classifier’s name.
• DefiningFeatureName is the name of a slot.
The code returns:
• A slot value whose name is DefiningFeatureName and a classifier whose name is
ClassifierName.
• If the slot multiplicity is < =1 (less than or equals to 1), it will return the value in ValueSpecification.
• If the slot multiplicity is > 1, it will return the value in array of ValueSpecification.
If you want to retrieve the values of a slot whose name is “Address” and those of a classifier whose name is
“Communicate”, for example, type:
$instanceSpecification.slots.Communicate.Address
$instanceSpecification.slots.Communicate.get("Address")
$instanceSpecification.slots.get("Communicate").Address
$instanceSpecification.slots.get("Communicate").get("Address")
NOTE • ClassifierName and DefiningFeatureName are case-sensitive
properties.
• You can use:
$report.getSlotValue($element, ClassifierName,
DefiningFeatureName)
to retrieve the slot value. See 4.1 $report below for further details.
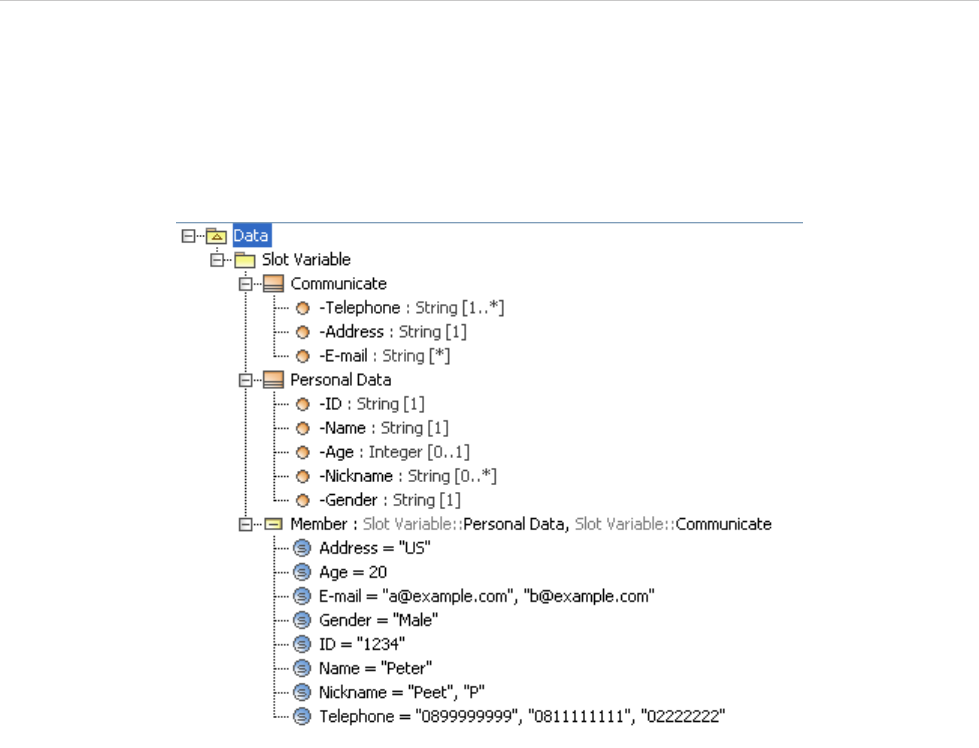
REPORT WIZARD
Template Variables
64
Copyright © 1998-2015 No Magic, Inc.
3.1.2.4 Code Examples to Retrieve Slot Values
This section demonstrates how to get the value of an instance slot from a classifier. Figure 63 shows the ele-
ments of a slot variable in the Containment tree in MagicDraw. You can see the values of the element Member
in the tree or you can right-click it and open the Specification dialog to see the values in the dialog.
Figure 63 -- Example of Elements in the Containment Tree
Figure 64 shows the Instance Specification dialog of the element Member of the slot variable. As you can see
in the dialog, the element Member of the slot variable contains slot names and values.
REPORT WIZARD
Template Variables
65
Copyright © 1998-2015 No Magic, Inc.
Figure 64 -- All Slots of Instance Specification
The following are the examples of using the code to retrieve a value of a slot.
Example 1
If you want to print the value of a slot Address of the element Member from the classifier Communicate, for
example, you can use the following template code as a shortcut. Note that the slot multiplicity = 1.
The output of the above code is as follows:
Example 2
If you want to print the value of a slot Telephone of the element Member from the classifier Communicate, for
example, you can use the following template code as a shortcut. Note that the slot multiplicity is > 1, [1..*].
#foreach($instance in $InstanceSpecification)
Slot value is $instance.slots.Communicate.Address
#end
Slot value is US
REPORT WIZARD
Template Variables
66
Copyright © 1998-2015 No Magic, Inc.
The output of the above code is as follows:
Example 3
If you want to print the value of a slot Name of the element Member from the classifier Personal Data, for
example, you can use the following template code as a shortcut. Note that the slot multiplicity = 1.
The output of the above code is as follows:
Example 4
If you want to print the value of a slot Nickname of the element Member from the classifier Personal Data, for
example, you can use the following template code as a shortcut. Note that the slot multiplicity is > 1, [0..*].
The output of the above code is as follows:
Example 5
If you want to use $Report method to print the value of a slot Name of the element Member from the classifier
Personal Data, for example, you can use the following template code.
The output of the above code is as follows:
Example 6
#foreach($instance in $InstanceSpecification)
Slot value is $instance.slots.Communicate.Telephone
#end
Slot value is [0899999999, 0811111111, 02222222]
#foreach($instance in $InstanceSpecification)
Slot value is $instance.slots.get("Personal Data").get("Name")
#end
Slot value is Peter
#foreach($instance in $InstanceSpecification)
Slot value is $instance.slots.get("Personal
Data").get("Nickname")
#end
Slot value is [Peet, P]
#foreach($instance in $InstanceSpecification)
Slot value is $report.getSlotValue($instance, "Personal Data",
"Name")
#end
Slot value is [Peter]
REPORT WIZARD
Template Variables
67
Copyright © 1998-2015 No Magic, Inc.
If you want to use $Report method to print the value of a slot Nickname of the element Member from the
classifier Personal Data, for example, you can use the following template code.
The output of the above code is as follows:
Example 7
If you want to print the names and values of all classifiers and the slot properties of all instance elements, for
example, you can use the following template code as a shortcut.
The output of the above code is as follows:
#foreach($instance in $InstanceSpecification)
Slot value is $report.getSlotValue($instance, "Personal Data",
"Name")
#end
Slot value is [Peet, P]
#foreach($instance in $InstanceSpecification)
#foreach($classifier in $instance.slots)
Classifier name: $classifier.name
Slots:
#foreach($slot in $classifier)
$slot.name : $slot.value
#end
#end
#end
Classifier name: Personal Data
Slots:
Name : Peter
Age : 20
Nickname : [Peet, P]
Gender : Male
ID : 1234
Classifier name: Communicate
Slots:
Telephone : [0899999999, 0811111111, 02222222]
E-mail : [a@example.com, b@example.com]
Address : US
REPORT WIZARD
Helper Modules
68
Copyright © 1998-2015 No Magic, Inc.
4. Helper Modules
For more details on element types, see OpenAPI.
4.1 $report
This module is a utility module enabling a template to get MagicDraw data.
$report.createValueSpecificationText(specification)
Create texts representing the ValueSpecification element.
$report.filterDiagram(diagramList, diagramTypes)
Return a collection of diagrams from a list of diagrams filtered by types.
For example:
$report.filterElement(elementList, humanTypes)
Return a collection of elements from a list of elements filtered by human types.
Name Type Description
Parameter(s) specification com.nomagic.uml2.ext.magic-
draw.classes.mdkernel.Value-
Specification
A given ValueSpecification.
Return - java.lang.String A String value for Value-
Specification.
Name Type Description
Parameter(s) diagramList java.util.Collection A collection of diagrams.
diagramTypes java.util.Collection A collection of diagram types
used as filters.
Return - java.util.Collection A collection of filtered dia-
grams.
#foreach($diagram in
$report.filterDiagram($Diagram,["Class
Diagram","Communication Diagram"]))
$diagram.name : $diagram.diagramType
#end
Name Type Description
Parameter(s) elementList java.util.Collection A collection of elements.
humanTypes java.util.Collection A collection of human types
used as filters.
Return - java.util.Collection A collection of filtered ele-
ments.
REPORT WIZARD
Helper Modules
69
Copyright © 1998-2015 No Magic, Inc.
For example:
$report.filter(elementList, propertyName, propertyValue)
Return a collection of elements filtered by a specified property name.
For example:
$report.findElementInCollection(elementList, name)
Find an element from a collection of elements by name.
$report.findRelationship(modelPackage)
Search and return a collection of relationship elements inside a package.
#foreach($element in $report.filterElement($elements,
["Use Case", "Actor"]))
$element.name : $element.humanType
#end
Name Type Description
Parameter(s) elementList java.util.Collection A collection of elements.
propertyName java.lang.String A property name.
propertyValue java.util.Collection A collection of property names
used as filters.
Return java.util.Collection A collection of filtered ele-
ments.
#foreach ($e in $report.filter($elements, "name",
["foo", "bar"]))
$e.name
#end
Name Type Description
Parameter(s) elementList java.util.Collection A collection of elements.
name java.lang.String An element name.
Return - com.nomagic.uml2.ext.magic-
draw.classes.mdkernel.Ele-
ment
An element instance. If it can-
not find the element, it will
return a null value.
Name Type Description
Parameter(s) modelPack-
age
com.nomagic.uml2.ext.magic-
draw.classes.mdkernel.Pack-
age
A package element.
Return - java.util.Collection A collection of relationships in
a package.

REPORT WIZARD
Helper Modules
70
Copyright © 1998-2015 No Magic, Inc.
$report.findRelationship(modelPackage, recursive)
Search and return a collection of relationship elements inside a package.
$report.getAppliedStereotypeByName(element, stereotypeName)
Return a stereotype assigned to an element.
$report.getBaseClassAssociations(classifier)
Obtain a collection of associations of a classifier.
$report.getBaseClassInheritableAttributes(classifier)
Get a collection of inheritable attributes of a classifier.
$report.getBaseClassInheritableOperations(classifier)
Obtain a collection of inheritable operations of a classifier.
Name Type Description
Parameter(s) modelPack-
age
com.nomagic.uml2.ext.magic-
draw.classes.mdkernel.Pack-
age
A package element.
recursive boolean If true, performs recursively.
Return - java.util.Collection A collection of relationships in
a package.
Name Type Description
Parameter(s) element com.nomagic.uml2.ext.magic-
draw.classes.mdkernel.Ele-
ment
An element.
stereotype-
Name
java.lang.String A stereotype name.
Return - com.nomagic.uml2.ext.magic-
draw.mdprofiles.Stereotype
An assigned stereotype with a
specified name.
Name Type Description
Parameter(s) classifier com.nomagic.uml2.ext.magic-
draw.classes.mdkernel.Classi-
fier
A classifier.
Return - java.util.Collection A collection of associations.
Name Type Description
Parameter(s) classifier com.nomagic.uml2.ext.magic-
draw.classes.mdkernel.Classi-
fier
A classifier.
Return - java.util.Collection A collection of attributes.
Name Type Description
Parameter(s) classifier com.nomagic.uml2.ext.magic-
draw.classes.mdkernel.Classi-
fier
A classifier.

REPORT WIZARD
Helper Modules
71
Copyright © 1998-2015 No Magic, Inc.
$report.getBaseClassPorts(classifier)
Find a collection of ports of a classifier.
$report.getBaseRealizedInterfaces(behavioredClassifier)
Find a collection of realized interfaces of a behaviored classifier.
$report.getBaseRelations(classifier)
Find a collection of relations of a classifier.
$report.getBaseClassifiers(child)
Return a collection of base elements of a classifier.
$report.getClientElement(element)
Return a client of a relationship.
Return - java.util.Collection A collection of operations.
Name Type Description
Parameter(s) classifier com.nomagic.uml2.ext.magic-
draw.classes.mdkernel.Classi-
fier
A classifier.
Return - java.util.Collection A collection of ports.
Name Type Description
Parameter(s) behaviored-
Classifier
com.nomagic.uml2.ext.magic-
draw.commonbehaviors.mdba-
sicbehaviors.BehavioredClassif
ier
A BehavioredClassifier.
Return - java.util.Collection A collection of RealizedInter-
faces.
Name Type Description
Parameter(s) classifier com.nomagic.uml2.ext.magic-
draw.classes.mdkernel.Classi-
fier
A classifier.
Return - java.util.Collection A collection of relations.
Name Type Description
Parameter(s) child com.nomagic.uml2.ext.magic-
draw.classes.mdkernel.Classi-
fier
A child class.
Return - java.util.Collection A collection of base elements
(classifiers).
Name Type Description
Parameter(s) element com.nomagic.uml2.ext.magic-
draw.classes.mdkernel.Ele-
ment
A relationship model element.
Name Type Description

REPORT WIZARD
Helper Modules
72
Copyright © 1998-2015 No Magic, Inc.
$report.getComment(element)
Return a documentation of a given element.
$report.getDerivedClassifiers(parent)
Return a collection of derived elements of a classifier.
$report.getDiagramElements(diagram)
Get a collection of elements from a diagram.
$report.getDiagramType(diagram)
Return a diagram type.
Return - com.nomagic.uml2.ext.magic-
draw.classes.mdkernel.Ele-
ment
The relationship’s client.
Name Type Description
Parameter(s) element com.nomagic.uml2.ext.magic-
draw.classes.mdkernel.Ele-
ment
An element.
Return - java.lang.String The documentation of an ele-
ment.
Name Type Description
Parameter(s) parent com.nomagic.uml2.ext.magic-
draw.classes.mdkernel.Classi-
fier
A parent class.
Return - java.util.Collection A collection of derived ele-
ments (classifiers).
Name Type Description
Parameter(s) diagram com.nomagic.uml2.ext.magic-
draw.classes.mdkernel.Dia-
gram
A diagram instance.
Return - java.util.Collection A collection of elements in a
diagram.
Name Type Description
Parameter(s) diagram com.nomagic.uml2.ext.magic-
draw.classes.mdkernel.Dia-
gram
A diagram instance.
Return - java.lang.String A diagram type.
Name Type Description
REPORT WIZARD
Helper Modules
73
Copyright © 1998-2015 No Magic, Inc.
$report.getDSLProperty(element, propertyName)
Return a DSL Property.
$report.getElementComment(element)
Return a comment attached to an element. If no comment is attached, it will return a null value.
$report.getElementName(element)
Get an element’s name. If the name is empty, it will return "<unnamed>". This method performs the following
procedures:
• If the element is generalized from the NamedElement metaclass, it will return $element.name
• If the element is generalized from the Slot metaclass, it will return
$element.definingFeature.name
• If the element is a UML element, it will return $element.humanName
• Else returns $element.toString()
$report.getIconFor(element)
Return an image icon of an element with a default icon filename (“icon_”+element type).
For example:
Name Type Description
Parameter(s) element com.nomagic.uml2.ext.magic-
draw.classes.mdkernel.Ele-
ment
An element.
propertyName java.lang.String A property name.
Return - java.lang.Object A property value.
Name Type Description
Parameter(s) element com.nomagic.uml2.ext.magic-
draw.classes.mdkernel.Ele-
ment
An element.
Return - com.nomagic.uml2.ext.magic-
draw.classes.mdkernel.Com-
ment
A comment instance of the
element.
Name Type Description
Parameter(s) element java.lang.Object An element.
Return - java.lang.String An element name.
Name Type Description
Parameter(s) element com.nomagic.magic-
draw.uml.BaseElement
A MagicDraw element.
Return - com.nomagic.magicrep-
ort.Image
An image object of the ele-
ment's icon.
$report.getIconFor($classObject)
REPORT WIZARD
Helper Modules
74
Copyright © 1998-2015 No Magic, Inc.
$report.getIconFor(element, prefix, suffix, hashCode)
Return an image icon of an element. The icon name depends on the hashCode value if hashCode equals true,
the icon’s name is set as ”icon_”+hash code value of the icon. If the hashCode value equals false, the
icon name is set as prefix + element type + suffix.
For example:
(i) To get an icon and set a name for hash code:
(ii) To get an icon and set a name for prefix and suffix:
$report.getIconFor(type)
Return an image icon for an element type with a default icon’s filename ((“icon_”+element type).
For example:
This results in an Image object of a class whose name is “icon_class”.
Name Type Description
Parameter(s) element com.nomagic.magic-
draw.uml.BaseElement
A MagicDraw element.
prefix java.lang.String A prefix of an icon name.
suffix java.lang.String A suffix of an icon name.
hashCode boolean If true, use hash code of an
icon as the icon name and
exclude a prefix or suffix from
the name.
Return - com.nomagic.magicrep-
ort.Image
An image object of an ele-
ment’s icon.
$report.getIconFor($classObject, “prefix_”, “_suffix”, true)
This results in an Image object of a class whose name “icon_24676200”. The number
in the icon name is hash code, which is regenerated whenever MagicDraw starts.
$report.getIconFor($classObject, “prefix_”, “_suffix”, false)
This results in an Image object of a class whose name is “prefix_class_suffix”.
Name Type Description
Parameter(s) type java.lang.String A type name.
Return - com.nomagic.magicrep-
ort.Image
An image object for the ele-
ment’s icon.
$report.getIconFor(“class”)
This results in an Image object of a class whose name is “icon_class”.
REPORT WIZARD
Helper Modules
75
Copyright © 1998-2015 No Magic, Inc.
$report.getIconFor(type, prefix, suffix, hashCode)
Return an image icon for an element type. The icon’s name depends on the hashCode value if hashCode
equals true, the icon name is set as “icon_”+hash code value of the icon. If the hashCode value equals
false, the icon name is set as prefix + element type + suffix.
For example:
(i) To get an icon and set a name for hash code:
(ii) To get an icon and set a name for prefix and suffix:
$report.getIncludeUseCase(useCase)
Return a collection of included elements of a UseCase.
$report.getInnerElement(element)
Return a collection of inner elements.
Name Type Description
Parameter(s) type java.lang.String A type name.
prefix java.lang.String A prefix for an icon name.
suffix java.lang.String A suffix for an icon name.
hashCode boolean If true, use hash code of an
icon as the icon’s name and
exclude a prefix or suffix from
the name.
Return - com.nomagic.magicrep-
ort.Image
An image object for an ele-
ment’s icon.
$report.getIconFor(“class”, “prefix_”, “_suffix”, true)
This results in an Image object of a class whose name “icon_24676200”. The number
in the icon name is hash code, which is regenerated whenever MagicDraw starts.
$report.getIconFor(“class”, “prefix_”, “_suffix”, false)
This results in an Image object of a class whose name is “prefix_class_suffix”.
Name Type Description
Parameter(s) useCase com.nomagic.uml2.ext.magic-
draw.mdusecases.UseCase
A UseCase instance.
Return - java.util.Collection A collection of included Use-
Cases.
Name Type Description
Parameter(s) element com.nomagic.uml2.ext.magic-
draw.classes.mdkernel.Ele-
ment
An element.

REPORT WIZARD
Helper Modules
76
Copyright © 1998-2015 No Magic, Inc.
$report.getInteractionMessageType(message)
Return an interaction message type.
$report.getMetaClass(stereotype)
Return a stereotype meta class.
$report.getPresentationDiagramElements(diagram)
Return presentation elements in a diagram. This method will return all presentation elements from the diagram,
except non-manipulator symbols.
$report.getPresentationDiagramElements(diagram, includeNonManipulator)
Return presentation elements in a diagram.
Return - java.util.Collection A collection of inner ele-
ments.
Name Type Description
Parameter(s) message com.nomagic.uml2.ext.magic-
draw.interactions.mdbasicinter-
actions.Message
A message instance.
Return - java.lang.String A message type.
Name Type Description
Parameter(s) stereotype com.nomagic.uml2.ext.magic-
draw.mdprofiles.Stereotype
A stereotype instance.
Return - java.util.Collection A collection of Meta Classes.
Name Type Description
Parameter(s) diagram com.nomagic.uml2.ext.magic-
draw.classes.mdkernel.Dia-
gram
A diagram instance.
Return - java.util.Collection A collection of elements.
Name Type Description
Parameter(s) diagram com.nomagic.uml2.ext.magic-
draw.classes.mdkernel.Dia-
gram
A diagram.
include Non-
Manipulator
boolean True to include all non-manip-
ulator elements.
Return - java.util.Collection A collection of elements.
Name Type Description

REPORT WIZARD
Helper Modules
77
Copyright © 1998-2015 No Magic, Inc.
$report.getPresentationElementBounds(diagram, element)
Return the polygonal bounds of an element. The bounds specify the component coordinates to its diagram.
$report.getPresentationElementBounds(element)
Return the polygonal bounds of an element. The bounds specify this component's coordinate to its diagram.
$report.getPresentationElementRectangle(diagram, element)
Return the rectangular bounds of an element. The bounds specify the component coordinates to its diagram.
Name Type Description
Parameter(s) diagram com.nomagic.uml2.ext.magic-
draw.classes.mdkernel.Dia-
gram
A target diagram.
element com.nomagic.uml2.ext.magic-
draw.classes.mdkernel.Ele-
ment
A presentation element on a
given diagram.
Return - java.util.List Returns the polygonal bounds
of an element. If the element
is not found in the diagram, it
will return null.
Name Type Description
Parameter(s) element com.nomagic.magic-
draw.uml.symbols.Presentatio-
nElement
A presentation element on a
diagram.
Return - com.nomagic.magicdraw.magi-
creport.helper.Polygon
Returns the polygonal bounds
of an element.
Name Type Description
Parameter(s) diagram com.nomagic.uml2.ext.magic-
draw.classes.mdkernel.Dia-
gram
A target diagram.
element com.nomagic.uml2.ext.magic-
draw.classes.mdkernel.Ele-
ment
A presentation element on a
given diagram.
Return - java.util.List Returns the rectangular
bounds of an element. If the
element is not found in the
diagram, it will return null.

REPORT WIZARD
Helper Modules
78
Copyright © 1998-2015 No Magic, Inc.
$report.getQualifiedName(namedElement, separator)
Get a qualified name. A qualified name is the name that allows a NamedElement to be identified within a hier-
archy of nested Namespaces. It is constructed from the names of the containing namespaces starting at the
root of the hierarchy and ending with the name of the NamedElement itself.
$report.getPackageQualifiedName(namedElement, separator)
Get a qualified name by considering only Packages and a given element. Models and Profiles will not be
included in the qualified name.
For example, given the element hierarchy:
and the template code:
If $class is a “BaseDialog” element, the result from the above template code will be:
$report.getReceivingOperationalNode(element)
Get the needline association ends.
Name Type Description
Parameter(s) namedEle-
ment
NamedElement A NamedElement.
separator java.lang.String A separator symbol. If the
value is null or an empty
string, the '::' will be used.
Return - java.lang.String A qualified name.
Design : Model -> com : Package -> nomagic : Package -> ui ->
Package -> BaseDialog : Class
$report.getPackageQualifiedName($class, ".")
com.nomagic.ui.BaseDialog
Name Type Description
Parameter(s) namedEle-
ment
NamedElement A NamedElement.
separator java.lang.String A separator symbol. If the
value is null or an empty
string, the '::' will be used.
Return - java.lang.String A qualified name.
Name Type Description
Parameter(s) element com.nomagic.uml2.ext.magic-
draw.classes.mdkernel.Ele-
ment
An element.
Return - com.nomagic.uml2.ext.magic-
draw.classes.mdkernel.Ele-
ment
A needline association
instance.

REPORT WIZARD
Helper Modules
79
Copyright © 1998-2015 No Magic, Inc.
$report.getRelationship(element)
Return an element’s relationship.
$report.getRelationship(element, recursive)
Return a collection of element relationships.
$report.getRelativeActor(element)
Return an element’s relative actor.
$report.getSendingOperationalNode(element)
Return the needline’s association ends.
$report.getSlotValue(element, ClassifierName, DefiningFeatureName)
Find and retrieve the values of a slot whose name and classifier’s name are DefiningFeatureName and
ClassifierName respectively. The code enables case-sensitivity queries such that only those case-sensitive
matches will return.
Name Type Description
Parameter(s) element com.nomagic.uml2.ext.magic-
draw.classes.mdkernel.Ele-
ment
An element.
Return - java.util.Collection A collection of relationships.
Name Type Description
Parameter(s) element com.nomagic.uml2.ext.magic-
draw.classes.mdkernel.element
An element.
recursive boolean If true, performs recursively.
Return - java.util.Collection A collection of relationships.
Name Type Description
Parameter(s) element com.nomagic.uml2.ext.magic-
draw.classes.mdkernel.Ele-
ment
An element.
Return - java.util.Collection A collection of actors.
Name Type Description
Parameter(s) element com.nomagic.uml2.ext.magic-
draw.classes.mdkernel.Ele-
ment
An element.
Return - com.nomagic.uml2.ext.magic-
draw.classes.mdkernel.Ele-
ment
A needline association
instance.

REPORT WIZARD
Helper Modules
80
Copyright © 1998-2015 No Magic, Inc.
For example:
Use the code to retrieve the value of a slot whose name and classifier’s name are Name and Personal Data
respectively.
• “Personal Data” is the name of the classifier.
• “Name” is the name of the slot.
$report.getStereotypeProperty(element, stereotypeName, propertyName)
Get a stereotype property.
$report.getStereotypeProperty(element, profileName, stereotypeName, propertyName)
Get a stereotype property.
Name Type Description
Parameter(s) element com.nomagic.uml2.ext.magic-
draw.classes.mdkernel.Ele-
ment
An element whose slot value
you want to find.
Classifier-
Name
java.lang.String A classifier name.
DefiningFea-
tureName
java.lang.String A slot name.
Return - java.util.Collection A collection of ValueSpecifica-
tions of a slot.
#foreach($instance in $InstanceSpecification)
Slot value is $report.getSlotValue($instance, “Personal Data”,
“Name”)
#end
Name Type Description
Parameter(s) element com.nomagic.uml2.ext.magic-
draw.classes.mdkernel.Ele-
ment
An element.
stereotype-
Name
java.lang.String A stereotype name.
propertyName java.lang.String A property name.
Return - java.lang.Object A property value.
Name Type Description
Parameter(s) element com.nomagic.uml2.ext.magic-
draw.classes.mdkernel.Ele-
ment
An element instance.
profileName java.lang.String A profile name.
stereotype-
Name
java.lang.String A stereotype name.
propertyName java.lang.String A property name.
REPORT WIZARD
Helper Modules
81
Copyright © 1998-2015 No Magic, Inc.
$report.getStereotypePropertyString(element, stereotypeName, propertyName)
Return a stereotype property as String value.
$report.getStereotypes(element)
Return all stereotypes applied to an element. This method is replaced by $element.appliedStereotype.
$report.getSupplierElement(element)
Return the supplier of a relationship.
$report.getUsageElements(usagesMap, element)
Return the usage of a specified element.
Return - java.lang.Object A property value.
Name Type Description
Parameter(s) element com.nomagic.uml2.ext.magic-
draw.classes.mdkernel.Ele-
ment
An element instance.
stereotype-
Name
java.lang.String A stereotype name.
propertyName java.lang.String A property name.
Return - java.lang.Object A property value.
Name Type Description
Parameter(s) element com.nomagic.uml2.ext.magic-
draw.classes.mdkernel.Ele-
ment
An element.
Return - java.util.List A list of stereotype instances.
Name Type Description
Parameter(s) element com.nomagic.uml2.ext.magic-
draw.classes.mdkernel.Ele-
ment
A relationship model element.
Return - com.nomagic.uml2.ext.magic-
draw.classes.mdkernel.Ele-
ment
The relationship’s supplier.
Name Type Description
Parameter(s) usagesMap java.util.Map The Usage Map of MD.
element com.nomagic.uml2.ext.magic-
draw.classes.mdkernel.Ele-
ment
An element.
Return - java.util.Collection A collection of element
usages.
Name Type Description

REPORT WIZARD
Helper Modules
82
Copyright © 1998-2015 No Magic, Inc.
$report.getUsages(selectedObjects)
Return the Usage Map of MagicDraw. It uses the getUsageElements method to return the usage of a specified
element.
$report.hasStereotype(element)
Check if an element has stereotypes.
$report.containsStereotype(element, stereotypeName)
Return true if an element contains a stereotype (including all derived stereotypes) for a specified stereotype
name.
$report.containsStereotype(element, stereotypeName, includeDerived)
Return true if an element contains a stereotype for a specified stereotype name.
Name Type Description
Parameter(s) selectedOb-
jects
java.lang.Object An element.
Return - java.util.Map A Map instance of element
usages.
Name Type Description
Parameter(s) element com.nomagic.uml2.ext.magic-
draw.classes.mdkernel.Ele-
ment
An element to check.
Return - boolean True if it has a stereotype.
Name Type Description
Parameter(s) element com.nomagic.uml2.ext.magic-
draw.classes.mdkernel.Ele-
ment
An element to check.
stereotype-
Name
java.lang.String A stereotype name to be
tested.
Return - boolean True if the element contains a
stereotype for the specified
stereotype name.
Name Type Description
Parameter(s) element com.nomagic.uml2.ext.magic-
draw.classes.mdkernel.Ele-
ment
An element to test.
stereotype-
Name
java.lang.String A stereotype name to be
tested.
includeDerived boolean True if the searched target
includes all derived stereo-
types; otherwise, false.
Return - boolean True if the element contains a
stereotype for the specified
stereotype name.

REPORT WIZARD
Helper Modules
83
Copyright © 1998-2015 No Magic, Inc.
$report.isDerivedClassifier(parent, child)
Check if a child is derived from the parent by generalization.
$report.isNamedElement(element)
Return whether an element is a NamedElement.
$report.isNull(obj)
Test and return true if an object is null.
$report.isRelationship(element)
Test and return true if an element is a relationship.
$report.serialize(hyperlink)
Convert com.nomagic.magicdraw.hyperlinks.Hyperlink to com.nomagic.magicdraw.plugins.impl.magi-
creport.helper.Hyperlink. Report Wizard needs the com.nomagic.magicdraw.plugins.impl.magicrep-
ort.helper.Hyperlink class wrapper to return com.nomagic.magicdraw.hyperlinks.Hyperlink data.
Name Type Description
Parameter(s) parent com.nomagic.uml2.ext.magic-
draw.classes.mdkernel.Classi-
fier
A parent.
child com.nomagic.uml2.ext.magic-
draw.classes.mdkernel.Classi-
fier
A possible child.
Return - boolean True if it is derived from the
parent by generalization.
Name Type Description
Parameter(s) element com.nomagic.uml2.ext.magic-
draw.classes.mdkernel.Ele-
ment
An element to test.
Return - boolean True if the given element is a
NamedElement; otherwise,
false.
Name Type Description
Parameter(s) obj java.lang.Object An object being tested.
Return - boolean True if the object is null.
Name Type Description
Parameter(s) element com.nomagic.uml2.ext.magic-
draw.classes.mdkernel.Ele-
ment
An element being tested.
Return - boolean True if the object is a relation-
ship.
Name Type Description
Parameter(s) hyperlink com.nomagic.magic-
draw.hyperlinks.Hyperlink
A MagicDraw hyperlink.
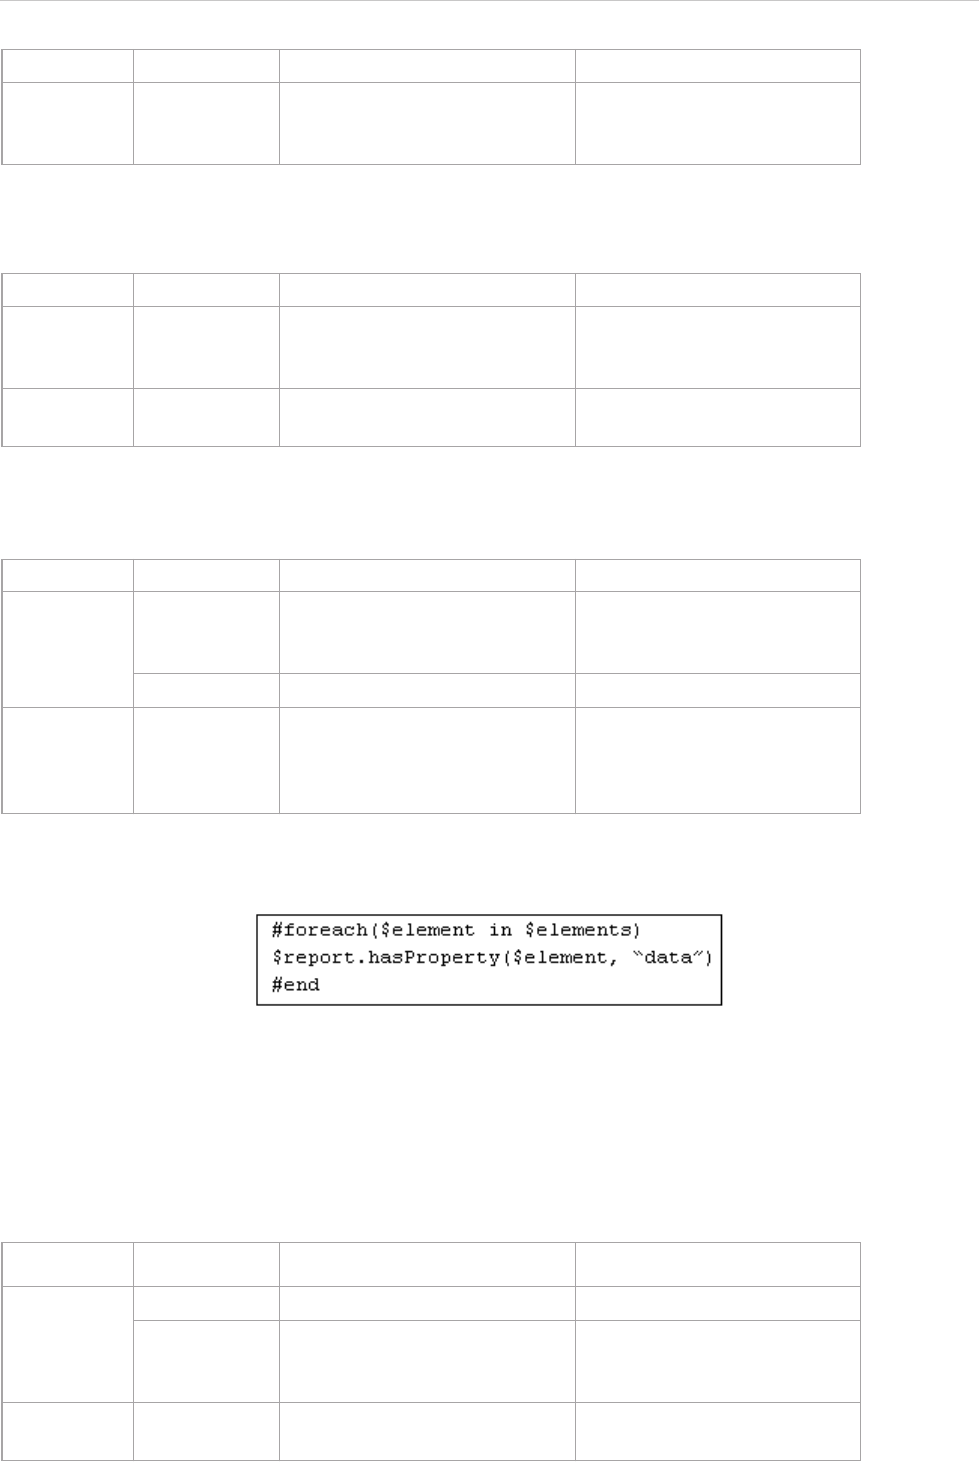
REPORT WIZARD
Helper Modules
84
Copyright © 1998-2015 No Magic, Inc.
$report.getUsedBy(element)
Return a list of element(s) used by this element (except diagrams).
$report.hasProperty(element, propertyName)
Return true when a property with a given name is specified in this element, otherwise returns false.
For example:
Figure 65 -- Sample of $report.hasProperty(element, propertyName)
• $element is the element.
• data is the name of the property.
$report.findElementByName(source, regex)
Search and return elements that match the name using a regular expression.
Return - com.nomagic.magic-
draw.plugins.impl.magicrep-
ort.helper.Hyperlink
A Report Wizard hyperlink
instance.
Name Type Description
Parameter(s) element com.nomagic.uml2.ext.magic-
draw.classes.mdkernel.Ele-
ment
An element of which to deter-
mine the usage.
Return - java.util.Collection A collection of elements used
by an input element.
Name Type Description
Parameter(s) element com.nomagic.uml2.ext.magic-
draw.classes.mdkernel.Ele-
ment
An element.
propertyName java.lang.String A property name.
Return - java.lang.Boolean Return true when a property
with a given name is specified
in this element, otherwise
returns false.
Name Type Description
Parameter(s) source java.util.Collection A collection of elements.
regex java.lang.String A regular expression with
which the name is to be
matched.
Return - java.util.Collection A collection of matching ele-
ments.
Name Type Description

REPORT WIZARD
Helper Modules
85
Copyright © 1998-2015 No Magic, Inc.
For example:
Figure 66 -- Sample of $report.findElementByName(source, regex)
• $elements is a collection of elements to be found.
• “[A]+.*” is a regular expression to find which element matches the name. In this example, the
following are the names that match, such as Auxiliary, AppServer, and Alternative Fragment.
$report.getPresentationElements(diagram)
Get a presentation element in a diagram. This method is equivalent to $report.getPresentationDia-
gramElements(diagram).
For example:
Figure 67 -- Sample of $report.getPresentationElements(diagram)
• $diagram is the diagram instance.
$report.getUsageRepresentationText(baseElement, bool)
Format the usage subject. The output string is the same as the Result column of Used by table in Magic Draw.
For example:
Name Type Description
Parameter(s) diagram com.nomagic.uml2.ext.magic-
draw.classes.mdkernel.Dia-
gram
A diagram instance.
Return - java.util.Collection A collection of elements.
Name Type Description
Parameter(s) baseElement com.nomagic.magic-
draw.uml.BaseElement
A model element to be format-
ted.
bool java.lang.Boolean True if a full path is used, oth-
erwise false.
Return - java.lang.String A formatted element.
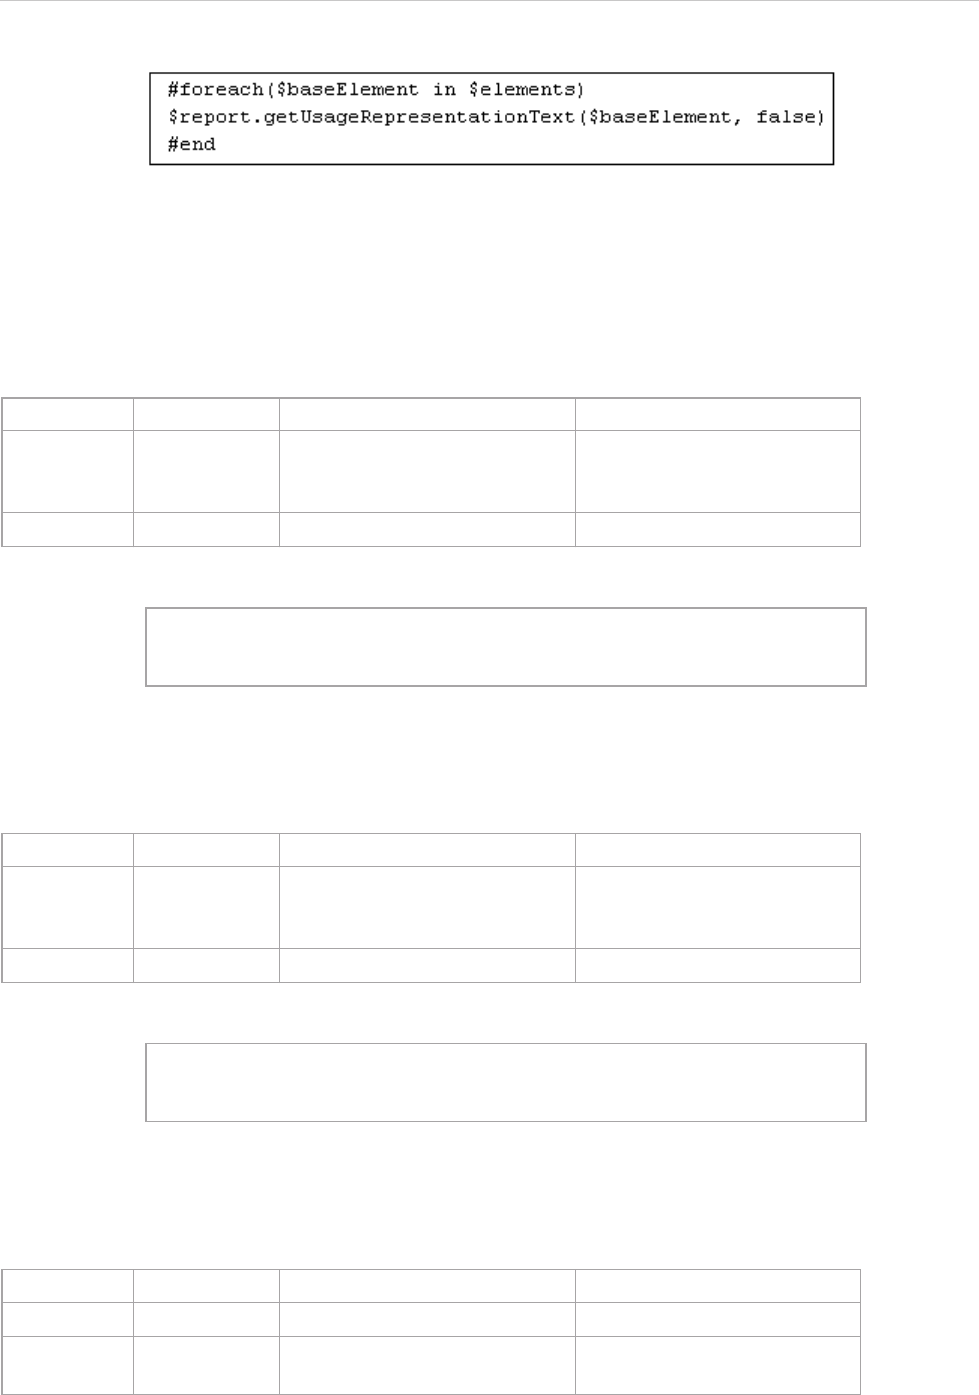
REPORT WIZARD
Helper Modules
86
Copyright © 1998-2015 No Magic, Inc.
Figure 68 -- Sample of $report.getUsageRepresentationText(baseElement, bool)
• $baseElement is the model element to be formatted.
• false if a full path is not used. In this example, a full path is not used.
$report.getUseCaseNumber(element)
Return a use case number of an element.
For example:
Figure 69 -- Sample of $report.getUseCaseNumber(element)
$report.getElementURL(element)
Return a MagicDraw's element URL.
For example:
Figure 70 -- Sample of $report.getElementURL(element)
$report.isEmpty(obj)
Test and return true if an object is null, empty string, or empty collection.
Name Type Description
Parameter(s) element com.nomagic.uml2.ext.magic-
draw.classes.mdkernel.Ele-
ment
A model element.
Return - java.lang.String A use case number.
#foreach ($uc in $RequirementsUseCase)
$report.getUseCaseNumber($uc) $uc.name
#end
Name Type Description
Parameter(s) element com.nomagic.uml2.ext.magic-
draw.classes.mdkernel.Ele-
ment
An element.
Return elementURL java.lang.String An element URL.
#foreach ($element in $elements)
$report.getElementURL($element)
#end
Name Type Description
Parameter(s) obj java.lang.Object An object being tested.
Return - boolean True if the object is null, empty
string, or empty collection.
REPORT WIZARD
Helper Modules
87
Copyright © 1998-2015 No Magic, Inc.
For example:
Figure 71 -- Sample of $report.isEmpty(obj)
$report.getBasicFlows(usecase:UseCase) : List<FlowStep>
Find and return a list of basic flows from a given use case. If a use case scenario is not being used, it will
retrieve the value from "requirementUseCase" stereotype tags.
The <FlowStep> is a MagicDraw "com.nomagic.magicdraw.usecasescenarios.scenarios.FlowStep" class.
The important properties of <FlowStep> are as follows:
• name prints a name of a current step, for example: $flowStep.name.
• element returns an element associates with a current step, for example: #set ($e =
$flowStep.element).
• alternativeConditions returns a list of alternative steps <AlternativeCondition> from a current
step, for example: #foreach ($alter in $flowStep.alternativeConditions) #end.
• exceptionTypes returns a list of exception steps <ExceptionType> from a current step, for example:
#foreach ($alter in $flowStep.exceptionTypes) #end.
For example:
Figure 72 -- Sample of $report.getBasicFlows(usecase:UseCase) : List<FlowStep>
$report.getAlternativeFlows(usecase:UseCase) : List<FlowStep>
Find and return all alternative flows from a given use case. The alternative flows will be listed from all possible
branches of basic flows. If a use case scenario is not being used, it will retrieve the value from "requiremen-
tUseCase" stereotype tags.
#if ($report.isEmpty($var))
Object is null, empty string or empty collection
#end
Name Type Description
Parameter(s) usecase com.nomagic.uml2.ext.magic-
draw.mdusecases.UseCase
A targeted Use Case.
Return - List<com.nomagic.magic-
draw.usecasescenarios.sce-
narios.FlowStep>
A list of flow steps. A Flow
Step is an object representing
each step of a Use Case flow.
#set ($basicFlowList = $report.getBasicFlows($useCase))
#foreach ($flowStep in $basicFlowList)
$flowStep.name
#foreach ($alter in $flowStep.alternativeConditions)
- $alter.name
#end
#end
Name Type Description
Parameter(s) usecase com.nomagic.uml2.ext.magic-
draw.mdusecases.UseCase
A targeted Use Case.
Return - List<com.nomagic.magic-
draw.usecasescenarios.sce-
narios.FlowStep>
A list of flow steps. A Flow
Step is an object representing
each step of a Use Case flow.

REPORT WIZARD
Helper Modules
88
Copyright © 1998-2015 No Magic, Inc.
For example:
Figure 73 -- Sample of $report.getAlternativeFlows(usecase:UseCase) : List<FlowStep>
$report.getExceptionalFlows(usecase:UseCase) : List<FlowStep>
Find and return all exceptional flows from a given use case. The alternative flows will be listed from all possible
branches of basic flows. If the use case scenario is not being used, it will retrieve the value from "requiremen-
tUseCase" stereotype tags.
For example:
Figure 74 -- Sample of $report.getExceptionalFlows(usecase:UseCase) : List<FlowStep>
$report.getOwnedElementsIncludingAdditional(element, includePureOwned) : List<Element>
This code returns owned elements of a given element including additional owned elements defined in the DSL
specification by additionalContentProperty.
#set ($basicFlowList = $report.getBasicFlows($useCase))
#foreach ($flowStep in $basicFlowList)
$flowStep.name
#foreach ($alternative =
$flowStep.alternativeConditions)
$alternative.name
#foreach ($alternativeFlow in
$alternative.alternativeFlowSteps)
$alternativeFlow.name
#end
#end
#end
Name Type Description
Parameter(s) usecase com.nomagic.uml2.ext.magic-
draw.mdusecases.UseCase
A targeted Use Case.
Return - List<com.nomagic.magic-
draw.usecasescenarios.sce-
narios.FlowStep>
A list of flow steps. A flow step
is an object representing each
steps of a Use Case flow.
#set ($basicFlowList = $report.getBasicFlows($useCase))
#foreach ($flowStep in $basicFlowList)
$flowStep.name
#foreach ($exception = $flowStep.exceptionTypes)
$exception.name
#foreach ($exceptionalFlow in
$exception.exceptionalFlowSteps)
$exceptionalFlow.name
#end
#end
#end

REPORT WIZARD
Helper Modules
89
Copyright © 1998-2015 No Magic, Inc.
The following are the examples of using the code.
Example 1
Example 2
Example 3
Name Type Description
Parameter(s) element com.nomagic.uml2.ext.magic-
draw.classes.mdkernel.Ele-
ment
A model element.
includePure-
Owned
java.lang.Boolean True if includes an element
owned directly in the owne-
dElement UML metaproperty.
Otherwise False.
Return - java.util.List A list of owned elements of a
given element.
#foreach($e in $elements)
$e.name : $e.humanType
#foreach($child in
$report.getOwnedElementsIncludingAdditional($e, true))
$child.name : $child.humanType
#end
#end
#foreach($e in $SmartPackage)
$e.name : $e.humanType
#foreach($child in
$report.getOwnedElementsIncludingAdditional($e, true))
$child.name : $child.humanType
#end
#end
#set($packages = $array.createArray())
#set($void = $array.addCollection($packages, $Package))
#set($void = $array.addCollection($packages,
$SmartPackage))
#foreach($e in $packages)
$e.name : $e.humanType
#foreach($child in
$report.getOwnedElementsIncludingAdditional($e, true))
$child.name : $child.humanType
#end
#end

REPORT WIZARD
Helper Modules
90
Copyright © 1998-2015 No Magic, Inc.
4.2 $project
This module is a project reference enabling a template to return the project information.
$project.getName()
Return a project name.
$project.getTitle()
Get a project title.
$project.getFileName()
Get a project filename.
$project.getExtension()
Get a project filename extension.
$project.getDirectory()
Get a project directory name.
$project.getVersionList()
Return a list of version information from an open Teamwork Server project.
Name Type Description
Parameter(s) -- -
Return - java.lang.String A project name.
Name Type Description
Parameter(s) -- -
Return - java.lang.String A project title.
Name Type Description
Parameter(s) -- -
Return - java.lang.String A project filename.
Name Type Description
Parameter(s) -- -
Return - java.lang.String A project filename extension.
Name Type Description
Parameter(s) -- -
Return - java.lang.String A project directory name.
Name Type Description
Return - java.util.List<Version> A list of com.nomagic.team-
work.common.projects.Ver-
sion.
REPORT WIZARD
Helper Modules
91
Copyright © 1998-2015 No Magic, Inc.
$project.getType()
Return a file type. A file type is one of the following values:
• 0 – UNDEF
• 2 – XML_NATIVE
• 3 – UNSIYS_XMI
$project.getDiagrams()
Return all existing diagrams stored in a particular project.
$project.getDiagrams(type)
Return existing diagrams of a given type stored in a particular project.
For example:
NOTE Version information consists of the following attributes:
• comment: a version committed comment
• date: a committed date
• dateAsString: a committed date as text
• number: a committed version
• numberAsString: a committed version as text
• user: a committer’s name
The following is sample code:
Current version : $project.version
All version:
-----------------
#foreach ($version in $project.versionList)
Date : $version.date
Number : $version.number
Number as String : $version.numberAsString
User : $version.user
Comment : $version.comment
-----------------
#end
Name Type Description
Return - int The value of a file type.
Name Type Description
Return - java.util.Collection A collection of diagram instances.
Name Type Description
Parameter(s) type java.lang.String A diagram type.
Return - java.util.Collection A collection of diagram instances.
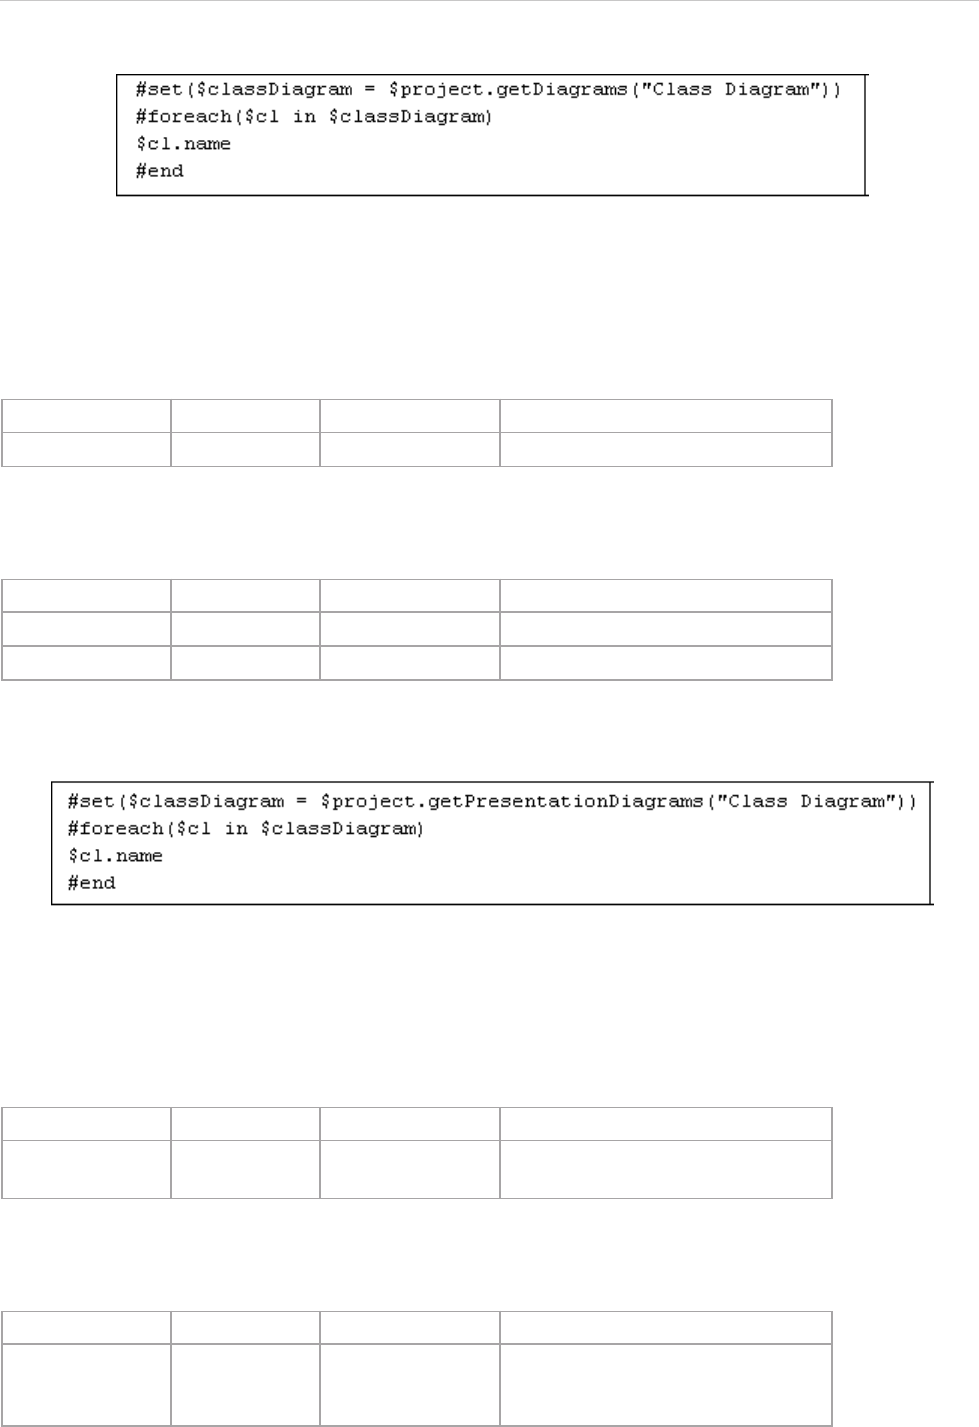
REPORT WIZARD
Helper Modules
92
Copyright © 1998-2015 No Magic, Inc.
Figure 75 -- Sample of $project.getDiagrams(type)
• “Class Diagram” is a diagram type
$project.getPresentationDiagrams()
Return all existing presentation diagrams stored in a particular project.
$project.getPresentationDiagrams(type)
Return all existing presentation diagrams of a given type stored in a particular project.
For example:
Figure 76 -- Sample of $project.getPresentationDiagrams(type)
• “Class Diagram” is a diagram type.
$project.isRemote()
Return the remote or non-remote state of a project.
$project.isDirty()
Return true if that particular project was modified after it had been saved or loaded.
Name Type Description
Return - java.util.Collection A collection of diagram views.
Name Type Description
Parameter(s) type java.lang.String A diagram type.
Return - java.util.Collection A collection of diagram views.
Name Type Description
Return - java.lang.Boolean Return true if a project is a remote
project, otherwise false.
Name Type Description
Return - java.lang.Boolean Return true if a project was modi-
fied after it had been saved/loaded,
otherwise false.
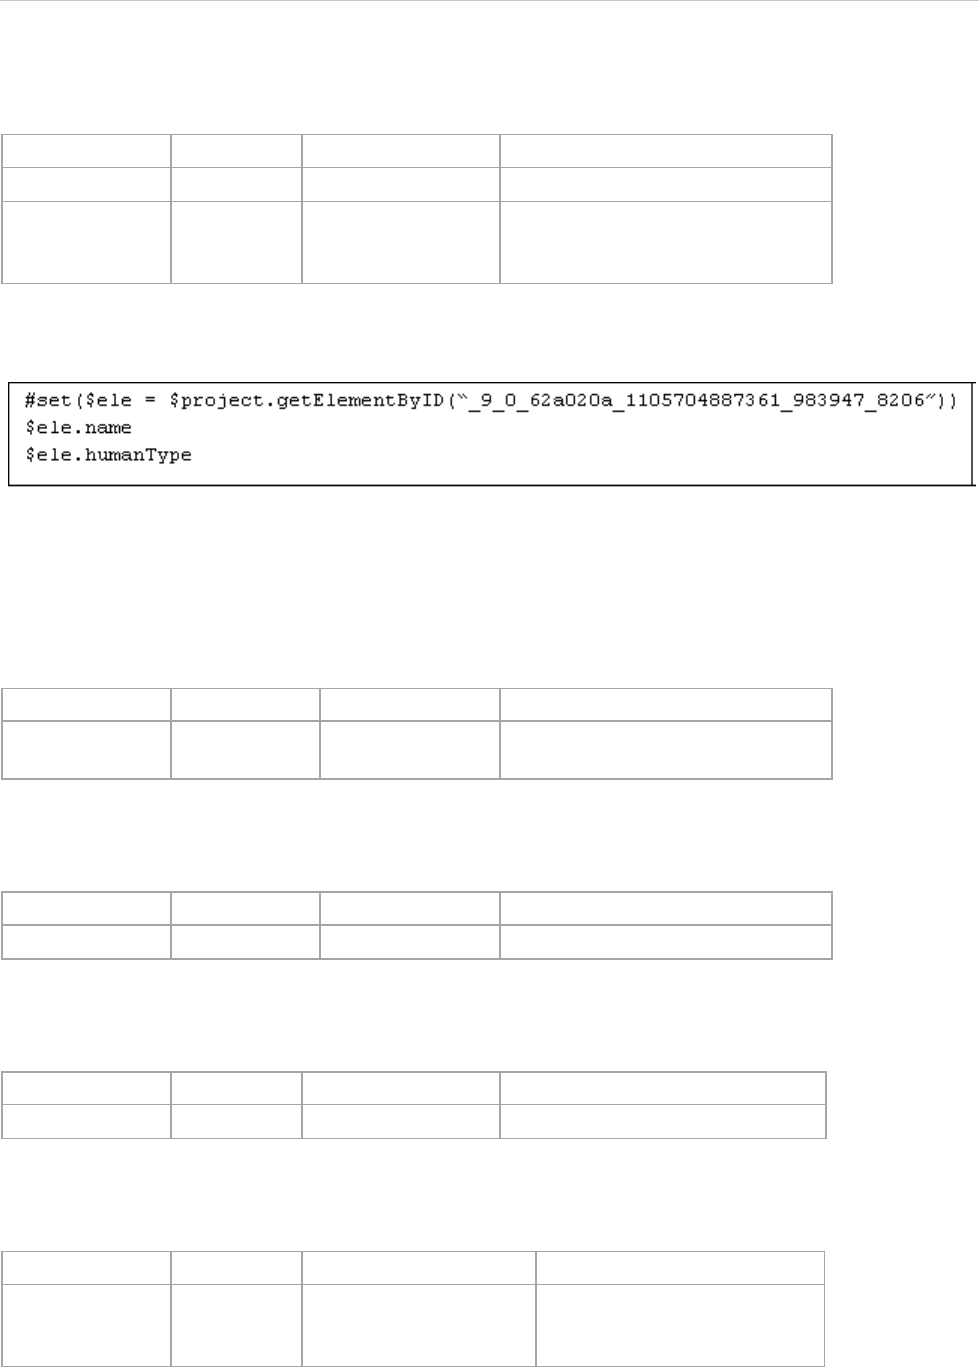
REPORT WIZARD
Helper Modules
93
Copyright © 1998-2015 No Magic, Inc.
$project.getElementByID(id)
Return an element with a given ID.
For example:
Figure 77 -- Sample of $project.getElementByID(id)
• “_9_0_62a020a_1105704887361_983947_8206” is the element’s ID number.
$project.getAllElementId()
Return a collection of all element IDs in a project.
$project.getXmiVersion()
Return the XMI version of a project.
$project.getVersion()
Return a project version number.
$project.getModel()
Return a model (the root container of all model structures).
Name Type Description
Parameter(s) ID java.lang.String An element ID.
Return - com.nomagic.magic
draw.uml.BaseEle-
ment
An element with a given ID or null if
the element with such ID is not reg-
istered in the project.
Name Type Description
Return - java.util.Collection A collection of all element IDs in a
project.
Name Type Description
Return - int An XMI version.
Name Type Description
Return - long A project version number.
Name Type Description
Return - com.nomagic.uml2.ext.
magicdraw.auxiliarycon-
structs.mdmodels.Model
A model.
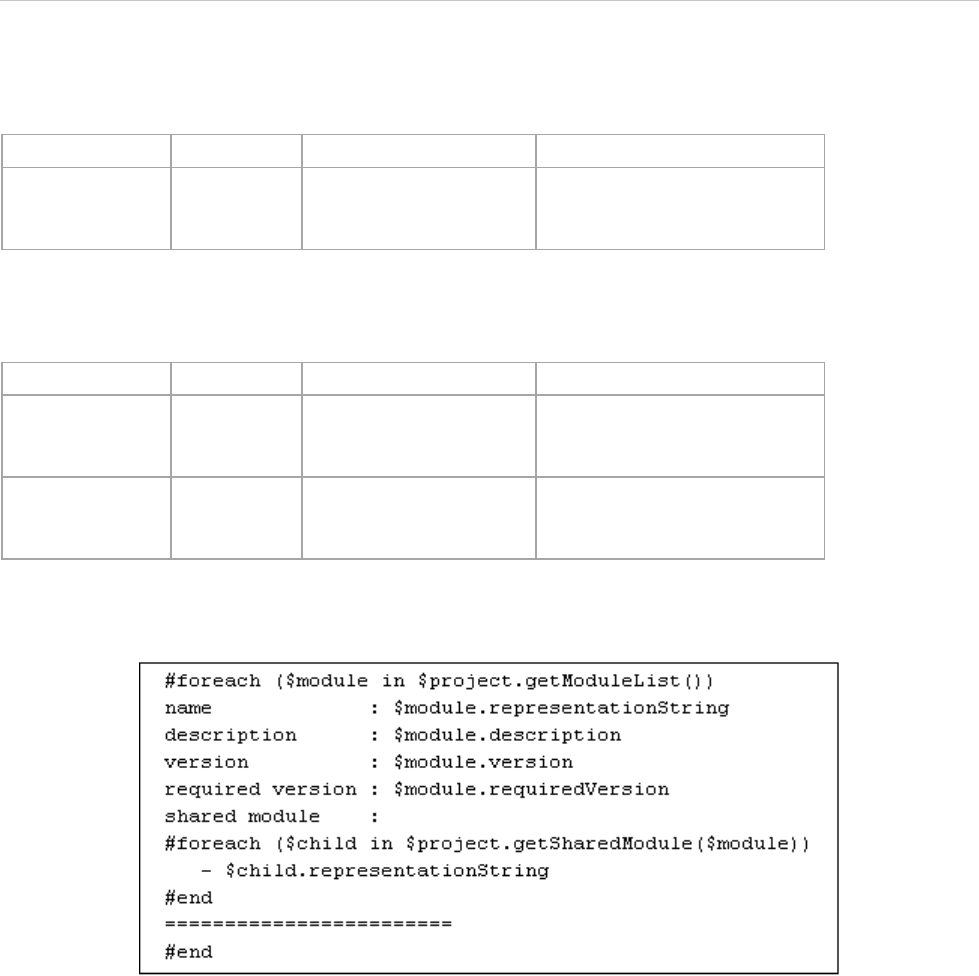
REPORT WIZARD
Helper Modules
94
Copyright © 1998-2015 No Magic, Inc.
$project.getModuleList()
Return a list of ModuleDescriptors from an open Teamwork Server project.
$project.getSharedModule(module)
Return a list of shared modules from a specified module.
For example:
Figure 78 -- Sample of $project.getSharedModule(module)
• $module is the module from Teamwork Server.
Name Type Description
Return - java.util.Collection A list of com.nomagic.magic-
draw.core.modules.Module-
Descriptor.
Name Type Description
Parameter(s) module com.nomagic.magic-
draw.core.mod-
ules.ModuleDescriptor
A module.
Return - java.util.Collection A list of com.nomagic.magic-
draw.core.modules.Module-
Descriptor.
REPORT WIZARD
Helper Modules
95
Copyright © 1998-2015 No Magic, Inc.
4.3 $iterator
This module is used with the #foreach loops. It wraps a list to let you specify a condition to terminate the loop
and reuse the same list in a different loop. The following example shows how to use $iterator.
$iterator.wrap( list )
Wrap a list with the tool.
$<IteratorTool instance>.hasMore()
Check if the iteration has more elements.
$<IteratorTool instance>.more()
Ask for the next element in the list.
$<IteratorTool instance>.remove()
Remove the current element from the list.
$<IteratorTool instance>.reset()
Reset the wrapper so that it will start over at the beginning of the list.
$<IteratorTool instance>.stop()
Put a condition to break off a loop.
#set ($list = [1, 2, 3, 5, 8, 13])
#set ($numbers = $iterator.wrap($list))
#foreach ($item in $numbers)
#if ($item < 8) $numbers.more()#end
#end
$numbers.more()
Output
------
1 2 3 5
8
Name Type Description
Parameter(s) list java.util.List An array or a list instance.
Return - IteratorTool Return an IteratorTool
instance.
Name Type Description
Return - boolean Return true if there are more
elements in the wrapped list.
Name Type Description
Return - java.lang.Object An element instance.
REPORT WIZARD
Helper Modules
96
Copyright © 1998-2015 No Magic, Inc.
$<IteratorTool instance>.toString()
Return an object as a string.
4.4 $list
This module is a list module used to work with lists and arrays in a template. It provides a method to get and
manage specified elements. You can also use it as a means to perform some actions on a list or array such as:
• Check if it is empty.
• Check if it contains certain elements.
For example:
$list.contains(list, element)
Check if a list or array contains certain elements.
$list.get(list, index)
Return a specified element of a list or array.
$list.isArray(object)
Check if an object is an array.
$primes
$list.size($primes)
$list.get($primes, 2)
$list.set($primes, 2, 1)
$list.get($primes, 2)
$list.isEmpty($primes)
$list.contains($primes, 7)
-> new int[] {2, 3, 5, 7}
-> 4
-> 5
-> (primes [2] becomes 1)
-> 1
-> false
-> true
Name Type Description
Parameter(s) list - A list or array instance.
element - An element instance.
Return - boolean Return true if a list or array
contains certain elements.
Otherwise, return false.
Name Type Description
Parameter(s) list - A list or array instance.
index - An index of an object in a list.
Return - object Return an object in a list.
Name Type Description
Parameter(s) object - An object
REPORT WIZARD
Helper Modules
97
Copyright © 1998-2015 No Magic, Inc.
$list.isEmpty(list)
Check if a list or array is empty.
$list.isList(object)
Check if an object is a list.
$list.set(list, index, value)
Set a specified element of a List/array.
$list.size(list)
Return the size of a List or array.
Return - boolean Return true if the object is an
array. Otherwise, returns
false.
Name Type Description
Parameter(s) list - A list of objects
Return - boolean Return true if the list or array
is empty. Otherwise, returns
false.
Name Type Description
Parameter(s) object - An object
Return - boolean Return true, if the object is a
List. Otherwise, return false.
Name Type Description
Parameter(s) list - A list of objects.
index - An index of an object in the
list.
value - An object to be set toReturn
aReturn a the list.
Return - object An object at the previously-
specified position with the set
value.
Name Type Description
Parameter(s) list - A list of objects.
Return - Integer Return the size of the list as
an Integer.
Name Type Description
REPORT WIZARD
Helper Modules
98
Copyright © 1998-2015 No Magic, Inc.
4.5 $bookmark
This module contains utility functions for bookmarking. The functions of this module are accessible from tem-
plates through $bookmark.
$bookmark.openURL(url, content)
Create a hyperlink to open a URL. For example:
$bookmark.openURL(url, content)
Create a hyperlink to open a URL. For example:
$bookmark.openURL(uri, content)
Create a hyperlink to open a URI. For example:
NOTE In RTF reports, the default style of bookmarks depends on the RTF editor used. For
example, Microsoft Word 2003 displays hyperlinks in blue.
$bookmark.openURL("http://www.nomagicasia.com","NoMagic Asia")
Name Type Description
Parameter(s) url java.lang.String A URL text.
content java.lang.Object The text content.
Return - com.nomagic.magicreport.Link The text content with a hyper-
link in the RTF format.
$bookmark.openURL($url, "NoMagic Asia")
Name Type Description
Parameter(s) url java.net.URL A URL instance.
content java.lang.Object The text content.
Return - com.nomagic.magicreport.Link The text content with a hyper-
link in the RTF format.
$bookmark.openURL($uri, "NoMagic Asia")
Name Type Description
Parameter(s) uri java.net.URI A URI instance.
content java.lang.Object The text content.
Return - com.nomagic.magicreport.Link The content with a hyperlink in
the RTF format.
REPORT WIZARD
Helper Modules
99
Copyright © 1998-2015 No Magic, Inc.
$bookmark.open(content)
Create a hyperlink for a bookmark. The bookmark ID will be automatically generated from the content.
$bookmark.open(bookmarkId, content)
Create a hyperlink for a bookmark. The bookmark ID value must match the parameter bookmark ID that passes
onto the link.
$bookmark.create(bookmarkObject)
Create a bookmark. The bookmark ID will be automatically generated from the bookmark object.
$bookmark.create(bookmarkId, bookmarkObject)
Create a bookmark. The default element type for this function is "label".
$bookmark.create(bookmarkId, bookmarkObject, elementType)
Create a bookmark by specifying an element type.
Name Type Description
Parameter(s) content java.lang.Object The text content.
Return - com.nomagic.magicreport.Link The text content with a hyper-
link in the RTF format.
Name Type Description
Parameter(s) bookmarkId java.lang.String The bookmark ID.
content java.lang.Object The text content.
Return - com.nomagic.magicreport.Link The text content with a hyper-
link in the RTF format.
Name Type Description
Parameter(s) bookmarkOb-
ject
java.lang.Object A bookmark object or content.
Return - com.nomagic.magicrep-
ort.Bookmark
The content with a bookmark
in the RTF format.
Name Type Description
Parameter(s) bookmarkId java.lang.String The bookmark ID.
bookmarkOb-
ject
java.lang.Object A bookmark object or content.
Return - com.nomagic.magicrep-
ort.Bookmark
The content with a bookmark
in the RTF format.
Name Type Description
Parameter(s) bookmarkId java.lang.String The bookmark ID.
bookmarkOb-
ject
java.lang.Object A bookmark object or content.
elementType java.lang.String An element type name, for
example, html tag.
Return - com.nomagic.magicrep-
ort.Bookmark
The content with a bookmark
in the RTF format.
REPORT WIZARD
Helper Modules
100
Copyright © 1998-2015 No Magic, Inc.
$bookmark.getBookmarkId(id)
Return a bookmark ID from a given string.
4.6 $sorter
This module is used to sort a collection of report templates.
$sorter.sort(Collection, fieldName)
The sort function for report templates. The context name of this class is "sorter". Use $sorter to access
public functions of this class through templates.
For example:
• $package is the collection to be sorted.
• "name:desc" is separated by ":" in two parts:
• The first part is to identify fieldName to be sorted.
• The second part is the option to identify the sorting direction. Sometimes, the direction is not
identified. It is ascending by default.
$sorter.sort(Collection)
This is the sort function for report templates. The context name of this class is "sorter". Use $sorter to
access public functions of this class through the templates.
For example:
• $package is a collection to be sorted.
Name Type Description
Parameter(s) id java.lang.String An original string value.
Return - com.nomagic.magicrep-
ort.Bookmark
The bookmark ID.
Name Type Description
Parameter(s) collection java.util.Collection A collection to be sorted
fieldname java.lang.String A fieldName to be sorted and
the sort direction.
Return - java.util.Collection A sorted collection.
#foreach ($rel in $sorter.sort($package, "name"))
$rel.name
#end
Name Type Description
Parameter(s) collection java.util.Collection A collection to be sorted.
Return - java.util.Collection A sorted collection.
#foreach ($rel in $sorter.sort($package))
$rel.name
#end
REPORT WIZARD
Helper Modules
101
Copyright © 1998-2015 No Magic, Inc.
$sorter.sortByFirstNumber(Collection, fieldName)
The sortByFirstNumber function is for report templates. The context name of this class is "sorter". Use
$sorter to access public functions of this class through templates.
For example:
• $package is a collection to be sorted by FirstNumber.
• "name:desc" is separated by ":" in two parts:
• The first part is to identify fieldName to be sorted.
• The second part is the option to identify the sorting direction. Sometimes, the direction is not
identified. It is ascending by default.
$sorter.sortByFirstNumber(Collection)
The sortByFirstNumber function for report templates. The context name of this class is "sorter". Use
$sorter to access public functions of this class through templates.
For example:
• $package is a collection to be sorted by FirstNumber.
$sorter.sortByLocale(Collection, String)
This is a function to sort for report templates. The context name of this class is "sorter". Use $sorter to
access public functions of this class through templates. To sort a given collection by a particular language,
identify the country code to specify the language.
Name Type Description
Parameter(s) collection java.util.Collection A collection to be sorted.
fieldName java.lang.String A fieldName to be sorted and
the sorting direction.
Return - java.util.Collection A sorted collection.
#foreach ($rel in $sorter.sortByFirstNumber($package,
"name:desc"))
$rel.name
#end
Name Type Description
Parameter(s) collection java.util.Collection A collection to be sorted.
Return - java.util.Collection A sorted collection.
#foreach ($rel in $sorter.sortByFirstNumber($package))
$rel.name
#end
Name Type Description
Parameter(s) collection java.util.Collection A collection to be sorted.
countryCode java.lang.String The country code to specify a
language to perform sorting.
Return - java.util.Collection A sorted collection.
REPORT WIZARD
Helper Modules
102
Copyright © 1998-2015 No Magic, Inc.
For example:
• $package is a collection to be sorted by country code.
• "DE" is the country code for GERMANY (ISO country code).
$sorter.sortByLocale(Collection, String, String)
This is a function to sort for report templates. The context name of this class is "sorter". Use $sorter to
access public functions of this class through templates. To sort a given collection by a particular language,
specify the language by identifying the country code and field name.
For example:
• $package is the collection to be sorted.
• “name” is the field name to be sorted.
• "DE" is the country code for GERMANY (ISO country code).
$sorter.humanSort(collection, fieldName)
This is a special function to sort text in a human-like order. It splits text into numeric and non-numeric chunks
and sorts them in numerical order. For example, "foo10" is ordered after "foo2".
For example:
#foreach ($p in $sorter.sortByLocale($package, "DE"))
$p.name
#end
NOTE This method sorts a collection by “name” attribute of each element by default.
Name Type Description
Parameter(s) collection java.util.Collection A collection to be sorted.
fieldName java.lang.String A fieldName to be sorted.
countryCode java.lang.String The country code to specify a
language to perform sorting.
Return - java.util.Collection A sorted collection.
#foreach ($p in $sorter.sortByLocale($package, "name",
“DE”))
$p.name
#end
Name Type Description
Parameter(s) collection java.util.Collection A collection to be sorted.
fieldName java.lang.String A fieldName to be sorted and the
sorting direction.
Return java.util.Collection A sorted collection.
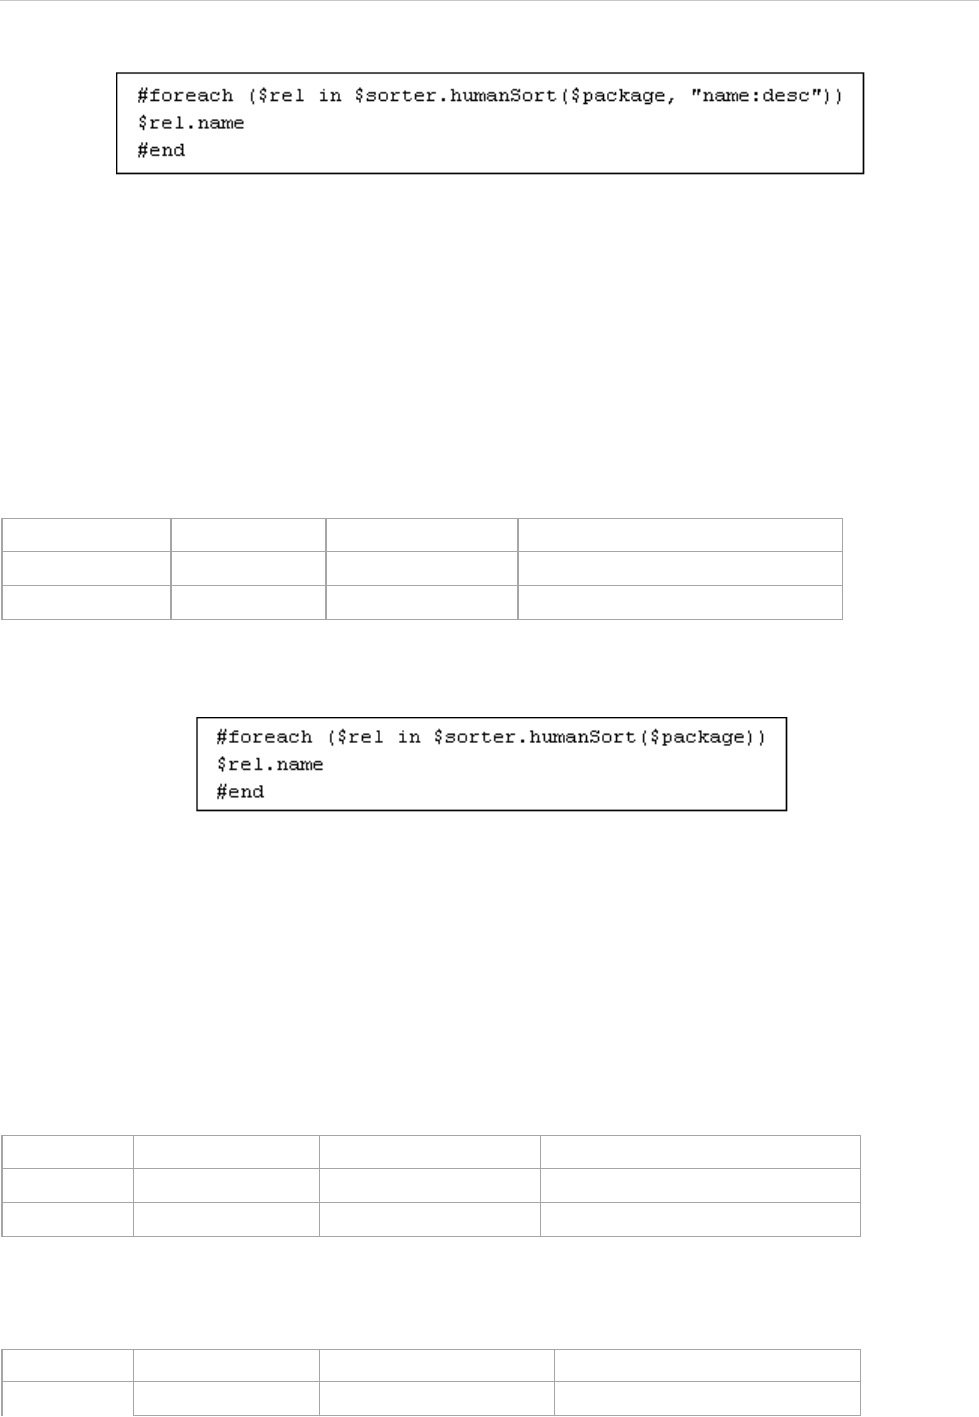
REPORT WIZARD
Helper Modules
103
Copyright © 1998-2015 No Magic, Inc.
Figure 79 -- $sorter.humanSort(collection, fieldName)
• $package is the collection to be sorted.
• "name:desc" is separated by ":" in two parts:
• The first part is to identify fieldName to be sorted.
• The second part is the option to identify the sorting scheme. Sometimes, the order is not
identified. It is ascending by default.
$sorter.humanSort(collection)
This is a special function to sort text in a human-like order. It splits text into numeric and non-numeric chunks
and sorts them in numerical order. For example, "foo10" is ordered after "foo2".
For example:
Figure 80 -- Sample of $sorter.humanSort(collection)
• $package is the collection to be sorted.
4.7 $template
This module is the tool used for getting a template’s information.
$template.getName()
Return the name of a template.
$template.getResourcesLocation()
Return the folder location of the resource file.
Name Type Description
Parameter(s) Collection java.util.Collection A collection to be sorted.
Return - java.util.Collection A sorted collection.
Name Type Description
Parameter(s) -- -
Return - java.lang.String Return a template name.
Name Type Description
Parameter(s) -- -
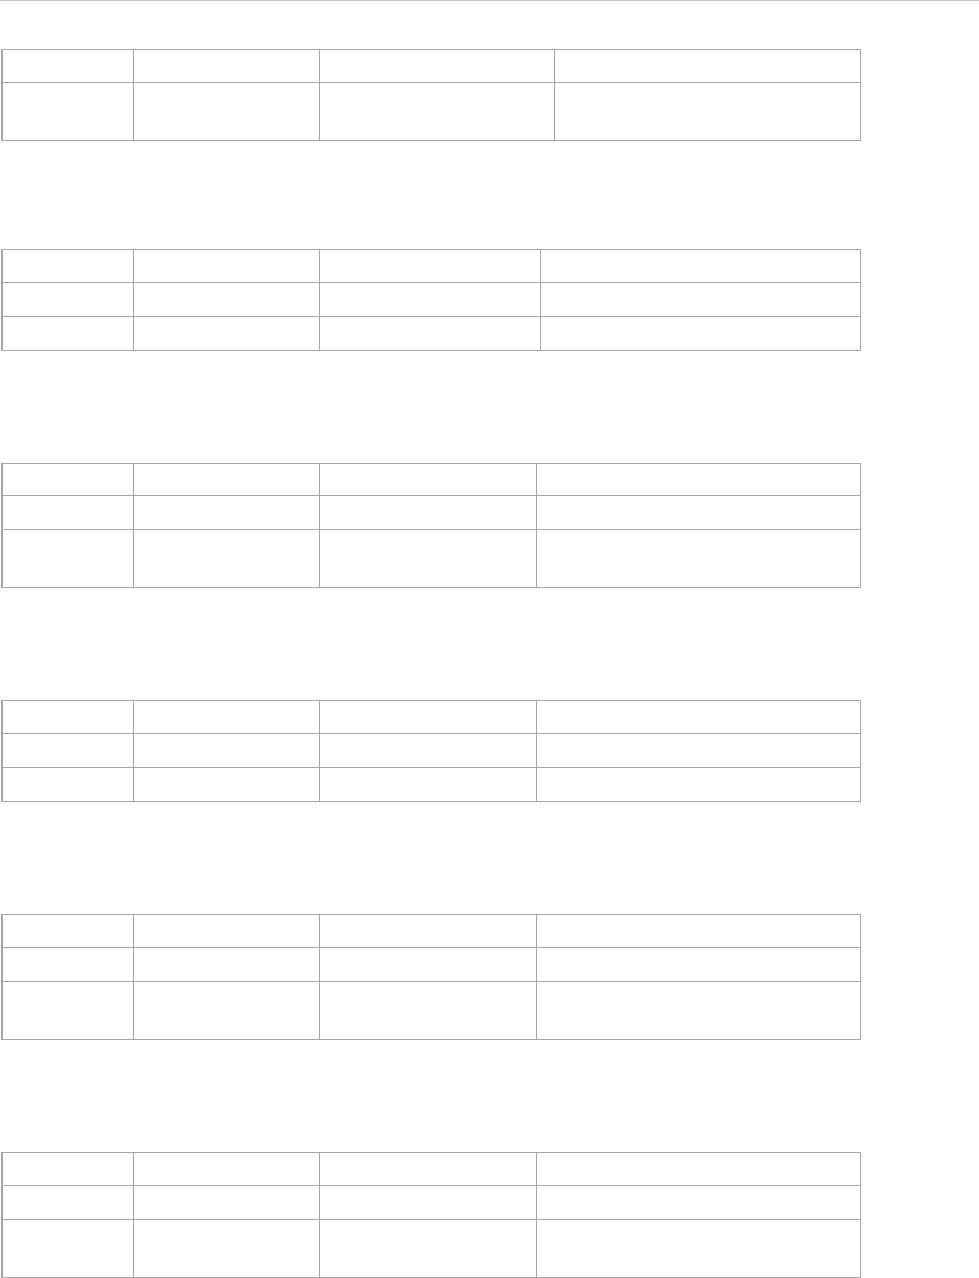
REPORT WIZARD
Helper Modules
104
Copyright © 1998-2015 No Magic, Inc.
$template.getTemplateFile()
Return a template filename.
$template.getTemplateLocation()
Return the folder location of a template file.
$template.getOutputFile()
Return the output filename.
$template.getOutputFileNoExt()
Return the output name.
$template.getOutputLocation()
Return the folder location of the output file.
Return - java.lang.String The location of a resource file
folder.
Name Type Description
Parameter(s) -- -
Return - java.lang.String Return a template filename.
Name Type Description
Parameter(s) -- -
Return - java.lang.String The location of a template file
folder.
Name Type Description
Parameter(s) -- -
Return - java.lang.String Return an output filename.
Name Type Description
Parameter(s) -- -
Return - java.lang.String An output name without a filename
extension.
Name Type Description
Parameter(s) -- -
Return - java.lang.String Return the location of an output file
folder.
Name Type Description

REPORT WIZARD
Helper Modules
105
Copyright © 1998-2015 No Magic, Inc.
4.8 $file
This module allows generating an output report file in a template file.
$file.silentCreate(template)
A shortcut to create a file, the output filename of which is the template name, not an import context object. For
example:
$file.silentCreate(template, importObject)
A shortcut to create a file, the output filename of which is the template name. For example:
$file.silentCreate(template, outputFileName, importObject)
Generate a report output from a given template name. For example:
$file.silentCreate('overview.html')
Name Type Description
Parameter(s) template java.lang.String An input template name.
Return - void -
$file.silentCreate('overview.html','')
Name Type Description
Parameter(s) template java.lang.String The input template name.
importObject java.lang.Object An object reference, which will be
$importer in the template file.
You can use the $importer variable
in the template file to get data.
Return - void -
$file.silentCreate('overview.html','overview.html','')
Name Type Description
Parameter(s) template java.lang.String The input template name.
outputFileName java.lang.String The output filename.
importObject java.lang.Object An object reference, which will be
$importer in the template file.
You can use the $importer vari-
able in the template file to get data.
Return - void -
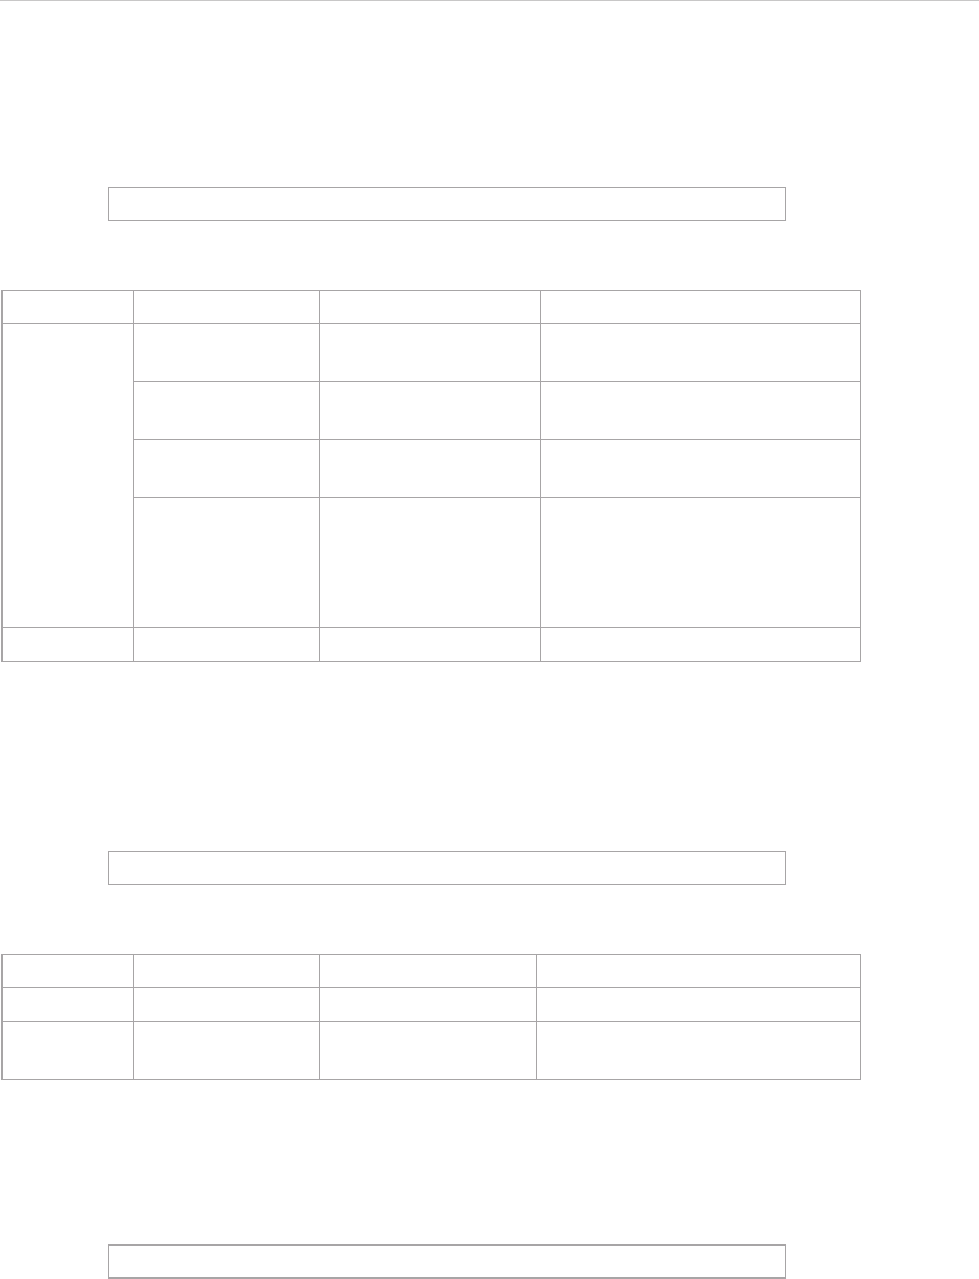
REPORT WIZARD
Helper Modules
106
Copyright © 1998-2015 No Magic, Inc.
$file.silentCreate(templateType, template, outputname, importObject)
Generate a report output from a given template name. For example:
$file.create(template)
A shortcut to create a file, the output filename of which is the template name, not an import context object. For
example:
$file.create(template, importObject)
A shortcut to create a file, the output filename of which is the template name. For example:
$file.silentCreate('html','overview','overview','')
Name Type Description
Parameter(s) templateType java.lang.String A template type such as rtf, html,
or htm.
template java.lang.String An input pathname string without
a filename extension.
outputFileName java.lang.String An output filename without a file-
name extension.
importObject java.lang.Object An object reference, which will be
$importer in the template file.
You can use the $importer vari-
able in the template file to get
data.
Return - void -
$file.create('overview.html')
Name Type Description
Parameter(s) template java.lang.String An input template name.
Return - java.lang.String An output pathname. It will return
an empty string if there is an error.
$file.create('overview.html','')
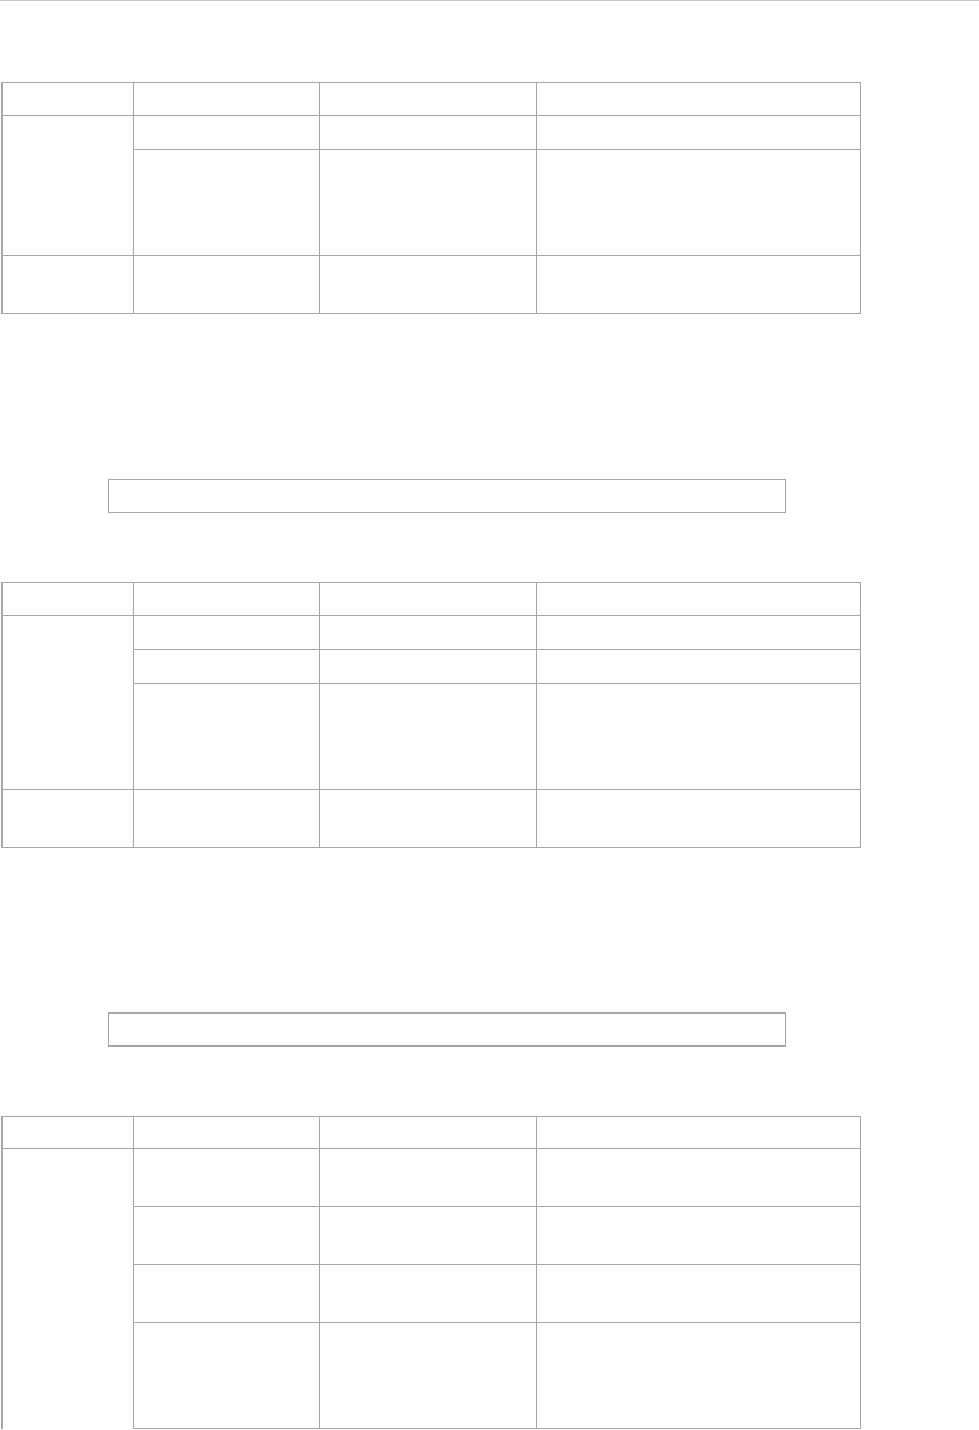
REPORT WIZARD
Helper Modules
107
Copyright © 1998-2015 No Magic, Inc.
$file.create(template, outputFileName, importObject)
Generate a report output from a given template name. For example:
$file.create(templateType, template, outputname, importObject)
Generate a report output from a given template name. For example:
Name Type Description
Parameter(s) template java.lang.String An input template name.
importObject java.lang.Object An object reference, which will be
importer in the template file. You
can use the $importer variable
in the template file to get data.
Return - java.lang.String An output pathname. It will return
an empty string if there is an error.
$file.create('overview.html','overview.html','')
Name Type Description
Parameter(s) template java.lang.String An input template name.
outputFileName java.lang.String An output filename.
importObject java.lang.Object An object reference, which will be
$importer in the template file.
You can use the $importer vari-
able in the template file to get data.
Return - java.lang.String An output pathname. It will return
an empty string if there is an error.
$file.create('html','overview','overview','')
Name Type Description
Parameter(s) templateType java.lang.String A template type such rtf, html, and
htm.
template java.lang.String An input pathname string without a
filename extension.
outputname java.lang.String An output filename without a file-
name extension.
importObject java.lang.Object An object reference, which will be
$importer in the template file.
You can use the $importer vari-
able in the template file to get data.
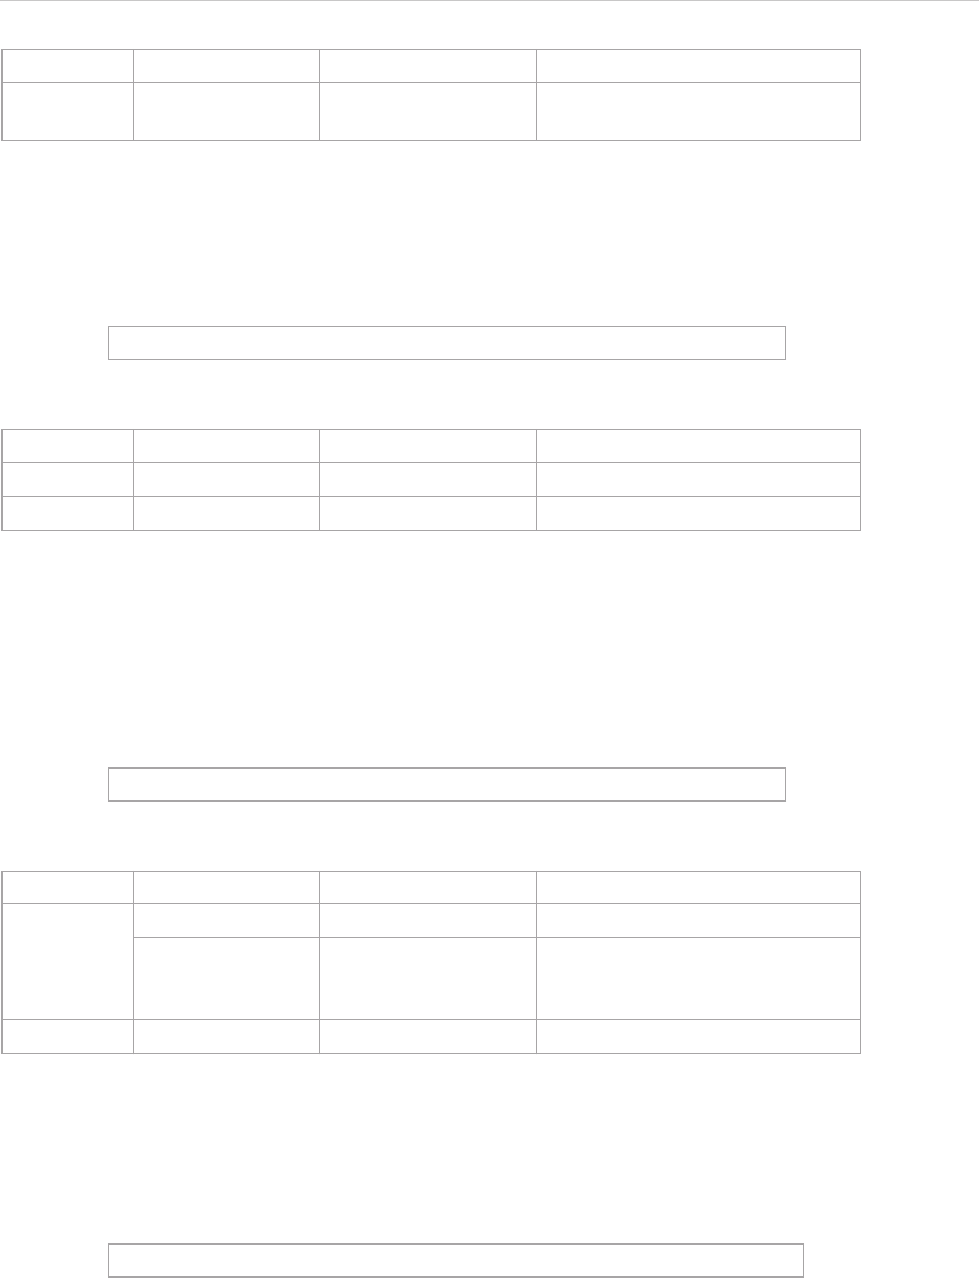
REPORT WIZARD
Helper Modules
108
Copyright © 1998-2015 No Magic, Inc.
$file.createAndWait(templateFilename)
Open a new template engine to generate a report and return a path to generate the file. The generated report
will be given the template filename. For example:
$file.createAndWait(template, contextValue)
Open a new template engine to generate a report and return a path to generate the file. The generated report
will be named after the template filename. For example:
$file.createAndWait(String templateFileName, String outputFileName, Object contextValue)
Open a new template engine to generate a report and return a path to generate the file. "importer" will be used
as the name of a context value. For example:
Return - java.lang.String An output pathname. It will return
an empty string if there is an error.
$file.createAndWait('overview.html')
Name Type Description
Parameter(s) templateFilename java.lang.String An input template filename.
Return - java.lang.String An absolute path to generate a file.
$file.createAndWait('overview.html',$var)
Name Type Description
Parameter(s) templateFilename java.lang.String An input template filename.
contextValue java.lang.Object An additional object added to a
new template context with a
default $importer name.
Return java.lang.String An absolute path to generate a file.
$file.createAndWait('overview.html','overview.html',$var)
Name Type Description
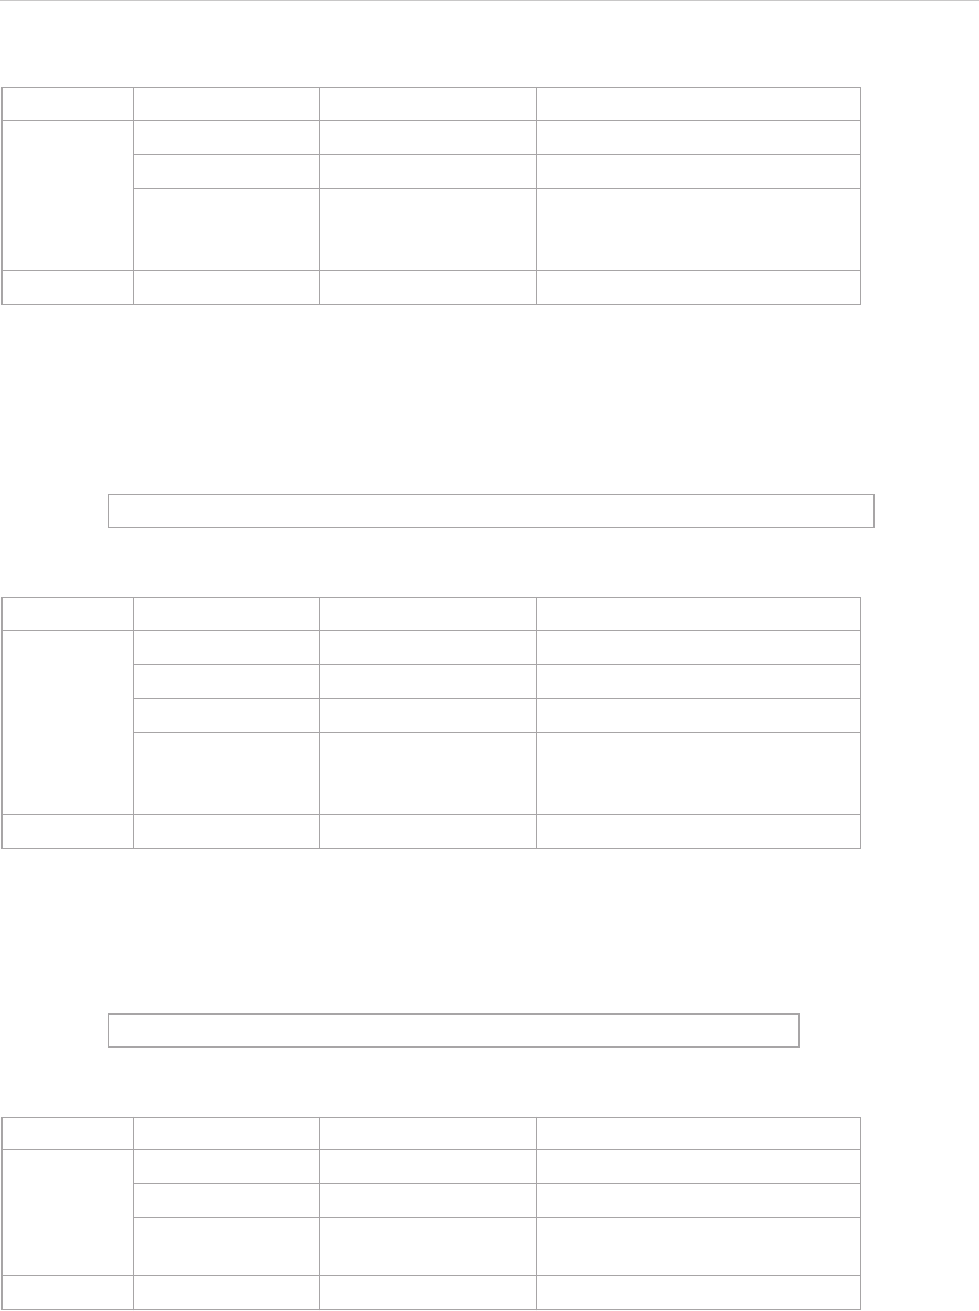
REPORT WIZARD
Helper Modules
109
Copyright © 1998-2015 No Magic, Inc.
$file.createAndWait(String templateFileName, String outputFileName, String ContextName, Object con-
textValue)
Open a new template engine to generate a report and return a path to generate the file. For example:
$file.createAndWait(String templateFileName, String outputFileName, Map<String, Object> context)
Open a new template engine to generate a report and return a path to generate the file. For example:
$file.copy(inputFilename)
Copy an input file to an output file using the same name in the binary format. For example:
Name Type Description
Parameter(s) templateFilename java.lang.String An input template filename.
outputFilename java.lang.String An output report filename.
contextValue java.lang.Object An additional object added to a
new template context with a
default $importer name.
Return java.lang.String An absolute path to generate a file.
$file.createAndWait('overview.html','overview.html','var',$var)
Name Type Description
Parameter(s) templateFilename java.lang.String An input template filename.
outputFilename java.lang.String An output report filename.
contextName java.lang.String Add an object context's name.
contextValue java.lang.Object An additional object added to a
new template context with a
default $importer name.
Return - java.lang.String An absolute path to generate a file.
$file.createAndWait('overview.html','overview.html',$map)
Name Type Description
Parameter(s) templateFilename java.lang.String An input template filename.
outputFilename java.lang.String An output report filename.
context java.util.Map<String,
Object>
An additional context added to a
new template.
Return - java.lang.String An absolute path to generate a file.
REPORT WIZARD
Helper Modules
110
Copyright © 1998-2015 No Magic, Inc.
$file.copy('icon.gif')
Name Type Description
Parameter(s) inputFilename java.lang.String An input filename
Return - java.lang.String An output pathname. It will return
an empty string if there is an error.
REPORT WIZARD
Helper Modules
111
Copyright © 1998-2015 No Magic, Inc.
$file.copy(inputFilename, outputFilename)
Copy an input file to an output file in the binary format. For example:
$file.exists(pathname)
Test if a file denoted by a specific pathname exists. By default, the current directory refers to a template loca-
tion. For example:
$file.computeName(directory, name)
Create a pathname string from a given directory and name.
For example:
$file.copy('icon.gif','icon.gif')
Name Type Description
Parameter(s) inputFilename java.lang.String An input filename.
outputFilename: java.lang.String An output filename.
Return - java.lang.String An output pathname. It will return
an empty string if there is an error.
$file.exists("$template.resourcesLocation/myimage.png")
$file.exists("C:/myfolder/myimage.png")
$file.exists("mytemplate.txt")
Name Type Description
Parameter(s) pathname java.lang.String A pathname string.
Return - java.lang.String True if and only if a file or directory
denoted by a specific pathname
exists; otherwise, false.
Name Type Description
Parameter(s) directory java.lang.String A parent directory of a file.
name java.lang.String A filename (excludes the filename
extension).
Return - java.lang.String A pathname from the given direc-
tory and name.
$file.computeName('actors', $ac.ID, 'html')
output: 'actor/_123456789.html'
REPORT WIZARD
Helper Modules
112
Copyright © 1998-2015 No Magic, Inc.
$file.computeName(directory, name, fileType)
Create a pathname string from a given directory, name, and file type.
4.9 $array
Use $array to create an Array or a HashSet instance.
$array.createArray()
Create an empty ArrayList.
$array.createArray(collection)
Construct an ArrayList containing elements of the specified collection, in the order they are returned by the col-
lection's iterator. Return a zero size ArrayList if the given collection is null.
$array.subList(list, size)
Create an ArrayList of a portion of the list in the given size.
Name Type Description
Parameter(s) directory java.lang.String A parent directory of a file.
name java.lang.String A filename (excluding the exten-
sion).
fileType java.lang.String A file type, such as rtf, txt, and
html.
Return - java.lang.String A pathname from the given direc-
tory, name, and file type.
Name Type Description
Parameter(s) -- -
Return - java.util.List An instance of ArrayList.
Name Type Description
Parameter(s) collection java.util.Collection A collection of instances whose
elements are to be placed into a
list.
Return - java.util.List An ArrayList containing elements
of the specified collection.
Name Type Description
Parameter(s) list java.util.List An original list.
size int A view size of a given list.
Return - java.util.List An ArrayList of a specified view
size within a given list.
REPORT WIZARD
Helper Modules
113
Copyright © 1998-2015 No Magic, Inc.
$array.addCollection(parent, child)
Add a child list into a parent collection. It helps the template handle the case where the child is null.
$array.createHashSet()
Create a HashSet instance.
4.10 $group
$group.create()
Create a new instance of a group tool.
$group.init()
Initialize a group tool.
$group.groupNames()
Return a set of group names.
$group.contains(groupName)
Test whether a group name is contained in a set of group names.
Name Type Description
Parameter(s) parent java.util.Collection A parent collection.
child java.util.Collection A child collection.
Return - void -
Name Type Description
Parameter(s) -- -
Return - java.util.Set An instance of HashSet.
Name Type Description
Parameter(s) -- -
Return - GroupTool An instance of a group tool.
Name Type Description
Parameter(s) -- -
Return - void -
Name Type Description
Parameter(s) -- -
Return - java.util.Set A set of group names.
Name Type Description
Parameter(s) groupName java.lang.String A group name.
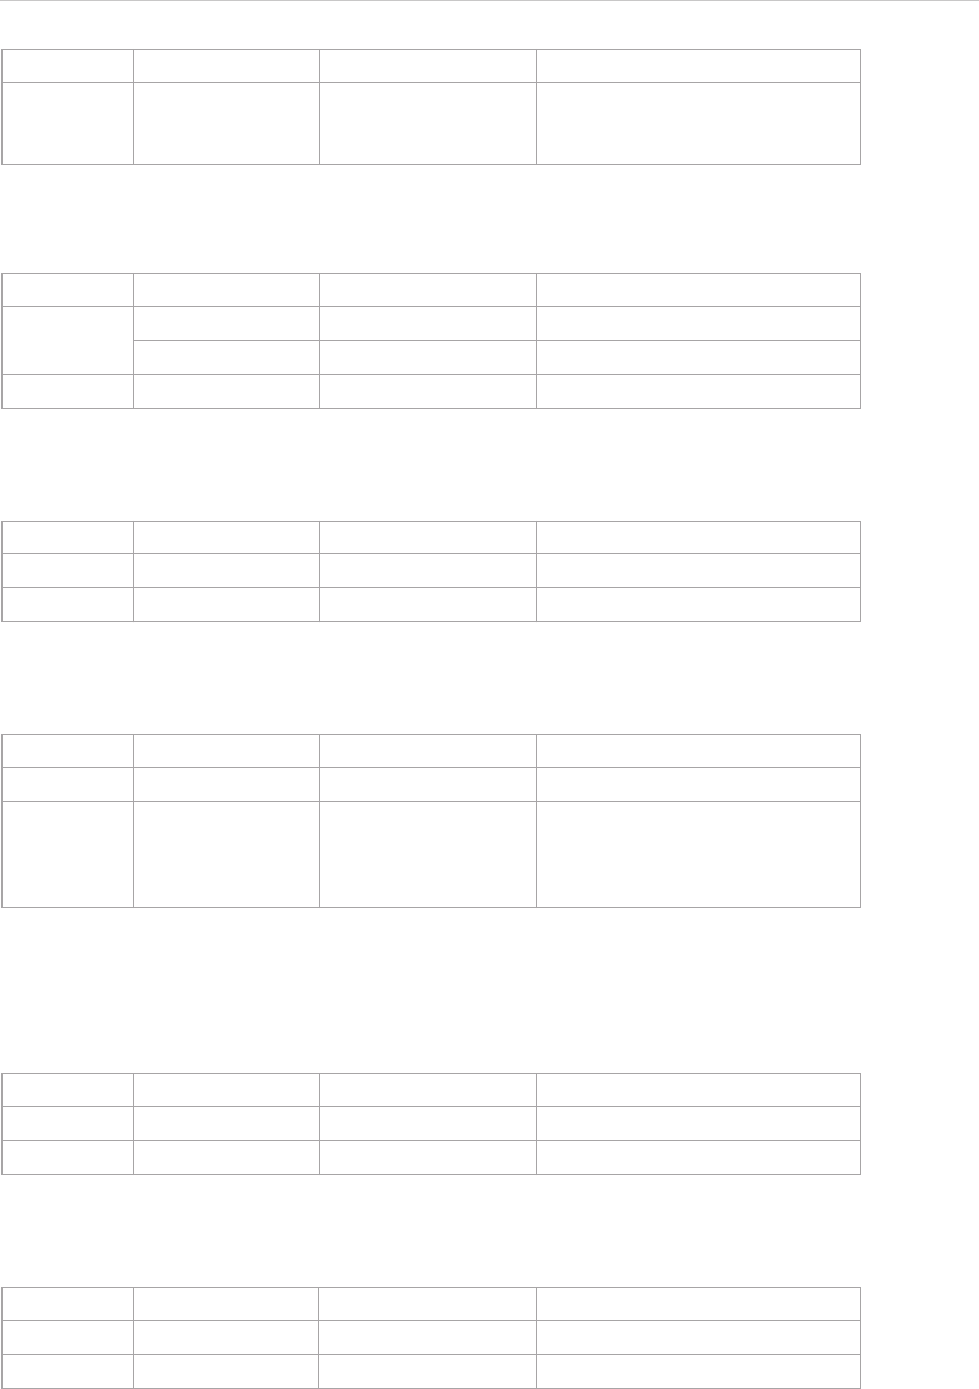
REPORT WIZARD
Helper Modules
114
Copyright © 1998-2015 No Magic, Inc.
$group.put(groupName, object)
Add an object into a group.
$group.get(groupName)
Return a list of group objects.
$group.remove(groupName)
Remove a group from the specified group name.
$group.removeAll()
Remove all groups.
$group.clear()
Remove all mappings.
Return - - True if the group name is con-
tained in a set of group names,
otherwise false.
Name Type Description
Parameter(s) groupName java.lang.String A group name.
object java.lang.Object An object being added.
Return - void -
Name Type Description
Parameter(s) groupName java.lang.String A group name.
Return - java.util.List A list of group objects.
Name Type Description
Parameter(s) groupName java.lang.String A group name.
Return - java.util.List A list of group objects previously
associated with a specified group
name, or null if there is no group
corresponding to the key.
Name Type Description
Parameter(s) -- -
Return - void -
Name Type Description
Parameter(s) -- -
Return - void -
Name Type Description
REPORT WIZARD
Helper Modules
115
Copyright © 1998-2015 No Magic, Inc.
4.11 $map
$map.createHashMap()
Create a HashMap instance.
4.12 $date
$date is a method to display and format the current date and time.
$date
Display the current date and time, for example, Oct 19, 2003 and 9:54:50 PM respectively.
$date.long
Display the current date and time in a long form, for example, October 19, 2003 and 9:54:50 PM. respectively.
$date.full_date
Display the current date in a full form, for example, Sunday, October 19, 2003.
$date.get('format')
Display the current date in a specific format, for example, $date.get('yyyy-M-d H:m:s') is displayed as
2003-10-19 21:54:50.
Name Type Description
Parameter(s) -- -
Return - java.util.HashMap An instance of HashMap.
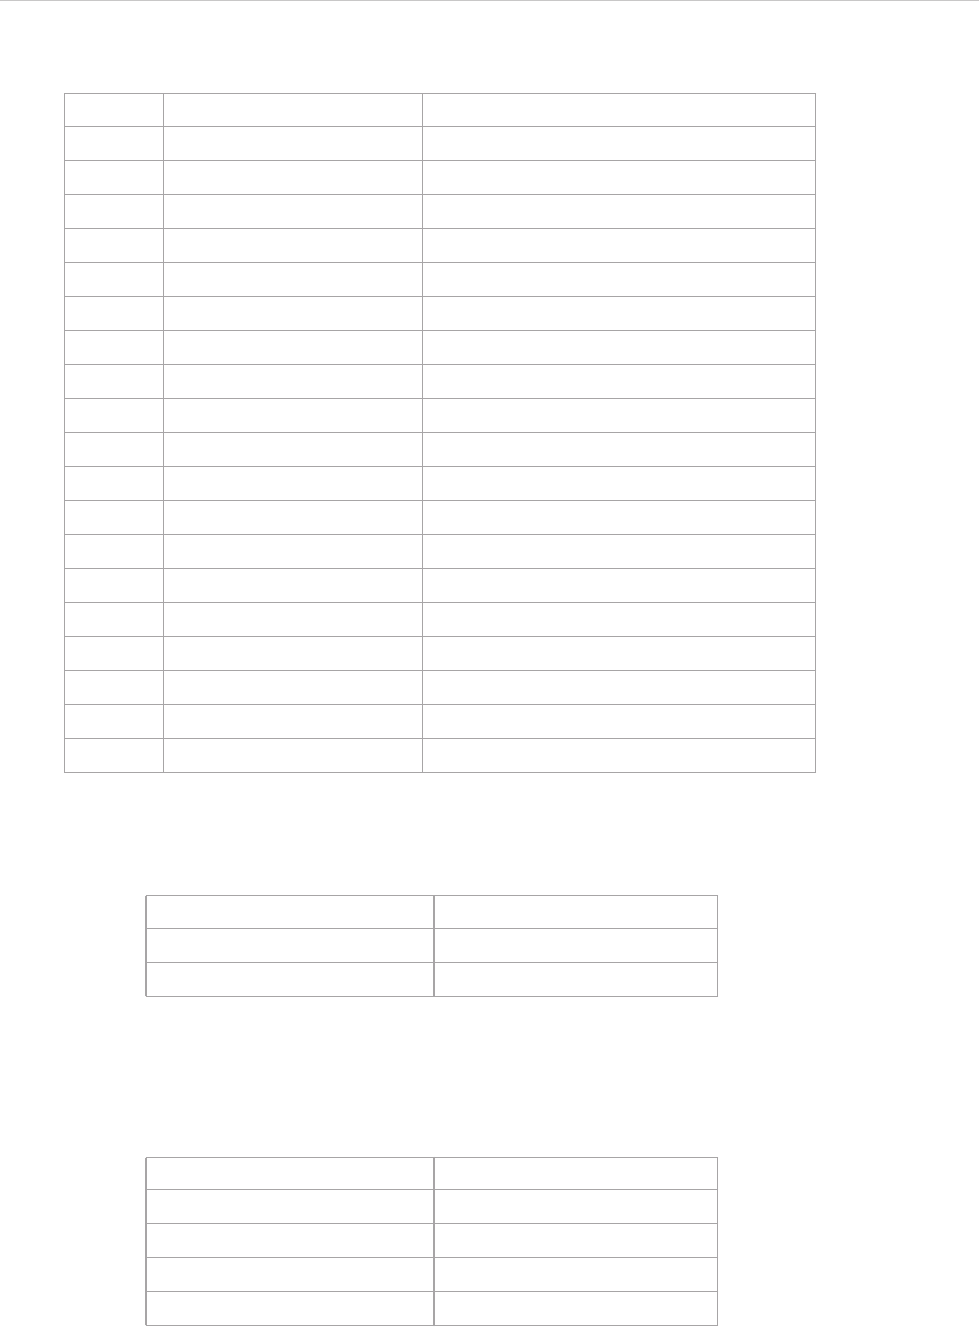
REPORT WIZARD
Helper Modules
116
Copyright © 1998-2015 No Magic, Inc.
Table 13 -- Date and Time Format
Year
• If the number of letters in a pattern letters is four or more, a calendar specific long form is used.
• Otherwise, a calendar specific short or abbreviated form is used.
Month
• If the number of letters in a pattern is less than 3, the number form is used.
• If the number of letters in a pattern is 3, a short or abbreviated form is used.
• If the number of letters in a pattern is 4 or more, the full form is used.
Days
• If the number of letters in a pattern is four or more, the full form is used.
Letter Date or Time Component Example
G Era designator AD
y Year 1996 96
M Month in year July; Jul; 07
w Week in year 27
W Week in month 2
D Day in year 189
d Day in month 10
F Day of week in month 2
E Day in week Tuesday; Tue
a Am/pm marker PM
H Hour in day (0-23) 0
k Hour in day (1-24) 24
K Hour in am/pm (0-11) 0
h Hour in am/pm (1-12) 12
m Minute in hour 30
s Second in minute 55
S Millisecond 978
z Time zone Pacific Standard Time; PST; GMT-08:00
Z Time zone Time zone -0800
Date and Time Pattern Result
yy 10
yyyy 2010
Date and Time Pattern Result
M4
MM 04
MMM Apr
MMMM April
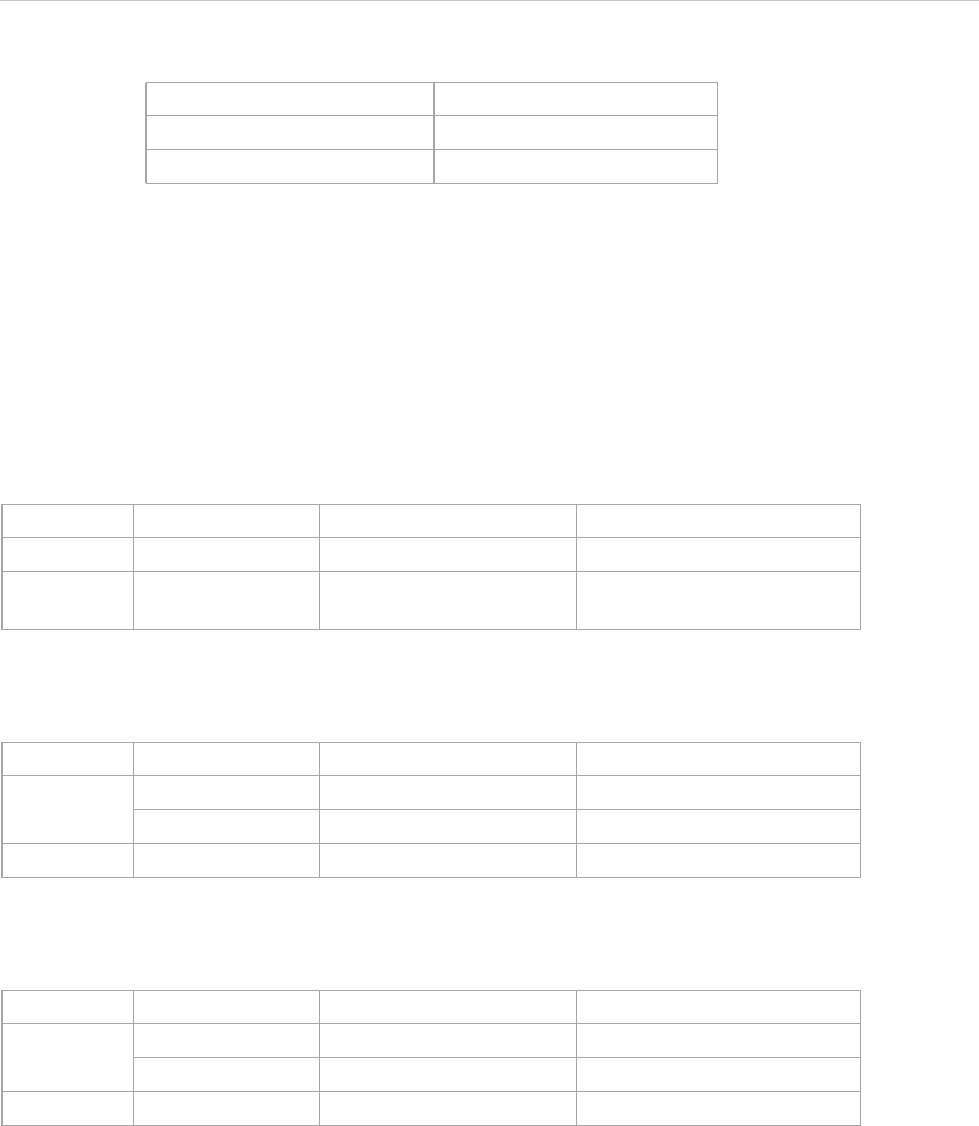
REPORT WIZARD
Helper Modules
117
Copyright © 1998-2015 No Magic, Inc.
• Otherwise, a calendar specific short or abbreviated form is used.
4.13 $profiling
You can use $profiling to access MagicDraw meta-model information.
$profiling.getGeneralizationName(modelName)
Return a generalization model of modelName.
$profiling.getDeclaringElementName (modelName, propertyName)
Retrieve the meta-model name which is the declared property name.
$profiling.getPropertyTypeName (modelName, propertyName)
Retrieve property types from meta-model names.
Date and Time Pattern Result
E Mon
EEEE Monday
Name Type Description
Parameter(s) modelName java.lang.String A meta-model name.
Return - java.util.Collection<String> A list of generalization model
names.
Name Type Description
Parameter(s) modelName java.lang.String A meta-model name.
propertyName java.lang.String A property name.
Return - java.lang.String A meta-model name.
Name Type Description
Parameter(s) modelName java.lang.String A meta-model name.
propertyName java.lang.String A property name.
Return - java.lang.String A property type name.
REPORT WIZARD
Helper Modules
118
Copyright © 1998-2015 No Magic, Inc.
$profiling.getPropertyTypeName (element, propertyName)
Retrieve property types from an element.
$profiling.getElementProperties(modelName)
Retrieve a collection of element property names from meta-model names.
$profiling.getElementProperties(element)
Retrieve a collection of element property names from elements.
$profiling.getElementProperty(element, propertyName)
Retrieve property values of specified elements and property names.
$profiling. getHumanPropertyName(element, propertyName)
Return text representing a property name.
Name Type Description
Parameter(s) element com.nomagic.uml2.ext.magic-
draw.classes.mdkernel.Ele-
ment
An element.
propertyName java.lang.String A property name.
Return - java.lang.String A property type name.
Name Type Description
Parameter(s) modelName java.lang.String A meta-model name.
Return - java.util.Collection<String> A collection of element prop-
erty names.
Name Type Description
Parameter(s) element com.nomagic.uml2.ext.magic-
draw.classes.mdkernel.Ele-
ment
An element.
Return - java.util.Collection<String> A collection of element prop-
erty names.
Name Type Description
Parameter(s) element com.nomagic.uml2.ext.magic-
draw.classes.mdkernel.Ele-
ment
An element.
propertyName java.lang.String A property name.
Return - java.lang.Object A property object.
Name Type Description
Parameter(s) propertyName java.lang.String A property name.
element com.nomagic.uml2.ext.magic-
draw.classes.mdkernel.Ele-
ment
An element.
Return - java.lang.String Text representing a property
name.

REPORT WIZARD
Helper Modules
119
Copyright © 1998-2015 No Magic, Inc.
4.14 $image
$image is an image tool that provides a rich set of image manipulation methods that enable you to transform
images during report generation. With $image, you can scale, rotate, and resize images.
Syntax
These manipulation methods can be broadly divided into five categories:
4.14.1 Scaling Images
4.14.2 Rotating Images
4.14.3 Fixed-Pixels Image Resizing
4.14.4 Fixed-Measurement Image Resizing
4.14.5 Including External Images
Multiple image transformations will have cumulative effects. Desired sizes can be specified either as pixel
counts or as measurements in inches, centimeters, or millimeters. While the parameters for resizing an image
with a specific measurement (in, cm, mm, pt, or px) must be specified in a pair of quote marks, all other size
parameters do not need to be specified in a pair of quote marks.
The keepRatio parameter takes either a true or false value; a true value will resize the image and keep the
original image height/width ratio; a false value will only resize one axis, as set by the method name, resulting in
a stretched image.
4.14.1 Scaling Images
There are two scaling methods that you can use to scale an image using a given factor, for example, Method 1
provides height and width parameters (scaleWidth and scaleHeight), while Method 2 provides a single param-
eter that will scale both axes equally (scaleFactor). These three parameters must be positive real numbers.
$image.scale(image, scaleWidth, scaleHeight)
Return an image icon for an element.
$image.scale(image, scaleFactor)
Return an image icon for an element.
Name Type Description
Parameter(s) image com.nomagic.magicreport.Ima
ge
An image object for the ele-
ment icon.
scaleWidth java.lang.Double The width parameter of the
image.
scaleHeight java.lang.Double The height parameter of the
image.
Return - com.nomagic.magicreport.Ima
ge
The resized image object for
the element icon.
Name Type Description
Parameter(s) image com.nomagic.magicreport.Ima
ge
An image object for the ele-
ment icon.
scaleFactor java.lang.Double The scaling parameter of the
image.
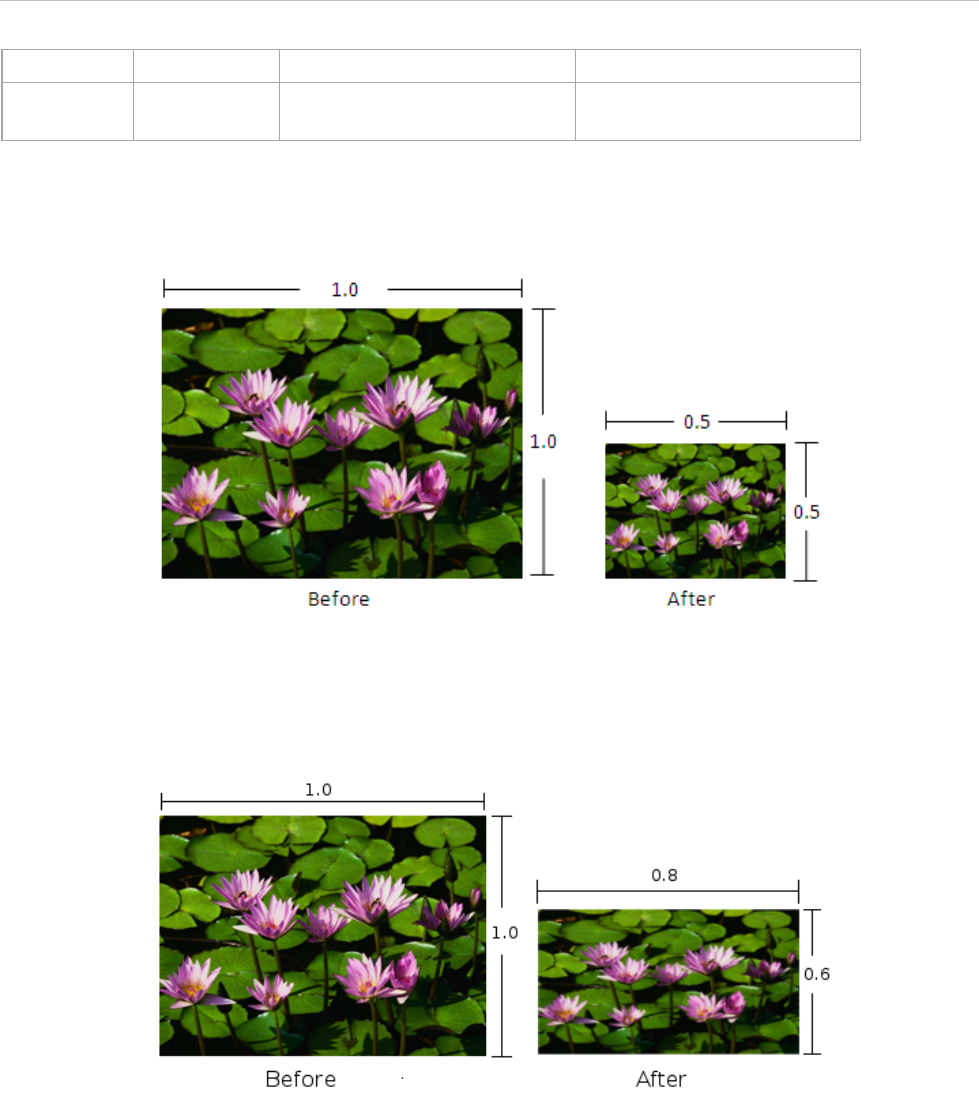
REPORT WIZARD
Helper Modules
120
Copyright © 1998-2015 No Magic, Inc.
Use $image.scale($diagram.image, 0.5), for example, to scale down the image to half the original size. The
following photos show the result.
Use $image.scale($diagram.image, 0.8, 0.6)to scale the image’s width down to 80% and height to 60%. The
following photos show the result.
Scaling Quality
Because the image tool provides several methods for scaling images, the quality of the scaled image depends
on the used algorithm. To set the image scaling quality, $image.setScalingQuality() code must be inserted
before scaling images. For example:
$image.setScalingQuality(5)
$image.scale(0.5)
The above code will set the image scaling quality to ‘highest’. The possible values are from 1 to 5, where 5 is
‘highest’ and 1 is ‘lowest’. The following table provides the description of each value.
Return - com.nomagic.magicreport.Ima
ge
The resized image object for
the element icon.
Name Type Description
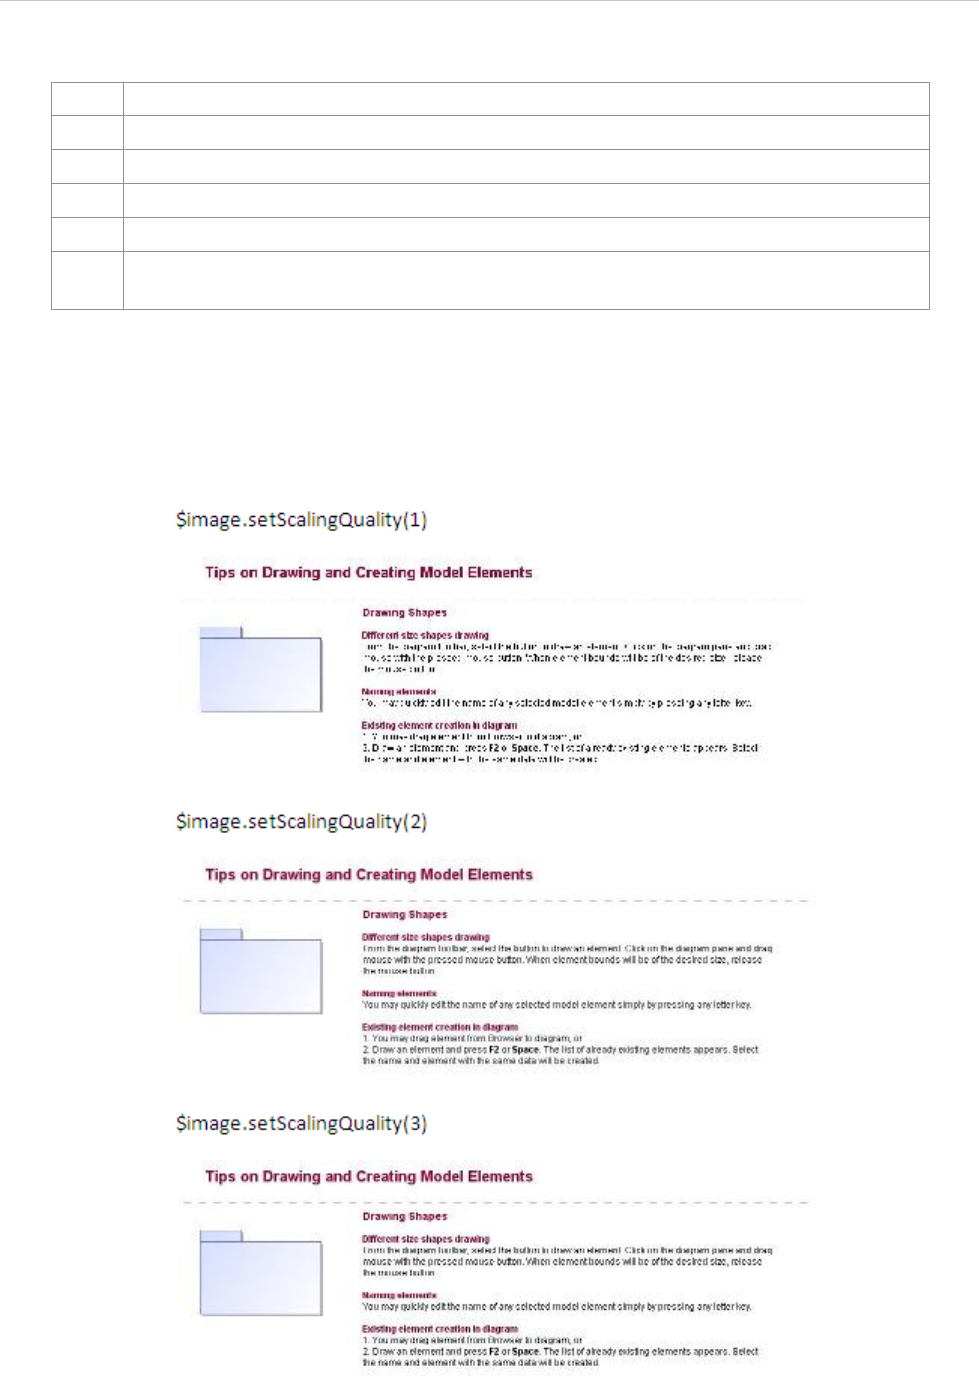
REPORT WIZARD
Helper Modules
121
Copyright © 1998-2015 No Magic, Inc.
Sample pictures from different image scaling qualities with their sizes scaled down to 50% are indicated in the
pictures below (ranging from the value 1 ‘lowest’ to 5 ‘highest’):
Value Description
1 lowest' – Use one-step nearest neighbor interpolation.
2 'low' – Use one-step bi-cubic interpolation.
3 'medium – Use multi-step bi-linear interpolation.
4 'high' – Use area average image scaling algorithm.
5 'highest' – Use a lossless transformation when the template is ODF, DOCX, or RTF; other-
wise, area average image scaling algorithm will be used instead.
REPORT WIZARD
Helper Modules
122
Copyright © 1998-2015 No Magic, Inc.
4.14.2 Rotating Images
There are two rotating methods that you can use to rotate a given image by 90 degrees: (i) rotateRight for
clockwise rotation and (ii) rotateLeft for counterclockwise rotation.
$image.rotateRight(image)
Return an image icon for an element.
$image.rotateLeft(image)
Return an image icon for an element.
Use $image.rotateRight($diagram.image), for example, to rotate the image 90 degrees clockwise. The fol-
lowing photos show the result.
Name Type Description
Parameter(s) image com.nomagic.magicreport.Ima
ge
An image object for the ele-
ment icon.
Return - com.nomagic.magicreport.Ima
ge
The rotated image object for
the element icon.
Name Type Description
Parameter(s) image com.nomagic.magicreport.Ima
ge
An image object for the ele-
ment icon.
Return - com.nomagic.magicreport.Ima
ge
The rotated image object for
the element icon.
REPORT WIZARD
Helper Modules
123
Copyright © 1998-2015 No Magic, Inc.
Use $image.rotateLeft($diagram.image), for example, to rotate the image 90 degrees counterclockwise. The
following photos show the result.
4.14.3 Fixed-Pixels Image Resizing
There are five methods to specify the resulting dimensions for an image to be resized in pixel size (the size
parameters must be positive numbers or -1 number). If the value is -1, it will resize an image to the document
paper dimensions. For example:
$image.setWidth($diagram.image, -1)
NOTE RTF Image rotation, with the scaling quality set to 'highest,' is not supported in
any RTF document when opened with OpenOffice.org.
REPORT WIZARD
Helper Modules
124
Copyright © 1998-2015 No Magic, Inc.
As shown by the example, the image will be resized to a paper width while maintaining the aspect ratio. The
value -1 applies only to certain template types such as RTF, ODT, and DOCX.
If the value is -2, it will resize an image to document paper bounds if and only if image bounds are larger than
paper bounds. For example:
$image.setWidth($diagram.image, -2)
Using the value -2 also maintains the image aspect ratio. However, it can only be applied to certain template
types such as RTF, ODT, and DOCX.
$image.setSize(image, sizeWidth, sizeHeight)
Return an image icon for an element. This method is used to resize the image to an exact size; the width and
height in pixels.
$image.setHeight(image, size)
Return an image icon for an element. This method is used to resize the image to a specific height (in pixels),
while maintaining the image aspect ratio.
$image.setHeight(image, size, keepRatio)
Return an image icon for an element. This method is used to resize the image to a specific height (in pixels)
and to specify whether the image aspect ratio is to be maintained or not (depending on the keepRatio parame-
ter).
Name Type Description
Parameter(s) image com.nomagic.magicreport.Ima
ge
An image object for the ele-
ment icon.
sizeWidth java.lang.Integer The width of the image in pix-
els.
sizeHeight java.lang.Integer The height of the image in pix-
els.
Return - com.nomagic.magicreport.Ima
ge
The resized image object for
the element icon.
Name Type Description
Parameter(s) image com.nomagic.magicreport.Ima
ge
An image object for the ele-
ment icon.
size java.lang.Integer The height of the image in pix-
els.
Return - com.nomagic.magicreport.Ima
ge
The resized image object for
the element icon.
Name Type Description
Parameter(s) image com.nomagic.magicreport.Ima
ge
An image object for the ele-
ment icon.
size java.lang.Integer The height of the image in pix-
els.
keepRatio java.lang.Boolean A flag to maintain the image
aspect ratio
Return - com.nomagic.magicreport.Ima
ge
The resized image object for
the element icon.
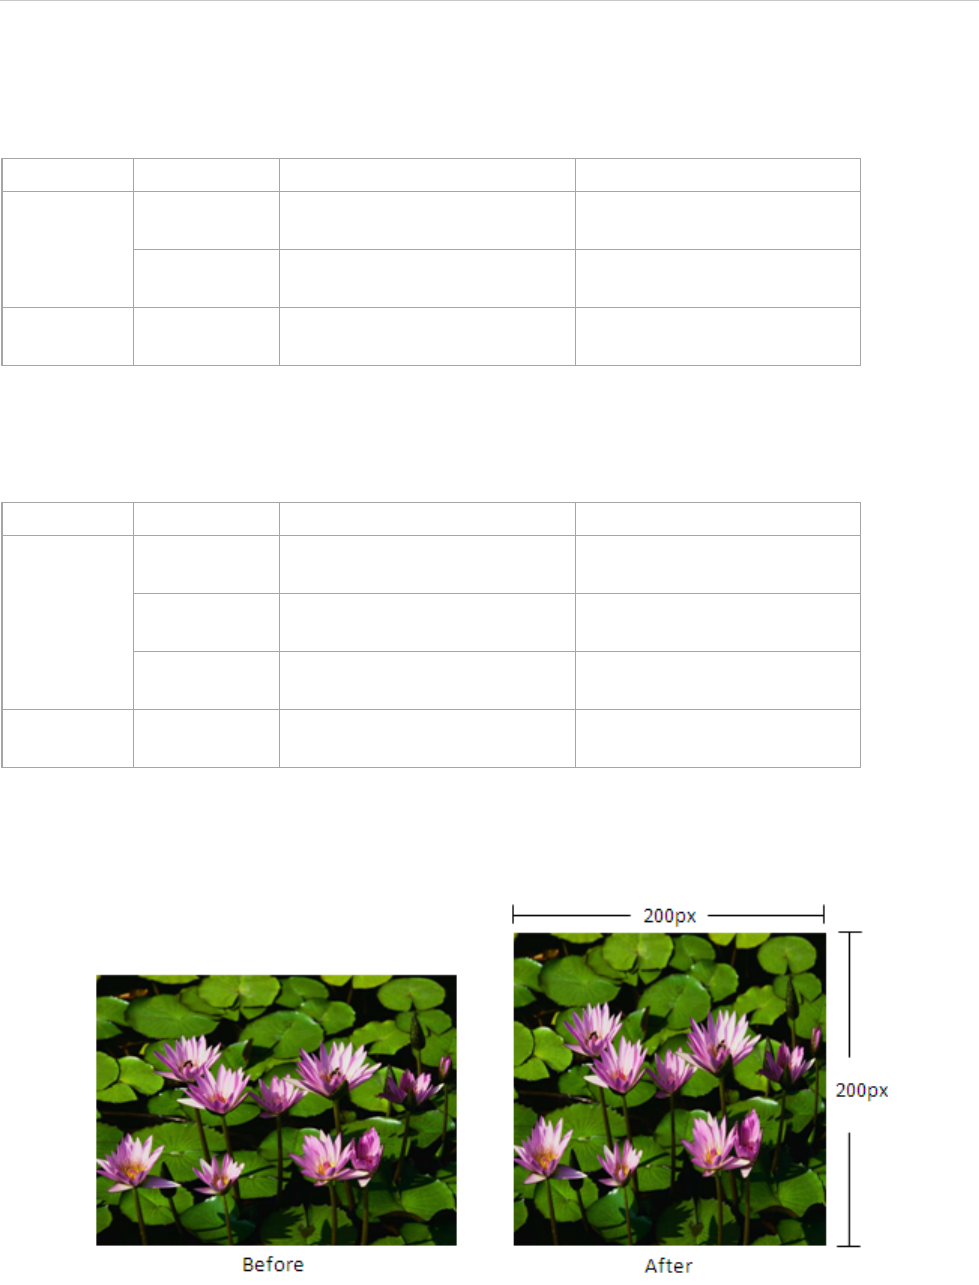
REPORT WIZARD
Helper Modules
125
Copyright © 1998-2015 No Magic, Inc.
$image.setWidth(image, size)
Return an image icon for an element. This method is used to resize the image to a specific width (in pixels),
while maintaining the image aspect ratio.
$image.setWidth(image, size, keepRatio)
Return an image icon for an element. This method is used to resize the image to a specific width (in pixels) and
to specify whether the image aspect ratio is to be maintained or not (depending on the keepRatio parameter).
Use $image.setSize($diagram.image, 200, 200), for example, to resize the image’s width and height to 200
pixels. The following photos show the result.
Use either $image.setWidth($diagram.image, 150) or $image.setWidth($diagram.image, 150, true), for
example, to resize the image’s width to 150 pixels and maintain the image aspect ratio. The following photos
show the result.
Name Type Description
Parameter(s) image com.nomagic.magicreport.Ima
ge
An image object for the ele-
ment icon.
size java.lang.Integer The width of the image in pix-
els.
Return - com.nomagic.magicreport.Ima
ge
The resized image object for
the element icon.
Name Type Description
Parameter(s) image com.nomagic.magicreport.Ima
ge
An image object for the ele-
ment icon.
size java.lang.Integer The width of the image in pix-
els.
keepRatio java.lang.Boolean A flag to maintain the image
aspect ratio
Return - com.nomagic.magicreport.Ima
ge
The resized image object for
the element icon.
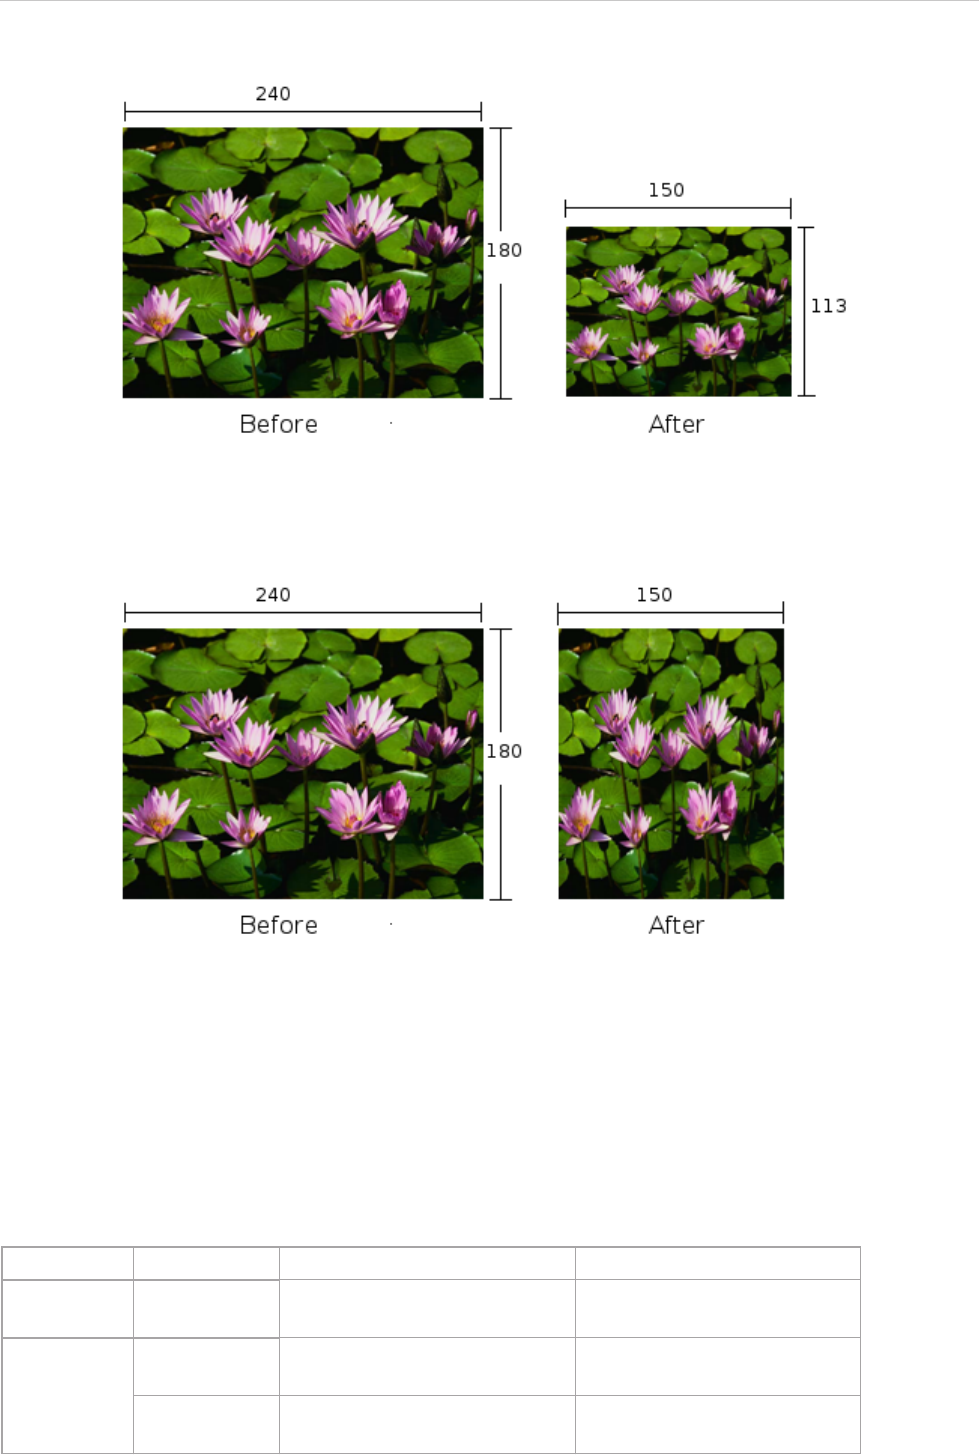
REPORT WIZARD
Helper Modules
126
Copyright © 1998-2015 No Magic, Inc.
Use $image.setWidth($diagram.image, 150, false), for example, to resize the image’s width to 150 pixels
and ignore the image aspect ratio. The following photos show the result.
4.14.4 Fixed-Measurement Image Resizing
There are six methods to specify the resulting dimensions in terms of measurements to resize an image, for
example, in inch (in), centimeter (cm), millimeter (mm), point (pt), or pixel (px)], and specifying the dot-per-inch
(DPI) value. Every measurement parameter must be specified in a pair of quote marks.
$image.setSize(image, measureWidth, measureHeight)
Return an image icon for an element. This method is used to resize the image to an exact size; the width and
height in terms of measurements.
Name Type Description
Parameter(s) image com.nomagic.magicreport.Ima
ge
An image object for the ele-
ment icon.
Parameter(s) measureWidth java.lang.String The width of the image in a
term of measurement.
measure-
Height
java.lang.String The height of the image in a
term of measurement.
REPORT WIZARD
Helper Modules
127
Copyright © 1998-2015 No Magic, Inc.
$image.setHeight(image, measureSize)
Return an image icon for an element. This method is used to resize the image to a specific height in terms of
measurement while maintaining the image aspect ratio.
$image.setHeight(image, measureSize, keepRatio)
Return an image icon for an element. This method is used to resize the image to a specific height (a term of
measurement), and to specify whether the image aspect ratio is to be maintained or not (depending on the kee-
pRatio parameter).
$image.setWidth(image, measureSize)
Return an image icon for an element. This method is used to resize the image to a specific width in a term of
measurement, while maintaining the image aspect ratio.
Return - com.nomagic.magicreport.Ima
ge
The resized image object for
the element icon.
Name Type Description
Parameter(s) image com.nomagic.magicreport.Ima
ge
An image object for the ele-
ment icon.
measureSize java.lang.String The height of the image in a
term of measurement.
Return - com.nomagic.magicreport.Ima
ge
The resized image object for
the element icon.
Name Type Description
Parameter(s) image com.nomagic.magicreport.Ima
ge
An image object for the ele-
ment icon.
measureSize java.lang.String The height of the image in a
term of measurement.
keepRatio java.lang.Boolean A flag to maintain the image
aspect ratio.
Return - com.nomagic.magicreport.Ima
ge
The resized image object for
the element icon.
Name Type Description
Parameter(s) image com.nomagic.magicreport.Ima
ge
An image object for the ele-
ment icon.
measureSize java.lang.String The width of the image in a
term of measurement.
Return - com.nomagic.magicreport.Ima
ge
The resized image object for
the element icon.
Name Type Description
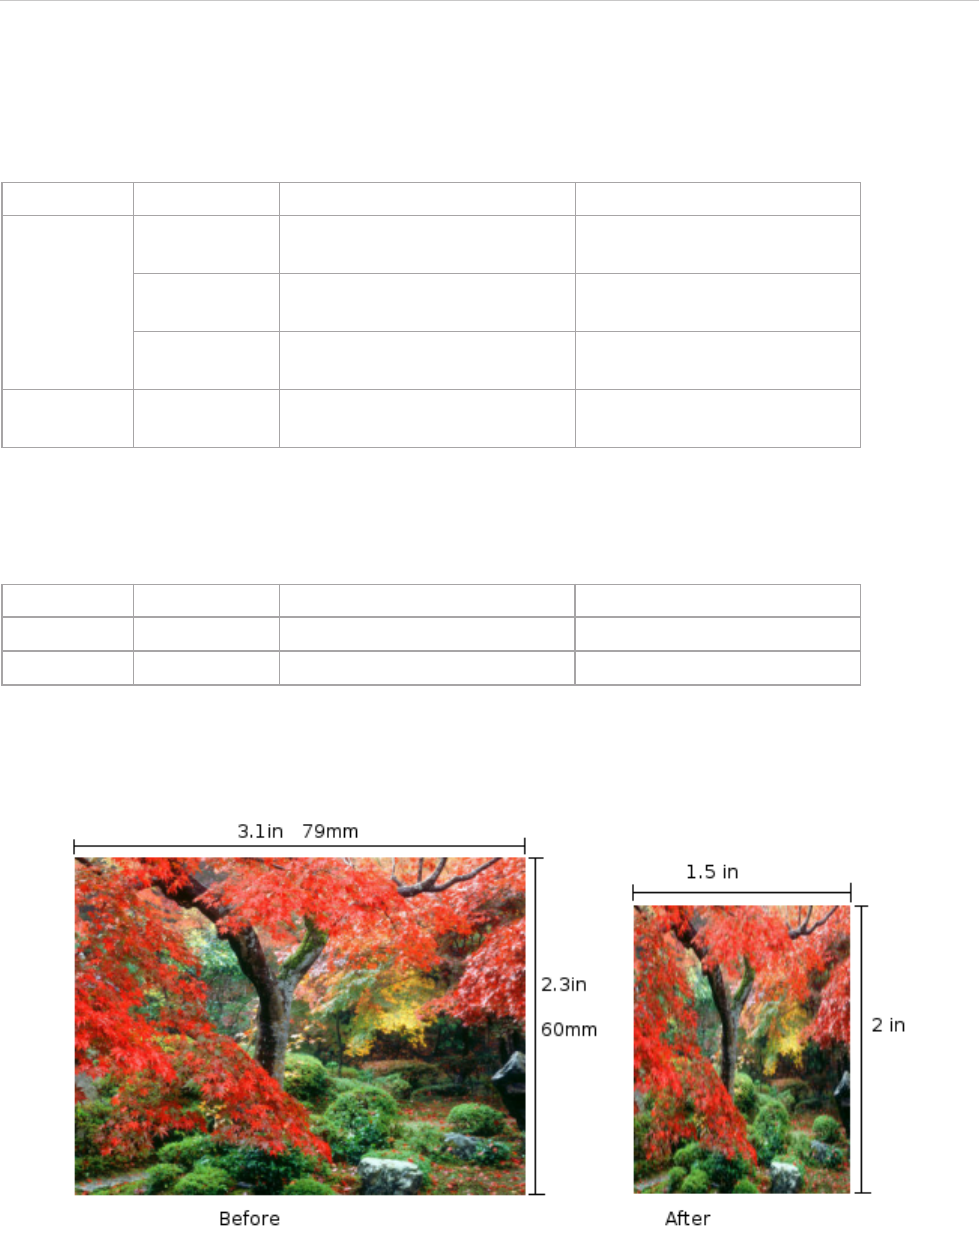
REPORT WIZARD
Helper Modules
128
Copyright © 1998-2015 No Magic, Inc.
$image.setWidth(image, measureSize, keepRatio)
Return an image icon for an element. This method is used to resize the image to a specific width (a term of
measurement), and to specify whether the image aspect ratio is to be maintained (depending on the keepRatio
parameter).
$image.setDPI(dotsPerInches)
This method is used to set the resolution (dpi) of images. The default value is 96 dpi. The dpi value will only
affect the methods that take inches, centimeters, and millimeters as their parameters.
Use $image.setSize($diagram.image, ‘1.5in’, ‘2in’), for example, to resize the image’s width to 1.5 inches
and height to 2 inches. The following photos show the result.
Use either $image.setHeight($diagram.image, ‘45mm’) or $image.setHeight($diagram.image, ‘45mm’,
true), for example, to resize the image’s height to 45 millimeters and maintain the image aspect ratio. The fol-
lowing photos show the result.
Name Type Description
Parameter(s) image com.nomagic.magicreport.Ima
ge
An image object for the ele-
ment icon.
measureSize java.lang.String The width of the image in a
term of measurement.
keepRatio java.lang.Boolean A flag to maintain the image
aspect ratio.
Return - com.nomagic.magicreport.Ima
ge
The resized image object for
the element icon.
Name Type Description
Parameter(s) dotsPerInches java.lang.Integer Image resolution (dpi).
Return -- -
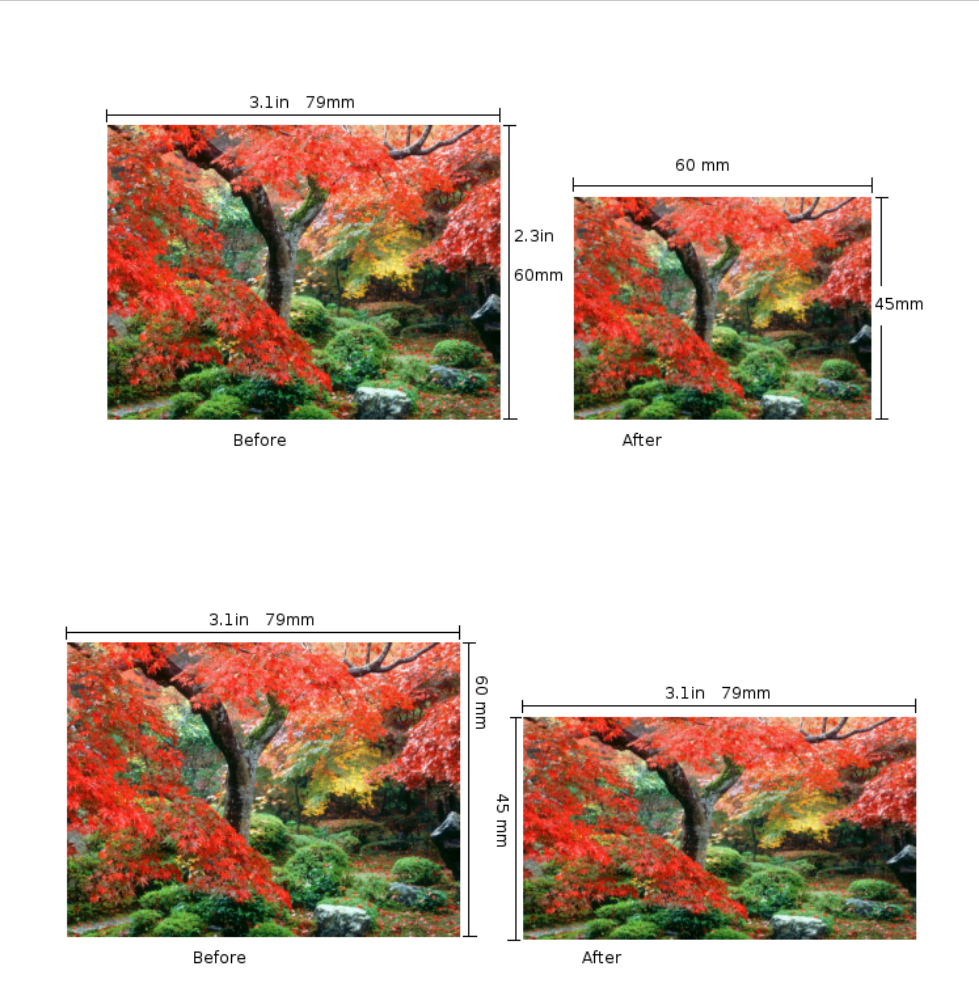
REPORT WIZARD
Helper Modules
129
Copyright © 1998-2015 No Magic, Inc.
Use $image.setHeight($diagram.image, ‘45mm’, false), for example, to resize the image’s height to 45 milli-
meters and ignore the image aspect ratio. The following photos show the result.
Use $image.setDPI(192) and then $image.setSize($diagram.image, ‘0.9in’, ‘1.1in’), for example, to set the
resolution (dpi) of the image to 192 dots per inch, and then resize the image width to 0.9 inches and height to
1.1 inches. The resulting image size will become 173x211 pixels. The following photos show the result.
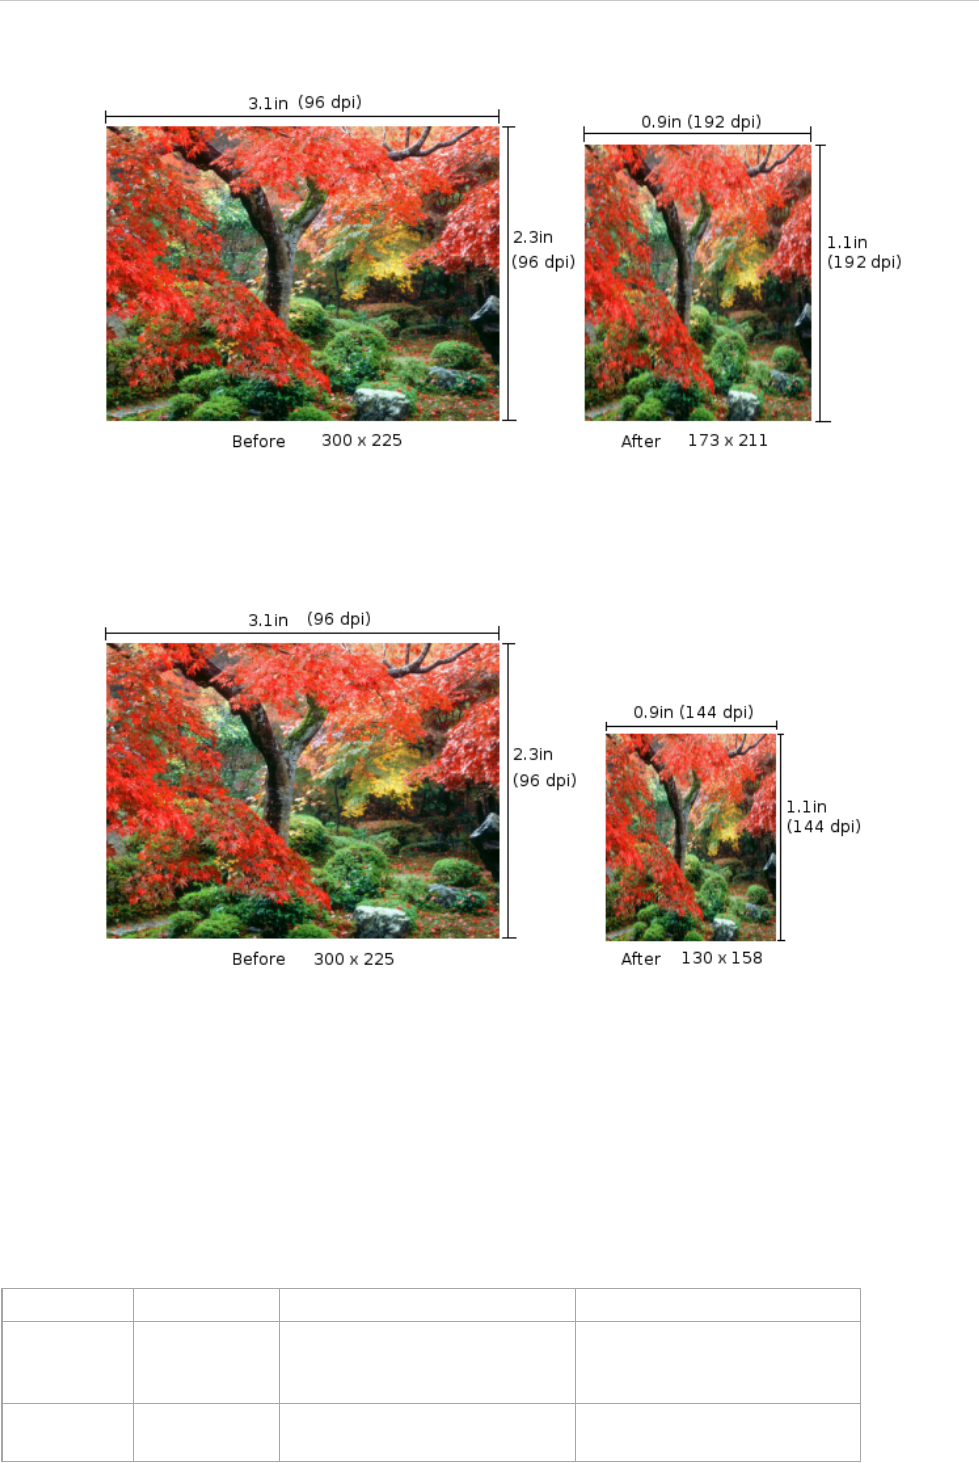
REPORT WIZARD
Helper Modules
130
Copyright © 1998-2015 No Magic, Inc.
Instead of using $image.setDPI(192), if you set the resolution (dpi) to 144 using $image.setDPI(144), the
resulting image size will become 130x158 pixels. The following photos show the result.
4.14.5 Including External Images
You can include images from an external source in a report. The supported image types are BMP, JPG, WBMP,
GIF, and PNG.
$image.include(location)
Include an external image from a local file or URL in a report.
Name Type Description
Parameter(s) location java.lang.String An image’s location. The loca-
tion format can be either a
URL or a local file.
Return - com.nomagic.magicreport.Ima
ge
An image included in a report.
REPORT WIZARD
Helper Modules
131
Copyright © 1998-2015 No Magic, Inc.
For example:
4.14.6 Splitting Images
If you have an image that is larger than the paper size, you can split the image into smaller tiles.
$image.split($diagram.image, columns, rows)
Split an image into rows and columns. The returned array of the image contains chunks of images arranged
from left-to-right and top-to-bottom.
Table 14 -- Splitting Image into Rows and Columns
To split an image into 3x2 tiles, for example, type:
$image.include("c:/my document/logo.gif")
$image.include("http:/www.nomagic.com/images/
product_boxes/MD.gif")
Name Type Description
Parameter(s) image com.nomagic.magicreport.Image An image object.
column int The number of columns.
Specifies -1 to automate the
calculated number of col-
umns from the paper width.
row int The number of rows. Speci-
fies -1 to automate the calcu-
lated number of rows from
the paper height.
Return java.util.List<com.nomagic.magi-
creport.Image>
The array of the split image
ordered from left-to-right and
top-to-bottom.
#foreach ($d in $Diagram)
#foreach ($chunk in $image.split($d.image, 3, 2))
$chunk
#end
#end
REPORT WIZARD
Helper Modules
132
Copyright © 1998-2015 No Magic, Inc.
Figure 81 -- Original Image vs. 3x2 Tiled Image
$image.split($diagram.image)
Split an image into rows and columns by automatically calculating the number of rows and columns based on
the paper size. The returned array of the image contains divided images arranged from left-to-right and top-to-
bottom.
Name Type Description
Parameter(s) image com.nomagic.magicreport.Image An image object.
Return java.util.List<com.nomagic.magi-
creport.Image>
The array of the split image
ordered from left to right and
top to bottom.
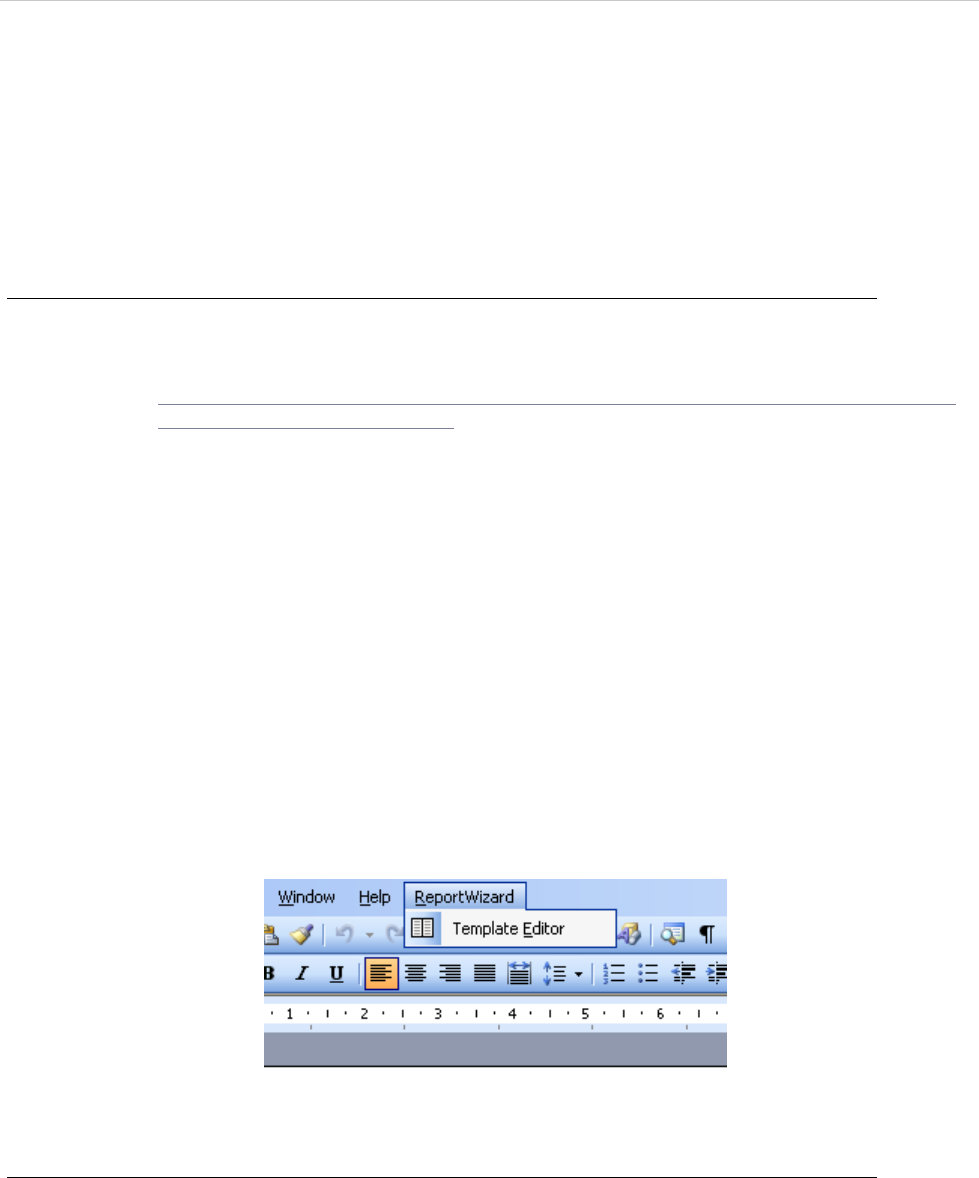
REPORT WIZARD
Report Wizard Template Editor
133
Copyright © 1998-2015 No Magic, Inc.
5. Report Wizard Template Editor
Template Editor is a Microsoft Word Add-In. It provides a list of fields that can be used in a Report Wizard tem-
plate.
5.1 Installation
To install Report Wizard Template Editor in Microsoft Word:
1. Download and install Microsoft XML Services (MSXML) from the following URL (You can skip
this step if the latest version of MSXML is already installed in your system):
http://www.microsoft.com/downloads/details.aspx?FamilyID=d21c292c-368b-4ce1-9dab-
3e9827b70604&DisplayLang=en
2. Copy all files and subdirectories from the
<install.dir>\plugins\com.nomagic.magicdraw.reportwizard\vba folder to
%APPDATA%\Microsoft\Word\STARTUP (%APPDATA% is the location where user data
is stored). For example,
• On Windows 2000 and Windows XP: C:\Documents and Settings\User
Name\Application Data\Microsoft\Word\STARTUP
• On Windows Vista:
C:\Users\UserName\AppData\Roaming\Microsoft\Word\STARTUP
3. Restart Microsoft Word.
5.2 Opening Template Editor
After installation has been completed, the Template Editor menu will appear on the Microsoft Word menu bar
(Figure 82).
Figure 82 -- Microsoft Word 2003 Template Editor Menu
To open Template Editor, either:
• On the Microsoft Word 2000 – 2003 menu, click ReportWizard > Template Editor (Figure 82) or
• On the Microsoft Word 2007 menu, click Add-Ins > ReportWizard > Template Editor (Figure 83).
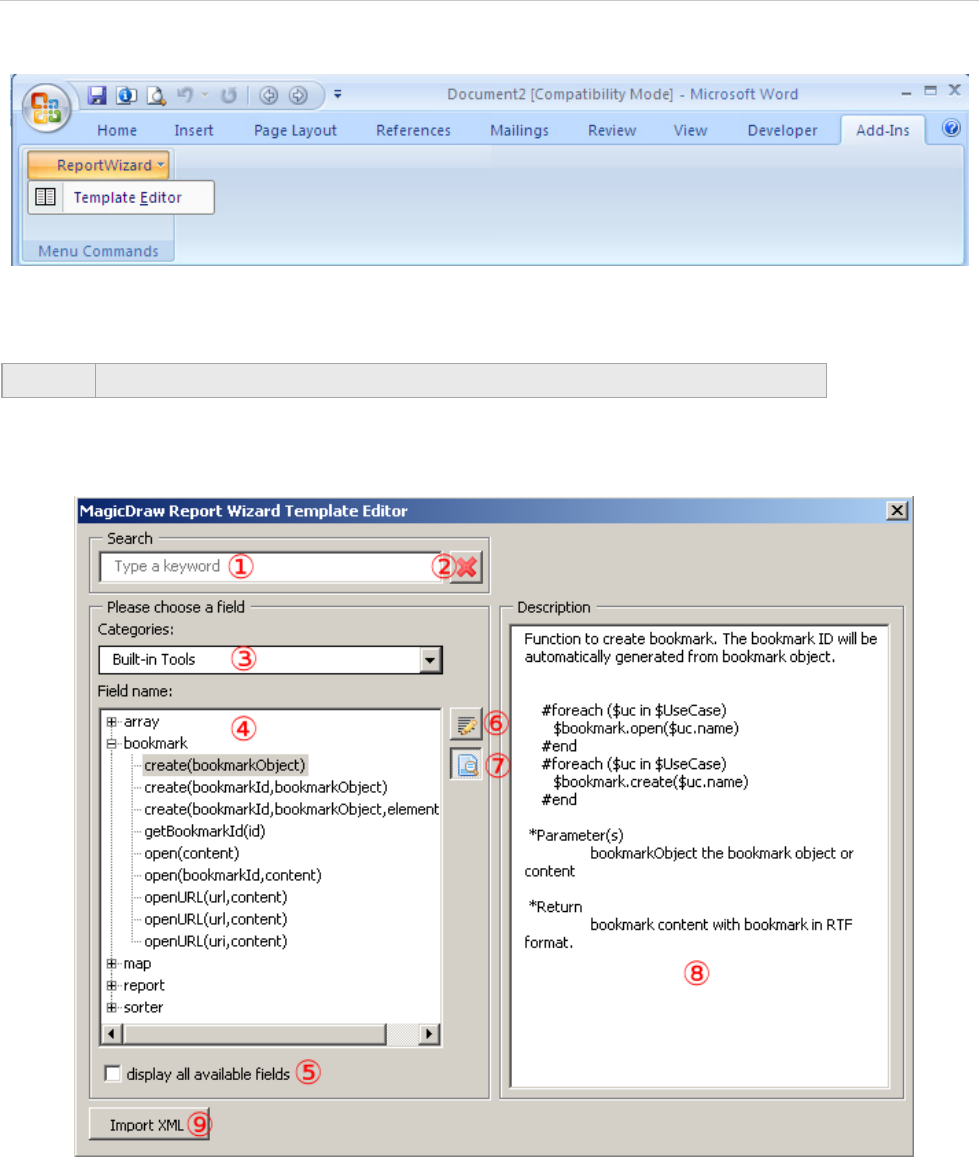
REPORT WIZARD
Report Wizard Template Editor
134
Copyright © 1998-2015 No Magic, Inc.
Figure 83 -- Microsoft Word 2007 Template Editor Menu
When Template Editor is open, the Report Wizard Template Editor dialog will open (Figure 84).
.
Figure 84 -- Report Wizard Template Editor Dialog
NOTE The macro-enabled option in Microsoft Word is required to open Template Editor.
REPORT WIZARD
Report Wizard Template Editor
135
Copyright © 1998-2015 No Magic, Inc.
Table 15 -- Report Wizard Template Editor Options
5.3 Data File
The Template Editor allows you to create a new data file and import it to the Report Wizard Template Editor
dialog. Click the Import button to import the data file. The data file is written in the XML format. The following is
the example of an XML data file schema (Figure 85).
Name Function
Search box Filter a list of fields. Only fields that contain a keyword of search
as part of their names can be shown in the (4) List of fields.
Clear search results Clear the current search result.
Categories combo box Select categories of fields. Fields are shown in (4) List of fields
according to their categories.
List of fields Show a list of fields. Double-click a field name to insert the code.
Display all available fields
check box Show all fields, otherwise it will show only commonly used fields.
Insert button Insert a code for a selected field into the document.
Show/Hide description button Show or hide (8) description pane.
Description pane Show the description of a selected field.
Import button Import a data file.

REPORT WIZARD
Report Wizard Template Editor
136
Copyright © 1998-2015 No Magic, Inc.
Figure 85 -- XML Data File Schema
<?xml version="1.0" encoding="utf-8"?>
<xs:schema elementFormDefault="qualified" xmlns:xs="http://www.w3.org/2001/
XMLSchema">
<xs:element name="data">
<xs:complexType>
<xs:sequence>
<xs:element minOccurs="0" maxOccurs="1" name="elements">
<xs:complexType>
<xs:sequence>
<xs:element minOccurs="0" maxOccurs="unbounded" name="element">
<xs:complexType>
<xs:all>
<xs:element minOccurs="1" maxOccurs="1" name="name" type="xs:string" />
<xs:element minOccurs="0" maxOccurs="1" name="description"
type="xs:string" />
<xs:element minOccurs="0" maxOccurs="1" name="members">
<xs:complexType>
<xs:sequence>
<xs:element minOccurs="0" maxOccurs="unbounded" name="function">
<xs:complexType>
<xs:sequence>
<xs:element minOccurs="1" maxOccurs="1" name="name" type="xs:string"
/>
<xs:element minOccurs="0" maxOccurs="1" name="description"
type="xs:string" />
<xs:element minOccurs="0" maxOccurs="unbounded" name="param">
<xs:complexType>
<xs:all>
<xs:element minOccurs="1" maxOccurs="1" name="name"
type="xs:string" />
<xs:element minOccurs="0" maxOccurs="1" name="description"
type="xs:string" />
<xs:element minOccurs="0" maxOccurs="1" name="type"
nillable="true" type="xs:string" />
<xs:element minOccurs="0" maxOccurs="1" name="direction">
<xs:simpleType>
<xs:restriction base="xs:string">
<xs:enumeration value="in" />
<xs:enumeration value="out" />
</xs:restriction>
</xs:simpleType>
</xs:element>
</xs:all>
</xs:complexType>
</xs:element>
</xs:sequence>
</xs:complexType>
</xs:element>
<xs:element minOccurs="0" maxOccurs="unbounded" name="attribute">
<xs:complexType>
<xs:all>
<xs:element minOccurs="1" maxOccurs="1" name="name" type="xs:string"
/>
<xs:element minOccurs="0" maxOccurs="1" name="description"
type="xs:string" />
<xs:element minOccurs="0" maxOccurs="1" name="type" nillable="true"
type="xs:string" />
</xs:all>
</xs:complexType>
</xs:element>
</xs:sequence>
</xs:complexType>
</xs:element>
</xs:all>
<xs:attribute name="often" type="xs:boolean" />
</xs:complexType>
</xs:element>
</xs:sequence>
</xs:complexType>
</xs:element>
</xs:sequence>
<xs:attribute name="name" type="xs:string" />
</xs:complexType>
</xs:element>
</xs:schema>

REPORT WIZARD
Report Wizard Template Editor
137
Copyright © 1998-2015 No Magic, Inc.
Table 16 -- XML Data File Schema Elements and Their Descriptions
The following is the example of an XML data file (Figure 86).
Element Attribute / Element Description
data A root element.
name : string A data name. This value will be used as a cate-
gory name in (3) Category.
elements : complexType A group of <element> elements.
elements A group of <element> elements.
element An element display on (4) List of fields.
name : string An element’s name.
description : string An element description.
often : boolean If an attribute is true, the element will be man-
aged as a suggested element.
members : complexType A group of <function> or <attribute>.
function A function member.
name : string A function’s name.
description : string A function description.
param : complexType A group of function parameters.
param A function parameter.
name : string A parameter’s name.
description : string A parameter description.
type : string A parameter type.
direction : simpleType The direction of a parameter:
• in - indicates this parameter is an input.
• out - indicates this parameter is an output.
attribute An attribute member.
name : string An attribute’s name.
description : string An attribute description.
type : string An attribute type.

REPORT WIZARD
Report Wizard Template Editor
138
Copyright © 1998-2015 No Magic, Inc.
Figure 86 -- Example of XML Data File
<?xml version="1.0" encoding="UTF-8"?>
<data name="Built-in Tools" xmlns:xsi="http://www.w3.org/2001/
XMLSchemainstance"
xsi:noNamespaceSchemaLocation="fields.xsd">
<elements>
<element often="true">
<name>array</name>
<description>Use for creating the Array or HashSet instance.</
description>
<members>
<function>
<name>subList</name>
<description>Create ArrayList of the portion of list in given size.</
description>
<param>
<name>list</name>
<direction>in</direction>
<type>List</type>
<description>a original list.</description>
</param>
<param>
<name>size</name>
<direction>in</direction>
<type>int</type>
<description>view size of given list</description>
</param>
<param>
<name>list</name>
<direction>out</direction>
<type/>
<description>a of view of the specified size within given list.</
description>
</param>
</function>
</members>
</element>
</elements>
</data>

REPORT WIZARD
Generating Reports from Report Wizard
139
Copyright © 1998-2015 No Magic, Inc.
6. Generating Reports from Report Wizard
In addition to default document templates, Report Wizard allows you to create customized specification docu-
ment templates. Templates may contain your own custom fields not related to model elements, as well as fields
that correspond to model elements. Once customized, a Report Wizard template can be used with data from
any project.
You can also format your template to create the style you want including tables of contents, headers and foot-
ers, and page numbers. You can apply most character and paragraph formatting available from your rtf editor
for the rtf template or specify with html tags in the HTML template, including keywords. Once the template has
been completed, you can run Report Wizard to create a report in a format that corresponds to the template.
Report Wizard templates can be in txt, rtf, html, odt, odf, odp, docx, xlsx, pptx, and xml for DocBook or FO files.
If you prefer, you can work in Report Wizard Template Editor until you have finished the template file and use
the Report Wizard template windows to save it in the template folder. The default templates are located in the
<MagicDraw home>/plugins/com.nomagic.magicdraw.reportwizard/data folder.
6.1 Concepts
Report Wizard includes the following concepts:
• Template: specifies the document layout, format, corresponding model elements, and custom defined
fields.
• Report Data: specifies a set of custom fields and data in the selected template. A template can have a
number of different custom defined fields for a project or different projects organized in a report.
• Report: a generated user document with data from the project displayed in the selected template style.
6.2 Default Templates
There are 13 default templates that come with the report engine.
(i) Class Specification Report: describes the specification of class, interface, and enumeration type of the
project.
(ii) Data Dictionary Report: enables you to print elements of MagicDraw data dictionary.
(iii) IEEE 1233: the standard template based on the IEEE 1233 recommendation.
(iv) Model Extension: describes common UML model extension mechanisms (stereotypes, tagged values,
and constraints). It is useful for reporting custom UML profiles.
(v) Use Case (Simple): describes system functionalities and actors in a simple format.
(vi) Use Case (Modern): describes system functionalities and actors that are useful in support of use-case
driven analysis.
(vii) Web Publisher (Simple HTML): enables you to publish MagicDraw models (including diagrams) in simple
HTML. The report is viewable using a standard browser such as Internet Explorer or Firefox.
(viii) Web Publisher 2.0: enables you to publish MagicDraw models (including diagrams) in HTML with rich
features. The report is viewable using a standard browser such as Internet Explorer or Firefox.
Note All built-in rtf report templates are combined into the RTF (depreciated)
report template category.

REPORT WIZARD
Generating Reports from Report Wizard
140
Copyright © 1998-2015 No Magic, Inc.
(ix) Activity Diagram: provides a standard report for activity diagrams. The content of the report is a list of all
the nodes (ordered by node hierarchy in each activity diagram).
(x) Activity Diagram Specification: provides a standard report for activities. The content of the report is a list
of all the nodes in each activity.
(xi) Sequence Diagram: provides a report that shows sequence diagrams and a list of all the messages in the
diagrams.
(xii) Sequence Diagram Specification: provides a report that shows sequence diagrams, and a list of all the
messages and lifelines in the diagrams.
(xiii) Web Publisher Collaboration: is implemented based on the Web Publisher 2.0 template. It improves
features for text editing, element review, and XML messages. The J2EE compliance server is required to run
the generated report.
6.3 Architecture Templates
There are five architecture report templates that come with the report engine: (i) Behavioral, (ii) Environment,
(iii) Implementation, (iv) Structural, and (v) Use Case report templates.
6.3.1 Behavioral Report
A Behavioral report is a standard report for the Behavioral view. This report will be generated by a selected
package that consists of Sequence, Communication, State Machine, and Activity diagrams. The report lists all
packages in a project and arranges them hierarchically. Each package consists of the specification of mes-
sages in the Sequence diagram, the specification of lifelines in the Communication diagram, the specification of
states in the State Machine diagram, and the actions in the Activity diagram. All elements in the report are
ordered by their names.
6.3.2 Environment Report
An Environment report is a standard report for the Environment view. The report will be generated by a selected
package that consists of an Implementation diagram (Deployment diagram). The report lists all packages in a
project and arranges them hierarchically. Each package describes the specification of nodes, interfaces, com-
ponents, and artifacts which are ordered by the element’s name.
6.3.3 Implementation Report
An Implementation report is a standard report for the Implementation view. The report will be generated by a
selected package that consists of an Implementation diagram (Component diagram). The report lists all pack-
ages in a project and arranges them hierarchically. Each package consists of a list of interfaces, components,
and artifacts. All elements in the report are ordered by their names.
6.3.4 Structural Report
A Structural report is a standard report for the Structural view. This report will be generated by a selected pack-
age that consists of a Class diagram. The report lists all packages in a project and arranges them hierarchically.
Each package describes the specification of interfaces, classes, and enumerations which are ordered by the
element’s name.
6.3.5 Use Case Report
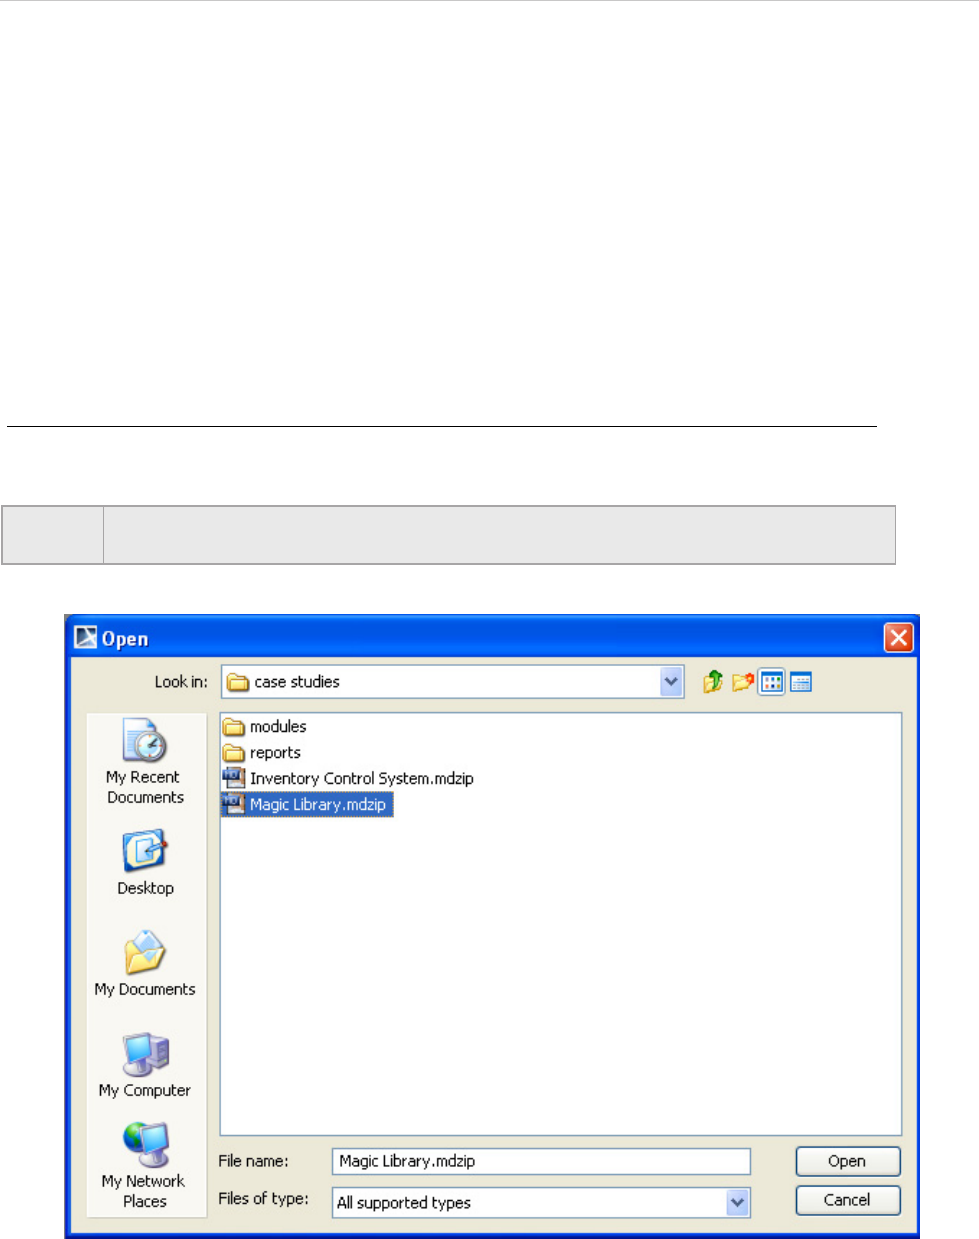
REPORT WIZARD
Generating Reports from Report Wizard
141
Copyright © 1998-2015 No Magic, Inc.
A Use Case report is a standard report for the Use Case view. This report will be generated by a selected pack-
age that consists of Use Case diagrams. The report lists all packages in a project and arranges them hierarchi-
cally. Each package describes the specification of actors and use case. All elements in the report are ordered
by their names.
6.4 Generating Use Case Description Reports
Report Wizard provides a Use Case Description document template, which is designed to capture all Use
Case-related artifacts, for example, UseCases, actors, Use Case descriptions, and so on, in a report. This tem-
plate includes all of the Use Case diagram-related keywords. Therefore, when you select the highest level of
the packages (the highest level of the packages in MagicDraw is Data) as the scope of the report, only Use
Case diagrams and their related elements will be added to the document.
To generate a Use Case description document:
1. Open the Magic Library.mdzip sample project from the <MagicDraw_home>/samples/
case studies directory (Figure 87).
Figure 87 -- The Magic Library.mdzip Project File
2. On the Tools menu, select the Report Wizard command. The Report Wizard dialog will
open.
3. Select a template, for example, Default Template > UseCase (Simple) and click Next
(Figure 88).
NOTE This step is only necessary for illustration purposes (as well as other steps within this
scenario).
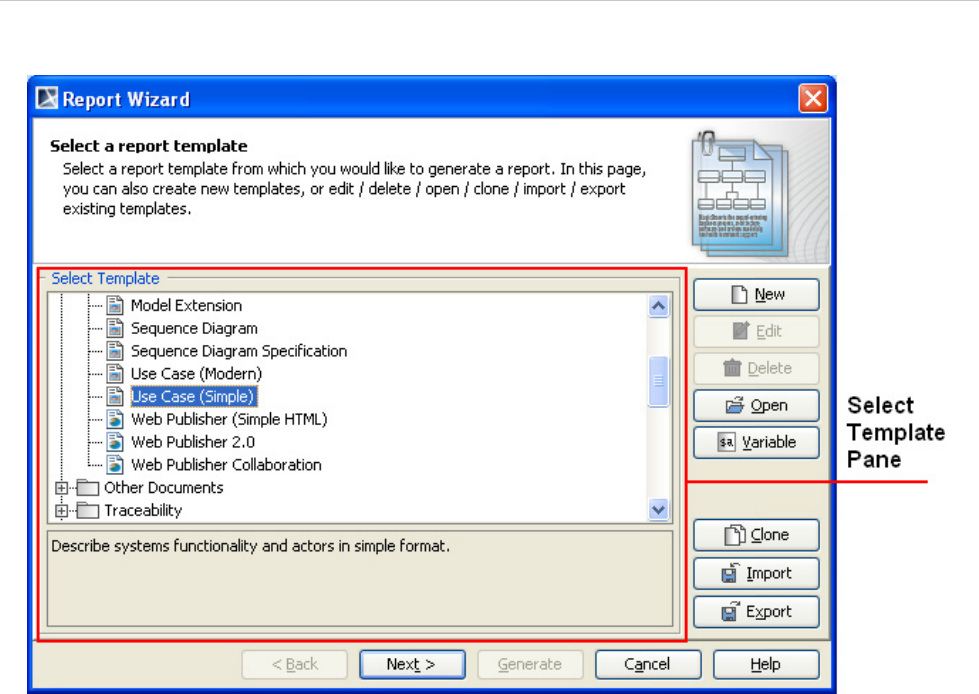
REPORT WIZARD
Generating Reports from Report Wizard
142
Copyright © 1998-2015 No Magic, Inc.
Figure 88 -- Report Wizard Dialog
4. Either
4.1. select the built-in Report Data (Figure 89). You can modify or delete some
variables of the Built-in Report Data in the Report Variable dialog (Figure 91) by
clicking the Variable button.
Or
4.2 click the New button to create a new one. Once you create a new Report Data, for
example, MyReportData, you will see it in the Select Report Data pane in the
Report Wizard dialog (Figure 90). You can select the new Report Data and click
the Variable button to create its report variables.
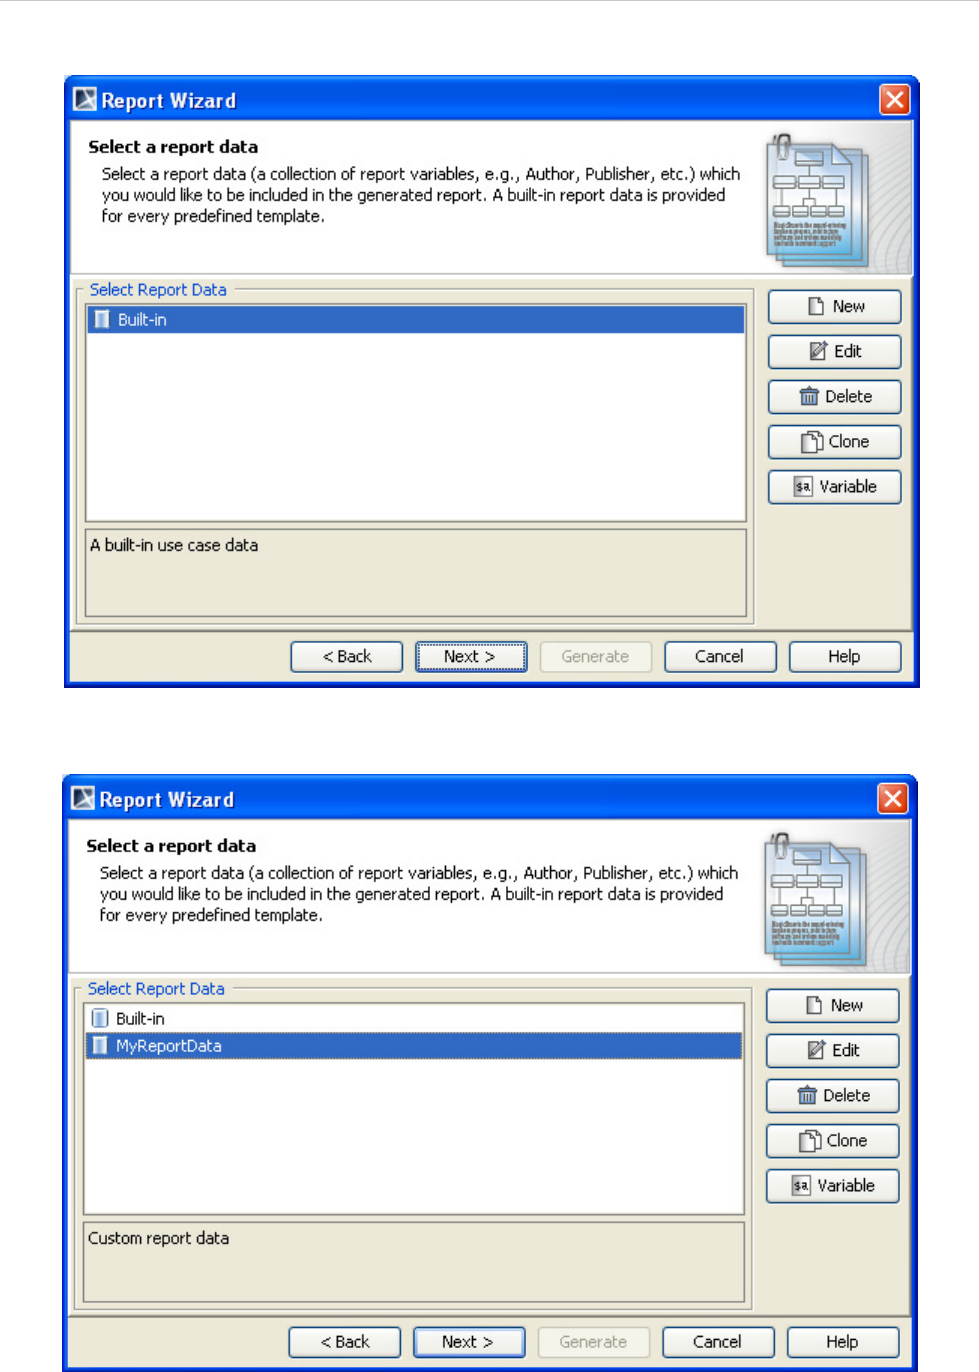
REPORT WIZARD
Generating Reports from Report Wizard
143
Copyright © 1998-2015 No Magic, Inc.
Figure 89 -- Selecting the Built-in Report Data
Figure 90 -- Selecting a Custom Report Data
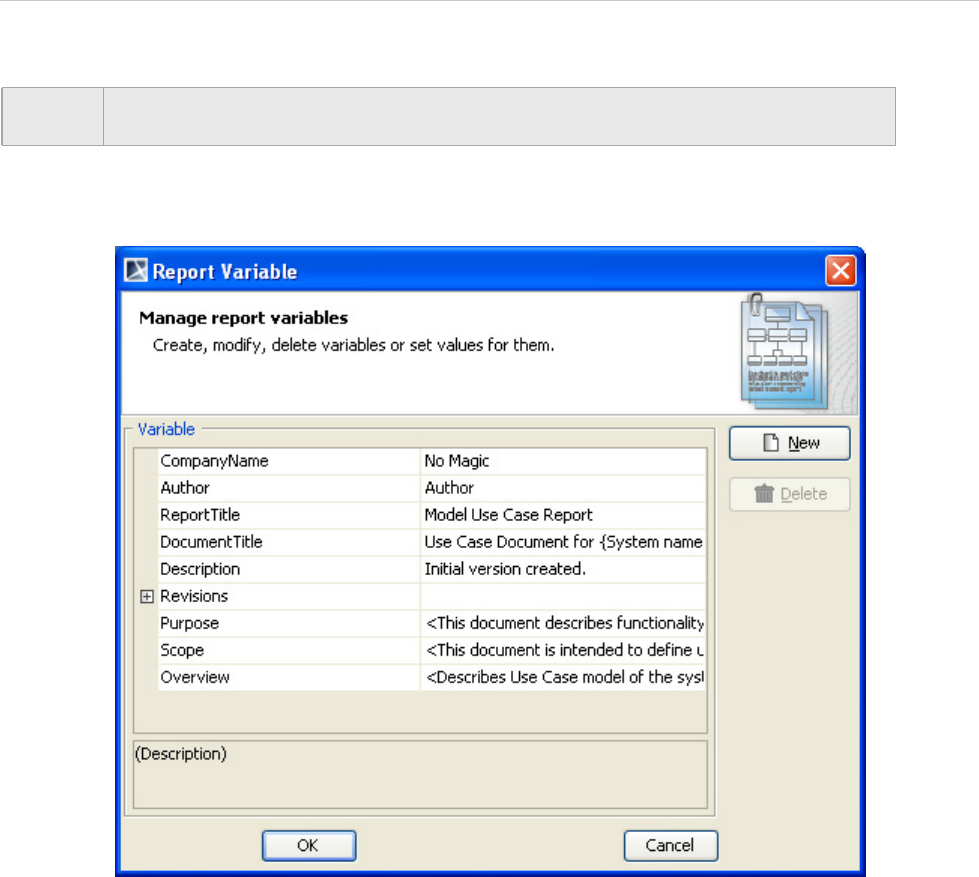
REPORT WIZARD
Generating Reports from Report Wizard
144
Copyright © 1998-2015 No Magic, Inc.
Figure 91 -- The Report Variable Dialog
5. Once you have completed modifying or creating the report variables, click Next. The Select
Element Scope option will open in the Report Wizard dialog.
6. Select the scope of the report from the package tree on the left-hand side. In this case, it will
be the MagicLibrary Requirements[MagicLibrary Requirements.mdzip] model package
because all use case requirements are stored in this package.
7. Click the Add button. The model package will be moved to the Selected objects tree on the
right-hand side (Figure 92).
8. Click Next (Figure 92).
NOTE You can create a new report variable and modify or delete an existing one through the
Report Variable dialog.
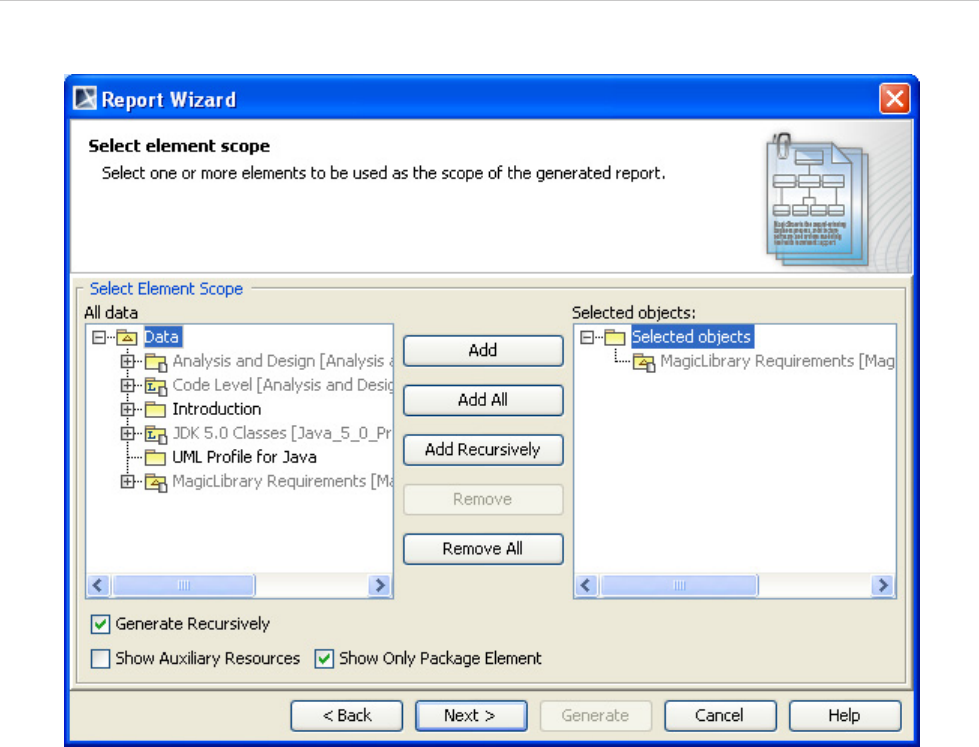
REPORT WIZARD
Generating Reports from Report Wizard
145
Copyright © 1998-2015 No Magic, Inc.
Figure 92 -- Selecting the Scope of the Report
9. Click the “...” button next to the Report file text box to specify the location where you want to
save the report (Figure 93). The Save as dialog will open.
10. Select the file location, enter the filename, and click Save. The report file format varies
depending on the template file format. For example, if the template file format is *.rtf, the
report file format will be *.rtf as well.
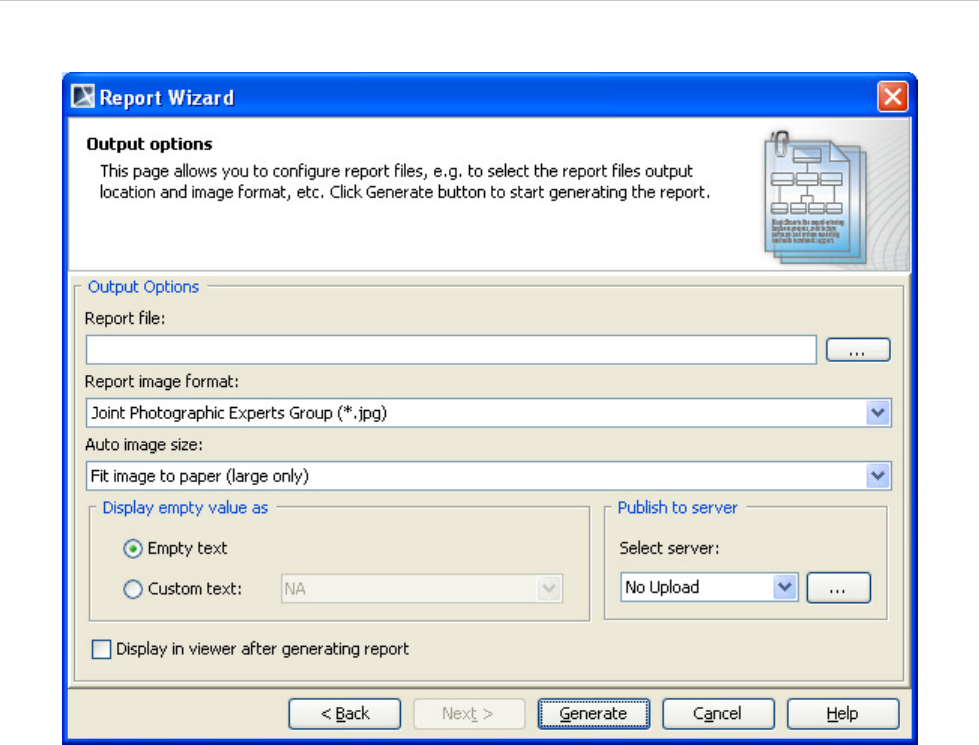
REPORT WIZARD
Generating Reports from Report Wizard
146
Copyright © 1998-2015 No Magic, Inc.
Figure 93 -- Selecting the Report File Location
11. Select the report image format, *.png, *.jpg, *.emf, or *.wmf and select an image size option
(Figure 94).
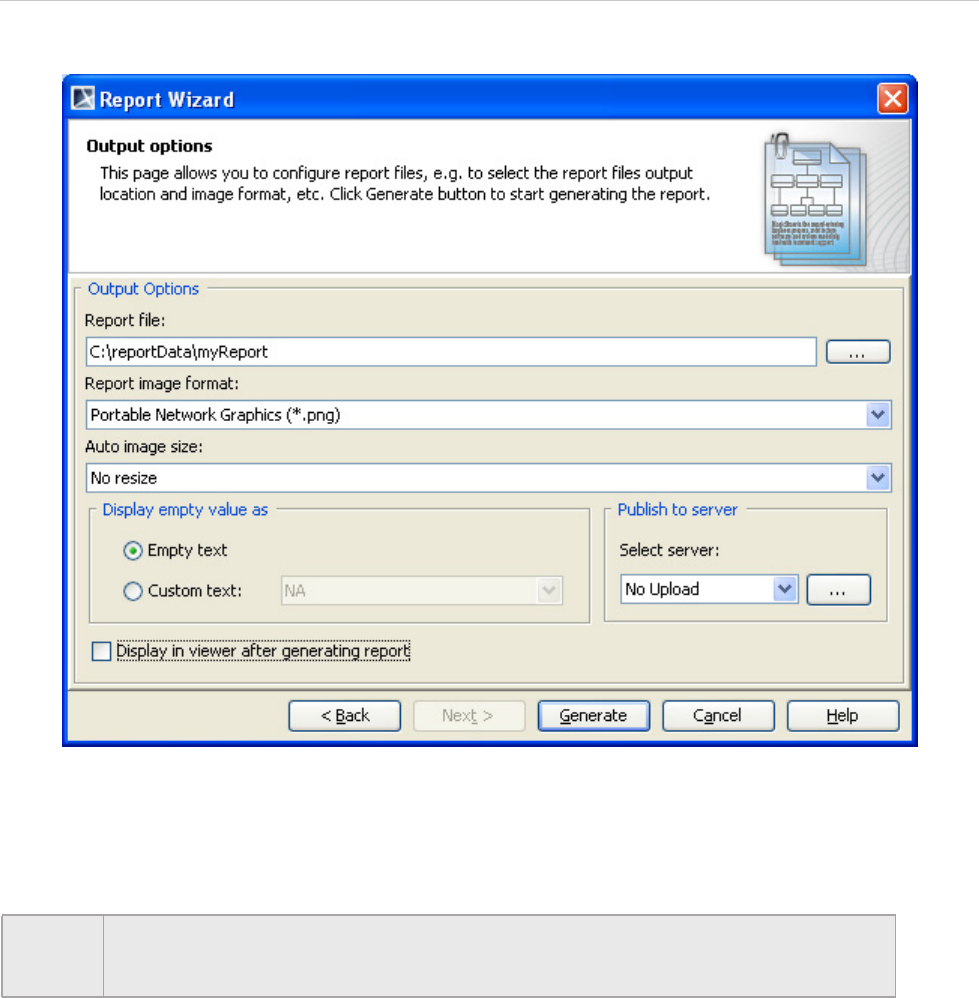
REPORT WIZARD
Generating Reports from Report Wizard
147
Copyright © 1998-2015 No Magic, Inc.
Figure 94 -- Selecting an Image Format
12. Select an option to display empty value information, either Empty text or Custom text
(Figure 95).
NOTE In some cases, a query may return an empty value that causes blank fields in the report.
The Display empty value as option is useful when you have a standard representation
for blank fields.
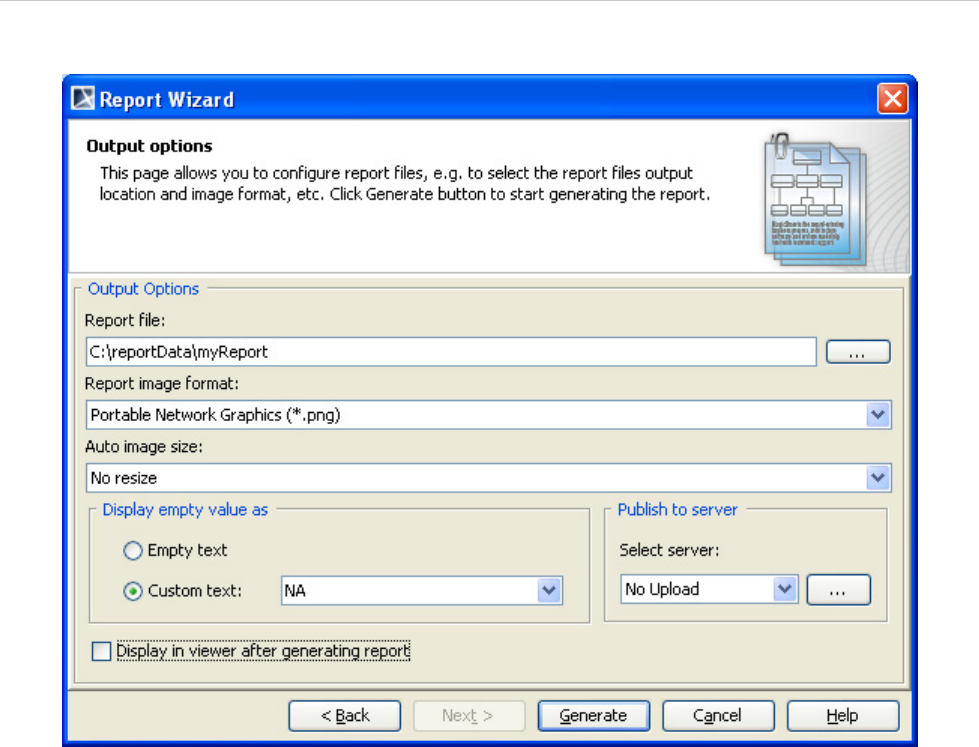
REPORT WIZARD
Generating Reports from Report Wizard
148
Copyright © 1998-2015 No Magic, Inc.
Figure 95 -- Selecting a Display Empty Value Option
13. Select the Display in viewer after generating report check box to open the report
document with a default editor (Figure 96).
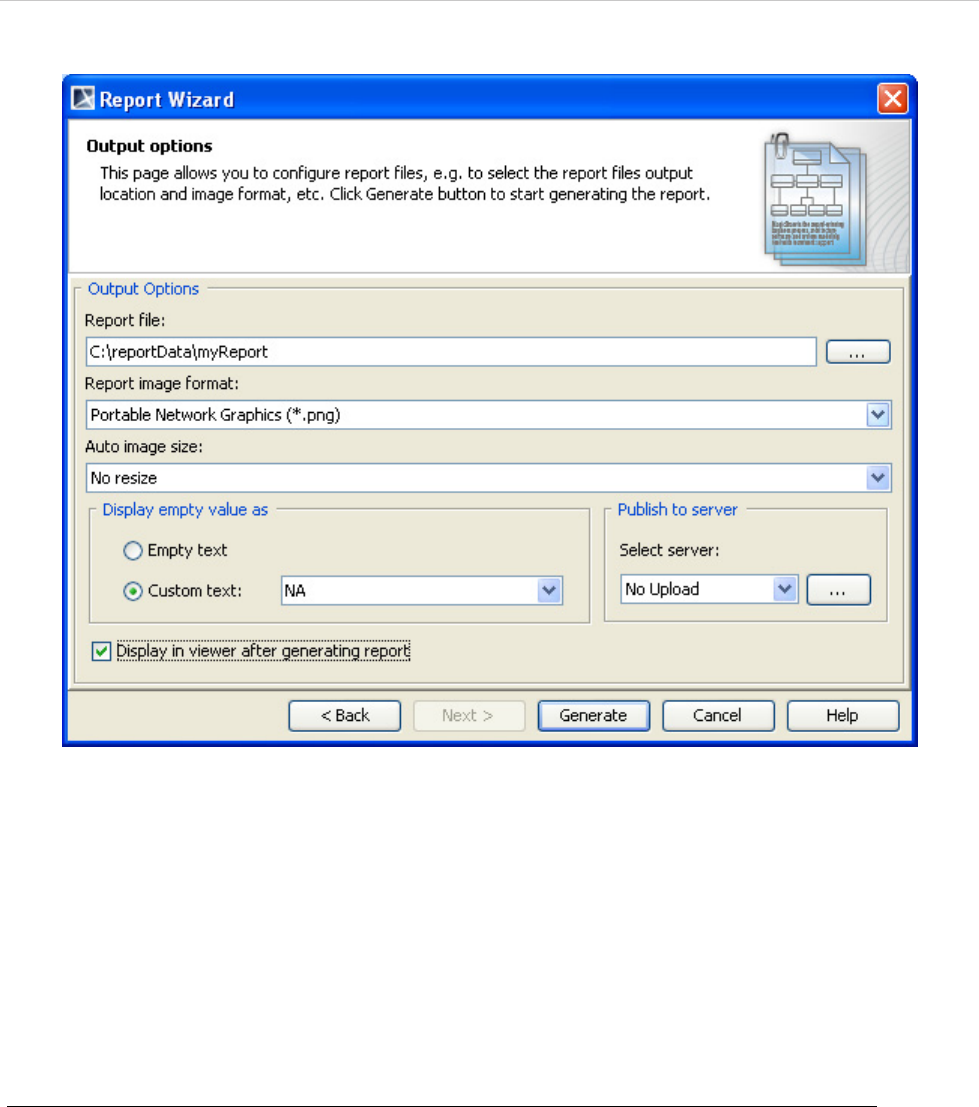
REPORT WIZARD
Generating Reports from Report Wizard
149
Copyright © 1998-2015 No Magic, Inc.
Figure 96 -- Selecting the Display in Viewer After Generating Report Option
14. Click Generate.
6.5 Web Publisher 2.0 Reports
6.5.1 Generating Reports
Web Publisher is a Java-Doc-like report with a clickable navigation and an image map for all diagrams and ele-
ments.
To generate a Web Publisher 2.0 report:
1. Open the Magic Library.mdzip sample project from the <MagicDraw_home>/samples/
case studies directory (see Figure 87 on page 141).
2. On the Tools menu, click Report Wizard. The Report Wizard dialog will open (Figure 97).
3. In the Select Template pane, select Default Template > Web Publisher 2.0, and click Next
(Figure 97).
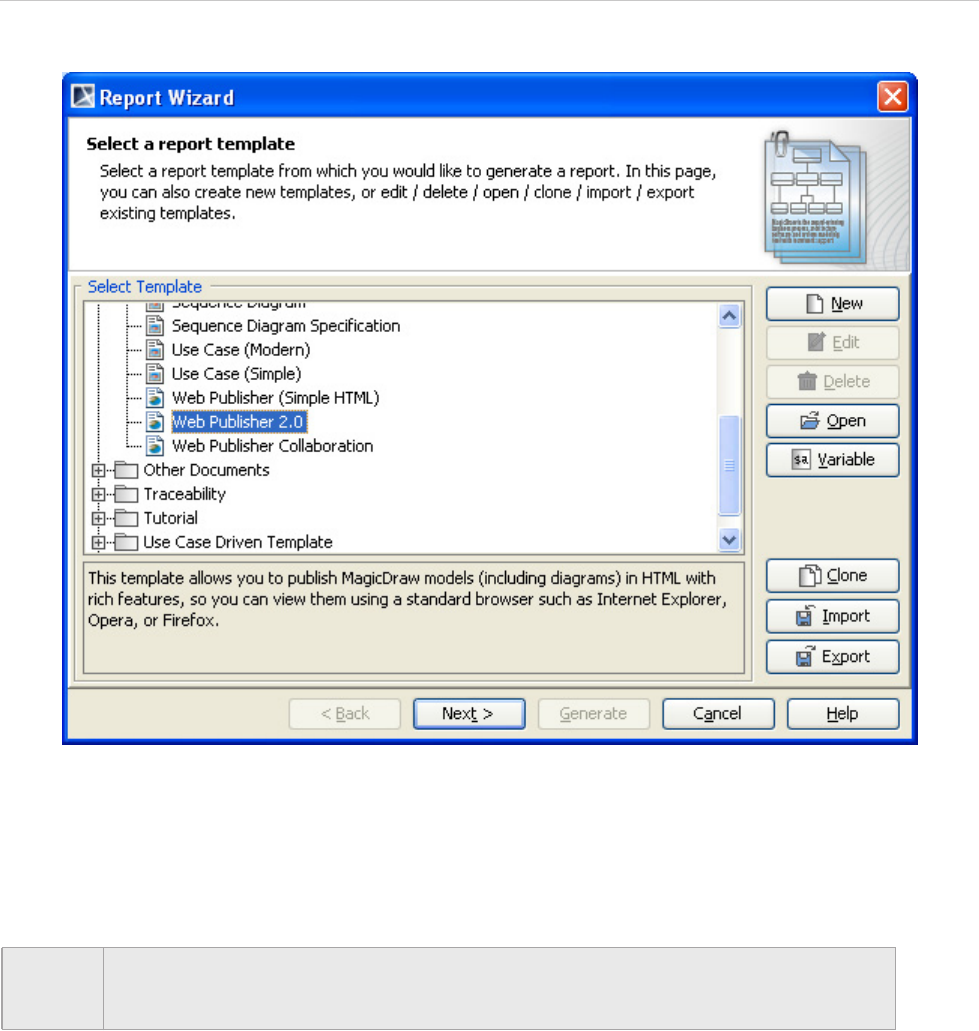
REPORT WIZARD
Generating Reports from Report Wizard
150
Copyright © 1998-2015 No Magic, Inc.
Figure 97 -- Selecting Web Publisher 2.0 Template
4. Click New. The New Template dialog will open. Type the report name and description and
select the location of the template file. Click Next.
5. In the Select Report Data pane, select the built-in Report Data and click Next.
6. In the Variable pane, enter information for predefined custom fields or create a new one
(Figure 98). Click OK.
NOTE In the Select Report Data pane, you can create a new set of Report Data for the Web
Publisher template. The Report Data is a container for a set of custom-defined fields in
the template. It can be used to group different report versions.
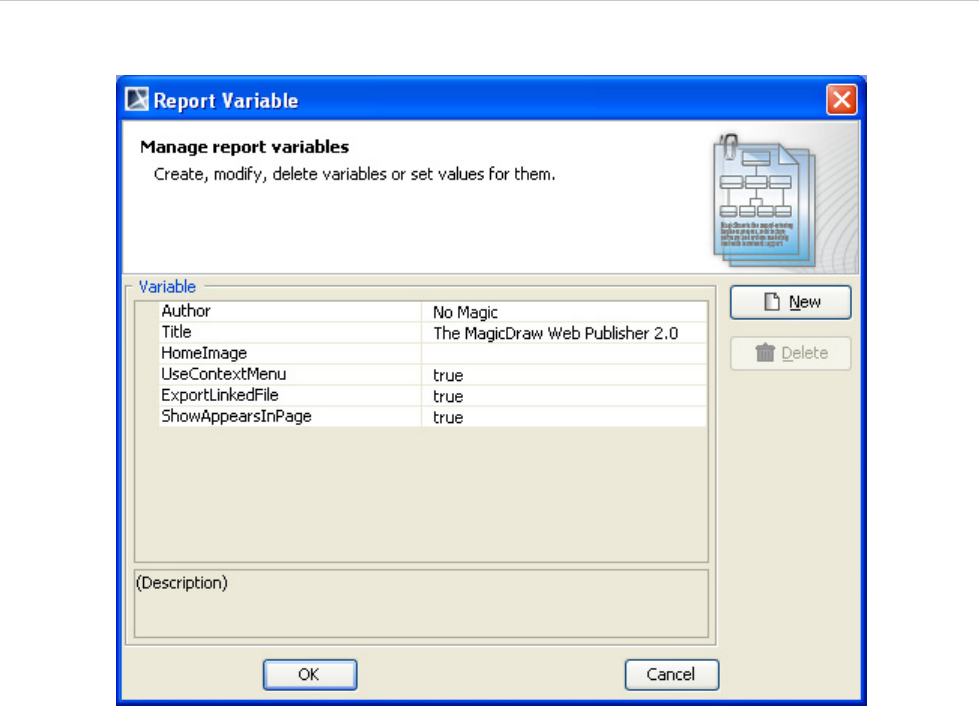
REPORT WIZARD
Generating Reports from Report Wizard
151
Copyright © 1998-2015 No Magic, Inc.
Figure 98 -- The Variable Pane
7. Select the scope of the report in the open package tree. In this case it will be the Data model
package if you want to have a web-based report of your entire project. Click Next (Figure 99).
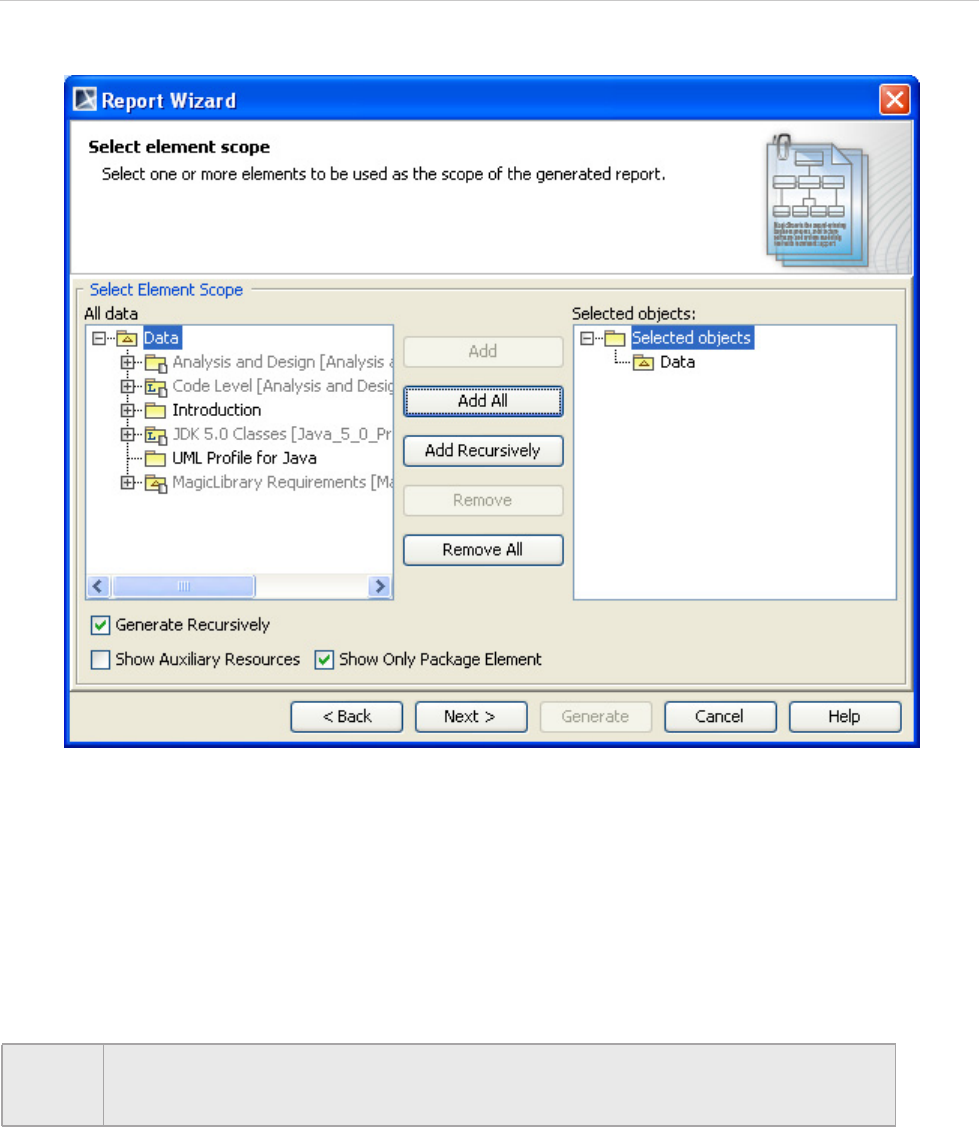
REPORT WIZARD
Generating Reports from Report Wizard
152
Copyright © 1998-2015 No Magic, Inc.
Figure 99 -- Selecting the Scope of the Web Publisher 2.0 Report
8. Click the “...” button to locate the report file location (see Figure 93). The Save as dialog will
open.
9. Select the file location, type the report name, and click Save. A generated web report will
include a number of folders and files.
10. Select the report image format: *.png, *.jpg or *.svg (see Figure 94).
11. Select an option to display empty value information, either Empty text or Custom text.
12. Select the Display in viewer after generating report check box to open the report
document with the default editor (see Figure 96).
13. After all options have been selected, click Generate.
NOTE In some cases, the query may return an empty value that creates blank fields in the
report. The Display empty value as option is useful when you have a standard repre-
sentation for blank fields (see Figure 95).
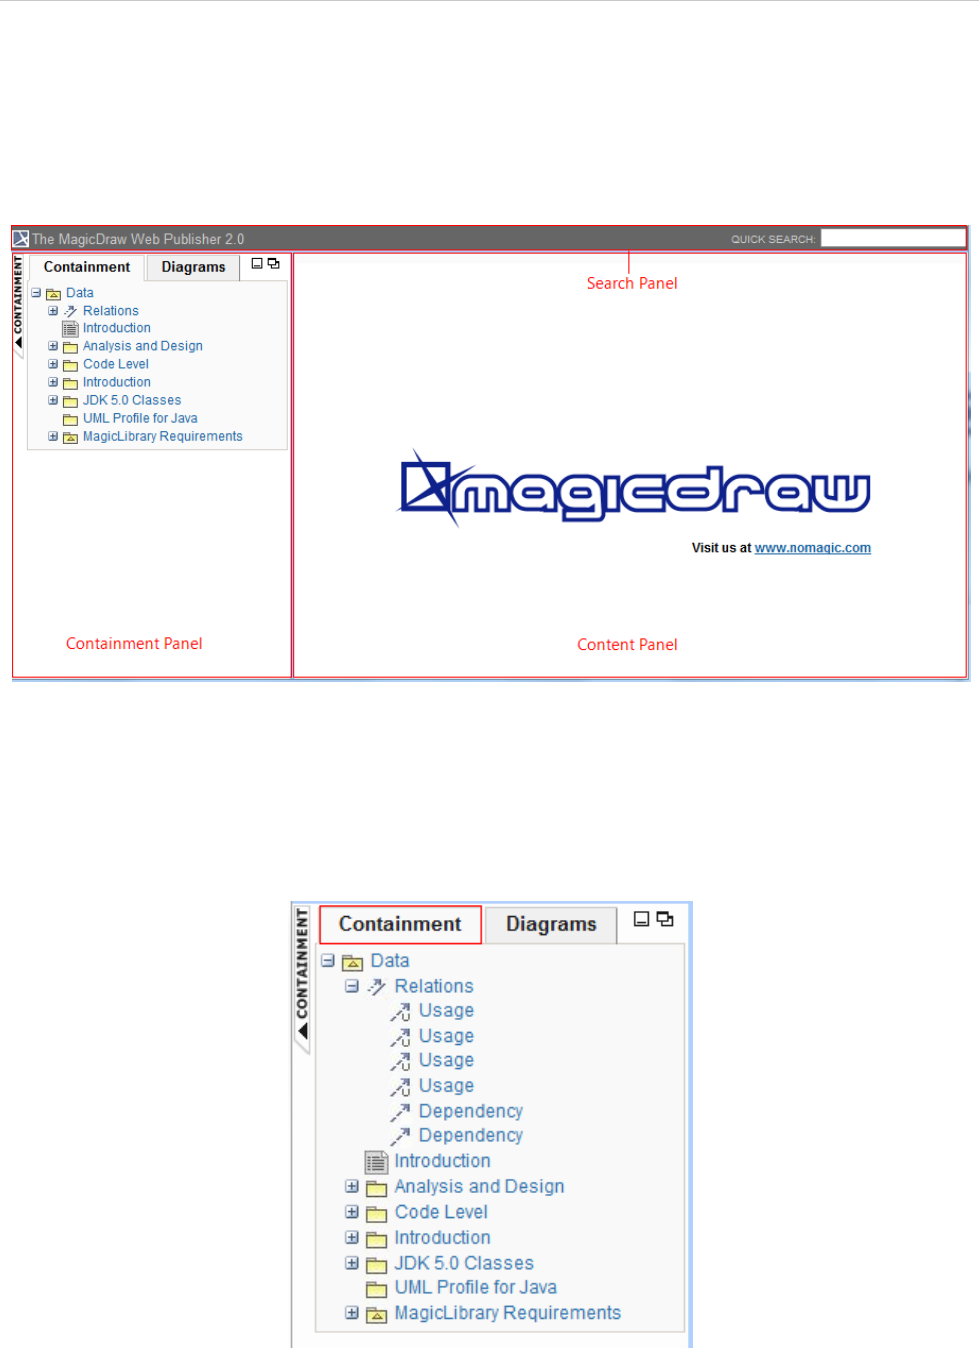
REPORT WIZARD
Generating Reports from Report Wizard
153
Copyright © 1998-2015 No Magic, Inc.
6.5.2 Web Publisher 2.0 Features
This section describes the look of Web Publisher 2.0 and gives examples on how to work with each feature.
6.5.2.1 Report Layout
Figure 100 -- Web Publisher 2.0 Report Layout
The Web Publisher report consists of three panels (Figure 100):
(i) Containment panel: This panel contains two tabs: (a) Containment tab and (b) Diagrams tab. The
Containment tab shows data of a project in a tree structure (Figure 100) and the Diagrams tab
shows all diagrams in a project, which are grouped by type (Figure 100).
Figure 101 -- The Containment Tab
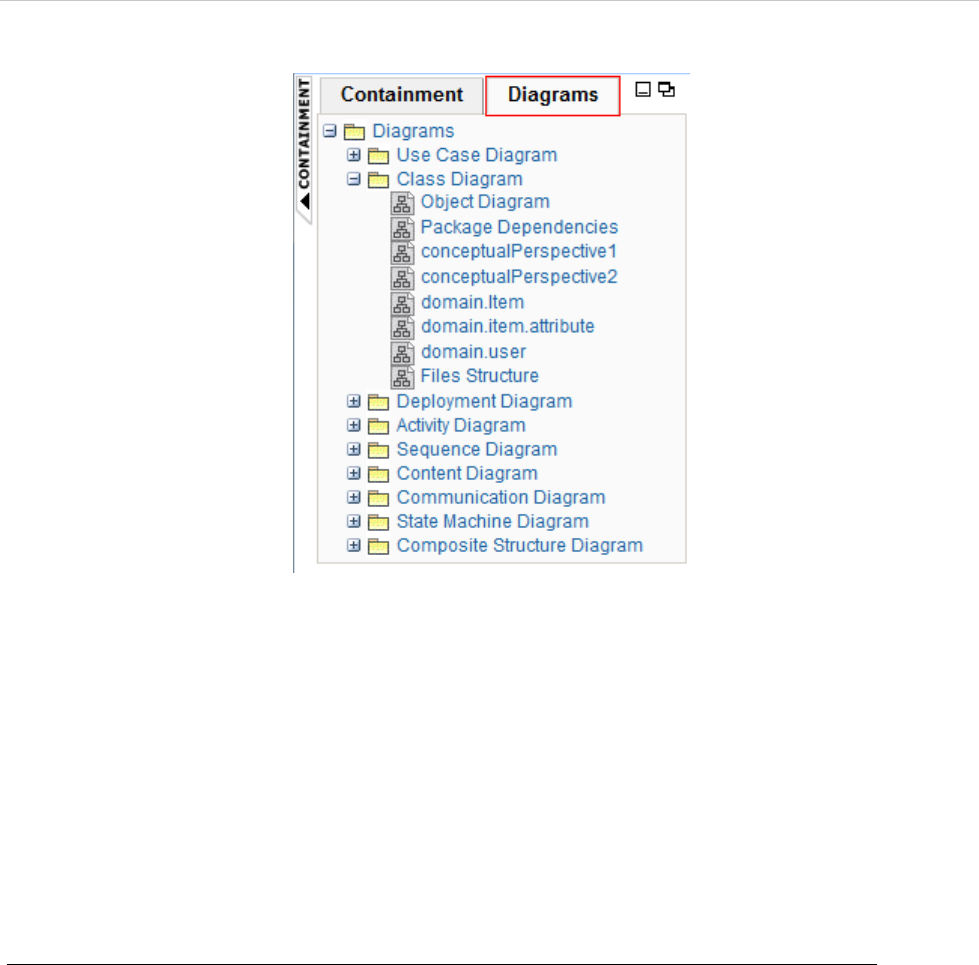
REPORT WIZARD
Generating Reports from Report Wizard
154
Copyright © 1998-2015 No Magic, Inc.
Figure 102 -- The Diagram Tab
(ii) Content panel: This panel shows an element's content.
(iii) Search panel: This panel contains a quick search box.
6.5.2.2 Containment Menu
To hide or show the Containment menu:
• Click the CONTAINMENT menu to hide it and click it again to show it (see Figure 103).

REPORT WIZARD
Generating Reports from Report Wizard
155
Copyright © 1998-2015 No Magic, Inc.
Figure 103 -- Hiding the Containment Menu
To expand or collapse the Containment tree:
• Click the “+” button in the Containment tree to expand it or click the “-” button to collapse it (see
Figure 104).
Figure 104 -- Expanding and Collapsing the Containment Tree
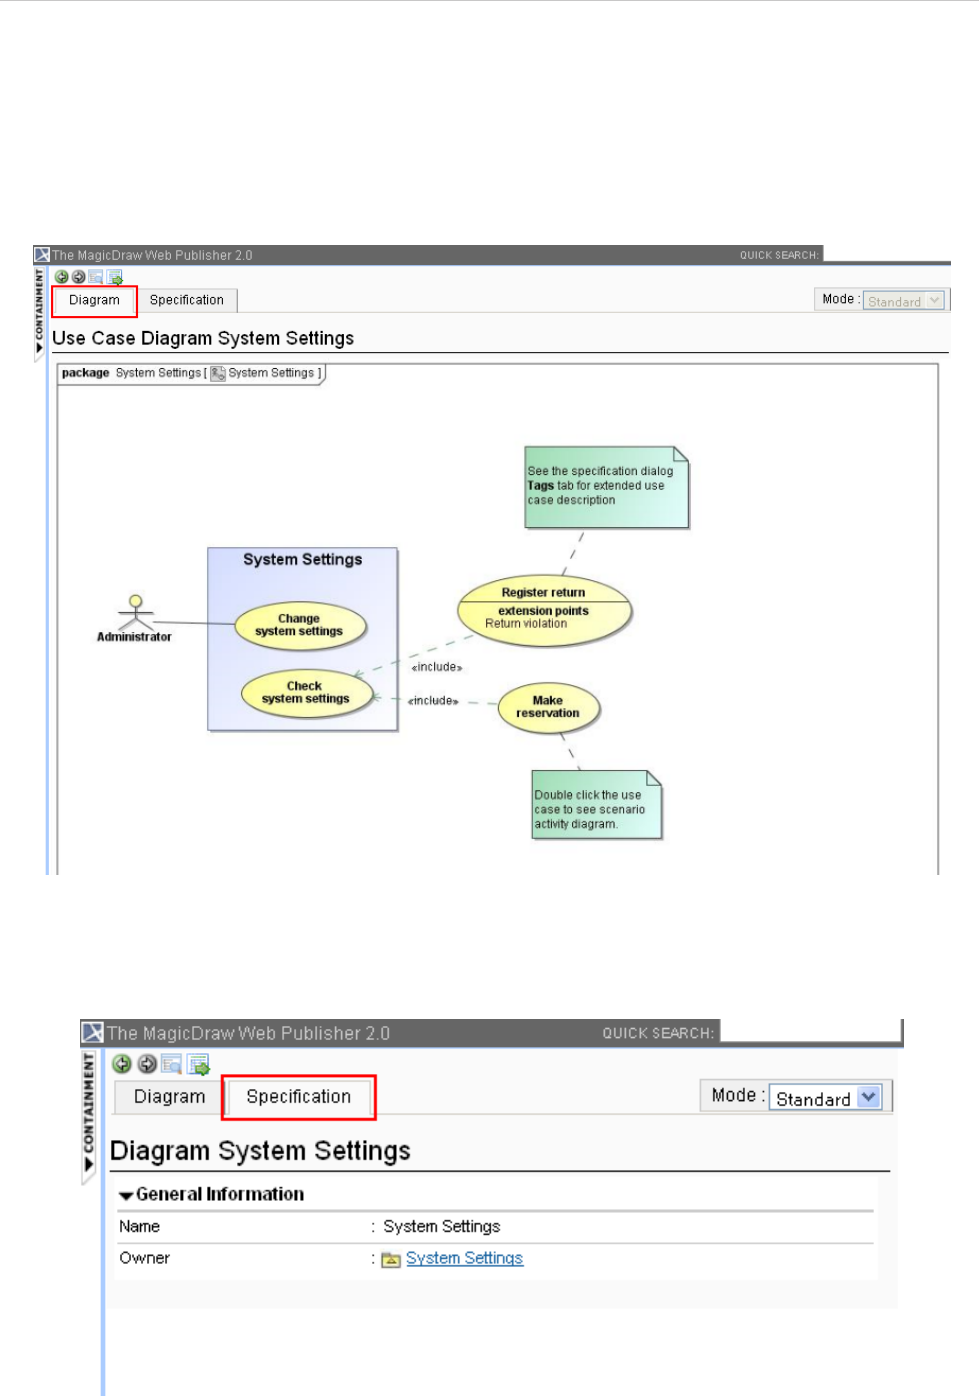
REPORT WIZARD
Generating Reports from Report Wizard
156
Copyright © 1998-2015 No Magic, Inc.
6.5.2.3 Contents Layout
The Contents panel of Web Publisher contains three tabs: (i) Diagram, (ii) Specification, and (iii) Appears in.
You can click any element in the Containment tree of Web Publisher to open three tabs.
(i) The Diagram tab shows diagram images (see Figure 105).
Figure 105 -- The Diagram Tab of Contents Panel
(ii) The Specification tab shows elements specification (see Figure 106).
Figure 106 -- The Specification Tab of Contents Panel
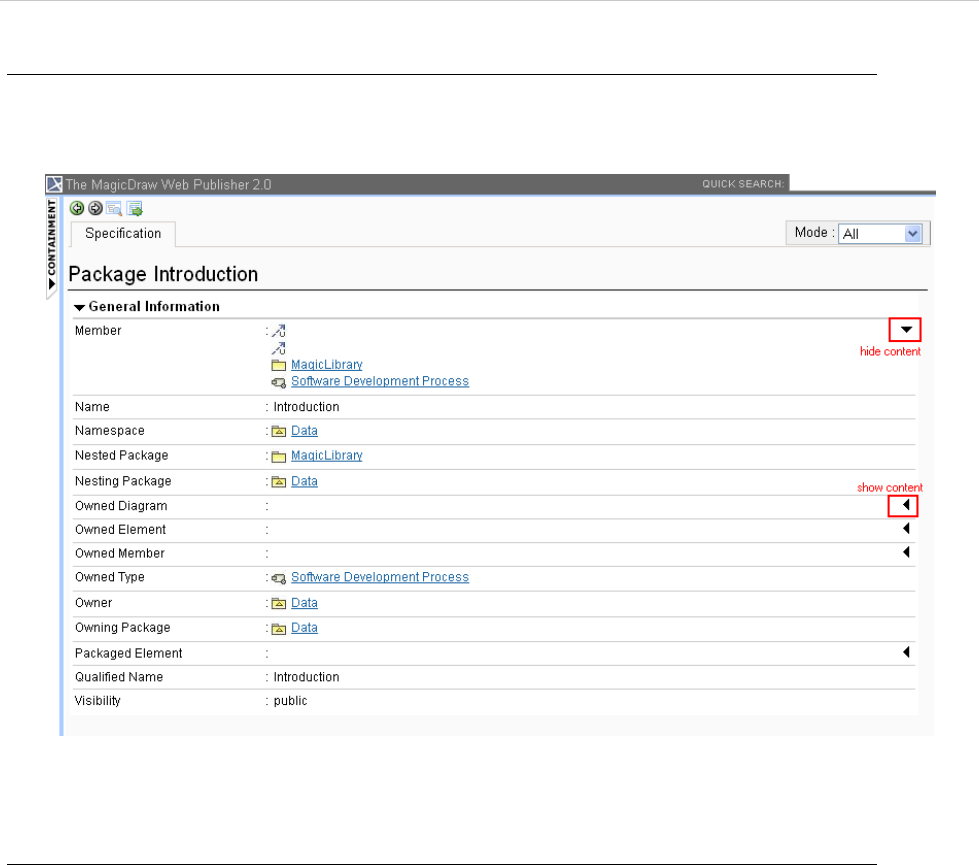
REPORT WIZARD
Generating Reports from Report Wizard
157
Copyright © 1998-2015 No Magic, Inc.
To show or hide element contents:
• Click and re-click the arrow button to show and hide the contents (see Figure 107).
Figure 107 -- Showing and Hiding Element Contents
To show an element specification, Active Hyperlink, Hyperlink, submachine of state, or behavior of the call
behavior action:
• Click a diagram's element to show the context menu for opening its specification, Active Hyperlink,
Hyperlink, submachine of state, or behavior of the call behavior action (see Figure 108).
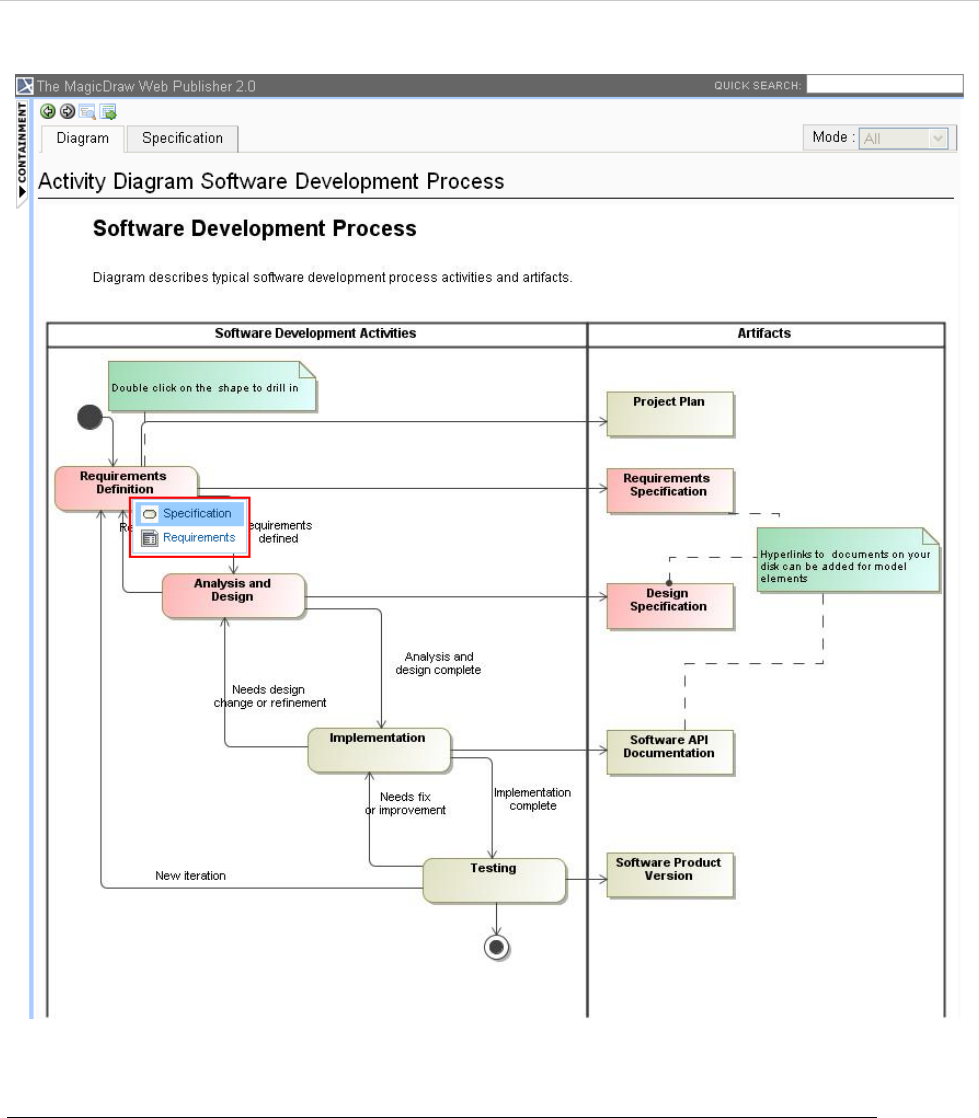
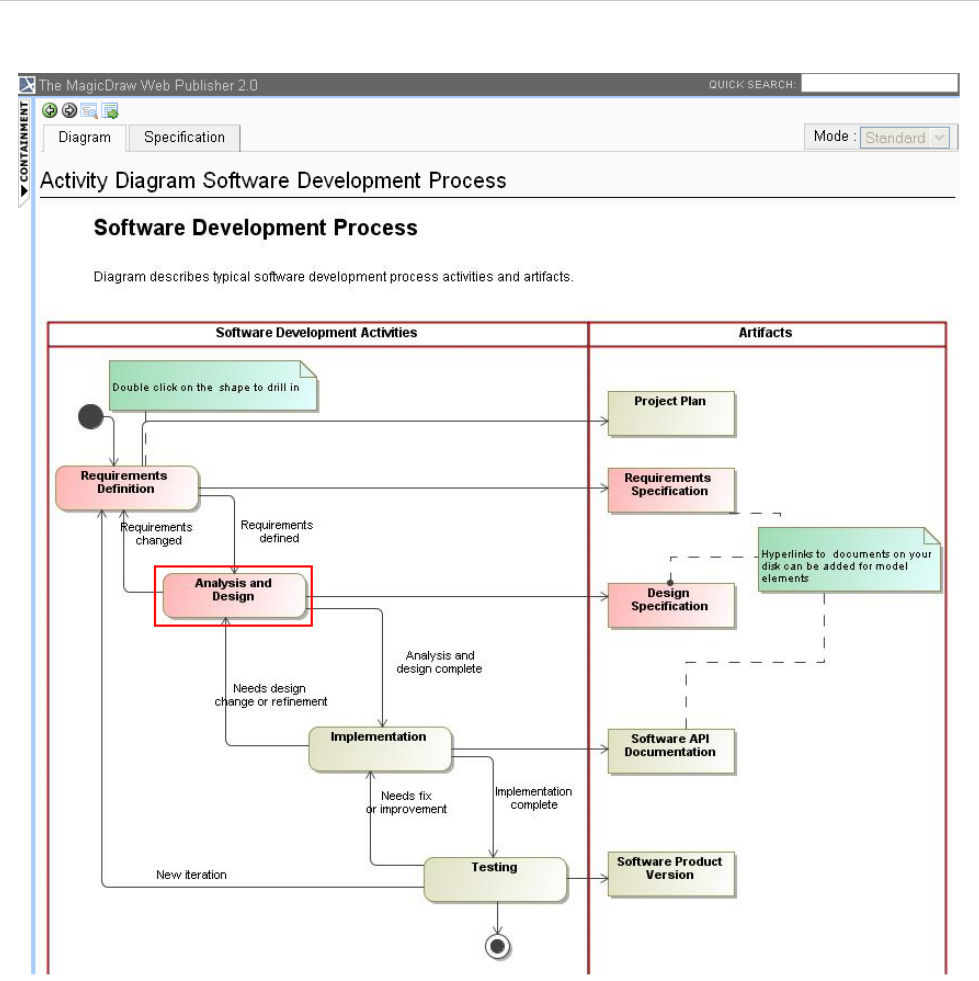
REPORT WIZARD
Generating Reports from Report Wizard
159
Copyright © 1998-2015 No Magic, Inc.
Figure 109 -- Adding Active Hyperlink
(ii) The Appears in tab shows you all diagrams in which a particular element is present (see Figure 106). You
need to select the element in the Containment tree to open the Appears in tab.
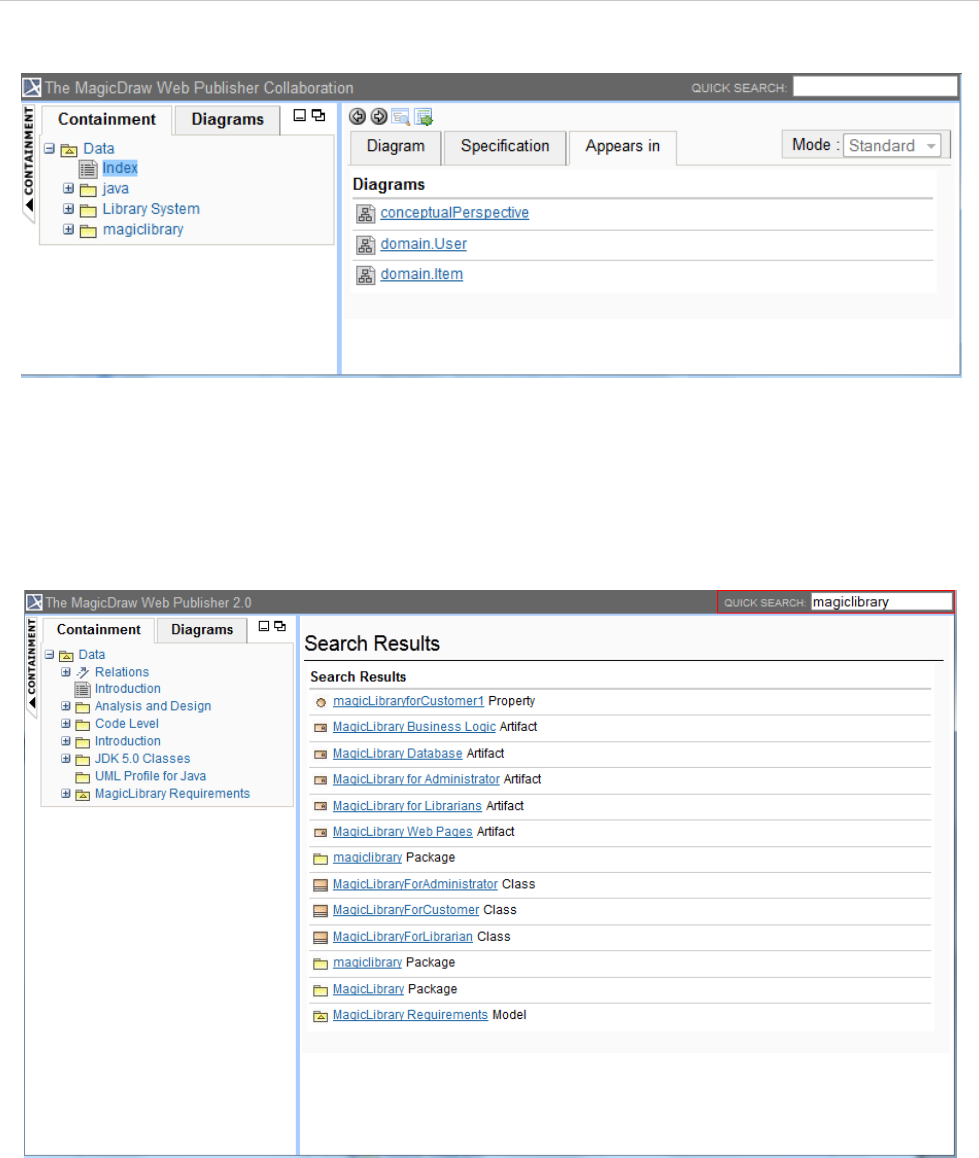
REPORT WIZARD
Generating Reports from Report Wizard
160
Copyright © 1998-2015 No Magic, Inc.
Figure 110 -- The Appears in Tab of Contents Panel
6.5.2.4 Quick Search Box
You can search for an element in a project by typing a specific keyword in the Quick Search box. You can also
use a regular expression as a keyword (see Figure 111).
Figure 111 -- Searching for an Element
6.5.2.5 NEW! Displaying Requirement ID Properties in the Containment Tree
Report Wizard can display requirement property IDs of a SysML Requirement diagram (Figure 112 and Fig-
ure 113) in the Containment tree in the Web Publisher 2.0 report output (Figure 114). You can select the option
to display the requirement property IDs in the Report Variable dialog (Figure 115).
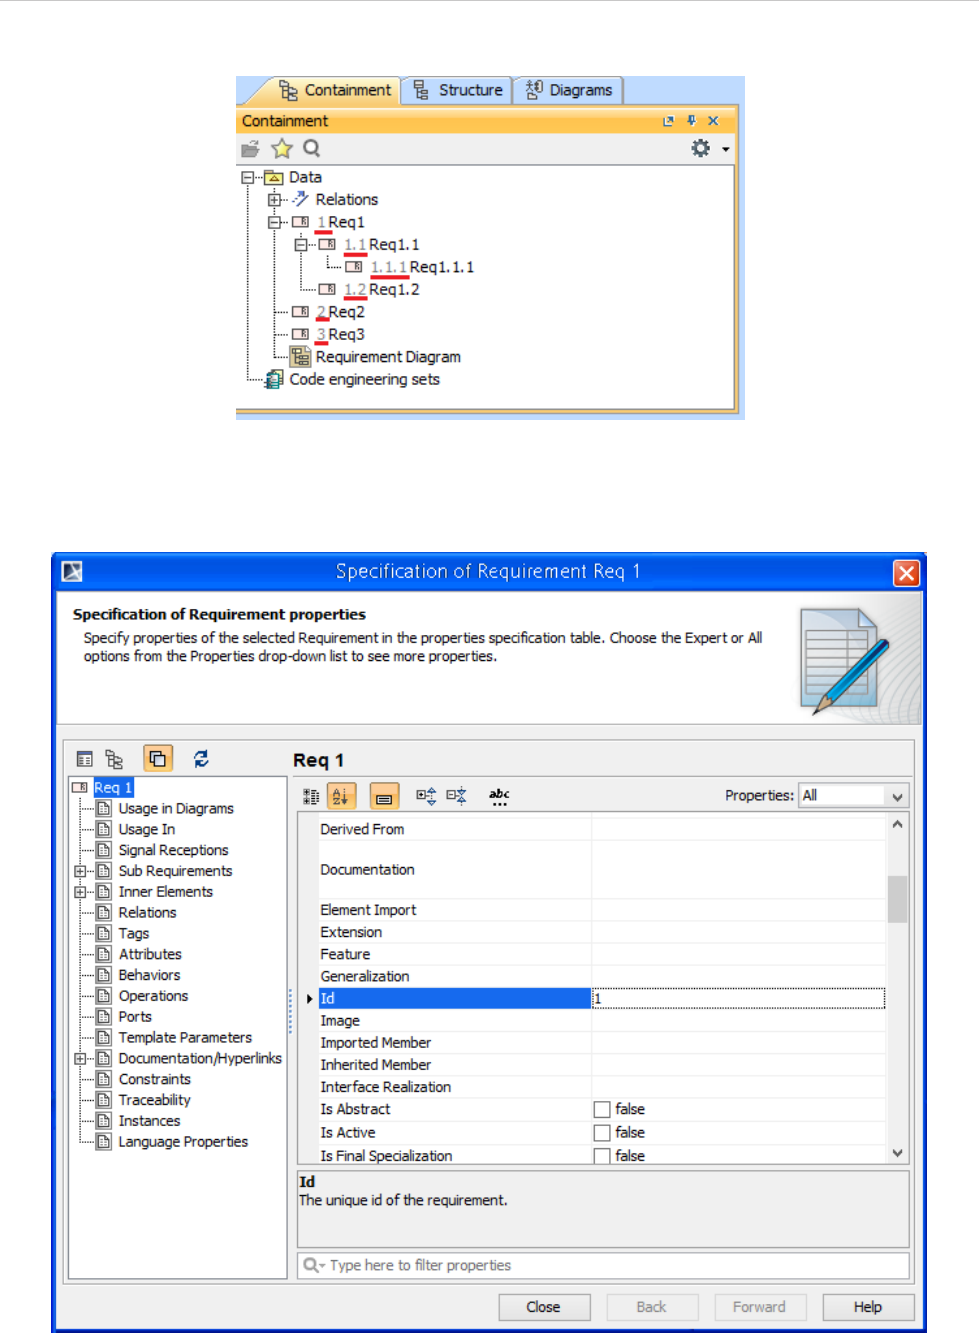
REPORT WIZARD
Generating Reports from Report Wizard
161
Copyright © 1998-2015 No Magic, Inc.
Figure 112 -- The Requirement Property IDs in the Containment Tree in MagicDraw
Figure 113 -- The Requirement Property ID in the Specification Dialog
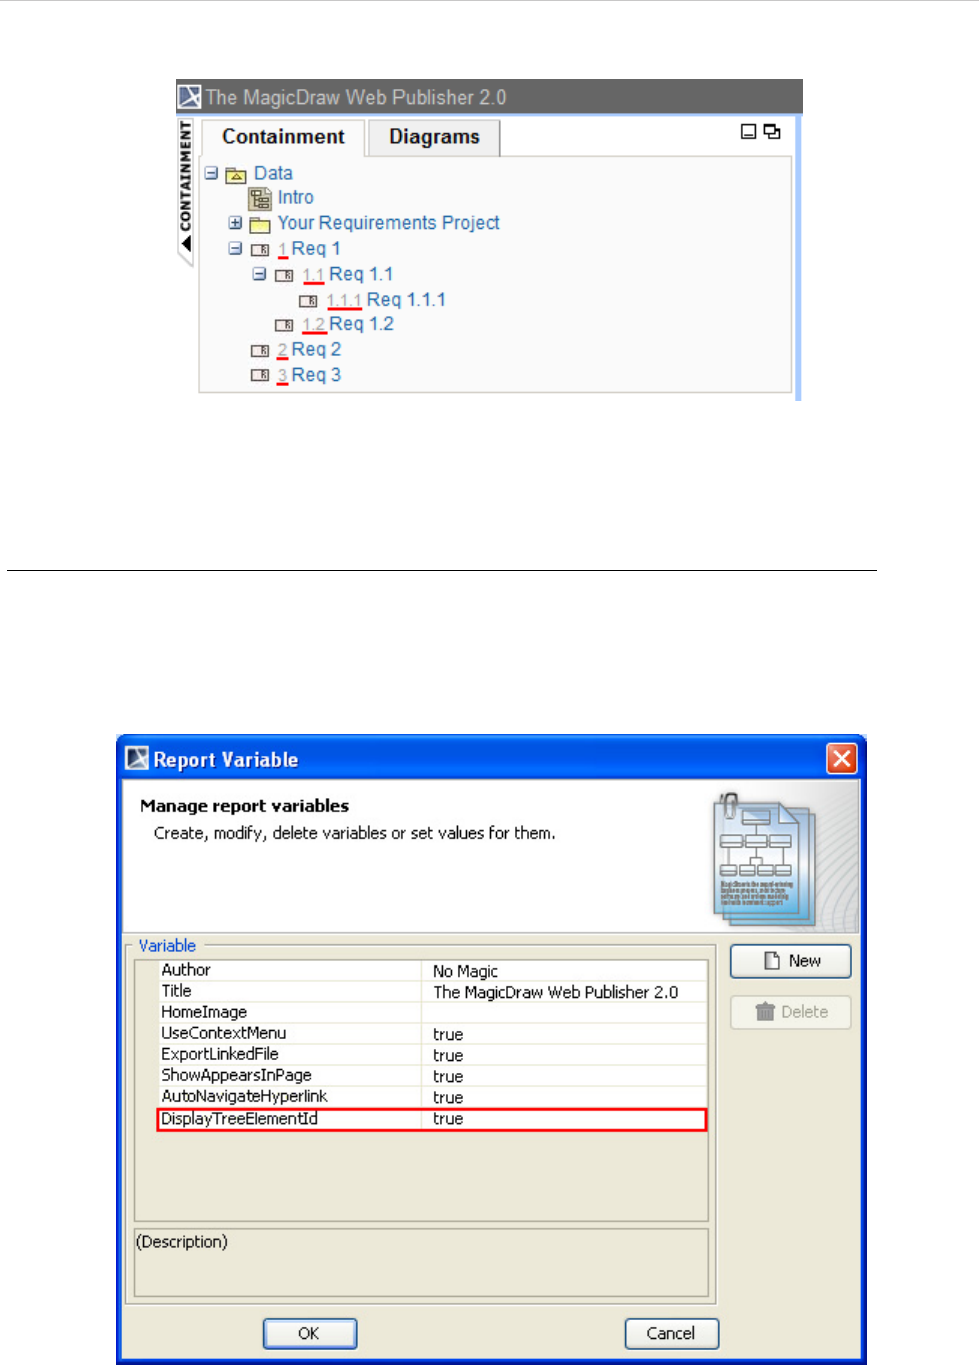
REPORT WIZARD
Generating Reports from Report Wizard
162
Copyright © 1998-2015 No Magic, Inc.
Figure 114 -- The Requirement Property ID in the Containment Tree in Web Publisher 2.0
To display requirement property IDs of a SysML Requirement diagram in the Web Publisher 2.0 report
Containment tree:
1. Open the Report Variable dialog.
2. Select the DisplayTreeElementId variable and enter the value true.
3. Click OK.
Figure 115 -- Selecting the Requirement Property ID Display Option in the Report Variable Dialog
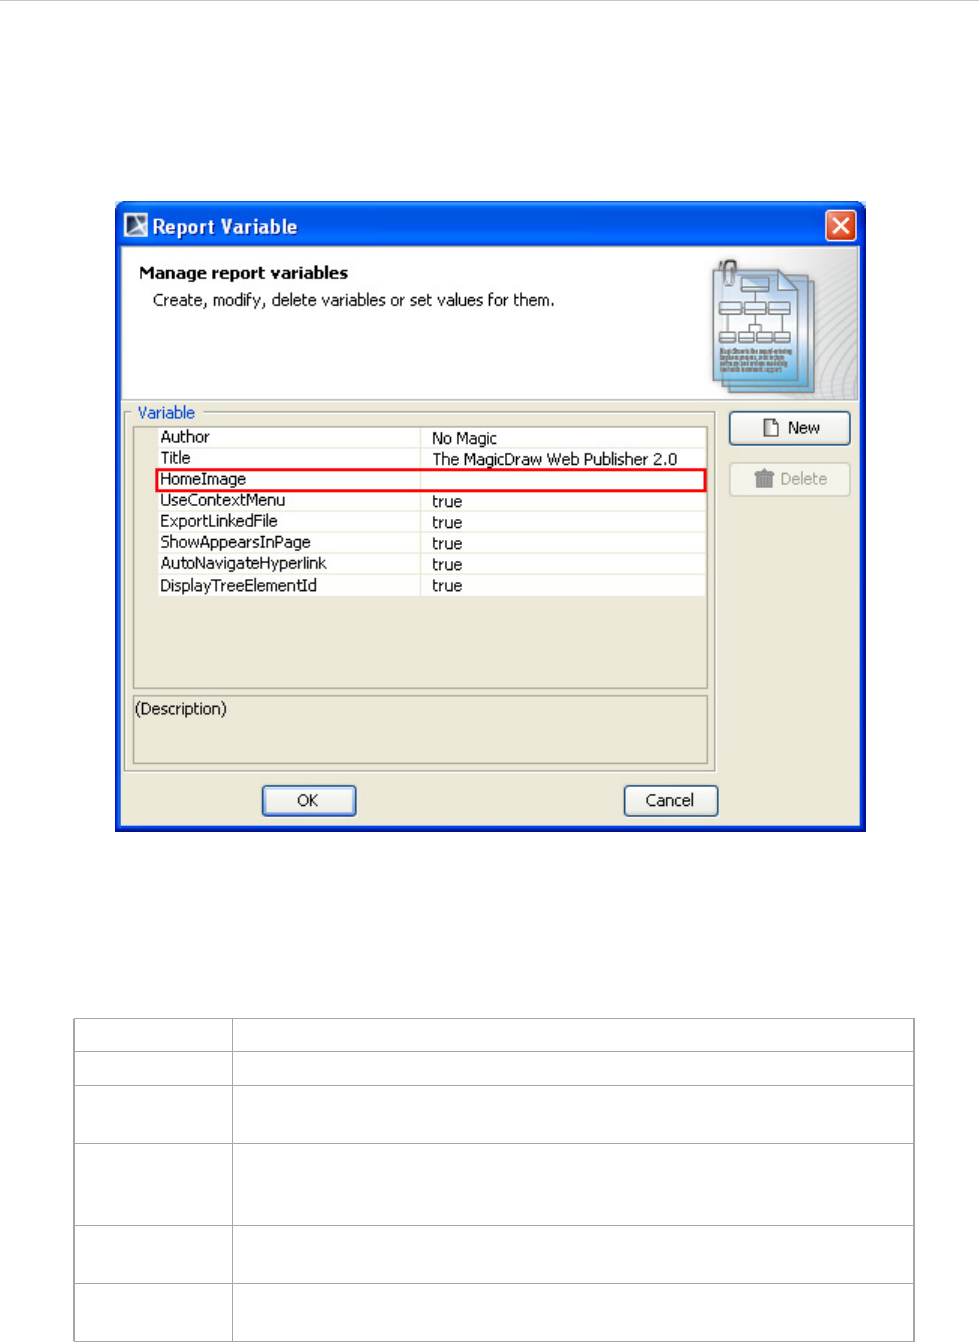
REPORT WIZARD
Generating Reports from Report Wizard
163
Copyright © 1998-2015 No Magic, Inc.
6.5.2.6 Changing a Homepage Image
Report Wizard enables you to change a homepage image. To change the homepage image, enter a specific
image value in the HomeImage user-defined variable in the Report Variable dialog (see Figure 116).
Figure 116 -- The Variable Pane in the Report Variable Dialog
See Table 17 below for the possible values of the HomeImage variable.
Table 17 -- HomeImage User-Defined Variable
Figure 117 demonstrates an example of specifying a diagram name (in plain text), in this case “Software Devel-
opment Process”, in the “HomeImage” variable.
Possible Value Result
(not specified) A MagicDraw logo image will be displayed as the homepage image.
Diagram Name
(plain text) Enter a diagram name (in plain text) to display the diagram as the homep-
age image.
Element ID
(mdel://) Enter “mdel://” followed by a model element ID to display the element as the
homepage image. For example, “mdel://
_10_0EAPbeta2_8740266_1126593738250_35764_172”.
Local Image
(file://) Enter the location of an image file on your computer to display the image as
the homepage image. For example, “file://d://picture//image.jpg”.
Web Image
(http://) Enter the location of an image on the Web to display the image as the
homepage image. For example, “http://www.photobucket.com/image.jpg”.

REPORT WIZARD
Generating Reports from Report Wizard
164
Copyright © 1998-2015 No Magic, Inc.
Figure 117 -- Example of Specifying Diagram Name (Plain Text) in the HomeImage Variable
6.5.2.7 Element Description
The Specification tab shows a brief description of elements in a tooltip. Move your mouse over an element to
see the description (see Figure 118).
Figure 118 -- Showing Element Description

REPORT WIZARD
Generating Reports from Report Wizard
165
Copyright © 1998-2015 No Magic, Inc.
6.5.2.8 Shortcut to Homepage
You can click The MagicDraw Web Publisher 2.0 at the top-left corner to go to the index page (see Fig-
ure 119).
Figure 119 -- Shortcut to Homepage
6.5.2.9 Property Visibility
The property visibility in the Specification tab has three mode types: (i) Standard, (ii) Expert, and (iii) All. The
mode that will be shown in the property visibility depends on the mode that you have selected in MagicDraw
(see Figure 120).
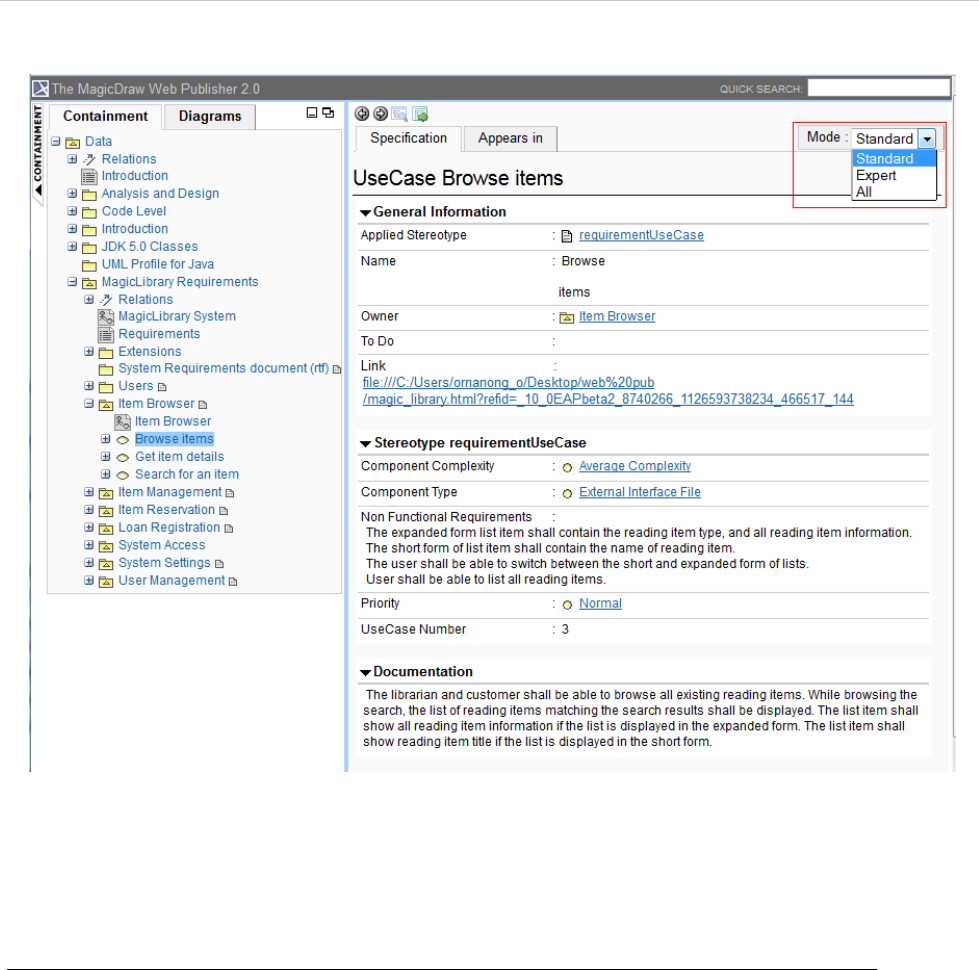
REPORT WIZARD
Generating Reports from Report Wizard
166
Copyright © 1998-2015 No Magic, Inc.
Figure 120 -- Property Visibility Mode Types
6.5.2.10 Showing or Hiding Context Menu
To show or hide a context menu:
1. Open the Report Variable dialog (Figure 121).
2. Either set the value of the UseContextMenu user-defined variable to “true” to show a context
menu or “false” to hide it.
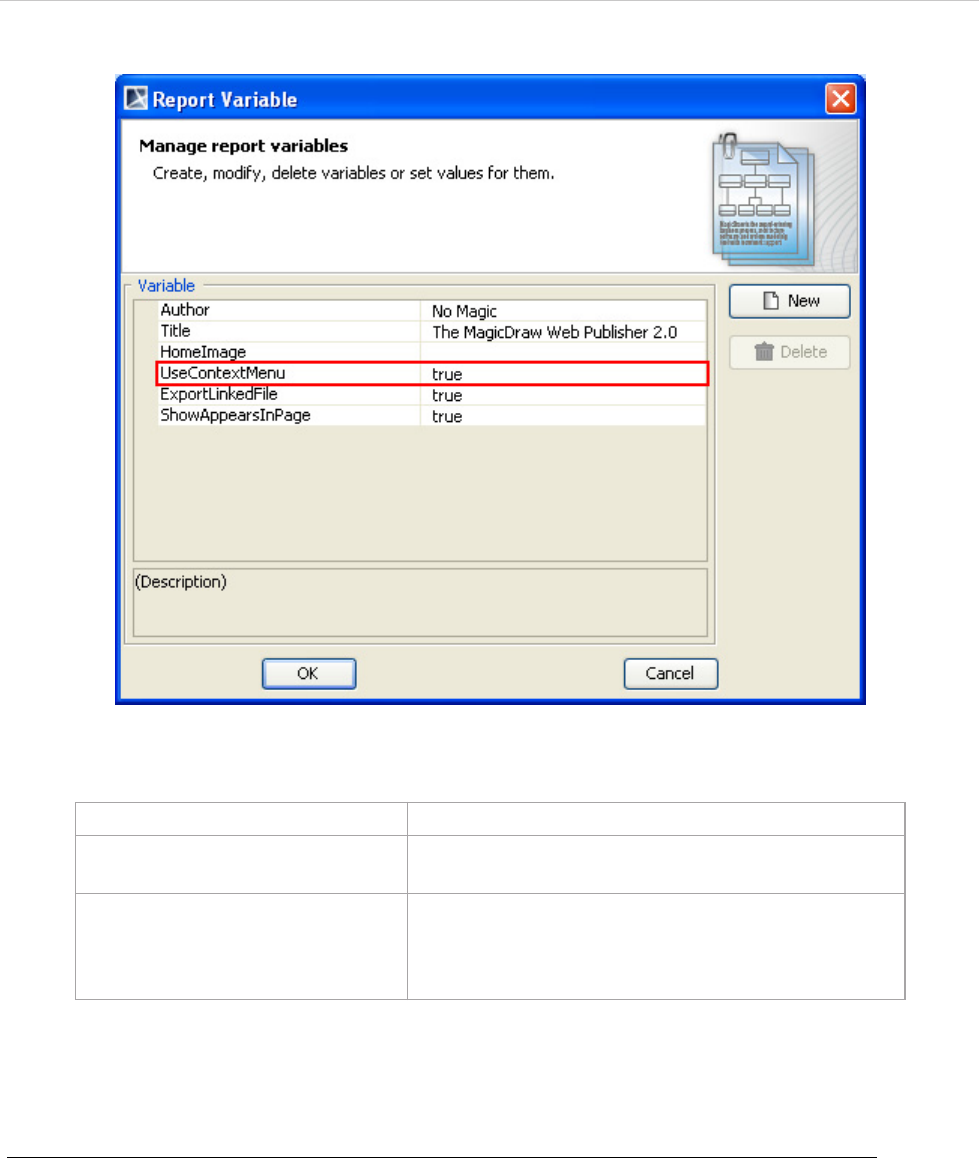
REPORT WIZARD
Generating Reports from Report Wizard
167
Copyright © 1998-2015 No Magic, Inc.
Figure 121 -- The UseContextMenu User-Defined Variable
6.5.2.11 Exporting a Linked File into an Output Folder
To export a linked file into an output folder:
1. Open the Report Variable dialog (Figure 122).
2. Set the value of the ExportLinkedFile user-defined variable to “true”.
UseContextMenu Value Function
true To show the context menu on a right mouse clicking of
a diagram element.
false To show an element specification or open an element,
diagram, or page specified in any existing active
hyperlink on a right mouse clicking of a diagram ele-
ment.
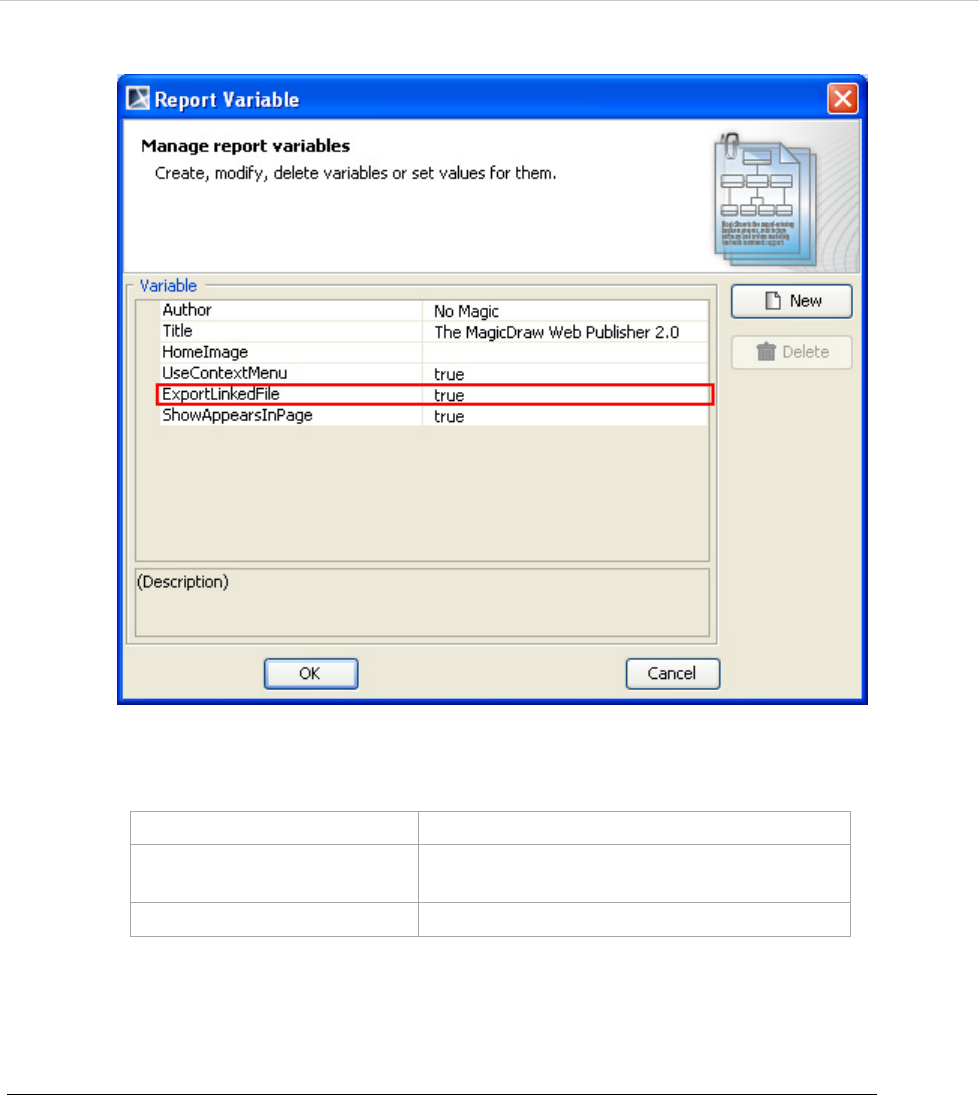
REPORT WIZARD
Generating Reports from Report Wizard
168
Copyright © 1998-2015 No Magic, Inc.
Figure 122 -- The ExportLinkedFile User-Defined Variable
6.5.2.12 Enabling the Appears in Tab in an Output Report
You can show or hide the Appears in tab in your web output report.
To show the Appears in tab in an output report:
1. Open the Report Variable dialog (Figure 123).
2. Set the value of the user-defined variable ShowAppearsInPage to “true” (“true” is the default
value).
ExportLinkedFile Value Function
true To allow the template to copy a linked file from
a model hyperlink into an output report folder.
false To keep the link to an absolute path only.
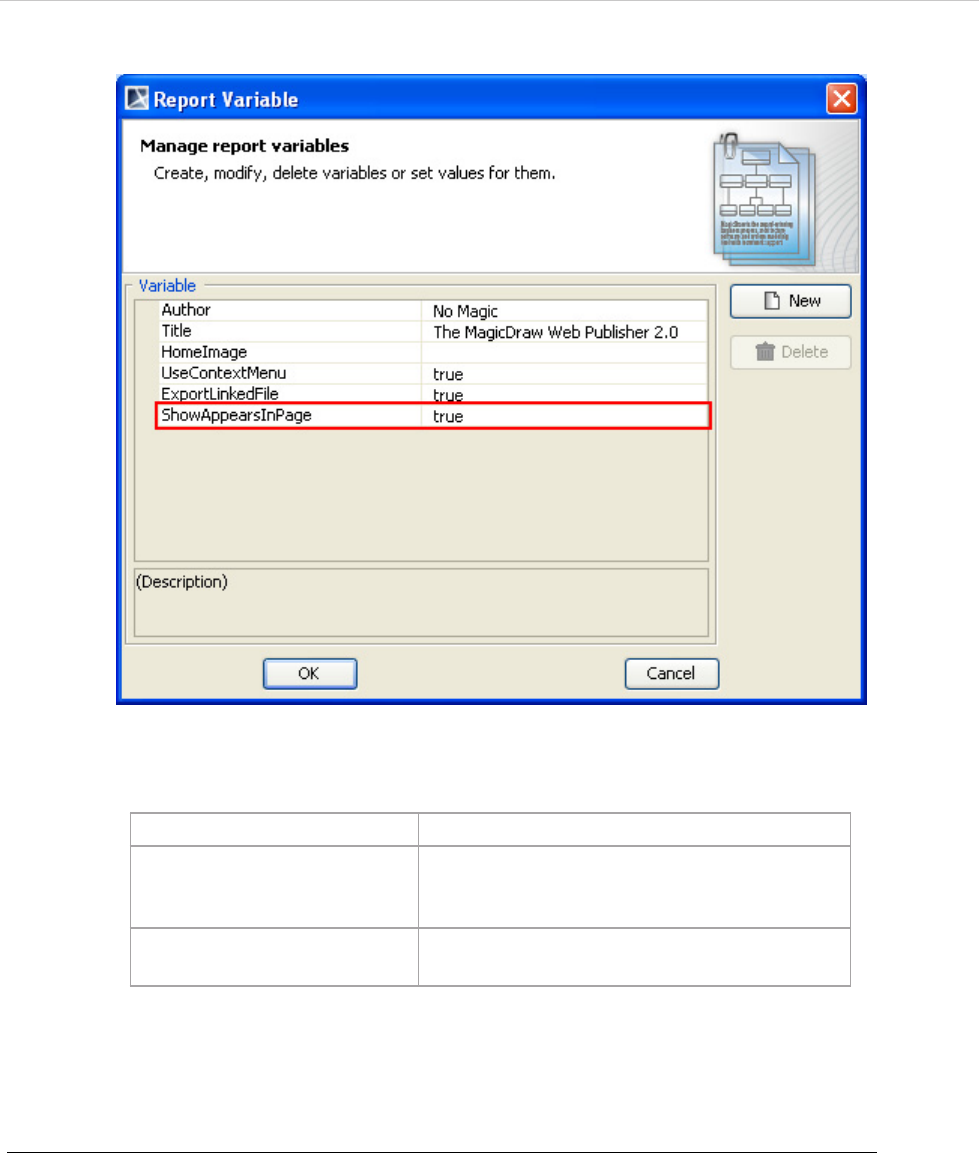
REPORT WIZARD
Generating Reports from Report Wizard
169
Copyright © 1998-2015 No Magic, Inc.
Figure 123 -- The ShowAppearsInPage User-Defined Variable
6.5.2.13 Navigating to Element Active Hyperlinks
To navigate to an active hyperlink of an element in an output report.
1. Open the Report Variable dialog (Figure 124).
2. Set the value of the "AutoNavigateHyperlink" user-defined variable as "true" or "false". The
default value is "true".
ExportLinkedFile Value Function
true To show data in a report and to open the
Appears in tab once you click an element in
the Containment tree or a diagram pane.
false To hide the Appears in tab in a generated
report.
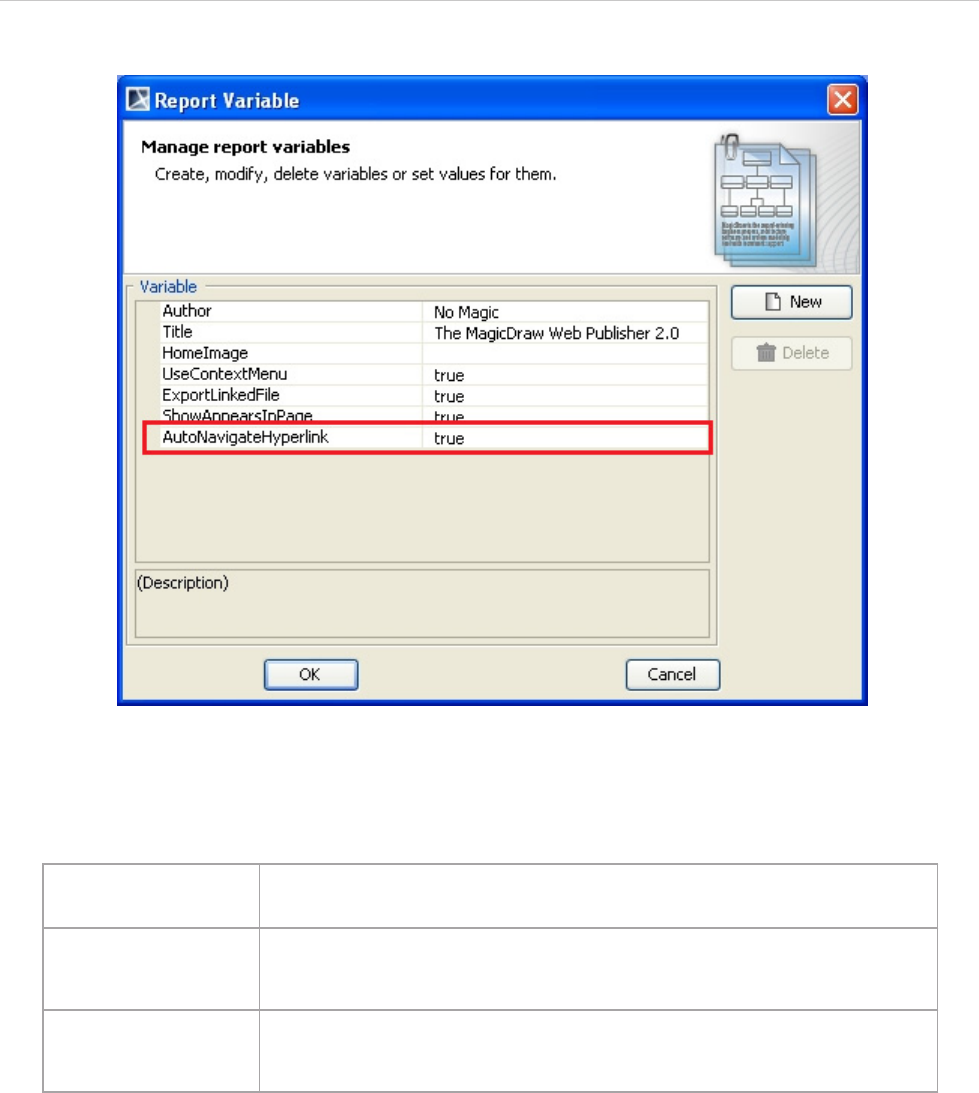
REPORT WIZARD
Generating Reports from Report Wizard
170
Copyright © 1998-2015 No Magic, Inc.
Figure 124 -- AutoNavigateHyperlink User Defined Variable
Table 18 -- AutoNavigateHyperlink User Defined Variable Value
6.5.2.14 Opening an Activity, State Machine, Collaboration, or Interaction Diagram
Click an Activity, State Machine, Collaboration, or Interaction diagram to open a sub-diagram associated with
an element.
AutoNavigateHyperlink
Value Function
true Automatically navigate the active hyperlink of each element. For example,
if A has an active hyperlink to B and B has an active hyperlink to C, then C
will be shown when you click A.
false The behavior of navigation to active hyperlink is the same as that of Magic-
Draw. For example, if A has an active hyperlink to B and B has an active
hyperlink to C, then B will be shown when you click A.
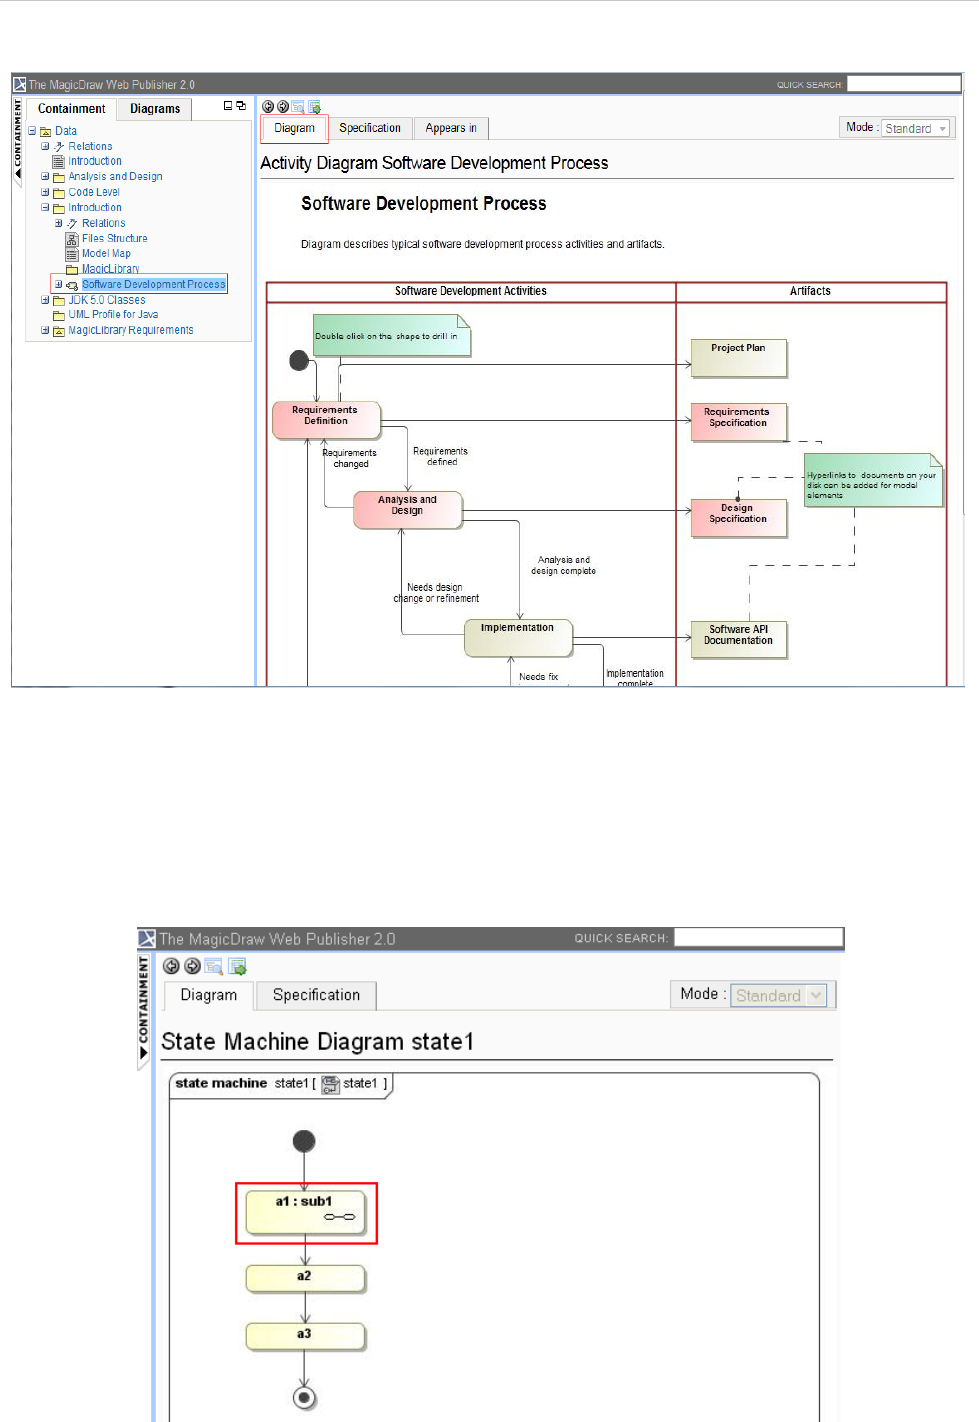
REPORT WIZARD
Generating Reports from Report Wizard
171
Copyright © 1998-2015 No Magic, Inc.
Figure 125 -- Opening Activity, State Machine, Collaboration, or Interaction Diagram
6.5.2.15 Opening the Sub-diagrams of a State with Submachine
To open the sub-diagrams, double-click either a state with a Submachine or a call behavior action of which
behavior is specified. For example, double-clicking the state “a1” (Figure 126) with the submachine “sub1” will
show a diagram of the state machine “sub1” (Figure 127).
Figure 126 -- Double-clicking a State with Submachine
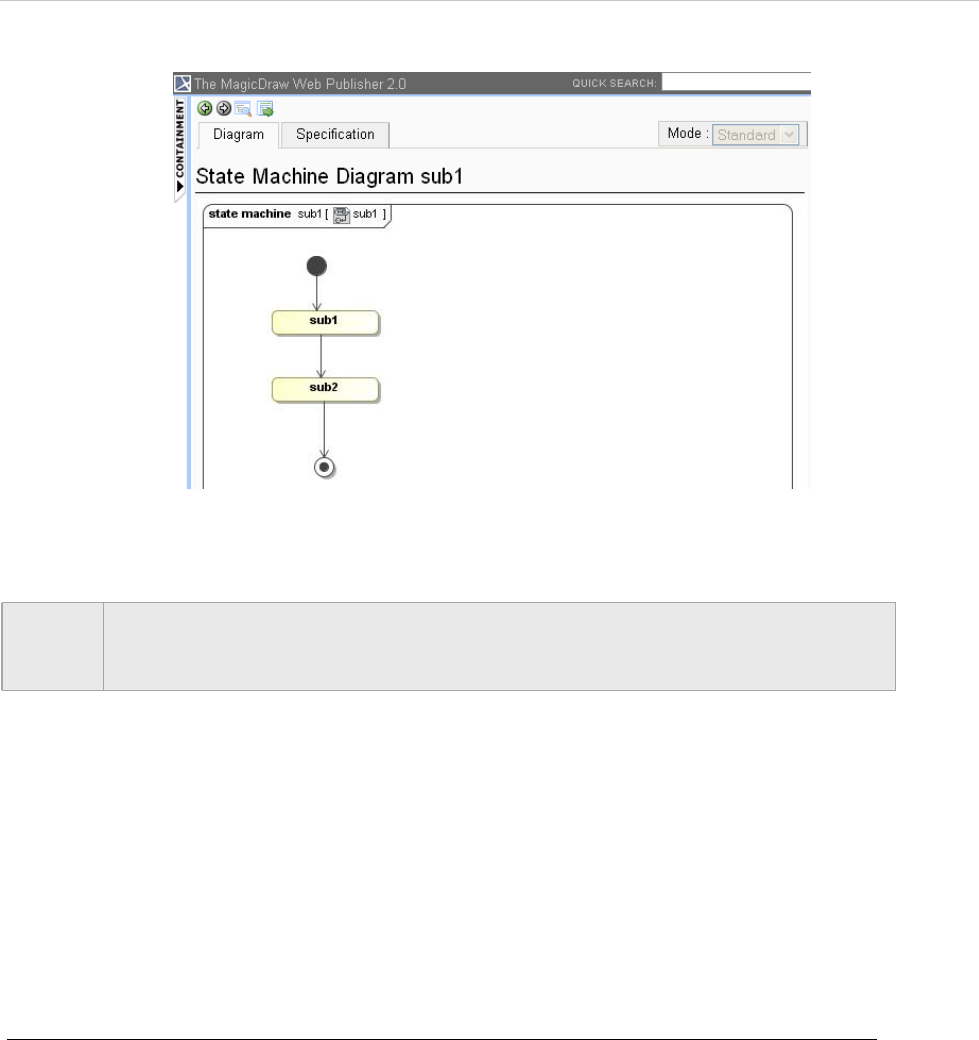
REPORT WIZARD
Generating Reports from Report Wizard
172
Copyright © 1998-2015 No Magic, Inc.
Figure 127 -- Diagram of State Machine “sub1”
6.6 Web Publisher Collaboration Reports
The Web Publisher Collaboration report is implemented based on the Web Publisher 2.0 report. The Web Pub-
lisher Collaboration report improves text editing, model review, and XML message features. The J2EE compli-
ance server requires a running generated report.
6.6.1 Generating Reports
The Web Publisher Collaboration template is located under the Default Template category.
To generate a Web Publisher Collaboration template report:
1. On the Tools menu, click Report Wizard. The Report Wizard dialog will open.
2. Select Web Publisher Collaboration (Figure 128).
NOTE • Web Publisher does not support SVG (Scalable Vector Graphics) images. You can
view all diagram images created in SVG but they are not linkable.
• Element icons in SVG will not be exported into a web page.
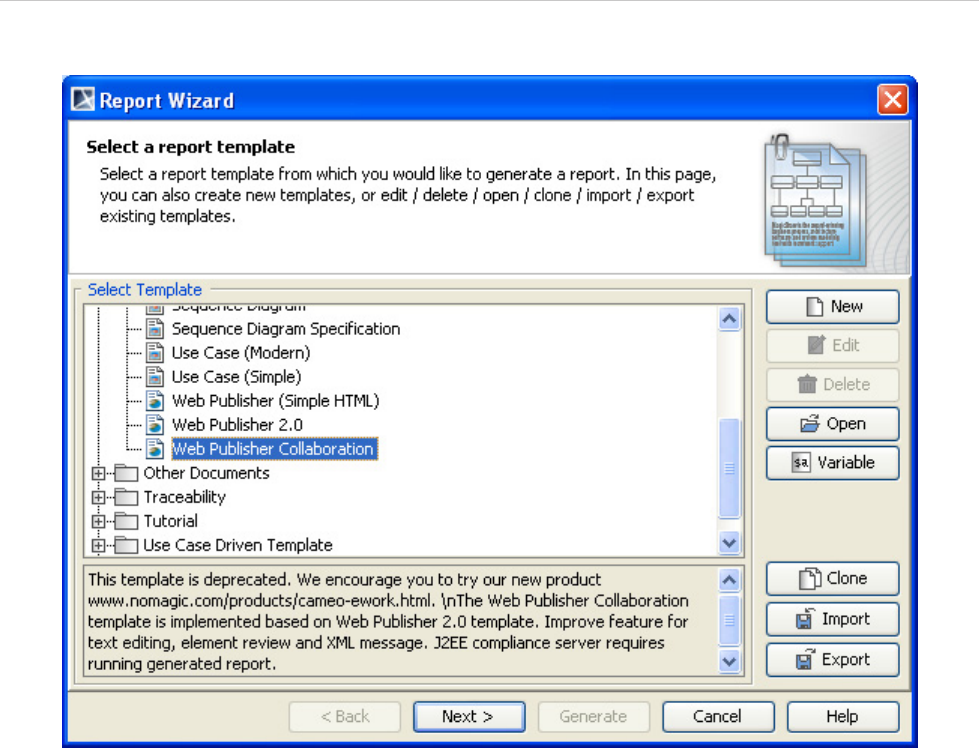
REPORT WIZARD
Generating Reports from Report Wizard
173
Copyright © 1998-2015 No Magic, Inc.
Figure 128 -- Selecting the Web Publisher Collaboration Template
• There are three user-defined variables available for the default Report Data.
(i) Author: The author of the report.
(ii) Title: The title of the web page.
(iii) UseElementLink: If “true”, it will allow the element hyperlink to work with diagrams. If
“false”, the element specification will be shown on the web page.
3. Before generating a report, choose the option to upload the generated report to the server
(Figure 129). See 6.8 Uploading Reports to Remote Locations for more detail.
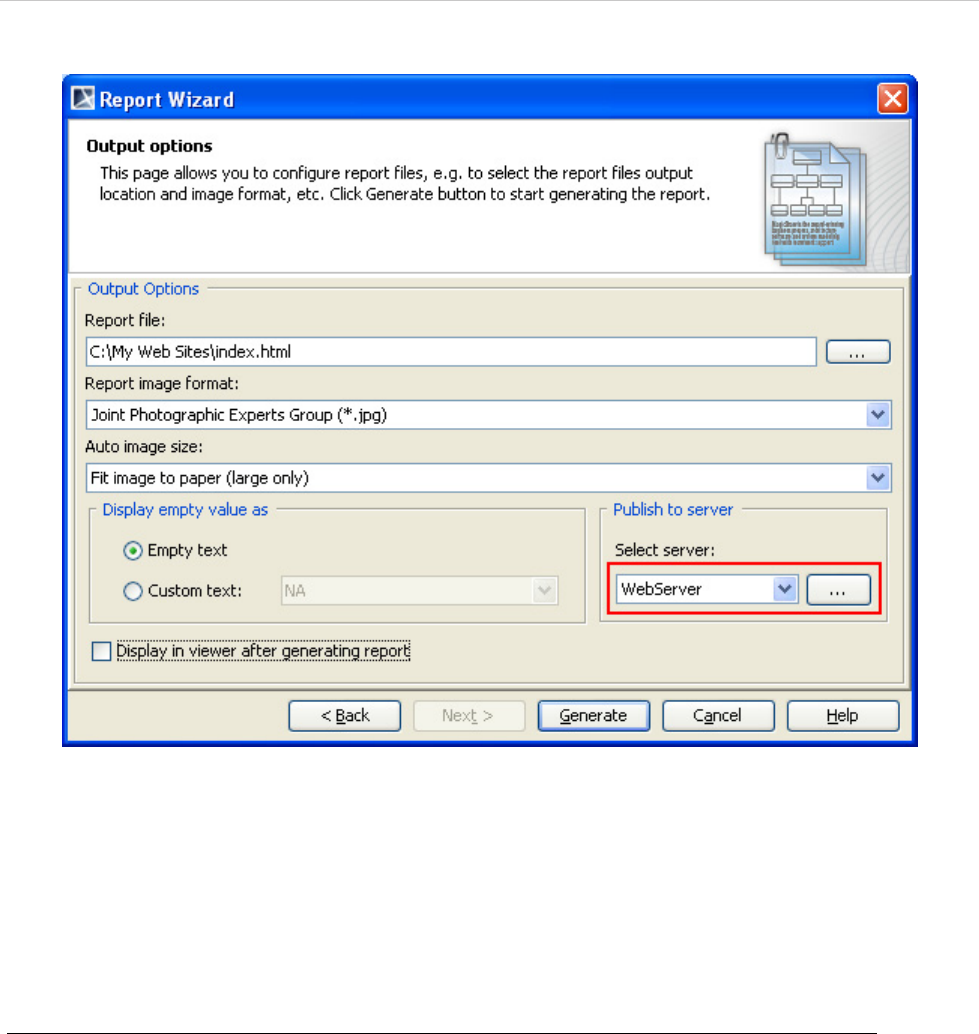
REPORT WIZARD
Generating Reports from Report Wizard
174
Copyright © 1998-2015 No Magic, Inc.
Figure 129 -- Selecting the Server to Upload the Report
6.6.2 Web Publisher Collaboration Feature
The main feature of the Web Publisher Collaboration report is for reviewing tasks. The generated report will
allow you to (6.6.2.1) add comments and (6.6.2.2) alter model contents including documentation.
6.6.2.1 Adding Comments
To add comments:
• Click Add Review to add review text (Figure 130). Review text can be in a rich text format, for
example, bold, italic, text color, etc. You cannot modify text in the review pane, but you can remove it
by clicking the Remove option.
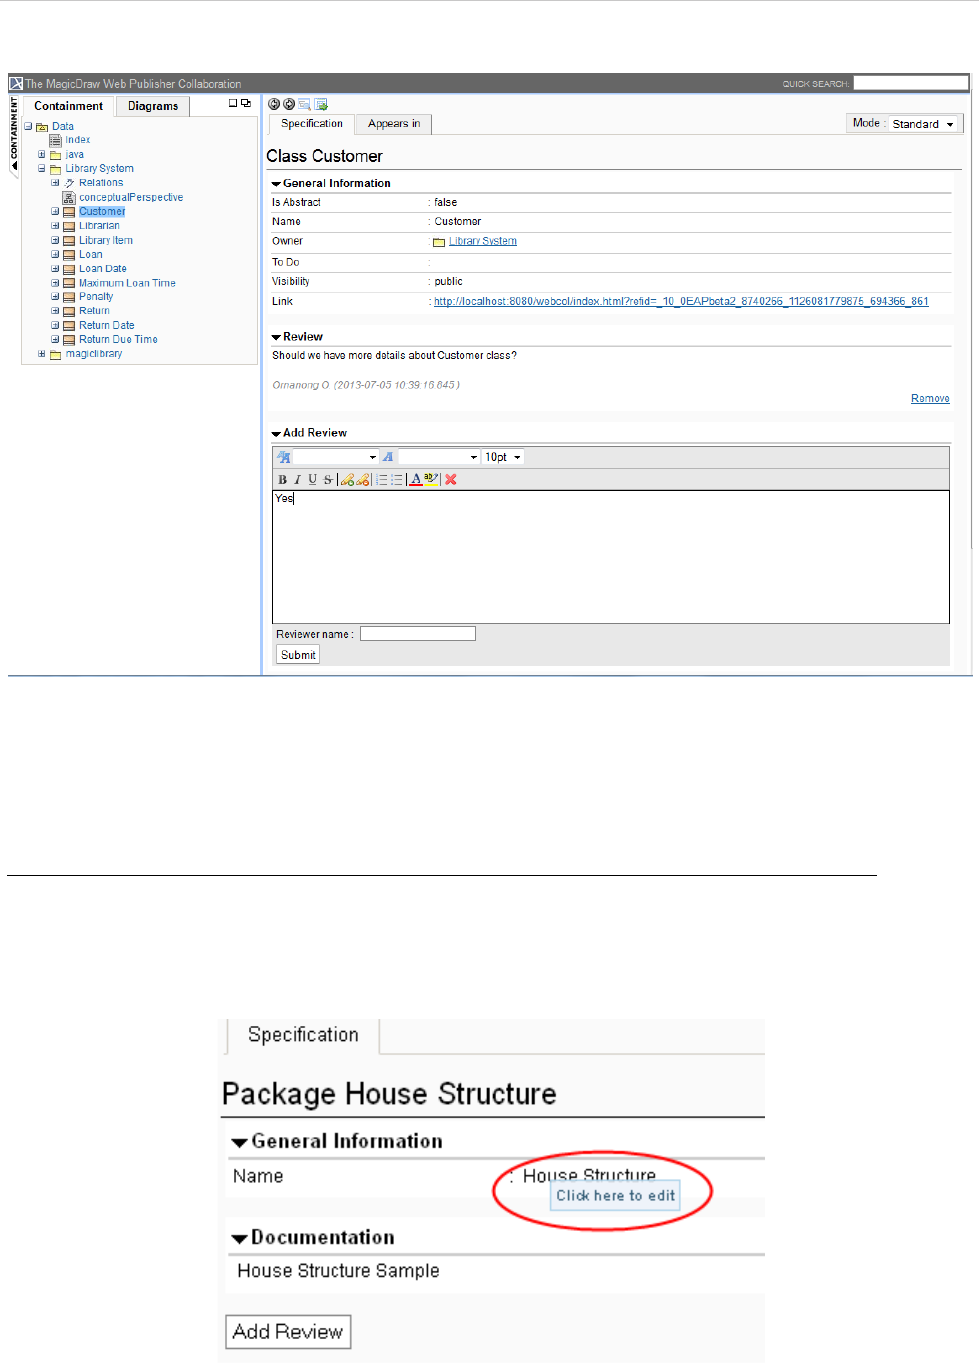
REPORT WIZARD
Generating Reports from Report Wizard
175
Copyright © 1998-2015 No Magic, Inc.
Figure 130 -- Adding Comments on the Web Publisher Collaboration Page
6.6.2.2 Altering Model Contents
To alter model contents:
• Click the field to open an input box (Figure 131). You can modify only the fields with text value. Field
editing completes once you have pressed enter or text input is out of focus. Press ESC to cancel the
editing process.
Figure 131 -- Editing Field
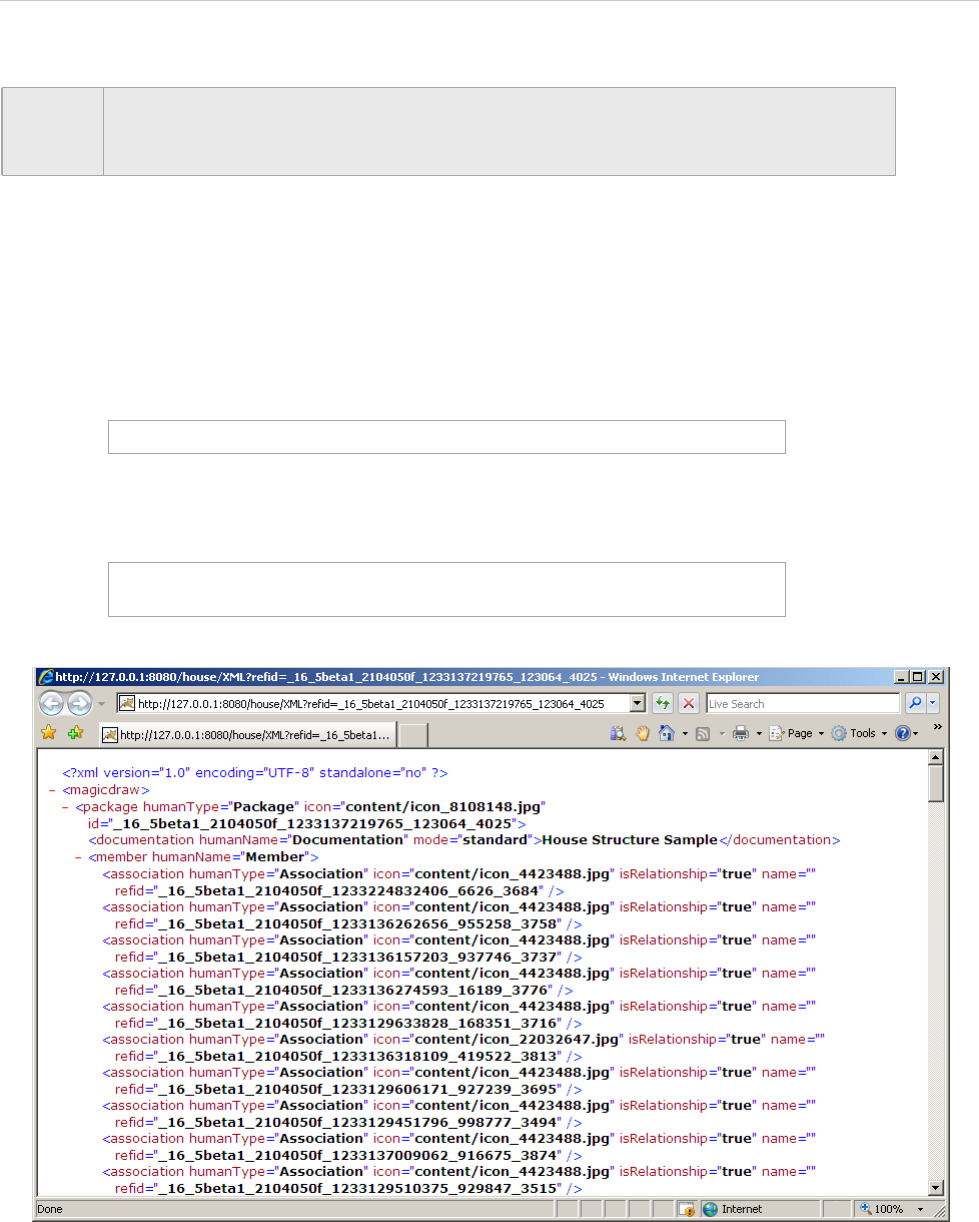
REPORT WIZARD
Generating Reports from Report Wizard
176
Copyright © 1998-2015 No Magic, Inc.
6.6.3 XML Integration
Web Publisher Collaboration opens an interface for retrieving model contents through XML or web services
(Figure 132).
The endpoint service is “XML” with a query string for “refid”, for example:
Figure 132 -- Example of Data Return from XML Service
NOTE • Web Publisher does not support SVG (Scalable Vector Graphics) images. You can
view all diagram images created in SVG but they are not linkable.
• Element icons in SVG will not be exported into a web page.
XML?refid=elementID
http://127.0.0.1:8080/house/
XML?refid=_16_5beta1_2104050f_1233137219765_123064_4025
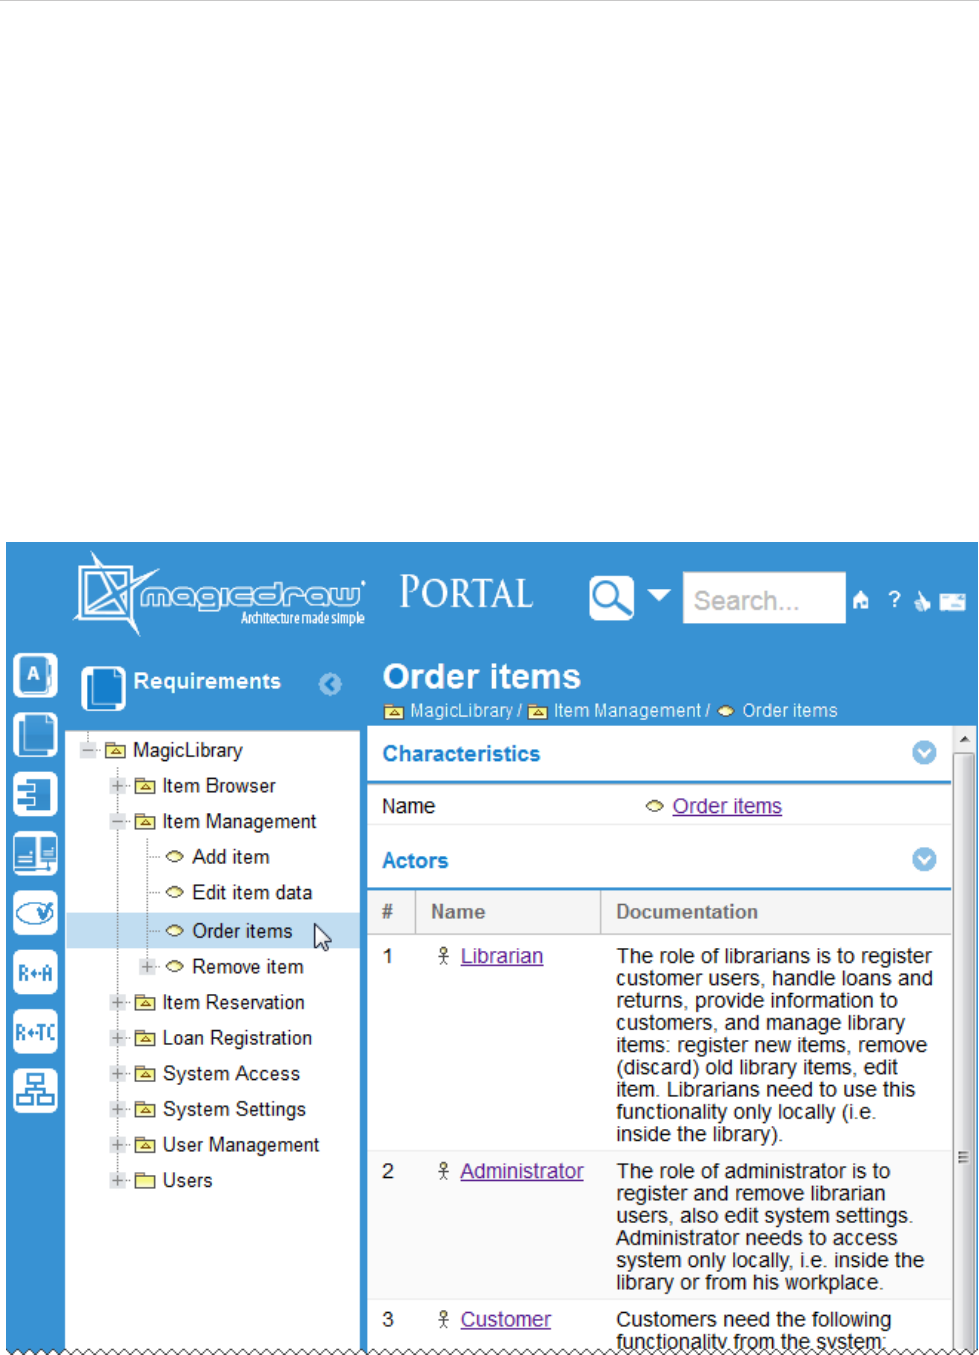
REPORT WIZARD
Generating Reports from Report Wizard
177
Copyright © 1998-2015 No Magic, Inc.
6.7 NEW! Web Portal Reports
Report Wizard provides a report template that you can use to generate a web portal report. A web portal report
is a report published in HTML format so it can be viewed in a web browser. With the web portal report, you can
share your project and virtually make your models readable to the other stakeholders, including those who do
not understand MagicDraw models. The web portal report allows the readers to provide feedback on any ele-
ment or diagram in the model by commenting on it. This web portal report template is only available in Magic-
Draw Enterprise edition. In other editions, MagicDraw provides a demo version of the web report template,
which can contain, at most, 10 symbols per view.
A web portal report simplifies the complexity of a model by reducing less needed elements from the model tree
and displays the most relevant views of your project. For example, a MagicDraw project report includes views
such as Glossary, Requirements, Architecture, Implementation, and so forth, and a SysML Plugin project report
includes views such as Requirements, Structure, Interfaces, Constraints, and so forth. It helps you generate
your project in a user-friendly and easy-to-browse environment.
The web portal report features a quick search to help you find elements and diagrams for faster content view-
ing.
Figure 133 -- An Example of Web Portal Report - Software Engineering Portal

REPORT WIZARD
Generating Reports from Report Wizard
178
Copyright © 1998-2015 No Magic, Inc.
6.7.1 Generating Reports
Generating a web portal report is as easy as generating any other reports with Report Wizard.
To generate a web portal report from a MagicDraw project:
1. Press Ctrl+Shift+G to open the Report Wizard dialog.
2. In the Select Template pane, expand the Web Reports package and select Software
Engineering Portal.
3. Click Next.
4. If you need to allow comments on the report, do the following:
4.1. Click the Variable button. The Report Variable dialog will open.
4.2. In the value cell of the WebComment variable, type the global address for
comments delivery, for example, example.com/jiraExample.php (Figure 134).
4.3. Click OK.
Figure 134 -- Enabling Feedback on a Web Portal Report
5. If you want ScreenTips to appear on the report when it opens for the first time, do the
following:
NOTE If your MagicDraw has a plugin that provides another template for
generating a web portal report, you can find this template in a sepa-
rate package. For example, if you have installed SysML Plugin, you
should expand the SysML - Web Reports package and select
SysML - Web Reports.
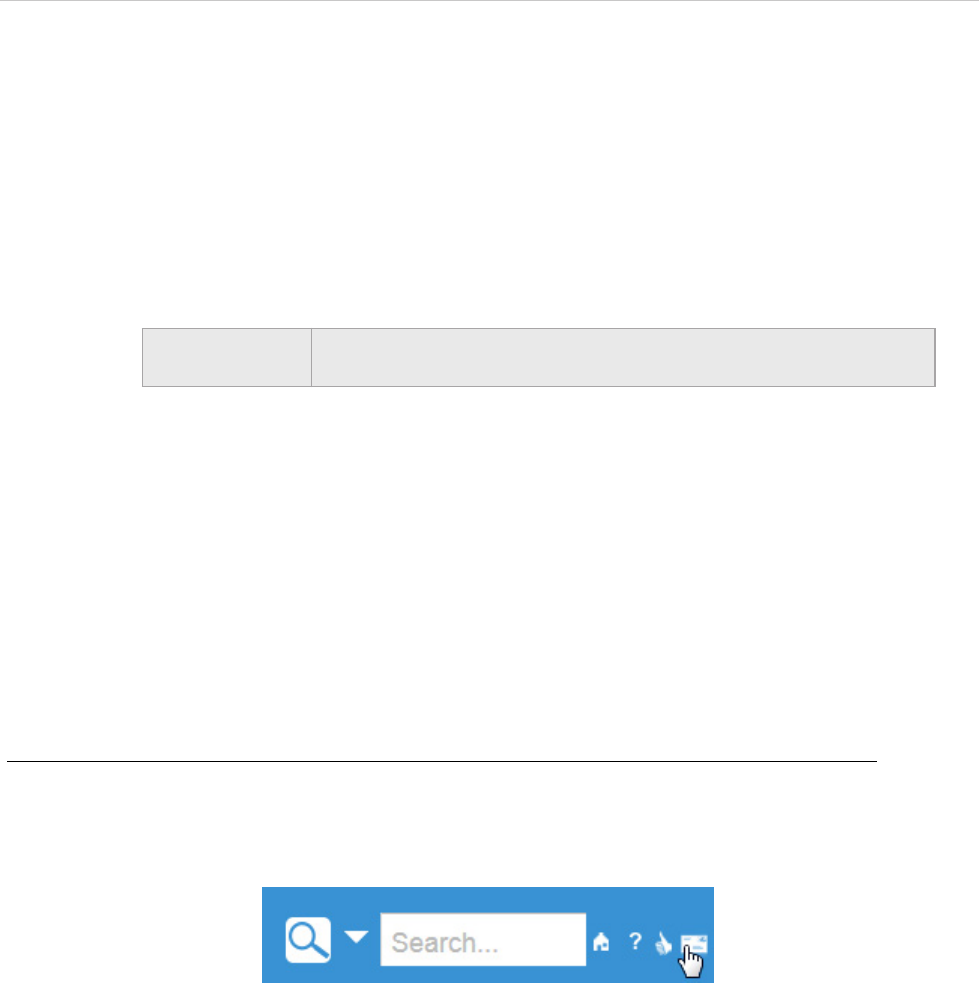
REPORT WIZARD
Generating Reports from Report Wizard
179
Copyright © 1998-2015 No Magic, Inc.
5.1. Click the Variable button. The Report Variable dialog will open.
5.2. In the value cell of the ShowTip variable, type either True or true.
5.3. Click OK.
6. Click Next.
7. Select the elements you need to include in the report and click Next.
For more information, refer to 1.1.2.3 Select Element Scope Pane on page 46.
8. Save your report in a specific location, type the report name (for example, report.html), and
specify other output options if desired.
9. Click Generate. The web portal report will be generated and ready for review.
For more information, refer to 1.1.2.4 Generate Output Pane on page 47.
10. You can open the report by double-clicking the HTML/HTM file in the location specified in
step 6 (in this example, report.html).
11. You can place the report in a shared directory or on a web server to make it available for the
other stakeholders.
6.7.2 Commenting on a Report
If a web portal report enables feedback or comments, you can write something about a model element or a dia-
gram in the report. See step 4 in 6.7.1 Generating Reports on page 178 for more information on how to enable
feedback or comments in a web portal report.
To write a comment on a web portal report:
1. Select an element or diagram you need to comment in the model tree view on the left-hand
side of the web portal report.
2. Click the comment icon in the upper-right corner of the report. The Comment dialog opens.
Figure 135 -- The Comment Icon
NOTE As a web portal report includes a number of files and folders, it is
strongly recommended that you save the report in a separate folder.
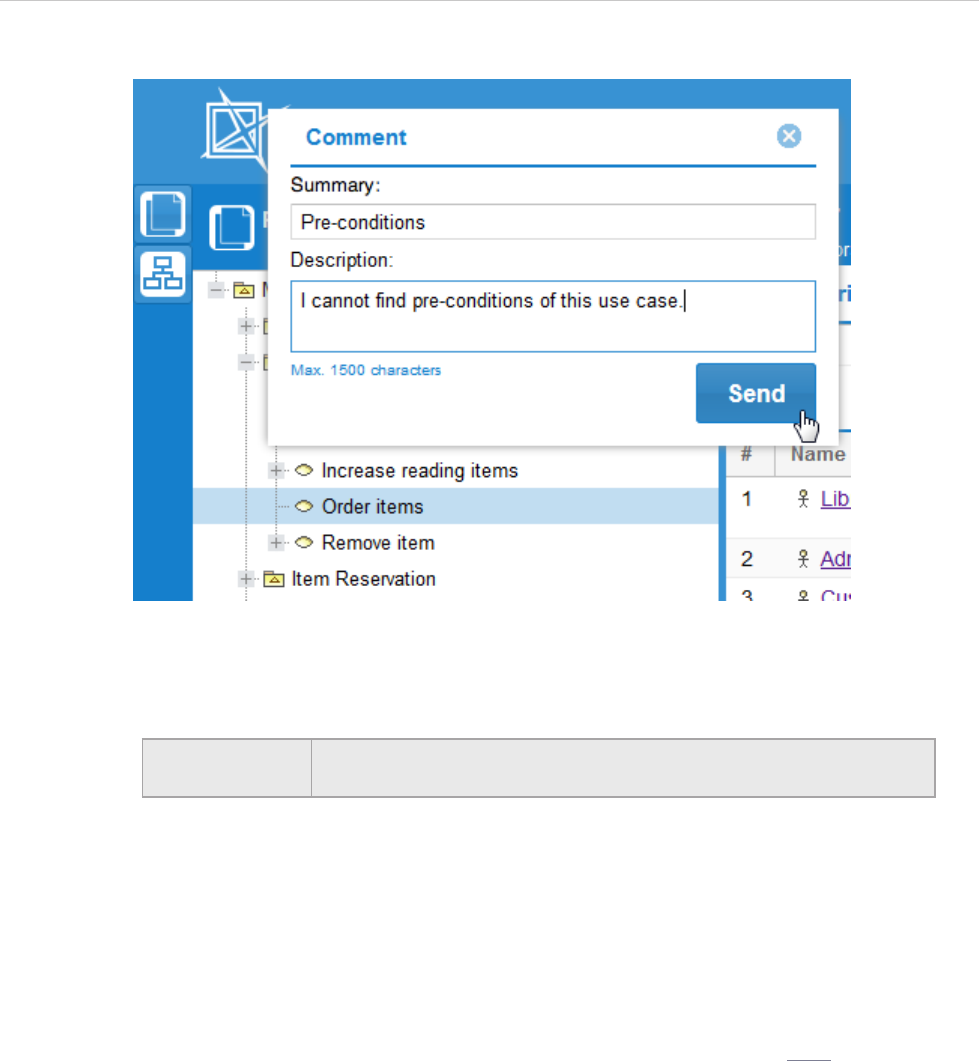
REPORT WIZARD
Generating Reports from Report Wizard
180
Copyright © 1998-2015 No Magic, Inc.
Figure 136 -- Commenting on a Web Portal Report
3. Type a short statement that describes your comment or feedback in the Summary box.
4. Type your comment in details in the Description box
5. Click Send. The global address of the selected element or diagram, the name of that element
or diagram, and the contents in both the Summary and Description boxes will be sent to the
web server.
6.7.3 Reading Comments
There are several ways to deliver comments on elements and diagrams in a web portal report and allow others
to read them. You can choose to deliver them through an issue tracking system, such as JIRA, or an e-mail
platform, such as Gmail or Outlook.
The following example shows how to deliver comments, if you need to get the comments to a certain account
on JIRA as issues of the type ‘Bug’:
1. Copy the following script:
<?php
$contentUrl = $_GET['url']; // Global address of the commented
// element or diagram.
$contentTitle = $_GET['contentTitle']; // Name of the commented element
// or diagram.
$contentSummary = $_GET['commentSummary'];// Summary text of the comment.
$contentCommentArray = $_GET['comment']; // Text of the comment.
$contentComment = implode(" ", $contentCommentArray);
IMPORTANT! Your comments in the Description box should not exceed 1500
characters. Comments exceeding the limit will not be included.

REPORT WIZARD
Generating Reports from Report Wizard
181
Copyright © 1998-2015 No Magic, Inc.
$description = $contentTitle . " \\\\ " . $contentComment . " \\\\ " . "Link to the
content: \\\\" . $contentUrl;
$issue = array(
'type'=>'1', // Type of JIRA issue
// that stores the comment.
// '1' means 'Bug'.
'project'=>'TEST', // Name of JIRA project
// that stores the comments (3.1).
'description'=> $description, // Description contents
// of JIRA issue that
// stores the comment.
'summary'=> $contentSummary, // Summary text of JIRA issue
// that stores the comment.
'priority'=>'2', // '2' means 'Critical'.
'assignee'=>'username', // Username of JIRA account,
// to which the comment is sent (3.2).
'reporter'=>'username', // Username of JIRA account,
// which sends the comment (3.3).
);
$soapClient = new SoapClient("https://example.com/rpc/soap/jirasoapservice-
v2?wsdl"); // (3.4)
$token = $soapClient->login('username', 'password'); // (3.5)
$soapClient->createIssue($token, $issue);
?>
2. Create a new file and paste the script onto the file.
3. Change the following values (the red ones in the script):
3.1. The name of a JIRA project.
3.2. The assignee’s username.
3.3. The reporter’s username.
3.4. The global address of a web service, which provides JIRA.
3.5. The username and password of the JIRA account wherein a new issue is created
from the comment data.
4. Save the file as jiraExample.php.
5. Upload the file to your web server, for example, Apache Tomcat.
6. When enabling comments in your web portal report (step 4 in 6.7.1 Generating Reports on
page 178), specify <web server address>/jiraExample.php (for example, example.com/
jiraExample.php) as the value of the WebComment variable.
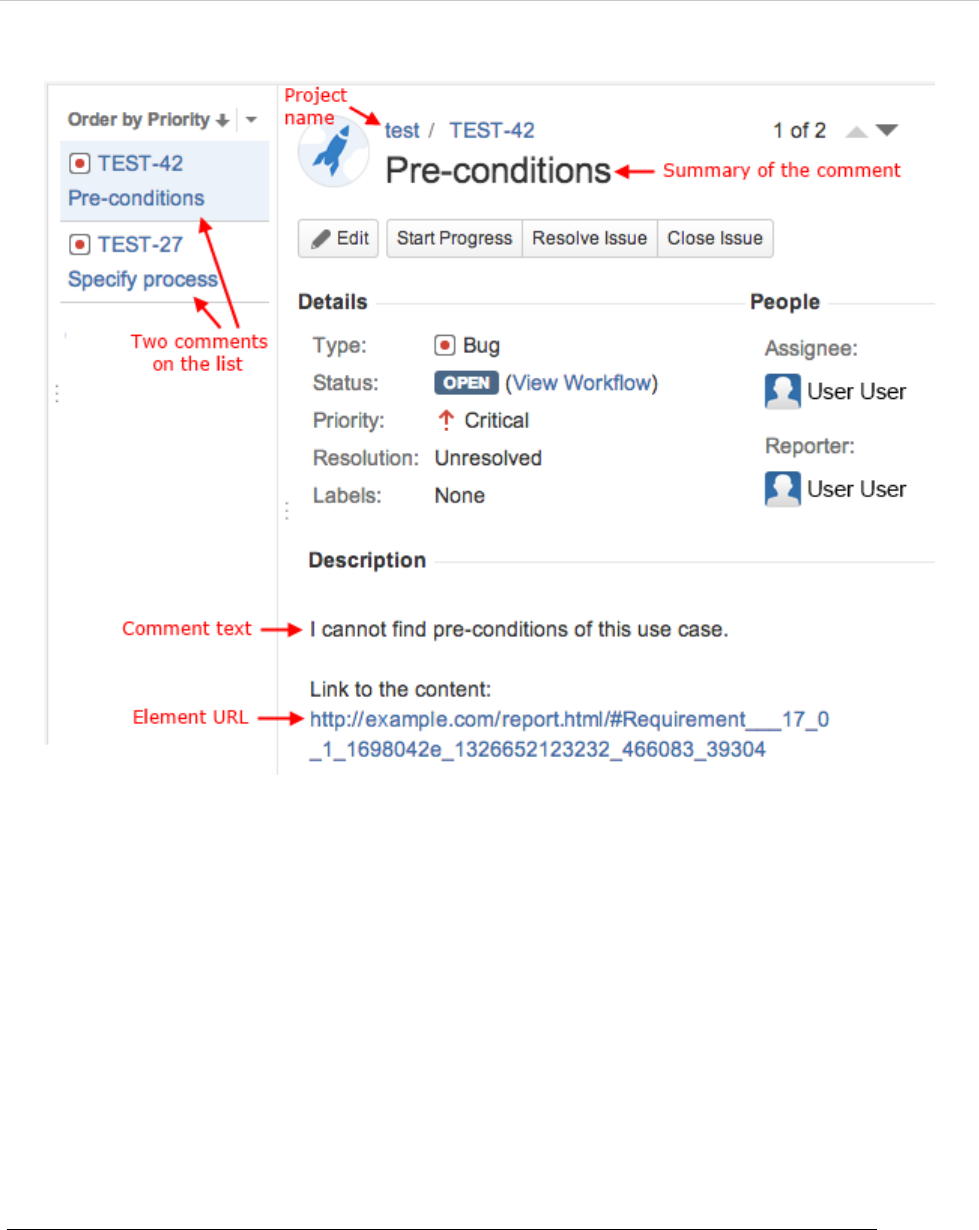
REPORT WIZARD
Generating Reports from Report Wizard
182
Copyright © 1998-2015 No Magic, Inc.
Figure 137 -- The Representation of Web Portal Report Comments on JIRA (a Fragment of JIRA Window)
6.8 Uploading Reports to Remote Locations
This feature allows you to upload a generated report to a predefined remote location. Each remote location is
described in a “Profile” that holds all necessary information. You can use the Profile Management dialog to
add, edit, or delete a profile.
This section contains (6.8.1) Quick Guide and (6.8.2) Detailed Explanations. In the Quick Guide section, you
will learn how to create a profile step-by-step and how to use the created profile to upload a report to a remote
server. The Detailed Explanations section describes what a valid Profile is and some of the common mistakes
or errors when uploading a report.
6.8.1 Quick Guide
To create a profile:
1. In the Report Wizard dialog, click the "..." button (Figure 138). The Profile Management
dialog will open (Figure 139).

REPORT WIZARD
Generating Reports from Report Wizard
183
Copyright © 1998-2015 No Magic, Inc.
Figure 138 -- Dialog for Uploading Report to Remote Server
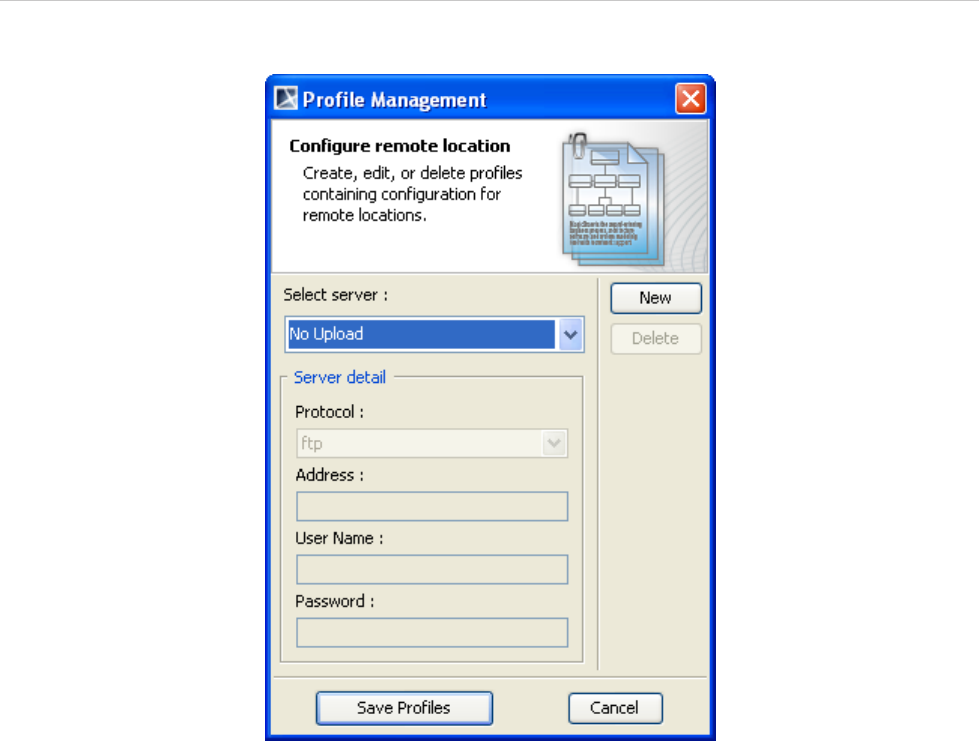
REPORT WIZARD
Generating Reports from Report Wizard
184
Copyright © 1998-2015 No Magic, Inc.
Figure 139 -- Profile Management Dialog
2. Click the New button to create a new Profile. The New server profile dialog will open
(Figure 140).
3. Enter the name of the profile to be created. You cannot leave the Name field empty nor can
you assign a name already been used in an existing set of Profiles.
4. Click OK.
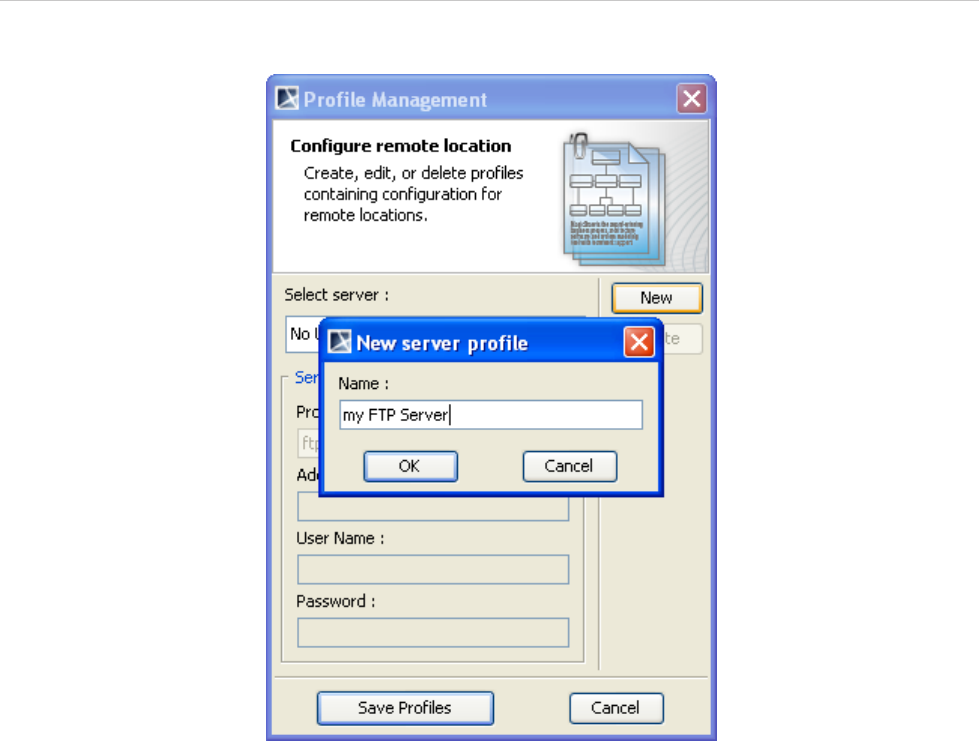
REPORT WIZARD
Generating Reports from Report Wizard
185
Copyright © 1998-2015 No Magic, Inc.
Figure 140 -- New Server Profile Dialog
5. To fill in the details of the profile, choose a Protocol and fill in a URL address. You can leave
the User Name and Password fields empty if desired.
6. Click the Save Profiles button to save the newly-added Profile and close the Profile
Management dialog (Figure 141).
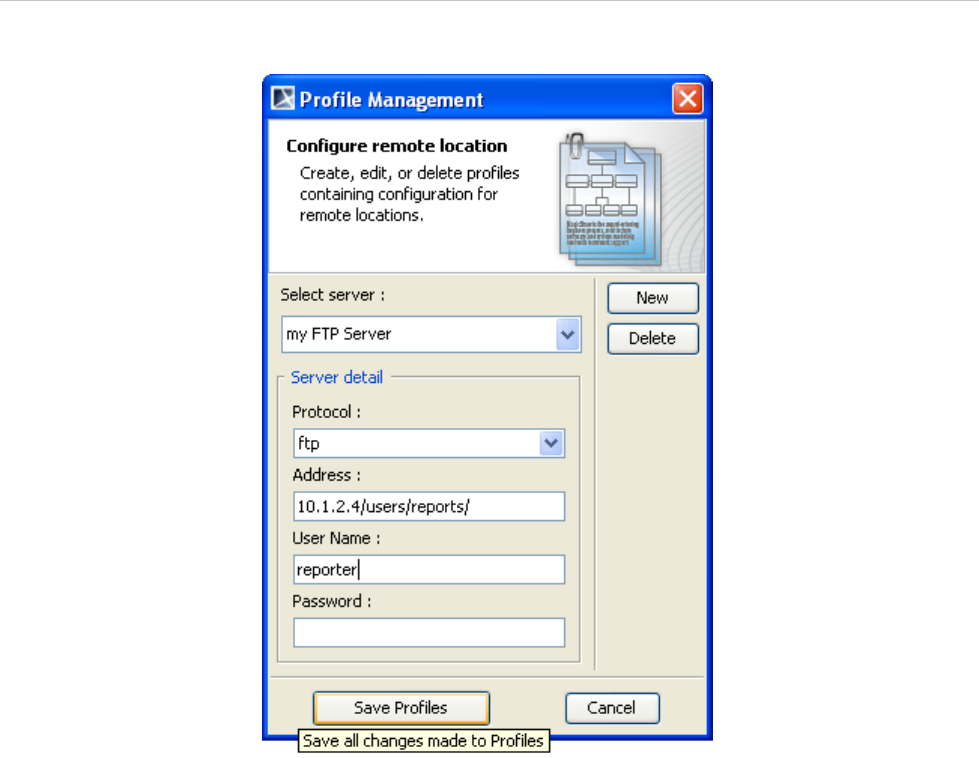
REPORT WIZARD
Generating Reports from Report Wizard
186
Copyright © 1998-2015 No Magic, Inc.
Figure 141 -- Enter Server Details
7. You are now back to the Report Wizard dialog and are ready to select the newly-created
Profile (Figure 142). Once the report has been generated, it will be uploaded to the location
specified in the Profile created earlier.
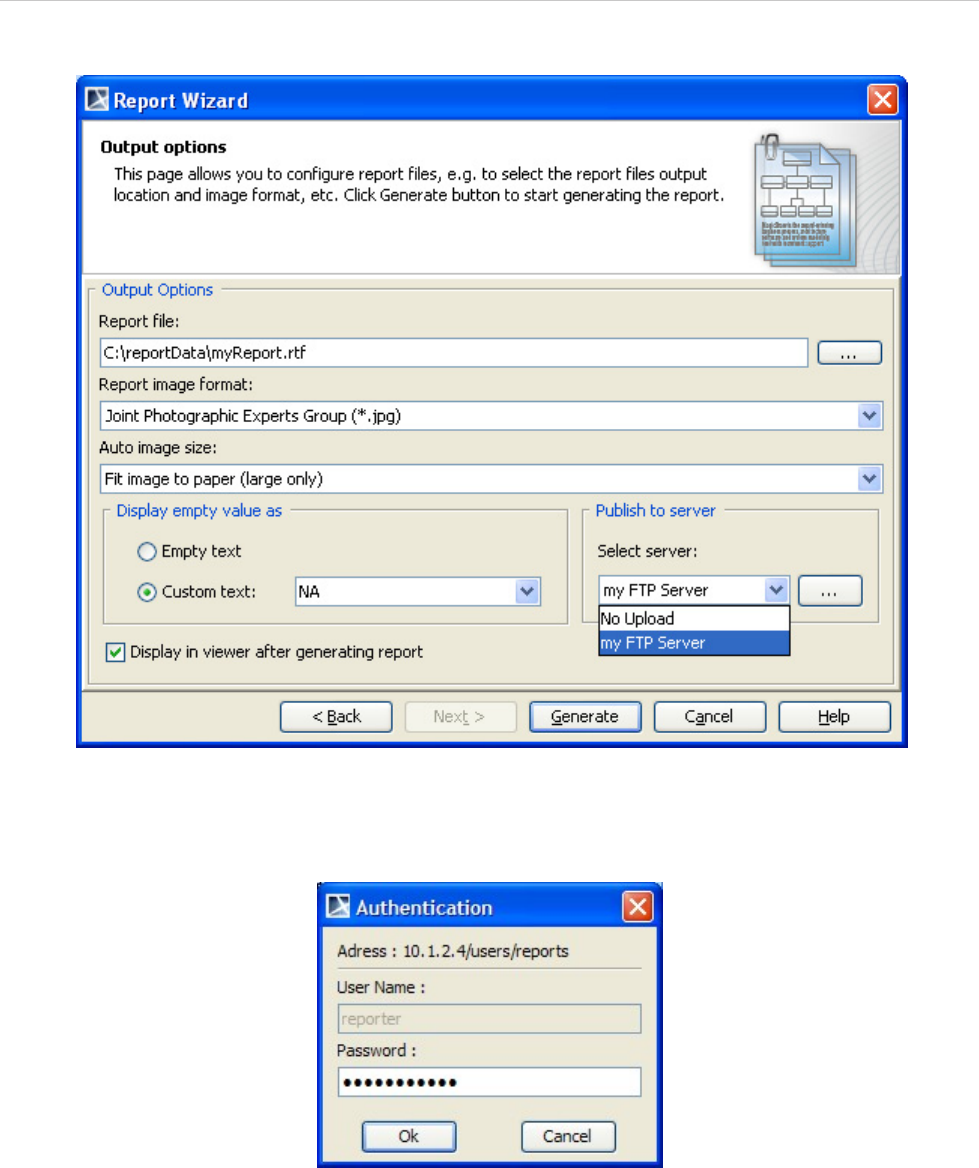
REPORT WIZARD
Generating Reports from Report Wizard
187
Copyright © 1998-2015 No Magic, Inc.
Figure 142 -- Selecting Server Profile
8. Enter authentication information in the Authentication dialog and click OK (Figure 143).
Figure 143 -- Authentication Dialog
9. If the report has been successfully uploaded, a message dialog will open showing the
following message (Figure 144).
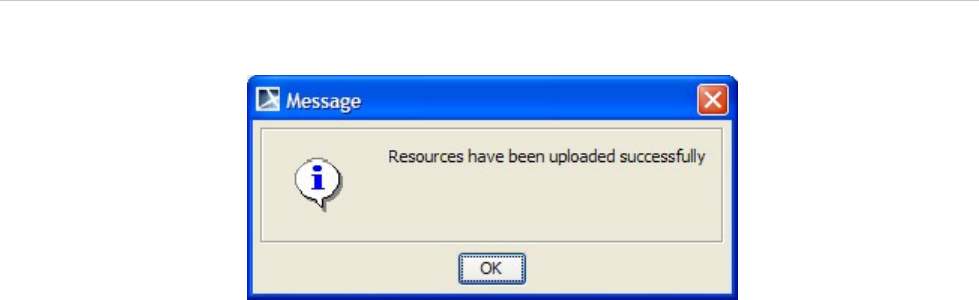
REPORT WIZARD
Generating Reports from Report Wizard
188
Copyright © 1998-2015 No Magic, Inc.
Figure 144 -- Successful Report Upload
10. Click OK.
6.8.2 Detailed Explanations
This section contains two parts: (6.8.2.1) Using the Profile Management dialog (Figure 139) and (6.8.2.2)
Upload Problems illustrating problems that may arise when uploading a report to a remote location.
6.8.2.1 Using Profile Management Dialog
This section contains explanation about (i) Profile Management dialog buttons and (ii) Profile Management dia-
log fields, describing the dialog in Figure 139.
(i) Profile Management Dialog Buttons
The Profile Management dialog contains five buttons:
(a) New: to add a new profile to the list of existing Profiles. You cannot create a profile with blank name
or with a name already been used. You can add and edit multiple Profiles. However, these profiles will
not be saved until you click the Save Profiles button.
(b) Remove: to remove the currently selected profile. Note that you cannot remove the "No Upload" pro-
file.
(c) Save Profiles: to save all profiles. If new profiles have been added or existing Profiles have been
modified, then these changes will be saved. All profiles will be checked for consistency or information
correctness. You will be asked to fix issues, if any. It is not possible to save profiles as long as invalid
information is detected. See Section (ii) Profile Management Dialog Fields below for the description
of "valid profile".
(d) Cancel: to abandon all newly-added profiles and all changes made to existing profiles. If you do not
make any changes to any profiles, clicking this button will bring you back to the Output Options pane
of the Report Wizard dialog. Otherwise, the Confirm Cancel dialog (Figure 145) will open. In this dia-
log, you will see the names of the profiles whose content you have changed. You can choose to either
abandon all changes or return to the Profile Management dialog and save the changes.
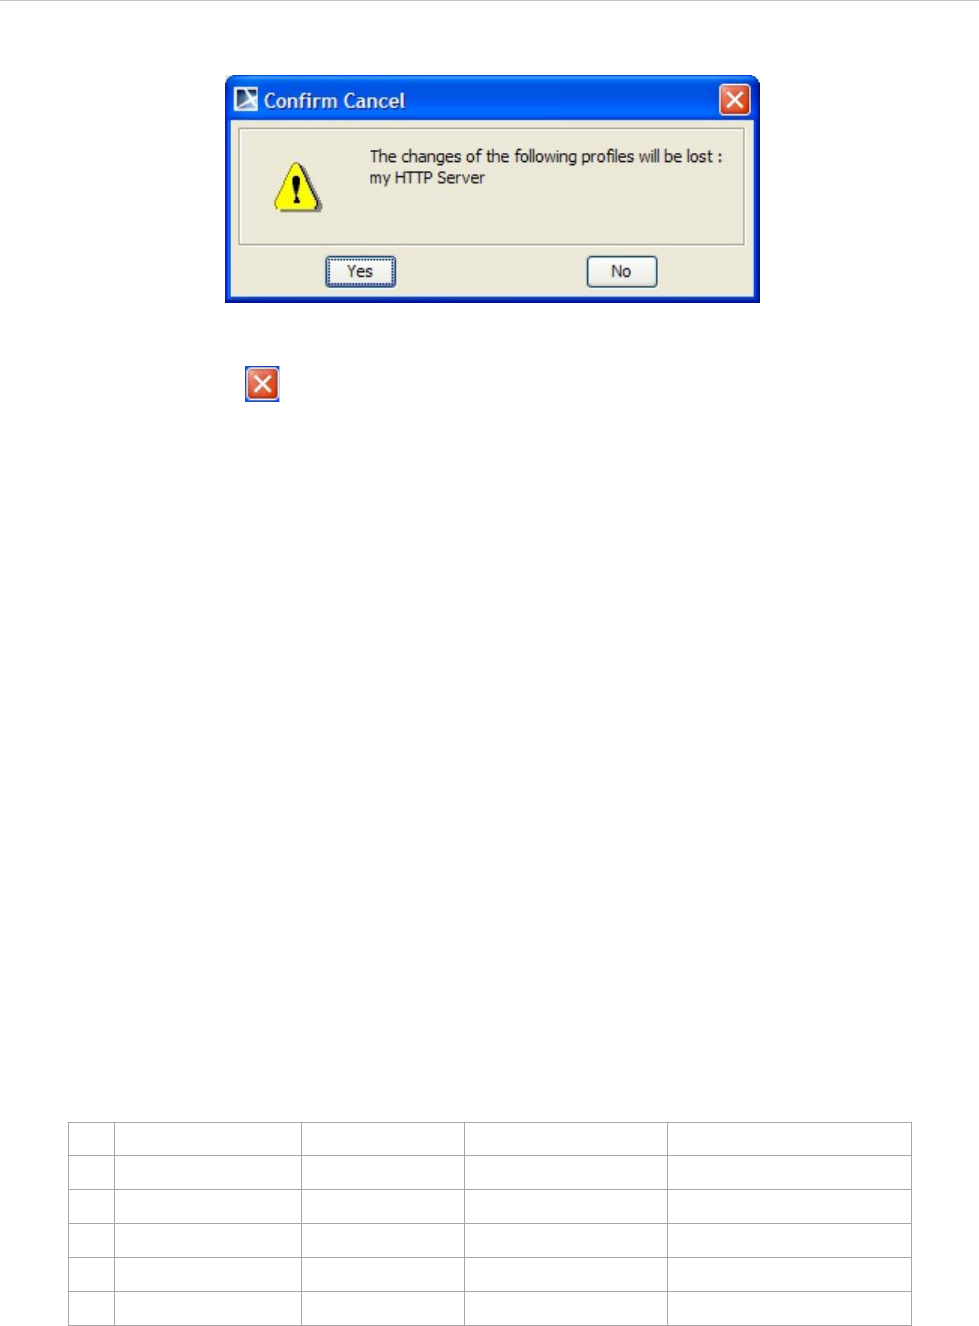
REPORT WIZARD
Generating Reports from Report Wizard
189
Copyright © 1998-2015 No Magic, Inc.
Figure 145 -- Cancel Confirmation Dialog
(e) Exit: this button is located in the upper-right corner of the Profile Management pane. It works in
a manner similar to the Cancel button.
(ii) Profile Management Dialog Fields
Profiles describe information necessary for sending a report to a remote location. The report will be saved
remotely with the same name as the locally-generated report and will overwrite any file with the same name on
the remote location.
The Address field is URL sensitive, and can hold protocol as well as username information. If the protocol or
username information is found in the Address field, the corresponding fields, namely the Protocol and User-
name fields, will be updated with the values from the Address field. At the very least, a profile must have a host-
name in the Address field.
You cannot save a profile unless this condition is met. The Username and Password fields contain sensitive
data and therefore are optional. If these fields are empty in a profile, you will be prompted for the username and
password when the server asks for your authentication.
• Profile name: This drop-down list holds all the existing Profiles. They are alphabetically sorted. The
"No upload" profile is always available and you can neither modify nor remove it. Select the "No
Upload" profile if you do not want to upload a report.
• Protocol: Five different protocols are supported: FTP, FTP over SSL (Secure Socket Layer), Webdav,
Webdav over SSL, and SSH (Secure Shell). You can either choose to select a protocol from the
protocol drop-down list or fill in the scheme in the address part of the profile. Certificates that are sent
by servers using secure traffic (FTP over SSL, Webdav over SSL, and SSH) are silently accepted.
The scheme identifiers and default port numbers of the five supported protocols are listed in Table 19.
Table 19 -- Scheme Identifier and Default Port Numbers of Five Supported Protocols
• Address: The Address field is the central part of a profile. Other fields, except the Password field, can
be set by it. An Address contains five different parts: scheme, username, hostname, port (number),
and (remote) path. Except hostname, every part is optional. Depending on the circumstances, you
Protocol Name Scheme Default Port Number Traffic Mode
1ftp ftp:// 21 Plain text
2webdav http:// 80 Plain text
3ftp + ssl ftps:// 990 Encrypted & Secure
4webdav + ssl https:// 443 Encrypted & Secure
5ssh ssh:// or sftp:// 22 Encrypted & Secure

REPORT WIZARD
Generating Reports from Report Wizard
190
Copyright © 1998-2015 No Magic, Inc.
might need to add a special port number and/or the remote path where you have write access. Even
though an address is valid without the path part, most servers will require a path and will not let you
write to the root directory. In every case, scheme and username parts will take precedence over the
selection in the Protocol Field or the content in the Username field. The following is the basic pattern
for the address field.
[scheme://][username@]hostname[:port][path]
• scheme: The supported schemes are ftp, ftps, http, https, ssh, or sftp. A scheme must be
followed by “://”.
• username: A username is needed for user authentication. It must be followed by “@”.
• hostname: Must be either an IP address (for example, 10.1.1.195) or a human readable URL
(for example, www.ftpserver.com), and a valid address.
• port: A port number where the server is listed. It is only necessary if the port number is
different from the default port for well-known services. It must be preceded by ":".
• path: A remote location where the report will be saved. Paths are Unix style paths and
therefore use “/” (forward-slash) as a delimiter. This is optional.
Examples of valid addresses:
• 10.1.1.195 (hostname only)
• 10.1.1.195/companyDav (hostname and path)
• 10.1.1.195:80/companyDav (hostname, port number, and path)
• ftp://www.ftpserver.com (scheme and hostname)
• john@10.1.1.195 (username and hostname)
• john@www.ftpserver.com/users/john/reports (username, hostname, and path)
• ssh://john@10.1.2.35:22/reports (all parts)
• User Name: This field specifies a username that will be used for authentication. If the address contains
a username part, the content of the Username field will be ignored. It will be either filled in or
overwritten with the username from the Address. A Profile with an empty username field is valid, but
you will be prompted for a username and password every time you upload to the server using this
profile.
• Password: A profile with a password must always be accompanied by a username. A Profile with a
password but without a username is invalid and therefore cannot be saved. The password field uses
an '*' to represent a character in a password. Saving a profile with a password will save the password
in an encrypted form. For example, if the password is 'test', it will be encrypted to '0013BCA5590DE'.
A Profile with an empty password field is valid, but you will be prompted for a password every time
you upload a report to the server in this profile.
6.8.2.2 Upload Problems
There are three main problems that can arise when uploading a report to a remote location.
(i) The server that you are trying to connect is not responding, or the valid address you have entered in the
Profile is not the address of the server that responds to your request (Figure 146).
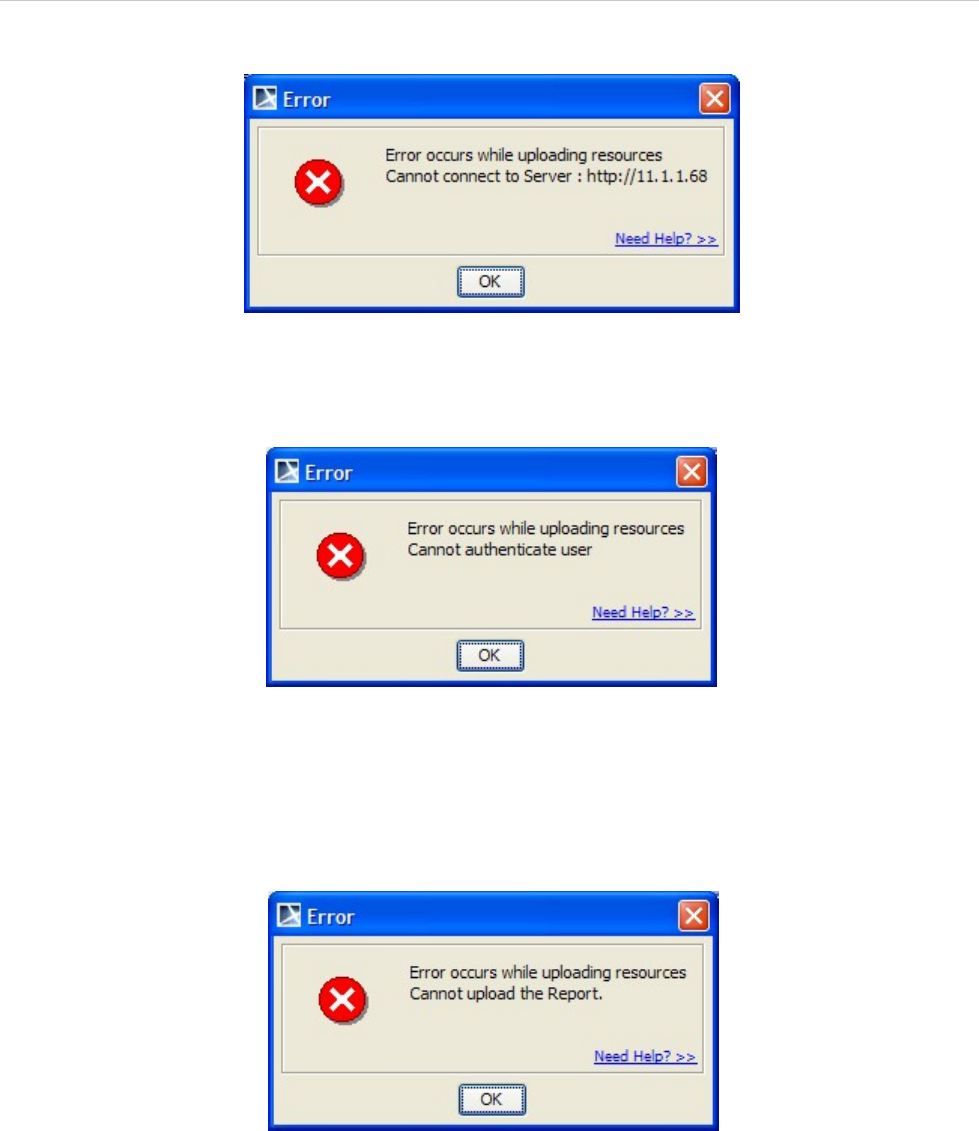
REPORT WIZARD
Generating Reports from Report Wizard
191
Copyright © 1998-2015 No Magic, Inc.
Figure 146 -- Connection Error Message Dialog
(ii) Your username and/or password are incorrect, and the server does not allow you to proceed (Figure 147).
Figure 147 -- Authentication Error Message Box Dialog
(iii) Various causes can lead to an unsuccessful attempt to upload a report. For example, the server runs out of
space and thus cannot save the report, or the connection could have been interrupted. Whatever the cause
might be, the report HAS NOT BEEN transmitted successfully (Figure 148). For more details on error mes-
sages, see MagicDraw logs.
Figure 148 -- Unsuccessful Upload Error Message Dialog
6.9 Adding Variables into an Output Report Filename
You can use the following variables and include them in an output report filename.
• Date variable
• Template variable
• Random number
• Project attribute
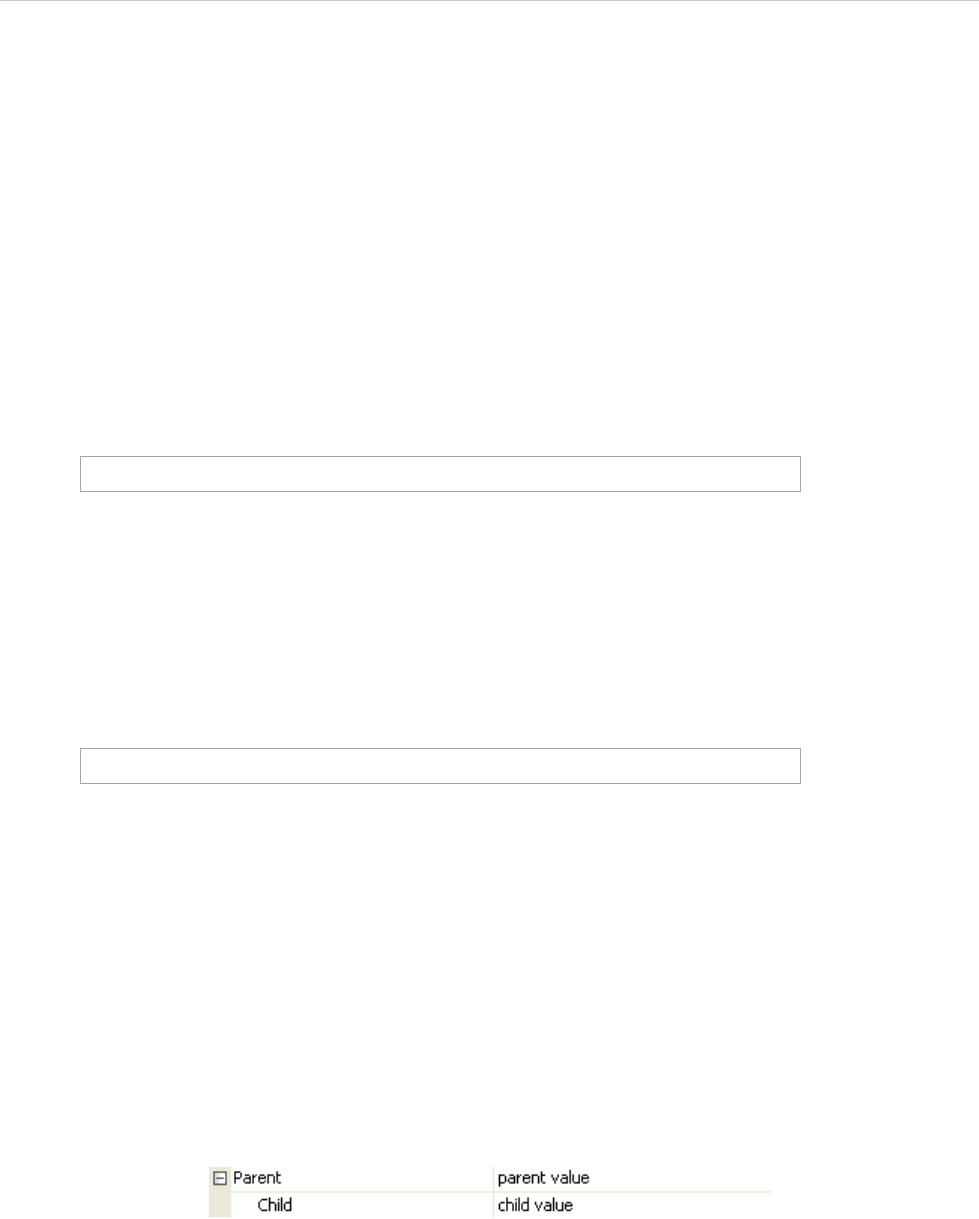
REPORT WIZARD
Generating Reports from Report Wizard
192
Copyright © 1998-2015 No Magic, Inc.
6.9.1 Date Variable
A date variable is a variable for the current date and time. (See section 4.12 $date above).
The date variable consists of:
• A date variable with the default format.
• A date variable with a customized date format.
6.9.1.1 Date Variables with Default Format
Using a date variable without an attribute causes it to format the current date and time into a default format.
The syntax: ${date}
For example:
The output report filename would be “index_2011-12-21 11.55.44.html”.
6.9.1.2 Date Variable with Custom Format
Using a date variable with an attribute causes it to format the current date and time into a specific format.
The syntax: ${date.get('format')} or ${date.get("format")}
For example:
The output filename would be “index_20111221-115544.html”.
6.9.2 Template Variable
A template variable is a variable for a template that is created in Report Wizard. It allows you to add all template
variables into an output report filename (see 1.1.2.2.4 Including Variables in a Template).
6.9.2.1 Including Template Variables in an Output Report Filename
When you include template variables created in an output report filename, the output filename which consists
of the variables will be converted into value. This section uses the following template variables as examples
(Figure 149).
Figure 149 -- Sample of Report Variables
6.9.2.2 Adding a Value of a Top-level Variable
You can retrieve a top-level variable in an output report filename by using the following syntax.
The syntax: ${Parent}
C:\OutputReport\index_${date}.html
C:\OutputReport\index_${date.get('yyyyMMdd-hhmmss')}.html
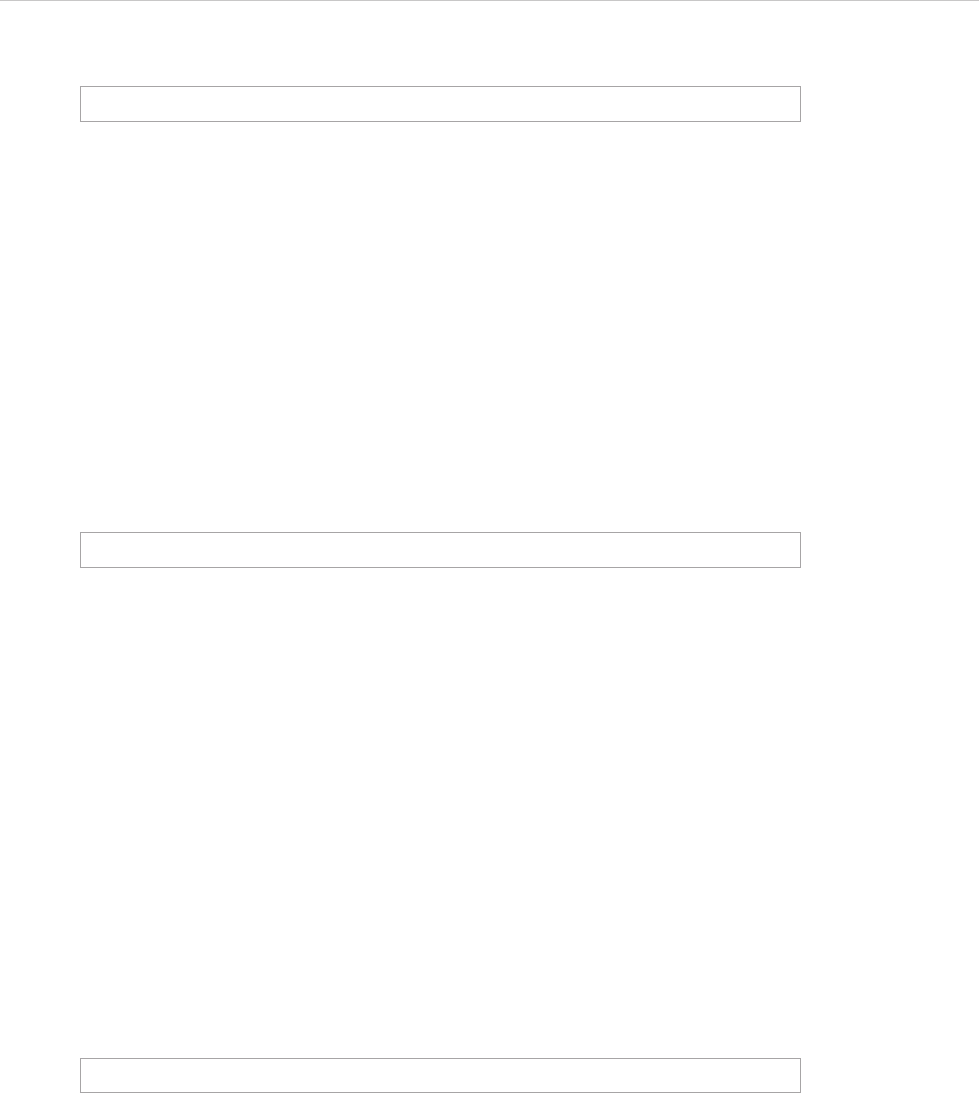
REPORT WIZARD
Generating Reports from Report Wizard
193
Copyright © 1998-2015 No Magic, Inc.
For example:
The report output filename would be “index_parent value.html”.
6.9.2.3 Adding a Value of a Child Variable
You can retrieve any of the following child variable values in an output report filename.
1. Getting a child variable at an index position:
The syntax: ${Parent.get(0)}
2. Getting a child variable by child names:
The syntax: ${Parent.get('Child')} or ${Parent.get("Child")}
3. Getting a child value by referencing its name (in this case “Child”):
The syntax: ${Parent.Child}
For example:
The output report filename would be “index_child value.html”.
6.9.3 Random Number
Report Wizard supports only pseudorandom numbers in an output report filename.
The random number consists of:
• A random number with the default distributed int value.
• A random number with a distributed int value between 0 (inclusive) and specified value (exclusive).
6.9.3.1 Random Number with the Default Distributed Integer Value
You can use Report Wizard to generate pseudorandom numbers with the default distributed integer value.
The syntax: ${random}
For example:
The output report filename would be “index_21547.html”.
6.9.3.2 Random number with a distributed integer value between 0 (inclusive) and specified value
(exclusive)
You can use Report Wizard to generate pseudorandom numbers with the default distributed integer value
between 0 and a specific value.
The syntax: ${random.nextInt(n)}
The Parameters:
“n” - the bound on the random number to be returned. The “n” value must be a positive integer.
C:\OutputReport\index_${Parent}.html
C:\OutputReport\index_${Parent.get('Child')}.html
C:\OutputReport\index_${random}.html
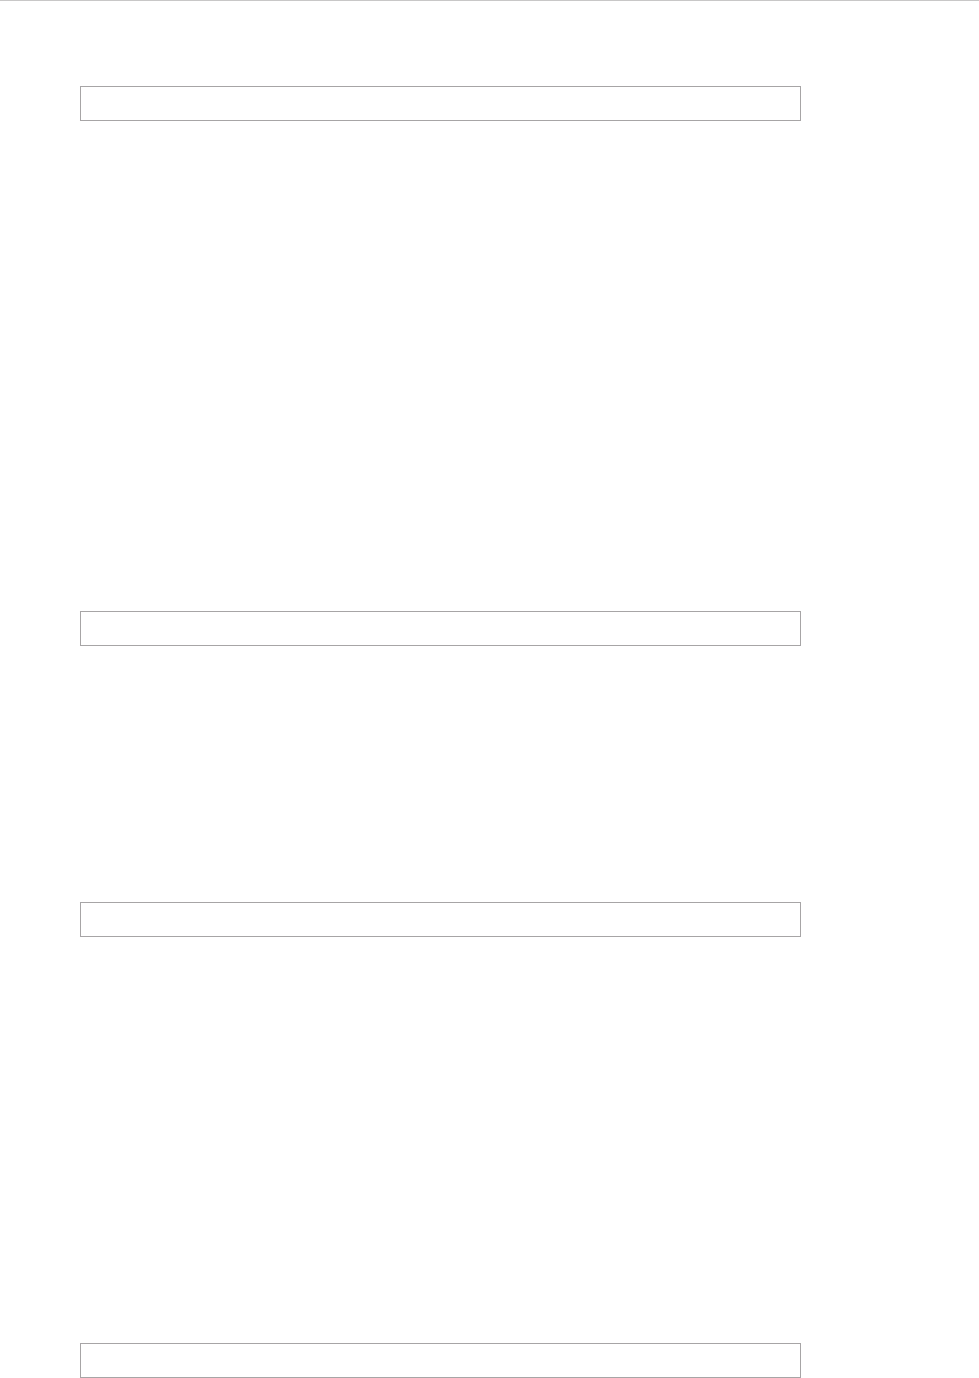
REPORT WIZARD
Generating Reports from Report Wizard
194
Copyright © 1998-2015 No Magic, Inc.
For example:
The output report filename would be “index_457.html”.
6.9.4 Project Attribute
You can add a project attribute or information about a project into an output report filename.
The project attribute consists of:
• Project name
• Teamwork version
6.9.4.1 Project Name
You can retrieve the name of a project by using the following syntax.
The syntax: ${project.name}
For example:
The output report filename would be “index_myProject.html”.
6.9.4.2 Teamwork version
You can retrieve a teamwork version of a project by using the following syntax.
The syntax: ${project.version}
For example:
The output report filename would be “index_1234.html”.
6.9.5 Exception Flow
You may accidentally specify an invalid output report filename such as:
• An invalid syntax variable.
• A variable that does not exist in a template variable.
• An invalid parameter.
If this happens, Report Wizard will use this variable as a filename and a warning message will open in a Magic-
Draw log file (\.magicdraw\version\md.log).
For example:
A single quote after “yyyyMMdd-hhmmss” was missing. Therefore, the output filename would be
“index_${date.get('yyyyMMdd-hhmmss)}.html” and a warning message would open in MagicDraw (Figure 150).
C:\OutputReport\index_${random.nextInt(1000)}.html
C:\OutputReport\index_${project.name}.html
C:\OutputReport\index_${project.version}.html
C:\OutputReport\index_${date.get('yyyyMMdd-hhmmss)}.html
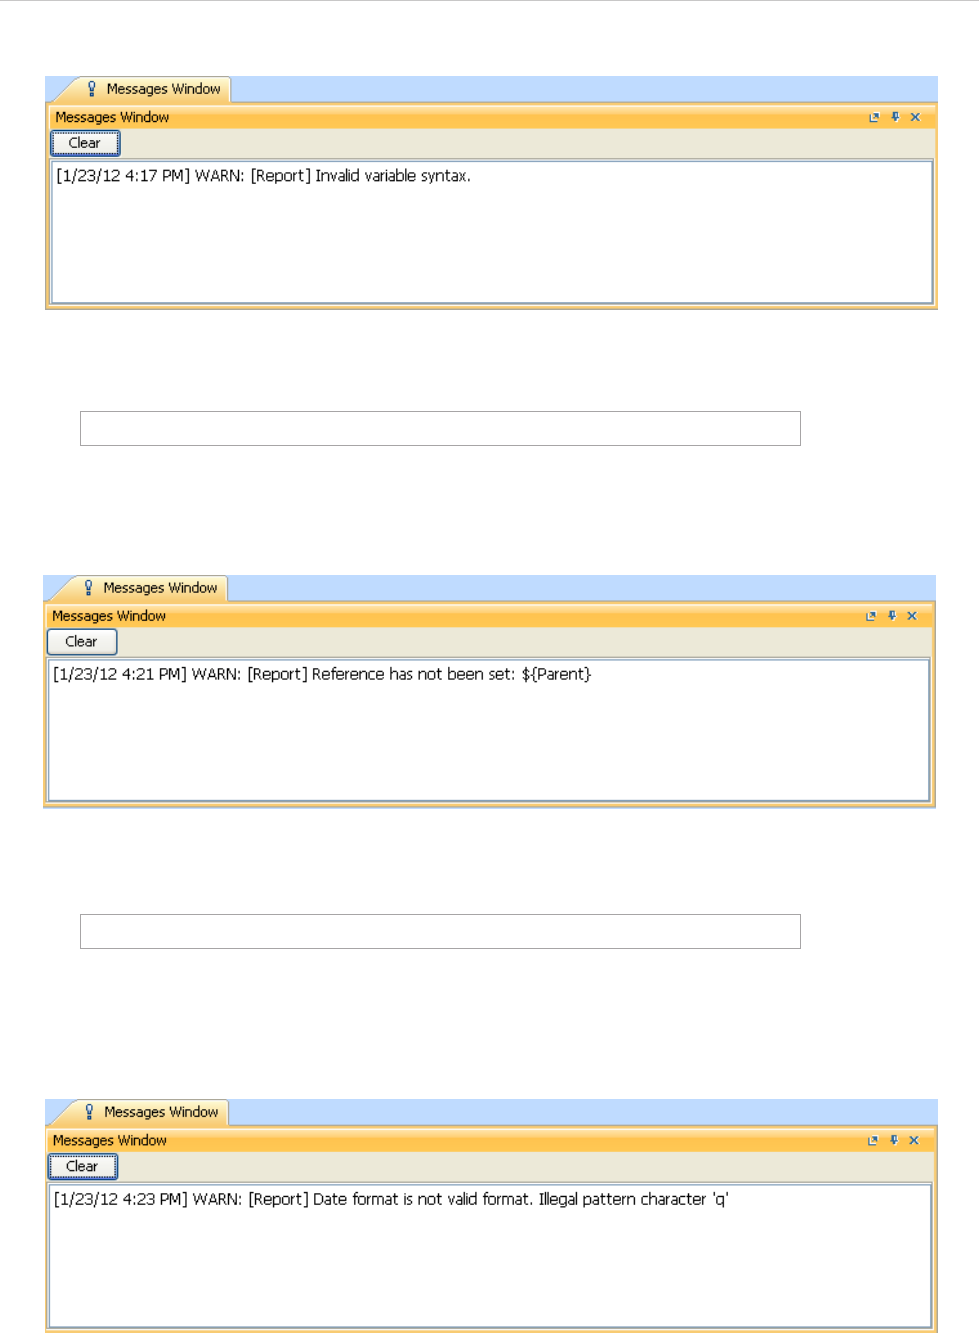
REPORT WIZARD
Generating Reports from Report Wizard
195
Copyright © 1998-2015 No Magic, Inc.
Figure 150 -- A Warning Message of an Invalid Variable Syntax
For example:
“${Parent}” was not in the report template variable. Therefore, the output filename would be
"index_${Parent}.html" and a warning message would open in MagicDraw (Figure 151).
Figure 151 -- A Warning Message of a Variable that Does not Exist in a Template Variable
For example:
In this example, ‘yyyy-MM-dd qq’ is an invalid parameter. Therefore, output filename would be
“index_${date.get('yyyy-MM-dd qq').html” and a warning message would open in MagicDraw (Fig-
ure 152).
Figure 152 -- A Warning Message of an Invalid Parameter
C:\OutputReport\index_${Parent}.html
C:\OutputReport\index_${date.get('yyyy-MM-dd qq')}.html
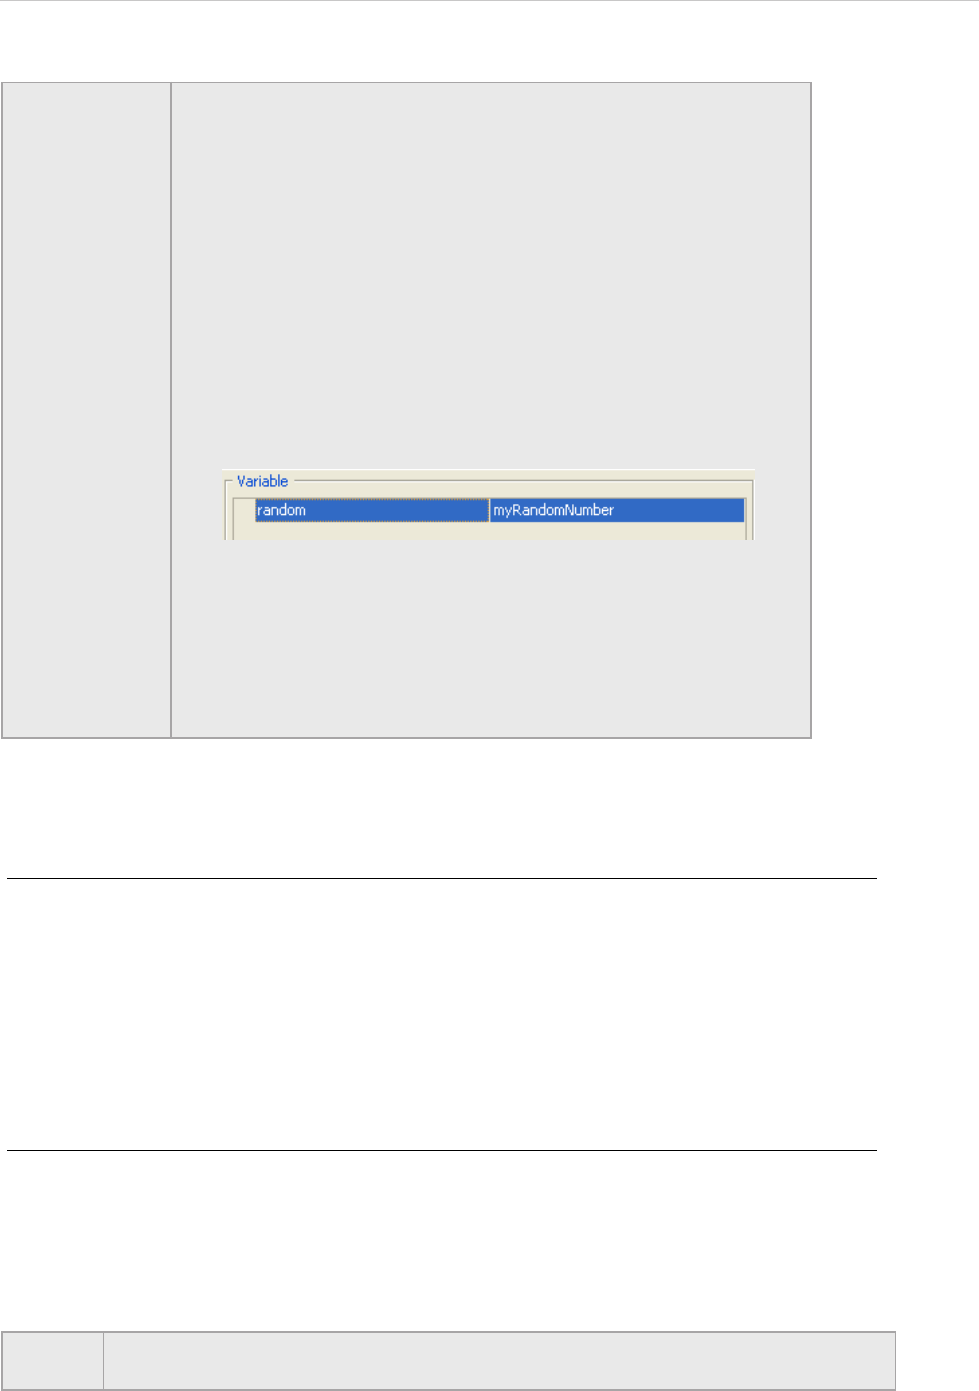
REPORT WIZARD
Generating Reports from Report Wizard
196
Copyright © 1998-2015 No Magic, Inc.
6.10 FAQs
To generate an output report document from Report Wizard:
1. On the Tools menu, click Report Wizard. The Report Wizard dialog will open.
2. Select the template or create a new one. Click Next.
3. Specify Report Data and add information for the variables. Click Next.
4. Select the document scope from the corresponding packages. Click Next.
5. Select the output location, images format, and text for blank fields.
6. Click Generate.
To add a new report template:
1. On the Tools menu, click Report Wizard. The Report Wizard dialog will open.
2. Click New. The New dialog will open.
3. Enter the template name and description. Click the “...” button to specify the template file
location.
4. Click Create.
NOTE • All variables should be able to be combined together. For example:
C:\OutputReport\index_${project.name}_${date}.html
The output filename would be “index_myProject_2011-12-21
11.55.44.html”.
• The template variable is the highest priority of all other variables. For
example:
C:\OutputReport\index_${random}.html
If you specify a template variable whose name is at random in the
Report Data, the variable value will be used as the filename.
Figure 153 -- Template Variable Name at Random
The output filename would be “index_myRandomNumber.html”.
If you do not specify a template variable whose name is at random in
the Report Data, the random number with the default distributed inte-
ger value will be used as the filename.
The output filename would be “index_12345.html”.
NOTE Once a new template has been created, Report Wizard will add a folder with the
entered template name and save the selected template in this folder.
REPORT WIZARD
Generating Reports from Report Wizard
197
Copyright © 1998-2015 No Magic, Inc.
To remove a template:
1. On the Tools menu, click Report Wizard. The Report Wizard dialog will open.
2. Select a template from the list and click Delete.
To modify a template file:
1. On the Tools menu, click Report Wizard. The Report Wizard dialog will open.
2. Select a template from the list and click Open. The default editor and a template file for
editing will open.
3. Modify the template and perform the save command in the editor.
To add a Report Data into the template:
1. On the Tools menu, click Report Wizard. The Report Wizard dialog will open.
2. Select a template or create a new one. Click Next. The Select Report Data pane will appear.
3. Click New. The New dialog will appear.
4. Enter the Report Data name and description. Click Create. A new Report Data will be
created. In the next step, you may add new fields or delete the existing ones.
To remove Report Data from the template:
1. On the Tools menu, click Report Wizard. The Report Wizard dialog will open.
2. Select a template or create a new one. Click Next. The Select Report Data pane will appear.
3. Select the Report Data from the list and click Delete.
To set the default viewer option for the report file:
1. On the Tools menu, click Report Wizard. The Report Wizard dialog will open.
2. Select a template and Report Data and specify the variables and package scope. Click the
Next button to proceed.
3. At the last wizard step, select the Display in viewer after generating report check box. The
report output will be displayed in the default editor or browser.
To change an output image format:
1. On the Tools menu, click Report Wizard. The Report Wizard dialog will open.
2. Select a template and Report Data and specify the variables and package scope. Click the
Next button to proceed.
3. At the last wizard step, select the output image format from the Report Image Format box.
NOTE Once removed, the selected template with its folder and reports cannot be recovered.
NOTE A different editor will be used for each template format. For example, MS Word could be
used for *.rtf template modification, or Macromedia Dreamweaver could be used for
*.html template editing.
NOTE The supported image formats include:
• *.PNG and *.JPG: for all supported report templates.
• *.SVG: for HTML, XML and Text report templates.
• *.EMF and *.WMF: for RTF, OOXML and Text report templates.
REPORT WIZARD
Generating Reports from Report Wizard
198
Copyright © 1998-2015 No Magic, Inc.
To change an empty value configuration:
1. On the Tools menu, click Report Wizard. The Report Wizard dialog will open.
2. Select a template and Report Data and specify the variables and package scope each
time.Click the Next button to proceed.
3. At the last wizard step, select an option for output on blank fields:
• Select Display empty value or Display value as, and select NA or
• Enter the text to represent other than null value when the template query fields return
empty.
To add a new variable:
1. On the Tools menu, click Report Wizard. The Report Wizard dialog will open.
2. Select a template and Report Data. Click the Next button to proceed.
3. Click the New button when the Variable pane opens. The Variables dialog will open.
4. Enter the name of a new variable and its value (the value can be modified later after the
variable has been created).
5. Click Create.
To delete a variable:
1. On the Tools menu, click Report Wizard. The Report Wizard dialog will open.
2. Select a template and Report Data. Click the Next button to proceed.
3. Select a field and click Delete when the Variable step opens.
To modify a variable:
1. On the Tools menu, click Report Wizard. The Report Wizard dialog will open.
2. Select a template and Report Data. Click the Next button to proceed with the steps.
3. Select a field and modify its value when the Variable step opens. The value can be modified
in the properties list or in the Field Value box below the properties list.
To select a package for report generation:
1. On the Tools menu, click Report Wizard. The Report Wizard dialog will open.
2. Select a template and Report Data and specify the variables. Click the Next button to
proceed.
3. The package tree will open. Select the package of the project and click the Add button to add
the elements from the package to the report.
To generate a normal text output format:
1. Create the MagicDraw query in the text file using the text editor (Figure 154).
NOTE You cannot recover any deleted Report Data.
NOTE Clicking the Add button will add only the selected element, not its children, to the report
scope. In order to include all children, click the Add Recursively button instead.
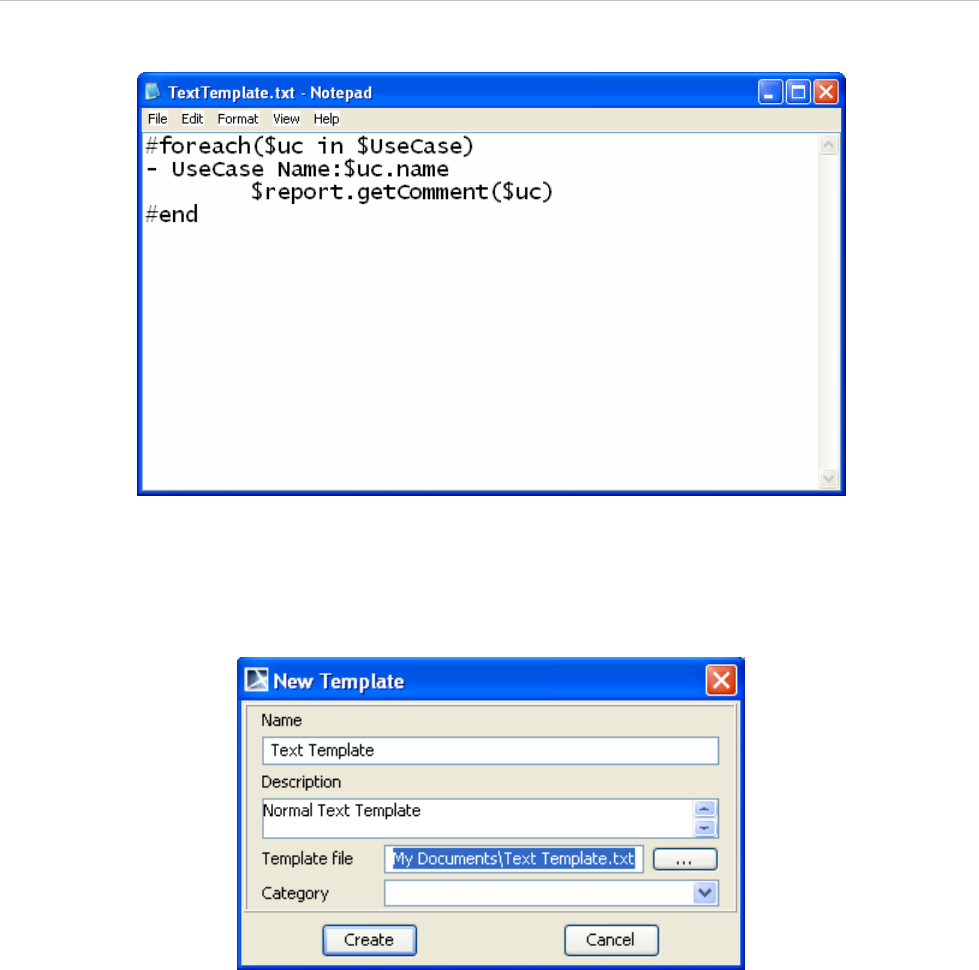
REPORT WIZARD
Generating Reports from Report Wizard
199
Copyright © 1998-2015 No Magic, Inc.
Figure 154 -- Entering Query in the Normal Text Template
2. Create a new template in the Report Wizard dialog through the New Template dialog
(Figure 155).
Figure 155 -- Creating New Text Template
3. Select Text Template (Figure 156) and generate the output report (Figure 157).
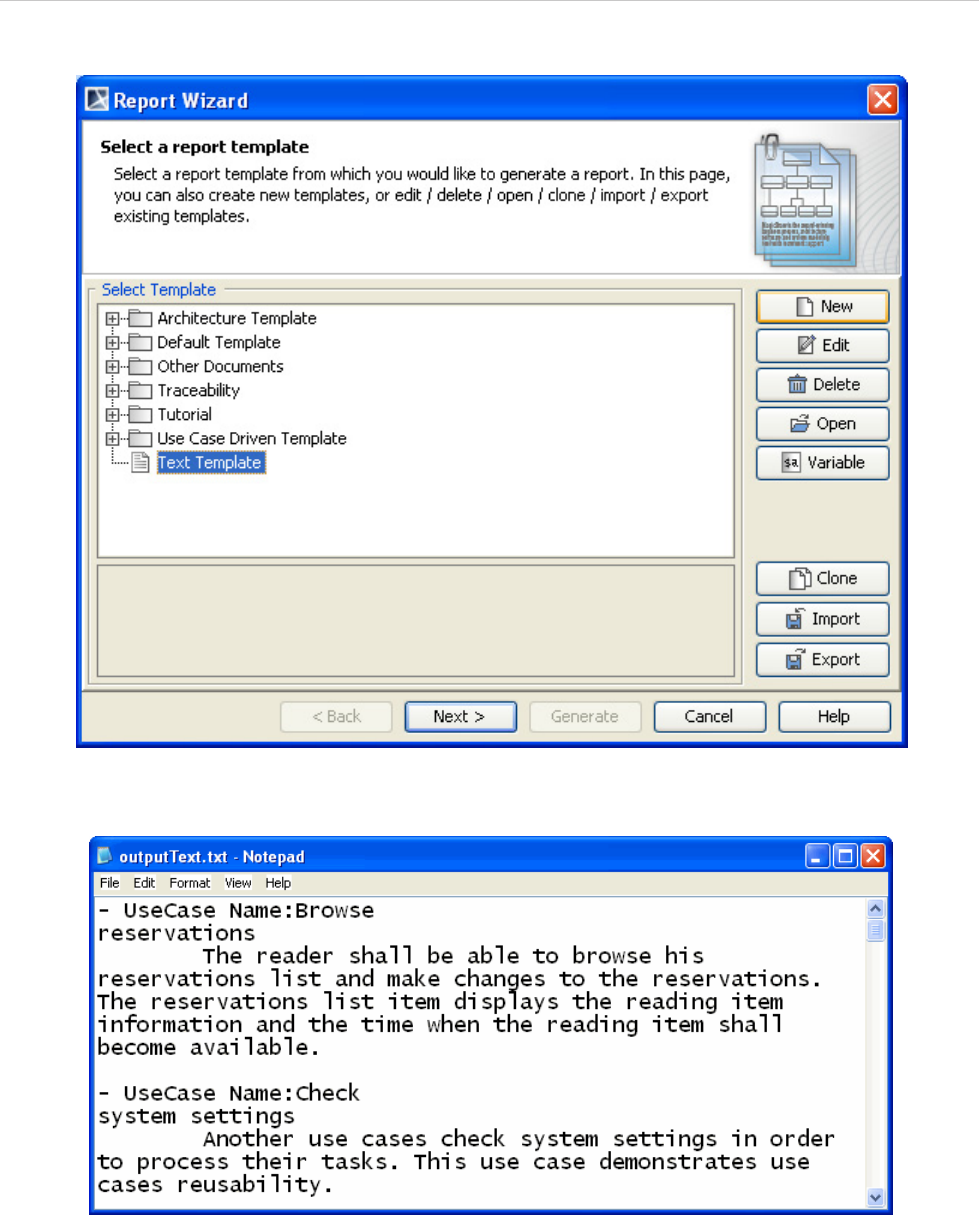
REPORT WIZARD
Generating Reports from Report Wizard
200
Copyright © 1998-2015 No Magic, Inc.
.
Figure 156 -- Selecting Text Template to Generate Report Output
Figure 157 -- Text Output Report
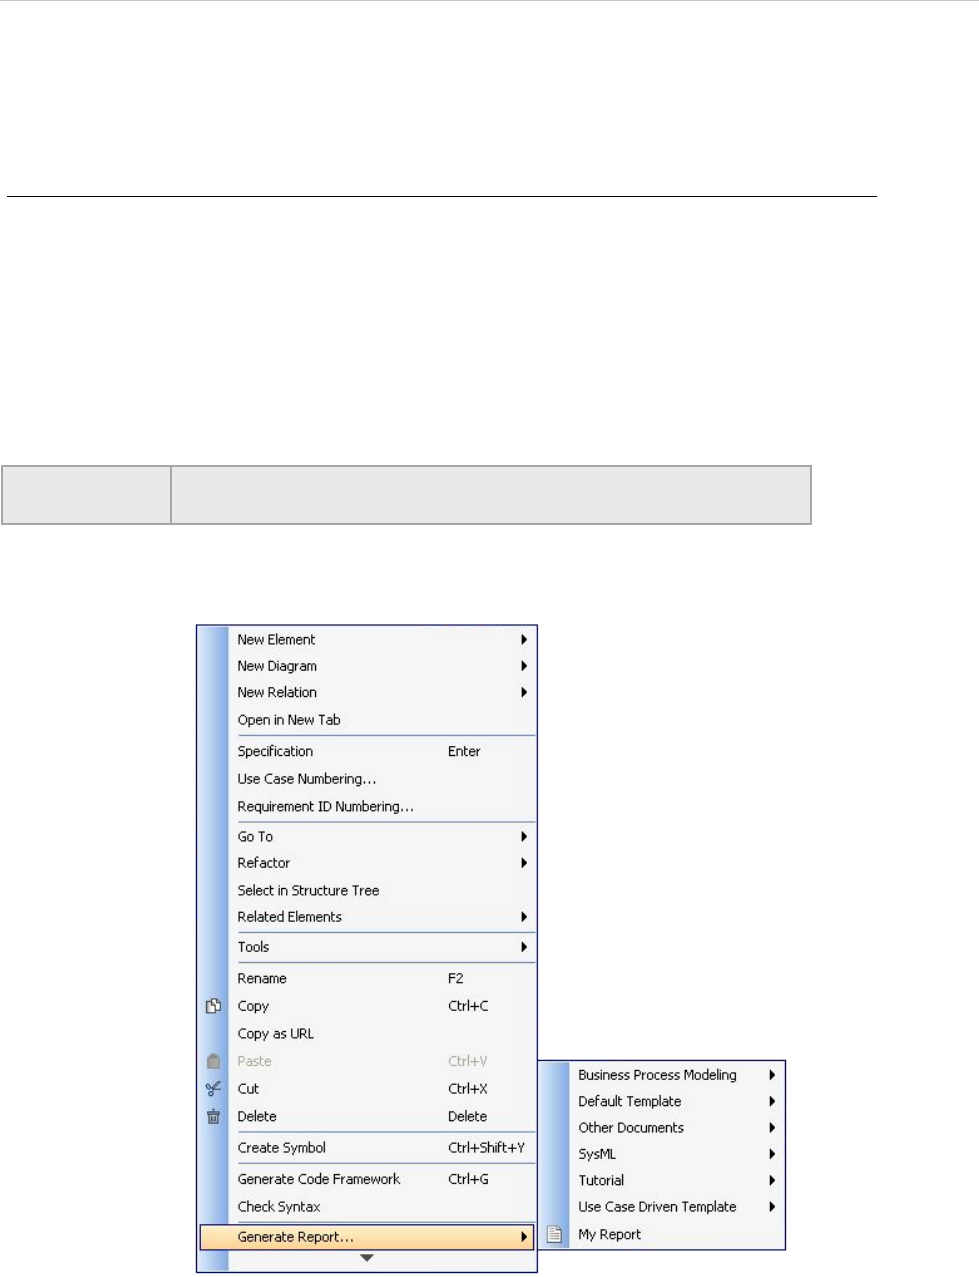
REPORT WIZARD
Generating Reports from the Containment Tree
201
Copyright © 1998-2015 No Magic, Inc.
7. Generating Reports from the Containment Tree
You can generate reports directly from the Containment tree in MagicDraw.
To generate reports from the Containment tree:
1. Either:
Right-click a package in the Containment tree to open the shortcut menu, as
displayed in Figure 158. Select Generate Report..., and then select a template from
the category list or template item.
or
Right-click a Report Data in the Containment tree to open the shortcut menu, as
displayed in Figure 159. Select Quick Generate Report....
Figure 158 -- Containment Tree Shortcut Menu - Generate Report
NOTE You must specify the template and data in the Report Data before
using the Quick Generate Report... shortcut menu.
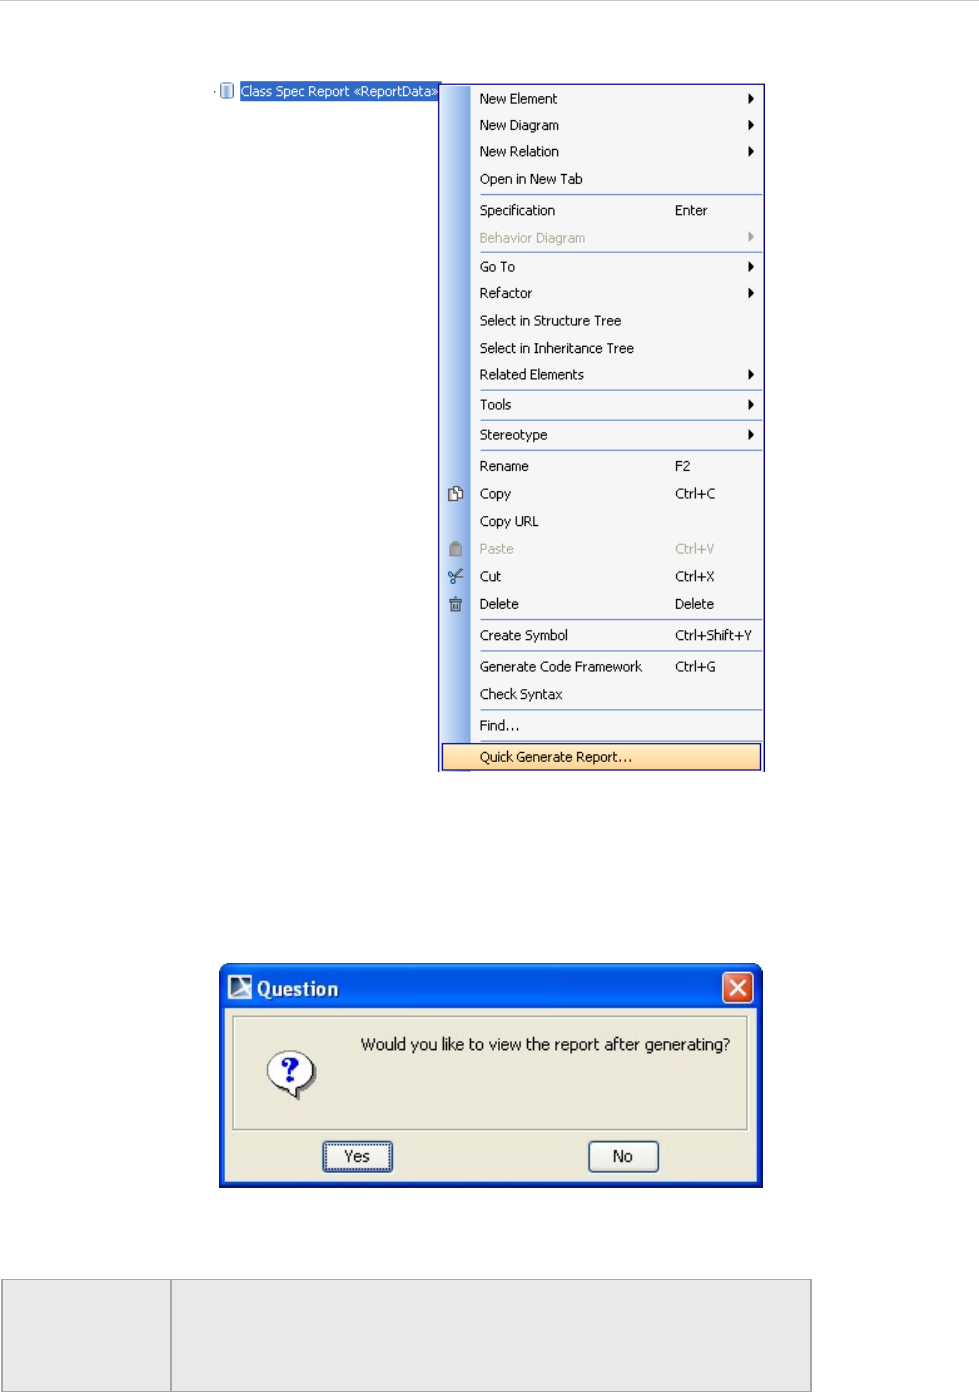
REPORT WIZARD
Generating Reports from the Containment Tree
202
Copyright © 1998-2015 No Magic, Inc.
Figure 159 -- Containment Tree Shortcut Menu - Quick Generate Report
2. Select the save location and type the filename.
3. A dialog will open, asking if you want to open the report in the default viewer after the report
generating process is complete (Figure 160).
Figure 160 -- Question Dialog - View Generated Report
NOTE • To open the Report Wizard dialog and modify the data or output
properties, click the Report Wizard... on the shortcut menu.
• By default, the quick generate report command will select the default
settings from the last changes saved to the Report Data.

REPORT WIZARD
Generating Reports from the Command Line
203
Copyright © 1998-2015 No Magic, Inc.
8. Generating Reports from the Command Line
To generate reports and schedule report printing, type the command in the terminal. This feature allows you to
generate reports without opening the MagicDraw application and using Report Wizard.
8.1 Generate - the Command to Generate Reports
To generate a report from the package scope:
• generate - project projectFileName -output outputFileName -template
templateName -package packageNameList
To generate a report from the element scope:
• generate -project projectFileName -output outputFileName -template
templateName -element elementNameList
To generate a report from the option specified in the properties file:
• generate -properties propertiesFileName
To generate a Teamwork password for a properties file:
• generate -generatepassword password
Description
The Generate command creates a report document with a received set of information from arguments and
parameters. The information will then be generated as a report document to the specified output file. By default,
an argument is the specified data of the parameters that are invoked. If the -properties option is specified,
the argument is the name of a properties file. A properties file contains other parameters with the specified data
of each parameter.
Synopsis
• -project projectFileName
This command specifies a filename with the MagicDraw project path.
• -output outputFileName
This command specifies a filename with the output file path.
• -template templateName
This command specifies a template name to be used for generating a report document. The
template must exist in MagicDraw prior to using this command, otherwise an error will occur. If
the template name is not specified, the template specified in the Report Data (specified in -
report reportName) will be used instead.
• -package packageNameList
This command specifies the name of one or more packages from a MagicDraw project that will
be included in the report. Package entries must be separated by a semicolon (;).
• -element elementNameList
This command specifies the name of one or more elements from a MagicDraw project that will
be included in the report. Element entries must be separated by a semicolon (;).

REPORT WIZARD
Generating Reports from the Command Line
204
Copyright © 1998-2015 No Magic, Inc.
• [options]
The command-line options.
• -properties propertiesFileName
This command specifies the name of a properties file to utilize. Use only with -properties.
• -generatepassword password
This command generates an encrypted password to be used with a properties file.
Options
The command line feature supports a set of options that are useful in adding more configuration possibilities.
• -report reportName
This command specifies the name of a Report Data file or Report Data element. The Report Data file
must exist in MagicDraw prior to using this command, otherwise an error will occur. If the
reportName is not specified, the previous Report Data will be set and used instead.
• -autoImage 0|1|2|3
This command specifies how an image will be shown in a report document. The default value for this
argument is 1.
0 – No resize.
1 – Fit image to paper (large only).
2 – Fit and rotate image (clockwise) to paper (large only).
3 – Fit and rotate image (counter-clockwise) to paper (large only)
• -imageFormat jpg|png|svg|emf|wmf
This command specifies an image format in a report document. The default value for this argument is
jpg.
jpg – Joint Photographic Expert Group
png – Portable Network Graphics
svg – Scaling Vector Image
emf – Microsoft Windows Enhanced Metafile
wmf – Windows Metafile
• -recursive true|false
This command specifies how to select a package in a MagicDraw project. The default value for this
argument is true.
true – select the specified package and its recursive package.
false – select only the specified package.
• -includeAuxiliary true|false
This command is used to select packages including auxiliary packages. The default value is false.
• -outputOnBlankField stringValue
This command will show a string value in a blank field in a report document. The default value for this
argument is “”.
• -category categoryName
This command specifies a template category.
• -fields[name=value]
This command specifies a variable.
• -server serverName|IPAddress
This command specifies the name or IP Address of a Teamwork Server project.

REPORT WIZARD
Generating Reports from the Command Line
205
Copyright © 1998-2015 No Magic, Inc.
• -login loginName
This command specifies a login name to log onto Teamwork Server.
• -password password
This command specifies a password to log on to Teamwork Server.
• -spassword encryptedPassword
This command specifies an encrypted password (Teamwork password) to log onto Teamwork
Server. This option is available only in a properties file.
• -upload serverAddress
This command specifies serverAddress consisting of a scheme, userInfo, host, port, and path to con-
nect and upload a generated report to a server (see 8.1.2.3 Upload generated report to server).
• -overwrite true|false
This command overwrites any previously generated files. The default value for this argument is true.
true – overwrites all files automatically (removes any existing file before generating a report.)
false – If the file exists, the following prompt message will open:
If you type ‘y’ or ‘yes’, Report Wizard will generate a new report and use it to replace the previous one.
If you type ‘n’ or ‘no’, Report Wizard will generate no report and terminate the process.
• -pversion projectVersion
This command specifies a Teamwork project version.
Using Command Line
You can use the command line on Windows, Linux, or Unix.
To use the command line on Windows:
1. Run a command line console. In the Console window, go to the local installation of the
MagicDraw application.
2. Go to the plugins\com.nomagic.magicdraw.reportwizard folder and type the
command line there.
To use the command line on Linux or Unix:
1. Run a terminal (command line console). In the Console window, go to the local installation of
the MagicDraw application.
2. Go to the plugins\com.nomagic.magicdraw.reportwizard folder and type the
command line there.
See the following examples of command line on Windows and Linux or Unix respectively.
Output file already exists.
Would you like to replace the existing file? [y][n]:

REPORT WIZARD
Generating Reports from the Command Line
206
Copyright © 1998-2015 No Magic, Inc.
Figure 161 -- Samples of Command Line
Figure 162 -- Samples of Command Line on Linux or Unix
8.2 Generating a Report from Teamwork Server
The available command arguments include:
• -server, -login, and -password are key arguments to log on to Teamwork Server. You will be
prompted for a password when trying to enter -server and -login without -password.
• If -spassword is used with a properties file, an encrypted password must be used for this property.
• -pversion is a key argument to specify a Teamwork project version. You can specify a project
version after -pversion. If either you do not specify any version or the version you specify does not
match any version in Teamwork Server, Report Wizard will generate the latest project version.
• You can specify a project name and its branch after -project. For example:
See the following for more examples of how to generate a project from a specific branch and/or a specific ver-
sion.
Example 1: Generating a project without specifying its branch.
"MyProject" --> This means generating MyProject
without specifying its branch.
"MyProject##release" --> This means generating MyProject
from the branch ["release"].
"MyProject##release##sp1" --> This means generating MyProject
from the branch and sub-branch
["release", "sp1"].
generate -project "MyProject" -template "Web Publisher
2.0" -output "D:\output\output.html" -package "Data" -
server "localhost" -login "Administrator" -password
"Administrator"
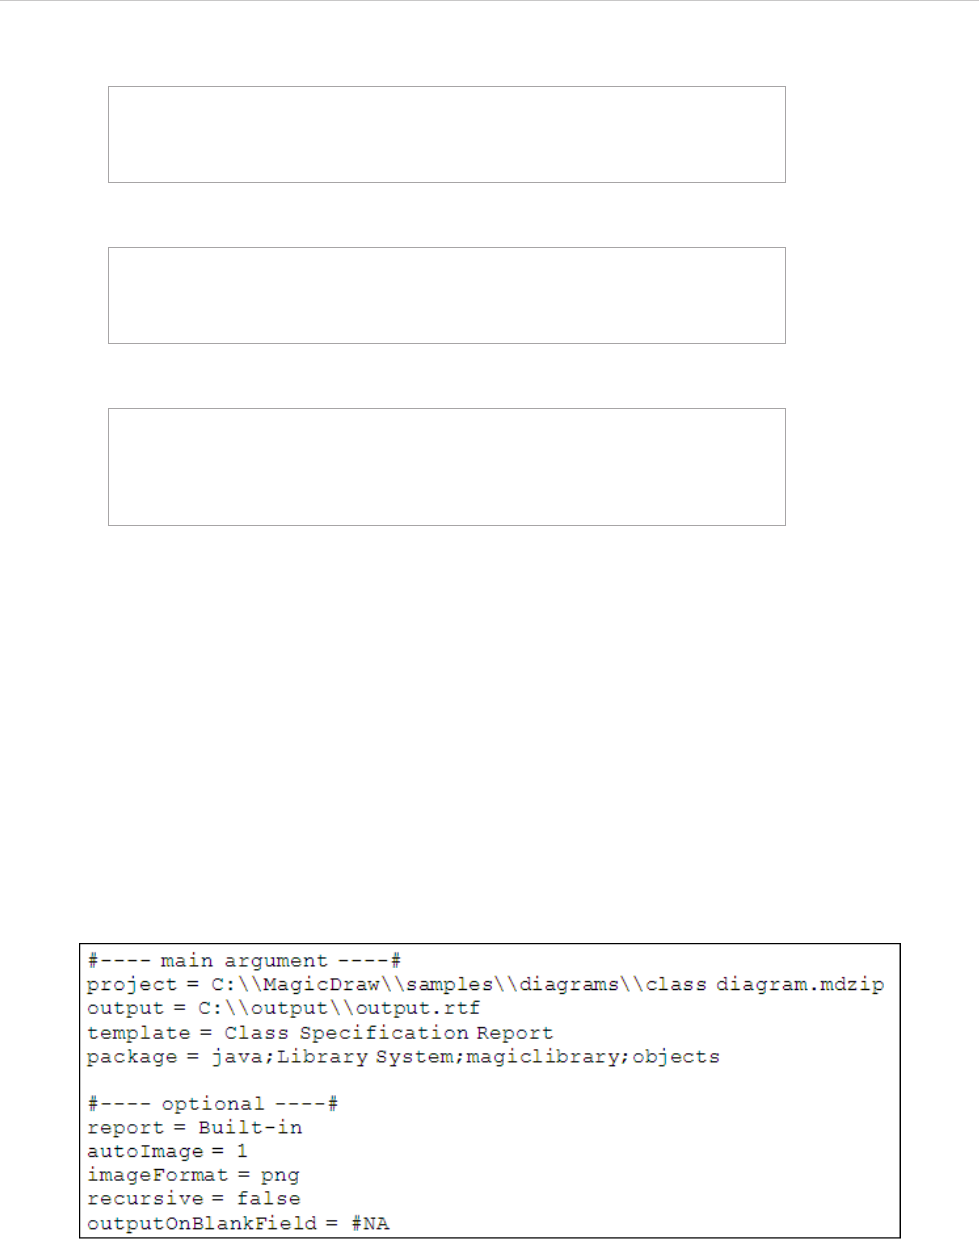
REPORT WIZARD
Generating Reports from the Command Line
207
Copyright © 1998-2015 No Magic, Inc.
Example 2: Generating a project from the branch release.
Example 3: Generating a specific version of a project without specifying its branch.
Example 4: Generating a specific version of a project from the branch release.
8.3 Properties Filename
When you use –properties, the other command actions are not necessary anymore because the configura-
tion information is contained in the properties file. The information in the properties file is the same as used in
the command line.
There are four parameters needed to specify data for a report: (i) project, (ii) output, (iii) template, and (iv) pack-
age. There are also other five parameters called options, which are additional configuration information such as
report, autoImage, imageFormat, recursive, and outputOnBlankField. These nine parameters are described in
the previous sections 8.1 Generate - the Command to Generate Reports.
A properties file is a simple text file. You can create and maintain a properties file with any text editors. See Fig-
ure 163 for an example.
Figure 163 -- Sample of Properties File
In Figure 163, the command lines begin with a pound sign (#). The other lines contain key-value pairs. The key
is on the left side of the equal sign, and the value is on the right. For instance, template is the key that corre-
sponds to the value of Class Specification Report.
The string that represents the key and value in the properties file has a special character. The special character
is an escape character and needs to be used to prevent interpretation errors. Each escape character starts with
a backslash.
generate -project "MyProject##release" -template "Web
Publisher 2.0" -output "D:\output\output.html" -package
"Data" -server "localhost" -login "Administrator" -
password "Administrator"
generate -project "MyProject" -pversion "2" -template
"Web Publisher 2.0" -output "D:\output\output.html" -
package "Data" -server "localhost" -login
"Administrator" -password "Administrator"
generate -project "MyProject##release" -pversion "2" -
template "Web Publisher 2.0" -output
"D:\output\output.html" -package "Data" -server
"localhost" -login "Administrator" -password
"Administrator"
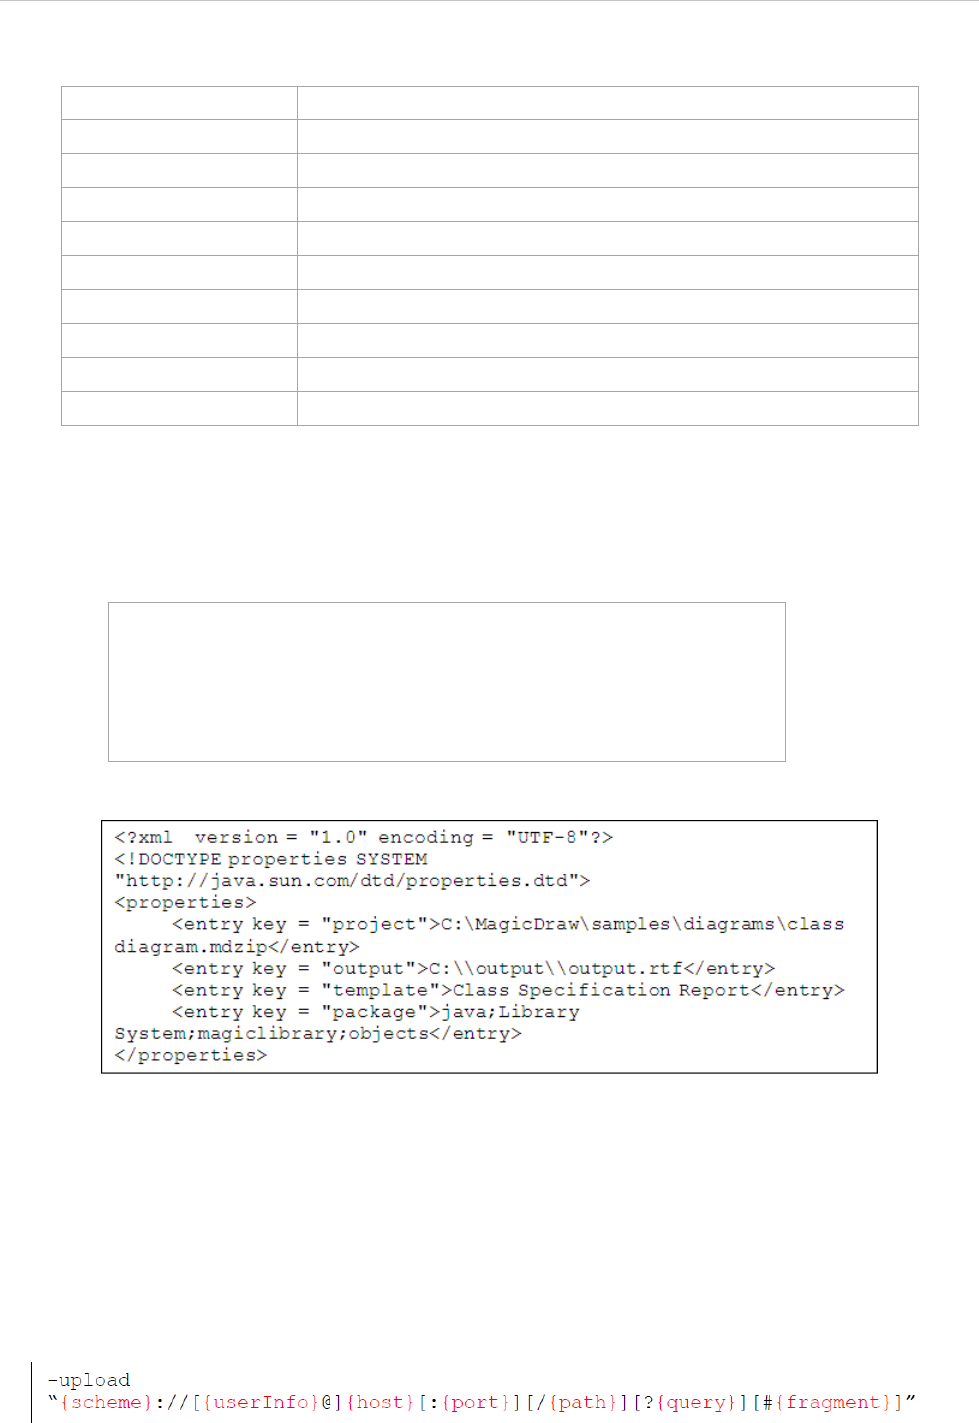
REPORT WIZARD
Generating Reports from the Command Line
208
Copyright © 1998-2015 No Magic, Inc.
Table 20 -- Available Character Sequences
8.3.1 XML Properties File
J2SE version 1.5 and Report Wizard version 15.5 allow you to use XML files to load and save key-value pairs.
Properties DTD:
For example:
Figure 164 -- Sample of XML Property
8.4 Uploading Generated Reports to Servers
The available command arguments include:
• -upload is the key argument to upload a generated report to a server.
The following code (Figure 165) is the uploaded command syntax of the -upload value.
Figure 165 -- The Uploaded Command Syntax
Escape Sequence Character
\n new line
\t tab
\b backspace
\f form feed
\r return
\” “ (double quote)
\’ ‘ (single quote)
\\ \ (backslash)
\uDDDD character from the Unicode character set (DDDD is four hex digits)
<?xml version="1.0" encoding="UTF-8"?>
<!-- DTD for properties -->
<!ELEMENT properties ( comment?, entry* ) >
<!ATTLIST properties version CDATA #FIXED "1.0">
<!ELEMENT comment (#PCDATA) >
<!ELEMENT entry (#PCDATA) >
<!ATTLIST entry key CDATA #REQUIRED>
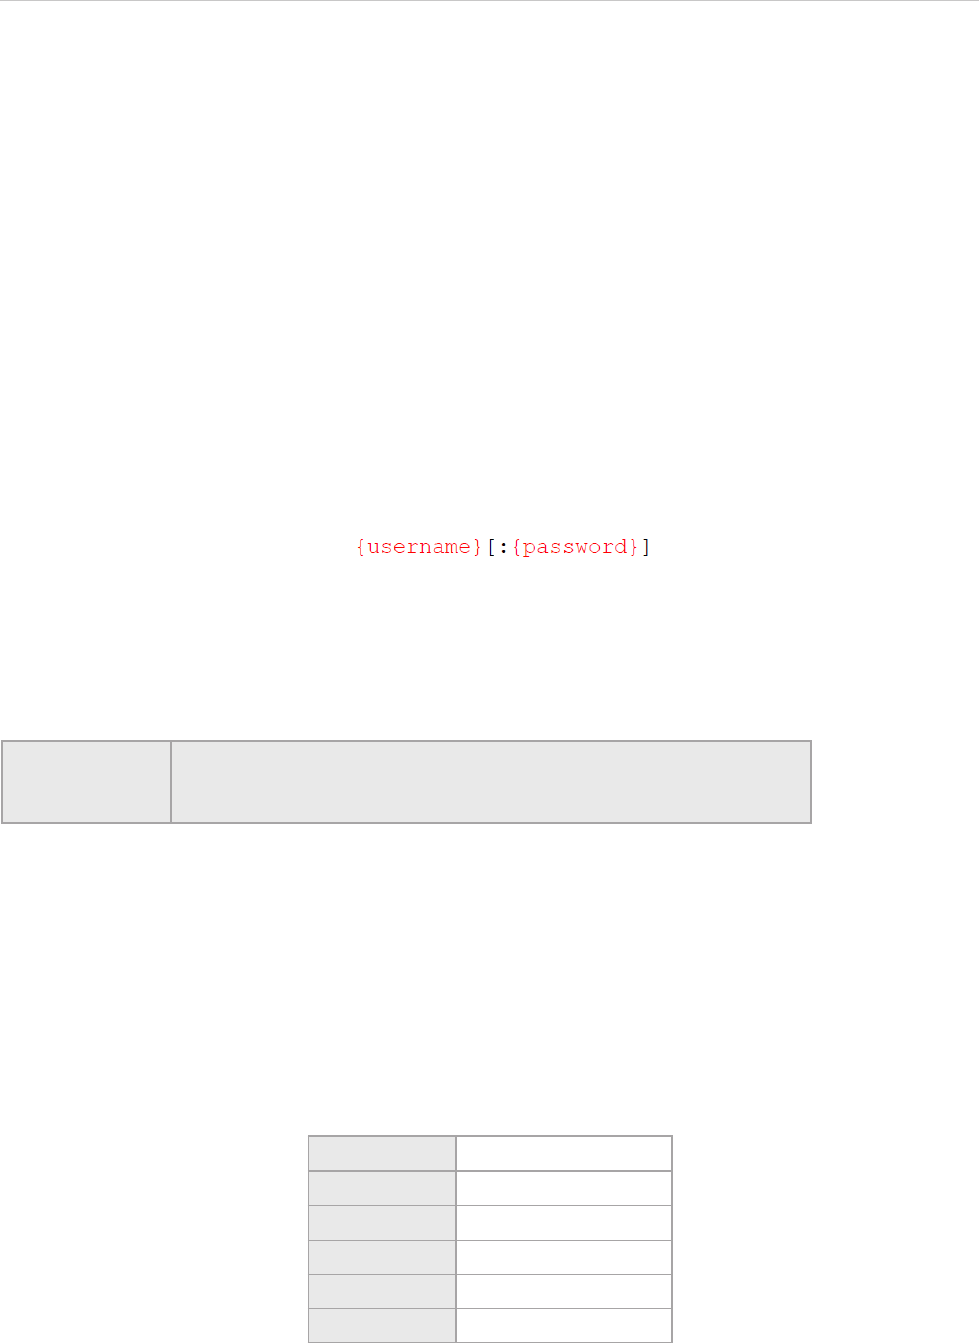
REPORT WIZARD
Generating Reports from the Command Line
209
Copyright © 1998-2015 No Magic, Inc.
where square brackets [...] are delineated as optional.
• {scheme}
The {scheme} defines the namespace, purpose, and the syntax of the remaining part of a URL.
This field is mandatory. A scheme must be followed by “://”. The supported schemes are:
• ftp
• ftps
• sftp
• http
• https
• {userInfo}
The {userInfo} defines the username and password for authentication. The syntax is displayed in
Figure 166.
Figure 166 -- The UserInfo Syntax
This optional password must be predicated by “:”, and it can be an empty string. If the password is omitted, the
command line will prompt for the password.
UserInfo must be followed by “@”, and this field is optional.
• {host}
The {host} defines a host name or an IP address that gives the destination location of a URL.
This field is mandatory.
• {port}
The {port} defines a port number where the server is listed. The port value has to be a value from
1 to 65535. It is necessary when the port number is different from the default port for well-known
services. If the port is omitted, the default port will be used to connect to the server. Table 21
shows a port number for each scheme.
Table 21 -- Default Port Numbers for Schemes
The port must be preceded by ":". This field is optional.
NOTE {username} and {password} should not contain special characters such
as “:”, “/”, and “@” for they may cause an invalid result or error when
the uploaded command is parsed.
Scheme Port Number
ftp 21
ftps 990
sftp 22
http 80
https 443
REPORT WIZARD
Generating Reports from the Command Line
210
Copyright © 1998-2015 No Magic, Inc.
• {path}
The {path} defines a remote location where the report will be saved. Paths are Unix-style paths;
therefore use “/” (forward-slash) as delimiters. This field is optional.
• {query}
The {query} defines a query string that contains data to be passed to software running on the
server. It may contain name or value pairs separated by ampersands.
• {fragment}
The {fragment} defines a fragment identifier that, if present, specifies a part or a position within
the overall resource or document.
The following are some examples of valid server addresses.
• ftp://magicreport:1234@10.1.2.4:25/report
• ftp://10.1.2.4:25/report
• ftp://10.1.2.4
• ftp://magicreport@10.1.2.4:25/report
NOTE For this feature, the parser ignores query and fragment. Both fields are
included in {path}.
Scheme ftp
User name magicreport
Password 1234
Host 10.1.2.4
Port 25
Path report
Scheme ftp
Host 10.1.2.4
Port 25
Path report
Scheme ftp
Host 10.1.2.4
Port 21 (Default port for ftp)
Scheme ftp
User name magicreport
Host 10.1.2.4
Port 25
REPORT WIZARD
Generating Reports from the Command Line
211
Copyright © 1998-2015 No Magic, Inc.
• ftp://magicreport:@10.1.2.4:25/report
The following are some examples of invalid server addresses.
Path report
NOTE The command line prompts for password.
Scheme ftp
User name magicreport
Password
Host 10.1.2.4
Port 25
Path report
NOTE The command line uses an empty password.
Invalid Server Address Cause
10.1.2.4:25 The scheme is required.
Xx://10.1.2.4:25 The scheme is invalid.
ftp://magicreport@ The host is required.
ftp://@10.1.2.4:25 The username is required.

REPORT WIZARD
Generating Reports from the Command Line
212
Copyright © 1998-2015 No Magic, Inc.
8.5 Syntax Rules
• Command parameters containing spaces must be enclosed in quotes, for example, "UML Standard
Profile".
• Command parameters are case sensitive, except project, imageFormat and recursive which
are not case-sensitive.
• Blank spaces (“ “) separate commands and parameters.
• To specify a package name that contains a semicolon (;), you can use a backslash (\). For example,
the package name “com;nomagic” can be typed by using “com\;nomagic”. The backslash followed
by a semicolon (\;) is not considered to be a character separator.
• For a parameter that contains unicode characters such as Thai, you can use the xml properties file to
generate a report. The properties file does not support the unicode encoding.
• A field entry consists of a name-value pair. The name and value formats are specified by [name=value]
pattern strings. A valid name must start with a letter (a-z or A-Z) and can be followed by any letter,
digit, or underscore.
• You can specify a field name that consists of brackets ( [ ] ) by using backslashes ( \ ). For example,
"[author=NoMagic][Revision=[1.0]]" will be typed as "[author=NoMagic][Revision=\[1.0\]]".
• Either -package or -element can be used with the Generate command. For example, you can use -
package without -element.
• If -upload is specified to the command line. Its value is validated and executed after a report has
been generated.
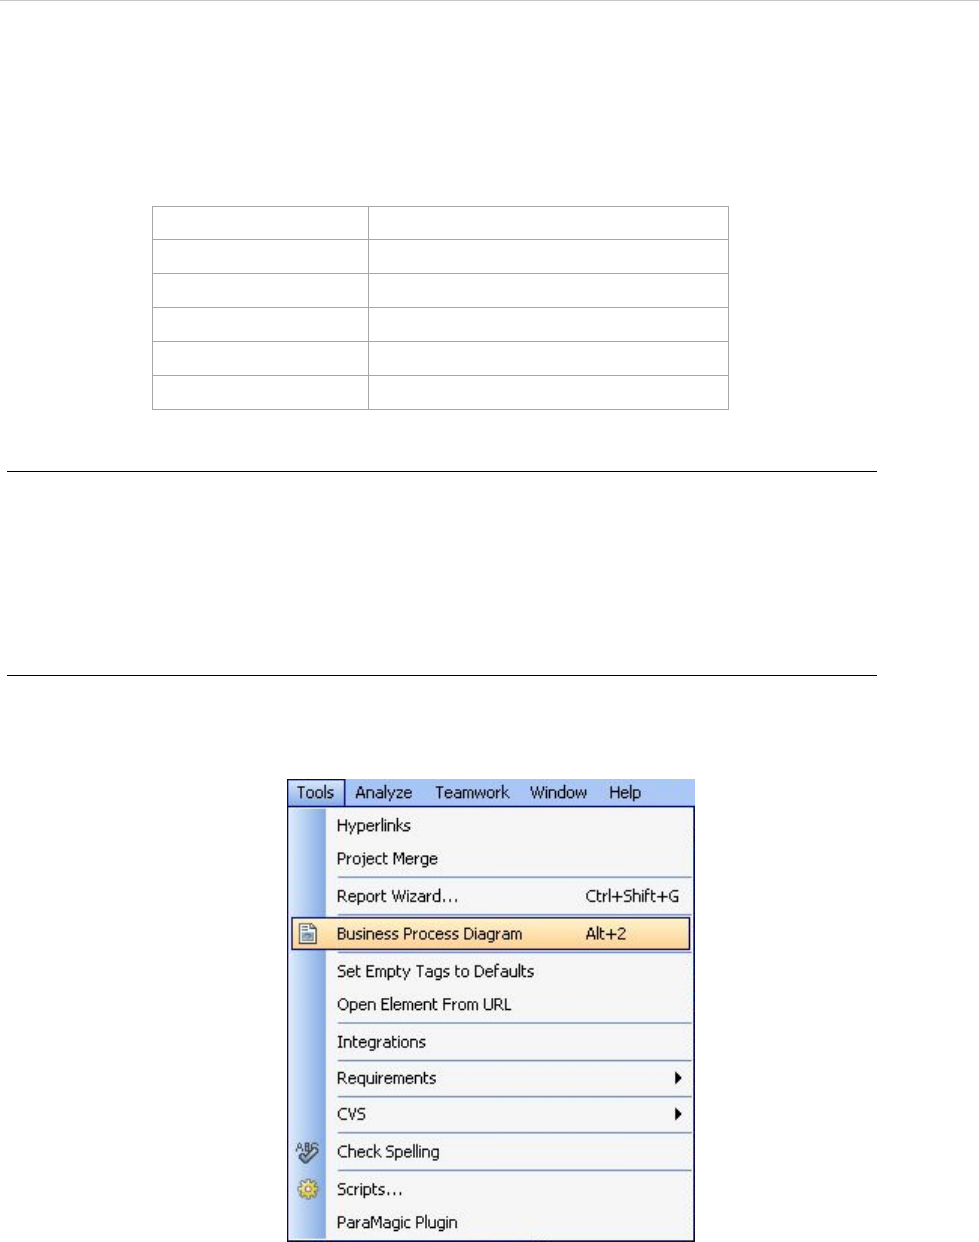
REPORT WIZARD
Report Wizard Quick Print
213
Copyright © 1998-2015 No Magic, Inc.
9. Report Wizard Quick Print
Report Wizard provides 5 keyboard shortcuts to create a report, with last used options, from a recently-used
template.
Table 22 -- The predefined keyboard shortcuts
To change a keyboard shortcut:
1. On the main menu, click Options > Environment to open the Environment Options dialog.
2. Select Category: Tools in the Keyboard pane.
3. Press the New key and click Assign.
4. For more details, see the MagicDraw User Manual, Setting Environment Options.
To use Report Wizard Quick Print:
1. After a report has been generated, a new menu will appear below the Report Wizard... menu
(Figure 167). The name of the new menu is the name of the recently generated template.
Figure 167 -- Newly-generated Report as a Quick Option in Main Menu
2. Either click this menu or press Alt+1, Alt+2, Alt+3, Alt+4 or Alt+5 to generate this template
with the last used options.
3. Select the saved location and filename (Figure 168).
Keyboard Shortcut Quick Print Template
Alt + 1 Template name A
Alt + 2 Template name B
Alt + 3 Template name C
Alt + 4 Template name D
Alt + 5 Template name E
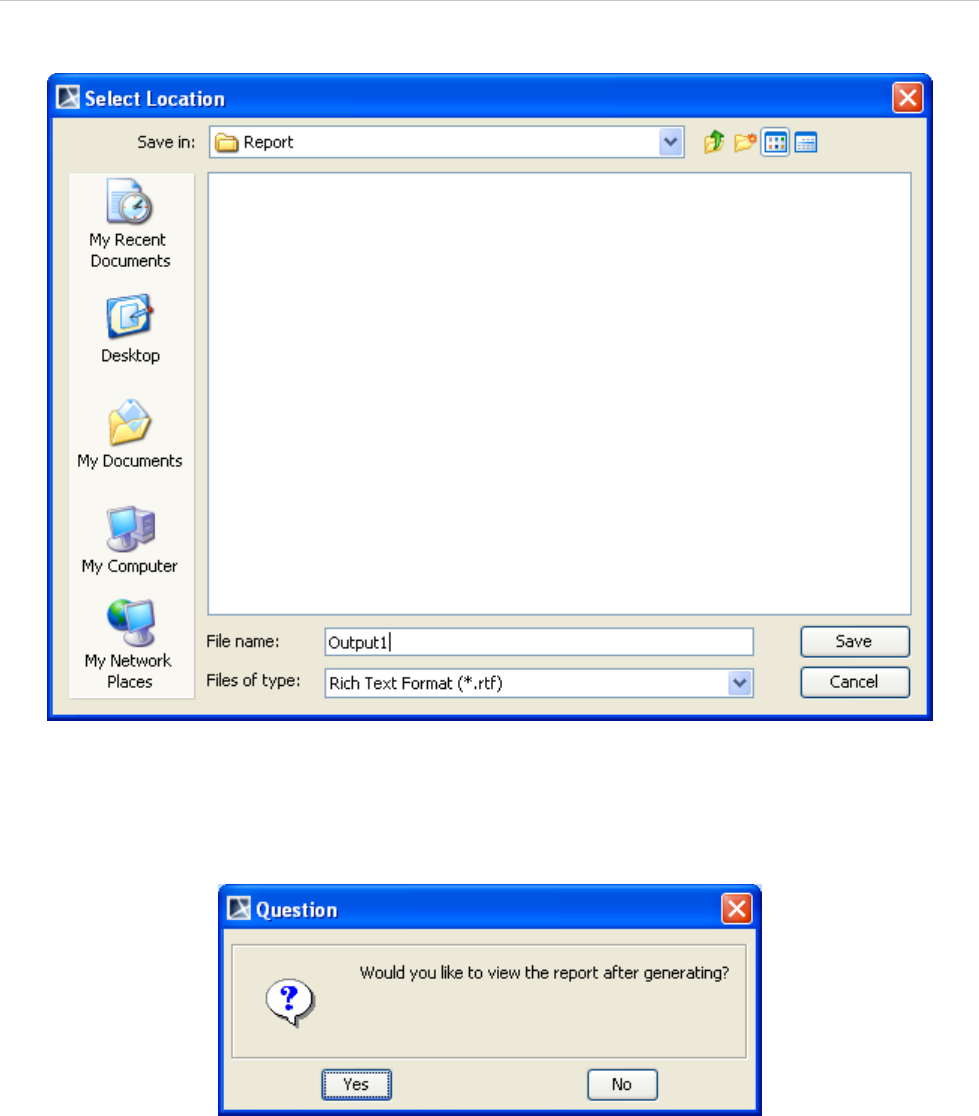
REPORT WIZARD
Report Wizard Quick Print
214
Copyright © 1998-2015 No Magic, Inc.
Figure 168 -- Select the Location to Save the Report
4. A message box will open, asking if you want to open the report in the default viewer once the
generating process has completed (Figure 169).
Figure 169 -- Question Dialog - View Report
5. The next time you generate a report, a new menu will create and map the keyboard shortcuts
until the keyboard shortcuts list is fully filled. The number of keyboard shortcuts is limited to
five.
6. If the keyboard shortcuts list is full and the new template has been generated, the keyboard
shortcuts will be reused.
For example, Report Wizard Quick Print provides the following keyboard shortcuts:

REPORT WIZARD
Report Wizard Quick Print
215
Copyright © 1998-2015 No Magic, Inc.
Table 23 -- Sample of Report Wizard Quick Print Keyboard Shortcuts
Table 23 shows that the Tutorial 01 – Print Element keyboard shortcut is the most outdated template and the
following report has been completed using the Business Process Diagram template. Report Wizard Quick Print
will reuse the keyboard shortcut of the most outdated template.
Table 24 -- Reusing Keyboard Shortcuts
If the next template to be generated has already been in the Quick Print list, the list will not change.
Shortcut Key Template Name
Alt + 1 Tutorial 01 – Print Element
Alt + 2 Tutorial 02 – Print Diagram
Alt + 3 Tutorial 03 – Print Project
Alt + 4 Tutorial 04 – Print Report Data
Alt + 5 Tutorial 05 – Macro
Shortcut Key Template Name
Alt + 1 Business Process Diagram
Alt + 2 Tutorial 02 – Print Diagram
Alt + 3 Tutorial 03 – Print Project
Alt + 4 Tutorial 04 – Print Report Data
Alt + 5 Tutorial 05 – Macro

REPORT WIZARD
Report Wizard Environment Options
216
Copyright © 1998-2015 No Magic, Inc.
10. Report Wizard Environment Options
The Report Wizard environment options in the MagicDraw Environment Options dialog allow you to configure
the report engine. There are three things that you can configure: (i) Report engine properties, (ii) Template
mappings, and (iii) Template folder.
(i) Report Engine Properties
Report Engine Properties can be configured as follows:
a. Template process size (int). This value defines the size of allocated memory for processing a tem-
plate. If the template is larger than the allocated size, the engine will create temporary files on a local
disk and process the template from these files.
b. Template pool size (int). This value defines the number of processing threads for evaluating a tem-
plate. An increase in the number of threads may improve the performance of the engine, which will
also depend on your hardware and JVM.
c. Velocity properties. These properties are a key-value pair. You can add any number for these proper-
ties. You will need a basic knowledge of Velocity to enter the value. (See http://velocity.apache.org/
engine/devel/apidocs/org/apache/velocity/runtime/RuntimeConstants.html)
d. Debug report template. You can configure this value to enable or disable any invalid properties, ref-
erences, or exception messages on the message window of MagicDraw. See 11 Debug Report Tem-
plate for more details.
(ii) Template Mapping
Template mappings associate a template type with the template engine. The Report engine allows you to
determine how to handle different types of files, such as JS or DOCBOOK files. All you have to do is specify a
filename extension and select an engine name. The Report engine also allows developers to add a user cus-
tom engine to this option.
(iii) Template Folder
You can either select or clear the Monitor template folder check box (Figure 170) in the Report Wizard envi-
ronment options in the MagicDraw Environments Options dialog to enable or disable the option to deploy an
MRZIP template file. If you select the check box, Report Wizard will automatically deploy the MRZIP template
file to the Report Wizard dialog whenever the file is added to your folder.
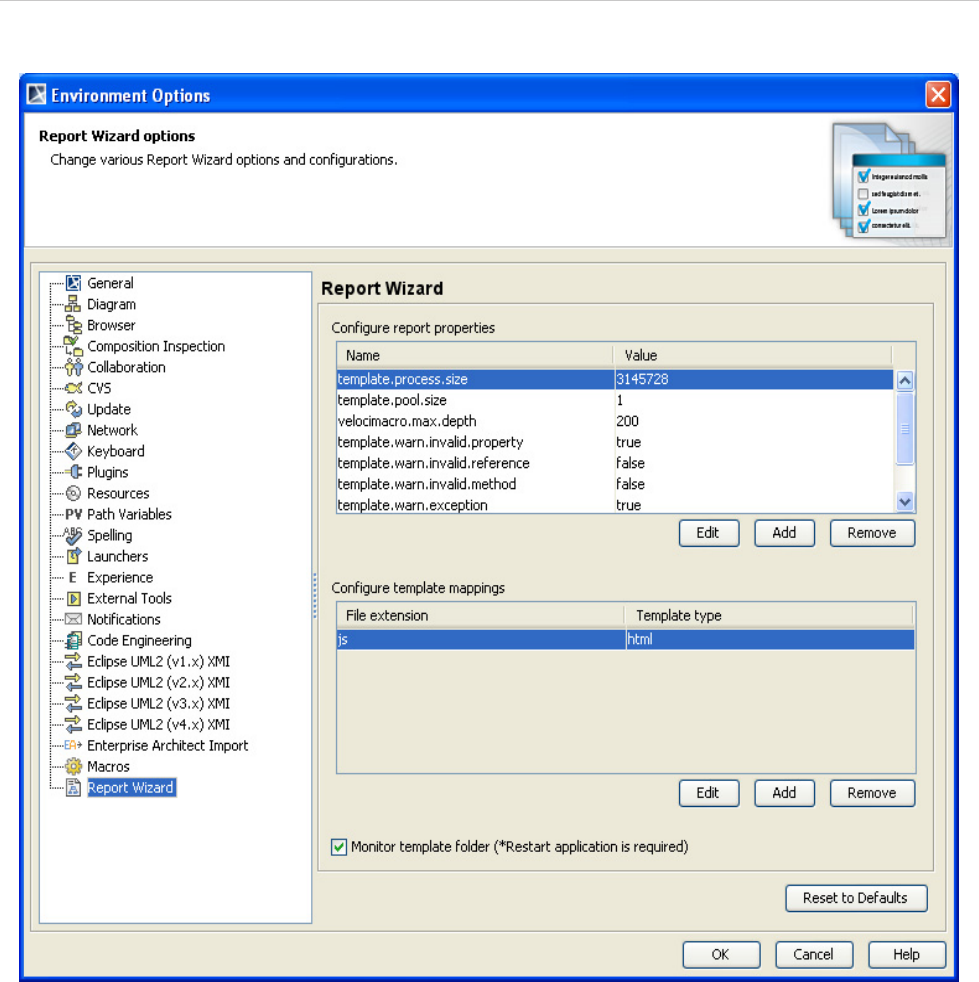
REPORT WIZARD
Report Wizard Environment Options
217
Copyright © 1998-2015 No Magic, Inc.
Figure 170 -- Report Wizard GUI Configuration in MagicDraw Environment Options Dialog
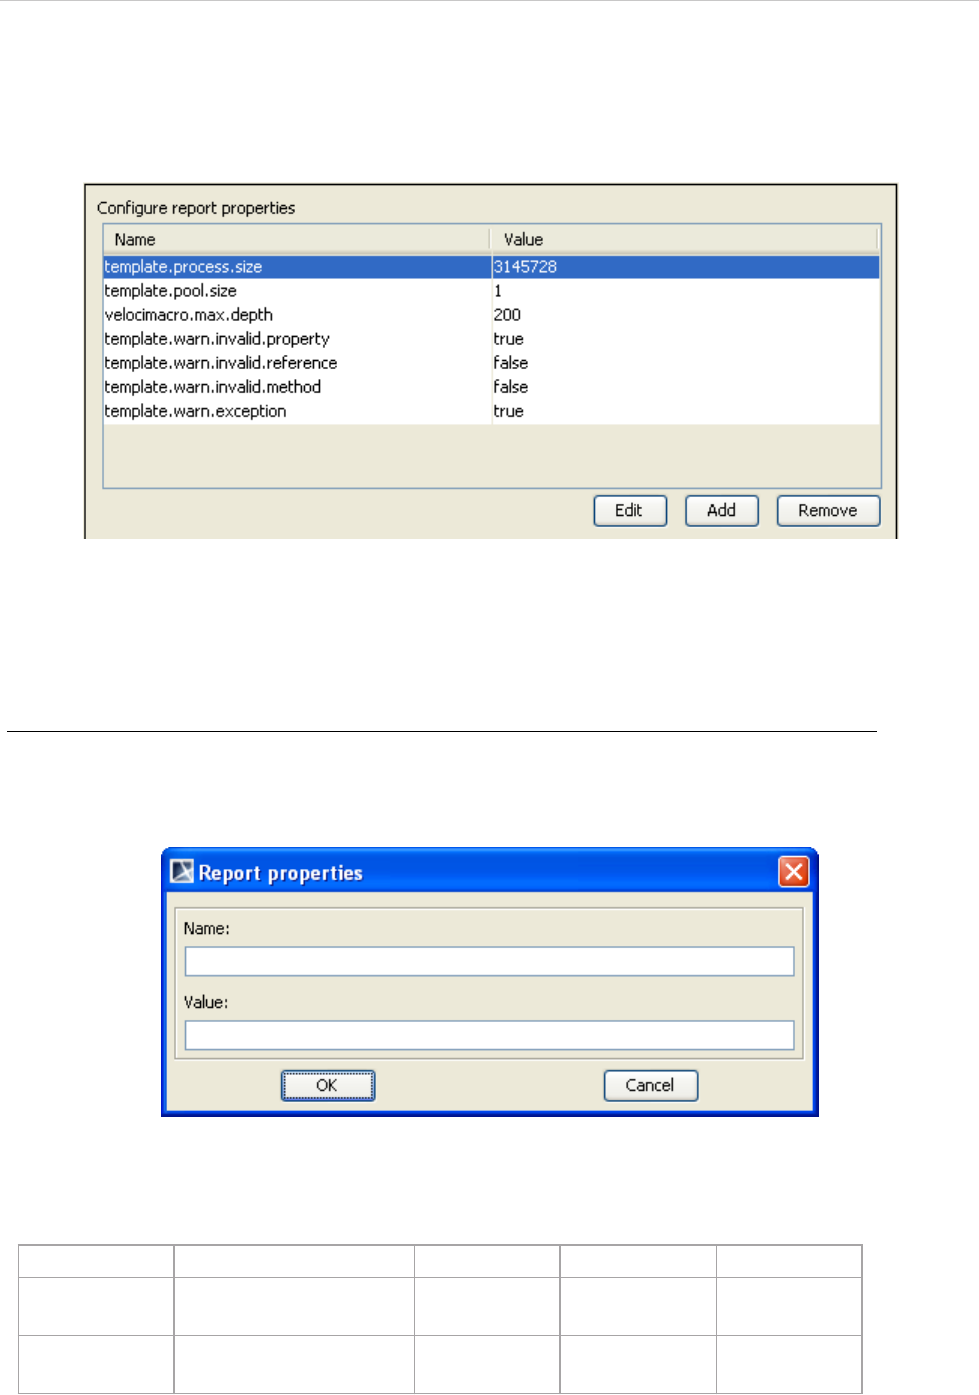
REPORT WIZARD
Report Wizard Environment Options
218
Copyright © 1998-2015 No Magic, Inc.
10.1 Configuring Report Engine Properties
Figure 171 shows the Configure report properties pane.
Figure 171 -- Configure Report Properties Pane
This pane contains 3 buttons: (i) Add, (ii) Edit, and (iii) Remove.
(i) Add
To create a new report property:
1. Click the Add button in the Configure Report Properties pane. The Report properties
dialog will open (Figure 172).
Figure 172 -- Creating a New Report Property in the Report Properties Dialog
2. Enter the property name and value.
Table 25 -- Report Engine Properties Dialog Fields
Field Name Function Default Value Possible Value Required
Name To enter the property
name
Blank Text Yes
Value To enter the property
value
Blank Text No
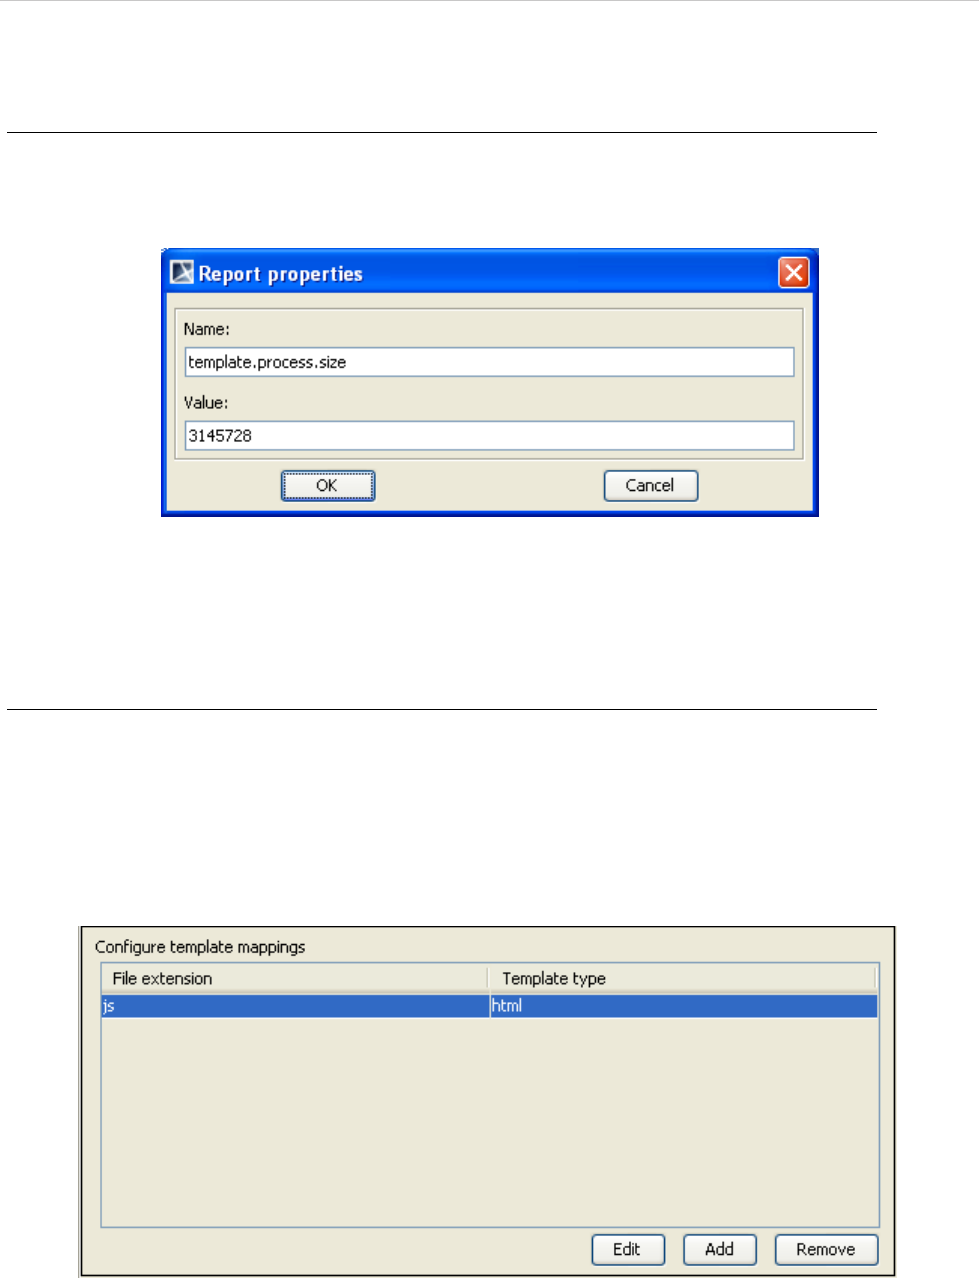
REPORT WIZARD
Report Wizard Environment Options
219
Copyright © 1998-2015 No Magic, Inc.
(ii) Edit
To edit a report engine property:
1. Select a property in the Configure Report Properties pane and click the Edit button. The
Report properties dialog will appear (Figure 173).
Figure 173 -- Editing a Report Property in the Report Properties Dialog
2. Edit the property name and value. (See Table 25 Report Engine Properties Dialog Fields.)
(iii) Remove
To delete a report property:
1. Select a property in the Configure Report Properties pane and click the Remove button.
10.2 Configuring Template Mappings
Figure 174 shows the Configure Template Mappings pane.
Figure 174 -- The Configure Template Mappings Pane
This pane contains 3 buttons: (i) Add, (ii) Edit, and (iii) Remove.
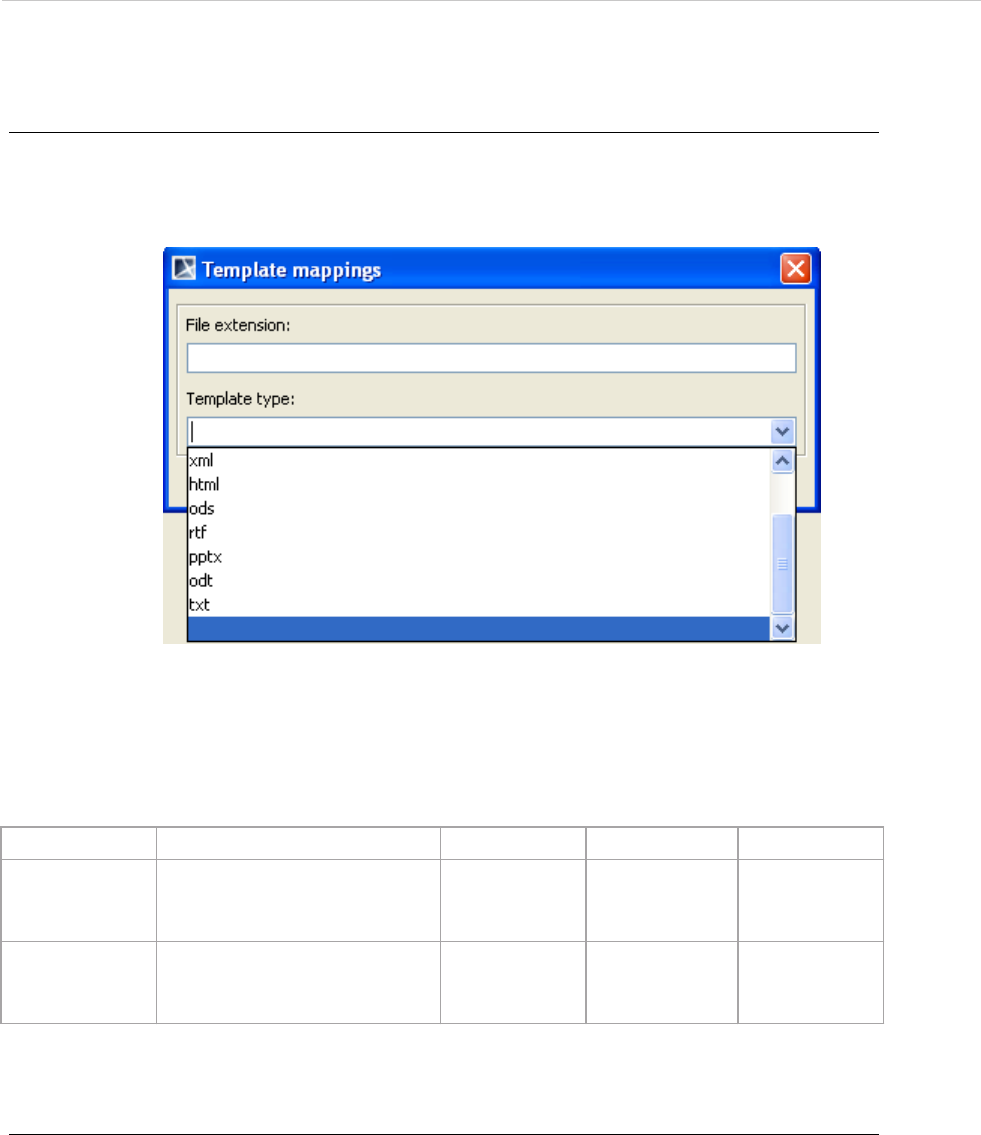
REPORT WIZARD
Report Wizard Environment Options
220
Copyright © 1998-2015 No Magic, Inc.
(i) Add button
To create a new template mapping:
1. Click the Add button in the Configure Template Mappings pane. The Template mappings
dialog will open (Figure 175).
Figure 175 -- Adding Template Mapping in the Template Mappings Dialog
2. Enter a filename extension and template type.
Table 26 -- Template Mappings Dialog Fields
(ii) Edit button
To edit a template mapping:
1. Select a template mapping in the Configure Template Mappings pane and click the Edit
button. The Template mappings dialog will open (Figure 176).
Field Name Function Default Value Possible Value Required
File extension To enter a filename extension.
The filename extension is not
case-sensitive
Blank Text Yes
Template type To enter a template type. The
template type is case-sensi-
tive
Blank Text Yes
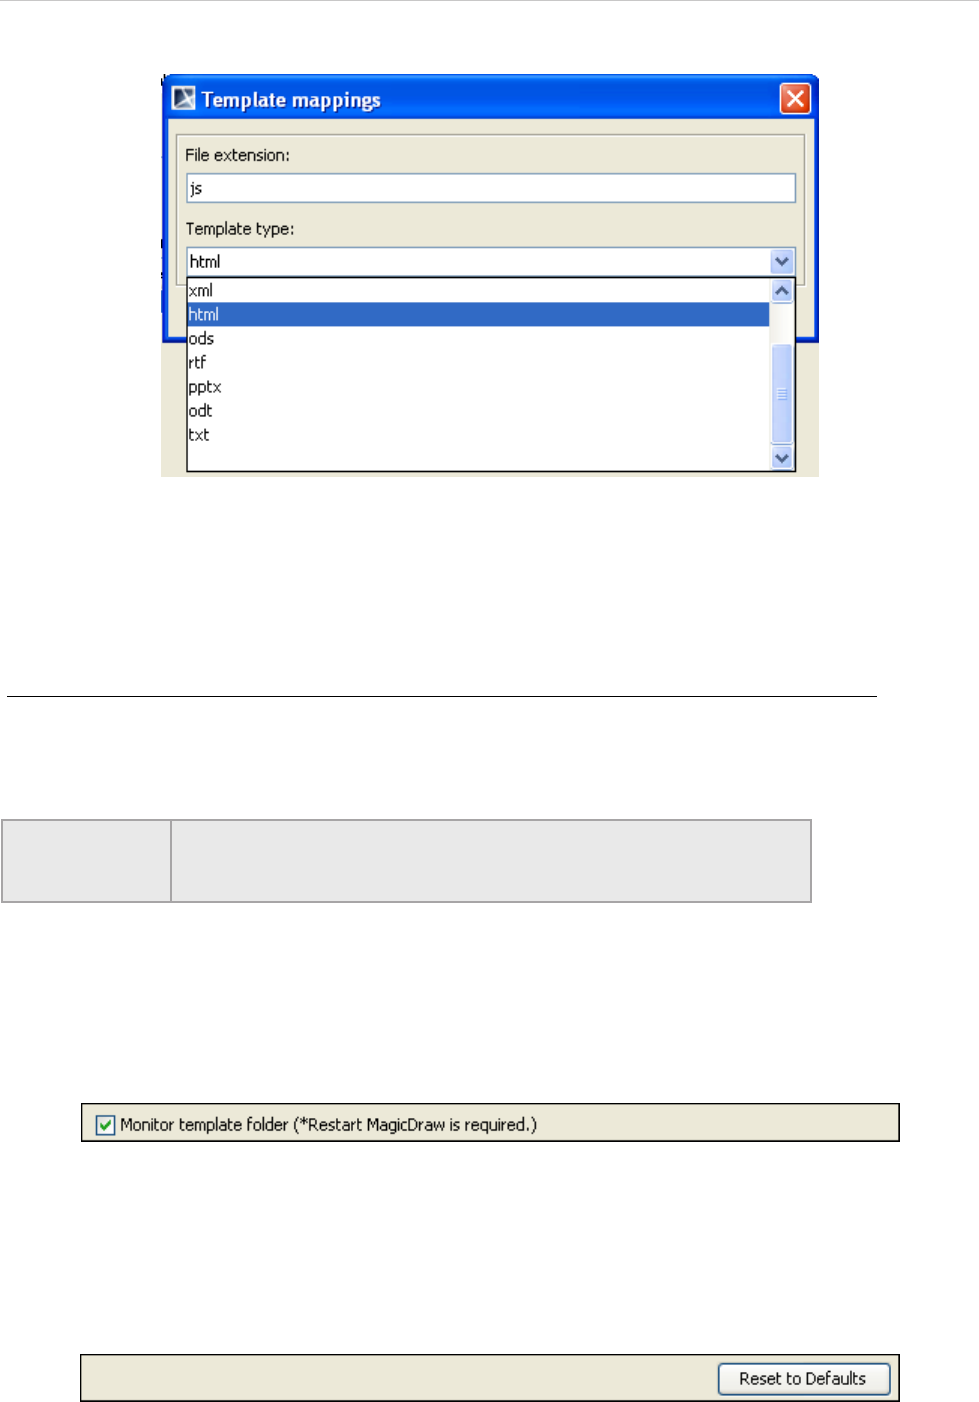
REPORT WIZARD
Report Wizard Environment Options
221
Copyright © 1998-2015 No Magic, Inc.
Figure 176 -- Editing Template Mapping in the Template Mappings Dialog
2. Edit the filename extension and template type. (See Table 26 Template Mappings Dialog
Fields.)
(iii) Remove button
To delete a template mapping:
1. Select a template mapping in the Configure Template Mappings pane and click the
Remove button.
10.3 Monitor Template Folder Option
You can either enable or disable the MRZIP template file automatic deployment option in the Report Wizard
environment options by selecting or clearing the Monitor template folder check box (Figure 177).
Figure 177 -- Monitor Template Folder Pane.
10.4 Reset to Defaults Option
Click the Reset to Defaults button to reset data to the default settings (Figure 178).
Figure 178 -- Reset to Defaults Button
NOTE When template mapping is removed from environment option, the file
extension mapping will be removed from MagicDraw. To restore
default setting, you have to restart MagicDraw.
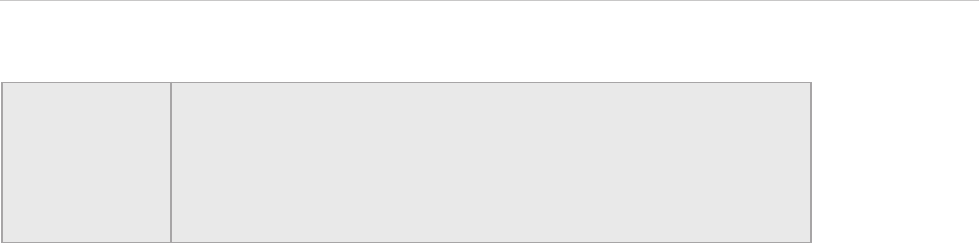
REPORT WIZARD
Report Wizard Environment Options
222
Copyright © 1998-2015 No Magic, Inc.
NOTE • MagicDraw allows you to configure the report engine settings in
three levels: (i) Environment option, (ii) global config.xml, and (iii)
template config.xml.
• The template config.xml configuration settings will override the
environment option configuration settings, which will override the
global config.xml configuration settings.
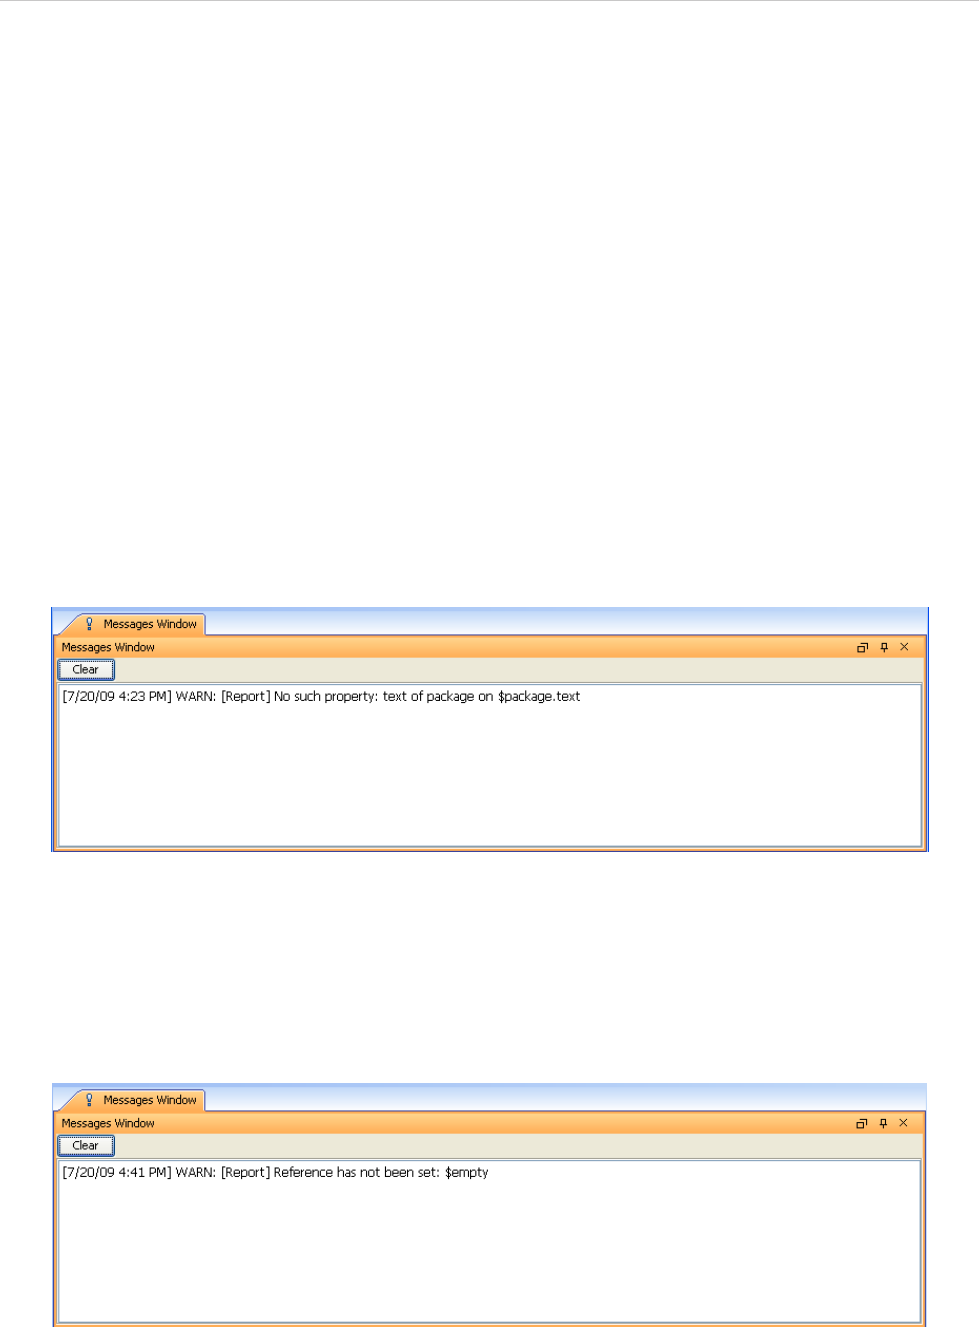
REPORT WIZARD
Debug Report Template
223
Copyright © 1998-2015 No Magic, Inc.
11. Debug Report Template
The Debug Report template features warning messages that describe template errors. A warning message will
appear in a Messages Window while the report template is being processed. Warning messages have no
effect on the output report, thus can be ignored. They are intended for informative purposes only.
There are 5 warning message types:
11.1 Invalid Property
11.2 Invalid Reference
11.3 Invalid Method Reference
11.4 Exception
11.5 Invalid Syntax
11.1 Invalid Property
The warning (Figure 179) will open when an invalid property is encountered during the report generation. For
example, getting a text property from the $package variable, when the text property is not a valid property for
$package, is a variable with an invalid property that will trigger a warning.
Figure 179 -- Invalid Property Warning Message
11.2 Invalid Reference
The warning will open (Figure 180) whenever using a variable, for example, $empty that has not been speci-
fied.
Figure 180 -- Invalid Reference Warning Message
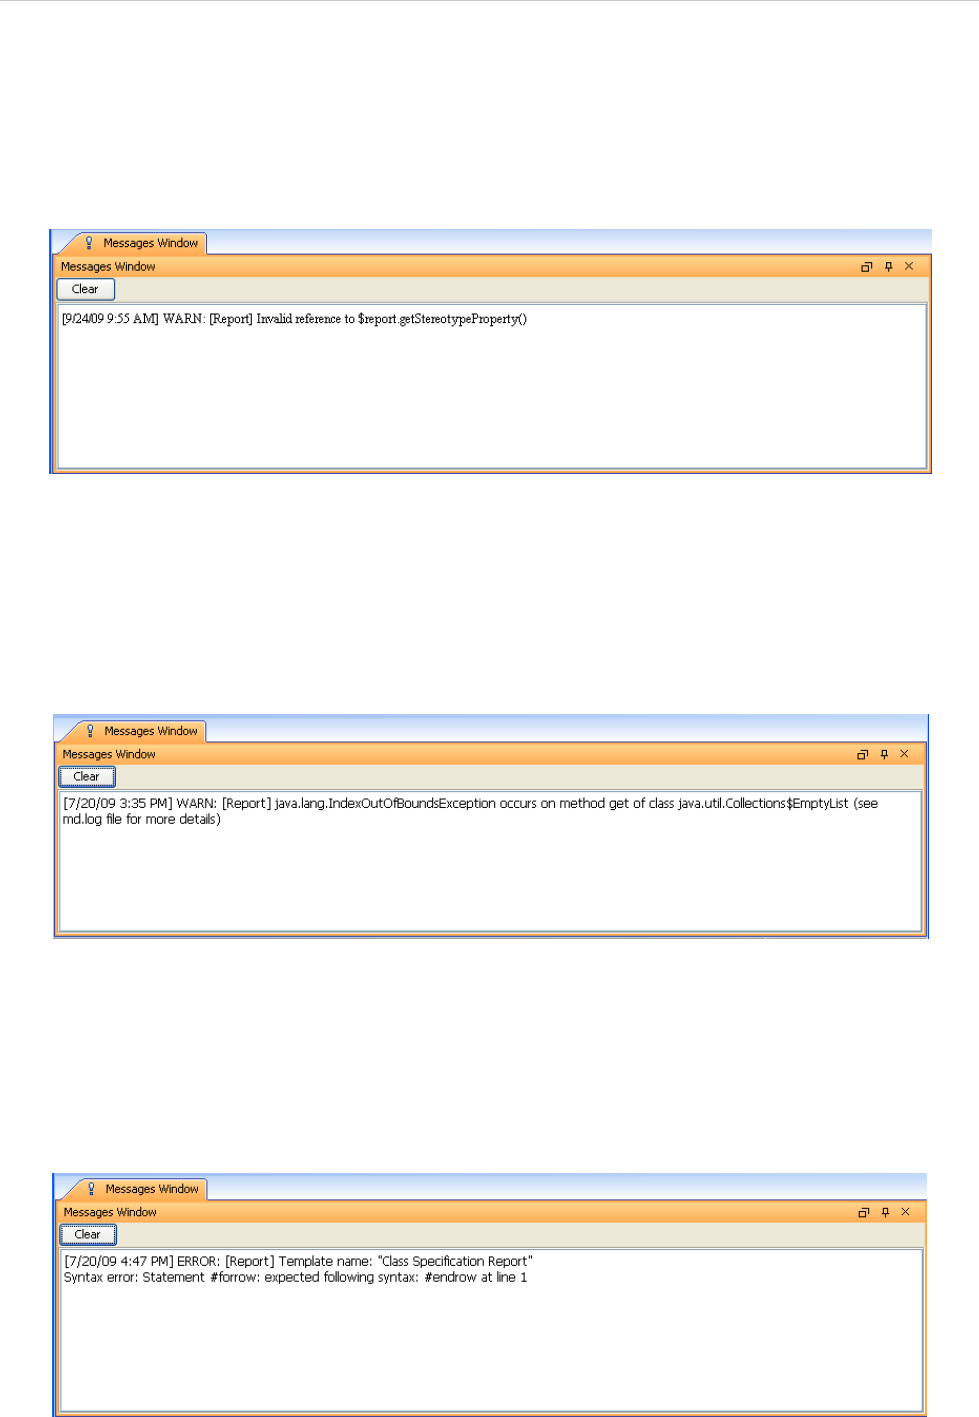
REPORT WIZARD
Debug Report Template
224
Copyright © 1998-2015 No Magic, Inc.
11.3 Invalid Method Reference
The warning message will open (see Figure 181) when the use of an invalid method from a variable is encoun-
tered during the report generation. In this example, the “getStereotypeProperty” method is not a valid method of
the $report variable.
Figure 181 -- Invalid Method Reference Warning Message
11.4 Exception
The warning message (Figure 182) will open whenever an exception, such as IndexOutOfBoundException,
occurs during the report generation.
Figure 182 -- Exception Warning Message
11.5 Invalid Syntax
The warning message (Figure 183) will open whenever a template contains any invalid syntax, such as using
#forrow without #endrow.
Figure 183 -- Invalid Syntax Warning Message
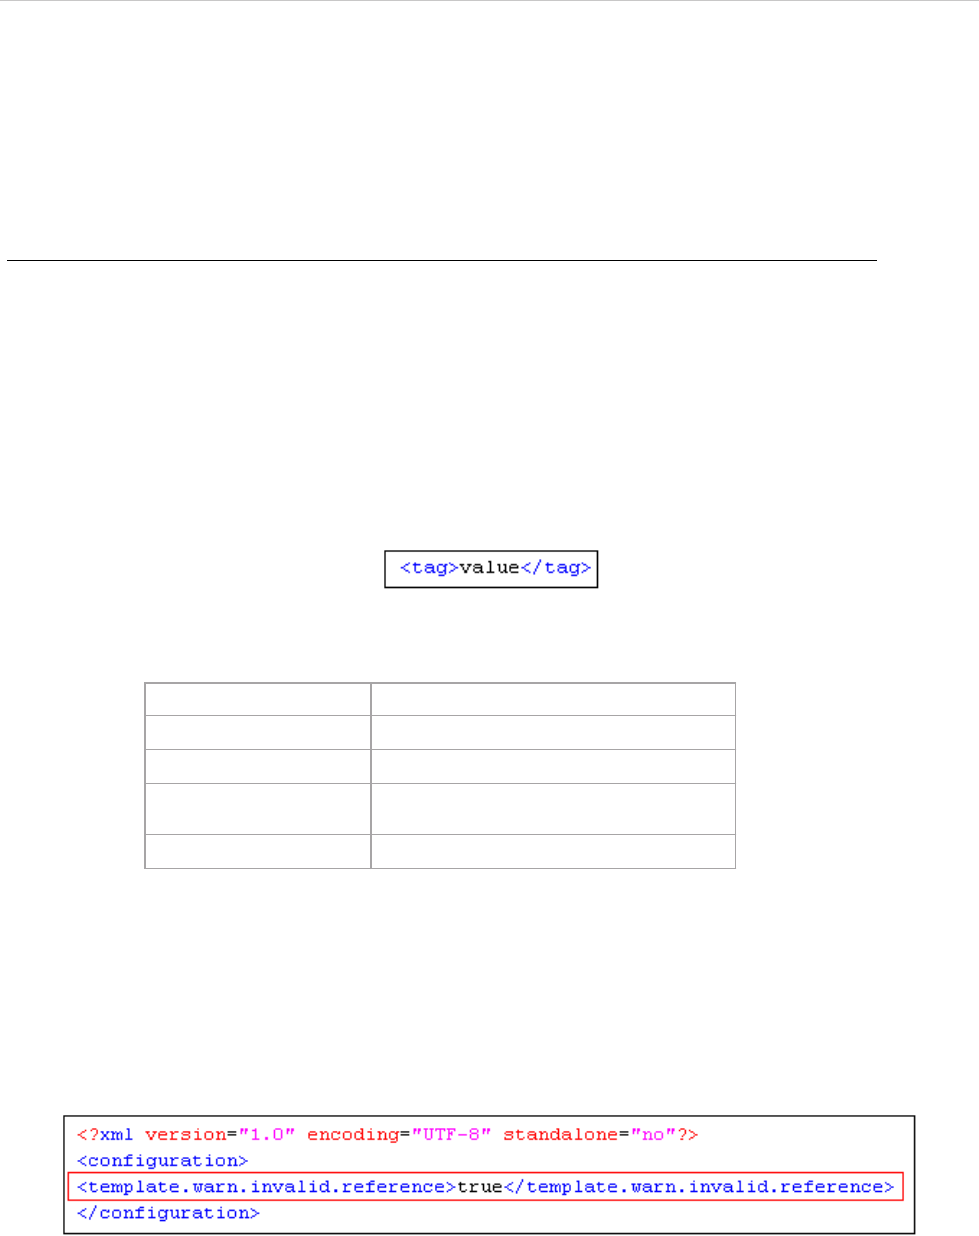
REPORT WIZARD
Debug Report Template
225
Copyright © 1998-2015 No Magic, Inc.
11.5.1 Enabling or Disabling Warning Messages
You can enable or disable any invalid properties, references, and exception messages except invalid syntax
messages by editing the config.xml file and tags and values. Invalid syntax messages are always enabled.
11.5.1.1 Modifying config.xml
To modify the config.xml file:
• Either (i) edit the config.xml file in the ...\plugins\com.nomagic.magicdraw.reportwizard\data
folder to enable or disable all templates’ warning messages or (ii) edit the config.xml file or create a
file in the ...\plugins\com.nomagic.magicdraw.reportwizard\data\templatefolder folder for each
template.
For example, to enable or disable a warning message of Class Specification Report you need to edit the con-
fig.xml file in the ...\plugins\com.nomagic.magicdraw.reportwizard\data\Class Specification Report folder.
11.5.1.2 Adding Tags and Values
Figure 184 -- A Tag for a Warning Message Type
Table 27 -- Warning Message Types
Set this boolean value to:
• “true” to enable warning messages, or
• “false” to disable warning messages.
An example of how an Invalid Reference warning message of Class Specification Report can be enabled is
shown in Figure 185.
Figure 185 -- The Invalid Reference Warning Message Enabled through File config.xml
Warning Message Type Tag
Invalid Property <template.warn.invalid.property>
Invalid Reference <template.warn.invalid.reference>
Invalid Method
Reference <template.warn.invalid.method>
Exception <template.warn.exception>

REPORT WIZARD
Use Case Driven
226
Copyright © 1998-2015 No Magic, Inc.
12. Use Case Driven
Report Wizard provides a set of templates to support the Use Case Driven approach methodology. A Magic-
Draw project that creates the Use Case Driven approach development steps can generate a report to capture
elements.
Report Wizard provides 3 templates for the Use Case Driven approach:
12.1 Use Case Specification Report
12.2 Method Specification Report
12.3 Use Case Project Estimation Report
You can create a new MagicDraw project using the Use Case Driven approach either as:
(i) A blank project with the UseCase_Profile.xml module or
(ii) A Use Case project
(i) To create a new project as a blank project using UseCase_Profile.xml:
1. On the main menu, click File.
2. Click Use Module… . The Use Module dialog will open.
3. Select the UseCase_Profile.xml module.
4. Click Finish. The MagicDraw project will apply the Use Case Description profile.
(ii) To create a new project as a Use Case Project:
• A MagicDraw project will apply the Use Case Description profile automatically.
12.1 Use Case Specification Report
The Use Case Specification report shows the details of actors and use cases in the project. The first part, which
is the actor summary, shows the list of all actors and their associated use cases. The second part presents the
use case specification in general information of relations and scenarios. The report supports use case and
SysML use case diagrams.
12.2 Method Specification Report
The purpose of the Method Specification report is to show the method design and its related use cases in detail
to developers.
The report shows a class diagram and a list of all classes in the diagram. The list contains attributes and meth-
ods for each class. The report also shows the method specification, parameters, and algorithms.
12.3 Use Case Project Estimation Report
The use case project estimation or 'Use Case Points' is a method for sizing and estimating projects developed
with the object-oriented method, developed by Gustav Karner of Objectory (now Rational Software). The
method is an extension of Function Point Analysis and Mk II Function Point Analysis (an adaption of FPA
mainly used in the UK).
The Use Case Project Estimation report is intended to estimate the project size and duration of hourly man-
power required based on the use case model. The report supports use case and SysML use case diagrams.
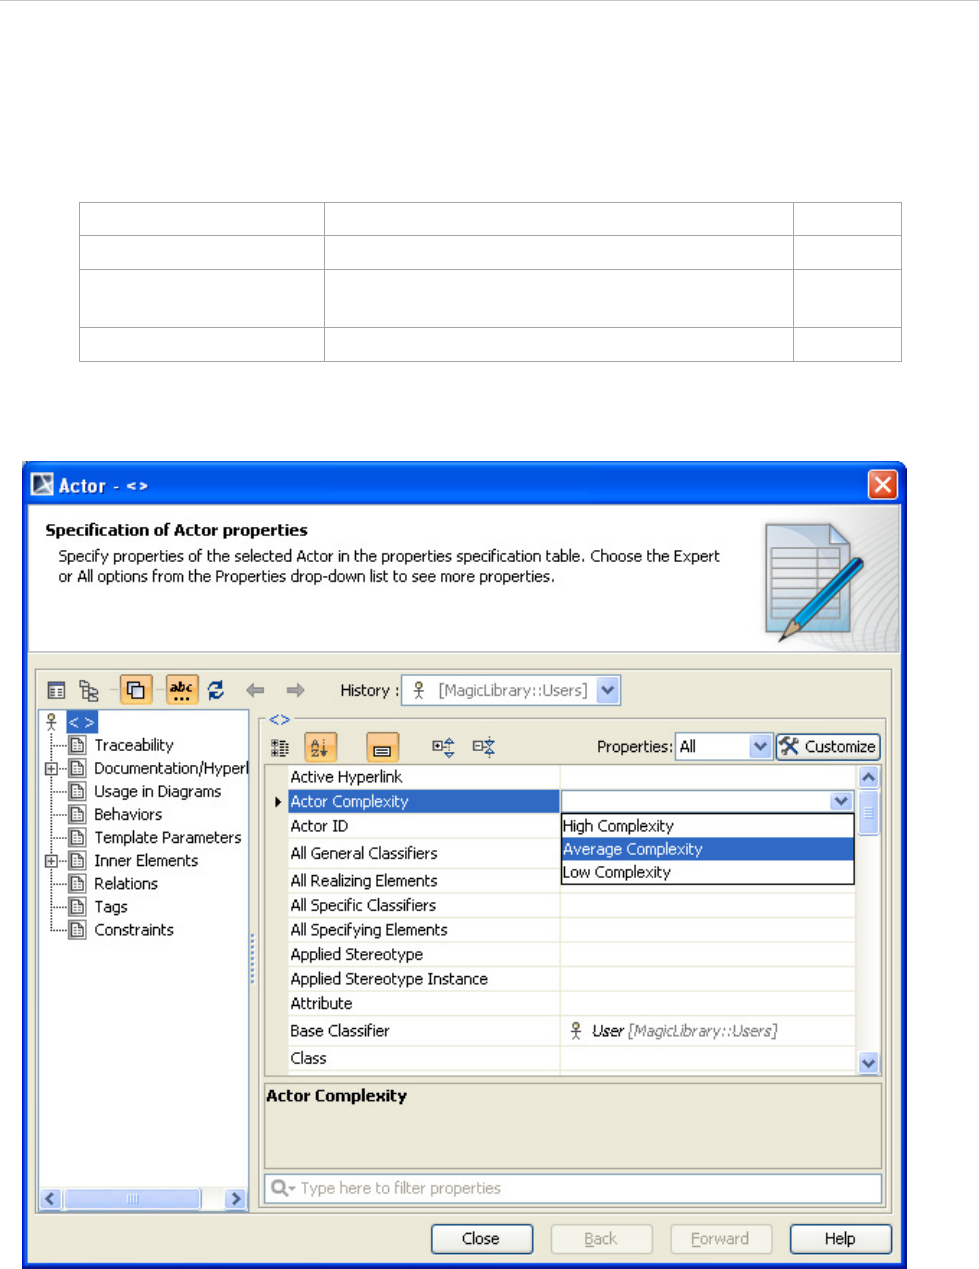
REPORT WIZARD
Use Case Driven
227
Copyright © 1998-2015 No Magic, Inc.
The use case point technique is applied to reestimate the project size. All the use cases used in the example
below are based on the use case diagram. The following weight criteria are used:
12.3.1 Classifying Actors
Table 28 -- Actors Classification
Figure 186 -- Use Case Driven - Actor Classification
12.3.2 Unadjusted Actor Weights
Unadjusted Actor Weights (UAW) is obtained by counting how many actors there are in each category, multi-
plying each total by its weight, and adding up the products.
Actor complexity Litmus Test to recognize classifications Weight
Low complexity An external system with a well-defined API. 1
Average complexity Either a human with a command line interface or an
external system via some protocols or a database.
2
High complexity A human with a GUI or a web page. 3
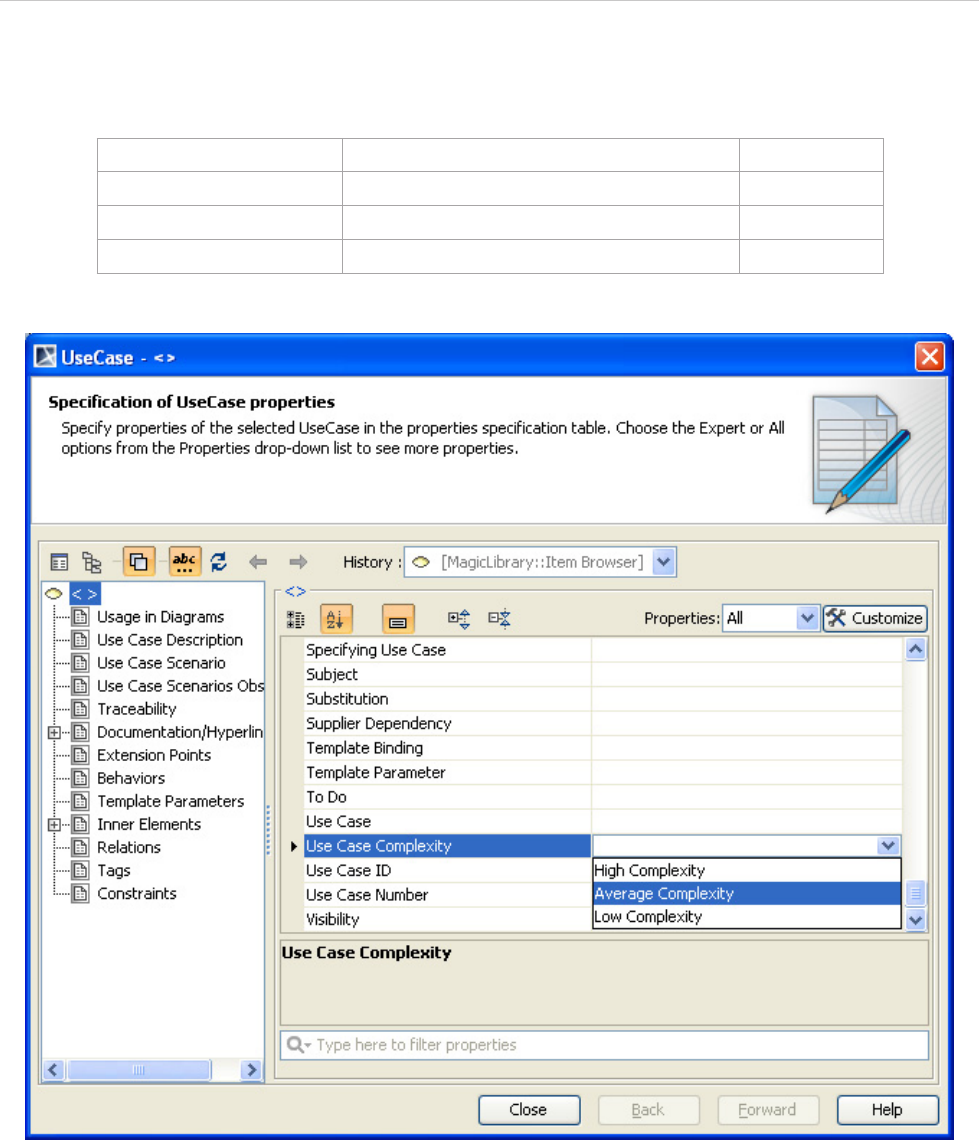
REPORT WIZARD
Use Case Driven
228
Copyright © 1998-2015 No Magic, Inc.
12.3.3 Determining Scenarios and Transactions of Use Cases
Table 29 -- Use Case Complexity
Figure 187 -- Use Case Driven - Use Case Complexity
12.3.4 Unadjusted Use Case Weights
A transaction is a set of activities, which is either performed entirely or not at all. To determine the number of
transactions, you need to count the use case steps. Next, multiply each use case type by the weighting factor
and add up the products to get Unadjusted Use Case Weights (UUCW).
12.3.5 Unadjusted Use Case Point
Add UAW and UUCW to get Unadjusted Use Case Point (UUCP): UUCP = UAW + UUCW.
Use Case Complexity Litmus Test To Decide Classifications Weight
Low complexity 1 - 3 transactions 5
Average complexity 4 - 7 transactions 10
High complexity > 7 transactions 15

REPORT WIZARD
Use Case Driven
229
Copyright © 1998-2015 No Magic, Inc.
Reference Documents
• The Estimation of Effort Based on Use Cases, published by Rational software
ftp://ftp.software.ibm.com/software/rational/web/whitepapers/2003/finalTP171.pdf
• COCOMO II
http://sunset.usc.edu/csse/research/COCOMOII/cocomo_main.html
12.4 Project Characteristics
The Technical and Environmental factors are associated with the weight of the project. You have to assign a
value to each factor. The value assigned to a particular factor depends on the degree of influence a factor has.
The relevance values range from 0 to 5, where 0 means no influence, 3 is the average level of influence, and 5
means a strong influence.
12.4.1 Technical Factors
Table 30 -- Technical Factors
Factor Technical Factors Weight Description
T1 Distributed system 2.0 The system distributed architecture or centralized
architecture.
T2 Response adjectives 1.0 The response time is one of the important criteria.
T3 End-user efficiency 1.0 The end-user efficiency.
T4 Complex processing 1.0 The business process is very complex.
T5 Reusable code 1.0 The project maintains high reusability. The design
is complex.
T6 Easy to install 0.5 The project requires simple installation.
T7 Easy to use 0.5 User-friendly is one of the important criteria.
T8 Portable 2.0 The project requires cross-platform implementa-
tion.
T9 Easy to change 1.0 The project is highly customizable in the future.
The architectural design is complex.
T10 Concurrent 1.0 The project has a large numbers of users working
with locking support. The architecture increases
the project complexity.
T11 Security features 1.0 The project has heavy security.
T12 Access for third par-
ties
1.0 The project is dependent on the third party’s con-
trol. Studying and understanding the third party is
required.
T13 Special training
required
1.0 The application is so complex for the user that
training must be provided.
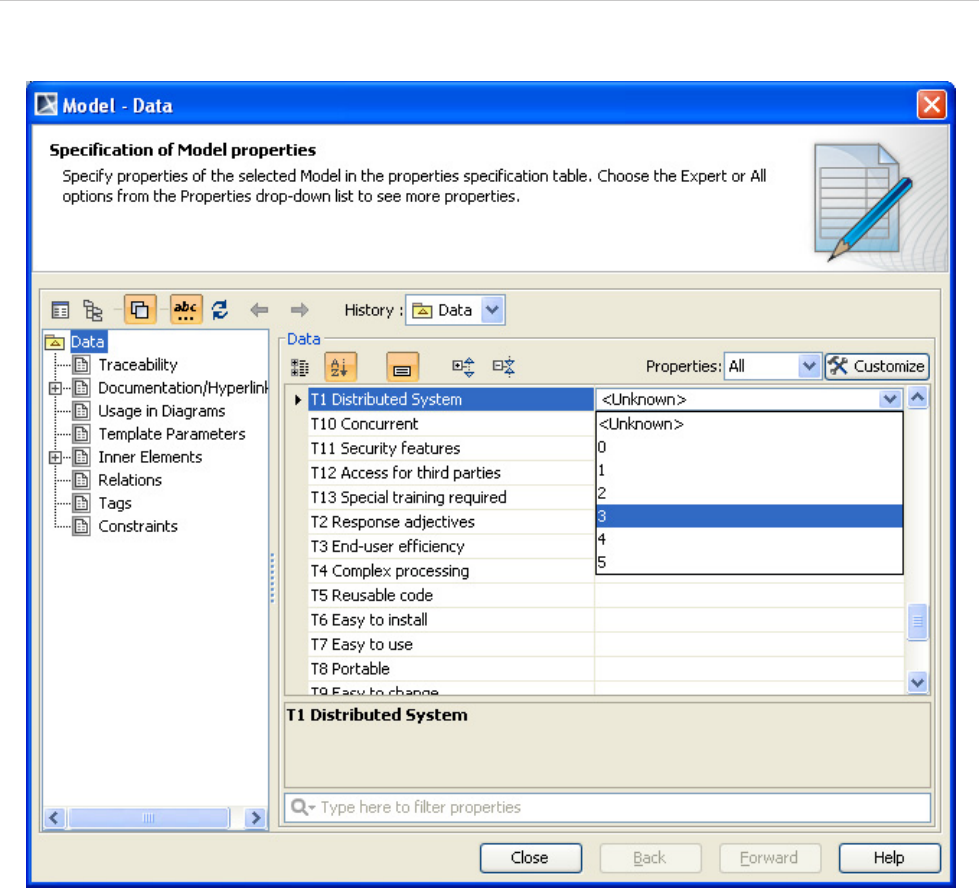
REPORT WIZARD
Use Case Driven
230
Copyright © 1998-2015 No Magic, Inc.
Figure 188 -- Use Case Driven Model Data T1
12.4.1.1 Technical Factor Value
Technical Factor Value (TFactor) is obtained with the multiplication of the value of each Technical factor by
its weight.
TFactor = value x weight
12.4.1.2 Technical Complexity Factor
Technical Complexity Factor (TCF) is obtained with the addition of 0.6 to the sum of TFactor multiplied by
0.01.
TCF = 0.6 + (0.01 * TFactor)
REPORT WIZARD
Use Case Driven
231
Copyright © 1998-2015 No Magic, Inc.
12.4.2 Environmental Factors
Table 31 -- Environmental Factors
Factor Environmental Factors Weight Description
E1 Familiar with RUP 1.5 Staff in the project are familiar with domain and
technical details of the project.
E2 Application experience 0.5 The application experience level.
E3 Object-oriented experi-
ence
1.0 Staff in the project have basic knowledge of the
OOP concept. The project is implemented on
the object oriented design.
E4 Lead analyst capability 0.5 The analyst who is leading the project has
enough domain knowledge.
E5 Motivation 1.0 The project motivates staff to work including
how the software industry is going on
E6 Stable requirements 2.0 The requirements are clear, stable, and
unlikely to change in the future.
E7 Part-time workers -1.0 Part-time staff are working on the project.
E8 Difficult programming lan-
guage
-1.0 Complexity of a programming language.
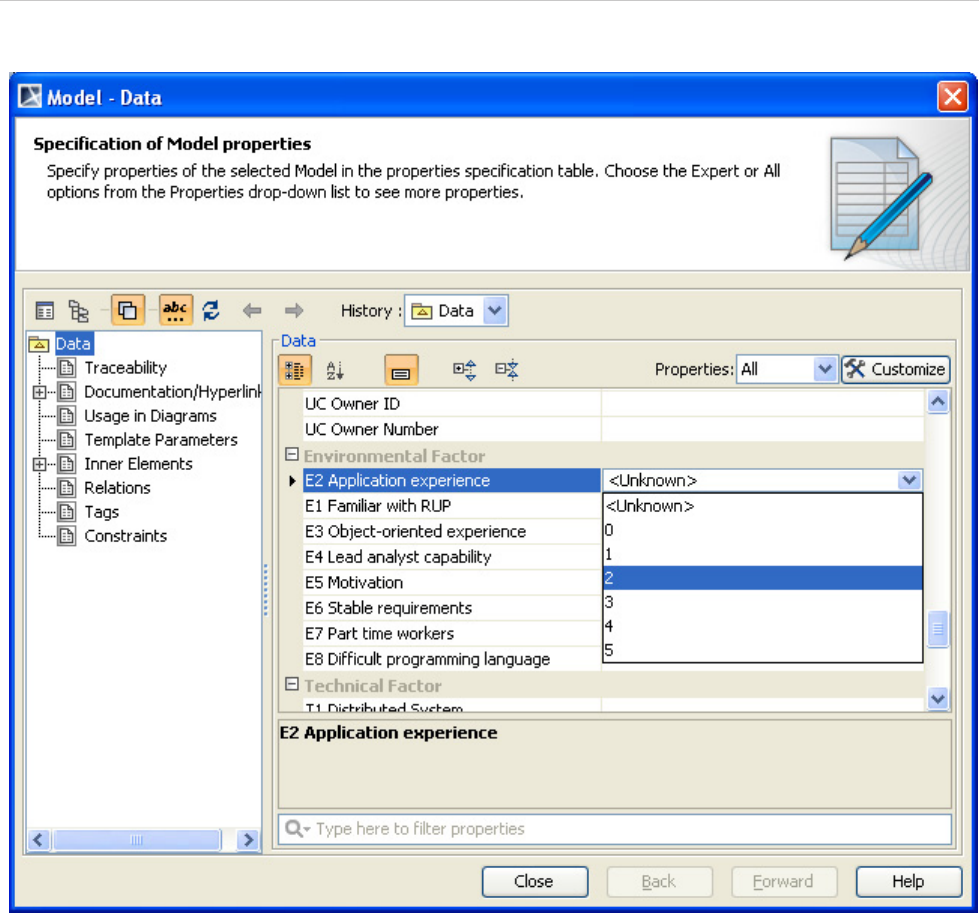
REPORT WIZARD
Use Case Driven
232
Copyright © 1998-2015 No Magic, Inc.
Figure 189 -- Use Case Driven Model Data E2
12.4.2.1 Environmental Factor Value
Environmental Factor Value (EFactor) is obtained with the multiplication of the value of each Environmental
factor by its weight.
12.4.2.2 Environmental Factor
Environmental Factor (EF) is obtained with the addition of 1.4 to the sum of EFactor multiplied by -0.03.
EF = 1.4 + (-0.03 * EFactor)
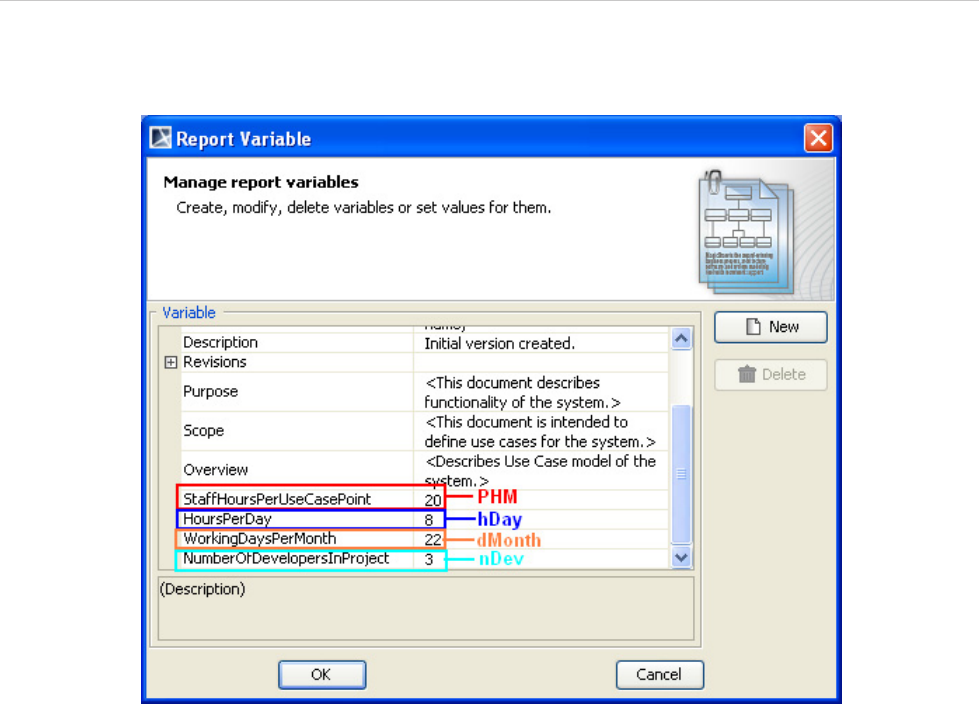
REPORT WIZARD
Use Case Driven
233
Copyright © 1998-2015 No Magic, Inc.
12.4.3 Project Estimation
Figure 190 -- Variables of Use Case Project Estimation
12.4.3.1 Adjusted Use Case Points
The Adjusted Use Case Point (UCP) is determined with the multiplication of Unadjusted Use Case Point
(UUCP) by Technical Complexity Factor (TCF) and Environmental Factor (EF).
UCP = UUCP * TCF * EF
12.4.3.2 Estimated Effort in Person Hours
The person hours multiplier or X hours is a ratio of the number of man hours (PHM) per Use Case Point based
on past projects. If no historical data has been collected, industry experts suggest using a figure between 15
and 30. A typical value is 20.
X hours = UCP * PHM
12.4.3.3 Estimated Effort in Scheduled Time
Divide X hours by the number of developers working on the project and working hours per day to determine
Estimated Effort in Scheduled Time or Y days. This means that with nDev developers, it would take Y days to
complete the project.
Y days = X / nDev / hay
12.4.3.4 Estimated Effort in Working Days
Divide Y days by working days per month to get the estimated effort in working days or Z months. This means
that with nDev developers, it would take Z month to complete the project.
Z months = Y / d Month
REPORT WIZARD
Javadoc Syntax Tool
234
Copyright © 1998-2015 No Magic, Inc.
13. Javadoc Syntax Tool
Javadoc is the industry standard for documenting Java classes. Javadoc can be documented inside the docu-
mentation field (Figure 191).
Figure 191 -- Documentation Field
Report Wizard provides a template tool for translating Javadoc text into Javadoc properties. Javadoc Tool will
be loaded and used inside the template upon the user’s request.
An example of Javadoc text is shown below:
REPORT WIZARD
Javadoc Syntax Tool
235
Copyright © 1998-2015 No Magic, Inc.
To print the Javadoc comment and author inside the template:
The output from this example will be:
The Javadoc Syntax Tool is implemented based on Custom Tool (See Appendix A: Report Extensions).
/**
* A base class realizing from interface {@link ITool}.
* This class provides default implementation for
* {@link ITool}. The extended class from this class may
* send message or object to observer class by invoking
* {@link #notifyObservers(Object)} of class <code>
* Observable</code>. The observer class such as
* {@link AbstractTemplateEngine} or graphical user
* interface can catch notified object and interact with
* user.
*
* @author Siri Chongasamethaworn (siri_c@nomagicasia.com)
* @since Aug 3, 2007
*/
#import ("javadoc",
"com.nomagic.reportwizard.tools.doc.JavaDocTool")
#set ($doc = $javadoc.create($class.documentation))
Comment:
$doc.comment
Author:
$doc.author
Comment:
A base class realizing from interface ITool. This class
provides default implementation for ITool. The extended
class from this class may send message or object to
observer class by invoke #notifyObservers(Object) of class
Observable. The observer class such as
AbstractTemplateEngine or graphical user interface can
catch notified object and interact with user.
Author:
Siri Chongasamethaworn (siri_c@nomagicasia.com)

REPORT WIZARD
Javadoc Syntax Tool
236
Copyright © 1998-2015 No Magic, Inc.
13.1 Javadoc Syntax
A doc comment consists of characters between the characters /** that begin the comment and the characters */
that end it. Leading asterisks are allowed on each line and are described below. Text in a comment can con-
tinue to multiple lines.
• Leading asterisks
When Javadoc Tool parses a doc comment, leading asterisk (*) characters on each line are
discarded.
• First sentence
The first sentence of each doc comment is a summary sentence. This sentence can be retrieved
from $doc.firstSentenceTags. The first sentence tags are a collection of inline tags until
full stops (.).
• Comment and tag sections
A comment is the main description which begins after the starting delimiters /** and continues
until the tag section. A tag section starts with the first block tag. The comment can be retrieved
by $doc.comment
• Comments written in HTML
Text is written in HTML and will be rendered as HTML support before being printed to a report.
(See Appendix D: HTML Tag Support)
• Block and in-line tags
A tag is a special keyword within a doc comment that Javadoc Tool can process. There are two
kinds of tags:
(i) Block tags
They can be placed only in the tag section. The block tag form is @tag. The block tag can be
accessed directly from the root document such as $doc.param and $doc.author.
The $doc.tags will provide a collection of all the tags appearing in this Javadoc.
(ii) Inline tags
They can be placed anywhere in the main description or in the block tags. The inline tag form is
{@tag}.

REPORT WIZARD
Javadoc Syntax Tool
237
Copyright © 1998-2015 No Magic, Inc.
Table 32 -- Current Supported Tags
Tag JDK Report Wizard Support
@author 1.0 Yes
{@code} 1.5 Render as <code>text</code>
{@docRoot} 1.3 Not supported
@deprecated 1.0 Yes
@exception 1.0 Yes
{@inheritDoc} 1.4 Not Supported
{@link} 1.2 Yes, with conditions (External link, model support, and class/
method link will be ignored)
{@linkplain} 1.4 Yes, see {@link link}
{@literal} 1.5 Yes
@param 1.0 Yes
@return 1.0 Yes
@see 1.0 Yes, with conditions (External link, model support, and class/
method link will be return as plain text)
@serial 1.2 Yes
@serialData 1.2 Yes
@serialField 1.2 Yes
@since 1.1 Yes
@throws 1.2 Yes
{@value} 1.4 Not Supported
@version 1.0 Yes
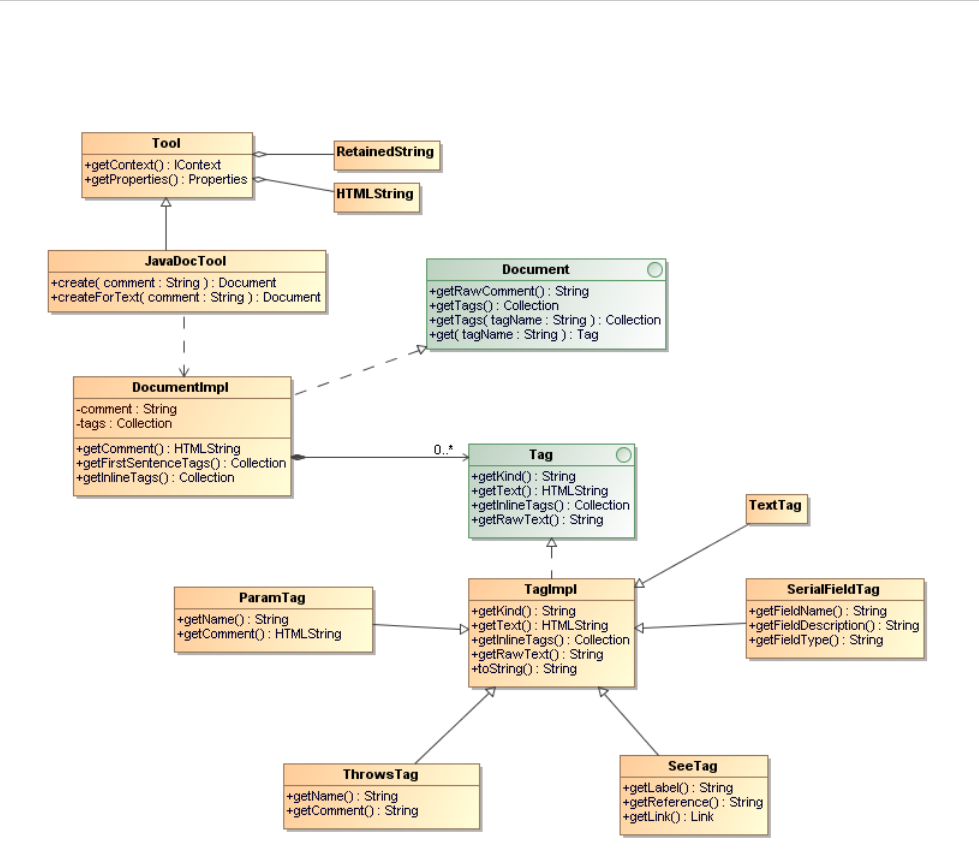
REPORT WIZARD
Javadoc Syntax Tool
238
Copyright © 1998-2015 No Magic, Inc.
13.2 Javadoc Tool API
Figure 192 -- Javadoc Tool API
13.2.1 JavaDocTool
JavaDoc Tool is a custom tool class used for creating a Document node.
• create() - Return a new instance of a Document node. Each JavaDoc comment must start with /** and
ended with */.
• createForText() - Return a new instance of a Document node. This method allows in-complete
JavaDoc (comments without /** and */) to be loaded with JavaDocTool.
13.2.1.1 Document
Document is an interface representing a Comment Document.
• getRawComment() - Return the full unprocessed text of the comment.
• getTags() - Return all tags in this document item.
• getTags(tagName : String) - Return a tag of the specified kind of this document item.
• get(tagName : String) - Return a tag of the specified kind of this document item. If any tags with the
same kind are found, the first tag of that kind will be returned.

REPORT WIZARD
Javadoc Syntax Tool
239
Copyright © 1998-2015 No Magic, Inc.
13.2.1.2 DocumentImpl
DocumentImpl is a default JavaDoc document implementation.
• getComment() - Return formatted text for this document.
• getInlineTags() - Return comment as a collection of tags.
• getFirstSentenceTags() - Return the first sentence of the comment as a collection of tags.
13.2.1.3 Tag
Tag is an interface representing a simple documentation tag, such as @since, @author, and @version
• getKind() - Return the kind of this tag.
• getText() - Return the text of this tag.
• getInlineTags() - Return a collection of tags for a documentation comment with embedded {@link}
tags.
13.2.1.4 TagImpl
TagImpl is a default tag implementation.
• getRawText() - Return the full unprocessed text of this tag.
• toString() - Return the text of this tag. Usually calls getText().
13.2.1.5 ParamTag
ParamTag represents a @param documentation tag.
• getName() - Return the name of the parameter associated with this tag.
• getComment() - Return the parameter’s comment.
13.2.1.6 ThrowsTag
ThrowsTag represents a @throws or @exception documentation tag.
• getName() - Return the name of the exception associated with this tag.
• getComment() - Return the exception’s comment.
13.2.1.7 SeeTag
SeeTag represents a user-defined cross-reference to related documentation. The reference can be either inline
with the comment using {@link} or a separate block comment using @see.
• getLabel() - Return the label of the @see tag.
• getReference() - Return the MODEL or URL of the @see reference.
• getLink() - Return the Link object representing this tag.
13.2.1.8 SerialFieldTag
SerialFieldTag represents a @serialField tag.
• getFieldName() - return the serial field name.
• getFieldDescription() - return the field comment.
• getFieldType() - return the field type string.
REPORT WIZARD
Javadoc Syntax Tool
240
Copyright © 1998-2015 No Magic, Inc.
For examples:
• Import the Javadoc tool and create an instance of Javadoc document:
• Print a Javadoc comment:
• Print the first encountered author:
• Print all authors:
• Print the first sentence:
• Print the inline tags:
• Print a raw comment (plain text without a document parser or HTML renderer):
• Print all block tags:
• Print all param tags:
• Print all throws tags:
• Print all see tags:
#import ("javadoc",
"com.nomagic.reportwizard.tools.doc.JavaDocTool")
#set ($doc = $javadoc.create($comment))
$doc.comment
$doc.author
#foreach ($author in $doc.getTags("author"))
$author.text
#end
#foreach ($tag in $doc.firstSentenceTags)
$tag.text
#end
#foreach ($tag in $doc.inlineTags)
$tag.kind
$tag.text
#end
$doc.rawComment
#foreach ($tag in $doc.tags)
$tag.kind : $tag.text
#end
#foreach ($tag in $doc.getTags("param"))
$tag.name – $tag.comment
#end
#foreach ($tag in $doc.getTags("throws"))
$tag.name – $tag.comment
#end
#foreach ($tag in $doc.getTags("see"))
$tag.label – $tag.reference
#end

REPORT WIZARD
Javadoc Syntax Tool
241
Copyright © 1998-2015 No Magic, Inc.
Reference Documents
• Javadoc specification
http://java.sun.com/j2se/1.5.0/docs/tooldocs/windows/javadoc.html#javadoctags
• Writing Javadoc
http://java.sun.com/j2se/javadoc/writingdoccomments/index.html
• Javadoc Tool API
<install.dir>/plugins/com.nomagic.magicdraw.reportwizard/api/javadoc.zip

REPORT WIZARD
Import Tool
242
Copyright © 1998-2015 No Magic, Inc.
14. Import Tool
Import Tool enables you to dynamically import documents or parts of them into reports, giving you greater flex-
ibility when generating reports that require dynamic resources. You can now include documents whose location
is only known at the actual translation time.
Import Tool allows you to:
• parse and import RTF, HTML, and text templates from any location in the file system;
• reuse the #sectionBegin and #sectionEnd syntax to import any part of a document. ImportTool
makes use of the predefined syntaxes: #sectionBegin and #sectionEnd, which were introduced
with the #includeSection directive. (See #includeSection Directive in the Report Wizard Custom
Language section for #sectionBegin and #sectionEnd usage)
14.1 Import Syntax
To use the Import tool syntax:
1. To declare Import Tool in the template, type: #import ('import',
'com.nomagic.reportwizard.tools.ImportTool'). The directive #import will load Import
Tool so that it can be accessed inside the template.
• The first parameter 'import' is for identifying the alias of Import Tool (in this case,
'import', but it can be named anything).
• The second parameter 'com.nomagic.reportwizard.tools.ImportTool' has to be copied
as it is (do not rename it). Otherwise, Import Tool will not be loaded. For further details,
see Ruby Script Tool.
2. To import any content from a child template, type:
• $import.include('child.rtf') to import a complete document at the current position of the
template, and/or
• $import.includeSection('child.rtf', 'Section A') to include only the text contained in the
named section of the document.
$import
This part names the alias assigned to Import Tool when declaring it to the template.

REPORT WIZARD
Import Tool
243
Copyright © 1998-2015 No Magic, Inc.
$import.include(FileName)
A 'FileName' specifies the location of a file in the file system. This filename can be either an absolute or a rela-
tive path. The 'FileName' parameter can be set either statically or dynamically. See the Import Usage section
for an illustration on how to use it.
$import.includeSection( FileName, SectionName)
A ‘FileName' functions the same as in the sub-section above. A 'SectionName' denotes a paragraph in the doc-
ument named 'FileName', which is delimited by the #sectionBegin(SectionName) and #sectionEnd identifi-
ers. The SectionName variable can also be set either statically or dynamically. See the Import Usage section
for an illustration on how to use it.
14.2 Import Usage
14.2.1 Preparatory Step
Define a child template that you will use as in examples 1, 2, and 3. This child template contains the following
header line and named sections ('Section A' and 'Section B'):
14.2.2 Usage in Example 1
This example shows how to statically include the complete child template as shown in the Preparatory Step.
To include it, call the $import.include('child.rtf') method. Note that there is no specified path, this path to the
child template tells you that the master and child templates reside in the same directory.
The output right below will include the entire text from the master template (right above) and from the child tem-
plate (see the Preparatory Step) minus the template directives. The included content will be then parsed and
stripped of all velocity directives. The output is as follows:
This is the child template.
#sectionBegin(Section A)
This is Section A.
#sectionEnd
#sectionBegin(Section B)
This is Section B.
#sectionEnd
#import ('import', 'com.nomagic.reportwizard.tools.ImportTool')
This is the 1st master template
Include child template
$import.include('child.rtf')
REPORT WIZARD
Import Tool
244
Copyright © 1998-2015 No Magic, Inc.
14.2.3 Usage in Example 2
This example shows how to statically include a section of the child template as shown in the Preparatory Step.
To include the section, named 'Section A' from the child template, call the $import.includeSection('tem-
plates/child.rtf', 'Section A') method. In this example, the master and child templates reside in different direc-
tories, which means that the child template will reside in a subdirectory called 'templates'. This 'templates'
directory will thus reside in the same directory as the master template.
The output will be:
14.2.4 Usage in Example 3
This example shows how to dynamically include the section of a child template as shown in the Preparatory
Step. Before dynamically including the section of the child template named 'Section B', set a variable for the file
location of the child template [#set ($child = "C:/ImportTool/child.rtf")] and another one for the section name
to be included [#set ($section = "Section B")]. To include the ‘Section B’ section from the child template, call
the $import.includeSection($child, $section) method. In this example, the child's template location is pro-
vided by an absolute path. Note that dynamic values must not be specified in a pair of quote marks, otherwise
the section will not be included.
The output will be:
This is the 1st master template
Include child template
This is the child template.
This is Section A.
This is Section B.
#import ('import', 'com.nomagic.reportwizard.tools.ImportTool')
This is the 2nd master template
Include Section A
$import.includeSection('templates/child.rtf', 'Section A')
This is the 2nd master template
Include Section A
This is Section A.
#import ('import', 'com.nomagic.reportwizard.tools.ImportTool')
This is the 3rd master template
Include Section B
#set ($child = "C:/ImportTool/child.rtf")
#set ($section = "Section B")
$import.includeSection($child, $section)

REPORT WIZARD
Import Tool
245
Copyright © 1998-2015 No Magic, Inc.
This is the 3rd master template
Include Section B
This is Section B.
NOTE The Import Tool supports RTF, HTML, XML, and text files only.
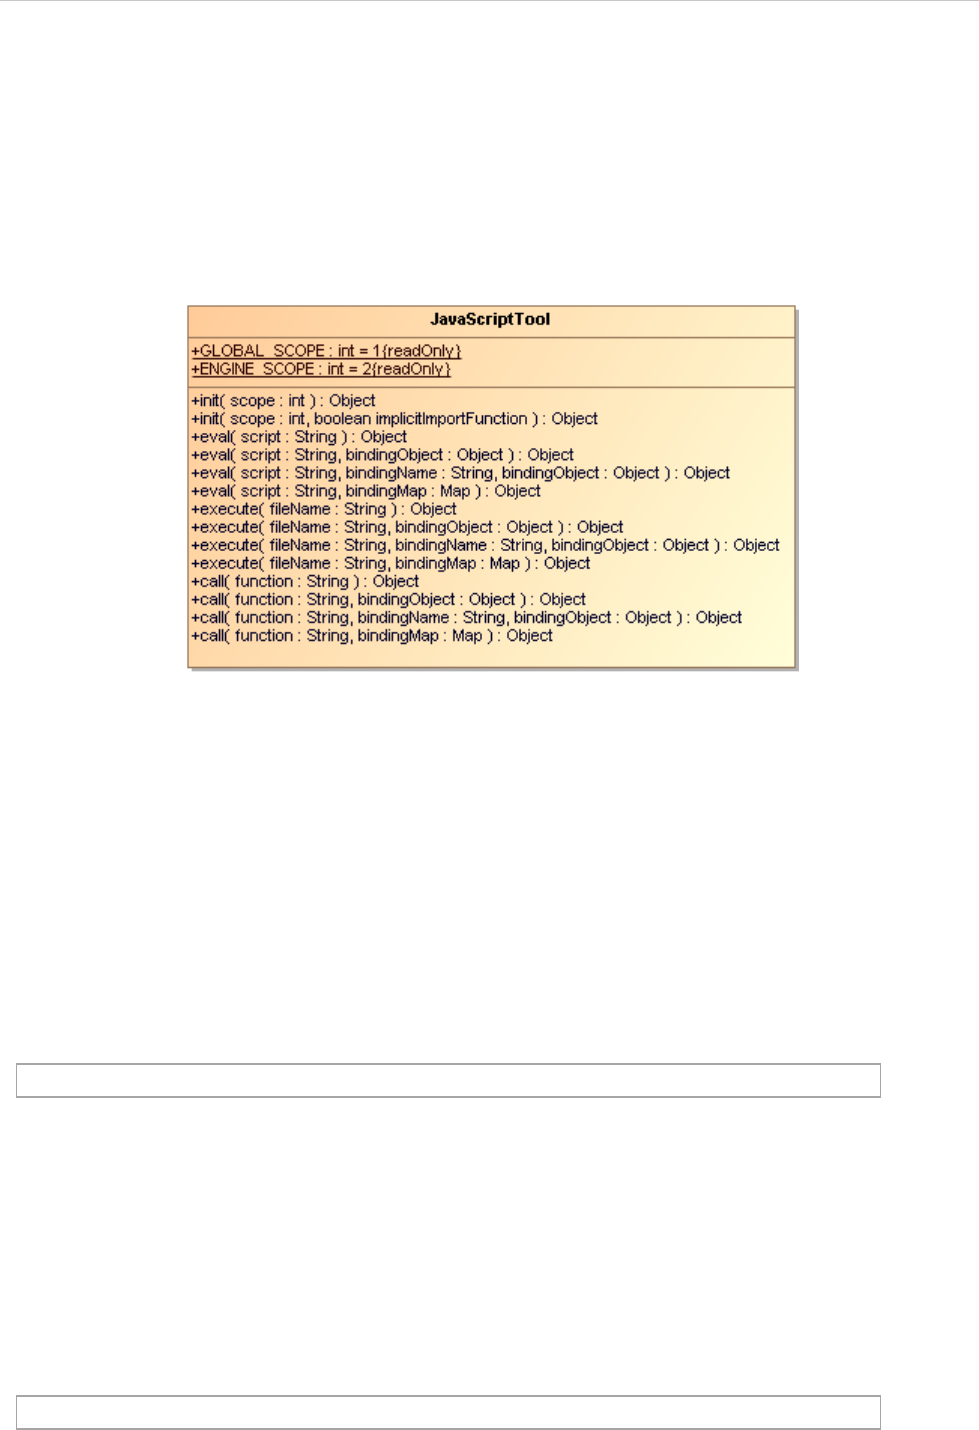
REPORT WIZARD
JavaScript Tool
246
Copyright © 1998-2015 No Magic, Inc.
15. JavaScript Tool
JavaScript Tool enables report templates to evaluate or run JavaScript codes from templates and external
JavaScript files (Figure 193).
The general concept behind this JavaScript feature is to separate complex business logic from presentation
logic. Complex logic should be executed by JavaScript, and presentation logic should be executed by Velocity
code.
Figure 193 -- Class Diagram: JavaScript Tool
JavaScript Tool includes 3 methods:
(i) 'eval' Method: this method will evaluate JavaScript text, and then return the result.
(ii) 'execute' Method: this method will execute a JavaScript file, and then return the result.
(iii) 'call' Method: this method will call a JavaScript function, and then return the result.
Like other Custom Tools, the JavaScript Tool 'scripttool.jar' must be installed in the 'extensions' folder of the
Report Wizard plugin, and 'js.jar' must be included in any class path or the 'extensions' folder. For further infor-
mation about Custom Tools and the installation, see 1 Custom Tool.
To import JavaScript Tool to a template type, for example:
15.1 JavaScript Tool API
15.1.1 'eval' Method
eval(String script)
This method will evaluate a JavaScript code from a string and return the result.
#import('js', 'com.nomagic.reportwizard.tools.script.JavaScriptTool')
$js.eval('script')
REPORT WIZARD
JavaScript Tool
247
Copyright © 1998-2015 No Magic, Inc.
eval(String script, Object bindingObject)
This method will evaluate a JavaScript code with a single binding object. The code will be evaluated from a
string. The "importer" name will be used as a binding name for this object.
eval(String script, String bindingName, Object bindingObject)
This method will evaluate a JavaScript code with a single binding object and specified binding name. The code
will be evaluated from a string. The binding name will be used as the name for this object.
eval(String script, Map bindingMap)
This method will evaluate a JavaScript code with a set of binding arguments (a name and an object). The code
will be evaluated from a string. The binding map consists of key-value pairs for this binding name and binding
object.
15.1.2 'execute' Method
execute(String filename)
This method will execute a JavaScript file. The filename parameter is a file path to the JavaScript file.
execute(String filename, Object bindingObject)
This method will execute a JavaScript file with a single binding object. The filename parameter is a file path to
the JavaScript file. The "importer" name will be used as the binding name for this object.
#foreach ($class in $Class)
$js.eval('importer.getName()', $class)
#end
#foreach ($class in $Class)
$js.eval('cls.getName()', 'cls', $class)
#end
#set ($dict = $map.createHashMap())
#set ($void = $dict.put("first", "foo"))
#set ($void = $dict.put("last", "bar"))
$js.eval("first + ' ' + last", $dict)
$js.execute('filename.js')

REPORT WIZARD
JavaScript Tool
248
Copyright © 1998-2015 No Magic, Inc.
execute(String filename, String bindingName, Object bindingObject)
This method will execute a JavaScript file with a single binding object and specified binding name. The filename
parameter is a file path to the JavaScript file. The binding name will be used as the name for this object.
execute(String filename, Map bindingMap)
This method will execute a JavaScript file with a set of binding arguments (a name and an object). The filename
parameter is a file path to the JavaScript file. The binding map consists of key-value pairs for this binding name
and binding object.
#foreach ($class in $Class)
$js.execute('filename.js', $class)
#end
// filename.js
importer.getName();
#foreach ($class in $Class)
$js.execute('filename.js', 'cls', $class)
#end
// filename.js
cls.getName();
#set ($map = $map.createHashMap())
#set ($void = $map.put("first", "foo"))
#set ($void = $map.put("last", "bar"))
$js.execute('filename.js', $map)
// filename.js
first + ' ' + last;
NOTE • Absolute Path: If a 'filename' is provided with an absolute path, JavaScript Tool will
read the JavaScript file from an absolute location such as $js.execute('c:/mycode/
readclass.js').
• Relative Path: If a 'filename' is provided with a relative path, JavaScript Tool will read
the template from a relative location. This relative location starts from the current
directory in which the template is located such as $js.execute('readclass.js').
REPORT WIZARD
JavaScript Tool
249
Copyright © 1998-2015 No Magic, Inc.
15.1.3 'call' Method
call(String function)
This method will provide a short and reusable method to call a JavaScript function. This function must be
defined before calling this method. This function can be defined by 'eval' or 'execute'.
call(String function, Object bindingObject)
This method will provide a short and reusable method to call a JavaScript function with a single binding object.
The "importer" name will be used as the binding name for this object. This function must be defined before call-
ing this method. This function can be defined by 'eval' or 'execute'.
call(String function, String bindingName, Object bindingObject)
This method will provide a short and reusable method to call a JavaScript function with a single binding object
and specified binding name. This binding name will be used as the name for this object. This function must be
defined before calling this method. This function can be defined by 'eval' or 'execute'.
$js.execute('javascript.js')
$js.call('calc(1, 3)')
// javascript.js
function calc(var1, var2)
{
return var1 + var2;
}
$js.execute('javascript.js')
$js.call('calc(1, 3)', 10)
// javascript.js
function calc(var1, var2)
{
var f = Number(importer ? importer : 0);
return f + var1 + var2;
}
$js.execute('javascript.js')
$js.call('calc(1, 3)', 'factor', 10)
// javascript.js
function calc(var1, var2)
{
var f = Number(factor ? factor : 0);
return f + var1 + var2;
}
REPORT WIZARD
JavaScript Tool
250
Copyright © 1998-2015 No Magic, Inc.
call(String function, Map bindingMap)
This method will provide a short and reusable method to call a JavaScript function with a set of binding argu-
ments (a name and an object). The binding map consists of key-value pairs for this binding name and binding
object.
15.2 References to Elements
References to elements are implicitly inserted into the JavaScript context when calling eval(), execute(), or
call(). Examples of implicit variables include, for instance, $Class, $UseCase, $sorter, etc.
For example:
A "functions.js"
A template code
Example:
#set ($map = $map.createHashMap())
#set ($void = $map.put("first", "foo"))
#set ($void = $map.put("last", "bar"))
$js.call('hello()', $map)
// filename.js
function hello()
{
return 'hello ' + first + ' ' + last;
}
importPackage(java.util)
// variable $Dependency and $sorter can be accessed directly inside
function getSupplier()
{
var supplierList = new ArrayList();
var sortedDependencyList = $sorter.sort($Dependency);
for (var i=0; i<sortedDependencyList.size(); i++)
{
var dependency = sortedDependencyList.get(i);
supplierList.addAll(dependency.getSupplier());
}
return supplierList;
}
#import ('js', 'com.nomagic.reportwizard.tools.script.JavaScriptTool')
$js.execute("functions.js")
#set ($supplierList = $js.eval("getSupplier()"))
#foreach ($supplier in $supplierList)
$supplier.name
#end

REPORT WIZARD
JavaScript Tool
251
Copyright © 1998-2015 No Magic, Inc.
A "functions.js"
A template code
Reference Documents
• Mozilla JavaScript Tool
http://developer.mozilla.org/en/Rhino_documentation
• Sun JavaScript programming guide
http://java.sun.com/javase/6/docs/technotes/guides/scripting/programmer_guide/index.html
var qualifiedName = "";
function packageQualifiedName(element)
{
qualifiedName = "";
packageName(element);
return qualifiedName==""?"Default":qualifiedName;
}
function packageName(element)
{
var parent = element.owner;
if (parent.classType.simpleName == 'Package') {
if (qualifiedName == "")
qualifiedName = parent.name;
else
qualifiedName = parent.name + '.' + qualifiedName;
packageName(parent);
}
}
#import ('js', 'com.nomagic.reportwizard.tools.script.JavaScriptTool')
$js.execute("functions.js")
#foreach ($c in $Class)
Package: $js.eval('packageQualifiedName($c)')
Name: $c.name
#end
REPORT WIZARD
Groovy Script Tool
252
Copyright © 1998-2015 No Magic, Inc.
16. Groovy Script Tool
Groovy Script Tool enables report templates to evaluate or run Groovy codes from templates and external
Groovy files.
The Groovy Tool includes two methods:
(i) 'eval' method: This method will evaluate Groovy text, and then return the result.
(ii) 'execute' method: This method will execute a Groovy file, and then return the result.
Like other Script Tools, the Groovy Script Tool 'scripttool.jar' must be installed in the 'extensions' folder of the
Report Wizard plugin, and 'groovy-all-1.7.9.jar' must be included in any class path or the 'extensions' folder. For
further information about Custom Tools and the installation, see 1 Custom Tool.
To import Groovy Script Tool to a template, type the following code:
16.1 Groovy Script Tool API
16.1.1 'eval' Method
eval(String script)
This method will evaluate a Groovy code from a string and return the result.
eval(String script, String bindingName, Object bindingObject)
This method will evaluate a Groovy code with a single binding object and specified binding name. The code will
be evaluated from a string. The binding name will be used as the name for this object.
eval(String script, Map bindingMap)
This method will evaluate a Groovy code with a set of binding arguments (a name and an object). The code will
be evaluated from a string. The binding map consists of key-value pairs for the binding name and the binding
object.
#import ('groovy', 'com.nomagic.reportwizard.tools.script.GroovyTool')
$groovy.eval("println 'Hello World!'")
#foreach ($c in $Class)
$groovy.eval("println classname", "classname", $c.name)
#end

REPORT WIZARD
Groovy Script Tool
253
Copyright © 1998-2015 No Magic, Inc.
Or
16.1.2 'execute' method
execute(String filename)
This method will execute a Groovy file. The 'filename' parameter refers to a name of the Groovy file or an abso-
lute path to the Groovy file.
execute(String filename, String bindingName, Object bindingObject)
This method will execute a Groovy file with a single binding object and specified binding name. The 'filename'
parameter is a file path to the Groovy file. The binding name will be used as the name for this object.
File filename.groovy
The template code
execute(String filename, Map bindingMap)
This method will execute a Groovy file with a set of binding arguments (a name and an object). The 'filename'
parameter is a file path to the Groovy file. The binding map consists of key-value pairs for the binding name and
the binding object.
#set ($dict = $map.createHashMap())
#set ($void = $dict.put("first", "foo"))
#set ($void = $dict.put("last", "bar"))
$groovy.eval("println first + last", $dict)
$groovy.eval("println first + ' ' + last", {"first":"foo", "last":"bar"})
NOTE The second code contains curly brackets; '{' and '}' characters, which are not allowed to
be used in any RTF template. For the RTF template, use the first code instead.
$groovy.execute("filename.groovy")
"Class name is $c.name"
#foreach ($c in $Class)
$groovy.execute("filename.groovy", 'c', $c)
#end
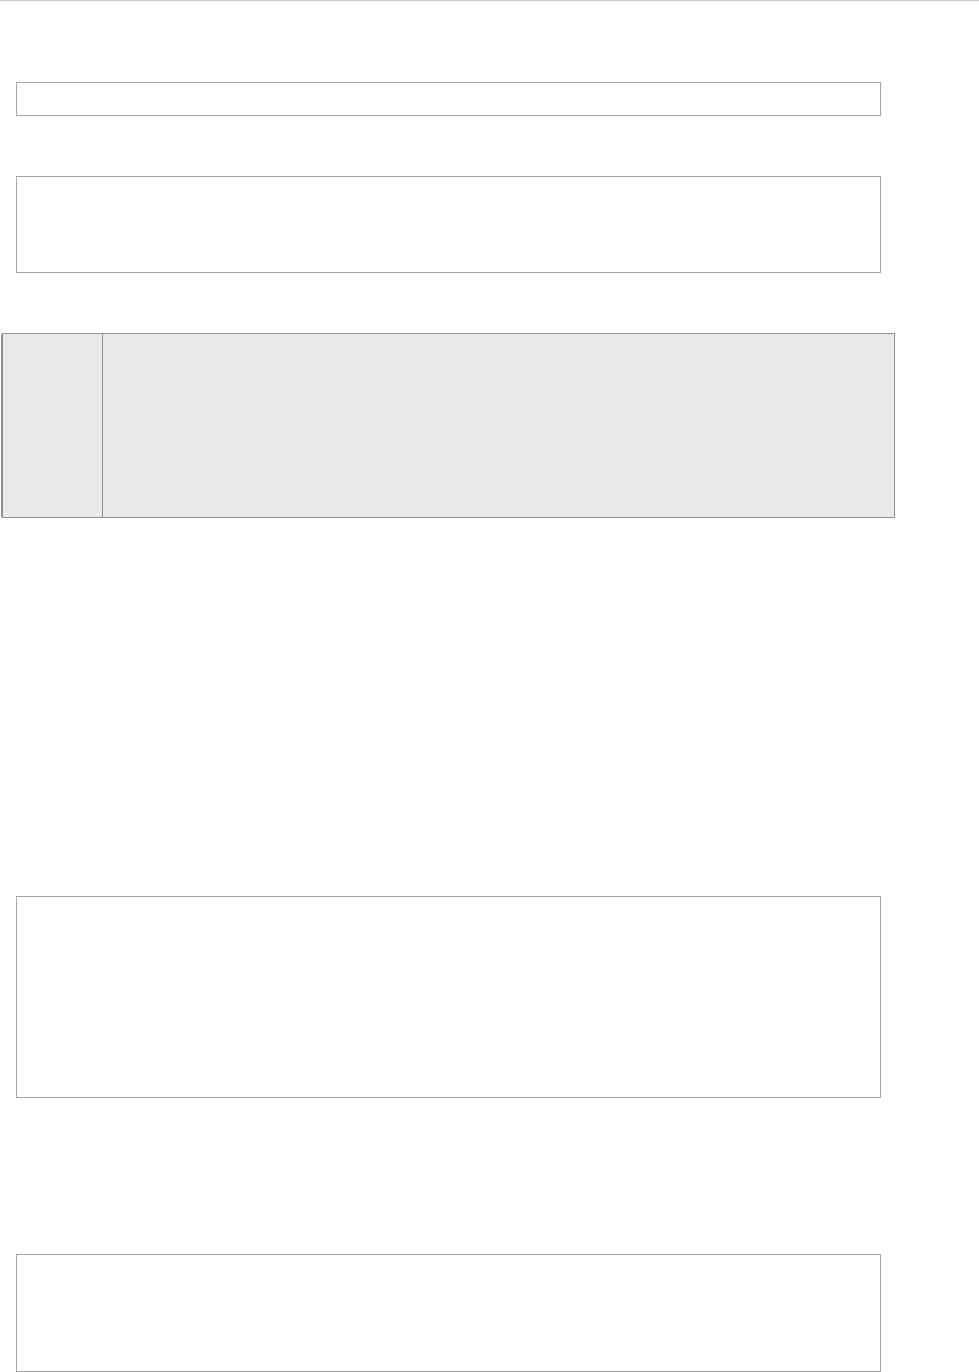
REPORT WIZARD
Groovy Script Tool
254
Copyright © 1998-2015 No Magic, Inc.
File filename.groovy
The template code
16.2 References to Elements
References to elements are similar to ones in JavaScript Tool. The elements are implicitly inserted into the
Groovy context when calling “eval()”, or “execute()”. Examples of implicit variables include $Class, $UseCase,
$sorter, etc.
File 'AllAbstractClass.groovy'
The report template code is:
first + " " + last
#set ($dict = $map.createHashMap())
#set ($void = $dict.put("first", "foo"))
#set ($void = $dict.put("last", "bar"))
$groovy.execute("filename.groovy", $dict)
NOTE • Absolute Path: If the 'filename' is provided with an absolute path, Groovy Tool will
read the Groovy file from an absolute location such as $groovy.execute('c:/mycode/
readclass.groovy').
• Relative Path: If the 'filename' is provided with a relative path, Groovy Tool will read
the template from a relative location. This relative location starts from the current
directory in which the template is located such as
$groovy.execute('readclass.groovy').
// variable $Class can be accessed directly inside Groovy script
def list = []
for (c in $Class) {
if (c.isAbstract()) {
list.add(c)
}
}
return list
#import ('groovy', 'com.nomagic.reportwizard.tools.script.GroovyTool')
#set ($abstractClassList = $groovy.execute('AllAbstractClass.groovy'))
#foreach ($cls in $abstractClassList)
$cls.name
#end
REPORT WIZARD
Ruby Script Tool
255
Copyright © 1998-2015 No Magic, Inc.
17. Ruby Script Tool
Ruby Script Tool enables report templates to evaluate or run Ruby codes from templates and external Ruby
files.
The Ruby Tool includes 2 methods:
(i) ‘eval’ method: This method will evaluate Ruby text, and then return the result.
(ii) ‘execute’ method: This method will execute a Ruby file, and then return the result.
Like other Script Tools, the Ruby Script Tool ‘scripttool.jar’ must be installed in the ‘extensions’ folder of the
Report Wizard plugin, and ‘jruby-complete-1.6.3.jar’ must be included in any class path or the ‘extensions’
folder. For further information about Custom Tools and the installation, see 1 Custom Tool.
To import Ruby Script Tool to a template, type the following code:
17.1 Ruby Script Tool API
17.1.1 ‘eval’ Method
17.1.1.1 eval(String script)
This method will evaluate a Ruby code from a string and return the result.
17.1.1.2 eval(String script, String bindingName, Object bindingObject)
This method will evaluate a Ruby code with a single binding object and specified binding name. The code will
be evaluated from a string. The binding name will be used as the name for this object.
17.1.1.3 eval(String script, Map bindingMap)
This method will evaluate a Ruby code with a set of binding arguments (a name and an object). The code will
be evaluated from a string. The binding map consists of key-value pairs for the binding name and binding
object.
#import (‘ruby’,
‘com.nomagic.reportwizard.tools.script.RubyScriptTool’)
$ruby.eval(“puts ‘Hello World!’”)
#foreach ($class in $Class)
$ruby.eval(‘“Class name is ” + c.name’, ‘c’, $class)
#end
#set ($dict = $map.createHashMap())
#set ($void = $dict.put(“first”, “foo”))
#set ($void = $dict.put(“last”, “bar”))
$ruby.eval(“puts first + last”, $dict)
REPORT WIZARD
Ruby Script Tool
256
Copyright © 1998-2015 No Magic, Inc.
Another alternative is as follows:
The second code contains curly brackets; “{“ and “}” characters, which are not allowed to be used in any RTF
template. For the RTF template, use the first code instead.
17.1.2 ‘execute’ Method
17.1.2.1 execute(String filename)
This method will execute a Ruby file. The ‘filename’ parameter is a name of the Ruby file or an absolute path to
the Ruby file.
After executing the Ruby file, the result of the execution will be stored in the single context for each report gen-
eration. If the Ruby file contains Ruby functions, you can recall the functions with the use of ‘eval()’ methods.
For example, File ‘String.rb’:
Indicated below is the template code.
17.1.2.2 execute(String filename, String bindingName, Object bindingObject)
This method will execute a Ruby file with a single binding object and specified binding name. The ‘filename’
parameter is a file path to the Ruby file. The binding name will be used as the name for this object.
File 'filename.rb'
The template code
17.1.2.3 execute(String filename, Map bindingMap)
This method will execute a Ruby file with a set of binding arguments (a name and an object). The ‘filename’
parameter is a file path to the Ruby file. The binding map consists of key-value pairs for the binding name and
binding object.
$ruby.eval(“puts first + last”, {“first”:“foo”, “last”:“bar”})
$ruby.execute(“filename.rb”)
def deCamelCase(str)
return str.gsub!(/(.)([A-Z])/,‘\1 \2’)
end
$ruby.execute(“String.rb”)
#foreach ($c in $Class)
$ruby.eval(‘deCamelCase($c.name)’)
#end
puts c.name
#foreach ($c in $Class)
$ruby.execute(“filename.rb”, ‘c’, $c)
#end
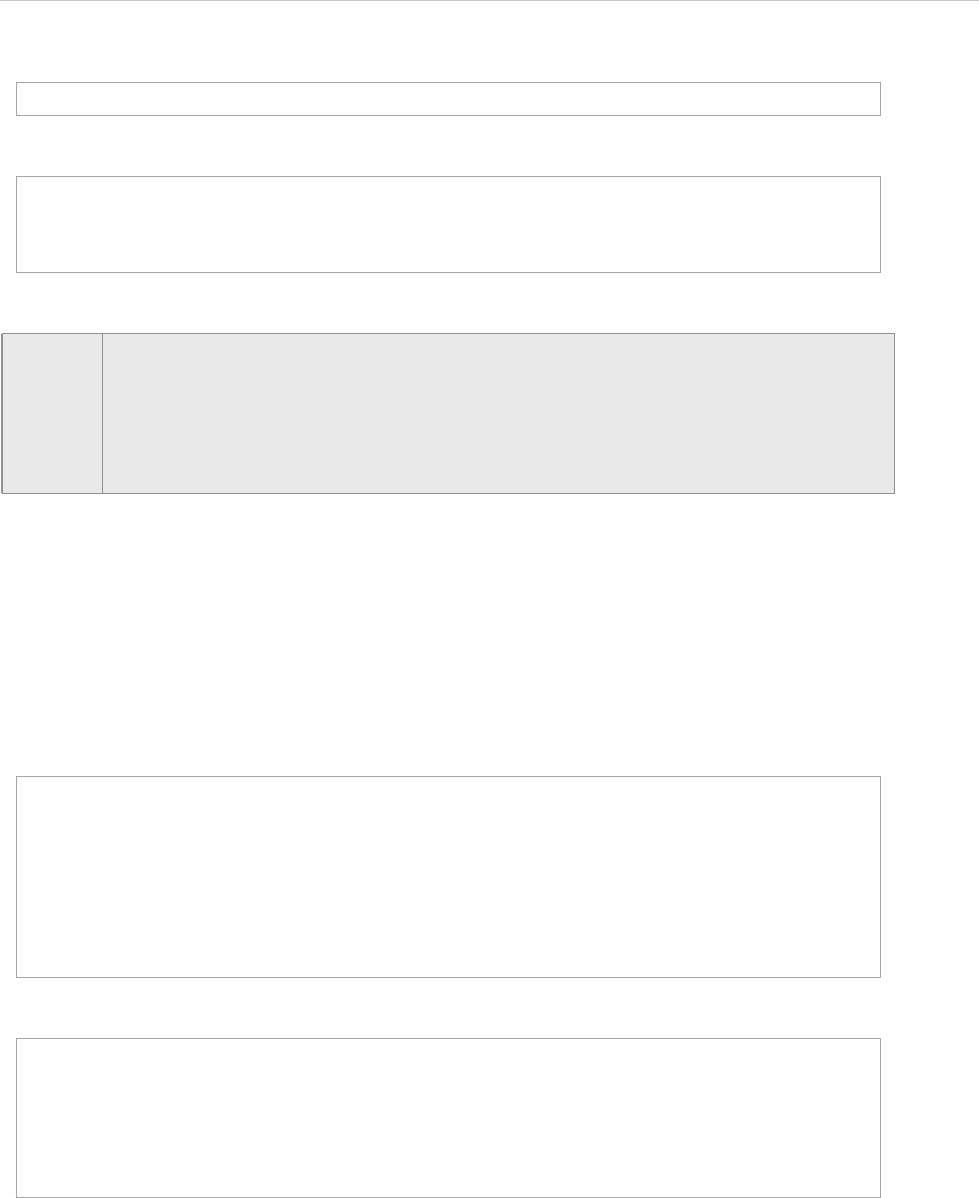
REPORT WIZARD
Ruby Script Tool
257
Copyright © 1998-2015 No Magic, Inc.
File 'filename.rb'
The template code
17.2 References to Elements
References to elements are similar to JavaScript Tool and Groovy Tool. The elements are implicitly inserted
into the Ruby context when “eval()” or “execute()” is called. Examples of implicit variables include $Class,
$UseCase, $sorter, etc.
For example, File ‘Functions.rb’:
Indicated below is the template code.
puts first+' '+last
#set ($dict = $map.createHashMap())
#set ($void = $dict.put(“first”, “foo”))
#set ($void = $dict.put(“last”, “bar”))
$ruby.execute(“filename.rb”, $dict)
NOTE • Absolute Path: If the ‘filename’ is provided with an absolute path, Ruby Tool will read
the Ruby file from an absolute location such as $ruby.execute(‘c:/mycode/
readclass.rb’).
• Relative Path: If the ‘filename’ is provided with a relative path, Ruby Tool will read the
template from a relative location. This relative location starts from the current directory
location of the template, such as $ruby.execute(‘readclass.rb’).
def supplierList
result = [];
$Dependency.each do |item|
item.supplier.each do |supplier|
result << supplier;
end
end
return result;
end
#import (‘ruby’,
‘com.nomagic.reportwizard.tools.script.RubyScriptTool’)
$ruby.execute(‘Functions.rb’)
#set ($supplierList = $ruby.eval(‘supplierList’))
#foreach ($e in $supplierList)
$e.name
#end
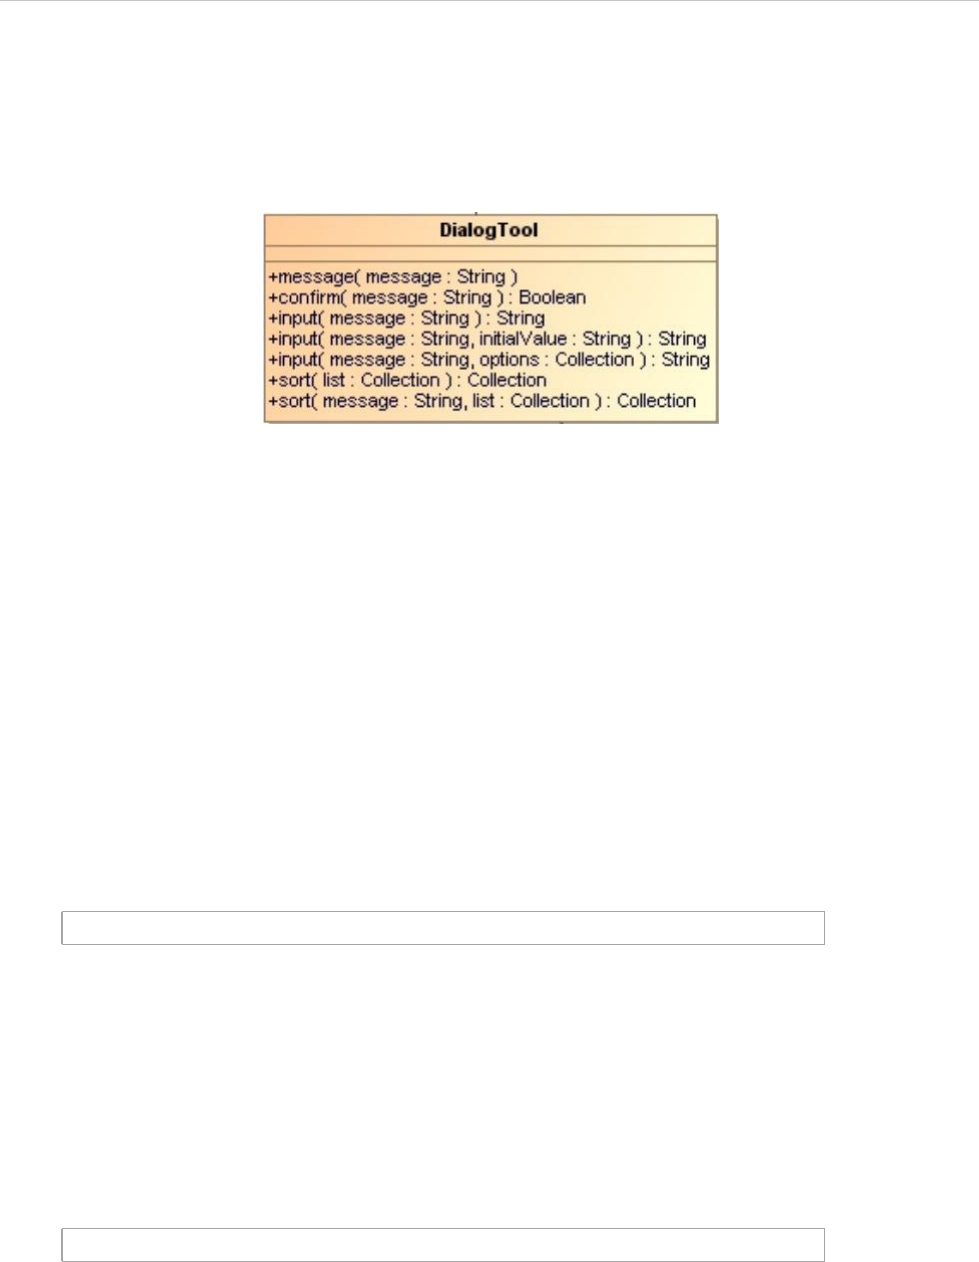
REPORT WIZARD
Dialog Tool
258
Copyright © 1998-2015 No Magic, Inc.
18. Dialog Tool
The purpose of a Dialog Tool is to enable report templates to call functions for creating dialogs to interact with
users during the report generation process. To modify the report templates, you can use the Dialog Tool.
Figure 194 -- Class Diagram: Dialog Tool
The Dialog Tool uses 4 methods:
(i) message: This method will create message dialogs.
(ii) confirm: This method will create confirmation dialogs and return the Boolean value ‘true’ when you click the
OK button or return ‘false’ when you click the Cancel button.
(iii) input: This method will create input dialogs and return the input value as a string.
(iv) sort: This method will create Sort and Enable dialogs and return a collection of newly-sorted results.
Like other Custom Tools, the Dialog Tool (dialogtool.jar) must be installed in the ‘extensions’ folder of the
Report Wizard plugin.
To import a Dialog Tool to a template, type the following:
18.1 Dialog Tool API
18.1.1 ‘message’ Method
message(String message) : void. This method will create messages into message dialogs. For exam-
ple:
#import('dialog','com.nomagic.reportwizard.tools.DialogTool')
$dialog.message("Click OK to close dialog")
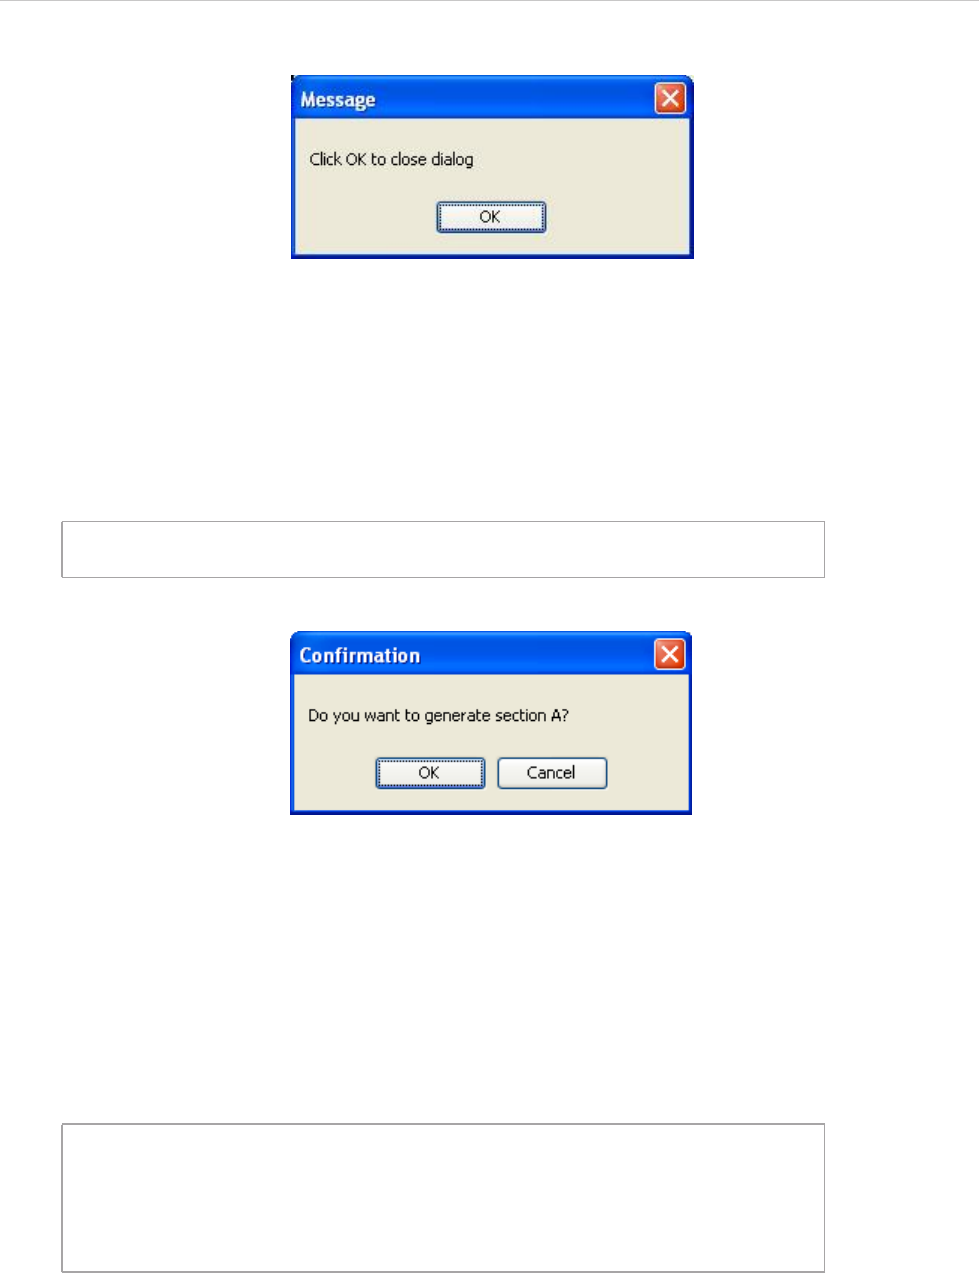
REPORT WIZARD
Dialog Tool
259
Copyright © 1998-2015 No Magic, Inc.
The output will be:
Figure 195 -- Message Dialog
18.1.2 ‘confirm’ Method
confirm(String message) : boolean. This method will create messages into confirmation dialogs and
return the Boolean value ‘true’ when you click the OK button or ‘false’ when you click the Cancel button in the
dialog. For example:
The output will be:
Figure 196 -- Confirmation Dialog
18.1.3 ‘input’ Method
18.1.3.1 Input Dialogs with Text
input(String message) : String. This method will create input dialogs from messages, and then return
the input values as strings when you click the OK button or ‘null’ when you click the Cancel button in the dialog.
For example:
#if($dialog.confirm("Do you want to geanerate section A?"))
#end
#set ($userText = $dialog.input("Enter your name"))
#if ($userText)
Your name is $userText
#else
Please specify your name
#end
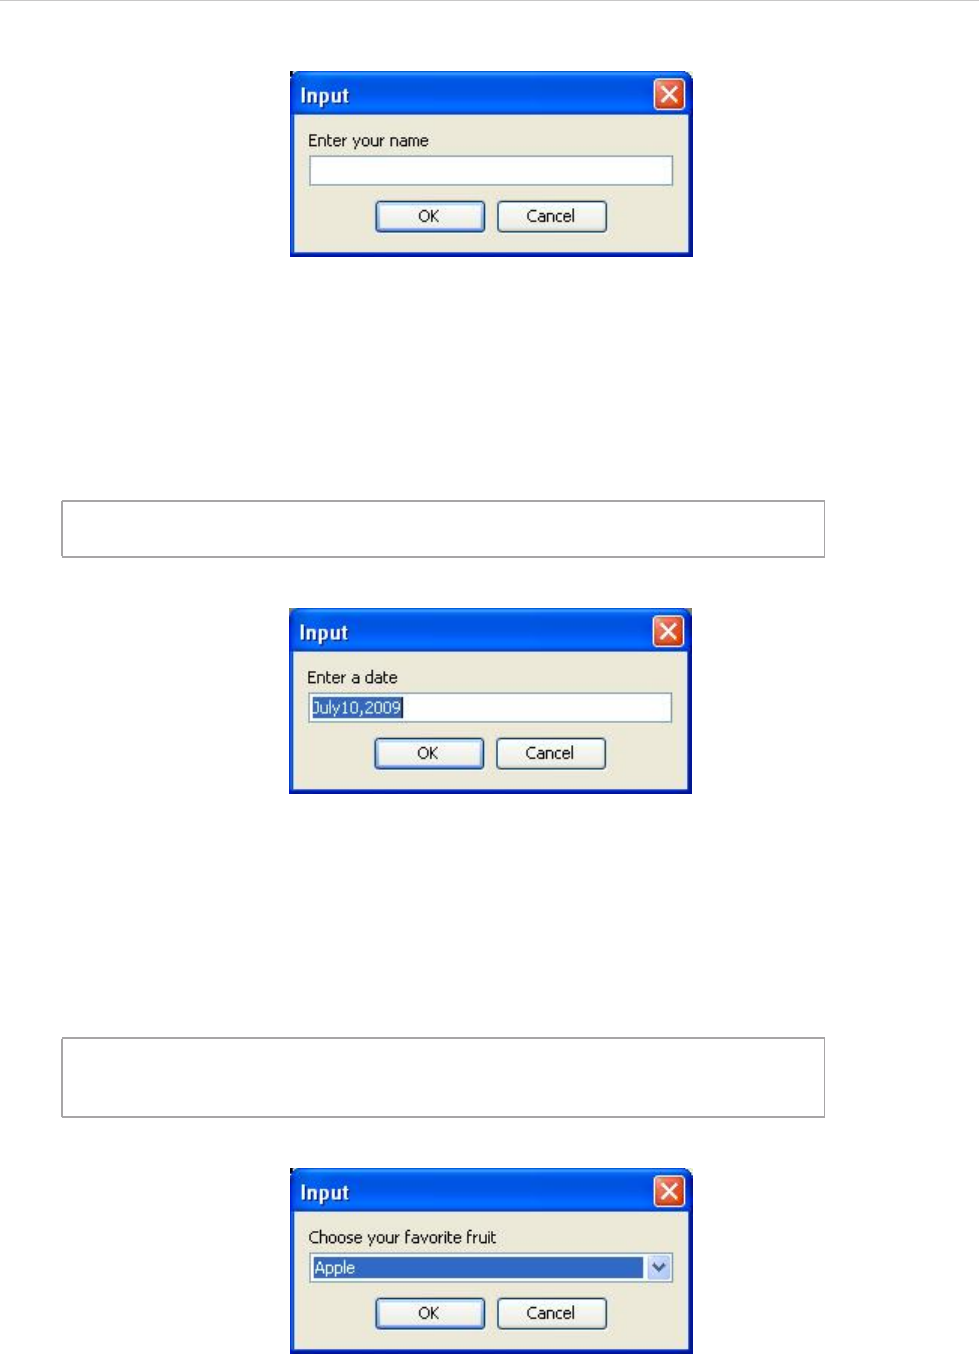
REPORT WIZARD
Dialog Tool
260
Copyright © 1998-2015 No Magic, Inc.
The output will be:
Figure 197 -- Input Dialog with Text
18.1.3.2 Input Dialogs with Text and Initial Value
input(String message, String initialValue) : String. This method will create messages and
add initial values in input dialogs. It will return the input values as strings when you click the OK button or ‘null’
when you click the Cancel button. For example:
The output will be:
Figure 198 -- The Input Dialog with Text and an Initial Value
18.1.3.3 Input Dialog with Text and Initial Value Array
input(String message, Collection options) : String. This method will create messages and
add initial value arrays in input dialogs. It will return the input values as strings when you click the OK button or
‘null’ when you click the Cancel button. For example:
The output will be:
Figure 199 -- Input Dialog with Text and Initial Value Array
18.1.4 ‘sort’ Method
#set ($userText = $dialog.input("Enter a date", “July10,2009”))
Date is $userText
#set ($selectedOption = $dialog.input("Choose your favorite
fruit", ["Apple", "Orange", "Banana"]))
Your favorite fruit is $selectedOption
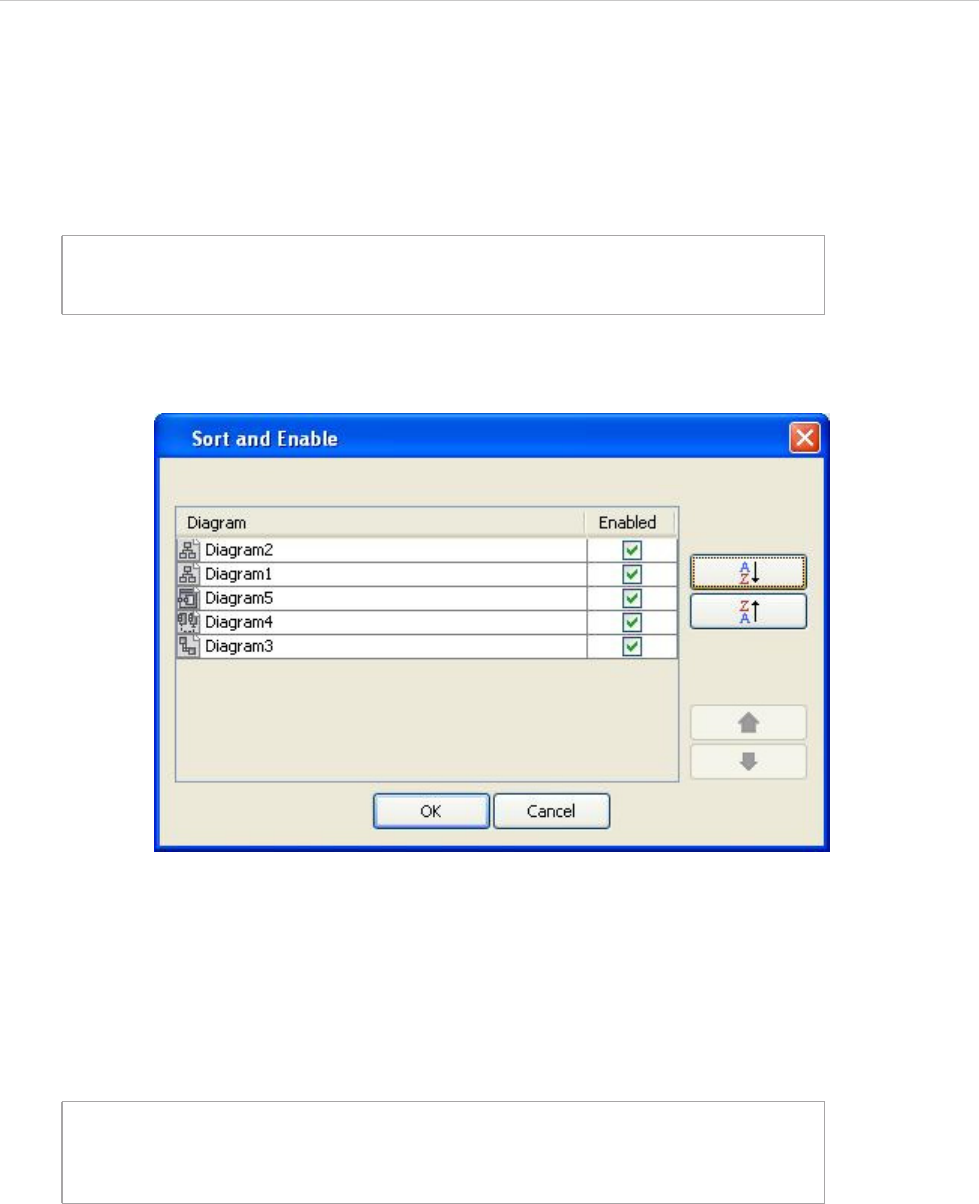
REPORT WIZARD
Dialog Tool
261
Copyright © 1998-2015 No Magic, Inc.
18.1.4.1 Sort and Enable Dialogs
sort(Collection list) : Collection. This method will create Sort and Enable dialogs from collections
and return a collection of the newly-sorted results when you click the OK button or return the original collection
when you click the Cancel button in the dialog. For example:
The output will be:
Figure 200 -- Sort and Enable Dialog
18.1.4.2 Sort and Enable Dialogs with Text
sort(String message, Collection list). This method will create the Sort and Enable dialogs from
text and collections and return a collection of the newly-sorted results when you click the OK button or return
the original collection when you click the Cancel button in the dialog. For example:
The output will be:
#foreach ($diagram in $dialog.sort($Diagram))
$diagram.name
#end
#foreach ($diagram in $dialog.sort("Rearrange diagram for presen-
tation report",$Diagram))
$diagram.name
#end
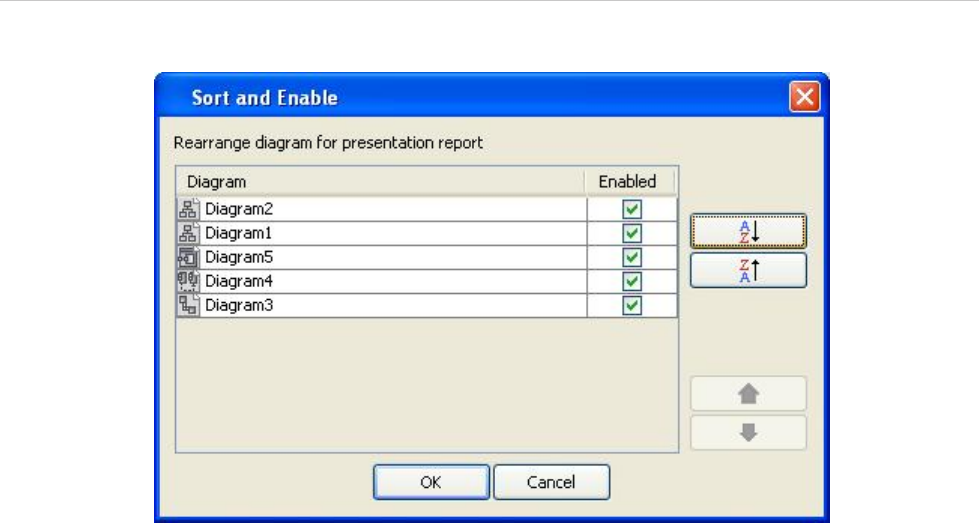
REPORT WIZARD
Dialog Tool
262
Copyright © 1998-2015 No Magic, Inc.
Figure 201 -- Sort and Enable Dialog with Text
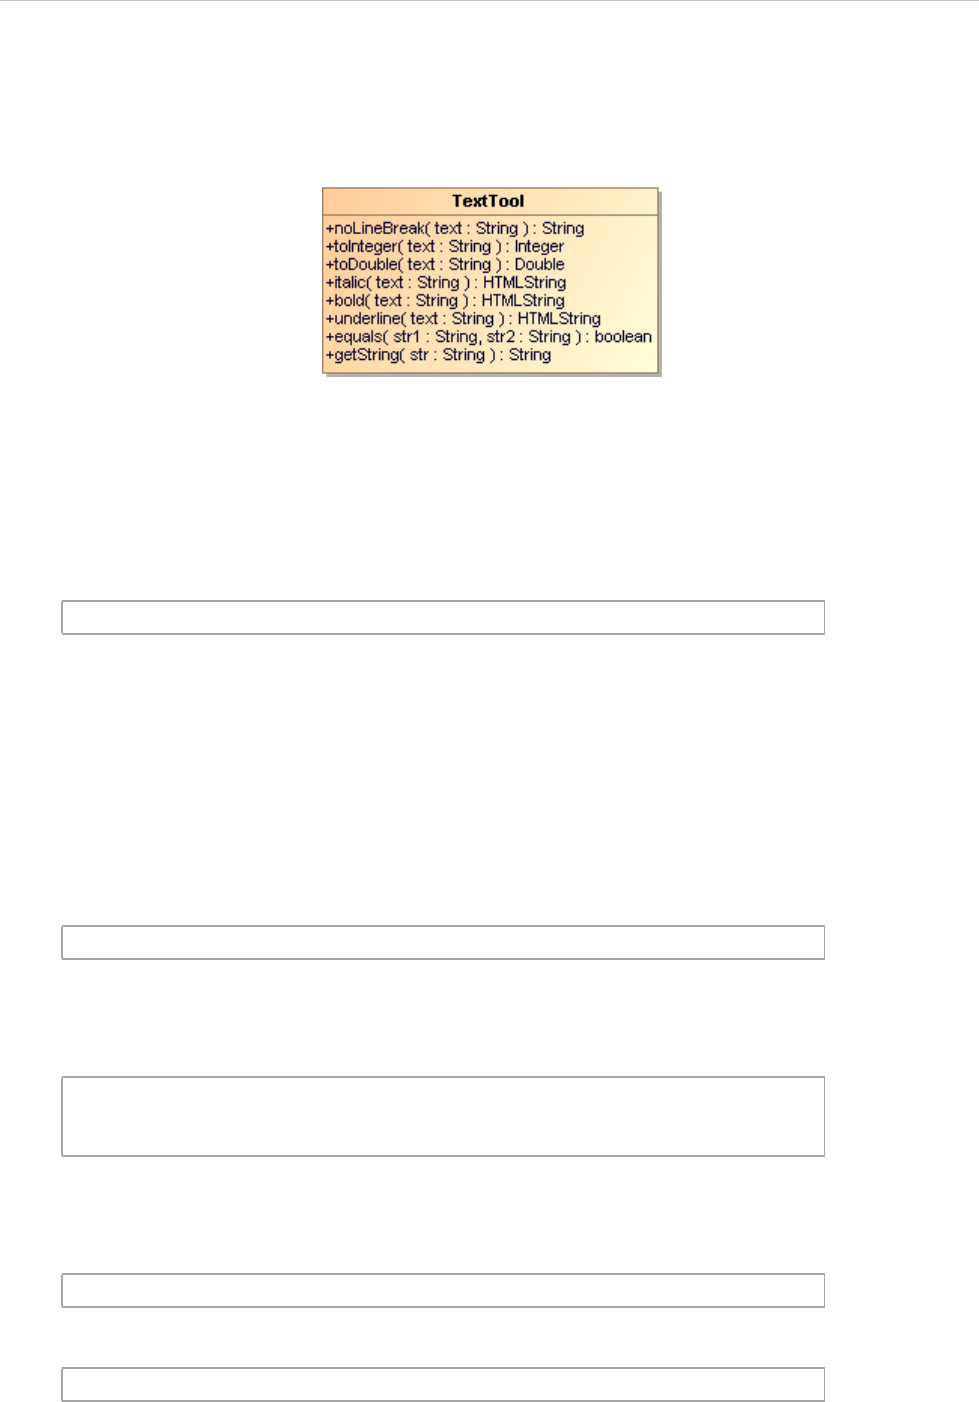
REPORT WIZARD
Text Tool
263
Copyright © 1998-2015 No Magic, Inc.
19. Text Tool
A Text tool provides extra functions to convert or format text.
Figure 202 -- Class Diagram: Text Tool
Like other Custom Tools, the Text Tool (text.jar) must be installed in the 'extensions' folder of the Report Wizard
plugin. For further information on Custom Tools and installation, see 1 Custom Tool.
To import a Text Tool to a template, type the following:
19.1 Text Tool API
noLineBreak(String text)
This method will remove all control characters such as U+0009 (Tab), U+000A (Line Feed), and U+000D (Car-
riage Return) from a given text. This method will also filter text under the category "Cc" in the Unicode specifi-
cation. An example of a use case that contains multiple lines has the code as shown below.
The output will be:
With the $text.noLineBreak() method, the code will be:
The output will be:
toInteger(String text)
#import('text', 'com.nomagic.reportwizard.tools.TextTool')
$usecase.name
Line 1
Line 2
Line 3
$text.noLineBreak($usecase.name)
Line 1 Line 2 Line 3

REPORT WIZARD
Text Tool
264
Copyright © 1998-2015 No Magic, Inc.
Converts a string argument to a signed decimal integer. For example:
toDouble(String text)
Converts a string argument to a signed decimal double. For example:
italic(String text)
Forces a report to render a given text in the italic style. For example:
The output will be:
bold(String text)
Forces a report to render a given text in the bold style. For example:
The output will be:
underline(String text)
Forces a report to render a given text in the underlined style. For example:
#set ($int = $text.toInteger('2'))
#set ($result = $int + 1)
Result is $result
#set ($d = $text.toDouble('10.1'))
#set ($result = $d + 2)
Result is $result
The $text.italic($class.name) must provide interface for web ser-
vices.
The BusinessServices must provide interface for web services.
Method $text.bold($operator.name) must be implemented by implemen-
tation class.
Method doService must be implemented by implementation class.
Attribute $text.underline($attribute.name) contains a service
name.
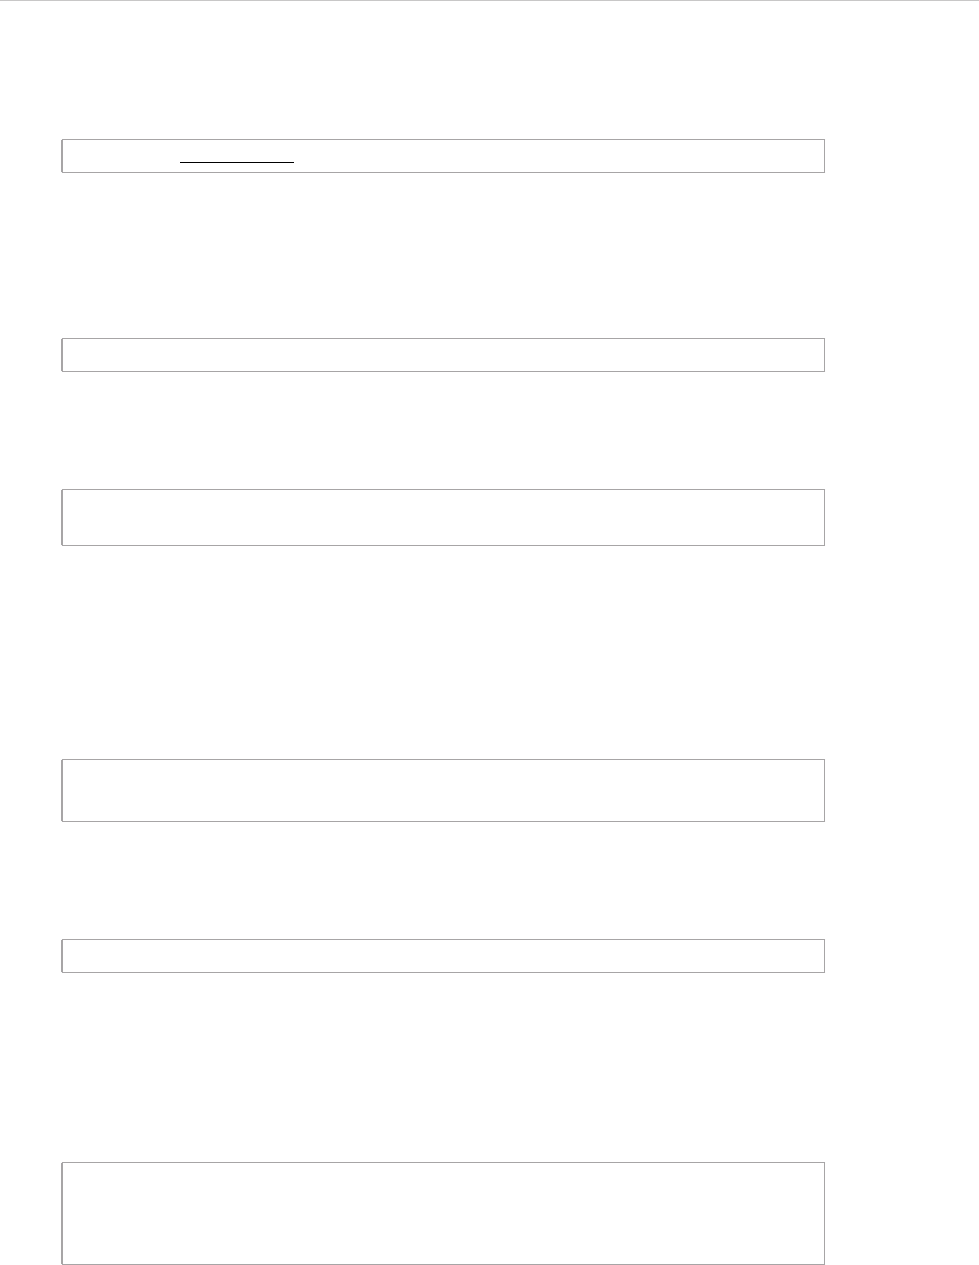
REPORT WIZARD
Text Tool
265
Copyright © 1998-2015 No Magic, Inc.
The output will be:
html(String text)
Forces a report to render a given text as HTML. For example:
The output will be:
For more information on supported HTML tags, see Appendix D: HTML Tag Support.
getString(String text)
Converts text from RTF to a Java String. For example:
The output will be:
equals(String str1, String str2)
Compares two strings. The result will be true if and only if str1 represents the same sequence of characters as
str2 does. This method supports RTF text comparison. For example:
Attribute serverName contains a service name.
$text.html('<ul><li>A</li><li>B</li></ul>')
·A
·B
#set ($str = $text.getString("Übersetzer"))
$str
Übersetzer
#set ($str = $text.getString("Übersetzer"))
#if ($text.equals($str, "Übersetzer"))
true
#end
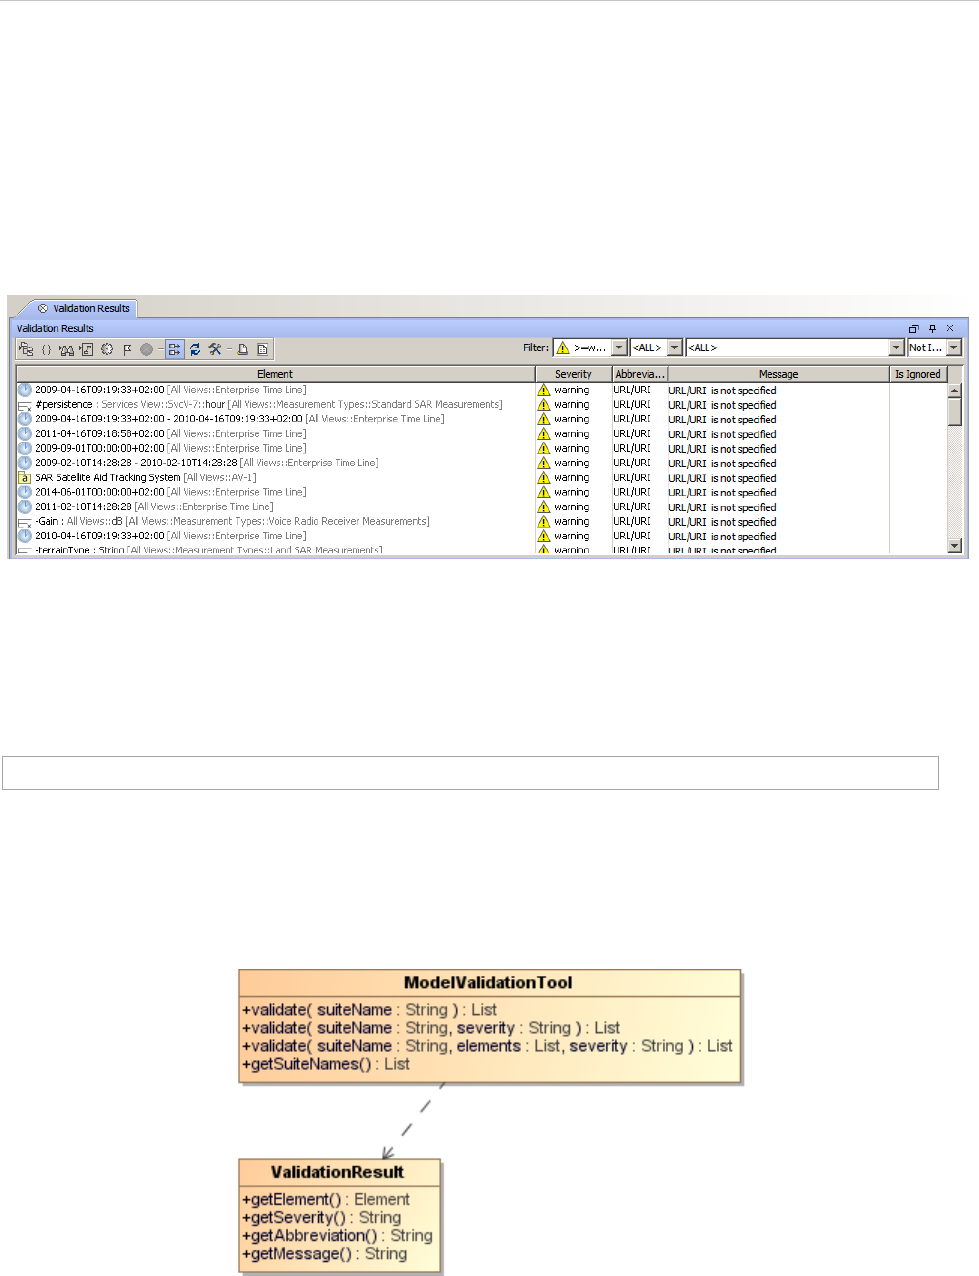
REPORT WIZARD
Model Validation Tool
266
Copyright © 1998-2015 No Magic, Inc.
20. Model Validation Tool
The Model Validation Tool allows templates to:
• Invoke the Validation menu and validate the models from suite names.
• Set the severity.
• Retrieve validation results.
Figure 203 -- Model Validation Dialog
Like other Custom Tools, the Model Validation Tool 'validationtool.jar' must be presented in the 'extensions'
folder of the Report Wizard plugin. For further information on Custom Tools and the installation, see 1 Custom
Tool.
To import a Model Validation Tool to a template, type this code in the template.
20.1 Model Validation Tool API
Figure 204 -- Class Diagram of a Model Validation Tool
#import('validator', 'com.nomagic.reportwizard.tools.ModelValidationTool')
REPORT WIZARD
Model Validation Tool
267
Copyright © 1998-2015 No Magic, Inc.
Class MetricsTool
Methods:
• +validate( suiteName : String ) : List<ValidationResult>
• +validate( suiteName : String, severity: String ) : List<ValidationResult>
• +validate( suiteName : String, element : List, severity : String) : List<ValidationResult>
• +getSuiteNames() : List<String>
Class ValidationResult
Methods:
• +getElement( ) : Element
• +getSeverity( ) : String
• +getAbbreviation() : String
• +getMessage( ) : String
20.1.1 Validate Methods
validate(suiteName : String) : List<ValidationResult>
Uses only a suite name to validate a model from the whole project with default “debug” as severity.
validate(suiteName : String, severity : String) : List<ValidationResult>
Uses a suite name and a severity type to validate a model from the whole project. The severity types are
“debug”, “info”, “warning”, “error” and “fatal”.
validate(suiteName : String, elementList : List<Element>, severity : String) : List<ValidationResult>
Uses a suite name and a severity type to validate a model from an element list. The severity types are “debug”,
“info”, “warning”, “error”, and “fatal”.
To validate all classes by using ‘UML completeness constraints’ suite and the severity type is warning, for
example, type the following code:
#set ($results = $validator.validate("suitename"))
#set ($results = $validator.validate("suitename", "severity"))
#set ($results = $validator.validate("suitename", $elementList, "severity"))
#set ($results = $validator.validate("UML completeness constraints", $Class,
"warning"))
REPORT WIZARD
Model Validation Tool
268
Copyright © 1998-2015 No Magic, Inc.
20.1.2 Getting the Suite Name List
The template author can list the entire available Model Validation suite names from ‘suiteNames’ methods. The
‘suiteNames’ is available in the ModelValidationTool class.
getSuiteNames() : List<String>
$validator represents the ModelValidationTool class.
Prints all Metrics names and their values of all Classes, for example, type the following code:
20.1.3 Getting the Validation Data from Validation Results
The object returned from validate methods in the previous section is the list of validation results. The validation
results contain columns of validation result with each row of validated models.
getElement() : Element
Gets a validated element.
To print all validated elements' names, for example, type the following code:
getSeverity() : String
Gets a severity type.
getAbbreviation() : String
Gets an abbreviation.
getMessage() : String
#set ($nameList = $validator.suiteNames)
#foreach ($name in $validator.suiteNames)
$name
#end
#set ($element = $results.getElement())
#set ($results = $validator.validate("UML completeness constraints"))
#foreach ($result in $results)
$result.element.name
#end
#set ($severity = $results.getSeverity())
#set ($abbr = $results.getAbbreviation())
REPORT WIZARD
Model Validation Tool
269
Copyright © 1998-2015 No Magic, Inc.
Gets a message.
20.2 Code Examples for Model Validation Tool
The code in this section demonstrates some scenarios with Model Validation Tool.
To print all validation results from a project by using the “UML completeness constraints” suite, for example,
type the following code:
To print only the validation results from the Class by using the “UML Correctness” suite and the "warning"
severity, for example, type the following code:
#set ($message = $results.getMessage())
#import('validator', 'com.nomagic.reportwizard.tools.ModelValidationTool')
#set ($results = $validator.validate("UML completeness constraints"))
#foreach ($result in $results)
Element: $result.element.name
Severity: $result.severity
Abbreviation: $result.abbreviation
Message: $result.message
#end
#import('validator', 'com.nomagic.reportwizard.tools.ModelValidationTool')
#set ($results = $validator.validate("UML Correctness", $Class, "warning"))
#foreach ($result in $results)
Element: $result.element.name
Abbreviation: $result.abbreviation
Message: $result.message
#end
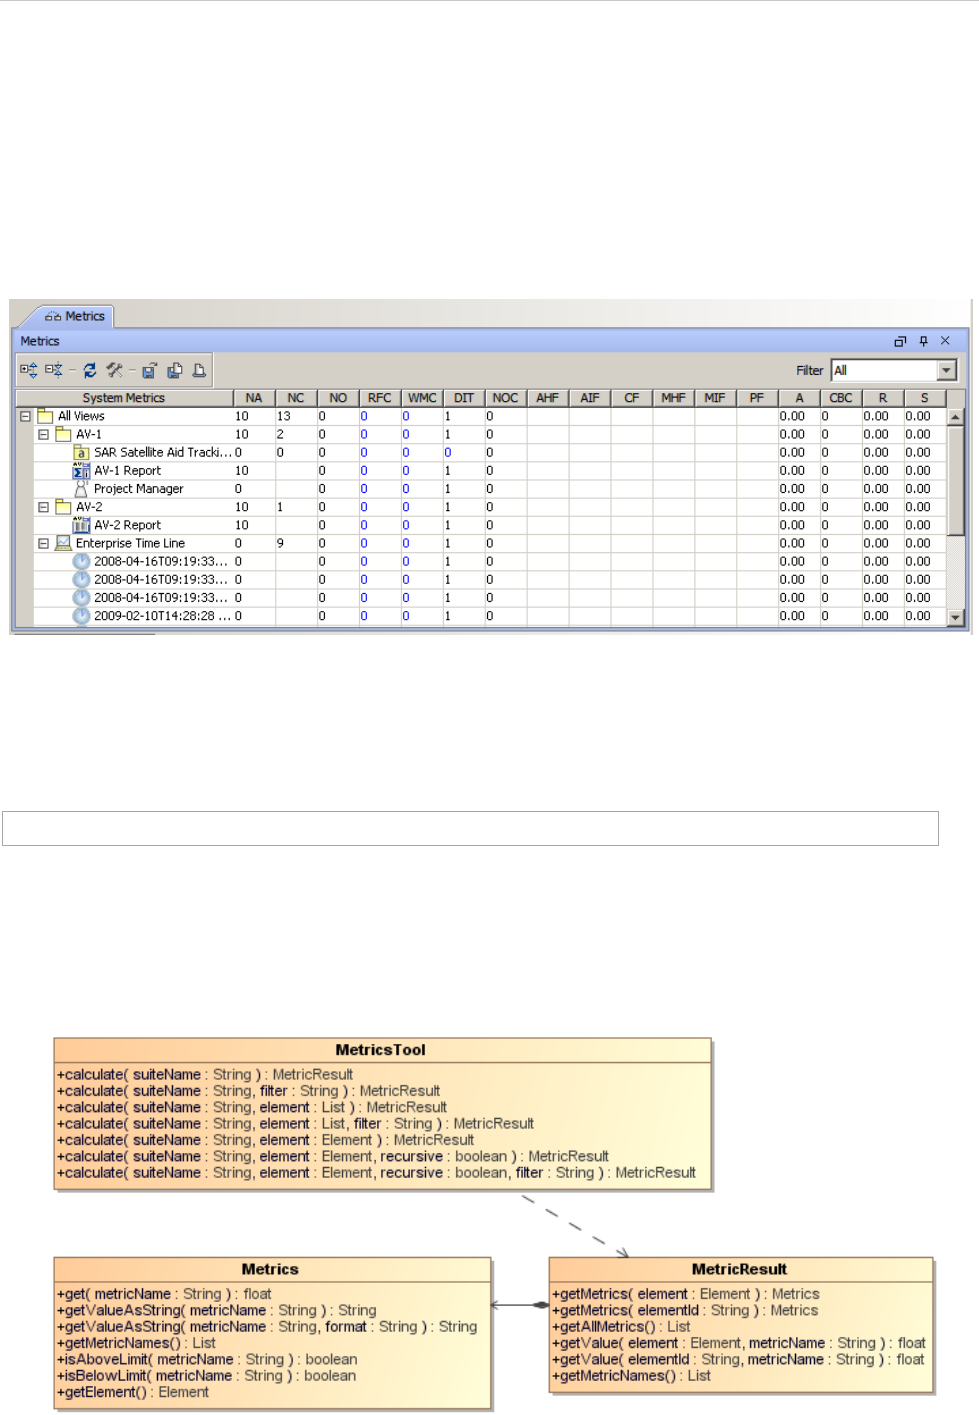
REPORT WIZARD
Metrics Tool
270
Copyright © 1998-2015 No Magic, Inc.
21. Metrics Tool
The Metrics Tool allows templates to:
• Invoke the Metrics menu and calculate the Metric from its suite names.
• Set a filter.
• Retrieve row elements and the Metric value.
Figure 205 -- Metrics Dialog
Like other Custom Tools, the Metrics Tool 'metrictool.jar' must be presented in the 'extensions' folder of the
Report Wizard plugin. For further information on Custom Tools and the installation, see 1 Custom Tool.
To import the Metrics Tool to a template, type this following code in the template:
21.1 Metrics Tool API
Figure 206 -- Class Diagram of the Metrics Tool
#import('metrics', 'com.nomagic.reportwizard.tools.MetricsTool')

REPORT WIZARD
Metrics Tool
271
Copyright © 1998-2015 No Magic, Inc.
Class of MetricsTool
Methods:
• +calculate( suiteName : String ) : MetricsResult
• +calculate( suiteName : String, filter : String ) : MetricsResult
• +calculate( suiteName : String, element : java::util::List ) : MetricsResult
• +calculate( suiteName : String, element : java::util::List, filter : String ) : MetricsResult
• +calculate( suiteName : String, element : Element ) : MetricsResult
• +calculate( suiteName : String, element : Element, recursive : boolean ) : MetricsResult
• +calculate( suiteName : String, element : Element, filter : String ) : MetricsResult
Class of MetricsResult
Methods:
• +getMetrics( element : Element ) : Metrics
• +getMetrics( elementId : String ) : Metrics
• +getAllMetrics() : List<Metrics>
• +getValue( element : Element, metricName : String ) : float
• +getValue( elementId : String, metricName : String ) : float
• +getMetricNames() : List<String>
Class of Metric
Methods:
• +get( metricName : String ) : float
• +getValueAsString( metricName : String ) : String
• +getValueAsString( metricName : String, format : String ) : String
• +getMetricNames() : List
• +isAboveLimit( metricName : String ) : boolean
• +isBelowLimit( metricName : String ) : boolean
21.1.1 Calculation Methods
calculate(suiteName : String) : MetricResult
Uses only the suite name to calculate the Metric from an entire project.
Example code:
Calculates the Metric from the Actor name “Template Author”.
#set ($metricsResults = $metrics.calculate('suitename'))
#set ($metricsResults = $metrics.calculate('System Metrics'))
REPORT WIZARD
Metrics Tool
272
Copyright © 1998-2015 No Magic, Inc.
calculate(suiteName : String, filter : String) : MetricResult
Uses a suite name and filter to calculate the Metric from an entire project. "filter" is a filter name displayed
in the Metric dialog.
calculate(suiteName : String, elementList : List<Element>) : MetricResult
Specifies a suite name and Element list to calculate the Metrics.
To calculate the Metrics from all classes by using the ‘System Metrics’ suite, for example, type the following
code:
calculate(suiteName : String, elementList : List<Element>) : MetricResult
Specifies a suite name and Element list to calculate the Metric with a specific filter name.
To calculate the Metric from all classes by using the ‘System Metrics’ suite with the package violations filter, for
example, type the following code:
calculate(suiteName : String, element : Element) : MetricResult
Calculates the Metric from a single element.
To calculate the Metric from the Actor name “Template Author”, for example, type the following code:
#set ($metricsResults = $metrics.calculate('suitename', "filter"))
NOTE If the language used in the MagicDraw interface changes, the filter
name needs to be replaced with a target language, for example:
French will be "Violations de Paquetage” for "Package Violations".
#set ($metricsResults = $metrics.calculate('suitename', $elementList))
#set ($metricsResults = $metrics.calculate('System Metrics', $Class))
#set ($metricsResults = $metrics.calculate('suitename', $elementList, "filter"))
#set ($metricsResults = $metrics.calculate('System Metrics', $Class, "Package
Violations"))
#set ($metricsResults = $metrics.calculate('suitename', $element))
#set ($actor = $report.findElementInCollection($Actor, "Template Author"))
#set ($metricsResults = $metrics.calculate('System Metrics', $actor))
REPORT WIZARD
Metrics Tool
273
Copyright © 1998-2015 No Magic, Inc.
calculate(suiteName : String, element : Element, recursive : boolean) : MetricResult
Calculates the Metric from a single element with the recursive option. If the recursive option is true, it will calcu-
late the result from a given root element and recursive to all children; otherwise (false), calculates the result
from the single element.
To calculate the Metric from a root element and recursive to all children. The result is similar to the calculated
result from all elements in a project, for example, type the following code:
calculate(suiteName : String, element : Element, recursive : Boolean, filter : String) : MetricResult
Calculates the Metric from a single element with the recursive option and a filter name. If the recursive option is
true, it will calculate the result from a given root element and recursive to all children; otherwise (false), calcu-
late the result from the single element.
21.1.2 Getting Metric Data from Metric Results
The object returned from calculating methods in the previous section is the Metrics results. The Metrics results
represent the Metrics Table as shown in MagicDraw. It consists of Element and the Metrics. To get the Metrics
and value, we need to pass the element (row) as parameter and get the Metrics (column).
getMetrics(element : Element) : Metrics
Gets the Metric of a specified element.
getMetrics(elementId : String) : Metrics
Gets the Metric of a specific element ID.
getAllMetrics() : List<Metrics>
Gets all Metrics at once.
#set ($metricsResults = $metrics.calculate('suitename', $element, $recursive))
#set ($root = $project.model)
#set ($metricsResults = $metrics.calculate('System Metrics', $root, true))
#set ($metricsResults = $metrics.calculate('suitename', $element, $recursive,
"filter"))
#set ($elementMetric = $metricsResults.getMetrics($element))
#set ($elementMetric = $metricsResults.getMetrics("element id"))
REPORT WIZARD
Metrics Tool
274
Copyright © 1998-2015 No Magic, Inc.
To print all numbers of attribute (NA) value of all elements, for example, type the following code:
getValue(element : Element, metricName : String) : float
This is the shortcut method to get a specific Metric value of a target element. The Metric name is the abbrevia-
tion of Metric, for example, NA, NC, NO, RFC, etc. This value is case-sensitive. See 21.1.3 Getting Metric Val-
ues.
getValue(elementId : String, metricName : String) : float
This is the shortcut method to get the specified Metrics value of a target element. The Metric name is the abbre-
viation of Metric, for example, NA, NC, NO, RFC, etc. This value is case-sensitive. See 21.1.3 Getting Metric
Values.
21.1.3 Getting Metric Values
The method in Section 21.1.2 Getting Metric Data from Metric Results will return a Metric object. The Metric
object represents all Metric values of a single element. If the Metric contains no value, the returned value will be
zero.
get(metricName : String) : float
The Metric name is the abbreviation of Metric, for example, NA, NC, NO, and RFC. This value is case-sensitive.
To return the number of attributes (NA) from Class SwingUtilities, for example, type the following code:
To return the number of an attribute (NA), for example, type the following code:
#set ($metricsResults = $metrics.calculate('System Metrics')
#foreach ($elementMetric in $metricsResults.allMetrics)
$elementMetric.element.name has $elementMetric.NA
#end
#set ($value = $metricsResults.getValue($element, "Metric name"))
#set ($value = $metricsResults.getValue("element id", "Metric name"))
#set ($class = $report.findElementInCollection($Class, "SwingUtilities"))
#set ($metricsResults = $metrics.calculate('System Metrics', $class))
#set ($elementMetric = $metricsResults.getMetrics($class))
#set ($value = $elementMetric.get("NA"))
NOTE The user can use the Velocity technique for a shortcut when retrieving
value from a Metrics name. The Metrics name is case-sensitive.
#set ($value = $elementMetric.NA)
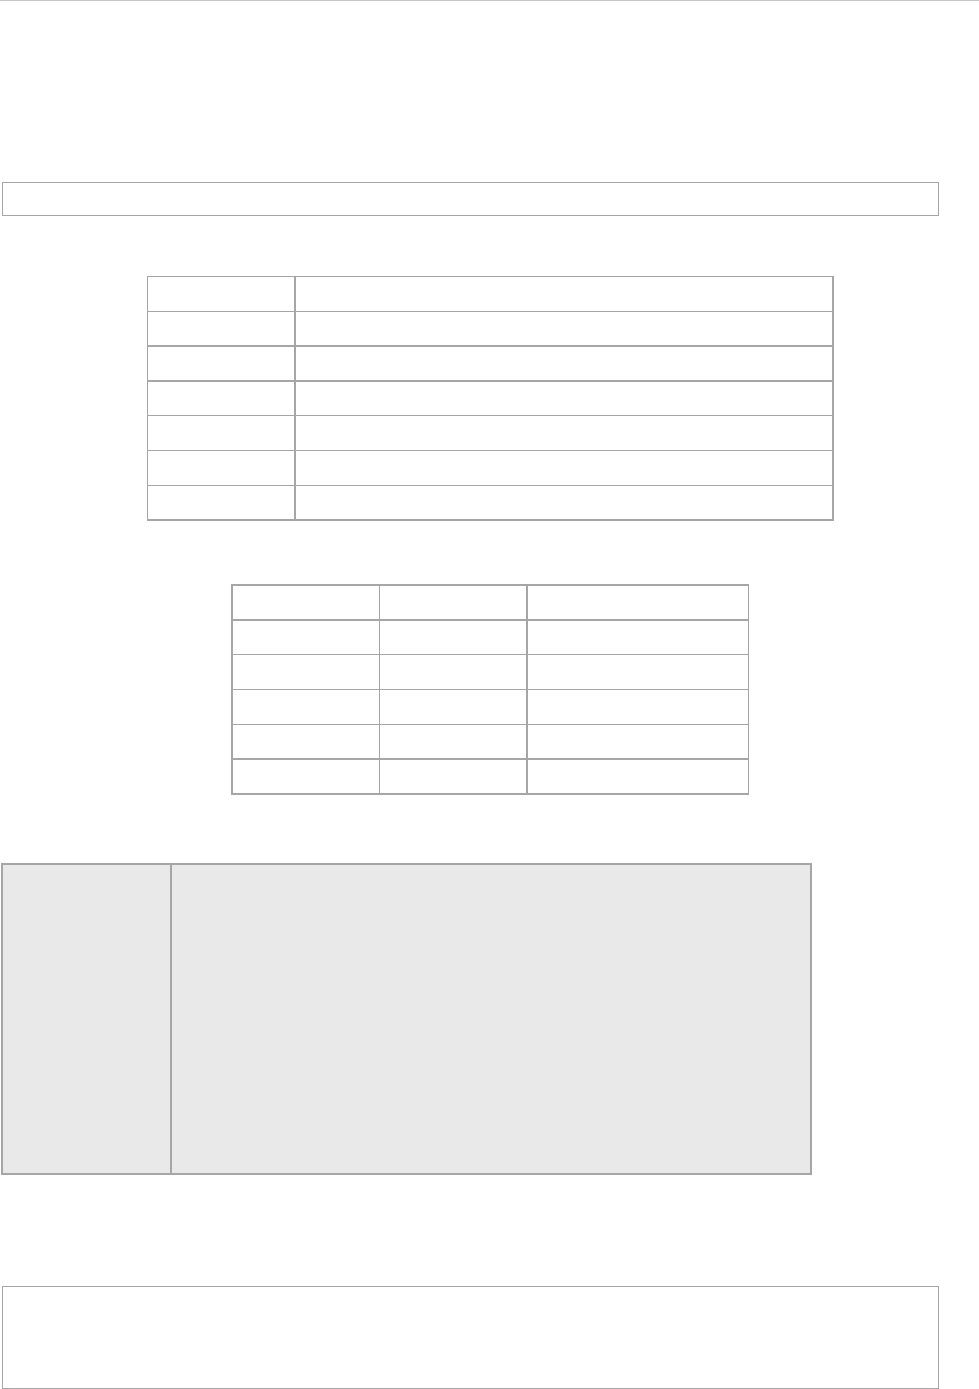
REPORT WIZARD
Metrics Tool
275
Copyright © 1998-2015 No Magic, Inc.
getValueAsString(metricName : String) : String
You can format an output value as string. The Metric name is the abbreviation of Metric, for example, NA, NC,
NO, and RFC. This value is case-sensitive. If the Metric contains no value, the returned string will be an empty
string.
The characters in the table below are used in the patterns.
The following are some examples of patterns.
The following is the sample code:
Return the number of an attribute (NA) from Class SwingUtilities.
#set ($value = $elementMetric.getValueAsString('metricName'))
Symbol Meaning
0Digit
# Digit, zero shows as absent
. Decimal separator or monetary decimal separator
,Grouping separator
ESeparates mantissa and exponent in scientific notation.
% Multiply by 100 and show as percentage
Value Pattern Result
23.456 ###.00 23.46
23.456 000.00 023.46
23.456 ###.### 23.456
12345678 ###,###.## 12,345,678.00
12345678 #.## 12345678
NOTE • Since the symbol contains # (hash character), which is a special
character for Velocity Template Language, you needs to use a pair
of single quotes instead of double quotes to pass the hash character
into the parameter.
• The following code is not in the correct format:
$elementMetric.getValueAsString("NA", "#.##")
The code written above will return an unexpected result. Use the fol-
lowing code to get the formatted text.
$elementMetric.getValueAsString("NA", '#.##')
However, this method cannot use a single quote character in format-
ted text.
#set ($class = $report.findElementInCollection($Class, "SwingUtilities"))
#set ($metricsResults = $metrics.calculate('System Metrics', $class))
#set ($elementMetric = $metricsResults.getMetrics($class))
#set ($value = $elementMetric.getValueAsString("NA", '#.##'))
REPORT WIZARD
Metrics Tool
276
Copyright © 1998-2015 No Magic, Inc.
21.1.4 Getting the Metric Name List
A template author can list an entire available Metric names from ‘metricNames’ methods. The ‘metricNames’ is
available in both Metric results and Metric class.
getMetricNames() : List<String>
Or
$elementMetric represents a Metric class and $metricsResults represents a MetricsResults class.
To print all Metric names and all of their classes’ values, for example, type the following code:
To print all Metric names and their values of all Classes, for example, type the following code:
21.1.5 Getting the Result Attribute “is above limit” from a Metrics Name
The “is above limit” is a Boolean value that indicates that a value is larger than the value configured in the Met-
rics menu. The $elementMetric represents a Metric class and $metricsResults represents a MetricsResults
class.
To change the HTML text color to red if the number of classes in a project is larger than the limit, for example,
type the following code:
#set ($nameList = $elementMetric.metricNames)
#set ($nameList = $metricsResults.metricNames)
#set ($metricsResults = $metrics.calculate('System Metrics', $Class))
#foreach ($class in $Class)
$class.humanName
#foreach ($metricName in $metricsResults.metricNames)
$metricName value $metricsResults.getValue($class, $metricName)
#end
#end
#set ($metricsResults = $metrics.calculate('System Metrics', $Class))
#foreach ($class in $Class)
#foreach ($elementMetric in $metricsResults.getMetrics($class))
#foreach ($metricName in $elementMetric.metricNames)
$metricName value $elementMetric.get($metricName)
#end
#end
#end
#set ($isAbove = $metricsResults.isAboveLimit('metricName'))
REPORT WIZARD
Metrics Tool
277
Copyright © 1998-2015 No Magic, Inc.
21.1.6 Getting the Result Attribute “is below limit” from a Metric Name
The “is below limit” is a Boolean value that indicates that a value is less than the value configured in the Metric
menu.
The $elementMetric represents a Metric class.
Example code:
Change the text color to red if the number of responses for the class “Customer” is less than the limit.
21.2 Code Examples for Metric Tool
The code in this section demonstrates some scenarios with Metric Tool.
(i) Printing all Metric names and their values of all elements under the package “Design” by using the “System
Metrics” suite.
(ii) Creating a hierarchy of elements of a project and printing all Metric names and their values by using the
“System Metrics” suite.
#set ($metricsResults = $metrics.calculate('System Metrics', $project.model,
true))
#set ($elementMetrics = $metricsResults.getMetrics($project.model))
#if ($elementMetrics.isAboveLimit('NC'))
Total classes is <font color="red">$elementMetrics.get('NC')</font>
#end
#end
#set ($isAbove = $elementMetric.isBelowLimit('metricName'))
#set ($class = $report.findElementInCollection($Class, "Customer"))
#set ($metricsResults = $metrics.calculate('System Metrics', $class))
#set ($elementMetrics = $metricsResults.getMetrics($class))
#if ($elementMetrics.isBelowLimit('RFC'))
$class.name is too complex. The total number of methods access to this class is
<font color="blue">$elementMetrics.get('RFC')</font>
#end
#import('metrics', 'com.nomagic.reportwizard.tools.MetricsTool')
#set ($package = $report.findElementInCollection($Package, "Design"))
#set ($metricsResults = $metrics.calculate('System Metrics', $package))
Package $package.name contains the following metrics
#foreach ($metricName in $metricsResults.metricNames)
$metricName value $metricsResults.getValue($package, $metricName)
#end

REPORT WIZARD
Metrics Tool
278
Copyright © 1998-2015 No Magic, Inc.
(iii) Creating a Metric table for Classes by using the “System Metrics” suite and formatting the result by using
two-decimal digits.
#import('metrics', 'com.nomagic.reportwizard.tools.MetricsTool')
#macro (next $e)
#set ($metricsResults = $metrics.calculate('System Metrics', $e))
Element $e.name
#foreach ($metricName in $metricsResults.metricNames)
$metricName value $metricsResults.getValue($e, $metricName)
#end
#foreach ($child in $e.ownedElement)
#next($child)
#end
#end
#next ($project.model)
#import('metrics', 'com.nomagic.reportwizard.tools.MetricsTool')
#set ($metricsResults = $metrics.calculate('System Metrics', $Class))
#foreach ($cls in $Class)
Class $cls.name
#set ($elementMetric = $metricsResults.getMetrics($cls))
#foreach ($name in $elementMetric.metricNames)
$name : $elementMetric.getValueAsString($name, '##.00')
#end
#end
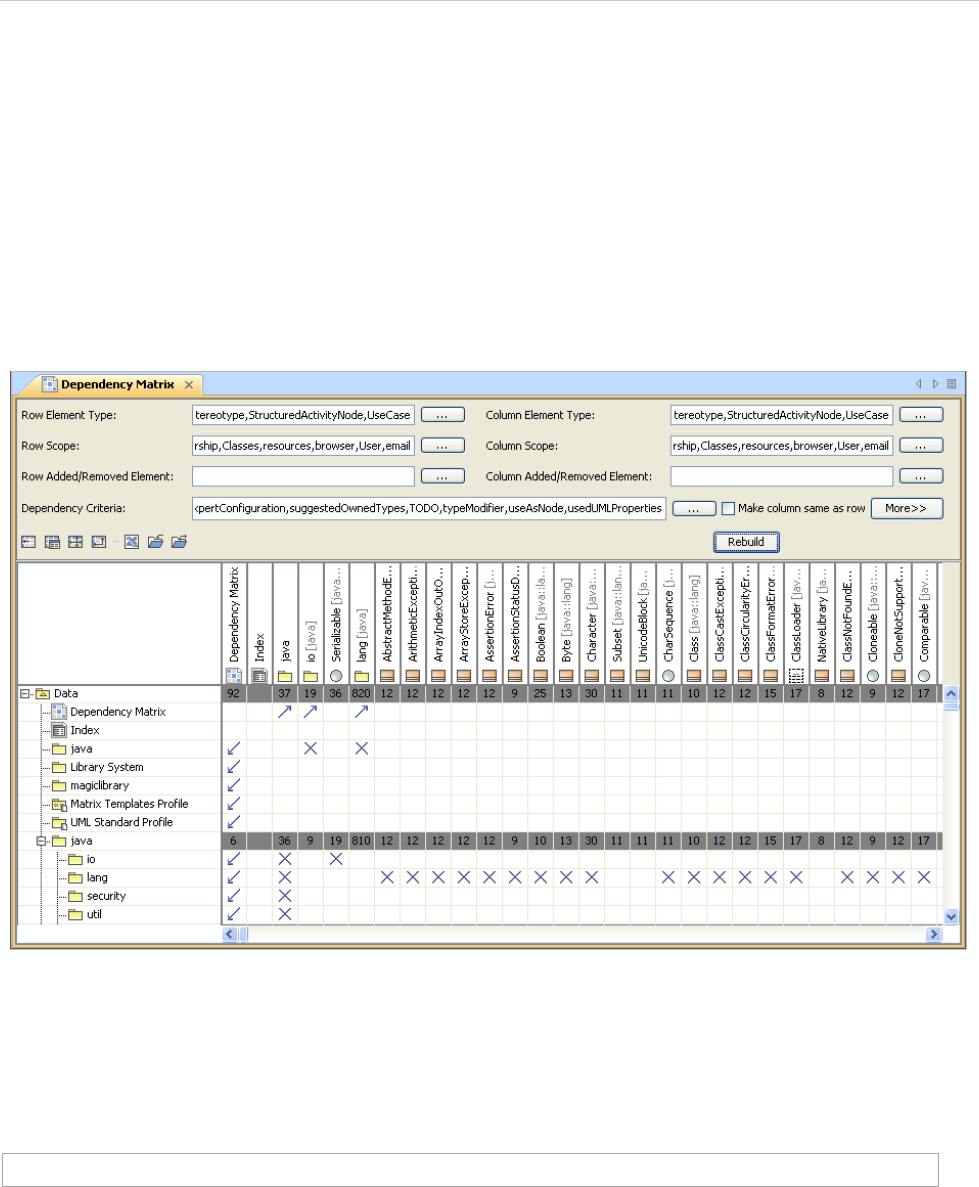
REPORT WIZARD
Dependency Matrix Tool
279
Copyright © 1998-2015 No Magic, Inc.
22. Dependency Matrix Tool
The Dependency Matrix Tool allows templates to:
• Access data from Dependency Matrix.
• Use diagrams to get data from Dependency Matrix.
• Get row elements.
• Get column names.
• Get relations between row and column elements.
Figure 207 -- Dependency Matrix Diagram
Like other Custom Tools, the Generic Table Tool 'dependencymatrixtool.jar' must be presented in the 'exten-
sions' folder of the Report Wizard plugin. For further information on Custom Tools and the installation, see 1
Custom Tool.
To import the Dependency Matrix tool to a template, type the following code in the template:
#import ('depmatrix', 'com.nomagic.reportwizard.tools.DependencyMatrixTool')
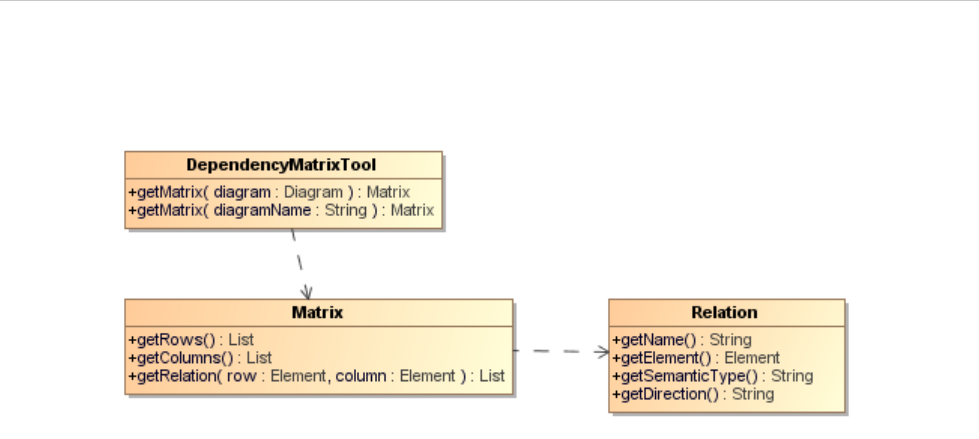
REPORT WIZARD
Dependency Matrix Tool
280
Copyright © 1998-2015 No Magic, Inc.
22.1 Dependency Matrix Tool API
Figure 208 -- Class Diagram of the Dependency Matrix Tool
Class DependencyMatrixTool
Methods:
• +getMatrix( diagram : Diagram) : Matrix
• +getMatrix( diagramName : String) : Matrix
Class Matrix
Methods:
• +getRows() : List<Element>
• +getRows() : List<Element>
• +getColumns() : List<Element>
• +getColumns() : List<Element>
• +getRelation( row: Element, column : Element) : List<Relation>
Class Relation
Methods:
• +getName() : String
• +getElement() : Element
• +getSemanticType() : String
• +getDirection() : String
22.1.1 Using Diagrams to Get Data from Dependency Matrix
A Dependency Matrix is a special diagram. You can retrieve it using the $Diagram variable. Thus, every
method must accept a diagram instance or a diagram’s name.
Use the following methods to return a Dependency Matrix instance. You can retrieve rows and columns from
the Dependency Matrix instances.
REPORT WIZARD
Dependency Matrix Tool
281
Copyright © 1998-2015 No Magic, Inc.
22.1.1.1 Getting Dependency Matrix Instances from Diagram Elements
getMatrix(diagram : Diagram) : Matrix
To get a Dependency Matrix instance from a specified diagram element, use the following code.
Where the parameter is:
• diagram – a diagram element
Return an instance of Dependency Matrix.
For example:
22.1.1.2 Getting Dependency Matrix Instances from Diagram Names
getMatrix(diagramName : String) : Matrix
To get a Dependency Matrix instance from a specified diagram’s name.
Where the parameter is:
• diagram – a diagram’s name
Return a Dependency Matrix instance.
Example code:
22.1.2 Getting Row Elements
The Matrix consists of rows and columns.
22.1.2.1 Getting All Row Elements
getRows() : List<Element>
Use this method to retrieve a list of row elements.
#set($matrix = $depmatrix.getMatrix($diagram))
#foreach($diagram in $project.getDiagrams(“Dependency Matrix”))
#set($matrix = $depmatrix.getMatrix($diagram))
#end
#set($matrix = $depmatrix.getMatrix($diagram))
#set($diagram = “diagram name”)
#set($matrix = $depmatrix.getMatrix($diagram))
$matrix.getRows()
REPORT WIZARD
Dependency Matrix Tool
282
Copyright © 1998-2015 No Magic, Inc.
The returned value is a list of Elements.
To print all row elements' names, for example, type the following code:
22.1.3 Getting Column Elements
The matrix consists of rows and columns.
22.1.3.1 Getting all column elements
getColumns() : List<Element>
Use this method to retrieve a list of column elements.
The returned value is a list of Elements.
To print all column elements' names, for example, type the following code:
22.1.4 Getting Relations between Row and Column Elements
getRelation(row : Element, column : Element) : List<Relation>
Use this method to retrieve the relations between row and column elements.
Where the parameter is:
• row – a row element
• column – a column element
The returned value is a list of Relations.
The Relation class contains the following methods:
• getSemanticType : String
Return the semantic type
• getElement : Element
Return a relationship element or null if the relationship is not an element, for example, tag name.
• getName : String
#foreach($row in $matrix.rows)
$row.name
#end
$matrix.getCloumns()
#foreach($col in $matrix.columns)
$col.name
#end
$matrix.getRelation($row, $column)

REPORT WIZARD
Dependency Matrix Tool
283
Copyright © 1998-2015 No Magic, Inc.
Return a relationship name. If the relationship is a tag name, it will return the tag name. If the
relationship is NamedElement, it will return the element name; otherwise, return a human name.
• getDirection : String
Return the direction.
To print the row, column, and its relationship name, for example, type the following code:
22.2 Example of Dependency Matrix Tool
The code in this section demonstrates some scenarios with Dependency Matrix Tool. The code may not be
executable or may not return a correct result. The purpose is to show you how to use Generic Table Tool and
how it works.
Prints the row, column and its relationship name.
Counts the number of relations of column elements.
#foreach($row in $matrix.rows)
#foreach($col in $matrix.cols)
#foreach($rel in $matrix.getRelation($row, $col))
$row.name has $rel.name with $col.name
#end
#end
#end
#foreach ($diagram in $project.getDiagrams("Dependency Matrix"))
#set ($matrix = $depmatrix.getMatrix($diagram))
#foreach ($row in $matrix.getRows())
#foreach ($col in $matrix.getColumns())
#foreach ($rel in $matrix.getRelation($row, $col))
$row.name has $rel.name with $col.name
#end
#end
#end
#end
#foreach ($diagram in $project.getDiagrams("Dependency Matrix"))
#set ($matrix = $depmatrix.getMatrix($diagram))
#foreach ($col in $matrix.getColumns())
#set ($count = 0)
#foreach ($row in $matrix.getRows())
#set ($numberOfrelation = $matrix.getRelation($row, $col).size())
#set ($count = $count + $numberOfrelation)
#end
$col.name has $count relations
#end
#end
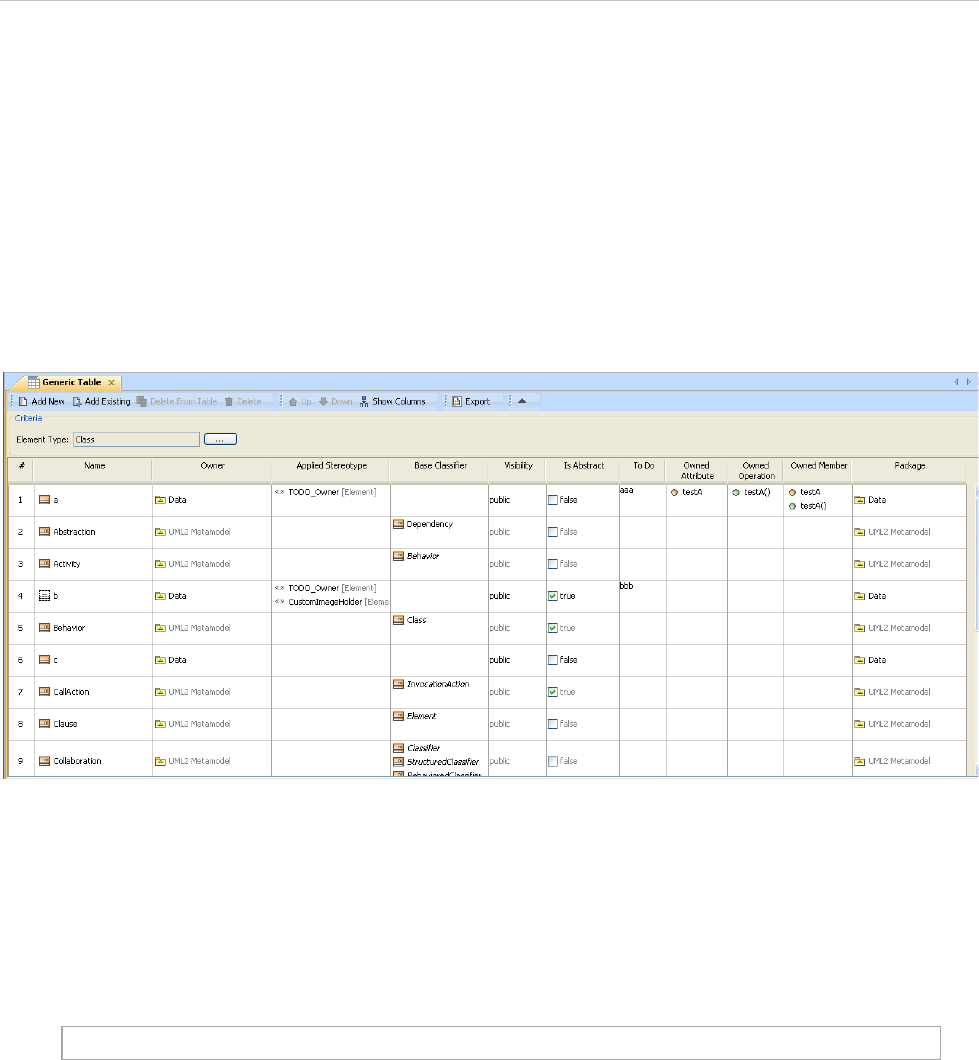
REPORT WIZARD
Generic Table Tool
284
Copyright © 1998-2015 No Magic, Inc.
23. Generic Table Tool
The Generic Table tool allows templates to:
• Access data of the Generic Table.
• Use diagrams to get data from the Generic Table.
• Get the row elements.
• Get the column names.
• Get the cell values.
Figure 209 -- Generic Table Dialog
Like other Custom Tools, the Generic Table tool 'generictabletool.jar' must be presented in the 'extensions'
folder of the Report Wizard plugin. For further information on Custom Tools and the installation, see 1 Custom
Tool.
To import the Generic Table tool to a template, for example, type the following code in the template.
#import('generic', 'com.nomagic.reportwizard.tools.GenericTableTool')
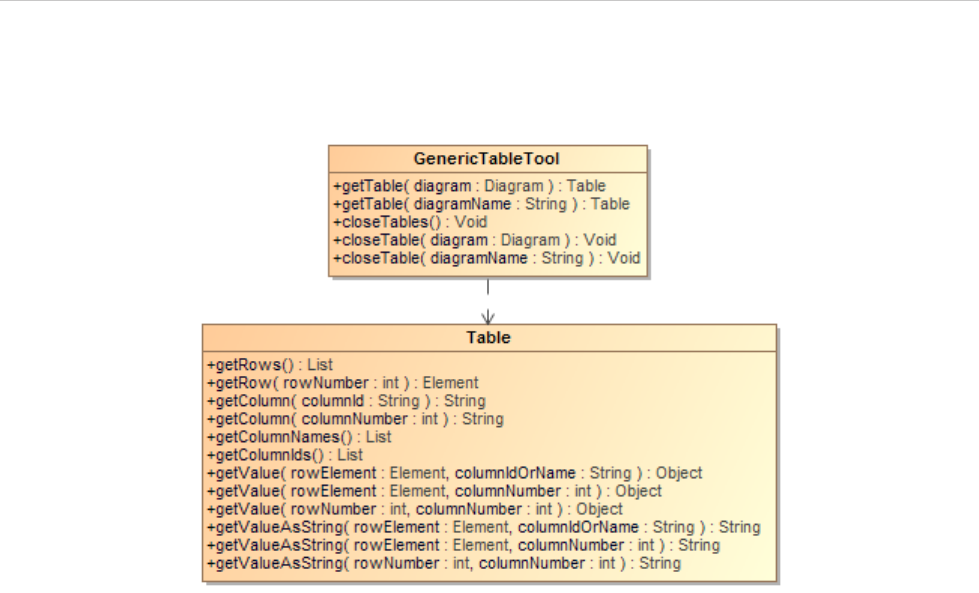
REPORT WIZARD
Generic Table Tool
285
Copyright © 1998-2015 No Magic, Inc.
23.1 Generic Table Tool API
Figure 210 -- Generic Table Tool Diagram
Class GenericTableTool:
Methods:
• +getTable( diagram : Diagram) : Table
• +getTable( diagramName : String) : Table
• +closeTables() : Void
• +closeTable(diagram : Diagram) : Void
• +closeTable(diagramName : String) : Void
Class Table:
Methods:
• +getRows() : List<Element>
• +getRow( rowNumber : int ) : Element
• +getColumn( columnId : String) : String
• +getColumn( columnNumber : int) : String
• +getColumnNames() : List<String>
• +getColumnIds() : List<String>
• +getValue( rowElement : Element, columnIdOrName : String ) : Object
• +getValue( rowElement : Element, columnNumber : int ) : Object
• +getValue( rowNumber : int, columnNumber : int ) : Object
• +getValueAsString( rowElement : Element, columnIdOrName : String ) : String
• +getValueAsString( rowElement : Element, columnNumber : int ) : String
• +getValueAsString( rowNumber : int, columnNumber : int ) : String
• +getVisibleColumnIds() : List<String>
REPORT WIZARD
Generic Table Tool
286
Copyright © 1998-2015 No Magic, Inc.
• +getVisibleColumn( columnNumber : int) : String
• +getVisibleValue( rowElement : Element, columnNumber : int ) : Object
• +getVisibleValue( rowNumber : int, columnNumber : int ) : Object
• +getVisibleValueAsString( rowElement : Element, columnNumber : int ) : String
• +getVisibleValueAsString( rowNumber : int, columnNumber : int ) : String
23.1.1 Getting Generic Table Data
A Generic Table is a special diagram. You can retrieve it by using the variable $Diagram. Thus, every method
must accept the diagram instance or diagram name.
Use the following method to get the Generic Table instance. We use Generic Table instances to retrieve table
information such as row elements and column names.
23.1.1.1 Getting Generic Table Instances from Diagram Elements
To get a Generic Table instance from a specified diagram element, use the following code.
getTable( diagram : Diagram) : Table
Where the parameter is:
• diagram – the diagram element.
Return the instance of a Generic Table.
Example code:
23.1.1.2 Getting Generic Table Instances from Diagram Names
To get a Generic Table instance from a specific diagram name, use the following code.
getTable( diagramName : String) : Table
Where the parameter is:
• diagram – the diagram name.
Return the instance of a Generic Table.
Example code:
#set($table = $generic.getTable($diagram))
#foreach($diagram in $project.getDiagrams(“Generic Table”))
#set($table = $generic.getTable($diagram))
#end
#set($table = $generic.getTable($diagram))
#set($diagram = “diagram name”)
#set($table = $generic.getTable($diagram))
REPORT WIZARD
Generic Table Tool
287
Copyright © 1998-2015 No Magic, Inc.
23.1.2 Closing Tables
Use the following method to close a table diagram.
23.1.2.1 Closing All Diagram Tables
CloseTables() : Void
23.1.2.2 Closing a Specific Table Diagram
closeTable(diagram: Diagram) : Void
Where the parameter is:
• diagram – a table diagram you want to close.
23.1.2.3 Closing a Table Diagram with a Specific diagramName
closeTable(diagramName: String) : Void
Where the parameter is:
• diagramName – the name of a table diagram you want to close.
23.1.3 Getting Row Elements
The Generic Table consists of a series of row elements and column names. Use the following methods to
retrieve a list of row elements.
23.1.3.1 Getting All Row Elements
getRows() : List<Element>
The returned value is a list of Elements. The following shows an example of how to print all row element
names.
$generic.closeTables()
$generic.closeTable($diagram)
$generic.closeTable($diagramName)
$table.getRows()
#foreach($row in $table.rows)
$row.name
#end

REPORT WIZARD
Generic Table Tool
288
Copyright © 1998-2015 No Magic, Inc.
23.1.3.2 Getting Row Elements in Specific Row Numbers
getRow( rowNumber : int ) : Element
Where the parameter is:
• rowNumber – the row number starts with 0.
The returned value is an Element.
23.1.4 Getting Column Names
Column names are referred by column IDs. A column is a MagicDraw QProperty ID that is not readable or
accessible by the user. We need to create other methods that provide better usability than using QProperty ID.
Use the following methods to retrieve column names.
23.1.4.1 Getting Column Names from Column ID
getColumn( columnId : String) : String
Where the parameter is:
• columnId – the ID of a column. Using column IDs has a benefit of consistency between different
languages, for example, French and English. The column ID can be retrieved by the method
getColumnIds().
The returned value is the name of a column.
23.1.4.2 Getting Column Names from Column Numbers
getColumn(columnNumber : int) : String
Where the parameter is:
• columnNumber – a column number starts with 1. The column number 0 is the row number.
The returned value is the name of a column.
23.1.4.3 Getting All Column Names
getColumnNames() : List<String>
The returned value is a list of column names.
Example code:
$table.getRow($rowNumber)
$table.getColumn($columnId)
$table.getColumn($columnNumber)
$table.getColumnNames()
REPORT WIZARD
Generic Table Tool
289
Copyright © 1998-2015 No Magic, Inc.
Prints all column names.
23.1.4.4 Getting All Column IDs
getColumnIds() : List<String>
The returned value is a list of column IDs.
Example code:
Print all columns IDs
23.1.5 Getting Cell Values
A cell value is the value in a row element with a column name. To get a cell value, you need to provide both the
row element and column. A cell value is an Element or row number. Use the following methods to retrieve a cell
value.
23.1.5.1 Getting Values from Row Element and Column ID
getValue( rowElement : Element, columnIdOrName : String ) : Object
Where the parameters are:
• rowElement – a row element.
• columnId – a column ID.
The returned value is the value in a cell. If the cell contains an element, the value is the Element.
Example code:
Prints the row, column, and value.
#foreach($colname in $table.getColumnNames())
$colname
#end
$table.getColumnIds()
#foreach($colid in $table.getColumnIds())
$table.getColumn($colid)
#end
$table.getValue($rowElement, $columnId)
#foreach($diagram in $project.getDiagrams(“Generic Table”))
#set($table = $generic.getTable($diagram))
#foreach($row in $table.getRows())
<h1>$row.name</h1>
#foreach($col in $table.getColumnIds())
$table.getColumn$col) : $table.getValue($row, $col)
#end
#end
#end
REPORT WIZARD
Generic Table Tool
290
Copyright © 1998-2015 No Magic, Inc.
23.1.5.2 Getting Values from Row Element and Column Name
getValue( rowElement : Element, columnIdOrName : String ) : Object
Where the parameters are:
• rowElement – a row element.
• columnName – a column name.
The returned value is the value in a cell. If the cell contains an element, the value is the Element.
23.1.5.3 Getting Values from Row Element and Column Number
getValue( rowElement : Element, columnNumber : int ) : Object
Where the parameters are:
• rowElement – a row element.
• columnName – a column number starts with 1. The column number 0 is the row number.
The returned value is the value in a cell. If the cell contains an element, the value is the Element.
23.1.5.4 Getting Values from Row and Column Numbers
getValue( rowNumber : int, columnNumber : int ) : Object
Where the parameters are:
• rowNumber – a row number starts with 0.
• columnNumber – a column number starts with 1. The column number 0 is the row number.
The returned value is the value in a cell. If the cell contains an element, the value is the Element.
23.1.5.5 Getting Values from Row Element and Column IDs as String
getValueAsString( rowElement : Element, columnIdOrName : String ) : String
Where the parameters are:
• rowElement – a row element.
• columnId – a column ID.
$table.getValue($rowElement, $columnName)
$table.getValue($rowElement, $columnNumber)
$table.getValue($rowNumber, $columnNumber)
$table.getValueAsString($rowElement, $columnId)

REPORT WIZARD
Generic Table Tool
291
Copyright © 1998-2015 No Magic, Inc.
The returned value is the value in a cell and is converted into String. The String value is created by MagicDraw
text representation API.
23.1.5.6 Getting Values from Row Element and Column Name as String
getValueAsString( rowElement : Element, columnIdOrName : String ) : String
Where the parameters are:
• rowElement – a row element
• columnName – a column name
The returned value is the value in a cell and is converted into String. The String value is created by MagicDraw
text representation API.
23.1.5.7 Getting Values from Row Element and Column Number as String
getValueAsString( rowElement : Element, columnNumber : int ) : String
Where the parameters are:
• rowElement – a row element.
• columnName – a column number starts with 1. The column number 0 is the row number.
The returned value is the value in a cell and is converted into String. The String value is created by MagicDraw
text representation API.
23.1.5.8 Getting Values from Row and Column Numbers as String
getValueAsString( rowNumber : int, columnNumber : int ) : String
Where the parameters are:
• rowNumber – a row number starts with 0.
• columnNumber – a column number starts with 1. The column number 0 is the row number.
The returned value is the value in a cell and is converted into String. The String value is created by MagicDraw
text representation API.
23.1.6 Getting Visible Column and Cell Values
A visible cell value is the column which is visible on a diagram. Unlike the methods described in section 23.1.5
Getting Cell Values, the following methods will retrieve only the value which is visible on a diagram.
$table.getValueAsString($rowElement, $columnName)
$table.getValueAsString($rowElement, $columnNumber)
$table.getValueAsString($rowNumber, $columnNumber)
REPORT WIZARD
Generic Table Tool
292
Copyright © 1998-2015 No Magic, Inc.
23.1.6.1 Getting All Visible Column IDs
getVisibleColumnIds() : List<String>
The returned value is a list of visible column IDs.
23.1.6.2 Getting Visible Column Names from Column Numbers
getVisibleColumn( columnNumber : int) : String
Where the parameter is:
• columnNumber – a column number starts with 1. The column number 0 is the row number.
The returned value is the name of a visible column.
23.1.6.3 Getting Visible Values from Row Elements and Column Number
getVisibleValue( rowElement : Element, columnNumber : int ) : Object
Where the parameters are:
• rowElement – a row element.
• columnNumber – a column number starts with 1. The column number 0 is the row number.
The returned value is the value in a visible cell. If the cell contains an element, the value is the Element.
23.1.6.4 Getting Visible Values from Row Number and Column Number
getVisibleValue( rowNumber : int, columnNumber : int ) : Object
Where the parameters are:
• rowNumber – a row number starts with 0.
• columnNumber – a column number starts with 1. The column number 0 is the row number.
The returned value is the value in a visible cell. If the cell contains an element, the value is the Element.
23.1.6.5 Getting Visible Values from Row Element and Column Number as String
getVisibleValueAsString( rowElement : Element, columnNumber : int ) : String
$table.getVisibleColumnIds()
$table.getVisibleColumn($columnNumber)
$table.getVisibleValue($rowElement, $columnNumber)
$table.getVisibleValue($rowNumber, $columnNumber)
$table.getVisibleValueAsString($rowElement, $columnNumber)
REPORT WIZARD
Generic Table Tool
293
Copyright © 1998-2015 No Magic, Inc.
Where the parameters are:
• rowElement – a row element.
• columnNumber – a column number starts with 1. The column number 0 is the row number.
The returned value is the value in a visible cell and is converted into String. The String value is created by
MagicDraw text representation API.
23.1.6.6 Getting Visible Values from Row and Column Numbers as String
getVisibleValueAsString( rowNumber : int, columnNumber : int ) : String
Where the parameters are:
• rowNumber – a row number starts with 0.
• columnNumber – a column number starts with 1. The column number 0 is the row number.
The returned value is the value in a visible cell and is converted into String. The String value is created by
MagicDraw text representation API.
23.2 Code Examples for Generic Table Tool
The code in this section demonstrates some scenarios with a Generic Table tool. The code may not be execut-
able or may not return the correct result. This is only the idea of how to use the Generic Table tool and how it
works.
The code shown below prints the row, column, and its value in the form of an HTML table.
$table.getVisibleValueAsString($rowNumber, $columnNumber)
#foreach($diagram in $project.getDiagrams("Generic Table"))
<table>
<tr>
#set($table = $generic.getTable($diagram))
<td>#</td>
#foreach($colName in $table.columnNames)
<td>$colName</td>
#end
</tr>
#foreach($row in $table.rows)
<tr>
<td>$velocityCount</td>
#foreach($col in $table.columnIds)
<td>$table.getValueAsString($row, $col)</td>
#end
</tr>
#end
</table>
#end
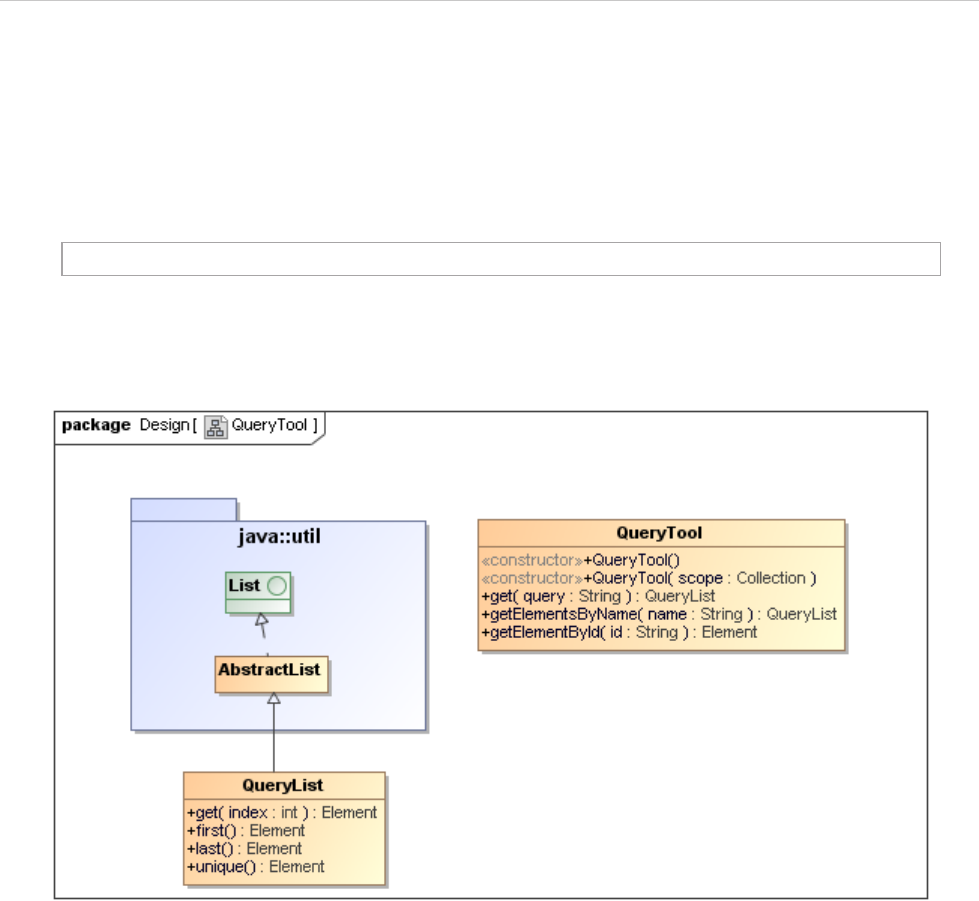
REPORT WIZARD
Query Tool
294
Copyright © 1998-2015 No Magic, Inc.
24. Query Tool
The Query tool provides extra functions to retrieve MagicDraw elements by using a query language. Like other
Custom Tools, the Query tool 'querytool.jar' must be presented in the 'extensions' folder of the Report Wizard
plugin. For further information on Custom Tools and the installation, see 1 Custom Tool.
Type the following code in a template to import the Query tool.
24.1 Query Tool API
Figure 211 -- Query Tool Class Diagram
Class QueryTool
Constructor
• QueryTool()
Creates the Query tool from your selected element scope. This method will use a default scope from
the variable $elements.
• QueryTool( scope : Collection<Element>)
Creates the Query tool from a specific element scope.
Methods
• +get( query :String) : QueryList
• +getElementsByName( name : String) : QueryList
• +getElementById( name : String) : Element
Class QueryList
#import('query', 'com.nomagic.reportwizard.tools.QueryTool')

REPORT WIZARD
Query Tool
295
Copyright © 1998-2015 No Magic, Inc.
Methods
• +get(index : int) : Element
• +first() : Element
• +last() : Element
• +unique () : Element
24.2 Recognizable Query Patterns
Query patterns are described as a CSS3 selector pattern (http://www.w3.org/TR/css3-selectors). The following
table (Table 33) shows all available query patterns of the query tool.
Table 33 -- Available Query Patterns of the Query Tool
24.2.1 Query by Type
A pattern allows a template to query elements from a given type name, for example:
A Type name is generated from the $element.elementType property.
Pattern Meaning
EAn element of type E.
E[foo] An E element with a “foo” attribute.
E[foo=bar] An E element whose “foo” attribute value exactly equals
“bar”.
E[foo^=bar] An E element whose “foo” attribute value begins exactly with
the string “bar”.
E[foo$=bar] An E element whose “foo” attribute value ends exactly with
the string “bar”.
E[foo*=bar] An E element whose “foo” attribute value contains the sub-
string string “bar”.
E:empty An E element that has no children.
#myid An element with an ID equals “myid”.
E F An F element descendant of an E element.
E > F An F element child of an E element.
class
Retrieve all classes from a selected package scope.

REPORT WIZARD
Query Tool
296
Copyright © 1998-2015 No Magic, Inc.
24.2.2 Query by Attribute
A pattern allows a template to query elements from given attribute name and value. When a pattern is used as
an expression to match an element, the attribute pattern must be considered to match the element and that ele-
ment must have an attribute that matches the attribute represented by the attribute pattern.
[attr]
Matches an element with an attr attribute regardless of the value of the attribute.
[attr=value]
Matches an element with an attr attribute whose value is exactly val.
The Query tool matches against case sensitivity of attribute names and values in a pattern. A VTL property syn-
tax (Camel case without space) will be used for the attribute names. You can use spaces in writing values.
When the value of an attribute is NamedElement, the element’s name will be used as a default value. An aster-
isk (*) can be used to match any element type when combined with the other patterns, for example:
24.2.3 Query by Substring Matching Attribute
This topic provides some additional attribute patterns for matching substrings in the value of an attribute:
[attr^=val]
Matches an element with an attr attribute whose value begins with the prefix val. If val is an empty string,
the query returns nothing.
[attr$=val]
Matches an element with an attr attribute whose value ends with the suffix val. If val is an empty string, the
query returns nothing.
*[name=foo]
Retrieve any element whose name attribute is exactly foo. Use an asterisk to match any element.
actor[name=foo]
Retrieve all actor elements whose name attribute is exactly foo.
actor[name=]
Retrieve all actor elements whose name attribute is empty.
class[owner=foo]
Retrieve class elements whose owner attribute name is exactly foo.
class[owner=foo][name=bar]
Retrieve class elements whose owner attribute name is exactly foo and name attribute is exactly
bar.
REPORT WIZARD
Query Tool
297
Copyright © 1998-2015 No Magic, Inc.
[attr*=val]
Matches an element with an attr attribute whose value contains at least one instance of the substring val. If
val is an empty string, the query returns nothing.
The Query tool matches against case sensitivity of attribute names and values in a pattern. A VTL property syn-
tax (Camel case without space) will be used for attribute name. You can use spaces in writing values.
When value of attribute is NamedElement, the element name will be used as default value, for example:
24.2.4 Query Element without Children
You can use :empty to query an element that has no children at all. If an element does not any children, its
“Owned Element” attribute value has a zero size of items, for example:
24.2.5 Query by Element ID
A pattern allows a template to query elements from a given element’s ID. An element’s ID is unique in a project,
for example:
An element’s ID is generated from the $element.elementID property.
24.2.6 Query by Descendent
A pattern allows a template to query an element that is the descendant of another element, for example, an
Actor that is contained within a Package. A descendant query is one or more white-spaces that separate(s) two
sequences of patterns.
*[name^=foo]
Retrieve any element whose name attributes begins with foo. Use an asterisk to match any ele-
ment.
actor[name$=foo]
Retrieve all actor elements whose name attribute is ends with foo.
class[qualifiedName*=nomagic]
Retrieve class elements whose qualifiedName attribute contains string nomagic.
package:empty
Retrieve any package whose ownedElement attribute is empty.
package[name=foo]:empty
Retrieve any package whose name attribute is exactly foo and ownedElement attribute is
empty.
#17_0_3_8e9027a_1325220298609_477646
Retrieve an element whose ID is exactly 17_0_3_8e9027a_1325220298609_477646.

REPORT WIZARD
Query Tool
298
Copyright © 1998-2015 No Magic, Inc.
You can use an asterisk (*) to match any element type when combined with the other patterns, for example:
24.2.7 Query by Child Element
A pattern allows a template to query elements that are the children of another element (describes a parent-child
relationship between two elements). An optional white-space around a greater sign can be ignored.
You can use an asterisk (*) to match any element type when combined with the other patterns, for example:
24.2.8 Additional Conditions for Query Patterns
When you are writing queries, be sure you observe the following conditions.
• A Query pattern cannot contain only spaces, for example:
• An element type cannot contain [, ], :, *, >, #, and white space.
• Characters #, >, and white-space are the end statements except in an attribute name or value, for example:
package class
Retrieve all classes that are the descendants of a package element.
package foo
- class bar1
- class bar2
- class bar3
The classes bar1, bar2, and bar3 are the results.
package class *[name=foo]
Retrieve any element that (i) has a name value exactly foo and (ii) is inside a class that is inside
a package.
package * property
Retrieve a property element that is the grandchild or a later descendant of a package ele-
ment.
package > class
Retrieve all classes that are children of a package.
package foo
- class bar1
- class bar2
- class bar3
The classes bar1 and bar2 are the results.
$query.get('') or $query.get(' ')
An invalid query pattern.
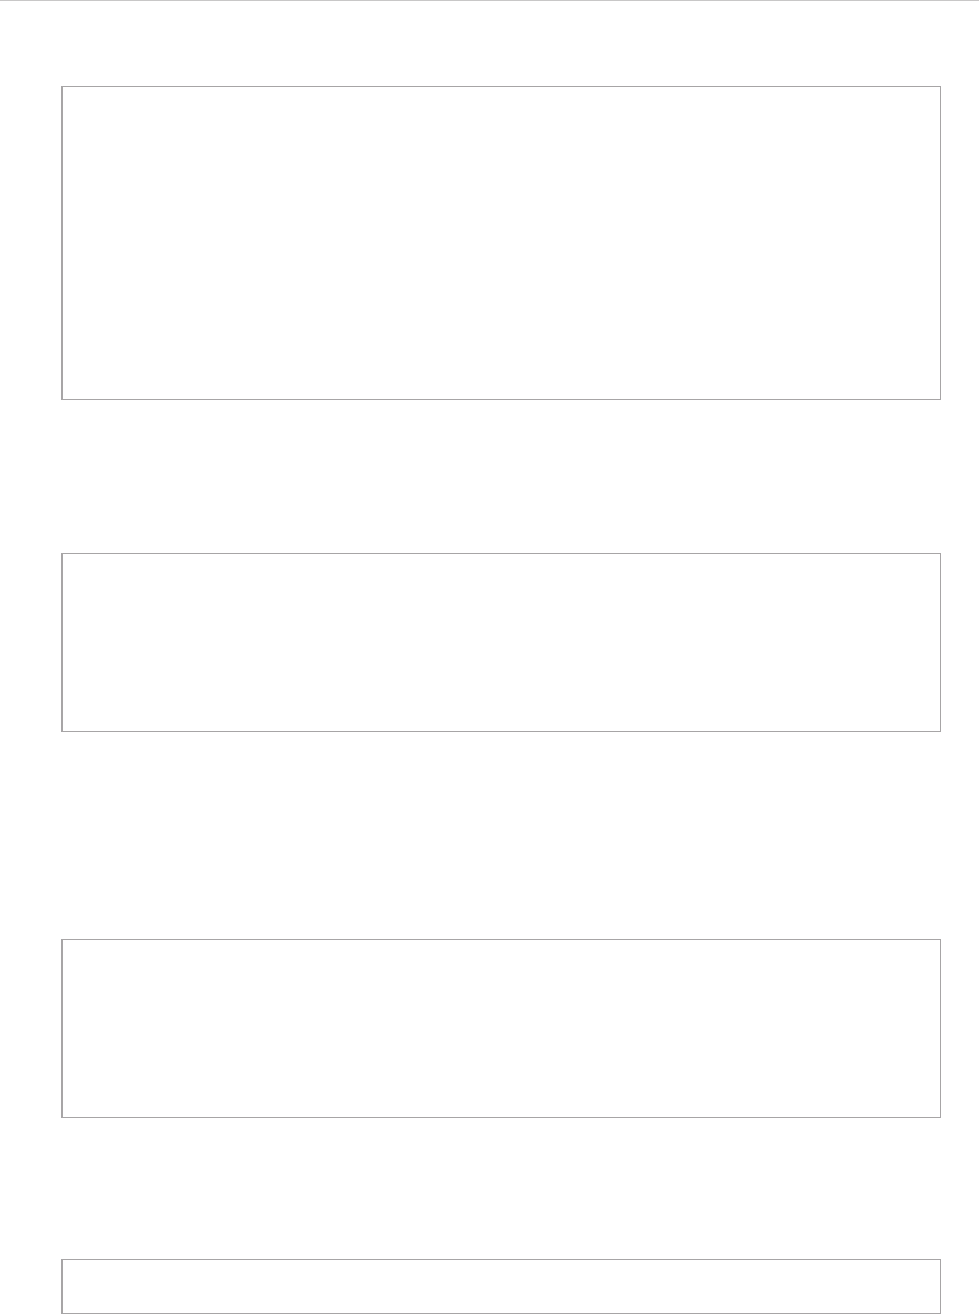
REPORT WIZARD
Query Tool
299
Copyright © 1998-2015 No Magic, Inc.
An end statement is required to separate an element and its child, or grandchild, for example:
• Characters = , ^=, $=, and *= are keywords and all strings except ] that are written next to these
keywords mean the attribute values.
• Attribute names are mandatory.
• An attribute name cannot contain white-space, =, ^=, $=, *=, and ], for example:
If an attribute value is not in any double quotes or single quotes, all strings, except ], after a keyword mean an
attribute value, for example:
• Character # must contain at least one string.
• An ID cannot contain [, : , >, #, and white-space, for example:
$query.get("class#17_0_3_8e9027a") equivalent to
$query.get("class #17_0_3_8e9027a")
Retrieve an element’s ID 17_0_3_8e9027a that is a grandchild or a later descendant of a
class element.
$query.get("class>property") equivalent to
$query.get("class > property")
Retrieve a property element that is the child of a class element.
$query.get("class property")
Retrieve a property element that is a grandchild or a later descendant of a class element.
$query.get("class[attr] property")
Retrieve a property element that is a grandchild or a later descendant of a class element that con-
tains an attr attribute.
$query.get("class[attr]property")
An invalid query pattern.
$query.get("*[ name =bean]") is equivalent to
$query.get("*[name=bean]")
Retrieve all elements whose name attribute is bean.
$query.get("*[ element type = bean ] ")
An invalid query pattern.
$query.get("*[name=bean]")
Retrieve all elements whose name attribute is bean

REPORT WIZARD
Query Tool
300
Copyright © 1998-2015 No Magic, Inc.
• A : must be followed by empty and “:empty” must be followed by [, #, >, or white-space, except
in an attribute, for example:
• If an attribute value of a MagicDraw element is null, it is equivalent to an empty attribute value.
24.3 Query Methods
This section provides query methods that you can use to retrieve an array of elements by query pattern.
24.3.1 Retrieving an Array of Element by Query Pattern
• Parameters: query : String (the query string as described in 24.2 Recognizable Query Patterns).
• Returns: java.util.List<Element> (a list or a collection of MagicDraw Elements or an empty
List if there is no matching element).
• The sample code to print all Use Case elements under a packagable element named foo is as
follows:
$query.get("#17_0_3_8e9027a#17_0_3_8e9027b") is equivalent to
$query.get("#17_0_3_8e9027a #17_0_3_8e9027b")
Retrieve an element ID #17_0_3_8e9027b that is a grandchild or a later descendant
of an element ID 17_0_3_8e9027a.
$query.get("#17_0_3_8e9027a > *")
Retrieve all elements that are the children of an element ID #17_0_3_8e9027a.
$query.get("#") or
$query.get("#[name=a]#17_0_3_8e9027a")
An invalid query pattern.
$query.get("*:empty") or
$query.get("*:empty#17_0_3_8e9027a") or
$query.get("*:empty > class") or
$query.get("*:empty[name*=class]")
A valid query pattern but the result of some patterns will be an empty list.
$query.get("*[name=:emptyx]")
Retrieve all elements whose name attribute is :emptyx
$query.get("*:emptyx") or
$query.get("*:em")
An invalid query pattern.
$query.get(query)
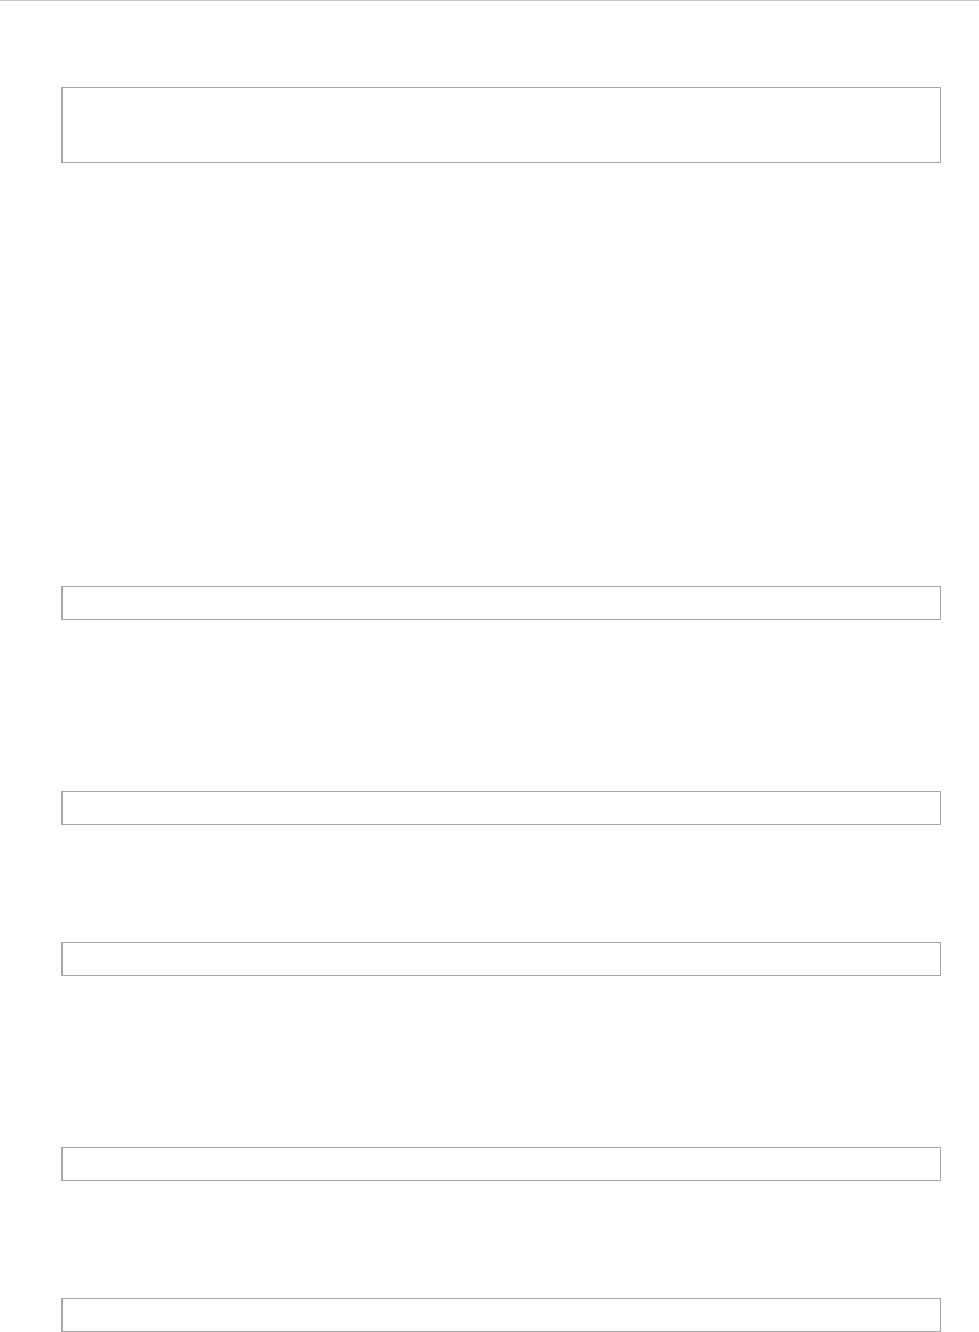
REPORT WIZARD
Query Tool
301
Copyright © 1998-2015 No Magic, Inc.
24.3.2 Getting a Single Result from Query Functions
Since a MagicDraw model element does not have a unique identified attribute so all methods will be returned in
a Collection. Thus we will need convenient methods to get a single result from the Collection. Additional meth-
ods for getting a single result from query methods are as follows:
• first() – returns the first element from a collection.
• last() – returns the last element from a collection.
• get(int) – returns the nth element of a collection.
• unique() – returns the first element from a collection (equivalent to first).
24.3.2.1 Getting the First Element from a Collection
• Returns: Element (the first element from a query result collection or a null value if there is no matching
element).
• A Sample code to print the first package is as follows:
24.3.2.2 Getting the Last Element from a Collection
• Returns: Element (the last element from a query result collection or a null value if there is no matching
element).
• A sample code to print the last package is as follows:
24.3.2.3 Getting the nth Element from a Collection
• Parameters: index : int (a zero-based integer indicating which element to retrieve).
• Returns: Element (an element from a specified index of a query result collection or if the index is out of
bounds, it will print a warning message to console/log and returns a null value)/
• A sample code to print the third package is as follows:
#foreach ($uc in $query.get("usecase[owner=foo]"))
$uc.name in $uc.owner.name
#end
$query.get(query).first()
$query.get(“package”).first()
$query.get(query).last()
$query.get(“package”).last()
$query.get(query).get(index)
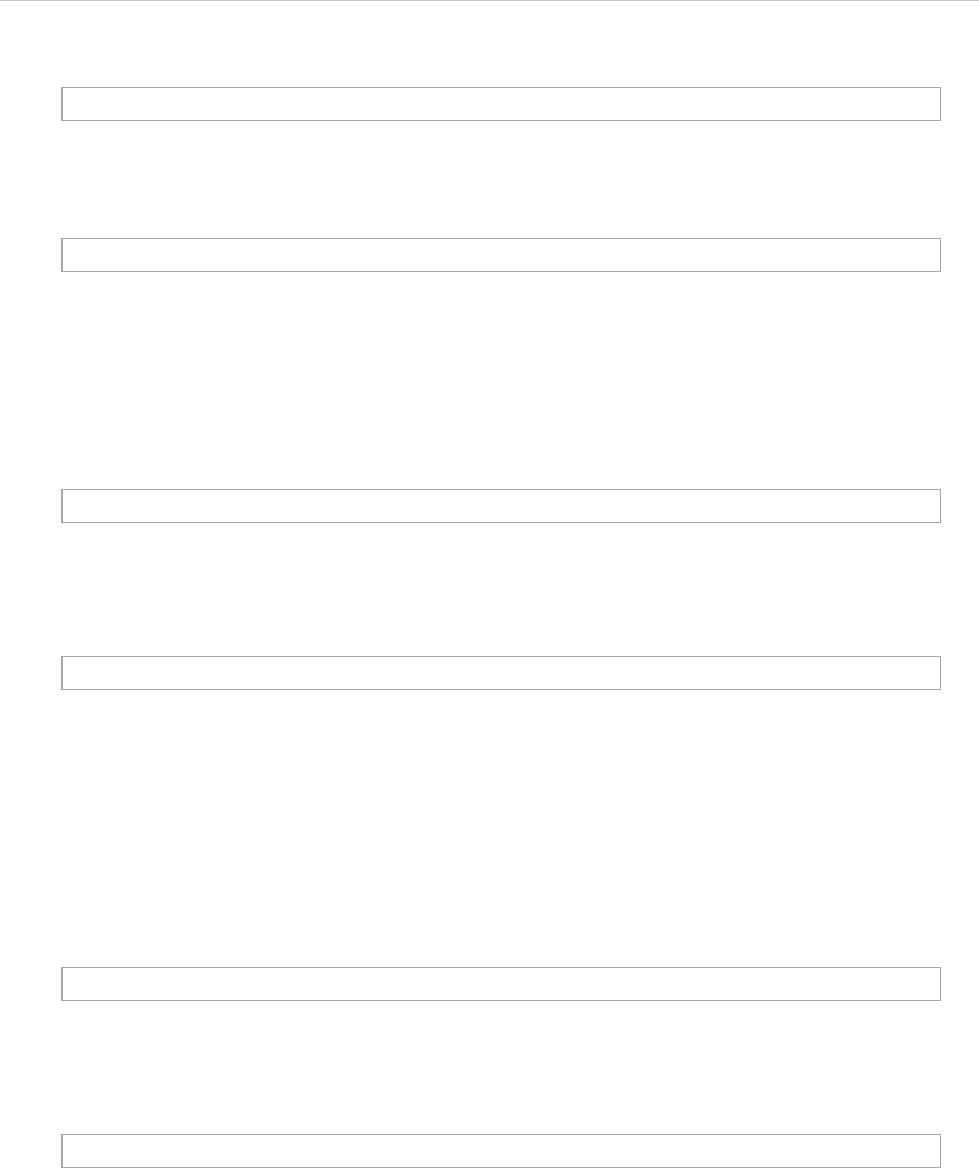
REPORT WIZARD
Query Tool
302
Copyright © 1998-2015 No Magic, Inc.
24.3.2.4 Getting the Unique Element from a Collection
This method is equivalent to the one in 24.3.2.1 Getting the First Element from a Collection.
• Returns: Element (a unique element from a query result collection or a null value if there is no
matching element).
• A sample code to print a single package is as follows:
24.3.3 Retrieving an Array of Elements by Name
Retrieve an element from a selected package scope whose element name exactly equals a given parameter.
This method is equivalent to query pattern *[name=var].
• Parameters: name : String (the element name string).
• Returns: java.util.List<Element> (a List or a collection of MagicDraw Elements or an empty List if there
is no matching element).
• A sample code to print the first element whose name exactly equals to foo is as follows:
24.3.4 Retrieving Elements by ID
Retrieve an element from a selected package scope whose element ID exactly equals a given parameter. This
method is equivalent to query pattern #id.
• Parameters: id : String (an element’s ID).
• Returns: Element (a MagicDraw Element or a null value if there is no matching element).
• A sample code to print an element that contains ID 17_0_3_8e9027a_1325220298609_477646 is as
follows:
$query.get("package").get(2)
$query.get(query).unique()
$query.get("package").unique()
$query.getElementsByName(name)
$query.getElementsByName("foo").unique()
$query.getElementById(id)
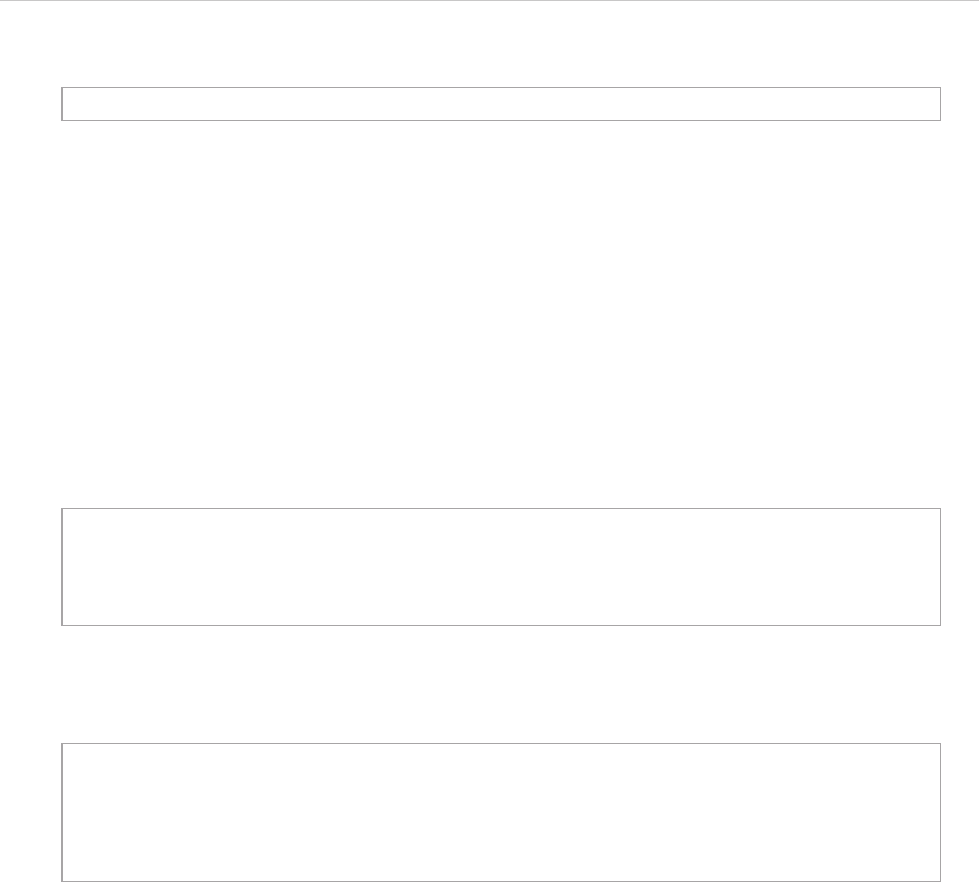
REPORT WIZARD
Query Tool
303
Copyright © 1998-2015 No Magic, Inc.
24.4 Examples
This section provides three sets of sample code to demonstrate some scenarios with the query tool. The codes
may not be executable or return a correct result. They are just examples to show you how to use the Query tool
and how it works.
(i) Example 1
Print any classes whose containing in package com.nomagic.reportwizard.
Without QueryTool:
With QueryTool:
(ii) Example 2
Print any classes whose containing in model Design and name ends with Bean.
Without QueryTool:
$query.getElementById("17_0_3_8e9027a_1325220298609_477646").unique()
#foreach ($c in $Class)
#if ($c.qualifiedName.startWith("com.nomagic.reportwizard"))
$c.name
#end
#end
#import("query", "com.nomagic.reportwizard.tools.QueryTool")
#foreach ($c in
$query.get("class[qualifiedName^=com.nomagic.reportwizard]"))
$c.name
#end

REPORT WIZARD
Query Tool
304
Copyright © 1998-2015 No Magic, Inc.
With QueryTool:
(iii) Example 3
Matches any property element which owner element is class whose name attributes value is exactly equal
to foo.
Without QueryTool:
With QueryTool:
#set ($match = false)
#macro (recursiveCheck $e)
#if ($e.elementType == "model" && e.name == "Design")
#set ($match = true)
#else
#recursiveCheck($e.owner)
#end
#end
#foreach ($c in $Class)
#set ($match = false)
#recursiveCheck($c)
#if ($check)
#if ($c.name.endsWith("Bean"))
$c.name
#end
#end
#end
#import("query", "com.nomagic.reportwizard.tools.QueryTool")
#foreach ($c in $query.get("model[name=Design] class[name$=Bean]"))
$c.name
#end
#foreach ($p in $Property)
#set ($owner = $p.owner)
#if ($owner.elementType == "class" && $owner.name == "foo")
$p.name
#end
#end
#import("query", "com.nomagic.reportwizard.tools.QueryTool")
#foreach ($p in $query.get("class[name=foo] > property"))
$p.name
#end
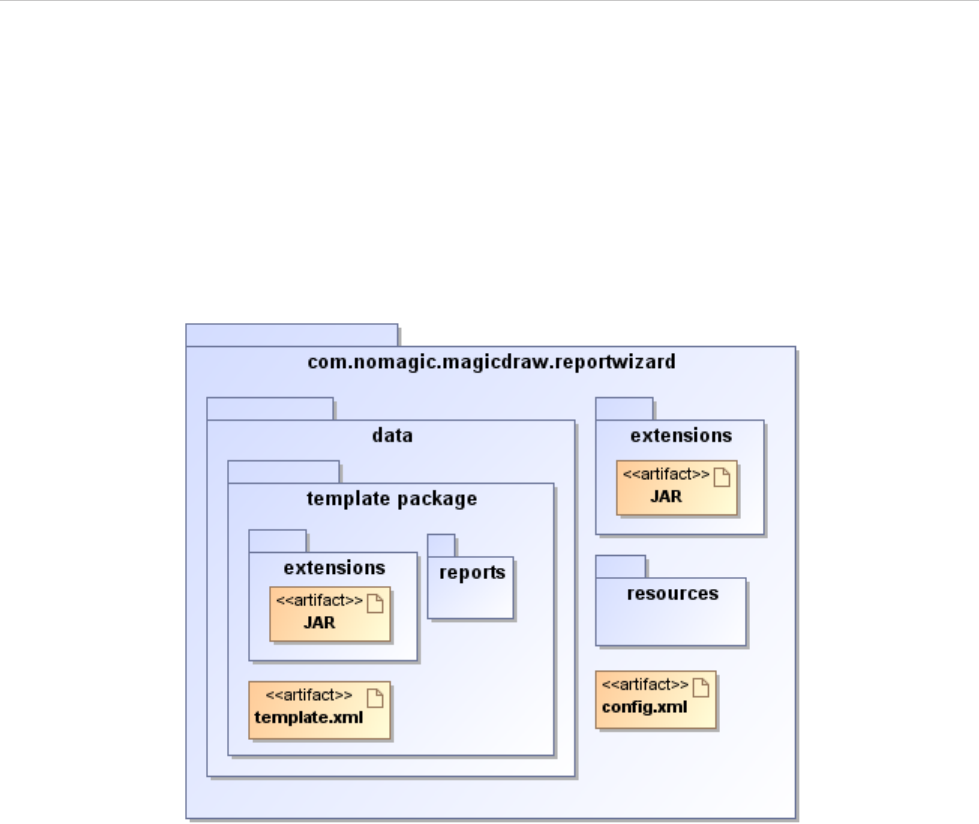
REPORT WIZARD
Appendix A: Report Extensions
305
Copyright © 1998-2015 No Magic, Inc.
Appendix A: Report Extensions
Report Wizard has been enhanced with an extension that provides additional functionalities (for example, a
Custom Tool that encapsulates Java functions in context). The report extensions are Java class and related
resources collected into JAR archives, which are merely ZIP files that contain a specially formatted “manifest”
file describing the contents of the archive.
To install the extension, copy the .jar file into the extensions directory under the Report Wizard plugin direc-
tory or template directory. The archives stored within subdirectories will not be loaded in Report Wizard (Fig-
ure 212).
Figure 212 -- Report Wizard Plug-in Directory Structure.
The extension deployed under the global extensions directory will affect all templates, which means you can
use the deployed Custom Tool in all templates. Extensions deployed under a template package will affect only
the specific template.
1. Custom Tool
A Custom Tool is a template library written in Java to encapsulate functions in context. The Custom Tool (Fig-
ure 213) is extended from the report API. The tool can be used to develop custom context properties that are
presentation centric or that can take advantage of the existing ‘Tool’ extensions or by document authors famil-
iar with Java.
Report Wizard uses the word 'Tool' meaning an object encapsulating dynamic functions on the JavaBean. A
Tool is a "carrier" of data between the Java and template layers. In other words, the Tool simplifies template
development and maintenance.
REPORT WIZARD
Appendix A: Report Extensions
306
Copyright © 1998-2015 No Magic, Inc.
Figure 213 -- Custom Tool API Structure.
1.1 Context Name
A Context name is a name for variables or references in the template. Report Wizard uses the Velocity Tem-
plate Language (VTL) as a standard syntax for the template. VTL uses “$” as a leading character followed by
an identifier for the variable.
For example:
1.2 Context Object
A Context object is a Java Object representing a variable. A Context object is modeled on the JavaBean speci-
fications defined by Sun Microsystems.
For example, if a String represents the variable $foo.name in context, the value of the String will be printed out
in the output report as follows.
2. Tool Interface
Custom Tool is written in the Java language. The tool implements a specialized interface called ITool. The
Report API provides both an interface and a class to support interface realization and class generalization. As
mentioned earlier, a Tool is modeled on the JavaBean specifications. Functions implemented in this class must
be defined in a series of setter or getter methods. The following sample shows the source code for the ITool
interface that you must implement:
$UseCase
$foo.name
Foo Name
REPORT WIZARD
Appendix A: Report Extensions
307
Copyright © 1998-2015 No Magic, Inc.
All tools must implement the ITool interface (or one of its subclasses) as it defines the methods the template
engine calls to execute. Table 34 provides a description of the methods in the ITool interface.
Table 34 -- Description of Methods in ITool interface.
The other classes that can be extended are Tool and ConcurrentTool.
public interface ITool extends IBean
{
// attributes
Void VOID = new Void();
// inner classes
public class Void{}
public class RetainedString implements CharSequence{}
// methods
void setContext(IContext context);
String getContext();
void setProperties(Properties properties);
Properties getProperties();
}
Method Description
setContext(Context context) Once the class has been initialized, this method is
called by the template engine runtime to set the tem-
plate context. Overriding the current context will affect
the code after this tool.
getContext() Return the template context that is assigned to the cur-
rent runtime.
setProperties(Properties properties) This method is called by the template engine runtime,
once the class has been initialized, to set the template
properties. Overriding the current properties will not
affect the engine.
getProperties() Return the current template properties.
VOID Represents the Void class. VOID is used to make sure
that returning data from the setter method is absolutely
nothing. In general, Velocity considers the return of
void from the setter method as a ‘null’ value. This
causes the word 'null' to be printed out in the report. To
avoid this problem, the setter method may use VOID as
a return object.
class Void A void class is used as a return in the Tool when you
want to be sure that nothing is returned to the context.
class RetainedString A direct command report formatter to keep the refer-
enced String format. The formatter and other reference
insertion handlers should maintain Strings directed by
this class.
REPORT WIZARD
Appendix A: Report Extensions
308
Copyright © 1998-2015 No Magic, Inc.
Figure 214 -- ITool Interface And Related Class.
2.1 Class Tool
A Class Tool is a base class realizing the interface ITool. This class provides the default implementation for
ITool.
This class also provides methods derived from the java.util.Observable class, which can be used to notify the
observers. An observer class, such as a template engine or a graphical user interface class, can receive the
notification message from the tool and manage to display or interact with the user.
2.2 Concurrent Tool
A Concurrent Tool provides concurrent tasks running in the template engine. This class implements an
unbounded thread-safe queue, which arranges the elements in a first-in-first-out (FIFO) order. New tasks are
inserted at the tail of the queue, and the queue retrieval operations obtain elements at the head of the queue.
The tool extends from this class and is ideal for processing a long task that does not want other tasks to wait
until the process is complete. The following code shows the sample usage of Concurrent Tool.
An example of Concurrent Tool is FileTool. The root template that calls the file tool method will create a
subprocess, offer the subprocess into a queue, and continue the root template until finished. The template
engine will later call the consume method to complete the subprocess once the consumer queue is available.
The number of concurrent processes available for the execution is declared in the template engine property
(See TemplateConstants.TEMPLATE_POOL_SIZE for detail.).
3. Creating Custom Tool
There are a few steps involved in developing a custom tool. These steps can be summarized as follows:
3.1 Developing a Tool Class
import com.nomagic.magicreport.engine.ConcurrentTool;
public class LongTaskTool extends ConcurrentTool
{
public String longTask() {
// enqueue object
offer(new ConsumeObject(referent));
}
public void consume(ConsumeObject consumeObject) {
Object referent = consumeObject.get();
// process long task
}
}

REPORT WIZARD
Appendix A: Report Extensions
309
Copyright © 1998-2015 No Magic, Inc.
3.2 Creating an Extension Package
3.1 Developing a Tool Class
Developing a Tool class requires setting a class path to magicreport.jar. You can find magicreport.jar from
the library folder under the Report Wizard plugin directory. The following sample shows the source code for
Hello.java.
The sample shows two methods following the getter concept defined by the JavaBean specification.
3.2 Creating an Extension Package
The extension package is delivered in a JAR file. JAR (Java ARchive) is a file format based on the popular ZIP
file format and is used for aggregating many files into one. To create a JAR file, you can store *.class with
the Java package folder structure in a ZIP file format or creating from a JAR tool.
To combine files into a JAR file (in this case), here is the sample code fragment:
In this example, all the class files in the current directory are placed in the file named "MyTool.jar". A mani-
fest file entry named META-INF/MANIFEST.MF is automatically generated by the JAR tool. The manifest file is
the place where any meta-information about the archive is stored as named: Value pairs. Please refer to the
JAR file specification for more details.
The example above shows that all the class files in the directory mytool are placed in the file named
"MyTool.jar".
A complete JAR tool tutorial can be found at:
• http://java.sun.com/docs/books/tutorial/deployment/jar/
• http://java.sun.com/javase/6/docs/technotes/tools/windows/jar.html
4. Installing Custom Tool
To install the extension, copy the JAR file containing a custom tool class into the extensions directory under the
Report Wizard plugin directory or template directory. Report Wizard will automatically load a new JAR file when
a new report is generated.
package mytool;
import com.nomagic.magicreport.engine.Tool;
public class HelloTool extends Tool
{
public String getHello() {
return "Hello World";
}
public String getHello(String name) {
return "Hello " + name;
}
}
jar cf MyTool.jar *.class
jar cf MyTool.jar mytool
REPORT WIZARD
Appendix A: Report Extensions
310
Copyright © 1998-2015 No Magic, Inc.
5. Importing Custom Tool to Template
Report Wizard uses the import directive for importing a Custom Tool to a template.
An example of a directive:
The import directive declares that the template uses the custom tool, names the tool that defines it, and speci-
fies its tag prefix before the custom tool is used in a template page. You can use more than one import directive
in a template, but the prefix defined in each template page must be unique.
5.1 Attributes
• name (type:String)
The uniform or full qualified class name that locates the Tool class, for example,
mytool.HelloTool
• prefix (type:String)
The prefix that precedes the custom tool name such as a string in $hello.getHello().
Empty prefixes are not allowed. When developing or using custom tools, do not use tag prefixes
such as bookmark, sorter, template, file, array, group, map, iterator, list, date, report, exporter,
profiling, and project, as they are reserved by Report Wizard.
The code fragment indicated below declares a custom tool.
The output from the above template is:
6. Auto Importing Template Tool
Report Wizard can automatically import a Template Tool to a template without having to declare the #import
statement in a template code manually (see 5 Importing Custom Tool to Template).
To enable Report Wizard to automatically import a Template Tool, you have to use the existing template vari-
able inside “template.xml” and “report.xml”.
The current template variable syntax:
#import('prefix', 'name')
#import('hello', 'mytool.HelloTool')
Get Hello
$hello.getHello()
Get Hello Foo
$hello.getHello('foo')
Get Hello
Hello World
Get Hello Foo
Hello foo
<variable>
<name>Variable Name</name>
<description>Variable Description</description>
<type/>
<value xml:space="preserve">Variable Value</value>
</variable>
REPORT WIZARD
Appendix A: Report Extensions
311
Copyright © 1998-2015 No Magic, Inc.
Add "com.nomagic.magicreport.engine.Tool" to a type value where the name is a variable name and
the value is a full-qualified template tool class, for example:
To automatically import TextTool:
1. Edit the built-in.xml file in the ...\data\reports\Tutorial 24 - Text Tool\reports.
2. Add a variable as shown in the following example.
The result is a template code that can access com.nomagic.reportwizard.tools.Text-
Tool from $text.
<variable>
<name>text</name>
<description>A text tool</description>
<type>com.nomagic.magicreport.engine.Tool</type>
<value
xml:space="preserve">com.nomagic.reportwizard.tools.TextTool</
value>
</variable>
$text.noLineBreak($diagram.name)
NOTE Once you have edited a template variable, you have to restart Magic-
Draw prior to generating a report through MagicDraw.
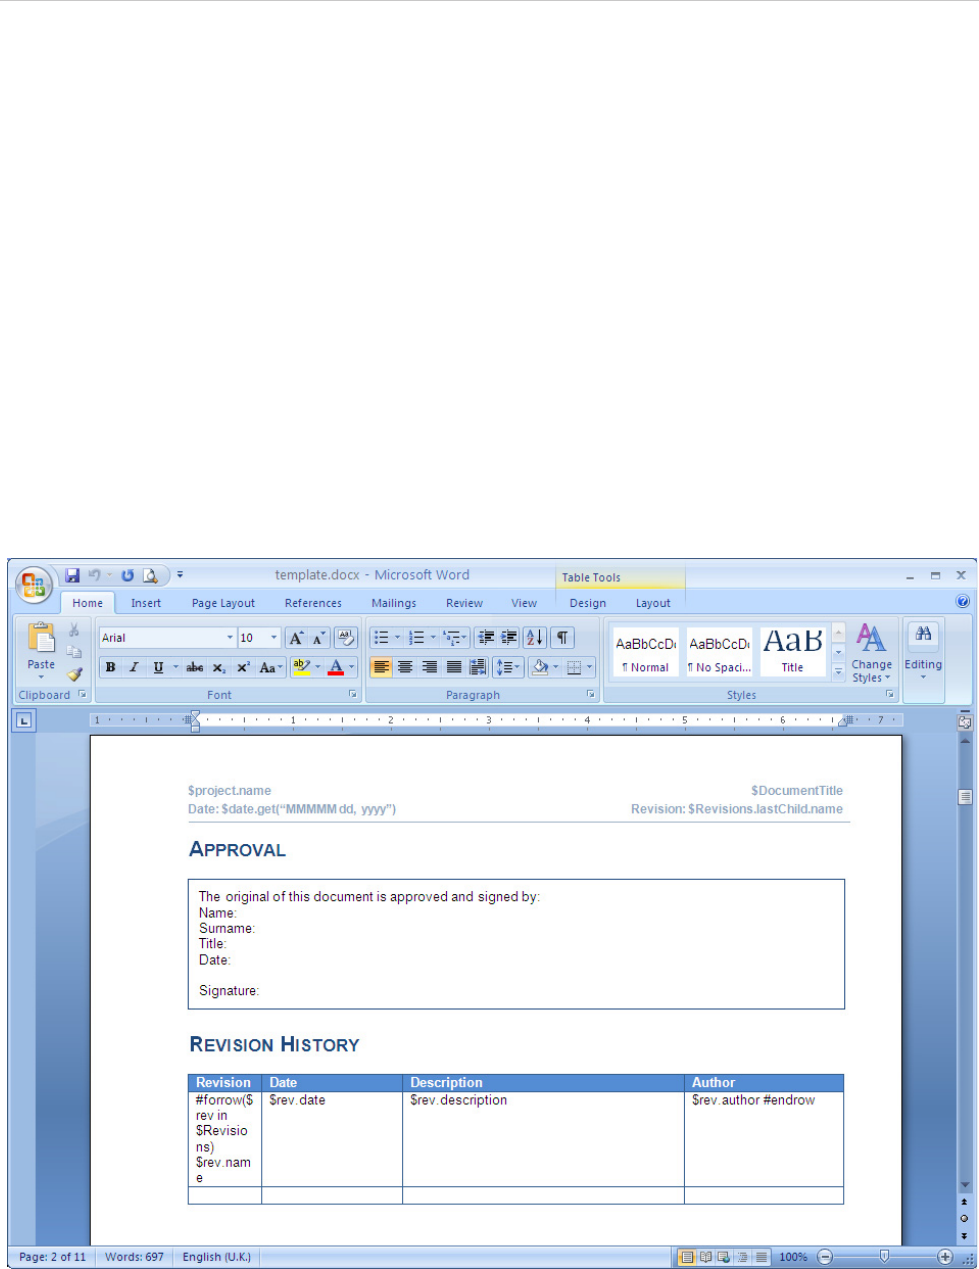
REPORT WIZARD
Appendix B: Office Open XML Format Template
312
Copyright © 1998-2015 No Magic, Inc.
Appendix B: Office Open XML Format Template
Office Open XML (also referred to as OOXML or Open XML) refers to the standardized file formats of spread-
sheets, charts, presentations, and word processing documents for Microsoft Office. These standardized file for-
mats become free and open as ECMA-376 Office Open XML File Formats - 2nd edition (December 2008) and
ISO/IEC 29500:2008.
The most common Open XML file formats supported by Report Wizard include:
• DOCX - for word processing (text) documents
• XLSX - for spreadsheets
• PPTX - for presentations
1. Microsoft Office Word Document (DOCX)
Report Wizard supports most DOCX features. You can place the VTL codes inside core (properties) and con-
tent of any DOCX file. All syntax usable in RTF can also be used in DOCX.
Figure 215 -- A Sample of DOCX Converted from an RTF Document
1.1. Limitations when Used in Microsoft Office Word Document
• You cannot use #forcol in DOCX. If you use it in a DOCX report template (Figure 216), an error
message will open (Figure 217).
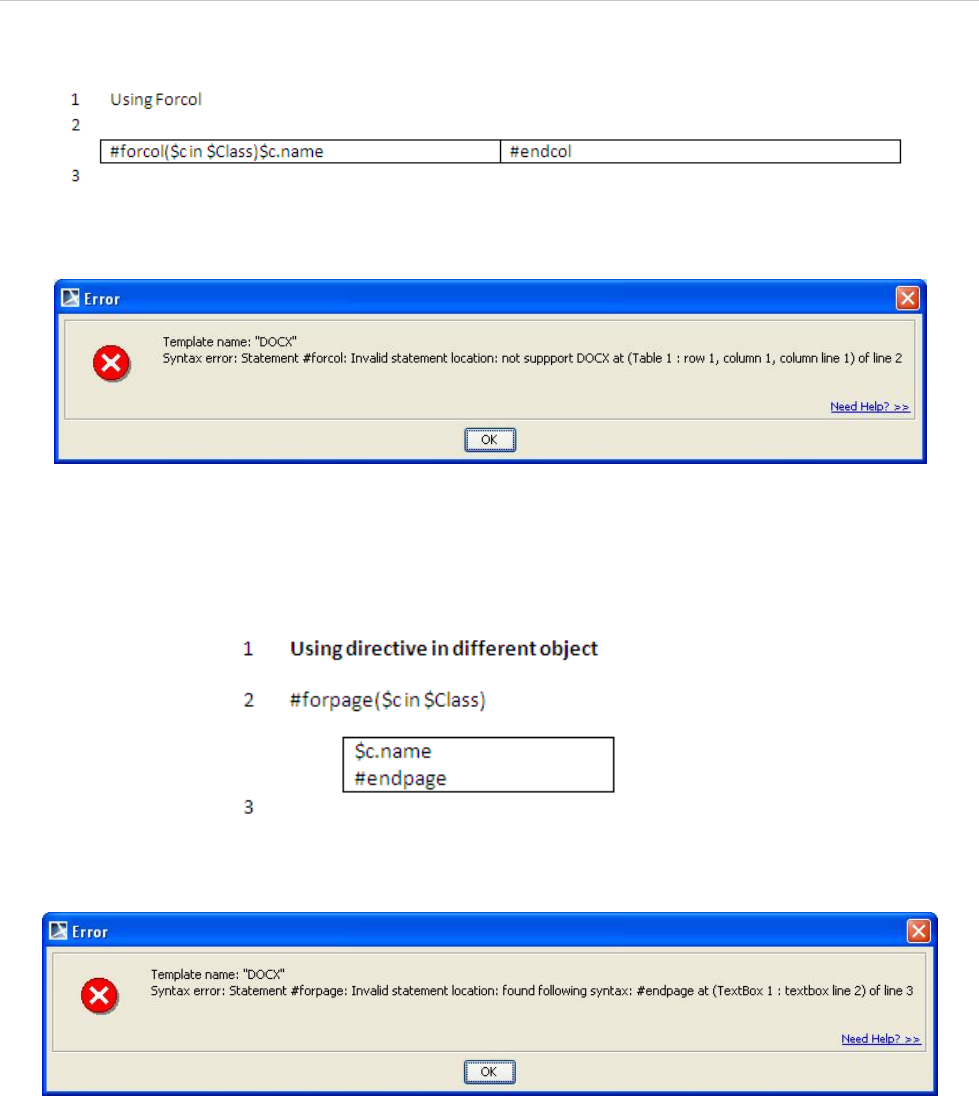
REPORT WIZARD
Appendix B: Office Open XML Format Template
313
Copyright © 1998-2015 No Magic, Inc.
Figure 216 -- Using #forcol in DOCX
Figure 217 -- Error Message When Using #forcol in DOCX
• You cannot use multi-line statements in different objects. If you try to use them in DOCX (Figure 218),
an error message will open (Figure 219).
Figure 218 -- Invalid Usage of Multi-line Statement in DOCX
Figure 219 -- The Error Message of Invalid Usage of the Multi-line Statements in DOCX
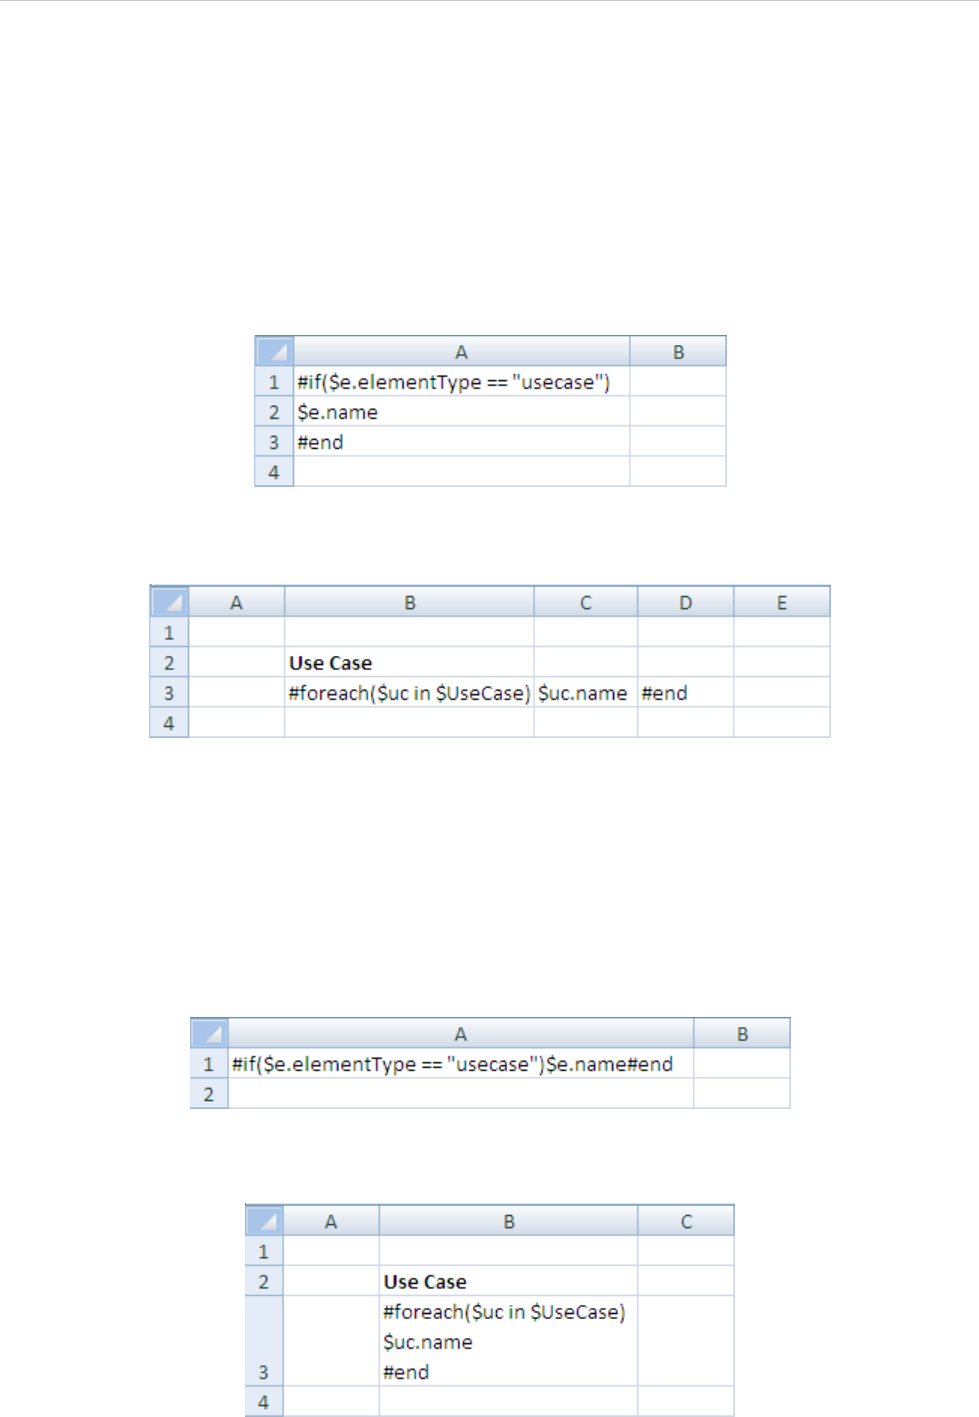
REPORT WIZARD
Appendix B: Office Open XML Format Template
314
Copyright © 1998-2015 No Magic, Inc.
2. Microsoft Office Excel Worksheet (XLSX)
2.1 Multi-Line Statements in XLSX
All multi-line directives such as #if-#else-#elseif, #foreach, and #macro must be used under the following
conditions.
• The beginning and ending statements must be declared within a single cell. Figure 220 and 221 below
show samples of invalid usage of the #if and #foreach statements between cells respectively.
Figure 220 -- Invalid Usage of the Multi-line #if Statement in XLSX
Figure 221 -- Invalid Usage of the Multi-line #foreach Statement in XLSX
In Figure 220, since the body of the #if statement ($e.name) resides in the A2 cell, not in
the A1 cell, the body will not be generated when generating a report, regardless of the
evaluation of the #if statement.
The code shown in Figure 221 will break the structure of a spreadsheet document.
Figure 222 and 223 demonstrate samples of valid usage of the #if and #foreach
statements respectively.
Figure 222 -- Valid Usage of the Multi-line #if Statement in XLSX
Figure 223 -- Valid Usage of Multi-line #foreach Statement in XLSX
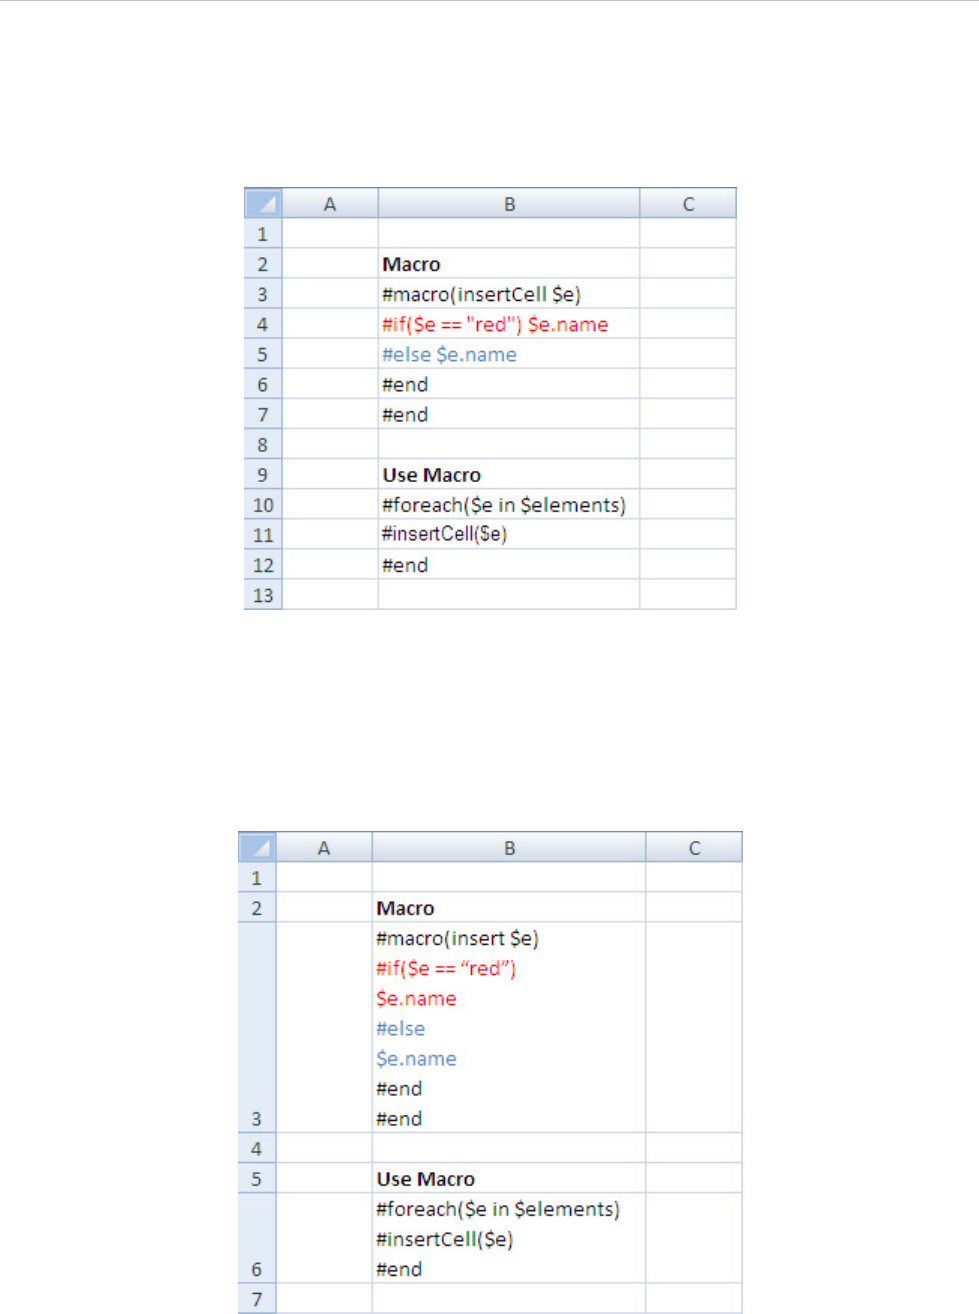
REPORT WIZARD
Appendix B: Office Open XML Format Template
315
Copyright © 1998-2015 No Magic, Inc.
• A VTL Macro must be declared within a single cell. Do not insert the multi-cell recorded macros in a
single cell (Figure 224).
Figure 224 -- Invalid Usage of #macro Statement in XLSX
The macro will copy all contents between #macro and #end. Cells and rows will be included in the
macro as well. Once this record has been inserted, the macro content will break the document
structure.
Figure 225 demonstrates a sample of valid usage of the #macro statement.
Figure 225 -- Valid Usage of #macro Statement in XLSX
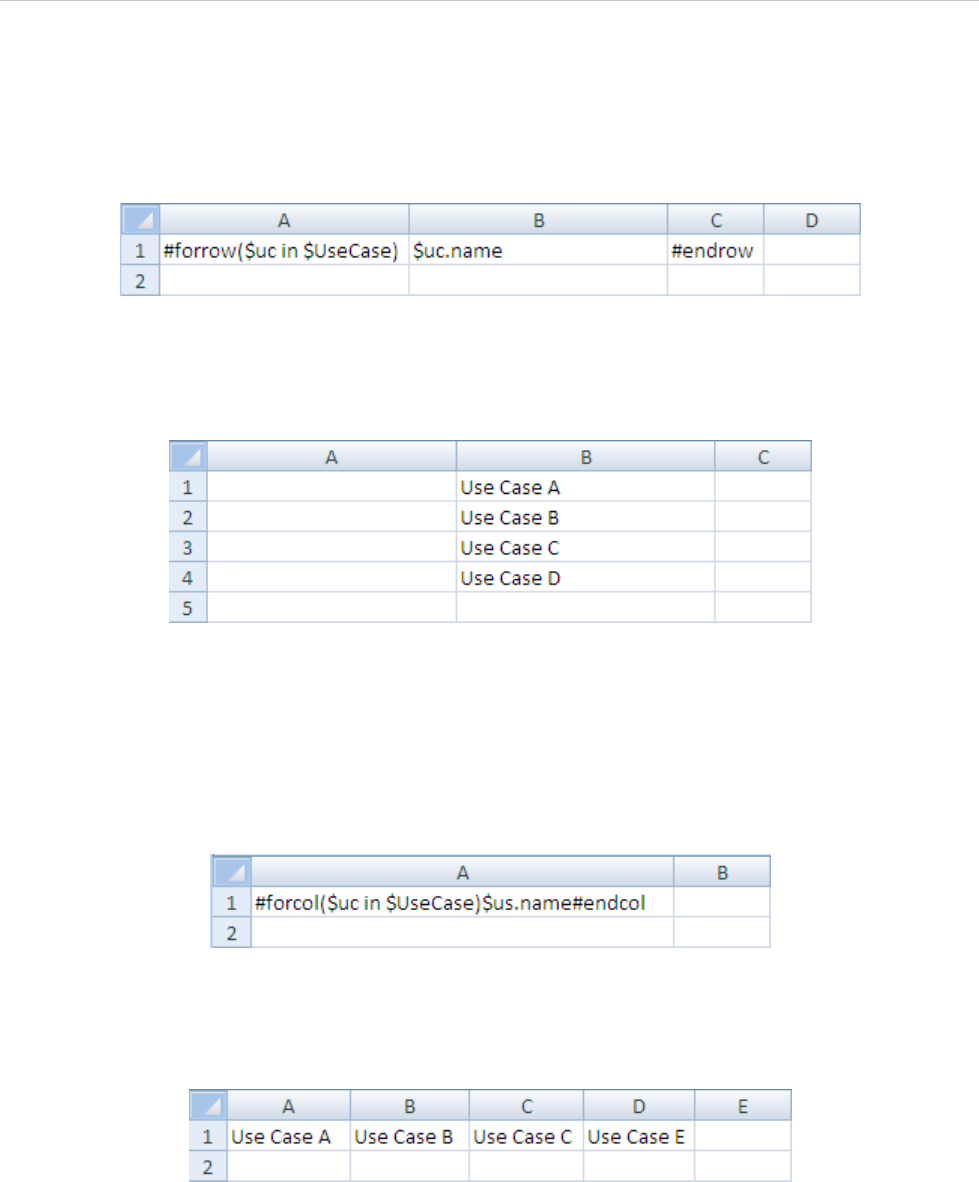
REPORT WIZARD
Appendix B: Office Open XML Format Template
316
Copyright © 1998-2015 No Magic, Inc.
2.2 Creating Data for Multiple Rows
The #foreach directive can only be used in a single cell record. To create data for multiple rows, use the
#forrow directive instead (Figure 226).
Figure 226 -- Usage of #forrow in XLSX
Figure 227 demonstrates the output of the above code.
Figure 227 -- Output of #forrow in XLSX
2.3 Creating Data for Multiple Columns
#forcol is used for creating data for multiple columns (Figure 228). This statement can be used in conjunction
with the #forrow statement.
Figure 228 -- Usage of #forcol in XLSX
Figure 229 demonstrates the output of the above code.
Figure 229 -- Output of #forcol in XLSX
2.4 Displaying Content in a Cell
Texts in any generated report are always wrapped. Also, the cells’ width in the generated report depends on
the cells’ width in the report template used. For example, an XLSX report template in Figure 230 will generate
an output report as shown in Figure 231.
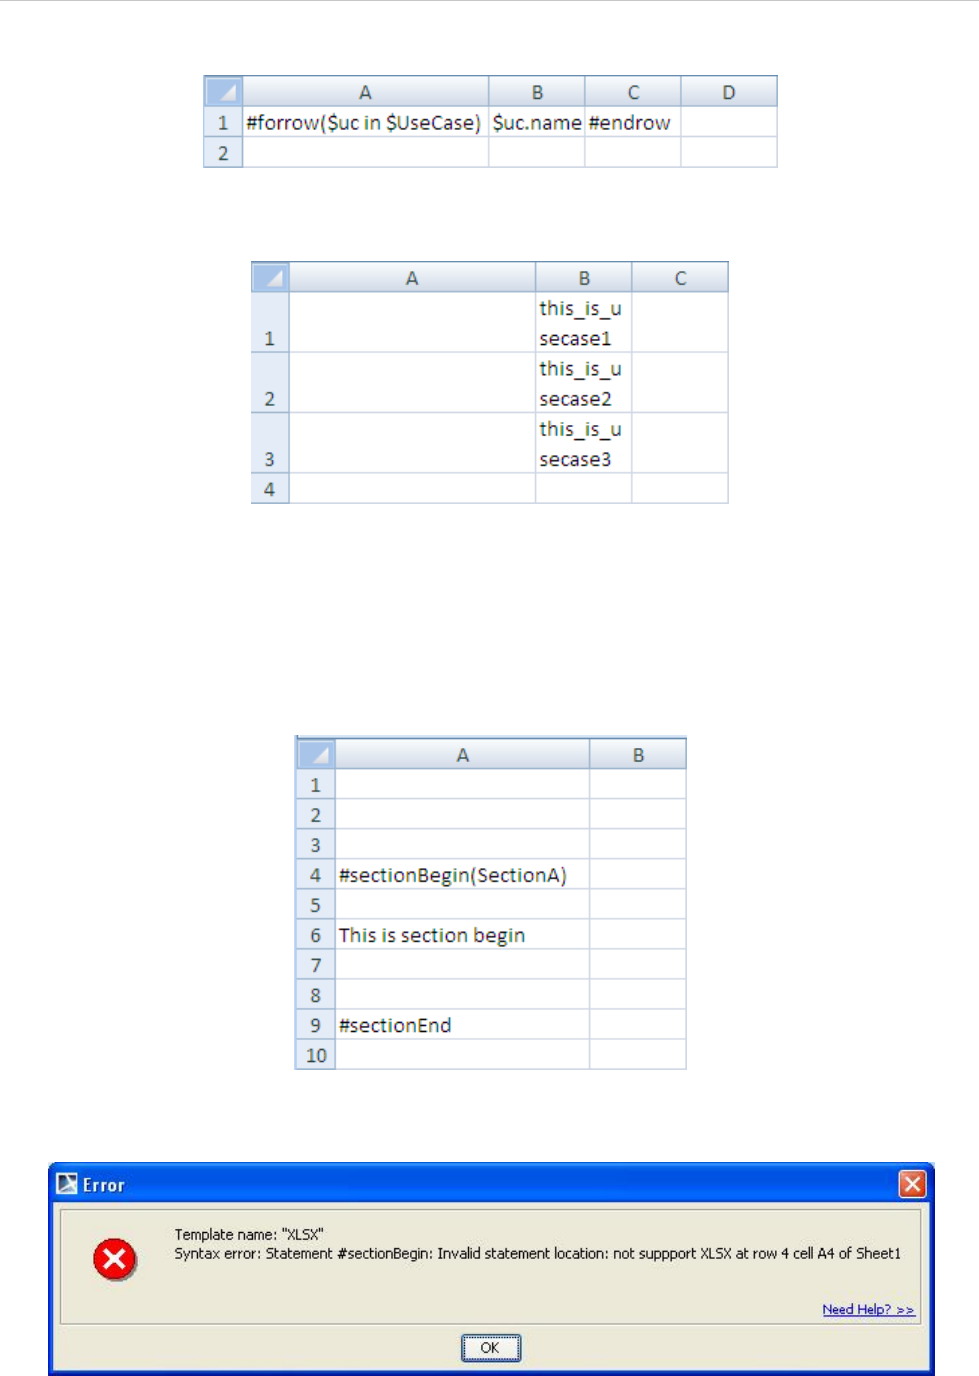
REPORT WIZARD
Appendix B: Office Open XML Format Template
317
Copyright © 1998-2015 No Magic, Inc.
Figure 230 -- Sample of Wrapped Text (Column B) in an XLSX Report Template
Figure 231 -- Wrapping Text Output in XLSX
2.5 Limitation when Used in Microsoft Office Excel Worksheet
You cannot use #sectionBegin and #includeSection in XLSX. If you try to use #sectionBegin or
#includeSection in an XLSX report template (Figure 232), an error message will open (Figure 233).
Figure 232 -- Using #sectionBegin in XLSX
Figure 233 -- Error Message When Using #sectionBegin in XLSX
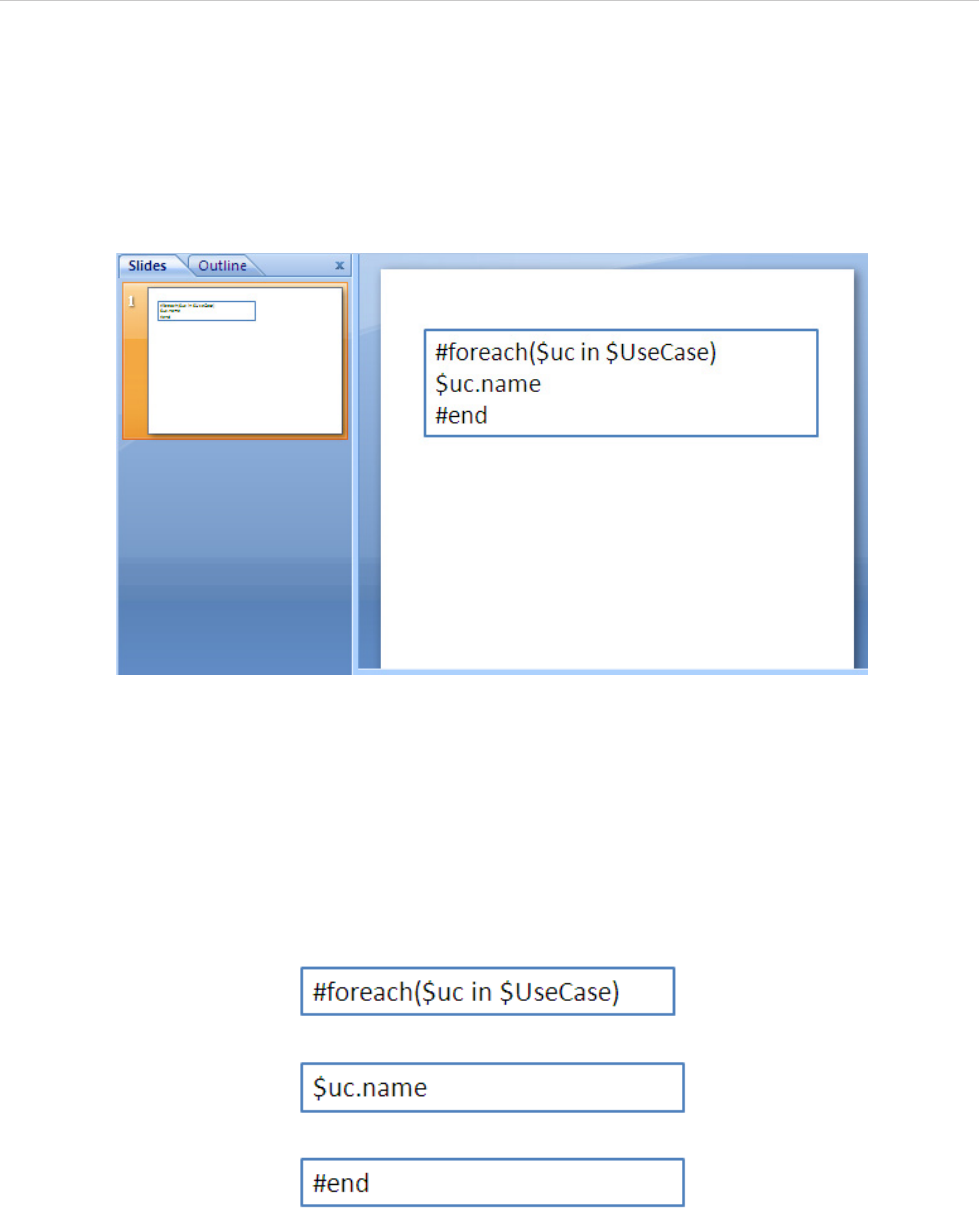
REPORT WIZARD
Appendix B: Office Open XML Format Template
318
Copyright © 1998-2015 No Magic, Inc.
3. Microsoft Office PowerPoint Presentation (PPTX)
A presentation document requires a special document template. This template does not contain any content
order, and all text content is always placed inside a text box. A text box is an image structure (an image struc-
ture keeps the position of each image in x, y coordinates). You can change a Text box position. You can also
place a Text box in the same positions as others (Figure 234).
Figure 234 -- Sample of PPTX Template
3.1 Multi-line Statements in PPTX
Similar to XLSX, all multi-line directives such as #if-#else-#elseif, #foreach, and #macro must be used
under the following conditions.
1. The beginning and ending statements must be declared within a single text box. Figure 235
below shows a sample of invalid usage of the#foreach statement between the text boxes.
Figure 235 -- Invalid Usage of Multi-line Statement #foreach in PPTX
Since the PPTX template does not provide the statement order, the template will not be
interpreted as the order of the displayed images (text boxes). For example, $uc.name may
not be processed after #foreach($uc in $UseCase) has been completely processed.
Figure 236 below demonstrates a sample of valid usage of the #foreach statement.
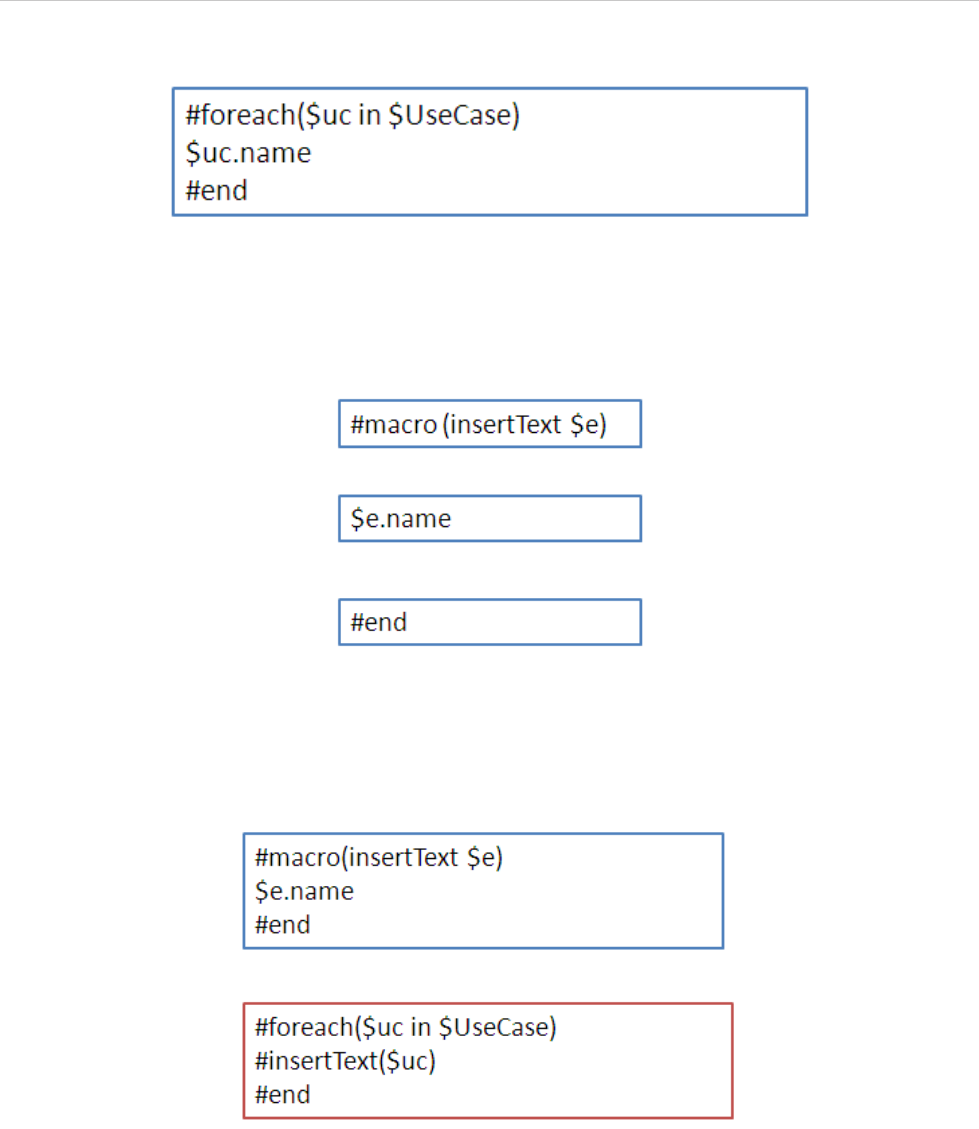
REPORT WIZARD
Appendix B: Office Open XML Format Template
319
Copyright © 1998-2015 No Magic, Inc.
Figure 236 -- Valid Usage of Multi-line Statement #foreach in PPTX
2. A VTL Macro must be declared within a single text box. Do not insert the multi-cell recorded
macros in a single text box (Figure 237).
Figure 237 -- Invalid Usage of #macro Statement in PPTX
Since each text box does not have any sequence order, the macro cannot record any content between the text
boxes. Figure 238 demonstrates a valid usage of the #macro statement.
Figure 238 -- Valid Usage of #macro Statement in PPTX
3.2 Creating Data for Multiple Slides
In PPTXreport templates, you can use the #forpage directive to create additional slide(s) in your presentation.
You can use #forpage and #endpage directives in any text box. However, the #endpage directive must be on
same slide as the #forpage directive or on the following slide, but not before the slide which contains the #for-
page directive. All directives on the slide(s) between 1) the slide the #forpage directive appears and 2) the
slide the #endpage directive appears will be included within the #forpage statement. For example, the tem-
plate in Figure 239 will produce the output in Figure 240.
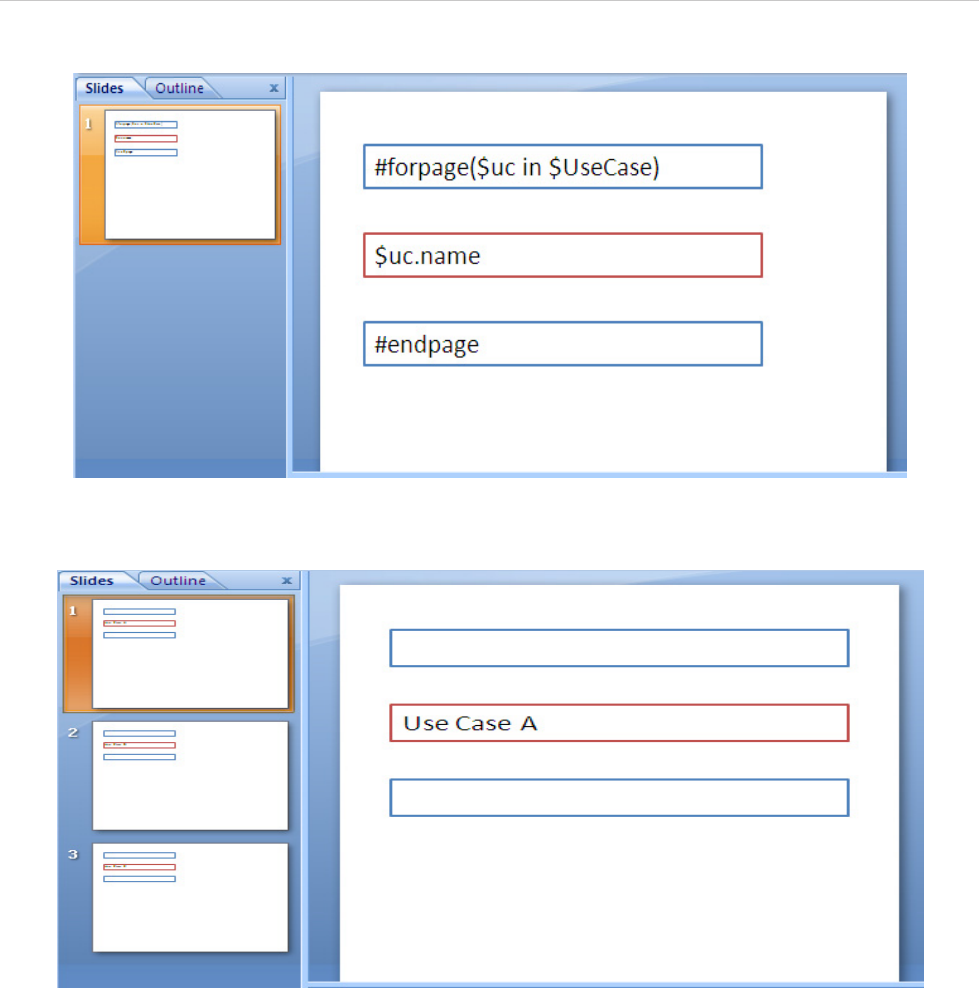
REPORT WIZARD
Appendix B: Office Open XML Format Template
320
Copyright © 1998-2015 No Magic, Inc.
Figure 239 -- Sample of Valid Usage of #forpage in PPTX
Figure 240 -- Sample Output of Valid Usage of #forpage in PPTX
3.3 Creating a Page with Conditions
Since a directive in the PPTX report template does not provide any statement order (unless residing in the
same text box), you cannot used the #if directive together with the #forpage directive (Figure 241).
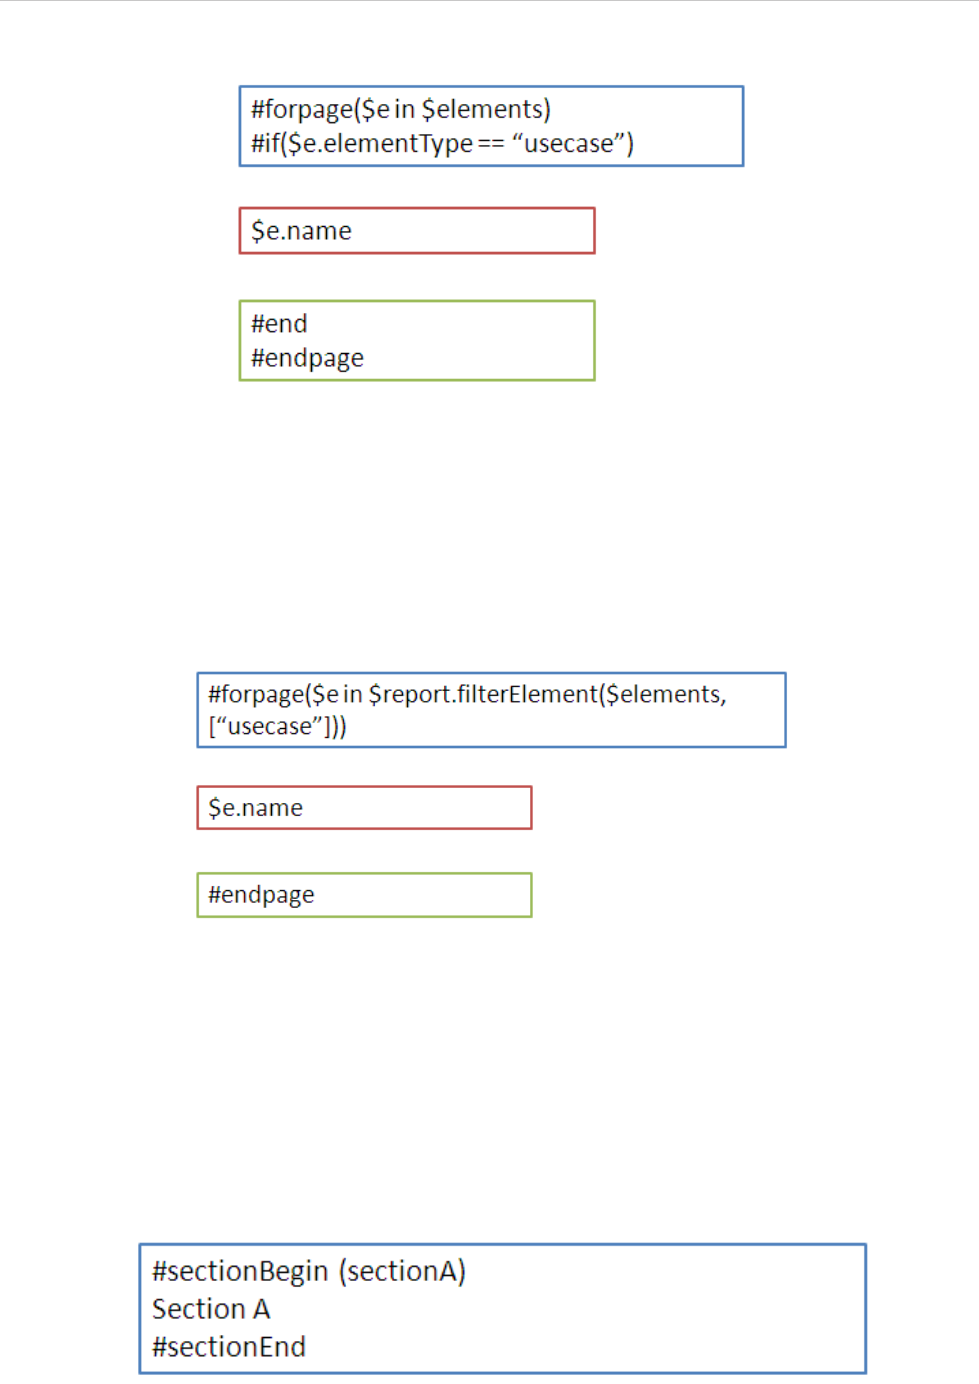
REPORT WIZARD
Appendix B: Office Open XML Format Template
321
Copyright © 1998-2015 No Magic, Inc.
Figure 241 -- Sample of Looping With Condition in General Style
The code in Figure 241 will not produce the output report as expected, because the #forpage directive auto-
matically covers all directives in the current page regardless of the statement order. Consequently, the #if
directive may not be interpreted after the #forpage directive.
To avoid this problem, you can use the $report.filterElement($elements, $types) method. This helper
method provides the element filter for the specified type. In this case, use the following code (Figure 242).
Figure 242 -- Sample of Looping With Conditional Filter
For more details on $report.filterElement($elements, $types), see Section 4 Helper Modules.
3.4 Limitation when Used in Microsoft Office PowerPoint Presentation
#sectionBegin, #includeSection, #forrow, and #forcol cannot be used in any PPTX report template. If
you try, for example, to use #sectionBegin in a PPTX report template (Figure 243), an error message (Fig-
ure 244) will open.
Figure 243 -- Using #sectionBegin in PPTX
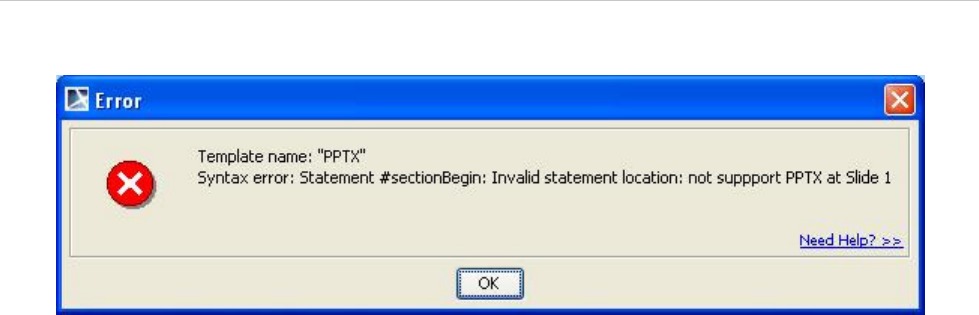
REPORT WIZARD
Appendix B: Office Open XML Format Template
322
Copyright © 1998-2015 No Magic, Inc.
Figure 244 -- Error Message When Using #sectionBegin in PPTX
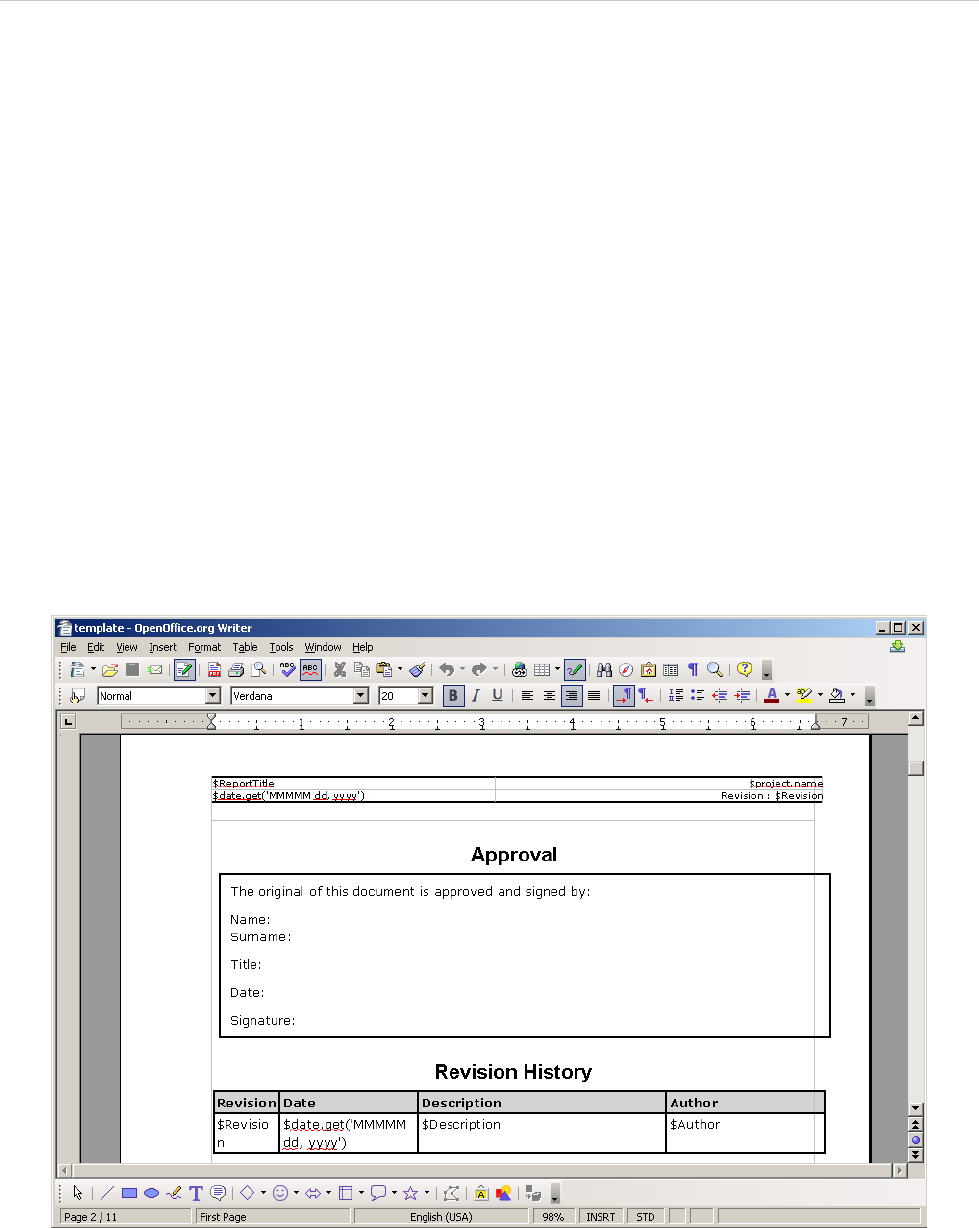
REPORT WIZARD
Appendix C: OpenDocument Format Template
323
Copyright © 1998-2015 No Magic, Inc.
Appendix C: OpenDocument Format Template
The OpenDocument format (ODF) is an open file format for office documents, such as spreadsheets, presen-
tations, and word processing documents. The standard was developed by the Open Office XML technical com-
mittee of the Organization for the Advancement of Structured Information Standards (OASIS) consortium.
The version 1.0 manifestation was published as an ISO/IEC International Standard, ISO/IEC 26300:2006
Open Document Format for Office Applications (OpenDocument) v1.0.
The most common files supported by Report Wizard are:
• ODT - for word processing (text) documents
• ODS - for spreadsheets
• ODP - for presentations
1. OpenDocument Text
Report Wizard supports most OpenDocument Text (ODT) features. It enables you to input the VTL codes
inside meta-data, styles, and text content. All syntax usable inside RTF can be used with ODT.
Figure 245 -- Sample of OpenDocument Text Converted From RTF Document
2. OpenDocument Spreadsheet
All multiline directives such as #if-#else-#elseif, #foreach, and #macro must be used under the fol-
lowing conditions:
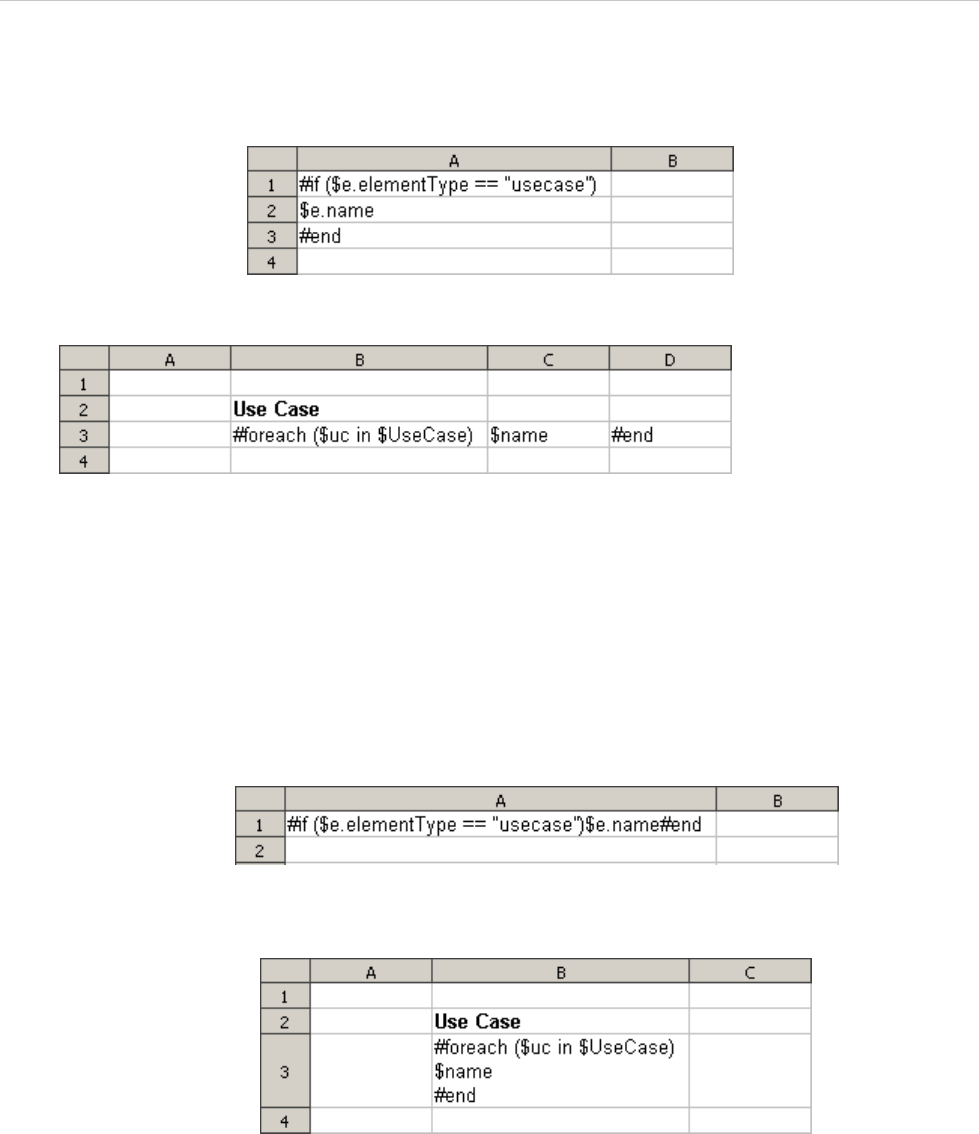
REPORT WIZARD
Appendix C: OpenDocument Format Template
324
Copyright © 1998-2015 No Magic, Inc.
1. The beginning and ending statements must be declared within a single cell. Figure 246 and
247 below show two samples of invalid usage of the multiline statements between cells.
Figure 246 -- Invalid Usage of the Multiline #if Statement in ODS
Figure 247 -- Invalid Usage of Multiline #foreach Statement in ODS
Since the body of the #if statement is contained in the cell A2, this cell will not be
generated if the condition is not true (the element type is not “usecase”). Due to the
constraints of spreadsheet document structure, the number of cells in a column must be
equal to the number of cells in all columns, and the number of cells in a row must be equal
to the number of cells in all rows.
The codes in Figure 247 will break the structure of a spreadsheet document. Figure 248
and 249 demonstrate two samples of valid usage of the multiline statements.
Figure 248 -- Valid Usage of Multiline #if Statement in ODS
Figure 249 -- Valid Usage of Multiline #foreach Statement in ODS
2. VTL Macro must be declared within a single cell. Do not insert the multi-cell recorded macros
in a single cell (Figure 250).
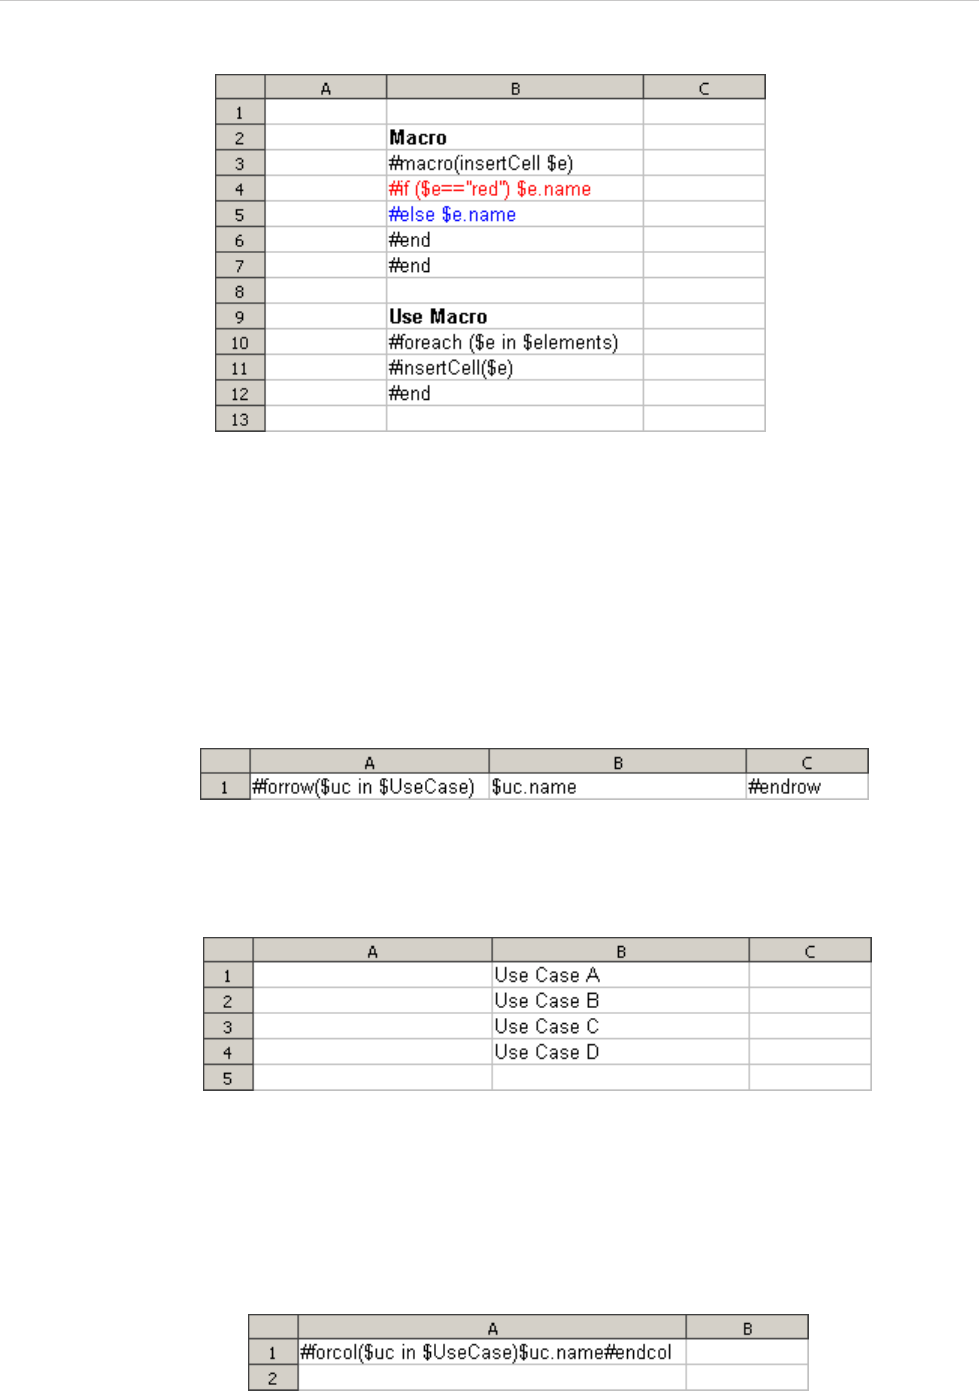
REPORT WIZARD
Appendix C: OpenDocument Format Template
325
Copyright © 1998-2015 No Magic, Inc.
Figure 250 -- Invalid Usage of Macro Statement in ODS
The macro will copy all contents between #macro and #end. Cells and rows will be
included in the macro as well. Once this record has been inserted, the macro content will
break the document’s structure.
2.1 Creating Data for Multiple Rows
The #foreach directive can only be used in a single cell record. To create data for multiple rows, use the
#forrow directive instead (Figure 251).
Figure 251 -- Usage of #forrow
As shown in Figure 251, the output will be:
Figure 252 -- Output of #forrow
2.2 Creating Data for Multiple Columns
#forcol is used to create data for multiple columns (Figure 253). This statement can be used with #forrow
(see the sample from the “Other Document” template).
Figure 253 -- Usage of #forcol
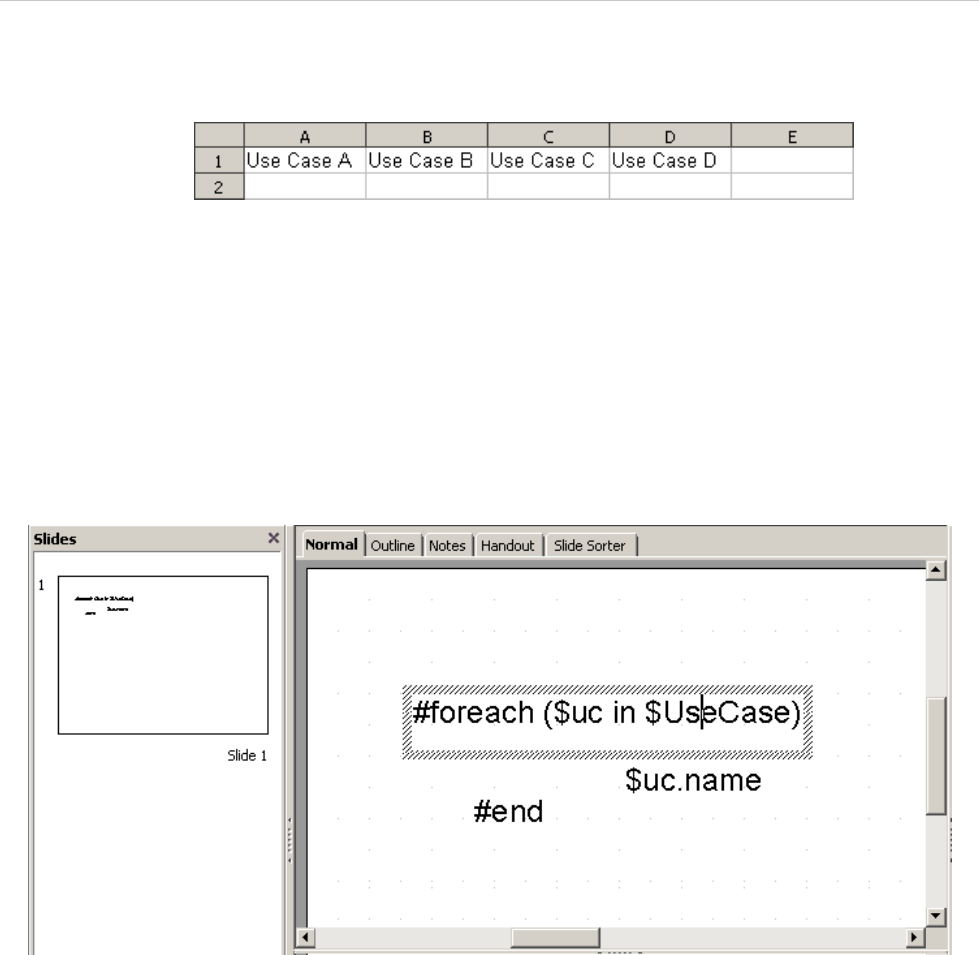
REPORT WIZARD
Appendix C: OpenDocument Format Template
326
Copyright © 1998-2015 No Magic, Inc.
From the usage of #forcol shown in Figure 253, the output will be:
Figure 254 -- The Output of #forcol
3. OpenDocument Presentation
A presentation document is a special document template. This template does not contain a content order. The
text content used within this document is inserted inside a text box. A text box is an image structure (An image
structure keeps the position of each image in x, y coordinates).
You can change the position of a Text box. You can also place Text boxes in the same positions as others (Fig-
ure 255).
Figure 255 -- Sample of ODP Template
Using the same concept as ODS, all multi-line directives such as #if-#else-#elseif, #foreach, and
#macro must be used under conditions.
• The beginning and ending statements must be declared within a single text box. Figure 256 below
shows the sample of invalid usage of the multiline #foreach statement between the text boxes.
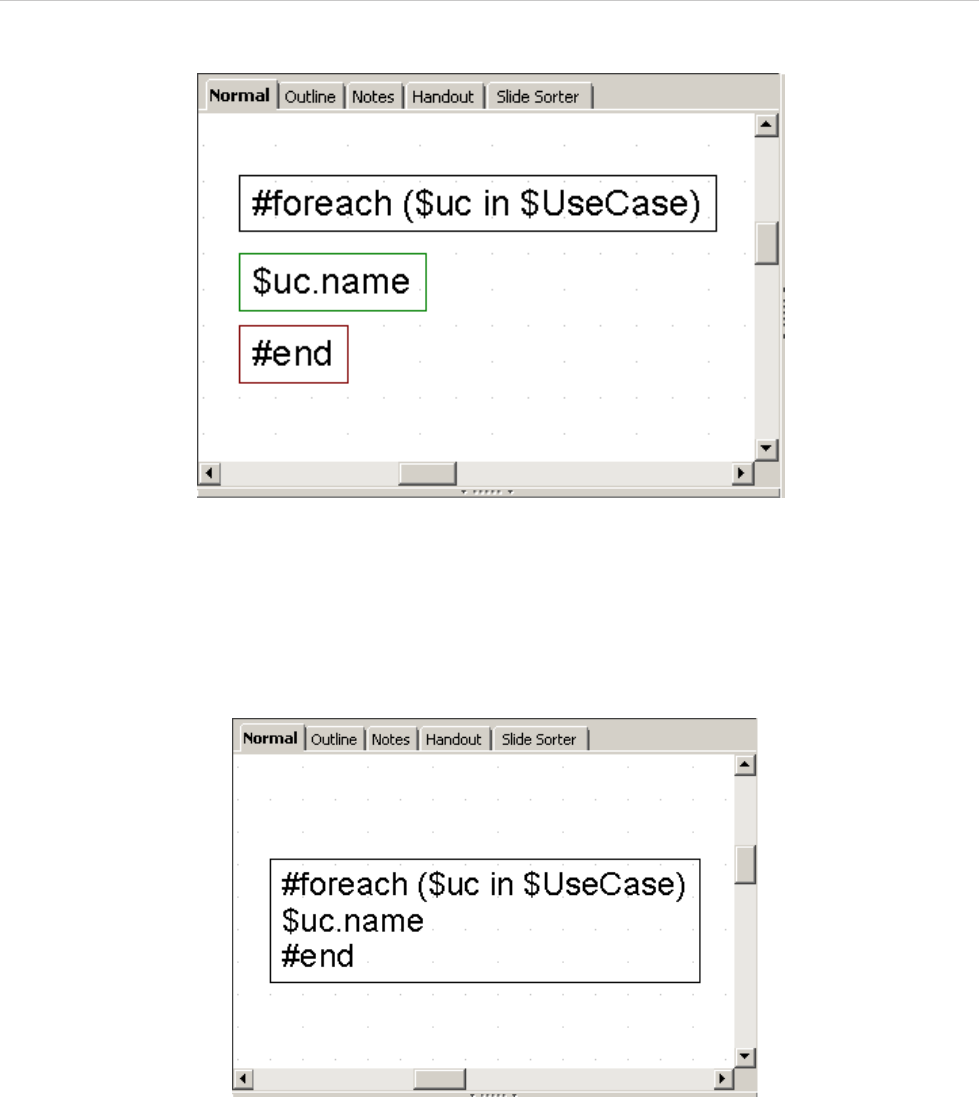
REPORT WIZARD
Appendix C: OpenDocument Format Template
327
Copyright © 1998-2015 No Magic, Inc.
Figure 256 -- Invalid Usage of Multiline Statement in ODP
Since the ODP template does not provide the statement order, the template will not be interpreted in
the order of the displayed images. For example, $uc.name may not be processed after
#foreach($uc in $UseCase) has been completed.
Figure 257 below shows the sample of valid usage of the #foreach statement.
Figure 257 -- Valid Usage of Multiline #foreach Statement in ODP
• A VTL Macro must be declared within a single text box. Do not insert the multi-cell recorded macros in
a single text box (Figure 258).
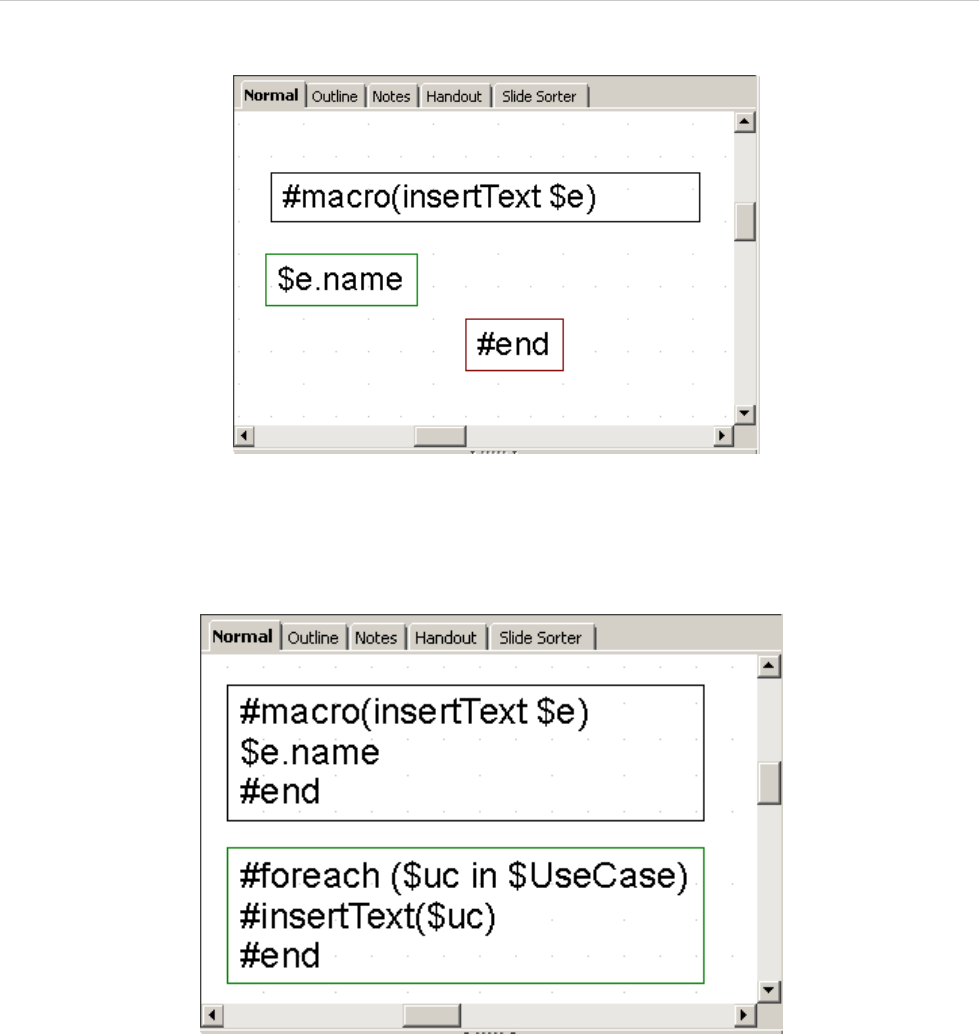
REPORT WIZARD
Appendix C: OpenDocument Format Template
328
Copyright © 1998-2015 No Magic, Inc.
Figure 258 -- Invalid Usage of Macro Statement in ODP
The text box does not have a sequence order; therefore, macros cannot record any
content between the text boxes (Figure 259).
Figure 259 -- Valid Usage of Macro Statement in ODP
3.1 Creating Data for Multiple Slides
ODP uses the #forpage directive to create a slide for each data. The #forpage directive does not contain
any order. You can use #forpage and #endpage in any text boxes. All directives on the slide will be included
within the #forpage statement (Figure 260).
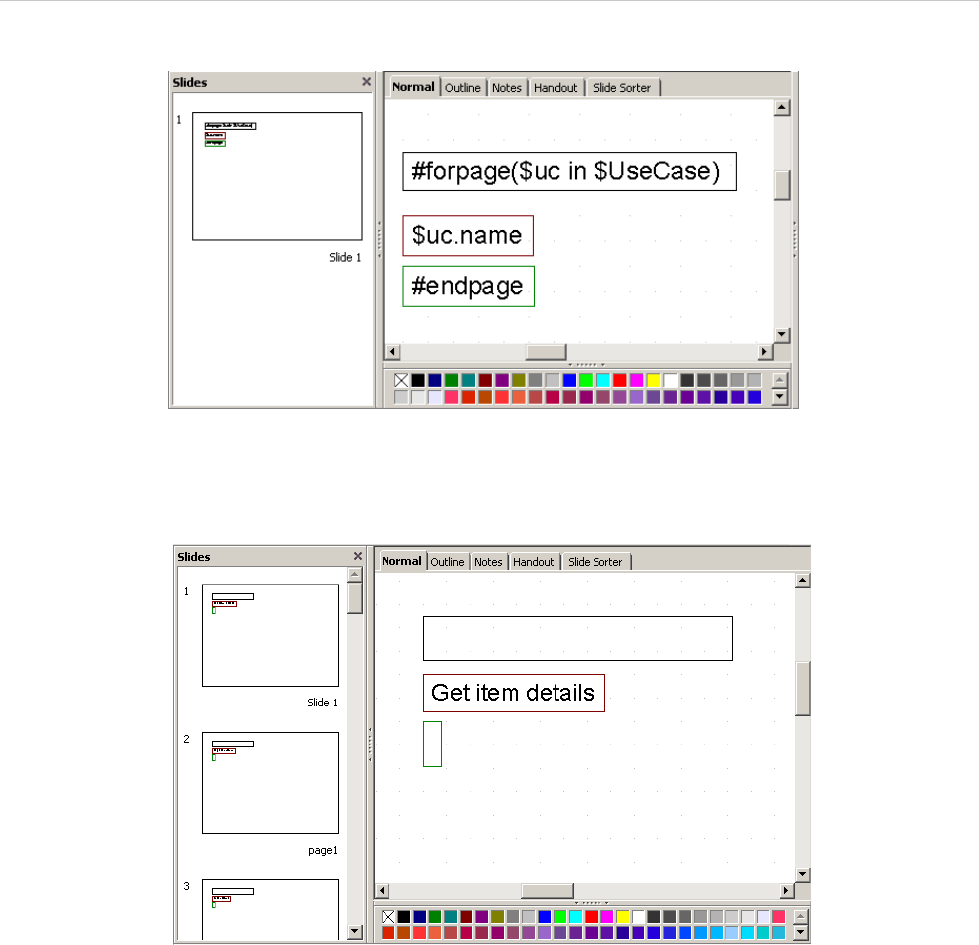
REPORT WIZARD
Appendix C: OpenDocument Format Template
329
Copyright © 1998-2015 No Magic, Inc.
Figure 260 -- Sample of #forpage Usage
The output from the code in Figure 261 is an ODP with a single use case name for each slide.
Figure 261 -- Sample Output from #forpage
For more samples of ODP reports, see the “Other Document” template.
3.2 Creating Page with Conditions
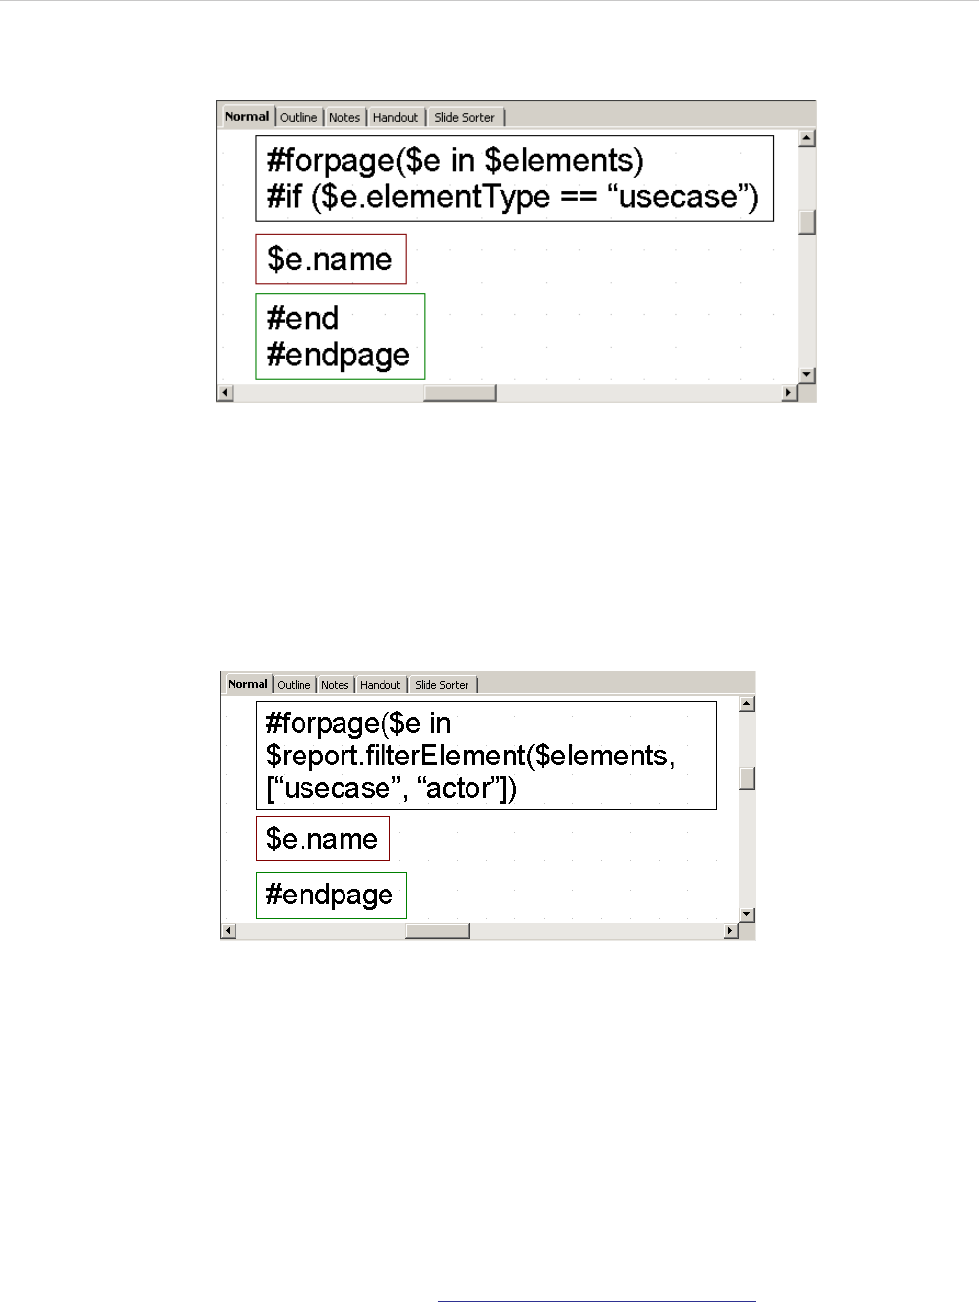
REPORT WIZARD
Appendix C: OpenDocument Format Template
330
Copyright © 1998-2015 No Magic, Inc.
The ODP directive does not provide any statement order; therefore, the #if directive will not be attached to
the #forpage statement (Figure 262).
Figure 262 -- Sample of Looping with Condition in General Style
The codes in Figure 262 may not produce the report exactly as expected. #forpage automatically covers all
directives in the current page without any statement order. Therefore, the #if directive may not be interpreted
after #forpage.
To solve this problem you can use the $report.filterElement($elements, $types) method. This
helper method provides the element filter for the specified type. The codes are shown in Figure 263:
Figure 263 -- Sample of Looping with Conditional Filter
For more details on $report.filterElement($elements, $types), see Section 4 Helper Modules.
4. OpenDocument Conversion Tool
The following tools can convert RTF documents to ODF documents.
4.1 Microsoft Office ODF Extensions
This Microsoft Office add-on allows Microsoft Office to open ODF documents and save Microsoft Office
documents in the OpenDocument format.
Download Microsoft Office ODF Extensions from http://odf-converter.sourceforge.net/
4.2 OpenOffice.org
OpenOffice.org is an office suite that can open and save documents in many formats. This tool can also open
RTF documents and save them as ODF documents.

REPORT WIZARD
Appendix C: OpenDocument Format Template
331
Copyright © 1998-2015 No Magic, Inc.
Download OpenOffice.org from http://www.openoffice.org.
5. OpenDocument References
ISO/IEC 26300:2006 Information Technology - Open Document Format for Office Applications
(OpenDocument) v1.0.
• http://www.iso.org/iso/iso_catalogue/catalogue_tc/catalogue_detail.htm?csnumber=43485
Application Supports for the OpenDocument Format
• http://opendocumentfellowship.com/applications
Microsoft expands List of Formats Supported in Microsoft Office
• http://www.microsoft.com/Presspass/press/2008/may08/05-21ExpandedFormatsPR.mspx
OpenOffice.org
• http://www.openoffice.org/
Microsoft Office ODF Extensions
• http://odf-converter.sourceforge.net/
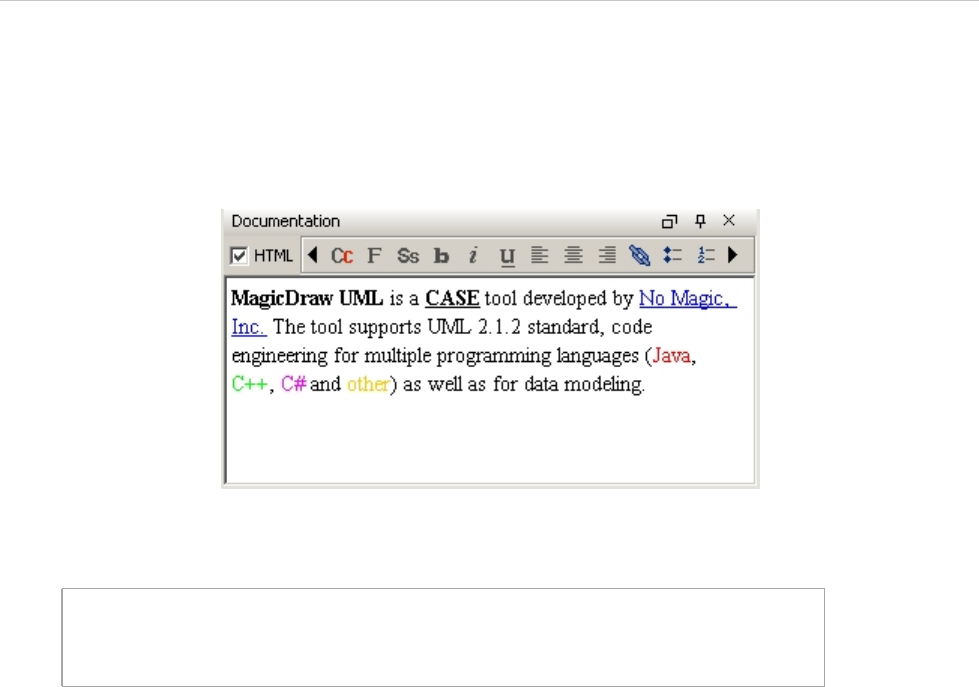
REPORT WIZARD
Appendix D: HTML Tag Support
332
Copyright © 1998-2015 No Magic, Inc.
Appendix D: HTML Tag Support
Report Wizard supports HTML code conversion to RTF, ODF, and OOXML file formats. The HTML code is cre-
ated from the Element Documentation pane (Figure 264).
Figure 264 -- MagicDraw Documentation Pane
The element documentation can also be retrieved by the following VTL code:
Whenever the report engine encounters HTML content, it will automatically convert the content into a valid out-
put format style.
1. Supported HTML Tags
1.1 Font Tags
A font tag consists of three attributes: (1.1.1) Size, (1.1.2) Face, and (1.1.3) Color.
1.1.1 Size
The Size attribute determines the font size. Possible values are integers from 1 to 7. The default base font size
is 3. The greater the value is, the larger the size becomes.
• The base font size for RTF documents is 24 dot (equivalent to 12 pt).
• The base font size for ODF documents is 12 pt.
• The base font size for OOXML documents is 12 pt.
• The base font size for HTML documents is determined by the web browser.
#foreach ($e in $elements)
$e.documentation
#end
REPORT WIZARD
Appendix D: HTML Tag Support
333
Copyright © 1998-2015 No Magic, Inc.
Each value will be multiplied by two. Shown below is an example of the size attribute:
If the size attribute is specified without the face attribute, the default font will be determined by the template or
document editor, unless the font tag is covered by other HTML elements such as <code> or <tt>.
1.1.2 Face
The Face attribute defines the font name. If the face attribute is specified without the size attribute, the default
size will be determined by the template or the document editor.
1.1.3 Color
The Color attribute specifies the text color. A color value can be either a hexadecimal number (prefixed with a
hash mark) or one of the following sixteen colors. Colors are case-insensitive.
Table 35 -- Font Colors
For example:
<font size="5">
It will be rendered as font size 16 pt
<font size="3">
It will be rendered as font size 12 pt
<font size="1">
It will be rendered as font size 8 pt
Color Hexadecimal code
Black #000000
Silver #C0C0C0
Gray #808080
White #FFFFFF
Maroon #800000
Red #FF0000
Purple #800080
Fuchsia #FF00FF
Green #008000
Lime #00FF00
Olive #808000
Yellow #FFFF00
Navy #000080
Blue #0000FF
Teal #008080
Aqua #00FFFF
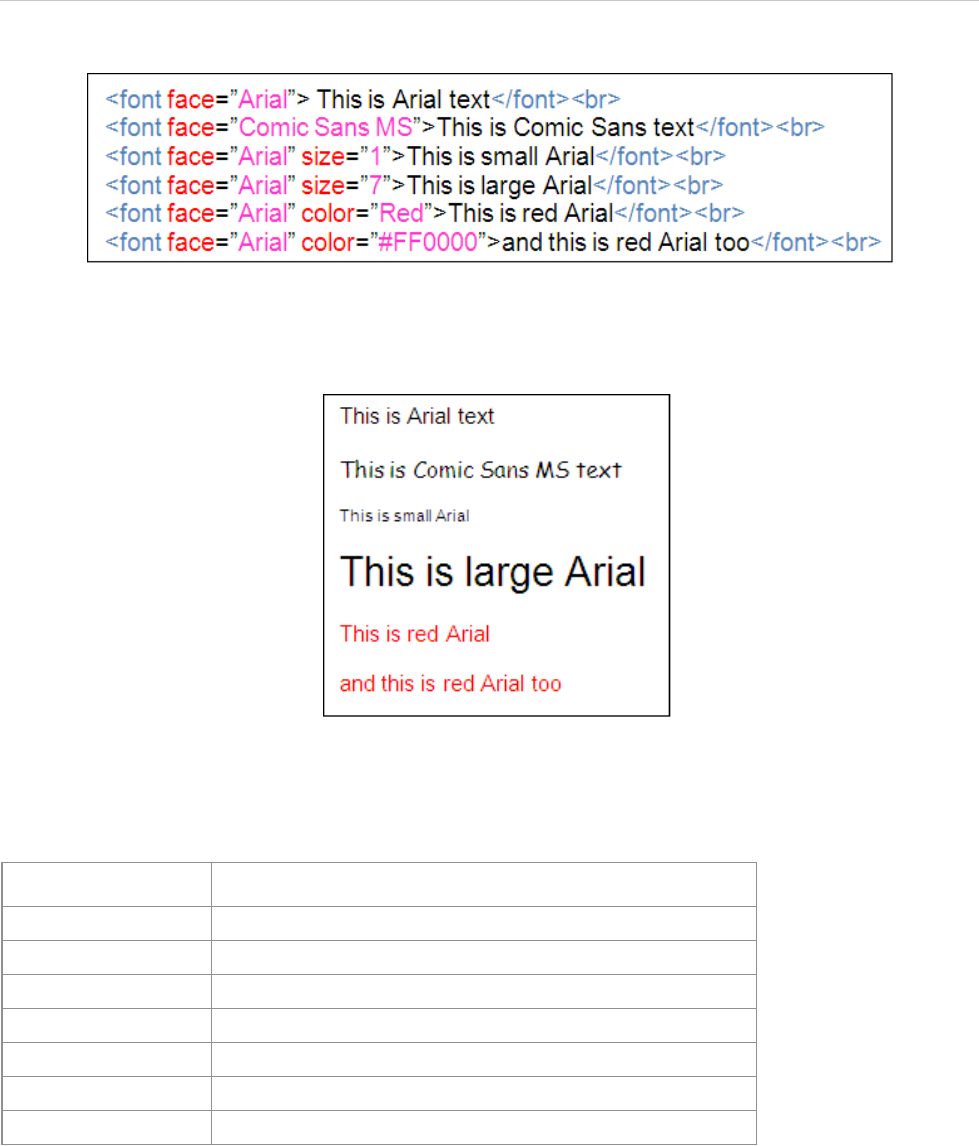
REPORT WIZARD
Appendix D: HTML Tag Support
334
Copyright © 1998-2015 No Magic, Inc.
Figure 265 -- Sample of Font Tags
As shown in Figure 266, the outputs in RTF, ODF, or HTML will be as follows:
Figure 266 -- Sample of RTF, ODF, or HTML Document Outputs
1.2 Font Style Tag
Table 36 -- Font Style Elements
• TT – This tag will be rendered as <font face=”Courier New”>
• I – This tag is supported by the existing HTML conversion component.
• B – This tag is supported by the existing HTML conversion component.
• BIG – This tag will be rendered as <font size=”5”>
• SMALL – This tag will be rendered as <font size=”1”>
• STRIKE and S – This tag will be rendered in a strikethrough text.
• U – This tag is supported by the existing HTML conversion component.
Tag name Description
TT Renders teletyped or monospaced text.
IRenders italic text.
BRenders bold text.
BIG Renders text in large font.
SMALL Renders text in small font.
STRIKE and S Renders strikethrough text.
URenders underlined text.
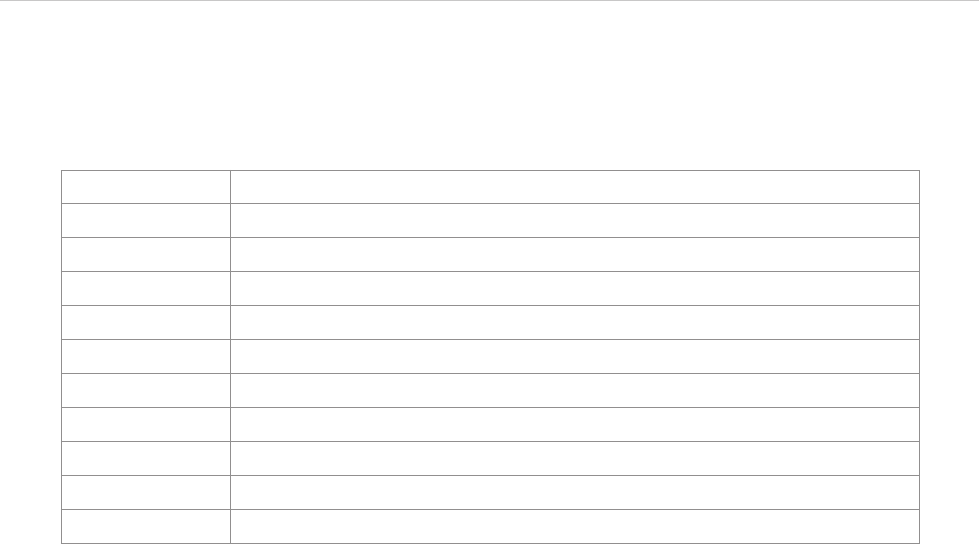
REPORT WIZARD
Appendix D: HTML Tag Support
335
Copyright © 1998-2015 No Magic, Inc.
1.3 Phrase Elements
Table 37 -- Phrase Elements
• EM – This tag will be rendered as <i>
• STRONG – This tag will be rendered as <b>
• CITE – This tag will be rendered as <i>
• DFN – This tag will be rendered as <i>
• CODE – This tag will be rendered as <font face=”Courier New”>
• SAMP – This tag will be rendered as <font face=”Courier New”>
• KBD – This tag will be rendered as <font face=”Courier New”>
• VAR – This tag will be rendered as <i>
• ABBR – This tag will be rendered as normal text.
• ACRONYM – This tag will be rendered as normal text.
1.4 Ordered and Unordered Lists and List Item Tags
Ordered and unordered lists are rendered in an identical manner, except that ordered list items are numbered.
The report engine supports both unordered and ordered lists without attributes. The list tag attributes will be
ignored in the report output. The list tag attributes are type, start, value, and compact.
Both unordered and ordered lists are not supported in XLSX and ODS templates.
1.4.1 Ordered Lists
An Ordered List is defined by the <OL> element. The element contains one or more <LI> elements that define
the actual items of the list.
Unlike unordered lists (UL), items in an ordered list have a definite sequence. A conversion will render each
item in the list with a number. All <OL> attributes will be ignored in the report output. An example of the Ordered
List tag is shown in Figure 267:
Tag name Function
EM Indicates emphasis.
STRONG Indicates stronger emphasis.
CITE Contains a citation or a reference to other sources.
DFN Indicates that this is the defining instance of the enclosed term.
CODE Designates a fragment of computer code.
SAMP Designates a sample output from programs, scripts, etc.
KBD Indicates the text to be entered by the user.
VAR Indicates an instance of a variable or program argument.
ABBR Indicates an abbreviated form such as WWW, HTTP, URI, and Mass.
ACRONYM Indicates an acronym such as WAC and radar.
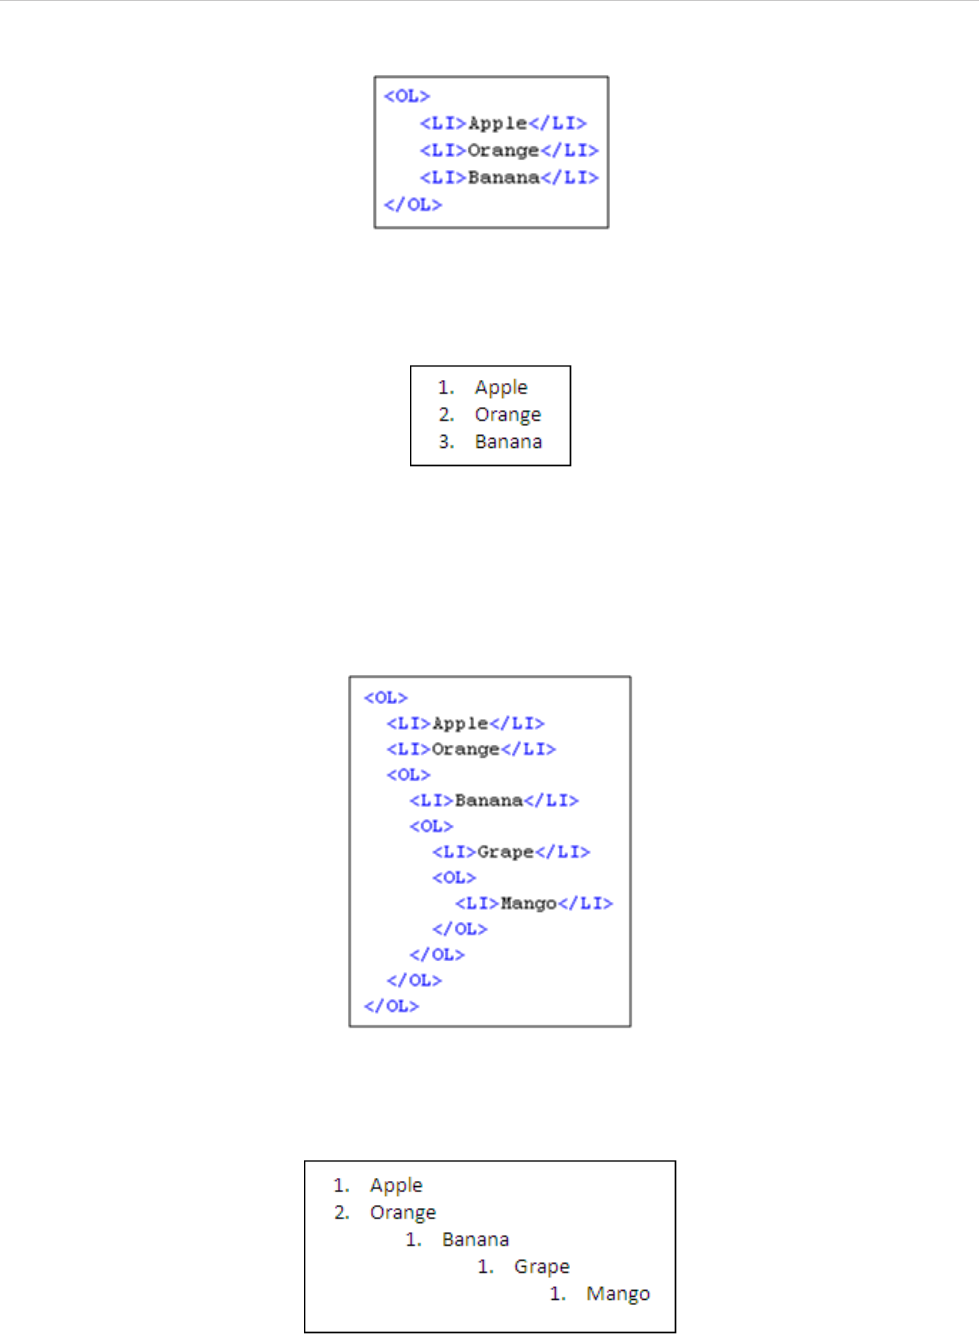
REPORT WIZARD
Appendix D: HTML Tag Support
336
Copyright © 1998-2015 No Magic, Inc.
Figure 267 -- Sample of Ordered List Tag
As shown in Figure 268, the outputs in RTF, ODF, or HTML will be as follows:
Figure 268 -- The Sample of RTF, ODF, or HTML Document Outputs
1.4.2 Nested Ordered Lists
HTML conversion will indent nested lists with respect to the current level of nesting. A number for each level will
start over at 1. An example of the Nested Ordered List tag is shown in Figure 269:
Figure 269 -- Sample of Nested OL Tags
As shown in Figure 270, the outputs in RTF, ODF, or HTML will be as follows:
Figure 270 -- The Sample of RTF, ODF, or HTML Document Outputs
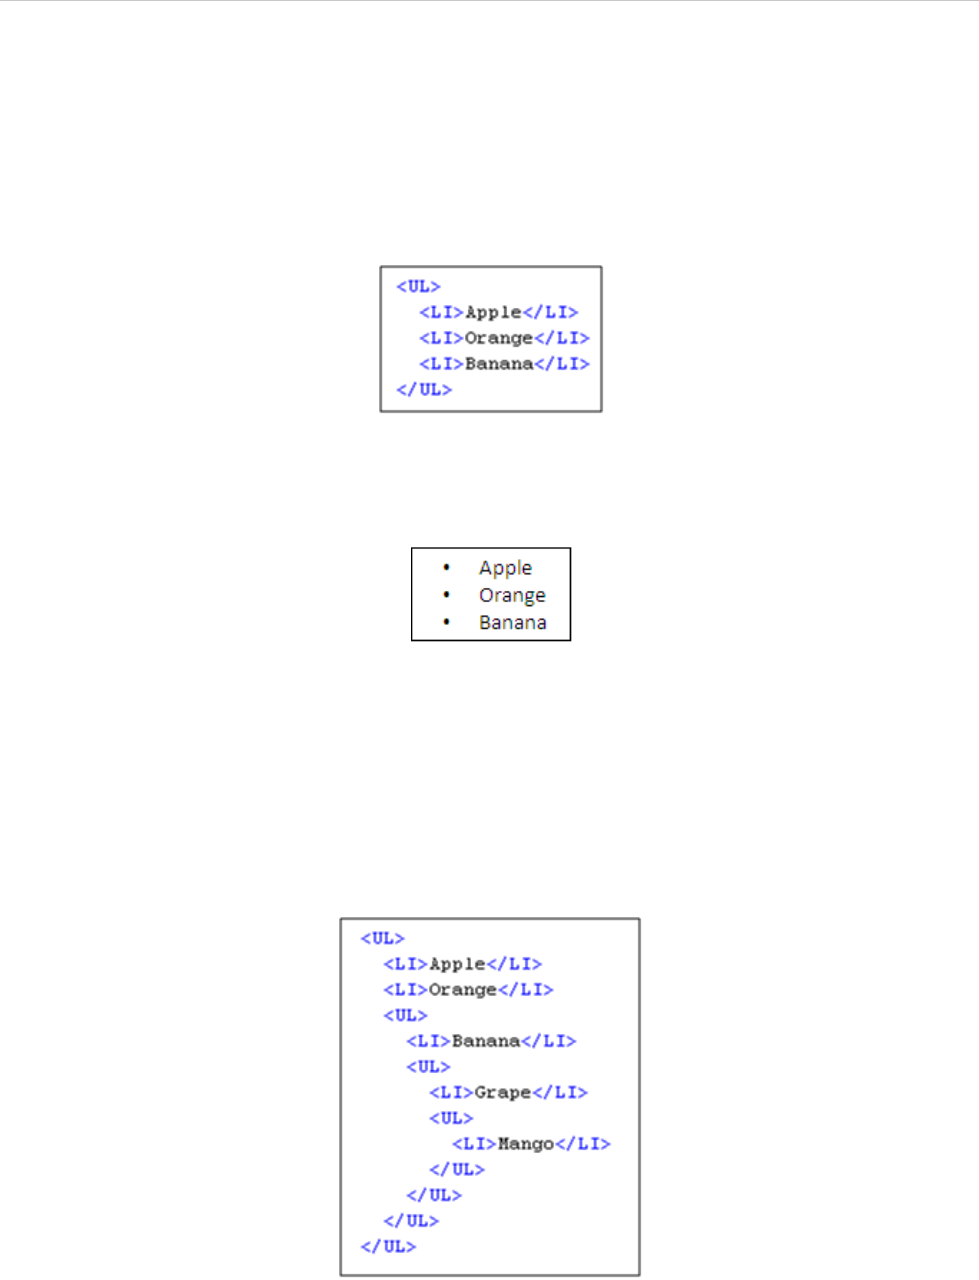
REPORT WIZARD
Appendix D: HTML Tag Support
337
Copyright © 1998-2015 No Magic, Inc.
1.4.3 Unordered Lists
An Unordered List is defined by the UL element. The element contains one or more LI elements that define the
actual items of the list.
A conversion will render the UL element with a bullet preceding each list item. All UL attributes will be ignored in
the report output. Figure 271 shows an example of an Unordered List tag:
Figure 271 -- Sample of UL Tags
As shown in Figure 272, the outputs in RTF, ODF, or HTML will be as follows:
Figure 272 -- Sample of RTF, ODF, or HTML Document Outputs
1.4.4 Nested Unordered Lists
Lists can also be nested. HTML conversion will indent nested lists with respect to the current level of nesting.
HTML conversion should attempt to present a small filled-in circle to the first level, a small circle outline to the
second level, and a filled-in square to the third level. Bullets after the third level are filled-in squares. An exam-
ple of the Nested Unordered List tag is shown in Figure 273:
Figure 273 -- Sample of Nested UL Tags
As shown in Figure 274, the outputs in RTF, ODF, or HTML will be as follows:
REPORT WIZARD
Appendix D: HTML Tag Support
338
Copyright © 1998-2015 No Magic, Inc.
Figure 274 -- Sample of RTF, ODF or HTML Document Outputs
1.5 Definition List Tags
A Definition List is defined by the DL element. An entry in the list is created using the DT element for the term
being defined and the DD element for the definition of the term.
A definition list can have multiple terms for a given definition as well as multiple definitions for a given term.
Authors can also give a term without a corresponding definition, and vice versa, but such a structure rarely
makes sense.
A conversion will render DT as a non-indent item and DD as a single indent item. The Definition List tag is not
supported in the XLSX template. Figure 275 shows an example of a Definition List tag:
Figure 275 -- Sample of DL Tags
As shown in Figure 276, the outputs in RTF, ODF or HTML will be as follows:
Figure 276 -- Sample of RTF, ODF, or HTML Document Outputs
1.6 Line and Paragraph Tags
A line break is defined by the <BR> element. The element inserts a single line break. It is an empty tag. This
means that it has no end tag. The line attributes will be ignored in the report output.
A paragraph is defined by the <P> element. The element automatically creates some space before and after
itself. The paragraph attributes will be ignored in the report output. Figure 277 shows an example of a Line
Break and Paragraph tag:
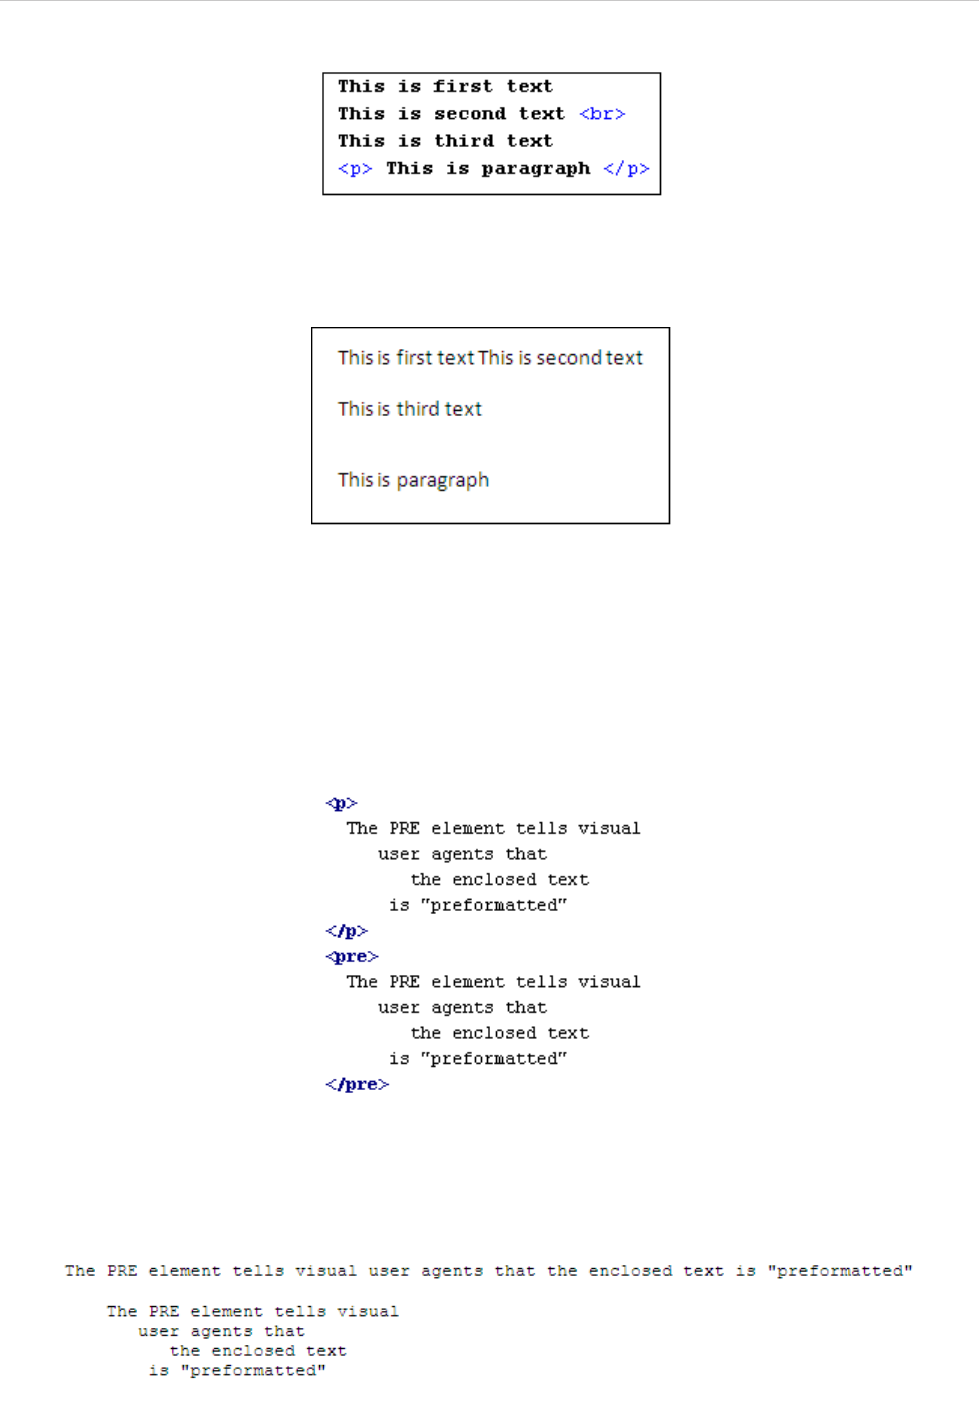
REPORT WIZARD
Appendix D: HTML Tag Support
339
Copyright © 1998-2015 No Magic, Inc.
Figure 277 -- Sample of Line and Paragraph Tags
As shown in Figure 278, the outputs in RTF, ODF, or HTML will be as follows:
Figure 278 -- The Sample of RTF, ODF, or HTML Document Outputs
1.7 Preformatted Text
A preformatted text is defined by the <PRE> element. All the space and carriage returns are rendered exactly
as you type them. The preformatted attributes will be ignored in the report output. Figure 279 shows an exam-
ple of the preformatted text:
Figure 279 -- Sample of Preformatted Text
As shown in Figure 280 and 281 respectively, the outputs in RTF/ ODF and HTML will be as follows:
Figure 280 -- Sample of RTF / ODF Document Output
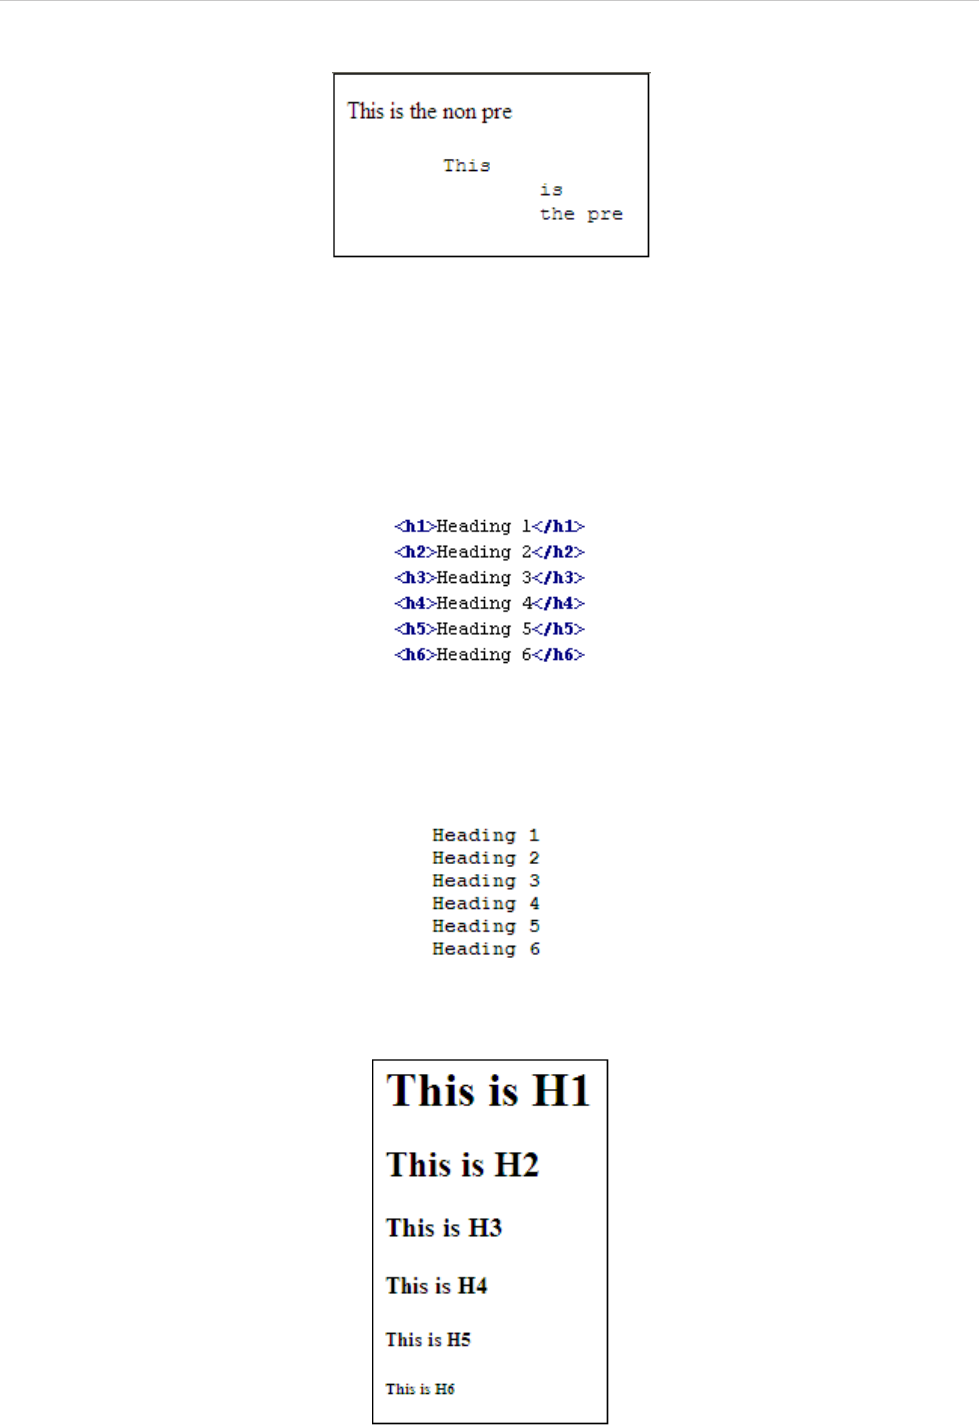
REPORT WIZARD
Appendix D: HTML Tag Support
340
Copyright © 1998-2015 No Magic, Inc.
Figure 281 -- Sample of HTML Document Output (Open in Internet Explorer 7.0)
1.8 Heading Tags
A heading is defined by the <H1>, <H2>, <H3>, <H4>, <H5>, or <H6> element. In this report, all heading tags
will be rendered as <b> for ODT, RTF, and OOXML document outputs. The heading attributes will be ignored in
the report output. Figure 282 shows an example of Heading tags.
Figure 282 -- Sample of Heading Tags
As shown in Figure 283 and 284 respectively, the outputs in RTF / ODF and HTML will be as follows:
Figure 283 -- Sample of RTF / ODF Document Output
Figure 284 -- Sample of HTML Document Output (Open in Internet Explorer 7.0)
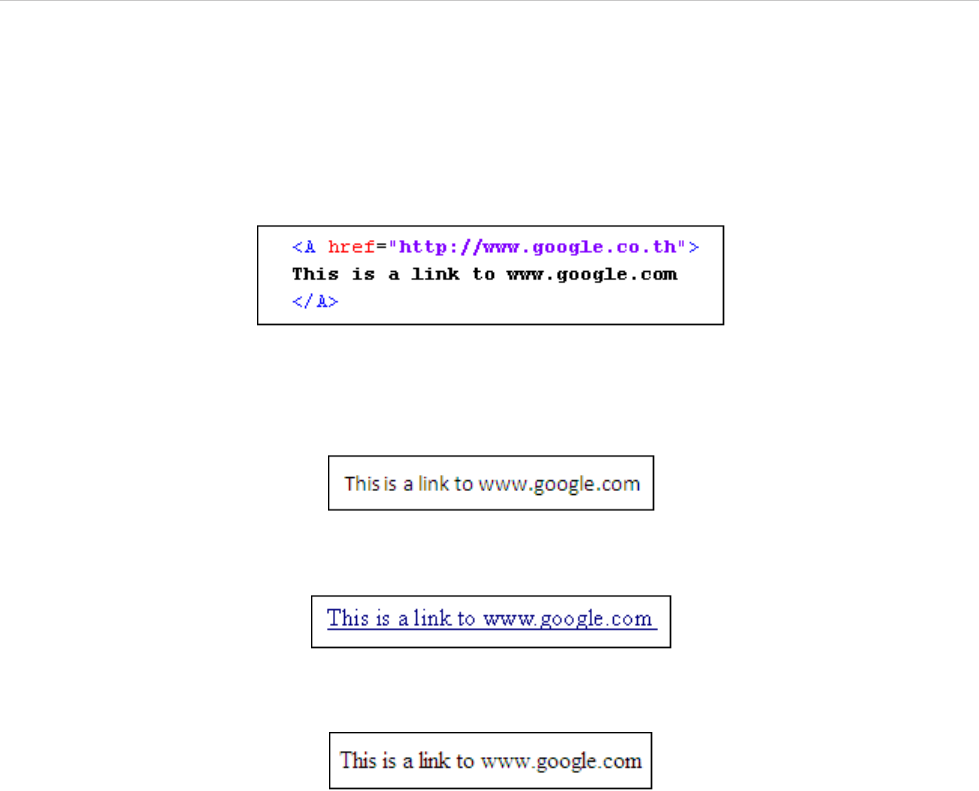
REPORT WIZARD
Appendix D: HTML Tag Support
341
Copyright © 1998-2015 No Magic, Inc.
1.9 Link Tags
A Link tag is defined by the <A> element. This element is used to create a link to another document with the
href attribute. The href attribute specifies the destination of the link. Link tag is not supported in the XLSX tem-
plate. Figure 285 shows an example of a Link tag:
Figure 285 -- Sample of Link Tag
As shown in Figure 286, 287, and 288 respectively, the outputs in RTF, ODF, and HTML will be as follows:
Figure 286 -- Sample of RTF Document Output
Figure 287 -- Sample of ODF Document Output
Figure 288 -- Sample of HTML Document Output (Open in Internet Explorer 7.0)
1.10 Table Tags
A table is defined by the <TABLE> element. A table consists of multi-dimensional data arranged in rows and
columns.
1.10.1 Table Elements
The <TABLE> element takes a number of optional attributes to provide presentational alternatives in a docu-
ment. The table attributes will be ignored in the report output except the following attributes:
(i) border - specifies the width in unit of the border of a table.
(ii) bgcolor - specifies table background color. Apply the background color here will affect the whole table.
Table elements are not supported in XLSX, PPTX, ODS, and ODP templates.
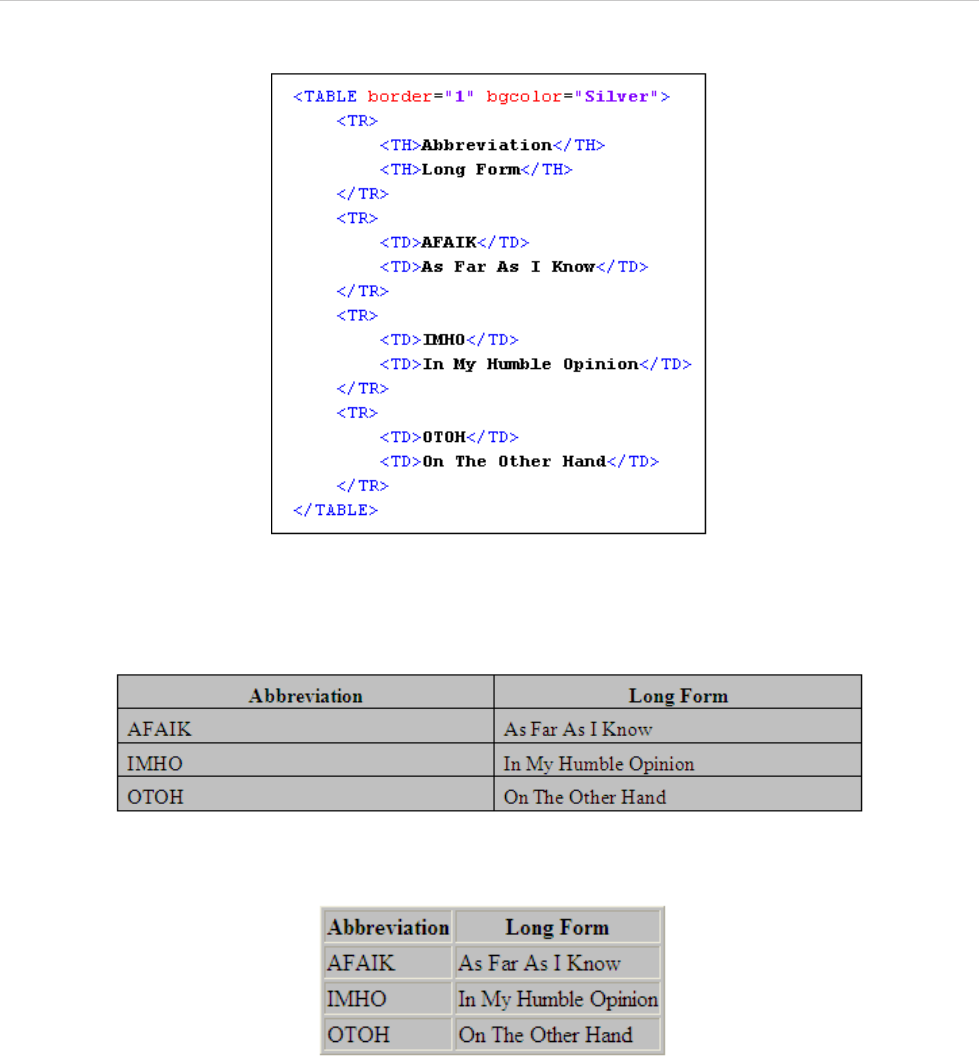
REPORT WIZARD
Appendix D: HTML Tag Support
342
Copyright © 1998-2015 No Magic, Inc.
Figure 289 shows an example of table tags:
Figure 289 -- Sample of Table Tags
As shown in Figure 290 and 291 respectively, the outputs in RTF / ODF and HTML will be as follows:
Figure 290 -- Sample of RTF Document Output
Figure 291 -- Sample of HTML Document Output (Open in Internet Explorer 7.0)
(i) Border
Border width in HTML is specified in pixels. When the table attributes are converted into RTF, ODF, or OOXML,
1 pixel will be equal to 1 pt.
(ii) Color
The attribute value type "bgcolor" refers to color definitions as specified in [SRGB]. A color value may be either
a hexadecimal number (prefixed by a hash mark) or one of the following sixteen colors. Colors are case-insen-
sitive.
REPORT WIZARD
Appendix D: HTML Tag Support
343
Copyright © 1998-2015 No Magic, Inc.
Table 38 -- Table Element Colors
1.10.2 Row Elements
The <TR> elements act as a container for a row of table cells. The <TR> elements must be contained within
<TABLE>.
<TR> contains <TH> or <TD> elements, which in turn contain the actual data of the table. <TR> takes presen-
tational attributes for specifying the alignment of cells within the row and the row's background color. The row
attributes will be ignored in the report output except for the following attributes:
(i) align - Specifies the horizontal alignment for each cell in a row.
(ii) valign - Specifies the vertical position of a cell's content.
(iii) bgcolor - Specifies the table background color. A background color will apply to rows only (See Color in
1.10.1 Table Elements for more details).
Row elements are not supported in XLSX, PPTX, ODS, and ODP templates.
(i) Align
This attribute specifies the alignment of data and the justification of text in a cell. Possible values are:
• left - Left-flushed data/Left-justified text. This is the default value for table data.
• center - Centered data/Center-justified text. This is the default value for table headers.
• right - Right-flushed data/Right-justified text.
• justify - Double -justified text.
• char - No text alignment set.
(ii) Valign
Color Hexadecimal Code
Black #00000000
Silver #C0C0C0
Gray #808080
White #FFFFFF
Maroon #800000
Red #FF0000
Purple #800080
Fuchsia #FF00FF
Green #008000
Lime #00FF00
Olive #808000
Yellow #FFFF00
Navy #000080
Blue #0000FF
Teal #008080
Aqua #00FFFF
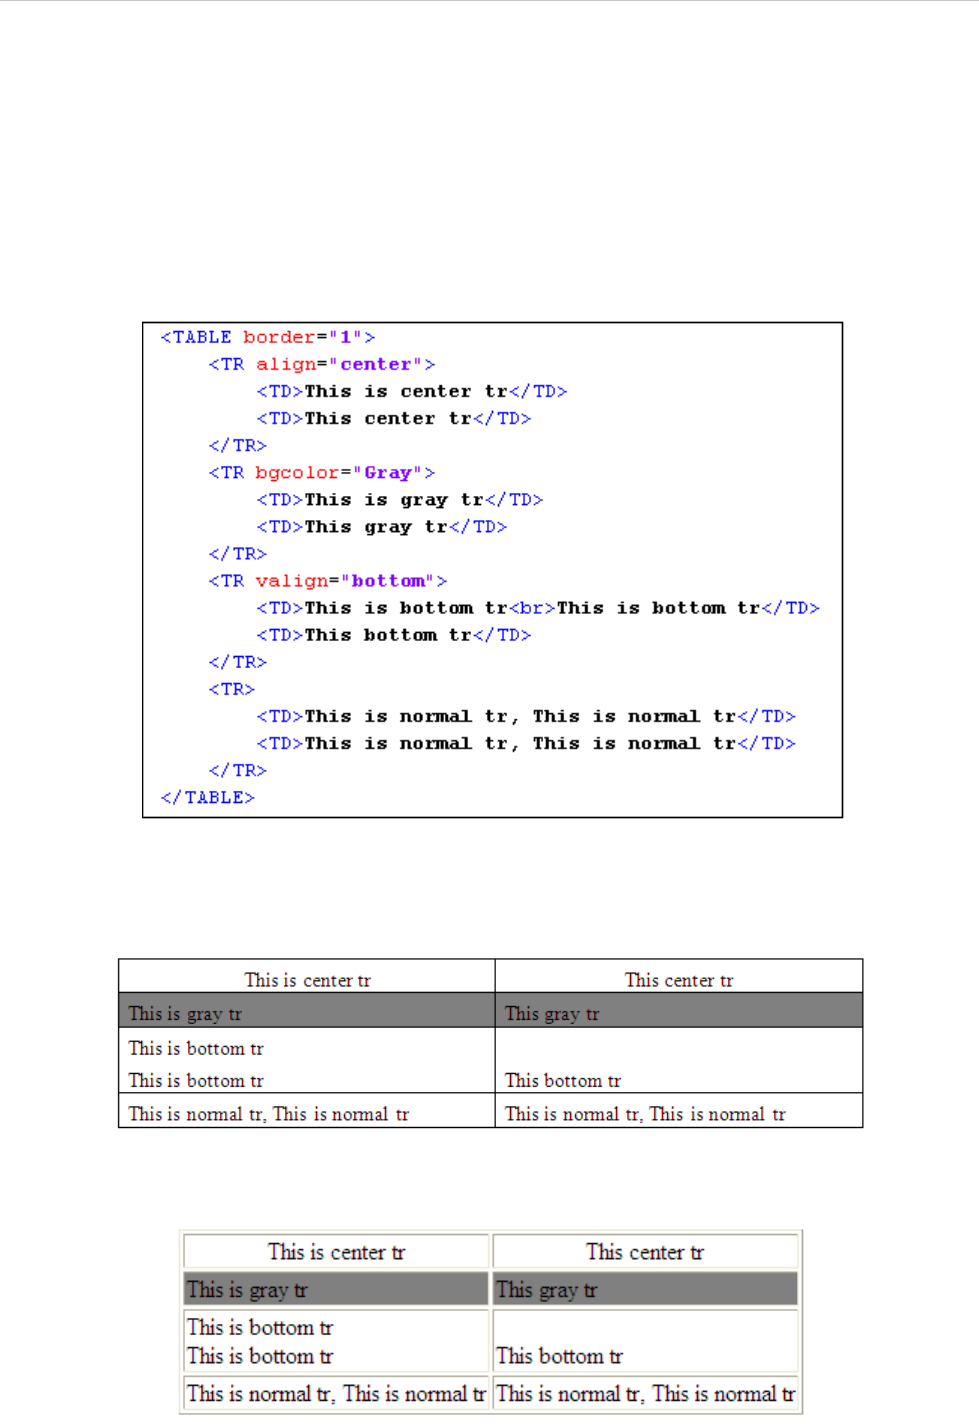
REPORT WIZARD
Appendix D: HTML Tag Support
344
Copyright © 1998-2015 No Magic, Inc.
This attribute specifies the vertical position of data within a cell. Possible values are:
• top: Cell data is flushed with the top of a cell.
• middle: Cell data is centered vertically within a cell. This is the default value.
• bottom: Cell data is flushed with the bottom of a cell.
• baseline: No text alignment set.
Figure 292 shows an example of TR tags:
Figure 292 -- Sample of TR Tags
As shown in Figure 293 and 294 respectively, the outputs in RTF / ODF and HTML will be as follows:
Figure 293 -- Sample of RTF Document Output
Figure 294 -- Sample of HTML Document Output (Open in Internet Explorer 7.0)
REPORT WIZARD
Appendix D: HTML Tag Support
345
Copyright © 1998-2015 No Magic, Inc.
1.10.3 Cell Elements
The <TD> elements define a data cell in a table. <TD> elements are contained within a <TR> element (a table
row). The cell attributes will be ignored in the report output except for the following attributes:
• align - specifies the horizontal alignment for each cell in the row. See Align in 1.10.2 Row Elements for
more details.
• valign - specifies the vertical position of a cell's contents. See Valign in 1.10.2 Row Elements for more
details.
• bgcolor - specifies the table background color. A background color will apply only to cells. See Color in
1.10.1 Table Elements for more details.
• rowspan - rows spanned by the cell
• colspan - columns spanned by the cell
Cell elements are not supported in XLSX, PPTX, ODS, and ODP templates.
Row Span
This attribute specifies the number of rows spanned by the current cell. The default value of this attribute is one
("1"). For an RTF output, the result of row span (*.rtf) is readable only in Word on Mac, and MS Word.
Column Span
This attribute specifies the number of columns spanned by the current cell. The default value of this attribute is
one ("1"). Figure 295 shows an example of a column span:
Figure 295 -- Sample of TD Tags As Column Spans
As shown in Figure 296 and 297 respectively, the outputs in RTF / ODF and HTML will be as follows:
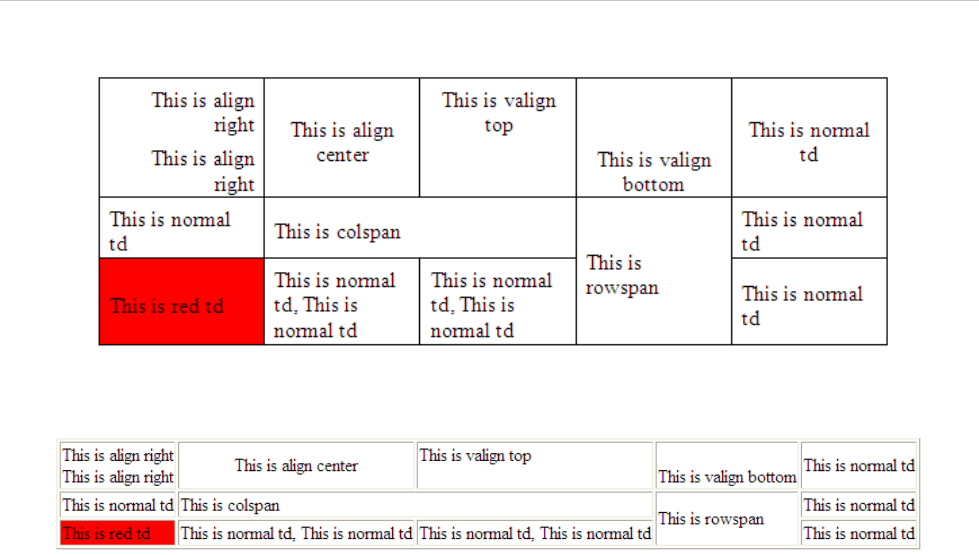
REPORT WIZARD
Appendix D: HTML Tag Support
346
Copyright © 1998-2015 No Magic, Inc.
Figure 296 -- Sample of RTF / ODF Document Output
Figure 297 -- Sample of HTML Document Output (Open in Internet Explorer 7.0)
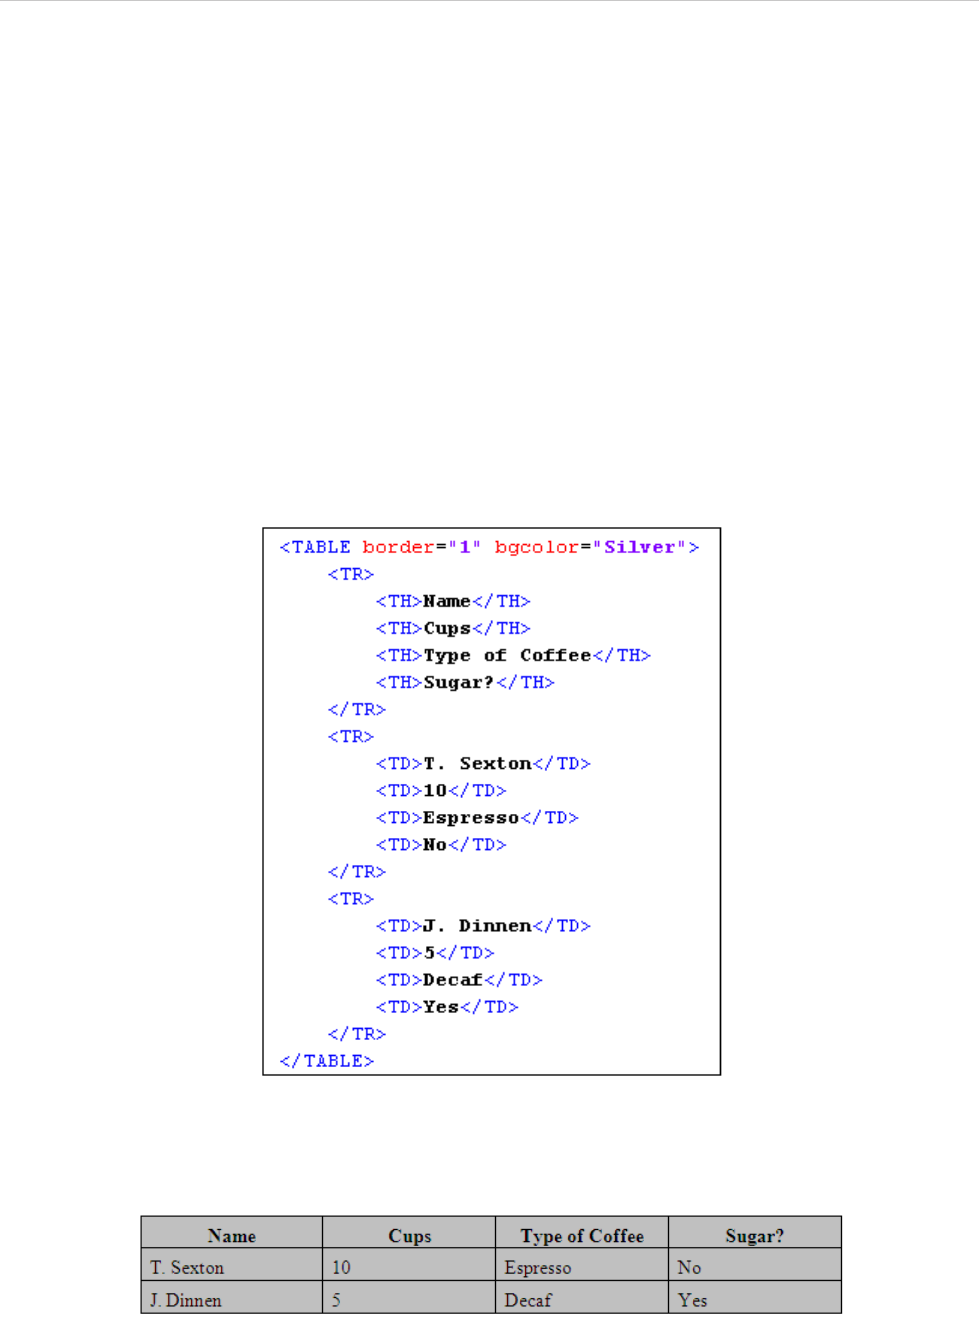
REPORT WIZARD
Appendix D: HTML Tag Support
347
Copyright © 1998-2015 No Magic, Inc.
1.10.4 Header Elements
The <TH> elements define a header cell in a table. <TH> elements are contained within a <TR> element (a
table row). The header attributes will be ignored in the report output, except for the following attributes:
• align - specifies the horizontal alignment for each cell in the row. See Align in 1.10.2 Row Elements for
more details.
• valign - specifies the vertical position of a cell's contents. See Valign in 1.10.2 Row Elements for more
details.
• bgcolor - specifies the table background color. A background color will apply to the whole table. See
Color in 1.10.1 Table Elements for more details.
• rowspan - rows spanned by the cell. See Row span in 1.10.3 Cell Elements for more details.
• colspan - columns spanned by the cell. See Column span in 1.10.3 Cell Elements for more details.
The default alignment for <TH> is center and the default font style for <TH> is bold. Header elements are not
supported in XLSX, PPTX, ODS, and ODP templates. Figure 298 shows an example of header elements:
Figure 298 -- Sample of TH Tags As Header Elements
As shown in Figure 299 and 300 respectively, the outputs in RTF / ODF and HTML will be as follows:
Figure 299 -- Sample of RTF / ODF Document Output
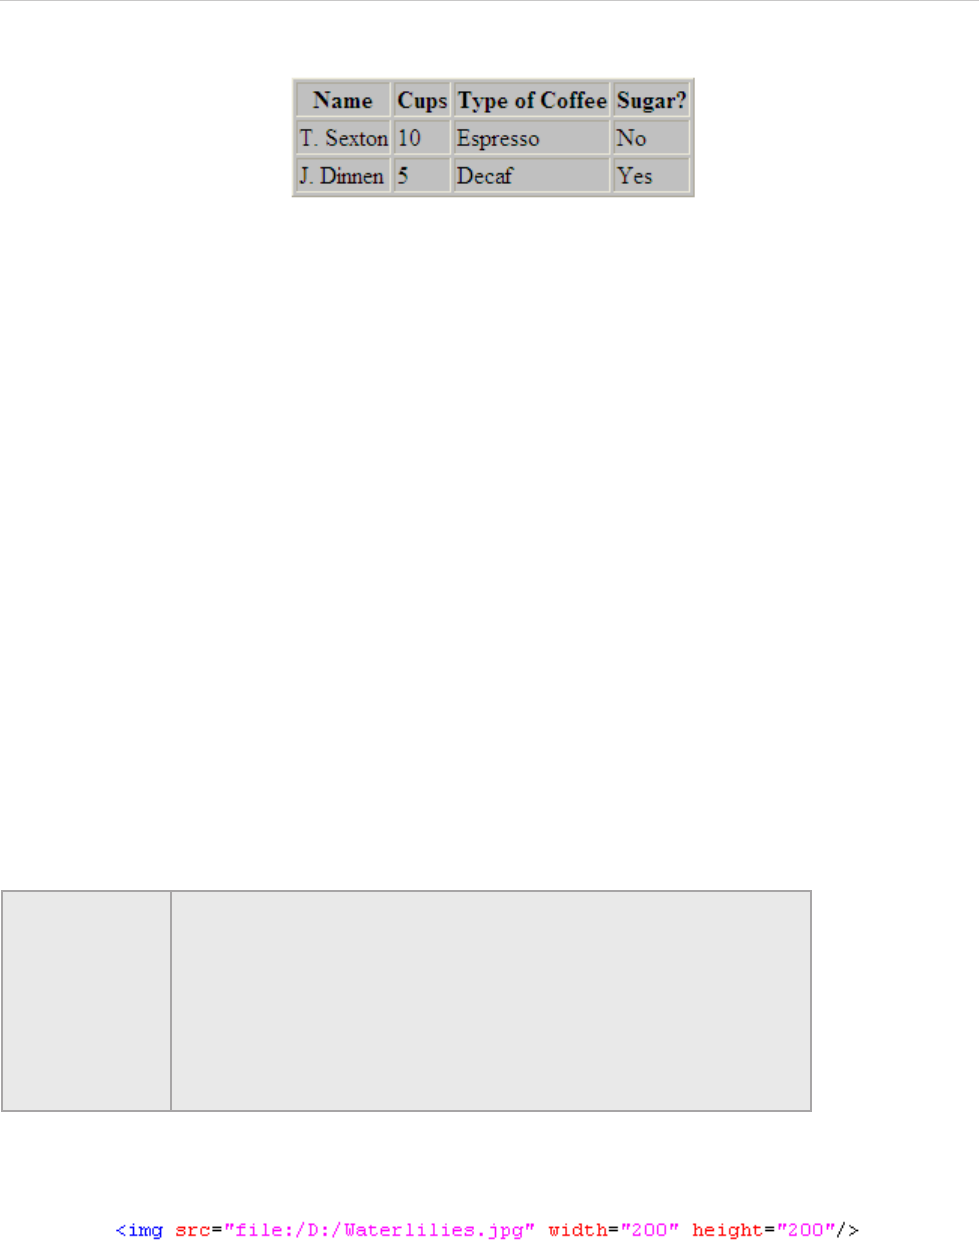
REPORT WIZARD
Appendix D: HTML Tag Support
348
Copyright © 1998-2015 No Magic, Inc.
Figure 300 -- Sample of HTML Document Output (Open in Internet Explorer 7.0)
1.11 Image Tags
The <img> tag embeds an image in a document. The <img> tag consists of three attributes: (1.11.1) src,
(1.11.2) width, and (1.11.3) height
1.11.1 src
The src attribute specifies the location of an image resource. The value of this attribute can be one of the fol-
lowing types:
• A URL. The recognized scheme types are HTTP, HTTPS, and FILE
• An absolute path such as c:/user/image.png. The path separator can be either /(slash) or \(blackslash)
The output image format will depend on the format of the image source.
1.11.2 Width
The width attribute specifies the width of an image in pixel units. For example, width = “100” or width = “100px”
1.11.3 Height
The height attribute specifies the height of an image in pixel units. For example, height = “100”, or height =
“100px”
In the event that the HTML code is as follows:
The image will be as shown in Figure 301:
NOTE If the width or height attribute of an image is not specified, the size of
the image will be calculated according to the following rules:
• For an image file that contains the width and height properties such
as JPG, PNG, and GIF, the size of the image output will be
calculated from the size of the image.
• For an image file that has no width and height properties such as
SVG, EMF, and WMF, the size of the image output will be calculated
from the size of the paper.
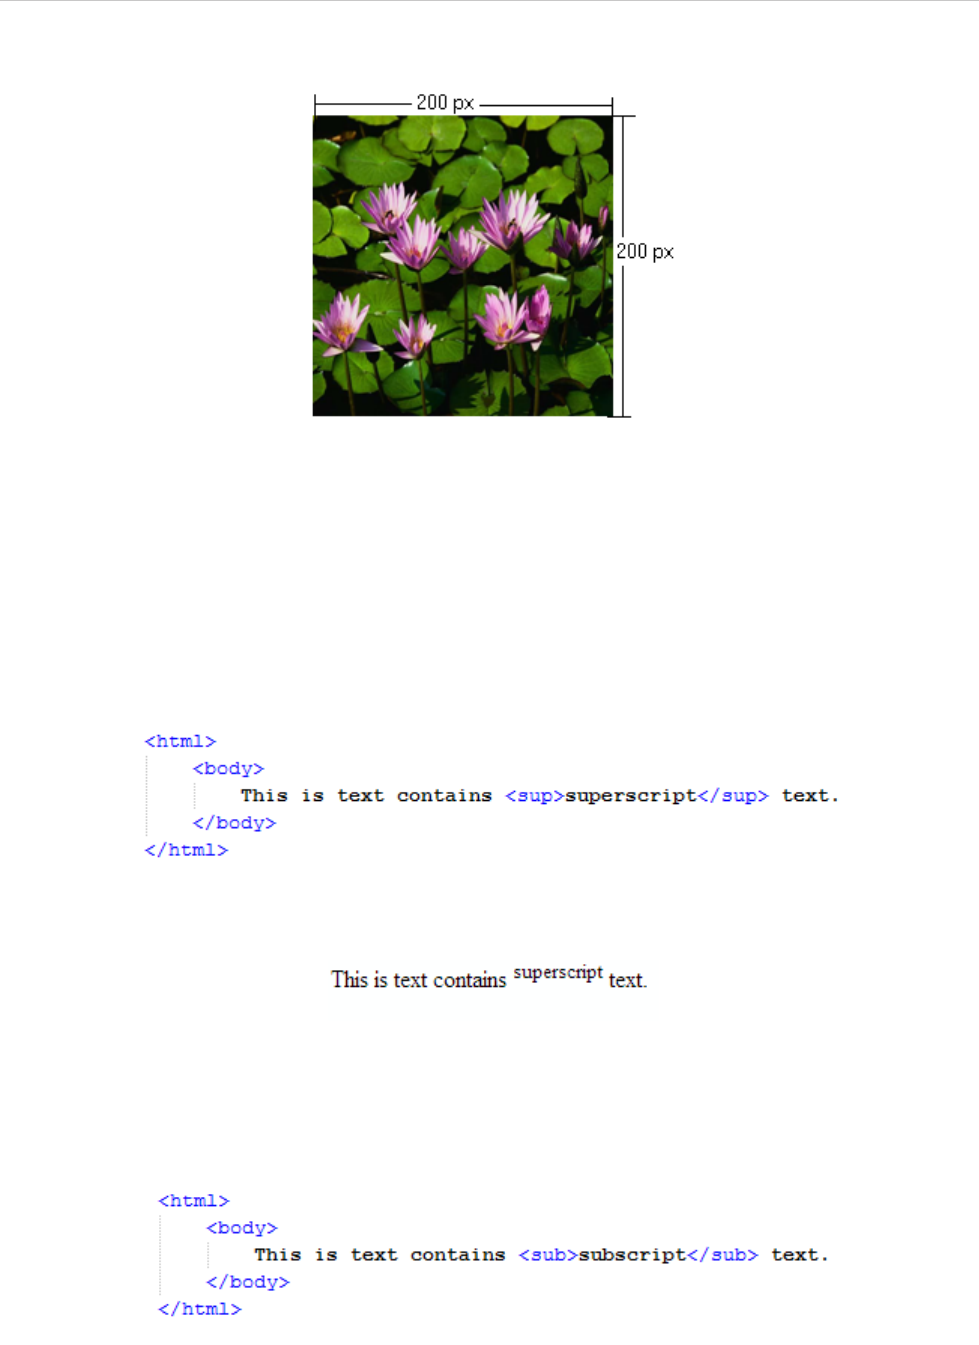
REPORT WIZARD
Appendix D: HTML Tag Support
349
Copyright © 1998-2015 No Magic, Inc.
Figure 301 -- Sample of IMG Tag
1.12 Superscript and Subscript Tag
1.12.1 Superscript
The <sup> tag defines a supersript, which is a very small letter, figure, or symbol, and printed above the line.
Superscript characters can be used to write footnotes, like www[1], for example:
Figure 302 -- Sample of <sup> Code
Figure 303 -- Output of <sup> Code
The <sub> tag defines a subscript, which is a very small letter, figure, or symbol, and printed below the line.
Subscript characters can be used to write chemical formulas, like H2O, for example:
Figure 304 -- Sample <sub> Code
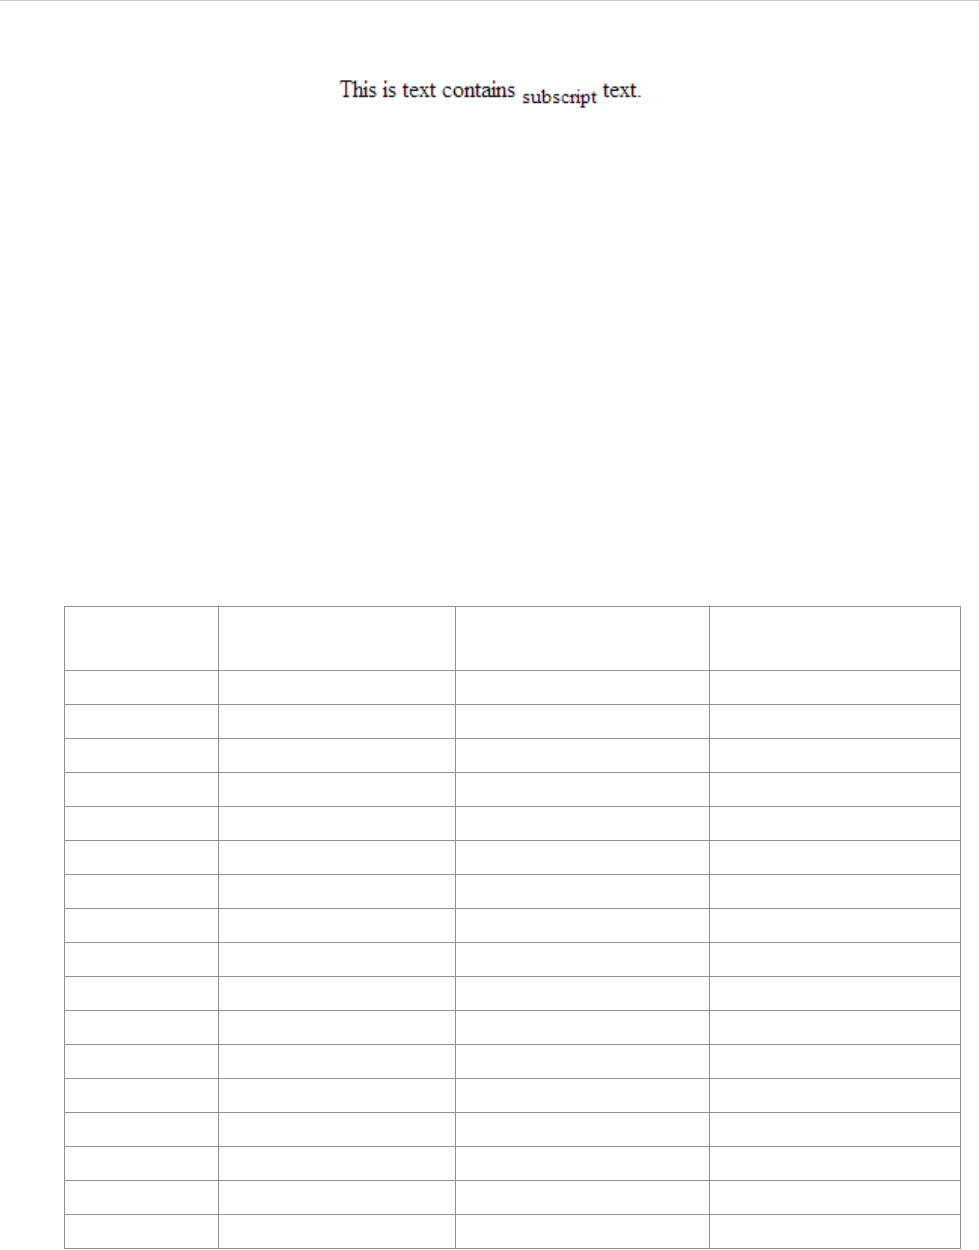
REPORT WIZARD
Appendix D: HTML Tag Support
350
Copyright © 1998-2015 No Magic, Inc.
Figure 305 -- Output of <sub> Code
2. Supported CSS
2.1 Background
The shorthand property for the background property is 'background', which is used for setting an individual
background style. Only the ‘background-color’ attribute is supported. Such attribute can be used in RTF, ODT,
and DOCX report templates.
2.1.1 Color Specification
Color attributes such as background-color, can be specified by either a keyword or a numerical RGB specifica-
tion (hexadecimal, integer, and percentage value). The list of color keywords is displayed in Table 39.
Table 39 -- Color Keywords and Corresponding RGB Specification
The format of an RGB specification value in form of the hexadecimal notation is a '#' immediately followed by
either three or six hexadecimal characters. The three-digit RGB notation (#rgb) is converted to the six-digit form
(#rrggbb) by replicating digits. For example, #FB0 is converted to #FFBB00.
For example:
<p style = “background-color:#FB0”>
<p style = “background-color:#FFBB00”>
Color
RGB Specification -
Hexadecimal Code RGB Specification Integer
RGB Specification
Percentage
Maroon #800000 RGB(128,0,0) RGB(50%,0%,0%)
Red #FF0000 RGB(255,0,0) RGB(100%,0%,0%)
Orange #FFA500 RGB(255,165,0) RGB(100%,65%,0%)
Yellow #FFFF00 RGB(255,255,0) RGB(100%,100%,0%)
Olive #808000 RGB(128,128,0) RGB(50%,50%,0%)
Purple #800080 RGB(128,0,128) RGB(50%,0%,50%)
Fuchsia #FF00FF RGB(255,0,255) RGB(100%,0%,100%)
White #FFFFFF RGB(255,255,255) RGB(100%,100%,100%)
Lime #00FF00 RGB(0,255,0) RGB(0%,100%,0%)
Green #008000 RGB(0,128,0) RGB(0%,50%,0%)
Navy #000080 RGB(0,0,128) RGB(0%,0%,50%)
Blue #0000FF RGB(0,0,255 RGB(0%,0%,100%)
Aqua #00FFFF RGB(0,255,255) RGB(0%,100%,100%)
Teal #008080 RGB(0,128,128) RGB(0%,50%,50%)
Black #000000 RGB(0,0,0) RGB(0%,0%,0%)
Silver #C0C0C0 RGB(192,192,192) RGB(75%,75%,75%)
Gray #808080 RGB(128,128,128) RGB(50%,50%,50%)

REPORT WIZARD
Appendix D: HTML Tag Support
351
Copyright © 1998-2015 No Magic, Inc.
The RGB specification Integer and Percentage form is "rgb" followed by RGB values in the same format in
brackets. You cannot use both integer and percentage at the same time. In the case that an RGB value is more
than a maximum value (255 or 100%) or less than a minimum (0 or 0%), the value will be set to the maximum
or minimum value instead, for example:
<p style = "background-color:rgb(-100,500,0)">
<p style = "background-color:rgb(0,255,0)">
<p style = "background-colr:rgb(-100%,200%,0%)">
<p style = "background-colr:rgb(0%,100%,0%)">
The color used in all of the above examples is lime.
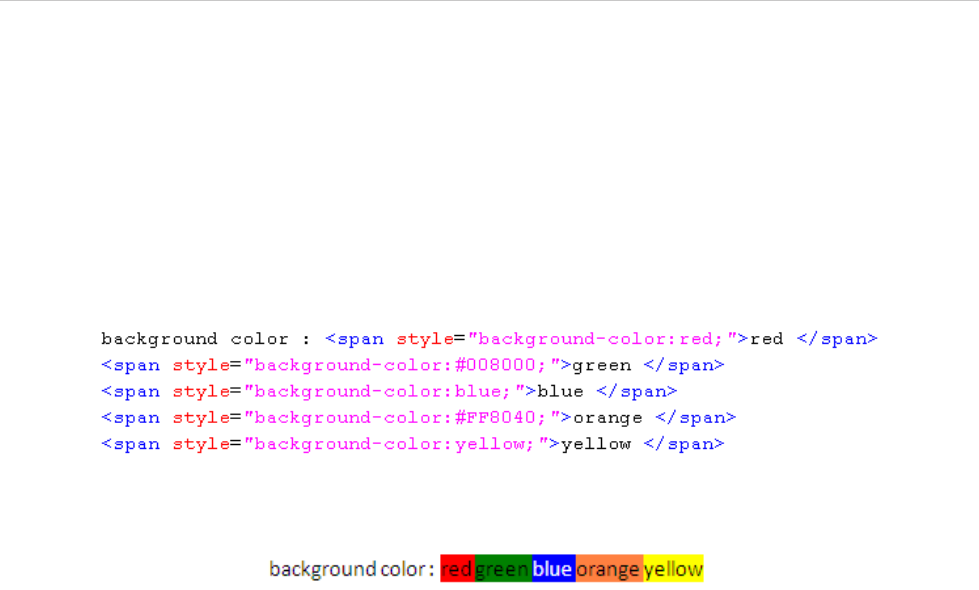
REPORT WIZARD
Appendix D: HTML Tag Support
352
Copyright © 1998-2015 No Magic, Inc.
2.1.2 Supported Tags
The ‘background-color’ property can be used in the following tags:
b, i, u, h1, h2, h3, h4, h5, h6, tt, code, samp, kbd, pre, big, small, strike, s,
em, cite, dfn, var, strong, font, a, dl, dt, dd, ul, ol, li, table, tr, td, th, p,
div, span, sup, and sub.
For example:
Figure 306 -- Sample of Background Style
Figure 307 -- Sample of Document Output (Resulted from Figure 306)
2.2 Border
The shorthand property for the border property is 'border', which is used for setting the same width, color, and
style of all four borders on four sides of a box. Border can be used in RTF, ODT, and DOCX report templates.
2.2.1 Border Width
Border width properties specify the width of border areas. The value of the border property is length. The bor-
der width properties that can be used with a longhand property are as follows:
• 'border-top-width'
• 'border-right-width'
• 'border-bottom-width'
• 'border-left-width'
2.2.2 Length Specification
The format of a length value is a real number immediately followed by a unit identifier. There are two types of
length units: relative and absolute. Relative length units specify a length relative to another length property of
the displaying device.
Relative units are:
• px: pixels, relative to the displaying device.
Absolute units are:
• in: inches, 1 inch is equal to 2.54 centimeters.
• cm: centimeters.
• mm: millimeters.
• pt: points - the points used by CSS 2.1 are equal to 1/72nd of an inch.
• pc: picas - 1 pica is equal to 12 points.

REPORT WIZARD
Appendix D: HTML Tag Support
353
Copyright © 1998-2015 No Magic, Inc.
2.2.3 Border Color
Border color properties specify the border colors of a box. The value of the border color has two meanings:
1. Color: Specifies a border color. See 2.1.1 Color Specification on page 350 for more details
on color.
2. Transparent: Referred to as a transparent border.
The border color properties that can be used with a longhand property are as follows:
• 'border-top-color'
• 'border-right-color'
• 'border-bottom-color'
• 'border-left-color'
2.2.4 Border Style
The Border style properties specify the style of a box's border lines. The border style may take one of the fol-
lowing 10 values:
1. none: This value will create no border because the computed border width is zero.
2. hidden: The same as 'none'.
3. dotted: This value will create a dotted border.
4. dashed: This value will create a dashed border.
5. solid: This value will create a single line segment border.
6. double: This value will create a two solid line border.
7. groove: This value will create a border that looks as though it were carved into the rendering
surface.
8. ridge: The opposite of 'groove'. This value will create a border that looks as though it were
coming out of the rendering surface.
9. inset: This value will create a border that looks as though it were embedded in the rendering
surface.
10. outset: The opposite of 'inset'. This value will create a border that looks as though it were
coming out of the rendering surface.
The border style properties that can be used with a longhand property are as follows:
• 'border-top-style'
• 'border-right-style'
• 'border-bottom-style'
• 'border-left-style'
NOTE • The supported border values for ODF documents are none, hidden, solid, and
double.
• The supported border values for RTF documents are none, hidden,dotted, dashed,
solid, and double.
• The supported border values for DOCX documents are none, hidden,dotted,
dashed, solid, double, outset, and inset (groove and ridge will be rendered as
solid).
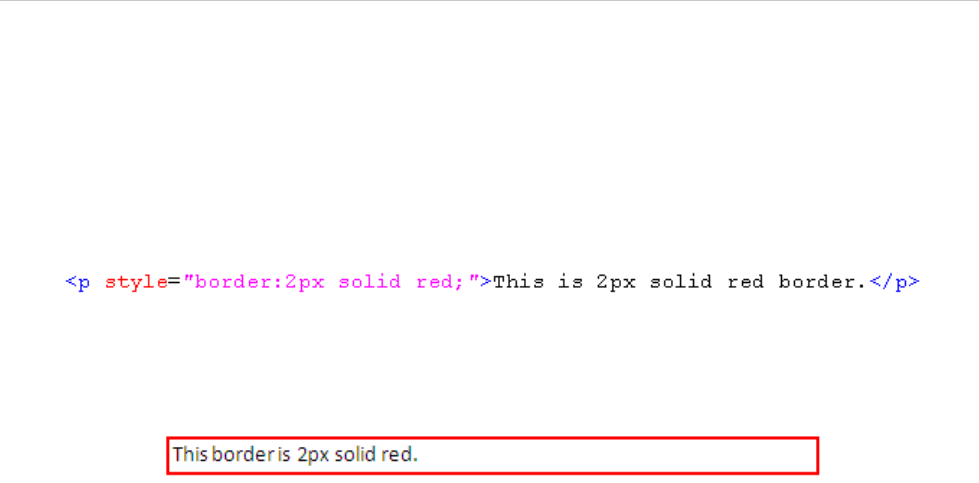
REPORT WIZARD
Appendix D: HTML Tag Support
354
Copyright © 1998-2015 No Magic, Inc.
2.2.5 Supported Tags
Border properties can be used in the following tags:
h1, h2, h3, h4, h5, h6, td, th, p, and div.
For example, if you want to have a red border, type the following line of code (Figure 308):
Figure 308 -- Border Style Example
The result of using the above example will be as shown in Figure 309.
Figure 309 -- Red Border Output
2.3 Margin
Margin properties specify the width of margin area within a box. The 'margin' property is a shorthand property
for setting the margin of all four sides while the other margin properties only set their respective side. The value
of the margin property is length (See 2.2.2 Length Specification on page 352 for more details). Margin can be
used in RTF, ODT, ODP, DOCX and PPTX report templates.
The margin properties that can be used with a longhand property are as follows:
• 'margin-top'
• 'margin-right'
• 'margin-bottom'
• 'margin-left'
2.3.1 Supported Tags
The supported tags for margins are as follows:
h1, h2, h3, h4, h5, h6, table (supported only in RTF, ODT, and DOCX), p, and div.
For example, if you want to set a specific margin width for your cells, type the lines of code as shown in Fig-
ure 310.
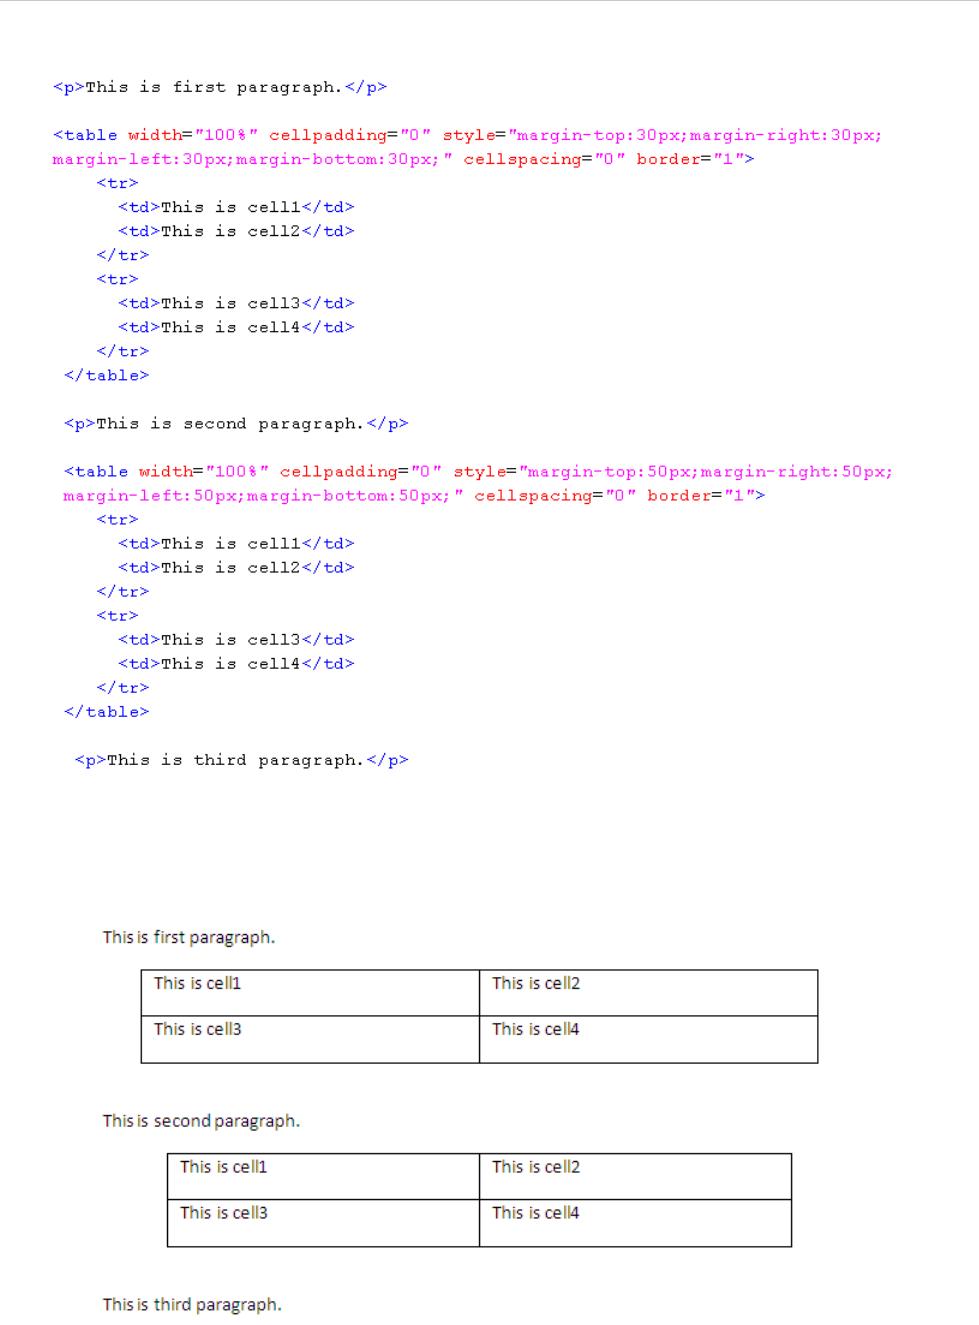
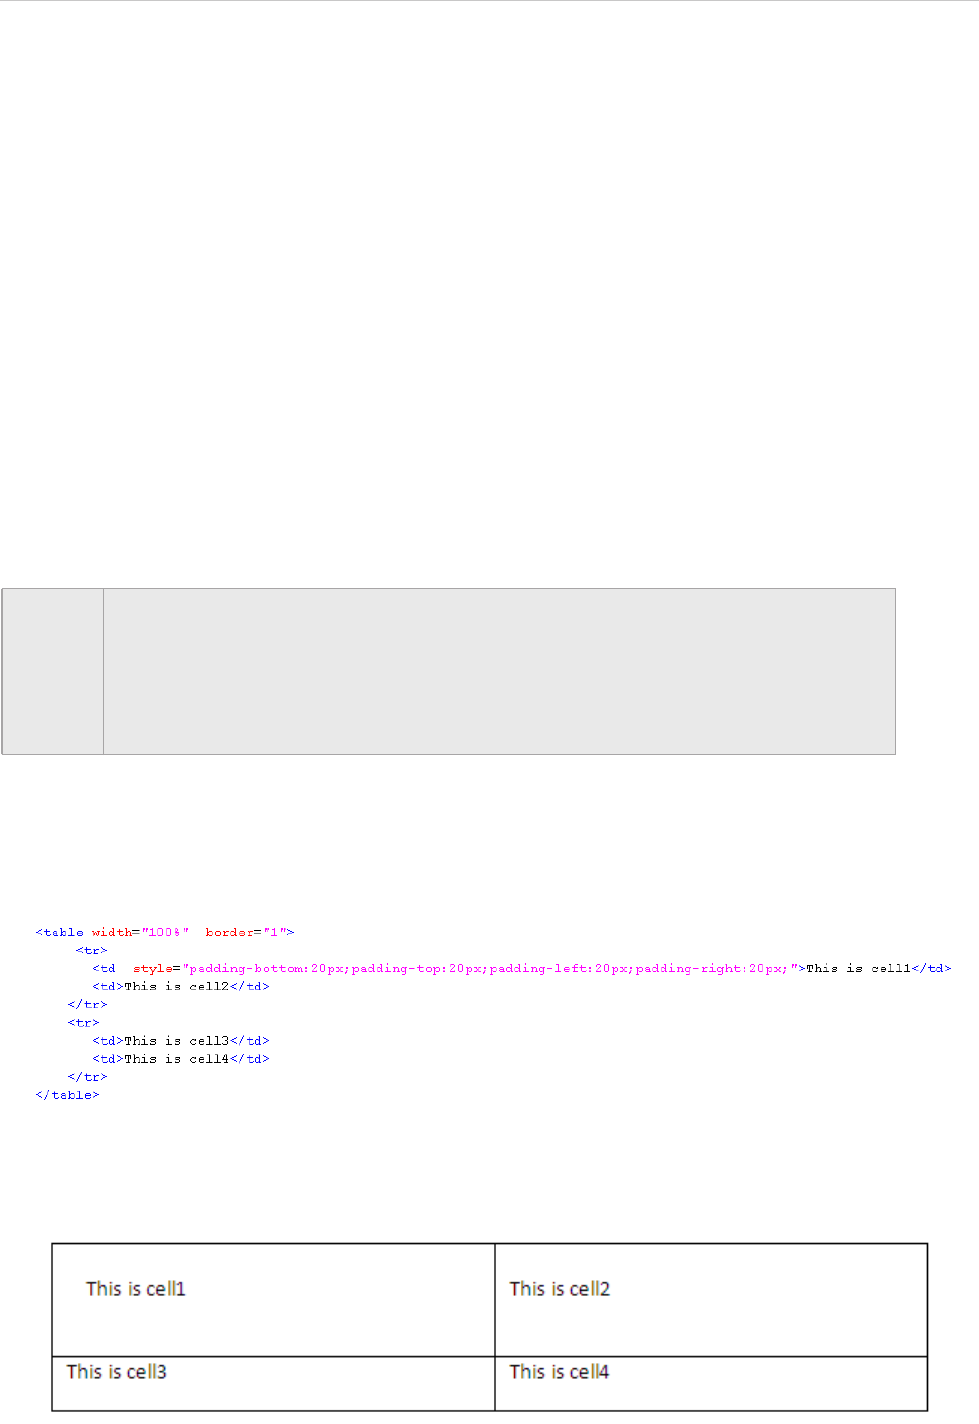
REPORT WIZARD
Appendix D: HTML Tag Support
356
Copyright © 1998-2015 No Magic, Inc.
2.4 Padding
Padding properties specify the width of padding area within a box. The 'padding' property is a shorthand prop-
erty for setting the padding for all four sides while the other padding properties only set their respective side.
The value of the padding property is length (See 2.2.2 Length Specification on page 352 for more details) add-
ing can be used in RTF, ODT and DOCX report templates.
The padding properties that can be used with a longhand property are as follows:
• 'padding-top'
• 'padding-right'
• 'padding-bottom'
• 'padding-left'
2.4.1 Supported Tags
The supported tags for padding are as follows:
h1, h2, h3, h4, h5, h6, td, th, p, and div.
For example, if you want to create specific padding styles for your cells, type the lines of code shown in Fig-
ure 312.
Figure 312 -- Padding Style Example
The result of using the above example will be as shown in Figure 313.
Figure 313 -- The Padding Style Outputs
NOTE • The supported border values of table tags for RTF documents are margin-left and
margin-right.for more details.
• The supported border values of table tags for DOCX documents are margin-left
and margin-right.
• The supported border values of all tags for PPTX documents are margin-left,
margin-top and margin-bottom.
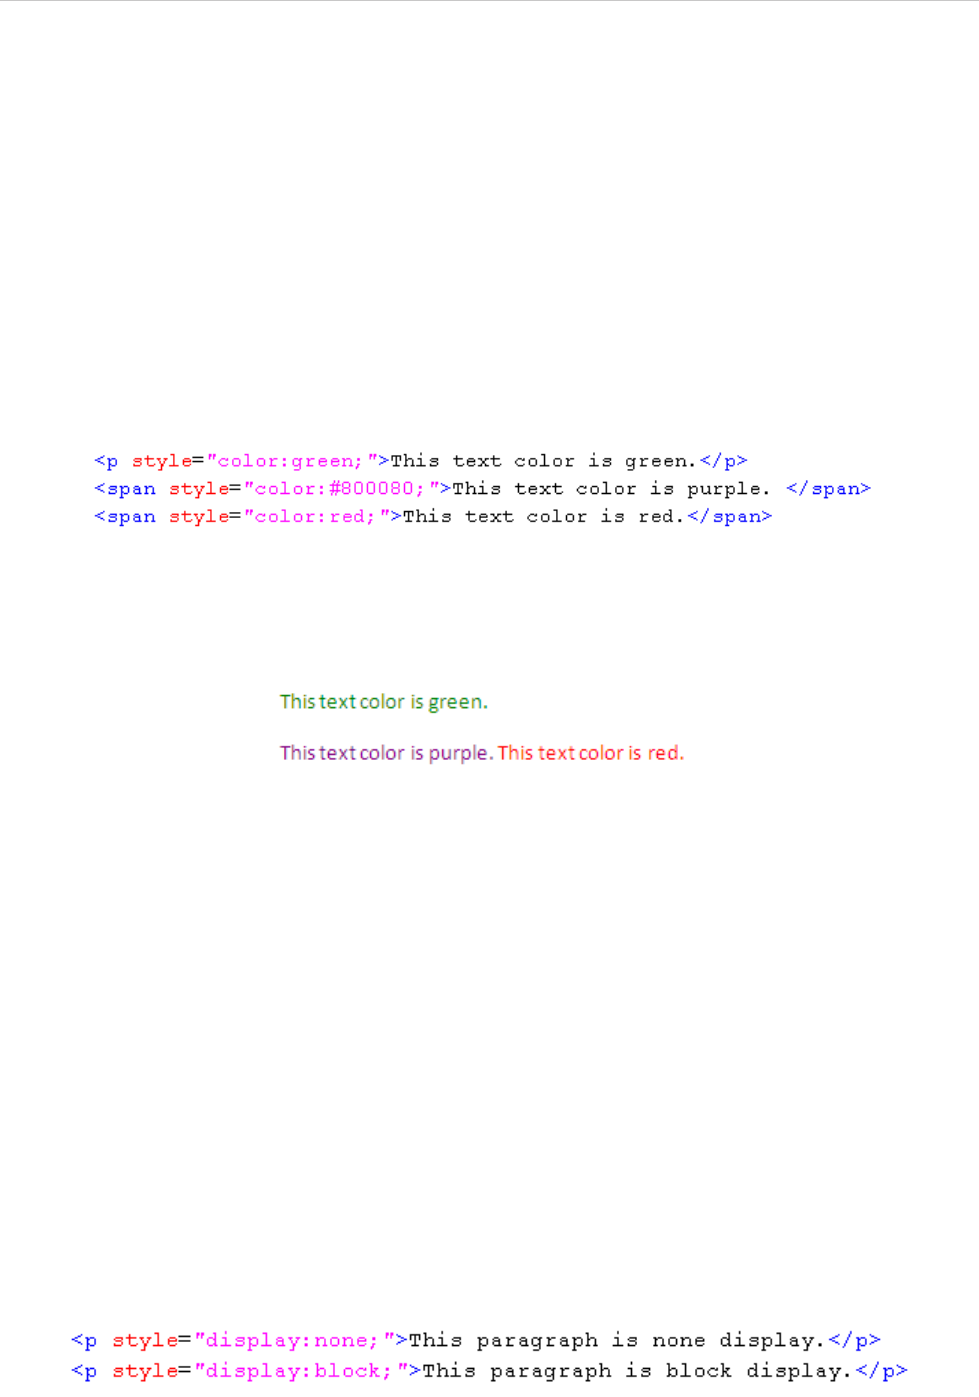
REPORT WIZARD
Appendix D: HTML Tag Support
357
Copyright © 1998-2015 No Magic, Inc.
2.5 Color
The 'color' property specifies the foreground color of an element's text contents. Only color values are allowed
in this property (See 2.1.1 Color Specification on page 350 for more details on color).
2.5.1 Supported Tags
The supported tags for colors are as follows:
b, i, u, h1, h2, h3, h4, h5, h6, tt, code, samp, kbd, pre, big, small, strike, s,
em, cite, dfn, var, strong, font, a, dl, dt, dd, ul, ol, li, table, tr, td, th, p,
div, span, sup, and sub.
For example, if you want to have a green text color, type the lines of code indicated in Figure 314.
Figure 314 -- Color Style Example
The result of using the above example will be as shown in Figure 315.
Figure 315 -- Color Style Outputs
2.6 Display
The 'display' property specifies how text will be displayed. The possible display values are:
1. block: This value will make an element appear in the output report.
2. none: This value will make an element disappear from the output report.
2.6.1 Supported Tags
The supported tags for the display property are:
br, b, i, u, h1, h2, h3, h4, h5, h6, tt, code, samp, kbd, pre, big, small, strike,
s, em, cite, dfn, var, strong, font, a, dl, dt, dd, ul, ol, li (supported only in RTF,
DOCX, and PPTX), table, tr, p, div, span, sup, and sub.
For example, if you want to display an element but do not want to display the other(s), type the lines of code as
shown in Figure 316.
Figure 316 -- Display Style Example

REPORT WIZARD
Appendix D: HTML Tag Support
358
Copyright © 1998-2015 No Magic, Inc.
The result of using the above example will be as indicated in Figure 317.
Figure 317 -- Display Style Output
2.7 Font
The 'font' property is a shorthand property for setting, except the following:
• 'font family'
• 'font-style'
• 'font-variant'
• 'font-weight'
• 'font-size'
2.7.1 Font Family
Specify a prioritized list of font family names and/or generic family names.
2.7.2 Font Style
Specify either normal or italic face (within the specified font family).
2.7.3 Font Variant
Specify either normal or small-caps of variant (within the specified font family). Font variant is not supported in
XLSX report templates.
2.7.4 Font Weight
Specifies the weight of the font. The following values are defined:
• normal, lighter, 100, 200, 300, and 400 will be rendered as ‘normal’.
• bold, bolder, 500, 600, 700, 800, and 900 will be rendered as ‘bold’.
2.7.5 Font size
Specify the font size. Possible values include xx-small, x-small, small, medium, large, xx-large, and the inte-
ger number from 1 to 7.
2.7.6 Supported Tags
The supported tags for the font property are as follows:
b, i, u, h1, h2, h3, h4, h5, h6, tt, code, samp, kbd, pre, big, small, strike, s,
em, cite, dfn, var, strong, font, a, dl, dt, dd, ul, ol, li, table, tr, td, th, p,
div, span, sup, and sub.
For example, if you want to have bold fonts in small caps, type the lines of code as displayed in Figure 318.
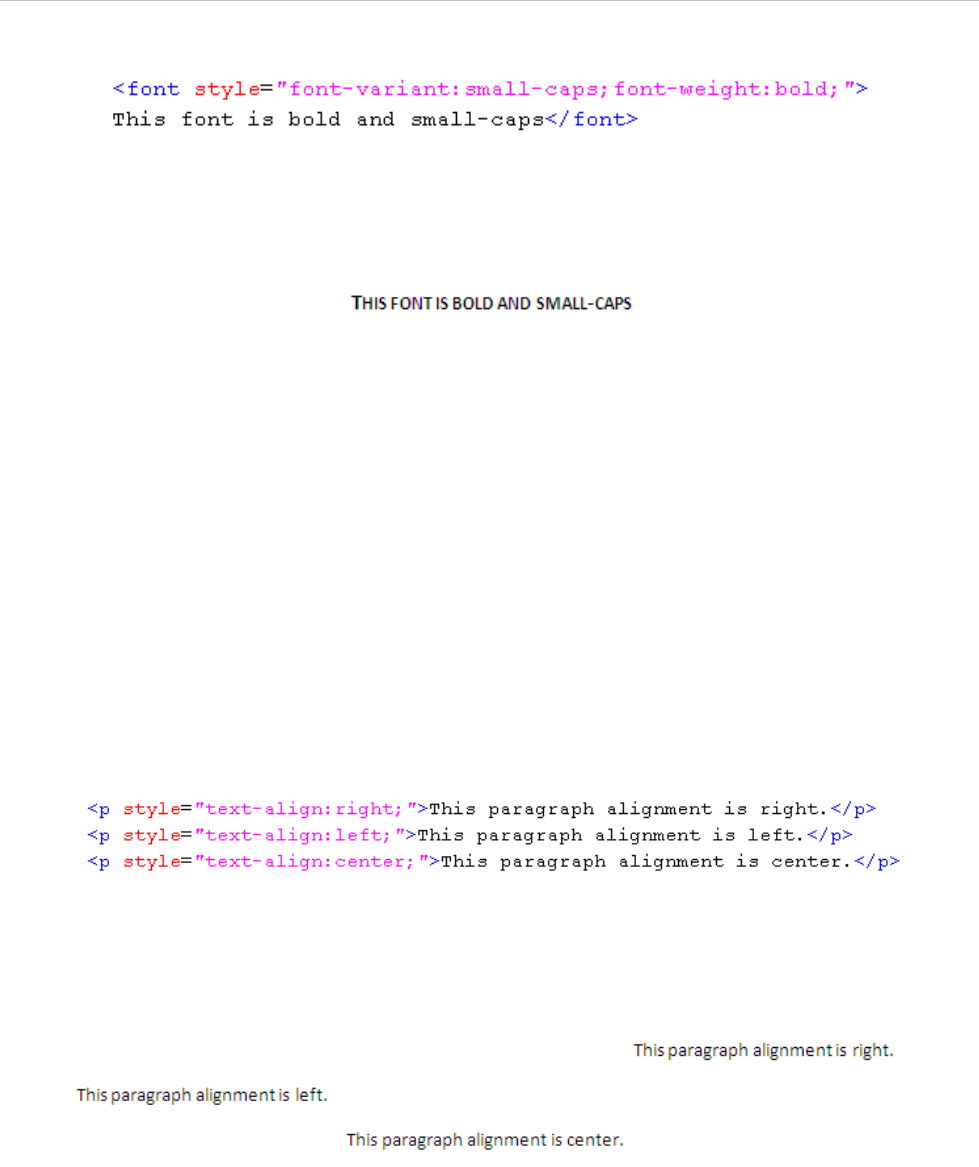
REPORT WIZARD
Appendix D: HTML Tag Support
359
Copyright © 1998-2015 No Magic, Inc.
Figure 318 -- Font Style Example
The result of using the above example will be as indicated in Figure 319.
Figure 319 -- Font Style Output
2.8 Text Align
The 'text align' property describes how inline content of a block is aligned. Possible values of the text align
property include: left, right, center and justify. The ‘text align’ property can be used in RTF, ODT, ODP, DOCX,
and PPTX report templates.
2.8.1 Supported Tags
The supported tags for the text align property are as follows:
table, tr, td, th, p, and div.
For example, if you want to align your paragraph to the left, center, and right, type the lines of code as shown in
Figure 320.
Figure 320 -- Text-align Style Example
The result of using the above example will be as displayed in Figure 321.
Figure 321 -- Text-align Outputs
2.9 Text Transform
The 'text transform' property controls capitalization effects of an element's text. Possible values of the 'text
transform' property include:
1. capitalize: This will write the first character in an uppercase letter. Other characters will not
be affected.
2. uppercase: This will write each word in upper case letters.
3. lowercase: This will write each word in lower case letters.
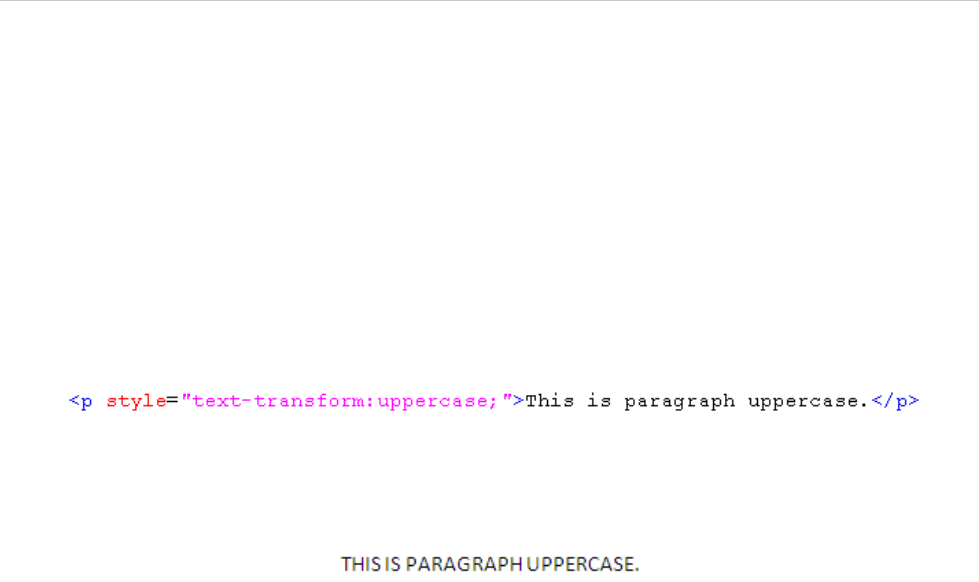
REPORT WIZARD
Appendix D: HTML Tag Support
360
Copyright © 1998-2015 No Magic, Inc.
4. none: This will not create any capitalization effects.
2.9.1 Supported Tags
The supported tags for the text transform property are as follows:
b, i, u, h1, h2, h3, h4, h5, h6, tt, code, samp, kbd, pre, big, small, strike, s,
em, cite, dfn, var, strong, font, a, dl, dt, dd, ul, ol, li, table, tr, td, th, p,
div, span, sup, and sub.
For example, if you want to make all letters in a paragraph become uppercases, type the line of code displayed
in Figure 322.
Figure 322 -- Text-transform Style Example
The result of using the above example will be as shown in Figure 323.
Figure 323 -- Text-transform Style Output
2.10 White-Space
The 'white-space' property affects the vertical position of white-space inside a lined box. White-space can be
used in RTF, ODT, DOCX and PPTX report templates. Possible values of the 'white-space' property include:
1. normal: To collapse sequences of white-space and break lines as necessary to fill line
boxes.
2. pre: To prevent from collapsing sequences of white-space. Lines are only broken at newlines
in the source or at occurrences of "\A" in the generated content. Report Wizard will render
this value as the <pre> tag.
3. nowrap: To collapse white-space as for 'normal' but suppressing line breaks within text.
4. pre-wrap: To prevent user agents from collapsing sequences of white-space. Lines are
broken at newlines in the source, at occurrences of "\A" in the generated content, and as
necessary to fill line boxes. This value will not be rendered as pre.
5. pre-line: To direct user agents to collapse sequences of white-space. Lines are broken at
newlines in the source, at occurrences of "\A" in the generated content, and as necessary to
fill line boxes. This value will not be rendered as pre.
2.10.1 Supported Tags
The supported tags for the 'white-space' property are as follows:
b, i, u, h1, h2, h3, h4, h5, h6, tt, code, samp, kbd, pre, big, small, strike, s,
em, cite, dfn, var, strong, font, a, table, tr, td, th, p, div, span, sup, and sub.
For example, if you want to preserve some white-space, type these lines of code as shown in Figure 324.

REPORT WIZARD
Appendix D: HTML Tag Support
361
Copyright © 1998-2015 No Magic, Inc.
Figure 324 -- White-space Style Example
The result of using the above example will be as indicated in Figure 325.
Figure 325 -- White-space Style Outputs
2.11 Width
The 'width' property specifies the contents width of each box generated by a block-level. The value of the width
property is length (See 2.2.2 Length Specification on page 352 for more details). Width can be used in RTF,
ODT, and DOCX report templates.
The supported tag for the width property includes table.
For example, if you want to have a specific table width, type the lines of code as described in Figure 326.
Figure 326 -- Width Style Example
The result of using the above example will be as shown in Figure 327.

REPORT WIZARD
Appendix D: HTML Tag Support
362
Copyright © 1998-2015 No Magic, Inc.
Figure 327 -- Width Style Outputs
2.12 Text Decoration
The 'text decoration' property describes decorations that are added to text. The possible values of the text dec-
oration property are as follows:
1. none: To produce no text decoration.
2. underline: To underline each line of text.
3. overline: To add a line above each line of text.
4. line-through: To add a line that strikes through each line of text.
5. blink: To add the blinking effect to text (being visible and invisible alternatively). The blink text
decoration supports only the ODT report template.
2.12.1 Supported Tags
The supported tags for the text decoration property are:
b, i, u, h1, h2, h3, h4, h5, h6, tt, code, samp, kbd, pre, big, small, strike, s,
em, cite, dfn, var, strong, font, a, dl, dt, dd, ul, ol, li, table, tr, td, th, p,
div, span, sup, and sub.
For example, if you want to create a line-through text, type the line of code as displayed in Figure 328.
Figure 328 -- Text-decoration Style Example
The result of using the above example will be as indicated in Figure 329.
Figure 329 -- Text-decoration Style Output
NOTE Report Wizard does not currently support the overline text decoration.
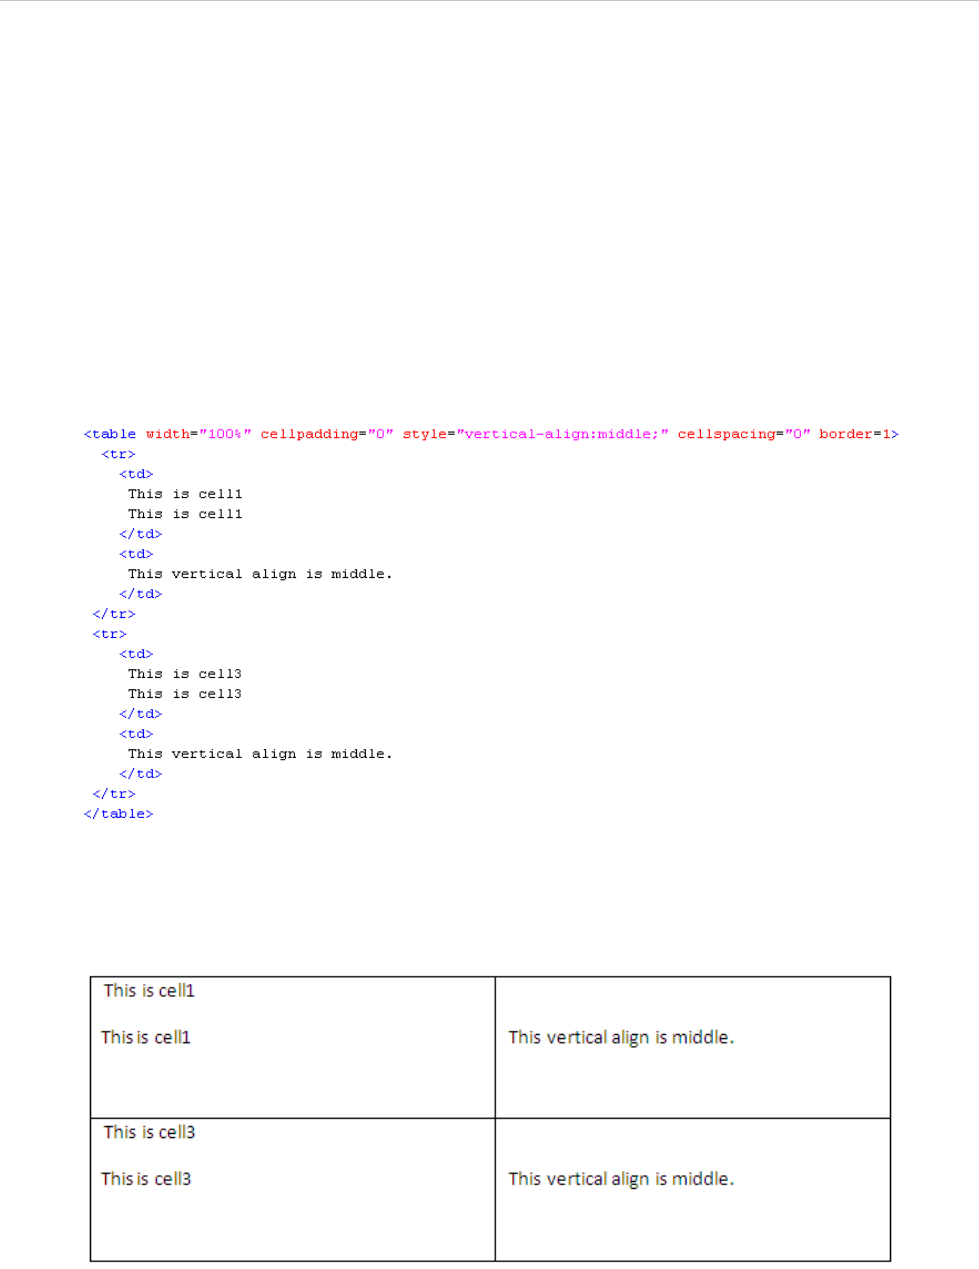
REPORT WIZARD
Appendix D: HTML Tag Support
363
Copyright © 1998-2015 No Magic, Inc.
2.13 Vertical Align
The 'vertical align' property affects the vertical position of an element inside a lined box. This property can be
used in RTF, ODT and DOCX report templates. Possible values of the vertical align property include:
1. baseline: This value will align the baseline of a box with the baseline of the parent box. Leave
the vertical alignment to be default when you encounter this value.
2. middle: This value will align the vertical midpoint of a box.
3. top: This value will align the top of the aligned sub-tree with the top of a line box.
4. bottom: This value will align the bottom of the aligned sub-tree with the bottom of a line box.
The supported tags for the vertical align property are: table, tr, td, and th, for example (Figure 330):
Figure 330 -- Vertical-align Style Example
The result of using the above example will be as shown in Figure 331.
Figure 331 -- Vertical-Align Style Output
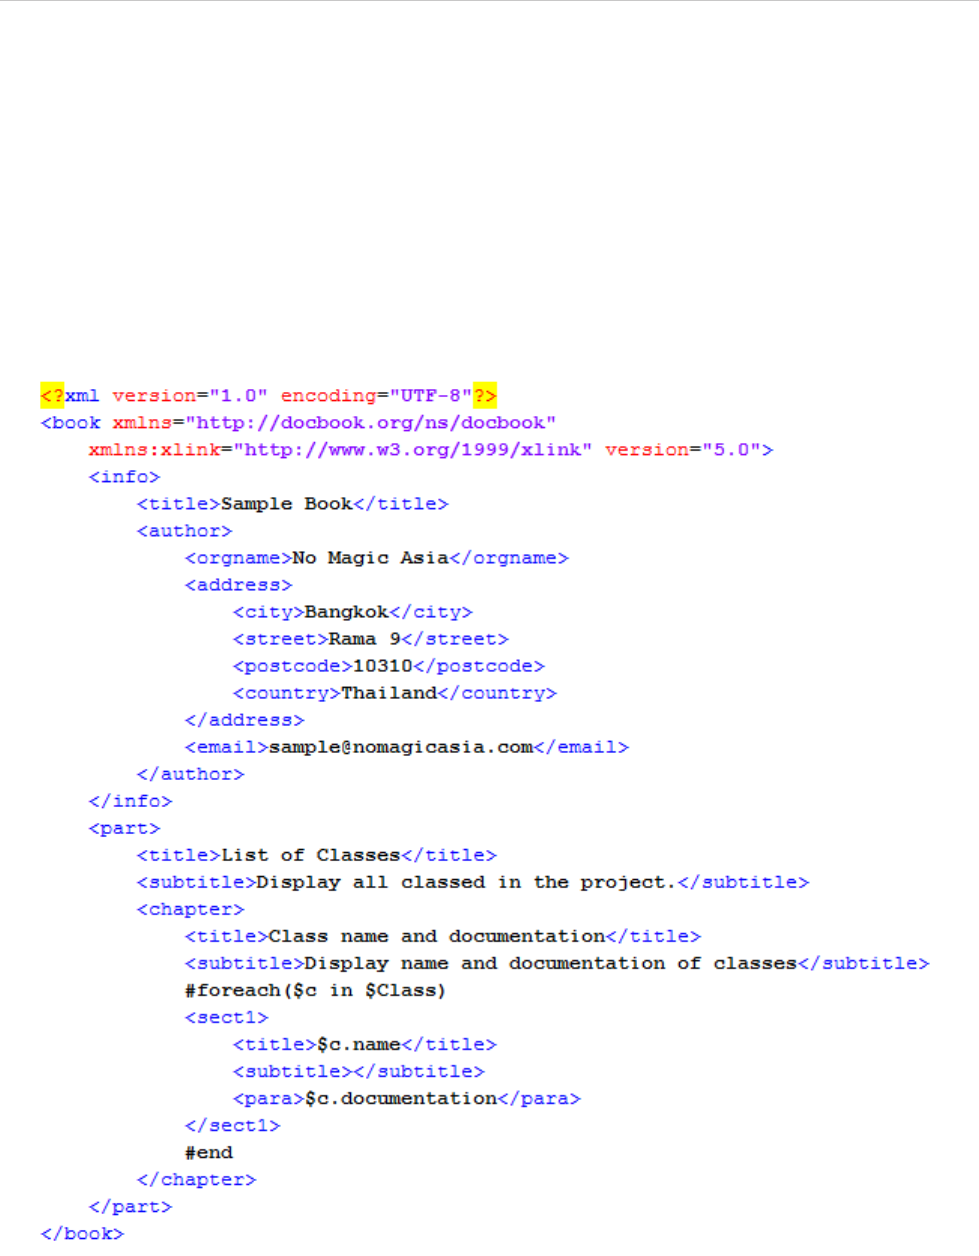
REPORT WIZARD
Appendix E: DocBook Support
364
Copyright © 1998-2015 No Magic, Inc.
Appendix E: DocBook Support
DocBook was built as an application to write technical documents related to computer hardware and software.
It is a semantic markup language that was extended from XML language. As an open source application, Doc-
Book has been adopted as a standard to write other types of documentation as well. The current version of
DocBook, published by O'Reilly Media and XML Press, is 5.1.
The Report Wizard’s DocBook engine enables you to input the VTL codes inside DocBook’s document content.
It also allows you to convert HTML into DocBook tags, rearrange tags, and escape special characters. Report
Wizard uses “dbk” and “docbook” file extensions to save DocBook files. Figure 332 below shows the Doc-
Book’s document content.
Figure 332 -- A DocBook Template
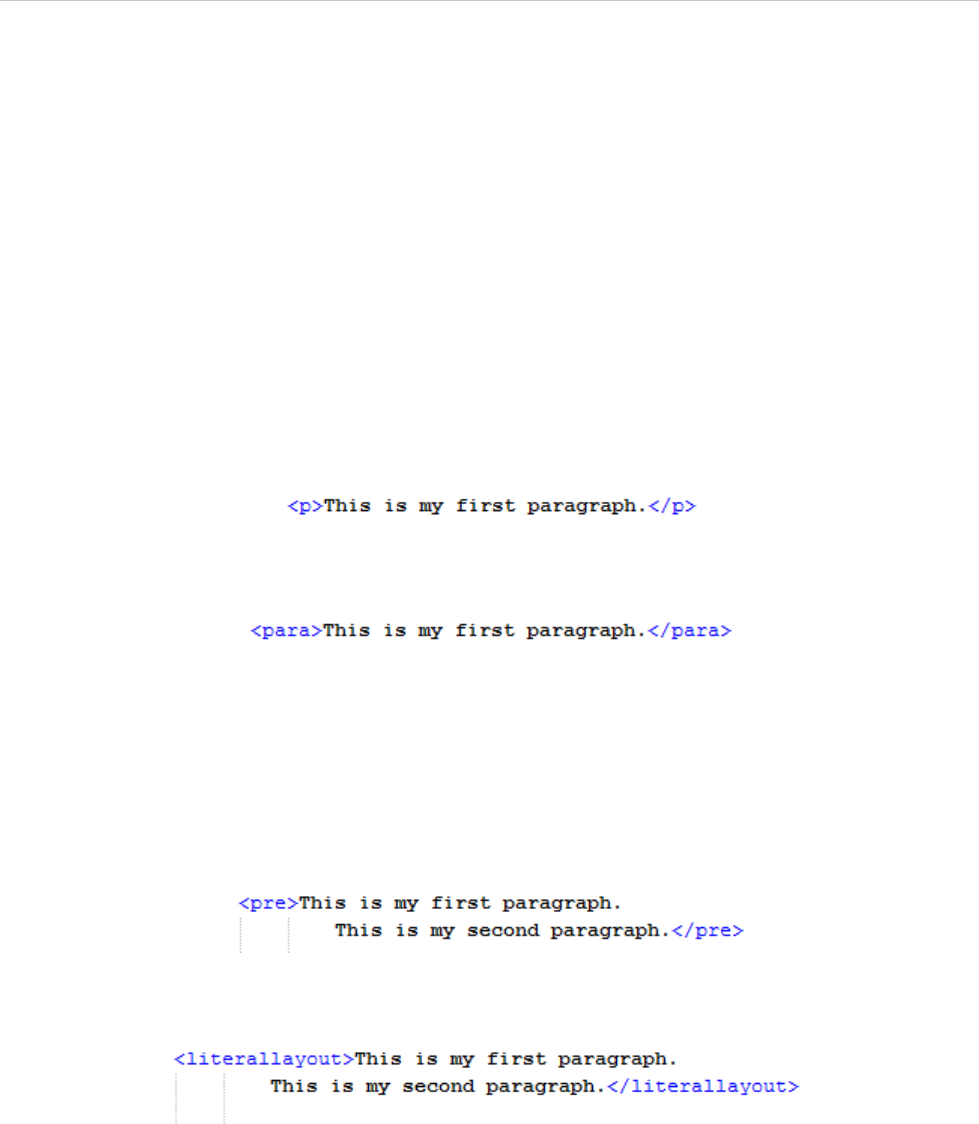
REPORT WIZARD
Appendix E: DocBook Support
365
Copyright © 1998-2015 No Magic, Inc.
1. The Supported HTML Tags
1.1 HTML Paragraph Elements
The HTML tags in the Report Wizard’s engine for DocBook defines how a paragraph is arranged in a DocBook
document. There are two categories of paragraph elements:
1.1.1 Paragraph
1.1.2 Preformatted Text
1.1.1 Paragraph
The Paragraph element (<p>) defines a paragraph. The <p> element shown in Figure 333 will be rendered in a
DocBook format in Figure 334.
Figure 333 -- HTML Tag for Paragraph
Figure 334 -- DocBook Tag for Paragraph
1.1.2 Preformatted Text
The Preformatted text element (<pre>) displays the text exactly as you expected it to. The <pre> tag pre-
serves both spaces and line breaks. The <pre> element shown in Figure 335 will be rendered in a DocBook
format in Figure 336.
Figure 335 -- HTML Tag for Pre-formatted Text
Figure 336 -- DocBook Tag for Pre-formatted Text
1.2 HTML Font Styles
Report Wizard specifies a group of HTML tags that you can use to define how fonts will be displayed on ren-
dered text. They are called font style elements.
1.2.1 Teletype Text
1.2.2 Italics
1.2.3 Bold
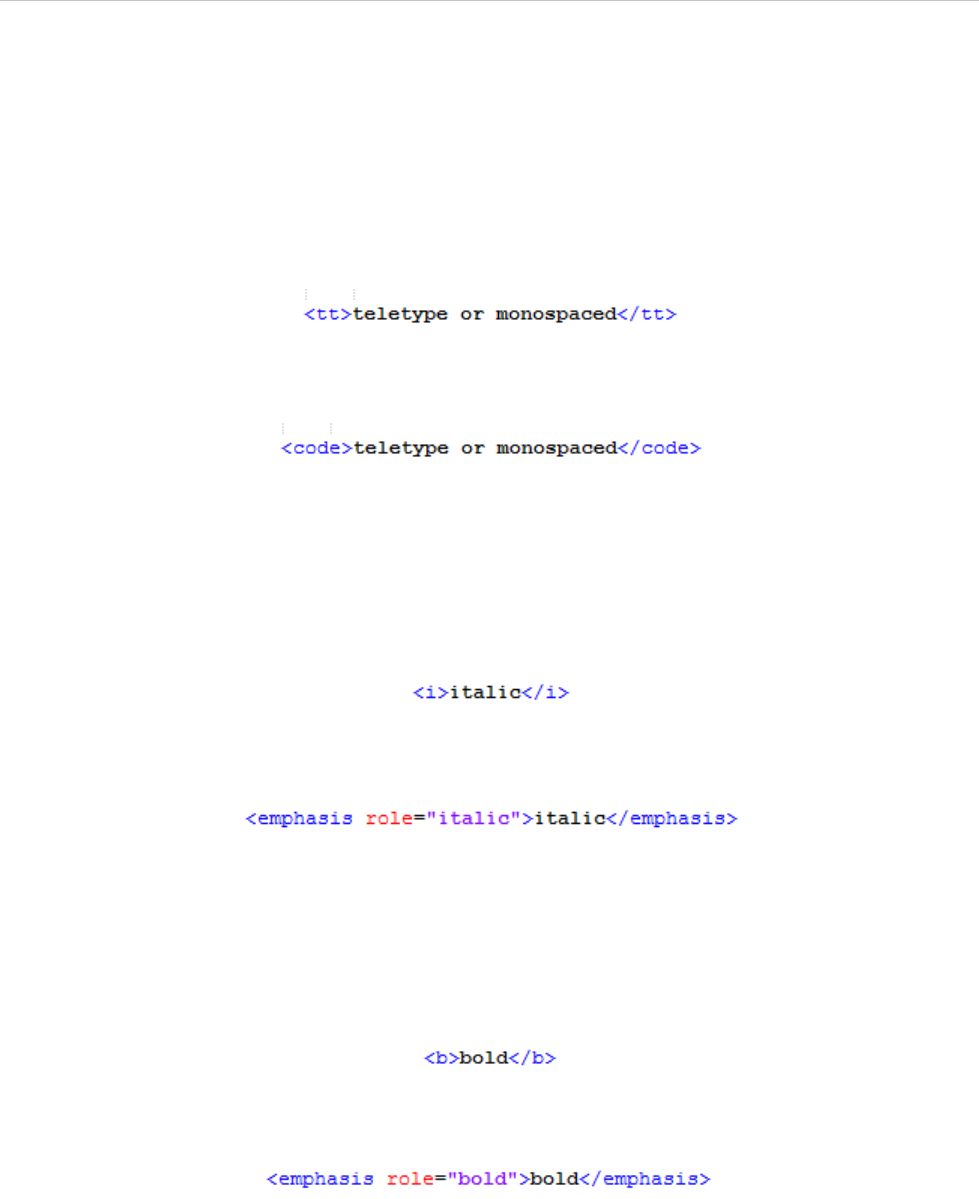
REPORT WIZARD
Appendix E: DocBook Support
366
Copyright © 1998-2015 No Magic, Inc.
1.2.4 Strikethrough
1.2.5 Underline
1.2.1 Teletype Text
The HTML Teletype Text element (<tt>) creates teletype or monospaced text. The <tt> element shown in
Figure 337 will be rendered in a DocBook format in Figure 338.
Figure 337 -- HTML Tag for Teletype Text
Figure 338 -- DocBook Tag for Teletype Text
1.2.2 Italics
The HTML Italics element (<i>) renders text slanted to the right. The <i> element shown in Figure 339 will be
rendered in a DocBook format in Figure 340.
Figure 339 -- HTML Tag for Italics
Figure 340 -- DocBook Tag for Italics
1.2.3 Bold
The HTML Bold element (<b>) renders bold text. The <b> element shown in Figure 341 will be rendered in a
DocBook format in Figure 342.
Figure 341 -- HTML Tag for Bold
Figure 342 -- DocBook Tag for Bold
1.2.4 Strikethrough
The HTML Strikethrough element (<strike> or <s>) renders text with a horizontal strike or a line through the
middle. The <strike> element shown in Figure 343 will be rendered in a DocBook format in Figure 344.
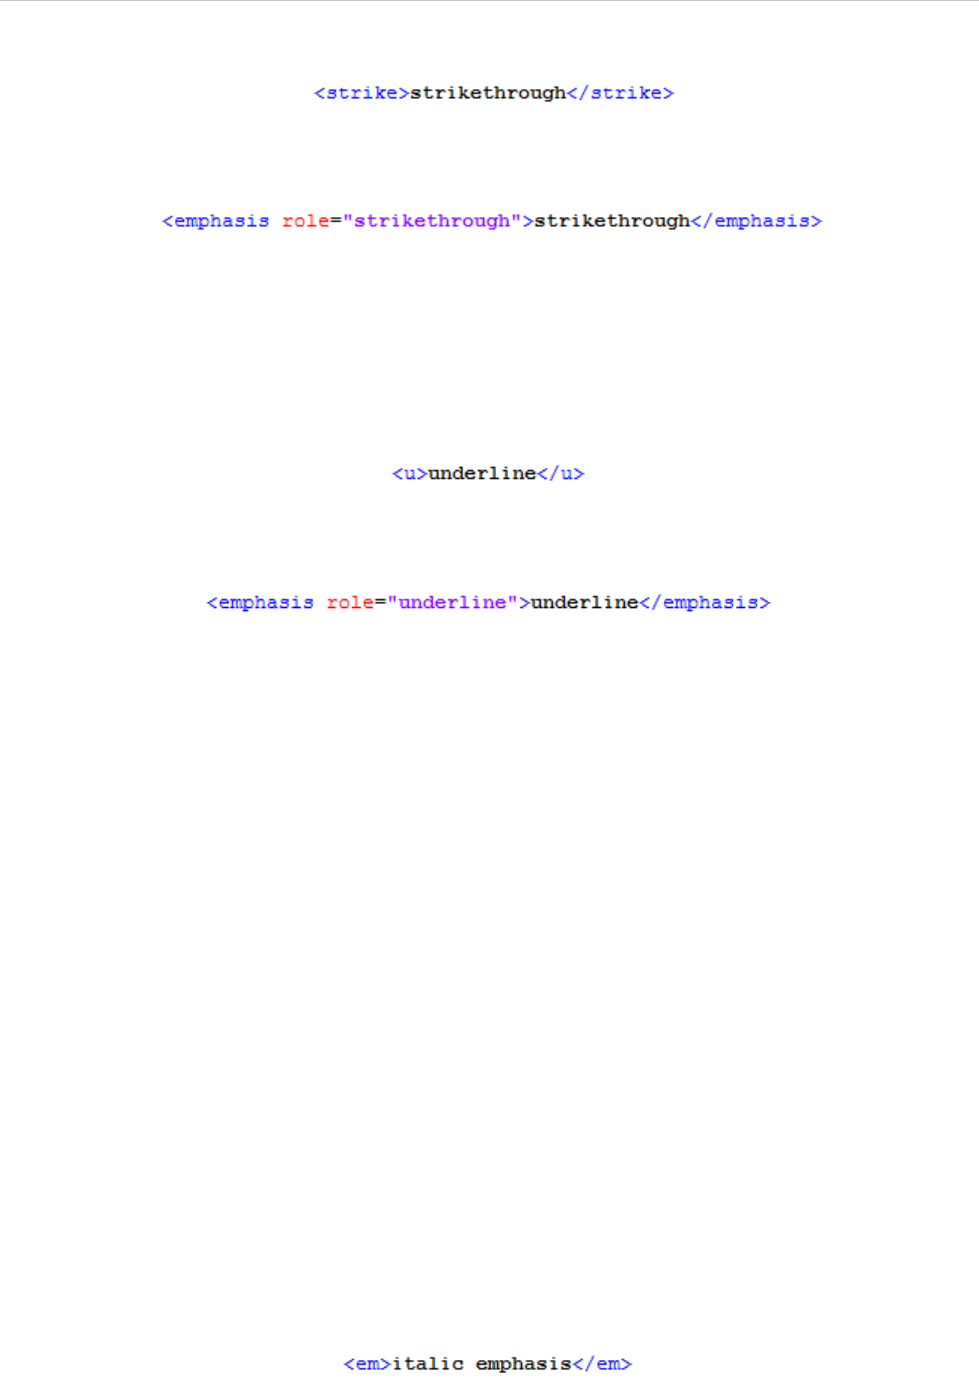
REPORT WIZARD
Appendix E: DocBook Support
367
Copyright © 1998-2015 No Magic, Inc.
Figure 343 -- HTML Tag for Strikethrough
Figure 344 -- DocBook Tag for Strikethrough
1.2.5 Underline
The HTML Underline element (<u>) underlines text. The underline <u> element shown in Figure 345 will be
rendered in a DocBook in Figure 346.
Figure 345 -- HTML Tag for Underline
Figure 346 -- DocBook Tag for Underline
1.3 HTML Phrase Elements
There is a group of HTML tags that allows you to specify how fonts will be displayed on rendered text. They are
called HTML Phrase Tags or Elements. The following is a list of these font style elements:
1.3.1 Emphasis
1.3.2 Strong
1.3.3 Citation
1.3.4 Definition
1.3.5 A Fragment of Computer Code
1.3.6 Sample Text
1.3.7 Keyboard Input
1.3.8 Variable
1.3.1 Emphasis
The Emphasis element (<em>) emphasizes text content and displays it in italics. The <em> element shown in
Figure 347 will be rendered in a DocBook format in Figure 348.
Figure 347 -- HTML Tag for Emphasis
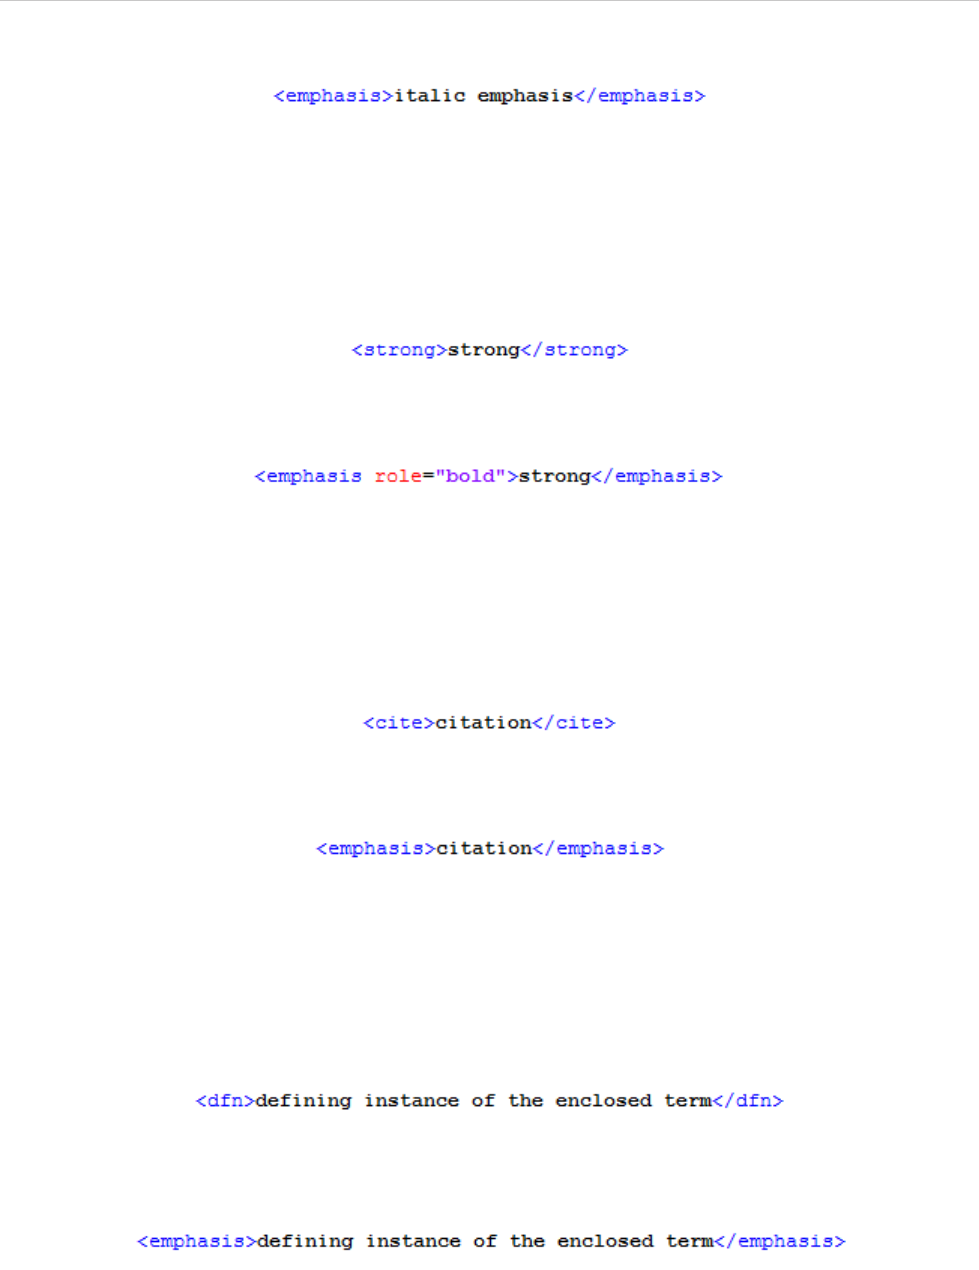
REPORT WIZARD
Appendix E: DocBook Support
368
Copyright © 1998-2015 No Magic, Inc.
Figure 348 -- DocBook Tag for Emphasis
1.3.2 Strong
The Strong element (<strong>) strongly emphasizes text content. It renders the text in bold. The <strong>
element shown in Figure 349 will be rendered in a DocBook format in Figure 350.
Figure 349 -- HTML Tag for Strong
Figure 350 -- DocBook Tag for Strong
1.3.3 Citation
The Citation element (<cite>) presents a citation or a reference to other sources. The <cite> element shown
in Figure 351 will be rendered in a DocBook format in Figure 352.
Figure 351 -- HTML Tag for Citation
Figure 352 -- DocBook Tag for Citation
1.3.4 Definition
The HTML Definition element (<dfn>) gives a definition for the term being defined. The Definition element
<dfn> shown in Figure 353 will be rendered in a DocBook format in Figure 354.
Figure 353 -- HTML Tag for Definition
Figure 354 -- DocBook Tag for Definition
1.3.5 A Fragment of Computer Code
The HTML fragment of code element (<code>) designates part of computer code. The <code> element shown
in Figure 355 will be rendered in a DocBook format in Figure 356.
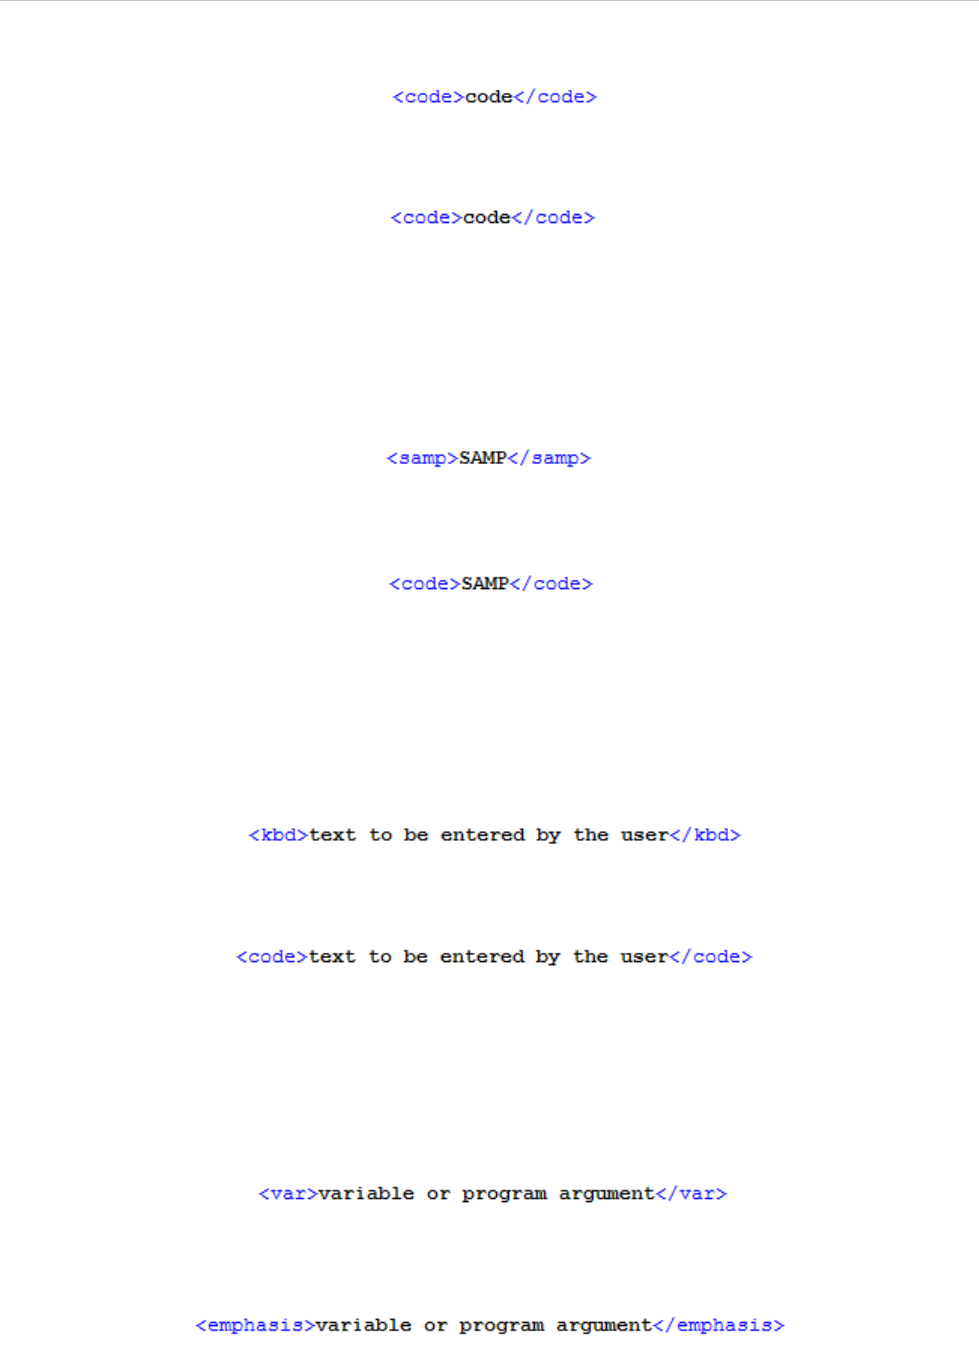
REPORT WIZARD
Appendix E: DocBook Support
369
Copyright © 1998-2015 No Magic, Inc.
Figure 355 -- HTML Tag for a Fragment of Code
Figure 356 -- DocBook Tag for a Fragment of Code
1.3.6 Sample Text
The HTML Sample Text element (<samp>) designates sample output of programs or scripts. The <samp> ele-
ment shown in Figure 357 will be rendered in a DocBook format in Figure 358.
Figure 357 -- HTML Tag for a Fragment of Sample Text
Figure 358 -- DocBook Tag for a Fragment of Sample Text
1.3.7 Keyboard Input
The HTML Keyboard Input element (<kbd>) indicates user input or text to be entered by the user. The <kbd>
element shown in Figure 359 will be rendered in a DocBook format in Figure 360.
Figure 359 -- HTML Tag for a Fragment of Keyboard Input
Figure 360 -- DocBook Tag for a Fragment of Keyboard Input
1.3.8 Variable
The HTML Variable element (<var>) indicates an instance of a variable or program argument. The <var> ele-
ment shown in Figure 361 will be rendered in a DocBook format in Figure 362.
Figure 361 -- HTML Tag for a Fragment of Variable
Figure 362 -- DocBook Tag for a Fragment of Variable
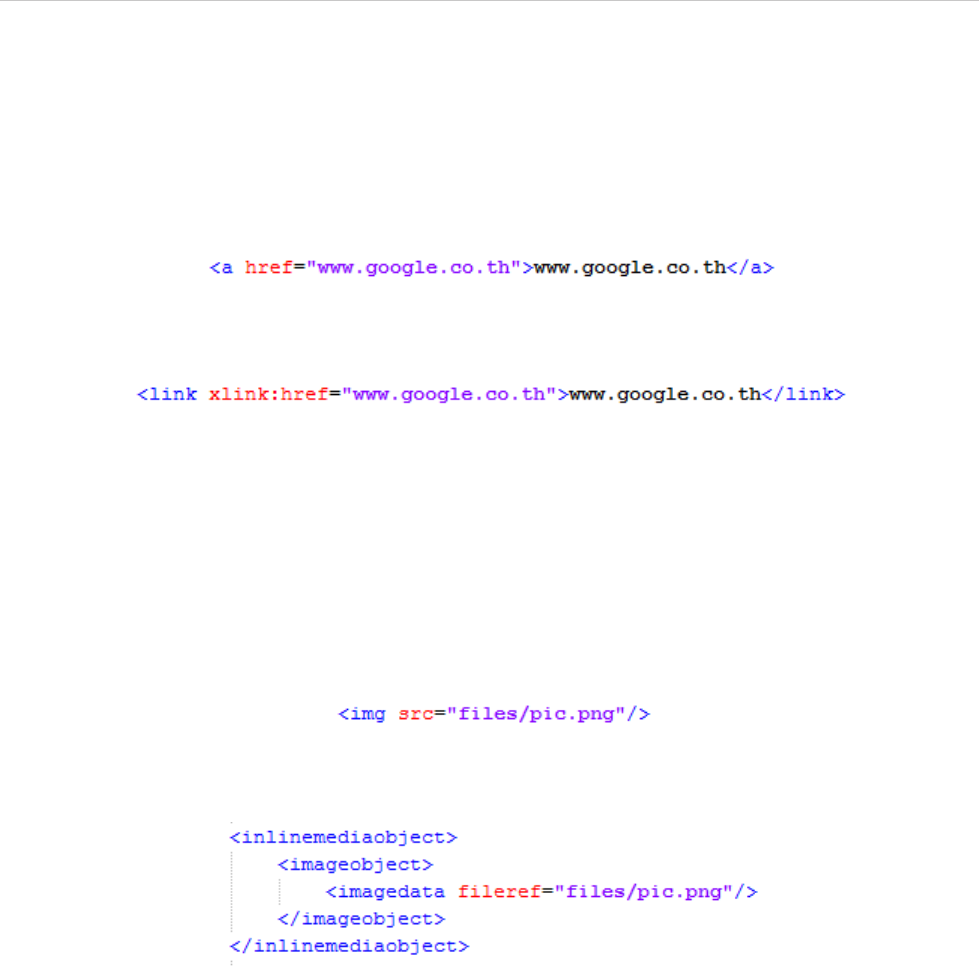
REPORT WIZARD
Appendix E: DocBook Support
370
Copyright © 1998-2015 No Magic, Inc.
1.4 HTML Link Element
The HTML Link element (<a>) defines a hyperlink that links one page to another. The <a> element supports
the attribute href, which specifies the URL of a page the hyperlink goes to.
The <a> element shown in Figure 363 will be rendered in a DocBook format in Figure 364
Figure 363 -- HTML Tag for a Fragment of Link
Figure 364 -- DocBook Tag for a Fragment of Link
1.5 HTML Image Element
The HTML Image element (<img>) defines an image in an HTML page. The <img> element supports the attri-
bute src, which specifies the URL of an image.
The <img> element shown in Figure 365 will be rendered in a DocBook format in Figure 366.
Figure 365 -- HTML Tag for a Fragment of Image
Figure 366 -- DocBook Tag for a Fragment of Image
2. The Supported HTML Lists
The DocBook engine of Report Wizard supports the following HTML lists:
2.1 Unordered Lists
2.2 Ordered Lists
2.3 Definition Lists
2.1 Unordered Lists
An unordered list is defined by the <ul> element. An unordered list element <ul> contains one or more <li>
elements that define the actual items of the list in bullets. The Unordered List element shown in Figure 367 will
be rendered in a DocBook format in Figure 368.
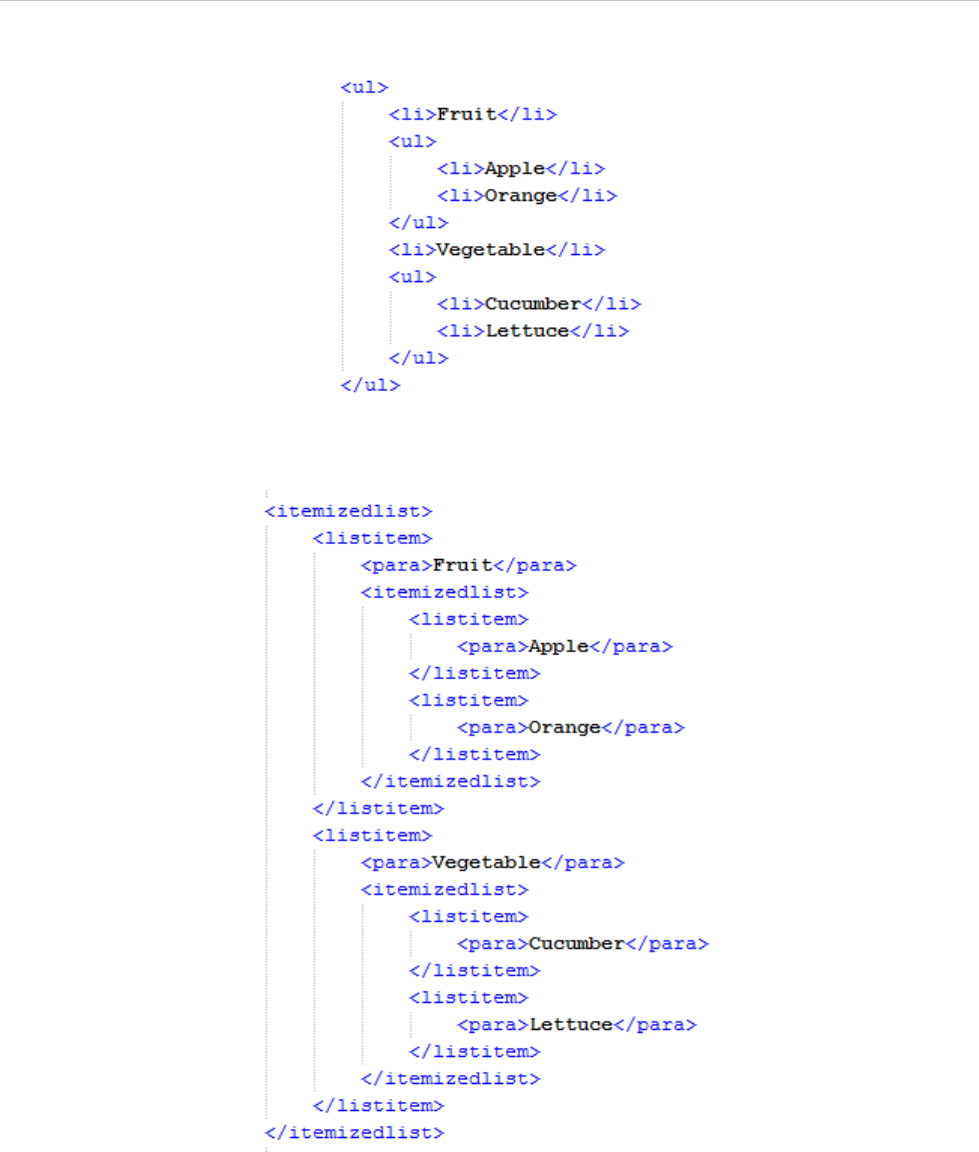
REPORT WIZARD
Appendix E: DocBook Support
371
Copyright © 1998-2015 No Magic, Inc.
Figure 367 -- HTML Tag for a Fragment of Unordered List
Figure 368 -- DocBook Tag for a Fragment of Unordered List
2.2 Ordered Lists
An ordered list is defined by the <ol> element. The ordered list element <ol> contains one or more <li> ele-
ments that define the actual items of the list preceded by numbers. The unordered list element shown in Fig-
ure 369 will be rendered in a DocBook format in Figure 370.
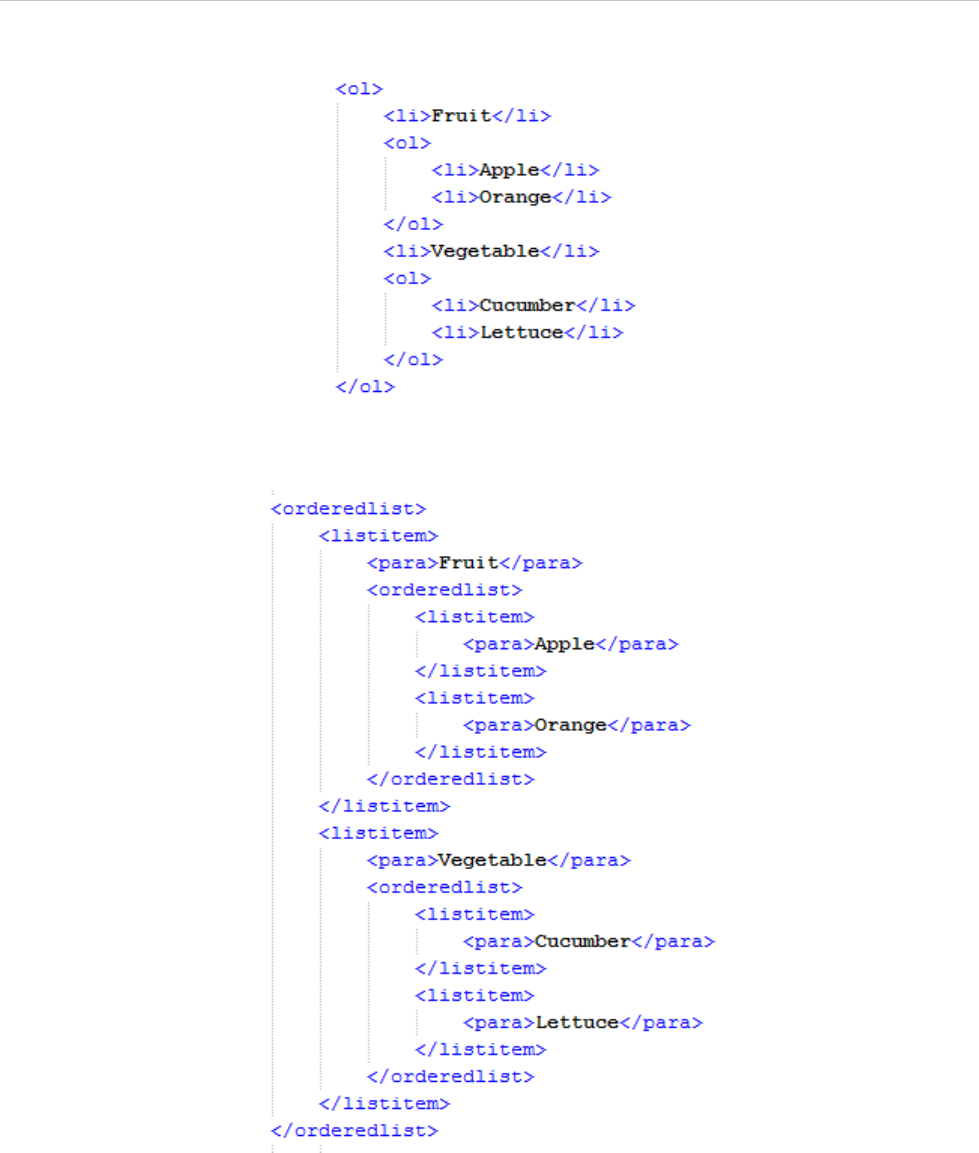
REPORT WIZARD
Appendix E: DocBook Support
372
Copyright © 1998-2015 No Magic, Inc.
Figure 369 -- HTML Tag for a Fragment of Ordered List
Figure 370 -- DocBook Tag for a Fragment of Ordered List
2.3 Definition Lists
A definition list is defined by <dl> element. A definition list element <dl> consists of two parts: (i) A term that
is created using the <dt> element and (ii) a description that is created using the <dd> element. The definition
list supports one to multiple terms and the corresponding definition(s). The term comes before the definition.
The definition list element shown in Figure 371 will be rendered in a DocBook format in Figure 372.
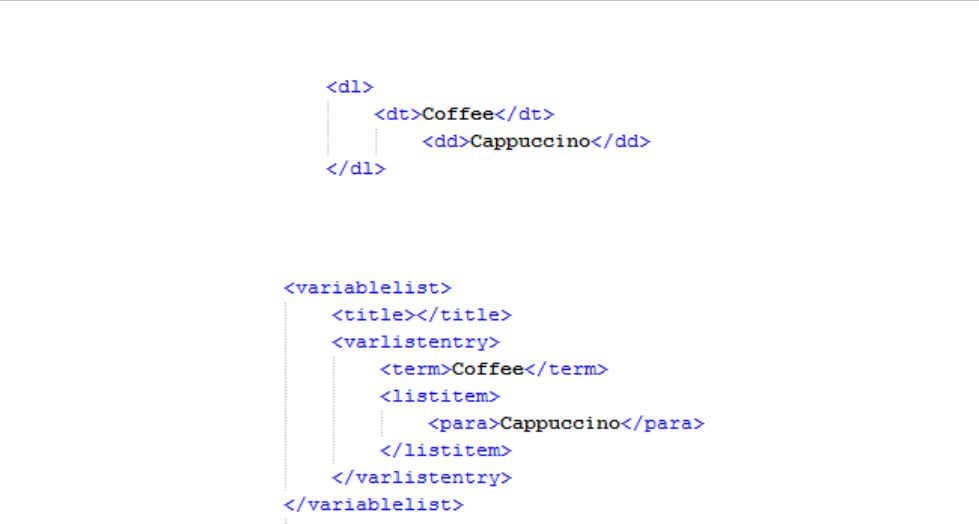
REPORT WIZARD
Appendix E: DocBook Support
373
Copyright © 1998-2015 No Magic, Inc.
Figure 371 -- HTML Tag for a Fragment of Definitions List
Figure 372 -- DocBook Tag for a Fragment of Definitions List
3. The Supported HTML Table Elements
The HTML table element (<table>) is divided into rows (<tr>), and each row may contain a number of table
data cells (<td>) or (<th>).
The <table>, <tr>, <td>, and <th> elements support two attributes: (i) align and (ii) valign.
(i) align
You use align to horizontally arrange items within a table cell. The possible values are as follows:
• "left" to left-align the content in a cell.
• "center" to center-align the content in a cell.
• “right” to right-align the content in a cell.
• “justify” to stretch the content with equal width.
• "char" to align the content to a specific character.
(ii) valign
You use valign to vertically arrange items within a table cell. The possible values are as follows:
• "top" to top-align the content in a cell.
• "middle" to center-align the content in a cell.
• "bottom" to bottom-align the content in a cell.
The table element shown in Figure 373 will be rendered in a DocBook format in Figure 374.
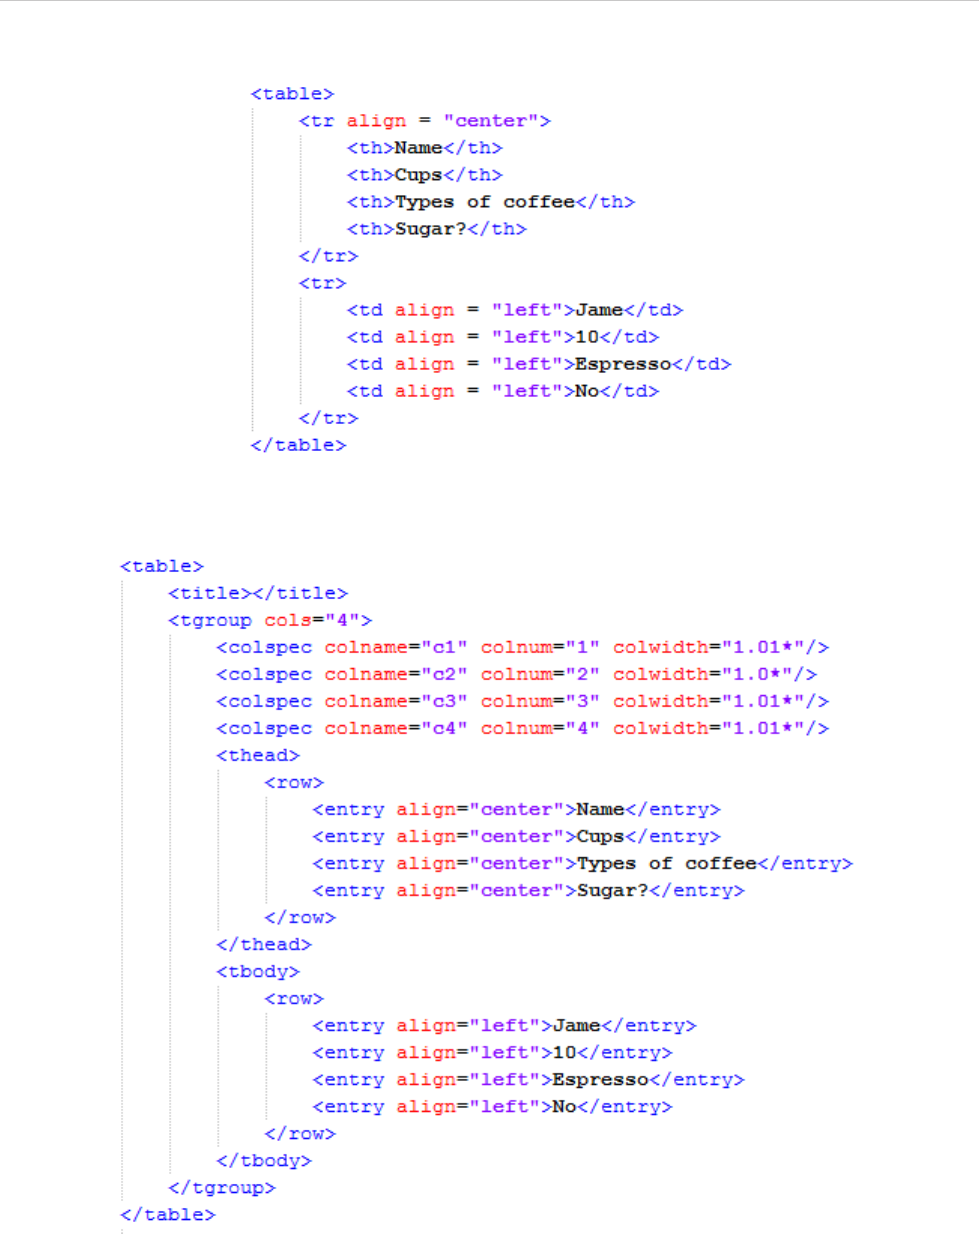
REPORT WIZARD
Appendix E: DocBook Support
374
Copyright © 1998-2015 No Magic, Inc.
Figure 373 -- HTML Tag for a Fragment of Table
Figure 374 -- DocBook Tag for a Fragment of Table
4. The Supported Style Sheet Properties
The DocBook engine of Report Wizard supports specific style sheets within an HTML element. The supported
style sheet properties are as follows:
4.1 Font
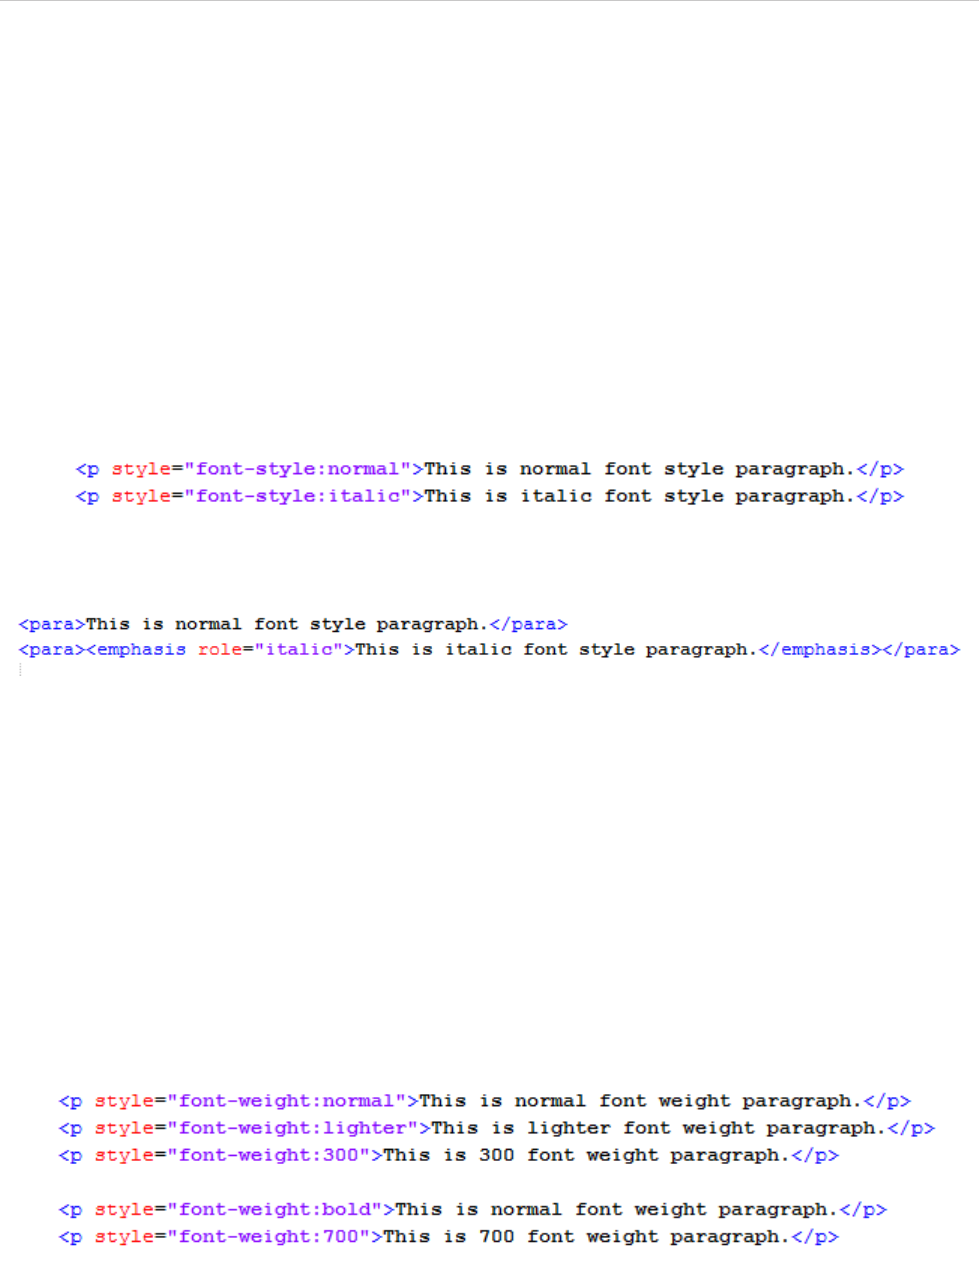
REPORT WIZARD
Appendix E: DocBook Support
375
Copyright © 1998-2015 No Magic, Inc.
4.2 Text Align
4.3 Text Decoration
4.4 Vertical Align
4.1 Font
The “font” property is a shorthand property for setting the “font-style”, and “font-weight” properties.
4.1.1 Font Style
The “font-style” property defines that the font be displayed either in normal way or in italics within a speci-
fied font family. The font-style shown in Figure 375 will be rendered in a DocBook format in Figure 376.
Figure 375 -- HTML Tag for a Fragment of Font Style
Figure 376 -- DocBook Tag for a Fragment of Font Style
4.1.2 Font Weight
The “font-weight” property specifies the weight of the font. The values “100” to “900” form an ordered
sequence where each value indicates the font weight. The keyword ‘normal’ is synonymous with “400”, and
“bold” is synonymous with “700”.
The following values are defined:
• normal, lighter, 100, 200, 300, and 400 will be rendered as ‘normal’.
• bold, bolder, 500, 600, 700, 800, and 900 will be rendered as ‘bold’.
The font-weight property shown in Figure 377 will be rendered in a DocBook format in Figure 378.
Figure 377 -- HTML Tag for a Fragment of Font Weight
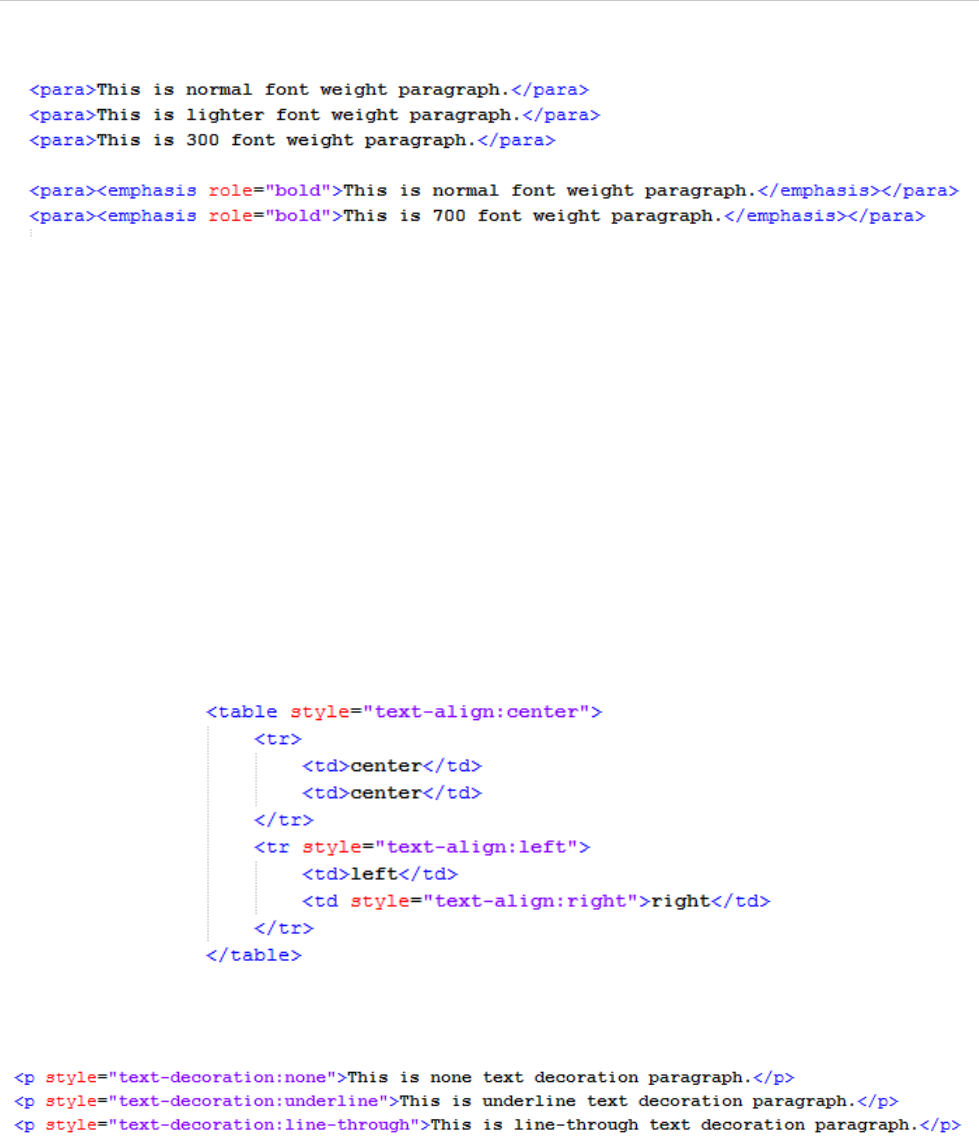
REPORT WIZARD
Appendix E: DocBook Support
376
Copyright © 1998-2015 No Magic, Inc.
Figure 378 -- DocBook Tag for a Fragment of Font Weight
4.2 Text Align
The text-align property specifies the horizontal alignment of inline content of a block. The supported tags of the
text-align property are <table>, <tr>, <td>, and <th>. The values of this property are:
• "left" to left-align the content.
• "center" to center-align the content.
• “right” to right-align the content.
• “justify” to stretch the content with equal width.
• "char" to align the content to a specific character.
The text-align property shown in Figure 379 will be rendered in a DocBook format in Figure 380.
Figure 379 -- HTML Tag for a Fragment of Text Align
Figure 380 -- DocBook Tag for a Fragment of Text Align
4.3 Text Decoration
The text-decoration property specifies decorations that are added to text. The values of this property are none,
underline, or line-through. The text-decoration property shown in Figure 381 will be rendered in a DocBook for-
mat in Figure 382.
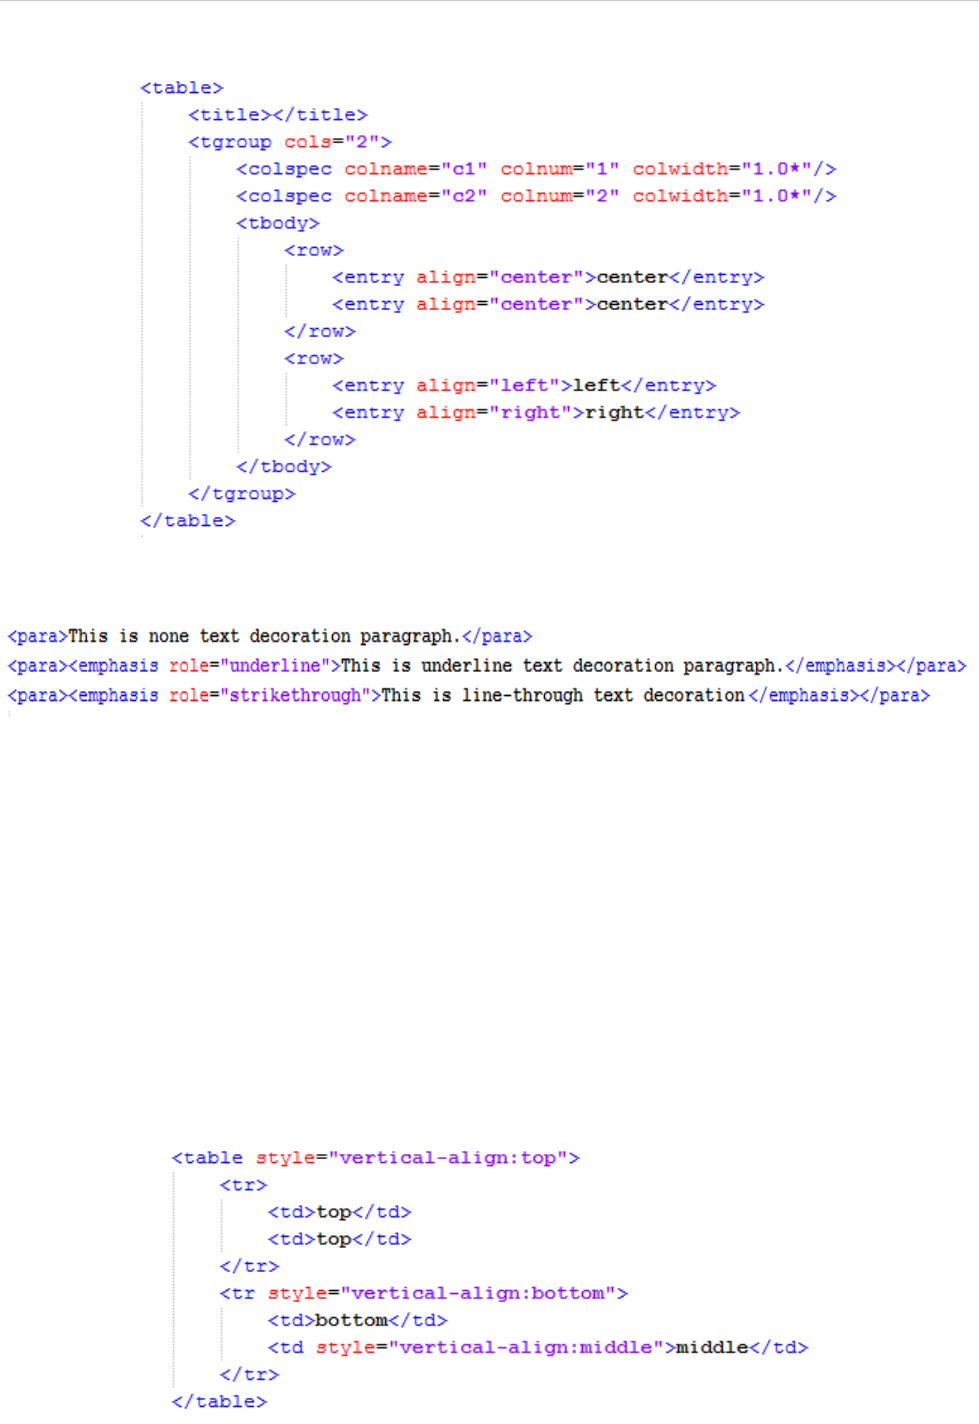
REPORT WIZARD
Appendix E: DocBook Support
377
Copyright © 1998-2015 No Magic, Inc.
Figure 381 -- HTML Tag for a Fragment of Text Decoration
Figure 382 -- DocBook Tag for a Fragment of Text Decoration
4.4 Vertical Align
The vertical-align property specifies the vertical alignment of text or an element within a lined box. The sup-
ported tags of vertical-align are <table>, <tr>, <td>, and <th>. The values of the vertical-align property are
top, middle, and bottom.
• "top" to top-align the content.
• "middle" to center-align the content.
• "bottom" to bottom-align the content.
The vertical-align property shown in Figure 383 will be rendered in a DocBook format in Figure 384.
Figure 383 -- HTML Tag for a Fragment of Vertical Align
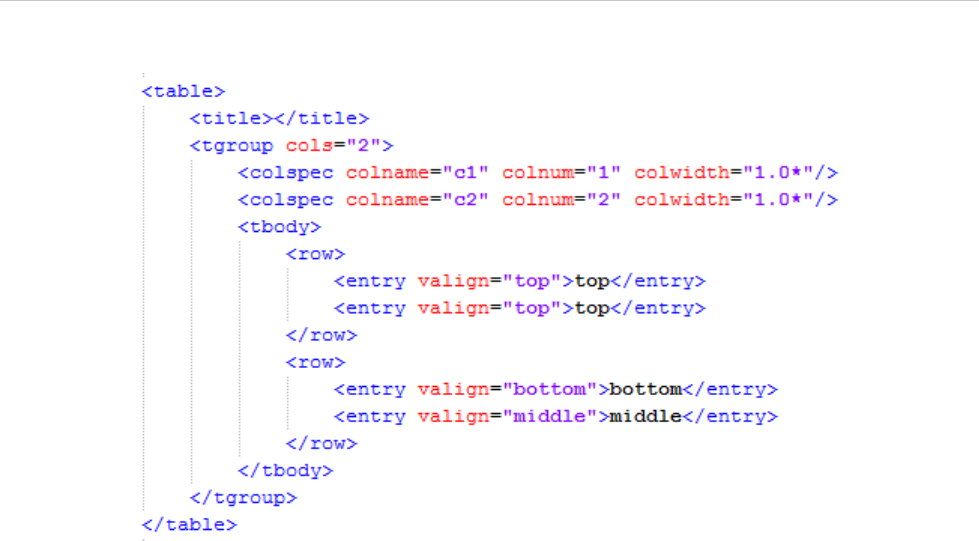
REPORT WIZARD
Appendix E: DocBook Support
378
Copyright © 1998-2015 No Magic, Inc.
Figure 384 -- DocBook Tag for a Fragment of Vertical Align
