Maintenance Manual
User Manual:
Open the PDF directly: View PDF ![]() .
.
Page Count: 21

SimuCopter Maintenance Manual
Version 1.0a
MAINTENANCE
MANUAL
1

SimuCopter Maintenance Manual
Version 1.0a
TableofContents
Table of Contents 2
Installation 4
Prerequisites 4
Installing SimuCopter 4
Creating a Flight Mode Diagram 5
Creating from a template (recommended) 5
Creating from scratch 5
Switching ArduPilot Modes (SITL / NAVIO) 9
Adding Simulink Blocks 10
Simulink 10
SimuCopter - Client Side 13
SimuCopter - ArduPilot Side 14
SimuCopter - SITL Side 14
Troubleshooting 15
Logs & progress 15
Agent shutdown / killall 15
Problem: Segmentation fault on arducopter start (NAVIO mode) 15
System Architecture 17
General 17
SimuCopter Integration Points 18
Communication 19
Caveats 21
Simulink shutdown quirks 21
Sporadic segmentation faults 21
Missing C++ library files in certain Simulink models 22
define private public 22
Message serialization - hardcoded buffers 22
No Simulink independence 22
2

SimuCopter Maintenance Manual
Version 1.0a
Installation
Prerequisites
●EMLID Real-Time Linux Image (or Raspbian for testing purposes)
●MATLAB 2015 or later with Simulink
InstallingSimuCopter
Step1:ClonetherepositoryontotheRaspberryPi
/home/pi$ git clone https://github.com/icedraco/simucopter-bridge.git
Step2:RuntheinstallerscriptontheRaspberryPi
/home/pi$ cd simucopter-bridge
/home/pi/simucopter-bridge$ bash install.sh
...
The installer script will automatically check for the presence of ardupilot and offer to download it if
missing. The script will also augment said ardupilot installation to work with the SimuCopter system.
Step3:Downloadsimucopter-matlabontothePC/controlstation
The directory is a part of the simucopter-bridge repository and can be safely extracted from within it onto
the PC via an SCP file transfer. Be sure to do this AFTER you run the installer!
WINDOWS/Desktop$ scp pi@10.66.66.254:simucopter-bridge/simucopter-matlab ./
3
SimuCopter Maintenance Manual
Version 1.0a
CreatingaFlightModeDiagram
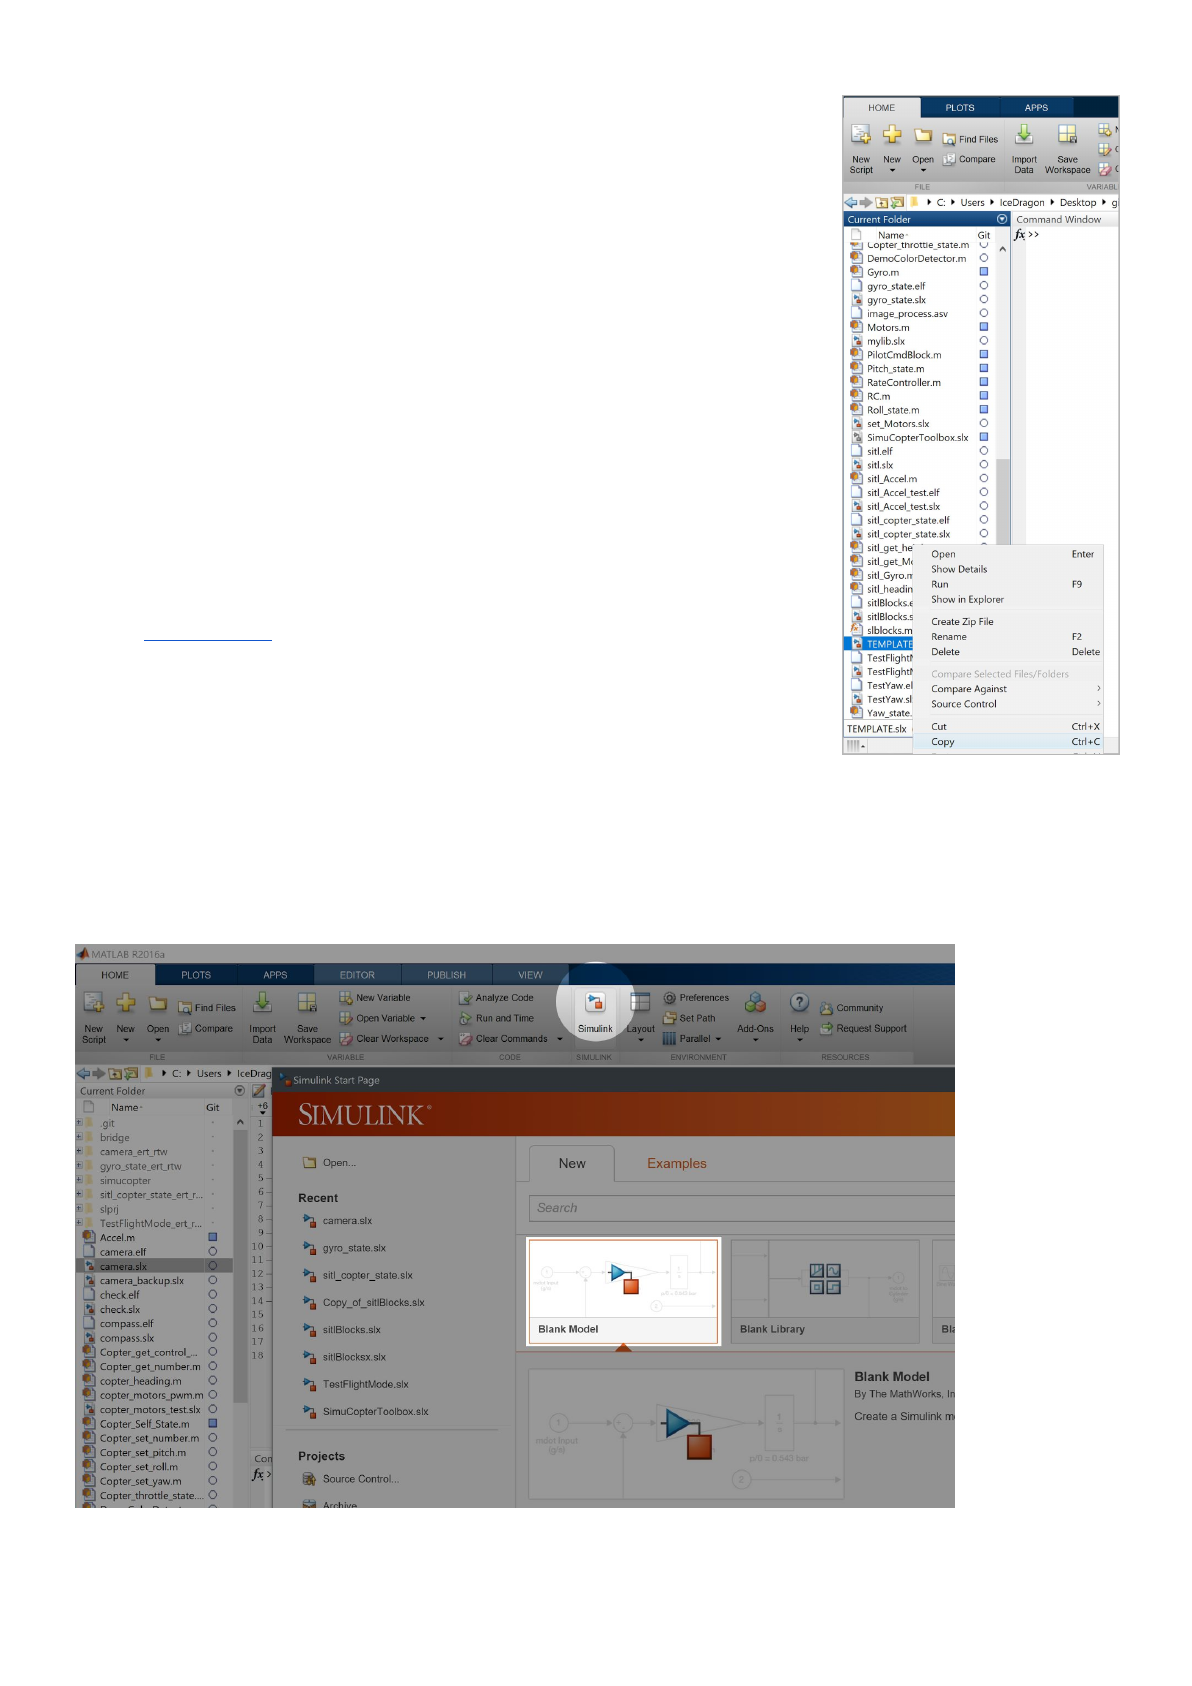
Creatingfromatemplate(recommended)
1. Locate the TEMPLATE.slx file in the simucopter-matlab directory.
2. Copy the TEMPLATE.slx file, then Paste it into the same location.
3. Rename the Copy of TEMPLATE.slx file into a flight mode.
4. Double-click the renamed SLX file to open a Simulink window, and
start designing your new flight mode diagram. The diagram should be
preconfigured to work with SimuCopter on a Raspberry Pi.
NOTE:
Be sure to check the Board Parameters in the Tools -> Options window:
●The correct IP and credentials should be set.
●The flight mode is deployed to SITL by default! If you need to use it
on physical hardware (navio), be sure to follow the instructions in the
NAVIO Mode section!
Creatingfromscratch
While it is much easier to use a template, in an event and the template file is damaged, or missing, the
following instructions will help you to reconstruct the template model.
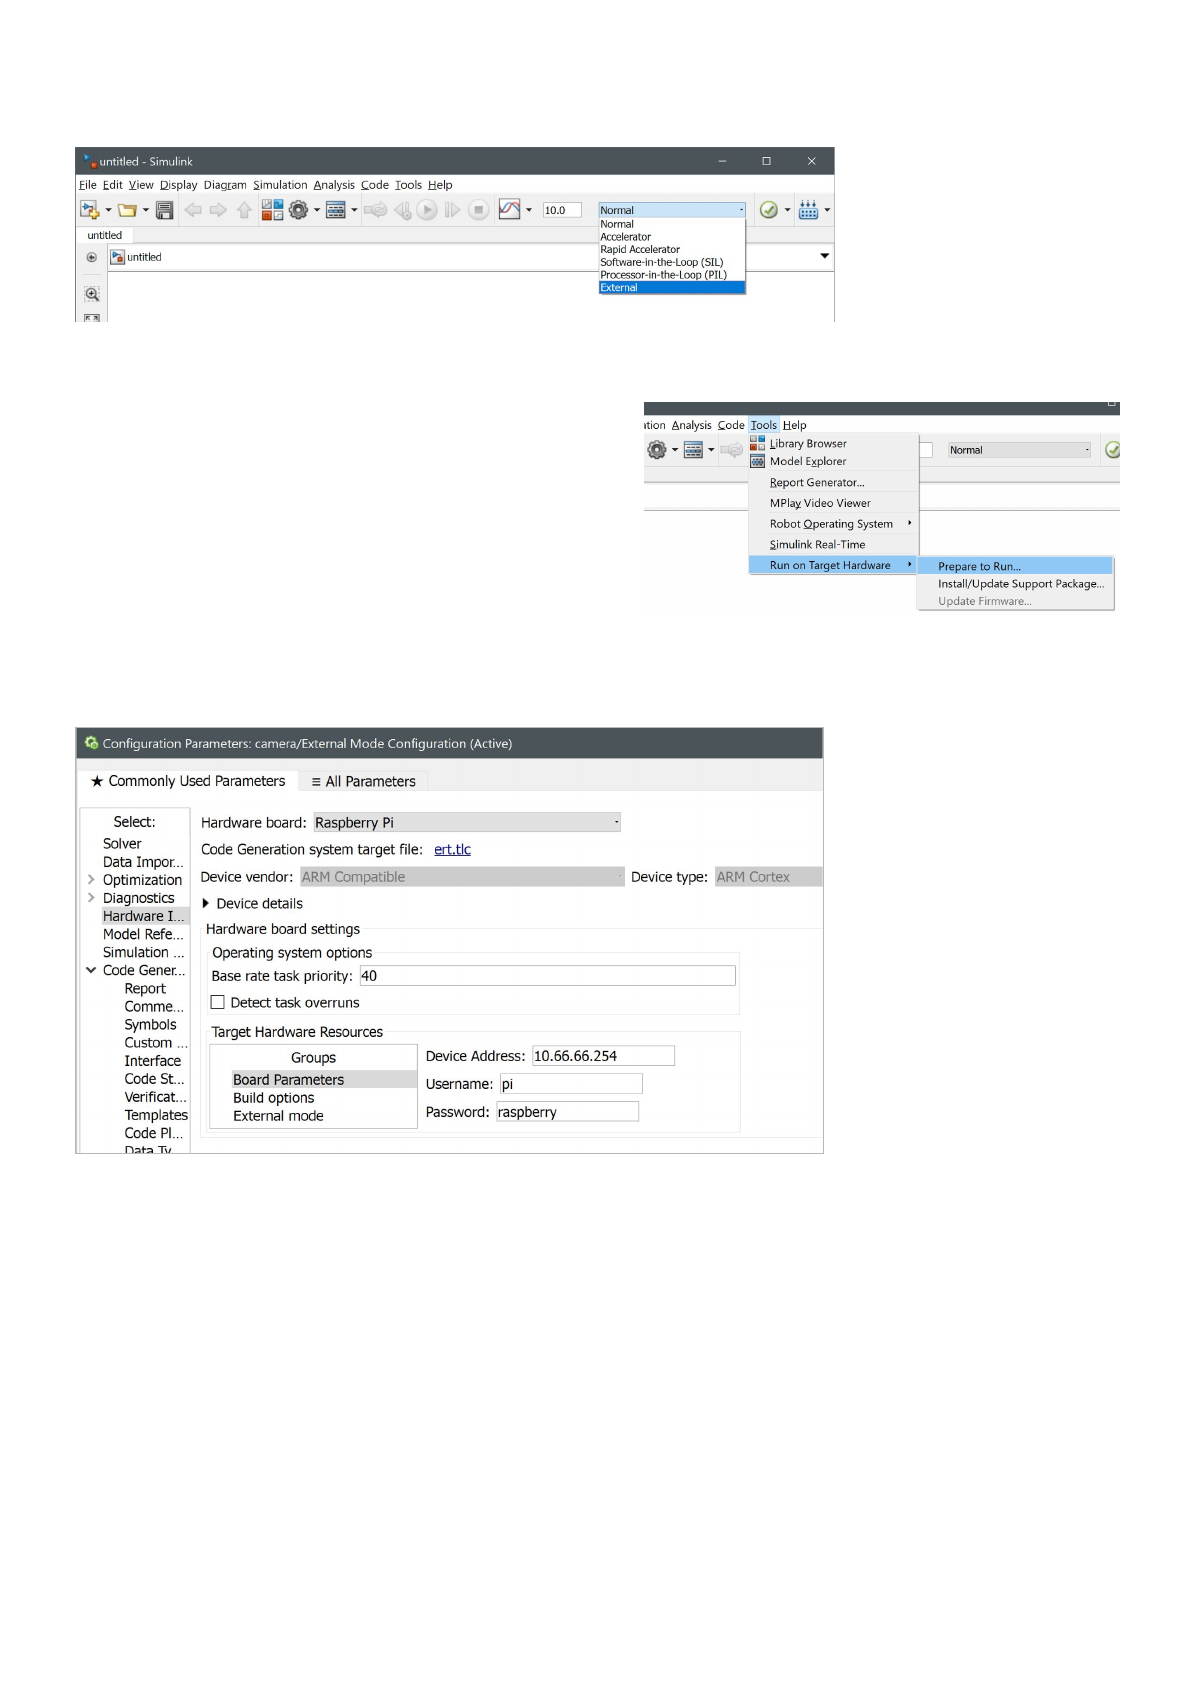
Step1:CreateablankSimulinkmodel
4
SimuCopter Maintenance Manual
Version 1.0a
Step2:ChangeexecutionmodetoExternal
Step3:Configuremodel
Click Tools -> Run on Target Hardware -> Prepare to run
to prepare, and open the Configuration Parameters
window.
Modify only the sections/settings mentioned below and
leave the rest as default, unless you have a reason not
to...
Section: Hardware Implementation
●Change Hardware board to be Raspberry Pi
●Configure Target Hardware Resources section below as follows:
○Board Parameters:
■Device Address: IP address of the Raspberry Pi (e.g.: 10.66.66.254)
■Username: username to log into (default: pi)
■Password: password to log in with (default: raspberry)
○Build Options:
■Build Action: Build and run
■Build directory: /home/pi/simucopter
5
SimuCopter Maintenance Manual
Version 1.0a
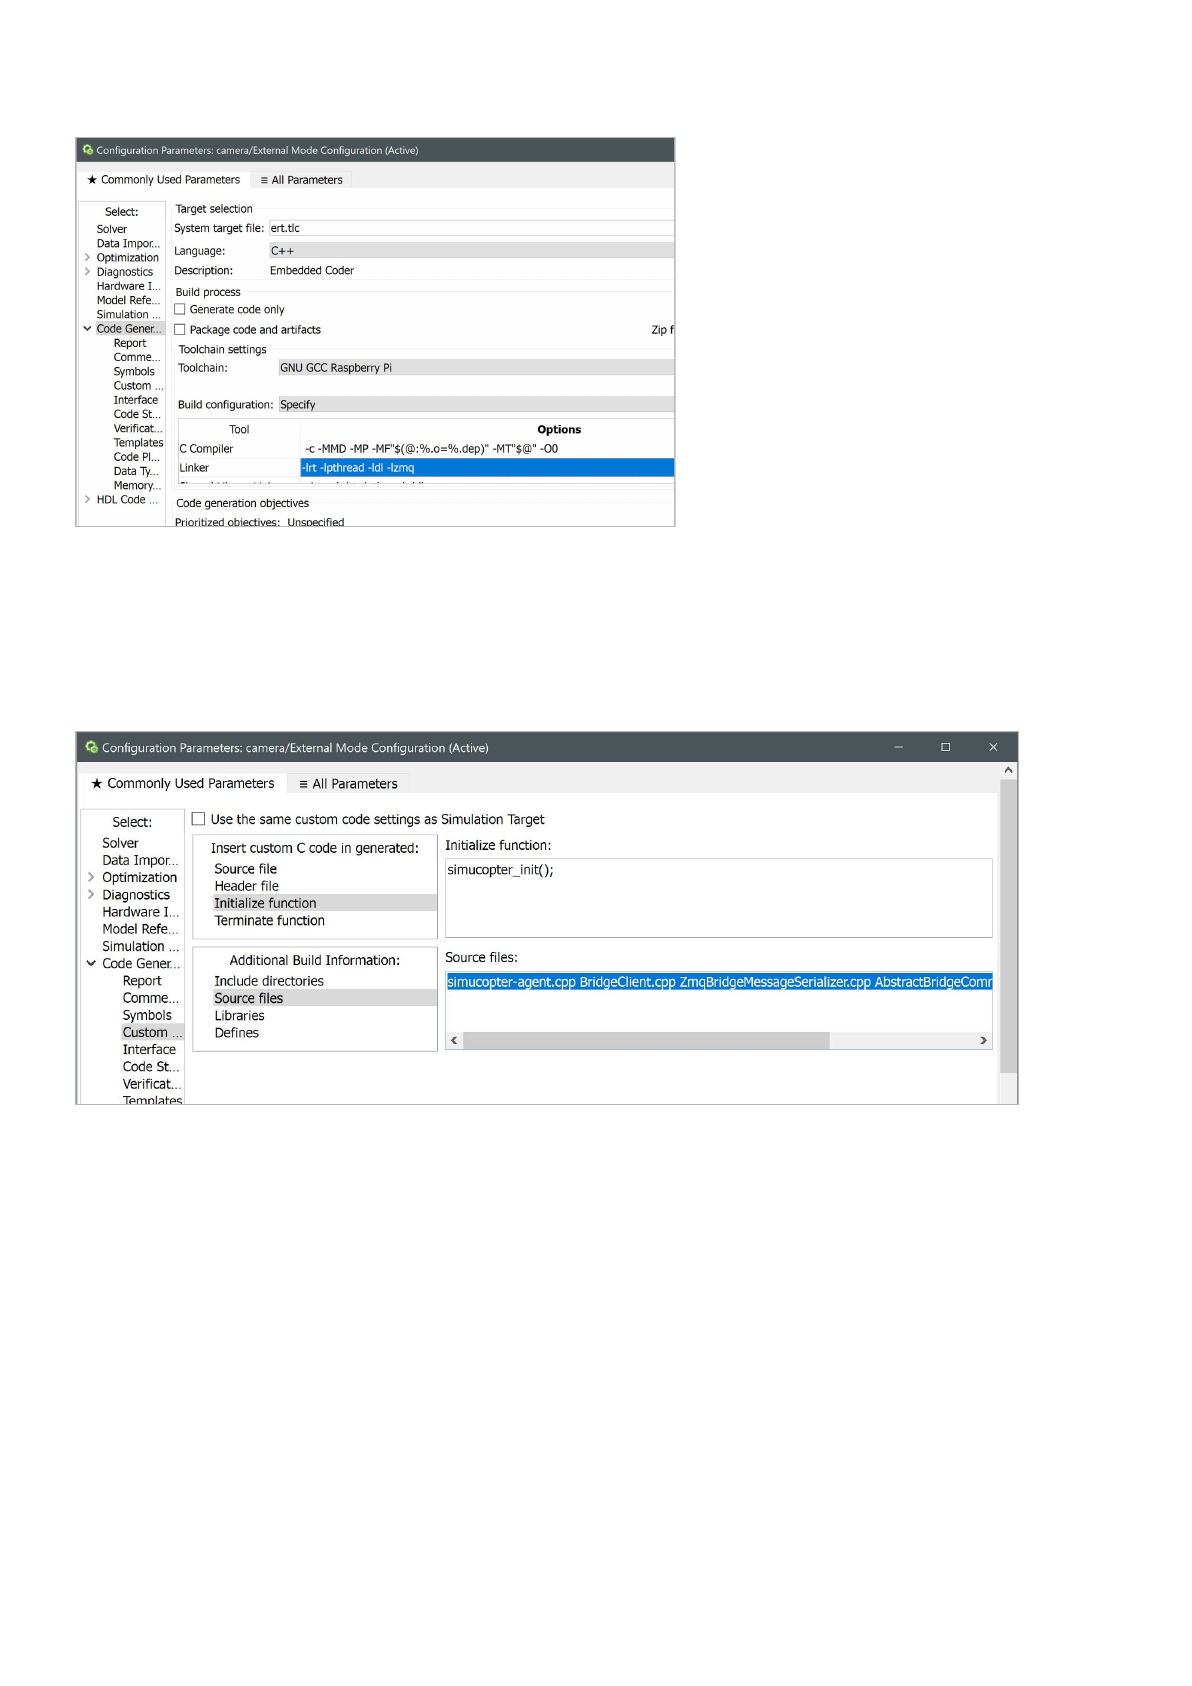
Section: Code Generation
●Language: C++
●Build configuration: Specify
○Linker: -lrt -lpthread -ldl -lzmq
○C++ Linker: -lrt -lpthread -ldl -lzmq
Section: Code Generation / Custom Code
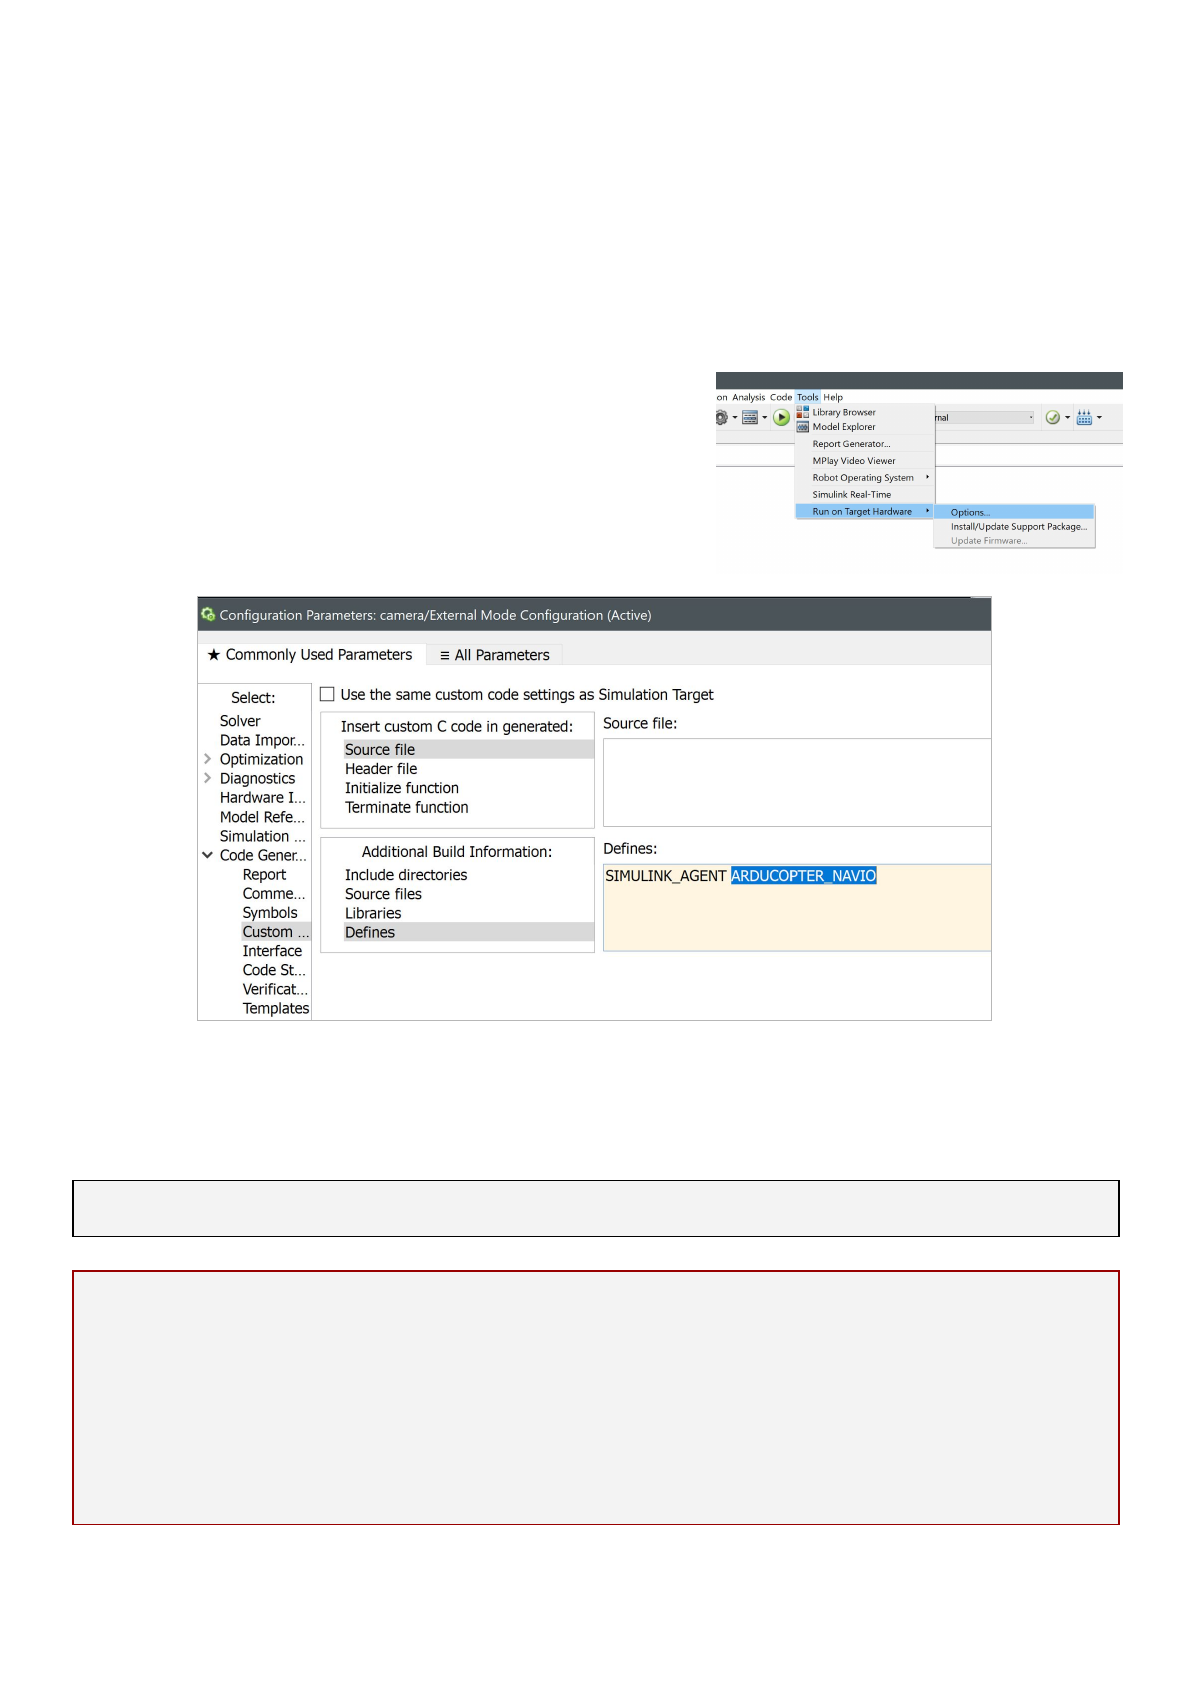
●Insert custom C code in generated:
○Source file:
Nothing
○Header file:
Nothing
○Initialize function: simucopter_init();
○Terminate function: simucopter_stop();
●Additional Build Information:
○Include directories(space-separated):
simucopter bridge
○Source files (space-separated):
simucopter-agent.cpp BridgeClient.cpp BridgeMessage.cpp
ZmqBridgeMessageSerializer.cpp AbstractBridgeCommandHandler.cpp
○Libraries:
Nothing
○Defines: SIMULINK_AGENT
6

SimuCopter Maintenance Manual
Version 1.0a
Section: Code Generation / Interface
●Code interface packaging: Nonreusable function
Any configuration not mentioned here can be left as-is.
NOTE
Don't mistake the Simulation Target section with Code Generation / Custom Code! Both sections
appear the same. However, the former is supposed to remain empty (unless you yourself have a reason
to reconfigure it) while the latter is to be configured as mentioned above!
At this point, you should have re-created the model template from the "Creating from a template" step.
You may proceed from there in creating your Flight Mode Diagram.
7
SimuCopter Maintenance Manual
Version 1.0a
SwitchingArduPilotModes(SITL/NAVIO)
The system can be configured to work in SITL (software-in-the-loop / "simulation") mode or in NAVIO
(hardware) mode.
NAVIOMode
In short: define ARDUCOPTER_NAVIO in the Simulink model configuration
Procedure:
1. Click Tools Run on Target Hardware Options...→ →
2. Select Code Generation / Custom Code
3. In Defines section, add the string: ARDUPILOT_NAVIO
SITLMode
This mode is used by default. In order to return to it, undo the instructions for NAVIO mode above.
TIP: See simucopter-agent.cpp to understand how the two modes are activated.
NOTE
Switching between SITL and NAVIO modes requires a lengthy recompilation process of the ArduPilot
software! It may take several minutes for the first Simulink flight mode deployment to work!
You can monitor the progress of the compilation from the Raspberry Pi device by reading the log file of
the flight mode (the name is usually the same as the SLX filename):
pi$ tail -f ~/FlightModeName.log
8

SimuCopter Maintenance Manual
Version 1.0a
AddingSimulinkBlocks
Simulink
ClicktheBlockLibraryiconinaSimulinkModelwindow
Addauser-definedfunctionblocktothemodel
Select the "User-Defined Functions" section in the Simulink Library Browser, and drag the MATLAB System
block onto the model window.
9

SimuCopter Maintenance Manual
Version 1.0a
Createanew.mfilefortheblock
Use the BLOCK_TEMPLATE.m file to create the code that the new block is going to execute:
●Right-click the BLOCK_TEMPLATE.m file, select Copy, then paste into the same folder.
●Rename the new Copy of BLOCK_TEMPLATE.m file into the name of the block you are going to
create. For example: Copter_Get_Pitch.m if your block name is going to be Copter_Get_Pitch.
●Double-click the .m file in order to edit it.
●Change the classdef string to match the name of your block (e.g., from BLOCK_TEMPLATE into
Copter_Get_Pitch)
●Change the copter_get_???? string to the name of the C function that this block will execute. In our
case, we name it copter_get_pitch.
IMPORTANT
Code executed solely on the Raspberry Pi MUST be inside the "coder.target('Rtw')" if block! Failing to do
so will result in Simulink trying to compile locally (i.e., on Windows) code that does not exist!
Associatetheblockcodefilewiththeblockitself
●Double-click the new block you've created to get the
Block Parameters dialog.
●Click the "Browse" (folder) button and select the
newly created Copter_Get_Pitch.m file inside.
●Click OK to associate the code with the block.
10
SimuCopter Maintenance Manual
Version 1.0a
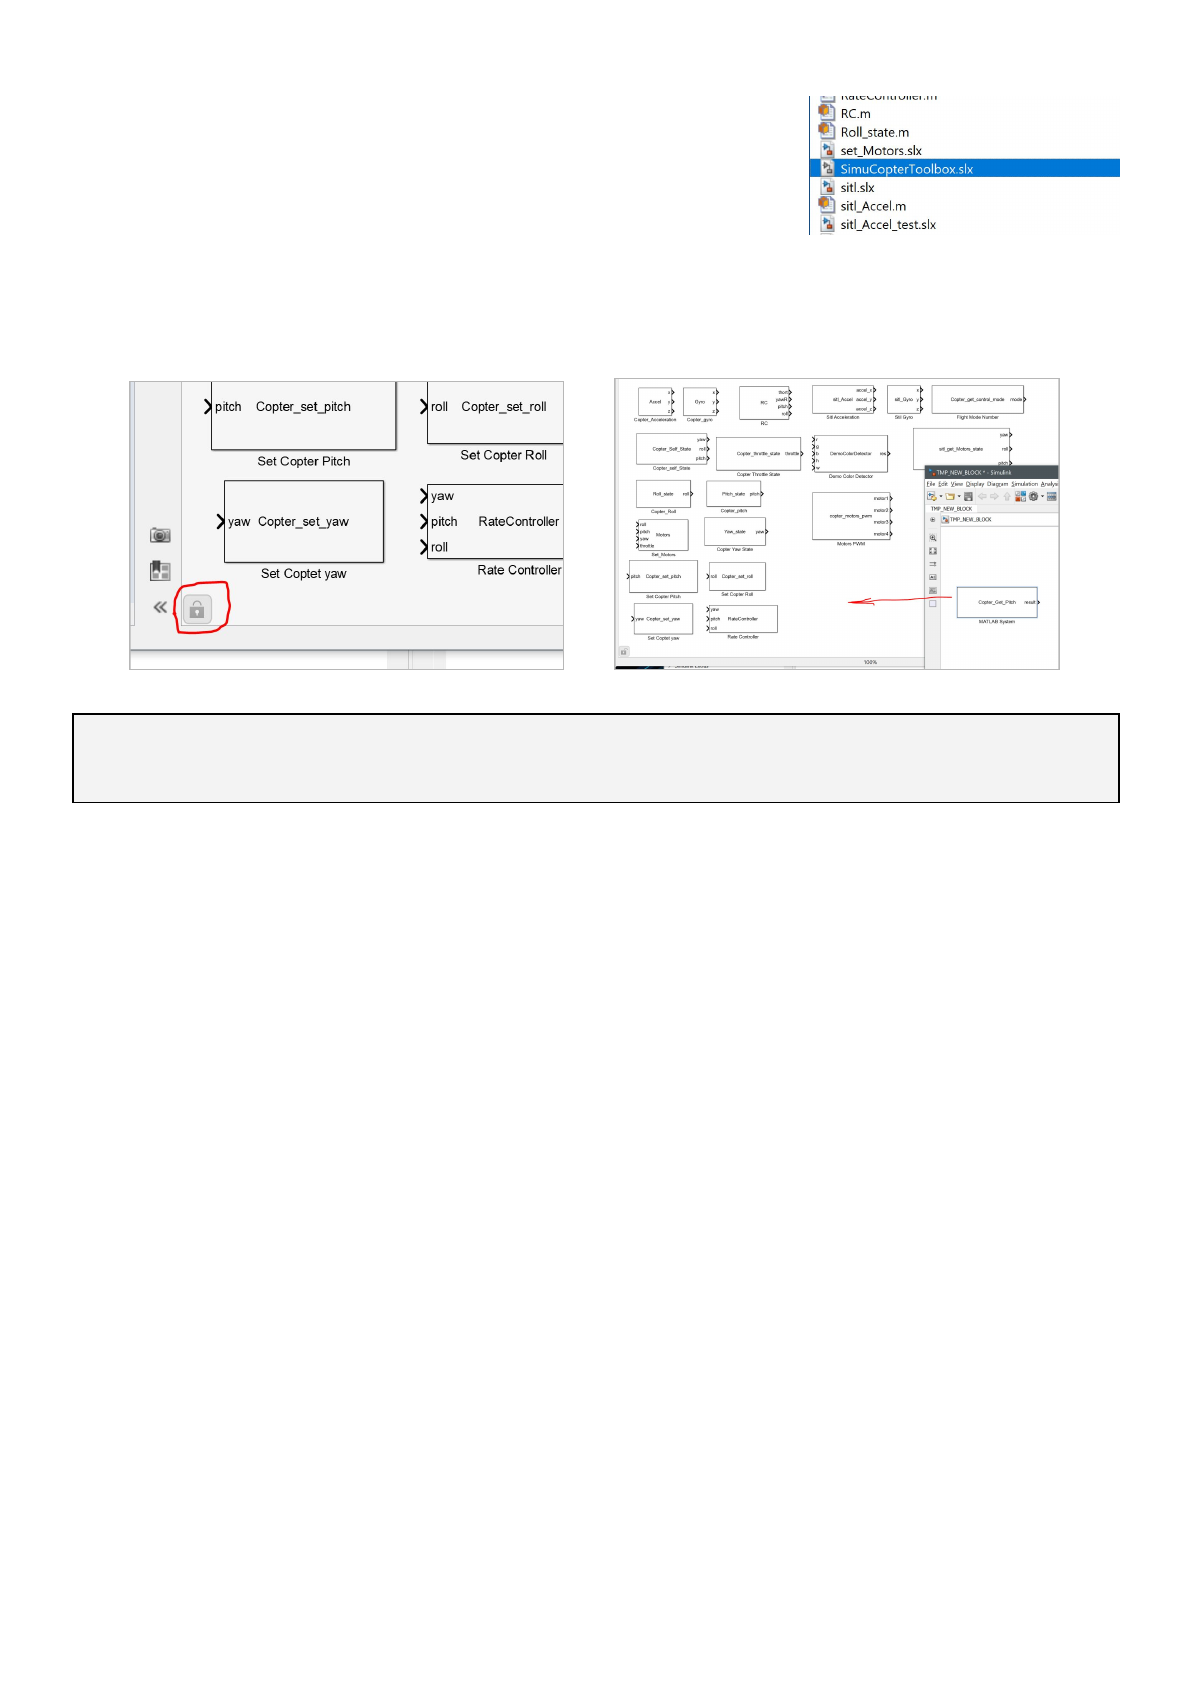
AddthenewlycreatedblocktotheSimuCopterBlockLibrary
●Locate and double-click the SimuCopterToolbox.slx file in the
left-hand file list; double-click it.
●Click the small "lock" icon in the bottom-left corner of the
window.
●Drag the newly created block from the model window into the SimuCopterToolbox window.
●Re-activate the lock and save changes.
At this point, you have created a Simulink block. However, you still need to add support for it in the
backend!
11

SimuCopter Maintenance Manual
Version 1.0a
SimuCopter-ClientSide
You are now going to edit the files/code used by the client side of the SimuCopter system: the side that is
ran by the Simulink Agent executable. The files/code you are about to edit must be available to the
Simulink software on your PC (i.e., the simucopter-bridge/simucopter/ folder on Windows)!
simucopter.h
Add a declaration to the header file for the function you defined in the .m file. The name is the same as the
name in the string:
double copter_get_pitch();
simucopter-agent.cpp
Add a definition of the copter_get_pitch function that calls a corresponding method of the ArduPilot
Bridge Client:
double copter_get_pitch() {
return G_ARDUPILOT->get_pitch();
}
SimuCopterMessage.h
Add a new SimuCopterMessage ID:
GET_PITCH = 0x6666;
IMPORTANT: This file must be synchronized with the server side below!
SimulinkBridgeinterface.h
Add an inline method that requests a double from the SimuCopter server:
inline double get_pitch() { return m_client->request_double(SimuCopterMessage::GET_PITCH); };
12

SimuCopter Maintenance Manual
Version 1.0a
SimuCopter-ArduPilotSide
Now it's time to edit the files/code used by the server side of the SimuCopter system: the side that is ran
by ArduPilot. The files/code you are about to edit must be available to the ArduPilot software on the
Raspberry Pi!
ArduCopterRequestHandler.cpp
IMPORTANT
This file should only be edited if you are adding a getter/request block! Blocks that instruct ArduPilot to
do something (rather than simply fetch information) should go in the next file instead!
●In the register_self method, add a line that shows that you can handle the new GET_PITCH
message: service.set_request_handler(SimuCopterMessage::GET_PITCH, this);
●In the handle method add a case that handles the aforementioned command. See available code in
that file for an example.
ArduCopterCommandHandler.cpp
IMPORTANT
This file should only be edited if you are adding a setter/command block! Blocks that obtain information
from ArduPilot should go in the previous file instead and not this one!
●Edit the do_handle and handle functions, adding a case for the SimuCopterMessage::GET_PITCH
that handles this command. See available code in that file for an example.
SimuCopter-SITLSide
NOTE: SITL side only has a request handler! It does not yet support commands!
The procedure is very similar to adding a block to the ArduPilot side with the SitlRequestHandler.cpp file
being used instead of ArduCopterRequestHandler.cpp!
13

SimuCopter Maintenance Manual
Version 1.0a
Troubleshooting
Logs&progress
After the flight model is finished "Building" in Simulink, you can view the execution progress on the
Raspberry Pi device itself by reading/tail-ing the log file. The log file is normally kept in the home folder
(i.e., /home/pi) under the same name as the SLX file that's being activated.
Example
tail -f /home/pi/TestFlightMode.log
Agentshutdown/killall
If your Simulink is stuck, and you need to shut down the system in order to restart it, you need to kill all the
relevant processes still running on the Raspberry Pi. In order to do it, you must perform a kill command as
a root user, taking out both - the Simulink agent (if still running), and ArduPilot executable.
Use the following commands to do so:
sudo -i
ps -ef | grep "\.elf -port" | grep -v grep | awk '{print $2}' | xargs kill -9
ps -ef | grep copter | grep -v grep | awk '{print $2}' | xargs kill -9
You may want to put these commands in a script, as it isn't rare for such measures to be needed from time
to time.
Problem:Segmentationfaultonarducopterstart(NAVIOmode)
This usually happens if ArduCopter was not launched as root. Use sudo in order to launch ArduCopter
instead: sudo ~/ardupilot/build/navio/bin/arducopter -C /dev/ttyAMA0 -A tcp:0.0.0.0:5760
THIS IS NOT THE PROBLEM WITH SPORADIC SEGMENTATION FAULTS AFTER THE STARTUP STAGE! SEE
CAVEATS SECTION FOR THE MORE NASTY ISSUE.
14

SimuCopter Maintenance Manual
Version 1.0a
TECHNICAL
MANUAL
15
SimuCopter Maintenance Manual
Version 1.0a
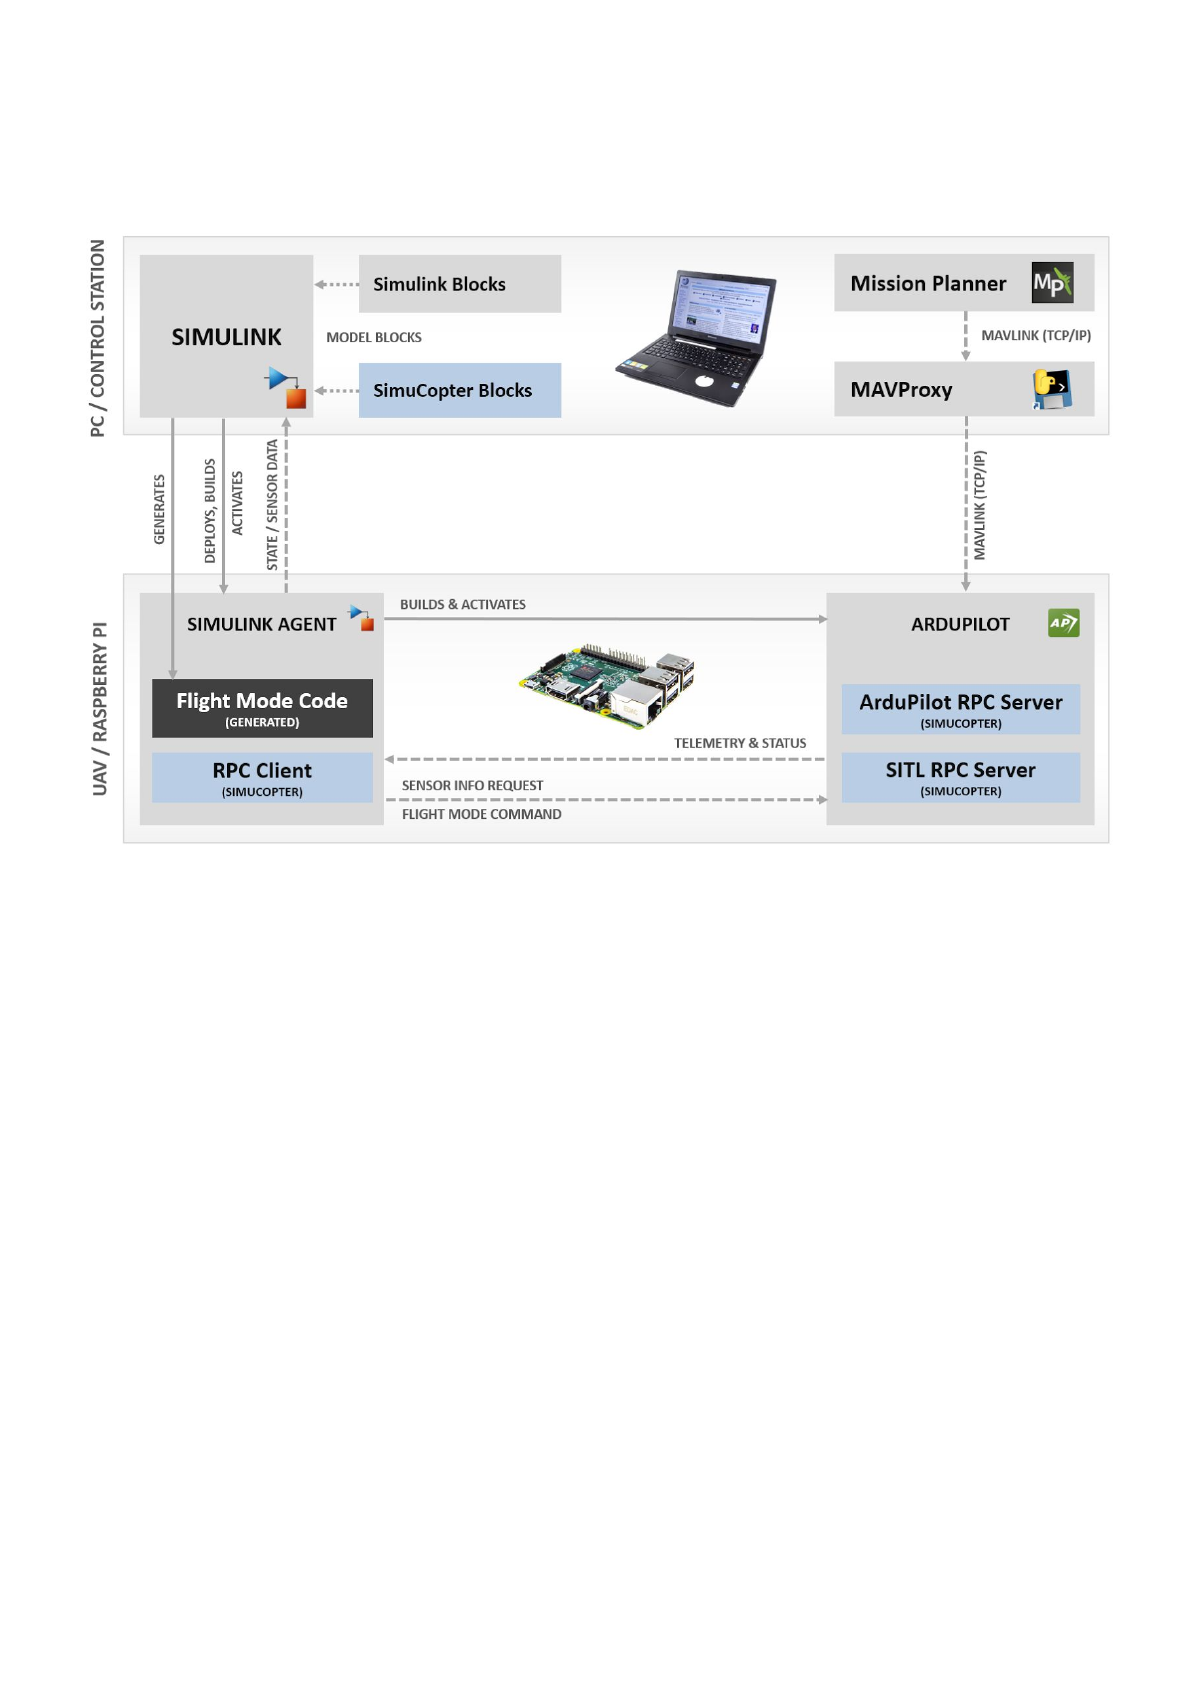
SystemArchitecture
General
The entire system consists of two sides, both of which are extended by SimuCopter:
●PC/CONTROL STATION
Runs the MATLAB/Simulink software; allows design and live monitoring of flight modes; optional.
○The Simulink software is expanded with ArduPilot-specific "SimuCopter Blocks". Said blocks
are used to access ArduPilot in various ways, whether to monitor its state, or even control it.
●RASPBERRY PI
A device/board that sits on top of the UAV; responsible for controlling it. This area has two subcom-
ponents: the Simulink Agent and ArduPilot itself.
○Simulink Agent is an executable compiled by the Simulink software and deployed onto the
Raspberry Pi (UAV). It runs on behalf of Simulink, keeps Simulink itself informed via the net-
work, and executes commands on the device itself (including those that control ArduPilot).
■Simulink Agent contains the Flight Mode Code that the user designed within it!
■This component is expanded with RPC-like "bridge" client code that allows it to send
messages to ArduPilot, as well as receive information about the UAV's current state.
○ArduPilot is the autopilot software with its basic capabilities.
■This component is expanded with RPC-like "bridge" server code that handles
incoming requests/commands, and performs various procedures on demand.
16
SimuCopter Maintenance Manual
Version 1.0a
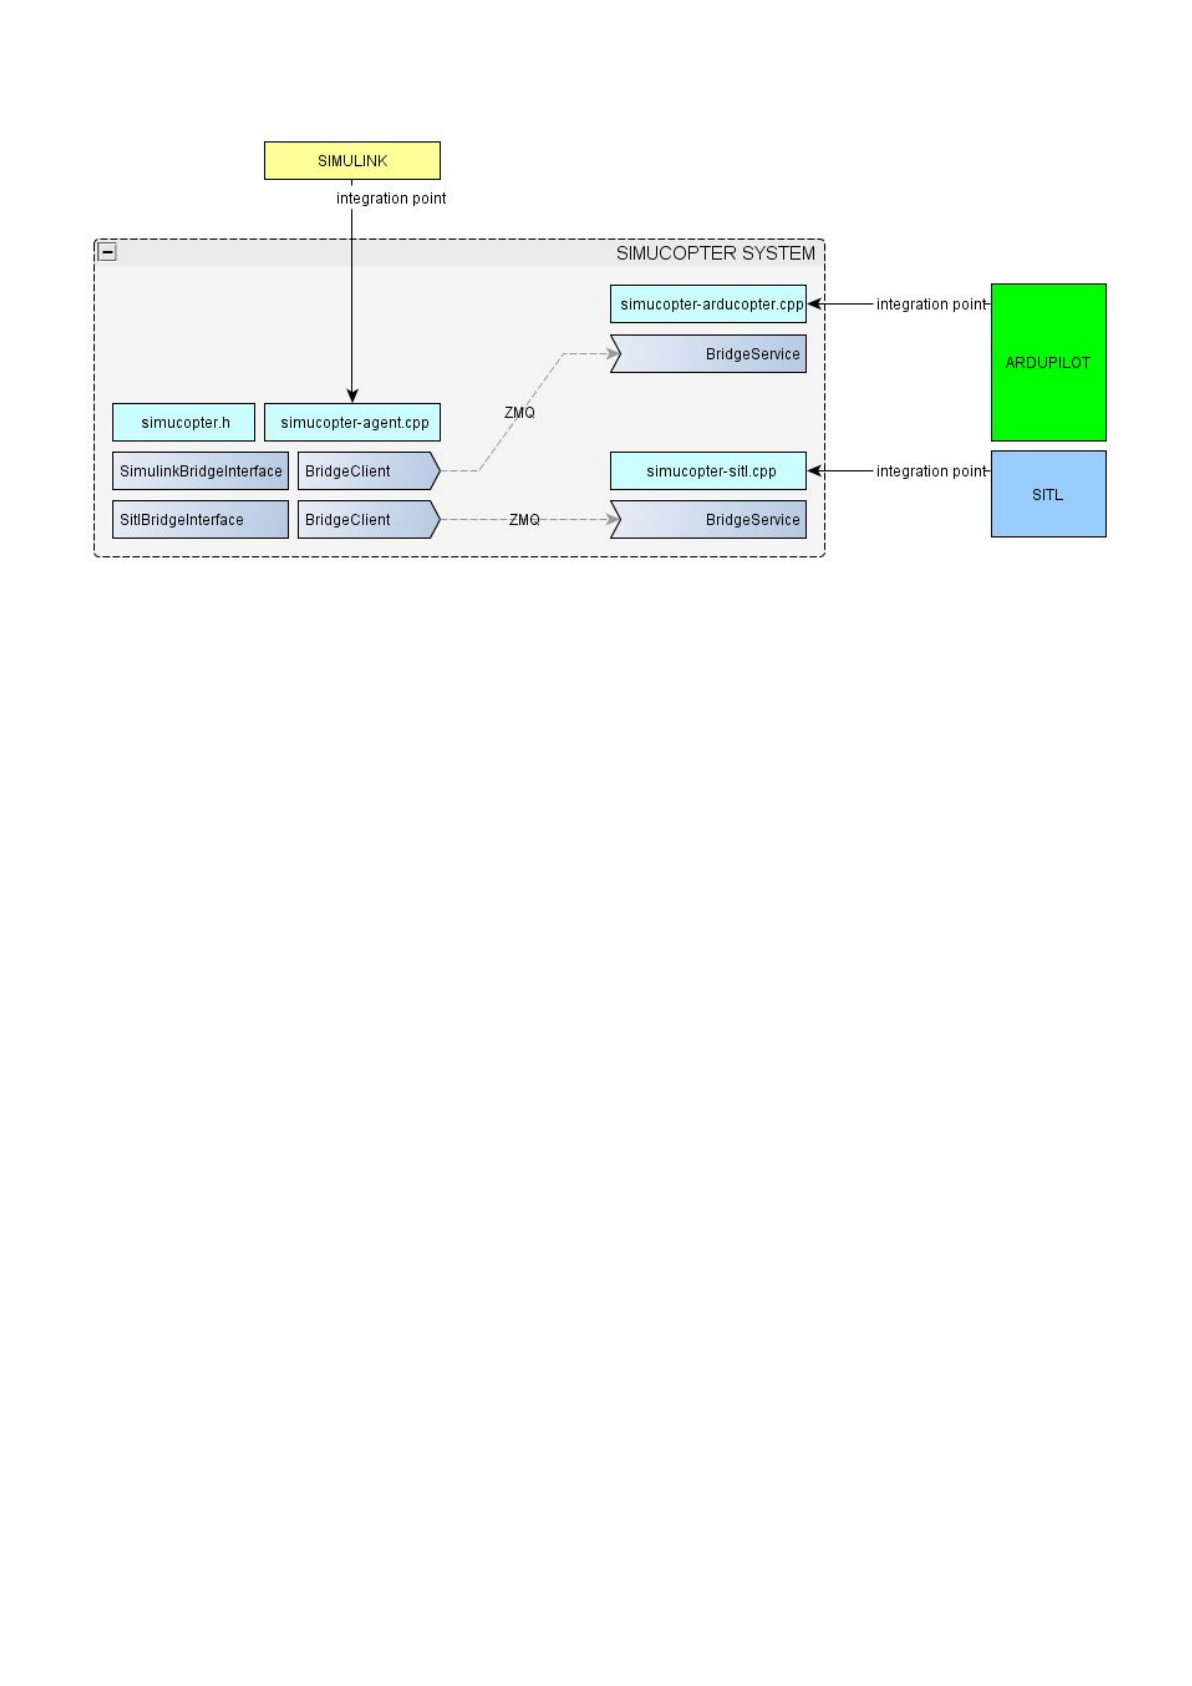
SimuCopterIntegrationPoints
The SimuCopter system extends both sides with communication-related code:
●ARDUPILOT / SITL
Each of the two components is extended with a Bridge Service server-like module, whose purpose
is to receive requests and commands, handle/execute them, and respond as necessary:
○The ARDUPILOT component interacts with the code in simucopter-arducopter.cpp
The initialization code is located in ardupilot/ArduCopter/system.cpp
○The SITL component interacts with the code in simucopter-sitl.cpp
The initialization code is located in ardupilot/libraries/AP_HAL_SITL/HAL_SITL_Class.cpp
The code at these integration points enable communication with SIMULINK.
●SIMULINK
Extended with two Bridge Client modules, whose purpose are to send requests to the ARDUPILOT
and SITL component respectively, and receive responses from them.
The initialization code and the Simulink block functions are located in the provided
simucopter/simucopter-agent.cpp file and included from the simucopter.h header file (see one of
the Simulink block for an example)
Both of these sides share the same bridge library: a library that provides a transport of arbitrary messages
over ZeroMQ protocol. This bridge library is (and should be) identical on both sides, whereas the code that
uses it to send or process messages - is not.
17
SimuCopter Maintenance Manual
Version 1.0a
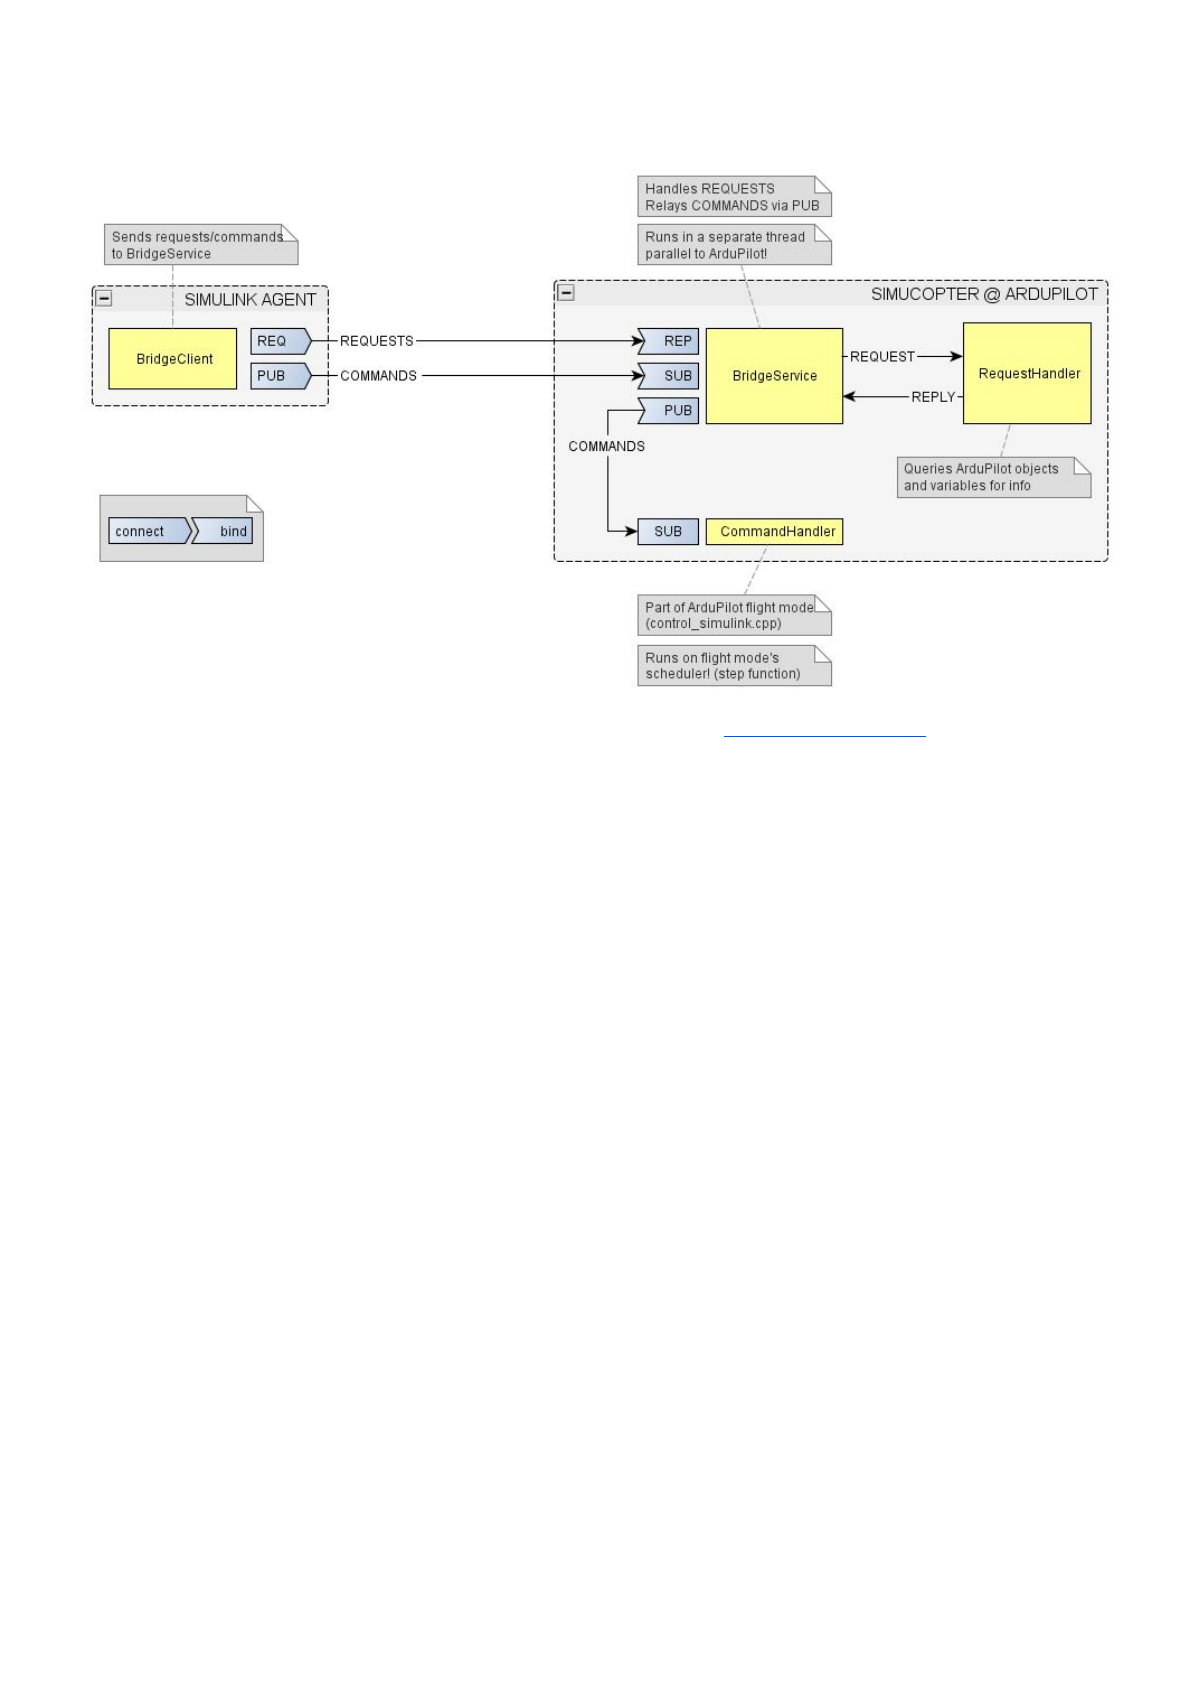
Communication
The communication between Simulink and ArduPilot is done using ZeroMQ socket pairs. There are two
types of pairs currently used in the bridge:
●REQ-REP (Request-Reply)
A "request" is delivered to the remote component. A "reply" must be provided by the remote
component before another request can be sent. This pair is used to pass REQUEST messages from
Simulink Agent to ArduPilot, and each request blocks execution until a response is received.
●PUB-SUB (Publish-Subscribe)
A publisher dispatches messages en masse to all its subscribers. A subscriber may not yet be
present, nor is it expected to keep up. If the subscriber cannot keep up, a message will be lost. This
pair is used to pass COMMAND messages from Simulink Agent to ArduPilot; I/O operations on
either side don't block execution.
MessageDeliverySequence
1. Simulink Agent executes simulink.h functions during its "step" function.
2. Each simulink.h function on the client side triggers an appropriate SimulinkBridgeInterface or
SitlBridgeInterface method.
3. Each such method creates a REQUEST or COMMAND message (depending on the block).
4. Simulink/SitlBridgeIntergace passes the command to the BridgeClient for delivery.
5. BridgeClient sends the command through a ZeroMQ socket.
(REQ/REP for REQUEST messages, PUB/SUB for COMMAND messages)
6. BridgeService receives the command through a ZeroMQ socket belonging to the same socket pair.
7. BridgeSerivce passes the message to a RequestHandler or a CommandHandler.
8. Request/CommandHandler extracts data from the message, and executes relevant commands on
the ArduPilot or SITL side.
9. RequestHandler sends back a REPLY message with the resulting values (if applicable).
18
SimuCopter Maintenance Manual
Version 1.0a
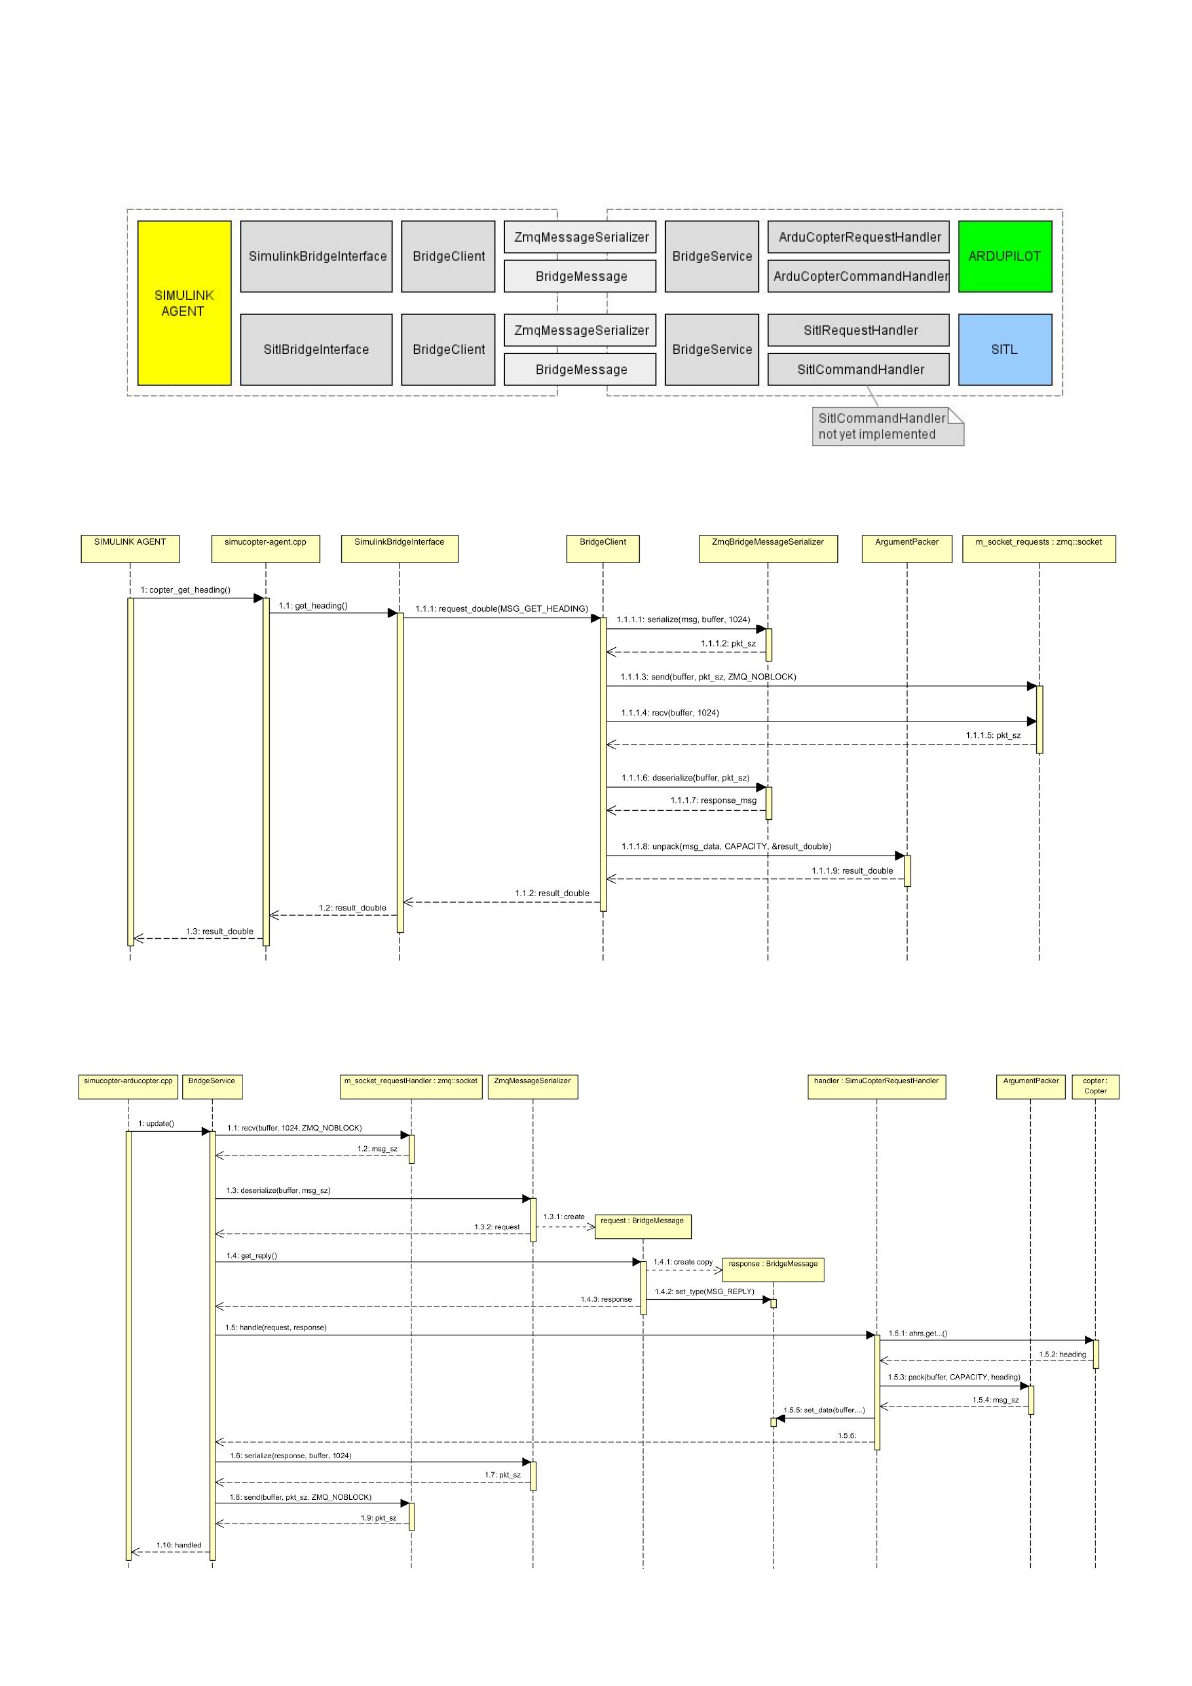
MessageDeliverySequence(cont'd)
The following image illustrates the connection between each sub-component responsible for creating and
delivering messages:
Client-Side Delivery Sequence (REQUEST message example)
Server-Side Delivery Sequence (REQUEST message example)
This is a continuation of the sequence above as the server sees it:
19

SimuCopter Maintenance Manual
Version 1.0a
Caveats
Simulinkshutdownquirks
●DO NOT run models with SITL blocks in "navio" mode!
If we are running in "navio" mode with SITL getter blocks, the Simulink diagram will lock up and will
be unable to shut down. This is because SITL BridgeService is down in "navio" mode - there is no
SITL running, and a request from it is expected indefinitely...
●DO NOT stop a model before aircraft is at rest!
Killing ArduPilot prematurely will keep the UAV in the state it was in when killed until ArduPilot is
restarted!
●The shutdown works. However, if the Simulink Agent is "stuck" before ArduPilot is fully operational
(T=0.000), or ArduPilot unexpectedly dies (i.e., "T=" value gets stuck), the shutdown will not work.
The agent has to be killed through the shell as root in such cases!
●Obviously, if the agent executable crashes of unexpectedly shuts down for any reason, the
ArduCopter process will also not be killed - you have to do this manually (see kill-arducopter.sh)!
Sporadicsegmentationfaults
WARNING: THIS PROBLEM IS STILL PRESENT!
At this point, ArduPilot appears to crash sporadically when using the SimuCopter infrastructure. The
backtrace of the crashes is as follows:
Program received signal SIGSEGV, Segmentation fault.
[Switching to Thread 0x759bf450 (LWP 5383)]
0x000bb6e8 in Linux::RCInput_RPI::_timer_tick() ()
(gdb) bt
#0 0x000bb6e8 in Linux::RCInput_RPI::_timer_tick() ()
#1 0x000be388 in Linux::PeriodicThread::_run() ()
#2 0x000be500 in Linux::Thread::_run_trampoline(void*) ()
#3 0x76d8be90 in start_thread (arg=0x759bf450) at pthread_create.c:311
#4 0x76d15598 in ?? () at ../ports/sysdeps/unix/sysv/linux/arm/nptl/../clone.S:92
from /lib/arm-linux-gnueabihf/libc.so.6
Backtrace stopped: previous frame identical to this frame (corrupt stack?)
The following is known about the crash:
●It does not seem to occur if all SimuCopter components are disabled.
●It never occurred in SITL mode.
●It does not occur immediately upon start.
If you get SEGV on start, you need to run as root - it's not the same case as this!
●The system is a lot more stable with the ASLR system DISABLED.
su -c "echo 0 | tee /proc/sys/kernel/randomize_va_space"
NOTE THAT THIS DOES NOT PREVENT CRASHES ALL TOGETHER - JUST REDUCES THE CHANCES!
●This ArduPilot bug report may be relevant: https://github.com/ArduPilot/ardupilot/issues/4850
It may be possible to upgrade ArduPilot to avoid these crashes all together… or not...
20

SimuCopter Maintenance Manual
Version 1.0a
MissingC++libraryfilesincertainSimulinkmodels
Currently, we are required to add all the ".cpp" files we use into the model configuration:
1. Tools Run on Target Hardware Options...→ →
2. Select Code Generation / Custom Code
3. Check the Source Files section
There may be models on GitHub that are still missing the ArgumentPacker.cpp file in that list - that file is
relatively new! If your model does not compile due to ArgumentPacker-related issues, make sure that this
file was added to the model!
This is a Simulink quirk and we cannot help it...
defineprivatepublic
Currently, there is no better way to extract information from ArduPilot than through "#define private
public". That said, this is the method used since before we took the project…
Messageserialization-hardcodedbuffers
The "message-to-bytes" serialization and deserialization code uses hardcoded 1024-byte buffers. This is no
big deal per se: the messages are MUCH smaller than that. However, those are hardcoded magic numbers
and likely need to be fixed in the long run (or changed to use a better method).
Search for "buffer[1024]" in the code - likely in the BridgeService.cpp or BridgeClient.cpp files.
NoSimulinkindependence
While the model can be compiled and activated through MATLAB/Simulink, the agent itself may not yet be
standalone, and may not function without the Simulink software running! Such autonomous behavior was
not implemented during this year.
21
