Manual Visual Studio
User Manual:
Open the PDF directly: View PDF ![]() .
.
Page Count: 74

“”Manual Visual Studio”” — 2018/10/28 — 21:25 — page 1 — #1
Programming with
Visual Studio:
Fortran & Python & C++
Miguel ´
Angel Rapado Tamarit
Bel´
en Moreno Santamar´ıa
Imanol Sard ´
on Delgado
Juan Antonio Hern´
andez Ramos
Department of Applied Mathematics
School of Aeronautical and Space Engineering
Technical University of Madrid (UPM)
October 28, 2018

“”Manual Visual Studio”” — 2018/10/28 — 21:25 — page 2 — #2
Portada: -Descripci´on foto de portada-
This manual has been written with the idea of increasing all the informa-
tion presented and improving the contents. We would kindly appreciate
ideas for something to be added, deleted or changed. We also thank cor-
rections and feedback about what things could be better explained. All
contributions can be made in:
Miguel ´
Angel Rapado Tamarit
marapadotamarit@gmail.com
Queda prohibida la reproducci´on de cualquier parte del texto por cualquier medio,
incluido fotocopia, sin permiso escrito del autor.
c
Miguel ´
Angel Rapado Tamarit, Bel´en Moreno Santamar´ıa, Imanol Sard´on
Delgado, Juan Antonio Hern´andez Ramos
ISBN 978-1727581539

“”Manual Visual Studio”” — 2018/10/28 — 21:25 — page i — #3
Contents
Preface 1
1 Visual Studio 3
1.1 Installing Visual Studio . . . . . . . . . . . . . . . . . . . . . . . . 3
1.2 Nomenclature: Projects and Solutions . . . . . . . . . . . . . . . . 4
1.3 VisualStudioFAQ........................... 6
2 Fortran Projects 17
2.1 Installing Fortran Compiler . . . . . . . . . . . . . . . . . . . . . . 17
2.2 Create a Fortran project . . . . . . . . . . . . . . . . . . . . . . . . 18
2.3 Compile, link and execute the “Hello world” example . . . . . . . . 19
2.4 Include new projects and new files . . . . . . . . . . . . . . . . . . 20
2.5 Configuring IDE environment . . . . . . . . . . . . . . . . . . . . . 28
2.6 Configuring Fortran Project . . . . . . . . . . . . . . . . . . . . . . 34
2.7 Configuring a graphic library: DISLIN . . . . . . . . . . . . . . . . 36
2.8 FortranFAQ .............................. 39
3 Python Projects 47
3.1 Installing Python Interpreter . . . . . . . . . . . . . . . . . . . . . 47
3.2 Create a Python project . . . . . . . . . . . . . . . . . . . . . . . . 50
3.3 Execute the “Hello World” example . . . . . . . . . . . . . . . . . 51
3.4 Installing and removing Python Packages . . . . . . . . . . . . . . 51
3.5 PythonFAQ .............................. 53
4 Arduino Projects 55
4.1 Install Visual Micro plug in . . . . . . . . . . . . . . . . . . . . . . 55
4.2 Create an Arduino Project . . . . . . . . . . . . . . . . . . . . . . . 55
4.3 Execute the ”Hello world” example . . . . . . . . . . . . . . . . . . 56
4.4 Configuring complex projects . . . . . . . . . . . . . . . . . . . . . 57
5 Configuring Git and GitHub 59
5.1 Installing GitHub Extension . . . . . . . . . . . . . . . . . . . . . . 59
5.2 VCS, Git and GitHub . . . . . . . . . . . . . . . . . . . . . . . . . 59
5.3 Create a Git repository of a solution . . . . . . . . . . . . . . . . . 61
i

“”Manual Visual Studio”” — 2018/10/28 — 21:25 — page ii — #4
ii CONTENTS
5.4 Save changes on a Git repository . . . . . . . . . . . . . . . . . . . 62
5.5 ConfigureGitHub ........................... 62
5.6 Import projects from GitHub . . . . . . . . . . . . . . . . . . . . . 63
5.7 Download repository updates from GitHub . . . . . . . . . . . . . 64
5.8 Upload local changes to GitHub . . . . . . . . . . . . . . . . . . . . 65
5.9 GitandGitHubFAQ.......................... 66
References 70

“”Manual Visual Studio”” — 2018/10/28 — 21:25 — page 1 — #5
PREFACE
The aim of this manual is to guide the user in the first steps of Fortran pro-
gramming with Visual Studio. We must not to confuse the Compiler with
the Integrated Development Environment (IDE); Compiler is in charge
of transforming the code written in a programming language (Fortran) into an-
other programming language (the target language). It generally translates the
source code from a high-level language into a lower-level (e.g. assembly language,
object code or machine code) in order to create an executable program. There
are many different types of compilers. IDE (Visual Studio), however, is a software
application that offers some facilities for software development.
Some of the functionalities that the IDE provides are a source code editor (text
editor), build automation tools, project manager, version management tools, a
debugger, intelligent code completion and a long etcetera. It’s possible to write
programs without IDE but it would be more difficult.This guide explains how to
install Microsoft Visual Studio 2017 (which accepts 36 different programming
languages) and Intel Fortran Compiler through Intel Parallel Studio XE 2018
in order to make possible compiling Fortran code with Visual. The installation
order is the mentioned, first the IDE and then compiler.

“”Manual Visual Studio”” — 2018/10/28 — 21:25 — page 2 — #6
It is necessary to understand the concepts of Source and Object Codes
and the differences between them:
“...source code is any collection of computer instructions, pos-
sibly with comments, written using a human-readable pro-
gramming language, usually as plain text. The source code
of a program is specially designed to facilitate the work of
computer programmers...”
(https:
//en.wikipedia.org/wiki/Source_code)
While Object Code:
“...is what a compiler produces. In a general sense object code
is a sequence of statements or instructions in a computer lan-
guage, usually a machine code language (i.e., binary) or an in-
termediate language such as register transfer language (RTL).”
(https:
//en.wikipedia.org/wiki/Object_code)

“”Manual Visual Studio”” — 2018/10/28 — 21:25 — page 3 — #7
CHAPTER
ONE
VISUAL STUDIO
1.1 Installing Visual Studio
First thing we have to do is installing Visual Studio. We are going to use En-
terprise Version of VS 2017 with an academic license in Windows. Steps
are:
a) Downloading Visual Studio with academic license:
1. We click directly on this url; http://e5.onthehub.com/WebStore/
ProductsByMajorVersionList.aspx?ws=f1b11fc4-826f-e011-
971f-0030487d8897&vsro=8&JSEnabled=1.
2. Log in (top right part), we have to write our institutional email (fin-
ished with @alumnos.upm.es) and enter with same password as our
personal account (figure 1.1).
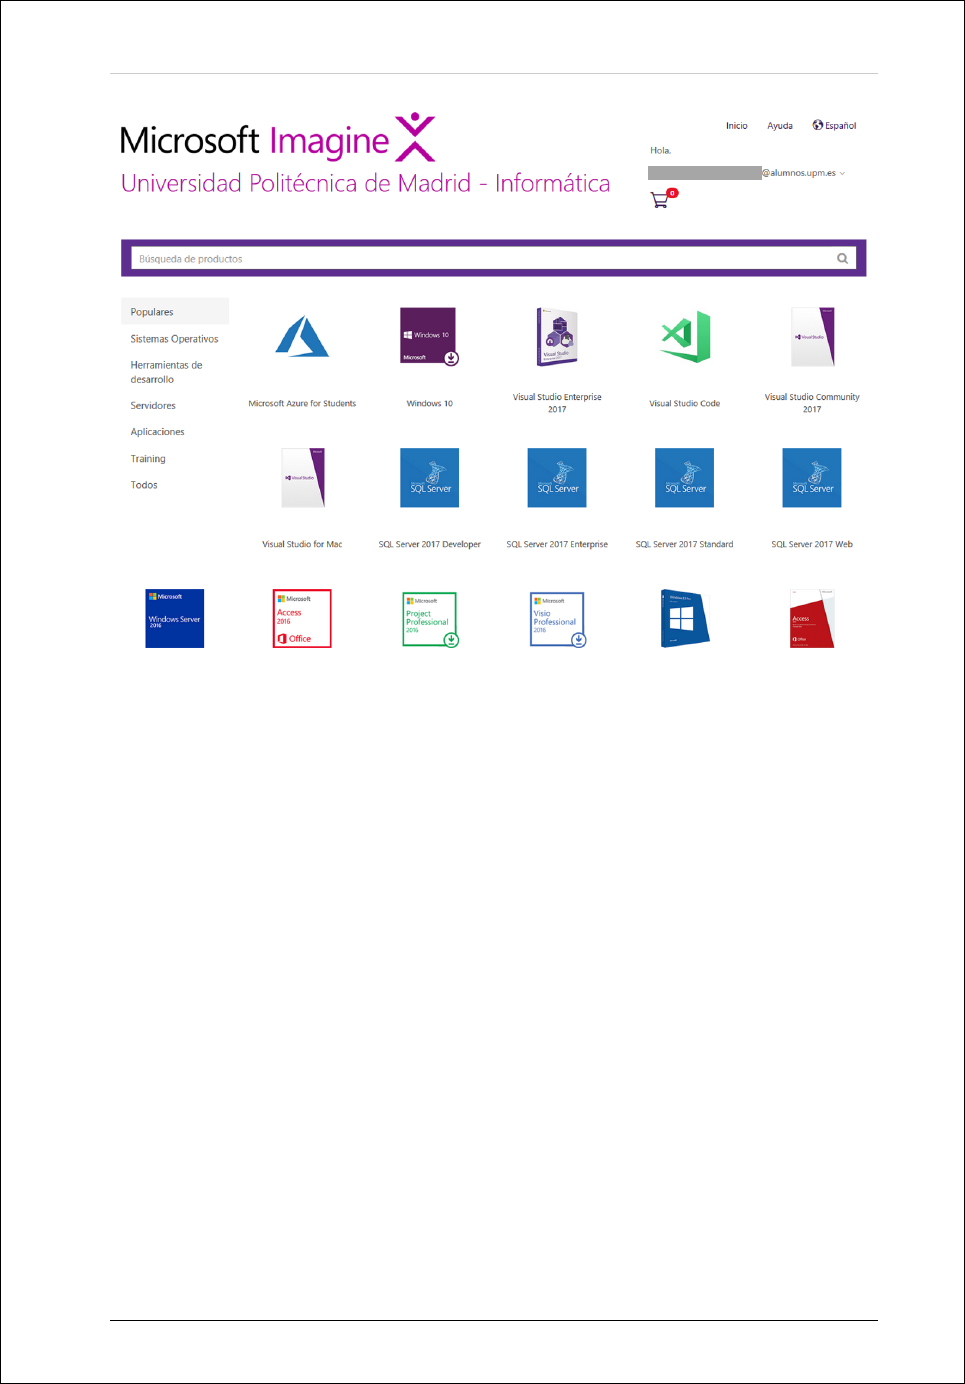
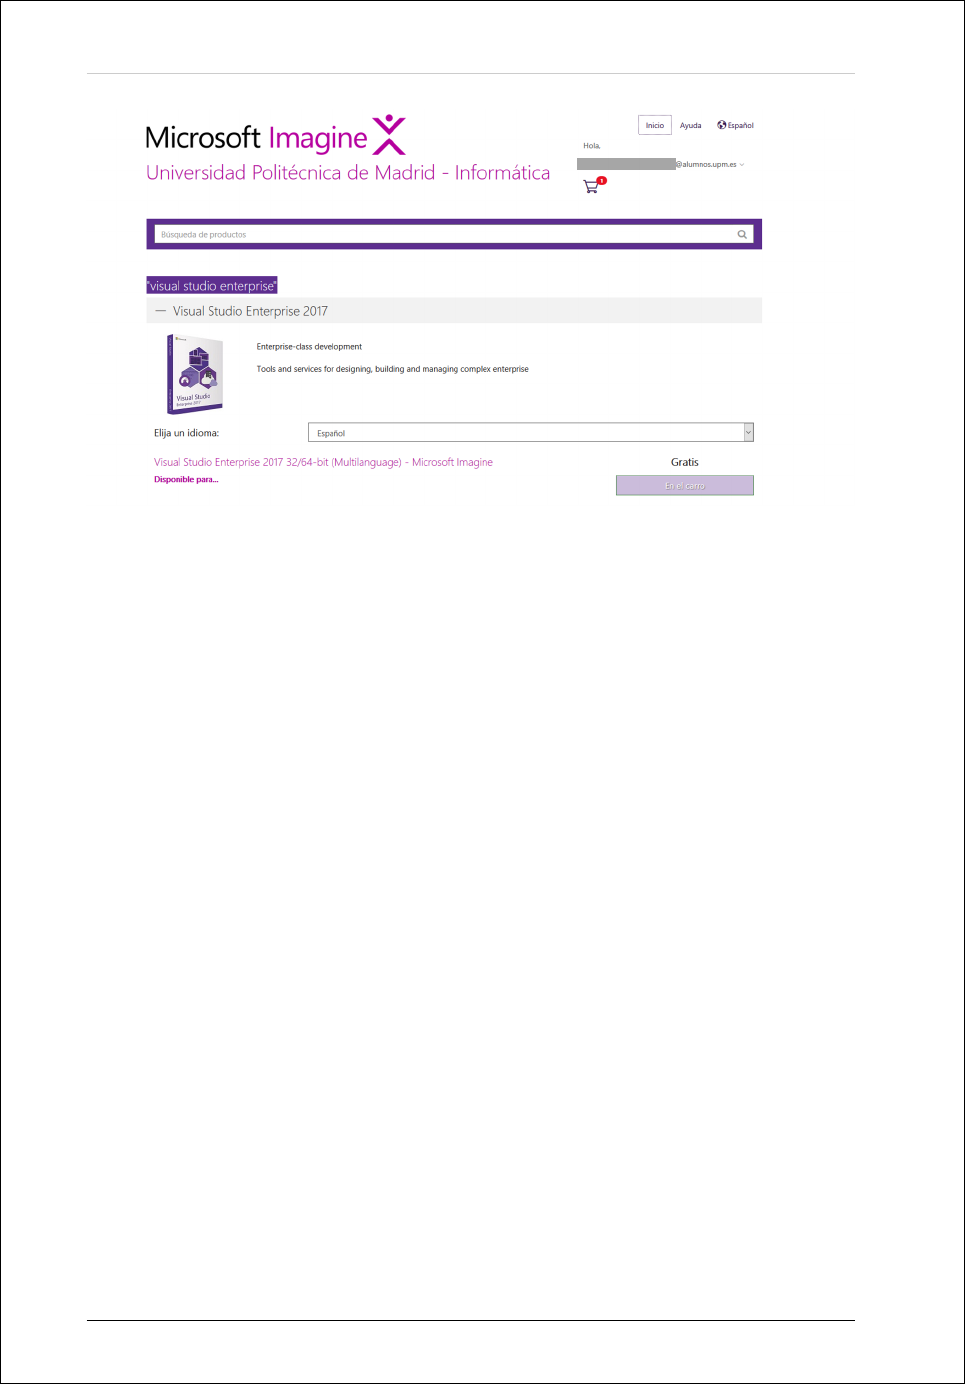
3. In the search line we write “Visual Studio Enterprise 2017”. First
result is our IDE, we choose Add to cart and go to the Shopping Cart.
4. Follow the instructions shown. We will be asked for the name, surname
and an email for confirming the process (Figure 1.2 and 1.3).
5. Once we complete the information we see the details of the purchase
with the Order Number and the License Key (an email with the pur-
chase details is also sent to our account). Figure 1.4 shows the down-
3

“”Manual Visual Studio”” — 2018/10/28 — 21:25 — page 4 — #8
4CHAPTER 1. VISUAL STUDIO
load button. License Key and Order Number should be saved for future
requests.
6. Click Download. The file vs enterprise xxxxx.exe should be down-
loaded in the download folder.
b) Installing:
1. Execute the installer vs enterprise xxxxx.exe, accept the conditions
and wait for the program to download and start installing.
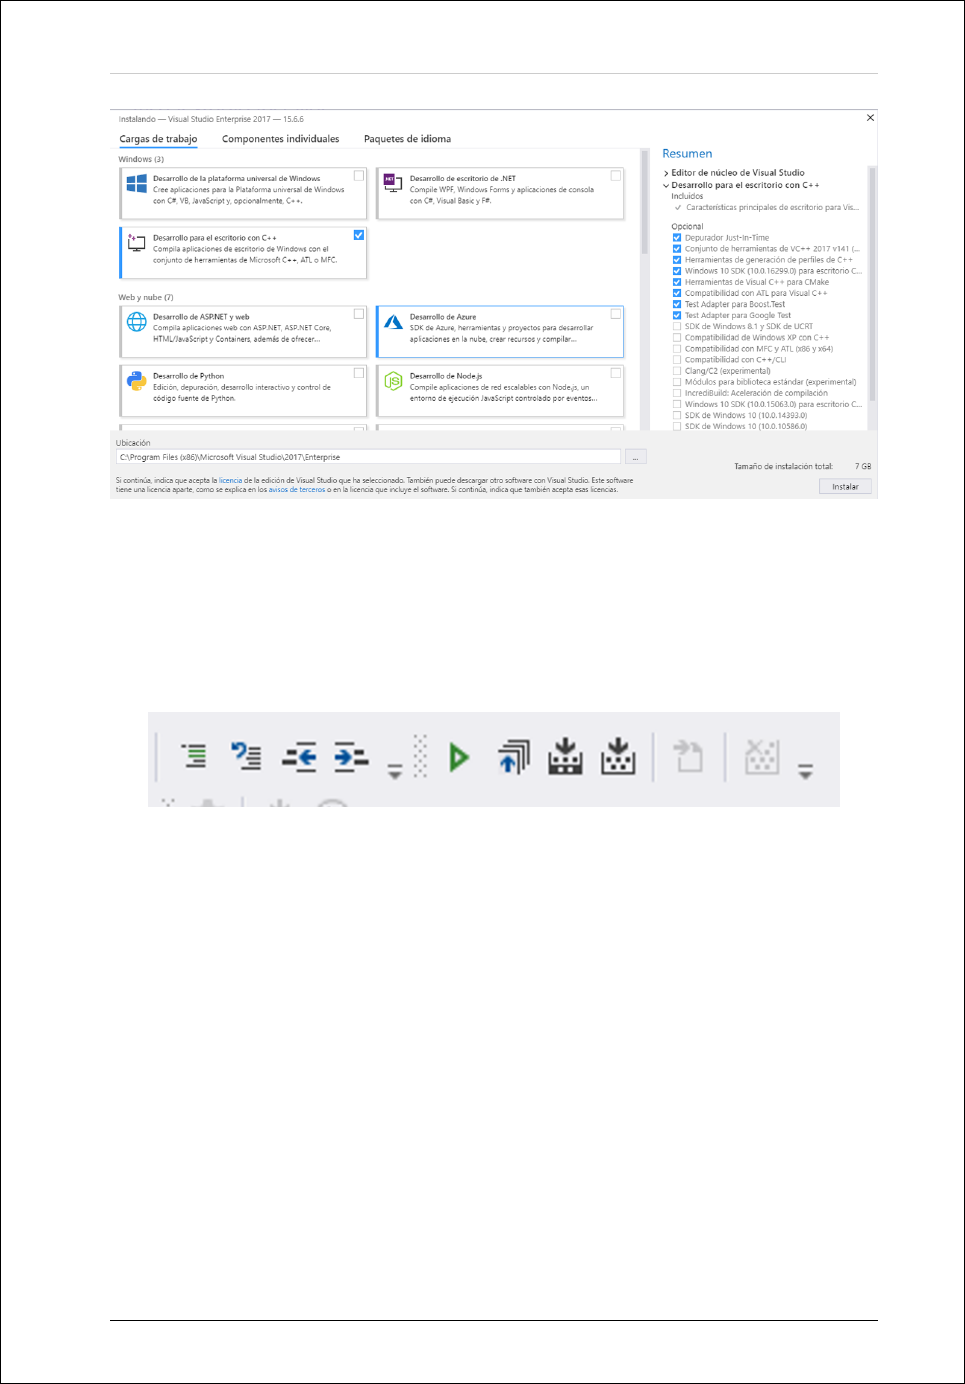
2. Options will appear during the process. There are four different tabs:
Workloads, Individual Components, Language Packages and Installa-
tion folder. In Workloads we choose Desarrollo para el escritorio con
C++. In Language packages we choose: English or both Spanish and
English (See figure 1.5).
3. We click Install and wait (it might be slow).
4. Once finished we restart the computer.
5. Execute Visual Studio.
6. Start session with our Microsoft account, same as we have associated
to Windows, Skype and other Microsoft tools.
7. Initiate Visual Studio.
8. Activate the product by clicking on the arrow besides our name (top
right part of the Visual Window) and on Account Settings....
9. In the right part of the new window we click on the activation with
Product Key and paste there the Key we obtained, we accept and IDE
will be ready.
1.2 Nomenclature: Projects and Solutions
First, it is important to define the nomenclature used by Visual Studio. To
simplify, we would say that a project is a specific program written in Fortran
language or in other programming language and a solution is a set of different
programs.
As can be read in Microsoft Visual Studio documentation:
“”Manual Visual Studio”” — 2018/10/28 — 21:25 — page 5 — #9
1.2. NOMENCLATURE: PROJECTS AND SOLUTIONS 5
Figure 1.1: Home page of the software repository of Microsoft, we log in and search for
Visual Studio 2017.
“...In a logical sense, a project contains of all the source code
files, icons, images, data files and anything else that will be
compiled into an executable program or web site, or else is
needed in order to perform the compilation. A project also
contains all the compiler settings and other configuration files
that might be needed by various services or components that
your program will communicate with.”
(https://msdn.microsoft.com/en-
us/library/b142f8e7.aspx)
The configuration parameters of a specific project are stored in an XML file.
If the project is an Intel Fortran Project, the extension file is *.vfproj.
In the same Microsoft Visual Studio documentation, a solution is defined in
the following way:
“”Manual Visual Studio”” — 2018/10/28 — 21:25 — page 6 — #10
6CHAPTER 1. VISUAL STUDIO
Figure 1.2: Version of Visual Studio chosen, Enterprise 2017. We have to write name,
surname and email.
“A project is contained, in a logical sense and in the file system,
within a solution, which may contain one or more projects,
along with build information, Visual Studio window settings,
and any miscellaneous files that aren’t associated with any
project. In a literal sense, the solution is a text file with its
own unique format; it is generally not intended to be edited
by hand.
A solution has an associated *.suo file that stores settings,
preferences and configuration information for each user that
has worked on the project.”
(https://msdn.microsoft.com/en-
us/library/b142f8e7.aspx)
1.3 Visual Studio FAQ
Here some general concepts and ideas are going to be explained, from good prac-
tices to programming advice or quick explanations.
•How can I change the language of Visual Studio?
All this manual has been written taking into account that the IDE is config-

“”Manual Visual Studio”” — 2018/10/28 — 21:25 — page 7 — #11
1.3. VISUAL STUDIO FAQ 7
Figure 1.3: Shopping Cart with Visual Studio Enterprise 2017 chosen.
ured in English, if you have used Spanish for the default language is possible
to change it in Tools/Options/International Settings. There are options and
commands with no intuitive translation to Spanish so we recommend be-
come familiarized with the English version of the IDE.
•What do I have to know about line Numbers?
Why showing line numbers is useful can be clear, but there is a good practice
that appears when our code is going to be shown in a text document (L
A
T
E
X);
it is useful to write before some subroutines, functions, etc. the line number
in a comment inside the code in order to “fix” a position of the whole code
and not move it when expanding the program. So when LaTeX looks for a
code and extracts some lines, the result will always be the same. With the
same purpose it is useful to leave some blank space between subroutine in
order to expand them without moving the rest of the code.
•What are Release and Debug?
They are two possible configurations, each one with its settings, that allows
to run the code in a different way. We can actually create more release
modes (Debug modes, or the name we prefer) with a different solution and
project configurations. We access the Configuration Manager by clicking
on Build/Configuration Manager or deploying the selector of Configuration
(where it says Release and Debug), there we can create new options or edit
those we have. For example, we could create one where default real KIND
is 4 and other where is 8, by changing between Release modes we would

“”Manual Visual Studio”” — 2018/10/28 — 21:25 — page 8 — #12
8CHAPTER 1. VISUAL STUDIO
Figure 1.4: Details of our License Key and Order Number, we should save this informa-
tion.
run the code with the two behaviours (if we open the project options we
directly can change between Modes and change options mode by mode).
Debug mode will allow to run the code without optimiser turned on and
lot of information will be included in the build files so we can check our
program step by step, it can be useful for fixing bugs. However, if we are
developing Numerical Simulations and related programs, we will use another
kind of debugging; graphic assisted. Checking errors in the code starts with
the printing of those results and the validation of the program module by
module. That is why we include Dislin libraries in our program, to check
quickly results and decide if we have executed correctly our program, later
we will save the numerical results in order to plot them with another tool.
•Do I have to Start without Debugging my projects?
We have seen what Debug and release are so we now understand why one
of the IDE configuration (2.5) has been changing the command that starts
the program, from the Start with Debugging to this one, that goes directly
to the execution of the code in the Release mode (or the mode selected).
•Which commands do I show in my IDE?
Figure 1.6 shows some commands that are going to be highly used when
programming. First two decrease and increase the indentation and next two
comment and uncomment the code selected. Fifth one is the Start without
Debugging button already explained and the last buttons that are active
“”Manual Visual Studio”” — 2018/10/28 — 21:25 — page 9 — #13
1.3. VISUAL STUDIO FAQ 9
Figure 1.5: Workload to be chosen in the installation process, desarrollo para el escritorio
con C++ will be selected. In language package we choose at least English.
compile and build our program. While the first compiles the current file,
the second builds the project or library selected and last builds the whole
solution (which we know can contain more than one project).
Figure 1.6: Very useful commands when programming, it is advisable to have them
shown.
•What should I know about navigation across files and codes?
There are some basic functionalities that are very useful when managing
big codes; first one is the Navigate Backward and Navigate Forward but-
tons (Figure 1.7) which has the same function as Back and Forward in
Windows OS but, instead of navigate across folders, we navigate across our
opened and recently viewed codes. Even more powerful tools are Go To
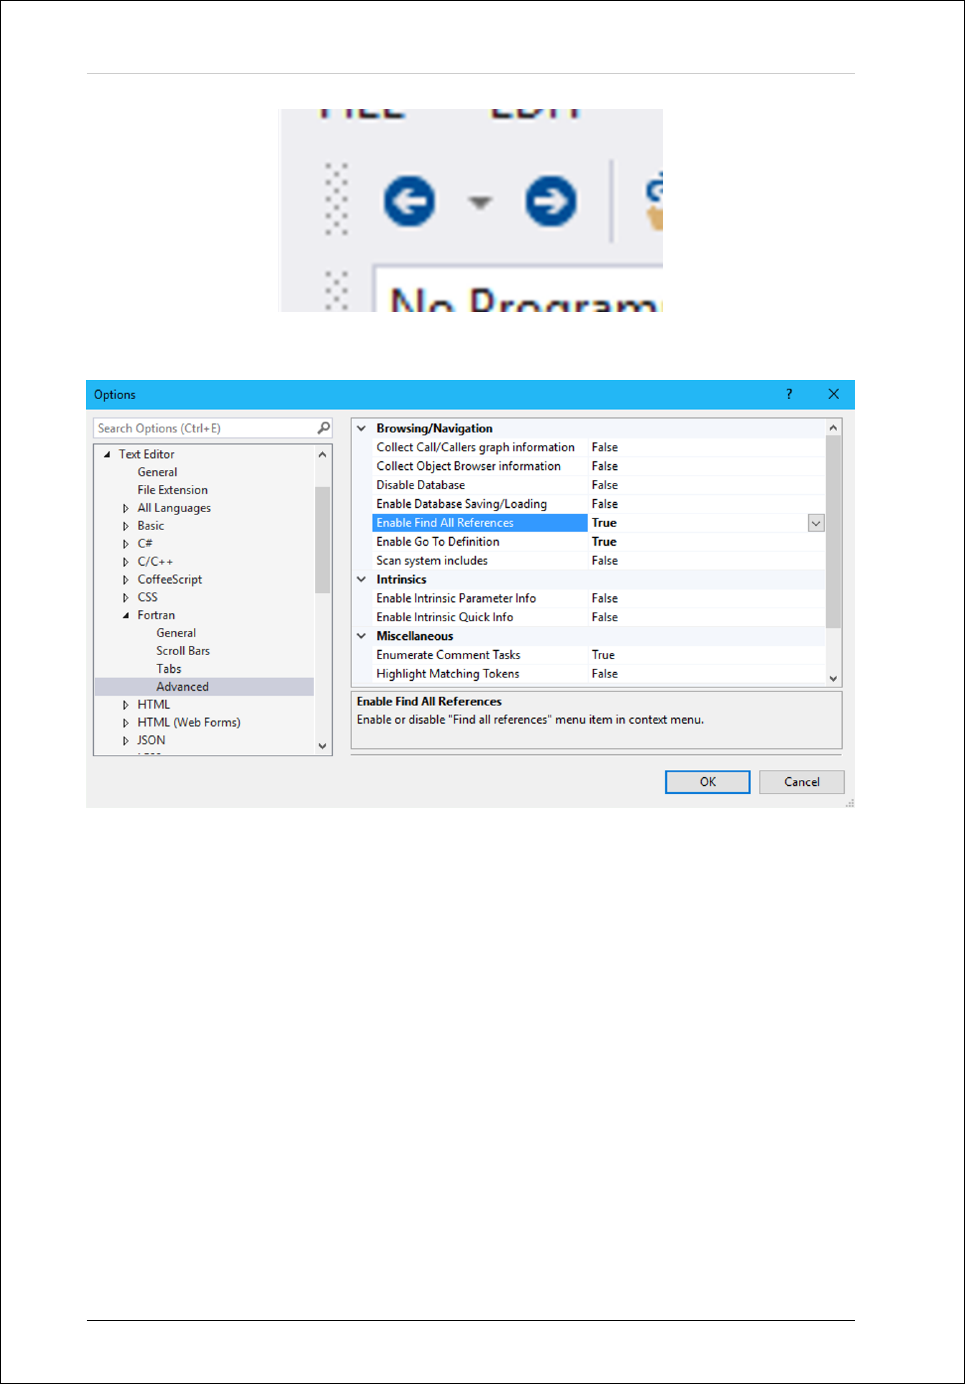
Definition and Find All Differences options. First we have to know how to
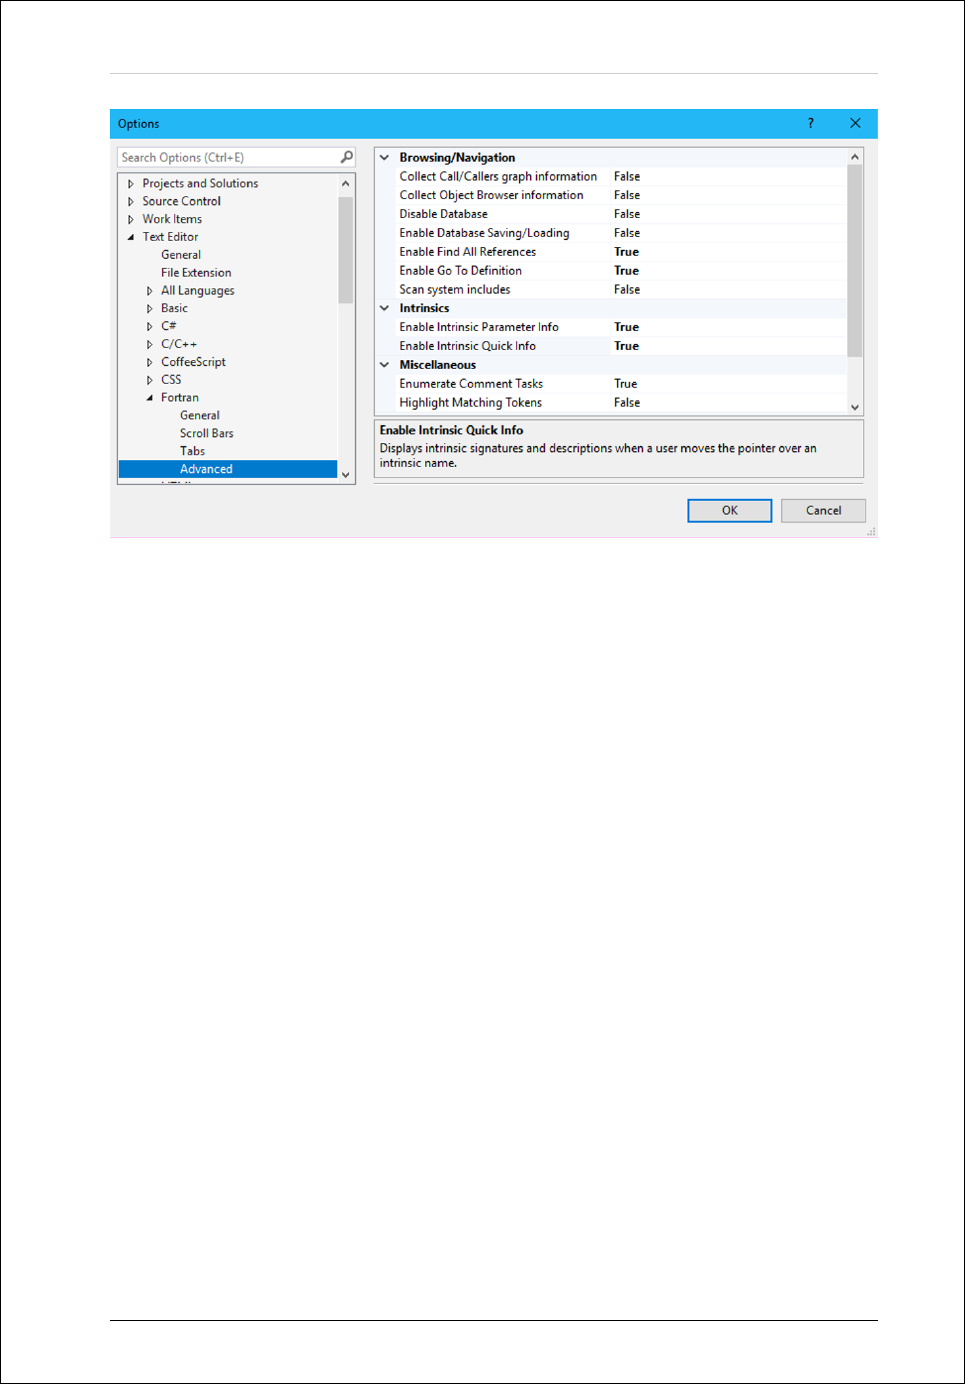
activate them; we click on Tools/Options.../Text Editor/Fortran/Advanced
and we select True in options Enable Find All References and Enable Go
To Definition as seen in figure 1.8.
They are really useful tools; Go to Definition allow us to find the declaration
of any variable in our code, if we for example have a big program and we
don’t know what a variable is, we click with the right button of our mouse
“”Manual Visual Studio”” — 2018/10/28 — 21:25 — page 10 — #14
10 CHAPTER 1. VISUAL STUDIO
Figure 1.7: Navigation buttons.
Figure 1.8: Really interesting navigation options that will make the programming task
easier.
in the variable and click on that option, the window will automatically move
to the line where is defined (or open a different module file and points the
specific line). It can also open a new window with an specific file when we
ask for the definition of a subroutine or a function and it’s done in the same
way. It doesn’t work if the subroutine is in a module already compiled,
library, etc. but if we have included the source in our project we will be
able to navigate really quickly between those files.
Find All References, as the name says, will find in the whole project what
we are asking for. If it’s a variable we can know how many times (and
where) it is used, changed, printed, etc. and if it is a subroutine we can find
where it is called, and where it is defined for example. Once again we have
to click on the right button in the name of the thing we want to look for
and click in the option.
“”Manual Visual Studio”” — 2018/10/28 — 21:25 — page 11 — #15
1.3. VISUAL STUDIO FAQ 11
Figure 1.9: Extra options: Enable Intrinsic Parameter Info and Enable Intrinsic Quick
Info, both really useful when our codes become long and they are spread in multiple
source files.
Related to this we can also remark that Visual Studio has a search engine
that can be very useful to have shown in our toolbars, we’ve already seen
how to do it before, the command is Find in files or just Find and also
it can be minimized and put everywhere in the screen, ready to be used
whenever.
Finally, two extra options are Enable Intrinsic Parameter Info and Enable
Intrinsic Quick Info, both can be found in Tools/Options.../Text Editor/-
Fortran/Advanced also and should be activated (see figure 1.9). First “dis-
plays the signature of an intrinsic in a tooltip when a user types the param-
eter list start character”, this means that information about the procedures
and arguments will appear when typing a parenthesis after an intrinsic func-
tion or subroutine. Figure 1.10 shows an example with the cosine function.
Second option displays intrinsic information and descriptions when we place
the pointer over an intrinsic name. Figure 1.11 shows a list of arguments
associated to the subroutine.
“”Manual Visual Studio”” — 2018/10/28 — 21:25 — page 12 — #16
12 CHAPTER 1. VISUAL STUDIO
Figure 1.10: Example of Intrinsic Parameter Info.
Figure 1.11: Example of Intrinsic Quick Info.

“”Manual Visual Studio”” — 2018/10/28 — 21:25 — page 13 — #17
1.3. VISUAL STUDIO FAQ 13
•What should I know about files and formats?
We have read in the introduction about source codes and object codes, the
program we write needs of both codes, first one will be what we write with
Fortran language and second will be the translation that the compiler makes
in order to make them understandable for computers. The source code we
write when using a programming language is stored in text files, in Fortran
case those files has extension .f90,.f or .for for example.
In order to execute that program we can choose between using an interpreter
(it adapts the instructions while they are found in the code) or a compiler
(translates the code to machine language), we are interested in compilers. It
works developing two sub processes, first verifies that the source code is well
written, fulfilling with syntactic and semantic Fortran rules, once finished,
it creates an intermediate code called object code (with extension .obj
in Windows OS). Second sub process consists in linking the object code
with other codes stored in libraries, the extensions used here are .dll for
shareable library files and .mod for module files (created if a source file
being compiled defines a Fortran module, which means, it uses MODULE
statement). Finally the compiler optimize the code and converts it in an
executable program (.exe in Windows).
The .mod files has the interfaces of the modules that we have compiled,
example.mod contains the necessary information regarding the modules that
have been defined in the program example.f90 and they are created with
the .obj file also, when compiling that project. Actually, a .mod file is
created for each module defined in our source (.f90 ) file and a .obj one will
appear for the whole source. The module interfaces share the name with
the modules and the object file has the same name as the source, typically,
we can define one module in each file and assign the same name to the
module and the source file (it’s not a requirement but it helps to organize
everything). More of this can be broaden in [10], Lionel [4] and [5]
The history behind the file extensions of the source codes in Fortran can be
broaden in Conic-Jacob [1] or Lionel [3].
Regarding Visual Studio files we can see .sln which is the format where
Visual stores our solution, there we open our projects associated. With the
solution appears a configuration file with extension .suo, as it is said in the
on line manual of Visual Studio:

“”Manual Visual Studio”” — 2018/10/28 — 21:25 — page 14 — #18
14 CHAPTER 1. VISUAL STUDIO
“The solution user options (.suo) file contains per-user
solution options. This file should not be checked in to
source code control.
The solution user options (.suo) file is a structured stor-
age, or compound, file stored in a binary format. You save
user information into streams with the name of the stream
being the key that will be used to identify the information
in the .suo file. The solution user options file is used to
store user preference settings, and is created automatically
when Visual Studio saves a solution.”
(https://msdn.microsoft.com/es-
es/library/bb165909.aspx)
Inside our solution folder we find folders with the different projects and the
file with extension .vfproj stores everything needed to open those projects.
That specific extension makes reference to an Intel Fortran project file while,
for example, .icproj would be the file created for C++ compiler.
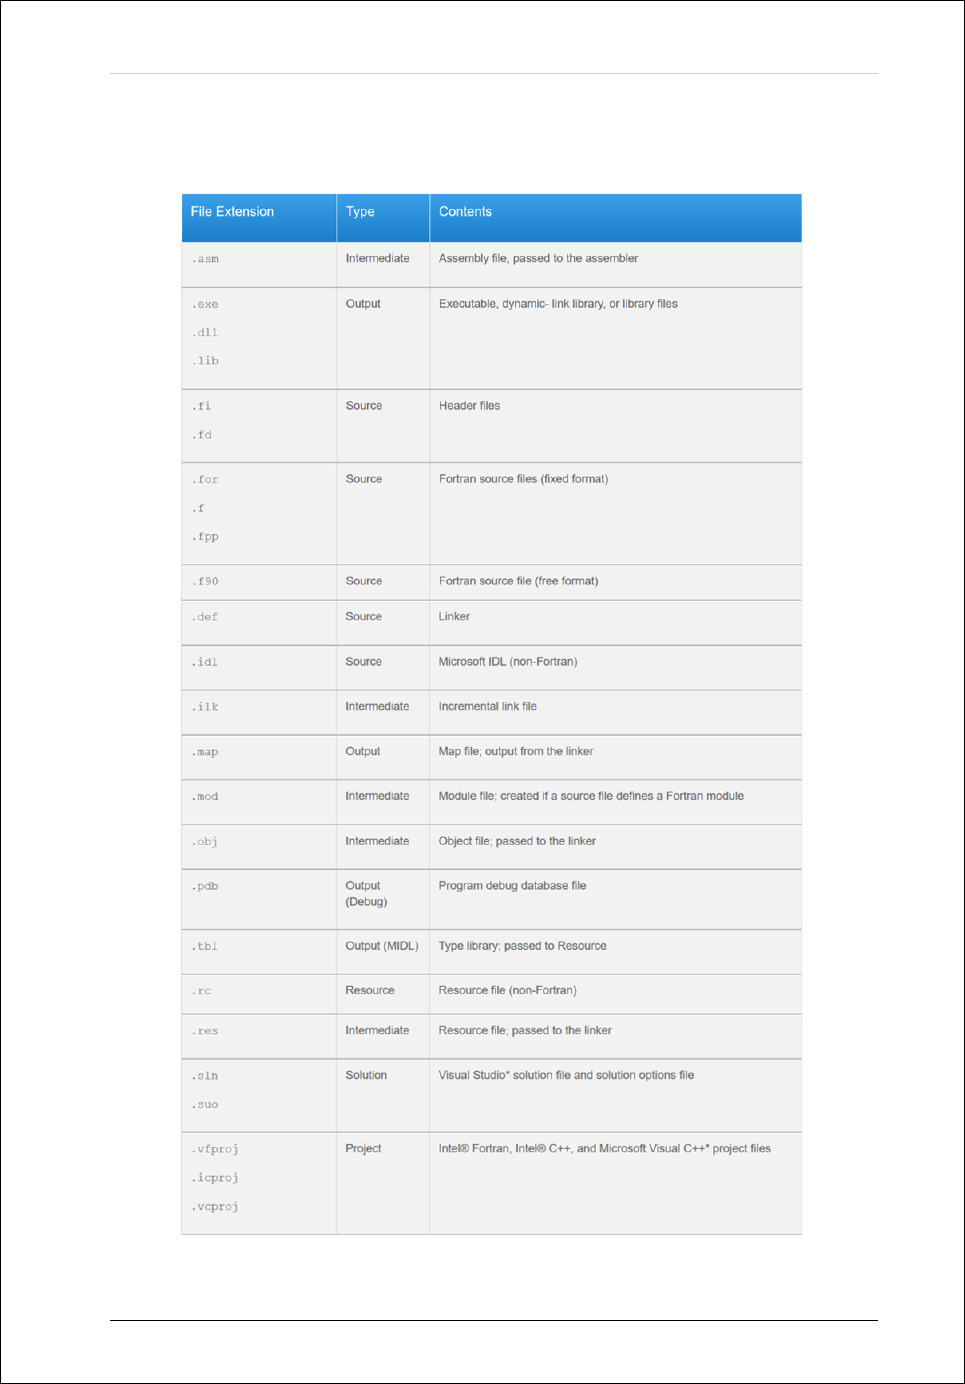
More information about formats can be found in official documentation of
Intel Fortran Compiler ([9]), also in the manual [2] or in [6]. Figure 2.17
summarise some of the extensions used.
“”Manual Visual Studio”” — 2018/10/28 — 21:25 — page 15 — #19
1.3. VISUAL STUDIO FAQ 15
Figure 1.12: List with common file extensions used in Intel Fortran projects.

“”Manual Visual Studio”” — 2018/10/28 — 21:25 — page 16 — #20
16 CHAPTER 1. VISUAL STUDIO

“”Manual Visual Studio”” — 2018/10/28 — 21:25 — page 17 — #21
CHAPTER
TWO
FORTRAN PROJECTS
2.1 Installing Fortran Compiler
The Intel Fortran Compiler must be installed in the computer and it should be
recognized by the Visual Studio environment.
a) Downloading Intel Fortran Compiler with academic license:
1. We first click on the url: https://software.intel.com/en-us/
qualify-for-free-software/student.
2. Click on Windows* option of Intel Parallel Studio XE (Figure 2.1).
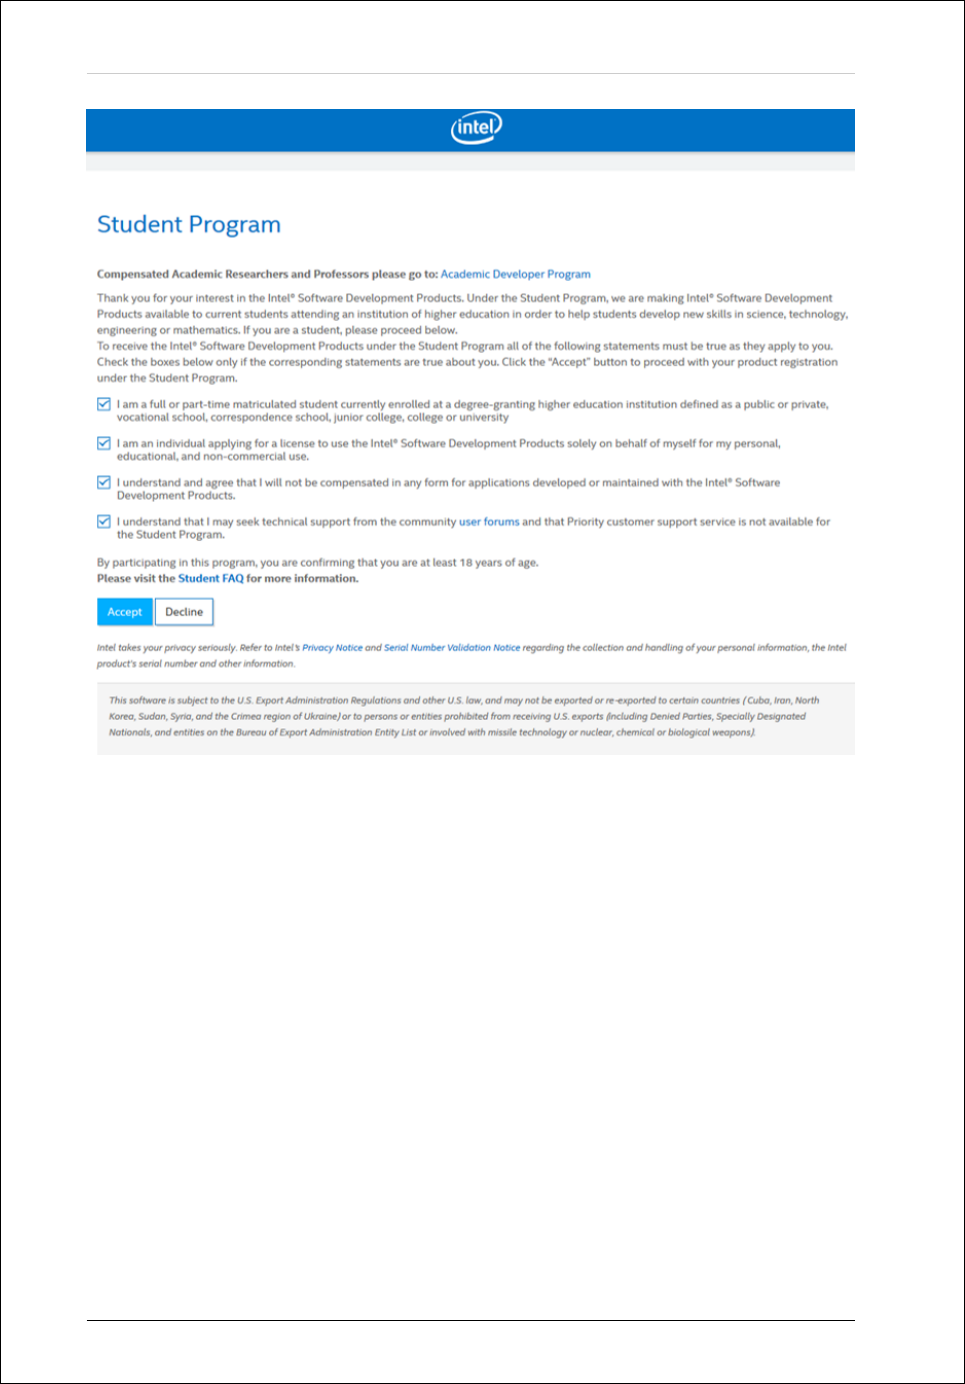
3. We will have to accept four options related to the use we are going to
make of the software, we mark all of them and click on Accept (Figure
2.2).
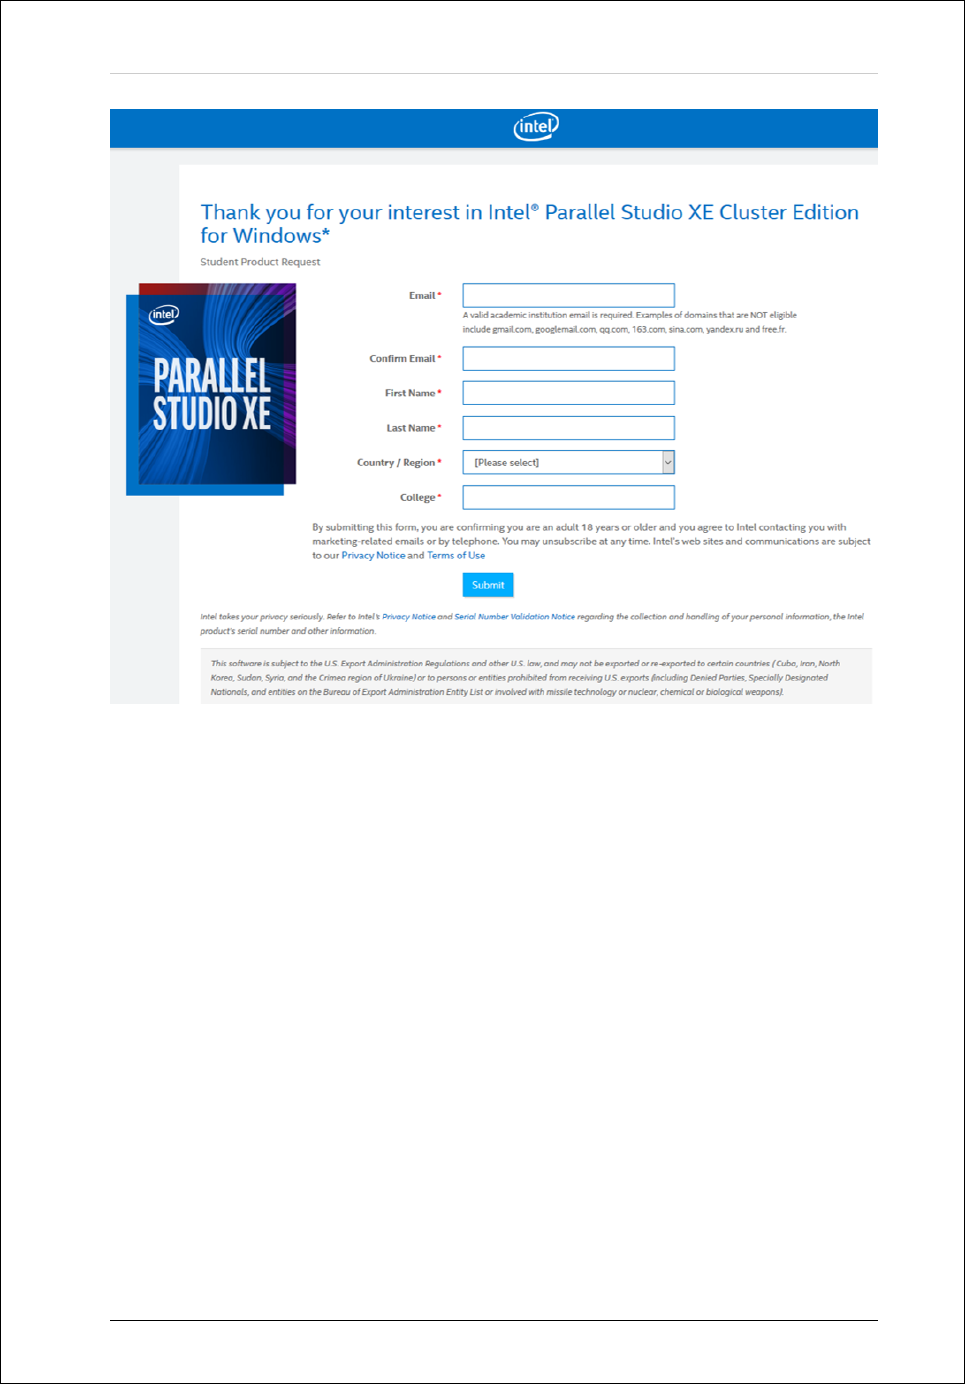
4. Now we have to complete some personal information (Figure 2.3). It is
important to write the institutional email in the box in order to receive
our serial number for the installation and confirmation email for the
account we are going to create.
5. Click on Submit.
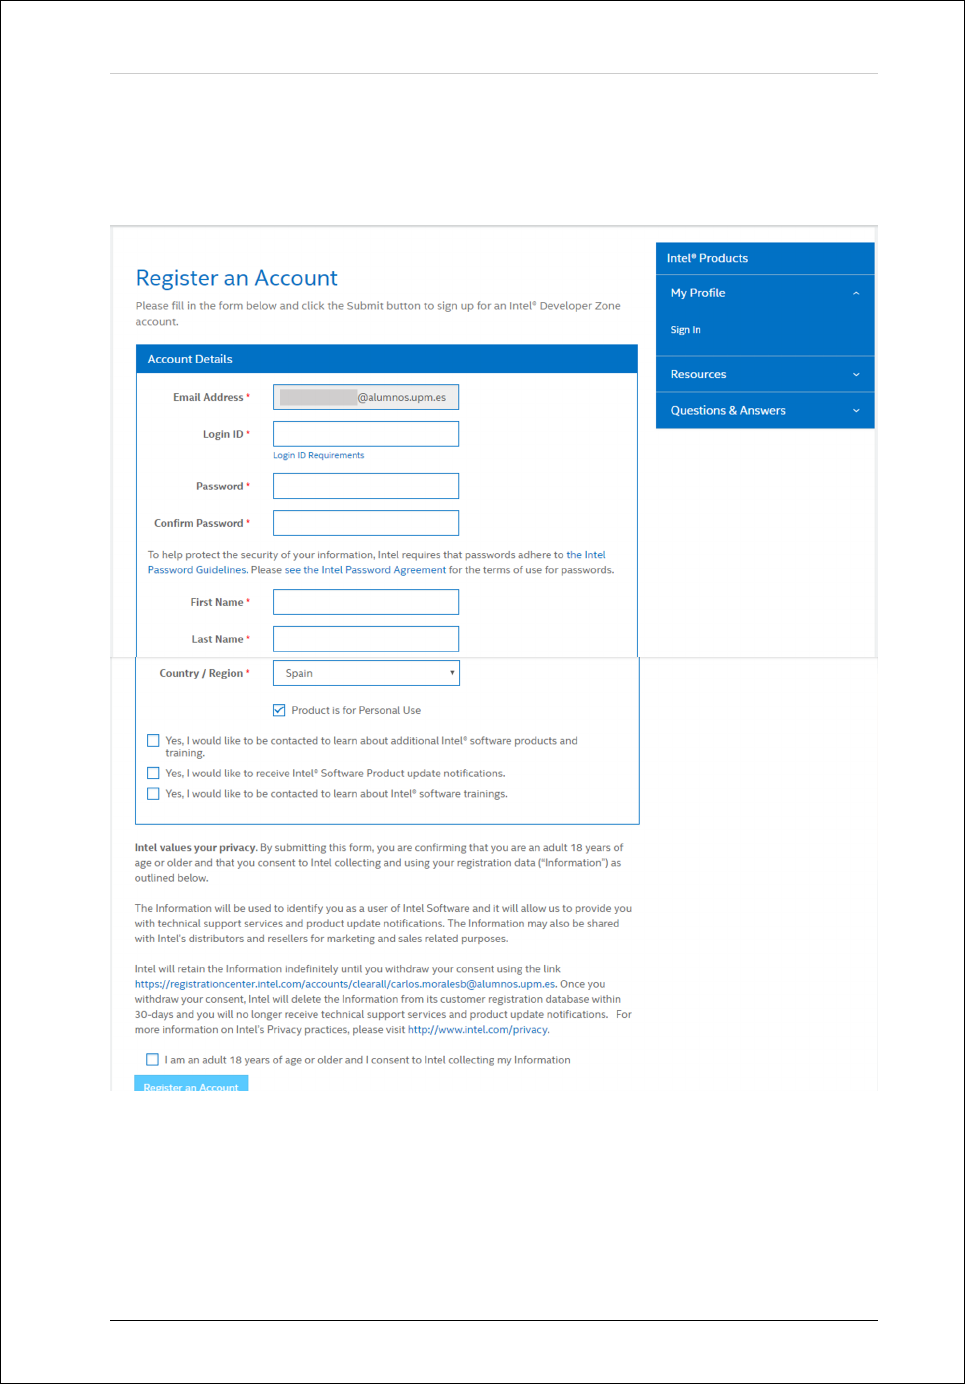
6. Fill in the form for the Intel Fortran register an account (Figure 2.4).
7. Click on Register an Account. We should receive a confirmation email.
17

“”Manual Visual Studio”” — 2018/10/28 — 21:25 — page 18 — #22
18 CHAPTER 2. FORTRAN PROJECTS
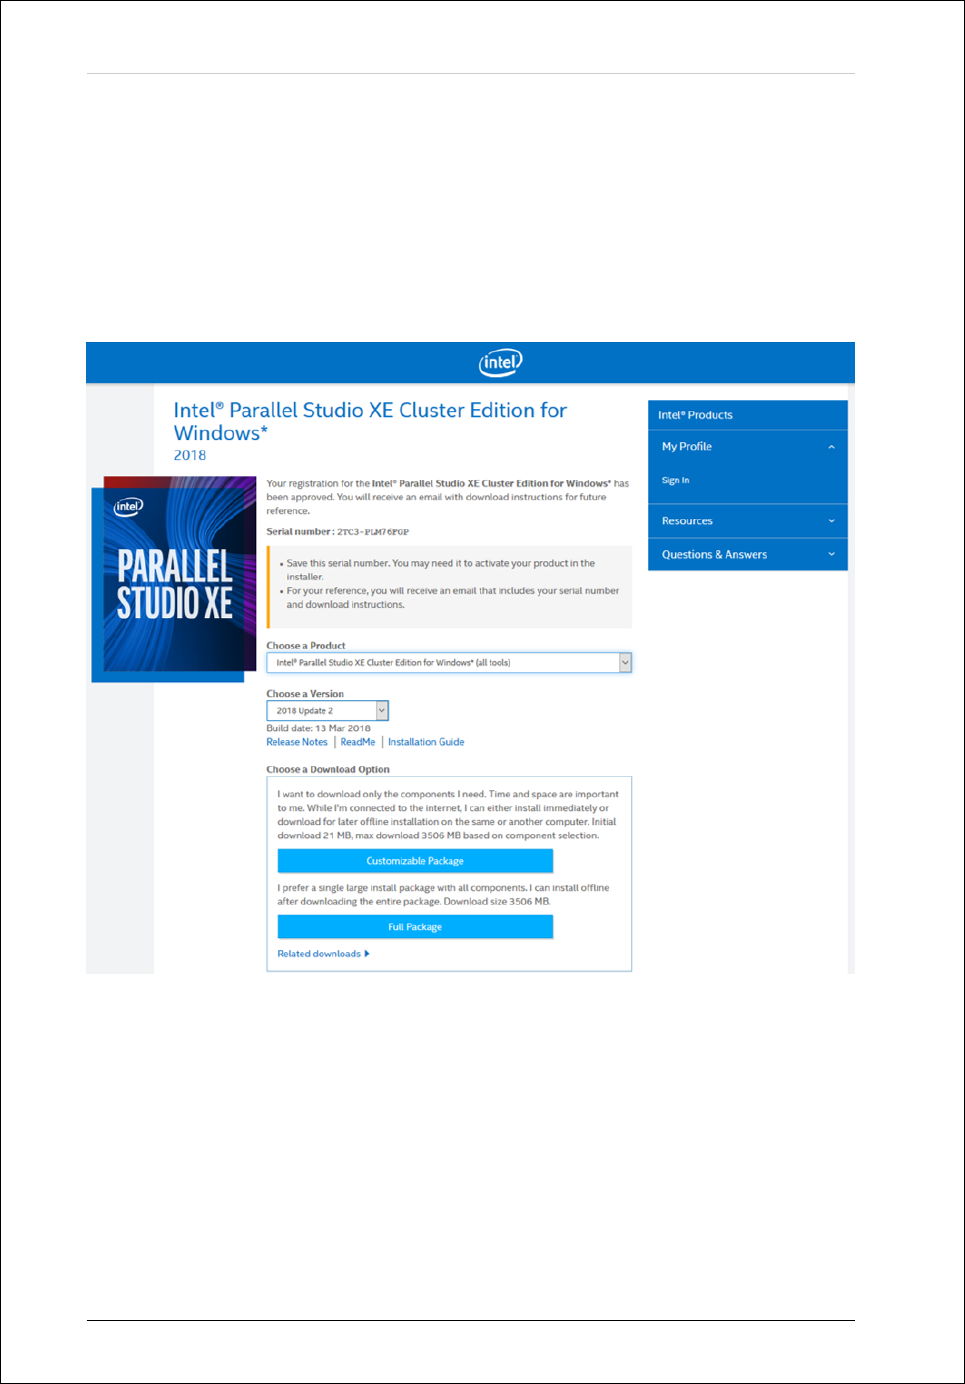
8. The email has a download button and a Serial Number.
9. Click on download and select Intel Parallel Studio Cluster Edition for
Windows* (all tools) and version 2018 Update 3.
10. In order to avoid future problems during compilations we click on Full
Package in the Download Options. The file: parallel studio xe 2018.....
.exe should be downloaded (Figure 2.5).
b) Installing:
1. Execute the file: parallel studio xe 2018..... .exe.
2. Click on Next (Figure 2.6).
3. Then we have to consent or not the collection of private information.
4. Click next.
5. Now installer shows warnings related to the needed modules (it should
not block the installation so we continue), click on Next.
6. Provide the Serial Number.
7. Final step is clicking on Install and wait (once again it can be slow).
After installation has finished we can start configuring the IDE, creating our
Fortran project and running programs.
2.2 Create a Fortran project
To create a Fortran project, proceed with the following steps:
1. Open Visual Studio 2017.
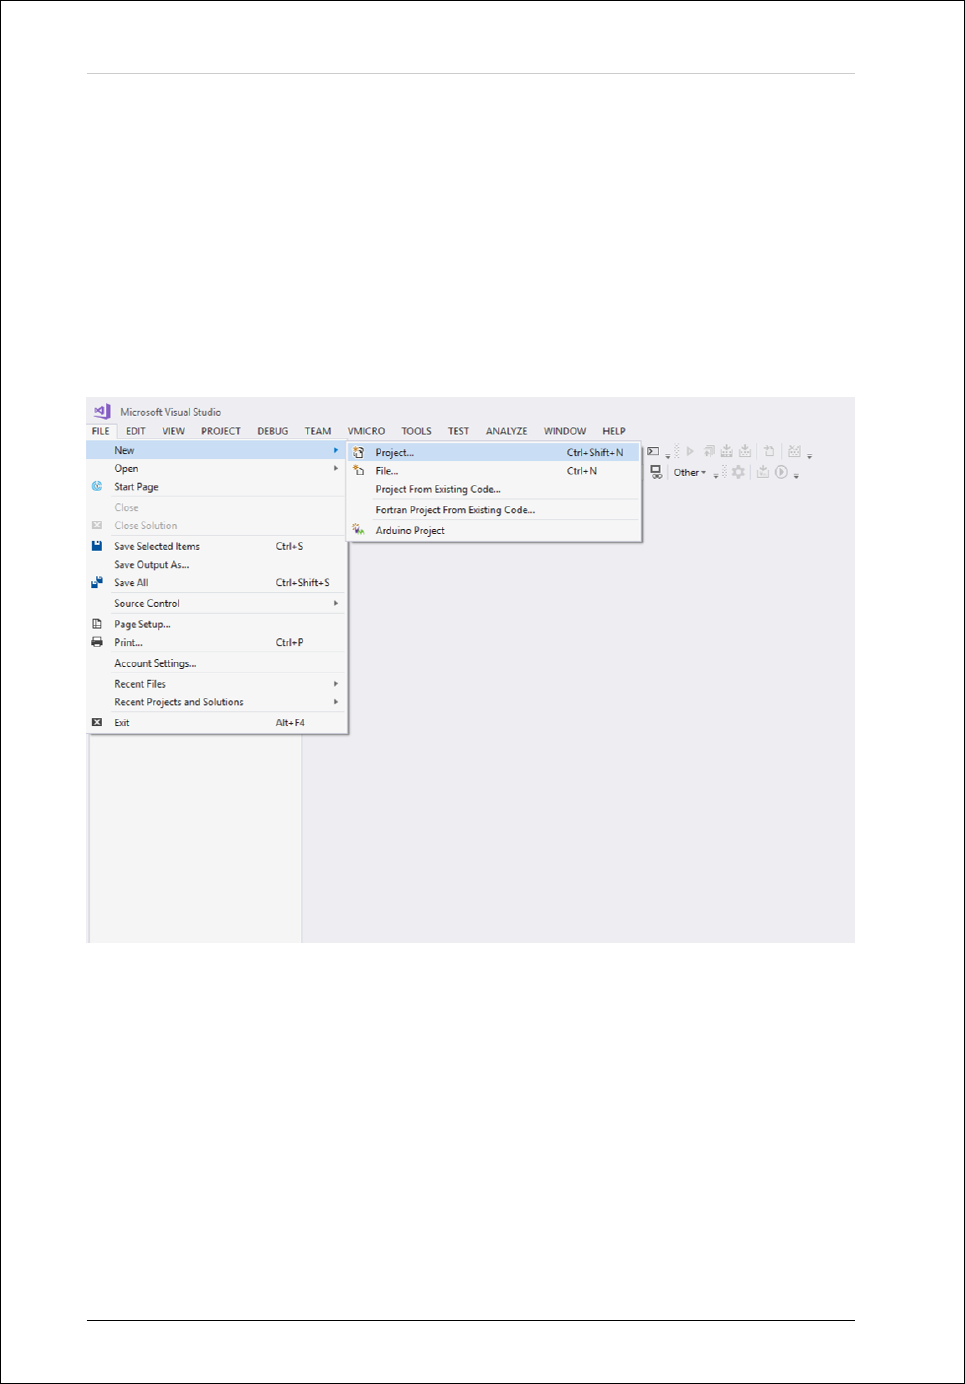
2. Click on File/New/Project... (Figure 2.7).
3. In the Intel(R) Visual Fortran menu select Console Application and then
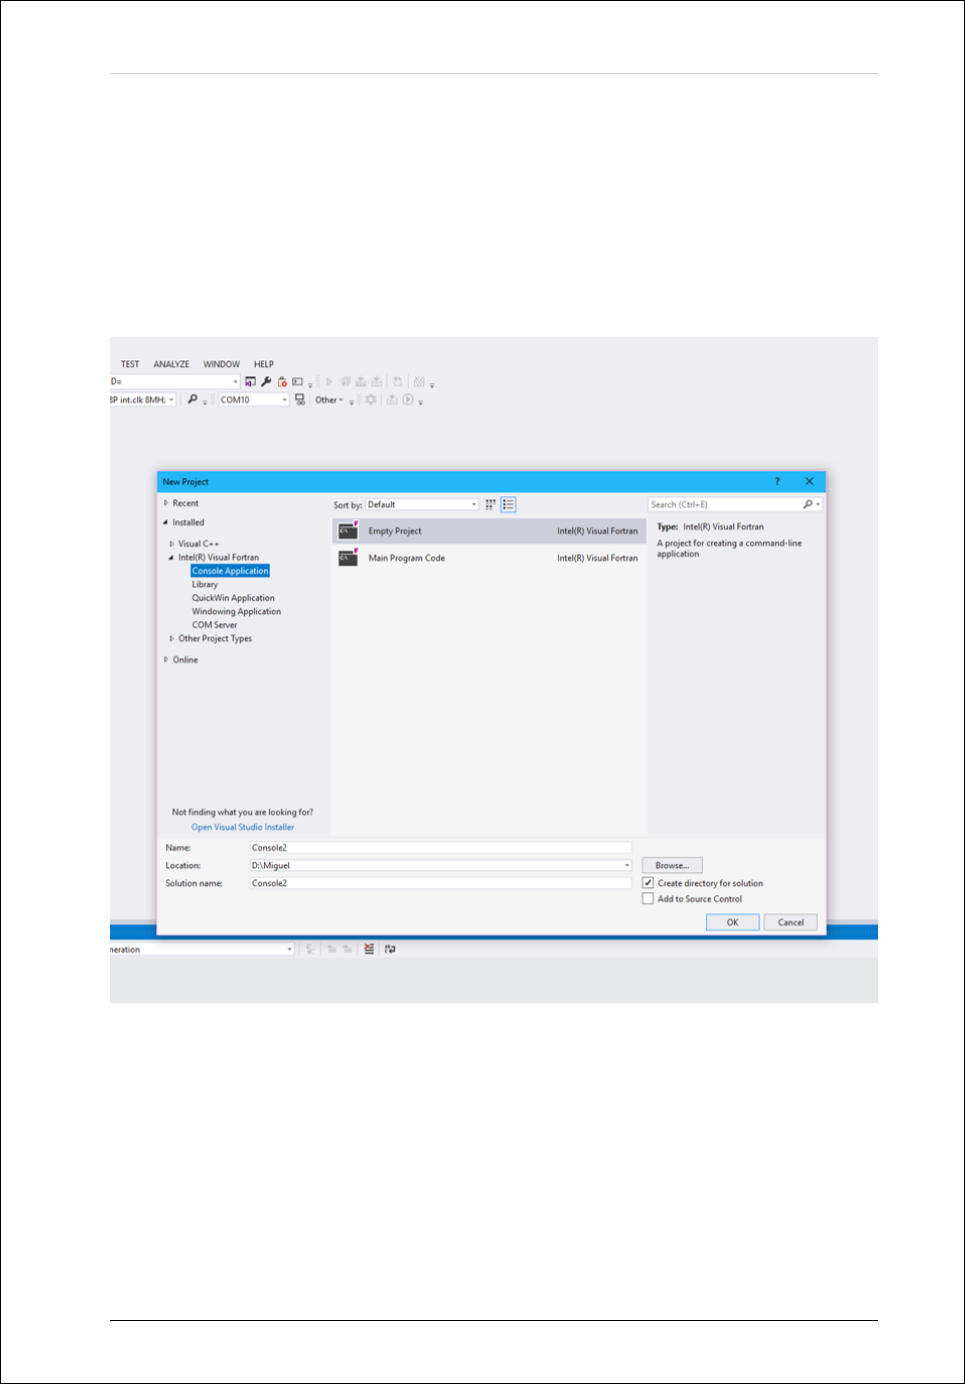
click on Main Program Code.
4. Change Name (project name) to “P1” (Figure 2.8).
5. Change the Location of the solution to /Desktop/Informatics.
6. Change the Solution name to “Semester1”.
7. Select option Create directory for solution.
8. Click OK.
“”Manual Visual Studio”” — 2018/10/28 — 21:25 — page 19 — #23
2.3. COMPILE, LINK AND EXECUTE THE “HELLO WORLD” EXAMPLE 19
Figure 2.1: Different available option for installation, we choose Windows version.
2.3 Compile, link and execute the “Hello world” ex-
ample
In order to check that everything is correctly installed, we will run the easiest
example. This is usually called: the “Hello world” example. This example is
written automatically when we select Main Program Code. This program opens
the window console, writes the message “Hello world” and after pressing the enter
key, it closes the window console.
If we want to execute this Fortran program, a translation to machine code
must be done. This compiling and linking process is done automatically by Visual
Studio by clicking the right button. This automatic process is accomplished by
the two steps. The source file p1.f90 is translated to an object code p1.o and
then it is linked to other components to create an executable file: p1.exe.
To compile, link and execute the program follow the next steps:
“”Manual Visual Studio”” — 2018/10/28 — 21:25 — page 20 — #24
20 CHAPTER 2. FORTRAN PROJECTS
Figure 2.2: We select all the conditions and click on Accept.
1. BUILD/Build solution or click on the corresponding icon. The program is
compiled and linked.
2. DEBUG/Start Without Debugging or click the corresponding icon. The
program is executed.
2.4 Include new projects and new files
We can check in the location chosen that a .sln file, a folder with the name of
the project and a .vfproj file inside have appeared. If the Solution is already
created and we just want to open it we double click on the .sln file or click on
File/Open/Project/Solution... and look for our .sln file. Later, if we want to
include another project in that solution we:
“”Manual Visual Studio”” — 2018/10/28 — 21:25 — page 21 — #25
2.4. INCLUDE NEW PROJECTS AND NEW FILES 21
Figure 2.3: Personal Information to complete in order to get the license.
1. Click on File/New/Project....
2. In the Intel(R) Visual Fortran menu select Console Application and then
click on Empty Project.
3. Write the name of the new project.
4. In Solution we select the option Add to solution.
5. Click on OK.
6. Before closing Visual Studio we click on Save All.
Including files in our project is easy;
1. Right click on the name of our project (in the solution explorer).
2. Click on Add.

“”Manual Visual Studio”” — 2018/10/28 — 21:25 — page 22 — #26
22 CHAPTER 2. FORTRAN PROJECTS
3. Click on New Item... if we are going to start from scratch (or click in
Existing Item... if we add it from an existing one).
4. Click on Fortran Free-form File (.f90).
5. Write the name of the file.
6. Click on Add.
The file appears in the source folder but we could grab and drop it in the
root location of the project so it appears in the same level as Source, Resource
and Header folders. For those files that we include in our project from a different
location (not the folder where we store all the project) we have to remember that
Visual Studio will look for it in the original location next time, so we cannot
change location. We can better save a copy in our project folder and include it
in the project from there.
“”Manual Visual Studio”” — 2018/10/28 — 21:25 — page 23 — #27
2.4. INCLUDE NEW PROJECTS AND NEW FILES 23
Figure 2.4: Register an Account in Intel Developer Zone, after filling in all the information
we click on Register an Account.
“”Manual Visual Studio”” — 2018/10/28 — 21:25 — page 24 — #28
24 CHAPTER 2. FORTRAN PROJECTS
Figure 2.5: Downloading page for Intel Parallel Studio where we choose Intel Parallel
Studio Cluster Edition for Windows* (all tools) and version 2018 Update 3.

“”Manual Visual Studio”” — 2018/10/28 — 21:25 — page 25 — #29
2.4. INCLUDE NEW PROJECTS AND NEW FILES 25
Figure 2.6: Options before installation. We select the options shown here and click on
next.
“”Manual Visual Studio”” — 2018/10/28 — 21:25 — page 26 — #30
26 CHAPTER 2. FORTRAN PROJECTS
Figure 2.7: Creating a Solution + Project, step 1.
“”Manual Visual Studio”” — 2018/10/28 — 21:25 — page 27 — #31
2.4. INCLUDE NEW PROJECTS AND NEW FILES 27
Figure 2.8: Creating a Solution + Project, step 2.

“”Manual Visual Studio”” — 2018/10/28 — 21:25 — page 28 — #32
28 CHAPTER 2. FORTRAN PROJECTS
2.5 Configuring IDE environment
Although this can be learnt while using the IDE, it is useful to have some quick
ideas about how to change basic options related to aspect and menus.
Assuming we have installed the English version we click on Tools/Options...
and start deciding our preferred configuration in the Environment menu like for
example the colour theme in General section (Dark, Light, Blue, etc.) or the time
we want to save the AutoRecover information. We can also change here the fonts
and colours of the programming language or the default options for the Startup
(first window that appears). In the Text Editor menu in Fortran section it is
mandatory to activate the line numbers and check that we have Insert Spaces
marked in the tab options. That is because Fortran does not recognise tab as
a character so we could find warnings each time we compile a code with tabs
instead of spaces (specially with other compilers like GFortran). We can mark
those same options in the menu All Languages too.
Related to the windows, the way of working is the same as Windows OS: so
we can change position, make them fixed or floating, configure different options,
etc. We can decide for each window in a little arrow located in the right upper
part, also close those we don’t need or open new ones in View tab. Solution
Explorer,Properties Window,Bookmark Window or Output are some windows
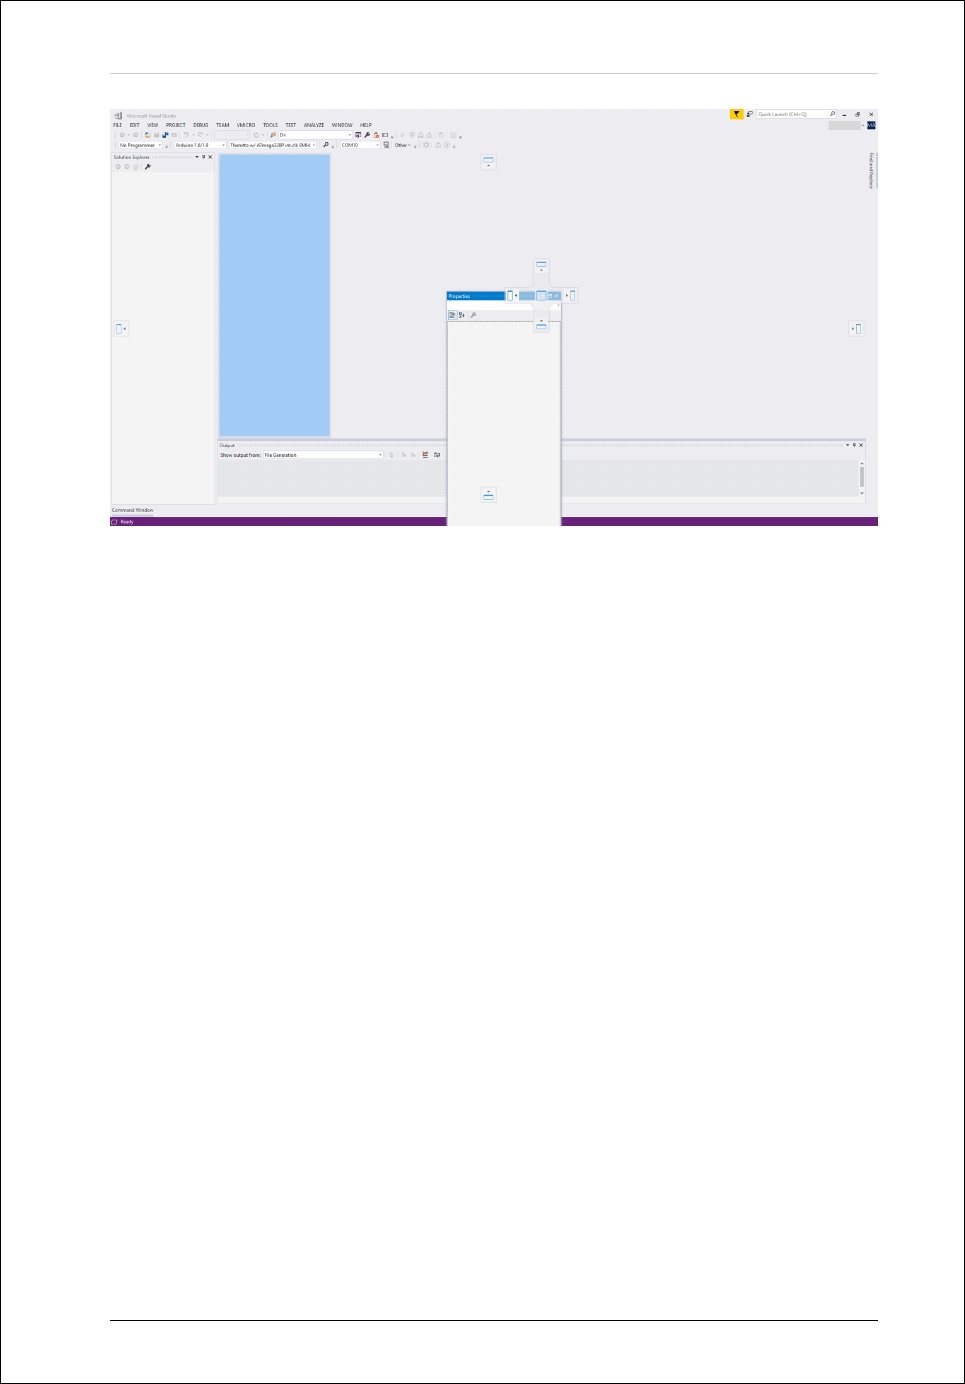
we could need. It is essential to have Solution Explorer and Output windows
visible and in the position we prefer (Figure 2.9 shows an example of the distri-
bution). If we want to move the windows we grab it and Visual Studio will show
us some default positions we could choose, we just have to drop it in the little
boxes it shows (or drop it in a floating point).
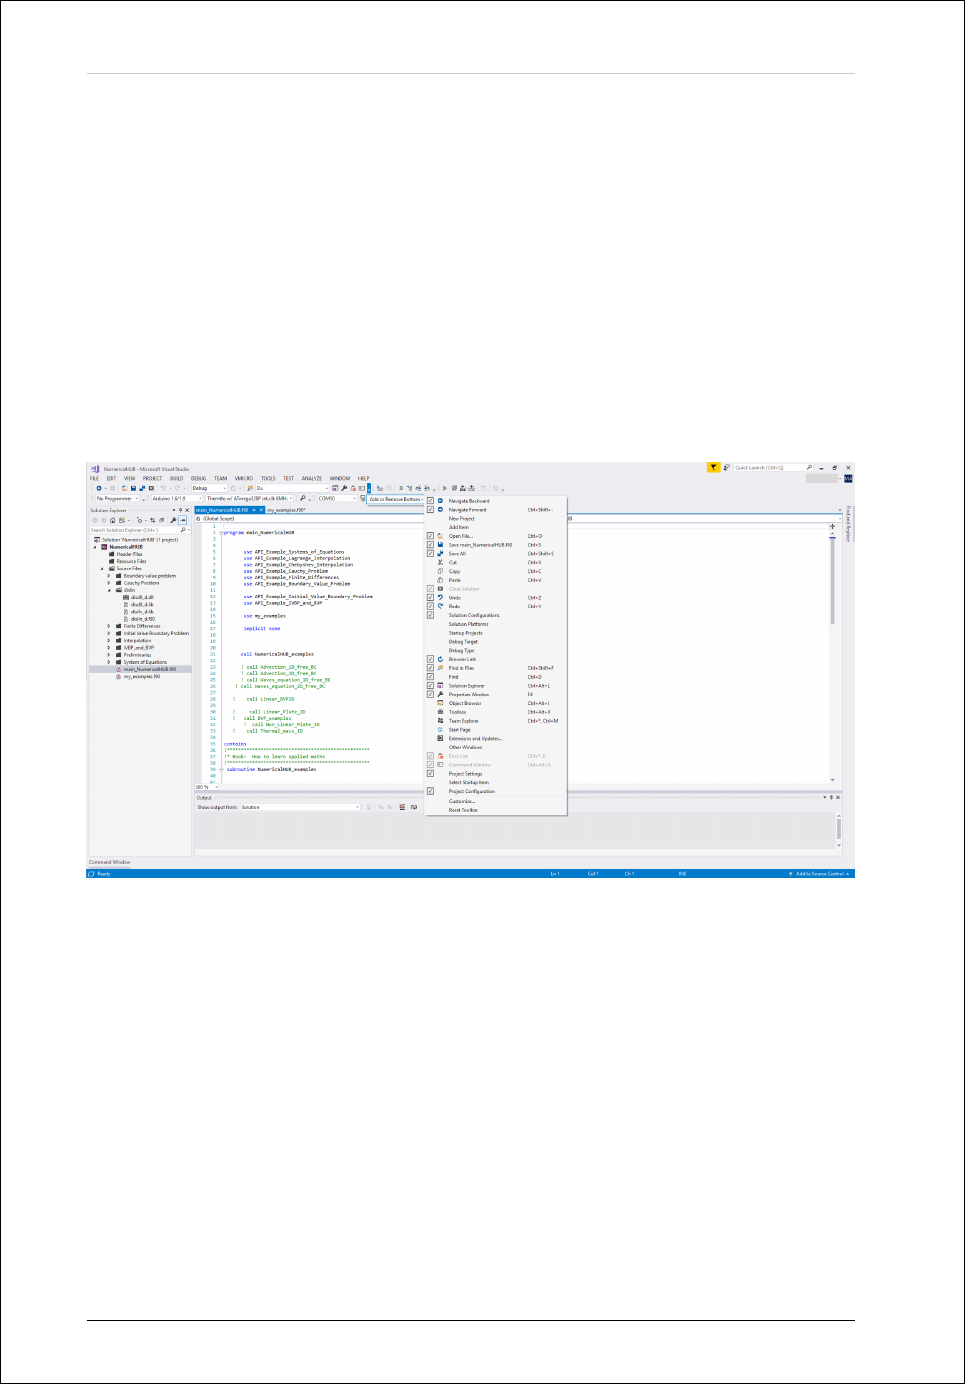
Apart from the windows we can personalise toolbars and commands, it can
be done in two ways; clicking on the right part of each toolbar we see option Add
or Remove Buttons which deploys a list of default options for that bar (Figure
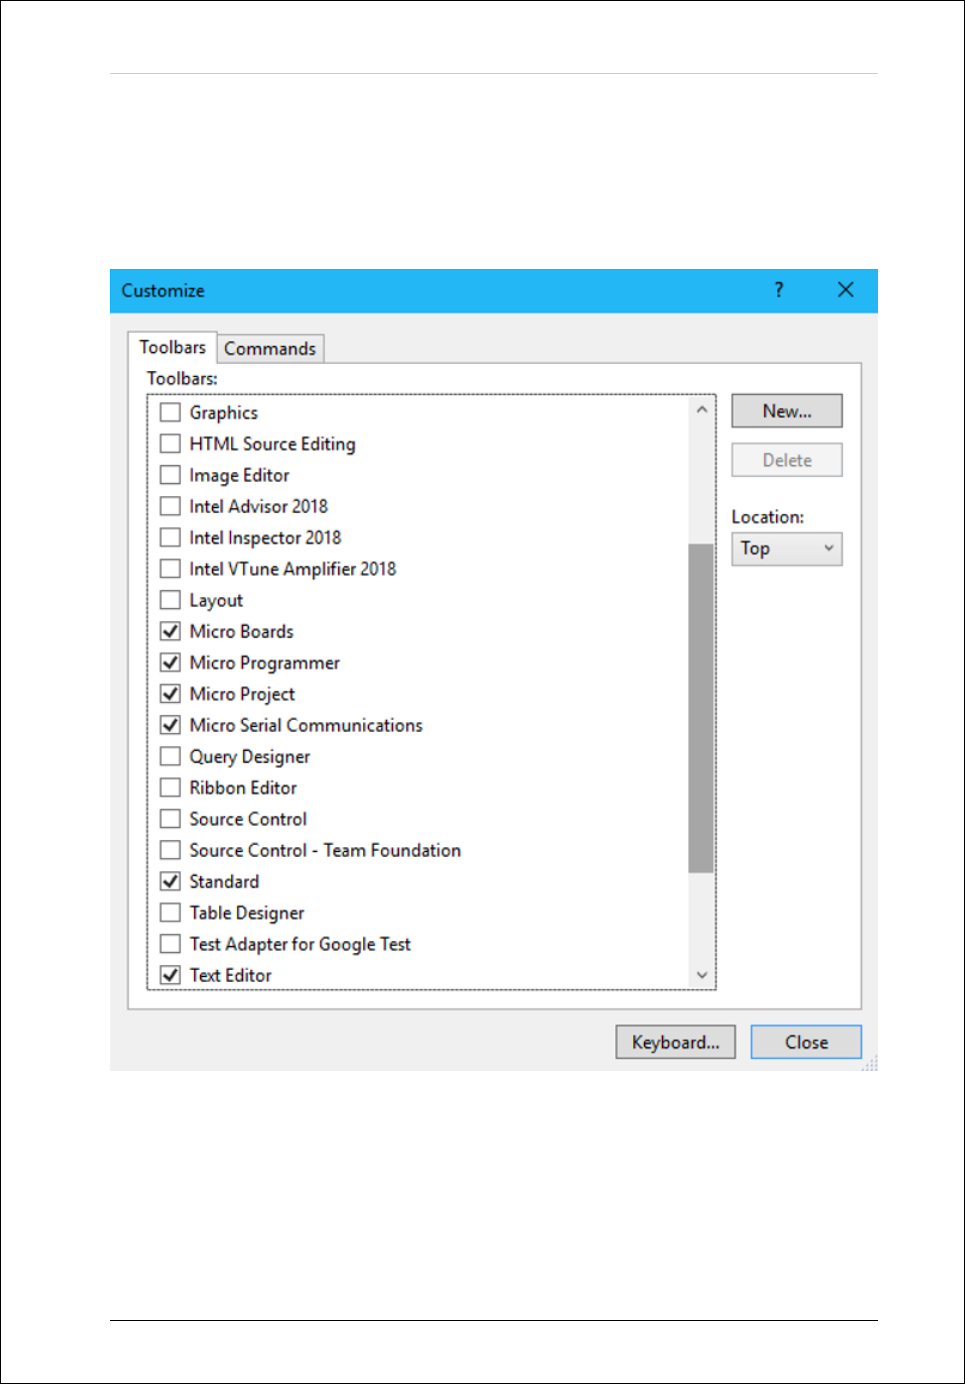
2.10). We can also click on Tools/Customize and we access two tabs, Toolbars
(Figure 2.11) which can show and hide a big list of toolbars and Commands where
we can select any of them, add and delete commands from there and also add
new buttons that are not in the bar by default (figures 2.13, 2.12 and 2.14).
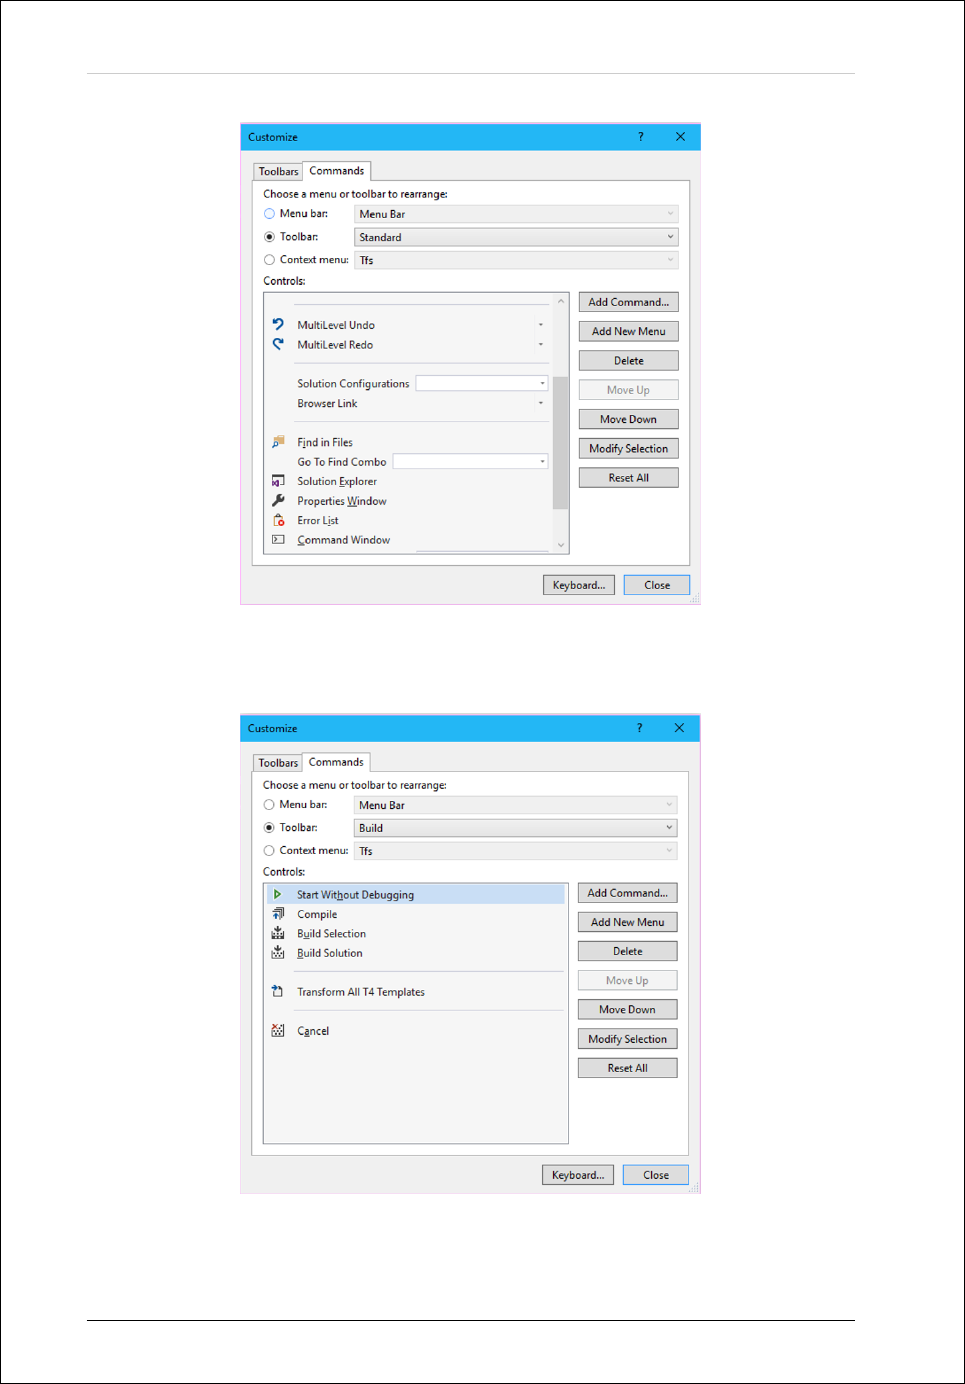
In figures below we can see that Text Editor,Standard,Build and Micro
toolbars are shown. Figure 2.12 shows that Standard bar includes new commands
like Find in Files,Solution Explorer and Properties Window while Build bar
(figure 2.13) includes Compile command and the most important; Start without
debugging. It is necessary to have quick access to this command because most
of the times (we could say always) we won’t use this debugger and we just want
“”Manual Visual Studio”” — 2018/10/28 — 21:25 — page 29 — #33
2.5. CONFIGURING IDE ENVIRONMENT 29
Figure 2.9: Example of windows distribution with a Fortran project already opened.
to run the code directly without debugging. Rest of the buttons will be explained
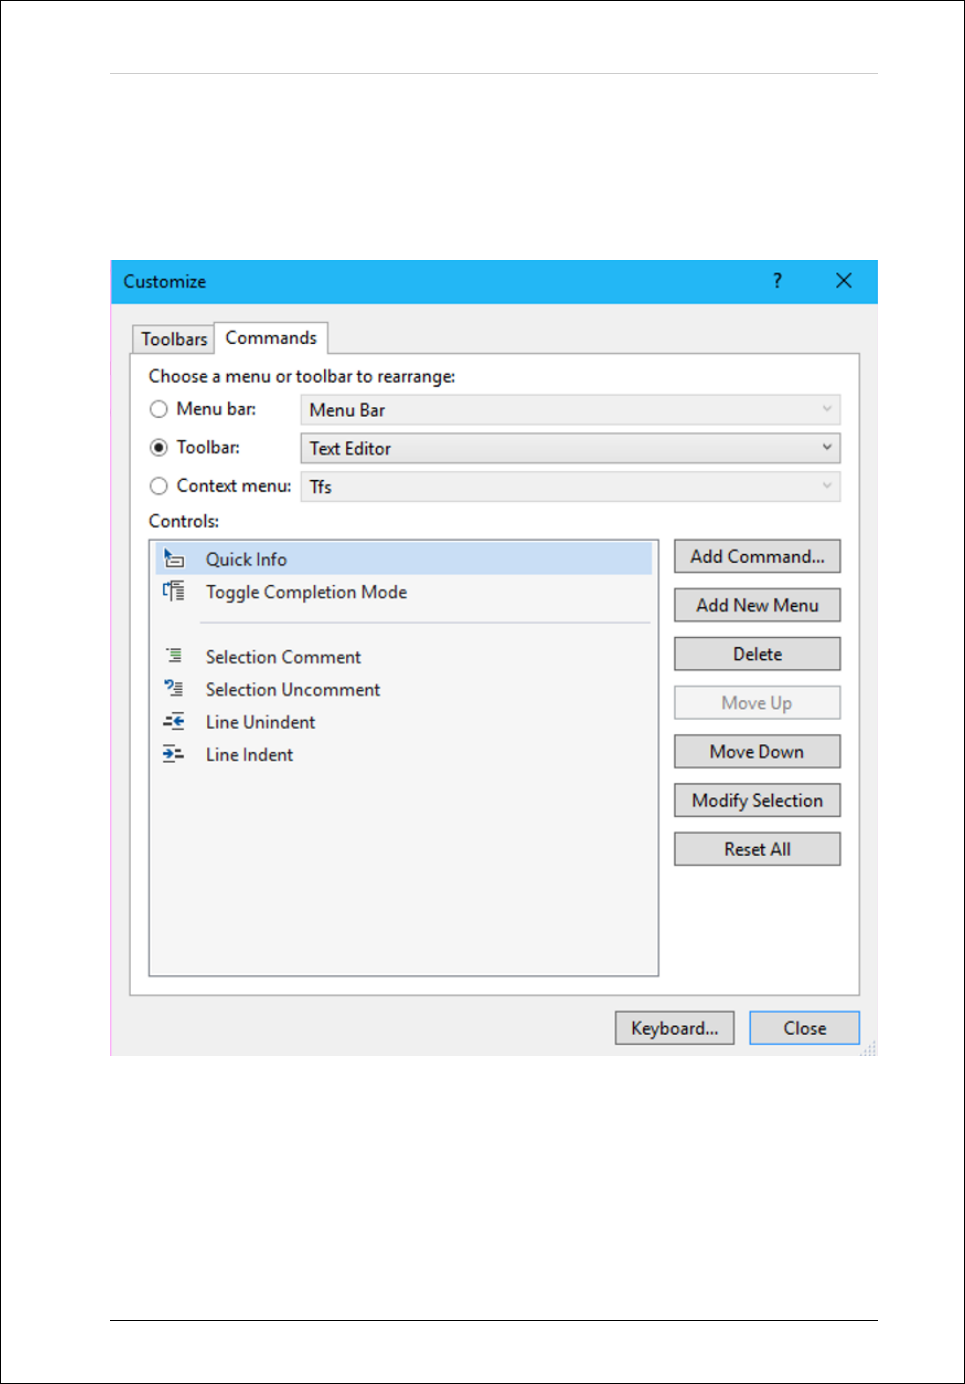
later. The toolbar Text Editor (figure 2.14) is really useful while writing code
because of the Comment and Uncomment commands or the new ones added,
Line Indent and Line Unindent. We should organize buttons and include those
we use more.
Once we have finished the configuration of the environment it is interesting
to make a backup copy in order to restore it if we reinstall Visual Studio, if
we work in two different computers or change our personal computer. We go to
Tools/Import and Export Settings/Export selected environment settings, click on
Next twice and choose where to save it. We can import the configuration in the
same place choosing Import selected environment settings and looking for our file
previously created. Actually, this manual is accompanied by a settings file called
“Exported-2018-05-23.vssettings” which has all the changes explained (only IDE
configuration!).
“”Manual Visual Studio”” — 2018/10/28 — 21:25 — page 30 — #34
30 CHAPTER 2. FORTRAN PROJECTS
Figure 2.10: Add and Delete option for the buttons that appears in the toolbars.
“”Manual Visual Studio”” — 2018/10/28 — 21:25 — page 31 — #35
2.5. CONFIGURING IDE ENVIRONMENT 31
Figure 2.11: Tab Customize, it allows to show and hide toolbars for the IDE.
“”Manual Visual Studio”” — 2018/10/28 — 21:25 — page 32 — #36
32 CHAPTER 2. FORTRAN PROJECTS
Figure 2.12: Commands tab, for adding commands to selected toolbar or menu (Standard
Toolbar).
Figure 2.13: Commands tab, for adding commands to selected toolbar or menu (Build
Toolbar).
“”Manual Visual Studio”” — 2018/10/28 — 21:25 — page 33 — #37
2.5. CONFIGURING IDE ENVIRONMENT 33
Figure 2.14: Commands tab, for adding commands to selected toolbar or menu (Text
Editor Toolbar).

“”Manual Visual Studio”” — 2018/10/28 — 21:25 — page 34 — #38
34 CHAPTER 2. FORTRAN PROJECTS
2.6 Configuring Fortran Project
In previous section we’ve seen how to configure general VS settings, which are
not related to the Fortran project configuration. For each project inside our
solution, or any project we create from now on, we should define some compilation
(and related) properties. It’s actually possible to define some properties for indi-
vidual source code files (Click right button on the name and click on properties)
but we are going to treat here some of those that involve the whole project.
With the project opened and selected in the solution explorer (specially if
our solution has more than one) we click on Project/Properties, those changes we
make will only affect the project selected. If we have selected a file inside the
project, the properties shown will be the individual file properties so we should
take care of this. Here we have to understand that a change in the properties of the
project will change all internal files except those we have change individually, for
example; if we change default Real KIND for Fortran/Data in a “example.f90”
file, we will see that changing the same option in the project configuration we
change all files not modified but “example.f90” does not change. What’s more, a
red spot will appear in the symbol of the file (in the solution explorer) and, if the
option does not have the compiler’s default value, the value will appear in bold.
Having said that, let’s take a look at important options in Project/Properties:
•In Fortran/Data/Default Real KIND; we have to change the default value
to “8 (/real size:64)”. Thus, when we write in our code “real :: x” the
default kind of the x will be 8 bytes (double precision) and we do not have
to specify “real(kind=8) :: x”. When we use this trick, we get used to write
only “real :: x” and not mix different precisions in the same code, and when
we want to run our program with simple precision we just have to change
this property and the whole program will run with simple precision.
•Stack Overflow can occur in our software for many reasons, it happens when
the call stack pointer exceeds the stack bound ([7], concepts like call stack
can be found in [8]). One of the main reasons of stack overflow appears
when allocating more memory on the stack than will fit (local array vari-
ables too large for example). So, in order to extend the size of the stack in
these cases we change configuration clicking on Linker/Command Line/Ad-
ditional Options: and writing “/STACK:100000000”.
•In Fortran/Command Line/Additional Options: write “/assume:realloc lhs”
in order to enable automatic reallocation, it decides if using current For-
tran Standard rules o old Fortran 2003 rules related to this option, which

“”Manual Visual Studio”” — 2018/10/28 — 21:25 — page 35 — #39
2.6. CONFIGURING FORTRAN PROJECT 35
is described as:
“Tells the compiler that when the left-hand side of an as-
signment is an allocatable object, it should be reallocated
to the shape of the right-hand side of the assignment be-
fore the assignment occurs. This is the current Fortran
Standard definition. This feature may cause extra over-
head at run time. The option standard-realloc-lhs has the
same effect as assume realloc lhs.”
(https://software.intel.com/en-
us/node/678222)

“”Manual Visual Studio”” — 2018/10/28 — 21:25 — page 36 — #40
36 CHAPTER 2. FORTRAN PROJECTS
2.7 Configuring a graphic library: DISLIN
DISLIN is a plotting library for Fortran and C languages that allows a quick plot
of results when we are making a lot of tests with the code or debugging (graphic
debugging) our program. It can be called from our main program or subroutines
and “contains routines and functions for displaying data as curves, bar graphs, pie
charts, 3D-colour plots, surfaces, contours and maps”. In order to add DISLIN
libraries to our project, we have to add the files to it by following steps:
1. Download the DISLIN distribution package required for our machine. From
the web http://www.mps.mpg.de/dislin/win-32-bit, we choose Intel Fortran
compiler package.
2. Unzip the downloaded file and look for:
disdll d.dll,disdll d.lib,disifc d.lib dislin d.f90
It is assumed that our calculations are done in double precision and that’s
why double precision files (* d.lib, dislin d.f90 ) are selected.
3. Create a folder named DISLIN and locate those files on it.
4. Include this folder in our visual Studio project.
5. Locate de file disdll d.dll and copy it into the release folder or into the folder
where the executable file is located. If this file is not properly copied, an
error will jump when trying to execute the program saying that cannot find
the .dll file.
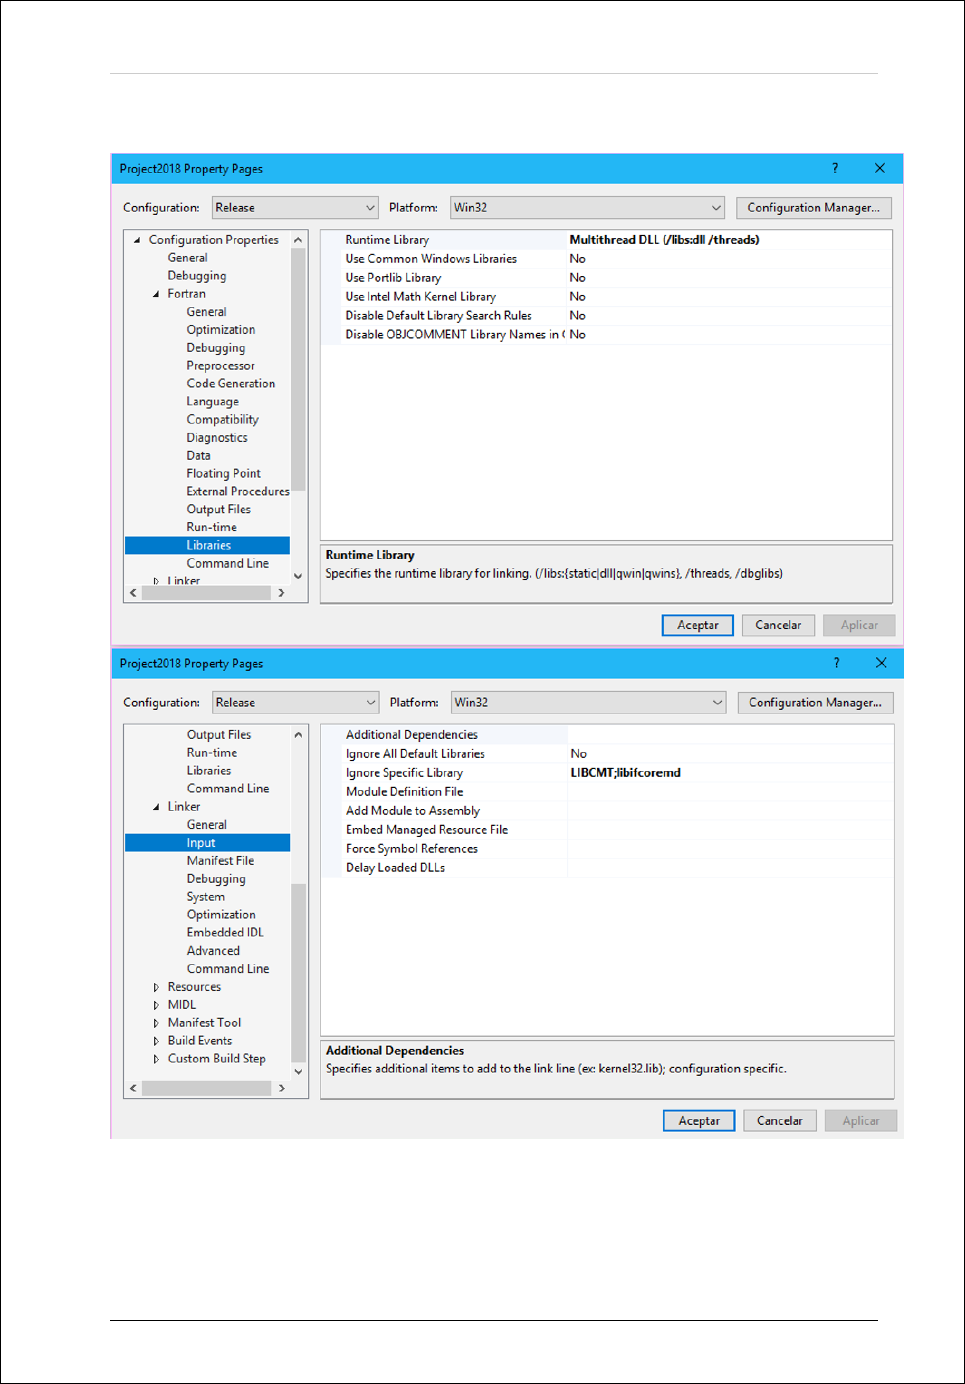
6. Configure the project to avoid errors (Figure 2.15). Open the project prop-
erty pages and check that in Fortran/Libraries/Runtime Library it is writ-
ten “Multithread DLL (/libs:dll /threads)”.
7. Configure the project to avoid duplications. Open the project property
pages in Linker/Input/Ignore Specific Library and write “LIBCMT;libifcoremd”
A detailed image of the configuration process is shown in Figure 2.15.
Once the configuration process has been done and the different projects have
been created, the solution explorer look like in Figure 2.16.
“”Manual Visual Studio”” — 2018/10/28 — 21:25 — page 37 — #41
2.7. CONFIGURING A GRAPHIC LIBRARY: DISLIN 37
Figure 2.15: Necessary configuration for the Project Properties in order to male the
program work with DISLIN, the fields to change are Runtime Library and Ignore Specific
Library.
“”Manual Visual Studio”” — 2018/10/28 — 21:25 — page 38 — #42
38 CHAPTER 2. FORTRAN PROJECTS
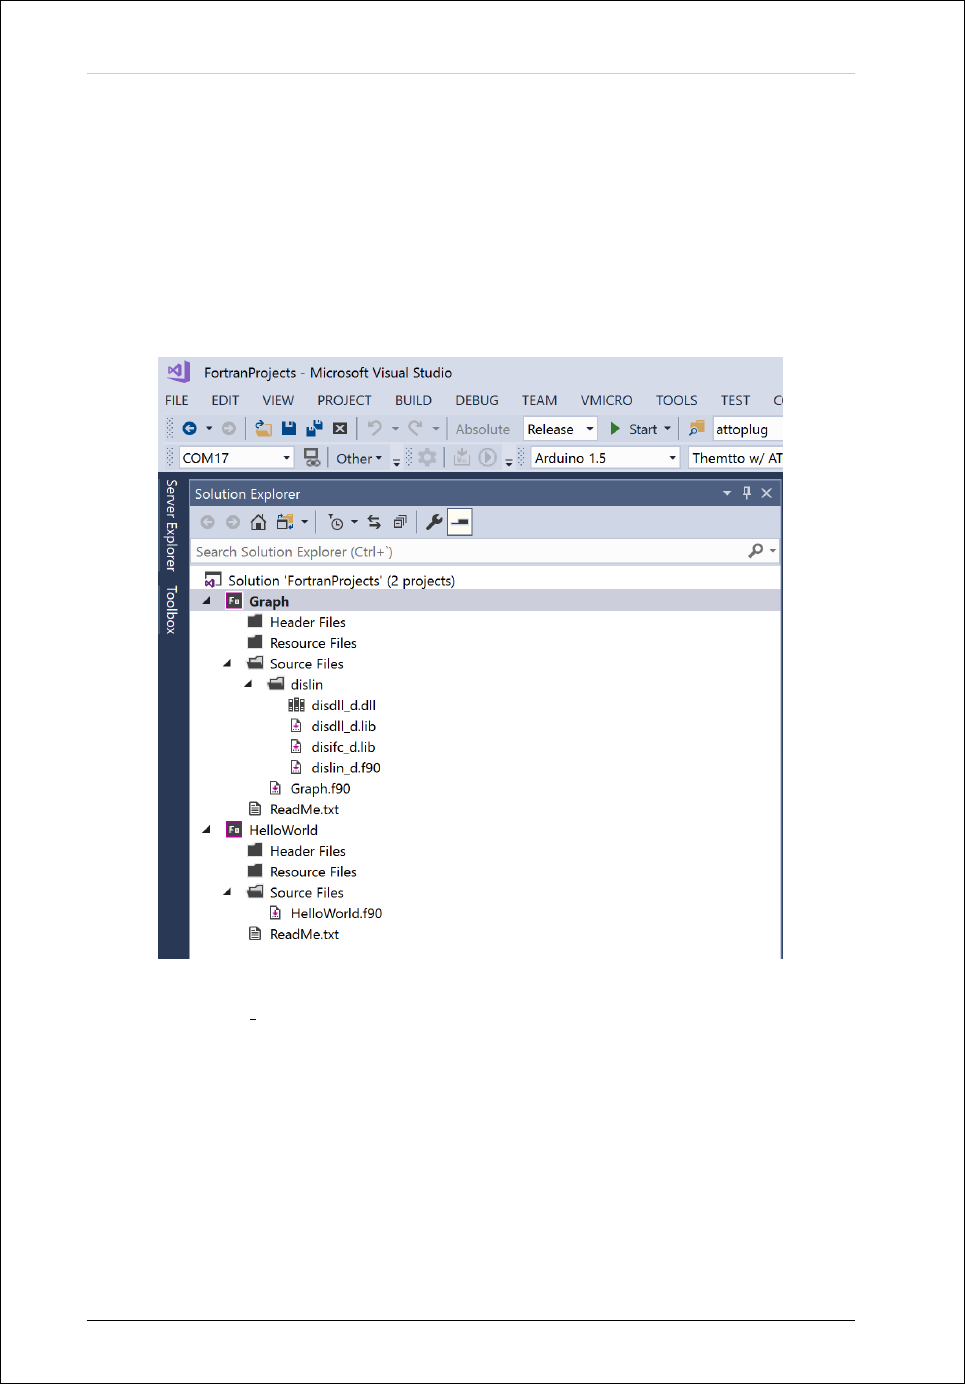
Figure 2.16: Solution explorer for the project Graph showing the inclusion of dislin
libraries and dislin d.f90 interfaces.

“”Manual Visual Studio”” — 2018/10/28 — 21:25 — page 39 — #43
2.8. FORTRAN FAQ 39
Now our dislin example should work, take note of the subroutines used in
that example for plotting a curve in order to use it in future codes. In addition,
a complete dislin manual can be found in the dislin web page.
The following code allows to plot a sine graph in a very simple way.
program Graph
use dislin
impli c i t none
c a l l sine graph
contains
subroutine sine graph
integer ,parameter : : N = 100
rea l : : x ( 0:N) , y ( 0:N)
integer : : i ;
rea l : : PI = 4∗atan (1. ) ;
rea l : : a , b ;
a = 0
b = 2∗PI
x = [ ( a + (b−a ) ∗i / N, i=0, N) ]
y = sin ( x )
c a l l scrmod ( ”reverse”)
c a l l metafl( ’XWIN ’ )
c a l l q p l o t ( x , y , N+1)
end subroutine
end program
To “use” this dislin module and call the subroutine in the main .f90, it is
advisable to write a “read(*,*)” line at the end of the program to avoid that
command line gets closed after finishing!
2.8 Fortran FAQ
Here some general concepts and ideas are going to be explained, from good prac-
tices to programming advice or quick explanations.

“”Manual Visual Studio”” — 2018/10/28 — 21:25 — page 40 — #44
40 CHAPTER 2. FORTRAN PROJECTS
•What are Static and Dynamic libraries? How can I create a .lib
file?
Let’s say we have some modules we feel comfortable about and we want to
create a library with them, we have to choose kind. In a Static Library that
code enters inside of the executable file once it is created, we could go to
another computer and run that program without problem, we have also a
quicker program as soon as it has all necessary code inside and doesn’t have
to look for outside. Disadvantages are; programs become heavier and if we
find a bug in the library code, we will have to recompile all programs that
use that lines.
Dynamic libraries are not in our executable file, so it is lighter and fixing
bugs is easier as soon as it is repaired for all programs once we change just
one file. However, we have to drag all libraries when moving the executable
to another computer and the execution will be slower because of the search
that program has to do when it needs those codes. We can see both have
advantages and disadvantages and one or another will be used depending
on the situation. Each of them is created, compiled and linked in a different
way.
We are going to see how to create a static library through an example:
1. We first create a project as seen before.
2. Then we add the main file, and paste there this example code:
program main
use floating point parameters
impli c i t none
c a l l real parameters
c a l l test divisions
end program
3. Now we close our project (saving) and open a new one, but with kind
Static Library (File/New/Project.../Installed/Intel(R) Visual Fortran/Li-
brary/Static Library). We take care of choosing name for the new
solution (name of the library) and project and choosing location.
4. We add to this Library project a .f90 file where we paste next example,
this will be the module we save in our library:

“”Manual Visual Studio”” — 2018/10/28 — 21:25 — page 41 — #45
2.8. FORTRAN FAQ 41
subroutine real parameters
rea l (4) : : x
rea l : : y
write(∗,∗)’Maximum v alue ’ ,huge ( x )
write(∗,∗)’Minimum valu e ’ ,tiny ( x )
write(∗,∗)’ Ro und off ’ ,epsilon( x )
write(∗,∗)’Significant digits ’ ,precision ( x )
write(∗,∗)’Maximum v alue ’ ,huge ( y )
write(∗,∗)’Minimum valu e ’ ,tiny ( y )
write(∗,∗)’ Ro und off ’ ,epsilon( y )
write(∗,∗)’Significant digits ’ ,precision ( y )
end subroutine
5. Then we save all, compile the file and build the project. We can see
that a .lib file (with the name of the project) and a .mod file (with
the name of the module) have appeared in the Release folder of the
project.
subroutine test divisions
write(∗,’ ( a20 , f 17 .15 ) ’ )’1.1/2. ’ ,1.1/2.
write(∗,’ ( a20 , f 17 .15 ) ’ )’1.1/2’,1.1/2
write(∗,’ ( a20 , f 17 .15 ) ’ )’1.1/2d0’,1.1/2d0
write(∗,’ ( a20 , f 17 .15 ) ’ )’1.1d0/2d0’,1.1d0/2d0
write(∗,’ ( a20 , f 17 .15 ) ’ )’1.1e0/2e0’,1.1e0/2e0
write(∗,’ ( a20 , f 17 .15 ) ’ )’1/3d0’,1/3d0
write(∗,’ ( a20 , f 17 .15 ) ’ )’1. / 3d0’,1. / 3d0
write(∗,’ ( a20 , f 17 .15 ) ’ )’1d0/3d0’,1d0/3d0
write(∗,’ ( a20 , f 17 .15 ) ’ )’1d0/3. ’ ,1d0/3.
write(∗,’ ( a20 , f 17 .15 ) ’ )’1. / 3. ’ ,1. / 3.
write(∗,’ ( a20 , f 17 .15 ) ’ )’1. / 3’,1. / 3
write(∗,’ ( a20 , f 17 .15 ) ’ )’1/3’,1/3
end subroutine
6. We can now close the solution of the library and open our project.
7. Add to the project both files in the Source folder, using right click-
/Add/Existing Item/etc for example. We can copy them first in our
project folder and then include it from the IDE or link them to the
original folder, this option let us rebuild the library whenever we want
and our main project will be accessing always the latest version of the
library but then Library Solution should not be opened in the IDE.

“”Manual Visual Studio”” — 2018/10/28 — 21:25 — page 42 — #46
42 CHAPTER 2. FORTRAN PROJECTS
8. We build the project and run it without debugging.
There is an interesting result here, we obtain something like:
Maximum value 3.4028235E+38
Minimum value 1.1754944E-38
Round_off 1.1920929E-07
Significant digits 6
Maximum value 3.4028235E+38
Minimum value 1.1754944E-38
Round_off 1.1920929E-07
Significant digits 15
1.1/2. 0.550000011920929
1.1/2 0.550000011920929
1.1/2d0 0.550000011920929
1.1d0/2d0 0.550000000000000
1.1e0/2e0 0.550000011920929
1/3d0 0.333333333333333
1./3d0 0.333333333333333
1d0/3d0 0.333333333333333
1d0/3. 0.333333333333333
This means that both “real(4):: x” and “real :: y” are being considered
as simple precision, in order to make reals double precision by default we
follow 2.6 when building library and repeat the process.
•What are Release and Debug?
They are two possible configurations, each one with its settings, that allows
to run the code in a different way. We can actually create more release
modes (Debug modes, or the name we prefer) with a different solution and
project configurations. We access the Configuration Manager by clicking
on Build/Configuration Manager or deploying the selector of Configuration
(where it says Release and Debug), there we can create new options or edit
those we have. For example, we could create one where default real KIND
is 4 and other where is 8, by changing between Release modes we would
run the code with the two behaviours (if we open the project options we
directly can change between Modes and change options mode by mode).
Debug mode will allow to run the code without optimiser turned on and
lot of information will be included in the build files so we can check our
program step by step, it can be useful for fixing bugs. However, if we are
developing Numerical Simulations and related programs, we will use another

“”Manual Visual Studio”” — 2018/10/28 — 21:25 — page 43 — #47
2.8. FORTRAN FAQ 43
kind of debugging; graphic assisted. Checking errors in the code starts with
the printing of those results and the validation of the program module by
module. That is why we include Dislin libraries in our program, to check
quickly results and decide if we have executed correctly our program, later
we will save the numerical results in order to plot them with another tool.
•Do I have to Start without Debugging my projects?
We have seen what Debug and release are so we now understand why one
of the IDE configuration (2.5) has been changing the command that starts
the program, from the Start with Debugging to this one, that goes directly
to the execution of the code in the Release mode (or the mode selected).
•What should I know about files and formats?
We have read in the introduction about source codes and object codes, the
program we write needs of both codes, first one will be what we write with
Fortran language and second will be the translation that the compiler makes
in order to make them understandable for computers. The source code we
write when using a programming language is stored in text files, in Fortran
case those files has extension .f90,.f or .for for example.
In order to execute that program we can choose between using an interpreter
(it adapts the instructions while they are found in the code) or a compiler
(translates the code to machine language), we are interested in compilers. It
works developing two sub processes, first verifies that the source code is well
written, fulfilling with syntactic and semantic Fortran rules, once finished,
it creates an intermediate code called object code (with extension .obj
in Windows OS). Second sub process consists in linking the object code
with other codes stored in libraries, the extensions used here are .dll for
shareable library files and .mod for module files (created if a source file
being compiled defines a Fortran module, which means, it uses MODULE
statement). Finally the compiler optimize the code and converts it in an
executable program (.exe in Windows).
The .mod files has the interfaces of the modules that we have compiled,
example.mod contains the necessary information regarding the modules that
have been defined in the program example.f90 and they are created with
the .obj file also, when compiling that project. Actually, a .mod file is
created for each module defined in our source (.f90 ) file and a .obj one will
appear for the whole source. The module interfaces share the name with
the modules and the object file has the same name as the source, typically,
we can define one module in each file and assign the same name to the
module and the source file (it’s not a requirement but it helps to organize
everything). More of this can be broaden in [10], Lionel [4] and [5]

“”Manual Visual Studio”” — 2018/10/28 — 21:25 — page 44 — #48
44 CHAPTER 2. FORTRAN PROJECTS
The history behind the file extensions of the source codes in Fortran can be
broaden in Conic-Jacob [1] or Lionel [3].
Regarding Visual Studio files we can see .sln which is the format where
Visual stores our solution, there we open our projects associated. With the
solution appears a configuration file with extension .suo, as it is said in the
on line manual of Visual Studio:
“The solution user options (.suo) file contains per-user
solution options. This file should not be checked in to
source code control.
The solution user options (.suo) file is a structured stor-
age, or compound, file stored in a binary format. You save
user information into streams with the name of the stream
being the key that will be used to identify the information
in the .suo file. The solution user options file is used to
store user preference settings, and is created automatically
when Visual Studio saves a solution.”
(https://msdn.microsoft.com/es-
es/library/bb165909.aspx)
Inside our solution folder we find folders with the different projects and the
file with extension .vfproj stores everything needed to open those projects.
That specific extension makes reference to an Intel Fortran project file while,
for example, .icproj would be the file created for C++ compiler.
More information about formats can be found in official documentation of
Intel Fortran Compiler ([9]), also in the manual [2] or in [6]. Figure 2.17
summarise some of the extensions used.

“”Manual Visual Studio”” — 2018/10/28 — 21:25 — page 45 — #49
2.8. FORTRAN FAQ 45
Figure 2.17: List with common file extensions used in Intel Fortran projects.

“”Manual Visual Studio”” — 2018/10/28 — 21:25 — page 46 — #50
46 CHAPTER 2. FORTRAN PROJECTS

“”Manual Visual Studio”” — 2018/10/28 — 21:25 — page 47 — #51
CHAPTER
THREE
PYTHON PROJECTS
3.1 Installing Python Interpreter
Visual Studio also supports Python programming language projects and solu-
tions by selecting the Python Development workload during Visual Studio
installation. We can always
•Downloading and installing Python:
1. Open Visual Studio Installer application.
2. It may happen that the program requires an upgrade. Click on Update
and wait for the installation to finish.
3. The next window shows the installed Visual Studio products. On
Visual Studio Enterprise 2017, click on Modify button (3.1). If the
Update button were to appear instead, click on Update and wait for the
installation to complete, the Modify button should be now available.
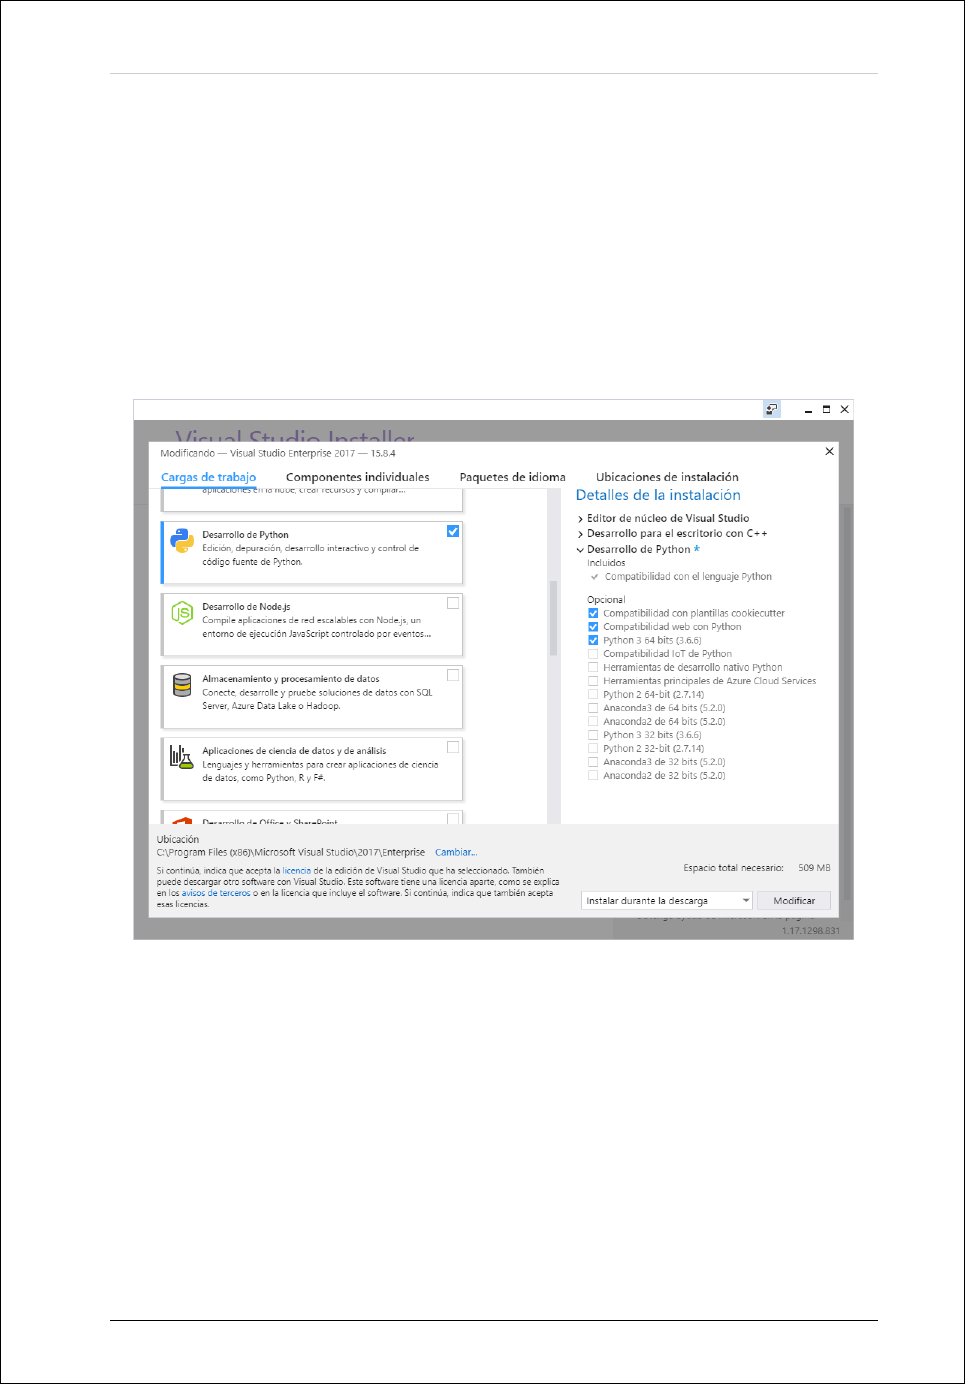
4. In the Workloads tab select Python Development. Make sure that at
the right of the window on Summary panel under the Optional section
the first three elements are selected, Python 3 xx-bit (3.x.x) included
(3.2).
5. Click Modify.
47
“”Manual Visual Studio”” — 2018/10/28 — 21:25 — page 48 — #52
48 CHAPTER 3. PYTHON PROJECTS
After installation has finished Python projects can be created and configured
at the IDE.
Figure 3.1: Installed Visual Studio products.
“”Manual Visual Studio”” — 2018/10/28 — 21:25 — page 49 — #53
3.1. INSTALLING PYTHON INTERPRETER 49
Figure 3.2: Available Visual Studio workloads.
“”Manual Visual Studio”” — 2018/10/28 — 21:25 — page 50 — #54
50 CHAPTER 3. PYTHON PROJECTS
3.2 Create a Python project
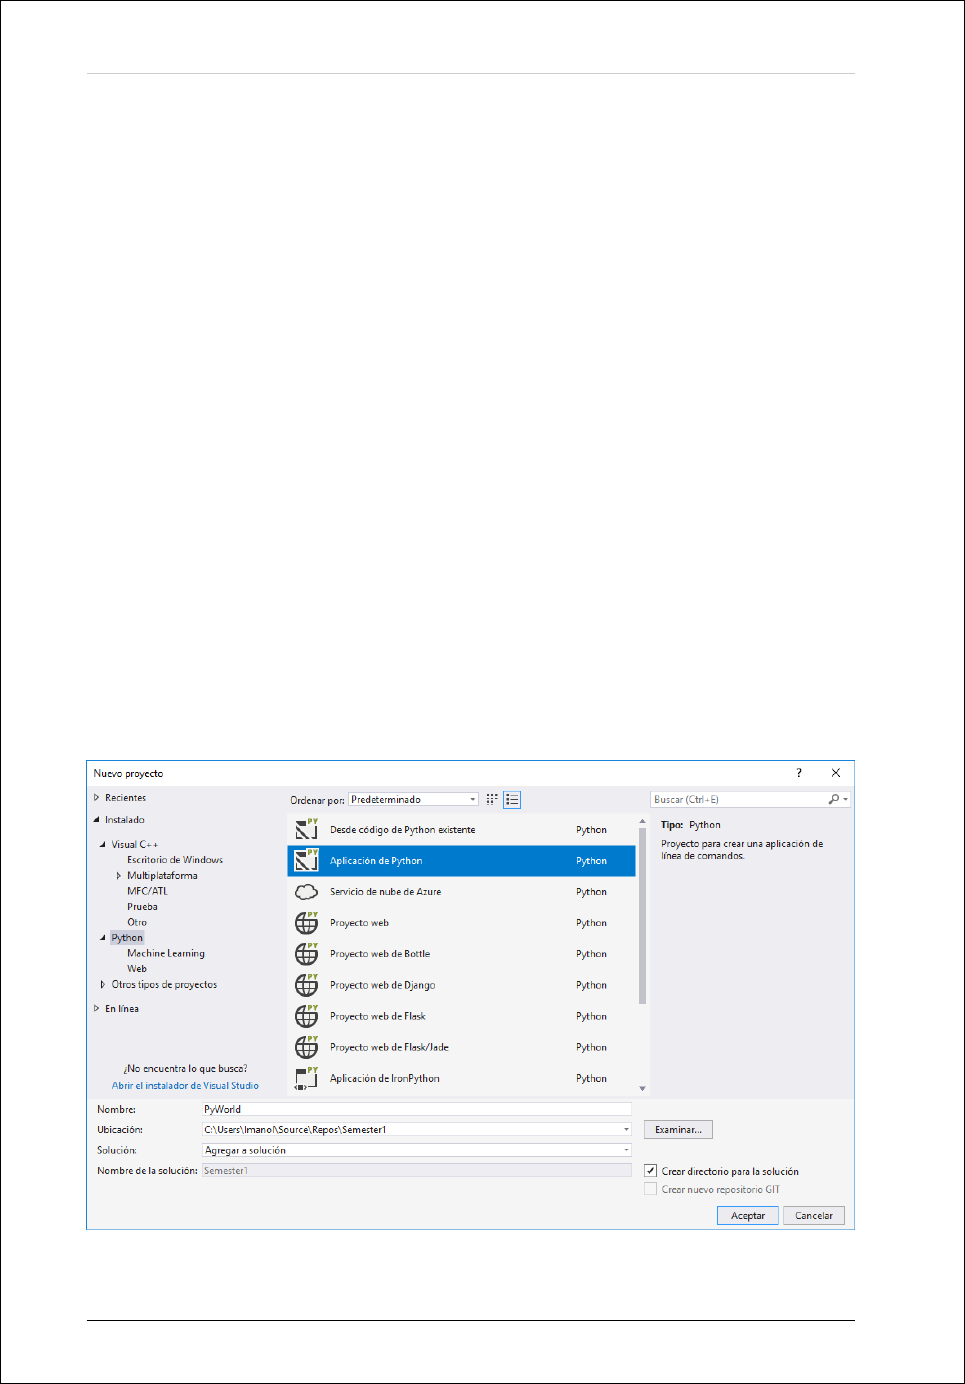
Creating a Python program is similar to creating a Fortran project as we have
previously seen. The steps are as follow:
1. Open Visual Studio 2017.
2. Click on File/New/Project...
3. In the Python menu select Python Application.
4. Change Name (project name) to “PyWorld” (Figure 3.3).
5. Select option Create directory for solution.
6. Change the Location of the solution to /Desktop/Informatics.
7. Change the Solution name to “Semester1”.
8. Click OK.
Figure 3.3: Creating a Python project.

“”Manual Visual Studio”” — 2018/10/28 — 21:25 — page 51 — #55
3.3. EXECUTE THE “HELLO WORLD” EXAMPLE 51
3.3 Execute the “Hello World” example
In order to check that Python works on Visual Studio, we will run a “Hello World”
example. Similar to the Fortran version, this example writes the “Hello World”
message on the console, but, on the contrary, Python does not include it and we
have to write it manually. Open the newly created Python project of the previous
section and write the following code:
print(” H e l l o World ! ” )
If we want to execute this Python script, the Python Interpreter program has
to be called for translating it to machine code dynamically. This process can be
done by Visual Studio by clicking a button.
To execute the script follow the next step:
1. DEBUG/Start Without Debugging or click the corresponding icon. The
program is executed on a new window.
3.4 Installing and removing Python Packages
Python is capable of downloading projects made by other teams and using it on
our own projects with little effort. This bundled projects or packages have been
tested by experts in order to ensure they correctly work and can help us in our
own projects by adding features that we do not need to code.
To install a package follow the next steps:
1. Open a Python Project.
2. Click on View/Solution Explorer or click on Solution Explorer tab.
3. Unfold Solution name/Python Environments menu.
4. Right click on Python x.x (xx-bit) and select Install Python package... (Fig-
ure 3.4).
5. Type the Package name to be installed and press Enter (Figure 3.5).

“”Manual Visual Studio”” — 2018/10/28 — 21:25 — page 52 — #56
52 CHAPTER 3. PYTHON PROJECTS
6. A new window will ask for Administrator privileges, grant them to
complete the installation process.
Figure 3.4: Install new Python packages on the python environment, step 1.
Figure 3.5: Install new Python packages on the python environment, step 2.
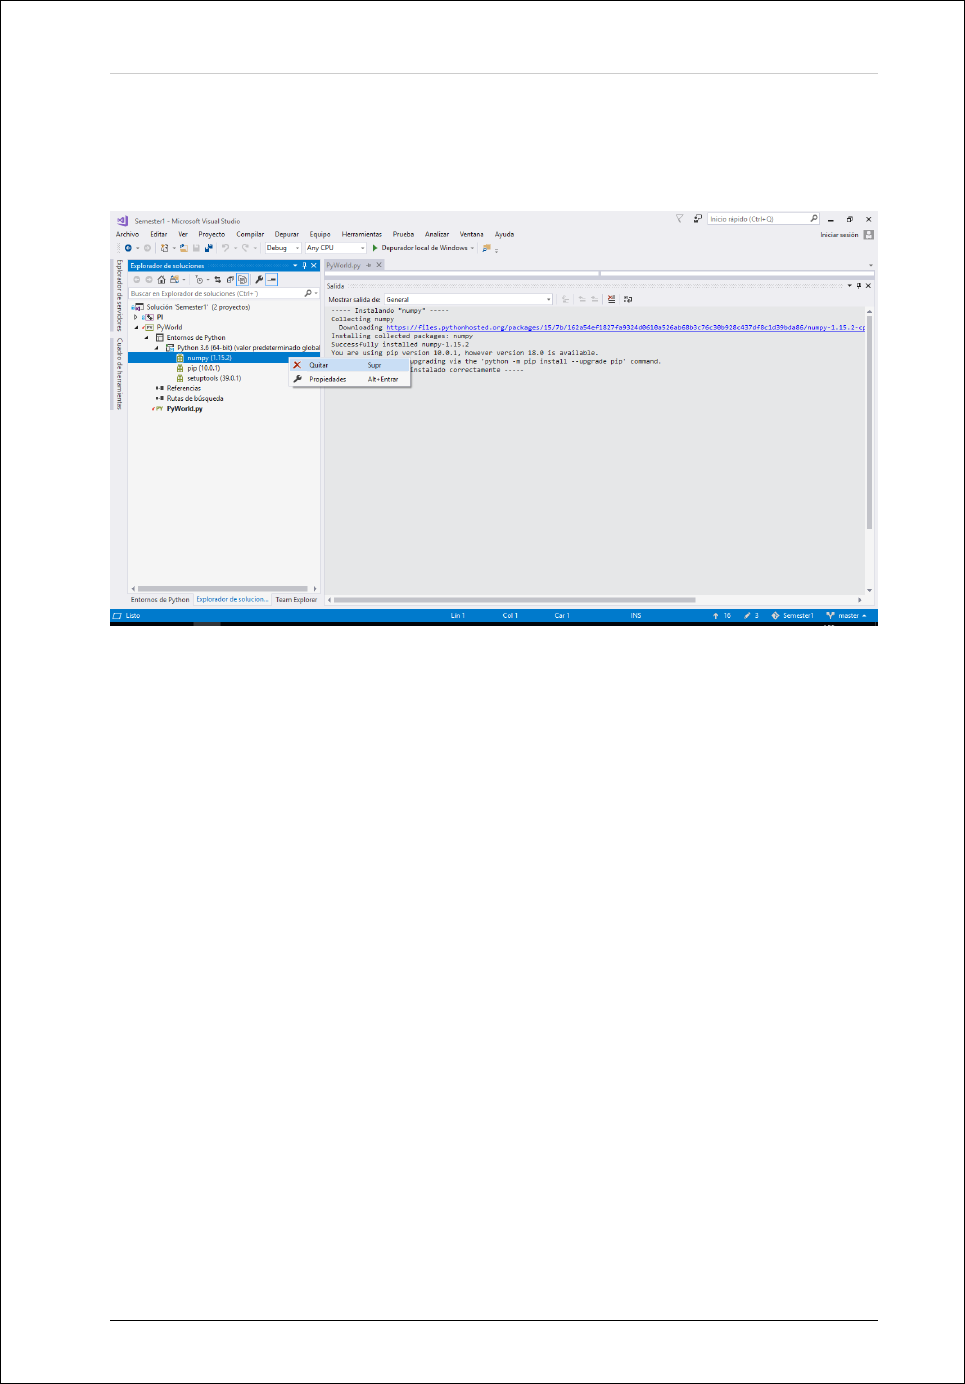
If a package is not needed anymore, it can be removed from the environment
by following the next steps:
1. Open a Python Project.
2. Click on Solution Explorer tab.
3. Unfold Solution name/Python Environments/Python x.x (xx-bit)/ menu.

“”Manual Visual Studio”” — 2018/10/28 — 21:25 — page 54 — #58
54 CHAPTER 3. PYTHON PROJECTS

“”Manual Visual Studio”” — 2018/10/28 — 21:25 — page 55 — #59
CHAPTER
FOUR
ARDUINO PROJECTS
4.1 Install Visual Micro plug in
4.2 Create an Arduino Project
1. Open Visual Studio 2017.
2. Click on File/New/Project... (Figure 2.7).
3. In the Visual C++ menu select Arduino Project.
4. Change Name (project name) to “HelloWorld”.
5. Change the Location of the solution to /Desktop.
6. Change the Solution name to “ArduinoProjects”.
7. Select option Create directory for solution.
8. Click OK.
Visual Studio will create a folder in the Desktop with the name Arduino-
Projects to hold the complete solution. Inside this folder another folder
name HelloWorld will contain the project HelloWorld.ino. In this case this
55

“”Manual Visual Studio”” — 2018/10/28 — 21:25 — page 56 — #60
56 CHAPTER 4. ARDUINO PROJECTS
project contains only one file. In order to be compatible with the Arduino
IDE this folder and the Arduino ino file should have the same name.
4.3 Execute the ”Hello world” example
The next step is to determine if the Arduino compiler is properly installed or
copy to same local folder.
To verify the installation, we will need any Arduino board and we will proceed
with the following steps:
1. Download the latest version of the Arduino IDE and unzip its content to
same folder.
2. Open the visual studio solution that we have created in the last step.
3. Select the location of the Arduino IDE from the VMICRO tab of the Visual
Studio window.
4. Select the specific Arduino board that we have.
5. Plug the Arduino board with a USB wire.
6. Select the Serial port in which the Arduino board is discovered: COM1,
COM2, ...
7. Copy and paste the following code in the HelloWorld.ino file:
// i n i t i a l s e t up f u n c t i o n : i t c o n f i g u r e s th e s e r i a l p o rt
with 9600 bauds
void setup ( )
{
S e r i a l . begin ( 960 0 ) ;
}
// t he l o op f u n c t i o n r uns ov er and o ve r a ga in u n t i l power
down or r e s e t
void lo op ( )
{
S e r i a l . p r i n t l n ( ” H e l l o wo rl d ” ) ;
delay(5000 ) ;
}
8. Click on VMICRO/Build & Upload.

“”Manual Visual Studio”” — 2018/10/28 — 21:25 — page 57 — #61
4.4. CONFIGURING COMPLEX PROJECTS 57
9. After the output windows shows: The upload process has finished, click on
the serial monitor for the selected port (Figure 4.1). It will open a serial
Figure 4.1: Icon to open the Serial monitor close to the selected port: COM17
COM17 window that showing the results of the program. Every 5 seconds,
the message : ” Hello World ” will appear on the serial terminal.
4.4 Configuring complex projects
Visual Studio is useful when we are dealing with very complex projects in which
many libraries of different codes files are involved.
Besides of the internal libraries of the Arduino IDE, Visual Studio can share
external libraries with the Arduino project as any other programming language.
To configure specifically some project, we propose to start from a simple project
to increase gradually the complexity by adding different external libraries.
To do that, we will start from a new project named:Automation. This project
is going to blink a led by using an external file or shared item named: Leds.

“”Manual Visual Studio”” — 2018/10/28 — 21:25 — page 58 — #62
58 CHAPTER 4. ARDUINO PROJECTS
1. Open the visual studio solution that we have created: ArduinoProjects.
2. Add a new Arduino project to the same solution named: Automation as we
did to create HelloWorld.
3. Add a new share item: File/New/Project/Add/Visual C++/Arduino Shared
Code Project
4. Select Add to solution.
5. Name Leds for the new project.
6. Create two files: LedClass.h and LedClass.cpp inside this share item.
7. Copy and paste the following code in the Ledclass.h file:
c l a s s Led
{
public :
int pin ;
void on ( ) ;
void o f f ( ) ;
};
8. Copy and paste the following code in the Ledclass.cpp file:
#include ” LedClass . h”
#include”Arduino .h”
void Led : : on ( )
{
d i g i t a l W r i t e ( pin , 1) ;
}
void Led : : o f f ( )
{
d i g i t a l W r i t e ( pin , 0) ;
};
9. Right click on References of the project Automation,Add references and
select Leds.
10. Click on VMICRO/Build & Upload.

“”Manual Visual Studio”” — 2018/10/28 — 21:25 — page 59 — #63
CHAPTER
FIVE
CONFIGURING GIT AND GITHUB
5.1 Installing GitHub Extension
Visual Studio 2017 includes a GitHub extension for saving Git repositories on-line
on our account.
To check whether the extension is installed, follow this steps:
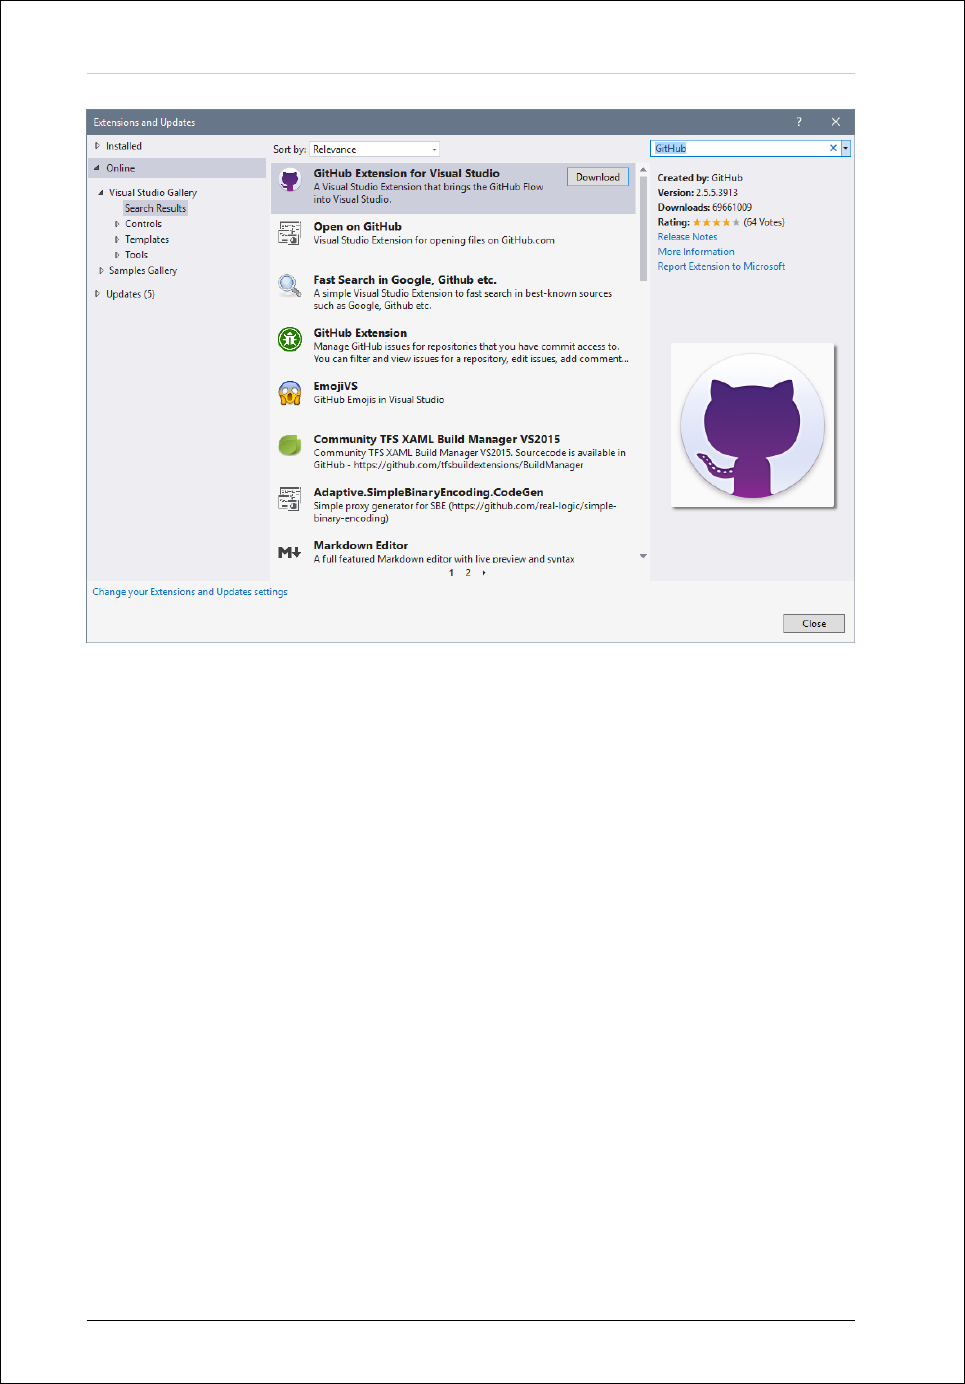
1. Click on Tools/Extensions and Updates...
2. Search for GitHub Extension for Visual Studio and download it (Figure
5.1).
3. Close all Visual Studio windows and follow the instructions of the GitHub
extension installer program.
5.2 VCS, Git and GitHub
It is important to define a few terms regarding Version Control Systems, VCS.
According to Visual Studio Docs, VCS are defined in the following way:
59
“”Manual Visual Studio”” — 2018/10/28 — 21:25 — page 60 — #64
60 CHAPTER 5. CONFIGURING GIT AND GITHUB
Figure 5.1: Extensions and updates window. GitHub extension can be installed, updated
or removed from here.
“Version control systems help you track changes to code over
time. As you make changes, the version control system takes
a snapshot of your files. The version control system saves that
snapshot permanently so you can recall it later if you need
it...”
(https://docs.microsoft.com/en-
us/visualstudio/version-
control/?view=vs-2017)
Git is a VCS created for tracking changes in computer files, making it ideal for
software development and one of the most popular choices. A project managed
by Git is called a repository and contains a .git hidden folder.
On the other hand, GitHub is a web-based hosting service made for Git where
any registered user can post their repositories. The benefit of using GitHub and
similar remote services is that multiple people can develop the same project at
the same time from any place.
“”Manual Visual Studio”” — 2018/10/28 — 21:25 — page 61 — #65
5.3. CREATE A GIT REPOSITORY OF A SOLUTION 61
This chapter explains how to install Git and GitHub tools on Visual Studio
and summarizes the most basic commands in order to use Git properly in our
projects.
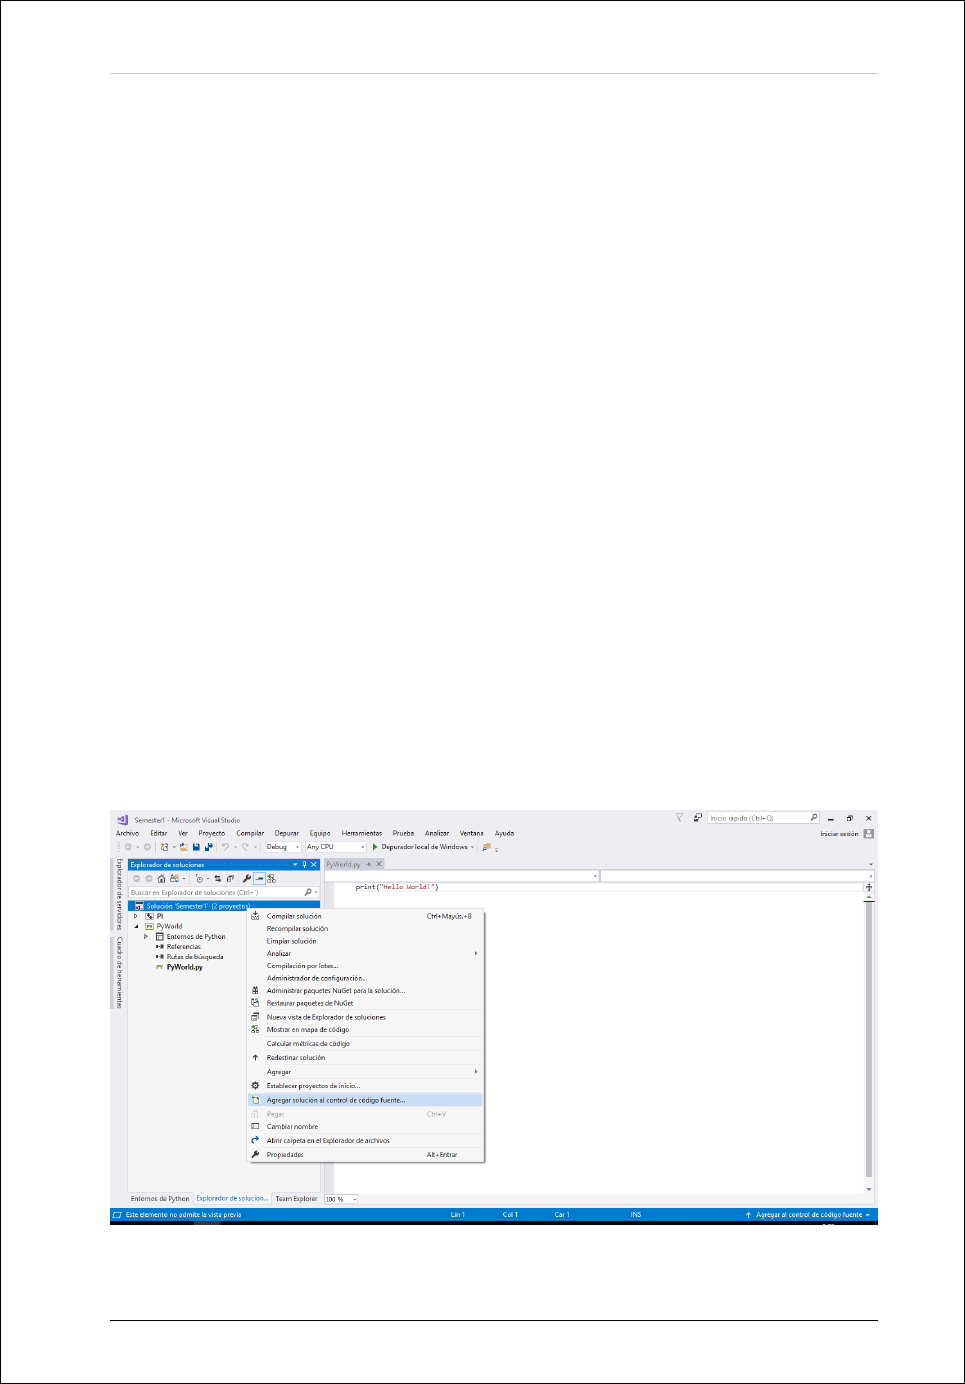
5.3 Create a Git repository of a solution
To add a Git repository to the solution, proceed with the following steps:
1. Open Visual Studio 2017.
2. Open a Visual Studio solution.
3. Right click on Solution name and select Add Solution to Source Control...
(Figure 5.2).
4. Click on View/Team Explorer and check that the repository has been cre-
ated (Figure 5.3).
Figure 5.2: Adding Version Control to an existing Visual Studio solution.

“”Manual Visual Studio”” — 2018/10/28 — 21:25 — page 62 — #66
62 CHAPTER 5. CONFIGURING GIT AND GITHUB
Figure 5.3: Team Viewer tab. VS solutions with Git repositories are shown at Local GIT
repositories menu.
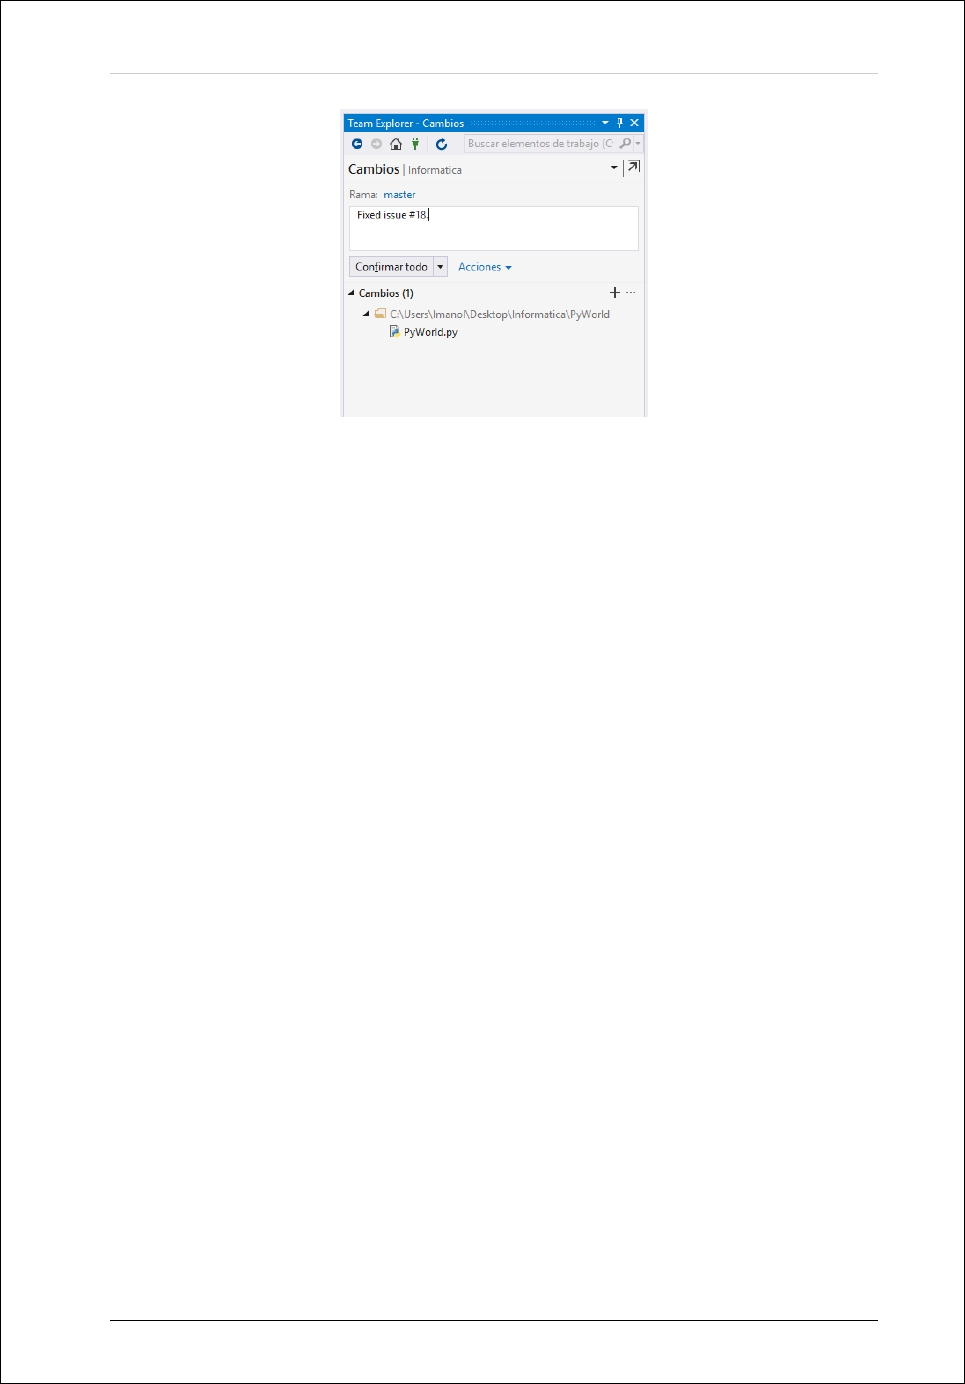
5.4 Save changes on a Git repository
In order to develop a project some files are modified, renamed or even deleted.
After reaching certain point, such as a working state of the code or fixing a bug,
we would like to save those changes on the repository.
To save or commit said changes on the repository, proceed with the following
steps:
1. Open an existing Visual Studio solution with Git repository.
2. Click on View/Team Explorer or on Team Viewer tab.
3. Click on Home icon ( ).
4. Click on Changes.
5. Write a short comment on the text area (Figure 5.4).
6. Click on confirm all .
5.5 Configure GitHub
Once we have GitHub extension working it is time to configure our account:
“”Manual Visual Studio”” — 2018/10/28 — 21:25 — page 63 — #67
5.6. IMPORT PROJECTS FROM GITHUB 63
Figure 5.4: Changes section on Team Viewer tab. PyWorld.py script has changed since
last version and is going to be saved.
With the working GitHub extension we can upload our projects to the web
by using a GitHub account and configuring the project with a remote repository:
1. Open Visual Studio 2017.
2. Open an existing solution with Git repository.
3. On Team Viewer tab, click on Home icon.
4. Click on Sync.
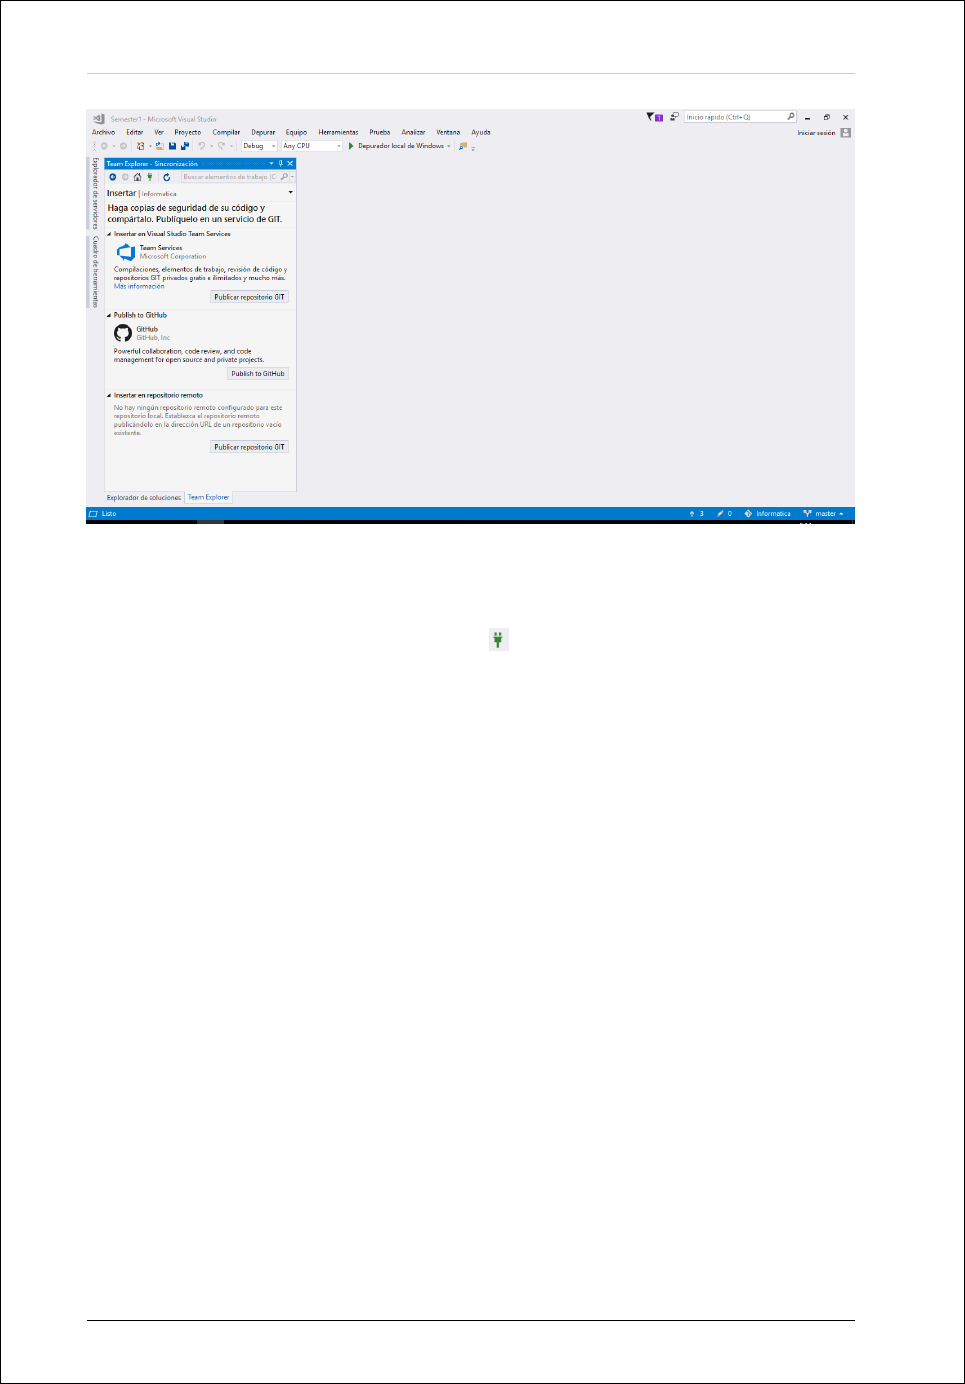
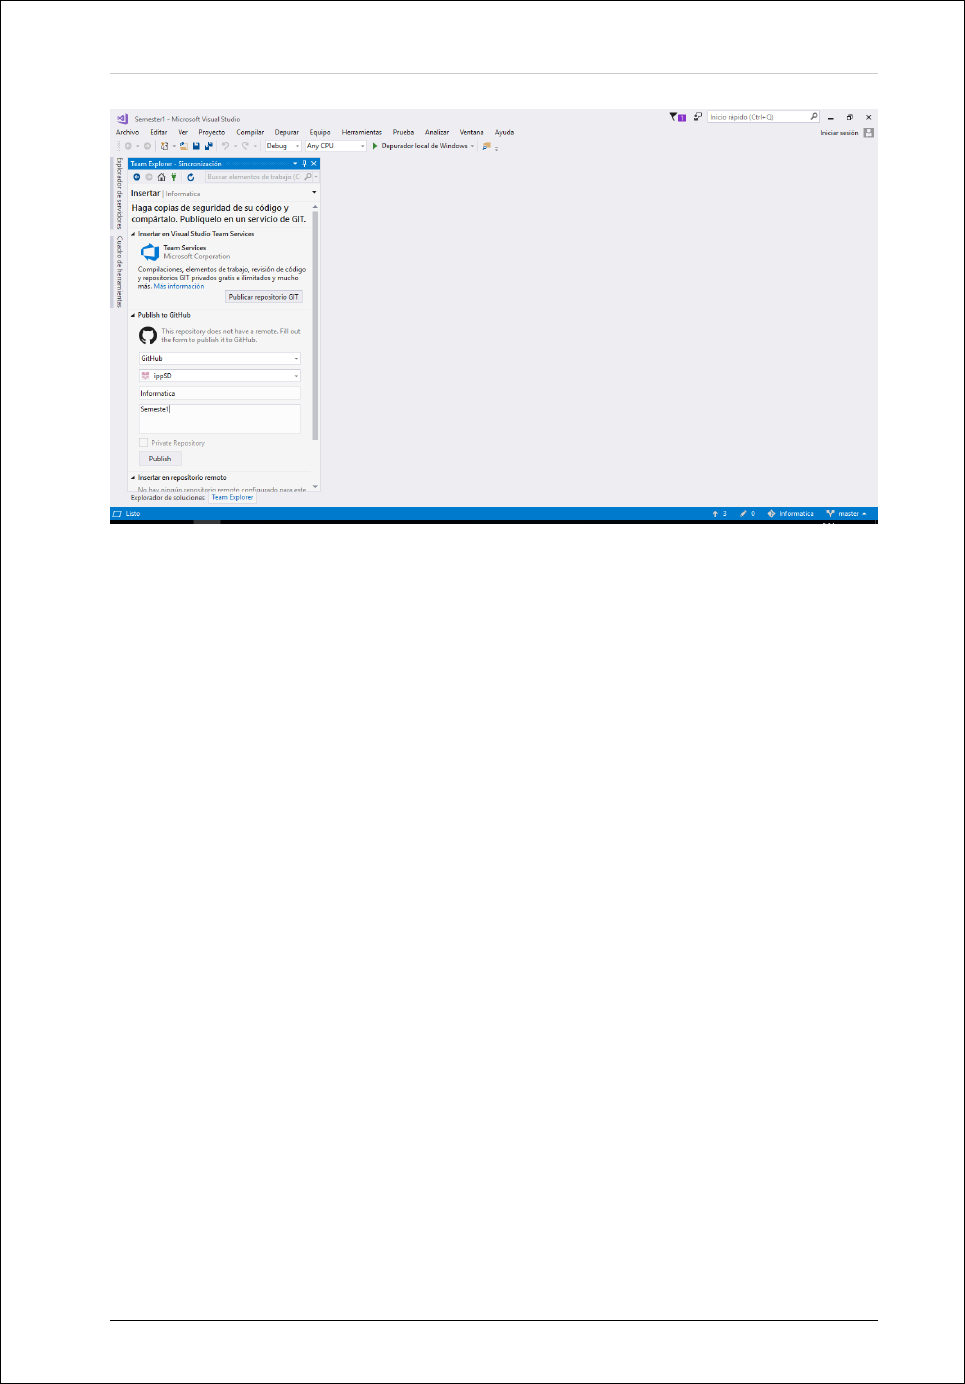
5. On Publish to GitHub section, click on Sign in for logging in with an account
(Figure 5.5).
6. Push the repository to GitHub (Figure 5.6).
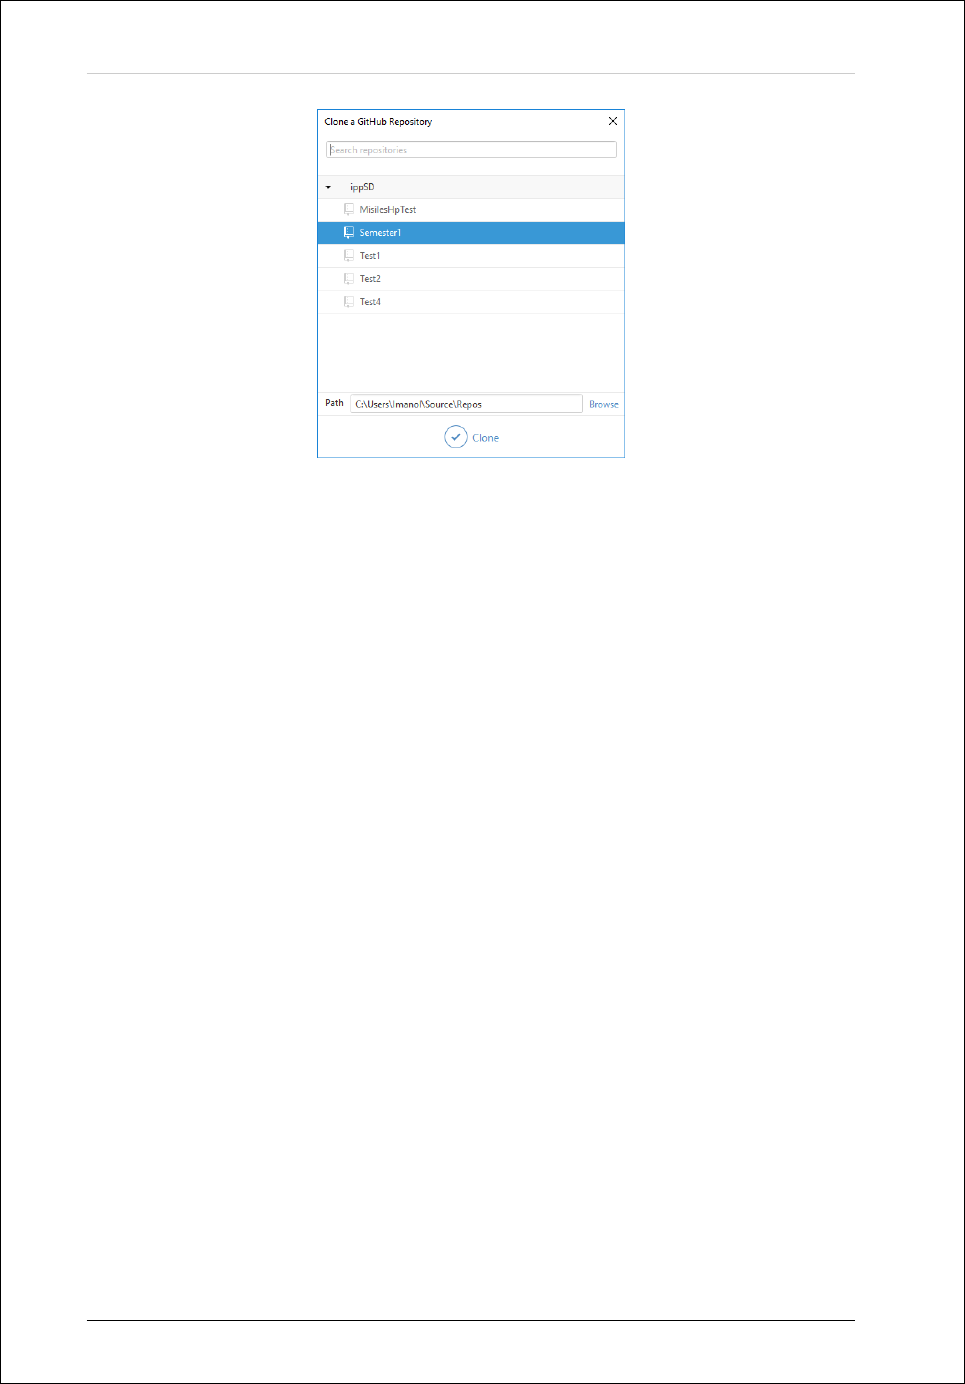
5.6 Import projects from GitHub
GitHub extension can download remote repositories and allow Visual Studio to
create solutions from said source code.
In order to import a repository, proceed with the following steps:
1. Go to Team Explorer tab.
“”Manual Visual Studio”” — 2018/10/28 — 21:25 — page 64 — #68
64 CHAPTER 5. CONFIGURING GIT AND GITHUB
Figure 5.5: Team Viewer Sync tab. Git repositories can be published on remote servers
such as Team Services or GitHub
2. Click on Manage Connections icon ( ).
3. On GitHub section select clone.
4. Select a Repository name (Figure 5.7).
5. Select a path for saving the repository.
6. Click on Clone.
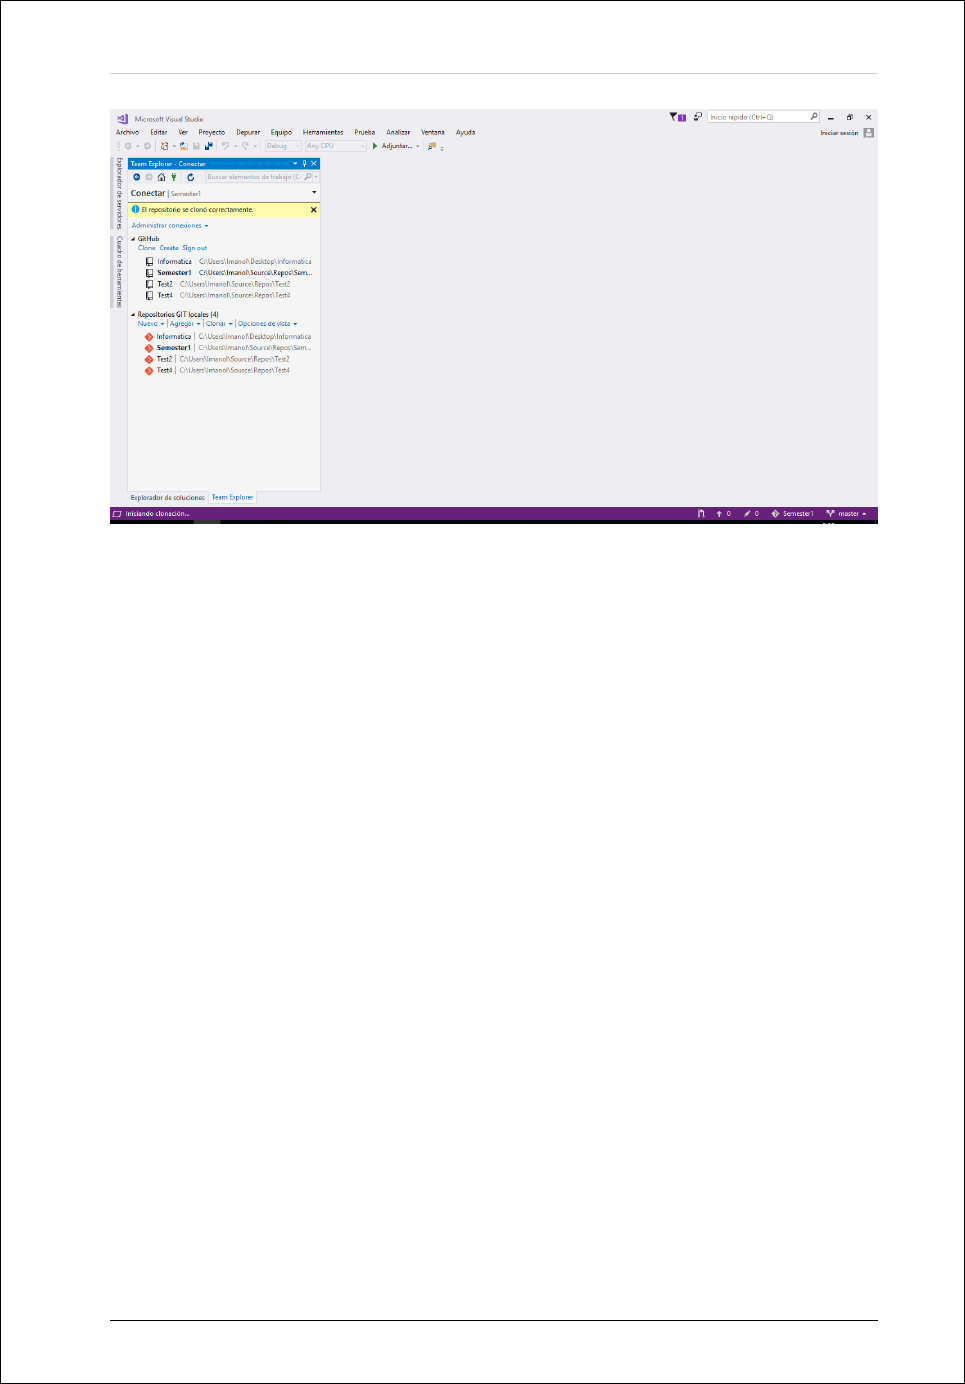
7. Go to Team Viewer tab and click on Manage Connections icon (Figure 5.8).
8. Double click on the downloaded Repository name.
9. If there is no solution on Solutions section, select New... for creating it.
10. Create a solution for the repository according to the programming language
of the source code.
5.7 Download repository updates from GitHub
On teamwork, it is possible to have a person make changes on the remote reposi-
tory at some point. These changes must be pulled from GitHub in order to have
an updated code and make sure that all members work on the same source files.
“”Manual Visual Studio”” — 2018/10/28 — 21:25 — page 65 — #69
5.8. UPLOAD LOCAL CHANGES TO GITHUB 65
Figure 5.6: Team Viewer Sync tab. With a GitHub account we can publish our Git
repositories.
In order to check for updates, follow the next instructions:
1. Go to Team Viewer tab and click on Home icon.
2. Click on Sync.
3. Select Recover for getting changes from the remote repository.
4. Click on Extract for applying said changes.
5.8 Upload local changes to GitHub
Once our project is ready for being published, it has to be pushed to the remote
repository so that every team member has access to the last updates.
This can be made by following these instructions:
1. Commit changes of the current project.
2. Go to Team Viewer tab and click on Home icon.
3. Click on Sync.
“”Manual Visual Studio”” — 2018/10/28 — 21:25 — page 66 — #70
66 CHAPTER 5. CONFIGURING GIT AND GITHUB
Figure 5.7: Available Git repositories list on a GitHub account that can be cloned by
Visual Studio.
4. Click on sync for automatically synchronize all commits.
5.9 Git and GitHub FAQ
Here some commonly made mistakes are to be discussed.
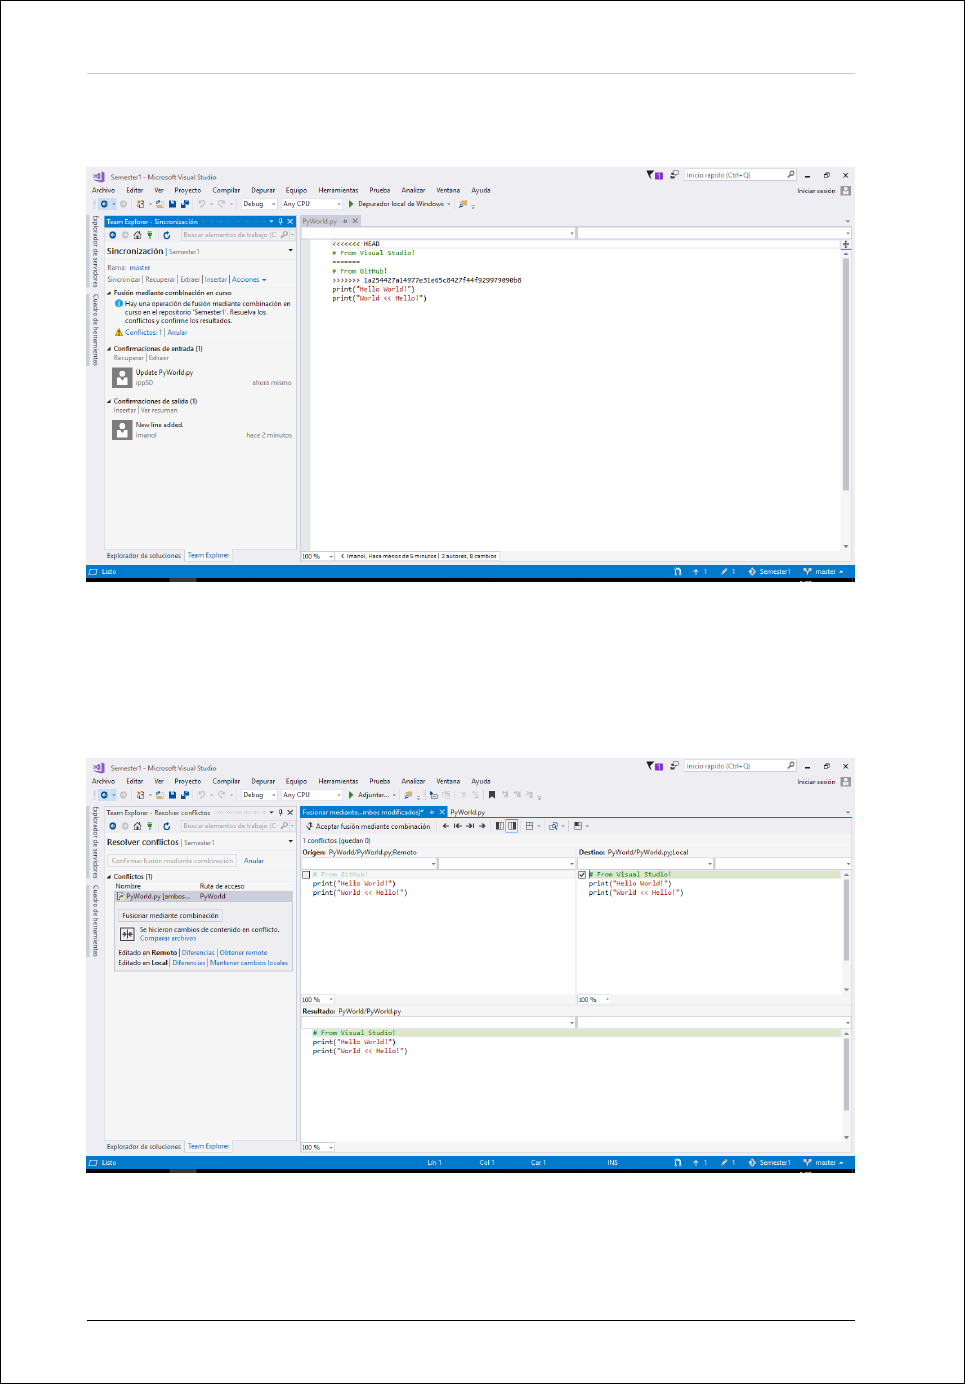
•I can’t save changes on GitHub: Updates were rejected because
the remote contains work that you do not have locally.
This occurs because there were changes on the remote repository that you
did not updated. Because you have modified outdated files, know there
are conflicts on those files that have to be resolved manually. You have to
download them first and then upload the new code:
1. Go to Team Viewer tab and click on Home icon.
2. Click on Sync.
3. Click on Recover. New changes should appear.
4. Click on sync.
5. There might be errors on merging (Figure 5.9).
6. Click on Conflicts.
7. Select a conflict file.
8. There are several ways of solving conflicts (Figure 5.10):
“”Manual Visual Studio”” — 2018/10/28 — 21:25 — page 67 — #71
5.9. GIT AND GITHUB FAQ 67
Figure 5.8: Available local Git repositories.
(a) Get remote file and discard local changes.
(b) Keep local changes and override remote file.
(c) Merge by combination both files and select code to be kept and
discard.
9. Sync again.
•How can I unbind a project from GitHub?
A local Git repository can be unlinked from the remote one on the config-
uration settings:
–Go to Team Viewer tab and click on Home icon.
–Click on Configuration.
–Click on Repository Configuration.
–On remote section, click on remove.
“”Manual Visual Studio”” — 2018/10/28 — 21:25 — page 68 — #72
68 CHAPTER 5. CONFIGURING GIT AND GITHUB
Figure 5.9: Solving conflicts with local and remote repositories, step 1.
Figure 5.10: Solving conflicts with local and remote repositories, step 2.

“”Manual Visual Studio”” — 2018/10/28 — 21:25 — page 69 — #73
REFERENCES
[1] D. Conic-Jacob. Fortran file extensions. http://degenerateconic.
com/fortran-file-extensions/. [Online; accessed 27-April-2018].
[2] Intel Software Development Tools. Intel R
Fortran Compiler User and Ref-
erence Guides-Document Number: 304970-006US. Intel.
[3] S. Lionel. Source form just wants to be free. https://software.intel.
com/en-us/blogs/2013/01/11/doctor-fortran-in-source-
form-just-wants-to-be-free, . [Online; accessed 27-April-2018].
[4] S. Lionel. Visual fortran newsletter articles. https://software.
intel.com/en-us/forums/intel-visual-fortran-compiler-
for-windows/topic/275071#comment-1548440, . [Online; accessed
29-April-2018].
[5] Oracle. Sun studio 12: Fortran user’s guide-4.9 module files. https://
docs.oracle.com/cd/E19205-01/819-5263/aevog/index.html.
[Online; accessed 28-April-2018].
[6] B. B. C. Society. What are the differences between .mod, .obj, .lib, .exp,
.exe, .dll and .def? http://www.fortran.bcs.org/2003/porting/
part_3/slide_06.html. [Online; accessed 27-April-2018].
[7] Wikipedia. Stack overflow. https://en.wikipedia.org/wiki/
Stack_overflow, . [Online; accessed 01-May-2018].
[8] Wikipedia. Call stack. https://en.wikipedia.org/wiki/Call_
stack, . [Online; accessed 01-May-2018].
[9] I. D. Zone. Understanding files associated with intel R
fortran applications
(windows*). https://software.intel.com/en-us/node/680056, .
[Online; accessed 27-April-2018].
69

