Pro Git Manual
ManualGit
User Manual:
Open the PDF directly: View PDF ![]() .
.
Page Count: 578 [warning: Documents this large are best viewed by clicking the View PDF Link!]
- Cover
- Preface by Scott Chacon
- Preface by Ben Straub
- Dedications
- Contribuidores
- Introduction
- Table of Contents
- Chapter 1. Inicio - Sobre el Control de Versiones
- Chapter 2. Fundamentos de Git
- Chapter 3. Ramificaciones en Git
- Chapter 4. Git en el Servidor
- Chapter 5. Distributed Git
- Chapter 6. GitHub
- Chapter 7. Git Tools
- Chapter 8. Customizing Git
- Chapter 9. Git and Other Systems
- Chapter 10. Git Internals
- Appendix A. Git in Other Environments
- Appendix B. Embedding Git in your Applications
- Appendix C. Git Commands
- Index

Preface by Scott Chacon
Welcome to the second edition of Pro Git. The first edition was published over
four years ago now. Since then a lot has changed and yet many important
things have not. While most of the core commands and concepts are still valid
today as the Git core team is pretty fantastic at keeping things backward com-
patible, there have been some significant additions and changes in the commu-
nity surrounding Git. The second edition of this book is meant to address those
changes and update the book so it can be more helpful to the new user.
When I wrote the first edition, Git was still a relatively diicult to use and
barely adopted tool for the harder core hacker. It was starting to gain steam in
certain communities, but had not reached anywhere near the ubiquity it has to-
day. Since then, nearly every open source community has adopted it. Git has
made incredible progress on Windows, in the explosion of graphical user inter-
faces to it for all platforms, in IDE support and in business use. The Pro Git of
four years ago knows about none of that. One of the main aims of this new edi-
tion is to touch on all of those new frontiers in the Git community.
The Open Source community using Git has also exploded. When I originally
sat down to write the book nearly five years ago (it took me a while to get the
first version out), I had just started working at a very little known company de-
veloping a Git hosting website called GitHub. At the time of publishing there
were maybe a few thousand people using the site and just four of us working on
it. As I write this introduction, GitHub is announcing our 10 millionth hosted
project, with nearly 5 million registered developer accounts and over 230 em-
ployees. Love it or hate it, GitHub has heavily changed large swaths of the Open
Source community in a way that was barely conceivable when I sat down to
write the first edition.
I wrote a small section in the original version of Pro Git about GitHub as an
example of hosted Git which I was never very comfortable with. I didn’t much
like that I was writing what I felt was essentially a community resource and also
talking about my company in it. While I still don’t love that conflict of interests,
the importance of GitHub in the Git community is unavoidable. Instead of an
example of Git hosting, I have decided to turn that part of the book into more
deeply describing what GitHub is and how to eectively use it. If you are going
to learn how to use Git then knowing how to use GitHub will help you take part
iii
in a huge community, which is valuable no matter which Git host you decide to
use for your own code.
The other large change in the time since the last publishing has been the de-
velopment and rise of the HTTP protocol for Git network transactions. Most of
the examples in the book have been changed to HTTP from SSH because it’s so
much simpler.
It’s been amazing to watch Git grow over the past few years from a relatively
obscure version control system to basically dominating commercial and open
source version control. I’m happy that Pro Git has done so well and has also
been able to be one of the few technical books on the market that is both quite
successful and fully open source.
I hope you enjoy this updated edition of Pro Git.
iv
Preface by Scott Chacon
Preface by Ben Straub
The first edition of this book is what got me hooked on Git. This was my intro-
duction to a style of making soware that felt more natural than anything I had
seen before. I had been a developer for several years by then, but this was the
right turn that sent me down a much more interesting path than the one I was
on.
Now, years later, I’m a contributor to a major Git implementation, I’ve
worked for the largest Git hosting company, and I’ve traveled the world teach-
ing people about Git. When Scott asked if I’d be interested in working on the
second edition, I didn’t even have to think.
It’s been a great pleasure and privilege to work on this book. I hope it helps
you as much as it did me.
v
Dedications
To my wife, Becky, without whom this adventure never would have begun. — Ben
This edition is dedicated to my girls. To my wife Jessica who has supported me
for all of these years and to my daughter Josephine, who will support me when
I’m too old to know what’s going on. — Scott
vii
Contribuidores
Debido a que este es un libro cuya traducción es “Open Source”, hemos recibi-
do la colaboración de muchas personas a lo largo de los últimos años. A contin-
uación hay una lista de todas las personas que han contribuido en la traduc-
ción del libro al idioma español. Muchas gracias a todos por colaborar a mejor-
ar este libro para el beneficio de todos los hispanohablantes.
35 Andrés Mancera
15 Carlos A. Henríquez Q.
4 Dmunoz94
3 Sergio Martell
2 Mario R. Rincón-Díaz
1 Juan Sebastián Casallas
ix
Introduction
You’re about to spend several hours of your life reading about Git. Let’s take a
minute to explain what we have in store for you. Here is a quick summary of the
ten chapters and three appendices of this book.
In Chapter 1, we’re going to cover Version Control Systems (VCSs) and Git
basics—no technical stu, just what Git is, why it came about in a land full of
VCSs, what sets it apart, and why so many people are using it. Then, we’ll ex-
plain how to download Git and set it up for the first time if you don’t already
have it on your system.
In Chapter 2, we will go over basic Git usage—how to use Git in the 80% of
cases you’ll encounter most oen. Aer reading this chapter, you should be
able to clone a repository, see what has happened in the history of the project,
modify files, and contribute changes. If the book spontaneously combusts at
this point, you should already be pretty useful wielding Git in the time it takes
you to go pick up another copy.
Chapter 3 is about the branching model in Git, oen described as Git’s killer
feature. Here you’ll learn what truly sets Git apart from the pack. When you’re
done, you may feel the need to spend a quiet moment pondering how you lived
before Git branching was part of your life.
Chapter 4 will cover Git on the server. This chapter is for those of you who
want to set up Git inside your organization or on your own personal server for
collaboration. We will also explore various hosted options if you prefer to let
someone else handle that for you.
Chapter 5 will go over in full detail various distributed workflows and how to
accomplish them with Git. When you are done with this chapter, you should be
able to work expertly with multiple remote repositories, use Git over e-mail and
dely juggle numerous remote branches and contributed patches.
Chapter 6 covers the GitHub hosting service and tooling in depth. We cover
signing up for and managing an account, creating and using Git repositories,
common workflows to contribute to projects and to accept contributions to
yours, GitHub’s programmatic interface and lots of little tips to make your life
easier in general.
Chapter 7 is about advanced Git commands. Here you will learn about top-
ics like mastering the scary reset command, using binary search to identify
xi
bugs, editing history, revision selection in detail, and a lot more. This chapter
will round out your knowledge of Git so that you are truly a master.
Chapter 8 is about configuring your custom Git environment. This includes
setting up hook scripts to enforce or encourage customized policies and using
environment configuration settings so you can work the way you want to. We
will also cover building your own set of scripts to enforce a custom committing
policy.
Chapter 9 deals with Git and other VCSs. This includes using Git in a Subver-
sion (SVN) world and converting projects from other VCSs to Git. A lot of organi-
zations still use SVN and are not about to change, but by this point you’ll have
learned the incredible power of Git—and this chapter shows you how to cope if
you still have to use a SVN server. We also cover how to import projects from
several dierent systems in case you do convince everyone to make the plunge.
Chapter 10 delves into the murky yet beautiful depths of Git internals. Now
that you know all about Git and can wield it with power and grace, you can
move on to discuss how Git stores its objects, what the object model is, details
of packfiles, server protocols, and more. Throughout the book, we will refer to
sections of this chapter in case you feel like diving deep at that point; but if you
are like us and want to dive into the technical details, you may want to read
Chapter 10 first. We leave that up to you.
In Appendix A we look at a number of examples of using Git in various spe-
cific environments. We cover a number of dierent GUIs and IDE programming
environments that you may want to use Git in and what is available for you. If
you’re interested in an overview of using Git in your shell, in Visual Studio or
Eclipse, take a look here.
In Appendix B we explore scripting and extending Git through tools like lib-
git2 and JGit. If you’re interested in writing complex and fast custom tools and
need low level Git access, this is where you can see what that landscape looks
like.
Finally in Appendix C we go through all the major Git commands one at a
time and review where in the book we covered them and what we did with
them. If you want to know where in the book we used any specific Git command
you can look that up here.
Let’s get started.
xii
Introduction
Table of Contents
Preface by Scott Chacon iii
Preface by Ben Straub v
Dedications vii
Contribuidores ix
Introduction xi
CHAPTER 1: Inicio - Sobre el Control de Versiones 25
Acerca del Control de Versiones 25
Sistemas de Control de Versiones Locales 26
Sistemas de Control de Versiones Centralizados 27
Sistemas de Control de Versiones Distribuidos 28
Una breve historia de Git 30
Fundamentos de Git 30
Copias instantáneas, no diferencias 31
Casi todas las operaciones son locales 32
Git tiene integridad 33
Git generalmente solo añade información 33
Los Tres Estados 33
La Línea de Comandos 35
Instalación de Git 35
Instalación en Linux 36
xiii
Instalación en Mac 36
Instalación en Windows 37
Instalación a partir del Código Fuente 38
Configurando Git por primera vez 38
Tu Identidad 39
Tu Editor 40
Comprobando tu Configuración 40
¿Cómo obtener ayuda? 41
Resumen 41
CHAPTER 2: Fundamentos de Git 43
Obteniendo un repositorio Git 43
Inicializando un repositorio en un directorio existente 43
Clonando un repositorio existente 44
Guardando cambios en el Repositorio 45
Revisando el Estado de tus Archivos 46
Rastrear Archivos Nuevos 47
Preparar Archivos Modificados 48
Estatus Abreviado 49
Ignorar Archivos 50
Ver los Cambios Preparados y No Preparados 51
Confirmar tus Cambios 54
Saltar el Área de Preparación 56
Eliminar Archivos 56
Cambiar el Nombre de los Archivos 58
Ver el Historial de Confirmaciones 59
Limitar la Salida del Historial 64
Deshacer Cosas 66
Deshacer un Archivo Preparado 67
Deshacer un Archivo Modificado 68
Trabajar con Remotos 69
Table of Contents
xiv
Ver Tus Remotos 69
Añadir Repositorios Remotos 71
Traer y Combinar Remotos 71
Enviar a Tus Remotos 72
Inspeccionar un Remoto 73
Eliminar y Renombrar Remotos 74
Etiquetado 74
Listar Tus Etiquetas 75
Crear Etiquetas 75
Etiquetas Anotadas 76
Etiquetas Ligeras 76
Etiquetado Tardío 77
Compartir Etiquetas 78
Sacar una Etiqueta 79
Git Aliases 79
Resumen 81
CHAPTER 3: Ramificaciones en Git 83
¿Qué es una rama? 83
Crear una Rama Nueva 86
Cambiar de Rama 87
Procedimientos Básicos para Ramificar y Fusionar 91
Procedimientos Básicos de Ramificación 91
Procedimientos Básicos de Fusión 96
Principales Conflictos que Pueden Surgir en las Fusiones 98
Gestión de Ramas 101
Flujos de Trabajo Ramificados 103
Ramas de Largo Recorrido 103
Ramas Puntuales 104
Ramas Remotas 107
Publicar 112
Table of Contents
xv
Hacer Seguimiento a las Ramas 114
Traer y Fusionar 116
Eliminar Ramas Remotas 116
Reorganizar el Trabajo Realizado 117
Reorganización Básica 117
Algunas Reorganizaciones Interesantes 120
Los Peligros de Reorganizar 122
Reorganizar una Reorganización 125
Reorganizar vs. Fusionar 127
Recapitulación 127
CHAPTER 4: Git en el Servidor 129
The Protocols 130
Local Protocol 130
The HTTP Protocols 131
The SSH Protocol 134
The Git Protocol 134
Configurando Git en un servidor 135
Colocando un Repositorio Vacío en un Servidor 136
Pequeñas configuraciones 137
Generating Your SSH Public Key 138
Setting Up the Server 139
Git Daemon 142
Smart HTTP 144
GitWeb 145
GitLab 148
Installation 148
Administration 149
Basic Usage 152
Working Together 152
Third Party Hosted Options 153
Table of Contents
xvi
Resumen 153
CHAPTER 5: Distributed Git 155
Distributed Workflows 155
Centralized Workflow 155
Integration-Manager Workflow 156
Dictator and Lieutenants Workflow 157
Workflows Summary 158
Contributing to a Project 159
Commit Guidelines 159
Private Small Team 161
Private Managed Team 168
Forked Public Project 174
Public Project over E-Mail 178
Summary 181
Maintaining a Project 181
Working in Topic Branches 182
Applying Patches from E-mail 182
Checking Out Remote Branches 186
Determining What Is Introduced 187
Integrating Contributed Work 188
Tagging Your Releases 195
Generating a Build Number 196
Preparing a Release 197
The Shortlog 197
Summary 198
CHAPTER 6: GitHub 199
Account Setup and Configuration 199
SSH Access 200
Your Avatar 202
Table of Contents
xvii
Your Email Addresses 203
Two Factor Authentication 204
Contributing to a Project 205
Forking Projects 205
The GitHub Flow 206
Advanced Pull Requests 214
Markdown 219
Maintaining a Project 224
Creating a New Repository 224
Adding Collaborators 226
Managing Pull Requests 228
Mentions and Notifications 233
Special Files 237
README 237
CONTRIBUTING 238
Project Administration 238
Managing an organization 240
Organization Basics 240
Teams 241
Audit Log 243
Scripting GitHub 244
Hooks 245
The GitHub API 249
Basic Usage 250
Commenting on an Issue 251
Changing the Status of a Pull Request 252
Octokit 254
Summary 255
CHAPTER 7: Git Tools 257
Revision Selection 257
Table of Contents
xviii
Single Revisions 257
Short SHA-1 257
Branch References 259
RefLog Shortnames 260
Ancestry References 261
Commit Ranges 263
Interactive Staging 266
Staging and Unstaging Files 266
Staging Patches 269
Stashing and Cleaning 270
Stashing Your Work 270
Creative Stashing 273
Creating a Branch from a Stash 274
Cleaning your Working Directory 275
Signing Your Work 276
GPG Introduction 277
Signing Tags 277
Verifying Tags 278
Signing Commits 279
Everyone Must Sign 281
Searching 281
Git Grep 281
Git Log Searching 283
Rewriting History 284
Changing the Last Commit 285
Changing Multiple Commit Messages 285
Reordering Commits 288
Squashing Commits 288
Splitting a Commit 290
The Nuclear Option: filter-branch 291
Reset Demystified 293
Table of Contents
xix
The Three Trees 293
The Workflow 295
The Role of Reset 301
Reset With a Path 306
Squashing 309
Check It Out 312
Summary 314
Advanced Merging 315
Merge Conflicts 315
Undoing Merges 327
Other Types of Merges 330
Rerere 335
Debugging with Git 341
File Annotation 341
Binary Search 343
Submodules 345
Starting with Submodules 345
Cloning a Project with Submodules 347
Working on a Project with Submodules 349
Submodule Tips 360
Issues with Submodules 362
Bundling 364
Replace 368
Credential Storage 377
Under the Hood 378
A Custom Credential Cache 381
Summary 383
CHAPTER 8: Customizing Git 385
Git Configuration 385
Basic Client Configuration 386
Table of Contents
xx
Colors in Git 389
External Merge and Di Tools 390
Formatting and Whitespace 394
Server Configuration 396
Git Attributes 397
Binary Files 397
Keyword Expansion 400
Exporting Your Repository 403
Merge Strategies 404
Git Hooks 405
Installing a Hook 405
Client-Side Hooks 406
Server-Side Hooks 408
An Example Git-Enforced Policy 409
Server-Side Hook 409
Client-Side Hooks 415
Summary 419
CHAPTER 9: Git and Other Systems 421
Git as a Client 421
Git and Subversion 421
Git and Mercurial 433
Git and Perforce 442
Git and TFS 458
Migrating to Git 467
Subversion 468
Mercurial 470
Perforce 472
TFS 475
A Custom Importer 476
Table of Contents
xxi
Summary 483
CHAPTER 10: Git Internals 485
Plumbing and Porcelain 485
Git Objects 486
Tree Objects 489
Commit Objects 492
Object Storage 495
Git References 497
The HEAD 498
Tags 499
Remotes 501
Packfiles 501
The Refspec 505
Pushing Refspecs 507
Deleting References 507
Transfer Protocols 508
The Dumb Protocol 508
The Smart Protocol 510
Protocols Summary 513
Maintenance and Data Recovery 514
Maintenance 514
Data Recovery 515
Removing Objects 518
Environment Variables 522
Global Behavior 522
Repository Locations 522
Pathspecs 523
Committing 523
Networking 524
Diing and Merging 524
Table of Contents
xxii
Inicio - Sobre el Control de
Versiones
Este capítulo habla de cómo comenzar a utilizar Git. Empezaremos describien-
do algunos conceptos básicos sobre las herramientas de control de versiones;
después, trataremos sobre cómo hacer que Git funcione en tu sistema; final-
mente, exploraremos cómo configurarlo para empezar a trabajar con él. Al final
de este capítulo deberás entender las razones por las cuales Git existe y con-
viene que lo uses, y deberás tener todo preparado para comenzar.
Acerca del Control de Versiones
¿Qué es control de versiones, y por qué debería importarte? Control de ver-
siones es un sistema que registra los cambios realizados en un archivo o con-
junto de archivos a lo largo del tiempo, de modo que puedas recuperar ver-
siones específicas más adelante. Aunque en los ejemplos de este libro usarás
archivos de código fuente como aquellos cuya versión está siendo controlada,
en realidad puedes hacer lo mismo con casi cualquier tipo de archivo que en-
cuentres en una computadora.
Si eres diseñador gráfico o de web y quieres mantener cada versión de una
imagen o diseño (algo que sin duda vas a querer), usar un sistema de control de
versiones (VCS por sus siglas en inglés) es una muy decisión muy acertada. Di-
cho sistema te permite regresar a versiones anteriores de tus archivos, regresar
a una versión anterior del proyecto completo, comparar cambios a lo largo del
tiempo, ver quién modificó por última vez algo que pueda estar causando prob-
lemas, ver quién introdujo un problema y cuándo, y mucho más. Usar un VCS
también significa generalmente que si arruinas o pierdes archivos, será posible
recuperarlos fácilmente. Adicionalmente, obtendrás todos estos beneficios a
un costo muy bajo.
25
1
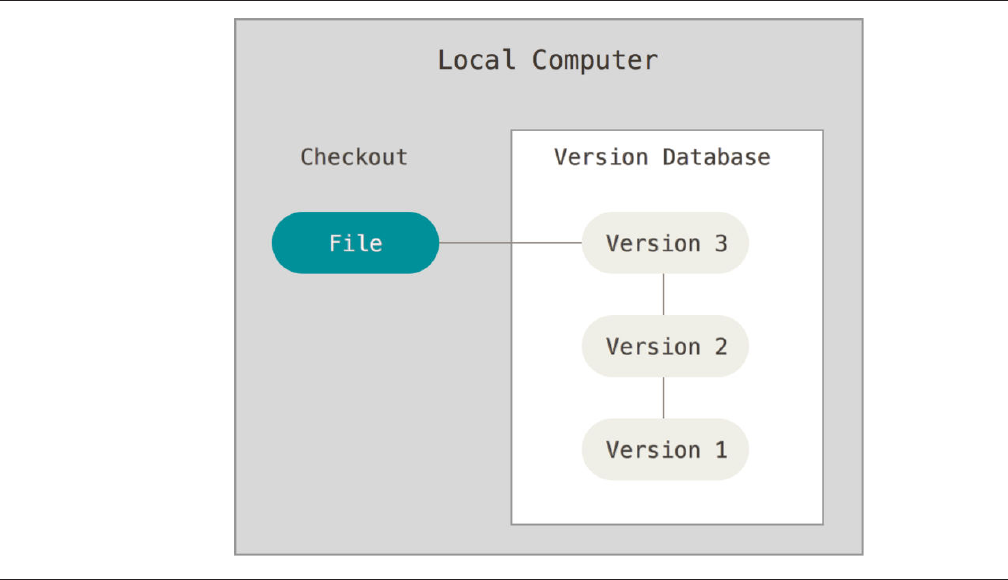
FIGURE 1-1
Local version
control.
Sistemas de Control de Versiones Locales
Un método de control de versiones usado por muchas personas es copiar los
archivos a otro directorio (quizás indicando la fecha y hora en que lo hicieron, si
son ingeniosos). Este método es muy común porque es muy sencillo, pero tam-
bién es tremendamente propenso a errores. Es fácil olvidar en qué directorio te
encuentras, y guardar accidentalmente en el archivo equivocado o sobrescribir
archivos que no querías.
Para afrontar este problema los programadores desarrollaron hace tiempo
VCS locales que contenían una simple base de datos en la que se llevaba el reg-
istro de todos los cambios realizados a los archivos.
Una de las herramientas de control de versiones más popular fue un sistema
llamado RCS, que todavía podemos encontrar en muchas de las computadoras
actuales. Incluso el famoso sistema operativo Mac OS X incluye el comando rcs
cuando instalas las herramientas de desarrollo. Esta herramienta funciona
guardando conjuntos de parches (es decir, las diferencias entre archivos) en un
CHAPTER 1: Inicio - Sobre el Control de Versiones
26
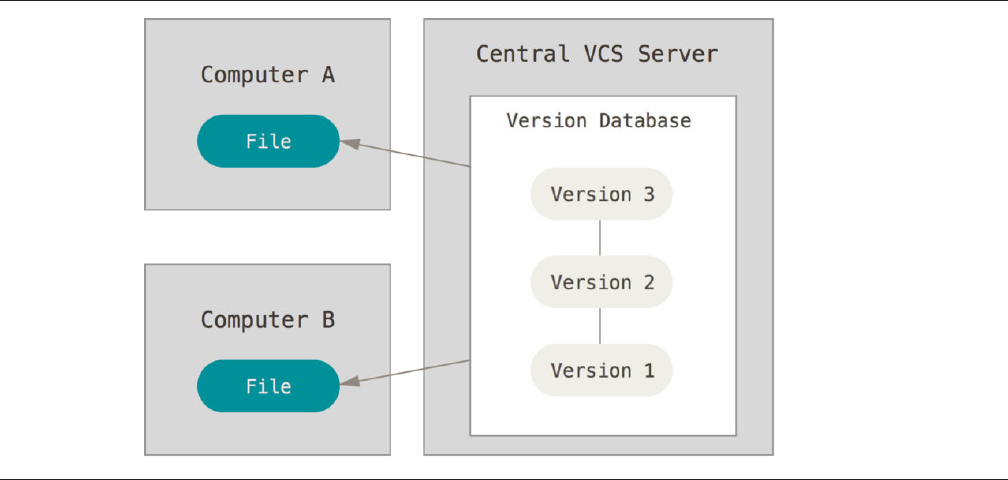
FIGURE 1-2
Centralized version
control.
formato especial en disco, y es capaz de recrear cómo era un archivo en cualqu-
ier momento a partir de dichos parches.
Sistemas de Control de Versiones Centralizados
El siguiente gran problema con el que se encuentran las personas es que neces-
itan colaborar con desarrolladores en otros sistemas. Los sistemas de Control
de Versiones Centralizados (CVCS por sus siglas en inglés) fueron desarrollados
para solucionar este problema. Estos sistemas, como CVS, Subversion, y Per-
force, tienen un único servidor que contiene todos los archivos versionados, y
varios clientes que descargan los archivos desde ese lugar central. Este ha sido
el estándar para el control de versiones por muchos años.
Esta configuración ofrece muchas ventajas, especialmente frente a VCS lo-
cales. Por ejemplo, todas las personas saben hasta cierto punto en qué están
trabajando los otros colaboradores del proyecto. Los administradores tienen
control detallado sobre qué puede hacer cada usuario, y es mucho más fácil ad-
ministrar un CVCS que tener que lidiar con bases de datos locales en cada cli-
ente.
Sin embargo, esta configuración también tiene serias desventajas. La más
obvia es el punto único de fallo que representa el servidor centralizado. Si ese
Acerca del Control de Versiones
27
servidor se cae durante una hora, entonces durante esa hora nadie podrá cola-
borar o guardar cambios en archivos en los que hayan estado trabajando. Si el
disco duro en el que se encuentra la base de datos central se corrompe, y no se
han realizado copias de seguridad adecuadamente, se perderá toda la informa-
ción del proyecto, con excepción de las copias instantáneas que las personas
tengan en sus máquinas locales. Los VCS locales sufren de este mismo prob-
lema: Cuando tienes toda la historia del proyecto en un mismo lugar, te arries-
gas a perderlo todo.
Sistemas de Control de Versiones Distribuidos
Los sistemas de Control de Versiones Distribuidos (DVCS por sus siglas en in-
glés) ofrecen soluciones para los problemas que han sido mencionados. En un
DVCS (como Git, Mercurial, Bazaar o Darcs), los clientes no solo descargan la úl-
tima copia instantánea de los archivos, sino que se replica completamente el
repositorio. De esta manera, si un servidor deja de funcionar y estos sistemas
estaban colaborando a través de él, cualquiera de los repositorios disponibles
en los clientes puede ser copiado al servidor con el fin de restaurarlo. Cada clon
es realmente una copia completa de todos los datos.
CHAPTER 1: Inicio - Sobre el Control de Versiones
28
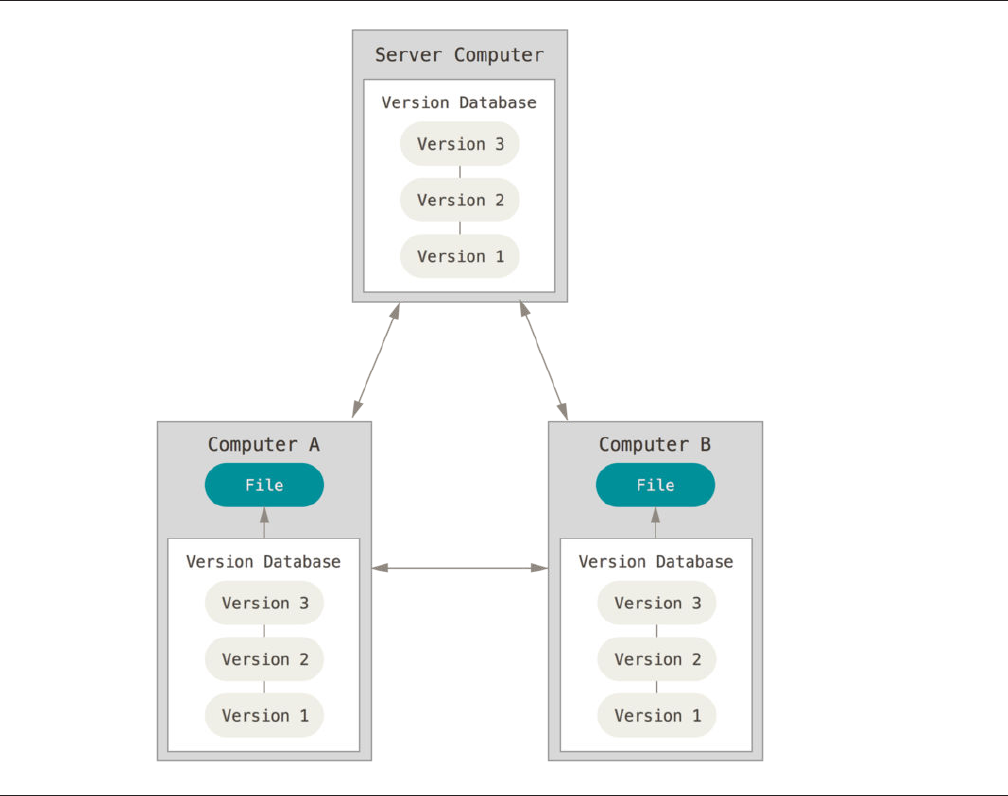
FIGURE 1-3
Distributed version
control.
Además, muchos de estos sistemas se encargan de manejar numerosos re-
positorios remotos con los cuales pueden trabajar, de tal forma que puedes co-
laborar simultáneamente con diferentes grupos de personas en distintas mane-
ras dentro del mismo proyecto. Esto permite establecer varios flujos de trabajo
que no son posibles en sistemas centralizados, como pueden ser los modelos
jerárquicos.
Acerca del Control de Versiones
29
Una breve historia de Git
Como muchas de las grandes cosas en esta vida, Git comenzó con un poco de
destrucción creativa y una gran polémica.
El kernel de Linux es un proyecto de soware de código abierto con un al-
cance bastante amplio. Durante la mayor parte del mantenimiento del kernel
de Linux (1991-2002), los cambios en el soware se realizaban a través de
parches y archivos. En el 2002, el proyecto del kernel de Linux empezó a usar un
DVCS propietario llamado BitKeeper.
En el 2005, la relación entre la comunidad que desarrollaba el kernel de Li-
nux y la compañía que desarrollaba BitKeeper se vino abajo, y la herramienta
dejó de ser ofrecida de manera gratuita. Esto impulsó a la comunidad de desar-
rollo de Linux (y en particular a Linus Torvalds, el creador de Linux) a desarrol-
lar su propia herramienta basada en algunas de las lecciones que aprendieron
mientras usaban BitKeeper. Algunos de los objetivos del nuevo sistema fueron
los siguientes:
•Velocidad
•Diseño sencillo
•Gran soporte para desarrollo no lineal (miles de ramas paralelas)
•Completamente distribuido
•Capaz de manejar grandes proyectos (como el kernel de Linux) eficiente-
ment (velocidad y tamaño de los datos)
Desde su nacimiento en el 2005, Git ha evolucionado y madurado para ser
fácil de usar y conservar sus características iniciales. Es tremendamente rápido,
muy eficiente con grandes proyectos, y tiene un increíble sistema de ramifica-
ción (branching) para desarrollo no lineal (véase Chapter 3) (véase el Capítulo
3). FIXME
Fundamentos de Git
Entonces, ¿qué es Git en pocas palabras? Es muy importante entender bien esta
sección, porque si entiendes lo que es Git y los fundamentos de cómo funciona,
probablemente te será mucho más fácil usar Git efectivamente. A medida que
aprendas Git, intenta olvidar todo lo que posiblemente conoces acerca de otros
VCS como Subversion y Perforce. Hacer esto te ayudará a evitar confusiones su-
tiles a la hora de utilizar la herramienta. Git almacena y maneja la información
de forma muy diferente a esos otros sistemas, a pesar de que su interfaz de
usuario es bastante similar. Comprender esas diferencias evitará que te confun-
das a la hora de usarlo.
CHAPTER 1: Inicio - Sobre el Control de Versiones
30
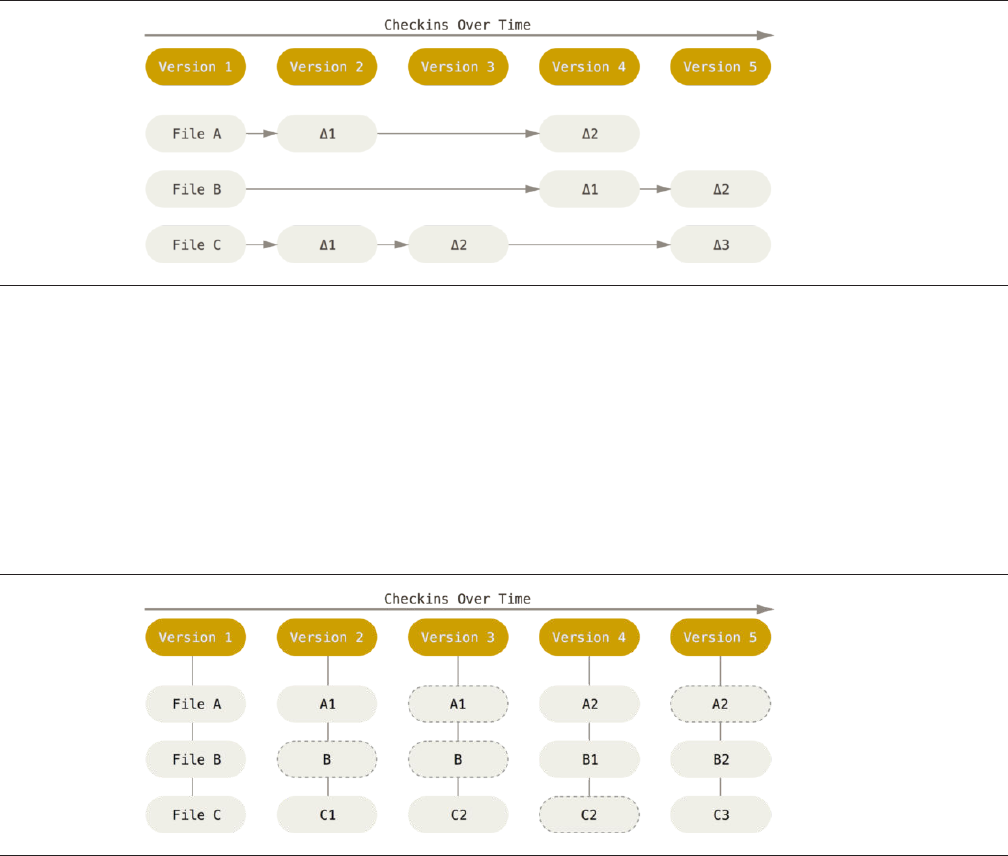
FIGURE 1-4
Storing data as
changes to a base
version of each le.
FIGURE 1-5
Storing data as
snapshots of the
project over time.
Copias instantáneas, no diferencias
La principal diferencia entre Git y cualquier otro VCS (incluyendo Subversion y
sus amigos) es la forma en la que manejan sus datos. Conceptualmente, la
mayoría de los otros sistemas almacenan la información como una lista de
cambios en los archivos. Estos sistemas (CVS, Subversion, Perforce, Bazaar,
etc.) manejan la información que almacenan como un conjunto de archivos y
las modificaciones hechas a cada uno de ellos a través del tiempo.
Git no maneja ni almacena sus datos de esta forma. Git maneja sus datos
como un conjunto de copias instantáneas de un sistema de archivos miniatura.
Cada vez que confirmas un cambio, o guardas el estado de tu proyecto en Git,
él básicamente toma una foto del aspecto de todos tus archivos en ese momen-
to, y guarda una referencia a esa copia instantánea. Para ser eficiente, si los ar-
chivos no se han modificado Git no almacena el archivo de nuevo, sino un en-
lace al archivo anterior idéntico que ya tiene almacenado. Git maneja sus datos
como una secuencia de copias instantáneas.
Fundamentos de Git
31
Esta es una diferencia importante entre Git y prácticamente todos los demás
VCS. Hace que Git reconsidere casi todos los aspectos del control de versiones
que muchos de los demás sistemas copiaron de la generación anterior. Esto
hace que Git se parezca más a un sistema de archivos miniatura con algunas
herramientas tremendamente poderosas desarrolladas sobre él, que a un VCS.
Exploraremos algunos de los beneficios que obtienes al modelar tus datos de
esta manera cuando veamos ramificación (branching) en Git en el (véase Chap-
ter 3) (véase el Capítulo 3). FIXME
Casi todas las operaciones son locales
La mayoría de las operaciones en Git sólo necesitan archivos y recursos locales
para funcionar. Por lo general no se necesita información de ningún otro orde-
nador de tu red. Si estás acostumbrado a un CVCS donde la mayoría de las op-
eraciones tienen el costo adicional del retardo de la red, este aspecto de Git te
va a hacer pensar que los dioses de la velocidad han bendecido Git con poderes
sobrenaturales. Debido a que tienes toda la historia del proyecto ahí mismo, en
tu disco local, la mayoría de las operaciones parecen prácticamente inmedia-
tas.
Por ejemplo, para navegar por la historia del proyecto, Git no necesita con-
ectarse al servidor para obtener la historia y mostrártela - simplemente la lee
directamente de tu base de datos local. Esto significa que ves la historia del
proyecto casi instantáneamente. Si quieres ver los cambios introducidos en un
archivo entre la versión actual y la de hace un mes, Git puede buscar el archivo
hace un mes y hacer un cálculo de diferencias localmente, en lugar de tener
que pedirle a un servidor remoto que lo haga u obtener una versión antigua
desde la red y hacerlo de manera local.
Esto también significa que hay muy poco que no puedes hacer si estás de-
sconectado o sin VPN. Si te subes a un avión o a un tren y quieres trabajar un
poco, puedes confirmar tus cambios felizmente hasta que consigas una conex-
ión de red para subirlos. Si te vas a casa y no consigues que tu cliente VPN fun-
cione correctamente, puedes seguir trabajando. En muchos otros sistemas, es-
to es imposible o muy engorroso. En Perforce, por ejemplo, no puedes hacer
mucho cuando no estás conectado al servidor. En Subversion y CVS, puedes ed-
itar archivos, pero no puedes confirmar los cambios a tu base de datos (porque
tu base de datos no tiene conexión). Esto puede no parecer gran cosa, pero te
sorprendería la diferencia que puede suponer.
CHAPTER 1: Inicio - Sobre el Control de Versiones
32
Git tiene integridad
Todo en Git es verificado mediante una suma de comprobación (checksum en
inglés) antes de ser almacenado, y es identificado a partir de ese momento me-
diante dicha suma. Esto significa que es imposible cambiar los contenidos de
cualquier archivo o directorio sin que Git lo sepa. Esta funcionalidad está inte-
grada en Git al más bajo nivel y es parte integral de su filosofía. No puedes
perder información durante su transmisión o sufrir corrupción de archivos sin
que Git sea capaz de detectarlo.
El mecanismo que usa Git para generar esta suma de comprobación se con-
oce como hash SHA-1. Se trata de una cadena de 40 caracteres hexadecimales
(0-9 y a-f), y se calcula en base a los contenidos del archivo o estructura del di-
rectorio en Git. Un hash SHA-1 se ve de la siguiente forma:
24b9da6552252987aa493b52f8696cd6d3b00373
Verás estos valores hash por todos lados en Git porque son usados con mu-
cha frecuencia. De hecho, Git guarda todo no por nombre de archivo, sino por
el valor hash de sus contenidos.
Git generalmente solo añade información
Cuando realizas acciones en Git, casi todas ellas solo añaden información a la
base de datos de Git. Es muy difícil conseguir que el sistema haga algo que no
se pueda enmendar, o que de algún modo borre información. Como en cualqui-
er VCS, puedes perder o estropear cambios que no has confirmado todavía.
Pero después de confirmar una copia instantánea en Git es muy difícil de per-
derla, especialmente si envías tu base de datos a otro repositorio con regulari-
dad.
Esto hace que usar Git sea un placer, porque sabemos que podemos experi-
mentar sin peligro de estropear gravemente las cosas. Para un análisis más ex-
haustivo de cómo almacena Git su información y cómo puedes recuperar datos
aparentemente perdidos, ver “Deshacer Cosas” Capítulo 2. FIXME
Los Tres Estados
Ahora presta atención. Esto es lo más importante qu debes recordar acerca de
Git si quieres que el resto de tu proceso de aprendizaje prosiga sin problemas.
Git tiene tres estados principales en los que se pueden encontrar tus archivos:
confirmado (committed), modificado (modified), y preparado (staged). Confir-
mado significa que los datos están almacenados de manera segura en tu base
de datos local. Modificado significa que has modificado el archivo pero todavía
Fundamentos de Git
33
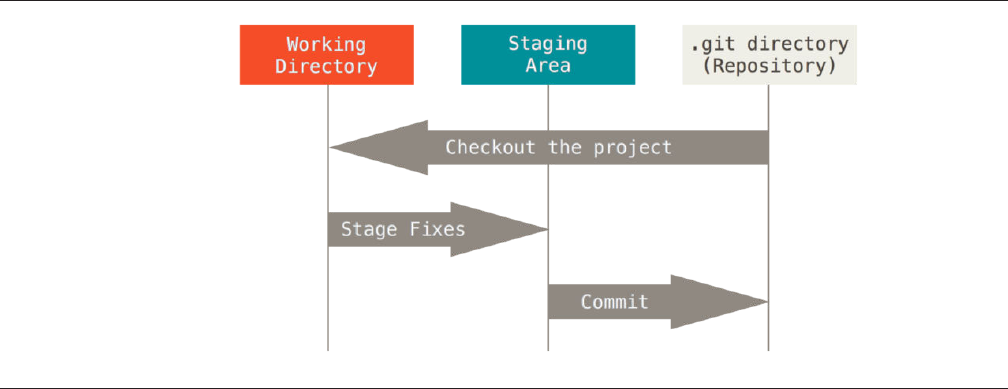
FIGURE 1-6
Working directory,
staging area, and Git
directory.
no lo has confirmado a tu base de datos. Preparado significa que has marcado
un archivo modificado en su versión actual para que vaya en tu próxima confir-
mación.
Esto nos lleva a las tres secciones principales de un proyecto de Git: El direc-
torio de Git (Git directory), el directorio de trabajo (working directory), y el área
de preparación (staging area).
El directorio de Git es donde se almacenan los metadatos y la base de datos
de objetos para tu proyecto. Es la parte más importante de Git, y es lo que se
copia cuando clonas un repositorio desde otra computadora.
El directorio de trabajo es una copia de una versión del proyecto. Estos ar-
chivos se sacan de la base de datos comprimida en el directorio de Git, y se co-
locan en disco para que los puedas usar o modificar.
El área de preparación es un archivo, generalmente contenido en tu director-
io de Git, que almacena información acerca de lo que va a ir en tu próxima con-
firmación. A veces se le denomina índice (“index”), pero se está convirtiendo en
estándar el referirse a ella como el área de preparación.
El flujo de trabajo básico en Git es algo así:
1. Modificas una serie de archivos en tu directorio de trabajo.
2. Preparas los archivos, añadiéndolos a tu área de preparación.
3. Confirmas los cambios, lo que toma los archivos tal y como están en el
área de preparación y almacena esa copia instantánea de manera perma-
nente en tu directorio de Git.
CHAPTER 1: Inicio - Sobre el Control de Versiones
34

Si una versión concreta de un archivo está en el directorio de Git, se consid-
era confirmada (committed). Si ha sufrido cambios desde que se obtuvo del re-
positorio, pero ha sido añadida al área de preparación, está preparada (staged).
Y si ha sufrido cambios desde que se obtuvo del repositorio, pero no se ha pre-
parado, está modificada (modified). En el Chapter 2 Capítulo 2 aprenderás
más acerca de estos estados y de cómo puedes aprovecharlos o saltarte toda la
parte de preparación.
La Línea de Comandos
Existen muchas formas de usar Git. Por un lado tenemos las herramientas origi-
nales de línea de comandos, y por otro lado tenemos una gran variedad de in-
terfaces de usuario con distintas capacidades. En ese libro vamos a utilizar Git
desde la línea de comandos. La línea de comandos en el único lugar en donde
puedes ejecutar todos los comandos de Git - la mayoría de interfaces gráficas
de usuario solo implementan una parte de las características de Git por moti-
vos de simplicidad. Si tú sabes cómo realizar algo desde la línea de comandos,
seguramente serás capaz de averiguar cómo hacer lo mismo desde una interfaz
gráfica. Sin embargo, la relación opuesta no es necesariamente cierta. Así mis-
mo, la decisión de qué cliente gráfico utilizar depende totalmente de tu gusto,
pero todos los usuarios tendrán las herramientas de línea de comandos instala-
das y disponibles.
Nosotros esperamos que sepas cómo abrir el Terminal en Mac, o el “Com-
mand Prompt” o “Powershell” en Windows. Si no entiendes de lo que estamos
hablando aquí, te recomendamos que hagas una pausa para investigar acerca
de esto de tal forma que puedas entender el resto de las explicaciones y de-
scripciones que siguen en este libro.
Instalación de Git
Antes de empezar a utilizar Git, tienes que instalarlo en tu computadora. Inclu-
so si ya está instalado, este es posiblemente un buen momento para actualizar-
lo a su última versión. Puedes instalarlo como un paquete, a partir de un archi-
vo instalador, o bajando el código fuente y compilándolo tú mismo.
Este libro fue escrito utilizando la versión 2.0.0 de Git. Aun cuando la
mayoría de comandos que usaremos deben funcionar en versiones más
antiguas de Git, es posible que algunos de ellos no funcionen o funcionen
ligeramente diferente si estás utilizando una versión anterior de Git. De-
bido a que Git es particularmente bueno en preservar compatibilidad ha-
cia atrás, cualquier versión posterior a 2.0 debe funcionar bien.
La Línea de Comandos
35
Instalación en Linux
Si quieres instalar Git en Linux a través de un instalador binario, en general
puedes hacerlo mediante la herramienta básica de administración de paquetes
que trae tu distribución. Si estás en Fedora por ejemplo, puedes usar yum:
$ yum install git
Si estás en una distribución basada en Debian como Ubuntu, puedes usar
apt-get:
If you’re on a Debian-based distribution like Ubuntu, try apt-get:
$ apt-get install git
Para opciones adicionales, la página web de Git tiene instrucciones para la
instalación en diferentes tipos de Unix. Puedes encontrar esta información en
http://git-scm.com/download/linux.
Instalación en Mac
Hay varias maneras de instalar Git en un Mac. Probablemente la más sencilla es
instalando las herramientas Xcode de Línea de Comandos. En Mavericks (10.9)
o superior puedes hacer esto desde el Terminal si intentas ejecutar git por pri-
mera vez. Si no lo tienes instalado, te preguntará si deseas instalarlo.
Si deseas una versión más actualizada, puedes hacerlo partir de un instala-
dor binario. Un instalador de Git para OSX es mantenido en la página web de
Git. Lo puedes descargar en http://git-scm.com/download/mac.
CHAPTER 1: Inicio - Sobre el Control de Versiones
36
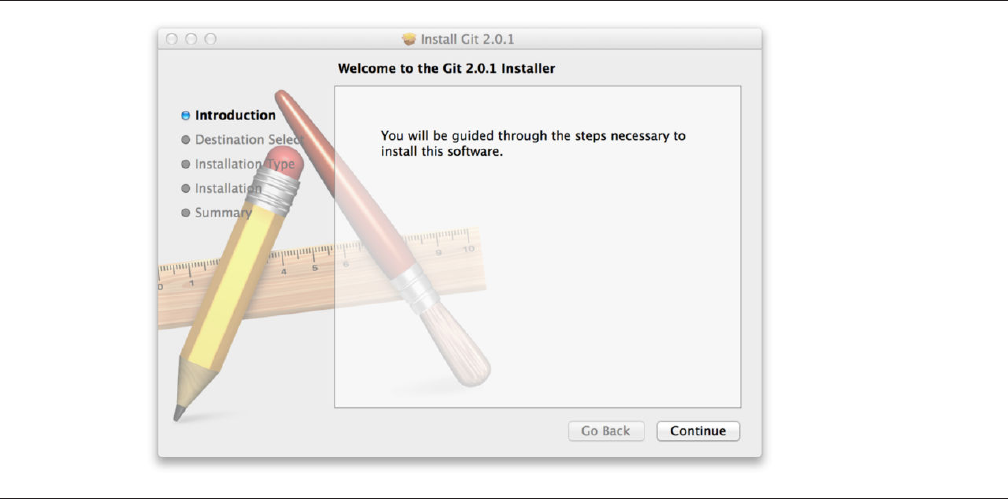
FIGURE 1-7
Git OS X Installer.
También puedes instalarlo como parte del instalador de Github para Mac. Su
interfaz gráfica de usuario tiene la opción de instalar las herramientas de línea
de comandos. Puedes descargar esa herramienta desde el sitio web de Github
para Mar en http://mac.github.com.
Instalación en Windows
También hay varias maneras de instalar Git en Windows. La forma más oficial
está disponible para ser descargada en el sitio web de Git. Solo tienes que visi-
tar http://git-scm.com/download/win y la descarga empezará automática-
mente. Fíjate que éste es un proyecto conocido como Git para Windows (tam-
bién llamado msysGit), el cual es diferente de Git. Para más información acerca
de este proyecto visita http://msysgit.github.io/.
Otra forma de obtener Git fácilmente es mediante la instalación de GitHub
para Windows. El instalador incluye la versión de línea de comandos y la inter-
faz de usuario de Git. Además funciona bien con Powershell y establece correc-
tamente “caching” de credenciales y configuración CRLF adecuada. Aprendere-
mos acerca de todas estas cosas un poco más adelante, pero por ahora es sufi-
ciente mencionar que éstas son cosas que deseas. Puedes descargar este insta-
lador del sitio web de GitHub para Windows en http://windows.github.com.
Instalación de Git
37
Instalación a partir del Código Fuente
Algunas personas desean instalar Git a partir de su código fuente debido a que
obtendrás una versión más reciente. Los instaladores binarios tienen a estar un
poco atrasados. Sin embargo, esto ha hecho muy poca diferencia a medida que
Git ha madurado en los últimos años.
Para instalar Git desde el código fuente necesitas tener las siguientes libre-
rías de las que Git depende: curl, zlib, openssl, expat y libiconv. Por ejemplo, si
estás en un sistema que tiene yum (como Fedora) o apt-get (como un sistema
basado en Debian), puedes usar estos comandos para instalar todas las de-
pendencias:
$ yum install curl-devel expat-devel gettext-devel \
openssl-devel zlib-devel
$ apt-get install libcurl4-gnutls-dev libexpat1-dev gettext \
libz-dev libssl-dev
Cuando tengas todas las dependencias necesarias, puedes descargar la ver-
sión más reciente de Git en diferentes sitios. Puedes obtenerlo a partir del sitio
Kernel.org en https://www.kernel.org/pub/soware/scm/git, o su “mirror” en
el sitio web de GitHub en https://github.com/git/git/releases. Generalmente la
más reciente versión en la página web de GitHub es un poco mejor, pero la pág-
ina de kernel.org también tiene ediciones con firma en caso de que desees veri-
ficar tu descarga.
Luego tienes que compilar e instalar de la siguiente manera:
$ tar -zxf git-2.0.0.tar.gz
$ cd git-2.0.0
$ make configure
$ ./configure --prefix=/usr
$ make all doc info
$ sudo make install install-doc install-html install-info
Una vez hecho esto, también puedes obtener Git, a través del propio Git,
para futuras actualizaciones:
$ git clone git://git.kernel.org/pub/scm/git/git.git
Configurando Git por primera vez
Ahora que tienes Git en tu sistema, vas a querer hacer algunas cosas para per-
sonalizar tu entorno de Git. Es necesario hacer estas cosas solamente una vez
en tu computadora, y se mantendrán entre actualizaciones. También puedes
CHAPTER 1: Inicio - Sobre el Control de Versiones
38

cambiarlas en cualquier momento volviendo a ejecutar los comandos corre-
spondientes.
Git trae una herramienta llamada git config que te permite obtener y es-
tablecer variables de configuración que controlan el aspecto y funcionamiento
de Git. Estas variables pueden almacenarse en tres sitios distintos:
1. Archivo /etc/gitconfig: Contiene valores para todos los usuarios del
sistema y todos sus repositorios. Si pasas la opción --system a git
config, lee y escribe específicamente en este archivo.
2. Archivo ~/.gitconfig o ~/.config/git/config: Este archivo es espe-
cífico a tu usuario. Puedes hacer que Git lea y escriba específicamente en
este archivo pasando la opción --global.
3. Archivo config en el directorio de Git (es decir, .git/config) del reposi-
torio que estés utilizando actualmente: Este archivo es específico al repo-
sitorio actual.
Cada nivel sobrescribe los valores del nivel anterior, por lo que los valores
de .git/config tienen preferencia sobre los de /etc/gitconfig.
En sistemas Windows, Git busca el archivo .gitconfig en el directorio
$HOME (para mucha gente será (C:\Users\$USER). También busca el archi-
vo /etc/gitconfig, aunque esta ruta es relativa a la raíz MSys, que es donde
decidiste instalar Git en tu sistema Windows cuando ejecutaste el instalador.
Tu Identidad
Lo primero que deberás hacer cuando instales Git es establecer tu nombre de
usuario y dirección de correo electrónico. Esto es importante porque los “com-
mits” de Git usan esta información, y es introducida de manera inmutable en
los commits que envías:
$ git config --global user.name "John Doe"
$ git config --global user.email johndoe@example.com
De nuevo, solo necesitas hacer esto una vez si especificas la opción --
global, ya que Git siempre usará esta información para todo lo que hagas en
ese sistema. Si quieres sobrescribir esta información con otro nombre o direc-
ción de correo para proyectos específicos, puedes ejecutar el comando sin la
opción --global cuando estés en ese proyecto.
Muchas de las herramientas de interfaz gráfica te ayudarán a hacer esto la
primera vez que las uses.
Configurando Git por primera vez
39

Tu Editor
Ahora que tu identidad está configurada, puedes elegir el editor de texto por
defecto que se utilizará cuando Git necesite que introduzcas un mensaje. Si no
indicas nada, Git usa el editor por defecto de tu sistema, que generalmente es
Vim. Si quieres usar otro editor de texto como Emacs, puedes hacer lo si-
guiente:
$ git config --global core.editor emacs
EXAMPLE 1-1.
Vim y Emacs son editores de texto frecuentemente usados por desarrolla-
dores en sistemas basados en Unix como Linux y Mac. Si no estás familiarizado
con ninguno de estos editores o estás en un sistema Windows, es posible que
necesites buscar instrucciones acerca de cómo configurar tu editor favorito con
Git. Si no configuras un editor así y no conoces acerca de Vim o Emacs, es muy
factible que termines en un estado bastante confuso en el momento en que
sean ejecutados.
Comprobando tu Configuración
Si quieres comprobar tu configuración, puedes usar el comando git config
--list para mostrar todas las propiedades que Git ha configurado:
$ git config --list
user.name=John Doe
user.email=johndoe@example.com
color.status=auto
color.branch=auto
color.interactive=auto
color.diff=auto
...
Puede que veas claves repetidas, porque Git lee la misma clave de distintos
archivos (/etc/gitconfig y ~/.gitconfig, por ejemplo). En ese caso, Git
usa el último valor para cada clave única que ve.
También puedes comprobar qué valor que Git utilizará para una clave espe-
cífica ejecutando git config <key>:
CHAPTER 1: Inicio - Sobre el Control de Versiones
40

$ git config user.name
John Doe
¿Cómo obtener ayuda?
Si alguna vez necesitas ayuda usando Git, existen tres formas de ver la página
del manual (manpage) para cualquier comando de Git:
$ git help <verb>
$ git <verb> --help
$ man git-<verb>
Por ejemplo, puedes ver la página del manual para el comando config ejecu-
tando
$ git help config
Estos comandos son muy útiles porque puedes acceder a ellos desde cual-
quier sitio, incluso sin conexión. Si las páginas del manual y este libro no son
suficientes y necesitas que te ayude una persona, puedes probar en los canales
#git o #github del servidor de IRC Freenode (irc.freenode.net). Estos canales es-
tán llenos de cientos de personas que conocen muy bien Git y suelen estar dis-
puestos a ayudar.
Resumen
Para este momento debes tener una comprensión básica de lo que es Git, y de
cómo se diferencia de cualquier otro sistema de control de versiones centraliza-
do que pudieras haber utilizado previamente. De igual manera, Git debe estar
funcionando en tu sistema y configurado con tu identidad personal. Es hora de
aprender los fundamentos de Git.
¿Cómo obtener ayuda?
41

Fundamentos de Git
Si pudieras leer solo un capítulo para empezar a trabajar con Git, este es el ca-
pítulo que debes leer. Este capítulo cubre todos los comandos básicos que nec-
esitas para hacer la gran mayoría de cosas a las que eventualmente vas a dedi-
car tu tiempo mientras trabajas con Git. Al final del capítulo, deberás ser capaz
de configurar e inicializar un repositorio, comenzar y detener el seguimiento de
archivos, y preparar (stage) y confirmar (commit) cambios. También te enseñar-
emos a configurar Git para que ignore ciertos archivos y patrones, cómo en-
mendar errores rápida y fácilmente, cómo navegar por la historia de tu proyec-
to y ver cambios entre confirmaciones, y cómo enviar (push) y recibir (pull) de
repositorios remotos.
Obteniendo un repositorio Git
Puedes obtener un proyecto Git de dos maneras. La primera es tomar un
proyecto o directorio existente e importarlo en Git. La segunda es clonar un re-
positorio existente en Git desde otro servidor.
Inicializando un repositorio en un directorio existente
Si estás empezando a seguir un proyecto existente en Git, debes ir al directorio
del proyecto y usar el siguiente comando:
$ git init
Esto crea un subdirectorio nuevo llamado .git, el cual contiene todos los
archivos necesarios del repositorio – un esqueleto de un repositorio de Git. To-
davía no hay nada en tu proyecto que esté bajo seguimiento. Puedes revisar
Chapter 10 para obtener más información acerca de los archivos presentes en
el directorio .git que acaba de ser creado.
43
2

Si deseas empezar a controlar versiones de archivos existentes (a diferencia
de un directorio vacío), probablemente deberías comenzar el seguimiento de
esos archivos y hacer una confirmación inicial. Puedes conseguirlo con unos
pocos comandos git add para especificar qué archivos quieres controlar, se-
guidos de un git commit para confirmar los cambios:
$ git add *.c
$ git add LICENSE
$ git commit -m 'initial project version'
Veremos lo que hacen estos comandos más adelante. En este momento,
tienes un repositorio de Git con archivos bajo seguimiento y una confirmación
inicial.
Clonando un repositorio existente
Si deseas obtener una copia de un repositorio Git existente — por ejemplo, un
proyecto en el que te gustaría contribuir — el comando que necesitas es git
clone. Si estás familizarizado con otros sistemas de control de versiones como
Subversion, verás que el comando es “clone” en vez de “checkout”. Es una dis-
tinción importante, ya que Git recibe una copia de casi todos los datos que
tiene el servidor. Cada versión de cada archivo de la historia del proyecto es
descargada por defecto cuando ejecutas git clone. De hecho, si el disco de tu
servidor se corrompe, puedes usar cualquiera de los clones en cualquiera de
los clientes para devolver al servidor al estado en el que estaba cuando fue clo-
nado (puede que pierdas algunos hooks del lado del servidor y demás, pero to-
da la información acerca de las versiones estará ahí) — véase “Configurando
Git en un servidor” para más detalles.
Puedes clonar un repositorio con git clone [url]. Por ejemplo, si
quieres clonar la librería de Git llamada libgit2 puedes hacer algo así:
$ git clone https://github.com/libgit2/libgit2
Esto crea un directorio llamado libgit2, inicializa un directorio .git en su
interior, descarga toda la información de ese repositorio y saca una copia de
trabajo de la última versión. Si te metes en el directorio libgit2, verás que es-
tán los archivos del proyecto listos para ser utilizados. Si quieres clonar el repo-
sitorio a un directorio con otro nombre que no sea libgit2, puedes especifi-
carlo con la siguiente opción de línea de comandos:
CHAPTER 2: Fundamentos de Git
44

$ git clone https://github.com/libgit2/libgit2 mylibgit
Ese comando hace lo mismo que el anterior, pero el directorio de destino se
llamará mylibgit.
Git te permite usar distintos protocolos de transferencia. El ejemplo anterior
usa el protocolo https://, pero también puedes utilizar git:// o usuar-
io@servidor:ruta/del/repositorio.git que utiliza el protocolo de trans-
ferencia SSH. En “Configurando Git en un servidor” se explicarán todas las
opciones disponibles a la hora de configurar el acceso a tu repositorio de Git, y
las ventajas e inconvenientes de cada una.
Guardando cambios en el Repositorio
Ya tienes un repositorio Git y un checkout o copia de trabajo de los archivos de
dicho proyecto. El siguiente paso es realizar algunos cambios y confirmar in-
stantáneas de esos cambios en el repositorio cada vez que el proyecto alcance
un estado que quieras conservar.
Recuerda que cada archivo de tu repositorio puede tener dos estados: ras-
treados y sin rastrear. Los archivos rastreados (tracked files en inglés) son todos
aquellos archivos que estaban en la última instantánea del proyecto; pueden
ser archivos sin modificar, modificados o preparados. Los archivos sin rastrear
son todos los demás - cualquier otro archivo en tu directorio de trabajo que no
estaba en tu última instantánea y que no están en el área de preparación (stag-
ing area). Cuando clonas por primera vez un repositorio, todos tus archivos es-
tarán rastreados y sin modificar pues acabas de sacarlos y aun no han sido edi-
tados.
Mientras editas archivos, Git los ve como modificados, pues han sido cam-
biados desde su último commit. Luego preparas estos archivos modificados y
finalmente confirmas todos los cambios preparados, y repites el ciclo.
Guardando cambios en el Repositorio
45
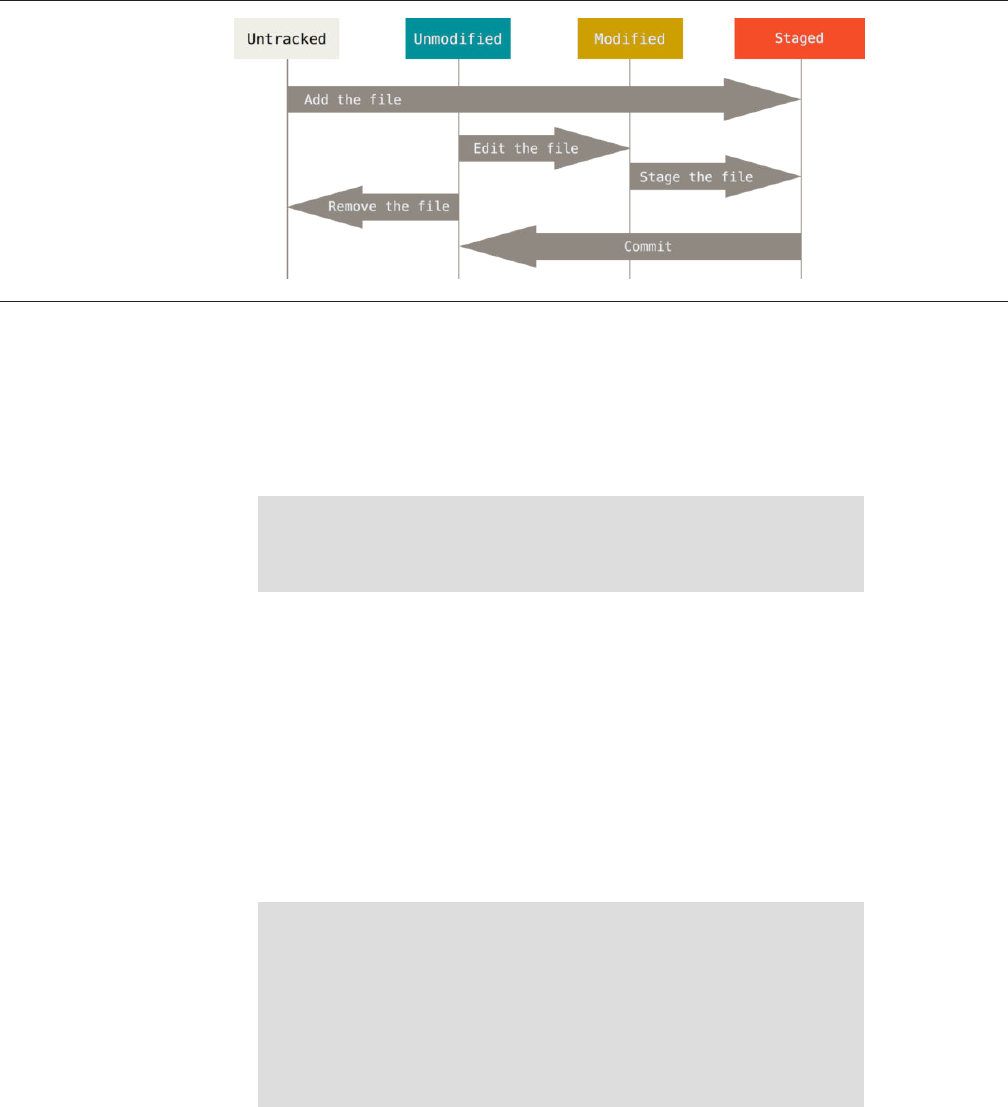
FIGURE 2-1
El ciclo de vida del
estado de tus
archivos.
Revisando el Estado de tus Archivos
La herramienta principal para determinar qué archivos están en qué estado es
el comando git status. Si ejecutas este comando inmediatamente después
de clonar un repositorio, deberías ver algo como esto:
$ git status
On branch master
nothing to commit, working directory clean
Esto significa que tienes un directorio de trabajo limpio - en otras palabras,
que no hay archivos rastreados y modificados. Además, Git no encuentra nin-
gún archivo sin rastrear, de lo contrario aparecerían listados aquí. Finalmente,
el comando te indica en cuál rama estás y te informa que no ha variado con
respecto a la misma rama en el servidor. Por ahora, la rama siempre será “mas-
ter”, que es la rama por defecto; no le prestaremos atención ahora. Chapter 3
tratará en detalle las ramas y las referencias.
Supongamos que añades un nuevo archivo a tu proyecto, un simple RE-
ADME. Si el archivo no existía antes, y ejecutas git status, verás el archivo sin
rastrear de la siguiente manera:
$ echo 'My Project' > README
$ git status
On branch master
Untracked files:
(use "git add <file>..." to include in what will be committed)
README
CHAPTER 2: Fundamentos de Git
46

nothing added to commit but untracked files present (use "git add" to track)
Puedes ver que el archivo README está sin rastrear porque aparece debajo
del encabezado “Untracked files” (“Archivos no rastreados” en inglés) en la sali-
da. Sin rastrear significa que Git ve archivos que no tenías en el commit anterior.
Git no los incluirá en tu próximo commit a menos que se lo indiques explícita-
mente. Se comporta así para evitar incluir accidentalmente archivos binarios o
cualquier otro archivo que no quieras incluir. Como tú sí quieres incluir RE-
ADME, debes comenzar a rastrearlo.
Rastrear Archivos Nuevos
Para comenzar a rastrear un archivo debes usar el comando git add. Para co-
menzar a rastrear el archivo README, puedes ejecutar lo siguiente:
$ git add README
Ahora si vuelves a ver el estado del proyecto, verás que el archivo README
está siendo rastreado y está preparado para ser confirmado:
$ git status
On branch master
Changes to be committed:
(use "git reset HEAD <file>..." to unstage)
new file: README
Puedes ver que está siendo rastreado porque aparece luego del encabezado
“Changes to be committed” (“Cambios a ser confirmados” en inglés). Si confir-
mas en este punto, se guardará en el historial la versión del archivo correspon-
diente al instante en que ejecutaste git add. Anteriormente cuando ejecu-
taste git init, ejecutaste luego git add (files) - lo cual inició el rastreo
de archivos en tu directorio. El comando git add puede recibir tanto una ruta
de archivo como de un directorio; si es de un directorio, el comando añade re-
cursivamente los archivos que están dentro de él.
Guardando cambios en el Repositorio
47

Preparar Archivos Modificados
Vamos a cambiar un archivo que esté rastreado. Si cambias el archivo rastreado
llamado “CONTRIBUTING.md” y luego ejecutas el comando git status, verás
algo parecido a esto:
$ git status
On branch master
Changes to be committed:
(use "git reset HEAD <file>..." to unstage)
new file: README
Changes not staged for commit:
(use "git add <file>..." to update what will be committed)
(use "git checkout -- <file>..." to discard changes in working directory)
modified: CONTRIBUTING.md
El archivo “CONTRIBUTING.md” aparece en una sección llamada “Changes
not staged for commit” (“Cambios no preparado para confirmar” en inglés) - lo
que significa que existe un archivo rastreado que ha sido modificado en el di-
rectorio de trabajo pero que aun no está preparado. Para prepararlo, ejecutas el
comando git add. git add es un comando que cumple varios propósitos - lo
usas para empezar a rastrear archivos nuevos, preparar archivos, y hacer otras
cosas como marcar como resuelto archivos en conflicto por combinación. Es
más útil que lo veas como un comando para “añadir este contenido a la próxi-
ma confirmación” mas que para “añadir este archivo al proyecto”. Ejecutemos
git add para preparar el archivo “CONTRIBUTING.md” y luego ejecutemos
git status:
$ git add CONTRIBUTING.md
$ git status
On branch master
Changes to be committed:
(use "git reset HEAD <file>..." to unstage)
new file: README
modified: CONTRIBUTING.md
Ambos archivos están preparados y formarán parte de tu próxima confirma-
ción. En este momento, supongamos que recuerdas que debes hacer un peque-
ño cambio en CONTRIBUTING.md antes de confirmarlo. Abres de nuevo el archi-
CHAPTER 2: Fundamentos de Git
48

vo, lo cambias y ahora estás listos para confirmar. Sin embargo, ejecutemos
git status una vez más:
$ vim CONTRIBUTING.md
$ git status
On branch master
Changes to be committed:
(use "git reset HEAD <file>..." to unstage)
new file: README
modified: CONTRIBUTING.md
Changes not staged for commit:
(use "git add <file>..." to update what will be committed)
(use "git checkout -- <file>..." to discard changes in working directory)
modified: CONTRIBUTING.md
¡¿Pero qué…?! Ahora CONTRIBUTING.md aparece como preparado y como
no preparado. ¿Cómo es posible? Resulta que Git prepara un archivo de acuer-
do al estado que tenía cuando ejecutas el comando git add. Si confirmas
ahora, se confirmará la versión de CONTRIBUTING.md que tenías la última vez
que ejecutaste git add y no la versión que ves ahora en tu directorio de traba-
jo al ejecutar git commit. Si modificas un archivo luego de ejecutar git add,
deberás ejecutar git add de nuevo para preparar la última versión del archivo:
$ git add CONTRIBUTING.md
$ git status
On branch master
Changes to be committed:
(use "git reset HEAD <file>..." to unstage)
new file: README
modified: CONTRIBUTING.md
Estatus Abreviado
Si bien es cierto que la salida de git status es bastante explícita, también es
verdad que es muy extensa. Git ofrece una opción para obtener un estatus
abreviado, de manera que puedas ver tus cambios de una forma más compac-
ta. Si ejecutas git status -s o git status --short obtendrás una salida
mucho más simplificada.
Guardando cambios en el Repositorio
49

$ git status -s
M README
MM Rakefile
A lib/git.rb
M lib/simplegit.rb
?? LICENSE.txt
Los archivos nuevos que no están rastreados tienen un ?? a su lado, los ar-
chivos que están preparados tienen una A y los modificados una M. El estado
aparece en dos columnas - la columna de la izquierda indica el estado prepara-
do y la columna de la derecha indica el estado sin preparar. Por ejemplo, en esa
salida, el archivo README está modificado en el directorio de trabajo pero no
está preparado, mientras que lib/simplegit.rb está modificado y prepara-
do. El archivo Rakefile fue modificado, preparado y modificado otra vez por
lo que existen cambios preparados y sin preparar.
Ignorar Archivos
A veces, tendrás algún tipo de archivo que no quieres que Git añada automáti-
camente o más aun, que ni siquiera quieras que aparezca como no rastreado.
Este suele ser el caso de archivos generados automáticamente como trazas o
archivos creados por tu sistema de construcción. En estos casos, puedes crear
un archivo llamado .gitignore que liste patrones a considerar. Este es un
ejemplo de un archivo .gitignore:
$ cat .gitignore
*.[oa]
*~
La primera línea le indica a Git que ignore cualquier archivo que termine en
“.o” o “.a” - archivos de objeto o librerías que pueden ser producto de compilar
tu código. La segunda línea le indica a Git que ignore todos los archivos que ter-
mine con una tilde (~), lo cual es usado por varios editores de texto como
Emacs para marcar archivos temporales. También puedes incluir cosas como
trazas, temporales, o pid directamente; documentación generada automática-
mente; etc. Crear un archivo .gitignore antes de comenzar a trabajar es gen-
eralmente una buena idea pues así evitas confirmar accidentalmente archivos
que en realidad no quieres incluir en tu repositorio Git.
Las reglas sobre los patrones que puedes incluir en el archivo .gitignore
son las siguientes:
CHAPTER 2: Fundamentos de Git
50

• Ignorar las líneas en blanco y aquellas que comiencen con #.
• Aceptar patrones glob estándar.
• Los patrones pueden terminar en barra (/) para especificar un directorio.
• Los patrones pueden negarse si se añade al principio el signo de exclama-
ción (!).
Los patrones glob son una especia de expresión regular simplificada usada
por los terminales. Un asterisco (*) corresponde a cero o más caracteres; [abc]
corresponde a cualquier carácter dentro de los corchetes (en este caso a, b o c);
el signo de interrogación (?) corresponde a un carácter cualquier; y los corch-
etes sobre caracteres separados por un guión ([0-9]) corresponde a cualquier
carácter entre ellos (en este caso del 0 al 9). También puedes usar dos asteris-
cos para indicar directorios anidados; a/**/z coincide con a/z, a/b/z,
a/b/c/z, etc.
Aquí puedes ver otro ejemplo de un archivo .gitignore:
# no .a files
*.a
# but do track lib.a, even though you're ignoring .a files above
!lib.a
# only ignore the root TODO file, not subdir/TODO
/TODO
# ignore all files in the build/ directory
build/
# ignore doc/notes.txt, but not doc/server/arch.txt
doc/*.txt
# ignore all .txt files in the doc/ directory
doc/**/*.txt
GitHub mantiene una extensa lista de archivos .gitignore adecuados a
docenas de proyectos y lenguajes en https://github.com/github/gitignore en
caso de que quieras tener un punto de partida para tu proyecto.
Ver los Cambios Preparados y No Preparados
Si el comando git status es muy impreciso para ti - quieres ver exactamente
que ha cambiado, no solo cuáles archivos lo han hecho - puedes usar el coman-
do git diff. Hablaremos sobre git diff más adelante, pero lo usarás pro-
Guardando cambios en el Repositorio
51

bablemente para responder estas dos preguntas: ¿Qué has cambiado pero aun
no has preparado? y ¿Qué has preparado y está listo para confirmar? A pesar de
que git status responde a estas preguntas de forma muy general listando el
nombre de los archivos, git diff te muestra las líneas exactas que fueron
añadidas y eliminadas, es decir, el parche.
Supongamos que editas y preparas el archivo README de nuevo y luego edi-
tas CONTRIBUTING.md pero no lo preparas. Si ejecutas el comando git sta-
tus, verás algo como esto:
$ git status
On branch master
Changes to be committed:
(use "git reset HEAD <file>..." to unstage)
new file: README
Changes not staged for commit:
(use "git add <file>..." to update what will be committed)
(use "git checkout -- <file>..." to discard changes in working directory)
modified: CONTRIBUTING.md
Para ver qué has cambiado pero aun no has preparado, escribe git diff
sin más parámetros:
$ git diff
diff --git a/CONTRIBUTING.md b/CONTRIBUTING.md
index 8ebb991..643e24f 100644
--- a/CONTRIBUTING.md
+++ b/CONTRIBUTING.md
@@ -65,7 +65,8 @@ branch directly, things can get messy.
Please include a nice description of your changes when you submit your PR;
if we have to read the whole diff to figure out why you're contributing
in the first place, you're less likely to get feedback and have your change
-merged in.
+merged in. Also, split your changes into comprehensive chunks if you patch is
+longer than a dozen lines.
If you are starting to work on a particular area, feel free to submit a PR
that highlights your work in progress (and note in the PR title that it's
Este comando compara lo que tienes en tu directorio de trabajo con lo que
está en el área de preparación. El resultado te indica los cambios que has hecho
pero que aun no has preparado.
CHAPTER 2: Fundamentos de Git
52

Si quieres ver lo que has preparado y será incluido en la próxima confirma-
ción, puedes usar git diff --staged. Este comando compara tus cambios
preparados con la última instantánea confirmada.
$ git diff --staged
diff --git a/README b/README
new file mode 100644
index 0000000..03902a1
--- /dev/null
+++ b/README
@@ -0,0 +1 @@
+My Project
Es importante resaltar que al llamar a git diff sin parámetros no verás los
cambios desde tu última confirmación - solo verás los cambios que aun no es-
tán preparados. Esto puede ser confuso porque si preparas todos tus cambios,
git diff no te devolverá ninguna salida.
Pasemos a otro ejemplo, si preparas el archivo CONTRIBUTING.md y luego lo
editas, puedes usar git diff para ver los cambios en el archivo que están pre-
parados y los cambios que no lo están. Si nuestro ambiente es como este:
$ git add CONTRIBUTING.md
$ echo 'test line' >> CONTRIBUTING.md
$ git status
On branch master
Changes to be committed:
(use "git reset HEAD <file>..." to unstage)
modified: CONTRIBUTING.md
Changes not staged for commit:
(use "git add <file>..." to update what will be committed)
(use "git checkout -- <file>..." to discard changes in working directory)
modified: CONTRIBUTING.md
Puedes usar git diff para ver qué está sin preparar
$ git diff
diff --git a/CONTRIBUTING.md b/CONTRIBUTING.md
index 643e24f..87f08c8 100644
--- a/CONTRIBUTING.md
+++ b/CONTRIBUTING.md
Guardando cambios en el Repositorio
53

@@ -119,3 +119,4 @@ at the
## Starter Projects
See our [projects list](https://github.com/libgit2/libgit2/blob/development/PROJECTS.md).
+# test line
y git diff --cached para ver que has preparado hasta ahora (--staged y
--cached son sinónimos):
$ git diff --cached
diff --git a/CONTRIBUTING.md b/CONTRIBUTING.md
index 8ebb991..643e24f 100644
--- a/CONTRIBUTING.md
+++ b/CONTRIBUTING.md
@@ -65,7 +65,8 @@ branch directly, things can get messy.
Please include a nice description of your changes when you submit your PR;
if we have to read the whole diff to figure out why you're contributing
in the first place, you're less likely to get feedback and have your change
-merged in.
+merged in. Also, split your changes into comprehensive chunks if you patch is
+longer than a dozen lines.
If you are starting to work on a particular area, feel free to submit a PR
that highlights your work in progress (and note in the PR title that it's
GIT DIFF COMO HERRAMIENTA EXTERNA
A lo largo del libro, continuaremos usando el comando git diff de dis-
tintas maneras. Existe otra forma de ver estas diferencias si prefieres
utilizar una interfaz gráfica u otro programa externo. Si ejecutas git
difftool en vez de git diff, podrás ver los cambios con programas de
este tipo como Araxis, emerge, vimdiff y más. Ejecuta git difftool --
tool-help para ver qué tienes disponible en tu sistema.
Confirmar tus Cambios
Ahora que tu área de preparación está como quieres, puedes confirmar tus
cambios. Recuerda que cualquier cosa que no esté preparada - cualquier archi-
vo que hayas creado o modificado y que no hayas agregado con git add desde
su edición - no será confirmado. Se mantendrán como archivos modificados en
tu disco. En este caso, digamos que la última vez que ejecutaste git status
verificaste que todo estaba preparado y que estás listos para confirmar tus
cambios. La forma más sencilla de confirmar es escribiendo git commit:
CHAPTER 2: Fundamentos de Git
54

$ git commit
Al hacerlo, arrancará el editor de tu preferencia. (El editor se establece a
través de la variable de ambiente $EDITOR de tu terminal - usualmente es vim o
emacs, aunque puedes configurarlo con el editor que quieras usando el coman-
do git config --global core.editor tal como viste en Chapter 1).
El editor mostrará el siguiente texto (este ejemplo corresponde a una pantal-
la de Vim):
# Please enter the commit message for your changes. Lines starting
# with '#' will be ignored, and an empty message aborts the commit.
# On branch master
# Changes to be committed:
# new file: README
# modified: CONTRIBUTING.md
#
~
~
~
".git/COMMIT_EDITMSG" 9L, 283C
Puedes ver que el mensaje de confirmación por defecto contiene la última
salida del comando git status comentada y una línea vacía encima de ella.
Puedes eliminar estos comentarios y escribir tu mensaje de confirmación, o
puedes dejarlos allí para ayudarte a recordar qué estás confirmando. (Para ob-
tener una forma más explícita de recordar qué has modificado, puedes pasar la
opción -v a git commit. Al hacerlo se incluirá en el editor el di de tus cam-
bios para que veas exactamente qué cambios estás confirmando.) Cuando
sales del editor, Git crea tu confirmación con tu mensaje (eliminando el texto
comentado y el di).
Otra alternativa es escribir el mensaje de confirmación directamente en el
comando commit utilizando la opción -m:
$ git commit -m "Story 182: Fix benchmarks for speed"
[master 463dc4f] Story 182: Fix benchmarks for speed
2 files changed, 2 insertions(+)
create mode 100644 README
¡Has creado tu primera confirmación (o commit)! Puedes ver que la confir-
mación te devuelve una salida descriptiva: indica cuál rama as confirmado
(master), que checksum SHA-1 tiene el commit (463dc4f), cuántos archivos
Guardando cambios en el Repositorio
55

han cambiado y estadísticas sobre las líneas añadidas y eliminadas en el com-
mit.
Recuerda que la confirmación guarda una instantánea de tu área de prepar-
ación. Todo lo que no hayas preparado sigue allí modificado; puedes hacer una
nueva confirmación para añadirlo a tu historial. Cada vez que realizas un com-
mit, guardas una instantánea de tu proyecto la cual puedes usar para comparar
o volver a ella luego.
Saltar el Área de Preparación
A pesar de que puede resultar muy útil para ajustar los commits tal como
quieres, el área de preparación es a veces un paso más complejo a lo que nec-
esitas para tu flujo de trabajo. Si quieres saltarte el área de preparación, Git te
ofrece un atajo sencillo. Añadiendo la opción -a al comando git commit harás
que Git prepare automáticamente todos los archivos rastreados antes de con-
firmarlos, ahorrándote el paso de git add:
$ git status
On branch master
Changes not staged for commit:
(use "git add <file>..." to update what will be committed)
(use "git checkout -- <file>..." to discard changes in working directory)
modified: CONTRIBUTING.md
no changes added to commit (use "git add" and/or "git commit -a")
$ git commit -a -m 'added new benchmarks'
[master 83e38c7] added new benchmarks
1 file changed, 5 insertions(+), 0 deletions(-)
Fíjate que en este caso no fue necesario ejecutar git add sobre el archivo
CONTRIBUTING.md antes de confirmar.
Eliminar Archivos
Para eliminar archivos de Git, debes eliminarlos de tus archivos rastreados (o
mejor dicho, eliminarlos del área de preparación) y luego confirmar. Para ello
existe el comando git rm, que además elimina el archivo de tu directorio de
trabajo de manera que no aparezca la próxima vez como un archivo no rastrea-
do.
CHAPTER 2: Fundamentos de Git
56

Si simplemente eliminas el archivo de tu directorio de trabajo, aparecerá en
la sección “Changes not staged for commit” (esto es, sin preparar) en la salida
de git status:
$ rm PROJECTS.md
$ git status
On branch master
Your branch is up-to-date with 'origin/master'.
Changes not staged for commit:
(use "git add/rm <file>..." to update what will be committed)
(use "git checkout -- <file>..." to discard changes in working directory)
deleted: PROJECTS.md
no changes added to commit (use "git add" and/or "git commit -a")
Ahora, si ejecutas git rm, entonces se prepara la eliminación del archivo:
$ git rm PROJECTS.md
rm 'PROJECTS.md'
$ git status
On branch master
Changes to be committed:
(use "git reset HEAD <file>..." to unstage)
deleted: PROJECTS.md
Con la próxima confirmación, el archivo habrá desaparecido y no volverá a
ser rastreado. Si modificaste el archivo y ya lo habías añadido al índice, tendrás
que forzar su eliminación con la opción -f. Esta propiedad existe por seguri-
dad, para prevenir que elimines accidentalmente datos que aun no han sido
guardados como una instantánea y que por lo tanto no podrás recuperar luego
con Git.
Otra cosa que puedas querer hacer es mantener el archivo en tu directorio
de trabajo pero eliminarlo del área de preparación. En otras palabras, quisieras
mantener el archivo en tu disco duro pero sin que Git lo siga rastreando. Esto
puede ser particularmente útil si olvidaste añadir algo en tu archivo .gi-
tignore y lo preparaste accidentalmente, algo como un gran archivo de trazas
a un montón de archivos compilados .a. Para hacerlo, utiliza la opción --
cached:
$ git rm --cached README
Guardando cambios en el Repositorio
57

Al comando git rm puedes pasarle archivos, directorios y patrones glob. Lo
que significa que puedes hacer cosas como
$ git rm log/\*.log
Fíjate en la barra invertida (\) antes del asterisco *. Esto es necesario porque
Git hace su propia expansión de nombres de archivo, aparte de la expansión
hecha por tu terminal. Este comando elimina todos los archivo que tengan la
extensión .log dentro del directorio log/. O también puedes hacer algo como:
$ git rm \*~
Este comando elimina todos los archivos que acaben con ~.
Cambiar el Nombre de los Archivos
Al contrario que muchos sistemas VCS, Git no rastrea explícitamente los cam-
bios de nombre en archivos. Si renombras un archivo en Git, no se guardará
ningún metadato que indique que renombraste el archivo. Sin embargo, Git es
bastante listo como para detectar estos cambios luego que los has hecho - más
adelante, veremos cómo se detecta el cambio de nombre.
Por esto, resulta confuso que Git tenga un comando mv. Si quieres renom-
brar un archivo en Git, puedes ejecutar algo como
$ git mv file_from file_to
y funcionará bien. De hecho, si ejecutas algo como eso y ves el estatus, verás
que Git lo considera como un renombramiento de archivo:
$ git mv README.md README
$ git status
On branch master
Changes to be committed:
(use "git reset HEAD <file>..." to unstage)
renamed: README.md -> README
Sin embargo, eso es equivalente a ejecutar algo como esto:
CHAPTER 2: Fundamentos de Git
58

$ mv README.md README
$ git rm README.md
$ git add README
Git se da cuenta que es un renombramiento implícito, así que no importa si
renombras el archivo de esa manera o a través del comando mv. La única difer-
encia real es que mv es un solo comando en vez de tres - existe por convenien-
cia. De hecho, puedes usar la herramienta que quieras para renombrar un ar-
chivo y luego realizar el proceso rm/add antes de confirmar.
Ver el Historial de Confirmaciones
Después de haber hecho varias confirmaciones, o si has clonado un repositorio
que ya tenía un histórico de confirmaciones, probablemente quieras mirar atrás
para ver qué modificaciones se han llevado a cabo. La herramienta más básica
y potente para hacer esto es el comando git log.
Estos ejemplos usan un proyecto muy sencillo llamado “simplegit”. Para clo-
nar el proyecto, ejecuta:
git clone https://github.com/schacon/simplegit-progit
Cuando ejecutes git log sobre este proyecto, deberías ver una salida simi-
lar a esta:
$ git log
commit ca82a6dff817ec66f44342007202690a93763949
Author: Scott Chacon <schacon@gee-mail.com>
Date: Mon Mar 17 21:52:11 2008 -0700
changed the version number
commit 085bb3bcb608e1e8451d4b2432f8ecbe6306e7e7
Author: Scott Chacon <schacon@gee-mail.com>
Date: Sat Mar 15 16:40:33 2008 -0700
removed unnecessary test
commit a11bef06a3f659402fe7563abf99ad00de2209e6
Author: Scott Chacon <schacon@gee-mail.com>
Date: Sat Mar 15 10:31:28 2008 -0700
Ver el Historial de Confirmaciones
59

first commit
Por defecto, si no pasas ningún parámetro, git log lista las confirmaciones
hechas sobre ese repositorio en orden cronológico inverso. Es decir, las confir-
maciones más recientes se muestran al principio. Como puedes ver, este co-
mando lista cada confirmación con su suma de comprobación SHA-1, el nom-
bre y dirección de correo del autor, la fecha y el mensaje de confirmación.
El comando git log proporciona gran cantidad de opciones para mos-
trarte exactamente lo que buscas. Aquí veremos algunas de las más usadas.
Una de las opciones más útiles es -p, que muestra las diferencias introduci-
das en cada confirmación. También puedes usar la opción -2, que hace que se
muestren únicamente las dos últimas entradas del historial:
$ git log -p -2
commit ca82a6dff817ec66f44342007202690a93763949
Author: Scott Chacon <schacon@gee-mail.com>
Date: Mon Mar 17 21:52:11 2008 -0700
changed the version number
diff --git a/Rakefile b/Rakefile
index a874b73..8f94139 100644
--- a/Rakefile
+++ b/Rakefile
@@ -5,7 +5,7 @@ require 'rake/gempackagetask'
spec = Gem::Specification.new do |s|
s.platform = Gem::Platform::RUBY
s.name = "simplegit"
- s.version = "0.1.0"
+ s.version = "0.1.1"
s.author = "Scott Chacon"
s.email = "schacon@gee-mail.com"
s.summary = "A simple gem for using Git in Ruby code."
commit 085bb3bcb608e1e8451d4b2432f8ecbe6306e7e7
Author: Scott Chacon <schacon@gee-mail.com>
Date: Sat Mar 15 16:40:33 2008 -0700
removed unnecessary test
diff --git a/lib/simplegit.rb b/lib/simplegit.rb
index a0a60ae..47c6340 100644
--- a/lib/simplegit.rb
+++ b/lib/simplegit.rb
@@ -18,8 +18,3 @@ class SimpleGit
CHAPTER 2: Fundamentos de Git
60

end
end
-
-if $0 == __FILE__
- git = SimpleGit.new
- puts git.show
-end
\ No newline at end of file
Esta opción muestra la misma información, pero añadiendo tras cada entra-
da las diferencias que le corresponden. Esto resulta muy útil para revisiones de
código, o para visualizar rápidamente lo que ha pasado en las confirmaciones
enviadas por un colaborador. También puedes usar con git log una serie de
opciones de resumen. Por ejemplo, si quieres ver algunas estadísticas de cada
confirmación, puedes usar la opción --stat:
$ git log --stat
commit ca82a6dff817ec66f44342007202690a93763949
Author: Scott Chacon <schacon@gee-mail.com>
Date: Mon Mar 17 21:52:11 2008 -0700
changed the version number
Rakefile | 2 +-
1 file changed, 1 insertion(+), 1 deletion(-)
commit 085bb3bcb608e1e8451d4b2432f8ecbe6306e7e7
Author: Scott Chacon <schacon@gee-mail.com>
Date: Sat Mar 15 16:40:33 2008 -0700
removed unnecessary test
lib/simplegit.rb | 5 -----
1 file changed, 5 deletions(-)
commit a11bef06a3f659402fe7563abf99ad00de2209e6
Author: Scott Chacon <schacon@gee-mail.com>
Date: Sat Mar 15 10:31:28 2008 -0700
first commit
README | 6 ++++++
Rakefile | 23 +++++++++++++++++++++++
lib/simplegit.rb | 25 +++++++++++++++++++++++++
3 files changed, 54 insertions(+)
Ver el Historial de Confirmaciones
61

Como puedes ver, la opción --stat imprime tras cada confirmación una lis-
ta de archivos modificados, indicando cuántos han sido modificados y cuántas
líneas han sido añadidas y eliminadas para cada uno de ellos, y un resumen de
toda esta información.
Otra opción realmente útil es --pretty, que modifica el formato de la sali-
da. Tienes unos cuantos estilos disponibles. La opción oneline imprime cada
confirmación en una única línea, lo que puede resultar útil si estás analizando
gran cantidad de confirmaciones. Otras opciones son short, full y fuller,
que muestran la salida en un formato parecido, pero añadiendo menos o más
información, respectivamente:
$ git log --pretty=oneline
ca82a6dff817ec66f44342007202690a93763949 changed the version number
085bb3bcb608e1e8451d4b2432f8ecbe6306e7e7 removed unnecessary test
a11bef06a3f659402fe7563abf99ad00de2209e6 first commit
La opción más interesante es format, que te permite especificar tu propio
formato. Esto resulta especialmente útil si estás generando una salida para que
sea analizada por otro programa —como especificas el formato explícitamente,
sabes que no cambiará en futuras actualizaciones de Git—:
$ git log --pretty=format:"%h - %an, %ar : %s"
ca82a6d - Scott Chacon, 6 years ago : changed the version number
085bb3b - Scott Chacon, 6 years ago : removed unnecessary test
a11bef0 - Scott Chacon, 6 years ago : first commit
Table 2-1 lista algunas de las opciones más útiles aceptadas por format.
TABLE 2-1. Opciones útiles de git log --pretty=format
Opción Descripción de la salida
%H Hash de la confirmación
%h Hash de la confirmación abreviado
%T Hash del árbol
%t Hash del árbol abreviado
%P Hashes de las confirmaciones padre
%p Hashes de las confirmaciones padre abreviados
CHAPTER 2: Fundamentos de Git
62

Opción Descripción de la salida
%an Nombre del autor
%ae Dirección de correo del autor
%ad Fecha de autoría (el formato respeta la opción -–date)
%ar Fecha de autoría, relativa
%cn Nombre del confirmador
%ce Dirección de correo del confirmador
%cd Fecha de confirmación
%cr Fecha de confirmación, relativa
%s Asunto
Puede que te estés preguntando la diferencia entre autor (author) y confir-
mador (committer). El autor es la persona que escribió originalmente el trabajo,
mientras que el confirmador es quien lo aplicó. Por tanto, si mandas un parche
a un proyecto, y uno de sus miembros lo aplica, ambos recibiréis reconocimien-
to —tú como autor, y el miembro del proyecto como confirmador—. Veremos
esta distinción en mayor profundidad en Chapter 5.
Las opciones oneline y format son especialmente útiles combinadas con
otra opción llamada --graph. Ésta añade un pequeño gráfico ASCII mostrando
tu historial de ramificaciones y uniones:
$ git log --pretty=format:"%h %s" --graph
* 2d3acf9 ignore errors from SIGCHLD on trap
* 5e3ee11 Merge branch 'master' of git://github.com/dustin/grit
|\
| * 420eac9 Added a method for getting the current branch.
* | 30e367c timeout code and tests
* | 5a09431 add timeout protection to grit
* | e1193f8 support for heads with slashes in them
|/
* d6016bc require time for xmlschema
* 11d191e Merge branch 'defunkt' into local
Este tipo de salidas serán más interesantes cuando empecemos a hablar so-
bre ramificaciones y combinaciones en el próximo capítulo.
Éstas son sólo algunas de las opciones para formatear la salida de git log
—existen muchas más. Table 2-2 lista las opciones vistas hasta ahora, y algu-
Ver el Historial de Confirmaciones
63

nas otras opciones de formateo que pueden resultarte útiles, así como su efec-
to sobre la salida.
TABLE 2-2. Opciones típicas de git log
Opción Descripción
-p Muestra el parche introducido en cada confirmación.
--stat Muestra estadísticas sobre los archivos modificados en ca-
da confirmación.
--shortstat Muestra solamente la línea de resumen de la opción --
stat.
--name-only Muestra la lista de archivos afectados.
--name-status Muestra la lista de archivos afectados, indicando además si
fueron añadidos, modificados o eliminados.
--abbrev-commit Muestra solamente los primeros caracteres de la suma
SHA-1, en vez de los 40 caracteres de que se compone.
--relative-date Muestra la fecha en formato relativo (por ejemplo, “2 weeks
ago” (“hace 2 semanas”)) en lugar del formato completo.
--graph Muestra un gráfico ASCII con la historia de ramificaciones y
uniones.
--pretty Muestra las confirmaciones usando un formato alternativo.
Posibles opciones son oneline, short, full, fuller y format
(mediante el cual puedes especificar tu propio formato).
Limitar la Salida del Historial
Además de las opciones de formateo, git log acepta una serie de opciones
para limitar su salida —es decir, opciones que te permiten mostrar únicamente
parte de las confirmaciones—. Ya has visto una de ellas, la opción -2, que
muestra sólo las dos últimas confirmaciones. De hecho, puedes hacer -<n>,
siendo n cualquier entero, para mostrar las últimas n confirmaciones. En reali-
dad es poco probable que uses esto con frecuencia, ya que Git por defecto pagi-
na su salida para que veas cada página del historial por separado.
Sin embargo, las opciones temporales como --since (desde) y --until
(hasta) sí que resultan muy útiles. Por ejemplo, este comando lista todas las
confirmaciones hechas durante las dos últimas semanas:
$ git log --since=2.weeks
CHAPTER 2: Fundamentos de Git
64

Este comando acepta muchos formatos. Puedes indicar una fecha concreta
("2008-01-15"), o relativa, como "2 years 1 day 3 minutes ago" ("hace
2 años, 1 día y 3 minutos").
También puedes filtrar la lista para que muestre sólo aquellas confirma-
ciones que cumplen ciertos criterios. La opción --author te permite filtrar por
autor, y --grep te permite buscar palabras clave entre los mensajes de confir-
mación. (Ten en cuenta que si quieres aplicar ambas opciones simultánea-
mente, tienes que añadir --all-match, o el comando mostrará las confirma-
ciones que cumplan cualquiera de las dos, no necesariamente las dos a la vez.)
Otra opción útil es -S, la cual recibe una cadena y solo muestra las confirma-
ciones que cambiaron el código añadiendo o eliminando la cadena. Por ejem-
plo, si quieres encontrar la última confirmación que añadió o eliminó una refer-
encia a una función específica, puede ejecutar:
$ git log -Sfunction_name
La última opción verdaderamente útil para filtrar la salida de git log es es-
pecificar una ruta. Si especificas la ruta de un directorio o archivo, puedes limi-
tar la salida a aquellas confirmaciones que introdujeron un cambio en dichos
archivos. Ésta debe ser siempre la última opción, y suele ir precedida de dos
guiones (--) para separar la ruta del resto de opciones.
En Table 2-3 se listan estas opciones, y algunas otras bastante comunes, a
modo de referencia.
TABLE 2-3. Opciones para limitar la salida de git log
Opción Descripción
-(n) Muestra solamente las últimas n confirmaciones
--since, --after Muestra aquellas confirmaciones hechas después
de la fecha especificada.
--until, --before Muestra aquellas confirmaciones hechas antes de
la fecha especificada.
--author Muestra solo aquellas confirmaciones cuyo autor
coincide con la cadena especificada.
--committer Muestra solo aquellas confirmaciones cuyo confir-
mador coincide con la cadena especificada.
-S Muestra solo aquellas confirmaciones que añadan
o eliminen código que corresponda con la cadena
especificada.
Ver el Historial de Confirmaciones
65

Por ejemplo, si quieres ver cuáles de las confirmaciones hechas sobre archi-
vos de prueba del código fuente de Git fueron enviadas por Junio Hamano, y no
fueron uniones, en el mes de octubre de 2008, ejecutarías algo así:
$ git log --pretty="%h - %s" --author=gitster --since="2008-10-01" \
--before="2008-11-01" --no-merges -- t/
5610e3b - Fix testcase failure when extended attributes are in use
acd3b9e - Enhance hold_lock_file_for_{update,append}() API
f563754 - demonstrate breakage of detached checkout with symbolic link HEAD
d1a43f2 - reset --hard/read-tree --reset -u: remove unmerged new paths
51a94af - Fix "checkout --track -b newbranch" on detached HEAD
b0ad11e - pull: allow "git pull origin $something:$current_branch" into an unborn branch
De las casi 40.000 confirmaciones en la historia del código fuente de Git, este
comando muestra las 6 que cumplen estas condiciones.
Deshacer Cosas
En cualquier momento puede que quieras deshacer algo. Aquí repasaremos al-
gunas herramientas básicas usadas para deshacer cambios que hayas hecho.
Ten cuidado, a veces no es posible recuperar algo luego que lo has deshecho.
Esta es una de las pocas áreas en las que Git puede perder parte de tu trabajo si
cometes un error.
Uno de las acciones más comunes a deshacer es cuando confirmas un cam-
bio antes de tiempo y olvidas agregar algún archivo, o te equivocas en el men-
saje de confirmación. Si quieres rehacer la confirmación, puedes reconfirmar
con la opción --amend:
$ git commit --amend
Este comando utiliza tu área de preparación para la confirmación. Si no has
hecho cambios desde tu última confirmación (por ejemplo, ejecutas este co-
mando justo después de tu confirmación anterior), entonces la instantánea lu-
cirá exactamente igual, y lo único que cambiarás será el mensaje de confirma-
ción.
Se lanzará el mismo editor de confirmación, pero verás que ya incluye el
mensaje de tu confirmación anterior. Puedes editar el mensaje como siempre y
se sobreescribirá tu confirmación anterior.
Por ejemplo, si confirmas y luego te das cuenta que olvidaste preparar los
cambios de un archivo que querías incluir en esta confirmación, puedes hacer
lo siguiente:
CHAPTER 2: Fundamentos de Git
66

$ git commit -m 'initial commit'
$ git add forgotten_file
$ git commit --amend
Al final terminarás con una sola confirmación - la segunda confirmación re-
emplaza el resultado de la primera.
Deshacer un Archivo Preparado
Las siguientes dos secciones demuestran cómo lidiar con los cambios de tu
área de preparación y tú directorio de trabajo. Afortunadamente, el comando
que usas para determinar el estado de esas dos áreas también te recuerda có-
mo deshacer los cambios en ellas. Por ejemplo, supongamos que has cambiado
dos archivos y que quieres confirmarlos como dos cambios separados, pero ac-
cidentalmente has escrito git add * y has preparado ambos. ¿Cómo puedes
sacar del área de preparación uno de ellos? El comando git status te recuer-
da cómo:
$ git add .
$ git status
On branch master
Changes to be committed:
(use "git reset HEAD <file>..." to unstage)
renamed: README.md -> README
modified: CONTRIBUTING.md
Justo debajo del texto “Changes to be committed” (“Cambios a ser confir-
mados”, en inglés), verás que dice que uses git reset HEAD <file>... para
deshacer la preparación. Por lo tanto, usemos el consejo para deshacer la pre-
paración del archivo CONTRIBUTING.md:
$ git reset HEAD CONTRIBUTING.md
Unstaged changes after reset:
M CONTRIBUTING.md
$ git status
On branch master
Changes to be committed:
(use "git reset HEAD <file>..." to unstage)
renamed: README.md -> README
Deshacer Cosas
67

Changes not staged for commit:
(use "git add <file>..." to update what will be committed)
(use "git checkout -- <file>..." to discard changes in working directory)
modified: CONTRIBUTING.md
El comando es un poco raro, pero funciona. El archivo CONTRIBUTING.md
esta modificado y, nuevamente, no preparado.
A pesar de que git reset puede ser un comando peligroso si lo llamas con
--hard, en este caso el archivo que está en tu directorio de trabajo no se
toca. Ejecutar git reset sin opciones no es peligroso - solo toca el área de
preparación.
Por ahora lo único que necesitas saber sobre el comando git reset es esta
invocación mágica. Entraremos en mucho más detalle sobre qué hace reset y
como dominarlo para que haga cosas realmente interesantes en “Reset De-
mystified”.
Deshacer un Archivo Modificado
¿Qué tal si te das cuenta que no quieres mantener los cambios del archivo CON-
TRIBUTING.md? ¿Cómo puedes restaurarlo fácilmente - volver al estado en el
que estaba en la última confirmación (o cuando estaba recién clonado, o como
sea que haya llegado a tu directorio de trabajo)? Afortunadamente, git sta-
tus también te dice cómo hacerlo. En la salida anterior, el área no preparada
lucía así:
Changes not staged for commit:
(use "git add <file>..." to update what will be committed)
(use "git checkout -- <file>..." to discard changes in working directory)
modified: CONTRIBUTING.md
Allí se te indica explícitamente como descartar los cambios que has hecho.
Hagamos lo que nos dice:
$ git checkout -- CONTRIBUTING.md
$ git status
On branch master
Changes to be committed:
(use "git reset HEAD <file>..." to unstage)
CHAPTER 2: Fundamentos de Git
68

renamed: README.md -> README
Ahora puedes ver que los cambios se han revertido.
Es importante entender que git checkout -- [archivo] es un comando
peligroso. Cualquier cambio que le hayas hecho a ese archivo desapare-
cerá - acabas de sobreescribirlo con otro archivo. Nunca utilices este co-
mando a menos que estés absolutamente seguro de que ya no quieres el
archivo.
Para mantener los cambios que has hecho y a la vez deshacerte del archivo
temporalmente, hablaremos sobre cómo esconder archivos (stashing, en in-
glés) y sobre ramas en Chapter 3; normalmente, estas son las mejores maneras
de hacerlo.
Recuerda, todo lo que esté confirmado en Git puede recuperarse. Incluso
commits que estuvieron en ramas que han sido eliminadas o commits que fuer-
on sobreescritos con --amend pueden recuperarse (véase “Data Recovery”
para recuperación de datos). Sin embargo, es posible que no vuelvas a ver ja-
más cualquier cosa que pierdas y que nunca haya sido confirmada.
Trabajar con Remotos
Para poder colaborar en cualquier proyecto Git, necesitas saber cómo gestionar
repositorios remotos. Los repositorios remotos son versiones de tu proyecto
que están hospedadas en Internet en cualquier otra red. Puedes tener varios de
ellos, y en cada uno tendrás generalmente permisos de solo lectura o de lectura
y escritura. Colaborar con otras personas implica gestionar estos repositorios
remotos y enviar y traer datos de ellos cada vez que necesites compartir tu tra-
bajo. Gestionar repositorios remotos incluye saber cómo añadir un repositorio
remoto, eliminar los remotos que ya no son válidos, gestionar varias ramas re-
motas y definir si deben rastrearse o no, y más. En esta sección, trataremos al-
gunas de estas habilidades de gestión de remotos.
Ver Tus Remotos
Para ver los remotos que tienes configurados, debes ejecutar el comando git
remote. Mostrará los nombres de cada uno de los remotos que tienes especifi-
cados. Si has clonado tu repositorio, deberías ver al menos origin (origen, en
inglés) - este es el nombre que por defecto Git le da al servidor del que has clo-
nado:
Trabajar con Remotos
69

$ git clone https://github.com/schacon/ticgit
Cloning into 'ticgit'...
remote: Reusing existing pack: 1857, done.
remote: Total 1857 (delta 0), reused 0 (delta 0)
Receiving objects: 100% (1857/1857), 374.35 KiB | 268.00 KiB/s, done.
Resolving deltas: 100% (772/772), done.
Checking connectivity... done.
$ cd ticgit
$ git remote
origin
También puedes pasar la opción -v, la cual muestra las URLs que Git ha aso-
ciado al nombre y que serán usadas al leer y escribir en ese remoto:
$ git remote -v
origin https://github.com/schacon/ticgit (fetch)
origin https://github.com/schacon/ticgit (push)
Si tienes más de un remoto, el comando los listará todos. Por ejemplo, un
repositorio con múltiples remotos para trabajar con distintos colaboradores
podría verse de la siguiente manera.
$ cd grit
$ git remote -v
bakkdoor https://github.com/bakkdoor/grit (fetch)
bakkdoor https://github.com/bakkdoor/grit (push)
cho45 https://github.com/cho45/grit (fetch)
cho45 https://github.com/cho45/grit (push)
defunkt https://github.com/defunkt/grit (fetch)
defunkt https://github.com/defunkt/grit (push)
koke git://github.com/koke/grit.git (fetch)
koke git://github.com/koke/grit.git (push)
origin git@github.com:mojombo/grit.git (fetch)
origin git@github.com:mojombo/grit.git (push)
Esto significa que podemos traer contribuciones de cualquiera de estos
usuarios fácilmente. Es posible que también tengamos permisos para enviar
datos a algunos, aunque no podemos saberlo desde aquí.
Fíjate que estos remotos usan distintos protocolos; hablaremos sobre ello
más adelante, en “Configurando Git en un servidor”.
CHAPTER 2: Fundamentos de Git
70

Añadir Repositorios Remotos
En secciones anteriores hemos mencionado y dado alguna demostración de
cómo añadir repositorios remotos. Ahora veremos explícitamente cómo hacer-
lo. Para añadir un remoto nuevo y asociarlo a un nombre que puedas referen-
ciar fácilmente, ejecuta git remote add [nombre] [url]:
$ git remote
origin
$ git remote add pb https://github.com/paulboone/ticgit
$ git remote -v
origin https://github.com/schacon/ticgit (fetch)
origin https://github.com/schacon/ticgit (push)
pb https://github.com/paulboone/ticgit (fetch)
pb https://github.com/paulboone/ticgit (push)
A partir de ahora puedes usar el nombre pb en la línea de comandos en lugar
de la URL entera. Por ejemplo, si quieres traer toda la información que tiene
Paul pero tú aun no tienes en tu repositorio, puedes ejecutar git fetch pb:
$ git fetch pb
remote: Counting objects: 43, done.
remote: Compressing objects: 100% (36/36), done.
remote: Total 43 (delta 10), reused 31 (delta 5)
Unpacking objects: 100% (43/43), done.
From https://github.com/paulboone/ticgit
* [new branch] master -> pb/master
* [new branch] ticgit -> pb/ticgit
La rama maestra de Paul ahora es accesible localmente con el nombre pb/
master - puedes combinarla con alguna de tus ramas, o puedes crear una rama
local en ese punto si quieres inspeccionarla. (Hablaremos con más detalle acer-
ca de qué son las ramas y cómo utilizarlas en Chapter 3.)
Traer y Combinar Remotos
Como hemos visto hasta ahora, para obtener datos de tus proyectos remotos
puedes ejecutar:
$ git fetch [remote-name]
Trabajar con Remotos
71

El comando irá al proyecto remoto y se traerá todos los datos que aun no
tienes de dicho remoto. Luego de hacer esto, tendrás referencias a todas las
ramas del remoto, las cuales puedes combinar e inspeccionar cuando quieras.
Si clonas un repositorio, el comando de clonar automáticamente añade ese
repositorio remoto con el nombre “origin”. Por lo tanto, git fetch origin se
trae todo el trabajo nuevo que ha sido enviado a ese servidor desde que lo clo-
naste (o desde la última vez que trajiste datos). Es importante destacar que el
comando git fetch solo trae datos a tu repositorio local - ni lo combina auto-
máticamente con tu trabajo ni modifica el trabajo que llevas hecho. La combi-
nación con tu trabajo debes hacerla manualmente cuando estés listo.
Si has configurado una rama para que rastree una rama remota (más infor-
mación en la siguiente sección y en Chapter 3), puedes usar el comando git
pull para traer y combinar automáticamente la rama remota con tu rama ac-
tual. Es posible que este sea un flujo de trabajo mucho más cómodo y fácil para
ti; y por defecto, el comando git clone le indica automáticamente a tu rama
maestra local que rastree la rama maestra remota (o como se llame la rama por
defecto) del servidor del que has clonado. Generalmente, al ejecutar git pull
traerás datos del servidor del que clonaste originalmente y se intentará combi-
nar automáticamente la información con el código en el que estás trabajando.
Enviar a Tus Remotos
Cuando tienes un proyecto que quieres compartir, debes enviarlo a un servidor.
El comando para hacerlo es simple: git push [nombre-remoto] [nombre-
rama]. Si quieres enviar tu rama master a tu servidor origin (recuerda, clonar
un repositorio establece esos nombres automáticamente), entonces puedes
ejecutar el siguiente comando y se enviarán todos los commits que hayas hecho
al servidor:
$ git push origin master
Este comando solo funciona si clonaste de un servidor sobre el que tienes
permisos de escritura y si nadie más ha enviado datos por el medio. Si alguien
más clona el mismo repositorio que tú y envía información antes que tú, tu en-
vío será rechazado. Tendrás que traerte su trabajo y combinarlo con el tuyo an-
tes de que puedas enviar datos al servidor. Para información más detallada so-
bre cómo enviar datos a servidores remotos, véase Chapter 3.
CHAPTER 2: Fundamentos de Git
72

Inspeccionar un Remoto
Si quieres ver más información acerca de un remoto en particular, puedes eje-
cutar el comando git remote show [nombre-remoto]. Si ejecutas el co-
mando con un nombre en particular, como origin, verás algo como lo si-
guiente:
$ git remote show origin
* remote origin
Fetch URL: https://github.com/schacon/ticgit
Push URL: https://github.com/schacon/ticgit
HEAD branch: master
Remote branches:
master tracked
dev-branch tracked
Local branch configured for 'git pull':
master merges with remote master
Local ref configured for 'git push':
master pushes to master (up to date)
El comando lista la URL del repositorio remoto y la información del rastreo
de ramas. El comando te indica claramente que si estás en la rama maestra y
ejecutas el comando git pull, automáticamente combinará la rama maestra
remota luego de haber traído toda la información de ella. También lista todas
las referencias remotas de las que ha traído datos.
Ejemplos como este son los que te encontrarás normalmente. Sin embargo,
si usas Git de forma más avanzada, puede que obtengas mucha más informa-
ción de un git remote show:
$ git remote show origin
* remote origin
URL: https://github.com/my-org/complex-project
Fetch URL: https://github.com/my-org/complex-project
Push URL: https://github.com/my-org/complex-project
HEAD branch: master
Remote branches:
master tracked
dev-branch tracked
markdown-strip tracked
issue-43 new (next fetch will store in remotes/origin)
issue-45 new (next fetch will store in remotes/origin)
refs/remotes/origin/issue-11 stale (use 'git remote prune' to remove)
Local branches configured for 'git pull':
dev-branch merges with remote dev-branch
master merges with remote master
Trabajar con Remotos
73

Local refs configured for 'git push':
dev-branch pushes to dev-branch (up to date)
markdown-strip pushes to markdown-strip (up to date)
master pushes to master (up to date)
Este comando te indica a cuál rama enviarás información automáticamente
cada vez que ejecutas git push, dependiendo de la rama en la que estés. Tam-
bién te muestra cuáles ramas remotas no tienes aun, cuáles ramas remotas
tienes que han sido eliminadas del servidor, y varias ramas que serán combina-
das automáticamente cuando ejecutes git pull.
Eliminar y Renombrar Remotos
Si quieres cambiar el nombre de la referencia de un remoto puedes ejecutar
git remote rename. Por ejemplo, si quieres cambiar el nombre de pb a paul,
puedes hacerlo con git remote rename:
$ git remote rename pb paul
$ git remote
origin
paul
Es importante destacar que al hacer esto también cambias el nombre de las
ramas remotas. Por lo tanto, lo que antes estaba referenciado como pb/
master ahora lo está como paul/master.
Si por alguna razón quieres eliminar un remoto - has cambiado de servidor o
no quieres seguir utilizando un mirror, o quizás un colaborador a dejado de tra-
bajar en el proyecto - puedes usar git remote rm:
$ git remote rm paul
$ git remote
origin
Etiquetado
Como muchos VCS, Git tiene la posibilidad de etiquetar puntos específicos del
historial como importantes. Esta funcionalidad se usa típicamente para marcar
versiones de lanzamiento (v1.0, por ejemplo). En esta sección, aprenderás có-
mo listar las etiquetas disponibles, cómo crear nuevas etiquetas y cuáles son
los distintos tipos de etiquetas.
CHAPTER 2: Fundamentos de Git
74

Listar Tus Etiquetas
Listar las etiquetas disponibles en Git es sencillo. Simplemente escribe git
tag:
$ git tag
v0.1
v1.3
Este comando lista las etiquetas en orden alfabético; el orden en el que
aparecen no tiene mayor importancia.
También puedes buscar etiquetas con un patrón particular. El repositorio del
código fuente de Git, por ejemplo, contiene más de 500 etiquetas. Si solo te in-
teresa ver la serie 1.8.5, puedes ejecutar:
$ git tag -l 'v1.8.5*'
v1.8.5
v1.8.5-rc0
v1.8.5-rc1
v1.8.5-rc2
v1.8.5-rc3
v1.8.5.1
v1.8.5.2
v1.8.5.3
v1.8.5.4
v1.8.5.5
Crear Etiquetas
Git utiliza dos tipos principales de etiquetas: ligeras y anotadas.
Una etiqueta ligera es muy parecido a una rama que no cambia - simple-
mente es un puntero a un commit específico.
Sin embargo, las etiquetas anotadas se guardan en la base de datos de Git
como objetos enteros. Tienen un checksum; contienen el nombre del etiqueta-
dor, correo electrónico y fecha; tienen un mensaje asociado; y pueden ser fir-
madas y verificadas con GNU Privacy Guard (GPG). Normalmente se recomienda
que crees etiquetas anotadas, de manera que tengas toda esta información;
pero si quieres una etiqueta temporal o por alguna razón no estás interesado
en esa información, entonces puedes usar las etiquetas ligeras.
Etiquetado
75

Etiquetas Anotadas
Crear una etiqueta anotada en Git es sencillo. La forma más fácil de hacer es
especificar la opción -a cuando ejecutas el comando tag:
$ git tag -a v1.4 -m 'my version 1.4'
$ git tag
v0.1
v1.3
v1.4
La opción -m especifica el mensaje de la etiqueta, el cual es guardado junto
con ella. Si no especificas el mensaje de una etiqueta anotada, Git abrirá el edi-
tor de texto para que lo escribas.
Puedes ver la información de la etiqueta junto con el commit que está eti-
quetado al usar el comando git show:
$ git show v1.4
tag v1.4
Tagger: Ben Straub <ben@straub.cc>
Date: Sat May 3 20:19:12 2014 -0700
my version 1.4
commit ca82a6dff817ec66f44342007202690a93763949
Author: Scott Chacon <schacon@gee-mail.com>
Date: Mon Mar 17 21:52:11 2008 -0700
changed the version number
El comando muestra la información del etiquetador, la fecha en la que el
commit fue etiquetado y el mensaje de la etiquetar, antes de mostrar la infor-
mación del commit.
Etiquetas Ligeras
La otra forma de etiquetar un commit es mediante una etiqueta ligera. Una eti-
queta ligera no es más que el checksum de un commit guardado en un archivo -
no incluye más información. Para crear una etiqueta ligera, no pases las op-
ciones -a, -s ni -m:
CHAPTER 2: Fundamentos de Git
76

$ git tag v1.4-lw
$ git tag
v0.1
v1.3
v1.4
v1.4-lw
v1.5
Esta vez, si ejecutas git show sobre la etiqueta, no verás la información
adicional. El comando solo mostrará el commit:
$ git show v1.4-lw
commit ca82a6dff817ec66f44342007202690a93763949
Author: Scott Chacon <schacon@gee-mail.com>
Date: Mon Mar 17 21:52:11 2008 -0700
changed the version number
Etiquetado Tardío
También puedes etiquetar commits mucho tiempo después de haberlos hecho.
Supongamos que tu historial luce como el siguiente:
$ git log --pretty=oneline
15027957951b64cf874c3557a0f3547bd83b3ff6 Merge branch 'experiment'
a6b4c97498bd301d84096da251c98a07c7723e65 beginning write support
0d52aaab4479697da7686c15f77a3d64d9165190 one more thing
6d52a271eda8725415634dd79daabbc4d9b6008e Merge branch 'experiment'
0b7434d86859cc7b8c3d5e1dddfed66ff742fcbc added a commit function
4682c3261057305bdd616e23b64b0857d832627b added a todo file
166ae0c4d3f420721acbb115cc33848dfcc2121a started write support
9fceb02d0ae598e95dc970b74767f19372d61af8 updated rakefile
964f16d36dfccde844893cac5b347e7b3d44abbc commit the todo
8a5cbc430f1a9c3d00faaeffd07798508422908a updated readme
Ahora, supongamos que olvidaste etiquetar el proyecto en su versión v1.2, la
cual corresponde al commit “updated rakefile”. Igual puedes etiquetarlo. Para
etiquetar un commit, debes especificar el checksum del commit (o parte de él)
al final del comando:
$ git tag -a v1.2 9fceb02
Etiquetado
77

Puedes ver que has etiquetado el commit:
$ git tag
v0.1
v1.2
v1.3
v1.4
v1.4-lw
v1.5
$ git show v1.2
tag v1.2
Tagger: Scott Chacon <schacon@gee-mail.com>
Date: Mon Feb 9 15:32:16 2009 -0800
version 1.2
commit 9fceb02d0ae598e95dc970b74767f19372d61af8
Author: Magnus Chacon <mchacon@gee-mail.com>
Date: Sun Apr 27 20:43:35 2008 -0700
updated rakefile
...
Compartir Etiquetas
Por defecto, el comando git push no transfiere las etiquetas a los servidores
remotos. Debes enviar las etiquetas de forma explícita al servidor luego de que
las hayas creado. Este proceso es similar al de compartir ramas remotas -
puede ejecutar git push origin [etiqueta].
$ git push origin v1.5
Counting objects: 14, done.
Delta compression using up to 8 threads.
Compressing objects: 100% (12/12), done.
Writing objects: 100% (14/14), 2.05 KiB | 0 bytes/s, done.
Total 14 (delta 3), reused 0 (delta 0)
To git@github.com:schacon/simplegit.git
* [new tag] v1.5 -> v1.5
Si quieres enviar varias etiquetas a la vez, puedes usar la opción --tags del
comando git push. Esto enviará al servidor remoto todas las etiquetas que
aun no existen en él.
CHAPTER 2: Fundamentos de Git
78

$ git push origin --tags
Counting objects: 1, done.
Writing objects: 100% (1/1), 160 bytes | 0 bytes/s, done.
Total 1 (delta 0), reused 0 (delta 0)
To git@github.com:schacon/simplegit.git
* [new tag] v1.4 -> v1.4
* [new tag] v1.4-lw -> v1.4-lw
Por lo tanto, cuando alguien clone o traiga información de tu repositorio,
también obtendrá todas las etiquetas.
Sacar una Etiqueta
En Git, no puedes sacar (check out) una etiqueta, pues no es algo que puedas
mover. Si quieres colocar en tu directorio de trabajo una versión de tu reposi-
torio que coincida con alguna etiqueta, debes crear una rama nueva en esa eti-
queta:
$ git checkout -b version2 v2.0.0
Switched to a new branch 'version2'
Obviamente, si haces esto y luego confirmas tus cambios, tu rama version2
será ligeramente distinta a tu etiqueta v2.0.0 puesto que incluirá tus nuevos
cambios; así que ten cuidado.
Git Aliases
Before we finish this chapter on basic Git, there’s just one little tip that can
make your Git experience simpler, easier, and more familiar: aliases. We won’t
refer to them or assume you’ve used them later in the book, but you should
probably know how to use them.
Git doesn’t automatically infer your command if you type it in partially. If
you don’t want to type the entire text of each of the Git commands, you can
easily set up an alias for each command using git config. Here are a couple
of examples you may want to set up:
$ git config --global alias.co checkout
$ git config --global alias.br branch
$ git config --global alias.ci commit
$ git config --global alias.st status
Git Aliases
79

This means that, for example, instead of typing git commit, you just need
to type git ci. As you go on using Git, you’ll probably use other commands
frequently as well; don’t hesitate to create new aliases.
This technique can also be very useful in creating commands that you think
should exist. For example, to correct the usability problem you encountered
with unstaging a file, you can add your own unstage alias to Git:
$ git config --global alias.unstage 'reset HEAD --'
This makes the following two commands equivalent:
$ git unstage fileA
$ git reset HEAD fileA
This seems a bit clearer. It’s also common to add a last command, like this:
$ git config --global alias.last 'log -1 HEAD'
This way, you can see the last commit easily:
$ git last
commit 66938dae3329c7aebe598c2246a8e6af90d04646
Author: Josh Goebel <dreamer3@example.com>
Date: Tue Aug 26 19:48:51 2008 +0800
test for current head
Signed-off-by: Scott Chacon <schacon@example.com>
As you can tell, Git simply replaces the new command with whatever you
alias it for. However, maybe you want to run an external command, rather than
a Git subcommand. In that case, you start the command with a ! character. This
is useful if you write your own tools that work with a Git repository. We can
demonstrate by aliasing git visual to run gitk:
$ git config --global alias.visual "!gitk"
CHAPTER 2: Fundamentos de Git
80
Resumen
En este momento puedes hacer todas las operaciones básicas de Git a nivel lo-
cal: Crear o clonar un repositorio, hacer cambios, preparar y confirmar esos
cambios y ver la historia de los cambios en el repositorio. A continuación cu-
briremos la mejor característica de Git: Su modelo de ramas.
Resumen
81
Ramificaciones en Git
Cualquier sistema de control de versiones moderno tiene algún mecanismo
para soportar distintos ramales. Cuando hablamos de ramificaciones, significa
que tú has tomado la rama principal de desarrollo (master) y a partir de ahí has
continuado trabajando sin seguir la rama principal de desarrollo. En muchas
sistemas de control de versiones este proceso es costoso, pues a menudo re-
quiere crear una nueva copia del código, lo cual puede tomar mucho tiempo
cuando se trata de proyectos grandes.
Algunas personas resaltan que uno de los puntos más fuertes de Git es su
sistema de ramificaciones y lo cierto es que esto le hace resaltar sobre los otros
sistemas de control de versiones. ¿Por qué esto es tan importante? La forma en
la que Git maneja las ramificaciones es increíblemente rápida, haciendo así de
las operaciones de ramificación algo casi instantáneo, al igual que el avance o
el retroceso entre distintas ramas, lo cual también es tremendamente rápido. A
diferencia de otros sistemas de control de versiones, Git promueve un ciclo de
desarrollo donde las ramas se crean y se unen ramas entre sí, incluso varias ve-
ces en el mismo día. Entender y manejar esta opción te proporciona una poder-
osa y exclusiva herramienta que puede, literalmente, cambiar la forma en la
que desarrollas.
¿Qué es una rama?
Para entender realmente cómo ramifica Git, previamente hemos de examinar la
forma en que almacena sus datos.
Recordando lo citado en Chapter 1, Git no los almacena de forma incremen-
tal (guardando solo diferencias), sino que los almacena como una serie de in-
stantáneas (copias puntuales de los archivos completos, tal y como se encuen-
tran en ese momento).
En cada confirmación de cambios (commit), Git almacena una instantánea
de tu trabajo preparado. Dicha instantánea contiene además unos metadatos
con el autor y el mensaje explicativo, y uno o varios apuntadores a las confir-
83
3
FIGURE 3-1
Una conrmación y
sus árboles
maciones (commit) que sean padres directos de esta (un padre en los casos de
confirmación normal, y múltiples padres en los casos de estar confirmando una
fusión (merge) de dos o más ramas).
Para ilustrar esto, vamos a suponer, por ejemplo, que tienes una carpeta con
tres archivos, que preparas (stage) todos ellos y los confirmas (commit). Al pre-
parar los archivos, Git realiza una suma de control de cada uno de ellos (un re-
sumen SHA-1, tal y como se mencionaba en Chapter 1), almacena una copia de
cada uno en el repositorio (estas copias se denominan “blobs”), y guarda cada
suma de control en el área de preparación (staging area):
$ git add README test.rb LICENSE
$ git commit -m 'initial commit of my project'
Cuando creas una confirmación con el comando git commit, Git realiza su-
mas de control de cada subdirectorio (en el ejemplo, solamente tenemos el di-
rectorio principal del proyecto), y las guarda como objetos árbol en el reposi-
torio Git. Después, Git crea un objeto de confirmación con los metadatos perti-
nentes y un apuntador al objeto árbol raiz del proyecto.
En este momento, el repositorio de Git contendrá cinco objetos: un “blob”
para cada uno de los tres archivos, un árbol con la lista de contenidos del direc-
torio (más sus respectivas relaciones con los “blobs”), y una confirmación de
cambios (commit) apuntando a la raiz de ese árbol y conteniendo el resto de
metadatos pertinentes.
CHAPTER 3: Ramificaciones en Git
84
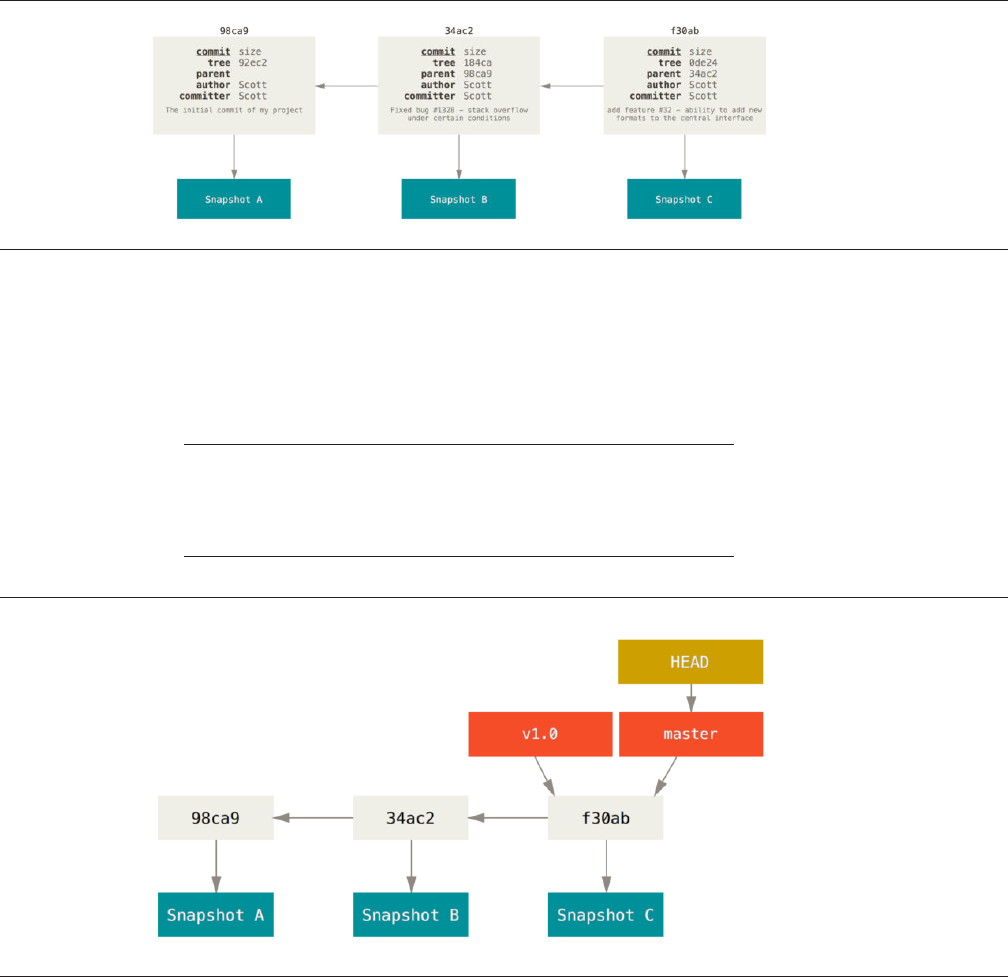
FIGURE 3-2
Conrmaciones y
sus predecesoras
FIGURE 3-3
Una rama y su
historial de
conrmaciones
Si haces más cambios y vuelves a confirmar, la siguiente confirmación guar-
dará un apuntador su confirmación precedente.
Una rama Git es simplemente un apuntador móvil apuntando a una de esas
confirmaciones. La rama por defecto de Git es la rama master. Con la primera
confirmación de cambios que realicemos, se creará esta rama principal master
apuntando a dicha confirmación. En cada confirmación de cambios que reali-
cemos, la rama irá avanzando automáticamente.
La rama “master” en Git no es una rama especial. Es como cualquier otra
rama. La única razón por la cual aparece en casi todos los repositorioes es
porque es la que crea por defecto el comando git init y la gente no se
molesta en cambiarle el nombre.
¿Qué es una rama?
85
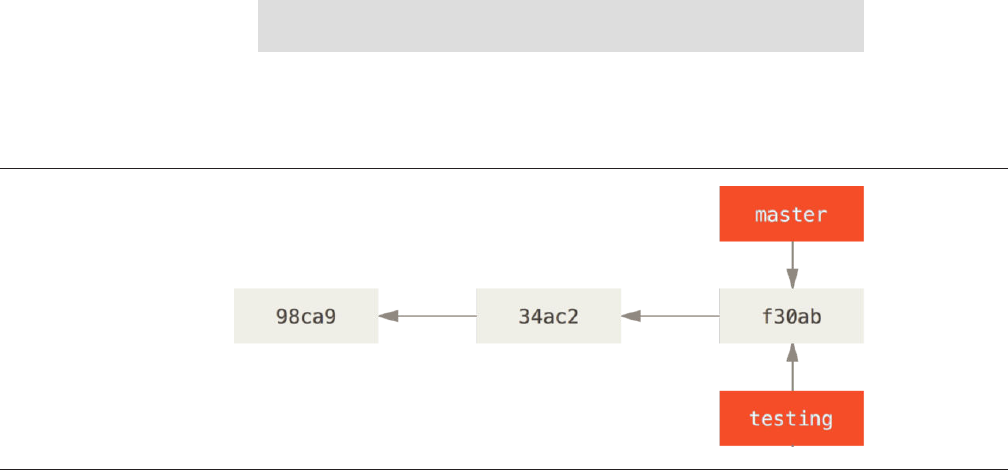
FIGURE 3-4
Dos ramas
apuntando al mismo
grupo de
conrmaciones
Crear una Rama Nueva
¿Qué sucede cuando creas una nueva rama? Bueno…, simplemente se crea un
nuevo apuntador para que lo puedas mover libremente. Por ejemplo, suponga-
mos que quieres crear una rama nueva denominada “testing”. Para ello, usarás
el comando git branch:
$ git branch testing
Esto creará un nuevo apuntador apuntando a la misma confirmación donde
estés actualmente.
Y, ¿cómo sabe Git en qué rama estás en este momento? Pues…, mediante un
apuntador especial denominado HEAD. Aunque es preciso comentar que este
HEAD es totalmente distinto al concepto de HEAD en otros sistemas de control
de cambios como Subversion o CVS. En Git, es simplemente el apuntador a la
rama local en la que tú estés en ese momento, en este caso la rama master;
pues el comando git branch solamente crea una nueva rama, y no salta a di-
cha rama.
CHAPTER 3: Ramificaciones en Git
86
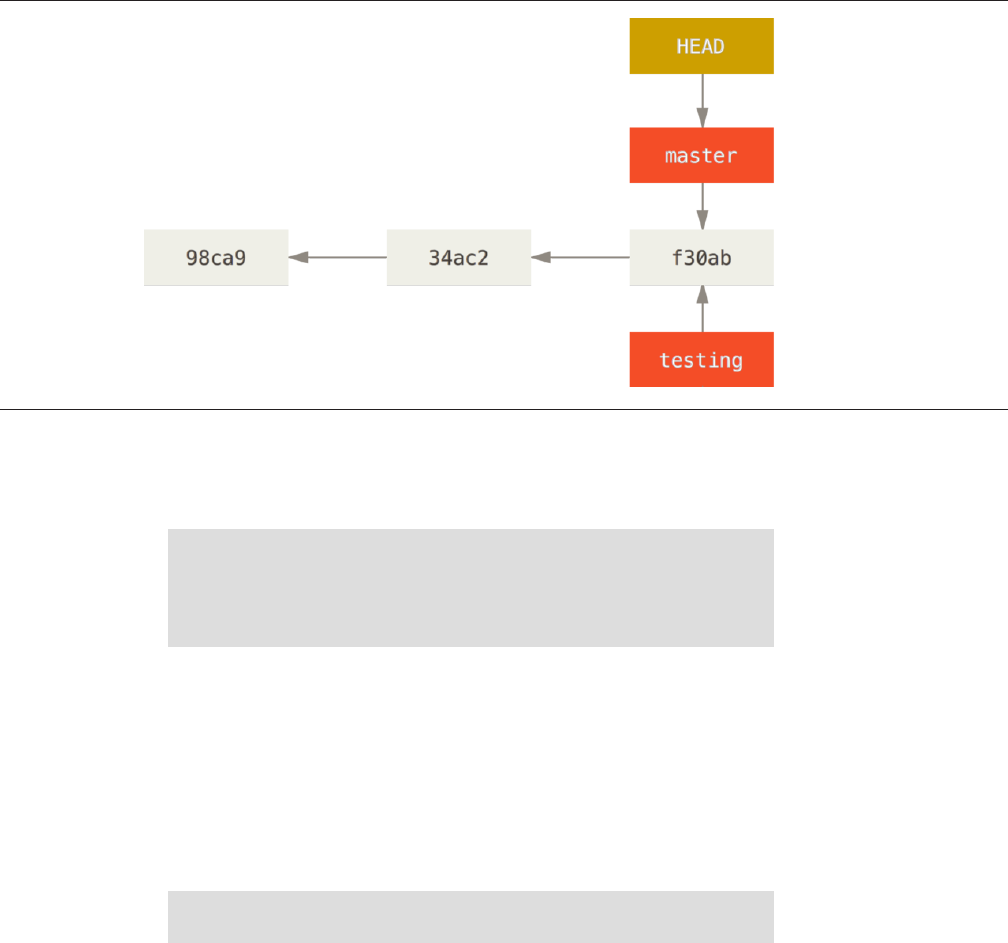
FIGURE 3-5
Apuntador HEAD a
la rama donde estás
actualmente
Esto puedes verlo fácilmente al ejecutar el comando git log para que te
muestre a dónde apunta cada rama. Esta opción se llama --decorate.
$ git log --oneline --decorate
f30ab (HEAD, master, testing) add feature #32 - ability to add new
34ac2 fixed bug #1328 - stack overflow under certain conditions
98ca9 initial commit of my project
Puedes ver que las ramas “master” y “testing” están junto a la confirmación
f30ab.
Cambiar de Rama
Para saltar de una rama a otra, tienes que utilizar el comando git checkout.
Hagamos una prueba, saltando a la rama testing recién creada:
$ git checkout testing
Esto mueve el apuntador HEAD a la rama testing.
¿Qué es una rama?
87
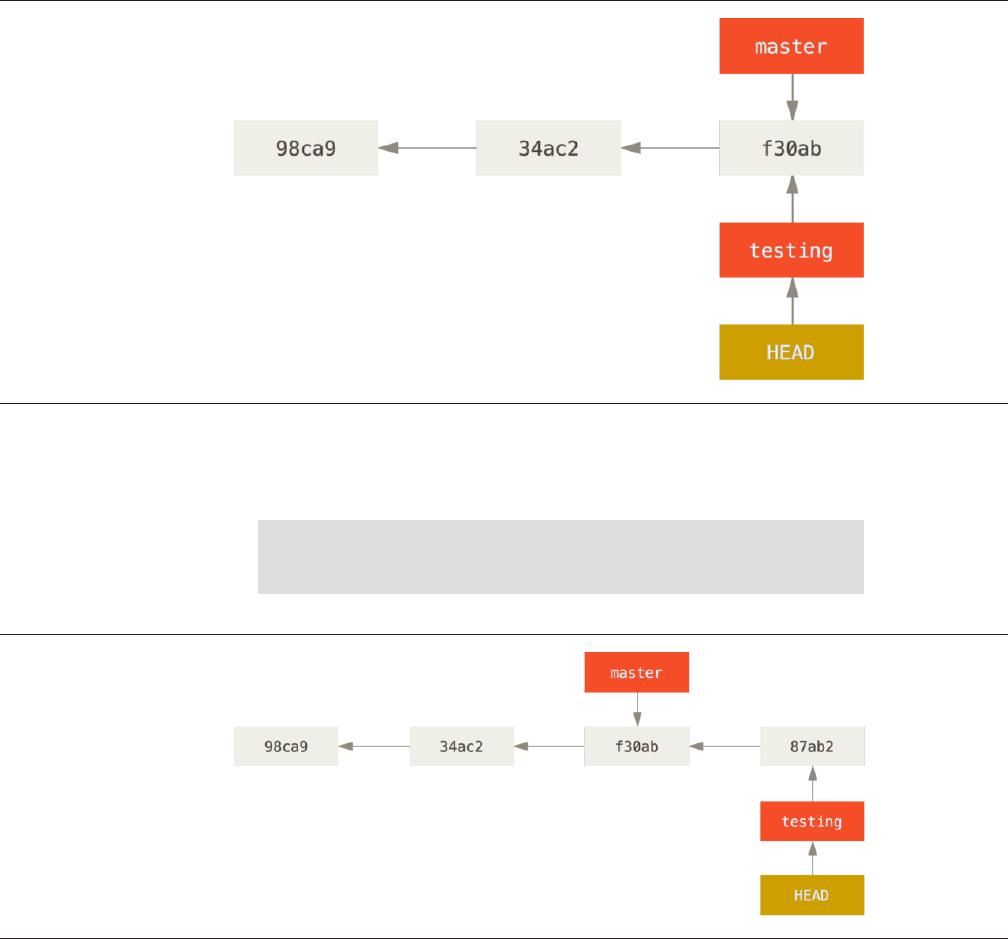
FIGURE 3-6
El apuntador HEAD
apunta a la rama
actual
FIGURE 3-7
La rama apuntada
por HEAD avanza
con cada
conrmación de
cambios
¿Cuál es el significado de todo esto? Bueno… lo veremos tras realizar otra
confirmación de cambios:
$ vim test.rb
$ git commit -a -m 'made a change'
Observamos algo interesante: la rama testing avanza, mientras que la
rama master permanece en la confirmación donde estaba cuando lanzaste el
comando git checkout para saltar. Volvamos ahora a la rama master:
CHAPTER 3: Ramificaciones en Git
88
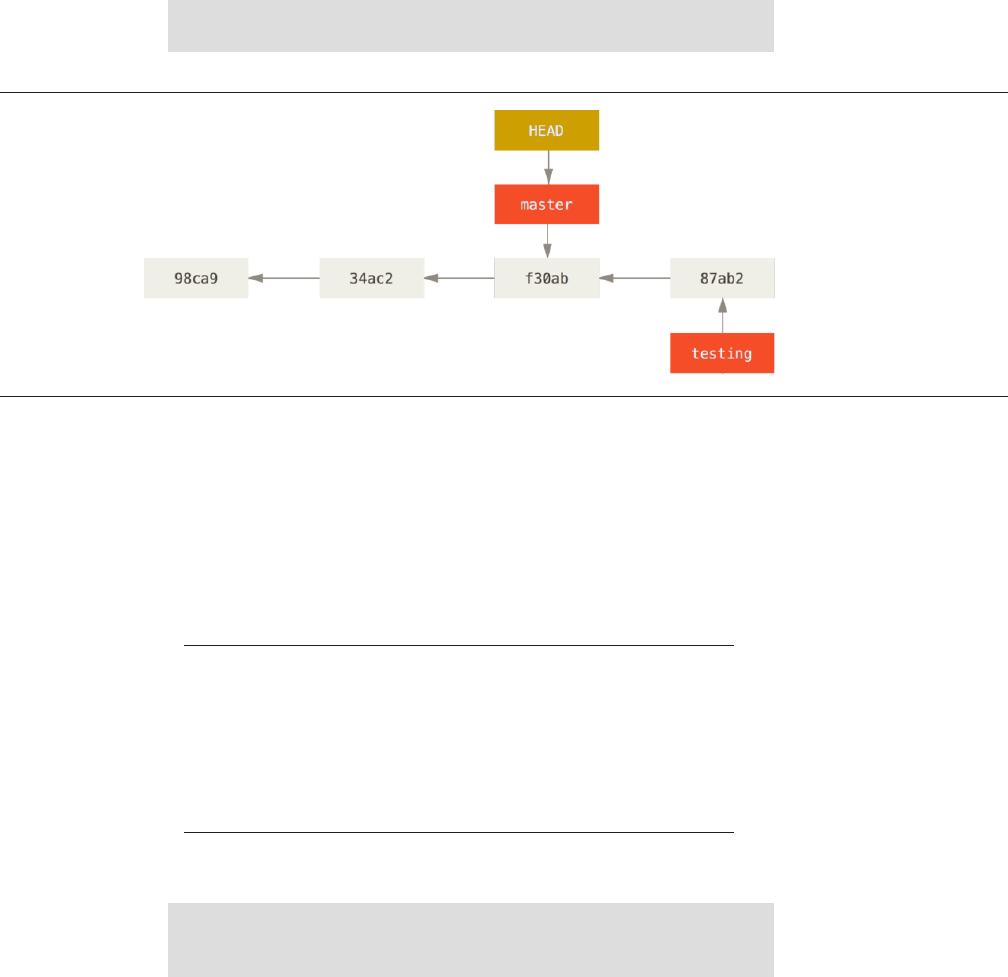
FIGURE 3-8
HEAD apunta a otra
rama cuando
hacemos un salto
$ git checkout master
Este comando realiza dos acciones: Mueve el apuntador HEAD de nuevo a la
rama master, y revierte los archivos de tu directorio de trabajo; dejándolos tal
y como estaban en la última instantánea confirmada en dicha rama master. Es-
to supone que los cambios que hagas desde este momento en adelante diver-
girán de la antigua versión del proyecto. Básicamente, lo que se está haciendo
es rebobinar el trabajo que habías hecho temporalmente en la rama testing;
de tal forma que puedas avanzar en otra dirección diferente.
SALTAR ENTRE RAMAS CAMBIA ARCHIVOS EN TU DIRECTORIO
DE TRABAJO
Es importante destacar que cuando saltas a una rama en Git, los archivos
de tu directorio de trabajo cambian. Si saltas a una rama antigua, tu di-
rectorio de trabajo retrocederá para verse como lo hacía la última vez que
confirmaste un cambio en dicha rama. Si Git no puede hacer el cambio
limpiamente, no te dejará saltar.
Haz algunos cambios más y confírmalos:
$ vim test.rb
$ git commit -a -m 'made other changes'
Ahora el historial de tu proyecto diverge (ver Figure 3-9). Has creado una
rama y saltado a ella, has trabajado sobre ella; has vuelto a la rama original, y
has trabajado también sobre ella. Los cambios realizados en ambas sesiones de
trabajo están aislados en ramas independientes: puedes saltar libremente de
¿Qué es una rama?
89
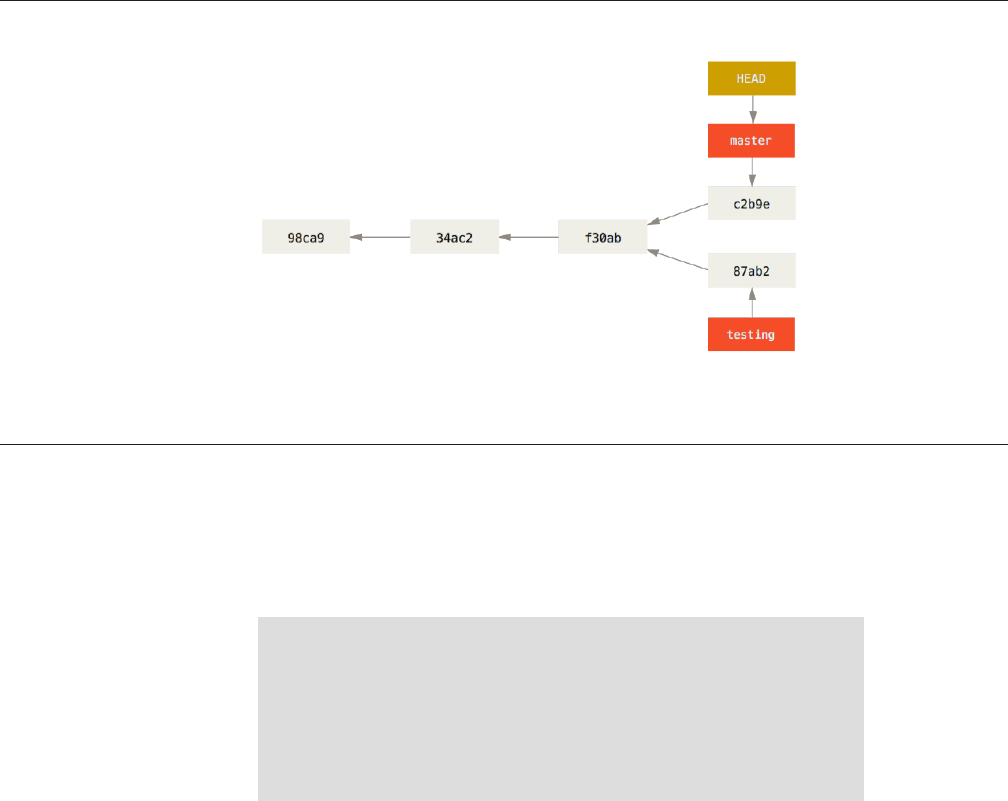
FIGURE 3-9
Los registros de las
ramas divergen
una a otra según estimes oportuno. Y todo ello simplemente con tres coman-
dos: git branch, git checkout y git commit.
También puedes ver esto fácilmente utilizando el comando git log. Si eje-
cutas git log --oneline --decorate --graph --all te mostrará el his-
torial de tus confirmaciones, indicando dónde están los apuntadores de tus
ramas y como ha divergido tu historial.
$ git log --oneline --decorate --graph --all
* c2b9e (HEAD, master) made other changes
| * 87ab2 (testing) made a change
|/
* f30ab add feature #32 - ability to add new formats to the
* 34ac2 fixed bug #1328 - stack overflow under certain conditions
* 98ca9 initial commit of my project
Debido a que una rama Git es realmente un simple archivo que contiene los
40 caracteres de una suma de control SHA-1, (representando la confirmación de
cambios a la que apunta), no cuesta nada el crear y destruir ramas en Git. Crear
una nueva rama es tan rápido y simple como escribir 41 bytes en un archivo, (40
caracteres y un retorno de carro).
Esto contrasta fuertemente con los métodos de ramificación usados por
otros sistemas de control de versiones, en los que crear una rama nueva su-
CHAPTER 3: Ramificaciones en Git
90
pone el copiar todos los archivos del proyecto a un directorio adicional nuevo.
Esto puede llevar segundos o incluso minutos, dependiendo del tamaño del
proyecto; mientras que en Git el proceso es siempre instantáneo. Y, además, de-
bido a que se almacenan también los nodos padre para cada confirmación, el
encontrar las bases adecuadas para realizar una fusión entre ramas es un proc-
eso automático y generalmente sencillo de realizar. Animando así a los desar-
rolladores a utilizar ramificaciones frecuentemente.
Vamos a ver el por qué merece la pena hacerlo así.
Procedimientos Básicos para Ramificar y Fusionar
Vamos a presentar un ejemplo simple de ramificar y de fusionar, con un flujo de
trabajo que se podría presentar en la realidad. Imagina que sigues los si-
quientes pasos:
1. Trabajas en un sitio web.
2. Creas una rama para un nuevo tema sobre el que quieres trabajar.
3. Realizas algo de trabajo en esa rama.
En este momento, recibes una llamada avisándote de un problema crítico
que has de resolver. Y sigues los siguientes pasos:
1. Vuelves a la rama de producción original.
2. Creas una nueva rama para el problema crítico y lo resuelves trabajando
en ella.
3. Tras las pertinentes pruebas, fusionas (merge) esa rama y la envías (push)
a la rama de producción.
4. Vuelves a la rama del tema en que andabas antes de la llamada y contin-
uas tu trabajo.
Procedimientos Básicos de Ramificación
Imagina que estas trabajando en un proyecto y tienes un par de confirmaciones
(commit) ya realizadas.
Procedimientos Básicos para Ramificar y Fusionar
91
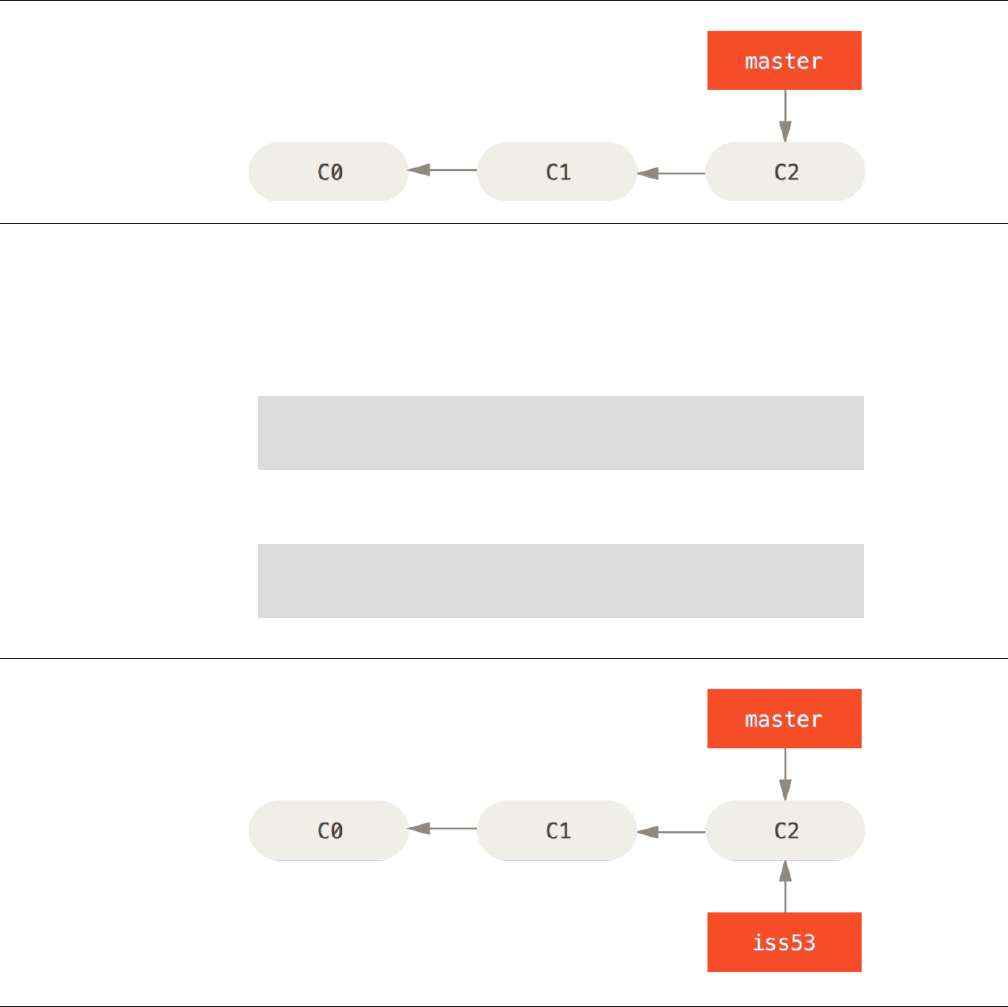
FIGURE 3-10
Un registro de
conrmaciones corto
y sencillo
FIGURE 3-11
Crear un apuntador
a la rama nueva
Decides trabajar en el problema #53, según el sistema que tu compañía uti-
liza para llevar seguimiento de los problemas. Para crear una nueva rama y sal-
tar a ella, en un solo paso, puedes utilizar el comando git checkout con la
opción -b:
$ git checkout -b iss53
Switched to a new branch "iss53"
Esto es un atajo a:
$ git branch iss53
$ git checkout iss53
CHAPTER 3: Ramificaciones en Git
92
FIGURE 3-12
La rama iss53 ha
avanzado con tu
trabajo
Trabajas en el sitio web y haces algunas confirmaciones de cambios (com-
mits). Con ello avanzas la rama iss53, que es la que tienes activada (checked
out) en este momento (es decir, a la que apunta HEAD):
$ vim index.html
$ git commit -a -m 'added a new footer [issue 53]'
Entonces, recibes una llamada avisándote de otro problema urgente en el
sitio web y debes resolverlo inmediatamente. Al usar Git, no necesitas mezclar
el nuevo problema con los cambios que ya habías realizado sobre el problema
#53; ni tampoco perder tiempo revirtiendo esos cambios para poder trabajar
sobre el contenido que está en producción. Basta con saltar de nuevo a la rama
master y continuar trabajando a partir de allí.
Pero, antes de poder hacer eso, hemos de tener en cuenta que si tenenmos
cambios aún no confirmados en el directorio de trabajo o en el área de prepara-
ción, Git no nos permitirá saltar a otra rama con la que podríamos tener conflic-
tos. Lo mejor es tener siempre un estado de trabajo limpio y despejado antes
de saltar entre ramas. Y, para ello, tenemos algunos procedimientos (stash y
corregir confirmaciones), que vamos a ver más adelante en “Stashing and
Cleaning”. Por ahora, como tenemos confirmados todos los cambios, pode-
mos saltar a la rama master sin problemas:
$ git checkout master
Switched to branch 'master'
Tras esto, tendrás el directorio de trabajo exactamente igual a como estaba
antes de comenzar a trabajar sobre el problema #53 y podrás concentrarte en el
nuevo problema urgente. Es importante recordar que Git revierte el directorio
Procedimientos Básicos para Ramificar y Fusionar
93
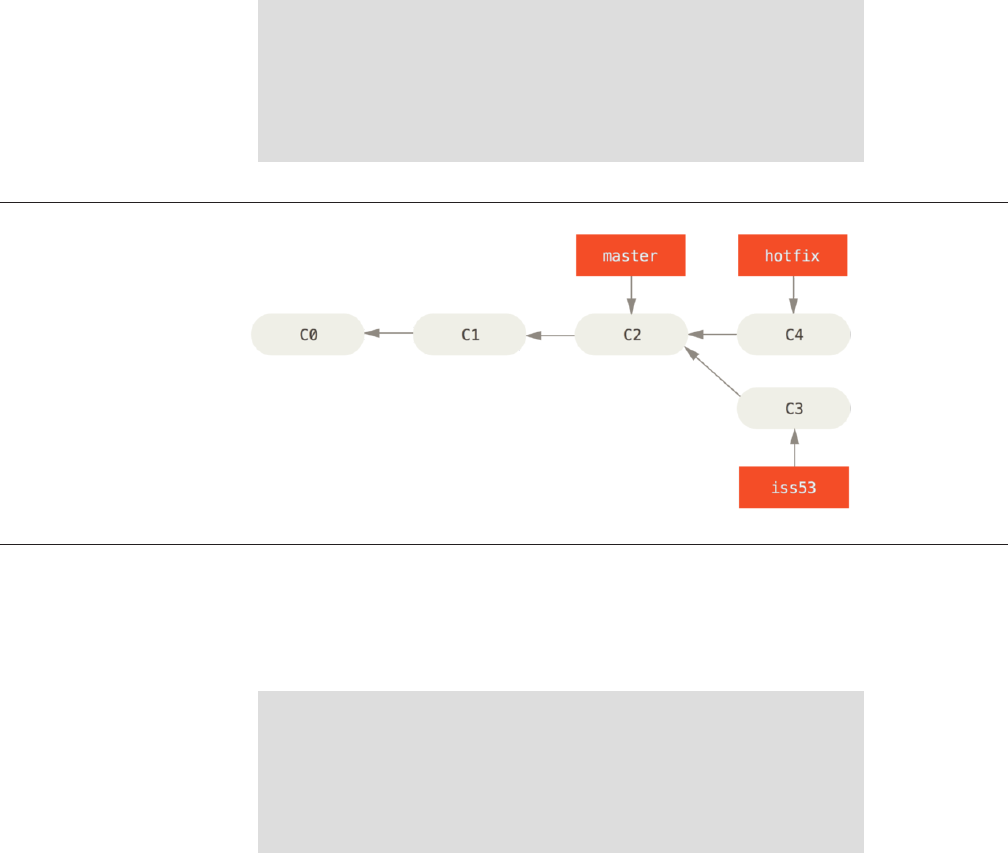
FIGURE 3-13
Rama hotfix
basada en la rama
master original
de trabajo exactamente al estado en que estaba en la confirmación (commit)
apuntada por la rama que activamos (checkout) en cada momento. Git añade,
quita y modifica archivos automáticamente para asegurar que tu copia de tra-
bajo luce exactamente como lucía la rama en la última confirmación de cam-
bios realizada sobre ella.
A continuación, es momento de resolver el problema urgente. Vamos a crear
una nueva rama hotfix, sobre la que trabajar hasta resolverlo:
$ git checkout -b hotfix
Switched to a new branch 'hotfix'
$ vim index.html
$ git commit -a -m 'fixed the broken email address'
[hotfix 1fb7853] fixed the broken email address
1 file changed, 2 insertions(+)
Puedes realizar las pruebas oportunas, asegurarte que la solución es correc-
ta, e incorporar los cambios a la rama master para ponerlos en producción. Es-
to se hace con el comando git merge:
$ git checkout master
$ git merge hotfix
Updating f42c576..3a0874c
Fast-forward
index.html | 2 ++
1 file changed, 2 insertions(+)
CHAPTER 3: Ramificaciones en Git
94
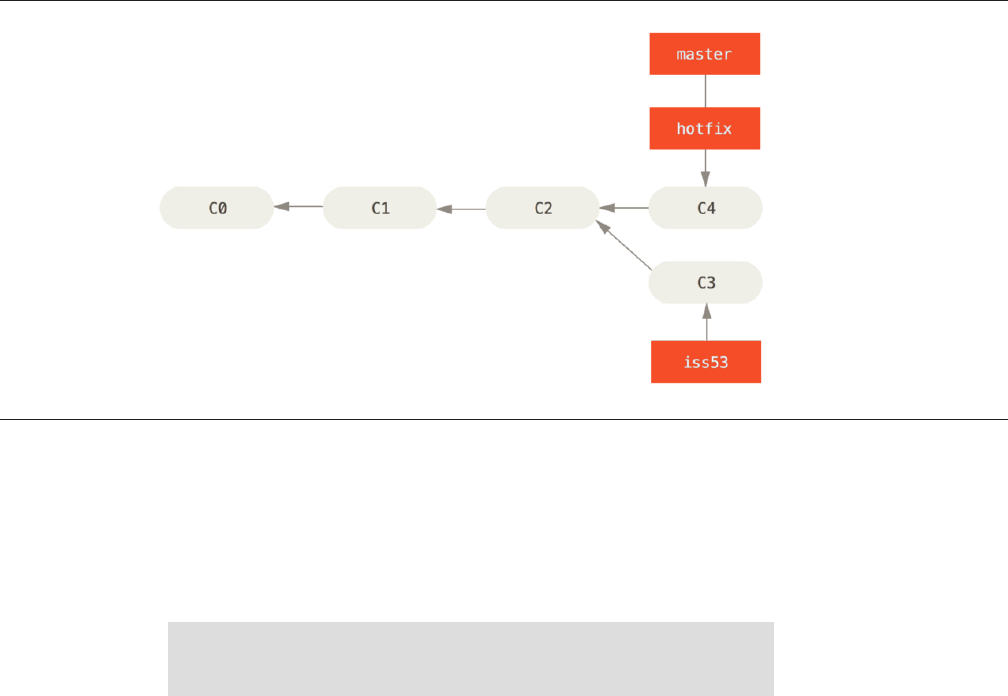
FIGURE 3-14
Tras la fusión
(merge), la rama
master apunta al
mismo sitio que la
rama hotfix.
Notarás la frase “Fast forward” (“Avance rápido”, en inglés) que aparece en la
salida del comando. Git ha movido el apuntador hacia adelante, ya que la con-
firmación apuntada en la rama donde has fusionado estaba directamente arri-
ba respecto a la confirmación actual. Dicho de otro modo: cuando intentas fu-
sionar una confirmación con otra confirmación accesible siguiendo directa-
mente el historial de la primera; Git simplifica las cosas avanzando el puntero,
ya que no hay ningún otro trabajo divergente a fusionar. Esto es lo que se de-
nomina “avance rápido” (“fast forward”).
Ahora, los cambios realizados están ya en la instantánea (snapshot) de la
confirmación (commit) apuntada por la rama master. Y puedes desplegarlos.
Tras haber resuelto el problema urgente que había interrumpido tu trabajo,
puedes volver a donde estabas. Pero antes, es importante borrar la rama hot-
fix, ya que no la vamos a necesitar más, puesto que apunta exactamente al
mismo sitio que la rama master. Esto lo puedes hacer con la opción -d del co-
mando git branch:
$ git branch -d hotfix
Deleted branch hotfix (3a0874c).
Y, con esto, ya estás listo para regresar al trabajo sobre el problema #53.
Procedimientos Básicos para Ramificar y Fusionar
95
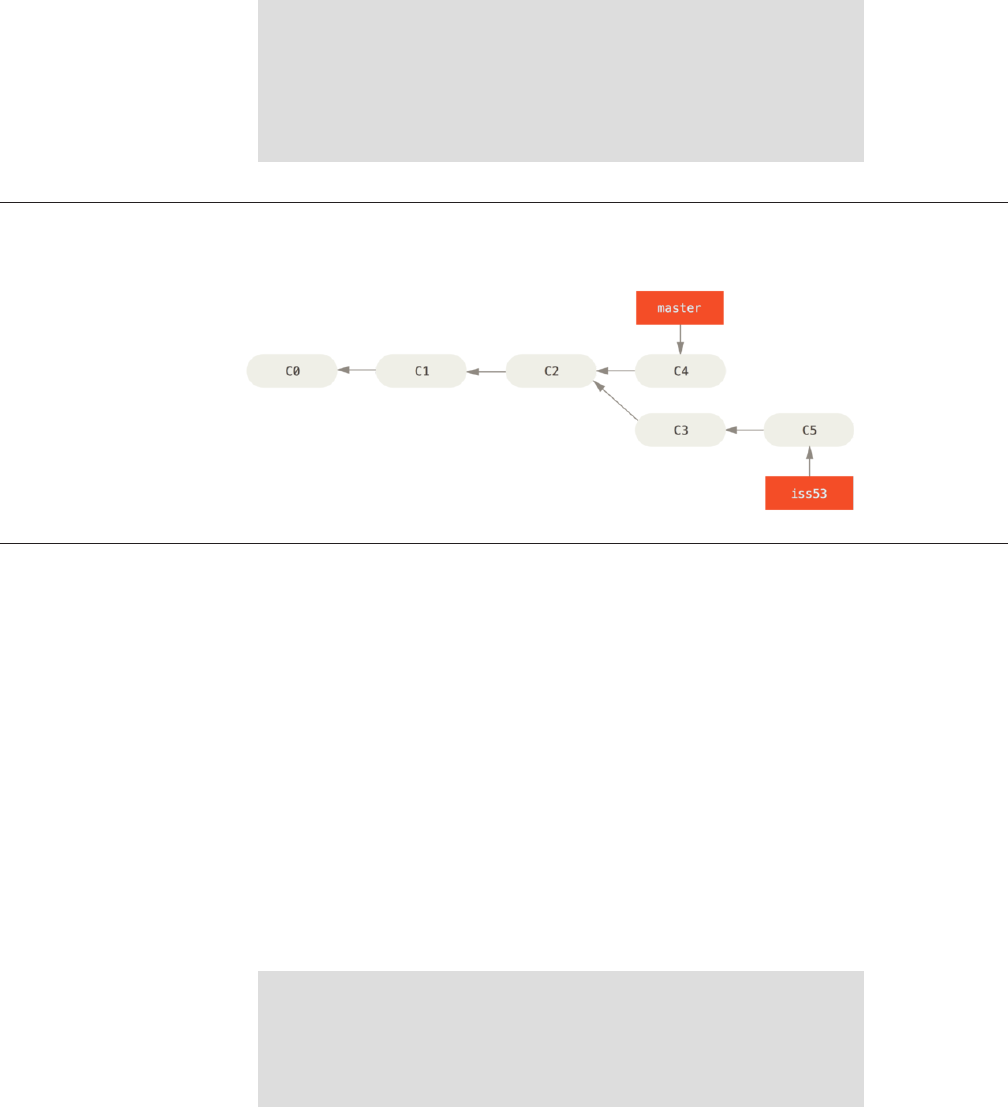
FIGURE 3-15
La rama iss53
puede avanzar
independientemente
$ git checkout iss53
Switched to branch "iss53"
$ vim index.html
$ git commit -a -m 'finished the new footer [issue 53]'
[iss53 ad82d7a] finished the new footer [issue 53]
1 file changed, 1 insertion(+)
Cabe destacar que todo el trabajo realizado en la rama hotfix no está en
los archivos de la rama iss53. Si fuera necesario agregarlos, puedes fusionar
(merge) la rama master sobre la rama iss53 utilizando el comando git
merge master, o puedes esperar hasta que decidas fusionar (merge) la rama
iss53 a la rama master.
Procedimientos Básicos de Fusión
Supongamos que tu trabajo con el problema #53 ya está completo y listo para
fusionarlo (merge) con la rama master. Para ello, de forma similar a como an-
tes has hecho con la rama hotfix, vas a fusionar la rama iss53. Simplemente,
activa (checkout) la rama donde deseas fusionar y lanza el comando git
merge:
$ git checkout master
Switched to branch 'master'
$ git merge iss53
Merge made by the 'recursive' strategy.
CHAPTER 3: Ramificaciones en Git
96
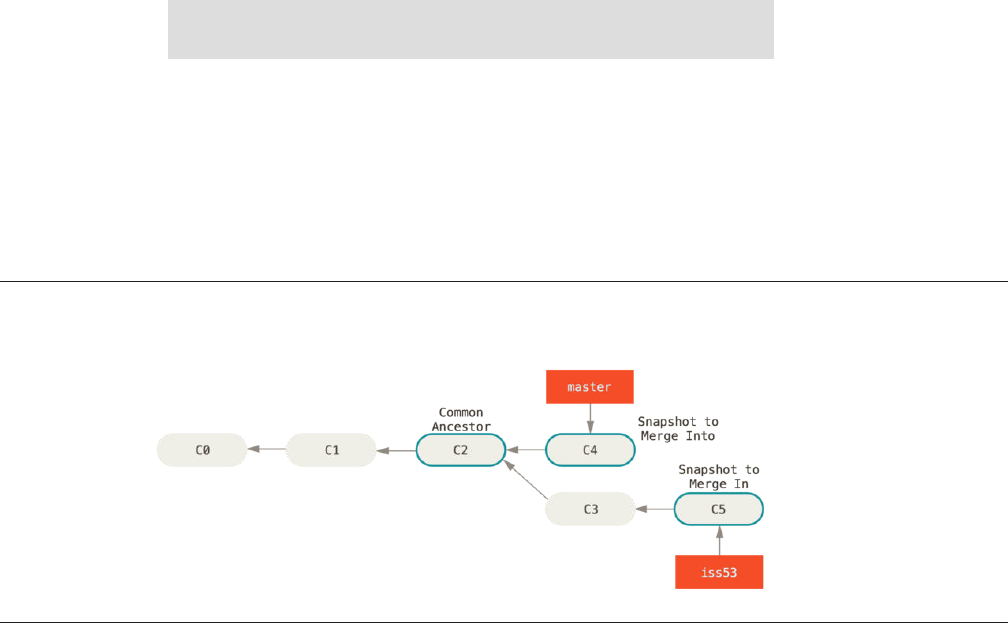
FIGURE 3-16
Git identica
automáticamente el
mejor ancestro
común para realizar
la fusión de las
ramas
index.html | 1 +
1 file changed, 1 insertion(+)
Es algo diferente de la fusión realizada anteriormente con hotfix. En este
caso, el registro de desarrollo había divergido en un punto anterior. Debido a
que la confirmación en la rama actual no es ancestro directo de la rama que
pretendes fusionar, Git tiene cierto trabajo extra que hacer. Git realizará una fu-
sión a tres bandas, utilizando las dos instantáneas apuntadas por el extremo de
cada una de las ramas y por el ancestro común a ambas.
En lugar de simplemente avanzar el apuntador de la rama, Git crea una nue-
va instantánea (snapshot) resultante de la fusión a tres bandas; y crea automá-
ticamente una nueva confirmación de cambios (commit) que apunta a ella. Nos
referimos a este proceso como “fusión confirmada” y su particularidad es que
tiene más de un padre.
Procedimientos Básicos para Ramificar y Fusionar
97
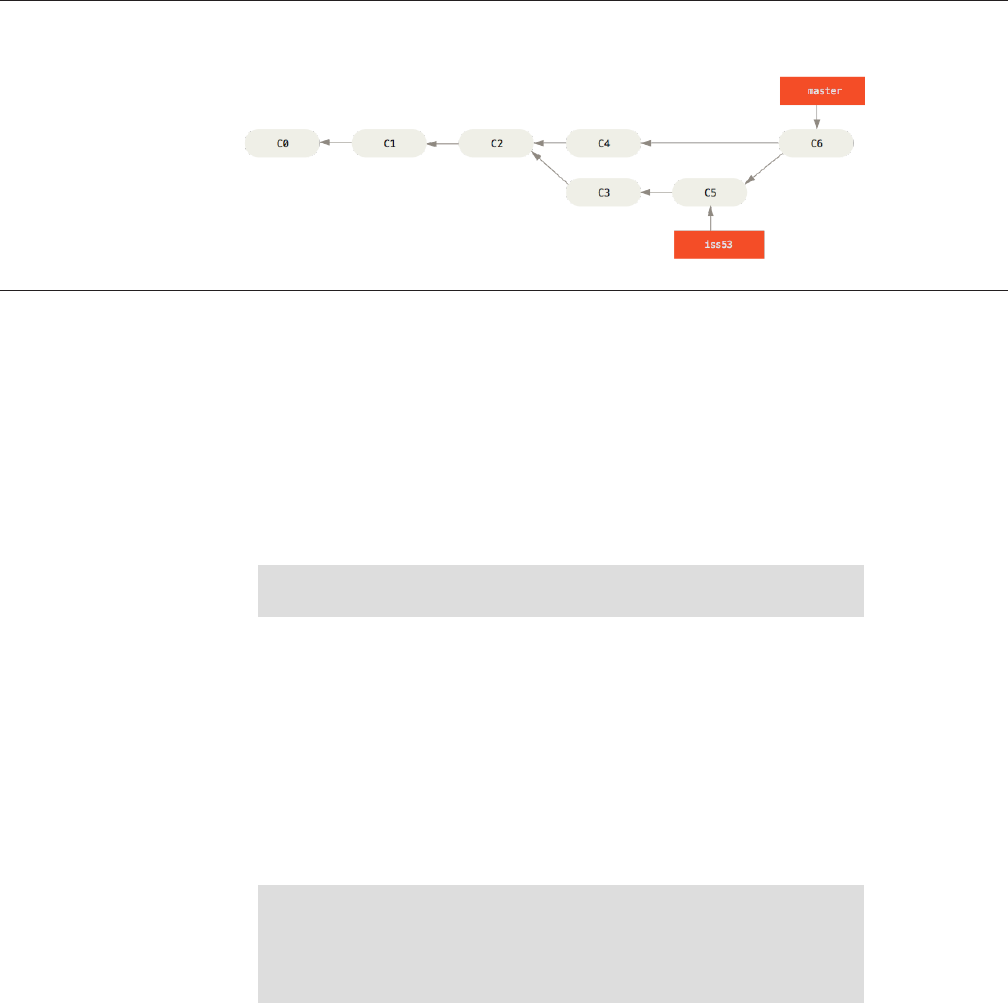
FIGURE 3-17
Git crea
automáticamente
una nueva
conrmación para la
fusión
Vale la pena destacar el hecho de que es el propio Git quien determina auto-
máticamente el mejor ancestro común para realizar la fusión; a diferencia de
otros sistemas tales como CVS o Subversion, donde es el desarrollador quien
ha de determinar cuál puede ser dicho mejor ancestro común. Esto hace que en
Git sea mucho más fácil realizar fusiones.
Ahora que todo tu trabajo ya está fusionado con la rama principal, no tienes
necesidad de la rama iss53. Por lo que puedes borrarla y cerrar manualmente
el problema en el sistema de seguimiento de problemas de tu empresa.
$ git branch -d iss53
Principales Conflictos que Pueden Surgir en las Fusiones
En algunas ocasiones, los procesos de fusión no suelen ser fluidos. Si hay modi-
ficaciones dispares en una misma porción de un mismo archivo en las dos
ramas distintas que pretendes fusionar, Git no será capaz de fusionarlas direc-
tamente. Por ejemplo, si en tu trabajo del problema #53 has modificado una
misma porción que también ha sido modificada en el problema hotfix, verás
un conflicto como este:
$ git merge iss53
Auto-merging index.html
CONFLICT (content): Merge conflict in index.html
Automatic merge failed; fix conflicts and then commit the result.
Git no crea automáticamente una nueva fusión confirmada (merge commit),
sino que hace una pausa en el proceso, esperando a que tú resuelvas el conflic-
CHAPTER 3: Ramificaciones en Git
98

to. Para ver qué archivos permanecen sin fusionar en un determinado momen-
to conflictivo de una fusión, puedes usar el comando git status:
$ git status
On branch master
You have unmerged paths.
(fix conflicts and run "git commit")
Unmerged paths:
(use "git add <file>..." to mark resolution)
both modified: index.html
no changes added to commit (use "git add" and/or "git commit -a")
Todo aquello que sea conflictivo y no se haya podido resolver, se marca co-
mo “sin fusionar” (unmerged). Git añade a los archivos conflictivos unos marca-
dores especiales de resolución de conflictos que te guiarán cuando abras man-
ualmente los archivos implicados y los edites para corregirlos. El archivo con-
flictivo contendrá algo como:
<<<<<<< HEAD:index.html
<div id="footer">contact : email.support@github.com</div>
=======
<div id="footer">
please contact us at support@github.com
</div>
>>>>>>> iss53:index.html
Donde nos dice que la versión en HEAD (la rama master, la que habias acti-
vado antes de lanzar el comando de fusión) contiene lo indicado en la parte su-
perior del bloque (todo lo que está encima de =======) y que la versión en
iss53 contiene el resto, lo indicado en la parte inferior del bloque. Para resolv-
er el conflicto, has de elegir manualmente el contenido de uno o de otro lado.
Por ejemplo, puedes optar por cambiar el bloque, dejándolo así:
<div id="footer">
please contact us at email.support@github.com
</div>
Esta corrección contiene un poco de ambas partes y se han eliminado com-
pletamente las líneas <<<<<<< , ======= y >>>>>>>. Tras resolver todos los
bloques conflictivos, has de lanzar comandos git add para marcar cada archi-
Procedimientos Básicos para Ramificar y Fusionar
99

vo modificado. Marcar archivos como preparados (staged) indica a Git que sus
conflictos han sido resueltos.
Si en lugar de resolver directamente prefieres utilizar una herramienta gráfi-
ca, puedes usar el comando git mergetool, el cual arrancará la correspon-
diente herramienta de visualización y te permitirá ir resolviendo conflictos con
ella:
$ git mergetool
This message is displayed because 'merge.tool' is not configured.
See 'git mergetool --tool-help' or 'git help config' for more details.
'git mergetool' will now attempt to use one of the following tools:
opendiff kdiff3 tkdiff xxdiff meld tortoisemerge gvimdiff diffuse diffmerge ecmerge p4merge araxis bc3 codecompare vimdiff emerge
Merging:
index.html
Normal merge conflict for 'index.html':
{local}: modified file
{remote}: modified file
Hit return to start merge resolution tool (opendiff):
Si deseas usar una herramienta distinta de la escogida por defecto (en mi
caso opendiff, porque estoy lanzando el comando en Mac), puedes escogerla
entre la lista de herramientas soportadas mostradas al principio (“merge tool
candidates”) tecleando el nombre de dicha herramienta.
Si necesitas herramientas más avanzadas para resolver conflictos de fu-
sión más complicados, revisa la sección de fusionado en “Advanced
Merging”.
Tras salir de la herramienta de fusionado, Git preguntará si hemos resuelto
todos los conflictos y la fusión ha sido satisfactoria. Si le indicas que así ha sido,
Git marca como preparado (staged) el archivo que acabamos de modificar. En
cualquier momento, puedes lanzar el comando git status para ver si ya has
resuelto todos los conflictos:
$ git status
On branch master
All conflicts fixed but you are still merging.
(use "git commit" to conclude merge)
Changes to be committed:
CHAPTER 3: Ramificaciones en Git
100

modified: index.html
Si todo ha ido correctamente, y ves que todos los archivos conflictivos están
marcados como preparados, puedes lanzar el comando git commit para ter-
minar de confirmar la fusión. El mensaje de confirmación por defecto será algo
parecido a:
Merge branch 'iss53'
Conflicts:
index.html
#
# It looks like you may be committing a merge.
# If this is not correct, please remove the file
# .git/MERGE_HEAD
# and try again.
# Please enter the commit message for your changes. Lines starting
# with '#' will be ignored, and an empty message aborts the commit.
# On branch master
# All conflicts fixed but you are still merging.
#
# Changes to be committed:
# modified: index.html
#
Puedes modificar este mensaje añadiendo detalles sobre cómo has resuelto
la fusión, si lo consideras útil para que otros entiendan esta fusión en un futuro.
Se trata de indicar por qué has hecho lo que has hecho; a no ser que resulte
obvio, claro está.
Gestión de Ramas
Ahora que ya has creado, fusionado y borrado algunas ramas, vamos a dar un
vistazo a algunas herramientas de gestión muy útiles cuando comienzas a uti-
lizar ramas de manera avanzada.
El comando git branch tiene más funciones que las de crear y borrar
ramas. Si lo lanzas sin parámetros, obtienes una lista de las ramas presentes en
tu proyecto:
Gestión de Ramas
101

$ git branch
iss53
* master
testing
Fijate en el carácter * delante de la rama master: nos indica la rama activa
en este momento (la rama a la que apunta HEAD). Si hacemos una confirmación
de cambios (commit), esa será la rama que avance. Para ver la última confirma-
ción de cambios en cada rama, puedes usar el comando git branch -v:
$ git branch -v
iss53 93b412c fix javascript issue
* master 7a98805 Merge branch 'iss53'
testing 782fd34 add scott to the author list in the readmes
Otra opción útil para averiguar el estado de las ramas, es filtrarlas y mostrar
solo aquellas que han sido fusionadas (o que no lo han sido) con la rama ac-
tualmente activa. Para ello, Git dispone de las opciones --merged y --no-
merged. Si deseas ver las ramas que han sido fusionadas en la rama activa,
puedes lanzar el comando git branch --merged:
$ git branch --merged
iss53
* master
Aparece la rama iss53 porque ya ha sido fusionada. Las ramas que no lle-
van por delante el caracter * pueden ser eliminadas sin problemas, porque to-
do su contenido ya ha sido incorporado a otras ramas.
Para mostrar todas las ramas que contienen trabajos sin fusionar, puedes
utilizar el comando git branch --no-merged:
$ git branch --no-merged
testing
Esto nos muestra la otra rama del proyecto. Debido a que contiene trabajos
sin fusionar, al intentarla borrarla con git branch -d, el comando nos dará
un error:
CHAPTER 3: Ramificaciones en Git
102

$ git branch -d testing
error: The branch 'testing' is not fully merged.
If you are sure you want to delete it, run 'git branch -D testing'.
Si realmente deseas borrar la rama, y perder el trabajo contenido en ella,
puedes forzar el borrado con la opción -D; tal y como indica el mensaje de ayu-
da.
Flujos de Trabajo Ramificados
Ahora que ya has visto los procedimientos básicos de ramificación y fusión,
¿qué puedes o qué debes hacer con ellos? En este apartado vamos a ver algu-
nos de los flujos de trabajo más comunes, de tal forma que puedas decidir si te
gustaría incorporar alguno de ellos a tu ciclo de desarrollo.
Ramas de Largo Recorrido
Por la sencillez de la fusión a tres bandas de Git, el fusionar una rama a otra
varias veces a lo largo del tiempo es fácil de hacer. Esto te posibilita tener varias
ramas siempre abiertas, e irlas usando en diferentes etapas del ciclo de desar-
rollo; realizando fusiones frecuentes entre ellas.
Muchos desarrolladores que usan Git llevan un flujo de trabajo de esta natu-
raleza, manteniendo en la rama master únicamente el código totalmente esta-
ble (el código que ha sido o que va a ser liberado) y teniendo otras ramas paral-
elas denominadas desarrollo o siguiente, en las que trabajan y realizan
pruebas. Estas ramas paralelas no suele estar siempre en un estado estable;
pero cada vez que sí lo están, pueden ser fusionadas con la rama master. Tam-
bién es habitual el incorporarle (pull) ramas puntuales (ramas temporales, co-
mo la rama iss53 del ejemplo anterior) cuando las completamos y estamos se-
guros de que no van a introducir errores.
En realidad, en todo momento estamos hablando simplemente de apunta-
dores moviéndose por la línea temporal de confirmaciones de cambio (commit
history). Las ramas estables apuntan hacia posiciones más antiguas en el his-
torial de confirmaciones, mientras que las ramas avanzadas, las que van
abriendo camino, apuntan hacia posiciones más recientes.
Flujos de Trabajo Ramificados
103
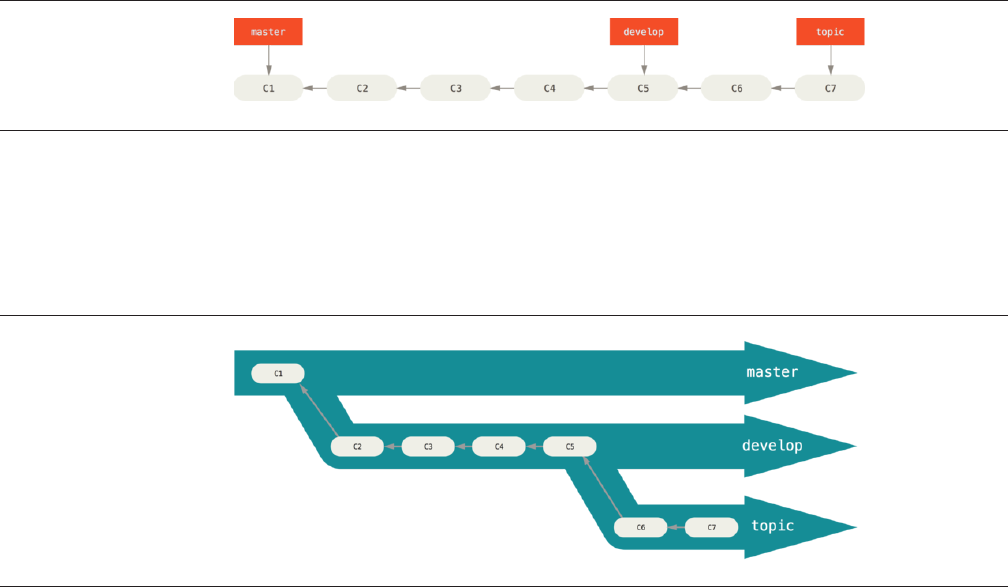
FIGURE 3-18
Una vista lineal del
ramicado
progresivo estable
FIGURE 3-19
Una vista tipo “silo”
del ramicado
progresivo estable
Podría ser más sencillo pensar en las ramas como si fueran silos de almace-
namiento, donde grupos de confirmaciones de cambio (commits) van siendo
promocionados hacia silos más estables a medida que son probados y depura-
dos.
Este sistema de trabajo se puede ampliar para diversos grados de estabili-
dad. Algunos proyectos muy grandes suelen tener una rama denominada pro-
puestas o pu (del inglés “proposed updates”, propuesta de actualización),
donde suele estar todo aquello integrado desde otras ramas, pero que aún no
está listo para ser incorporado a las ramas siguiente o master. La idea es
mantener siempre diversas ramas en diversos grados de estabilidad; pero
cuando alguna alcanza un estado más estable, la fusionamos con la rama in-
mediatamente superior a ella. Aunque no es obligatorio el trabajar con ramas
de larga duración, realmente es práctico y útil, sobre todo en proyectos largos o
complejos.
Ramas Puntuales
Las ramas puntuales, en cambio, son útiles en proyectos de cualquier tamaño.
Una rama puntual es aquella rama de corta duración que abres para un tema o
para una funcionalidad determinada. Es algo que nunca habrías hecho en otro
sistema VCS, debido a los altos costos de crear y fusionar ramas en esos siste-
CHAPTER 3: Ramificaciones en Git
104
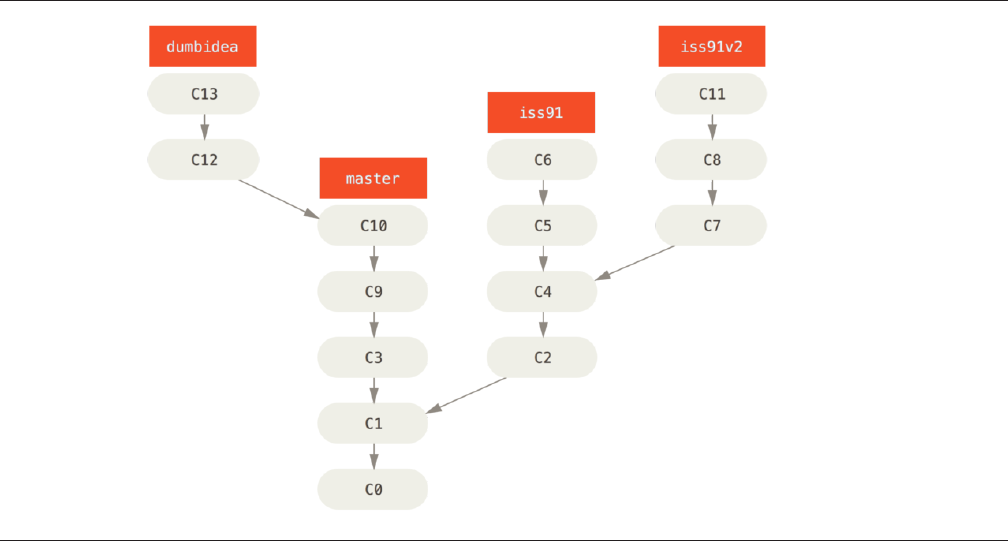
FIGURE 3-20
Múltiples ramas
puntuales
mas. Pero en Git, por el contrario, es muy habitual el crear, trabajar con, fusio-
nar y eliminar ramas varias veces al día.
Tal y como has visto con las ramas iss53 y hotfix que has creado en la sec-
ción anterior. Has hecho algunas confirmaciones de cambio en ellas, y luego las
has borrado tras fusionarlas con la rama principal. Esta técnica te posibilita re-
alizar cambios de contexto rápidos y completos y, debido a que el trabajo está
claramente separado en silos, con todos los cambios de cada tema en su propia
rama, te será mucho más sencillo revisar el código y seguir su evolución.
Puedes mantener los cambios ahí durante minutos, dias o meses; y fusionarlos
cuando realmente estén listos, sin importar el orden en el que fueron creados o
en el que comenzaste a trabajar en ellos.
Por ejemplo, puedes realizar cierto trabajo en la rama master, ramificar
para un problema concreto (rama iss91), trabajar en él un rato, ramificar una
segunda vez para probar otra manera de resolverlo (rama iss92v2), volver a la
rama master y trabajar un poco más, y, por último, ramificar temporalmente
para probar algo de lo que no estás seguro (rama dumbidea). El historial de
confirmaciones (commit history) será algo parecido esto:
Flujos de Trabajo Ramificados
105
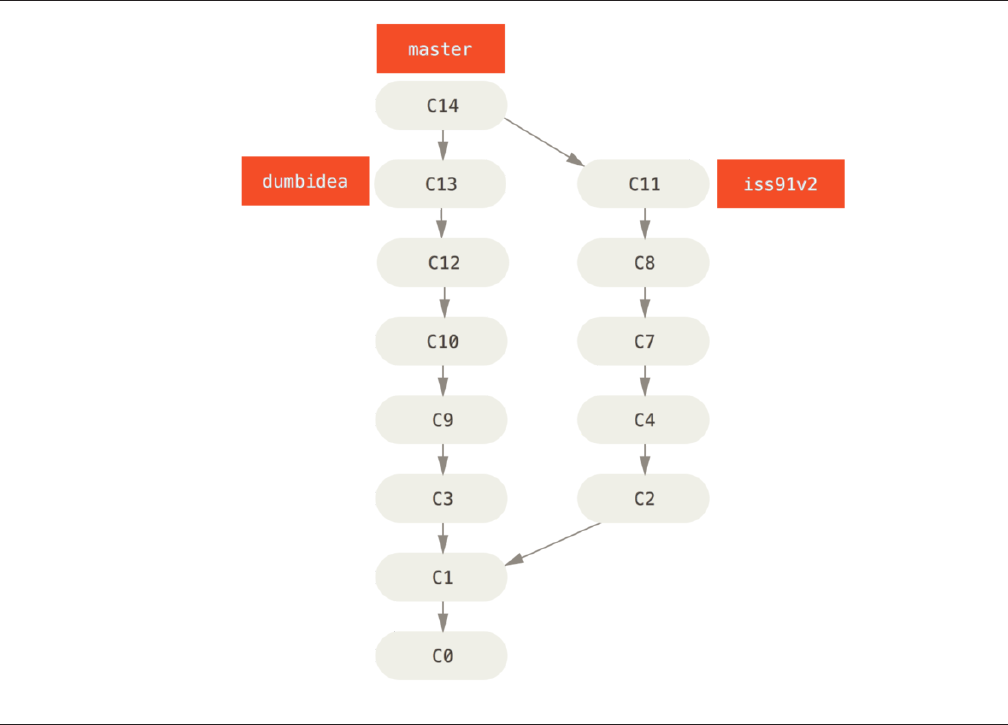
FIGURE 3-21
El historial tras
fusionar dumbidea e
iss91v2
En este momento, supongamos que te decides por la segunda solución al
problema (rama iss92v2); y que, tras mostrar la rama dumbidea a tus compa-
ñeros, resulta que les parece una idea genial. Puedes descartar la rama iss91
(perdiendo las confirmaciones C5 y C6), y fusionar las otras dos. El historial será
algo parecido a esto:
Hablaremos un poco más sobre los distintos flujos de trabajo de tu proyecto
Git en Chapter 5, así que antes de decidir qué estilo de ramificación usará tu
próximo proyecto, asegúrate de haber leído ese capítulo.
Es importante recordar que, mientras estás haciendo todo esto, todas las
ramas son completamente locales. Cuando ramificas y fusionas, todo se realiza
CHAPTER 3: Ramificaciones en Git
106

en tu propio repositorio Git. No hay nigún tipo de comunicación con ningún ser-
vidor.
Ramas Remotas
Las ramas remotas son referencias al estado de las ramas en tus repositorios
remotos. Son ramas locales que no puedes mover; se mueven automática-
mente cuando estableces comunicaciones en la red. Las ramas remotas fun-
cionan como marcadores, para recordarte en qué estado se encontraban tus re-
positorios remotos la última vez que conectaste con ellos.
Suelen referenciarse como (remoto)/(rama). Por ejemplo, si quieres saber
cómo estaba la rama master en el remoto origin, puedes revisar la rama
origin/master. O si estás trabajando en un problema con un compañero y
este envía (push) una rama iss53, tú tendrás tu propia rama de trabajo local
iss53; pero la rama en el servidor apuntará a la última confirmación (commit)
en la rama origin/iss53.
Esto puede ser un tanto confuso, pero intentemos aclararlo con un ejemplo.
Supongamos que tienes un sevidor Git en tu red, en git.ourcompany.com. Si
haces un clón desde ahí, Git automáticamente lo denominará origin, traerá
(pull) sus datos, creará un apuntador hacia donde esté en ese momento su
rama master y denominará la copia local origin/master. Git te proporcio-
nará también tu propia rama master, apuntando al mismo lugar que la rama
master de origin; de manera que tengas donde trabajar.
“ORIGIN” NO ES ESPECIAL
Así como la rama “master” no tiene ningún significado especial en Git,
tampoco lo tiene “origin”. “master” es un nombre muy usado solo por-
que es el nombre por defecto que Git le da a la rama inicial cuando ejecu-
tas git init. De la misma manera, “origin” es el nombre por defecto que
Git le da a un remoto cuando ejecutas git clone. Si en cambio ejecutases
git clone -o booyah, tendrías una rama booyah/master como rama remo-
ta por defecto.
Ramas Remotas
107
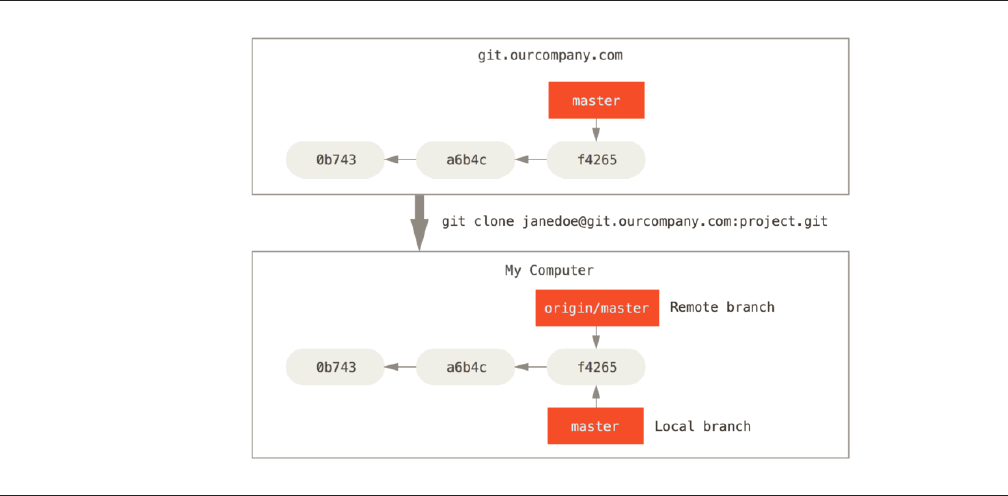
FIGURE 3-22
Servidor y
repositorio local
luego de ser clonado
Si haces algún trabajo en tu rama master local, y al mismo tiempo, alguien
más lleva (push) su trabajo al servidor git.ourcompany.com, actualizando la
rama master de allí, te encontrarás con que ambos registros avanzan de forma
diferente. Además, mientras no tengas contacto con el servidor, tu apuntador a
tu rama origin/master no se moverá.
CHAPTER 3: Ramificaciones en Git
108
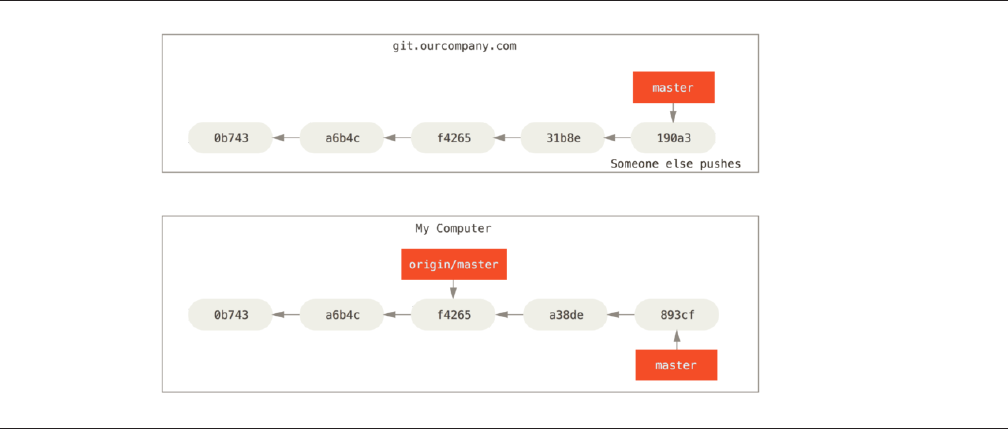
FIGURE 3-23
El trabajo remoto y
el local pueden
diverger
Para sincronizarte, puedes utilizar el comando git fetch origin. Este co-
mando localiza en qué servidor está el origen (en este caso git.ourcompa-
ny.com), recupera cualquier dato presente allí que tú no tengas, y actualiza tu
base de datos local, moviendo tu rama origin/master para que apunte a la
posición más reciente.
Ramas Remotas
109
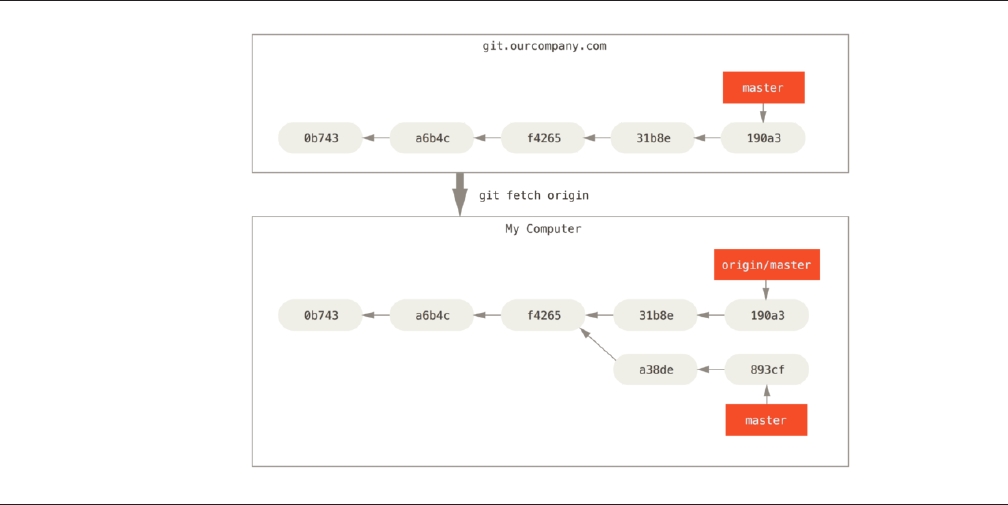
FIGURE 3-24
git fetch actualiza
las referencias de tu
remoto
Para ilustrar mejor el caso de tener múltiples servidores y cómo van las
ramas remotas para esos proyectos remotos, supongamos que tienes otro ser-
vidor Git; utilizado por uno de tus equipos sprint, solamente para desarrollo.
Este servidor se encuentra en git.team1.ourcompany.com. Puedes incluirlo
como una nueva referencia remota a tu proyecto actual, mediante el comando
git remote add, tal y como vimos en Chapter 2. Puedes denominar teamone
a este remoto al asignarle este nombre a la URL.
CHAPTER 3: Ramificaciones en Git
110
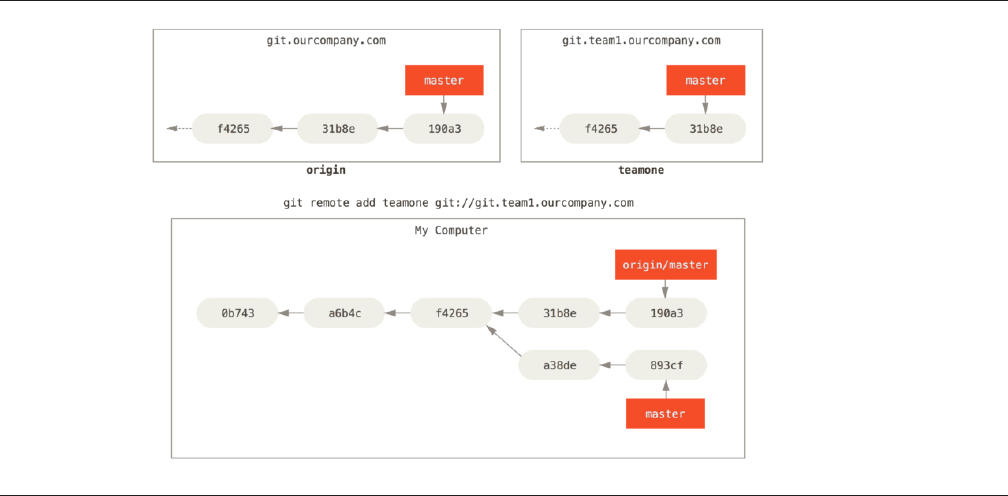
FIGURE 3-25
Añadiendo otro
servidor como
remoto
Ahora, puedes usar el comando git fetch teamone para recuperar todo
el contenido del remoto teamone que tú no tenias. Debido a que dicho servidor
es un subconjunto de los datos del servidor origin que tienes actualmente, Git
no recupera (fetch) ningún dato; simplemente prepara una rama remota llama-
da teamone/master para apuntar a la confirmación (commit) que teamone
tiene en su rama master.
Ramas Remotas
111
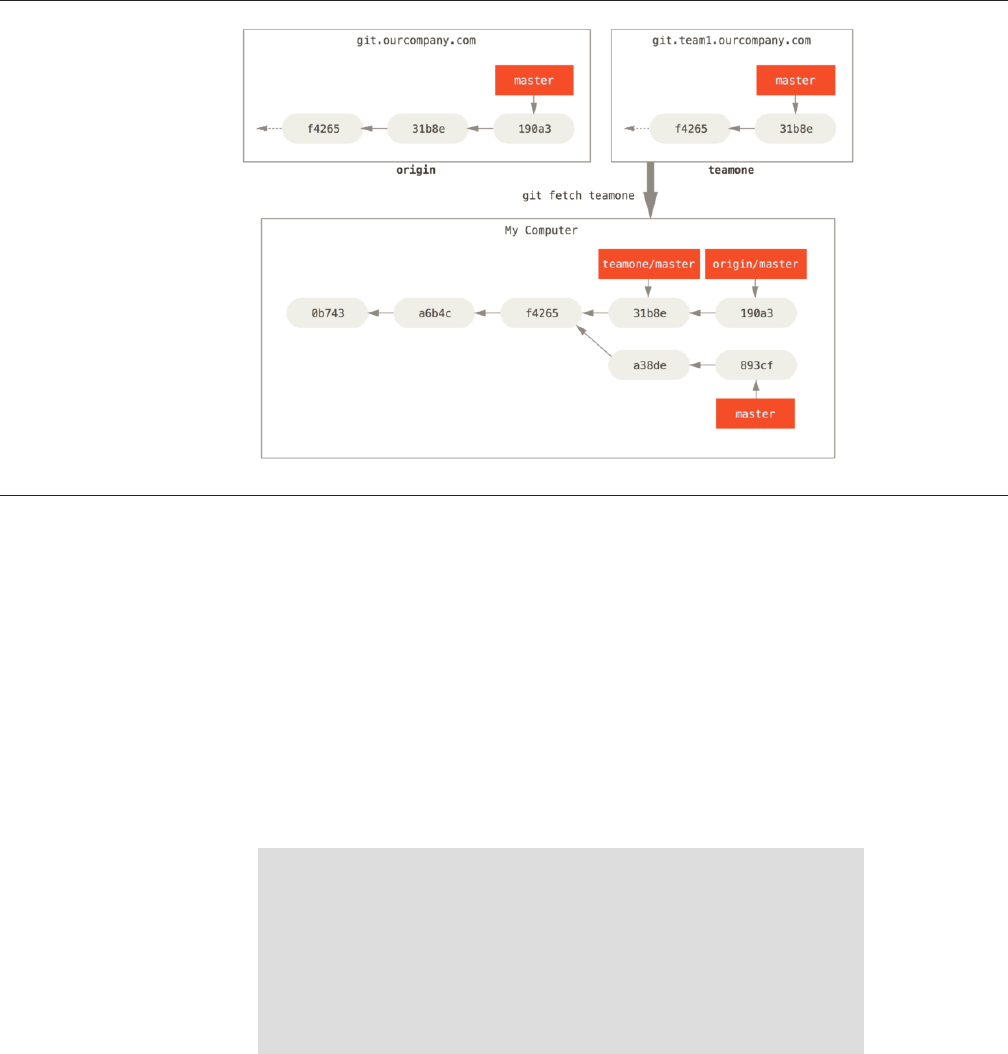
FIGURE 3-26
Seguimiento de la
rama remota a
través de teamone/
master
Publicar
Cuando quieres compartir una rama con el resto del mundo, debes llevarla
(push) a un remoto donde tengas permisos de escritura. Tus ramas locales no
se sincronizan automáticamente con los remotos en los que escribes, sino que
tienes que enviar (push) expresamente las ramas que desees compartir. De esta
forma, puedes usar ramas privadas para el trabajo que no deseas compartir, lle-
vando a un remoto tan solo aquellas partes que deseas aportar a los demás.
Si tienes una rama llamada serverfix, con la que vas a trabajar en colabor-
ación; puedes llevarla al remoto de la misma forma que llevaste tu primera
rama. Con el comando git push (remoto) (rama):
$ git push origin serverfix
Counting objects: 24, done.
Delta compression using up to 8 threads.
Compressing objects: 100% (15/15), done.
Writing objects: 100% (24/24), 1.91 KiB | 0 bytes/s, done.
Total 24 (delta 2), reused 0 (delta 0)
To https://github.com/schacon/simplegit
* [new branch] serverfix -> serverfix
CHAPTER 3: Ramificaciones en Git
112

Esto es un atajo. Git expande automáticamente el nombre de rama server-
fix a refs/heads/serverfix:refs/heads/serverfix, que significa: “coge
mi rama local serverfix y actualiza con ella la rama serverfix del remoto”.
Volveremos más tarde sobre el tema de refs/heads/, viéndolo en detalle en
Chapter 10; por ahora, puedes ignorarlo. También puedes hacer git push
origin serverfix:serverfix, que hace lo mismo; es decir: “coge mi serv-
erfix y hazlo el serverfix remoto”. Puedes utilizar este último formato para
llevar una rama local a una rama remota con un nombre distinto. Si no quieres
que se llame serverfix en el remoto, puedes lanzar, por ejemplo, git push
origin serverfix:awesomebranch; para llevar tu rama serverfix local a
la rama awesomebranch en el proyecto remoto.
NO ESCRIBAS TU CONTRASEÑA TODO EL TIEMPO
Si utilizas una dirección URL con HTTPS para enviar datos, el servidor Git
te preguntará tu usuario y contraseña para autenticarte. Por defecto, te
pedirá esta información a través del terminal, para determinar si estás
autorizado a enviar datos.
Si no quieres escribir tu contraseña cada vez que haces un envío, puedes
establecer un “cache de credenciales”. La manera más sencilla de hacerlo
es estableciéndolo en memoria por unos minutos, lo que puedes lograr
fácilmente al ejecutar git config --global credential.helper cache
Para más información sobre las distintas opciones de cache de creden-
ciales, véase “Credential Storage”.
La próxima vez que tus colaboradores recuperen desde el servidor, obten-
drán bajo la rama remota origin/serverfix una referencia a donde esté la
versión de serverfix en el servidor:
$ git fetch origin
remote: Counting objects: 7, done.
remote: Compressing objects: 100% (2/2), done.
remote: Total 3 (delta 0), reused 3 (delta 0)
Unpacking objects: 100% (3/3), done.
From https://github.com/schacon/simplegit
* [new branch] serverfix -> origin/serverfix
Es importante destacar que cuando recuperas (fetch) nuevas ramas remo-
tas, no obtienes automáticamente una copia local editable de las mismas. En
otras palabras, en este caso, no tienes una nueva rama serverfix. Sino que
únicamente tienes un puntero no editable a origin/serverfix.
Ramas Remotas
113

Para integrar (merge) esto en tu rama de trabajo actual, puedes usar el co-
mando git merge origin/serverfix. Y si quieres tener tu propia rama
serverfix para trabajar, puedes crearla directamente basandote en la rama
remota:
$ git checkout -b serverfix origin/serverfix
Branch serverfix set up to track remote branch serverfix from origin.
Switched to a new branch 'serverfix'
Esto sí te da una rama local donde puedes trabajar, que comienza donde
origin/serverfix estaba en ese momento.
Hacer Seguimiento a las Ramas
Al activar (checkout) una rama local a partir de una rama remota, se crea auto-
máticamente lo que podríamos denominar una “rama de seguimiento” (track-
ing branch). Las ramas de seguimiento son ramas locales que tienen una rela-
ción directa con alguna rama remota. Si estás en una rama de seguimiento y
tecleas el comando git pull, Git sabe de cuál servidor recuperar (fetch) y fu-
sionar (merge) datos.
Cuando clonas un repositorio, este suele crear automáticamente una rama
master que hace seguimiento de origin/master. Sin embargo, puedes pre-
parar otras ramas de seguimiento si deseas tener unas que sigan ramas de
otros remotos o no seguir la rama master. El ejemplo más simple es el que aca-
bas de ver al lanzar el comando git checkout -b [rama] [nombreremo-
to]/[rama]. Esta operación es tan común que git ofrece el parámetro --
track:
$ git checkout --track origin/serverfix
Branch serverfix set up to track remote branch serverfix from origin.
Switched to a new branch 'serverfix'
Para preparar una rama local con un nombre distinto a la del remoto,
puedes utilizar la primera versión con un nombre de rama local diferente:
$ git checkout -b sf origin/serverfix
Branch sf set up to track remote branch serverfix from origin.
Switched to a new branch 'sf'
CHAPTER 3: Ramificaciones en Git
114

Así, tu rama local sf traerá (pull) información automáticamente desde ori-
gin/serverfix.
Si ya tienes una rama local y quieres asignarla a una rama remota que aca-
bas de traerte, o quieres cambiar la rama a la que le haces seguimiento, puedes
usar en cualquier momento las opciones -u o --set-upstream-to del coman-
do git branch.
$ git branch -u origin/serverfix
Branch serverfix set up to track remote branch serverfix from origin.
ATAJO AL UPSTREAM
Cuando tienes asignada una rama de seguimiento, puedes hacer referen-
cia a ella mediante @{upstream} o mediante el atajo @{u}. De esta manera,
si estás en la rama master y esta sigue a la rama origin/master, puedes
hacer algo como git merge @{u} en vez de git merge origin/master.
Si quieres ver las ramas de seguimiento que tienes asignado, puedes usar la
opción -vv con git branch. Esto listará tus ramas locales con más informa-
ción, incluyendo a qué sigue cada rama y si tu rama local está por delante, por
detrás o ambas.
$ git branch -vv
iss53 7e424c3 [origin/iss53: ahead 2] forgot the brackets
master 1ae2a45 [origin/master] deploying index fix
* serverfix f8674d9 [teamone/server-fix-good: ahead 3, behind 1] this should do it
testing 5ea463a trying something new
Aquí podemos ver que nuestra rama iss53 sigue origin/iss53 y está
“ahead” (delante) por dos, es decir, que tenemos dos confirmaciones locales
que no han sido enviadas al servidor. También podemos ver que nuestra rama
master sigue a origin/master y está actualizada. Luego podemos ver que
nuestra rama serverfix sigue la rama server-fix-good de nuestro servidor
teamone y que está tres cambios por delante (ahead) y uno por detrás (behind),
lo que significa que existe una confirmación en el servidor que no hemos fusio-
nado y que tenemos tres confirmaciones locales que no hemos enviado. Por úl-
timo, podemos ver que nuestra rama testing no sigue a ninguna rama remo-
ta.
Es importante destacar que estos números se refieren a la última vez que
trajiste (fetch) datos de cada servidor. Este comando no se comunica con los
servidores, solo te indica lo que sabe de ellos localmente. Si quieres tener los
Ramas Remotas
115

cambios por delante y por detrás actualizados, debes traertelos (fetch) de cada
servidor antes de ejecutar el comando. Puedes hacerlo de esta manera: $ git
fetch --all; git branch -vv
Traer y Fusionar
A pesar de que el comando git fetch trae todos los cambios del servidor que
no tienes, este no modifica tu directorio de trabajo. Simplemente obtendrá los
datos y dejará que tú mismo los fusiones. Sin embargo, existe un comando lla-
mado git pull, el cuál básicamente hace git fetch seguido por git merge
en la mayoría de los casos. Si tienes una rama de seguimiento configurada co-
mo vimos en la última sección, bien sea asignándola explícitamente o creándo-
la mediante los comandos clone o checkout, git pull identificará a qué ser-
vidor y rama remota sigue tu rama actual, traerá los datos de dicho servidor e
intentará fusionar dicha rama remota.
Normalmente es mejor usar los comandos fetch y merge de manera explíc-
ita pues la magia de git pull puede resultar confusa.
Eliminar Ramas Remotas
Imagina que ya has terminado con una rama remota, es decir, tanto tú como
tus colaboradores habéis completado una determinada funcionalidad y la ha-
béis incorporado (merge) a la rama master en el remoto (o donde quiera que
tengáis la rama de código estable). Puedes borrar la rama remota utilizando la
opción --delete de git push. Por ejemplo, si quieres borrar la rama server-
fix del servidor, puedes utilizar:
$ git push origin --delete serverfix
To https://github.com/schacon/simplegit
- [deleted] serverfix
Básicamente lo que hace es eliminar el apuntador del servidor. El servidor
Git suele mantener los datos por un tiempo hasta que el recolector de basura se
ejecute, de manera que si la has borrado accidentalmente, suele ser fácil recu-
perarla.
CHAPTER 3: Ramificaciones en Git
116
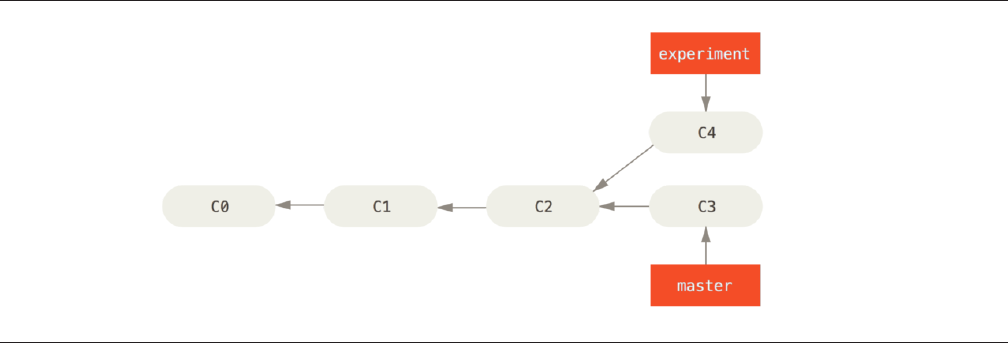
FIGURE 3-27
El registro de
conrmaciones
inicial
Reorganizar el Trabajo Realizado
En Git tenemos dos formas de integrar cambios de una rama en otra: la fusión
(merge) y la reorganización (rebase). En esta sección vas a aprender en qué con-
siste la reorganización, cómo utilizarla, por qué es una herramienta sorpren-
dente y en qué casos no es conveniente utilizarla.
Reorganización Básica
Volviendo al ejemplo anterior, en la sección sobre fusiones “Procedimientos
Básicos de Fusión” puedes ver que has separado tu trabajo y realizado confir-
maciones (commit) en dos ramas diferentes.
La manera más sencilla de integrar ramas, tal y como hemos visto, es el co-
mando git merge. Realiza una fusión a tres bandas entre las dos últimas in-
stantáneas de cada rama (C3 y C4) y el ancestro común a ambas (C2); creando
una nueva instantánea (snapshot) y la correspondiente confirmación (commit).
Reorganizar el Trabajo Realizado
117
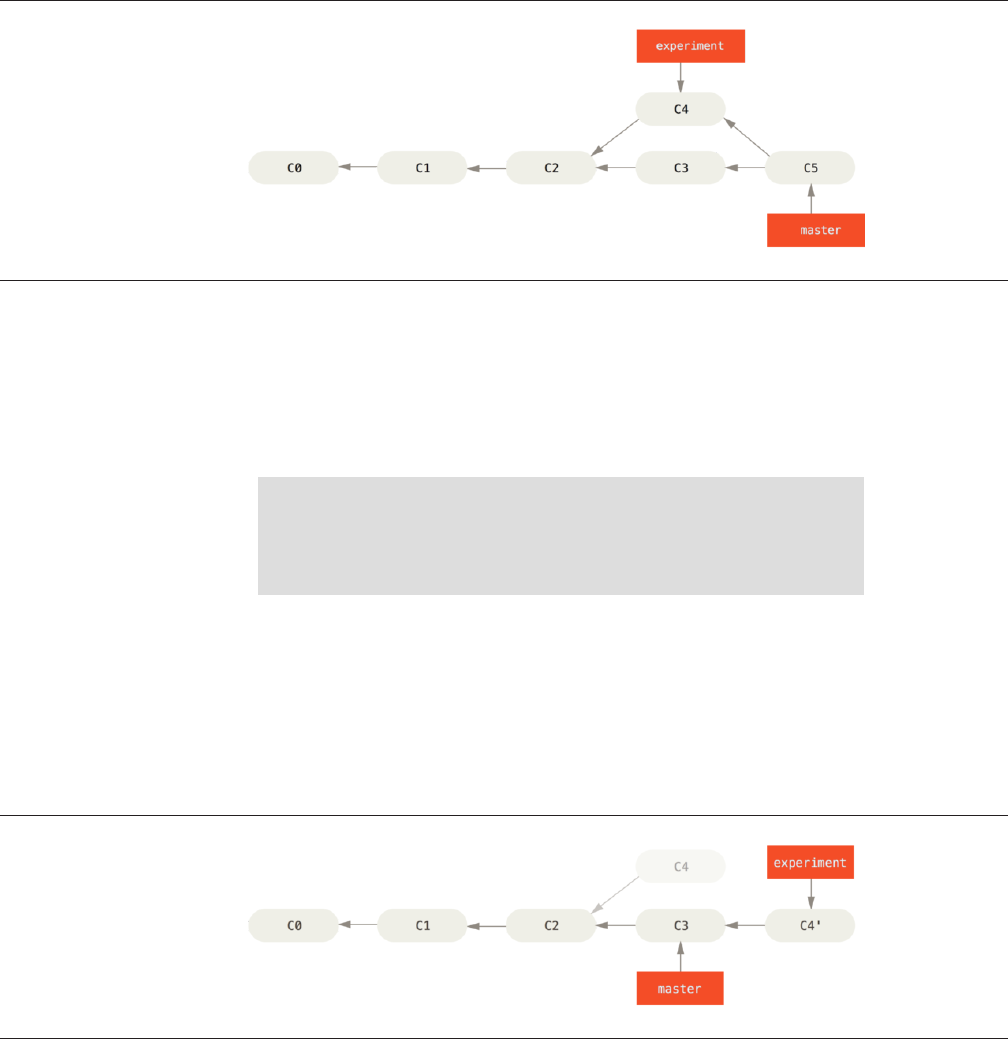
FIGURE 3-28
Fusionar una rama
para integrar el
registro de trabajos
divergentes
FIGURE 3-29
Reorganizando
sobre C3 los cambios
introducidos en C4
Sin embargo, también hay otra forma de hacerlo: puedes coger los cambios
introducidos en C3 y reaplicarlos encima de C4. Esto es lo que en Git llamamos
reorganizar (rebasing, en inglés). Con el comando git rebase, puedes coger
todos los cambios confirmados en una rama, y reaplicarlos sobre otra.
Por ejemplo, puedes lanzar los comandos:
$ git checkout experiment
$ git rebase master
First, rewinding head to replay your work on top of it...
Applying: added staged command
Haciendo que Git vaya al ancestro común de ambas ramas (donde estás ac-
tualmente y de donde quieres reorganizar), saque las diferencias introducidas
por cada confirmación en la rama donde estás, guarde esas diferencias en ar-
chivos temporales, reinicie (reset) la rama actual hasta llevarla a la misma con-
firmación en la rama de donde quieres reorganizar, y, finalmente, vuelva a apli-
car ordenadamente los cambios.
CHAPTER 3: Ramificaciones en Git
118
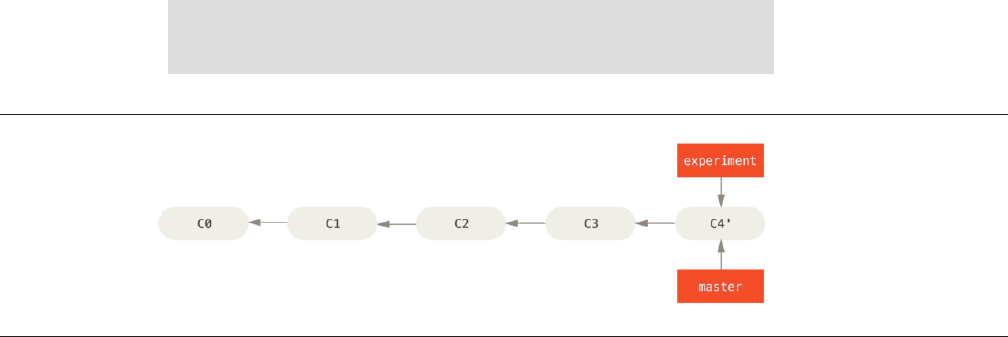
FIGURE 3-30
Avance rápido de la
rama master
En este momento, puedes volver a la rama master y hacer una fusión con
avance rápido (fast-forward merge).
$ git checkout master
$ git merge experiment
Así, la instantánea apuntada por C4' es exactamente la misma apuntada
por C5 en el ejemplo de la fusión. No hay ninguna diferencia en el resultado fi-
nal de la integración, pero el haberla hecho reorganizando nos deja un historial
más claro. Si examinas el historial de una rama reorganizada, este aparece
siempre como un historial lineal: como si todo el trabajo se hubiera realizado
en series, aunque realmente se haya hecho en paralelo.
Habitualmente, optarás por esta vía cuando quieras estar seguro de que tus
confirmaciones de cambio (commits) se pueden aplicar limpiamente sobre una
rama remota; posiblemente, en un proyecto donde estés intentando colaborar,
pero lleves tú el mantenimiento. En casos como esos, puedes trabajar sobre
una rama y luego reorganizar lo realizado en la rama origin/master cuando
lo tengas todo listo para enviarlo al proyecto principal. De esta forma, la per-
sona que mantiene el proyecto no necesitará hacer ninguna integración con tu
trabajo; le bastará con un avance rápido o una incorporación limpia.
Cabe destacar que la instantánea (snapshot) apuntada por la confirmación
(commit) final, tanto si es producto de una reorganización (rebase) como si lo
es de una fusión (merge), es exactamente la misma instantánea; lo único difer-
ente es el historial. La reorganización vuelve a aplicar cambios de una rama de
trabajo sobre otra rama, en el mismo orden en que fueron introducidos en la
primera, mientras que la fusión combina entre sí los dos puntos finales de am-
bas ramas.
Reorganizar el Trabajo Realizado
119

FIGURE 3-31
Un historial con una
rama puntual sobre
otra rama puntual
Algunas Reorganizaciones Interesantes
También puedes aplicar una reorganización (rebase) sobre otra cosa además
de sobre la rama de reorganización. Por ejemplo, considera un historial como el
de Figure 3-31. Has ramificado a una rama puntual (server) para añadir algu-
nas funcionalidades al proyecto, y luego has confirmado los cambios. Después,
vuelves a la rama original para hacer algunos cambios en la parte cliente (rama
client), y confirmas también esos cambios. Por último, vuelves sobre la rama
server y haces algunos cambios más.
Imagina que decides incorporar tus cambios del lado cliente sobre el
proyecto principal para hacer un lanzamiento de versión; pero no quieres lan-
zar aún los cambios del lado servidor porque no están aún suficientemente
probados. Puedes coger los cambios del cliente que no están en server (C8 y
C9) y reaplicarlos sobre tu rama principal usando la opción --onto del coman-
do git rebase:
$ git rebase --onto master server client
Esto viene a decir: “Activa la rama client, averigua los cambios desde el
ancestro común entre las ramas client y server, y aplicalos en la rama mas-
ter”. Puede parecer un poco complicado, pero los resultados son realmente in-
teresantes.
CHAPTER 3: Ramificaciones en Git
120
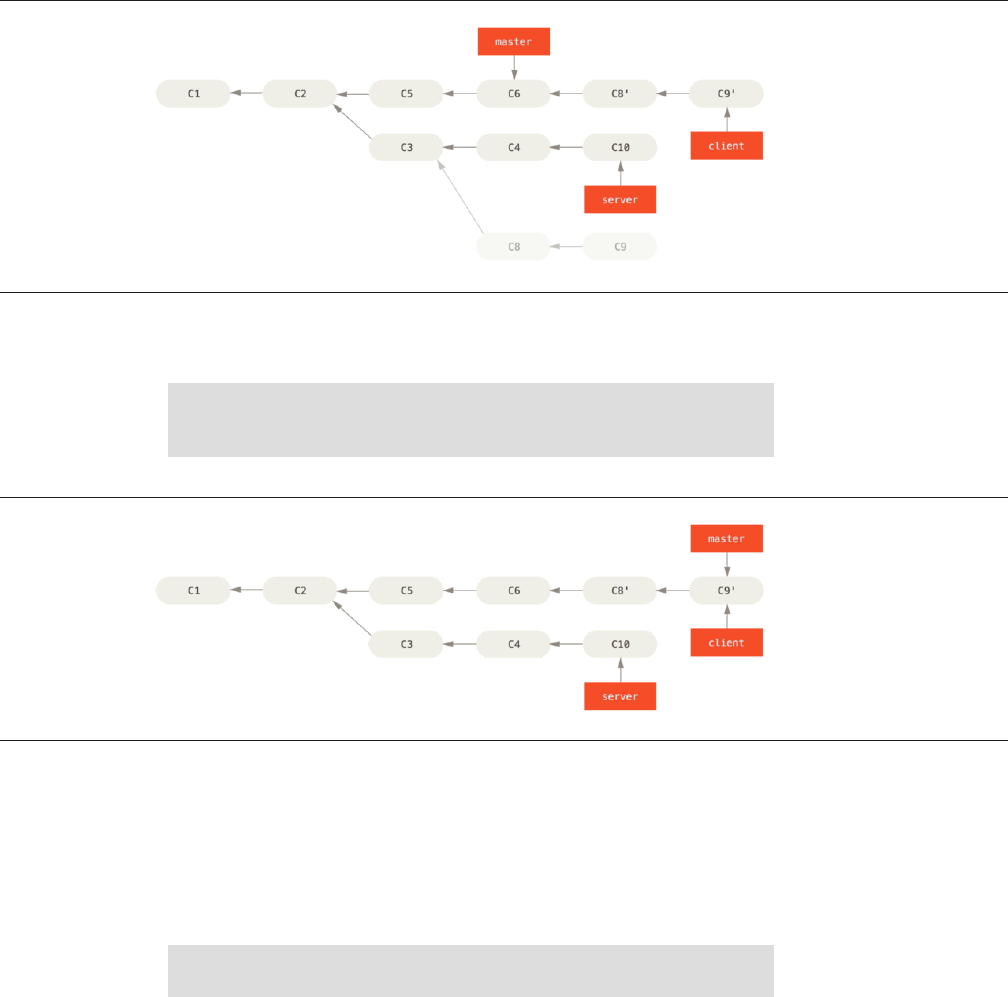
FIGURE 3-32
Reorganizando una
rama puntual fuera
de otra rama
puntual
FIGURE 3-33
Avance rápido de tu
rama master, para
incluir los cambios
de la rama client
Y, tras esto, ya puedes avanzar la rama principal (ver Figure 3-33):
$ git checkout master
$ git merge client
Ahora supongamos que decides traerlos (pull) también sobre tu rama serv-
er. Puedes reorganizar (rebase) la rama server sobre la rama master sin nec-
esidad siquiera de comprobarlo previamente, usando el comando git rebase
[rama-base] [rama-puntual], el cual activa la rama puntual (server en
este caso) y la aplica sobre la rama base (master en este caso):
$ git rebase master server
Esto vuelca el trabajo de server sobre el de master, tal y como se muestra
en Figure 3-34.
Reorganizar el Trabajo Realizado
121
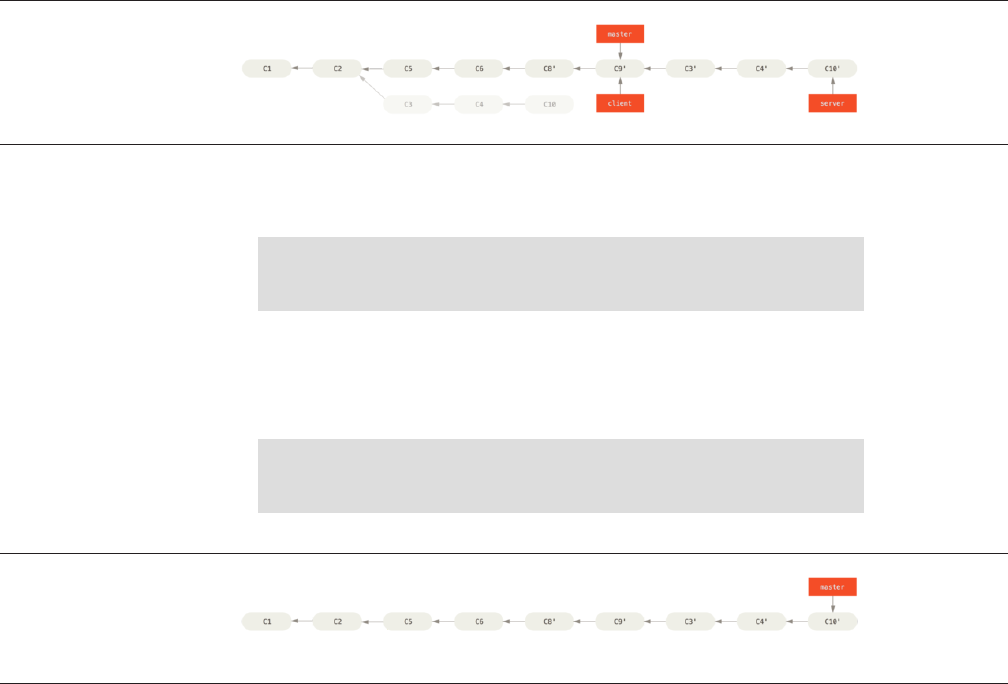
FIGURE 3-34
Reorganizando la
rama server sobre
la rama master
FIGURE 3-35
Historial nal de
conrmaciones de
cambio
Después, puedes avanzar rápidamente la rama base (master):
$ git checkout master
$ git merge server
Y por último puedes eliminar las ramas client y server porque ya todo su
contenido ha sido integrado y no las vas a necesitar más, dejando tu registro
tras todo este proceso tal y como se muestra en Figure 3-35:
$ git branch -d client
$ git branch -d server
Los Peligros de Reorganizar
Ahh…, pero la dicha de la reorganización no la alcanzamos sin sus contraparti-
das, las cuales pueden resumirse en una línea:
Nunca reorganices confirmaciones de cambio (commits) que hayas en-
viado (push) a un repositorio público.
Si sigues esta recomendación, no tendrás problemas. Pero si no lo haces, la
gente te odiará y serás despreciado por tus familiares y amigos.
Cuando reorganizas algo, estás abandonando las confirmaciones de cambio
ya creadas y estás creando unas nuevas; que son similares, pero diferentes. Si
envias (push) confirmaciones (commits) a alguna parte, y otros las recogen
(pull) de allí; y después vas tú y las reescribes con git rebase y las vuelves a
enviar (push); tus colaboradores tendrán que refusionar (re-merge) su trabajo y
CHAPTER 3: Ramificaciones en Git
122
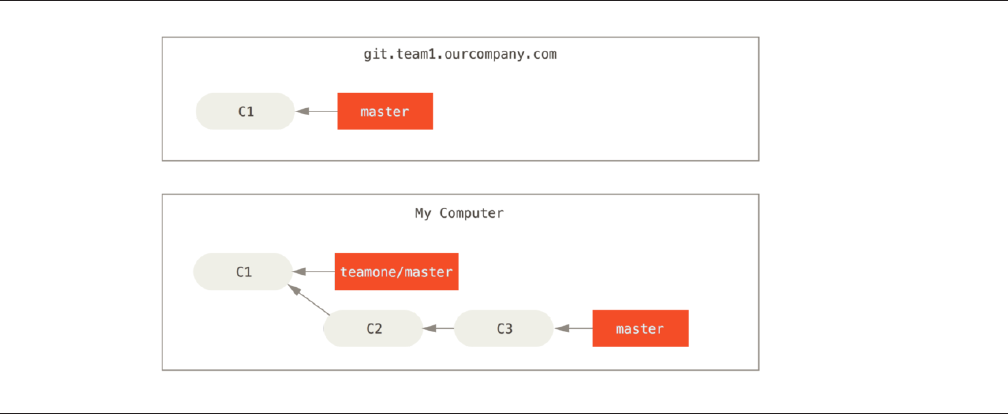
FIGURE 3-36
Clonar un
repositorio y
trabajar sobre él
todo se volverá tremendamente complicado cuando intentes recoger (pull) su
trabajo de vuelta sobre el tuyo.
Veamos con un ejemplo como reorganizar trabajo que has hecho público
puede causar problemas. Imagínate que haces un clon desde un servidor cen-
tral, y luego trabajas sobre él. Tu historial de cambios puede ser algo como es-
to:
Ahora, otra persona trabaja también sobre ello, realiza una fusión (merge) y
lleva (push) su trabajo al servidor central. Tú te traes (fetch) sus trabajos y los
fusionas (merge) sobre una nueva rama en tu trabajo, con lo que tu historial
quedaría parecido a esto:
Reorganizar el Trabajo Realizado
123
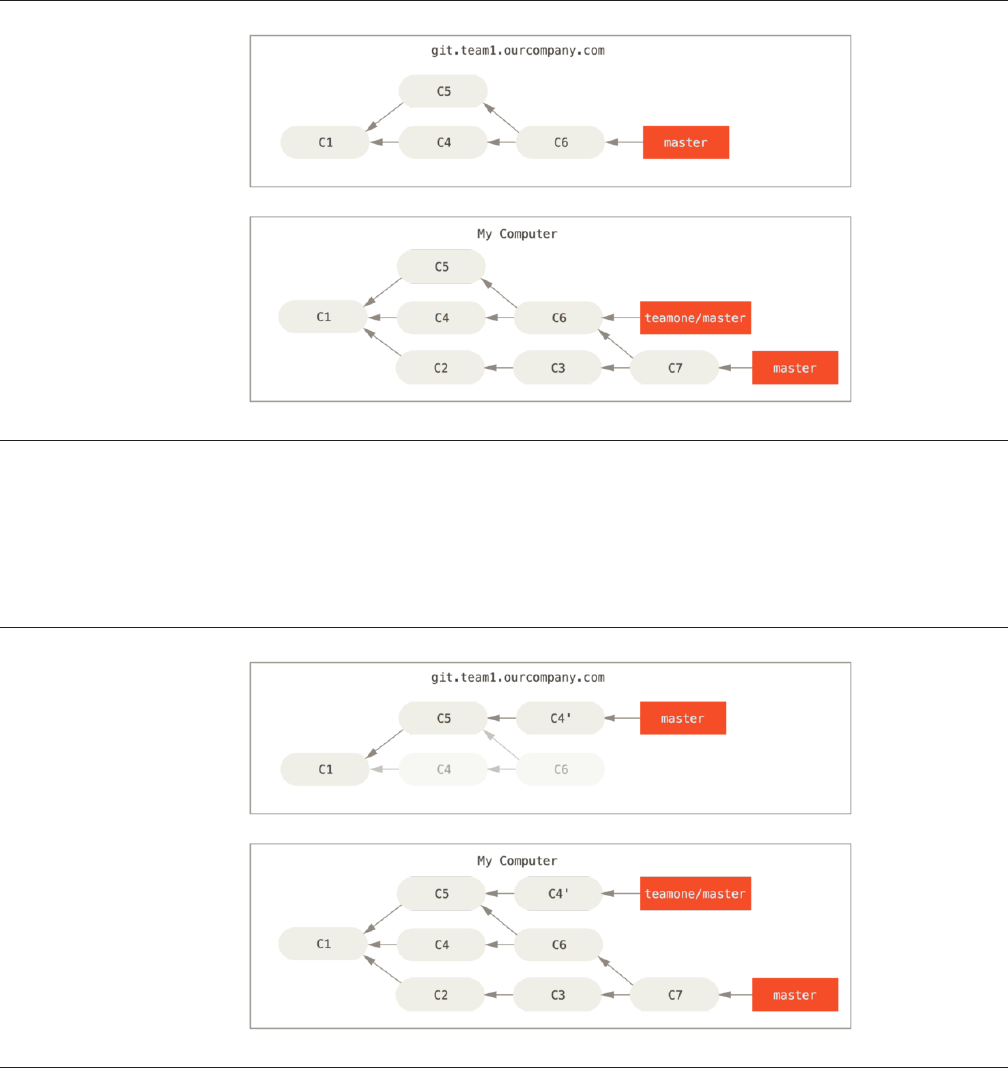
FIGURE 3-37
Traer (fetch)
algunas
conrmaciones de
cambio (commits) y
fusionarlas (merge)
sobre tu trabajo
FIGURE 3-38
Alguien envií (push)
conrmaciones
(commits)
reorganizadas,
abandonando las
conrmaciones en
las que tu habías
basado tu trabajo
A continuación, la persona que había llevado cambios al servidor central de-
cide retroceder y reorganizar su trabajo; haciendo un git push --force para
sobrescribir el registro en el servidor. Tu te traes (fetch) esos nuevos cambios
desde el servidor.
CHAPTER 3: Ramificaciones en Git
124
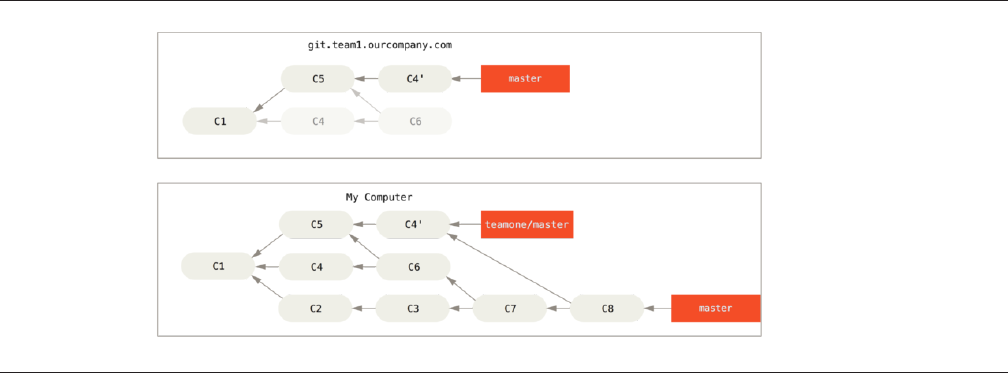
FIGURE 3-39
Vuelves a fusionar el
mismo trabajo en
una nueva fusión
conrmada
Ahora los dos están en un aprieto. Si haces git pull crearás una fusión
confirmada, la cual incluirá ambas líneas del historial, y tu repositorio lucirá así:
Si ejecutas git log sobre un historial así, verás dos confirmaciones hechas
por el mismo autor y con la misma fecha y mensaje, lo cual será confuso. Es
más, si luego tu envías (push) ese registro de vuelta al servidor, vas a introducir
todas esas confirmaciones reorganizadas en el servidor central. Lo que puede
confundir aún más a la gente. Era más seguro asumir que el otro desarrollador
no quería que C4 y C6 estuviesen en el historial; por ello había reorganizado su
trabajo de esa manera.
Reorganizar una Reorganización
Si te encuentras en una situación como esta, Git tiene algunos trucos que pue-
den ayudarte. Si alguien de tu equipo sobreescribe cambios en los que se basa-
ba tu trabajo, tu reto es descubrir qué han sobreescrito y qué te pertenece.
Además de la suma de control SHA-1, Git calcula una suma de control basa-
da en el parche que introduce una confirmación. A esta se le conoce como
“patch-id”.
Si te traes el trabajo que ha sido sobreescrito y lo reorganizas sobre las nue-
vas confirmaciones de tu compañero, es posible que Git pueda identificar qué
parte correspondía específicamente a tu trabajo y aplicarla de vuelta en la
rama nueva.
Reorganizar el Trabajo Realizado
125
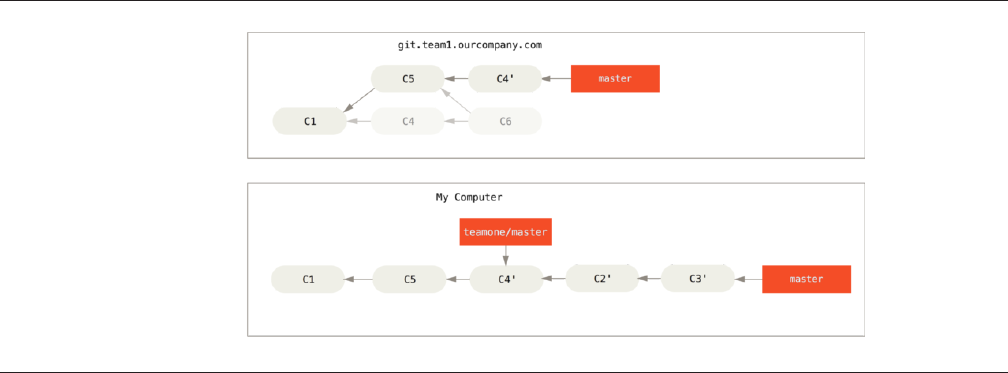
FIGURE 3-40
Reorganizar encima
de un trabajo
sobreescrito
reorganizado.
Por ejemplo, en el caso anterior, si en vez de hacer una fusión cuando está-
bamos en Figure 3-38 ejecutamos git rebase teamone/master, Git hará lo
siguiente:
•Determinar el trabajo que es específico de nuestra rama (C2, C3, C4, C6,
C7)
•Determinar cuáles no son fusiones confirmadas (C2, C3, C4)
•Determinar cuáles no han sido sobreescritas en la rama destino (solo C2 y
C3, pues C4 corresponde al mismo parche que C4')
• Aplicar dichas confirmaciones encima de teamone/master
Así que en vez del resultado que vimos en Figure 3-39, terminaremos con
algo más parecido a Figure 3-40.
Esto solo funciona si C4 y el C4’ de tu compañero son parches muy similares.
De lo contrario, la reorganización no será capaz de identificar que se trata de un
duplicado y agregará otro parche similar a C4 (lo cual probablemente no podrá
aplicarse limpiamente, pues los cambios ya estarían allí en algún lugar).
También puedes simplificar el proceso si ejecutas git pull --rebase en
vez del tradicional git pull. O, en este caso, puedes hacerlo manualmente
con un git fetch primero, seguido de un git rebase teamone/master.
Si sueles utilizar git pull y quieres que la opción --rebase esté activada
por defecto, puedes asignar el valor de configuración pull.rebase haciendo
algo como esto git config --global pull.rebase true.
CHAPTER 3: Ramificaciones en Git
126
Si consideras la reorganización como una manera de limpiar tu trabajo y tus
confirmaciones antes de enviarlas (push), y si solo reorganizas confirmaciones
(commits) que nunca han estado disponibles públicamente, no tendrás prob-
lemas. Si reorganizas (rebase) confirmaciones (commits) que ya estaban dis-
ponibles públicamente y la gente había basado su trabajo en ellas, entonces
prepárate para tener problemas, frustar a tu equipo y ser despreciado por tus
compañeros.
Si tu compañero o tú ven que aun así es necesario hacerlo en algún momen-
to, asegúrense que todos sepan que deben ejecutar git pull --rebase para
intentar aliviar en lo posible la frustración.
Reorganizar vs. Fusionar
Ahora que has visto en acción la reorganización y la fusión, te preguntarás cuál
es mejor. Antes de responder, repasemos un poco qué representa el historial.
Para algunos, el historial de confirmaciones de tu repositorio es un registro
de todo lo que ha pasado. Un documento histórico, valioso por sí mismo y que
no debería ser alterado. Desde este punto de vista, cambiar el historial de con-
firmaciones es casi como blasfemar; estarías mintiendo sobre lo que en verdad
ocurrió. ¿Y qué pasa si hay una serie desastrosa de fusiones confirmadas? Nada.
Así fue como ocurrió y el repositorio debería tener un registro de esto para la
posteridad.
La otra forma de verlo es que el historial de confirmaciones es la historia de
cómo se hizo tu proyecto. Tú no publicarías el primer borrador de tu novela, y
el manual de cómo mantener tus programas también debe estar editado con
mucho cuidado. Esta es el área que utiliza herramientas como rebase y
filter-branch para contar la historia de la mejor manera para los futuros lec-
tores.
Ahora, sobre qué es mejor si fusionar o reorganizar: verás que la respuesta
no es tan sencilla. Git es una herramienta poderosa que te permite hacer mu-
chas cosas con tu historial, y cada equipo y cada proyecto es diferente. Ahora
que conoces cómo trabajan ambas herramientas, será cosa tuya decidir cuál de
las dos es mejor para tu situación en particular.
Normalmente, la manera de sacar lo mejor de ambas es reorganizar tu tra-
bajo local, que aun no has compartido, antes de enviarlo a algún lugar; pero
nunca reorganizar nada que ya haya sido compartido.
Recapitulación
Hemos visto los procedimientos básicos de ramificación (branching) y fusión
(merging) en Git. A estas alturas, te sentirás cómodo creando nuevas ramas
Recapitulación
127
(branch), saltando (checkout) entre ramas para trabajar y fusionando (merge)
ramas entre ellas. También conocerás cómo compartir tus ramas enviándolas
(push) a un servidor compartido, cómo trabajar colaborativamente en ramas
compartidas, y cómo reorganizar (rebase) tus ramas antes de compartirlas. A
continuación, hablaremos sobre lo que necesitas para tener tu propio servidor
de hospedaje Git.
CHAPTER 3: Ramificaciones en Git
128
Git en el Servidor
En este punto, deberías ser capaz de realizar la mayoría de las tareas diarias
para las cuales estarás usando Git. Sin embargo, para poder realizar cualquier
colaboración en Git, necesitarás tener un repositorio remoto Git. Aunque técni-
camente puedes enviar y recibir cambios desde repositorios de otros individ-
uos, no se recomienda hacerlo porque, si no tienes cuidado, fácilmente podrías
confudir en que es en lo que se está trabajando. Además, lo deseable es que tus
colaboradores sean capaces de acceder al repositorio incluso si tu computa-
dora no está en línea – muchas veces es útil tener un repositorio confiable en
común. Por lo tanto, el método preferido para colaborar con otra persona es
configurar un repositorio intermedio al cual ambos tengan acceso, y enviar
(push) y recibir (pull) desde allí.
Poner en funcionamiento un servidor Git es un proceso bastante claro. Pri-
mero, eliges con qué protocolos ha de comunicarse tu servidor. La primera sec-
ción de este capítulo cubrirá los protocolos disponibles, así como los pros y los
contras de cada uno. Las siguientes secciones explicarán algunas configura-
ciones comunes utilizando dichos protocolos y como poner a funcionar tu ser-
vidor con alguno de ellos. Finalmente, revisaremos algunas de las opciones
hospedadas, si no te importa hospedar tu código en el servidor de alguien más
y no quieres tomarte la molestia de configurar y mantener tu propio servidor.
Si no tienes interés en tener tu propio servidor, puedes saltarte hasta la últi-
ma sección de este capítulo para ver algunas de las opciones para configurar
una cuenta hospedada y seguir al siguiente capítulo, donde discutiremos los
varios pormenores de trabajar en un ambiente de control de fuente distribuído.
Un repositorio remoto es generalmente un repositorio básico – un repositor-
io Git que no tiene directorio de trabajo. Dado que el repositorio es solamente
utilizado como un punto de colaboración, no hay razín para tener una copia in-
stantánea verificada en el disco; tan solo son datos Git. En los más simples tér-
minos, un repositorio básico es el contenido .git del directorio de tu proyecto
y nada más.
129
4

The Protocols
Git can use four major protocols to transfer data: Local, HTTP, Secure Shell
(SSH) and Git. Here we’ll discuss what they are and in what basic circumstances
you would want (or not want) to use them.
Local Protocol
The most basic is the Local protocol, in which the remote repository is in anoth-
er directory on disk. This is oen used if everyone on your team has access to a
shared filesystem such as an NFS mount, or in the less likely case that everyone
logs in to the same computer. The latter wouldn’t be ideal, because all your
code repository instances would reside on the same computer, making a cata-
strophic loss much more likely.
If you have a shared mounted filesystem, then you can clone, push to, and
pull from a local file-based repository. To clone a repository like this or to add
one as a remote to an existing project, use the path to the repository as the
URL. For example, to clone a local repository, you can run something like this:
$ git clone /opt/git/project.git
Or you can do this:
$ git clone file:///opt/git/project.git
Git operates slightly dierently if you explicitly specify file:// at the begin-
ning of the URL. If you just specify the path, Git tries to use hardlinks or directly
copy the files it needs. If you specify file://, Git fires up the processes that it
normally uses to transfer data over a network which is generally a lot less ei-
cient method of transferring the data. The main reason to specify the file://
prefix is if you want a clean copy of the repository with extraneous references or
objects le out – generally aer an import from another version-control system
or something similar (see Chapter 10 for maintenance tasks). We’ll use the nor-
mal path here because doing so is almost always faster.
To add a local repository to an existing Git project, you can run something
like this:
$ git remote add local_proj /opt/git/project.git
CHAPTER 4: Git en el Servidor
130
Then, you can push to and pull from that remote as though you were doing
so over a network.
THE PROS
The pros of file-based repositories are that they’re simple and they use existing
file permissions and network access. If you already have a shared filesystem to
which your whole team has access, setting up a repository is very easy. You
stick the bare repository copy somewhere everyone has shared access to and
set the read/write permissions as you would for any other shared directory.
We’ll discuss how to export a bare repository copy for this purpose in “Configu-
rando Git en un servidor”.
This is also a nice option for quickly grabbing work from someone else’s
working repository. If you and a co-worker are working on the same project and
they want you to check something out, running a command like git pull /
home/john/project is oen easier than them pushing to a remote server and
you pulling down.
THE CONS
The cons of this method are that shared access is generally more diicult to set
up and reach from multiple locations than basic network access. If you want to
push from your laptop when you’re at home, you have to mount the remote
disk, which can be diicult and slow compared to network-based access.
It’s also important to mention that this isn’t necessarily the fastest option if
you’re using a shared mount of some kind. A local repository is fast only if you
have fast access to the data. A repository on NFS is oen slower than the reposi-
tory over SSH on the same server, allowing Git to run o local disks on each sys-
tem.
The HTTP Protocols
Git can communicate over HTTP in two dierent modes. Prior to Git 1.6.6 there
was only one way it could do this which was very simple and generally read-
only. In version 1.6.6 a new, smarter protocol was introduced that involved Git
being able to intelligently negotiate data transfer in a manner similar to how it
does over SSH. In the last few years, this new HTTP protocol has become very
popular since it’s simpler for the user and smarter about how it communicates.
The newer version is oen referred to as the “Smart” HTTP protocol and the
older way as “Dumb” HTTP. We’ll cover the newer “smart” HTTP protocol first.
The Protocols
131

SMART HTTP
The “smart” HTTP protocol operates very similarly to the SSH or Git protocols
but runs over standard HTTP/S ports and can use various HTTP authentication
mechanisms, meaning it’s oen easier on the user than something like SSH,
since you can use things like username/password basic authentication rather
than having to set up SSH keys.
It has probably become the most popular way to use Git now, since it can be
set up to both serve anonymously like the git:// protocol, and can also be
pushed over with authentication and encryption like the SSH protocol. Instead
of having to set up dierent URLs for these things, you can now use a single URL
for both. If you try to push and the repository requires authentication (which it
normally should), the server can prompt for a username and password. The
same goes for read access.
In fact, for services like GitHub, the URL you use to view the repository online
(for example, “https://github.com/schacon/simplegit”) is the same URL you
can use to clone and, if you have access, push over.
DUMB HTTP
If the server does not respond with a Git HTTP smart service, the Git client will
try to fall back to the simpler “dumb” HTTP protocol. The Dumb protocol ex-
pects the bare Git repository to be served like normal files from the web server.
The beauty of the Dumb HTTP protocol is the simplicity of setting it up. Basical-
ly, all you have to do is put a bare Git repository under your HTTP document
root and set up a specific post-update hook, and you’re done (See “Git
Hooks”). At that point, anyone who can access the web server under which you
put the repository can also clone your repository. To allow read access to your
repository over HTTP, do something like this:
$ cd /var/www/htdocs/
$ git clone --bare /path/to/git_project gitproject.git
$ cd gitproject.git
$ mv hooks/post-update.sample hooks/post-update
$ chmod a+x hooks/post-update
That’s all. The post-update hook that comes with Git by default runs the
appropriate command (git update-server-info) to make HTTP fetching
and cloning work properly. This command is run when you push to this reposi-
tory (over SSH perhaps); then, other people can clone via something like
CHAPTER 4: Git en el Servidor
132

$ git clone https://example.com/gitproject.git
In this particular case, we’re using the /var/www/htdocs path that is com-
mon for Apache setups, but you can use any static web server – just put the
bare repository in its path. The Git data is served as basic static files (see Chap-
ter 10 for details about exactly how it’s served).
Generally you would either choose to run a read/write Smart HTTP server or
simply have the files accessible as read-only in the Dumb manner. It’s rare to
run a mix of the two services.
THE PROS
We’ll concentrate on the pros of the Smart version of the HTTP protocol.
The simplicity of having a single URL for all types of access and having the
server prompt only when authentication is needed makes things very easy for
the end user. Being able to authenticate with a username and password is also
a big advantage over SSH, since users don’t have to generate SSH keys locally
and upload their public key to the server before being able to interact with it.
For less sophisticated users, or users on systems where SSH is less common,
this is a major advantage in usability. It is also a very fast and eicient protocol,
similar to the SSH one.
You can also serve your repositories read-only over HTTPS, which means you
can encrypt the content transfer; or you can go so far as to make the clients use
specific signed SSL certificates.
Another nice thing is that HTTP/S are such commonly used protocols that
corporate firewalls are oen set up to allow traic through these ports.
THE CONS
Git over HTTP/S can be a little more tricky to set up compared to SSH on some
servers. Other than that, there is very little advantage that other protocols have
over the “Smart” HTTP protocol for serving Git.
If you’re using HTTP for authenticated pushing, providing your credentials is
sometimes more complicated than using keys over SSH. There are however sev-
eral credential caching tools you can use, including Keychain access on OSX
and Credential Manager on Windows, to make this pretty painless. Read “Cre-
dential Storage” to see how to set up secure HTTP password caching on your
system.
The Protocols
133

The SSH Protocol
A common transport protocol for Git when self-hosting is over SSH. This is be-
cause SSH access to servers is already set up in most places – and if it isn’t, it’s
easy to do. SSH is also an authenticated network protocol; and because it’s
ubiquitous, it’s generally easy to set up and use.
To clone a Git repository over SSH, you can specify ssh:// URL like this:
$ git clone ssh://user@server/project.git
Or you can use the shorter scp-like syntax for the SSH protocol:
$ git clone user@server:project.git
You can also not specify a user, and Git assumes the user you’re currently
logged in as.
THE PROS
The pros of using SSH are many. First, SSH is relatively easy to set up – SSH dae-
mons are commonplace, many network admins have experience with them,
and many OS distributions are set up with them or have tools to manage them.
Next, access over SSH is secure – all data transfer is encrypted and authentica-
ted. Last, like the HTTP/S, Git and Local protocols, SSH is eicient, making the
data as compact as possible before transferring it.
THE CONS
The negative aspect of SSH is that you can’t serve anonymous access of your
repository over it. People must have access to your machine over SSH to access
it, even in a read-only capacity, which doesn’t make SSH access conducive to
open source projects. If you’re using it only within your corporate network, SSH
may be the only protocol you need to deal with. If you want to allow anony-
mous read-only access to your projects and also want to use SSH, you’ll have to
set up SSH for you to push over but something else for others to fetch over.
The Git Protocol
Next is the Git protocol. This is a special daemon that comes packaged with Git;
it listens on a dedicated port (9418) that provides a service similar to the SSH
CHAPTER 4: Git en el Servidor
134

protocol, but with absolutely no authentication. In order for a repository to be
served over the Git protocol, you must create the git-daemon-export-ok file
– the daemon won’t serve a repository without that file in it – but other than
that there is no security. Either the Git repository is available for everyone to
clone or it isn’t. This means that there is generally no pushing over this proto-
col. You can enable push access; but given the lack of authentication, if you turn
on push access, anyone on the internet who finds your project’s URL could push
to your project. Suice it to say that this is rare.
THE PROS
The Git protocol is oen the fastest network transfer protocol available. If
you’re serving a lot of traic for a public project or serving a very large project
that doesn’t require user authentication for read access, it’s likely that you’ll
want to set up a Git daemon to serve your project. It uses the same data-
transfer mechanism as the SSH protocol but without the encryption and au-
thentication overhead.
THE CONS
The downside of the Git protocol is the lack of authentication. It’s generally un-
desirable for the Git protocol to be the only access to your project. Generally,
you’ll pair it with SSH or HTTPS access for the few developers who have push
(write) access and have everyone else use git:// for read-only access. It’s also
probably the most diicult protocol to set up. It must run its own daemon,
which requires xinetd configuration or the like, which isn’t always a walk in
the park. It also requires firewall access to port 9418, which isn’t a standard
port that corporate firewalls always allow. Behind big corporate firewalls, this
obscure port is commonly blocked.
Configurando Git en un servidor
Ahora vamos a cubrir la creación de un servicio de Git ejecutando estos proto-
colos en su propio servidor.
Aquí demostraremos los comandos y pasos necesarios para hacer las in-
stalaciones básicas simplificadas en un servidor basado en Linux, aunque
también es posible ejecutar estos servicios en los servidores Mac o Win-
dows. Configurar un servidor de producción dentro de tu infraestructura
sin duda supondrá diferencias en las medidas de seguridad o de las herra-
mientas del sistema operativo, pero se espera que esto le de la idea gen-
eral de lo que el proceso involucra.
Configurando Git en un servidor
135

Para configurar por primera vez un servidor de Git, hay que exportar un re-
positorio existente en un nuevo repositorio vacío - un repositorio que no con-
tiene un directorio de trabajo. Esto es generalmente fácil de hacer. Para clonar
el repositorio con el fin de crear un nuevo repositorio vacío, se ejecuta el co-
mando clone con la opción --bare. Por convención, los directorios del reposi-
torio vacío terminan en .git , así:
$ git clone --bare my_project my_project.git
Cloning into bare repository 'my_project.git'...
done.
Deberías tener ahora una copia de los datos del directorio Git en tu director-
io my_project.git. Esto es más o menos equivalente a algo así:
$ cp -Rf my_project/.git my_project.git
Hay un par de pequeñas diferencias en el archivo de configuración; pero
para tú propósito, esto es casi la misma cosa. Toma el repositorio Git en sí mis-
mo, sin un directorio de trabajo, y crea un directorio específicamente para él
solo.
Colocando un Repositorio Vacío en un Servidor
Ahora que tienes una copia vacía de tú repositorio, todo lo que necesitas hacer
es ponerlo en un servidor y establecer sus protocolos. Digamos que has config-
urado un servidor llamado git.example.com que tiene acceso a SSH, y
quieres almacenar todos tus repositorios Git bajo el directorio / opt` / git`. Su-
poniendo que existe / opt / git en ese servidor, puedes configurar tu nuevo
repositorio copiando tu repositorio vacío a:
$ scp -r my_project.git user@git.example.com:/opt/git
En este punto, otros usuarios que con acceso SSH al mismo servidor que
tiene permisos de lectura-acceso al directorio / opt / git pueden clonar tu
repositorio mediante el comando
$ git clone user@git.example.com:/opt/git/my_project.git
CHAPTER 4: Git en el Servidor
136

Si un usuario accede por medio de SSH a un servidor y tiene permisos de
escritura en el directorio git my_project.git / opt / /, automáticamente
también tendrán acceso push.
Git automáticamente agrega permisos de grupo para la escritura en un repo-
sitorio apropiadamente si se ejecuta el comando git init con la opción` --
shared`.
$ ssh user@git.example.com
$ cd /opt/git/my_project.git
$ git init --bare --shared
Puedes ver lo fácil que es tomar un repositorio Git, crear una versión vacía, y
colocarlo en un servidor al que tú y tus colaboradores tienen acceso SSH. Ahora
estan listos para colaborar en el mismo proyecto.
Es importante tener en cuenta que esto es literalmente todo lo que necesitas
hacer para ejecutar un útil servidor Git al cual varias personas tendrán acceso -
sólo tiene que añadir cuentas con acceso SSH a un servidor, y subir un reposi-
torio vacío en alguna parte a la que todos los usuarios puedan leer y escribir.
Estás listo para trabajar. Nada más es necesario.
En las próximas secciones, verás cómo ampliar a configuraciones más sofis-
ticadas. Esta sección incluirá no tener que crear cuentas para cada usuario,
añadiendo permisos de lectura pública a los repositorios, la creación de inter-
faces de usuario web y más. Sin embargo, ten en cuenta que para colaborar con
un par de personas en un proyecto privado, todo_lo_que_necesitas_es un ser-
vidor SSH y un repositorio vacío.
Pequeñas configuraciones
Si tienes un pequeño equipo o acabas de probar Git en tr organización y tienes
sólo unos pocos desarrolladores, las cosas pueden ser simples para tí. Uno de
los aspectos más complicados de configurar un servidor Git es la gestión de
usuarios. Si quieres que algunos repositorios sean de sólo lectura para ciertos
usuarios y lectura / escritura para los demás, el acceso y los permisos pueden
ser un poco más difíciles de organizar.
ACCESO SSH
Si tienes un servidor al que todos los desarrolladores ya tienen acceso SSH, es
generalmente más fácil de configurar el primer repositorio allí, porque no hay
que hacer casi ningún trabajo (como ya vimos en la sección anterior). Si quieres
permisos de acceso más complejas en tus repositorios, puedes manejarlos con
Configurando Git en un servidor
137

los permisos del sistema de archivos normales del sistema operativo donde tu
servidor se ejecuta.
Si deseas colocar los repositorios en un servidor que no tiene cuentas para
todo el mundo en su equipo para el que deseas tener acceso de escritura,
debes configurar el acceso SSH para ellos. Suponiendo que tienes un servidor
con el que hacer esto, ya tiene un servidor SSH instalado, y así es como estás
accediendo al servidor.
Hay algunas maneras con las cuales puedes dar acceso a todo tu equipo. La
primera es la creación de cuentas para todo el mundo, que es sencillo, pero
puede ser engorroso. Podrías no desear ejecutar adduser y establecer contras-
eñas temporales para cada usuario.
Un segundo método consiste en crear un solo usuario git en la máquina,
preguntar a cada usuario de quién se trata para otorgarle permisos de escritura
para que te envíe una llave SSH pública, y agregar esa llave al archivo
~ / .ssh / authorized_keys de tu nuevo usuario git. En ese momento, to-
do el mundo podrá acceder a esa máquina mediante el usuario git. Esto no
afecta a los datos commit de ninguna manera - el usuario SSH con el que te
conectas no puede modificar los commits que has registrado.
Otra manera de hacer que tu servidor SSH autentifique desde un servidor
LDAP o desde alguna otra fuente de autentificación centralizada que pudieras
tener ya configurada. Mientras que cada usuario sea capaz de tener acceso shell
a la máquina, cualquier mecanismo de autentificación SSH que se te ocurra de-
bería de funcionar.
Generating Your SSH Public Key
That being said, many Git servers authenticate using SSH public keys. In order
to provide a public key, each user in your system must generate one if they
don’t already have one. This process is similar across all operating systems.
First, you should check to make sure you don’t already have a key. By default, a
user’s SSH keys are stored in that user’s ~/.ssh directory. You can easily check
to see if you have a key already by going to that directory and listing the con-
tents:
$ cd ~/.ssh
$ ls
authorized_keys2 id_dsa known_hosts
config id_dsa.pub
You’re looking for a pair of files named something like id_dsa or id_rsa
and a matching file with a .pub extension. The .pub file is your public key, and
CHAPTER 4: Git en el Servidor
138

the other file is your private key. If you don’t have these files (or you don’t even
have a .ssh directory), you can create them by running a program called ssh-
keygen, which is provided with the SSH package on Linux/Mac systems and
comes with the MSysGit package on Windows:
$ ssh-keygen
Generating public/private rsa key pair.
Enter file in which to save the key (/home/schacon/.ssh/id_rsa):
Created directory '/home/schacon/.ssh'.
Enter passphrase (empty for no passphrase):
Enter same passphrase again:
Your identification has been saved in /home/schacon/.ssh/id_rsa.
Your public key has been saved in /home/schacon/.ssh/id_rsa.pub.
The key fingerprint is:
d0:82:24:8e:d7:f1:bb:9b:33:53:96:93:49:da:9b:e3 schacon@mylaptop.local
First it confirms where you want to save the key (.ssh/id_rsa), and then it
asks twice for a passphrase, which you can leave empty if you don’t want to
type a password when you use the key.
Now, each user that does this has to send their public key to you or whoever
is administrating the Git server (assuming you’re using an SSH server setup that
requires public keys). All they have to do is copy the contents of the .pub file
and e-mail it. The public keys look something like this:
$ cat ~/.ssh/id_rsa.pub
ssh-rsa AAAAB3NzaC1yc2EAAAABIwAAAQEAklOUpkDHrfHY17SbrmTIpNLTGK9Tjom/BWDSU
GPl+nafzlHDTYW7hdI4yZ5ew18JH4JW9jbhUFrviQzM7xlELEVf4h9lFX5QVkbPppSwg0cda3
Pbv7kOdJ/MTyBlWXFCR+HAo3FXRitBqxiX1nKhXpHAZsMciLq8V6RjsNAQwdsdMFvSlVK/7XA
t3FaoJoAsncM1Q9x5+3V0Ww68/eIFmb1zuUFljQJKprrX88XypNDvjYNby6vw/Pb0rwert/En
mZ+AW4OZPnTPI89ZPmVMLuayrD2cE86Z/il8b+gw3r3+1nKatmIkjn2so1d01QraTlMqVSsbx
NrRFi9wrf+M7Q== schacon@mylaptop.local
For a more in-depth tutorial on creating an SSH key on multiple operating
systems, see the GitHub guide on SSH keys at https://help.github.com/articles/
generating-ssh-keys.
Setting Up the Server
Let’s walk through setting up SSH access on the server side. In this example,
you’ll use the authorized_keys method for authenticating your users. We al-
so assume you’re running a standard Linux distribution like Ubuntu. First, you
create a git user and a .ssh directory for that user.
Setting Up the Server
139

$ sudo adduser git
$ su git
$ cd
$ mkdir .ssh && chmod 700 .ssh
$ touch .ssh/authorized_keys && chmod 600 .ssh/authorized_keys
Next, you need to add some developer SSH public keys to the author-
ized_keys file for the git user. Let’s assume you have some trusted public
keys and have saved them to temporary files. Again, the public keys look some-
thing like this:
$ cat /tmp/id_rsa.john.pub
ssh-rsa AAAAB3NzaC1yc2EAAAADAQABAAABAQCB007n/ww+ouN4gSLKssMxXnBOvf9LGt4L
ojG6rs6hPB09j9R/T17/x4lhJA0F3FR1rP6kYBRsWj2aThGw6HXLm9/5zytK6Ztg3RPKK+4k
Yjh6541NYsnEAZuXz0jTTyAUfrtU3Z5E003C4oxOj6H0rfIF1kKI9MAQLMdpGW1GYEIgS9Ez
Sdfd8AcCIicTDWbqLAcU4UpkaX8KyGlLwsNuuGztobF8m72ALC/nLF6JLtPofwFBlgc+myiv
O7TCUSBdLQlgMVOFq1I2uPWQOkOWQAHukEOmfjy2jctxSDBQ220ymjaNsHT4kgtZg2AYYgPq
dAv8JggJICUvax2T9va5 gsg-keypair
You just append them to the git user’s authorized_keys file in its .ssh
directory:
$ cat /tmp/id_rsa.john.pub >> ~/.ssh/authorized_keys
$ cat /tmp/id_rsa.josie.pub >> ~/.ssh/authorized_keys
$ cat /tmp/id_rsa.jessica.pub >> ~/.ssh/authorized_keys
Now, you can set up an empty repository for them by running git init
with the --bare option, which initializes the repository without a working di-
rectory:
$ cd /opt/git
$ mkdir project.git
$ cd project.git
$ git init --bare
Initialized empty Git repository in /opt/git/project.git/
Then, John, Josie, or Jessica can push the first version of their project into
that repository by adding it as a remote and pushing up a branch. Note that
someone must shell onto the machine and create a bare repository every time
you want to add a project. Let’s use gitserver as the hostname of the server
on which you’ve set up your git user and repository. If you’re running it inter-
CHAPTER 4: Git en el Servidor
140

nally, and you set up DNS for gitserver to point to that server, then you can
use the commands pretty much as is (assuming that myproject is an existing
project with files in it):
# on Johns computer
$ cd myproject
$ git init
$ git add .
$ git commit -m 'initial commit'
$ git remote add origin git@gitserver:/opt/git/project.git
$ git push origin master
At this point, the others can clone it down and push changes back up just as
easily:
$ git clone git@gitserver:/opt/git/project.git
$ cd project
$ vim README
$ git commit -am 'fix for the README file'
$ git push origin master
With this method, you can quickly get a read/write Git server up and running
for a handful of developers.
You should note that currently all these users can also log into the server
and get a shell as the git user. If you want to restrict that, you will have to
change the shell to something else in the passwd file.
You can easily restrict the git user to only doing Git activities with a limited
shell tool called git-shell that comes with Git. If you set this as your git
user’s login shell, then the git user can’t have normal shell access to your serv-
er. To use this, specify git-shell instead of bash or csh for your user’s login
shell. To do so, you must first add git-shell to /etc/shells if it’s not already
there:
$ cat /etc/shells # see if `git-shell` is already in there. If not...
$ which git-shell # make sure git-shell is installed on your system.
$ sudo vim /etc/shells # and add the path to git-shell from last command
Now you can edit the shell for a user using chsh <username>:
$ sudo chsh git # and enter the path to git-shell, usually: /usr/bin/git-shell
Setting Up the Server
141

Now, the git user can only use the SSH connection to push and pull Git re-
positories and can’t shell onto the machine. If you try, you’ll see a login rejec-
tion like this:
$ ssh git@gitserver
fatal: Interactive git shell is not enabled.
hint: ~/git-shell-commands should exist and have read and execute access.
Connection to gitserver closed.
Now Git network commands will still work just fine but the users won’t be
able to get a shell. As the output states, you can also set up a directory in the
git user’s home directory that customizes the git-shell command a bit. For
instance, you can restrict the Git commands that the server will accept or you
can customize the message that users see if they try to SSH in like that. Run git
help shell for more information on customizing the shell.
Git Daemon
Next we’ll set up a daemon serving repositories over the “Git” protocol. This is
common choice for fast, unauthenticated access to your Git data. Remember
that since it’s not an authenticated service, anything you serve over this proto-
col is public within its network.
If you’re running this on a server outside your firewall, it should only be used
for projects that are publicly visible to the world. If the server you’re running it
on is inside your firewall, you might use it for projects that a large number of
people or computers (continuous integration or build servers) have read-only
access to, when you don’t want to have to add an SSH key for each.
In any case, the Git protocol is relatively easy to set up. Basically, you need to
run this command in a daemonized manner:
git daemon --reuseaddr --base-path=/opt/git/ /opt/git/
--reuseaddr allows the server to restart without waiting for old connec-
tions to time out, the --base-path option allows people to clone projects
without specifying the entire path, and the path at the end tells the Git daemon
where to look for repositories to export. If you’re running a firewall, you’ll also
need to punch a hole in it at port 9418 on the box you’re setting this up on.
You can daemonize this process a number of ways, depending on the operat-
ing system you’re running. On an Ubuntu machine, you can use an Upstart
script. So, in the following file
CHAPTER 4: Git en el Servidor
142

/etc/event.d/local-git-daemon
you put this script:
start on startup
stop on shutdown
exec /usr/bin/git daemon \
--user=git --group=git \
--reuseaddr \
--base-path=/opt/git/ \
/opt/git/
respawn
For security reasons, it is strongly encouraged to have this daemon run as a
user with read-only permissions to the repositories – you can easily do this by
creating a new user git-ro and running the daemon as them. For the sake of
simplicity we’ll simply run it as the same git user that git-shell is running as.
When you restart your machine, your Git daemon will start automatically
and respawn if it goes down. To get it running without having to reboot, you
can run this:
initctl start local-git-daemon
On other systems, you may want to use xinetd, a script in your sysvinit
system, or something else – as long as you get that command daemonized and
watched somehow.
Next, you have to tell Git which repositories to allow unauthenticated Git
server-based access to. You can do this in each repository by creating a file
name git-daemon-export-ok.
$ cd /path/to/project.git
$ touch git-daemon-export-ok
The presence of that file tells Git that it’s OK to serve this project without au-
thentication.
Git Daemon
143

Smart HTTP
We now have authenticated access though SSH and unauthenticated access
through git://, but there is also a protocol that can do both at the same time.
Setting up Smart HTTP is basically just enabling a CGI script that is provided
with Git called git-http-backend on the server. This CGI will read the path
and headers sent by a git fetch or git push to an HTTP URL and determine
if the client can communicate over HTTP (which is true for any client since ver-
sion 1.6.6). If the CGI sees that the client is smart, it will communicate smartly
with it, otherwise it will fall back to the dumb behavior (so it is backward com-
patible for reads with older clients).
Let’s walk through a very basic setup. We’ll set this up with Apache as the
CGI server. If you don’t have Apache setup, you can do so on a Linux box with
something like this:
$ sudo apt-get install apache2 apache2-utils
$ a2enmod cgi alias env
This also enables the mod_cgi, mod_alias, and mod_env modules, which
are all needed for this to work properly.
Next we need to add some things to the Apache configuration to run the
git-http-backend as the handler for anything coming into the /git path of
your web server.
SetEnv GIT_PROJECT_ROOT /opt/git
SetEnv GIT_HTTP_EXPORT_ALL
ScriptAlias /git/ /usr/libexec/git-core/git-http-backend/
If you leave out GIT_HTTP_EXPORT_ALL environment variable, then Git will
only serve to unauthenticated clients the repositories with the git-daemon-
export-ok file in them, just like the Git daemon did.
Then you’ll have to tell Apache to allow requests to that path with some-
thing like this:
<Directory "/usr/lib/git-core*">
Options ExecCGI Indexes
Order allow,deny
Allow from all
Require all granted
</Directory>
CHAPTER 4: Git en el Servidor
144

Finally you’ll want to make writes be authenticated somehow, possibly with
an Auth block like this:
<LocationMatch "^/git/.*/git-receive-pack$">
AuthType Basic
AuthName "Git Access"
AuthUserFile /opt/git/.htpasswd
Require valid-user
</LocationMatch>
That will require you to create a .htaccess file containing the passwords of
all the valid users. Here is an example of adding a “schacon” user to the file:
$ htdigest -c /opt/git/.htpasswd "Git Access" schacon
There are tons of ways to have Apache authenticate users, you’ll have to
choose and implement one of them. This is just the simplest example we could
come up with. You’ll also almost certainly want to set this up over SSL so all this
data is encrypted.
We don’t want to go too far down the rabbit hole of Apache configuration
specifics, since you could well be using a dierent server or have dierent au-
thentication needs. The idea is that Git comes with a CGI called git-http-
backend that when invoked will do all the negotiation to send and receive data
over HTTP. It does not implement any authentication itself, but that can easily
be controlled at the layer of the web server that invokes it. You can do this with
nearly any CGI-capable web server, so go with the one that you know best.
For more information on configuring authentication in Apache, check
out the Apache docs here: http://httpd.apache.org/docs/current/howto/
auth.html
GitWeb
Now that you have basic read/write and read-only access to your project, you
may want to set up a simple web-based visualizer. Git comes with a CGI script
called GitWeb that is sometimes used for this.
GitWeb
145

FIGURE 4-1
The GitWeb web-
based user interface.
If you want to check out what GitWeb would look like for your project, Git
comes with a command to fire up a temporary instance if you have a light-
weight server on your system like lighttpd or webrick. On Linux machines,
lighttpd is oen installed, so you may be able to get it to run by typing git
instaweb in your project directory. If you’re running a Mac, Leopard comes
preinstalled with Ruby, so webrick may be your best bet. To start instaweb
with a non-lighttpd handler, you can run it with the --httpd option.
$ git instaweb --httpd=webrick
[2009-02-21 10:02:21] INFO WEBrick 1.3.1
[2009-02-21 10:02:21] INFO ruby 1.8.6 (2008-03-03) [universal-darwin9.0]
That starts up an HTTPD server on port 1234 and then automatically starts a
web browser that opens on that page. It’s pretty easy on your part. When you’re
done and want to shut down the server, you can run the same command with
the --stop option:
$ git instaweb --httpd=webrick --stop
CHAPTER 4: Git en el Servidor
146

If you want to run the web interface on a server all the time for your team or
for an open source project you’re hosting, you’ll need to set up the CGI script to
be served by your normal web server. Some Linux distributions have a gitweb
package that you may be able to install via apt or yum, so you may want to try
that first. We’ll walk through installing GitWeb manually very quickly. First, you
need to get the Git source code, which GitWeb comes with, and generate the
custom CGI script:
$ git clone git://git.kernel.org/pub/scm/git/git.git
$ cd git/
$ make GITWEB_PROJECTROOT="/opt/git" prefix=/usr gitweb
SUBDIR gitweb
SUBDIR ../
make[2]: `GIT-VERSION-FILE' is up to date.
GEN gitweb.cgi
GEN static/gitweb.js
$ sudo cp -Rf gitweb /var/www/
Notice that you have to tell the command where to find your Git repositories
with the GITWEB_PROJECTROOT variable. Now, you need to make Apache use
CGI for that script, for which you can add a VirtualHost:
<VirtualHost *:80>
ServerName gitserver
DocumentRoot /var/www/gitweb
<Directory /var/www/gitweb>
Options ExecCGI +FollowSymLinks +SymLinksIfOwnerMatch
AllowOverride All
order allow,deny
Allow from all
AddHandler cgi-script cgi
DirectoryIndex gitweb.cgi
</Directory>
</VirtualHost>
Again, GitWeb can be served with any CGI or Perl capable web server; if you
prefer to use something else, it shouldn’t be diicult to set up. At this point, you
should be able to visit http://gitserver/ to view your repositories online.
GitWeb
147
FIGURE 4-2
The Bitnami GitLab
virtual machine
login screen.
GitLab
GitWeb is pretty simplistic though. If you’re looking for a more modern, fully
featured Git server, there are some several open source solutions out there that
you can install instead. As GitLab is one of the more popular ones, we’ll cover
installing and using it as an example. This is a bit more complex than the Git-
Web option and likely requires more maintenance, but it is a much more fully
featured option.
Installation
GitLab is a database-backed web application, so its installation is a bit more in-
volved than some other git servers. Fortunately, this process is very well-
documented and supported.
There are a few methods you can pursue to install GitLab. To get something
up and running quickly, you can download a virtual machine image or a one-
click installer from https://bitnami.com/stack/gitlab, and tweak the configura-
tion to match your particular environment. One nice touch Bitnami has includ-
ed is the login screen (accessed by typing alt-→); it tells you the IP address and
default username and password for the installed GitLab.
For anything else, follow the guidance in the GitLab Community Edition re-
adme, which can be found at https://gitlab.com/gitlab-org/gitlab-ce/tree/
master. There you’ll find assistance for installing GitLab using Chef recipes, a
CHAPTER 4: Git en el Servidor
148

FIGURE 4-3
The “Admin area”
item in the GitLab
menu.
virtual machine on Digital Ocean, and RPM and DEB packages (which, as of this
writing, are in beta). There’s also “unoicial” guidance on getting GitLab run-
ning with non-standard operating systems and databases, a fully-manual in-
stallation script, and many other topics.
Administration
GitLab’s administration interface is accessed over the web. Simply point your
browser to the hostname or IP address where GitLab is installed, and log in as
an admin user. The default username is admin@local.host, and the default
password is 5iveL!fe (which you will be prompted to change as soon as you
enter it). Once logged in, click the “Admin area” icon in the menu at the top
right.
USERS
Users in GitLab are accounts that correspond to people. User accounts don’t
have a lot of complexity; mainly it’s a collection of personal information attach-
ed to login data. Each user account comes with a namespace, which is a logical
grouping of projects that belong to that user. If the user jane had a project
named project, that project’s url would be http://server/jane/project.
GitLab
149

FIGURE 4-4
The GitLab user
administration
screen.
Removing a user can be done in two ways. “Blocking” a user prevents them
from logging into the GitLab instance, but all of the data under that user’s
namespace will be preserved, and commits signed with that user’s email ad-
dress will still link back to their profile.
“Destroying” a user, on the other hand, completely removes them from the
database and filesystem. All projects and data in their namespace is removed,
and any groups they own will also be removed. This is obviously a much more
permanent and destructive action, and its uses are rare.
GROUPS
A GitLab group is an assemblage of projects, along with data about how users
can access those projects. Each group has a project namespace (the same way
that users do), so if the group training has a project materials, its url would
be http://server/training/materials.
CHAPTER 4: Git en el Servidor
150
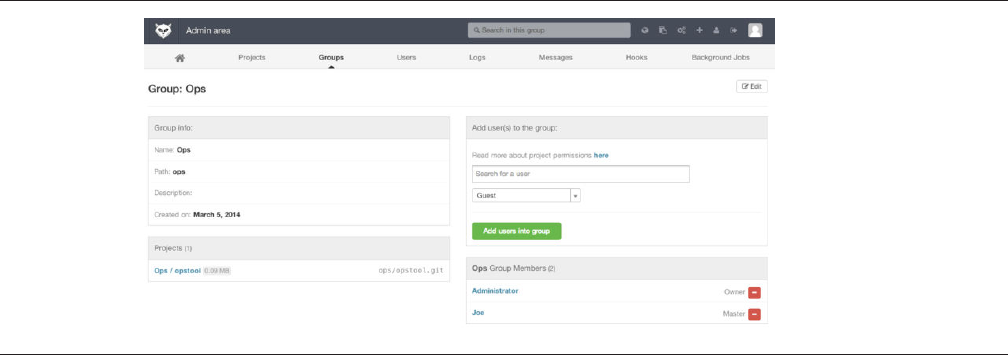
FIGURE 4-5
The GitLab group
administration
screen.
Each group is associated with a number of users, each of which has a level of
permissions for the group’s projects and the group itself. These range from
“Guest” (issues and chat only) to “Owner” (full control of the group, its mem-
bers, and its projects). The types of permissions are too numerous to list here,
but GitLab has a helpful link on the administration screen.
PROJECTS
A GitLab project roughly corresponds to a single git repository. Every project
belongs to a single namespace, either a user or a group. If the project belongs
to a user, the owner of the project has direct control over who has access to the
project; if the project belongs to a group, the group’s user-level permissions will
also take eect.
Every project also has a visibility level, which controls who has read access
to that project’s pages and repository. If a project is Private, the project’s owner
must explicitly grant access to specific users. An Internal project is visible to any
logged-in user, and a Public project is visible to anyone. Note that this controls
both git “fetch” access as well as access to the web UI for that project.
HOOKS
GitLab includes support for hooks, both at a project or system level. For either
of these, the GitLab server will perform an HTTP POST with some descriptive
JSON whenever relevant events occur. This is a great way to connect your git
repositories and GitLab instance to the rest of your development automation,
such as CI servers, chat rooms, or deployment tools.
GitLab
151

Basic Usage
The first thing you’ll want to do with GitLab is create a new project. This is ac-
complished by clicking the “+” icon on the toolbar. You’ll be asked for the
project’s name, which namespace it should belong to, and what its visibility lev-
el should be. Most of what you specify here isn’t permanent, and can be re-
adjusted later through the settings interface. Click “Create Project”, and you’re
done.
Once the project exists, you’ll probably want to connect it with a local Git
repository. Each project is accessible over HTTPS or SSH, either of which can be
used to configure a Git remote. The URLs are visible at the top of the project’s
home page. For an existing local repository, this command will create a remote
named gitlab to the hosted location:
$ git remote add gitlab https://server/namespace/project.git
If you don’t have a local copy of the repository, you can simply do this:
$ git clone https://server/namespace/project.git
The web UI provides access to several useful views of the repository itself.
Each project’s home page shows recent activity, and links along the top will
lead you to views of the project’s files and commit log.
Working Together
The simplest way of working together on a GitLab project is by giving another
user direct push access to the git repository. You can add a user to a project by
going to the “Members” section of that project’s settings, and associating the
new user with an access level (the dierent access levels are discussed a bit in
“Groups”). By giving a user an access level of “Developer” or above, that user
can push commits and branches directly to the repository with impunity.
Another, more decoupled way of collaboration is by using merge requests.
This feature enables any user that can see a project to contribute to it in a con-
trolled way. Users with direct access can simply create a branch, push commits
to it, and open a merge request from their branch back into master or any oth-
er branch. Users who don’t have push permissions for a repository can “fork” it
(create their own copy), push commits to that copy, and open a merge request
from their fork back to the main project. This model allows the owner to be in
CHAPTER 4: Git en el Servidor
152
full control of what goes into the repository and when, while allowing contribu-
tions from untrusted users.
Merge requests and issues are the main units of long-lived discussion in Gi-
tLab. Each merge request allows a line-by-line discussion of the proposed
change (which supports a lightweight kind of code review), as well as a general
overall discussion thread. Both can be assigned to users, or organized into mile-
stones.
This section is focused mainly on the Git-related features of GitLab, but as a
mature project, it provides many other features to help your team work togeth-
er, such as project wikis and system maintenance tools. One benefit to GitLab is
that, once the server is set up and running, you’ll rarely need to tweak a config-
uration file or access the server via SSH; most administration and general usage
can be accomplished through the in-browser interface.
Third Party Hosted Options
If you don’t want to go through all of the work involved in setting up your own
Git server, you have several options for hosting your Git projects on an external
dedicated hosting site. Doing so oers a number of advantages: a hosting site is
generally quick to set up and easy to start projects on, and no server mainte-
nance or monitoring is involved. Even if you set up and run your own server in-
ternally, you may still want to use a public hosting site for your open source
code – it’s generally easier for the open source community to find and help you
with.
These days, you have a huge number of hosting options to choose from,
each with dierent advantages and disadvantages. To see an up-to-date list,
check out the GitHosting page on the main Git wiki at https://
git.wiki.kernel.org/index.php/GitHosting
We’ll cover using GitHub in detail in Chapter 6, as it is the largest Git host
out there and you may need to interact with projects hosted on it in any case,
but there are dozens more to choose from should you not want to set up your
own Git server.
Resumen
Tienes varias opciones para obtener un repositorio Git remoto y ponerlo a fun-
cionar para que puedas colaborar con otras personas o compartir tu trabajo.
Mantener tu propio servidor te da control y te permite correr tu servidor
dentro de tu propio cortafuegos, pero tal servidor generalmente requiere una
importante cantidad de tu tiempo para configurar y mantener. Si almacenas tus
datos en un servidor hospedado, es fácil de configurar y mantener; sin embar-
Third Party Hosted Options
153
go, tienes que ser capaz de mantener tu código en los servidores de alguien
más, y agunas organizaciones no te lo permitirán.
Debería ser un proceso claro determinar que solución o combinación de sol-
uciones es apropiada para tí y para tu organización.
CHAPTER 4: Git en el Servidor
154
Distributed Git
Now that you have a remote Git repository set up as a point for all the develop-
ers to share their code, and you’re familiar with basic Git commands in a local
workflow, you’ll look at how to utilize some of the distributed workflows that
Git aords you.
In this chapter, you’ll see how to work with Git in a distributed environment
as a contributor and an integrator. That is, you’ll learn how to contribute code
successfully to a project and make it as easy on you and the project maintainer
as possible, and also how to maintain a project successfully with a number of
developers contributing.
Distributed Workflows
Unlike Centralized Version Control Systems (CVCSs), the distributed nature of
Git allows you to be far more flexible in how developers collaborate on projects.
In centralized systems, every developer is a node working more or less equally
on a central hub. In Git, however, every developer is potentially both a node
and a hub – that is, every developer can both contribute code to other reposito-
ries and maintain a public repository on which others can base their work and
which they can contribute to. This opens a vast range of workflow possibilities
for your project and/or your team, so we’ll cover a few common paradigms that
take advantage of this flexibility. We’ll go over the strengths and possible weak-
nesses of each design; you can choose a single one to use, or you can mix and
match features from each.
Centralized Workflow
In centralized systems, there is generally a single collaboration model–the cen-
tralized workflow. One central hub, or repository, can accept code, and every-
one synchronizes their work to it. A number of developers are nodes – consum-
ers of that hub – and synchronize to that one place.
155
5

FIGURE 5-1
Centralized
workow.
This means that if two developers clone from the hub and both make
changes, the first developer to push their changes back up can do so with no
problems. The second developer must merge in the first one’s work before
pushing changes up, so as not to overwrite the first developer’s changes. This
concept is as true in Git as it is in Subversion (or any CVCS), and this model
works perfectly well in Git.
If you are already comfortable with a centralized workflow in your company
or team, you can easily continue using that workflow with Git. Simply set up a
single repository, and give everyone on your team push access; Git won’t let
users overwrite each other. Say John and Jessica both start working at the
same time. John finishes his change and pushes it to the server. Then Jessica
tries to push her changes, but the server rejects them. She is told that she’s try-
ing to push non-fast-forward changes and that she won’t be able to do so until
she fetches and merges. This workflow is attractive to a lot of people because
it’s a paradigm that many are familiar and comfortable with.
This is also not limited to small teams. With Git’s branching model, it’s possi-
ble for hundreds of developers to successfully work on a single project through
dozens of branches simultaneously.
Integration-Manager Workflow
Because Git allows you to have multiple remote repositories, it’s possible to
have a workflow where each developer has write access to their own public
repository and read access to everyone else’s. This scenario oen includes a
canonical repository that represents the “oicial” project. To contribute to that
project, you create your own public clone of the project and push your changes
to it. Then, you can send a request to the maintainer of the main project to pull
in your changes. The maintainer can then add your repository as a remote, test
CHAPTER 5: Distributed Git
156
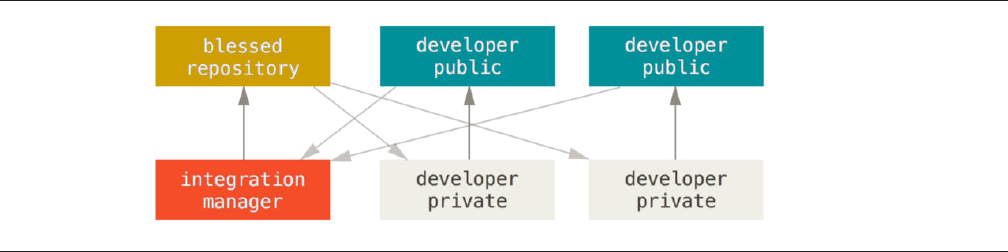
FIGURE 5-2
Integration-
manager workow.
your changes locally, merge them into their branch, and push back to their
repository. The process works as follows (see Figure 5-2):
1. The project maintainer pushes to their public repository.
2. A contributor clones that repository and makes changes.
3. The contributor pushes to their own public copy.
4. The contributor sends the maintainer an e-mail asking them to pull
changes.
5. The maintainer adds the contributor’s repo as a remote and merges local-
ly.
6. The maintainer pushes merged changes to the main repository.
This is a very common workflow with hub-based tools like GitHub or GitLab,
where it’s easy to fork a project and push your changes into your fork for every-
one to see. One of the main advantages of this approach is that you can contin-
ue to work, and the maintainer of the main repository can pull in your changes
at any time. Contributors don’t have to wait for the project to incorporate their
changes – each party can work at their own pace.
Dictator and Lieutenants Workflow
This is a variant of a multiple-repository workflow. It’s generally used by huge
projects with hundreds of collaborators; one famous example is the Linux ker-
nel. Various integration managers are in charge of certain parts of the reposito-
ry; they’re called lieutenants. All the lieutenants have one integration manager
known as the benevolent dictator. The benevolent dictator’s repository serves
as the reference repository from which all the collaborators need to pull. The
process works like this (see Figure 5-3):
Distributed Workflows
157
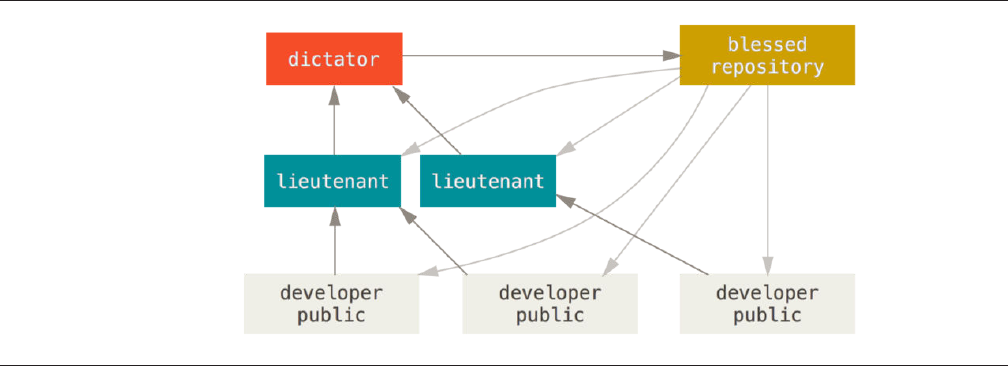
FIGURE 5-3
Benevolent dictator
workow.
1. Regular developers work on their topic branch and rebase their work on
top of master. The master branch is that of the dictator.
2. Lieutenants merge the developers’ topic branches into their master
branch.
3. The dictator merges the lieutenants’ master branches into the dictator’s
master branch.
4. The dictator pushes their master to the reference repository so the other
developers can rebase on it.
This kind of workflow isn’t common, but can be useful in very big projects, or
in highly hierarchical environments. It allows the project leader (the dictator) to
delegate much of the work and collect large subsets of code at multiple points
before integrating them.
Workflows Summary
These are some commonly used workflows that are possible with a distributed
system like Git, but you can see that many variations are possible to suit your
particular real-world workflow. Now that you can (hopefully) determine which
workflow combination may work for you, we’ll cover some more specific exam-
ples of how to accomplish the main roles that make up the dierent flows. In
the next section, you’ll learn about a few common patterns for contributing to a
project.
CHAPTER 5: Distributed Git
158
Contributing to a Project
The main diiculty with describing how to contribute to a project is that there
are a huge number of variations on how it’s done. Because Git is very flexible,
people can and do work together in many ways, and it’s problematic to de-
scribe how you should contribute – every project is a bit dierent. Some of the
variables involved are active contributor count, chosen workflow, your commit
access, and possibly the external contribution method.
The first variable is active contributor count – how many users are actively
contributing code to this project, and how oen? In many instances, you’ll have
two or three developers with a few commits a day, or possibly less for some-
what dormant projects. For larger companies or projects, the number of devel-
opers could be in the thousands, with hundreds or thousands of commits com-
ing in each day. This is important because with more and more developers, you
run into more issues with making sure your code applies cleanly or can be easi-
ly merged. Changes you submit may be rendered obsolete or severely broken
by work that is merged in while you were working or while your changes were
waiting to be approved or applied. How can you keep your code consistently up
to date and your commits valid?
The next variable is the workflow in use for the project. Is it centralized, with
each developer having equal write access to the main codeline? Does the
project have a maintainer or integration manager who checks all the patches?
Are all the patches peer-reviewed and approved? Are you involved in that pro-
cess? Is a lieutenant system in place, and do you have to submit your work to
them first?
The next issue is your commit access. The workflow required in order to con-
tribute to a project is much dierent if you have write access to the project than
if you don’t. If you don’t have write access, how does the project prefer to ac-
cept contributed work? Does it even have a policy? How much work are you
contributing at a time? How oen do you contribute?
All these questions can aect how you contribute eectively to a project and
what workflows are preferred or available to you. We’ll cover aspects of each of
these in a series of use cases, moving from simple to more complex; you should
be able to construct the specific workflows you need in practice from these ex-
amples.
Commit Guidelines
Before we start looking at the specific use cases, here’s a quick note about com-
mit messages. Having a good guideline for creating commits and sticking to it
makes working with Git and collaborating with others a lot easier. The Git
Contributing to a Project
159
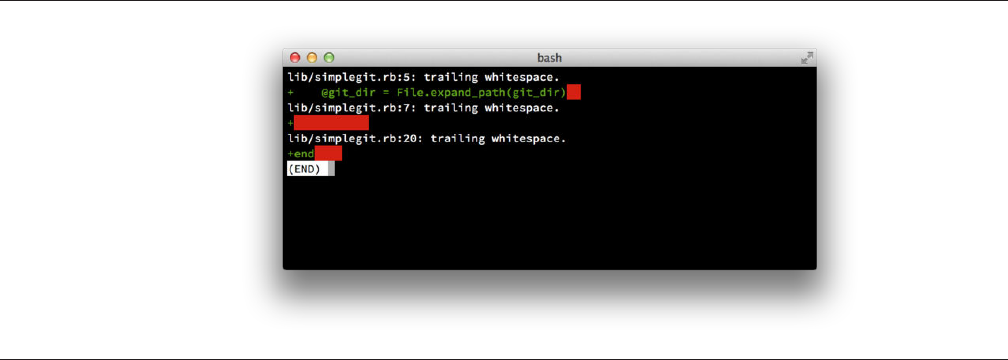
FIGURE 5-4
Output of git diff
--check.
project provides a document that lays out a number of good tips for creating
commits from which to submit patches – you can read it in the Git source code
in the Documentation/SubmittingPatches file.
First, you don’t want to submit any whitespace errors. Git provides an easy
way to check for this – before you commit, run git diff --check, which
identifies possible whitespace errors and lists them for you.
If you run that command before committing, you can tell if you’re about to
commit whitespace issues that may annoy other developers.
Next, try to make each commit a logically separate changeset. If you can, try
to make your changes digestible – don’t code for a whole weekend on five dif-
ferent issues and then submit them all as one massive commit on Monday.
Even if you don’t commit during the weekend, use the staging area on Monday
to split your work into at least one commit per issue, with a useful message per
commit. If some of the changes modify the same file, try to use git add --
patch to partially stage files (covered in detail in “Interactive Staging”). The
project snapshot at the tip of the branch is identical whether you do one com-
mit or five, as long as all the changes are added at some point, so try to make
things easier on your fellow developers when they have to review your changes.
This approach also makes it easier to pull out or revert one of the changesets if
you need to later. “Rewriting History” describes a number of useful Git tricks
for rewriting history and interactively staging files – use these tools to help cra
a clean and understandable history before sending the work to someone else.
The last thing to keep in mind is the commit message. Getting in the habit of
creating quality commit messages makes using and collaborating with Git a lot
easier. As a general rule, your messages should start with a single line that’s no
CHAPTER 5: Distributed Git
160
more than about 50 characters and that describes the changeset concisely, fol-
lowed by a blank line, followed by a more detailed explanation. The Git project
requires that the more detailed explanation include your motivation for the
change and contrast its implementation with previous behavior – this is a good
guideline to follow. It’s also a good idea to use the imperative present tense in
these messages. In other words, use commands. Instead of “I added tests for”
or “Adding tests for,” use “Add tests for.” Here is a template originally written by
Tim Pope:
Short (50 chars or less) summary of changes
More detailed explanatory text, if necessary. Wrap it to
about 72 characters or so. In some contexts, the first
line is treated as the subject of an email and the rest of
the text as the body. The blank line separating the
summary from the body is critical (unless you omit the body
entirely); tools like rebase can get confused if you run
the two together.
Further paragraphs come after blank lines.
- Bullet points are okay, too
- Typically a hyphen or asterisk is used for the bullet,
preceded by a single space, with blank lines in
between, but conventions vary here
If all your commit messages look like this, things will be a lot easier for you
and the developers you work with. The Git project has well-formatted commit
messages – try running git log --no-merges there to see what a nicely for-
matted project-commit history looks like.
In the following examples, and throughout most of this book, for the sake of
brevity this book doesn’t have nicely-formatted messages like this; instead, we
use the -m option to git commit. Do as we say, not as we do.
Private Small Team
The simplest setup you’re likely to encounter is a private project with one or
two other developers. “Private,” in this context, means closed-source – not ac-
cessible to the outside world. You and the other developers all have push ac-
cess to the repository.
In this environment, you can follow a workflow similar to what you might do
when using Subversion or another centralized system. You still get the advan-
tages of things like oline committing and vastly simpler branching and merg-
Contributing to a Project
161

ing, but the workflow can be very similar; the main dierence is that merges
happen client-side rather than on the server at commit time. Let’s see what it
might look like when two developers start to work together with a shared
repository. The first developer, John, clones the repository, makes a change,
and commits locally. (The protocol messages have been replaced with ... in
these examples to shorten them somewhat.)
# John's Machine
$ git clone john@githost:simplegit.git
Initialized empty Git repository in /home/john/simplegit/.git/
...
$ cd simplegit/
$ vim lib/simplegit.rb
$ git commit -am 'removed invalid default value'
[master 738ee87] removed invalid default value
1 files changed, 1 insertions(+), 1 deletions(-)
The second developer, Jessica, does the same thing – clones the repository
and commits a change:
# Jessica's Machine
$ git clone jessica@githost:simplegit.git
Initialized empty Git repository in /home/jessica/simplegit/.git/
...
$ cd simplegit/
$ vim TODO
$ git commit -am 'add reset task'
[master fbff5bc] add reset task
1 files changed, 1 insertions(+), 0 deletions(-)
Now, Jessica pushes her work up to the server:
# Jessica's Machine
$ git push origin master
...
To jessica@githost:simplegit.git
1edee6b..fbff5bc master -> master
John tries to push his change up, too:
# John's Machine
$ git push origin master
To john@githost:simplegit.git
CHAPTER 5: Distributed Git
162
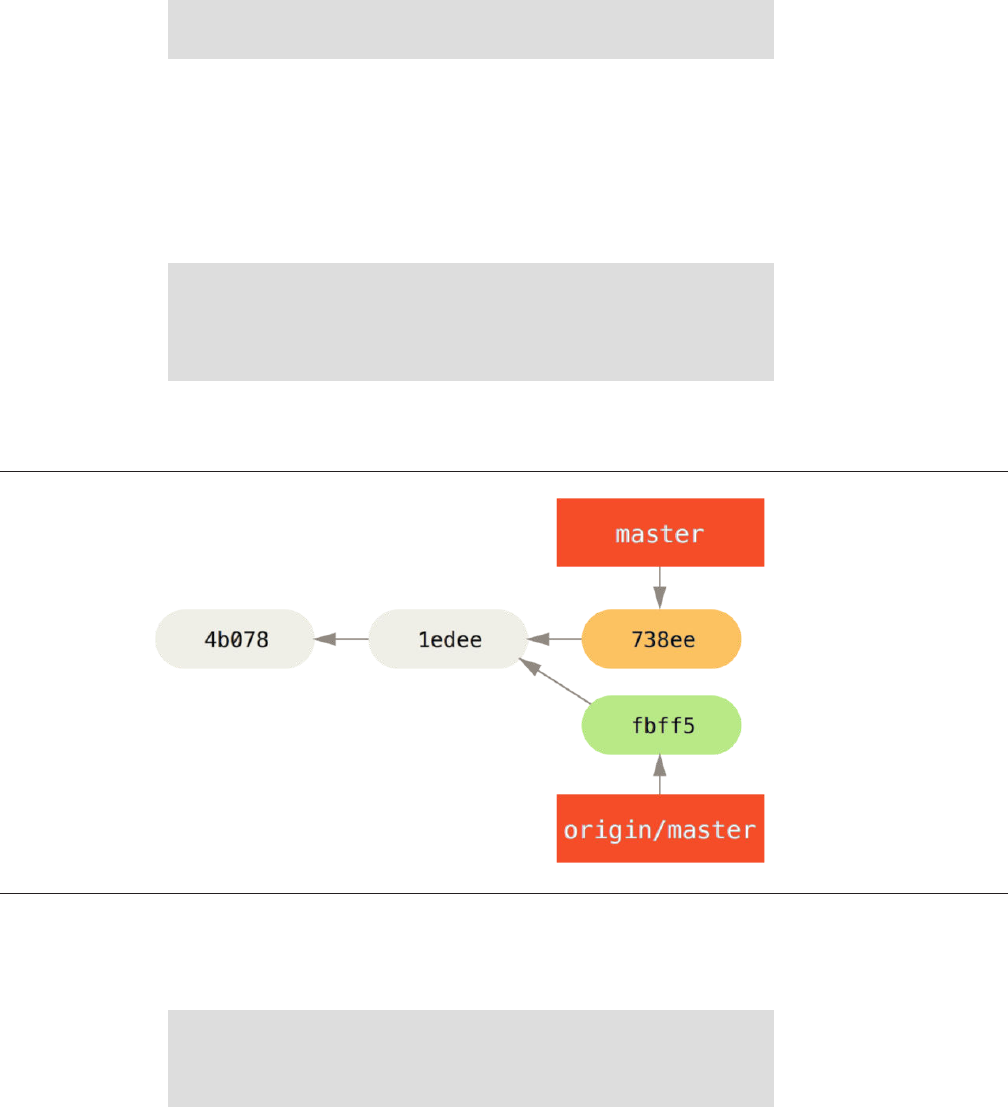
FIGURE 5-5
John’s divergent
history.
! [rejected] master -> master (non-fast forward)
error: failed to push some refs to 'john@githost:simplegit.git'
John isn’t allowed to push because Jessica has pushed in the meantime.
This is especially important to understand if you’re used to Subversion, be-
cause you’ll notice that the two developers didn’t edit the same file. Although
Subversion automatically does such a merge on the server if dierent files are
edited, in Git you must merge the commits locally. John has to fetch Jessica’s
changes and merge them in before he will be allowed to push:
$ git fetch origin
...
From john@githost:simplegit
+ 049d078...fbff5bc master -> origin/master
At this point, John’s local repository looks something like this:
John has a reference to the changes Jessica pushed up, but he has to merge
them into his own work before he is allowed to push:
$ git merge origin/master
Merge made by recursive.
Contributing to a Project
163
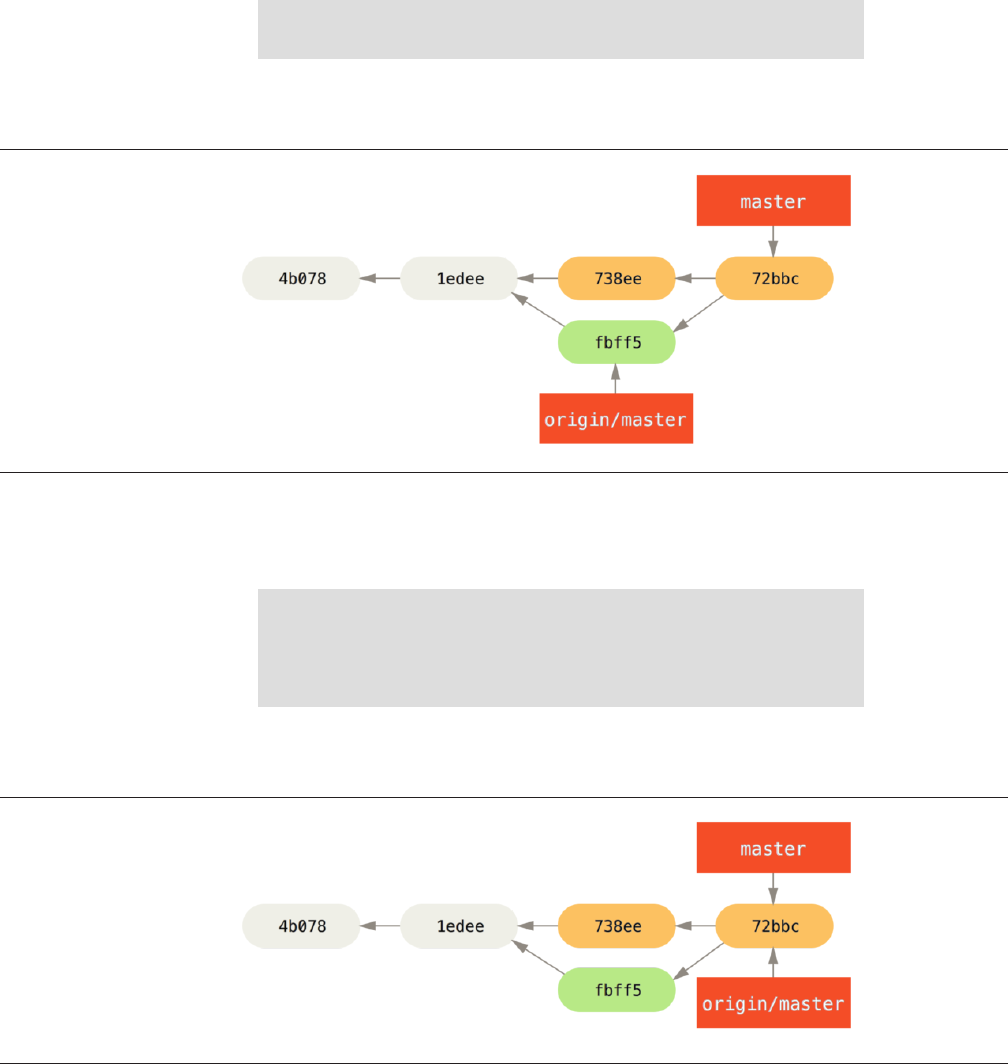
FIGURE 5-6
John’s repository
after merging
origin/master.
FIGURE 5-7
John’s history after
pushing to the
origin server.
TODO | 1 +
1 files changed, 1 insertions(+), 0 deletions(-)
The merge goes smoothly – John’s commit history now looks like this:
Now, John can test his code to make sure it still works properly, and then he
can push his new merged work up to the server:
$ git push origin master
...
To john@githost:simplegit.git
fbff5bc..72bbc59 master -> master
Finally, John’s commit history looks like this:
CHAPTER 5: Distributed Git
164
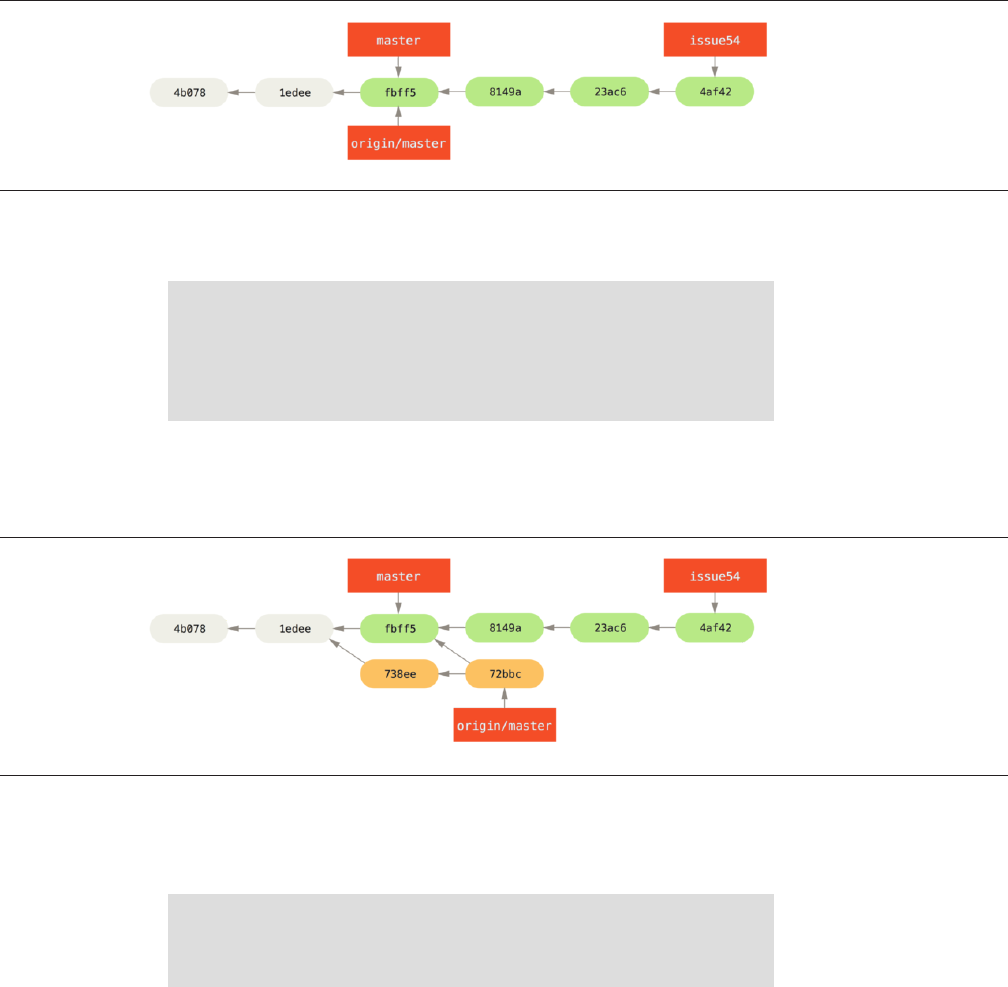
FIGURE 5-8
Jessica’s topic
branch.
FIGURE 5-9
Jessica’s history
after fetching John’s
changes.
In the meantime, Jessica has been working on a topic branch. She’s created
a topic branch called issue54 and done three commits on that branch. She
hasn’t fetched John’s changes yet, so her commit history looks like this:
Jessica wants to sync up with John, so she fetches:
# Jessica's Machine
$ git fetch origin
...
From jessica@githost:simplegit
fbff5bc..72bbc59 master -> origin/master
That pulls down the work John has pushed up in the meantime. Jessica’s
history now looks like this:
Jessica thinks her topic branch is ready, but she wants to know what she has
to merge into her work so that she can push. She runs git log to find out:
$ git log --no-merges issue54..origin/master
commit 738ee872852dfaa9d6634e0dea7a324040193016
Author: John Smith <jsmith@example.com>
Contributing to a Project
165

Date: Fri May 29 16:01:27 2009 -0700
removed invalid default value
The issue54..origin/master syntax is a log filter that asks Git to only
show the list of commits that are on the latter branch (in this case origin/
master) that are not on the first branch (in this case issue54). We’ll go over
this syntax in detail in “Commit Ranges”.
For now, we can see from the output that there is a single commit that John
has made that Jessica has not merged in. If she merges origin/master, that is
the single commit that will modify her local work.
Now, Jessica can merge her topic work into her master branch, merge John’s
work (origin/master) into her master branch, and then push back to the
server again. First, she switches back to her master branch to integrate all this
work:
$ git checkout master
Switched to branch 'master'
Your branch is behind 'origin/master' by 2 commits, and can be fast-forwarded.
She can merge either origin/master or issue54 first – they’re both up-
stream, so the order doesn’t matter. The end snapshot should be identical no
matter which order she chooses; only the history will be slightly dierent. She
chooses to merge in issue54 first:
$ git merge issue54
Updating fbff5bc..4af4298
Fast forward
README | 1 +
lib/simplegit.rb | 6 +++++-
2 files changed, 6 insertions(+), 1 deletions(-)
No problems occur; as you can see it was a simple fast-forward. Now Jessica
merges in John’s work (origin/master):
$ git merge origin/master
Auto-merging lib/simplegit.rb
Merge made by recursive.
lib/simplegit.rb | 2 +-
1 files changed, 1 insertions(+), 1 deletions(-)
CHAPTER 5: Distributed Git
166
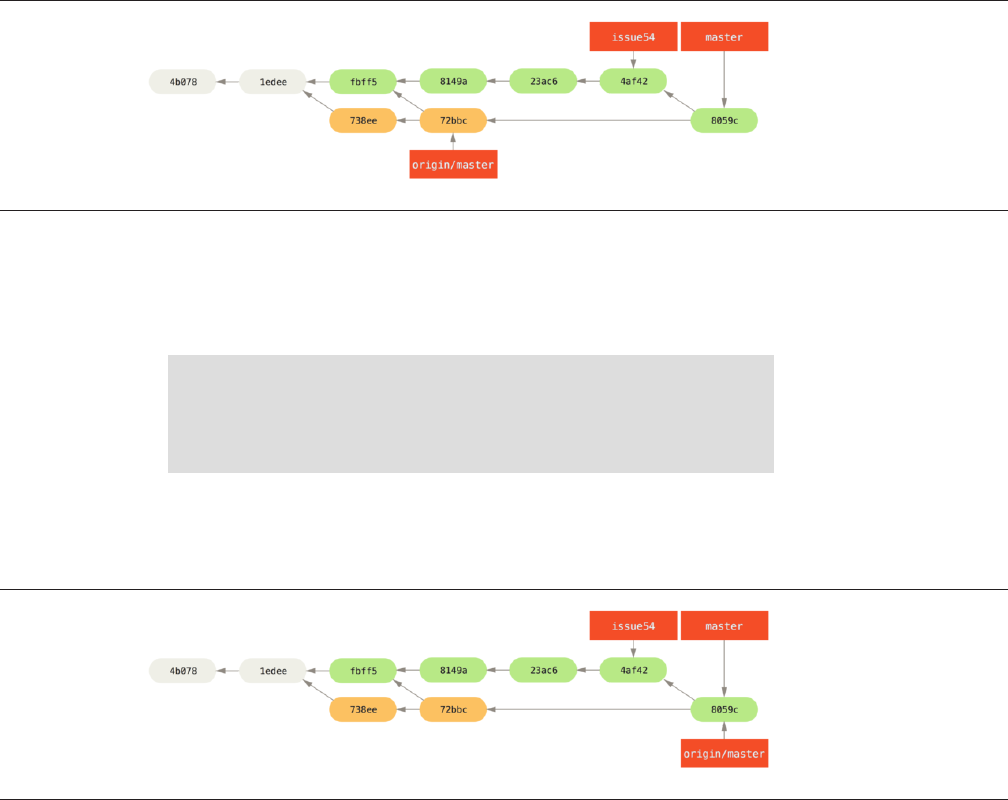
FIGURE 5-10
Jessica’s history
after merging John’s
changes.
FIGURE 5-11
Jessica’s history
after pushing all
changes back to the
server.
Everything merges cleanly, and Jessica’s history looks like this:
Now origin/master is reachable from Jessica’s master branch, so she
should be able to successfully push (assuming John hasn’t pushed again in the
meantime):
$ git push origin master
...
To jessica@githost:simplegit.git
72bbc59..8059c15 master -> master
Each developer has committed a few times and merged each other’s work
successfully.
That is one of the simplest workflows. You work for a while, generally in a
topic branch, and merge into your master branch when it’s ready to be integra-
ted. When you want to share that work, you merge it into your own master
branch, then fetch and merge origin/master if it has changed, and finally
push to the master branch on the server. The general sequence is something
like this:
Contributing to a Project
167
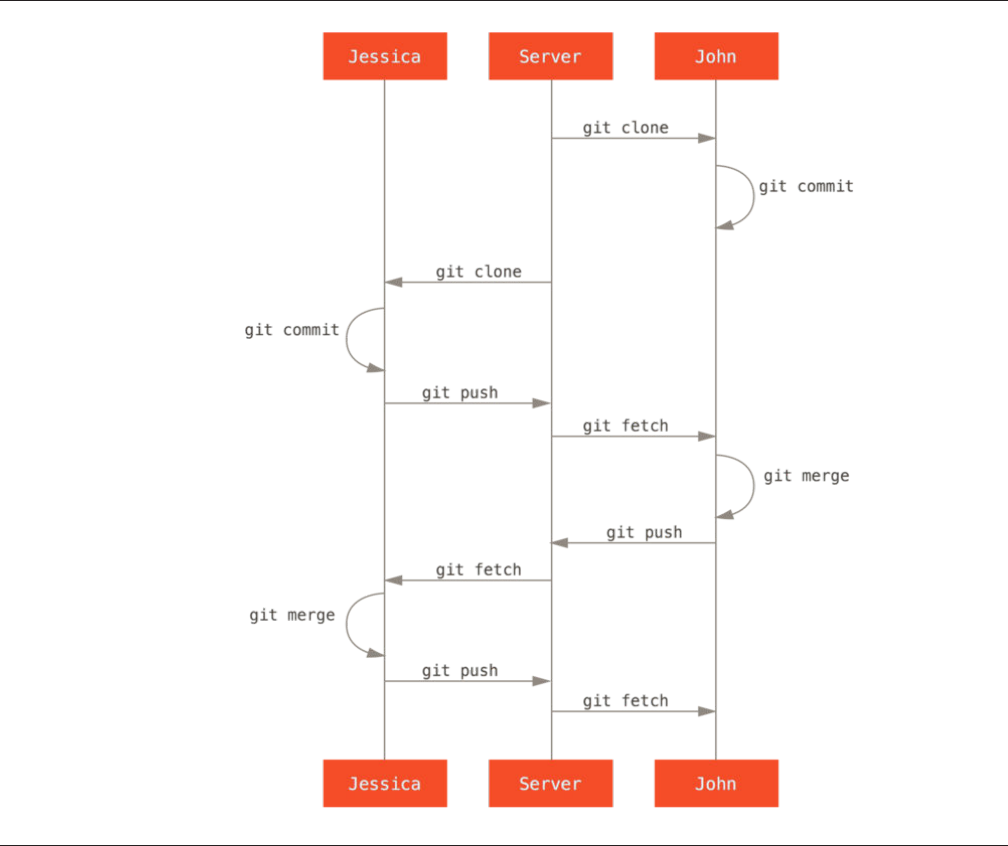
FIGURE 5-12
General sequence of
events for a simple
multiple-developer
Git workow.
Private Managed Team
In this next scenario, you’ll look at contributor roles in a larger private group.
You’ll learn how to work in an environment where small groups collaborate on
features and then those team-based contributions are integrated by another
party.
Let’s say that John and Jessica are working together on one feature, while
Jessica and Josie are working on a second. In this case, the company is using a
CHAPTER 5: Distributed Git
168

type of integration-manager workflow where the work of the individual groups
is integrated only by certain engineers, and the master branch of the main repo
can be updated only by those engineers. In this scenario, all work is done in
team-based branches and pulled together by the integrators later.
Let’s follow Jessica’s workflow as she works on her two features, collaborat-
ing in parallel with two dierent developers in this environment. Assuming she
already has her repository cloned, she decides to work on featureA first. She
creates a new branch for the feature and does some work on it there:
# Jessica's Machine
$ git checkout -b featureA
Switched to a new branch 'featureA'
$ vim lib/simplegit.rb
$ git commit -am 'add limit to log function'
[featureA 3300904] add limit to log function
1 files changed, 1 insertions(+), 1 deletions(-)
At this point, she needs to share her work with John, so she pushes her fea-
tureA branch commits up to the server. Jessica doesn’t have push access to
the master branch – only the integrators do – so she has to push to another
branch in order to collaborate with John:
$ git push -u origin featureA
...
To jessica@githost:simplegit.git
* [new branch] featureA -> featureA
Jessica e-mails John to tell him that she’s pushed some work into a branch
named featureA and he can look at it now. While she waits for feedback from
John, Jessica decides to start working on featureB with Josie. To begin, she
starts a new feature branch, basing it o the server’s master branch:
# Jessica's Machine
$ git fetch origin
$ git checkout -b featureB origin/master
Switched to a new branch 'featureB'
Now, Jessica makes a couple of commits on the featureB branch:
$ vim lib/simplegit.rb
$ git commit -am 'made the ls-tree function recursive'
Contributing to a Project
169
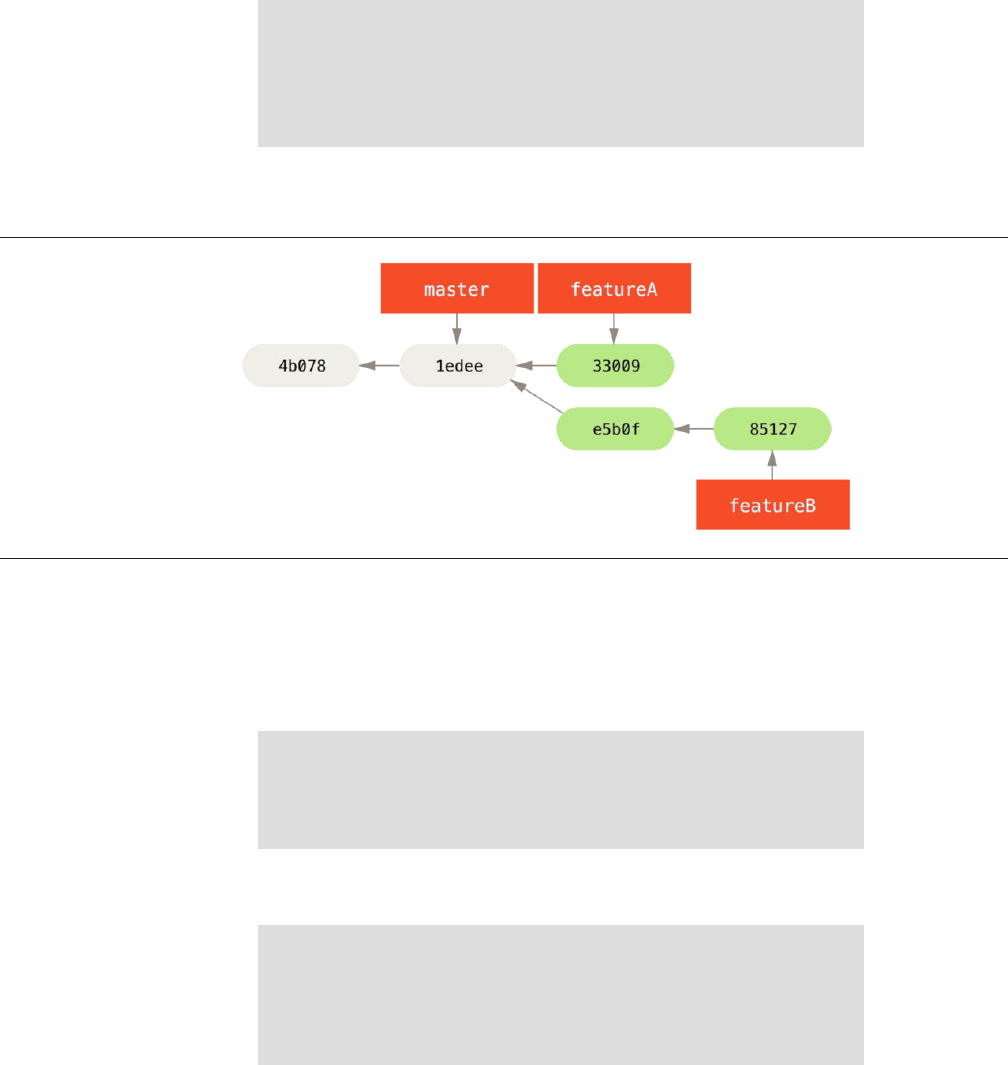
FIGURE 5-13
Jessica’s initial
commit history.
[featureB e5b0fdc] made the ls-tree function recursive
1 files changed, 1 insertions(+), 1 deletions(-)
$ vim lib/simplegit.rb
$ git commit -am 'add ls-files'
[featureB 8512791] add ls-files
1 files changed, 5 insertions(+), 0 deletions(-)
Jessica’s repository looks like this:
She’s ready to push up her work, but gets an e-mail from Josie that a branch
with some initial work on it was already pushed to the server as featureBee.
Jessica first needs to merge those changes in with her own before she can push
to the server. She can then fetch Josie’s changes down with git fetch:
$ git fetch origin
...
From jessica@githost:simplegit
* [new branch] featureBee -> origin/featureBee
Jessica can now merge this into the work she did with git merge:
$ git merge origin/featureBee
Auto-merging lib/simplegit.rb
Merge made by recursive.
lib/simplegit.rb | 4 ++++
1 files changed, 4 insertions(+), 0 deletions(-)
CHAPTER 5: Distributed Git
170

There is a bit of a problem – she needs to push the merged work in her fea-
tureB branch to the featureBee branch on the server. She can do so by speci-
fying the local branch followed by a colon (:) followed by the remote branch to
the git push command:
$ git push -u origin featureB:featureBee
...
To jessica@githost:simplegit.git
fba9af8..cd685d1 featureB -> featureBee
This is called a refspec. See “The Refspec” for a more detailed discussion of
Git refspecs and dierent things you can do with them. Also notice the -u flag;
this is short for --set-upstream, which configures the branches for easier
pushing and pulling later.
Next, John e-mails Jessica to say he’s pushed some changes to the featur-
eA branch and asks her to verify them. She runs a git fetch to pull down
those changes:
$ git fetch origin
...
From jessica@githost:simplegit
3300904..aad881d featureA -> origin/featureA
Then, she can see what has been changed with git log:
$ git log featureA..origin/featureA
commit aad881d154acdaeb2b6b18ea0e827ed8a6d671e6
Author: John Smith <jsmith@example.com>
Date: Fri May 29 19:57:33 2009 -0700
changed log output to 30 from 25
Finally, she merges John’s work into her own featureA branch:
$ git checkout featureA
Switched to branch 'featureA'
$ git merge origin/featureA
Updating 3300904..aad881d
Fast forward
lib/simplegit.rb | 10 +++++++++-
1 files changed, 9 insertions(+), 1 deletions(-)
Contributing to a Project
171
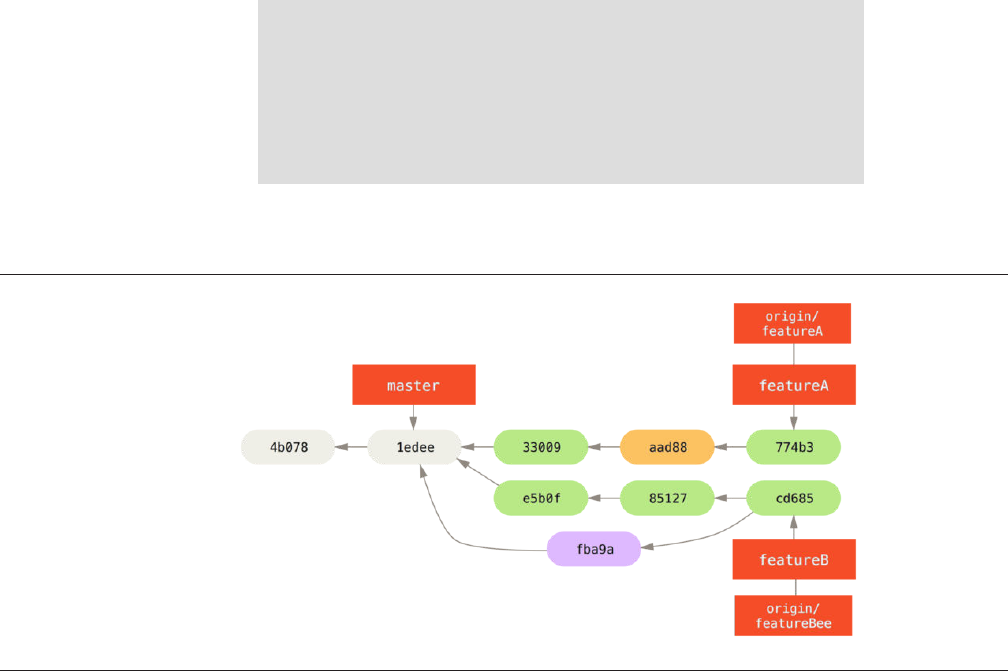
FIGURE 5-14
Jessica’s history
after committing on
a feature branch.
Jessica wants to tweak something, so she commits again and then pushes
this back up to the server:
$ git commit -am 'small tweak'
[featureA 774b3ed] small tweak
1 files changed, 1 insertions(+), 1 deletions(-)
$ git push
...
To jessica@githost:simplegit.git
3300904..774b3ed featureA -> featureA
Jessica’s commit history now looks something like this:
Jessica, Josie, and John inform the integrators that the featureA and fea-
tureBee branches on the server are ready for integration into the mainline. Af-
er the integrators merge these branches into the mainline, a fetch will bring
down the new merge commit, making the history look like this:
CHAPTER 5: Distributed Git
172
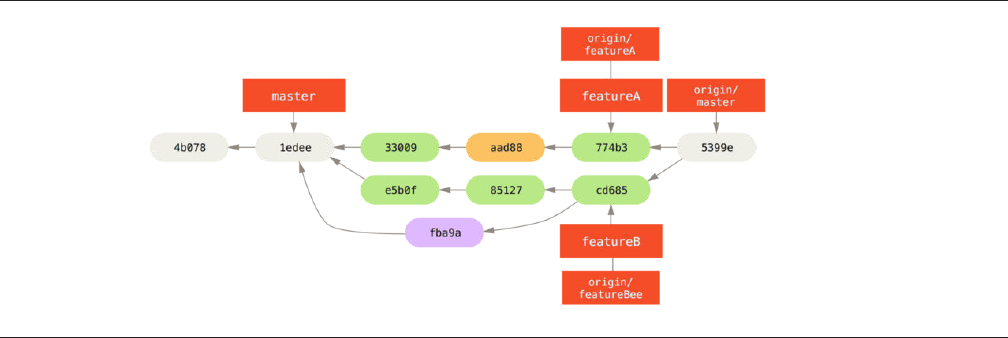
FIGURE 5-15
Jessica’s history
after merging both
her topic branches.
Many groups switch to Git because of this ability to have multiple teams
working in parallel, merging the dierent lines of work late in the process. The
ability of smaller subgroups of a team to collaborate via remote branches
without necessarily having to involve or impede the entire team is a huge bene-
fit of Git. The sequence for the workflow you saw here is something like this:
Contributing to a Project
173
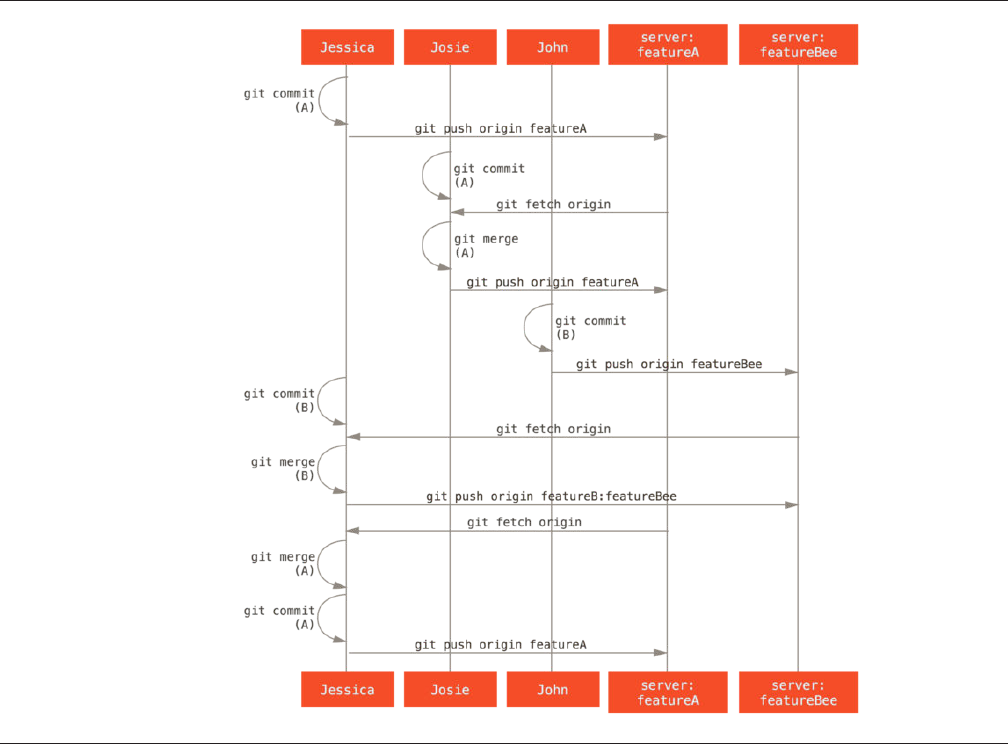
FIGURE 5-16
Basic sequence of
this managed-team
workow.
Forked Public Project
Contributing to public projects is a bit dierent. Because you don’t have the
permissions to directly update branches on the project, you have to get the
work to the maintainers some other way. This first example describes contribu-
ting via forking on Git hosts that support easy forking. Many hosting sites sup-
port this (including GitHub, BitBucket, Google Code, repo.or.cz, and others),
and many project maintainers expect this style of contribution. The next sec-
tion deals with projects that prefer to accept contributed patches via e-mail.
First, you’ll probably want to clone the main repository, create a topic
branch for the patch or patch series you’re planning to contribute, and do your
work there. The sequence looks basically like this:
CHAPTER 5: Distributed Git
174

$ git clone (url)
$ cd project
$ git checkout -b featureA
# (work)
$ git commit
# (work)
$ git commit
You may want to use rebase -i to squash your work down to a single
commit, or rearrange the work in the commits to make the patch easier
for the maintainer to review – see “Rewriting History” for more infor-
mation about interactive rebasing.
When your branch work is finished and you’re ready to contribute it back to
the maintainers, go to the original project page and click the “Fork” button, cre-
ating your own writable fork of the project. You then need to add in this new
repository URL as a second remote, in this case named myfork:
$ git remote add myfork (url)
Then you need to push your work up to it. It’s easiest to push the topic
branch you’re working on up to your repository, rather than merging into your
master branch and pushing that up. The reason is that if the work isn’t accept-
ed or is cherry picked, you don’t have to rewind your master branch. If the
maintainers merge, rebase, or cherry-pick your work, you’ll eventually get it
back via pulling from their repository anyhow:
$ git push -u myfork featureA
When your work has been pushed up to your fork, you need to notify the
maintainer. This is oen called a pull request, and you can either generate it via
the website – GitHub has its own Pull Request mechanism that we’ll go over in
Chapter 6 – or you can run the git request-pull command and e-mail the
output to the project maintainer manually.
The request-pull command takes the base branch into which you want
your topic branch pulled and the Git repository URL you want them to pull
from, and outputs a summary of all the changes you’re asking to be pulled in.
For instance, if Jessica wants to send John a pull request, and she’s done two
commits on the topic branch she just pushed up, she can run this:
Contributing to a Project
175

$ git request-pull origin/master myfork
The following changes since commit 1edee6b1d61823a2de3b09c160d7080b8d1b3a40:
John Smith (1):
added a new function
are available in the git repository at:
git://githost/simplegit.git featureA
Jessica Smith (2):
add limit to log function
change log output to 30 from 25
lib/simplegit.rb | 10 +++++++++-
1 files changed, 9 insertions(+), 1 deletions(-)
The output can be sent to the maintainer–it tells them where the work was
branched from, summarizes the commits, and tells where to pull this work
from.
On a project for which you’re not the maintainer, it’s generally easier to have
a branch like master always track origin/master and to do your work in top-
ic branches that you can easily discard if they’re rejected. Having work themes
isolated into topic branches also makes it easier for you to rebase your work if
the tip of the main repository has moved in the meantime and your commits no
longer apply cleanly. For example, if you want to submit a second topic of work
to the project, don’t continue working on the topic branch you just pushed up –
start over from the main repository’s master branch:
$ git checkout -b featureB origin/master
# (work)
$ git commit
$ git push myfork featureB
# (email maintainer)
$ git fetch origin
Now, each of your topics is contained within a silo – similar to a patch queue
– that you can rewrite, rebase, and modify without the topics interfering or in-
terdepending on each other, like so:
CHAPTER 5: Distributed Git
176
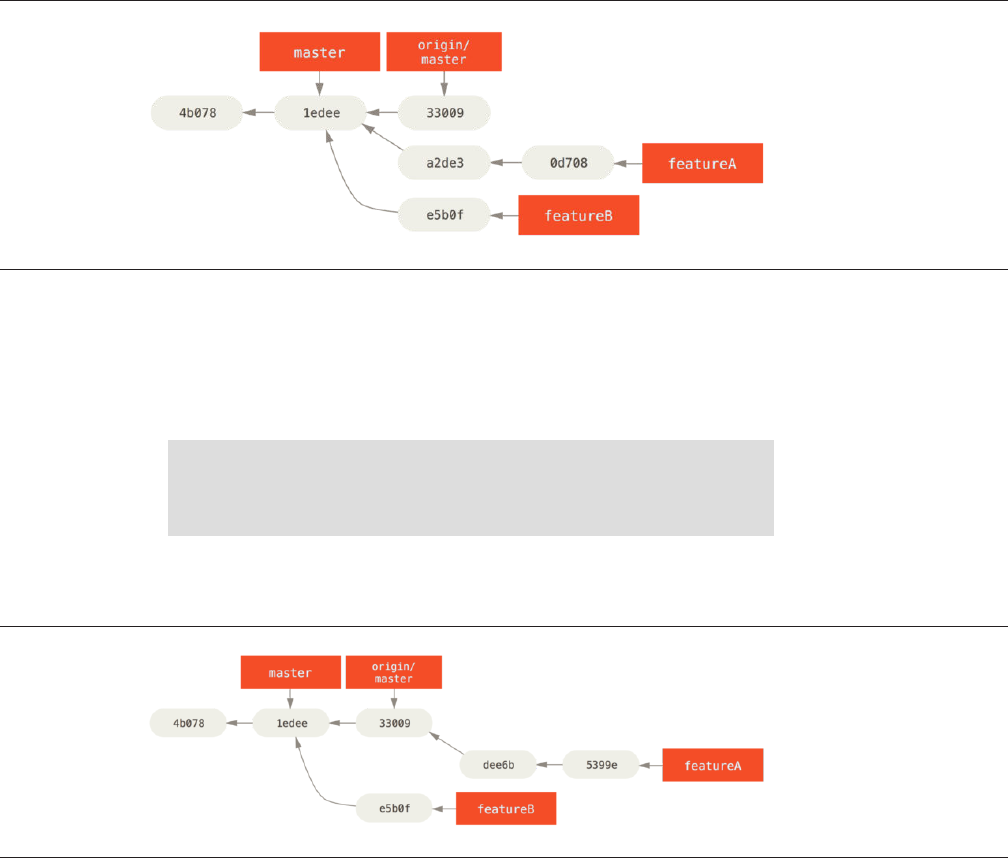
FIGURE 5-17
Initial commit
history with
featureB work.
FIGURE 5-18
Commit history after
featureA work.
Let’s say the project maintainer has pulled in a bunch of other patches and
tried your first branch, but it no longer cleanly merges. In this case, you can try
to rebase that branch on top of origin/master, resolve the conflicts for the
maintainer, and then resubmit your changes:
$ git checkout featureA
$ git rebase origin/master
$ git push -f myfork featureA
This rewrites your history to now look like Figure 5-18.
Because you rebased the branch, you have to specify the -f to your push
command in order to be able to replace the featureA branch on the server
with a commit that isn’t a descendant of it. An alternative would be to push this
new work to a dierent branch on the server (perhaps called featureAv2).
Let’s look at one more possible scenario: the maintainer has looked at work
in your second branch and likes the concept but would like you to change an
implementation detail. You’ll also take this opportunity to move the work to be
Contributing to a Project
177

FIGURE 5-19
Commit history after
featureBv2 work.
based o the project’s current master branch. You start a new branch based o
the current origin/master branch, squash the featureB changes there, re-
solve any conflicts, make the implementation change, and then push that up as
a new branch:
$ git checkout -b featureBv2 origin/master
$ git merge --no-commit --squash featureB
# (change implementation)
$ git commit
$ git push myfork featureBv2
The --squash option takes all the work on the merged branch and squash-
es it into one non-merge commit on top of the branch you’re on. The --no-
commit option tells Git not to automatically record a commit. This allows you
to introduce all the changes from another branch and then make more changes
before recording the new commit.
Now you can send the maintainer a message that you’ve made the reques-
ted changes and they can find those changes in your featureBv2 branch.
Public Project over E-Mail
Many projects have established procedures for accepting patches – you’ll need
to check the specific rules for each project, because they will dier. Since there
are several older, larger projects which accept patches via a developer mailing
list, we’ll go over an example of that now.
The workflow is similar to the previous use case – you create topic branches
for each patch series you work on. The dierence is how you submit them to
the project. Instead of forking the project and pushing to your own writable ver-
sion, you generate e-mail versions of each commit series and e-mail them to
the developer mailing list:
CHAPTER 5: Distributed Git
178

$ git checkout -b topicA
# (work)
$ git commit
# (work)
$ git commit
Now you have two commits that you want to send to the mailing list. You use
git format-patch to generate the mbox-formatted files that you can e-mail
to the list – it turns each commit into an e-mail message with the first line of the
commit message as the subject and the rest of the message plus the patch that
the commit introduces as the body. The nice thing about this is that applying a
patch from an e-mail generated with format-patch preserves all the commit
information properly.
$ git format-patch -M origin/master
0001-add-limit-to-log-function.patch
0002-changed-log-output-to-30-from-25.patch
The format-patch command prints out the names of the patch files it cre-
ates. The -M switch tells Git to look for renames. The files end up looking like
this:
$ cat 0001-add-limit-to-log-function.patch
From 330090432754092d704da8e76ca5c05c198e71a8 Mon Sep 17 00:00:00 2001
From: Jessica Smith <jessica@example.com>
Date: Sun, 6 Apr 2008 10:17:23 -0700
Subject: [PATCH 1/2] add limit to log function
Limit log functionality to the first 20
---
lib/simplegit.rb | 2 +-
1 files changed, 1 insertions(+), 1 deletions(-)
diff --git a/lib/simplegit.rb b/lib/simplegit.rb
index 76f47bc..f9815f1 100644
--- a/lib/simplegit.rb
+++ b/lib/simplegit.rb
@@ -14,7 +14,7 @@ class SimpleGit
end
def log(treeish = 'master')
- command("git log #{treeish}")
+ command("git log -n 20 #{treeish}")
Contributing to a Project
179

end
def ls_tree(treeish = 'master')
--
2.1.0
You can also edit these patch files to add more information for the e-mail list
that you don’t want to show up in the commit message. If you add text between
the --- line and the beginning of the patch (the diff --git line), then devel-
opers can read it; but applying the patch excludes it.
To e-mail this to a mailing list, you can either paste the file into your e-mail
program or send it via a command-line program. Pasting the text oen causes
formatting issues, especially with “smarter” clients that don’t preserve new-
lines and other whitespace appropriately. Luckily, Git provides a tool to help
you send properly formatted patches via IMAP, which may be easier for you.
We’ll demonstrate how to send a patch via Gmail, which happens to be the e-
mail agent we know best; you can read detailed instructions for a number of
mail programs at the end of the aforementioned Documentation/Submit-
tingPatches file in the Git source code.
First, you need to set up the imap section in your ~/.gitconfig file. You
can set each value separately with a series of git config commands, or you
can add them manually, but in the end your config file should look something
like this:
[imap]
folder = "[Gmail]/Drafts"
host = imaps://imap.gmail.com
user = user@gmail.com
pass = p4ssw0rd
port = 993
sslverify = false
If your IMAP server doesn’t use SSL, the last two lines probably aren’t neces-
sary, and the host value will be imap:// instead of imaps://. When that is set
up, you can use git send-email to place the patch series in the Dras folder
of the specified IMAP server:
$ git send-email *.patch
0001-added-limit-to-log-function.patch
0002-changed-log-output-to-30-from-25.patch
Who should the emails appear to be from? [Jessica Smith <jessica@example.com>]
Emails will be sent from: Jessica Smith <jessica@example.com>
CHAPTER 5: Distributed Git
180

Who should the emails be sent to? jessica@example.com
Message-ID to be used as In-Reply-To for the first email? y
Then, Git spits out a bunch of log information looking something like this for
each patch you’re sending:
(mbox) Adding cc: Jessica Smith <jessica@example.com> from
\line 'From: Jessica Smith <jessica@example.com>'
OK. Log says:
Sendmail: /usr/sbin/sendmail -i jessica@example.com
From: Jessica Smith <jessica@example.com>
To: jessica@example.com
Subject: [PATCH 1/2] added limit to log function
Date: Sat, 30 May 2009 13:29:15 -0700
Message-Id: <1243715356-61726-1-git-send-email-jessica@example.com>
X-Mailer: git-send-email 1.6.2.rc1.20.g8c5b.dirty
In-Reply-To: <y>
References: <y>
Result: OK
At this point, you should be able to go to your Dras folder, change the To
field to the mailing list you’re sending the patch to, possibly CC the maintainer
or person responsible for that section, and send it o.
Summary
This section has covered a number of common workflows for dealing with sev-
eral very dierent types of Git projects you’re likely to encounter, and intro-
duced a couple of new tools to help you manage this process. Next, you’ll see
how to work the other side of the coin: maintaining a Git project. You’ll learn
how to be a benevolent dictator or integration manager.
Maintaining a Project
In addition to knowing how to eectively contribute to a project, you’ll likely
need to know how to maintain one. This can consist of accepting and applying
patches generated via format-patch and e-mailed to you, or integrating
changes in remote branches for repositories you’ve added as remotes to your
project. Whether you maintain a canonical repository or want to help by verify-
ing or approving patches, you need to know how to accept work in a way that is
clearest for other contributors and sustainable by you over the long run.
Maintaining a Project
181

Working in Topic Branches
When you’re thinking of integrating new work, it’s generally a good idea to try it
out in a topic branch – a temporary branch specifically made to try out that
new work. This way, it’s easy to tweak a patch individually and leave it if it’s not
working until you have time to come back to it. If you create a simple branch
name based on the theme of the work you’re going to try, such as ruby_cli-
ent or something similarly descriptive, you can easily remember it if you have
to abandon it for a while and come back later. The maintainer of the Git project
tends to namespace these branches as well – such as sc/ruby_client, where
sc is short for the person who contributed the work. As you’ll remember, you
can create the branch based o your master branch like this:
$ git branch sc/ruby_client master
Or, if you want to also switch to it immediately, you can use the checkout -
b option:
$ git checkout -b sc/ruby_client master
Now you’re ready to add your contributed work into this topic branch and
determine if you want to merge it into your longer-term branches.
Applying Patches from E-mail
If you receive a patch over e-mail that you need to integrate into your project,
you need to apply the patch in your topic branch to evaluate it. There are two
ways to apply an e-mailed patch: with git apply or with git am.
APPLYING A PATCH WITH APPLY
If you received the patch from someone who generated it with the git diff or
a Unix diff command (which is not recommended; see the next section), you
can apply it with the git apply command. Assuming you saved the patch
at /tmp/patch-ruby-client.patch, you can apply the patch like this:
$ git apply /tmp/patch-ruby-client.patch
CHAPTER 5: Distributed Git
182

This modifies the files in your working directory. It’s almost identical to run-
ning a patch -p1 command to apply the patch, although it’s more paranoid
and accepts fewer fuzzy matches than patch. It also handles file adds, deletes,
and renames if they’re described in the git diff format, which patch won’t
do. Finally, git apply is an “apply all or abort all” model where either every-
thing is applied or nothing is, whereas patch can partially apply patchfiles,
leaving your working directory in a weird state. git apply is overall much
more conservative than patch. It won’t create a commit for you – aer running
it, you must stage and commit the changes introduced manually.
You can also use git apply to see if a patch applies cleanly before you try ac-
tually applying it – you can run git apply --check with the patch:
$ git apply --check 0001-seeing-if-this-helps-the-gem.patch
error: patch failed: ticgit.gemspec:1
error: ticgit.gemspec: patch does not apply
If there is no output, then the patch should apply cleanly. This command al-
so exits with a non-zero status if the check fails, so you can use it in scripts if
you want.
APPLYING A PATCH WITH AM
If the contributor is a Git user and was good enough to use the format-patch
command to generate their patch, then your job is easier because the patch
contains author information and a commit message for you. If you can, encour-
age your contributors to use format-patch instead of diff to generate patch-
es for you. You should only have to use git apply for legacy patches and
things like that.
To apply a patch generated by format-patch, you use git am. Technically,
git am is built to read an mbox file, which is a simple, plain-text format for
storing one or more e-mail messages in one text file. It looks something like
this:
From 330090432754092d704da8e76ca5c05c198e71a8 Mon Sep 17 00:00:00 2001
From: Jessica Smith <jessica@example.com>
Date: Sun, 6 Apr 2008 10:17:23 -0700
Subject: [PATCH 1/2] add limit to log function
Limit log functionality to the first 20
Maintaining a Project
183

This is the beginning of the output of the format-patch command that you
saw in the previous section. This is also a valid mbox e-mail format. If someone
has e-mailed you the patch properly using git send-email, and you download
that into an mbox format, then you can point git am to that mbox file, and it
will start applying all the patches it sees. If you run a mail client that can save
several e-mails out in mbox format, you can save entire patch series into a file
and then use git am to apply them one at a time.
However, if someone uploaded a patch file generated via format-patch to
a ticketing system or something similar, you can save the file locally and then
pass that file saved on your disk to git am to apply it:
$ git am 0001-limit-log-function.patch
Applying: add limit to log function
You can see that it applied cleanly and automatically created the new com-
mit for you. The author information is taken from the e-mail’s From and Date
headers, and the message of the commit is taken from the Subject and body
(before the patch) of the e-mail. For example, if this patch was applied from the
mbox example above, the commit generated would look something like this:
$ git log --pretty=fuller -1
commit 6c5e70b984a60b3cecd395edd5b48a7575bf58e0
Author: Jessica Smith <jessica@example.com>
AuthorDate: Sun Apr 6 10:17:23 2008 -0700
Commit: Scott Chacon <schacon@gmail.com>
CommitDate: Thu Apr 9 09:19:06 2009 -0700
add limit to log function
Limit log functionality to the first 20
The Commit information indicates the person who applied the patch and the
time it was applied. The Author information is the individual who originally
created the patch and when it was originally created.
But it’s possible that the patch won’t apply cleanly. Perhaps your main
branch has diverged too far from the branch the patch was built from, or the
patch depends on another patch you haven’t applied yet. In that case, the git
am process will fail and ask you what you want to do:
$ git am 0001-seeing-if-this-helps-the-gem.patch
Applying: seeing if this helps the gem
error: patch failed: ticgit.gemspec:1
error: ticgit.gemspec: patch does not apply
CHAPTER 5: Distributed Git
184

Patch failed at 0001.
When you have resolved this problem run "git am --resolved".
If you would prefer to skip this patch, instead run "git am --skip".
To restore the original branch and stop patching run "git am --abort".
This command puts conflict markers in any files it has issues with, much like
a conflicted merge or rebase operation. You solve this issue much the same way
– edit the file to resolve the conflict, stage the new file, and then run git am --
resolved to continue to the next patch:
$ (fix the file)
$ git add ticgit.gemspec
$ git am --resolved
Applying: seeing if this helps the gem
If you want Git to try a bit more intelligently to resolve the conflict, you can
pass a -3 option to it, which makes Git attempt a three-way merge. This option
isn’t on by default because it doesn’t work if the commit the patch says it was
based on isn’t in your repository. If you do have that commit – if the patch was
based on a public commit – then the -3 option is generally much smarter about
applying a conflicting patch:
$ git am -3 0001-seeing-if-this-helps-the-gem.patch
Applying: seeing if this helps the gem
error: patch failed: ticgit.gemspec:1
error: ticgit.gemspec: patch does not apply
Using index info to reconstruct a base tree...
Falling back to patching base and 3-way merge...
No changes -- Patch already applied.
In this case, this patch had already been applied. Without the -3 option, it
looks like a conflict.
If you’re applying a number of patches from an mbox, you can also run the
am command in interactive mode, which stops at each patch it finds and asks if
you want to apply it:
$ git am -3 -i mbox
Commit Body is:
--------------------------
seeing if this helps the gem
Maintaining a Project
185

--------------------------
Apply? [y]es/[n]o/[e]dit/[v]iew patch/[a]ccept all
This is nice if you have a number of patches saved, because you can view the
patch first if you don’t remember what it is, or not apply the patch if you’ve al-
ready done so.
When all the patches for your topic are applied and committed into your
branch, you can choose whether and how to integrate them into a longer-
running branch.
Checking Out Remote Branches
If your contribution came from a Git user who set up their own repository, push-
ed a number of changes into it, and then sent you the URL to the repository and
the name of the remote branch the changes are in, you can add them as a re-
mote and do merges locally.
For instance, if Jessica sends you an e-mail saying that she has a great new
feature in the ruby-client branch of her repository, you can test it by adding
the remote and checking out that branch locally:
$ git remote add jessica git://github.com/jessica/myproject.git
$ git fetch jessica
$ git checkout -b rubyclient jessica/ruby-client
If she e-mails you again later with another branch containing another great
feature, you can fetch and check out because you already have the remote set-
up.
This is most useful if you’re working with a person consistently. If someone
only has a single patch to contribute once in a while, then accepting it over e-
mail may be less time consuming than requiring everyone to run their own
server and having to continually add and remove remotes to get a few patches.
You’re also unlikely to want to have hundreds of remotes, each for someone
who contributes only a patch or two. However, scripts and hosted services may
make this easier – it depends largely on how you develop and how your contrib-
utors develop.
The other advantage of this approach is that you get the history of the com-
mits as well. Although you may have legitimate merge issues, you know where
in your history their work is based; a proper three-way merge is the default
rather than having to supply a -3 and hope the patch was generated o a pub-
lic commit to which you have access.
CHAPTER 5: Distributed Git
186

If you aren’t working with a person consistently but still want to pull from
them in this way, you can provide the URL of the remote repository to the git
pull command. This does a one-time pull and doesn’t save the URL as a re-
mote reference:
$ git pull https://github.com/onetimeguy/project
From https://github.com/onetimeguy/project
* branch HEAD -> FETCH_HEAD
Merge made by recursive.
Determining What Is Introduced
Now you have a topic branch that contains contributed work. At this point, you
can determine what you’d like to do with it. This section revisits a couple of
commands so you can see how you can use them to review exactly what you’ll
be introducing if you merge this into your main branch.
It’s oen helpful to get a review of all the commits that are in this branch but
that aren’t in your master branch. You can exclude commits in the master
branch by adding the --not option before the branch name. This does the
same thing as the master..contrib format that we used earlier. For example,
if your contributor sends you two patches and you create a branch called con-
trib and applied those patches there, you can run this:
$ git log contrib --not master
commit 5b6235bd297351589efc4d73316f0a68d484f118
Author: Scott Chacon <schacon@gmail.com>
Date: Fri Oct 24 09:53:59 2008 -0700
seeing if this helps the gem
commit 7482e0d16d04bea79d0dba8988cc78df655f16a0
Author: Scott Chacon <schacon@gmail.com>
Date: Mon Oct 22 19:38:36 2008 -0700
updated the gemspec to hopefully work better
To see what changes each commit introduces, remember that you can pass
the -p option to git log and it will append the di introduced to each com-
mit.
To see a full di of what would happen if you were to merge this topic
branch with another branch, you may have to use a weird trick to get the cor-
rect results. You may think to run this:
Maintaining a Project
187

$ git diff master
This command gives you a di, but it may be misleading. If your master
branch has moved forward since you created the topic branch from it, then
you’ll get seemingly strange results. This happens because Git directly com-
pares the snapshots of the last commit of the topic branch you’re on and the
snapshot of the last commit on the master branch. For example, if you’ve add-
ed a line in a file on the master branch, a direct comparison of the snapshots
will look like the topic branch is going to remove that line.
If master is a direct ancestor of your topic branch, this isn’t a problem; but if
the two histories have diverged, the di will look like you’re adding all the new
stu in your topic branch and removing everything unique to the master
branch.
What you really want to see are the changes added to the topic branch – the
work you’ll introduce if you merge this branch with master. You do that by hav-
ing Git compare the last commit on your topic branch with the first common
ancestor it has with the master branch.
Technically, you can do that by explicitly figuring out the common ancestor
and then running your di on it:
$ git merge-base contrib master
36c7dba2c95e6bbb78dfa822519ecfec6e1ca649
$ git diff 36c7db
However, that isn’t convenient, so Git provides another shorthand for doing
the same thing: the triple-dot syntax. In the context of the diff command, you
can put three periods aer another branch to do a diff between the last com-
mit of the branch you’re on and its common ancestor with another branch:
$ git diff master...contrib
This command shows you only the work your current topic branch has intro-
duced since its common ancestor with master. That is a very useful syntax to
remember.
Integrating Contributed Work
When all the work in your topic branch is ready to be integrated into a more
mainline branch, the question is how to do it. Furthermore, what overall work-
CHAPTER 5: Distributed Git
188
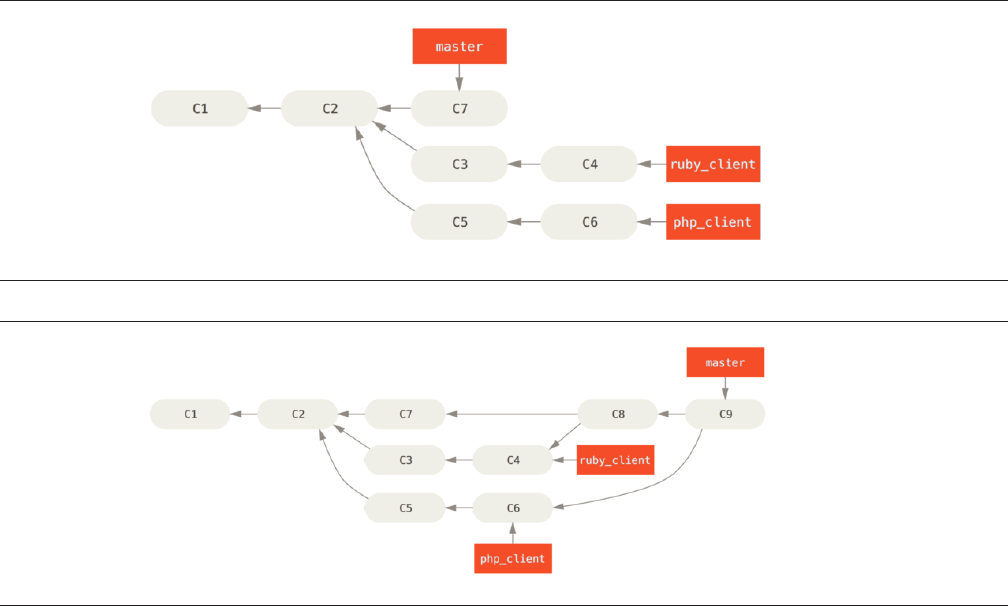
FIGURE 5-20
History with several
topic branches.
FIGURE 5-21
After a topic branch
merge.
flow do you want to use to maintain your project? You have a number of
choices, so we’ll cover a few of them.
MERGING WORKFLOWS
One simple workflow merges your work into your master branch. In this sce-
nario, you have a master branch that contains basically stable code. When you
have work in a topic branch that you’ve done or that someone has contributed
and you’ve verified, you merge it into your master branch, delete the topic
branch, and then continue the process. If we have a repository with work in two
branches named ruby_client and php_client that looks like Figure 5-20
and merge ruby_client first and then php_client next, then your history
will end up looking like Figure 5-21.
Maintaining a Project
189
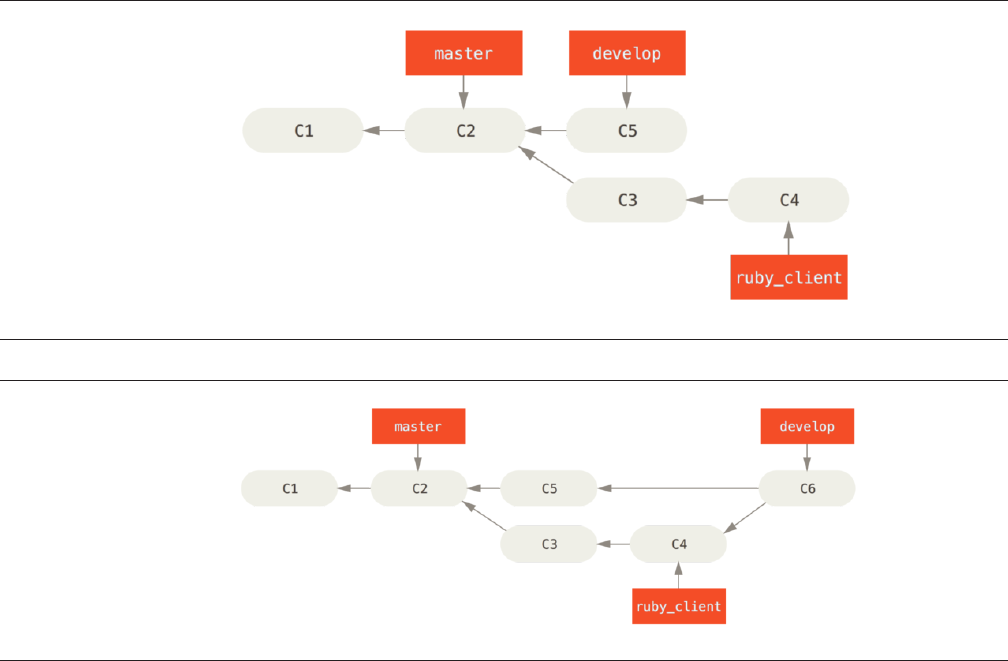
FIGURE 5-22
Before a topic
branch merge.
FIGURE 5-23
After a topic branch
merge.
That is probably the simplest workflow, but it can possibly be problematic if
you’re dealing with larger or more stable projects where you want to be really
careful about what you introduce.
If you have a more important project, you might want to use a two-phase
merge cycle. In this scenario, you have two long-running branches, master and
develop, in which you determine that master is updated only when a very sta-
ble release is cut and all new code is integrated into the develop branch. You
regularly push both of these branches to the public repository. Each time you
have a new topic branch to merge in (Figure 5-22), you merge it into develop
(Figure 5-23); then, when you tag a release, you fast-forward master to wher-
ever the now-stable develop branch is (Figure 5-24).
CHAPTER 5: Distributed Git
190
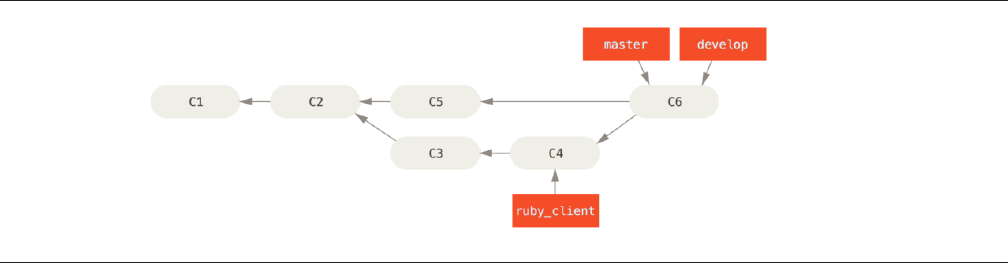
FIGURE 5-24
After a project
release.
This way, when people clone your project’s repository, they can either check
out master to build the latest stable version and keep up to date on that easily,
or they can check out develop, which is the more cutting-edge stu. You can
also continue this concept, having an integrate branch where all the work is
merged together. Then, when the codebase on that branch is stable and passes
tests, you merge it into a develop branch; and when that has proven itself sta-
ble for a while, you fast-forward your master branch.
LARGE-MERGING WORKFLOWS
The Git project has four long-running branches: master, next, and pu (pro-
posed updates) for new work, and maint for maintenance backports. When
new work is introduced by contributors, it’s collected into topic branches in the
maintainer’s repository in a manner similar to what we’ve described (see
Figure 5-25). At this point, the topics are evaluated to determine whether
they’re safe and ready for consumption or whether they need more work. If
they’re safe, they’re merged into next, and that branch is pushed up so every-
one can try the topics integrated together.
Maintaining a Project
191
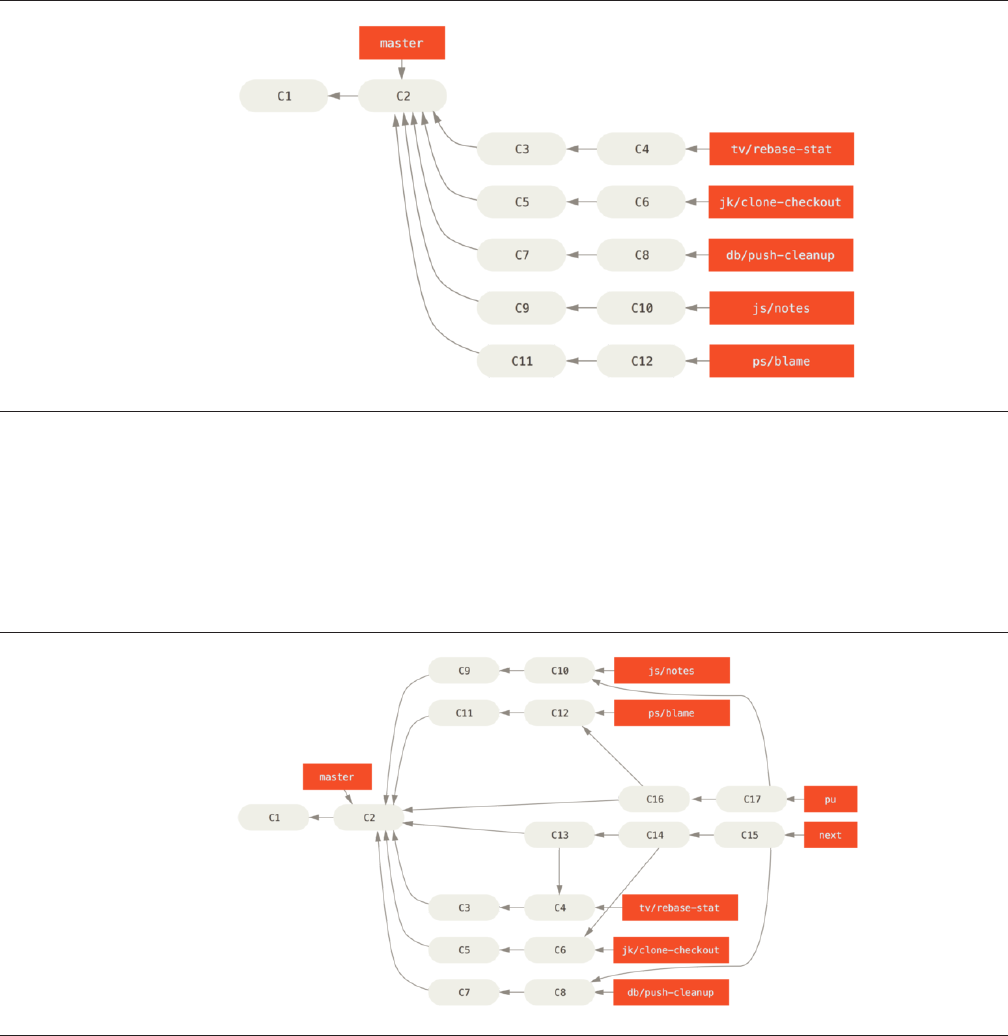
FIGURE 5-25
Managing a complex
series of parallel
contributed topic
branches.
FIGURE 5-26
Merging contributed
topic branches into
long-term
integration
branches.
If the topics still need work, they’re merged into pu instead. When it’s deter-
mined that they’re totally stable, the topics are re-merged into master and are
then rebuilt from the topics that were in next but didn’t yet graduate to mas-
ter. This means master almost always moves forward, next is rebased occa-
sionally, and pu is rebased even more oen:
CHAPTER 5: Distributed Git
192
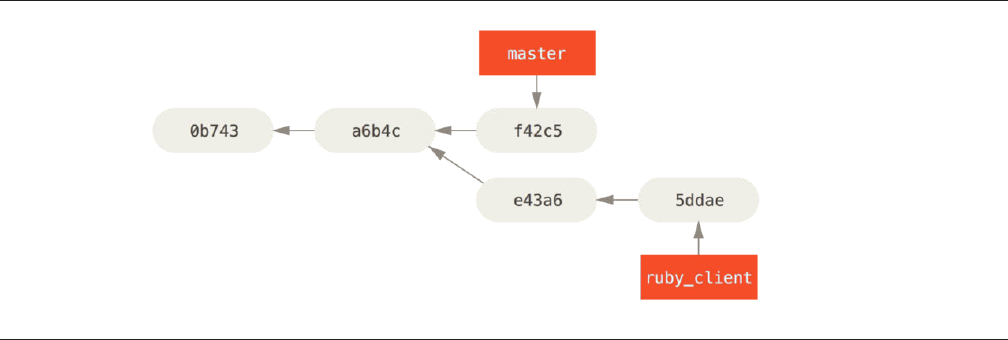
FIGURE 5-27
Example history
before a cherry-pick.
When a topic branch has finally been merged into master, it’s removed from
the repository. The Git project also has a maint branch that is forked o from
the last release to provide backported patches in case a maintenance release is
required. Thus, when you clone the Git repository, you have four branches that
you can check out to evaluate the project in dierent stages of development,
depending on how cutting edge you want to be or how you want to contribute;
and the maintainer has a structured workflow to help them vet new contribu-
tions.
REBASING AND CHERRY PICKING WORKFLOWS
Other maintainers prefer to rebase or cherry-pick contributed work on top of
their master branch, rather than merging it in, to keep a mostly linear history.
When you have work in a topic branch and have determined that you want to
integrate it, you move to that branch and run the rebase command to rebuild
the changes on top of your current master (or develop, and so on) branch. If
that works well, you can fast-forward your master branch, and you’ll end up
with a linear project history.
The other way to move introduced work from one branch to another is to
cherry-pick it. A cherry-pick in Git is like a rebase for a single commit. It takes
the patch that was introduced in a commit and tries to reapply it on the branch
you’re currently on. This is useful if you have a number of commits on a topic
branch and you want to integrate only one of them, or if you only have one
commit on a topic branch and you’d prefer to cherry-pick it rather than run re-
base. For example, suppose you have a project that looks like this:
If you want to pull commit e43a6 into your master branch, you can run
Maintaining a Project
193
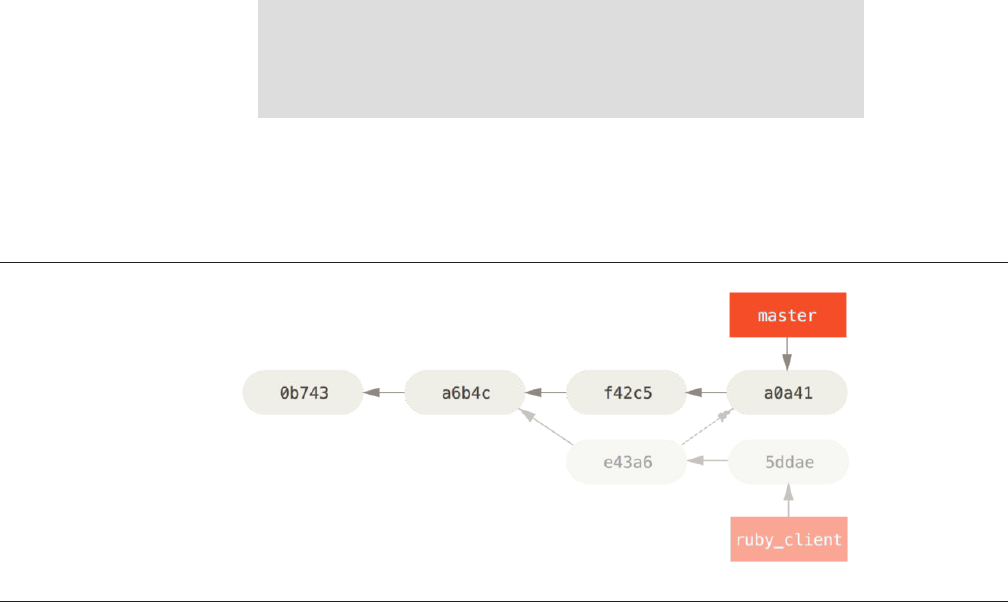
FIGURE 5-28
History after cherry-
picking a commit on
a topic branch.
$ git cherry-pick e43a6fd3e94888d76779ad79fb568ed180e5fcdf
Finished one cherry-pick.
[master]: created a0a41a9: "More friendly message when locking the index fails."
3 files changed, 17 insertions(+), 3 deletions(-)
This pulls the same change introduced in e43a6, but you get a new commit
SHA-1 value, because the date applied is dierent. Now your history looks like
this:
Now you can remove your topic branch and drop the commits you didn’t
want to pull in.
RERERE
If you’re doing lots of merging and rebasing, or you’re maintaining a long-lived
topic branch, Git has a feature called “rerere” that can help.
Rerere stands for “reuse recorded resolution” – it’s a way of shortcutting
manual conflict resolution. When rerere is enabled, Git will keep a set of pre-
and post-images from successful merges, and if it notices that there’s a conflict
that looks exactly like one you’ve already fixed, it’ll just use the fix from last
time, without bothering you with it.
This feature comes in two parts: a configuration setting and a command. The
configuration setting is rerere.enabled, and it’s handy enough to put in your
global config:
CHAPTER 5: Distributed Git
194

$ git config --global rerere.enabled true
Now, whenever you do a merge that resolves conflicts, the resolution will be
recorded in the cache in case you need it in the future.
If you need to, you can interact with the rerere cache using the git rerere
command. When it’s invoked alone, Git checks its database of resolutions and
tries to find a match with any current merge conflicts and resolve them (al-
though this is done automatically if rerere.enabled is set to true). There are
also subcommands to see what will be recorded, to erase specific resolution
from the cache, and to clear the entire cache. We will cover rerere in more detail
in “Rerere”.
Tagging Your Releases
When you’ve decided to cut a release, you’ll probably want to drop a tag so you
can re-create that release at any point going forward. You can create a new tag
as discussed in Chapter 2. If you decide to sign the tag as the maintainer, the
tagging may look something like this:
$ git tag -s v1.5 -m 'my signed 1.5 tag'
You need a passphrase to unlock the secret key for
user: "Scott Chacon <schacon@gmail.com>"
1024-bit DSA key, ID F721C45A, created 2009-02-09
If you do sign your tags, you may have the problem of distributing the public
PGP key used to sign your tags. The maintainer of the Git project has solved this
issue by including their public key as a blob in the repository and then adding a
tag that points directly to that content. To do this, you can figure out which key
you want by running gpg --list-keys:
$ gpg --list-keys
/Users/schacon/.gnupg/pubring.gpg
---------------------------------
pub 1024D/F721C45A 2009-02-09 [expires: 2010-02-09]
uid Scott Chacon <schacon@gmail.com>
sub 2048g/45D02282 2009-02-09 [expires: 2010-02-09]
Then, you can directly import the key into the Git database by exporting it
and piping that through git hash-object, which writes a new blob with
those contents into Git and gives you back the SHA-1 of the blob:
Maintaining a Project
195

$ gpg -a --export F721C45A | git hash-object -w --stdin
659ef797d181633c87ec71ac3f9ba29fe5775b92
Now that you have the contents of your key in Git, you can create a tag that
points directly to it by specifying the new SHA-1 value that the hash-object
command gave you:
$ git tag -a maintainer-pgp-pub 659ef797d181633c87ec71ac3f9ba29fe5775b92
If you run git push --tags, the maintainer-pgp-pub tag will be shared
with everyone. If anyone wants to verify a tag, they can directly import your
PGP key by pulling the blob directly out of the database and importing it into
GPG:
$ git show maintainer-pgp-pub | gpg --import
They can use that key to verify all your signed tags. Also, if you include in-
structions in the tag message, running git show <tag> will let you give the
end user more specific instructions about tag verification.
Generating a Build Number
Because Git doesn’t have monotonically increasing numbers like v123 or the
equivalent to go with each commit, if you want to have a human-readable
name to go with a commit, you can run git describe on that commit. Git
gives you the name of the nearest tag with the number of commits on top of
that tag and a partial SHA-1 value of the commit you’re describing:
$ git describe master
v1.6.2-rc1-20-g8c5b85c
This way, you can export a snapshot or build and name it something under-
standable to people. In fact, if you build Git from source code cloned from the
Git repository, git --version gives you something that looks like this. If
you’re describing a commit that you have directly tagged, it gives you the tag
name.
The git describe command favors annotated tags (tags created with the
-a or -s flag), so release tags should be created this way if you’re using git
CHAPTER 5: Distributed Git
196

describe, to ensure the commit is named properly when described. You can
also use this string as the target of a checkout or show command, although it
relies on the abbreviated SHA-1 value at the end, so it may not be valid forever.
For instance, the Linux kernel recently jumped from 8 to 10 characters to ensure
SHA-1 object uniqueness, so older git describe output names were invalida-
ted.
Preparing a Release
Now you want to release a build. One of the things you’ll want to do is create an
archive of the latest snapshot of your code for those poor souls who don’t use
Git. The command to do this is git archive:
$ git archive master --prefix='project/' | gzip > `git describe master`.tar.gz
$ ls *.tar.gz
v1.6.2-rc1-20-g8c5b85c.tar.gz
If someone opens that tarball, they get the latest snapshot of your project
under a project directory. You can also create a zip archive in much the same
way, but by passing the --format=zip option to git archive:
$ git archive master --prefix='project/' --format=zip > `git describe master`.zip
You now have a nice tarball and a zip archive of your project release that you
can upload to your website or e-mail to people.
The Shortlog
It’s time to e-mail your mailing list of people who want to know what’s happen-
ing in your project. A nice way of quickly getting a sort of changelog of what has
been added to your project since your last release or e-mail is to use the git
shortlog command. It summarizes all the commits in the range you give it; for
example, the following gives you a summary of all the commits since your last
release, if your last release was named v1.0.1:
$ git shortlog --no-merges master --not v1.0.1
Chris Wanstrath (8):
Add support for annotated tags to Grit::Tag
Add packed-refs annotated tag support.
Add Grit::Commit#to_patch
Maintaining a Project
197

Update version and History.txt
Remove stray `puts`
Make ls_tree ignore nils
Tom Preston-Werner (4):
fix dates in history
dynamic version method
Version bump to 1.0.2
Regenerated gemspec for version 1.0.2
You get a clean summary of all the commits since v1.0.1, grouped by author,
that you can e-mail to your list.
Summary
You should feel fairly comfortable contributing to a project in Git as well as
maintaining your own project or integrating other users’ contributions. Con-
gratulations on being an eective Git developer! In the next chapter, you’ll learn
about how to use the largest and most popular Git hosting service, GitHub.
CHAPTER 5: Distributed Git
198

GitHub
GitHub is the single largest host for Git repositories, and is the central point of
collaboration for millions of developers and projects. A large percentage of all
Git repositories are hosted on GitHub, and many open-source projects use it for
Git hosting, issue tracking, code review, and other things. So while it’s not a di-
rect part of the Git open source project, there’s a good chance that you’ll want
or need to interact with GitHub at some point while using Git professionally.
This chapter is about using GitHub eectively. We’ll cover signing up for and
managing an account, creating and using Git repositories, common workflows
to contribute to projects and to accept contributions to yours, GitHub’s pro-
grammatic interface and lots of little tips to make your life easier in general.
If you are not interested in using GitHub to host your own projects or to col-
laborate with other projects that are hosted on GitHub, you can safely skip to
Chapter 7.
INTERFACES CHANGE
It’s important to note that like many active websites, the UI elements in
these screenshots are bound to change over time. Hopefully the general
idea of what we’re trying to accomplish here will still be there, but if you
want more up to date versions of these screens, the online versions of
this book may have newer screenshots.
Account Setup and Configuration
The first thing you need to do is set up a free user account. Simply visit https://
github.com, choose a user name that isn’t already taken, provide an email ad-
dress and a password, and click the big green “Sign up for GitHub” button.
199
6
FIGURE 6-1
The GitHub sign-up
form.
The next thing you’ll see is the pricing page for upgraded plans, but it’s safe
to ignore this for now. GitHub will send you an email to verify the address you
provided. Go ahead and do this, it’s pretty important (as we’ll see later).
GitHub provides all of its functionality with free accounts, with the limi-
tation that all of your projects are fully public (everyone has read access).
GitHub’s paid plans include a set number of private projects, but we
won’t be covering those in this book.
Clicking the Octocat logo at the top-le of the screen will take you to your
dashboard page. You’re now ready to use GitHub.
SSH Access
As of right now, you’re fully able to connect with Git repositories using the
https:// protocol, authenticating with the username and password you just
set up. However, to simply clone public projects, you don’t even need to sign up
- the account we just created comes into play when we fork projects and push
to our forks a bit later.
CHAPTER 6: GitHub
200
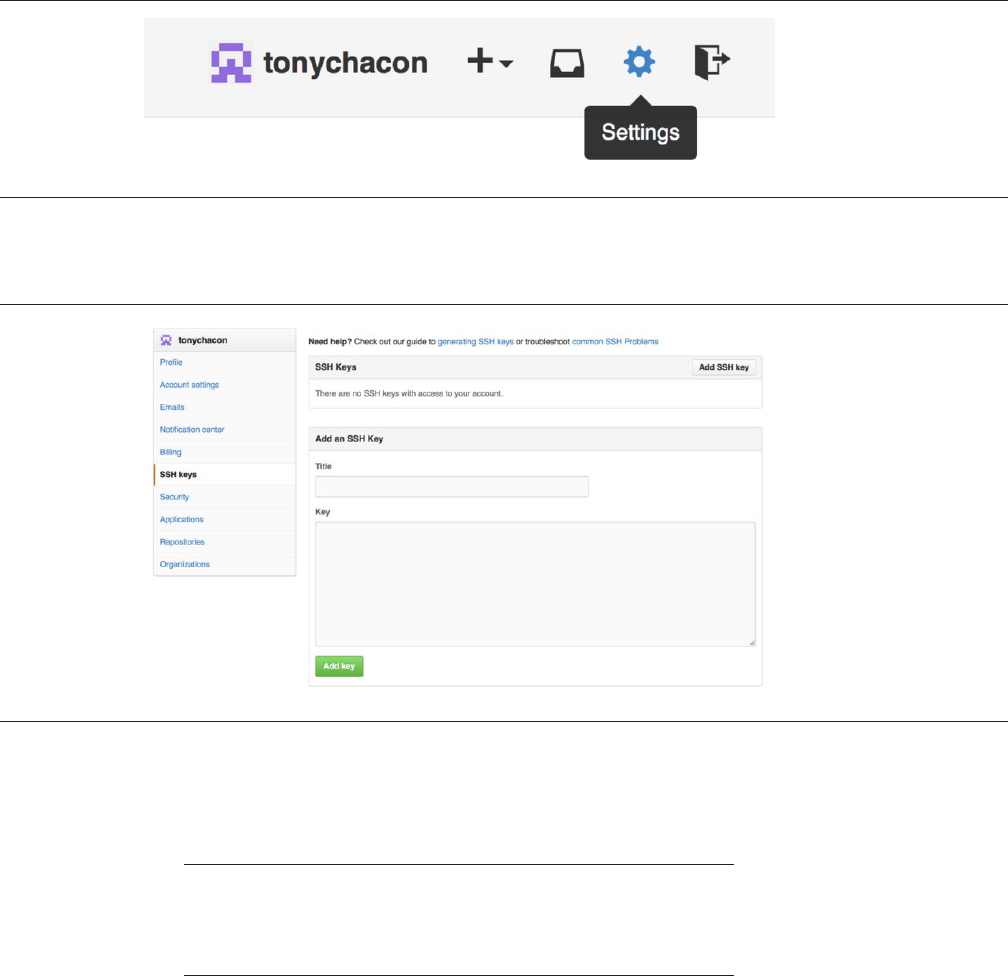
FIGURE 6-2
The “Account
settings” link.
FIGURE 6-3
The “SSH keys” link.
If you’d like to use SSH remotes, you’ll need to configure a public key. (If you
don’t already have one, see “Generating Your SSH Public Key”.) Open up your
account settings using the link at the top-right of the window:
Then select the “SSH keys” section along the le-hand side.
From there, click the "Add an SSH key" button, give your key a name,
paste the contents of your ~/.ssh/id_rsa.pub (or whatever you named it)
public-key file into the text area, and click “Add key”.
Be sure to name your SSH key something you can remember. You can
name each of your keys (e.g. “My Laptop” or “Work Account”) so that if
you need to revoke a key later, you can easily tell which one you’re look-
ing for.
Account Setup and Configuration
201
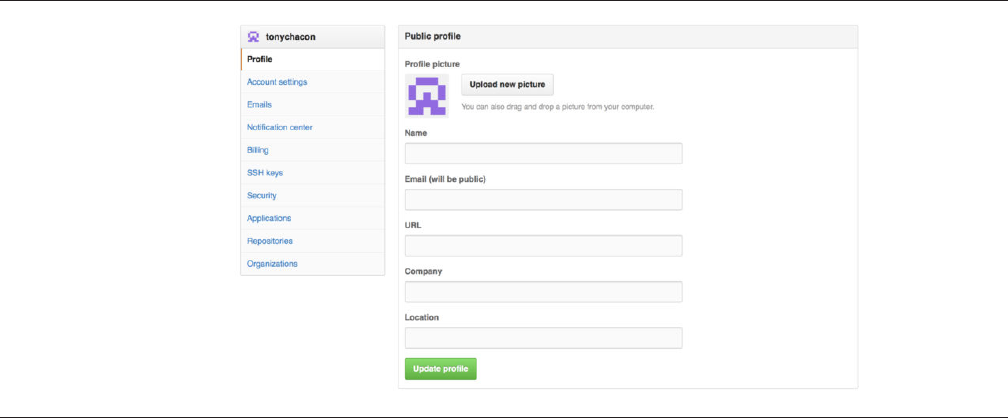
FIGURE 6-4
The “Prole” link.
Your Avatar
Next, if you wish, you can replace the avatar that is generated for you with an
image of your choosing. First go to the “Profile” tab (above the SSH Keys tab)
and click “Upload new picture”.
We’ll choose a copy of the Git logo that is on our hard drive and then we get
a chance to crop it.
CHAPTER 6: GitHub
202
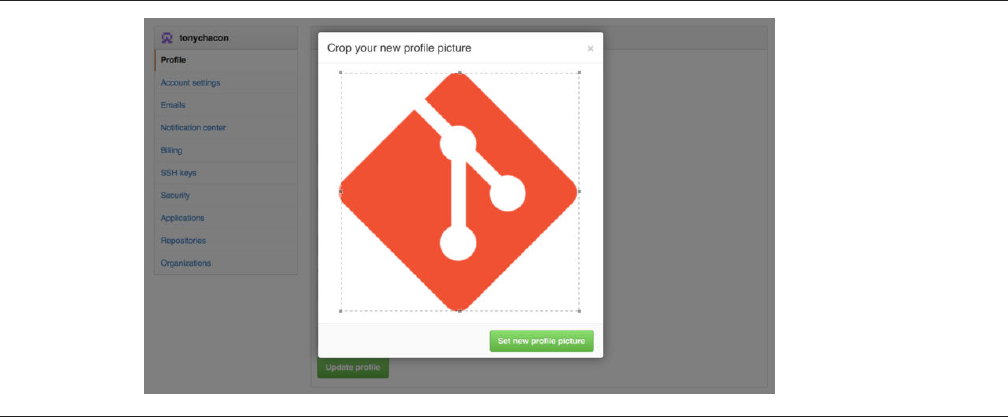
FIGURE 6-5
Crop your avatar
Now anywhere you interact on the site, people will see your avatar next to
your username.
If you happen to have uploaded an avatar to the popular Gravatar service
(oen used for Wordpress accounts), that avatar will be used by default and you
don’t need to do this step.
Your Email Addresses
The way that GitHub maps your Git commits to your user is by email address. If
you use multiple email addresses in your commits and you want GitHub to link
them up properly, you need to add all the email addresses you have used to the
Emails section of the admin section.
Account Setup and Configuration
203
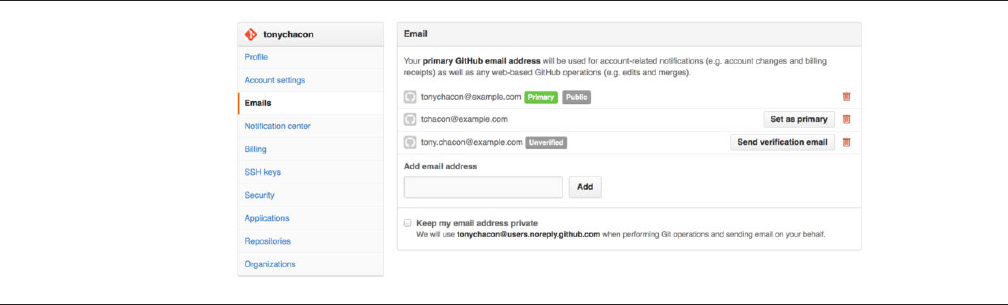
FIGURE 6-6
Add email addresses
In Figure 6-6 we can see some of the dierent states that are possible. The
top address is verified and set as the primary address, meaning that is where
you’ll get any notifications and receipts. The second address is verified and so
can be set as the primary if you wish to switch them. The final address is unveri-
fied, meaning that you can’t make it your primary address. If GitHub sees any of
these in commit messages in any repository on the site, it will be linked to your
user now.
Two Factor Authentication
Finally, for extra security, you should definitely set up Two-factor Authentica-
tion or “2FA”. Two-factor Authentication is an authentication mechanism that is
becoming more and more popular recently to mitigate the risk of your account
being compromised if your password is stolen somehow. Turning it on will
make GitHub ask you for two dierent methods of authentication, so that if one
of them is compromised, an attacker will not be able to access your account.
You can find the Two-factor Authentication setup under the Security tab of
your Account settings.
CHAPTER 6: GitHub
204
FIGURE 6-7
2FA in the Security
Tab
If you click on the “Set up two-factor authentication” button, it will take you
to a configuration page where you can choose to use a phone app to generate
your secondary code (a “time based one-time password”), or you can have Git-
Hub send you a code via SMS each time you need to log in.
Aer you choose which method you prefer and follow the instructions for
setting up 2FA, your account will then be a little more secure and you will have
to provide a code in addition to your password whenever you log into GitHub.
Contributing to a Project
Now that our account is set up, let’s walk through some details that could be
useful in helping you contribute to an existing project.
Forking Projects
If you want to contribute to an existing project to which you don’t have push
access, you can “fork” the project. What this means is that GitHub will make a
copy of the project that is entirely yours; it lives in your user’s namespace, and
you can push to it.
Contributing to a Project
205
FIGURE 6-8
The “Fork” button.
Historically, the term “fork” has been somewhat negative in context,
meaning that someone took an open source project in a different direc-
tion, sometimes creating a competing project and splitting the contribu-
tors. In GitHub, a “fork” is simply the same project in your own name-
space, allowing you to make changes to a project publicly as a way to
contribute in a more open manner.
This way, projects don’t have to worry about adding users as collaborators
to give them push access. People can fork a project, push to it, and contribute
their changes back to the original repository by creating what’s called a Pull Re-
quest, which we’ll cover next. This opens up a discussion thread with code re-
view, and the owner and the contributor can then communicate about the
change until the owner is happy with it, at which point the owner can merge it
in.
To fork a project, visit the project page and click the “Fork” button at the
top-right of the page.
Aer a few seconds, you’ll be taken to your new project page, with your own
writeable copy of the code.
The GitHub Flow
GitHub is designed around a particular collaboration workflow, centered on
Pull Requests. This flow works whether you’re collaborating with a tightly-knit
team in a single shared repository, or a globally-distributed company or net-
work of strangers contributing to a project through dozens of forks. It is cen-
tered on the “Ramas Puntuales” workflow covered in Chapter 3.
Here’s how it generally works:
1. Create a topic branch from master.
2. Make some commits to improve the project.
3. Push this branch to your GitHub project.
4. Open a Pull Request on GitHub.
5. Discuss, and optionally continue committing.
6. The project owner merges or closes the Pull Request.
CHAPTER 6: GitHub
206
FIGURE 6-9
The project we want
to contribute to.
This is basically the Integration Manager workflow covered in “Integration-
Manager Workflow”, but instead of using email to communicate and review
changes, teams use GitHub’s web based tools.
Let’s walk through an example of proposing a change to an open source
project hosted on GitHub using this flow.
CREATING A PULL REQUEST
Tony is looking for code to run on his Arduino programmable microcontroller
and has found a great program file on GitHub at https://github.com/schacon/
blink.
The only problem is that the blinking rate is too fast, we think it’s much nicer
to wait 3 seconds instead of 1 in between each state change. So let’s improve
the program and submit it back to the project as a proposed change.
First, we click the Fork button as mentioned earlier to get our own copy of
the project. Our user name here is “tonychacon” so our copy of this project is at
https://github.com/tonychacon/blink and that’s where we can edit it.
We will clone it locally, create a topic branch, make the code change and finally
push that change back up to GitHub.
Contributing to a Project
207

$ git clone https://github.com/tonychacon/blink
Cloning into 'blink'...
$ cd blink
$ git checkout -b slow-blink
Switched to a new branch 'slow-blink'
$ sed -i '' 's/1000/3000/' blink.ino
$ git diff --word-diff
diff --git a/blink.ino b/blink.ino
index 15b9911..a6cc5a5 100644
--- a/blink.ino
+++ b/blink.ino
@@ -18,7 +18,7 @@ void setup() {
// the loop routine runs over and over again forever:
void loop() {
digitalWrite(led, HIGH); // turn the LED on (HIGH is the voltage level)
[-delay(1000);-]{+delay(3000);+} // wait for a second
digitalWrite(led, LOW); // turn the LED off by making the voltage LOW
[-delay(1000);-]{+delay(3000);+} // wait for a second
}
$ git commit -a -m 'three seconds is better'
[slow-blink 5ca509d] three seconds is better
1 file changed, 2 insertions(+), 2 deletions(-)
$ git push origin slow-blink
Username for 'https://github.com': tonychacon
Password for 'https://tonychacon@github.com':
Counting objects: 5, done.
Delta compression using up to 8 threads.
Compressing objects: 100% (3/3), done.
Writing objects: 100% (3/3), 340 bytes | 0 bytes/s, done.
Total 3 (delta 1), reused 0 (delta 0)
To https://github.com/tonychacon/blink
* [new branch] slow-blink -> slow-blink
Clone our fork of the project locally
Create a descriptive topic branch
Make our change to the code
Check that the change is good
Commit our change to the topic branch
CHAPTER 6: GitHub
208
FIGURE 6-10
Pull Request button
Push our new topic branch back up to our GitHub fork
Now if we go back to our fork on GitHub, we can see that GitHub noticed that
we pushed a new topic branch up and present us with a big green button to
check out our changes and open a Pull Request to the original project.
You can alternatively go to the “Branches” page at https://github.com/
<user>/<project>/branches to locate your branch and open a new Pull Re-
quest from there.
If we click that green button, we’ll see a screen that allows us to create a title
and description for the change we would like to request so the project owner
has a good reason to consider it. It is generally a good idea to spend some eort
making this description as useful as possible so the author knows why this is
being suggested and why it would be a valuable change for them to accept.
We also see a list of the commits in our topic branch that are “ahead” of the
master branch (in this case, just the one) and a unified di of all the changes
that will be made should this branch get merged by the project owner.
Contributing to a Project
209
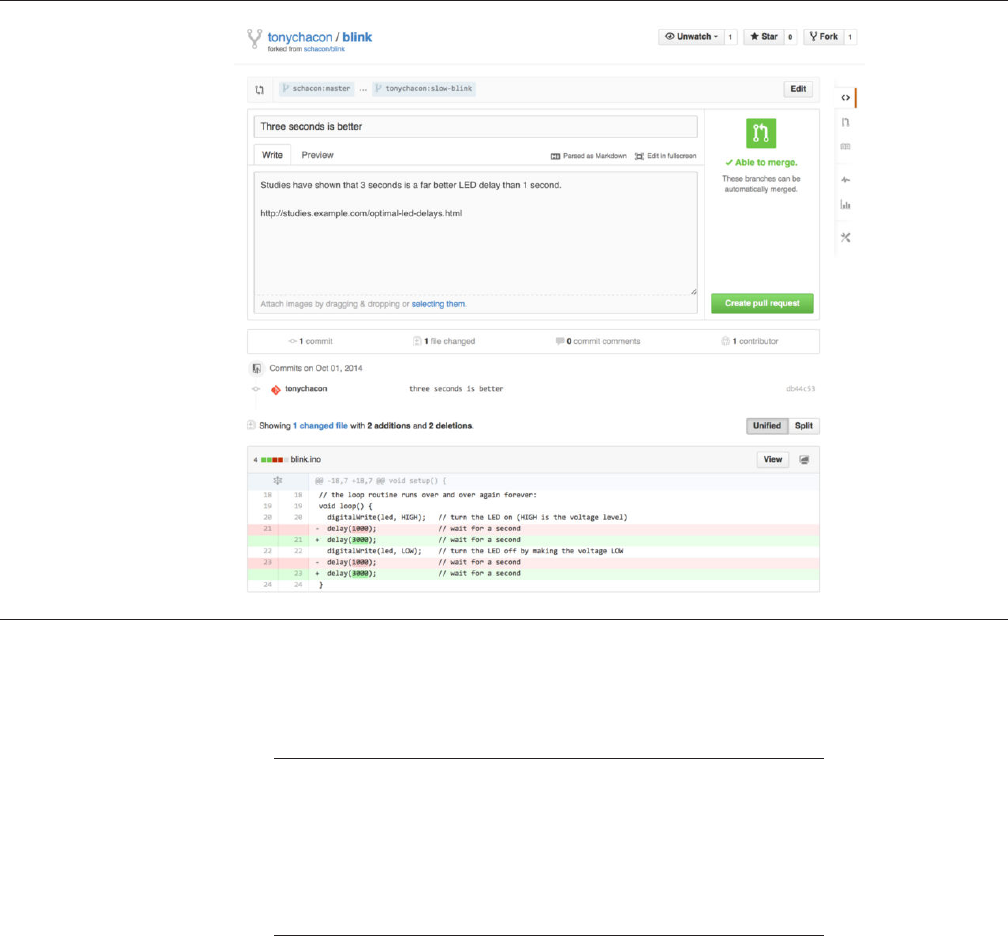
FIGURE 6-11
Pull Request
creation page
When you hit the Create pull request button on this screen, the owner of the
project you forked will get a notification that someone is suggesting a change
and will link to a page that has all of this information on it.
Though Pull Requests are used commonly for public projects like this
when the contributor has a complete change ready to be made, it’s also
often used in internal projects at the beginning of the development cycle.
Since you can keep pushing to the topic branch even after the Pull Re-
quest is opened, it’s often opened early and used as a way to iterate on
work as a team within a context, rather than opened at the very end of
the process.
ITERATING ON A PULL REQUEST
At this point, the project owner can look at the suggested change and merge it,
reject it or comment on it. Let’s say that he likes the idea, but would prefer a
slightly longer time for the light to be o than on.
CHAPTER 6: GitHub
210
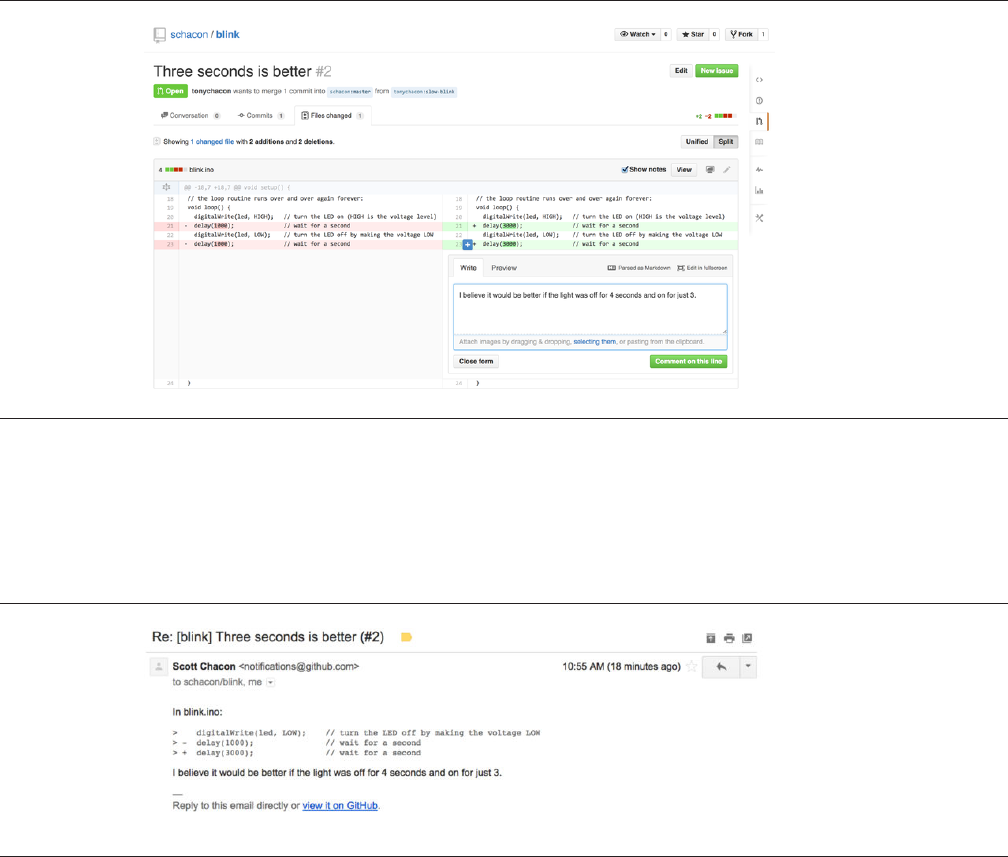
FIGURE 6-12
Comment on a
specic line of code
in a Pull Request
FIGURE 6-13
Comments sent as
email notications
Where this conversation may take place over email in the workflows presen-
ted in Chapter 5, on GitHub this happens online. The project owner can review
the unified di and leave a comment by clicking on any of the lines.
Once the maintainer makes this comment, the person who opened the Pull
Request (and indeed, anyone else watching the repository) will get a notifica-
tion. We’ll go over customizing this later, but if he had email notifications
turned on, Tony would get an email like this:
Anyone can also leave general comments on the Pull Request. In Figure 6-14
we can see an example of the project owner both commenting on a line of code
Contributing to a Project
211
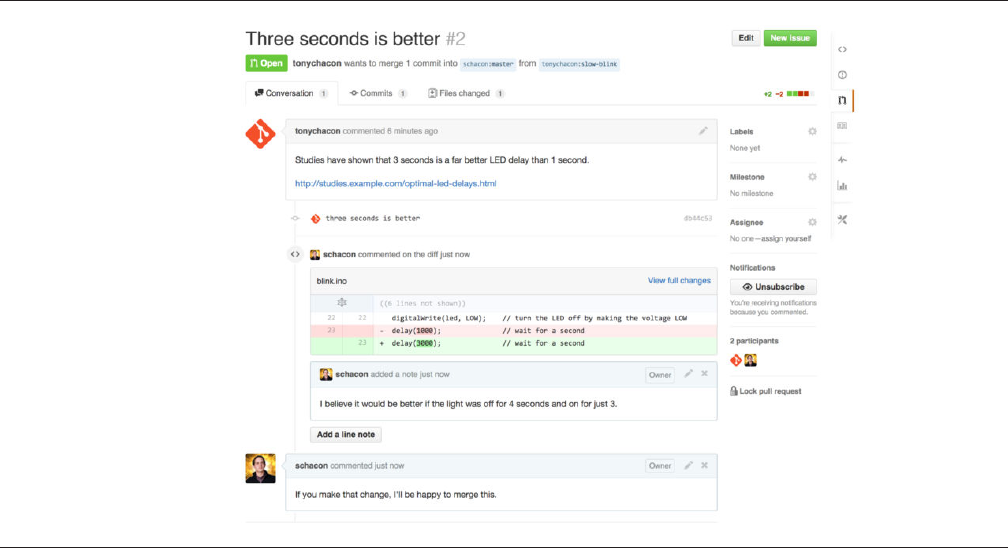
FIGURE 6-14
Pull Request
discussion page
and then leaving a general comment in the discussion section. You can see that
the code comments are brought into the conversation as well.
Now the contributor can see what they need to do in order to get their
change accepted. Luckily this is also a very simple thing to do. Where over email
you may have to re-roll your series and resubmit it to the mailing list, with Git-
Hub you simply commit to the topic branch again and push.
If the contributor does that then the project owner will get notified again
and when they visit the page they will see that it’s been addressed. In fact, since
a line of code changed that had a comment on it, GitHub notices that and col-
lapses the outdated di.
CHAPTER 6: GitHub
212
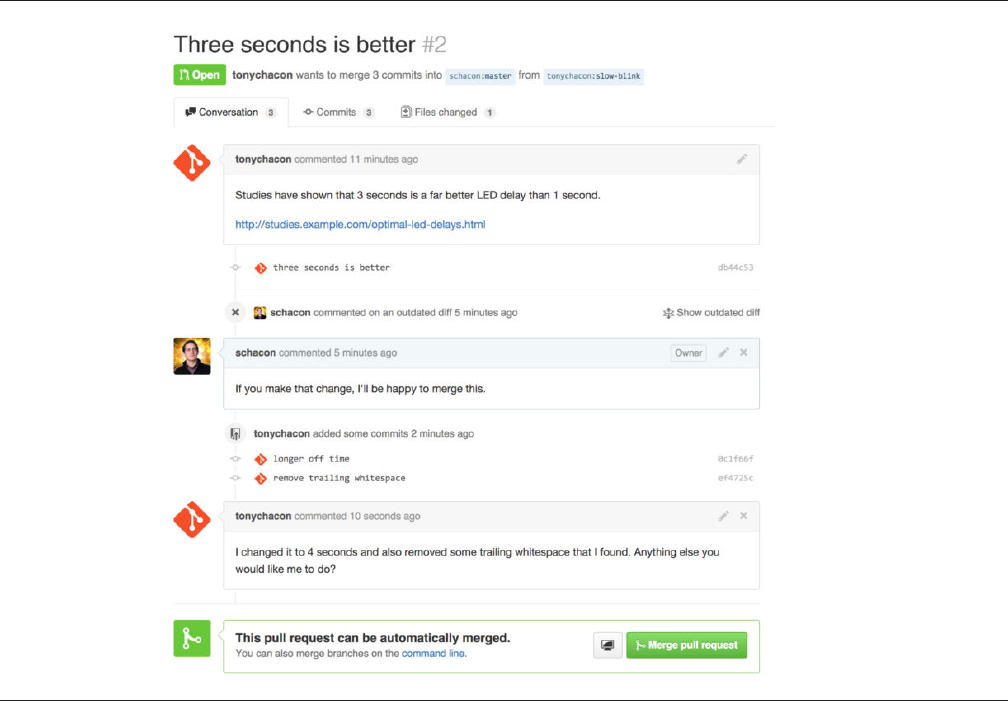
FIGURE 6-15
Pull Request nal
An interesting thing to notice is that if you click on the “Files Changed” tab
on this Pull Request, you’ll get the “unified” di — that is, the total aggregate
dierence that would be introduced to your main branch if this topic branch
was merged in. In git diff terms, it basically automatically shows you git
diff master...<branch> for the branch this Pull Request is based on. See
“Determining What Is Introduced” for more about this type of di.
The other thing you’ll notice is that GitHub checks to see if the Pull Request
merges cleanly and provides a button to do the merge for you on the server.
This button only shows up if you have write access to the repository and a trivi-
al merge is possible. If you click it GitHub will perform a “non-fast-forward”
merge, meaning that even if the merge could be a fast-forward, it will still cre-
ate a merge commit.
Contributing to a Project
213

If you would prefer, you can simply pull the branch down and merge it local-
ly. If you merge this branch into the master branch and push it to GitHub, the
Pull Request will automatically be closed.
This is the basic workflow that most GitHub projects use. Topic branches are
created, Pull Requests are opened on them, a discussion ensues, possibly more
work is done on the branch and eventually the request is either closed or
merged.
NOT ONLY FORKS
It’s important to note that you can also open a Pull Request between two
branches in the same repository. If you’re working on a feature with
someone and you both have write access to the project, you can push a
topic branch to the repository and open a Pull Request on it to the master
branch of that same project to initiate the code review and discussion
process. No forking necessary.
Advanced Pull Requests
Now that we’ve covered the basics of contributing to a project on GitHub, let’s
cover a few interesting tips and tricks about Pull Requests so you can be more
eective in using them.
PULL REQUESTS AS PATCHES
It’s important to understand that many projects don’t really think of Pull Re-
quests as queues of perfect patches that should apply cleanly in order, as most
mailing list-based projects think of patch series contributions. Most GitHub
projects think about Pull Request branches as iterative conversations around a
proposed change, culminating in a unified di that is applied by merging.
This is an important distinction, because generally the change is suggested
before the code is thought to be perfect, which is far more rare with mailing list
based patch series contributions. This enables an earlier conversation with the
maintainers so that arriving at the proper solution is more of a community ef-
ort. When code is proposed with a Pull Request and the maintainers or com-
munity suggest a change, the patch series is generally not re-rolled, but instead
the dierence is pushed as a new commit to the branch, moving the conversa-
tion forward with the context of the previous work intact.
For instance, if you go back and look again at Figure 6-15, you’ll notice that
the contributor did not rebase his commit and send another Pull Request. In-
stead they added new commits and pushed them to the existing branch. This
way if you go back and look at this Pull Request in the future, you can easily find
all of the context of why decisions were made. Pushing the “Merge” button on
CHAPTER 6: GitHub
214
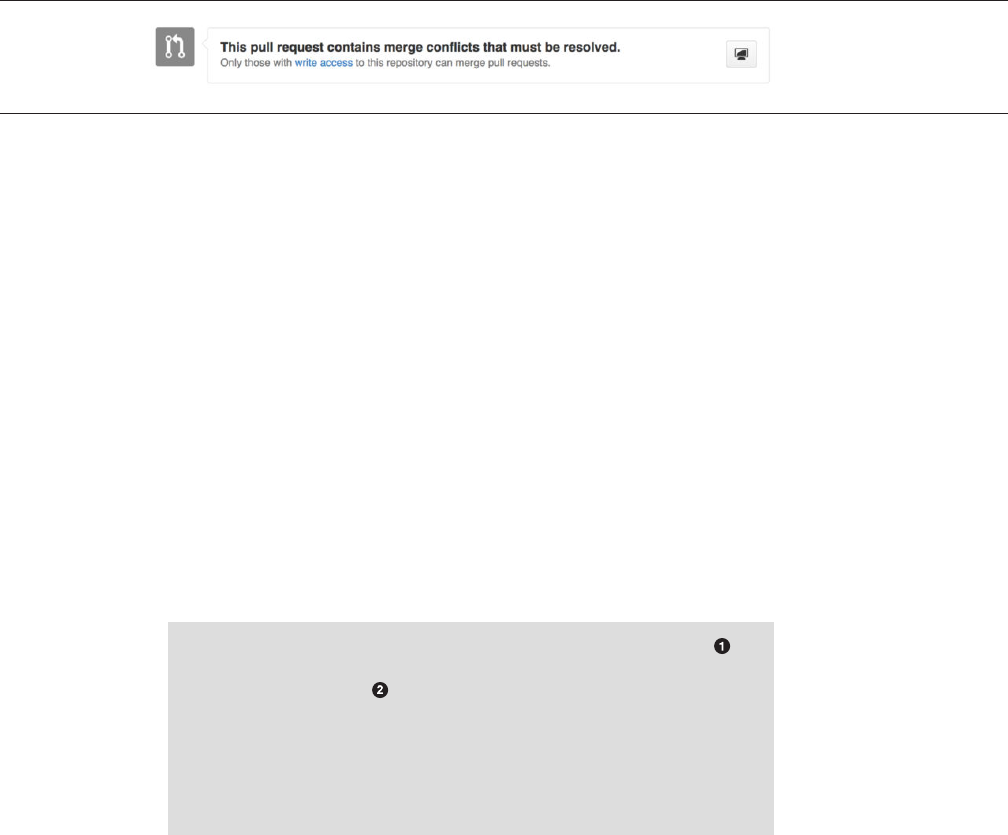
FIGURE 6-16
Pull Request does
not merge cleanly
the site purposefully creates a merge commit that references the Pull Request
so that it’s easy to go back and research the original conversation if necessary.
KEEPING UP WITH UPSTREAM
If your Pull Request becomes out of date or otherwise doesn’t merge cleanly,
you will want to fix it so the maintainer can easily merge it. GitHub will test this
for you and let you know at the bottom of every Pull Request if the merge is
trivial or not.
If you see something like Figure 6-16, you’ll want to fix your branch so that it
turns green and the maintainer doesn’t have to do extra work.
You have two main options in order to do this. You can either rebase your
branch on top of whatever the target branch is (normally the master branch of
the repository you forked), or you can merge the target branch into your
branch.
Most developers on GitHub will choose to do the latter, for the same reasons
we just went over in the previous section. What matters is the history and the
final merge, so rebasing isn’t getting you much other than a slightly cleaner his-
tory and in return is far more diicult and error prone.
If you want to merge in the target branch to make your Pull Request mergea-
ble, you would add the original repository as a new remote, fetch from it, merge
the main branch of that repository into your topic branch, fix any issues and fi-
nally push it back up to the same branch you opened the Pull Request on.
For example, let’s say that in the “tonychacon” example we were using be-
fore, the original author made a change that would create a conflict in the Pull
Request. Let’s go through those steps.
$ git remote add upstream https://github.com/schacon/blink
$ git fetch upstream
remote: Counting objects: 3, done.
remote: Compressing objects: 100% (3/3), done.
Unpacking objects: 100% (3/3), done.
remote: Total 3 (delta 0), reused 0 (delta 0)
From https://github.com/schacon/blink
Contributing to a Project
215

* [new branch] master -> upstream/master
$ git merge upstream/master
Auto-merging blink.ino
CONFLICT (content): Merge conflict in blink.ino
Automatic merge failed; fix conflicts and then commit the result.
$ vim blink.ino
$ git add blink.ino
$ git commit
[slow-blink 3c8d735] Merge remote-tracking branch 'upstream/master' \
into slower-blink
$ git push origin slow-blink
Counting objects: 6, done.
Delta compression using up to 8 threads.
Compressing objects: 100% (6/6), done.
Writing objects: 100% (6/6), 682 bytes | 0 bytes/s, done.
Total 6 (delta 2), reused 0 (delta 0)
To https://github.com/tonychacon/blink
ef4725c..3c8d735 slower-blink -> slow-blink
Add the original repository as a remote named “upstream”
Fetch the newest work from that remote
Merge the main branch into your topic branch
Fix the conflict that occurred
Push back up to the same topic branch
Once you do that, the Pull Request will be automatically updated and re-
checked to see if it merges cleanly.
CHAPTER 6: GitHub
216
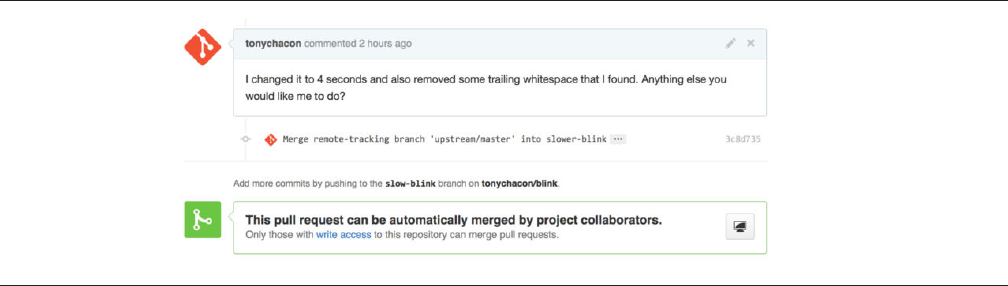
FIGURE 6-17
Pull Request now
merges cleanly
One of the great things about Git is that you can do that continuously. If you
have a very long-running project, you can easily merge from the target branch
over and over again and only have to deal with conflicts that have arisen since
the last time that you merged, making the process very manageable.
If you absolutely wish to rebase the branch to clean it up, you can certainly
do so, but it is highly encouraged to not force push over the branch that the Pull
Request is already opened on. If other people have pulled it down and done
more work on it, you run into all of the issues outlined in “Los Peligros de Re-
organizar”. Instead, push the rebased branch to a new branch on GitHub and
open a brand new Pull Request referencing the old one, then close the original.
REFERENCES
Your next question may be “How do I reference the old Pull Request?”. It turns
out there are many, many ways to reference other things almost anywhere you
can write in GitHub.
Let’s start with how to cross-reference another Pull Request or an Issue. All
Pull Requests and Issues are assigned numbers and they are unique within the
project. For example, you can’t have Pull Request #3 and Issue #3. If you want
to reference any Pull Request or Issue from any other one, you can simply put
#<num> in any comment or description. You can also be more specific if the Is-
sue or Pull request lives somewhere else; write username#<num> if you’re refer-
ring to an Issue or Pull Request in a fork of the repository you’re in, or user-
name/repo#<num> to reference something in another repository.
Let’s look at an example. Say we rebased the branch in the previous exam-
ple, created a new pull request for it, and now we want to reference the old pull
request from the new one. We also want to reference an issue in the fork of the
repository and an issue in a completely dierent project. We can fill out the de-
scription just like Figure 6-18.
Contributing to a Project
217
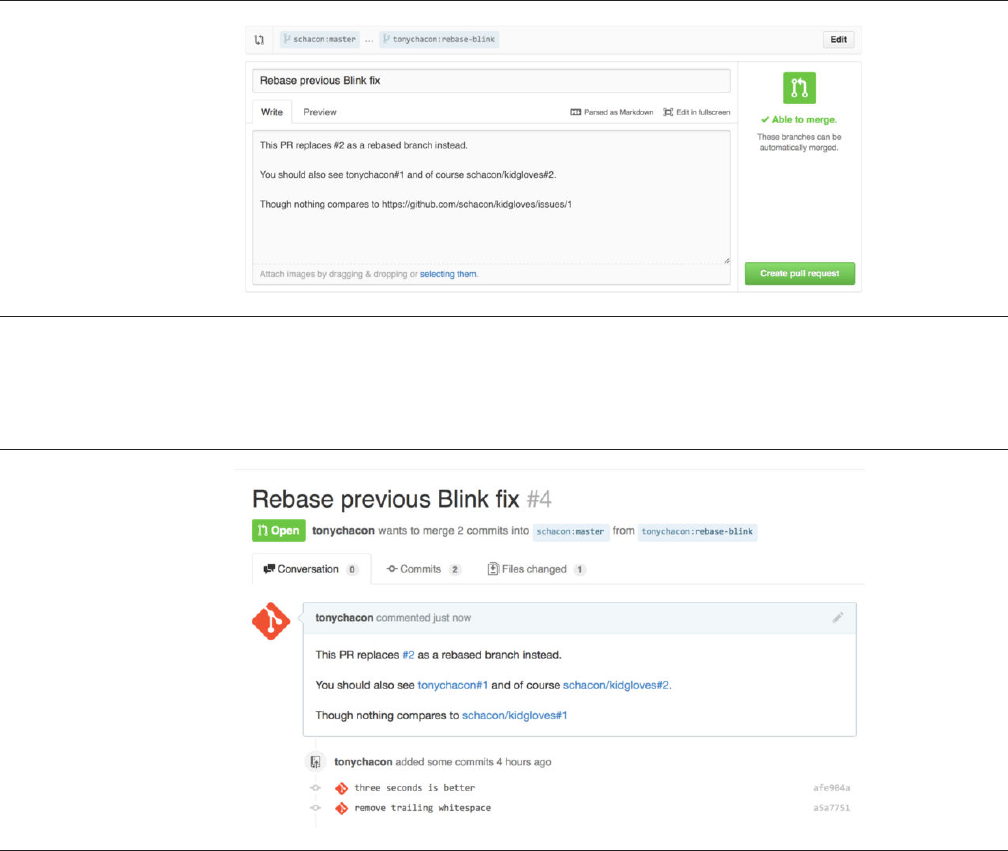
FIGURE 6-18
Cross references in a
Pull Request.
FIGURE 6-19
Cross references
rendered in a Pull
Request.
When we submit this pull request, we’ll see all of that rendered like
Figure 6-19.
Notice that the full GitHub URL we put in there was shortened to just the in-
formation needed.
Now if Tony goes back and closes out the original Pull Request, we can see
that by mentioning it in the new one, GitHub has automatically created a track-
back event in the Pull Request timeline. This means that anyone who visits this
Pull Request and sees that it is closed can easily link back to the one that super-
seded it. The link will look something like Figure 6-20.
CHAPTER 6: GitHub
218

FIGURE 6-20
Cross references
rendered in a Pull
Request.
FIGURE 6-21
An example of
Markdown as
written and as
rendered.
In addition to issue numbers, you can also reference a specific commit by
SHA-1. You have to specify a full 40 character SHA-1, but if GitHub sees that in a
comment, it will link directly to the commit. Again, you can reference commits
in forks or other repositories in the same way you did with issues.
Markdown
Linking to other Issues is just the beginning of interesting things you can do
with almost any text box on GitHub. In Issue and Pull Request descriptions,
comments, code comments and more, you can use what is called “GitHub Fla-
vored Markdown”. Markdown is like writing in plain text but which is rendered
richly.
See Figure 6-21 for an example of how comments or text can be written and
then rendered using Markdown.
Contributing to a Project
219

FIGURE 6-22
Task lists rendered
in a Markdown
comment.
GITHUB FLAVORED MARKDOWN
The GitHub flavor of Markdown adds more things you can do beyond the basic
Markdown syntax. These can all be really useful when creating useful Pull Re-
quest or Issue comments or descriptions.
Task Lists
The first really useful GitHub specific Markdown feature, especially for use in
Pull Requests, is the Task List. A task list is a list of checkboxes of things you
want to get done. Putting them into an Issue or Pull Request normally indicates
things that you want to get done before you consider the item complete.
You can create a task list like this:
- [X] Write the code
- [ ] Write all the tests
- [ ] Document the code
If we include this in the description of our Pull Request or Issue, we’ll see it
rendered like Figure 6-22
This is oen used in Pull Requests to indicate what all you would like to get
done on the branch before the Pull Request will be ready to merge. The really
cool part is that you can simply click the checkboxes to update the comment —
you don’t have to edit the Markdown directly to check tasks o.
What’s more, GitHub will look for task lists in your Issues and Pull Requests
and show them as metadata on the pages that list them out. For example, if you
have a Pull Request with tasks and you look at the overview page of all Pull Re-
quests, you can see how far done it is. This helps people break down Pull Re-
quests into subtasks and helps other people track the progress of the branch.
You can see an example of this in Figure 6-23.
CHAPTER 6: GitHub
220
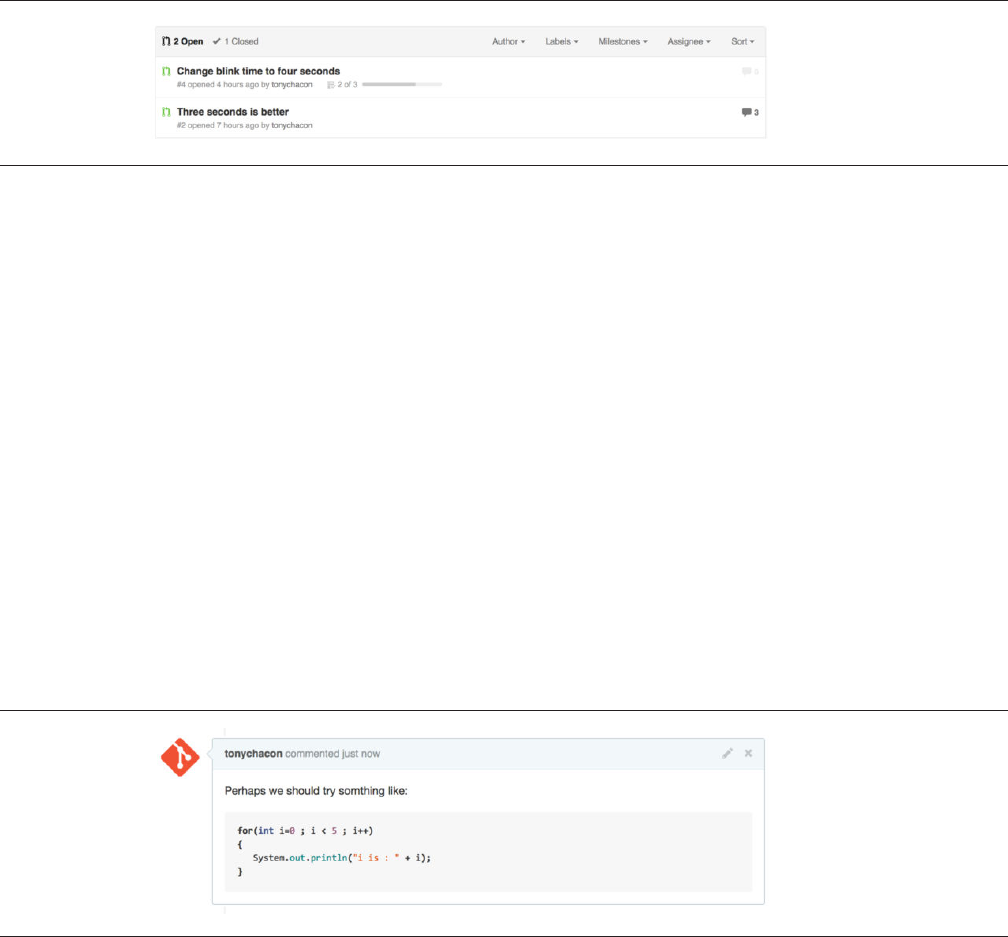
FIGURE 6-23
Task list summary in
the Pull Request list.
FIGURE 6-24
Rendered fenced
code example.
These are incredibly useful when you open a Pull Request early and use it to
track your progress through the implementation of the feature.
Code Snippets
You can also add code snippets to comments. This is especially useful if you
want to present something that you could try to do before actually implement-
ing it as a commit on your branch. This is also oen used to add example code
of what is not working or what this Pull Request could implement.
To add a snippet of code you have to “fence” it in backticks.
```java
for(int i=0 ; i < 5 ; i++)
{
System.out.println("i is : " + i);
}
```
If you add a language name like we did there with java, GitHub will also try
to syntax highlight the snippet. In the case of the above example, it would end
up rendering like Figure 6-24.
Quoting
If you’re responding to a small part of a long comment, you can selectively
quote out of the other comment by preceding the lines with the > character. In
fact, this is so common and so useful that there is a keyboard shortcut for it. If
Contributing to a Project
221
FIGURE 6-25
Rendered quoting
example.
you highlight text in a comment that you want to directly reply to and hit the r
key, it will quote that text in the comment box for you.
The quotes look something like this:
> Whether 'tis Nobler in the mind to suffer
> The Slings and Arrows of outrageous Fortune,
How big are these slings and in particular, these arrows?
Once rendered, the comment will look like Figure 6-25.
Emoji
Finally, you can also use emoji in your comments. This is actually used quite
extensively in comments you see on many GitHub Issues and Pull Requests.
There is even an emoji helper in GitHub. If you are typing a comment and you
start with a : character, an autocompleter will help you find what you’re look-
ing for.
CHAPTER 6: GitHub
222

FIGURE 6-26
Emoji autocompleter
in action.
FIGURE 6-27
Heavy emoji
commenting.
Emojis take the form of :<name>: anywhere in the comment. For instance,
you could write something like this:
I :eyes: that :bug: and I :cold_sweat:.
:trophy: for :microscope: it.
:+1: and :sparkles: on this :ship:, it's :fire::poop:!
:clap::tada::panda_face:
When rendered, it would look something like Figure 6-27.
Not that this is incredibly useful, but it does add an element of fun and emo-
tion to a medium that is otherwise hard to convey emotion in.
There are actually quite a number of web services that make use of emoji
characters these days. A great cheat sheet to reference to find emoji that
expresses what you want to say can be found at:
http://www.emoji-cheat-sheet.com
Contributing to a Project
223
FIGURE 6-28
Drag and drop
images to upload
them and auto-
embed them.
Images
This isn’t technically GitHub Flavored Markdown, but it is incredibly useful.
In addition to adding Markdown image links to comments, which can be dii-
cult to find and embed URLs for, GitHub allows you to drag and drop images
into text areas to embed them.
If you look back at Figure 6-18, you can see a small “Parsed as Markdown”
hint above the text area. Clicking on that will give you a full cheat sheet of ev-
erything you can do with Markdown on GitHub.
Maintaining a Project
Now that we’re comfortable contributing to a project, let’s look at the other
side: creating, maintaining and administering your own project.
Creating a New Repository
Let’s create a new repository to share our project code with. Start by clicking
the “New repository” button on the right-hand side of the dashboard, or from
the + button in the top toolbar next to your username as seen in Figure 6-30.
CHAPTER 6: GitHub
224

FIGURE 6-29
The “Your
repositories” area.
FIGURE 6-30
The “New
repository”
dropdown.
This takes you to the “new repository” form:
Maintaining a Project
225
FIGURE 6-31
The “new
repository” form.
All you really have to do here is provide a project name; the rest of the fields
are completely optional. For now, just click the “Create Repository” button, and
boom – you have a new repository on GitHub, named <user>/
<project_name>.
Since you have no code there yet, GitHub will show you instructions for how
create a brand-new Git repository, or connect an existing Git project. We won’t
belabor this here; if you need a refresher, check out Chapter 2.
Now that your project is hosted on GitHub, you can give the URL to anyone
you want to share your project with. Every project on GitHub is accessible over
HTTP as https://github.com/<user>/<project_name>, and over SSH as
git@github.com:<user>/<project_name>. Git can fetch from and push to
both of these URLs, but they are access-controlled based on the credentials of
the user connecting to them.
It is often preferable to share the HTTP based URL for a public project,
since the user does not have to have a GitHub account to access it for
cloning. Users will have to have an account and an uploaded SSH key to
access your project if you give them the SSH URL. The HTTP one is also
exactly the same URL they would paste into a browser to view the project
there.
Adding Collaborators
If you’re working with other people who you want to give commit access to, you
need to add them as “collaborators”. If Ben, Je, and Louise all sign up for ac-
CHAPTER 6: GitHub
226
FIGURE 6-32
The repository
settings link.
FIGURE 6-33
Repository
collaborators.
counts on GitHub, and you want to give them push access to your repository,
you can add them to your project. Doing so will give them “push” access, which
means they have both read and write access to the project and Git repository.
Click the “Settings” link at the bottom of the right-hand sidebar.
Then select “Collaborators” from the menu on the le-hand side. Then, just
type a username into the box, and click “Add collaborator.” You can repeat this
as many times as you like to grant access to everyone you like. If you need to
revoke access, just click the “X” on the right-hand side of their row.
Maintaining a Project
227
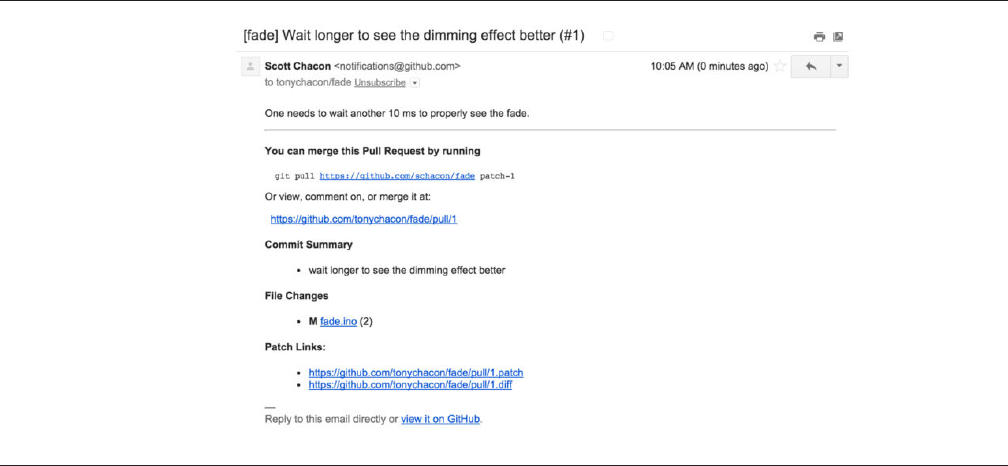
FIGURE 6-34
Email notication of
a new Pull Request.
Managing Pull Requests
Now that you have a project with some code in it and maybe even a few collab-
orators who also have push access, let’s go over what to do when you get a Pull
Request yourself.
Pull Requests can either come from a branch in a fork of your repository or
they can come from another branch in the same repository. The only dierence
is that the ones in a fork are oen from people where you can’t push to their
branch and they can’t push to yours, whereas with internal Pull Requests gen-
erally both parties can access the branch.
For these examples, let’s assume you are “tonychacon” and you’ve created a
new Arduino code project named “fade”.
EMAIL NOTIFICATIONS
Someone comes along and makes a change to your code and sends you a Pull
Request. You should get an email notifying you about the new Pull Request and
it should look something like Figure 6-34.
There are a few things to notice about this email. It will give you a small di-
stat — a list of files that have changed in the Pull Request and by how much. It
CHAPTER 6: GitHub
228
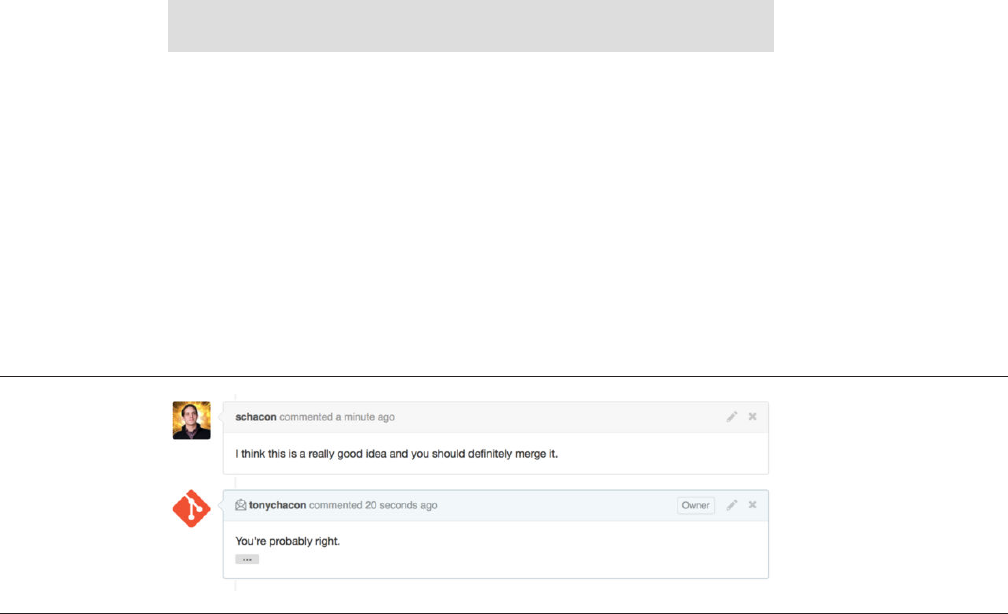
FIGURE 6-35
Responses to emails
are included in the
thread.
gives you a link to the Pull Request on GitHub. It also gives you a few URLs that
you can use from the command line.
If you notice the line that says git pull <url> patch-1, this is a simple
way to merge in a remote branch without having to add a remote. We went over
this quickly in “Checking Out Remote Branches”. If you wish, you can create
and switch to a topic branch and then run this command to merge in the Pull
Request changes.
The other interesting URLs are the .diff and .patch URLs, which as you
may guess, provide unified di and patch versions of the Pull Request. You
could technically merge in the Pull Request work with something like this:
$ curl http://github.com/tonychacon/fade/pull/1.patch | git am
COLLABORATING ON THE PULL REQUEST
As we covered in “The GitHub Flow”, you can now have a conversation with
the person who opened the Pull Request. You can comment on specific lines of
code, comment on whole commits or comment on the entire Pull Request itself,
using GitHub Flavored Markdown everywhere.
Every time someone else comments on the Pull Request you will continue to
get email notifications so you know there is activity happening. They will each
have a link to the Pull Request where the activity is happening and you can also
directly respond to the email to comment on the Pull Request thread.
Once the code is in a place you like and want to merge it in, you can either
pull the code down and merge it locally, either with the git pull <url>
<branch> syntax we saw earlier, or by adding the fork as a remote and fetching
and merging.
If the merge is trivial, you can also just hit the “Merge” button on the GitHub
site. This will do a “non-fast-forward” merge, creating a merge commit even if a
Maintaining a Project
229
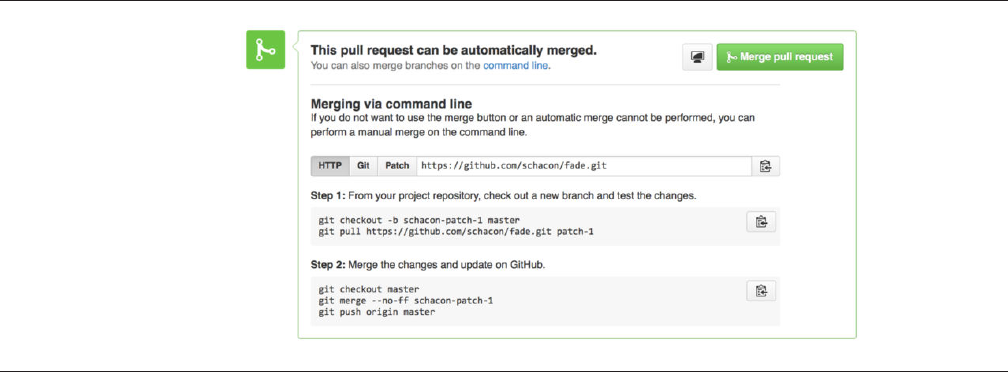
FIGURE 6-36
Merge button and
instructions for
merging a Pull
Request manually.
fast-forward merge was possible. This means that no matter what, every time
you hit the merge button, a merge commit is created. As you can see in
Figure 6-36, GitHub gives you all of this information if you click the hint link.
If you decide you don’t want to merge it, you can also just close the Pull Re-
quest and the person who opened it will be notified.
PULL REQUEST REFS
If you’re dealing with a lot of Pull Requests and don’t want to add a bunch of
remotes or do one time pulls every time, there is a neat trick that GitHub allows
you to do. This is a bit of an advanced trick and we’ll go over the details of this a
bit more in “The Refspec”, but it can be pretty useful.
GitHub actually advertises the Pull Request branches for a repository as sort
of pseudo-branches on the server. By default you don’t get them when you
clone, but they are there in an obscured way and you can access them pretty
easily.
To demonstrate this, we’re going to use a low-level command (oen referred
to as a “plumbing” command, which we’ll read about more in “Plumbing and
Porcelain”) called ls-remote. This command is generally not used in day-to-
day Git operations but it’s useful to show us what references are present on the
server.
If we run this command against the “blink” repository we were using earlier,
we will get a list of all the branches and tags and other references in the reposi-
tory.
CHAPTER 6: GitHub
230

$ git ls-remote https://github.com/schacon/blink
10d539600d86723087810ec636870a504f4fee4d HEAD
10d539600d86723087810ec636870a504f4fee4d refs/heads/master
6a83107c62950be9453aac297bb0193fd743cd6e refs/pull/1/head
afe83c2d1a70674c9505cc1d8b7d380d5e076ed3 refs/pull/1/merge
3c8d735ee16296c242be7a9742ebfbc2665adec1 refs/pull/2/head
15c9f4f80973a2758462ab2066b6ad9fe8dcf03d refs/pull/2/merge
a5a7751a33b7e86c5e9bb07b26001bb17d775d1a refs/pull/4/head
31a45fc257e8433c8d8804e3e848cf61c9d3166c refs/pull/4/merge
Of course, if you’re in your repository and you run git ls-remote origin
or whatever remote you want to check, it will show you something similar to
this.
If the repository is on GitHub and you have any Pull Requests that have been
opened, you’ll get these references that are prefixed with refs/pull/. These
are basically branches, but since they’re not under refs/heads/ you don’t get
them normally when you clone or fetch from the server — the process of fetch-
ing ignores them normally.
There are two references per Pull Request - the one that ends in /head
points to exactly the same commit as the last commit in the Pull Request
branch. So if someone opens a Pull Request in our repository and their branch
is named bug-fix and it points to commit a5a775, then in our repository we
will not have a bug-fix branch (since that’s in their fork), but we will have
pull/<pr#>/head that points to a5a775. This means that we can pretty easily
pull down every Pull Request branch in one go without having to add a bunch
of remotes.
Now, you could do something like fetching the reference directly.
$ git fetch origin refs/pull/958/head
From https://github.com/libgit2/libgit2
* branch refs/pull/958/head -> FETCH_HEAD
This tells Git, “Connect to the origin remote, and download the ref named
refs/pull/958/head.” Git happily obeys, and downloads everything you
need to construct that ref, and puts a pointer to the commit you want un-
der .git/FETCH_HEAD. You can follow that up with git merge FETCH_HEAD
into a branch you want to test it in, but that merge commit message looks a bit
weird. Also, if you’re reviewing a lot of pull requests, this gets tedious.
There’s also a way to fetch all of the pull requests, and keep them up to date
whenever you connect to the remote. Open up .git/config in your favorite
editor, and look for the origin remote. It should look a bit like this:
Maintaining a Project
231

[remote "origin"]
url = https://github.com/libgit2/libgit2
fetch = +refs/heads/*:refs/remotes/origin/*
That line that begins with fetch = is a “refspec.” It’s a way of mapping
names on the remote with names in your local .git directory. This particular
one tells Git, “the things on the remote that are under refs/heads should go in
my local repository under refs/remotes/origin.” You can modify this sec-
tion to add another refspec:
[remote "origin"]
url = https://github.com/libgit2/libgit2.git
fetch = +refs/heads/*:refs/remotes/origin/*
fetch = +refs/pull/*/head:refs/remotes/origin/pr/*
That last line tells Git, “All the refs that look like refs/pull/123/head
should be stored locally like refs/remotes/origin/pr/123.” Now, if you
save that file, and do a git fetch:
$ git fetch
# …
* [new ref] refs/pull/1/head -> origin/pr/1
* [new ref] refs/pull/2/head -> origin/pr/2
* [new ref] refs/pull/4/head -> origin/pr/4
# …
Now all of the remote pull requests are represented locally with refs that act
much like tracking branches; they’re read-only, and they update when you do a
fetch. This makes it super easy to try the code from a pull request locally:
$ git checkout pr/2
Checking out files: 100% (3769/3769), done.
Branch pr/2 set up to track remote branch pr/2 from origin.
Switched to a new branch 'pr/2'
The eagle-eyed among you would note the head on the end of the remote
portion of the refspec. There’s also a refs/pull/#/merge ref on the GitHub
side, which represents the commit that would result if you push the “merge”
button on the site. This can allow you to test the merge before even hitting the
button.
CHAPTER 6: GitHub
232
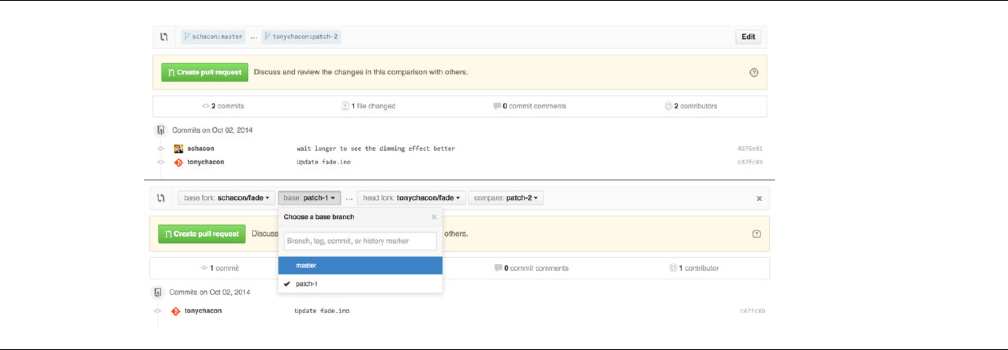
FIGURE 6-37
Manually change
the Pull Request
target fork and
branch.
PULL REQUESTS ON PULL REQUESTS
Not only can you open Pull Requests that target the main or master branch,
you can actually open a Pull Request targeting any branch in the network. In
fact, you can even target another Pull Request.
If you see a Pull Request that is moving in the right direction and you have
an idea for a change that depends on it or you’re not sure is a good idea, or you
just don’t have push access to the target branch, you can open a Pull Request
directly to it.
When you go to open a Pull Request, there is a box at the top of the page
that specifies which branch you’re requesting to pull to and which you’re re-
questing to pull from. If you hit the “Edit” button at the right of that box you can
change not only the branches but also which fork.
Here you can fairly easily specify to merge your new branch into another Pull
Request or another fork of the project.
Mentions and Notifications
GitHub also has a pretty nice notifications system built in that can come in han-
dy when you have questions or need feedback from specific individuals or
teams.
In any comment you can start typing a @ character and it will begin to auto-
complete with the names and usernames of people who are collaborators or
contributors in the project.
Maintaining a Project
233

FIGURE 6-38
Start typing @ to
mention someone.
You can also mention a user who is not in that dropdown, but oen the au-
tocompleter can make it faster.
Once you post a comment with a user mention, that user will be notified.
This means that this can be a really eective way of pulling people into conver-
sations rather than making them poll. Very oen in Pull Requests on GitHub
people will pull in other people on their teams or in their company to review an
Issue or Pull Request.
If someone gets mentioned on a Pull Request or Issue, they will be “subscri-
bed” to it and will continue getting notifications any time some activity occurs
on it. You will also be subscribed to something if you opened it, if you’re watch-
ing the repository or if you comment on something. If you no longer wish to re-
ceive notifications, there is an “Unsubscribe” button on the page you can click
to stop receiving updates on it.
CHAPTER 6: GitHub
234
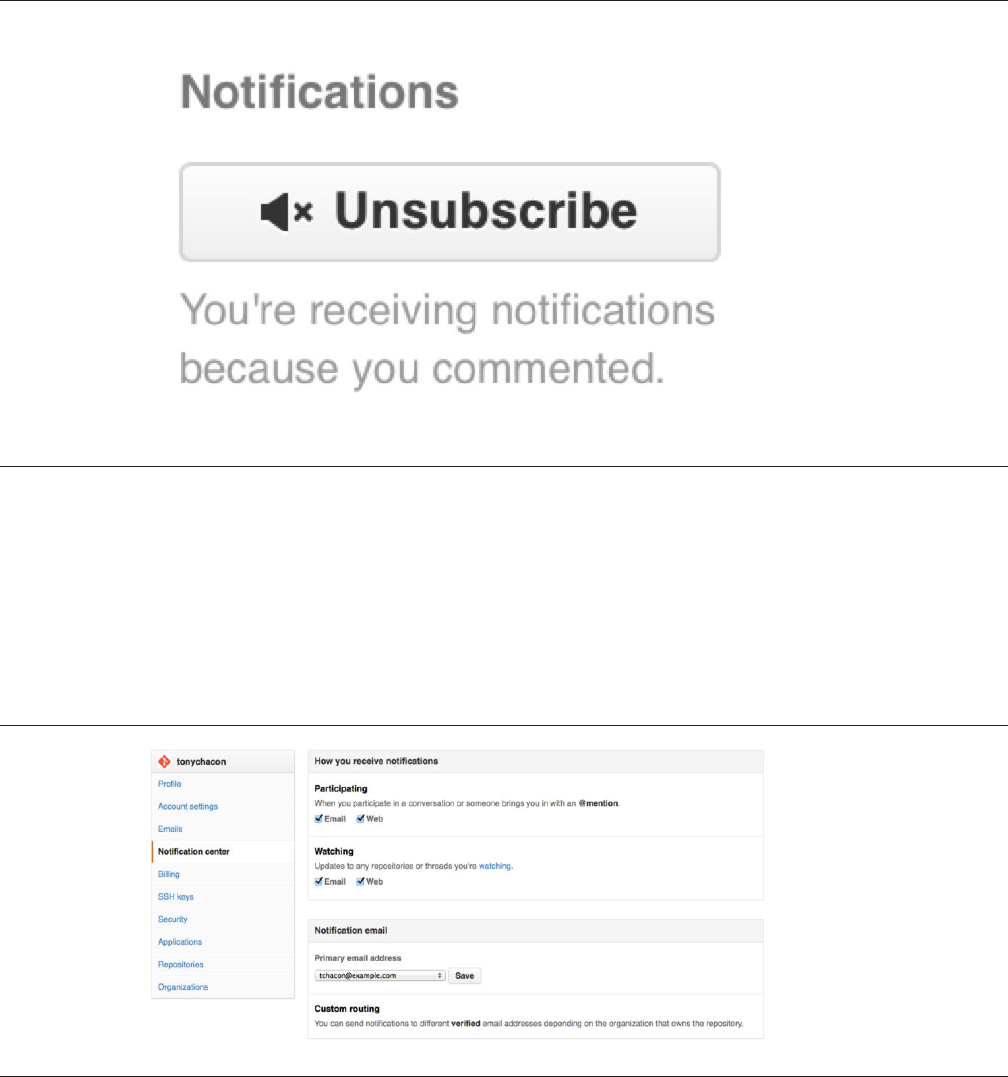
FIGURE 6-39
Unsubscribe from an
Issue or Pull
Request.
FIGURE 6-40
Notication center
options.
THE NOTIFICATIONS PAGE
When we mention “notifications” here with respect to GitHub, we mean a spe-
cific way that GitHub tries to get in touch with you when events happen and
there are a few dierent ways you can configure them. If you go to the “Notifica-
tion center” tab from the settings page, you can see some of the options you
have.
Maintaining a Project
235
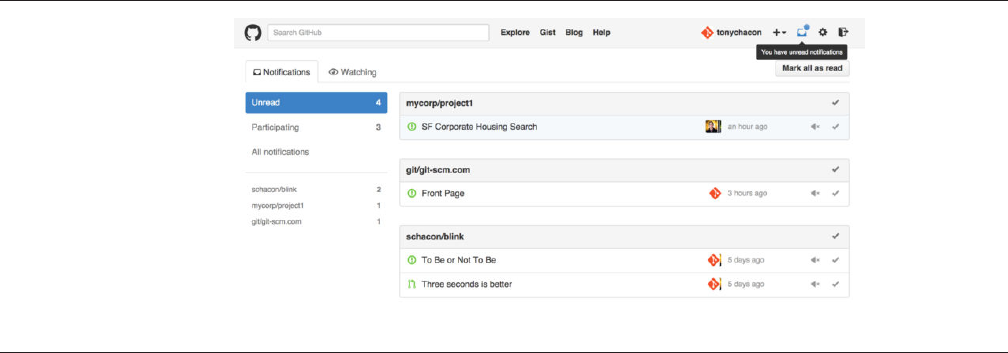
FIGURE 6-41
Notication center.
The two choices are to get notifications over “Email” and over “Web” and
you can choose either, neither or both for when you actively participate in
things and for activity on repositories you are watching.
Web Notifications
Web notifications only exist on GitHub and you can only check them on Git-
Hub. If you have this option selected in your preferences and a notification is
triggered for you, you will see a small blue dot over your notifications icon at
the top of your screen as seen in Figure 6-41.
If you click on that, you will see a list of all the items you have been notified
about, grouped by project. You can filter to the notifications of a specific project
by clicking on it’s name in the le hand sidebar. You can also acknowledge the
notification by clicking the checkmark icon next to any notification, or acknowl-
edge all of the notifications in a project by clicking the checkmark at the top of
the group. There is also a mute button next to each checkmark that you can
click to not receive any further notifications on that item.
All of these tools are very useful for handling large numbers of notifications.
Many GitHub power users will simply turn o email notifications entirely and
manage all of their notifications through this screen.
Email Notifications
Email notifications are the other way you can handle notifications through
GitHub. If you have this turned on you will get emails for each notification. We
saw examples of this in Figure 6-13 and Figure 6-34. The emails will also be
threaded properly, which is nice if you’re using a threading email client.
There is also a fair amount of metadata embedded in the headers of the
emails that GitHub sends you, which can be really helpful for setting up custom
filters and rules.
CHAPTER 6: GitHub
236
For instance, if we look at the actual email headers sent to Tony in the email
shown in Figure 6-34, we will see the following among the information sent:
To: tonychacon/fade <fade@noreply.github.com>
Message-ID: <tonychacon/fade/pull/1@github.com>
Subject: [fade] Wait longer to see the dimming effect better (#1)
X-GitHub-Recipient: tonychacon
List-ID: tonychacon/fade <fade.tonychacon.github.com>
List-Archive: https://github.com/tonychacon/fade
List-Post: <mailto:reply+i-4XXX@reply.github.com>
List-Unsubscribe: <mailto:unsub+i-XXX@reply.github.com>,...
X-GitHub-Recipient-Address: tchacon@example.com
There are a couple of interesting things here. If you want to highlight or re-
route emails to this particular project or even Pull Request, the information in
Message-ID gives you all the data in <user>/<project>/<type>/<id> for-
mat. If this were an issue, for example, the <type> field would have been “is-
sues” rather than “pull”.
The List-Post and List-Unsubscribe fields mean that if you have a mail
client that understands those, you can easily post to the list or “Unsubscribe”
from the thread. That would be essentially the same as clicking the “mute” but-
ton on the web version of the notification or “Unsubscribe” on the Issue or Pull
Request page itself.
It’s also worth noting that if you have both email and web notifications en-
abled and you read the email version of the notification, the web version will be
marked as read as well if you have images allowed in your mail client.
Special Files
There are a couple of special files that GitHub will notice if they are present in
your repository.
README
The first is the README file, which can be of nearly any format that GitHub rec-
ognizes as prose. For example, it could be README, README.md, RE-
ADME.asciidoc, etc. If GitHub sees a README file in your source, it will render
it on the landing page of the project.
Many teams use this file to hold all the relevant project information for
someone who might be new to the repository or project. This generally includes
things like:
• What the project is for
Maintaining a Project
237
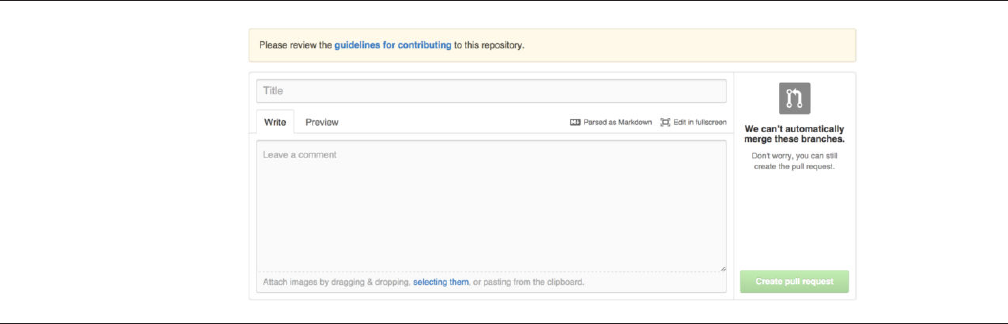
FIGURE 6-42
Opening a Pull
Request when a
CONTRIBUTING le
exists.
• How to configure and install it
• An example of how to use it or get it running
• The license that the project is oered under
• How to contribute to it
Since GitHub will render this file, you can embed images or links in it for add-
ed ease of understanding.
CONTRIBUTING
The other special file that GitHub recognizes is the CONTRIBUTING file. If you
have a file named CONTRIBUTING with any file extension, GitHub will show
Figure 6-42 when anyone starts opening a Pull Request.
The idea here is that you can specify specific things you want or don’t want
in a Pull Request sent to your project. This way people may actually read the
guidelines before opening the Pull Request.
Project Administration
Generally there are not a lot of administrative things you can do with a single
project, but there are a couple of items that might be of interest.
CHAPTER 6: GitHub
238

FIGURE 6-43
Change the default
branch for a project.
FIGURE 6-44
Transfer a project to
anther GitHub user
or Organization.
CHANGING THE DEFAULT BRANCH
If you are using a branch other than “master” as your default branch that you
want people to open Pull Requests on or see by default, you can change that in
your repository’s settings page under the “Options” tab.
Simply change the default branch in the dropdown and that will be the de-
fault for all major operations from then on, including which branch is checked
out by default when someone clones the repository.
TRANSFERRING A PROJECT
If you would like to transfer a project to another user or an organization in Git-
Hub, there is a “Transfer ownership” option at the bottom of the same “Op-
tions” tab of your repository settings page that allows you to do this.
This is helpful if you are abandoning a project and someone wants to take it
over, or if your project is getting bigger and want to move it into an organiza-
tion.
Maintaining a Project
239
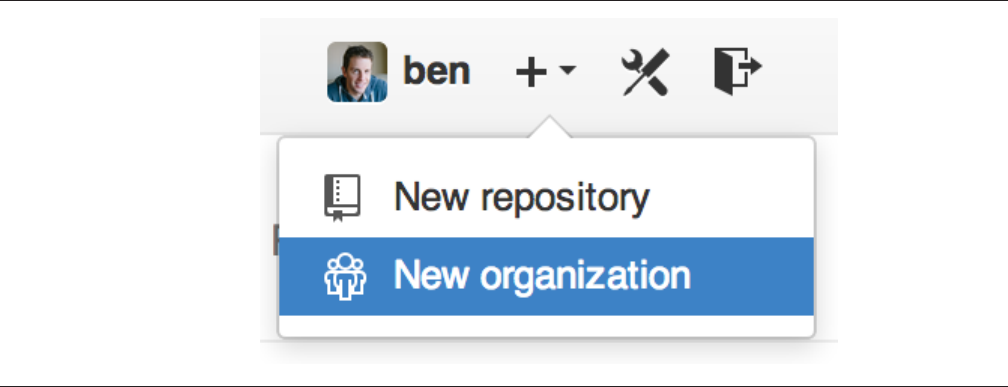
FIGURE 6-45
The “New
organization” menu
item.
Not only does this move the repository along with all it’s watchers and stars
to another place, it also sets up a redirect from your URL to the new place. It
will also redirect clones and fetches from Git, not just web requests.
Managing an organization
In addition to single-user accounts, GitHub has what are called Organizations.
Like personal accounts, Organizational accounts have a namespace where all
their projects exist, but many other things are dierent. These accounts repre-
sent a group of people with shared ownership of projects, and there are many
tools to manage subgroups of those people. Normally these accounts are used
for Open Source groups (such as “perl” or “rails”) or companies (such as “goo-
gle” or “twitter”).
Organization Basics
An organization is pretty easy to create; just click on the “+” icon at the top-
right of any GitHub page, and select “New organization” from the menu.
First you’ll need to name your organization and provide an email address for
a main point of contact for the group. Then you can invite other users to be co-
owners of the account if you want to.
CHAPTER 6: GitHub
240
Follow these steps and you’ll soon be the owner of a brand-new organiza-
tion. Like personal accounts, organizations are free if everything you plan to
store there will be open source.
As an owner in an organization, when you fork a repository, you’ll have the
choice of forking it to your organization’s namespace. When you create new re-
positories you can create them either under your personal account or under
any of the organizations that you are an owner in. You also automatically
“watch” any new repository created under these organizations.
Just like in “Your Avatar”, you can upload an avatar for your organization to
personalize it a bit. Also just like personal accounts, you have a landing page for
the organization that lists all of your repositories and can be viewed by other
people.
Now let’s cover some of the things that are a bit dierent with an organiza-
tional account.
Teams
Organizations are associated with individual people by way of teams, which are
simply a grouping of individual user accounts and repositories within the orga-
nization and what kind of access those people have in those repositories.
For example, say your company has three repositories: frontend, backend,
and deployscripts. You’d want your HTML/CSS/Javascript developers to
have access to frontend and maybe backend, and your Operations people to
have access to backend and deployscripts. Teams make this easy, without
having to manage the collaborators for every individual repository.
The Organization page shows you a simple dashboard of all the repositories,
users and teams that are under this organization.
Managing an organization
241
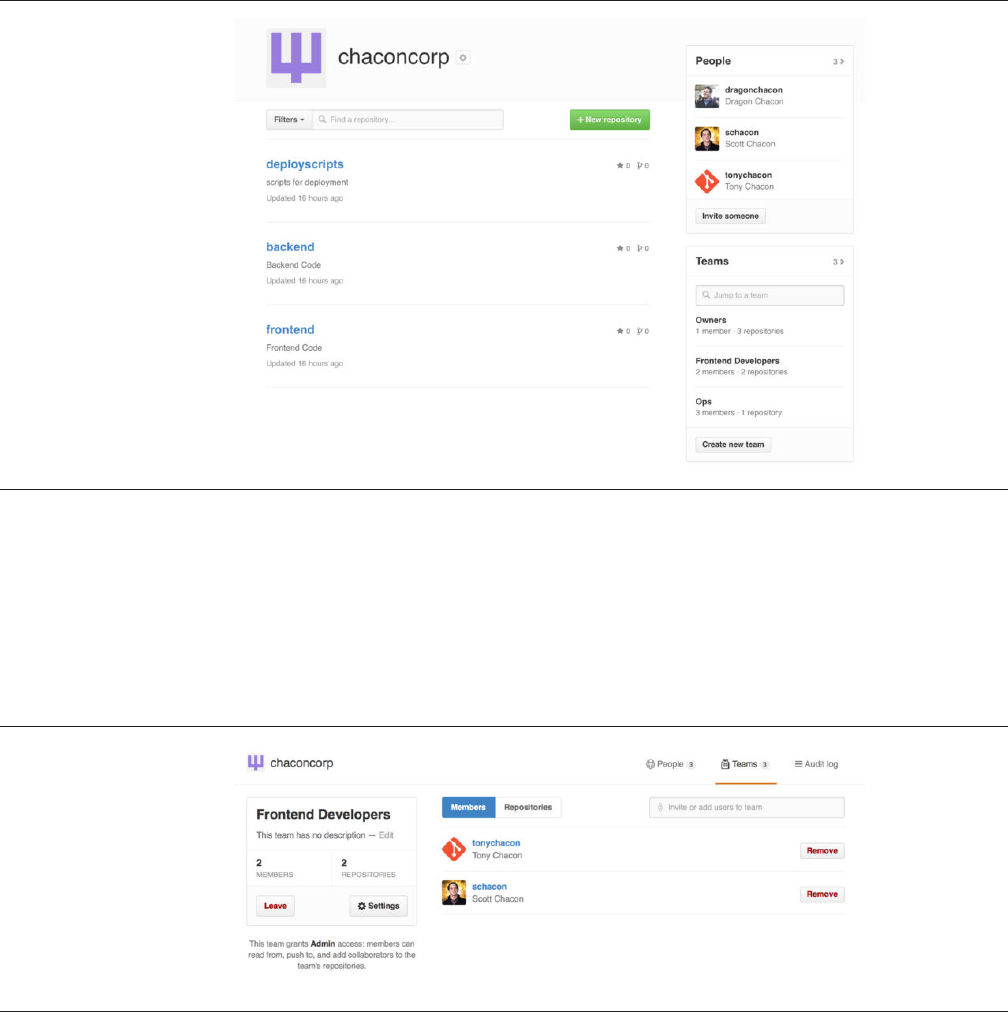
FIGURE 6-46
The Organization
page.
FIGURE 6-47
The Team page.
To manage your Teams, you can click on the Teams sidebar on the right
hand side of the page in Figure 6-46. This will bring you to a page you can use
to add members to the team, add repositories to the team or manage the set-
tings and access control levels for the team. Each team can have read only,
read/write or administrative access to the repositories. You can change that lev-
el by clicking the “Settings” button in Figure 6-47.
When you invite someone to a team, they will get an email letting them
know they’ve been invited.
CHAPTER 6: GitHub
242
Additionally, team @mentions (such as @acmecorp/frontend) work much
the same as they do with individual users, except that all members of the team
are then subscribed to the thread. This is useful if you want the attention from
someone on a team, but you don’t know exactly who to ask.
A user can belong to any number of teams, so don’t limit yourself to only
access-control teams. Special-interest teams like ux, css, or refactoring are
useful for certain kinds of questions, and others like legal and colorblind for
an entirely dierent kind.
Audit Log
Organizations also give owners access to all the information about what went
on under the organization. You can go to the Audit Log tab and see what events
have happened at an organization level, who did them and where in the world
they were done.
Managing an organization
243
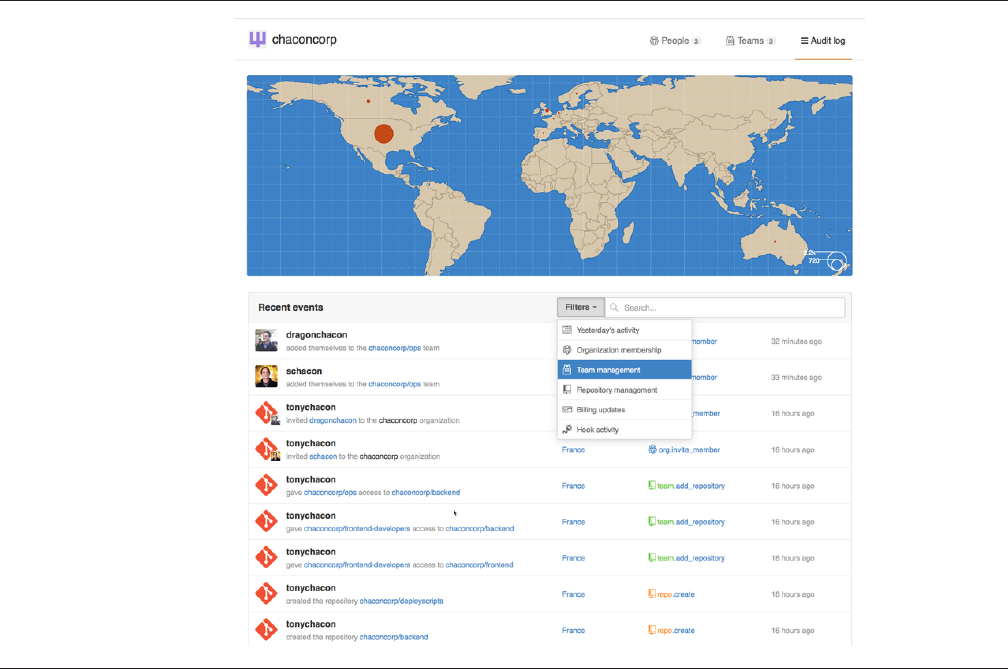
FIGURE 6-48
The Audit log.
You can also filter down to specific types of events, specific places or specific
people.
Scripting GitHub
So now we’ve covered all of the major features and workflows of GitHub, but
any large group or project will have customizations they may want to make or
external services they may want to integrate.
Luckily for us, GitHub is really quite hackable in many ways. In this section
we’ll cover how to use the GitHub hooks system and it’s API to make GitHub
work how we want it to.
CHAPTER 6: GitHub
244
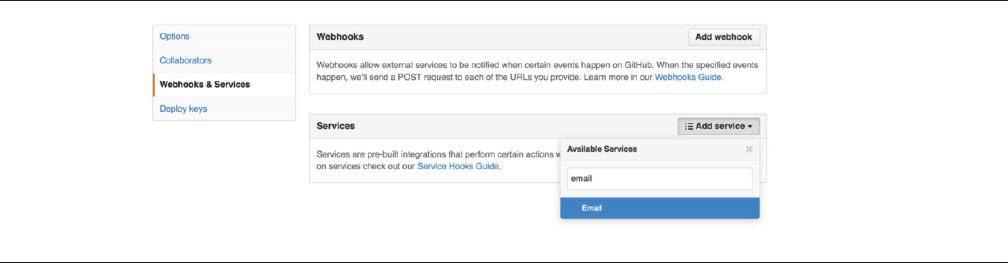
FIGURE 6-49
Services and Hooks
conguration
section.
Hooks
The Hooks and Services section of GitHub repository administration is the easi-
est way to have GitHub interact with external systems.
SERVICES
First we’ll take a look at Services. Both the Hooks and Services integrations can
be found in the Settings section of your repository, where we previously looked
at adding Collaborators and changing the default branch of your project. Under
the “Webhooks and Services” tab you will see something like Figure 6-49.
There are dozens of services you can choose from, most of them integrations
into other commercial and open source systems. Most of them are for Continu-
ous Integration services, bug and issue trackers, chat room systems and docu-
mentation systems. We’ll walk through setting up a very simple one, the Email
hook. If you choose “email” from the “Add Service” dropdown, you’ll get a con-
figuration screen like Figure 6-50.
Scripting GitHub
245

FIGURE 6-50
Email service
conguration.
In this case, if we hit the “Add service” button, the email address we speci-
fied will get an email every time someone pushes to the repository. Services
can listen for lots of dierent types of events, but most only listen for push
events and then do something with that data.
If there is a system you are using that you would like to integrate with Git-
Hub, you should check here to see if there is an existing service integration
available. For example, if you’re using Jenkins to run tests on your codebase,
you can enable the Jenkins builtin service integration to kick o a test run every
time someone pushes to your repository.
HOOKS
If you need something more specific or you want to integrate with a service or
site that is not included in this list, you can instead use the more generic hooks
system. GitHub repository hooks are pretty simple. You specify a URL and Git-
Hub will post an HTTP payload to that URL on any event you want.
Generally the way this works is you can setup a small web service to listen
for a GitHub hook payload and then do something with the data when it is re-
ceived.
To enable a hook, you click the “Add webhook” button in Figure 6-49. This
will bring you to a page that looks like Figure 6-51.
CHAPTER 6: GitHub
246

FIGURE 6-51
Web hook
conguration.
The configuration for a web hook is pretty simple. In most cases you simply
enter a URL and a secret key and hit “Add webhook”. There are a few options for
which events you want GitHub to send you a payload for — the default is to only
get a payload for the push event, when someone pushes new code to any
branch of your repository.
Let’s see a small example of a web service you may set up to handle a web
hook. We’ll use the Ruby web framework Sinatra since it’s fairly concise and you
should be able to easily see what we’re doing.
Let’s say we want to get an email if a specific person pushes to a specific
branch of our project modifying a specific file. We could fairly easily do that
with code like this:
require 'sinatra'
require 'json'
require 'mail'
post '/payload' do
push = JSON.parse(request.body.read) # parse the JSON
# gather the data we're looking for
pusher = push["pusher"]["name"]
branch = push["ref"]
# get a list of all the files touched
files = push["commits"].map do |commit|
Scripting GitHub
247
commit['added'] + commit['modified'] + commit['removed']
end
files = files.flatten.uniq
# check for our criteria
if pusher == 'schacon' &&
branch == 'ref/heads/special-branch' &&
files.include?('special-file.txt')
Mail.deliver do
from 'tchacon@example.com'
to 'tchacon@example.com'
subject 'Scott Changed the File'
body "ALARM"
end
end
end
Here we’re taking the JSON payload that GitHub delivers us and looking up
who pushed it, what branch they pushed to and what files were touched in all
the commits that were pushed. Then we check that against our criteria and
send an email if it matches.
In order to develop and test something like this, you have a nice developer
console in the same screen where you set the hook up. You can see the last few
deliveries that GitHub has tried to make for that webhook. For each hook you
can dig down into when it was delivered, if it was successful and the body and
headers for both the request and the response. This makes it incredibly easy to
test and debug your hooks.
CHAPTER 6: GitHub
248
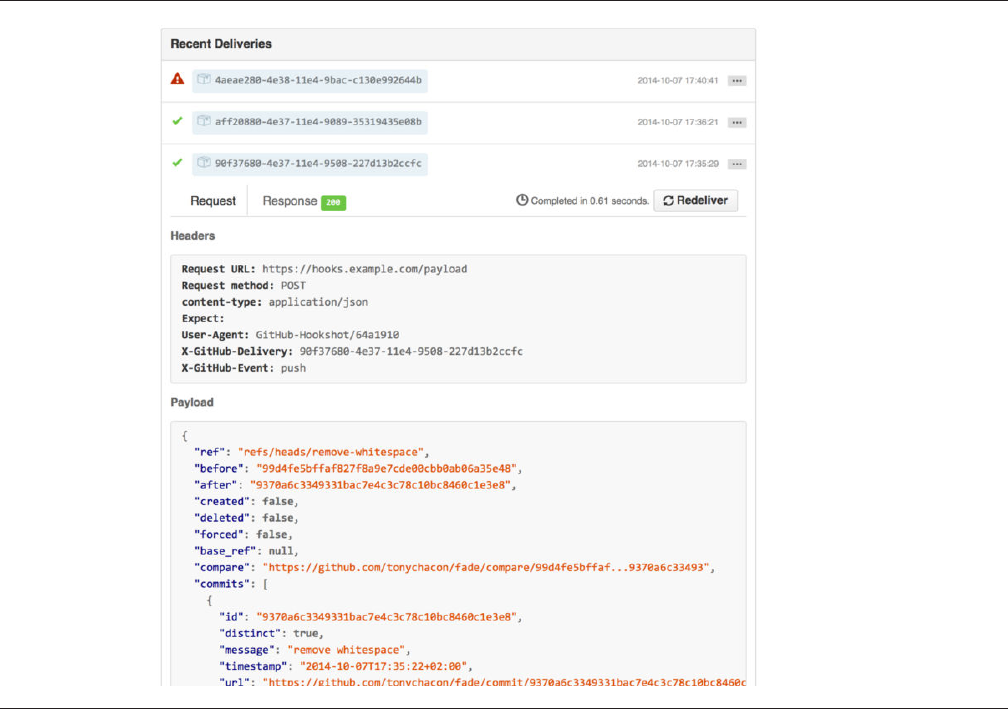
FIGURE 6-52
Web hook debugging
information.
The other great feature of this is that you can redeliver any of the payloads
to test your service easily.
For more information on how to write webhooks and all the dierent event
types you can listen for, go to the GitHub Developer documentation at: https://
developer.github.com/webhooks/
The GitHub API
Services and hooks give you a way to receive push notifications about events
that happen on your repositories, but what if you need more information about
these events? What if you need to automate something like adding collabora-
tors or labeling issues?
Scripting GitHub
249
This is where the GitHub API comes in handy. GitHub has tons of API end-
points for doing nearly anything you can do on the website in an automated
fashion. In this section we’ll learn how to authenticate and connect to the API,
how to comment on an issue and how to change the status of a Pull Request
through the API.
Basic Usage
The most basic thing you can do is a simple GET request on an endpoint that
doesn’t require authentication. This could be a user or read-only information
on an open source project. For example, if we want to know more about a user
named “schacon”, we can run something like this:
$ curl https://api.github.com/users/schacon
{
"login": "schacon",
"id": 70,
"avatar_url": "https://avatars.githubusercontent.com/u/70",
# …
"name": "Scott Chacon",
"company": "GitHub",
"following": 19,
"created_at": "2008-01-27T17:19:28Z",
"updated_at": "2014-06-10T02:37:23Z"
}
There are tons of endpoints like this to get information about organizations,
projects, issues, commits — just about anything you can publicly see on GitHub.
You can even use the API to render arbitrary Markdown or find a .gitignore
template.
$ curl https://api.github.com/gitignore/templates/Java
{
"name": "Java",
"source": "*.class
# Mobile Tools for Java (J2ME)
.mtj.tmp/
# Package Files #
*.jar
*.war
*.ear
# virtual machine crash logs, see http://www.java.com/en/download/help/error_hotspot.xml
hs_err_pid*
CHAPTER 6: GitHub
250
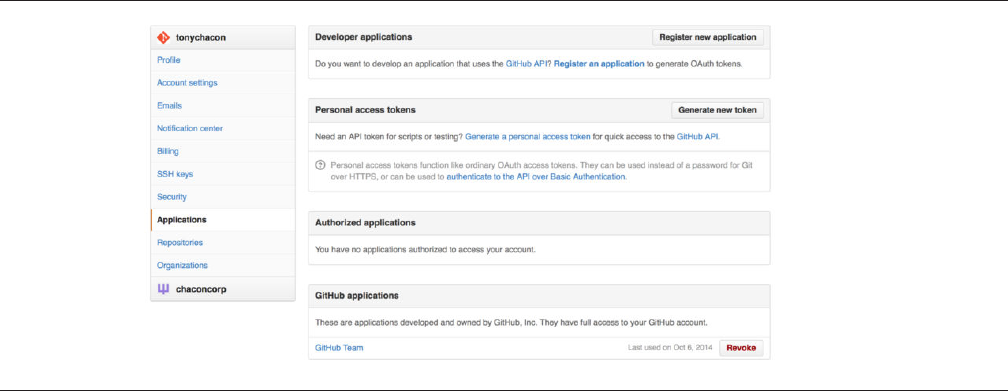
FIGURE 6-53
Generate your access
token from the
“Applications” tab
of your settings
page.
"
}
Commenting on an Issue
However, if you want to do an action on the website such as comment on an
Issue or Pull Request or if you want to view or interact with private content,
you’ll need to authenticate.
There are several ways to authenticate. You can use basic authentication
with just your username and password, but generally it’s a better idea to use a
personal access token. You can generate this from the “Applications” tab of
your settings page.
It will ask you which scopes you want for this token and a description. Make
sure to use a good description so you feel comfortable removing the token
when your script or application is no longer used.
GitHub will only show you the token once, so be sure to copy it. You can now
use this to authenticate in your script instead of using a username and pass-
word. This is nice because you can limit the scope of what you want to do and
the token is revocable.
This also has the added advantage of increasing your rate limit. Without au-
thenticating, you will be limited to 60 requests per hour. If you authenticate you
can make up to 5,000 requests per hour.
So let’s use it to make a comment on one of our issues. Let’s say we want to
leave a comment on a specific issue, Issue #6. To do so we have to do an HTTP
Scripting GitHub
251

FIGURE 6-54
A comment posted
from the GitHub API.
POST request to repos/<user>/<repo>/issues/<num>/comments with the
token we just generated as an Authorization header.
$ curl -H "Content-Type: application/json" \
-H "Authorization: token TOKEN" \
--data '{"body":"A new comment, :+1:"}' \
https://api.github.com/repos/schacon/blink/issues/6/comments
{
"id": 58322100,
"html_url": "https://github.com/schacon/blink/issues/6#issuecomment-58322100",
...
"user": {
"login": "tonychacon",
"id": 7874698,
"avatar_url": "https://avatars.githubusercontent.com/u/7874698?v=2",
"type": "User",
},
"created_at": "2014-10-08T07:48:19Z",
"updated_at": "2014-10-08T07:48:19Z",
"body": "A new comment, :+1:"
}
Now if you go to that issue, you can see the comment that we just success-
fully posted as in Figure 6-54.
You can use the API to do just about anything you can do on the website —
creating and setting milestones, assigning people to Issues and Pull Requests,
creating and changing labels, accessing commit data, creating new commits
and branches, opening, closing or merging Pull Requests, creating and editing
teams, commenting on lines of code in a Pull Request, searching the site and on
and on.
Changing the Status of a Pull Request
One final example we’ll look at since it’s really useful if you’re working with Pull
Requests. Each commit can have one or more statuses associated with it and
there is an API to add and query that status.
CHAPTER 6: GitHub
252
Most of the Continuous Integration and testing services make use of this API
to react to pushes by testing the code that was pushed, and then report back if
that commit has passed all the tests. You could also use this to check if the
commit message is properly formatted, if the submitter followed all your contri-
bution guidelines, if the commit was validly signed — any number of things.
Let’s say you set up a webhook on your repository that hits a small web ser-
vice that checks for a Signed-off-by string in the commit message.
require 'httparty'
require 'sinatra'
require 'json'
post '/payload' do
push = JSON.parse(request.body.read) # parse the JSON
repo_name = push['repository']['full_name']
# look through each commit message
push["commits"].each do |commit|
# look for a Signed-off-by string
if /Signed-off-by/.match commit['message']
state = 'success'
description = 'Successfully signed off!'
else
state = 'failure'
description = 'No signoff found.'
end
# post status to GitHub
sha = commit["id"]
status_url = "https://api.github.com/repos/#{repo_name}/statuses/#{sha}"
status = {
"state" => state,
"description" => description,
"target_url" => "http://example.com/how-to-signoff",
"context" => "validate/signoff"
}
HTTParty.post(status_url,
:body => status.to_json,
:headers => {
'Content-Type' => 'application/json',
'User-Agent' => 'tonychacon/signoff',
'Authorization' => "token #{ENV['TOKEN']}" }
)
end
end
Scripting GitHub
253
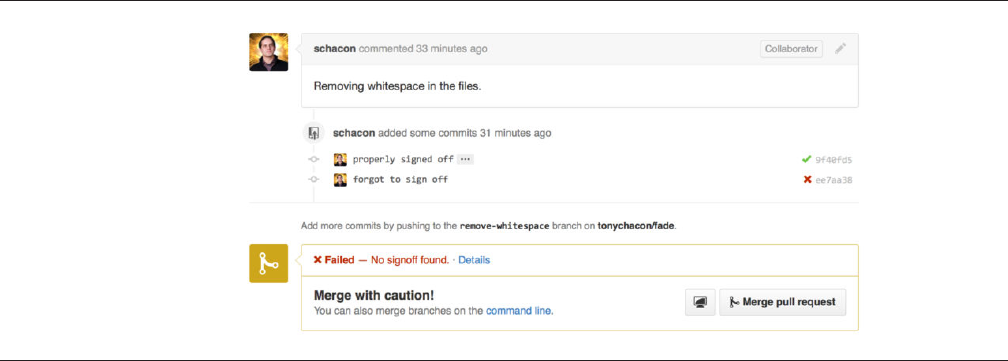
FIGURE 6-55
Commit status via
the API.
Hopefully this is fairly simple to follow. In this web hook handler we look
through each commit that was just pushed, we look for the string Signed-o-by
in the commit message and finally we POST via HTTP to the /repos/<user>/
<repo>/statuses/<commit_sha> API endpoint with the status.
In this case you can send a state (success, failure, error), a description of
what happened, a target URL the user can go to for more information and a
“context” in case there are multiple statuses for a single commit. For example, a
testing service may provide a status and a validation service like this may also
provide a status — the “context” field is how they’re dierentiated.
If someone opens a new Pull Request on GitHub and this hook is set up, you
may see something like Figure 6-55.
You can now see a little green check mark next to the commit that has a
“Signed-o-by” string in the message and a red cross through the one where
the author forgot to sign o. You can also see that the Pull Request takes the
status of the last commit on the branch and warns you if it is a failure. This is
really useful if you’re using this API for test results so you don’t accidentally
merge something where the last commit is failing tests.
Octokit
Though we’ve been doing nearly everything through curl and simple HTTP re-
quests in these examples, several open-source libraries exist that make this API
available in a more idiomatic way. At the time of this writing, the supported lan-
guages include Go, Objective-C, Ruby, and .NET. Check out http://github.com/
CHAPTER 6: GitHub
254
octokit for more information on these, as they handle much of the HTTP for
you.
Hopefully these tools can help you customize and modify GitHub to work
better for your specific workflows. For complete documentation on the entire
API as well as guides for common tasks, check out https://develop-
er.github.com.
Summary
Now you’re a GitHub user. You know how to create an account, manage an or-
ganization, create and push to repositories, contribute to other people’s
projects and accept contributions from others. In the next chapter, you’ll learn
more powerful tools and tips for dealing with complex situations, which will
truly make you a Git master.
Summary
255
Git Tools
By now, you’ve learned most of the day-to-day commands and workflows that
you need to manage or maintain a Git repository for your source code control.
You’ve accomplished the basic tasks of tracking and committing files, and
you’ve harnessed the power of the staging area and lightweight topic branching
and merging.
Now you’ll explore a number of very powerful things that Git can do that you
may not necessarily use on a day-to-day basis but that you may need at some
point.
Revision Selection
Git allows you to specify specific commits or a range of commits in several
ways. They aren’t necessarily obvious but are helpful to know.
Single Revisions
You can obviously refer to a commit by the SHA-1 hash that it’s given, but there
are more human-friendly ways to refer to commits as well. This section outlines
the various ways you can refer to a single commit.
Short SHA-1
Git is smart enough to figure out what commit you meant to type if you provide
the first few characters, as long as your partial SHA-1 is at least four characters
long and unambiguous – that is, only one object in the current repository be-
gins with that partial SHA-1.
For example, to see a specific commit, suppose you run a git log com-
mand and identify the commit where you added certain functionality:
257
7

$ git log
commit 734713bc047d87bf7eac9674765ae793478c50d3
Author: Scott Chacon <schacon@gmail.com>
Date: Fri Jan 2 18:32:33 2009 -0800
fixed refs handling, added gc auto, updated tests
commit d921970aadf03b3cf0e71becdaab3147ba71cdef
Merge: 1c002dd... 35cfb2b...
Author: Scott Chacon <schacon@gmail.com>
Date: Thu Dec 11 15:08:43 2008 -0800
Merge commit 'phedders/rdocs'
commit 1c002dd4b536e7479fe34593e72e6c6c1819e53b
Author: Scott Chacon <schacon@gmail.com>
Date: Thu Dec 11 14:58:32 2008 -0800
added some blame and merge stuff
In this case, choose 1c002dd.... If you git show that commit, the follow-
ing commands are equivalent (assuming the shorter versions are unambigu-
ous):
$ git show 1c002dd4b536e7479fe34593e72e6c6c1819e53b
$ git show 1c002dd4b536e7479f
$ git show 1c002d
Git can figure out a short, unique abbreviation for your SHA-1 values. If you
pass --abbrev-commit to the git log command, the output will use shorter
values but keep them unique; it defaults to using seven characters but makes
them longer if necessary to keep the SHA-1 unambiguous:
$ git log --abbrev-commit --pretty=oneline
ca82a6d changed the version number
085bb3b removed unnecessary test code
a11bef0 first commit
Generally, eight to ten characters are more than enough to be unique within
a project.
As an example, the Linux kernel, which is a pretty large project with over
450k commits and 3.6 million objects, has no two objects whose SHA-1s over-
lap more than the first 11 characters.
CHAPTER 7: Git Tools
258

A SHORT NOTE ABOUT SHA-1
A lot of people become concerned at some point that they will, by ran-
dom happenstance, have two objects in their repository that hash to the
same SHA-1 value. What then?
If you do happen to commit an object that hashes to the same SHA-1 val-
ue as a previous object in your repository, Git will see the previous object
already in your Git database and assume it was already written. If you try
to check out that object again at some point, you’ll always get the data of
the first object.
However, you should be aware of how ridiculously unlikely this scenario
is. The SHA-1 digest is 20 bytes or 160 bits. The number of randomly
hashed objects needed to ensure a 50% probability of a single collision is
about 280 (the formula for determining collision probability is p =
(n(n-1)/2) * (1/2^160)). 280 is 1.2 x 1024 or 1 million billion billion.
That’s 1,200 times the number of grains of sand on the earth.
Here’s an example to give you an idea of what it would take to get a
SHA-1 collision. If all 6.5 billion humans on Earth were programming,
and every second, each one was producing code that was the equivalent
of the entire Linux kernel history (3.6 million Git objects) and pushing it
into one enormous Git repository, it would take roughly 2 years until that
repository contained enough objects to have a 50% probability of a single
SHA-1 object collision. A higher probability exists that every member of
your programming team will be attacked and killed by wolves in unrela-
ted incidents on the same night.
Branch References
The most straightforward way to specify a commit requires that it has a branch
reference pointed at it. Then, you can use a branch name in any Git command
that expects a commit object or SHA-1 value. For instance, if you want to show
the last commit object on a branch, the following commands are equivalent,
assuming that the topic1 branch points to ca82a6d:
$ git show ca82a6dff817ec66f44342007202690a93763949
$ git show topic1
If you want to see which specific SHA-1 a branch points to, or if you want to
see what any of these examples boils down to in terms of SHA-1s, you can use a
Git plumbing tool called rev-parse. You can see Chapter 10 for more informa-
tion about plumbing tools; basically, rev-parse exists for lower-level opera-
tions and isn’t designed to be used in day-to-day operations. However, it can be
Revision Selection
259

helpful sometimes when you need to see what’s really going on. Here you can
run rev-parse on your branch.
$ git rev-parse topic1
ca82a6dff817ec66f44342007202690a93763949
RefLog Shortnames
One of the things Git does in the background while you’re working away is keep
a “reflog” – a log of where your HEAD and branch references have been for the
last few months.
You can see your reflog by using git reflog:
$ git reflog
734713b HEAD@{0}: commit: fixed refs handling, added gc auto, updated
d921970 HEAD@{1}: merge phedders/rdocs: Merge made by recursive.
1c002dd HEAD@{2}: commit: added some blame and merge stuff
1c36188 HEAD@{3}: rebase -i (squash): updating HEAD
95df984 HEAD@{4}: commit: # This is a combination of two commits.
1c36188 HEAD@{5}: rebase -i (squash): updating HEAD
7e05da5 HEAD@{6}: rebase -i (pick): updating HEAD
Every time your branch tip is updated for any reason, Git stores that infor-
mation for you in this temporary history. And you can specify older commits
with this data, as well. If you want to see the fih prior value of the HEAD of
your repository, you can use the @{n} reference that you see in the reflog out-
put:
$ git show HEAD@{5}
You can also use this syntax to see where a branch was some specific
amount of time ago. For instance, to see where your master branch was yester-
day, you can type
$ git show master@{yesterday}
That shows you where the branch tip was yesterday. This technique only
works for data that’s still in your reflog, so you can’t use it to look for commits
older than a few months.
CHAPTER 7: Git Tools
260

To see reflog information formatted like the git log output, you can run
git log -g:
$ git log -g master
commit 734713bc047d87bf7eac9674765ae793478c50d3
Reflog: master@{0} (Scott Chacon <schacon@gmail.com>)
Reflog message: commit: fixed refs handling, added gc auto, updated
Author: Scott Chacon <schacon@gmail.com>
Date: Fri Jan 2 18:32:33 2009 -0800
fixed refs handling, added gc auto, updated tests
commit d921970aadf03b3cf0e71becdaab3147ba71cdef
Reflog: master@{1} (Scott Chacon <schacon@gmail.com>)
Reflog message: merge phedders/rdocs: Merge made by recursive.
Author: Scott Chacon <schacon@gmail.com>
Date: Thu Dec 11 15:08:43 2008 -0800
Merge commit 'phedders/rdocs'
It’s important to note that the reflog information is strictly local – it’s a log of
what you’ve done in your repository. The references won’t be the same on
someone else’s copy of the repository; and right aer you initially clone a
repository, you’ll have an empty reflog, as no activity has occurred yet in your
repository. Running git show HEAD@{2.months.ago} will work only if you
cloned the project at least two months ago – if you cloned it five minutes ago,
you’ll get no results.
Ancestry References
The other main way to specify a commit is via its ancestry. If you place a ^ at the
end of a reference, Git resolves it to mean the parent of that commit. Suppose
you look at the history of your project:
$ git log --pretty=format:'%h %s' --graph
* 734713b fixed refs handling, added gc auto, updated tests
* d921970 Merge commit 'phedders/rdocs'
|\
| * 35cfb2b Some rdoc changes
* | 1c002dd added some blame and merge stuff
|/
* 1c36188 ignore *.gem
* 9b29157 add open3_detach to gemspec file list
Revision Selection
261

Then, you can see the previous commit by specifying HEAD^, which means
“the parent of HEAD”:
$ git show HEAD^
commit d921970aadf03b3cf0e71becdaab3147ba71cdef
Merge: 1c002dd... 35cfb2b...
Author: Scott Chacon <schacon@gmail.com>
Date: Thu Dec 11 15:08:43 2008 -0800
Merge commit 'phedders/rdocs'
You can also specify a number aer the ^ – for example, d921970^2 means
“the second parent of d921970.” This syntax is only useful for merge commits,
which have more than one parent. The first parent is the branch you were on
when you merged, and the second is the commit on the branch that you
merged in:
$ git show d921970^
commit 1c002dd4b536e7479fe34593e72e6c6c1819e53b
Author: Scott Chacon <schacon@gmail.com>
Date: Thu Dec 11 14:58:32 2008 -0800
added some blame and merge stuff
$ git show d921970^2
commit 35cfb2b795a55793d7cc56a6cc2060b4bb732548
Author: Paul Hedderly <paul+git@mjr.org>
Date: Wed Dec 10 22:22:03 2008 +0000
Some rdoc changes
The other main ancestry specification is the ~. This also refers to the first
parent, so HEAD~ and HEAD^ are equivalent. The dierence becomes apparent
when you specify a number. HEAD~2 means “the first parent of the first parent,”
or “the grandparent” – it traverses the first parents the number of times you
specify. For example, in the history listed earlier, HEAD~3 would be
$ git show HEAD~3
commit 1c3618887afb5fbcbea25b7c013f4e2114448b8d
Author: Tom Preston-Werner <tom@mojombo.com>
Date: Fri Nov 7 13:47:59 2008 -0500
ignore *.gem
CHAPTER 7: Git Tools
262
FIGURE 7-1
Example history for
range selection.
This can also be written HEAD^^^, which again is the first parent of the first
parent of the first parent:
$ git show HEAD^^^
commit 1c3618887afb5fbcbea25b7c013f4e2114448b8d
Author: Tom Preston-Werner <tom@mojombo.com>
Date: Fri Nov 7 13:47:59 2008 -0500
ignore *.gem
You can also combine these syntaxes – you can get the second parent of the
previous reference (assuming it was a merge commit) by using HEAD~3^2, and
so on.
Commit Ranges
Now that you can specify individual commits, let’s see how to specify ranges of
commits. This is particularly useful for managing your branches – if you have a
lot of branches, you can use range specifications to answer questions such as,
“What work is on this branch that I haven’t yet merged into my main branch?”
DOUBLE DOT
The most common range specification is the double-dot syntax. This basically
asks Git to resolve a range of commits that are reachable from one commit but
aren’t reachable from another. For example, say you have a commit history that
looks like Figure 7-1.
You want to see what is in your experiment branch that hasn’t yet been
merged into your master branch. You can ask Git to show you a log of just those
commits with master..experiment – that means “all commits reachable by
experiment that aren’t reachable by master.” For the sake of brevity and clarity
Revision Selection
263

in these examples, I’ll use the letters of the commit objects from the diagram in
place of the actual log output in the order that they would display:
$ git log master..experiment
D
C
If, on the other hand, you want to see the opposite – all commits in master
that aren’t in experiment – you can reverse the branch names. experi-
ment..master shows you everything in master not reachable from experi-
ment:
$ git log experiment..master
F
E
This is useful if you want to keep the experiment branch up to date and
preview what you’re about to merge in. Another very frequent use of this syntax
is to see what you’re about to push to a remote:
$ git log origin/master..HEAD
This command shows you any commits in your current branch that aren’t in
the master branch on your origin remote. If you run a git push and your
current branch is tracking origin/master, the commits listed by git log
origin/master..HEAD are the commits that will be transferred to the server.
You can also leave o one side of the syntax to have Git assume HEAD. For ex-
ample, you can get the same results as in the previous example by typing git
log origin/master.. – Git substitutes HEAD if one side is missing.
MULTIPLE POINTS
The double-dot syntax is useful as a shorthand; but perhaps you want to speci-
fy more than two branches to indicate your revision, such as seeing what com-
mits are in any of several branches that aren’t in the branch you’re currently on.
Git allows you to do this by using either the ^ character or --not before any
reference from which you don’t want to see reachable commits. Thus these
three commands are equivalent:
CHAPTER 7: Git Tools
264

$ git log refA..refB
$ git log ^refA refB
$ git log refB --not refA
This is nice because with this syntax you can specify more than two refer-
ences in your query, which you cannot do with the double-dot syntax. For in-
stance, if you want to see all commits that are reachable from refA or refB but
not from refC, you can type one of these:
$ git log refA refB ^refC
$ git log refA refB --not refC
This makes for a very powerful revision query system that should help you
figure out what is in your branches.
TRIPLE DOT
The last major range-selection syntax is the triple-dot syntax, which specifies all
the commits that are reachable by either of two references but not by both of
them. Look back at the example commit history in Figure 7-1. If you want to
see what is in master or experiment but not any common references, you can
run
$ git log master...experiment
F
E
D
C
Again, this gives you normal log output but shows you only the commit in-
formation for those four commits, appearing in the traditional commit date or-
dering.
A common switch to use with the log command in this case is --left-
right, which shows you which side of the range each commit is in. This helps
make the data more useful:
$ git log --left-right master...experiment
< F
< E
Revision Selection
265

> D
> C
With these tools, you can much more easily let Git know what commit or
commits you want to inspect.
Interactive Staging
Git comes with a couple of scripts that make some command-line tasks easier.
Here, you’ll look at a few interactive commands that can help you easily cra
your commits to include only certain combinations and parts of files. These
tools are very helpful if you modify a bunch of files and then decide that you
want those changes to be in several focused commits rather than one big mes-
sy commit. This way, you can make sure your commits are logically separate
changesets and can be easily reviewed by the developers working with you. If
you run git add with the -i or --interactive option, Git goes into an inter-
active shell mode, displaying something like this:
$ git add -i
staged unstaged path
1: unchanged +0/-1 TODO
2: unchanged +1/-1 index.html
3: unchanged +5/-1 lib/simplegit.rb
*** Commands ***
1: status 2: update 3: revert 4: add untracked
5: patch 6: diff 7: quit 8: help
What now>
You can see that this command shows you a much dierent view of your
staging area – basically the same information you get with git status but a
bit more succinct and informative. It lists the changes you’ve staged on the le
and unstaged changes on the right.
Aer this comes a Commands section. Here you can do a number of things,
including staging files, unstaging files, staging parts of files, adding untracked
files, and seeing dis of what has been staged.
Staging and Unstaging Files
If you type 2 or u at the What now> prompt, the script prompts you for which
files you want to stage:
CHAPTER 7: Git Tools
266

What now> 2
staged unstaged path
1: unchanged +0/-1 TODO
2: unchanged +1/-1 index.html
3: unchanged +5/-1 lib/simplegit.rb
Update>>
To stage the TODO and index.html files, you can type the numbers:
Update>> 1,2
staged unstaged path
* 1: unchanged +0/-1 TODO
* 2: unchanged +1/-1 index.html
3: unchanged +5/-1 lib/simplegit.rb
Update>>
The * next to each file means the file is selected to be staged. If you press
Enter aer typing nothing at the Update>> prompt, Git takes anything selected
and stages it for you:
Update>>
updated 2 paths
*** Commands ***
1: status 2: update 3: revert 4: add untracked
5: patch 6: diff 7: quit 8: help
What now> 1
staged unstaged path
1: +0/-1 nothing TODO
2: +1/-1 nothing index.html
3: unchanged +5/-1 lib/simplegit.rb
Now you can see that the TODO and index.html files are staged and the sim-
plegit.rb file is still unstaged. If you want to unstage the TODO file at this point,
you use the 3 or r (for revert) option:
*** Commands ***
1: status 2: update 3: revert 4: add untracked
5: patch 6: diff 7: quit 8: help
What now> 3
staged unstaged path
1: +0/-1 nothing TODO
2: +1/-1 nothing index.html
Interactive Staging
267

3: unchanged +5/-1 lib/simplegit.rb
Revert>> 1
staged unstaged path
* 1: +0/-1 nothing TODO
2: +1/-1 nothing index.html
3: unchanged +5/-1 lib/simplegit.rb
Revert>> [enter]
reverted one path
Looking at your Git status again, you can see that you’ve unstaged the TODO
file:
*** Commands ***
1: status 2: update 3: revert 4: add untracked
5: patch 6: diff 7: quit 8: help
What now> 1
staged unstaged path
1: unchanged +0/-1 TODO
2: +1/-1 nothing index.html
3: unchanged +5/-1 lib/simplegit.rb
To see the di of what you’ve staged, you can use the 6 or d (for di) com-
mand. It shows you a list of your staged files, and you can select the ones for
which you would like to see the staged di. This is much like specifying git
diff --cached on the command line:
*** Commands ***
1: status 2: update 3: revert 4: add untracked
5: patch 6: diff 7: quit 8: help
What now> 6
staged unstaged path
1: +1/-1 nothing index.html
Review diff>> 1
diff --git a/index.html b/index.html
index 4d07108..4335f49 100644
--- a/index.html
+++ b/index.html
@@ -16,7 +16,7 @@ Date Finder
<p id="out">...</p>
-<div id="footer">contact : support@github.com</div>
+<div id="footer">contact : email.support@github.com</div>
<script type="text/javascript">
CHAPTER 7: Git Tools
268

With these basic commands, you can use the interactive add mode to deal
with your staging area a little more easily.
Staging Patches
It’s also possible for Git to stage certain parts of files and not the rest. For exam-
ple, if you make two changes to your simplegit.rb file and want to stage one of
them and not the other, doing so is very easy in Git. From the interactive
prompt, type 5 or p (for patch). Git will ask you which files you would like to
partially stage; then, for each section of the selected files, it will display hunks
of the file di and ask if you would like to stage them, one by one:
diff --git a/lib/simplegit.rb b/lib/simplegit.rb
index dd5ecc4..57399e0 100644
--- a/lib/simplegit.rb
+++ b/lib/simplegit.rb
@@ -22,7 +22,7 @@ class SimpleGit
end
def log(treeish = 'master')
- command("git log -n 25 #{treeish}")
+ command("git log -n 30 #{treeish}")
end
def blame(path)
Stage this hunk [y,n,a,d,/,j,J,g,e,?]?
You have a lot of options at this point. Typing ? shows a list of what you can
do:
Stage this hunk [y,n,a,d,/,j,J,g,e,?]? ?
y - stage this hunk
n - do not stage this hunk
a - stage this and all the remaining hunks in the file
d - do not stage this hunk nor any of the remaining hunks in the file
g - select a hunk to go to
/ - search for a hunk matching the given regex
j - leave this hunk undecided, see next undecided hunk
J - leave this hunk undecided, see next hunk
k - leave this hunk undecided, see previous undecided hunk
K - leave this hunk undecided, see previous hunk
s - split the current hunk into smaller hunks
e - manually edit the current hunk
? - print help
Interactive Staging
269

Generally, you’ll type y or n if you want to stage each hunk, but staging all of
them in certain files or skipping a hunk decision until later can be helpful too. If
you stage one part of the file and leave another part unstaged, your status out-
put will look like this:
What now> 1
staged unstaged path
1: unchanged +0/-1 TODO
2: +1/-1 nothing index.html
3: +1/-1 +4/-0 lib/simplegit.rb
The status of the simplegit.rb file is interesting. It shows you that a couple of
lines are staged and a couple are unstaged. You’ve partially staged this file. At
this point, you can exit the interactive adding script and run git commit to
commit the partially staged files.
You also don’t need to be in interactive add mode to do the partial-file stag-
ing – you can start the same script by using git add -p or git add --patch
on the command line.
Furthermore, you can use patch mode for partially resetting files with the
reset --patch command, for checking out parts of files with the checkout
--patch command and for stashing parts of files with the stash save --
patch command. We’ll go into more details on each of these as we get to more
advanced usages of these commands.
Stashing and Cleaning
Oen, when you’ve been working on part of your project, things are in a messy
state and you want to switch branches for a bit to work on something else. The
problem is, you don’t want to do a commit of half-done work just so you can get
back to this point later. The answer to this issue is the git stash command.
Stashing takes the dirty state of your working directory – that is, your modi-
fied tracked files and staged changes – and saves it on a stack of unfinished
changes that you can reapply at any time.
Stashing Your Work
To demonstrate, you’ll go into your project and start working on a couple of
files and possibly stage one of the changes. If you run git status, you can see
your dirty state:
CHAPTER 7: Git Tools
270

$ git status
Changes to be committed:
(use "git reset HEAD <file>..." to unstage)
modified: index.html
Changes not staged for commit:
(use "git add <file>..." to update what will be committed)
(use "git checkout -- <file>..." to discard changes in working directory)
modified: lib/simplegit.rb
Now you want to switch branches, but you don’t want to commit what
you’ve been working on yet; so you’ll stash the changes. To push a new stash
onto your stack, run git stash or git stash save:
$ git stash
Saved working directory and index state \
"WIP on master: 049d078 added the index file"
HEAD is now at 049d078 added the index file
(To restore them type "git stash apply")
Your working directory is clean:
$ git status
# On branch master
nothing to commit, working directory clean
At this point, you can easily switch branches and do work elsewhere; your
changes are stored on your stack. To see which stashes you’ve stored, you can
use git stash list:
$ git stash list
stash@{0}: WIP on master: 049d078 added the index file
stash@{1}: WIP on master: c264051 Revert "added file_size"
stash@{2}: WIP on master: 21d80a5 added number to log
In this case, two stashes were done previously, so you have access to three
dierent stashed works. You can reapply the one you just stashed by using the
command shown in the help output of the original stash command: git stash
apply. If you want to apply one of the older stashes, you can specify it by nam-
Stashing and Cleaning
271

ing it, like this: git stash apply stash@{2}. If you don’t specify a stash, Git
assumes the most recent stash and tries to apply it:
$ git stash apply
# On branch master
# Changed but not updated:
# (use "git add <file>..." to update what will be committed)
#
# modified: index.html
# modified: lib/simplegit.rb
#
You can see that Git re-modifies the files you reverted when you saved the
stash. In this case, you had a clean working directory when you tried to apply
the stash, and you tried to apply it on the same branch you saved it from; but
having a clean working directory and applying it on the same branch aren’t
necessary to successfully apply a stash. You can save a stash on one branch,
switch to another branch later, and try to reapply the changes. You can also
have modified and uncommitted files in your working directory when you apply
a stash – Git gives you merge conflicts if anything no longer applies cleanly.
The changes to your files were reapplied, but the file you staged before
wasn’t restaged. To do that, you must run the git stash apply command
with a --index option to tell the command to try to reapply the staged
changes. If you had run that instead, you’d have gotten back to your original
position:
$ git stash apply --index
# On branch master
# Changes to be committed:
# (use "git reset HEAD <file>..." to unstage)
#
# modified: index.html
#
# Changed but not updated:
# (use "git add <file>..." to update what will be committed)
#
# modified: lib/simplegit.rb
#
The apply option only tries to apply the stashed work – you continue to have
it on your stack. To remove it, you can run git stash drop with the name of
the stash to remove:
CHAPTER 7: Git Tools
272

$ git stash list
stash@{0}: WIP on master: 049d078 added the index file
stash@{1}: WIP on master: c264051 Revert "added file_size"
stash@{2}: WIP on master: 21d80a5 added number to log
$ git stash drop stash@{0}
Dropped stash@{0} (364e91f3f268f0900bc3ee613f9f733e82aaed43)
You can also run git stash pop to apply the stash and then immediately
drop it from your stack.
Creative Stashing
There are a few stash variants that may also be helpful. The first option that is
quite popular is the --keep-index option to the stash save command. This
tells Git to not stash anything that you’ve already staged with the git add
command.
This can be really helpful if you’ve made a number of changes but want to
only commit some of them and then come back to the rest of the changes at a
later time.
$ git status -s
M index.html
M lib/simplegit.rb
$ git stash --keep-index
Saved working directory and index state WIP on master: 1b65b17 added the index file
HEAD is now at 1b65b17 added the index file
$ git status -s
M index.html
Another common thing you may want to do with stash is to stash the un-
tracked files as well as the tracked ones. By default, git stash will only store
files that are already in the index. If you specify --include-untracked or -u,
Git will also stash any untracked files you have created.
$ git status -s
M index.html
M lib/simplegit.rb
?? new-file.txt
$ git stash -u
Stashing and Cleaning
273

Saved working directory and index state WIP on master: 1b65b17 added the index file
HEAD is now at 1b65b17 added the index file
$ git status -s
$
Finally, if you specify the --patch flag, Git will not stash everything that is
modified but will instead prompt you interactively which of the changes you
would like to stash and which you would like to keep in your working directly.
$ git stash --patch
diff --git a/lib/simplegit.rb b/lib/simplegit.rb
index 66d332e..8bb5674 100644
--- a/lib/simplegit.rb
+++ b/lib/simplegit.rb
@@ -16,6 +16,10 @@ class SimpleGit
return `#{git_cmd} 2>&1`.chomp
end
end
+
+ def show(treeish = 'master')
+ command("git show #{treeish}")
+ end
end
test
Stash this hunk [y,n,q,a,d,/,e,?]? y
Saved working directory and index state WIP on master: 1b65b17 added the index file
Creating a Branch from a Stash
If you stash some work, leave it there for a while, and continue on the branch
from which you stashed the work, you may have a problem reapplying the
work. If the apply tries to modify a file that you’ve since modified, you’ll get a
merge conflict and will have to try to resolve it. If you want an easier way to test
the stashed changes again, you can run git stash branch, which creates a
new branch for you, checks out the commit you were on when you stashed your
work, reapplies your work there, and then drops the stash if it applies success-
fully:
$ git stash branch testchanges
Switched to a new branch "testchanges"
# On branch testchanges
CHAPTER 7: Git Tools
274

# Changes to be committed:
# (use "git reset HEAD <file>..." to unstage)
#
# modified: index.html
#
# Changed but not updated:
# (use "git add <file>..." to update what will be committed)
#
# modified: lib/simplegit.rb
#
Dropped refs/stash@{0} (f0dfc4d5dc332d1cee34a634182e168c4efc3359)
This is a nice shortcut to recover stashed work easily and work on it in a new
branch.
Cleaning your Working Directory
Finally, you may not want to stash some work or files in your working directory,
but simply get rid of them. The git clean command will do this for you.
Some common reasons for this might be to remove cru that has been gen-
erated by merges or external tools or to remove build artifacts in order to run a
clean build.
You’ll want to be pretty careful with this command, since it’s designed to re-
move files from your working directory that are not tracked. If you change your
mind, there is oen no retrieving the content of those files. A safer option is to
run git stash --all to remove everything but save it in a stash.
Assuming you do want to remove cru files or clean your working directory,
you can do so with git clean. To remove all the untracked files in your work-
ing directory, you can run git clean -f -d, which removes any files and also
any subdirectories that become empty as a result. The -f means force or “really
do this”.
If you ever want to see what it would do, you can run the command with the
-n option, which means “do a dry run and tell me what you would have re-
moved”.
$ git clean -d -n
Would remove test.o
Would remove tmp/
By default, the git clean command will only remove untracked files that
are not ignored. Any file that matches a pattern in your .gitignore or other
ignore files will not be removed. If you want to remove those files too, such as
Stashing and Cleaning
275

to remove all .o files generated from a build so you can do a fully clean build,
you can add a -x to the clean command.
$ git status -s
M lib/simplegit.rb
?? build.TMP
?? tmp/
$ git clean -n -d
Would remove build.TMP
Would remove tmp/
$ git clean -n -d -x
Would remove build.TMP
Would remove test.o
Would remove tmp/
If you don’t know what the git clean command is going to do, always run
it with a -n first to double check before changing the -n to a -f and doing it for
real. The other way you can be careful about the process is to run it with the -i
or “interactive” flag.
This will run the clean command in an interactive mode.
$ git clean -x -i
Would remove the following items:
build.TMP test.o
*** Commands ***
1: clean 2: filter by pattern 3: select by numbers 4: ask each 5: quit
6: help
What now>
This way you can step through each file individually or specify patterns for
deletion interactively.
Signing Your Work
Git is cryptographically secure, but it’s not foolproof. If you’re taking work from
others on the internet and want to verify that commits are actually from a trus-
ted source, Git has a few ways to sign and verify work using GPG.
CHAPTER 7: Git Tools
276

GPG Introduction
First of all, if you want to sign anything you need to get GPG configured and
your personal key installed.
$ gpg --list-keys
/Users/schacon/.gnupg/pubring.gpg
---------------------------------
pub 2048R/0A46826A 2014-06-04
uid Scott Chacon (Git signing key) <schacon@gmail.com>
sub 2048R/874529A9 2014-06-04
If you don’t have a key installed, you can generate one with gpg --gen-
key.
gpg --gen-key
Once you have a private key to sign with, you can configure Git to use it for
signing things by setting the user.signingkey config setting.
git config --global user.signingkey 0A46826A
Now Git will use your key by default to sign tags and commits if you want.
Signing Tags
If you have a GPG private key setup, you can now use it to sign new tags. All you
have to do is use -s instead of -a:
$ git tag -s v1.5 -m 'my signed 1.5 tag'
You need a passphrase to unlock the secret key for
user: "Ben Straub <ben@straub.cc>"
2048-bit RSA key, ID 800430EB, created 2014-05-04
If you run git show on that tag, you can see your GPG signature attached to
it:
Signing Your Work
277

$ git show v1.5
tag v1.5
Tagger: Ben Straub <ben@straub.cc>
Date: Sat May 3 20:29:41 2014 -0700
my signed 1.5 tag
-----BEGIN PGP SIGNATURE-----
Version: GnuPG v1
iQEcBAABAgAGBQJTZbQlAAoJEF0+sviABDDrZbQH/09PfE51KPVPlanr6q1v4/Ut
LQxfojUWiLQdg2ESJItkcuweYg+kc3HCyFejeDIBw9dpXt00rY26p05qrpnG+85b
hM1/PswpPLuBSr+oCIDj5GMC2r2iEKsfv2fJbNW8iWAXVLoWZRF8B0MfqX/YTMbm
ecorc4iXzQu7tupRihslbNkfvfciMnSDeSvzCpWAHl7h8Wj6hhqePmLm9lAYqnKp
8S5B/1SSQuEAjRZgI4IexpZoeKGVDptPHxLLS38fozsyi0QyDyzEgJxcJQVMXxVi
RUysgqjcpT8+iQM1PblGfHR4XAhuOqN5Fx06PSaFZhqvWFezJ28/CLyX5q+oIVk=
=EFTF
-----END PGP SIGNATURE-----
commit ca82a6dff817ec66f44342007202690a93763949
Author: Scott Chacon <schacon@gee-mail.com>
Date: Mon Mar 17 21:52:11 2008 -0700
changed the version number
Verifying Tags
To verify a signed tag, you use git tag -v [tag-name]. This command uses
GPG to verify the signature. You need the signer’s public key in your keyring for
this to work properly:
$ git tag -v v1.4.2.1
object 883653babd8ee7ea23e6a5c392bb739348b1eb61
type commit
tag v1.4.2.1
tagger Junio C Hamano <junkio@cox.net> 1158138501 -0700
GIT 1.4.2.1
Minor fixes since 1.4.2, including git-mv and git-http with alternates.
gpg: Signature made Wed Sep 13 02:08:25 2006 PDT using DSA key ID F3119B9A
gpg: Good signature from "Junio C Hamano <junkio@cox.net>"
gpg: aka "[jpeg image of size 1513]"
Primary key fingerprint: 3565 2A26 2040 E066 C9A7 4A7D C0C6 D9A4 F311 9B9A
If you don’t have the signer’s public key, you get something like this instead:
CHAPTER 7: Git Tools
278

gpg: Signature made Wed Sep 13 02:08:25 2006 PDT using DSA key ID F3119B9A
gpg: Can't check signature: public key not found
error: could not verify the tag 'v1.4.2.1'
Signing Commits
In more recent versions of Git (v1.7.9 and above), you can now also sign individ-
ual commits. If you’re interested in signing commits directly instead of just the
tags, all you need to do is add a -S to your git commit command.
$ git commit -a -S -m 'signed commit'
You need a passphrase to unlock the secret key for
user: "Scott Chacon (Git signing key) <schacon@gmail.com>"
2048-bit RSA key, ID 0A46826A, created 2014-06-04
[master 5c3386c] signed commit
4 files changed, 4 insertions(+), 24 deletions(-)
rewrite Rakefile (100%)
create mode 100644 lib/git.rb
To see and verify these signatures, there is also a --show-signature op-
tion to git log.
$ git log --show-signature -1
commit 5c3386cf54bba0a33a32da706aa52bc0155503c2
gpg: Signature made Wed Jun 4 19:49:17 2014 PDT using RSA key ID 0A46826A
gpg: Good signature from "Scott Chacon (Git signing key) <schacon@gmail.com>"
Author: Scott Chacon <schacon@gmail.com>
Date: Wed Jun 4 19:49:17 2014 -0700
signed commit
Additionally, you can configure git log to check any signatures it finds and
list them in it’s output with the %G? format.
$ git log --pretty="format:%h %G? %aN %s"
5c3386c G Scott Chacon signed commit
ca82a6d N Scott Chacon changed the version number
Signing Your Work
279

085bb3b N Scott Chacon removed unnecessary test code
a11bef0 N Scott Chacon first commit
Here we can see that only the latest commit is signed and valid and the pre-
vious commits are not.
In Git 1.8.3 and later, “git merge” and “git pull” can be told to inspect and
reject when merging a commit that does not carry a trusted GPG signature with
the --verify-signatures command.
If you use this option when merging a branch and it contains commits that
are not signed and valid, the merge will not work.
$ git merge --verify-signatures non-verify
fatal: Commit ab06180 does not have a GPG signature.
If the merge contains only valid signed commits, the merge command will
show you all the signatures it has checked and then move forward with the
merge.
$ git merge --verify-signatures signed-branch
Commit 13ad65e has a good GPG signature by Scott Chacon (Git signing key) <schacon@gmail.com>
Updating 5c3386c..13ad65e
Fast-forward
README | 2 ++
1 file changed, 2 insertions(+)
You can also use the -S option with the git merge command itself to sign
the resulting merge commit itself. The following example both verifies that
every commit in the branch to be merged is signed and furthermore signs the
resulting merge commit.
$ git merge --verify-signatures -S signed-branch
Commit 13ad65e has a good GPG signature by Scott Chacon (Git signing key) <schacon@gmail.com>
You need a passphrase to unlock the secret key for
user: "Scott Chacon (Git signing key) <schacon@gmail.com>"
2048-bit RSA key, ID 0A46826A, created 2014-06-04
Merge made by the 'recursive' strategy.
README | 2 ++
1 file changed, 2 insertions(+)
CHAPTER 7: Git Tools
280

Everyone Must Sign
Signing tags and commits is great, but if you decide to use this in your normal
workflow, you’ll have to make sure that everyone on your team understands
how to do so. If you don’t, you’ll end up spending a lot of time helping people
figure out how to rewrite their commits with signed versions. Make sure you un-
derstand GPG and the benefits of signing things before adopting this as part of
your standard workflow.
Searching
With just about any size codebase, you’ll oen need to find where a function is
called or defined, or find the history of a method. Git provides a couple of useful
tools for looking through the code and commits stored in it’s database quickly
and easily. We’ll go through a few of them.
Git Grep
Git ships with a command called grep that allows you to easily search through
any committed tree or the working directory for a string or regular expression.
For these examples, we’ll look through the Git source code itself.
By default, it will look through the files in your working directory. You can
pass -n to print out the line numbers where Git has found matches.
$ git grep -n gmtime_r
compat/gmtime.c:3:#undef gmtime_r
compat/gmtime.c:8: return git_gmtime_r(timep, &result);
compat/gmtime.c:11:struct tm *git_gmtime_r(const time_t *timep, struct tm *result)
compat/gmtime.c:16: ret = gmtime_r(timep, result);
compat/mingw.c:606:struct tm *gmtime_r(const time_t *timep, struct tm *result)
compat/mingw.h:162:struct tm *gmtime_r(const time_t *timep, struct tm *result);
date.c:429: if (gmtime_r(&now, &now_tm))
date.c:492: if (gmtime_r(&time, tm)) {
git-compat-util.h:721:struct tm *git_gmtime_r(const time_t *, struct tm *);
git-compat-util.h:723:#define gmtime_r git_gmtime_r
There are a number of interesting options you can provide the grep com-
mand.
For instance, instead of the previous call, you can have Git summarize the
output by just showing you which files matched and how many matches there
were in each file with the --count option:
Searching
281

$ git grep --count gmtime_r
compat/gmtime.c:4
compat/mingw.c:1
compat/mingw.h:1
date.c:2
git-compat-util.h:2
If you want to see what method or function it thinks it has found a match in,
you can pass -p:
$ git grep -p gmtime_r *.c
date.c=static int match_multi_number(unsigned long num, char c, const char *date, char *end, struct tm *tm)
date.c: if (gmtime_r(&now, &now_tm))
date.c=static int match_digit(const char *date, struct tm *tm, int *offset, int *tm_gmt)
date.c: if (gmtime_r(&time, tm)) {
So here we can see that gmtime_r is called in the match_multi_number
and match_digit functions in the date.c file.
You can also look for complex combinations of strings with the --and flag,
which makes sure that multiple matches are in the same line. For instance, let’s
look for any lines that define a constant with either the strings “LINK” or
“BUF_MAX” in them in the Git codebase in an older 1.8.0 version.
Here we’ll also use the --break and --heading options which help split up
the output into a more readable format.
$ git grep --break --heading \
-n -e '#define' --and \( -e LINK -e BUF_MAX \) v1.8.0
v1.8.0:builtin/index-pack.c
62:#define FLAG_LINK (1u<<20)
v1.8.0:cache.h
73:#define S_IFGITLINK 0160000
74:#define S_ISGITLINK(m) (((m) & S_IFMT) == S_IFGITLINK)
v1.8.0:environment.c
54:#define OBJECT_CREATION_MODE OBJECT_CREATION_USES_HARDLINKS
v1.8.0:strbuf.c
326:#define STRBUF_MAXLINK (2*PATH_MAX)
v1.8.0:symlinks.c
53:#define FL_SYMLINK (1 << 2)
v1.8.0:zlib.c
CHAPTER 7: Git Tools
282

30:/* #define ZLIB_BUF_MAX ((uInt)-1) */
31:#define ZLIB_BUF_MAX ((uInt) 1024 * 1024 * 1024) /* 1GB */
The git grep command has a few advantages over normal searching com-
mands like grep and ack. The first is that it’s really fast, the second is that you
can search through any tree in Git, not just the working directory. As we saw in
the above example, we looked for terms in an older version of the Git source
code, not the version that was currently checked out.
Git Log Searching
Perhaps you’re looking not for where a term exists, but when it existed or was
introduced. The git log command has a number of powerful tools for finding
specific commits by the content of their messages or even the content of the
di they introduce.
If we want to find out for example when the ZLIB_BUF_MAX constant was
originally introduced, we can tell Git to only show us the commits that either
added or removed that string with the -S option.
$ git log -SZLIB_BUF_MAX --oneline
e01503b zlib: allow feeding more than 4GB in one go
ef49a7a zlib: zlib can only process 4GB at a time
If we look at the di of those commits we can see that in ef49a7a the con-
stant was introduced and in e01503b it was modified.
If you need to be more specific, you can provide a regular expression to
search for with the -G option.
LINE LOG SEARCH
Another fairly advanced log search that is insanely useful is the line history
search. This is a fairly recent addition and not very well known, but it can be
really helpful. It is called with the -L option to git log and will show you the
history of a function or line of code in your codebase.
For example, if we wanted to see every change made to the function
git_deflate_bound in the zlib.c file, we could run git log -
L :git_deflate_bound:zlib.c. This will try to figure out what the bounds
of that function are and then look through the history and show us every
change that was made to the function as a series of patches back to when the
function was first created.
Searching
283

$ git log -L :git_deflate_bound:zlib.c
commit ef49a7a0126d64359c974b4b3b71d7ad42ee3bca
Author: Junio C Hamano <gitster@pobox.com>
Date: Fri Jun 10 11:52:15 2011 -0700
zlib: zlib can only process 4GB at a time
diff --git a/zlib.c b/zlib.c
--- a/zlib.c
+++ b/zlib.c
@@ -85,5 +130,5 @@
-unsigned long git_deflate_bound(z_streamp strm, unsigned long size)
+unsigned long git_deflate_bound(git_zstream *strm, unsigned long size)
{
- return deflateBound(strm, size);
+ return deflateBound(&strm->z, size);
}
commit 225a6f1068f71723a910e8565db4e252b3ca21fa
Author: Junio C Hamano <gitster@pobox.com>
Date: Fri Jun 10 11:18:17 2011 -0700
zlib: wrap deflateBound() too
diff --git a/zlib.c b/zlib.c
--- a/zlib.c
+++ b/zlib.c
@@ -81,0 +85,5 @@
+unsigned long git_deflate_bound(z_streamp strm, unsigned long size)
+{
+ return deflateBound(strm, size);
+}
+
If Git can’t figure out how to match a function or method in your program-
ming language, you can also provide it a regex. For example, this would have
done the same thing: git log -L '/unsigned long git_de-
flate_bound/',/^}/:zlib.c. You could also give it a range of lines or a sin-
gle line number and you’ll get the same sort of output.
Rewriting History
Many times, when working with Git, you may want to revise your commit histo-
ry for some reason. One of the great things about Git is that it allows you to
CHAPTER 7: Git Tools
284

make decisions at the last possible moment. You can decide what files go into
which commits right before you commit with the staging area, you can decide
that you didn’t mean to be working on something yet with the stash command,
and you can rewrite commits that already happened so they look like they hap-
pened in a dierent way. This can involve changing the order of the commits,
changing messages or modifying files in a commit, squashing together or split-
ting apart commits, or removing commits entirely – all before you share your
work with others.
In this section, you’ll cover how to accomplish these very useful tasks so that
you can make your commit history look the way you want before you share it
with others.
Changing the Last Commit
Changing your last commit is probably the most common rewriting of history
that you’ll do. You’ll oen want to do two basic things to your last commit:
change the commit message, or change the snapshot you just recorded by
adding, changing and removing files.
If you only want to modify your last commit message, it’s very simple:
$ git commit --amend
That drops you into your text editor, which has your last commit message in
it, ready for you to modify the message. When you save and close the editor, the
editor writes a new commit containing that message and makes it your new last
commit.
If you’ve committed and then you want to change the snapshot you commit-
ted by adding or changing files, possibly because you forgot to add a newly cre-
ated file when you originally committed, the process works basically the same
way. You stage the changes you want by editing a file and running git add on
it or git rm to a tracked file, and the subsequent git commit --amend takes
your current staging area and makes it the snapshot for the new commit.
You need to be careful with this technique because amending changes the
SHA-1 of the commit. It’s like a very small rebase – don’t amend your last com-
mit if you’ve already pushed it.
Changing Multiple Commit Messages
To modify a commit that is farther back in your history, you must move to more
complex tools. Git doesn’t have a modify-history tool, but you can use the re-
Rewriting History
285

base tool to rebase a series of commits onto the HEAD they were originally
based on instead of moving them to another one. With the interactive rebase
tool, you can then stop aer each commit you want to modify and change the
message, add files, or do whatever you wish. You can run rebase interactively
by adding the -i option to git rebase. You must indicate how far back you
want to rewrite commits by telling the command which commit to rebase onto.
For example, if you want to change the last three commit messages, or any
of the commit messages in that group, you supply as an argument to git re-
base -i the parent of the last commit you want to edit, which is HEAD~2^ or
HEAD~3. It may be easier to remember the ~3 because you’re trying to edit the
last three commits; but keep in mind that you’re actually designating four com-
mits ago, the parent of the last commit you want to edit:
$ git rebase -i HEAD~3
Remember again that this is a rebasing command – every commit included
in the range HEAD~3..HEAD will be rewritten, whether you change the message
or not. Don’t include any commit you’ve already pushed to a central server –
doing so will confuse other developers by providing an alternate version of the
same change.
Running this command gives you a list of commits in your text editor that
looks something like this:
pick f7f3f6d changed my name a bit
pick 310154e updated README formatting and added blame
pick a5f4a0d added cat-file
# Rebase 710f0f8..a5f4a0d onto 710f0f8
#
# Commands:
# p, pick = use commit
# r, reword = use commit, but edit the commit message
# e, edit = use commit, but stop for amending
# s, squash = use commit, but meld into previous commit
# f, fixup = like "squash", but discard this commit's log message
# x, exec = run command (the rest of the line) using shell
#
# These lines can be re-ordered; they are executed from top to bottom.
#
# If you remove a line here THAT COMMIT WILL BE LOST.
#
# However, if you remove everything, the rebase will be aborted.
CHAPTER 7: Git Tools
286

#
# Note that empty commits are commented out
It’s important to note that these commits are listed in the opposite order
than you normally see them using the log command. If you run a log, you see
something like this:
$ git log --pretty=format:"%h %s" HEAD~3..HEAD
a5f4a0d added cat-file
310154e updated README formatting and added blame
f7f3f6d changed my name a bit
Notice the reverse order. The interactive rebase gives you a script that it’s go-
ing to run. It will start at the commit you specify on the command line (HEAD~3)
and replay the changes introduced in each of these commits from top to bot-
tom. It lists the oldest at the top, rather than the newest, because that’s the first
one it will replay.
You need to edit the script so that it stops at the commit you want to edit. To
do so, change the word ‘pick’ to the word ‘edit’ for each of the commits you
want the script to stop aer. For example, to modify only the third commit mes-
sage, you change the file to look like this:
edit f7f3f6d changed my name a bit
pick 310154e updated README formatting and added blame
pick a5f4a0d added cat-file
When you save and exit the editor, Git rewinds you back to the last commit
in that list and drops you on the command line with the following message:
$ git rebase -i HEAD~3
Stopped at f7f3f6d... changed my name a bit
You can amend the commit now, with
git commit --amend
Once you’re satisfied with your changes, run
git rebase --continue
These instructions tell you exactly what to do. Type
Rewriting History
287

$ git commit --amend
Change the commit message, and exit the editor. Then, run
$ git rebase --continue
This command will apply the other two commits automatically, and then
you’re done. If you change pick to edit on more lines, you can repeat these
steps for each commit you change to edit. Each time, Git will stop, let you
amend the commit, and continue when you’re finished.
Reordering Commits
You can also use interactive rebases to reorder or remove commits entirely. If
you want to remove the “added cat-file” commit and change the order in which
the other two commits are introduced, you can change the rebase script from
this
pick f7f3f6d changed my name a bit
pick 310154e updated README formatting and added blame
pick a5f4a0d added cat-file
to this:
pick 310154e updated README formatting and added blame
pick f7f3f6d changed my name a bit
When you save and exit the editor, Git rewinds your branch to the parent of
these commits, applies 310154e and then f7f3f6d, and then stops. You eec-
tively change the order of those commits and remove the “added cat-file” com-
mit completely.
Squashing Commits
It’s also possible to take a series of commits and squash them down into a sin-
gle commit with the interactive rebasing tool. The script puts helpful instruc-
tions in the rebase message:
CHAPTER 7: Git Tools
288

#
# Commands:
# p, pick = use commit
# r, reword = use commit, but edit the commit message
# e, edit = use commit, but stop for amending
# s, squash = use commit, but meld into previous commit
# f, fixup = like "squash", but discard this commit's log message
# x, exec = run command (the rest of the line) using shell
#
# These lines can be re-ordered; they are executed from top to bottom.
#
# If you remove a line here THAT COMMIT WILL BE LOST.
#
# However, if you remove everything, the rebase will be aborted.
#
# Note that empty commits are commented out
If, instead of “pick” or “edit”, you specify “squash”, Git applies both that
change and the change directly before it and makes you merge the commit
messages together. So, if you want to make a single commit from these three
commits, you make the script look like this:
pick f7f3f6d changed my name a bit
squash 310154e updated README formatting and added blame
squash a5f4a0d added cat-file
When you save and exit the editor, Git applies all three changes and then
puts you back into the editor to merge the three commit messages:
# This is a combination of 3 commits.
# The first commit's message is:
changed my name a bit
# This is the 2nd commit message:
updated README formatting and added blame
# This is the 3rd commit message:
added cat-file
When you save that, you have a single commit that introduces the changes
of all three previous commits.
Rewriting History
289

Splitting a Commit
Splitting a commit undoes a commit and then partially stages and commits as
many times as commits you want to end up with. For example, suppose you
want to split the middle commit of your three commits. Instead of “updated RE-
ADME formatting and added blame”, you want to split it into two commits: “up-
dated README formatting” for the first, and “added blame” for the second. You
can do that in the rebase -i script by changing the instruction on the commit
you want to split to “edit”:
pick f7f3f6d changed my name a bit
edit 310154e updated README formatting and added blame
pick a5f4a0d added cat-file
Then, when the script drops you to the command line, you reset that com-
mit, take the changes that have been reset, and create multiple commits out of
them. When you save and exit the editor, Git rewinds to the parent of the first
commit in your list, applies the first commit (f7f3f6d), applies the second
(310154e), and drops you to the console. There, you can do a mixed reset of
that commit with git reset HEAD^, which eectively undoes that commit
and leaves the modified files unstaged. Now you can stage and commit files un-
til you have several commits, and run git rebase --continue when you’re
done:
$ git reset HEAD^
$ git add README
$ git commit -m 'updated README formatting'
$ git add lib/simplegit.rb
$ git commit -m 'added blame'
$ git rebase --continue
Git applies the last commit (a5f4a0d) in the script, and your history looks
like this:
$ git log -4 --pretty=format:"%h %s"
1c002dd added cat-file
9b29157 added blame
35cfb2b updated README formatting
f3cc40e changed my name a bit
CHAPTER 7: Git Tools
290

Once again, this changes the SHA-1s of all the commits in your list, so make
sure no commit shows up in that list that you’ve already pushed to a shared
repository.
The Nuclear Option: filter-branch
There is another history-rewriting option that you can use if you need to rewrite
a larger number of commits in some scriptable way – for instance, changing
your e-mail address globally or removing a file from every commit. The com-
mand is filter-branch, and it can rewrite huge swaths of your history, so you
probably shouldn’t use it unless your project isn’t yet public and other people
haven’t based work o the commits you’re about to rewrite. However, it can be
very useful. You’ll learn a few of the common uses so you can get an idea of
some of the things it’s capable of.
REMOVING A FILE FROM EVERY COMMIT
This occurs fairly commonly. Someone accidentally commits a huge binary file
with a thoughtless git add ., and you want to remove it everywhere. Perhaps
you accidentally committed a file that contained a password, and you want to
make your project open source. filter-branch is the tool you probably want
to use to scrub your entire history. To remove a file named passwords.txt from
your entire history, you can use the --tree-filter option to filter-
branch:
$ git filter-branch --tree-filter 'rm -f passwords.txt' HEAD
Rewrite 6b9b3cf04e7c5686a9cb838c3f36a8cb6a0fc2bd (21/21)
Ref 'refs/heads/master' was rewritten
The --tree-filter option runs the specified command aer each check-
out of the project and then recommits the results. In this case, you remove a file
called passwords.txt from every snapshot, whether it exists or not. If you want
to remove all accidentally committed editor backup files, you can run some-
thing like git filter-branch --tree-filter 'rm -f *~' HEAD.
You’ll be able to watch Git rewriting trees and commits and then move the
branch pointer at the end. It’s generally a good idea to do this in a testing
branch and then hard-reset your master branch aer you’ve determined the
outcome is what you really want. To run filter-branch on all your branches,
you can pass --all to the command.
Rewriting History
291

MAKING A SUBDIRECTORY THE NEW ROOT
Suppose you’ve done an import from another source control system and have
subdirectories that make no sense (trunk, tags, and so on). If you want to make
the trunk subdirectory be the new project root for every commit, filter-
branch can help you do that, too:
$ git filter-branch --subdirectory-filter trunk HEAD
Rewrite 856f0bf61e41a27326cdae8f09fe708d679f596f (12/12)
Ref 'refs/heads/master' was rewritten
Now your new project root is what was in the trunk subdirectory each time.
Git will also automatically remove commits that did not aect the subdirectory.
CHANGING E-MAIL ADDRESSES GLOBALLY
Another common case is that you forgot to run git config to set your name
and e-mail address before you started working, or perhaps you want to open-
source a project at work and change all your work e-mail addresses to your per-
sonal address. In any case, you can change e-mail addresses in multiple com-
mits in a batch with filter-branch as well. You need to be careful to change
only the e-mail addresses that are yours, so you use --commit-filter:
$ git filter-branch --commit-filter '
if [ "$GIT_AUTHOR_EMAIL" = "schacon@localhost" ];
then
GIT_AUTHOR_NAME="Scott Chacon";
GIT_AUTHOR_EMAIL="schacon@example.com";
git commit-tree "$@";
else
git commit-tree "$@";
fi' HEAD
This goes through and rewrites every commit to have your new address. Be-
cause commits contain the SHA-1 values of their parents, this command
changes every commit SHA-1 in your history, not just those that have the
matching e-mail address.
CHAPTER 7: Git Tools
292

Reset Demystified
Before moving on to more specialized tools, let’s talk about reset and check-
out. These commands are two of the most confusing parts of Git when you first
encounter them. They do so many things, that it seems hopeless to actually un-
derstand them and employ them properly. For this, we recommend a simple
metaphor.
The Three Trees
An easier way to think about reset and checkout is through the mental frame
of Git being a content manager of three dierent trees. By “tree” here we really
mean “collection of files”, not specifically the data structure. (There are a few
cases where the index doesn’t exactly act like a tree, but for our purposes it is
easier to think about it this way for now.)
Git as a system manages and manipulates three trees in its normal opera-
tion:
Tree Role
HEAD Last commit snapshot, next parent
Index Proposed next commit snapshot
Working Directory Sandbox
THE HEAD
HEAD is the pointer to the current branch reference, which is in turn a pointer to
the last commit made on that branch. That means HEAD will be the parent of
the next commit that is created. It’s generally simplest to think of HEAD as the
snapshot of your last commit.
In fact, it’s pretty easy to see what that snapshot looks like. Here is an exam-
ple of getting the actual directory listing and SHA-1 checksums for each file in
the HEAD snapshot:
$ git cat-file -p HEAD
tree cfda3bf379e4f8dba8717dee55aab78aef7f4daf
author Scott Chacon 1301511835 -0700
committer Scott Chacon 1301511835 -0700
initial commit
Reset Demystified
293

$ git ls-tree -r HEAD
100644 blob a906cb2a4a904a152... README
100644 blob 8f94139338f9404f2... Rakefile
040000 tree 99f1a6d12cb4b6f19... lib
The cat-file and ls-tree commands are “plumbing” commands that are
used for lower level things and not really used in day-to-day work, but they help
us see what’s going on here.
THE INDEX
The Index is your proposed next commit. We’ve also been referring to this con-
cept as Git’s “Staging Area” as this is what Git looks at when you run git com-
mit.
Git populates this index with a list of all the file contents that were last
checked out into your working directory and what they looked like when they
were originally checked out. You then replace some of those files with new ver-
sions of them, and git commit converts that into the tree for a new commit.
$ git ls-files -s
100644 a906cb2a4a904a152e80877d4088654daad0c859 0 README
100644 8f94139338f9404f26296befa88755fc2598c289 0 Rakefile
100644 47c6340d6459e05787f644c2447d2595f5d3a54b 0 lib/simplegit.rb
Again, here we’re using ls-files, which is more of a behind the scenes
command that shows you what your index currently looks like.
The index is not technically a tree structure – it’s actually implemented as a
flattened manifest – but for our purposes it’s close enough.
THE WORKING DIRECTORY
Finally, you have your working directory. The other two trees store their content
in an eicient but inconvenient manner, inside the .git folder. The Working Di-
rectory unpacks them into actual files, which makes it much easier for you to
edit them. Think of the Working Directory as a sandbox, where you can try
changes out before committing them to your staging area (index) and then to
history.
$ tree
.
├── README
├── Rakefile
CHAPTER 7: Git Tools
294

FIGURE 7-2
└── lib
└── simplegit.rb
1 directory, 3 files
The Workflow
Git’s main purpose is to record snapshots of your project in successively better
states, by manipulating these three trees.
Let’s visualize this process: say you go into a new directory with a single file
in it. We’ll call this v1 of the file, and we’ll indicate it in blue. Now we run git
init, which will create a Git repository with a HEAD reference which points to
an unborn branch (master doesn’t exist yet).
Reset Demystified
295
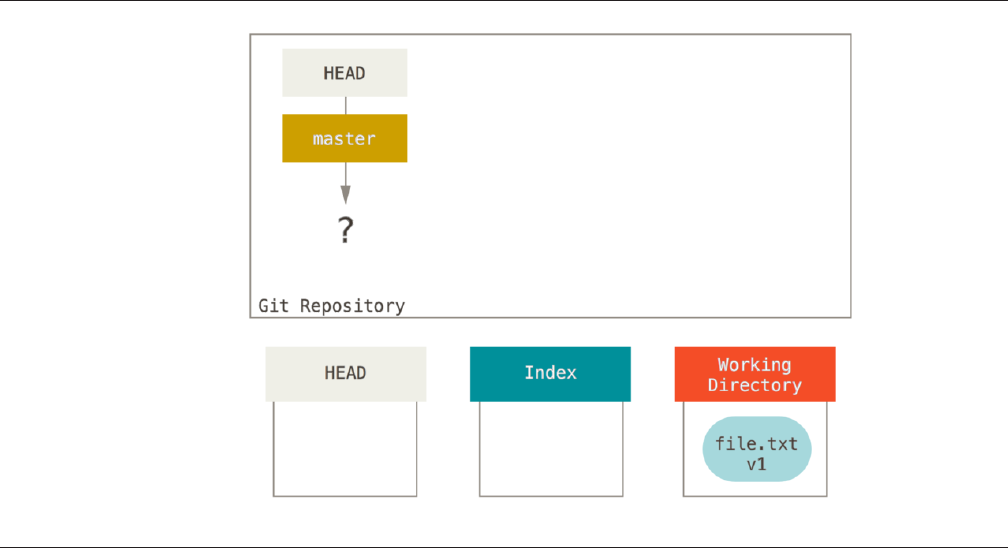
FIGURE 7-3
At this point, only the Working Directory tree has any content.
Now we want to commit this file, so we use git add to take content in the
Working Directory and copy it to the Index.
CHAPTER 7: Git Tools
296
FIGURE 7-4
Then we run git commit, which takes the contents of the Index and saves it
as a permanent snapshot, creates a commit object which points to that snap-
shot, and updates master to point to that commit.
Reset Demystified
297

FIGURE 7-5
If we run git status, we’ll see no changes, because all three trees are the
same.
Now we want to make a change to that file and commit it. We’ll go through
the same process; first we change the file in our working directory. Let’s call this
v2 of the file, and indicate it in red.
CHAPTER 7: Git Tools
298
FIGURE 7-6
If we run git status right now, we’ll see the file in red as “Changes not
staged for commit,” because that entry diers between the Index and the Work-
ing Directory. Next we run git add on it to stage it into our Index.
Reset Demystified
299
FIGURE 7-7
At this point if we run git status we will see the file in green under
“Changes to be committed” because the Index and HEAD dier – that is, our
proposed next commit is now dierent from our last commit. Finally, we run
git commit to finalize the commit.
CHAPTER 7: Git Tools
300
FIGURE 7-8
Now git status will give us no output, because all three trees are the
same again.
Switching branches or cloning goes through a similar process. When you
checkout a branch, it changes HEAD to point to the new branch ref, populates
your Index with the snapshot of that commit, then copies the contents of the
Index into your Working Directory.
The Role of Reset
The reset command makes more sense when viewed in this context.
For the purposes of these examples, let’s say that we’ve modified file.txt
again and committed it a third time. So now our history looks like this:
Reset Demystified
301

FIGURE 7-9
Let’s now walk through exactly what reset does when you call it. It directly
manipulates these three trees in a simple and predictable way. It does up to
three basic operations.
STEP 1: MOVE HEAD
The first thing reset will do is move what HEAD points to. This isn’t the same
as changing HEAD itself (which is what checkout does); reset moves the
branch that HEAD is pointing to. This means if HEAD is set to the master branch
(i.e. you’re currently on the master branch), running git reset 9e5e64a will
start by making master point to 9e5e64a.
CHAPTER 7: Git Tools
302

FIGURE 7-10
No matter what form of reset with a commit you invoke, this is the first
thing it will always try to do. With reset --soft, it will simply stop there.
Now take a second to look at that diagram and realize what happened: it es-
sentially undid the last git commit command. When you run git commit, Git
creates a new commit and moves the branch that HEAD points to up to it. When
you reset back to HEAD~ (the parent of HEAD), you are moving the branch back
to where it was, without changing the Index or Working Directory. You could
now update the Index and run git commit again to accomplish what git
commit --amend would have done (see “Changing the Last Commit”).
STEP 2: UPDATING THE INDEX (--MIXED)
Note that if you run git status now you’ll see in green the dierence be-
tween the Index and what the new HEAD is.
The next thing reset will do is to update the Index with the contents of
whatever snapshot HEAD now points to.
Reset Demystified
303
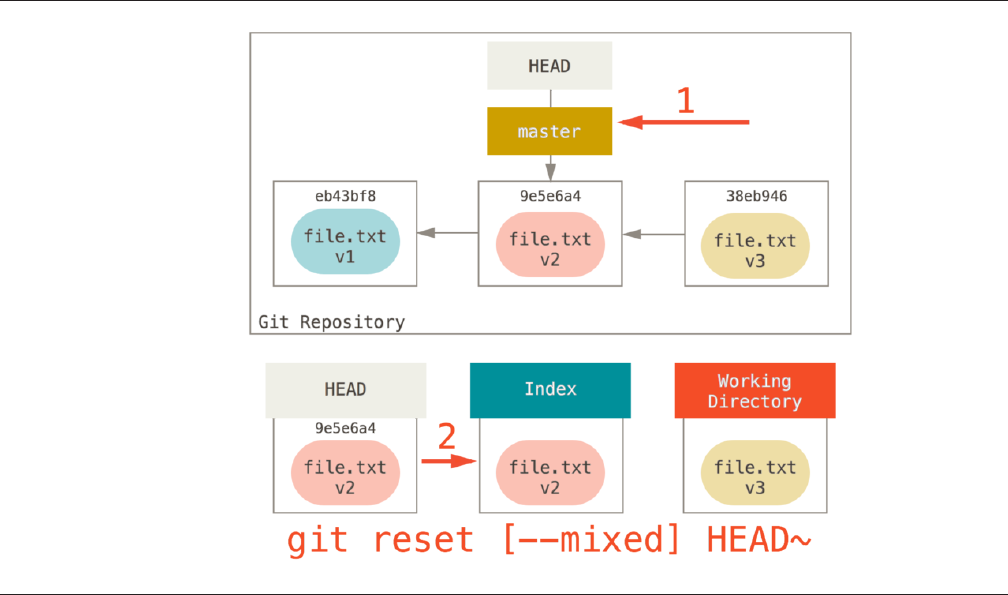
FIGURE 7-11
If you specify the --mixed option, reset will stop at this point. This is also
the default, so if you specify no option at all (just git reset HEAD~ in this
case), this is where the command will stop.
Now take another second to look at that diagram and realize what hap-
pened: it still undid your last commit, but also unstaged everything. You rolled
back to before you ran all your git add and git commit commands.
STEP 3: UPDATING THE WORKING DIRECTORY (--HARD)
The third thing that reset will do is to make the Working Directory look like the
Index. If you use the --hard option, it will continue to this stage.
CHAPTER 7: Git Tools
304
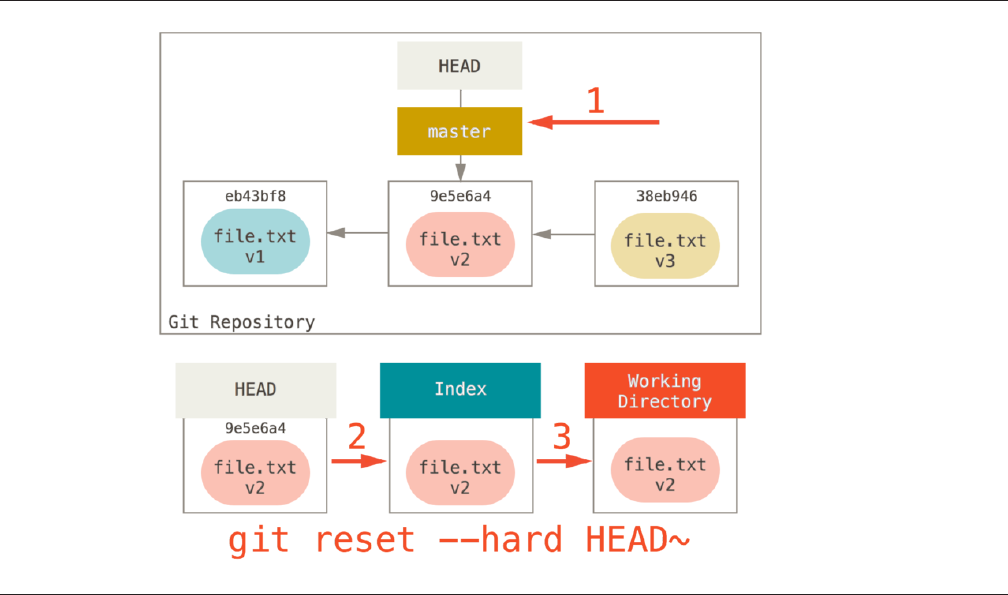
FIGURE 7-12
So let’s think about what just happened. You undid your last commit, the
git add and git commit commands, and all the work you did in your work-
ing directory.
It’s important to note that this flag (--hard) is the only way to make the
reset command dangerous, and one of the very few cases where Git will ac-
tually destroy data. Any other invocation of reset can be pretty easily undone,
but the --hard option cannot, since it forcibly overwrites files in the Working
Directory. In this particular case, we still have the v3 version of our file in a com-
mit in our Git DB, and we could get it back by looking at our reflog, but if we
had not committed it, Git still would have overwritten the file and it would be
unrecoverable.
RECAP
The reset command overwrites these three trees in a specific order, stopping
when you tell it to:
1. Move the branch HEAD points to (stop here if --soft)
Reset Demystified
305
2. Make the Index look like HEAD (stop here unless --hard)
3. Make the Working Directory look like the Index
Reset With a Path
That covers the behavior of reset in its basic form, but you can also provide it
with a path to act upon. If you specify a path, reset will skip step 1, and limit
the remainder of its actions to a specific file or set of files. This actually sort of
makes sense – HEAD is just a pointer, and you can’t point to part of one commit
and part of another. But the Index and Working directory can be partially upda-
ted, so reset proceeds with steps 2 and 3.
So, assume we run git reset file.txt. This form (since you did not
specify a commit SHA-1 or branch, and you didn’t specify --soft or --hard) is
shorthand for git reset --mixed HEAD file.txt, which will:
1. Move the branch HEAD points to (skipped)
2. Make the Index look like HEAD (stop here)
So it essentially just copies file.txt from HEAD to the Index.
CHAPTER 7: Git Tools
306
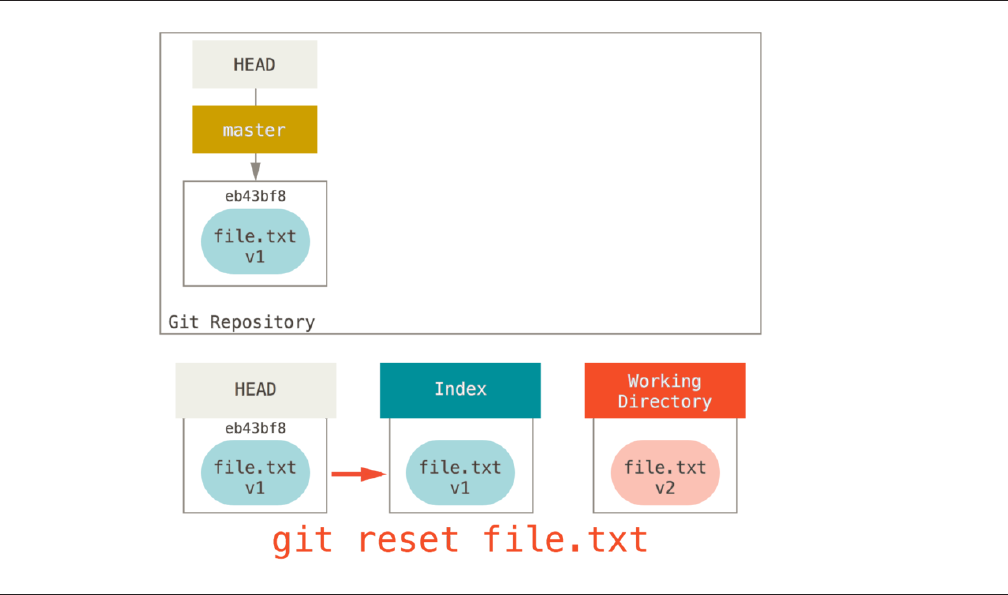
FIGURE 7-13
This has the practical eect of unstaging the file. If we look at the diagram
for that command and think about what git add does, they are exact oppo-
sites.
Reset Demystified
307
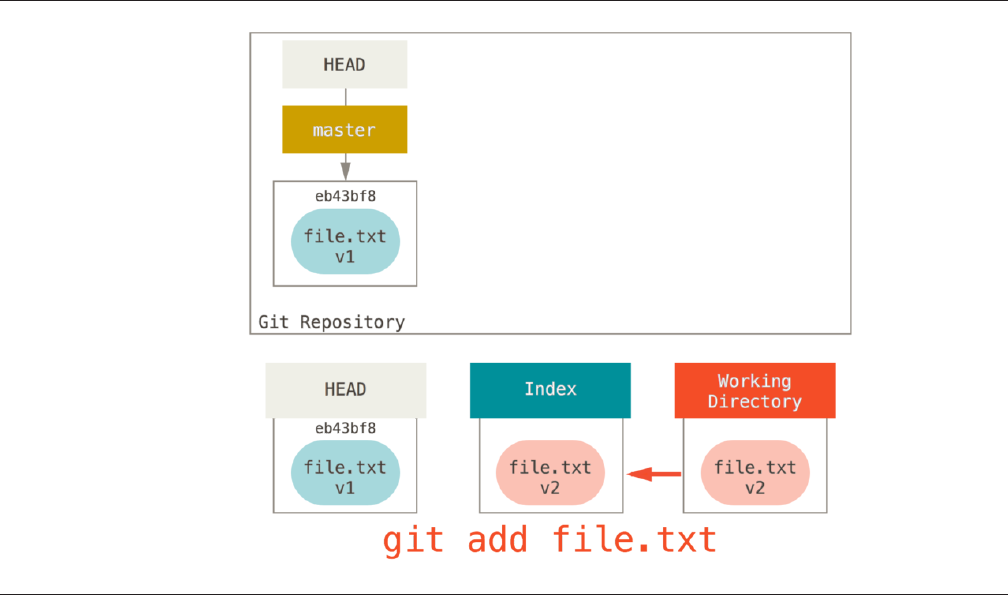
FIGURE 7-14
This is why the output of the git status command suggests that you run
this to unstage a file. (See “Deshacer un Archivo Preparado” for more on this.)
We could just as easily not let Git assume we meant “pull the data from
HEAD” by specifying a specific commit to pull that file version from. We would
just run something like git reset eb43bf file.txt.
CHAPTER 7: Git Tools
308
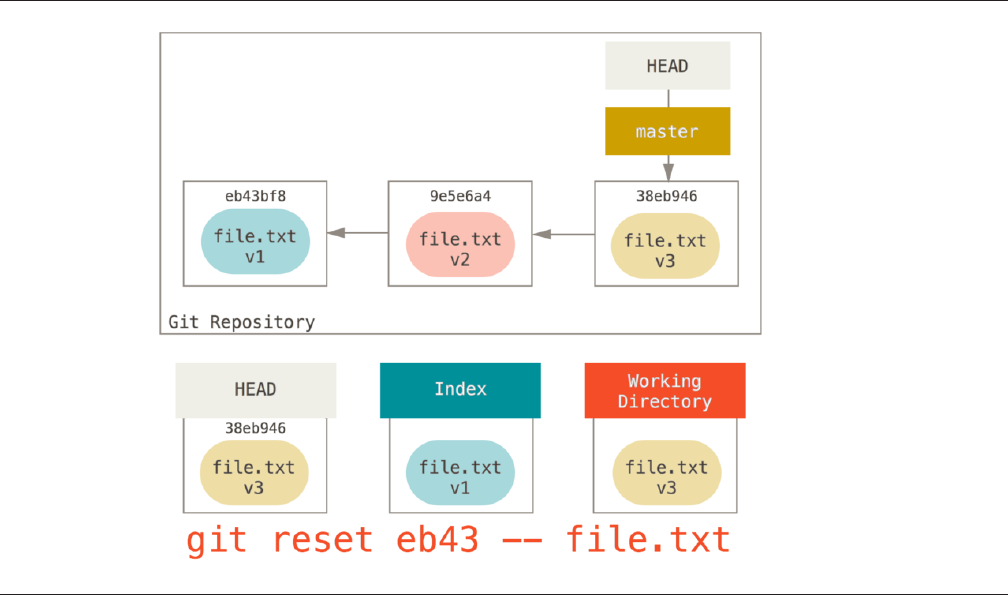
FIGURE 7-15
This eectively does the same thing as if we had reverted the content of the
file to v1 in the Working Directory, ran git add on it, then reverted it back to
v3 again (without actually going through all those steps). If we run git commit
now, it will record a change that reverts that file back to v1, even though we
never actually had it in our Working Directory again.
It’s also interesting to note that like git add, the reset command will ac-
cept a --patch option to unstage content on a hunk-by-hunk basis. So you can
selectively unstage or revert content.
Squashing
Let’s look at how to do something interesting with this newfound power –
squashing commits.
Say you have a series of commits with messages like “oops.”, “WIP” and “for-
got this file”. You can use reset to quickly and easily squash them into a single
commit that makes you look really smart. (“Squashing Commits” shows an-
other way to do this, but in this example it’s simpler to use reset.)
Reset Demystified
309
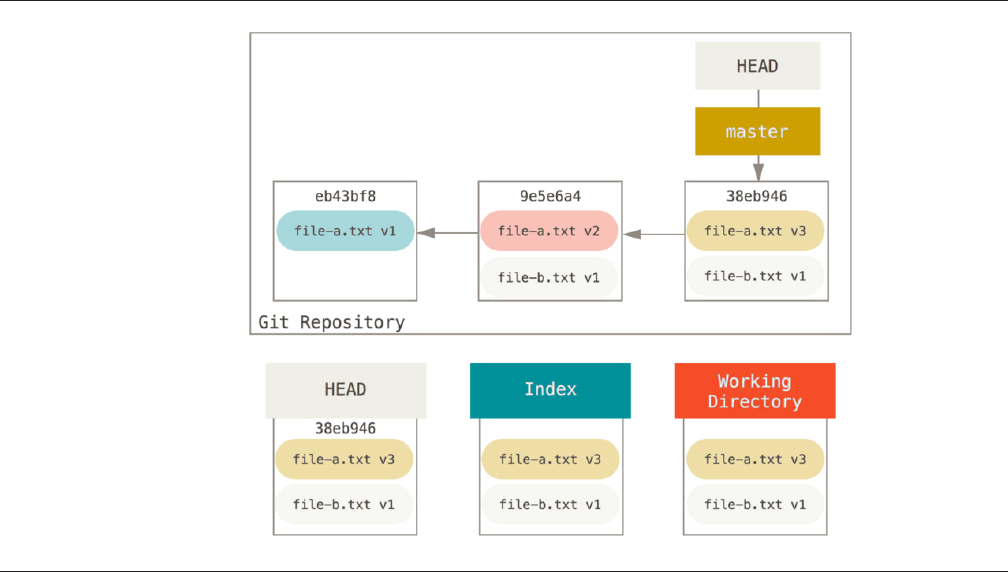
FIGURE 7-16
Let’s say you have a project where the first commit has one file, the second
commit added a new file and changed the first, and the third commit changed
the first file again. The second commit was a work in progress and you want to
squash it down.
You can run git reset --soft HEAD~2 to move the HEAD branch back to
an older commit (the first commit you want to keep):
CHAPTER 7: Git Tools
310
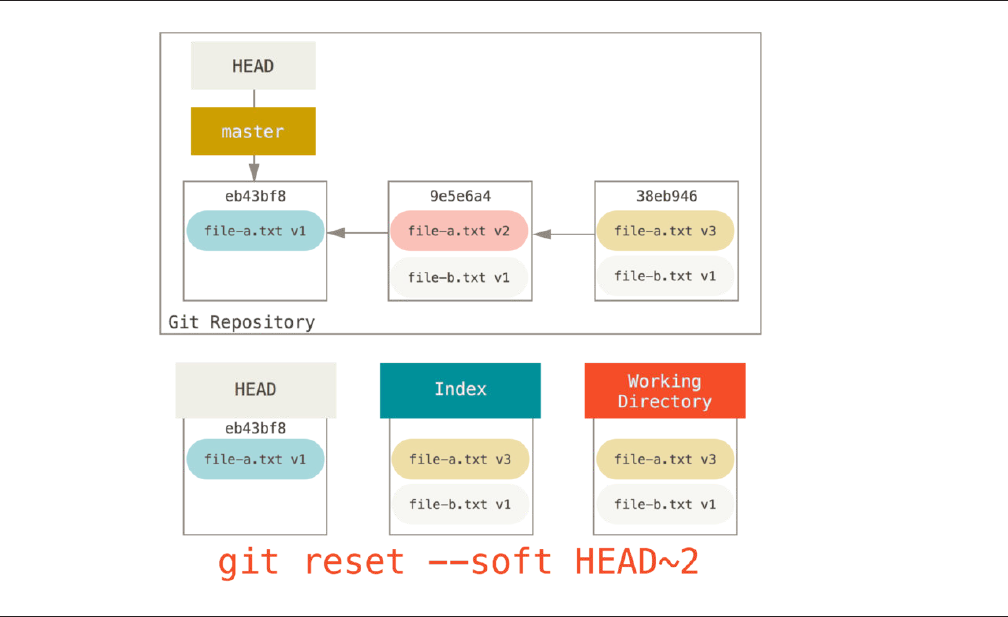
FIGURE 7-17
And then simply run git commit again:
Reset Demystified
311
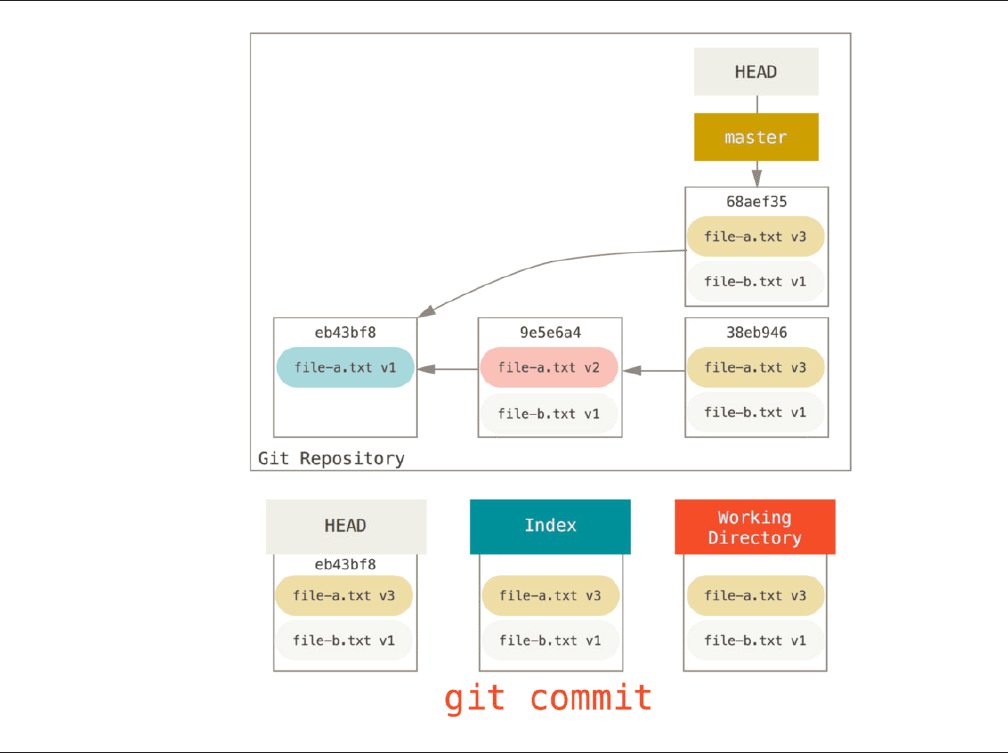
FIGURE 7-18
Now you can see that your reachable history, the history you would push,
now looks like you had one commit with file-a.txt v1, then a second that
both modified file-a.txt to v3 and added file-b.txt. The commit with the
v2 version of the file is no longer in the history.
Check It Out
Finally, you may wonder what the dierence between checkout and reset is.
Like reset, checkout manipulates the three trees, and it is a bit dierent de-
pending on whether you give the command a file path or not.
CHAPTER 7: Git Tools
312
WITHOUT PATHS
Running git checkout [branch] is pretty similar to running git reset --
hard [branch] in that it updates all three trees for you to look like [branch],
but there are two important dierences.
First, unlike reset --hard, checkout is working-directory safe; it will
check to make sure it’s not blowing away files that have changes to them. Ac-
tually, it’s a bit smarter than that – it tries to do a trivial merge in the Working
Directory, so all of the files you haven’t changed in will be updated. reset --
hard, on the other hand, will simply replace everything across the board
without checking.
The second important dierence is how it updates HEAD. Where reset will
move the branch that HEAD points to, checkout will move HEAD itself to point
to another branch.
For instance, say we have master and develop branches which point at dif-
ferent commits, and we’re currently on develop (so HEAD points to it). If we
run git reset master, develop itself will now point to the same commit
that master does. If we instead run git checkout master, develop does not
move, HEAD itself does. HEAD will now point to master.
So, in both cases we’re moving HEAD to point to commit A, but how we do so
is very dierent. reset will move the branch HEAD points to, checkout moves
HEAD itself.
Reset Demystified
313
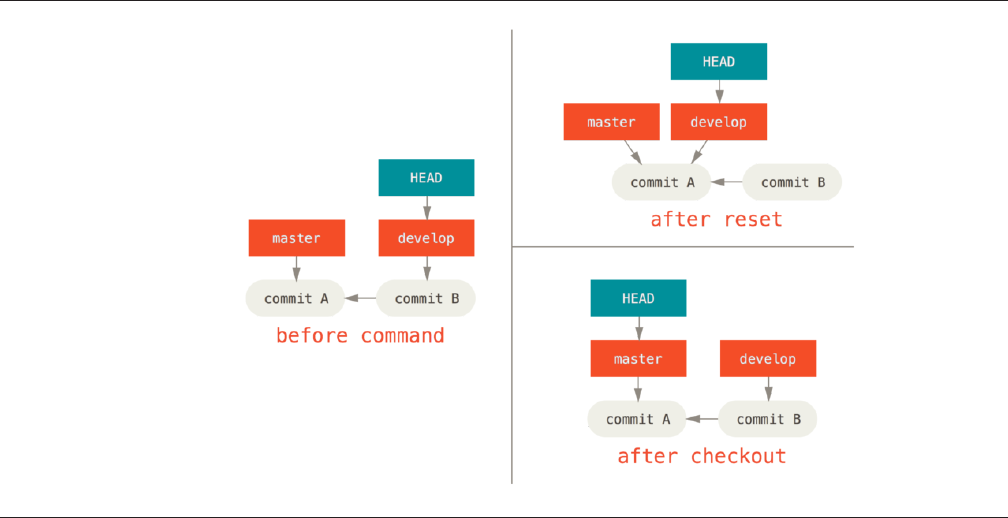
FIGURE 7-19
WITH PATHS
The other way to run checkout is with a file path, which, like reset, does not
move HEAD. It is just like git reset [branch] file in that it updates the
index with that file at that commit, but it also overwrites the file in the working
directory. It would be exactly like git reset --hard [branch] file (if re-
set would let you run that) – it’s not working-directory safe, and it does not
move HEAD.
Also, like git reset and git add, checkout will accept a --patch option
to allow you to selectively revert file contents on a hunk-by-hunk basis.
Summary
Hopefully now you understand and feel more comfortable with the reset com-
mand, but are probably still a little confused about how exactly it diers from
checkout and could not possibly remember all the rules of the dierent invo-
cations.
Here’s a cheat-sheet for which commands aect which trees. The “HEAD”
column reads “REF” if that command moves the reference (branch) that HEAD
points to, and “HEAD” if it moves HEAD itself. Pay especial attention to the WD
CHAPTER 7: Git Tools
314

Safe? column – if it says NO, take a second to think before running that com-
mand.
HEAD Index Workdir WD Safe?
Commit Level
reset --soft [commit] REF NO NO YES
reset [commit] REF YES NO YES
reset --hard [commit] REF YES YES NO
checkout [commit] HEAD YES YES YES
File Level
reset (commit) [file] NO YES NO YES
checkout (commit) [file] NO YES YES NO
Advanced Merging
Merging in Git is typically fairly easy. Since Git makes it easy to merge another
branch multiple times, it means that you can have a very long lived branch but
you can keep it up to date as you go, solving small conflicts oen, rather than
be surprised by one enormous conflict at the end of the series.
However, sometimes tricky conflicts do occur. Unlike some other version
control systems, Git does not try to be overly clever about merge conflict reso-
lution. Git’s philosophy is to be smart about determining when a merge resolu-
tion is unambiguous, but if there is a conflict, it does not try to be clever about
automatically resolving it. Therefore, if you wait too long to merge two branch-
es that diverge quickly, you can run into some issues.
In this section, we’ll go over what some of those issues might be and what
tools Git gives you to help handle these more tricky situations. We’ll also cover
some of the dierent, non-standard types of merges you can do, as well as see
how to back out of merges that you’ve done.
Merge Conflicts
While we covered some basics on resolving merge conflicts in “Principales
Conflictos que Pueden Surgir en las Fusiones”, for more complex conflicts,
Git provides a few tools to help you figure out what’s going on and how to bet-
ter deal with the conflict.
Advanced Merging
315

First of all, if at all possible, try to make sure your working directory is clean
before doing a merge that may have conflicts. If you have work in progress, ei-
ther commit it to a temporary branch or stash it. This makes it so that you can
undo anything you try here. If you have unsaved changes in your working di-
rectory when you try a merge, some of these tips may help you lose that work.
Let’s walk through a very simple example. We have a super simple Ruby file
that prints hello world.
#! /usr/bin/env ruby
def hello
puts 'hello world'
end
hello()
In our repository, we create a new branch named whitespace and proceed
to change all the Unix line endings to DOS line endings, essentially changing
every line of the file, but just with whitespace. Then we change the line “hello
world” to “hello mundo”.
$ git checkout -b whitespace
Switched to a new branch 'whitespace'
$ unix2dos hello.rb
unix2dos: converting file hello.rb to DOS format ...
$ git commit -am 'converted hello.rb to DOS'
[whitespace 3270f76] converted hello.rb to DOS
1 file changed, 7 insertions(+), 7 deletions(-)
$ vim hello.rb
$ git diff -w
diff --git a/hello.rb b/hello.rb
index ac51efd..e85207e 100755
--- a/hello.rb
+++ b/hello.rb
@@ -1,7 +1,7 @@
#! /usr/bin/env ruby
def hello
- puts 'hello world'
+ puts 'hello mundo'^M
end
hello()
$ git commit -am 'hello mundo change'
CHAPTER 7: Git Tools
316

[whitespace 6d338d2] hello mundo change
1 file changed, 1 insertion(+), 1 deletion(-)
Now we switch back to our master branch and add some documentation for
the function.
$ git checkout master
Switched to branch 'master'
$ vim hello.rb
$ git diff
diff --git a/hello.rb b/hello.rb
index ac51efd..36c06c8 100755
--- a/hello.rb
+++ b/hello.rb
@@ -1,5 +1,6 @@
#! /usr/bin/env ruby
+# prints out a greeting
def hello
puts 'hello world'
end
$ git commit -am 'document the function'
[master bec6336] document the function
1 file changed, 1 insertion(+)
Now we try to merge in our whitespace branch and we’ll get conflicts be-
cause of the whitespace changes.
$ git merge whitespace
Auto-merging hello.rb
CONFLICT (content): Merge conflict in hello.rb
Automatic merge failed; fix conflicts and then commit the result.
ABORTING A MERGE
We now have a few options. First, let’s cover how to get out of this situation. If
you perhaps weren’t expecting conflicts and don’t want to quite deal with the
situation yet, you can simply back out of the merge with git merge --abort.
$ git status -sb
## master
Advanced Merging
317

UU hello.rb
$ git merge --abort
$ git status -sb
## master
The git merge --abort option tries to revert back to your state before
you ran the merge. The only cases where it may not be able to do this perfectly
would be if you had unstashed, uncommitted changes in your working directo-
ry when you ran it, otherwise it should work fine.
If for some reason you find yourself in a horrible state and just want to start
over, you can also run git reset --hard HEAD or wherever you want to get
back to. Remember again that this will blow away your working directory, so
make sure you don’t want any changes there.
IGNORING WHITESPACE
In this specific case, the conflicts are whitespace related. We know this because
the case is simple, but it’s also pretty easy to tell in real cases when looking at
the conflict because every line is removed on one side and added again on the
other. By default, Git sees all of these lines as being changed, so it can’t merge
the files.
The default merge strategy can take arguments though, and a few of them
are about properly ignoring whitespace changes. If you see that you have a lot
of whitespace issues in a merge, you can simply abort it and do it again, this
time with -Xignore-all-space or -Xignore-space-change. The first option
ignores changes in any amount of existing whitespace, the second ignores all
whitespace changes altogether.
$ git merge -Xignore-all-space whitespace
Auto-merging hello.rb
Merge made by the 'recursive' strategy.
hello.rb | 2 +-
1 file changed, 1 insertion(+), 1 deletion(-)
Since in this case, the actual file changes were not conflicting, once we ig-
nore the whitespace changes, everything merges just fine.
This is a lifesaver if you have someone on your team who likes to occasional-
ly reformat everything from spaces to tabs or vice-versa.
CHAPTER 7: Git Tools
318

MANUAL FILE RE-MERGING
Though Git handles whitespace pre-processing pretty well, there are other
types of changes that perhaps Git can’t handle automatically, but are scriptable
fixes. As an example, let’s pretend that Git could not handle the whitespace
change and we needed to do it by hand.
What we really need to do is run the file we’re trying to merge in through a
dos2unix program before trying the actual file merge. So how would we do
that?
First, we get into the merge conflict state. Then we want to get copies of my
version of the file, their version (from the branch we’re merging in) and the
common version (from where both sides branched o). Then we want to fix up
either their side or our side and re-try the merge again for just this single file.
Getting the three file versions is actually pretty easy. Git stores all of these
versions in the index under “stages” which each have numbers associated with
them. Stage 1 is the common ancestor, stage 2 is your version and stage 3 is
from the MERGE_HEAD, the version you’re merging in (“theirs”).
You can extract a copy of each of these versions of the conflicted file with the
git show command and a special syntax.
$ git show :1:hello.rb > hello.common.rb
$ git show :2:hello.rb > hello.ours.rb
$ git show :3:hello.rb > hello.theirs.rb
If you want to get a little more hard core, you can also use the ls-files -u
plumbing command to get the actual SHA-1s of the Git blobs for each of these
files.
$ git ls-files -u
100755 ac51efdc3df4f4fd328d1a02ad05331d8e2c9111 1 hello.rb
100755 36c06c8752c78d2aff89571132f3bf7841a7b5c3 2 hello.rb
100755 e85207e04dfdd5eb0a1e9febbc67fd837c44a1cd 3 hello.rb
The :1:hello.rb is just a shorthand for looking up that blob SHA-1.
Now that we have the content of all three stages in our working directory, we
can manually fix up theirs to fix the whitespace issue and re-merge the file with
the little-known git merge-file command which does just that.
$ dos2unix hello.theirs.rb
dos2unix: converting file hello.theirs.rb to Unix format ...
Advanced Merging
319

$ git merge-file -p \
hello.ours.rb hello.common.rb hello.theirs.rb > hello.rb
$ git diff -w
diff --cc hello.rb
index 36c06c8,e85207e..0000000
--- a/hello.rb
+++ b/hello.rb
@@@ -1,8 -1,7 +1,8 @@@
#! /usr/bin/env ruby
+# prints out a greeting
def hello
- puts 'hello world'
+ puts 'hello mundo'
end
hello()
At this point we have nicely merged the file. In fact, this actually works better
than the ignore-all-space option because this actually fixes the whitespace
changes before merge instead of simply ignoring them. In the ignore-all-
space merge, we actually ended up with a few lines with DOS line endings,
making things mixed.
If you want to get an idea before finalizing this commit about what was ac-
tually changed between one side or the other, you can ask git diff to com-
pare what is in your working directory that you’re about to commit as the result
of the merge to any of these stages. Let’s go through them all.
To compare your result to what you had in your branch before the merge, in
other words, to see what the merge introduced, you can run git diff --ours
$ git diff --ours
* Unmerged path hello.rb
diff --git a/hello.rb b/hello.rb
index 36c06c8..44d0a25 100755
--- a/hello.rb
+++ b/hello.rb
@@ -2,7 +2,7 @@
# prints out a greeting
def hello
- puts 'hello world'
+ puts 'hello mundo'
end
CHAPTER 7: Git Tools
320

hello()
So here we can easily see that what happened in our branch, what we’re ac-
tually introducing to this file with this merge, is changing that single line.
If we want to see how the result of the merge diered from what was on their
side, you can run git diff --theirs. In this and the following example, we
have to use -w to strip out the whitespace because we’re comparing it to what
is in Git, not our cleaned up hello.theirs.rb file.
$ git diff --theirs -w
* Unmerged path hello.rb
diff --git a/hello.rb b/hello.rb
index e85207e..44d0a25 100755
--- a/hello.rb
+++ b/hello.rb
@@ -1,5 +1,6 @@
#! /usr/bin/env ruby
+# prints out a greeting
def hello
puts 'hello mundo'
end
Finally, you can see how the file has changed from both sides with git diff
--base.
$ git diff --base -w
* Unmerged path hello.rb
diff --git a/hello.rb b/hello.rb
index ac51efd..44d0a25 100755
--- a/hello.rb
+++ b/hello.rb
@@ -1,7 +1,8 @@
#! /usr/bin/env ruby
+# prints out a greeting
def hello
- puts 'hello world'
+ puts 'hello mundo'
end
hello()
Advanced Merging
321

At this point we can use the git clean command to clear out the extra files
we created to do the manual merge but no longer need.
$ git clean -f
Removing hello.common.rb
Removing hello.ours.rb
Removing hello.theirs.rb
CHECKING OUT CONFLICTS
Perhaps we’re not happy with the resolution at this point for some reason, or
maybe manually editing one or both sides still didn’t work well and we need
more context.
Let’s change up the example a little. For this example, we have two longer
lived branches that each have a few commits in them but create a legitimate
content conflict when merged.
$ git log --graph --oneline --decorate --all
* f1270f7 (HEAD, master) update README
* 9af9d3b add a README
* 694971d update phrase to hola world
| * e3eb223 (mundo) add more tests
| * 7cff591 add testing script
| * c3ffff1 changed text to hello mundo
|/
* b7dcc89 initial hello world code
We now have three unique commits that live only on the master branch and
three others that live on the mundo branch. If we try to merge the mundo branch
in, we get a conflict.
$ git merge mundo
Auto-merging hello.rb
CONFLICT (content): Merge conflict in hello.rb
Automatic merge failed; fix conflicts and then commit the result.
We would like to see what the merge conflict is. If we open up the file, we’ll
see something like this:
#! /usr/bin/env ruby
def hello
CHAPTER 7: Git Tools
322

<<<<<<< HEAD
puts 'hola world'
=======
puts 'hello mundo'
>>>>>>> mundo
end
hello()
Both sides of the merge added content to this file, but some of the commits
modified the file in the same place that caused this conflict.
Let’s explore a couple of tools that you now have at your disposal to deter-
mine how this conflict came to be. Perhaps it’s not obvious how exactly you
should fix this conflict. You need more context.
One helpful tool is git checkout with the ‘--conflict’ option. This will re-
checkout the file again and replace the merge conflict markers. This can be use-
ful if you want to reset the markers and try to resolve them again.
You can pass --conflict either diff3 or merge (which is the default). If
you pass it diff3, Git will use a slightly dierent version of conflict markers, not
only giving you the “ours” and “theirs” versions, but also the “base” version in-
line to give you more context.
$ git checkout --conflict=diff3 hello.rb
Once we run that, the file will look like this instead:
#! /usr/bin/env ruby
def hello
<<<<<<< ours
puts 'hola world'
||||||| base
puts 'hello world'
=======
puts 'hello mundo'
>>>>>>> theirs
end
hello()
If you like this format, you can set it as the default for future merge conflicts
by setting the merge.conflictstyle setting to diff3.
Advanced Merging
323

$ git config --global merge.conflictstyle diff3
The git checkout command can also take --ours and --theirs options,
which can be a really fast way of just choosing either one side or the other
without merging things at all.
This can be particularly useful for conflicts of binary files where you can sim-
ply choose one side, or where you only want to merge certain files in from an-
other branch - you can do the merge and then checkout certain files from one
side or the other before committing.
MERGE LOG
Another useful tool when resolving merge conflicts is git log. This can help
you get context on what may have contributed to the conflicts. Reviewing a lit-
tle bit of history to remember why two lines of development were touching the
same area of code can be really helpful sometimes.
To get a full list of all of the unique commits that were included in either
branch involved in this merge, we can use the “triple dot” syntax that we
learned in “Triple Dot”.
$ git log --oneline --left-right HEAD...MERGE_HEAD
< f1270f7 update README
< 9af9d3b add a README
< 694971d update phrase to hola world
> e3eb223 add more tests
> 7cff591 add testing script
> c3ffff1 changed text to hello mundo
That’s a nice list of the six total commits involved, as well as which line of
development each commit was on.
We can further simplify this though to give us much more specific context. If
we add the --merge option to git log, it will only show the commits in either
side of the merge that touch a file that’s currently conflicted.
$ git log --oneline --left-right --merge
< 694971d update phrase to hola world
> c3ffff1 changed text to hello mundo
If you run that with the -p option instead, you get just the dis to the file
that ended up in conflict. This can be really helpful in quickly giving you the
CHAPTER 7: Git Tools
324

context you need to help understand why something conflicts and how to more
intelligently resolve it.
COMBINED DIFF FORMAT
Since Git stages any merge results that are successful, when you run git diff
while in a conflicted merge state, you only get what is currently still in conflict.
This can be helpful to see what you still have to resolve.
When you run git diff directly aer a merge conflict, it will give you infor-
mation in a rather unique di output format.
$ git diff
diff --cc hello.rb
index 0399cd5,59727f0..0000000
--- a/hello.rb
+++ b/hello.rb
@@@ -1,7 -1,7 +1,11 @@@
#! /usr/bin/env ruby
def hello
++<<<<<<< HEAD
+ puts 'hola world'
++=======
+ puts 'hello mundo'
++>>>>>>> mundo
end
hello()
The format is called “Combined Di” and gives you two columns of data next
to each line. The first column shows you if that line is dierent (added or re-
moved) between the “ours” branch and the file in your working directory and
the second column does the same between the “theirs” branch and your work-
ing directory copy.
So in that example you can see that the <<<<<<< and >>>>>>> lines are in
the working copy but were not in either side of the merge. This makes sense
because the merge tool stuck them in there for our context, but we’re expected
to remove them.
If we resolve the conflict and run git diff again, we’ll see the same thing,
but it’s a little more useful.
$ vim hello.rb
$ git diff
Advanced Merging
325

diff --cc hello.rb
index 0399cd5,59727f0..0000000
--- a/hello.rb
+++ b/hello.rb
@@@ -1,7 -1,7 +1,7 @@@
#! /usr/bin/env ruby
def hello
- puts 'hola world'
- puts 'hello mundo'
++ puts 'hola mundo'
end
hello()
This shows us that “hola world” was in our side but not in the working copy,
that “hello mundo” was in their side but not in the working copy and finally
that “hola mundo” was not in either side but is now in the working copy. This
can be useful to review before committing the resolution.
You can also get this from the git log for any merge aer the fact to see
how something was resolved aer the fact. Git will output this format if you run
git show on a merge commit, or if you add a --cc option to a git log -p
(which by default only shows patches for non-merge commits).
$ git log --cc -p -1
commit 14f41939956d80b9e17bb8721354c33f8d5b5a79
Merge: f1270f7 e3eb223
Author: Scott Chacon <schacon@gmail.com>
Date: Fri Sep 19 18:14:49 2014 +0200
Merge branch 'mundo'
Conflicts:
hello.rb
diff --cc hello.rb
index 0399cd5,59727f0..e1d0799
--- a/hello.rb
+++ b/hello.rb
@@@ -1,7 -1,7 +1,7 @@@
#! /usr/bin/env ruby
def hello
- puts 'hola world'
- puts 'hello mundo'
++ puts 'hola mundo'
end
CHAPTER 7: Git Tools
326
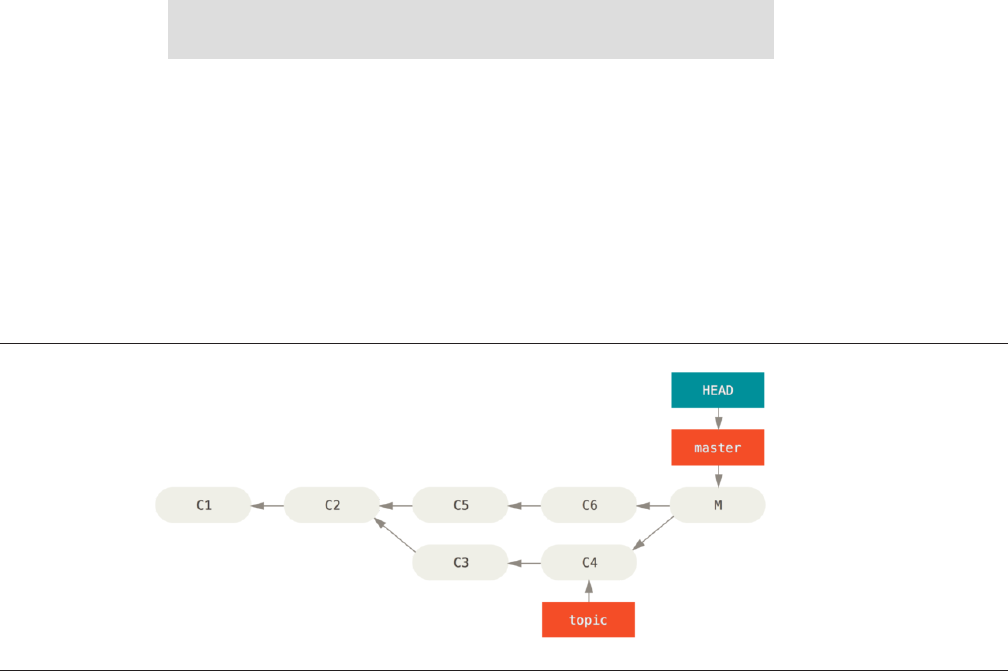
FIGURE 7-20
Accidental merge
commit
hello()
Undoing Merges
Now that you know how to create a merge commit, you’ll probably make some
by mistake. One of the great things about working with Git is that it’s okay to
make mistakes, because it’s possible (and in many cases easy) to fix them.
Merge commits are no dierent. Let’s say you started work on a topic
branch, accidentally merged it into master, and now your commit history looks
like this:
There are two ways to approach this problem, depending on what your de-
sired outcome is.
FIX THE REFERENCES
If the unwanted merge commit only exists on your local repository, the easiest
and best solution is to move the branches so that they point where you want
them to. In most cases, if you follow the errant git merge with git reset --
hard HEAD~, this will reset the branch pointers so they look like this:
Advanced Merging
327
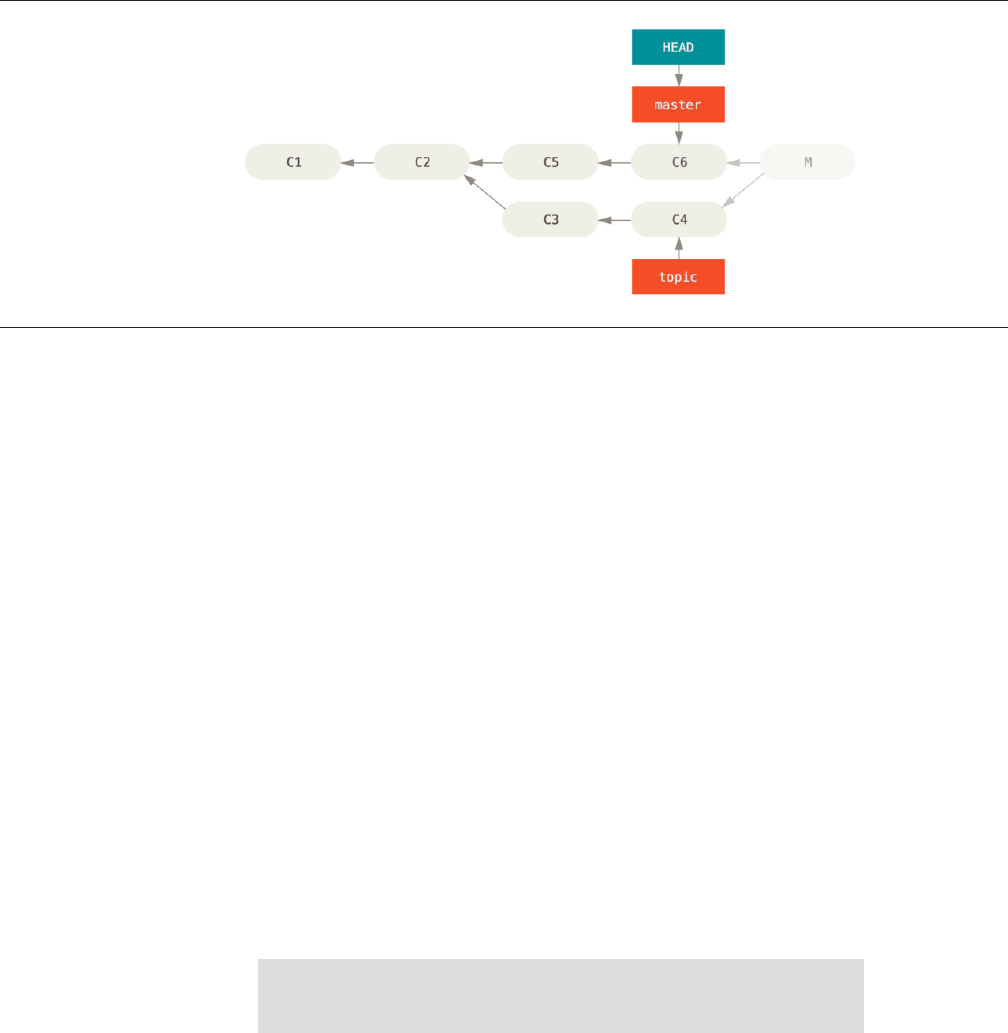
FIGURE 7-21
History after git
reset --hard
HEAD~
We covered reset back in “Reset Demystified”, so it shouldn’t be too hard
to figure out what’s going on here. Here’s a quick refresher: reset --hard usu-
ally goes through three steps:
1. Move the branch HEAD points to. In this case, we want to move master to
where it was before the merge commit (C6).
2. Make the index look like HEAD.
3. Make the working directory look like the index.
The downside of this approach is that it’s rewriting history, which can be
problematic with a shared repository. Check out “Los Peligros de Reorgani-
zar” for more on what can happen; the short version is that if other people
have the commits you’re rewriting, you should probably avoid reset. This ap-
proach also won’t work if any other commits have been created since the
merge; moving the refs would eectively lose those changes.
REVERSE THE COMMIT
If moving the branch pointers around isn’t going to work for you, Git gives you
the option of making a new commit which undoes all the changes from an ex-
isting one. Git calls this operation a “revert”, and in this particular scenario,
you’d invoke it like this:
$ git revert -m 1 HEAD
[master b1d8379] Revert "Merge branch 'topic'"
CHAPTER 7: Git Tools
328
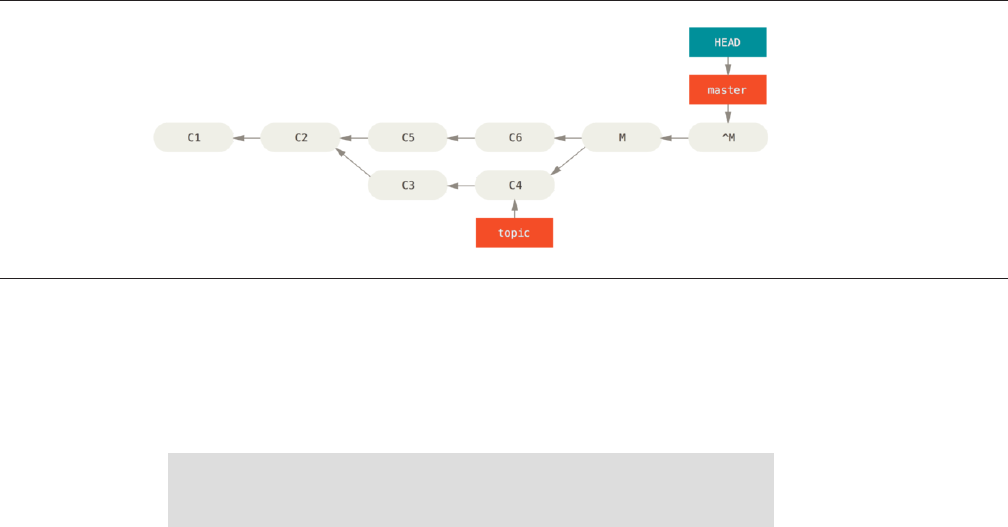
FIGURE 7-22
History after git
revert -m 1
The -m 1 flag indicates which parent is the “mainline” and should be kept.
When you invoke a merge into HEAD (git merge topic), the new commit has
two parents: the first one is HEAD (C6), and the second is the tip of the branch
being merged in (C4). In this case, we want to undo all the changes introduced
by merging in parent #2 (C4), while keeping all the content from parent #1 (C6).
The history with the revert commit looks like this:
The new commit ^M has exactly the same contents as C6, so starting from
here it’s as if the merge never happened, except that the now-unmerged com-
mits are still in HEAD’s history. Git will get confused if you try to merge topic
into master again:
$ git merge topic
Already up-to-date.
There’s nothing in topic that isn’t already reachable from master. What’s
worse, if you add work to topic and merge again, Git will only bring in the
changes since the reverted merge:
Advanced Merging
329

FIGURE 7-23
History with a bad
merge
FIGURE 7-24
History after re-
merging a reverted
merge
The best way around this is to un-revert the original merge, since now you
want to bring in the changes that were reverted out, then create a new merge
commit:
$ git revert ^M
[master 09f0126] Revert "Revert "Merge branch 'topic'""
$ git merge topic
In this example, M and ^M cancel out. ^^M eectively merges in the changes
from C3 and C4, and C8 merges in the changes from C7, so now topic is fully
merged.
Other Types of Merges
So far we’ve covered the normal merge of two branches, normally handled with
what is called the “recursive” strategy of merging. There are other ways to
merge branches together however. Let’s cover a few of them quickly.
CHAPTER 7: Git Tools
330

OUR OR THEIRS PREFERENCE
First of all, there is another useful thing we can do with the normal “recursive”
mode of merging. We’ve already seen the ignore-all-space and ignore-
space-change options which are passed with a -X but we can also tell Git to
favor one side or the other when it sees a conflict.
By default, when Git sees a conflict between two branches being merged, it
will add merge conflict markers into your code and mark the file as conflicted
and let you resolve it. If you would prefer for Git to simply choose a specific side
and ignore the other side instead of letting you manually merge the conflict,
you can pass the merge command either a -Xours or -Xtheirs.
If Git sees this, it will not add conflict markers. Any dierences that are
mergeable, it will merge. Any dierences that conflict, it will simply choose the
side you specify in whole, including binary files.
If we go back to the “hello world” example we were using before, we can see
that merging in our branch causes conflicts.
$ git merge mundo
Auto-merging hello.rb
CONFLICT (content): Merge conflict in hello.rb
Resolved 'hello.rb' using previous resolution.
Automatic merge failed; fix conflicts and then commit the result.
However if we run it with -Xours or -Xtheirs it does not.
$ git merge -Xours mundo
Auto-merging hello.rb
Merge made by the 'recursive' strategy.
hello.rb | 2 +-
test.sh | 2 ++
2 files changed, 3 insertions(+), 1 deletion(-)
create mode 100644 test.sh
In that case, instead of getting conflict markers in the file with “hello mun-
do” on one side and “hola world” on the other, it will simply pick “hola world”.
However, all the other non-conflicting changes on that branch are merged suc-
cessfully in.
This option can also be passed to the git merge-file command we saw
earlier by running something like git merge-file --ours for individual file
merges.
Advanced Merging
331

If you want to do something like this but not have Git even try to merge
changes from the other side in, there is a more draconian option, which is the
“ours” merge strategy. This is dierent from the “ours” recursive merge option.
This will basically do a fake merge. It will record a new merge commit with
both branches as parents, but it will not even look at the branch you’re merging
in. It will simply record as the result of the merge the exact code in your current
branch.
$ git merge -s ours mundo
Merge made by the 'ours' strategy.
$ git diff HEAD HEAD~
$
You can see that there is no dierence between the branch we were on and
the result of the merge.
This can oen be useful to basically trick Git into thinking that a branch is
already merged when doing a merge later on. For example, say you branched
o a “release” branch and have done some work on it that you will want to
merge back into your “master” branch at some point. In the meantime some
bugfix on “master” needs to be backported into your release branch. You can
merge the bugfix branch into the release branch and also merge -s ours
the same branch into your master branch (even though the fix is already there)
so when you later merge the release branch again, there are no conflicts from
the bugfix.
SUBTREE MERGING
The idea of the subtree merge is that you have two projects, and one of the
projects maps to a subdirectory of the other one and vice versa. When you
specify a subtree merge, Git is oen smart enough to figure out that one is a
subtree of the other and merge appropriately.
We’ll go through an example of adding a separate project into an existing
project and then merging the code of the second into a subdirectory of the first.
First, we’ll add the Rack application to our project. We’ll add the Rack
project as a remote reference in our own project and then check it out into its
own branch:
$ git remote add rack_remote https://github.com/rack/rack
$ git fetch rack_remote
warning: no common commits
remote: Counting objects: 3184, done.
remote: Compressing objects: 100% (1465/1465), done.
CHAPTER 7: Git Tools
332

remote: Total 3184 (delta 1952), reused 2770 (delta 1675)
Receiving objects: 100% (3184/3184), 677.42 KiB | 4 KiB/s, done.
Resolving deltas: 100% (1952/1952), done.
From https://github.com/rack/rack
* [new branch] build -> rack_remote/build
* [new branch] master -> rack_remote/master
* [new branch] rack-0.4 -> rack_remote/rack-0.4
* [new branch] rack-0.9 -> rack_remote/rack-0.9
$ git checkout -b rack_branch rack_remote/master
Branch rack_branch set up to track remote branch refs/remotes/rack_remote/master.
Switched to a new branch "rack_branch"
Now we have the root of the Rack project in our rack_branch branch and
our own project in the master branch. If you check out one and then the other,
you can see that they have dierent project roots:
$ ls
AUTHORS KNOWN-ISSUES Rakefile contrib lib
COPYING README bin example test
$ git checkout master
Switched to branch "master"
$ ls
README
This is sort of a strange concept. Not all the branches in your repository ac-
tually have to be branches of the same project. It’s not common, because it’s
rarely helpful, but it’s fairly easy to have branches contain completely dierent
histories.
In this case, we want to pull the Rack project into our master project as a
subdirectory. We can do that in Git with git read-tree. You’ll learn more
about read-tree and its friends in Chapter 10, but for now know that it reads
the root tree of one branch into your current staging area and working directo-
ry. We just switched back to your master branch, and we pull the rack_branch
branch into the rack subdirectory of our master branch of our main project:
$ git read-tree --prefix=rack/ -u rack_branch
When we commit, it looks like we have all the Rack files under that subdirec-
tory – as though we copied them in from a tarball. What gets interesting is that
we can fairly easily merge changes from one of the branches to the other. So, if
the Rack project updates, we can pull in upstream changes by switching to that
branch and pulling:
Advanced Merging
333

$ git checkout rack_branch
$ git pull
Then, we can merge those changes back into our master branch. To pull in
the changes and prepopulate the commit message, use the --squash and --
no-commit options, as well as the recursive merge strategy’s -Xsubtree op-
tion. (The recursive strategy is the default here, but we include it for clarity.)
$ git checkout master
$ git merge --squash -s recursive -Xsubtree=rack --no-commit rack_branch
Squash commit -- not updating HEAD
Automatic merge went well; stopped before committing as requested
All the changes from the Rack project are merged in and ready to be commit-
ted locally. You can also do the opposite – make changes in the rack subdirec-
tory of your master branch and then merge them into your rack_branch
branch later to submit them to the maintainers or push them upstream.
This gives us a way to have a workflow somewhat similar to the submodule
workflow without using submodules (which we will cover in “Submodules”).
We can keep branches with other related projects in our repository and subtree
merge them into our project occasionally. It is nice in some ways, for example
all the code is committed to a single place. However, it has other drawbacks in
that it’s a bit more complex and easier to make mistakes in reintegrating
changes or accidentally pushing a branch into an unrelated repository.
Another slightly weird thing is that to get a di between what you have in
your rack subdirectory and the code in your rack_branch branch – to see if
you need to merge them – you can’t use the normal diff command. Instead,
you must run git diff-tree with the branch you want to compare to:
$ git diff-tree -p rack_branch
Or, to compare what is in your rack subdirectory with what the master
branch on the server was the last time you fetched, you can run
$ git diff-tree -p rack_remote/master
CHAPTER 7: Git Tools
334

Rerere
The git rerere functionality is a bit of a hidden feature. The name stands for
“reuse recorded resolution” and as the name implies, it allows you to ask Git to
remember how you’ve resolved a hunk conflict so that the next time it sees the
same conflict, Git can automatically resolve it for you.
There are a number of scenarios in which this functionality might be really
handy. One of the examples that is mentioned in the documentation is if you
want to make sure a long lived topic branch will merge cleanly but don’t want
to have a bunch of intermediate merge commits. With rerere turned on you
can merge occasionally, resolve the conflicts, then back out the merge. If you
do this continuously, then the final merge should be easy because rerere can
just do everything for you automatically.
This same tactic can be used if you want to keep a branch rebased so you
don’t have to deal with the same rebasing conflicts each time you do it. Or if
you want to take a branch that you merged and fixed a bunch of conflicts and
then decide to rebase it instead - you likely won’t have to do all the same con-
flicts again.
Another situation is where you merge a bunch of evolving topic branches to-
gether into a testable head occasionally, as the Git project itself oen does. If
the tests fail, you can rewind the merges and re-do them without the topic
branch that made the tests fail without having to re-resolve the conflicts again.
To enable the rerere functionality, you simply have to run this config set-
ting:
$ git config --global rerere.enabled true
You can also turn it on by creating the .git/rr-cache directory in a specific
repository, but the config setting is clearer and it can be done globally.
Now let’s see a simple example, similar to our previous one. Let’s say we
have a file that looks like this:
#! /usr/bin/env ruby
def hello
puts 'hello world'
end
In one branch we change the word “hello” to “hola”, then in another branch
we change the “world” to “mundo”, just like before.
Rerere
335

FIGURE 7-25
When we merge the two branches together, we’ll get a merge conflict:
$ git merge i18n-world
Auto-merging hello.rb
CONFLICT (content): Merge conflict in hello.rb
Recorded preimage for 'hello.rb'
Automatic merge failed; fix conflicts and then commit the result.
You should notice the new line Recorded preimage for FILE in there.
Otherwise it should look exactly like a normal merge conflict. At this point, re-
rere can tell us a few things. Normally, you might run git status at this point
to see what all conflicted:
$ git status
# On branch master
# Unmerged paths:
# (use "git reset HEAD <file>..." to unstage)
# (use "git add <file>..." to mark resolution)
#
# both modified: hello.rb
#
However, git rerere will also tell you what it has recorded the pre-merge
state for with git rerere status:
CHAPTER 7: Git Tools
336

$ git rerere status
hello.rb
And git rerere diff will show the current state of the resolution - what
you started with to resolve and what you’ve resolved it to.
$ git rerere diff
--- a/hello.rb
+++ b/hello.rb
@@ -1,11 +1,11 @@
#! /usr/bin/env ruby
def hello
-<<<<<<<
- puts 'hello mundo'
-=======
+<<<<<<< HEAD
puts 'hola world'
->>>>>>>
+=======
+ puts 'hello mundo'
+>>>>>>> i18n-world
end
Also (and this isn’t really related to rerere), you can use ls-files -u to
see the conflicted files and the before, le and right versions:
$ git ls-files -u
100644 39804c942a9c1f2c03dc7c5ebcd7f3e3a6b97519 1 hello.rb
100644 a440db6e8d1fd76ad438a49025a9ad9ce746f581 2 hello.rb
100644 54336ba847c3758ab604876419607e9443848474 3 hello.rb
Now you can resolve it to just be puts 'hola mundo' and you can run the
rerere diff command again to see what rerere will remember:
$ git rerere diff
--- a/hello.rb
+++ b/hello.rb
@@ -1,11 +1,7 @@
#! /usr/bin/env ruby
def hello
-<<<<<<<
Rerere
337

FIGURE 7-26
- puts 'hello mundo'
-=======
- puts 'hola world'
->>>>>>>
+ puts 'hola mundo'
end
So that basically says, when Git sees a hunk conflict in a hello.rb file that
has “hello mundo” on one side and “hola world” on the other, it will resolve it
to “hola mundo”.
Now we can mark it as resolved and commit it:
$ git add hello.rb
$ git commit
Recorded resolution for 'hello.rb'.
[master 68e16e5] Merge branch 'i18n'
You can see that it “Recorded resolution for FILE”.
Now, let’s undo that merge and then rebase it on top of our master branch
instead. We can move our branch back by using reset as we saw in “Reset De-
mystified”.
CHAPTER 7: Git Tools
338

$ git reset --hard HEAD^
HEAD is now at ad63f15 i18n the hello
Our merge is undone. Now let’s rebase the topic branch.
$ git checkout i18n-world
Switched to branch 'i18n-world'
$ git rebase master
First, rewinding head to replay your work on top of it...
Applying: i18n one word
Using index info to reconstruct a base tree...
Falling back to patching base and 3-way merge...
Auto-merging hello.rb
CONFLICT (content): Merge conflict in hello.rb
Resolved 'hello.rb' using previous resolution.
Failed to merge in the changes.
Patch failed at 0001 i18n one word
Now, we got the same merge conflict like we expected, but take a look at the
Resolved FILE using previous resolution line. If we look at the file,
we’ll see that it’s already been resolved, there are no merge conflict markers in
it.
$ cat hello.rb
#! /usr/bin/env ruby
def hello
puts 'hola mundo'
end
Also, git diff will show you how it was automatically re-resolved:
$ git diff
diff --cc hello.rb
index a440db6,54336ba..0000000
--- a/hello.rb
+++ b/hello.rb
@@@ -1,7 -1,7 +1,7 @@@
#! /usr/bin/env ruby
def hello
- puts 'hola world'
Rerere
339
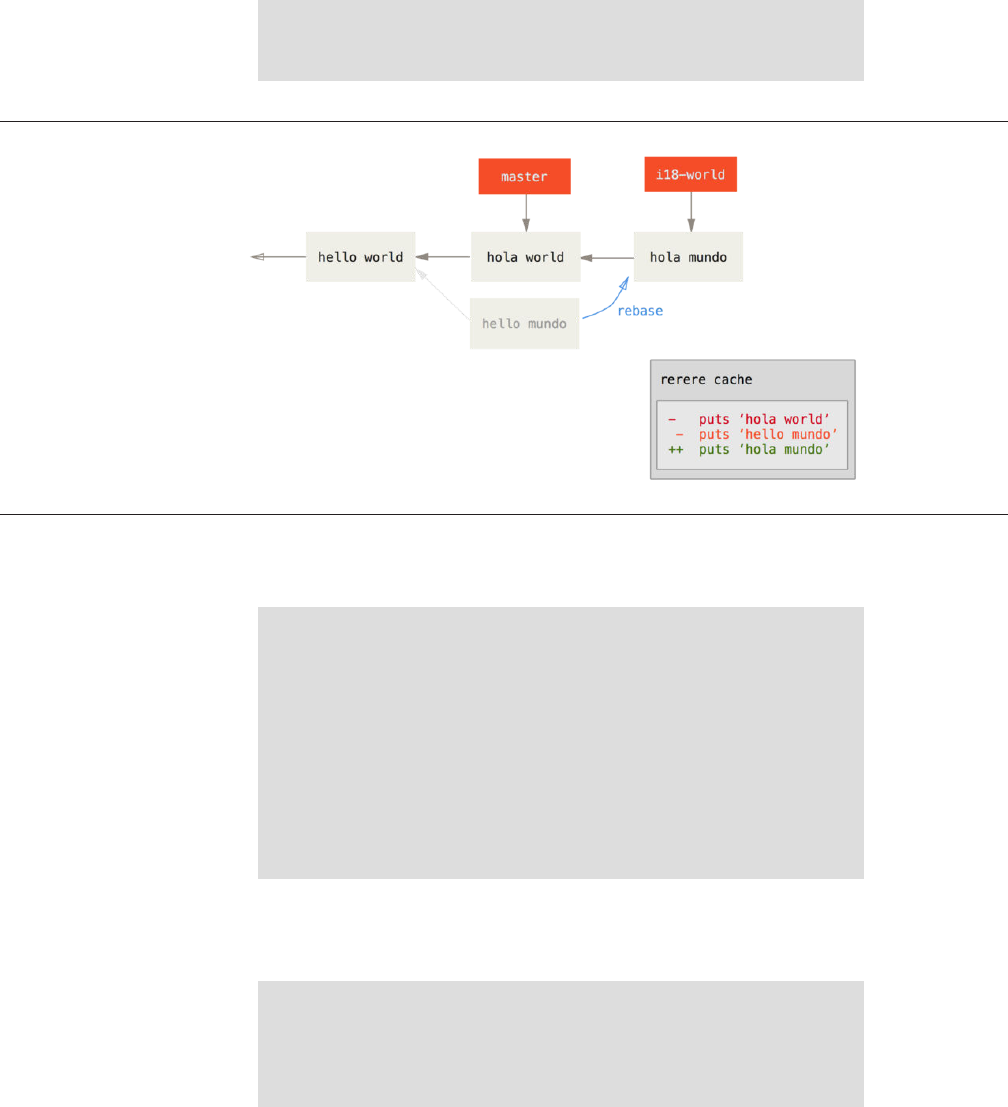
FIGURE 7-27
- puts 'hello mundo'
++ puts 'hola mundo'
end
You can also recreate the conflicted file state with the checkout command:
$ git checkout --conflict=merge hello.rb
$ cat hello.rb
#! /usr/bin/env ruby
def hello
<<<<<<< ours
puts 'hola world'
=======
puts 'hello mundo'
>>>>>>> theirs
end
We saw an example of this in “Advanced Merging”. For now though, let’s re-
resolve it by just running rerere again:
$ git rerere
Resolved 'hello.rb' using previous resolution.
$ cat hello.rb
#! /usr/bin/env ruby
CHAPTER 7: Git Tools
340

def hello
puts 'hola mundo'
end
We have re-resolved the file automatically using the rerere cached resolu-
tion. You can now add and continue the rebase to complete it.
$ git add hello.rb
$ git rebase --continue
Applying: i18n one word
So, if you do a lot of re-merges, or want to keep a topic branch up to date
with your master branch without a ton of merges, or you rebase oen, you can
turn on rerere to help your life out a bit.
Debugging with Git
Git also provides a couple of tools to help you debug issues in your projects.
Because Git is designed to work with nearly any type of project, these tools are
pretty generic, but they can oen help you hunt for a bug or culprit when things
go wrong.
File Annotation
If you track down a bug in your code and want to know when it was introduced
and why, file annotation is oen your best tool. It shows you what commit was
the last to modify each line of any file. So, if you see that a method in your code
is buggy, you can annotate the file with git blame to see when each line of the
method was last edited and by whom. This example uses the -L option to limit
the output to lines 12 through 22:
$ git blame -L 12,22 simplegit.rb
^4832fe2 (Scott Chacon 2008-03-15 10:31:28 -0700 12) def show(tree = 'master')
^4832fe2 (Scott Chacon 2008-03-15 10:31:28 -0700 13) command("git show #{tree}")
^4832fe2 (Scott Chacon 2008-03-15 10:31:28 -0700 14) end
^4832fe2 (Scott Chacon 2008-03-15 10:31:28 -0700 15)
9f6560e4 (Scott Chacon 2008-03-17 21:52:20 -0700 16) def log(tree = 'master')
79eaf55d (Scott Chacon 2008-04-06 10:15:08 -0700 17) command("git log #{tree}")
9f6560e4 (Scott Chacon 2008-03-17 21:52:20 -0700 18) end
9f6560e4 (Scott Chacon 2008-03-17 21:52:20 -0700 19)
42cf2861 (Magnus Chacon 2008-04-13 10:45:01 -0700 20) def blame(path)
Debugging with Git
341

42cf2861 (Magnus Chacon 2008-04-13 10:45:01 -0700 21) command("git blame #{path}")
42cf2861 (Magnus Chacon 2008-04-13 10:45:01 -0700 22) end
Notice that the first field is the partial SHA-1 of the commit that last modi-
fied that line. The next two fields are values extracted from that commit–the au-
thor name and the authored date of that commit – so you can easily see who
modified that line and when. Aer that come the line number and the content
of the file. Also note the ^4832fe2 commit lines, which designate that those
lines were in this file’s original commit. That commit is when this file was first
added to this project, and those lines have been unchanged since. This is a tad
confusing, because now you’ve seen at least three dierent ways that Git uses
the ^ to modify a commit SHA-1, but that is what it means here.
Another cool thing about Git is that it doesn’t track file renames explicitly. It
records the snapshots and then tries to figure out what was renamed implicitly,
aer the fact. One of the interesting features of this is that you can ask it to fig-
ure out all sorts of code movement as well. If you pass -C to git blame, Git
analyzes the file you’re annotating and tries to figure out where snippets of
code within it originally came from if they were copied from elsewhere. For ex-
ample, say you are refactoring a file named GITServerHandler.m into multi-
ple files, one of which is GITPackUpload.m. By blaming GITPackUpload.m
with the -C option, you can see where sections of the code originally came
from:
$ git blame -C -L 141,153 GITPackUpload.m
f344f58d GITServerHandler.m (Scott 2009-01-04 141)
f344f58d GITServerHandler.m (Scott 2009-01-04 142) - (void) gatherObjectShasFromC
f344f58d GITServerHandler.m (Scott 2009-01-04 143) {
70befddd GITServerHandler.m (Scott 2009-03-22 144) //NSLog(@"GATHER COMMI
ad11ac80 GITPackUpload.m (Scott 2009-03-24 145)
ad11ac80 GITPackUpload.m (Scott 2009-03-24 146) NSString *parentSha;
ad11ac80 GITPackUpload.m (Scott 2009-03-24 147) GITCommit *commit = [g
ad11ac80 GITPackUpload.m (Scott 2009-03-24 148)
ad11ac80 GITPackUpload.m (Scott 2009-03-24 149) //NSLog(@"GATHER COMMI
ad11ac80 GITPackUpload.m (Scott 2009-03-24 150)
56ef2caf GITServerHandler.m (Scott 2009-01-05 151) if(commit) {
56ef2caf GITServerHandler.m (Scott 2009-01-05 152) [refDict setOb
56ef2caf GITServerHandler.m (Scott 2009-01-05 153)
This is really useful. Normally, you get as the original commit the commit
where you copied the code over, because that is the first time you touched
those lines in this file. Git tells you the original commit where you wrote those
lines, even if it was in another file.
CHAPTER 7: Git Tools
342

Binary Search
Annotating a file helps if you know where the issue is to begin with. If you don’t
know what is breaking, and there have been dozens or hundreds of commits
since the last state where you know the code worked, you’ll likely turn to git
bisect for help. The bisect command does a binary search through your
commit history to help you identify as quickly as possible which commit intro-
duced an issue.
Let’s say you just pushed out a release of your code to a production environ-
ment, you’re getting bug reports about something that wasn’t happening in
your development environment, and you can’t imagine why the code is doing
that. You go back to your code, and it turns out you can reproduce the issue,
but you can’t figure out what is going wrong. You can bisect the code to find
out. First you run git bisect start to get things going, and then you use
git bisect bad to tell the system that the current commit you’re on is bro-
ken. Then, you must tell bisect when the last known good state was, using git
bisect good [good_commit]:
$ git bisect start
$ git bisect bad
$ git bisect good v1.0
Bisecting: 6 revisions left to test after this
[ecb6e1bc347ccecc5f9350d878ce677feb13d3b2] error handling on repo
Git figured out that about 12 commits came between the commit you
marked as the last good commit (v1.0) and the current bad version, and it
checked out the middle one for you. At this point, you can run your test to see if
the issue exists as of this commit. If it does, then it was introduced sometime
before this middle commit; if it doesn’t, then the problem was introduced
sometime aer the middle commit. It turns out there is no issue here, and you
tell Git that by typing git bisect good and continue your journey:
$ git bisect good
Bisecting: 3 revisions left to test after this
[b047b02ea83310a70fd603dc8cd7a6cd13d15c04] secure this thing
Now you’re on another commit, halfway between the one you just tested
and your bad commit. You run your test again and find that this commit is bro-
ken, so you tell Git that with git bisect bad:
Debugging with Git
343

$ git bisect bad
Bisecting: 1 revisions left to test after this
[f71ce38690acf49c1f3c9bea38e09d82a5ce6014] drop exceptions table
This commit is fine, and now Git has all the information it needs to deter-
mine where the issue was introduced. It tells you the SHA-1 of the first bad com-
mit and show some of the commit information and which files were modified in
that commit so you can figure out what happened that may have introduced
this bug:
$ git bisect good
b047b02ea83310a70fd603dc8cd7a6cd13d15c04 is first bad commit
commit b047b02ea83310a70fd603dc8cd7a6cd13d15c04
Author: PJ Hyett <pjhyett@example.com>
Date: Tue Jan 27 14:48:32 2009 -0800
secure this thing
:040000 040000 40ee3e7821b895e52c1695092db9bdc4c61d1730
f24d3c6ebcfc639b1a3814550e62d60b8e68a8e4 M config
When you’re finished, you should run git bisect reset to reset your
HEAD to where you were before you started, or you’ll end up in a weird state:
$ git bisect reset
This is a powerful tool that can help you check hundreds of commits for an
introduced bug in minutes. In fact, if you have a script that will exit 0 if the
project is good or non-0 if the project is bad, you can fully automate git bi-
sect. First, you again tell it the scope of the bisect by providing the known bad
and good commits. You can do this by listing them with the bisect start
command if you want, listing the known bad commit first and the known good
commit second:
$ git bisect start HEAD v1.0
$ git bisect run test-error.sh
Doing so automatically runs test-error.sh on each checked-out commit
until Git finds the first broken commit. You can also run something like make or
make tests or whatever you have that runs automated tests for you.
CHAPTER 7: Git Tools
344

Submodules
It oen happens that while working on one project, you need to use another
project from within it. Perhaps it’s a library that a third party developed or that
you’re developing separately and using in multiple parent projects. A common
issue arises in these scenarios: you want to be able to treat the two projects as
separate yet still be able to use one from within the other.
Here’s an example. Suppose you’re developing a web site and creating Atom
feeds. Instead of writing your own Atom-generating code, you decide to use a
library. You’re likely to have to either include this code from a shared library like
a CPAN install or Ruby gem, or copy the source code into your own project tree.
The issue with including the library is that it’s diicult to customize the library
in any way and oen more diicult to deploy it, because you need to make sure
every client has that library available. The issue with vendoring the code into
your own project is that any custom changes you make are diicult to merge
when upstream changes become available.
Git addresses this issue using submodules. Submodules allow you to keep a
Git repository as a subdirectory of another Git repository. This lets you clone
another repository into your project and keep your commits separate.
Starting with Submodules
We’ll walk through developing a simple project that has been split up into a
main project and a few sub-projects.
Let’s start by adding an existing Git repository as a submodule of the reposi-
tory that we’re working on. To add a new submodule you use the git submod-
ule add command with the URL of the project you would like to start tracking.
In this example, we’ll add a library called “DbConnector”.
$ git submodule add https://github.com/chaconinc/DbConnector
Cloning into 'DbConnector'...
remote: Counting objects: 11, done.
remote: Compressing objects: 100% (10/10), done.
remote: Total 11 (delta 0), reused 11 (delta 0)
Unpacking objects: 100% (11/11), done.
Checking connectivity... done.
By default, submodules will add the subproject into a directory named the
same as the repository, in this case “DbConnector”. You can add a dierent path
at the end of the command if you want it to go elsewhere.
If you run git status at this point, you’ll notice a few things.
Submodules
345

$ git status
On branch master
Your branch is up-to-date with 'origin/master'.
Changes to be committed:
(use "git reset HEAD <file>..." to unstage)
new file: .gitmodules
new file: DbConnector
First you should notice the new .gitmodules file. This is a configuration file
that stores the mapping between the project’s URL and the local subdirectory
you’ve pulled it into:
$ cat .gitmodules
[submodule "DbConnector"]
path = DbConnector
url = https://github.com/chaconinc/DbConnector
If you have multiple submodules, you’ll have multiple entries in this file. It’s
important to note that this file is version-controlled with your other files, like
your .gitignore file. It’s pushed and pulled with the rest of your project. This
is how other people who clone this project know where to get the submodule
projects from.
Since the URL in the .gitmodules file is what other people will first try to
clone/fetch from, make sure to use a URL that they can access if possible.
For example, if you use a different URL to push to than others would to
pull from, use the one that others have access to. You can overwrite this
value locally with git config submodule.DbConnector.url PRIVATE_URL for
your own use.
The other listing in the git status output is the project folder entry. If you
run git diff on that, you see something interesting:
$ git diff --cached DbConnector
diff --git a/DbConnector b/DbConnector
new file mode 160000
index 0000000..c3f01dc
--- /dev/null
+++ b/DbConnector
CHAPTER 7: Git Tools
346

@@ -0,0 +1 @@
+Subproject commit c3f01dc8862123d317dd46284b05b6892c7b29bc
Although DbConnector is a subdirectory in your working directory, Git sees
it as a submodule and doesn’t track its contents when you’re not in that direc-
tory. Instead, Git sees it as a particular commit from that repository.
If you want a little nicer di output, you can pass the --submodule option
to git diff.
$ git diff --cached --submodule
diff --git a/.gitmodules b/.gitmodules
new file mode 100644
index 0000000..71fc376
--- /dev/null
+++ b/.gitmodules
@@ -0,0 +1,3 @@
+[submodule "DbConnector"]
+ path = DbConnector
+ url = https://github.com/chaconinc/DbConnector
Submodule DbConnector 0000000...c3f01dc (new submodule)
When you commit, you see something like this:
$ git commit -am 'added DbConnector module'
[master fb9093c] added DbConnector module
2 files changed, 4 insertions(+)
create mode 100644 .gitmodules
create mode 160000 DbConnector
Notice the 160000 mode for the DbConnector entry. That is a special mode
in Git that basically means you’re recording a commit as a directory entry rath-
er than a subdirectory or a file.
Cloning a Project with Submodules
Here we’ll clone a project with a submodule in it. When you clone such a
project, by default you get the directories that contain submodules, but none of
the files within them yet:
$ git clone https://github.com/chaconinc/MainProject
Cloning into 'MainProject'...
remote: Counting objects: 14, done.
Submodules
347

remote: Compressing objects: 100% (13/13), done.
remote: Total 14 (delta 1), reused 13 (delta 0)
Unpacking objects: 100% (14/14), done.
Checking connectivity... done.
$ cd MainProject
$ ls -la
total 16
drwxr-xr-x 9 schacon staff 306 Sep 17 15:21 .
drwxr-xr-x 7 schacon staff 238 Sep 17 15:21 ..
drwxr-xr-x 13 schacon staff 442 Sep 17 15:21 .git
-rw-r--r-- 1 schacon staff 92 Sep 17 15:21 .gitmodules
drwxr-xr-x 2 schacon staff 68 Sep 17 15:21 DbConnector
-rw-r--r-- 1 schacon staff 756 Sep 17 15:21 Makefile
drwxr-xr-x 3 schacon staff 102 Sep 17 15:21 includes
drwxr-xr-x 4 schacon staff 136 Sep 17 15:21 scripts
drwxr-xr-x 4 schacon staff 136 Sep 17 15:21 src
$ cd DbConnector/
$ ls
$
The DbConnector directory is there, but empty. You must run two com-
mands: git submodule init to initialize your local configuration file, and
git submodule update to fetch all the data from that project and check out
the appropriate commit listed in your superproject:
$ git submodule init
Submodule 'DbConnector' (https://github.com/chaconinc/DbConnector) registered for path 'DbConnector'
$ git submodule update
Cloning into 'DbConnector'...
remote: Counting objects: 11, done.
remote: Compressing objects: 100% (10/10), done.
remote: Total 11 (delta 0), reused 11 (delta 0)
Unpacking objects: 100% (11/11), done.
Checking connectivity... done.
Submodule path 'DbConnector': checked out 'c3f01dc8862123d317dd46284b05b6892c7b29bc'
Now your DbConnector subdirectory is at the exact state it was in when you
committed earlier.
There is another way to do this which is a little simpler, however. If you pass
--recursive to the git clone command, it will automatically initialize and
update each submodule in the repository.
$ git clone --recursive https://github.com/chaconinc/MainProject
Cloning into 'MainProject'...
remote: Counting objects: 14, done.
CHAPTER 7: Git Tools
348

remote: Compressing objects: 100% (13/13), done.
remote: Total 14 (delta 1), reused 13 (delta 0)
Unpacking objects: 100% (14/14), done.
Checking connectivity... done.
Submodule 'DbConnector' (https://github.com/chaconinc/DbConnector) registered for path 'DbConnector'
Cloning into 'DbConnector'...
remote: Counting objects: 11, done.
remote: Compressing objects: 100% (10/10), done.
remote: Total 11 (delta 0), reused 11 (delta 0)
Unpacking objects: 100% (11/11), done.
Checking connectivity... done.
Submodule path 'DbConnector': checked out 'c3f01dc8862123d317dd46284b05b6892c7b29bc'
Working on a Project with Submodules
Now we have a copy of a project with submodules in it and will collaborate with
our teammates on both the main project and the submodule project.
PULLING IN UPSTREAM CHANGES
The simplest model of using submodules in a project would be if you were sim-
ply consuming a subproject and wanted to get updates from it from time to
time but were not actually modifying anything in your checkout. Let’s walk
through a simple example there.
If you want to check for new work in a submodule, you can go into the direc-
tory and run git fetch and git merge the upstream branch to update the
local code.
$ git fetch
From https://github.com/chaconinc/DbConnector
c3f01dc..d0354fc master -> origin/master
$ git merge origin/master
Updating c3f01dc..d0354fc
Fast-forward
scripts/connect.sh | 1 +
src/db.c | 1 +
2 files changed, 2 insertions(+)
Now if you go back into the main project and run git diff --submodule
you can see that the submodule was updated and get a list of commits that
were added to it. If you don’t want to type --submodule every time you run
git diff, you can set it as the default format by setting the diff.submodule
config value to “log”.
Submodules
349

$ git config --global diff.submodule log
$ git diff
Submodule DbConnector c3f01dc..d0354fc:
> more efficient db routine
> better connection routine
If you commit at this point then you will lock the submodule into having the
new code when other people update.
There is an easier way to do this as well, if you prefer to not manually fetch
and merge in the subdirectory. If you run git submodule update --remote,
Git will go into your submodules and fetch and update for you.
$ git submodule update --remote DbConnector
remote: Counting objects: 4, done.
remote: Compressing objects: 100% (2/2), done.
remote: Total 4 (delta 2), reused 4 (delta 2)
Unpacking objects: 100% (4/4), done.
From https://github.com/chaconinc/DbConnector
3f19983..d0354fc master -> origin/master
Submodule path 'DbConnector': checked out 'd0354fc054692d3906c85c3af05ddce39a1c0644'
This command will by default assume that you want to update the checkout
to the master branch of the submodule repository. You can, however, set this
to something dierent if you want. For example, if you want to have the DbCon-
nector submodule track that repository’s “stable” branch, you can set it in ei-
ther your .gitmodules file (so everyone else also tracks it), or just in your lo-
cal .git/config file. Let’s set it in the .gitmodules file:
$ git config -f .gitmodules submodule.DbConnector.branch stable
$ git submodule update --remote
remote: Counting objects: 4, done.
remote: Compressing objects: 100% (2/2), done.
remote: Total 4 (delta 2), reused 4 (delta 2)
Unpacking objects: 100% (4/4), done.
From https://github.com/chaconinc/DbConnector
27cf5d3..c87d55d stable -> origin/stable
Submodule path 'DbConnector': checked out 'c87d55d4c6d4b05ee34fbc8cb6f7bf4585ae6687'
If you leave o the -f .gitmodules it will only make the change for you,
but it probably makes more sense to track that information with the repository
so everyone else does as well.
CHAPTER 7: Git Tools
350

When we run git status at this point, Git will show us that we have “new
commits” on the submodule.
$ git status
On branch master
Your branch is up-to-date with 'origin/master'.
Changes not staged for commit:
(use "git add <file>..." to update what will be committed)
(use "git checkout -- <file>..." to discard changes in working directory)
modified: .gitmodules
modified: DbConnector (new commits)
no changes added to commit (use "git add" and/or "git commit -a")
If you set the configuration setting status.submodulesummary, Git will al-
so show you a short summary of changes to your submodules:
$ git config status.submodulesummary 1
$ git status
On branch master
Your branch is up-to-date with 'origin/master'.
Changes not staged for commit:
(use "git add <file>..." to update what will be committed)
(use "git checkout -- <file>..." to discard changes in working directory)
modified: .gitmodules
modified: DbConnector (new commits)
Submodules changed but not updated:
* DbConnector c3f01dc...c87d55d (4):
> catch non-null terminated lines
At this point if you run git diff we can see both that we have modified
our .gitmodules file and also that there are a number of commits that we’ve
pulled down and are ready to commit to our submodule project.
$ git diff
diff --git a/.gitmodules b/.gitmodules
index 6fc0b3d..fd1cc29 100644
Submodules
351

--- a/.gitmodules
+++ b/.gitmodules
@@ -1,3 +1,4 @@
[submodule "DbConnector"]
path = DbConnector
url = https://github.com/chaconinc/DbConnector
+ branch = stable
Submodule DbConnector c3f01dc..c87d55d:
> catch non-null terminated lines
> more robust error handling
> more efficient db routine
> better connection routine
This is pretty cool as we can actually see the log of commits that we’re about
to commit to in our submodule. Once committed, you can see this information
aer the fact as well when you run git log -p.
$ git log -p --submodule
commit 0a24cfc121a8a3c118e0105ae4ae4c00281cf7ae
Author: Scott Chacon <schacon@gmail.com>
Date: Wed Sep 17 16:37:02 2014 +0200
updating DbConnector for bug fixes
diff --git a/.gitmodules b/.gitmodules
index 6fc0b3d..fd1cc29 100644
--- a/.gitmodules
+++ b/.gitmodules
@@ -1,3 +1,4 @@
[submodule "DbConnector"]
path = DbConnector
url = https://github.com/chaconinc/DbConnector
+ branch = stable
Submodule DbConnector c3f01dc..c87d55d:
> catch non-null terminated lines
> more robust error handling
> more efficient db routine
> better connection routine
Git will by default try to update all of your submodules when you run git
submodule update --remote so if you have a lot of them, you may want to
pass the name of just the submodule you want to try to update.
CHAPTER 7: Git Tools
352

WORKING ON A SUBMODULE
It’s quite likely that if you’re using submodules, you’re doing so because you
really want to work on the code in the submodule at the same time as you’re
working on the code in the main project (or across several submodules). Other-
wise you would probably instead be using a simpler dependency management
system (such as Maven or Rubygems).
So now let’s go through an example of making changes to the submodule at
the same time as the main project and committing and publishing those
changes at the same time.
So far, when we’ve run the git submodule update command to fetch
changes from the submodule repositories, Git would get the changes and up-
date the files in the subdirectory but will leave the sub-repository in what’s
called a “detached HEAD” state. This means that there is no local working
branch (like “master”, for example) tracking changes. So any changes you make
aren’t being tracked well.
In order to set up your submodule to be easier to go in and hack on, you
need do two things. You need to go into each submodule and check out a
branch to work on. Then you need to tell Git what to do if you have made
changes and then git submodule update --remote pulls in new work from
upstream. The options are that you can merge them into your local work, or
you can try to rebase your local work on top of the new changes.
First of all, let’s go into our submodule directory and check out a branch.
$ git checkout stable
Switched to branch 'stable'
Let’s try it with the “merge” option. To specify it manually, we can just add
the --merge option to our update call. Here we’ll see that there was a change
on the server for this submodule and it gets merged in.
$ git submodule update --remote --merge
remote: Counting objects: 4, done.
remote: Compressing objects: 100% (2/2), done.
remote: Total 4 (delta 2), reused 4 (delta 2)
Unpacking objects: 100% (4/4), done.
From https://github.com/chaconinc/DbConnector
c87d55d..92c7337 stable -> origin/stable
Updating c87d55d..92c7337
Fast-forward
src/main.c | 1 +
Submodules
353

1 file changed, 1 insertion(+)
Submodule path 'DbConnector': merged in '92c7337b30ef9e0893e758dac2459d07362ab5ea'
If we go into the DbConnector directory, we have the new changes already
merged into our local stable branch. Now let’s see what happens when we
make our own local change to the library and someone else pushes another
change upstream at the same time.
$ cd DbConnector/
$ vim src/db.c
$ git commit -am 'unicode support'
[stable f906e16] unicode support
1 file changed, 1 insertion(+)
Now if we update our submodule we can see what happens when we have
made a local change and upstream also has a change we need to incorporate.
$ git submodule update --remote --rebase
First, rewinding head to replay your work on top of it...
Applying: unicode support
Submodule path 'DbConnector': rebased into '5d60ef9bbebf5a0c1c1050f242ceeb54ad58da94'
If you forget the --rebase or --merge, Git will just update the submodule
to whatever is on the server and reset your project to a detached HEAD state.
$ git submodule update --remote
Submodule path 'DbConnector': checked out '5d60ef9bbebf5a0c1c1050f242ceeb54ad58da94'
If this happens, don’t worry, you can simply go back into the directory and
check out your branch again (which will still contain your work) and merge or
rebase origin/stable (or whatever remote branch you want) manually.
If you haven’t committed your changes in your submodule and you run a
submodule update that would cause issues, Git will fetch the changes but not
overwrite unsaved work in your submodule directory.
$ git submodule update --remote
remote: Counting objects: 4, done.
remote: Compressing objects: 100% (3/3), done.
remote: Total 4 (delta 0), reused 4 (delta 0)
Unpacking objects: 100% (4/4), done.
From https://github.com/chaconinc/DbConnector
CHAPTER 7: Git Tools
354

5d60ef9..c75e92a stable -> origin/stable
error: Your local changes to the following files would be overwritten by checkout:
scripts/setup.sh
Please, commit your changes or stash them before you can switch branches.
Aborting
Unable to checkout 'c75e92a2b3855c9e5b66f915308390d9db204aca' in submodule path 'DbConnector'
If you made changes that conflict with something changed upstream, Git will
let you know when you run the update.
$ git submodule update --remote --merge
Auto-merging scripts/setup.sh
CONFLICT (content): Merge conflict in scripts/setup.sh
Recorded preimage for 'scripts/setup.sh'
Automatic merge failed; fix conflicts and then commit the result.
Unable to merge 'c75e92a2b3855c9e5b66f915308390d9db204aca' in submodule path 'DbConnector'
You can go into the submodule directory and fix the conflict just as you nor-
mally would.
PUBLISHING SUBMODULE CHANGES
Now we have some changes in our submodule directory. Some of these were
brought in from upstream by our updates and others were made locally and
aren’t available to anyone else yet as we haven’t pushed them yet.
$ git diff
Submodule DbConnector c87d55d..82d2ad3:
> Merge from origin/stable
> updated setup script
> unicode support
> remove unnecessary method
> add new option for conn pooling
If we commit in the main project and push it up without pushing the sub-
module changes up as well, other people who try to check out our changes are
going to be in trouble since they will have no way to get the submodule
changes that are depended on. Those changes will only exist on our local copy.
In order to make sure this doesn’t happen, you can ask Git to check that all
your submodules have been pushed properly before pushing the main project.
The git push command takes the --recurse-submodules argument which
can be set to either “check” or “on-demand”. The “check” option will make
Submodules
355

push simply fail if any of the committed submodule changes haven’t been
pushed.
$ git push --recurse-submodules=check
The following submodule paths contain changes that can
not be found on any remote:
DbConnector
Please try
git push --recurse-submodules=on-demand
or cd to the path and use
git push
to push them to a remote.
As you can see, it also gives us some helpful advice on what we might want
to do next. The simple option is to go into each submodule and manually push
to the remotes to make sure they’re externally available and then try this push
again.
The other option is to use the “on-demand” value, which will try to do this
for you.
$ git push --recurse-submodules=on-demand
Pushing submodule 'DbConnector'
Counting objects: 9, done.
Delta compression using up to 8 threads.
Compressing objects: 100% (8/8), done.
Writing objects: 100% (9/9), 917 bytes | 0 bytes/s, done.
Total 9 (delta 3), reused 0 (delta 0)
To https://github.com/chaconinc/DbConnector
c75e92a..82d2ad3 stable -> stable
Counting objects: 2, done.
Delta compression using up to 8 threads.
Compressing objects: 100% (2/2), done.
Writing objects: 100% (2/2), 266 bytes | 0 bytes/s, done.
Total 2 (delta 1), reused 0 (delta 0)
To https://github.com/chaconinc/MainProject
3d6d338..9a377d1 master -> master
As you can see there, Git went into the DbConnector module and pushed it
before pushing the main project. If that submodule push fails for some reason,
the main project push will also fail.
CHAPTER 7: Git Tools
356

MERGING SUBMODULE CHANGES
If you change a submodule reference at the same time as someone else, you
may run into some problems. That is, if the submodule histories have diverged
and are committed to diverging branches in a superproject, it may take a bit of
work for you to fix.
If one of the commits is a direct ancestor of the other (a fast-forward merge),
then Git will simply choose the latter for the merge, so that works fine.
Git will not attempt even a trivial merge for you, however. If the submodule
commits diverge and need to be merged, you will get something that looks like
this:
$ git pull
remote: Counting objects: 2, done.
remote: Compressing objects: 100% (1/1), done.
remote: Total 2 (delta 1), reused 2 (delta 1)
Unpacking objects: 100% (2/2), done.
From https://github.com/chaconinc/MainProject
9a377d1..eb974f8 master -> origin/master
Fetching submodule DbConnector
warning: Failed to merge submodule DbConnector (merge following commits not found)
Auto-merging DbConnector
CONFLICT (submodule): Merge conflict in DbConnector
Automatic merge failed; fix conflicts and then commit the result.
So basically what has happened here is that Git has figured out that the two
branches record points in the submodule’s history that are divergent and need
to be merged. It explains it as “merge following commits not found”, which is
confusing but we’ll explain why that is in a bit.
To solve the problem, you need to figure out what state the submodule
should be in. Strangely, Git doesn’t really give you much information to help
out here, not even the SHA-1s of the commits of both sides of the history. Fortu-
nately, it’s simple to figure out. If you run git diff you can get the SHA-1s of
the commits recorded in both branches you were trying to merge.
$ git diff
diff --cc DbConnector
index eb41d76,c771610..0000000
--- a/DbConnector
+++ b/DbConnector
So, in this case, eb41d76 is the commit in our submodule that we had and
c771610 is the commit that upstream had. If we go into our submodule directo-
Submodules
357

ry, it should already be on eb41d76 as the merge would not have touched it. If
for whatever reason it’s not, you can simply create and checkout a branch
pointing to it.
What is important is the SHA-1 of the commit from the other side. This is
what you’ll have to merge in and resolve. You can either just try the merge with
the SHA-1 directly, or you can create a branch for it and then try to merge that
in. We would suggest the latter, even if only to make a nicer merge commit mes-
sage.
So, we will go into our submodule directory, create a branch based on that
second SHA-1 from git diff and manually merge.
$ cd DbConnector
$ git rev-parse HEAD
eb41d764bccf88be77aced643c13a7fa86714135
$ git branch try-merge c771610
(DbConnector) $ git merge try-merge
Auto-merging src/main.c
CONFLICT (content): Merge conflict in src/main.c
Recorded preimage for 'src/main.c'
Automatic merge failed; fix conflicts and then commit the result.
We got an actual merge conflict here, so if we resolve that and commit it,
then we can simply update the main project with the result.
$ vim src/main.c
$ git add src/main.c
$ git commit -am 'merged our changes'
Recorded resolution for 'src/main.c'.
[master 9fd905e] merged our changes
$ cd ..
$ git diff
diff --cc DbConnector
index eb41d76,c771610..0000000
--- a/DbConnector
+++ b/DbConnector
@@@ -1,1 -1,1 +1,1 @@@
- Subproject commit eb41d764bccf88be77aced643c13a7fa86714135
-Subproject commit c77161012afbbe1f58b5053316ead08f4b7e6d1d
++Subproject commit 9fd905e5d7f45a0d4cbc43d1ee550f16a30e825a
$ git add DbConnector
CHAPTER 7: Git Tools
358

$ git commit -m "Merge Tom's Changes"
[master 10d2c60] Merge Tom's Changes
First we resolve the conflict
Then we go back to the main project directory
We can check the SHA-1s again
Resolve the conflicted submodule entry
Commit our merge
It can be a bit confusing, but it’s really not very hard.
Interestingly, there is another case that Git handles. If a merge commit exists
in the submodule directory that contains both commits in it’s history, Git will
suggest it to you as a possible solution. It sees that at some point in the sub-
module project, someone merged branches containing these two commits, so
maybe you’ll want that one.
This is why the error message from before was “merge following commits
not found”, because it could not do this. It’s confusing because who would ex-
pect it to try to do this?
If it does find a single acceptable merge commit, you’ll see something like
this:
$ git merge origin/master
warning: Failed to merge submodule DbConnector (not fast-forward)
Found a possible merge resolution for the submodule:
9fd905e5d7f45a0d4cbc43d1ee550f16a30e825a: > merged our changes
If this is correct simply add it to the index for example
by using:
git update-index --cacheinfo 160000 9fd905e5d7f45a0d4cbc43d1ee550f16a30e825a "DbConnector"
which will accept this suggestion.
Auto-merging DbConnector
CONFLICT (submodule): Merge conflict in DbConnector
Automatic merge failed; fix conflicts and then commit the result.
What it’s suggesting that you do is to update the index like you had run git
add, which clears the conflict, then commit. You probably shouldn’t do this
though. You can just as easily go into the submodule directory, see what the
dierence is, fast-forward to this commit, test it properly, and then commit it.
Submodules
359

$ cd DbConnector/
$ git merge 9fd905e
Updating eb41d76..9fd905e
Fast-forward
$ cd ..
$ git add DbConnector
$ git commit -am 'Fast forwarded to a common submodule child'
This accomplishes the same thing, but at least this way you can verify that it
works and you have the code in your submodule directory when you’re done.
Submodule Tips
There are a few things you can do to make working with submodules a little
easier.
SUBMODULE FOREACH
There is a foreach submodule command to run some arbitrary command in
each submodule. This can be really helpful if you have a number of submodules
in the same project.
For example, let’s say we want to start a new feature or do a bugfix and we
have work going on in several submodules. We can easily stash all the work in
all our submodules.
$ git submodule foreach 'git stash'
Entering 'CryptoLibrary'
No local changes to save
Entering 'DbConnector'
Saved working directory and index state WIP on stable: 82d2ad3 Merge from origin/stable
HEAD is now at 82d2ad3 Merge from origin/stable
Then we can create a new branch and switch to it in all our submodules.
$ git submodule foreach 'git checkout -b featureA'
Entering 'CryptoLibrary'
Switched to a new branch 'featureA'
Entering 'DbConnector'
Switched to a new branch 'featureA'
CHAPTER 7: Git Tools
360

You get the idea. One really useful thing you can do is produce a nice unified
di of what is changed in your main project and all your subprojects as well.
$ git diff; git submodule foreach 'git diff'
Submodule DbConnector contains modified content
diff --git a/src/main.c b/src/main.c
index 210f1ae..1f0acdc 100644
--- a/src/main.c
+++ b/src/main.c
@@ -245,6 +245,8 @@ static int handle_alias(int *argcp, const char ***argv)
commit_pager_choice();
+ url = url_decode(url_orig);
+
/* build alias_argv */
alias_argv = xmalloc(sizeof(*alias_argv) * (argc + 1));
alias_argv[0] = alias_string + 1;
Entering 'DbConnector'
diff --git a/src/db.c b/src/db.c
index 1aaefb6..5297645 100644
--- a/src/db.c
+++ b/src/db.c
@@ -93,6 +93,11 @@ char *url_decode_mem(const char *url, int len)
return url_decode_internal(&url, len, NULL, &out, 0);
}
+char *url_decode(const char *url)
+{
+ return url_decode_mem(url, strlen(url));
+}
+
char *url_decode_parameter_name(const char **query)
{
struct strbuf out = STRBUF_INIT;
Here we can see that we’re defining a function in a submodule and calling it
in the main project. This is obviously a simplified example, but hopefully it
gives you an idea of how this may be useful.
USEFUL ALIASES
You may want to set up some aliases for some of these commands as they can
be quite long and you can’t set configuration options for most of them to make
them defaults. We covered setting up Git aliases in “Git Aliases”, but here is an
Submodules
361

example of what you may want to set up if you plan on working with submod-
ules in Git a lot.
$ git config alias.sdiff '!'"git diff && git submodule foreach 'git diff'"
$ git config alias.spush 'push --recurse-submodules=on-demand'
$ git config alias.supdate 'submodule update --remote --merge'
This way you can simply run git supdate when you want to update your
submodules, or git spush to push with submodule dependency checking.
Issues with Submodules
Using submodules isn’t without hiccups, however.
For instance switching branches with submodules in them can also be tricky.
If you create a new branch, add a submodule there, and then switch back to a
branch without that submodule, you still have the submodule directory as an
untracked directory:
$ git checkout -b add-crypto
Switched to a new branch 'add-crypto'
$ git submodule add https://github.com/chaconinc/CryptoLibrary
Cloning into 'CryptoLibrary'...
...
$ git commit -am 'adding crypto library'
[add-crypto 4445836] adding crypto library
2 files changed, 4 insertions(+)
create mode 160000 CryptoLibrary
$ git checkout master
warning: unable to rmdir CryptoLibrary: Directory not empty
Switched to branch 'master'
Your branch is up-to-date with 'origin/master'.
$ git status
On branch master
Your branch is up-to-date with 'origin/master'.
Untracked files:
(use "git add <file>..." to include in what will be committed)
CryptoLibrary/
CHAPTER 7: Git Tools
362

nothing added to commit but untracked files present (use "git add" to track)
Removing the directory isn’t diicult, but it can be a bit confusing to have
that in there. If you do remove it and then switch back to the branch that has
that submodule, you will need to run submodule update --init to repopu-
late it.
$ git clean -fdx
Removing CryptoLibrary/
$ git checkout add-crypto
Switched to branch 'add-crypto'
$ ls CryptoLibrary/
$ git submodule update --init
Submodule path 'CryptoLibrary': checked out 'b8dda6aa182ea4464f3f3264b11e0268545172af'
$ ls CryptoLibrary/
Makefile includes scripts src
Again, not really very diicult, but it can be a little confusing.
The other main caveat that many people run into involves switching from
subdirectories to submodules. If you’ve been tracking files in your project and
you want to move them out into a submodule, you must be careful or Git will
get angry at you. Assume that you have files in a subdirectory of your project,
and you want to switch it to a submodule. If you delete the subdirectory and
then run submodule add, Git yells at you:
$ rm -Rf CryptoLibrary/
$ git submodule add https://github.com/chaconinc/CryptoLibrary
'CryptoLibrary' already exists in the index
You have to unstage the CryptoLibrary directory first. Then you can add
the submodule:
$ git rm -r CryptoLibrary
$ git submodule add https://github.com/chaconinc/CryptoLibrary
Cloning into 'CryptoLibrary'...
remote: Counting objects: 11, done.
remote: Compressing objects: 100% (10/10), done.
remote: Total 11 (delta 0), reused 11 (delta 0)
Submodules
363

Unpacking objects: 100% (11/11), done.
Checking connectivity... done.
Now suppose you did that in a branch. If you try to switch back to a branch
where those files are still in the actual tree rather than a submodule – you get
this error:
$ git checkout master
error: The following untracked working tree files would be overwritten by checkout:
CryptoLibrary/Makefile
CryptoLibrary/includes/crypto.h
...
Please move or remove them before you can switch branches.
Aborting
You can force it to switch with checkout -f, but be careful that you don’t
have unsaved changes in there as they could be overwritten with that com-
mand.
$ git checkout -f master
warning: unable to rmdir CryptoLibrary: Directory not empty
Switched to branch 'master'
Then, when you switch back, you get an empty CryptoLibrary directory
for some reason and git submodule update may not fix it either. You may
need to go into your submodule directory and run a git checkout . to get all
your files back. You could run this in a submodule foreach script to run it for
multiple submodules.
It’s important to note that submodules these days keep all their Git data in
the top project’s .git directory, so unlike much older versions of Git, destroy-
ing a submodule directory won’t lose any commits or branches that you had.
With these tools, submodules can be a fairly simple and eective method for
developing on several related but still separate projects simultaneously.
Bundling
Though we’ve covered the common ways to transfer Git data over a network
(HTTP, SSH, etc), there is actually one more way to do so that is not commonly
used but can actually be quite useful.
CHAPTER 7: Git Tools
364

Git is capable of “bundling” it’s data into a single file. This can be useful in
various scenarios. Maybe your network is down and you want to send changes
to your co-workers. Perhaps you’re working somewhere osite and don’t have
access to the local network for security reasons. Maybe your wireless/ethernet
card just broke. Maybe you don’t have access to a shared server for the mo-
ment, you want to email someone updates and you don’t want to transfer 40
commits via format-patch.
This is where the git bundle command can be helpful. The bundle com-
mand will package up everything that would normally be pushed over the wire
with a git push command into a binary file that you can email to someone or
put on a flash drive, then unbundle into another repository.
Let’s see a simple example. Let’s say you have a repository with two com-
mits:
$ git log
commit 9a466c572fe88b195efd356c3f2bbeccdb504102
Author: Scott Chacon <schacon@gmail.com>
Date: Wed Mar 10 07:34:10 2010 -0800
second commit
commit b1ec3248f39900d2a406049d762aa68e9641be25
Author: Scott Chacon <schacon@gmail.com>
Date: Wed Mar 10 07:34:01 2010 -0800
first commit
If you want to send that repository to someone and you don’t have access to
a repository to push to, or simply don’t want to set one up, you can bundle it
with git bundle create.
$ git bundle create repo.bundle HEAD master
Counting objects: 6, done.
Delta compression using up to 2 threads.
Compressing objects: 100% (2/2), done.
Writing objects: 100% (6/6), 441 bytes, done.
Total 6 (delta 0), reused 0 (delta 0)
Now you have a file named repo.bundle that has all the data needed to re-
create the repository’s master branch. With the bundle command you need to
list out every reference or specific range of commits that you want to be includ-
Bundling
365

ed. If you intend for this to be cloned somewhere else, you should add HEAD as
a reference as well as we’ve done here.
You can email this repo.bundle file to someone else, or put it on a USB
drive and walk it over.
On the other side, say you are sent this repo.bundle file and want to work
on the project. You can clone from the binary file into a directory, much like you
would from a URL.
$ git clone repo.bundle repo
Initialized empty Git repository in /private/tmp/bundle/repo/.git/
$ cd repo
$ git log --oneline
9a466c5 second commit
b1ec324 first commit
If you don’t include HEAD in the references, you have to also specify -b
master or whatever branch is included because otherwise it won’t know what
branch to check out.
Now let’s say you do three commits on it and want to send the new commits
back via a bundle on a USB stick or email.
$ git log --oneline
71b84da last commit - second repo
c99cf5b fourth commit - second repo
7011d3d third commit - second repo
9a466c5 second commit
b1ec324 first commit
First we need to determine the range of commits we want to include in the
bundle. Unlike the network protocols which figure out the minimum set of data
to transfer over the network for us, we’ll have to figure this out manually. Now,
you could just do the same thing and bundle the entire repository, which will
work, but it’s better to just bundle up the dierence - just the three commits we
just made locally.
In order to do that, you’ll have to calculate the dierence. As we described in
“Commit Ranges”, you can specify a range of commits in a number of ways. To
get the three commits that we have in our master branch that weren’t in the
branch we originally cloned, we can use something like origin/
master..master or master ^origin/master. You can test that with the log
command.
CHAPTER 7: Git Tools
366

$ git log --oneline master ^origin/master
71b84da last commit - second repo
c99cf5b fourth commit - second repo
7011d3d third commit - second repo
So now that we have the list of commits we want to include in the bundle,
let’s bundle them up. We do that with the git bundle create command, giv-
ing it a filename we want our bundle to be and the range of commits we want to
go into it.
$ git bundle create commits.bundle master ^9a466c5
Counting objects: 11, done.
Delta compression using up to 2 threads.
Compressing objects: 100% (3/3), done.
Writing objects: 100% (9/9), 775 bytes, done.
Total 9 (delta 0), reused 0 (delta 0)
Now we have a commits.bundle file in our directory. If we take that and
send it to our partner, she can then import it into the original repository, even if
more work has been done there in the meantime.
When she gets the bundle, she can inspect it to see what it contains before
she imports it into her repository. The first command is the bundle verify
command that will make sure the file is actually a valid Git bundle and that you
have all the necessary ancestors to reconstitute it properly.
$ git bundle verify ../commits.bundle
The bundle contains 1 ref
71b84daaf49abed142a373b6e5c59a22dc6560dc refs/heads/master
The bundle requires these 1 ref
9a466c572fe88b195efd356c3f2bbeccdb504102 second commit
../commits.bundle is okay
If the bundler had created a bundle of just the last two commits they had
done, rather than all three, the original repository would not be able to import
it, since it is missing requisite history. The verify command would have
looked like this instead:
$ git bundle verify ../commits-bad.bundle
error: Repository lacks these prerequisite commits:
error: 7011d3d8fc200abe0ad561c011c3852a4b7bbe95 third commit - second repo
Bundling
367

However, our first bundle is valid, so we can fetch in commits from it. If you
want to see what branches are in the bundle that can be imported, there is also
a command to just list the heads:
$ git bundle list-heads ../commits.bundle
71b84daaf49abed142a373b6e5c59a22dc6560dc refs/heads/master
The verify sub-command will tell you the heads as well. The point is to see
what can be pulled in, so you can use the fetch or pull commands to import
commits from this bundle. Here we’ll fetch the master branch of the bundle to a
branch named other-master in our repository:
$ git fetch ../commits.bundle master:other-master
From ../commits.bundle
* [new branch] master -> other-master
Now we can see that we have the imported commits on the other-master
branch as well as any commits we’ve done in the meantime in our own master
branch.
$ git log --oneline --decorate --graph --all
* 8255d41 (HEAD, master) third commit - first repo
| * 71b84da (other-master) last commit - second repo
| * c99cf5b fourth commit - second repo
| * 7011d3d third commit - second repo
|/
* 9a466c5 second commit
* b1ec324 first commit
So, git bundle can be really useful for sharing or doing network-type oper-
ations when you don’t have the proper network or shared repository to do so.
Replace
Git’s objects are unchangeable, but it does provide an interesting way to pre-
tend to replace objects in it’s database with other objects.
The replace command lets you specify an object in Git and say “every time
you see this, pretend it’s this other thing”. This is most commonly useful for re-
placing one commit in your history with another one.
CHAPTER 7: Git Tools
368

For example, let’s say you have a huge code history and want to split your
repository into one short history for new developers and one much longer and
larger history for people interested in data mining. You can gra one history on-
to the other by `replace`ing the earliest commit in the new line with the latest
commit on the older one. This is nice because it means that you don’t actually
have to rewrite every commit in the new history, as you would normally have to
do to join them together (because the parentage eects the SHA-1s).
Let’s try this out. Let’s take an existing repository, split it into two reposito-
ries, one recent and one historical, and then we’ll see how we can recombine
them without modifying the recent repositories SHA-1 values via replace.
We’ll use a simple repository with five simple commits:
$ git log --oneline
ef989d8 fifth commit
c6e1e95 fourth commit
9c68fdc third commit
945704c second commit
c1822cf first commit
We want to break this up into two lines of history. One line goes from com-
mit one to commit four - that will be the historical one. The second line will just
be commits four and five - that will be the recent history.
Replace
369
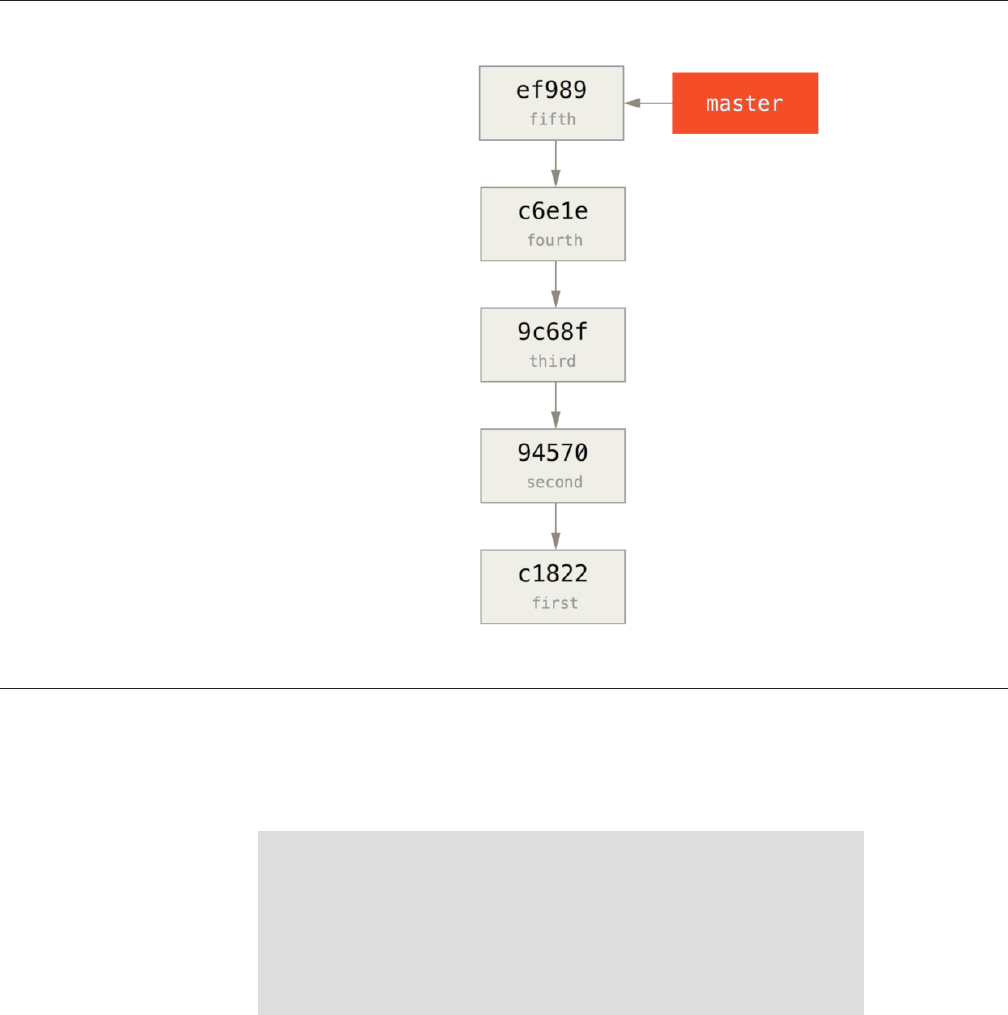
FIGURE 7-28
Well, creating the historical history is easy, we can just put a branch in the
history and then push that branch to the master branch of a new remote repos-
itory.
$ git branch history c6e1e95
$ git log --oneline --decorate
ef989d8 (HEAD, master) fifth commit
c6e1e95 (history) fourth commit
9c68fdc third commit
945704c second commit
c1822cf first commit
CHAPTER 7: Git Tools
370
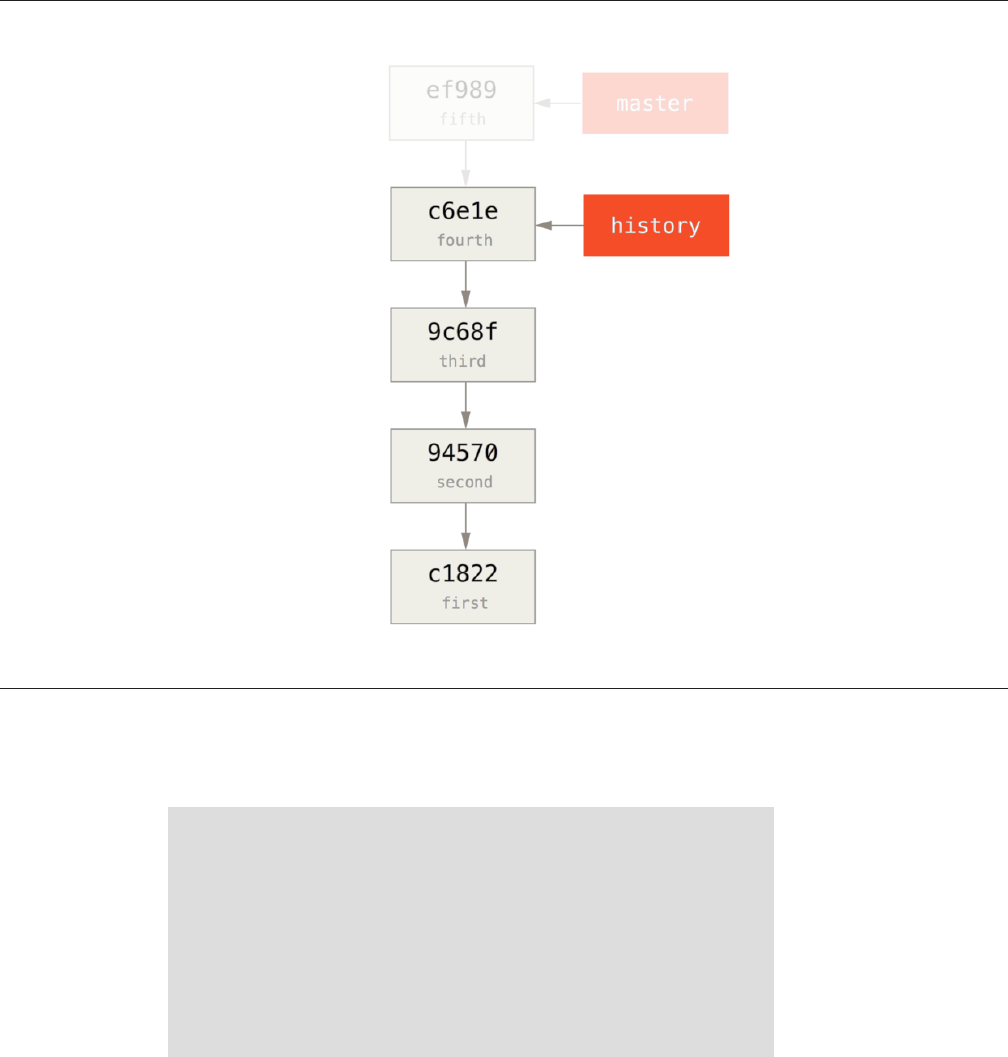
FIGURE 7-29
Now we can push the new history branch to the master branch of our new
repository:
$ git remote add project-history https://github.com/schacon/project-history
$ git push project-history history:master
Counting objects: 12, done.
Delta compression using up to 2 threads.
Compressing objects: 100% (4/4), done.
Writing objects: 100% (12/12), 907 bytes, done.
Total 12 (delta 0), reused 0 (delta 0)
Unpacking objects: 100% (12/12), done.
To git@github.com:schacon/project-history.git
* [new branch] history -> master
Replace
371

OK, so our history is published. Now the harder part is truncating our recent
history down so it’s smaller. We need an overlap so we can replace a commit in
one with an equivalent commit in the other, so we’re going to truncate this to
just commits four and five (so commit four overlaps).
$ git log --oneline --decorate
ef989d8 (HEAD, master) fifth commit
c6e1e95 (history) fourth commit
9c68fdc third commit
945704c second commit
c1822cf first commit
It’s useful in this case to create a base commit that has instructions on how
to expand the history, so other developers know what to do if they hit the first
commit in the truncated history and need more. So, what we’re going to do is
create an initial commit object as our base point with instructions, then rebase
the remaining commits (four and five) on top of it.
To do that, we need to choose a point to split at, which for us is the third
commit, which is 9c68fdc in SHA-speak. So, our base commit will be based o
of that tree. We can create our base commit using the commit-tree command,
which just takes a tree and will give us a brand new, parentless commit object
SHA-1 back.
$ echo 'get history from blah blah blah' | git commit-tree 9c68fdc^{tree}
622e88e9cbfbacfb75b5279245b9fb38dfea10cf
The commit-tree command is one of a set of commands that are com-
monly referred to as plumbing commands. These are commands that are
not generally meant to be used directly, but instead are used by other Git
commands to do smaller jobs. On occasions when we’re doing weirder
things like this, they allow us to do really low-level things but are not
meant for daily use. You can read more about plumbing commands in
“Plumbing and Porcelain”
CHAPTER 7: Git Tools
372
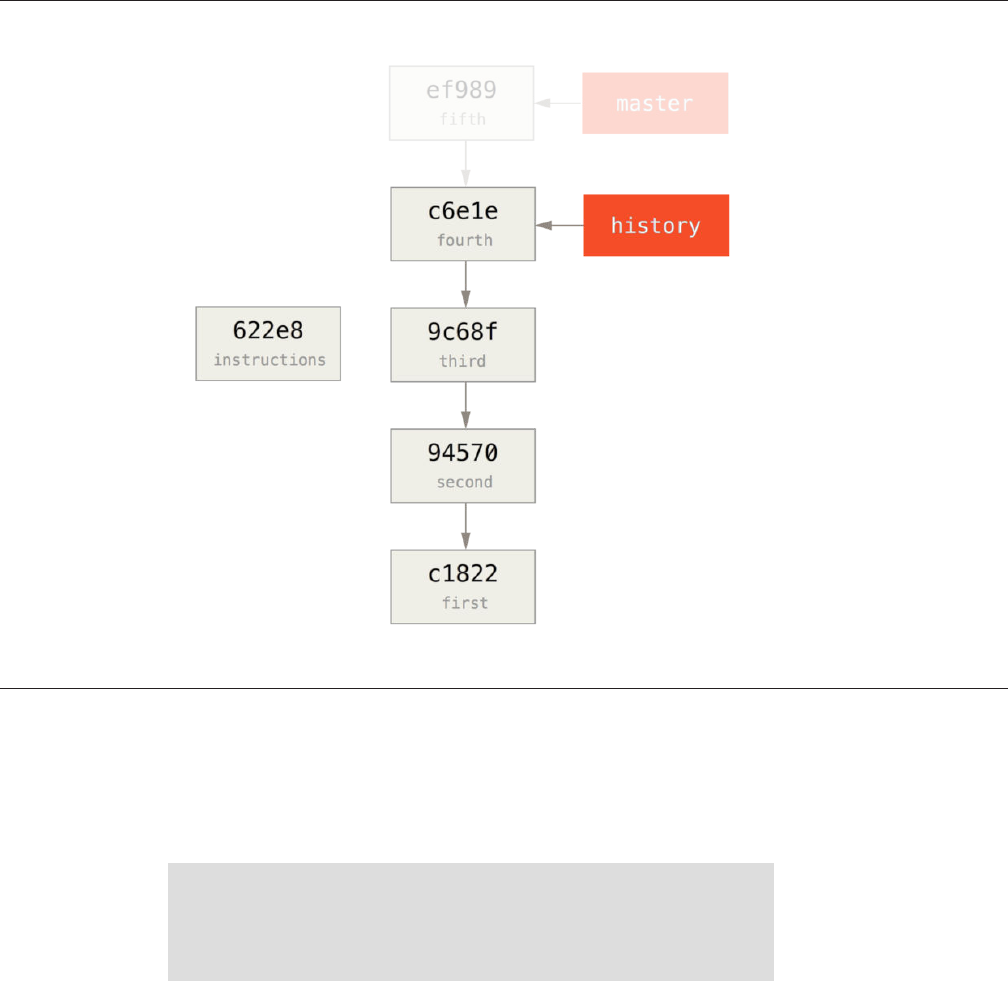
FIGURE 7-30
OK, so now that we have a base commit, we can rebase the rest of our histo-
ry on top of that with git rebase --onto. The --onto argument will be the
SHA-1 we just got back from commit-tree and the rebase point will be the
third commit (the parent of the first commit we want to keep, 9c68fdc):
$ git rebase --onto 622e88 9c68fdc
First, rewinding head to replay your work on top of it...
Applying: fourth commit
Applying: fifth commit
Replace
373
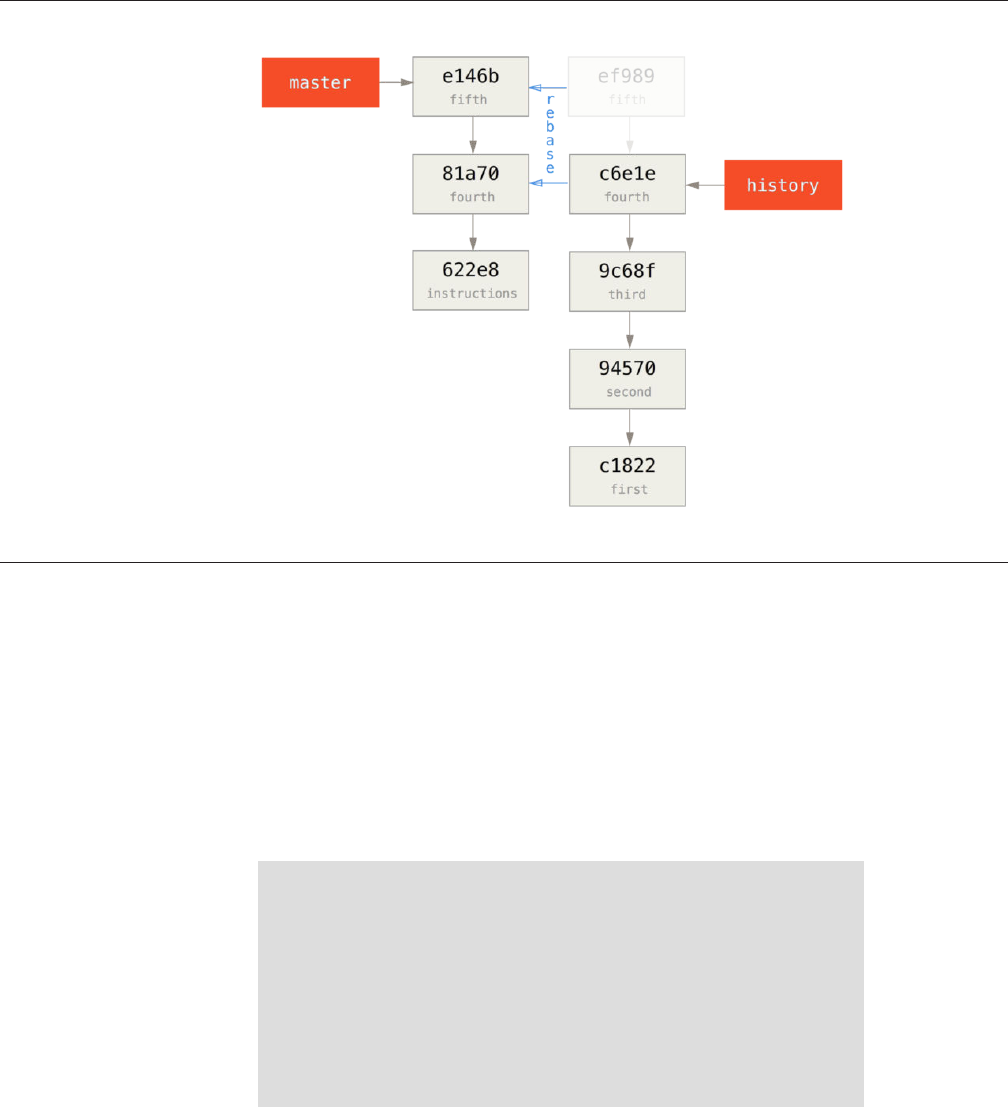
FIGURE 7-31
OK, so now we’ve re-written our recent history on top of a throw away base
commit that now has instructions in it on how to reconstitute the entire history
if we wanted to. We can push that new history to a new project and now when
people clone that repository, they will only see the most recent two commits
and then a base commit with instructions.
Let’s now switch roles to someone cloning the project for the first time who
wants the entire history. To get the history data aer cloning this truncated
repository, one would have to add a second remote for the historical repository
and fetch:
$ git clone https://github.com/schacon/project
$ cd project
$ git log --oneline master
e146b5f fifth commit
81a708d fourth commit
622e88e get history from blah blah blah
$ git remote add project-history https://github.com/schacon/project-history
$ git fetch project-history
CHAPTER 7: Git Tools
374

From https://github.com/schacon/project-history
* [new branch] master -> project-history/master
Now the collaborator would have their recent commits in the master branch
and the historical commits in the project-history/master branch.
$ git log --oneline master
e146b5f fifth commit
81a708d fourth commit
622e88e get history from blah blah blah
$ git log --oneline project-history/master
c6e1e95 fourth commit
9c68fdc third commit
945704c second commit
c1822cf first commit
To combine them, you can simply call git replace with the commit you
want to replace and then the commit you want to replace it with. So we want to
replace the “fourth” commit in the master branch with the “fourth” commit in
the project-history/master branch:
$ git replace 81a708d c6e1e95
Now, if you look at the history of the master branch, it appears to look like
this:
$ git log --oneline master
e146b5f fifth commit
81a708d fourth commit
9c68fdc third commit
945704c second commit
c1822cf first commit
Cool, right? Without having to change all the SHA-1s upstream, we were able
to replace one commit in our history with an entirely dierent commit and all
the normal tools (bisect, blame, etc) will work how we would expect them to.
Replace
375
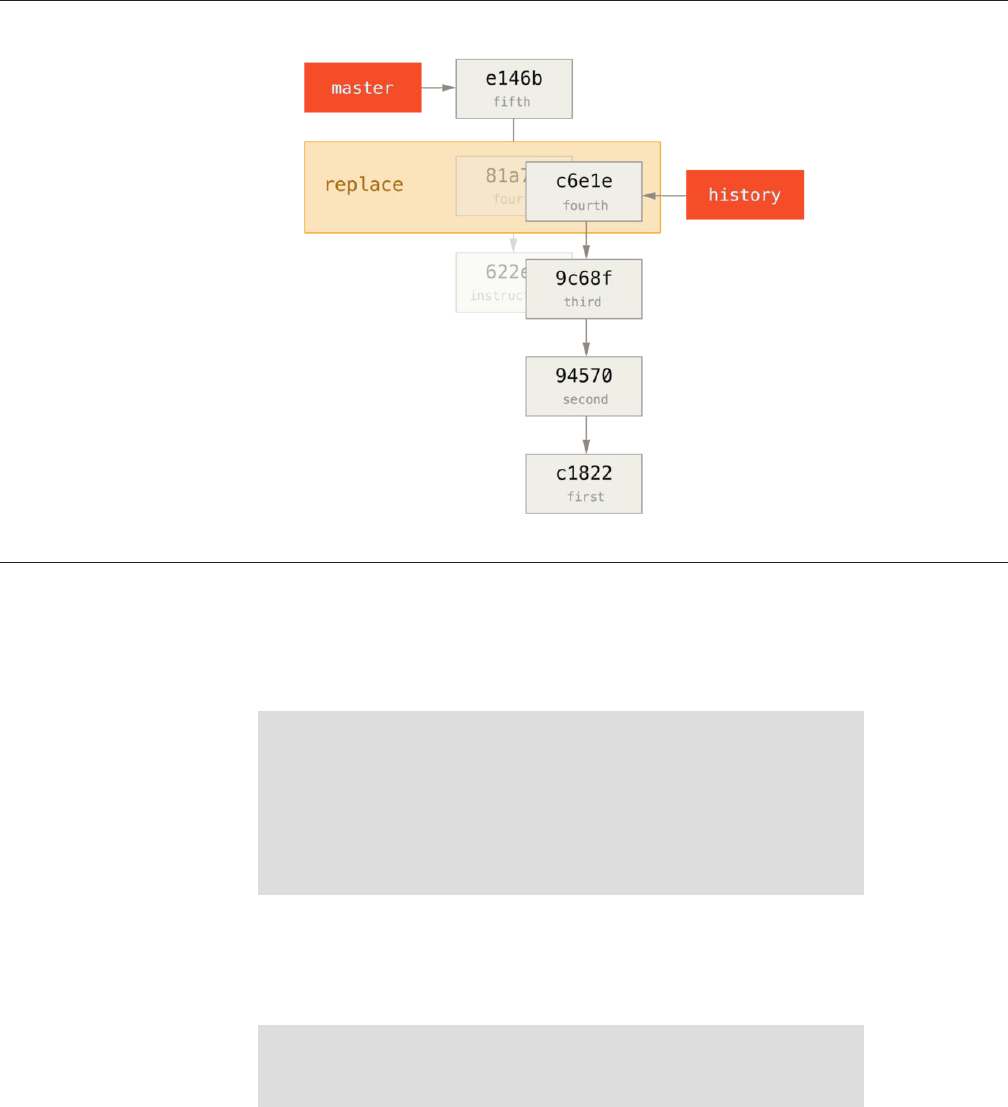
FIGURE 7-32
Interestingly, it still shows 81a708d as the SHA-1, even though it’s actually
using the c6e1e95 commit data that we replaced it with. Even if you run a com-
mand like cat-file, it will show you the replaced data:
$ git cat-file -p 81a708d
tree 7bc544cf438903b65ca9104a1e30345eee6c083d
parent 9c68fdceee073230f19ebb8b5e7fc71b479c0252
author Scott Chacon <schacon@gmail.com> 1268712581 -0700
committer Scott Chacon <schacon@gmail.com> 1268712581 -0700
fourth commit
Remember that the actual parent of 81a708d was our placeholder commit
(622e88e), not 9c68fdce as it states here.
Another interesting thing is that this data is kept in our references:
$ git for-each-ref
e146b5f14e79d4935160c0e83fb9ebe526b8da0d commit refs/heads/master
c6e1e95051d41771a649f3145423f8809d1a74d4 commit refs/remotes/history/master
CHAPTER 7: Git Tools
376

e146b5f14e79d4935160c0e83fb9ebe526b8da0d commit refs/remotes/origin/HEAD
e146b5f14e79d4935160c0e83fb9ebe526b8da0d commit refs/remotes/origin/master
c6e1e95051d41771a649f3145423f8809d1a74d4 commit refs/replace/81a708dd0e167a3f691541c7a6463343bc457040
This means that it’s easy to share our replacement with others, because we
can push this to our server and other people can easily download it. This is not
that helpful in the history graing scenario we’ve gone over here (since every-
one would be downloading both histories anyhow, so why separate them?) but
it can be useful in other circumstances.
Credential Storage
If you use the SSH transport for connecting to remotes, it’s possible for you to
have a key without a passphrase, which allows you to securely transfer data
without typing in your username and password. However, this isn’t possible
with the HTTP protocols – every connection needs a username and password.
This gets even harder for systems with two-factor authentication, where the to-
ken you use for a password is randomly generated and unpronounceable.
Fortunately, Git has a credentials system that can help with this. Git has a
few options provided in the box:
•The default is not to cache at all. Every connection will prompt you for
your username and password.
•The “cache” mode keeps credentials in memory for a certain period of
time. None of the passwords are ever stored on disk, and they are purged
from the cache aer 15 minutes.
•The “store” mode saves the credentials to a plain-text file on disk, and
they never expire. This means that until you change your password for
the Git host, you won’t ever have to type in your credentials again. The
downside of this approach is that your passwords are stored in cleartext
in a plain file in your home directory.
•If you’re using a Mac, Git comes with an “osxkeychain” mode, which ca-
ches credentials in the secure keychain that’s attached to your system ac-
count. This method stores the credentials on disk, and they never expire,
but they’re encrypted with the same system that stores HTTPS certifi-
cates and Safari auto-fills.
•If you’re using Windows, you can install a helper called “winstore.” This is
similar to the “osxkeychain” helper described above, but uses the Win-
dows Credential Store to control sensitive information. It can be found at
https://gitcredentialstore.codeplex.com.
Credential Storage
377

You can choose one of these methods by setting a Git configuration value:
$ git config --global credential.helper cache
Some of these helpers have options. The “store” helper can take a --file
<path> argument, which customizes where the plaintext file is saved (the de-
fault is ~/.git-credentials). The “cache” helper accepts the --timeout
<seconds> option, which changes the amount of time its daemon is kept run-
ning (the default is “900”, or 15 minutes). Here’s an example of how you’d con-
figure the “store” helper with a custom file name:
$ git config --global credential.helper store --file ~/.my-credentials
Git even allows you to configure several helpers. When looking for creden-
tials for a particular host, Git will query them in order, and stop aer the first
answer is provided. When saving credentials, Git will send the username and
password to all of the helpers in the list, and they can choose what to do with
them. Here’s what a .gitconfig would look like if you had a credentials file on
a thumb drive, but wanted to use the in-memory cache to save some typing if
the drive isn’t plugged in:
[credential]
helper = store --file /mnt/thumbdrive/.git-credentials
helper = cache --timeout 30000
Under the Hood
How does this all work? Git’s root command for the credential-helper system is
git credential, which takes a command as an argument, and then more in-
put through stdin.
This might be easier to understand with an example. Let’s say that a creden-
tial helper has been configured, and the helper has stored credentials for mygi-
thost. Here’s a session that uses the “fill” command, which is invoked when Git
is trying to find credentials for a host:
$ git credential fill
protocol=https
host=mygithost
protocol=https
CHAPTER 7: Git Tools
378
host=mygithost
username=bob
password=s3cre7
$ git credential fill
protocol=https
host=unknownhost
Username for 'https://unknownhost': bob
Password for 'https://bob@unknownhost':
protocol=https
host=unknownhost
username=bob
password=s3cre7
This is the command line that initiates the interaction.
Git-credential is then waiting for input on stdin. We provide it with the things
we know: the protocol and hostname.
A blank line indicates that the input is complete, and the credential system
should answer with what it knows.
Git-credential then takes over, and writes to stdout with the bits of informa-
tion it found.
If credentials are not found, Git asks the user for the username and pass-
word, and provides them back to the invoking stdout (here they’re attached
to the same console).
The credential system is actually invoking a program that’s separate from Git
itself; which one and how depends on the credential.helper configuration
value. There are several forms it can take:
Configuration Value Behavior
foo Runs git-credential-foo
foo -a --opt=bcd Runs git-credential-foo -a --
opt=bcd
/absolute/path/foo -xyz Runs /absolute/path/foo -xyz
!f() { echo "pass-
word=s3cre7"; }; f Code aer ! evaluated in shell
Credential Storage
379

So the helpers described above are actually named git-credential-
cache, git-credential-store, and so on, and we can configure them to
take command-line arguments. The general form for this is “git-credential-foo
[args] <action>.” The stdin/stdout protocol is the same as git-credential, but
they use a slightly dierent set of actions:
•get is a request for a username/password pair.
•store is a request to save a set of credentials in this helper’s memory.
•erase purge the credentials for the given properties from this helper’s
memory.
For the store and erase actions, no response is required (Git ignores it any-
way). For the get action, however, Git is very interested in what the helper has
to say. If the helper doesn’t know anything useful, it can simply exit with no out-
put, but if it does know, it should augment the provided information with the
information it has stored. The output is treated like a series of assignment
statements; anything provided will replace what Git already knows.
Here’s the same example from above, but skipping git-credential and going
straight for git-credential-store:
$ git credential-store --file ~/git.store store
protocol=https
host=mygithost
username=bob
password=s3cre7
$ git credential-store --file ~/git.store get
protocol=https
host=mygithost
username=bob
password=s3cre7
Here we tell git-credential-store to save some credentials: the user-
name “bob” and the password “s3cre7” are to be used when https://
mygithost is accessed.
Now we’ll retrieve those credentials. We provide the parts of the connection
we already know (https://mygithost), and an empty line.
git-credential-store replies with the username and password we stor-
ed above.
Here’s what the ~/git.store file looks like:
CHAPTER 7: Git Tools
380

https://bob:s3cre7@mygithost
It’s just a series of lines, each of which contains a credential-decorated URL.
The osxkeychain and winstore helpers use the native format of their backing
stores, while cache uses its own in-memory format (which no other process
can read).
A Custom Credential Cache
Given that git-credential-store and friends are separate programs from
Git, it’s not much of a leap to realize that any program can be a Git credential
helper. The helpers provided by Git cover many common use cases, but not all.
For example, let’s say your team has some credentials that are shared with the
entire team, perhaps for deployment. These are stored in a shared directory,
but you don’t want to copy them to your own credential store, because they
change oen. None of the existing helpers cover this case; let’s see what it
would take to write our own. There are several key features this program needs
to have:
1. The only action we need to pay attention to is get; store and erase are
write operations, so we’ll just exit cleanly when they’re received.
2. The file format of the shared-credential file is the same as that used by
git-credential-store.
3. The location of that file is fairly standard, but we should allow the user to
pass a custom path just in case.
Once again, we’ll write this extension in Ruby, but any language will work so
long as Git can execute the finished product. Here’s the full source code of our
new credential helper:
#!/usr/bin/env ruby
require 'optparse'
path = File.expand_path '~/.git-credentials'
OptionParser.new do |opts|
opts.banner = 'USAGE: git-credential-read-only [options] <action>'
opts.on('-f', '--file PATH', 'Specify path for backing store') do |argpath|
path = File.expand_path argpath
end
end.parse!
exit(0) unless ARGV[0].downcase == 'get'
exit(0) unless File.exists? path
Credential Storage
381

known = {}
while line = STDIN.gets
break if line.strip == ''
k,v = line.strip.split '=', 2
known[k] = v
end
File.readlines(path).each do |fileline|
prot,user,pass,host = fileline.scan(/^(.*?):\/\/(.*?):(.*?)@(.*)$/).first
if prot == known['protocol'] and host == known['host'] then
puts "protocol=#{prot}"
puts "host=#{host}"
puts "username=#{user}"
puts "password=#{pass}"
exit(0)
end
end
Here we parse the command-line options, allowing the user to specify the
input file. The default is ~/.git-credentials.
This program only responds if the action is get and the backing-store file ex-
ists.
This loop reads from stdin until the first blank line is reached. The inputs are
stored in the known hash for later reference.
This loop reads the contents of the storage file, looking for matches. If the
protocol and host from known match this line, the program prints the results
to stdout and exits.
We’ll save our helper as git-credential-read-only, put it somewhere in
our PATH and mark it executable. Here’s what an interactive session looks like:
$ git credential-read-only --file=/mnt/shared/creds get
protocol=https
host=mygithost
protocol=https
host=mygithost
username=bob
password=s3cre7
CHAPTER 7: Git Tools
382

Since its name starts with “git-”, we can use the simple syntax for the config-
uration value:
$ git config --global credential.helper read-only --file /mnt/shared/creds
As you can see, extending this system is pretty straightforward, and can
solve some common problems for you and your team.
Summary
You’ve seen a number of advanced tools that allow you to manipulate your
commits and staging area more precisely. When you notice issues, you should
be able to easily figure out what commit introduced them, when, and by whom.
If you want to use subprojects in your project, you’ve learned how to accommo-
date those needs. At this point, you should be able to do most of the things in
Git that you’ll need on the command line day to day and feel comfortable doing
so.
Summary
383

Customizing Git
So far, we’ve covered the basics of how Git works and how to use it, and we’ve
introduced a number of tools that Git provides to help you use it easily and ei-
ciently. In this chapter, we’ll see how you can make Git operate in a more cus-
tomized fashion, by introducing several important configuration settings and
the hooks system. With these tools, it’s easy to get Git to work exactly the way
you, your company, or your group needs it to.
Git Configuration
As you briefly saw in Chapter 1, you can specify Git configuration settings with
the git config command. One of the first things you did was set up your
name and e-mail address:
$ git config --global user.name "John Doe"
$ git config --global user.email johndoe@example.com
Now you’ll learn a few of the more interesting options that you can set in this
manner to customize your Git usage.
First, a quick review: Git uses a series of configuration files to determine non-
default behavior that you may want. The first place Git looks for these values is
in an /etc/gitconfig file, which contains values for every user on the system
and all of their repositories. If you pass the option --system to git config, it
reads and writes from this file specifically.
The next place Git looks is the ~/.gitconfig (or ~/.config/git/config)
file, which is specific to each user. You can make Git read and write to this file by
passing the --global option.
Finally, Git looks for configuration values in the configuration file in the Git
directory (.git/config) of whatever repository you’re currently using. These
values are specific to that single repository.
385
8

Each of these “levels” (system, global, local) overwrites values in the previ-
ous level, so values in .git/config trump those in /etc/gitconfig, for in-
stance.
Git’s configuration files are plain-text, so you can also set these values
by manually editing the file and inserting the correct syntax. It’s gener-
ally easier to run the git config command, though.
Basic Client Configuration
The configuration options recognized by Git fall into two categories: client-side
and server-side. The majority of the options are client-side – configuring your
personal working preferences. Many, many configuration options are support-
ed, but a large fraction of them are only useful in certain edge cases. We’ll only
be covering the most common and most useful here. If you want to see a list of
all the options your version of Git recognizes, you can run
$ man git-config
This command lists all the available options in quite a bit of detail. You can
also find this reference material at http://git-scm.com/docs/git-config.html.
CORE.EDITOR
By default, Git uses whatever you’ve set as your default text editor ($VISUAL or
$EDITOR) or else falls back to the vi editor to create and edit your commit and
tag messages. To change that default to something else, you can use the
core.editor setting:
$ git config --global core.editor emacs
Now, no matter what is set as your default shell editor, Git will fire up Emacs
to edit messages.
COMMIT.TEMPLATE
If you set this to the path of a file on your system, Git will use that file as the
default message when you commit. For instance, suppose you create a tem-
plate file at ~/.gitmessage.txt that looks like this:
CHAPTER 8: Customizing Git
386

subject line
what happened
[ticket: X]
To tell Git to use it as the default message that appears in your editor when
you run git commit, set the commit.template configuration value:
$ git config --global commit.template ~/.gitmessage.txt
$ git commit
Then, your editor will open to something like this for your placeholder com-
mit message when you commit:
subject line
what happened
[ticket: X]
# Please enter the commit message for your changes. Lines starting
# with '#' will be ignored, and an empty message aborts the commit.
# On branch master
# Changes to be committed:
# (use "git reset HEAD <file>..." to unstage)
#
# modified: lib/test.rb
#
~
~
".git/COMMIT_EDITMSG" 14L, 297C
If your team has a commit-message policy, then putting a template for that
policy on your system and configuring Git to use it by default can help increase
the chance of that policy being followed regularly.
CORE.PAGER
This setting determines which pager is used when Git pages output such as log
and diff. You can set it to more or to your favorite pager (by default, it’s less),
or you can turn it o by setting it to a blank string:
$ git config --global core.pager ''
Git Configuration
387

If you run that, Git will page the entire output of all commands, no matter
how long they are.
USER.SIGNINGKEY
If you’re making signed annotated tags (as discussed in “Signing Your Work”),
setting your GPG signing key as a configuration setting makes things easier. Set
your key ID like so:
$ git config --global user.signingkey <gpg-key-id>
Now, you can sign tags without having to specify your key every time with
the git tag command:
$ git tag -s <tag-name>
CORE.EXCLUDESFILE
You can put patterns in your project’s .gitignore file to have Git not see them
as untracked files or try to stage them when you run git add on them, as dis-
cussed in “Ignorar Archivos”.
But sometimes you want to ignore certain files for all repositories that you
work with. If your computer is running Mac OS X, you’re probably familiar
with .DS_Store files. If your preferred editor is Emacs or Vim, you know about
files that end with a ~.
This setting lets you write a kind of global .gitignore file. If you create a
~/.gitignore_global file with these contents:
*~
.DS_Store
…and you run git config --global core.excludesfile ~/.gi-
tignore_global, Git will never again bother you about those files.
HELP.AUTOCORRECT
If you mistype a command, it shows you something like this:
$ git chekcout master
git: 'chekcout' is not a git command. See 'git --help'.
CHAPTER 8: Customizing Git
388

Did you mean this?
checkout
Git helpfully tries to figure out what you meant, but it still refuses to do it. If
you set help.autocorrect to 1, Git will actually run this command for you:
$ git chekcout master
WARNING: You called a Git command named 'chekcout', which does not exist.
Continuing under the assumption that you meant 'checkout'
in 0.1 seconds automatically...
Note that “0.1 seconds” business. help.autocorrect is actually an integer
which represents tenths of a second. So if you set it to 50, Git will give you 5
seconds to change your mind before executing the autocorrected command.
Colors in Git
Git fully supports colored terminal output, which greatly aids in visually parsing
command output quickly and easily. A number of options can help you set the
coloring to your preference.
COLOR.UI
Git automatically colors most of its output, but there’s a master switch if you
don’t like this behavior. To turn o all Git’s colored terminal output, do this:
$ git config --global color.ui false
The default setting is auto, which colors output when it’s going straight to a
terminal, but omits the color-control codes when the output is redirected to a
pipe or a file.
You can also set it to always to ignore the dierence between terminals and
pipes. You’ll rarely want this; in most scenarios, if you want color codes in your
redirected output, you can instead pass a --color flag to the Git command to
force it to use color codes. The default setting is almost always what you’ll
want.
Git Configuration
389
COLOR.*
If you want to be more specific about which commands are colored and how,
Git provides verb-specific coloring settings. Each of these can be set to true,
false, or always:
color.branch
color.diff
color.interactive
color.status
In addition, each of these has subsettings you can use to set specific colors
for parts of the output, if you want to override each color. For example, to set
the meta information in your di output to blue foreground, black background,
and bold text, you can run
$ git config --global color.diff.meta "blue black bold"
You can set the color to any of the following values: normal, black, red,
green, yellow, blue, magenta, cyan, or white. If you want an attribute like
bold in the previous example, you can choose from bold, dim, ul (underline),
blink, and reverse (swap foreground and background).
External Merge and Di Tools
Although Git has an internal implementation of di, which is what we’ve been
showing in this book, you can set up an external tool instead. You can also set
up a graphical merge-conflict-resolution tool instead of having to resolve con-
flicts manually. We’ll demonstrate setting up the Perforce Visual Merge Tool
(P4Merge) to do your dis and merge resolutions, because it’s a nice graphical
tool and it’s free.
If you want to try this out, P4Merge works on all major platforms, so you
should be able to do so. We’ll use path names in the examples that work on Mac
and Linux systems; for Windows, you’ll have to change /usr/local/bin to an
executable path in your environment.
To begin, download P4Merge from http://www.perforce.com/downloads/
Perforce/. Next, you’ll set up external wrapper scripts to run your commands.
We’ll use the Mac path for the executable; in other systems, it will be where
your p4merge binary is installed. Set up a merge wrapper script named ex-
tMerge that calls your binary with all the arguments provided:
CHAPTER 8: Customizing Git
390

$ cat /usr/local/bin/extMerge
#!/bin/sh
/Applications/p4merge.app/Contents/MacOS/p4merge $*
The di wrapper checks to make sure seven arguments are provided and
passes two of them to your merge script. By default, Git passes the following
arguments to the di program:
path old-file old-hex old-mode new-file new-hex new-mode
Because you only want the old-file and new-file arguments, you use
the wrapper script to pass the ones you need.
$ cat /usr/local/bin/extDiff
#!/bin/sh
[ $# -eq 7 ] && /usr/local/bin/extMerge "$2" "$5"
You also need to make sure these tools are executable:
$ sudo chmod +x /usr/local/bin/extMerge
$ sudo chmod +x /usr/local/bin/extDiff
Now you can set up your config file to use your custom merge resolution and
di tools. This takes a number of custom settings: merge.tool to tell Git what
strategy to use, mergetool.<tool>.cmd to specify how to run the command,
mergetool.<tool>.trustExitCode to tell Git if the exit code of that program
indicates a successful merge resolution or not, and diff.external to tell Git
what command to run for dis. So, you can either run four config commands
$ git config --global merge.tool extMerge
$ git config --global mergetool.extMerge.cmd \
'extMerge \"$BASE\" \"$LOCAL\" \"$REMOTE\" \"$MERGED\"'
$ git config --global mergetool.extMerge.trustExitCode false
$ git config --global diff.external extDiff
or you can edit your ~/.gitconfig file to add these lines:
[merge]
tool = extMerge
[mergetool "extMerge"]
cmd = extMerge "$BASE" "$LOCAL" "$REMOTE" "$MERGED"
Git Configuration
391
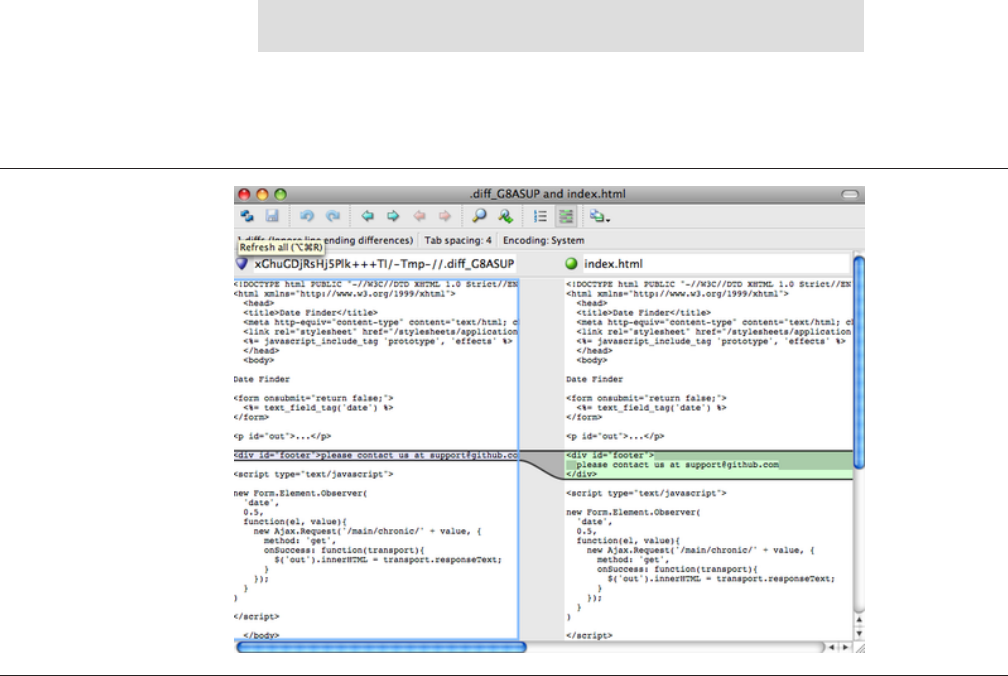
FIGURE 8-1
P4Merge.
trustExitCode = false
[diff]
external = extDiff
Aer all this is set, if you run di commands such as this:
$ git diff 32d1776b1^ 32d1776b1
Instead of getting the di output on the command line, Git fires up P4Merge,
which looks something like this:
If you try to merge two branches and subsequently have merge conflicts,
you can run the command git mergetool; it starts P4Merge to let you resolve
the conflicts through that GUI tool.
The nice thing about this wrapper setup is that you can change your di and
merge tools easily. For example, to change your extDiff and extMerge tools
to run the KDi3 tool instead, all you have to do is edit your extMerge file:
CHAPTER 8: Customizing Git
392

$ cat /usr/local/bin/extMerge
#!/bin/sh
/Applications/kdiff3.app/Contents/MacOS/kdiff3 $*
Now, Git will use the KDi3 tool for di viewing and merge conflict resolu-
tion.
Git comes preset to use a number of other merge-resolution tools without
your having to set up the cmd configuration. To see a list of the tools it sup-
ports, try this:
$ git mergetool --tool-help
'git mergetool --tool=<tool>' may be set to one of the following:
emerge
gvimdiff
gvimdiff2
opendiff
p4merge
vimdiff
vimdiff2
The following tools are valid, but not currently available:
araxis
bc3
codecompare
deltawalker
diffmerge
diffuse
ecmerge
kdiff3
meld
tkdiff
tortoisemerge
xxdiff
Some of the tools listed above only work in a windowed
environment. If run in a terminal-only session, they will fail.
If you’re not interested in using KDi3 for di but rather want to use it just
for merge resolution, and the kdi3 command is in your path, then you can run
$ git config --global merge.tool kdiff3
If you run this instead of setting up the extMerge and extDiff files, Git will
use KDi3 for merge resolution and the normal Git di tool for dis.
Git Configuration
393

Formatting and Whitespace
Formatting and whitespace issues are some of the more frustrating and subtle
problems that many developers encounter when collaborating, especially
cross-platform. It’s very easy for patches or other collaborated work to intro-
duce subtle whitespace changes because editors silently introduce them, and if
your files ever touch a Windows system, their line endings might be replaced.
Git has a few configuration options to help with these issues.
CORE.AUTOCRLF
If you’re programming on Windows and working with people who are not (or
vice-versa), you’ll probably run into line-ending issues at some point. This is be-
cause Windows uses both a carriage-return character and a linefeed character
for newlines in its files, whereas Mac and Linux systems use only the linefeed
character. This is a subtle but incredibly annoying fact of cross-platform work;
many editors on Windows silently replace existing LF-style line endings with
CRLF, or insert both line-ending characters when the user hits the enter key.
Git can handle this by auto-converting CRLF line endings into LF when you
add a file to the index, and vice versa when it checks out code onto your filesys-
tem. You can turn on this functionality with the core.autocrlf setting. If
you’re on a Windows machine, set it to true – this converts LF endings into
CRLF when you check out code:
$ git config --global core.autocrlf true
If you’re on a Linux or Mac system that uses LF line endings, then you don’t
want Git to automatically convert them when you check out files; however, if a
file with CRLF endings accidentally gets introduced, then you may want Git to
fix it. You can tell Git to convert CRLF to LF on commit but not the other way
around by setting core.autocrlf to input:
$ git config --global core.autocrlf input
This setup should leave you with CRLF endings in Windows checkouts, but
LF endings on Mac and Linux systems and in the repository.
If you’re a Windows programmer doing a Windows-only project, then you
can turn o this functionality, recording the carriage returns in the repository
by setting the config value to false:
CHAPTER 8: Customizing Git
394

$ git config --global core.autocrlf false
CORE.WHITESPACE
Git comes preset to detect and fix some whitespace issues. It can look for six
primary whitespace issues – three are enabled by default and can be turned o,
and three are disabled by default but can be activated.
The ones that are turned on by default are blank-at-eol, which looks for
spaces at the end of a line; blank-at-eof, which notices blank lines at the end
of a file; and space-before-tab, which looks for spaces before tabs at the be-
ginning of a line.
The three that are disabled by default but can be turned on are indent-
with-non-tab, which looks for lines that begin with spaces instead of tabs
(and is controlled by the tabwidth option); tab-in-indent, which watches
for tabs in the indentation portion of a line; and cr-at-eol, which tells Git that
carriage returns at the end of lines are OK.
You can tell Git which of these you want enabled by setting core.white-
space to the values you want on or o, separated by commas. You can disable
settings by either leaving them out of the setting string or prepending a - in
front of the value. For example, if you want all but cr-at-eol to be set, you can
do this:
$ git config --global core.whitespace \
trailing-space,space-before-tab,indent-with-non-tab
Git will detect these issues when you run a git diff command and try to
color them so you can possibly fix them before you commit. It will also use
these values to help you when you apply patches with git apply. When you’re
applying patches, you can ask Git to warn you if it’s applying patches with the
specified whitespace issues:
$ git apply --whitespace=warn <patch>
Or you can have Git try to automatically fix the issue before applying the
patch:
$ git apply --whitespace=fix <patch>
Git Configuration
395

These options apply to the git rebase command as well. If you’ve commit-
ted whitespace issues but haven’t yet pushed upstream, you can run git re-
base --whitespace=fix to have Git automatically fix whitespace issues as
it’s rewriting the patches.
Server Configuration
Not nearly as many configuration options are available for the server side of Git,
but there are a few interesting ones you may want to take note of.
RECEIVE.FSCKOBJECTS
Git is capable of making sure every object received during a push still matches
its SHA-1 checksum and points to valid objects. However, it doesn’t do this by
default; it’s a fairly expensive operation, and might slow down the operation,
especially on large repositories or pushes. If you want Git to check object con-
sistency on every push, you can force it to do so by setting receive.fsckOb-
jects to true:
$ git config --system receive.fsckObjects true
Now, Git will check the integrity of your repository before each push is ac-
cepted to make sure faulty (or malicious) clients aren’t introducing corrupt da-
ta.
RECEIVE.DENYNONFASTFORWARDS
If you rebase commits that you’ve already pushed and then try to push again,
or otherwise try to push a commit to a remote branch that doesn’t contain the
commit that the remote branch currently points to, you’ll be denied. This is
generally good policy; but in the case of the rebase, you may determine that
you know what you’re doing and can force-update the remote branch with a -f
flag to your push command.
To tell Git to refuse force-pushes, set receive.denyNonFastForwards:
$ git config --system receive.denyNonFastForwards true
The other way you can do this is via server-side receive hooks, which we’ll
cover in a bit. That approach lets you do more complex things like deny non-
fast-forwards to a certain subset of users.
CHAPTER 8: Customizing Git
396

RECEIVE.DENYDELETES
One of the workarounds to the denyNonFastForwards policy is for the user to
delete the branch and then push it back up with the new reference. To avoid
this, set receive.denyDeletes to true:
$ git config --system receive.denyDeletes true
This denies any deletion of branches or tags – no user can do it. To remove
remote branches, you must remove the ref files from the server manually. There
are also more interesting ways to do this on a per-user basis via ACLs, as you’ll
learn in “An Example Git-Enforced Policy”.
Git Attributes
Some of these settings can also be specified for a path, so that Git applies those
settings only for a subdirectory or subset of files. These path-specific settings
are called Git attributes and are set either in a .gitattributes file in one of
your directories (normally the root of your project) or in the .git/info/
attributes file if you don’t want the attributes file committed with your
project.
Using attributes, you can do things like specify separate merge strategies for
individual files or directories in your project, tell Git how to di non-text files, or
have Git filter content before you check it into or out of Git. In this section,
you’ll learn about some of the attributes you can set on your paths in your Git
project and see a few examples of using this feature in practice.
Binary Files
One cool trick for which you can use Git attributes is telling Git which files are
binary (in cases it otherwise may not be able to figure out) and giving Git spe-
cial instructions about how to handle those files. For instance, some text files
may be machine generated and not diable, whereas some binary files can be
died. You’ll see how to tell Git which is which.
IDENTIFYING BINARY FILES
Some files look like text files but for all intents and purposes are to be treated
as binary data. For instance, Xcode projects on the Mac contain a file that ends
in .pbxproj, which is basically a JSON (plain-text Javascript data format) data-
Git Attributes
397

set written out to disk by the IDE, which records your build settings and so on.
Although it’s technically a text file (because it’s all UTF-8), you don’t want to
treat it as such because it’s really a lightweight database – you can’t merge the
contents if two people change it, and dis generally aren’t helpful. The file is
meant to be consumed by a machine. In essence, you want to treat it like a bi-
nary file.
To tell Git to treat all pbxproj files as binary data, add the following line to
your .gitattributes file:
*.pbxproj binary
Now, Git won’t try to convert or fix CRLF issues; nor will it try to compute or
print a di for changes in this file when you run git show or git diff on your
project.
DIFFING BINARY FILES
You can also use the Git attributes functionality to eectively di binary files.
You do this by telling Git how to convert your binary data to a text format that
can be compared via the normal di.
First, you’ll use this technique to solve one of the most annoying problems
known to humanity: version-controlling Microso Word documents. Everyone
knows that Word is the most horrific editor around, but oddly, everyone still
uses it. If you want to version-control Word documents, you can stick them in a
Git repository and commit every once in a while; but what good does that do? If
you run git diff normally, you only see something like this:
$ git diff
diff --git a/chapter1.docx b/chapter1.docx
index 88839c4..4afcb7c 100644
Binary files a/chapter1.docx and b/chapter1.docx differ
You can’t directly compare two versions unless you check them out and scan
them manually, right? It turns out you can do this fairly well using Git attributes.
Put the following line in your .gitattributes file:
*.docx diff=word
This tells Git that any file that matches this pattern (.docx) should use the
“word” filter when you try to view a di that contains changes. What is the
“word” filter? You have to set it up. Here you’ll configure Git to use the
CHAPTER 8: Customizing Git
398

docx2txt program to convert Word documents into readable text files, which it
will then di properly.
First, you’ll need to install docx2txt; you can download it from http://
docx2txt.sourceforge.net. Follow the instructions in the INSTALL file to put it
somewhere your shell can find it. Next, you’ll write a wrapper script to convert
output to the format Git expects. Create a file that’s somewhere in your path
called docx2txt, and add these contents:
#!/bin/bash
docx2txt.pl $1 -
Don’t forget to chmod a+x that file. Finally, you can configure Git to use this
script:
$ git config diff.word.textconv docx2txt
Now Git knows that if it tries to do a di between two snapshots, and any of
the files end in .docx, it should run those files through the “word” filter, which
is defined as the docx2txt program. This eectively makes nice text-based ver-
sions of your Word files before attempting to di them.
Here’s an example: Chapter 1 of this book was converted to Word format and
committed in a Git repository. Then a new paragraph was added. Here’s what
git diff shows:
$ git diff
diff --git a/chapter1.docx b/chapter1.docx
index 0b013ca..ba25db5 100644
--- a/chapter1.docx
+++ b/chapter1.docx
@@ -2,6 +2,7 @@
This chapter will be about getting started with Git. We will begin at the beginning by explaining some background on version control tools, then move on to how to get Git running on your system and finally how to get it setup to start working with. At the end of this chapter you should understand why Git is around, why you should use it and you should be all setup to do so.
1.1. About Version Control
What is "version control", and why should you care? Version control is a system that records changes to a file or set of files over time so that you can recall specific versions later. For the examples in this book you will use software source code as the files being version controlled, though in reality you can do this with nearly any type of file on a computer.
+Testing: 1, 2, 3.
If you are a graphic or web designer and want to keep every version of an image or layout (which you would most certainly want to), a Version Control System (VCS) is a very wise thing to use. It allows you to revert files back to a previous state, revert the entire project back to a previous state, compare changes over time, see who last modified something that might be causing a problem, who introduced an issue and when, and more. Using a VCS also generally means that if you screw things up or lose files, you can easily recover. In addition, you get all this for very little overhead.
1.1.1. Local Version Control Systems
Many people's version-control method of choice is to copy files into another directory (perhaps a time-stamped directory, if they're clever). This approach is very common because it is so simple, but it is also incredibly error prone. It is easy to forget which directory you're in and accidentally write to the wrong file or copy over files you don't mean to.
Git successfully and succinctly tells us that we added the string “Testing: 1, 2,
3.”, which is correct. It’s not perfect – formatting changes wouldn’t show up
here – but it certainly works.
Git Attributes
399

Another interesting problem you can solve this way involves diing image
files. One way to do this is to run image files through a filter that extracts their
EXIF information – metadata that is recorded with most image formats. If you
download and install the exiftool program, you can use it to convert your im-
ages into text about the metadata, so at least the di will show you a textual
representation of any changes that happened:
$ echo '*.png diff=exif' >> .gitattributes
$ git config diff.exif.textconv exiftool
If you replace an image in your project and run git diff, you see some-
thing like this:
diff --git a/image.png b/image.png
index 88839c4..4afcb7c 100644
--- a/image.png
+++ b/image.png
@@ -1,12 +1,12 @@
ExifTool Version Number : 7.74
-File Size : 70 kB
-File Modification Date/Time : 2009:04:21 07:02:45-07:00
+File Size : 94 kB
+File Modification Date/Time : 2009:04:21 07:02:43-07:00
File Type : PNG
MIME Type : image/png
-Image Width : 1058
-Image Height : 889
+Image Width : 1056
+Image Height : 827
Bit Depth : 8
Color Type : RGB with Alpha
You can easily see that the file size and image dimensions have both
changed.
Keyword Expansion
SVN- or CVS-style keyword expansion is oen requested by developers used to
those systems. The main problem with this in Git is that you can’t modify a file
with information about the commit aer you’ve committed, because Git check-
sums the file first. However, you can inject text into a file when it’s checked out
and remove it again before it’s added to a commit. Git attributes oers you two
ways to do this.
CHAPTER 8: Customizing Git
400
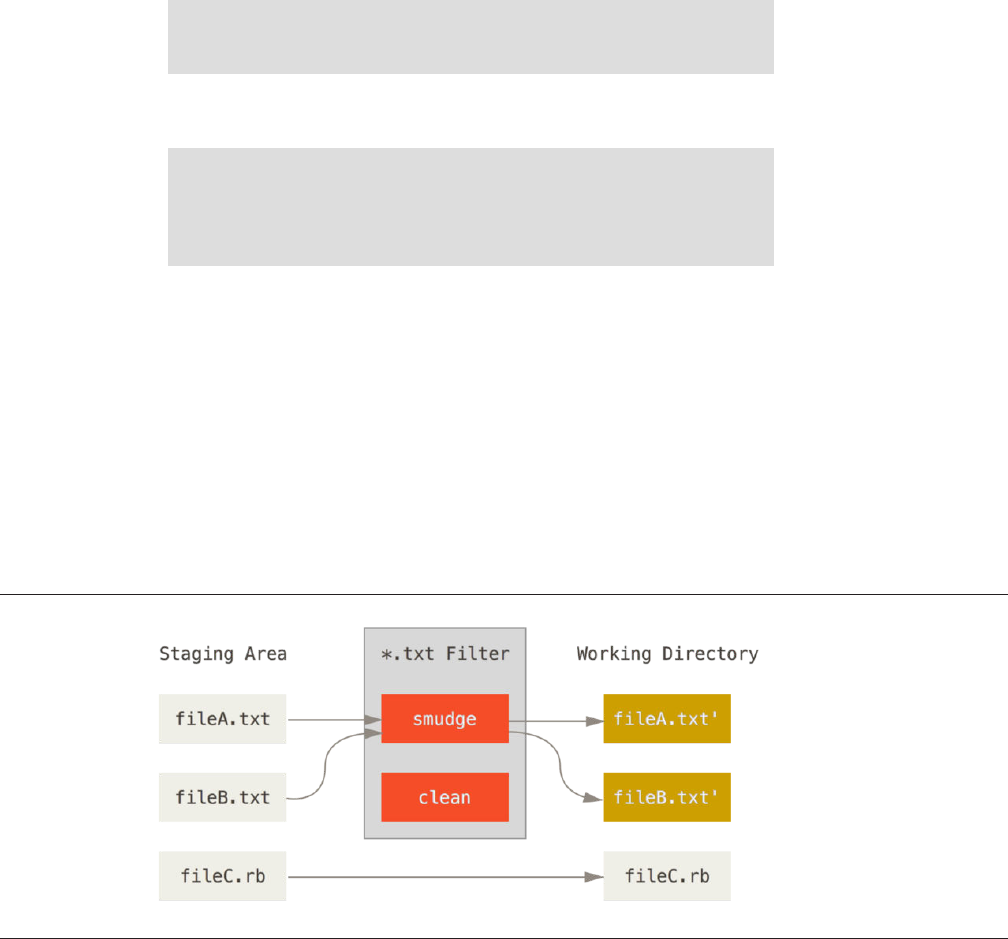
FIGURE 8-2
The “smudge” lter
is run on checkout.
First, you can inject the SHA-1 checksum of a blob into an $Id$ field in the
file automatically. If you set this attribute on a file or set of files, then the next
time you check out that branch, Git will replace that field with the SHA-1 of the
blob. It’s important to notice that it isn’t the SHA-1 of the commit, but of the
blob itself:
$ echo '*.txt ident' >> .gitattributes
$ echo '$Id$' > test.txt
The next time you check out this file, Git injects the SHA-1 of the blob:
$ rm test.txt
$ git checkout -- test.txt
$ cat test.txt
$Id: 42812b7653c7b88933f8a9d6cad0ca16714b9bb3 $
However, that result is of limited use. If you’ve used keyword substitution in
CVS or Subversion, you can include a datestamp – the SHA-1 isn’t all that help-
ful, because it’s fairly random and you can’t tell if one SHA-1 is older or newer
than another just by looking at them.
It turns out that you can write your own filters for doing substitutions in files
on commit/checkout. These are called “clean” and “smudge” filters. In the .gi-
tattributes file, you can set a filter for particular paths and then set up
scripts that will process files just before they’re checked out (“smudge”, see
Figure 8-2) and just before they’re staged (“clean”, see Figure 8-3). These filters
can be set to do all sorts of fun things.
Git Attributes
401
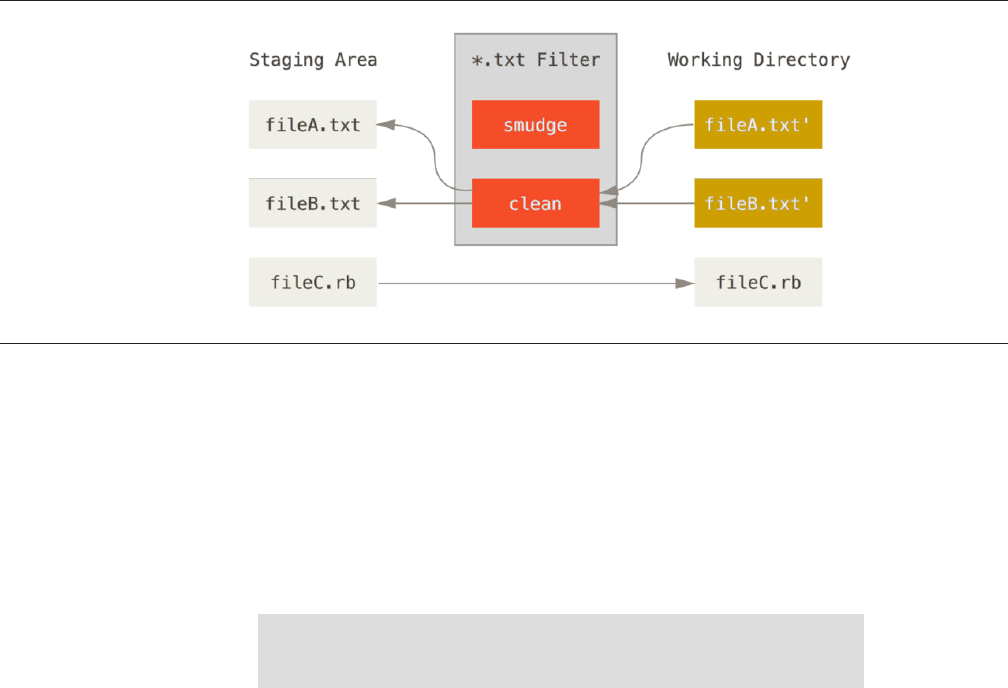
FIGURE 8-3
The “clean” lter is
run when les are
staged.
The original commit message for this feature gives a simple example of run-
ning all your C source code through the indent program before committing.
You can set it up by setting the filter attribute in your .gitattributes file to
filter *.c files with the “indent” filter:
*.c filter=indent
Then, tell Git what the “indent” filter does on smudge and clean:
$ git config --global filter.indent.clean indent
$ git config --global filter.indent.smudge cat
In this case, when you commit files that match *.c, Git will run them
through the indent program before it stages them and then run them through
the cat program before it checks them back out onto disk. The cat program
does essentially nothing: it spits out the same data that it comes in. This combi-
nation eectively filters all C source code files through indent before commit-
ting.
Another interesting example gets $Date$ keyword expansion, RCS style. To
do this properly, you need a small script that takes a filename, figures out the
last commit date for this project, and inserts the date into the file. Here is a
small Ruby script that does that:
#! /usr/bin/env ruby
data = STDIN.read
last_date = `git log --pretty=format:"%ad" -1`
puts data.gsub('$Date$', '$Date: ' + last_date.to_s + '$')
CHAPTER 8: Customizing Git
402

All the script does is get the latest commit date from the git log command,
stick that into any $Date$ strings it sees in stdin, and print the results – it
should be simple to do in whatever language you’re most comfortable in. You
can name this file expand_date and put it in your path. Now, you need to set
up a filter in Git (call it dater) and tell it to use your expand_date filter to
smudge the files on checkout. You’ll use a Perl expression to clean that up on
commit:
$ git config filter.dater.smudge expand_date
$ git config filter.dater.clean 'perl -pe "s/\\\$Date[^\\\$]*\\\$/\\\$Date\\\$/"'
This Perl snippet strips out anything it sees in a $Date$ string, to get back to
where you started. Now that your filter is ready, you can test it by setting up a
file with your $Date$ keyword and then setting up a Git attribute for that file
that engages the new filter:
$ echo '# $Date$' > date_test.txt
$ echo 'date*.txt filter=dater' >> .gitattributes
If you commit those changes and check out the file again, you see the key-
word properly substituted:
$ git add date_test.txt .gitattributes
$ git commit -m "Testing date expansion in Git"
$ rm date_test.txt
$ git checkout date_test.txt
$ cat date_test.txt
# $Date: Tue Apr 21 07:26:52 2009 -0700$
You can see how powerful this technique can be for customized applica-
tions. You have to be careful, though, because the .gitattributes file is com-
mitted and passed around with the project, but the driver (in this case, dater)
isn’t, so it won’t work everywhere. When you design these filters, they should
be able to fail gracefully and have the project still work properly.
Exporting Your Repository
Git attribute data also allows you to do some interesting things when exporting
an archive of your project.
Git Attributes
403

EXPORT-IGNORE
You can tell Git not to export certain files or directories when generating an
archive. If there is a subdirectory or file that you don’t want to include in your
archive file but that you do want checked into your project, you can determine
those files via the export-ignore attribute.
For example, say you have some test files in a test/ subdirectory, and it
doesn’t make sense to include them in the tarball export of your project. You
can add the following line to your Git attributes file:
test/ export-ignore
Now, when you run git archive to create a tarball of your project, that direc-
tory won’t be included in the archive.
EXPORT-SUBST
Another thing you can do for your archives is some simple keyword substitu-
tion. Git lets you put the string $Format:$ in any file with any of the --
pretty=format formatting shortcodes, many of which you saw in Chapter 2.
For instance, if you want to include a file named LAST_COMMIT in your project,
and the last commit date was automatically injected into it when git archive
ran, you can set up the file like this:
$ echo 'Last commit date: $Format:%cd$' > LAST_COMMIT
$ echo "LAST_COMMIT export-subst" >> .gitattributes
$ git add LAST_COMMIT .gitattributes
$ git commit -am 'adding LAST_COMMIT file for archives'
When you run git archive, the contents of that file when people open the
archive file will look like this:
$ cat LAST_COMMIT
Last commit date: $Format:Tue Apr 21 08:38:48 2009 -0700$
Merge Strategies
You can also use Git attributes to tell Git to use dierent merge strategies for
specific files in your project. One very useful option is to tell Git to not try to
CHAPTER 8: Customizing Git
404

merge specific files when they have conflicts, but rather to use your side of the
merge over someone else’s.
This is helpful if a branch in your project has diverged or is specialized, but
you want to be able to merge changes back in from it, and you want to ignore
certain files. Say you have a database settings file called database.xml that is
dierent in two branches, and you want to merge in your other branch without
messing up the database file. You can set up an attribute like this:
database.xml merge=ours
And then define a dummy ours merge strategy with:
$ git config --global merge.ours.driver true
If you merge in the other branch, instead of having merge conflicts with the
database.xml file, you see something like this:
$ git merge topic
Auto-merging database.xml
Merge made by recursive.
In this case, database.xml stays at whatever version you originally had.
Git Hooks
Like many other Version Control Systems, Git has a way to fire o custom
scripts when certain important actions occur. There are two groups of these
hooks: client-side and server-side. Client-side hooks are triggered by operations
such as committing and merging, while server-side hooks run on network oper-
ations such as receiving pushed commits. You can use these hooks for all sorts
of reasons
Installing a Hook
The hooks are all stored in the hooks subdirectory of the Git directory. In most
projects, that’s .git/hooks. When you initialize a new repository with git
init, Git populates the hooks directory with a bunch of example scripts, many
of which are useful by themselves; but they also document the input values of
each script. All the examples are written as shell scripts, with some Perl thrown
Git Hooks
405

in, but any properly named executable scripts will work fine – you can write
them in Ruby or Python or what have you. If you want to use the bundled hook
scripts, you’ll have to rename them; their file names all end with .sample.
To enable a hook script, put a file in the hooks subdirectory of your Git direc-
tory that is named appropriately and is executable. From that point forward, it
should be called. We’ll cover most of the major hook filenames here.
Client-Side Hooks
There are a lot of client-side hooks. This section splits them into committing-
workflow hooks, e-mail-workflow scripts, and everything else.
It’s important to note that client-side hooks are not copied when you
clone a repository. If your intent with these scripts is to enforce a policy,
you’ll probably want to do that on the server side; see the example in
“An Example Git-Enforced Policy”.
COMMITTING-WORKFLOW HOOKS
The first four hooks have to do with the committing process.
The pre-commit hook is run first, before you even type in a commit mes-
sage. It’s used to inspect the snapshot that’s about to be committed, to see if
you’ve forgotten something, to make sure tests run, or to examine whatever
you need to inspect in the code. Exiting non-zero from this hook aborts the
commit, although you can bypass it with git commit --no-verify. You can
do things like check for code style (run lint or something equivalent), check
for trailing whitespace (the default hook does exactly this), or check for appro-
priate documentation on new methods.
The prepare-commit-msg hook is run before the commit message editor is
fired up but aer the default message is created. It lets you edit the default
message before the commit author sees it. This hook takes a few parameters:
the path to the file that holds the commit message so far, the type of commit,
and the commit SHA-1 if this is an amended commit. This hook generally isn’t
useful for normal commits; rather, it’s good for commits where the default mes-
sage is auto-generated, such as templated commit messages, merge commits,
squashed commits, and amended commits. You may use it in conjunction with
a commit template to programmatically insert information.
The commit-msg hook takes one parameter, which again is the path to a
temporary file that contains the commit message written by the developer. If
this script exits non-zero, Git aborts the commit process, so you can use it to
validate your project state or commit message before allowing a commit to go
CHAPTER 8: Customizing Git
406
through. In the last section of this chapter, We’ll demonstrate using this hook to
check that your commit message is conformant to a required pattern.
Aer the entire commit process is completed, the post-commit hook runs.
It doesn’t take any parameters, but you can easily get the last commit by run-
ning git log -1 HEAD. Generally, this script is used for notification or some-
thing similar.
E-MAIL WORKFLOW HOOKS
You can set up three client-side hooks for an e-mail-based workflow. They’re all
invoked by the git am command, so if you aren’t using that command in your
workflow, you can safely skip to the next section. If you’re taking patches over
e-mail prepared by git format-patch, then some of these may be helpful to
you.
The first hook that is run is applypatch-msg. It takes a single argument: the
name of the temporary file that contains the proposed commit message. Git
aborts the patch if this script exits non-zero. You can use this to make sure a
commit message is properly formatted, or to normalize the message by having
the script edit it in place.
The next hook to run when applying patches via git am is pre-
applypatch. Somewhat confusingly, it is run aer the patch is applied but be-
fore a commit is made, so you can use it to inspect the snapshot before making
the commit. You can run tests or otherwise inspect the working tree with this
script. If something is missing or the tests don’t pass, exiting non-zero aborts
the git am script without committing the patch.
The last hook to run during a git am operation is post-applypatch, which
runs aer the commit is made. You can use it to notify a group or the author of
the patch you pulled in that you’ve done so. You can’t stop the patching process
with this script.
OTHER CLIENT HOOKS
The pre-rebase hook runs before you rebase anything and can halt the pro-
cess by exiting non-zero. You can use this hook to disallow rebasing any com-
mits that have already been pushed. The example pre-rebase hook that Git
installs does this, although it makes some assumptions that may not match
with your workflow.
The post-rewrite hook is run by commands that replace commits, such as
git commit --amend and git rebase (though not by git filter-
branch). Its single argument is which command triggered the rewrite, and it re-
Git Hooks
407
ceives a list of rewrites on stdin. This hook has many of the same uses as the
post-checkout and post-merge hooks.
Aer you run a successful git checkout, the post-checkout hook runs;
you can use it to set up your working directory properly for your project envi-
ronment. This may mean moving in large binary files that you don’t want
source controlled, auto-generating documentation, or something along those
lines.
The post-merge hook runs aer a successful merge command. You can use
it to restore data in the working tree that Git can’t track, such as permissions
data. This hook can likewise validate the presence of files external to Git control
that you may want copied in when the working tree changes.
The pre-push hook runs during git push, aer the remote refs have been
updated but before any objects have been transferred. It receives the name and
location of the remote as parameters, and a list of to-be-updated refs through
stdin. You can use it to validate a set of ref updates before a push occurs (a
non-zero exit code will abort the push).
Git occasionally does garbage collection as part of its normal operation, by
invoking git gc --auto. The pre-auto-gc hook is invoked just before the
garbage collection takes place, and can be used to notify you that this is hap-
pening, or to abort the collection if now isn’t a good time.
Server-Side Hooks
In addition to the client-side hooks, you can use a couple of important server-
side hooks as a system administrator to enforce nearly any kind of policy for
your project. These scripts run before and aer pushes to the server. The pre
hooks can exit non-zero at any time to reject the push as well as print an error
message back to the client; you can set up a push policy that’s as complex as
you wish.
PRE-RECEIVE
The first script to run when handling a push from a client is pre-receive. It
takes a list of references that are being pushed from stdin; if it exits non-zero,
none of them are accepted. You can use this hook to do things like make sure
none of the updated references are non-fast-forwards, or to do access control
for all the refs and files they’re modifying with the push.
CHAPTER 8: Customizing Git
408
UPDATE
The update script is very similar to the pre-receive script, except that it’s run
once for each branch the pusher is trying to update. If the pusher is trying to
push to multiple branches, pre-receive runs only once, whereas update runs
once per branch they’re pushing to. Instead of reading from stdin, this script
takes three arguments: the name of the reference (branch), the SHA-1 that ref-
erence pointed to before the push, and the SHA-1 the user is trying to push. If
the update script exits non-zero, only that reference is rejected; other refer-
ences can still be updated.
POST-RECEIVE
The post-receive hook runs aer the entire process is completed and can be
used to update other services or notify users. It takes the same stdin data as the
pre-receive hook. Examples include e-mailing a list, notifying a continuous
integration server, or updating a ticket-tracking system – you can even parse
the commit messages to see if any tickets need to be opened, modified, or
closed. This script can’t stop the push process, but the client doesn’t discon-
nect until it has completed, so be careful if you try to do anything that may take
a long time.
An Example Git-Enforced Policy
In this section, you’ll use what you’ve learned to establish a Git workflow that
checks for a custom commit message format, and allows only certain users to
modify certain subdirectories in a project. You’ll build client scripts that help
the developer know if their push will be rejected and server scripts that actually
enforce the policies.
The scripts we’ll show are written in Ruby; partly because of our intellectual
inertia, but also because Ruby is easy to read, even if you can’t necessarily write
it. However, any language will work – all the sample hook scripts distributed
with Git are in either Perl or Bash, so you can also see plenty of examples of
hooks in those languages by looking at the samples.
Server-Side Hook
All the server-side work will go into the update file in your hooks directory. The
update hook runs once per branch being pushed and takes three arguments:
• The name of the reference being pushed to
An Example Git-Enforced Policy
409

• The old revision where that branch was
• The new revision being pushed
You also have access to the user doing the pushing if the push is being run
over SSH. If you’ve allowed everyone to connect with a single user (like “git”)
via public-key authentication, you may have to give that user a shell wrapper
that determines which user is connecting based on the public key, and set an
environment variable accordingly. Here we’ll assume the connecting user is in
the $USER environment variable, so your update script begins by gathering all
the information you need:
#!/usr/bin/env ruby
$refname = ARGV[0]
$oldrev = ARGV[1]
$newrev = ARGV[2]
$user = ENV['USER']
puts "Enforcing Policies..."
puts "(#{$refname}) (#{$oldrev[0,6]}) (#{$newrev[0,6]})"
Yes, those are global variables. Don’t judge – it’s easier to demonstrate this
way.
ENFORCING A SPECIFIC COMMIT-MESSAGE FORMAT
Your first challenge is to enforce that each commit message adheres to a partic-
ular format. Just to have a target, assume that each message has to include a
string that looks like “ref: 1234” because you want each commit to link to a
work item in your ticketing system. You must look at each commit being push-
ed up, see if that string is in the commit message, and, if the string is absent
from any of the commits, exit non-zero so the push is rejected.
You can get a list of the SHA-1 values of all the commits that are being push-
ed by taking the $newrev and $oldrev values and passing them to a Git
plumbing command called git rev-list. This is basically the git log com-
mand, but by default it prints out only the SHA-1 values and no other informa-
tion. So, to get a list of all the commit SHA-1s introduced between one commit
SHA-1 and another, you can run something like this:
$ git rev-list 538c33..d14fc7
d14fc7c847ab946ec39590d87783c69b031bdfb7
9f585da4401b0a3999e84113824d15245c13f0be
234071a1be950e2a8d078e6141f5cd20c1e61ad3
CHAPTER 8: Customizing Git
410

dfa04c9ef3d5197182f13fb5b9b1fb7717d2222a
17716ec0f1ff5c77eff40b7fe912f9f6cfd0e475
You can take that output, loop through each of those commit SHA-1s, grab
the message for it, and test that message against a regular expression that
looks for a pattern.
You have to figure out how to get the commit message from each of these
commits to test. To get the raw commit data, you can use another plumbing
command called git cat-file. We’ll go over all these plumbing commands
in detail in Chapter 10; but for now, here’s what that command gives you:
$ git cat-file commit ca82a6
tree cfda3bf379e4f8dba8717dee55aab78aef7f4daf
parent 085bb3bcb608e1e8451d4b2432f8ecbe6306e7e7
author Scott Chacon <schacon@gmail.com> 1205815931 -0700
committer Scott Chacon <schacon@gmail.com> 1240030591 -0700
changed the version number
A simple way to get the commit message from a commit when you have the
SHA-1 value is to go to the first blank line and take everything aer that. You
can do so with the sed command on Unix systems:
$ git cat-file commit ca82a6 | sed '1,/^$/d'
changed the version number
You can use that incantation to grab the commit message from each commit
that is trying to be pushed and exit if you see anything that doesn’t match. To
exit the script and reject the push, exit non-zero. The whole method looks like
this:
$regex = /\[ref: (\d+)\]/
# enforced custom commit message format
def check_message_format
missed_revs = `git rev-list #{$oldrev}..#{$newrev}`.split("\n")
missed_revs.each do |rev|
message = `git cat-file commit #{rev} | sed '1,/^$/d'`
if !$regex.match(message)
puts "[POLICY] Your message is not formatted correctly"
exit 1
end
end
An Example Git-Enforced Policy
411
end
check_message_format
Putting that in your update script will reject updates that contain commits
that have messages that don’t adhere to your rule.
ENFORCING A USER-BASED ACL SYSTEM
Suppose you want to add a mechanism that uses an access control list (ACL)
that specifies which users are allowed to push changes to which parts of your
projects. Some people have full access, and others can only push changes to
certain subdirectories or specific files. To enforce this, you’ll write those rules to
a file named acl that lives in your bare Git repository on the server. You’ll have
the update hook look at those rules, see what files are being introduced for all
the commits being pushed, and determine whether the user doing the push has
access to update all those files.
The first thing you’ll do is write your ACL. Here you’ll use a format very much
like the CVS ACL mechanism: it uses a series of lines, where the first field is
avail or unavail, the next field is a comma-delimited list of the users to which
the rule applies, and the last field is the path to which the rule applies (blank
meaning open access). All of these fields are delimited by a pipe (|) character.
In this case, you have a couple of administrators, some documentation writ-
ers with access to the doc directory, and one developer who only has access to
the lib and tests directories, and your ACL file looks like this:
avail|nickh,pjhyett,defunkt,tpw
avail|usinclair,cdickens,ebronte|doc
avail|schacon|lib
avail|schacon|tests
You begin by reading this data into a structure that you can use. In this case,
to keep the example simple, you’ll only enforce the avail directives. Here is a
method that gives you an associative array where the key is the user name and
the value is an array of paths to which the user has write access:
def get_acl_access_data(acl_file)
# read in ACL data
acl_file = File.read(acl_file).split("\n").reject { |line| line == '' }
access = {}
acl_file.each do |line|
avail, users, path = line.split('|')
next unless avail == 'avail'
users.split(',').each do |user|
access[user] ||= []
CHAPTER 8: Customizing Git
412

access[user] << path
end
end
access
end
On the ACL file you looked at earlier, this get_acl_access_data method
returns a data structure that looks like this:
{"defunkt"=>[nil],
"tpw"=>[nil],
"nickh"=>[nil],
"pjhyett"=>[nil],
"schacon"=>["lib", "tests"],
"cdickens"=>["doc"],
"usinclair"=>["doc"],
"ebronte"=>["doc"]}
Now that you have the permissions sorted out, you need to determine what
paths the commits being pushed have modified, so you can make sure the user
who’s pushing has access to all of them.
You can pretty easily see what files have been modified in a single commit
with the --name-only option to the git log command (mentioned briefly in
Chapter 2):
$ git log -1 --name-only --pretty=format:'' 9f585d
README
lib/test.rb
If you use the ACL structure returned from the get_acl_access_data
method and check it against the listed files in each of the commits, you can de-
termine whether the user has access to push all of their commits:
# only allows certain users to modify certain subdirectories in a project
def check_directory_perms
access = get_acl_access_data('acl')
# see if anyone is trying to push something they can't
new_commits = `git rev-list #{$oldrev}..#{$newrev}`.split("\n")
new_commits.each do |rev|
files_modified = `git log -1 --name-only --pretty=format:'' #{rev}`.split("\n")
files_modified.each do |path|
next if path.size == 0
has_file_access = false
access[$user].each do |access_path|
An Example Git-Enforced Policy
413

if !access_path # user has access to everything
|| (path.start_with? access_path) # access to this path
has_file_access = true
end
end
if !has_file_access
puts "[POLICY] You do not have access to push to #{path}"
exit 1
end
end
end
end
check_directory_perms
You get a list of new commits being pushed to your server with git rev-
list. Then, for each of those commits, you find which files are modified and
make sure the user who’s pushing has access to all the paths being modified.
Now your users can’t push any commits with badly formed messages or with
modified files outside of their designated paths.
TESTING IT OUT
If you run chmod u+x .git/hooks/update, which is the file into which you
should have put all this code, and then try to push a commit with a non-
compliant message, you get something like this:
$ git push -f origin master
Counting objects: 5, done.
Compressing objects: 100% (3/3), done.
Writing objects: 100% (3/3), 323 bytes, done.
Total 3 (delta 1), reused 0 (delta 0)
Unpacking objects: 100% (3/3), done.
Enforcing Policies...
(refs/heads/master) (8338c5) (c5b616)
[POLICY] Your message is not formatted correctly
error: hooks/update exited with error code 1
error: hook declined to update refs/heads/master
To git@gitserver:project.git
! [remote rejected] master -> master (hook declined)
error: failed to push some refs to 'git@gitserver:project.git'
There are a couple of interesting things here. First, you see this where the
hook starts running.
CHAPTER 8: Customizing Git
414
Enforcing Policies...
(refs/heads/master) (fb8c72) (c56860)
Remember that you printed that out at the very beginning of your update
script. Anything your script echoes to stdout will be transferred to the client.
The next thing you’ll notice is the error message.
[POLICY] Your message is not formatted correctly
error: hooks/update exited with error code 1
error: hook declined to update refs/heads/master
The first line was printed out by you, the other two were Git telling you that
the update script exited non-zero and that is what is declining your push. Last-
ly, you have this:
To git@gitserver:project.git
! [remote rejected] master -> master (hook declined)
error: failed to push some refs to 'git@gitserver:project.git'
You’ll see a remote rejected message for each reference that your hook de-
clined, and it tells you that it was declined specifically because of a hook fail-
ure.
Furthermore, if someone tries to edit a file they don’t have access to and
push a commit containing it, they will see something similar. For instance, if a
documentation author tries to push a commit modifying something in the lib
directory, they see
[POLICY] You do not have access to push to lib/test.rb
From now on, as long as that update script is there and executable, your
repository will never have a commit message without your pattern in it, and
your users will be sandboxed.
Client-Side Hooks
The downside to this approach is the whining that will inevitably result when
your users’ commit pushes are rejected. Having their carefully craed work re-
jected at the last minute can be extremely frustrating and confusing; and fur-
thermore, they will have to edit their history to correct it, which isn’t always for
the faint of heart.
The answer to this dilemma is to provide some client-side hooks that users
can run to notify them when they’re doing something that the server is likely to
reject. That way, they can correct any problems before committing and before
An Example Git-Enforced Policy
415

those issues become more diicult to fix. Because hooks aren’t transferred with
a clone of a project, you must distribute these scripts some other way and then
have your users copy them to their .git/hooks directory and make them exe-
cutable. You can distribute these hooks within the project or in a separate
project, but Git won’t set them up automatically.
To begin, you should check your commit message just before each commit is
recorded, so you know the server won’t reject your changes due to badly for-
matted commit messages. To do this, you can add the commit-msg hook. If you
have it read the message from the file passed as the first argument and com-
pare that to the pattern, you can force Git to abort the commit if there is no
match:
#!/usr/bin/env ruby
message_file = ARGV[0]
message = File.read(message_file)
$regex = /\[ref: (\d+)\]/
if !$regex.match(message)
puts "[POLICY] Your message is not formatted correctly"
exit 1
end
If that script is in place (in .git/hooks/commit-msg) and executable, and
you commit with a message that isn’t properly formatted, you see this:
$ git commit -am 'test'
[POLICY] Your message is not formatted correctly
No commit was completed in that instance. However, if your message con-
tains the proper pattern, Git allows you to commit:
$ git commit -am 'test [ref: 132]'
[master e05c914] test [ref: 132]
1 file changed, 1 insertions(+), 0 deletions(-)
Next, you want to make sure you aren’t modifying files that are outside your
ACL scope. If your project’s .git directory contains a copy of the ACL file you
used previously, then the following pre-commit script will enforce those con-
straints for you:
#!/usr/bin/env ruby
CHAPTER 8: Customizing Git
416
$user = ENV['USER']
# [ insert acl_access_data method from above ]
# only allows certain users to modify certain subdirectories in a project
def check_directory_perms
access = get_acl_access_data('.git/acl')
files_modified = `git diff-index --cached --name-only HEAD`.split("\n")
files_modified.each do |path|
next if path.size == 0
has_file_access = false
access[$user].each do |access_path|
if !access_path || (path.index(access_path) == 0)
has_file_access = true
end
if !has_file_access
puts "[POLICY] You do not have access to push to #{path}"
exit 1
end
end
end
check_directory_perms
This is roughly the same script as the server-side part, but with two impor-
tant dierences. First, the ACL file is in a dierent place, because this script runs
from your working directory, not from your .git directory. You have to change
the path to the ACL file from this
access = get_acl_access_data('acl')
to this:
access = get_acl_access_data('.git/acl')
The other important dierence is the way you get a listing of the files that
have been changed. Because the server-side method looks at the log of com-
mits, and, at this point, the commit hasn’t been recorded yet, you must get your
file listing from the staging area instead. Instead of
files_modified = `git log -1 --name-only --pretty=format:'' #{ref}`
you have to use
files_modified = `git diff-index --cached --name-only HEAD`
An Example Git-Enforced Policy
417
But those are the only two dierences – otherwise, the script works the
same way. One caveat is that it expects you to be running locally as the same
user you push as to the remote machine. If that is dierent, you must set the
$user variable manually.
One other thing we can do here is make sure the user doesn’t push non-fast-
forwarded references. To get a reference that isn’t a fast-forward, you either
have to rebase past a commit you’ve already pushed up or try pushing a dier-
ent local branch up to the same remote branch.
Presumably, the server is already configured with receive.denyDeletes
and receive.denyNonFastForwards to enforce this policy, so the only acci-
dental thing you can try to catch is rebasing commits that have already been
pushed.
Here is an example pre-rebase script that checks for that. It gets a list of all
the commits you’re about to rewrite and checks whether they exist in any of
your remote references. If it sees one that is reachable from one of your remote
references, it aborts the rebase.
#!/usr/bin/env ruby
base_branch = ARGV[0]
if ARGV[1]
topic_branch = ARGV[1]
else
topic_branch = "HEAD"
end
target_shas = `git rev-list #{base_branch}..#{topic_branch}`.split("\n")
remote_refs = `git branch -r`.split("\n").map { |r| r.strip }
target_shas.each do |sha|
remote_refs.each do |remote_ref|
shas_pushed = `git rev-list ^#{sha}^@ refs/remotes/#{remote_ref}`
if shas_pushed.split("\n").include?(sha)
puts "[POLICY] Commit #{sha} has already been pushed to #{remote_ref}"
exit 1
end
end
end
This script uses a syntax that wasn’t covered in the Revision Selection sec-
tion of Chapter 6. You get a list of commits that have already been pushed up by
running this:
`git rev-list ^#{sha}^@ refs/remotes/#{remote_ref}`
CHAPTER 8: Customizing Git
418
The SHA^@ syntax resolves to all the parents of that commit. You’re looking
for any commit that is reachable from the last commit on the remote and that
isn’t reachable from any parent of any of the SHA-1s you’re trying to push up –
meaning it’s a fast-forward.
The main drawback to this approach is that it can be very slow and is oen
unnecessary – if you don’t try to force the push with -f, the server will warn you
and not accept the push. However, it’s an interesting exercise and can in theory
help you avoid a rebase that you might later have to go back and fix.
Summary
We’ve covered most of the major ways that you can customize your Git client
and server to best fit your workflow and projects. You’ve learned about all sorts
of configuration settings, file-based attributes, and event hooks, and you’ve
built an example policy-enforcing server. You should now be able to make Git fit
nearly any workflow you can dream up.
Summary
419
Git and Other Systems
The world isn’t perfect. Usually, you can’t immediately switch every project you
come in contact with to Git. Sometimes you’re stuck on a project using another
VCS, and wish it was Git. We’ll spend the first part of this chapter learning about
ways to use Git as a client when the project you’re working on is hosted in a
dierent system.
At some point, you may want to convert your existing project to Git. The sec-
ond part of this chapter covers how to migrate your project into Git from several
specific systems, as well as a method that will work if no pre-built import tool
exists.
Git as a Client
Git provides such a nice experience for developers that many people have fig-
ured out how to use it on their workstation, even if the rest of their team is us-
ing an entirely dierent VCS. There are a number of these adapters, called
“bridges,” available. Here we’ll cover the ones you’re most likely to run into in
the wild.
Git and Subversion
A large fraction of open source development projects and a good number of
corporate projects use Subversion to manage their source code. It’s been
around for more than a decade, and for most of that time was the de facto VCS
choice for open-source projects. It’s also very similar in many ways to CVS,
which was the big boy of the source-control world before that.
One of Git’s great features is a bidirectional bridge to Subversion called git
svn. This tool allows you to use Git as a valid client to a Subversion server, so
you can use all the local features of Git and then push to a Subversion server as
if you were using Subversion locally. This means you can do local branching
and merging, use the staging area, use rebasing and cherry-picking, and so on,
421
9

while your collaborators continue to work in their dark and ancient ways. It’s a
good way to sneak Git into the corporate environment and help your fellow de-
velopers become more eicient while you lobby to get the infrastructure
changed to support Git fully. The Subversion bridge is the gateway drug to the
DVCS world.
GIT SVN
The base command in Git for all the Subversion bridging commands is git
svn. It takes quite a few commands, so we’ll show the most common while go-
ing through a few simple workflows.
It’s important to note that when you’re using git svn, you’re interacting
with Subversion, which is a system that works very dierently from Git. Al-
though you can do local branching and merging, it’s generally best to keep your
history as linear as possible by rebasing your work, and avoiding doing things
like simultaneously interacting with a Git remote repository.
Don’t rewrite your history and try to push again, and don’t push to a parallel
Git repository to collaborate with fellow Git developers at the same time. Sub-
version can have only a single linear history, and confusing it is very easy. If
you’re working with a team, and some are using SVN and others are using Git,
make sure everyone is using the SVN server to collaborate – doing so will make
your life easier.
SETTING UP
To demonstrate this functionality, you need a typical SVN repository that you
have write access to. If you want to copy these examples, you’ll have to make a
writeable copy of my test repository. In order to do that easily, you can use a
tool called svnsync that comes with Subversion. For these tests, we created a
new Subversion repository on Google Code that was a partial copy of the pro-
tobuf project, which is a tool that encodes structured data for network trans-
mission.
To follow along, you first need to create a new local Subversion repository:
$ mkdir /tmp/test-svn
$ svnadmin create /tmp/test-svn
Then, enable all users to change revprops – the easy way is to add a pre-
revprop-change script that always exits 0:
CHAPTER 9: Git and Other Systems
422

$ cat /tmp/test-svn/hooks/pre-revprop-change
#!/bin/sh
exit 0;
$ chmod +x /tmp/test-svn/hooks/pre-revprop-change
You can now sync this project to your local machine by calling svnsync in-
it with the to and from repositories.
$ svnsync init file:///tmp/test-svn \
http://progit-example.googlecode.com/svn/
This sets up the properties to run the sync. You can then clone the code by
running
$ svnsync sync file:///tmp/test-svn
Committed revision 1.
Copied properties for revision 1.
Transmitting file data .............................[...]
Committed revision 2.
Copied properties for revision 2.
[…]
Although this operation may take only a few minutes, if you try to copy the
original repository to another remote repository instead of a local one, the pro-
cess will take nearly an hour, even though there are fewer than 100 commits.
Subversion has to clone one revision at a time and then push it back into anoth-
er repository – it’s ridiculously ineicient, but it’s the only easy way to do this.
GETTING STARTED
Now that you have a Subversion repository to which you have write access, you
can go through a typical workflow. You’ll start with the git svn clone com-
mand, which imports an entire Subversion repository into a local Git repository.
Remember that if you’re importing from a real hosted Subversion repository,
you should replace the file:///tmp/test-svn here with the URL of your
Subversion repository:
$ git svn clone file:///tmp/test-svn -T trunk -b branches -t tags
Initialized empty Git repository in /private/tmp/progit/test-svn/.git/
r1 = dcbfb5891860124cc2e8cc616cded42624897125 (refs/remotes/origin/trunk)
A m4/acx_pthread.m4
Git as a Client
423

A m4/stl_hash.m4
A java/src/test/java/com/google/protobuf/UnknownFieldSetTest.java
A java/src/test/java/com/google/protobuf/WireFormatTest.java
…
r75 = 556a3e1e7ad1fde0a32823fc7e4d046bcfd86dae (refs/remotes/origin/trunk)
Found possible branch point: file:///tmp/test-svn/trunk => file:///tmp/test-svn/branches/my-calc-branch, 75
Found branch parent: (refs/remotes/origin/my-calc-branch) 556a3e1e7ad1fde0a32823fc7e4d046bcfd86dae
Following parent with do_switch
Successfully followed parent
r76 = 0fb585761df569eaecd8146c71e58d70147460a2 (refs/remotes/origin/my-calc-branch)
Checked out HEAD:
file:///tmp/test-svn/trunk r75
This runs the equivalent of two commands – git svn init followed by git
svn fetch – on the URL you provide. This can take a while. The test project
has only about 75 commits and the codebase isn’t that big, but Git has to check
out each version, one at a time, and commit it individually. For a project with
hundreds or thousands of commits, this can literally take hours or even days to
finish.
The -T trunk -b branches -t tags part tells Git that this Subversion
repository follows the basic branching and tagging conventions. If you name
your trunk, branches, or tags dierently, you can change these options. Be-
cause this is so common, you can replace this entire part with -s, which means
standard layout and implies all those options. The following command is equiv-
alent:
$ git svn clone file:///tmp/test-svn -s
At this point, you should have a valid Git repository that has imported your
branches and tags:
$ git branch -a
* master
remotes/origin/my-calc-branch
remotes/origin/tags/2.0.2
remotes/origin/tags/release-2.0.1
remotes/origin/tags/release-2.0.2
remotes/origin/tags/release-2.0.2rc1
remotes/origin/trunk
Note how this tool manages Subversion tags as remote refs. Let’s take a clos-
er look with the Git plumbing command show-ref:
CHAPTER 9: Git and Other Systems
424

$ git show-ref
556a3e1e7ad1fde0a32823fc7e4d046bcfd86dae refs/heads/master
0fb585761df569eaecd8146c71e58d70147460a2 refs/remotes/origin/my-calc-branch
bfd2d79303166789fc73af4046651a4b35c12f0b refs/remotes/origin/tags/2.0.2
285c2b2e36e467dd4d91c8e3c0c0e1750b3fe8ca refs/remotes/origin/tags/release-2.0.1
cbda99cb45d9abcb9793db1d4f70ae562a969f1e refs/remotes/origin/tags/release-2.0.2
a9f074aa89e826d6f9d30808ce5ae3ffe711feda refs/remotes/origin/tags/release-2.0.2rc1
556a3e1e7ad1fde0a32823fc7e4d046bcfd86dae refs/remotes/origin/trunk
Git doesn’t do this when it clones from a Git server; here’s what a repository
with tags looks like aer a fresh clone:
$ git show-ref
c3dcbe8488c6240392e8a5d7553bbffcb0f94ef0 refs/remotes/origin/master
32ef1d1c7cc8c603ab78416262cc421b80a8c2df refs/remotes/origin/branch-1
75f703a3580a9b81ead89fe1138e6da858c5ba18 refs/remotes/origin/branch-2
23f8588dde934e8f33c263c6d8359b2ae095f863 refs/tags/v0.1.0
7064938bd5e7ef47bfd79a685a62c1e2649e2ce7 refs/tags/v0.2.0
6dcb09b5b57875f334f61aebed695e2e4193db5e refs/tags/v1.0.0
Git fetches the tags directly into refs/tags, rather than treating them re-
mote branches.
COMMITTING BACK TO SUBVERSION
Now that you have a working repository, you can do some work on the project
and push your commits back upstream, using Git eectively as a SVN client. If
you edit one of the files and commit it, you have a commit that exists in Git lo-
cally that doesn’t exist on the Subversion server:
$ git commit -am 'Adding git-svn instructions to the README'
[master 4af61fd] Adding git-svn instructions to the README
1 file changed, 5 insertions(+)
Next, you need to push your change upstream. Notice how this changes the
way you work with Subversion – you can do several commits oline and then
push them all at once to the Subversion server. To push to a Subversion server,
you run the git svn dcommit command:
$ git svn dcommit
Committing to file:///tmp/test-svn/trunk ...
M README.txt
Git as a Client
425

Committed r77
M README.txt
r77 = 95e0222ba6399739834380eb10afcd73e0670bc5 (refs/remotes/origin/trunk)
No changes between 4af61fd05045e07598c553167e0f31c84fd6ffe1 and refs/remotes/origin/trunk
Resetting to the latest refs/remotes/origin/trunk
This takes all the commits you’ve made on top of the Subversion server
code, does a Subversion commit for each, and then rewrites your local Git com-
mit to include a unique identifier. This is important because it means that all
the SHA-1 checksums for your commits change. Partly for this reason, working
with Git-based remote versions of your projects concurrently with a Subversion
server isn’t a good idea. If you look at the last commit, you can see the new
git-svn-id that was added:
$ git log -1
commit 95e0222ba6399739834380eb10afcd73e0670bc5
Author: ben <ben@0b684db3-b064-4277-89d1-21af03df0a68>
Date: Thu Jul 24 03:08:36 2014 +0000
Adding git-svn instructions to the README
git-svn-id: file:///tmp/test-svn/trunk@77 0b684db3-b064-4277-89d1-21af03df0a68
Notice that the SHA-1 checksum that originally started with 4af61fd when
you committed now begins with 95e0222. If you want to push to both a Git
server and a Subversion server, you have to push (dcommit) to the Subversion
server first, because that action changes your commit data.
PULLING IN NEW CHANGES
If you’re working with other developers, then at some point one of you will
push, and then the other one will try to push a change that conflicts. That
change will be rejected until you merge in their work. In git svn, it looks like
this:
$ git svn dcommit
Committing to file:///tmp/test-svn/trunk ...
ERROR from SVN:
Transaction is out of date: File '/trunk/README.txt' is out of date
W: d5837c4b461b7c0e018b49d12398769d2bfc240a and refs/remotes/origin/trunk differ, using rebase:
:100644 100644 f414c433af0fd6734428cf9d2a9fd8ba00ada145 c80b6127dd04f5fcda218730ddf3a2da4eb39138 M README.txt
Current branch master is up to date.
CHAPTER 9: Git and Other Systems
426

ERROR: Not all changes have been committed into SVN, however the committed
ones (if any) seem to be successfully integrated into the working tree.
Please see the above messages for details.
To resolve this situation, you can run git svn rebase, which pulls down
any changes on the server that you don’t have yet and rebases any work you
have on top of what is on the server:
$ git svn rebase
Committing to file:///tmp/test-svn/trunk ...
ERROR from SVN:
Transaction is out of date: File '/trunk/README.txt' is out of date
W: eaa029d99f87c5c822c5c29039d19111ff32ef46 and refs/remotes/origin/trunk differ, using rebase:
:100644 100644 65536c6e30d263495c17d781962cfff12422693a b34372b25ccf4945fe5658fa381b075045e7702a M README.txt
First, rewinding head to replay your work on top of it...
Applying: update foo
Using index info to reconstruct a base tree...
M README.txt
Falling back to patching base and 3-way merge...
Auto-merging README.txt
ERROR: Not all changes have been committed into SVN, however the committed
ones (if any) seem to be successfully integrated into the working tree.
Please see the above messages for details.
Now, all your work is on top of what is on the Subversion server, so you can
successfully dcommit:
$ git svn dcommit
Committing to file:///tmp/test-svn/trunk ...
M README.txt
Committed r85
M README.txt
r85 = 9c29704cc0bbbed7bd58160cfb66cb9191835cd8 (refs/remotes/origin/trunk)
No changes between 5762f56732a958d6cfda681b661d2a239cc53ef5 and refs/remotes/origin/trunk
Resetting to the latest refs/remotes/origin/trunk
Note that unlike Git, which requires you to merge upstream work you don’t
yet have locally before you can push, git svn makes you do that only if the
changes conflict (much like how Subversion works). If someone else pushes a
change to one file and then you push a change to another file, your dcommit
will work fine:
Git as a Client
427

$ git svn dcommit
Committing to file:///tmp/test-svn/trunk ...
M configure.ac
Committed r87
M autogen.sh
r86 = d8450bab8a77228a644b7dc0e95977ffc61adff7 (refs/remotes/origin/trunk)
M configure.ac
r87 = f3653ea40cb4e26b6281cec102e35dcba1fe17c4 (refs/remotes/origin/trunk)
W: a0253d06732169107aa020390d9fefd2b1d92806 and refs/remotes/origin/trunk differ, using rebase:
:100755 100755 efa5a59965fbbb5b2b0a12890f1b351bb5493c18 e757b59a9439312d80d5d43bb65d4a7d0389ed6d M autogen.sh
First, rewinding head to replay your work on top of it...
This is important to remember, because the outcome is a project state that
didn’t exist on either of your computers when you pushed. If the changes are
incompatible but don’t conflict, you may get issues that are diicult to diag-
nose. This is dierent than using a Git server – in Git, you can fully test the state
on your client system before publishing it, whereas in SVN, you can’t ever be
certain that the states immediately before commit and aer commit are identi-
cal.
You should also run this command to pull in changes from the Subversion
server, even if you’re not ready to commit yourself. You can run git svn
fetch to grab the new data, but git svn rebase does the fetch and then up-
dates your local commits.
$ git svn rebase
M autogen.sh
r88 = c9c5f83c64bd755368784b444bc7a0216cc1e17b (refs/remotes/origin/trunk)
First, rewinding head to replay your work on top of it...
Fast-forwarded master to refs/remotes/origin/trunk.
Running git svn rebase every once in a while makes sure your code is al-
ways up to date. You need to be sure your working directory is clean when you
run this, though. If you have local changes, you must either stash your work or
temporarily commit it before running git svn rebase – otherwise, the com-
mand will stop if it sees that the rebase will result in a merge conflict.
GIT BRANCHING ISSUES
When you’ve become comfortable with a Git workflow, you’ll likely create topic
branches, do work on them, and then merge them in. If you’re pushing to a
Subversion server via git svn, you may want to rebase your work onto a sin-
gle branch each time instead of merging branches together. The reason to pre-
CHAPTER 9: Git and Other Systems
428

fer rebasing is that Subversion has a linear history and doesn’t deal with merg-
es like Git does, so git svn follows only the first parent when converting the
snapshots into Subversion commits.
Suppose your history looks like the following: you created an experiment
branch, did two commits, and then merged them back into master. When you
dcommit, you see output like this:
$ git svn dcommit
Committing to file:///tmp/test-svn/trunk ...
M CHANGES.txt
Committed r89
M CHANGES.txt
r89 = 89d492c884ea7c834353563d5d913c6adf933981 (refs/remotes/origin/trunk)
M COPYING.txt
M INSTALL.txt
Committed r90
M INSTALL.txt
M COPYING.txt
r90 = cb522197870e61467473391799148f6721bcf9a0 (refs/remotes/origin/trunk)
No changes between 71af502c214ba13123992338569f4669877f55fd and refs/remotes/origin/trunk
Resetting to the latest refs/remotes/origin/trunk
Running dcommit on a branch with merged history works fine, except that
when you look at your Git project history, it hasn’t rewritten either of the com-
mits you made on the experiment branch – instead, all those changes appear
in the SVN version of the single merge commit.
When someone else clones that work, all they see is the merge commit with
all the work squashed into it, as though you ran git merge --squash; they
don’t see the commit data about where it came from or when it was commit-
ted.
SUBVERSION BRANCHING
Branching in Subversion isn’t the same as branching in Git; if you can avoid us-
ing it much, that’s probably best. However, you can create and commit to
branches in Subversion using git svn.
CREATING A NEW SVN BRANCH
To create a new branch in Subversion, you run git svn branch [branch-
name]:
Git as a Client
429

$ git svn branch opera
Copying file:///tmp/test-svn/trunk at r90 to file:///tmp/test-svn/branches/opera...
Found possible branch point: file:///tmp/test-svn/trunk => file:///tmp/test-svn/branches/opera, 90
Found branch parent: (refs/remotes/origin/opera) cb522197870e61467473391799148f6721bcf9a0
Following parent with do_switch
Successfully followed parent
r91 = f1b64a3855d3c8dd84ee0ef10fa89d27f1584302 (refs/remotes/origin/opera)
This does the equivalent of the svn copy trunk branches/opera com-
mand in Subversion and operates on the Subversion server. It’s important to
note that it doesn’t check you out into that branch; if you commit at this point,
that commit will go to trunk on the server, not opera.
SWITCHING ACTIVE BRANCHES
Git figures out what branch your dcommits go to by looking for the tip of any of
your Subversion branches in your history – you should have only one, and it
should be the last one with a git-svn-id in your current branch history.
If you want to work on more than one branch simultaneously, you can set up
local branches to dcommit to specific Subversion branches by starting them at
the imported Subversion commit for that branch. If you want an opera branch
that you can work on separately, you can run
$ git branch opera remotes/origin/opera
Now, if you want to merge your opera branch into trunk (your master
branch), you can do so with a normal git merge. But you need to provide a
descriptive commit message (via -m), or the merge will say “Merge branch op-
era” instead of something useful.
Remember that although you’re using git merge to do this operation, and
the merge likely will be much easier than it would be in Subversion (because Git
will automatically detect the appropriate merge base for you), this isn’t a nor-
mal Git merge commit. You have to push this data back to a Subversion server
that can’t handle a commit that tracks more than one parent; so, aer you push
it up, it will look like a single commit that squashed in all the work of another
branch under a single commit. Aer you merge one branch into another, you
can’t easily go back and continue working on that branch, as you normally can
in Git. The dcommit command that you run erases any information that says
what branch was merged in, so subsequent merge-base calculations will be
wrong – the dcommit makes your git merge result look like you ran git
CHAPTER 9: Git and Other Systems
430

merge --squash. Unfortunately, there’s no good way to avoid this situation –
Subversion can’t store this information, so you’ll always be crippled by its limi-
tations while you’re using it as your server. To avoid issues, you should delete
the local branch (in this case, opera) aer you merge it into trunk.
SUBVERSION COMMANDS
The git svn toolset provides a number of commands to help ease the transi-
tion to Git by providing some functionality that’s similar to what you had in
Subversion. Here are a few commands that give you what Subversion used to.
SVN Style History
If you’re used to Subversion and want to see your history in SVN output
style, you can run git svn log to view your commit history in SVN formatting:
$ git svn log
------------------------------------------------------------------------
r87 | schacon | 2014-05-02 16:07:37 -0700 (Sat, 02 May 2014) | 2 lines
autogen change
------------------------------------------------------------------------
r86 | schacon | 2014-05-02 16:00:21 -0700 (Sat, 02 May 2014) | 2 lines
Merge branch 'experiment'
------------------------------------------------------------------------
r85 | schacon | 2014-05-02 16:00:09 -0700 (Sat, 02 May 2014) | 2 lines
updated the changelog
You should know two important things about git svn log. First, it works
oline, unlike the real svn log command, which asks the Subversion server for
the data. Second, it only shows you commits that have been committed up to
the Subversion server. Local Git commits that you haven’t dcommited don’t
show up; neither do commits that people have made to the Subversion server
in the meantime. It’s more like the last known state of the commits on the Sub-
version server.
SVN Annotation
Much as the git svn log command simulates the svn log command o-
line, you can get the equivalent of svn annotate by running git svn blame
[FILE]. The output looks like this:
Git as a Client
431

$ git svn blame README.txt
2 temporal Protocol Buffers - Google's data interchange format
2 temporal Copyright 2008 Google Inc.
2 temporal http://code.google.com/apis/protocolbuffers/
2 temporal
22 temporal C++ Installation - Unix
22 temporal =======================
2 temporal
79 schacon Committing in git-svn.
78 schacon
2 temporal To build and install the C++ Protocol Buffer runtime and the Protocol
2 temporal Buffer compiler (protoc) execute the following:
2 temporal
Again, it doesn’t show commits that you did locally in Git or that have been
pushed to Subversion in the meantime.
SVN Server Information
You can also get the same sort of information that svn info gives you by
running git svn info:
$ git svn info
Path: .
URL: https://schacon-test.googlecode.com/svn/trunk
Repository Root: https://schacon-test.googlecode.com/svn
Repository UUID: 4c93b258-373f-11de-be05-5f7a86268029
Revision: 87
Node Kind: directory
Schedule: normal
Last Changed Author: schacon
Last Changed Rev: 87
Last Changed Date: 2009-05-02 16:07:37 -0700 (Sat, 02 May 2009)
This is like blame and log in that it runs oline and is up to date only as of
the last time you communicated with the Subversion server.
Ignoring What Subversion Ignores
If you clone a Subversion repository that has svn:ignore properties set
anywhere, you’ll likely want to set corresponding .gitignore files so you
don’t accidentally commit files that you shouldn’t. git svn has two com-
mands to help with this issue. The first is git svn create-ignore, which au-
tomatically creates corresponding .gitignore files for you so your next com-
mit can include them.
CHAPTER 9: Git and Other Systems
432

The second command is git svn show-ignore, which prints to stdout the
lines you need to put in a .gitignore file so you can redirect the output into
your project exclude file:
$ git svn show-ignore > .git/info/exclude
That way, you don’t litter the project with .gitignore files. This is a good
option if you’re the only Git user on a Subversion team, and your teammates
don’t want .gitignore files in the project.
GIT-SVN SUMMARY
The git svn tools are useful if you’re stuck with a Subversion server, or are
otherwise in a development environment that necessitates running a Subver-
sion server. You should consider it crippled Git, however, or you’ll hit issues in
translation that may confuse you and your collaborators. To stay out of trouble,
try to follow these guidelines:
•Keep a linear Git history that doesn’t contain merge commits made by
git merge. Rebase any work you do outside of your mainline branch
back onto it; don’t merge it in.
•Don’t set up and collaborate on a separate Git server. Possibly have one
to speed up clones for new developers, but don’t push anything to it that
doesn’t have a git-svn-id entry. You may even want to add a pre-
receive hook that checks each commit message for a git-svn-id and
rejects pushes that contain commits without it.
If you follow those guidelines, working with a Subversion server can be more
bearable. However, if it’s possible to move to a real Git server, doing so can gain
your team a lot more.
Git and Mercurial
The DVCS universe is larger than just Git. In fact, there are many other systems
in this space, each with their own angle on how to do distributed version con-
trol correctly. Apart from Git, the most popular is Mercurial, and the two are
very similar in many respects.
The good news, if you prefer Git’s client-side behavior but are working with a
project whose source code is controlled with Mercurial, is that there’s a way to
use Git as a client for a Mercurial-hosted repository. Since the way Git talks to
server repositories is through remotes, it should come as no surprise that this
Git as a Client
433

bridge is implemented as a remote helper. The project’s name is git-remote-hg,
and it can be found at https://github.com/felipec/git-remote-hg.
GIT-REMOTE-HG
First, you need to install git-remote-hg. This basically entails dropping its file
somewhere in your path, like so:
$ curl -o ~/bin/git-remote-hg \
https://raw.githubusercontent.com/felipec/git-remote-hg/master/git-remote-hg
$ chmod +x ~/bin/git-remote-hg
…assuming ~/bin is in your $PATH. Git-remote-hg has one other dependen-
cy: the mercurial library for Python. If you have Python installed, this is as
simple as:
$ pip install mercurial
(If you don’t have Python installed, visit https://www.python.org/ and get it
first.)
The last thing you’ll need is the Mercurial client. Go to http://mercuri-
al.selenic.com/ and install it if you haven’t already.
Now you’re ready to rock. All you need is a Mercurial repository you can push
to. Fortunately, every Mercurial repository can act this way, so we’ll just use the
“hello world” repository everyone uses to learn Mercurial:
$ hg clone http://selenic.com/repo/hello /tmp/hello
GETTING STARTED
Now that we have a suitable “server-side” repository, we can go through a typi-
cal workflow. As you’ll see, these two systems are similar enough that there
isn’t much friction.
As always with Git, first we clone:
$ git clone hg::/tmp/hello /tmp/hello-git
$ cd /tmp/hello-git
$ git log --oneline --graph --decorate
CHAPTER 9: Git and Other Systems
434

* ac7955c (HEAD, origin/master, origin/branches/default, origin/HEAD, refs/hg/origin/branches/default, refs/hg/origin/bookmarks/master, master) Create a makefile
* 65bb417 Create a standard "hello, world" program
You’ll notice that working with a Mercurial repository uses the standard git
clone command. That’s because git-remote-hg is working at a fairly low level,
using a similar mechanism to how Git’s HTTP/S protocol is implemented (re-
mote helpers). Since Git and Mercurial are both designed for every client to
have a full copy of the repository history, this command makes a full clone, in-
cluding all the project’s history, and does it fairly quickly.
The log command shows two commits, the latest of which is pointed to by a
whole slew of refs. It turns out some of these aren’t actually there. Let’s take a
look at what’s actually in the .git directory:
$ tree .git/refs
.git/refs
├── heads
│ └── master
├── hg
│ └── origin
│ ├── bookmarks
│ │ └── master
│ └── branches
│ └── default
├── notes
│ └── hg
├── remotes
│ └── origin
│ └── HEAD
└── tags
9 directories, 5 files
Git-remote-hg is trying to make things more idiomatically Git-esque, but un-
der the hood it’s managing the conceptual mapping between two slightly dier-
ent systems. The refs/hg directory is where the actual remote refs are stored.
For example, the refs/hg/origin/branches/default is a Git ref file that
contains the SHA-1 starting with “ac7955c”, which is the commit that master
points to. So the refs/hg directory is kind of like a fake refs/remotes/
origin, but it has the added distinction between bookmarks and branches.
The notes/hg file is the starting point for how git-remote-hg maps Git com-
mit hashes to Mercurial changeset IDs. Let’s explore a bit:
Git as a Client
435

$ cat notes/hg
d4c10386...
$ git cat-file -p d4c10386...
tree 1781c96...
author remote-hg <> 1408066400 -0800
committer remote-hg <> 1408066400 -0800
Notes for master
$ git ls-tree 1781c96...
100644 blob ac9117f... 65bb417...
100644 blob 485e178... ac7955c...
$ git cat-file -p ac9117f
0a04b987be5ae354b710cefeba0e2d9de7ad41a9
So refs/notes/hg points to a tree, which in the Git object database is a list
of other objects with names. git ls-tree outputs the mode, type, object
hash, and filename for items inside a tree. Once we dig down to one of the tree
items, we find that inside it is a blob named “ac9117f” (the SHA-1 hash of the
commit pointed to by master), with contents “0a04b98” (which is the ID of the
Mercurial changeset at the tip of the default branch).
The good news is that we mostly don’t have to worry about all of this. The
typical workflow won’t be very dierent from working with a Git remote.
There’s one more thing we should attend to before we continue: ignores.
Mercurial and Git use a very similar mechanism for this, but it’s likely you don’t
want to actually commit a .gitignore file into a Mercurial repository. Fortu-
nately, Git has a way to ignore files that’s local to an on-disk repository, and the
Mercurial format is compatible with Git, so you just have to copy it over:
$ cp .hgignore .git/info/exclude
The .git/info/exclude file acts just like a .gitignore, but isn’t included
in commits.
WORKFLOW
Let’s assume we’ve done some work and made some commits on the master
branch, and you’re ready to push it to the remote repository. Here’s what our
repository looks like right now:
CHAPTER 9: Git and Other Systems
436

$ git log --oneline --graph --decorate
* ba04a2a (HEAD, master) Update makefile
* d25d16f Goodbye
* ac7955c (origin/master, origin/branches/default, origin/HEAD, refs/hg/origin/branches/default, refs/hg/origin/bookmarks/master) Create a makefile
* 65bb417 Create a standard "hello, world" program
Our master branch is two commits ahead of origin/master, but those two
commits exist only on our local machine. Let’s see if anyone else has been do-
ing important work at the same time:
$ git fetch
From hg::/tmp/hello
ac7955c..df85e87 master -> origin/master
ac7955c..df85e87 branches/default -> origin/branches/default
$ git log --oneline --graph --decorate --all
* 7b07969 (refs/notes/hg) Notes for default
* d4c1038 Notes for master
* df85e87 (origin/master, origin/branches/default, origin/HEAD, refs/hg/origin/branches/default, refs/hg/origin/bookmarks/master) Add some documentation
| * ba04a2a (HEAD, master) Update makefile
| * d25d16f Goodbye
|/
* ac7955c Create a makefile
* 65bb417 Create a standard "hello, world" program
Since we used the --all flag, we see the “notes” refs that are used internal-
ly by git-remote-hg, but we can ignore them. The rest is what we expected;
origin/master has advanced by one commit, and our history has now di-
verged. Unlike the other systems we work with in this chapter, Mercurial is ca-
pable of handling merges, so we’re not going to do anything fancy.
$ git merge origin/master
Auto-merging hello.c
Merge made by the 'recursive' strategy.
hello.c | 2 +-
1 file changed, 1 insertion(+), 1 deletion(-)
$ git log --oneline --graph --decorate
* 0c64627 (HEAD, master) Merge remote-tracking branch 'origin/master'
|\
| * df85e87 (origin/master, origin/branches/default, origin/HEAD, refs/hg/origin/branches/default, refs/hg/origin/bookmarks/master) Add some documentation
* | ba04a2a Update makefile
* | d25d16f Goodbye
|/
* ac7955c Create a makefile
* 65bb417 Create a standard "hello, world" program
Git as a Client
437

Perfect. We run the tests and everything passes, so we’re ready to share our
work with the rest of the team:
$ git push
To hg::/tmp/hello
df85e87..0c64627 master -> master
That’s it! If you take a look at the Mercurial repository, you’ll see that this did
what we’d expect:
$ hg log -G --style compact
o 5[tip]:4,2 dc8fa4f932b8 2014-08-14 19:33 -0700 ben
|\ Merge remote-tracking branch 'origin/master'
| |
| o 4 64f27bcefc35 2014-08-14 19:27 -0700 ben
| | Update makefile
| |
| o 3:1 4256fc29598f 2014-08-14 19:27 -0700 ben
| | Goodbye
| |
@ | 2 7db0b4848b3c 2014-08-14 19:30 -0700 ben
|/ Add some documentation
|
o 1 82e55d328c8c 2005-08-26 01:21 -0700 mpm
| Create a makefile
|
o 0 0a04b987be5a 2005-08-26 01:20 -0700 mpm
Create a standard "hello, world" program
The changeset numbered 2 was made by Mercurial, and the changesets
numbered 3 and 4 were made by git-remote-hg, by pushing commits made with
Git.
BRANCHES AND BOOKMARKS
Git has only one kind of branch: a reference that moves when commits are
made. In Mercurial, this kind of a reference is called a “bookmark,” and it be-
haves in much the same way as a Git branch.
Mercurial’s concept of a “branch” is more heavyweight. The branch that a
changeset is made on is recorded with the changeset, which means it will al-
ways be in the repository history. Here’s an example of a commit that was made
on the develop branch:
CHAPTER 9: Git and Other Systems
438

$ hg log -l 1
changeset: 6:8f65e5e02793
branch: develop
tag: tip
user: Ben Straub <ben@straub.cc>
date: Thu Aug 14 20:06:38 2014 -0700
summary: More documentation
Note the line that begins with “branch”. Git can’t really replicate this (and
doesn’t need to; both types of branch can be represented as a Git ref), but git-
remote-hg needs to understand the dierence, because Mercurial cares.
Creating Mercurial bookmarks is as easy as creating Git branches. On the Git
side:
$ git checkout -b featureA
Switched to a new branch 'featureA'
$ git push origin featureA
To hg::/tmp/hello
* [new branch] featureA -> featureA
That’s all there is to it. On the Mercurial side, it looks like this:
$ hg bookmarks
featureA 5:bd5ac26f11f9
$ hg log --style compact -G
@ 6[tip] 8f65e5e02793 2014-08-14 20:06 -0700 ben
| More documentation
|
o 5[featureA]:4,2 bd5ac26f11f9 2014-08-14 20:02 -0700 ben
|\ Merge remote-tracking branch 'origin/master'
| |
| o 4 0434aaa6b91f 2014-08-14 20:01 -0700 ben
| | update makefile
| |
| o 3:1 318914536c86 2014-08-14 20:00 -0700 ben
| | goodbye
| |
o | 2 f098c7f45c4f 2014-08-14 20:01 -0700 ben
|/ Add some documentation
|
o 1 82e55d328c8c 2005-08-26 01:21 -0700 mpm
| Create a makefile
|
Git as a Client
439

o 0 0a04b987be5a 2005-08-26 01:20 -0700 mpm
Create a standard "hello, world" program
Note the new [featureA] tag on revision 5. These act exactly like Git
branches on the Git side, with one exception: you can’t delete a bookmark from
the Git side (this is a limitation of remote helpers).
You can work on a “heavyweight” Mercurial branch also: just put a branch in
the branches namespace:
$ git checkout -b branches/permanent
Switched to a new branch 'branches/permanent'
$ vi Makefile
$ git commit -am 'A permanent change'
$ git push origin branches/permanent
To hg::/tmp/hello
* [new branch] branches/permanent -> branches/permanent
Here’s what that looks like on the Mercurial side:
$ hg branches
permanent 7:a4529d07aad4
develop 6:8f65e5e02793
default 5:bd5ac26f11f9 (inactive)
$ hg log -G
o changeset: 7:a4529d07aad4
| branch: permanent
| tag: tip
| parent: 5:bd5ac26f11f9
| user: Ben Straub <ben@straub.cc>
| date: Thu Aug 14 20:21:09 2014 -0700
| summary: A permanent change
|
| @ changeset: 6:8f65e5e02793
|/ branch: develop
| user: Ben Straub <ben@straub.cc>
| date: Thu Aug 14 20:06:38 2014 -0700
| summary: More documentation
|
o changeset: 5:bd5ac26f11f9
|\ bookmark: featureA
| | parent: 4:0434aaa6b91f
| | parent: 2:f098c7f45c4f
| | user: Ben Straub <ben@straub.cc>
| | date: Thu Aug 14 20:02:21 2014 -0700
CHAPTER 9: Git and Other Systems
440

| | summary: Merge remote-tracking branch 'origin/master'
[...]
The branch name “permanent” was recorded with the changeset marked 7.
From the Git side, working with either of these branch styles is the same: just
checkout, commit, fetch, merge, pull, and push as you normally would. One
thing you should know is that Mercurial doesn’t support rewriting history, only
adding to it. Here’s what our Mercurial repository looks like aer an interactive
rebase and a force-push:
$ hg log --style compact -G
o 10[tip] 99611176cbc9 2014-08-14 20:21 -0700 ben
| A permanent change
|
o 9 f23e12f939c3 2014-08-14 20:01 -0700 ben
| Add some documentation
|
o 8:1 c16971d33922 2014-08-14 20:00 -0700 ben
| goodbye
|
| o 7:5 a4529d07aad4 2014-08-14 20:21 -0700 ben
| | A permanent change
| |
| | @ 6 8f65e5e02793 2014-08-14 20:06 -0700 ben
| |/ More documentation
| |
| o 5[featureA]:4,2 bd5ac26f11f9 2014-08-14 20:02 -0700 ben
| |\ Merge remote-tracking branch 'origin/master'
| | |
| | o 4 0434aaa6b91f 2014-08-14 20:01 -0700 ben
| | | update makefile
| | |
+---o 3:1 318914536c86 2014-08-14 20:00 -0700 ben
| | goodbye
| |
| o 2 f098c7f45c4f 2014-08-14 20:01 -0700 ben
|/ Add some documentation
|
o 1 82e55d328c8c 2005-08-26 01:21 -0700 mpm
| Create a makefile
|
o 0 0a04b987be5a 2005-08-26 01:20 -0700 mpm
Create a standard "hello, world" program
Git as a Client
441
Changesets 8, 9, and 10 have been created and belong to the permanent
branch, but the old changesets are still there. This can be very confusing for
your teammates who are using Mercurial, so try to avoid it.
MERCURIAL SUMMARY
Git and Mercurial are similar enough that working across the boundary is fairly
painless. If you avoid changing history that’s le your machine (as is generally
recommended), you may not even be aware that the other end is Mercurial.
Git and Perforce
Perforce is a very popular version-control system in corporate environments.
It’s been around since 1995, which makes it the oldest system covered in this
chapter. As such, it’s designed with the constraints of its day; it assumes you’re
always connected to a single central server, and only one version is kept on the
local disk. To be sure, its features and constraints are well-suited to several spe-
cific problems, but there are lots of projects using Perforce where Git would ac-
tually work better.
There are two options if you’d like to mix your use of Perforce and Git. The
first one we’ll cover is the “Git Fusion” bridge from the makers of Perforce,
which lets you expose subtrees of your Perforce depot as read-write Git reposi-
tories. The second is git-p4, a client-side bridge that lets you use Git as a Per-
force client, without requiring any reconfiguration of the Perforce server.
GIT FUSION
Perforce provides a product called Git Fusion (available at http://
www.perforce.com/git-fusion), which synchronizes a Perforce server with Git
repositories on the server side.
Setting Up
For our examples, we’ll be using the easiest installation method for Git Fu-
sion, which is downloading a virtual machine that runs the Perforce daemon
and Git Fusion. You can get the virtual machine image from http://
www.perforce.com/downloads/Perforce/20-User, and once it’s finished down-
loading, import it into your favorite virtualization soware (we’ll use Virtual-
Box).
Upon first starting the machine, it asks you to customize the password for
three Linux users (root, perforce, and git), and provide an instance name,
which can be used to distinguish this installation from others on the same net-
work. When that has all completed, you’ll see this:
CHAPTER 9: Git and Other Systems
442
FIGURE 9-1
The Git Fusion
virtual machine boot
screen.
You should take note of the IP address that’s shown here, we’ll be using it
later on. Next, we’ll create a Perforce user. Select the “Login” option at the bot-
tom and press enter (or SSH to the machine), and log in as root. Then use
these commands to create a user:
$ p4 -p localhost:1666 -u super user -f john
$ p4 -p localhost:1666 -u john passwd
$ exit
The first one will open a VI editor to customize the user, but you can accept
the defaults by typing :wq and hitting enter. The second one will prompt you to
enter a password twice. That’s all we need to do with a shell prompt, so exit out
of the session.
The next thing you’ll need to do to follow along is to tell Git not to verify SSL
certificates. The Git Fusion image comes with a certificate, but it’s for a domain
that won’t match your virtual machine’s IP address, so Git will reject the HTTPS
connection. If this is going to be a permanent installation, consult the Perforce
Git as a Client
443

Git Fusion manual to install a dierent certificate; for our example purposes,
this will suice:
$ export GIT_SSL_NO_VERIFY=true
Now we can test that everything is working.
$ git clone https://10.0.1.254/Talkhouse
Cloning into 'Talkhouse'...
Username for 'https://10.0.1.254': john
Password for 'https://john@10.0.1.254':
remote: Counting objects: 630, done.
remote: Compressing objects: 100% (581/581), done.
remote: Total 630 (delta 172), reused 0 (delta 0)
Receiving objects: 100% (630/630), 1.22 MiB | 0 bytes/s, done.
Resolving deltas: 100% (172/172), done.
Checking connectivity... done.
The virtual-machine image comes equipped with a sample project that you
can clone. Here we’re cloning over HTTPS, with the john user that we created
above; Git asks for credentials for this connection, but the credential cache will
allow us to skip this step for any subsequent requests.
Fusion Configuration
Once you’ve got Git Fusion installed, you’ll want to tweak the configuration.
This is actually fairly easy to do using your favorite Perforce client; just map
the //.git-fusion directory on the Perforce server into your workspace. The
file structure looks like this:
$ tree
.
├── objects
│ ├── repos
│ │ └── [...]
│ └── trees
│ └── [...]
│
├── p4gf_config
├── repos
│ └── Talkhouse
│ └── p4gf_config
└── users
└── p4gf_usermap
CHAPTER 9: Git and Other Systems
444

498 directories, 287 files
The objects directory is used internally by Git Fusion to map Perforce ob-
jects to Git and vice versa, you won’t have to mess with anything in there.
There’s a global p4gf_config file in this directory, as well as one for each
repository – these are the configuration files that determine how Git Fusion be-
haves. Let’s take a look at the file in the root:
[repo-creation]
charset = utf8
[git-to-perforce]
change-owner = author
enable-git-branch-creation = yes
enable-swarm-reviews = yes
enable-git-merge-commits = yes
enable-git-submodules = yes
preflight-commit = none
ignore-author-permissions = no
read-permission-check = none
git-merge-avoidance-after-change-num = 12107
[perforce-to-git]
http-url = none
ssh-url = none
[@features]
imports = False
chunked-push = False
matrix2 = False
parallel-push = False
[authentication]
email-case-sensitivity = no
We won’t go into the meanings of these flags here, but note that this is just
an INI-formatted text file, much like Git uses for configuration. This file specifies
the global options, which can then be overridden by repository-specific config-
uration files, like repos/Talkhouse/p4gf_config. If you open this file, you’ll
see a [@repo] section with some settings that are dierent from the global de-
faults. You’ll also see sections that look like this:
[Talkhouse-master]
git-branch-name = master
view = //depot/Talkhouse/main-dev/... ...
Git as a Client
445
This is a mapping between a Perforce branch and a Git branch. The section
can be named whatever you like, so long as the name is unique. git-branch-
name lets you convert a depot path that would be cumbersome under Git to a
more friendly name. The view setting controls how Perforce files are mapped
into the Git repository, using the standard view mapping syntax. More than one
mapping can be specified, like in this example:
[multi-project-mapping]
git-branch-name = master
view = //depot/project1/main/... project1/...
//depot/project2/mainline/... project2/...
This way, if your normal workspace mapping includes changes in the struc-
ture of the directories, you can replicate that with a Git repository.
The last file we’ll discuss is users/p4gf_usermap, which maps Perforce
users to Git users, and which you may not even need. When converting from a
Perforce changeset to a Git commit, Git Fusion’s default behavior is to look up
the Perforce user, and use the email address and full name stored there for the
author/committer field in Git. When converting the other way, the default is to
look up the Perforce user with the email address stored in the Git commit’s au-
thor field, and submit the changeset as that user (with permissions applying).
In most cases, this behavior will do just fine, but consider the following map-
ping file:
john john@example.com "John Doe"
john johnny@appleseed.net "John Doe"
bob employeeX@example.com "Anon X. Mouse"
joe employeeY@example.com "Anon Y. Mouse"
Each line is of the format <user> <email> "<full name>", and creates a
single user mapping. The first two lines map two distinct email addresses to the
same Perforce user account. This is useful if you’ve created Git commits under
several dierent email addresses (or change email addresses), but want them
to be mapped to the same Perforce user. When creating a Git commit from a
Perforce changeset, the first line matching the Perforce user is used for Git au-
thorship information.
The last two lines mask Bob and Joe’s actual names and email addresses
from the Git commits that are created. This is nice if you want to open-source
an internal project, but don’t want to publish your employee directory to the
entire world. Note that the email addresses and full names should be unique,
unless you want all the Git commits to be attributed to a single fictional author.
CHAPTER 9: Git and Other Systems
446

Workflow
Perforce Git Fusion is a two-way bridge between Perforce and Git version
control. Let’s have a look at how it feels to work from the Git side. We’ll assume
we’ve mapped in the “Jam” project using a configuration file as shown above,
which we can clone like this:
$ git clone https://10.0.1.254/Jam
Cloning into 'Jam'...
Username for 'https://10.0.1.254': john
Password for 'https://ben@10.0.1.254':
remote: Counting objects: 2070, done.
remote: Compressing objects: 100% (1704/1704), done.
Receiving objects: 100% (2070/2070), 1.21 MiB | 0 bytes/s, done.
remote: Total 2070 (delta 1242), reused 0 (delta 0)
Resolving deltas: 100% (1242/1242), done.
Checking connectivity... done.
$ git branch -a
* master
remotes/origin/HEAD -> origin/master
remotes/origin/master
remotes/origin/rel2.1
$ git log --oneline --decorate --graph --all
* 0a38c33 (origin/rel2.1) Create Jam 2.1 release branch.
| * d254865 (HEAD, origin/master, origin/HEAD, master) Upgrade to latest metrowerks on Beos -- the Intel one.
| * bd2f54a Put in fix for jam's NT handle leak.
| * c0f29e7 Fix URL in a jam doc
| * cc644ac Radstone's lynx port.
[...]
The first time you do this, it may take some time. What’s happening is that
Git Fusion is converting all the applicable changesets in the Perforce history in-
to Git commits. This happens locally on the server, so it’s relatively fast, but if
you have a lot of history, it can still take some time. Subsequent fetches do in-
cremental conversion, so it’ll feel more like Git’s native speed.
As you can see, our repository looks exactly like any other Git repository you
might work with. There are three branches, and Git has helpfully created a local
master branch that tracks origin/master. Let’s do a bit of work, and create a
couple of new commits:
# ...
$ git log --oneline --decorate --graph --all
* cfd46ab (HEAD, master) Add documentation for new feature
* a730d77 Whitespace
* d254865 (origin/master, origin/HEAD) Upgrade to latest metrowerks on Beos -- the Intel one.
Git as a Client
447

* bd2f54a Put in fix for jam's NT handle leak.
[...]
We have two new commits. Now let’s check if anyone else has been working:
$ git fetch
remote: Counting objects: 5, done.
remote: Compressing objects: 100% (3/3), done.
remote: Total 3 (delta 2), reused 0 (delta 0)
Unpacking objects: 100% (3/3), done.
From https://10.0.1.254/Jam
d254865..6afeb15 master -> origin/master
$ git log --oneline --decorate --graph --all
* 6afeb15 (origin/master, origin/HEAD) Update copyright
| * cfd46ab (HEAD, master) Add documentation for new feature
| * a730d77 Whitespace
|/
* d254865 Upgrade to latest metrowerks on Beos -- the Intel one.
* bd2f54a Put in fix for jam's NT handle leak.
[...]
It looks like someone was! You wouldn’t know it from this view, but the
6afeb15 commit was actually created using a Perforce client. It just looks like
another commit from Git’s point of view, which is exactly the point. Let’s see
how the Perforce server deals with a merge commit:
$ git merge origin/master
Auto-merging README
Merge made by the 'recursive' strategy.
README | 2 +-
1 file changed, 1 insertion(+), 1 deletion(-)
$ git push
Counting objects: 9, done.
Delta compression using up to 8 threads.
Compressing objects: 100% (9/9), done.
Writing objects: 100% (9/9), 917 bytes | 0 bytes/s, done.
Total 9 (delta 6), reused 0 (delta 0)
remote: Perforce: 100% (3/3) Loading commit tree into memory...
remote: Perforce: 100% (5/5) Finding child commits...
remote: Perforce: Running git fast-export...
remote: Perforce: 100% (3/3) Checking commits...
remote: Processing will continue even if connection is closed.
remote: Perforce: 100% (3/3) Copying changelists...
remote: Perforce: Submitting new Git commit objects to Perforce: 4
CHAPTER 9: Git and Other Systems
448

FIGURE 9-2
Perforce revision
graph resulting from
Git push.
To https://10.0.1.254/Jam
6afeb15..89cba2b master -> master
Git thinks it worked. Let’s take a look at the history of the README file from
Perforce’s point of view, using the revision graph feature of p4v:
If you’ve never seen this view before, it may seem confusing, but it shows the
same concepts as a graphical viewer for Git history. We’re looking at the history
of the README file, so the directory tree at top le only shows that file as it sur-
faces in various branches. At top right, we have a visual graph of how dierent
revisions of the file are related, and the big-picture view of this graph is at bot-
tom right. The rest of the view is given to the details view for the selected revi-
sion (2 in this case).
One thing to notice is that the graph looks exactly like the one in Git’s histo-
ry. Perforce didn’t have a named branch to store the 1 and 2 commits, so it
made an “anonymous” branch in the .git-fusion directory to hold it. This
will also happen for named Git branches that don’t correspond to a named Per-
force branch (and you can later map them to a Perforce branch using the con-
figuration file).
Most of this happens behind the scenes, but the end result is that one per-
son on a team can be using Git, another can be using Perforce, and neither of
them will know about the other’s choice.
Git as a Client
449

Git-Fusion Summary
If you have (or can get) access to your Perforce server, Git Fusion is a great
way to make Git and Perforce talk to each other. There’s a bit of configuration
involved, but the learning curve isn’t very steep. This is one of the few sections
in this chapter where cautions about using Git’s full power will not appear.
That’s not to say that Perforce will be happy with everything you throw at it – if
you try to rewrite history that’s already been pushed, Git Fusion will reject it –
but Git Fusion tries very hard to feel native. You can even use Git submodules
(though they’ll look strange to Perforce users), and merge branches (this will be
recorded as an integration on the Perforce side).
If you can’t convince the administrator of your server to set up Git Fusion,
there is still a way to use these tools together.
GIT-P4
Git-p4 is a two-way bridge between Git and Perforce. It runs entirely inside your
Git repository, so you won’t need any kind of access to the Perforce server (oth-
er than user credentials, of course). Git-p4 isn’t as flexible or complete a solu-
tion as Git Fusion, but it does allow you to do most of what you’d want to do
without being invasive to the server environment.
You’ll need the p4 tool somewhere in your PATH to work with git-p4. As of
this writing, it is freely available at http://www.perforce.com/downloads/
Perforce/20-User.
Setting Up
For example purposes, we’ll be running the Perforce server from the Git Fu-
sion OVA as shown above, but we’ll bypass the Git Fusion server and go directly
to the Perforce version control.
In order to use the p4 command-line client (which git-p4 depends on), you’ll
need to set a couple of environment variables:
$ export P4PORT=10.0.1.254:1666
$ export P4USER=john
Getting Started
As with anything in Git, the first command is to clone:
$ git p4 clone //depot/www/live www-shallow
Importing from //depot/www/live into www-shallow
CHAPTER 9: Git and Other Systems
450

Initialized empty Git repository in /private/tmp/www-shallow/.git/
Doing initial import of //depot/www/live/ from revision #head into refs/remotes/p4/master
This creates what in Git terms is a “shallow” clone; only the very latest Per-
force revision is imported into Git; remember, Perforce isn’t designed to give
every revision to every user. This is enough to use Git as a Perforce client, but
for other purposes it’s not enough.
Once it’s finished, we have a fully-functional Git repository:
$ cd myproject
$ git log --oneline --all --graph --decorate
* 70eaf78 (HEAD, p4/master, p4/HEAD, master) Initial import of //depot/www/live/ from the state at revision #head
Note how there’s a “p4” remote for the Perforce server, but everything else
looks like a standard clone. Actually, that’s a bit misleading; there isn’t actually
a remote there.
$ git remote -v
No remotes exist in this repository at all. Git-p4 has created some refs to rep-
resent the state of the server, and they look like remote refs to git log, but
they’re not managed by Git itself, and you can’t push to them.
Workflow
Okay, let’s do some work. Let’s assume you’ve made some progress on a
very important feature, and you’re ready to show it to the rest of your team.
$ git log --oneline --all --graph --decorate
* 018467c (HEAD, master) Change page title
* c0fb617 Update link
* 70eaf78 (p4/master, p4/HEAD) Initial import of //depot/www/live/ from the state at revision #head
We’ve made two new commits that we’re ready to submit to the Perforce
server. Let’s check if anyone else was working today:
$ git p4 sync
git p4 sync
Performing incremental import into refs/remotes/p4/master git branch
Depot paths: //depot/www/live/
Import destination: refs/remotes/p4/master
Importing revision 12142 (100%)
$ git log --oneline --all --graph --decorate
Git as a Client
451

* 75cd059 (p4/master, p4/HEAD) Update copyright
| * 018467c (HEAD, master) Change page title
| * c0fb617 Update link
|/
* 70eaf78 Initial import of //depot/www/live/ from the state at revision #head
Looks like they were, and master and p4/master have diverged. Perforce’s
branching system is nothing like Git’s, so submitting merge commits doesn’t
make any sense. Git-p4 recommends that you rebase your commits, and even
comes with a shortcut to do so:
$ git p4 rebase
Performing incremental import into refs/remotes/p4/master git branch
Depot paths: //depot/www/live/
No changes to import!
Rebasing the current branch onto remotes/p4/master
First, rewinding head to replay your work on top of it...
Applying: Update link
Applying: Change page title
index.html | 2 +-
1 file changed, 1 insertion(+), 1 deletion(-)
You can probably tell from the output, but git p4 rebase is a shortcut for
git p4 sync followed by git rebase p4/master. It’s a bit smarter than
that, especially when working with multiple branches, but this is a good ap-
proximation.
Now our history is linear again, and we’re ready to contribute our changes
back to Perforce. The git p4 submit command will try to create a new Per-
force revision for every Git commit between p4/master and master. Running it
drops us into our favorite editor, and the contents of the file look something like
this:
# A Perforce Change Specification.
#
# Change: The change number. 'new' on a new changelist.
# Date: The date this specification was last modified.
# Client: The client on which the changelist was created. Read-only.
# User: The user who created the changelist.
# Status: Either 'pending' or 'submitted'. Read-only.
# Type: Either 'public' or 'restricted'. Default is 'public'.
# Description: Comments about the changelist. Required.
# Jobs: What opened jobs are to be closed by this changelist.
# You may delete jobs from this list. (New changelists only.)
# Files: What opened files from the default changelist are to be added
CHAPTER 9: Git and Other Systems
452

# to this changelist. You may delete files from this list.
# (New changelists only.)
Change: new
Client: john_bens-mbp_8487
User: john
Status: new
Description:
Update link
Files:
//depot/www/live/index.html # edit
######## git author ben@straub.cc does not match your p4 account.
######## Use option --preserve-user to modify authorship.
######## Variable git-p4.skipUserNameCheck hides this message.
######## everything below this line is just the diff #######
--- //depot/www/live/index.html 2014-08-31 18:26:05.000000000 0000
+++ /Users/ben/john_bens-mbp_8487/john_bens-mbp_8487/depot/www/live/index.html 2014-08-31 18:26:05.000000000 0000
@@ -60,7 +60,7 @@
</td>
<td valign=top>
Source and documentation for
-<a href="http://www.perforce.com/jam/jam.html">
+<a href="jam.html">
Jam/MR</a>,
a software build tool.
</td>
This is mostly the same content you’d see by running p4 submit, except the
stu at the end which git-p4 has helpfully included. Git-p4 tries to honor your
Git and Perforce settings individually when it has to provide a name for a com-
mit or changeset, but in some cases you want to override it. For example, if the
Git commit you’re importing was written by a contributor who doesn’t have a
Perforce user account, you may still want the resulting changeset to look like
they write it (and not you).
Git-p4 has helpfully imported the message from the Git commit as the con-
tent for this Perforce changeset, so all we have to do is save and quit, twice
(once for each commit). The resulting shell output will look something like this:
Git as a Client
453

$ git p4 submit
Perforce checkout for depot path //depot/www/live/ located at /Users/ben/john_bens-mbp_8487/john_bens-mbp_8487/depot/www/live/
Synchronizing p4 checkout...
... - file(s) up-to-date.
Applying dbac45b Update link
//depot/www/live/index.html#4 - opened for edit
Change 12143 created with 1 open file(s).
Submitting change 12143.
Locking 1 files ...
edit //depot/www/live/index.html#5
Change 12143 submitted.
Applying 905ec6a Change page title
//depot/www/live/index.html#5 - opened for edit
Change 12144 created with 1 open file(s).
Submitting change 12144.
Locking 1 files ...
edit //depot/www/live/index.html#6
Change 12144 submitted.
All commits applied!
Performing incremental import into refs/remotes/p4/master git branch
Depot paths: //depot/www/live/
Import destination: refs/remotes/p4/master
Importing revision 12144 (100%)
Rebasing the current branch onto remotes/p4/master
First, rewinding head to replay your work on top of it...
$ git log --oneline --all --graph --decorate
* 775a46f (HEAD, p4/master, p4/HEAD, master) Change page title
* 05f1ade Update link
* 75cd059 Update copyright
* 70eaf78 Initial import of //depot/www/live/ from the state at revision #head
The result is as though we just did a git push, which is the closest analogy
to what actually did happen.
Note that during this process every Git commit is turned into a Perforce
changeset; if you want to squash them down into a single changeset, you can
do that with an interactive rebase before running git p4 submit. Also note
that the SHA-1 hashes of all the commits that were submitted as changesets
have changed; this is because git-p4 adds a line to the end of each commit it
converts:
$ git log -1
commit 775a46f630d8b46535fc9983cf3ebe6b9aa53145
Author: John Doe <john@example.com>
Date: Sun Aug 31 10:31:44 2014 -0800
Change page title
CHAPTER 9: Git and Other Systems
454

[git-p4: depot-paths = "//depot/www/live/": change = 12144]
What happens if you try to submit a merge commit? Let’s give it a try. Here’s
the situation we’ve gotten ourselves into:
$ git log --oneline --all --graph --decorate
* 3be6fd8 (HEAD, master) Correct email address
* 1dcbf21 Merge remote-tracking branch 'p4/master'
|\
| * c4689fc (p4/master, p4/HEAD) Grammar fix
* | cbacd0a Table borders: yes please
* | b4959b6 Trademark
|/
* 775a46f Change page title
* 05f1ade Update link
* 75cd059 Update copyright
* 70eaf78 Initial import of //depot/www/live/ from the state at revision #head
The Git and Perforce history diverge aer 775a46f. The Git side has two com-
mits, then a merge commit with the Perforce head, then another commit. We’re
going to try to submit these on top of a single changeset on the Perforce side.
Let’s see what would happen if we tried to submit now:
$ git p4 submit -n
Perforce checkout for depot path //depot/www/live/ located at /Users/ben/john_bens-mbp_8487/john_bens-mbp_8487/depot/www/live/
Would synchronize p4 checkout in /Users/ben/john_bens-mbp_8487/john_bens-mbp_8487/depot/www/live/
Would apply
b4959b6 Trademark
cbacd0a Table borders: yes please
3be6fd8 Correct email address
The -n flag is short for --dry-run, which tries to report what would happen
if the submit command were run for real. In this case, it looks like we’d be creat-
ing three Perforce changesets, which correspond to the three non-merge com-
mits that don’t yet exist on the Perforce server. That sounds like exactly what
we want, let’s see how it turns out:
$ git p4 submit
[…]
$ git log --oneline --all --graph --decorate
* dadbd89 (HEAD, p4/master, p4/HEAD, master) Correct email address
* 1b79a80 Table borders: yes please
Git as a Client
455

* 0097235 Trademark
* c4689fc Grammar fix
* 775a46f Change page title
* 05f1ade Update link
* 75cd059 Update copyright
* 70eaf78 Initial import of //depot/www/live/ from the state at revision #head
Our history became linear, just as though we had rebased before submitting
(which is in fact exactly what happened). This means you can be free to create,
work on, throw away, and merge branches on the Git side without fear that
your history will somehow become incompatible with Perforce. If you can re-
base it, you can contribute it to a Perforce server.
Branching
If your Perforce project has multiple branches, you’re not out of luck; git-p4
can handle that in a way that makes it feel like Git. Let’s say your Perforce depot
is laid out like this:
//depot
└── project
├── main
└── dev
And let’s say you have a dev branch, which has a view spec that looks like
this:
//depot/project/main/... //depot/project/dev/...
Git-p4 can automatically detect that situation and do the right thing:
$ git p4 clone --detect-branches //depot/project@all
Importing from //depot/project@all into project
Initialized empty Git repository in /private/tmp/project/.git/
Importing revision 20 (50%)
Importing new branch project/dev
Resuming with change 20
Importing revision 22 (100%)
Updated branches: main dev
$ cd project; git log --oneline --all --graph --decorate
* eae77ae (HEAD, p4/master, p4/HEAD, master) main
| * 10d55fb (p4/project/dev) dev
| * a43cfae Populate //depot/project/main/... //depot/project/dev/....
|/
* 2b83451 Project init
CHAPTER 9: Git and Other Systems
456

Note the “@all” specifier in the depot path; that tells git-p4 to clone not just
the latest changeset for that subtree, but all changesets that have ever touched
those paths. This is closer to Git’s concept of a clone, but if you’re working on a
project with a long history, it could take a while.
The --detect-branches flag tells git-p4 to use Perforce’s branch specs to
map the branches to Git refs. If these mappings aren’t present on the Perforce
server (which is a perfectly valid way to use Perforce), you can tell git-p4 what
the branch mappings are, and you get the same result:
$ git init project
Initialized empty Git repository in /tmp/project/.git/
$ cd project
$ git config git-p4.branchList main:dev
$ git clone --detect-branches //depot/project@all .
Setting the git-p4.branchList configuration variable to main:dev tells
git-p4 that “main” and “dev” are both branches, and the second one is a child
of the first one.
If we now git checkout -b dev p4/project/dev and make some com-
mits, git-p4 is smart enough to target the right branch when we do git p4
submit. Unfortunately, git-p4 can’t mix shallow clones and multiple branches;
if you have a huge project and want to work on more than one branch, you’ll
have to git p4 clone once for each branch you want to submit to.
For creating or integrating branches, you’ll have to use a Perforce client. Git-
p4 can only sync and submit to existing branches, and it can only do it one line-
ar changeset at a time. If you merge two branches in Git and try to submit the
new changeset, all that will be recorded is a bunch of file changes; the metada-
ta about which branches are involved in the integration will be lost.
GIT AND PERFORCE SUMMARY
Git-p4 makes it possible to use a Git workflow with a Perforce server, and it’s
pretty good at it. However, it’s important to remember that Perforce is in charge
of the source, and you’re only using Git to work locally. Just be really careful
about sharing Git commits; if you have a remote that other people use, don’t
push any commits that haven’t already been submitted to the Perforce server.
If you want to freely mix the use of Perforce and Git as clients for source con-
trol, and you can convince the server administrator to install it, Git Fusion
makes using Git a first-class version-control client for a Perforce server.
Git as a Client
457
Git and TFS
Git is becoming popular with Windows developers, and if you’re writing code on
Windows, there’s a good chance you’re using Microso’s Team Foundation
Server (TFS). TFS is a collaboration suite that includes defect and work-item
tracking, process support for Scrum and others, code review, and version con-
trol. There’s a bit of confusion ahead: TFS is the server, which supports control-
ling source code using both Git and their own custom VCS, which they’ve dub-
bed TFVC (Team Foundation Version Control). Git support is a somewhat new
feature for TFS (shipping with the 2013 version), so all of the tools that predate
that refer to the version-control portion as “TFS”, even though they’re mostly
working with TFVC.
If you find yourself on a team that’s using TFVC but you’d rather use Git as
your version-control client, there’s a project for you.
WHICH TOOL
In fact, there are two: git-tf and git-tfs.
Git-tfs (found at https://github.com/git-tfs/git-tfs) is a .NET project, and (as
of this writing) it only runs on Windows. To work with Git repositories, it uses
the .NET bindings for libgit2, a library-oriented implementation of Git which is
highly performant and allows a lot of flexibility with the guts of a Git repository.
Libgit2 is not a complete implementation of Git, so to cover the dierence git-
tfs will actually call the command-line Git client for some operations, so there
are no artificial limits on what it can do with Git repositories. Its support of
TFVC features is very mature, since it uses the Visual Studio assemblies for op-
erations with servers. This does mean you’ll need access to those assemblies,
which means you need to install a recent version of Visual Studio (any edition
since version 2010, including Express since version 2012), or the Visual Studio
SDK.
Git-tf (whose home is at https://gittf.codeplex.com) is a Java project, and as
such runs on any computer with a Java runtime environment. It interfaces with
Git repositories through JGit (a JVM implementation of Git), which means it has
virtually no limitations in terms of Git functions. However, its support for TFVC
is limited as compared to git-tfs – it does not support branches, for instance.
So each tool has pros and cons, and there are plenty of situations that favor
one over the other. We’ll cover the basic usage of both of them in this book.
CHAPTER 9: Git and Other Systems
458

You’ll need access to a TFVC-based repository to follow along with these
instructions. These aren’t as plentiful in the wild as Git or Subversion re-
positories, so you may need to create one of your own. Codeplex (https://
www.codeplex.com) or Visual Studio Online (http://www.visualstudio.com)
are both good choices for this.
GETTING STARTED: GIT-TF
The first thing you do, just as with any Git project, is clone. Here’s what that
looks like with git-tf:
$ git tf clone https://tfs.codeplex.com:443/tfs/TFS13 $/myproject/Main project_git
The first argument is the URL of a TFVC collection, the second is of the form
$/project/branch, and the third is the path to the local Git repository that is
to be created (this last one is optional). Git-tf can only work with one branch at
a time; if you want to make checkins on a dierent TFVC branch, you’ll have to
make a new clone from that branch.
This creates a fully functional Git repository:
$ cd project_git
$ git log --all --oneline --decorate
512e75a (HEAD, tag: TFS_C35190, origin_tfs/tfs, master) Checkin message
This is called a shallow clone, meaning that only the latest changeset has
been downloaded. TFVC isn’t designed for each client to have a full copy of the
history, so git-tf defaults to only getting the latest version, which is much faster.
If you have some time, it’s probably worth it to clone the entire project histo-
ry, using the --deep option:
$ git tf clone https://tfs.codeplex.com:443/tfs/TFS13 $/myproject/Main \
project_git --deep
Username: domain\user
Password:
Connecting to TFS...
Cloning $/myproject into /tmp/project_git: 100%, done.
Cloned 4 changesets. Cloned last changeset 35190 as d44b17a
$ cd project_git
$ git log --all --oneline --decorate
d44b17a (HEAD, tag: TFS_C35190, origin_tfs/tfs, master) Goodbye
126aa7b (tag: TFS_C35189)
8f77431 (tag: TFS_C35178) FIRST
Git as a Client
459

0745a25 (tag: TFS_C35177) Created team project folder $/tfvctest via the \
Team Project Creation Wizard
Notice the tags with names like TFS_C35189; this is a feature that helps you
know which Git commits are associated with TFVC changesets. This is a nice
way to represent it, since you can see with a simple log command which of your
commits is associated with a snapshot that also exists in TFVC. They aren’t nec-
essary (and in fact you can turn them o with git config git-tf.tag
false) – git-tf keeps the real commit-changeset mappings in the .git/git-tf
file.
GETTING STARTED: GIT-TFS
Git-tfs cloning behaves a bit dierently. Observe:
PS> git tfs clone --with-branches \
https://username.visualstudio.com/DefaultCollection \
$/project/Trunk project_git
Initialized empty Git repository in C:/Users/ben/project_git/.git/
C15 = b75da1aba1ffb359d00e85c52acb261e4586b0c9
C16 = c403405f4989d73a2c3c119e79021cb2104ce44a
Tfs branches found:
- $/tfvc-test/featureA
The name of the local branch will be : featureA
C17 = d202b53f67bde32171d5078968c644e562f1c439
C18 = 44cd729d8df868a8be20438fdeeefb961958b674
Notice the --with-branches flag. Git-tfs is capable of mapping TFVC
branches to Git branches, and this flag tells it to set up a local Git branch for
every TFVC branch. This is highly recommended if you’ve ever branched or
merged in TFS, but it won’t work with a server older than TFS 2010 – before that
release, “branches” were just folders, so git-tfs can’t tell them from regular fold-
ers.
Let’s take a look at the resulting Git repository:
PS> git log --oneline --graph --decorate --all
* 44cd729 (tfs/featureA, featureA) Goodbye
* d202b53 Branched from $/tfvc-test/Trunk
* c403405 (HEAD, tfs/default, master) Hello
* b75da1a New project
PS> git log -1
commit c403405f4989d73a2c3c119e79021cb2104ce44a
Author: Ben Straub <ben@straub.cc>
Date: Fri Aug 1 03:41:59 2014 +0000
CHAPTER 9: Git and Other Systems
460

Hello
git-tfs-id: [https://username.visualstudio.com/DefaultCollection]$/myproject/Trunk;C16
There are two local branches, master and featureA, which represent the
initial starting point of the clone (Trunk in TFVC) and a child branch (featureA
in TFVC). You can also see that the tfs “remote” has a couple of refs too: de-
fault and featureA, which represent TFVC branches. Git-tfs maps the branch
you cloned from to tfs/default, and others get their own names.
Another thing to notice is the git-tfs-id: lines in the commit messages.
Instead of tags, git-tfs uses these markers to relate TFVC changesets to Git com-
mits. This has the implication that your Git commits will have a dierent SHA-1
hash before and aer they have been pushed to TFVC.
GIT-TF[S] WORKFLOW
Regardless of which tool you’re using, you should set a couple of Git con-
figuration values to avoid running into issues.
$ git config set --local core.ignorecase=true
$ git config set --local core.autocrlf=false
The obvious next thing you’re going to want to do is work on the project.
TFVC and TFS have several features that may add complexity to your workflow:
1. Feature branches that aren’t represented in TFVC add a bit of complexity.
This has to do with the very dierent ways that TFVC and Git represent
branches.
2. Be aware that TFVC allows users to “checkout” files from the server, lock-
ing them so nobody else can edit them. This obviously won’t stop you
from editing them in your local repository, but it could get in the way
when it comes time to push your changes up to the TFVC server.
3. TFS has the concept of “gated” checkins, where a TFS build-test cycle has
to complete successfully before the checkin is allowed. This uses the
“shelve” function in TFVC, which we don’t cover in detail here. You can
fake this in a manual fashion with git-tf, and git-tfs provides the check-
intool command which is gate-aware.
In the interest of brevity, what we’ll cover here is the happy path, which side-
steps or avoids most of these issues.
Git as a Client
461

WORKFLOW: GIT-TF
Let’s say you’ve done some work, made a couple of Git commits on master,
and you’re ready to share your progress on the TFVC server. Here’s our Git
repository:
$ git log --oneline --graph --decorate --all
* 4178a82 (HEAD, master) update code
* 9df2ae3 update readme
* d44b17a (tag: TFS_C35190, origin_tfs/tfs) Goodbye
* 126aa7b (tag: TFS_C35189)
* 8f77431 (tag: TFS_C35178) FIRST
* 0745a25 (tag: TFS_C35177) Created team project folder $/tfvctest via the \
Team Project Creation Wizard
We want to take the snapshot that’s in the 4178a82 commit and push it up
to the TFVC server. First things first: let’s see if any of our teammates did any-
thing since we last connected:
$ git tf fetch
Username: domain\user
Password:
Connecting to TFS...
Fetching $/myproject at latest changeset: 100%, done.
Downloaded changeset 35320 as commit 8ef06a8. Updated FETCH_HEAD.
$ git log --oneline --graph --decorate --all
* 8ef06a8 (tag: TFS_C35320, origin_tfs/tfs) just some text
| * 4178a82 (HEAD, master) update code
| * 9df2ae3 update readme
|/
* d44b17a (tag: TFS_C35190) Goodbye
* 126aa7b (tag: TFS_C35189)
* 8f77431 (tag: TFS_C35178) FIRST
* 0745a25 (tag: TFS_C35177) Created team project folder $/tfvctest via the \
Team Project Creation Wizard
Looks like someone else is working, too, and now we have divergent history.
This is where Git shines, but we have two choices of how to proceed:
1. Making a merge commit feels natural as a Git user (aer all, that’s what
git pull does), and git-tf can do this for you with a simple git tf
pull. Be aware, however, that TFVC doesn’t think this way, and if you
push merge commits your history will start to look dierent on both
CHAPTER 9: Git and Other Systems
462

sides, which can be confusing. However, if you plan on submitting all of
your changes as one changeset, this is probably the easiest choice.
2. Rebasing makes our commit history linear, which means we have the op-
tion of converting each of our Git commits into a TFVC changeset. Since
this leaves the most options open, we recommend you do it this way; git-
tf even makes it easy for you with git tf pull --rebase.
The choice is yours. For this example, we’ll be rebasing:
$ git rebase FETCH_HEAD
First, rewinding head to replay your work on top of it...
Applying: update readme
Applying: update code
$ git log --oneline --graph --decorate --all
* 5a0e25e (HEAD, master) update code
* 6eb3eb5 update readme
* 8ef06a8 (tag: TFS_C35320, origin_tfs/tfs) just some text
* d44b17a (tag: TFS_C35190) Goodbye
* 126aa7b (tag: TFS_C35189)
* 8f77431 (tag: TFS_C35178) FIRST
* 0745a25 (tag: TFS_C35177) Created team project folder $/tfvctest via the \
Team Project Creation Wizard
Now we’re ready to make a checkin to the TFVC server. Git-tf gives you the
choice of making a single changeset that represents all the changes since the
last one (--shallow, which is the default) and creating a new changeset for
each Git commit (--deep). For this example, we’ll just create one changeset:
$ git tf checkin -m 'Updating readme and code'
Username: domain\user
Password:
Connecting to TFS...
Checking in to $/myproject: 100%, done.
Checked commit 5a0e25e in as changeset 35348
$ git log --oneline --graph --decorate --all
* 5a0e25e (HEAD, tag: TFS_C35348, origin_tfs/tfs, master) update code
* 6eb3eb5 update readme
* 8ef06a8 (tag: TFS_C35320) just some text
* d44b17a (tag: TFS_C35190) Goodbye
* 126aa7b (tag: TFS_C35189)
* 8f77431 (tag: TFS_C35178) FIRST
* 0745a25 (tag: TFS_C35177) Created team project folder $/tfvctest via the \
Team Project Creation Wizard
Git as a Client
463
There’s a new TFS_C35348 tag, indicating that TFVC is storing the exact
same snapshot as the 5a0e25e commit. It’s important to note that not every
Git commit needs to have an exact counterpart in TFVC; the 6eb3eb5 commit,
for example, doesn’t exist anywhere on the server.
That’s the main workflow. There are a couple of other considerations you’ll
want to keep in mind:
•There is no branching. Git-tf can only create Git repositories from one
TFVC branch at a time.
•Collaborate using either TFVC or Git, but not both. Dierent git-tf clones
of the same TFVC repository may have dierent commit SHA-1 hashes,
which will cause no end of headaches.
•If your team’s workflow includes collaborating in Git and syncing periodi-
cally with TFVC, only connect to TFVC with one of the Git repositories.
WORKFLOW: GIT-TFS
Let’s walk through the same scenario using git-tfs. Here are the new commits
we’ve made to the master branch in our Git repository:
PS> git log --oneline --graph --all --decorate
* c3bd3ae (HEAD, master) update code
* d85e5a2 update readme
| * 44cd729 (tfs/featureA, featureA) Goodbye
| * d202b53 Branched from $/tfvc-test/Trunk
|/
* c403405 (tfs/default) Hello
* b75da1a New project
Now let’s see if anyone else has done work while we were hacking away:
PS> git tfs fetch
C19 = aea74a0313de0a391940c999e51c5c15c381d91d
PS> git log --all --oneline --graph --decorate
* aea74a0 (tfs/default) update documentation
| * c3bd3ae (HEAD, master) update code
| * d85e5a2 update readme
|/
| * 44cd729 (tfs/featureA, featureA) Goodbye
| * d202b53 Branched from $/tfvc-test/Trunk
|/
* c403405 Hello
* b75da1a New project
CHAPTER 9: Git and Other Systems
464
Yes, it turns out our coworker has added a new TFVC changeset, which
shows up as the new aea74a0 commit, and the tfs/default remote branch
has moved.
As with git-tf, we have two fundamental options for how to resolve this diver-
gent history:
1. Rebase to preserve a linear history.
2. Merge to preserve what actually happened.
In this case, we’re going to do a “deep” checkin, where every Git commit be-
comes a TFVC changeset, so we want to rebase.
PS> git rebase tfs/default
First, rewinding head to replay your work on top of it...
Applying: update readme
Applying: update code
PS> git log --all --oneline --graph --decorate
* 10a75ac (HEAD, master) update code
* 5cec4ab update readme
* aea74a0 (tfs/default) update documentation
| * 44cd729 (tfs/featureA, featureA) Goodbye
| * d202b53 Branched from $/tfvc-test/Trunk
|/
* c403405 Hello
* b75da1a New project
Now we’re ready to complete our contribution by checking in our code to the
TFVC server. We’ll use the rcheckin command here to create a TFVC changeset
for each Git commit in the path from HEAD to the first tfs remote branch found
(the checkin command would only create one changeset, sort of like squash-
ing Git commits).
PS> git tfs rcheckin
Working with tfs remote: default
Fetching changes from TFS to minimize possibility of late conflict...
Starting checkin of 5cec4ab4 'update readme'
add README.md
C20 = 71a5ddce274c19f8fdc322b4f165d93d89121017
Done with 5cec4ab4b213c354341f66c80cd650ab98dcf1ed, rebasing tail onto new TFS-commit...
Rebase done successfully.
Starting checkin of b1bf0f99 'update code'
edit .git\tfs\default\workspace\ConsoleApplication1/ConsoleApplication1/Program.cs
C21 = ff04e7c35dfbe6a8f94e782bf5e0031cee8d103b
Done with b1bf0f9977b2d48bad611ed4a03d3738df05ea5d, rebasing tail onto new TFS-commit...
Rebase done successfully.
No more to rcheckin.
PS> git log --all --oneline --graph --decorate
Git as a Client
465
FIGURE 9-3
The git-tfs checkin
tool.
* ff04e7c (HEAD, tfs/default, master) update code
* 71a5ddc update readme
* aea74a0 update documentation
| * 44cd729 (tfs/featureA, featureA) Goodbye
| * d202b53 Branched from $/tfvc-test/Trunk
|/
* c403405 Hello
* b75da1a New project
Notice how aer every successful checkin to the TFVC server, git-tfs is rebas-
ing the remaining work onto what it just did. That’s because it’s adding the
git-tfs-id field to the bottom of the commit messages, which changes the
SHA-1 hashes. This is exactly as designed, and there’s nothing to worry about,
but you should be aware that it’s happening, especially if you’re sharing Git
commits with others.
TFS has many features that integrate with its version control system, such as
work items, designated reviewers, gated checkins, and so on. It can be cumber-
some to work with these features using only a command-line tool, but fortu-
nately git-tfs lets you launch a graphical checkin tool very easily:
PS> git tfs checkintool
PS> git tfs ct
It looks a bit like this:
CHAPTER 9: Git and Other Systems
466
This will look familiar to TFS users, as it’s the same dialog that’s launched
from within Visual Studio.
Git-tfs also lets you control TFVC branches from your Git repository. As an ex-
ample, let’s create one:
PS> git tfs branch $/tfvc-test/featureBee
The name of the local branch will be : featureBee
C26 = 1d54865c397608c004a2cadce7296f5edc22a7e5
PS> git log --oneline --graph --decorate --all
* 1d54865 (tfs/featureBee) Creation branch $/myproject/featureBee
* ff04e7c (HEAD, tfs/default, master) update code
* 71a5ddc update readme
* aea74a0 update documentation
| * 44cd729 (tfs/featureA, featureA) Goodbye
| * d202b53 Branched from $/tfvc-test/Trunk
|/
* c403405 Hello
* b75da1a New project
Creating a branch in TFVC means adding a changeset where that branch now
exists, and this is projected as a Git commit. Note also that git-tfs created the
tfs/featureBee remote branch, but HEAD is still pointing to master. If you
want to work on the newly-minted branch, you’ll want to base your new com-
mits on the 1d54865 commit, perhaps by creating a topic branch from that
commit.
GIT AND TFS SUMMARY
Git-tf and Git-tfs are both great tools for interfacing with a TFVC server. They al-
low you to use the power of Git locally, avoid constantly having to round-trip to
the central TFVC server, and make your life as a developer much easier, without
forcing your entire team to migrate to Git. If you’re working on Windows (which
is likely if your team is using TFS), you’ll probably want to use git-tfs, since it’s
feature set is more complete, but if you’re working on another platform, you’ll
be using git-tf, which is more limited. As with most of the tools in this chapter,
you should choose one of these version-control systems to be canonical, and
use the other one in a subordinate fashion – either Git or TFVC should be the
center of collaboration, but not both.
Migrating to Git
If you have an existing codebase in another VCS but you’ve decided to start us-
ing Git, you must migrate your project one way or another. This section goes
Migrating to Git
467

over some importers for common systems, and then demonstrates how to de-
velop your own custom importer. You’ll learn how to import data from several
of the bigger professionally used SCM systems, because they make up the ma-
jority of users who are switching, and because high-quality tools for them are
easy to come by.
Subversion
If you read the previous section about using git svn, you can easily use those
instructions to git svn clone a repository; then, stop using the Subversion
server, push to a new Git server, and start using that. If you want the history,
you can accomplish that as quickly as you can pull the data out of the Subver-
sion server (which may take a while).
However, the import isn’t perfect; and because it will take so long, you may
as well do it right. The first problem is the author information. In Subversion,
each person committing has a user on the system who is recorded in the com-
mit information. The examples in the previous section show schacon in some
places, such as the blame output and the git svn log. If you want to map
this to better Git author data, you need a mapping from the Subversion users to
the Git authors. Create a file called users.txt that has this mapping in a for-
mat like this:
schacon = Scott Chacon <schacon@geemail.com>
selse = Someo Nelse <selse@geemail.com>
To get a list of the author names that SVN uses, you can run this:
$ svn log --xml | grep author | sort -u | \
perl -pe 's/.*>(.*?)<.*/$1 = /'
That generates the log output in XML format, then keeps only the lines with
author information, discards duplicates, strips out the XML tags. (Obviously this
only works on a machine with grep, sort, and perl installed.) Then, redirect
that output into your users.txt file so you can add the equivalent Git user data
next to each entry.
You can provide this file to git svn to help it map the author data more ac-
curately. You can also tell git svn not to include the metadata that Subversion
normally imports, by passing --no-metadata to the clone or init command.
This makes your import command look like this:
CHAPTER 9: Git and Other Systems
468

$ git svn clone http://my-project.googlecode.com/svn/ \
--authors-file=users.txt --no-metadata -s my_project
Now you should have a nicer Subversion import in your my_project direc-
tory. Instead of commits that look like this
commit 37efa680e8473b615de980fa935944215428a35a
Author: schacon <schacon@4c93b258-373f-11de-be05-5f7a86268029>
Date: Sun May 3 00:12:22 2009 +0000
fixed install - go to trunk
git-svn-id: https://my-project.googlecode.com/svn/trunk@94 4c93b258-373f-11de-
be05-5f7a86268029
they look like this:
commit 03a8785f44c8ea5cdb0e8834b7c8e6c469be2ff2
Author: Scott Chacon <schacon@geemail.com>
Date: Sun May 3 00:12:22 2009 +0000
fixed install - go to trunk
Not only does the Author field look a lot better, but the git-svn-id is no
longer there, either.
You should also do a bit of post-import cleanup. For one thing, you should
clean up the weird references that git svn set up. First you’ll move the tags so
they’re actual tags rather than strange remote branches, and then you’ll move
the rest of the branches so they’re local.
To move the tags to be proper Git tags, run
$ cp -Rf .git/refs/remotes/origin/tags/* .git/refs/tags/
$ rm -Rf .git/refs/remotes/origin/tags
This takes the references that were remote branches that started with re-
motes/origin/tags/ and makes them real (lightweight) tags.
Next, move the rest of the references under refs/remotes to be local
branches:
$ cp -Rf .git/refs/remotes/* .git/refs/heads/
$ rm -Rf .git/refs/remotes
Migrating to Git
469

Now all the old branches are real Git branches and all the old tags are real
Git tags. The last thing to do is add your new Git server as a remote and push to
it. Here is an example of adding your server as a remote:
$ git remote add origin git@my-git-server:myrepository.git
Because you want all your branches and tags to go up, you can now run this:
$ git push origin --all
All your branches and tags should be on your new Git server in a nice, clean
import.
Mercurial
Since Mercurial and Git have fairly similar models for representing versions, and
since Git is a bit more flexible, converting a repository from Mercurial to Git is
fairly straightforward, using a tool called “hg-fast-export”, which you’ll need a
copy of:
$ git clone http://repo.or.cz/r/fast-export.git /tmp/fast-export
The first step in the conversion is to get a full clone of the Mercurial reposito-
ry you want to convert:
$ hg clone <remote repo URL> /tmp/hg-repo
The next step is to create an author mapping file. Mercurial is a bit more for-
giving than Git for what it will put in the author field for changesets, so this is a
good time to clean house. Generating this is a one-line command in a bash
shell:
$ cd /tmp/hg-repo
$ hg log | grep user: | sort | uniq | sed 's/user: *//' > ../authors
This will take a few seconds, depending on how long your project’s history is,
and aerwards the /tmp/authors file will look something like this:
CHAPTER 9: Git and Other Systems
470

bob
bob@localhost
bob <bob@company.com>
bob jones <bob <AT> company <DOT> com>
Bob Jones <bob@company.com>
Joe Smith <joe@company.com>
In this example, the same person (Bob) has created changesets under four
dierent names, one of which actually looks correct, and one of which would
be completely invalid for a Git commit. Hg-fast-export lets us fix this by adding
={new name and email address} at the end of every line we want to
change, and removing the lines for any usernames that we want to leave alone.
If all the usernames look fine, we won’t need this file at all. In this example, we
want our file to look like this:
bob=Bob Jones <bob@company.com>
bob@localhost=Bob Jones <bob@company.com>
bob jones <bob <AT> company <DOT> com>=Bob Jones <bob@company.com>
bob <bob@company.com>=Bob Jones <bob@company.com>
The next step is to create our new Git repository, and run the export script:
$ git init /tmp/converted
$ cd /tmp/converted
$ /tmp/fast-export/hg-fast-export.sh -r /tmp/hg-repo -A /tmp/authors
The -r flag tells hg-fast-export where to find the Mercurial repository we
want to convert, and the -A flag tells it where to find the author-mapping file.
The script parses Mercurial changesets and converts them into a script for Git’s
“fast-import” feature (which we’ll discuss in detail a bit later on). This takes a
bit (though it’s much faster than it would be over the network), and the output
is fairly verbose:
$ /tmp/fast-export/hg-fast-export.sh -r /tmp/hg-repo -A /tmp/authors
Loaded 4 authors
master: Exporting full revision 1/22208 with 13/0/0 added/changed/removed files
master: Exporting simple delta revision 2/22208 with 1/1/0 added/changed/removed files
master: Exporting simple delta revision 3/22208 with 0/1/0 added/changed/removed files
[…]
master: Exporting simple delta revision 22206/22208 with 0/4/0 added/changed/removed files
master: Exporting simple delta revision 22207/22208 with 0/2/0 added/changed/removed files
master: Exporting thorough delta revision 22208/22208 with 3/213/0 added/changed/removed files
Exporting tag [0.4c] at [hg r9] [git :10]
Exporting tag [0.4d] at [hg r16] [git :17]
Migrating to Git
471

[…]
Exporting tag [3.1-rc] at [hg r21926] [git :21927]
Exporting tag [3.1] at [hg r21973] [git :21974]
Issued 22315 commands
git-fast-import statistics:
---------------------------------------------------------------------
Alloc'd objects: 120000
Total objects: 115032 ( 208171 duplicates )
blobs : 40504 ( 205320 duplicates 26117 deltas of 39602 attempts)
trees : 52320 ( 2851 duplicates 47467 deltas of 47599 attempts)
commits: 22208 ( 0 duplicates 0 deltas of 0 attempts)
tags : 0 ( 0 duplicates 0 deltas of 0 attempts)
Total branches: 109 ( 2 loads )
marks: 1048576 ( 22208 unique )
atoms: 1952
Memory total: 7860 KiB
pools: 2235 KiB
objects: 5625 KiB
---------------------------------------------------------------------
pack_report: getpagesize() = 4096
pack_report: core.packedGitWindowSize = 1073741824
pack_report: core.packedGitLimit = 8589934592
pack_report: pack_used_ctr = 90430
pack_report: pack_mmap_calls = 46771
pack_report: pack_open_windows = 1 / 1
pack_report: pack_mapped = 340852700 / 340852700
---------------------------------------------------------------------
$ git shortlog -sn
369 Bob Jones
365 Joe Smith
That’s pretty much all there is to it. All of the Mercurial tags have been con-
verted to Git tags, and Mercurial branches and bookmarks have been converted
to Git branches. Now you’re ready to push the repository up to its new server-
side home:
$ git remote add origin git@my-git-server:myrepository.git
$ git push origin --all
Perforce
The next system you’ll look at importing from is Perforce. As we discussed
above, there are two ways to let Git and Perforce talk to each other: git-p4 and
Perforce Git Fusion.
CHAPTER 9: Git and Other Systems
472

PERFORCE GIT FUSION
Git Fusion makes this process fairly painless. Just configure your project set-
tings, user mappings, and branches using a configuration file (as discussed in
“Git Fusion”), and clone the repository. Git Fusion leaves you with what looks
like a native Git repository, which is then ready to push to a native Git host if
you desire. You could even use Perforce as your Git host if you like.
GIT-P4
Git-p4 can also act as an import tool. As an example, we’ll import the Jam
project from the Perforce Public Depot. To set up your client, you must export
the P4PORT environment variable to point to the Perforce depot:
$ export P4PORT=public.perforce.com:1666
In order to follow along, you’ll need a Perforce depot to connect with.
We’ll be using the public depot at public.perforce.com for our examples,
but you can use any depot you have access to.
Run the git p4 clone command to import the Jam project from the Per-
force server, supplying the depot and project path and the path into which you
want to import the project:
$ git-p4 clone //guest/perforce_software/jam@all p4import
Importing from //guest/perforce_software/jam@all into p4import
Initialized empty Git repository in /private/tmp/p4import/.git/
Import destination: refs/remotes/p4/master
Importing revision 9957 (100%)
This particular project has only one branch, but if you have branches that
are configured with branch views (or just a set of directories), you can use the
--detect-branches flag to git p4 clone to import all the project’s branch-
es as well. See “Branching” for a bit more detail on this.
At this point you’re almost done. If you go to the p4import directory and
run git log, you can see your imported work:
$ git log -2
commit e5da1c909e5db3036475419f6379f2c73710c4e6
Author: giles <giles@giles@perforce.com>
Date: Wed Feb 8 03:13:27 2012 -0800
Migrating to Git
473

Correction to line 355; change </UL> to </OL>.
[git-p4: depot-paths = "//public/jam/src/": change = 8068]
commit aa21359a0a135dda85c50a7f7cf249e4f7b8fd98
Author: kwirth <kwirth@perforce.com>
Date: Tue Jul 7 01:35:51 2009 -0800
Fix spelling error on Jam doc page (cummulative -> cumulative).
[git-p4: depot-paths = "//public/jam/src/": change = 7304]
You can see that git-p4 has le an identifier in each commit message. It’s
fine to keep that identifier there, in case you need to reference the Perforce
change number later. However, if you’d like to remove the identifier, now is the
time to do so – before you start doing work on the new repository. You can use
git filter-branch to remove the identifier strings en masse:
$ git filter-branch --msg-filter 'sed -e "/^\[git-p4:/d"'
Rewrite e5da1c909e5db3036475419f6379f2c73710c4e6 (125/125)
Ref 'refs/heads/master' was rewritten
If you run git log, you can see that all the SHA-1 checksums for the com-
mits have changed, but the git-p4 strings are no longer in the commit messag-
es:
$ git log -2
commit b17341801ed838d97f7800a54a6f9b95750839b7
Author: giles <giles@giles@perforce.com>
Date: Wed Feb 8 03:13:27 2012 -0800
Correction to line 355; change </UL> to </OL>.
commit 3e68c2e26cd89cb983eb52c024ecdfba1d6b3fff
Author: kwirth <kwirth@perforce.com>
Date: Tue Jul 7 01:35:51 2009 -0800
Fix spelling error on Jam doc page (cummulative -> cumulative).
Your import is ready to push up to your new Git server.
CHAPTER 9: Git and Other Systems
474

TFS
If your team is converting their source control from TFVC to Git, you’ll want the
highest-fidelity conversion you can get. This means that, while we covered both
git-tfs and git-tf for the interop section, we’ll only be covering git-tfs for this
part, because git-tfs supports branches, and this is prohibitively diicult using
git-tf.
This is a one-way conversion. The resulting Git repository won’t be able
to connect with the original TFVC project.
The first thing to do is map usernames. TFVC is fairly liberal with what goes
into the author field for changesets, but Git wants a human-readable name and
email address. You can get this information from the tf command-line client,
like so:
PS> tf history $/myproject -recursive > AUTHORS_TMP
This grabs all of the changesets in the history of the project and put it in the
AUTHORS_TMP file that we will process to extract the data of the User column
(the 2nd one). Open the file and find at which characters start and end the col-
umn and replace, in the following command-line, the parameters 11-20 of the
cut command with the ones found:
PS> cat AUTHORS_TMP | cut -b 11-20 | tail -n+3 | uniq | sort > AUTHORS
The cut command keeps only the characters between 11 and 20 from each
line. The tail command skips the first two lines, which are field headers and
ASCII-art underlines. The result of all of this is piped to uniq to eliminate dupli-
cates, and saved to a file named AUTHORS. The next step is manual; in order for
git-tfs to make eective use of this file, each line must be in this format:
DOMAIN\username = User Name <email@address.com>
The portion on the le is the “User” field from TFVC, and the portion on the
right side of the equals sign is the user name that will be used for Git commits.
Once you have this file, the next thing to do is make a full clone of the TFVC
project you’re interested in:
PS> git tfs clone --with-branches --authors=AUTHORS https://username.visualstudio.com/DefaultCollection $/project/Trunk project_git
Next you’ll want to clean the git-tfs-id sections from the bottom of the
commit messages. The following command will do that:
Migrating to Git
475

PS> git filter-branch -f --msg-filter 'sed "s/^git-tfs-id:.*$//g"' -- --all
That uses the sed command from the Git-bash environment to replace any
line starting with “git-tfs-id:” with emptiness, which Git will then ignore.
Once that’s all done, you’re ready to add a new remote, push all your
branches up, and have your team start working from Git.
A Custom Importer
If your system isn’t one of the above, you should look for an importer online –
quality importers are available for many other systems, including CVS, Clear
Case, Visual Source Safe, even a directory of archives. If none of these tools
works for you, you have a more obscure tool, or you otherwise need a more
custom importing process, you should use git fast-import. This command
reads simple instructions from stdin to write specific Git data. It’s much easier
to create Git objects this way than to run the raw Git commands or try to write
the raw objects (see Chapter 10 for more information). This way, you can write
an import script that reads the necessary information out of the system you’re
importing from and prints straightforward instructions to stdout. You can then
run this program and pipe its output through git fast-import.
To quickly demonstrate, you’ll write a simple importer. Suppose you work in
current, you back up your project by occasionally copying the directory into a
time-stamped back_YYYY_MM_DD backup directory, and you want to import
this into Git. Your directory structure looks like this:
$ ls /opt/import_from
back_2014_01_02
back_2014_01_04
back_2014_01_14
back_2014_02_03
current
In order to import a Git directory, you need to review how Git stores its data.
As you may remember, Git is fundamentally a linked list of commit objects that
point to a snapshot of content. All you have to do is tell fast-import what the
content snapshots are, what commit data points to them, and the order they go
in. Your strategy will be to go through the snapshots one at a time and create
commits with the contents of each directory, linking each commit back to the
previous one.
As we did in “An Example Git-Enforced Policy”, we’ll write this in Ruby, be-
cause it’s what we generally work with and it tends to be easy to read. You can
CHAPTER 9: Git and Other Systems
476
write this example pretty easily in anything you’re familiar with – it just needs
to print the appropriate information to stdout. And, if you are running on Win-
dows, this means you’ll need to take special care to not introduce carriage re-
turns at the end your lines – git fast-import is very particular about just wanting
line feeds (LF) not the carriage return line feeds (CRLF) that Windows uses.
To begin, you’ll change into the target directory and identify every subdirec-
tory, each of which is a snapshot that you want to import as a commit. You’ll
change into each subdirectory and print the commands necessary to export it.
Your basic main loop looks like this:
last_mark = nil
# loop through the directories
Dir.chdir(ARGV[0]) do
Dir.glob("*").each do |dir|
next if File.file?(dir)
# move into the target directory
Dir.chdir(dir) do
last_mark = print_export(dir, last_mark)
end
end
end
You run print_export inside each directory, which takes the manifest and
mark of the previous snapshot and returns the manifest and mark of this one;
that way, you can link them properly. “Mark” is the fast-import term for an
identifier you give to a commit; as you create commits, you give each one a
mark that you can use to link to it from other commits. So, the first thing to do
in your print_export method is generate a mark from the directory name:
mark = convert_dir_to_mark(dir)
You’ll do this by creating an array of directories and using the index value as
the mark, because a mark must be an integer. Your method looks like this:
$marks = []
def convert_dir_to_mark(dir)
if !$marks.include?(dir)
$marks << dir
end
($marks.index(dir) + 1).to_s
end
Migrating to Git
477
Now that you have an integer representation of your commit, you need a
date for the commit metadata. Because the date is expressed in the name of
the directory, you’ll parse it out. The next line in your print_export file is
date = convert_dir_to_date(dir)
where convert_dir_to_date is defined as
def convert_dir_to_date(dir)
if dir == 'current'
return Time.now().to_i
else
dir = dir.gsub('back_', '')
(year, month, day) = dir.split('_')
return Time.local(year, month, day).to_i
end
end
That returns an integer value for the date of each directory. The last piece of
meta-information you need for each commit is the committer data, which you
hardcode in a global variable:
$author = 'John Doe <john@example.com>'
Now you’re ready to begin printing out the commit data for your importer.
The initial information states that you’re defining a commit object and what
branch it’s on, followed by the mark you’ve generated, the committer informa-
tion and commit message, and then the previous commit, if any. The code
looks like this:
# print the import information
puts 'commit refs/heads/master'
puts 'mark :' + mark
puts "committer #{$author} #{date} -0700"
export_data('imported from ' + dir)
puts 'from :' + last_mark if last_mark
You hardcode the time zone (-0700) because doing so is easy. If you’re im-
porting from another system, you must specify the time zone as an oset. The
commit message must be expressed in a special format:
data (size)\n(contents)
CHAPTER 9: Git and Other Systems
478
The format consists of the word data, the size of the data to be read, a new-
line, and finally the data. Because you need to use the same format to specify
the file contents later, you create a helper method, export_data:
def export_data(string)
print "data #{string.size}\n#{string}"
end
All that’s le is to specify the file contents for each snapshot. This is easy,
because you have each one in a directory – you can print out the deleteall
command followed by the contents of each file in the directory. Git will then re-
cord each snapshot appropriately:
puts 'deleteall'
Dir.glob("**/*").each do |file|
next if !File.file?(file)
inline_data(file)
end
Note: Because many systems think of their revisions as changes from one
commit to another, fast-import can also take commands with each commit to
specify which files have been added, removed, or modified and what the new
contents are. You could calculate the dierences between snapshots and pro-
vide only this data, but doing so is more complex – you may as well give Git all
the data and let it figure it out. If this is better suited to your data, check the
fast-import man page for details about how to provide your data in this man-
ner.
The format for listing the new file contents or specifying a modified file with
the new contents is as follows:
M 644 inline path/to/file
data (size)
(file contents)
Here, 644 is the mode (if you have executable files, you need to detect and
specify 755 instead), and inline says you’ll list the contents immediately aer
this line. Your inline_data method looks like this:
def inline_data(file, code = 'M', mode = '644')
content = File.read(file)
puts "#{code} #{mode} inline #{file}"
export_data(content)
end
Migrating to Git
479

You reuse the export_data method you defined earlier, because it’s the
same as the way you specified your commit message data.
The last thing you need to do is to return the current mark so it can be
passed to the next iteration:
return mark
If you are running on Windows you’ll need to make sure that you add one
extra step. As mentioned before, Windows uses CRLF for new line char-
acters while git fast-import expects only LF. To get around this problem
and make git fast-import happy, you need to tell ruby to use LF instead
of CRLF:
$stdout.binmode
That’s it. Here’s the script in its entirety:
#!/usr/bin/env ruby
$stdout.binmode
$author = "John Doe <john@example.com>"
$marks = []
def convert_dir_to_mark(dir)
if !$marks.include?(dir)
$marks << dir
end
($marks.index(dir)+1).to_s
end
def convert_dir_to_date(dir)
if dir == 'current'
return Time.now().to_i
else
dir = dir.gsub('back_', '')
(year, month, day) = dir.split('_')
return Time.local(year, month, day).to_i
end
end
def export_data(string)
print "data #{string.size}\n#{string}"
end
def inline_data(file, code='M', mode='644')
content = File.read(file)
puts "#{code} #{mode} inline #{file}"
CHAPTER 9: Git and Other Systems
480

export_data(content)
end
def print_export(dir, last_mark)
date = convert_dir_to_date(dir)
mark = convert_dir_to_mark(dir)
puts 'commit refs/heads/master'
puts "mark :#{mark}"
puts "committer #{$author} #{date} -0700"
export_data("imported from #{dir}")
puts "from :#{last_mark}" if last_mark
puts 'deleteall'
Dir.glob("**/*").each do |file|
next if !File.file?(file)
inline_data(file)
end
mark
end
# Loop through the directories
last_mark = nil
Dir.chdir(ARGV[0]) do
Dir.glob("*").each do |dir|
next if File.file?(dir)
# move into the target directory
Dir.chdir(dir) do
last_mark = print_export(dir, last_mark)
end
end
end
If you run this script, you’ll get content that looks something like this:
$ ruby import.rb /opt/import_from
commit refs/heads/master
mark :1
committer John Doe <john@example.com> 1388649600 -0700
data 29
imported from back_2014_01_02deleteall
M 644 inline README.md
data 28
# Hello
This is my readme.
commit refs/heads/master
Migrating to Git
481

mark :2
committer John Doe <john@example.com> 1388822400 -0700
data 29
imported from back_2014_01_04from :1
deleteall
M 644 inline main.rb
data 34
#!/bin/env ruby
puts "Hey there"
M 644 inline README.md
(...)
To run the importer, pipe this output through git fast-import while in
the Git directory you want to import into. You can create a new directory and
then run git init in it for a starting point, and then run your script:
$ git init
Initialized empty Git repository in /opt/import_to/.git/
$ ruby import.rb /opt/import_from | git fast-import
git-fast-import statistics:
---------------------------------------------------------------------
Alloc'd objects: 5000
Total objects: 13 ( 6 duplicates )
blobs : 5 ( 4 duplicates 3 deltas of 5 attempts)
trees : 4 ( 1 duplicates 0 deltas of 4 attempts)
commits: 4 ( 1 duplicates 0 deltas of 0 attempts)
tags : 0 ( 0 duplicates 0 deltas of 0 attempts)
Total branches: 1 ( 1 loads )
marks: 1024 ( 5 unique )
atoms: 2
Memory total: 2344 KiB
pools: 2110 KiB
objects: 234 KiB
---------------------------------------------------------------------
pack_report: getpagesize() = 4096
pack_report: core.packedGitWindowSize = 1073741824
pack_report: core.packedGitLimit = 8589934592
pack_report: pack_used_ctr = 10
pack_report: pack_mmap_calls = 5
pack_report: pack_open_windows = 2 / 2
pack_report: pack_mapped = 1457 / 1457
---------------------------------------------------------------------
CHAPTER 9: Git and Other Systems
482

As you can see, when it completes successfully, it gives you a bunch of statis-
tics about what it accomplished. In this case, you imported 13 objects total for 4
commits into 1 branch. Now, you can run git log to see your new history:
$ git log -2
commit 3caa046d4aac682a55867132ccdfbe0d3fdee498
Author: John Doe <john@example.com>
Date: Tue Jul 29 19:39:04 2014 -0700
imported from current
commit 4afc2b945d0d3c8cd00556fbe2e8224569dc9def
Author: John Doe <john@example.com>
Date: Mon Feb 3 01:00:00 2014 -0700
imported from back_2014_02_03
There you go – a nice, clean Git repository. It’s important to note that noth-
ing is checked out – you don’t have any files in your working directory at first.
To get them, you must reset your branch to where master is now:
$ ls
$ git reset --hard master
HEAD is now at 3caa046 imported from current
$ ls
README.md main.rb
You can do a lot more with the fast-import tool – handle dierent modes,
binary data, multiple branches and merging, tags, progress indicators, and
more. A number of examples of more complex scenarios are available in the
contrib/fast-import directory of the Git source code.
Summary
You should feel comfortable using Git as a client for other version-control sys-
tems, or importing nearly any existing repository into Git without losing data. In
the next chapter, we’ll cover the raw internals of Git so you can cra every sin-
gle byte, if need be.
Summary
483
Git Internals
You may have skipped to this chapter from a previous chapter, or you may have
gotten here aer reading the rest of the book – in either case, this is where we’ll
go over the inner workings and implementation of Git. We found that learning
this information was fundamentally important to understanding how useful
and powerful Git is, but others have argued to us that it can be confusing and
unnecessarily complex for beginners. Thus, we’ve made this discussion the last
chapter in the book so you could read it early or later in your learning process.
We leave it up to you to decide.
Now that you’re here, let’s get started. First, if it isn’t yet clear, Git is funda-
mentally a content-addressable filesystem with a VCS user interface written on
top of it. You’ll learn more about what this means in a bit.
In the early days of Git (mostly pre 1.5), the user interface was much more
complex because it emphasized this filesystem rather than a polished VCS. In
the last few years, the UI has been refined until it’s as clean and easy to use as
any system out there; but oen, the stereotype lingers about the early Git UI
that was complex and diicult to learn.
The content-addressable filesystem layer is amazingly cool, so we’ll cover
that first in this chapter; then, you’ll learn about the transport mechanisms and
the repository maintenance tasks that you may eventually have to deal with.
Plumbing and Porcelain
This book covers how to use Git with 30 or so verbs such as checkout, branch,
remote, and so on. But because Git was initially a toolkit for a VCS rather than a
full user-friendly VCS, it has a bunch of verbs that do low-level work and were
designed to be chained together UNIX style or called from scripts. These com-
mands are generally referred to as “plumbing” commands, and the more user-
friendly commands are called “porcelain” commands.
The book’s first nine chapters deal almost exclusively with porcelain com-
mands. But in this chapter, you’ll be dealing mostly with the lower-level plumb-
485
10

ing commands, because they give you access to the inner workings of Git, and
help demonstrate how and why Git does what it does. Many of these com-
mands aren’t meant to be used manually on the command line, but rather to
be used as building blocks for new tools and custom scripts.
When you run git init in a new or existing directory, Git creates the .git
directory, which is where almost everything that Git stores and manipulates is
located. If you want to back up or clone your repository, copying this single di-
rectory elsewhere gives you nearly everything you need. This entire chapter ba-
sically deals with the stu in this directory. Here’s what it looks like:
$ ls -F1
HEAD
config*
description
hooks/
info/
objects/
refs/
You may see some other files in there, but this is a fresh git init reposito-
ry – it’s what you see by default. The description file is only used by the Git-
Web program, so don’t worry about it. The config file contains your project-
specific configuration options, and the info directory keeps a global exclude
file for ignored patterns that you don’t want to track in a .gitignore file. The
hooks directory contains your client- or server-side hook scripts, which are dis-
cussed in detail in “Git Hooks”.
This leaves four important entries: the HEAD and (yet to be created) index
files, and the objects and refs directories. These are the core parts of Git. The
objects directory stores all the content for your database, the refs directory
stores pointers into commit objects in that data (branches), the HEAD file points
to the branch you currently have checked out, and the index file is where Git
stores your staging area information. You’ll now look at each of these sections
in detail to see how Git operates.
Git Objects
Git is a content-addressable filesystem. Great. What does that mean? It means
that at the core of Git is a simple key-value data store. You can insert any kind of
content into it, and it will give you back a key that you can use to retrieve the
content again at any time. To demonstrate, you can use the plumbing com-
mand hash-object, which takes some data, stores it in your .git directory,
CHAPTER 10: Git Internals
486

and gives you back the key the data is stored as. First, you initialize a new Git
repository and verify that there is nothing in the objects directory:
$ git init test
Initialized empty Git repository in /tmp/test/.git/
$ cd test
$ find .git/objects
.git/objects
.git/objects/info
.git/objects/pack
$ find .git/objects -type f
Git has initialized the objects directory and created pack and info subdir-
ectories in it, but there are no regular files. Now, store some text in your Git da-
tabase:
$ echo 'test content' | git hash-object -w --stdin
d670460b4b4aece5915caf5c68d12f560a9fe3e4
The -w tells hash-object to store the object; otherwise, the command sim-
ply tells you what the key would be. --stdin tells the command to read the
content from stdin; if you don’t specify this, hash-object expects a file path at
the end. The output from the command is a 40-character checksum hash. This
is the SHA-1 hash – a checksum of the content you’re storing plus a header,
which you’ll learn about in a bit. Now you can see how Git has stored your data:
$ find .git/objects -type f
.git/objects/d6/70460b4b4aece5915caf5c68d12f560a9fe3e4
You can see a file in the objects directory. This is how Git stores the content
initially – as a single file per piece of content, named with the SHA-1 checksum
of the content and its header. The subdirectory is named with the first 2 charac-
ters of the SHA-1, and the filename is the remaining 38 characters.
You can pull the content back out of Git with the cat-file command. This
command is sort of a Swiss army knife for inspecting Git objects. Passing -p to
it instructs the cat-file command to figure out the type of content and dis-
play it nicely for you:
Git Objects
487

$ git cat-file -p d670460b4b4aece5915caf5c68d12f560a9fe3e4
test content
Now, you can add content to Git and pull it back out again. You can also do
this with content in files. For example, you can do some simple version control
on a file. First, create a new file and save its contents in your database:
$ echo 'version 1' > test.txt
$ git hash-object -w test.txt
83baae61804e65cc73a7201a7252750c76066a30
Then, write some new content to the file, and save it again:
$ echo 'version 2' > test.txt
$ git hash-object -w test.txt
1f7a7a472abf3dd9643fd615f6da379c4acb3e3a
Your database contains the two new versions of the file as well as the first
content you stored there:
$ find .git/objects -type f
.git/objects/1f/7a7a472abf3dd9643fd615f6da379c4acb3e3a
.git/objects/83/baae61804e65cc73a7201a7252750c76066a30
.git/objects/d6/70460b4b4aece5915caf5c68d12f560a9fe3e4
Now you can revert the file back to the first version
$ git cat-file -p 83baae61804e65cc73a7201a7252750c76066a30 > test.txt
$ cat test.txt
version 1
or the second version:
$ git cat-file -p 1f7a7a472abf3dd9643fd615f6da379c4acb3e3a > test.txt
$ cat test.txt
version 2
But remembering the SHA-1 key for each version of your file isn’t practical;
plus, you aren’t storing the filename in your system – just the content. This ob-
CHAPTER 10: Git Internals
488

ject type is called a blob. You can have Git tell you the object type of any object
in Git, given its SHA-1 key, with cat-file -t:
$ git cat-file -t 1f7a7a472abf3dd9643fd615f6da379c4acb3e3a
blob
Tree Objects
The next type we’ll look at is the tree, which solves the problem of storing the
filename and also allows you to store a group of files together. Git stores con-
tent in a manner similar to a UNIX filesystem, but a bit simplified. All the con-
tent is stored as tree and blob objects, with trees corresponding to UNIX direc-
tory entries and blobs corresponding more or less to inodes or file contents. A
single tree object contains one or more tree entries, each of which contains a
SHA-1 pointer to a blob or subtree with its associated mode, type, and file-
name. For example, the most recent tree in a project may look something like
this:
$ git cat-file -p master^{tree}
100644 blob a906cb2a4a904a152e80877d4088654daad0c859 README
100644 blob 8f94139338f9404f26296befa88755fc2598c289 Rakefile
040000 tree 99f1a6d12cb4b6f19c8655fca46c3ecf317074e0 lib
The master^{tree} syntax specifies the tree object that is pointed to by
the last commit on your master branch. Notice that the lib subdirectory isn’t
a blob but a pointer to another tree:
$ git cat-file -p 99f1a6d12cb4b6f19c8655fca46c3ecf317074e0
100644 blob 47c6340d6459e05787f644c2447d2595f5d3a54b simplegit.rb
Conceptually, the data that Git is storing is something like this:
Git Objects
489
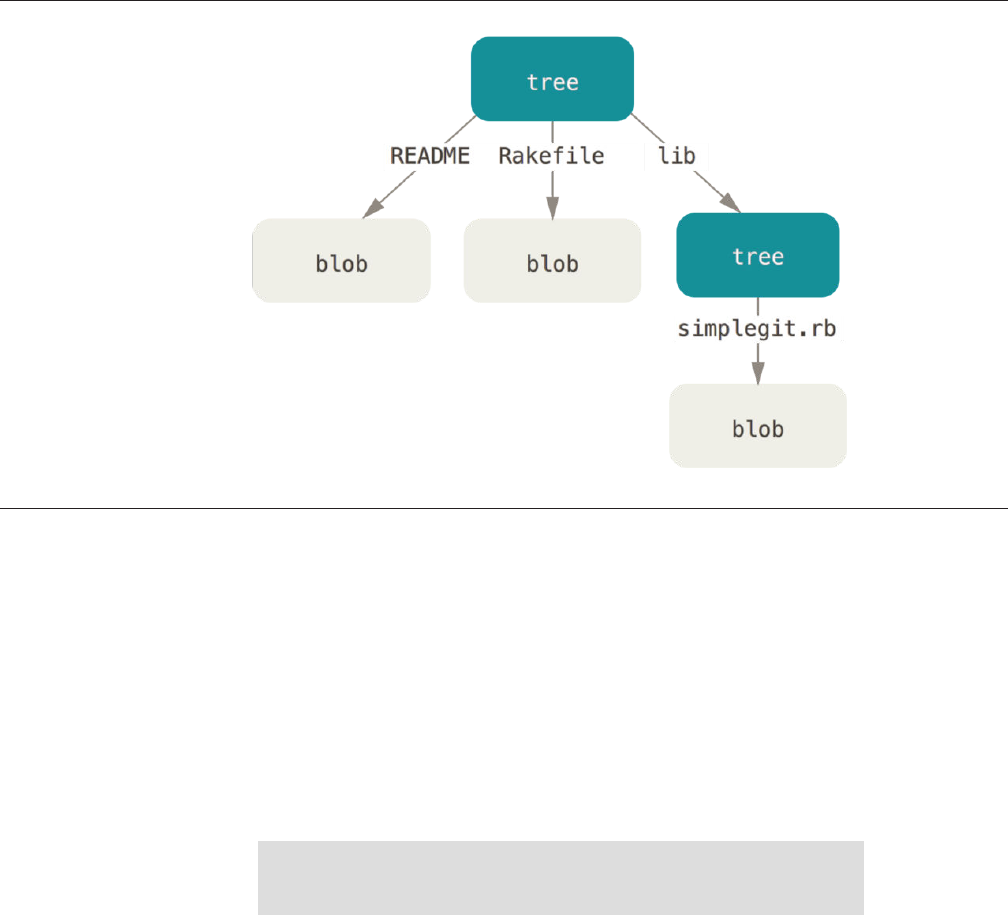
FIGURE 10-1
Simple version of the
Git data model.
You can fairly easily create your own tree. Git normally creates a tree by tak-
ing the state of your staging area or index and writing a series of tree objects
from it. So, to create a tree object, you first have to set up an index by staging
some files. To create an index with a single entry – the first version of your
test.txt file – you can use the plumbing command update-index. You use this
command to artificially add the earlier version of the test.txt file to a new stag-
ing area. You must pass it the --add option because the file doesn’t yet exist in
your staging area (you don’t even have a staging area set up yet) and --
cacheinfo because the file you’re adding isn’t in your directory but is in your
database. Then, you specify the mode, SHA-1, and filename:
$ git update-index --add --cacheinfo 100644 \
83baae61804e65cc73a7201a7252750c76066a30 test.txt
In this case, you’re specifying a mode of 100644, which means it’s a normal
file. Other options are 100755, which means it’s an executable file; and 120000,
which specifies a symbolic link. The mode is taken from normal UNIX modes
but is much less flexible – these three modes are the only ones that are valid for
files (blobs) in Git (although other modes are used for directories and submod-
ules).
CHAPTER 10: Git Internals
490

Now, you can use the write-tree command to write the staging area out to
a tree object. No -w option is needed – calling write-tree automatically cre-
ates a tree object from the state of the index if that tree doesn’t yet exist:
$ git write-tree
d8329fc1cc938780ffdd9f94e0d364e0ea74f579
$ git cat-file -p d8329fc1cc938780ffdd9f94e0d364e0ea74f579
100644 blob 83baae61804e65cc73a7201a7252750c76066a30 test.txt
You can also verify that this is a tree object:
$ git cat-file -t d8329fc1cc938780ffdd9f94e0d364e0ea74f579
tree
You’ll now create a new tree with the second version of test.txt and a new file
as well:
$ echo 'new file' > new.txt
$ git update-index test.txt
$ git update-index --add new.txt
Your staging area now has the new version of test.txt as well as the new file
new.txt. Write out that tree (recording the state of the staging area or index to a
tree object) and see what it looks like:
$ git write-tree
0155eb4229851634a0f03eb265b69f5a2d56f341
$ git cat-file -p 0155eb4229851634a0f03eb265b69f5a2d56f341
100644 blob fa49b077972391ad58037050f2a75f74e3671e92 new.txt
100644 blob 1f7a7a472abf3dd9643fd615f6da379c4acb3e3a test.txt
Notice that this tree has both file entries and also that the test.txt SHA-1 is
the “version 2” SHA-1 from earlier (1f7a7a). Just for fun, you’ll add the first tree
as a subdirectory into this one. You can read trees into your staging area by call-
ing read-tree. In this case, you can read an existing tree into your staging area
as a subtree by using the --prefix option to read-tree:
$ git read-tree --prefix=bak d8329fc1cc938780ffdd9f94e0d364e0ea74f579
$ git write-tree
3c4e9cd789d88d8d89c1073707c3585e41b0e614
Git Objects
491
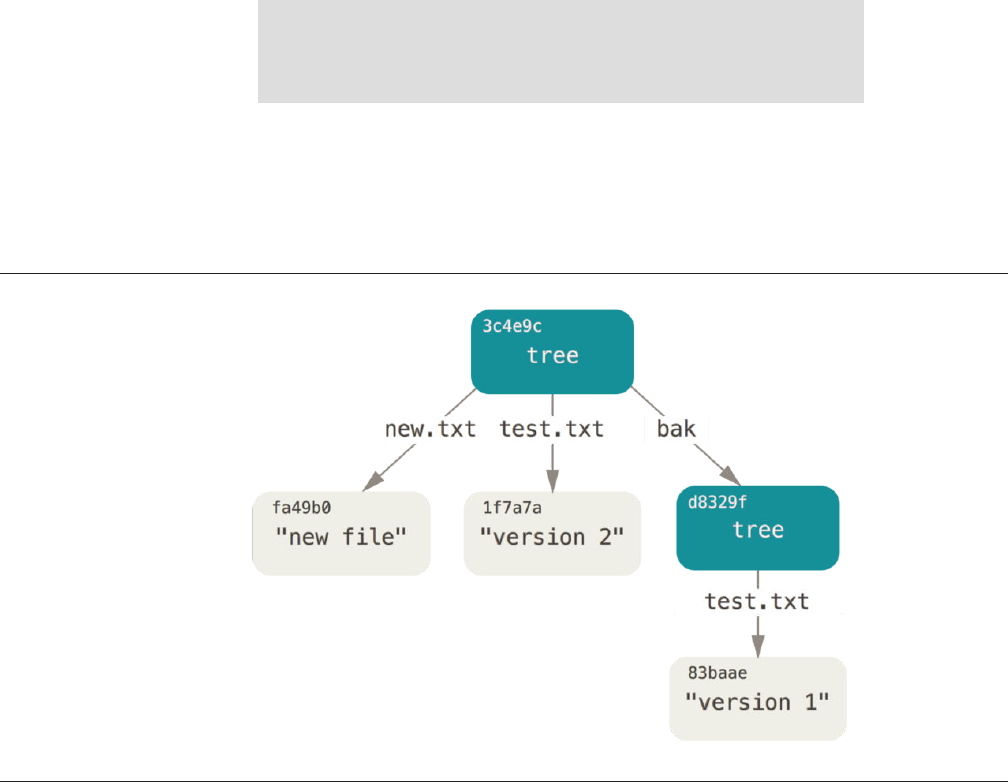
FIGURE 10-2
The content
structure of your
current Git data.
$ git cat-file -p 3c4e9cd789d88d8d89c1073707c3585e41b0e614
040000 tree d8329fc1cc938780ffdd9f94e0d364e0ea74f579 bak
100644 blob fa49b077972391ad58037050f2a75f74e3671e92 new.txt
100644 blob 1f7a7a472abf3dd9643fd615f6da379c4acb3e3a test.txt
If you created a working directory from the new tree you just wrote, you
would get the two files in the top level of the working directory and a subdirec-
tory named bak that contained the first version of the test.txt file. You can think
of the data that Git contains for these structures as being like this:
Commit Objects
You have three trees that specify the dierent snapshots of your project that
you want to track, but the earlier problem remains: you must remember all
three SHA-1 values in order to recall the snapshots. You also don’t have any in-
formation about who saved the snapshots, when they were saved, or why they
were saved. This is the basic information that the commit object stores for you.
To create a commit object, you call commit-tree and specify a single tree
SHA-1 and which commit objects, if any, directly preceded it. Start with the first
tree you wrote:
CHAPTER 10: Git Internals
492

$ echo 'first commit' | git commit-tree d8329f
fdf4fc3344e67ab068f836878b6c4951e3b15f3d
Now you can look at your new commit object with cat-file:
$ git cat-file -p fdf4fc3
tree d8329fc1cc938780ffdd9f94e0d364e0ea74f579
author Scott Chacon <schacon@gmail.com> 1243040974 -0700
committer Scott Chacon <schacon@gmail.com> 1243040974 -0700
first commit
The format for a commit object is simple: it specifies the top-level tree for
the snapshot of the project at that point; the author/committer information
(which uses your user.name and user.email configuration settings and a
timestamp); a blank line, and then the commit message.
Next, you’ll write the other two commit objects, each referencing the com-
mit that came directly before it:
$ echo 'second commit' | git commit-tree 0155eb -p fdf4fc3
cac0cab538b970a37ea1e769cbbde608743bc96d
$ echo 'third commit' | git commit-tree 3c4e9c -p cac0cab
1a410efbd13591db07496601ebc7a059dd55cfe9
Each of the three commit objects points to one of the three snapshot trees
you created. Oddly enough, you have a real Git history now that you can view
with the git log command, if you run it on the last commit SHA-1:
$ git log --stat 1a410e
commit 1a410efbd13591db07496601ebc7a059dd55cfe9
Author: Scott Chacon <schacon@gmail.com>
Date: Fri May 22 18:15:24 2009 -0700
third commit
bak/test.txt | 1 +
1 file changed, 1 insertion(+)
commit cac0cab538b970a37ea1e769cbbde608743bc96d
Author: Scott Chacon <schacon@gmail.com>
Date: Fri May 22 18:14:29 2009 -0700
Git Objects
493

second commit
new.txt | 1 +
test.txt | 2 +-
2 files changed, 2 insertions(+), 1 deletion(-)
commit fdf4fc3344e67ab068f836878b6c4951e3b15f3d
Author: Scott Chacon <schacon@gmail.com>
Date: Fri May 22 18:09:34 2009 -0700
first commit
test.txt | 1 +
1 file changed, 1 insertion(+)
Amazing. You’ve just done the low-level operations to build up a Git history
without using any of the front end commands. This is essentially what Git does
when you run the git add and git commit commands – it stores blobs for the
files that have changed, updates the index, writes out trees, and writes commit
objects that reference the top-level trees and the commits that came immedi-
ately before them. These three main Git objects – the blob, the tree, and the
commit – are initially stored as separate files in your .git/objects directory.
Here are all the objects in the example directory now, commented with what
they store:
$ find .git/objects -type f
.git/objects/01/55eb4229851634a0f03eb265b69f5a2d56f341 # tree 2
.git/objects/1a/410efbd13591db07496601ebc7a059dd55cfe9 # commit 3
.git/objects/1f/7a7a472abf3dd9643fd615f6da379c4acb3e3a # test.txt v2
.git/objects/3c/4e9cd789d88d8d89c1073707c3585e41b0e614 # tree 3
.git/objects/83/baae61804e65cc73a7201a7252750c76066a30 # test.txt v1
.git/objects/ca/c0cab538b970a37ea1e769cbbde608743bc96d # commit 2
.git/objects/d6/70460b4b4aece5915caf5c68d12f560a9fe3e4 # 'test content'
.git/objects/d8/329fc1cc938780ffdd9f94e0d364e0ea74f579 # tree 1
.git/objects/fa/49b077972391ad58037050f2a75f74e3671e92 # new.txt
.git/objects/fd/f4fc3344e67ab068f836878b6c4951e3b15f3d # commit 1
If you follow all the internal pointers, you get an object graph something like
this:
CHAPTER 10: Git Internals
494
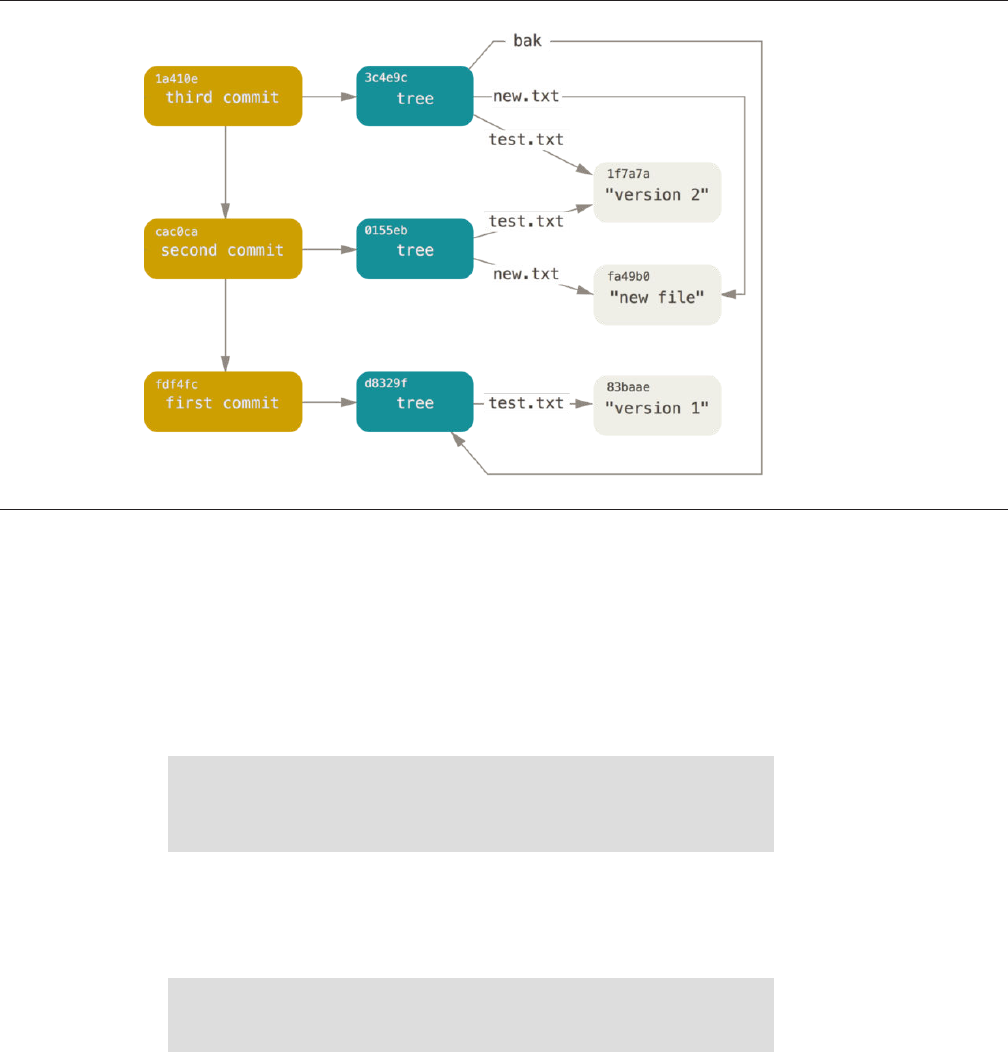
FIGURE 10-3
All the objects in
your Git directory.
Object Storage
We mentioned earlier that a header is stored with the content. Let’s take a mi-
nute to look at how Git stores its objects. You’ll see how to store a blob object –
in this case, the string “what is up, doc?” – interactively in the Ruby scripting
language.
You can start up interactive Ruby mode with the irb command:
$ irb
>> content = "what is up, doc?"
=> "what is up, doc?"
Git constructs a header that starts with the type of the object, in this case a
blob. Then, it adds a space followed by the size of the content and finally a null
byte:
>> header = "blob #{content.length}\0"
=> "blob 16\u0000"
Git Objects
495

Git concatenates the header and the original content and then calculates
the SHA-1 checksum of that new content. You can calculate the SHA-1 value of a
string in Ruby by including the SHA1 digest library with the require command
and then calling Digest::SHA1.hexdigest() with the string:
>> store = header + content
=> "blob 16\u0000what is up, doc?"
>> require 'digest/sha1'
=> true
>> sha1 = Digest::SHA1.hexdigest(store)
=> "bd9dbf5aae1a3862dd1526723246b20206e5fc37"
Git compresses the new content with zlib, which you can do in Ruby with the
zlib library. First, you need to require the library and then run Zlib::De-
flate.deflate() on the content:
>> require 'zlib'
=> true
>> zlib_content = Zlib::Deflate.deflate(store)
=> "x\x9CK\xCA\xC9OR04c(\xCFH,Q\xC8,V(-\xD0QH\xC9O\xB6\a\x00_\x1C\a\x9D"
Finally, you’ll write your zlib-deflated content to an object on disk. You’ll de-
termine the path of the object you want to write out (the first two characters of
the SHA-1 value being the subdirectory name, and the last 38 characters being
the filename within that directory). In Ruby, you can use the FileU-
tils.mkdir_p() function to create the subdirectory if it doesn’t exist. Then,
open the file with File.open() and write out the previously zlib-compressed
content to the file with a write() call on the resulting file handle:
>> path = '.git/objects/' + sha1[0,2] + '/' + sha1[2,38]
=> ".git/objects/bd/9dbf5aae1a3862dd1526723246b20206e5fc37"
>> require 'fileutils'
=> true
>> FileUtils.mkdir_p(File.dirname(path))
=> ".git/objects/bd"
>> File.open(path, 'w') { |f| f.write zlib_content }
=> 32
That’s it – you’ve created a valid Git blob object. All Git objects are stored the
same way, just with dierent types – instead of the string blob, the header will
CHAPTER 10: Git Internals
496

begin with commit or tree. Also, although the blob content can be nearly any-
thing, the commit and tree content are very specifically formatted.
Git References
You can run something like git log 1a410e to look through your whole histo-
ry, but you still have to remember that 1a410e is the last commit in order to
walk that history to find all those objects. You need a file in which you can store
the SHA-1 value under a simple name so you can use that pointer rather than
the raw SHA-1 value.
In Git, these are called “references” or “refs;” you can find the files that con-
tain the SHA-1 values in the .git/refs directory. In the current project, this
directory contains no files, but it does contain a simple structure:
$ find .git/refs
.git/refs
.git/refs/heads
.git/refs/tags
$ find .git/refs -type f
To create a new reference that will help you remember where your latest
commit is, you can technically do something as simple as this:
$ echo "1a410efbd13591db07496601ebc7a059dd55cfe9" > .git/refs/heads/master
Now, you can use the head reference you just created instead of the SHA-1
value in your Git commands:
$ git log --pretty=oneline master
1a410efbd13591db07496601ebc7a059dd55cfe9 third commit
cac0cab538b970a37ea1e769cbbde608743bc96d second commit
fdf4fc3344e67ab068f836878b6c4951e3b15f3d first commit
You aren’t encouraged to directly edit the reference files. Git provides a safer
command to do this if you want to update a reference called update-ref:
$ git update-ref refs/heads/master 1a410efbd13591db07496601ebc7a059dd55cfe9
Git References
497
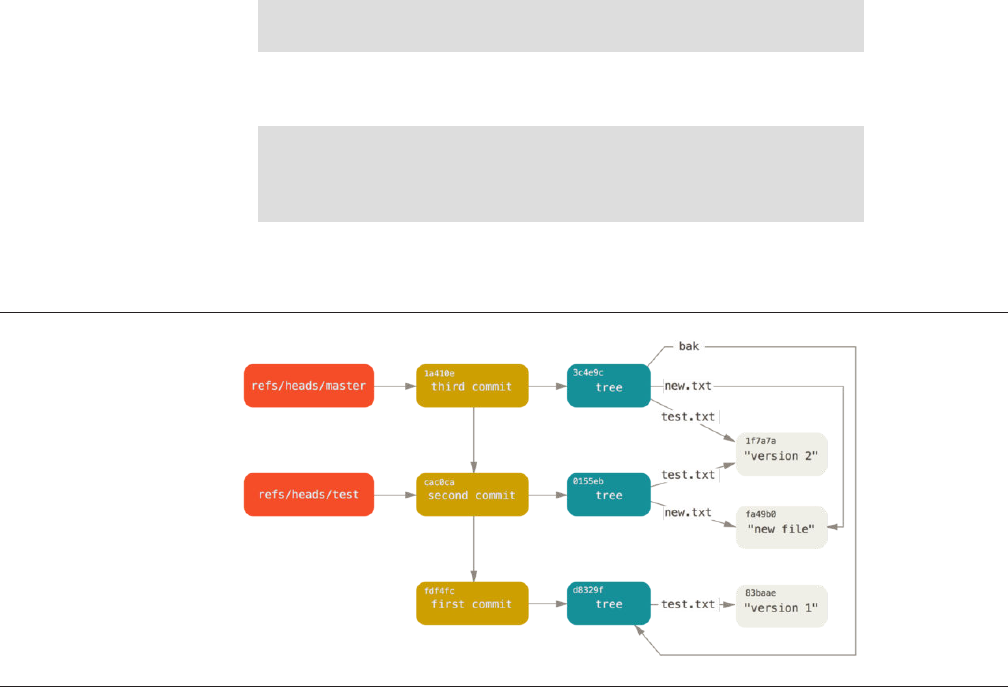
FIGURE 10-4
Git directory objects
with branch head
references included.
That’s basically what a branch in Git is: a simple pointer or reference to the
head of a line of work. To create a branch back at the second commit, you can
do this:
$ git update-ref refs/heads/test cac0ca
Your branch will contain only work from that commit down:
$ git log --pretty=oneline test
cac0cab538b970a37ea1e769cbbde608743bc96d second commit
fdf4fc3344e67ab068f836878b6c4951e3b15f3d first commit
Now, your Git database conceptually looks something like this:
When you run commands like git branch (branchname), Git basically
runs that update-ref command to add the SHA-1 of the last commit of the
branch you’re on into whatever new reference you want to create.
The HEAD
The question now is, when you run git branch (branchname), how does Git
know the SHA-1 of the last commit? The answer is the HEAD file.
The HEAD file is a symbolic reference to the branch you’re currently on. By
symbolic reference, we mean that unlike a normal reference, it doesn’t general-
CHAPTER 10: Git Internals
498

ly contain a SHA-1 value but rather a pointer to another reference. If you look at
the file, you’ll normally see something like this:
$ cat .git/HEAD
ref: refs/heads/master
If you run git checkout test, Git updates the file to look like this:
$ cat .git/HEAD
ref: refs/heads/test
When you run git commit, it creates the commit object, specifying the par-
ent of that commit object to be whatever SHA-1 value the reference in HEAD
points to.
You can also manually edit this file, but again a safer command exists to do
so: symbolic-ref. You can read the value of your HEAD via this command:
$ git symbolic-ref HEAD
refs/heads/master
You can also set the value of HEAD:
$ git symbolic-ref HEAD refs/heads/test
$ cat .git/HEAD
ref: refs/heads/test
You can’t set a symbolic reference outside of the refs style:
$ git symbolic-ref HEAD test
fatal: Refusing to point HEAD outside of refs/
Tags
We just finished discussing Git’s three main object types, but there is a fourth.
The tag object is very much like a commit object – it contains a tagger, a date, a
message, and a pointer. The main dierence is that a tag object generally
points to a commit rather than a tree. It’s like a branch reference, but it never
moves – it always points to the same commit but gives it a friendlier name.
Git References
499

As discussed in Chapter 2, there are two types of tags: annotated and light-
weight. You can make a lightweight tag by running something like this:
$ git update-ref refs/tags/v1.0 cac0cab538b970a37ea1e769cbbde608743bc96d
That is all a lightweight tag is – a reference that never moves. An annotated
tag is more complex, however. If you create an annotated tag, Git creates a tag
object and then writes a reference to point to it rather than directly to the com-
mit. You can see this by creating an annotated tag (-a specifies that it’s an an-
notated tag):
$ git tag -a v1.1 1a410efbd13591db07496601ebc7a059dd55cfe9 -m 'test tag'
Here’s the object SHA-1 value it created:
$ cat .git/refs/tags/v1.1
9585191f37f7b0fb9444f35a9bf50de191beadc2
Now, run the cat-file command on that SHA-1 value:
$ git cat-file -p 9585191f37f7b0fb9444f35a9bf50de191beadc2
object 1a410efbd13591db07496601ebc7a059dd55cfe9
type commit
tag v1.1
tagger Scott Chacon <schacon@gmail.com> Sat May 23 16:48:58 2009 -0700
test tag
Notice that the object entry points to the commit SHA-1 value that you tag-
ged. Also notice that it doesn’t need to point to a commit; you can tag any Git
object. In the Git source code, for example, the maintainer has added their GPG
public key as a blob object and then tagged it. You can view the public key by
running this in a clone of the Git repository:
$ git cat-file blob junio-gpg-pub
The Linux kernel repository also has a non-commit-pointing tag object – the
first tag created points to the initial tree of the import of the source code.
CHAPTER 10: Git Internals
500

Remotes
The third type of reference that you’ll see is a remote reference. If you add a
remote and push to it, Git stores the value you last pushed to that remote for
each branch in the refs/remotes directory. For instance, you can add a re-
mote called origin and push your master branch to it:
$ git remote add origin git@github.com:schacon/simplegit-progit.git
$ git push origin master
Counting objects: 11, done.
Compressing objects: 100% (5/5), done.
Writing objects: 100% (7/7), 716 bytes, done.
Total 7 (delta 2), reused 4 (delta 1)
To git@github.com:schacon/simplegit-progit.git
a11bef0..ca82a6d master -> master
Then, you can see what the master branch on the origin remote was the
last time you communicated with the server, by checking the refs/remotes/
origin/master file:
$ cat .git/refs/remotes/origin/master
ca82a6dff817ec66f44342007202690a93763949
Remote references dier from branches (refs/heads references) mainly in
that they’re considered read-only. You can git checkout to one, but Git won’t
point HEAD at one, so you’ll never update it with a commit command. Git man-
ages them as bookmarks to the last known state of where those branches were
on those servers.
Packfiles
Let’s go back to the objects database for your test Git repository. At this point,
you have 11 objects – 4 blobs, 3 trees, 3 commits, and 1 tag:
$ find .git/objects -type f
.git/objects/01/55eb4229851634a0f03eb265b69f5a2d56f341 # tree 2
.git/objects/1a/410efbd13591db07496601ebc7a059dd55cfe9 # commit 3
.git/objects/1f/7a7a472abf3dd9643fd615f6da379c4acb3e3a # test.txt v2
.git/objects/3c/4e9cd789d88d8d89c1073707c3585e41b0e614 # tree 3
.git/objects/83/baae61804e65cc73a7201a7252750c76066a30 # test.txt v1
.git/objects/95/85191f37f7b0fb9444f35a9bf50de191beadc2 # tag
Packfiles
501

.git/objects/ca/c0cab538b970a37ea1e769cbbde608743bc96d # commit 2
.git/objects/d6/70460b4b4aece5915caf5c68d12f560a9fe3e4 # 'test content'
.git/objects/d8/329fc1cc938780ffdd9f94e0d364e0ea74f579 # tree 1
.git/objects/fa/49b077972391ad58037050f2a75f74e3671e92 # new.txt
.git/objects/fd/f4fc3344e67ab068f836878b6c4951e3b15f3d # commit 1
Git compresses the contents of these files with zlib, and you’re not storing
much, so all these files collectively take up only 925 bytes. You’ll add some larg-
er content to the repository to demonstrate an interesting feature of Git. To
demonstrate, we’ll add the repo.rb file from the Grit library – this is about a
22K source code file:
$ curl https://raw.githubusercontent.com/mojombo/grit/master/lib/grit/repo.rb > repo.rb
$ git add repo.rb
$ git commit -m 'added repo.rb'
[master 484a592] added repo.rb
3 files changed, 709 insertions(+), 2 deletions(-)
delete mode 100644 bak/test.txt
create mode 100644 repo.rb
rewrite test.txt (100%)
If you look at the resulting tree, you can see the SHA-1 value your repo.rb file
got for the blob object:
$ git cat-file -p master^{tree}
100644 blob fa49b077972391ad58037050f2a75f74e3671e92 new.txt
100644 blob 033b4468fa6b2a9547a70d88d1bbe8bf3f9ed0d5 repo.rb
100644 blob e3f094f522629ae358806b17daf78246c27c007b test.txt
You can then use git cat-file to see how big that object is:
$ git cat-file -s 033b4468fa6b2a9547a70d88d1bbe8bf3f9ed0d5
22044
Now, modify that file a little, and see what happens:
$ echo '# testing' >> repo.rb
$ git commit -am 'modified repo a bit'
[master 2431da6] modified repo.rb a bit
1 file changed, 1 insertion(+)
CHAPTER 10: Git Internals
502

Check the tree created by that commit, and you see something interesting:
$ git cat-file -p master^{tree}
100644 blob fa49b077972391ad58037050f2a75f74e3671e92 new.txt
100644 blob b042a60ef7dff760008df33cee372b945b6e884e repo.rb
100644 blob e3f094f522629ae358806b17daf78246c27c007b test.txt
The blob is now a dierent blob, which means that although you added only
a single line to the end of a 400-line file, Git stored that new content as a com-
pletely new object:
$ git cat-file -s b042a60ef7dff760008df33cee372b945b6e884e
22054
You have two nearly identical 22K objects on your disk. Wouldn’t it be nice if
Git could store one of them in full but then the second object only as the delta
between it and the first?
It turns out that it can. The initial format in which Git saves objects on disk is
called a “loose” object format. However, occasionally Git packs up several of
these objects into a single binary file called a “packfile” in order to save space
and be more eicient. Git does this if you have too many loose objects around,
if you run the git gc command manually, or if you push to a remote server. To
see what happens, you can manually ask Git to pack up the objects by calling
the git gc command:
$ git gc
Counting objects: 18, done.
Delta compression using up to 8 threads.
Compressing objects: 100% (14/14), done.
Writing objects: 100% (18/18), done.
Total 18 (delta 3), reused 0 (delta 0)
If you look in your objects directory, you’ll find that most of your objects are
gone, and a new pair of files has appeared:
$ find .git/objects -type f
.git/objects/bd/9dbf5aae1a3862dd1526723246b20206e5fc37
.git/objects/d6/70460b4b4aece5915caf5c68d12f560a9fe3e4
.git/objects/info/packs
.git/objects/pack/pack-978e03944f5c581011e6998cd0e9e30000905586.idx
.git/objects/pack/pack-978e03944f5c581011e6998cd0e9e30000905586.pack
Packfiles
503

The objects that remain are the blobs that aren’t pointed to by any commit –
in this case, the “what is up, doc?” example and the “test content” example
blobs you created earlier. Because you never added them to any commits,
they’re considered dangling and aren’t packed up in your new packfile.
The other files are your new packfile and an index. The packfile is a single file
containing the contents of all the objects that were removed from your filesys-
tem. The index is a file that contains osets into that packfile so you can quickly
seek to a specific object. What is cool is that although the objects on disk before
you ran the gc were collectively about 22K in size, the new packfile is only 7K.
You’ve cut your disk usage by ⅔ by packing your objects.
How does Git do this? When Git packs objects, it looks for files that are
named and sized similarly, and stores just the deltas from one version of the file
to the next. You can look into the packfile and see what Git did to save space.
The git verify-pack plumbing command allows you to see what was
packed up:
$ git verify-pack -v .git/objects/pack/pack-978e03944f5c581011e6998cd0e9e30000905586.idx
2431da676938450a4d72e260db3bf7b0f587bbc1 commit 223 155 12
69bcdaff5328278ab1c0812ce0e07fa7d26a96d7 commit 214 152 167
80d02664cb23ed55b226516648c7ad5d0a3deb90 commit 214 145 319
43168a18b7613d1281e5560855a83eb8fde3d687 commit 213 146 464
092917823486a802e94d727c820a9024e14a1fc2 commit 214 146 610
702470739ce72005e2edff522fde85d52a65df9b commit 165 118 756
d368d0ac0678cbe6cce505be58126d3526706e54 tag 130 122 874
fe879577cb8cffcdf25441725141e310dd7d239b tree 136 136 996
d8329fc1cc938780ffdd9f94e0d364e0ea74f579 tree 36 46 1132
deef2e1b793907545e50a2ea2ddb5ba6c58c4506 tree 136 136 1178
d982c7cb2c2a972ee391a85da481fc1f9127a01d tree 6 17 1314 1 \
deef2e1b793907545e50a2ea2ddb5ba6c58c4506
3c4e9cd789d88d8d89c1073707c3585e41b0e614 tree 8 19 1331 1 \
deef2e1b793907545e50a2ea2ddb5ba6c58c4506
0155eb4229851634a0f03eb265b69f5a2d56f341 tree 71 76 1350
83baae61804e65cc73a7201a7252750c76066a30 blob 10 19 1426
fa49b077972391ad58037050f2a75f74e3671e92 blob 9 18 1445
b042a60ef7dff760008df33cee372b945b6e884e blob 22054 5799 1463
033b4468fa6b2a9547a70d88d1bbe8bf3f9ed0d5 blob 9 20 7262 1 \
b042a60ef7dff760008df33cee372b945b6e884e
1f7a7a472abf3dd9643fd615f6da379c4acb3e3a blob 10 19 7282
non delta: 15 objects
chain length = 1: 3 objects
.git/objects/pack/pack-978e03944f5c581011e6998cd0e9e30000905586.pack: ok
Here, the 033b4 blob, which if you remember was the first version of your
repo.rb file, is referencing the b042a blob, which was the second version of the
file. The third column in the output is the size of the object in the pack, so you
CHAPTER 10: Git Internals
504

can see that b042a takes up 22K of the file, but that 033b4 only takes up 9
bytes. What is also interesting is that the second version of the file is the one
that is stored intact, whereas the original version is stored as a delta – this is
because you’re most likely to need faster access to the most recent version of
the file.
The really nice thing about this is that it can be repacked at any time. Git will
occasionally repack your database automatically, always trying to save more
space, but you can also manually repack at any time by running git gc by
hand.
The Refspec
Throughout this book, we’ve used simple mappings from remote branches to
local references, but they can be more complex. Suppose you add a remote like
this:
$ git remote add origin https://github.com/schacon/simplegit-progit
It adds a section to your .git/config file, specifying the name of the re-
mote (origin), the URL of the remote repository, and the refspec for fetching:
[remote "origin"]
url = https://github.com/schacon/simplegit-progit
fetch = +refs/heads/*:refs/remotes/origin/*
The format of the refspec is an optional +, followed by <src>:<dst>, where
<src> is the pattern for references on the remote side and <dst> is where
those references will be written locally. The + tells Git to update the reference
even if it isn’t a fast-forward.
In the default case that is automatically written by a git remote add com-
mand, Git fetches all the references under refs/heads/ on the server and
writes them to refs/remotes/origin/ locally. So, if there is a master branch
on the server, you can access the log of that branch locally via
$ git log origin/master
$ git log remotes/origin/master
$ git log refs/remotes/origin/master
They’re all equivalent, because Git expands each of them to refs/
remotes/origin/master.
The Refspec
505

If you want Git instead to pull down only the master branch each time, and
not every other branch on the remote server, you can change the fetch line to
fetch = +refs/heads/master:refs/remotes/origin/master
This is just the default refspec for git fetch for that remote. If you want to
do something one time, you can specify the refspec on the command line, too.
To pull the master branch on the remote down to origin/mymaster locally,
you can run
$ git fetch origin master:refs/remotes/origin/mymaster
You can also specify multiple refspecs. On the command line, you can pull
down several branches like so:
$ git fetch origin master:refs/remotes/origin/mymaster \
topic:refs/remotes/origin/topic
From git@github.com:schacon/simplegit
! [rejected] master -> origin/mymaster (non fast forward)
* [new branch] topic -> origin/topic
In this case, the master branch pull was rejected because it wasn’t a fast-
forward reference. You can override that by specifying the + in front of the re-
fspec.
You can also specify multiple refspecs for fetching in your configuration file.
If you want to always fetch the master and experiment branches, add two lines:
[remote "origin"]
url = https://github.com/schacon/simplegit-progit
fetch = +refs/heads/master:refs/remotes/origin/master
fetch = +refs/heads/experiment:refs/remotes/origin/experiment
You can’t use partial globs in the pattern, so this would be invalid:
fetch = +refs/heads/qa*:refs/remotes/origin/qa*
However, you can use namespaces (or directories) to accomplish something
like that. If you have a QA team that pushes a series of branches, and you want
to get the master branch and any of the QA team’s branches but nothing else,
you can use a config section like this:
CHAPTER 10: Git Internals
506

[remote "origin"]
url = https://github.com/schacon/simplegit-progit
fetch = +refs/heads/master:refs/remotes/origin/master
fetch = +refs/heads/qa/*:refs/remotes/origin/qa/*
If you have a complex workflow process that has a QA team pushing branch-
es, developers pushing branches, and integration teams pushing and collabo-
rating on remote branches, you can namespace them easily this way.
Pushing Refspecs
It’s nice that you can fetch namespaced references that way, but how does the
QA team get their branches into a qa/ namespace in the first place? You accom-
plish that by using refspecs to push.
If the QA team wants to push their master branch to qa/master on the re-
mote server, they can run
$ git push origin master:refs/heads/qa/master
If they want Git to do that automatically each time they run git push ori-
gin, they can add a push value to their config file:
[remote "origin"]
url = https://github.com/schacon/simplegit-progit
fetch = +refs/heads/*:refs/remotes/origin/*
push = refs/heads/master:refs/heads/qa/master
Again, this will cause a git push origin to push the local master branch
to the remote qa/master branch by default.
Deleting References
You can also use the refspec to delete references from the remote server by run-
ning something like this:
$ git push origin :topic
Because the refspec is <src>:<dst>, by leaving o the <src> part, this ba-
sically says to make the topic branch on the remote nothing, which deletes it.
The Refspec
507

Transfer Protocols
Git can transfer data between two repositories in two major ways: the “dumb”
protocol and the “smart” protocol. This section will quickly cover how these
two main protocols operate.
The Dumb Protocol
If you’re setting up a repository to be served read-only over HTTP, the dumb
protocol is likely what will be used. This protocol is called “dumb” because it
requires no Git-specific code on the server side during the transport process;
the fetch process is a series of HTTP GET requests, where the client can assume
the layout of the Git repository on the server.
The dumb protocol is fairly rarely used these days. It’s difficult to secure
or make private, so most Git hosts (both cloud-based and on-premises)
will refuse to use it. It’s generally advised to use the smart protocol,
which we describe a bit further on.
Let’s follow the http-fetch process for the simplegit library:
$ git clone http://server/simplegit-progit.git
The first thing this command does is pull down the info/refs file. This file
is written by the update-server-info command, which is why you need to
enable that as a post-receive hook in order for the HTTP transport to work
properly:
=> GET info/refs
ca82a6dff817ec66f44342007202690a93763949 refs/heads/master
Now you have a list of the remote references and SHA-1s. Next, you look for
what the HEAD reference is so you know what to check out when you’re finish-
ed:
=> GET HEAD
ref: refs/heads/master
You need to check out the master branch when you’ve completed the pro-
cess. At this point, you’re ready to start the walking process. Because your start-
CHAPTER 10: Git Internals
508

ing point is the ca82a6 commit object you saw in the info/refs file, you start
by fetching that:
=> GET objects/ca/82a6dff817ec66f44342007202690a93763949
(179 bytes of binary data)
You get an object back – that object is in loose format on the server, and you
fetched it over a static HTTP GET request. You can zlib-uncompress it, strip o
the header, and look at the commit content:
$ git cat-file -p ca82a6dff817ec66f44342007202690a93763949
tree cfda3bf379e4f8dba8717dee55aab78aef7f4daf
parent 085bb3bcb608e1e8451d4b2432f8ecbe6306e7e7
author Scott Chacon <schacon@gmail.com> 1205815931 -0700
committer Scott Chacon <schacon@gmail.com> 1240030591 -0700
changed the version number
Next, you have two more objects to retrieve – cfda3b, which is the tree of
content that the commit we just retrieved points to; and 085bb3, which is the
parent commit:
=> GET objects/08/5bb3bcb608e1e8451d4b2432f8ecbe6306e7e7
(179 bytes of data)
That gives you your next commit object. Grab the tree object:
=> GET objects/cf/da3bf379e4f8dba8717dee55aab78aef7f4daf
(404 - Not Found)
Oops – it looks like that tree object isn’t in loose format on the server, so you
get a 404 response back. There are a couple of reasons for this – the object
could be in an alternate repository, or it could be in a packfile in this repository.
Git checks for any listed alternates first:
=> GET objects/info/http-alternates
(empty file)
If this comes back with a list of alternate URLs, Git checks for loose files and
packfiles there – this is a nice mechanism for projects that are forks of one an-
other to share objects on disk. However, because no alternates are listed in this
case, your object must be in a packfile. To see what packfiles are available on
this server, you need to get the objects/info/packs file, which contains a
listing of them (also generated by update-server-info):
Transfer Protocols
509
=> GET objects/info/packs
P pack-816a9b2334da9953e530f27bcac22082a9f5b835.pack
There is only one packfile on the server, so your object is obviously in there,
but you’ll check the index file to make sure. This is also useful if you have multi-
ple packfiles on the server, so you can see which packfile contains the object
you need:
=> GET objects/pack/pack-816a9b2334da9953e530f27bcac22082a9f5b835.idx
(4k of binary data)
Now that you have the packfile index, you can see if your object is in it – be-
cause the index lists the SHA-1s of the objects contained in the packfile and the
osets to those objects. Your object is there, so go ahead and get the whole
packfile:
=> GET objects/pack/pack-816a9b2334da9953e530f27bcac22082a9f5b835.pack
(13k of binary data)
You have your tree object, so you continue walking your commits. They’re all
also within the packfile you just downloaded, so you don’t have to do any more
requests to your server. Git checks out a working copy of the master branch
that was pointed to by the HEAD reference you downloaded at the beginning.
The Smart Protocol
The dumb protocol is simple but a bit ineicient, and it can’t handle writing of
data from the client to the server. The smart protocol is a more common meth-
od of transferring data, but it requires a process on the remote end that is intel-
ligent about Git – it can read local data, figure out what the client has and
needs, and generate a custom packfile for it. There are two sets of processes for
transferring data: a pair for uploading data and a pair for downloading data.
UPLOADING DATA
To upload data to a remote process, Git uses the send-pack and receive-
pack processes. The send-pack process runs on the client and connects to a
receive-pack process on the remote side.
SSH
For example, say you run git push origin master in your project, and
origin is defined as a URL that uses the SSH protocol. Git fires up the send-
pack process, which initiates a connection over SSH to your server. It tries to
CHAPTER 10: Git Internals
510

run a command on the remote server via an SSH call that looks something like
this:
$ ssh -x git@server "git-receive-pack 'simplegit-progit.git'"
005bca82a6dff817ec66f4437202690a93763949 refs/heads/master report-status \
delete-refs side-band-64k quiet ofs-delta \
agent=git/2:2.1.1+github-607-gfba4028 delete-refs
003e085bb3bcb608e1e84b2432f8ecbe6306e7e7 refs/heads/topic
0000
The git-receive-pack command immediately responds with one line for
each reference it currently has – in this case, just the master branch and its
SHA-1. The first line also has a list of the server’s capabilities (here, report-
status, delete-refs, and some others, including the client identifier).
Each line starts with a 4-character hex value specifying how long the rest of
the line is. Your first line starts with 005b, which is hexadecimal for 91, meaning
that 91 bytes remain on that line. The next line starts with 003e, which is 62, so
you read the remaining 62 bytes. The next line is 0000, meaning the server is
done with its references listing.
Now that it knows the server’s state, your send-pack process determines
what commits it has that the server doesn’t. For each reference that this push
will update, the send-pack process tells the receive-pack process that infor-
mation. For instance, if you’re updating the master branch and adding an ex-
periment branch, the send-pack response may look something like this:
0085ca82a6dff817ec66f44342007202690a93763949 15027957951b64cf874c3557a0f3547bd83b3ff6 \
refs/heads/master report-status
00670000000000000000000000000000000000000000 cdfdb42577e2506715f8cfeacdbabc092bf63e8d \
refs/heads/experiment
0000
Git sends a line for each reference you’re updating with the line’s length, the
old SHA-1, the new SHA-1, and the reference that is being updated. The first line
also has the client’s capabilities. The SHA-1 value of all ’0’s means that nothing
was there before – because you’re adding the experiment reference. If you were
deleting a reference, you would see the opposite: all ’0’s on the right side.
Next, the client sends a packfile of all the objects the server doesn’t have
yet. Finally, the server responds with a success (or failure) indication:
000Aunpack ok
Transfer Protocols
511

HTTP(S)
This process is mostly the same over HTTP, though the handshaking is a bit
dierent. The connection is initiated with this request:
=> GET http://server/simplegit-progit.git/info/refs?service=git-receive-pack
001f# service=git-receive-pack
000000ab6c5f0e45abd7832bf23074a333f739977c9e8188 refs/heads/master \
report-status delete-refs side-band-64k quiet ofs-delta \
agent=git/2:2.1.1~vmg-bitmaps-bugaloo-608-g116744e
0000
That’s the end of the first client-server exchange. The client then makes an-
other request, this time a POST, with the data that git-upload-pack provides.
=> POST http://server/simplegit-progit.git/git-receive-pack
The POST request includes the send-pack output and the packfile as its
payload. The server then indicates success or failure with its HTTP response.
DOWNLOADING DATA
When you download data, the fetch-pack and upload-pack processes are in-
volved. The client initiates a fetch-pack process that connects to an upload-
pack process on the remote side to negotiate what data will be transferred
down.
SSH
If you’re doing the fetch over SSH, fetch-pack instead runs something like
this:
$ ssh -x git@server "git-upload-pack 'simplegit-progit.git'"
Aer fetch-pack connects, upload-pack sends back something like this:
00dfca82a6dff817ec66f44342007202690a93763949 HEADmulti_ack thin-pack \
side-band side-band-64k ofs-delta shallow no-progress include-tag \
multi_ack_detailed symref=HEAD:refs/heads/master \
agent=git/2:2.1.1+github-607-gfba4028
003fca82a6dff817ec66f44342007202690a93763949 refs/heads/master
0000
This is very similar to what receive-pack responds with, but the capabili-
ties are dierent. In addition, it sends back what HEAD points to (sym-
CHAPTER 10: Git Internals
512
ref=HEAD:refs/heads/master) so the client knows what to check out if this
is a clone.
At this point, the fetch-pack process looks at what objects it has and re-
sponds with the objects that it needs by sending “want” and then the SHA-1 it
wants. It sends all the objects it already has with “have” and then the SHA-1. At
the end of this list, it writes “done” to initiate the upload-pack process to be-
gin sending the packfile of the data it needs:
0054want ca82a6dff817ec66f44342007202690a93763949 ofs-delta
0032have 085bb3bcb608e1e8451d4b2432f8ecbe6306e7e7
0000
0009done
HTTP(S)
The handshake for a fetch operation takes two HTTP requests. The first is a
GET to the same endpoint used in the dumb protocol:
=> GET $GIT_URL/info/refs?service=git-upload-pack
001e# service=git-upload-pack
000000e7ca82a6dff817ec66f44342007202690a93763949 HEADmulti_ack thin-pack \
side-band side-band-64k ofs-delta shallow no-progress include-tag \
multi_ack_detailed no-done symref=HEAD:refs/heads/master \
agent=git/2:2.1.1+github-607-gfba4028
003fca82a6dff817ec66f44342007202690a93763949 refs/heads/master
0000
This is very similar to invoking git-upload-pack over an SSH connection,
but the second exchange is performed as a separate request:
=> POST $GIT_URL/git-upload-pack HTTP/1.0
0032want 0a53e9ddeaddad63ad106860237bbf53411d11a7
0032have 441b40d833fdfa93eb2908e52742248faf0ee993
0000
Again, this is the same format as above. The response to this request indi-
cates success or failure, and includes the packfile.
Protocols Summary
This section contains a very basic overview of the transfer protocols. The proto-
col includes many other features, such as multi_ack or side-band capabili-
ties, but covering them is outside the scope of this book. We’ve tried to give you
a sense of the general back-and-forth between client and server; if you need
Transfer Protocols
513

more knowledge than this, you’ll probably want to take a look at the Git source
code.
Maintenance and Data Recovery
Occasionally, you may have to do some cleanup – make a repository more com-
pact, clean up an imported repository, or recover lost work. This section will
cover some of these scenarios.
Maintenance
Occasionally, Git automatically runs a command called “auto gc”. Most of the
time, this command does nothing. However, if there are too many loose objects
(objects not in a packfile) or too many packfiles, Git launches a full-fledged git
gc command. The “gc” stands for garbage collect, and the command does a
number of things: it gathers up all the loose objects and places them in pack-
files, it consolidates packfiles into one big packfile, and it removes objects that
aren’t reachable from any commit and are a few months old.
You can run auto gc manually as follows:
$ git gc --auto
Again, this generally does nothing. You must have around 7,000 loose ob-
jects or more than 50 packfiles for Git to fire up a real gc command. You can
modify these limits with the gc.auto and gc.autopacklimit config settings,
respectively.
The other thing gc will do is pack up your references into a single file. Sup-
pose your repository contains the following branches and tags:
$ find .git/refs -type f
.git/refs/heads/experiment
.git/refs/heads/master
.git/refs/tags/v1.0
.git/refs/tags/v1.1
If you run git gc, you’ll no longer have these files in the refs directory. Git
will move them for the sake of eiciency into a file named .git/packed-refs
that looks like this:
CHAPTER 10: Git Internals
514

$ cat .git/packed-refs
# pack-refs with: peeled fully-peeled
cac0cab538b970a37ea1e769cbbde608743bc96d refs/heads/experiment
ab1afef80fac8e34258ff41fc1b867c702daa24b refs/heads/master
cac0cab538b970a37ea1e769cbbde608743bc96d refs/tags/v1.0
9585191f37f7b0fb9444f35a9bf50de191beadc2 refs/tags/v1.1
^1a410efbd13591db07496601ebc7a059dd55cfe9
If you update a reference, Git doesn’t edit this file but instead writes a new
file to refs/heads. To get the appropriate SHA-1 for a given reference, Git
checks for that reference in the refs directory and then checks the packed-
refs file as a fallback. However, if you can’t find a reference in the refs direc-
tory, it’s probably in your packed-refs file.
Notice the last line of the file, which begins with a ^. This means the tag di-
rectly above is an annotated tag and that line is the commit that the annotated
tag points to.
Data Recovery
At some point in your Git journey, you may accidentally lose a commit. General-
ly, this happens because you force-delete a branch that had work on it, and it
turns out you wanted the branch aer all; or you hard-reset a branch, thus
abandoning commits that you wanted something from. Assuming this happens,
how can you get your commits back?
Here’s an example that hard-resets the master branch in your test repository
to an older commit and then recovers the lost commits. First, let’s review where
your repository is at this point:
$ git log --pretty=oneline
ab1afef80fac8e34258ff41fc1b867c702daa24b modified repo a bit
484a59275031909e19aadb7c92262719cfcdf19a added repo.rb
1a410efbd13591db07496601ebc7a059dd55cfe9 third commit
cac0cab538b970a37ea1e769cbbde608743bc96d second commit
fdf4fc3344e67ab068f836878b6c4951e3b15f3d first commit
Now, move the master branch back to the middle commit:
$ git reset --hard 1a410efbd13591db07496601ebc7a059dd55cfe9
HEAD is now at 1a410ef third commit
$ git log --pretty=oneline
1a410efbd13591db07496601ebc7a059dd55cfe9 third commit
Maintenance and Data Recovery
515

cac0cab538b970a37ea1e769cbbde608743bc96d second commit
fdf4fc3344e67ab068f836878b6c4951e3b15f3d first commit
You’ve eectively lost the top two commits – you have no branch from which
those commits are reachable. You need to find the latest commit SHA-1 and
then add a branch that points to it. The trick is finding that latest commit SHA-1
– it’s not like you’ve memorized it, right?
Oen, the quickest way is to use a tool called git reflog. As you’re work-
ing, Git silently records what your HEAD is every time you change it. Each time
you commit or change branches, the reflog is updated. The reflog is also upda-
ted by the git update-ref command, which is another reason to use it in-
stead of just writing the SHA-1 value to your ref files, as we covered in “Git Ref-
erences”. You can see where you’ve been at any time by running git reflog:
$ git reflog
1a410ef HEAD@{0}: reset: moving to 1a410ef
ab1afef HEAD@{1}: commit: modified repo.rb a bit
484a592 HEAD@{2}: commit: added repo.rb
Here we can see the two commits that we have had checked out, however
there is not much information here. To see the same information in a much
more useful way, we can run git log -g, which will give you a normal log out-
put for your reflog.
$ git log -g
commit 1a410efbd13591db07496601ebc7a059dd55cfe9
Reflog: HEAD@{0} (Scott Chacon <schacon@gmail.com>)
Reflog message: updating HEAD
Author: Scott Chacon <schacon@gmail.com>
Date: Fri May 22 18:22:37 2009 -0700
third commit
commit ab1afef80fac8e34258ff41fc1b867c702daa24b
Reflog: HEAD@{1} (Scott Chacon <schacon@gmail.com>)
Reflog message: updating HEAD
Author: Scott Chacon <schacon@gmail.com>
Date: Fri May 22 18:15:24 2009 -0700
modified repo.rb a bit
CHAPTER 10: Git Internals
516

It looks like the bottom commit is the one you lost, so you can recover it by
creating a new branch at that commit. For example, you can start a branch
named recover-branch at that commit (ab1afef):
$ git branch recover-branch ab1afef
$ git log --pretty=oneline recover-branch
ab1afef80fac8e34258ff41fc1b867c702daa24b modified repo a bit
484a59275031909e19aadb7c92262719cfcdf19a added repo.rb
1a410efbd13591db07496601ebc7a059dd55cfe9 third commit
cac0cab538b970a37ea1e769cbbde608743bc96d second commit
fdf4fc3344e67ab068f836878b6c4951e3b15f3d first commit
Cool – now you have a branch named recover-branch that is where your
master branch used to be, making the first two commits reachable again. Next,
suppose your loss was for some reason not in the reflog – you can simulate that
by removing recover-branch and deleting the reflog. Now the first two com-
mits aren’t reachable by anything:
$ git branch -D recover-branch
$ rm -Rf .git/logs/
Because the reflog data is kept in the .git/logs/ directory, you eectively
have no reflog. How can you recover that commit at this point? One way is to
use the git fsck utility, which checks your database for integrity. If you run it
with the --full option, it shows you all objects that aren’t pointed to by an-
other object:
$ git fsck --full
Checking object directories: 100% (256/256), done.
Checking objects: 100% (18/18), done.
dangling blob d670460b4b4aece5915caf5c68d12f560a9fe3e4
dangling commit ab1afef80fac8e34258ff41fc1b867c702daa24b
dangling tree aea790b9a58f6cf6f2804eeac9f0abbe9631e4c9
dangling blob 7108f7ecb345ee9d0084193f147cdad4d2998293
In this case, you can see your missing commit aer the string “dangling com-
mit”. You can recover it the same way, by adding a branch that points to that
SHA-1.
Maintenance and Data Recovery
517

Removing Objects
There are a lot of great things about Git, but one feature that can cause issues is
the fact that a git clone downloads the entire history of the project, includ-
ing every version of every file. This is fine if the whole thing is source code, be-
cause Git is highly optimized to compress that data eiciently. However, if
someone at any point in the history of your project added a single huge file,
every clone for all time will be forced to download that large file, even if it was
removed from the project in the very next commit. Because it’s reachable from
the history, it will always be there.
This can be a huge problem when you’re converting Subversion or Perforce
repositories into Git. Because you don’t download the whole history in those
systems, this type of addition carries few consequences. If you did an import
from another system or otherwise find that your repository is much larger than
it should be, here is how you can find and remove large objects.
Be warned: this technique is destructive to your commit history. It re-
writes every commit object since the earliest tree you have to modify to remove
a large file reference. If you do this immediately aer an import, before anyone
has started to base work on the commit, you’re fine – otherwise, you have to
notify all contributors that they must rebase their work onto your new commits.
To demonstrate, you’ll add a large file into your test repository, remove it in
the next commit, find it, and remove it permanently from the repository. First,
add a large object to your history:
$ curl https://www.kernel.org/pub/software/scm/git/git-2.1.0.tar.gz > git.tgz
$ git add git.tgz
$ git commit -m 'add git tarball'
[master 7b30847] add git tarball
1 file changed, 0 insertions(+), 0 deletions(-)
create mode 100644 git.tgz
Oops – you didn’t want to add a huge tarball to your project. Better get rid of
it:
$ git rm git.tgz
rm 'git.tgz'
$ git commit -m 'oops - removed large tarball'
[master dadf725] oops - removed large tarball
1 file changed, 0 insertions(+), 0 deletions(-)
delete mode 100644 git.tgz
Now, gc your database and see how much space you’re using:
CHAPTER 10: Git Internals
518

$ git gc
Counting objects: 17, done.
Delta compression using up to 8 threads.
Compressing objects: 100% (13/13), done.
Writing objects: 100% (17/17), done.
Total 17 (delta 1), reused 10 (delta 0)
You can run the count-objects command to quickly see how much space
you’re using:
$ git count-objects -v
count: 7
size: 32
in-pack: 17
packs: 1
size-pack: 4868
prune-packable: 0
garbage: 0
size-garbage: 0
The size-pack entry is the size of your packfiles in kilobytes, so you’re us-
ing almost 5MB. Before the last commit, you were using closer to 2K – clearly,
removing the file from the previous commit didn’t remove it from your history.
Every time anyone clones this repository, they will have to clone all 5MB just to
get this tiny project, because you accidentally added a big file. Let’s get rid of it.
First you have to find it. In this case, you already know what file it is. But sup-
pose you didn’t; how would you identify what file or files were taking up so
much space? If you run git gc, all the objects are in a packfile; you can identify
the big objects by running another plumbing command called git verify-
pack and sorting on the third field in the output, which is file size. You can also
pipe it through the tail command because you’re only interested in the last
few largest files:
$ git verify-pack -v .git/objects/pack/pack-29…69.idx \
| sort -k 3 -n \
| tail -3
dadf7258d699da2c8d89b09ef6670edb7d5f91b4 commit 229 159 12
033b4468fa6b2a9547a70d88d1bbe8bf3f9ed0d5 blob 22044 5792 4977696
82c99a3e86bb1267b236a4b6eff7868d97489af1 blob 4975916 4976258 1438
The big object is at the bottom: 5MB. To find out what file it is, you’ll use the
rev-list command, which you used briefly in “Enforcing a Specific Commit-
Maintenance and Data Recovery
519

Message Format”. If you pass --objects to rev-list, it lists all the commit
SHA-1s and also the blob SHA-1s with the file paths associated with them. You
can use this to find your blob’s name:
$ git rev-list --objects --all | grep 82c99a3
82c99a3e86bb1267b236a4b6eff7868d97489af1 git.tgz
Now, you need to remove this file from all trees in your past. You can easily
see what commits modified this file:
$ git log --oneline --branches -- git.tgz
dadf725 oops - removed large tarball
7b30847 add git tarball
You must rewrite all the commits downstream from 7b30847 to fully remove
this file from your Git history. To do so, you use filter-branch, which you
used in “Rewriting History”:
$ git filter-branch --index-filter \
'git rm --cached --ignore-unmatch git.tgz' -- 7b30847^..
Rewrite 7b30847d080183a1ab7d18fb202473b3096e9f34 (1/2)rm 'git.tgz'
Rewrite dadf7258d699da2c8d89b09ef6670edb7d5f91b4 (2/2)
Ref 'refs/heads/master' was rewritten
The --index-filter option is similar to the --tree-filter option used
in “Rewriting History”, except that instead of passing a command that modi-
fies files checked out on disk, you’re modifying your staging area or index each
time.
Rather than remove a specific file with something like rm file, you have to
remove it with git rm --cached – you must remove it from the index, not
from disk. The reason to do it this way is speed – because Git doesn’t have to
check out each revision to disk before running your filter, the process can be
much, much faster. You can accomplish the same task with --tree-filter if
you want. The --ignore-unmatch option to git rm tells it not to error out if
the pattern you’re trying to remove isn’t there. Finally, you ask filter-branch
to rewrite your history only from the 7b30847 commit up, because you know
that is where this problem started. Otherwise, it will start from the beginning
and will unnecessarily take longer.
Your history no longer contains a reference to that file. However, your reflog
and a new set of refs that Git added when you did the filter-branch un-
CHAPTER 10: Git Internals
520

der .git/refs/original still do, so you have to remove them and then re-
pack the database. You need to get rid of anything that has a pointer to those
old commits before you repack:
$ rm -Rf .git/refs/original
$ rm -Rf .git/logs/
$ git gc
Counting objects: 15, done.
Delta compression using up to 8 threads.
Compressing objects: 100% (11/11), done.
Writing objects: 100% (15/15), done.
Total 15 (delta 1), reused 12 (delta 0)
Let’s see how much space you saved.
$ git count-objects -v
count: 11
size: 4904
in-pack: 15
packs: 1
size-pack: 8
prune-packable: 0
garbage: 0
size-garbage: 0
The packed repository size is down to 8K, which is much better than 5MB.
You can see from the size value that the big object is still in your loose objects,
so it’s not gone; but it won’t be transferred on a push or subsequent clone,
which is what is important. If you really wanted to, you could remove the object
completely by running git prune with the --expire option:
$ git prune --expire now
$ git count-objects -v
count: 0
size: 0
in-pack: 15
packs: 1
size-pack: 8
prune-packable: 0
garbage: 0
size-garbage: 0
Maintenance and Data Recovery
521
Environment Variables
Git always runs inside a bash shell, and uses a number of shell environment
variables to determine how it behaves. Occasionally, it comes in handy to know
what these are, and how they can be used to make Git behave the way you
want it to. This isn’t an exhaustive list of all the environment variables Git pays
attention to, but we’ll cover the most useful.
Global Behavior
Some of Git’s general behavior as a computer program depends on environ-
ment variables.
GIT_EXEC_PATH determines where Git looks for its sub-programs (like git-
commit, git-diff, and others). You can check the current setting by running
git --exec-path.
HOME isn’t usually considered customizable (too many other things depend
on it), but it’s where Git looks for the global configuration file. If you want a truly
portable Git installation, complete with global configuration, you can override
HOME in the portable Git’s shell profile.
PREFIX is similar, but for the system-wide configuration. Git looks for this
file at $PREFIX/etc/gitconfig.
GIT_CONFIG_NOSYSTEM, if set, disables the use of the system-wide configu-
ration file. This is useful if your system config is interfering with your com-
mands, but you don’t have access to change or remove it.
GIT_PAGER controls the program used to display multi-page output on the
command line. If this is unset, PAGER will be used as a fallback.
GIT_EDITOR is the editor Git will launch when the user needs to edit some
text (a commit message, for example). If unset, EDITOR will be used.
Repository Locations
Git uses several environment variables to determine how it interfaces with the
current repository.
GIT_DIR is the location of the .git folder. If this isn’t specified, Git walks up
the directory tree until it gets to ~ or /, looking for a .git directory at every
step.
GIT_CEILING_DIRECTORIES controls the behavior of searching for a .git
directory. If you access directories that are slow to load (such as those on a tape
drive, or across a slow network connection), you may want to have Git stop try-
CHAPTER 10: Git Internals
522
ing earlier than it might otherwise, especially if Git is invoked when building
your shell prompt.
GIT_WORK_TREE is the location of the root of the working directory for a
non-bare repository. If not specified, the parent directory of $GIT_DIR is used.
GIT_INDEX_FILE is the path to the index file (non-bare repositories only).
GIT_OBJECT_DIRECTORY can be used to specify the location of the directo-
ry that usually resides at .git/objects.
GIT_ALTERNATE_OBJECT_DIRECTORIES is a colon-separated list (format-
ted like /dir/one:/dir/two:…) which tells Git where to check for objects if
they aren’t in GIT_OBJECT_DIRECTORY. If you happen to have a lot of projects
with large files that have the exact same contents, this can be used to avoid
storing too many copies of them.
Pathspecs
A “pathspec” refers to how you specify paths to things in Git, including the use
of wildcards. These are used in the .gitignore file, but also on the command-
line (git add *.c).
GIT_GLOB_PATHSPECS and GIT_NOGLOB_PATHSPECS control the default
behavior of wildcards in pathspecs. If GIT_GLOB_PATHSPECS is set to 1, wild-
card characters act as wildcards (which is the default); if GIT_NOGLOB_PATH-
SPECS is set to 1, wildcard characters only match themselves, meaning some-
thing like *.c would only match a file named “*.c”, rather than any file whose
name ends with .c. You can override this in individual cases by starting the
pathspec with :(glob) or :(literal), as in :(glob)*.c.
GIT_LITERAL_PATHSPECS disables both of the above behaviors; no wild-
card characters will work, and the override prefixes are disabled as well.
GIT_ICASE_PATHSPECS sets all pathspecs to work in a case-insensitive
manner.
Committing
The final creation of a Git commit object is usually done by git-commit-tree,
which uses these environment variables as its primary source of information,
falling back to configuration values only if these aren’t present.
GIT_AUTHOR_NAME is the human-readable name in the “author” field.
GIT_AUTHOR_EMAIL is the email for the “author” field.
GIT_AUTHOR_DATE is the timestamp used for the “author” field.
GIT_COMMITTER_NAME sets the human name for the “committer” field.
GIT_COMMITTER_EMAIL is the email address for the “committer” field.
Environment Variables
523
GIT_COMMITTER_DATE is used for the timestamp in the “committer” field.
EMAIL is the fallback email address in case the user.email configuration
value isn’t set. If this isn’t set, Git falls back to the system user and host names.
Networking
Git uses the curl library to do network operations over HTTP, so
GIT_CURL_VERBOSE tells Git to emit all the messages generated by that library.
This is similar to doing curl -v on the command line.
GIT_SSL_NO_VERIFY tells Git not to verify SSL certificates. This can some-
times be necessary if you’re using a self-signed certificate to serve Git reposito-
ries over HTTPS, or you’re in the middle of setting up a Git server but haven’t
installed a full certificate yet.
If the data rate of an HTTP operation is lower than
GIT_HTTP_LOW_SPEED_LIMIT bytes per second for longer than
GIT_HTTP_LOW_SPEED_TIME seconds, Git will abort that operation. These val-
ues override the http.lowSpeedLimit and http.lowSpeedTime configura-
tion values.
GIT_HTTP_USER_AGENT sets the user-agent string used by Git when com-
municating over HTTP. The default is a value like git/2.0.0.
Diing and Merging
GIT_DIFF_OPTS is a bit of a misnomer. The only valid values are -u<n> or --
unified=<n>, which controls the number of context lines shown in a git
diff command.
GIT_EXTERNAL_DIFF is used as an override for the diff.external config-
uration value. If it’s set, Git will invoke this program when git diff is invoked.
GIT_DIFF_PATH_COUNTER and GIT_DIFF_PATH_TOTAL are useful from in-
side the program specified by GIT_EXTERNAL_DIFF or diff.external. The
former represents which file in a series is being died (starting with 1), and the
latter is the total number of files in the batch.
GIT_MERGE_VERBOSITY controls the output for the recursive merge strat-
egy. The allowed values are as follows:
•0 outputs nothing, except possibly a single error message.
•1 shows only conflicts.
•2 also shows file changes.
• 3 shows when files are skipped because they haven’t changed.
• 4 shows all paths as they are processed.
CHAPTER 10: Git Internals
524

• 5 and above show detailed debugging information.
The default value is 2.
Debugging
Want to really know what Git is up to? Git has a fairly complete set of traces em-
bedded, and all you need to do is turn them on. The possible values of these
variables are as follows:
• “true”, “1”, or “2” – the trace category is written to stderr.
•An absolute path starting with / – the trace output will be written to that
file.
GIT_TRACE controls general traces, which don’t fit into any specific catego-
ry. This includes the expansion of aliases, and delegation to other sub-
programs.
$ GIT_TRACE=true git lga
20:12:49.877982 git.c:554 trace: exec: 'git-lga'
20:12:49.878369 run-command.c:341 trace: run_command: 'git-lga'
20:12:49.879529 git.c:282 trace: alias expansion: lga => 'log' '--graph' '--pretty=oneline' '--abbrev-commit' '--decorate' '--all'
20:12:49.879885 git.c:349 trace: built-in: git 'log' '--graph' '--pretty=oneline' '--abbrev-commit' '--decorate' '--all'
20:12:49.899217 run-command.c:341 trace: run_command: 'less'
20:12:49.899675 run-command.c:192 trace: exec: 'less'
GIT_TRACE_PACK_ACCESS controls tracing of packfile access. The first field
is the packfile being accessed, the second is the oset within that file:
$ GIT_TRACE_PACK_ACCESS=true git status
20:10:12.081397 sha1_file.c:2088 .git/objects/pack/pack-c3fa...291e.pack 12
20:10:12.081886 sha1_file.c:2088 .git/objects/pack/pack-c3fa...291e.pack 34662
20:10:12.082115 sha1_file.c:2088 .git/objects/pack/pack-c3fa...291e.pack 35175
# […]
20:10:12.087398 sha1_file.c:2088 .git/objects/pack/pack-e80e...e3d2.pack 56914983
20:10:12.087419 sha1_file.c:2088 .git/objects/pack/pack-e80e...e3d2.pack 14303666
On branch master
Your branch is up-to-date with 'origin/master'.
nothing to commit, working directory clean
GIT_TRACE_PACKET enables packet-level tracing for network operations.
Environment Variables
525

$ GIT_TRACE_PACKET=true git ls-remote origin
20:15:14.867043 pkt-line.c:46 packet: git< # service=git-upload-pack
20:15:14.867071 pkt-line.c:46 packet: git< 0000
20:15:14.867079 pkt-line.c:46 packet: git< 97b8860c071898d9e162678ea1035a8ced2f8b1f HEAD\0multi_ack thin-pack side-band side-band-64k ofs-delta shallow no-progress include-tag multi_ack_detailed no-done symref=HEAD:refs/heads/master agent=git/2.0.4
20:15:14.867088 pkt-line.c:46 packet: git< 0f20ae29889d61f2e93ae00fd34f1cdb53285702 refs/heads/ab/add-interactive-show-diff-func-name
20:15:14.867094 pkt-line.c:46 packet: git< 36dc827bc9d17f80ed4f326de21247a5d1341fbc refs/heads/ah/doc-gitk-config
# […]
GIT_TRACE_PERFORMANCE controls logging of performance data. The out-
put shows how long each particular git invocation takes.
$ GIT_TRACE_PERFORMANCE=true git gc
20:18:19.499676 trace.c:414 performance: 0.374835000 s: git command: 'git' 'pack-refs' '--all' '--prune'
20:18:19.845585 trace.c:414 performance: 0.343020000 s: git command: 'git' 'reflog' 'expire' '--all'
Counting objects: 170994, done.
Delta compression using up to 8 threads.
Compressing objects: 100% (43413/43413), done.
Writing objects: 100% (170994/170994), done.
Total 170994 (delta 126176), reused 170524 (delta 125706)
20:18:23.567927 trace.c:414 performance: 3.715349000 s: git command: 'git' 'pack-objects' '--keep-true-parents' '--honor-pack-keep' '--non-empty' '--all' '--reflog' '--unpack-unreachable=2.weeks.ago' '--local' '--delta-base-offset' '.git/objects/pack/.tmp-49190-pack'
20:18:23.584728 trace.c:414 performance: 0.000910000 s: git command: 'git' 'prune-packed'
20:18:23.605218 trace.c:414 performance: 0.017972000 s: git command: 'git' 'update-server-info'
20:18:23.606342 trace.c:414 performance: 3.756312000 s: git command: 'git' 'repack' '-d' '-l' '-A' '--unpack-unreachable=2.weeks.ago'
Checking connectivity: 170994, done.
20:18:25.225424 trace.c:414 performance: 1.616423000 s: git command: 'git' 'prune' '--expire' '2.weeks.ago'
20:18:25.232403 trace.c:414 performance: 0.001051000 s: git command: 'git' 'rerere' 'gc'
20:18:25.233159 trace.c:414 performance: 6.112217000 s: git command: 'git' 'gc'
GIT_TRACE_SETUP shows information about what Git is discovering about
the repository and environment it’s interacting with.
$ GIT_TRACE_SETUP=true git status
20:19:47.086765 trace.c:315 setup: git_dir: .git
20:19:47.087184 trace.c:316 setup: worktree: /Users/ben/src/git
20:19:47.087191 trace.c:317 setup: cwd: /Users/ben/src/git
20:19:47.087194 trace.c:318 setup: prefix: (null)
On branch master
Your branch is up-to-date with 'origin/master'.
nothing to commit, working directory clean
CHAPTER 10: Git Internals
526

Miscellaneous
GIT_SSH, if specified, is a program that is invoked instead of ssh when Git tries
to connect to an SSH host. It is invoked like $GIT_SSH [username@]host [-p
<port>] <command>. Note that this isn’t the easiest way to customize how
ssh is invoked; it won’t support extra command-line parameters, so you’d have
to write a wrapper script and set GIT_SSH to point to it. It’s probably easier just
to use the ~/.ssh/config file for that.
GIT_ASKPASS is an override for the core.askpass configuration value. This
is the program invoked whenever Git needs to ask the user for credentials,
which can expect a text prompt as a command-line argument, and should re-
turn the answer on stdout. (See “Credential Storage” for more on this sub-
system.)
GIT_NAMESPACE controls access to namespaced refs, and is equivalent to
the --namespace flag. This is mostly useful on the server side, where you may
want to store multiple forks of a single repository in one repository, only keep-
ing the refs separate.
GIT_FLUSH can be used to force Git to use non-buered I/O when writing in-
crementally to stdout. A value of 1 causes Git to flush more oen, a value of 0
causes all output to be buered. The default value (if this variable is not set) is
to choose an appropriate buering scheme depending on the activity and the
output mode.
GIT_REFLOG_ACTION lets you specify the descriptive text written to the re-
flog. Here’s an example:
$ GIT_REFLOG_ACTION="my action" git commit --allow-empty -m 'my message'
[master 9e3d55a] my message
$ git reflog -1
9e3d55a HEAD@{0}: my action: my message
Summary
You should have a pretty good understanding of what Git does in the back-
ground and, to some degree, how it’s implemented. This chapter has covered a
number of plumbing commands – commands that are lower level and simpler
than the porcelain commands you’ve learned about in the rest of the book. Un-
derstanding how Git works at a lower level should make it easier to understand
why it’s doing what it’s doing and also to write your own tools and helping
scripts to make your specific workflow work for you.
Summary
527
Git as a content-addressable filesystem is a very powerful tool that you can
easily use as more than just a VCS. We hope you can use your newfound knowl-
edge of Git internals to implement your own cool application of this technology
and feel more comfortable using Git in more advanced ways.
CHAPTER 10: Git Internals
528
Git in Other Environments
If you read through the whole book, you’ve learned a lot about how to use Git
at the command line. You can work with local files, connect your repository to
others over a network, and work eectively with others. But the story doesn’t
end there; Git is usually used as part of a larger ecosystem, and the terminal
isn’t always the best way to work with it. Now we’ll take a look at some of the
other kinds of environments where Git can be useful, and how other applica-
tions (including yours) work alongside Git.
Graphical Interfaces
Git’s native environment is in the terminal. New features show up there first,
and only at the command line is the full power of Git completely at your dispos-
al. But plain text isn’t the best choice for all tasks; sometimes a visual represen-
tation is what you need, and some users are much more comfortable with a
point-and-click interface.
It’s important to note that dierent interfaces are tailored for dierent work-
flows. Some clients expose only a carefully curated subset of Git functionality,
in order to support a specific way of working that the author considers eec-
tive. When viewed in this light, none of these tools can be called “better” than
any of the others, they’re simply more fit for their intended purpose. Also note
that there’s nothing these graphical clients can do that the command-line client
can’t; the command-line is still where you’ll have the most power and control
when working with your repositories.
gitk and git-gui
When you install Git, you also get its visual tools, gitk and git-gui.
gitk is a graphical history viewer. Think of it like a powerful GUI shell over
git log and git grep. This is the tool to use when you’re trying to find some-
thing that happened in the past, or visualize your project’s history.
529
A
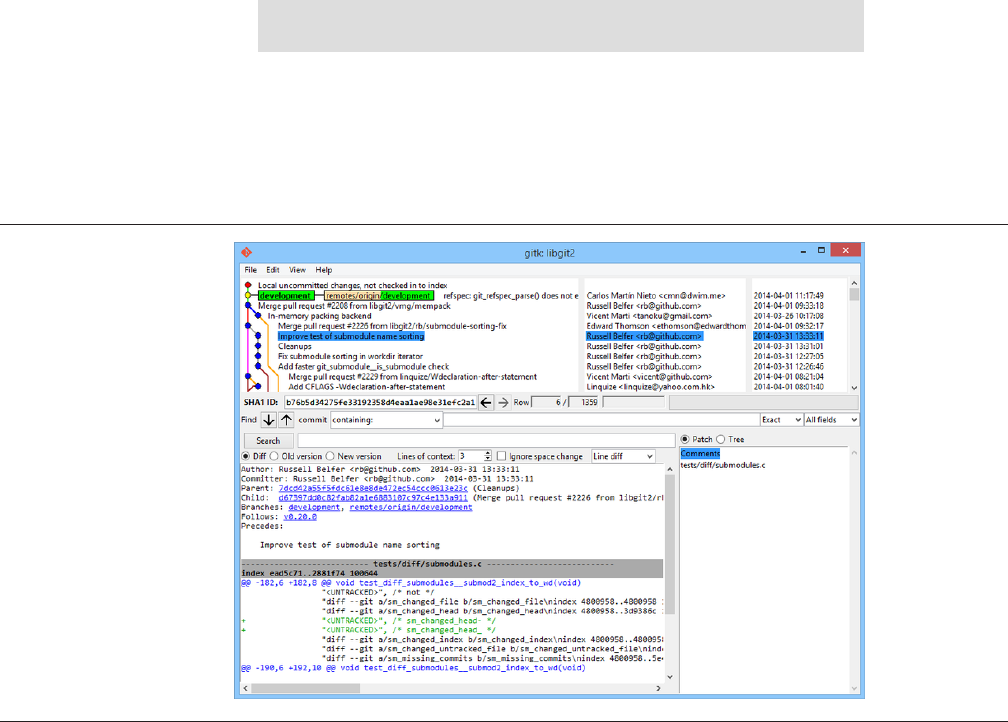
Figure 1-1.
The gitk history
viewer.
Gitk is easiest to invoke from the command-line. Just cd into a Git reposito-
ry, and type:
$ gitk [git log options]
Gitk accepts many command-line options, most of which are passed
through to the underlying git log action. Probably one of the most useful is
the --all flag, which tells gitk to show commits reachable from any ref, not
just HEAD. Gitk’s interface looks like this:
On the top is something that looks a bit like the output of git log --
graph; each dot represents a commit, the lines represent parent relationships,
and refs are shown as colored boxes. The yellow dot represents HEAD, and the
red dot represents changes that are yet to become a commit. At the bottom is a
view of the selected commit; the comments and patch on the le, and a sum-
mary view on the right. In between is a collection of controls used for searching
history.
git-gui, on the other hand, is primarily a tool for craing commits. It, too,
is easiest to invoke from the command line:
Appendix A, Git in Other Environments530
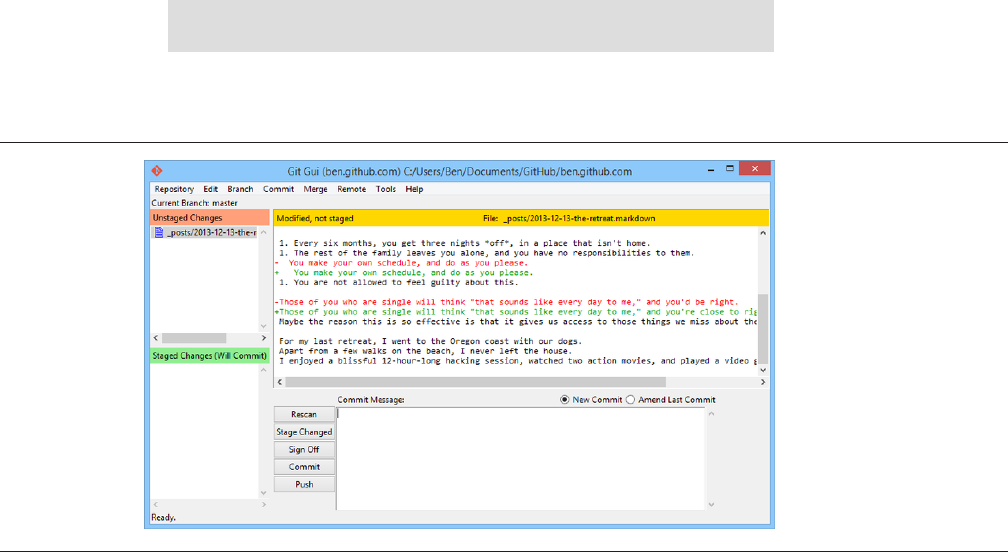
Figure 1-2.
The git-gui commit
tool.
$ git gui
And it looks something like this:
On the le is the index; unstaged changes are on top, staged changes on the
bottom. You can move entire files between the two states by clicking on their
icons, or you can select a file for viewing by clicking on its name.
At top right is the di view, which shows the changes for the currently-
selected file. You can stage individual hunks (or individual lines) by right-
clicking in this area.
At the bottom right is the message and action area. Type your message into
the text box and click “Commit” to do something similar to git commit. You
can also choose to amend the last commit by choosing the “Amend” radio but-
ton, which will update the “Staged Changes” area with the contents of the last
commit. Then you can simply stage or unstage some changes, alter the commit
message, and click “Commit” again to replace the old commit with a new one.
gitk and git-gui are examples of task-oriented tools. Each of them is tail-
ored for a specific purpose (viewing history and creating commits, respective-
ly), and omit the features not necessary for that task.
Graphical Interfaces 531
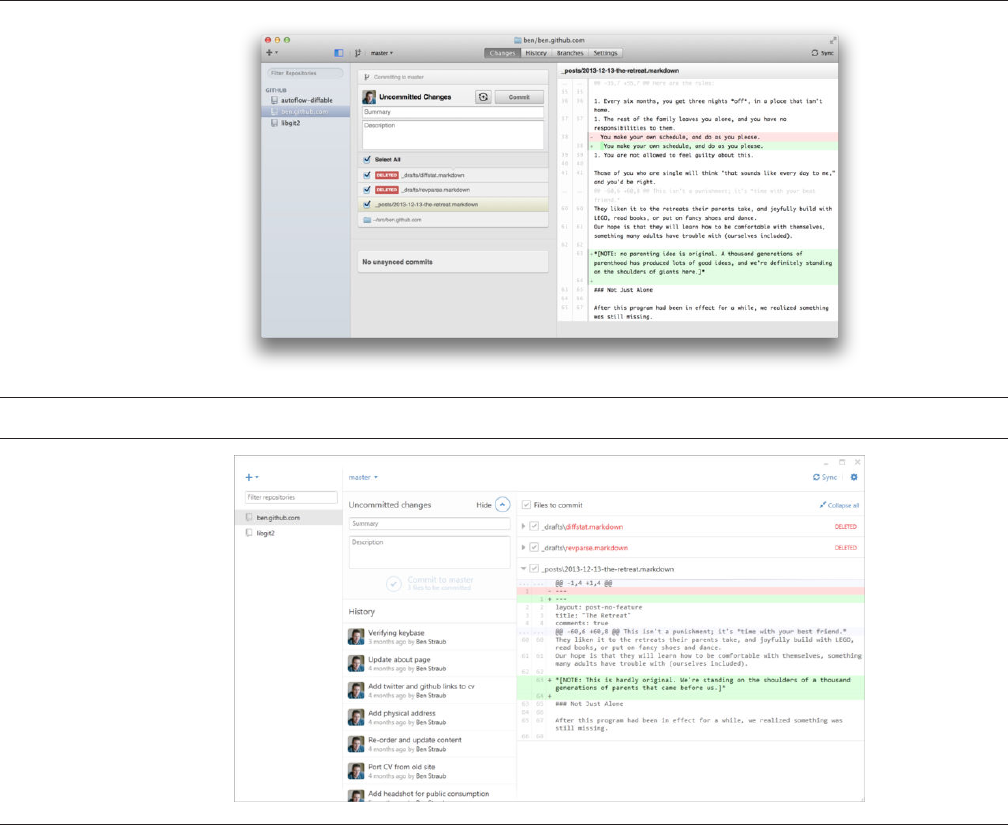
Figure 1-3.
GitHub for Mac.
Figure 1-4.
GitHub for Windows.
GitHub for Mac and Windows
GitHub has created two workflow-oriented Git clients: one for Windows, and
one for Mac. These clients are a good example of workflow-oriented tools –
rather than expose all of Git’s functionality, they instead focus on a curated set
of commonly-used features that work well together. They look like this:
Appendix A, Git in Other Environments532

They are designed to look and work very much alike, so we’ll treat them like
a single product in this chapter. We won’t be doing a detailed rundown of these
tools (they have their own documentation), but a quick tour of the “changes”
view (which is where you’ll spend most of your time) is in order.
•On the le is the list of repositories the client is tracking; you can add a
repository (either by cloning or attaching locally) by clicking the “+” icon
at the top of this area.
•In the center is a commit-input area, which lets you input a commit mes-
sage, and select which files should be included. (On Windows, the com-
mit history is displayed directly below this; on Mac, it’s on a separate tab.)
•On the right is a di view, which shows what’s changed in your working
directory, or which changes were included in the selected commit.
•The last thing to notice is the “Sync” button at the top-right, which is the
primary way you interact over the network.
You don’t need a GitHub account to use these tools. While they’re de-
signed to highlight GitHub’s service and recommended workflow, they
will happily work with any repository, and do network operations with
any Git host.
INSTALLATION
GitHub for Windows can be downloaded from https://windows.github.com,
and GitHub for Mac from https://mac.github.com. When the applications are
first run, they walk you through all the first-time Git setup, such as configuring
your name and email address, and both set up sane defaults for many common
configuration options, such as credential caches and CRLF behavior.
Both are “evergreen” – updates are downloaded and installed in the back-
ground while the applications are open. This helpfully includes a bundled ver-
sion of Git, which means you probably won’t have to worry about manually up-
dating it again. On Windows, the client includes a shortcut to launch Powershell
with Posh-git, which we’ll talk more about later in this chapter.
The next step is to give the tool some repositories to work with. The client
shows you a list of the repositories you have access to on GitHub, and can clone
them in one step. If you already have a local repository, just drag its directory
from the Finder or Windows Explorer into the GitHub client window, and it will
be included in the list of repositories on the le.
Graphical Interfaces 533
Figure 1-5.
“Create Branch”
button on Mac.
Figure 1-6.
Creating a branch
on Windows.
RECOMMENDED WORKFLOW
Once it’s installed and configured, you can use the GitHub client for many com-
mon Git tasks. The intended workflow for this tool is sometimes called the “Git-
Hub Flow.” We cover this in more detail in “The GitHub Flow”, but the general
gist is that (a) you’ll be committing to a branch, and (b) you’ll be syncing up
with a remote repository fairly regularly.
Branch management is one of the areas where the two tools diverge. On
Mac, there’s a button at the top of the window for creating a new branch:
On Windows, this is done by typing the new branch’s name in the branch-
switching widget:
Once your branch is created, making new commits is fairly straightforward.
Make some changes in your working directory, and when you switch to the Git-
Hub client window, it will show you which files changed. Enter a commit mes-
sage, select the files you’d like to include, and click the “Commit” button (ctrl-
enter or ⌘-enter).
The main way you interact with other repositories over the network is
through the “Sync” feature. Git internally has separate operations for pushing,
Appendix A, Git in Other Environments534
fetching, merging, and rebasing, but the GitHub clients collapse all of these into
one multi-step feature. Here’s what happens when you click the Sync button:
1. git pull --rebase. If this fails because of a merge conflict, fall back to
git pull --no-rebase.
2. git push.
This is the most common sequence of network commands when working in
this style, so squashing them into one command saves a lot of time.
SUMMARY
These tools are very well-suited for the workflow they’re designed for. Develop-
ers and non-developers alike can be collaborating on a project within minutes,
and many of the best practices for this kind of workflow are baked into the
tools. However, if your workflow is dierent, or you want more control over how
and when network operations are done, we recommend you use another client
or the command line.
Other GUIs
There are a number of other graphical Git clients, and they run the gamut from
specialized, single-purpose tools all the way to apps that try to expose every-
thing Git can do. The oicial Git website has a curated list of the most popular
clients at http://git-scm.com/downloads/guis. A more comprehensive list is
available on the Git wiki site, at https://git.wiki.kernel.org/index.php/Inter-
faces,_frontends,_and_tools#Graphical_Interfaces.
Git in Visual Studio
Starting with Visual Studio 2013 Update 1, Visual Studio users have a Git client
built directly into their IDE. Visual Studio has had source-control integration
features for quite some time, but they were oriented towards centralized, file-
locking systems, and Git was not a good match for this workflow. Visual Studio
2013’s Git support has been separated from this older feature, and the result is
a much better fit between Studio and Git.
To locate the feature, open a project that’s controlled by Git (or just git in-
it an existing project), and select View > Team Explorer from the menu. You’ll
see the “Connect” view, which looks a bit like this:
Git in Visual Studio 535
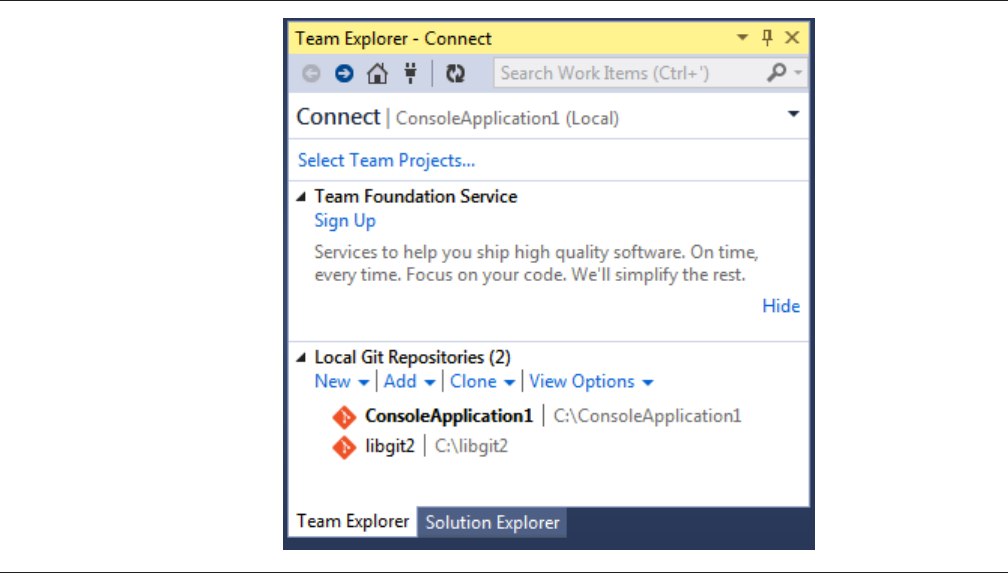
Figure 1-7.
Connecting to a Git
repository from
Team Explorer.
Visual Studio remembers all of the projects you’ve opened that are Git-
controlled, and they’re available in the list at the bottom. If you don’t see the
one you want there, click the “Add” link and type in the path to the working di-
rectory. Double clicking on one of the local Git repositories leads you to the
Home view, which looks like Figure A-8. This is a hub for performing Git ac-
tions; when you’re writing code, you’ll probably spend most of your time in the
“Changes” view, but when it comes time to pull down changes made by your
teammates, you’ll use the “Unsynced Commits” and “Branches” views.
Appendix A, Git in Other Environments536
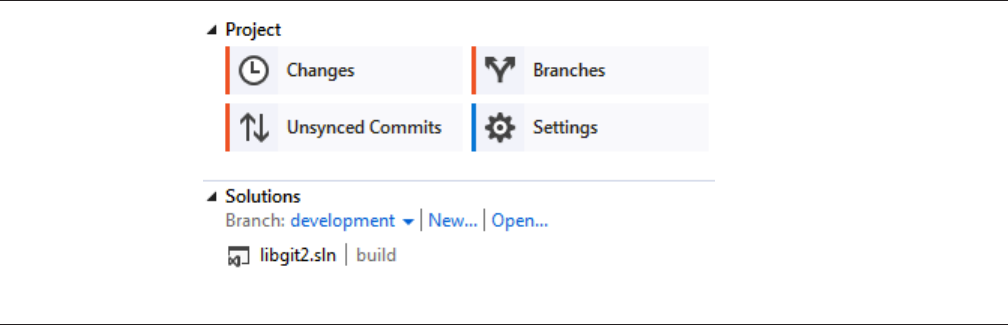
Figure 1-8.
The “Home” view
for a Git repository
in Visual Studio.
Visual Studio now has a powerful task-focused UI for Git. It includes a linear
history view, a di viewer, remote commands, and many other capabilities. For
complete documentation of this feature (which doesn’t fit here), go to http://
msdn.microso.com/en-us/library/hh850437.aspx.
Git in Eclipse
Eclipse ships with a plugin called Egit, which provides a fairly-complete inter-
face to Git operations. It’s accessed by switching to the Git Perspective (Window
> Open Perspective > Other…, and select “Git”).
Git in Eclipse 537
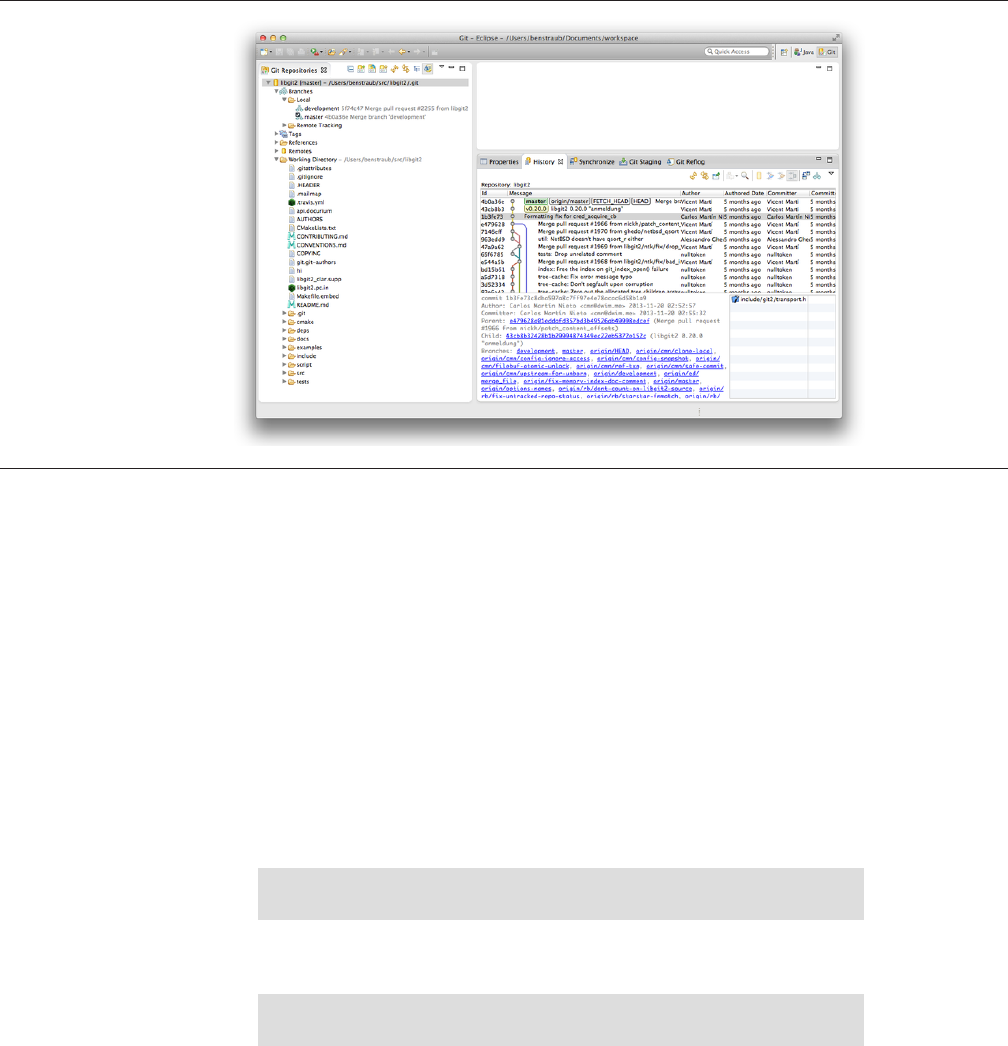
Figure 1-9.
Eclipse’s EGit
environment.
EGit comes with plenty of great documentation, which you can find by going
to Help > Help Contents, and choosing the “EGit Documentation” node from
the contents listing.
Git in Bash
If you’re a Bash user, you can tap into some of your shell’s features to make
your experience with Git a lot friendlier. Git actually ships with plugins for sever-
al shells, but it’s not turned on by default.
First, you need to get a copy of the contrib/completion/git-
completion.bash file out of the Git source code. Copy it somewhere handy,
like your home directory, and add this to your .bashrc:
. ~/git-completion.bash
Once that’s done, change your directory to a git repository, and type:
$ git chec<tab>
Appendix A, Git in Other Environments538
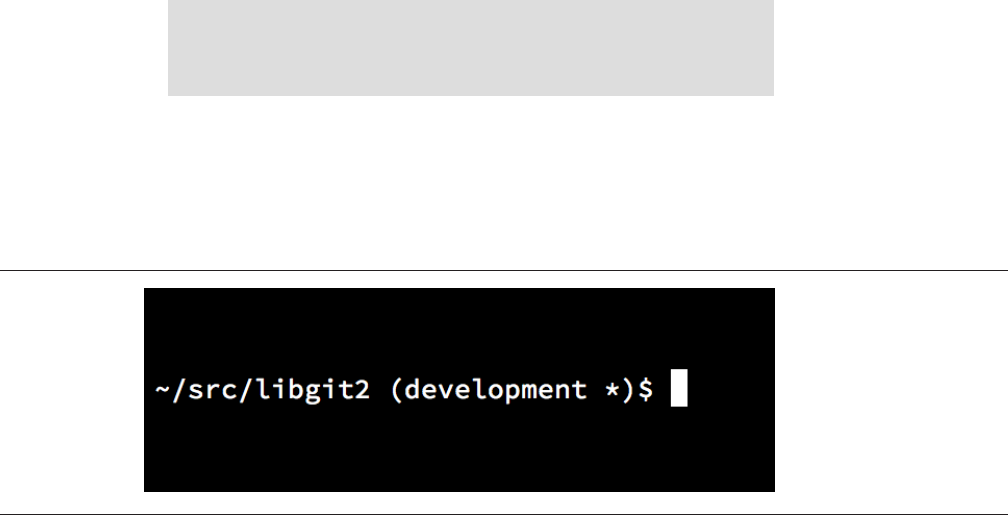
Figure 1-10.
Customized bash
prompt.
…and Bash will auto-complete to git checkout. This works with all of Git’s
subcommands, command-line parameters, and remotes and ref names where
appropriate.
It’s also useful to customize your prompt to show information about the cur-
rent directory’s Git repository. This can be as simple or complex as you want,
but there are generally a few key pieces of information that most people want,
like the current branch, and the status of the working directory. To add these to
your prompt, just copy the contrib/completion/git-prompt.sh file from
Git’s source repository to your home directory, add something like this to
your .bashrc:
. ~/git-prompt.sh
export GIT_PS1_SHOWDIRTYSTATE=1
export PS1='\w$(__git_ps1 " (%s)")\$ '
The \w means print the current working directory, the \$ prints the $ part of
the prompt, and __git_ps1 " (%s)" calls the function provided by git-
prompt.sh with a formatting argument. Now your bash prompt will look like
this when you’re anywhere inside a Git-controlled project:
Both of these scripts come with helpful documentation; take a look at the
contents of git-completion.bash and git-prompt.sh for more informa-
tion.
Git in Zsh
Git also ships with a tab-completion library for Zsh. Just copy contrib/
completion/git-completion.zsh to your home directory and source it from
your .zshrc. Zsh’s interface is a bit more powerful than Bash’s:
Git in Zsh 539

$ git che<tab>
check-attr -- display gitattributes information
check-ref-format -- ensure that a reference name is well formed
checkout -- checkout branch or paths to working tree
checkout-index -- copy files from index to working directory
cherry -- find commits not merged upstream
cherry-pick -- apply changes introduced by some existing commits
Ambiguous tab-completions aren’t just listed; they have helpful descrip-
tions, and you can graphically navigate the list by repeatedly hitting tab. This
works with Git commands, their arguments, and names of things inside the
repository (like refs and remotes), as well filenames and all the other things Zsh
knows how to tab-complete.
Zsh happens to be fairly compatible with Bash when it comes to prompt cus-
tomization, but it allows you to have a right-side prompt as well. To include the
branch name on the right side, add these lines to your ~/.zshrc file:
setopt prompt_subst
. ~/git-prompt.sh
export RPROMPT=$'$(__git_ps1 "%s")'
This results in a display of the current branch on the right-hand side of the
terminal window, whenever your shell is inside a Git repository. It looks a bit
like this:
Appendix A, Git in Other Environments540
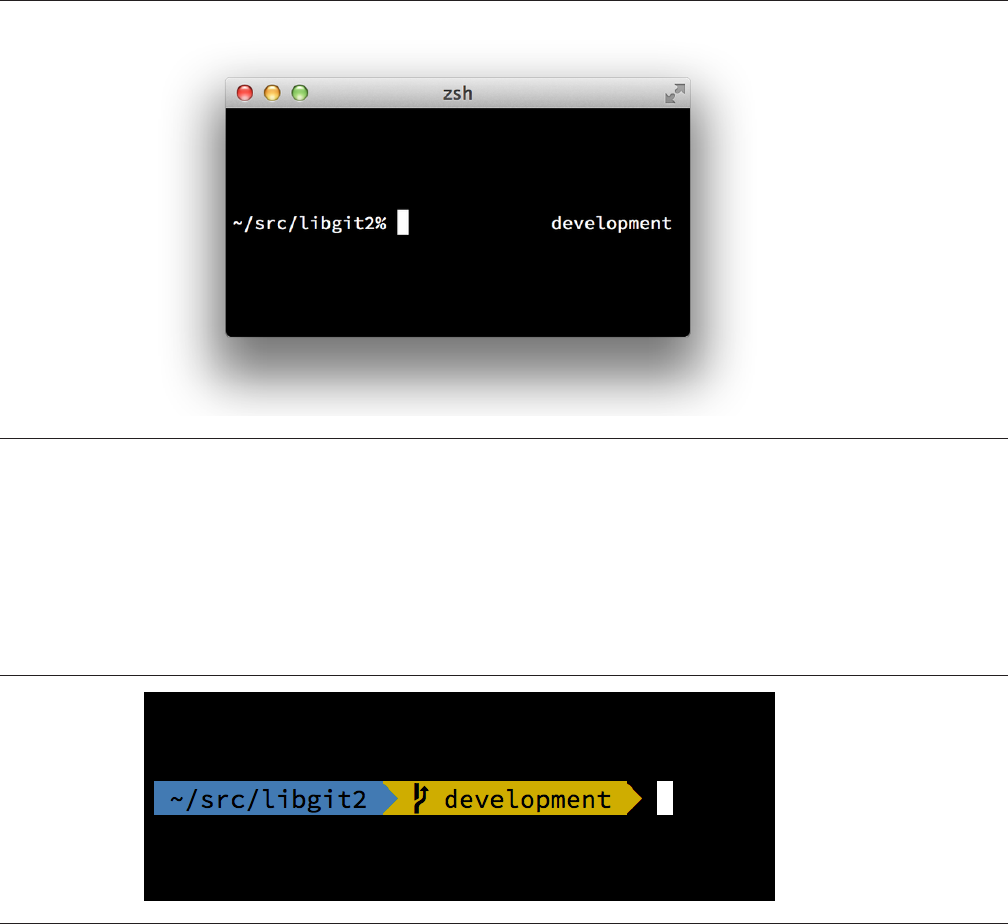
Figure 1-11.
Customized zsh
prompt.
Figure 1-12.
An example of an
oh-my-zsh theme.
Zsh is powerful enough that there are entire frameworks dedicated to mak-
ing it better. One of them is called “oh-my-zsh”, and it can be found at https://
github.com/robbyrussell/oh-my-zsh. oh-my-zsh’s plugin system comes with
powerful git tab-completion, and it has a variety of prompt “themes”, many of
which display version-control data. Figure A-12 is just one example of what can
be done with this system.
Git in Powershell
The standard command-line terminal on Windows (cmd.exe) isn’t really capa-
ble of a customized Git experience, but if you’re using Powershell, you’re in
luck. A package called Posh-Git (https://github.com/dahlbyk/posh-git) pro-
Git in Powershell 541

Figure 1-13.
Powershell with
Posh-git.
vides powerful tab-completion facilities, as well as an enhanced prompt to help
you stay on top of your repository status. It looks like this:
If you’ve installed GitHub for Windows, Posh-Git is included by default, and
all you have to do is add these lines to your profile.ps1 (which is usually lo-
cated in C:\Users\<username>\Documents\WindowsPowerShell):
. (Resolve-Path "$env:LOCALAPPDATA\GitHub\shell.ps1")
. $env:github_posh_git\profile.example.ps1
If you’re not a GitHub for Windows user, just download a Posh-Git release
from (https://github.com/dahlbyk/posh-git), and uncompress it to the Win-
dowsPowershell directory. Then open a Powershell prompt as the administra-
tor, and do this:
> Set-ExecutionPolicy RemoteSigned -Scope CurrentUser -Confirm
> cd ~\Documents\WindowsPowerShell\posh-git
> .\install.ps1
This will add the proper line to your profile.ps1 file, and posh-git will be
active the next time you open your prompt.
Appendix A, Git in Other Environments542
Summary
You’ve learned how to harness Git’s power from inside the tools that you use
during your everyday work, and also how to access Git repositories from your
own programs.
Summary 543
Embedding Git in your
Applications
If your application is for developers, chances are good that it could benefit from
integration with source control. Even non-developer applications, such as
document editors, could potentially benefit from version-control features, and
Git’s model works very well for many dierent scenarios.
If you need to integrate Git with your application, you have essentially three
choices: spawning a shell and using the Git command-line tool; Libgit2; and
JGit.
Command-line Git
One option is to spawn a shell process and use the Git command-line tool to do
the work. This has the benefit of being canonical, and all of Git’s features are
supported. This also happens to be fairly easy, as most runtime environments
have a relatively simple facility for invoking a process with command-line argu-
ments. However, this approach does have some downsides.
One is that all the output is in plain text. This means that you’ll have to parse
Git’s occasionally-changing output format to read progress and result informa-
tion, which can be ineicient and error-prone.
Another is the lack of error recovery. If a repository is corrupted somehow, or
the user has a malformed configuration value, Git will simply refuse to perform
many operations.
Yet another is process management. Git requires you to maintain a shell en-
vironment on a separate process, which can add unwanted complexity. Trying
to coordinate many of these processes (especially when potentially accessing
the same repository from several processes) can be quite a challenge.
545
B
Libgit2
Another option at your disposal is to use Libgit2. Libgit2 is a dependency-free
implementation of Git, with a focus on having a nice API for use within other
programs. You can find it at http://libgit2.github.com.
First, let’s take a look at what the C API looks like. Here’s a whirlwind tour:
// Open a repository
git_repository *repo;
int error = git_repository_open(&repo, "/path/to/repository");
// Dereference HEAD to a commit
git_object *head_commit;
error = git_revparse_single(&head_commit, repo, "HEAD^{commit}");
git_commit *commit = (git_commit*)head_commit;
// Print some of the commit's properties
printf("%s", git_commit_message(commit));
const git_signature *author = git_commit_author(commit);
printf("%s <%s>\n", author->name, author->email);
const git_oid *tree_id = git_commit_tree_id(commit);
// Cleanup
git_commit_free(commit);
git_repository_free(repo);
The first couple of lines open a Git repository. The git_repository type
represents a handle to a repository with a cache in memory. This is the simplest
method, for when you know the exact path to a repository’s working directory
or .git folder. There’s also the git_repository_open_ext which includes
options for searching, git_clone and friends for making a local clone of a re-
mote repository, and git_repository_init for creating an entirely new
repository.
The second chunk of code uses rev-parse syntax (see “Branch References”
for more on this) to get the commit that HEAD eventually points to. The type
returned is a git_object pointer, which represents something that exists in
the Git object database for a repository. git_object is actually a “parent” type
for several dierent kinds of objects; the memory layout for each of the “child”
types is the same as for git_object, so you can safely cast to the right one. In
this case, git_object_type(commit) would return GIT_OBJ_COMMIT, so it’s
safe to cast to a git_commit pointer.
The next chunk shows how to access the commit’s properties. The last line
here uses a git_oid type; this is Libgit2’s representation for a SHA-1 hash.
From this sample, a couple of patterns have started to emerge:
Appendix B, Embedding Git in your Applications546

•If you declare a pointer and pass a reference to it into a Libgit2 call, that
call will probably return an integer error code. A 0 value indicates success;
anything less is an error.
• If Libgit2 populates a pointer for you, you’re responsible for freeing it.
•If Libgit2 returns a const pointer from a call, you don’t have to free it, but
it will become invalid when the object it belongs to is freed.
• Writing C is a bit painful.
That last one means it isn’t very probable that you’ll be writing C when using
Libgit2. Fortunately, there are a number of language-specific bindings available
that make it fairly easy to work with Git repositories from your specific language
and environment. Let’s take a look at the above example written using the Ruby
bindings for Libgit2, which are named Rugged, and can be found at https://
github.com/libgit2/rugged.
repo = Rugged::Repository.new('path/to/repository')
commit = repo.head.target
puts commit.message
puts "#{commit.author[:name]} <#{commit.author[:email]}>"
tree = commit.tree
As you can see, the code is much less cluttered. Firstly, Rugged uses excep-
tions; it can raise things like ConfigError or ObjectError to signal error con-
ditions. Secondly, there’s no explicit freeing of resources, since Ruby is garbage-
collected. Let’s take a look at a slightly more complicated example: craing a
commit from scratch
blob_id = repo.write("Blob contents", :blob)
index = repo.index
index.read_tree(repo.head.target.tree)
index.add(:path => 'newfile.txt', :oid => blob_id)
sig = {
:email => "bob@example.com",
:name => "Bob User",
:time => Time.now,
}
commit_id = Rugged::Commit.create(repo,
:tree => index.write_tree(repo),
:author => sig,
:committer => sig,
:message => "Add newfile.txt",
:parents => repo.empty? ? [] : [ repo.head.target ].compact,
:update_ref => 'HEAD',
Libgit2 547

)
commit = repo.lookup(commit_id)
Create a new blob, which contains the contents of a new file.
Populate the index with the head commit’s tree, and add the new file at the
path newfile.txt.
This creates a new tree in the ODB, and uses it for the new commit.
We use the same signature for both the author and committer fields.
The commit message.
When creating a commit, you have to specify the new commit’s parents. This
uses the tip of HEAD for the single parent.
Rugged (and Libgit2) can optionally update a reference when making a com-
mit.
The return value is the SHA-1 hash of a new commit object, which you can
then use to get a Commit object.
The Ruby code is nice and clean, but since Libgit2 is doing the heavy liing,
this code will run pretty fast, too. If you’re not a rubyist, we touch on some oth-
er bindings in “Other Bindings”.
Advanced Functionality
Libgit2 has a couple of capabilities that are outside the scope of core Git. One
example is pluggability: Libgit2 allows you to provide custom “backends” for
several types of operation, so you can store things in a dierent way than stock
Git does. Libgit2 allows custom backends for configuration, ref storage, and the
object database, among other things.
Let’s take a look at how this works. The code below is borrowed from the set
of backend examples provided by the Libgit2 team (which can be found at
https://github.com/libgit2/libgit2-backends). Here’s how a custom backend
for the object database is set up:
git_odb *odb;
int error = git_odb_new(&odb);
git_odb_backend *my_backend;
error = git_odb_backend_mine(&my_backend, /*…*/);
Appendix B, Embedding Git in your Applications548

error = git_odb_add_backend(odb, my_backend, 1);
git_repository *repo;
error = git_repository_open(&repo, "some-path");
error = git_repository_set_odb(odb);
(Note that errors are captured, but not handled. We hope your code is better
than ours.)
Initialize an empty object database (ODB) “frontend,” which will act as a
container for the “backends” which are the ones doing the real work.
Initialize a custom ODB backend.
Add the backend to the frontend.
Open a repository, and set it to use our ODB to look up objects.
But what is this git_odb_backend_mine thing? Well, that’s the constructor
for your own ODB implementation, and you can do whatever you want in there,
so long as you fill in the git_odb_backend structure properly. Here’s what it
could look like:
typedef struct {
git_odb_backend parent;
// Some other stuff
void *custom_context;
} my_backend_struct;
int git_odb_backend_mine(git_odb_backend **backend_out, /*…*/)
{
my_backend_struct *backend;
backend = calloc(1, sizeof (my_backend_struct));
backend->custom_context = …;
backend->parent.read = &my_backend__read;
backend->parent.read_prefix = &my_backend__read_prefix;
backend->parent.read_header = &my_backend__read_header;
// …
*backend_out = (git_odb_backend *) backend;
return GIT_SUCCESS;
}
Libgit2 549
The subtlest constraint here is that my_backend_struct’s first member
must be a git_odb_backend structure; this ensures that the memory layout is
what the Libgit2 code expects it to be. The rest of it is arbitrary; this structure
can be as large or small as you need it to be.
The initialization function allocates some memory for the structure, sets up
the custom context, and then fills in the members of the parent structure that
it supports. Take a look at the include/git2/sys/odb_backend.h file in the
Libgit2 source for a complete set of call signatures; your particular use case will
help determine which of these you’ll want to support.
Other Bindings
Libgit2 has bindings for many languages. Here we show a small example using
a few of the more complete bindings packages as of this writing; libraries exist
for many other languages, including C++, Go, Node.js, Erlang, and the JVM, all
in various stages of maturity. The oicial collection of bindings can be found by
browsing the repositories at https://github.com/libgit2. The code we’ll write
will return the commit message from the commit eventually pointed to by
HEAD (sort of like git log -1).
LIBGIT2SHARP
If you’re writing a .NET or Mono application, LibGit2Sharp (https://github.com/
libgit2/libgit2sharp) is what you’re looking for. The bindings are written in C#,
and great care has been taken to wrap the raw Libgit2 calls with native-feeling
CLR APIs. Here’s what our example program looks like:
new Repository(@"C:\path\to\repo").Head.Tip.Message;
For desktop Windows applications, there’s even a NuGet package that will
help you get started quickly.
OBJECTIVE-GIT
If your application is running on an Apple platform, you’re likely using
Objective-C as your implementation language. Objective-Git (https://
github.com/libgit2/objective-git) is the name of the Libgit2 bindings for that
environment. The example program looks like this:
GTRepository *repo =
[[GTRepository alloc] initWithURL:[NSURL fileURLWithPath: @"/path/to/repo"] error:NULL];
NSString *msg = [[[repo headReferenceWithError:NULL] resolvedTarget] message];
Appendix B, Embedding Git in your Applications550
Objective-git is fully interoperable with Swi, so don’t fear if you’ve le
Objective-C behind.
PYGIT2
The bindings for Libgit2 in Python are called Pygit2, and can be found at http://
www.pygit2.org/. Our example program:
pygit2.Repository("/path/to/repo") # open repository
.head # get the current branch
.peel(pygit2.Commit) # walk down to the commit
.message # read the message
Further Reading
Of course, a full treatment of Libgit2’s capabilities is outside the scope of this
book. If you want more information on Libgit2 itself, there’s API documentation
at https://libgit2.github.com/libgit2, and a set of guides at https://
libgit2.github.com/docs. For the other bindings, check the bundled README
and tests; there are oen small tutorials and pointers to further reading there.
JGit
If you want to use Git from within a Java program, there is a fully featured Git
library called JGit. JGit is a relatively full-featured implementation of Git written
natively in Java, and is widely used in the Java community. The JGit project is
under the Eclipse umbrella, and its home can be found at http://
www.eclipse.org/jgit.
Getting Set Up
There are a number of ways to connect your project with JGit and start writing
code against it. Probably the easiest is to use Maven – the integration is accom-
plished by adding the following snippet to the <dependencies> tag in your
pom.xml file:
<dependency>
<groupId>org.eclipse.jgit</groupId>
<artifactId>org.eclipse.jgit</artifactId>
<version>3.5.0.201409260305-r</version>
</dependency>
JGit 551

The version will most likely have advanced by the time you read this; check
http://mvnrepository.com/artifact/org.eclipse.jgit/org.eclipse.jgit for upda-
ted repository information. Once this step is done, Maven will automatically ac-
quire and use the JGit libraries that you’ll need.
If you would rather manage the binary dependencies yourself, pre-built JGit
binaries are available from http://www.eclipse.org/jgit/download. You can
build them into your project by running a command like this:
javac -cp .:org.eclipse.jgit-3.5.0.201409260305-r.jar App.java
java -cp .:org.eclipse.jgit-3.5.0.201409260305-r.jar App
Plumbing
JGit has two basic levels of API: plumbing and porcelain. The terminology for
these comes from Git itself, and JGit is divided into roughly the same kinds of
areas: porcelain APIs are a friendly front-end for common user-level actions
(the sorts of things a normal user would use the Git command-line tool for),
while the plumbing APIs are for interacting with low-level repository objects di-
rectly.
The starting point for most JGit sessions is the Repository class, and the
first thing you’ll want to do is create an instance of it. For a filesystem-based
repository (yes, JGit allows for other storage models), this is accomplished us-
ing FileRepositoryBuilder:
// Create a new repository; the path must exist
Repository newlyCreatedRepo = FileRepositoryBuilder.create(
new File("/tmp/new_repo/.git"));
// Open an existing repository
Repository existingRepo = new FileRepositoryBuilder()
.setGitDir(new File("my_repo/.git"))
.build();
The builder has a fluent API for providing all the things it needs to find a Git
repository, whether or not your program knows exactly where it’s located. It
can use environment variables (.readEnvironment()), start from a place in
the working directory and search (.setWorkTree(…).findGitDir()), or just
open a known .git directory as above.
Once you have a Repository instance, you can do all sorts of things with it.
Here’s a quick sampling:
Appendix B, Embedding Git in your Applications552
// Get a reference
Ref master = repo.getRef("master");
// Get the object the reference points to
ObjectId masterTip = master.getObjectId();
// Rev-parse
ObjectId obj = repo.resolve("HEAD^{tree}");
// Load raw object contents
ObjectLoader loader = repo.open(masterTip);
loader.copyTo(System.out);
// Create a branch
RefUpdate createBranch1 = repo.updateRef("refs/heads/branch1");
createBranch1.setNewObjectId(masterTip);
createBranch1.update();
// Delete a branch
RefUpdate deleteBranch1 = repo.updateRef("refs/heads/branch1");
deleteBranch1.setForceUpdate(true);
deleteBranch1.delete();
// Config
Config cfg = repo.getConfig();
String name = cfg.getString("user", null, "name");
There’s quite a bit going on here, so let’s go through it one section at a time.
The first line gets a pointer to the master reference. JGit automatically grabs
the actual master ref, which lives at refs/heads/master, and returns an ob-
ject that lets you fetch information about the reference. You can get the name
(.getName()), and either the target object of a direct reference (.getObjec-
tId()) or the reference pointed to by a symbolic ref (.getTarget()). Ref ob-
jects are also used to represent tag refs and objects, so you can ask if the tag is
“peeled,” meaning that it points to the final target of a (potentially long) string
of tag objects.
The second line gets the target of the master reference, which is returned as
an ObjectId instance. ObjectId represents the SHA-1 hash of an object, which
might or might not exist in Git’s object database. The third line is similar, but
shows how JGit handles the rev-parse syntax (for more on this, see “Branch
References”); you can pass any object specifier that Git understands, and JGit
will return either a valid ObjectId for that object, or null.
The next two lines show how to load the raw contents of an object. In this
example, we call ObjectLoader.copyTo() to stream the contents of the ob-
ject directly to stdout, but ObjectLoader also has methods to read the type and
size of an object, as well as return it as a byte array. For large objects
JGit 553
(where .isLarge() returns true), you can call .openStream() to get an
InputStream-like object that can read the raw object data without pulling it all
into memory at once.
The next few lines show what it takes to create a new branch. We create a
RefUpdate instance, configure some parameters, and call .update() to trigger
the change. Directly following this is the code to delete that same branch. Note
that .setForceUpdate(true) is required for this to work; otherwise the .de-
lete() call will return REJECTED, and nothing will happen.
The last example shows how to fetch the user.name value from the Git con-
figuration files. This Config instance uses the repository we opened earlier for
local configuration, but will automatically detect the global and system config-
uration files and read values from them as well.
This is only a small sampling of the full plumbing API; there are many more
methods and classes available. Also not shown here is the way JGit handles er-
rors, which is through the use of exceptions. JGit APIs sometimes throw stan-
dard Java exceptions (such as IOException), but there are a host of JGit-
specific exception types that are provided as well (such as NoRemoteReposi-
toryException, CorruptObjectException, and NoMergeBaseException).
Porcelain
The plumbing APIs are rather complete, but it can be cumbersome to string
them together to achieve common goals, like adding a file to the index, or mak-
ing a new commit. JGit provides a higher-level set of APIs to help out with this,
and the entry point to these APIs is the Git class:
Repository repo;
// construct repo...
Git git = new Git(repo);
The Git class has a nice set of high-level builder-style methods that can be
used to construct some pretty complex behavior. Let’s take a look at an exam-
ple – doing something like git ls-remote:
CredentialsProvider cp = new UsernamePasswordCredentialsProvider("username", "p4ssw0rd");
Collection<Ref> remoteRefs = git.lsRemote()
.setCredentialsProvider(cp)
.setRemote("origin")
.setTags(true)
.setHeads(false)
.call();
for (Ref ref : remoteRefs) {
Appendix B, Embedding Git in your Applications554
System.out.println(ref.getName() + " -> " + ref.getObjectId().name());
}
This is a common pattern with the Git class; the methods return a command
object that lets you chain method calls to set parameters, which are executed
when you call .call(). In this case, we’re asking the origin remote for tags,
but not heads. Also notice the use of a CredentialsProvider object for au-
thentication.
Many other commands are available through the Git class, including but not
limited to add, blame, commit, clean, push, rebase, revert, and reset.
Further Reading
This is only a small sampling of JGit’s full capabilities. If you’re interested and
want to learn more, here’s where to look for information and inspiration:
•The oicial JGit API documentation is available online at http://down-
load.eclipse.org/jgit/docs/latest/apidocs. These are standard Javadoc,
so your favorite JVM IDE will be able to install them locally, as well.
•The JGit Cookbook at https://github.com/centic9/jgit-cookbook has
many examples of how to do specific tasks with JGit.
•There are several good resources pointed out at http://stackover-
flow.com/questions/6861881.
JGit 555
Git Commands
Throughout the book we have introduced dozens of Git commands and have
tried hard to introduce them within something of a narrative, adding more
commands to the story slowly. However, this leaves us with examples of usage
of the commands somewhat scattered throughout the whole book.
In this appendix, we’ll go through all the Git commands we addressed
throughout the book, grouped roughly by what they’re used for. We’ll talk
about what each command very generally does and then point out where in the
book you can find us having used it.
Setup and Config
There are two commands that are used quite a lot, from the first invocations of
Git to common every day tweaking and referencing, the config and help com-
mands.
git config
Git has a default way of doing hundreds of things. For a lot of these things, you
can tell Git to default to doing them a dierent way, or set your preferences.
This involves everything from telling Git what your name is to specific terminal
color preferences or what editor you use. There are several files this command
will read from and write to so you can set values globally or down to specific
repositories.
The git config command has been used in nearly every chapter of the
book.
In “Configurando Git por primera vez” we used it to specify our name,
email address and editor preference before we even got started using Git.
In “Git Aliases” we showed how you could use it to create shorthand com-
mands that expand to long option sequences so you don’t have to type them
every time.
557
C
In “Reorganizar el Trabajo Realizado” we used it to make --rebase the
default when you run git pull.
In “Credential Storage” we used it to set up a default store for your HTTP
passwords.
In “Keyword Expansion” we showed how to set up smudge and clean filters
on content coming in and out of Git.
Finally, basically the entirety of “Git Configuration” is dedicated to the
command.
git help
The git help command is used to show you all the documentation shipped
with Git about any command. While we’re giving a rough overview of most of
the more popular ones in this appendix, for a full listing of all of the possible
options and flags for every command, you can always run git help <com-
mand>.
We introduced the git help command in “¿Cómo obtener ayuda?” and
showed you how to use it to find more information about the git shell in
“Setting Up the Server”.
Getting and Creating Projects
There are two ways to get a Git repository. One is to copy it from an existing
repository on the network or elsewhere and the other is to create a new one in
an existing directory.
git init
To take a directory and turn it into a new Git repository so you can start version
controlling it, you can simply run git init.
We first introduce this in “Obteniendo un repositorio Git”, where we show
creating a brand new repository to start working with.
We talk briefly about how you can change the default branch from “master”
in “Ramas Remotas”.
We use this command to create an empty bare repository for a server in “Co-
locando un Repositorio Vacío en un Servidor”.
Finally, we go through some of the details of what it actually does behind
the scenes in “Plumbing and Porcelain”.
Appendix C, Git Commands558
git clone
The git clone command is actually something of a wrapper around several
other commands. It creates a new directory, goes into it and runs git init to
make it an empty Git repository, adds a remote (git remote add) to the URL
that you pass it (by default named origin), runs a git fetch from that re-
mote repository and then checks out the latest commit into your working direc-
tory with git checkout.
The git clone command is used in dozens of places throughout the book,
but we’ll just list a few interesting places.
It’s basically introduced and explained in “Clonando un repositorio exis-
tente”, where we go through a few examples.
In “Configurando Git en un servidor” we look at using the --bare option
to create a copy of a Git repository with no working directory.
In “Bundling” we use it to unbundle a bundled Git repository.
Finally, in “Cloning a Project with Submodules” we learn the --
recursive option to make cloning a repository with submodules a little sim-
pler.
Though it’s used in many other places through the book, these are the ones
that are somewhat unique or where it is used in ways that are a little dierent.
Basic Snapshotting
For the basic workflow of staging content and committing it to your history,
there are only a few basic commands.
git add
The git add command adds content from the working directory into the stag-
ing area (or “index”) for the next commit. When the git commit command is
run, by default it only looks at this staging area, so git add is used to cra
what exactly you would like your next commit snapshot to look like.
This command is an incredibly important command in Git and is mentioned
or used dozens of times in this book. We’ll quickly cover some of the unique
uses that can be found.
We first introduce and explain git add in detail in “Rastrear Archivos Nue-
vos”.
We mention how to use it to resolve merge conflicts in “Principales Conflic-
tos que Pueden Surgir en las Fusiones”.
Basic Snapshotting 559
We go over using it to interactively stage only specific parts of a modified file
in “Interactive Staging”.
Finally, we emulate it at a low level in “Tree Objects”, so you can get an idea
of what it’s doing behind the scenes.
git status
The git status command will show you the dierent states of files in your
working directory and staging area. Which files are modified and unstaged and
which are staged but not yet committed. In it’s normal form, it also will show
you some basic hints on how to move files between these stages.
We first cover status in “Revisando el Estado de tus Archivos”, both in it’s
basic and simplified forms. While we use it throughout the book, pretty much
everything you can do with the git status command is covered there.
git di
The git diff command is used when you want to see dierences between
any two trees. This could be the dierence between your working environment
and your staging area (git diff by itself), between your staging area and your
last commit (git diff --staged), or between two commits (git diff mas-
ter branchB).
We first look at the basic uses of git diff in “Ver los Cambios Preparados
y No Preparados”, where we show how to see what changes are staged and
which are not yet staged.
We use it to look for possible whitespace issues before committing with the
--check option in “Commit Guidelines”.
We see how to check the dierences between branches more eectively with
the git diff A...B syntax in “Determining What Is Introduced”.
We use it to filter out whitespace dierences with -w and how to compare
dierent stages of conflicted files with --theirs, --ours and --base in “Ad-
vanced Merging”.
Finally, we use it to eectively compare submodule changes with --
submodule in “Starting with Submodules”.
git ditool
The git difftool command simply launches an external tool to show you
the dierence between two trees in case you want to use something other than
the built in git diff command.
Appendix C, Git Commands560
We only briefly mention this in “Ver los Cambios Preparados y No Prepara-
dos”.
git commit
The git commit command takes all the file contents that have been staged
with git add and records a new permanent snapshot in the database and then
moves the branch pointer on the current branch up to it.
We first cover the basics of committing in “Confirmar tus Cambios”. There
we also demonstrate how to use the -a flag to skip the git add step in daily
workflows and how to use the -m flag to pass a commit message in on the com-
mand line instead of firing up an editor.
In “Deshacer Cosas” we cover using the --amend option to redo the most
recent commit.
In “¿Qué es una rama?”, we go into much more detail about what git com-
mit does and why it does it like that.
We looked at how to sign commits cryptographically with the -S flag in
“Signing Commits”.
Finally, we take a look at what the git commit command does in the back-
ground and how it’s actually implemented in “Commit Objects”.
git reset
The git reset command is primarily used to undo things, as you can possibly
tell by the verb. It moves around the HEAD pointer and optionally changes the
index or staging area and can also optionally change the working directory if
you use --hard. This final option makes it possible for this command to lose
your work if used incorrectly, so make sure you understand it before using it.
We first eectively cover the simplest use of git reset in “Deshacer un Ar-
chivo Preparado”, where we use it to unstage a file we had run git add on.
We then cover it in quite some detail in “Reset Demystified”, which is en-
tirely devoted to explaining this command.
We use git reset --hard to abort a merge in “Aborting a Merge”, where
we also use git merge --abort, which is a bit of a wrapper for the git re-
set command.
Basic Snapshotting 561
git rm
The git rm command is used to remove files from the staging area and work-
ing directory for Git. It is similar to git add in that it stages a removal of a file
for the next commit.
We cover the git rm command in some detail in “Eliminar Archivos”, in-
cluding recursively removing files and only removing files from the staging area
but leaving them in the working directory with --cached.
The only other diering use of git rm in the book is in “Removing Ob-
jects” where we briefly use and explain the --ignore-unmatch when running
git filter-branch, which simply makes it not error out when the file we are
trying to remove doesn’t exist. This can be useful for scripting purposes.
git mv
The git mv command is a thin convenience command to move a file and then
run git add on the new file and git rm on the old file.
We only briefly mention this command in “Cambiar el Nombre de los Ar-
chivos”.
git clean
The git clean command is used to remove unwanted files from your working
directory. This could include removing temporary build artifacts or merge con-
flict files.
We cover many of the options and scenarios in which you might used the
clean command in “Cleaning your Working Directory”.
Branching and Merging
There are just a handful of commands that implement most of the branching
and merging functionality in Git.
git branch
The git branch command is actually something of a branch management
tool. It can list the branches you have, create a new branch, delete branches
and rename branches.
Most of Chapter 3 is dedicated to the branch command and it’s used
throughout the entire chapter. We first introduce it in “Crear una Rama Nue-
Appendix C, Git Commands562
va” and we go through most of it’s other features (listing and deleting) in “Ges-
tión de Ramas”.
In “Hacer Seguimiento a las Ramas” we use the git branch -u option to
set up a tracking branch.
Finally, we go through some of what it does in the background in “Git Refer-
ences”.
git checkout
The git checkout command is used to switch branches and check content
out into your working directory.
We first encounter the command in “Cambiar de Rama” along with the git
branch command.
We see how to use it to start tracking branches with the --track flag in
“Hacer Seguimiento a las Ramas”.
We use it to reintroduce file conflicts with --conflict=diff3 in “Checking
Out Conflicts”.
We go into closer detail on it’s relationship with git reset in “Reset De-
mystified”.
Finally, we go into some implementation detail in “The HEAD”.
git merge
The git merge tool is used to merge one or more branches into the branch you
have checked out. It will then advance the current branch to the result of the
merge.
The git merge command was first introduced in “Procedimientos Básicos
de Ramificación”. Though it is used in various places in the book, there are
very few variations of the merge command — generally just git merge
<branch> with the name of the single branch you want to merge in.
We covered how to do a squashed merge (where Git merges the work but
pretends like it’s just a new commit without recording the history of the branch
you’re merging in) at the very end of “Forked Public Project”.
We went over a lot about the merge process and command, including the -
Xignore-all-whitespace command and the --abort flag to abort a prob-
lem merge in “Advanced Merging”.
We learned how to verify signatures before merging if your project is using
GPG signing in “Signing Commits”.
Finally, we learned about Subtree merging in “Subtree Merging”.
Branching and Merging 563
git mergetool
The git mergetool command simply launches an external merge helper in
case you have issues with a merge in Git.
We mention it quickly in “Principales Conflictos que Pueden Surgir en las
Fusiones” and go into detail on how to implement your own external merge
tool in “External Merge and Di Tools”.
git log
The git log command is used to show the reachable recorded history of a
project from the most recent commit snapshot backwards. By default it will on-
ly show the history of the branch you’re currently on, but can be given dierent
or even multiple heads or branches from which to traverse. It is also oen used
to show dierences between two or more branches at the commit level.
This command is used in nearly every chapter of the book to demonstrate
the history of a project.
We introduce the command and cover it in some depth in “Ver el Historial
de Confirmaciones”. There we look at the -p and --stat option to get an idea
of what was introduced in each commit and the --pretty and --oneline op-
tions to view the history more concisely, along with some simple date and au-
thor filtering options.
In “Crear una Rama Nueva” we use it with the --decorate option to easily
visualize where our branch pointers are located and we also use the --graph
option to see what divergent histories look like.
In “Private Small Team” and “Commit Ranges” we cover the bran-
chA..branchB syntax to use the git log command to see what commits are
unique to a branch relative to another branch. In “Commit Ranges” we go
through this fairly extensively.
In “Merge Log” and “Triple Dot” we cover using the branchA...branchB
format and the --left-right syntax to see what is in one branch or the other
but not in both. In “Merge Log” we also look at how to use the --merge option
to help with merge conflict debugging as well as using the --cc option to look
at merge commit conflicts in your history.
In “RefLog Shortnames” we use the -g option to view the Git reflog
through this tool instead of doing branch traversal.
In “Searching” we look at using the -S and -L options to do fairly sophisti-
cated searches for something that happened historically in the code such as
seeing the history of a function.
Appendix C, Git Commands564
In “Signing Commits” we see how to use --show-signature to add a vali-
dation string to each commit in the git log output based on if it was validly
signed or not.
git stash
The git stash command is used to temporarily store uncommitted work in
order to clean out your working directory without having to commit unfinished
work on a branch.
This is basically entirely covered in “Stashing and Cleaning”.
git tag
The git tag command is used to give a permanent bookmark to a specific
point in the code history. Generally this is used for things like releases.
This command is introduced and covered in detail in “Etiquetado” and we
use it in practice in “Tagging Your Releases”.
We also cover how to create a GPG signed tag with the -s flag and verify one
with the -v flag in “Signing Your Work”.
Sharing and Updating Projects
There are not very many commands in Git that access the network, nearly all of
the commands operate on the local database. When you are ready to share
your work or pull changes from elsewhere, there are a handful of commands
that deal with remote repositories.
git fetch
The git fetch command communicates with a remote repository and fetches
down all the information that is in that repository that is not in your current one
and stores it in your local database.
We first look at this command in “Traer y Combinar Remotos” and we con-
tinue to see examples of it use in “Ramas Remotas”.
We also use it in several of the examples in “Contributing to a Project”.
We use it to fetch a single specific reference that is outside of the default
space in “Pull Request Refs” and we see how to fetch from a bundle in “Bun-
dling”.
We set up highly custom refspecs in order to make git fetch do something
a little dierent than the default in “The Refspec”.
Sharing and Updating Projects 565
git pull
The git pull command is basically a combination of the git fetch and git
merge commands, where Git will fetch from the remote you specify and then
immediately try to merge it into the branch you’re on.
We introduce it quickly in “Traer y Combinar Remotos” and show how to
see what it will merge if you run it in “Inspeccionar un Remoto”.
We also see how to use it to help with rebasing diiculties in “Reorganizar
una Reorganización”.
We show how to use it with a URL to pull in changes in a one-o fashion in
“Checking Out Remote Branches”.
Finally, we very quickly mention that you can use the --verify-
signatures option to it in order to verify that commits you are pulling have
been GPG signed in “Signing Commits”.
git push
The git push command is used to communicate with another repository, cal-
culate what your local database has that the remote one does not, and then
pushes the dierence into the other repository. It requires write access to the
other repository and so normally is authenticated somehow.
We first look at the git push command in “Enviar a Tus Remotos”. Here
we cover the basics of pushing a branch to a remote repository. In “Publicar”
we go a little deeper into pushing specific branches and in “Hacer Seguimien-
to a las Ramas” we see how to set up tracking branches to automatically push
to. In “Eliminar Ramas Remotas” we use the --delete flag to delete a branch
on the server with git push.
Throughout “Contributing to a Project” we see several examples of using
git push to share work on branches through multiple remotes.
We see how to use it to share tags that you have made with the --tags op-
tion in “Compartir Etiquetas”.
In “Publishing Submodule Changes” we use the --recurse-submodules
option to check that all of our submodules work has been published before
pushing the superproject, which can be really helpful when using submodules.
In “Other Client Hooks” we talk briefly about the pre-push hook, which is
a script we can setup to run before a push completes to verify that it should be
allowed to push.
Finally, in “Pushing Refspecs” we look at pushing with a full refspec instead
of the general shortcuts that are normally used. This can help you be very spe-
cific about what work you wish to share.
Appendix C, Git Commands566
git remote
The git remote command is a management tool for your record of remote re-
positories. It allows you to save long URLs as short handles, such as “origin” so
you don’t have to type them out all the time. You can have several of these and
the git remote command is used to add, change and delete them.
This command is covered in detail in “Trabajar con Remotos”, including
listing, adding, removing and renaming them.
It is used in nearly every subsequent chapter in the book too, but always in
the standard git remote add <name> <url> format.
git archive
The git archive command is used to create an archive file of a specific snap-
shot of the project.
We use git archive to create a tarball of a project for sharing in “Prepar-
ing a Release”.
git submodule
The git submodule command is used to manage external repositories within
a normal repositories. This could be for libraries or other types of shared re-
sources. The submodule command has several sub-commands (add, update,
sync, etc) for managing these resources.
This command is only mentioned and entirely covered in “Submodules”.
Inspection and Comparison
git show
The git show command can show a Git object in a simple and human reada-
ble way. Normally you would use this to show the information about a tag or a
commit.
We first use it to show annotated tag information in “Etiquetas Anotadas”.
Later we use it quite a bit in “Revision Selection” to show the commits that
our various revision selections resolve to.
One of the more interesting things we do with git show is in “Manual File
Re-merging” to extract specific file contents of various stages during a merge
conflict.
Inspection and Comparison 567
git shortlog
The git shortlog command is used to summarize the output of git log. It
will take many of the same options that the git log command will but instead
of listing out all of the commits it will present a summary of the commits grou-
ped by author.
We showed how to use it to create a nice changelog in “The Shortlog”.
git describe
The git describe command is used to take anything that resolves to a com-
mit and produces a string that is somewhat human-readable and will not
change. It’s a way to get a description of a commit that is as unambiguous as a
commit SHA-1 but more understandable.
We use git describe in “Generating a Build Number” and “Preparing a
Release” to get a string to name our release file aer.
Debugging
Git has a couple of commands that are used to help debug an issue in your
code. This ranges from figuring out where something was introduced to figuring
out who introduced it.
git bisect
The git bisect tool is an incredibly helpful debugging tool used to find which
specific commit was the first one to introduce a bug or problem by doing an au-
tomatic binary search.
It is fully covered in “Binary Search” and is only mentioned in that section.
git blame
The git blame command annotates the lines of any file with which commit
was the last one to introduce a change to each line of the file and what person
authored that commit. This is helpful in order to find the person to ask for more
information about a specific section of your code.
It is covered in “File Annotation” and is only mentioned in that section.
Appendix C, Git Commands568
git grep
The git grep command can help you find any string or regular expression in
any of the files in your source code, even older versions of your project.
It is covered in “Git Grep” and is only mentioned in that section.
Patching
A few commands in Git are centered around the concept of thinking of commits
in terms of the changes they introduce, as thought the commit series is a series
of patches. These commands help you manage your branches in this manner.
git cherry-pick
The git cherry-pick command is used to take the change introduced in a
single Git commit and try to re-introduce it as a new commit on the branch
you’re currently on. This can be useful to only take one or two commits from a
branch individually rather than merging in the branch which takes all the
changes.
Cherry picking is described and demonstrated in “Rebasing and Cherry
Picking Workflows”.
git rebase
The git rebase command is basically an automated cherry-pick. It deter-
mines a series of commits and then cherry-picks them one by one in the same
order somewhere else.
Rebasing is covered in detail in “Reorganizar el Trabajo Realizado”, includ-
ing covering the collaborative issues involved with rebasing branches that are
already public.
We use it in practice during an example of splitting your history into two sep-
arate repositories in “Replace”, using the --onto flag as well.
We go through running into a merge conflict during rebasing in “Rerere”.
We also use it in an interactive scripting mode with the -i option in “Chang-
ing Multiple Commit Messages”.
Patching 569
git revert
The git revert command is essentially a reverse git cherry-pick. It cre-
ates a new commit that applies the exact opposite of the change introduced in
the commit you’re targeting, essentially undoing or reverting it.
We use this in “Reverse the commit” to undo a merge commit.
Email
Many Git projects, including Git itself, are entirely maintained over mailing lists.
Git has a number of tools built into it that help make this process easier, from
generating patches you can easily email to applying those patches from an
email box.
git apply
The git apply command applies a patch created with the git diff or even
GNU di command. It is similar to what the patch command might do with a
few small dierences.
We demonstrate using it and the circumstances in which you might do so in
“Applying Patches from E-mail”.
git am
The git am command is used to apply patches from an email inbox, specifical-
ly one that is mbox formatted. This is useful for receiving patches over email
and applying them to your project easily.
We covered usage and workflow around git am in “Applying a Patch with
am” including using the --resolved, -i and -3 options.
There are also a number of hooks you can use to help with the workflow
around git am and they are all covered in “E-mail Workflow Hooks”.
We also use it to apply patch formatted GitHub Pull Request changes in
“Email Notifications”.
git format-patch
The git format-patch command is used to generate a series of patches in
mbox format that you can use to send to a mailing list properly formatted.
We go through an example of contributing to a project using the git
format-patch tool in “Public Project over E-Mail”.
Appendix C, Git Commands570
git send-email
The git send-email command is used to send patches that are generated
with git format-patch over email.
We go through an example of contributing to a project by sending patches
with the git send-email tool in “Public Project over E-Mail”.
git request-pull
The git request-pull command is simply used to generate an example mes-
sage body to email to someone. If you have a branch on a public server and
want to let someone know how to integrate those changes without sending the
patches over email, you can run this command and send the output to the per-
son you want to pull the changes in.
We demonstrate how to use git request-pull to generate a pull message
in “Forked Public Project”.
External Systems
Git comes with a few commands to integrate with other version control sys-
tems.
git svn
The git svn command is used to communicate with the Subversion version
control system as a client. This means you can use Git to checkout from and
commit to a Subversion server.
This command is covered in depth in “Git and Subversion”.
git fast-import
For other version control systems or importing from nearly any format, you can
use git fast-import to quickly map the other format to something Git can
easily record.
This command is covered in depth in “A Custom Importer”.
External Systems 571
Administration
If you’re administering a Git repository or need to fix something in a big way, Git
provides a number of administrative commands to help you out.
git gc
The git gc command runs “garbage collection” on your repository, removing
unnecessary files in your database and packing up the remaining files into a
more eicient format.
This command normally runs in the background for you, though you can
manually run it if you wish. We go over some examples of this in “Mainte-
nance”.
git fsck
The git fsck command is used to check the internal database for problems or
inconsistencies.
We only quickly use this once in “Data Recovery” to search for dangling ob-
jects.
git reflog
The git reflog command goes through a log of where all the heads of your
branches have been as you work to find commits you may have lost through
rewriting histories.
We cover this command mainly in “RefLog Shortnames”, where we show
normal usage to and how to use git log -g to view the same information
with git log output.
We also go through a practical example of recovering such a lost branch in
“Data Recovery”.
git filter-branch
The git filter-branch command is used to rewrite loads of commits ac-
cording to certain patterns, like removing a file everywhere or filtering the en-
tire repository down to a single subdirectory for extracting a project.
In “Removing a File from Every Commit” we explain the command and ex-
plore several dierent options such as --commit-filter, --subdirectory-
filter and --tree-filter.
Appendix C, Git Commands572
In “Git-p4” and “TFS” we use it to fix up imported external repositories.
Plumbing Commands
There were also quite a number of lower level plumbing commands that we en-
countered in the book.
The first one we encounter is ls-remote in “Pull Request Refs” which we
use to look at the raw references on the server.
We use ls-files in “Manual File Re-merging”, “Rerere” and “The In-
dex” to take a more raw look at what your staging area looks like.
We also mention rev-parse in “Branch References” to take just about any
string and turn it into an object SHA-1.
However, most of the low level plumbing commands we cover are in Chap-
ter 10, which is more or less what the chapter is focused on. We tried to avoid
use of them throughout most of the rest of the book.
Plumbing Commands 573

Index
Symbols
$EDITOR, 386
$VISUAL
see $EDITOR, 386
.gitignore, 388
.NET, 550
@{upstream}, 115
@{u}, 115
A
aliases, 79
Apache, 144
Apple, 550
archiving, 403
attributes, 397
autocorrect, 388
B
bash, 538
binary files, 397
BitKeeper, 30
bitnami, 148
branches, 83
basic workflow, 91
creating, 86
diing, 187
long-running, 103
managing, 101
merging, 96
remote, 107, 186
switching, 87
topic, 182
tracking, 114
upstream, 114
build numbers, 196
C
C#, 550
Cocoa, 550
color, 389
commit templates, 386
contributing, 159
private managed team, 168
private small team, 161
public large project, 178
public small project, 174
credential caching, 37
credentials, 377
CRLF, 37
crlf, 394
CVS, 27
D
ditool, 390
distributed git, 155
E
Eclipse, 537
editor
changing default, 55
email, 180
applying patches from, 182
excludes, 388, 486
F
files
moving, 58
removing, 56
forking, 157, 205
G
Git as a client, 421
575

git commands
add, 47, 47, 48
am, 183
apply, 182
archive, 197
branch, 101
checkout, 87
cherry-pick, 193
clone, 44
bare, 136
commit, 54, 84
config, 39, 40, 55, 79, 180, 385
credential, 377
daemon, 142
describe, 196
di, 51
check, 160
fast-import, 476
fetch, 71
fetch-pack, 512
filter-branch, 474
format-patch, 179
gitk, 529
gui, 529
help, 41, 142
http-backend, 144
init, 43, 47
bare, 137, 140
instaweb, 146
log, 59
merge, 94
squash, 178
mergetool, 100
p4, 450, 473
pull, 72
push, 72, 78, 112
rebase, 118
receive-pack, 510
remote, 69, 71, 73, 74
request-pull, 175
rerere, 194
send-pack, 510
shortlog, 197
show, 77
show-ref, 424
status, 46, 54
svn, 421
tag, 75, 76, 78
upload-pack, 512
git-svn, 421
git-tf, 458
git-tfs, 458
GitHub, 199
API, 249
Flow, 206
organizations, 240
pull requests, 209
user accounts, 199
GitHub for Mac, 532
GitHub for Windows, 532
gitk, 529
GitLab, 148
GitWeb, 145
GPG, 388
Graphical tools, 529
GUIs, 529
H
hooks, 405
post-update, 132
I
ignoring files, 50
Importing
from Mercurial, 470
from others, 476
from Perforce, 472
from Subversion, 468
from TFS, 475
integrating work, 188
Interoperation with other VCSs
Mercurial, 433
Perforce, 442
Subversion, 421
TFS, 458
IRC, 41
J
java, 551
jgit, 551
K
keyword expansion, 400
L
libgit2, 546
line endings, 394
Linux, 30
576

installing, 36
log filtering, 66
log formatting, 62
M
Mac
installing, 36
maintaining a project, 181
master, 85
Mercurial, 433, 470
mergetool, 390
merging, 96
conflicts, 98
strategies, 404
vs. rebasing, 127
Migrating to Git, 467
Mono, 550
O
Objective-C, 550
origin, 107
P
pager, 387
Perforce, 27, 30, 442, 472
Git Fusion, 442
policy example, 409
posh-git, 541
Powershell, 37
powershell, 541
protocols
dumb HTTP, 132
git, 134
local, 130
smart HTTP, 132
SSH, 134
pulling, 116
pushing, 112
Python, 551
R
rebasing, 117
perils of, 122
vs. merging, 127
references
remote, 107
releasing, 197
rerere, 194
Ruby, 547
S
serving repositories, 129
git protocol, 142
GitLab, 148
GitWeb, 145
HTTP, 144
SSH, 137
SHA-1, 33
shell prompts
bash, 538
powershell, 541
zsh, 539
SSH keys, 138
with GitHub, 200
staging area
skipping, 56
Subversion, 27, 30, 156, 421, 468
T
tab completion
bash, 538
powershell, 541
zsh, 539
tags, 74, 195
annotated, 76
lightweight, 76
signing, 195
TFS, 458, 475
TFVC (see TFS)
V
version control, 25
centralized, 27
distributed, 28
local, 26
Visual Studio, 535
W
whitespace, 394
Windows
installing, 37
workflows, 155
centralized, 155
dictator and lieutenants, 157
integration manager, 156
merging, 189
577

