Manual Hadoop HIve Installation
User Manual:
Open the PDF directly: View PDF ![]() .
.
Page Count: 4
“Created for Udemy course: Hive to ADVANCE Hive (Real time usage) : Hadoop querying tool”
STEP BY STEP HADOOP AND HIVE INSTALLATION
Important Note **- The following steps are to install a specific version of Ubuntu, Hadoop, Java and
Hive. The steps will vary if you are using other versions.**
I will be installing Hadoop 1.2.1 and Hive 0.14 as these versions are best suited for learning purposes.
Step 1 – If you are using Linux OS directly go to Installing Hadoop .
For Windows:
Download the Virtual box from this link
https://www.virtualbox.org/wiki/Downloads
Click on Windows host to download.
Step 2 - Download UBUNTU LTS 64 bit from below link. Note that it should be LTS and 64 bit. I
downloaded the Ubuntu LTS 12.04 (preferable for this installation).
http://www.ubuntu.com/download/desktop
Installing Ubuntu on VM
Install Virtual box an open it .
Open the VM -- > New -- >Give any name
Choose the below options and click next everytime
• Keep the memory to 2 GB (recommended).
• Create a virtual hard drive now.
• VDI (VirtualBox Disk Image)
• Dynamically allocated
• Give the memory 20 GB ( you can give more)
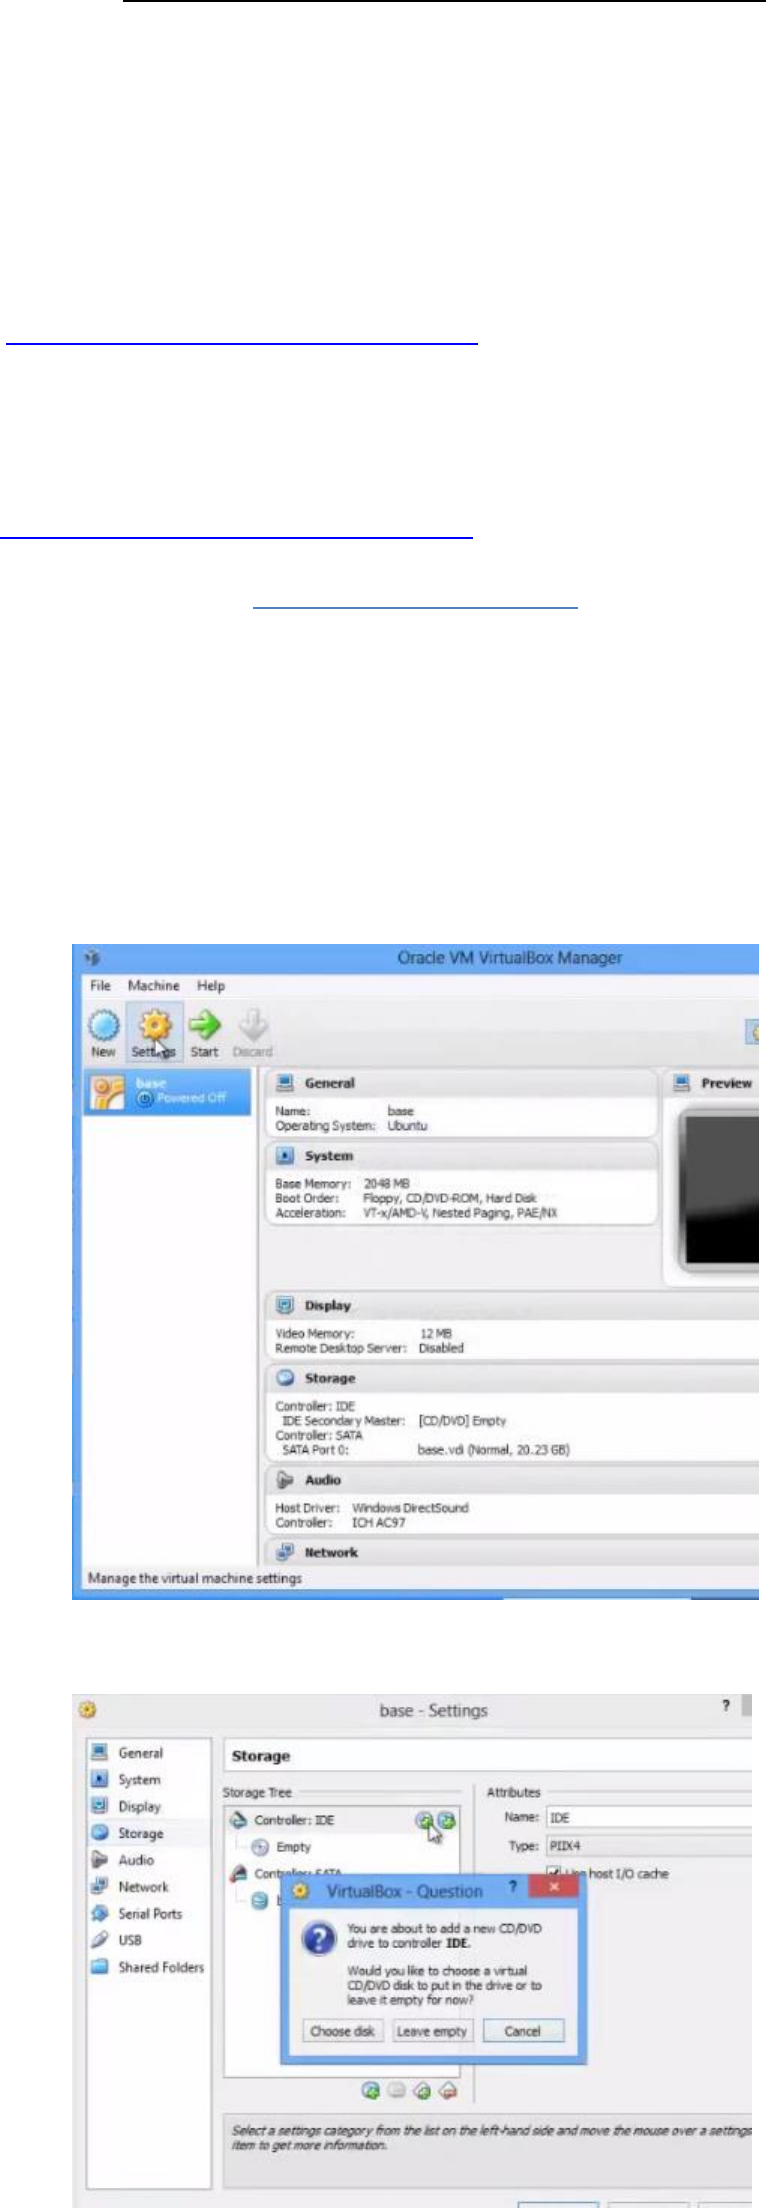
• Click on Settings as shown in image.
Click Storage-- >Controlloer:IDE-- >Choose disk.
• Browse to the Ubuntu image downloaded and click OK.
• START the Virtual machine.
Note ** While running VM for the first time an error showing VT-x/AMD-V support may come.
You have to change the BIOS settings to rectify this issue. This setting depend from PC to PC so I
would recommend to google the issue and resolve it. It is fairly simple ,you have to edit 1 BIOS
setting and restart.
• If the error is not coming you will get a pop up where you have to select INSTALL
UBUNTU.
• Click continue.
• Click on Erase disk and install Ubuntu. ( Don’t worry it will format only your dynamic
memory selected i.e. 20 GB).
• Install Now
• Put your username and password.

“Created for Udemy course: Hive to ADVANCE Hive (Real time usage) : Hadoop querying tool”
• Restart and your Ubuntu is installed on VM.
Installing Hadoop
• Download Hadoop tar.gz
• You can download it from here http://www.apache.org/dyn/closer.cgi/hadoop/common/
Or you can google it and get a link . (My downloaded zip file was near 60 Mb).
• Create a new folder /home/hadoop
• Move the file hadoop-1.2.1.tar.gz to the folder /home/hadoop
• Open terminal and type cd /home/hadoop
• Extract the folder by typing tar xzf hadoop*tar.gz
Installing Java
Download these two files from this link
http://www.oracle.com/technetwork/java/javase/downloads/java-archive-downloads-javase7-
521261.html
1.) jdk-7u40-linux-x64.tar (aprox 131 Mb) 2.) jre-7u40-linux-x64.tar (aprox 46 MB)
** Note – Download for only Linux 64 bit version.**
Open terminal and paste following commands
• sudo apt-get purge openjdk-\*
• sudo mkdir -p /usr/local/java
• cd downloads (downloads = the folder where your java files are downloaded)
• sudo cp -r jdk-*.tar.gz /usr/local/java (moving jdk to /usr/local/java)
• sudo cp -r jre-*.tar.gz /usr/local/java (moving jre to /usr/local/java)
• cd /usr/local/java
• sudo tar xvzf jdk*.tar.gz (extracting jdk)
• sudo tar xvzf jre*.tar.gz (extracting jre)
Setting variables
• sudo gedit /etc/profile
Paste the following lines at the end of file and SAVE it.
JAVA_HOME=/usr/local/java/jdk1.7.0_40
PATH=$PATH:$JAVA_HOME/bin
JRE_HOME=/usr/local/java/jre1.7.0_40
PATH=$PATH:$JRE_HOME/bin
HADOOP_INSTALL=/home/hadoop/Hadoop/hadoop-1.2.1
PATH=$PATH:$HADOOP_INSTALL/bin
export JAVA_HOME
export JRE_HOME
export PATH
Again type or paste the following commands in terminal one by one
• sudo update-alternatives --install "/usr/bin/java" "java" "/usr/local/java/jre1.7.0_40/bin/java"
1
• sudo update-alternatives --install "/usr/bin/javac" "javac"
"/usr/local/java/jdk1.7.0_40/bin/javac" 1
• sudo update-alternatives --install "/usr/bin/javaws" "javaws"
"/usr/local/java/jre1.7.0_40/bin/javaws" 1
• sudo update-alternatives --set java /usr/local/java/jre1.7.0_40/bin/java
• sudo update-alternatives --set javac /usr/local/java/jdk1.7.0_40/bin/javac
• sudo update-alternatives --set javaws /usr/local/java/jre1.7.0_40/bin/javaws
Update the profile by typing this command.
• . /etc/profile
Installing Pseudo Distribution Mode
Open terminal and run the below commands
• sudo apt-get install ssh (to install ssh)
• sudo apt-get install rsync
Go to hadoop folder -- >conf -- > core-site.xml
Open the core-site.xml file and paste the following code in it. (Delete the lines which are already
written)
<configuration>
<property>
<name>fs.default.name</name>
<value>hdfs://localhost:9000</value>
</property>
</configuration>

“Created for Udemy course: Hive to ADVANCE Hive (Real time usage) : Hadoop querying tool”
Open hdfs-site.xml and paste below lines. ( Delete the lines which are already written)
<configuration>
<property>
<name>dfs.replication</name>
<value>1</value>
</property>
</configuration>
Open mapred-site.xml and paste below lines. ( Delete the lines which are already written)
<configuration>
<property>
<name>mapred.job.tracker</name>
<value>localhost:9001</value>
</property>
</configuration>
Open hadoop-env.sh and paste below line
** Do not delete any other line,Just paste it anywhere in the file**
export JAVA_HOME=/usr/local/java/jdk1.7.0_40
Setup password less ssh connectivity by:
• ssh-keygen -t dsa -P '' -f ~/.ssh/id_dsa
• cat ~/.ssh/id_dsa.pub >> ~/.ssh/authorized_keys
Confirm the password less connectivity by typing below command
• ssh localhost
Format the namenode by
• bin/hadoop namenode –format
Start the all the demons:
• bin/start–all.sh
Congratulations ! Your hadoop has been setup.
Installing Hive
Click on link https://archive.apache.org/dist/hive/hive-0.14.0/ .
Download apache-hive-0.14.0-bin.tar ( 77 MB). Save and extract it.
Open terminal and run below commands.
• cd /usr/lib/
• sudo mkdir hive
• cd Downloads (downloads = where our hive is extracted)
• sudo mv apache-hive-0.14.0-bin /usr/lib/hive
• cd (come out to base directory)
• sudo gedit /etc/profile
Copy and paste the following lines at end of the file
# Set HIVE_HOME
export HIVE_HOME="/usr/lib/hive/apache-hive-0.14.0-bin"
PATH=$PATH:$HIVE_HOME/bin
export PATH
• Run command . /etc/profile (Update the profile)
Setting HADOOP_PATH in HIVE config.sh
• cd /usr/lib/hive/apache-hive-0.14.0-bin/bin ( you can go via GUI also)
• sudo gedit hive-config.sh
Write the below command at the end of file.
export HADOOP_HOME=/home/<username>/hadoop/hadoop-1.2.1 (writing the path where hadoop
folder is located)
Create Hive directories within HDFS, Open Hadoop terminal and type
• bin/hadoop fs -mkdir /usr/hive/warehouse
Setting READ/WRITE permission for table
• bin/ hadoop fs -chmod 777 /usr/hive/warehouse
Your Hive got installed.
Launch hive shell by first going to hadoop shell and then type hive there.
Note** Some of the users may encounter this error
After launching hive shell for first time you may get an error as shown in screenshot.

“Created for Udemy course: Hive to ADVANCE Hive (Real time usage) : Hadoop querying tool”
Resolution:
Type hive again and 1 more error will come
Put command bin/hadoop fs -chmod 777 /tmp/hive
Now run the hive shell, It will work now.
Important: After every shut down of your system and running Hadoop again you have to follow these
steps.
1. Format the namenode by bin/hadoop namenode –format
2. Start the daemons by bin/start–all.sh
3. Launch hive.
