Manufacturing Web App Guide
Manufacturing%20WebApp%20Guide
Manufacturing%20WebApp%20Guide
User Manual:
Open the PDF directly: View PDF ![]() .
.
Page Count: 9

Inventory Management Portal
Version
Status
Date
1.0
Draft
13/06/2018
P a g e 1 | 8
CONTENTS
1 INTRODUCTION……………………………………………..………………………………………..2
2 DROPDOWN MANAGEMENT ................................................................................................4
3 STEPS TO BE PERFORM ......................................................................................................6
P a g e 2 | 8
Inventory Management Portal
Introduction
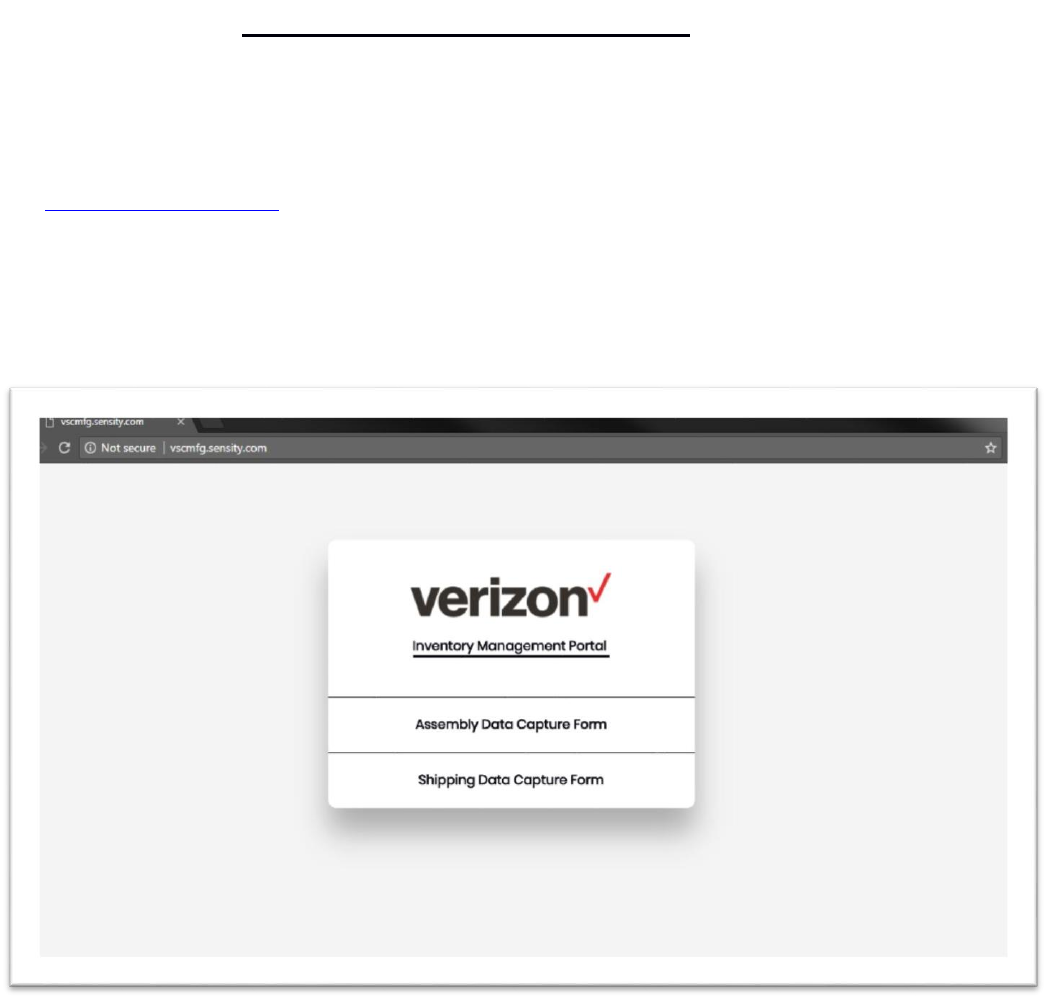
URL: http://vscmfg.sensity.com
Above “Inventory Management Portal” URL first open welcome page, which contains link of “Assembly
Data Capture Form” and “Shipping Data Capture Form”.
Welcome Page:-
Click on “Assembly Data Capture Form”, It will open Assembly Data Capture Form. Using this user can
add product details to system.
Click on “Shipping Data Capture Form”, It will open Shipping Data Capture Form. Using this user can
update shipping details to system.
P a g e 3 | 8
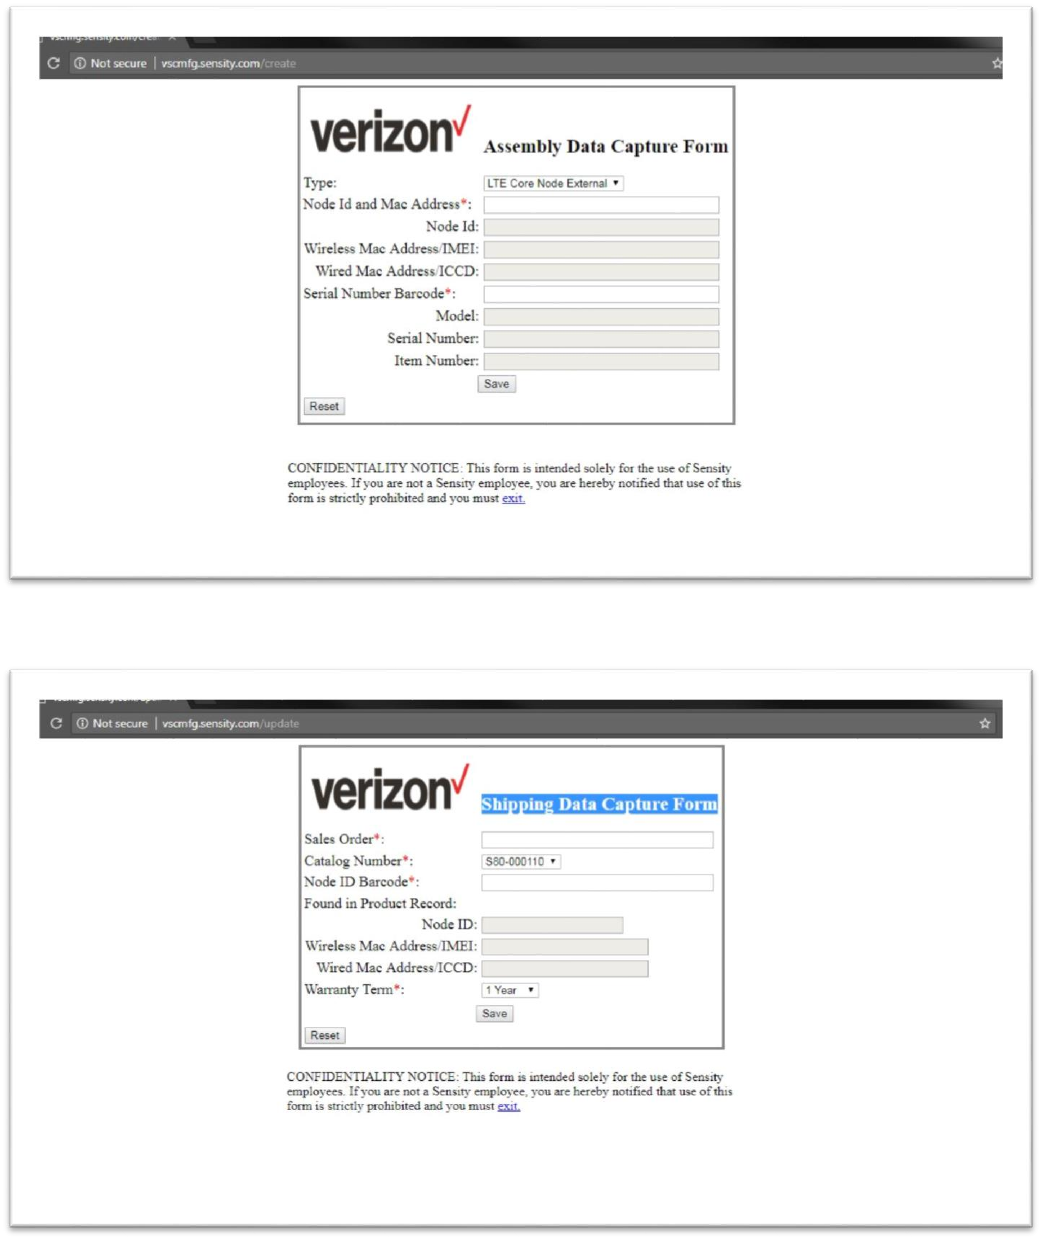
Assembly Data Capture Form:-
Shipping Data Capture Form:-
P a g e 4 | 8
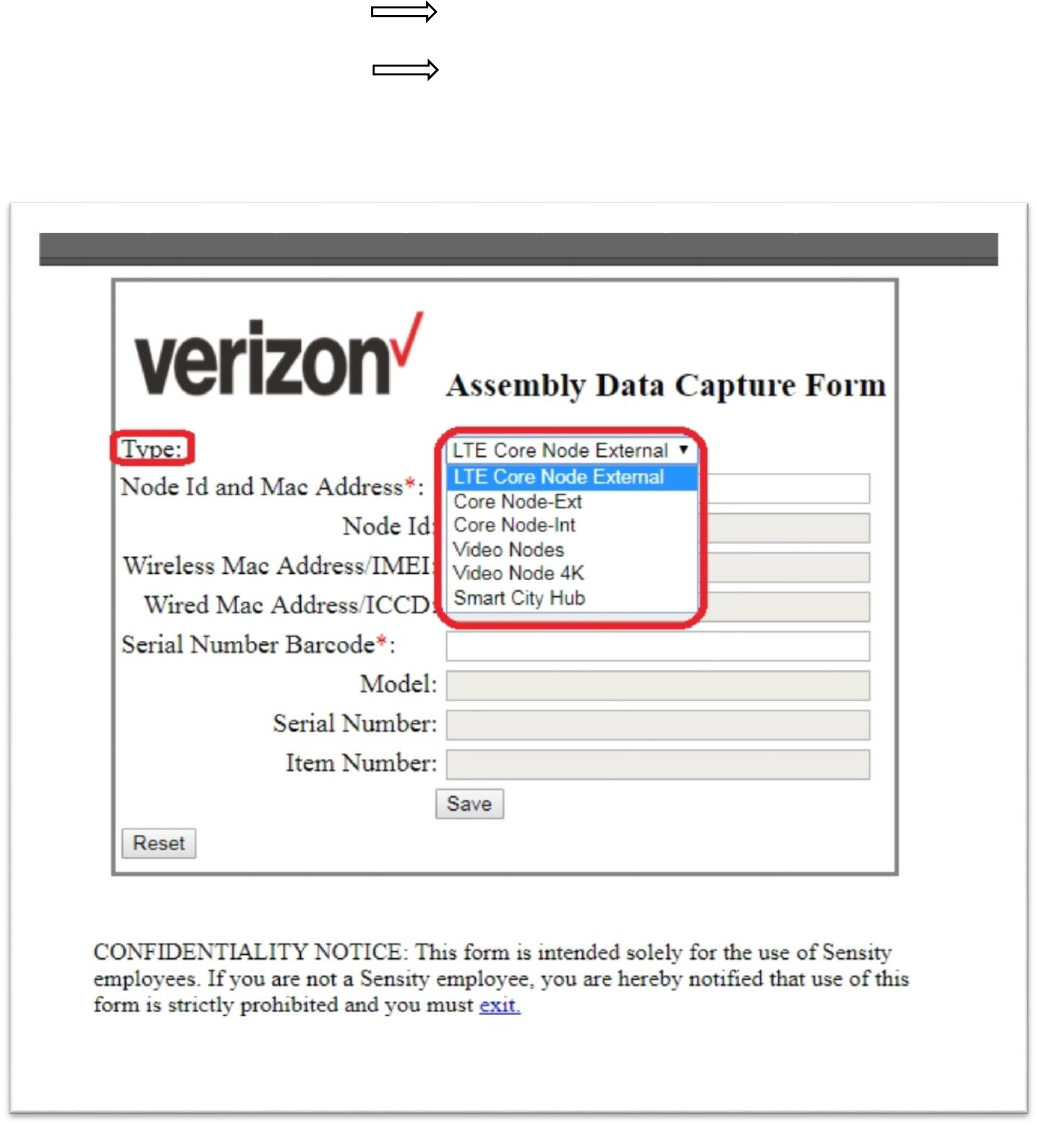
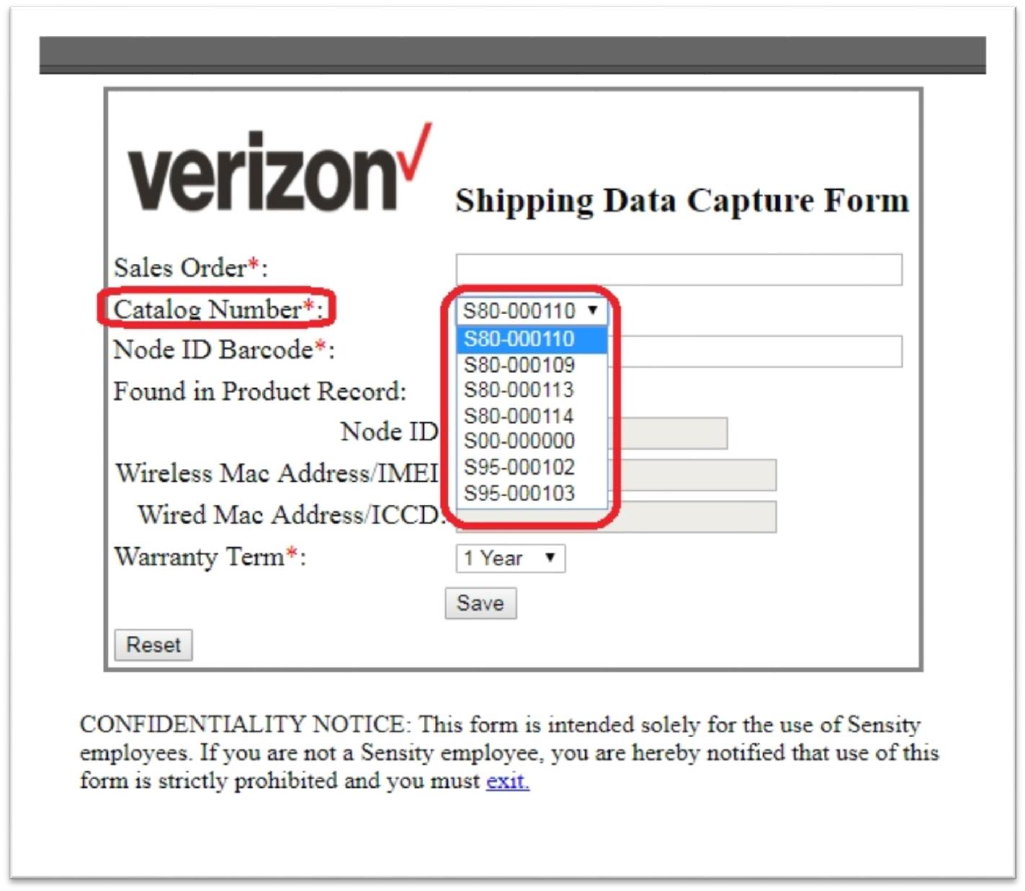
Dropdown Management.
In this portal, you can add/update/delete dropdown items. There is two-dropdown list, which can
modified using instructed steps.
i. Assembly Data Capture Form “Type” Dropdown.
ii. Shipping Data Capture Form “Catalog Number” Dropdown.
“Type” Dropdown:-
P a g e 5 | 8
“Catalog Number” Dropdown:-
P a g e 6 | 8
Steps to be perform.
Above both dropdown values comes from their respective text files from server. Therefore, we need to
change that text files in case of any change required in this dropdowns.
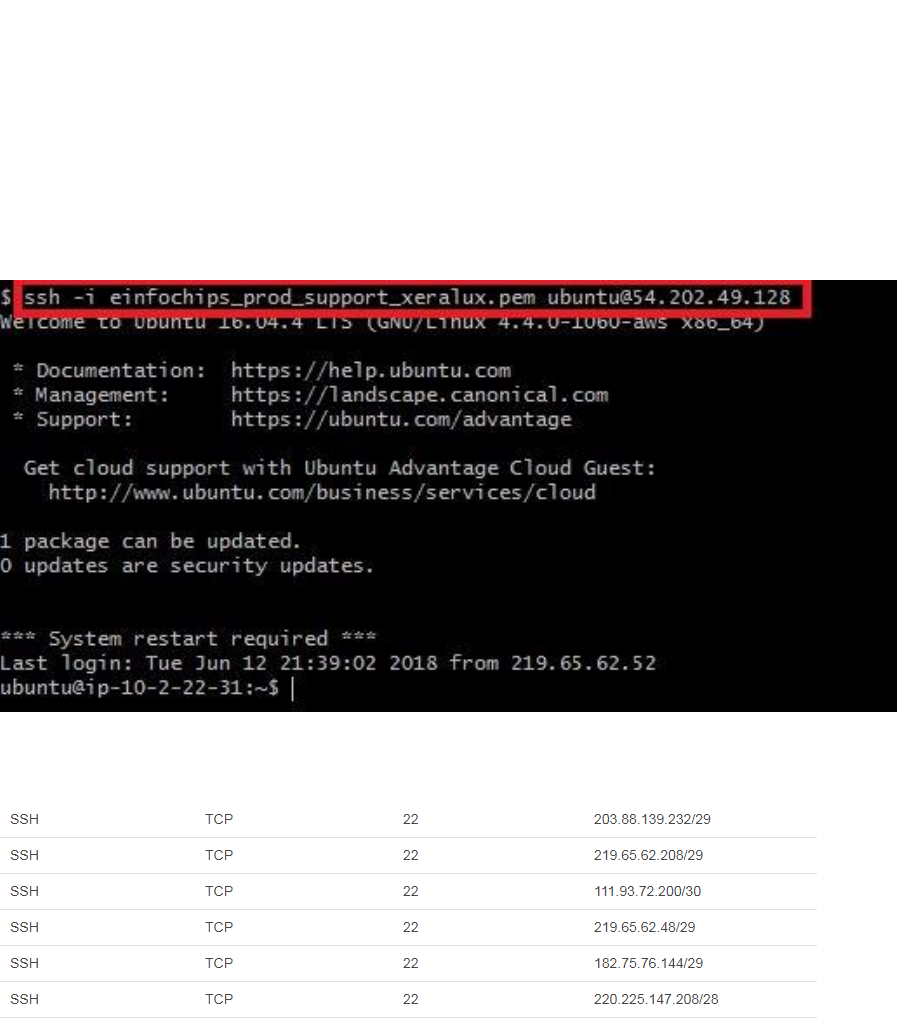
1) Login into AWS Server :-
First, we need to login to the aws server via SSH where our application deployed using its
respective key pair.
Instance IP: 54.202.49.128
Keypair Name: einfochips_prod_support_xeralux
i. Open the terminal
ii. Change location to the path where key “einfochips_prod_support_xeralux” is stored.
iii. Execute Command:
“ssh -i einfochips_prod_support_xeralux.pem ubuntu@54.202.49.128”
Screen Shot:-
NOTE: You can only able to SSH into server only if your network’s IP address or CIDR block is
registered on server’s inbound rule of “Security Group” settings.

P a g e 7 | 8
If you want to access this servers from your location than you need to add your IP address in
Security Group for Port 22 with SSH Service for TCP with your <<IP.Address>>
(For this process, you can connect CloudOps Team or Einfochips CloudOps Support)
2) Change Location:-
Then we need to change location of your working directory to the location where dropdown’s
options file stored.
Execute command: “cd source_code/JiraAPI/Scripts/static/”
Screen Shot:-
3) Identify File:-
Then we need to identify respective text file for specific dropdown’s options.
Execute “ls” command to list all files in current directory.
Screen Shot:-
File with name “AssemblyDataCaptureDropdownMenu.txt” is for “Type” dropdown of
“Assembly Data Capture Form”
File with name “ShippingDataCaptureDropDownMenu.txt” is for “Catalog Number” dropdown
of “Shipping Data Capture Form”
4) Change file content:-
Now if we need to change file content then we can do it by any file editor (Ex. Vi/Nano editor).
Here are using Nano editor to demonstrate.
Execute nano with respective file name (Ex. nano AssemblyDataCaptureDropdownMenu.txt)

P a g e 8 | 8
Screen Shot:-
This will open file for editing. Now we can change list of data as per our requirements.
Screen Shot:-
5) Safely Exit:-
Now Execute “exit” command for avoid any accidental changes on running server.
6) Check the reflections on UI :
Now you can find all this changes to UI dropdown.
