Map Nav 1.5.0 Operation Manual
User Manual:
Open the PDF directly: View PDF ![]() .
.
Page Count: 16
Thank you for purchasing MapNav! We have made a great effort to provide you with a
powerful and easy to use geolocation engine and maps implementation for Unity, including
GPS navigation, 2D/3D content integration and map/camera controls.
This manual will guide you through each and every step necessary to start building your
location-based app or game. Please also have a look to the included Demo Scenes where you
can find working examples of basic MapNav configurations and check the inline comments of
the included scripts for additional information.
TABLE OF CONTENTS
GETTING STARTED
To start using MapNav you will first need to introduce two basic objects in your scene: a map
(usually a plane containing the mapnav.cs script) and a player (user visualization). In the first
case, we highly recommend using the “Map” object included in the MapNav's prefabs folder
(/MAPNAV/Prefabs). This map object is ready to use and includes all relevant scripts
attached. As a player visualization you can also use one of the prefabs provided (2D and 3D
pointer), but if you would like to use your own (2d or 3d model, animated character, etc.) this
is as easy as setting its Tag property to “Player”. MapNav will then automatically recognize it
as the main actor and set all the navigation system around it.

Note that the provided map object uses a diffuse shader for its main material, so any
downloaded texture might appear considerably dark unless some kind of light source is being
used in your scene (e.g. directional light). The reason for this is to enable the rendering of
shadows from 3d objects located on the map, but if you are planning a 2D app/game you might
want to use the “unlit/texture” shader instead. Finally, you will need to get a valid AppKey
from MapQuest (or your alternative maps provider) and use it in the MapNav main inspector
(see “Maps AppKey” on next page).
MAPS IMPLEMENTATION
By default, MapNav uses the MapQuest Open Static Maps Service and OpenStreetMap* data
to obtain the map tile for your current location. This texture is loaded into the Map object
which is automatically scaled according to the tile size and zoom level, so world distances
remain constant in your scene. Once the texture is no longer needed, it is properly destroyed
to avoid memory leaks. However, since version 1.3 you can also disable the map and still use
the MapNav geolocation engine with your own terrain and custom scenery. This is great, for
example, if you are planning to build a “parallel world” type of game that can be navigated via
GPS with optional AR visualizations.
Alternatively, if you would like to use maps from another tiles provider (e.g. Google Static
Maps) you can easily do so by modifying the corresponding url for the http call in the
mapnav.cs script. The new url should be compatible with the MapNav geolocation engine as
long as it uses the center (lat,lon), size (e.g. 640X640) and zoom syntax to retrieve images from
a map tiles server. Also, you might need to populate the maptype array with the new map
layers options available from your tiles provider (please see the Maptype property below and
visit http://recursivearts.com/mapnav/FAQ.html for additional information).
On early versions, MapNav used a default 1:100 map scale (1 unit in Unity world space equaled
100 m in the real physical world at latitude zero), however, since version 1.4 any map scale
value from 1:100 up to 1:1 can be selected via the new inspector option. Please read below for
further details.
Please make sure you read and meet the terms of service and usage limitations of any maps
provider you intend to implement. The MapQuest Platform Terms of Use are available at
https://developer.mapquest.com/legal.
MAIN INSPECTOR PANEL
The core functionality of our geolocation engine is provided by the MapNav script which is
included in the “Map” prefab. If you are using any other object to render the map, please make
sure that this script (/MAPNAV/Scripts/MapNav.cs) is attached to it. All the options and
parameters can then be accessed from the custom Inspector Panel (Figure 1)
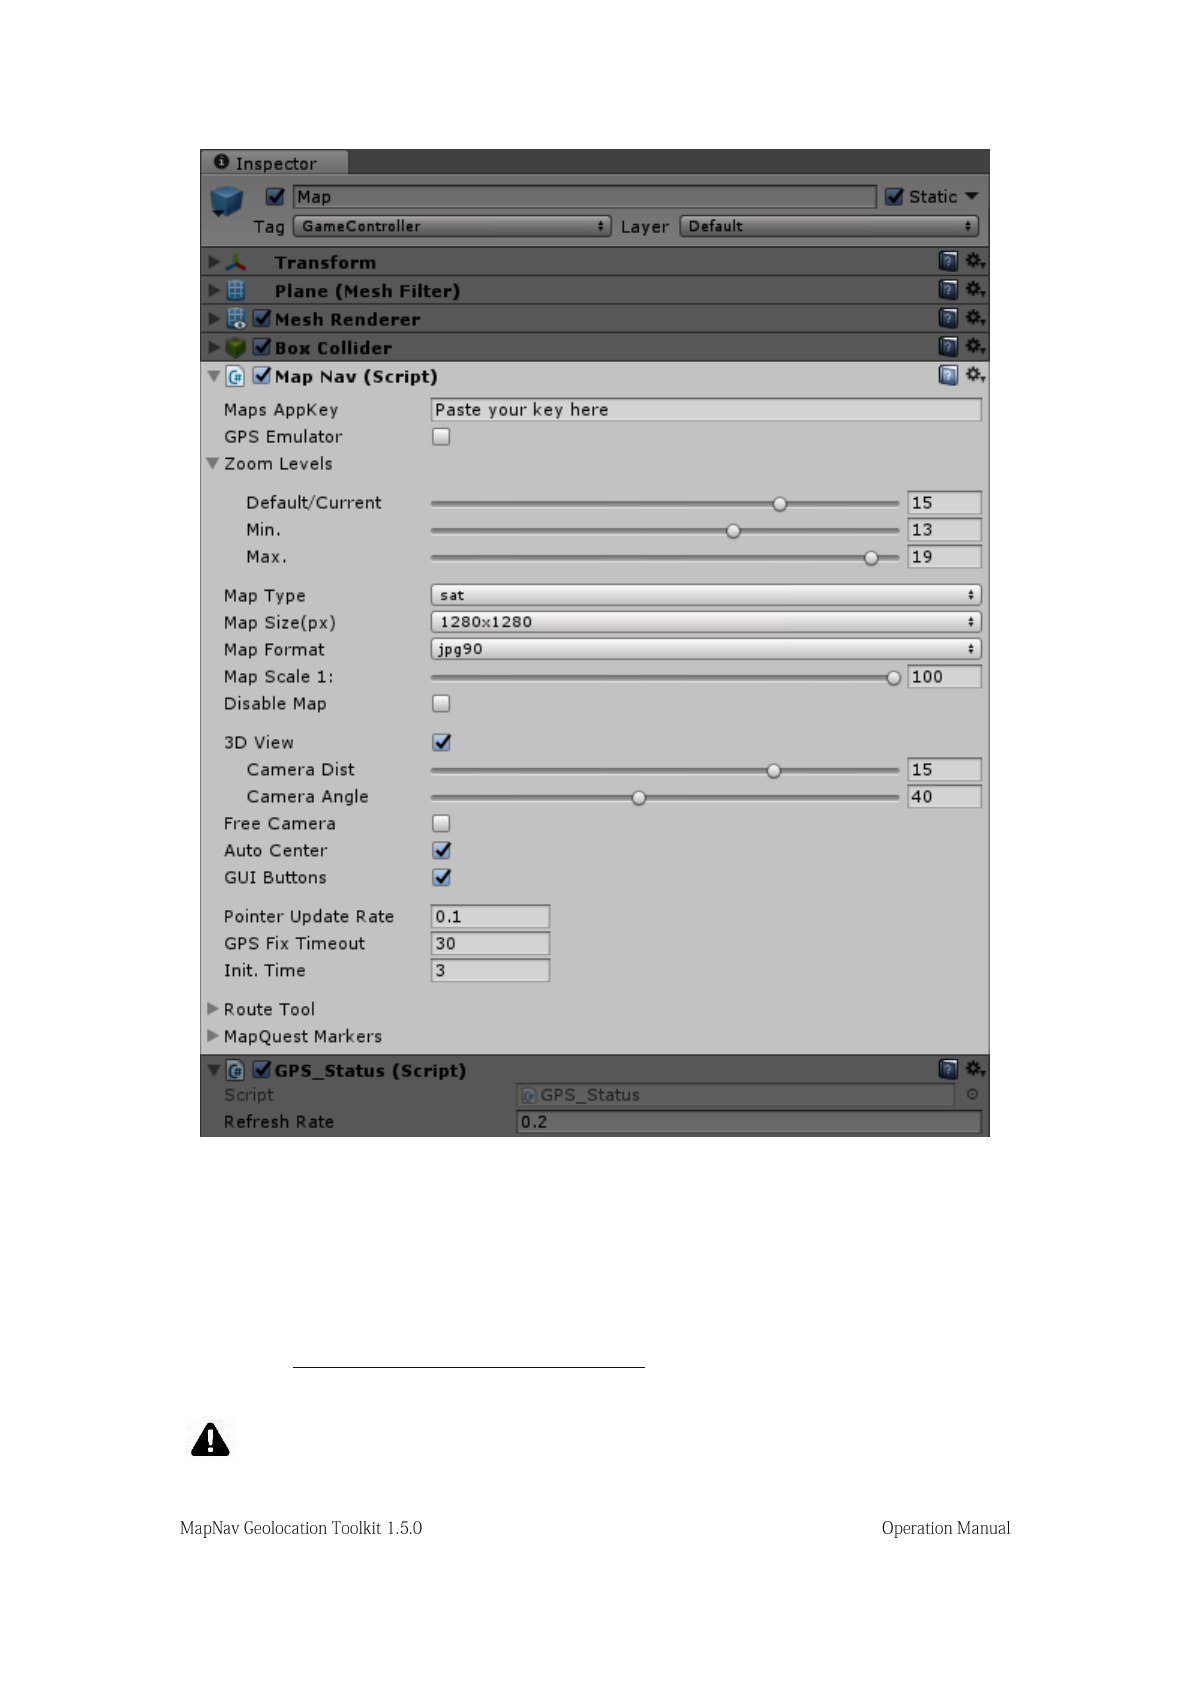
Figure 1.MapNav Inspector (3D View)
Maps AppKey. This field allows you to enter an AppKey code (API key) so your application
can be identified by the maps servers. This is required in order to use MapQuest Open Static
Maps and other maps services (e.g. Google Maps).
App Keys can be requested from your MapQuest developer account. To create a new account
please visit: https://developer.mapquest.com/plans
Please obtain a unique AppKey before you start using MapNav to avoid sharing the
default sample key with other developers and reaching possible usage limitations.

GPS Emulator. Check this box if you are building to PC/Mac standalone or using Unity
Editor. A GPS Emulator will be enabled to simulate location tracking.
If building for mobile devices (Android/iOS) please disable this option just before you build
your project. The real GPS sensor in your device will then be used.
Zoom Levels. Use these controls to set the default, minimum and maximum operative zoom
levels for your application. Note that, even if some maps providers accept zoom levels up to
20, this level of detail might not be available in all geographical areas or might differ depending
on the type of map used.
Map Type. This drop-down list includes all the possible map types that MapQuest Open Static
Maps currently offers, i.e. map, sat, hyb, light, and dark. Choose the one that better suits your
application. If you are using a different maps provider other than MapQuest, you can modify
this list by editing the values of the maptype (array) variable in the MapNav.cs and
MapNavInspector.cs scripts.
Map Size. Size (in pixels) for the map tile request. The resolution of the map on the screen will
directly depend on this setting and the available sizes are usually different for each maps
provider and license you are using. As an example, Google Static Maps has a maximum tile
size of 640x640 for its free license, although using their “scale” property this can be double
effectively up to 1280x1280. MapQuest offers tiles as large as 1920x1920, but their servers are
generally slower, so it is usually desirable to achieve a balance between download times and
image definition.
Map Format. Allows you to select a compression algorithm for the requested map image.
Available options are png, jpg90, jpg80 and jpg70. The png format delivers the best image quality
at the cost of larger file sizes and slower download times. On the other end, jpg70 offers the
highest compression rate and fastest download times with a slightly reduced image quality.
Map Scale. This setting defines the ratio between real world meters and Unity’s world units.
For instance, at 1:100 scale, every Unity world unit will correspond to 100 meters in the real
world. However, this is only true at the equator (0 degrees latitude), because of the distortion
introduced by the map projection as we move toward the poles. In order to measure distances
or scale 3D objects in a scene, such a distortion needs to be corrected by calculating the “scale
factor” for the current latitude:
factor = 1 / cos(latitude)
For example, at 60 degrees latitude and a map scale of 1:10, scale factor will be 2, so 1 Unity
world unit will correspond to 20 real world meters. This calculation is automatically performed
by the SetGeolocation.cs script when the option “Mercator Scale Distortion” is enabled (see
page 7 for details).

Disable Map. Tick this box if you do not need to display the base map. MapNav will also stop
calling the map tiles service. It has no effect over the geolocation engine as long as the map
game object (tagged as GameController) and the MapNav.cs script remain enabled.
3D-View. Enable this option if you are planning to add 3D objects on your map, so the camera
can be adjusted to allow a three-dimensional perspective view (distance and angle). If disabled
(2D-view), the camera is switched to orthographic projection and the orthographic size is
automatically set depending on the zoom level for an optimal map visualization.
In 3D-view, the camera position can be adjusted using the distance and angle parameters. This
distance is measured from the object tagged as “Player”. Please make sure that your camera is
also tagged as “MainCamera”.
Free Camera. By default this option is disabled, so the Main Camera will follow your player
(as a child), using the angle and distance settings mentioned earlier. However, enabling this
option, it is also possible to use a “free” camera with no constrains or implementing your own
custom camera control system. This is a 3D-view-only feature.
Auto Center. When enabled, the map texture will automatically be updated and the camera
centered on the new player's position if the following conditions are met:
2D mode: The player exits a pre-defined rectangle on the screen. Uses the
WorldToViewportPoint method and can be modified using the “rect” variable in
the MapNav.cs script.
3D mode: The player exits the box collider attached to the Map tile object. The
size of the collider can also be changed to set a different auto center boundary.
GUI Buttons. Activates a sample graphic user interface to control the following parameters:
maptype, zoom out, zoom in, refresh/center map, and info. The info button enables a GPS status
overlay showing geo-location data and console messages. This information will only be
available if the “GPS_Status script” (/MAPNAV/Scripts/GPS_Status.cs) is attached to the
Map object. Since version 1.5, the “InfoCanvas” prefab (/MAPNAV/Prefabs/InfoCanvas)
must also be included in the scene.
This GUI is only provided as a basic functional example. Please feel free to modify or extend
it according to your particular needs.
Pointer Update Rate (mobile only). This value sets how often the player's position will be
updated using the location data provided by the GPS sensor.
GPS Fix Timeout (mobile only). Maximum time in seconds before the user gets a warning to
check if location services are enabled. Allow at least 15-20 seconds so the GPS sensor (if
enabled) has enough time to get a GPS fix (it might take longer on some devices).
Init. Time (optional). An initialization time (delay) after a GPS fix has occurred and before
the map is displayed, in order to increase the accuracy of the location data (number of
satellites).
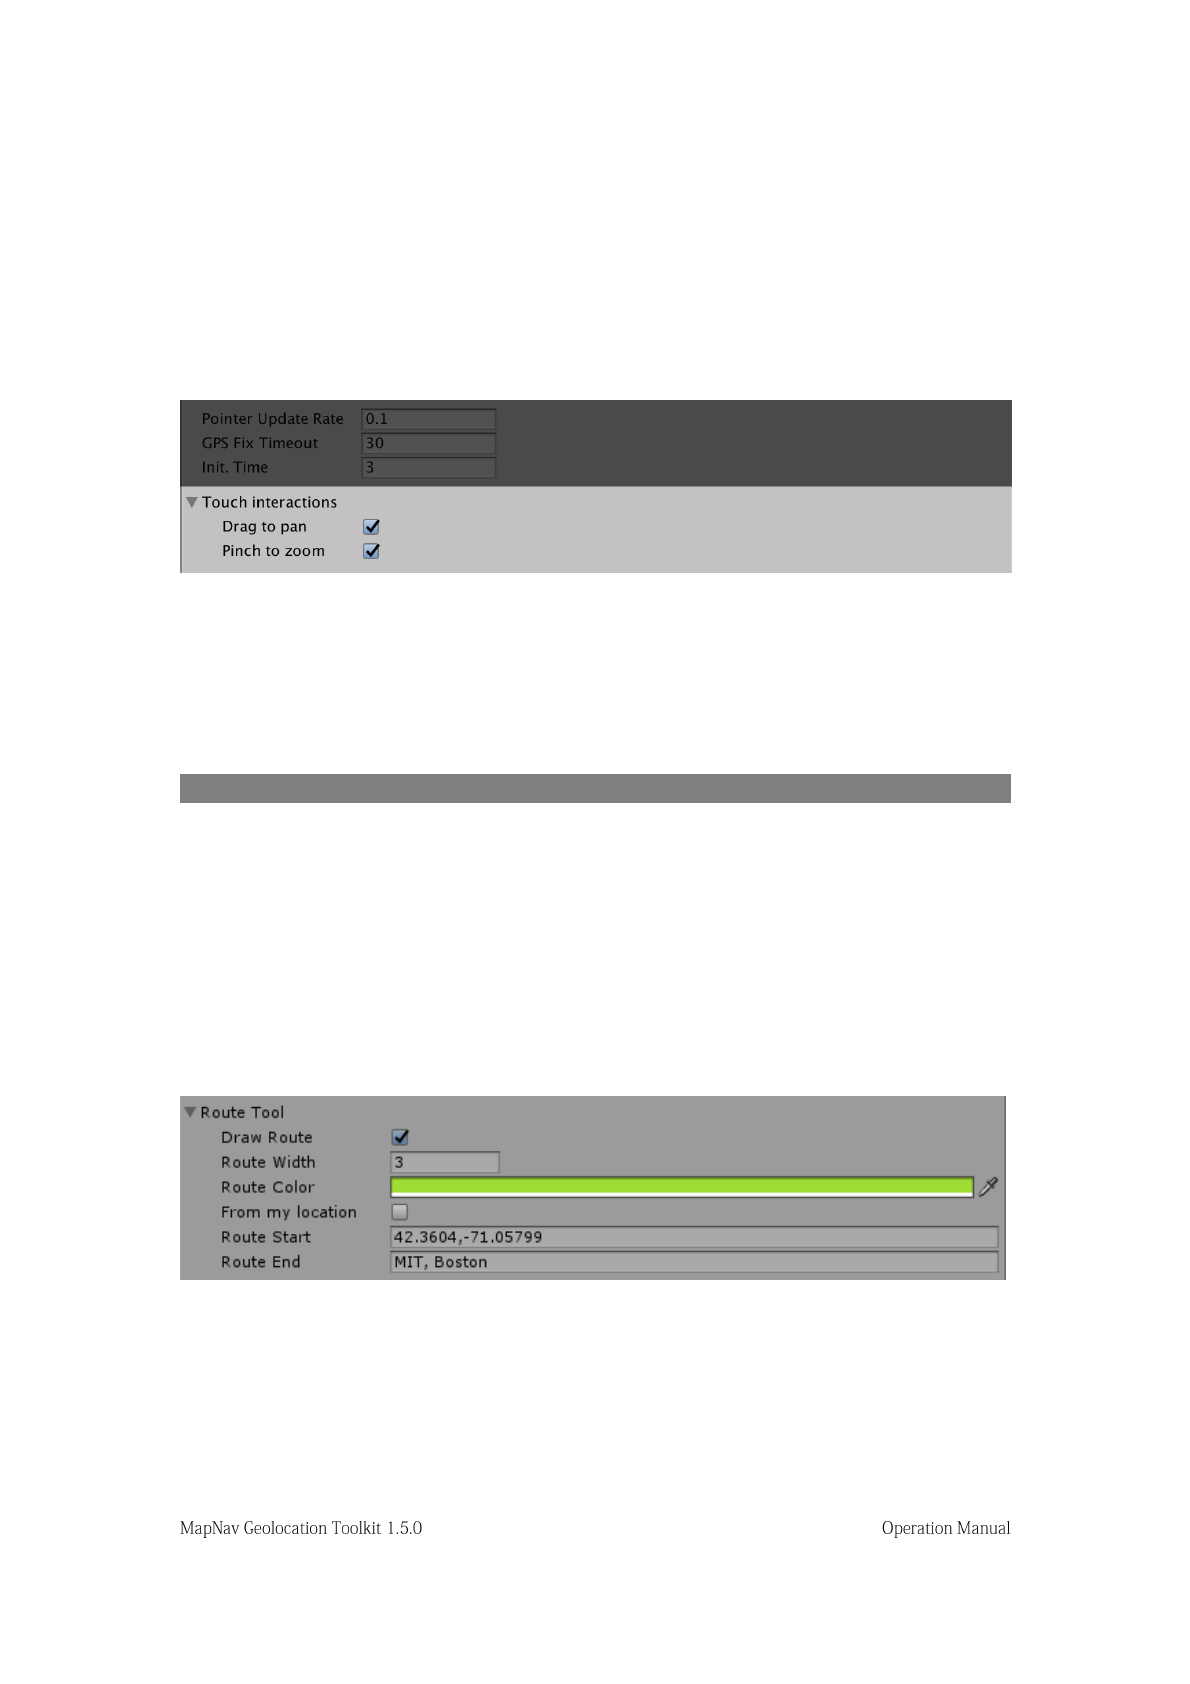
Touch Interactions (2D-view only). “Drag to Pan” and “Pinch to Zoom” options can be
individually activated when targeting touch screen enabled devices.
Figure 2. Touch Interactions (2D-View)
Route Tool. See next section below.
MapQuest Markers. See details below.
MAPQUEST ROUTES AND MARKERS
MapNav 1.5 introduces MapQuest native routes and markers as a simple and effective method
to display useful information. This method complements the existing geolocation tools in
MapNav (see page 10) and can therefore be combined together.
Drawing a MapQuest Route
Rendering Maquest native routes is now possible using the new Route Tool section of the main
MapNav inspector (Figure 3).
Figure 3. Route Tool
This tool will automatically add route parameters to our map queries so the corresponding path
is included in the returned image (Figure 4). Available parameters are self-explanatory,
however, note that the current user position can also be used as a starting point, instead of
providing an actual address or latitude, longitude pair. Simply tick the corresponding option
box ‘From my location’.
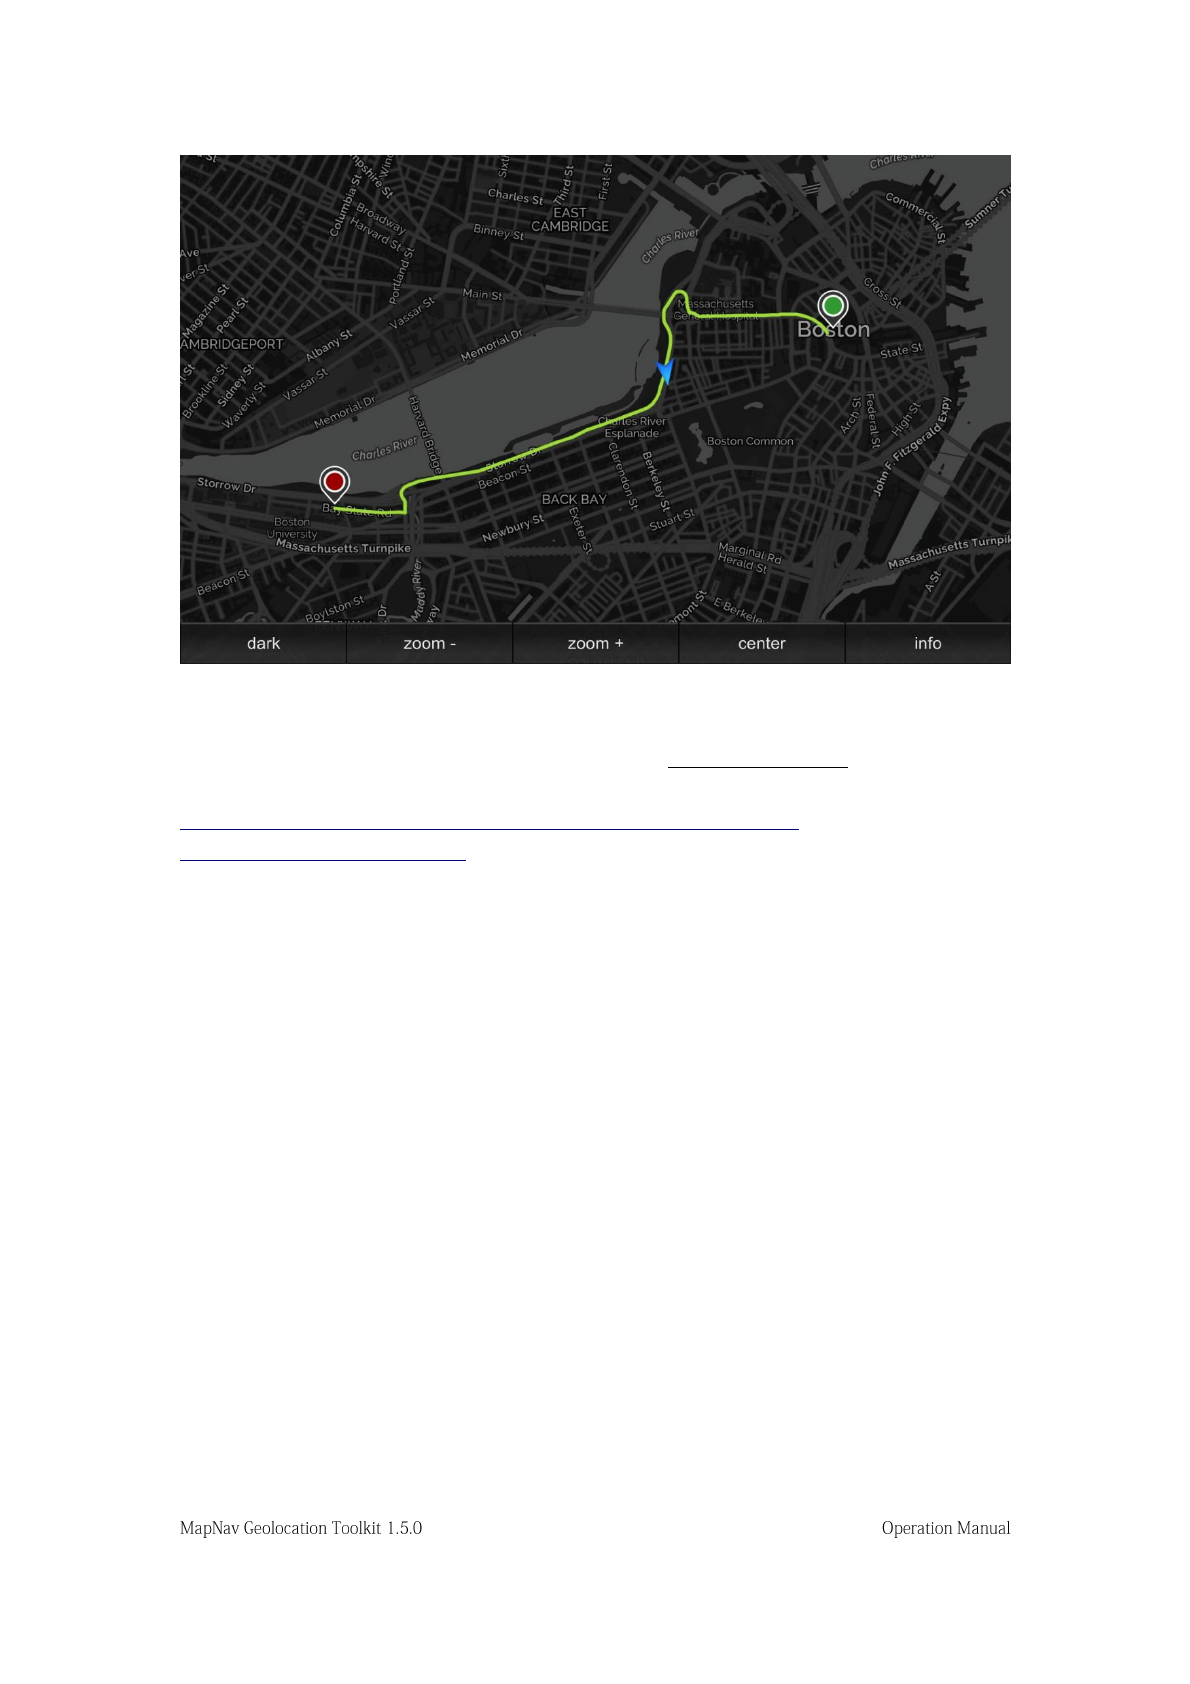
Figure 4. Resulting Route from A to B
When using addresses, please make sure you are using single-line addresses. For further
information and examples of single-line addressed please visit:
https://developer.mapquest.com/documentation/common/forming-
locations/#singleLineLocations
Adding MapQuest Markers
Similarly to drawing routes, we can also ask the MapQuest server to render native markers
onto our map. The number of markers to be included can be set by changing the size of the
MapQuest Markers array, either using the inspector or via script.
Each marker can be customized using the following customization parameters (Figure 5):
Name. You can type a name here to identify the current marker.
Latitude. Latitude position as decimal degrees.
Longitude. Longitude position as decimal degrees.
Type. Four marker types (shapes) can be used: marker (default), flag, via, and circle.
Size. Determines the size of the marker: small (Sm), medium (Md), or large (Lg).
Inner Color. Selects a color for the inside area of the marker.
Outer Color. Selects a color for the outside area/border of the marker.
Label. You can include up to five letters, numbers, and characters except for "-" and "."
(Characters will need to be URL escaped and letters will be capitalized). Not available for
‘Via’ type markers.
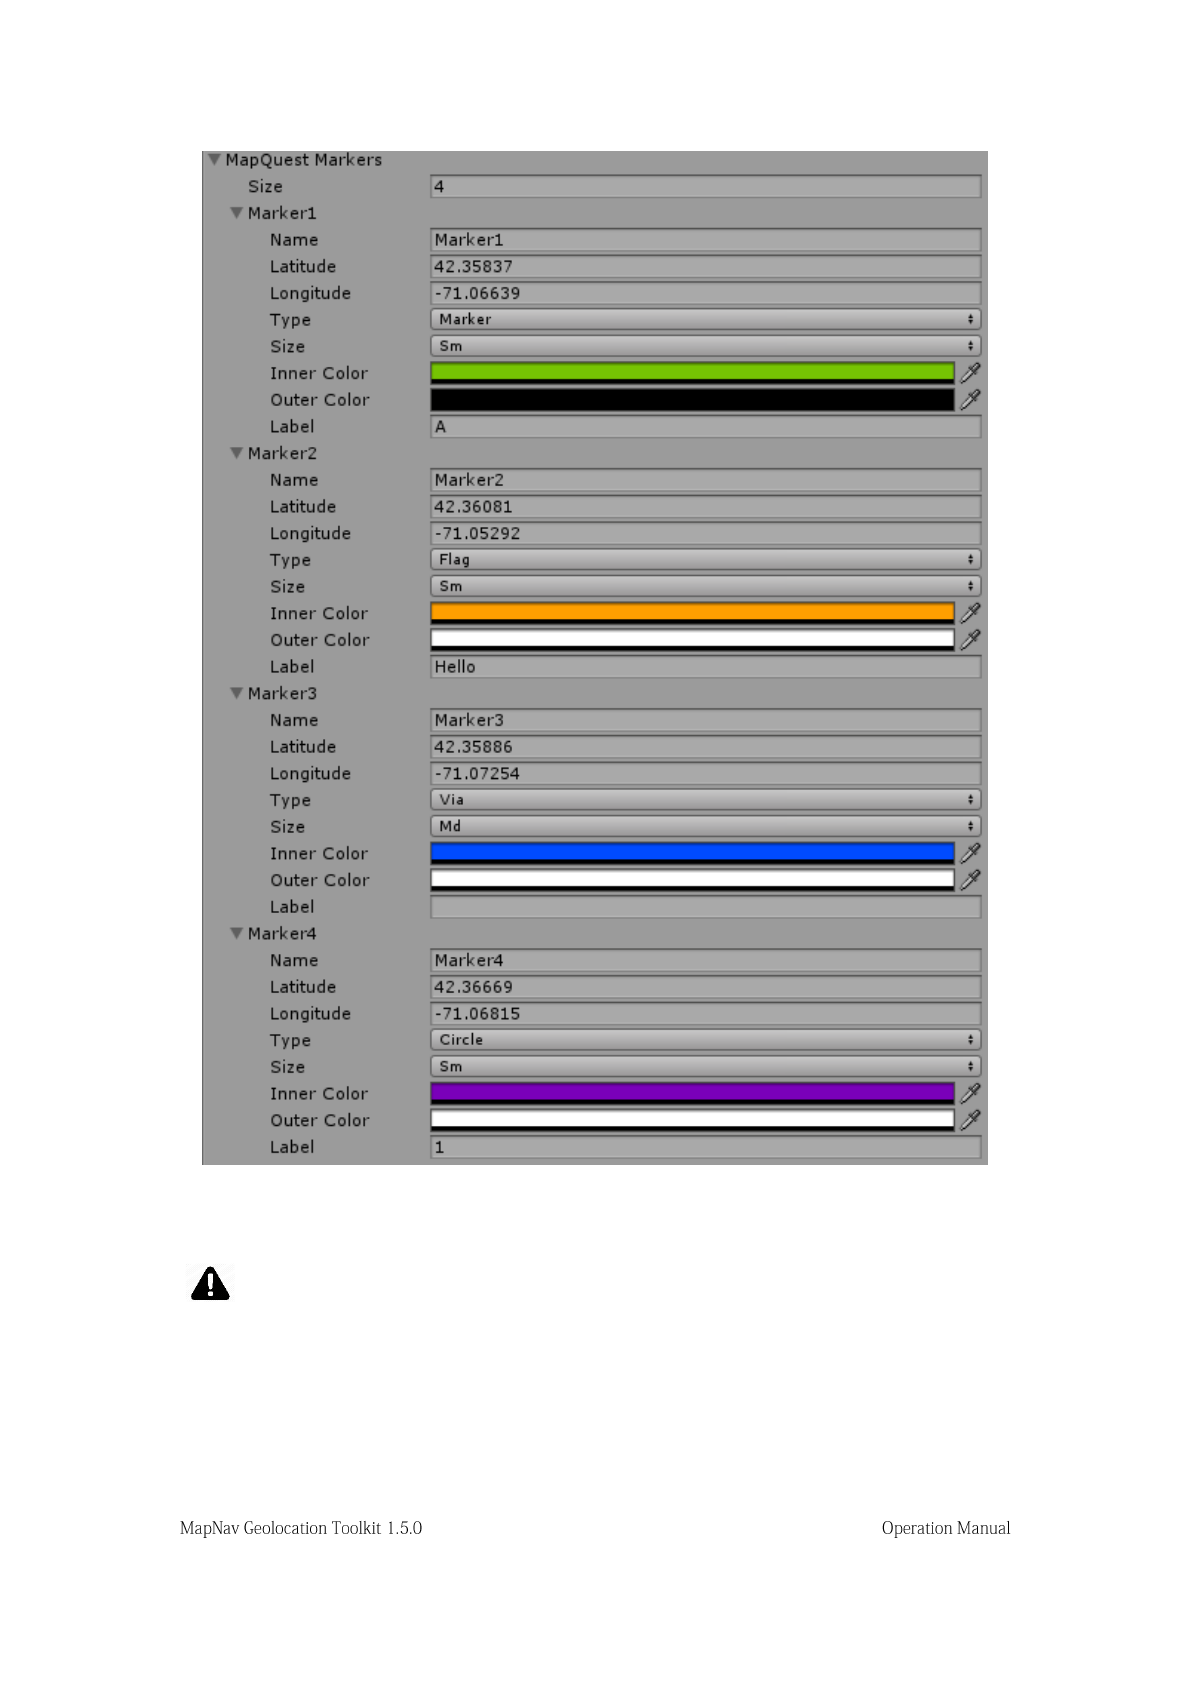
Figure 5. MapQuest Markers Customization Panel
If you using an alternative map provider other than MapQuest please contact us for
details on implementing native markers (e.g. Google Maps markers)
An example of map including MapQuest native markers is shown in Figure 6.
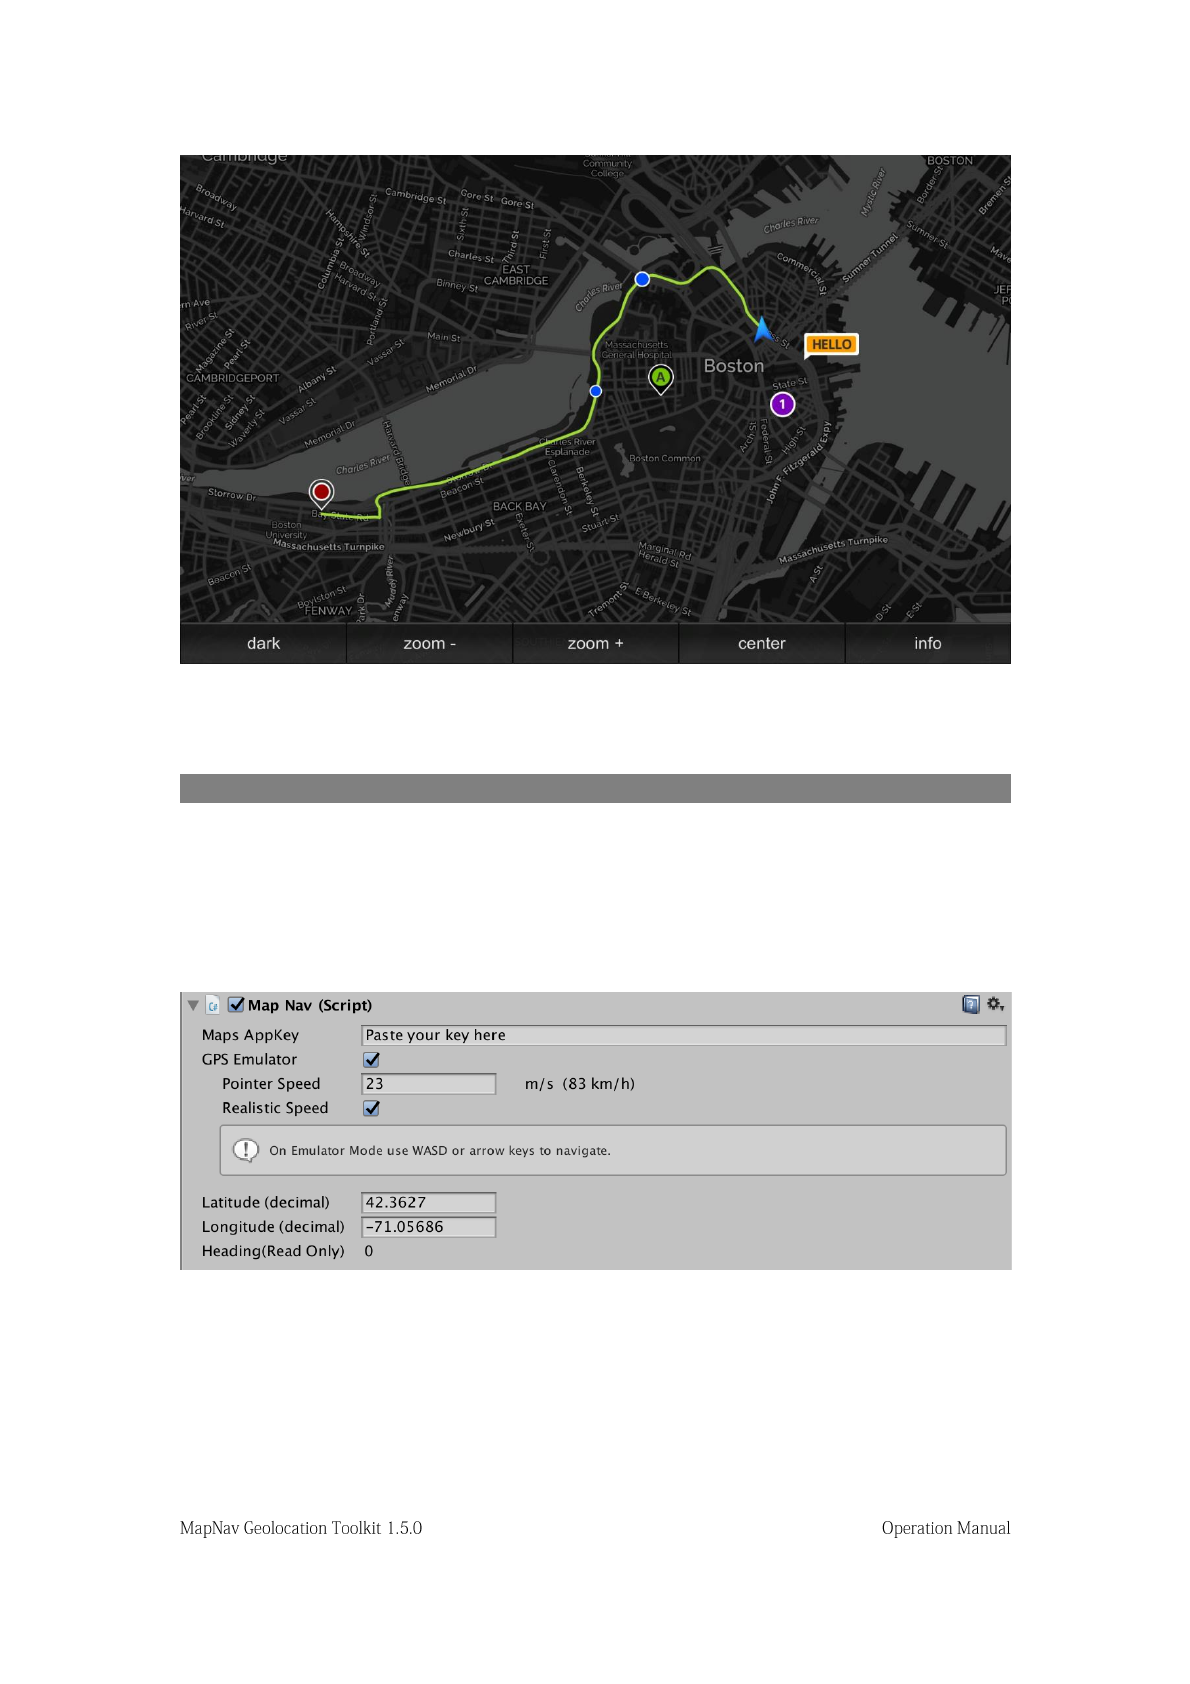
Figure 6. Map including MapQuest Native Markers and Route
USING THE GPS EMULATOR
The GPS emulator allows us to implement the MAPNAV navigation system even if the target
hardware/platform does not feature a GPS sensor (e.g. PC/MAC standalone). Therefore, the
user position and movement is simulated using the keyboard input (WASD and arrow keys),
and location data (latitude, longitude, etc.) is calculated according to our position on the map.
Figure 7. GPS Emulator
A number of additional options are shown in the inspector when the GPS Emulator is enabled:
Pointer Speed. This value sets how fast the player moves on the map when using the keyboard
input. Speed units are in m/s, but also displayed as km/h.
Realistic Speed. If disabled, the perceived pointer/player speed is independent of the selected
zoom level (unrealistic behavior). On the other hand, if this option is enabled, the player will
seem to move slower on the screen when the zoom level is lower, and faster when we zoom in
(realistic behavior).
Latitude/Longitude. When using the GPS Emulator you can provide initial Latitude and
Longitude values to set the location where your game/app will start. This fields will also read
the current user position as geographical coordinates (WGS84) while the game/app is running.
Heading (Read Only). The current user heading provided by the magnetometer sensor. When
the GPS emulator is enabled, it takes its value from the user's transform.eulerAngles.y.
Even if your target platform is mobile (Android, iOS or Windows Phone), the GPS Emulator
is also extremely useful while working in the Unity Editor, so you can geolocate your content
on the map. Just remember to disable the emulator mode before the final build, so the actual
GPS sensor in your mobile device can be used.
GEO-LOCATING 2D/3D GAME OBJECTS ON THE MAP
In order to populate the map with your own 3D or 2D content, simply drop any game object
into your scene and attach the GetGeolocation and SetGeolocation scripts to it.
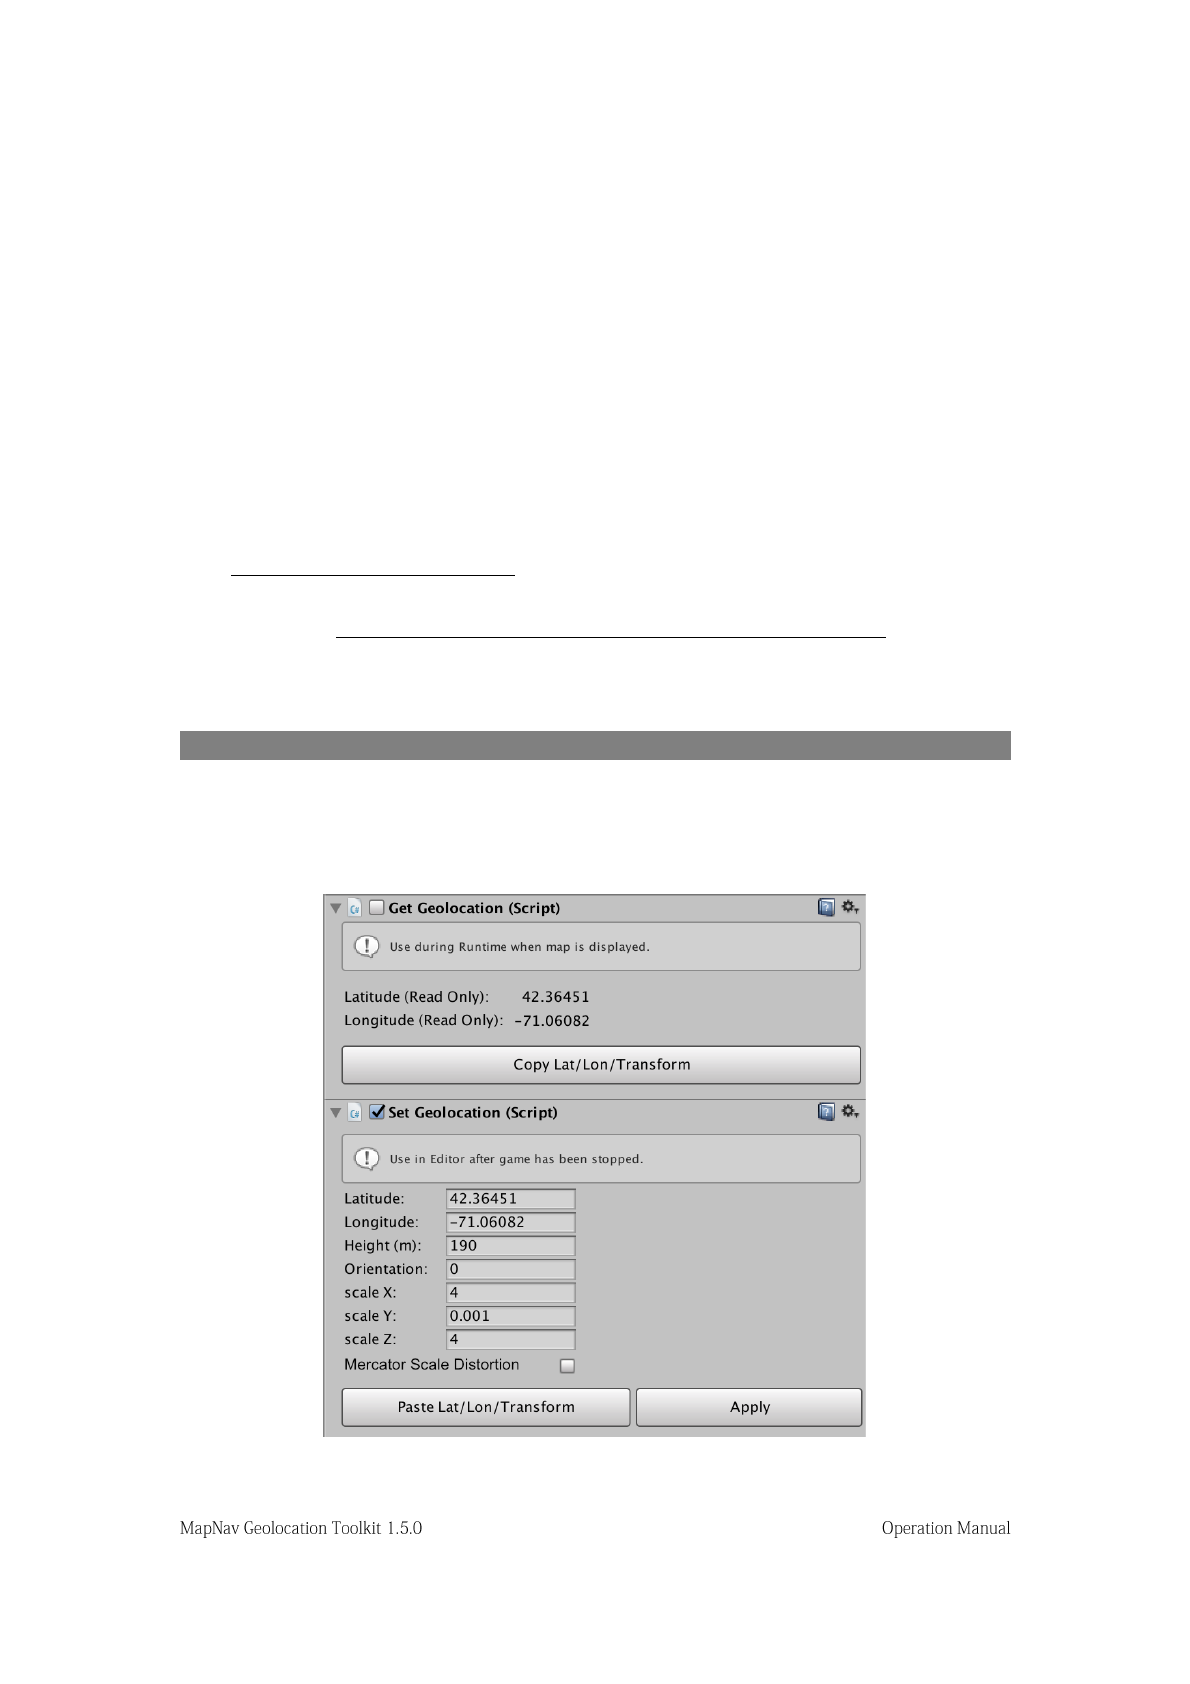
Figure 8. Geolocation of Game Object

The GetGeolocation script will allow you to adjust the position (x,y,z), orientation (y-axis
only) and scale of your objects on the map while the scene is running, and temporally store
these values for later use. This is necessary as the map texture for the current location can only
be visualized while the scene is playing and the Unity editor does not keep any changes made
during runtime.
After the scene is stopped, you can then use the SetGeolocation script to restore this data.
We can summarize this process in six simple steps:
Step 1. Drag a 2D/3D model into your scene and attach the GetGeolocation and
SetGeolocation scripts to it. Enable the GetGeolocation script and check that
SetGeolocation is disabled.
Step 2. Start playing the scene.
Step 3. Once the map is visible, adjust the scale, orientation and position of your game
object on the map and click on the “Copy Lat/Lon/Transform” button (GetGeolocation
inspector). The console will print a message when the data has been successfully copied.
Step 4. Stop playing the scene.
Step 5. Click on the “Paste Lat/Lon/Transform” button in the SetGeolocation inspector
and press “Apply” if you want to visualize the new values now while the scene is still
stopped.
Step 6. Disable or delete the GetGeolocation script, and make sure that the SetGeolocation
script is now enabled before you play the scene again. Everything should now be in the
right location, no matter what the initial location of the player is.
Alternatively, if you already know the latitude, longitude and orientation for a particular object,
you can also omit the GetGeolocation step and directly insert these values into the
SetGeolocation inspector. In such a case, you might want to enable the new Mercator Scale
Distortion option so your object’s scale is automatically adjusted to match the Mercator
projection scale factor corresponding to the selected latitude.
GEO-LOCATING DYNAMIC (ANIMATED) OBJECTS
It is also possible to geolocate non-static game objects using the Get/Set-Geolocation method
described in the previous section. An example of this can be found in the 3D Demo Scene
included with MapNav (/MAPNAV/Demo Scenes/3D Scene/MapNav_3D_Demo) where
the 3D bus model is animated to drive along a particular street. As you can see, the only
difference is that we have created an empty parent object for this animated object, so the
movement of our model is now relative to the position and orientation of its parent's transform.
Therefore, the GetGeolocation/SetGeolocation scripts can be used normally on the parent
object, ensuring that our animated model is perfectly positioned within that street.
FIXING THE ASPECT OF 2D OBJECTS
A frequently desirable feature of 2D content when displayed on an online map (e.g. markers
icons, labels, etc.), is the ability to maintain their aspect constant regardless of the selected
zoom level. We are using here the term ‘aspect’ to refer to the apparent size of the object (not
to be confused with ‘aspect radio’).
See the following MapNav screenshots as an example:
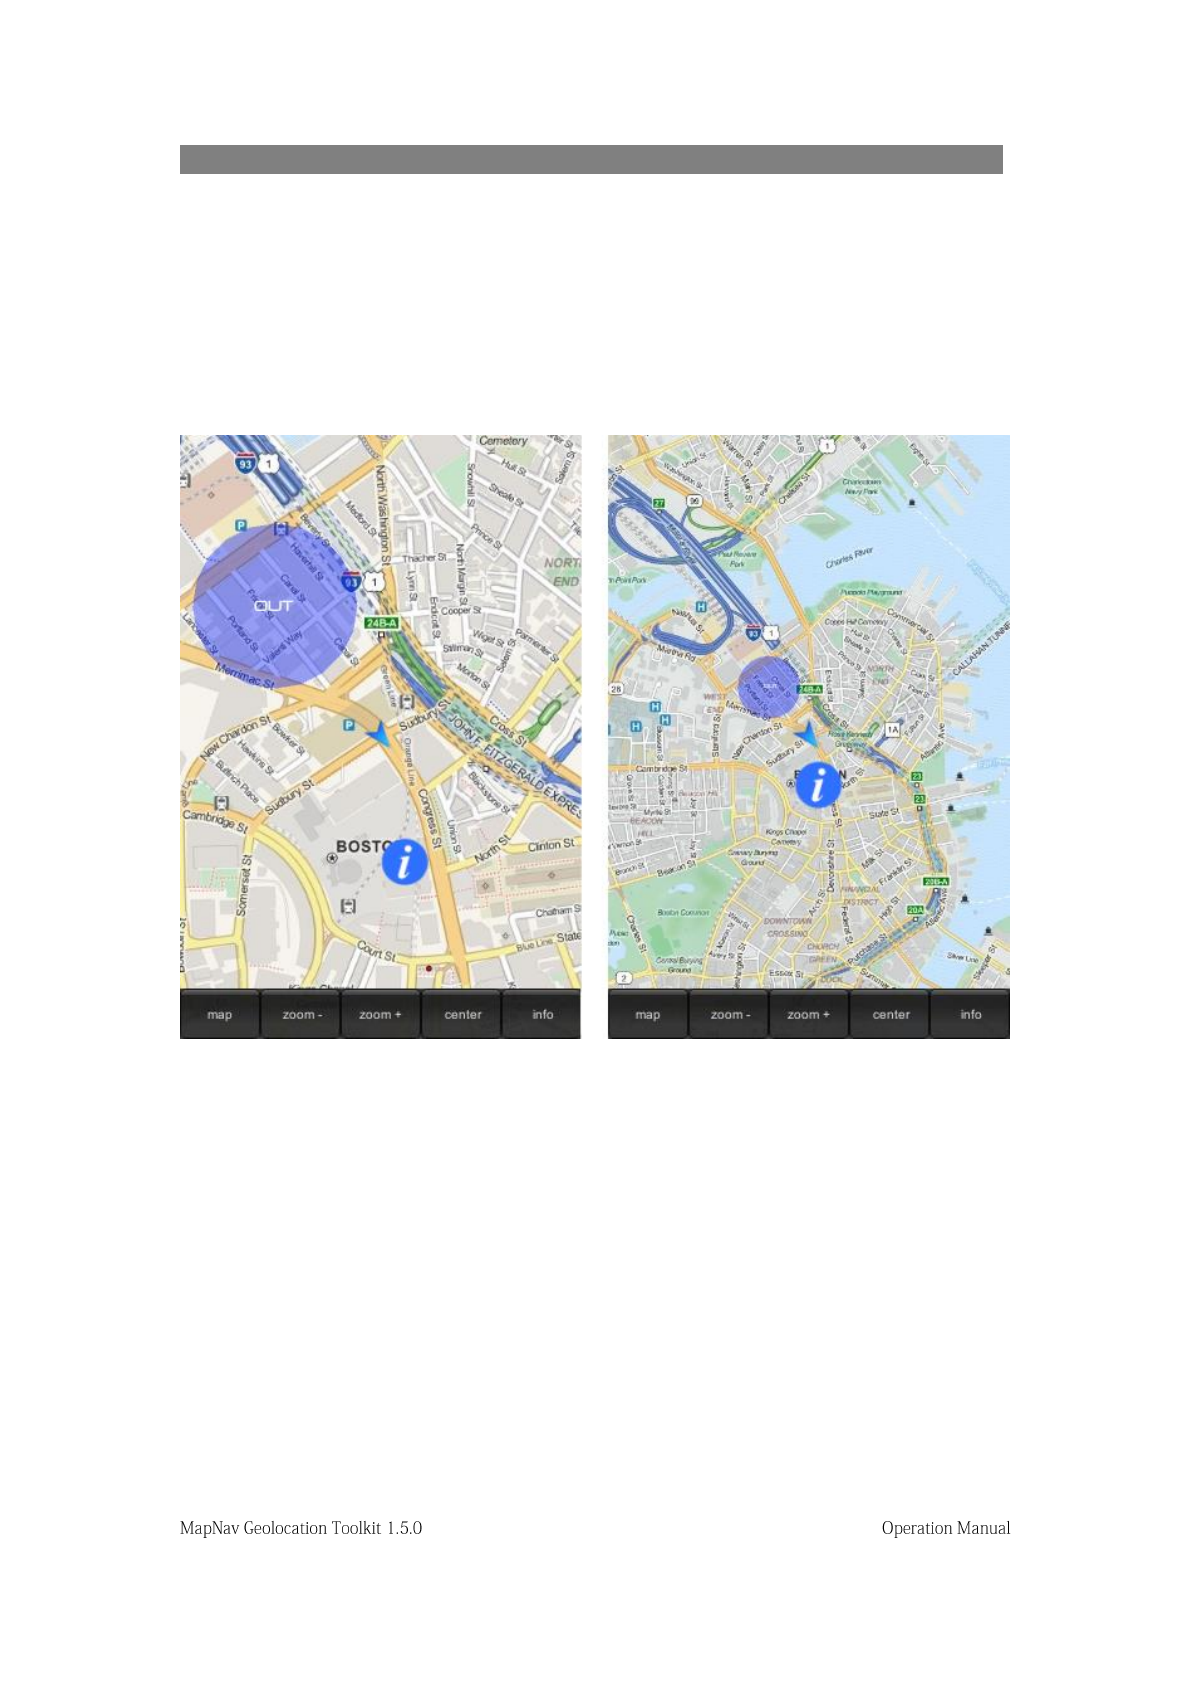
Figure 9. Fixing the size of a 2D game object regardless of zoom level
The image on the left has a higher zoom level than the image on the right, which shows a much
larger area of central Boston. However, notice how the user pointer and the information icon
maintain their size on the screen, despite the operative zoom level of each map. In contrast,
the transparent circular area looks much smaller on the right image given that it has not been
re-scaled and maintains its world-space proportions.
In order to get this fixed aspect effect, MapNav includes two separate scripts:
FixPlaneAspect.cs and FixQuadAspect.cs (depending on the type of mesh that your 2D object
is using). Just add the corresponding script to the object where you want to achieve this
behavior, and it will automatically be re-sized whenever the zoom level is changed,
maintaining a constant aspect on the screen while preserving its location on the map.
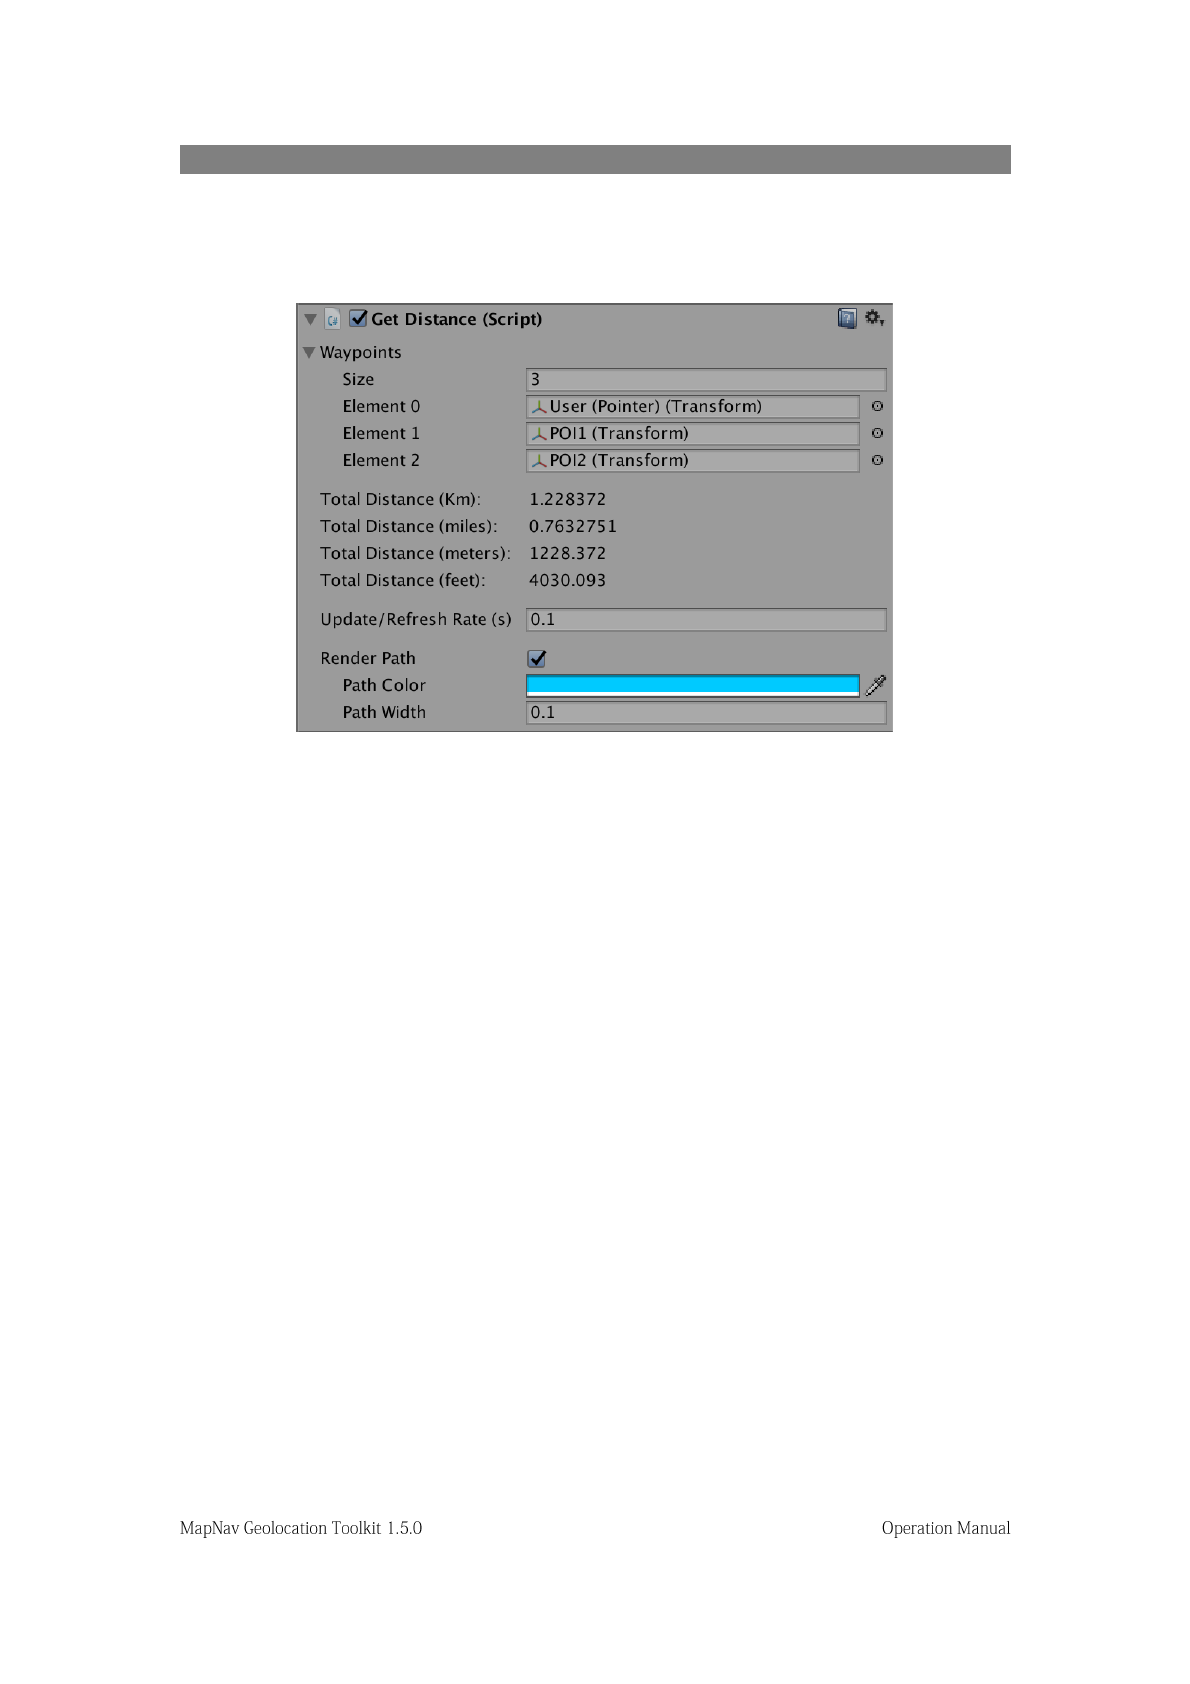
CALCULATING REAL-WORLD DISTANCES
Automatic distance calculations are now possible thanks to the new GetDistance.cs script
(/MAPNAV/Scripts/GetDistance.cs) available since version 1.3.3.
Figure 10. Measuring real-world distances between game objects
Given the unavoidable distortion introduced by the modified Mercator projection used by most
online maps providers (Google, Bing, MapQuest, etc.), it is not possible to measure distances
directly on the map using Vector3.Distance and Unity world units. If you try to do so, you will
notice that the obtained values differ considerably from the real ones depending on your
latitude (see “Map Scale” above). However, the new GetDistance.cs tool implements spherical
trigonometry that takes into account the curvature of the Earth and the effects of latitude in
distance calculations with a minimal error.
To use the GetDistance.cs tool, you just need to add this script into any game object in your
scene (e.g. an empty object) and provide at least two locations using the inspector (Figure 10).
You can also increase the size of the Transform type array if your path/route includes more
than two locations/waypoints. The total distance between these locations will then be
calculated and displayed using multiple units (kilometers, miles, meters and feet). Additionally,
the GetDistance.cs tool includes a basic LineRenderer implementation that can be enabled in
order to visualize the resulting path. Choose a color and path width to customize this
visualization. Distance values are updated in runtime according to the “Update/Refresh Rate”
property in the inspector, so dynamic objects (e.g. the Player’s position) can also be used as
waypoints.
ADDITIONAL TOOLS
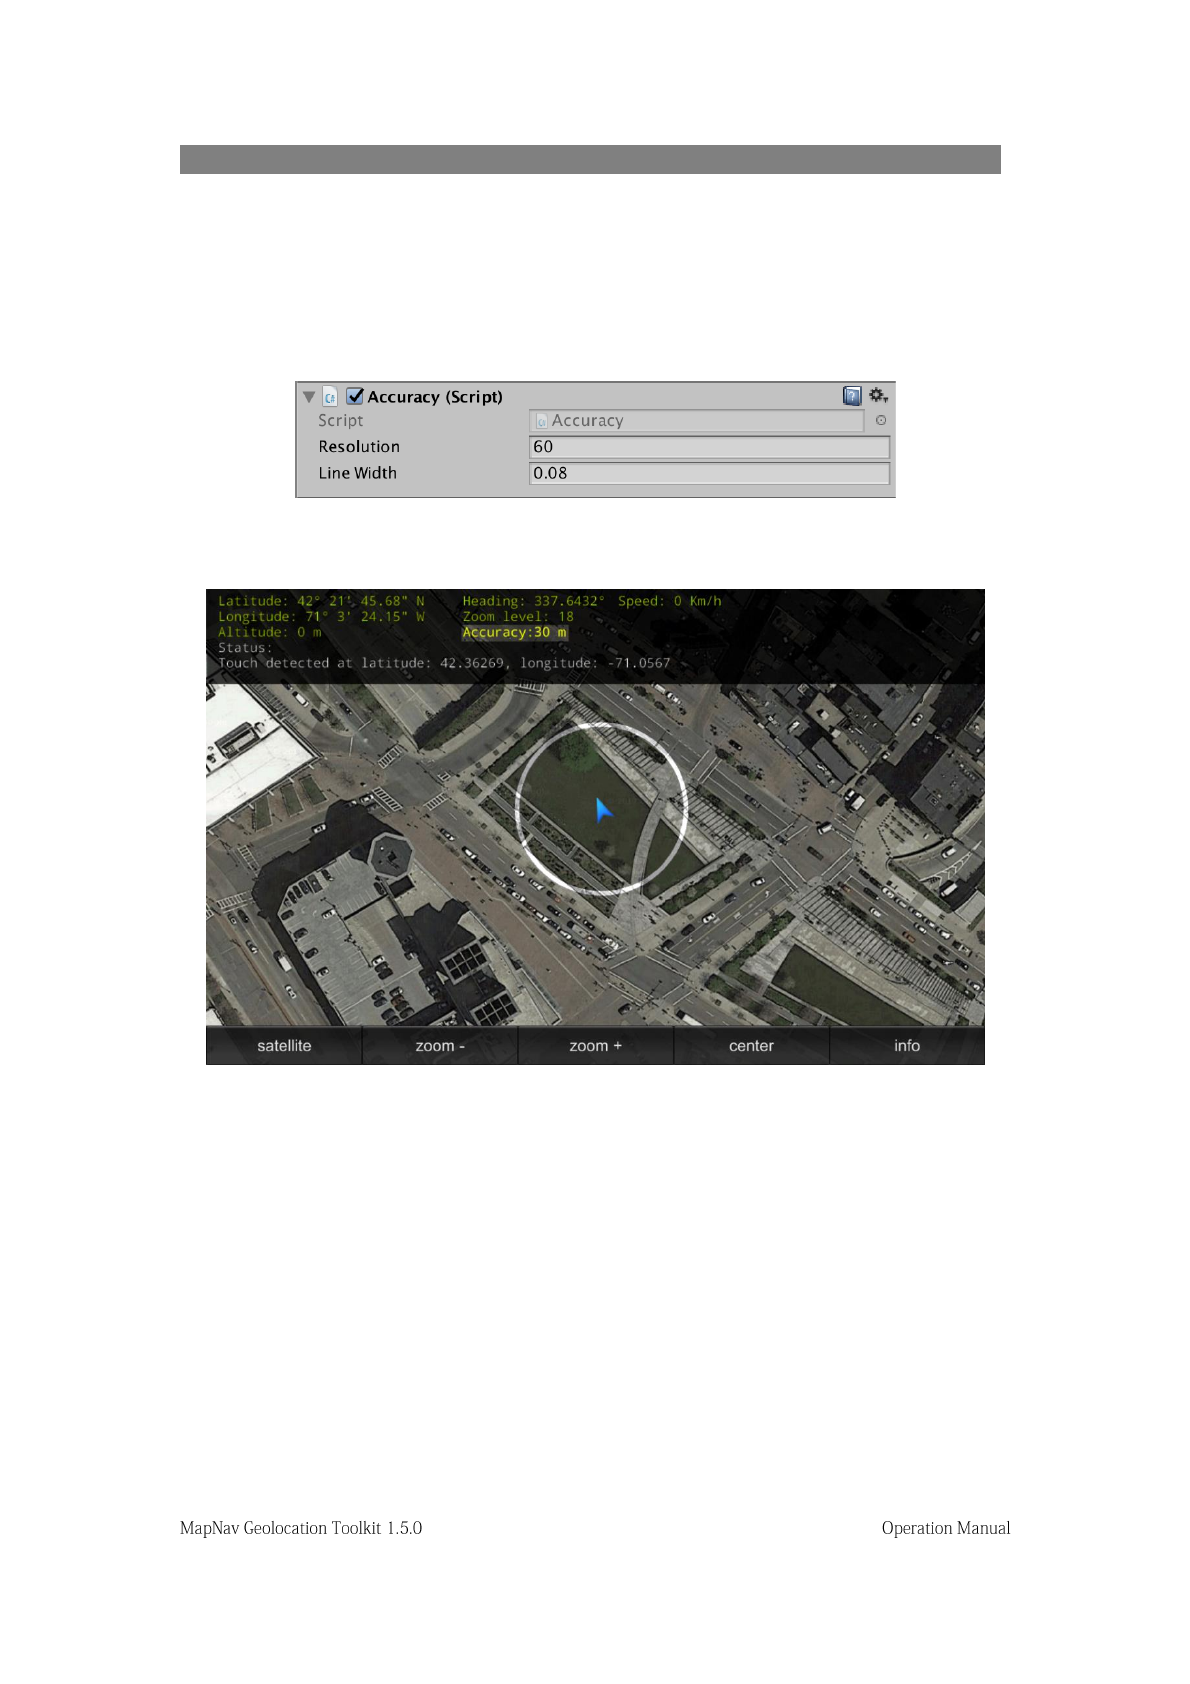
Accuracy.cs
This tool displays the horizontal accuracy of the GPS sensor, both graphically (as a variable
radius circle around the user) and numerically (via the GPS_Status.cs info button). In order to
function, this script needs to be attached to the “Player” game object.
Figure 11. Accuracy script inspector
Figure 12. Horizontal accuracy graphical representation
InstantVelocity.cs
Attach this script to any game object in your scene (e.g. the Main Camera or an empty
gameobject) in order to calculate the current user speed. The resulting value will automatically
be displayed via the GPS_Status.cs script info button (Figure 13).
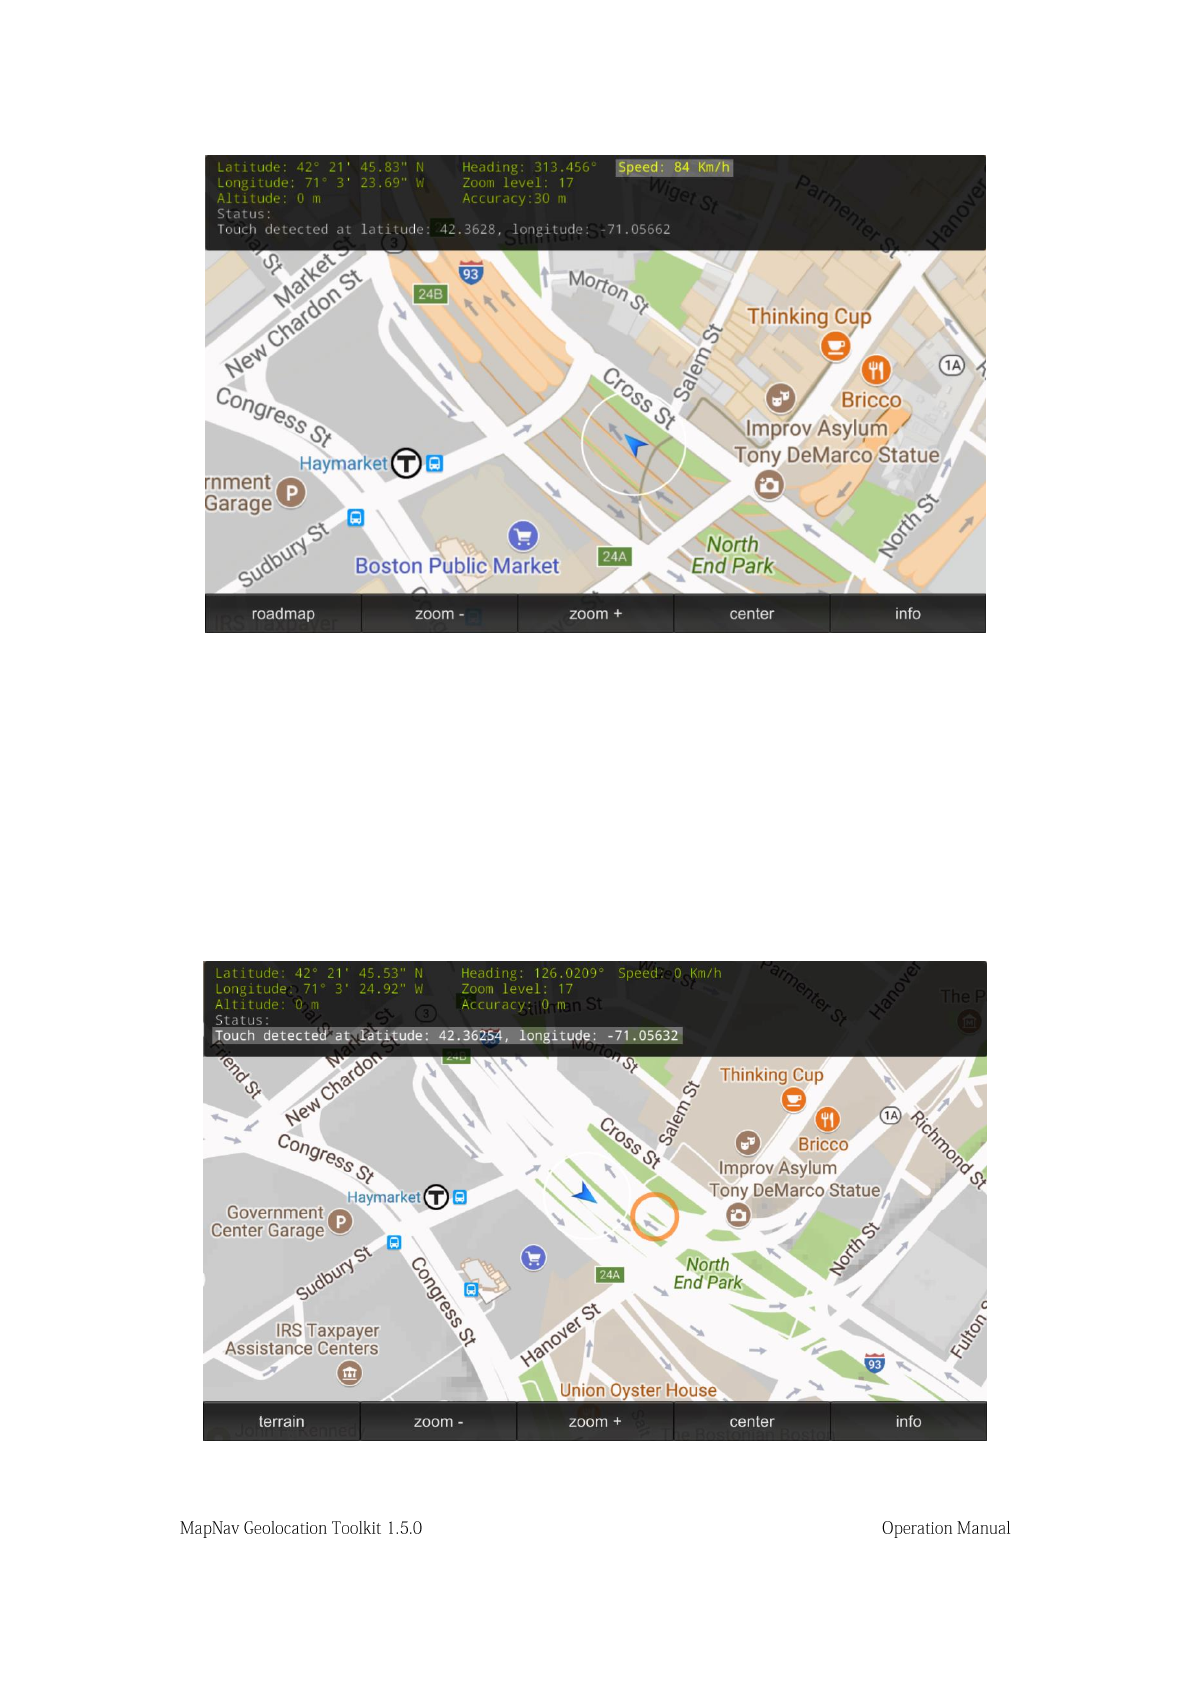
Figure 13. Instant Velocity calculation using MapNav
GetTapLocation.cs
When attached to the “Main Camera”, this new tool detects if a user has tapped the screen and
returns the exact location (latitude/longitude in decimal degrees) of the touch position on the
map. These coordinates will be displayed via the GPS_Status.cs info button, and can be used
to instantiate custom content at that location (e.g. POIs). This tool also works on Unity Editor
using the mouse. An animated circle around the detected location is also shown on the map.
Figure 14. Obtaining GPS coordinates of a point on the map

__________________________________
MapNav - Geolocation Toolkit
For support or further information please contact:
support@recursivearts.com
_____________________________________________________________________
* OpenStreetMap is open data, licensed under the Open Data Commons Open Database License (OdbL),
credited to © OpenStreetMap contributors and licensed under the Creative Commons Attribution-
ShareAlike 2.0 license (CC BY-SA).
